

Technical Support and E-Warranty Certificate www.vevor.com/support
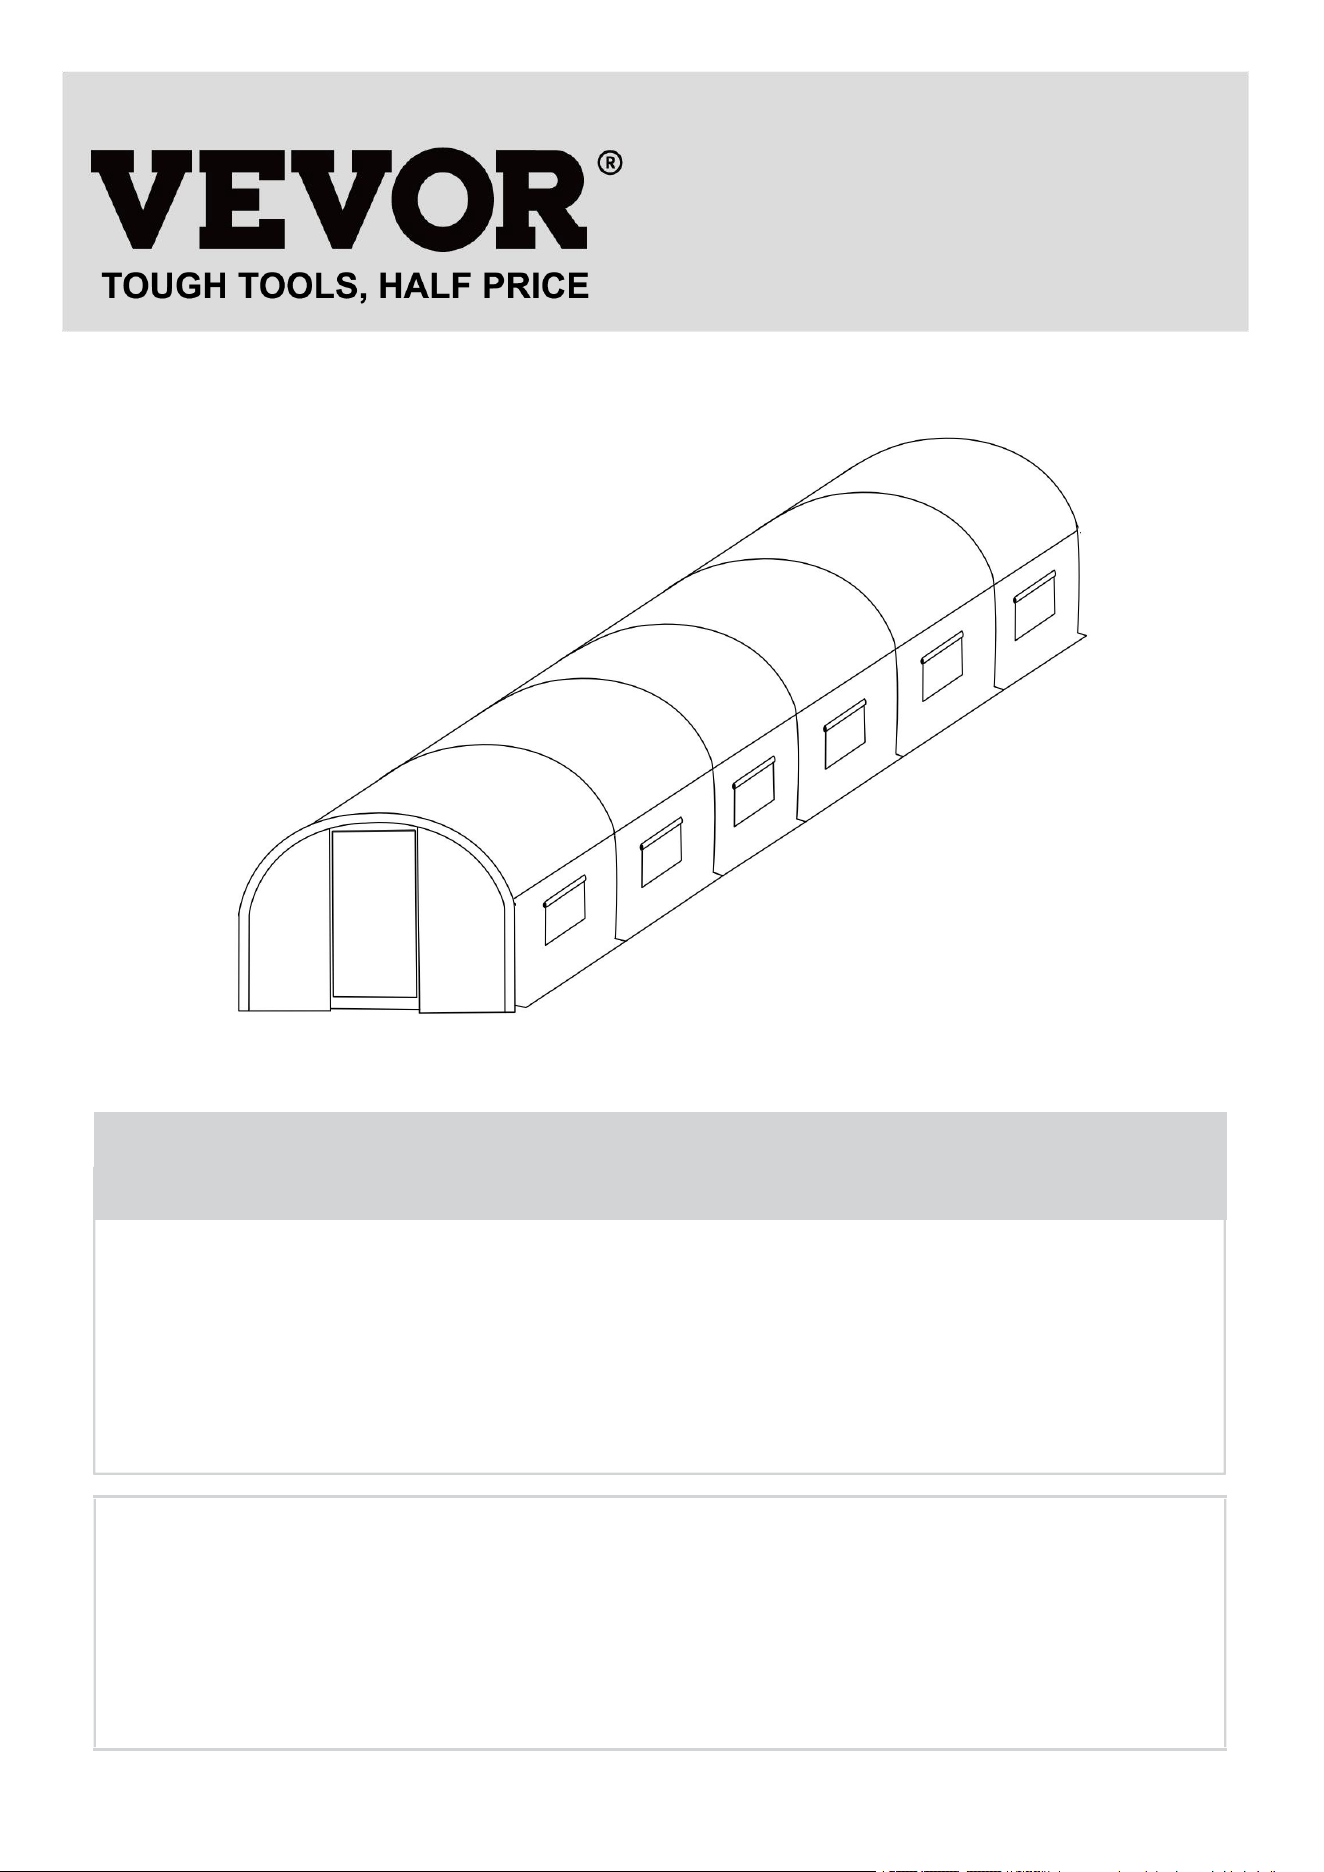
TUNNEL GREENHOUSE
USER MANUAL
We continue to be committed to provide you tools with competitive price.
"Save Half","Half Price" or any other similar expressions used by us only represents an estimate
of savings you might benefit from buying certain tools with us compared to the major top brands
and does not necessarily mean to cover all categories of tools offered by us. You are kindly
reminded to verify carefully when you are placing an order with us if you are actually saving half
in comparison with the top major brands.

1
3×8.4×2.25M(8)G
Have product questions? Need technical support? Please feel free to
contact us:
Technical Support and E-Warranty Certificate
www.vevor.com/support
NEED HELP? CONTACT US!
This is the original instruction,please read all manual instructions
carefully before operating. VEVOR reserves a clear interpretation of
our user manual. The appearance of the product shall be subject to the
product you received. Please forgive us that we won't inform you again
if there are any technology or software updates on our product.
TUNNEL GREENHOUSE

2
Safety precautions
WARNING:
Read this instructions before using this product. Failure to do so can result in serious
injury. the basic precautions should always be followed,including the following:
1. The tunnel greenhouse may not be used or stored in hazardous areas. It is not
allowed to use the appliance in hazardous locations.
2. The tunnel greenhouse must be checked to ensure that it is in proper working order
and is operating safely prior to use. Otherwise,the appliance must not be used.
3. Use as intended only. Corrosive substances should not be stored in tunnel
greenhouses
4. The operator must use the tunnel greenhouse properly. He must consider the local
conditions and must pay attention to third parties,in particular children,when working
with the tunnel greenhouse.
5. This tunnel greenhouse is not intended for use by persons (including children) with
reduced physical,sensory or mental abilities or lacking experience and/or
knowledge,unless they are supervised by a person responsible for their safety or are
instructed by these persons on the use of the device. Children should be supervised,to
ensure that they do not play with the tunnel greenhouse.
SAVE THESE INSTRUCTIONS
3
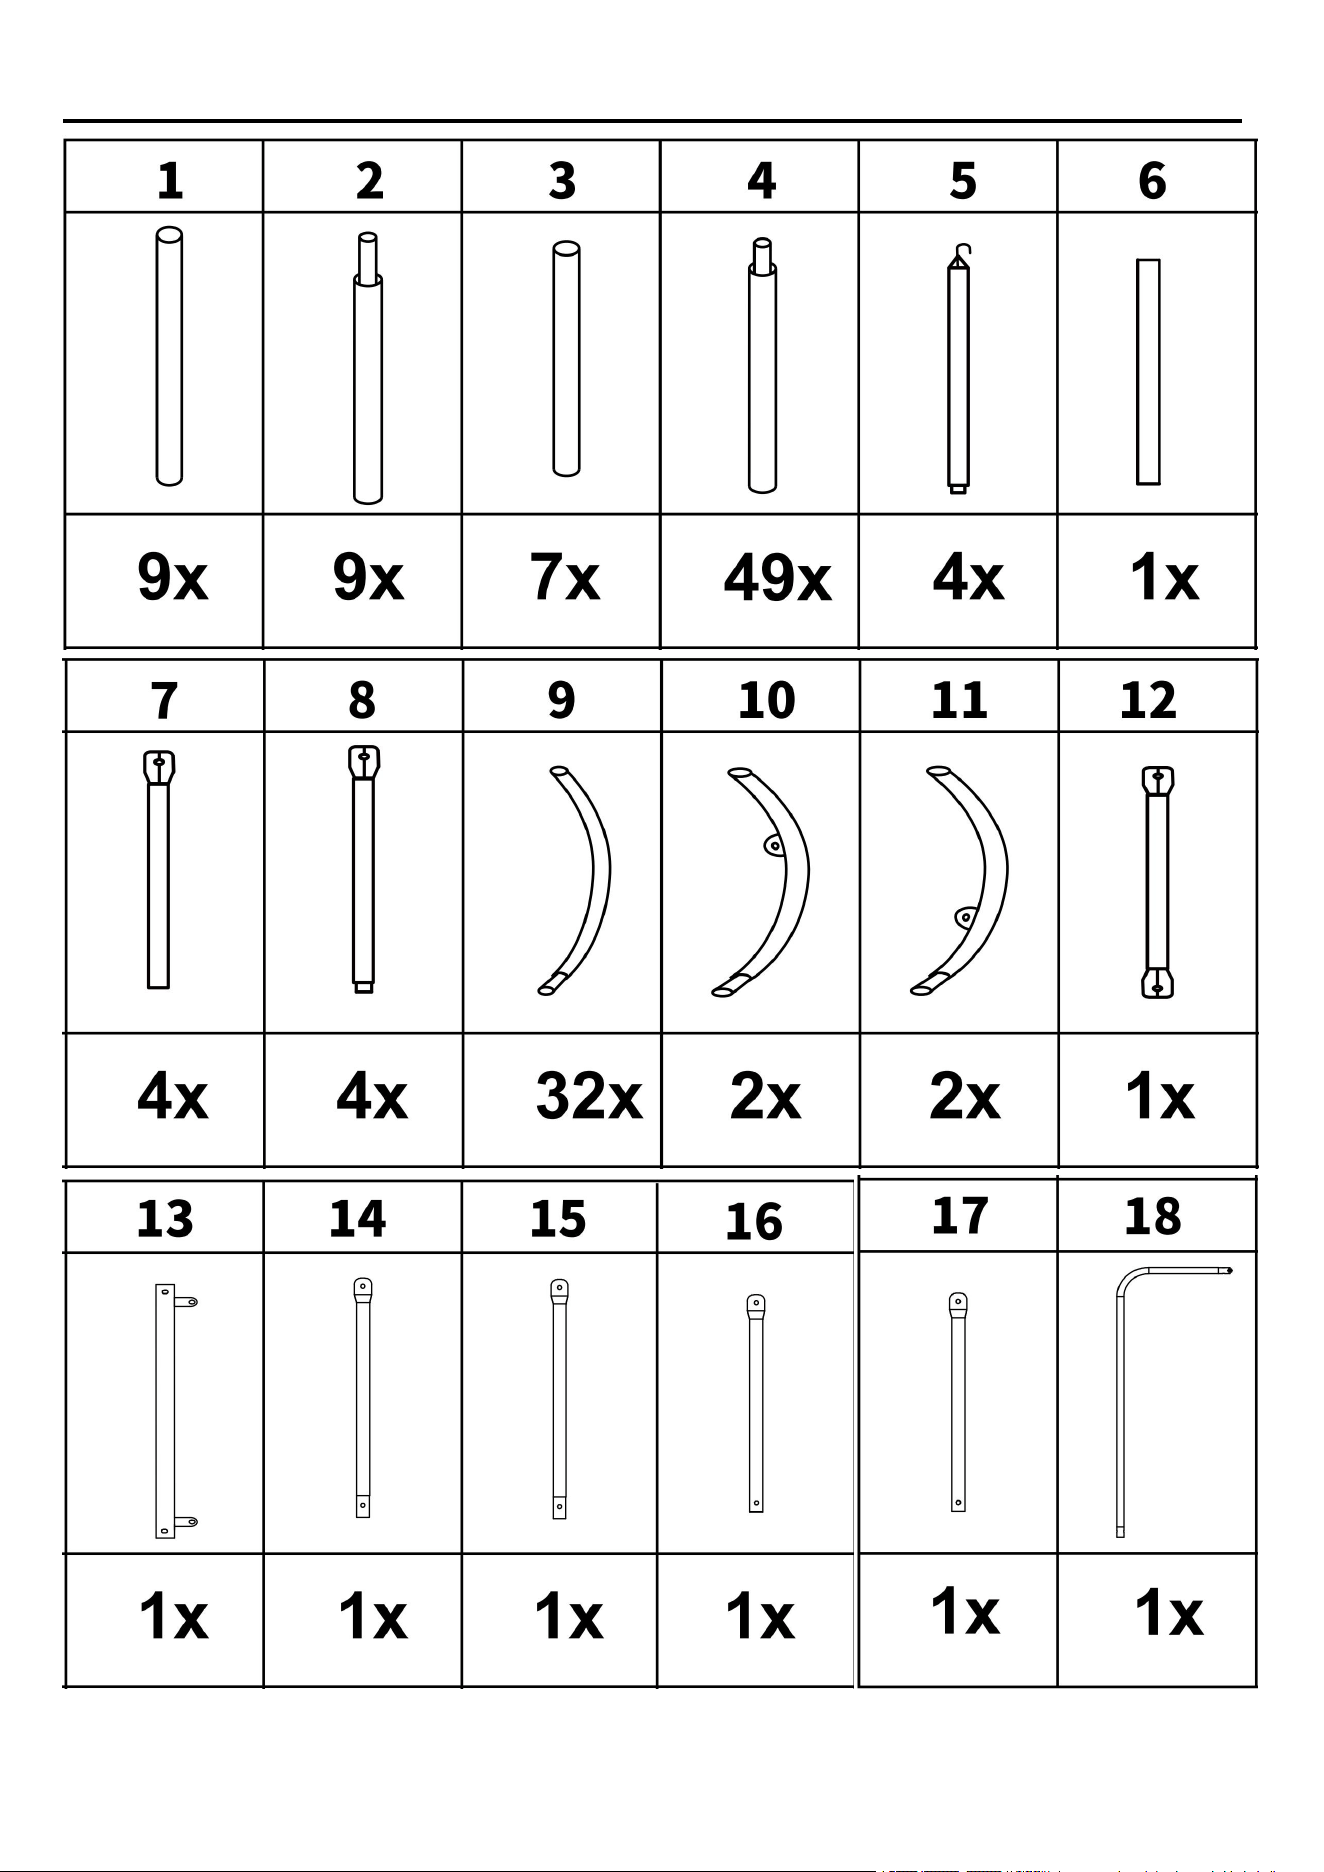
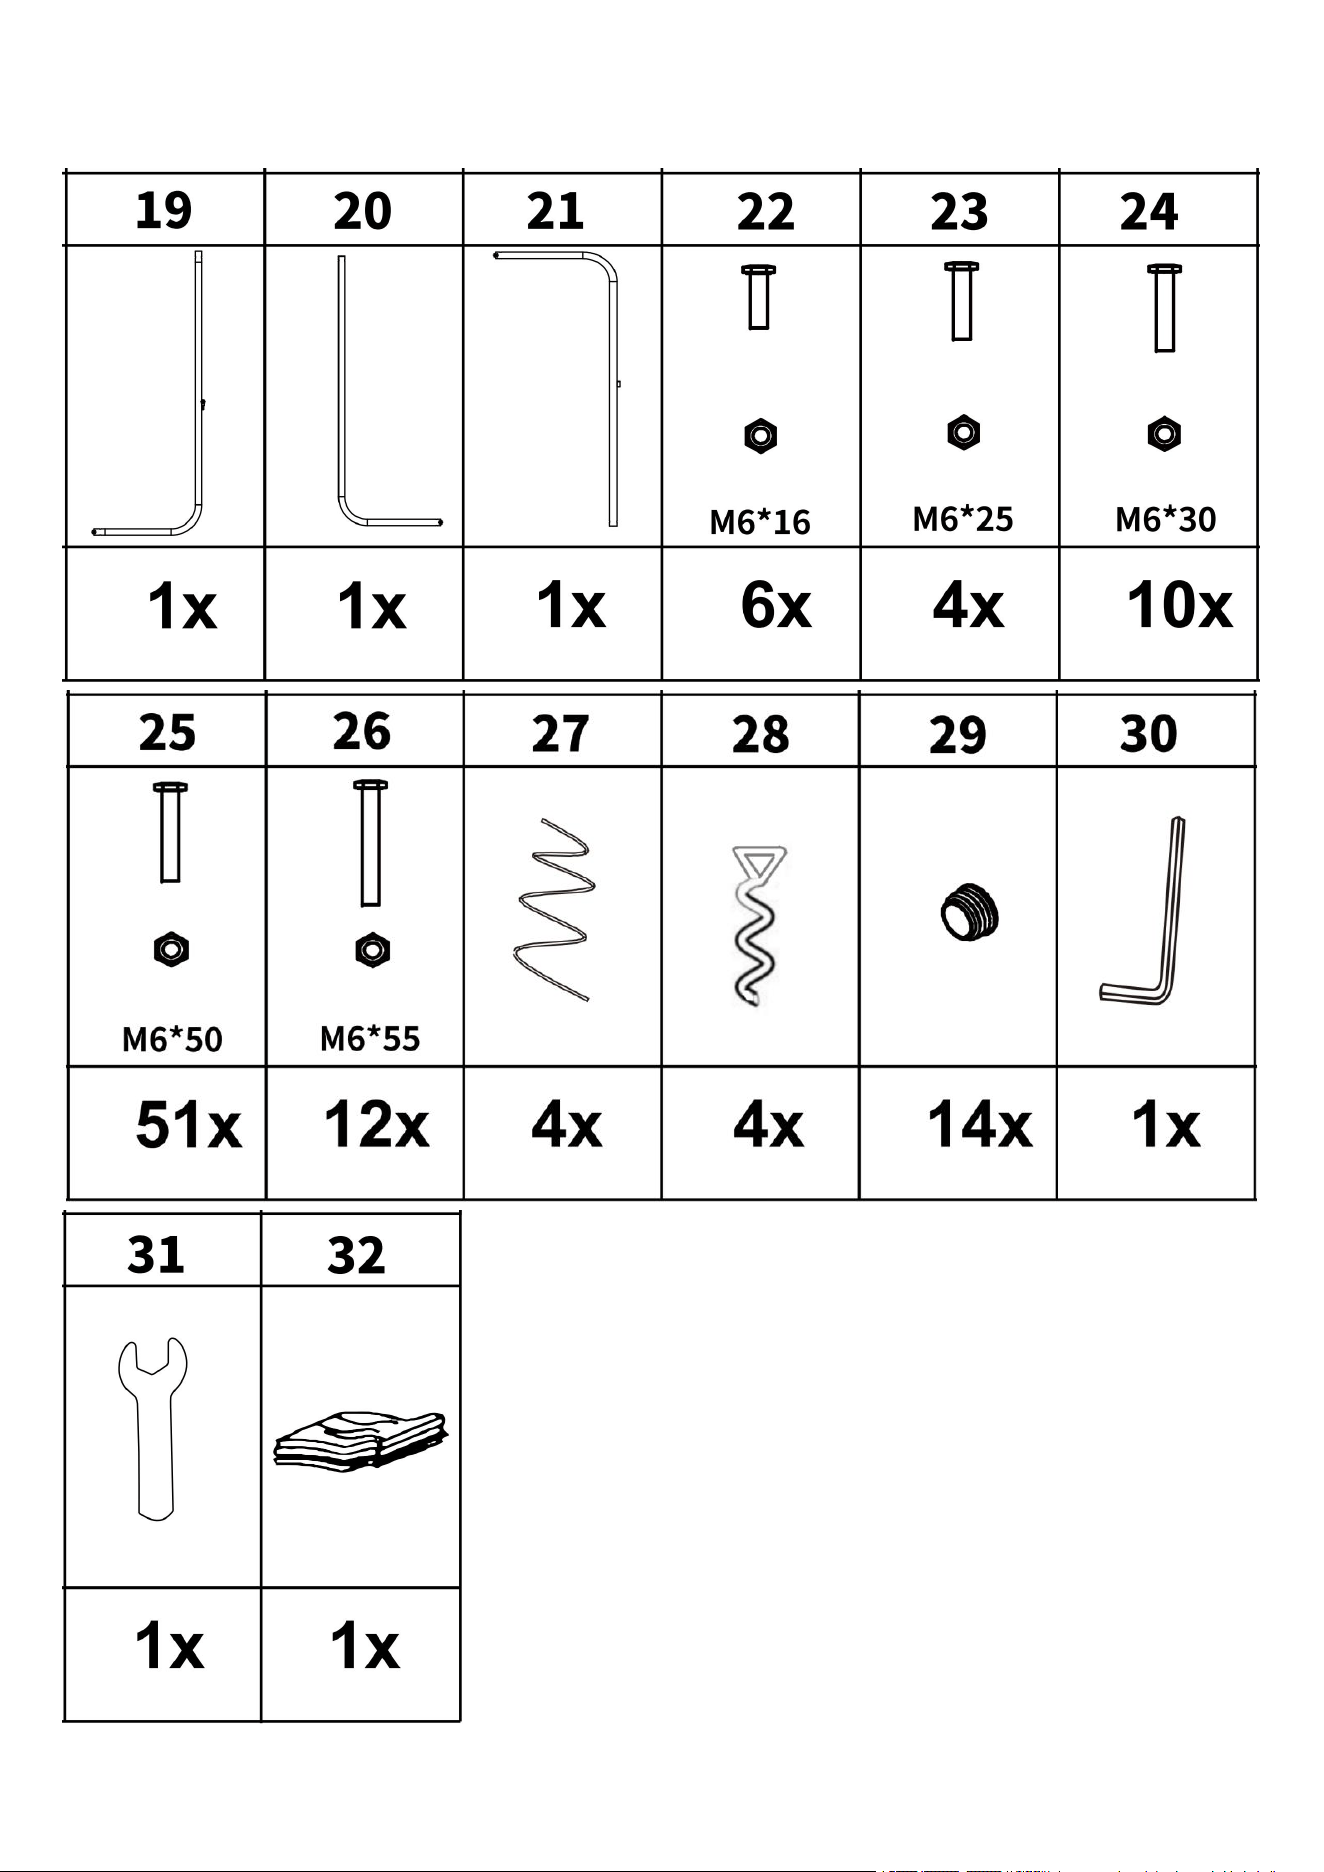
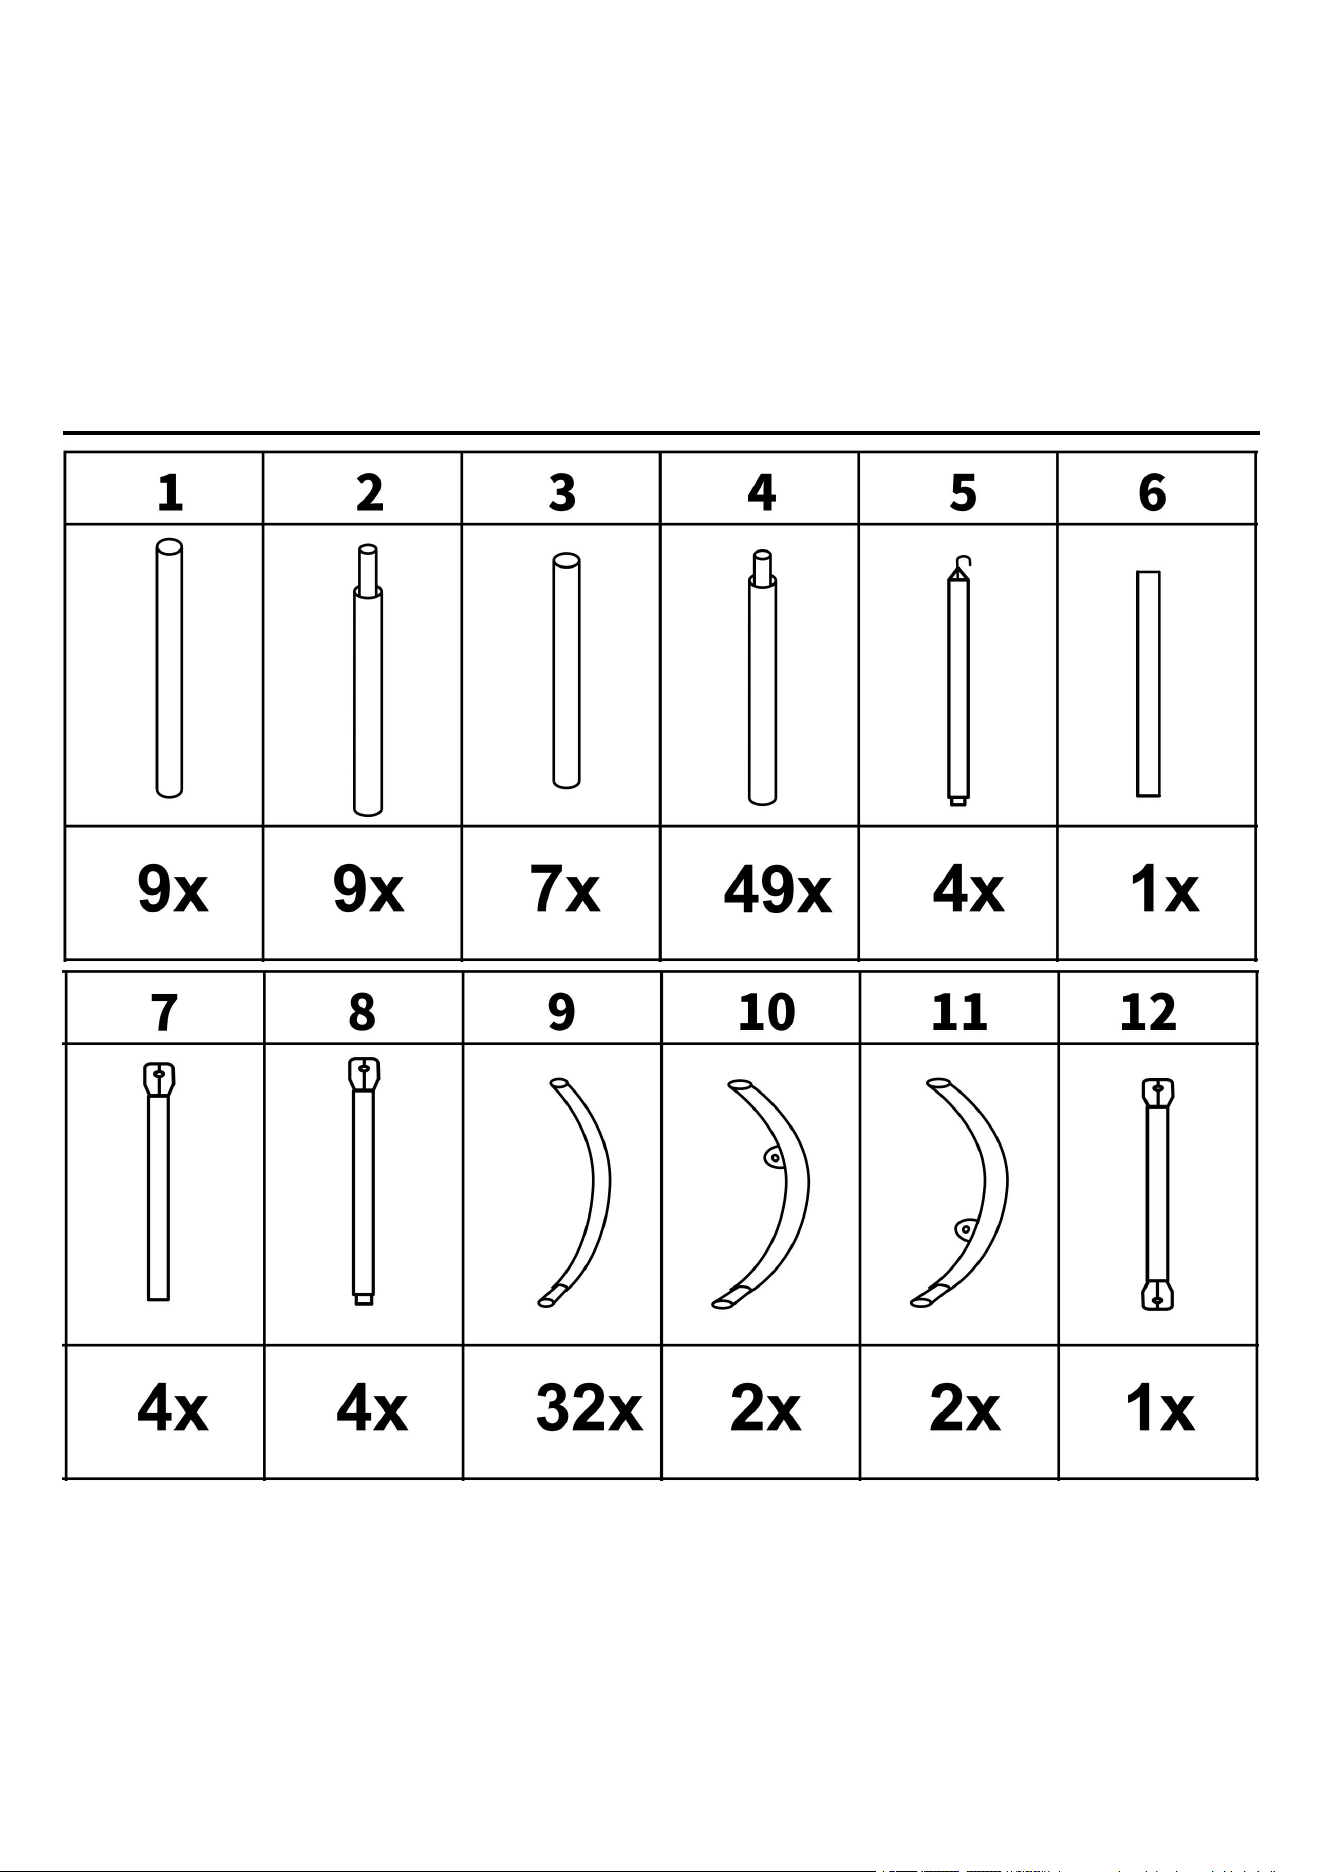
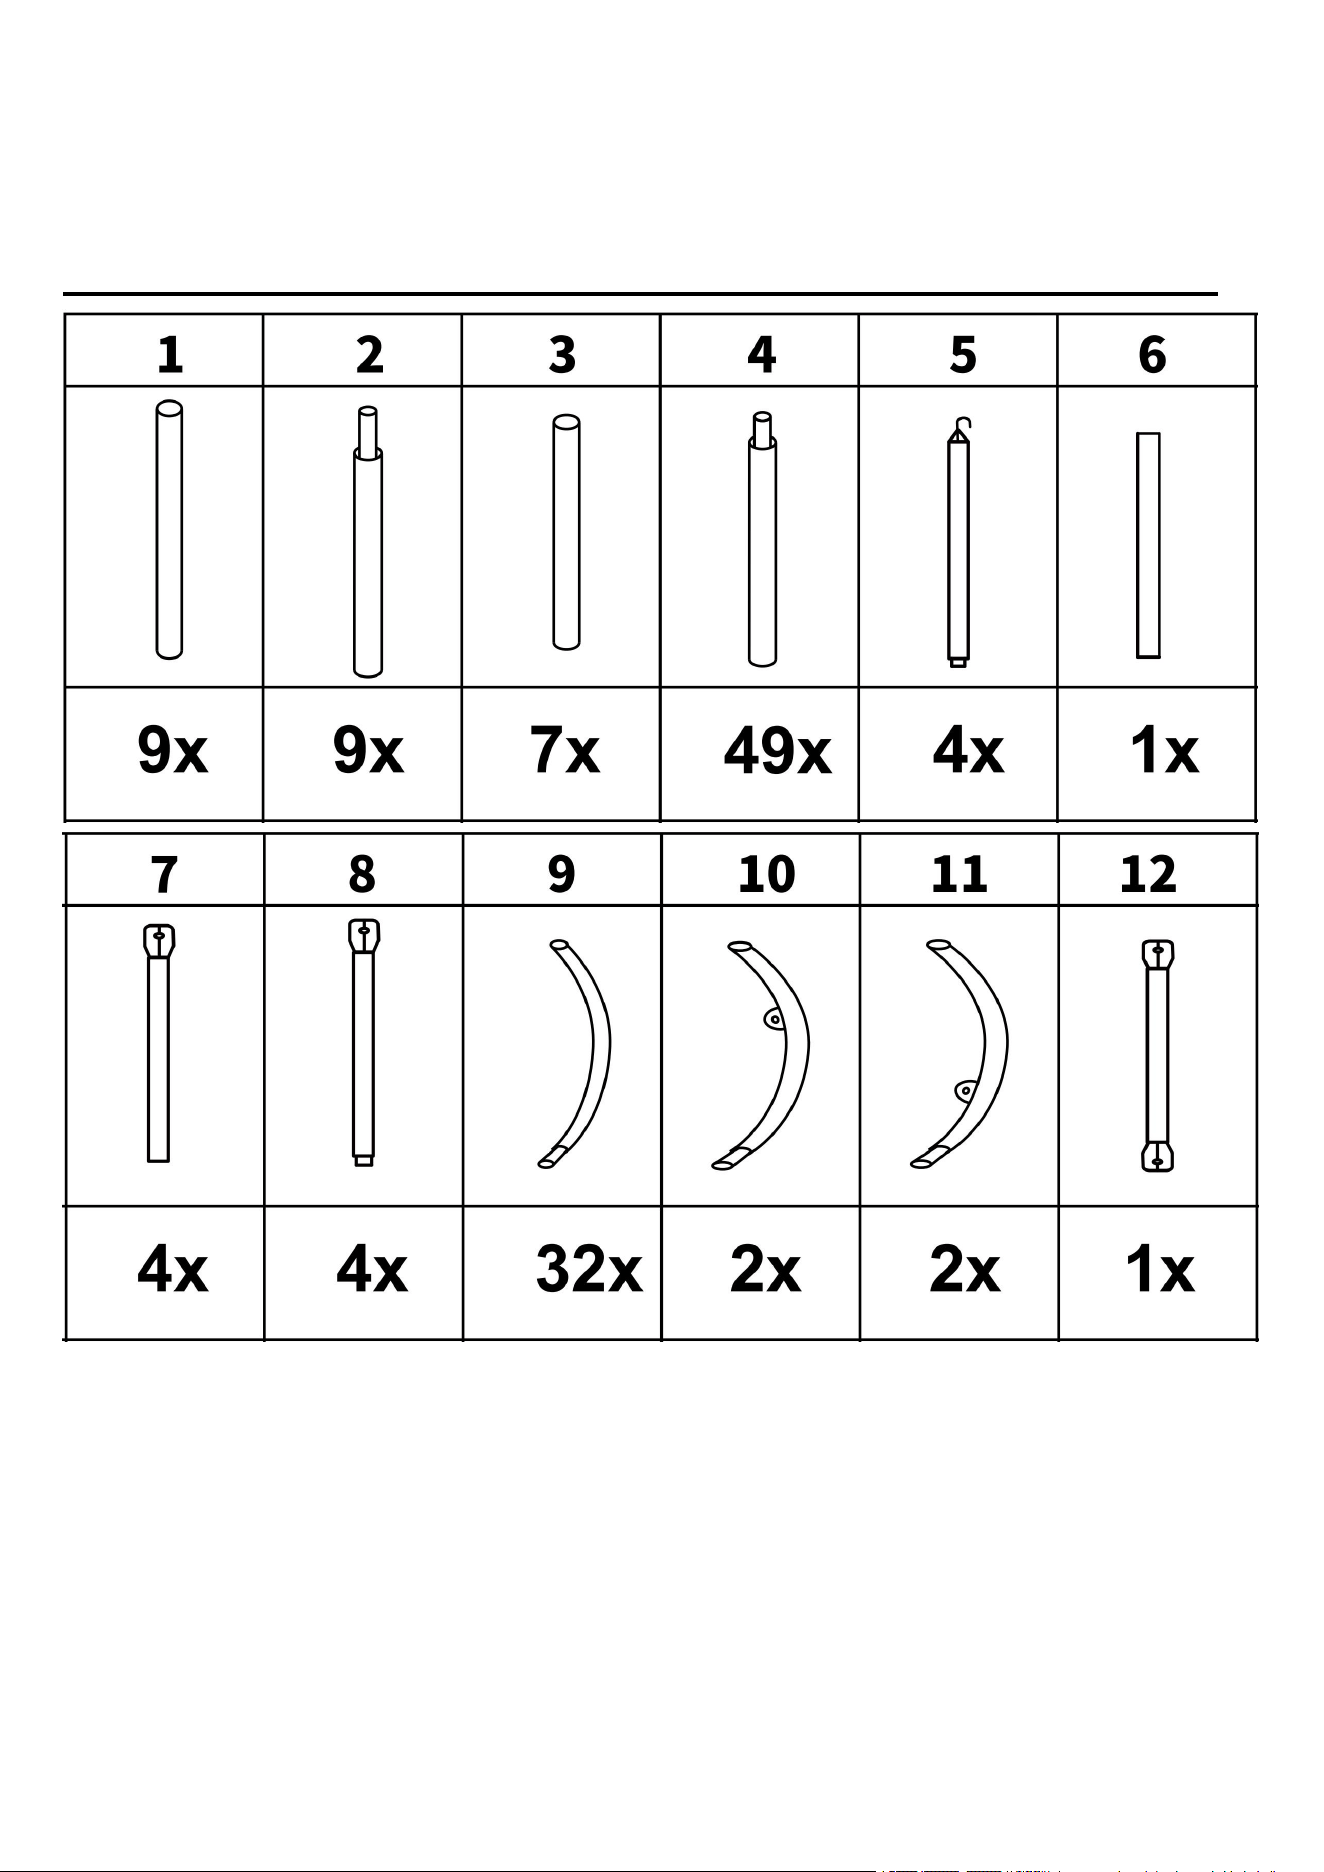
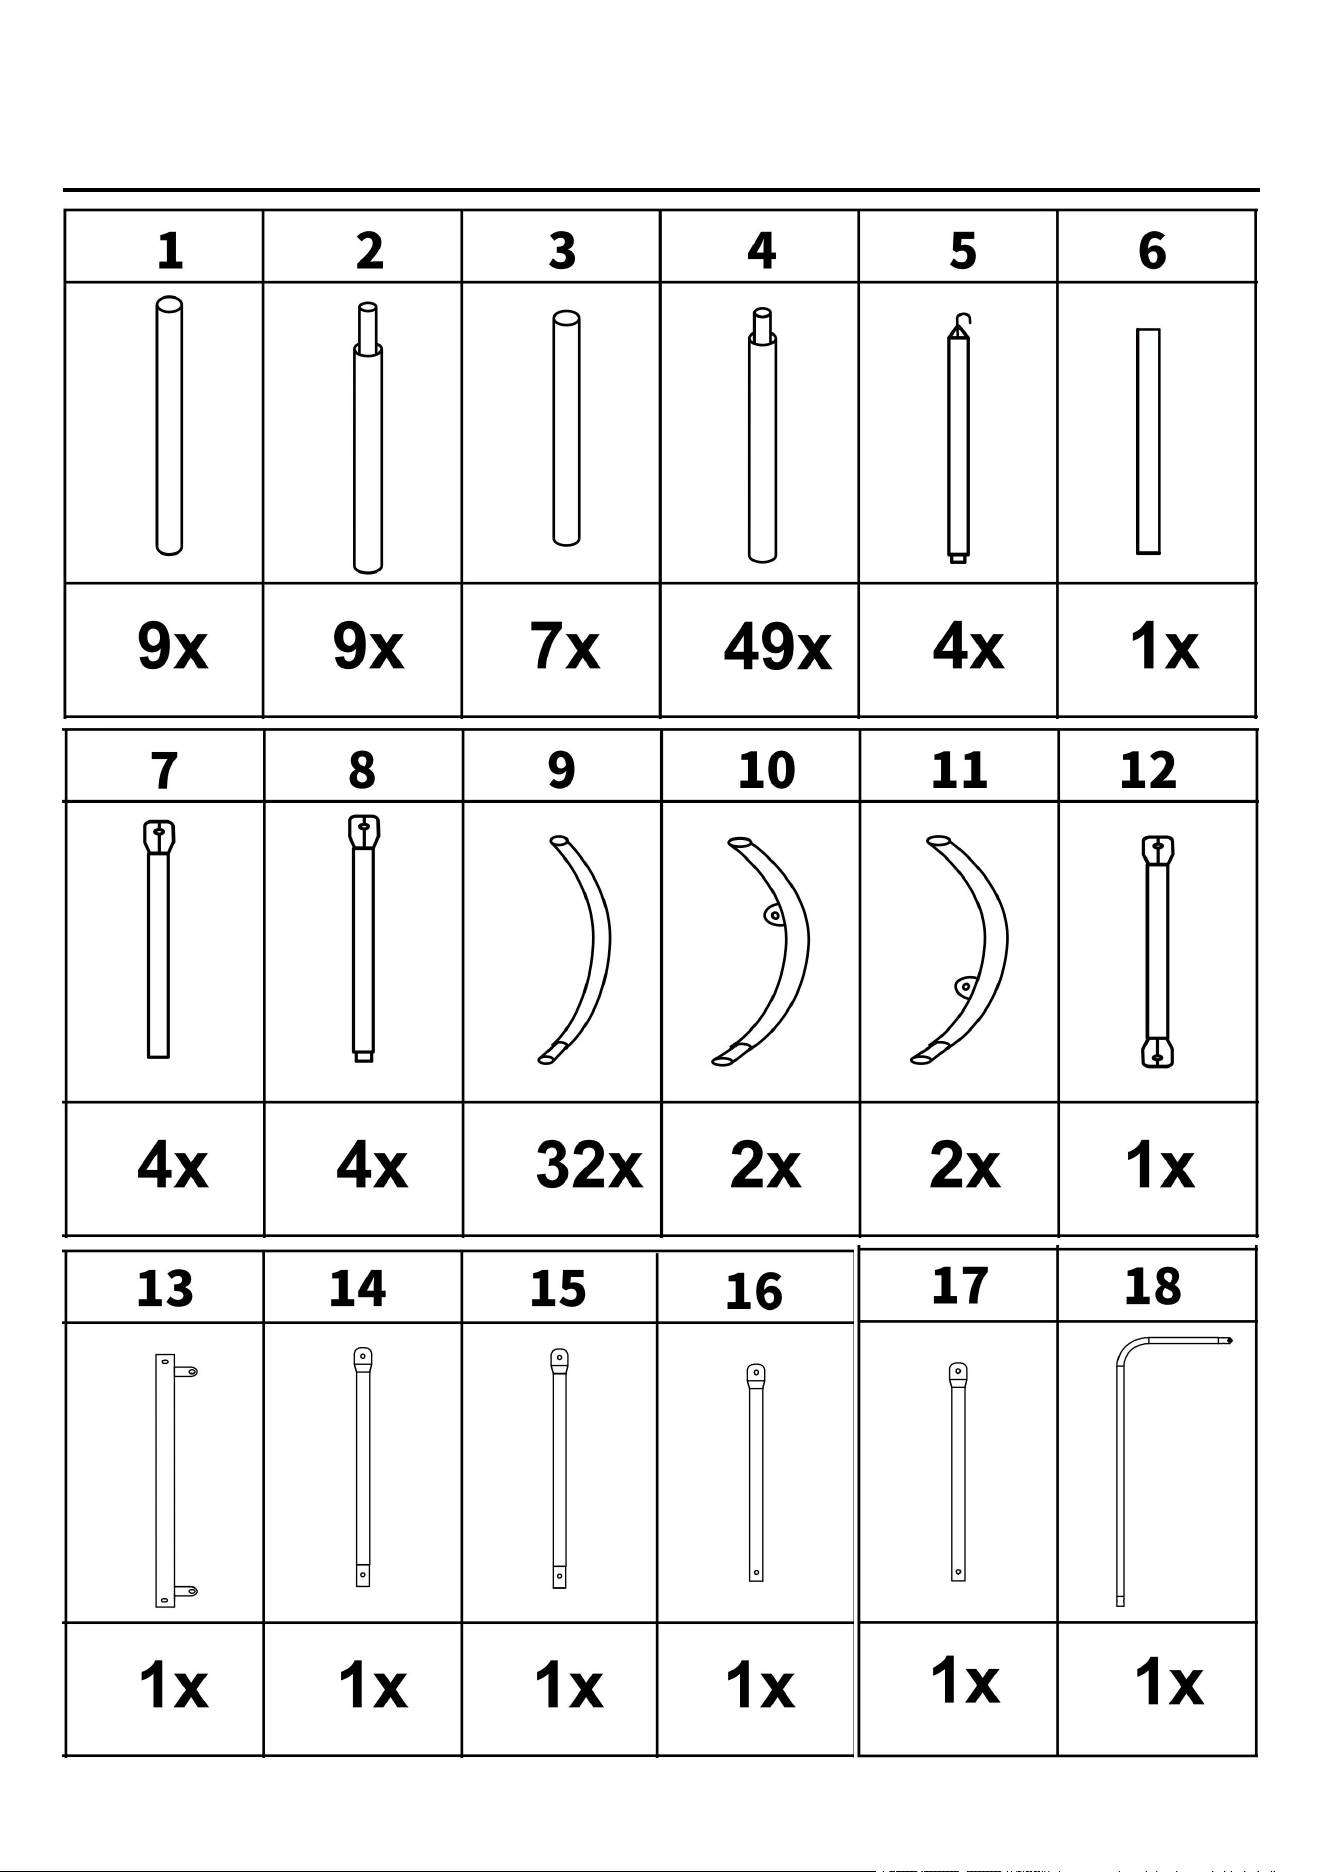
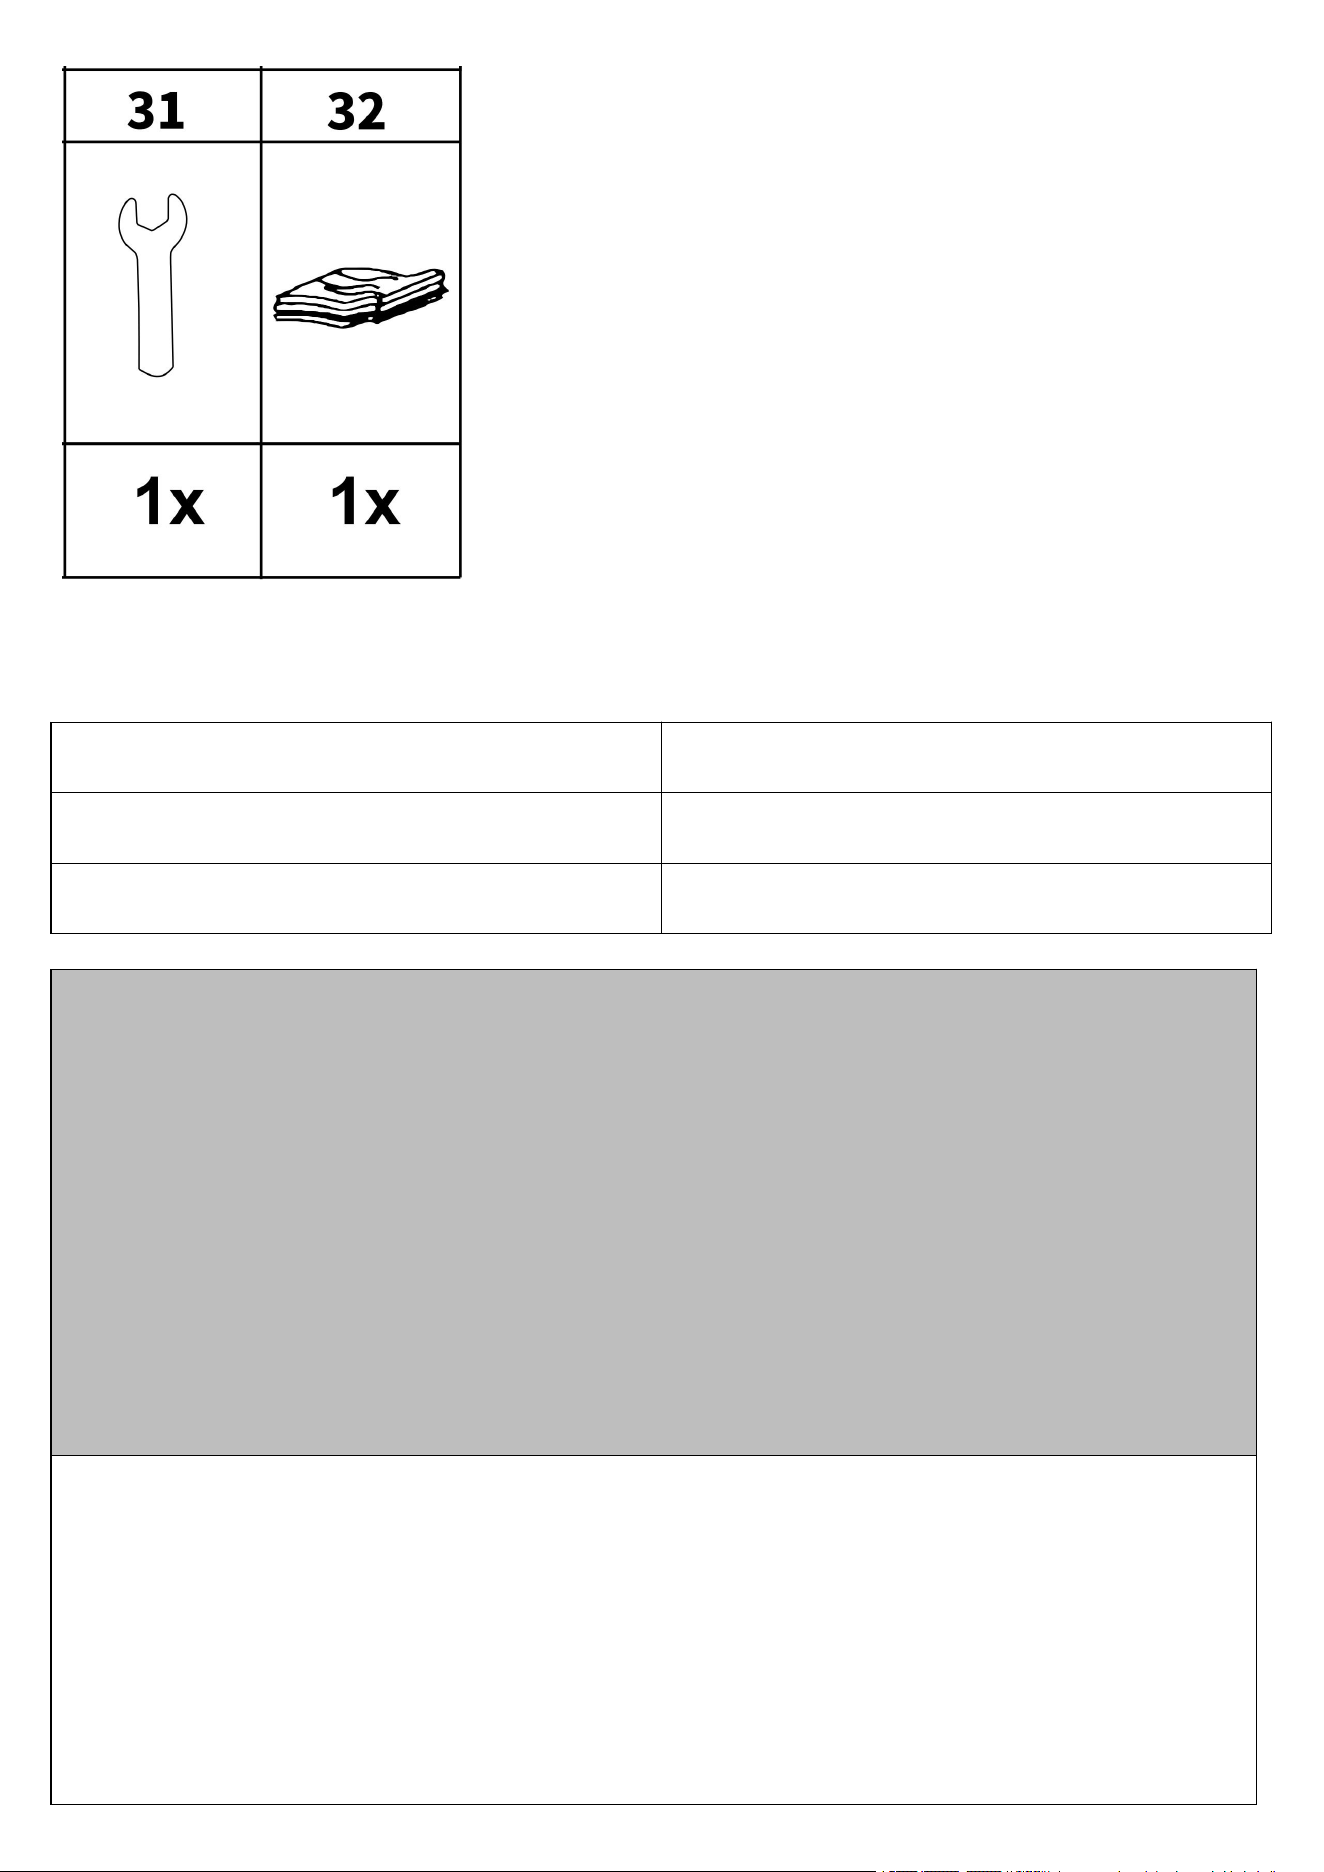
Product List
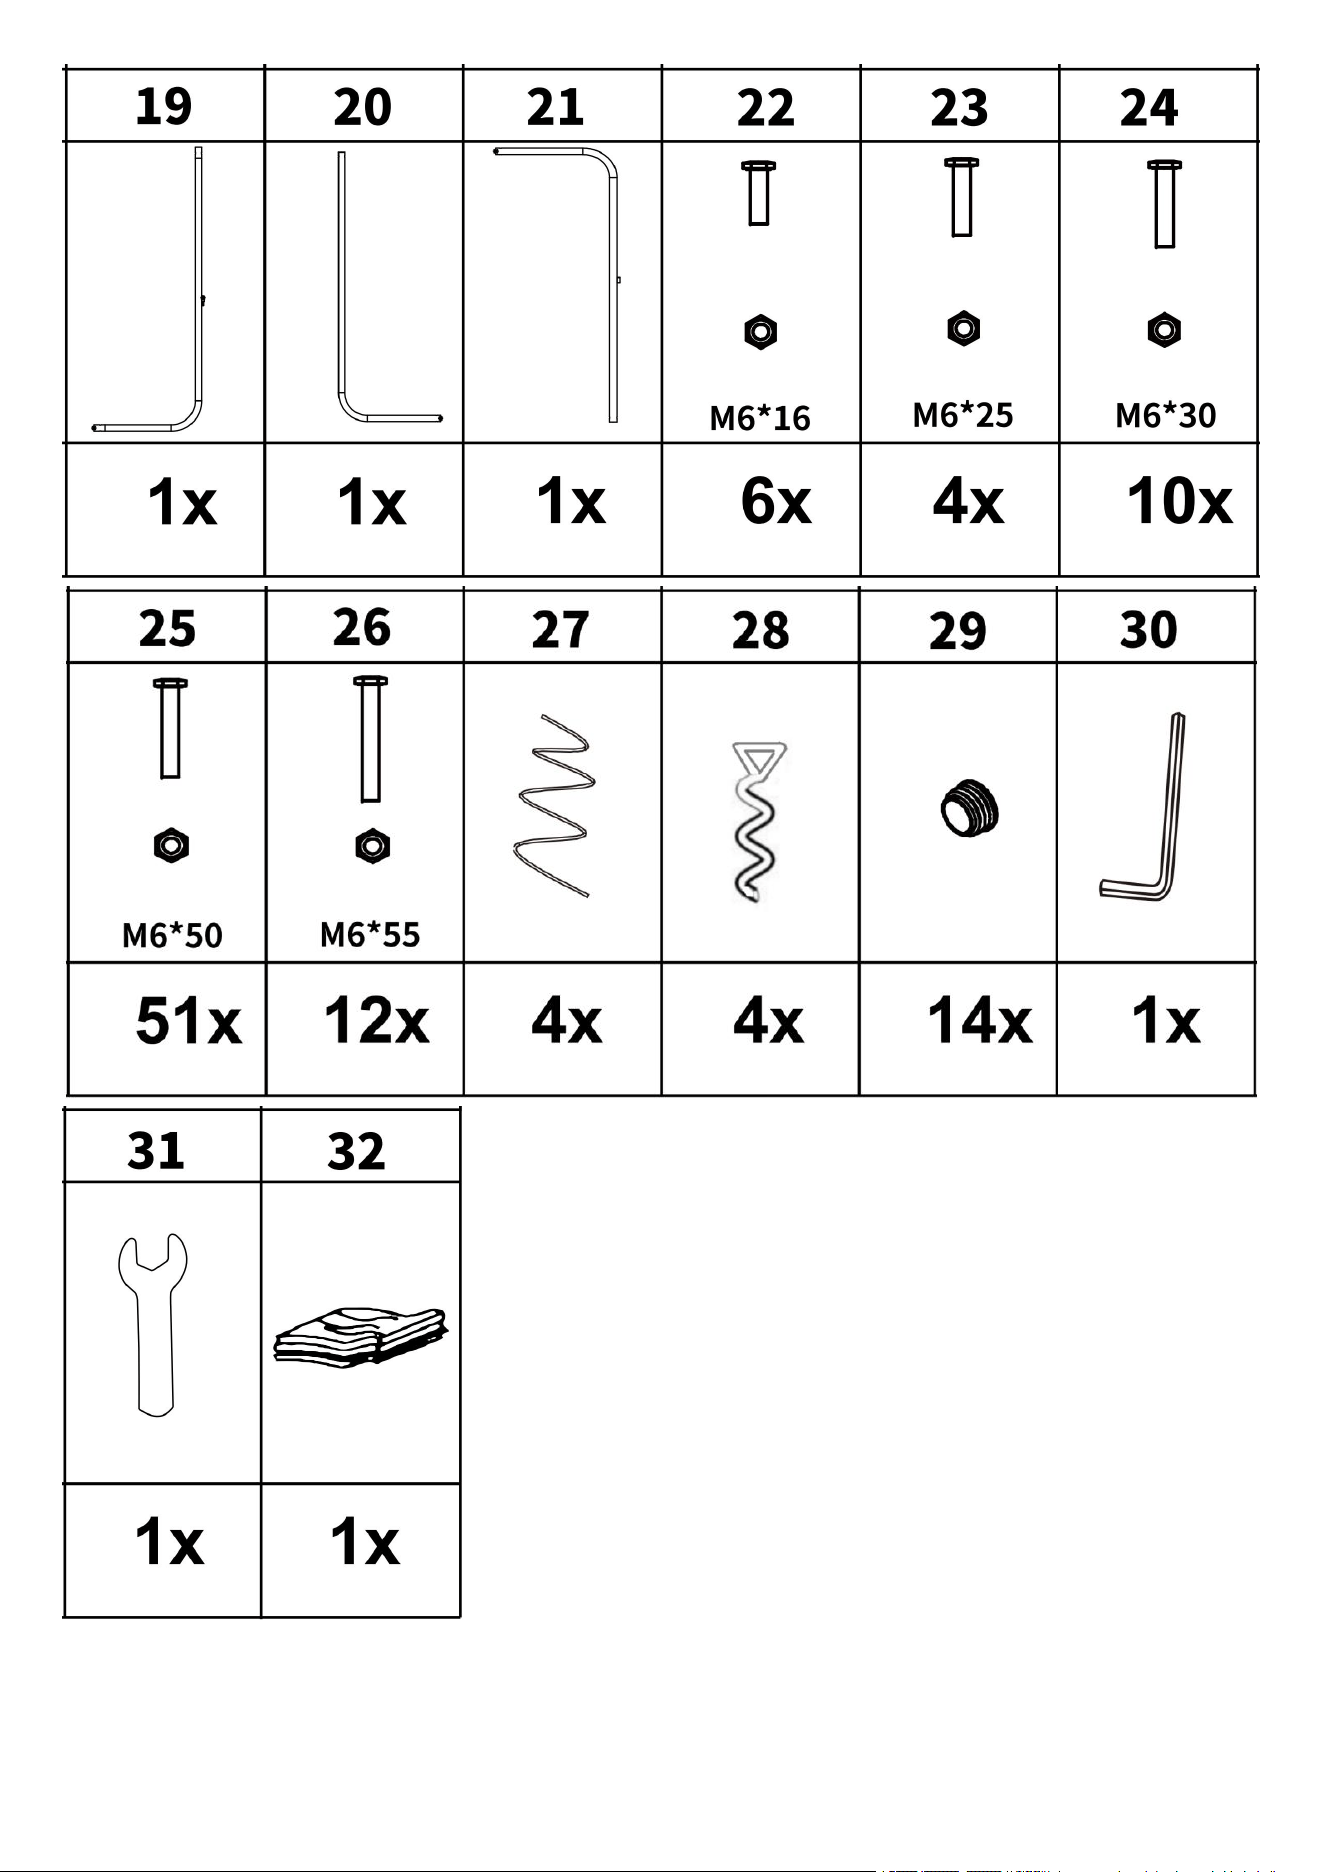
4

5
Model
3×8.4×2.25m(8)G
Product Size
28x10x7.5ft (835*295*220cm)
Tarpaulin Color
Green
WARNING
Covering the roof carefully, puts all places in the right position.
As much as possible as not make the frame structure of the
greenhouse out of the shape.
Do not use it in bad weather conditions, such as a rainstorm,
hailstone, heavy snow, and heavy wind.
Note:
1. This product needs two people to cooperate with the assembly.
2. Due to the large number of screws, it is recommended to use power tools.
3. Do not lock the screws directly during the installation process, and lock all
the screws after all the shelves are set up.
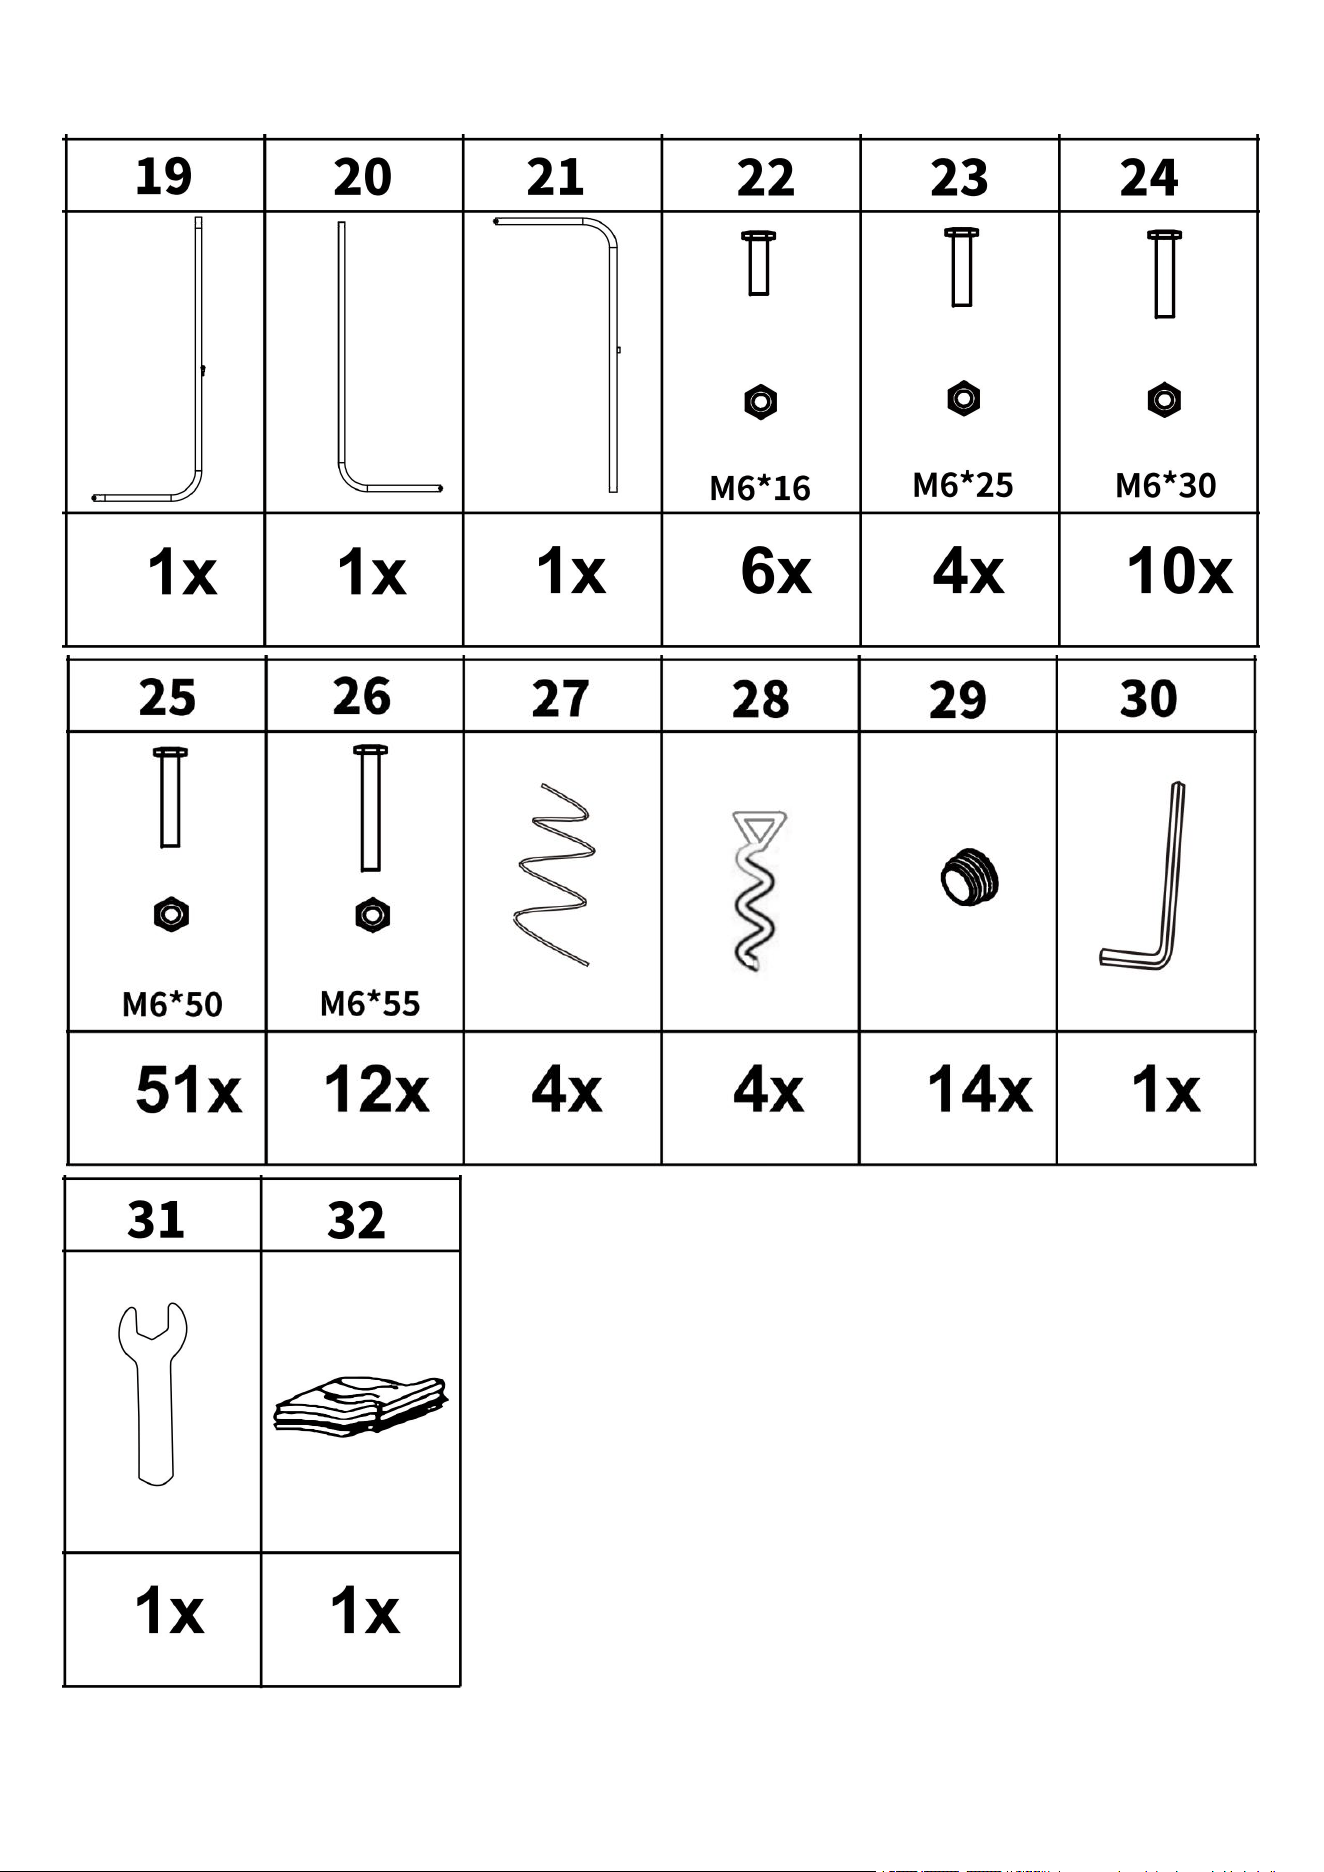
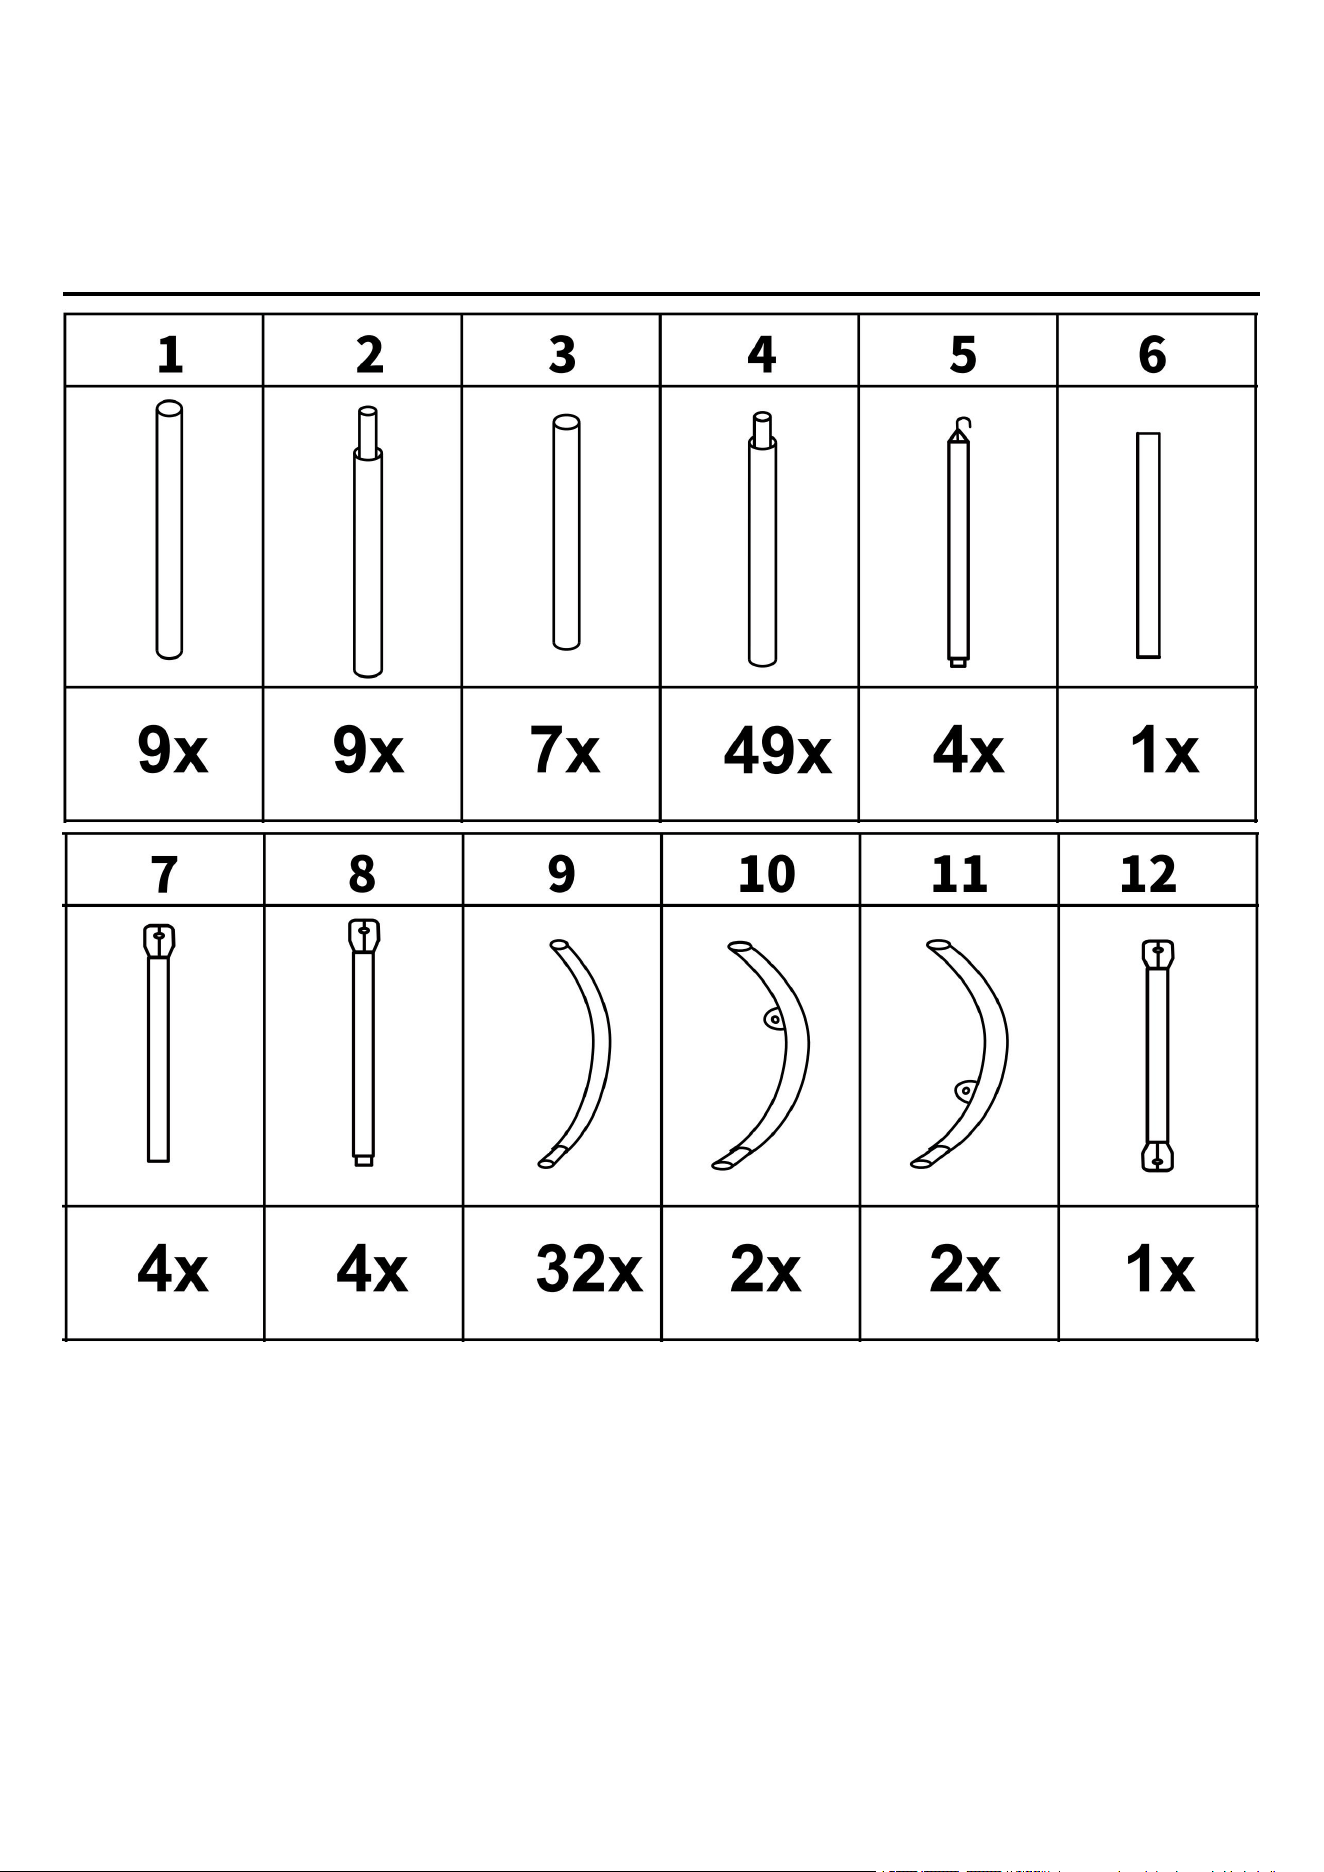
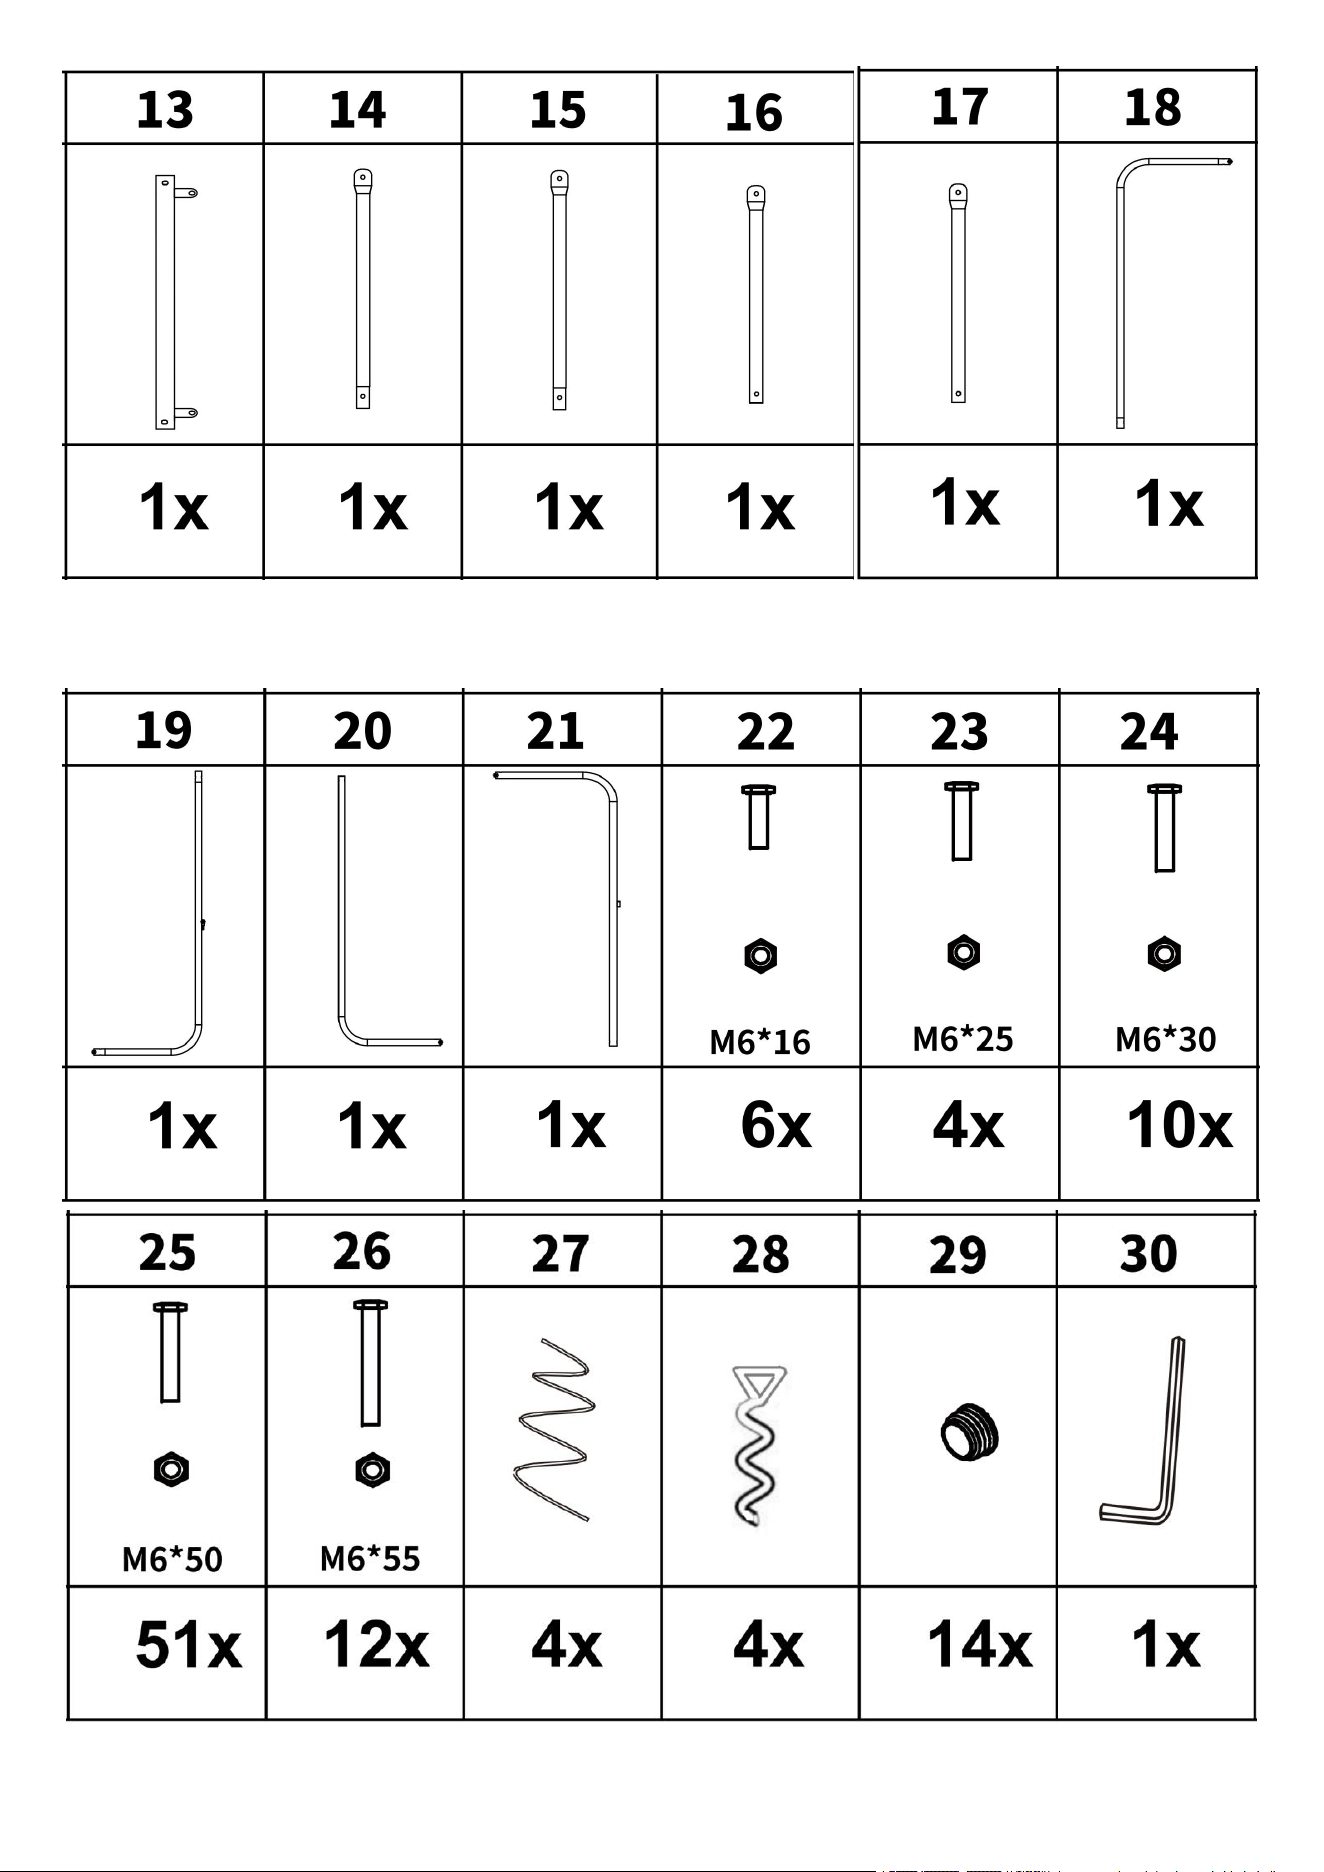
4. Take out all the accessories and place them according to the list above for
installation.
6
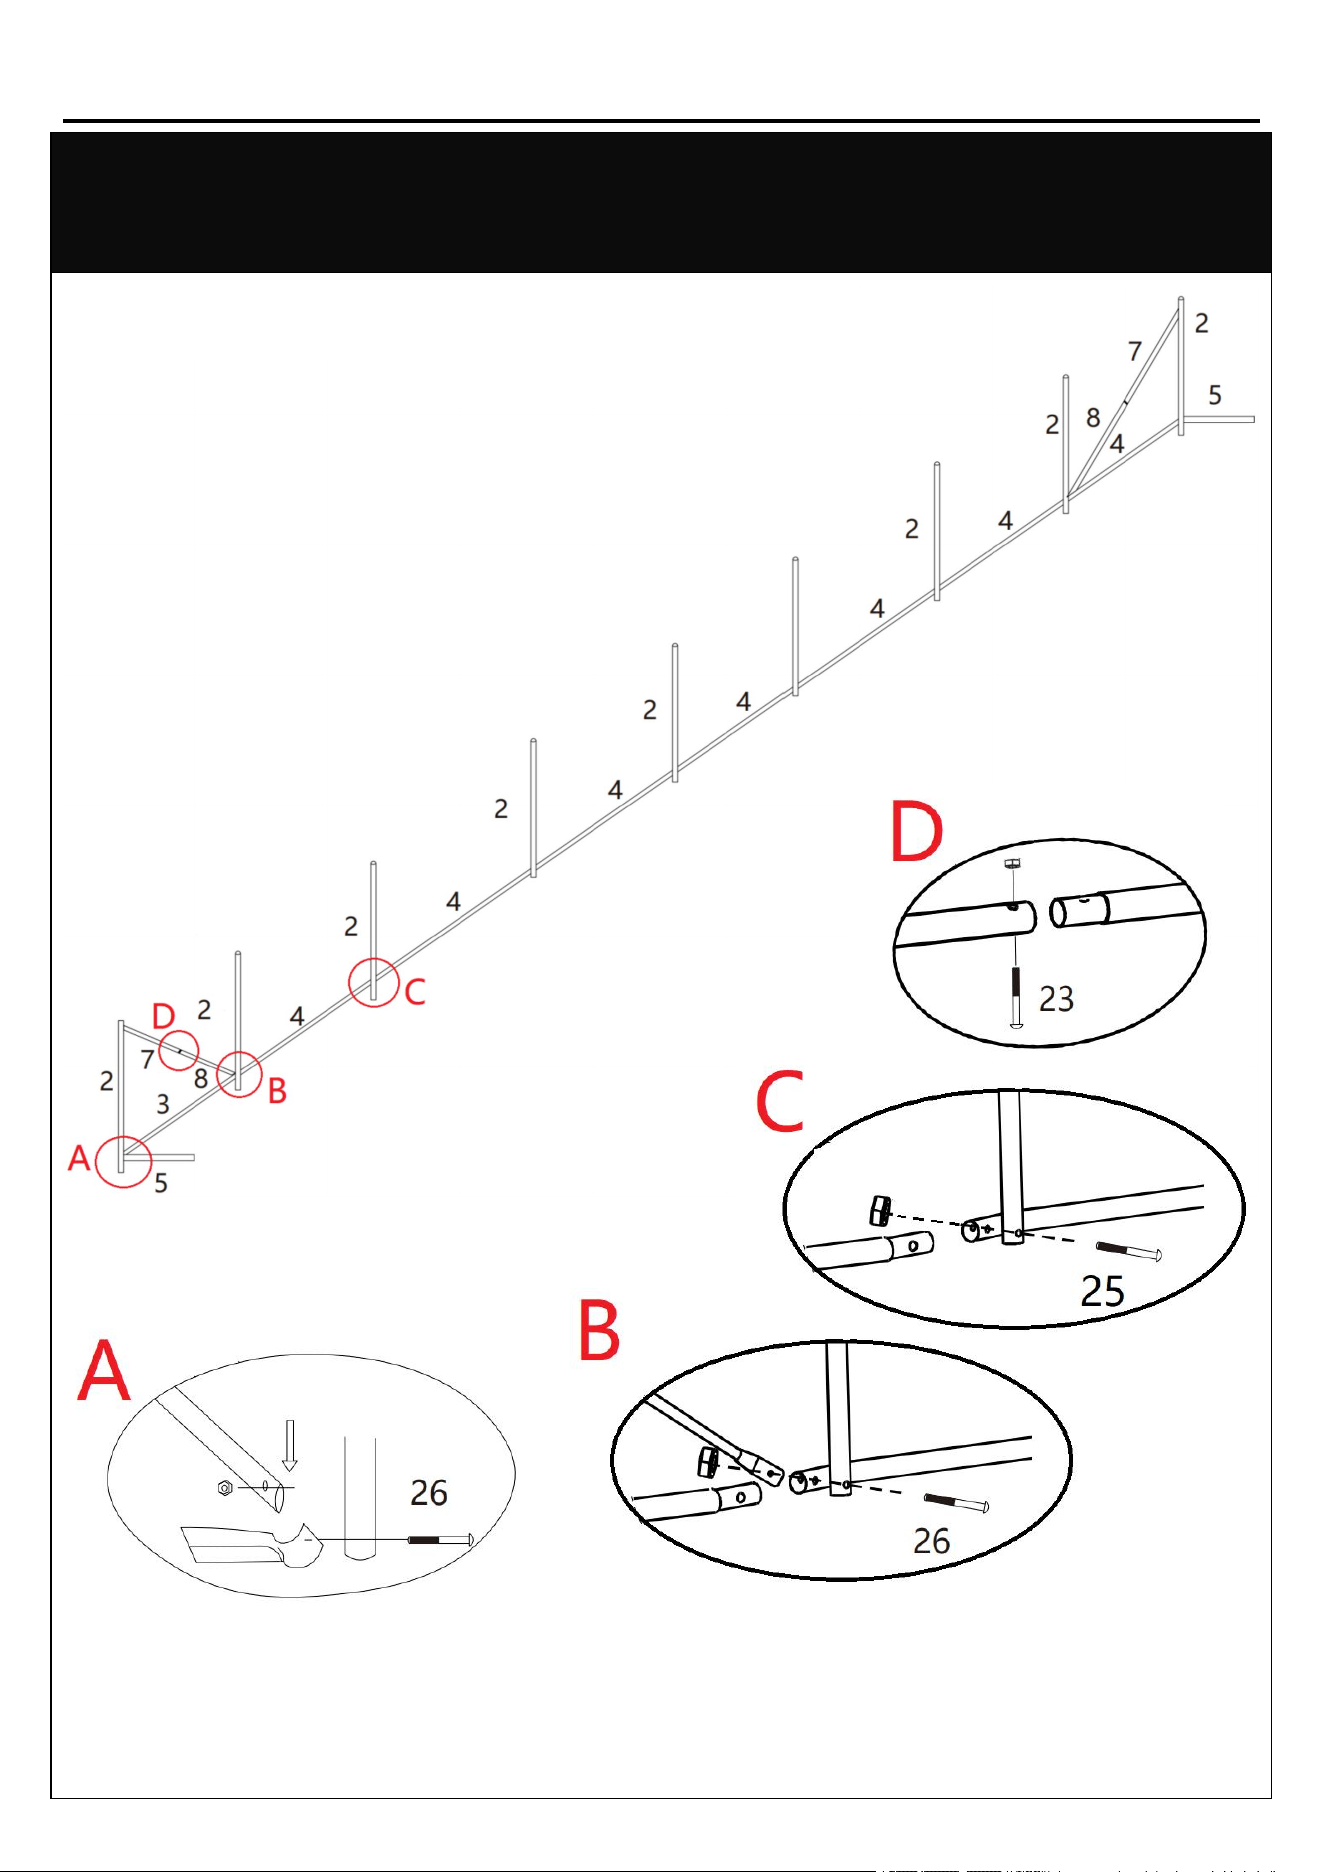
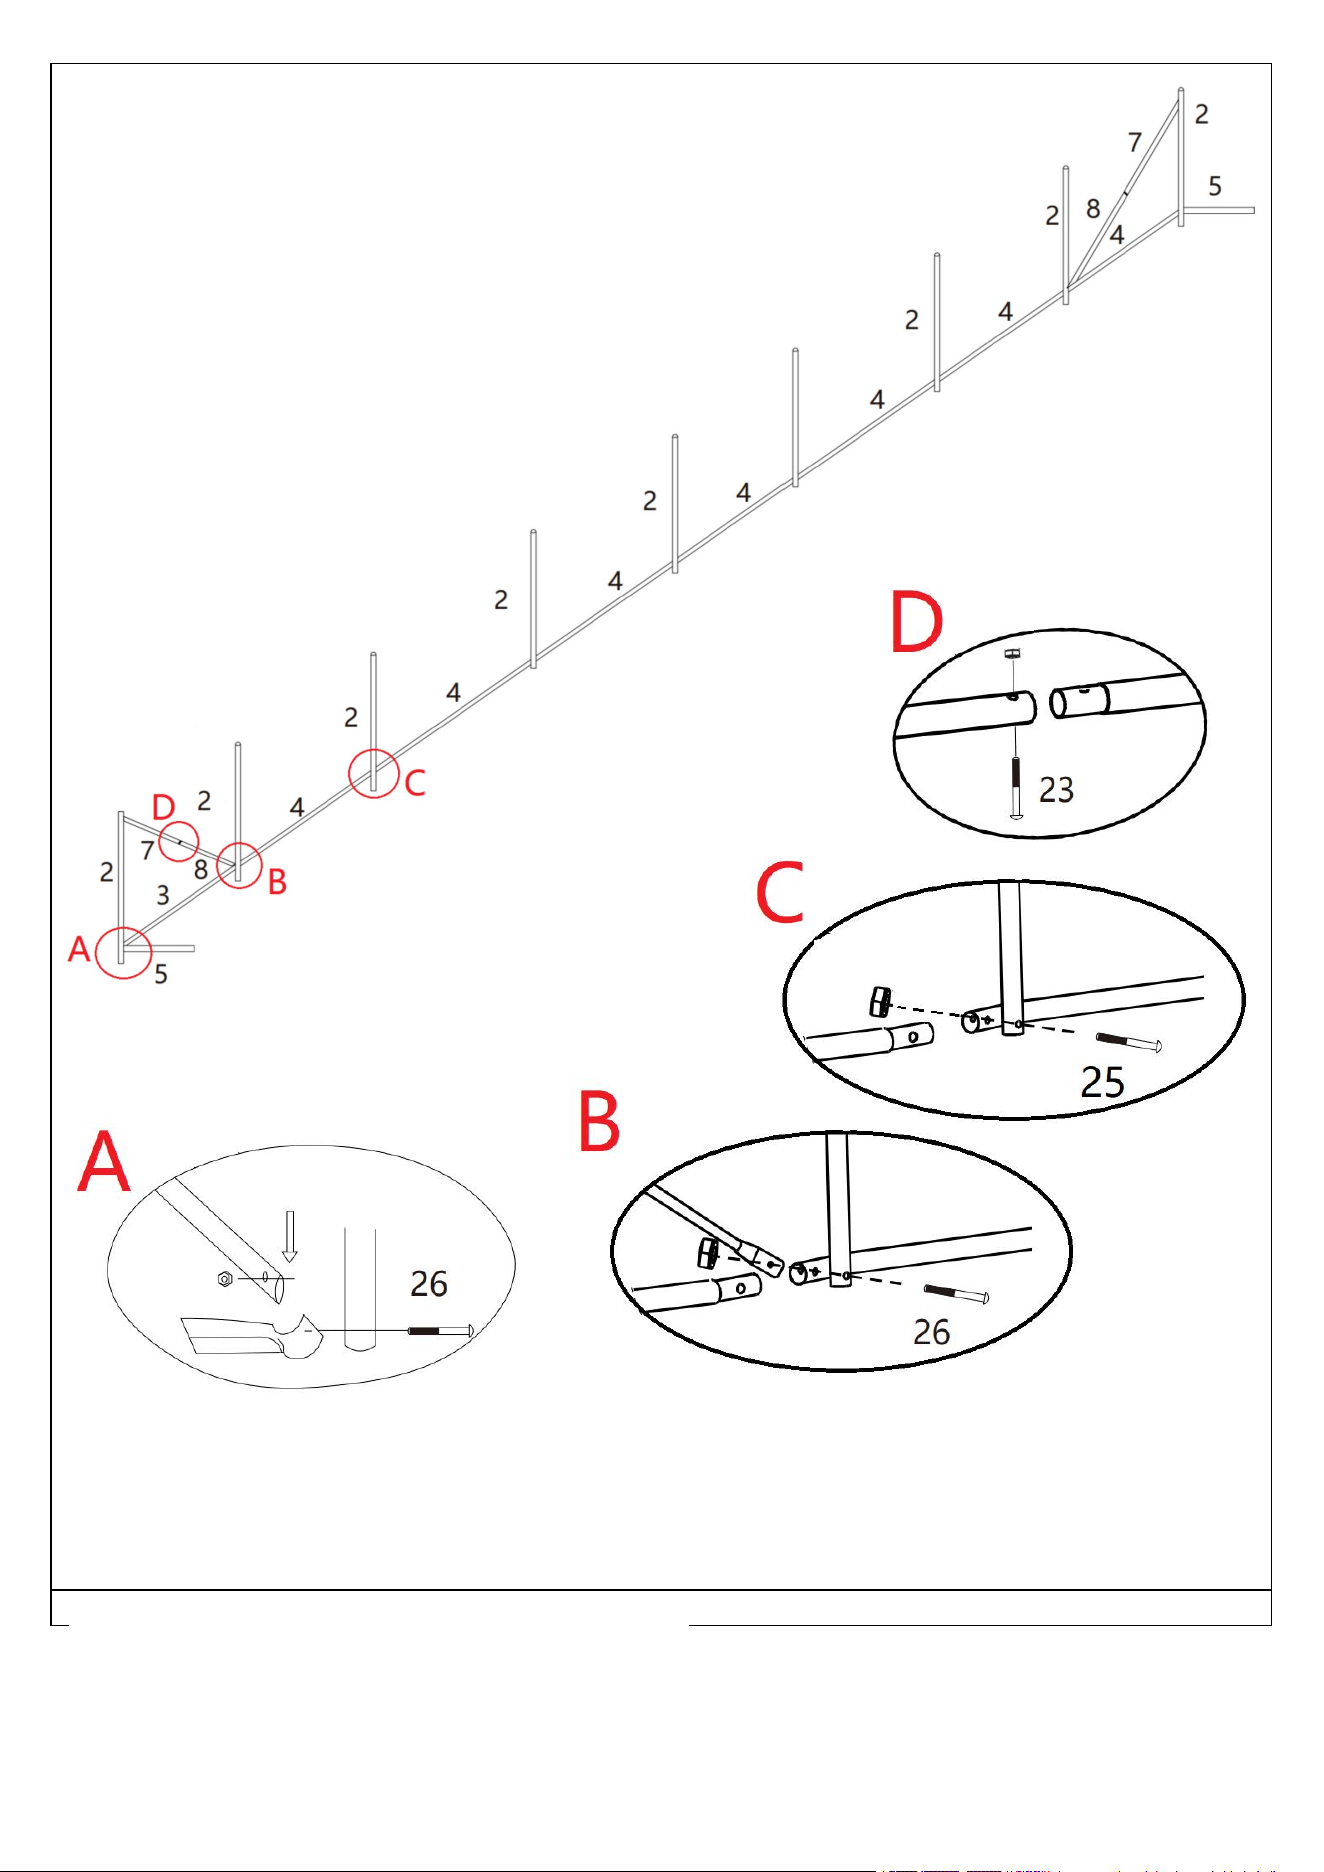
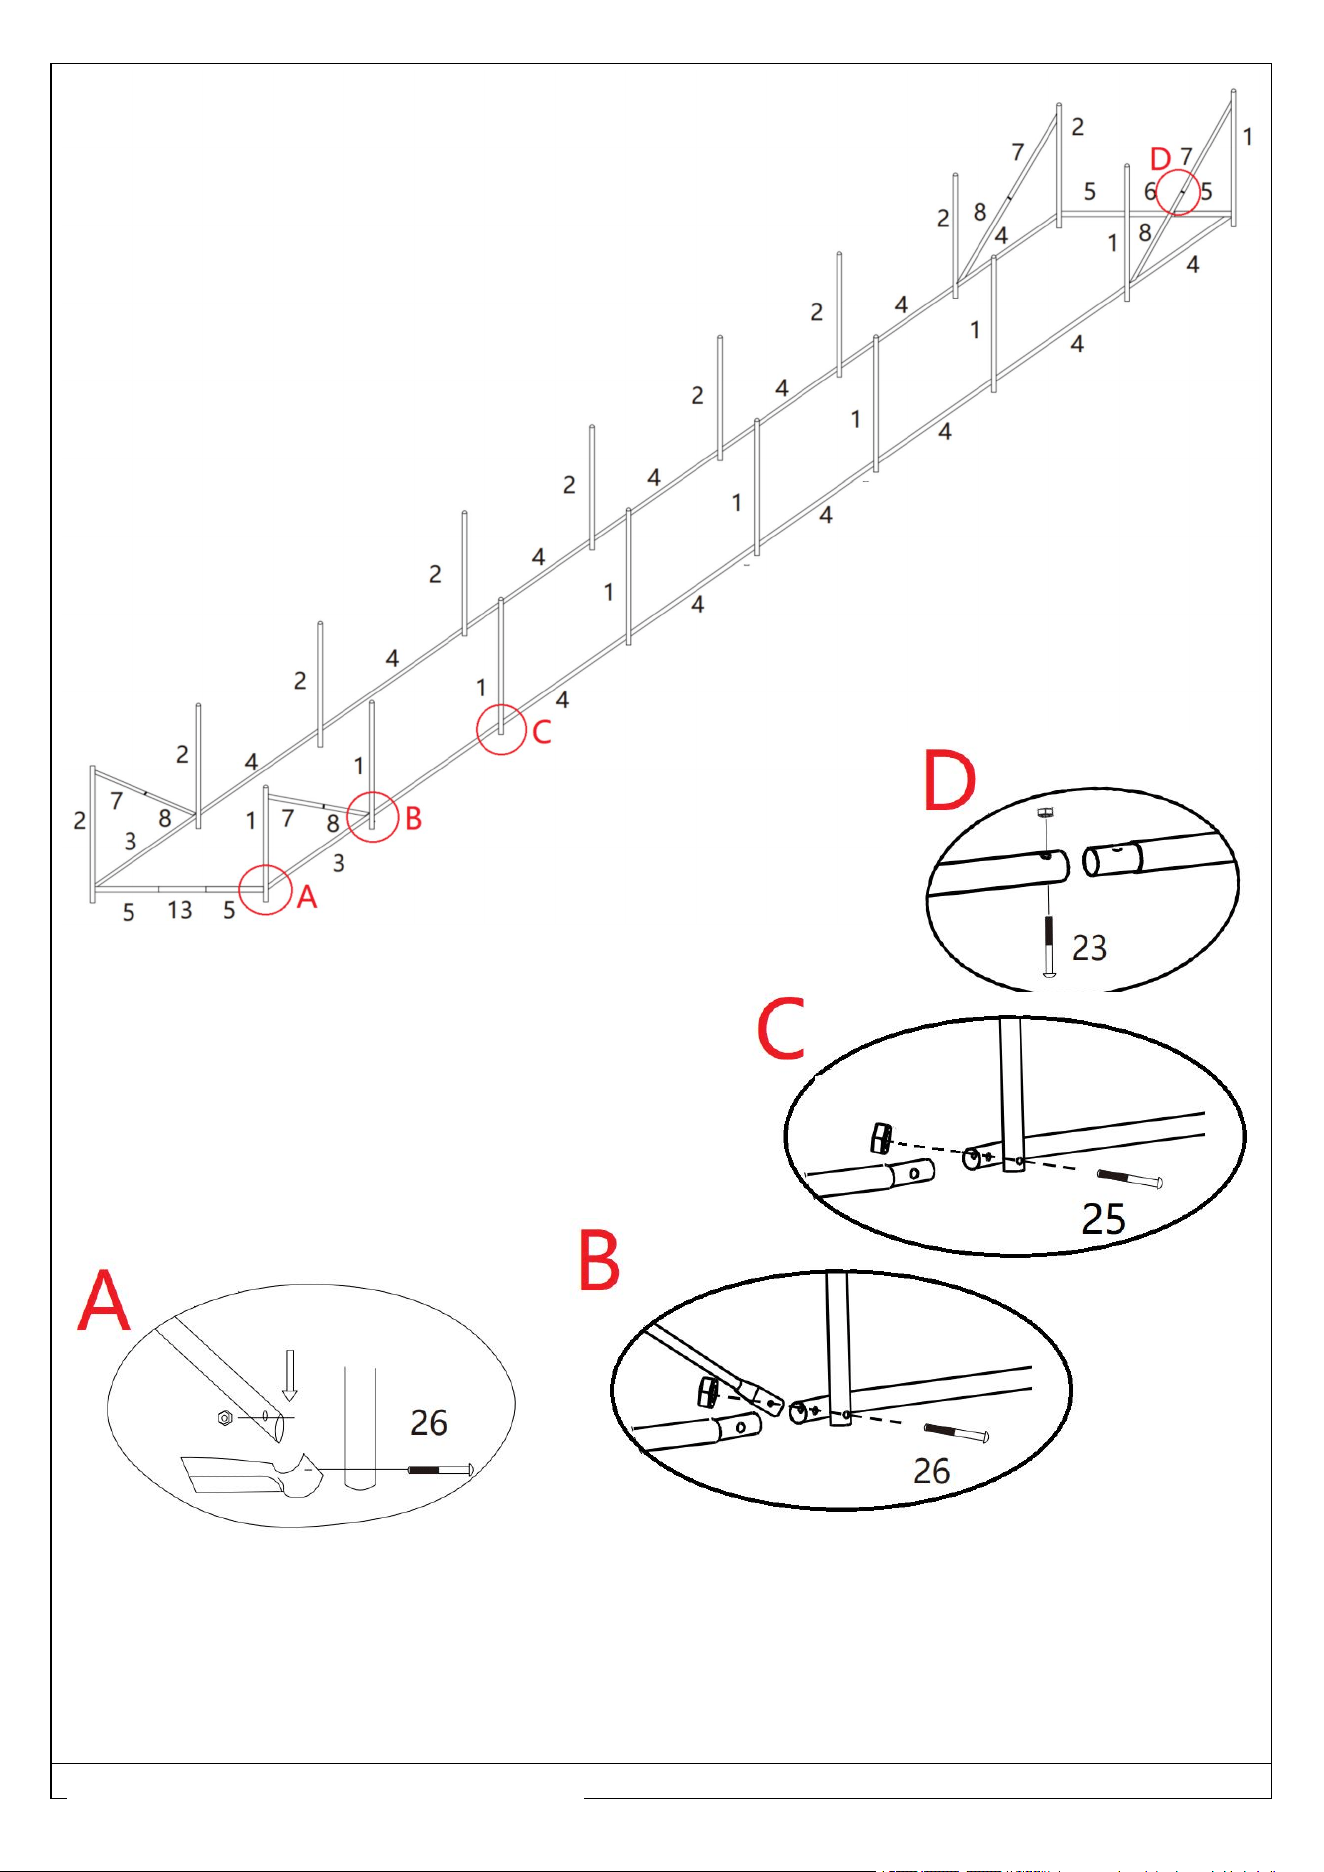
Assembly Instruction
Take out all the accessories and place them
according to the list above for installation.
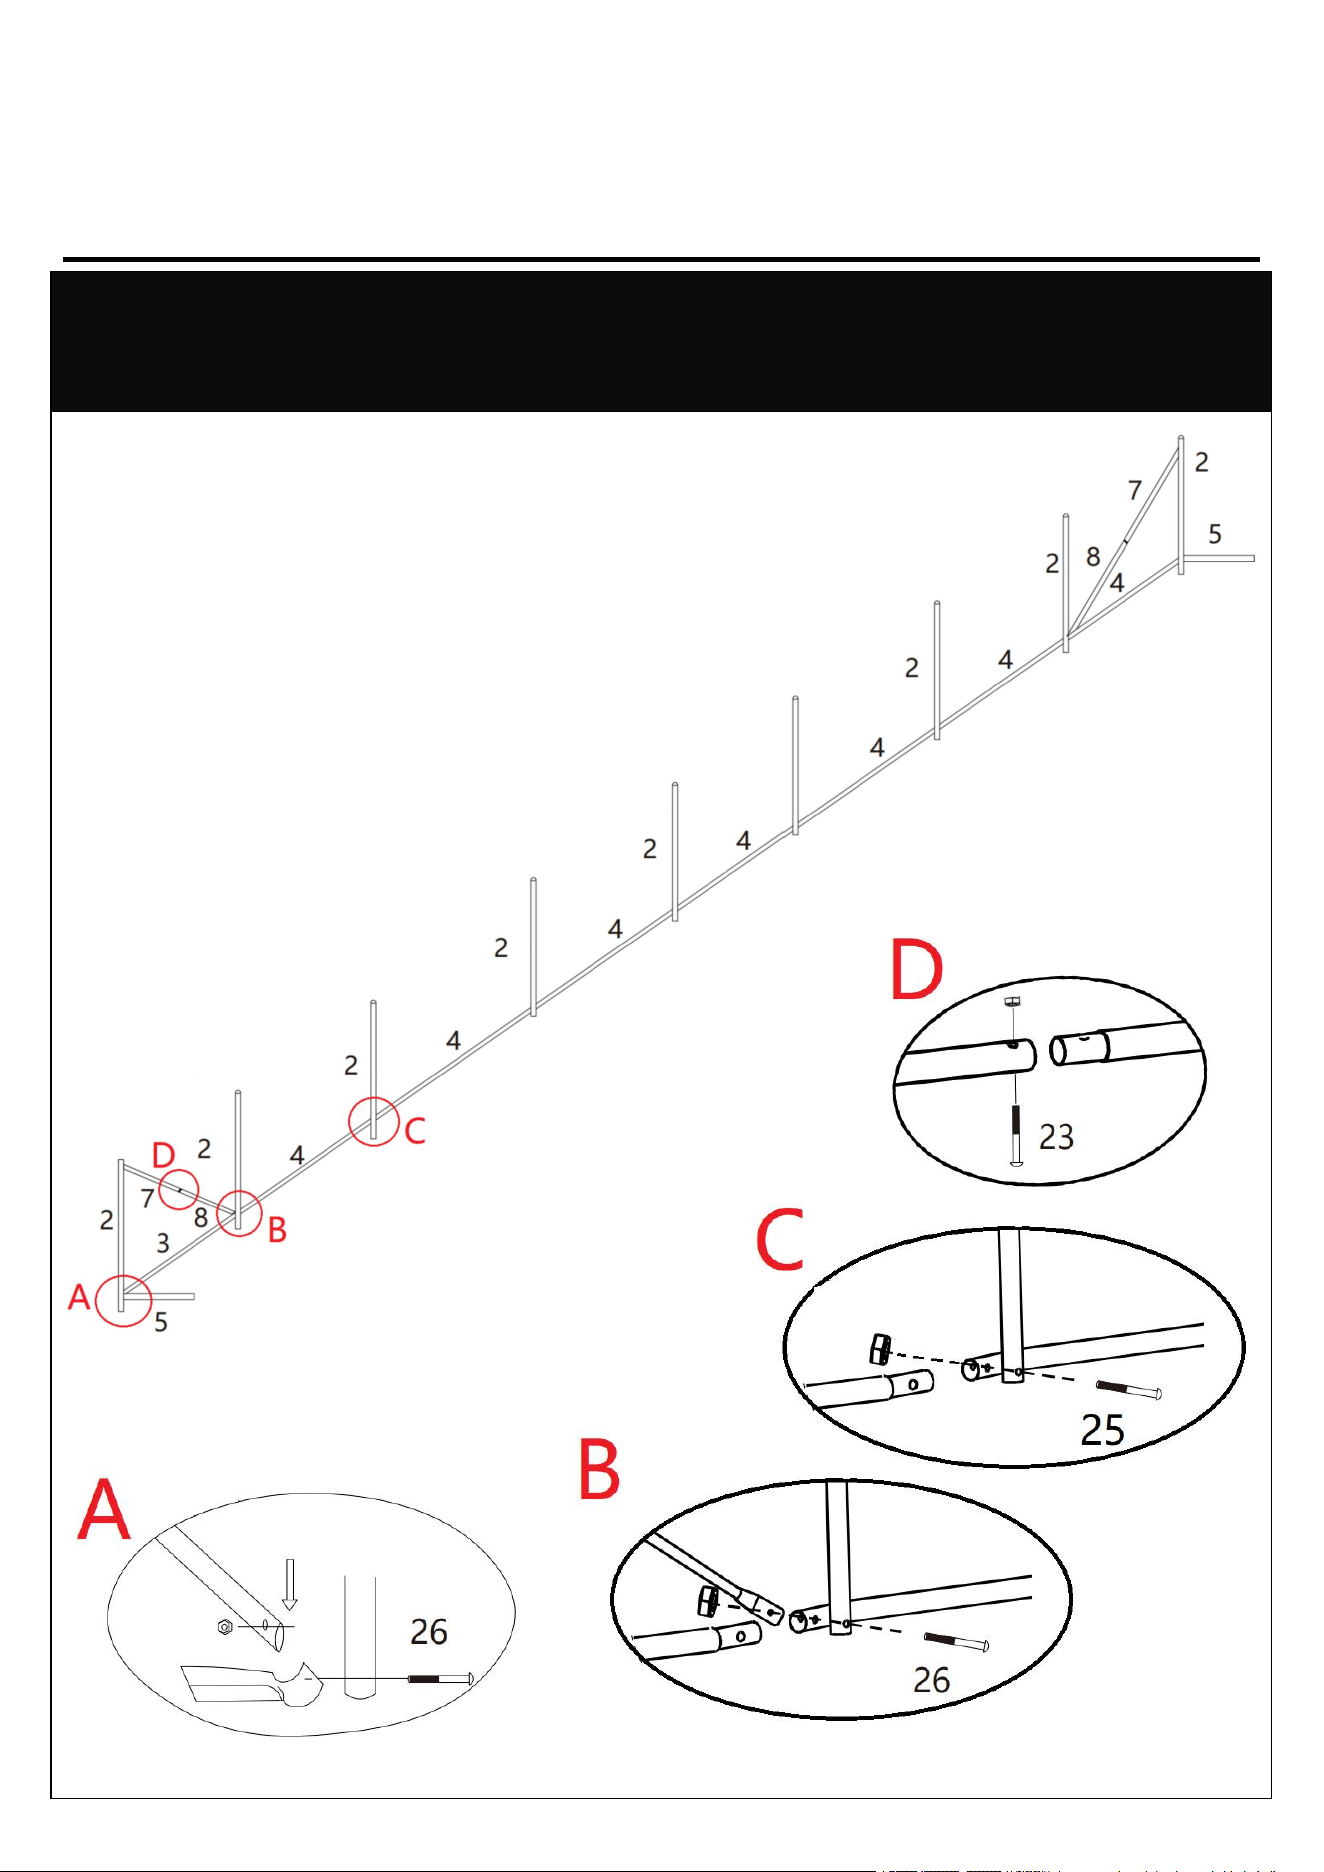
1. Please place the parts according to the above picture;
2. Lock the pole with screws(26*4pcs)(25*5pcs)(23*2pcs);
3. Do not lock it first, so as to facilitate the installation later;
Install the brackets on left sides.
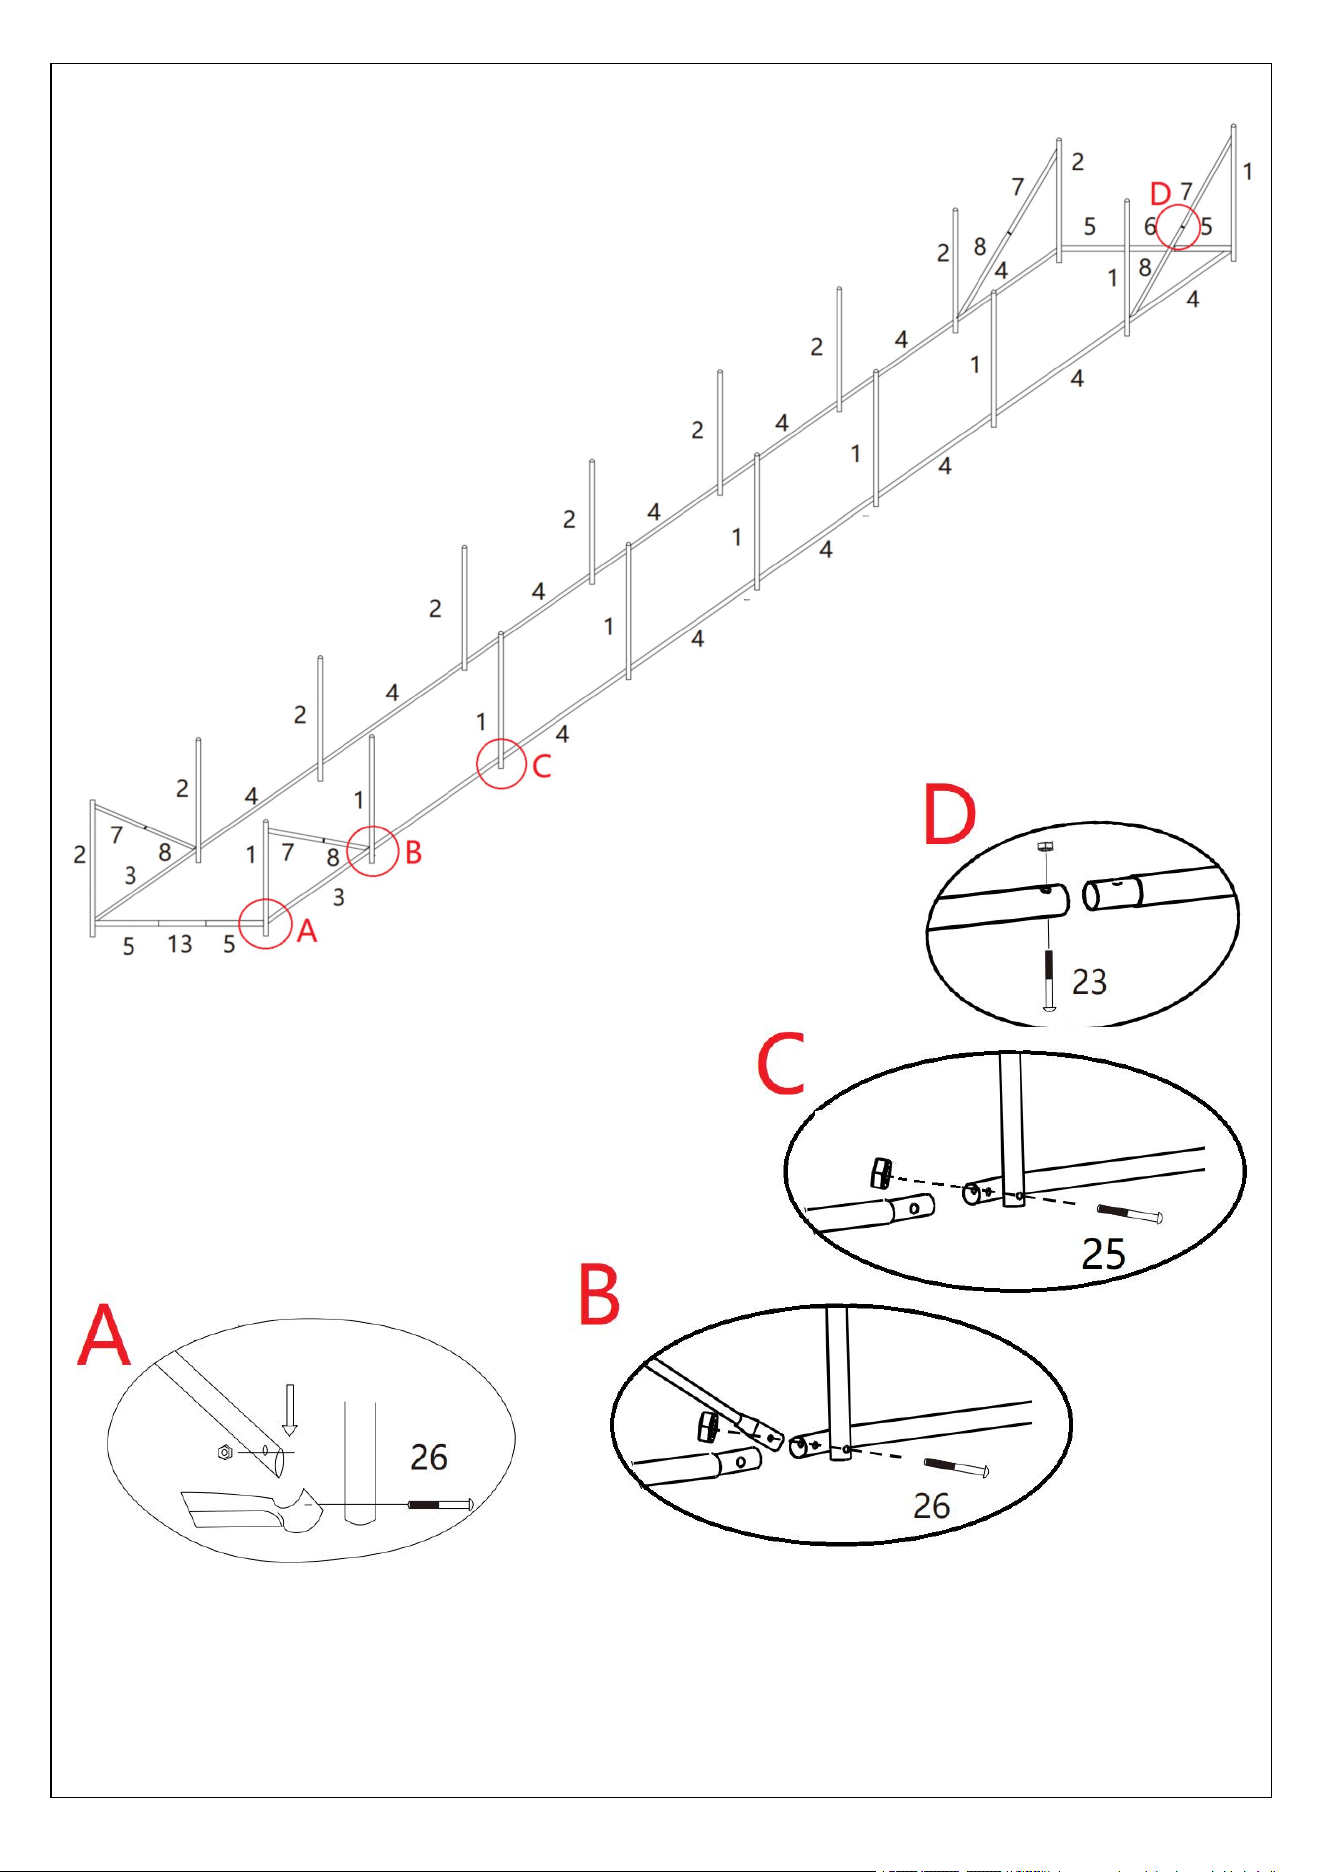
7
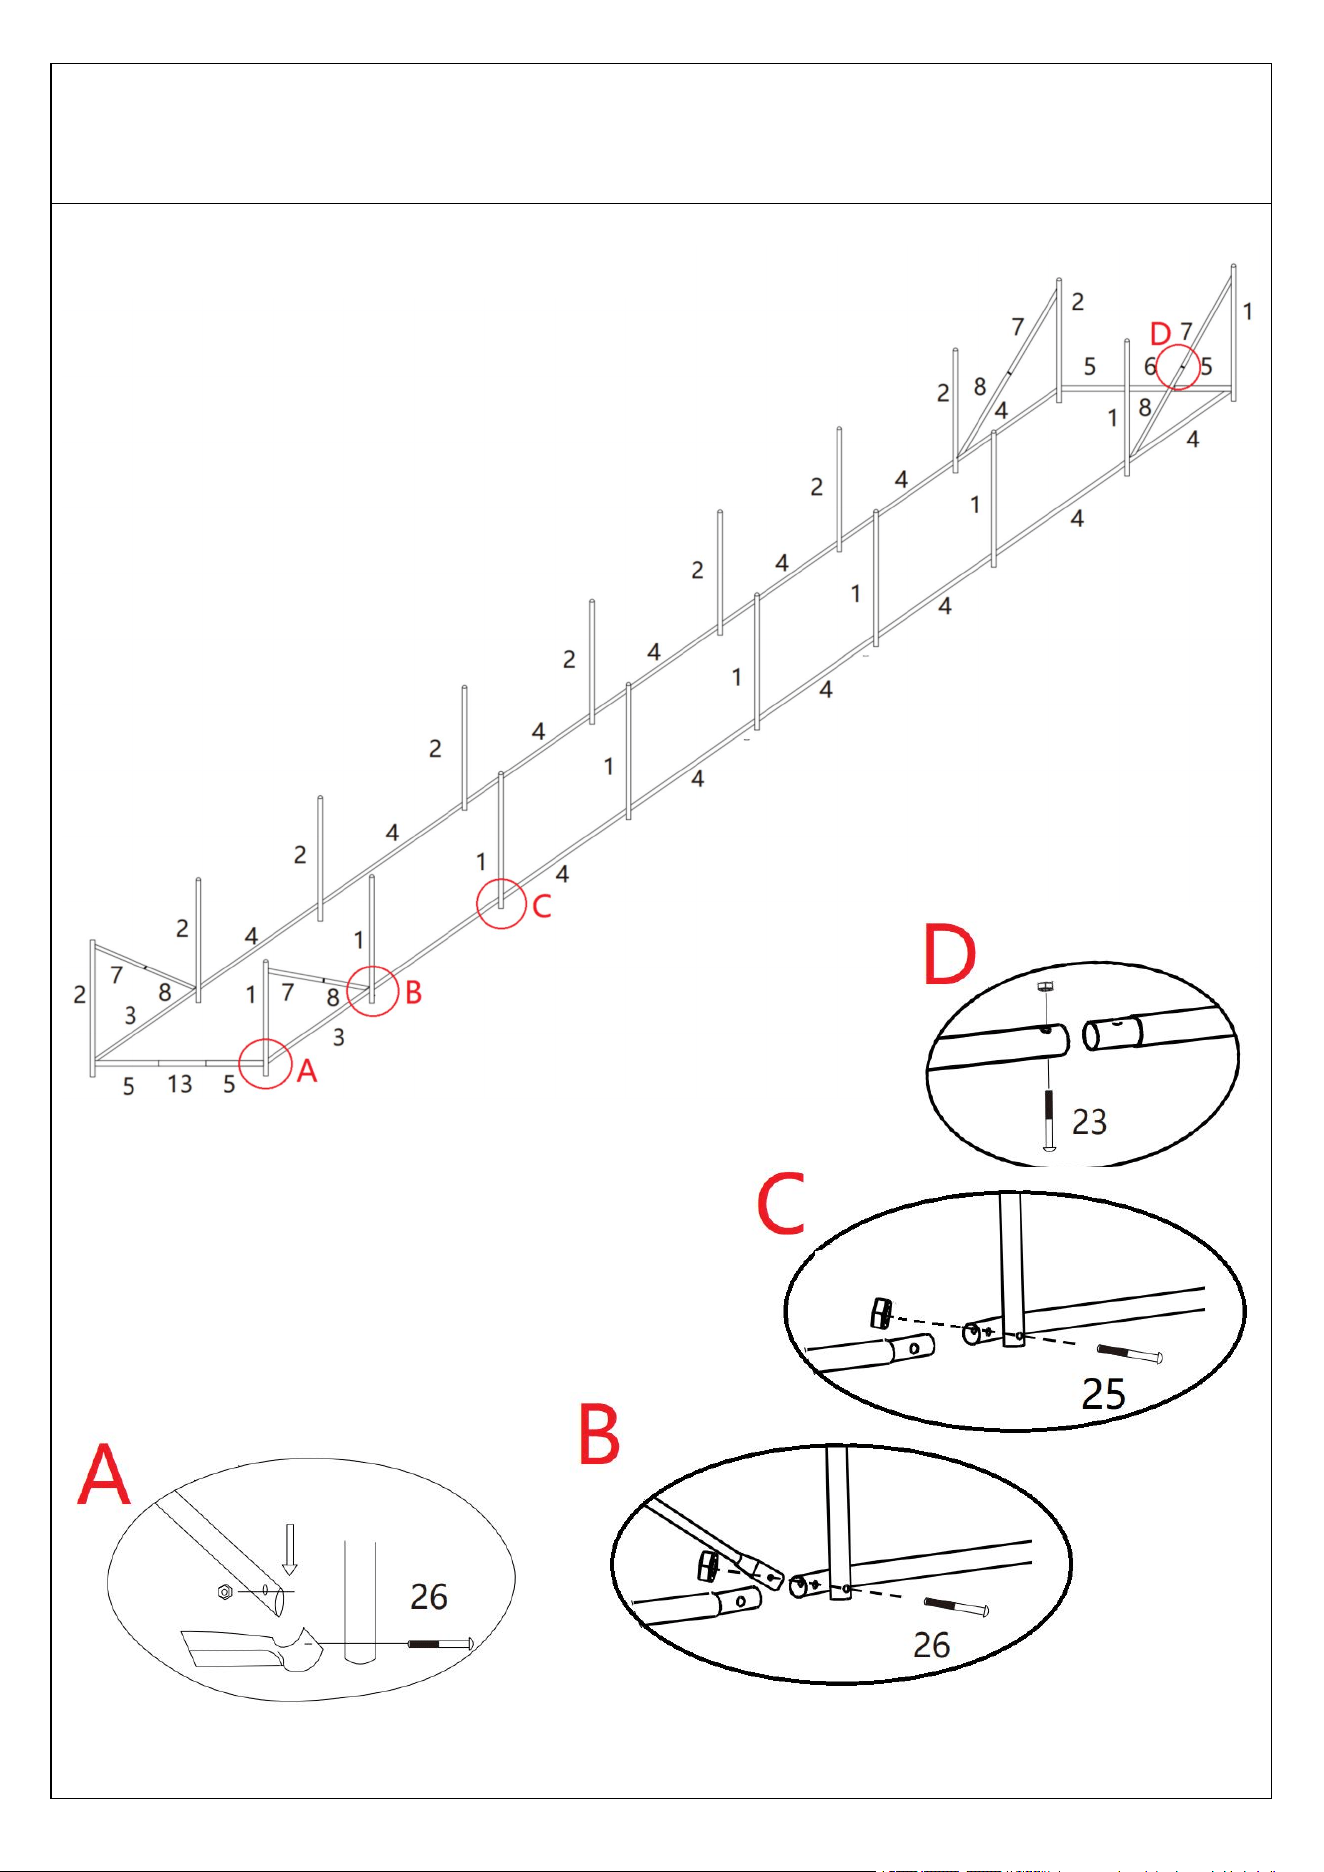
1. Please place the parts according to the above picture;
2. Lock the pole with screws(26*4pcs)(25*5pcs)(23*2pcs);
3. Do not lock it first, so as to facilitate the installation later;
Install the brackets on right sides.

8
1. Please place the parts according to the above picture ;
2. Lock the pole with screws(26*4pcs;25*14pcs;);
3. Do not lock it first, so as to facilitate the installation later;
Install the bracket at the top.

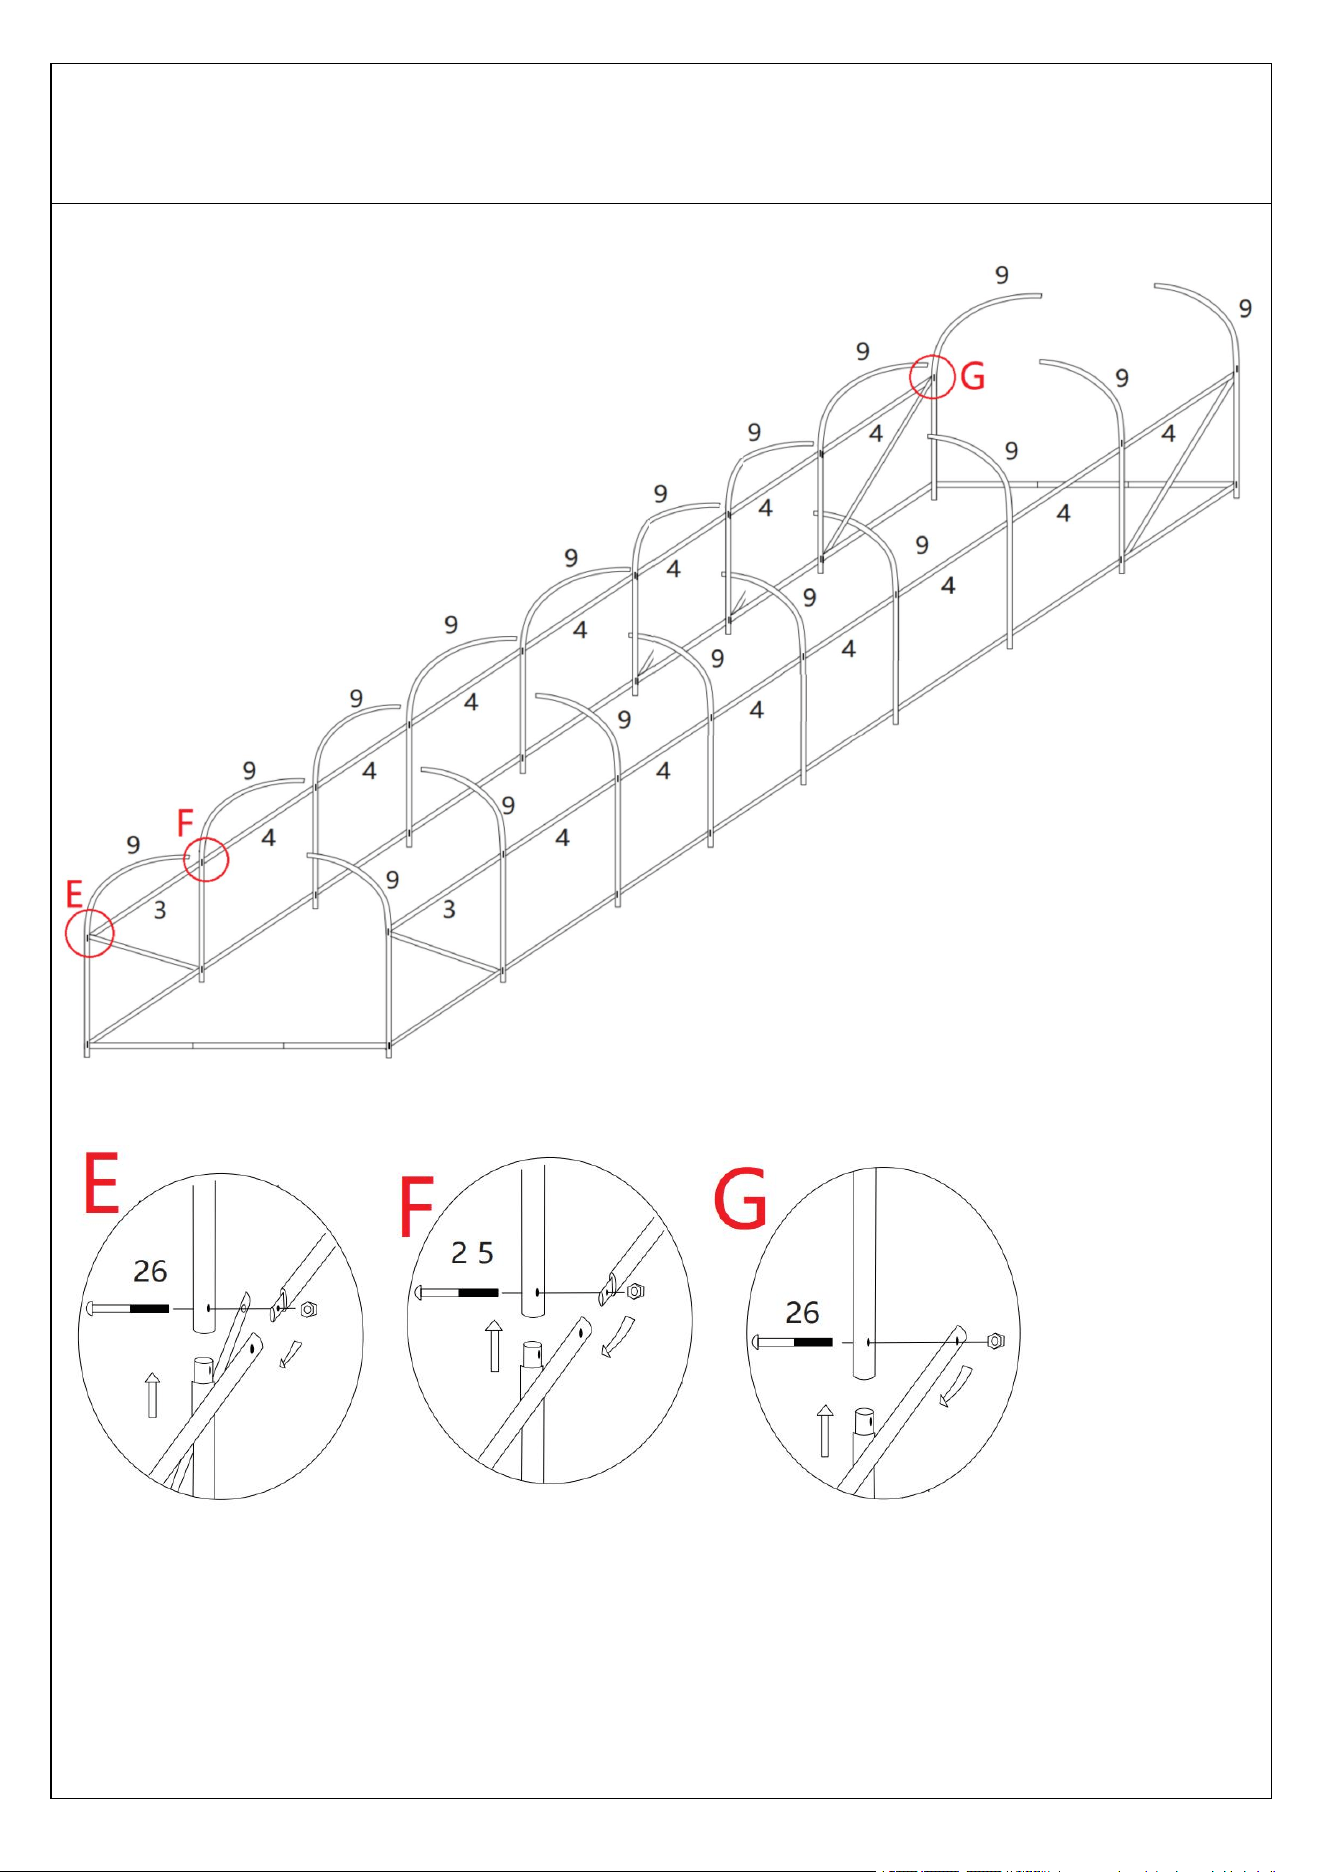
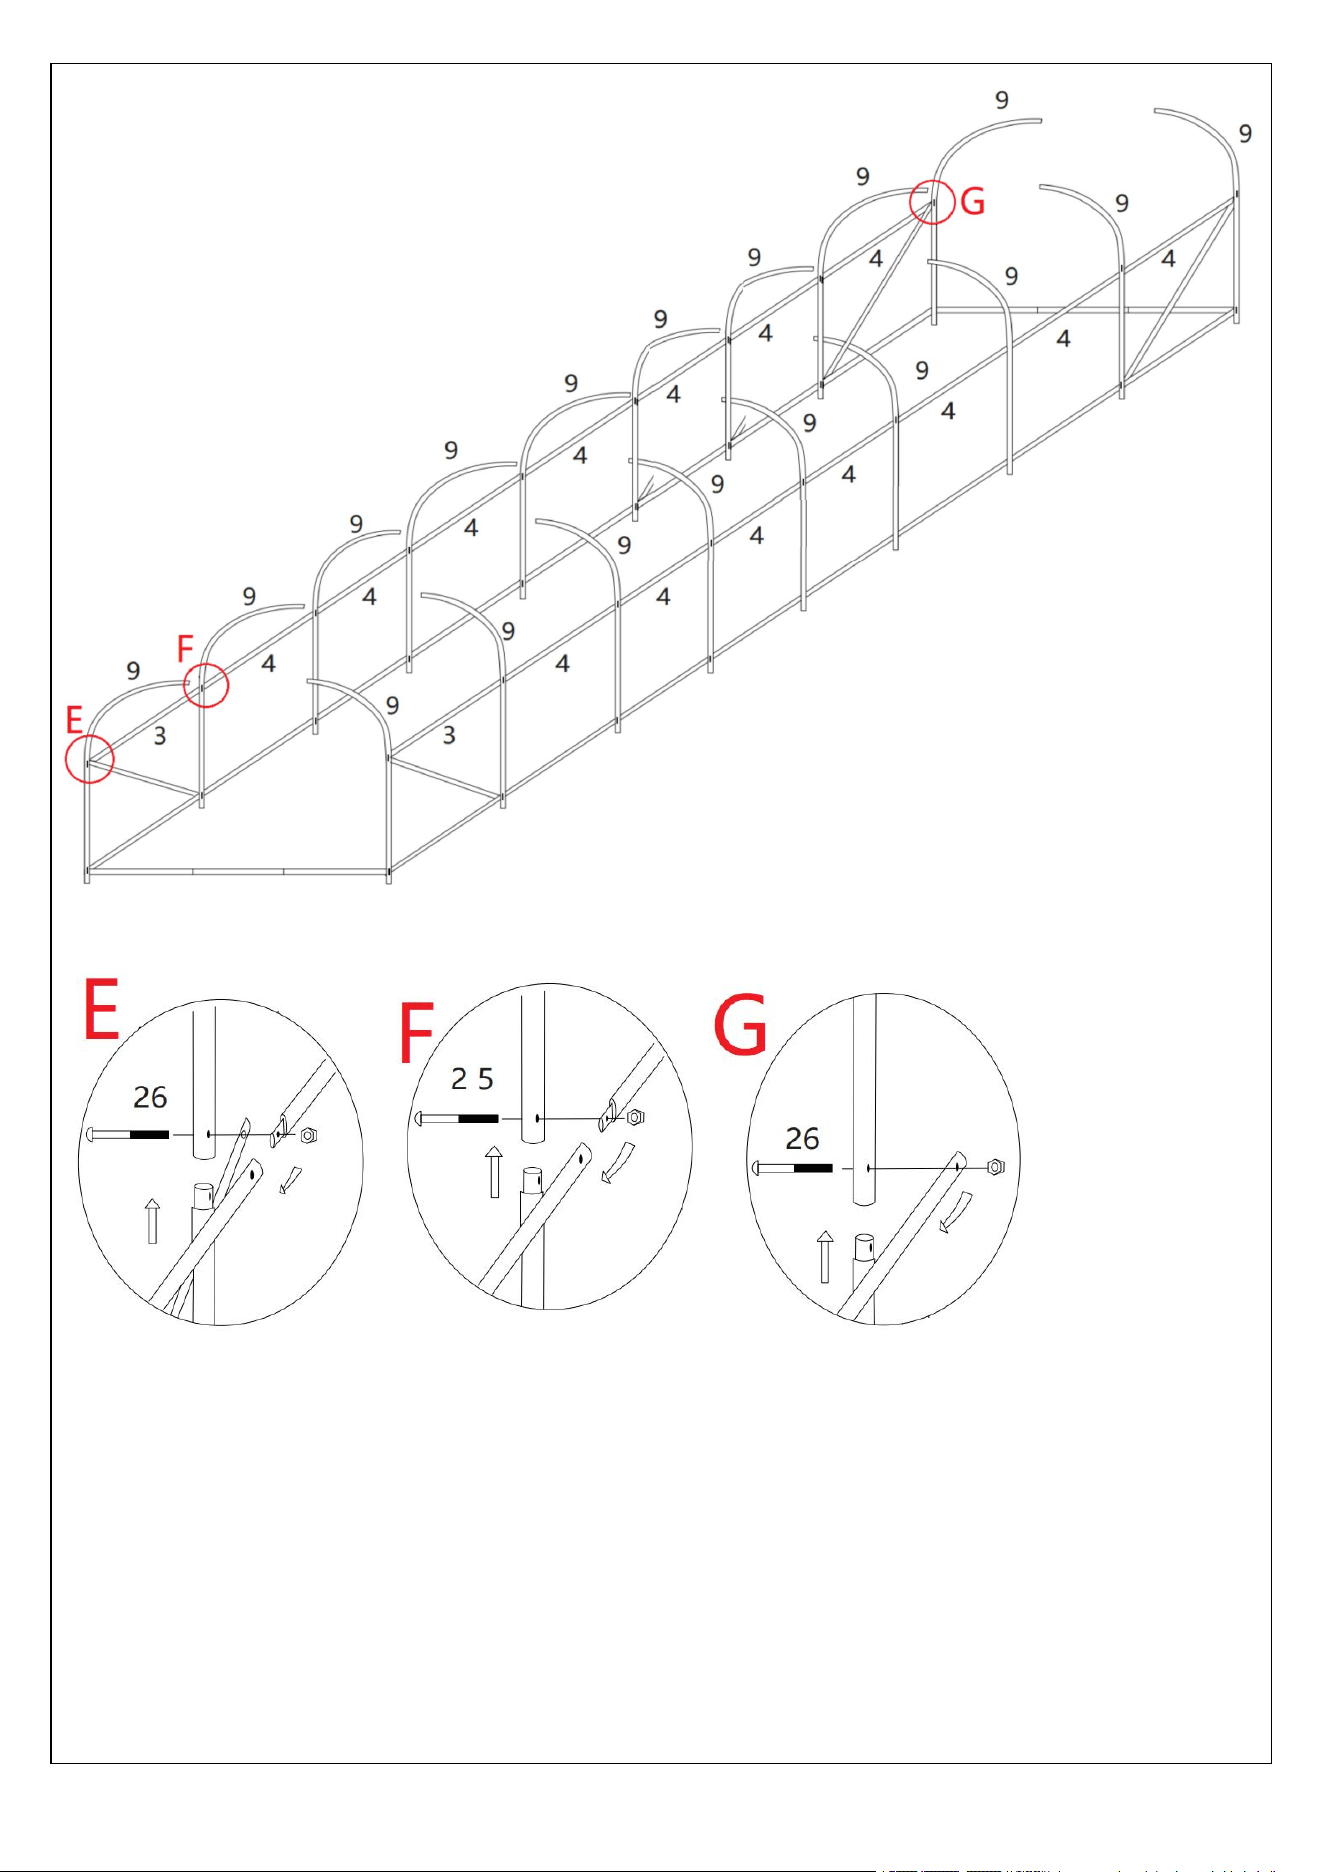
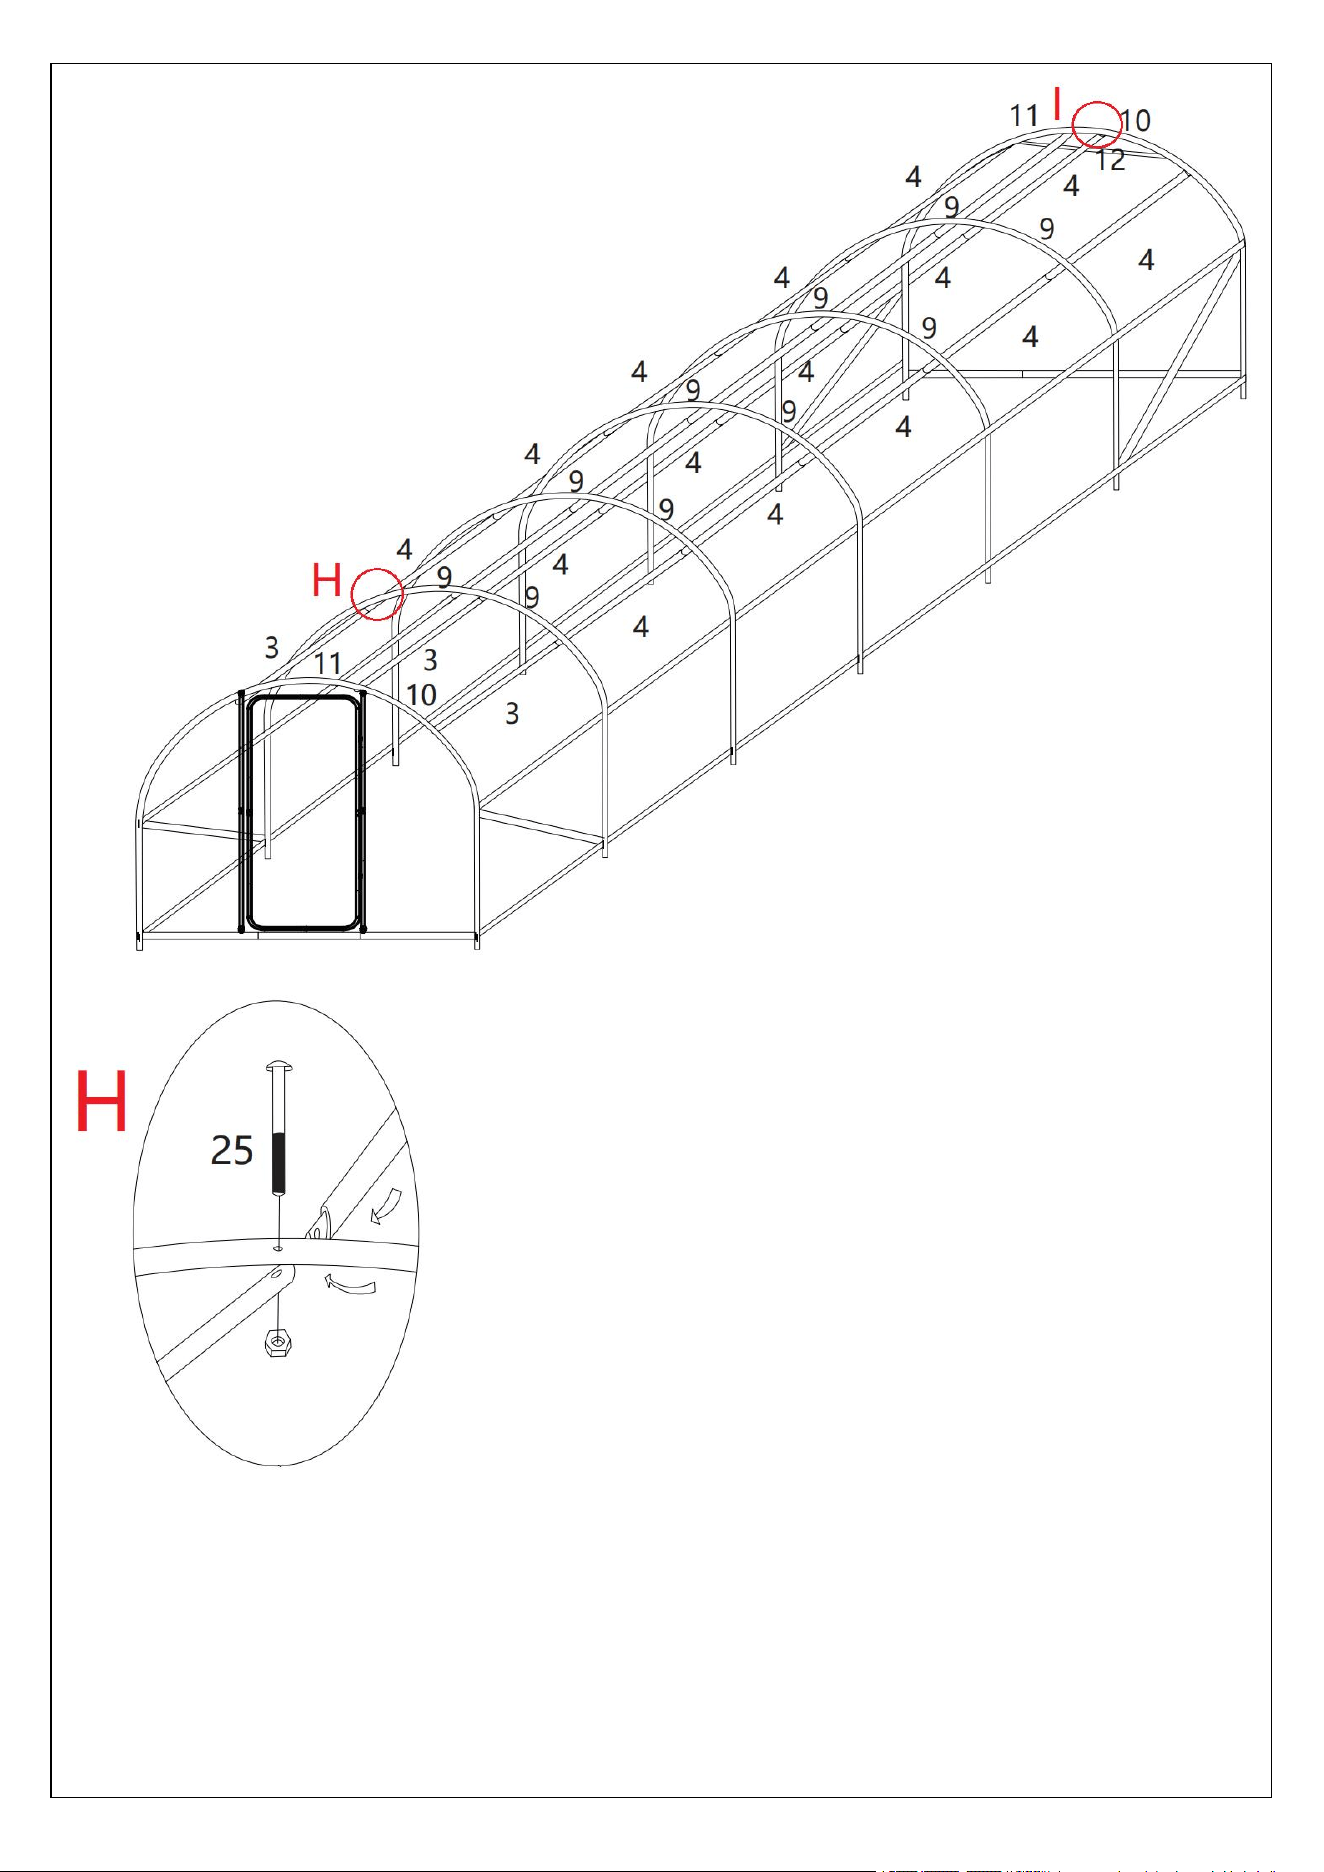
9
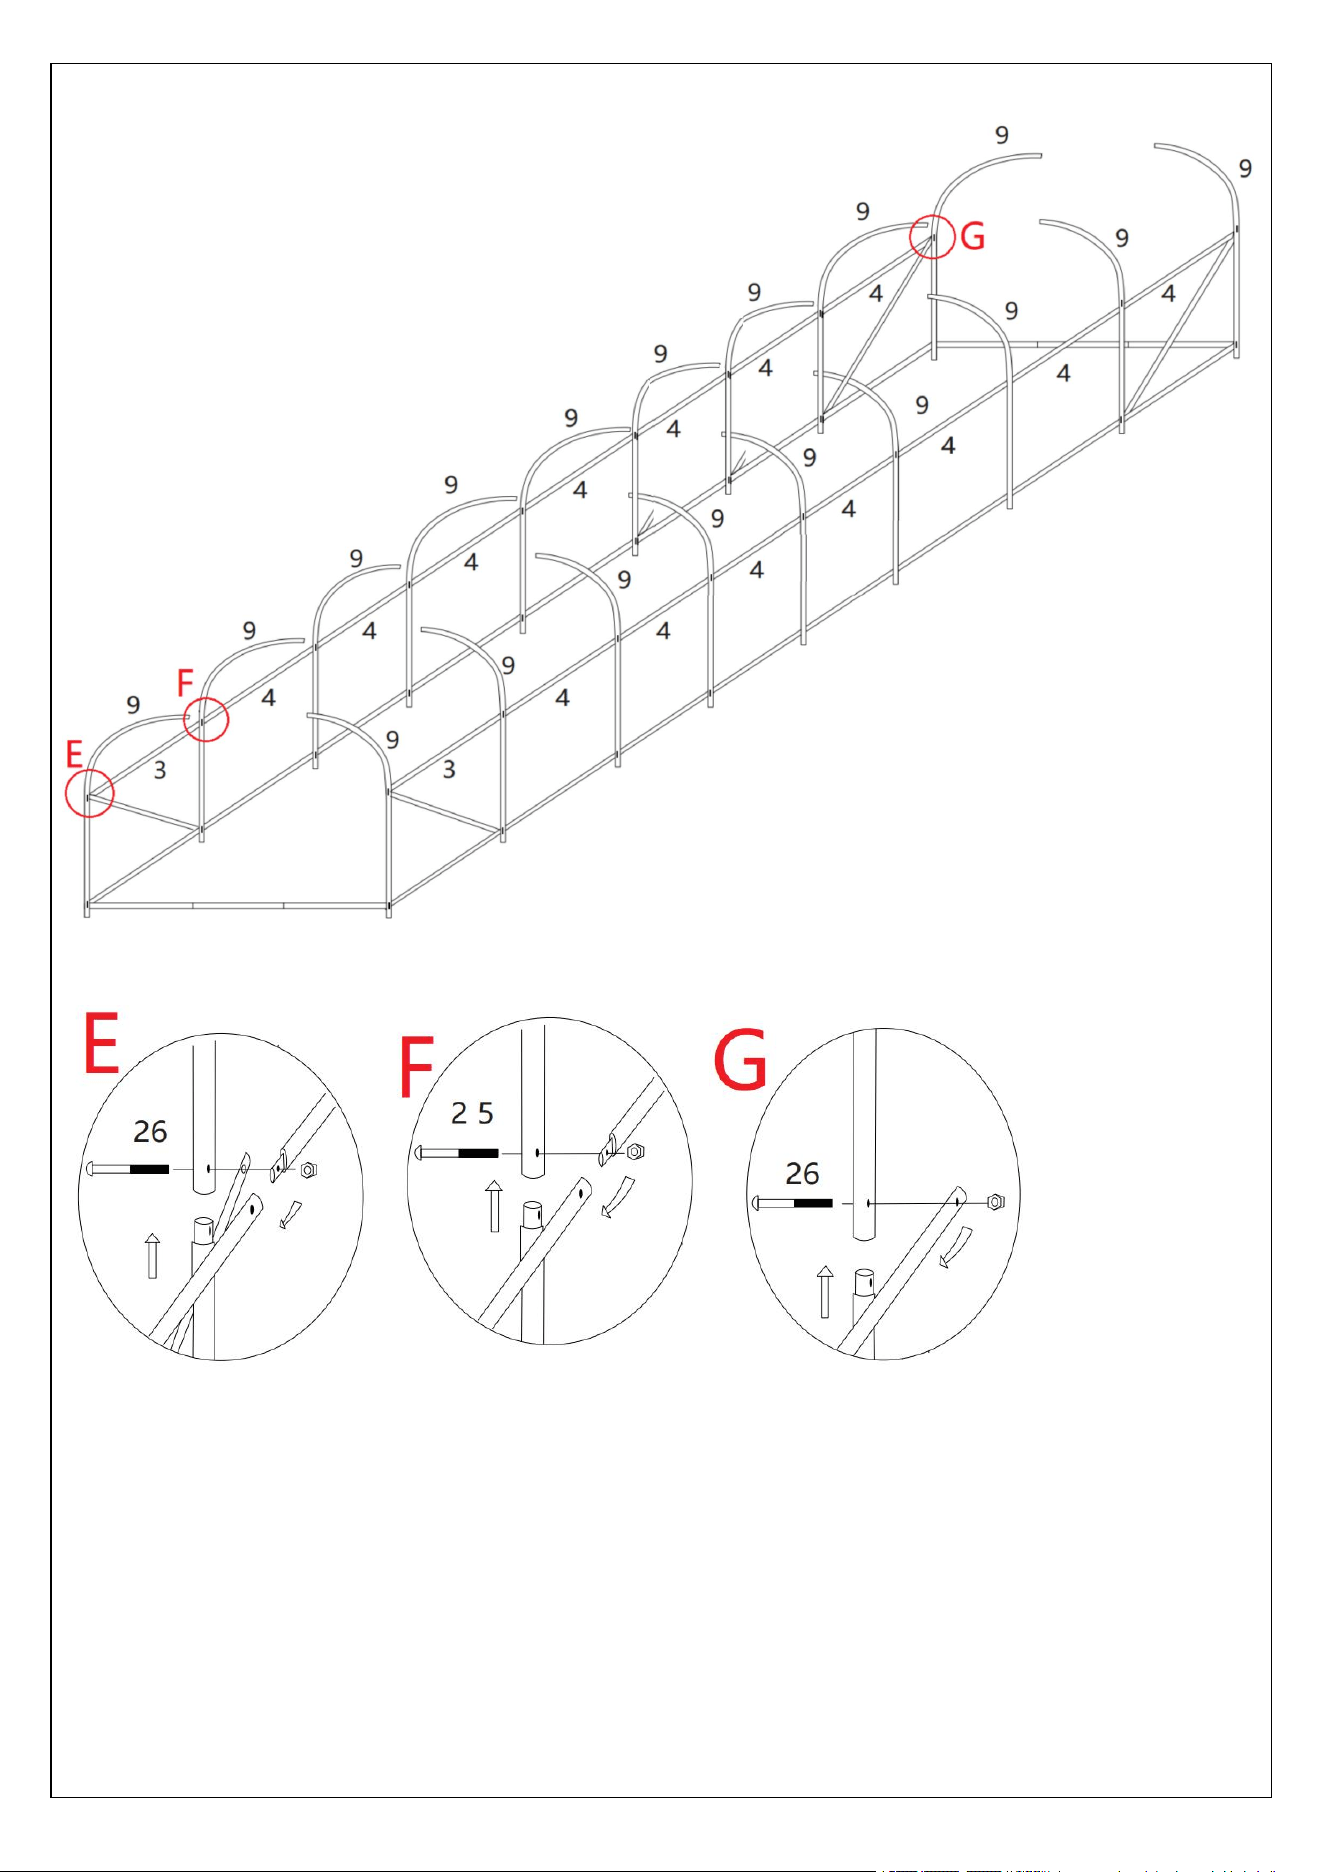
1. Please place the parts according to the above picture ;
2. Lock the pole with screws(25*27pcs);
3. Do not lock it first, so as to facilitate the installation later;
Assemble the assembled left and
right brackets and the top brackets.

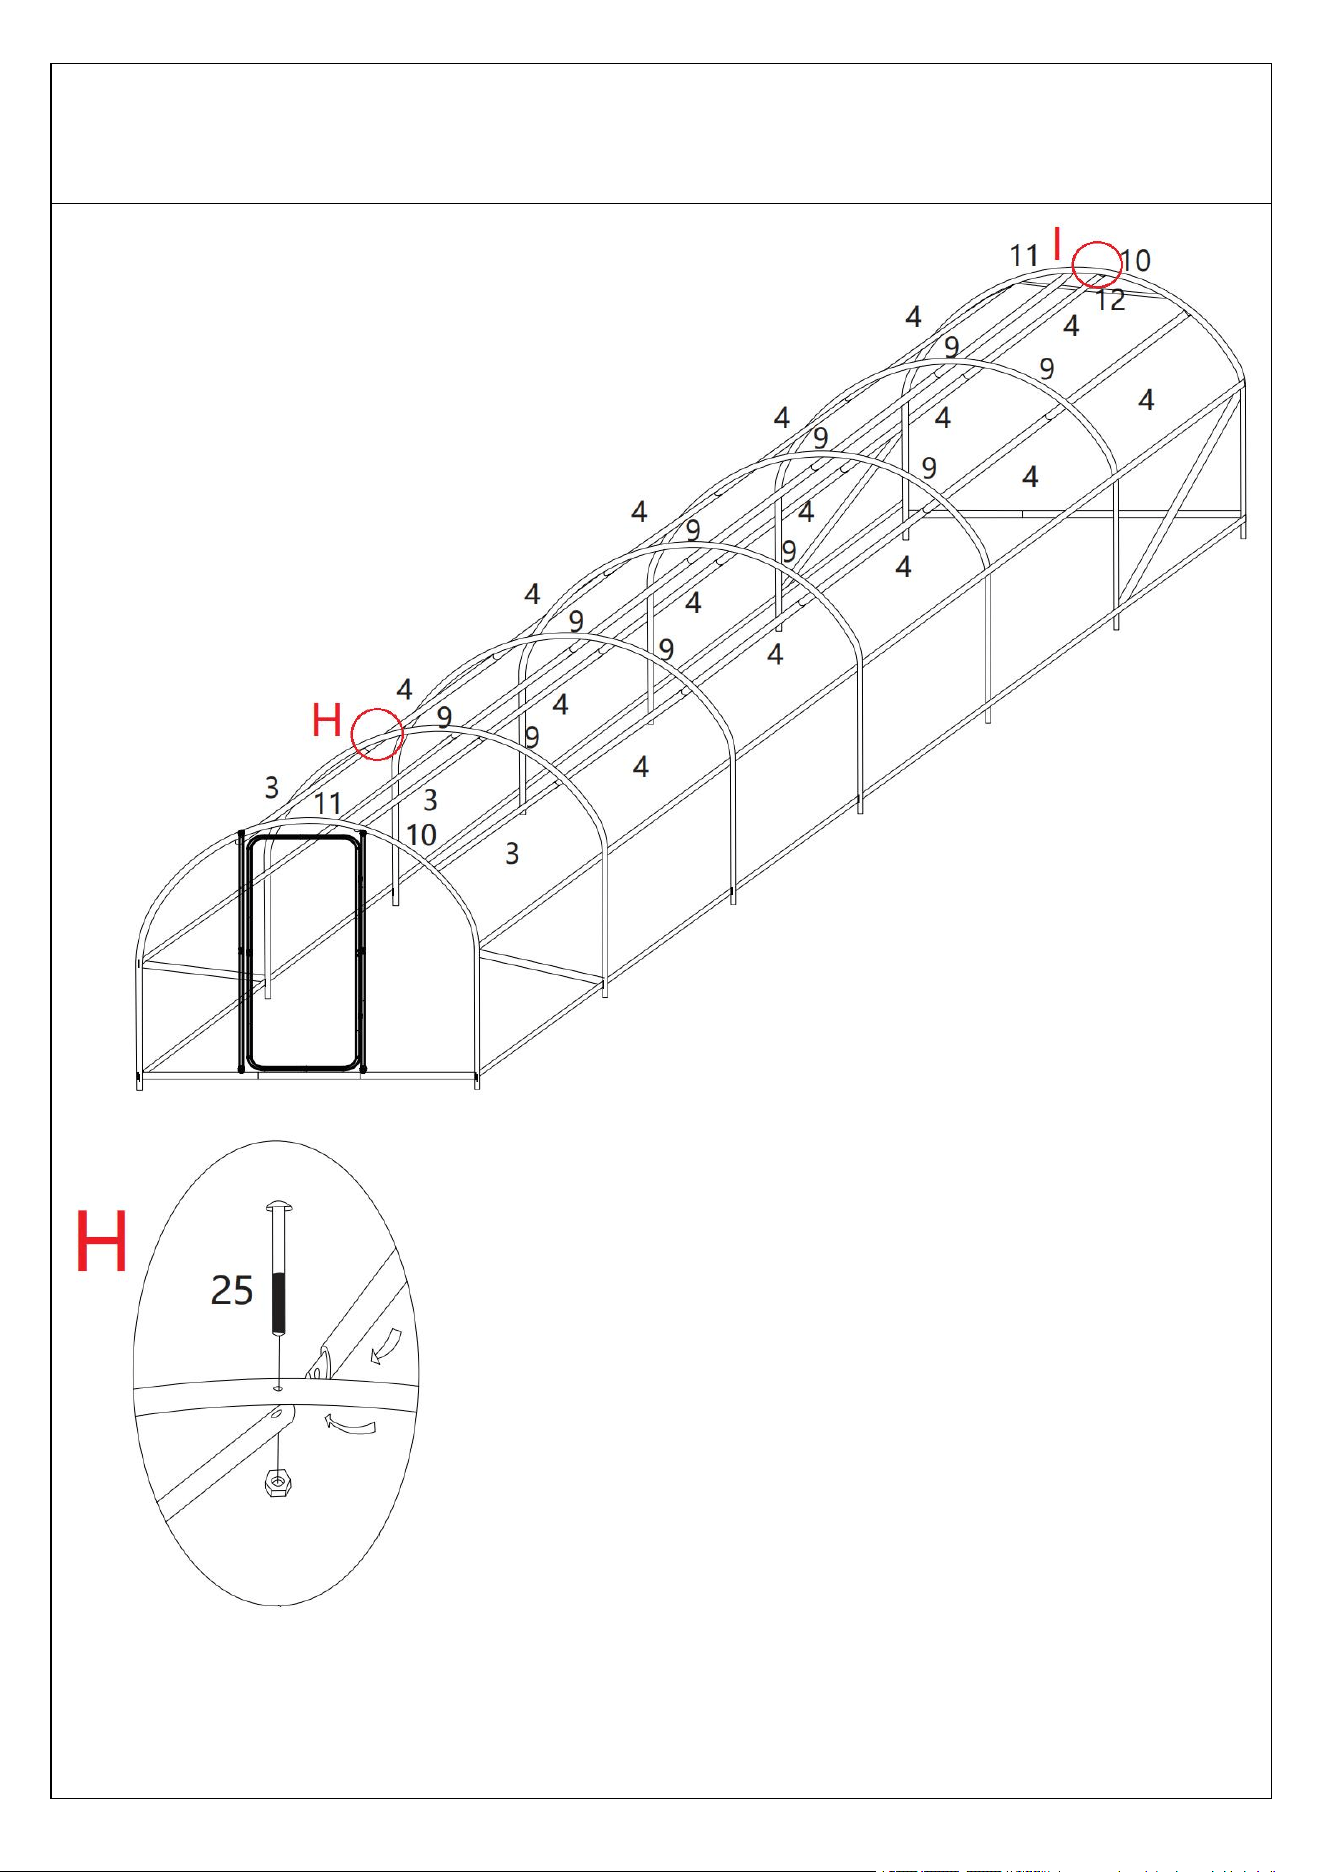
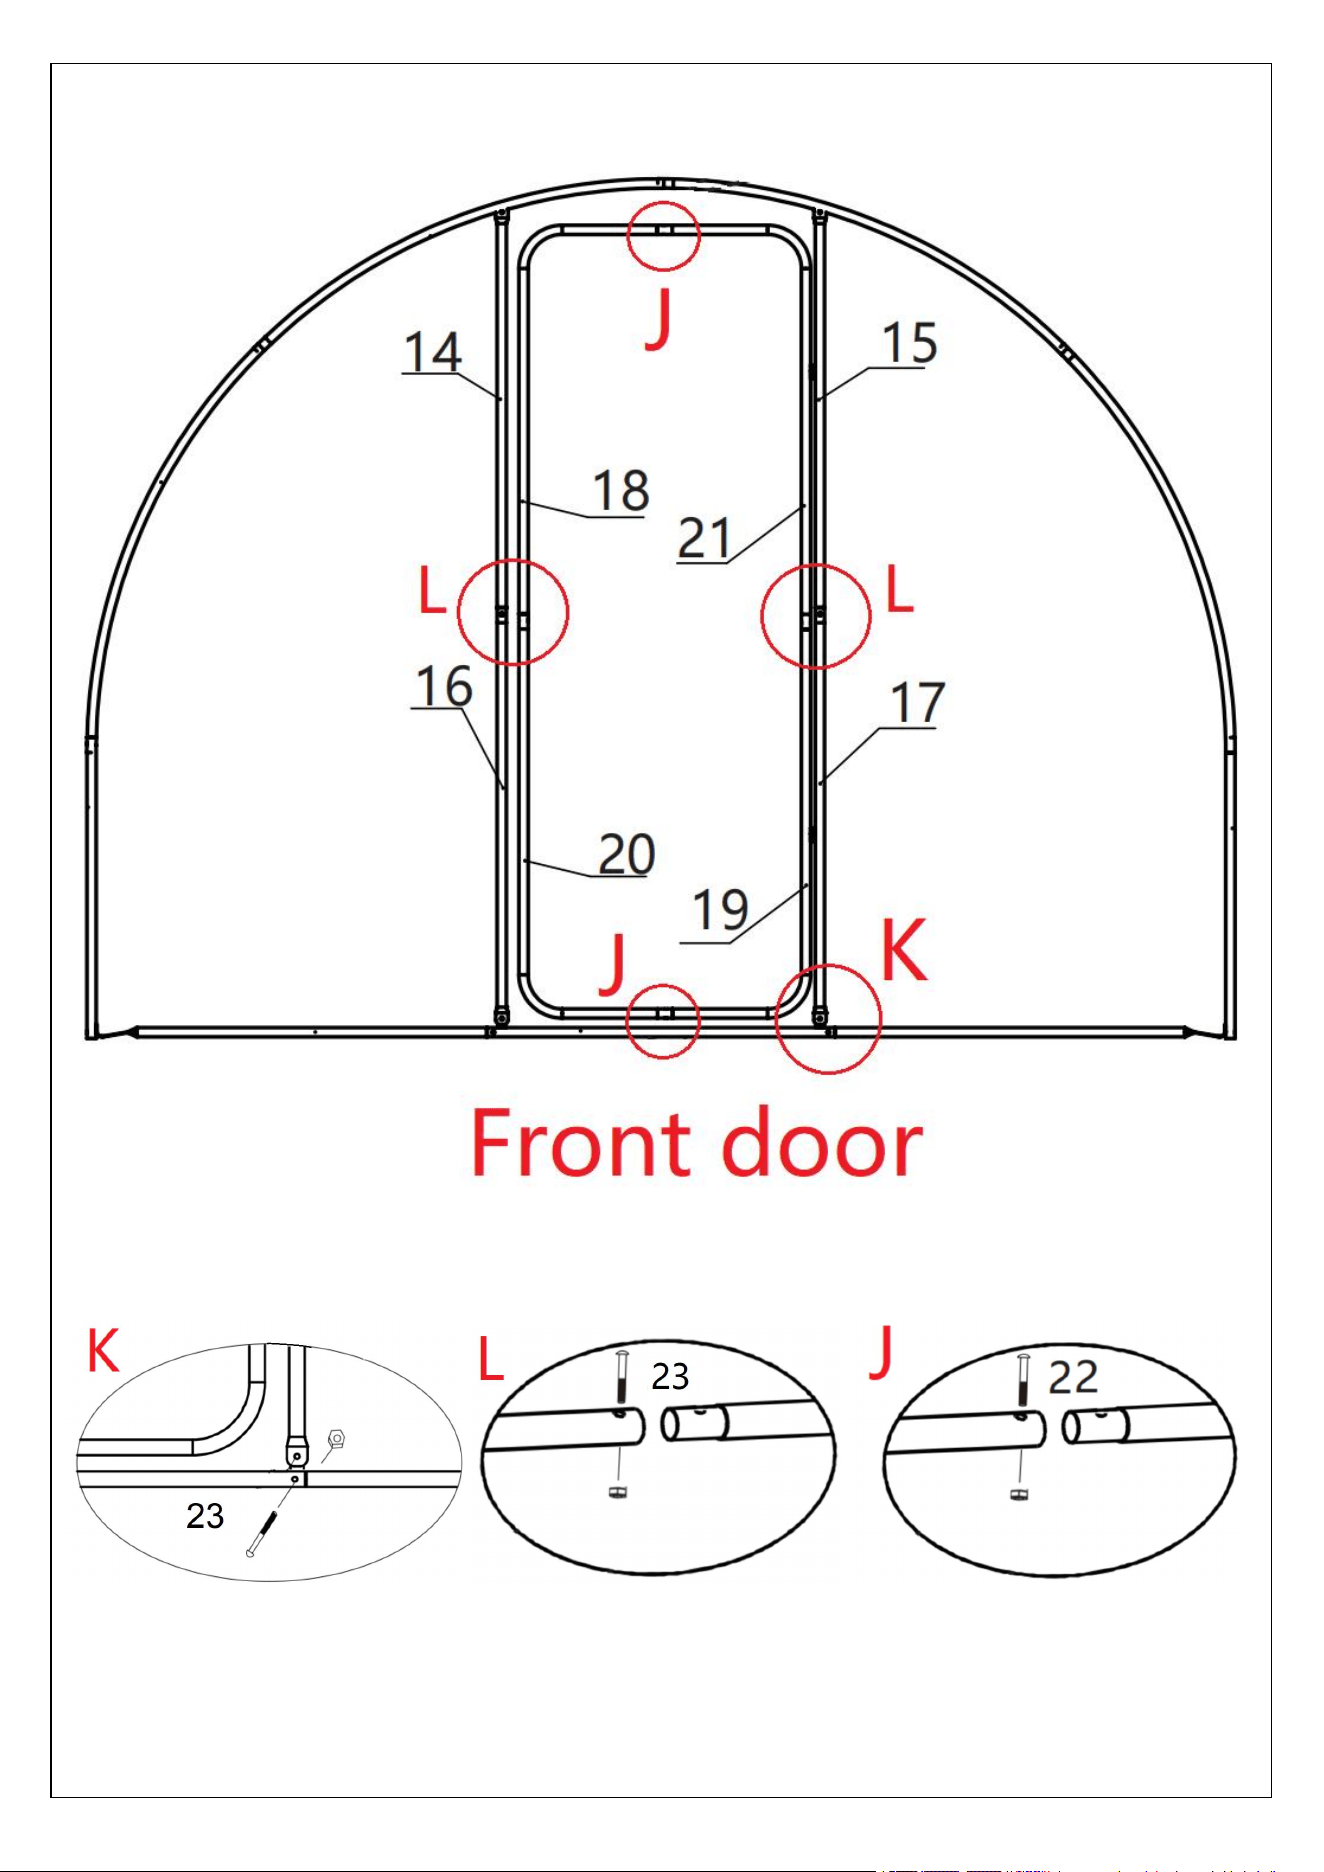
10
1. Please place the parts according to the above picture ;
2. Lock the pole with screws(23*10pcs;22*2pcs);
3. Do not lock it first, so as to facilitate the installation later;
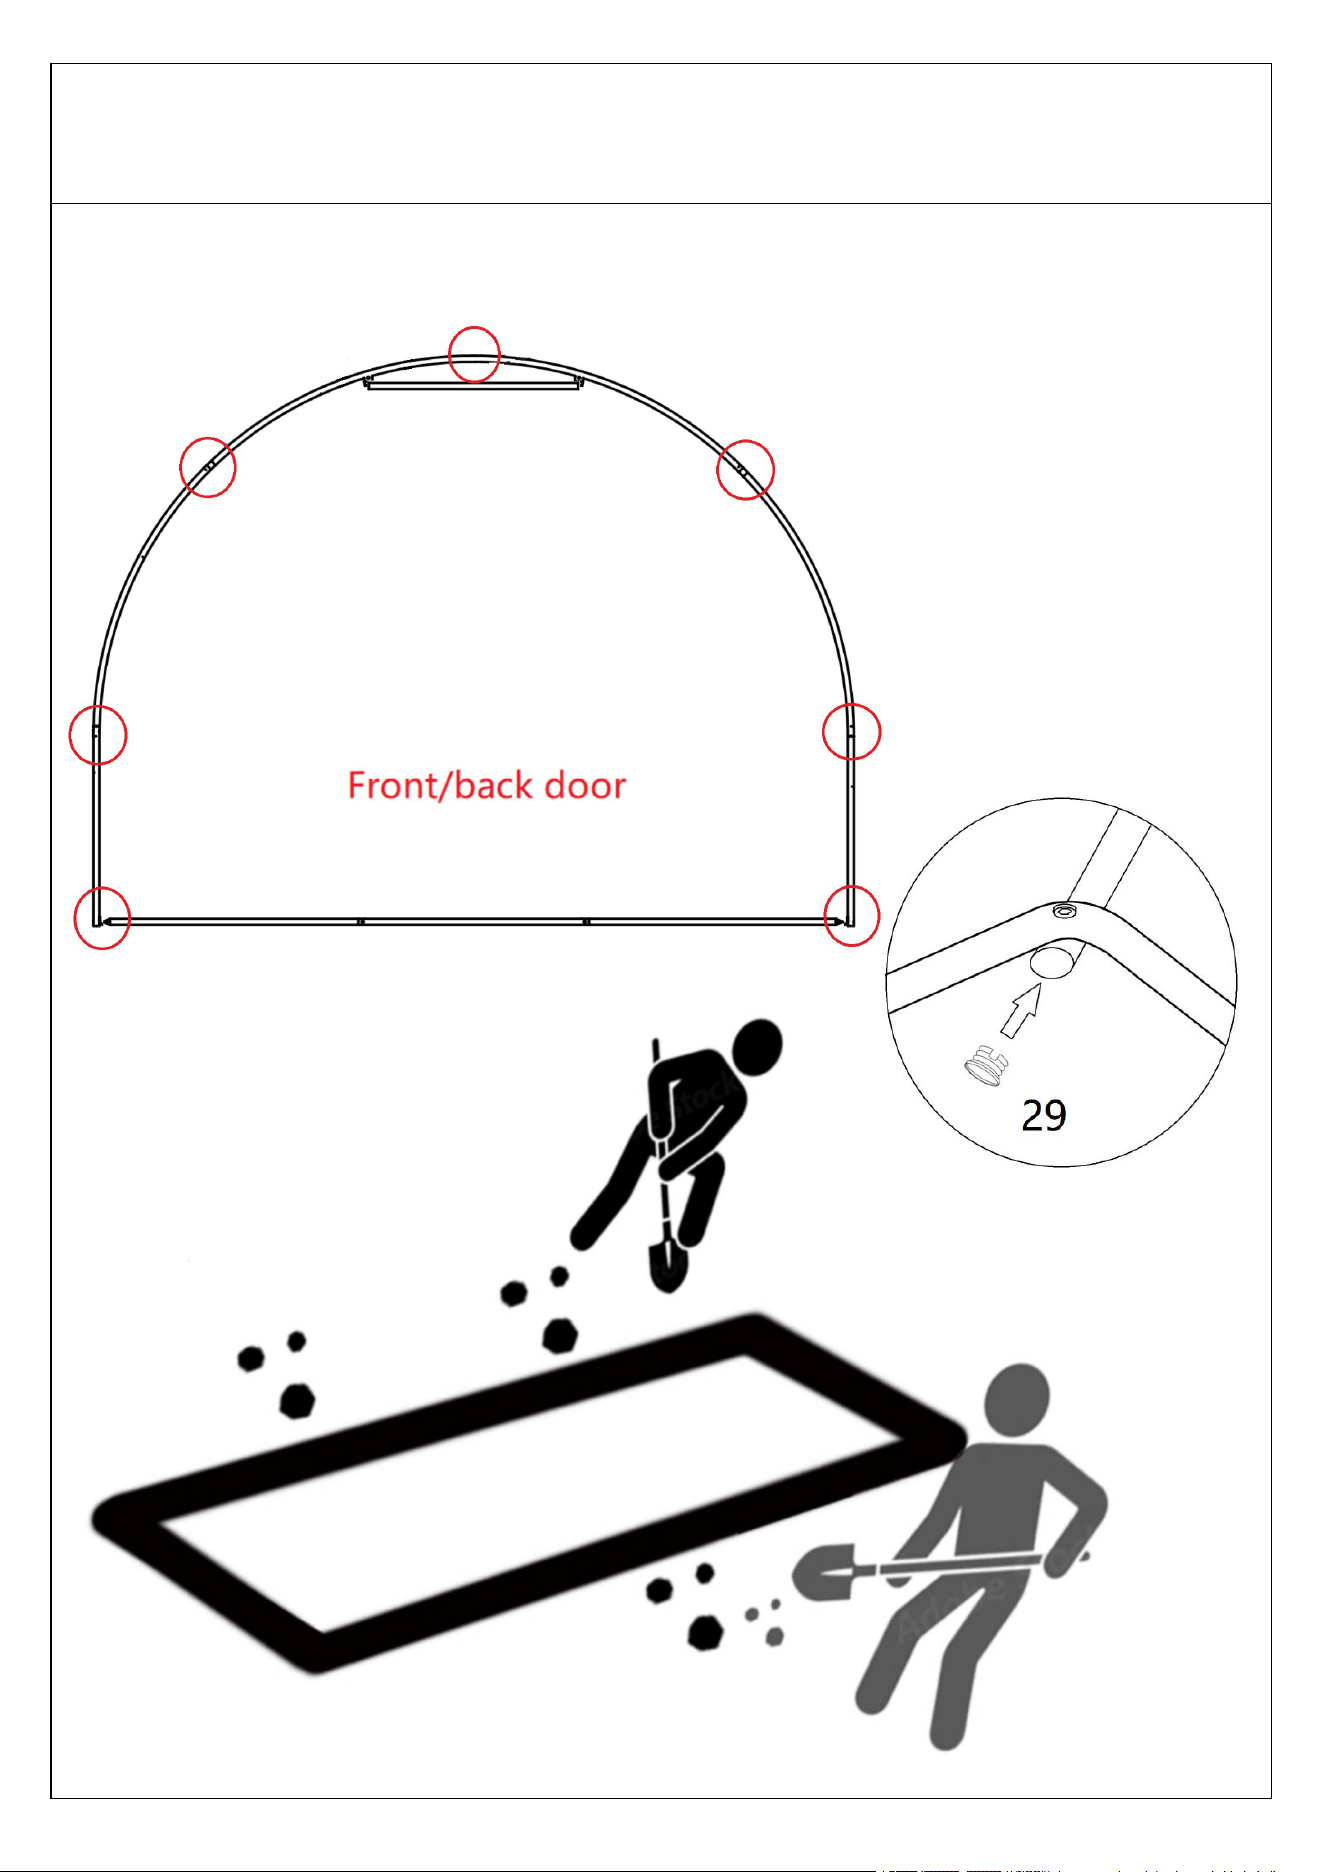
Assemble the front door.

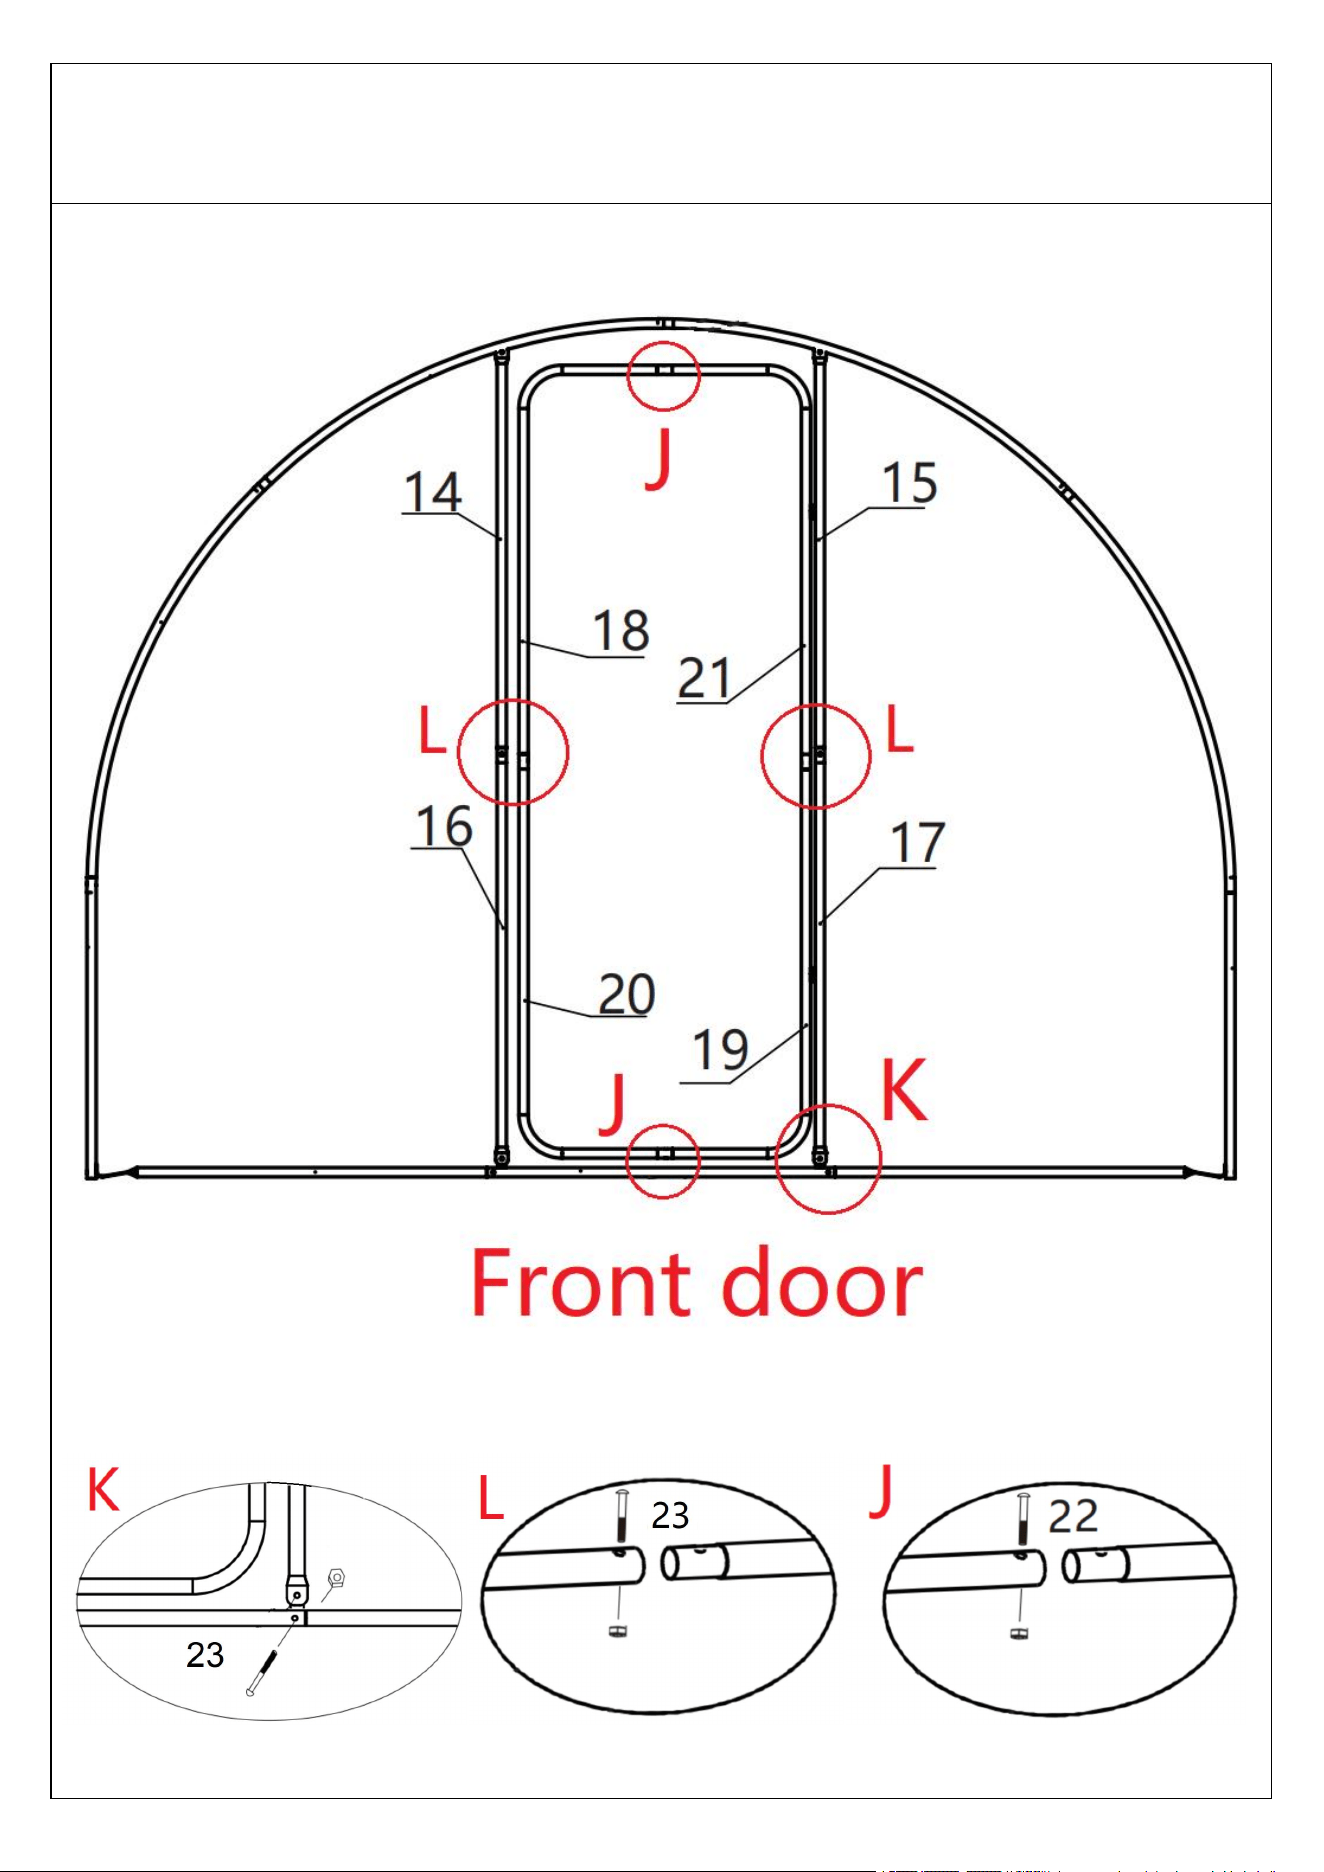
11
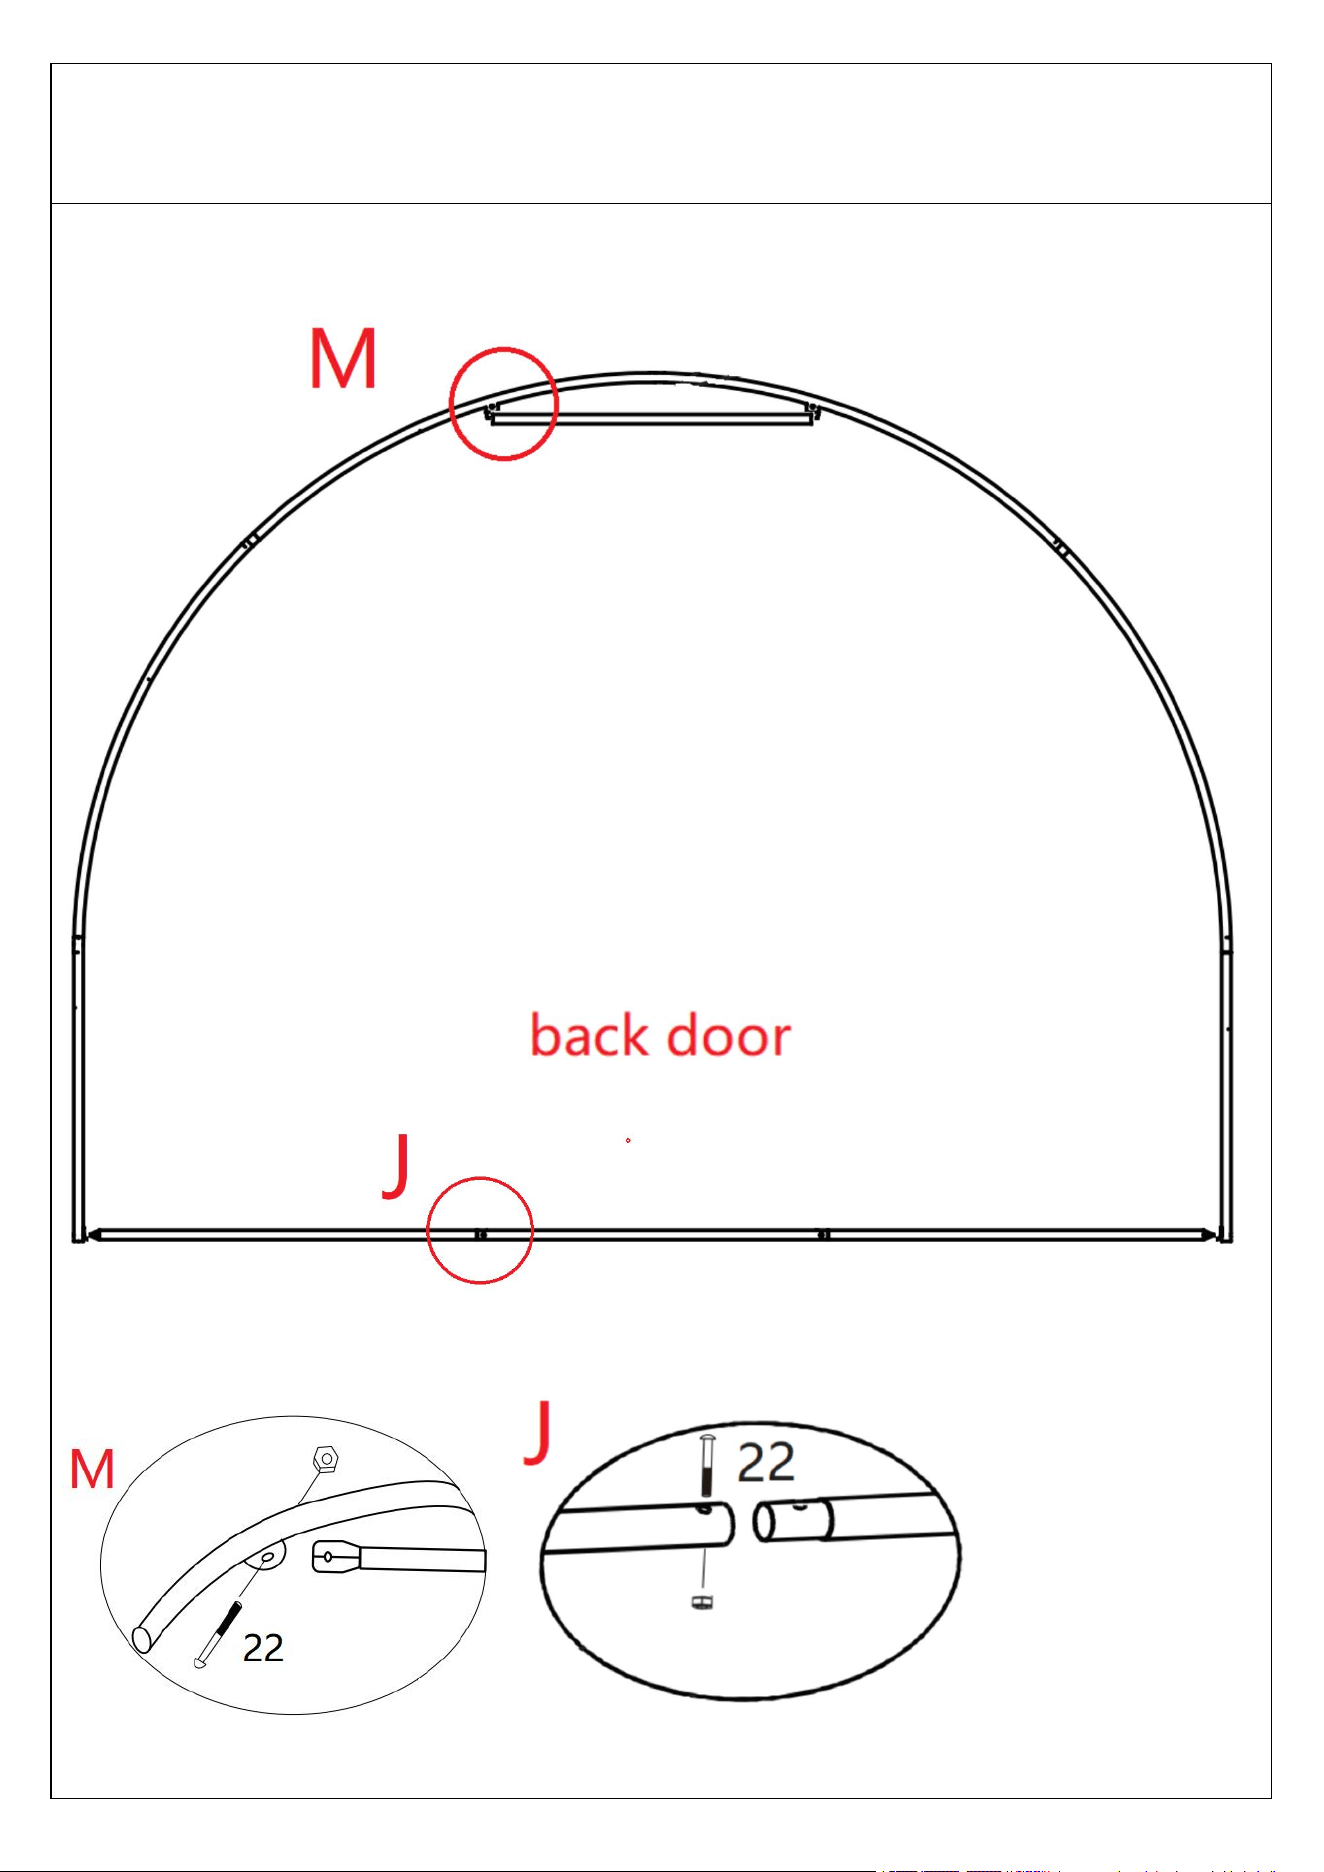
1. Please place the parts according to the above picture ;
2. Lock the pole with screws(22*4pcs);
3. Do not lock it first, so as to facilitate the installation later;
Assemble the back door.

12
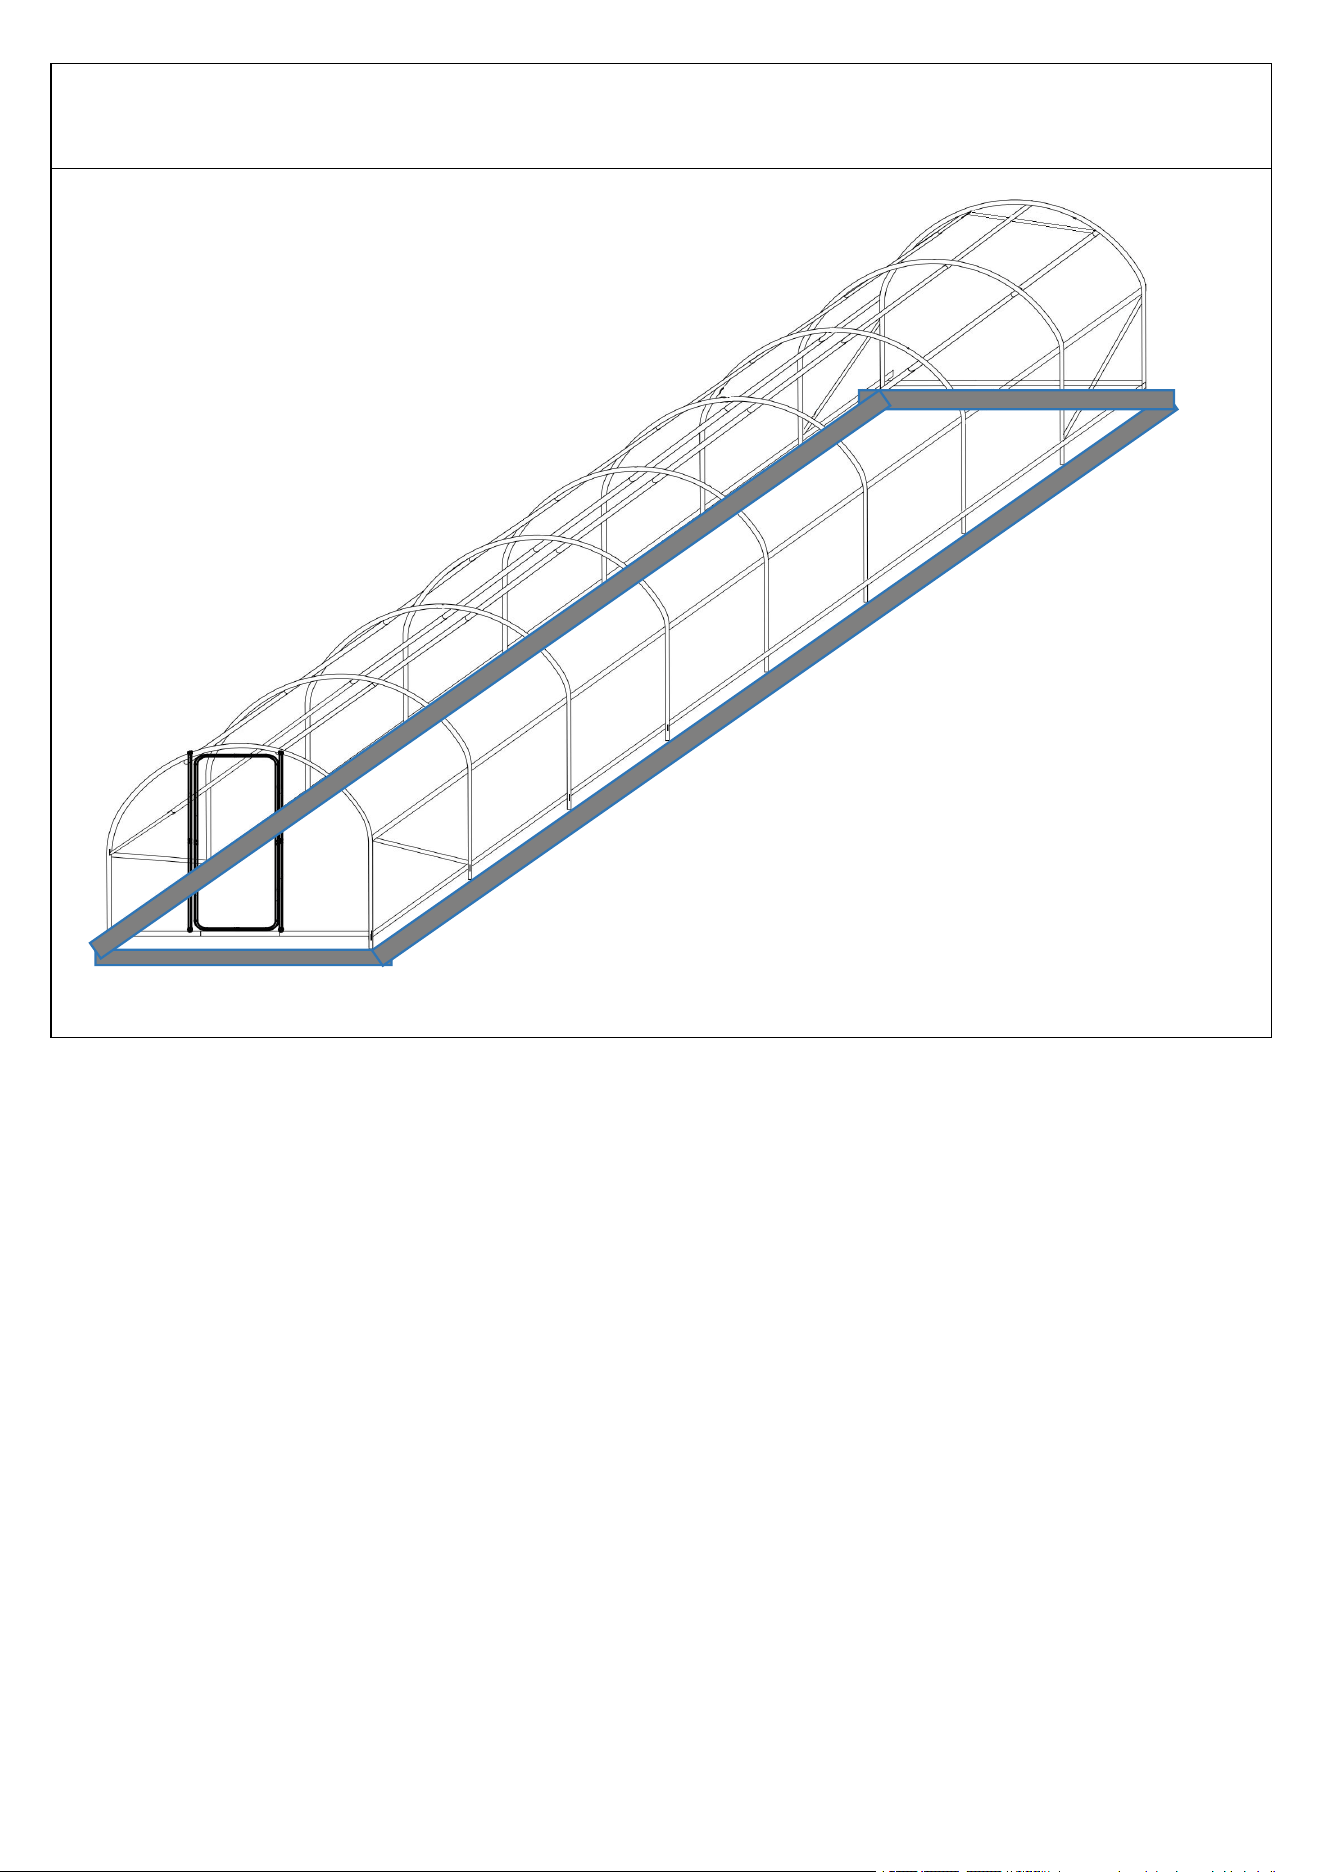
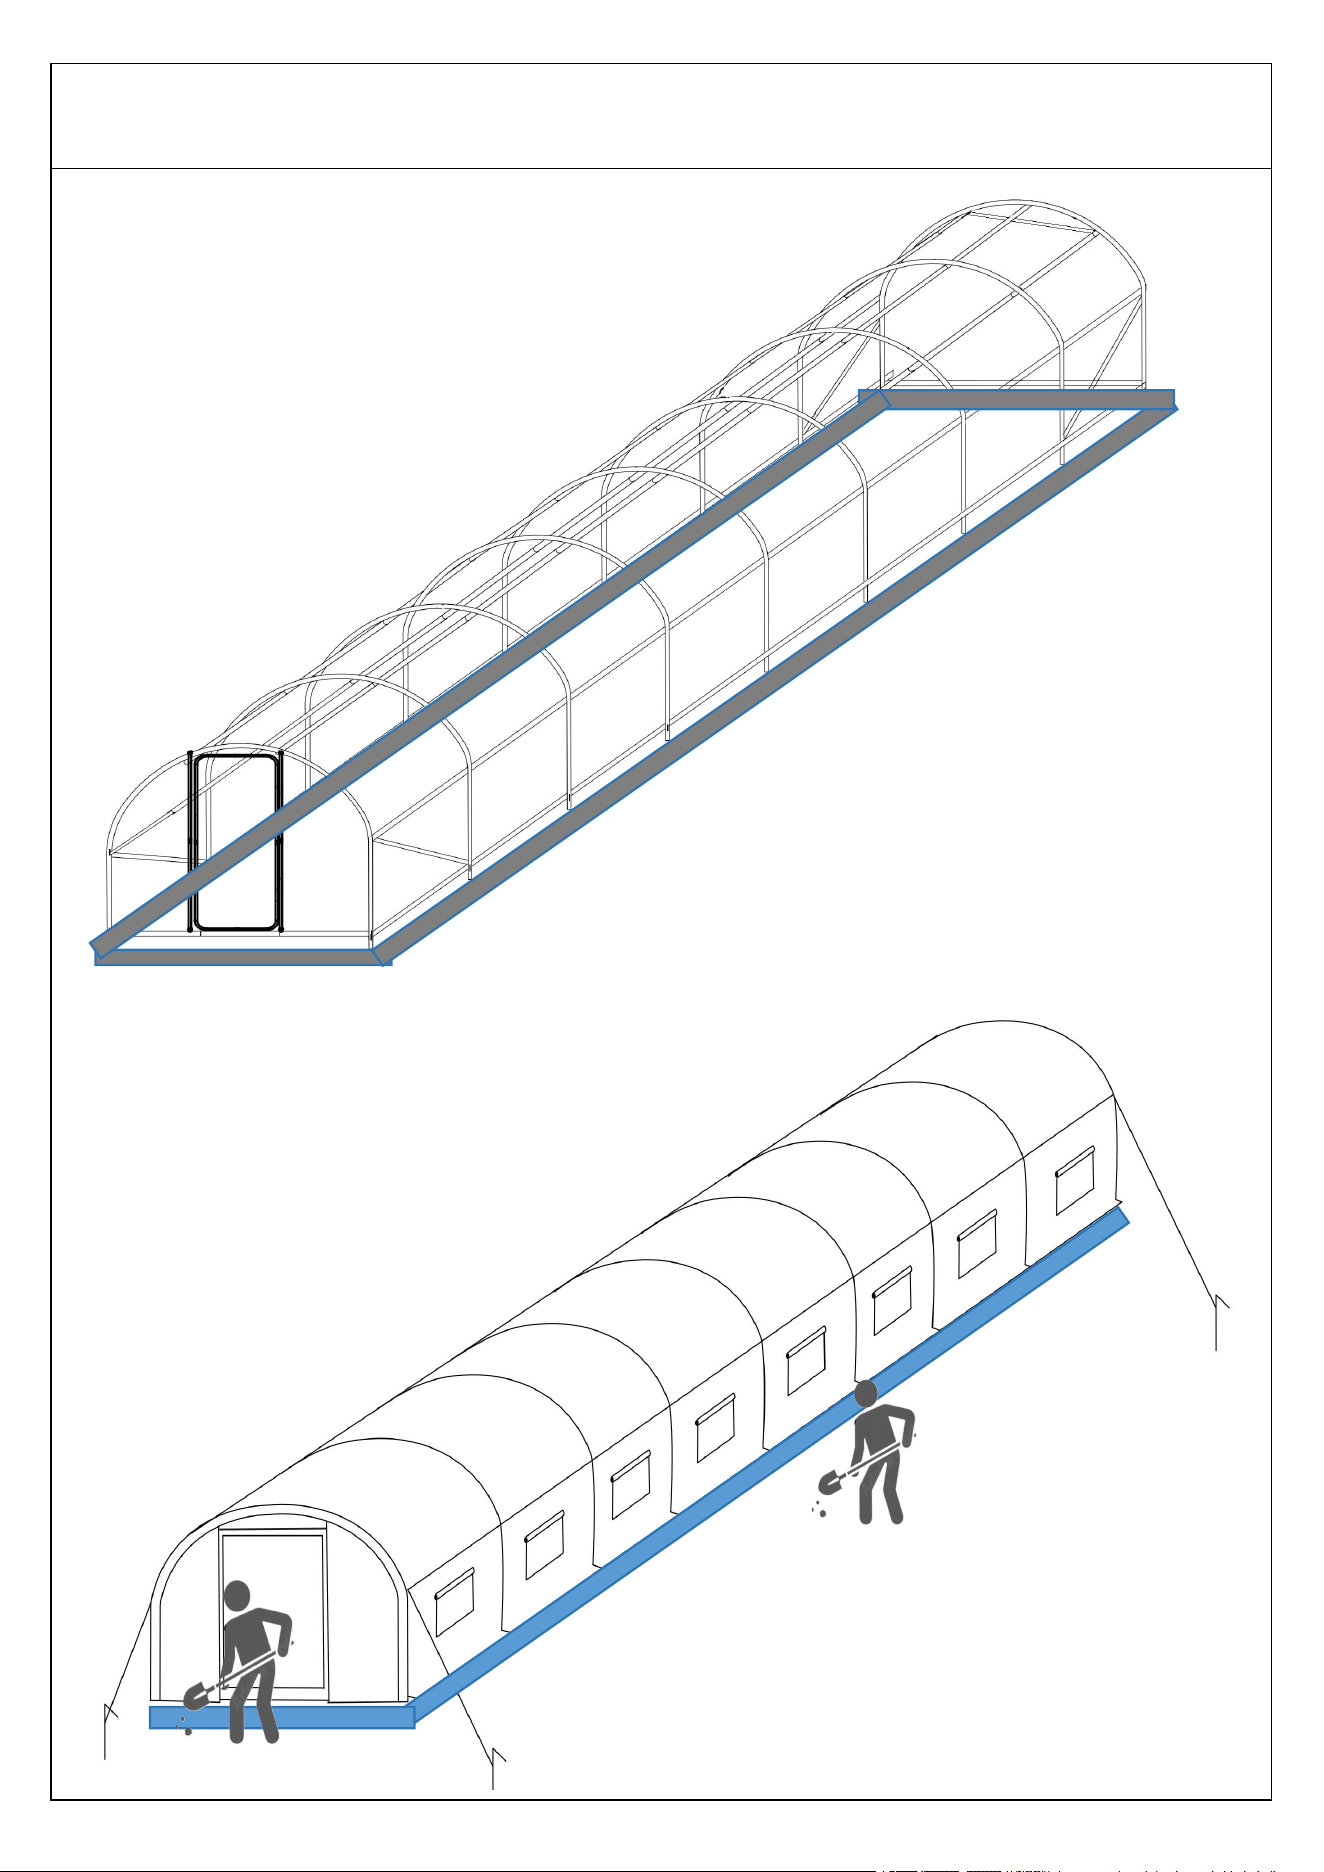
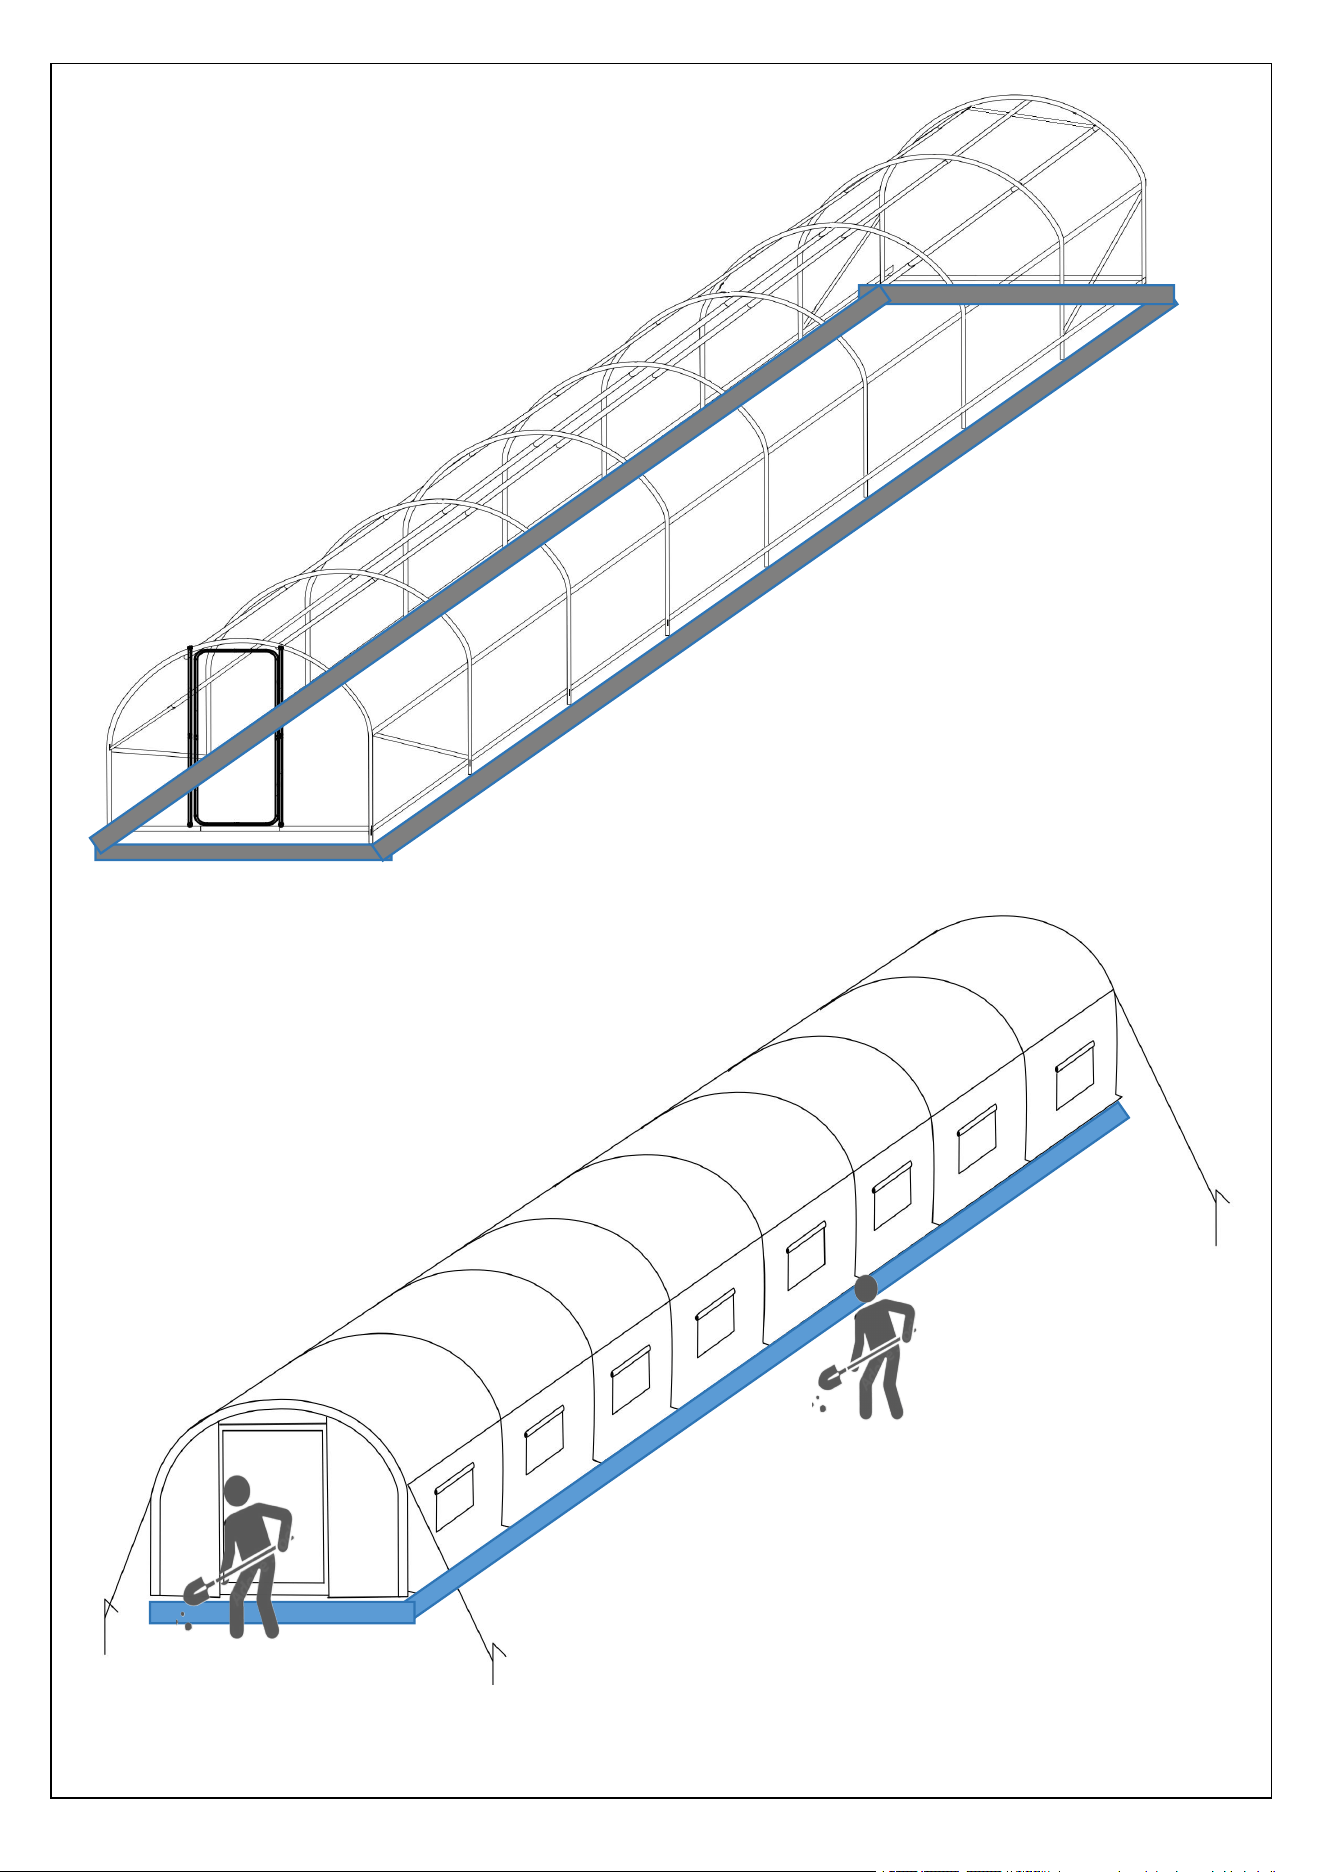
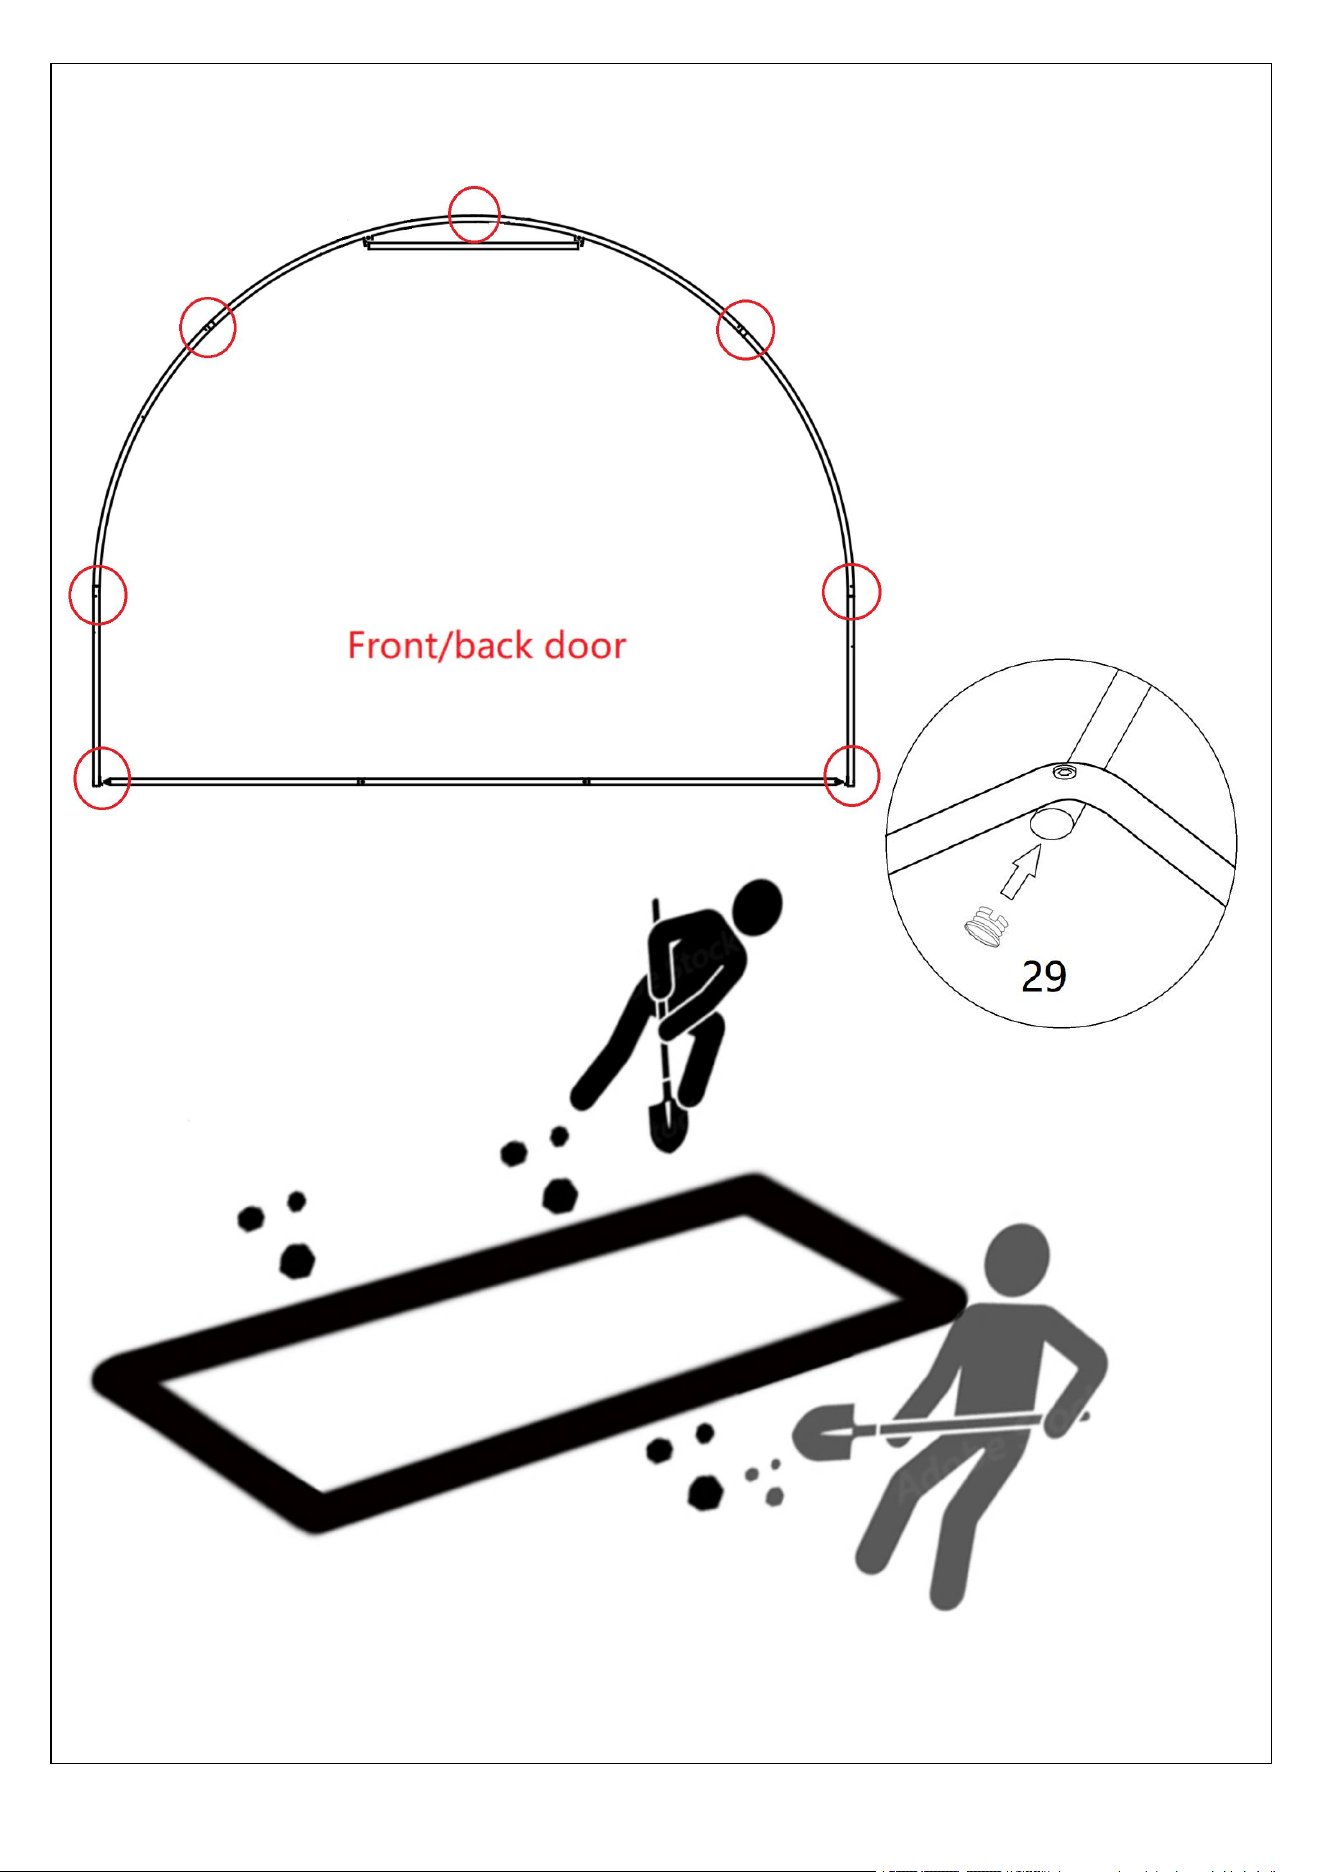
For maximum stability of your polytunnel, we recommend digging a 20cm width trench around the
base of the polytunnel and back.
Tighten all bolts and nuts in full.
Use plastic stoppers(29*14pcs)
to plug the nozzles on both sides.

13
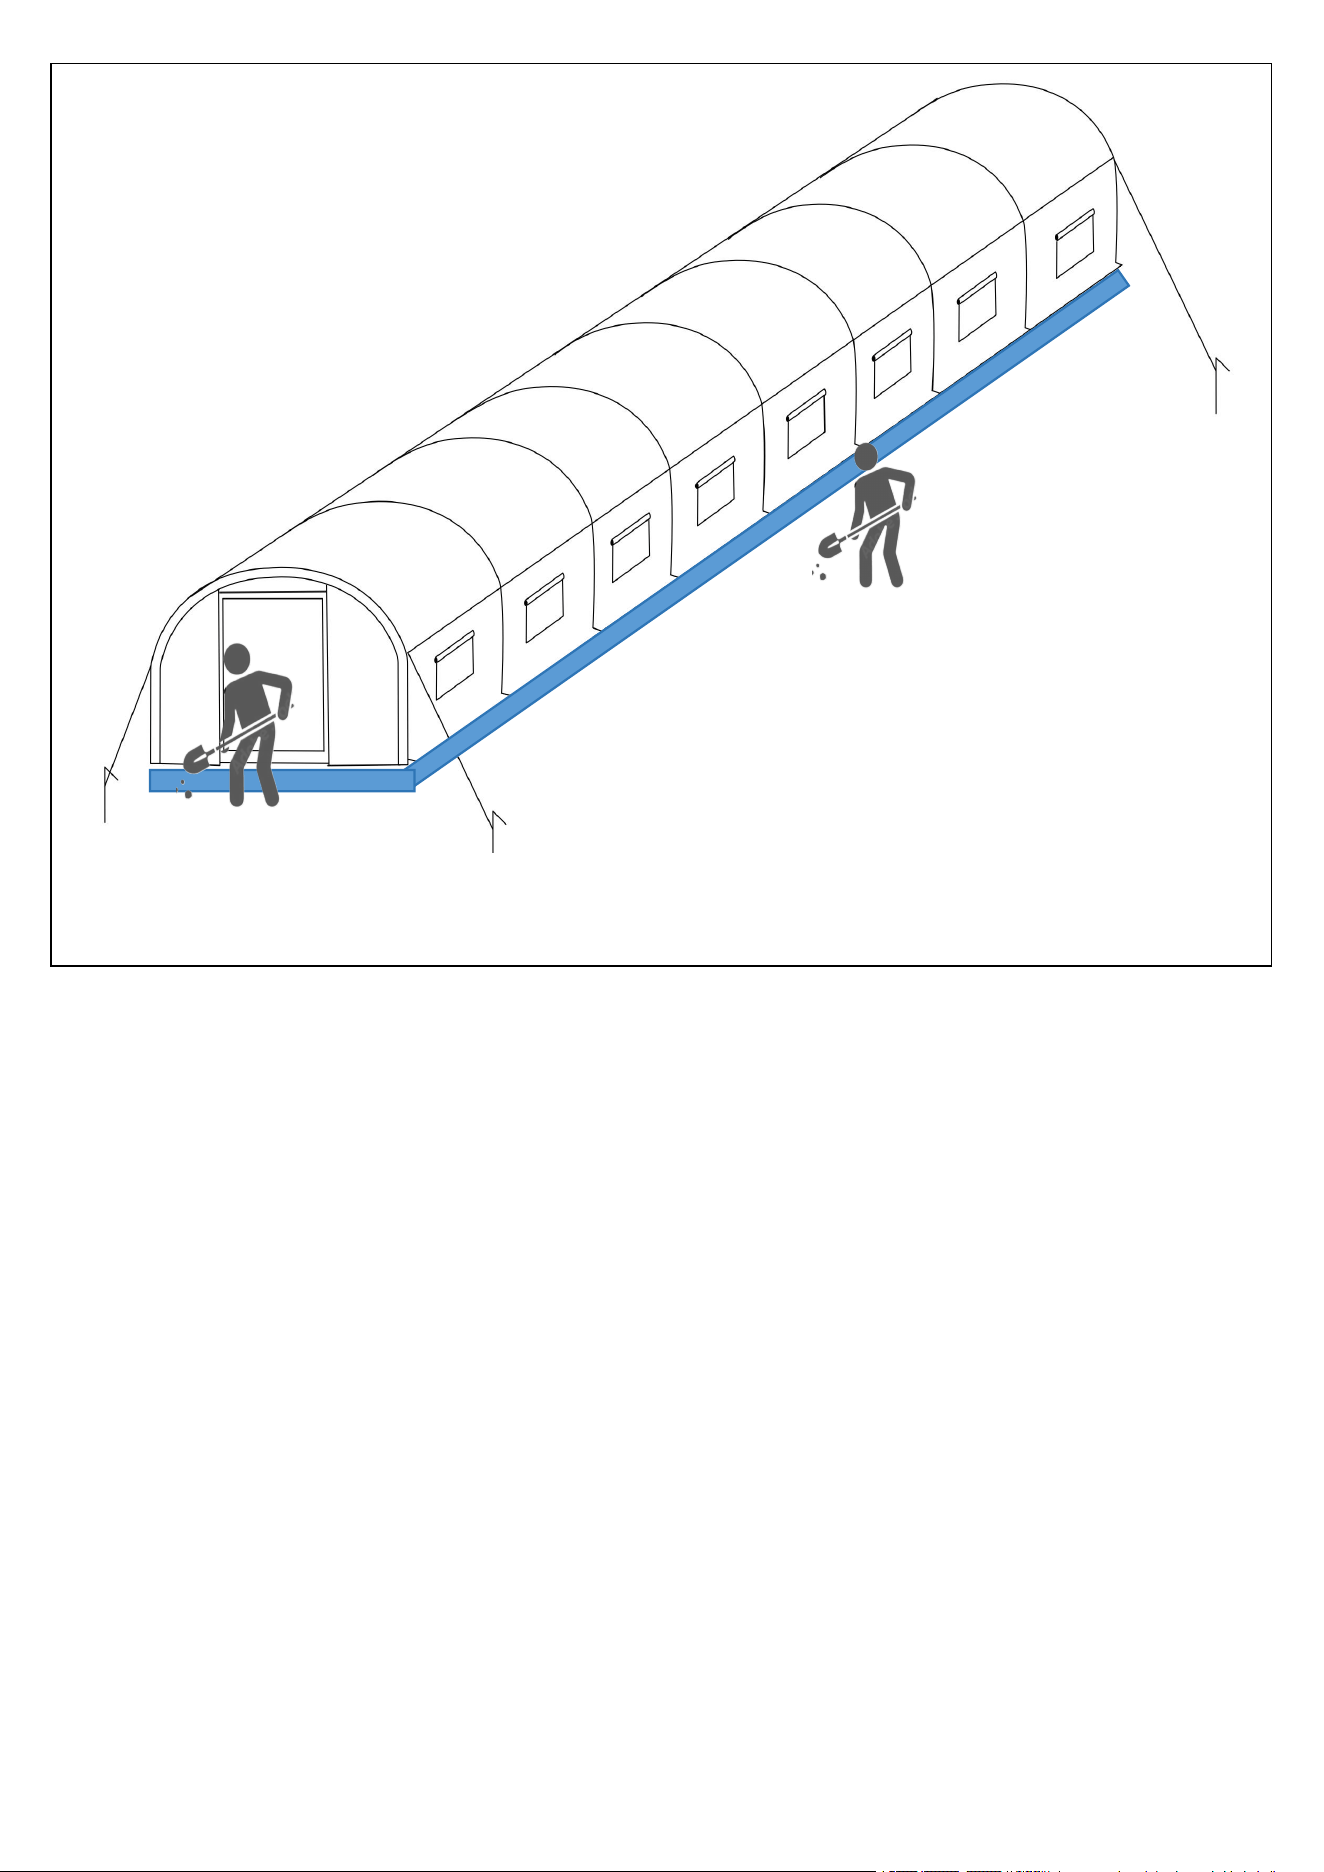
Place the assembled bracket in its entirety into the pre-dug pit foundation.
Cover the edges of the tarpaulin(32) with dirt and compact, to reinforce the stability of it.
Drill the spiral nail(28*4pcs) into the soil first, and then use a rope(27*4pcs) to tighten and tie tunnel
greenhouse and the spiral nail tightly.

14
Manufacturer: Shanghaimuxinmuyeyouxiangongsi
Address: Shuangchenglu 803nong11hao1602A-1609shi, baoshanqu, shanghai
200000 CN.
EC REP: E-CrossStu GmbH.
Mainzer Landstr.69, 60329 Frankfurt am Main.
UK REP: YH CONSULTING LIMITED.
C/O YH Consulting Limited Office 147, Centurion House, London Road,
Staines-upon-Thames, Surrey, TW18 4AX
Imported to AUS: SIHAO PTY LTD.
1 ROKEVA STREETEASTWOOD NSW 2122 Australia
Imported to USA: Sanven Technology Ltd.
Suite 250, 9166 Anaheim Place, Rancho Cucamonga, CA 91730


Tecnico Supporto e certificato di garanzia elettronica www.vevor.com/support
SERRA A TUNNEL
MANUALE D'USO
We continue to be committed to provide you tools with competitive price.
"Save Half","Half Price" or any other similar expressions used by us only represents an estimate
of savings you might benefit from buying certain tools with us compared to the major top brands
and does not necessarily mean to cover all categories of tools offered by us. You are kindly
reminded to verify carefully when you are placing an order with us if you are actually saving half
in comparison with the top major brands.
1
3×8,4×2,25M(8)G
Have product questions? Need technical support? Please feel free to
contact us:
Technical Support and E-Warranty Certificate
www.vevor.com/support
NEED HELP? CONTACT US!
This is the original instruction,please read all manual instructions
carefully before operating. VEVOR reserves a clear interpretation of
our user manual. The appearance of the product shall be subject to the
product you received. Please forgive us that we won't inform you again
if there are any technology or software updates on our product.
TUNNEL GREENHOUSE

2
Misure di sicurezza
AVVERTIMENTO:
Leggere queste istruzioni prima di utilizzare questo prodotto. In caso contrario si
potrebbero causare lesioni gravi. È necessario seguire sempre le precauzioni di base ,
incluse le seguenti:
6. La serra a tunnel non può essere utilizzato o conservato in aree pericolose. Non è
consentito utilizzare l'apparecchio in luoghi pericolosi.
7. La serra a tunnel deve essere controllato per garantire che sia in buone condizioni di
funzionamento e funzioni in sicurezza prima dell'uso. In caso contrario l' apparecchio
non deve essere utilizzato.
8. Utilizzare solo come previsto. Le sostanze corrosive non devono essere
immagazzinate nelle serre a tunnel
9. L'operatore deve utilizzare la serra a tunnel correttamente. Durante il lavoro con la
serra a tunnel è necessario considerare le condizioni locali e prestare attenzione a
terzi , in particolare ai bambini .
10. Questa serra a tunnel non è destinato all'uso da parte di persone (compresi i
bambini) con ridotte capacità fisiche , sensoriali o mentali o prive di esperienza e/o
conoscenza , a meno che non siano supervisionate da una persona responsabile della
loro sicurezza o siano istruite da queste persone sull'uso dell'apparecchio . I bambini
devono essere sorvegliati per assicurarsi che non giochino con la serra a tunnel .

3
CONSERVA QUESTE ISTRUZIONI
Elenco prodotti

4

5
Modello
3×8,4×2,25m(8)G
Taglia del prodotto
28x10x7,5 piedi (835*295*220 cm)
Telone Colore
Verde
AVVERTIMENTO
Coprire il tetto con attenzione, mette tutti i posti nella giusta
posizione.
Per quanto possibile, evitare di deformare la struttura del telaio della
serra.
Non utilizzarlo in condizioni meteorologiche avverse, come temporali,
grandine, forti nevicate e vento forte.
Nota:
2. Questo prodotto richiede che due persone collaborino all'assemblaggio .
2. A causa dell'elevato numero di viti, si consiglia di utilizzare utensili elettrici.
3. Non bloccare le viti direttamente durante il processo di installazione e
bloccare tutte le viti dopo aver installato tutti i ripiani.
4. Estrarre tutti gli accessori e posizionarli secondo l'elenco sopra per
l'installazione.

6
Istruzioni di assemblaggio
Estrarre tutti gli accessori e posizionarli secondo
l'elenco riportato sopra per l'installazione.
Install the brackets on left sides.

7
2. Si prega di posizionare le parti secondo l'immagine sopra;
2. Bloccare l'asta con le viti (26*4 pezzi) (25*5 pezzi) (23*2 pezzi) ;
3. Non bloccarlo prima, in modo da facilitare l'installazione successiva;
Install the brackets on right sides.
8
2. Si prega di posizionare le parti secondo l'immagine sopra;
2. Bloccare l'asta con le viti (26*4 pezzi) (25*5 pezzi) (23*2 pezzi) ;
3. Non bloccarlo prima, in modo da facilitare l'installazione successiva;
Install the bracket at the top.
9
2. Si prega di posizionare le parti secondo l'immagine sopra;
2. Bloccare il palo con le viti (26*4 pezzi; 25*14 pezzi;) ;
3. Non bloccarlo prima, in modo da facilitare l'installazione successiva;
Assemble the assembled left and
right brackets and the top brackets.
10
2. Si prega di posizionare le parti secondo l'immagine sopra;
2. Bloccare il palo con le viti (25*27 pezzi) ;
3. Non bloccarlo prima, in modo da facilitare l'installazione successiva;
Assemble the front door.
11
2. Si prega di posizionare le parti secondo l'immagine sopra;
2. Bloccare il palo con le viti (23*10 pezzi; 22*2 pezzi) ;
3. Non bloccarlo prima, in modo da facilitare l'installazione successiva;
Assemble the back door.

12
2. Si prega di posizionare le parti secondo l'immagine sopra;
2. Bloccare il palo con le viti (22*4 pezzi) ;
3. Non bloccarlo prima, in modo da facilitare l'installazione successiva;
Tighten all bolts and nuts in full.
Use plastic stoppers(29*14pcs)
to plug the nozzles on both sides.
13
Per la massima stabilità del tuo tunnel, ti consigliamo di scavare una fossa larga 20 cm attorno alla
base del tunnel e sul retro.
Posizionare la staffa assemblata nella sua interezza nella fondazione della fossa precedentemente
scavata.
14
Coprire i bordi del telone (32) con terra e compattarlo , per rinforzarne la stabilità.
Per prima cosa forare il chiodo a spirale (28*4 pezzi) nel terreno, quindi utilizzare una corda (27*4
pezzi) per stringere e legare saldamente la serra del tunnel e il chiodo a spirale.

14
Produttore: Shanghaimuxinmuyeyouxiangongsi
Indirizzo: Shuangchenglu 803nong11hao1602A-1609shi, baoshanqu, shanghai
200000 CN.
RAPPRESENTANTE CE: E-CrossStu GmbH.
Mainzer Landstr.69, 60329 Francoforte sul Meno.
RAPPRESENTANTE DEL REGNO UNITO: YH CONSULTING LIMITED.
C/O YH Consulting Limited Office 147, Centurion House, London Road,
Staines-upon-Thames, Surrey, TW18 4AX
Importato in AUS: SIHAO PTY LTD.
1 ROKEVA STREETEASTWOOD NSW 2122 Australia
Importato negli Stati Uniti: Sanven Technology Ltd.
Suite 250, 9166 Anaheim Place, Rancho Cucamonga, CA 9173 0


Techniczny Certyfikat wsparcia i e-gwarancji www.vevor.com/support
SZKLARNIA TUNELOWA
INSTRUKCJA OBSŁUGI
We continue to be committed to provide you tools with competitive price.
"Save Half","Half Price" or any other similar expressions used by us only represents an estimate
of savings you might benefit from buying certain tools with us compared to the major top brands
and does not necessarily mean to cover all categories of tools offered by us. You are kindly
reminded to verify carefully when you are placing an order with us if you are actually saving half
in comparison with the top major brands.

1
3×8,4×2,25M(8)G
Have product questions? Need technical support? Please feel free to
contact us:
Technical Support and E-Warranty Certificate
www.vevor.com/support
NEED HELP? CONTACT US!
This is the original instruction,please read all manual instructions
carefully before operating. VEVOR reserves a clear interpretation of
our user manual. The appearance of the product shall be subject to the
product you received. Please forgive us that we won't inform you again
if there are any technology or software updates on our product.
TUNNEL GREENHOUSE

2
Środki ostrożności
OSTRZEŻENIE:
Przeczytaj tę instrukcję przed użyciem tego produktu. Niezastosowanie się do tego
może spowodować poważne obrażenia. należy zawsze przestrzegać podstawowych
środków ostrożności , w tym:
11. Szklarnia tunelowa nie wolno używać ani przechowywać w obszarach
niebezpiecznych. Nie wolno używać urządzenia w miejscach niebezpiecznych.
12. Szklarnia tunelowa przed użyciem należy sprawdzić, czy jest w dobrym stanie i czy
działa bezpiecznie. W przeciwnym razie nie wolno używać urządzenia.
13. Używaj wyłącznie zgodnie z przeznaczeniem. W szklarniach tunelowych nie należy
przechowywać substancji żrących
14. Operator musi korzystać ze szklarni tunelowej odpowiednio. Podczas pracy w
szklarni tunelowej musi wziąć pod uwagę lokalne warunki i zwracać uwagę na osoby
trzecie , w szczególności na dzieci .
15. Ta szklarnia tunelowa nie jest przeznaczony do użytku przez osoby (w tym dzieci) o
ograniczonych zdolnościach fizycznych , sensorycznych lub umysłowych lub
nieposiadające doświadczenia i/lub wiedzy , chyba że znajdują się pod nadzorem
osoby odpowiedzialnej za ich bezpieczeństwo lub zostaną przez te osoby
poinstruowane w zakresie obsługi urządzenia . Dzieci powinny być nadzorowane , aby
mieć pewność, że nie bawią się szklarnią tunelową .

3
ZACHOWAJ TE INSTRUKCJE
Lista produktów
4

5
Model
3×8,4×2,25m(8)G
Rozmiar produktu
28x10x7,5 stopy (835*295*220cm)
Plandeka Kolor
Zielony
OSTRZEŻENIE
Starannie przykrycie dachu ustawia wszystkie miejsca na właściwym
miejscu.
W miarę możliwości nie odkształcaj konstrukcji ramy szklarni z
kształtu.
Nie używaj go w złych warunkach pogodowych, takich jak ulewa,
grad, obfite opady śniegu i silny wiatr.
Notatka:
3. Do montażu tego produktu potrzebne są dwie osoby .
2. Ze względu na dużą ilość śrub zaleca się stosowanie elektronarzędzi.
3. Nie blokuj śrub bezpośrednio podczas procesu instalacji, ale zablokuj
wszystkie śruby po ustawieniu wszystkich półek.
4. Wyjmij wszystkie akcesoria i umieść je zgodnie z powyższą listą w celu
instalacji.
6
Instrukcja montażu
Wyjmij wszystkie akcesoria i umieść je zgodnie z
powyższą listą w celu instalacji.
Install the brackets on left sides.
7
3. Proszę umieścić części zgodnie z powyższym rysunkiem;
2. Zablokuj słupek śrubą s(26*4szt)(25*5szt)(23*2szt) ;
3. Nie zamykaj go najpierw, aby ułatwić późniejszy montaż;
Install the brackets on right sides.

8
3. Proszę umieścić części zgodnie z powyższym rysunkiem;
2. Zablokuj słupek śrubą s(26*4szt)(25*5szt)(23*2szt) ;
3. Nie zamykaj go najpierw, aby ułatwić późniejszy montaż;
Install the bracket at the top.

9
3. Proszę umieścić części zgodnie z powyższym rysunkiem;
2. Zablokuj słupek śrubami (26*4szt;25*14szt;) ;
3. Nie zamykaj go najpierw, aby ułatwić późniejszy montaż;
Assemble the assembled left and
right brackets and the top brackets.

10
3. Proszę umieścić części zgodnie z powyższym rysunkiem;
2. Zablokuj słupek śrubami (25*27szt.) ;
3. Nie zamykaj go najpierw, aby ułatwić późniejszy montaż;
Assemble the front door.

11
3. Proszę umieścić części zgodnie z powyższym rysunkiem;
2. Zablokuj słupek śrubami (23*10 szt.; 22*2 szt.) ;
3. Nie zamykaj go najpierw, aby ułatwić późniejszy montaż;
Assemble the back door.
12
3. Proszę umieścić części zgodnie z powyższym rysunkiem;
2. Zablokuj słupek śrubami (22*4szt.) ;
3. Nie zamykaj go najpierw, aby ułatwić późniejszy montaż;
Tighten all bolts and nuts in full.
Use plastic stoppers(29*14pcs)
to plug the nozzles on both sides.
13
Aby zapewnić maksymalną stabilność tunelu foliowego, zalecamy wykopanie rowu o szerokości 20
cm wokół podstawy tunelu foliowego i z tyłu.
Umieść zmontowany wspornik w całości we wstępnie wykopanym fundamencie wykopu.

14
Krawędzie plandeki (32) zasypujemy ziemią i zagęszczamy , aby wzmocnić jej stabilność.
Najpierw wywierć spiralny gwóźdź (28*4 szt.) w ziemi, a następnie użyj liny (27*4 szt.), aby dokręcić i
mocno związać tunel szklarniowy i spiralny gwóźdź.

14
Producent: Shanghaimuxinmuyeyouxiangongsi
Adres: Shuangchenglu 803nong11hao1602A-1609shi, baoshanqu, szanghaj
200000 CN.
Przedstawiciel KE: E-CrossStu GmbH.
Mainzer Landstr.69, 60329 Frankfurt nad Menem.
REPUBLIKA WIELKIEJ BRYTANII: YH CONSULTING LIMITED.
C/O YH Consulting Limited Office 147, Centurion House, London Road,
Staines-upon-Thames, Surrey, TW18 4AX
Import do AUS: SIHAO PTY LTD.
1 ROKEVA STREETEASTWOOD NSW 2122 Australia
Import do USA: Sanven Technology Ltd.
Suite 250, 9166 Anaheim Place, Rancho Cucamonga, Kalifornia 9173 0


Technisch Support und E-Garantie-Zertifikat www.vevor.com/support
TUNNELGEWÄCHSHAUS
BENUTZERHANDBUCH
We continue to be committed to provide you tools with competitive price.
"Save Half","Half Price" or any other similar expressions used by us only represents an estimate
of savings you might benefit from buying certain tools with us compared to the major top brands
and does not necessarily mean to cover all categories of tools offered by us. You are kindly
reminded to verify carefully when you are placing an order with us if you are actually saving half
in comparison with the top major brands.

1
3×8,4×2,25 M(8)G
Have product questions? Need technical support? Please feel free to
contact us:
Technical Support and E-Warranty Certificate
www.vevor.com/support
NEED HELP? CONTACT US!
This is the original instruction,please read all manual instructions
carefully before operating. VEVOR reserves a clear interpretation of
our user manual. The appearance of the product shall be subject to the
product you received. Please forgive us that we won't inform you again
if there are any technology or software updates on our product.
TUNNEL GREENHOUSE

2
Sicherheitsvorkehrungen
WARNUNG:
Lesen Sie diese Anweisungen, bevor Sie dieses Produkt verwenden. Andernfalls
kann es zu schweren Verletzungen kommen. Die grundlegenden Vorsichtsmaßnahmen
sollten immer befolgt werden , einschließlich der folgenden:
16. Das Tunnelgewächshaus darf nicht in explosionsgefährdeten Bereichen verwendet
oder gelagert werden. Der Einsatz des Gerätes in explosionsgefährdeten Bereichen ist
nicht zulässig.
17. Das Tunnelgewächshaus muss vor der Inbetriebnahme auf Funktionstüchtigkeit
und Betriebssicherheit geprüft werden. Andernfalls darf das Gerät nicht verwendet
werden.
18. Nur bestimmungsgemäß verwenden. Ätzende Stoffe dürfen nicht in
Tunnelgewächshäusern gelagert werden.
19. Der Betreiber muss das Tunnelgewächshaus Er muss die örtlichen Gegebenheiten
berücksichtigen und bei der Arbeit mit dem Tunnelgewächshaus auf Dritte ,
insbesondere Kinder , achten .
20. Dieses Tunnelgewächshaus ist nicht für die Benutzung durch Personen
(einschließlich Kinder) mit eingeschränkten physischen , sensorischen oder geistigen
Fähigkeiten oder mangelhafter Erfahrung und/oder Kenntnissen vorgesehen , es sei
denn, sie werden durch eine für ihre Sicherheit verantwortliche Person beaufsichtigt
3
oder erhalten von dieser Person Anweisungen zur Benutzung des Gerätes. Kinder
sollten beaufsichtigt werden , um sicherzustellen, dass sie nicht mit dem
Tunnelgewächshaus spielen .
ANLEITUNG AUFBEWAHREN
Produktliste

4

5
Modell
3×8,4×2,25 m(8)G
Produktgröße
28x10x7,5 Fuß (835 x 295 x 220 cm)
Plane Farbe
Grün
WARNUNG
Durch eine sorgfältige Dacheindeckung kommen alle Stellen an die
richtige Stelle.
Achten Sie darauf, dass die Rahmenkonstruktion des
Gewächshauses möglichst nicht aus der Form herausragt.
Verwenden Sie es nicht bei schlechten Wetterbedingungen wie
Regensturm, Hagel, starkem Schneefall oder starkem Wind.
Notiz:
4. Für die Montage dieses Produkts sind zwei Personen erforderlich .
2. Aufgrund der Vielzahl an Schrauben wird die Verwendung von
Elektrowerkzeugen empfohlen.
3. Ziehen Sie die Schrauben nicht direkt während der Installation fest, sondern

6
ziehen Sie alle Schrauben erst fest, wenn alle Regale aufgestellt sind.
4. Nehmen Sie sämtliches Zubehör heraus und platzieren Sie es gemäß der
obigen Liste für die Installation.
Bauanleitung
Nehmen Sie sämtliches Zubehör heraus und
platzieren Sie es für die Installation gemäß der
obigen Liste.
7
4. Bitte platzieren Sie die Teile entsprechend der Abbildung oben;
2. Befestigen Sie die Stange mit Schrauben (26 x 4 Stück) (25 x 5 Stück) (23 x 2 Stück) .
3. Verriegeln Sie es nicht zuerst, um die spätere Installation zu erleichtern.
Install the brackets on left sides.
Install the brackets on right sides.

8
4. Bitte platzieren Sie die Teile entsprechend der Abbildung oben;
2. Befestigen Sie die Stange mit Schrauben (26 x 4 Stück) (25 x 5 Stück) (23 x 2 Stück) .
3. Verriegeln Sie es nicht zuerst, um die spätere Installation zu erleichtern.
Install the bracket at the top.
9
4. Bitte platzieren Sie die Teile entsprechend der Abbildung oben.
2. Befestigen Sie die Stange mit Schrauben (26 x 4 Stück; 25 x 14 Stück) ;
3. Verriegeln Sie es nicht zuerst, um die spätere Installation zu erleichtern.

10
4. Bitte platzieren Sie die Teile entsprechend der Abbildung oben.
2. Befestigen Sie die Stange mit Schrauben (25 x 27 Stück) .
3. Verriegeln Sie es nicht zuerst, um die spätere Installation zu erleichtern.
Assemble the assembled left and
right brackets and the top brackets.

11
4. Bitte platzieren Sie die Teile entsprechend der Abbildung oben.
2. Befestigen Sie die Stange mit Schrauben (23 x 10 Stück; 22 x 2 Stück) .
3. Verriegeln Sie es nicht zuerst, um die spätere Installation zu erleichtern.
Assemble the front door.

12
4. Bitte platzieren Sie die Teile entsprechend der Abbildung oben.
2. Befestigen Sie die Stange mit Schrauben (22 x 4 Stück) .
3. Verriegeln Sie es nicht zuerst, um die spätere Installation zu erleichtern.
Assemble the back door.

13
Für maximale Stabilität Ihres Folientunnels empfehlen wir, rund um den Boden des Folientunnels und
dahinter einen 20 cm breiten Graben auszuheben.
Tighten all bolts and nuts in full.
Use plastic stoppers(29*14pcs)
to plug the nozzles on both sides.

14
Setzen Sie die montierte Halterung vollständig in das vorgegrabene Grubenfundament ein.
Die Ränder der Plane (32) mit Erde bedecken und verdichten , um die Stabilität der Plane zu
verstärken.
Bohren Sie zuerst den Spiralnagel (28 x 4 Stück) in den Boden und verwenden Sie dann ein Seil (27 x

15
4 Stück), um das Tunnelgewächshaus und den Spiralnagel festzuziehen und festzubinden.

14
Hersteller: Shanghaimuxinmuyeyouxiangongsi
Adresse: Shuangchenglu 803nong11hao1602A-1609shi, Baoshanqu, Shanghai
200000 CN.
EG-Vertreter: E-CrossStu GmbH.
Mainzer Landstr.69, 60329 Frankfurt am Main.
UK-VERTRETER: YH CONSULTING LIMITED.
C/O YH Consulting Limited Office 147, Centurion House, London Road,
Staines-upon-Thames, Surrey, TW18 4AX
Nach AUS importiert: SIHAO PTY LTD.
1 ROKEVA STREETEASTWOOD NSW 2122 Australien
In die USA importiert: Sanven Technology Ltd.
Suite 250, 9166 Anaheim Place, Rancho Cucamonga, CA 9173 0


Technique Assistance et certificat de garantie électronique www.vevor.com/support
SERRE TUNNEL
MANUEL DE L'UTILISATEUR
We continue to be committed to provide you tools with competitive price.
"Save Half","Half Price" or any other similar expressions used by us only represents an estimate
of savings you might benefit from buying certain tools with us compared to the major top brands
and does not necessarily mean to cover all categories of tools offered by us. You are kindly
reminded to verify carefully when you are placing an order with us if you are actually saving half
in comparison with the top major brands.

1
3×8,4×2,25 M(8)G
Have product questions? Need technical support? Please feel free to
contact us:
Technical Support and E-Warranty Certificate
www.vevor.com/support
NEED HELP? CONTACT US!
This is the original instruction,please read all manual instructions
carefully before operating. VEVOR reserves a clear interpretation of
our user manual. The appearance of the product shall be subject to the
product you received. Please forgive us that we won't inform you again
if there are any technology or software updates on our product.
TUNNEL GREENHOUSE

2
Précautions de sécurité
AVERTISSEMENT:
Lisez ces instructions avant d'utiliser ce produit. Ne pas le faire peut entraîner des
blessures graves. les précautions de base doivent toujours être suivies , notamment les
suivantes :
21. La serre tunnel ne peut pas être utilisé ou stocké dans des zones dangereuses. Il
est interdit d'utiliser l'appareil dans des endroits dangereux.
22. La serre tunnel doit être vérifié pour s’assurer qu’il est en bon état de
fonctionnement et qu’il fonctionne en toute sécurité avant utilisation. Dans le cas
contraire , l'appareil ne doit pas être utilisé.
23. Utiliser uniquement comme prévu. Les substances corrosives ne doivent pas être
stockées dans les serres tunnel
24. L'exploitant doit utiliser la serre tunnel correctement. Il doit tenir compte des
conditions locales et faire attention aux tiers , en particulier aux enfants , lorsqu'il
travaille avec la serre tunnel .
25. Cette serre tunnel n'est pas destiné à être utilisé par des personnes (y compris des
enfants) ayant des capacités physiques , sensorielles ou mentales réduites ou
manquant d'expérience et/ou de connaissances , à moins qu'elles ne soient
supervisées par une personne responsable de leur sécurité ou qu'elles ne soient
instruites par ces personnes sur l'utilisation de l'appareil. . Les enfants doivent être

3
surveillés pour s'assurer qu'ils ne jouent pas avec la serre tunnel .
CONSERVEZ CES INSTRUCTIONS
Liste de produits

4

5
Modèle
3×8,4×2,25 m(8)G
Taille du produit
28x10x7,5 pieds (835*295*220cm)
Bâche Couleur
Vert
AVERTISSEMENT
Couvrir soigneusement le toit met tous les endroits dans la bonne
position.
Dans la mesure du possible, ne déformez pas la structure du cadre de
la serre.
Ne l'utilisez pas dans des conditions météorologiques défavorables,
telles qu'un orage, de la grêle, de la neige abondante et un vent
violent.
Note:
5. Ce produit nécessite deux personnes pour coopérer à l'assemblage .
2. En raison du grand nombre de vis, il est recommandé d'utiliser des outils
électriques.

6
3. Ne verrouillez pas les vis directement pendant le processus d'installation et
verrouillez toutes les vis une fois toutes les étagères installées.
4. Retirez tous les accessoires et placez-les selon la liste ci-dessus pour
l'installation.
de montage
Retirez tous les accessoires et placez-les selon la
liste ci-dessus pour l'installation.

7
5. Veuillez placer les pièces selon l'image ci-dessus ;
2. Verrouillez le poteau avec des vis (26*4 pièces)(25*5 pièces)(23*2 pièces) ;
3. Ne le verrouillez pas d'abord, afin de faciliter l'installation ultérieure ;
Install the brackets on left sides.
Install the brackets on right sides.

8
5. Veuillez placer les pièces selon l'image ci-dessus ;
2. Verrouillez le poteau avec des vis (26*4 pièces)(25*5 pièces)(23*2 pièces) ;
3. Ne le verrouillez pas d'abord, afin de faciliter l'installation ultérieure ;
Install the bracket at the top.

9
5. Veuillez placer les pièces selon l'image ci-dessus ;
2. Verrouillez le poteau avec des vis (26*4 pièces ; 25*14 pièces ;) ;
3. Ne le verrouillez pas d'abord, afin de faciliter l'installation ultérieure ;

10
5. Veuillez placer les pièces selon l'image ci-dessus ;
2. Verrouillez le poteau avec des vis (25*27 pièces) ;
3. Ne le verrouillez pas d'abord, afin de faciliter l'installation ultérieure ;
Assemble the assembled left and
right brackets and the top brackets.
11
5. Veuillez placer les pièces selon l'image ci-dessus ;
2. Verrouillez le poteau avec des vis (23*10 pièces ; 22*2 pièces) ;
3. Ne le verrouillez pas d'abord, afin de faciliter l'installation ultérieure ;
Assemble the front door.

12
5. Veuillez placer les pièces selon l'image ci-dessus ;
2. Verrouillez le poteau avec des vis (22*4 pièces) ;
3. Ne le verrouillez pas d'abord, afin de faciliter l'installation ultérieure ;
Assemble the back door.

13
Pour une stabilité maximale de votre tunnel, nous vous recommandons de creuser une tranchée de
20 cm de large autour de la base du tunnel et à l'arrière.
Tighten all bolts and nuts in full.
Use plastic stoppers(29*14pcs)
to plug the nozzles on both sides.

14
Placez le support assemblé dans son intégralité dans la fondation de la fosse pré-creusée.
Recouvrir les bords de la bâche (32) de terre et compacter , pour renforcer la stabilité de celle-ci.
Percez d'abord le clou en spirale (28*4 pièces) dans le sol, puis utilisez une corde (27*4 pièces) pour
serrer et attacher fermement la serre tunnel et le clou en spirale.

14
Fabricant : Shanghaimuxinmuyeyouxiangongsi
Adresse : Shuangchenglu 803nong11hao1602A-1609shi, baoshanqu, Shanghai
200000 CN.
REPRÉSENTANT CE : E-CrossStu GmbH.
Mainzer Landstr.69, 60329 Francfort-sur-le-Main.
REPRÉSENTANT DU ROYAUME-UNI : YH CONSULTING LIMITED.
C/O YH Consulting Limited Bureau 147, Centurion House, London Road,
Staines-upon-Thames, Surrey, TW18 4AX
Importé en Australie : SIHAO PTY LTD.
1 ROKEVA STREETASTWOOD NSW 2122 Australie
Importé aux États-Unis : Sanven Technology Ltd.
Bureau 250, 9166 Anaheim Place, Rancho Cucamonga, CA 9173 0


Technisch Ondersteuning en e-garantiecertificaat www.vevor.com/support
TUNNELSERRE
HANDLEIDING
We continue to be committed to provide you tools with competitive price.
"Save Half","Half Price" or any other similar expressions used by us only represents an estimate
of savings you might benefit from buying certain tools with us compared to the major top brands
and does not necessarily mean to cover all categories of tools offered by us. You are kindly
reminded to verify carefully when you are placing an order with us if you are actually saving half
in comparison with the top major brands.

1
3×8,4×2,25M(8)G
Have product questions? Need technical support? Please feel free to
contact us:
Technical Support and E-Warranty Certificate
www.vevor.com/support
NEED HELP? CONTACT US!
This is the original instruction,please read all manual instructions
carefully before operating. VEVOR reserves a clear interpretation of
our user manual. The appearance of the product shall be subject to the
product you received. Please forgive us that we won't inform you again
if there are any technology or software updates on our product.
TUNNEL GREENHOUSE

2
Veiligheidsmaatregelen
WAARSCHUWING:
Lees deze instructies voordat u dit product gebruikt. Als u dit niet doet, kan dit leiden
tot ernstig letsel. de basisvoorzorgsmaatregelen moeten altijd worden gevolgd ,
waaronder de volgende:
26. De tunnelkas mag niet worden gebruikt of opgeslagen in gevaarlijke gebieden. Het
is niet toegestaan het apparaat op gevaarlijke locaties te gebruiken.
27. De tunnelkas moet vóór gebruik worden gecontroleerd om er zeker van te zijn dat
deze in goede staat verkeert en veilig werkt. Anders mag het apparaat niet worden
gebruikt.
28. Alleen gebruiken zoals bedoeld. Corrosieve stoffen mogen niet in tunnelkassen
worden opgeslagen
29. De exploitant moet gebruik maken van de tunnelkas op de juiste manier. Hij moet
rekening houden met de plaatselijke omstandigheden en moet bij het werken met de
tunnelkas rekening houden met derden , in het bijzonder kinderen .
30. Deze tunnelkas is niet bedoeld voor gebruik door personen (inclusief kinderen) met
verminderde fysieke , zintuiglijke of mentale vermogens of gebrek aan ervaring en/of
kennis , tenzij zij onder toezicht staan van een persoon die verantwoordelijk is voor hun
veiligheid of door deze personen zijn geïnstrueerd over het gebruik van het apparaat .
Op kinderen moet toezicht worden gehouden , om er zeker van te zijn dat ze niet met
3
de tunnelkas spelen .
BEWAAR DEZE INSTRUCTIES
Product lijst

4

5
Model
3×8,4×2,25m(8)G
Product grootte
28x10x7.5ft (835*295*220cm)
Zeildoek Kleur
Groente
WAARSCHUWING
Door het dak zorgvuldig af te dekken, komen alle plekken in de juiste
positie.
Zoveel mogelijk om de framestructuur van de kas niet uit de vorm te
halen.
Gebruik het niet bij slechte weersomstandigheden, zoals een
regenbui, hagel, zware sneeuwval en harde wind.
Opmerking:
6. Voor dit product zijn twee mensen nodig die meewerken aan de montage .
2. Vanwege het grote aantal schroeven wordt het gebruik van elektrisch
gereedschap aanbevolen.
3. Vergrendel de schroeven niet direct tijdens het installatieproces en

6
vergrendel alle schroeven nadat alle planken zijn geplaatst.
4. Haal alle accessoires eruit en plaats ze volgens de bovenstaande lijst voor
installatie.
Montage -instructies
Haal alle accessoires eruit en plaats ze volgens de
bovenstaande lijst voor installatie.

7
6. Plaats de onderdelen volgens de bovenstaande afbeelding;
2. Vergrendel de paal met schroef s (26*4 stuks) (25*5 stuks) (23*2 stuks) ;
3. Vergrendel het niet eerst, om de installatie later te vergemakkelijken;
Install the brackets on left sides.
Install the brackets on right sides.

8
6. Plaats de onderdelen volgens de bovenstaande afbeelding;
2. Vergrendel de paal met schroef s (26*4 stuks) (25*5 stuks) (23*2 stuks) ;
3. Vergrendel het niet eerst, om de installatie later te vergemakkelijken;
Install the bracket at the top.

9
6. Plaats de onderdelen volgens de bovenstaande afbeelding;
2. Vergrendel de paal met schroeven (26*4 stuks; 25*14 stuks;) ;
3. Vergrendel het niet eerst, om de installatie later te vergemakkelijken;
10
6. Plaats de onderdelen volgens de bovenstaande afbeelding;
2. Vergrendel de paal met schroeven (25*27 stuks) ;
3. Vergrendel het niet eerst, om de installatie later te vergemakkelijken;
Assemble the assembled left and
right brackets and the top brackets.

11
6. Plaats de onderdelen volgens de bovenstaande afbeelding;
2. Vergrendel de paal met schroeven (23*10 stuks; 22*2 stuks) ;
3. Vergrendel het niet eerst, om de installatie later te vergemakkelijken;
Assemble the front door.

12
6. Plaats de onderdelen volgens de bovenstaande afbeelding;
2. Vergrendel de paal met schroeven (22*4 stuks) ;
3. Vergrendel het niet eerst, om de installatie later te vergemakkelijken;
Assemble the back door.

13
Voor maximale stabiliteit van uw polytunnel raden wij u aan een sleuf van 20 cm breed rond de basis
van de polytunnel en de achterkant te graven.
Tighten all bolts and nuts in full.
Use plastic stoppers(29*14pcs)
to plug the nozzles on both sides.
14
Plaats de gemonteerde beugel in zijn geheel in de voorgegraven putfundering.
Bedek de randen van het zeildoek (32) met vuil en compact , om de stabiliteit ervan te versterken.
Boor eerst de spiraalspijker (28*4 stuks) in de grond en gebruik vervolgens een touw (27*4 stuks) om
de tunnelkas en de spiraalspijker stevig vast te maken en vast te binden.

14
Fabrikant: Shanghaimuxinmuyeyouxiangongsi
Adres: Shuangchenglu 803nong11hao1602A-1609shi, baoshanqu, shanghai
200000 CN.
EG-REP: E-CrossStu GmbH.
Mainzer Landstr.69, 60329 Frankfurt am Main.
VK REP: YH CONSULTING LIMITED.
C/O YH Consulting Limited Office 147, Centurion House, London Road,
Staines-upon-Thames, Surrey, TW18 4AX
Geïmporteerd naar AUS: SIHAO PTY LTD.
1 ROKEVA STREETEASTWOOD NSW 2122 Australië
Geïmporteerd naar de VS: Sanven Technology Ltd.
Suite 250, 9166 Anaheim Place, Rancho Cucamonga, CA 9173 0


Teknisk Support och e-garanticertifikat www.vevor.com/support
TUNNELVÄXTHUS
ANVÄNDARMANUAL
We continue to be committed to provide you tools with competitive price.
"Save Half","Half Price" or any other similar expressions used by us only represents an estimate
of savings you might benefit from buying certain tools with us compared to the major top brands
and does not necessarily mean to cover all categories of tools offered by us. You are kindly
reminded to verify carefully when you are placing an order with us if you are actually saving half
in comparison with the top major brands.

1
3×8,4×2,25M(8)G
Have product questions? Need technical support? Please feel free to
contact us:
Technical Support and E-Warranty Certificate
www.vevor.com/support
NEED HELP? CONTACT US!
This is the original instruction,please read all manual instructions
carefully before operating. VEVOR reserves a clear interpretation of
our user manual. The appearance of the product shall be subject to the
product you received. Please forgive us that we won't inform you again
if there are any technology or software updates on our product.
TUNNEL GREENHOUSE

2
Säkerhetsåtgärder
VARNING:
Läs dessa instruktioner innan du använder denna produkt. Underlåtenhet att göra det
kan resultera i allvarliga skador. de grundläggande försiktighetsåtgärderna bör alltid
följas , inklusive följande:
31. Tunnelväxthuset får inte användas eller förvaras i farliga områden. Det är inte
tillåtet att använda apparaten på farliga platser.
32. Tunnelväxthuset måste kontrolleras för att säkerställa att den är i korrekt
fungerande skick och fungerar säkert före användning. I annat fall får apparaten inte
användas.
33. Använd endast som avsett. Frätande ämnen bör inte förvaras i tunnelväxthus
34. Operatören ska använda tunnelväxthuset ordentligt. Han måste ta hänsyn till de
lokala förhållandena och vara uppmärksam på tredje part , särskilt barn , när han
arbetar med tunnelväxthuset .
35. Detta tunnelväxthus är inte avsedd att användas av personer (inklusive barn) med
nedsatta fysiska , sensoriska eller mentala förmågor eller som saknar erfarenhet
och/eller kunskap, såvida de inte övervakas av en person som ansvarar för deras
säkerhet eller instrueras av dessa personer om användningen av enheten . Barn bör
övervakas för att säkerställa att de inte leker med tunnelväxthuset .
3
SPARA DESSA INSTRUKTIONER
Produktlista
4

5
Modell
3×8,4×2,25m(8)G
Produktstorlek
28x10x7,5ft (835*295*220 cm)
Presenning Färg
Grön
VARNING
Att täcka taket noggrant, sätter alla platser i rätt läge.
Så mycket som möjligt som inte gör växthusets ramstruktur ur
formen.
Använd den inte i dåliga väderförhållanden, som regn, hagel, kraftig
snö och kraftig vind.
Notera:
7. Denna produkt behöver två personer för att samarbeta med monteringen .
2. På grund av det stora antalet skruvar rekommenderas det att använda
elverktyg.
3. Lås inte skruvarna direkt under installationsprocessen, och lås alla skruvar
efter att alla hyllor är uppsatta.
4. Ta ut alla tillbehör och placera dem enligt listan ovan för installation.

6
Monteringsanvisning
Ta ut alla tillbehör och placera dem enligt listan
ovan för installation.
7. Vänligen placera delarna enligt bilden ovan;
2. Lås stången med skruv s(26*4st)(25*5st)(23*2st) ;
3. Lås den inte först, för att underlätta installationen senare;
Install the brackets on left sides.

7
7. Vänligen placera delarna enligt bilden ovan;
2. Lås stången med skruv s(26*4st)(25*5st)(23*2st) ;
3. Lås den inte först, för att underlätta installationen senare;
Install the brackets on right sides.
8
7. Vänligen placera delarna enligt bilden ovan;
2. Lås stången med skruvar (26*4st;25*14st;) ;
3. Lås den inte först, för att underlätta installationen senare;
Install the bracket at the top.

9
7. Vänligen placera delarna enligt bilden ovan;
2. Lås stången med skruvar (25*27st) ;
3. Lås den inte först, för att underlätta installationen senare;
Assemble the assembled left and
right brackets and the top brackets.

10
7. Vänligen placera delarna enligt bilden ovan;
2. Lås stången med skruvar (23*10st;22*2st) ;
3. Lås den inte först, för att underlätta installationen senare;
Assemble the front door.

11
7. Vänligen placera delarna enligt bilden ovan;
2. Lås stången med skruvar (22*4st) ;
3. Lås den inte först, för att underlätta installationen senare;
Assemble the back door.

12
För maximal stabilitet hos din polytunnel rekommenderar vi att du gräver en 20 cm bred dike runt
basen av polytunneln och baksidan.
Tighten all bolts and nuts in full.
Use plastic stoppers(29*14pcs)
to plug the nozzles on both sides.

13
Placera det sammansatta fästet i sin helhet i det förgrävda gropfundamentet.
Täck kanterna på presenningen (32) med smuts och kompakt , för att förstärka stabiliteten.
Borra spiralspiken (28*4st) i jorden först och använd sedan ett rep (27*4st) för att dra åt och knyta fast
tunnelväxthuset och spiralspiken.

14
Tillverkare: Shanghaimuxinmuyeyouxiangongsi
Adress: Shuangchenglu 803nong11hao1602A-1609shi, baoshanqu, shanghai
200000 CN.
EC REP: E-CrossStu GmbH.
Mainzer Landstr.69, 60329 Frankfurt am Main.
UK REP: YH CONSULTING LIMITED.
C/O YH Consulting Limited Office 147, Centurion House, London Road,
Staines-upon-Thames, Surrey, TW18 4AX
Importerad till AUS: SIHAO PTY LTD.
1 ROKEVA STREETEASTWOOD NSW 2122 Australien
Importerad till USA: Sanven Technology Ltd.
Suite 250, 9166 Anaheim Place, Rancho Cucamonga, CA 9173 0


Técnico Soporte y certificado de garantía electrónica www.vevor.com/support
INVERNADERO TÚNEL
MANUAL DE USUARIO
We continue to be committed to provide you tools with competitive price.
"Save Half","Half Price" or any other similar expressions used by us only represents an estimate
of savings you might benefit from buying certain tools with us compared to the major top brands
and does not necessarily mean to cover all categories of tools offered by us. You are kindly
reminded to verify carefully when you are placing an order with us if you are actually saving half
in comparison with the top major brands.

1
3×8,4×2,25M(8)G
Have product questions? Need technical support? Please feel free to
contact us:
Technical Support and E-Warranty Certificate
www.vevor.com/support
NEED HELP? CONTACT US!
This is the original instruction,please read all manual instructions
carefully before operating. VEVOR reserves a clear interpretation of
our user manual. The appearance of the product shall be subject to the
product you received. Please forgive us that we won't inform you again
if there are any technology or software updates on our product.
TUNNEL GREENHOUSE

2
Precauciones de seguridad
ADVERTENCIA:
Lea estas instrucciones antes de usar este producto. De lo contrario, se pueden
producir lesiones graves. Siempre se deben seguir las precauciones básicas , incluidas
las siguientes:
36. El invernadero del túnel No se puede utilizar ni almacenar en zonas peligrosas. No
está permitido utilizar el aparato en lugares peligrosos.
37. El invernadero del túnel Se debe verificar para garantizar que esté en buenas
condiciones de funcionamiento y que funcione de manera segura antes de su uso. De
lo contrario , no se debe utilizar el aparato.
38. Úselo únicamente según lo previsto. No se deben almacenar sustancias corrosivas
en invernaderos tipo túnel.
39. El operador debe utilizar el invernadero túnel. adecuadamente. Al trabajar con el
invernadero túnel debe tener en cuenta las condiciones locales y prestar atención a
terceros , en particular a los niños .
40. Este invernadero tipo túnel no está diseñado para que lo utilicen personas
(incluidos niños) con capacidades físicas , sensoriales o mentales reducidas o que
carezcan de experiencia y/o conocimientos , a menos que estén supervisados por una
persona responsable de su seguridad o reciban instrucciones de estas personas sobre
el uso del dispositivo. . Los niños deben ser supervisados para asegurarse de que no
3
jueguen con el invernadero túnel .
GUARDA ESTAS INSTRUCCIONES
Lista de productos
4
5
Modelo
3×8,4×2,25m(8)G
Tamaño del producto
28x10x7,5 pies (835*295*220cm)
Lona alquitranada Color
Verde
ADVERTENCIA
Cubrir el techo con cuidado coloca todos los lugares en la posición
correcta.
En la medida de lo posible, no deforme la estructura del marco del
invernadero.
No lo utilice en condiciones climáticas adversas, como tormentas,
granizo, nevadas intensas y vientos fuertes.
Nota:
8. Este producto necesita dos personas para cooperar con el montaje .
2. Debido a la gran cantidad de tornillos, se recomienda utilizar herramientas
eléctricas.
3. No bloquee los tornillos directamente durante el proceso de instalación y

6
bloquee todos los tornillos después de instalar todos los estantes.
4. Saque todos los accesorios y colóquelos según la lista anterior para su
instalación.
Instrucciones de ensamblaje
Saque todos los accesorios y colóquelos según la
lista anterior para su instalación.

7
8. Coloque las piezas según la imagen de arriba;
2. Bloquee el poste con tornillos s(26*4 piezas)(25*5 piezas)(23*2 piezas) ;
3. No bloquearlo primero, para facilitar la instalación posterior;
Install the brackets on left sides.
Install the brackets on right sides.
8
8. Coloque las piezas según la imagen de arriba;
2. Bloquee el poste con tornillos s(26*4 piezas)(25*5 piezas)(23*2 piezas) ;
3. No bloquearlo primero, para facilitar la instalación posterior;
Install the bracket at the top.

9
8. Coloque las piezas según la imagen de arriba;
2. Bloquee el poste con tornillos (26*4 piezas; 25*14 piezas;) ;
3. No bloquearlo primero, para facilitar la instalación posterior;

10
8. Coloque las piezas según la imagen de arriba;
2. Bloquee el poste con tornillos (25*27 piezas) ;
3. No bloquearlo primero, para facilitar la instalación posterior;
Assemble the assembled left and
right brackets and the top brackets.

11
8. Coloque las piezas según la imagen de arriba;
2. Bloquee el poste con tornillos (23*10 piezas; 22*2 piezas) ;
3. No bloquearlo primero, para facilitar la instalación posterior;
Assemble the front door.

12
8. Coloque las piezas según la imagen de arriba;
2. Bloquee el poste con tornillos (22*4 piezas) ;
3. No bloquearlo primero, para facilitar la instalación posterior;
Assemble the back door.
13
Para obtener la máxima estabilidad de su politúnel, recomendamos cavar una zanja de 20 cm de
ancho alrededor de la base del politúnel y la parte posterior.
Tighten all bolts and nuts in full.
Use plastic stoppers(29*14pcs)
to plug the nozzles on both sides.

14
Coloque el soporte ensamblado en su totalidad en la base del pozo previamente excavado.
Cubrir los bordes de la lona (32) con tierra y compactar , para reforzar la estabilidad de la misma.
Primero taladre el clavo en espiral (28*4 piezas) en el suelo y luego use una cuerda (27*4 piezas)
para apretar y atar firmemente el invernadero del túnel y el clavo en espiral.

14
Fabricante: Shanghaimuxinmuyeyouxiangongsi
Dirección: Shuangchenglu 803nong11hao1602A-1609shi, baoshanqu, shanghai
200000 CN.
REPRESENTANTE CE: E-CrossStu GmbH.
Mainzer Landstr.69, 60329 Fráncfort del Meno.
REPRESENTANTE DEL REINO UNIDO: YH CONSULTING LIMITED.
C/O YH Consulting Limited Oficina 147, Centurion House, London Road,
Staines-upon-Thames, Surrey, TW18 4AX
Importado a AUS: SIHAO PTY LTD.
1 ROKEVA STREET ASTWOOD NSW 2122 Australia
Importado a EE. UU.: Sanven Technology Ltd.
Suite 250, 9166 Anaheim Place, Rancho Cucamonga, CA 9173 0

