

Operator’s Manual
HYDRAULIC
TRACKED
DUMPER
READ AND UNDERSTAND THE ENTIRE MANUAL BEFORE OPERATING MACHINE


TABLE OF CONTENTS
TABLE OF CONTENTS
SPECIFICATIONS
SAFETY SIGNS
BRIEF DESCRIPTION
1
2
Add Oil To Engine
Add Gasoline To Engine
19
19
FUEL RECOMMENDATIONS
19
Hydraulic Oil
19
Pre-start check
19
Starting
20
Operating
21
Idle Speed
21
Stop Engine
21
Travelling on slopes
21
Driving across slopes
22
Driving on slopes
22
Loading loose material
22
Transporting with a full skip
23
Dumping out the skip 23
Hydraulic lifting Handle
24
Parking the machine
24
Preventive Maintenance
25
Hydraulic Oil
25
Tightening Tracks
25
Replacing Tracks
26
Engine Maintenance
26
Safety instructions
28
Regulations
Safety instructions
Designated use
4
4
5
Exemption from liability
5
Safety instructions regarding operation
Safety instructions for maintenance
Warning of special hazards
7
9
11
Control Lever Assembly
Shovel Assembly
15
15
Speed Control Lever
Hopper Control lever
17
17
Left/Right Steering Lever
17
Shovel Lifting lever
Engine On/Off Switch
18
18
Recoil Starter Handle
18
Hydraulic Lifting Handle
18
Shovel Speed Control Valve & Hopper
Speed Control Valve
18
3
4
6
13
SAFETY INSTRUCTIONS
UNPACKING THE CONTAINER
14
CONTENTS SUPPLIED
15
ASSEMBLE
15
KNOW YOUR MACHINE
19
OPERATION
25
MAINTENANCE
27
STORAGE
28
TRANSPORTATION
29
TROUBLESHOOTING
1
TABLE OF CONTENTS

SPECIFICATIONS
2
SPECIFICATIONS
Model T80HL
Engine Type
Model Name
Displacement/Horsepower
Engine Power
Start
Maximum Torque
Overall Length (w/o Shovel)
Overall Length with Shovel
Overall Height
Overall Height(Lifting height)
Overall Width
Max. Overall Height
Max. dumping height
Loading Capacity
Weight
Operating Weight
Wheelbase
Bucket Capacity
Track Width
Track Length
Track Height
Dump Front End Height
Dump Back End Height
Dump Width
Console Height
Platform Ground Clearance
Max.Travel Speed
Min. Travel Speed
Max. Gradeability
Ground Pressure (with Operator)
Single cylinder; 4 stroke; air cooled; OHV
Loncin G420F(D)
420cc; 15HP
9.0 kW / 3600 rpm
E-start
26.5Nm/2500rpm
85.4 in
112.2 in
47.2 in
98.5 in
28.7 in
120 in
65.3 in
1102 lbs
1631 lbs
1785 lbs
38.7 in
10.6 ft³
7 in
51.1 in
11.8 in
33.2 in
43.3 in
24.3 in
40 in
10 in
2.7 Mph
1.3 Mph
30%(Walking grade in non-lifting condition)
20.0kpa

3
SAFETY SIGNS
SAFETY SIGNS
The rating plate on your machine may show symbols. These represent important information about the product or instruc-
tions on its use.

4
BRIEF DESCRIPTION
BRIEF DESCRIPTION
Regulations
Safety instructions
Requirements to be met by the driver
Earth moving machines may be driven and serviced only by persons who meet the following requirements:
• 18 years or older
• Physically and mentally suited for this work
• Persons have been instructed in driving and servicing the earth moving machine and have proven their qualifications to
the contractor
• Persons are expected to carry out work reliably.
They have been appointed by the contractor for driving and servicing the earth moving machine.
Get informed on and follow the legal regulations of your country.
Important indications regarding the safety of the staff and the machine are identified in this Operator’s Manual with the
following terms and symbols:
Warranty claims can be brought forward to your dealer only. Furthermore, the instructions in this Operator's Manual must
be observed.
All fluids, lubricants, material, etc., used on the machine are subject to specific regulations regarding collection and
disposal. Dispose of different materials and consumables separately and in an environmentally friendly manner!
Disposal may be carried out by a dealer only. Also observe the national regulations regarding disposal!
Identification of warnings and dangers
Warranty
Disposal
The driver must always firmly hold onto the handle of the control stand with both hands.
The driver is subjected to high acceleration forces in particular when moving off with the machine!
Failure to observe the instructions identified by this symbol can result in personal injury or death for the operator
or other persons.
Avoid damage to the environment! Do not allow the oil and oily wastes to get into the ground or stretches of water!

5
BRIEF DESCRIPTION
Designated use
The machine is intended for:
• Moving earth, gravel, coarse gravel or ballast and rubble
• Every other application is regarded as not designated for the use of the machine.
Shall not be liable for damage resulting from this and the risk shall be fully borne by the user.
Designated use also includes observing the instructions set forth in the Operator’s Manual and observing the mainte-
nance and service conditions.
Making machine modifications without proper authorizatior and using spare parts, equipment and options that have not
been inspected and released can negatively impact the safety of the machine. Not liable for personal injury and/or proper-
ty damage resulting from failure to comply with the safety instructions and Operator's Manual, and failure to exercise due
care, in the following cases:
• handling
• operating
• servicing and carrying out maintenance work and
• repairing the machine. This is also applicable in those cases in which special
attention has not been drawn to the duty to exercise due care, in the safety instruc�tions, the Operator’s Manuals and
maintenance manuals (machine/engine).
• Read and understand the Operator’s Manual before starting up, servicing or repairing
the machine. Observe the safety instructions!
The machine may not be used for transport jobs on public roads.
Exemption from liability

6
SAFETY INSTRUCTIONS
SAFETY INSTRUCTIONS
The machine has been designed and built in accordance with state-of-the-art standards and the recognised safety regula-
tions. Nevertheless, its use can constitute a risk to life and limb of the user or of third parties, or cause damage to the
machine and to other material property
The machine must only be used in technically perfect condition in accordance with its designated use and the instruc-
tions set forth in the Operator’s Manual, and only by safety-conscious persons who are fully aware of the risks involved in
operating the machine! Any malfunctions, especially those affecting safety, must therefore be rectified immediately!
Basic rule:
Before putting the machine into operation, inspect the machine for safety in work and road operation!
Careful and prudent working is the best way to avoid accidents!
The Operator’s Manual must always be at hand at the place of use of the machine, and must therefore be kept in its
storage bin.
Immediately complete or replace an incomplete or illegible Operator’s Manual.
In addition to the Operator’s Manual, observe and instruct the operator in all other generally applicable legal and other
mandatory regulations relevant to accident prevention and environmental protection.
These compulsory regulations may also deal with handling hazardous substances, issuing and/or wearing personal
protective equipment, or traffic regulations
With regard to specific operational features, e.g. those relevant to job organisation, work sequences or the persons
entrusted with the work, supplement the Operator’s Manual by corresponding instructions, including those relevant to
supervising and reporting duties
Persons entrusted with work on the machine must have read and understood the Operator’s Manual and in particular,
chapter “Safety Instructions” before beginning work. This applies especially to persons working only occasionally on the
machine, e.g. set-up or maintenance
The user/owner must check – at least from time to time – whether the persons entrusted with operation or maintenance
are working in compliance with the Operator’s Manual and are aware of risks and safety factors.
The user/owner commits himself to operate and keep the machine in perfect condition, and, if necessary or required by
law, to require the operating or servicing persons to wear protective clothing (e. g. safety shoes, hard hat).
In the event of safety-relevant modifications or changes on the machine or of its behaviour, stop the machine immediately
and report the malfunction to the competent authority/person.
Safety-relevant damage or malfunctions of the machine must be rectified immediately
Replace hydraulic hoses within stipulated and appropriate intervals even if no safety relevant defects have been detected
Before working on or with the machine, remove jewellery, such as rings, wristwatches, bracelets etc., and tie back long
hair and do not wear loose-fitting garments, such as unbuttoned or unzipped jackets, ties or scarves.
Injury can result from being caught up in the machinery or from rings catching on moving parts!
• Keep the machine clean.This reduces
• Fire hazard, e.g. due to oil-soaked rags lying around
• Danger of injury, e.g. due to dirt or debris on the foothold, and
• Danger of accidents e.g. due to dirt pile-up on the control elements
Observe all safety, warning and information signs and labels on the machine
Adhere to prescribed intervals or those specified in the Operator’s Manual for routine checks/inspections and mainte-
nance work!

7
SAFETY INSTRUCTIONS
Safety instructions regarding operation
For service, inspection, maintenance or repair work, tools and workshop equipment adapted to the task on hand are abso-
lutely indispensable.
Any work on or with the machine must be carried out by reliable staff only. Do not let unauthorised persons drive or work
with the machine! Observe statutory minimum age limits!
The machine may be used by correctly trained or competent staff only. The staff’s authorities for operating, equipping and
carrying out maintenance and repair of the machine must be defined clearly and distinctly!
Define the machine operator’s responsibilities – also with regard to observing traffic regulations. Give the operator the
authority to refuse instructions by third parties that are contrary to safety.
Do not allow persons to be trained or instructed or persons taking part in a general training course to work on or with the
machine without being permanently supervised by an experienced person!
Work on the electrical system and equipment, on the undercarriage and the steering and brake systems may be carried
out only by skilled staff which has been specially trained for such work.
Work on the hydraulic system of the machine must be carried out only by staff with special knowledge and experience in
hydraulic equipment!
Seal off the danger zone should it not be possible to keep a safe distance.
Stop work if persons do not leave the danger zone in spite of warning! Keep out of the danger zone!
Danger zone:
The danger zone is the area in which persons are in danger due to the movements of the
• machine
• work equipment
• additional equipment or
• material
• This also includes the area affected by falling material, equipment or by parts which are thrown out.
The danger zone must be extended by 0.5 m in the immediate vicinity of
• buildings
• scaffolds or
• other elements of construction
Avoid any operational mode that might be prejudicial to safety!
Before beginning work, familiarise yourself with the surroundings and circumstances of the work site. These are e.g.
obstacles in the working and travelling area, the soil bearing capacity and any necessary barriers separating the work site
from public roads
Take the necessary precautions to ensure that the machine is used only when in a safe and reliable state!
Operate the machine only if all protective and safety-oriented devices, e.g. removable safety-devices, soundproofing
elements and exhausters etc., are in place and fully functional!
Check the machine at least once a day/per work shift for visible damage and defects! Report any changes (incl. changes
in working behaviour) to the competent organisation/person immediately! If necessary, stop the machine immediately and
lock it!
In the event of malfunctions, stop the machine immediately and lock it! Have any defects rectified immediately!
Start and operate the machine from the seat only!
Carry out start-up and shut-down procedures in accordance with the Operator’s Manual, and observe the indicator lights!
Before putting the machine/attachment into operation (start-up/moving), ensure that noone is at risk by putting the
machine/attachment into operation!

8
SAFETY INSTRUCTIONS
Before driving with the machine, and also after interrupting work, check whether all control levers are functional!
Before moving the machine always check whether the supplementary equipment has safely stowed away or attached!
When driving on public roads, ways and places for purposes of construction work, observe the traffic regulations in force
and, if necessary, ensure beforehand that the machine is in a condition perfectly compatible with these regulations!
Ensure good illumination of the machine’s work area in conditions of poor visibility or after dark!
Stop work if this is not possible to a reasonable degree!
Since the machine has no acoustic warning system, stop the machine or interrupt work immediately if a person is likely
to approach the working range of the machine!
No lifting, lowering or carrying persons!
Installing a man basket or a working platform is prohibited!
When crossing underpasses, bridges and tunnels, or when passing under overhead lines always ensure that there is
enough clearance!
Always keep a safe distance from the edges of building pits and slopes!
When working in buildings or in enclosed areas, look out for:
• Height of the ceiling/clearances
• Width of entrances
• Maximum load of ceilings and floors
• Sufficient room ventilation – danger of poisoning!
Avoid any operation that might be a risk to machine stability!
During operation on slopes, drive or work uphill or downhill. If driving across a slope cannot be avoided, bear in mind the
tilting limit of the machine! Always keep the work equipment close to the ground! This also applies to driving downhill!
When driving or working across a slope, the load must be on the uphill side of the machine.
On sloping terrain always adapt your drive speed to the prevailing ground conditions! Never change to lower gear on a
slope but always before reaching it!
Before leaving the seat always secure the machine against unintentional movement and unauthorised use!
Lower the work equipment to the ground
The machine has no FOPS protection. Therefore, do not use the machine in areas with danger of falling objects!
Before starting work check whether
• all safety devices are properly installed and functional
Before moving the machine or before taking up work:
• Ensure that visibility is sufficient
• Inspect the immediate area (children!)
• In the work area the operator is responsible for third parties!
Caution when handling fuel – increased danger of fire!
• Ensure that fuel does not come into contact with hot parts!
Do not smoke during refuelling, and avoid fire and sparks. Stop the engine during refuelling and do not smoke!
Operation in potentially explosive areas is forbidden.
Never get on or off a moving machine! Never jump off the machine!
The drive levers take time getting used to them. Drive speed must be adapted to your skills and to the prevailing condi-
tions.

9
SAFETY INSTRUCTIONS
Transport
Temperature ranges
The machine must be loaded and transported only in accordance with the Operator’s Manual!
For towing the machine observe the prescribed transport position, admissible speed and itinerary.
Use only suitable means of transport of adequate capacity/payload!
Safely secure the machine on means of transport! Use suitable mounting points and load-securing devices
The recommissioning procedure must be strictly in accordance with the Operator’s Manual!
The machine can be used within a temperature range of 5°F to 113°F. It is necessary to carry out all maintenance and
inspection work before storing the machine for the winter. Then store the machine in a dry place at ambient temperature
(about 59°F). Observe these temperature ranges so as not to affect the machine’s service life.
Safety instructions for maintenance
Avoid any operational mode that might be prejudicial to safety!
Observe the adjustment, maintenance and inspection activities and intervals set forth in the Operator’s Manual, including
information on the replacement of parts/partial equipment!
These activities must be carried out by technical staff only.
The machine may not be serviced, repaired or test-driven by unauthorised staff
Brief the staff/the driver before beginning special operations and maintenance work! Appoint a person to supervise the
activities!
In any work concerning the operation, conversion or adjustment of the machine and its safety-oriented devices, or any
work related to maintenance, inspection and repair, observe the start-up and shut-down procedures set forth in the
Operator’s Manual, and the information on maintenance work.
If required, secure the maintenance area appropriately!
Prior to carrying out service, maintenance and repair work, attach a warning label, such as “Repair work – do not start
machine ! ”, to the ignition lock/steering wheel or to the
control elements.
Remove the ignition key!
Carry out service, maintenance and repair work only if the
• machine is positioned on firm and level ground
• the forwards-reverse lever is in neutral
• all hydraulically movable attachments and working equipment have been lowered to the ground
• engine is stopped
• ignition key is removed and
• machine has been secured against unintentional movement
Should maintenance or repair be inevitable with the engine running:
• Only work in groups of two
• Both persons must be authorised for the operation of the machine
• Observe the specific safety instructions in the work manual
• Keep a safe distance from all rotating and moving parts, e.g. fan blades, V-belt drives, fans etc.

10
SAFETY INSTRUCTIONS
Prior to carrying out assembly work on the machine, ensure that no movable parts will roll away or start moving.
To avoid the risk of accidents, parts and large assemblies being moved for replacement purposes must be carefully
attached and secured to lifting gear.
Use only suitable lifting gear and suspension systems in a technically perfect state with
adequate load-bearing capacity!
Stay clear of suspended loads!
Have loads fastened and crane operators guided by experienced persons only!
The person guiding the operator must be within sight or sound of him
Always use specially designed or otherwise safety-oriented ladders and working platforms to carry out overhead assembly
work.
Never use machine parts or attachments/superstructures as a climbing aid!
Wear a safety harness when carrying out maintenance work at greater heights!
Keep all handles, steps, handrails, platforms, landings and ladders free from dirt, snow and ice!
Clean the machine, especially connections and threaded unions, of any traces of oil, fuel or preservatives before carrying
out maintenance/repair work!
Do not use aggressive detergents!
Use lint-free cleaning rags!
Before cleaning the machine with water, steam jet (high-pressure cleaner) or deter�gents, cover or tape up all openings
which – for safety and functional reasons – must be protected against water, steam or detergent penetration. Special
care must be taken with the electrical system.
After cleaning, remove all covers and tapes applied for that purpose!
After cleaning, examine all fuel, lubricant and hydraulic oil lines for leaks, chafe marks and damage!
Rectify all defects without delay!
Always tighten any screw connections that have been loosened during maintenance and repair!
Any safety devices removed for set-up, maintenance or repair purposes must be refitted and checked immediately upon
completion of the maintenance and repair work.
Ensure that all consumables and replaced parts are disposed of safely and with minimum environmental impact!
Do not use the work equipment as lifting platforms for persons!
Before taking up work on machine parts dangerous for life and limb (bruising, cutting), always ensure safe blocking/sup-
port of these areas
Carry out maintenance and repair work beneath a raised machine, attachments or additional equipment only if a safe and
secure support has been provided for (the sole use of hydraulic rams, jacks etc. does not sufficiently secure raised
machines or equipment/attachments)
Avoid contact with hot parts, such as the engine block or the exhaust system during the operation of the machine and for
some time afterwards – danger of burns!
Retainer pins can fly out or splinter when struck with force – danger of personal injury!
Do not use starting fuel! This especially applies to those cases in which a heater plug (intake-air preheating) is used at
the same time – danger of explosions!
Apply special care when working on the fuel system – increased danger of fire!

11
SAFETY INSTRUCTIONS
Warning of special hazards
Gas, dust, steam, smoke
Hydraulics
Noise
Electrical energy
Always remove the earthing strap from the battery when working on the electrical system or when carrying out welding
work!
Starting with a battery jumper cable can be dangerous if carried out improperly. Observe the safety instructions regarding
the battery!
Operate the machine only on adequately ventilated premises! Before starting the internal combustion engine on enclosed
premises, ensure that there is sufficient ventilation!
Observe the regulations in force at the respective site!
Before carrying out welding, flame-cutting and grinding work, clean the machine and its surroundings from dust and other
inflammable substances, and ensure that the premises are adequately ventilated – danger of explosions!
In areas with special hazards (e.g. toxic gases, caustic vapours, toxic environments), wear appropriate protective equip-
ment (breathing filters, protective clothing)!
Work on the hydraulic equipment of the machine must be carried out only by persons having specific technical knowledge
and experience in hydraulic systems!
Check all lines, hoses and screw connections regularly for leaks and obvious damage! Repair any damage and leaks imme-
diately! Splashed oil can cause injury and fire
In accordance with the Operator’s Manual/instructions for the respective assembly, release the pressure in all system
sections and pressure lines (hydraulic system) to be opened before carrying out any implementing/repair work!
Hydraulic and compressed-air lines must be laid and fitted properly! Ensure that no connections are interchanged! The
fittings, lengths and quality of the hoses must comply with the technical requirements
During operation all sound baffles must be closed. Wear ear protectors if necessary!
Use only original fuses with the specified current rating!
Switch off the machine immediately and rectify the malfunction if trouble occurs in the electrical system!
When working with the machine, maintain a safe distance from overhead electric lines! If work must be carried out close
to overhead lines, the equipment/attachments must be kept well away from them. Caution, danger! Get informed on the
prescribed safety distances!
If your machine comes into contact with a live wire
Warn others against approaching and touching the machine
Have the live wire de-energised
Do not leave the machine until the line that has been touched or damaged has been safely de-energised!
Work on the electrical system may only be carried out by a technician with appropriate training, in accordance with the
applicable electrical engineering rules
Inspect and check the electric equipment of the machine at regular intervals. Defects such as loose connections or
scorched cables must be rectified immediately
Observe the machine’s operating voltage!

12
SAFETY INSTRUCTIONS
Oil, grease and other chemical substances
When handling oil, grease and other chemical substances (e.g. battery electrolyte – sulphuric acid), observe the
product-related safety regulations (safety data sheet)!
Be careful when handling hot consumables – risk of being burned or scalded by fluids!
Battery
Tracks
When handling the battery observe the specific safety instructions and regulations relevant to accident prevention.
Batteries contain sulphuric acid – caustic!
When charging batteries in particular, as well as during normal operation of batteries, an oxyhydrogen mixture is formed
in the battery cells. Danger of explosion!
In case of a frozen battery or of an insufficient electrolyte level, do not try start-up with a battery jumper cable. The
battery can burst or explode
Dispose of the battery immediately
Repair work on the tracks must be carried out by technical staff or by an authorised workshop only!
Defective tracks reduce the machine’s operational safety. Therefore carry out regular checks of the tracks for
• Cracks, cuts or other damage.
• Check track tension at regular intervals.

13
UNPACKING THE CONTAINER
UNPACKING THE CONTAINER
Use the screwdriver and hammer to open all the side locks.

14
The Hydraulic Tracked Dumper comes partially assembled and is shipped in carefully packed package.After all the parts
have been removed from the package, you should have:
CONTENTS SUPPLIED
CONTENTS SUPPLIED
Control Lever
Hardware Bag
Operator’s Manual & Engine Manual
Main Body 1x
1x
1x
1x
1x
Self-Loading Shovel
15
The main part of the hydraulic tracked dumper was assembled well at the factory. Other parts need to be assembled by
the operator.
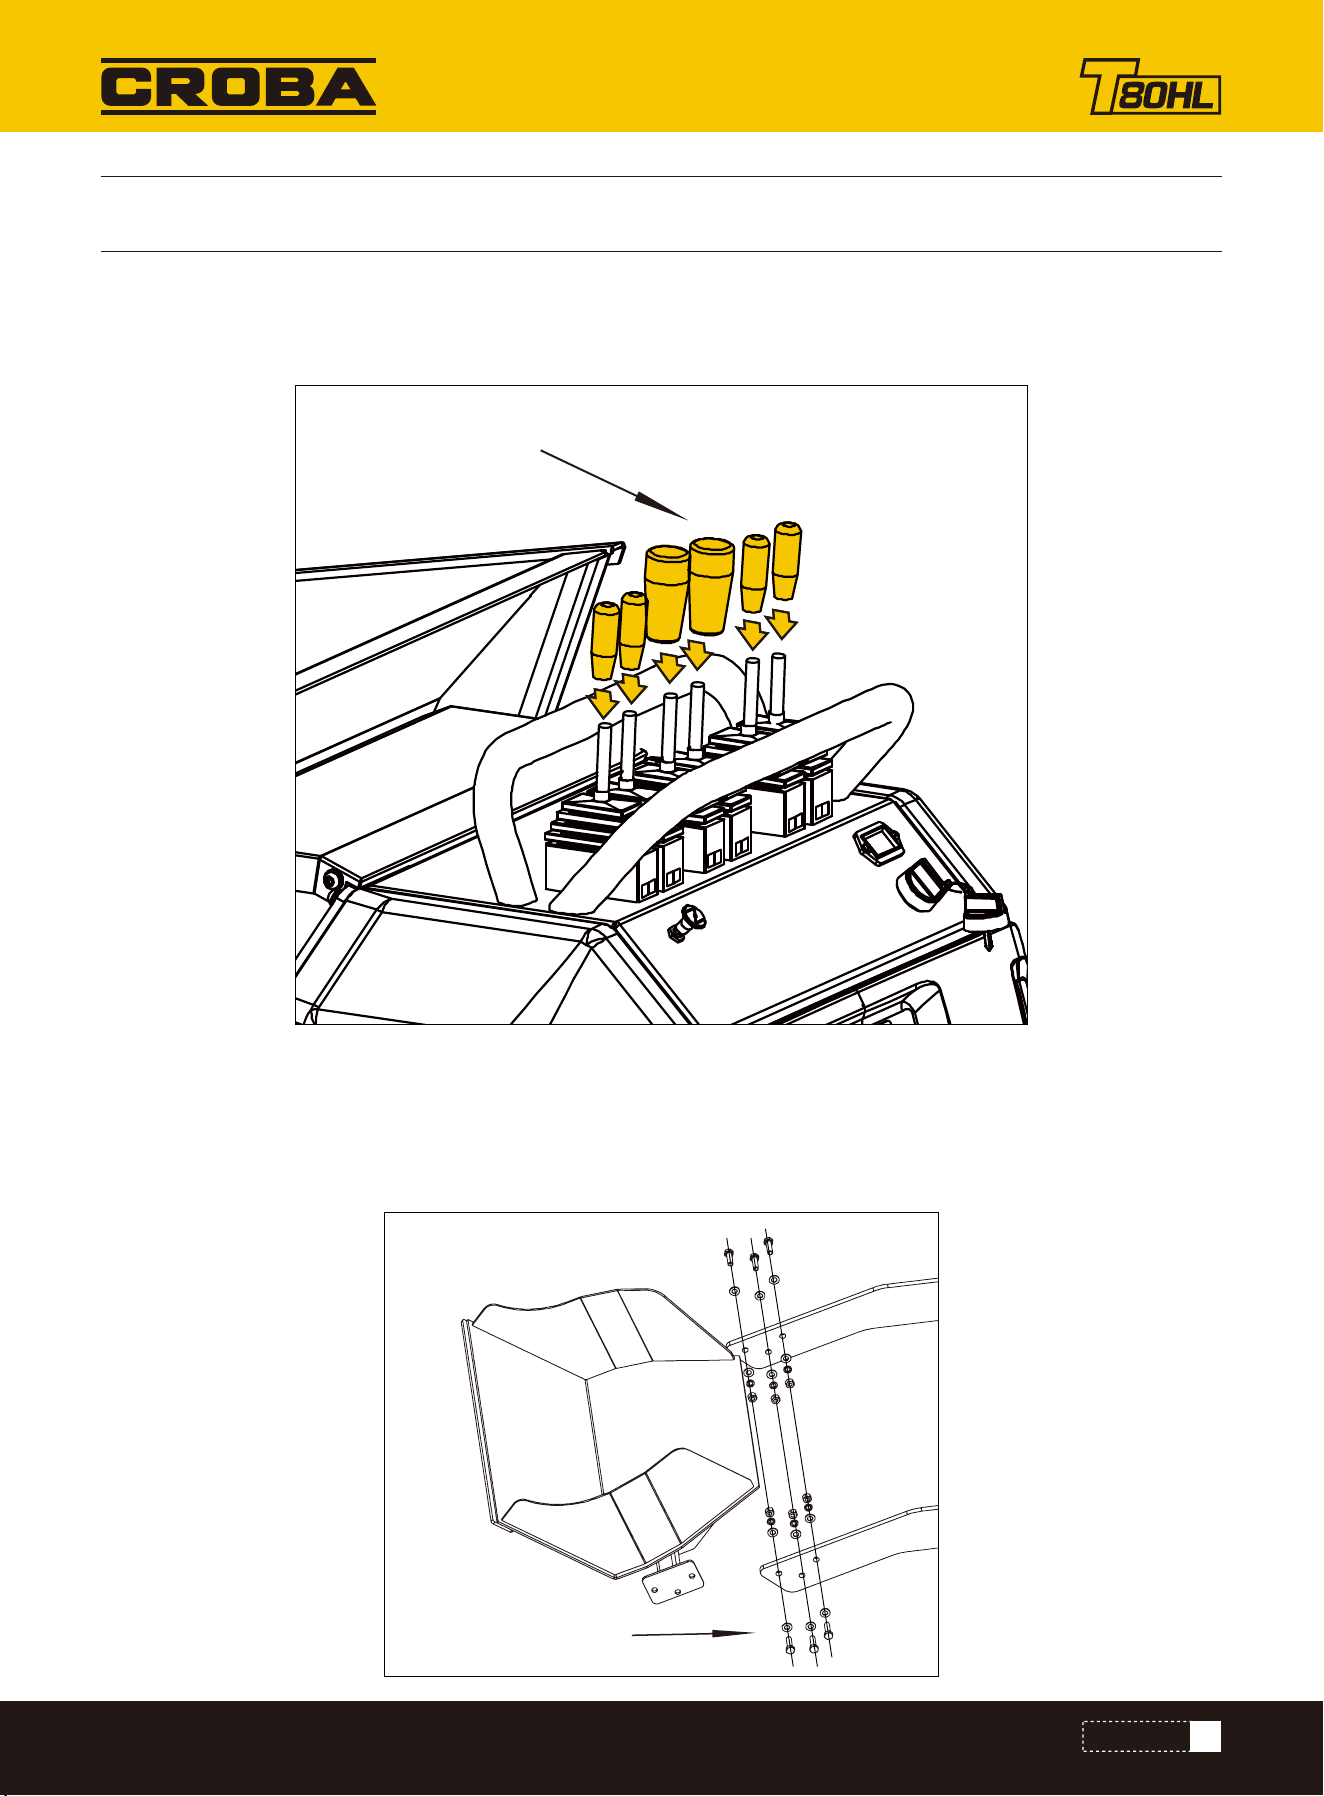
Insert the control levers into the connecting sleeves and tighten them.
Attach the connecting plates of the self loading shovel to the connecting plates of the chassis from outside and align the
holes. Secure the connection with six M10×35 bolts, washers and nuts on both sides.
ASSEMBLE
ASSEMBLE
Control Lever Assembly
Shovel Assembly
M10x35
Control Lever
16
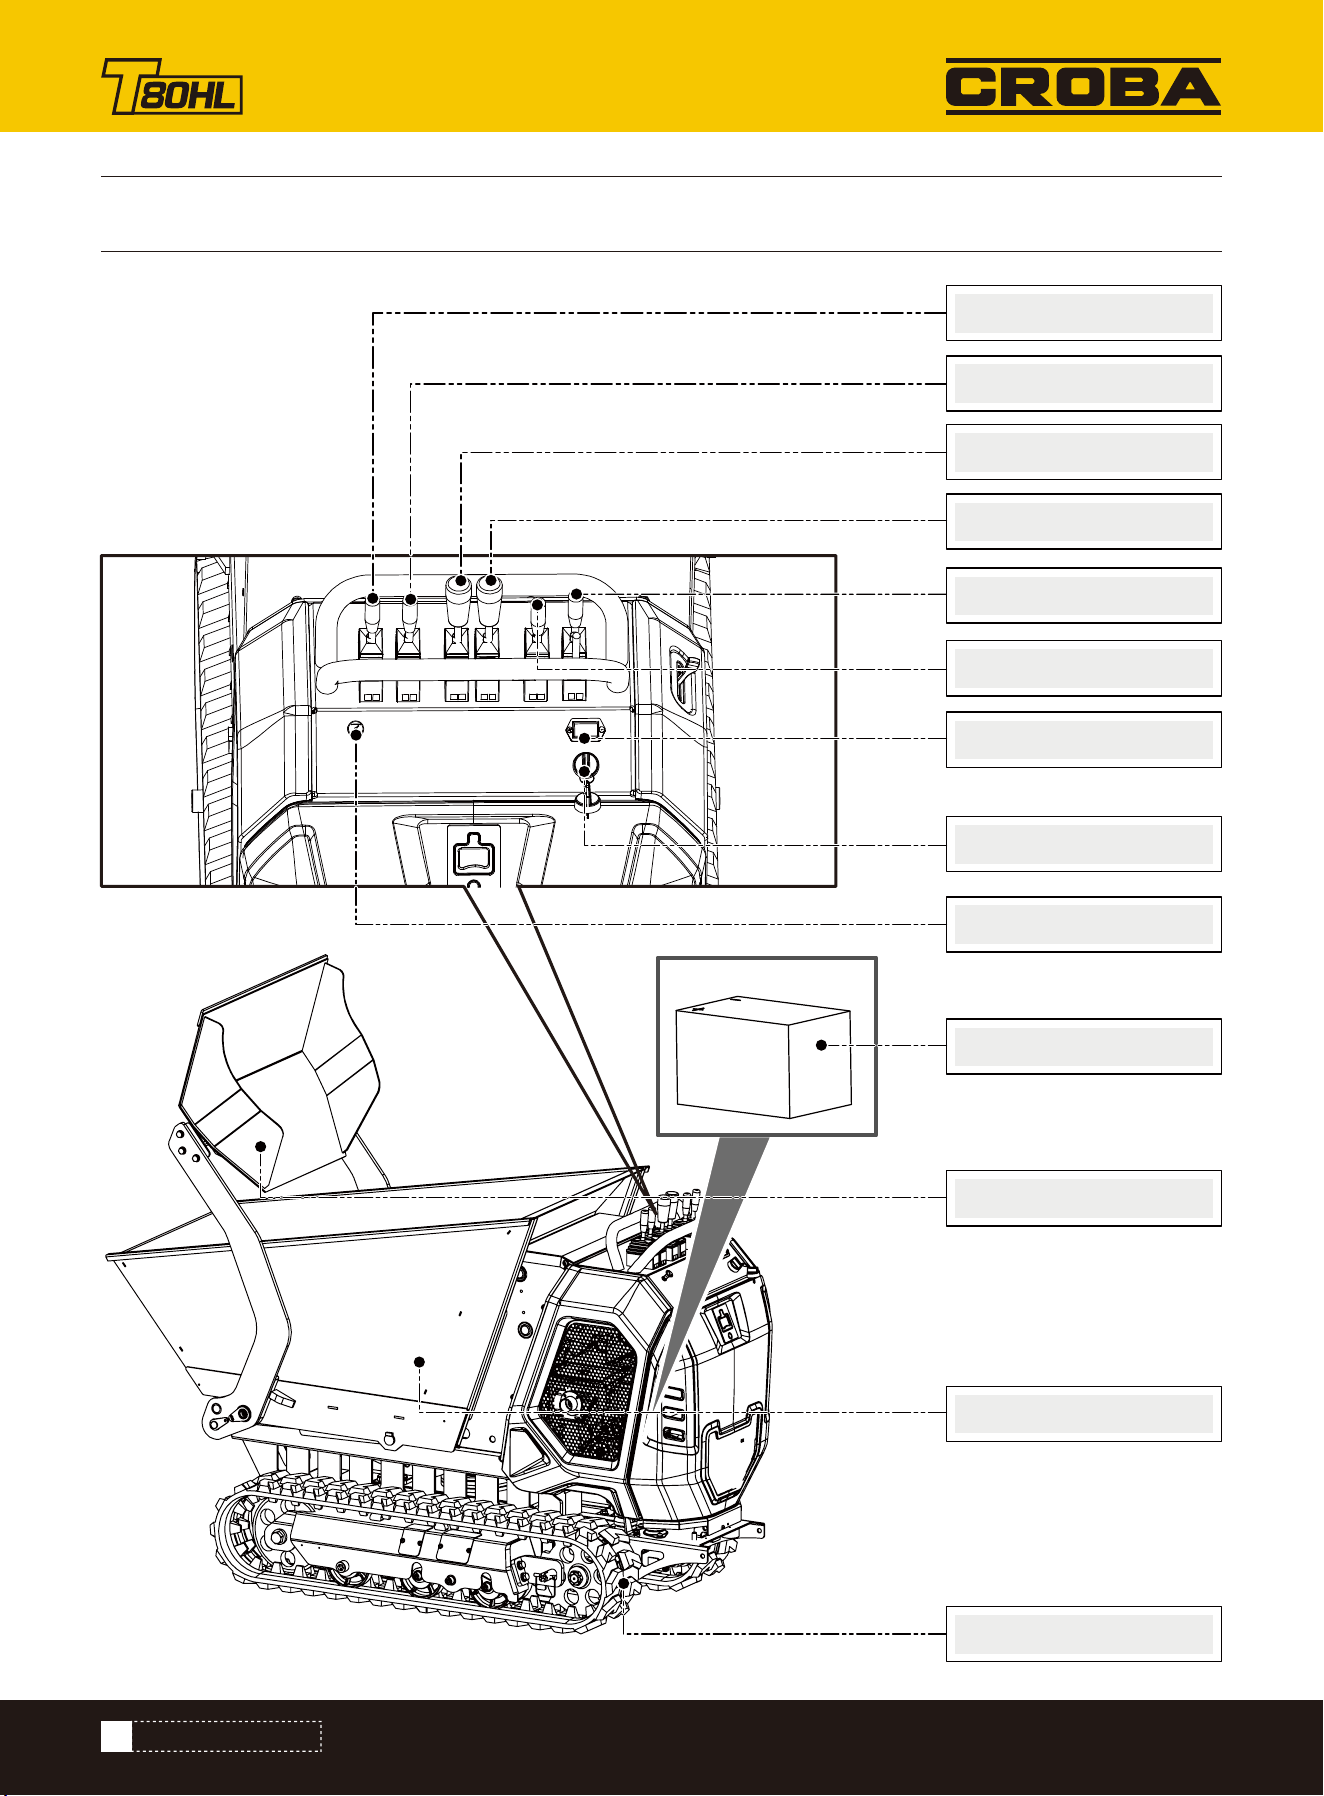
KNOW YOUR MACHINE
KNOW YOUR MACHINE
TRACK
Hopper
Battery
Time Totalizer
Speed Control Lever
Self-loading Shovel
Choke
Switch Lock
Shovel Lifting lever
Right wheel steering lever
Left wheel steering lever
Hopper Control lever
Hydraulic Lifting Handle
17
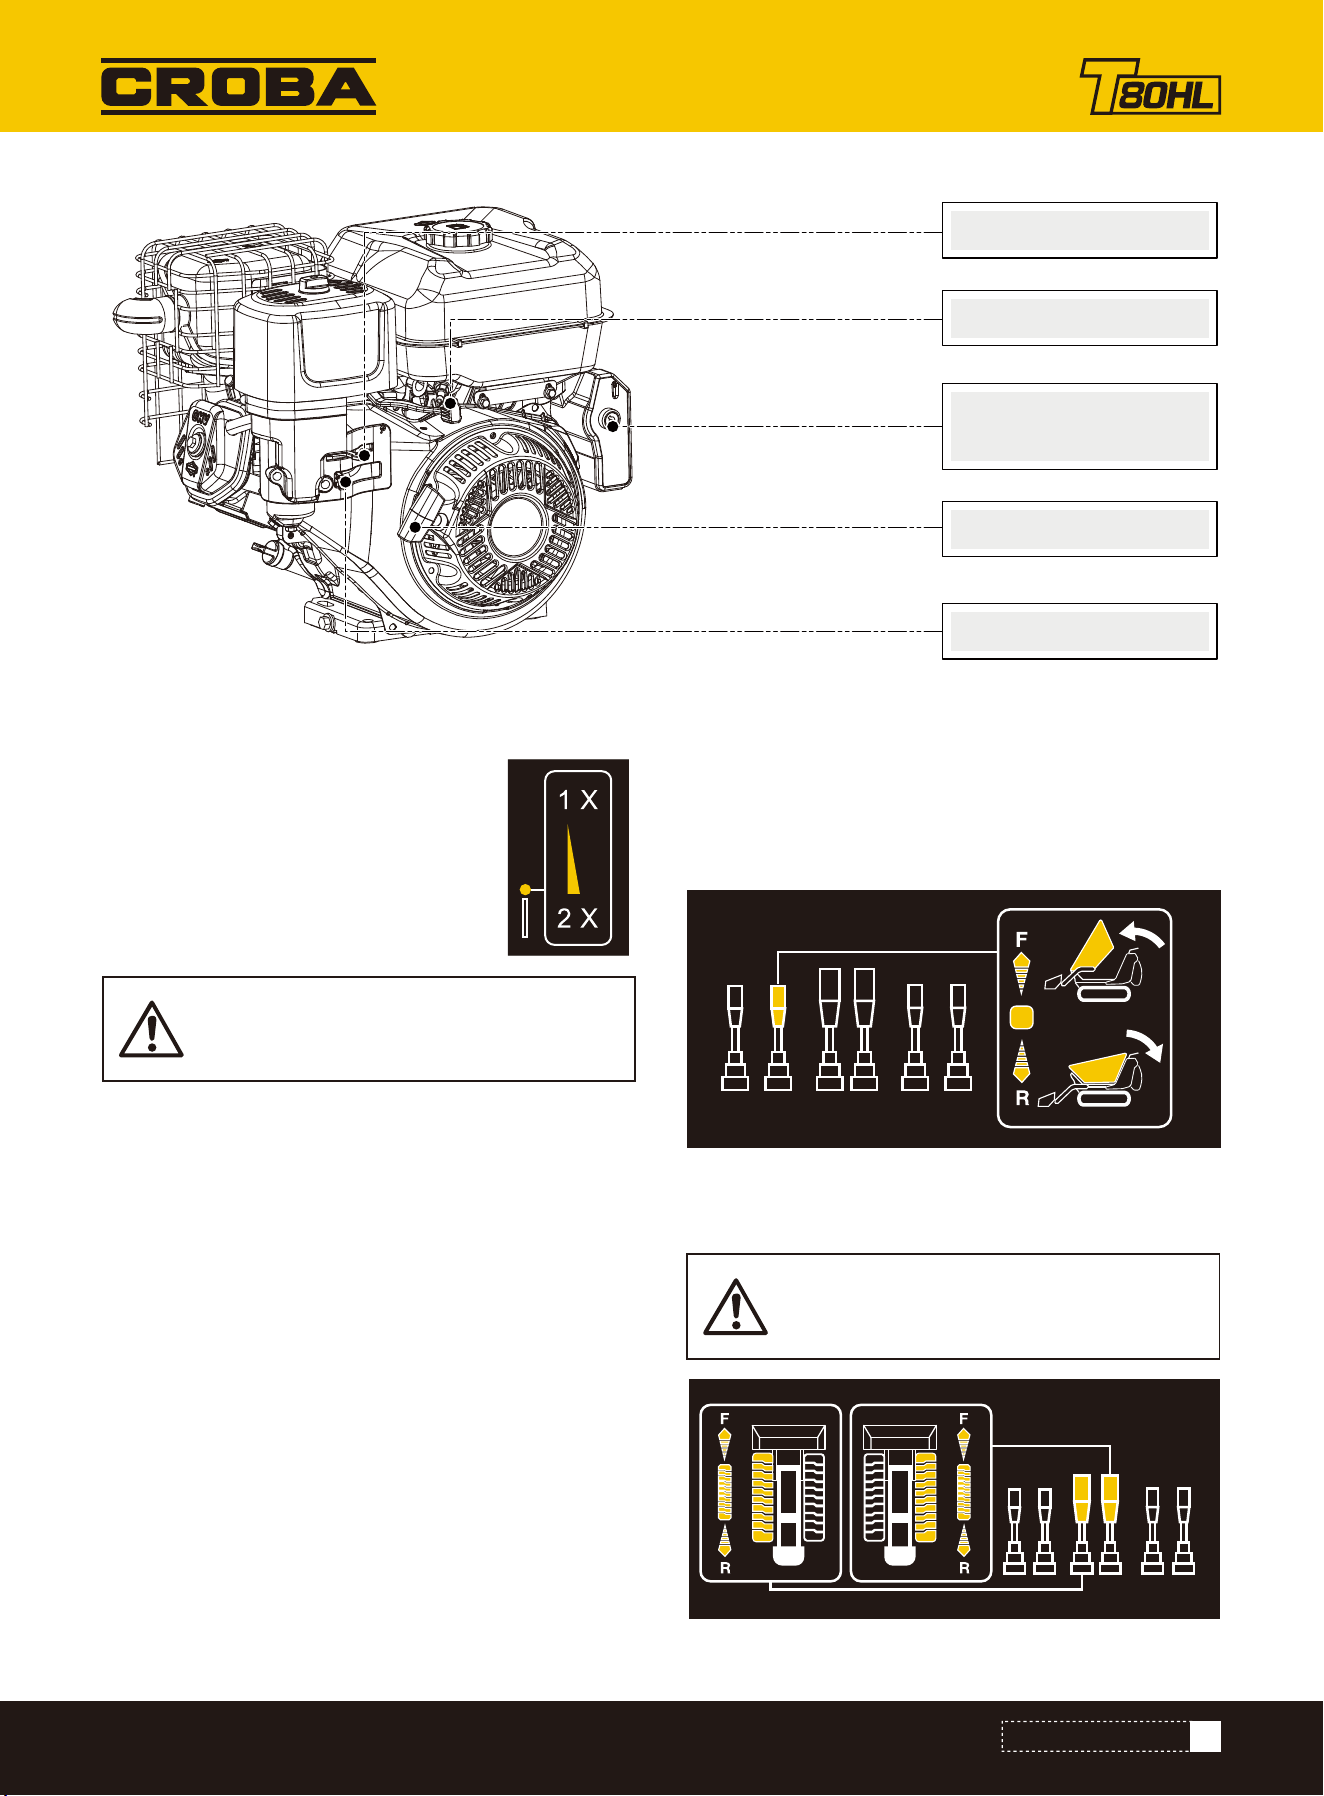
KNOW YOUR MACHINE
Electric Starter & Start
Button (optional)
Choke Control
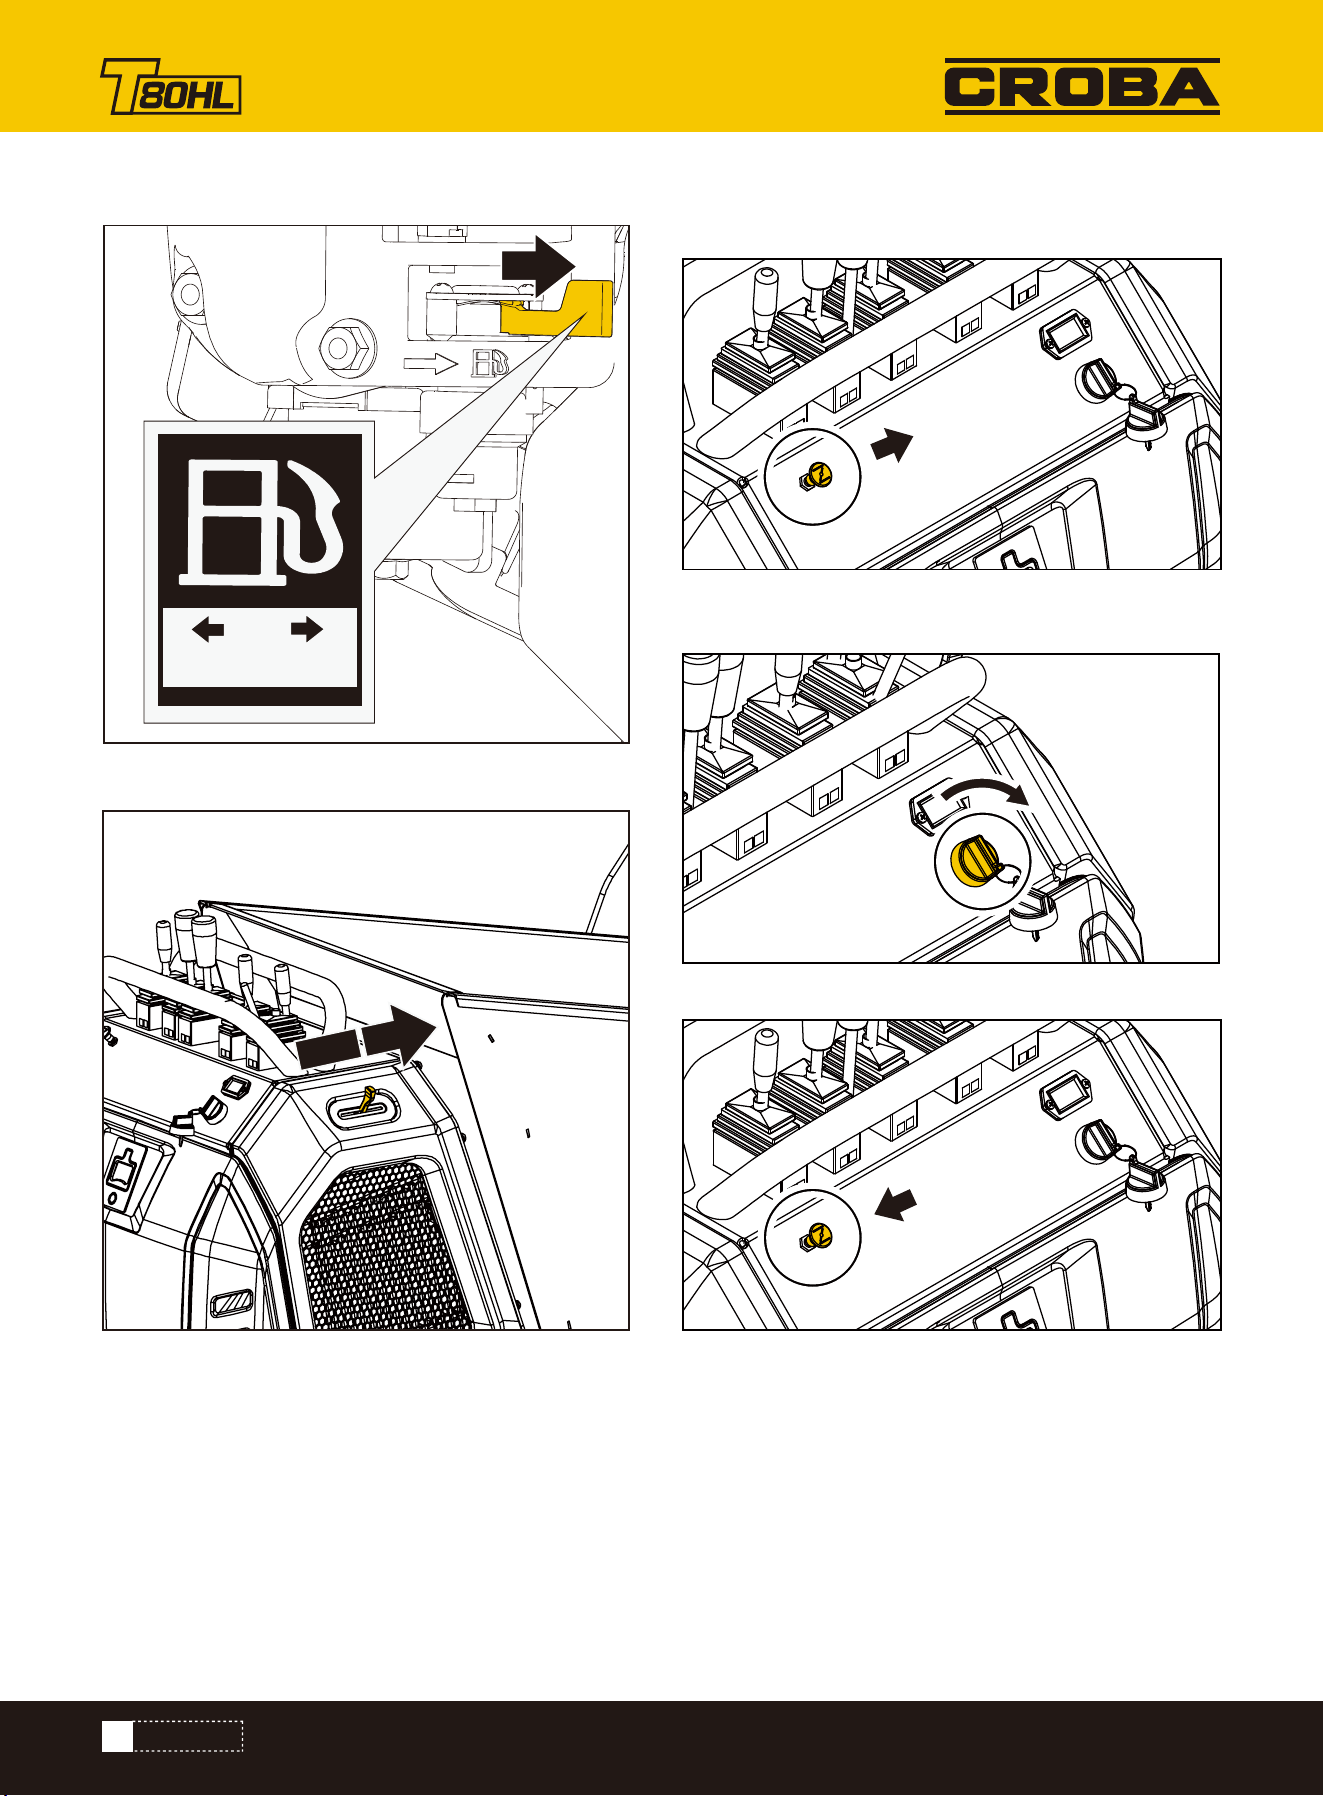
Fuel Shut-Off Valve
Throttle Control
Recoil Starter Handle
The speed control lever has two positions:
High speed and Low speed
Low speed is for heavier loads, while high speed is are for
transporting light loads or an empty hopper. It is recom-
mended that you use a slower speed until you are familiar
with the operation of the power trackbarrow. If the engine
slows down under a load or the tracks slip, shift the
machine into a lower gear. If the front of the machine
rides up, shift the machine into a lower gear. If the front
continues to ride up, lift up on the handles.
Use your left hand, push the lever to forward direction to
tip the hopper, pull back the lever to flat the hopper in its
original position.
Speed Control Lever
Hopper Control lever
Operate the lever to turn left/right.
Left/Right Steering Lever
STOP
Always release the clutch control lever before
changing speeds.
Operate the steering levers only at a reduced
speed.

18
KNOW YOUR MACHINE
The engine switch has two positions. OFF - engine will
not start or run. ON - engine will start and run.
The recoil starter handle is used to start the engine.
Engine On/Off Switch
Recoil Starter Handle
Shovel Lifting lever
STOP
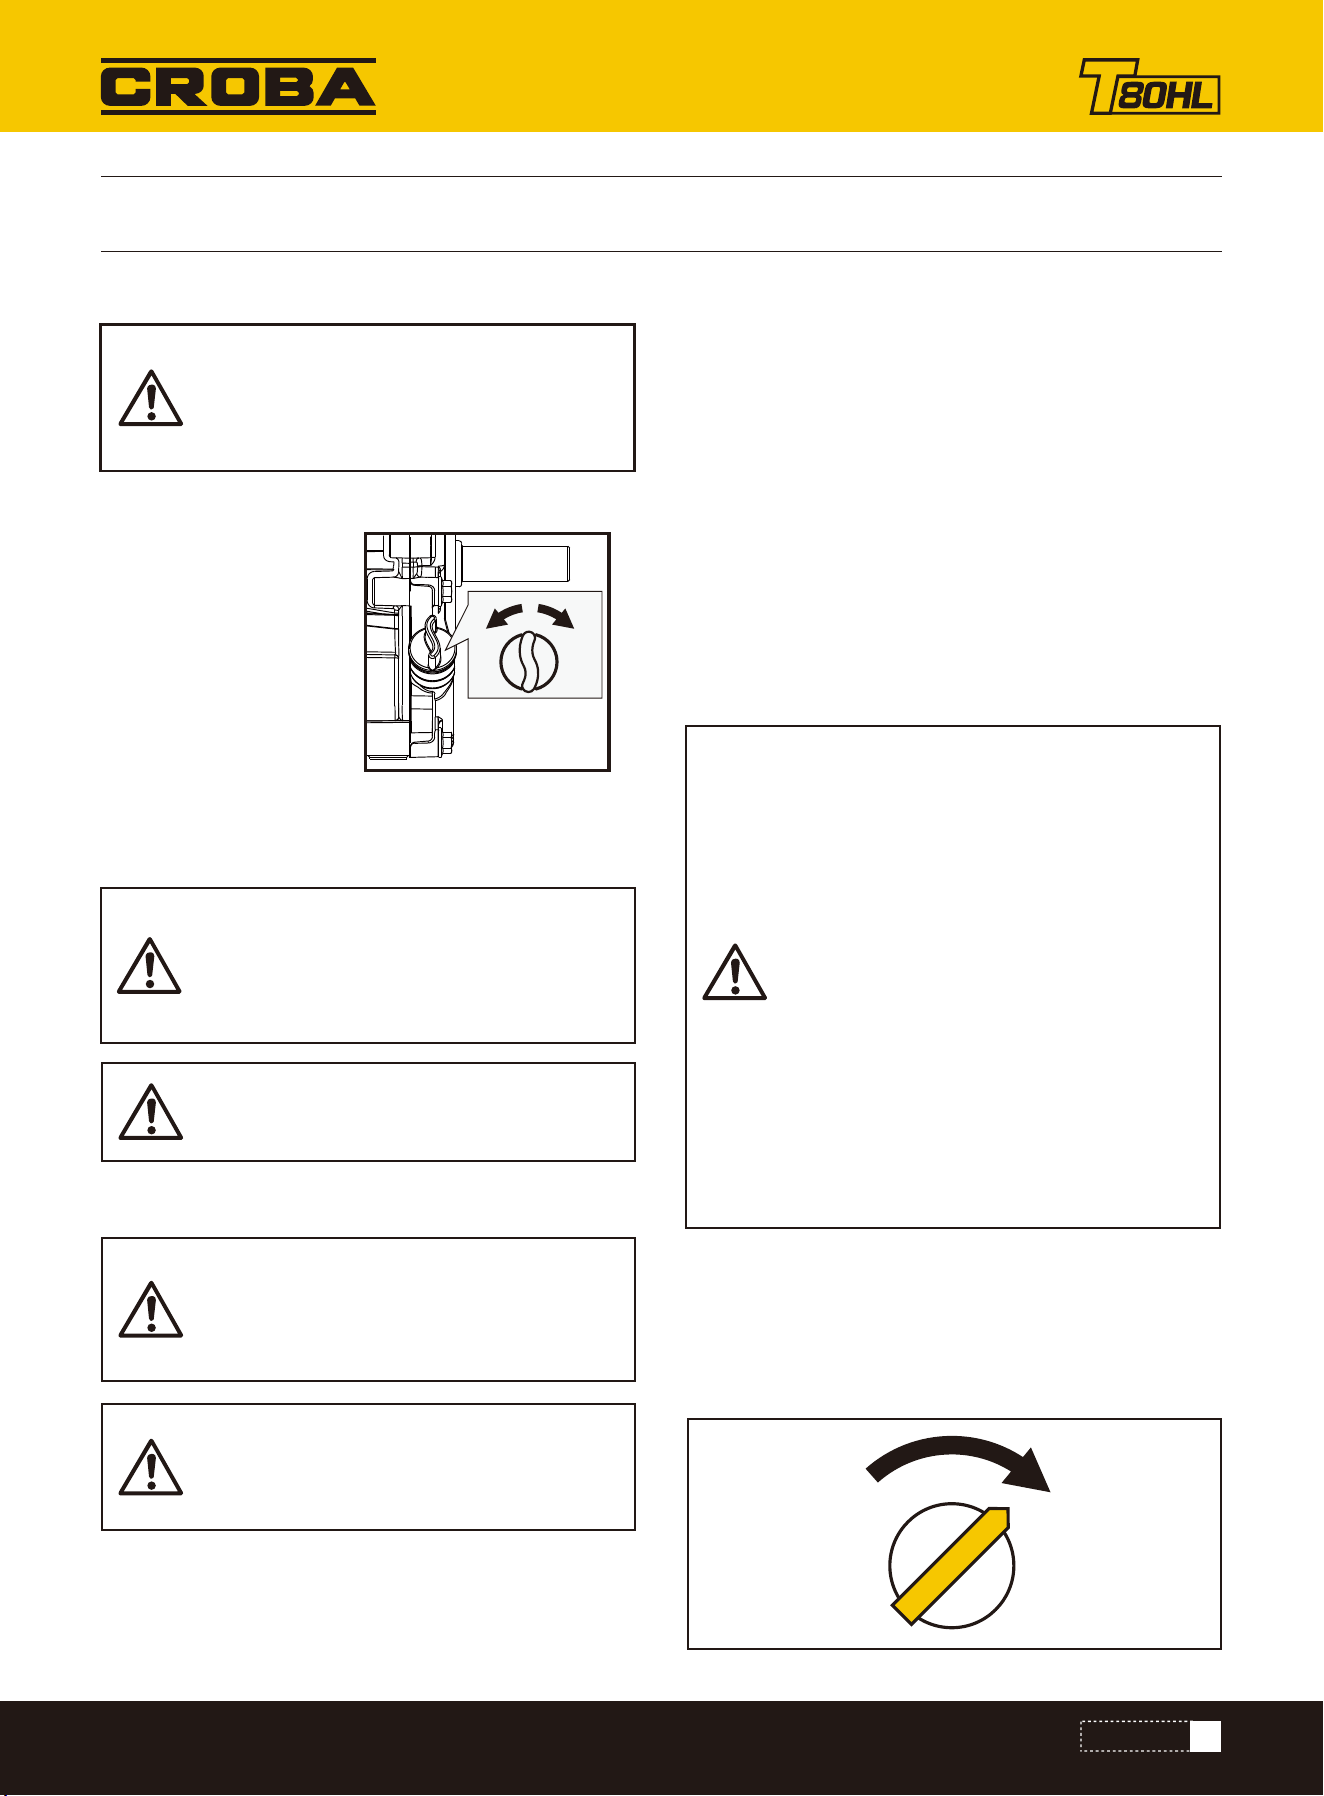
The valves have been set in factory, so no need to adjust
them under normal circumstances.
If it's necessary, rotate the valve on the left counter-
clockwise to increase the lifting speed of the shovel and
clockwise to decrease the speed; rotate the valve on the
right counterclockwise to increase the falling speed of
the hopper and clockwise to decrease the speed.
Shovel Speed Control Valve & Hopper
Speed Control Valve
Equal tire pressure should be maintained at all
times. If the tire pressure is not equal in both
tires, the machine may not travel in a straight
path and the scraper blade may wear unevenly.
Hydraulic Lifting Handle
STOP
1. Turning operation requires the ball valve at
low speed. Operate it only after adjusting the
throttle according to the actual load. Do not
make a turn when the ball valve is at high
speed gear;
2. For driving, it is necessary to stably control
the valve lever. Avoid sudden stop or start in
operation;
3. For normal driving start, it is necessary to
stably control the valve lever to start when the
ball valve is at low speed gear;
4. To stop at high speed, the ball valve needs
to be switched to the low speed gear or small
throttle state to stabilize the control valve lever
to stop;
5. During normal driving, do not loosen one of
the two travel control valve levers to avoid mis
operation of high-speed turning;
6. When the self-loading shovel falls back, the
valve levers need to be stably controlled to
avoid big impact between the shovel and
ground
19
OIL HAS BEEN DRAINED FOR SHIPPING.
Failure to fill engine sump with oil before
starting engine will result in permanent
damage and void engine warranty.
OPERATION
OPERATION
1.Make sure the power trackbarrow is on a flat, level
surface.
2.Remove the oil fill
cap/dipstick to add oil.
3.Using a funnel, add oil up to the FULL mark on the
dipstick. (See engine manual for oil capacity, oil recom-
mendation, and location of fill cap.)
Use unleaded gasoline with a pump octane rating of 86 or
higher.
Sulfur content below 10 mg/L
The recommended hydraulic oil is 10W AW32. ASLE
H-150, or ISO 32.
1.The engine must be off and allowed to cool at least two
minutes before adding fuel.
2.Remove the fuel filler cap and fill the tank. (See engine
manual for fuel capacity, fuel recommendation, and
location of fuel cap.)
Add Oil To Engine
Add Gasoline To Engine
CLOSEDOPEN
The engine is shipped without oil. Do not start
the engine before adding oil. Please refer to
your engine manual for the proper grade of oil
to add.
DO NOT OVERFILL. Check engine oil level daily
and add as needed.
Gasoline is highly flammable and explosive.
You can be burned or seriously injured when
handling fuel. Use extreme care when handling
gasoline.
Fill the fuel tank outdoors, never indoors. Gaso-
line vapors can ignite if they collect inside an
enclosure. Explosion can result.
FUEL RECOMMENDATIONS
Hydraulic Oil
3.Reinstall the fuel cap and tighten. Always clean up
spilled fuel.
1.Move the engine switch to the ON position.
Pre-start check
ONOFF
IMPORTANT: DO NOT OVERFILL!
This equipment and/or its engine may include
evaporative emissions control system compo-
nents , required to meet EPA and / or CARB
regulations, that will only function properly
when the fuel tank has been filled to the recom-
mended level. Overfilling may cause permanent
damage to evaporative emissions control
system components. Filling to the recommend-
ed level ensures a vapor gap required to allow
for fuel expansion. Pay close attention while
filling the fuel tank to ensure that the recom-
mended fuel level inside the tank is not exceed-
ed. Use a portable gasoline container with an
appropriately sized dispensing spout when
filling the tank. Do not use a funnel or other
device that obstructs the view of the tank filling
process.
20
OPERATION
2.Open the fuel shut-off valve.
3.Pull the throttle lever forward
ONOFF
Turn the key to the open position and start Hydraulic
Tracked Dumper
Open the choke
Starting
Engine normal after a few seconds,knob down choke

21
OPERATION
Set the throttle control lever to the SLOW position to
reduce stress on the engine when work is not being
performed. Lowering the engine speed will help extend
the life of the engine, as well as conserve fuel and reduce
noise level.
To stop the engine in an emergency, simply turn the
engine switch to the OFF position. Under normal condi-
tions, use the following procedure:
1.Move the throttle lever to the SLOW ( ) position.
2.Let the engine idle for one or two minutes.
3.Turn the engine switch to the OFF position.
4.Turn the fuel valve lever to the OFF ( ) position.
After engine warms up, pull throttle lever to accelerate
engine speed.
The Hydraulic Tracked Dumper has the steering levers on
the handlebars and this makes steering very easy. To turn
right or left, simply operate the corresponding right or left
steering lever.
The sensitivity of the steering increases in proportion to
the speed of the machine and that with the empty
machine, a light pressure on the lever is all that is needed
to turn. While when the machine is loaded, more pressure
is required.
The Hydraulic Tracked Dumper has a maximum capacity of
800kg. However, it is advisable to assess the load and
adjust it according to the ground on which the machine
will be used.
It is therefore advisable to cover such stretches using low
gear and taking extra care. In such situations, the
machine should be kept in low gear for the whole stretch.
Avoid sharp turns and frequent changes of direction while
driving on the road, in particularly on rough, hard terrains
full of sharp, uneven points with a high degree of friction.
Remember to be careful when working in adverse weather
conditions (ice, heavy rain and snow) or on types of
ground that could make the Hydraulic Tracked Dumper
unstable.
When the clutch control lever is released, the machine
will stop and brake automatically.
If the machine is stopped on a steep slope, a wedge
should be placed against one of the wheels.
Operating
Idle Speed
Stop Engine
Do not move the choke control to CLOSE to
stop the engine. Backfire or engine damage
may occur.
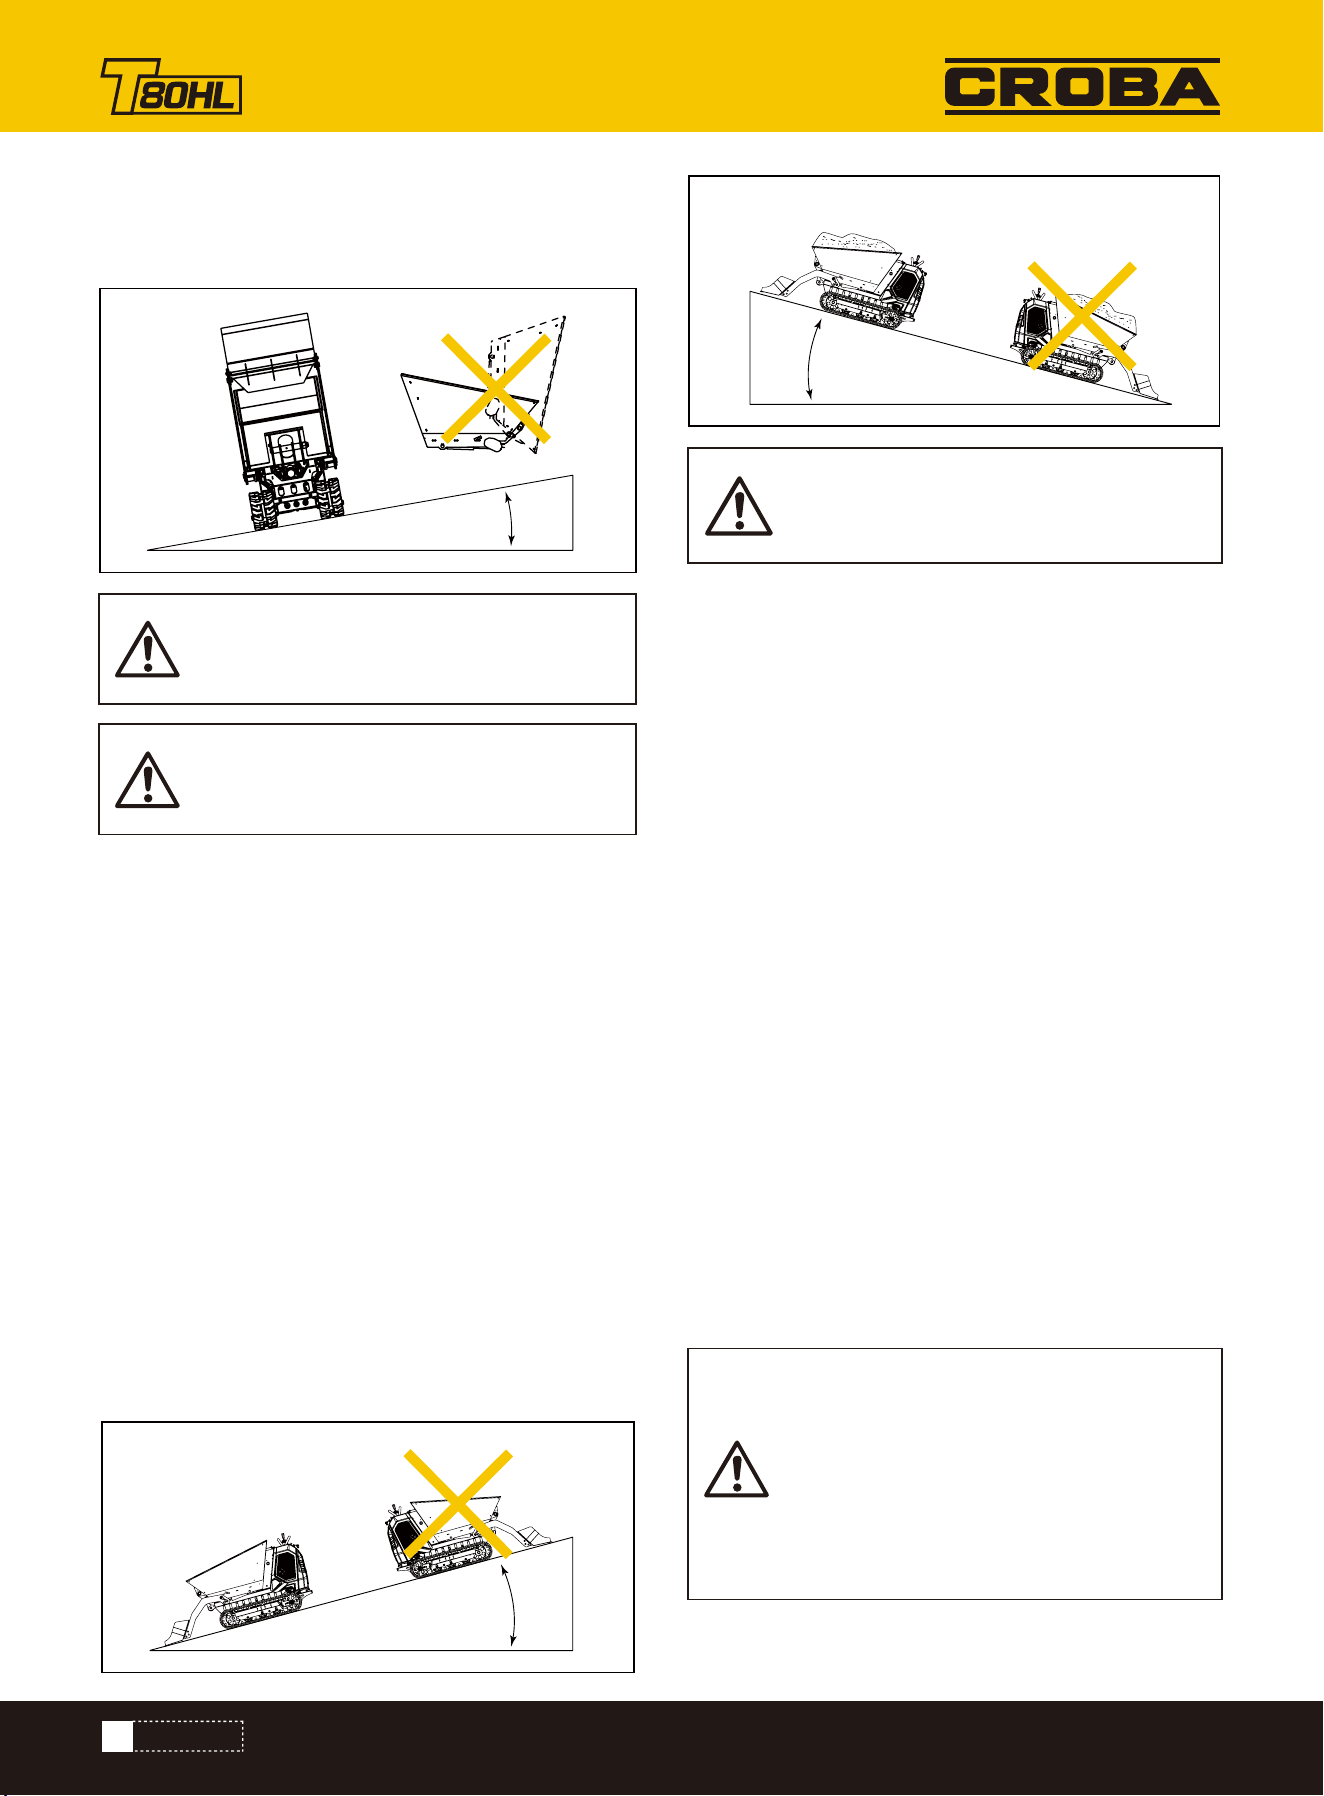
Travelling on slopes
In order to avoid accidents, observe these safety instruc-
tions in particular when driving on slopes.
Dump in the skip when driving the machine.
Dump in the skip when driving the machine.
Always drive in low speed on slopes!
This also ensures more precise and smooth movements
of the steering system.
When driving on slopes or across obstacles,
Do not steer or drive across slopes.
If possible, avoid changing direction when driving on
slopes
When steering the machine, ensure that you can stop
safely at all times if the machine starts to skid or if it
becomes unstable.
Dumping, swivelling or using the skip on slopes can cause
the machine to lose its balance and to tip over.
Avoid this under all circumstances.
Do not drive on slopes steeper than 59°F, otherwise the
machine can tip over.
Do not drive across slopes steeper than 50°F otherwise
the machine can tip over laterally.
If the tracks slip when driving uphill and it is no longer
possible to move on with the force of the tracks alone
Do not use any auxiliary means to move the machine
otherwise it can tip over.
Always drive straight ahead when driving uphill or down-
hill. Driving diagonally or at an angle to the slope is very
dangerous.
Avoid changing direction on slopes or driving across a
slope.
Drive slowly in meadows, on leaves or wet steel plates.
The machine risks slipping even if the slope is not steep.
If the engine stops as you drive across a slope, immedi-
ately put the control levers to neutral position and start
the engine again.
Specific safety instructions
22
OPERATION
The dumper may be driven on firm ground across a
slope of up to 10°.
The dumper may be driven on fim ground on a slope of up
to 15°.
The angle must be smaller in the case of soft and uneven
ground!
Do not actuate the skip as you drive on slopes
Always dump in the skip before driving on slopes
Always keep the loader unit 11.81 - 15.75 inches above
the ground when driving the machine.
Always reduce your speed as you drive on slopes
Always drive straight ahead when driving uphill or down-
hill. Avoid driving diagonally or at an angle.
The machine is very narrow. Therefore, drive very carefully
on slopes or on soft or uneven ground.
Drive with extreme care on slopes in rain or if the ground
is wet or slippery
Do not exceed the maximum slope.
When driving on a slope up to 10°, do not lift the
bucket, otherwise the dumper will tip over or it
will cause death.
Driving across slopes
Driving on slopes
MAX. 10°
MAX. 15°
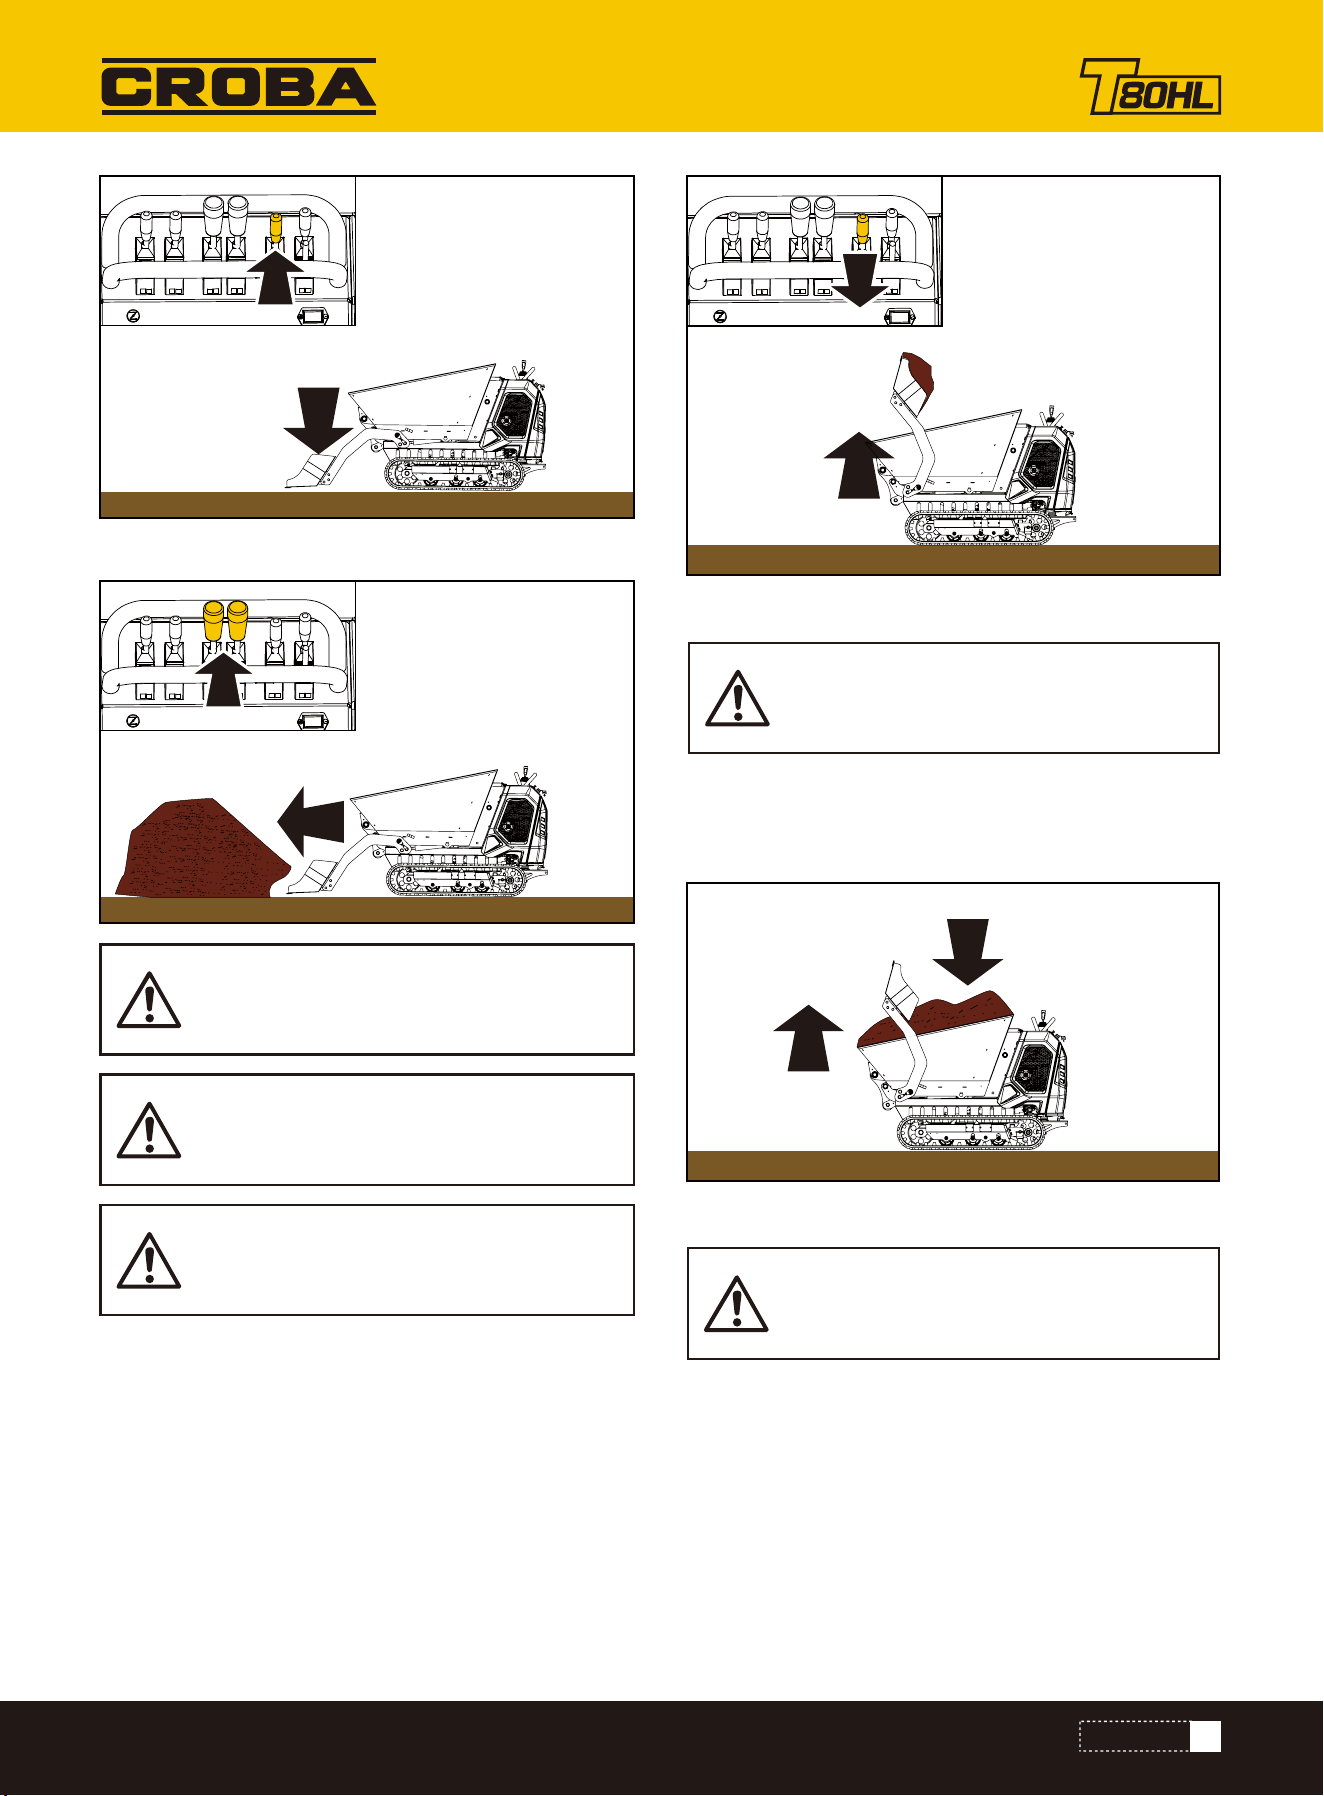
Loading loose material
The driver is not allowed to stand on the foothold when
driving on slopes with a loaded machine!
If the skip is less than half full, drive backwards uphill or
forwards downhill
If the skip is more than half full, drive forwards uphill or
backwards downhill.
The angle must be smaller in the case of soft and uneven
ground!
Before driving on a slope, lower the skip and do not
operate it on the slope!
Always keep the loader unit 11.81 - 15.75 inches above
the ground.
Always reduce your speed as you drive on slopes
Always drive straight ahead when driving uphill or down-
hill.
Avoid driving diagonally or at an angle.
The machine is very narrow.
Therefore, drive very carefully on slopes or on soft or
uneven ground.
Drive with extreme care on slopes in rain or if the ground
is wet or slippery
Lower the loader unit to the ground A
Push lever 5 back B
Do not exceed the maximum slope.
Do not carry out any steering movements once
the bucket has penetrated the material.
Lower the loader unit only when the machine is
at a standstill and if there is enough room to the
front.
The loader unit is not designed for loading
compacted material (hard to penetrate), severe
loader unit damage can occur.
MAX. 15°
23
OPERATION
Drive forwards into the material A
Push brake lever B forward
Set the loader unit to position C
Carry out slow movements of the loader unit. This distrib-
utes the material evenly in the skip.
Load the machine only on firm and level
ground!
If the loader unit cannot be raised in the mate-
rialReduce the load on the loader unit by
reversing
Do not carry out any steering movements once
the bucket has penetrated the material.
A
C
A
B
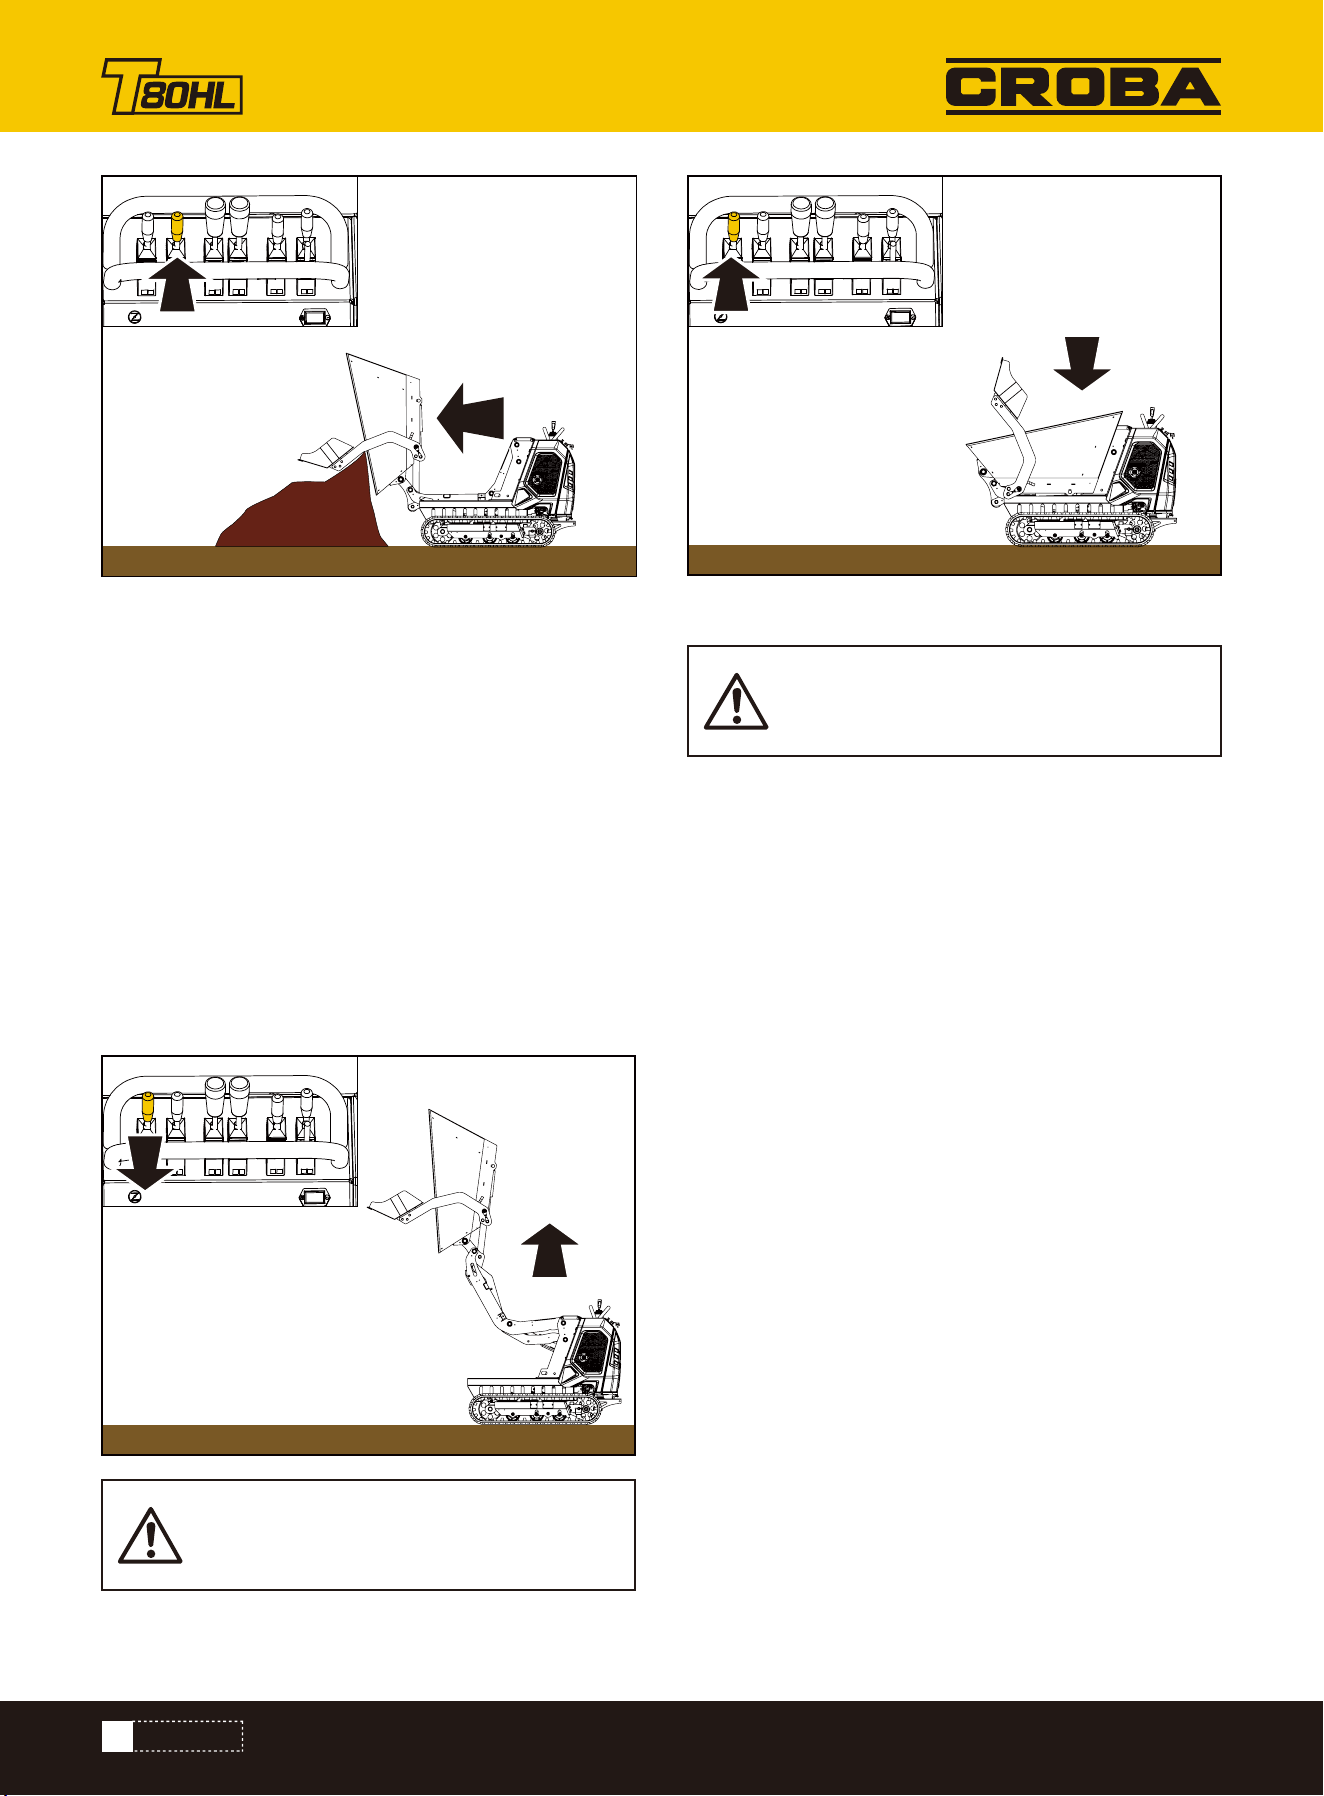
Push lever B forward
Fully dump in the skip A
Lower the loader unit (option) to transport position B
Always reverse up a slope at low speed with a full skip
Dumping out the skip alongside a pit is danger-
ous
Observe the maximum angle when driving on
slopes
Transporting with a full skip
Dumping out the skip
A
B
A
B
24
OPERATION
Ensure sufficient stability
Do not drive too closely to the pit
Always watch the material as you dump out the skip:
ensure that the material is dumped out evenly and does
not remain stuck in the skip, otherwise the machine could
tip over
When lifting the hopper, pull the handle back until the
hopper reaches the desired position.
To stop lifting the hopper, simply loosen the lifting handle.
When lowering the hopper, push the handle forward, and
when the hopper is back in place, put the lifting handle
back in place.
Maximum lifting and dumping limit: longitudi-
nal angle is 5°, lateral angle is 2°.
Hydraulic lifting Handle
A
B
Park the machine on level ground
Fasten the tracks with fastening elements (e. g. chocks)
Let the engine run at idling speed for at least 1 minute
before switching it off.
1.Stop the machine
2.Dump in the skip
3.Lower the loader unit to the ground
4.Reduce engine speed completely
5.Switch off ignition
6.Remove the ignition key
Always park the machine on firm ground
Parking the machine
25
Maintaining your Hydraulic Tracked Dumper will ensure long life to the machine and its components.
If any part of the protective structure is affected by a plastic deformation and/or rupture, the protective structure must
be replaced according to manufacturer's specifications
1. Turn off the engine and disengage all command levers. The engine must be cool.
2. Keep the engine's throttle lever in its SLOW position and remove the spark plug wire from the spark plug and secure.
3. Inspect the general condition of the power trackbarrow. Check for loose screws, misalignment or binding of moving
parts, cracked or broken parts, and any other condition that may affect its safe operation.
4. Use a soft brush, vacuum or compressed air to remove all contaminants from the machine. Then use high quality light
oil to lubricate all moving parts.
5. Check the spark plug wire regularly for signs of wear, and replace when needed.
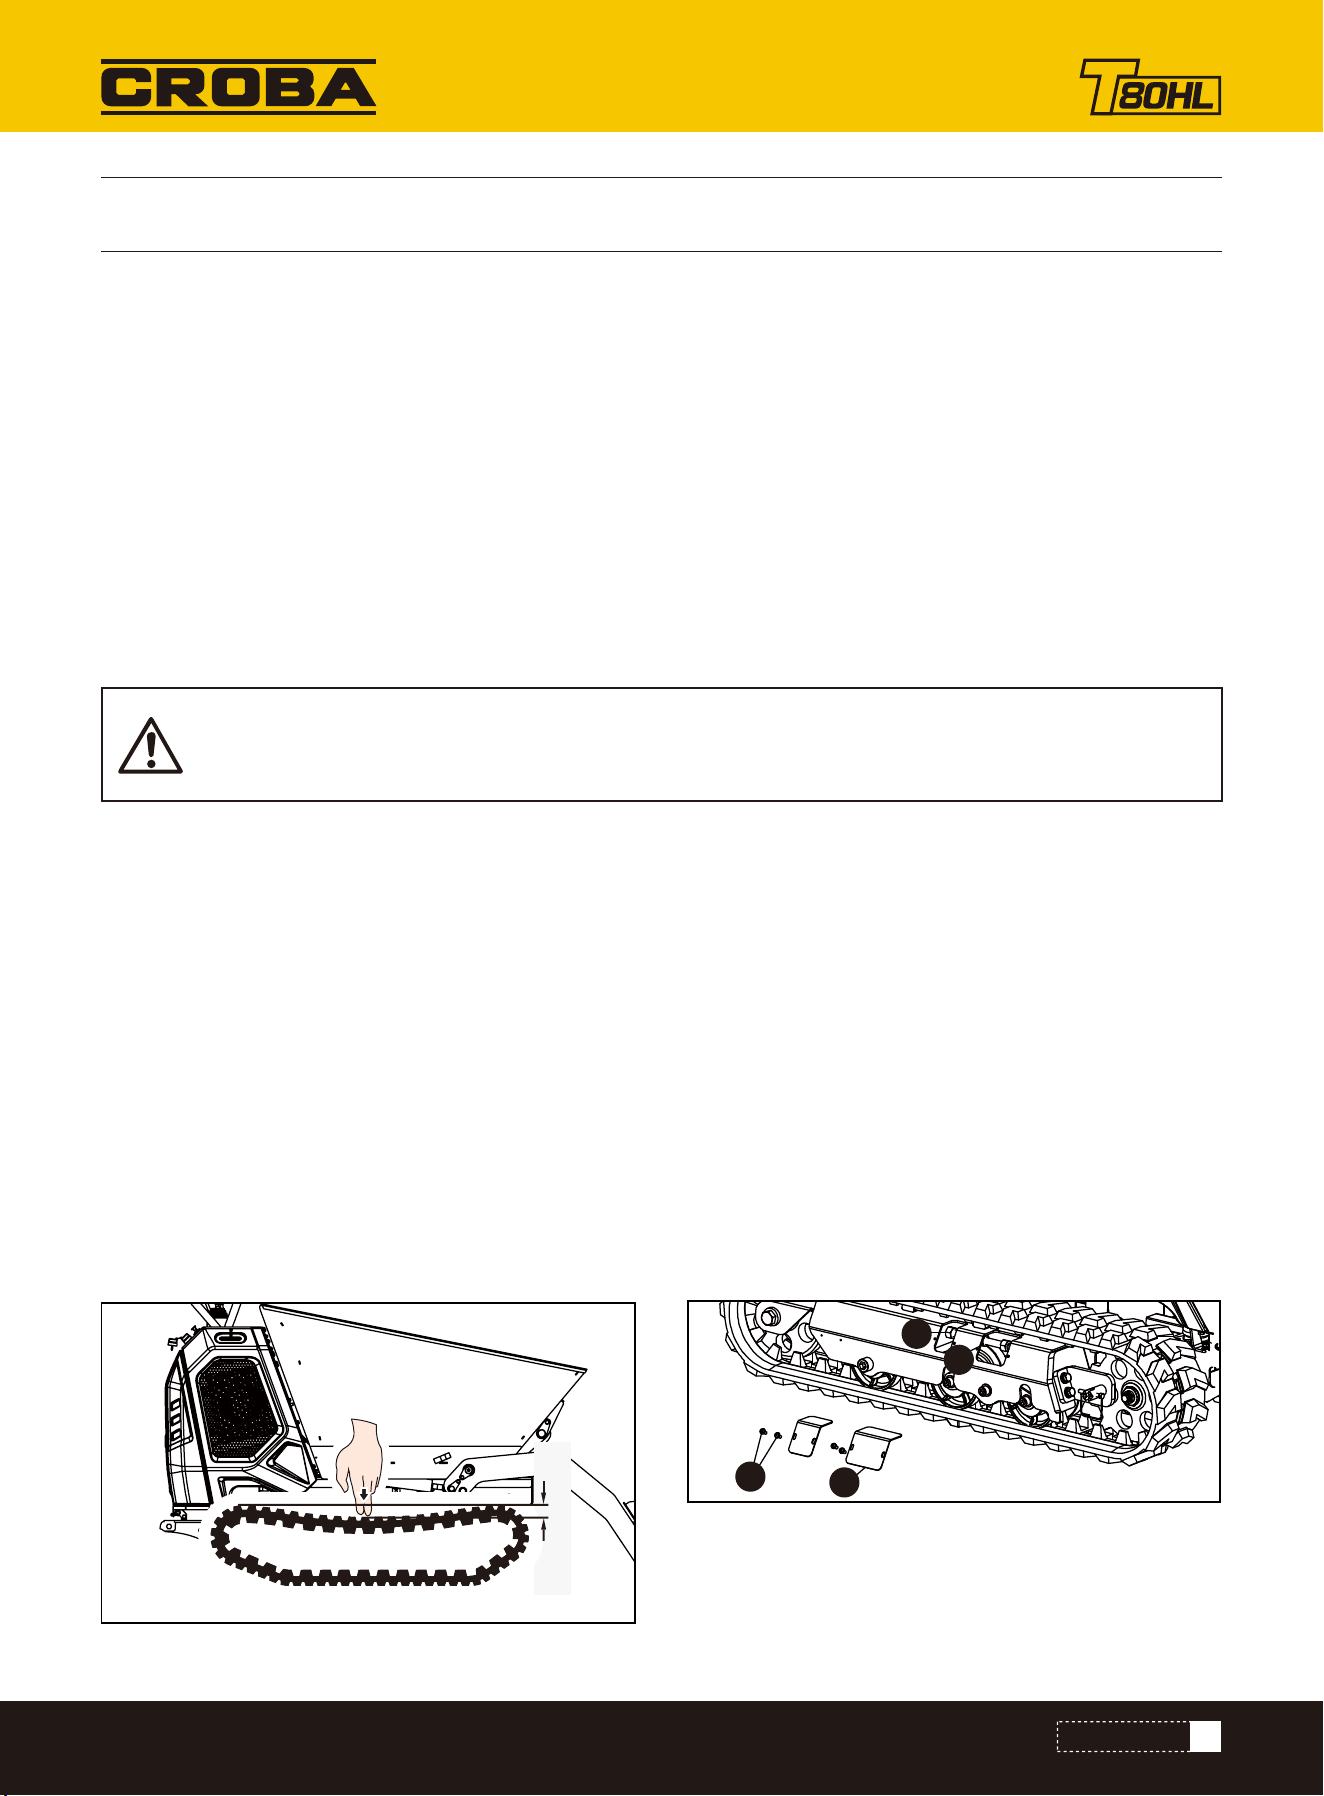
Take off the cover #3 by unscrewing the two screws #4.
Using two wrenches, loosen the counter nut #2, tighten
the nut #1.
Put the cover back on.
Repeat the same procedure on the other track.
3. Measure the track midline vs. the horizontal line. The reading must not be more than 3.94 - 5.91 inches.
Operate the valve levers to lift the self-loading shovel to the highest position and tip the hopper to the extreme. Unscrew
the oil plug and drain the oil into a container.
Remove the oil dipstick with gasket and add hydraulic oil. The recommended hydraulic oil is 10W AW32, ASLE H-150, or
ISO 32. Tank capacity is 22.5L.
Attention! Do not operate the valve levers during draining or adding oil, to prevent the shovel and hopper from falling.
With use, tracks tend to loosen. When operating with loose tracks, they tend to slip over the driving wheel causing it to
jump its housing, thus damaging wear to the housing.To check track tightness, proceed as follows.
1. Set the machine on a flat surface with compact ground, or on asphalt or pavement.
2. Lift the machine and set it on blocks or supports rated for the weight of the machine so that the tracks are approxi-
mately 3.94 inch off the ground.
Never use a "pressure washer" to clean your unit. Water can penetrate tight areas of the machine and its transmis-
sion case and cause damage to spindles, gears, bearings, or the engine. The use of pressure washers will result in
shortened life and reduce serviceability.
MAINTENANCE
MAINTENANCE
Preventive Maintenance
Hydraulic Oil
Tightening Tracks
3.94 - 5.91 inches
4
3
1
2

26
MAINTENANCE
Check the condition of the tracks periodically. If any track is cracked or frayed, it should be replaced as soon as conve-
nient.
1. Lift up the hopper and insert a support rod for safety purposes.
2. Lift the machine and set it on blocks or supports rated for the weight of the machine so that the tracks are approxi-
mately 4" off the ground.
3. Remove the two nuts M10 with washers and take off the front guard plate.
4. Loosen the adjusting bolts and pull the steering wheel axle toward the engine, then track will be loosen.
5. Pull out the whole track.
Refer to the Engine Manual included in your unit for the information on engine maintenance. Your engine manual provides
detailed information and a maintenance schedule for performing the tasks.
When removing or installing the tracks, be careful not to get your fingers caught between the track and pulley.
Replacing Tracks
Engine Maintenance

27
1. Drain the fuel tank completely. Stored fuel containing ethanol or MTBE can start to go stale in 30 days. Stale fuel has
high gum content and can clog the carburetor and restrict fuel flow.
2. Start the engine and allow it to run until it stops. This ensures no fuel is left in the carburetor. Run the engine until it
stops. This helps prevent gum deposits from forming inside the carburetor and possible engine damage.
3. While the engine is still warm, drain the oil from the engine. Refill with fresh oil of the grade recommended in the Engine
Manual.
4. Use clean cloths to clean off the outside of the machine and to keep the air vents free of obstructions.
5. Inspect for any loose or damaged parts. Repair or replace damaged parts and tighten loose screws, nuts or bolts.
6. Store your unit on flat ground in a clean, dry building that has good ventilation.
Do not use strong detergents or petroleum based cleaners when cleaning plastic parts. Chemicals can damage
plastics.
Do not store the machine with fuel in a non-ventilated area where fuel fumes may reach flame, sparks, pilot lights
or any ignition sources.
If the Hydraulic Tracked Dumper will not be used for a period longer than 30 days, follow the steps below to prepare your
unit for storage.
STORAGE
STORAGE

28
The crane and the lifting gear must have suitable dimensions
Crane handling the machine requires suitable lifting gear
Secure the machine against unintentional movement
Load the machine as follows:
• Empty the skip and the loader unit
• Lower the skip
• Stop the engine
• Remove the ignition key.
• Use suitable lifting gear, chains etc
• Slowly raise the machine
Ensure that no-one is near the machine!
Have loads fastened and crane operators guided by experienced persons only! The person guiding the crane
operator must be within sight or sound of him
Ensure that the crane and the lifting gear (cables, chains) have sufficient load-bearing capacity!
Only raise the machine with an empty loader unit and skip
Stay clear of suspended loads!
It is essential that you read the safety instructions at the beginning of this chapter and follow any other safety
instructions relevant in your country!
TRANSPORTATION
TRANSPORTATION
Safety instructions

29
TROUBLESHOOTING
TROUBLESHOOTING
Problem Cause Remedy
Engine fails to
start.
1. Spark plug wire disconnected.
2. Out of fuel or stale fuel.
3. Choke not in open position.
4. Blocked fuel line.
5. Fouled spark plug.
6. Engine flooding.
1. Attach spark plug wire securely to
spark plug.
2. Fill with clean, fresh gasoline.
3. Throttle must be positioned at choke
for a cold start.
4. Clean the fuel line.
5. Clean, adjust gap, or replace.
6. Wait a few minutes to restart, but do
not prime.
Engine runs
erratically.
1. Spark plug wire loose.
2. Unit running on CHOKE.
3. Blocked fuel line or stale fuel.
4. Vent plugged.
5. Water or dirt in fuel system.
6. Dirty air cleaner.
7. Improper carburetor adjustment.
1. Connect and tighten spark plug wire.
2. Move choke lever to OFF.
3. Clean fuel line. Fill tank with clean,
fresh gasoline.
4. Clear vent.
5. Drain fuel tank. Refill with fresh fuel.
6. Clean or replace air cleaner.
7. Refer to Engine Manual.
Engine
overheats.
1. Engine oil level low.
2. Dirty air cleaner.
3. Air flow restricted.
4. Carburetor not adjusted properly.
1. Fill crankcase with proper oil.
2. Clean air cleaner.
3. Remove housing and clean.
4. Refer to Engine Manual.
One of the two
tracks is blocked.
Foreign bodies have worked their
way between the track and the
frame.
Remove the foreign body.
Machine does
not move while
engine is running.
1. Gear is not properly selected.
2. Driving tracks not tight enough.
1. Ensure gear lever is not in-between
two different gears.
2. Tighten driving tracks.