
Technical Support and E-Warranty Certificate www.vevor.com/support
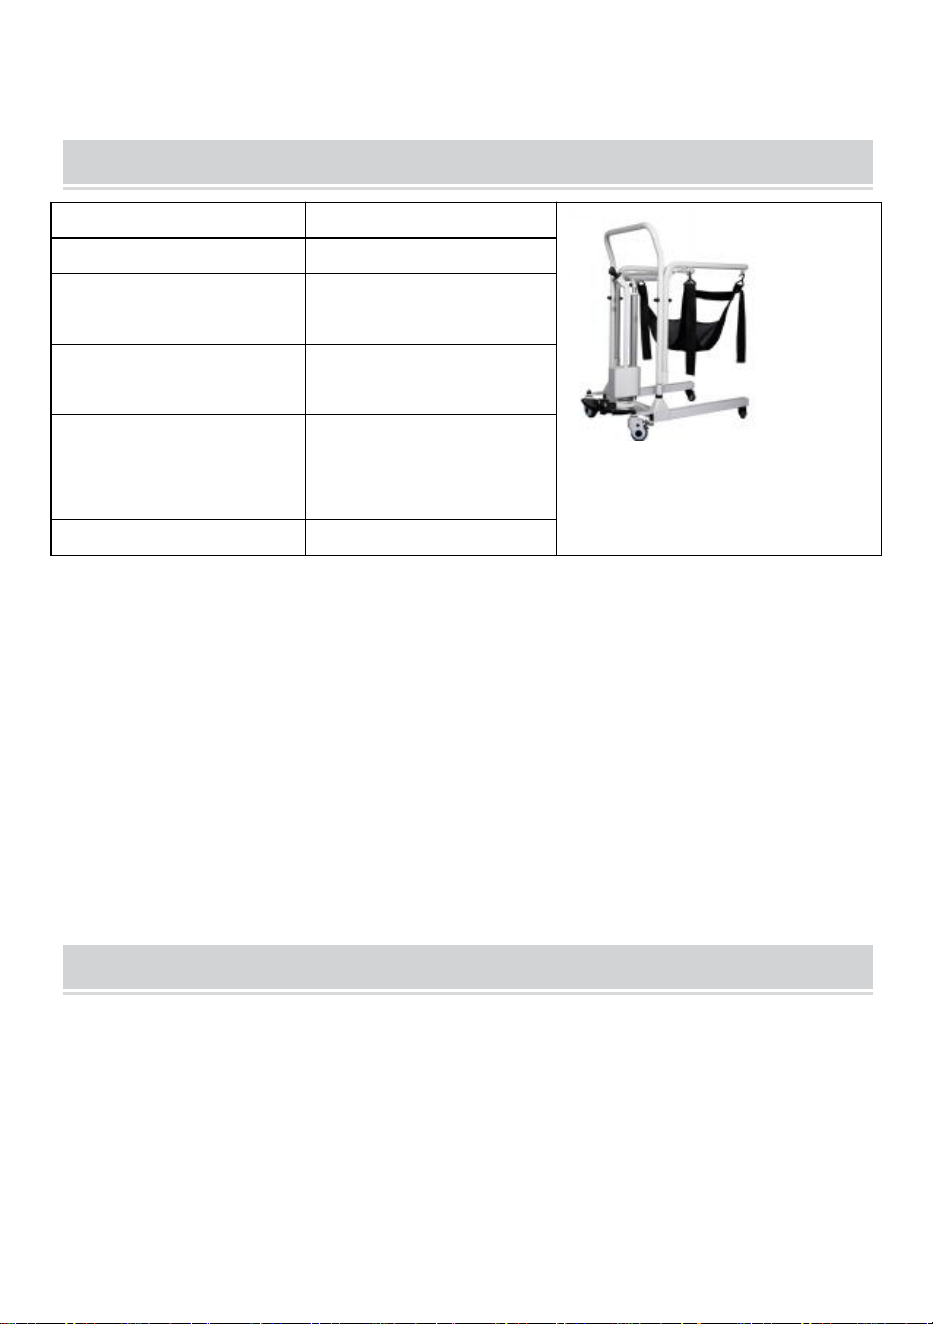
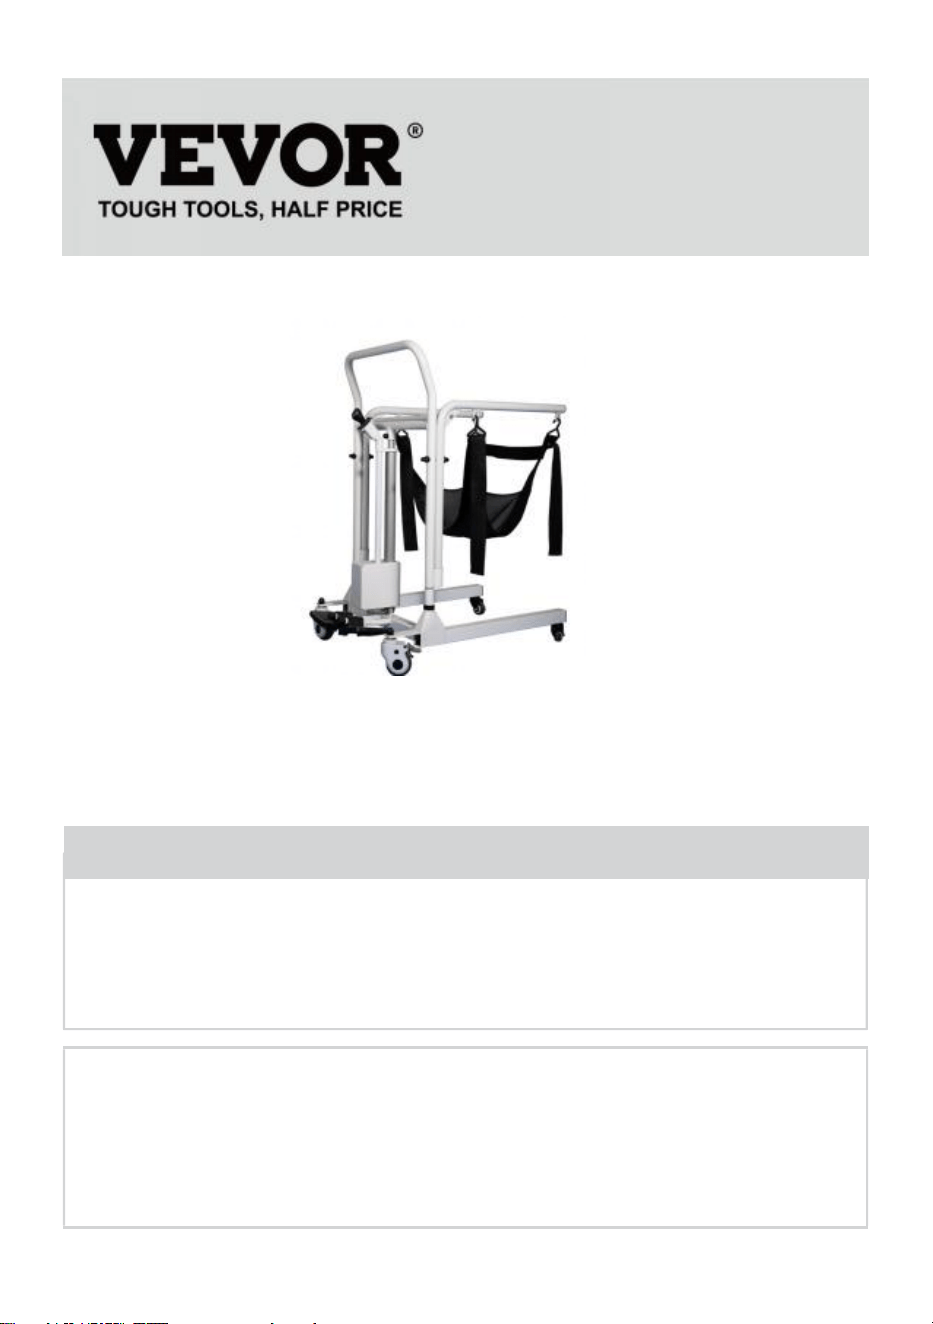
Patient Transfer Chair
MODEL:XFL-QX-YW02
We continue to be committed to provide you tools with competitive price.
"Save Half", "Half Price" or any other similar expressions used by us only represents an
estimate of savings you might benefit from buying certain tools with us compared to the major
top brands and does not necessarily mean to cover all categories of tools offered by us. You
are kindly reminded to verify carefully when you are placing an order with us if you are
actually saving half in comparison with the top major brands.
- 1 -
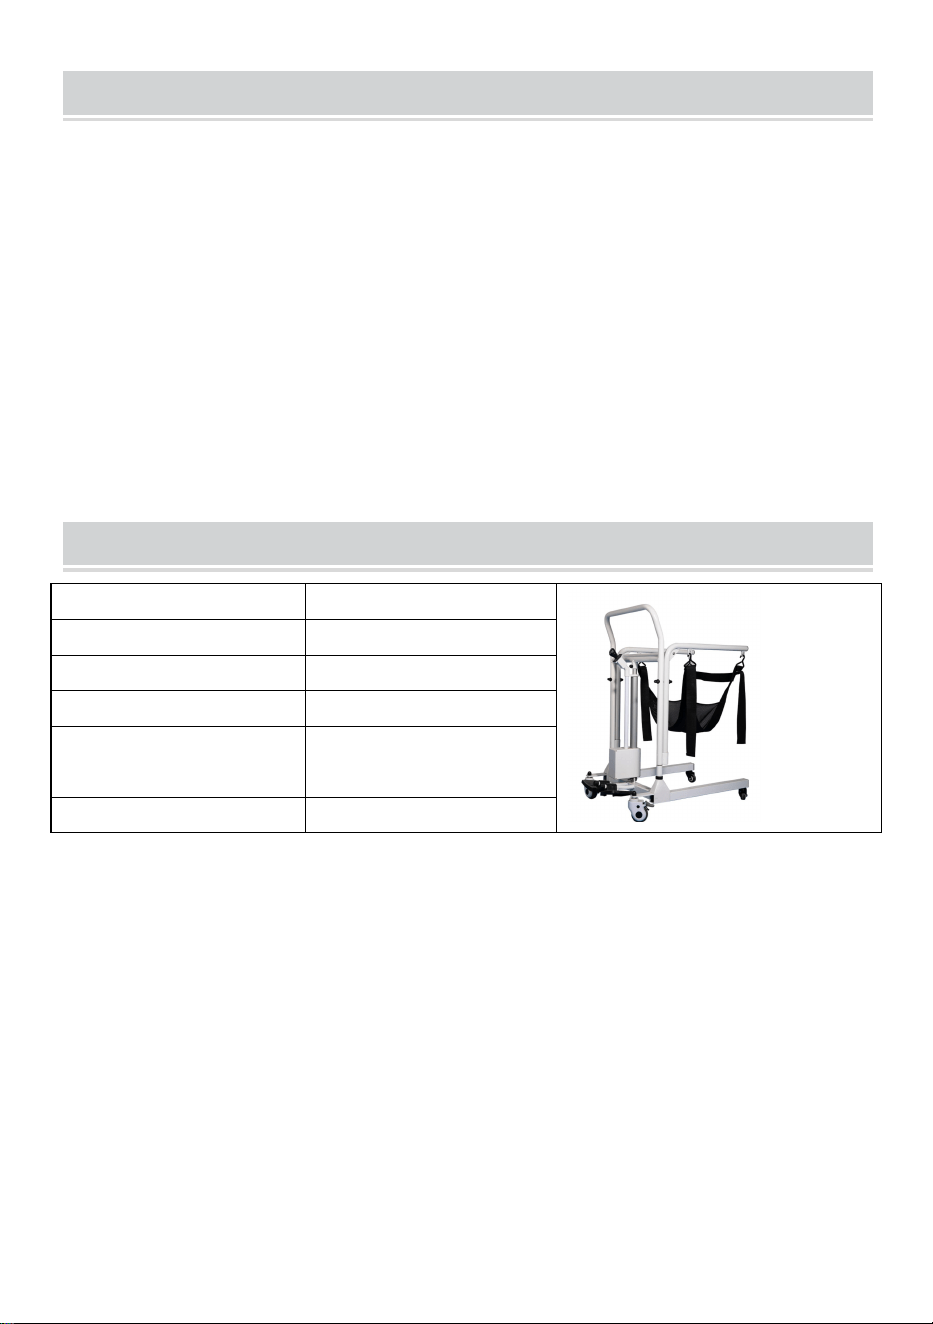
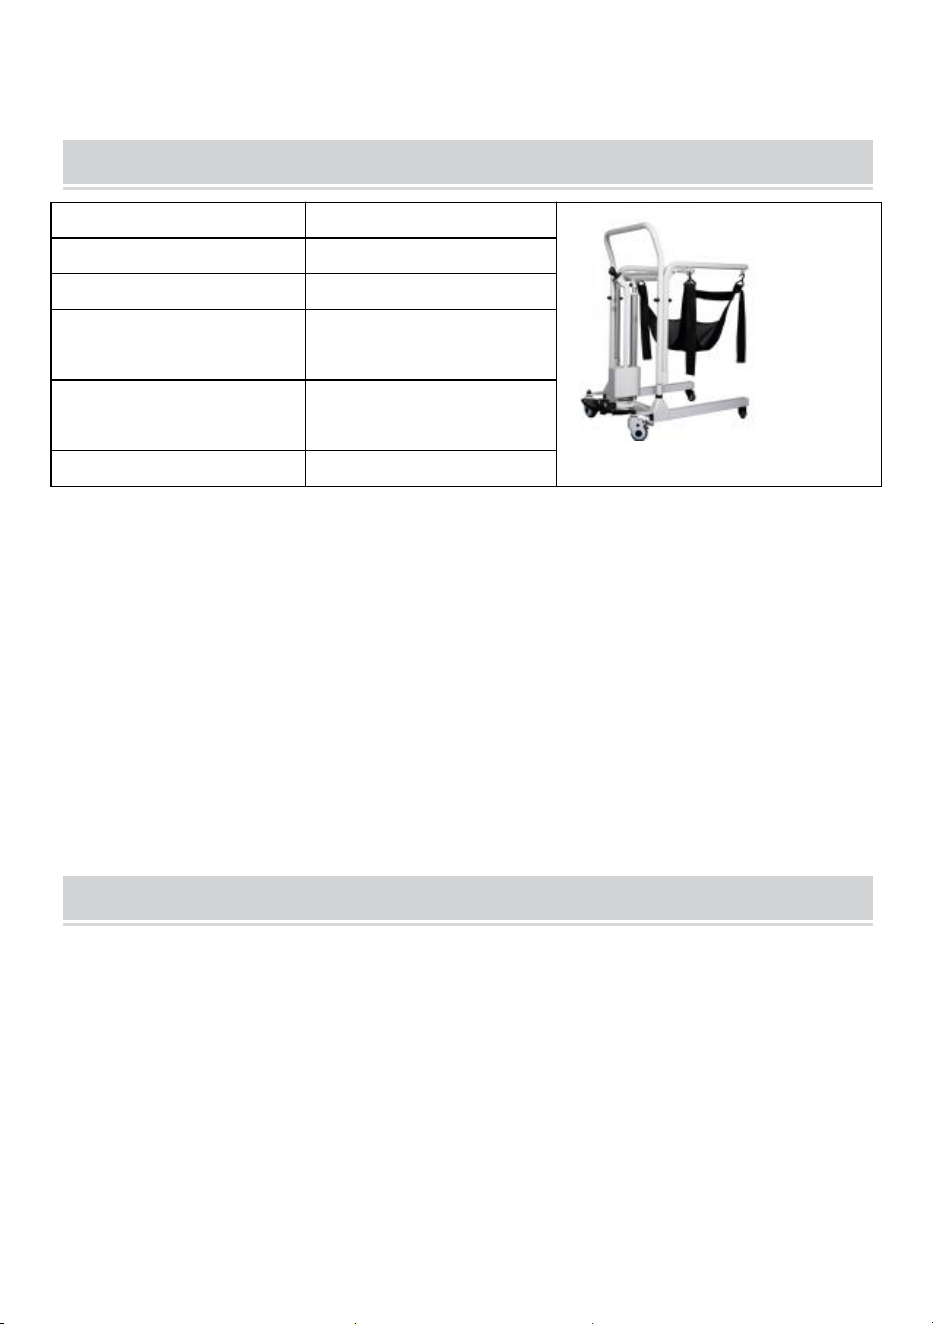
MODEL:XFL-QX-YW02
Note:The product picture is for reference, the actual details shall prevail
Have product questions? Need technical support? Please feel free to
contact us:
Technical Support and E-Warranty Certificate
www.vevor.com/support
NEED HELP? CONTACT US!
This is the original instruction, please read all manual instructions
carefully before operating. VEVOR reserves a clear interpretation of our
user manual. The appearance of the product shall be subject to the
product you received. Please forgive us that we won't inform you again if
there are any technology or software updates on our product.
Patient Transfer Chair
- 2 -
Thank you very much for choosing this Patient Transfer Chair
Please read all of the instructions before using it.The information will help
you achieve the best possible results.
Operation safety
Please put this manual in a place easy to check and keep it properly.This
instructionmanual clearlyindicateshowto use the equipment safely and correctly,
so astopreventanyharmorpropertylosscausedfro youandothers.
Warning
1. Must use matched adapter with this product when charging.2.
This chair is not recommended to use for showering, if you have to
must turn off the power and put the waterproof cover on the
charging port.
3. The light on adapter will be on red while charging, it will stop
charging automatically when the battery is fully charged, and the
light will turn green.4. The maintenance of this machine must be
carried out by professionals.
Prohibition
1. Do not open the battery box when it is charging
2. Do not use the product during the charging process
3. Do not use it if the weight over 300 lbs(150kg)
4. Do not put it in the place that the kids can touch it to avoid injury5. lt is
strictly forbidden to operate the machine when there are objects blocking
it , otherwise the machine will be damaged
*Our company will not be responsible for any loss or damage caused by
operation neglecting warning and attention. Please pay attention on.
- 3 -
Product introduction
Intended use
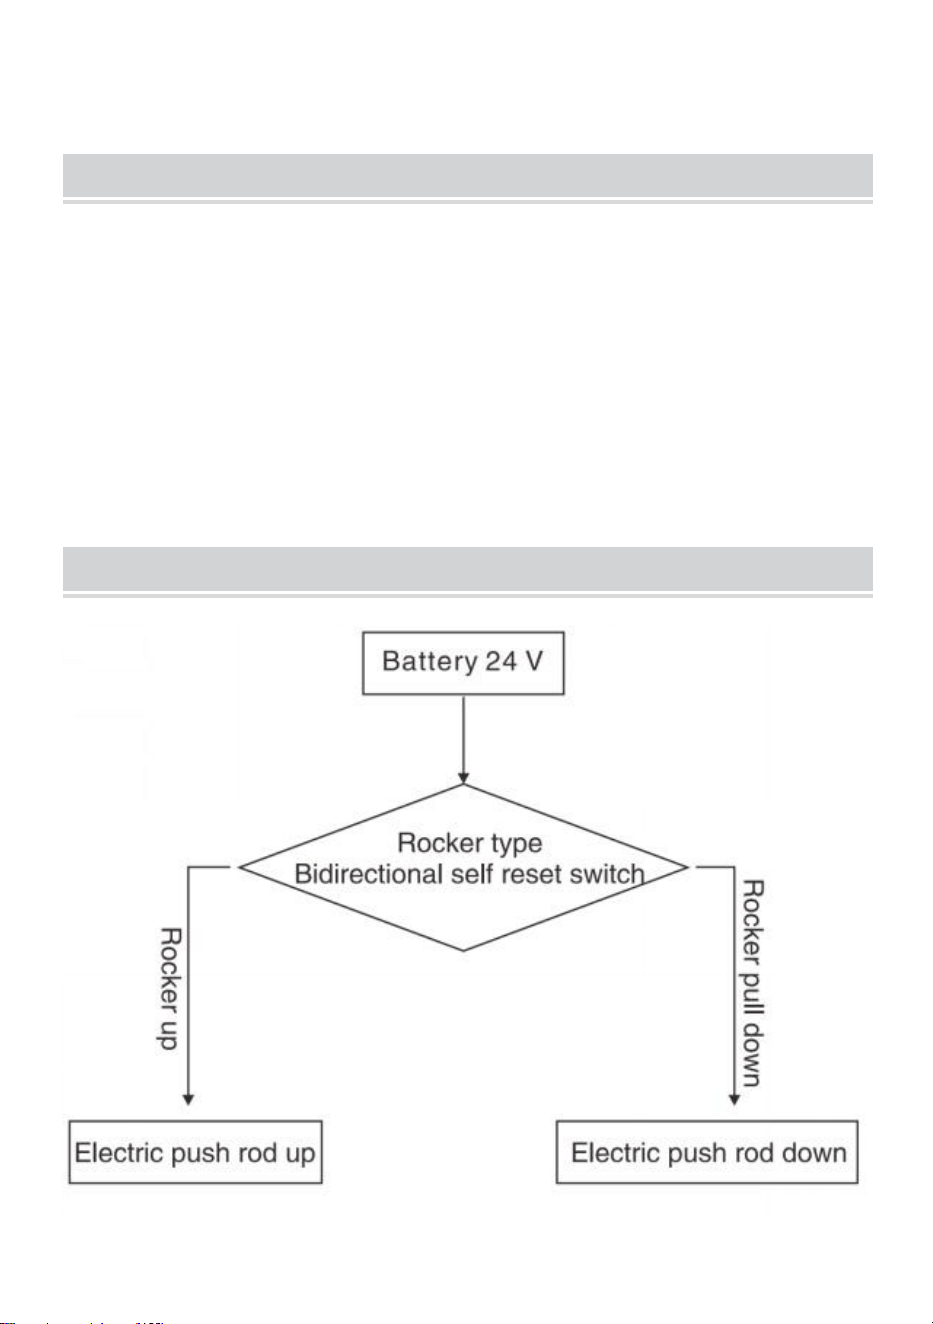
Electric lift transfer chair is the nursing device which helps disabled people moving
without barrier,it is designed for short distance transferring and rehabilitation nursing.
The caregivers can transfer the patients easily by controlling the lift button, which
improve the nursing efficiency greatly.lt help the caregivers to transfer patient who is
immobile to car, living room, toilet, and bath room.In summary, it can greatly reduce the
nursing intensity for caregivers and lower the nursing risk of secondary injury during
the transfer process.
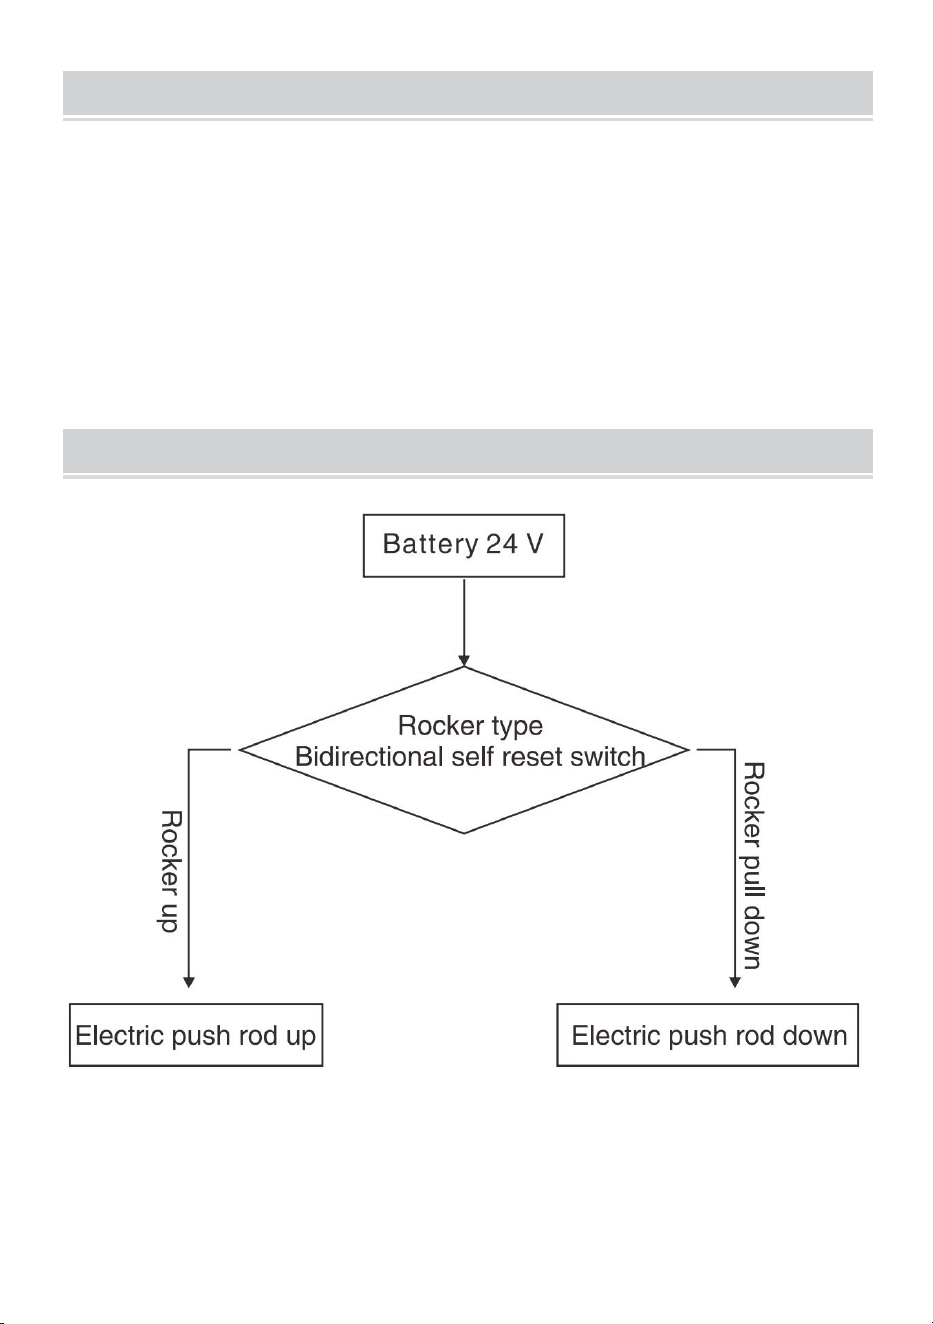
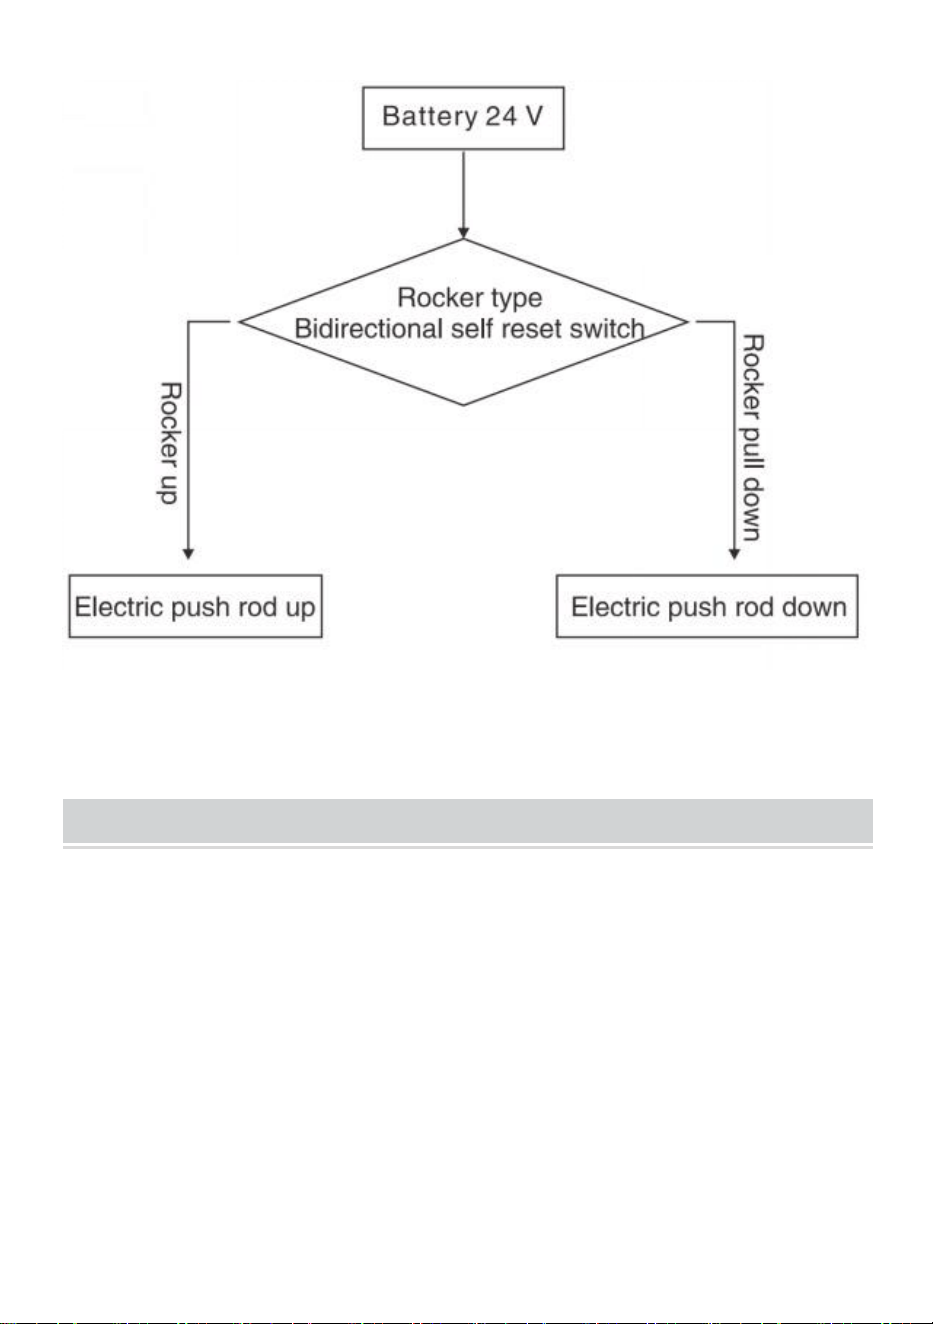
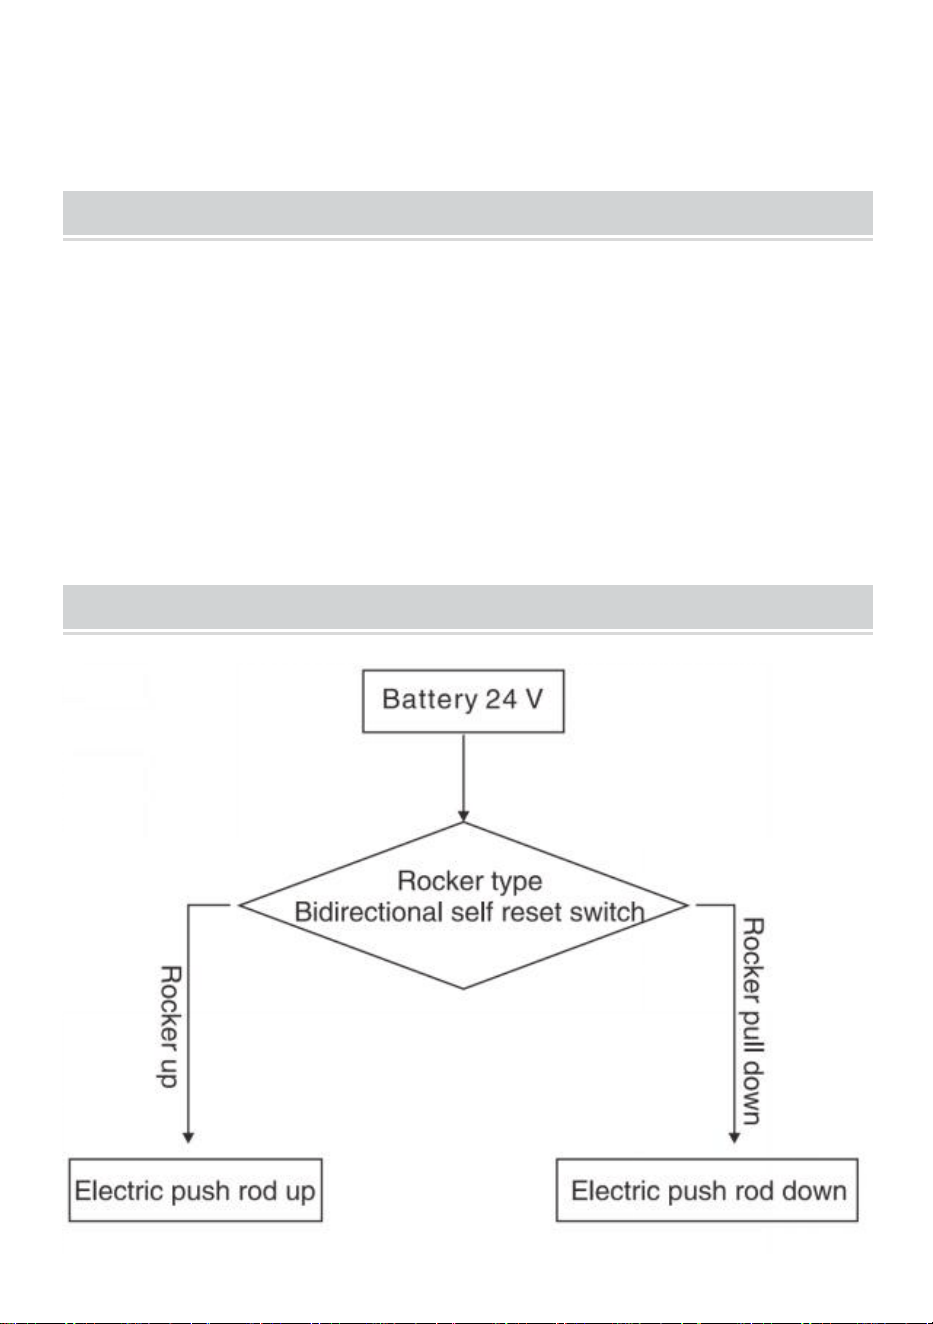
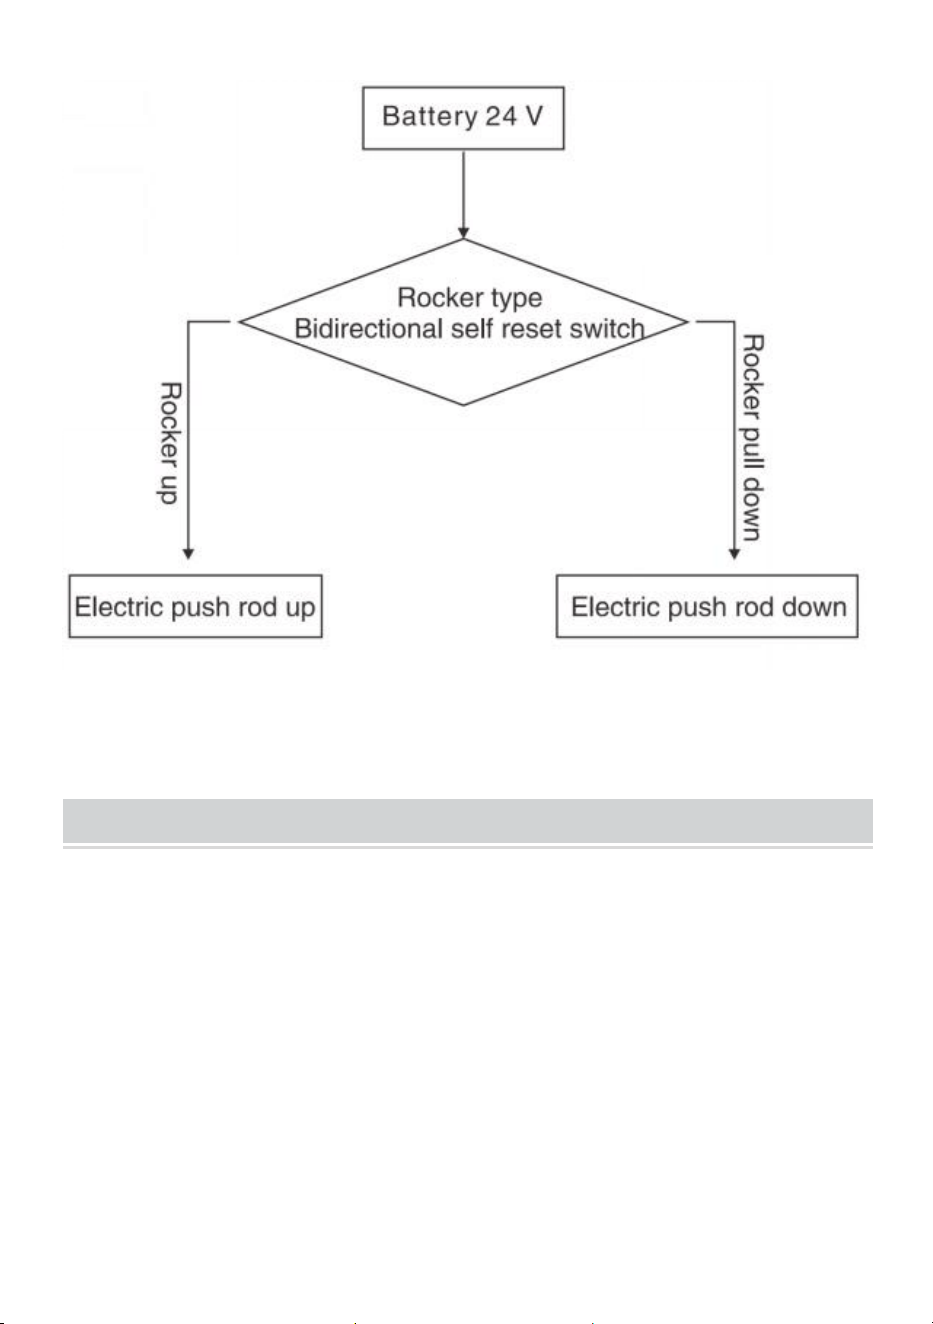
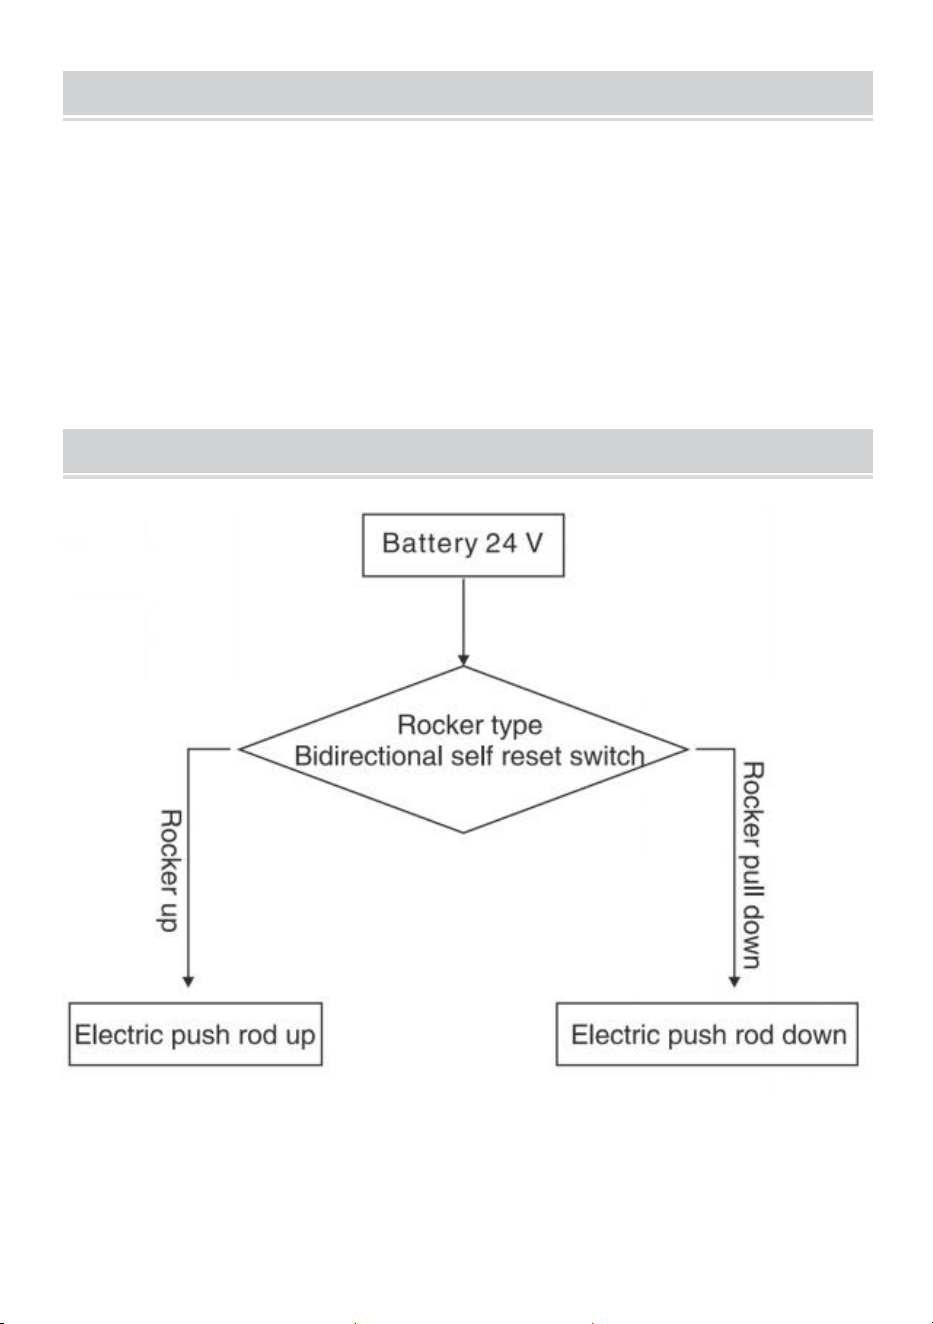
Circuit principle block diagram
- 4 -
Environmental requirements
◆Use environment:
Ambienttemperaturerange:+10℃~+40℃Relative humidity
range:30%~75%Atmospheric pressure range: 700hPa~1060hPaNo
corrosive and combustible materials, dry and less dust indoor
◆Storage environment:
Ambient temperature:0℃~+50℃relative humidity: s93%Atmospheric
pressure:500hPa~1060hPaNo corrosive gas, well ventilated room.
◆During transportation and storage, handle with care, and do notthrow or
drop objects.
Do not store the equipment in a place where liquid may splash.
Do not store the equipment under the risk of combustible gas.
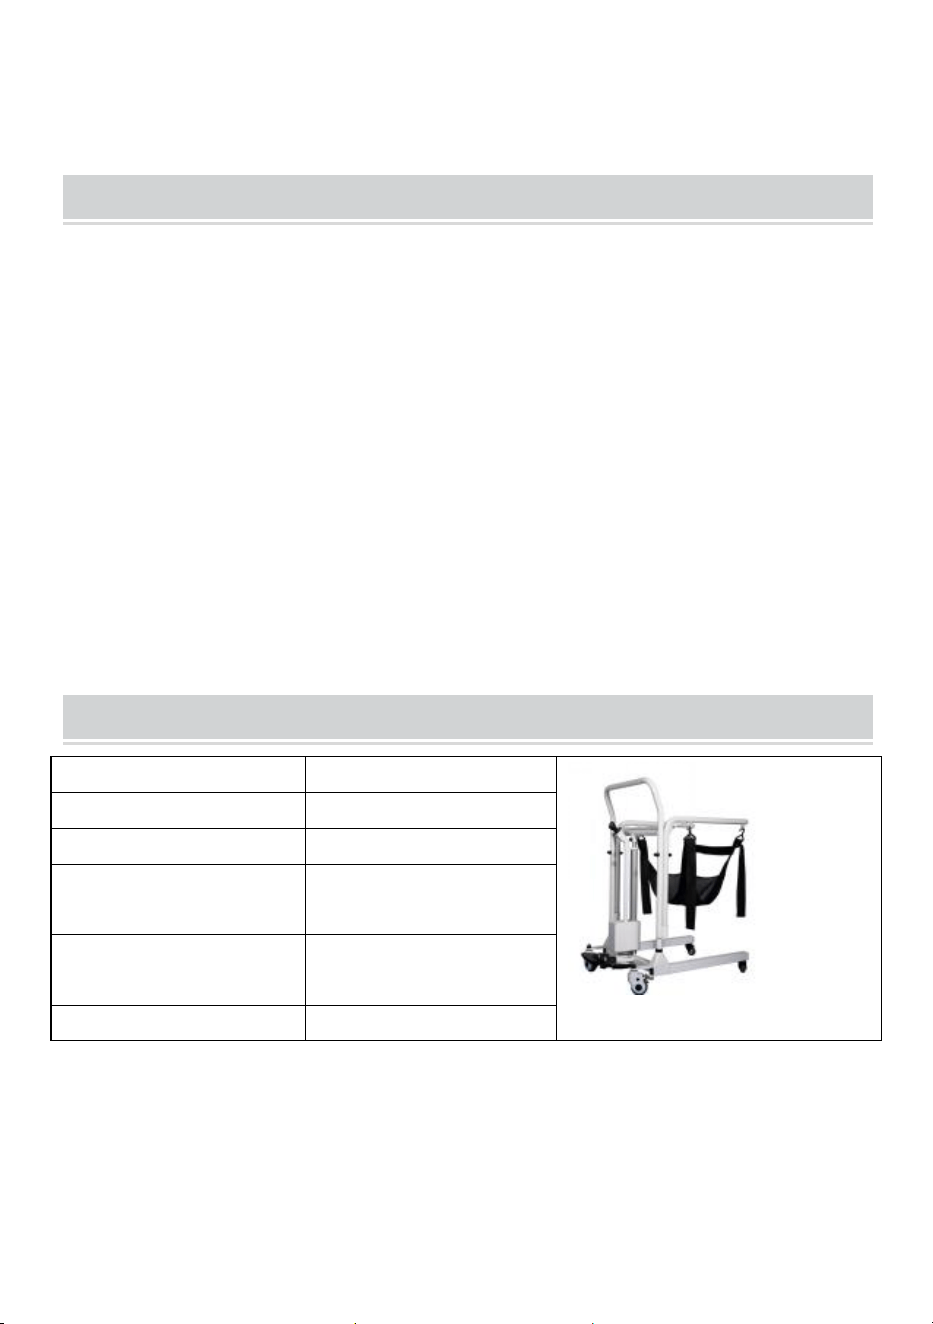
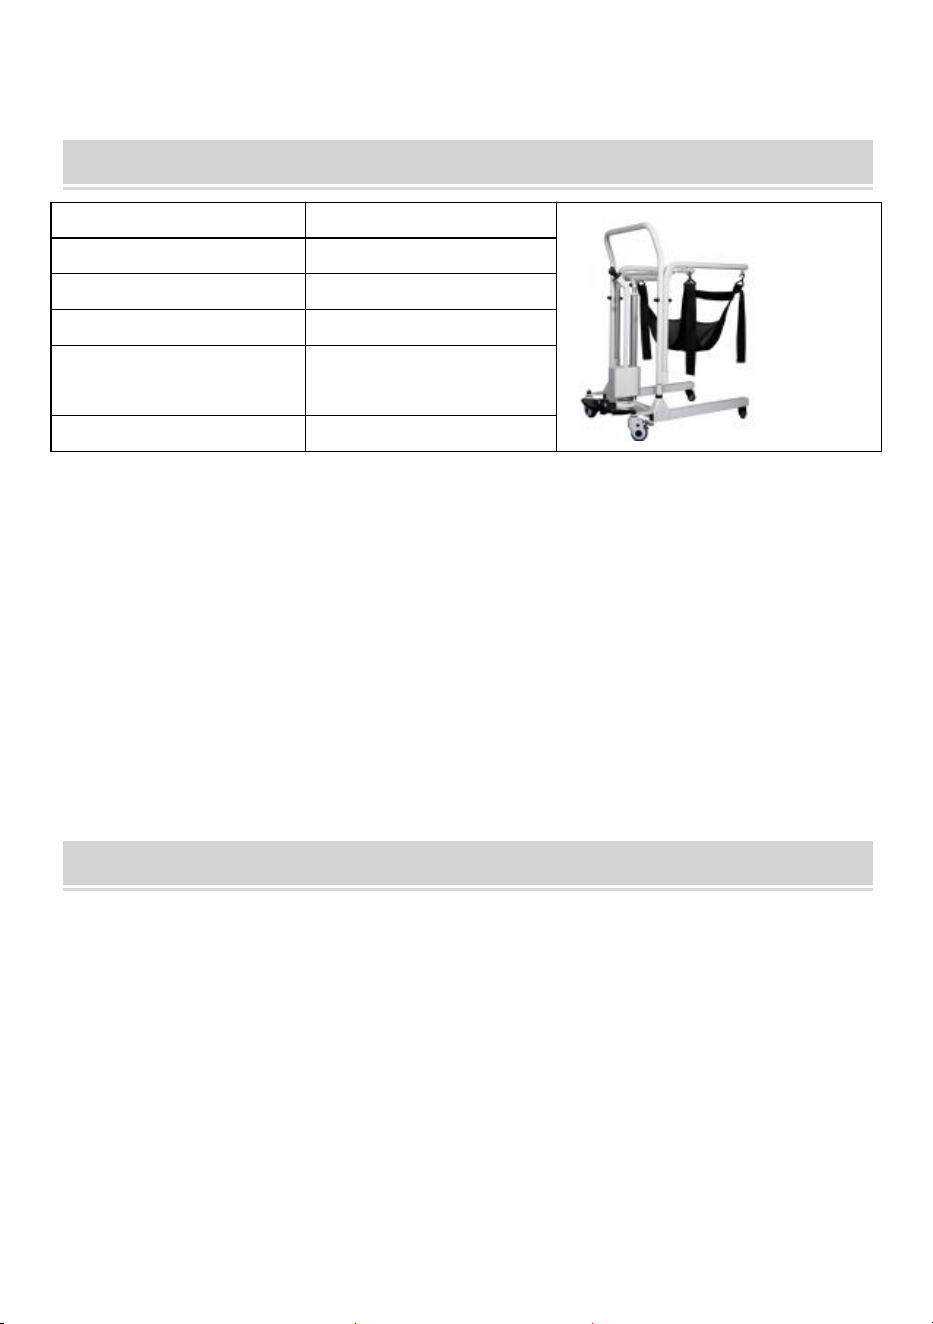
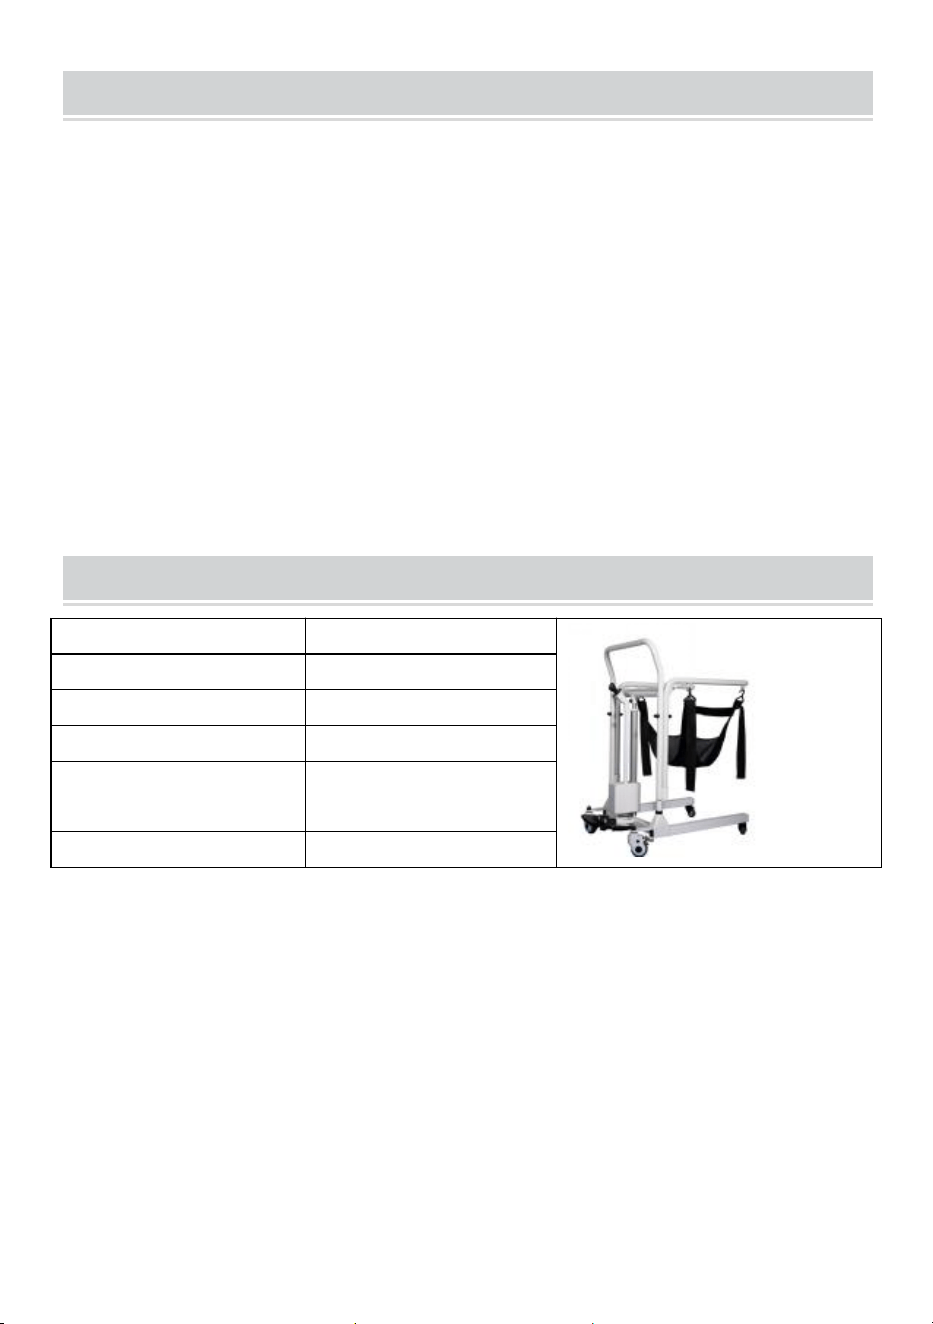
Product parameter
Model
XFL-QX-YW02
Colour
White + black
Lift Range
330mm
Waterproof Class
IPX44
Maximum Load
≤150 KG(330 lbs)
Product Size
860 x 550x 980 mm
- 5 -
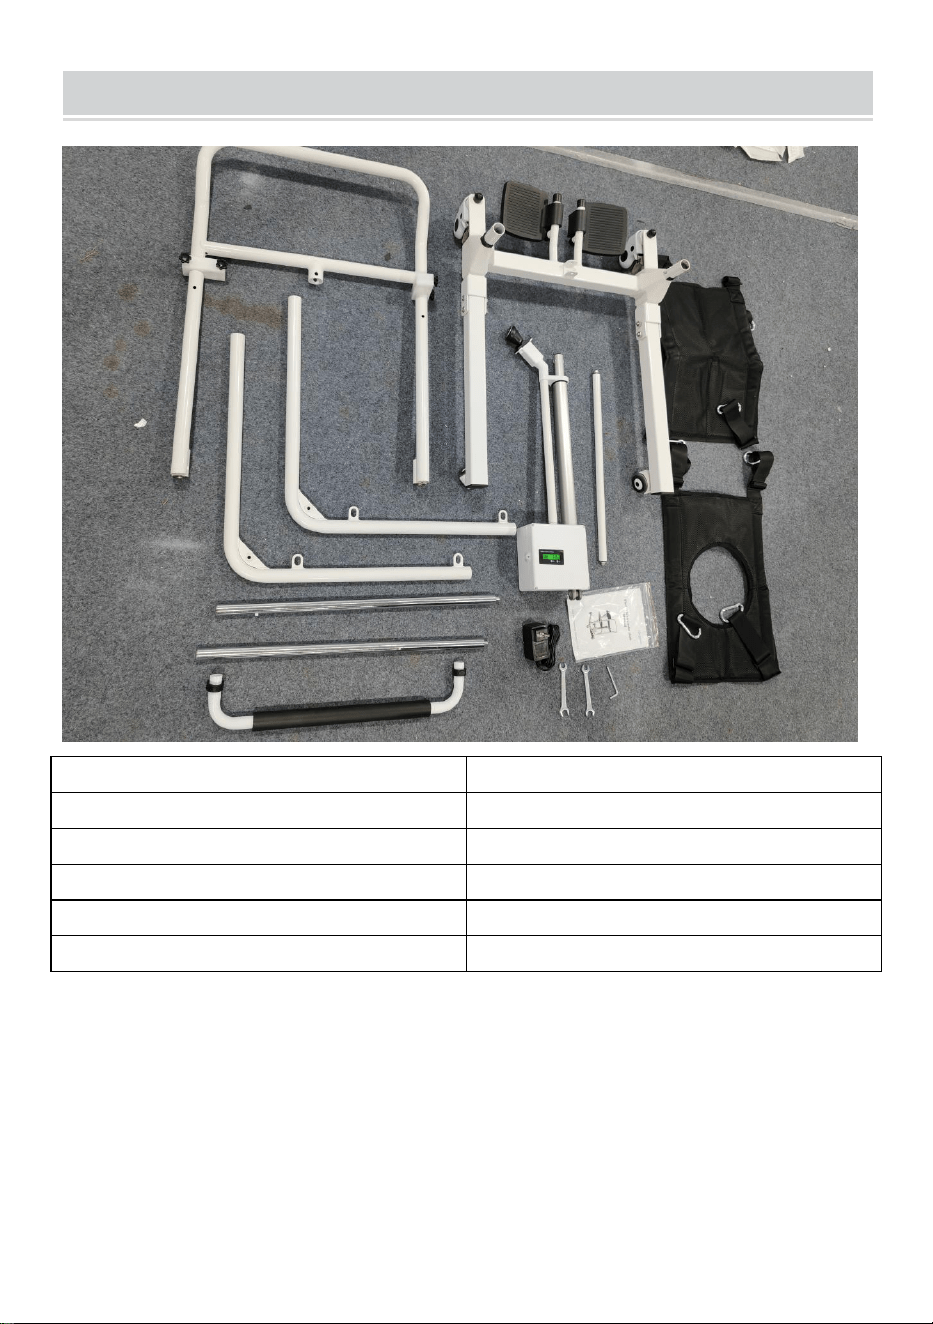
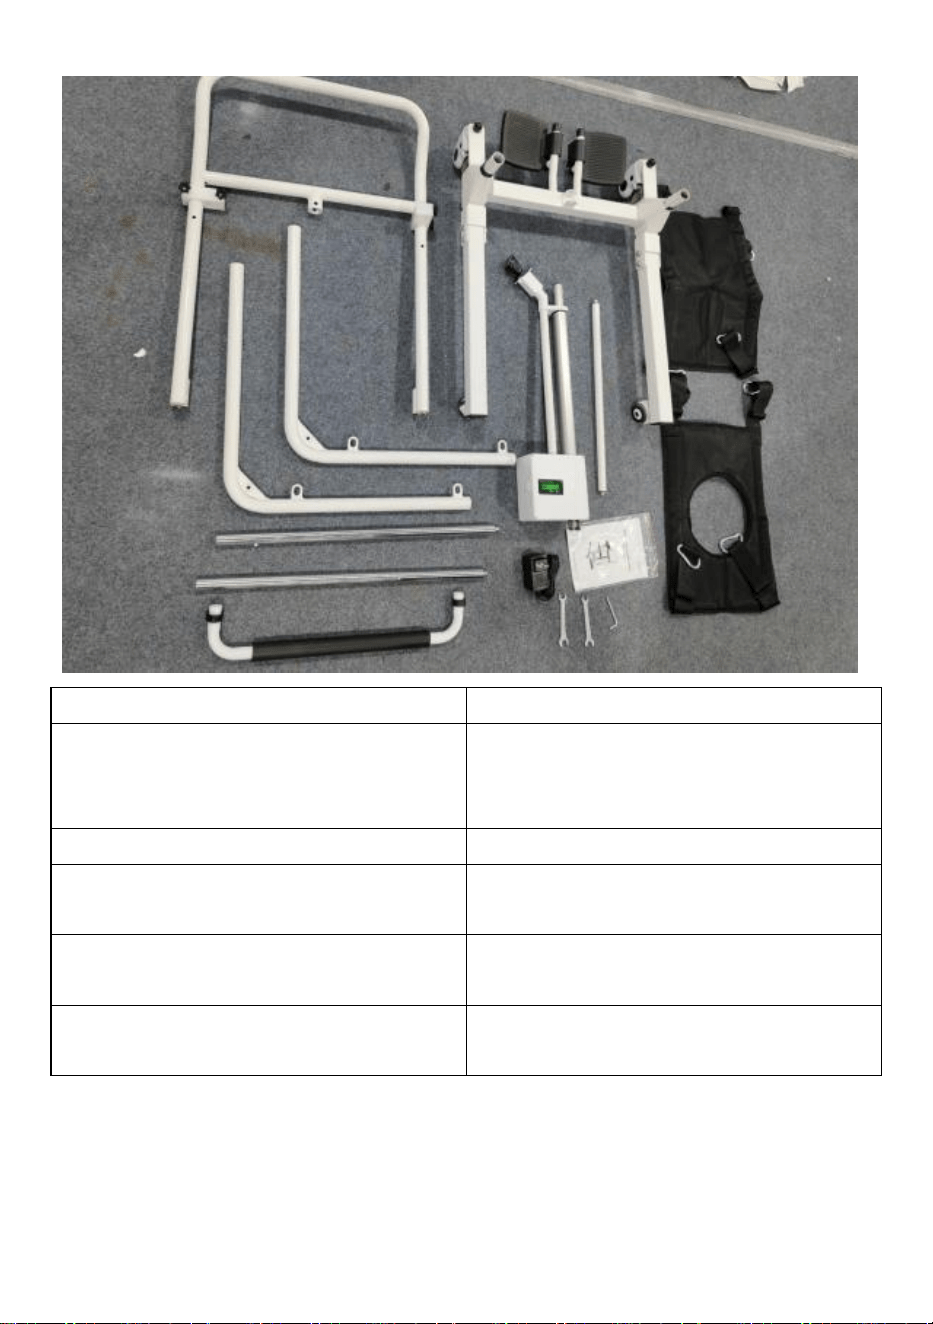
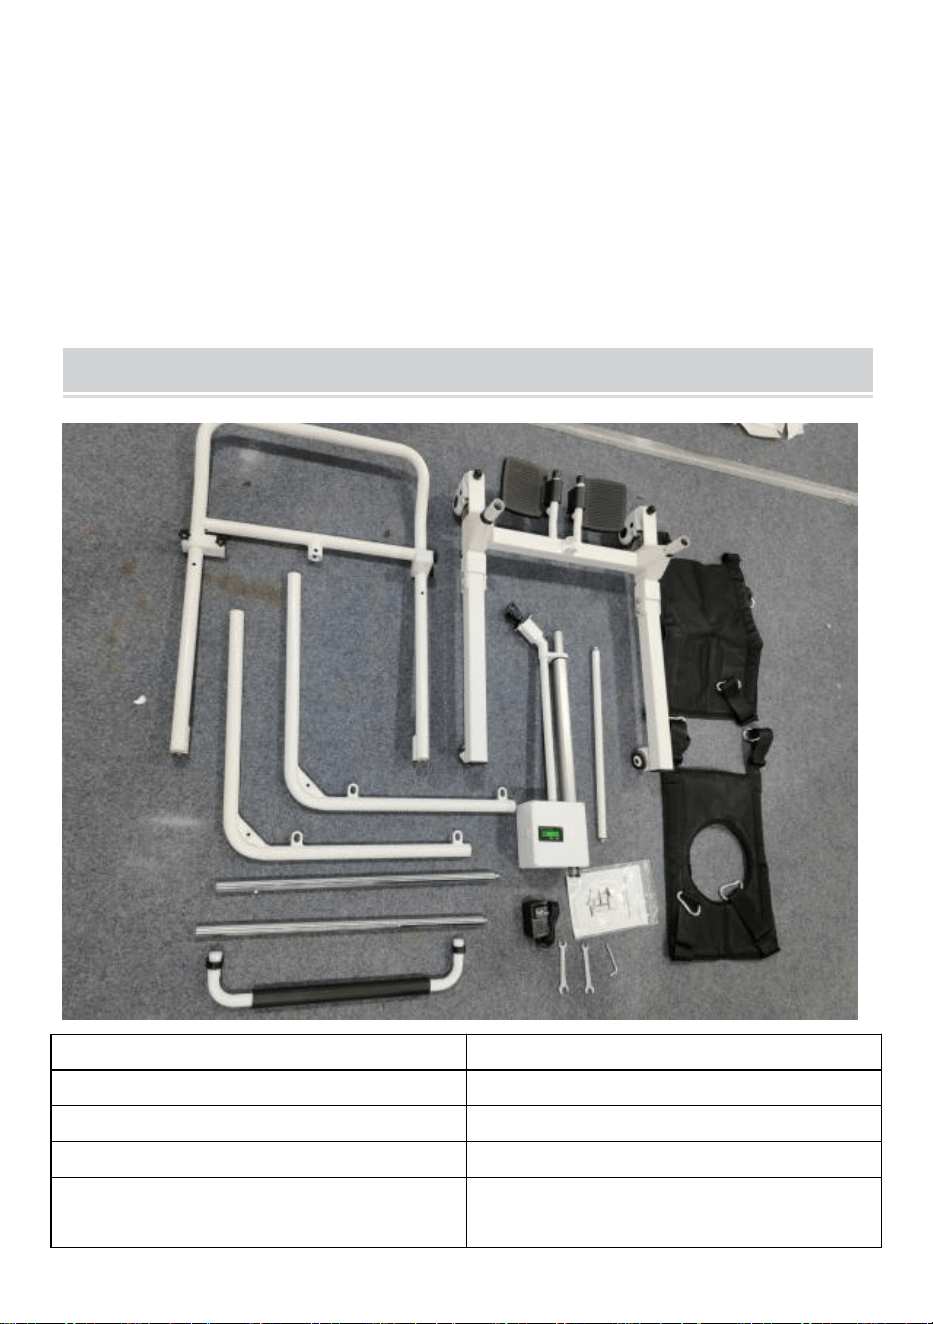
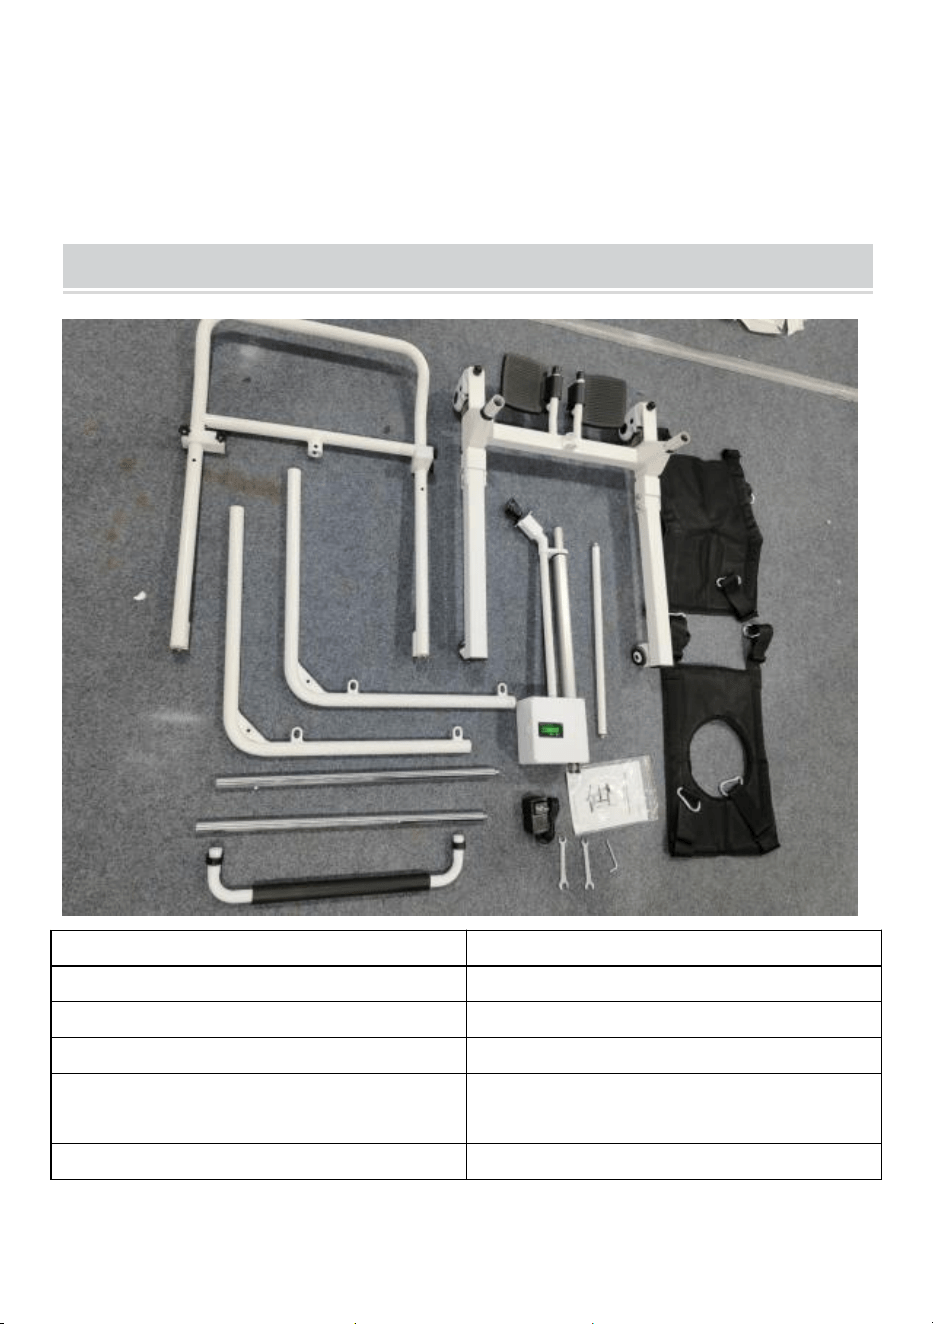
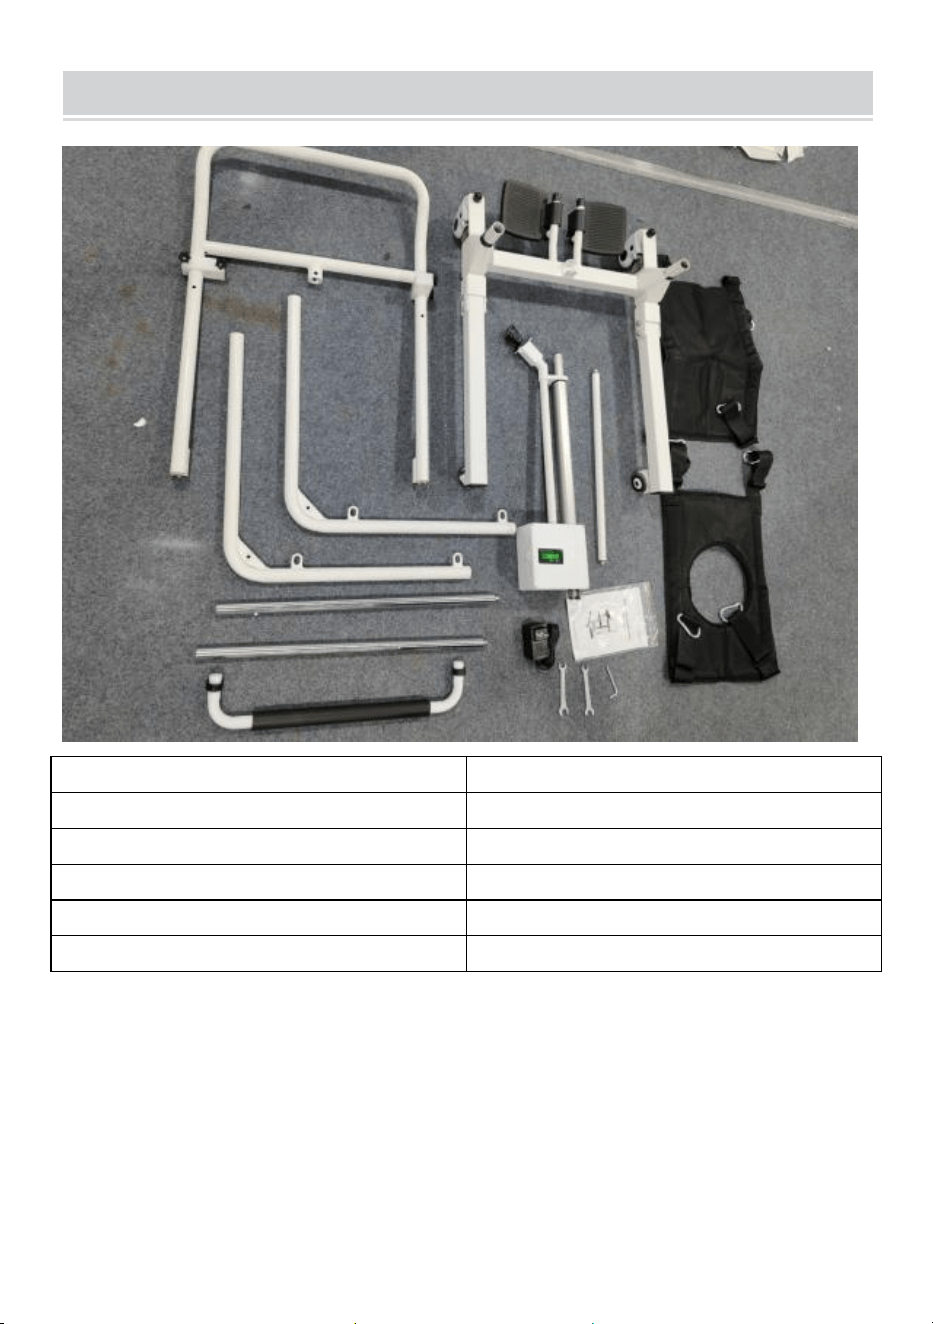
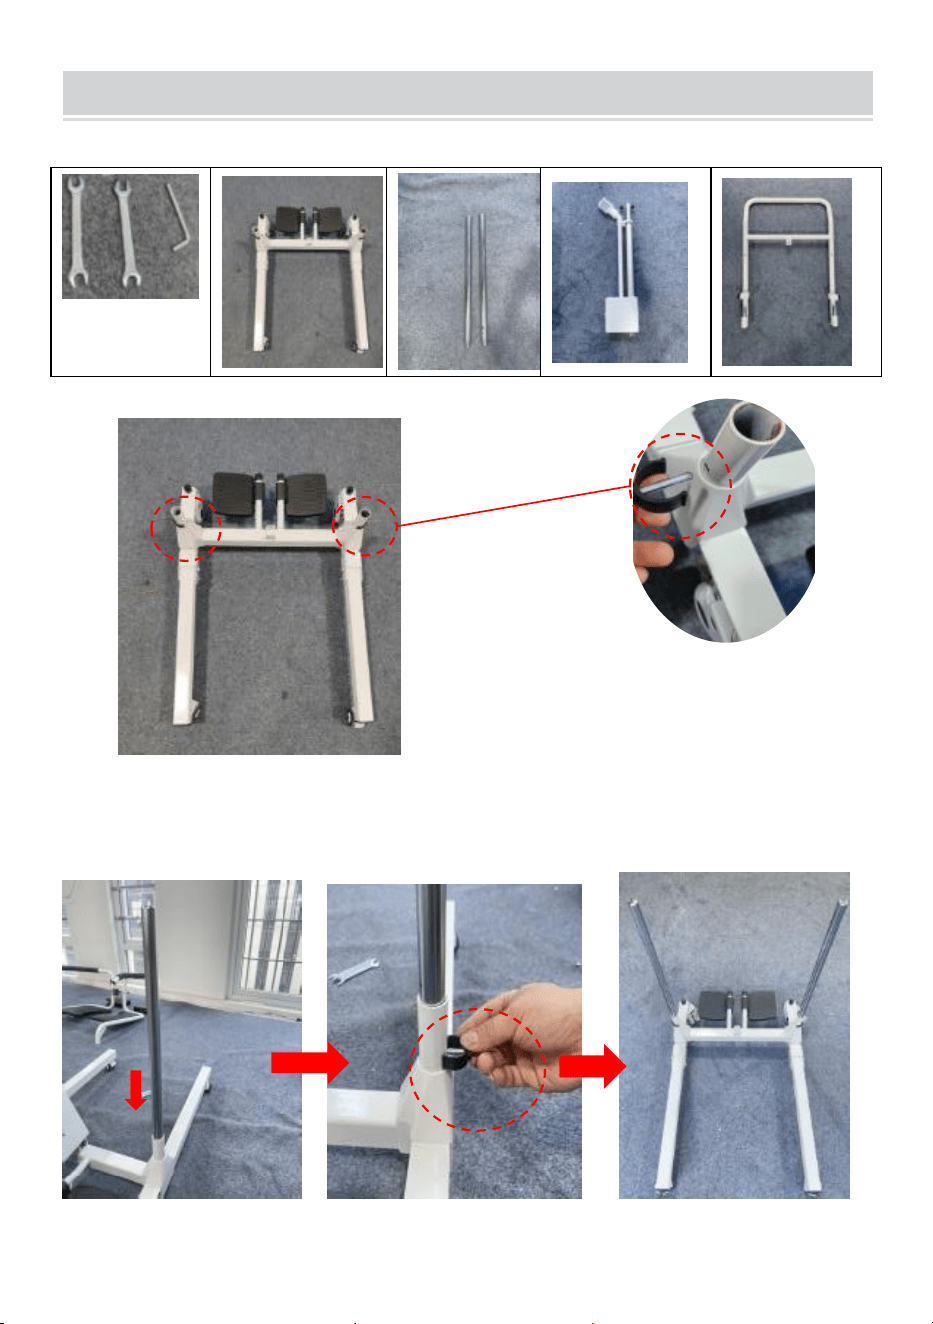
Part List
1.Base frame x1
2.Handrail frame x1
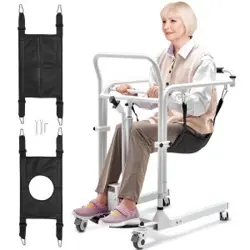
3.seat pocket x1
4.seat pocket (with holes) x1
5.Seat left bracke tx1
6.Seat right bracket x1
7.Mandrel x2
8.Power adapter x1
9.Electric push rod assembly x1
10.Connecting rod x1
11.Back rest lever x1
12. Mounting fittings x 1set

- 6 -
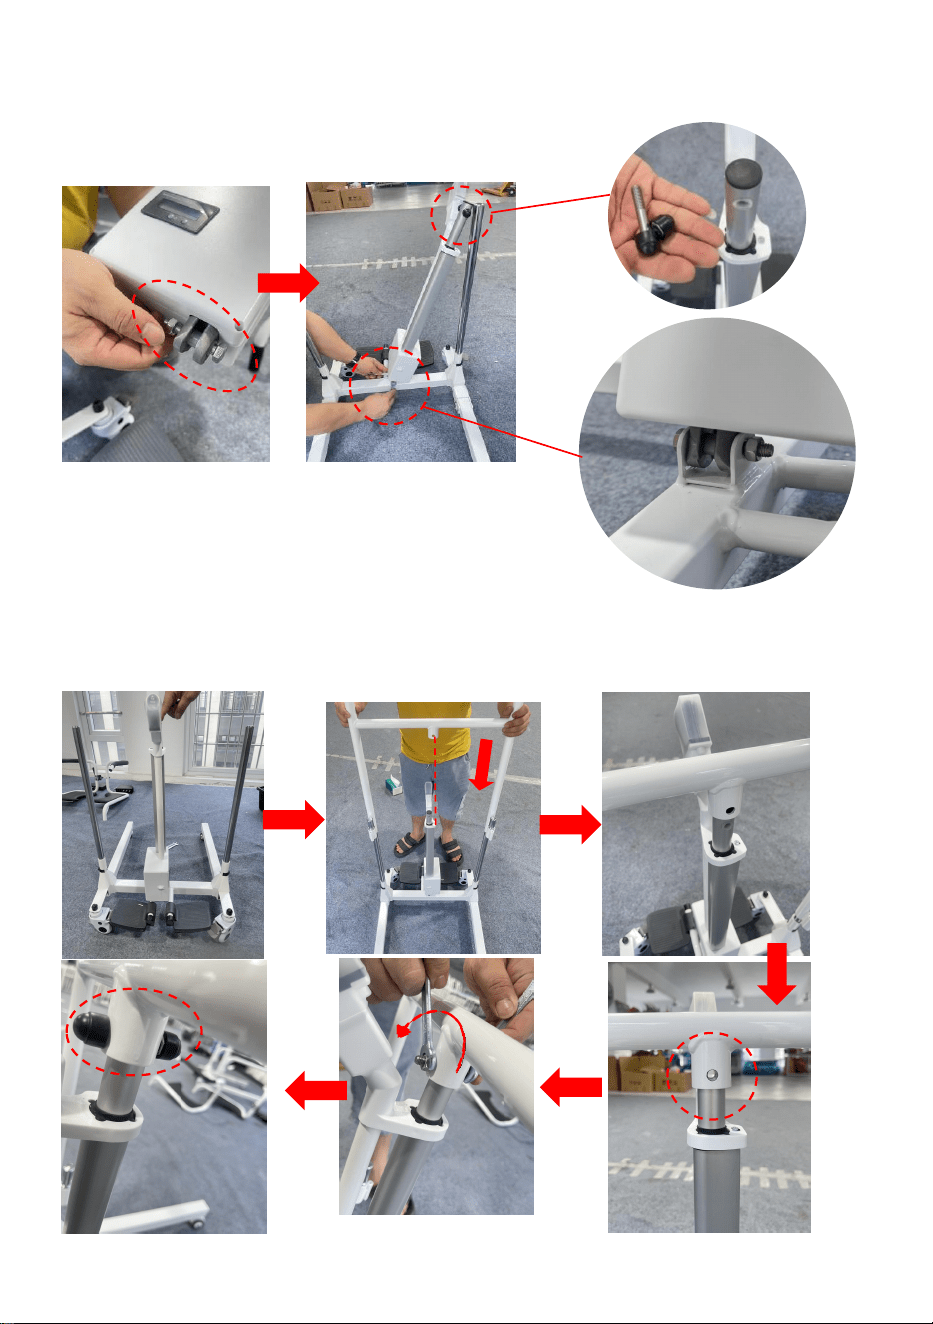
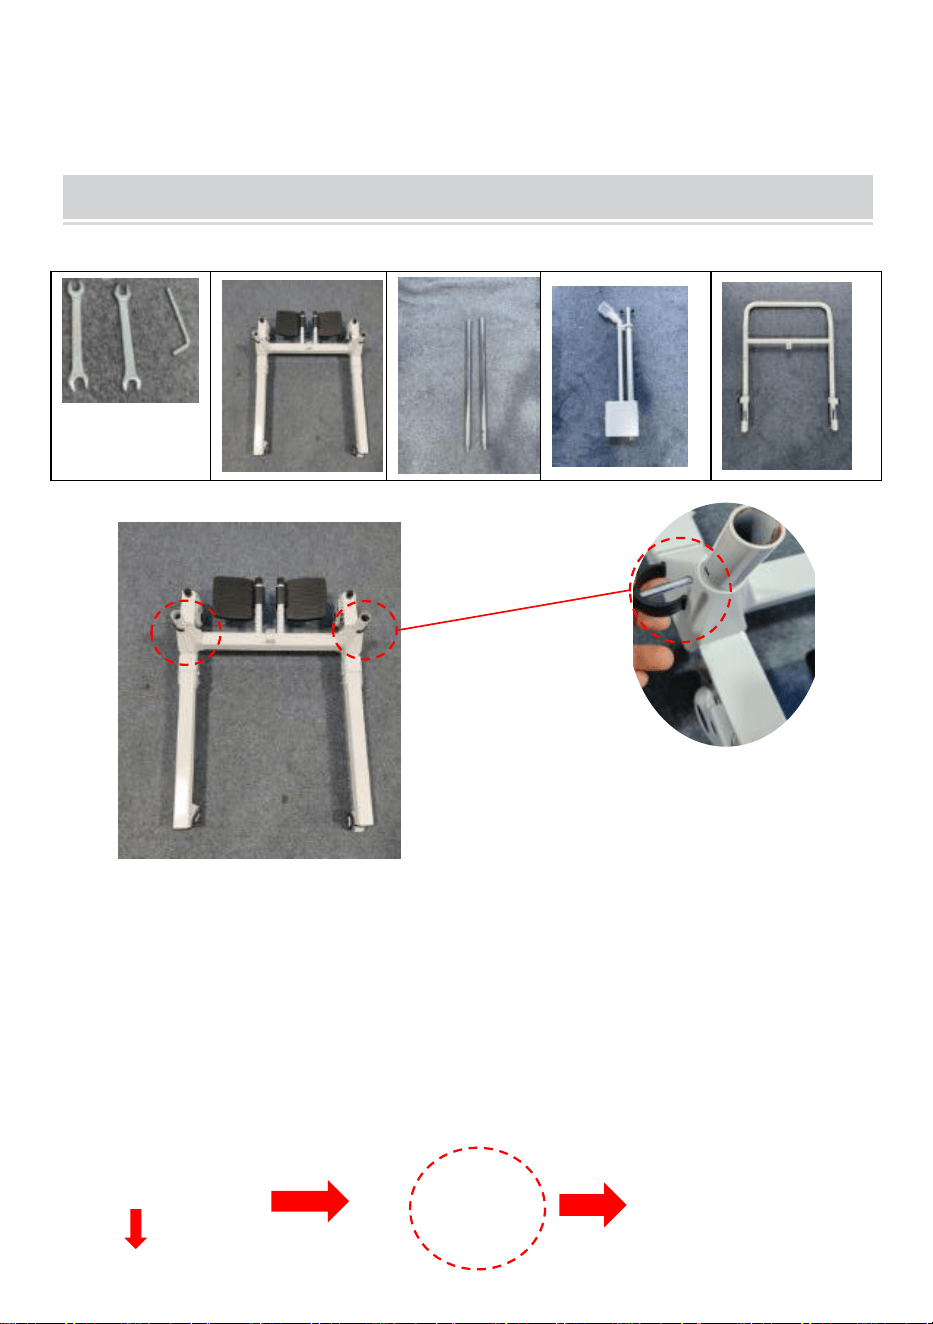
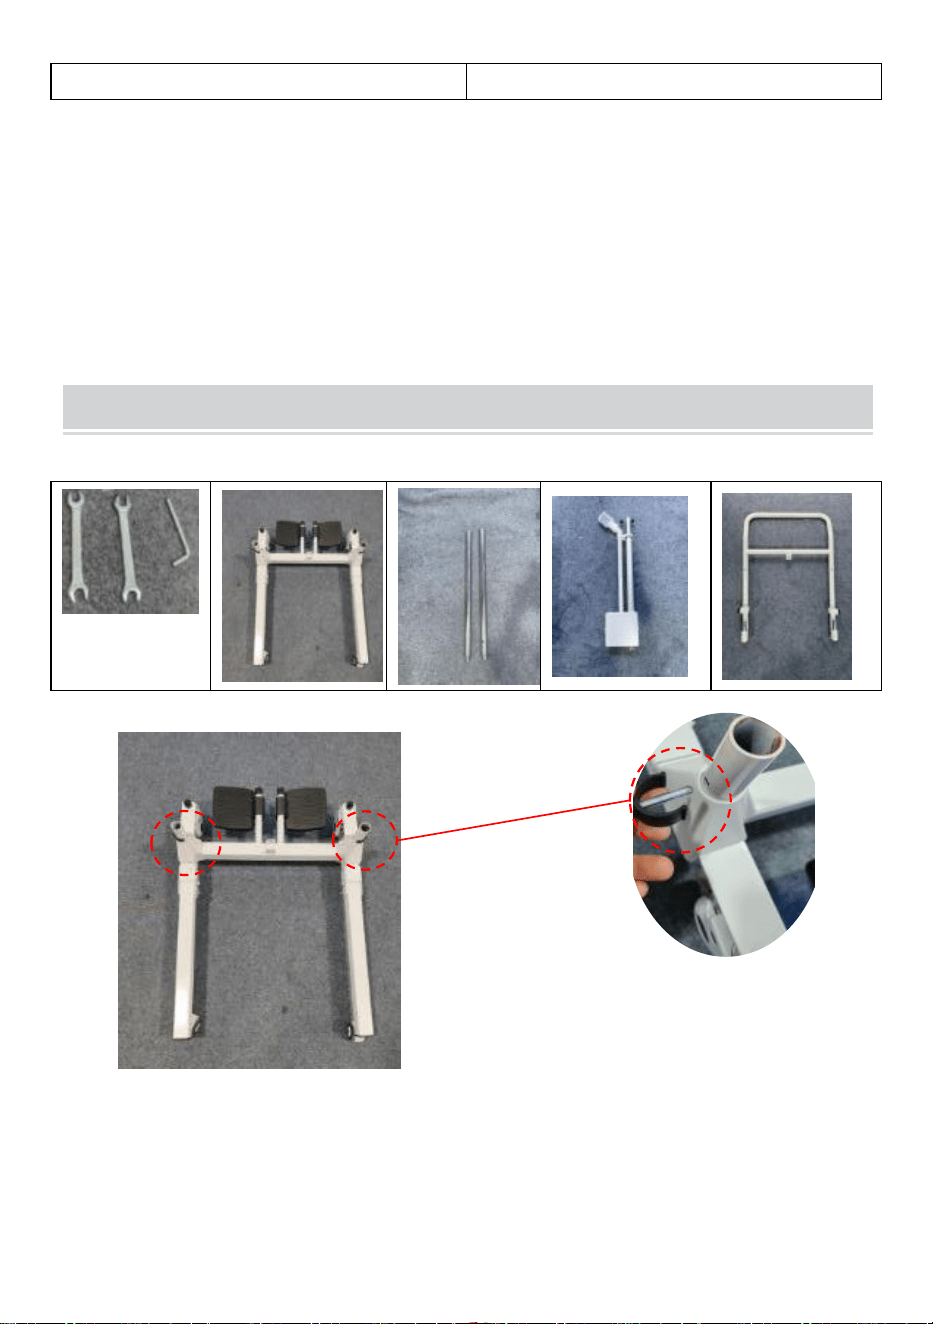
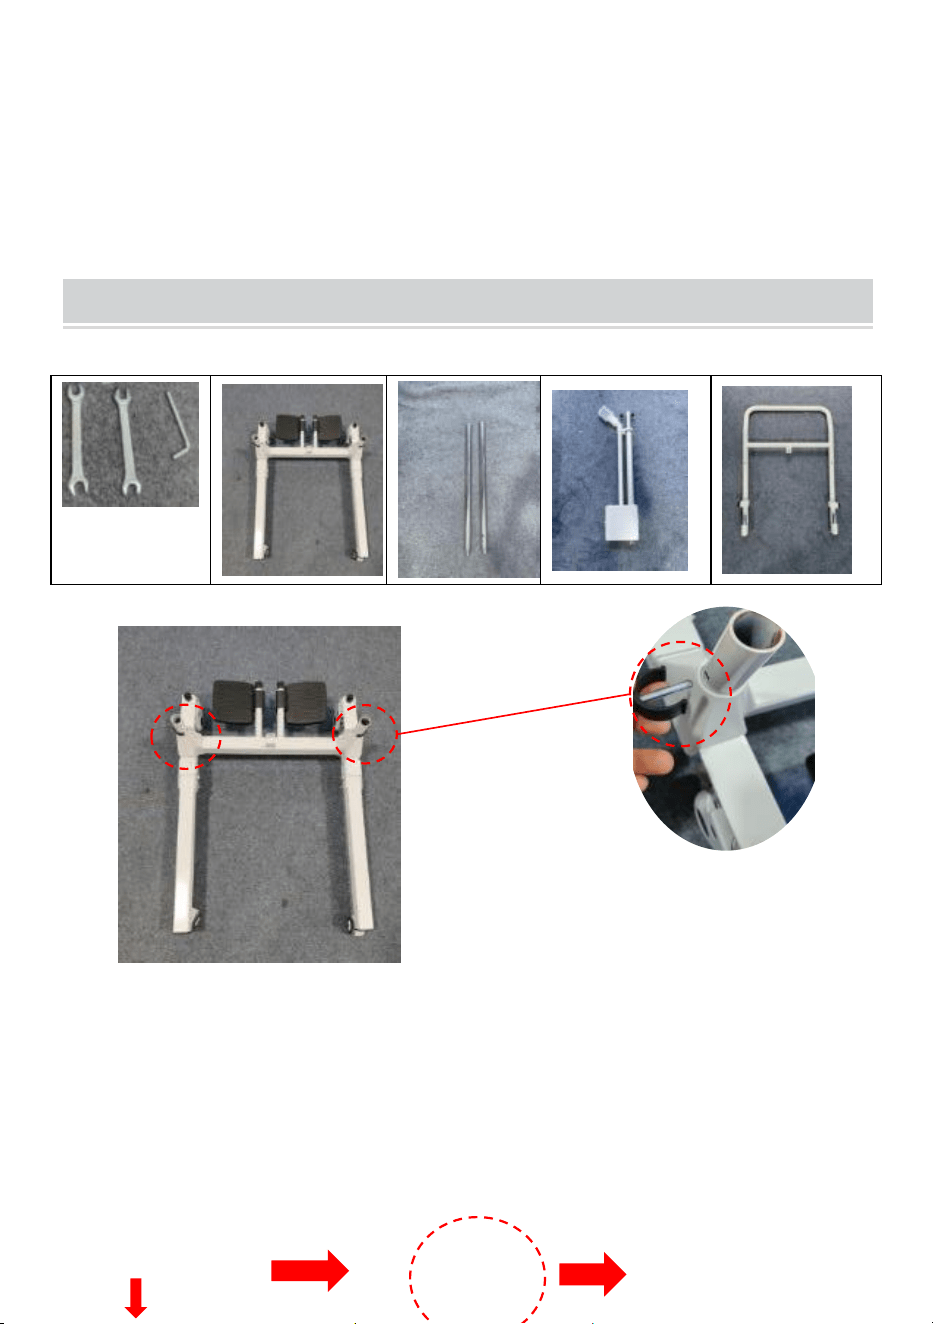
Installation instructions
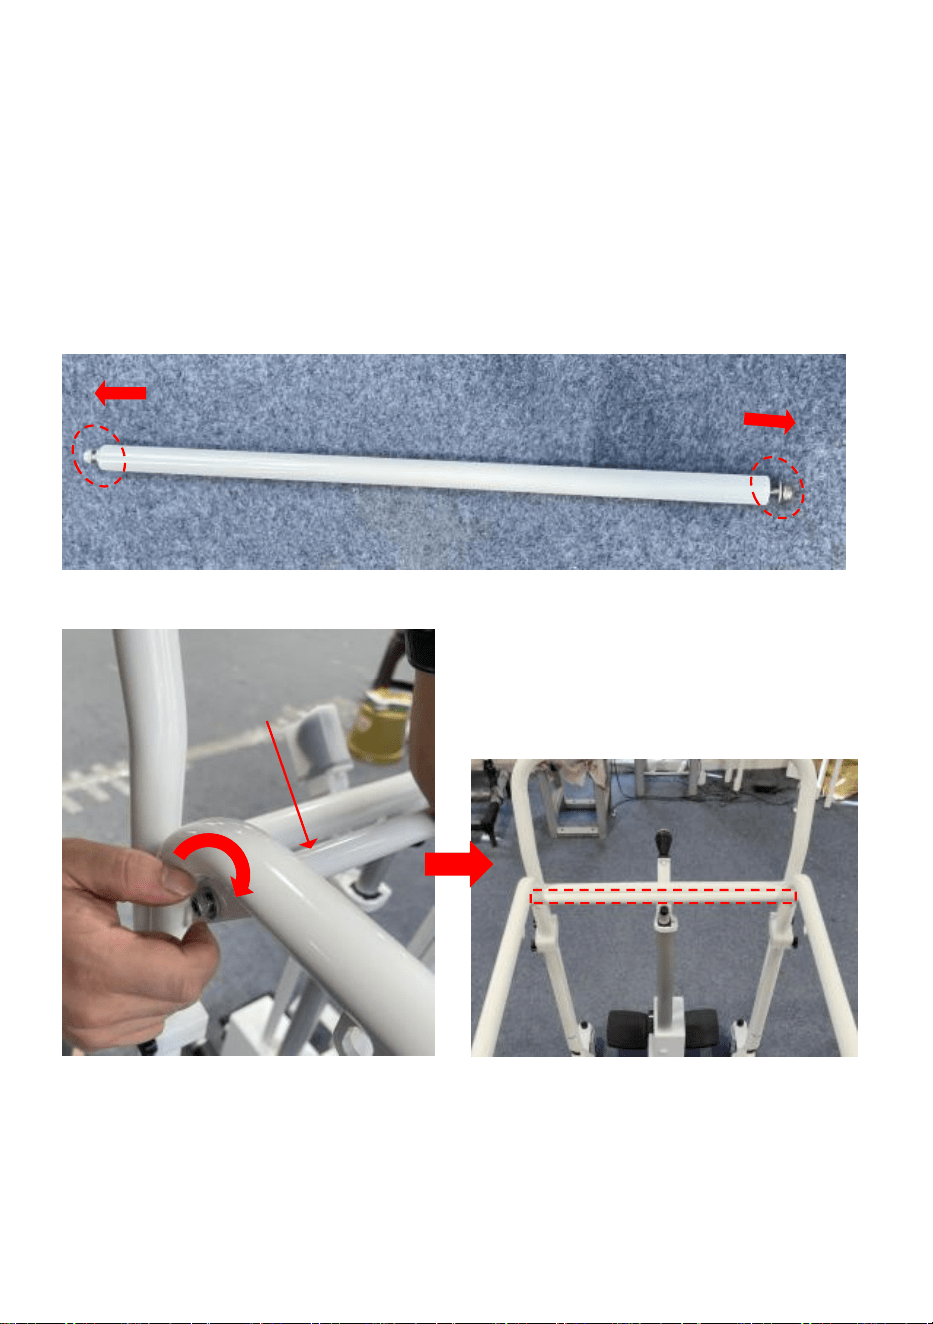
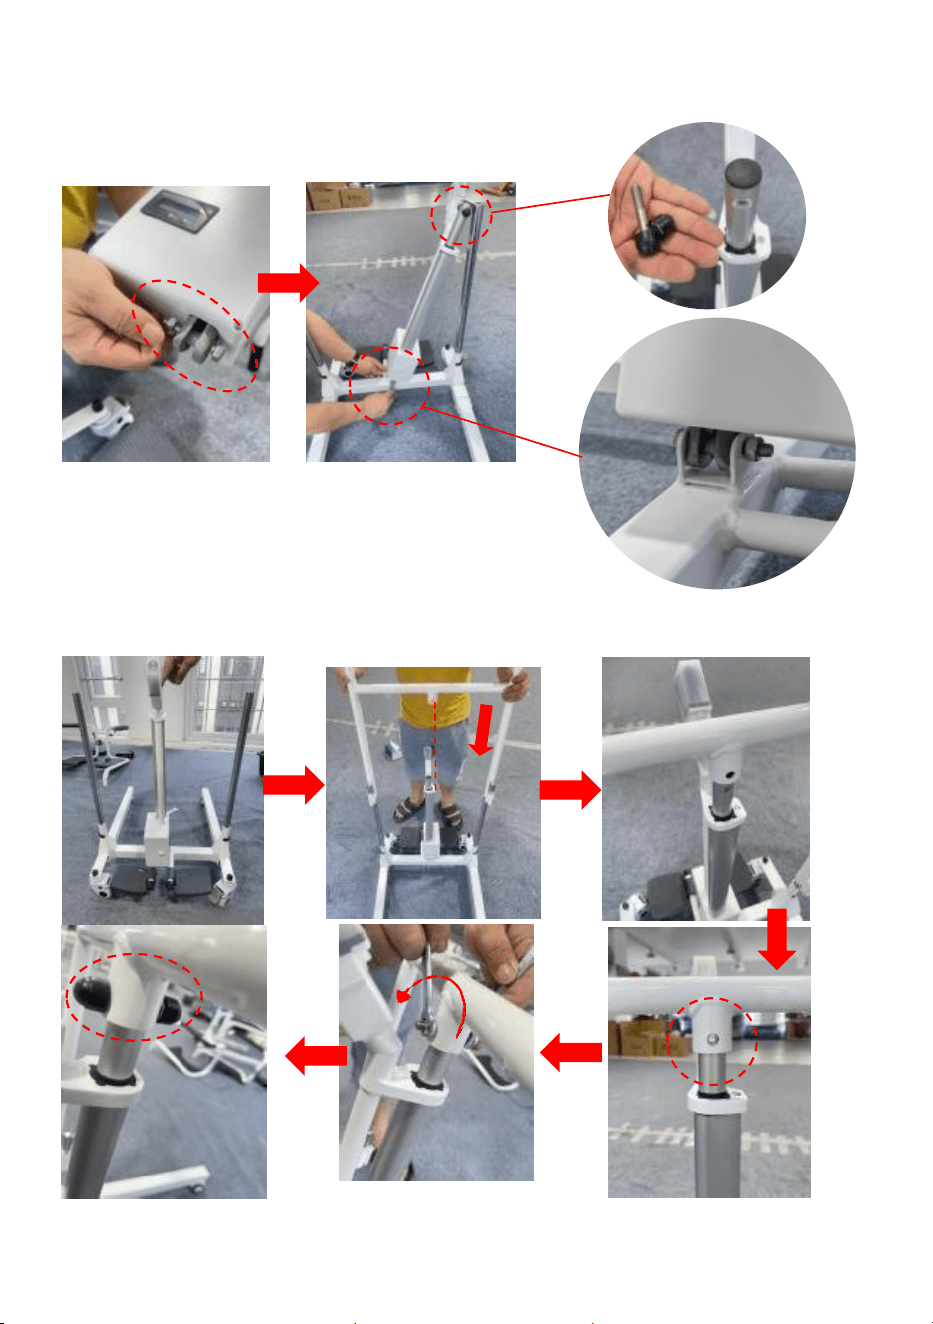
Step 1: Mounting body
1.1 Pre-unplug the latch on the frame assembly
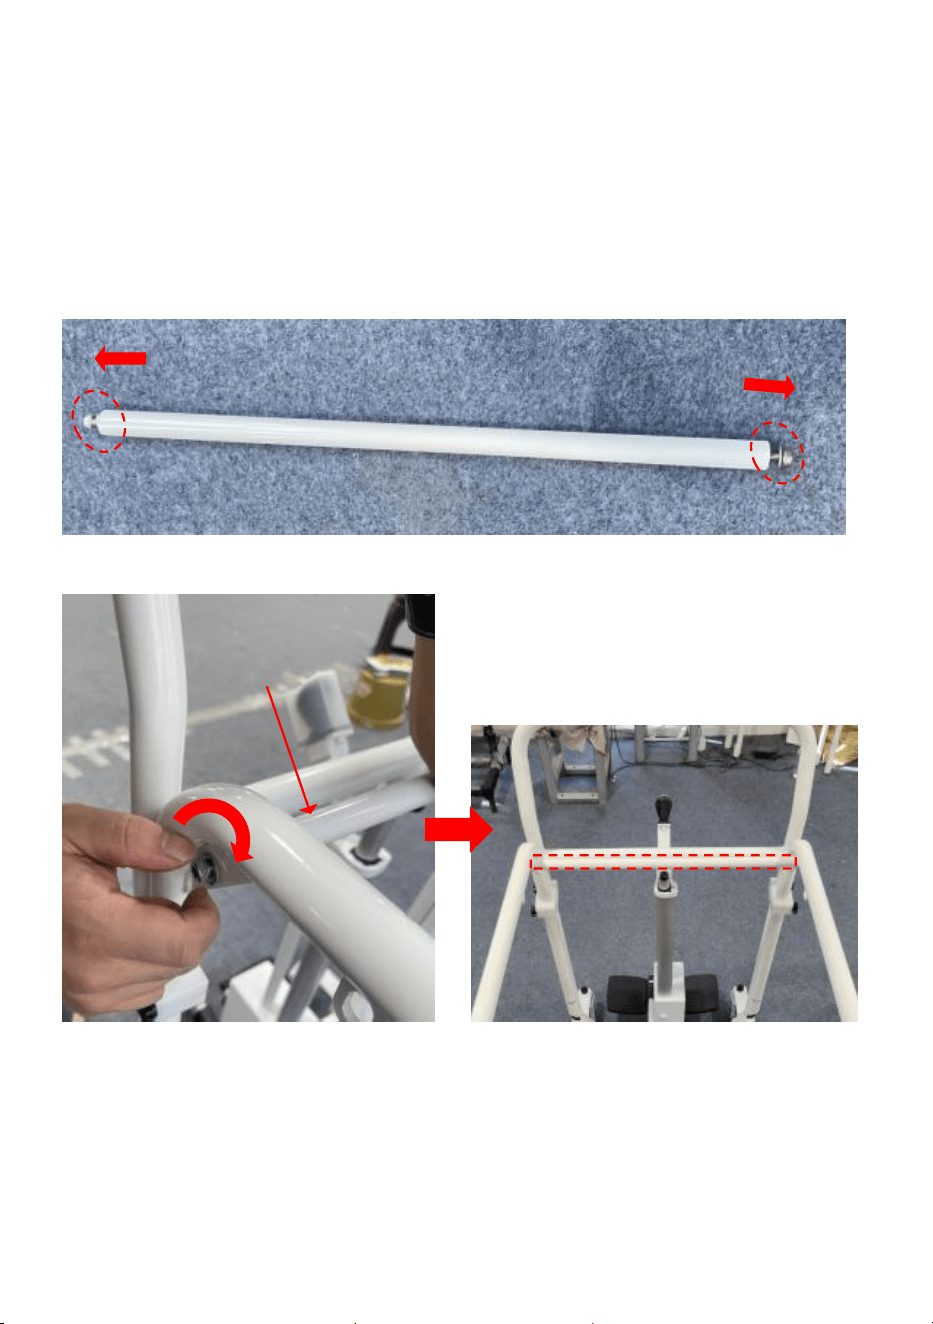
1.2 Insert the mandrel into the mounting holes on the left and right sides of
the frame assembly and insert the latch
(Note: The perforated end of the mandrel is the insert end)
- 7 -
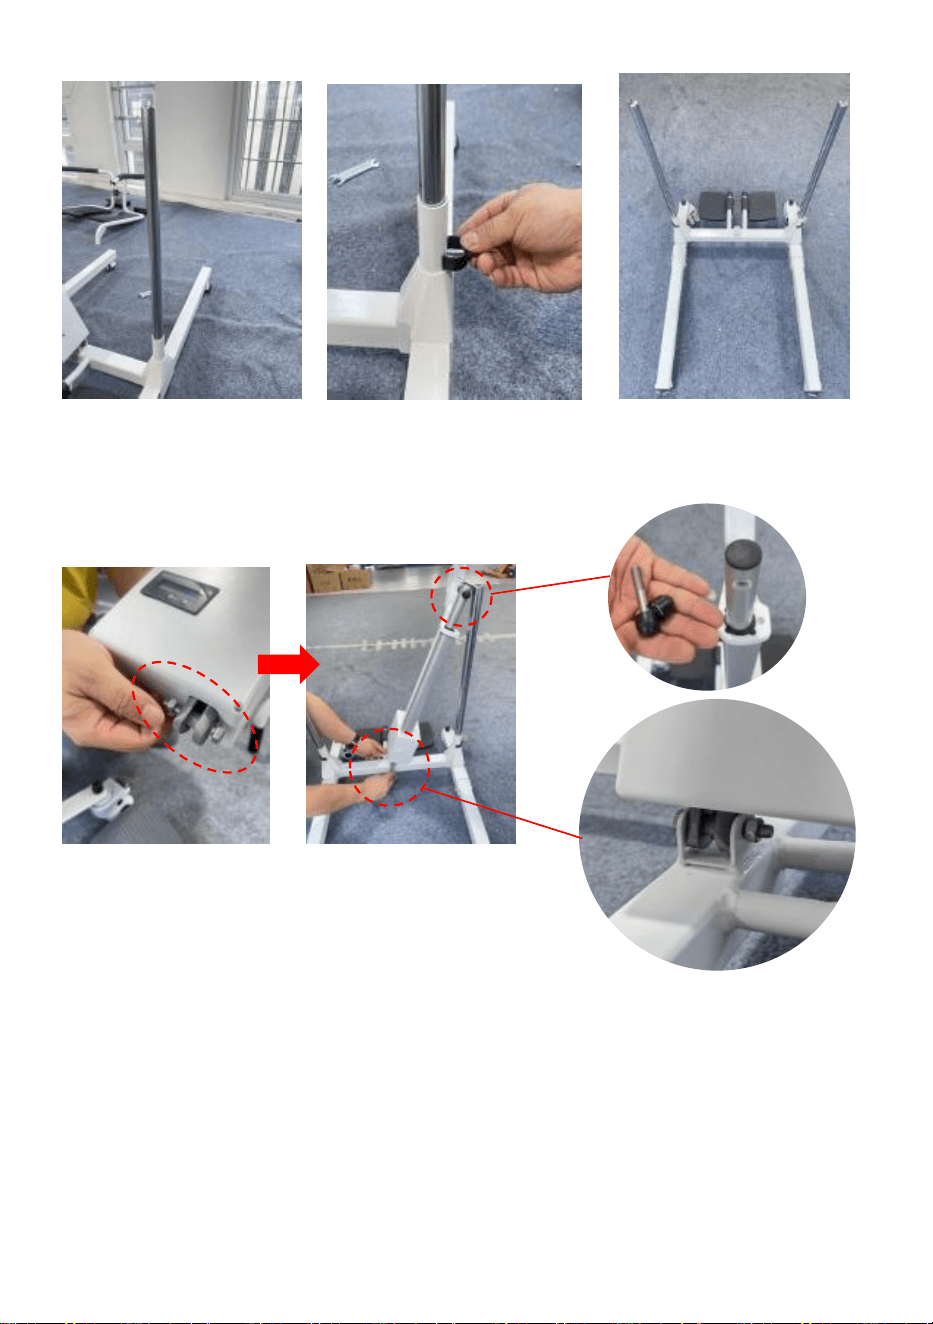
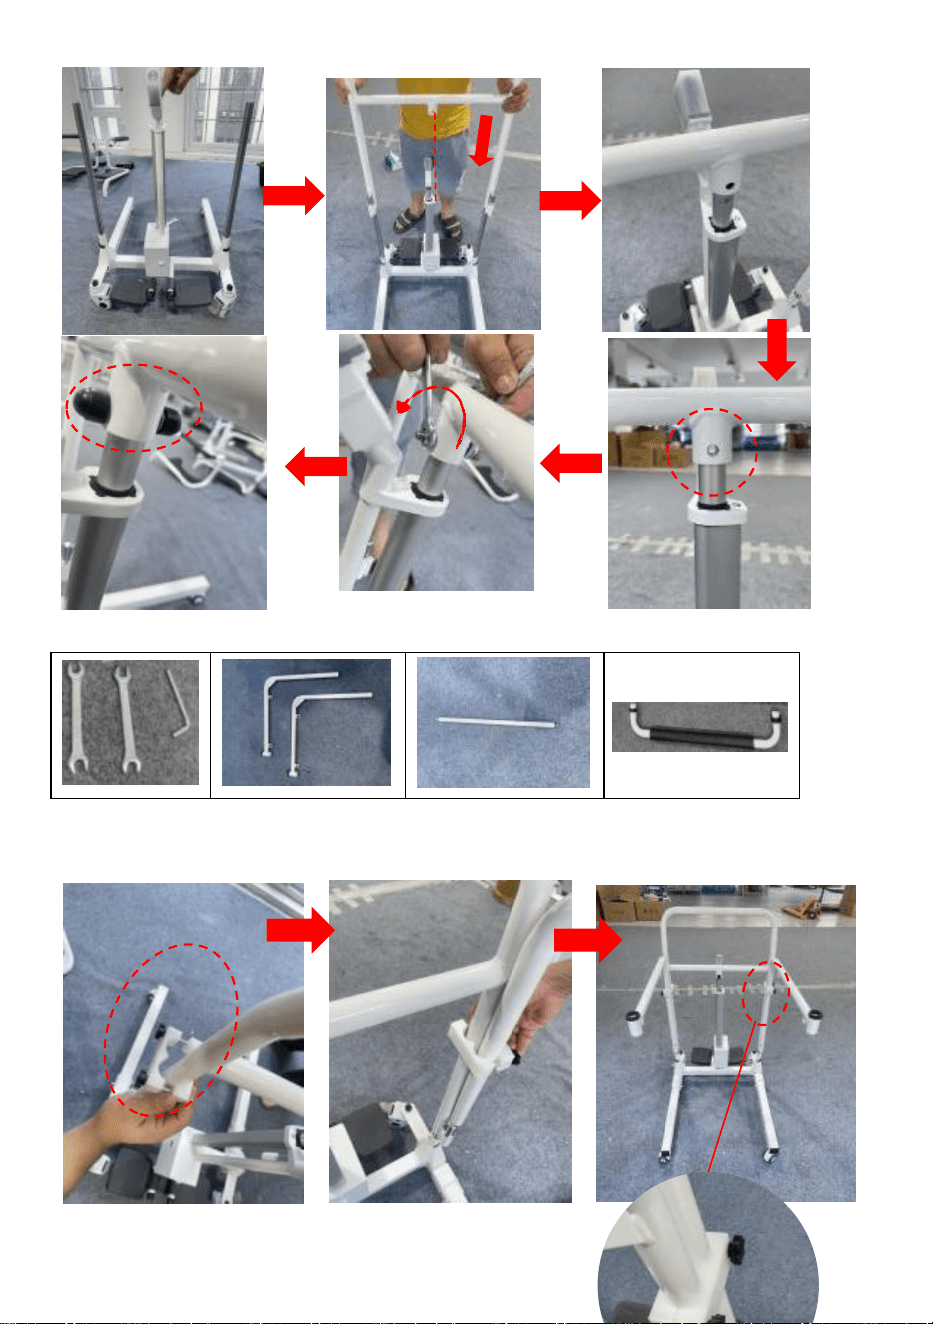
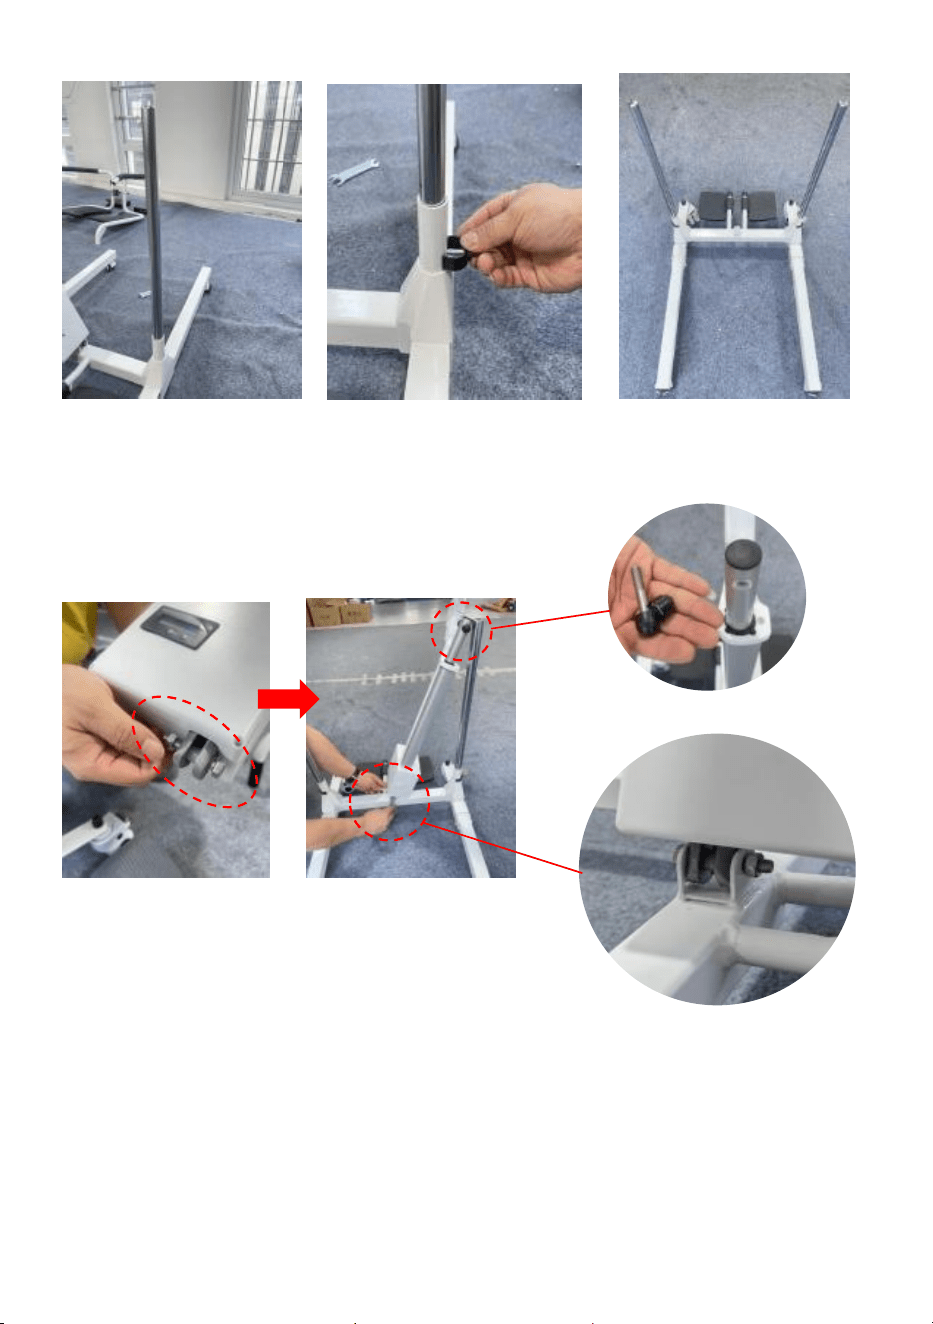
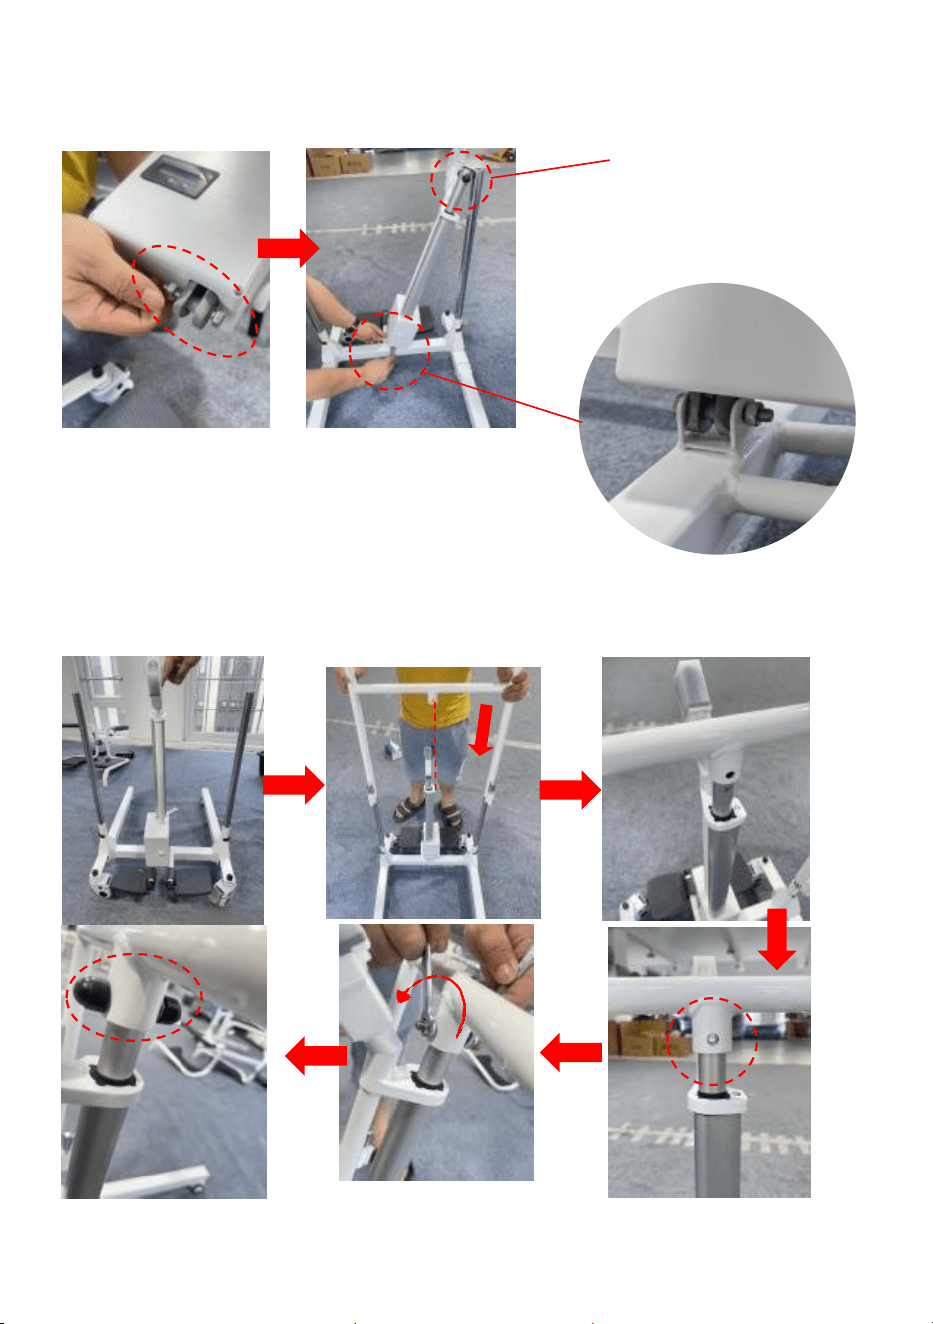
1.3 Unscrew the upper and lower ends of the push rod assembly and
attach the lower end of the push rod assembly to the frame assembly
1.4 After installation, the push rod assembly is kept upright and then
inserted into the handrail gantry.Align the mounting holes and lock the
screws.
- 8 -
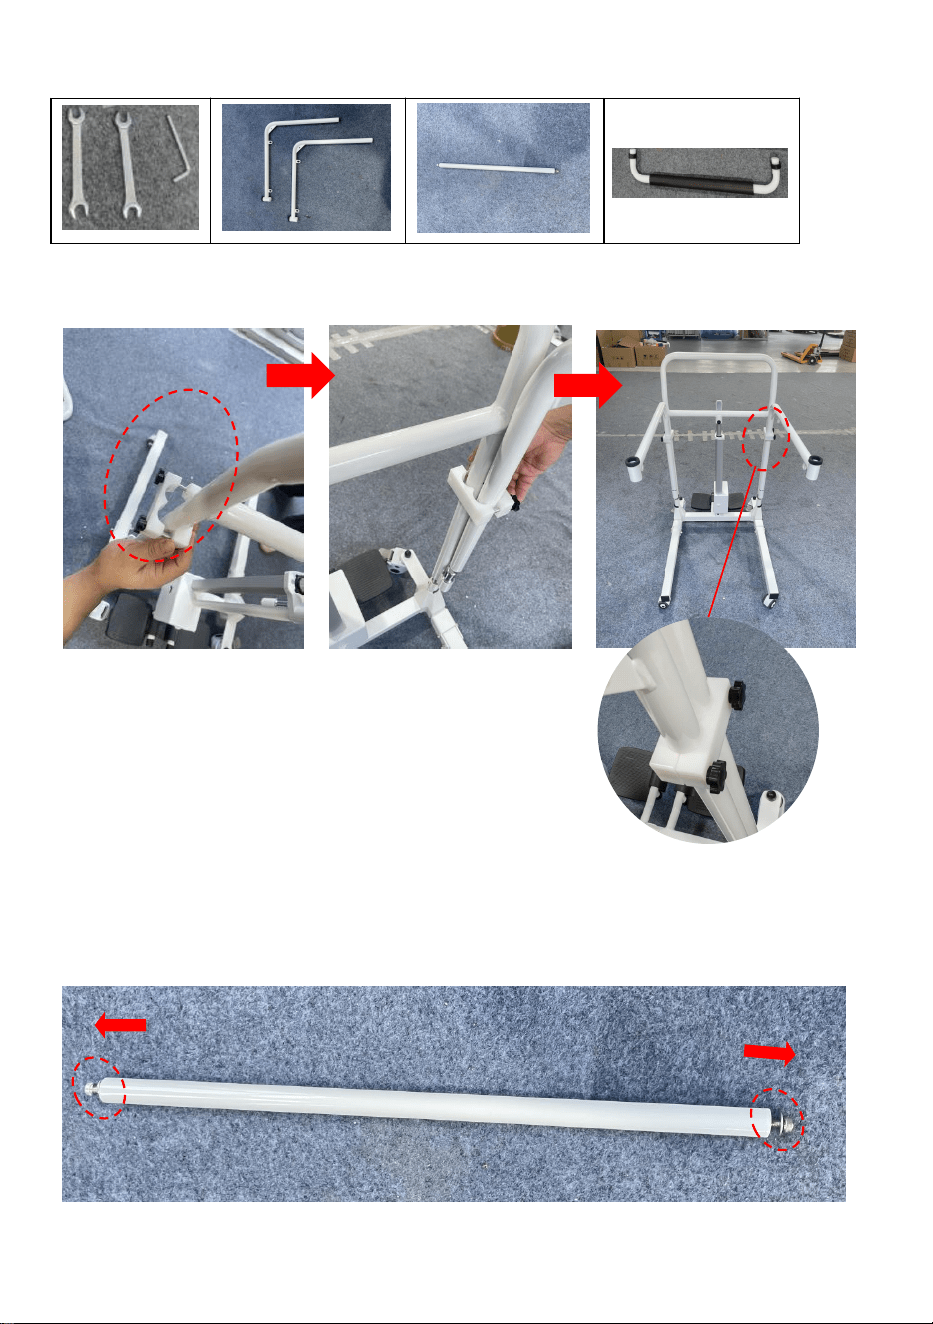
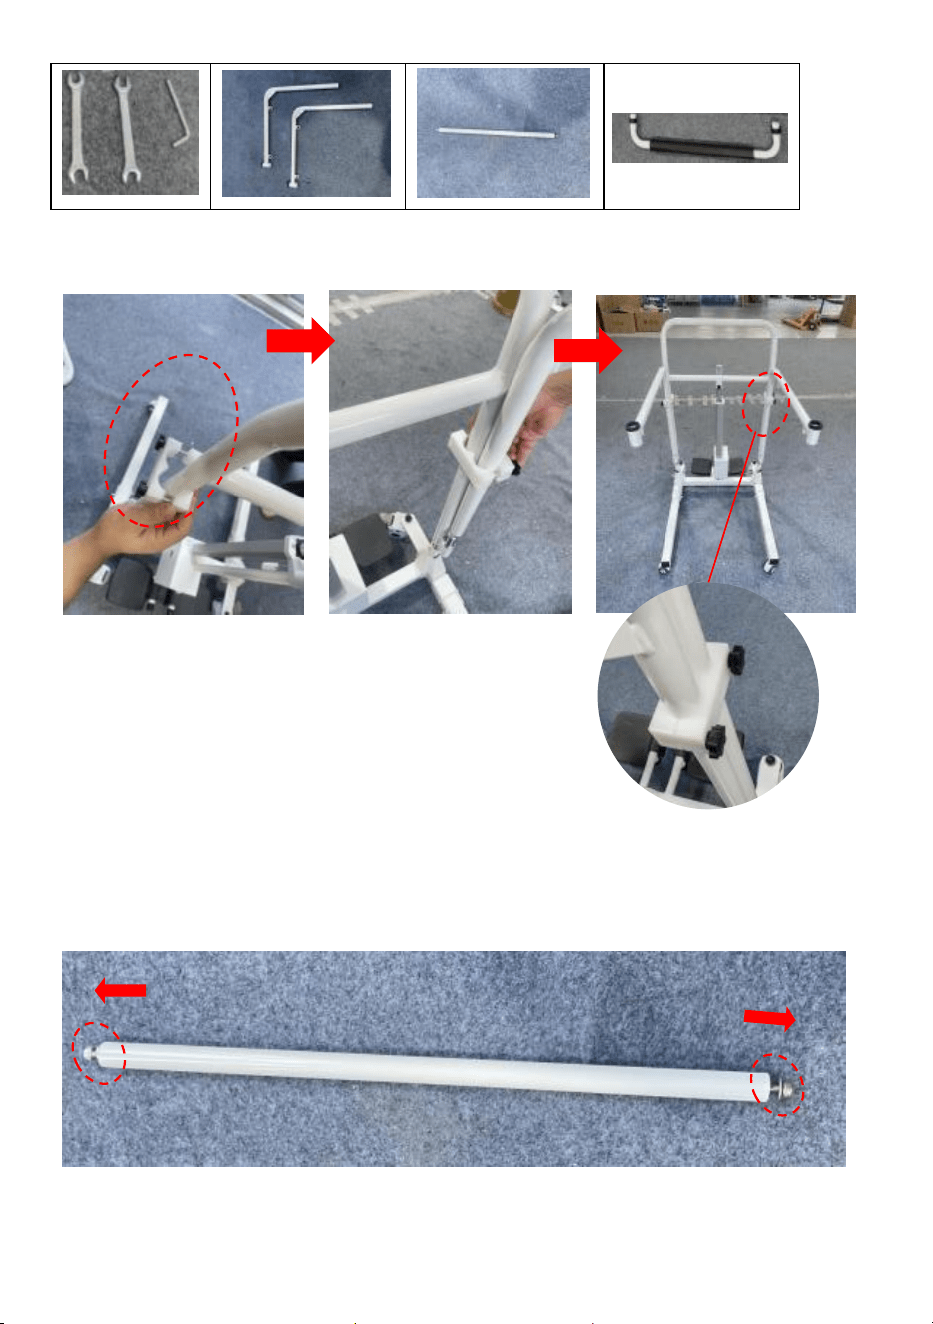
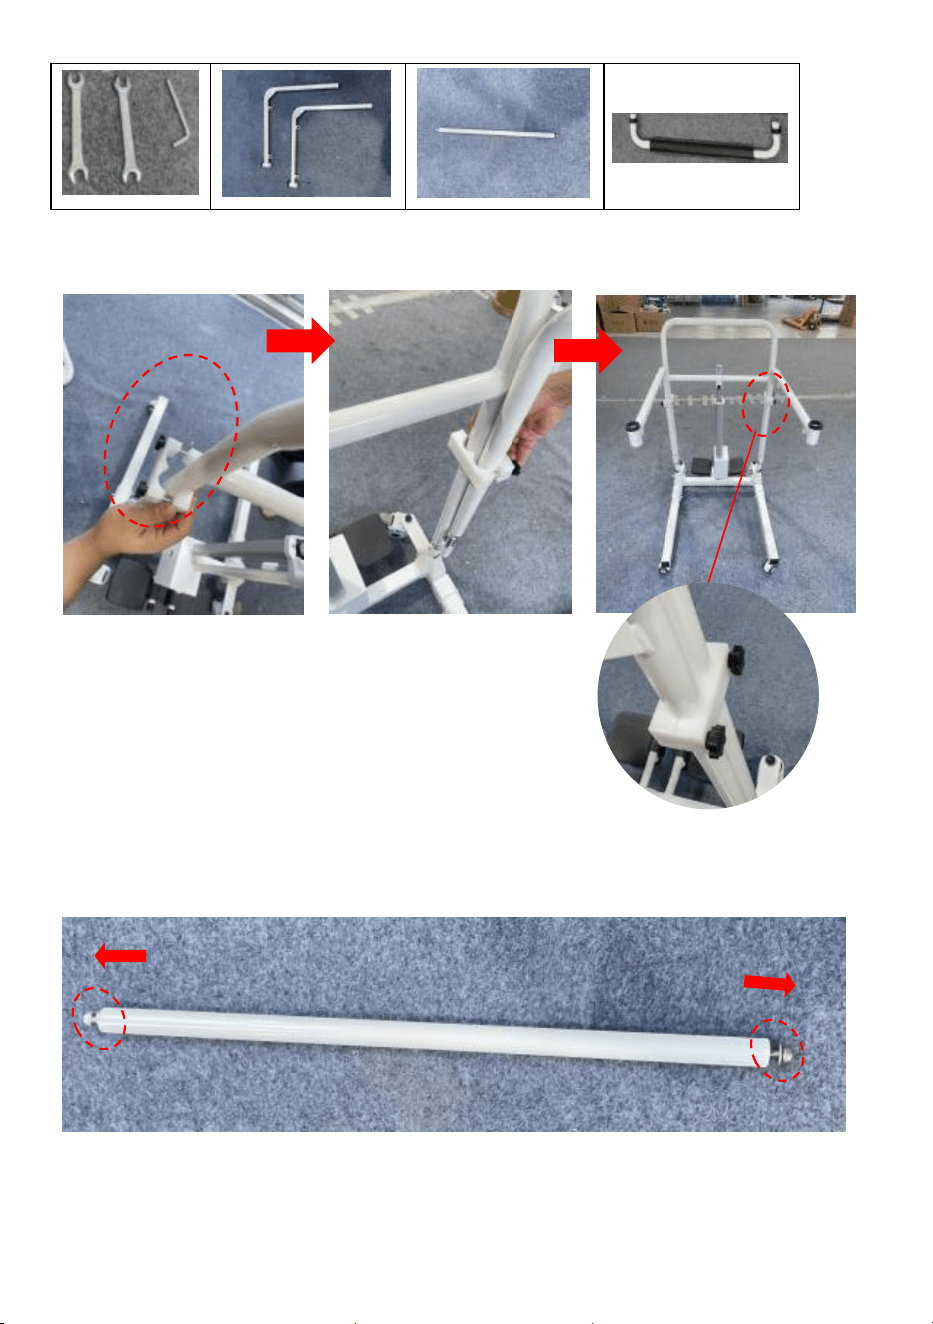
Step 2: Install the cushion frame
2.1Loosen the M-lock screws on the frame, insert the left and right side
frames of the seat cushion and tighten the screws.
2.2 Loosen the screws of the connecting rod.The two ends of the
connecting rod are connected with the frame of the left and right sides of
the seat cushion by screws.
Note:Keep the nut facing outwards

- 9 -
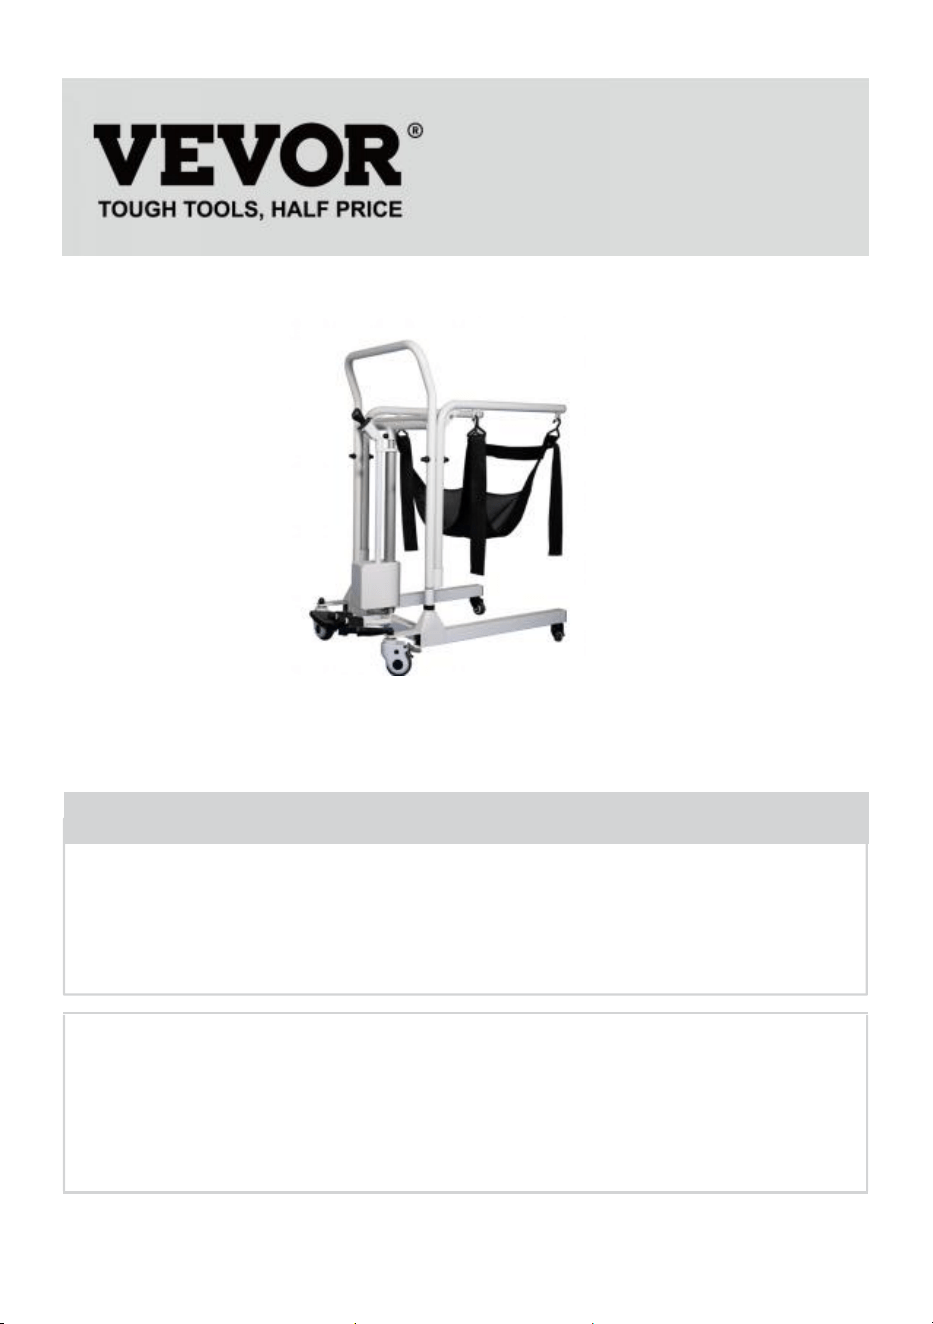
2.3 Insert both ends of the backrest rod into the mounting holes on the left
side of the seat cushion and the right side of the frame.
Connecting rod

- 10 -
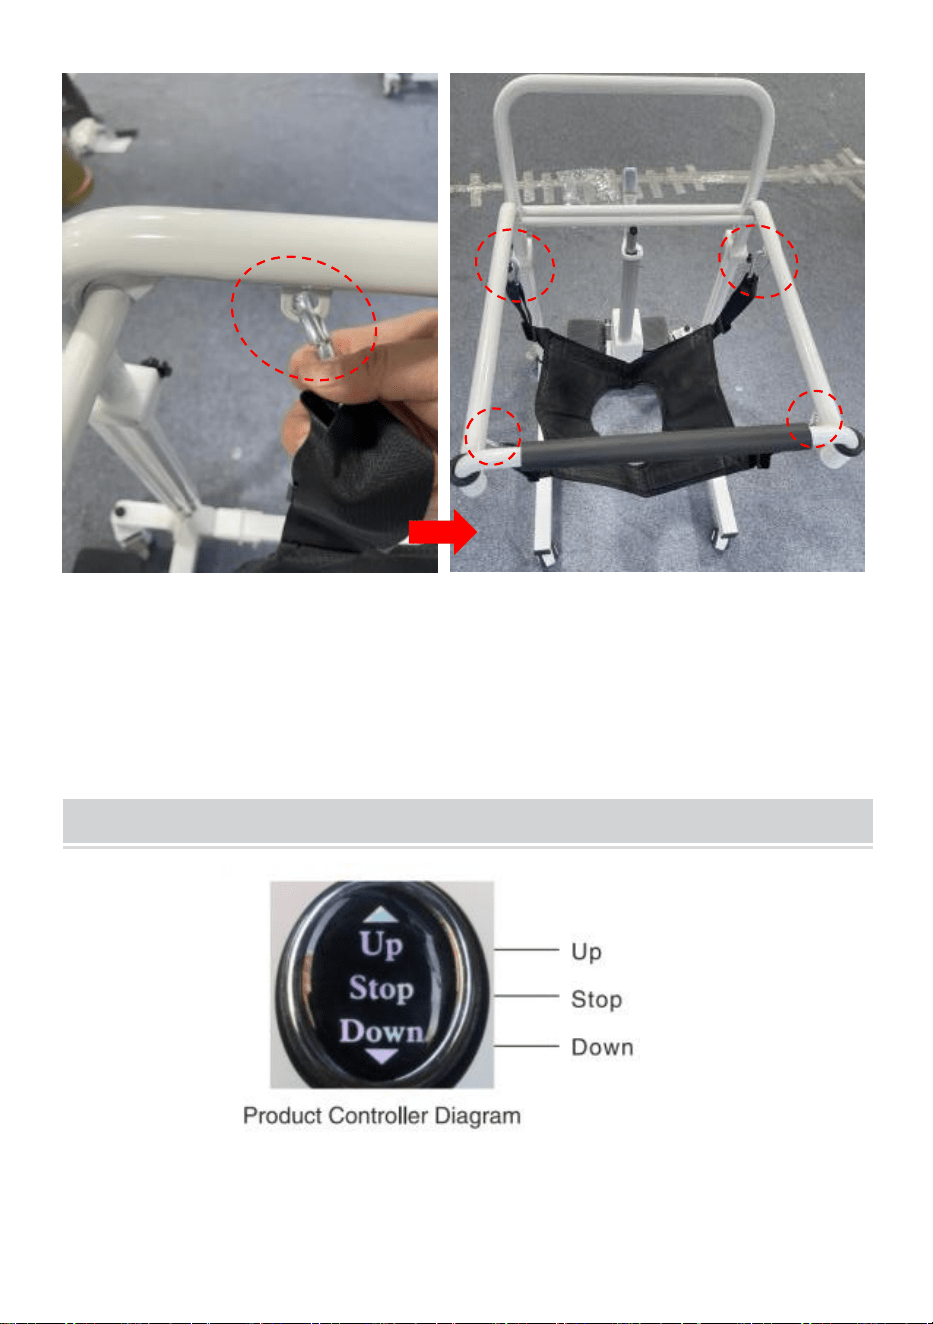
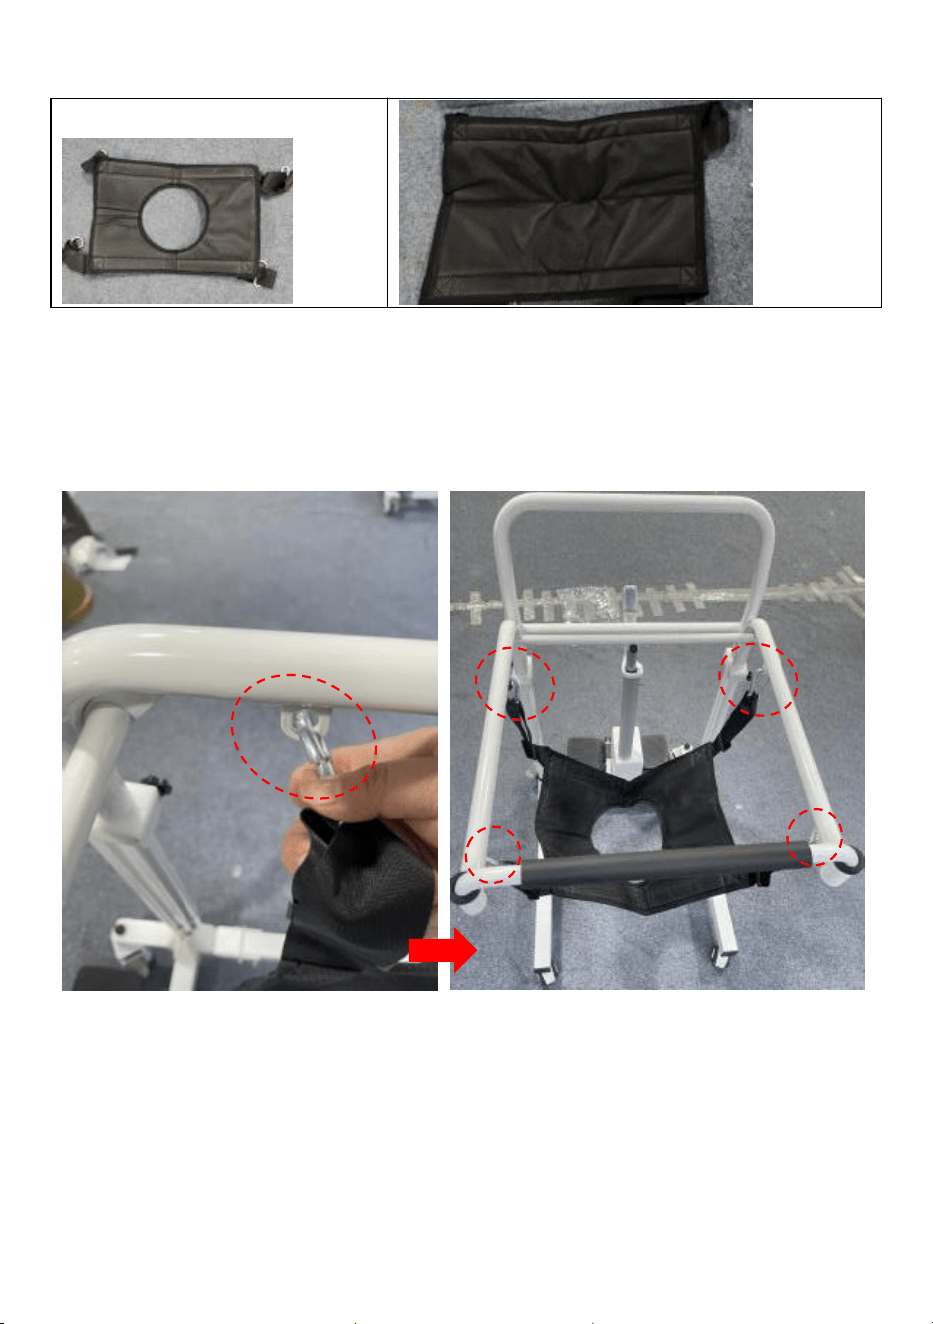
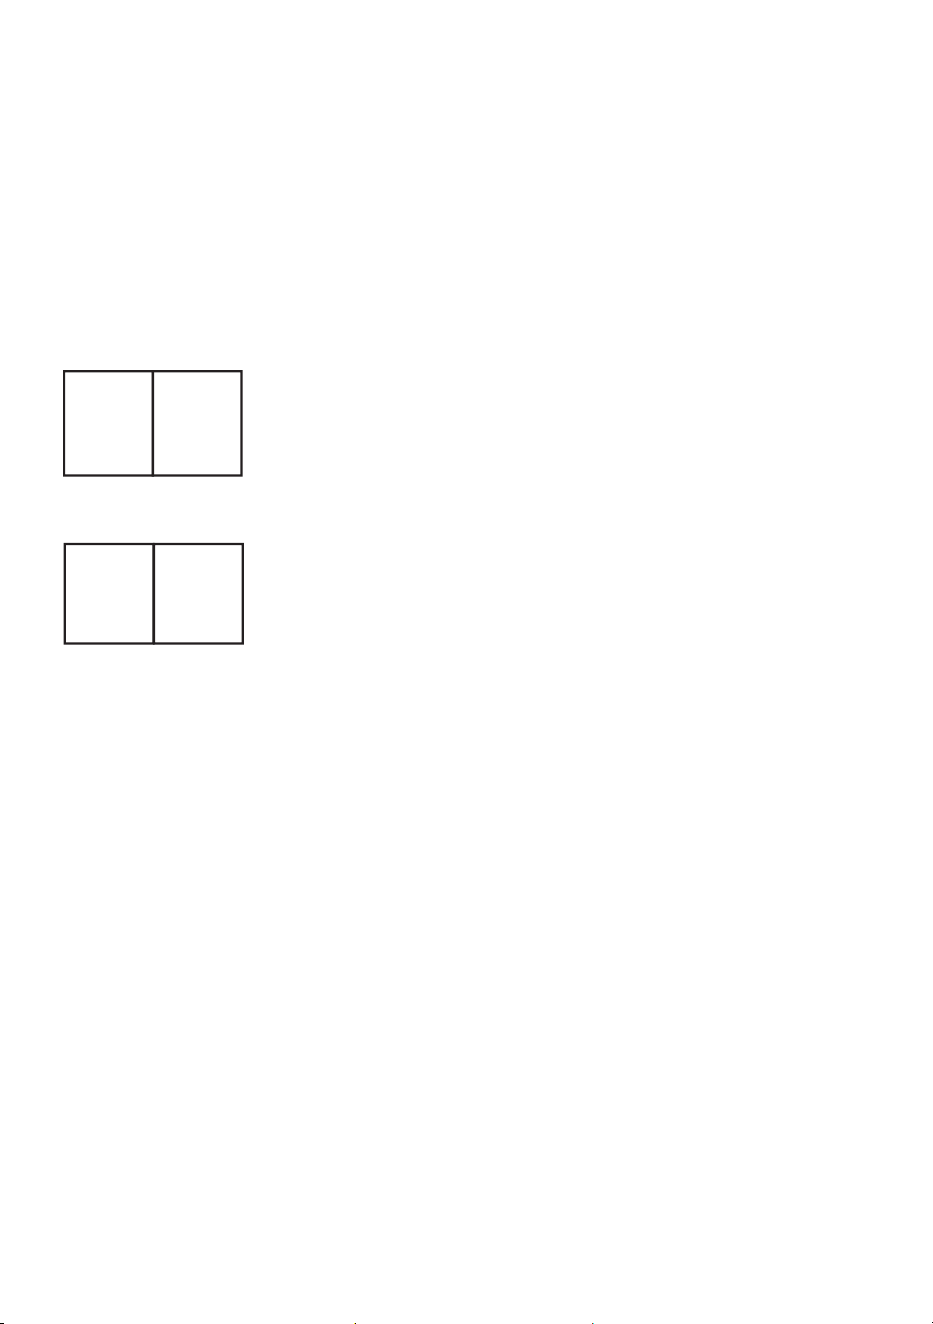
Step 3: Mounting seat pocket
3.1Install the four locks on both sides of the seat pocket on the mounting
holes of the left and right side frames of the seat cushion to adjust the
height of the seat pocket, finished.
Warm Tip:
This product provides two seat pockets, please install or
replace as needed.

- 11 -
Instructions
After charging, it can be used normally. It can be adjusted up and down.
The proper height can be moved. Before use, it must be confirmed that the
spindle of the frame is inserted to ensure safety. According to the height of
the product, press the up button to the appropriate height, release and stop.
If the key is not released, the product automatically stops at its highest
point. The power supply designed for this product is low voltage power
supply, please rest assured.
Note :There is a power display on the battery box. Please check the power
display on the monitor regularly and charge it in time
Troubleshooting
In the event of a failure, please contact our after-sales personnel or log on
to our official website for contact information. With the trust of our technical
staff, we will solve the problem. If we can't solve this problem, we will return
it to the manufacturer free of charge. If the warranty period ends or is

- 12 -
caused by personnel, our company will not give you a free warranty.
Materials and shipping are required.
Maintenance
Warning: Do not disassemble and repair the machine without the
permission of the manufacturer.
Cleaning and disinfection
It is recommended to wipe the seat ring with a soft cotton cloth and alcohol
before use, and disinfect it after cleaning. The conveyor shell and
accessories should be scrubbed with medical alcohol or other
non-corrosive disinfectants.
Warning:
When cleaning and disinfecting, do not charge or use the machine.
It is forbidden to wash or disinfect the transfer machine and accessories in
liquid.
It is forbidden to use corrosive detergent to clean the shifter and
accessories.
It is forbidden to use corrosive disinfectant to disinfect the moving machine
and accessories.
Only after the detergent and disinfectant are dried, can the shifter and
accessories be used.
When the machine is not used for a long time, please take it out and
charge it regularly to avoid battery failure
Safe use and maintenance
1. Do not always plug in power supply during the process. At least once a
week, the battery should be used to work, and until the battery is
exhausted, it is necessary to ensure that the battery is recharged when the
battery is exhausted. Although the lithium battery has no memory effect, it
can prolong the life span of the battery.2. Please destroy the battery
according to the relevant local regulations when the machine is scrapped.
3. After using the machine, it is not necessary to clean and maintain it
every time. It can be used normally after charging when the battery is not
- 13 -
powered. lf it is found that there will be jitter when the machine is rising or
falling, touch the electric lubricating oil on both long shafts.
4. After using the product for a period of time, check whether the screws of
each part are loose. lf there is any looseness, it should be tightened in
time.
5. The internal power supply of this product is DC low voltage power supply.
lf there is water on the surface of the body, it can be dried with towel. Do
not bubble in water directly.
CORRECT DISPOSAL
This product is subject to the provision of european Directive
2012/19/EU. The symbol showing a wheelie bin crossed through
indicates that the product requires separate refuse collection in
the European Union. This applies to the product and all
accessories marked with this symbol. Products marked as such may not
be discarded with normal domestic waste, but must be taken to acollection
point for recycling electrical and electronic devices.
BATTERY DISPOSAL
To minimize hazards to health and the environment at the end of
this product's life,laws dealing with Waste Electrical and
Electronic Equipment(WEEE)and The Waste Battery Directive
require you to dispose of this product at a suitable collection facility where
it will be sent in order to remove the batteries and for appropriate
recycling.Please contact your local authorities for more details on recycling
and safe disposal of these in your area.
- 14 -
XIANG FALI TECHNOLOGY(XIAMEN) CO.LTD
Address: Floor 5th,No. 63,Pingcheng North Road, Haicang District
Xiamen Fujian,CN 361026
Imported to AUS: SIHAO PTY LTD. 1 ROKEVA STREETEASTWOOD
NSW 2122 Australia
Imported to USA: Sanven Technology Ltd. Suite 250, 9166 Anaheim
Place, Rancho Cucamonga, CA 91730
REP
UK
YH CONSULTING LIMITED.
C/O YH Consulting Limited Office 147,
Centurion House,
London Road, Staines-upon-Thames, Surrey,
TW18 4AX
REP
EC
E-CrossStu GmbH
Mainzer Landstr.69, 60329 Frankfurt am
Main.


Techniczny Wsparcie i certyfikat gwarancji elektronicznej www.vevor.com/support
Przeniesienie pacjenta C włosy
MODELE: XFL-QX-YW02
We continue to be committed to provide you tools with competitive price.
"Save Half", "Half Price" or any other similar expressions used by us only represents an
estimate of savings you might benefit from buying certain tools with us compared to the major
top brands and does not necessarily mean to cover all categories of tools offered by us. You
are kindly reminded to verify carefully when you are placing an order with us if you are
actually saving half in comparison with the top major brands.

- 1 -
MODELE: XFL-QX-YW02
Uwaga: Zdjęcie produktu ma charakter poglądowy, decydujące znaczenie
mają rzeczywiste szczegóły.
Have product questions? Need technical support? Please feel free to
contact us:
Technical Support and E-Warranty Certificate
www.vevor.com/support
NEED HELP? CONTACT US!
This is the original instruction, please read all manual instructions
carefully before operating. VEVOR reserves a clear interpretation of our
user manual. The appearance of the product shall be subject to the
product you received. Please forgive us that we won't inform you again if
there are any technology or software updates on our product.
Patient Transfer Chair
- 2 -
Dziękujemy bardzo za wybranie tego Przeniesienie pacjenta C włosy
Przed użyciem należy przeczytać całą instrukcję. Zawarte w niej
informacje pomogą w osiągnięciu najlepszych możliwych rezultatów.
Operation safety
Prosimy o umieszczenie niniejszej instrukcji w miejscu, w którym będzie można ją
łatwo sprawdzić, i o jej właściwe przechowywanie. Niniejsza instrukcja obsługi
wyraźniewskazuje sposób korzystaniaz urządzenia.sprzętu w sposób bezpiecznyi
prawidłowy, zapobiegający jakimkolwiek szkodom lub straty materialne
poniesione przezCiebie i innych.
Ostrzeżenie
1. Podczas ładowania tego produktu należy używać odpowiedniego
adaptera. 2. Nie zaleca się używania tego krzesła pod prysznicem,
jeśli jest to konieczne. należy wyłączyć zasilanie i założyć
wodoodporną osłonę na ładowarkę port.
3. Podczas ładowania kontrolka na adapterze będzie świecić na
czerwono, ładowanie zostanie przerwane. automatycznie po pełnym
naładowaniu akumulatora, a światło włączy się zielony.4.
Konserwację tej maszyny należy wykonywać profesjonaliści.
Zakaz
1. Nie otwieraj pojemnika na baterie podczas ładowania.
2. Nie używaj produktu podczas ładowania.
3. Nie używaj go, jeśli waga przekracza 300 funtów ( 150 kg ).
4. Nie umieszczaj urządzenia w miejscu, w którym dzieci mogą go dotknąć,
aby uniknąć obrażeń. 5. Zabrania się używania urządzenia, gdy w pobliżu
znajdują się przedmioty. blokując go, w przeciwnym razie maszyna zostanie
uszkodzona

- 3 -
*Nasza firma nie ponosi odpowiedzialności za jakiekolwiek straty lub
szkody spowodowane operacja ignorująca ostrzeżenie i uwagę. Proszę
zwrócić uwagę na.
Product introduction
Przeznaczenie
Elektryczny fotel transportowy to urządzenie pielęgniarskie, które pomaga osobom
niepełnosprawnym ludzie poruszający się bez barier, przeznaczony na krótkie odległości
przenoszenie i pielęgniarstwo rehabilitacyjne. Opiekunowie mogą przenosić pacjentów,
dzięki łatwemu sterowaniu przyciskiem windy, co poprawia jakość opieki pielęgniarskiej
znacznie zwiększyć wydajność.lt pomaga opiekunom w przenoszeniu pacjentów, którzy
są nieruchomy w samochodzie, salonie, toalecie i łazience.Podsumowując, może znacznie
zmniejszyć intensywność opieki pielęgniarskiej dla opiekunów i obniżyć koszty opieki
pielęgniarskiej ryzyko wtórnych obrażeń w trakcie transferu.
Circuit principle block diagram
- 4 -
Environmental requirements
◆Użyj środowiska:
Zakres temperatur otoczenia: +10℃~+40℃Wilgotność względna
zakres: 30%~75% Zakres ciśnienia atmosferycznego: 700hPa~1060hPa
Brak materiałów żrących i palnych, suche i mniej zakurzone wnętrze
◆Środowisko przechowywania:
Temperatura otoczenia: 0℃~+50℃, wilgotność względna: s93%, ciśnienie
atmosferyczne: 500hPa~1060hPa, brak gazów żrących, pomieszczenie
dobrze wentylowane.
◆Podczas transportu i przechowywania należy zachować ostrożność, nie
rzucać i nie upuszczać przedmiotów.
Nie przechowuj urządzenia w miejscu, w którym istnieje ryzyko
- 5 -
rozchlapania cieczy.
Nie przechowuj sprzętu w miejscu narażonym na działanie gazów palnych.
Product parameter
Model
XFL-QX-YW02
Kolor
Biały + czarny
Zakres podnoszenia
330 mm
Klasa
wodoodporności
IPX44
Maksymalne
obciążenie
≤150 kg (330
funtów)
Rozmiar produktu
860x550x980 mm
Part List
- 6 -
1. Rama podstawowa x1
2.Rama poręczy x1
3.kieszeń na siedzeniu x1
4.kiesze ń na siedzeniu (z
otworami) x1
5. Lewy wspornik siedzenia tx1
6. Prawy wspornik siedzenia x1
7.Trzpień x2
8. Zasilacz x1
9.Zespół popychacza elektrycznego
x1
10. Korbowód x1
11. Dźwignia oparcia x1
12. Elementy montażowe x 1
zestaw
- 7 -
Installation instructions
Krok 1: Montaż nadwozia
1.1 Wstępnie odłącz zatrzask na ramie
1.2 Włóż trzpień do otworów montażowych po lewej i prawej stronie ramy i
włóż zatrzask
(Uwaga: Perforowany koniec trzpienia jest końcem wkładu)
- 8 -
1.3 Odkręć górny i dolny koniec zespołu popychacza i przymocuj dolny
koniec zespołu popychacza do zespołu ramy.
1.4 Po zamontowaniu zespół pręta popychającego należy ustawić w
pozycji pionowej, a następnie wsunąć go do poręczy. Wyrównać otwory
montażowe i zablokować śruby.

- 9 -
Krok 2: Zamontuj ramę poduszki
2.1 Odkręć śruby M-lock na ramie, włóż lewą i prawą ramę poduszki
siedziska i dokręć śruby.
- 10 -
2.2 Odkręć śruby korbowodu. Oba końce korbowodu należy połączyć
śrubami z ramą lewej i prawej strony poduszki siedziska.
2.3 Włóż oba końce drążka oparcia w otwory montażowe znajdujące się
po lewej stronie poduszki siedziska i po prawej stronie ramy.
Connecting rod
Note:Keep the nut facing outwards

- 11 -
Krok 3: Montaż kieszeni siedziska
3.1 Zamontuj cztery zamki po obu stronach kieszeni siedziska na otworach
montażowych lewej i prawej ramy poduszki siedziska, aby wyregulować
wysokość kieszeni siedziska. Gotowe.
- 12 -
Ciepła rada: Produkt ten posiada dwie kieszenie na siedzeniach.
Należy je zamontować lub wymienić w razie potrzeby.
Instructions
Po naładowaniu można go normalnie używać. Można go regulować w górę
i w dół. Można przesuwać na odpowiednią wysokość. Przed użyciem
należy upewnić się, że wrzeciono ramy jest włożone, aby zapewnić

- 13 -
bezpieczeństwo. Zgodnie z wysokością produktu naciśnij przycisk w górę
do odpowiedniej wysokości, zwolnij i zatrzymaj. Jeśli klucz nie zostanie
zwolniony, produkt automatycznie zatrzyma się w najwyższym punkcie.
Zasilacz zaprojektowany dla tego produktu jest zasilaczem
niskonapięciowym, proszę mieć pewność.
Uwaga: Na obudowie baterii znajduje się wyświetlacz mocy. Regularnie
sprawdzaj wyświetlacz mocy na monitorze i ładuj go na czas.
Troubleshooting
W przypadku awarii skontaktuj się z naszym personelem obsługi
posprzedażowej lub zaloguj się na naszą oficjalną stronę internetową, aby
uzyskać informacje kontaktowe. Dzięki zaufaniu naszego personelu
technicznego rozwiążemy problem. Jeśli nie będziemy w stanie rozwiązać
tego problemu, zwrócimy go producentowi bezpłatnie. Jeśli okres
gwarancji dobiegnie końca lub zostanie spowodowany przez personel,
nasza firma nie udzieli bezpłatnej gwarancji. Wymagane są materiały i
wysyłka .
Maintenance
Ostrzeżenie: Nie rozmontowuj i nie naprawiaj urządzenia bez zgody
producenta .
Cleaning and disinfection
Zaleca się przetarcie pierścienia siedziska miękką bawełnianą ściereczką i

- 14 -
alkoholem przed użyciem i zdezynfekowanie go po czyszczeniu. Skorupę
przenośnika i akcesoria należy czyścić alkoholem medycznym lub innymi
niekorozyjnymi środkami dezynfekującymi.
Ostrzeżenie:
Podczas czyszczenia i dezynfekcji nie należy ładować ani używać
urządzenia.
Zabrania się mycia i dezynfekcji maszyny transferowej oraz akcesoriów w
płynach.
Do czyszczenia dźwigni zmiany biegów i akcesoriów zabrania się
stosowania żrących detergentów.
Zabrania się stosowania żrących środków dezynfekujących do dezynfekcji
maszyny ruchomej i jej osprzętu.
Dopiero po wyschnięciu detergentu i środka dezynfekującego można
używać dźwigni zmiany biegów i akcesoriów.
Jeśli urządzenie nie będzie używane przez dłuższy czas, należy je
regularnie wyjmować i ładować, aby uniknąć uszkodzenia akumulatora.
Safe use and maintenance
1. Nie podłączaj zasilania zawsze podczas procesu. Przynajmniej raz w
tygodniu należy używać baterii do pracy i do momentu jej wyczerpania,
należy upewnij się, że bateria jest ładowana, gdy bateria jest rozładowana.
Chociaż lit bateria nie ma efektu pamięci, co wydłuża jej żywotność.2.
Należy zniszczyć baterię zgodnie z odpowiednimi lokalnymi przepisami,
gdy maszyna jest złomowana.
3. Po użyciu maszyny nie ma potrzeby czyszczenia i konserwacji za
każdym razem . można używać normalnie po naładowaniu, gdy
akumulator nie jest zasilany. Jeśli okaże się, że wystąpią drgania podczas
podnoszenia się lub opadania maszyny, dotknij elektrycznego oleju
smarującego oba długie wałki.
4. Po pewnym czasie użytkowania produktu należy sprawdzić, czy śruby
każdej z nich są dokręcone. części są luźne. Jeśli występuje jakikolwiek
luz, należy go na czas dokręcić.
5. Wewnętrzne zasilanie tego produktu to zasilacz niskiego napięcia prądu
stałego. Jeżeli jest woda na powierzchni ciała, można ją osuszyć
- 15 -
ręcznikiem. Nie bulgotać w wodzie bezpośrednio.
CORRECT DISPOSAL
Ten produkt podlega przepisom dyrektywy europejskiej
2012/19/UE. Symbol przedstawiający przekreślony kosz na
śmieci na kółkach oznacza, że produkt wymaga oddzielnej zbiórki
odpadów w Unii Europejskiej. Dotyczy to produktu i wszystkich
akcesoriów oznaczonych tym symbolem. Produktów oznaczonych w ten
sposób nie można wyrzucać razem ze zwykłymi odpadami domowymi, ale
należy je oddać do punktu zbiórki w celu recyklingu urządzeń
elektrycznych i elektronicznych.
BATTERY DISPOSAL
Aby zminimalizować zagrożenia dla zdrowia i środowiska po
zakończeniu okresu użytkowania produktu, przepisy dotyczące
zużytego sprzętu elektrycznego i elektronicznego (WEEE) oraz
dyrektywa w sprawie zużytych baterii wymagają, aby ten
produkt został przekazany do odpowiedniego punktu zbiórki, do którego
zostanie on wysłany w celu wyjęcia baterii i poddania odpowiedniemu
recyklingowi. Aby uzyskać więcej informacji na temat recyklingu i
bezpiecznej utylizacji zużytych baterii w Twojej okolicy, skontaktuj się z
lokalnymi władzami.
XIANG FALI TECHNOLOGY (XIAMEN) CO.LTD
Adres: Piętro 5, nr 63, Pingcheng North Road, dzielnica Haicang
Xiamen Fujian,CN 361026

- 16 -
Importowane do AUS: SIHAO PTY LTD. 1 ROKEVA STREETEASTWOOD
NSW 2122 Australia
Importowane do USA: Sanven Technology Ltd. Suite 250, 9166 Anaheim
Miejsce, Rancho Cucamonga, CA 91730
REP
UK
YH CONSULTING LIMITED.
C/O YH Consulting Limited Office 147,
Centurion House,
London Road, Staines-upon-Thames, Surrey,
TW18 4AX
REP
EC
E-CrossStu GmbH
Mainzer Landstr.69, 60329 Frankfurt am
Main.


Technisch Support und E-Garantie-Zertifikat www.vevor.com/support
Patiententransferstuhl
MODELL: XFL-QX-YW02
We continue to be committed to provide you tools with competitive price.
"Save Half", "Half Price" or any other similar expressions used by us only represents an
estimate of savings you might benefit from buying certain tools with us compared to the major
top brands and does not necessarily mean to cover all categories of tools offered by us. You
are kindly reminded to verify carefully when you are placing an order with us if you are
actually saving half in comparison with the top major brands.

- 1 -
MODELL: XFL-QX-YW02
Hinweis: Das Produktbild dient als Referenz. Die tatsächlichen Details sind
maßgebend.
Have product questions? Need technical support? Please feel free to
contact us:
Technical Support and E-Warranty Certificate
www.vevor.com/support
NEED HELP? CONTACT US!
This is the original instruction, please read all manual instructions
carefully before operating. VEVOR reserves a clear interpretation of our
user manual. The appearance of the product shall be subject to the
product you received. Please forgive us that we won't inform you again if
there are any technology or software updates on our product.
Patient Transfer Chair

- 2 -
Vielen Dank, dass Sie sich für dieses Patiententransferstuhl
Lesen Sie vor der Anwendung bitte alle Hinweise sorgfältig durch. Die
Informationen helfen Ihnen dabei, optimale Ergebnisse zu erzielen.
Operation safety
Bitte legen Sie dieses Handbuch an einem leicht zugänglichen Ort ab und
bewahren Sie es ordnungsgemäß auf. In dieser Bedienungsanleitung ist klar
beschrieben, wie Sie das Geräte sicher und richtig zu benutzen, um Schäden oder
Sachschäden,die Ihnenund anderenentstehen.
Warnung
1. Beim Laden muss ein passender Adapter für dieses Produkt
verwendet werden.2. Dieser Stuhl wird nicht zum Duschen
empfohlen, wenn Sie müssen Sie den Strom ausschalten und die
wasserdichte Abdeckung auf das Ladegerät setzen Hafen.
3. Das Licht am Adapter leuchtet während des Ladevorgangs rot.
Der Ladevorgang wird dann beendet. automatisch, wenn der Akku
vollständig geladen ist, und das Licht wird eingeschaltet grün.4. Die
Wartung dieser Maschine muss durchgeführt werden von Profis.
Verbot
1. Öffnen Sie das Batteriefach nicht während des Ladevorgangs.
2. Benutzen Sie das Produkt nicht während des Ladevorgangs
3. Verwenden Sie es nicht, wenn das Gewicht über 300 lbs ( 1 50 kg ) liegt.
4. Stellen Sie es nicht an einen Ort, an dem Kinder es berühren können, um
Verletzungen zu vermeiden. 5. Es ist strengstens verboten, die Maschine zu
betreiben, wenn sich Gegenstände im Gerät befinden. Blockierung, sonst
wird die Maschine beschädigt
*Unser Unternehmen haftet nicht für Verluste oder Schäden, die durch
Betrieb unter Missachtung von Warnungen und Vorsicht. Bitte beachten
- 3 -
Sie:
Product introduction
Anwendungsgebiete
Der elektrische Transferstuhl mit Hebefunktion ist ein Pflegegerät, das behinderten
Menschen hilft Menschen, die sich ohne Barrieren bewegen, es ist für kurze Distanzen
konzipiert Transfer- und Rehabilitationspflege. Die Pflegekräfte können die Patienten
leicht durch die Steuerung der Lift-Taste, die die Pflege verbessern Effizienz enorm. Es
hilft den Pflegekräften, Patienten zu übertragen, die unbeweglich zu Auto, Wohnzimmer,
Toilette und Badezimmer. Zusammenfassend kann es die Pflegeintensität für die
Pflegenden deutlich zu reduzieren und die Pflegekosten zu senken Gefahr von
Sekundärverletzungen während des Transfervorgangs.
Circuit principle block diagram

- 4 -
Environmental requirements
◆Nutzungsumgebung:
Umgebungstemperaturbereich: +10 ℃ ~ +40 ℃ Relative Luftfeuchtigkeit
Bereich: 30 % ~ 75 % Luftdruckbereich: 700 hPa ~ 1060 hPa Keine
korrosiven und brennbaren Materialien, trocken und weniger Staub im
Innenbereich
◆Speicherumgebung:
Umgebungstemperatur: 0 °C bis +50 °C, relative Luftfeuchtigkeit: 93 %.
Luftdruck: 500 hPa bis 1060 hPa. Keine ätzenden Gase, gut belüfteter
Raum.
◆ Gehen Sie beim Transport und der Lagerung vorsichtig damit um und
werfen oder lassen Sie keine Gegenstände fallen.
Bewahren Sie das Gerät nicht an einem Ort auf, wo Flüssigkeit spritzen
könnte.
Lagern Sie das Gerät nicht in einer Umgebung, in der die Gefahr von
brennbaren Gasen besteht.
Product parameter
Modell
XFL-QX-YW02
Farbe
Weiß + Schwarz
Hubbereich
330 mm
Wasserdicht Klasse
IPX44
Maximale Belastung
≤150 kg (330
Pfund)
Produktgröße
860 x 550 x 980 mm
- 5 -
Part List
1.Grundrahmen x1
2.Handlaufrahmen x1
3.Sitztasche x1
4.Sitztasche (mit Löchern) x1
5.Sitzhalterung links TX1
6.Sitz rechte Halterung x1
7.Dorn x2
8.Netzteil x1
9.Elektrische
Schubstangenbaugruppe x1
10.Pleuelstange x1
- 6 -
11.Rückenlehnenhebel x1
12. Montagezubehör x 1 Satz
Installation instructions
Schritt 1: Karosserie montieren
1.1 Vorab den Riegel an der Rahmenbaugruppe lösen
1.2 Den Dorn in die Befestigungslöcher auf der linken und rechten Seite
der Rahmenbaugruppe einführen und den Riegel einsetzen
(Hinweis: Das perforierte Ende des Dorns ist das Einsteckende)

- 7 -
1.3 Die oberen und unteren Enden der Schubstangenbaugruppe
abschrauben und das untere Ende der Schubstangenbaugruppe an der
Rahmenbaugruppe befestigen
1.4 Nach der Installation wird die Schubstangenbaugruppe aufrecht
gehalten und dann in das Handlaufportal eingesetzt. Richten Sie die
Befestigungslöcher aus und ziehen Sie die Schrauben fest.
- 8 -
Schritt 2: Den Polsterrahmen montieren
2.1 Die M-Lock-Schrauben am Rahmen lösen, den linken und rechten
Seitenrahmen des Sitzpolsters einsetzen und die Schrauben festziehen.

- 9 -
2.2 Lösen Sie die Schrauben der Verbindungsstange. Die beiden Enden
der Verbindungsstange sind durch Schrauben mit dem Rahmen der linken
und rechten Seite des Sitzkissens verbunden.
2.3 Stecken Sie beide Enden der Rückenlehnenstange in die
Befestigungslöcher auf der linken Seite des Sitzpolsters und der rechten
Seite des Rahmens.
Connecting rod
Note:Keep the nut facing outwards

- 10 -
Schritt 3: Sitztasche montieren
3.1 Die vier Verriegelungen auf beiden Seiten der Sitztasche an den
Befestigungslöchern des linken und rechten Seitenrahmens des
Sitzpolsters anbringen, um die Höhe der Sitztasche einzustellen, fertig.

- 11 -
Warmer Tipp: Dieses Produkt verfügt über zwei Sitztaschen. Bitte
installieren oder ersetzen Sie diese nach Bedarf.
Instructions
Nach dem Aufladen kann es normal verwendet werden. Es kann nach
oben und unten eingestellt werden. Die richtige Höhe kann verschoben
werden. Vor dem Gebrauch muss bestätigt werden, dass die Spindel des

- 12 -
Rahmens eingesetzt ist, um die Sicherheit zu gewährleisten. Drücken Sie
je nach Höhe des Produkts die Aufwärtstaste auf die entsprechende Höhe,
lassen Sie sie los und stoppen Sie. Wenn die Taste nicht losgelassen wird,
stoppt das Produkt automatisch an seinem höchsten Punkt. Das für dieses
Produkt vorgesehene Netzteil ist ein Niederspannungsnetzteil, seien Sie
unbesorgt.
Hinweis: Auf dem Batteriefach befindet sich eine Ladestandsanzeige. Bitte
überprüfen Sie regelmäßig die Ladestandsanzeige auf dem Monitor und
laden Sie ihn rechtzeitig auf.
Troubleshooting
Im Falle eines Fehlers wenden Sie sich bitte an unser
Kundendienstpersonal oder melden Sie sich auf unserer offiziellen
Website an, um Kontaktinformationen zu erhalten. Mit dem Vertrauen
unseres technischen Personals werden wir das Problem lösen. Wenn wir
dieses Problem nicht lösen können, senden wir es kostenlos an den
Hersteller zurück. Wenn die Garantiezeit endet oder durch Personal
verursacht wird, gewährt Ihnen unser Unternehmen keine kostenlose
Garantie. Materialien und Versand sind erforderlich .
Maintenance
Achtung: Zerlegen und reparieren Sie die Maschine nicht ohne die
Erlaubnis des Herstellers .
Cleaning and disinfection
Es wird empfohlen, den Sitzring vor dem Gebrauch mit einem weichen

- 13 -
Baumwolltuch und Alkohol abzuwischen und ihn nach der Reinigung zu
desinfizieren. Die Förderschale und das Zubehör sollten mit
medizinischem Alkohol oder anderen nicht ätzenden Desinfektionsmitteln
geschrubbt werden.
Warnung:
Während der Reinigung und Desinfektion darf das Gerät nicht aufgeladen
oder verwendet werden.
Es ist verboten, die Transfermaschine und das Zubehör in Flüssigkeiten zu
waschen oder zu desinfizieren.
Die Verwendung ätzender Reinigungsmittel zur Reinigung des
Schalthebels und des Zubehörs ist verboten.
Die Verwendung ätzender Desinfektionsmittel zur Desinfektion der
beweglichen Maschine und des Zubehörs ist verboten.
Erst wenn das Reinigungs- und Desinfektionsmittel getrocknet ist, können
Schalthebel und Zubehör verwendet werden.
Wenn Sie das Gerät längere Zeit nicht benutzen, nehmen Sie es bitte
heraus und laden Sie es regelmäßig auf, um einen Batterieausfall zu
vermeiden.
Safe use and maintenance
1. Stecken Sie während des Vorgangs nicht immer das Netzteil ein.
Mindestens einmal pro Woche muss der Batterie sollte verwendet werden,
um zu arbeiten, und bis die Batterie erschöpft ist, ist es notwendig, Stellen
Sie sicher, dass die Batterie wieder aufgeladen wird, wenn sie leer ist.
Obwohl die Lithium- Batterie hat keinen Memory-Effekt, es kann die
Lebensdauer der Batterie verlängern.2. Bitte entsorgen Sie die Batterie
gemäß den jeweiligen örtlichen Vorschriften, wenn die Maschine wird
verschrottet.
3. Nach dem Gebrauch der Maschine ist es nicht notwendig, sie jedes Mal
zu reinigen und zu warten . kann nach dem Laden normal verwendet
werden, wenn der Akku nicht mit Strom versorgt wird. Wenn festgestellt
wird, dass Es wird Jitter geben, wenn die Maschine steigt oder fällt,
berühren Sie das elektrische Schmieröl auf beide langen Schäfte.
4. Überprüfen Sie nach längerem Gebrauch des Produkts, ob die
- 14 -
Schrauben der einzelnen Teile sind locker. Wenn welche locker sind,
sollten sie rechtzeitig festgezogen werden.
5. Die interne Stromversorgung dieses Produkts erfolgt über eine
DC-Niederspannungsversorgung. ist Wasser auf der Oberfläche des
Körpers, kann es mit Handtuch getrocknet werden. Nicht im Wasser
sprudeln direkt.
CORRECT DISPOSAL
Dieses Produkt unterliegt den Bestimmungen der europäischen
Richtlinie 2012/19/EU. Das Symbol einer durchgestrichenen
Mülltonne weist darauf hin, dass dieses Produkt in der
Europäischen Union einer getrennten Müllentsorgung unterliegt.
Dies gilt für das Produkt und alle mit diesem Symbol gekennzeichneten
Zubehörteile. So gekennzeichnete Produkte dürfen nicht im normalen
Hausmüll entsorgt werden, sondern müssen an einer Sammelstelle für das
Recycling von elektrischen und elektronischen Geräten abgegeben
werden.
BATTERY DISPOSAL
Um die Gefahren für Gesundheit und Umwelt am Ende der
Lebensdauer dieses Produkts zu minimieren, schreiben die
Gesetze zu Elektro- und Elektronik-Altgeräten (WEEE) und die
Altbatterie-Richtlinie vor, dass Sie dieses Produkt bei einer
geeigneten Sammelstelle abgeben müssen. Dorthin wird es zur
Entfernung der Batterien und zum ordnungsgemäßen Recycling geschickt.
Weitere Informationen zum Recycling und zur sicheren Entsorgung dieser
Batterien in Ihrer Gegend erhalten Sie bei Ihren örtlichen Behörden.
- 15 -
XIANG FALI TECHNOLOGY (XIAMEN) CO.LTD
Adresse: 5. Stock, Nr. 63, Pingcheng North Road, Bezirk Haicang
Xiamen Fujian, CN 361026
Nach AUS importiert: SIHAO PTY LTD. 1 ROKEVA STREETEASTWOOD
NSW 2122 Australien
Importiert in die USA: Sanven Technology Ltd. Suite 250, 9166 Anaheim
Ort, Rancho Cucamonga, CA 91730
REP
UK
YH CONSULTING LIMITED.
C/O YH Consulting Limited Office 147,
Centurion House,
London Road, Staines-upon-Thames, Surrey,
TW18 4AX
REP
EC
E-CrossStu GmbH
Mainzer Landstr.69, 60329 Frankfurt am
Main.


Technique Certificat d'assistance et de garantie électronique
www.vevor.com/support
Chaise de transfert de patient
MODÈLE : XFL-QX-YW02
We continue to be committed to provide you tools with competitive price.
"Save Half", "Half Price" or any other similar expressions used by us only represents an
estimate of savings you might benefit from buying certain tools with us compared to the major
top brands and does not necessarily mean to cover all categories of tools offered by us. You
are kindly reminded to verify carefully when you are placing an order with us if you are
actually saving half in comparison with the top major brands.
- 1 -
MODÈLE : XFL-QX-YW02
Remarque : l'image du produit est fournie à titre de référence, les détails
réels prévalent
Have product questions? Need technical support? Please feel free to
contact us:
Technical Support and E-Warranty Certificate
www.vevor.com/support
NEED HELP? CONTACT US!
This is the original instruction, please read all manual instructions
carefully before operating. VEVOR reserves a clear interpretation of our
user manual. The appearance of the product shall be subject to the
product you received. Please forgive us that we won't inform you again if
there are any technology or software updates on our product.
Patient Transfer Chair
- 2 -
Merci beaucoup d'avoir choisi ceci Chaise de transfert de patient
Veuillez lire toutes les instructions avant de l'utiliser. Les informations vous
aideront à obtenir les meilleurs résultats possibles.
Operation safety
Veuillez placer ce manuel dans un endroit facile à consulter et le conserver
correctement. Ce manuel d'instructions indique clairement comment utiliser le
l'équipement de manière sûre et correcte, afin d'éviter tout dommage ou perte de
bienscauséeàvousetà d’autres.
Avertissement
1. Vous devez utiliser un adaptateur adapté à ce produit lors du
chargement. 2. Il n'est pas recommandé d'utiliser cette chaise pour
prendre une douche, si vous devez doit éteindre l'alimentation et
mettre le couvercle étanche sur le chargement port.
3. Le voyant de l'adaptateur sera rouge pendant la charge, il
arrêtera la charge automatiquement lorsque la batterie est
complètement chargée et la lumière s'allume vert.4. L'entretien de
cette machine doit être effectué par professionnels.
Interdiction
1. N'ouvrez pas le boîtier de la batterie pendant la charge.
2. N'utilisez pas le produit pendant le processus de charge
3. Ne l'utilisez pas si le poids est supérieur à 300 lb ( 1,50 kg ) .
4. Ne le placez pas dans un endroit où les enfants peuvent le toucher pour
éviter les blessures. 5. Il est strictement interdit d'utiliser la machine lorsqu'il
y a des objets le bloquer, sinon la machine sera endommagée
*Notre société ne sera pas responsable de toute perte ou dommage causé
par opération négligeant l'avertissement et l'attention. Veuillez faire
attention.
- 3 -
Product introduction
Utilisation prévue
Le fauteuil de transfert électrique est un appareil de soins infirmiers qui aide les
personnes handicapées les personnes se déplacent sans barrière, il est conçu pour les
courtes distances transfert et soins infirmiers de réadaptation. Les soignants peuvent
transférer les patients facilement en contrôlant le bouton de levage, ce qui améliore les
soins infirmiers efficacité grandement. Cela aide les soignants à transférer le patient qui
est immobile à la voiture, au salon, aux toilettes et à la salle de bain. En résumé, il peut
réduire considérablement l'intensité des soins infirmiers pour les soignants et diminuer
les soins infirmiers risque de blessure secondaire pendant le processus de transfert.
Circuit principle block diagram
- 4 -
Environmental requirements
◆Environnement d'utilisation :
Plage de température ambiante : +10℃~+40℃Humidité relative
Plage : 30 % à 75 % Plage de pression atmosphérique : 700 hPa à 1 060
hPa Pas de matériaux corrosifs et combustibles, intérieur sec et peu
poussiéreux
◆Environnement de stockage :
Température ambiante : 0℃~+50℃Humidité relative : s93%Pression
atmosphérique : 500hPa~1060hPaPas de gaz corrosif, pièce bien ventilée.
◆Pendant le transport et le stockage, manipulez avec précaution et ne
jetez pas et ne laissez pas tomber d’objets.
Ne stockez pas l’équipement dans un endroit où du liquide pourrait
éclabousser.
Ne pas stocker l'équipement sous risque de gaz combustible.
Product parameter
Modèle
XFL-QX-YW02
Couleur
Blanc + noir
Portée de levage
330 mm
Classe imperméable
IPX44
Charge maximale
≤150 KG (330 lb)
Taille du produit
860 x 550 x 980 mm
- 5 -
Part List
1.Cadre de base x1
2. Cadre de main courante x1
3.poche de siège x1
4.poche de siège (avec trous) x1
5.Support de siège gauche tx1
6. Support de siège droit x1
7. Mandrin x2
8. Adaptateur secteur x1
9. Ensemble de tige de poussée
électrique x1
10. Bielle x1
11.Levier de dossier x1
12. 1 jeu de ferrures de montage
- 6 -
Installation instructions
Étape 1 : Montage du corps
1.1 Pré-débrancher le loquet de l'ensemble cadre
1.2 Insérez le mandrin dans les trous de montage sur les côtés gauche et
droit de l'assemblage du cadre et insérez le loquet
(Remarque : l'extrémité perforée du mandrin est l'extrémité de l'insert)
- 7 -
1.3 Dévissez les extrémités supérieure et inférieure de l'ensemble de tige
de poussée et fixez l'extrémité inférieure de l'ensemble de tige de poussée
à l'ensemble de châssis
1.4 Après l'installation, l'ensemble de la tige de poussée est maintenu en
position verticale puis inséré dans le portique de la main courante. Alignez
les trous de montage et verrouillez les vis.

- 8 -
Étape 2 : Installez le cadre du coussin
2.1Desserrez les vis M-lock sur le cadre, insérez les cadres latéraux
gauche et droit du coussin de siège et serrez les vis.
- 9 -
2.2 Desserrez les vis de la bielle. Les deux extrémités de la bielle sont
reliées au cadre des côtés gauche et droit du coussin de siège par des vis.
2.3 Insérez les deux extrémités de la tige du dossier dans les trous de
montage situés sur le côté gauche du coussin de siège et sur le côté droit
du cadre.
Connecting rod
Note:Keep the nut facing outwards

- 10 -
Étape 3 : Montage de la poche de siège
3.1Installez les quatre verrous des deux côtés de la poche de siège sur les
trous de montage des cadres latéraux gauche et droit du coussin de siège
pour régler la hauteur de la poche de siège, terminé.

- 11 -
Conseil chaleureux : Ce produit fournit deux poches de siège,
veuillez les installer ou les remplacer selon vos besoins.
Instructions
Après la charge, il peut être utilisé normalement. Il peut être réglé de haut
en bas. La hauteur appropriée peut être déplacée. Avant utilisation, il faut
confirmer que la broche du cadre est insérée pour assurer la sécurité.

- 12 -
Selon la hauteur du produit, appuyez sur le bouton haut jusqu'à la hauteur
appropriée, relâchez et arrêtez. Si la touche n'est pas relâchée, le produit
s'arrête automatiquement à son point le plus élevé. L'alimentation conçue
pour ce produit est une alimentation basse tension, soyez rassuré.
Remarque : Il y a un indicateur de puissance sur le boîtier de la batterie.
Veuillez vérifier régulièrement l'affichage de puissance sur le moniteur et le
charger à temps
Troubleshooting
En cas de panne, veuillez contacter notre service après-vente ou vous
connecter sur notre site officiel pour obtenir les coordonnées. Avec la
confiance de notre personnel technique, nous résoudrons le problème. Si
nous ne pouvons pas résoudre ce problème, nous le renverrons
gratuitement au fabricant. Si la période de garantie se termine ou est
causée par le personnel, notre société ne vous accordera pas de garantie
gratuite. Les matériaux et l'expédition sont nécessaires .
Maintenance
Avertissement : Ne pas démonter ni réparer la machine sans l'autorisation
du fabricant .
Cleaning and disinfection
Il est recommandé d'essuyer la bague de siège avec un chiffon en coton
doux et de l'alcool avant utilisation, et de la désinfecter après le nettoyage.
La coque du convoyeur et les accessoires doivent être frottés avec de
l'alcool médical ou d'autres désinfectants non corrosifs.

- 13 -
Avertissement:
Lors du nettoyage et de la désinfection, ne chargez pas et n'utilisez pas la
machine.
Il est interdit de laver ou de désinfecter la machine de transfert et les
accessoires dans du liquide.
Il est interdit d'utiliser un détergent corrosif pour nettoyer le levier de
vitesses et les accessoires.
Il est interdit d'utiliser un désinfectant corrosif pour désinfecter la machine
en mouvement et les accessoires.
Ce n'est qu'une fois le détergent et le désinfectant séchés que le levier de
vitesses et les accessoires peuvent être utilisés.
Lorsque la machine n'est pas utilisée pendant une longue période, veuillez
la sortir et la charger régulièrement pour éviter une panne de batterie.
Safe use and maintenance
1. Ne branchez pas toujours l'alimentation électrique pendant le processus.
Au moins une fois par semaine, la batterie doit être utilisée pour
fonctionner, et jusqu'à ce que la batterie soit épuisée, il est nécessaire de
assurez-vous que la batterie est rechargée lorsque la batterie est épuisée.
Bien que la batterie au lithium La batterie n'a pas d'effet mémoire, elle peut
prolonger la durée de vie de la batterie. 2. Veuillez détruire la batterie
conformément aux réglementations locales en vigueur lors de la la
machine est mise au rebut.
3. Après avoir utilisé la machine, il n'est pas nécessaire de la nettoyer et de
l'entretenir à chaque fois . peut être utilisé normalement après la charge
lorsque la batterie n'est pas alimentée. s'il est constaté que il y aura des
secousses lorsque la machine monte ou descend, touchez l'huile de
lubrification électrique sur les deux tiges longues.
4. Après avoir utilisé le produit pendant un certain temps, vérifiez si les vis
de chaque Les pièces sont desserrées. S'il y a du jeu, il faut les resserrer à
temps.
5. L'alimentation interne de ce produit est une alimentation basse tension
CC. Il y a de l'eau à la surface du corps, elle peut être séchée avec une
serviette. Ne pas faire de bulles dans l'eau directement.
- 14 -
CORRECT DISPOSAL
Ce produit est soumis aux dispositions de la directive européenne
2012/19/UE. Le symbole représentant une poubelle barrée
indique que le produit doit faire l'objet d'une collecte sélective
dans l'Union européenne. Cela s'applique au produit et à tous les
accessoires marqués de ce symbole. Les produits marqués comme tels ne
doivent pas être jetés avec les ordures ménagères normales, mais doivent
être déposés dans un point de collecte pour le recyclage des appareils
électriques et électroniques.
BATTERY DISPOSAL
Afin de minimiser les risques pour la santé et l'environnement à
la fin de la vie de ce produit, les lois relatives aux déchets
d'équipements électriques et électroniques (DEEE) et la
directive sur les piles usagées exigent que vous jetiez ce produit
dans un centre de collecte approprié où il sera envoyé afin de retirer les
piles et de les recycler de manière appropriée. Veuillez contacter vos
autorités locales pour plus de détails sur le recyclage et l'élimination sûre
de ces dernières dans votre région.
TECHNOLOGIE XIANG FALI (XIAMEN) CO.LTD
Adresse : 5e étage, n° 63, Pingcheng North Road, district de Haicang
Xiamen, Fujian, Chine 361026
Importé en Australie : SIHAO PTY LTD. 1 ROKEVA STREETEASTWOOD
- 15 -
NSW 2122 Australie
Importé aux États-Unis : Sanven Technology Ltd. Suite 250, 9166 Anaheim
Lieu, Rancho Cucamonga, CA 91730
REP
UK
YH CONSULTING LIMITED.
C/O YH Consulting Limited Office 147,
Centurion House,
London Road, Staines-upon-Thames, Surrey,
TW18 4AX
REP
EC
E-CrossStu GmbH
Mainzer Landstr.69, 60329 Frankfurt am
Main.


Technisch Ondersteuning en E-garantiecertificaat www.vevor.com/support
Patiëntenoverdrachtsstoel
MODEL: XFL-QX-YW02
We continue to be committed to provide you tools with competitive price.
"Save Half", "Half Price" or any other similar expressions used by us only represents an
estimate of savings you might benefit from buying certain tools with us compared to the major
top brands and does not necessarily mean to cover all categories of tools offered by us. You
are kindly reminded to verify carefully when you are placing an order with us if you are
actually saving half in comparison with the top major brands.

- 1 -
MODEL: XFL-QX-YW02
Let op: De productfoto is ter referentie, de werkelijke details zijn
doorslaggevend
Have product questions? Need technical support? Please feel free to
contact us:
Technical Support and E-Warranty Certificate
www.vevor.com/support
NEED HELP? CONTACT US!
This is the original instruction, please read all manual instructions
carefully before operating. VEVOR reserves a clear interpretation of our
user manual. The appearance of the product shall be subject to the
product you received. Please forgive us that we won't inform you again if
there are any technology or software updates on our product.
Patient Transfer Chair

- 2 -
Hartelijk dank dat u hiervoor heeft gekozen Patiëntenoverdrachtsstoel
Lees de volledige instructies aandachtig door voordat u het product
gebruikt. Deze informatie helpt u om de best mogelijke resultaten te
behalen.
Operation safety
Bewaardeze handleidingopeen plekwaaru hemgemakkelijkkuntraadplegenen
bewaar hem op de juiste manier. Deze gebruiksaanwijzing geeft duidelijk aan hoe
u de apparatuur veilig en correct gebruiken, om schade of letsel te voorkomen
eigendomsverliesveroorzaakt door uenanderen.
Waarschuwing
1. Gebruik een bijpassende adapter bij dit product tijdens het
opladen. 2. Deze stoel wordt niet aanbevolen voor het douchen, als
u moet moet de stroom uitschakelen en de waterdichte hoes op de
oplader plaatsen haven.
3. Het lampje op de adapter brandt rood tijdens het opladen, het
opladen stopt automatisch wanneer de batterij volledig is
opgeladen, en het lampje gaat uit groen.4. Het onderhoud van deze
machine moet worden uitgevoerd door vakmensen.
Verbod
1. Open de batterijdoos niet tijdens het opladen
2. Gebruik het product niet tijdens het opladen
3. Gebruik het niet als het gewicht meer dan 300 lbs ( 1,50 kg ) bedraagt
4. Zet het niet op een plek waar kinderen het kunnen aanraken om
verwondingen te voorkomen. 5. Het is ten strengste verboden om de
machine te bedienen als er voorwerpen in de buurt zijn. het blokkeren
ervan, anders raakt de machine beschadigd

- 3 -
*Ons bedrijf is niet aansprakelijk voor verlies of schade veroorzaakt door
bediening verwaarlozen waarschuwing en aandacht. Let op.
Product introduction
Beoogd gebruik
Elektrische lift-transferstoel is een verpleeghulpmiddel dat gehandicapten helpt
mensen die zich zonder barrières verplaatsen, het is ontworpen voor korte afstanden
overdracht en revalidatieverpleging. De verzorgers kunnen de patiënten eenvoudig
door de liftknop te bedienen, wat de verpleging verbetert efficiëntie enorm. Het helpt
de verzorgers om de patiënt die onbeweeglijk voor auto, woonkamer, toilet en
badkamer. Kortom, het kan de intensiteit van de verpleging voor verzorgers aanzienlijk
verminderen en de verpleegkosten verlagen risico op secundair letsel tijdens het
overdrachtsproces.
Circuit principle block diagram
- 4 -
Environmental requirements
◆Gebruik omgeving:
Omgevingstemperatuurbereik: +10℃~+40℃Relatieve vochtigheid
bereik: 30% ~ 75% Atmosferische drukbereik: 700 hPa ~ 1060 hPa Geen
corrosieve en brandbare materialen, droog en minder stof binnenshuis
◆Opslagomgeving:
Omgevingstemperatuur: 0℃~+50℃Relatieve vochtigheid:
s93%Atmosferische druk: 500hPa~1060hPaGeen corrosief gas, goed
geventileerde ruimte.
◆ Ga voorzichtig te werk tijdens het transport en de opslag. Gooi er geen
voorwerpen mee en laat ze niet vallen.
Bewaar het apparaat niet op een plek waar vloeistof kan spatten.
- 5 -
Bewaar de apparatuur niet op een plaats waar er gevaar bestaat voor
brandbaar gas.
Product parameter
Model
XFL-QX-YW02
Kleur
Wit + zwart
Liftbereik
330mm
Waterdichte klasse
IPX44
Maximale belasting
≤150 kg (330 lbs)
Productgrootte
860x550x980mm
Part List

- 6 -
1. Basisframe x1
2. Leuningframe x1
3. zitzak x1
4.Zitzak (met gaten) x1
5. Stoel linker beugel tx1
6. Stoel rechterbeugel x1
7. Doorn x2
8. Stroomadapter x1
9. Elektrische duwstangmontage x1
10.Drijfstang x1
11. Rugleuninghendel x1
12. Montagemateriaal x 1set
Installation instructions

- 7 -
Stap 1: Montage van het lichaam
1.1 Ontkoppel de vergrendeling op de frameconstructie
1.2 Plaats de doorn in de montagegaten aan de linker- en rechterkant van
de frameconstructie en plaats de vergrendeling
(Let op: het geperforeerde uiteinde van de doorn is het inzetstuk)
1.3 Schroef de bovenste en onderste uiteinden van de
duwstangconstructie los en bevestig het onderste uiteinde van de
- 8 -
duwstangconstructie aan de frameconstructie
1.4 Na de installatie wordt de duwstangconstructie rechtop gehouden en
vervolgens in de leuningconstructie gestoken. Lijn de montagegaten uit en
draai de schroeven vast.
Stap 2: Installeer het kussenframe
- 9 -
2.1 Draai de M-lock schroeven op het frame los, plaats het linker- en
rechterframe van het zitkussen en draai de schroeven vast.
2.2 Draai de schroeven van de verbindingsstang los. De twee uiteinden
van de verbindingsstang zijn met schroeven verbonden met het frame van
de linker- en rechterkant van het zitkussen.
Note:Keep the nut facing outwards

- 10 -
2.3 Steek beide uiteinden van de rugleuningstang in de montagegaten aan
de linkerkant van het zitkussen en aan de rechterkant van het frame.
Connecting rod

- 11 -
Stap 3: Montage van de zadeltas
3.1 Monteer de vier sloten aan beide zijden van de zitzak op de
bevestigingsgaten van het linker- en rechterframe van het zitkussen om de
hoogte van de zitzak aan te passen.
Warme tip:
Dit product is voorzien van twee zitzakken. Installeer of
vervang deze indien nodig.

- 12 -
Instructions
Na het opladen kan het normaal worden gebruikt. Het kan omhoog en
omlaag worden aangepast. De juiste hoogte kan worden verplaatst. Voor
gebruik moet worden bevestigd dat de spindel van het frame is geplaatst
om de veiligheid te garanderen. Druk op de omhoogknop tot de juiste
hoogte, laat los en stop, afhankelijk van de hoogte van het product. Als de
sleutel niet wordt losgelaten, stopt het product automatisch op het hoogste
punt. De voeding die voor dit product is ontworpen, is een
laagspanningsvoeding, wees gerust.
Let op: Er is een power display op de batterijdoos. Controleer de power
display op de monitor regelmatig en laad deze op tijd op
Troubleshooting
In het geval van een storing, neem dan contact op met ons
aftersalespersoneel of log in op onze officiële website voor
contactgegevens. Met het vertrouwen van onze technische staf lossen we
het probleem op. Als we dit probleem niet kunnen oplossen, sturen we het

- 13 -
gratis terug naar de fabrikant. Als de garantieperiode afloopt of wordt
veroorzaakt door personeel, geeft ons bedrijf u geen gratis garantie.
Materialen en verzending zijn vereist .
Maintenance
Waarschuwing: Demonteer en repareer het apparaat niet zonder
toestemming van de fabrikant .
Cleaning and disinfection
Het wordt aanbevolen om de zittingring voor gebruik af te vegen met een
zachte katoenen doek en alcohol en deze na het reinigen te desinfecteren.
De transportbandbehuizing en accessoires moeten worden geschrobd met
medische alcohol of andere niet-corrosieve ontsmettingsmiddelen.
Waarschuwing:
Tijdens het reinigen en desinfecteren mag u het apparaat niet opladen of
gebruiken.
Het is verboden om de transfermachine en de accessoires in vloeistof te
wassen of te desinfecteren.
Het is verboden om bijtende schoonmaakmiddelen te gebruiken om de
schakelpook en accessoires schoon te maken.
Het is verboden om bijtende ontsmettingsmiddelen te gebruiken om de
bewegende machine en de accessoires te ontsmetten.
Pas nadat het reinigings- en ontsmettingsmiddel is opgedroogd, kunt u de
schakelpook en de accessoires gebruiken.
Wanneer het apparaat gedurende een langere tijd niet wordt gebruikt, haal
het dan regelmatig uit de machine en laad het op om te voorkomen dat de
batterij leeg raakt.
Safe use and maintenance
1. Sluit de voeding niet altijd aan tijdens het proces. Minimaal één keer per
week, de De batterij moet worden gebruikt om te werken, en totdat de
batterij leeg is, is het noodzakelijk om ervoor zorgen dat de batterij wordt
opgeladen wanneer de batterij leeg is. Hoewel de lithium batterij heeft
geen geheugeneffect, het kan de levensduur van de batterij verlengen.2.

- 14 -
Vernietig de batterij volgens de relevante lokale voorschriften wanneer de
machine wordt gesloopt.
3. Na gebruik van de machine is het niet nodig om deze elke keer schoon
te maken en te onderhouden . kan normaal worden gebruikt na het
opladen wanneer de batterij niet van stroom wordt voorzien. Als blijkt dat er
zal trilling optreden wanneer de machine stijgt of daalt, raak de elektrische
smeerolie aan beide lange schachten.
4. Controleer na gebruik van het product gedurende een bepaalde tijd of
de schroeven van elk onderdeel los zitten. Als er sprake is van speling,
moet het op tijd worden aangedraaid.
5. De interne voeding van dit product is een DC-laagspanningsvoeding. Als
er is water op het oppervlak van het lichaam, het kan worden gedroogd
met een handdoek. Laat geen water bubbelen direct.
CORRECT DISPOSAL
Dit product is onderworpen aan de bepalingen van de Europese
richtlijn 2012/19/EU. Het symbool met een doorgestreepte
afvalbak geeft aan dat het product in de Europese Unie
gescheiden afvalinzameling vereist. Dit geldt voor het product en
alle accessoires die met dit symbool zijn gemarkeerd. Producten die als
zodanig zijn gemarkeerd, mogen niet met het normale huishoudelijke afval
worden weggegooid, maar moeten worden ingeleverd bij een inzamelpunt
voor recycling van elektrische en elektronische apparaten.
BATTERY DISPOSAL
Om de gevaren voor de gezondheid en het milieu aan het einde
van de levensduur van dit product tot een minimum te beperken,
vereisen de wetten met betrekking tot afgedankte elektrische en
elektronische apparatuur (AEEA) en de richtlijn afgedankte
batterijen dat u dit product inlevert bij een daarvoor geschikt inzamelpunt.
Daar worden de batterijen verwijderd en wordt het op de juiste manier
gerecycled. Neem contact op met uw plaatselijke autoriteiten voor meer
informatie over recycling en veilige verwijdering hiervan in uw omgeving.

- 15 -
XIANG FALI TECHNOLOGIE (XIAMEN) CO.LTD
Adres: 5e verdieping, nr. 63, Pingcheng North Road, district Haicang
Xiamen Fujian,CN 361026
Geïmporteerd naar AUS: SIHAO PTY LTD. 1 ROKEVA
STREETEASTWOOD
NSW 2122 Australië
Geïmporteerd naar de VS: Sanven Technology Ltd. Suite 250, 9166
Anaheim
Plaats, Rancho Cucamonga, CA 91730
REP
UK
YH CONSULTING LIMITED.
C/O YH Consulting Limited Office 147,
Centurion House,
London Road, Staines-upon-Thames, Surrey,
TW18 4AX
REP
EC
E-CrossStu GmbH
Mainzer Landstr.69, 60329 Frankfurt am
Main.


Teknisk Support och e-garanticertifikat www.vevor.com/support
Patient T ransfer C hår
MODELL: XFL-QX-YW02
We continue to be committed to provide you tools with competitive price.
"Save Half", "Half Price" or any other similar expressions used by us only represents an
estimate of savings you might benefit from buying certain tools with us compared to the major
top brands and does not necessarily mean to cover all categories of tools offered by us. You
are kindly reminded to verify carefully when you are placing an order with us if you are
actually saving half in comparison with the top major brands.
- 1 -
MODELL: XFL-QX-YW02
Obs: Produktbilden är för referens, de faktiska detaljerna ska råda
Have product questions? Need technical support? Please feel free to
contact us:
Technical Support and E-Warranty Certificate
www.vevor.com/support
NEED HELP? CONTACT US!
This is the original instruction, please read all manual instructions
carefully before operating. VEVOR reserves a clear interpretation of our
user manual. The appearance of the product shall be subject to the
product you received. Please forgive us that we won't inform you again if
there are any technology or software updates on our product.
Patient Transfer Chair
- 2 -
Tack så mycket för att du valde detta Patient T ransfer C hår
Läs alla instruktioner innan du använder den. Informationen hjälper dig att
uppnå bästa möjliga resultat.
Operation safety
Vänligenläggden här bruksanvisningenpå enplats somär lätt attkontrollera och
förvara den på rätt sätt. Den här bruksanvisningen visar tydligt hur du använder
utrustning säkert och korrekt, för att förhindra skada eller egendomsförlust
orsakadavdigochandra.
Varning
1. Måste använda matchad adapter med denna produkt vid
laddning.2. Denna stol rekommenderas inte att använda för att
duscha, om du måste måste stänga av strömmen och sätta det
vattentäta locket på laddningen hamn.
3. Lampan på adaptern lyser rött under laddning, den kommer att
sluta ladda automatiskt när batteriet är fulladdat och lampan tänds
grön.4. Underhållet av denna maskin måste utföras av proffs.
Förbud
1. Öppna inte batterilådan när den laddas
2. Använd inte produkten under laddningsprocessen
3. Använd den inte om vikten överstiger 300 lbs ( 1 50 kg )
4. Placera den inte på en plats där barnen kan röra den för att undvika
skador5. Det är strängt förbjudet att använda maskinen när det finns
föremål blockerar den, annars skadas maskinen
*Vårt företag kommer inte att ansvara för förlust eller skada som orsakas
av operation som försummar varning och uppmärksamhet. Var
uppmärksam på.
- 3 -
Product introduction
Avsedd användning
Elektrisk lyftstol är amningsanordningen som hjälper handikappade människor som rör
sig utan barriär, den är designad för korta avstånd förflyttnings- och
rehabiliteringsvård. Vårdgivarna kan överföra patienter enkelt genom att styra
lyftknappen, vilket förbättrar omvårdnaden Det hjälper vårdgivarna att överföra
patienten som är orörlig till bil, vardagsrum, toalett och badrum. Sammanfattningsvis
kan det minska omvårdnadsintensiteten kraftigt för vårdgivare och sänka omvårdnaden
risk för sekundär skada under överföringsprocessen.
Circuit principle block diagram
- 4 -
Environmental requirements
◆Använd miljö:
Omgivningstemperaturområde: +10℃~+40℃Relativ luftfuktighet
område: 30%~75%Atmosfäriskt tryckområde: 700hPa~1060hPaInga
korrosiva och brännbara material, torrt och mindre damm inomhus
◆Lagringsmiljö:
Omgivningstemperatur:0℃~+50℃Relativ luftfuktighet:
s93%Atmosfärstryck:500hPa~1060hPaIngen frätande gas, välventilerat
rum.
◆ Under transport och förvaring ska du hantera dem varsamt och inte
kasta eller tappa föremål.
Förvara inte utrustningen på en plats där vätska kan stänka.
Förvara inte utrustningen med risk för brännbar gas.
Product parameter
Modell
XFL-QX-YW02
Färg
Vit + svart
Lyft R ange
330 mm
Vattentät klass
IPX44
Maximal belastning
≤150 KG (330 lbs)
Produktstorlek
860 x 550 x 980 mm
- 5 -
Part List
1. Basram x1
2. Ledstångsram x1
3.sitsficka x1
4.sitsficka (med hål) x1
5. Säte vänster fäste tx1
6. Säte höger fäste x1
7. Dorn x2
8. Strömadapter x1
9. Elektrisk tryckstångsenhet x1
10. Vevstång x1
11. Ryggstödsspak x1
12. Monteringsbeslag x 1 set

- 6 -
Installation instructions
Steg 1: Monteringskropp
1.1 Koppla ur spärren på ramenheten i förväg
1.2 Sätt in dornen i monteringshålen på vänster och höger sida av
ramenheten och sätt in spärren
(Obs: Den perforerade änden av dornen är insatsänden)
- 7 -
1.3 Skruva loss de övre och nedre ändarna av tryckstångsenheten och fäst
den nedre änden av tryckstångsenheten till ramenheten
1.4 Efter installationen hålls tryckstångsenheten upprätt och sätts sedan in
i ledstångsportalen. Rikta in monteringshålen och lås skruvarna.
Steg 2: Installera dynramen
- 8 -
2.1 Lossa M-låsskruvarna på ramen, sätt i vänster och höger sidoram på
sittdynan och dra åt skruvarna.
2.2 Lossa vevstakens skruvar. Vevstångens två ändar är förbundna med
ramen på vänster och höger sida av sittdynan med skruvar.
Note:Keep the nut facing outwards

- 9 -
2.3 Sätt in båda ändarna av ryggstödsstången i monteringshålen på
vänster sida av sittdynan och höger sida av ramen.
Connecting rod
- 10 -
Steg 3: Montering av sätesficka
3.1 Installera de fyra låsen på båda sidor av sittfickan på monteringshålen
på vänster och höger sidoram på sittdynan för att justera höjden på
sittfickan, färdig.
Varmt tips:
Denna produkt har två sitsfickor, installera eller byt ut efter
behov.

- 11 -
Instructions
Efter laddning kan den användas normalt. Den kan justeras upp och ner.
Rätt höjd kan flyttas. Före användning måste det bekräftas att spindeln på
ramen är insatt för att garantera säkerheten. Beroende på produktens höjd,
tryck på upp-knappen till lämplig höjd, släpp och stoppa. Om nyckeln inte
släpps stannar produkten automatiskt på sin högsta punkt.
Strömförsörjningen som är designad för denna produkt är
lågspänningsförsörjning, var vänlig.
Obs: Det finns en strömdisplay på batterilådan. Kontrollera strömdisplayen
på monitorn regelbundet och ladda den i tid
Troubleshooting
I händelse av ett fel, vänligen kontakta vår kundtjänst eller logga in på vår
officiella webbplats för kontaktinformation. Med vår tekniska personals
förtroende löser vi problemet. Om vi inte kan lösa detta problem kommer vi
att returnera det till tillverkaren utan kostnad. Om garantiperioden går ut

- 12 -
eller orsakas av personal, kommer vårt företag inte att ge dig en gratis
garanti. Material och frakt krävs .
Maintenance
Varning: Ta inte isär och reparera maskinen utan tillstånd från tillverkaren .
Cleaning and disinfection
Det rekommenderas att torka av sätesringen med en mjuk bomullstrasa
och alkohol före användning och desinficera den efter rengöring.
Transportbandet och tillbehören ska skrubbas med medicinsk alkohol eller
andra icke-frätande desinfektionsmedel.
Varning:
Vid rengöring och desinficering, ladda eller använd inte maskinen.
Det är förbjudet att tvätta eller desinficera överföringsmaskinen och
tillbehören i vätska.
Det är förbjudet att använda frätande rengöringsmedel för att rengöra
växelreglaget och tillbehören.
Det är förbjudet att använda frätande desinfektionsmedel för att desinficera
den rörliga maskinen och tillbehören.
Först efter att tvätt- och desinfektionsmedlet har torkat kan växeln och
tillbehören användas.
När maskinen inte används under en längre tid, ta ut den och ladda den
regelbundet för att undvika batteriavbrott
Safe use and maintenance
1. Anslut inte alltid strömförsörjningen under processen. Minst en gång i
veckan batteri ska användas för att fungera, och tills batteriet är urladdat,
är det nödvändigt att se till att batteriet laddas när batteriet är urladdat.
Även om litium batteriet har ingen minneseffekt, det kan förlänga batteriets
livslängd.2. Vänligen förstör batteriet i enlighet med relevanta lokala
bestämmelser när maskinen skrotas.
3. Efter användning av maskinen är det inte nödvändigt att rengöra och
underhålla den varje gång. Jag t kan användas normalt efter laddning när
batteriet inte är strömsatt. Om det upptäcks det det kommer att bli

- 13 -
skakande när maskinen stiger eller faller, rör på den elektriska smörjoljan
båda långa skaften.
4. Efter att ha använt produkten under en tid, kontrollera om skruvarna på
var och en delen är lösa. Om det finns något löst, bör det dras åt i tid.
5. Den interna strömförsörjningen för denna produkt är
DC-lågspänningsströmförsörjning. Om där är vatten på kroppens yta, kan
det torkas med handduk. Bubbla inte i vatten direkt.
CORRECT DISPOSAL
Denna produkt omfattas av bestämmelserna i det europeiska
direktivet 2012/19/EU. Symbolen som visar en soptunna korsad
anger att produkten kräver separat sophämtning i EU. Detta gäller
för produkten och alla tillbehör märkta med denna symbol.
Produkter märkta som sådana får inte slängas tillsammans med vanligt
hushållsavfall, utan måste lämnas till en insamlingsplats för återvinning av
elektriska och elektroniska apparater.
BATTERY DISPOSAL
För att minimera risker för hälsa och miljö vid slutet av denna
produkts livslängd, kräver lagar som handlar om avfall från
elektrisk och elektronisk utrustning (WEEE) och direktivet om
avfallsbatterier att du kasserar denna produkt på en lämplig
insamlingsanläggning dit den kommer att skickas in för att ta bort
batterierna och för lämplig återvinning. Kontakta dina lokala myndigheter
för mer information om återvinning och säker kassering av dessa i ditt
område.
- 14 -
XIANG FALI TECHNOLOGY(XIAMEN) CO.LTD
Adress: Floor 5th,No. 63, Pingcheng North Road, Haicang District
Xiamen Fujian, CN 361026
Importerad till AUS: SIHAO PTY LTD. 1 ROKEVA STREETEASTWOOD
NSW 2122 Australien
Importerad till USA: Sanven Technology Ltd. Suite 250, 9166 Anaheim
Place, Rancho Cucamonga, CA 91730
REP
UK
YH CONSULTING LIMITED.
C/O YH Consulting Limited Office 147,
Centurion House,
London Road, Staines-upon-Thames, Surrey,
TW18 4AX
REP
EC
E-CrossStu GmbH
Mainzer Landstr.69, 60329 Frankfurt am
Main.


Técnico Soporte y certificado de garantía electrónica www.vevor.com/support
Transferencia de Paciente C cabello
MODELO: XFL-QX-YW02
We continue to be committed to provide you tools with competitive price.
"Save Half", "Half Price" or any other similar expressions used by us only represents an
estimate of savings you might benefit from buying certain tools with us compared to the major
top brands and does not necessarily mean to cover all categories of tools offered by us. You
are kindly reminded to verify carefully when you are placing an order with us if you are
actually saving half in comparison with the top major brands.

- 1 -
MODELO: XFL-QX-YW02
Nota: La imagen del producto es de referencia, prevalecerán los detalles
reales.
Have product questions? Need technical support? Please feel free to
contact us:
Technical Support and E-Warranty Certificate
www.vevor.com/support
NEED HELP? CONTACT US!
This is the original instruction, please read all manual instructions
carefully before operating. VEVOR reserves a clear interpretation of our
user manual. The appearance of the product shall be subject to the
product you received. Please forgive us that we won't inform you again if
there are any technology or software updates on our product.
Patient Transfer Chair
- 2 -
Muchas gracias por elegir este Transferencia de Paciente C cabello
Lea todas las instrucciones antes de usarlo. La información le ayudará a
lograr los mejores resultados posibles.
Operation safety
Guarde este manual en un lugar fácil de consultar y guárdelo adecuadamente.
Este manual de instrucciones indica claramente cómo utilizar el utilizar el equipo
de forma segura y correcta, a fin de evitar cualquier daño o Pérdida de propiedad
causadapor ustedy otros.
Advertencia
1. Debe utilizar un adaptador compatible con este producto al
cargarlo. 2. No se recomienda utilizar esta silla para ducharse si
tiene que hacerlo. Debe apagar la alimentación y colocar la cubierta
impermeable en el cargador. puerto.
3. La luz del adaptador estará en rojo mientras se carga, luego
dejará de cargar. automáticamente cuando la batería esté
completamente cargada y la luz se encenderá verde.4. El
mantenimiento de esta máquina debe ser realizado por
profesionales.
Prohibición
1. No abra la caja de la batería mientras se esté cargando.
2. No utilice el producto durante el proceso de carga.
3. No lo use si el peso supera las 300 libras ( 1,50 kg ).
4. No lo coloque en un lugar donde los niños puedan tocarlo para evitar
lesiones. 5. Está estrictamente prohibido operar la máquina cuando haya
objetos bloqueándolo, de lo contrario la máquina se dañará.
*Nuestra empresa no será responsable de ninguna pérdida o daño causado

- 3 -
por Operación que no respeta las advertencias ni la atención. Preste
atención.
Product introduction
Uso previsto
La silla de transferencia con elevación eléctrica es un dispositivo de enfermería que
ayuda a las personas discapacitadas. Personas que se desplazan sin barreras, están
diseñadas para distancias cortas. enfermería de traslado y rehabilitación. Los
cuidadores pueden transferir el Los pacientes pueden levantarse fácilmente
controlando el botón de elevación, lo que mejora la atención de enfermería. eficiencia
en gran medida. Ayuda a los cuidadores a transferir al paciente que está inmóvil en el
coche, la sala de estar, el baño y el aseo. En resumen, puede reducir en gran medida la
intensidad de enfermería para los cuidadores y disminuir la Riesgo de lesiones
secundarias durante el proceso de transferencia.
Circuit principle block diagram

- 4 -
Environmental requirements
◆Entorno de uso:
Rango de temperatura ambiente: +10℃~+40℃ Humedad relativa
Rango: 30% ~ 75% Rango de presión atmosférica: 700 hPa ~ 1060 hPa
Sin materiales corrosivos ni combustibles, seco y con menos polvo en
interiores
◆Entorno de almacenamiento:
Temperatura ambiente: 0℃~+50℃Humedad relativa: s93%Presión
atmosférica: 500hPa~1060hPaSin gases corrosivos, habitación bien
ventilada.
◆Durante el transporte y almacenamiento, manipúlelo con cuidado y no
arroje ni deje caer objetos.
- 5 -
No guarde el equipo en un lugar donde pueda salpicar líquido.
No almacene el equipo bajo el riesgo de gases combustibles.
Product parameter
Modelo
XFL-QX-YW02
Color
Blanco + negro
Rango de elevación
330 mm
Clase impermeable
IPX44
Carga máxima
≤150 kg (330 libras)
Tamaño del producto
860 x 550 x 980 mm
Part List

- 6 -
1. Marco base x1
2. Marco de pasamanos x1
3.Bolsillo para asiento x1
4.Bolsillo para asiento (con
agujeros) x1
5.Soporte de asiento izquierdo tx1
6.Soporte derecho del asiento x1
7. Mandril x2
8. Adaptador de corriente x1
9. Conjunto de varilla de empuje
eléctrica x1
10. Biela x1
11.Palanca del respaldo x1
12. Accesorios de montaje x 1 juego
- 7 -
Installation instructions
Paso 1: Montaje del cuerpo
1.1 Desconecte previamente el pestillo del conjunto del marco.
1.2 Inserte el mandril en los orificios de montaje en los lados izquierdo y
derecho del conjunto del marco e inserte el pestillo.
(Nota: El extremo perforado del mandril es el extremo del inserto)
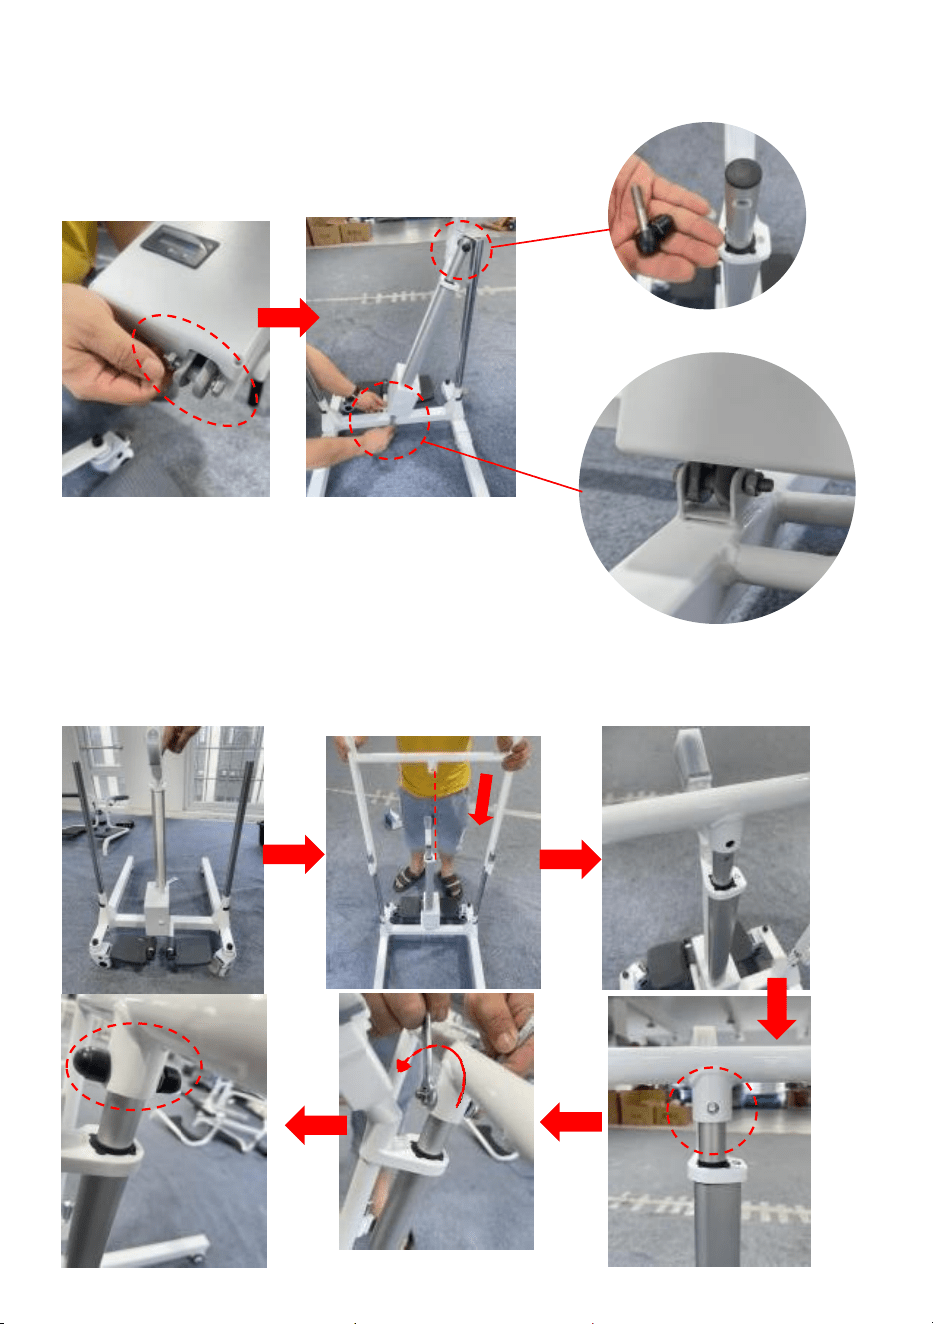
- 8 -
1.3 Desatornille los extremos superior e inferior del conjunto de la varilla
de empuje y fije el extremo inferior del conjunto de la varilla de empuje al
conjunto del marco.
1.4 Después de la instalación, el conjunto de la varilla de empuje se
mantiene en posición vertical y luego se inserta en el pórtico del
pasamanos. Alinee los orificios de montaje y bloquee los tornillos.
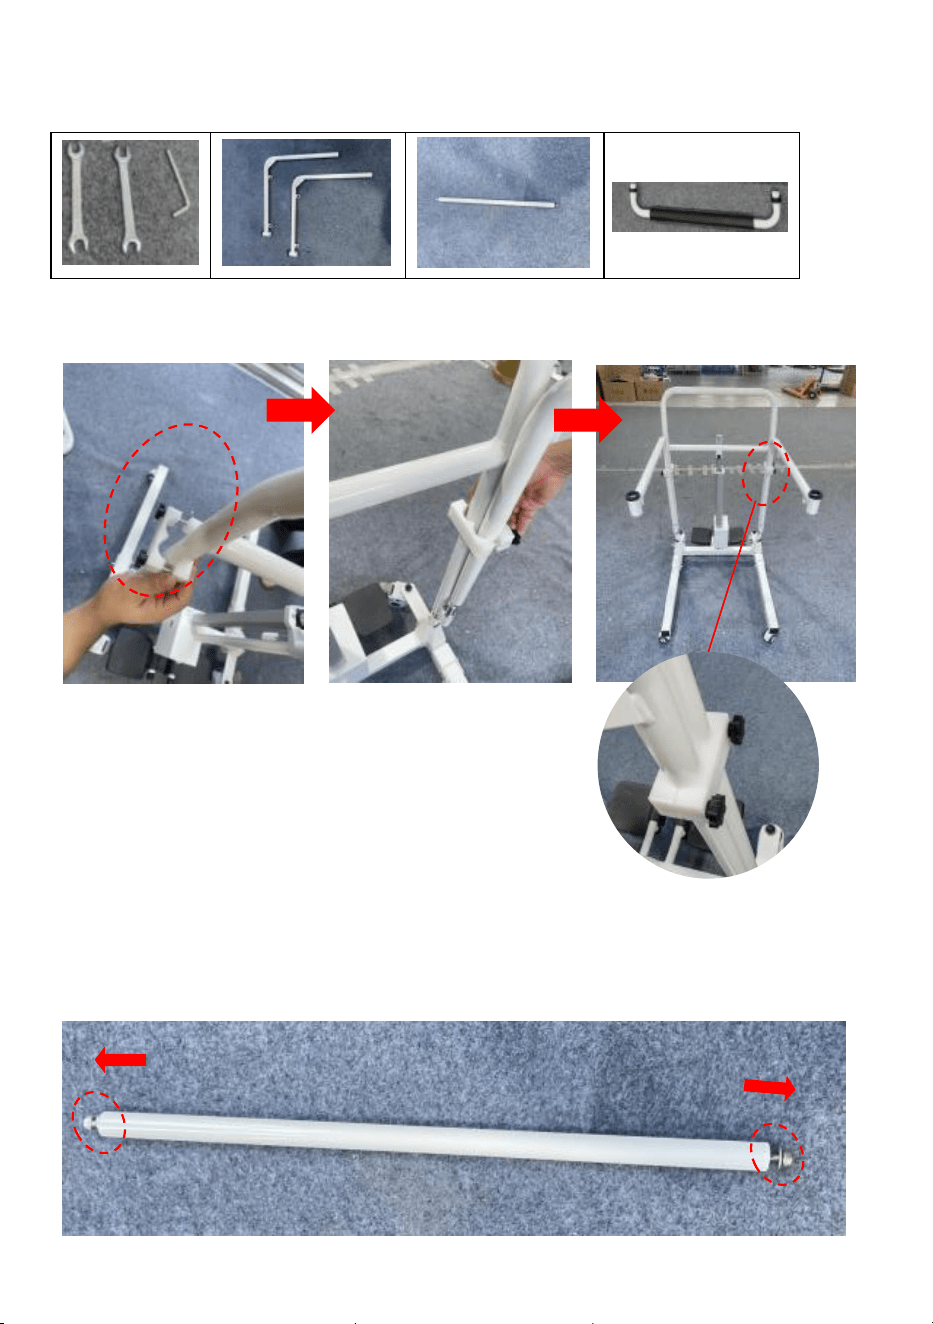
- 9 -
Paso 2: Instale el marco del cojín
2.1 Afloje los tornillos M-lock en el marco, inserte los marcos laterales
izquierdo y derecho del cojín del asiento y apriete los tornillos.
2.2 Afloje los tornillos de la biela. Los dos extremos de la biela están
conectados con el marco de los lados izquierdo y derecho del cojín del
asiento mediante tornillos.
Note:Keep the nut facing outwards

- 10 -
2.3 Inserte ambos extremos de la varilla del respaldo en los orificios de
montaje del lado izquierdo del cojín del asiento y del lado derecho del
marco.
Connecting rod
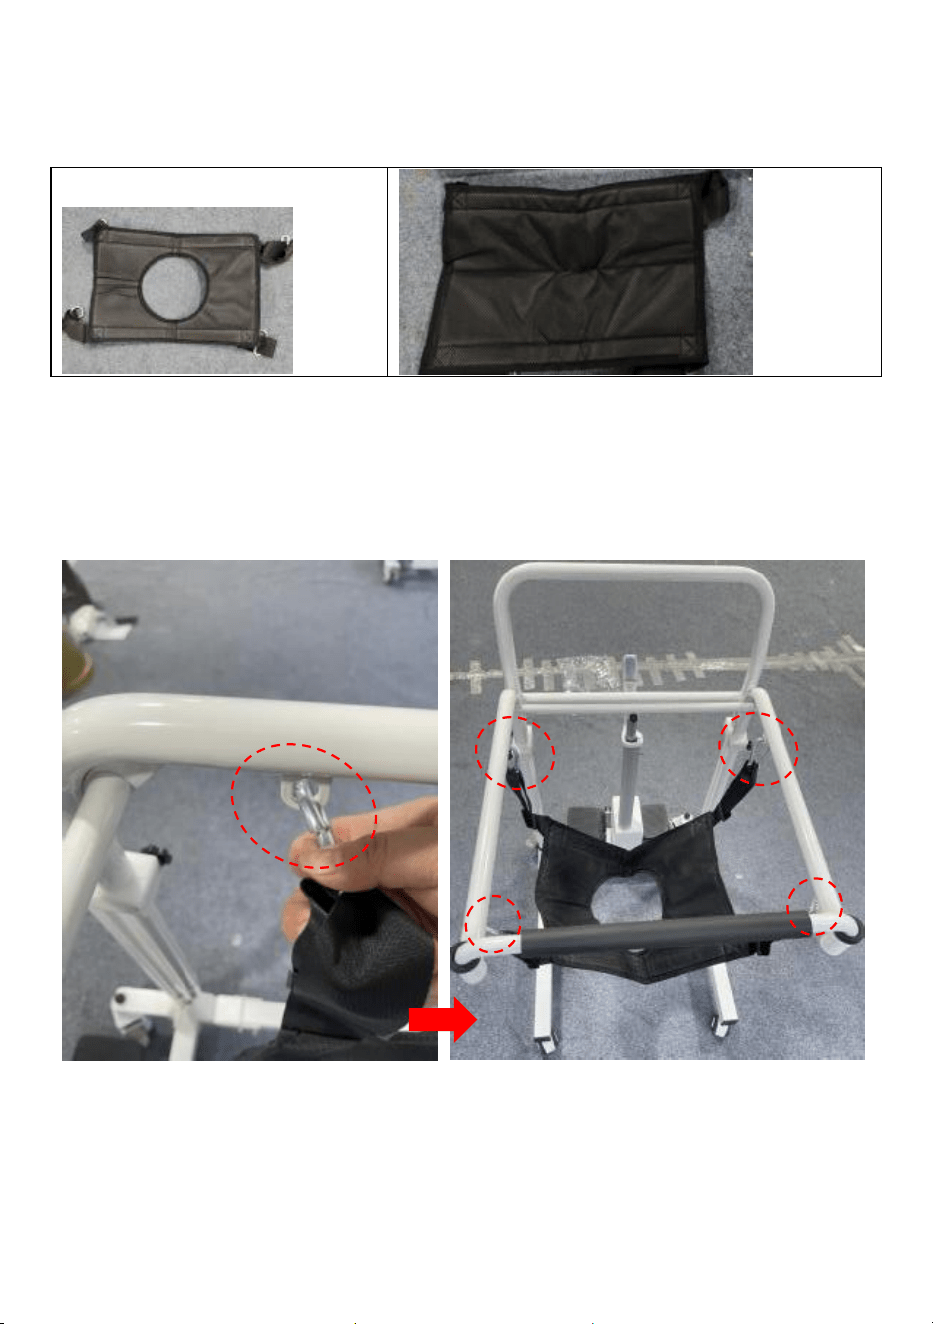
- 11 -
Paso 3: Montaje del bolsillo del asiento
3.1 Instale las cuatro cerraduras en ambos lados del bolsillo del asiento en
los orificios de montaje de los marcos laterales izquierdo y derecho del
cojín del asiento para ajustar la altura del bolsillo del asiento, terminado.
Consejo útil:
Este producto proporciona dos bolsillos para el asiento;
instálelos o reemplácelos según sea necesario.

- 12 -
Instructions
Después de la carga, se puede utilizar con normalidad. Se puede ajustar
hacia arriba y hacia abajo. Se puede mover a la altura adecuada. Antes de
su uso, se debe confirmar que el eje del marco está insertado para
garantizar la seguridad. De acuerdo con la altura del producto, presione el
botón hacia arriba hasta la altura adecuada, suéltelo y deténgase. Si no se
suelta la tecla, el producto se detiene automáticamente en su punto más
alto. La fuente de alimentación diseñada para este producto es una fuente
de alimentación de bajo voltaje, tenga la seguridad.
Nota: Hay una pantalla de energía en la caja de la batería. Verifique la
pantalla de energía en el monitor regularmente y cárguela a tiempo.
Troubleshooting
En caso de avería, póngase en contacto con nuestro personal de posventa
o acceda a nuestro sitio web oficial para obtener información de contacto.
Con la confianza de nuestro personal técnico, solucionaremos el problema.

- 13 -
Si no podemos solucionar este problema, se lo devolveremos al fabricante
sin coste alguno. Si el periodo de garantía finaliza o es causado por el
personal, nuestra empresa no le dará una garantía gratuita. Se requieren
materiales y envío .
Maintenance
Advertencia: No desmonte ni repare la máquina sin el permiso del
fabricante .
Cleaning and disinfection
Se recomienda limpiar el anillo del asiento con un paño de algodón suave
y alcohol antes de usarlo y desinfectarlo después de limpiarlo. La carcasa
del transportador y los accesorios deben limpiarse con alcohol medicinal u
otros desinfectantes no corrosivos.
Advertencia:
Durante la limpieza y desinfección, no cargue ni utilice la máquina.
Está prohibido lavar o desinfectar la máquina de transferencia y sus
accesorios con líquido.
Está prohibido utilizar detergentes corrosivos para limpiar la palanca de
cambios y los accesorios.
Está prohibido utilizar desinfectantes corrosivos para desinfectar la
máquina en movimiento y sus accesorios.
Solo después de que el detergente y el desinfectante se hayan secado, se
puede utilizar la palanca de cambios y los accesorios.
Cuando la máquina no se utilice durante un tiempo prolongado, sáquela y
cárguela periódicamente para evitar fallas de la batería.
Safe use and maintenance
1. No siempre conecte la fuente de alimentación durante el proceso. Al
menos una vez a la semana, La batería debe usarse para trabajar y hasta
que la batería se agote, es necesario Asegúrese de recargar la batería
cuando se agote. Aunque la batería de litio La batería no tiene efecto
memoria, por lo que puede prolongar su vida útil. 2. Destruya la batería de
acuerdo con las normas locales pertinentes cuando la utilice. La máquina
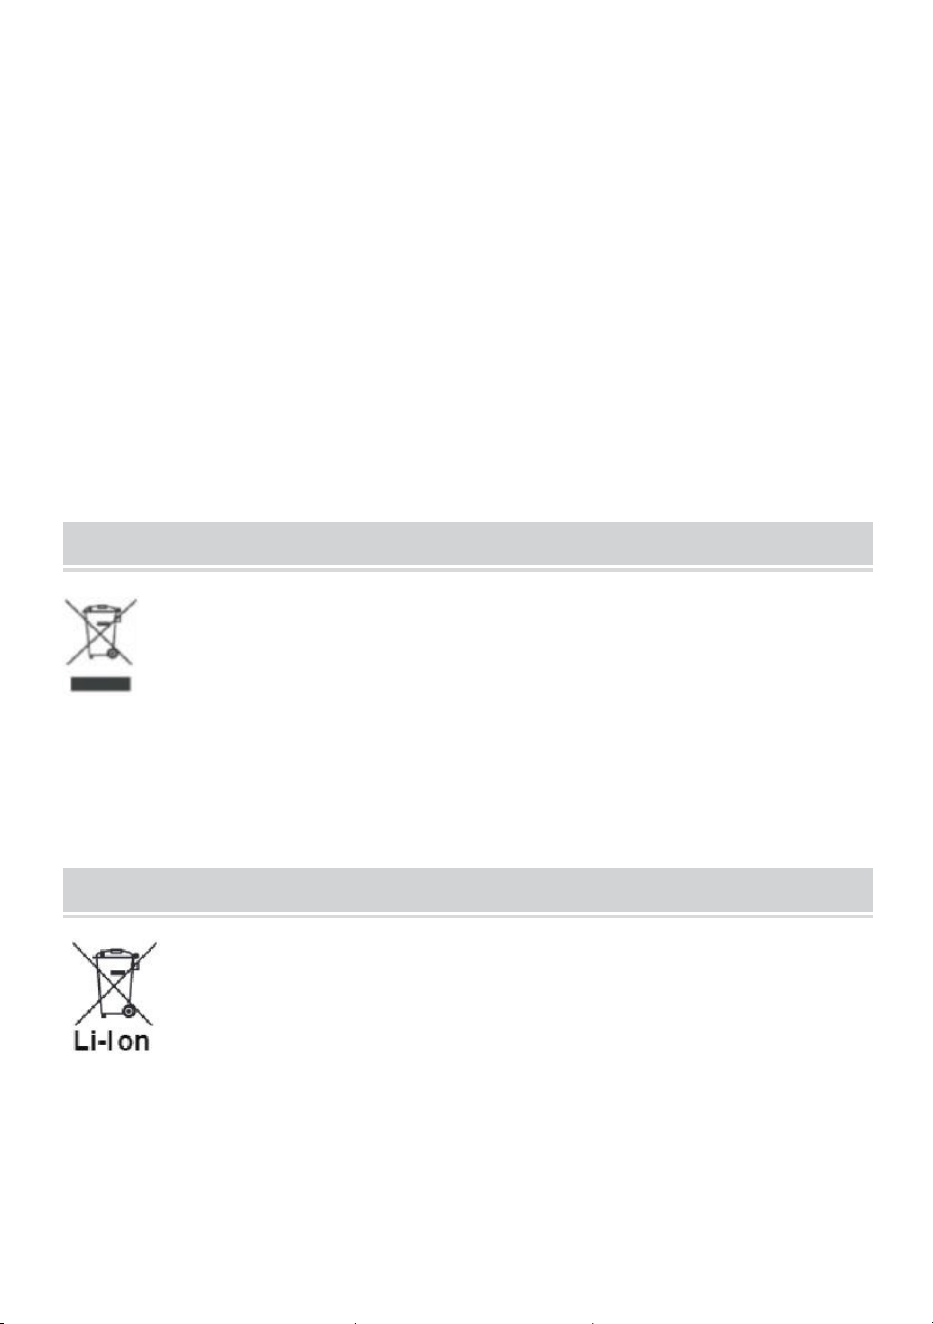
- 14 -
está desguazada.
la máquina, no es necesario limpiarla ni realizarle mantenimiento cada
vez . Se puede utilizar normalmente después de cargarlo cuando la
batería no está alimentada. Si se descubre que Habrá vibraciones cuando
la máquina esté subiendo o bajando, toque el aceite lubricante eléctrico en
Ambos ejes largos.
4. Después de utilizar el producto durante un período de tiempo, verifique
si los tornillos de cada Las piezas están sueltas. Si hay alguna holgura, se
debe apretar a tiempo.
5. La fuente de alimentación interna de este producto es una fuente de
alimentación de CC de bajo voltaje. Si hay Si hay agua en la superficie del
cuerpo, se puede secar con una toalla. No haga burbujas en el agua.
directamente.
CORRECT DISPOSAL
Este producto está sujeto a las disposiciones de la Directiva
europea 2012/19/UE. El símbolo que muestra un contenedor de
basura tachado indica que el producto requiere una recogida
selectiva de residuos en la Unión Europea. Esto se aplica al
producto y a todos los accesorios marcados con este símbolo. Los
productos marcados como tales no pueden desecharse con los residuos
domésticos normales, sino que deben llevarse a un punto de recogida
para reciclar dispositivos eléctricos y electrónicos.
BATTERY DISPOSAL
Para minimizar los riesgos para la salud y el medio ambiente al
final de la vida útil de este producto, las leyes que tratan sobre
Residuos de Equipos Eléctricos y Electrónicos (RAEE) y la
Directiva sobre Residuos de Baterías requieren que deseche
este producto en un centro de recolección adecuado donde será enviado
para retirar las baterías y reciclarlas adecuadamente. Comuníquese con
las autoridades locales para obtener más detalles sobre el reciclaje y la
eliminación segura de estas en su área.
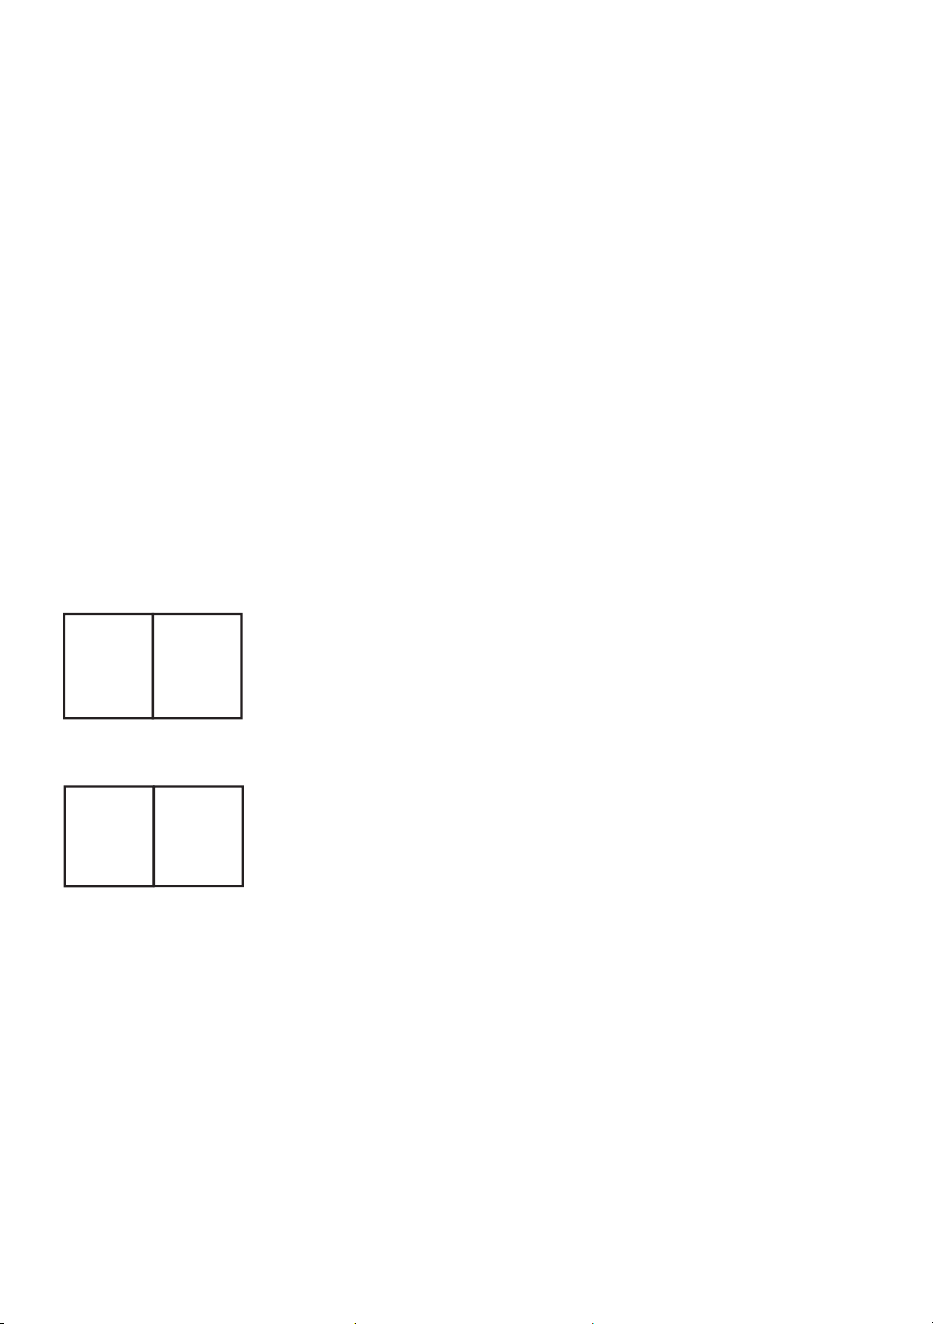
- 15 -
TECNOLOGÍA XIANG FALI (XIAMEN) CO.LTD
Dirección: Piso 5, No. 63, Pingcheng North Road, Distrito Haicang
Xiamen, Fujian, China 361026
Importado a Australia: SIHAO PTY LTD. 1 ROKEVA STREETEASTWOOD
Nueva Gales del Sur 2122 Australia
Importado a EE. UU.: Sanven Technology Ltd. Suite 250, 9166 Anaheim
Lugar, Rancho Cucamonga, CA 91730
REP
UK
YH CONSULTING LIMITED.
C/O YH Consulting Limited Office 147,
Centurion House,
London Road, Staines-upon-Thames, Surrey,
TW18 4AX
REP
EC
E-CrossStu GmbH
Mainzer Landstr.69, 60329 Frankfurt am
Main.


Tecnico Supporto e certificato di garanzia elettronica www.vevor.com/support
Trasferimento del paziente C hair
MODELLO: XFL-QX-YW02
We continue to be committed to provide you tools with competitive price.
"Save Half", "Half Price" or any other similar expressions used by us only represents an
estimate of savings you might benefit from buying certain tools with us compared to the major
top brands and does not necessarily mean to cover all categories of tools offered by us. You
are kindly reminded to verify carefully when you are placing an order with us if you are
actually saving half in comparison with the top major brands.

- 1 -
MODELLO: XFL-QX-YW02
Nota: l'immagine del prodotto è di riferimento, i dettagli effettivi prevarranno
Have product questions? Need technical support? Please feel free to
contact us:
Technical Support and E-Warranty Certificate
www.vevor.com/support
NEED HELP? CONTACT US!
This is the original instruction, please read all manual instructions
carefully before operating. VEVOR reserves a clear interpretation of our
user manual. The appearance of the product shall be subject to the
product you received. Please forgive us that we won't inform you again if
there are any technology or software updates on our product.
Patient Transfer Chair
- 2 -
Grazie mille per aver scelto questo Trasferimento del paziente C hair
Si prega di leggere attentamente le istruzioni prima di utilizzare il prodotto.
Le informazioni fornite vi aiuteranno a ottenere i migliori risultati possibili.
Operation safety
Si prega di conservare questo manuale in un luogo facilmente consultabile e di
conservarlo correttamente. Questo manuale di istruzioni indica chiaramente come
utilizzare il attrezzature in modo sicuro e corretto, in modo da prevenire qualsiasi
dannooperditadiproprietà causataa tee adaltri.
Avvertimento
1. È necessario utilizzare l'adattatore abbinato a questo prodotto
durante la ricarica. 2. Questa sedia non è consigliata per l'uso per la
doccia, se è necessario è necessario spegnere l'alimentazione e
mettere la copertura impermeabile sulla ricarica porta.
3. La luce sull'adattatore sarà rossa durante la ricarica, la ricarica si
interromperà automaticamente quando la batteria è
completamente carica e la luce si accenderà verde.4. La
manutenzione di questa macchina deve essere effettuata da
professionisti.
Divieto
1. Non aprire la scatola della batteria quando è in carica
2. Non utilizzare il prodotto durante il processo di ricarica
3. Non utilizzarlo se il peso supera le 300 libbre ( 1,50 kg )
4. Non posizionarlo in un luogo in cui i bambini possano toccarlo per evitare
lesioni. 5. È severamente vietato utilizzare la macchina quando ci sono
oggetti. bloccandolo, altrimenti la macchina verrà danneggiata
*La nostra azienda non sarà responsabile per eventuali perdite o danni
causati da operazione trascurando avvertimento e attenzione. Si prega di

- 3 -
prestare attenzione.
Product introduction
Uso previsto
La sedia elettrica per il trasferimento è il dispositivo di assistenza infermieristica che
aiuta i disabili persone che si muovono senza barriere, è progettato per brevi distanze
trasferimento e riabilitazione infermieristica. Gli assistenti possono trasferire il pazienti
facilmente controllando il pulsante di sollevamento, che migliora l'assistenza
infermieristica efficienza notevolmente. Aiuta gli operatori sanitari a trasferire il
paziente che è immobile rispetto all'auto, al soggiorno, al bagno e alla stanza da
bagno.In sintesi, può ridurre notevolmente l'intensità dell'assistenza infermieristica per
gli operatori sanitari e abbassare il costo dell'assistenza infermieristica rischio di lesioni
secondarie durante il processo di trasferimento.
Circuit principle block diagram

- 4 -
Environmental requirements
◆Utilizza l'ambiente:
Intervallo di temperatura ambiente: +10℃~+40℃ Umidità relativa
intervallo: 30%~75%Intervallo di pressione atmosferica:
700hPa~1060hPaNessun materiale corrosivo e combustibile, asciutto e
meno polvere all'interno
◆Ambiente di archiviazione:
Temperatura ambiente: 0℃~+50℃ Umidità relativa: s93% Pressione
atmosferica: 500hPa~1060hPa Nessun gas corrosivo, stanza ben
ventilata.
◆Durante il trasporto e lo stoccaggio, maneggiare con cura e non lanciare
o far cadere oggetti.
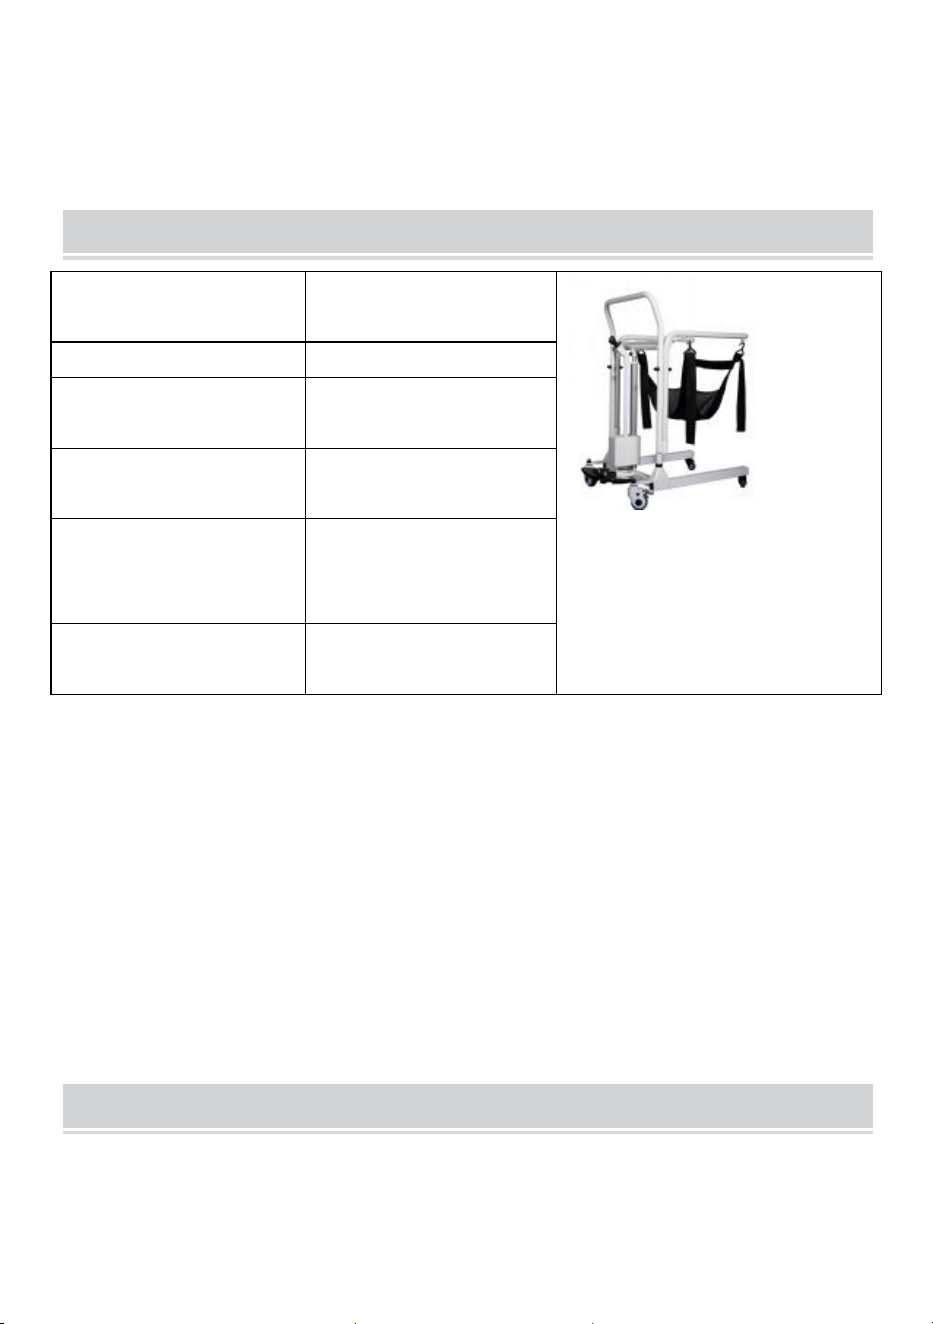
- 5 -
Non conservare l'apparecchiatura in un luogo in cui potrebbero verificarsi
schizzi di liquidi.
Non conservare l'apparecchiatura in luoghi esposti al rischio di gas
combustibili.
Product parameter
Modello
MODELLO
XFL-QX-YW02
Colore
Bianco + nero
Portata di
sollevamento
330mm
Classe impermeabile
Grado di protezione
IPX44
Carico massimo
≤150 KG (330
libbre)
Dimensioni del
prodotto
Dimensioni:
860x550x980 mm
Part List
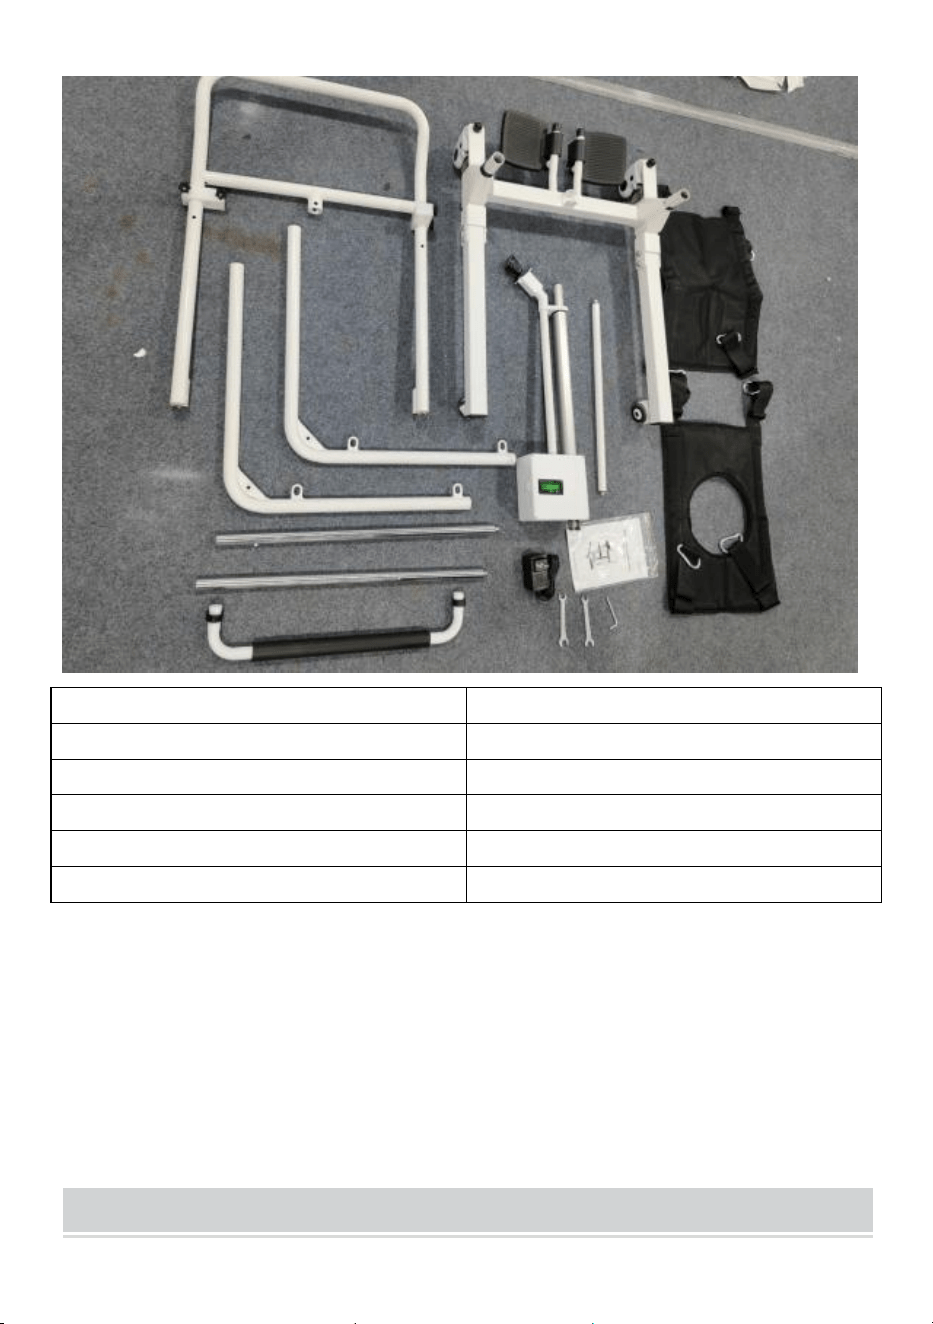
- 6 -
1. Telaio di base x1
2. Telaio corrimano x1
3. tasca del sedile x1
4. tasca del sedile (con fori) x1
5.Supporto sinistro del sedile tx1
6. Staffa destra del sedile x1
7.Mandrino x2
8.Adattatore di alimentazione x1
9. Gruppo asta di spinta elettrica x1
10.Biella x1
11. Leva dello schienale x1
12. Raccordi di montaggio x 1 set
Installation instructions
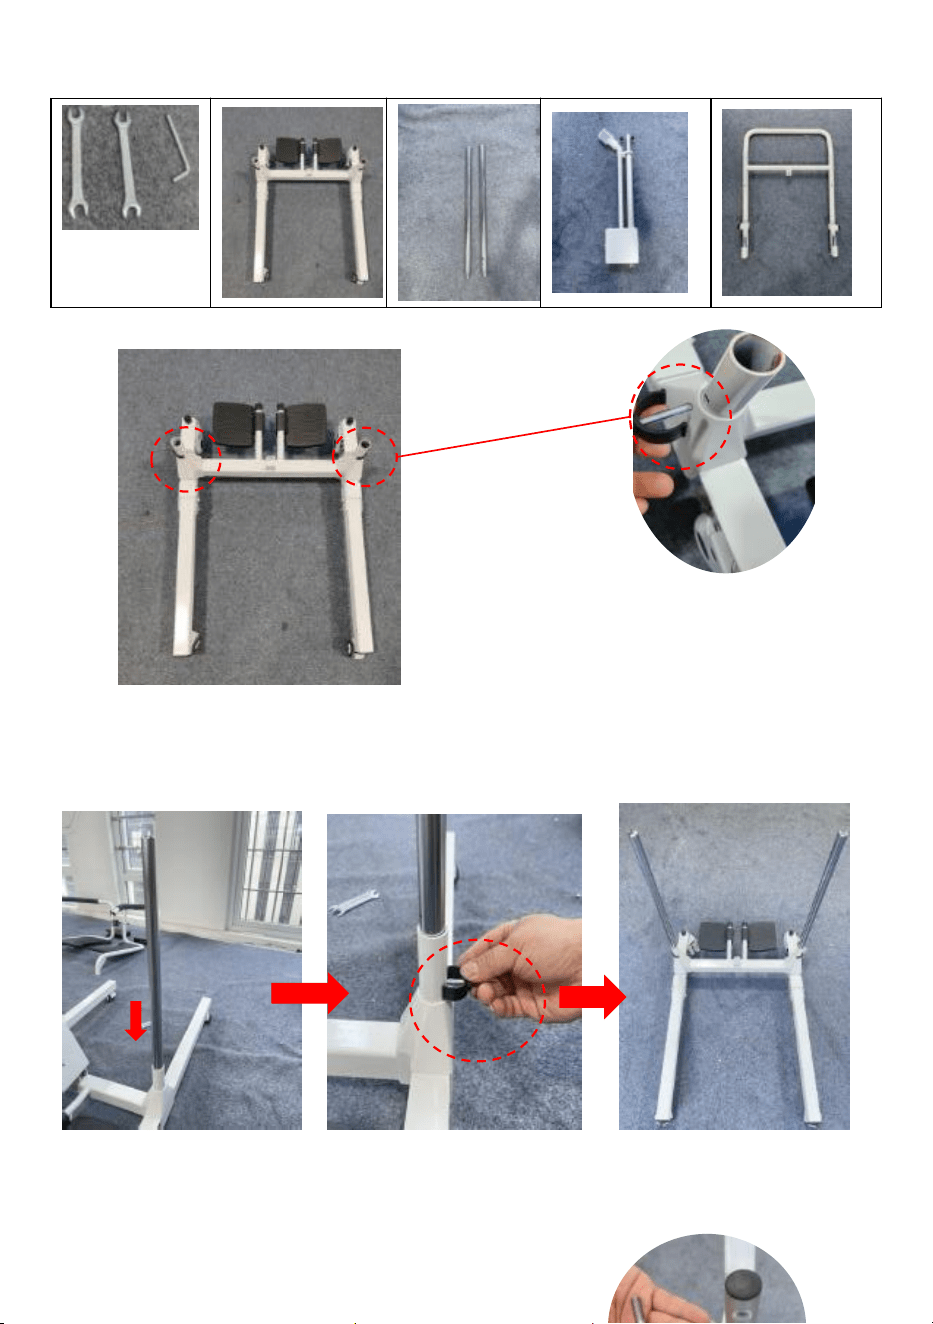
- 7 -
Fase 1: Montaggio del corpo
1.1 Scollegare preventivamente il fermo sul gruppo telaio
1.2 Inserire il mandrino nei fori di montaggio sui lati sinistro e destro del
gruppo telaio e inserire il fermo
(Nota: l'estremità perforata del mandrino è l'estremità dell'inserto)
1.3 Svitare le estremità superiore e inferiore del gruppo asta di spinta e
fissare l'estremità inferiore del gruppo asta di spinta al gruppo telaio
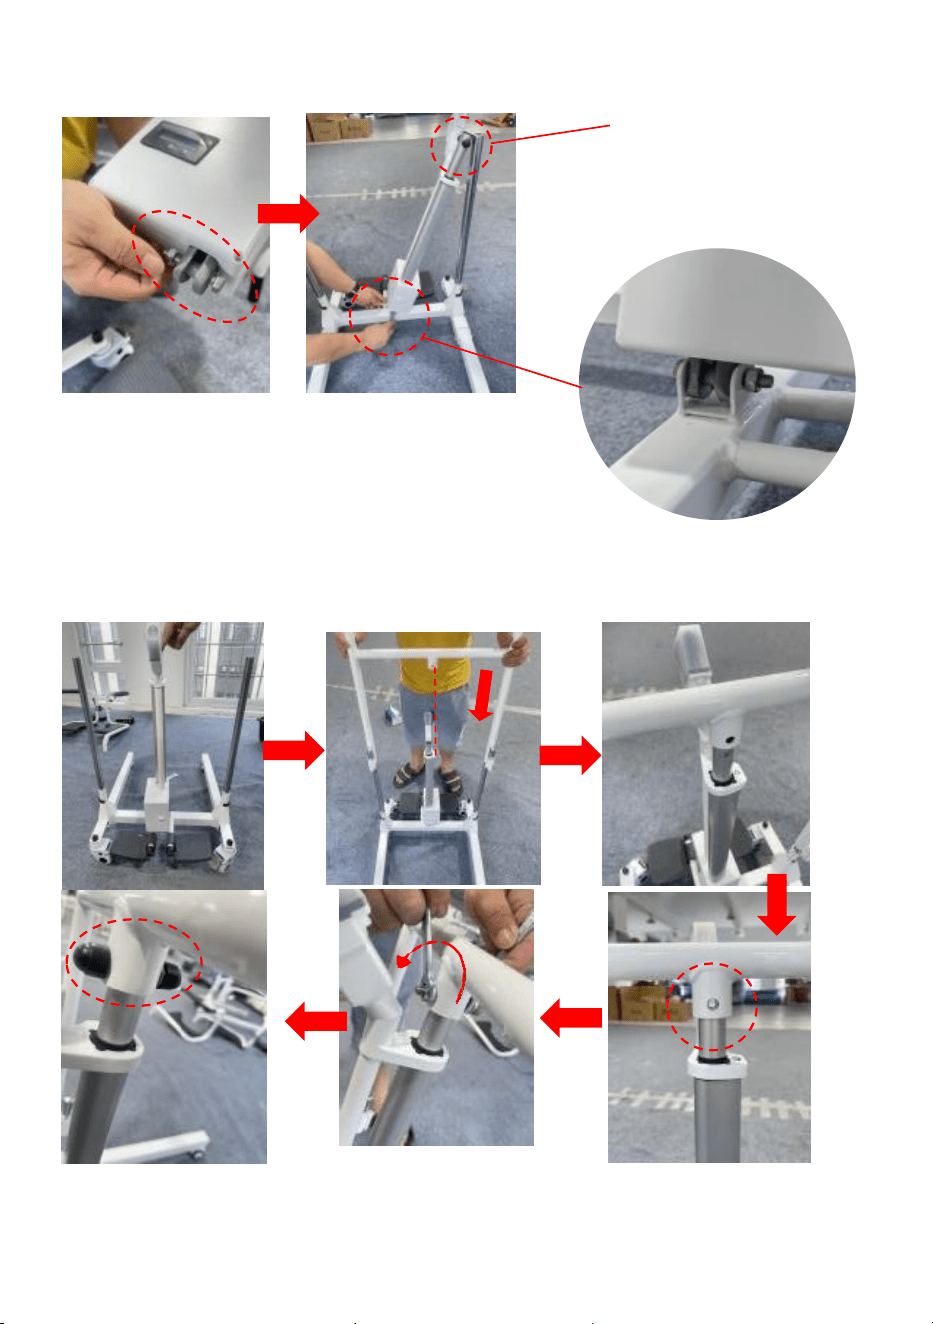
- 8 -
1.4 Dopo l'installazione, il gruppo tirante viene mantenuto in posizione
verticale e poi inserito nel portale del corrimano. Allineare i fori di
montaggio e bloccare le viti.
Fase 2: installare il telaio del cuscino

- 9 -
2.1Allentare le viti M-lock sul telaio, inserire i telai laterali sinistro e destro
del cuscino del sedile e stringere le viti.
2.2 Allentare le viti della biella. Le due estremità della biella sono collegate
al telaio del lato sinistro e destro del cuscino del sedile tramite viti.
Note:Keep the nut facing outwards

- 10 -
2.3 Inserire entrambe le estremità dell'asta dello schienale nei fori di
montaggio sul lato sinistro del cuscino del sedile e sul lato destro del telaio.
Connecting rod

- 11 -
Fase 3: Montaggio della tasca del sedile
3.1 Installare i quattro lucchetti su entrambi i lati della tasca del sedile sui
fori di montaggio dei telai laterali sinistro e destro del cuscino del sedile per
regolare l'altezza della tasca del sedile, fatto.
Suggerimento:
Questo prodotto è dotato di due tasche per i sedili:
installarle o sostituirle a seconda delle necessità.

- 12 -
Instructions
Dopo la carica, può essere utilizzato normalmente. Può essere regolato su
e giù. L'altezza corretta può essere spostata. Prima dell'uso, è necessario
confermare che il mandrino del telaio sia inserito per garantire la sicurezza.
In base all'altezza del prodotto, premere il pulsante su all'altezza
appropriata, rilasciare e arrestare. Se la chiave non viene rilasciata, il
prodotto si ferma automaticamente nel suo punto più alto. L'alimentatore
progettato per questo prodotto è un alimentatore a bassa tensione, si
prega di stare tranquilli.
Nota: c'è un display di alimentazione sulla scatola della batteria. Si prega
di controllare regolarmente il display di alimentazione sul monitor e di
caricarlo in tempo
Troubleshooting
In caso di guasto, contattare il nostro personale post-vendita o accedere al
nostro sito Web ufficiale per le informazioni di contatto. Con la fiducia del
nostro personale tecnico, risolveremo il problema. Se non riusciamo a

- 13 -
risolvere questo problema, lo restituiremo al produttore gratuitamente. Se il
periodo di garanzia termina o è causato dal personale, la nostra azienda
non ti fornirà una garanzia gratuita. Sono richiesti materiali e spedizione .
Maintenance
Attenzione: non smontare e riparare la macchina senza l'autorizzazione
del produttore .
Cleaning and disinfection
Si consiglia di pulire l'anello del sedile con un panno di cotone morbido e
alcol prima dell'uso e di disinfettarlo dopo la pulizia. Il guscio del
trasportatore e gli accessori devono essere strofinati con alcol medicale o
altri disinfettanti non corrosivi.
Avvertimento:
Durante la pulizia e la disinfezione, non caricare o utilizzare la macchina.
È vietato lavare o disinfettare la macchina transfer e gli accessori con
liquidi.
È vietato utilizzare detergenti corrosivi per pulire il cambio e gli accessori.
È vietato utilizzare disinfettanti corrosivi per disinfettare la macchina in
movimento e gli accessori.
Il cambio e gli accessori possono essere utilizzati solo dopo che il
detergente e il disinfettante si sono asciugati.
Quando la macchina non viene utilizzata per un lungo periodo, si prega di
estrarla e caricarla regolarmente per evitare guasti alla batteria.
Safe use and maintenance
1. Non collegare sempre l'alimentatore durante il processo. Almeno una
volta alla settimana, il la batteria deve essere utilizzata per funzionare e
finché la batteria non è scarica, è necessario assicurarsi che la batteria
venga ricaricata quando è scarica. Sebbene il litio la batteria non ha effetto
memoria, può prolungare la durata della batteria. 2. Si prega di distruggere
la batteria secondo le normative locali pertinenti quando la la macchina è
rottamata.
3. Dopo aver utilizzato la macchina, non è necessario pulirla e
- 14 -
manutenerla ogni volta. I t può essere utilizzato normalmente dopo la
ricarica quando la batteria non è alimentata. Se si riscontra che ci saranno
vibrazioni quando la macchina sale o scende, toccare l'olio lubrificante
elettrico su entrambi gli alberi sono lunghi.
4. Dopo aver utilizzato il prodotto per un periodo di tempo, verificare che le
viti di ciascuna parti sono allentate. Se c'è qualche allentamento, dovrebbe
essere serrato in tempo.
5. L'alimentazione interna di questo prodotto è un alimentatore a bassa
tensione CC. Se c'è è acqua sulla superficie del corpo, può essere
asciugata con un asciugamano. Non fare bolle in acqua direttamente.
CORRECT DISPOSAL
Questo prodotto è soggetto alle disposizioni della Direttiva
europea 2012/19/UE. Il simbolo raffigurante un bidone della
spazzatura barrato indica che il prodotto richiede la raccolta
differenziata nell'Unione Europea. Ciò si applica al prodotto e a
tutti gli accessori contrassegnati con questo simbolo. I prodotti
contrassegnati come tali non possono essere smaltiti con i normali rifiuti
domestici, ma devono essere portati in un punto di raccolta per il riciclaggio
di dispositivi elettrici ed elettronici.
BATTERY DISPOSAL
Per ridurre al minimo i rischi per la salute e per l'ambiente al
termine del ciclo di vita di questo prodotto, le leggi sui rifiuti di
apparecchiature elettriche ed elettroniche (RAEE) e la direttiva
sulle pile esauste impongono di smaltire questo prodotto presso
un centro di raccolta idoneo, dove verrà inviato per rimuovere le batterie e
procedere al riciclaggio appropriato. Contattare le autorità locali per
maggiori dettagli sul riciclaggio e lo smaltimento sicuro di questi prodotti
nella propria zona.
- 15 -
TECNOLOGIA XIANG FALI (XIAMEN) CO.LTD
Indirizzo: Piano 5, n. 63, Pingcheng North Road, Distretto di Haicang
Xiamen, Cina 361026
Importato in AUS: SIHAO PTY LTD. 1 ROKEVA STREETEASTWOOD
Nuovo Galles del Sud 2122 Australia
Importato negli USA: Sanven Technology Ltd. Suite 250, 9166 Anaheim
Luogo, Rancho Cucamonga, CA 91730
REP
UK
YH CONSULTING LIMITED.
C/O YH Consulting Limited Office 147,
Centurion House,
London Road, Staines-upon-Thames, Surrey,
TW18 4AX
REP
EC
E-CrossStu GmbH
Mainzer Landstr.69, 60329 Frankfurt am
Main.

