USE AND CARE MANUAL
MANUEL D’UTILISATION ET
D’ENTRETIEN
MANUAL DE USO Y CUIDADO
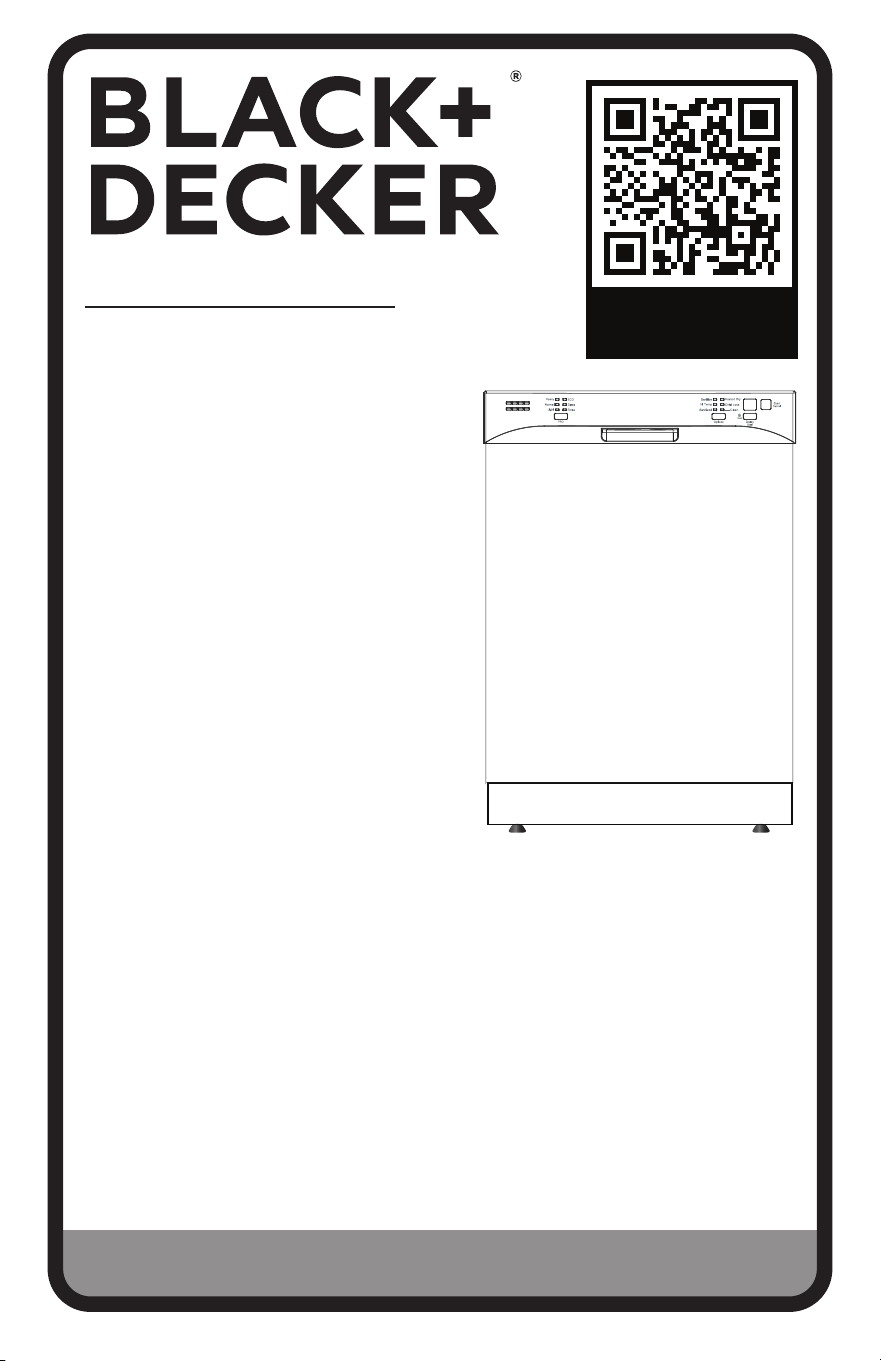
BUILT-IN DISHWASHER
LAVE-VAISSELLE ENCASTRÉ
LAVAVAJILLAS EMPOTRABLE
CATALOG NUMBER
NUMÉRO DE CATALOGUE
NÚMERO DE CATÁLOGO
BDW200MW,
BDW200MB,
BDW200MS
Thank you for choosing BLACK+DECKER!
Merci d’avoir choisi BLACK+DECKER!
¡Gracias por elegir BLACK+DECKER!
PLEASE READ BEFORE RETURNING THIS PRODUCT FOR ANY REASON.
VEUILLEZ LIRE AVANT DE RETOURNER CE PRODUIT POUR QUELQUE
RAISON.
POR FAVOR, LEA ESTE MANUAL ANTES DE DEVOLVER EL PRODUCTO POR
CUALQUIER RAZÓN.
If you have a question or experience a problem with your BLACK+DECKER purchase, go to www.blackanddecker.com/
instantanswers If you can’t find the answer or do not have access to the Internet, call 844-299-0879 from 10:30 a.m. to 6:30
p.m. EST Mon. - Fri. to speak with an agent. Please have the catalog number available when you call.
Si vous avez une question ou rencontrez un problème avec votre achat Black+Decker, allez sur
www.blackanddecker.com/instantanswers Si vous ne trouvez pas la réponse ou n’avez pas accès à l’Internet, appelez au
844-299-0879 de 10h30 à 18h30 HNE du lun. au ven. pour parler avec un agent. Veuillez avoir le numéro de catalogue
disponible lorsque vous appelez.
Si tiene una pregunta o experimenta un problema con tu compra de BLACK+DECKER, vaya a
www.blackanddecker.com/instantanswers Si no puede encontrar las respuestas que necesita o no tiene acceso a Internet, llame
al 844-299-0879 desde las 10:30 a.m. a las 6:30 p.m. EST de lunes a viernes para hablar con un agente. Por favor, tenga el
número de catálogo a mano cuando llame.
SAVE THIS MANUAL FOR FUTURE REFERENCE.
CONSERVEZ CE MANUEL POUR TOUTE CONSULTATION ULTÉRIEURE.
GUARDE ESTE MANUAL PARA SU REFERENCIA FUTURA.
ACTIVATE
WARRANTY

Page 2

Page 3
ENGLISH
Thank you for purchasing our
BLACK+DECKER product. This
easy-to-use manual will guide you
in getting the best use of your
product.
Remember to record the model and
serial numbers. They are on a label
on the rear.
Staple your receipt to your manual.
You will need it to obtain warranty service.
Model number
Serial number
Date of purchase
PRODUCT REGISTRATION
Page 4
ENGLISH
SAFETY INFORMATION
IMPORTANT SAFETY INSTRUCTIONS
1. READ ALL INSTRUCTIONS BEFORE USING THE DISHWASHER
2. Use the dishwasher only for its intended function.
3. Use only detergents or wetting agents recommended for use in a
dishwasher and keep them out of the reach of children.
4. When loading items to be washed:
1) Locate sharp items so that they are not likely to damage the door
seal;
2) Warning: Knives and other utensils with sharp points must be
loaded in the basket with their points down or placed in a horizontal
position.
5. Check that the detergent receptacle is empty after completion of the
wash cycle.
6. Use only detergent and rinse additives designed for an automatic
dishwasher.
7. Never use soap, laundry detergent, or hand washing detergent in
your dishwasher. Keep these products out of the reach of children.
8. Keep children away from detergent and rinse aid. Keep children
away from the open door of the dishwasher, there could still be some
detergent left inside.
9. This appliance is not intended for use by persons (including children)
with reduced physical, sensory or mental capabilities, or lack of
experience and knowledge, unless they have been given supervision
or instruction concerning use of the appliance by a person
responsible for their safety.
10. Children should be supervised to ensure that they do not play with
the appliance.
11. Dishwasher detergents are strongly alkaline, they can be extremely
dangerous if swallowed. Avoid contact with skin and eyes and keep
children away from the dishwasher when the door is open.
12. The door should not be left in the open position since this could
present a tripping hazard.
WARNING
WARNING - Hazards or unsafe
practices which COULD result in
severe personal injury or death
DANGER
DANGER - Immediate hazards
which WILL result in severe
personal injury or death
CAUTION
CAUTION - Hazards or unsafe
practices which COULD result in
minor personal injury
WARNING
When using your dishwasher, follow basic precautions,
including the following

Page 5
ENGLISH
SAFETY INFORMATION
13. Do not abuse, sit on, or stand on the door or dish rack of the
dishwasher.
14. Remove the door to the washing compartment when removing an
old dishwasher from service or discarding it.
15. Please dispose of packing materials properly.
16. Use the dishwasher only for its intended function.
17. During installation, the power supply must not be excessively or
dangerously bent or flattened. Do not tamper with controls.
18. The appliance is to be connected to the water mains using new hose
sets and that old hose-sets should not be reused.
19. The maximum number of place settings to be washed is 12.
20. Do not use this dishwasher outdoors.
21. This appliance must be properly installed in accordance with the
installation instructions before its use.
22. This appliance must be connected to a proper electrical outlet with
the correct electrical supply.
23. Disconnect electrical power and water intake hose to dishwasher
before cleaning and/or servicing.
24. Under certain conditions, hydrogen gas may be produced in a
hot-water system that has not been used for two weeks or more.
HYDROGEN GAS IS EXPLOSIVE. If the hot-water system has not
been used for such a period, before using the dishwasher turn on
all hot-water faucets and let the water flow from each for several
minutes. This will release any accumulated hydrogen gas. As the gas
is flammable, do not smoke or use an open flame during this time.
25. Do not wash plastic items unless they are marked as dishwasher
safe. For plastic items not so marked, check the manufacturer’s
recommendations.
26. Do not touch the HEATING ELEMENT during or immediately after
use.
27. Do not operate your dishwasher unless all ENCLOSURE panels are
properly in place.
28. Do not tamper with controls.
Do not abuse, sit on, or stand on the door or dish rack of the
dishwasher.
SAVE THESE INSTRUCTIONS
HOUSEHOLD USE ONLY
GROUNDING INSTRUCTIONS
ELECTRICAL REQUIREMENTS
Page 6
ENGLISH
SAFETY INFORMATION
This appliance must be grounded. In the event of a malfunction or breakdown,
grounding will reduce the risk of electric shock by providing a path of least resistance
for electric current. This appliance is equipped with a cord having an equipment-
grounding conductor and a grounding plug. The plug must be plugged into an
appropriate outlet that is installed and grounded in accordance with all local codes
and ordinances.
POWER SUPPLY CORD
• If the power supply cord is too short, do not use an extension cord.
Have a qualified electrician or serviceman install an outlet near the appliance.
WARNING
Improper connection of the equipment-grounding conductor can result in a risk of
electric shock. Check with a qualified electrician or service representative if you are
in doubt whether the appliance is properly grounded. Do not modify the plug
provided with the appliance, if it will not fit the outlet, have a proper outlet
installed by a qualified electrician.
Page 7
ENGLISH
SAFETY INFORMATION
INSTALLATION INSTRUCTIONS
CAUTION: The installation of the pipes and electrical equipment should be done by
professionals.
The installation position of dishwasher should be near the existing inlet and drain
hoses and power cord.
One side of the cabinet sink should be chosen to facilitate the connection of drain
hoses of the dishwasher.
Position the appliance in the desired location. The back should rest against the
wall behind it, and the sides, along the adjacent cabinets or wall. The dishwasher is
equipped with water supply and drain hoses that can be positioned to the right or the
left to facilitate proper installation.
WARNING: DO NOT USE AN EXTENSION CORD OR AN ADAPTER PLUG WITH
THIS APPLIANCE.
DO NOT, UNDER ANY CIRCUMSTANCES, CUT OR REMOVE THE
GROUND CONNECTION FROM THE POWER CORD.
State of California Proposition 65 Warnings:
WARNING: Cancer and Reproductive Harm
www.P65Warnings.ca.gov.
WARNING
Electrical Shock Hazard - Disconnect electrical power before installing dishwasher.
Failure to do so can result in death or electric shock.
WARNING
Tip Over Hazard
• Do not use dishwasher until completely installed.
• Do not push down on open door.
• Doing so can result in serious injury or cuts.
Page 8
ENGLISH
SAFETY INFORMATION
WARNING
Suocation Hazard-Before you throw away your old appliance, remove the door or
lid so that children cannot hide or get trapped inside your old appliance. Failure to
follow these instructions can result in death or brain damage.
CAUTION:
• Never use harsh chemicals to clean your dishwasher. Some chloride-containing
products can damage your dishwasher and may present health hazards!
• Never use steam cleaning products to clean your dishwasher. The manufacturer will
not be responsible for the possible damages or consequences.
• To avoid possible dishwasher damage, do not use harsh chemicals, abrasive
cleaners, scouring pads (metal or plastic), or abrasive cloths/paper towels to clean
your dishwasher’s exterior door panel. Your dishwasher’s exterior door panel can be
damaged by doing so.
• It is highly recommended that the user become familiar with the procedure to
shut o the incoming water supply and the procedure to shut o the incoming
power supply. See the Installation Instructions or contact your installer for more
information.
• If the dishwasher drains into a food disposer, make sure disposer is completely
empty before running dishwasher.
• NSF/ANSI 184 Certifed residential dishwashers are not intended for licensed food
establishments.
• Protect your dishwasher from the elements. Protect against freezing to avoid
possible damage to the fill valve. Damage caused by freezing is not covered by the
warranty.
• Not for outdoor use.
Page 9
ENGLISH
SAFETY INFORMATION
OPERATING REQUIREMENTS
ELECTRICAL REQUIREMENTS
This dishwasher is designed for operation on an adequately wired individual 120 V, 60
Hz, 15- or 20-amp fused electrical supply with copper wire only. It is recommended
that a time-delay fuse or circuit breaker is used, and that a separate circuit serving
only this appliance is provided. If an outlet is used, the outlet should be placed in
adjacent cabinet.
LOCATION REQUIREMENTS
• Install where dishwasher is protected from the elements. Protect against freezing to
avoid possible rupture of fll valve. Such ruptures are not covered by the warranty.
For winter storage information, see “Storing” in the “Dishwasher Care” section.
• Install and level dishwasher on a floor that will hold the weight and in an area
suitable for its size and use.
WATER SUPPLY REQUIREMENTS
• The water supply temperature should be 120°F to 150°F (49°C to 66°C).
• The water supply must maintain water pressure between 20 and 80 psi for sucient
flow.
WARNING
Electrical Shock Hazard-
• Electrically ground dishwasher.
• Connect ground wire to green ground connector in terminal box.
• Do not use an extension cord.
• Failure to follow these instructions can result in death, fire, or electrical shock.
Page 10
ENGLISH
SET UP & USE
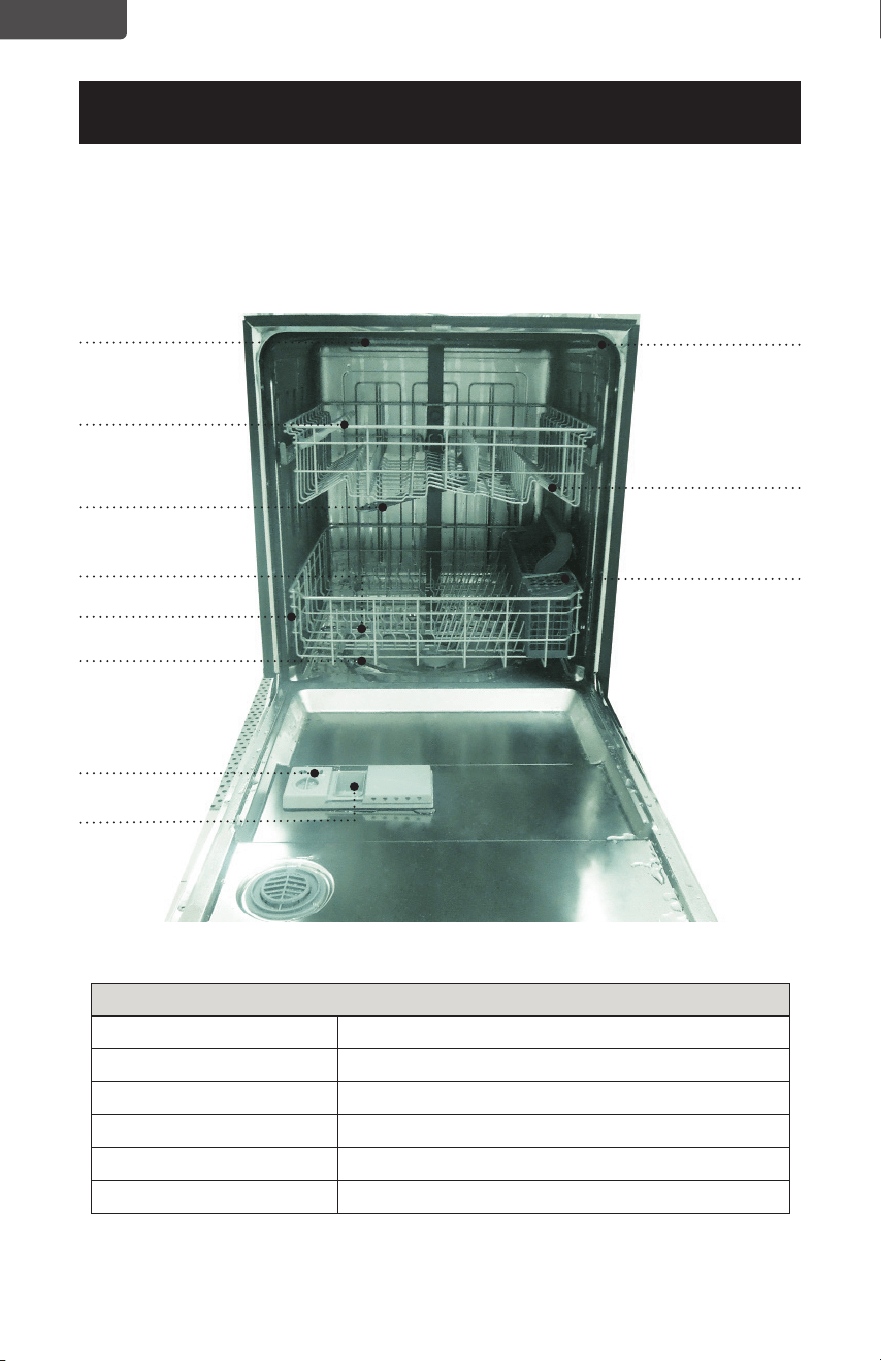
PARTS AND FEATURES
Top Spray Arm
Cup Shelf
Upper Spray
Arm
Tub Gasket
Adjustable
Upper Rack
Sliverware Basket
Bottom Rack
Heating Element
Lower Spray
Arm
Rinse Aid
Dispenser
Detergent
Dispenser
SPECIFICATIONS
Capacity: 14 Place Settings
Dimensions (WxDxH): 23.9”x25.6”x33.7”
Weight Unpacked: 99 lb (45kg)
Power Supply: 120 volts, 60 Hz
Rated Power Usage: Wash motor 50 W Heater 840 W
Water Feed Pressure: 20 - 120 psi (138 - 828 kPA)
Page 11
ENGLISH
SET UP & USE
DISHWASHER LOADING
Dish preparation
Scrape away large pieces of food, bones, pits,
toothpicks, etc. The continuous filtered wash
system will remove the remaining food particles.
Burned-on foods should be loosened before
loading. Empty liquids from glasses and cups.
Foods such as mustard, mayonnaise, vinegar,
lemon juice and tomato based products may
cause discoloration of stainless steel and
plastics if allowed to sit for a long period of
time. Unless the dishwasher is to be opertated
at once it is best to rinse o these food soils.
If the dishwasher drains into a food disposer,
be sure disposer is completely empty before
starting dishwasher.
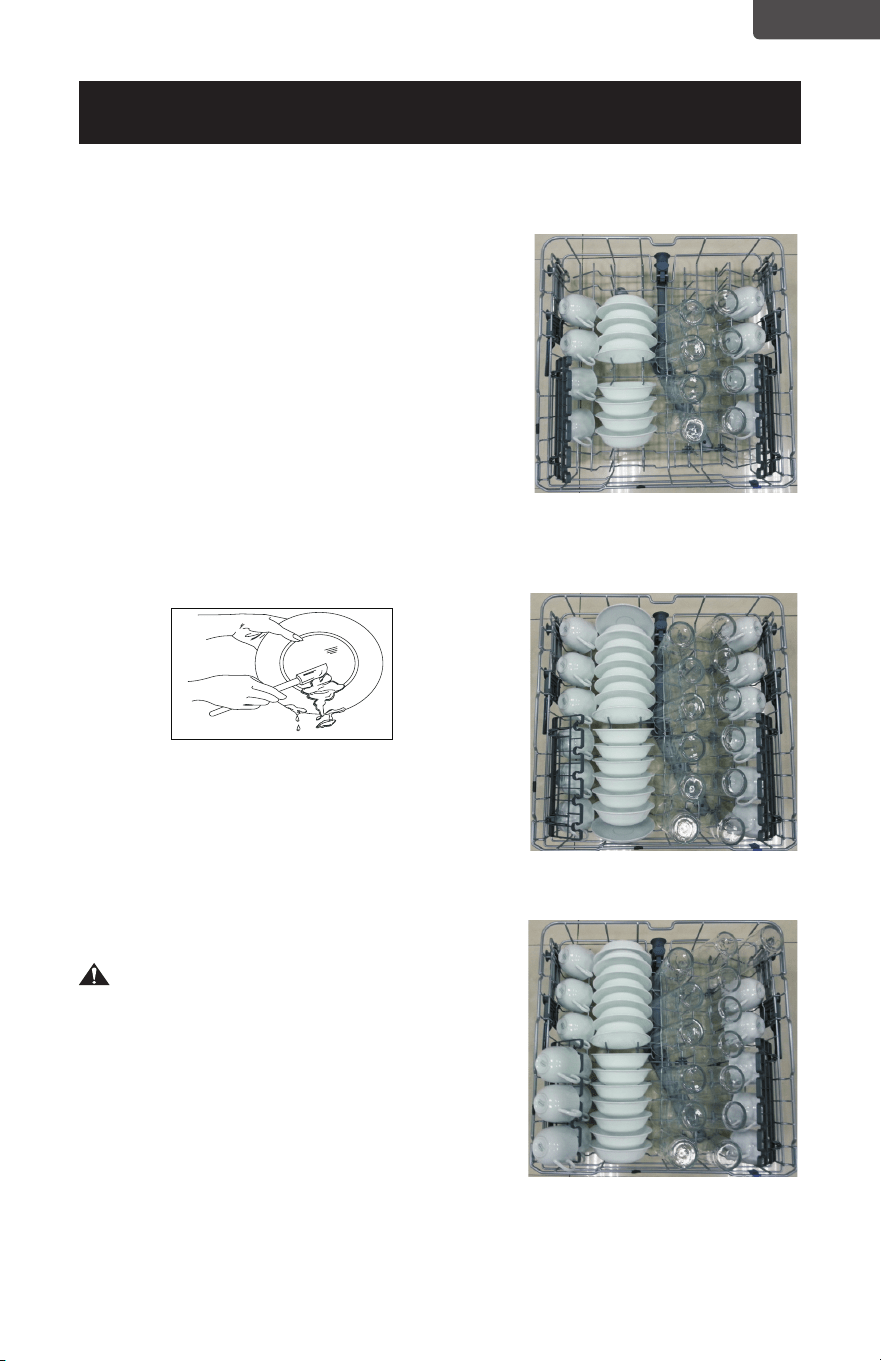
Loading the top rack
The upper rack is designed for cups, glasses,
small plates, bowls and plastic items marked
“dishwasher safe” etc.
For best results, place the bowls, cups, glasses,
sauce pans with soiled surface facing down
or toward the center. Tilt slightly for better
drainage.
Warning: Make sure the loaded dishes do
not interfere with the rotation
of the middle spray arm, which
is located at the bottom of
the upper rack. (Check this by
rotating the middle spray arm by
hand.)
8 place settings standard loading
pattern (For best washing
performance, the upper rack
should be in the raised positon.)
12 place settings standard loading
pattern
14 place settings standard loading
pattern
Page 12
ENGLISH
SET UP & USE
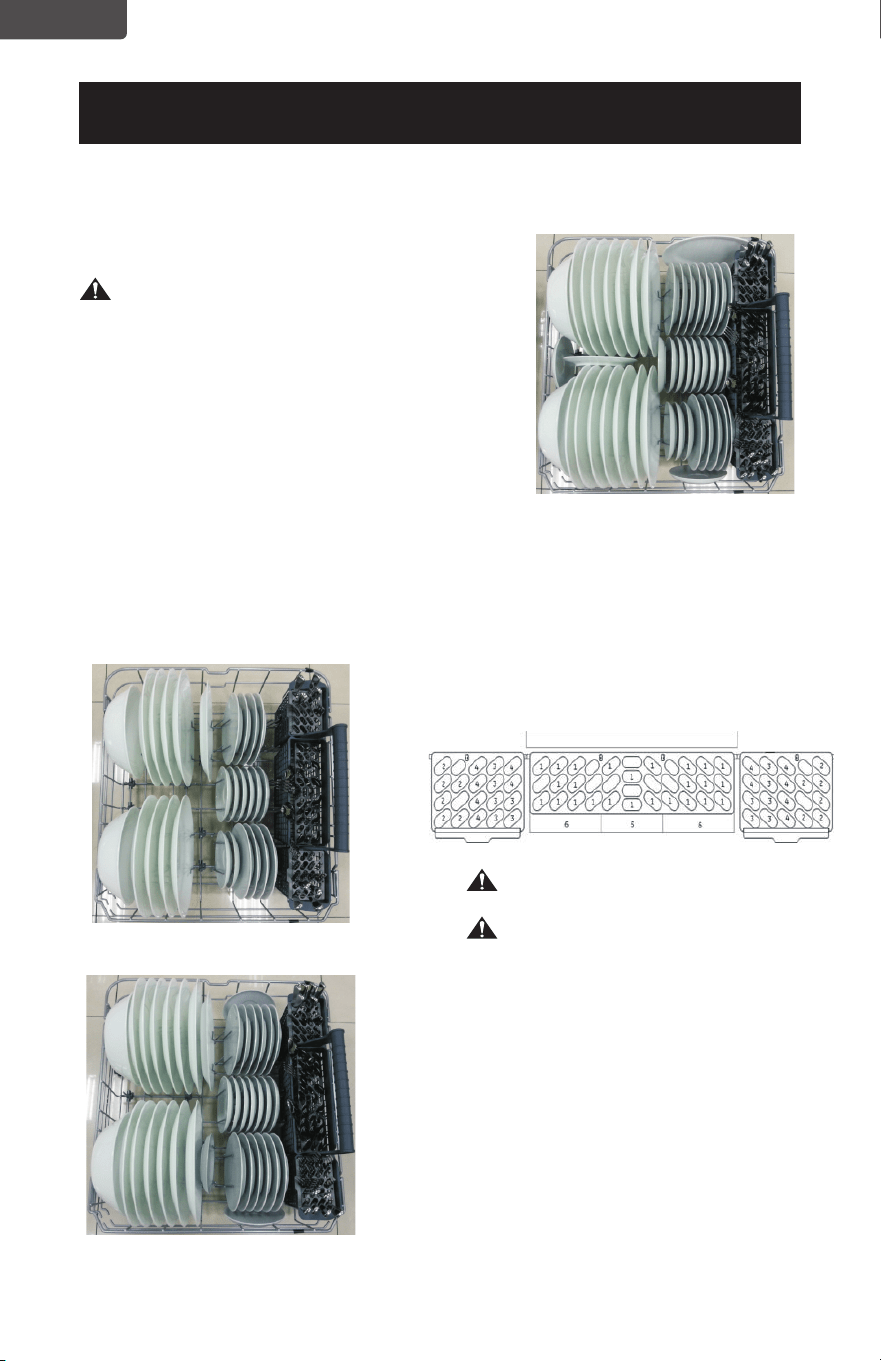
Loading the Bottom Rack
The bottom rack is designed to load plates,
soup bowls, plates, saucers and cookware.
The adjustable rack space will allow you to
load maximum 13 inch items.
Warning: Large items should be
placed along the edge
so they do not interfere
with the middle spray arm
rotation, and make sure they
not prevent the detergent
dispenser from opening.
Large items should be
turned so that the inside
faces downward, and make
sure these items do not
interfere with the lower
spray arm rotation.
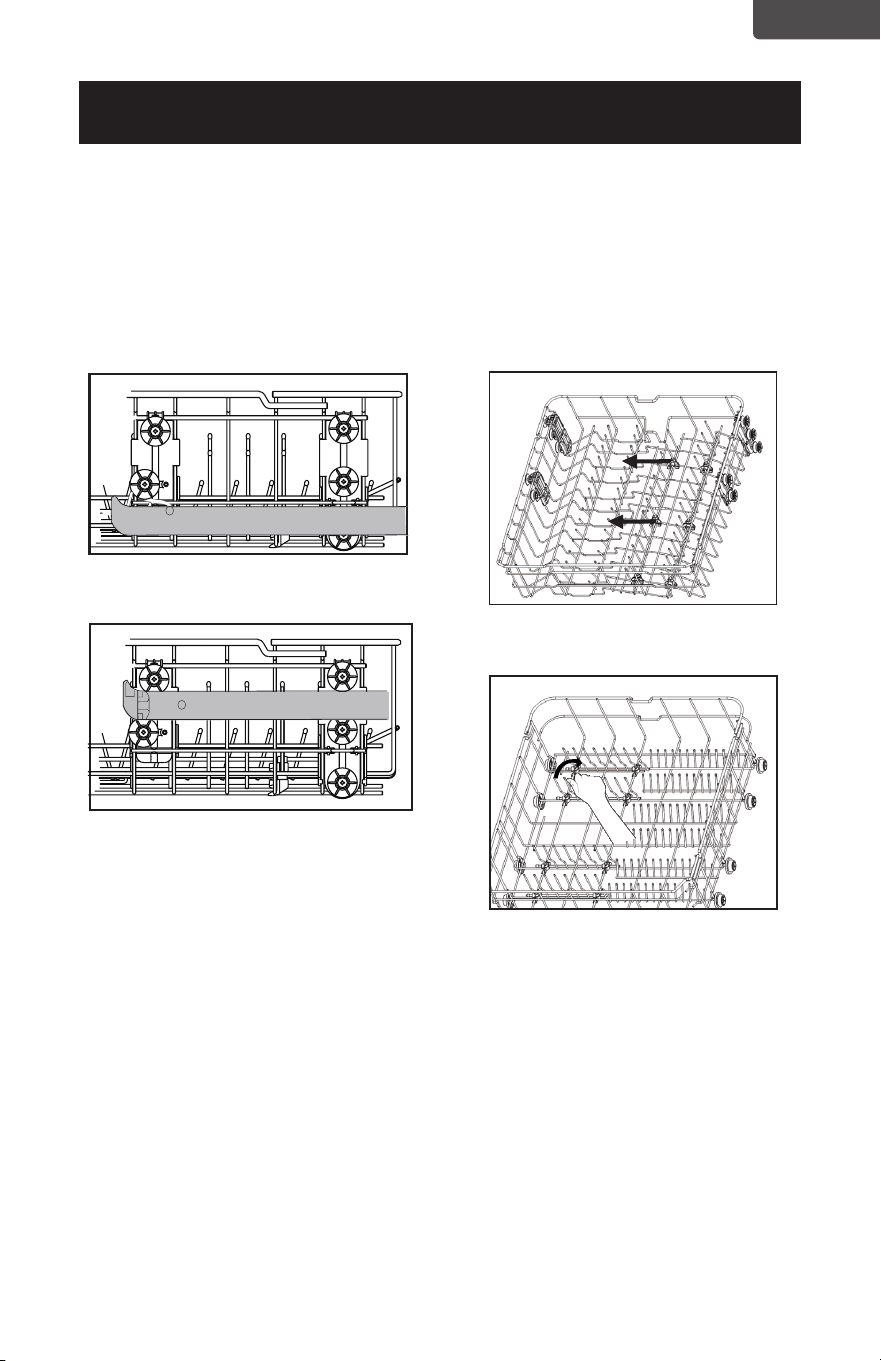
The fold-down tines in the bottom rack
make it easy to load those extra large and
hard-to-fit items. The tines may be left up
for normal use or folded down for more
flexible loading. Fold down for more space
to load large pots or pans.
Loading the Silverware Basket
The silverware basket is divisible into
three separate modules that can be
used in both upper and lower racks
1. Spoons 2. Knives
3. Salad forks 4. Forks
5. Large forks 6. Large spoons
Warning: Do not let any item
extend through bottom.
Warning: Be sure nothing
protrudes though
bottom of the basket or
rack to block the lower
spray arm.
Adding A Dish
To add or remove items after wash
cycle starts:
1 Open door slightly and wait a few
seconds until wash action stops before
completely opening.
2 Add the item.
3 Close door firmly to latch and cycle
will automatically resume.
8 place settings standard loading
pattern
12 place settings standard loading
pattern
Page 13
ENGLISH
SET UP & USE
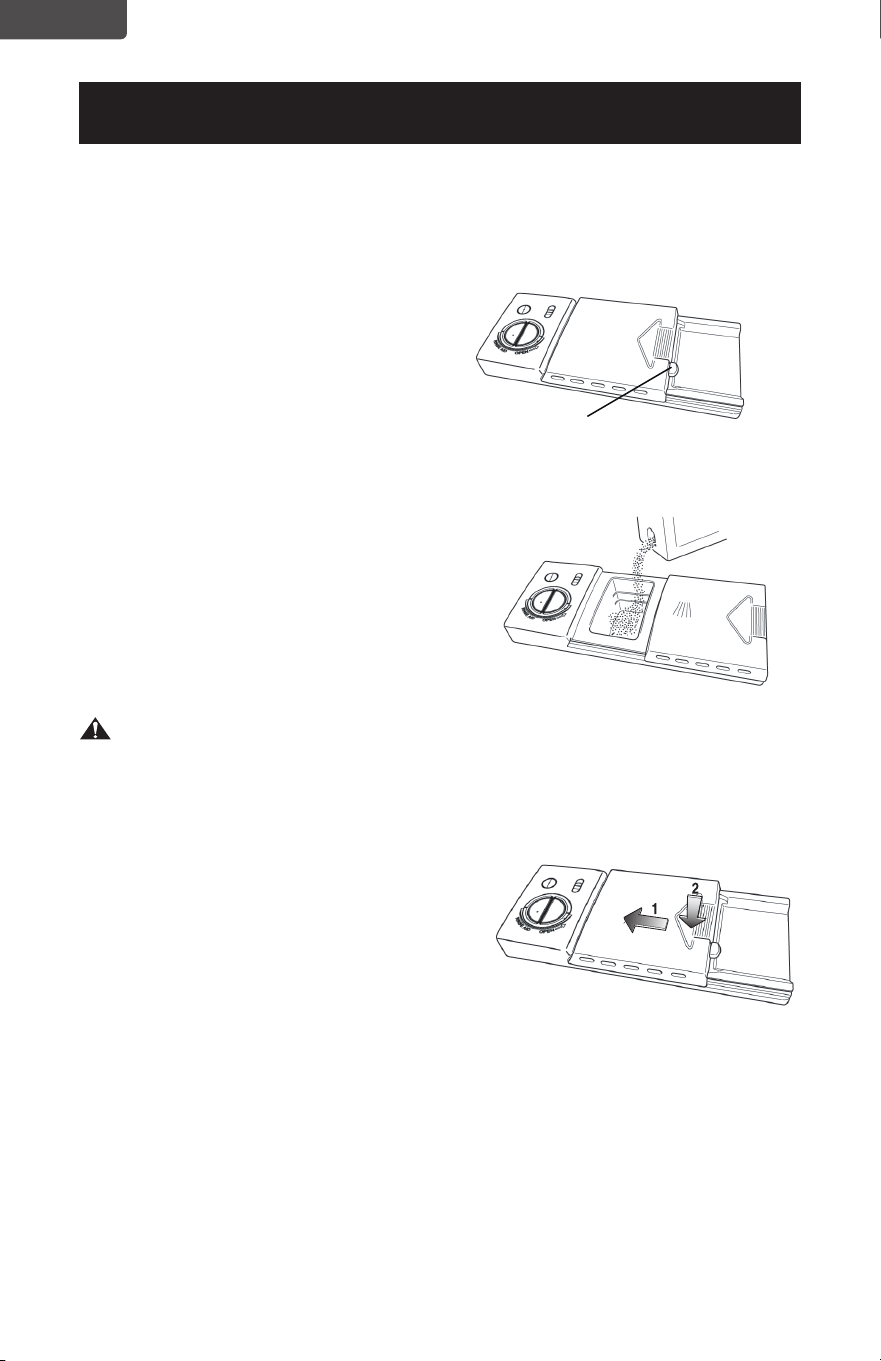
Upper Rack Position
Upper Rack
Lower Rack
Lower Rack Position
Note: Height should be adjusted
without dishes in the racks.
Adjustable Upper Rack
The upper rack height can be easily
adjusted to accommodate loading taller
dishes in either rack. To accommodate
taller dishes in the bottom rack, there are
2 positions available:
Fold-down Tines
The fold-down tines in the rack make
easy loading for those extra large and
hard-to-fit items. The tines may be left
up for normal use or folded down for
more flexible loading. Fold down for
more space to load large pots or pans.
Page 14
ENGLISH
SET UP & USE
Filling the detergent dispenser
The upper rack height can be easily
adjusted to accommodate loading taller
dishes in either rack. To accommodate
taller dishes in the bottom rack, there are
2 positions available:
Rinse aid greatly improves drying
and reduces water spots and filming.
Without rinse aid your dishes and
dishwasher interior will have excessive
moisture. The Heated Dry option will
not perform as well without rinse aid.
The rinse aid dispenser, located next
to the Detergent cup, automatically
releases a measured amount of rinse
aid during the last rinse.
If spotting and poor drying is a
problem, increase the amount of
rinse aid dispensed by rotating the
dial to a higher number. The dial is
located under the dispenser cap. If the
rinse aid is low, the Rinse Aid light is
illuminated at the beginning and end
of the cycle indicating that it is time to
refill.
Warning:
Your dishwasher is designed to use
liquid rinse aid. The use of rinse greatly
improves drying performance after the
final rinse. Do not use a solid or bar-type
rinse aid. Under normal conditions, the
rinse aid will last approximately one
month, try to keep it full, but do not over
fill.
1. Rinse agent removes spots and
prevents new film build up on your
dishes, glasses, flatware, cookware and
plastic.
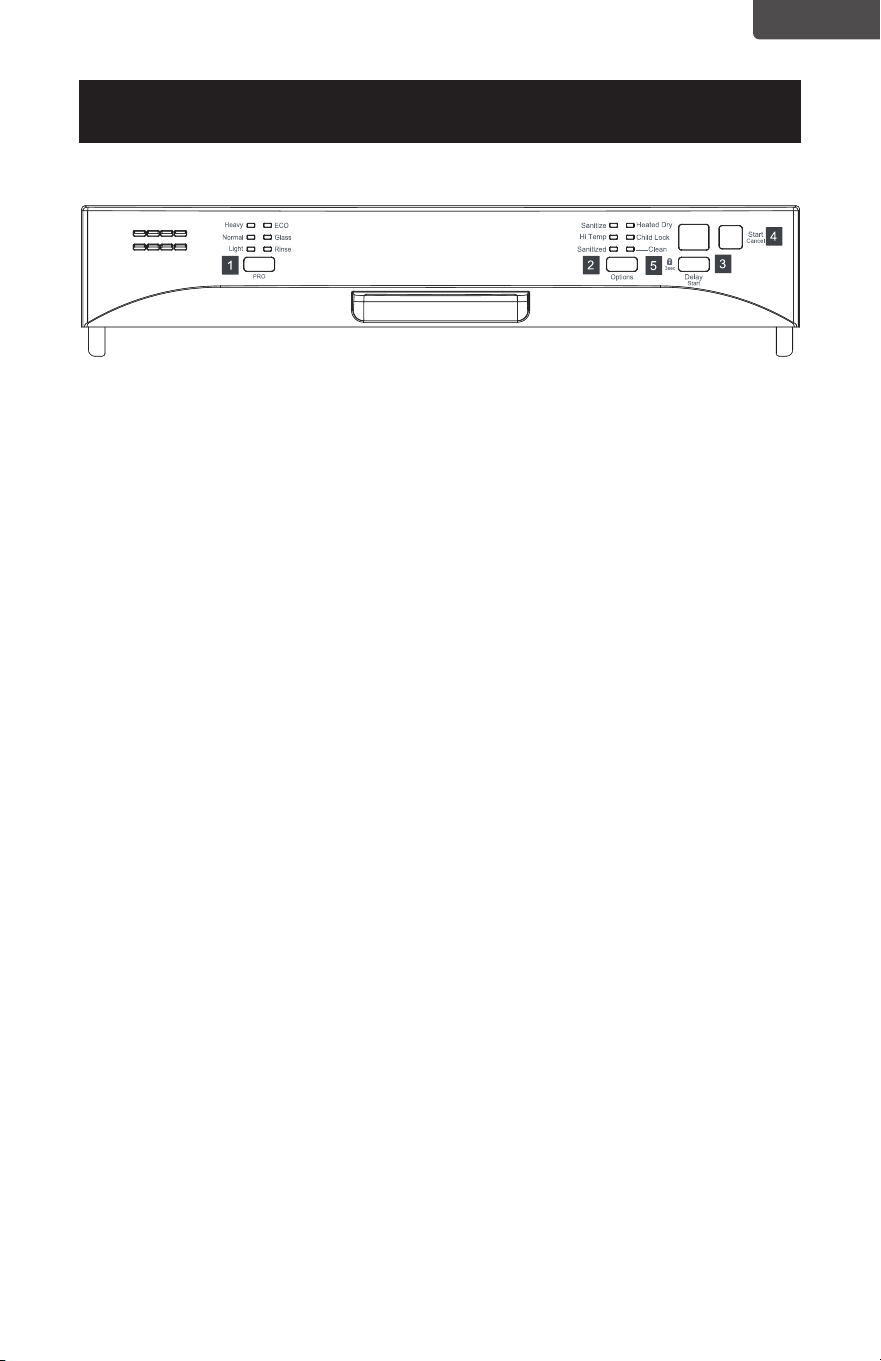
Filling the Dispenser
1. Try to keep it full, but do not over fill.
2. Turn the dispenser cap to the left
and lift it out.
3. Add rinse agent until the indicator
window looks full.
4. Clean up any spilled rinse agent with
a damp cloth.
5. Replace the dispenser cap.
Filling the detergent dispenser
1. Push the dispenser cover latch
downwards and open it .
2. Add the detergent to the main wash
compartment.
3. After pouring the detergent into the
container, close the lid, first pushing
(1) and then pressing on it (2) until
hear the click.
Open
cup
Page 15
ENGLISH
SET UP & USE
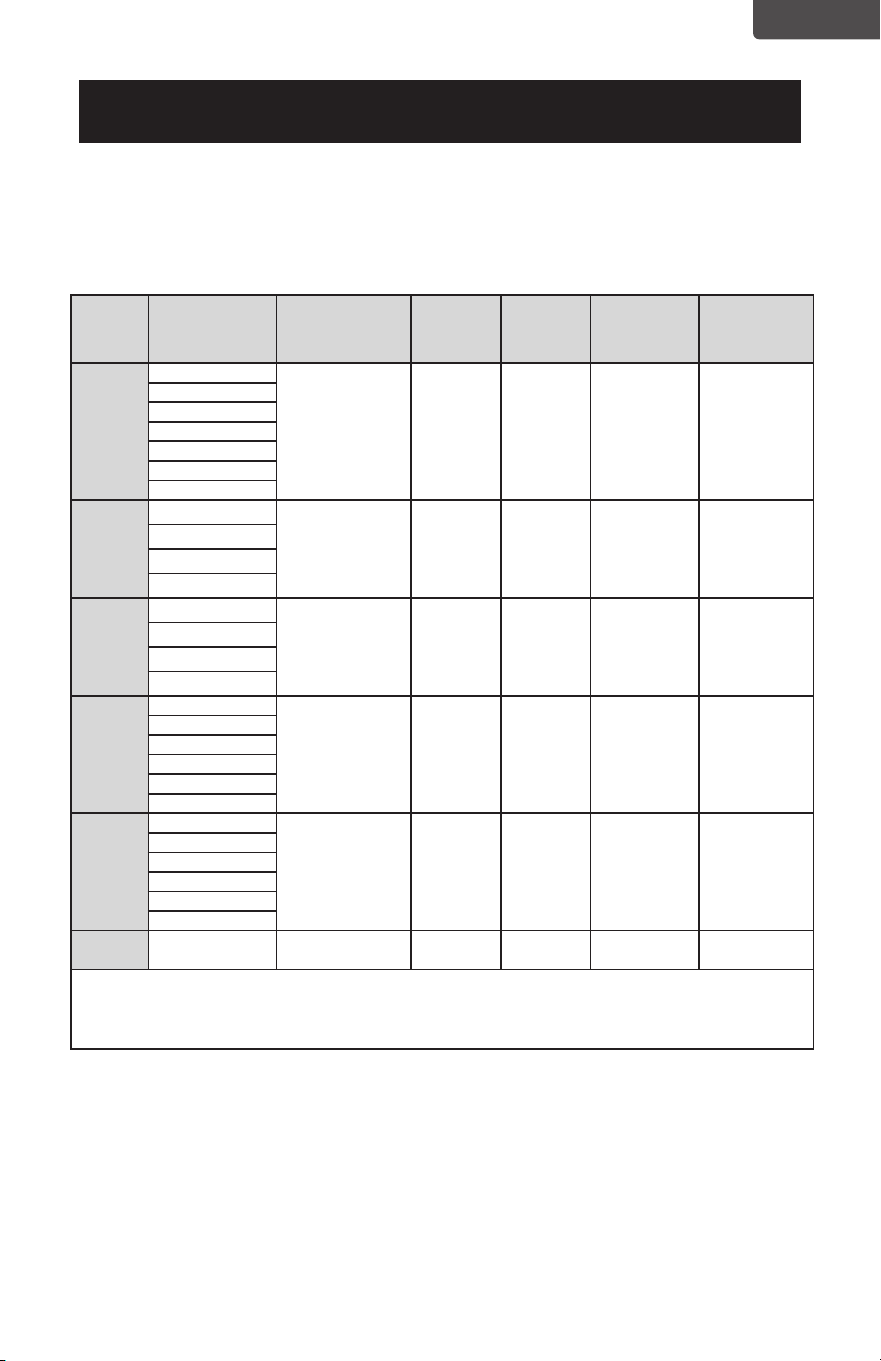
1. PRO
With the dishwasher door closed, you
can press the PRO button to select the
wash cycle. A light on the display will
indicate which cycle has been selected.
WASH CYCLE SELECTIONS
Heavy wash
This cycle is for hard-to-clean, heavily
soiled dishes, pots, pans and dishes.
Normal wash
This cycle is for regularly soiled dishes or
glasses.
Light wash
This cycle is for lightly soiled and pre-
rinsed dishes and silverware.
Eco
This cycle is for all items. It can
determine the condition of soil on the
dishes and initiate the optimal cycle to
obtain the best cleaning performance.
Glass
This cycle is for lightiy dishes or glasses.
Rinse wash
This cycle is for pre-rinsing dishes or
glasses. This is only a rinse that keeps
food from drying on your dishes and
reduces odor buildup in your dishwasher
until you are ready to wash a full load. Do
not use detergent.
2. OPTIONS
When the wash cycle has been selected,
select from the following by pressing the
“Options” button.
ABOUT THE OPTIONS
Sanitize
To sanitize your dishes and glassware,
select the Sanitize option. When
selected, the light above the pad will turn
on and remain on until end of cycle. The
water temperature in the final rinse will
be raised. The option is available in Auto
Wash, Pots&Wash and Normal Wash.
Hi-Temp Wash
This option can increase the water
temperature in the main wash and rinse.
This increase in water temperature
helps the dishwasher detergent remove
food, grease and soil from dishes more
eectively . The option is available in
Auto Wash, Pots&Wash and Normal
Wash.
Heated Dry
This option is available on all cycles
except rinse only. The Heated Dry
option in combination with rinse aid will
enhance drying performance. You can
turn o this option by pressing Heated
Dry during the period of washing and
the LED light will go o.

Page 16
ENGLISH
SET UP & USE
3. DELAY START
To delay the start of a selected cycle,
press Delay Start pad until the desired
delay time shows in the LED indicator.
It allows you to automatically start your
dishwasher for a 1 to 24 hour delay. To
cancel the Delay Start option and begin
the cycle before the delay period is over
press the Start/Cancel pad.
4. START/CANCEL
Push door firmly closed. The door
latches automatically. Select the wash
cycle and options desired, the indicator
light above the pad will turn on. To
start, press the Start/Cancel key once,
the light will illuminate and the wash
action begins. To cancel when a cycle
is running, press Start/Cancel pad
once and the dishwasher will start a
60 second drain and then shut o. At
the end of the drain, you can select the
desired cycle. When you want to load
more dishes or pause the dishwasher
while it is already running, make sure to
open the door slowly and carefully as
there is a possibility of injury from the
hot steam inside the dishwasher. You
can add more dishes before the main
wash starts. Open the door and check
the detergent dispenser. If the main wash
section of the detergent dispenser is still
closed, you can add items. If the door is
opened while the dishwasher is running,
a safety mechanism is activated and
stops the cycle.
5. CHILD LOCK
You can lock all controls to prevent
children from accidently changing
the dishwasher cycle or starting the
dishwasher.
Press and hold the Delay Start pad for
3 seconds the lock light will turn on. To
unlock, press and hold the Delay Start
pad for 3 seconds, the lock light will turn
o.
INDICATOR LIGHT
Sanitized
When “sanitize” option is selected, the
temperature of the water will reach a
maximum of 70°C (158°F).
Certified residential dishwashers
are not intended for licensed food
establishments. The sanitize cycle is NSF
certified.
Warning: The sanitize option is
available with “ Heavy” “
Normal” “ Light” and “ECO”
cycle.
Clean
The clean light will turn on at the end of
the cycle.
Status Window
01-24
If the Delay Start option is selected, the
number of delay start hours shows in
the Status Window. If the dishwasher
is working and the wash cycle time is
more than a hour, number of hours and
minutes left shows alternately in the
Status Window.
CL
Flashes once the program has been
entered and the Start/Cancel key is
pressed. It also flashes if the door is
opened during a wash cycle. Close the
dishwasher door to begin or continue a
wash cycle.
MINUTES
Number of minutes left in a cycle (0-59
or 1H-2H). It shows hours and minutes
alternately.
Page 17
ENGLISH
SET UP & USE
NOTE: The remaining running time could suddenly increase or drop several minutes.
This means the Smart Sensor has checked the soil level and determined if additional
water fills are needed or if water fills can be eliminated.
Program
Description of
Cycle
Detergent(g) Water(L)
Running
time (min)
Running
time with Hi
temp(min)
Running time
with Sanitize
(min)
Heavy
Pre Wash
0/9.9 22.8 140 150 170
Pre Wash
Wash(48
O
C)
Rinse
Rinse
Rinse(58
O
C)
Drying
Normal
Pre Wash
AHAM/CU Test:
0/19.9
DOE Test: 0/9.9
CU Test : 15/15
10.8~23.0 105~135 130 135~165
Auto(42~48
O
C)
Rinse(50~58
O
C)
Drying
Light 0/9.9 11.4~19.3 115~120 125~130 145~150
ECO 0/9.9 19.3 105 115 150
Glass 0/9.9 19.3 120 / /
Rinse 0 8.0 20 / /
NOTE: NSF certification is Normal/Auto Cycle with the sanitize option selected.
The CU test is Normal Cycle with the hi temp option selected.
Page 18
ENGLISH
CLEANING & CARE
CLEAN THE
STAINLESS STEEL
INNER
DOOR AND TUB
The tub is made of Stainless Steel, it will
not rust or corrode if the dishwasher
should be scratched or dented.
CLEAN THE
CYLINDER FILTER
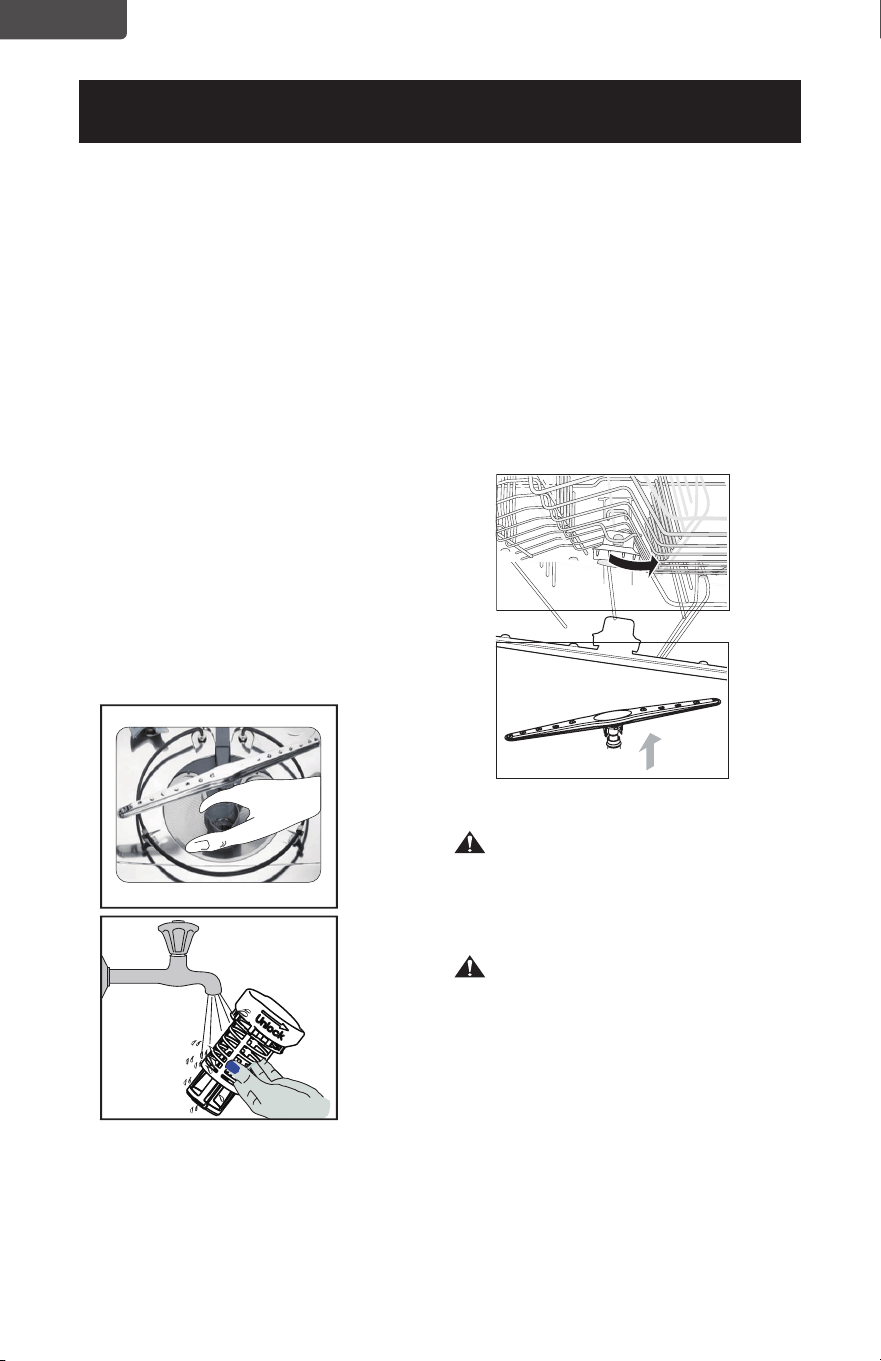
The Cylinder Filter is designed to
collect some big items such as broken
glass, bones and pits. The Cylinder
Filter needs to be cleaned to maximize
wash performance.
Remove the lower rack, rotate the
Cylinder Filter as shown, lift it out,
empty and clean it by rinsing it under
running water and replace.
Because hard water chemicals will
clog the spray arm jets and bearings,
it is necessary to clean the spray arms
regularly. Wash the arms in soapy,
warm water and use a soft brush to
clean the jets. Replace them after
rinsing thoroughly.
To remove the upper or middle spray
arm, unscrew the nut clockwise.
To remove the lower spray arm, pull
upward.
PULL OUT
Lower
Arm
Warning: Clean the spots on the
steel inner door and tub
with a damp non-abrasive
cloth.
Warning:
Burn Hazard
Allow heating element to cool before
cleaning the interior.
Failure to do so can result in burns.
Page 19
ENGLISH
CLEANING & CARE
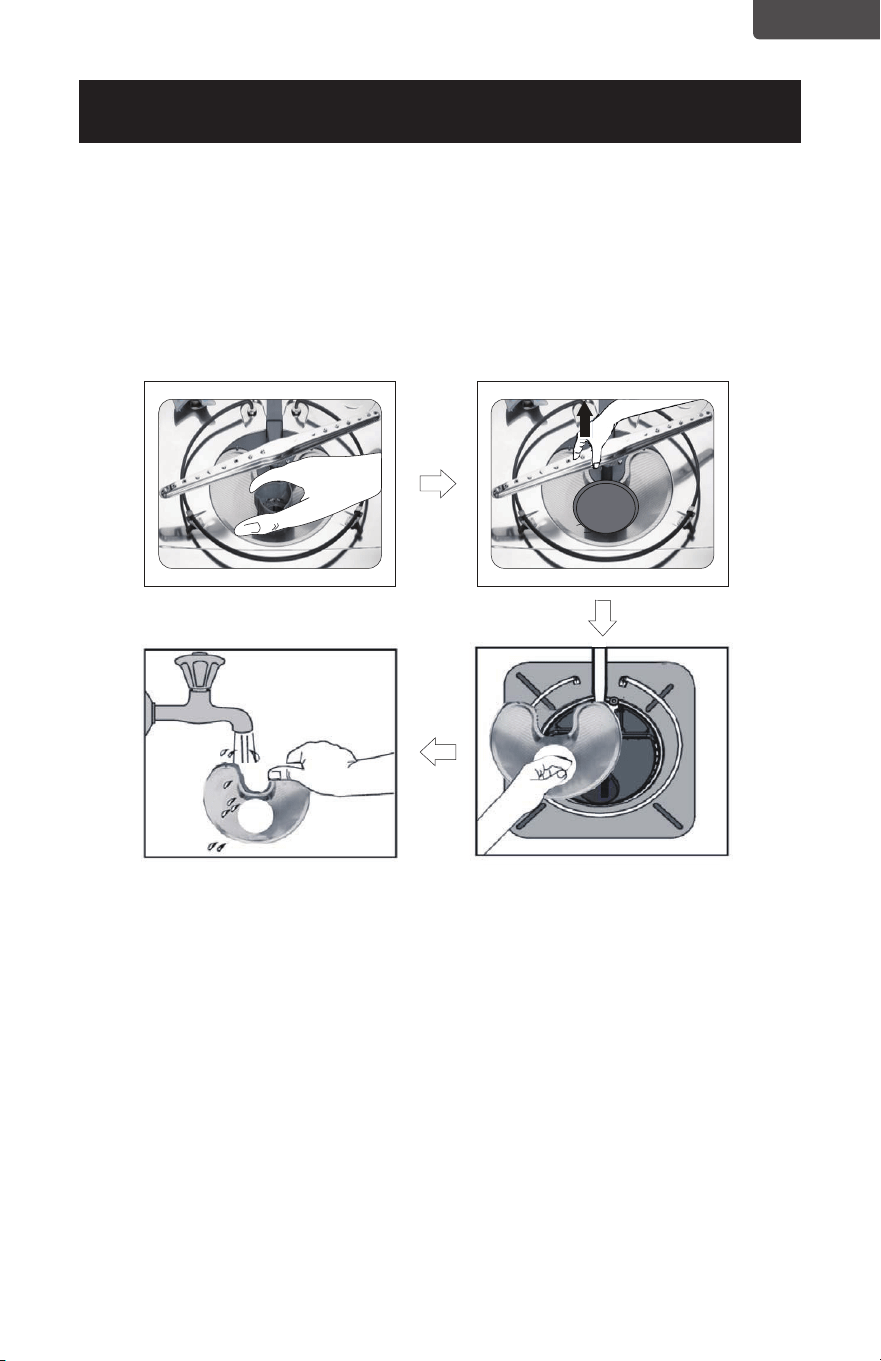
CLEAN THE FINE FILTER
Take out the Cylinder Filter and remove the Fine Filter from the dishwasher tub
bottom. To remove the Fine Filter you must first remove the bottom spray arm as
shown below.
Flush the Fine Filter by holding it under running water and replace.
Page 20
ENGLISH
TROUBLE POSSIBLE CAUSE POSSIBLE REMEDY
Dishwasher
won’t start
Door may not be closed properly. Shut the door completely and
make sure it is latched
Power supply or power line is not
connected.
Check and connect the power
supply
Delay Start option has been selected Refer to Delay Start section in this
manual to reset
Child Lock activated(select models). Deactivate the child lock, refer to
child lock section in this manual
Dishwasher
beeps at the
end of the cycle
It indicates the wash cycle is finished. Select the proper cycle as
indicated by the manual.
Rinse Aid light
on
The rinse aid level is low Add rinse aid
Dishwasher
operates too
long
The dishwasher is connected to cold
water.
Check the dishwasher, making
sure it connected to the hot water
supply.
The cycle time will vary due to the
soil.
When heavy soil is detected, the
auto, normal, pots&pan cycle will
automatically increase the cycle
time.
The sanitize option is selected When sanitize option is selected,
the cycle time will be increased to
meet the sanitized temperature
request.
Dishes are not
clean enough
Water pressure is temporarily low Use you dishwasher when the
water pressure is normal
The inlet water is low Make sure the dishwasher is
connected to the hot water supply.
Try not use your dishwasher when
hot water is being used elsewhere
in the house
Dishes are loaded too close together
improper use of detergent
Load the dishes again as the
manual shows. Add detergent
depending on the water hardness
and the cleaning cycle you chose.
Use fresh detergent.
The selected cycle is not suitable for
food soil condition
Choose anther cycle for longer
washing time
Spay arms is blocked by some
items
Make sure the spay arm is rotating
freely
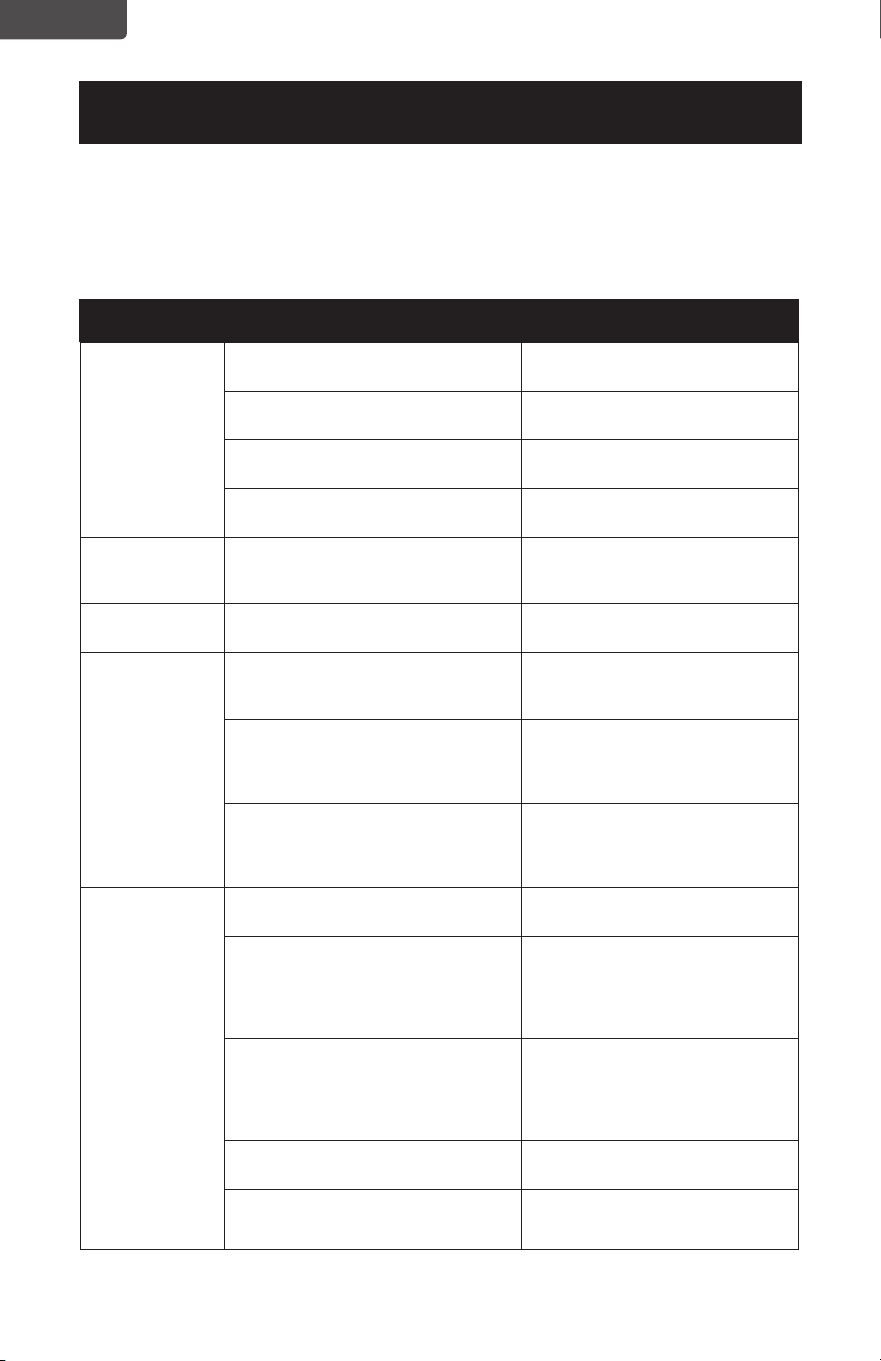
Troubleshoot your problem by using the chart below. If the appliance still does not
work properly, contact W Appliance Co. customer service center or the nearest
authorized service center. Customers must never troubleshoot internal components.
DISHWASHER NOT OPERATING PROPERLY
TROUBLESHOOTING & WARRANTY
Page 21
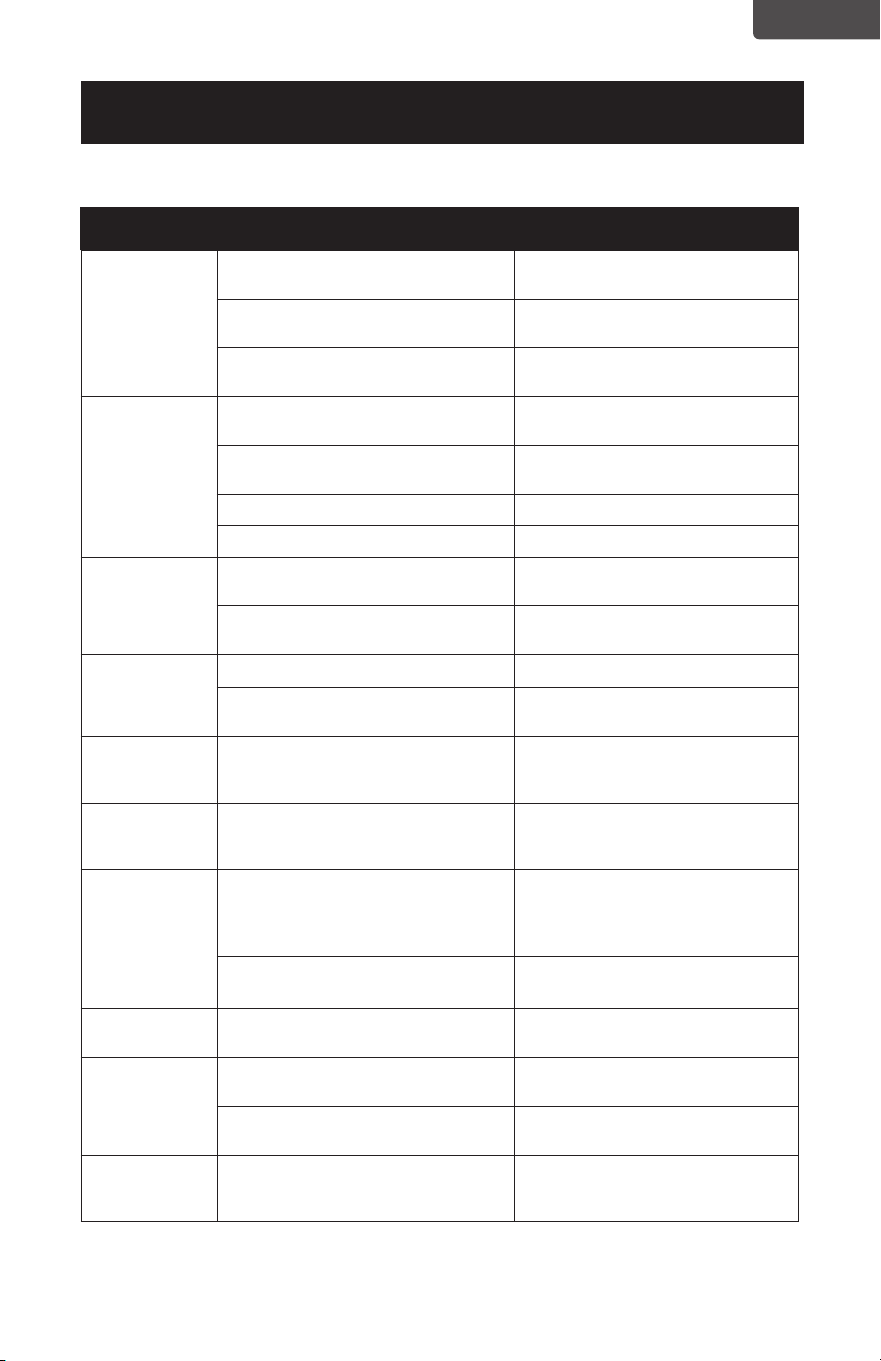
ENGLISH
TROUBLE POSSIBLE CAUSE POSSIBLE REMEDY
Dishes not dry
enough
Detergent dispenser is empty Fill rinse aid dispenser or increase
the amount of rinse aid.
Improper loading of dishes Load the dishes again as the
manual indicates
The cycle you chose did not include
the drying.
Choose the proper cycle with
drying
Spots and film
on dishes
Water hardness is too high For extremely hard water install a
water softener
Improper loading of dishes Load the dishes again as the
manual indicates
Old or damp powder rinse aid is used Use fresh rinse aid
Rinse dispenser empty Add rinse aid to the dispenser
Etching Using too much detergent Use less detergent if you have soft
water
The inlet water temperature exceeds
150
o
F
Lower the inlet water temperature
Detergent left
in dispenser
cup
Detergent may be too old Use fresh detergent
Spray arm is blocked
Load the dishes,making sure the
spray arms are not blocked.
Detergent
dispenser will
not shut
Improper operation of the detergent
cover.
Add the detergent and rinse aid as
indicated by the manual.
Water
remains in the
dishwasher
Previous cycle has not finished or has
been interrupted.
Select the proper cycle as indicated
by the manual.
Dishwasher
does not drain
properly
Drain is clogged. Check to see if you have an air
gap. If you have one, make sure the
disposal is empty if the dishwasher
is connected to it.
Drain hose is kinked. Make sure the drain hose is properly
connected to the sink.
Suds in the tub Improper detergent is used. Make sure to use only automatic
dishwasher detergent
Dishwasher
leaks
Excessive suds caused by using the
improper detergent.
Make sure to use only automatic
dishwasher detergent.
Dishwasher is not level Level the dishwasher (see the
installation manual)
Black or gray
marks on
dishes
Aluminum utensils have rubbed
against dishes.
Chose a higher cycle
Make sure the inlet water is no less
than 120
o
F
TROUBLESHOOTING & WARRANTY
Page 22
ENGLISH
TROUBLESHOOTING & WARRANTY
TROUBLE POSSIBLE CAUSE POSSIBLE REMEDY
Stained tub
interior
Coee and tea soil Using a spot cleaner to remove
the soil
Reddish stain Some tomato food will cause this.
Use of the rinse only cycle right
after loading will decrease the
staining
Noises Detergent cup opening/Drain pump
sound
This is normal
A hard object has entered the wash
module. When the object is ground
up,the sound should stop.
If the noise persists after a complete
cycle, call for service.
Dishwasher
won’t fill
Water valve is turned o Check if the water valve is turned
on
Door latch may not be properly
seated
Make sure the door is closed
ERROR CODES
When some malfunctions occur, the appliance will display error codes to warn you:
CODES MEANINGS POSSIBLE CAUSE
E1 Longer inlet time.
Faucets are not open, or water intake is restricted,or
water pressure is too low.
E4 Overflow. Some element of dishwasher leaks .
WARNING
• If overflow occurs, turn o the main water supply before calling for service.
• If there is water in the base pan because of an overfill or small leak, the water
should be removed before restarting the dishwasher.
Page 23
ENGLISH
LIMITED WARRANTY
ACTIVATE WARRANTY
Any repair, replacement, or warranty service, and all questions about this product should be
directed to W Appliance Co. at 844-299-0879 from the US, including Puerto Rico, or Canada.
Some issues can be addressed without service. Before contacting regarding your warranty,
please visit the “Troubleshooting” section of your user manual.
All warranty service is provided exclusively by our authorized W Appliance Co. service providers.
For service in US, including Puerto Rico, and Canada call 1-844-299-0879 to create a ticket.
When calling, please have the following information available: date of purchase, model number,
proof of purchase and a brief description of the problem.
WHAT IS COVERED
YOUR SOLE AND EXCLUSIVE REMEDY UNDER THIS LIMITED WARRANTY SHALL BE PRODUCT REPAIR AS PROVIDED
HEREIN. This limited warranty is valid only in the United States or Canada and applies only when the major appliance is used in
the country in which it was purchased:
ONE (1) YEAR FROM THE DATE OF DELIVERY OF THE ORIGINAL PURCHASE (PARTS AND LABOR INCLUDED):
W Appliance Co. will pay for factory-specied replacement parts and labor to correct defects in materials or workmanship that
existed when this major appliance was purchased, or at its sole discretion, replace the product with a new, or remanufactured,
unit equivalent to your original purchase. In the event of product replacement, your appliance will be warranted for the
remaining term of the original unit’s warranty period.
YEARS TWO (2) THROUGH FIVE (5) FROM DATE OF DELIVERY OF THE ORIGINAL PURCHASE (CERTAIN COMPONENT
PARTS ONLY - LABOR NOT INCLUDED): W Appliance Co. will pay for factory-specied replacement parts for the component
parts listed below to correct non- cosmetic defects in materials or workmanship in these parts that prevent function of this
major appliance and that existed when this major appliance was purchased:
DISHWASHER WASHING MACHINE DRYER
REFRIGERATORS AND
FREEZERS
MICROWAVE
Lower, Upper and
Third Level (where
applicable) Wire
Racks (excludes cup
shelves, silverware
basket, and third rack
trays), Chopper Blade,
Stainless Steel Tub and
Inner Door Liner
Drive Motor
(Stator and Rotor
Only)
Drive Motor
Only
Compressor
Only
Magnetron Tube
Only
ACTIVATE
WARRANTY

Page 24
ENGLISH
1. Commercial, non-residential or multiple family use or use
inconsistent with the product instructions and manuals.
2. In-home instruction on how to use your product.
3. Repair to correct improper maintenance, installation not
in accordance with installation instructions or electrical
or plumbing codes, or repair of household electrical or
plumbing systems.
4. Consumable parts (e.g., light bulbs, batteries, air or water
lters, preservation solutions, etc.).
5. Defects or damage resulting from accident, misuse, abuse,
alteration, re, oods, acts of God or improper installation.
6. Damages, defects, or repairs caused by unauthorized
servicers or use of non-genuine or third- party parts.
7. Any damage to the nish of appliance or home incurred
during installation, including but not limited to oors,
cabinets, walls, etc.
8. Cosmetic damage (e.g., scratches, dents, chips, and other
damage to appliance nishes), unless such damage results
from defects in materials and workmanship and is reported
to W Appliance Co., within 48 hours from date of delivery.
9. If the appearance or exterior of the product has been
damaged or defaced, altered or modied in design or
construction.
10. Discoloration, rust or oxidation of surfaces resulting
from caustic or corrosive environments (e.g., high salt
concentrations, high moisture or humidity or exposure to
chemicals).
11. Product pick-up or delivery. This warranty is for in-home
repair only.
12. Travel or transportation expenses for service in remote
locations where an authorized servicer is not available.
13. Products not accessible to provide required service or for
expenses making the product accessible for servicing.
14. Surcharges including but not limited to, any after hour,
weekend, or holiday service calls, tolls, ferry trip charges,
or mileage expenses for service calls to remote areas,
including the state of Alaska.
15. Repair, removal or reinstallation of inaccessible appliances
or built-in xtures (e.g., trim, decorative panels, ooring,
cabinetry, islands, countertops, drywall) that interfere with
servicing, removal or replacement of the product.
16. Appliances with original, factory installed model/serial
numbers removed, altered or not easily determined.
17. Incidental or consequential damages (e.g., loss of food or
medicine) resulting from appliance breakdown or delay in
service, repair or replacement.
18. Transportation and shipping costs associated with the
replacement of the unit.
19. Glass parts and other accessory items included with the
unit.
20. Products that have been purchased as refurbished, like
new, second-hand, under “as is” or “nal sale” terms.
21. Units that have been transferred from the original owner/
purchaser.
22. If there is damage due to power line surge, user damage
to the AC power cord or connection to improper voltage
source.
23. Products which are not defective or broken, or which are
working as described in the owner’s manual.
WHAT IS NOT COVERED / EXCLUSIONS
LIMITED WARRANTY
DISCLAIMER OF IMPLIED WARRANTIES
Repair or replacement as provided under this warranty is the exclusive remedy to the customer. W. Appliance Co. shall not
be liable for any incidental or consequential damages for breach of any express or implied warranty on this product, except to
the extent prohibited by applicable law. Any implied warranties, including any implied warranty of merchantability or implied
warranty of tness for a particular purpose, are limited to the duration of this warranty or the shortest period allowed by law.
Some states do not allow the exclusion or limitations of consequential damages, or limitations on how long the warranty lasts.
In these cases, the above exclusions or limitations may not apply to you. This warranty gives you specic legal rights and you
may also have other rights which may vary from state to state.
W. Appliance Co. does not warrant that the appliance will work properly in all environmental conditions and makes no
warranty and representation, either implied or expressed, with respect to the quality, performance, merchantability, or tness
for a particular purpose other than the purpose identied within this user’s manual. W Appliance Co. has made every effort
to ensure that this user’s manual is accurate and disclaims liability for any inaccuracies or omissions that may have occurred.
Information in this user’s manual is subject to change without notice and does not represent a commitment on the part of
W Appliance Co. W Appliance Co. reserves the right to make improvements to this user’s manual and/or to the product
described at any time without notice. If you nd information in this manual that is incorrect, misleading or incomplete, please
call 844-299-0879.
W Appliance Co.
New York, NY 10018
Page 25
ENGLISH
EXTENDED WARRANTY COVERAGE
Protect Your Appliance with Extended Warranty Coverage
Thank you for purchasing your new appliance! Your product comes with our one-year limited
warranty, but why stop there? With our Extended Warranty and Accidental Damage Protection
Plan, provided by Mulberry, you can ensure your appliances are covered for longer—without
worrying about unexpected breakdowns or accidents.
Why Upgrade to the Extended Warranty Plan?
• Comprehensive Protection – Extend your warranty coverage
and get full protection for accidental damage and mechanical/
electrical failures, giving you peace of mind well beyond the
rst year.
• No Hidden Costs – You won’t pay any deductibles or service
fees for repairs or replacements. We’ve got you covered!
• Avoid Expensive Repairs – Appliances like refrigerators,
air conditioners, and dishwashers can be costly to repair.
Keep your products running smoothly without the worry of
unexpected repair bills.
• Quick & Easy Claims – Mulberry offers hassle-free claims and
quick, reliable service when you need it most—no complicated
paperwork, just fast and efcient help.
Coverage Basic Warranty Protection +
Mechanical / Electrical Failure
Coverage
Yes
(1 year)
Yes
(2 - 4 years)
Service Fee or Deductible
Yes
(may apply)
No
Parts & Labor
Costs Covered
Yes
(limited to 1 year)
Yes
(2 - 4 years)
Hassle-Free
Claims Process
Standard
Priority
(faster service)
Repair / Replacement Options
Yes
(limited to 1 year)
Yes
(2 - 4 years)
Convenience &
Peace of Mind
Limited to 1 year
Guaranteed for
up to 4 years
ACTIVATE
WARRANTY

BLACK & DECKER, BLACK+DECKER, the BLACK & DECKER and BLACK+DECKER
logos and product names and the orange and black color scheme are trademarks of
The Black & Decker Corporation, used under license. All rights reserved.
BLACK & DECKER, BLACK+DECKER, y los logos y nombres de productos de BLACK
& DECKER y BLACK+DECKER y el esquema de colores naranja y rojo son marcas
registradas de The Black & Decker Corporation, usados bajo licencia. Todos los
derechos reservados.
BLACK & DECKER, BLACK + DECKER, les logos et noms de produits BLACK & DECKER
et BLACK + DECKER, ainsi que la palette de couleurs orange et noir sont des marques
de commerce de The Black & Decker Corporation, utilisées sous licence. Tout droit
réservé.
Product in this box may differ slightly from that pictured. Does not affect function. Not
all accessories shown in photography are included in this package.
El producto en esta caja puede diferir ligeramente del representado en las imágenes.
Esto no afecta su función. No todos los accesorios mostrados en las fotografías son
incluidos en este paquete.
Le produit dans cette boîte peut différer légèrement de celui illustré. N’affecte pas la
fonction. Pas tous les accessoires présentés dans la photographie sont inclus dans ce
paquet.
Imported by W Appliance, Inc., 1356 Broadway, New York, NY 10018
Customer Service: 844-299-0879
Importado por W Appliance, Inc., 1356 Broadway, New York, NY 10018
Servicio al Cliente: 844-299-0879
Importé par W Appliance, Inc., 1356 Broadway, New York, NY 10018
Service À La Clientèle: 844-299-0879
October 2024 Printed in China