INDUCTION HARDWARE www.inductionhardware.com | 12920 OLD VIRGINIA ROAD, SUITE 160, RENO, NEVADA 89521, USA
1
The Future of Cooking
INDUCTION HARDWARE
At Induction Hardware, our mission is to make the next generation of appliances around induction electric technology. Everything
we make is all electric and focused on building the best appliances for the future. We believe that Induction tech is a massive
upgrade in the world of appliances and is the next level in living a healthier, safer and more efficient lifestyle.
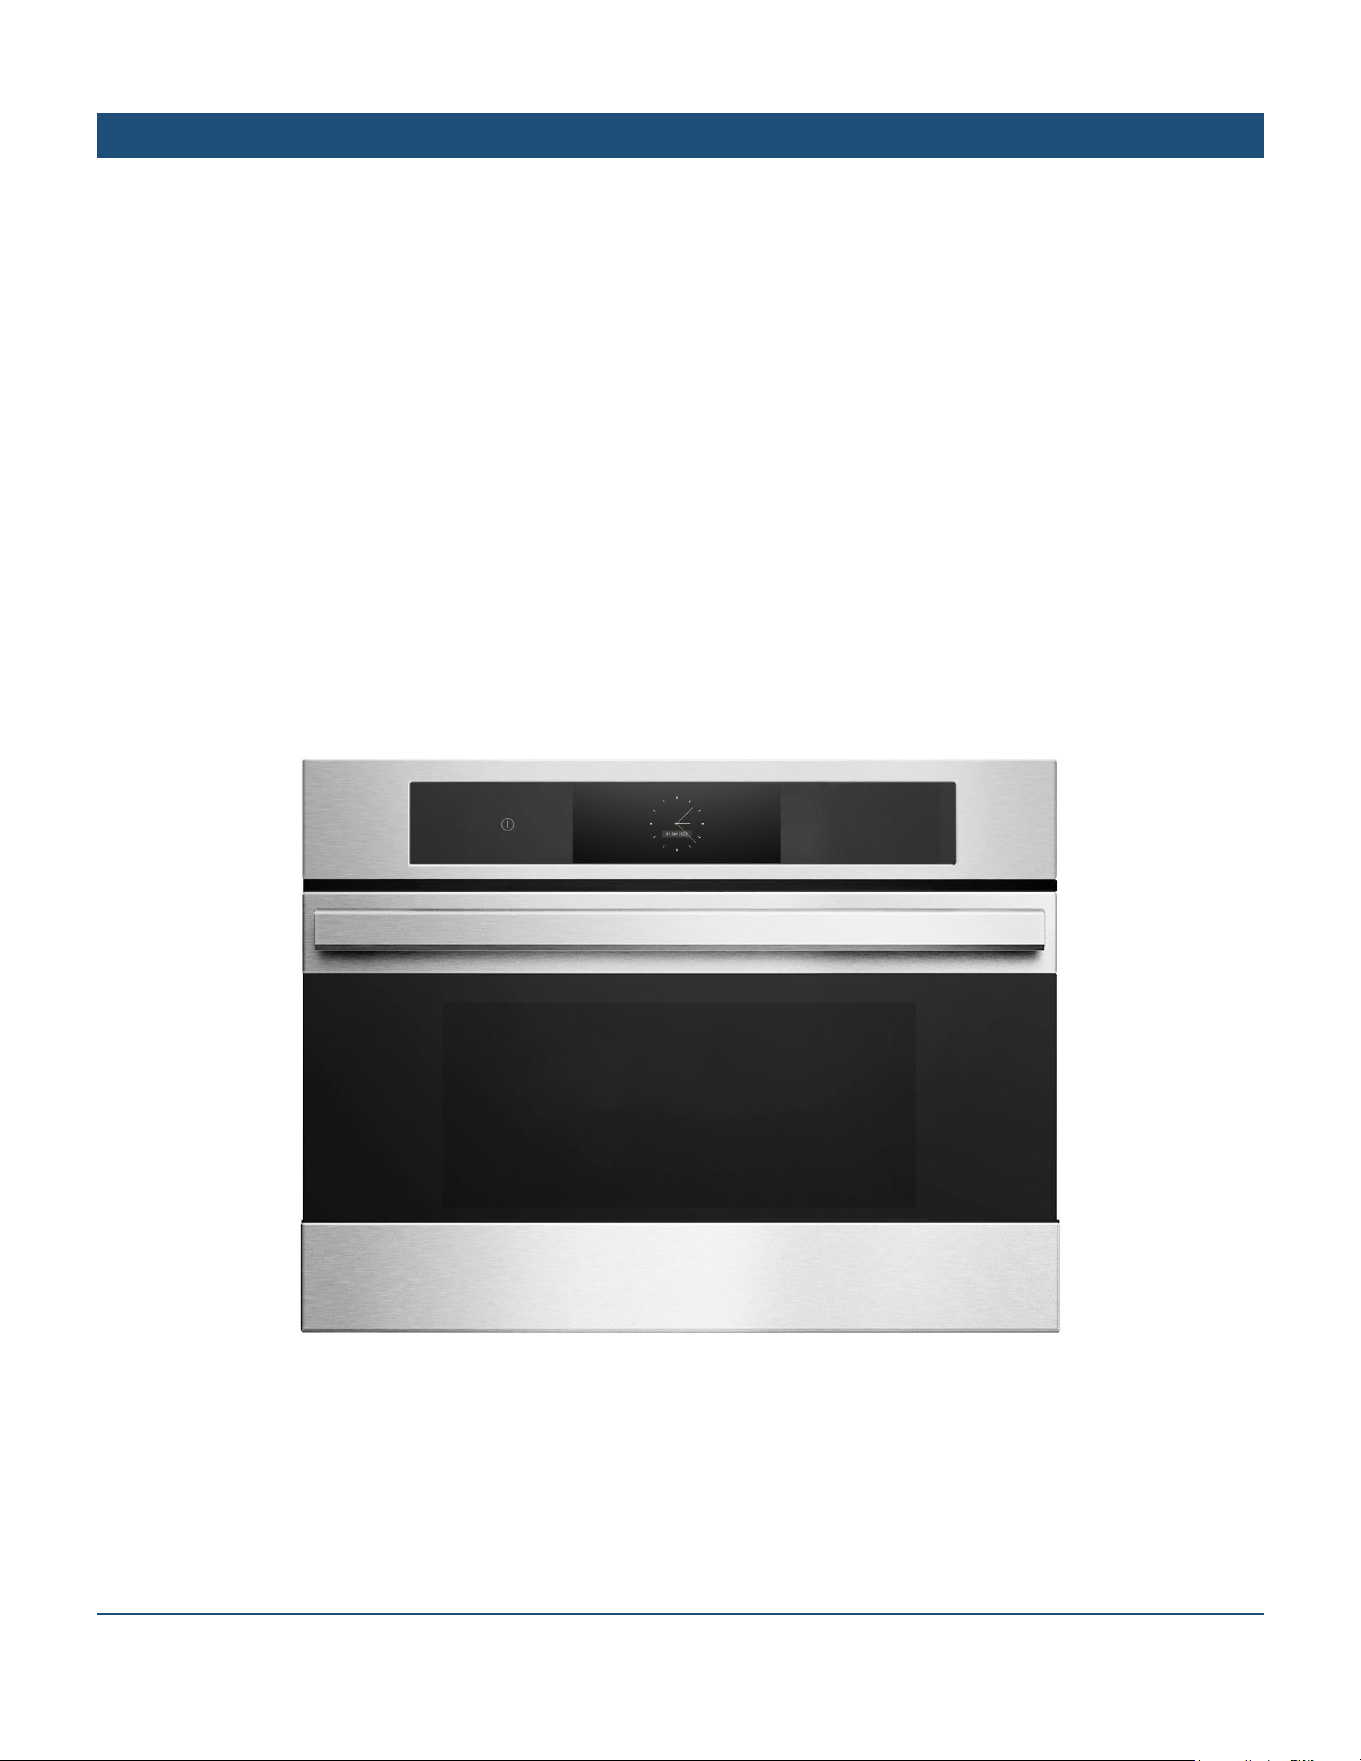
Drawer Microwave Oven
Use and Care Manual

INDUCTION HARDWARE www.inductionhardware.com | 12920 OLD VIRGINIA ROAD, SUITE 160, RENO, NEVADA 89521, USA
2
The Future of Cooking
APPLIANCE SHOWROOM: WWW.INDUCTIONHARDWARE.COM
12920 OLD VIRGINIA ROAD, SUITE 160, RENO, NEVADA 89521, USA
CONTACT: (775) 898-7562 | INFO@INDUCTIONHARDWARE.COM

INDUCTION HARDWARE www.inductionhardware.com | 12920 OLD VIRGINIA ROAD, SUITE 160, RENO, NEVADA 89521, USA
3
The Future of Cooking
Product Information
Item
Description
Product Type
Drawer Microwave Oven
Control Method
6.86-inch TFT full-touch display
Power Supply
110-120 VAC, 60 Hz
Maximum Input Load
1900 W
Microwave Power
Adjustable from 10% to 100%; 100% corresponds to
approximately 900 W microwave power.
Operating Modes
Microwave, Reheat, Popcorn, Beverage, Defrost,
Melt, Soften, Simmer, Keep Warm, Potato, Vegetable,
Pizza, Slow Cook, Rice, Kids Meal, Steam Clean
Note: For service, have the product model number, serial number, and proof of purchase ready. The model and serial
number are subject to the product rating label.

INDUCTION HARDWARE www.inductionhardware.com | 12920 OLD VIRGINIA ROAD, SUITE 160, RENO, NEVADA 89521, USA
4
The Future of Cooking
Contents
Product Information ...........................................................................................................................................................2
Safety Instructions .............................................................................................................................................................5
Avoid Possible Exposure to Excessive Microwave Energy .......................................................................................5
Important Safety Instructions ......................................................................................................................................5
Grounding and Power Supply ....................................................................................................................................5
Radio and Television Interference..............................................................................................................................6
Installation Requirements ..................................................................................................................................................7
Built-in Installation Location ........................................................................................................................................7
Ventilation and Clearances ........................................................................................................................................7
Power Supply and Cord..............................................................................................................................................7
Handling and Removal ...............................................................................................................................................7
Installation Dimensions...............................................................................................................................................7
Installation Diagram Notes .........................................................................................................................................8
Pre-installation Checklist ............................................................................................................................................9
Before Use .......................................................................................................................................................................10
Before First Use ........................................................................................................................................................10
Microwave Cooking Tips ..........................................................................................................................................10
Suitable Cookware ...................................................................................................................................................10
Food Safety Tips ......................................................................................................................................................10
Getting to Know Your Microwave Oven...........................................................................................................................12
Main Components ....................................................................................................................................................12
Control Panel ............................................................................................................................................................12
Basic Operation ...............................................................................................................................................................14
Standby and Home Screen ......................................................................................................................................14
Opening or Closing the Drawer ................................................................................................................................14
Drawer Closure Detection ........................................................................................................................................15
Placement in the Turntable-free Cavity ....................................................................................................................16
Pause, Cancel, and Adjust .......................................................................................................................................16
Manual Microwave Cooking.............................................................................................................................................17
Setting Time and Power Level .................................................................................................................................17
Auto Menu ........................................................................................................................................................................19
Reheat ......................................................................................................................................................................19

INDUCTION HARDWARE www.inductionhardware.com | 12920 OLD VIRGINIA ROAD, SUITE 160, RENO, NEVADA 89521, USA
5
The Future of Cooking
Popcorn ....................................................................................................................................................................19
Beverage ..................................................................................................................................................................19
Defrost ......................................................................................................................................................................20
Melt ...........................................................................................................................................................................20
Soften .......................................................................................................................................................................21
Simmer .....................................................................................................................................................................21
Keep Warm ...............................................................................................................................................................22
Potato .......................................................................................................................................................................22
Vegetable..................................................................................................................................................................23
Pizza .........................................................................................................................................................................23
Slow Cook.................................................................................................................................................................24
Steam Clean .............................................................................................................................................................24
Rice ...........................................................................................................................................................................25
Kids Meal ..................................................................................................................................................................25
More Functions ................................................................................................................................................................27
Favorites ...................................................................................................................................................................27
Clock, Alarm, and Timer ...........................................................................................................................................27
Child Lock .................................................................................................................................................................29
Light ..........................................................................................................................................................................29
System Settings ........................................................................................................................................................29
Sound Prompts .........................................................................................................................................................32
Cleaning and Care ...........................................................................................................................................................33
Cleanable Areas and Areas Not to Be Rinsed .........................................................................................................33
Exterior Surfaces ......................................................................................................................................................33
Drawer Front and Glass ...........................................................................................................................................33
Touch Panel .............................................................................................................................................................33
Cavity and Sealing Surfaces ....................................................................................................................................33
Mica Sheet ................................................................................................................................................................33
Drawer Rails .............................................................................................................................................................33
Vent ..........................................................................................................................................................................33
Cavity Deodorizing ...................................................................................................................................................33
Operating Environment ....................................................................................................................................................35
Environmental Requirements ...................................................................................................................................35
Fault Code Description ....................................................................................................................................................36

INDUCTION HARDWARE www.inductionhardware.com | 12920 OLD VIRGINIA ROAD, SUITE 160, RENO, NEVADA 89521, USA
6
The Future of Cooking
Troubleshooting ...............................................................................................................................................................36
Safety Instructions
Avoid Possible Exposure to Excessive Microwave Energy
1. Do not operate the microwave oven with the drawer open.
2. Do not defeat, modify, or bypass the safety interlock devices.
3. Do not place objects between the front face of the cavity and the drawer.
4. Keep the drawer sealing surfaces clean. Do not allow food residue or cleaner to accumulate.
5. If the drawer, rails, door seal, or sealing surfaces are damaged, stop using the appliance and contact service
personnel.
WARNING: No one except qualified service personnel may disassemble, adjust, or repair the microwave
oven.
Important Safety Instructions
• This appliance is intended only for household food heating, cooking, defrosting, keeping warm, and cleaning
assistance. It must not be used for industrial, laboratory, or outdoor purposes.
• Do not heat whole eggs in shells, sealed containers, sealed glass bottles, or other items that may burst.
• Close supervision by an adult is required when children use or are near the appliance.
• Do not allow children to play with the appliance, climb on the drawer, touch hot containers, or remove hot food
alone.
• Do not climb, sit, or stand on the drawer.
• When the drawer opens or closes automatically, keep fingers, clothing, utensils, and other objects away from the
drawer opening and rails.
• For electric drawer models, never forcefully pull or push the drawer. If the drawer is stuck, makes abnormal
noise, or cannot open or close, stop operation first and remove visible obstructions. Do not force it.
• Do not leave the appliance unattended when using paper, plastic, or other combustible materials to assist
cooking.
• If materials inside the cavity ignite, keep the drawer closed, turn off the microwave oven, and disconnect power
at the circuit breaker or fuse.
• Do not use ordinary cooking thermometers. Metal or mercury components may cause arcing or damage.
• After operation, the cavity, containers, food, and drawer front may be very hot. Use oven mitts when removing
food, and avoid direct skin contact with hot surfaces.
• Do not operate the control panel or power components with wet hands, and do not splash water directly onto the
appliance body, control panel, rails, or ventilation area.
• Do not block the air inlet or outlet. Poor ventilation may cause overheat protection, shutdown, or damage.
• Do not use this appliance to heat deep-fried foods, large amounts of cooking oil, alcohol, highly flammable
materials, or non-food items.
CAUTION: Liquids may exceed the boiling point without obvious boiling. When heating water, coffee, tea,
milk, or other liquids, stir before and after heating and let stand briefly before removing.

INDUCTION HARDWARE www.inductionhardware.com | 12920 OLD VIRGINIA ROAD, SUITE 160, RENO, NEVADA 89521, USA
7
The Future of Cooking
Grounding and Power Supply
This appliance must be properly grounded and connected to a 110-120 VAC, 60 Hz power supply. Installation and
power connection must comply with local codes. This unit requires a dedicated 20A circuit.
WARNING: Do not use extension cords or adapter plugs, and do not cut off the grounding terminal.
Radio and Television Interference
Microwave oven operation may cause slight interference to radios, televisions, or similar devices. Try cleaning the
drawer sealing surfaces, adjusting the receiving antenna direction, moving the receiving device, or connecting the
device to an outlet on a different circuit.

INDUCTION HARDWARE www.inductionhardware.com | 12920 OLD VIRGINIA ROAD, SUITE 160, RENO, NEVADA 89521, USA
8
The Future of Cooking
Installation Requirements
Built-in Installation Location
• This appliance is a built-in drawer structure and should be installed in a sturdy, level, dry, and well-ventilated
cabinet.
• Cabinet materials and structure must support the appliance weight, food weight, and dynamic load generated by
drawer opening and closing. Appliance weight and load-bearing requirements are subject to the rating label or
product specification label.
• Do not install directly below a cooktop, near open flames or high-temperature heat sources, in damp areas,
outdoors, or where water may splash onto the appliance.
• After installation, the drawer must be level. Tilted installation may cause sticking, abnormal automatic
opening/closing, or incomplete closure.
Ventilation and Clearances
• During installation, reserve left, right, rear, top, and bottom ventilation clearances according to the installation
dimension drawing.
• Never enclose or cover the air inlet, air outlet, or ventilation passages with cabinet panels, decorative panels,
insulation, or other objects.
• If frequent overheat shutdown, odor, abnormal noise, or abnormal appliance temperature rise occurs, stop using
the appliance and check the ventilation space.
Power Supply and Cord
• A dedicated circuit and dedicated grounded outlet are recommended. Do not use power strips in series,
extension cords, or adapter plugs.
• Keep the power cord away from rails, sharp edges, hot parts, and the drawer movement area to avoid pinching,
bending, or pulling.
• Installation and service should be performed by qualified personnel in accordance with local electrical codes.
Handling and Removal
• Before moving, removing, or reinstalling the appliance, disconnect power and secure the drawer to prevent it
from sliding out, striking objects, or damaging the rail structure.
• Do not carry the appliance by holding only the drawer front panel or control panel. There are handles on each
side you can use to grab and carry where needed.
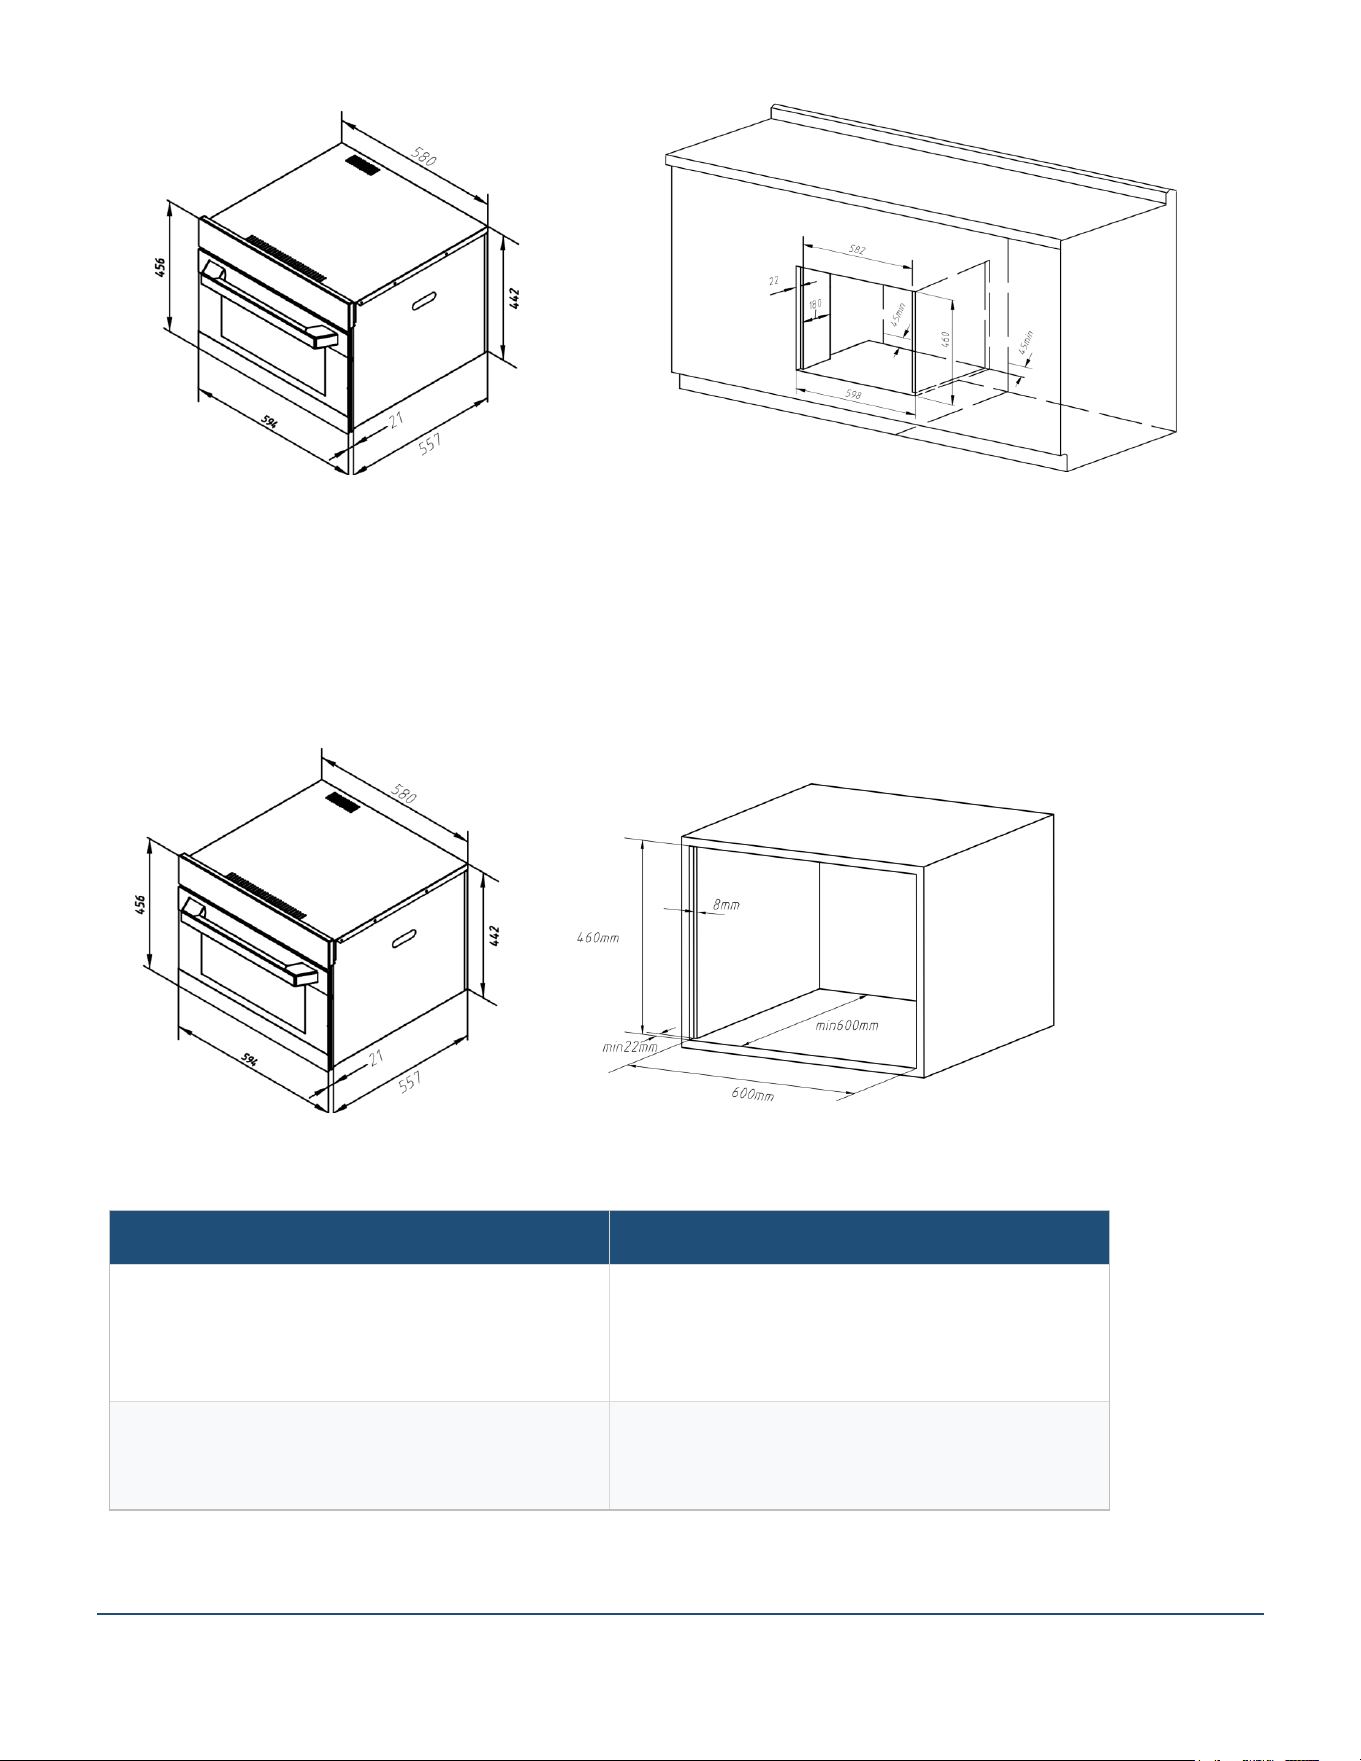
Installation Dimensions
A. Bottom-mount installation diagram
INDUCTION HARDWARE www.inductionhardware.com | 12920 OLD VIRGINIA ROAD, SUITE 160, RENO, NEVADA 89521, USA
9
The Future of Cooking
B. Fully built-in installation diagram
Installation Diagram Notes
Position
Items to Confirm
Front
Cutout width and height should match the selected
installation method; the clearance around the front
panel should be even and must not press against the
cabinet.
Side
Cabinet depth must be at least 23.622 inches (600
mm), with space reserved for the power cord, rear
ventilation, and appliance insertion.

INDUCTION HARDWARE www.inductionhardware.com | 12920 OLD VIRGINIA ROAD, SUITE 160, RENO, NEVADA 89521, USA
10
The Future of Cooking
Bottom
The support surface must be level, flat, and sturdy. Do
not allow the front panel or decorative parts alone to
bear the load.
Front Clearance
When the drawer is fully open, the front area should
be unobstructed. Reserve an operating distance
based on approximately 14.96 inches (380 mm)
drawer extension.
Ventilation
Do not block top, side, rear, or bottom ventilation
paths to avoid overheat protection or shutdown.
Pre-installation Checklist
1. Confirm the installation method: bottom-mount or fully built-in.
2. Check the cutout width, height, and depth according to the selected method.
3. Confirm the cabinet is level and has reliable load-bearing capacity, and that the bottom panel will not sag or
deform.
4. Confirm the power source is a dedicated, properly grounded outlet, and that the power cord will not be pinched
or contact the drawer movement area.
5. Confirm the air inlet, air outlet, and rear ventilation space are not blocked by cabinet panels or debris.
6. After installation, test drawer opening and closing with no load to confirm there is no sticking, abnormal noise,
scraping, or incomplete closure.

INDUCTION HARDWARE www.inductionhardware.com | 12920 OLD VIRGINIA ROAD, SUITE 160, RENO, NEVADA 89521, USA
11
The Future of Cooking
Before Use
Before First Use
1. Remove all packaging materials from inside the cavity.
2. Do not remove the mica sheet inside the cavity.
3. Check the drawer, rails, door seal, sealing surfaces, and cavity for damage.
4. If damage is found, do not connect power or use the appliance.
5. Confirm the drawer opens and closes smoothly with no foreign objects blocking it, and confirm the air inlet and
outlet are not blocked.
Microwave Cooking Tips
• During microwave operation, food or liquid should be inside the cavity to absorb microwave energy.
• Do not block the vents during cooking. Steam from the vents is normal.
• Start with a shorter heating time and add more time if necessary.
• Place thicker portions of food toward the outside of the container.
• Stir, turn, or rearrange food as needed for more even heating.
• Let food stand as instructed after cooking so heat can continue to distribute.
• Pierce or cut foods with skins, membranes, or dense texture before heating to release steam.
• After heating, check the center temperature of food first, especially meat, poultry, seafood, soups/sauces, filled
foods, and children's food.
Suitable Cookware
Suitable
Not Recommended
Glass, ceramic, and plastic containers labeled
microwave-safe
Metal cookware, metal baking trays, and aluminum foil
trays
Microwave-safe plastic wrap, wax paper, paper
towels, and microwave covers
Metal twist ties and tableware with metal trim
Deep, heat-resistant containers with sufficient
capacity
Narrow-mouth straight-sided containers for heating
liquids
Containers sized for the drawer cavity that do not
touch the cavity wall or sealing surfaces
Containers that are too large, too tall, or interfere with
drawer closure
Food Safety Tips
Food or Situation
Use Tip
Eggs
Do not heat eggs in shells or whole cooked eggs; they
may burst. When cooking eggs, break the yolks and
whites first.
Popcorn
Use only popcorn packages labeled microwave-safe
and follow package instructions. Do not reheat
unpopped kernels.

INDUCTION HARDWARE www.inductionhardware.com | 12920 OLD VIRGINIA ROAD, SUITE 160, RENO, NEVADA 89521, USA
12
The Future of Cooking
Potatoes, apples, squash, sausages, and other foods
with skins
Pierce or cut before heating to release steam.
Baby Food
After heating, stir thoroughly and check the
temperature. Do not heat sealed baby bottles in the
microwave oven.
Liquids
Stir before and after heating, and let stand briefly
before removing to prevent burns from delayed
boiling.
INDUCTION HARDWARE www.inductionhardware.com | 12920 OLD VIRGINIA ROAD, SUITE 160, RENO, NEVADA 89521, USA
13
The Future of Cooking
Getting to Know Your Microwave Oven
Main Components
Component
Description
Control Panel and Display
Select functions, enter time and power level, and view
on-screen prompts.
Drawer Door
Opens or closes automatically using Open/Close.
Oven Cavity
Turntable-free drawer cavity for microwave-safe
containers and food.
Mica Sheet
Protects microwave components. Do not remove it.
Sealing Surface
Keep clean to ensure the drawer closes properly.
Light
Provides illumination when the drawer is open or the
oven is operating.
Drawer Rails
Support automatic drawer opening and closing; keep
them clean.
Vent
Exhausts heat and steam generated during cooking.
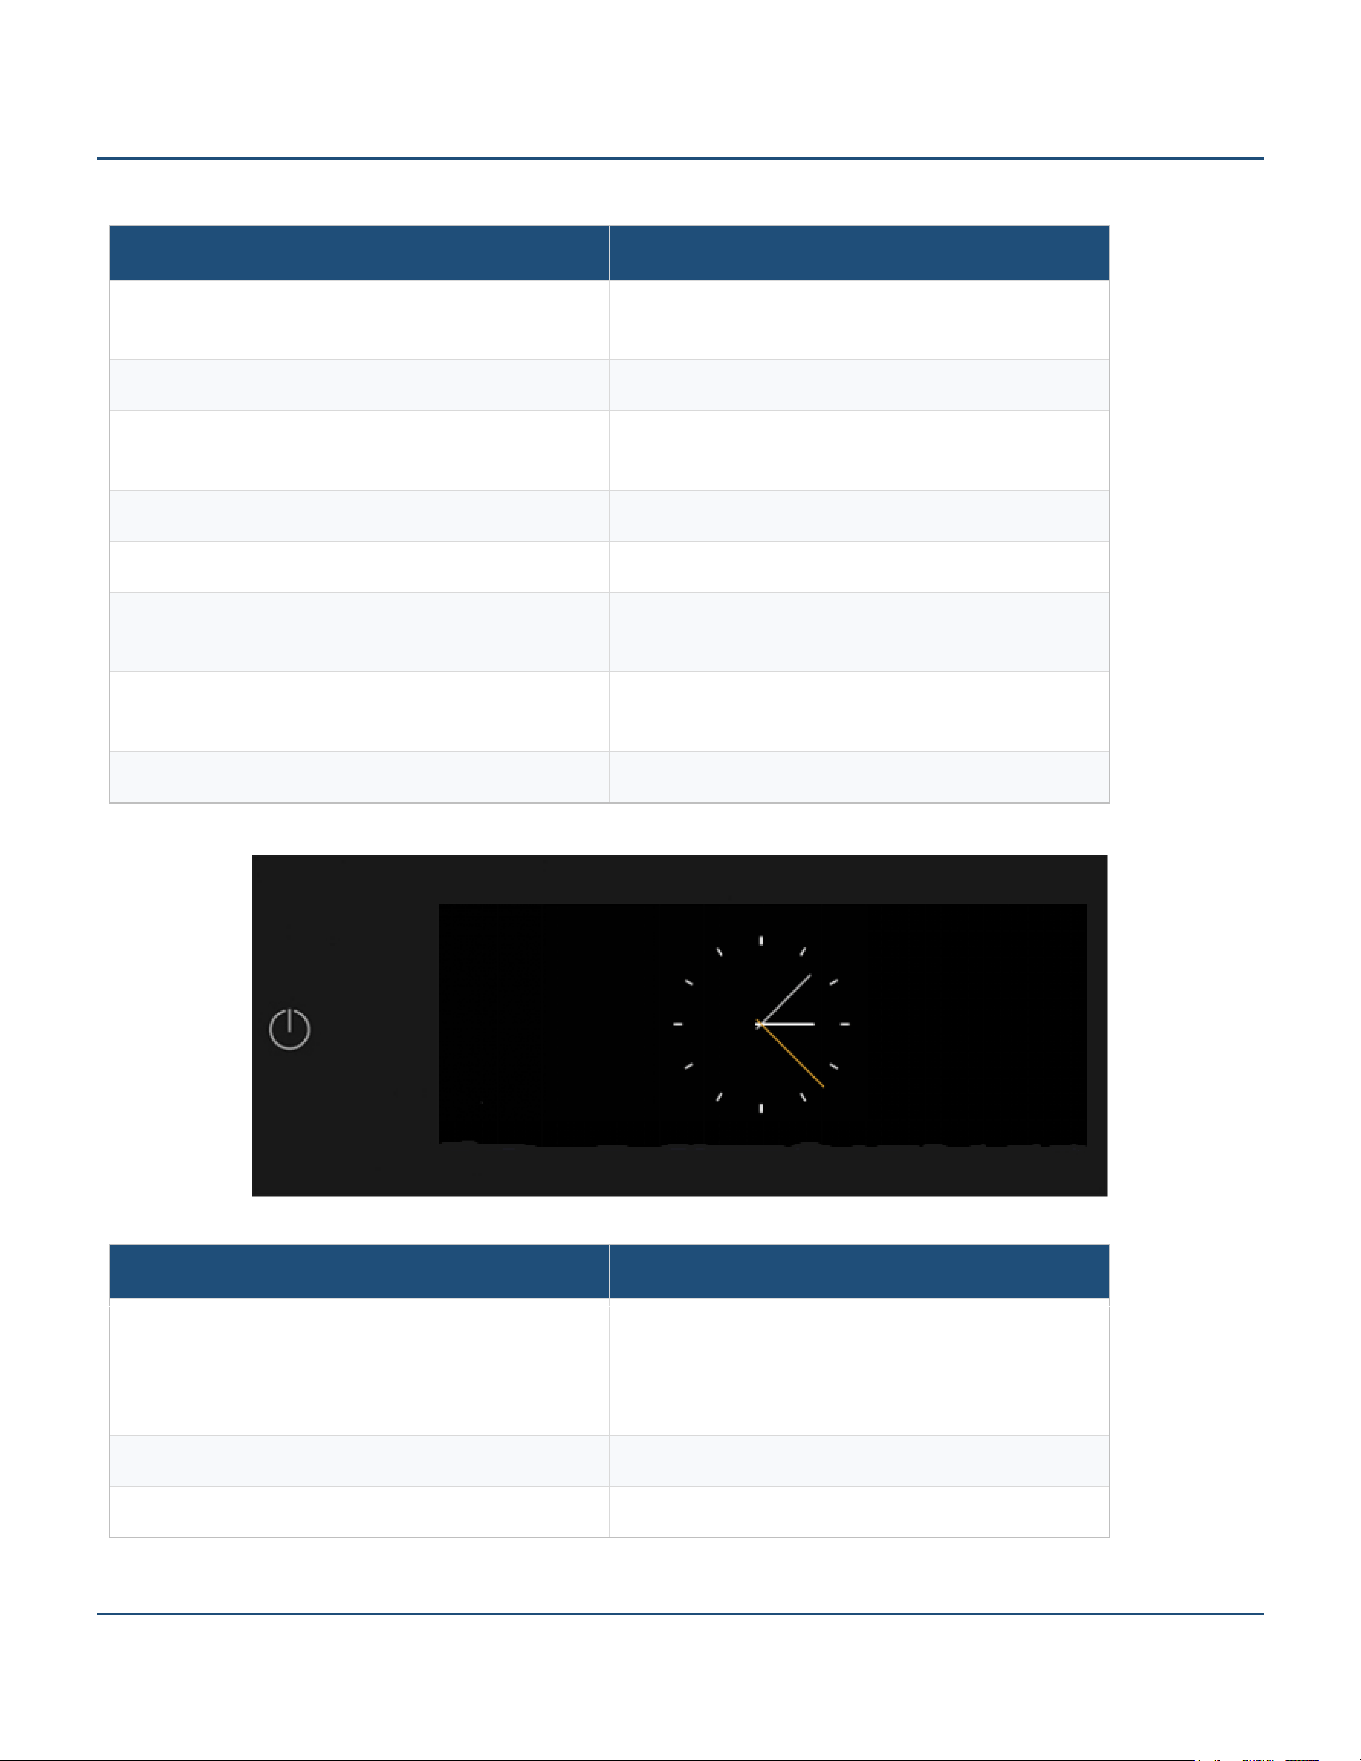
Control Panel
6.86-inch touch-screen home screen illustration
Display/Button
Purpose
Standby key
Short press to enter the clock or standby page; on an
operating page, follow the on-screen prompt to exit or
return. Press and hold for about 10 seconds to restart
the system.
More modes
View all cooking and special functions.
Microwave
Manually set microwave time and power level.

INDUCTION HARDWARE www.inductionhardware.com | 12920 OLD VIRGINIA ROAD, SUITE 160, RENO, NEVADA 89521, USA
14
The Future of Cooking
Reheat / Defrost / Simmer / Slow Cook
Enter with default parameters; time or power can be
adjusted.
Popcorn / Pizza
Select by weight or number of pieces, then start.
Melt / Soften / Beverage
Select by food or beverage type and weight/capacity,
then start.
Special Function
Access Potato, Vegetable, Rice, and Kids Meal.
Favorites
Save and recall frequently used programs.
Clock / Timer / Alarm
Set timer and alarm functions.
Child Lock
Lock the touch screen to prevent unintended
operation.
Light / Settings / Auto Door
Lighting, system settings, and automatic drawer
opening/closing.
INDUCTION HARDWARE www.inductionhardware.com | 12920 OLD VIRGINIA ROAD, SUITE 160, RENO, NEVADA 89521, USA
15
The Future of Cooking
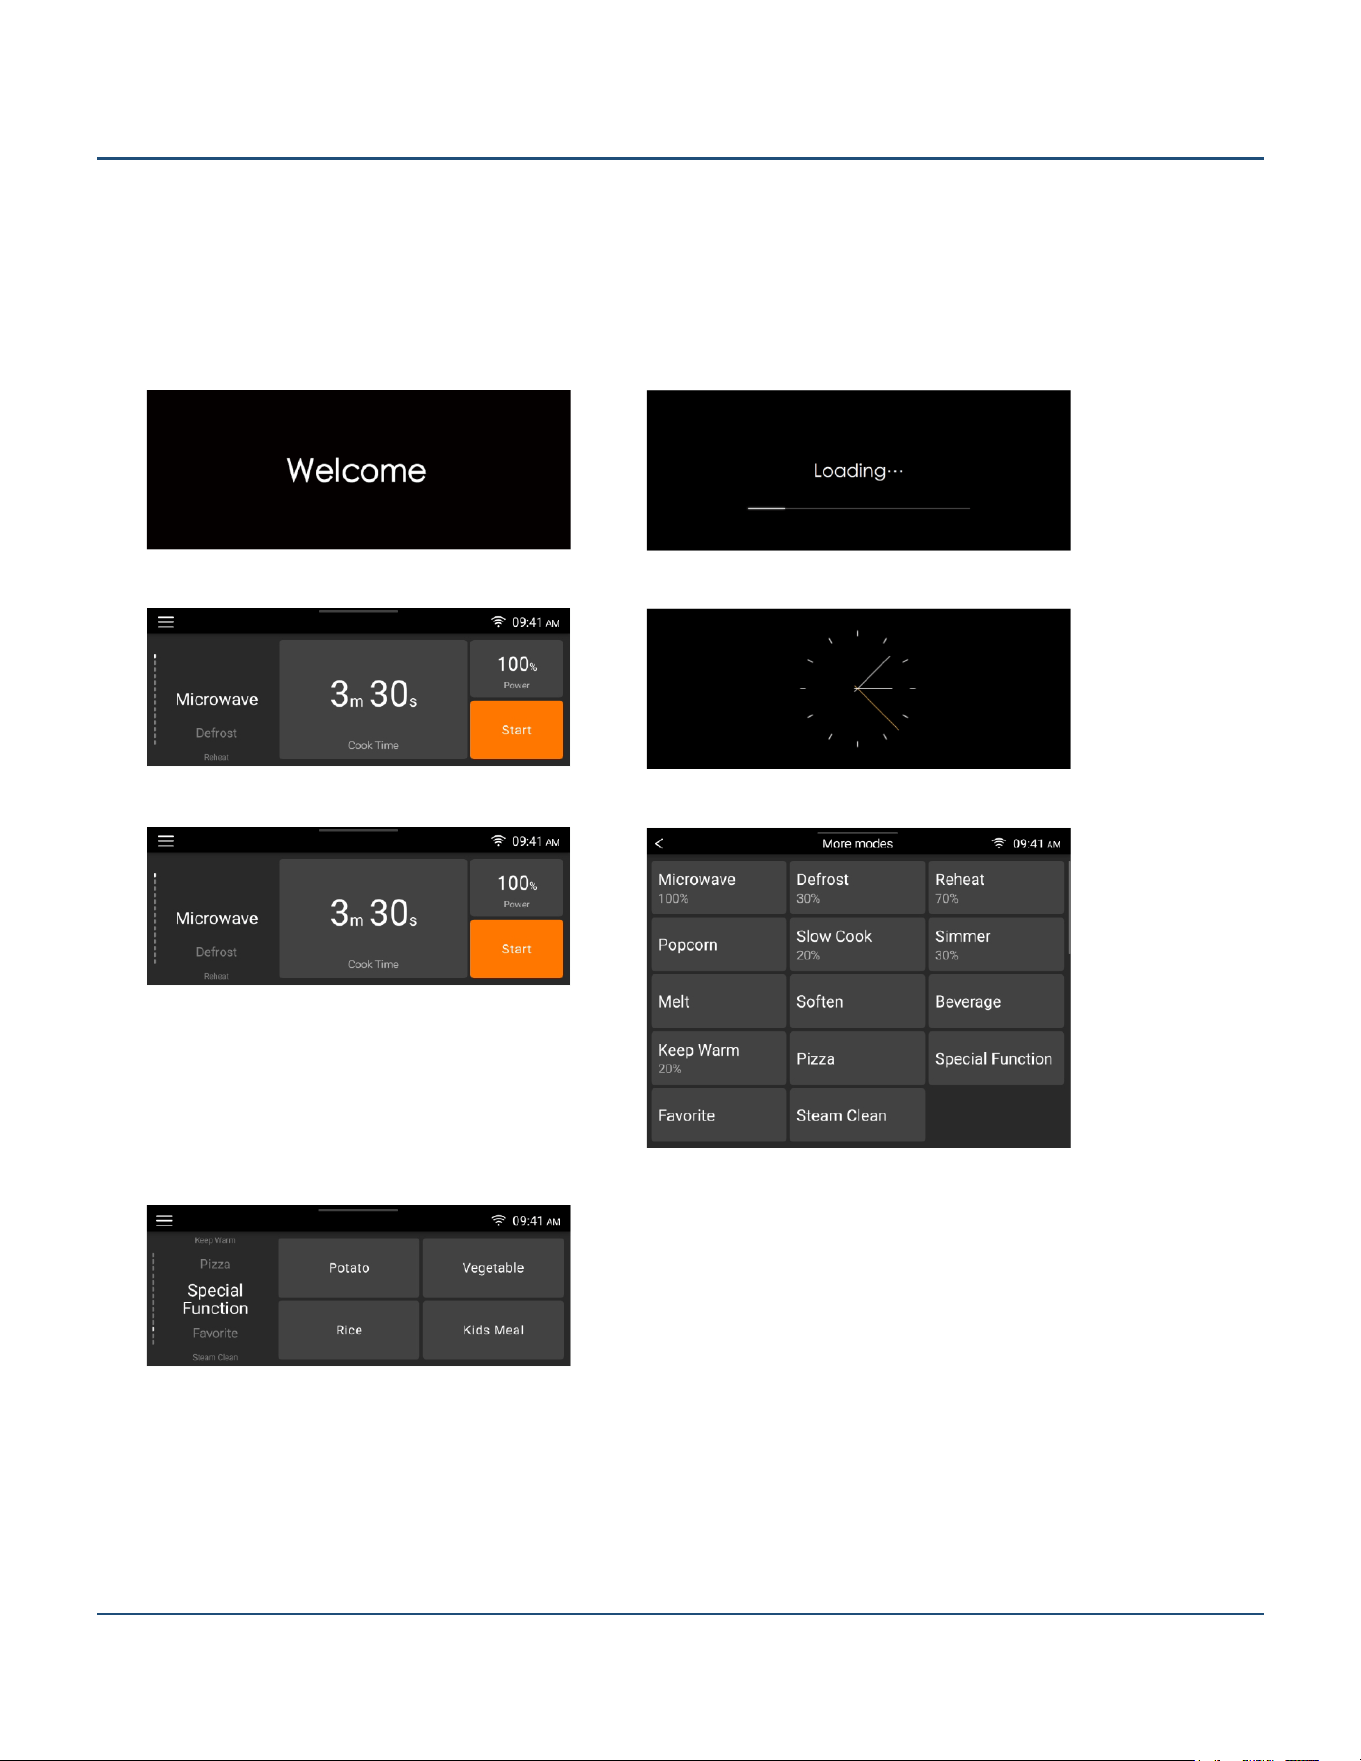
Basic Operation
Standby and Home Screen
After power-on, the appliance performs a startup self-check. When not operating, it automatically enters the standby
clock page after 2 minutes with no operation; you can also short press the Standby key to enter standby. In standby,
short press the Standby key or touch the screen to enter the home screen.
Power-on, standby, and home screen
Power-on, standby, and home screen 1
Power-on, standby, and home screen 2
Power-on, standby, and home screen 3
Power-on, standby, and home screen 4
Power-on, standby, and home screen 5
Power-on, standby, and home screen 6
Power-on, standby, and home screen 7
Opening or Closing the Drawer
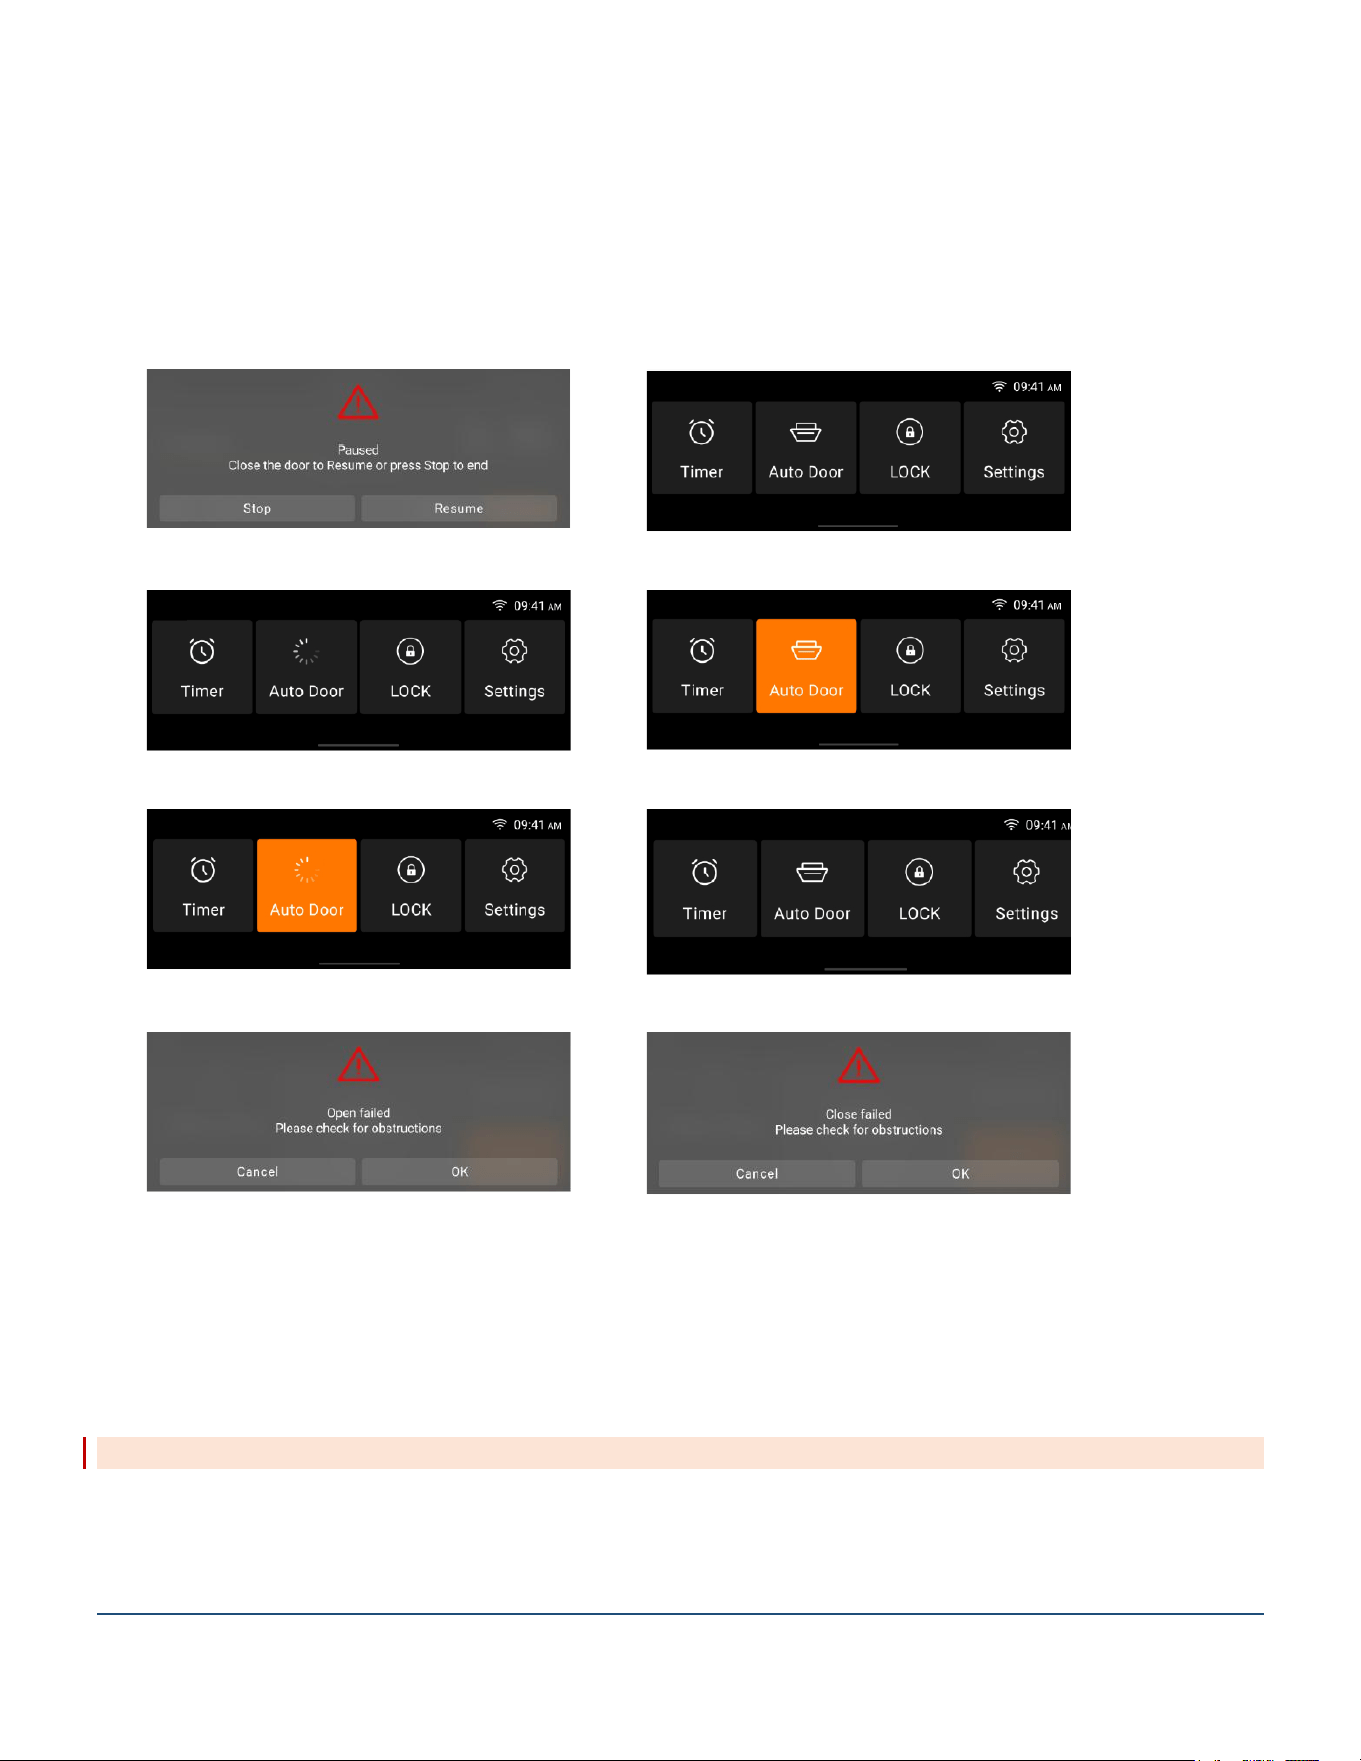
1. Select Auto Door from the pull-down function bar. The screen displays the automatic open/close function.
2. Short press Auto Door. The icon enters loading status, and the drawer automatically opens or closes.
INDUCTION HARDWARE www.inductionhardware.com | 12920 OLD VIRGINIA ROAD, SUITE 160, RENO, NEVADA 89521, USA
16
The Future of Cooking
3. After opening is complete, the icon background lights up; after closing is complete, the icon background turns
off.
4. If an opening/closing error occurs, the screen displays a prompt. Press OK to try again, or press Cancel to
cancel.
5. During drawer movement, keep fingers, utensils, and packaging out of the opening/closing area. Do not force
the drawer.
Auto Door screen
Auto Door screen 1
Auto Door screen 2
Auto Door screen 3
Auto Door screen 4
Auto Door screen 5
Auto Door screen 6
Auto Door screen 7
Auto Door screen 8
Drawer Closure Detection
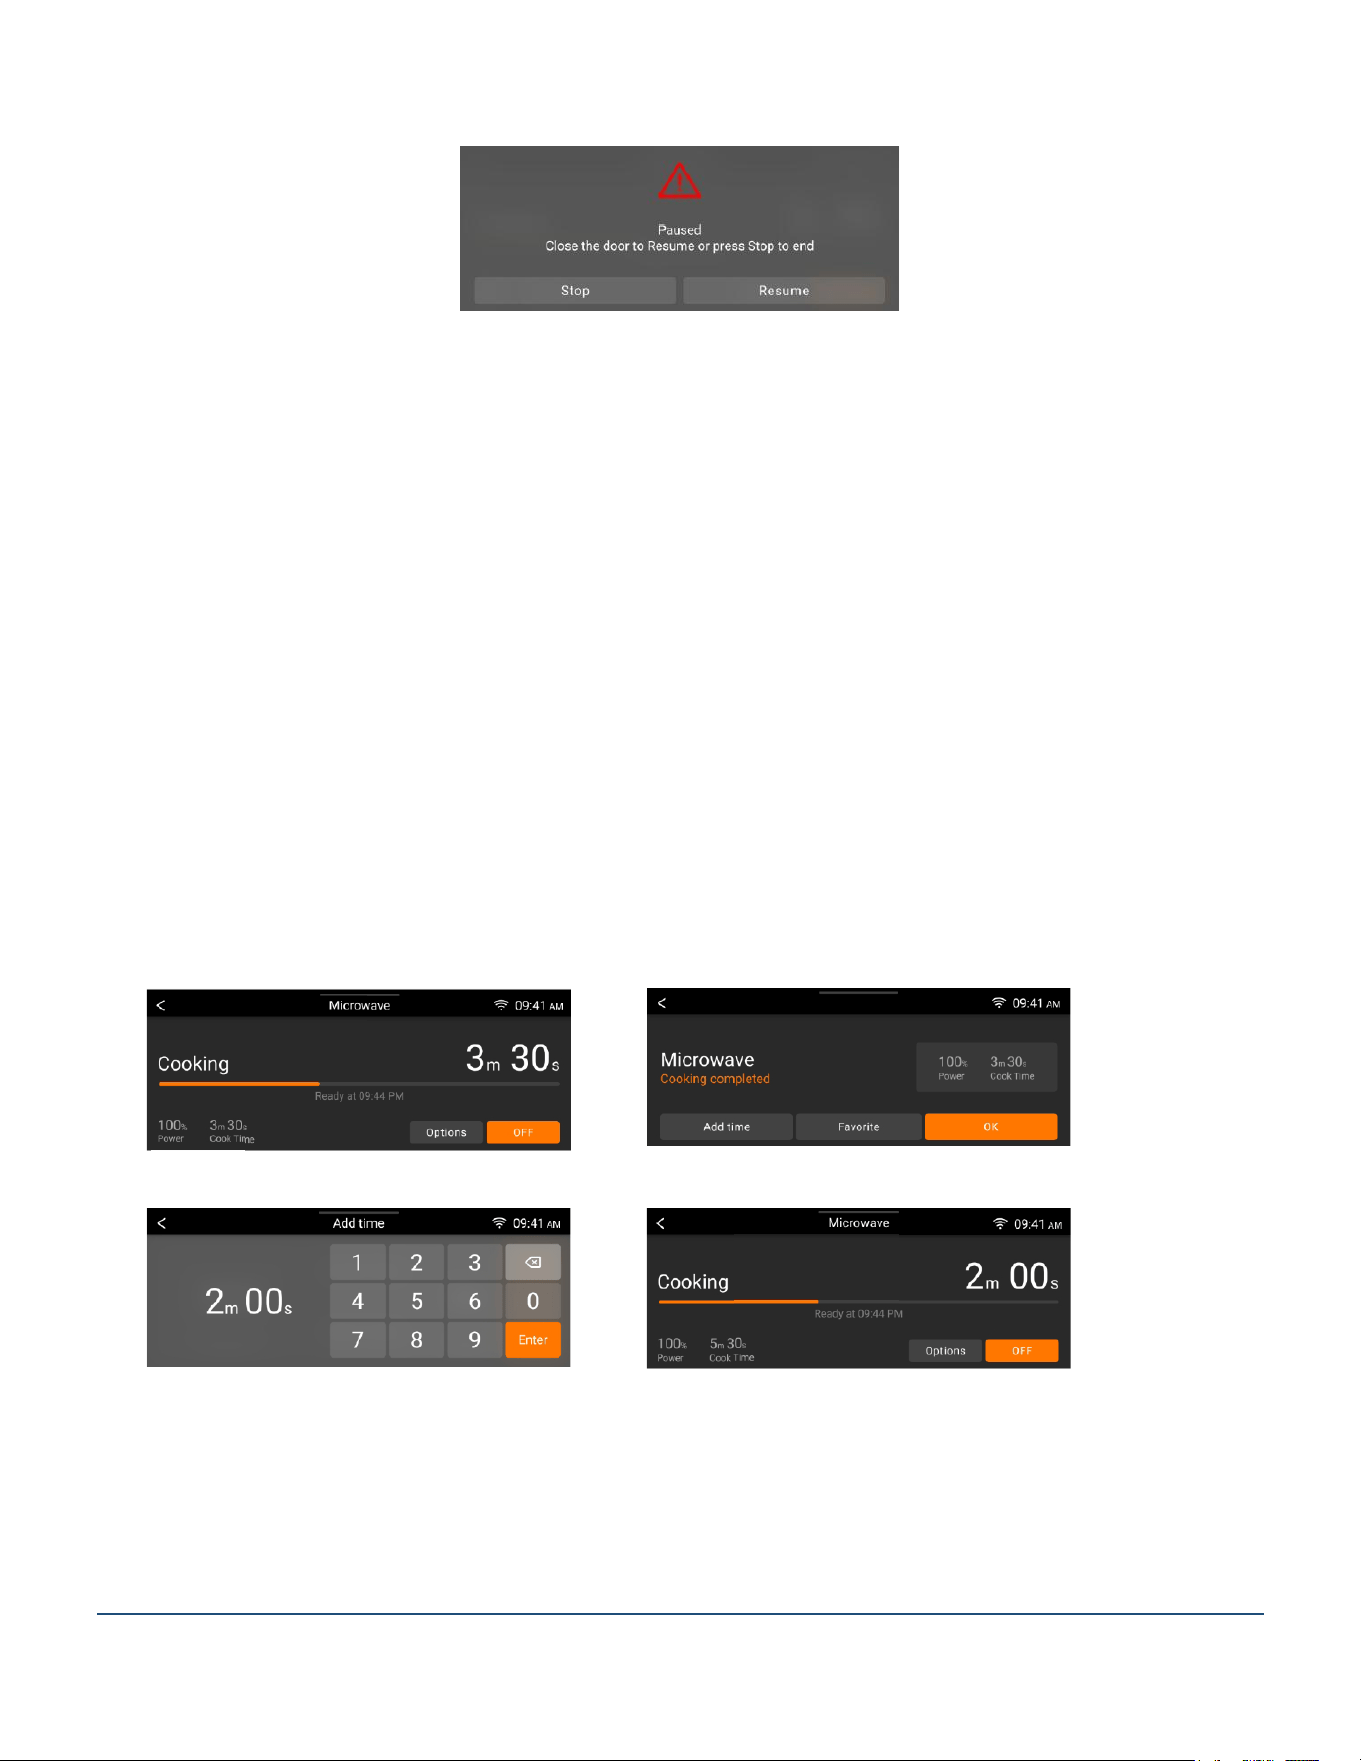
The appliance will not start heating unless the drawer is fully closed. If the screen displays a close-door, door, or
similar prompt, remove any item preventing closure, gently push the drawer until it is fully closed, and then press
Start. Opening the drawer in any mode pauses the current operation. After closing the drawer, follow the on-screen
prompt to continue.
WARNING: Do not use tape, tools, or any other method to bypass door detection or safety interlocks.
INDUCTION HARDWARE www.inductionhardware.com | 12920 OLD VIRGINIA ROAD, SUITE 160, RENO, NEVADA 89521, USA
17
The Future of Cooking
Door prompt screen
Door prompt screen
Placement in the Turntable-free Cavity
• This appliance uses a drawer-type, turntable-free structure. Place food and containers in the center of the cavity
and keep containers stable.
• Make sure large cookware does not touch the cavity wall, waveguide cover, lighting area, or sealing surface,
and does not prevent the drawer from closing.
• When heating multiple portions, leave space between items and stir, turn, or rearrange them as needed during
cooking.
Pause, Cancel, and Adjust
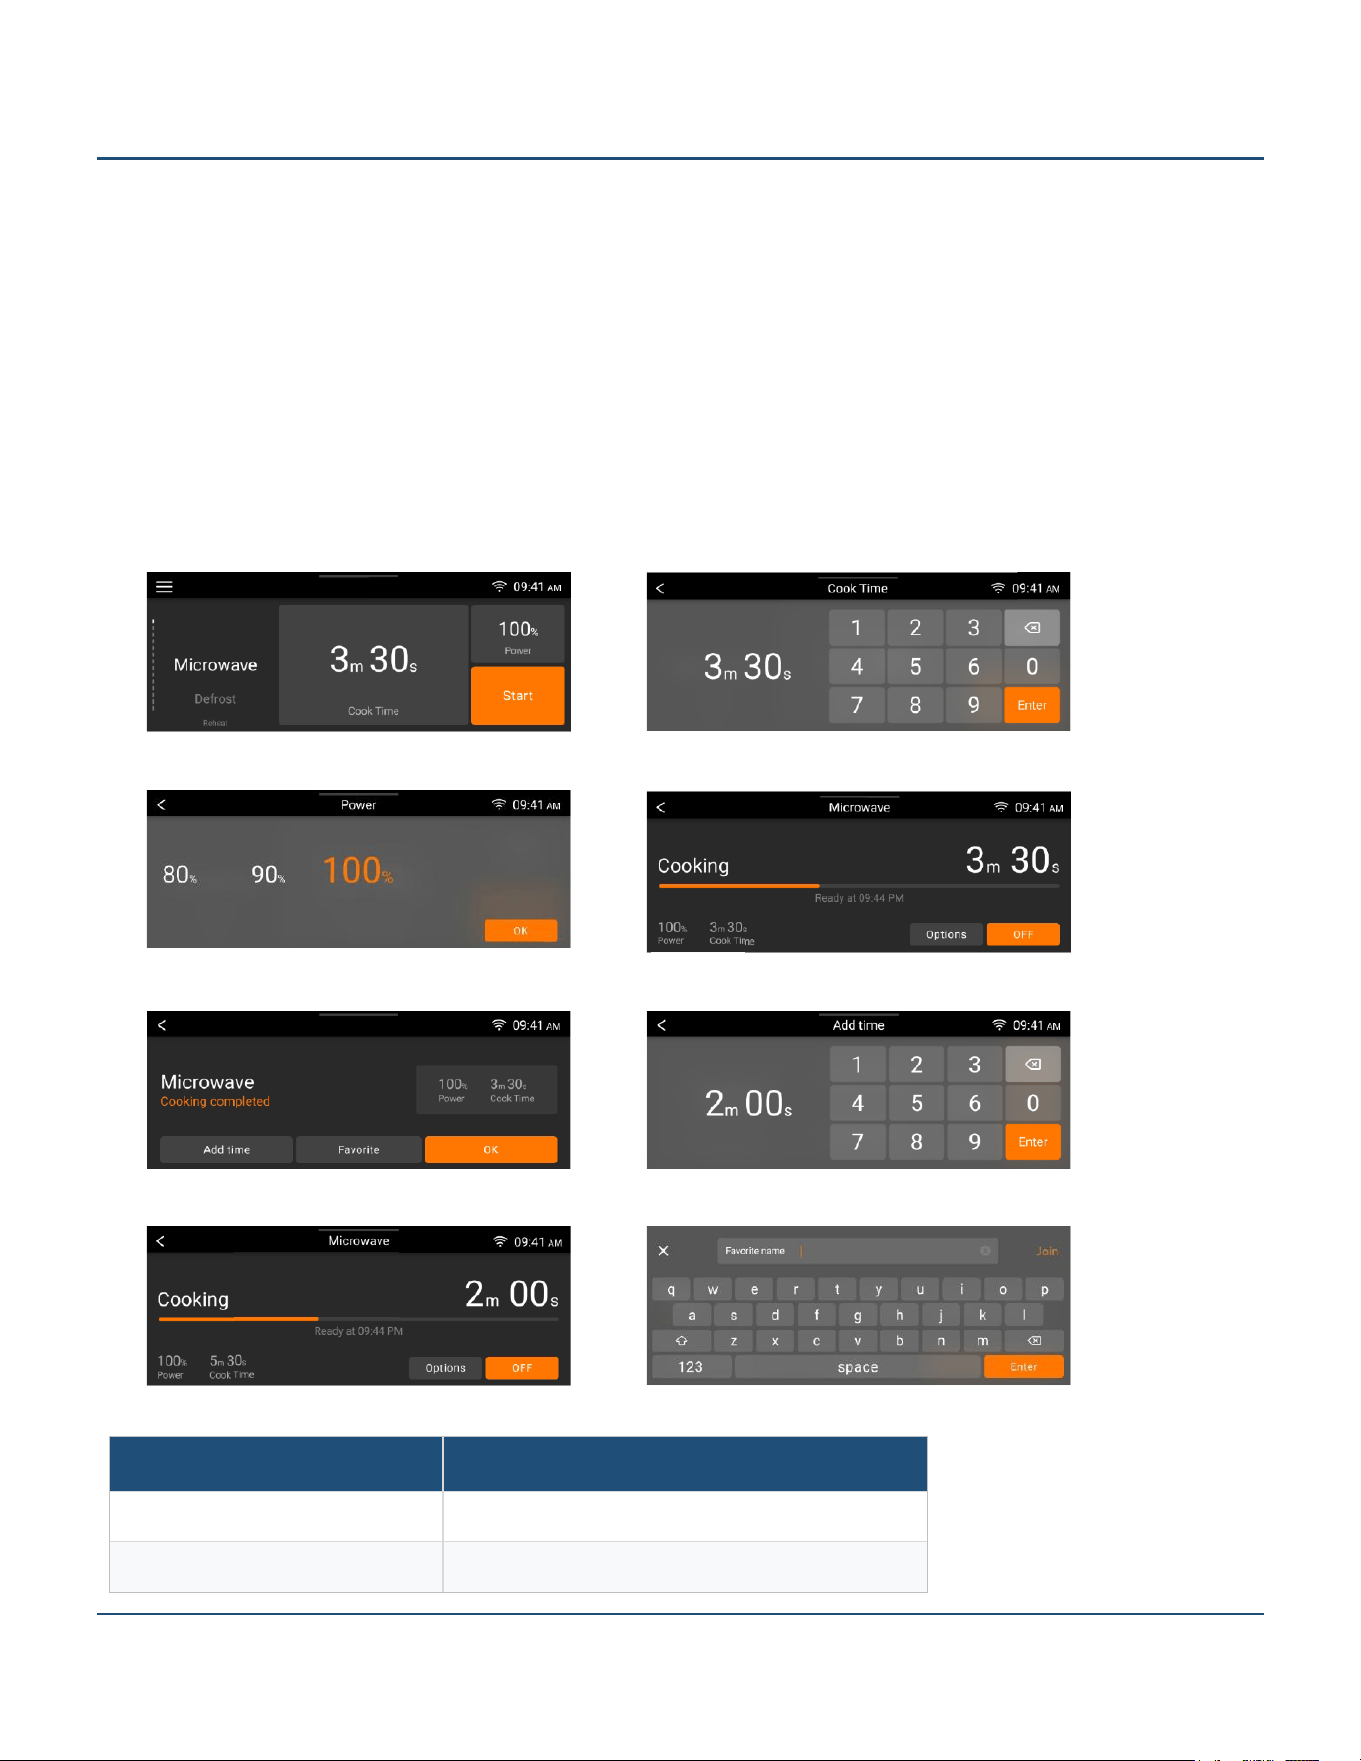
1. Opening the drawer during operation pauses the appliance and stops heating.
2. Opening the drawer during operation also pauses heating. After placing or removing food, close the drawer
promptly. Do not leave it open for an extended time in standby.
3. During operation, short press Options to reset the operating time or microwave power level, then press Start to
continue.
4. After operation ends, press OK to return to the function page, or select Add time to extend the operating time.
5. To exit the current operation, confirm exit according to the on-screen prompt.
Operation adjustment and add-time screen
Operation adjustment and add-time screen 1
Operation adjustment and add-time screen 2
Operation adjustment and add-time screen 3
Operation adjustment and add-time screen 4
INDUCTION HARDWARE www.inductionhardware.com | 12920 OLD VIRGINIA ROAD, SUITE 160, RENO, NEVADA 89521, USA
18
The Future of Cooking
Manual Microwave Cooking
Setting Time and Power Level
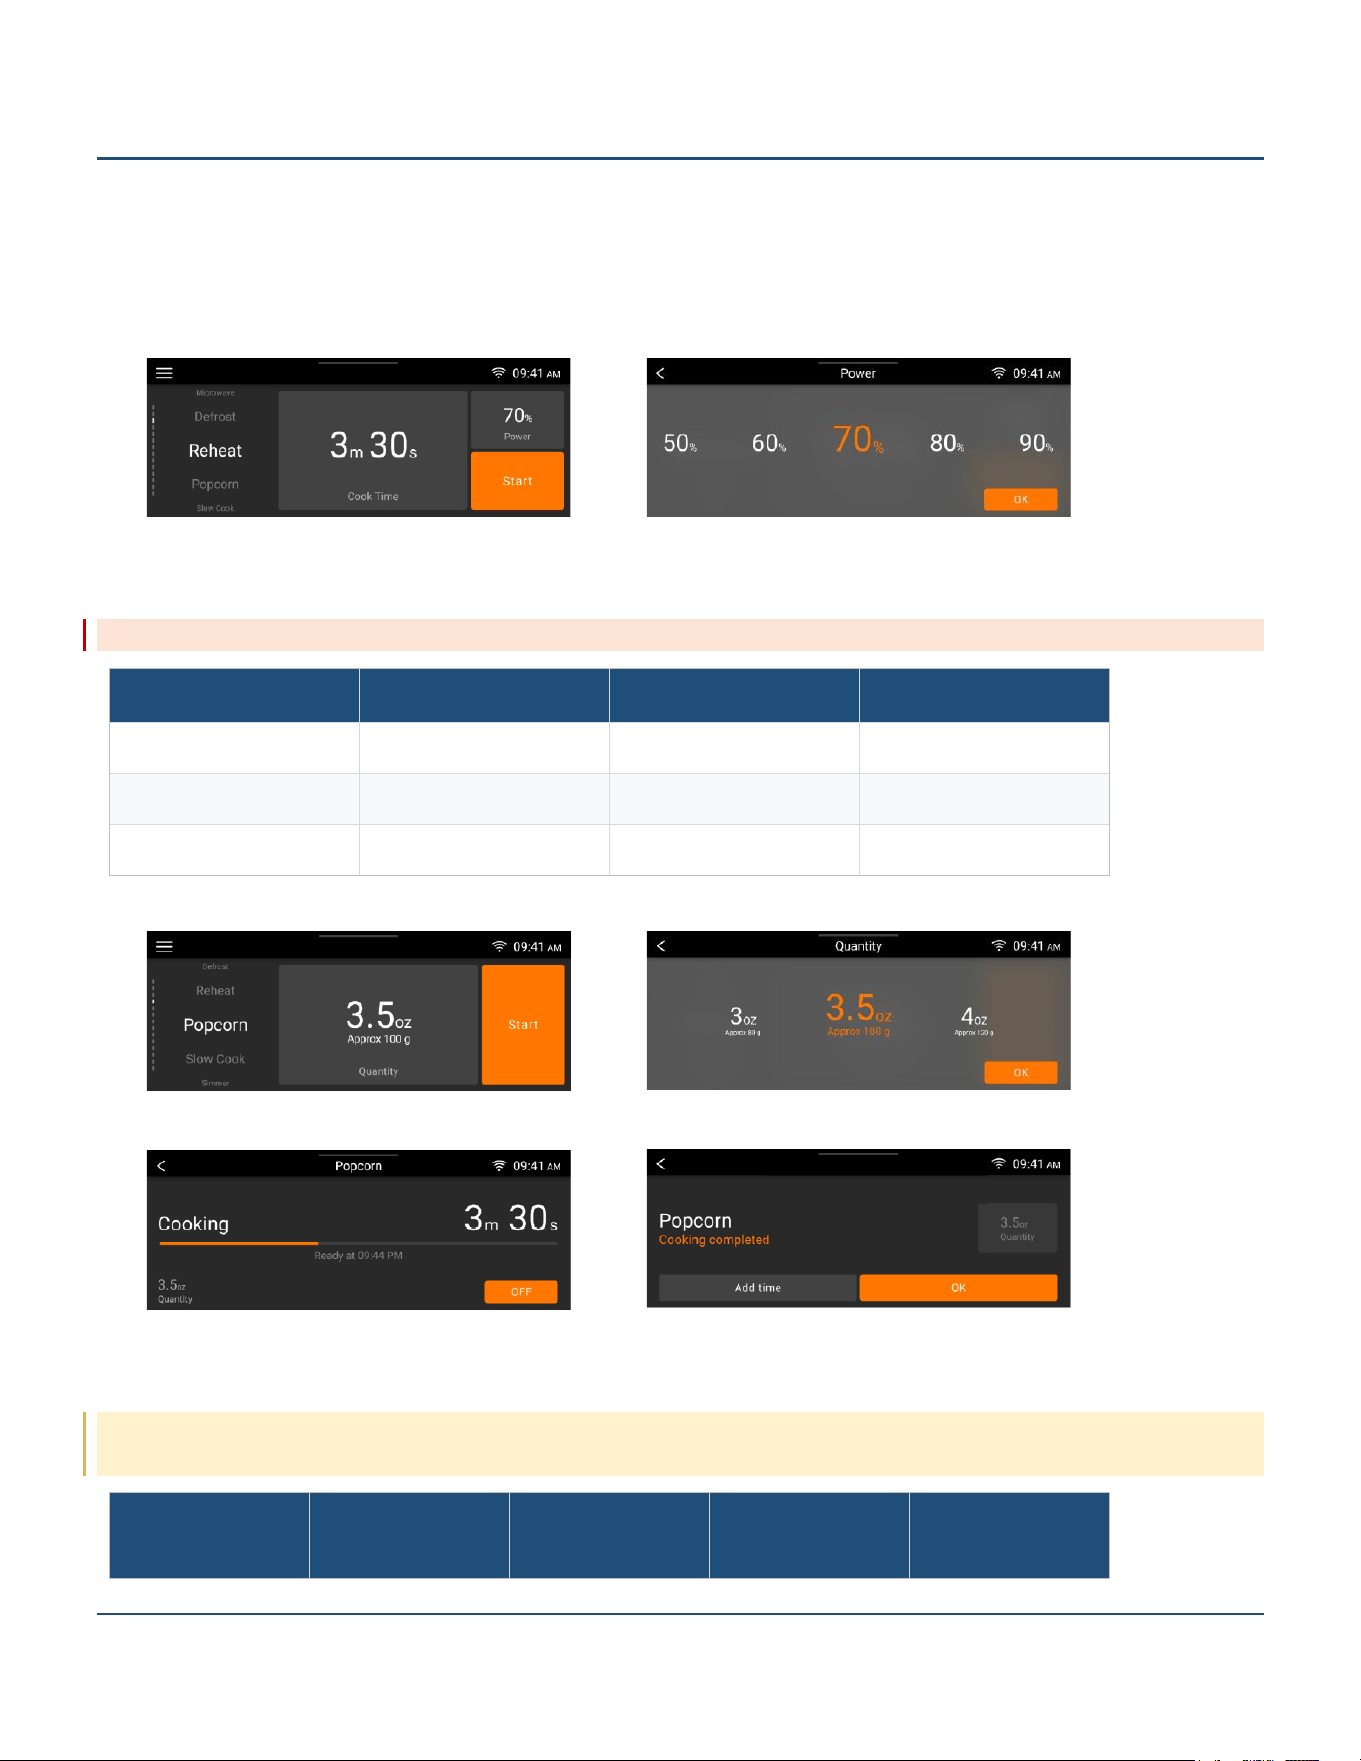
1. Short press Microwave.
2. The default time is 3 minutes 30 seconds, and the default microwave power level is 100%. If no adjustment is
needed, press Start to begin.
3. Short press the time area to enter operating time setting. After input, press Enter to confirm and return.
4. Short press the power area to enter microwave power selection. Swipe left or right to select 10%-100% power,
then press OK to confirm.
5. Press Start to begin. During operation, short press Options to adjust time or power. After operation ends, press
OK to confirm or select Add time to add time.
Microwave operation screen
Microwave operation screen 1
Microwave operation screen 2
Microwave operation screen 3
Microwave operation screen 4
Microwave operation screen 5
Microwave operation screen 6
Microwave operation screen 7
Microwave operation screen 8
Power Level
Recommended Use
100%
Fast heating, water, vegetables, popcorn, leftovers.
80%-90%
Beverages and medium-high reheating.

INDUCTION HARDWARE www.inductionhardware.com | 12920 OLD VIRGINIA ROAD, SUITE 160, RENO, NEVADA 89521, USA
19
The Future of Cooking
60%-70%
General reheating, dairy, or denser foods.
40%-50%
Melting and gentle heating.
20%-30%
Defrosting, slow cooking, and low-power heating.
10%
Keeping warm.
Note: Actual heating results are affected by food weight, shape, initial temperature, and container. If heating is
insufficient, add more time.
INDUCTION HARDWARE www.inductionhardware.com | 12920 OLD VIRGINIA ROAD, SUITE 160, RENO, NEVADA 89521, USA
20
The Future of Cooking
Auto Menu
Reheat
Used to heat cooked food. Default time is 3 minutes 30 seconds, and default power is 70%. Adjust time or power
according to the on-screen prompt.
Reheat operation screen
Reheat operation screen 1
Reheat operation screen 2
Popcorn
WARNING: Stay near the appliance and monitor popcorn while heating. Do not reheat unpopped kernels.
Package Weight
Approx. Weight
Time (min:s)
Power Level
3 oz
approx. 85 g
2:50
90%
3.5 oz
approx. 100 g
3:10
90%
4 oz
approx. 115 g
3:30
90%
Popcorn operation screen
Popcorn operation screen 1
Popcorn operation screen 2
Popcorn operation screen 3
Popcorn operation screen 4
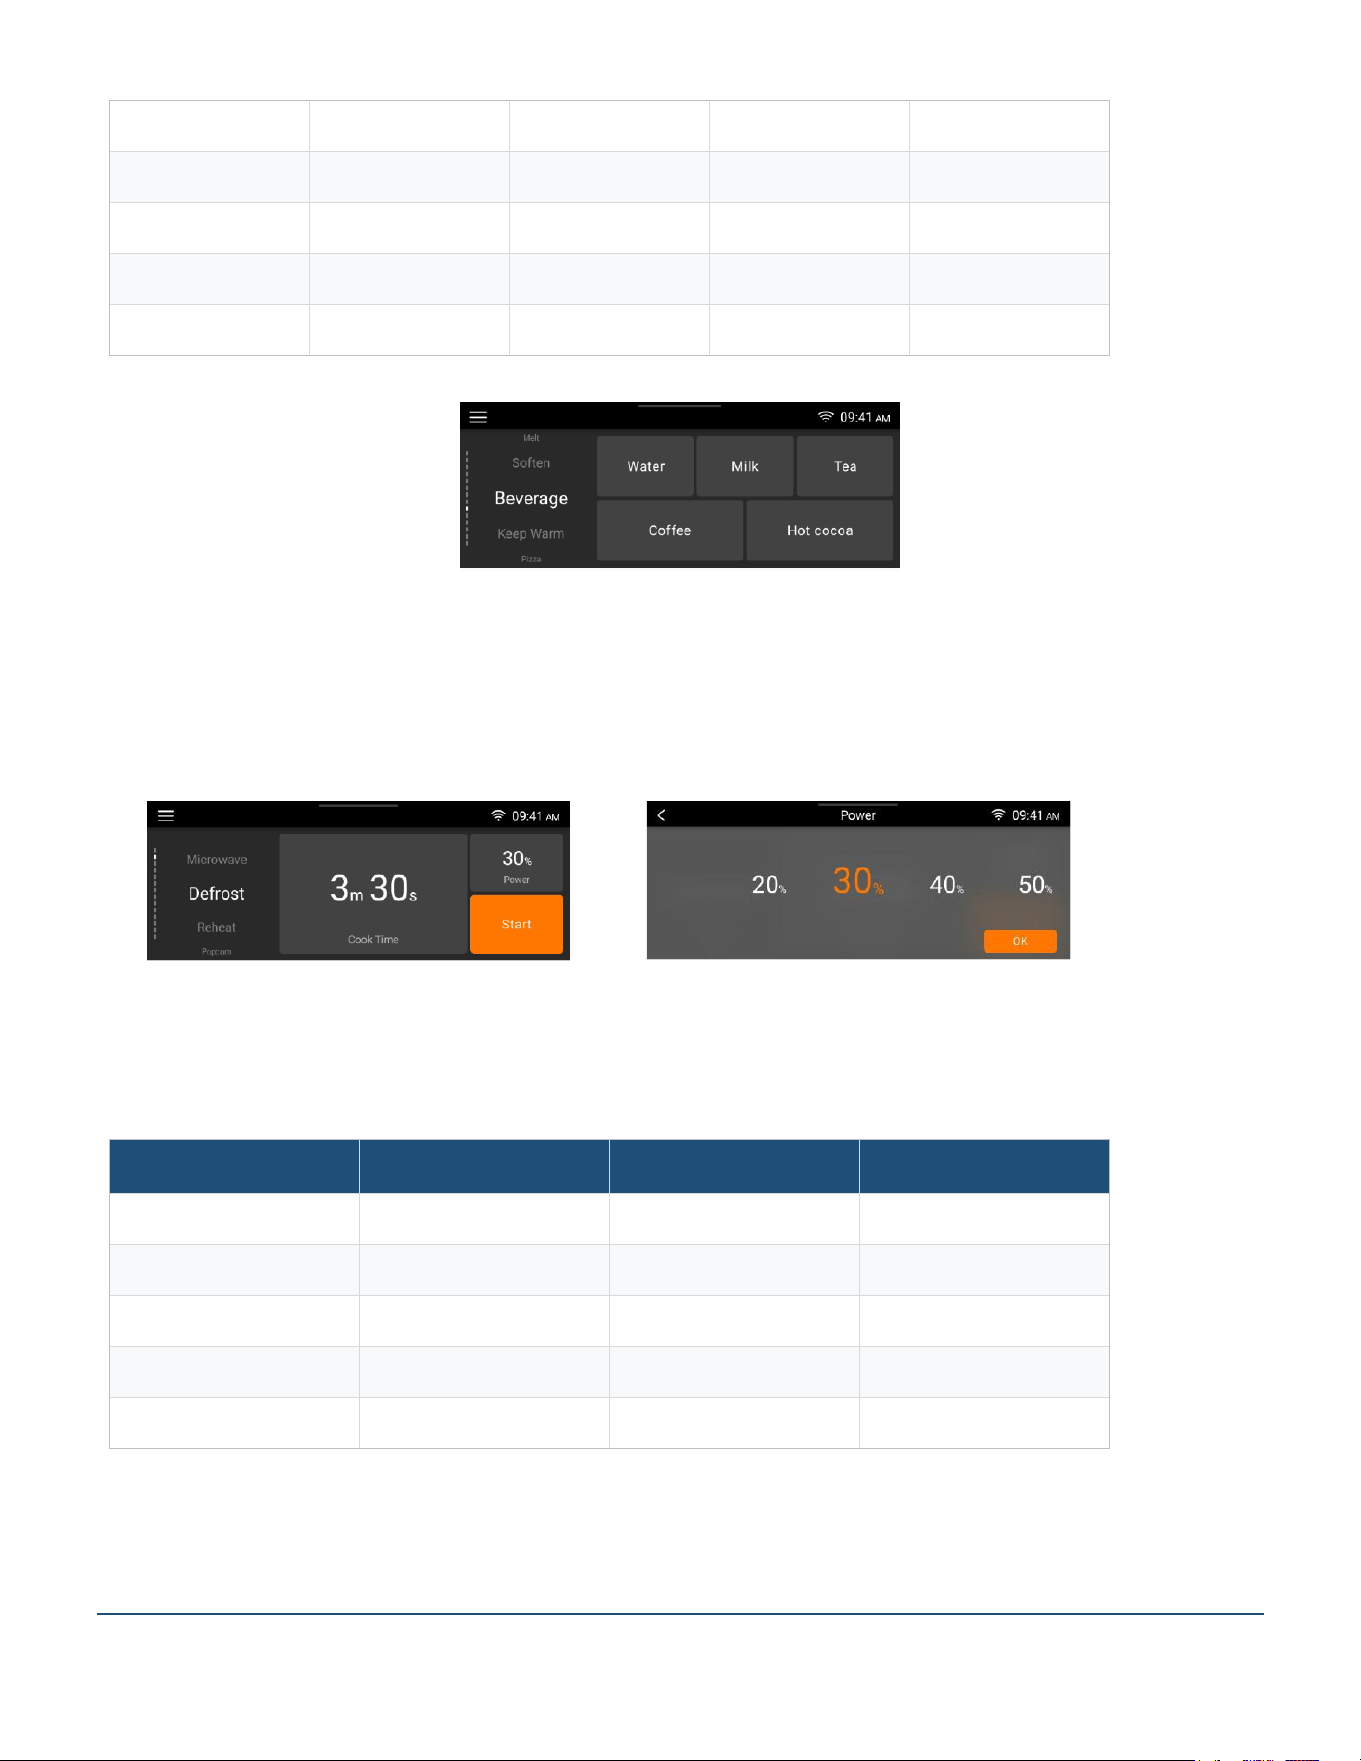
Beverage
CAUTION: After heating beverages, the container and liquid may be very hot. Let stand before removing, and
stir before drinking.
Beverage
0.5 cup / approx.
120 ml
1 cup / approx.
240 ml
2 cups / approx.
480 ml
Power Level
INDUCTION HARDWARE www.inductionhardware.com | 12920 OLD VIRGINIA ROAD, SUITE 160, RENO, NEVADA 89521, USA
21
The Future of Cooking
Water
0:30
1:00
2:00
80%
Coffee
0:40
1:30
2:30
80%
Tea
0:40
1:30
2:30
80%
Milk
0:50
1:30
2:30
70%
Hot cocoa
1:00
2:00
2:30
70%
Beverage operation screen
Beverage operation screen
Defrost
Default time is 3 minutes 30 seconds, and default power is 30%. It can be adjusted from 20% to 60%. During
defrosting, turn, separate, or remove thawed portions as needed.
Defrost operation screen
Defrost operation screen 1
Defrost operation screen 2
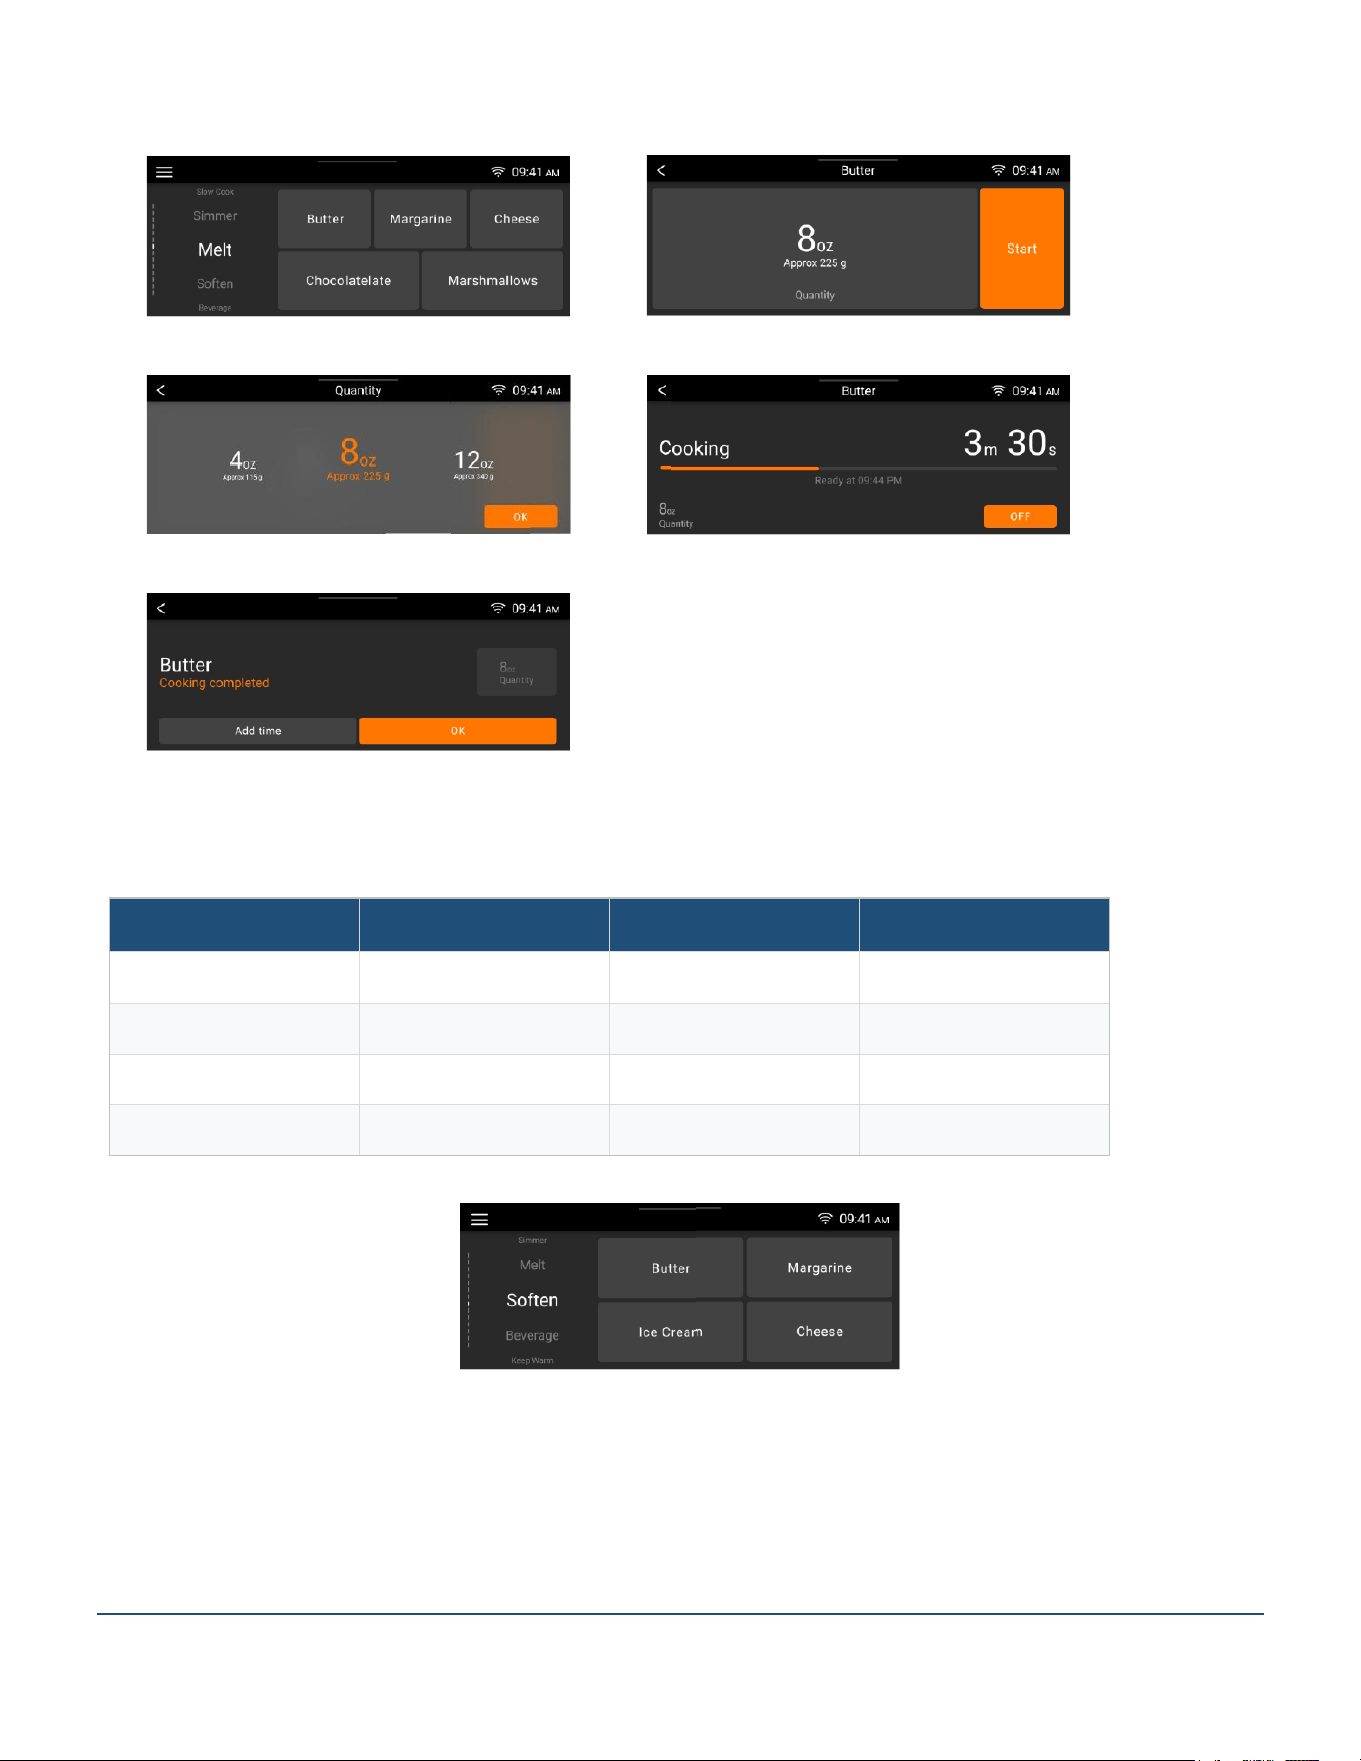
Melt
Used to melt butter, margarine, chocolate, cheese, marshmallows, etc. Use a microwave-safe container and stir after
heating.
Food
Weight
Power Level
Time (min:s)
Butter
4 / 8 / 12 oz
60%
2:00 / 3:30 / 4:00
Margarine
4 / 8 / 12 oz
50%
2:00 / 3:00 / 4:30
Chocolate
4 / 8 oz
40%
3:30 / 6:30
Cheese
8 / 16 oz
50%
4:00 / 6:00
Marshmallows
5 / 10 oz
40%
4:00 / 6:00
INDUCTION HARDWARE www.inductionhardware.com | 12920 OLD VIRGINIA ROAD, SUITE 160, RENO, NEVADA 89521, USA
22
The Future of Cooking
Melt operation screen
Melt operation screen 1
Melt operation screen 2
Melt operation screen 3
Melt operation screen 4
Melt operation screen 5
Soften
Used to soften butter, margarine, ice cream, cheese, etc. Do not cover ice cream when softening.
Food
Weight
Power Level
Time (min:s)
Butter
4 / 8 / 12 oz
20%/20%/40%
2:15 / 4:25 / 1:50
Margarine
4 / 8 / 12 oz
40%
1:30 / 1:50 / 2:10
Ice Cream
8 / 16 / 32 oz
30%
0:13 / 0:18 / 0:22
Cheese
3 / 8 oz
40%
1:30 / 1:30
Soften operation screen
Soften operation screen
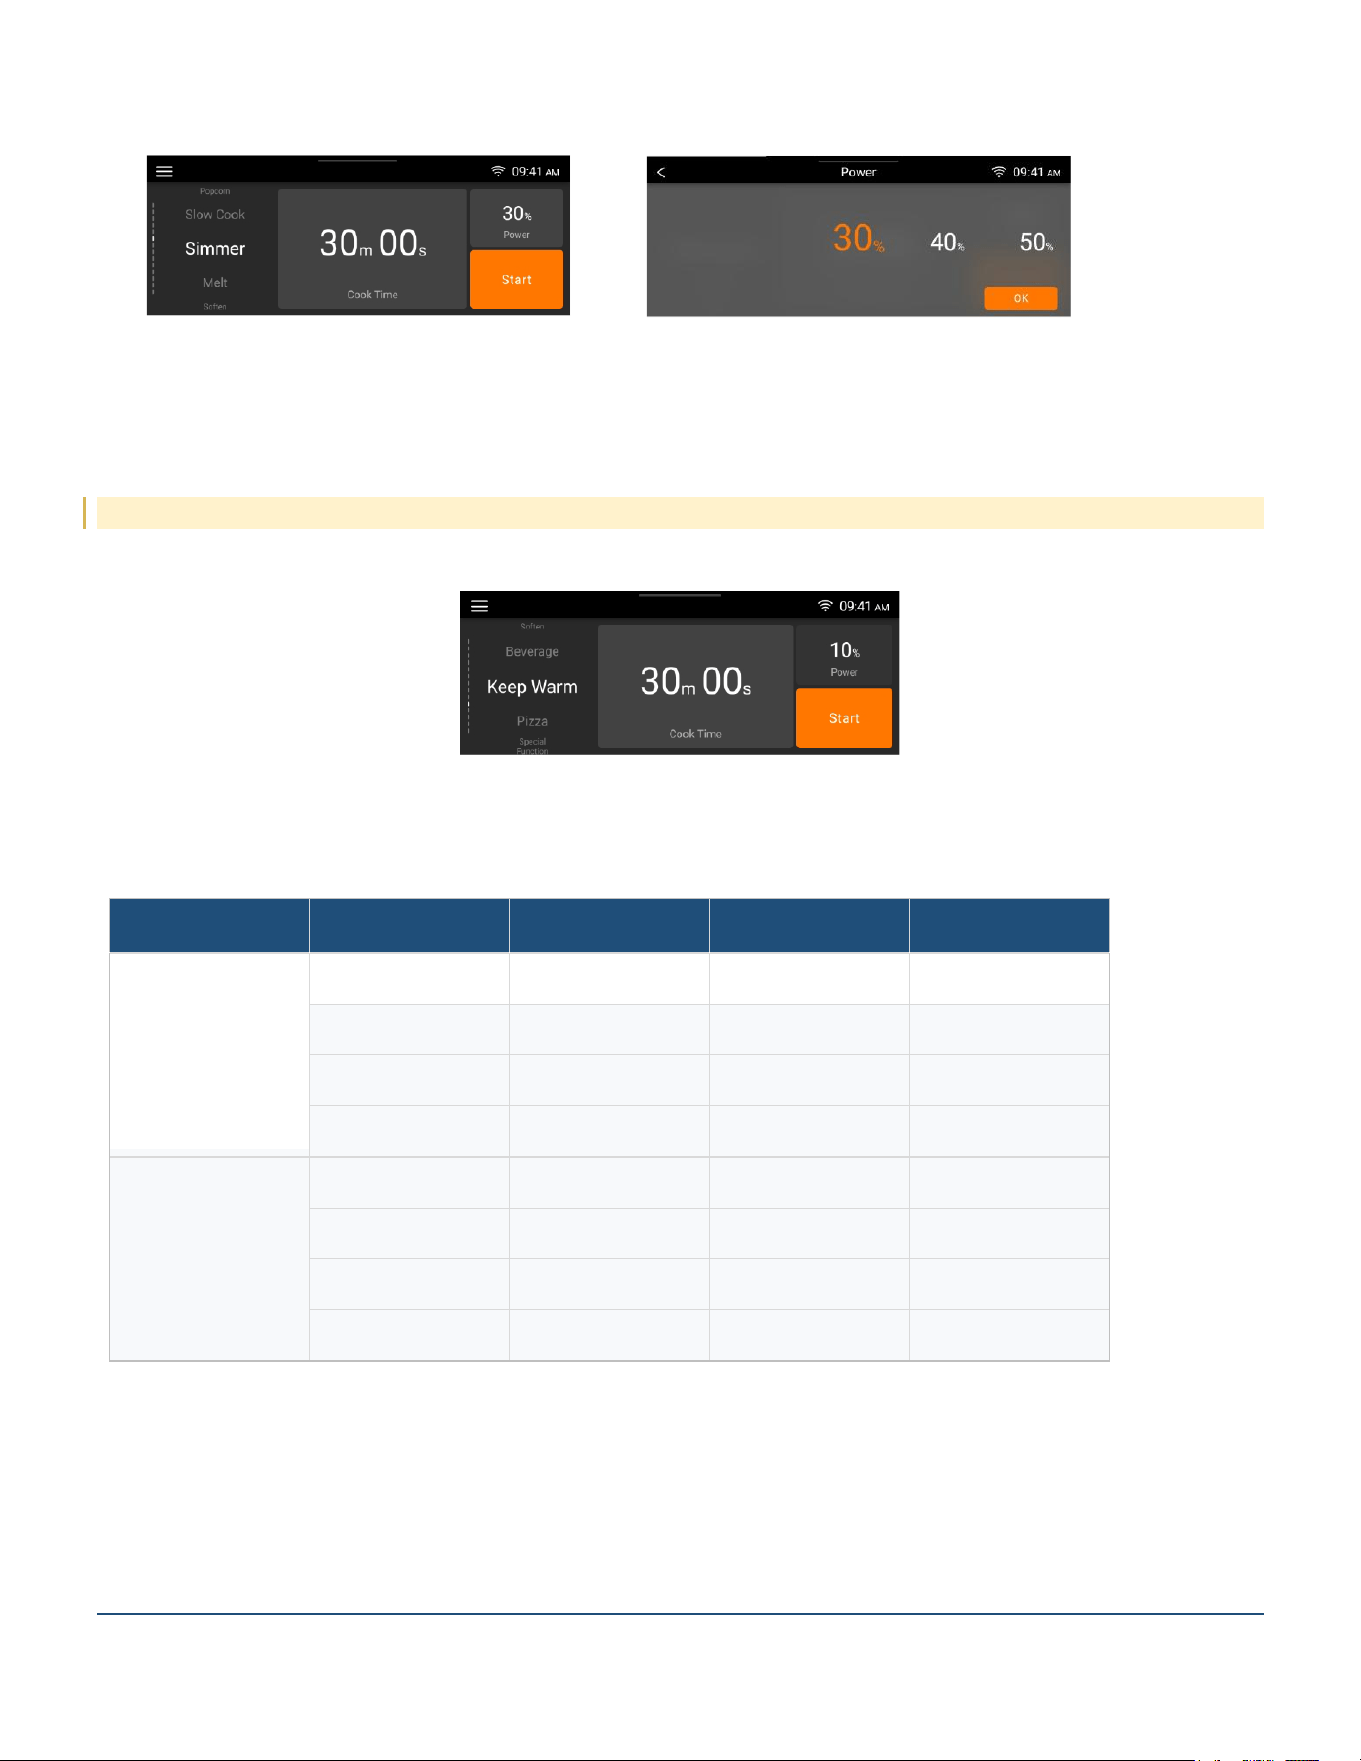
Simmer
Used for slow low-power heating. Default time is 30 minutes, default power is 30%, and 30%, 40%, or 50% power can
be selected.
INDUCTION HARDWARE www.inductionhardware.com | 12920 OLD VIRGINIA ROAD, SUITE 160, RENO, NEVADA 89521, USA
23
The Future of Cooking
Simmer operation screen
Simmer operation screen 1
Simmer operation screen 2
Keep Warm
Used to keep cooked food warm for a short time. Default time is 30 minutes and power is 10%; power cannot be
adjusted. If you try to adjust the power, the screen displays "Fixed value, Cannot adjust".
CAUTION: For food safety, food should not be left in the oven for more than 1 hour before or after cooking.
Keep Warm operation screen
Keep Warm operation screen
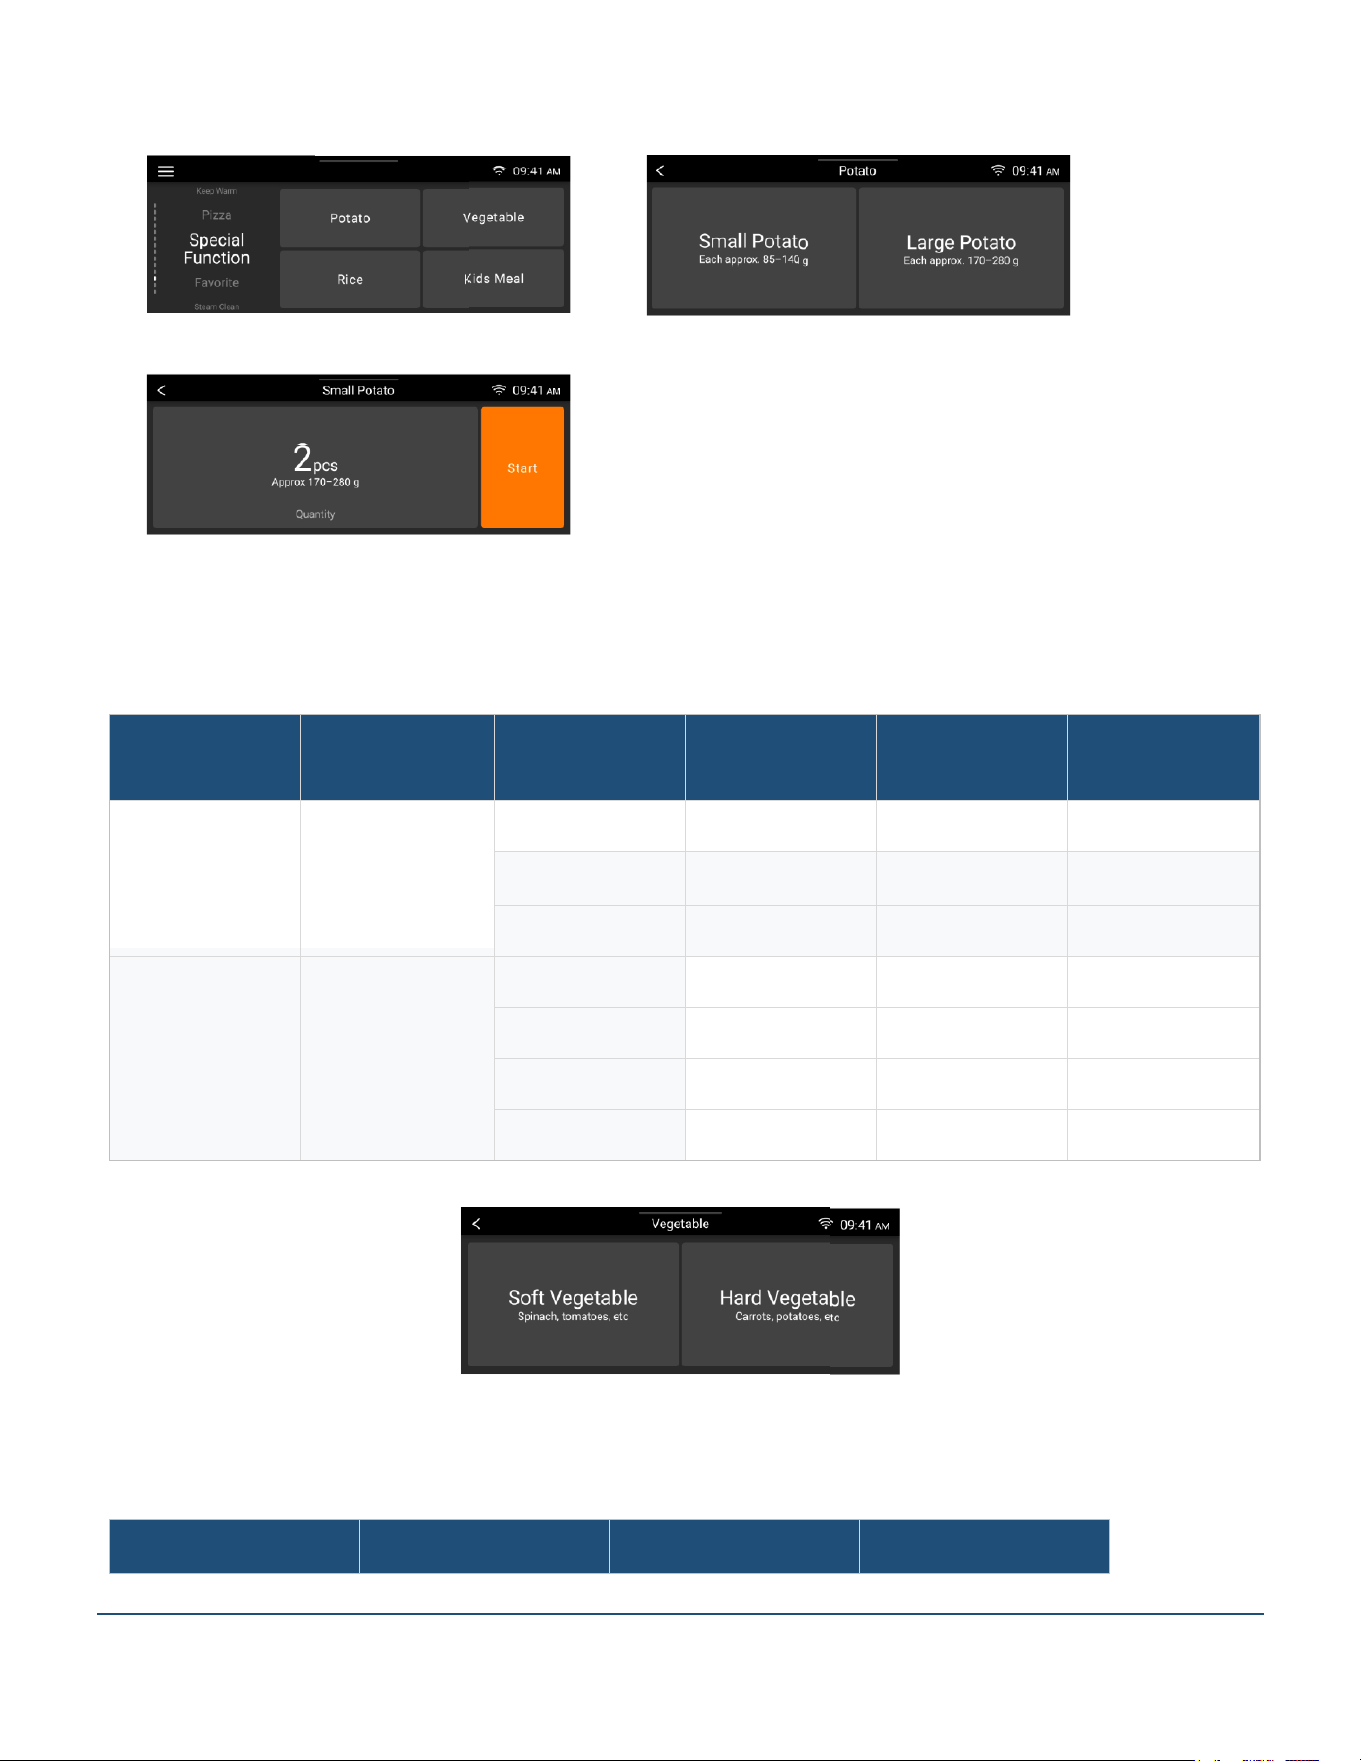
Potato
Pierce before cooking. Let stand for 5-10 minutes after cooking.
Type
Quantity
Approx. Weight
Time (min:s)
Power Level
Small Potato
1 piece
approx. 85-140 g
5:30
60%
2 pieces
approx. 170-280 g
8:30
60%
3 pieces
approx. 255-420 g
11:00
70%
4 pieces
approx. 340-560 g
14:30
70%
Large Potato
1 piece
approx. 170-230 g
9:00
70%
2 pieces
approx. 340-460 g
13:00
70%
3 pieces
approx. 510-690 g
17:00
80%
4 pieces
approx. 580-920 g
21:00
80%
INDUCTION HARDWARE www.inductionhardware.com | 12920 OLD VIRGINIA ROAD, SUITE 160, RENO, NEVADA 89521, USA
24
The Future of Cooking
Potato operation screen
Potato operation screen 1
Potato operation screen 2
Potato operation screen 3
Vegetable
Select Soft Vegetable or Hard Vegetable. After washing vegetables, place them in a microwave-safe container, cover,
or use microwave-safe plastic wrap with a vent.
Type
Recommended
Ingredients
Quantity / cup
Weight / g
Heating Time
(min:s)
Microwave
Power
Soft Vegetable
Spinach, tomato,
etc.
1
approx. 50g-100g
3:00
40%
2
approx. 100-200g
4:30
40%
3
approx. 150-300g
5:30
50%
Hard Vegetable
Broccoli, carrot,
etc.
1
approx. 50g-100g
4:30
70%
2
approx. 100-200g
6:00
70%
3
approx. 150-300g
7:00
80%
4
approx. 200-400g
8:00
80%
Vegetable operation screen
Vegetable operation screen
Pizza
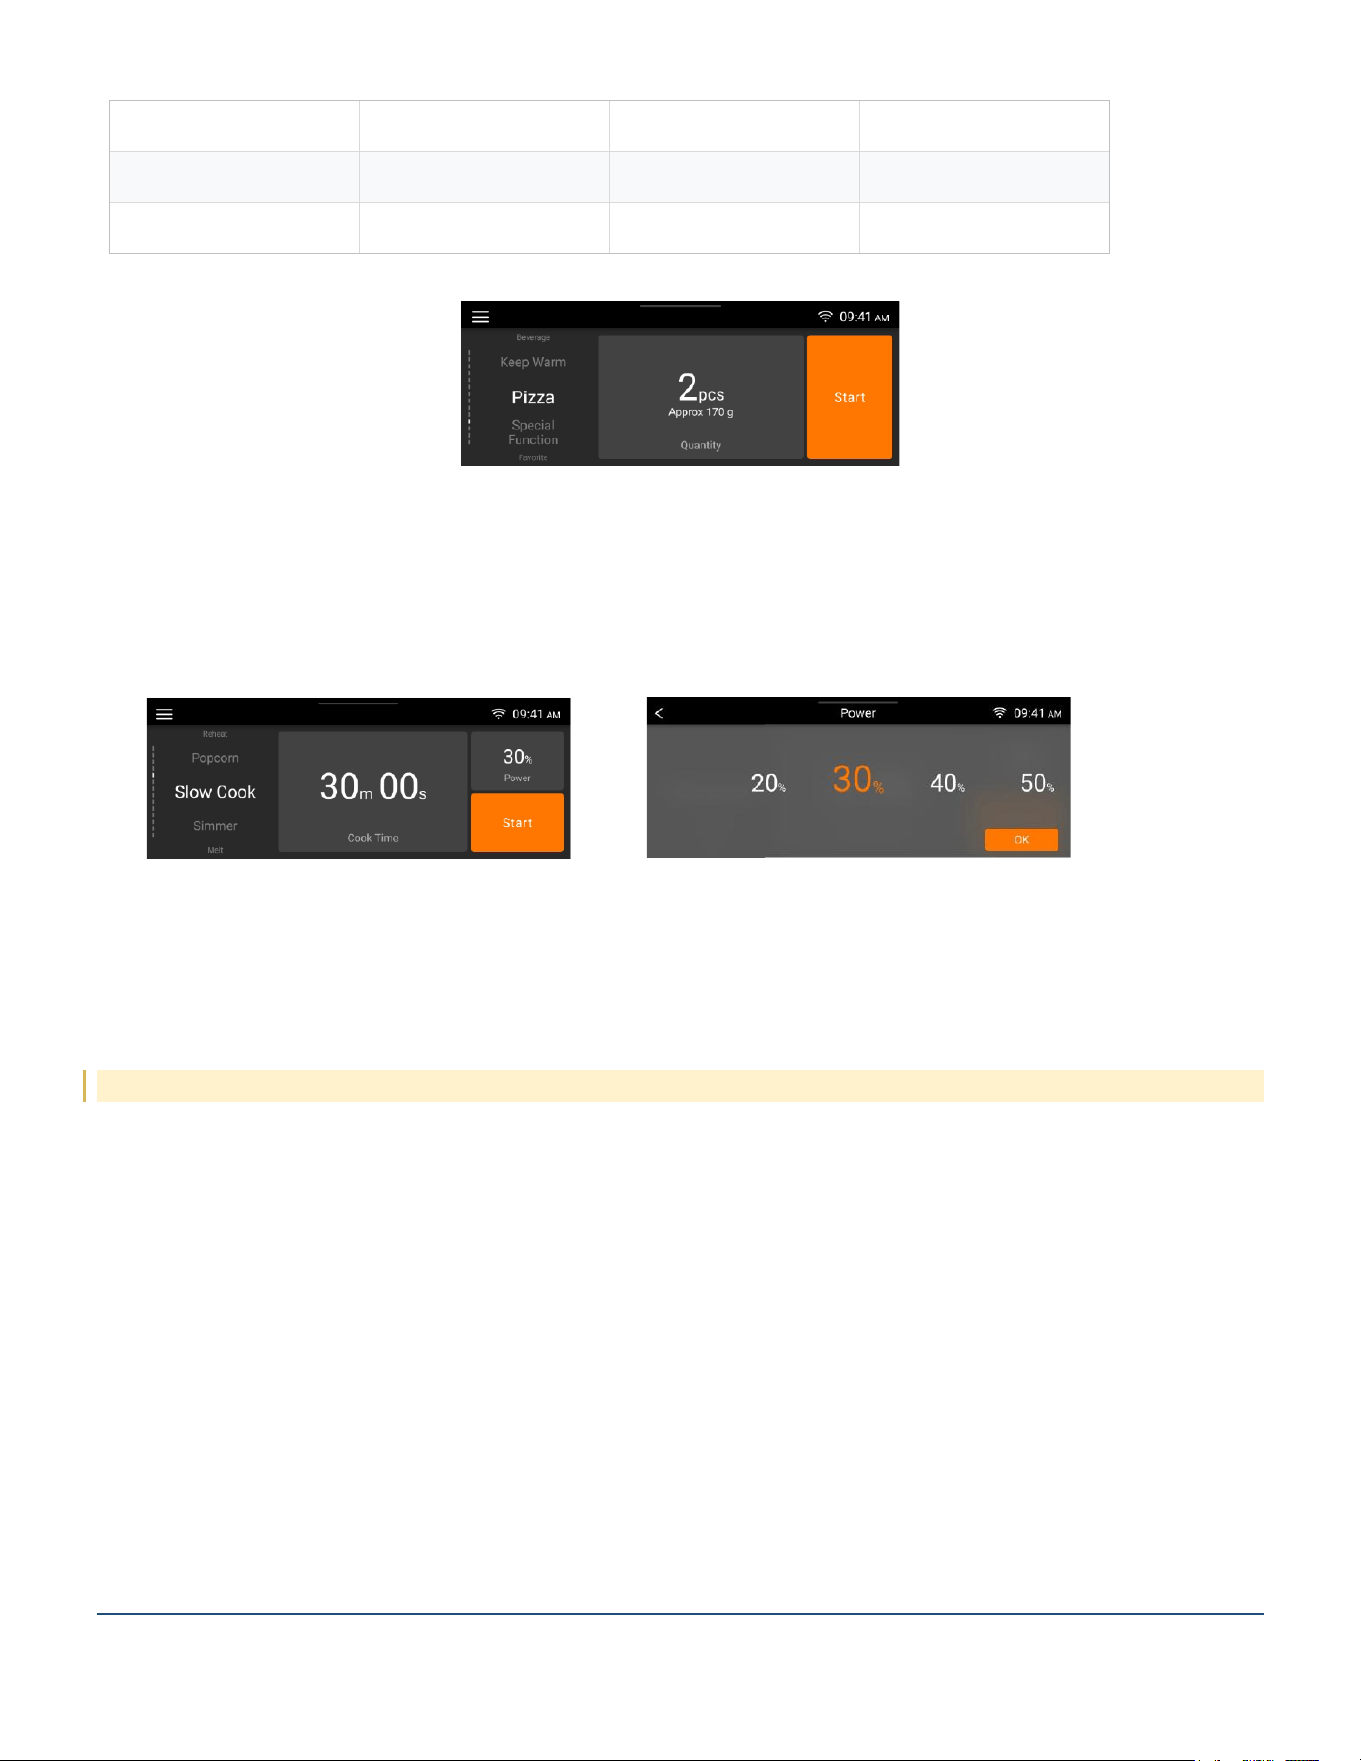
Select 1, 2, or 3 slices. It is recommended to place pizza on a microwave-safe plate lined with a paper towel.
Quantity
Approx. Weight
Time (min:s)
Power Level
INDUCTION HARDWARE www.inductionhardware.com | 12920 OLD VIRGINIA ROAD, SUITE 160, RENO, NEVADA 89521, USA
25
The Future of Cooking
1 slice
approx. 85 g
2:00
100%
2 slices
approx. 170 g
3:00
100%
3 slices
approx. 255 g
5:00
100%
Pizza operation screen
Pizza operation screen
Slow Cook
Used for longer low-power heating. Default time is 30 minutes, default power is 20%, and 20% or 30% power can be
selected.
Slow Cook operation screen
Slow Cook operation screen 1
Slow Cook operation screen 2
Steam Clean
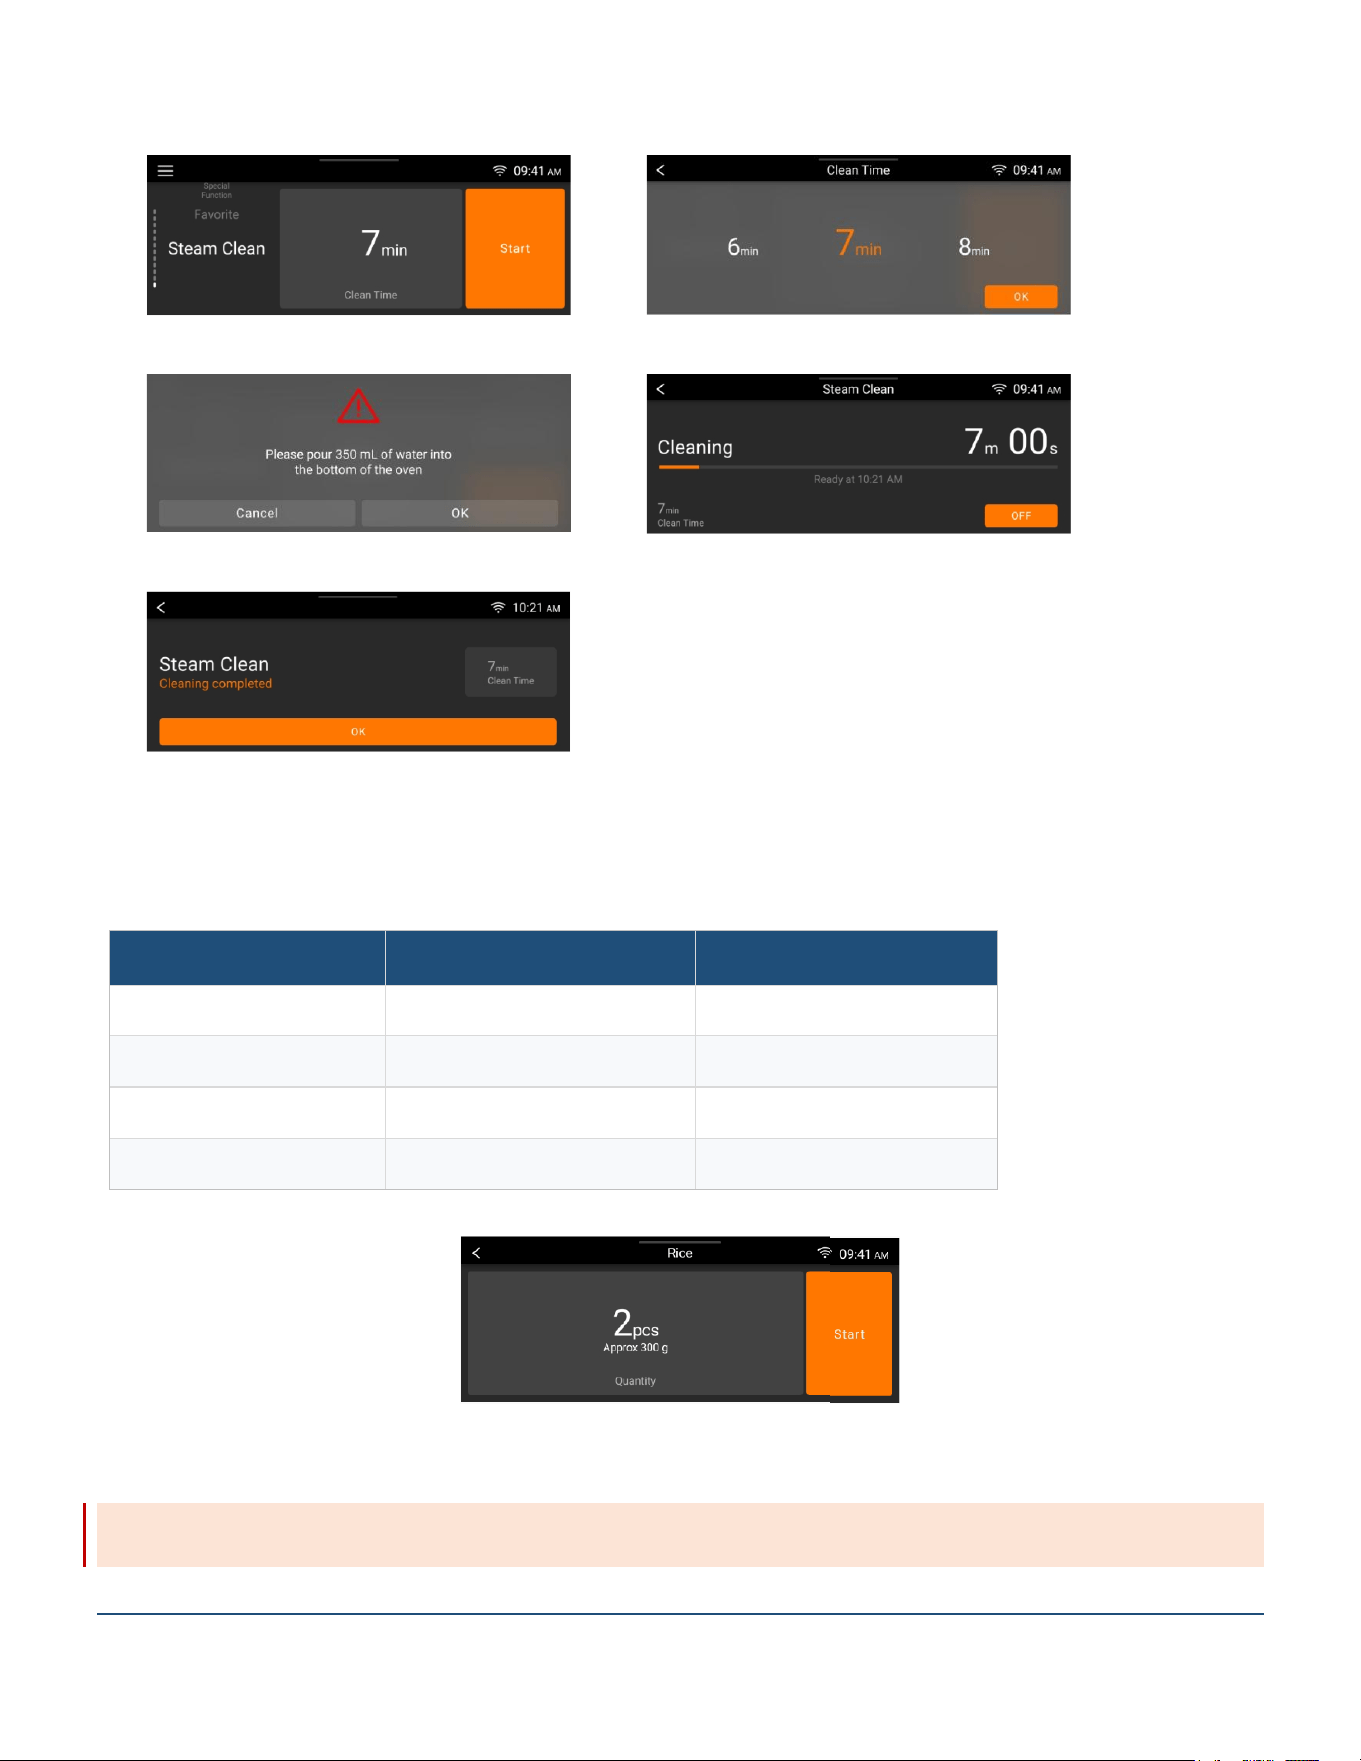
Used to soften light soil inside the cavity. Select 20 / 40 / 60 minutes; default is 40 minutes, with approximately 80%
power. Add water according to the on-screen prompt, select the time, and start. After completion, wait for steam to
dissipate, then wipe the cavity with a soft cloth.
CAUTION: After steam cleaning, water, steam, and cavity surfaces may be very hot.
INDUCTION HARDWARE www.inductionhardware.com | 12920 OLD VIRGINIA ROAD, SUITE 160, RENO, NEVADA 89521, USA
26
The Future of Cooking
Steam Clean operation screen
Steam Clean operation screen 1
Steam Clean operation screen 2
Steam Clean operation screen 3
Steam Clean operation screen 4
Steam Clean operation screen 5
Rice
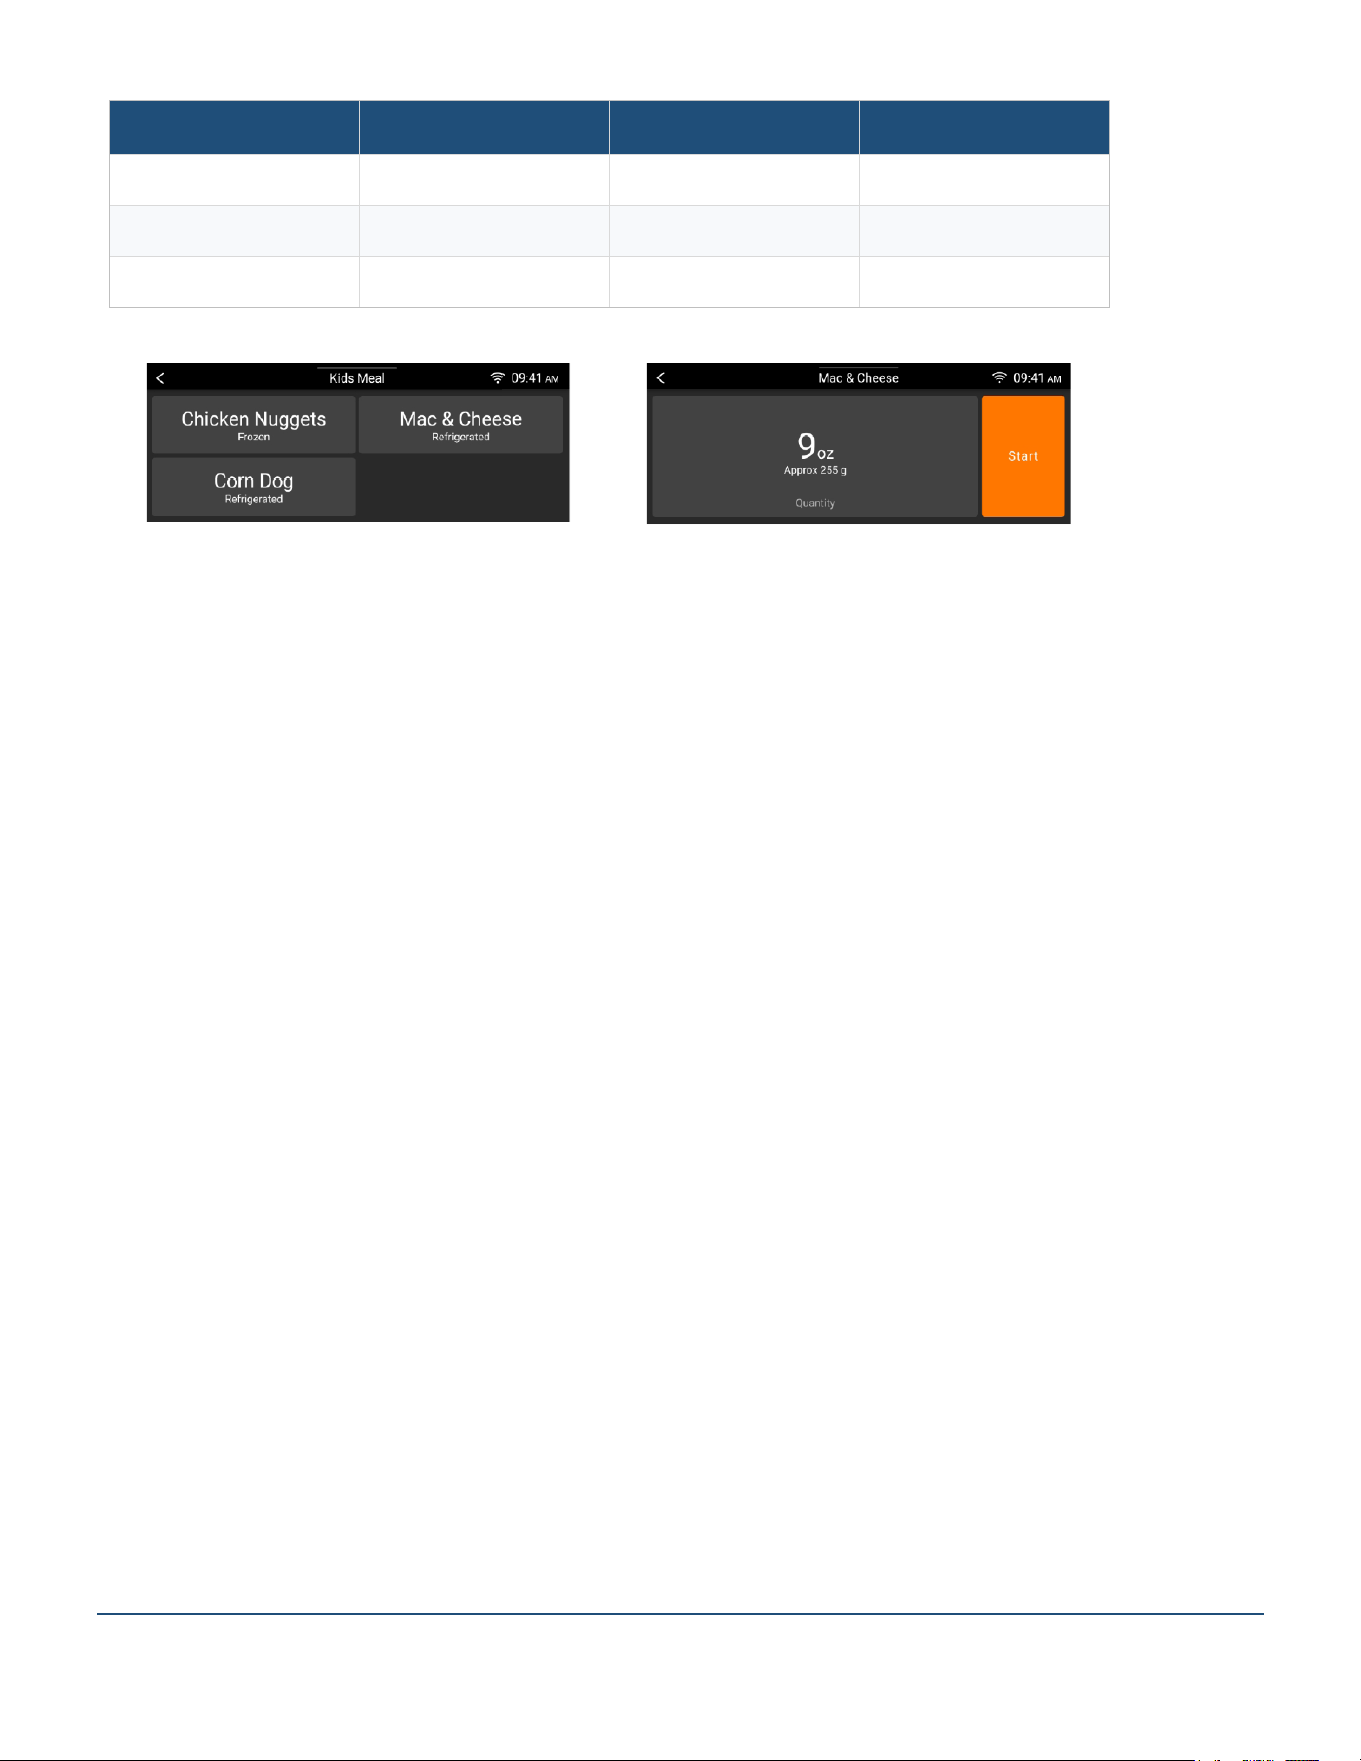
Access Rice from Special Function. Use a deep microwave-safe container, add an appropriate amount of water
according to rice type and desired texture, and do not overfill.
Rice Amount
Microwave Power
Time (min:s)
150 g
100%
13:00
300 g
100%
25:00
450 g
100%
30:00
600 g
100%
45:00
Rice operation screen
Rice operation screen
Kids Meal
WARNING: Before serving to children, always check the temperature at the center of the food, especially
cheese, sauces, and filled foods.
INDUCTION HARDWARE www.inductionhardware.com | 12920 OLD VIRGINIA ROAD, SUITE 160, RENO, NEVADA 89521, USA
27
The Future of Cooking
Food
Weight
Power Level
Time (min:s)
Chicken Nuggets
4 / 6 / 8 oz
80%
2:30 / 3:30 / 4:30
Mac & Cheese
6 / 9 / 12 oz
60%
7:00 / 9:00 / 11:00
Corn Dog
2 / 2.5 oz
60%
2:00 / 2:30
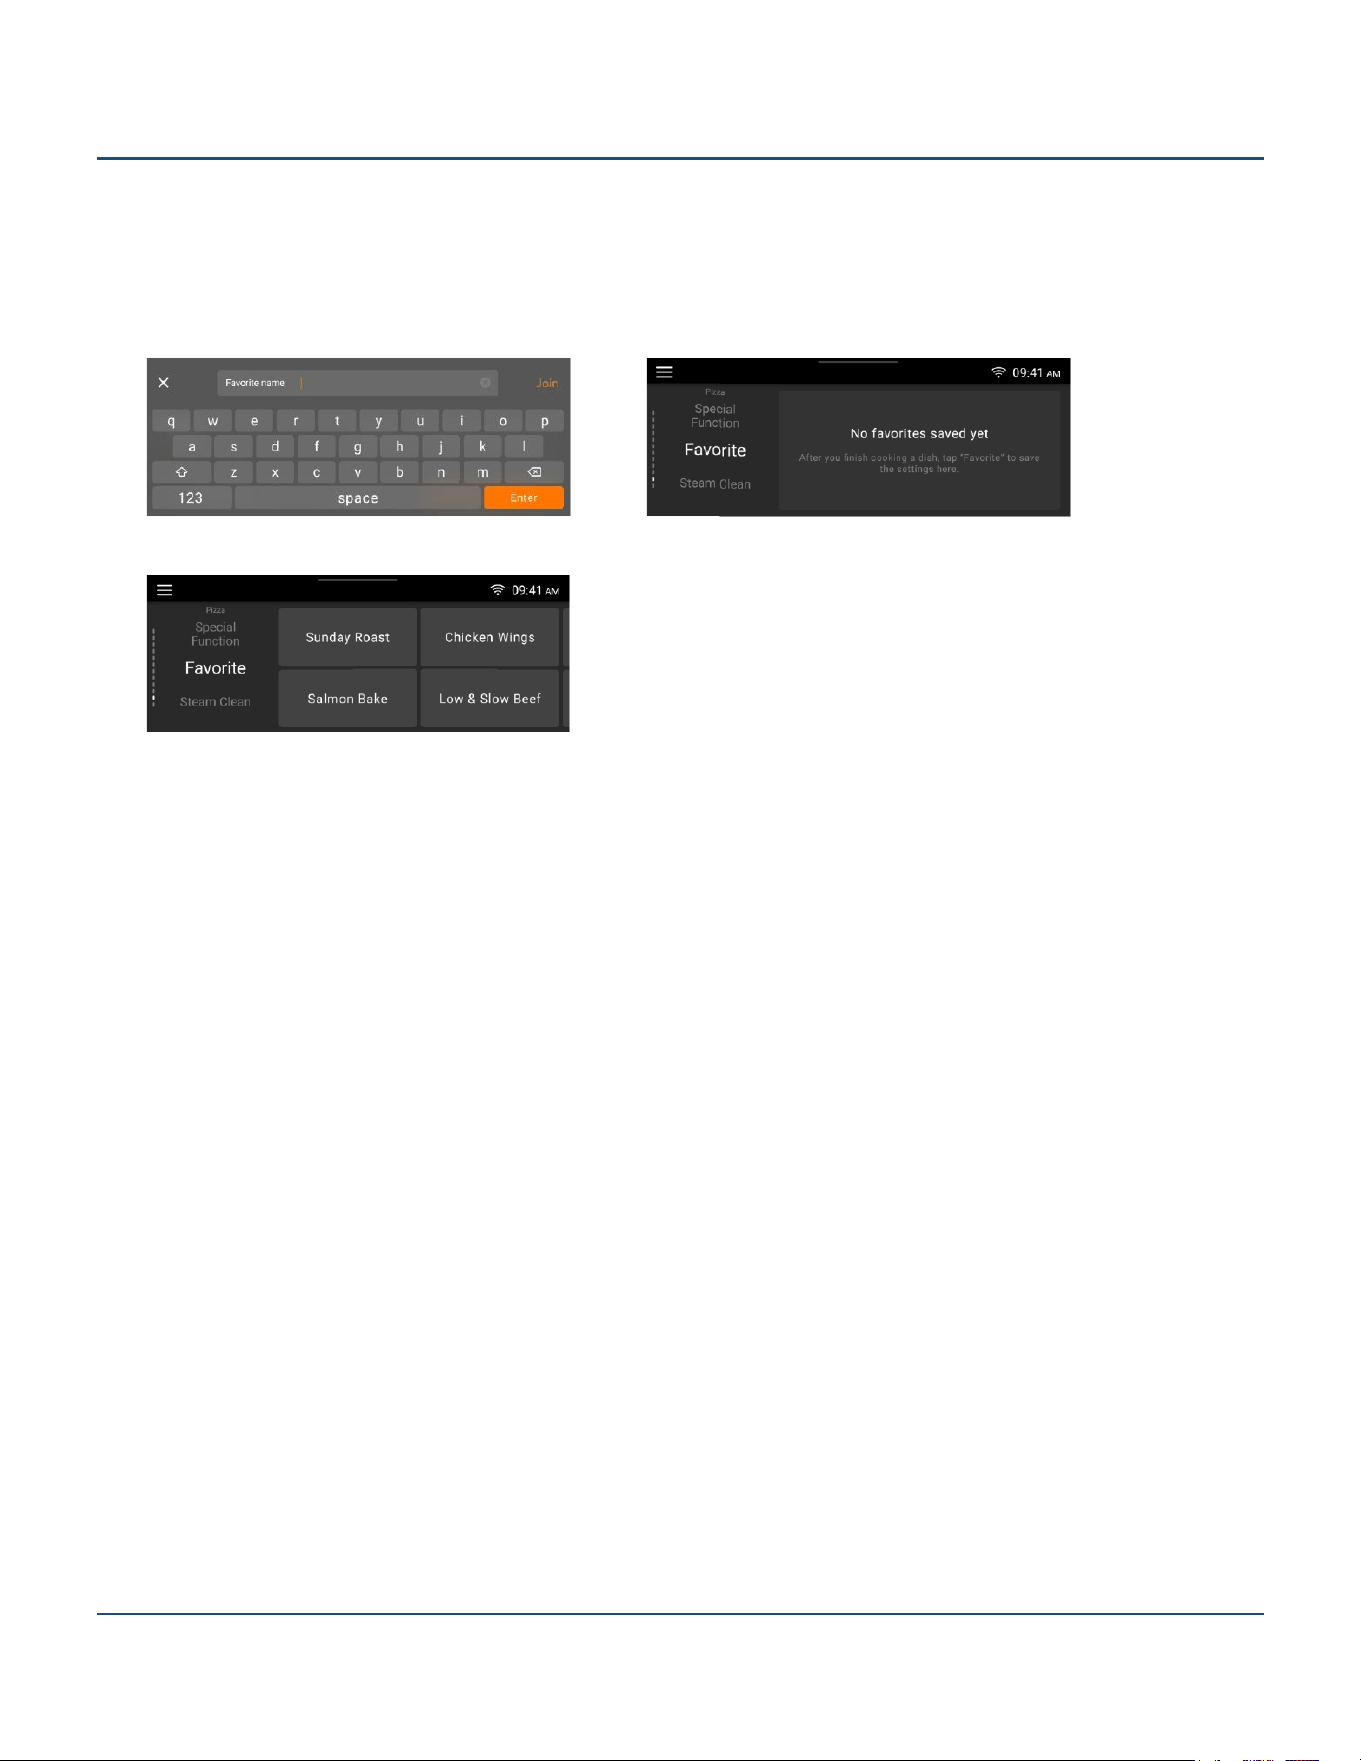
Kids Meal operation screen
Kids Meal operation screen 1
Kids Meal operation screen 2
INDUCTION HARDWARE www.inductionhardware.com | 12920 OLD VIRGINIA ROAD, SUITE 160, RENO, NEVADA 89521, USA
28
The Future of Cooking
More Functions
Favorites
In a program that can be saved, short press Favorite to enter a name and save it. Later, enter the Favorites menu to
view and quickly recall saved modes. If no function has been saved, Favorites displays an empty-list prompt.
Favorites screen
Favorites screen 1
Favorites screen 2
Favorites screen 3
Clock, Alarm, and Timer
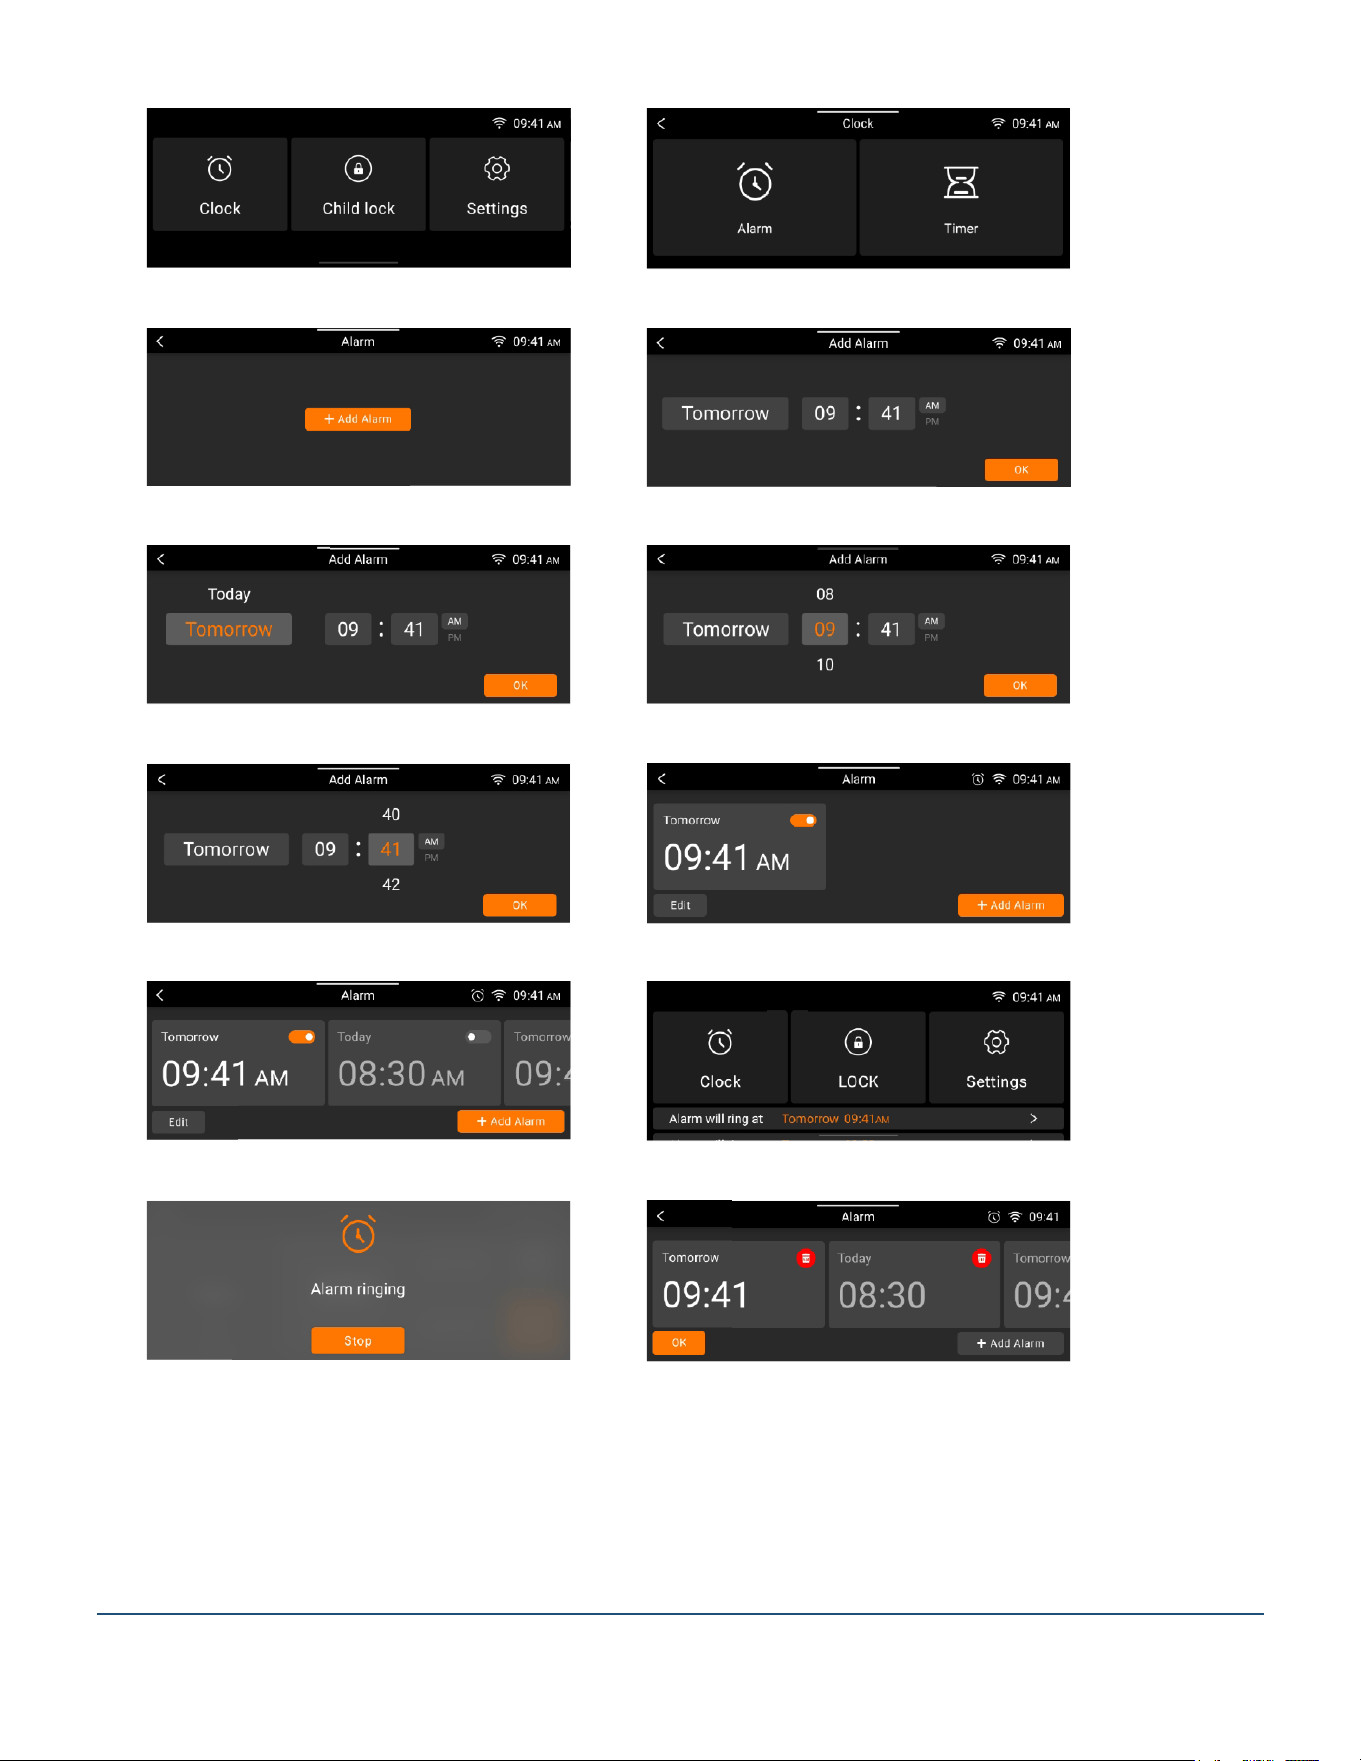
Pull down the screen to open additional functions. Short press Clock to enter the clock page, where you can select
Alarm or Timer. Up to 10 alarms can be set, with date, hour, minute, and AM/PM settings. Timer can be used as a
kitchen timer.
1. Short press Clock from the pull-down function bar.
2. Select Alarm or Timer.
3. Short press Add Alarm or Add Timer to add an item.
4. Set the time according to the on-screen prompt, then press OK to confirm.
5. To delete an alarm, short press Edit in the alarm list and then operate.

INDUCTION HARDWARE www.inductionhardware.com | 12920 OLD VIRGINIA ROAD, SUITE 160, RENO, NEVADA 89521, USA
29
The Future of Cooking
Clock, Alarm, and Timer screen
INDUCTION HARDWARE www.inductionhardware.com | 12920 OLD VIRGINIA ROAD, SUITE 160, RENO, NEVADA 89521, USA
30
The Future of Cooking
Clock, Alarm, and Timer screen 1
Clock, Alarm, and Timer screen 2
Clock, Alarm, and Timer screen 3
Clock, Alarm, and Timer screen 4
Clock, Alarm, and Timer screen 5
Clock, Alarm, and Timer screen 6
Clock, Alarm, and Timer screen 7
Clock, Alarm, and Timer screen 8
Clock, Alarm, and Timer screen 9
Clock, Alarm, and Timer screen 10
Clock, Alarm, and Timer screen 11
Clock, Alarm, and Timer screen 12
INDUCTION HARDWARE www.inductionhardware.com | 12920 OLD VIRGINIA ROAD, SUITE 160, RENO, NEVADA 89521, USA
31
The Future of Cooking
Clock, Alarm, and Timer screen 13
Clock, Alarm, and Timer screen 14
Child Lock
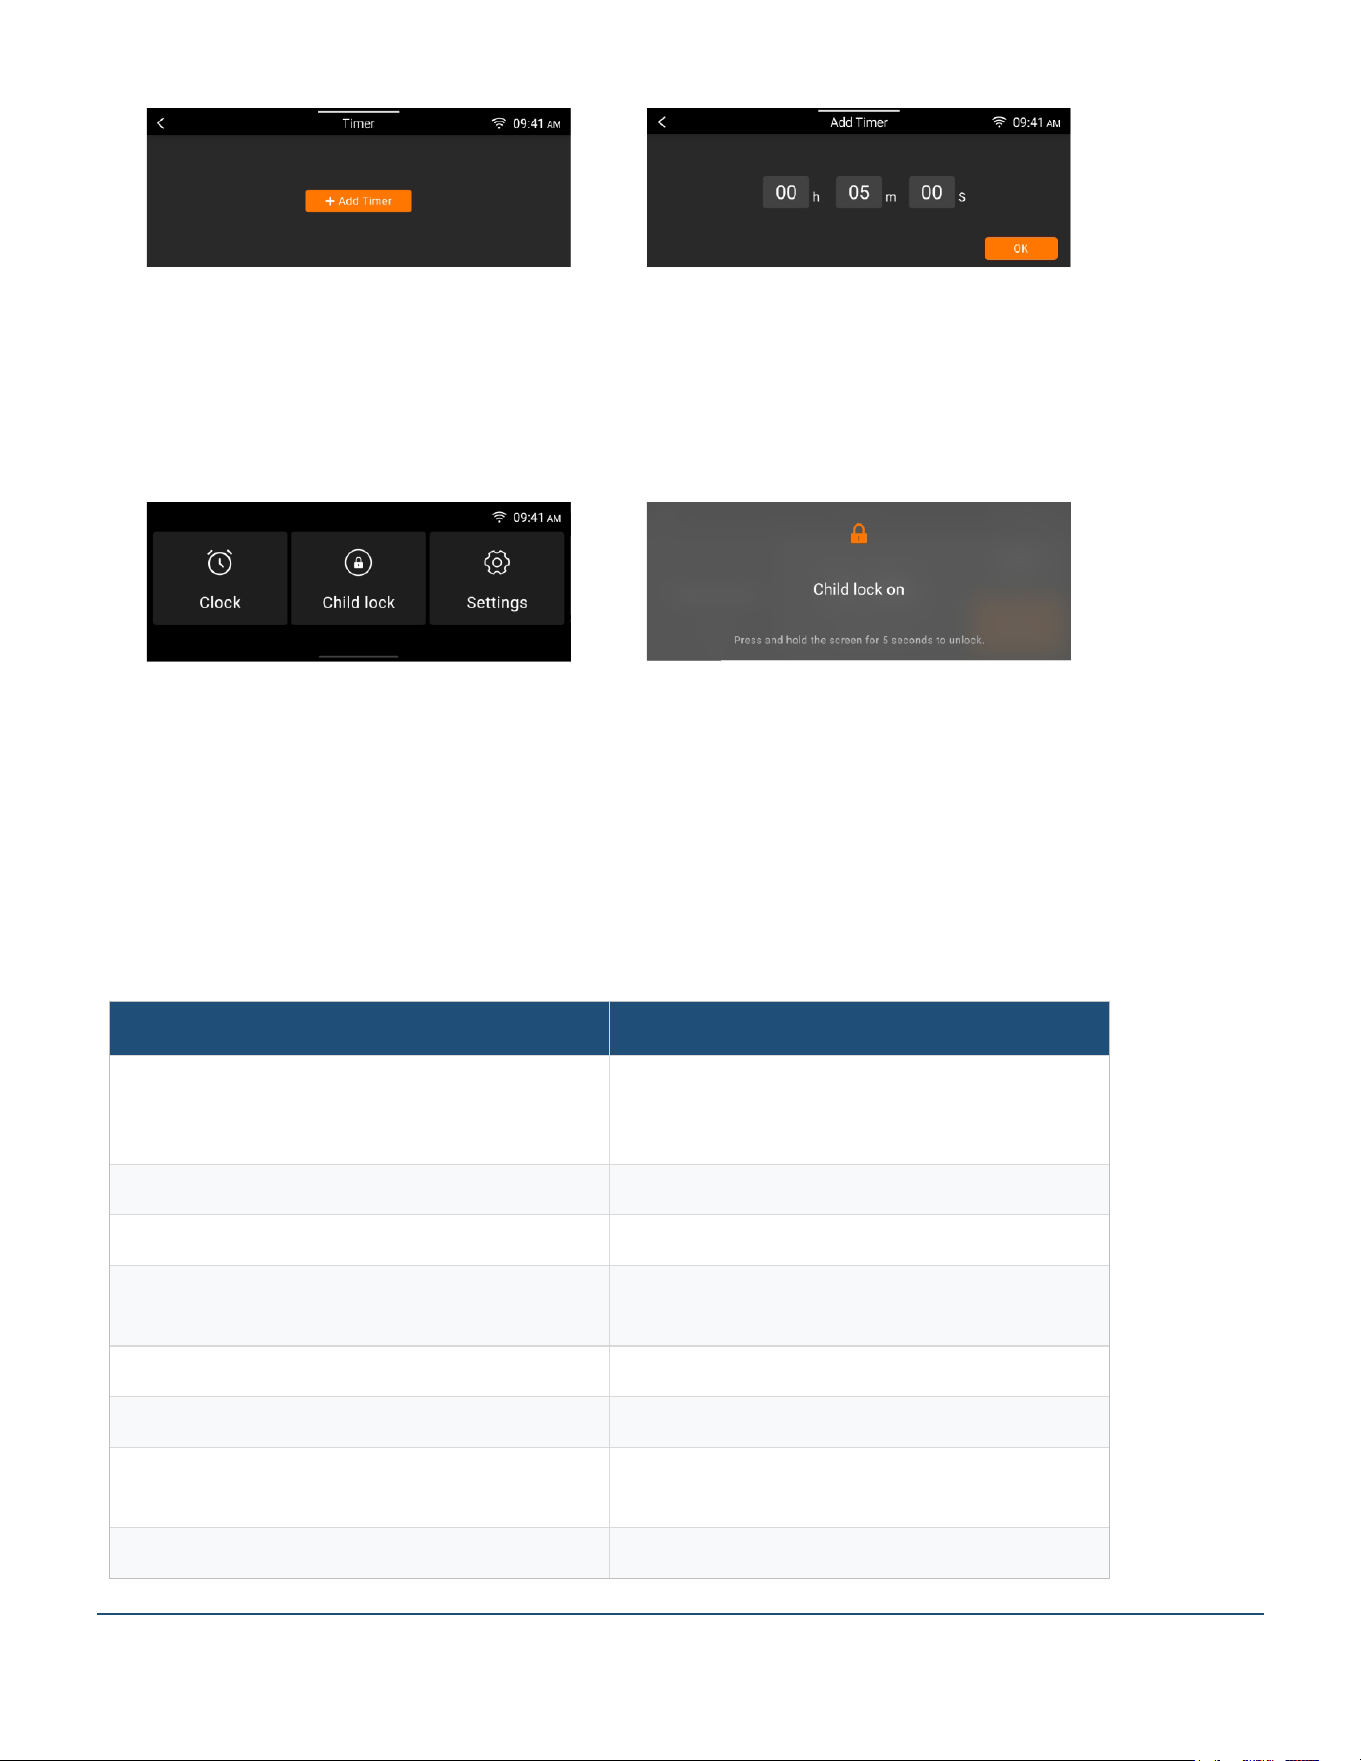
Short press Child Lock from the pull-down function bar to lock the screen. After locking, press and hold the screen for
about 5 seconds to unlock and continue operation. Child Lock cannot be selected or is ineffective during operation.
Child Lock screen
Child Lock screen 1
Child Lock screen 2
Light
During operation, the light turns on according to the selected mode. When the drawer is opened, the light turns on
automatically; when the drawer is closed, the light turns off automatically. When not operating, if the drawer remains
open for about 2 minutes, the light turns off automatically.
System Settings
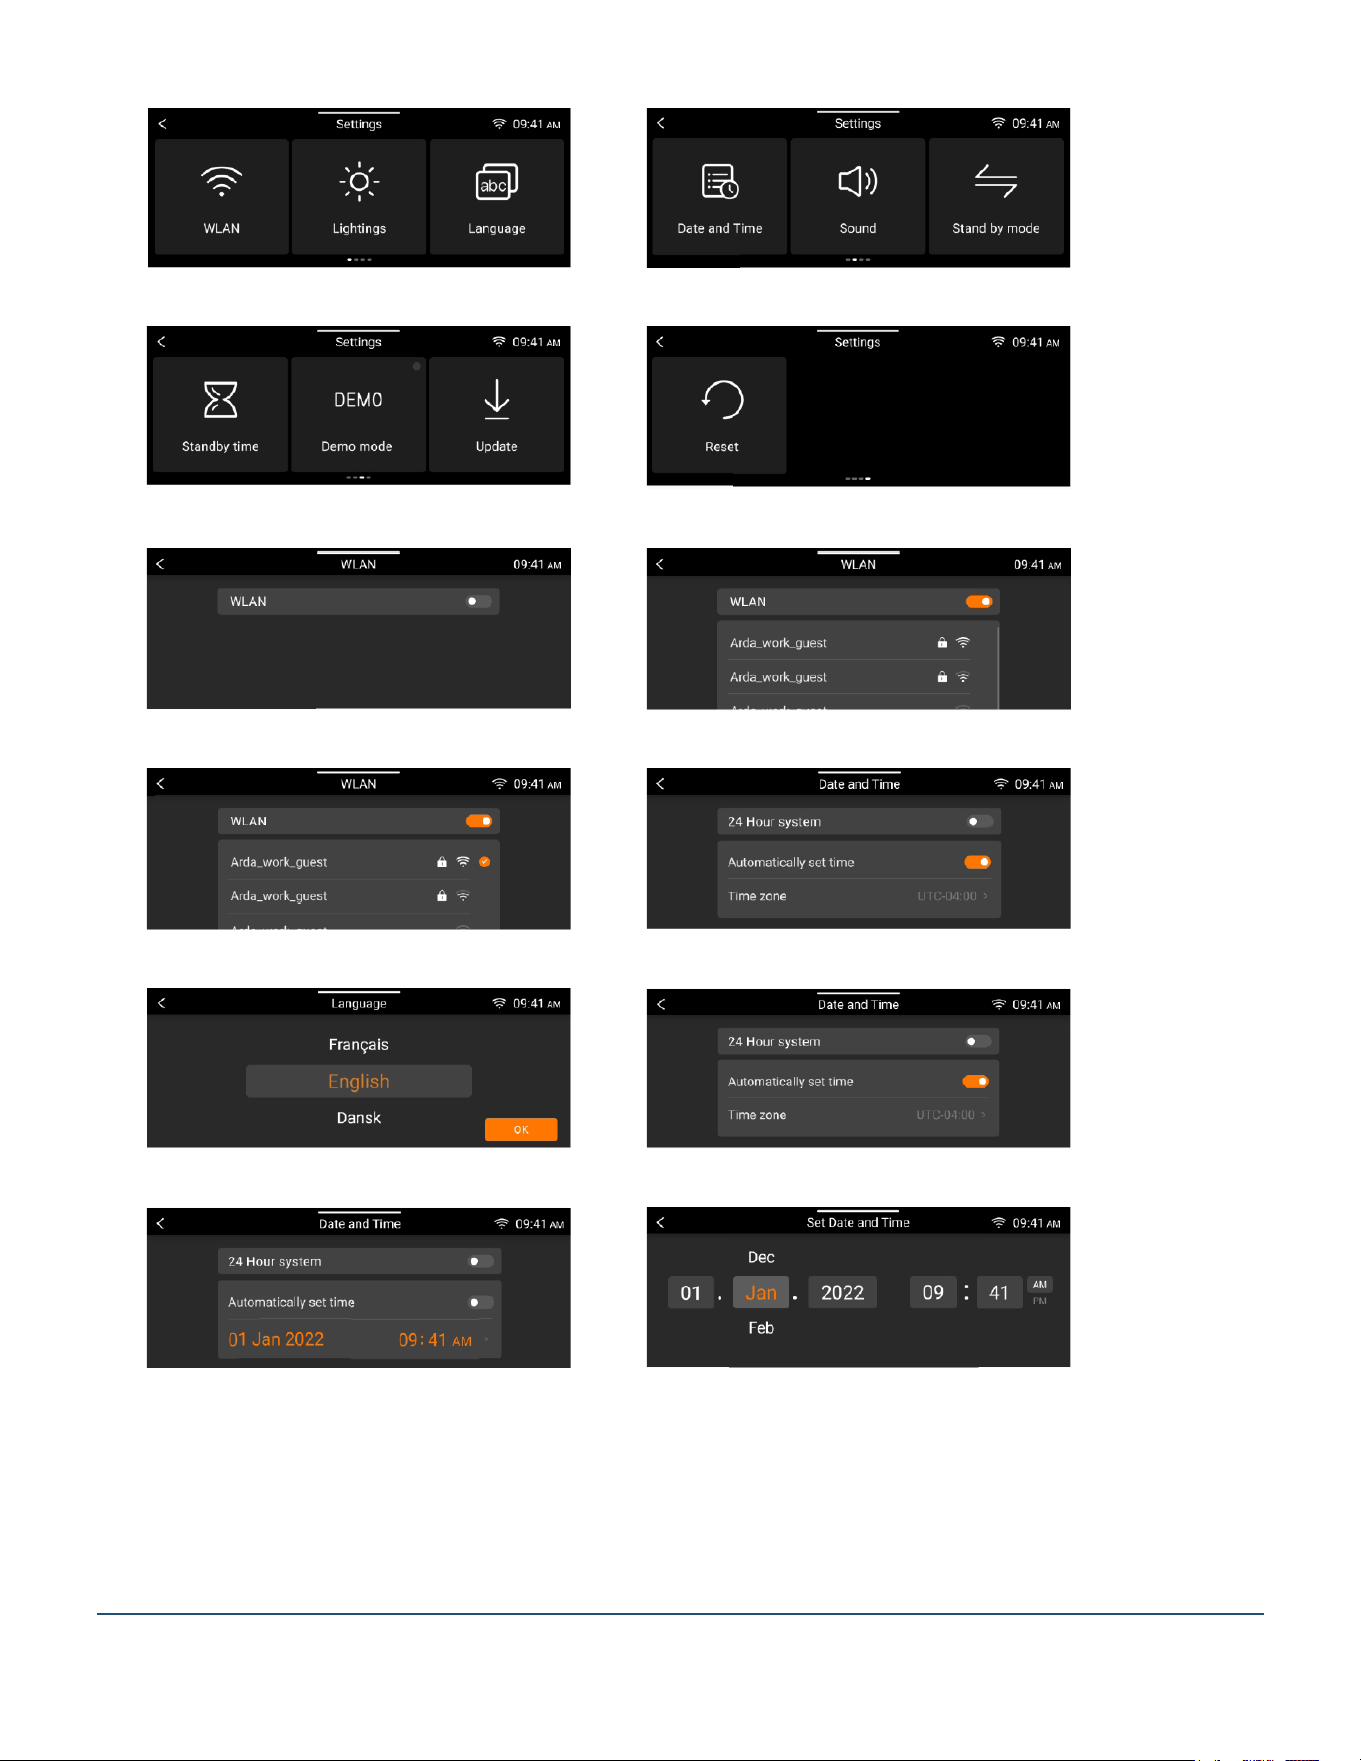
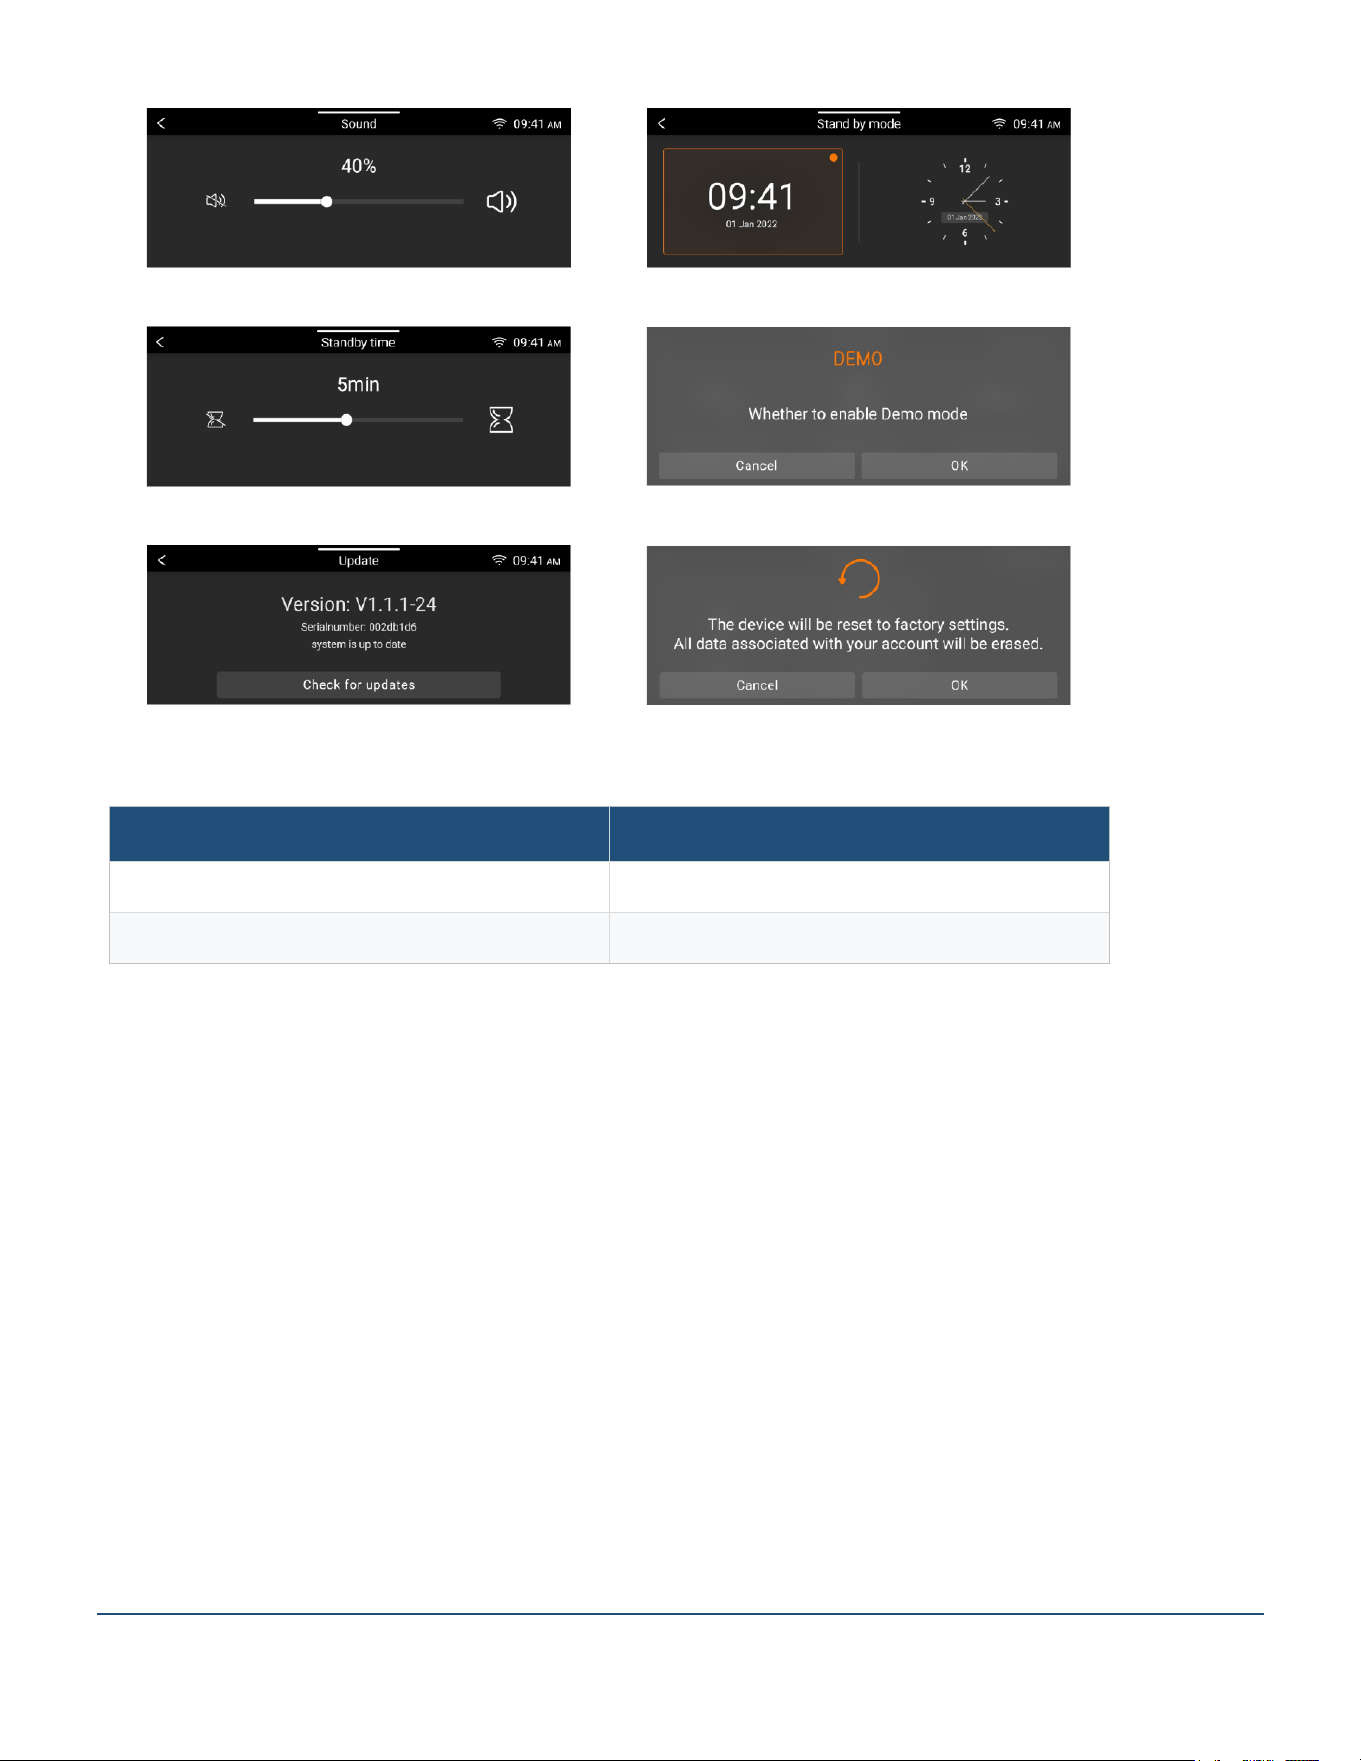
Short press Settings from the pull-down function bar to enter system settings. There are 10 system setting items;
swipe left or right to turn pages.
Setting Item
Purpose
WLAN
Connect to a wireless network. After networking, it can
be used for automatic time calibration, system
updates, and other functions.
Lightings
Adjust screen brightness.
Language
Set the interface language.
Date and Time
Set date and time; after networking, automatic time
calibration can be selected.
Sound
Adjust prompt sound volume from 0 to 100%.
Standby mode
Set standby display style.
Standby time
Set automatic standby time. Default is 2 minutes; 2 / 5
/ 10 / 15 / 20 minutes can be selected.
DEMO mode
Demonstration operation without heating.

INDUCTION HARDWARE www.inductionhardware.com | 12920 OLD VIRGINIA ROAD, SUITE 160, RENO, NEVADA 89521, USA
32
The Future of Cooking
Update
View version information and perform system updates
when connected to a network.
Reset
Restore factory settings.

INDUCTION HARDWARE www.inductionhardware.com | 12920 OLD VIRGINIA ROAD, SUITE 160, RENO, NEVADA 89521, USA
33
The Future of Cooking
Settings screen
INDUCTION HARDWARE www.inductionhardware.com | 12920 OLD VIRGINIA ROAD, SUITE 160, RENO, NEVADA 89521, USA
34
The Future of Cooking
Settings settings screen 1
Settings settings screen 2
Settings settings screen 3
Settings settings screen 4
Settings settings screen 5
Settings settings screen 6
Settings settings screen 7
Settings settings screen 8
Settings settings screen 9
Settings settings screen 10
Settings settings screen 11
Settings settings screen 12
INDUCTION HARDWARE www.inductionhardware.com | 12920 OLD VIRGINIA ROAD, SUITE 160, RENO, NEVADA 89521, USA
35
The Future of Cooking
Settings settings screen 13
Settings settings screen 14
Settings settings screen 15
Settings settings screen 16
Settings settings screen 17
Settings settings screen 18
Sound Prompts
Prompt Sound
Meaning
3 short beeps
Preheating finished
4 short beeps
Operation finished

INDUCTION HARDWARE www.inductionhardware.com | 12920 OLD VIRGINIA ROAD, SUITE 160, RENO, NEVADA 89521, USA
36
The Future of Cooking
Cleaning and Care
WARNING: Before cleaning, make sure the microwave oven has stopped operating and has cooled down. It is
recommended to lock the control panel before cleaning it.
Cleanable Areas and Areas Not to Be Rinsed
Area
Cleaning Method
Cavity, drawer front, glass, and removable tray
Wipe with a soft damp cloth and mild soapy water,
then dry after cleaning.
Control panel, rails, motor area, vents, power cord,
and electrical areas
Do not rinse directly, spray wash, or use a steam
cleaner. Only wipe exposed surfaces gently with a
slightly damp soft cloth.
Exterior Surfaces
Wipe in the direction of the stainless-steel grain. Clean with a soft damp cloth, then dry with a soft dry cloth. Do not
spray cleaner directly onto the appliance surface.
Drawer Front and Glass
Wipe both sides of the glass with a soft damp cloth to remove spills and splatter. Do not use abrasive pads or highly
corrosive cleaners.
Touch Panel
Gently wipe with a slightly damp soft cloth, then dry with a soft cloth. Do not scrub forcefully.
Cavity and Sealing Surfaces
Wipe the cavity, drawer sealing surfaces, and contact surfaces with a soft damp cloth. Heavier soil can be cleaned
with mild soapy water and then wiped clean.
Mica Sheet (Wave Guide)
CAUTION: Do not remove the mica sheet. Wipe off splatter promptly to prevent deposits from overheating,
smoking, or catching fire.
Drawer Rails
Regularly remove food crumbs, packaging fragments, and grease from the rails and drawer opening/closing area, and
wipe with a soft dry cloth to keep the drawer opening and closing smoothly.
CAUTION: Do not spray oil, apply grease, or disassemble the rails, motor, or drive structure yourself. If
persistent sticking, abnormal noise, or incomplete opening/closing occurs, contact after-sales service.
Vent
Regularly clean dust around the air inlet and outlet. Blocked vents may cause overheat protection, shutdown, or
shortened product life.

INDUCTION HARDWARE www.inductionhardware.com | 12920 OLD VIRGINIA ROAD, SUITE 160, RENO, NEVADA 89521, USA
37
The Future of Cooking
Cavity Deodorizing
If the cavity has an odor, add about 1 cup of water and a small amount of lemon juice or lemon peel to a microwave-
safe cup; add a few cloves if needed. Heat briefly until steam is produced, then stop. After the cavity cools, wipe clean
with a soft damp cloth.
CAUTION: After deodorizing heating, the cup and water may be very hot. Wait for cooling and use oven mitts
before removing.

INDUCTION HARDWARE www.inductionhardware.com | 12920 OLD VIRGINIA ROAD, SUITE 160, RENO, NEVADA 89521, USA
38
The Future of Cooking
Operating Environment
Environmental Requirements
• Use this appliance in a dry, ventilated indoor environment without condensation.
• Do not use or store it for long periods in low-temperature condensation, heavy grease, high humidity, outdoors,
or locations where it may be exposed to rain.
• If the product is moved indoors from a low-temperature environment, wait until there is no condensation on the
surface and the inside has returned to room temperature before powering on.

INDUCTION HARDWARE www.inductionhardware.com | 12920 OLD VIRGINIA ROAD, SUITE 160, RENO, NEVADA 89521, USA
39
The Future of Cooking
Fault Code Description
Fault Prompt
Error Description
Temperature sensor open circuit
Temperature sensor open circuit or
not installed
Temperature sensor short circuit
Temperature sensor short circuit
Communication fault
Communication fault between
display board and power board
Rail motor abnormality (drawer
model)
Rail motor communication fault
Troubleshooting
Symptom
Possible Cause
Solution
Appliance does not operate
Power not connected, power
outage, circuit breaker tripped, or
fuse blown.
Check the power connection and
household circuit.
Food is not heated
Drawer not closed, Start not
pressed, demo mode active, or
time/power too low.
Close the drawer, press Start, turn
off demo mode, or add time.
Control panel does not respond
Child Lock is on or appliance has
no power.
Press and hold OK to unlock, and
check power.
12:00 AM is displayed or the clock
flashes
Power interruption.
Reset date and time.
Drawer cannot open or close
automatically
Drawer is blocked, debris is in the
opening/closing area, power is
abnormal, or the automatic
opening/closing mechanism is
abnormal.
Remove visible obstructions and
confirm power before trying again;
do not force the drawer. If still
abnormal, contact after-sales
service.
Drawer sticks or makes abnormal
noise
Food crumbs, packaging
fragments, grease in the rail area,
or abnormal automatic
opening/closing mechanism.
The user may clean visible debris
and grease. Do not disassemble
rails or the drive structure. If the
abnormality persists, contact after-
sales service.
Drawer cannot close completely
Container is too large, food
packaging or foreign object is
caught on the sealing surface, or
drawer is not level.
Remove obstructions and
reposition the container; confirm
level installation. If it still cannot
close, stop using the appliance.

INDUCTION HARDWARE www.inductionhardware.com | 12920 OLD VIRGINIA ROAD, SUITE 160, RENO, NEVADA 89521, USA
40
The Future of Cooking
Frequent overheat shutdown
Vents blocked, insufficient
installation ventilation space, or
ambient temperature too high.
Clean the vents and check
installation space. If shutdowns
remain frequent, contact after-sales
service.
Steam comes from the vent
Normal cooking phenomenon.
No action required. If smoke, burnt
odor, or abnormal high temperature
occurs, stop using the appliance
immediately.
Fault prompt appears on the
screen
Abnormal temperature detection,
internal communication, drawer
open/close detection, or door
control detection.
Stop using the appliance,
disconnect power, and contact
after-sales service personnel.
Note: User-serviceable actions include closing the drawer firmly again, removing visible debris, wiping sealing
surfaces, cleaning vents, and resetting the time. Problems involving the motor, rail deformation, circuits, door control
switch, or drive structure must be handled by after-sales service. Do not disassemble the appliance for repair yourself.
Warranty Conditions
This warranty applies to the original purchaser only, for products installed and used in accordance
with this guide.
Proof of purchase is required for all warranty claims.
Warranty is void if the product has been modified, repaired by unauthorized personnel, or damaged
through misuse, negligence, or failure to follow installation and operating instructions.
Warranty does not cover damage caused by improper installation, use of non-original parts, or
operation in non-residential or commercial settings.
Warranty will not cover damages caused by environment.
Contact Us
Contact Method
Details
Website
www.inductionhardware.com
Phone
(775) 898-7562
Email
Address
12920 Old Virginia Road, Suite 160, Reno, Nevada 89521, USA
Thank you for choosing Induction Hardware. If you ever need assistance, our team is here to help.

INDUCTION HARDWARE www.inductionhardware.com | 12920 OLD VIRGINIA ROAD, SUITE 160, RENO, NEVADA 89521, USA
41
The Future of Cooking

INDUCTION HARDWARE www.inductionhardware.com | 12920 OLD VIRGINIA ROAD, SUITE 160, RENO, NEVADA 89521, USA
42
The Future of Cooking
INDUCTION HARDWARE
The Future of Cooking
At Induction Hardware, our mission is to make the next generation of appliances around induction electric technology. Everything
we make is all electric and focused on building the best appliances for the future. We believe that Induction tech is a massive
upgrade in the world of appliances and is the next level in living a healthier, safer and more efficient lifestyle.
APPLIANCE SHOWROOM
WWW.INDUCTIONHARDWARE.COM
12920 OLD VIRGINIA ROAD, SUITE 160
RENO, NEVADA 89521, USA
(775) 898-7562 | INFO@INDUCTIONHARDWARE.COM