User Guide
Welcome to CHIP’d. We’re excited to have you here.
Your CHIP’d Smart Golf Ball is designed to bring real-time performance data and insights to
your putting practice. This guide will walk you through setting up your account, connecting
your balls, and getting started.

1
Getting Started with you CHIP’d Golf balls
Before you begin…
Make sure you have the following:
● Your set of 3 CHIP’d Golf balls in-hand
● Compatible mobile device
○ iPhone (iOS X.X or higher)
○ Android (Android X.X or higher)
● Bluetooth enabled

2
Step 1: Set Up the CHIP’d Golf App
Download the App
Download the CHIP’d Golf app on your smartphone.
● On mobile, tap here to Download CHIP’d Golf for iOS
● On mobile, tap here to Download CHIP’d Golf for Android
Create Your Account
1. Open the app and select Create Account.
2. Enter your First Name, Last Name and Email Address and create a password
3. A six-digit verification code will be sent to your email address.
4. Enter the code in the app to verify your account.
Complete Your Profile
Follow the in-app prompts to complete your setup:
● Add a profile image (optional)
● Select your player type (e.g., Professional, Coach, Amateur)
● Choose your handedness (Left or Right)

3
Add Your Putter (Optional)
You may add one or more putters to your profile:
● Select brand (or add other)
● Enter model (customizable)
● Assign a nickname (customizable)
This step is optional and can be skipped.
Register Your Golf Balls
Each set of balls includes a QR code and a six-digit alphanumeric code located inside the
packaging.
1. Scan the QR code or manually enter the code in the app.
2. This will register the three unique ball IDs to your account.
Note: This step does not activate or connect the balls. It simply assigns ownership of the balls
to your account.
Verify Ball Connectivity
To complete setup:
1. Shake a ball to wake it.
2. The ball will begin broadcasting via Bluetooth.
3. The app will automatically detect and connect to balls assigned to your account.
Repeat this step for each ball to confirm all devices are functioning.
Once all balls have been verified, setup is complete.

4
Step 2: Using Your CHIP’d Golf Ball
Start a Session
From the home screen, select a session type:
● Launch Monitor (Live data mode)
● Challenges (with instructions and objectives)
● Skills (with instructions and objectives)
Each activity includes on-screen guidance explaining how it works.
Ball Status & Feedback
During use, the app provides real-time status of the ball:
● Ready (Green Screen)
○ The ball is at rest and ready to be hit.
● Rolling - A putt is in progress
○ The ball is actively tracking and transmitting data.
● In Motion
○ The ball is moving but not in a valid putting state (e.g., being picked up).
When the ball comes to rest after a putt, results will be displayed in the app.

5
Ending a Session
There are different ways to end a session depending on the activity you are using.
Launch Monitor Mode
1. Tap Pause during the session.
2. Select End Session or Resume.
You can end a session at any time while in Launch Monitor mode.
Guided Activities (Drills, Challenges, Skills)
Guided activities include a defined goal. There are two ways to end a session:
1. Complete the Activity
a. Finish the task and reach the defined goal to automatically complete the
session.
2. End Early
a. Tap Pause during the activity
b. Select End Session.
c. Confirm that you want to end the session before completing the activity.

6
Step 3: Finish and Store Your Ball
When you are finished practicing, follow these steps to properly disconnect and store your balls.
Disconnect and Power Down
1. Open the Balls screen from the main navigation panel
○ You can also access this screen by going to your Profile and select My Balls
2. Select the connected ball within the app
3. Tap Disconnect
Once disconnected, the ball will automatically return to sleep mode and stop Bluetooth
transmission.
Note: To preserve battery life, ensure that balls are disconnected and powered down when not
in use.
Store Your Balls
Place your balls back into the EVA foam case provided.
The case is designed to protect your balls and keep them organized when not in use.
7
FCC Regulatory Information
Where Can I Find My FCC ID for My CHIP’d Golf
Balls?
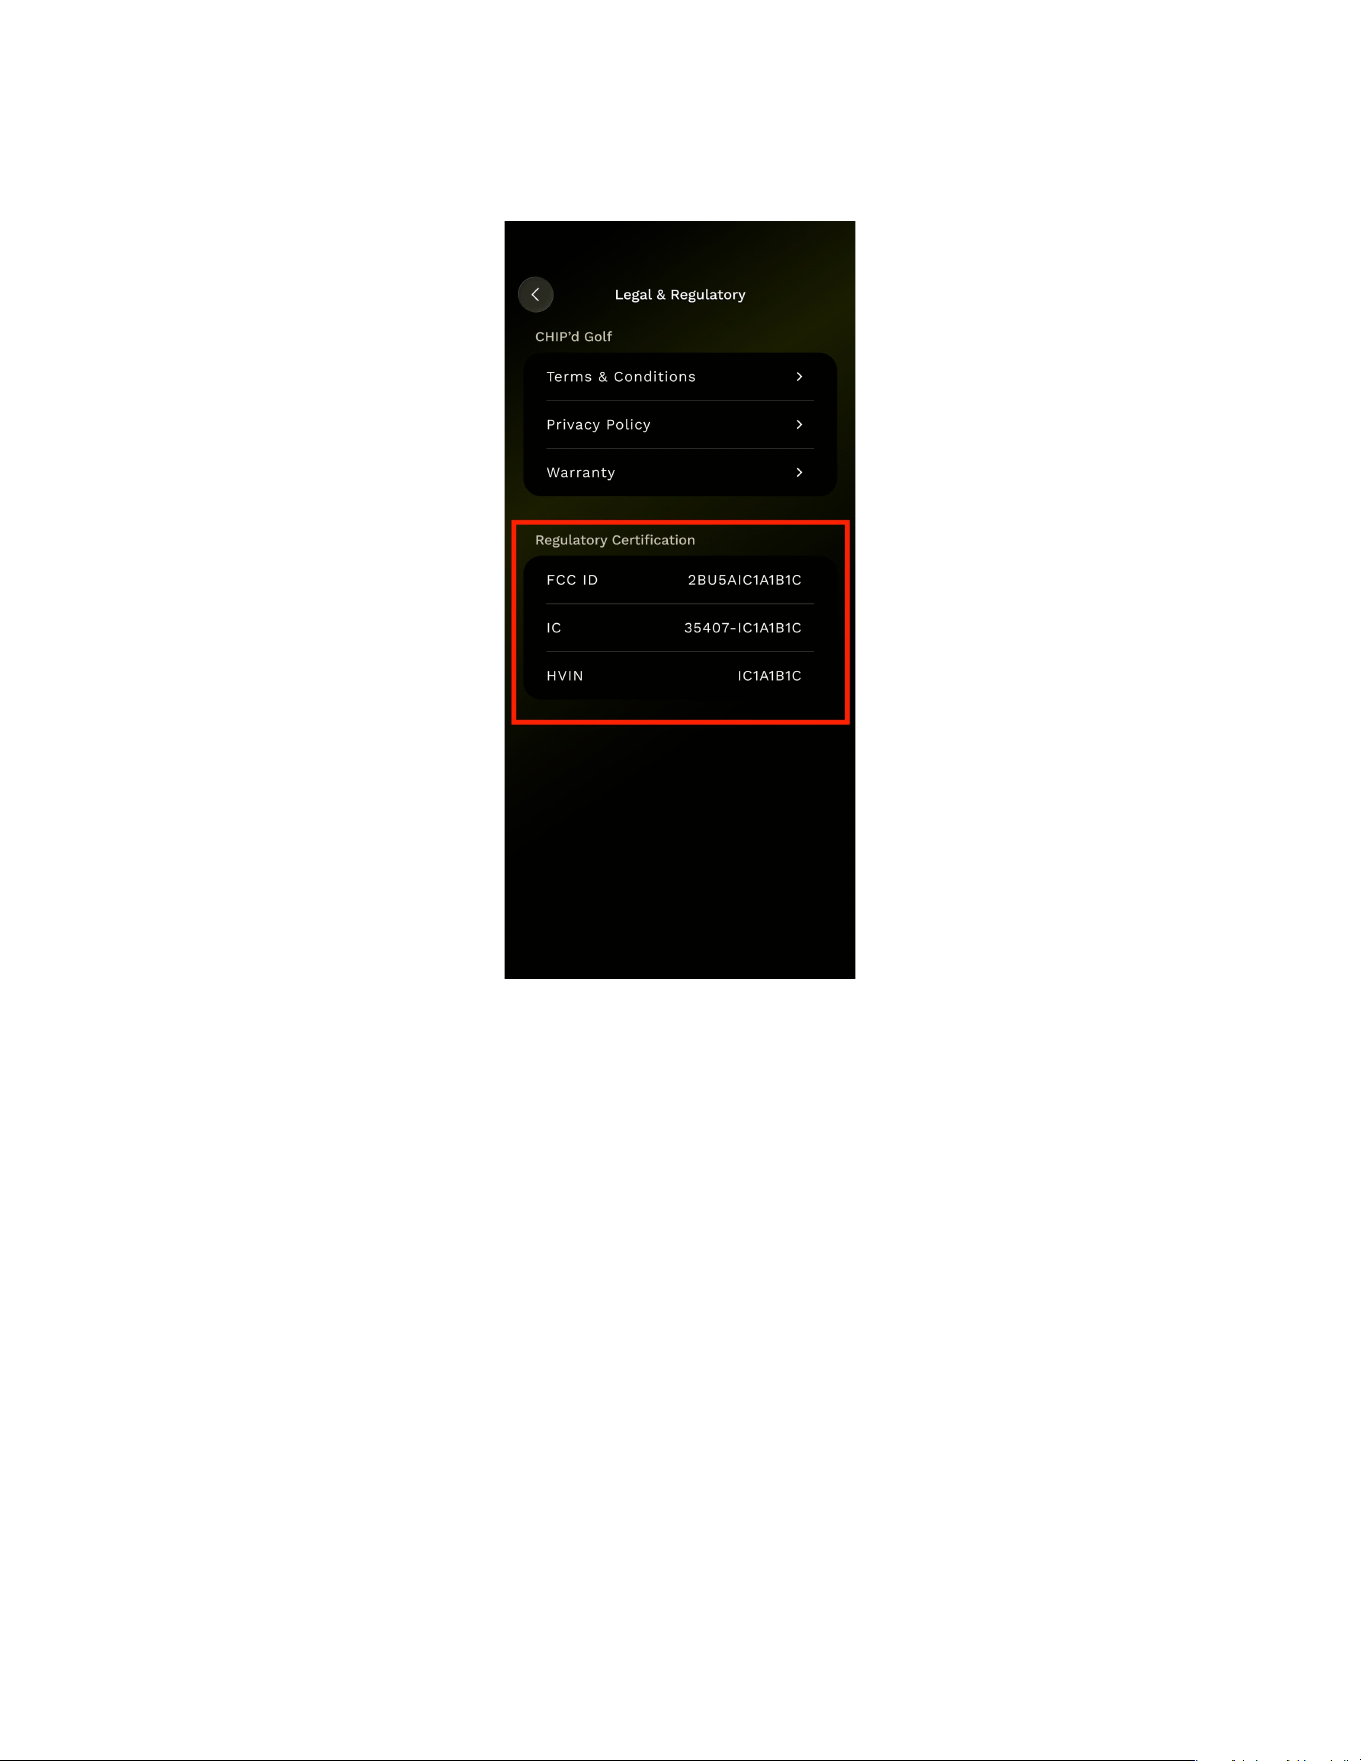
You can find your unique FCC ID for your CHIP’d Golf balls within the CHIP’d Golf app.
Steps to Find Your FCC ID
1. Open the CHIP’d Golf app
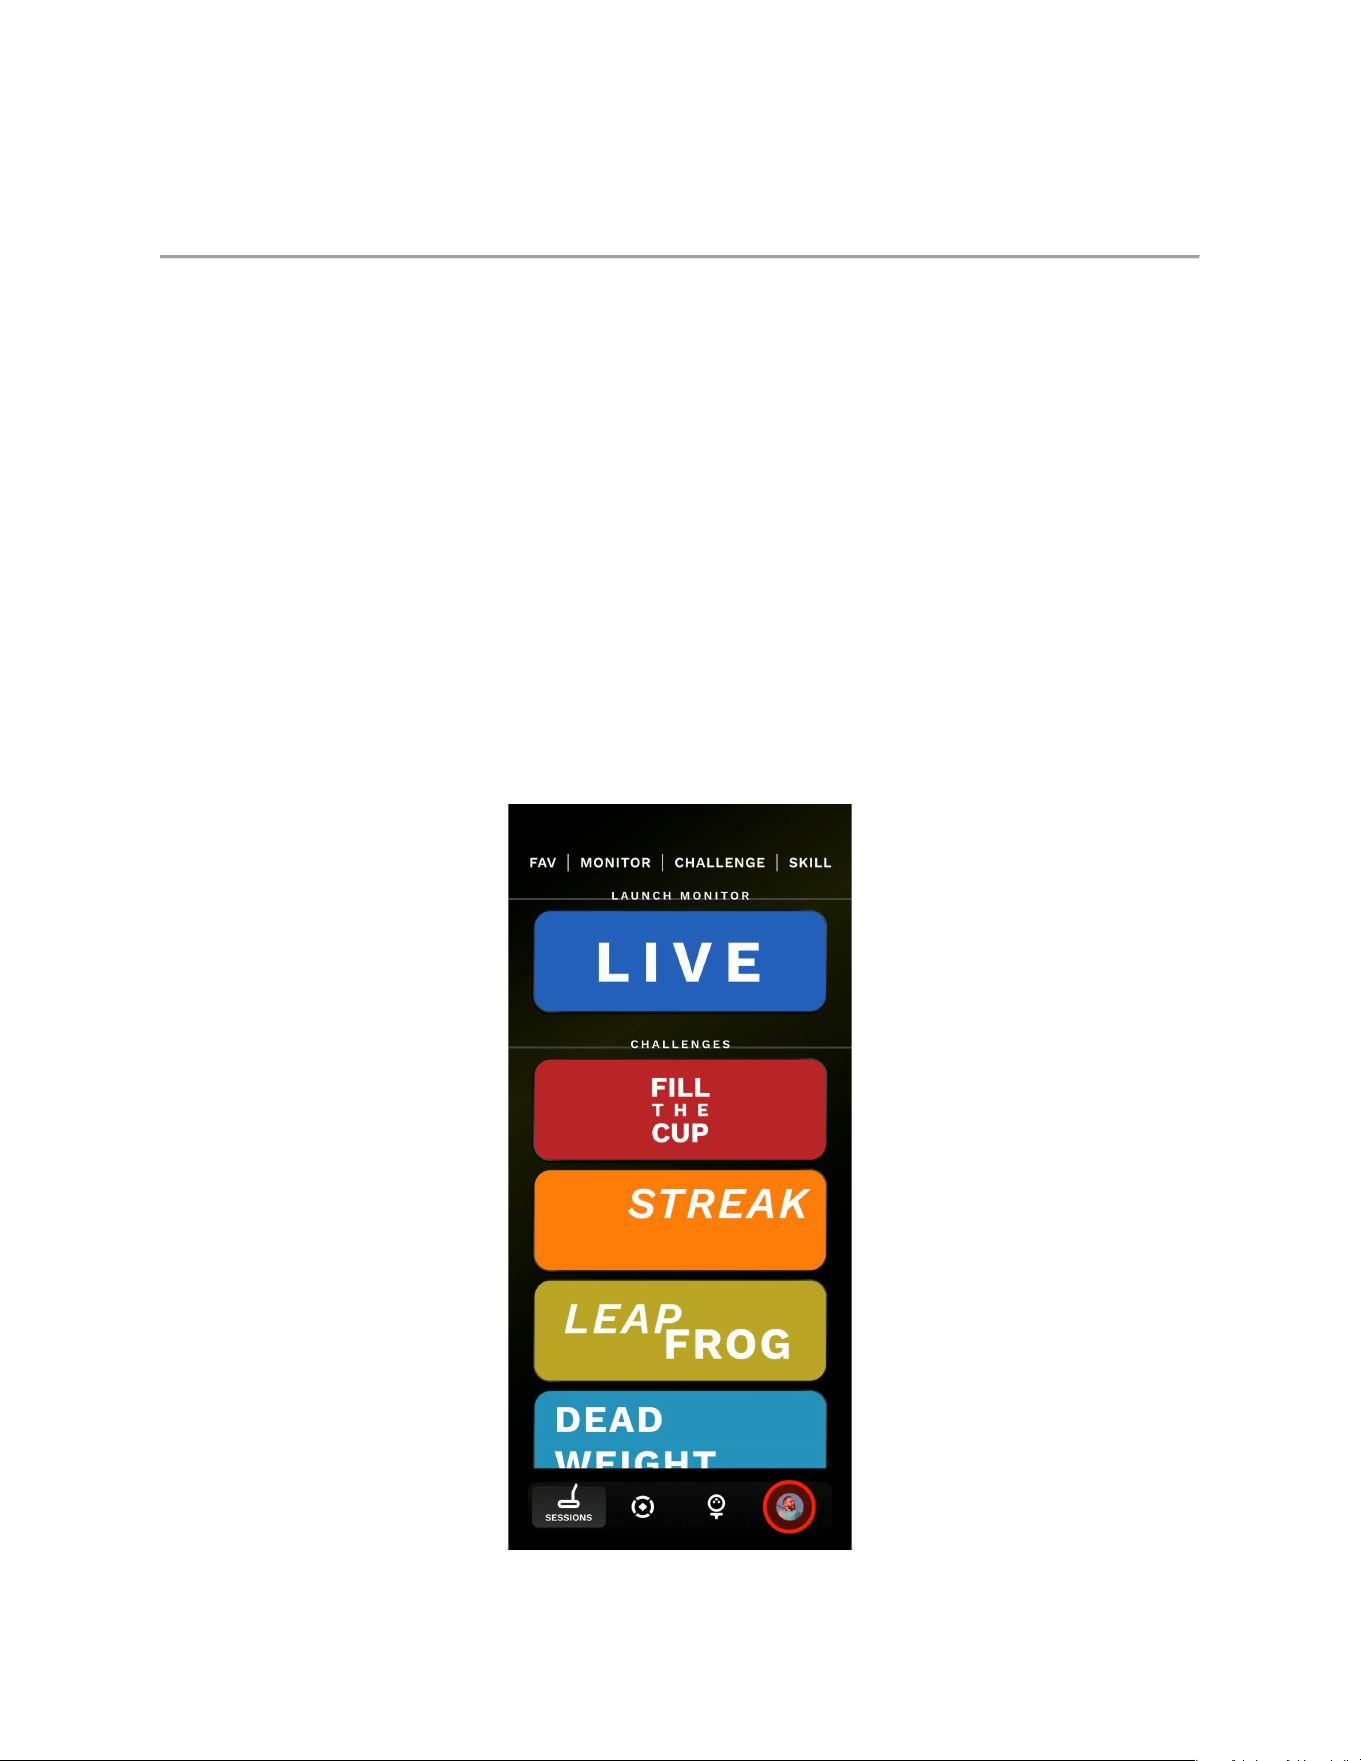
2. Starting from the Main Screen, tap your profile picture in the lower right corner.
8
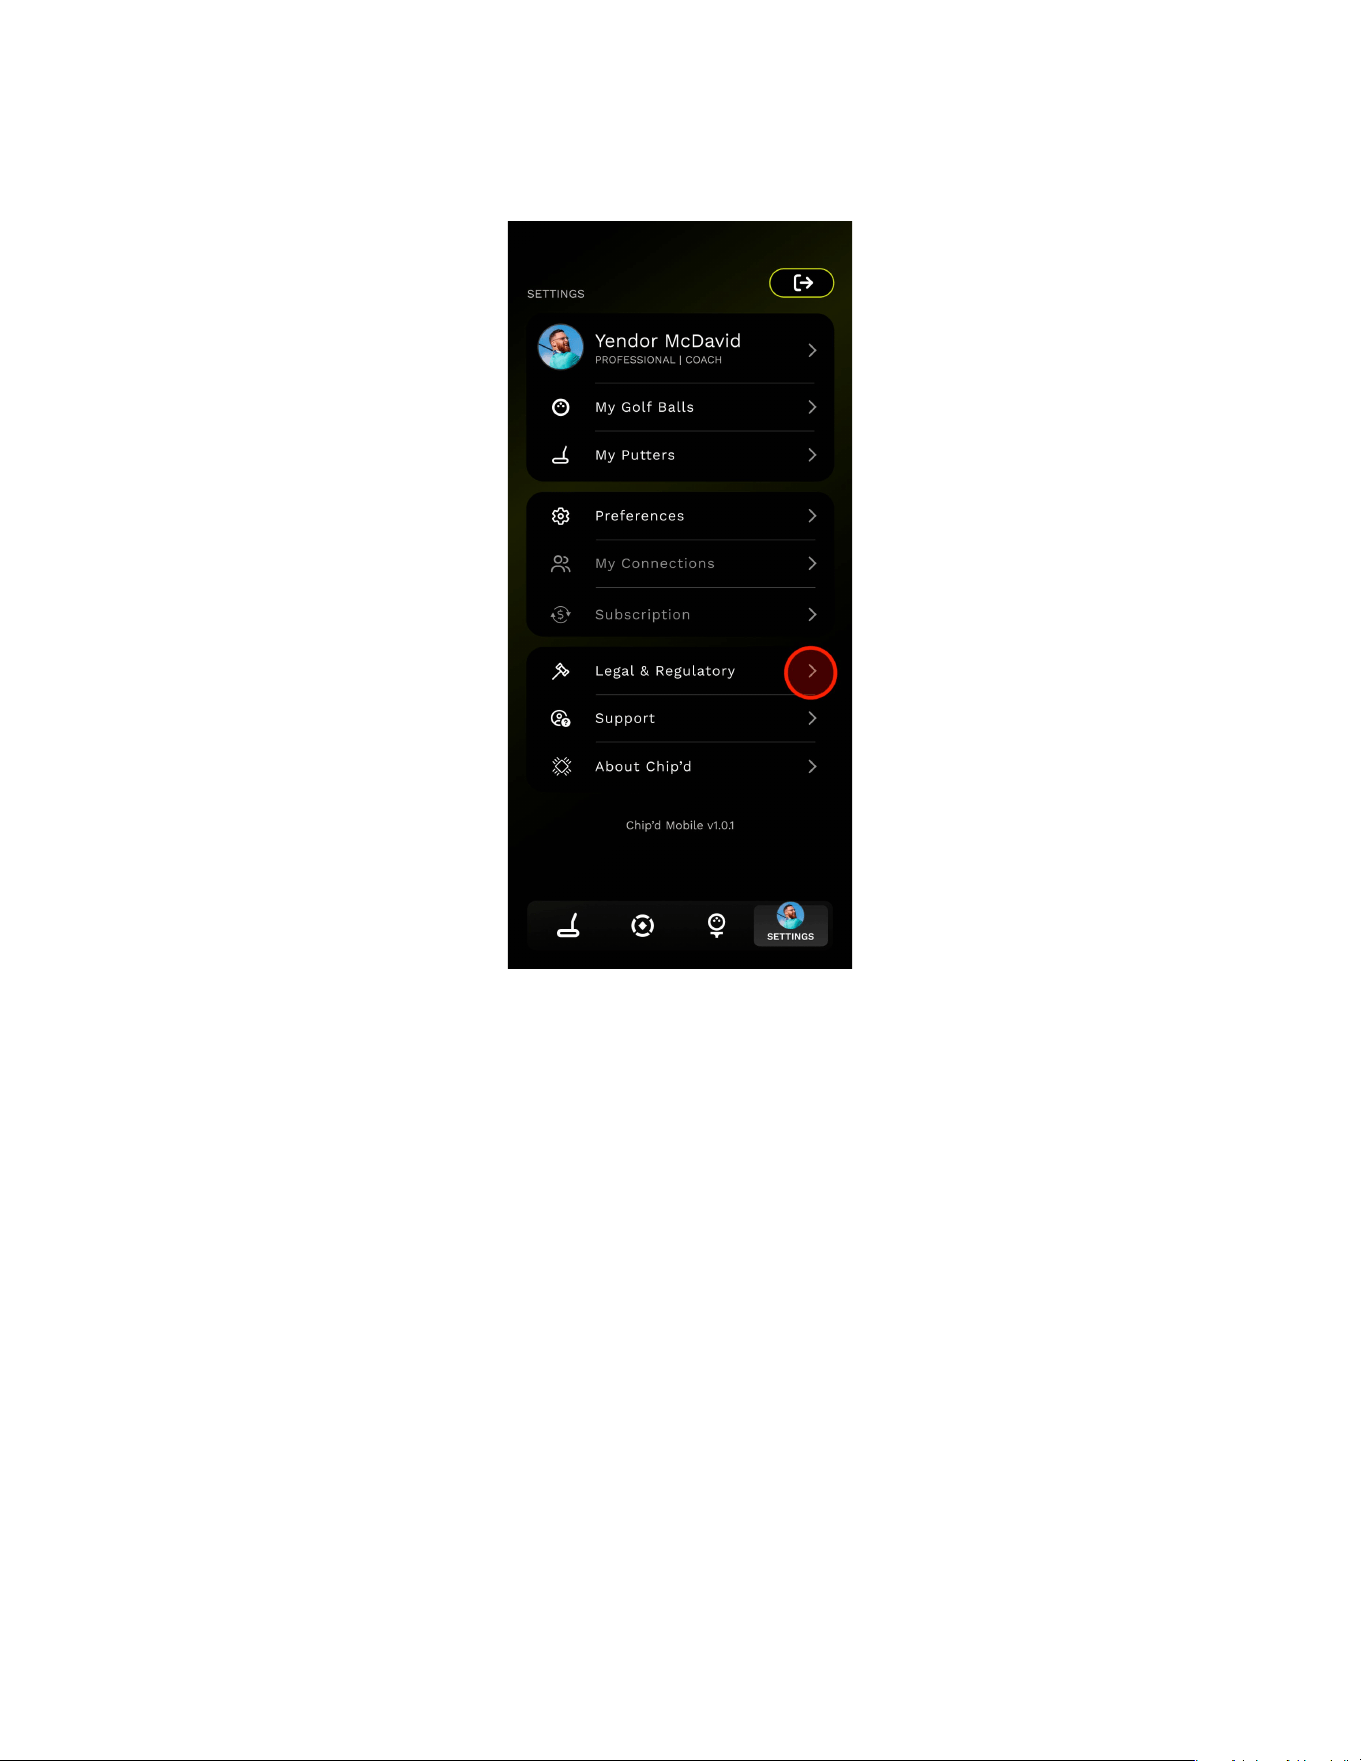
3. From the list of menu items, select Legal & Regulatory
9
4. The FCC ID for the CHIP’d Golf balls will be displayed under Regulatory Certification.
CHIP’d Golf Ball - FCC Regulations
FCC Authorization Label
This device complies with part 15 of the FCC Rules. Operation is subject to the following two
conditions:
1. This device may not cause harmful interference.
2 This device must accept any interference received, including interference that may cause
undesired operation.

10
This device has been tested and found to comply with the limits for a Class B digital device,
pursuant to part 15 of the FCC Rules. These limits are designed to provide reasonable protection
against harmful interference in a residential installation. This equipment generates, uses and
can radiate radio frequency energy and if not used in accordance with the instructions, may
cause harmful interference to radio communications.
However, there is no guarantee that interference will not occur in a particular installation. If
this device does cause harmful interference to radio or television reception, the user is
encouraged to try to correct the interference by one or more of the following measures:
• Reorient or relocate the receiving antenna.
• Increase or decrease the separation between the device and receiver.
This device has been verified to comply with the limits for a Class B computing device,
pursuant to FCC Rules. The user is cautioned that changes and modifications made to the
device without the approval of manufacturer could void the user's authority to operate this
device.
INDUSTRY CANADA USER’S STATEMENT FOR NON‐DETACHABLE ANTENNA FOR BOTH ENGLISH
AND FRENCH.
This device contains license‐exempt transmitter(s)/receiver(s) that comply with Innovation,
Science and Economic Development Canada’s license‐exempt RSS(s). Operation is subject to
the following two conditions:
(1) This device may not cause interference.
(2) This device must accept any interference, including interference that may cause undesired
operation of the device.
L’émetteur/récepteur exempt de licence contenu dans le present appareil est conforme aux
CNR d’Innovation, Sciences et Développement économique Canada applicables aux apperilis
radio exempts de licence. L’explotation est autorisée aux deux conditions suivantes:
(1) L’appareil ne doit pas produire de brouillage;

11
(2) L’appareil doit accepter taout brouillage radioélectrique subi, même si le brouillage est
susceptible d’en compromettre le fonctionnement.
Modification Warning
Changes or modifications not expressly approved by the party responsible for compliance could
void the user’s authority to operate the device.
RF Exposure Information
This equipment complies with FCC radiation exposure limits set forth for an uncontrolled
environment.
Additional Information
This device is intended for use with compatible mobile devices and operates using standard
Bluetooth Low Energy communication protocols. No user serviceable parts are contained within
the device.