
Rev. 2608
Groove Thing
User Guide
©2026 Groove Thing!
PATENTS PENDING!
All rights reserved
Welcome and THANK YOU!
Groove Thing is the culmination of over two years
of work, and it’s here because of YOU.!
But getting to this point was a sprint. Now comes
the marathon of sharing it with the world. !
So please talk about it! The most powerful
recommendation in the world is a friend’s.!
Michael Weiss-Malik & Elizabeth Dell"
Groove Thing’s founders!
P.S."
We hope Groove Thing expands your relationship
to music and pleasure, like it has for both of us. It
can unlock intense experiences that border on the
profound, if you’re up for it.
Groove Thing User Manual
TABLE OF CONTENTS
1. Safety Information ......................1
2. Main Package Contents .............4
3. Product Overview .......................5
What Music Works Best?# !.................7
4. Setup .........................................16
Wiring for Couples Kit# !....................19
Wiring for External Speakers# !..........21
5. Operation Guide .......................22
6. Maintenance & Care .................26
7. Troubleshooting ........................31
8. Technical Specifications ..........41
9. Warranty ...................................43
10. FCC and IC Statements .........45
11. Contact Info and Links ...........47
!

1. Safety Information
⚠ WARNING:
READ ALL SAFETY INFORMATION BEFORE USING.
Electrical Safety
•
NEVER immerse the speaker or the resonator puck in water.!
•
Keep away from water or excessive moisture.!
•
Do not use device while you are swimming, bathing, or showering.!
•
Connect only to power sources matching the included power adapter’s rating label.!
•
Disconnect from power before cleaning.!
•
Do not open, disassemble, modify, or attempt to repair the device; risk of electric
shock. Repairs must be performed only by qualified personnel.!
•
Use only the power adapter and cables included with this product. Do not use if any of
the cords are damaged.!
•
MAINTAIN SLACK in all cables at all times. They are not designed to be used under
tension, and their connectors are not designed to withstand yanking or pulling.!
- -1
General Safety
•
⚠ DO NOT USE ON OR NEAR IMPLANTED ELECTRIC MEDICAL DEVICES ⚠ ,
SUCH AS A PACEMAKER. The device’s resonator and speakers contain moving
magnetic components that generate a varying and moving magnetic field.!
•
WASH ALL ATTACHMENT SHAPES before first use and after each use, with a damp
non-abrasive cloth and mild antibacterial soap. Do not put in dishwasher or
microwave.!
•
CONSULT A MEDICAL PROFESSIONAL BEFORE USING…
•
…in/on/near any part of your body affected by any medical condition that
increases your sensitivity to impact, vibration, or pressure; or that increases your
susceptibility or sensitivity to bruising or laceration.!
•
…in/on/near any part of your body that has recently had surgery.!
•
…INTERNALLY if you suffer from pelvic floor issues that could be exacerbated
by internal vibration.!
•
DO NOT USE in/on/near open wounds.!
•
DO NOT USE in mouth or against teeth.!
•
Always keep dials at medium or lower setting when first turning on.!
- -2

•
Use extra caution when playing unfamiliar music on the device, as sudden changes in
the source music’s content or volume may cause sudden and unexpected changes in
vibration intensity or sensation.!
•
Take a break or discontinue use if there are any feelings of discomfort.!
•
Keep out of reach of children.!
•
Ensure proper ventilation during operation.!
•
If the product undergoes excessive overheating, makes unusual noises not previously
noticed during operation, or the vibrations seem abnormal, discontinue use
immediately and contact customer support.!
•
Do not pull, stretch, or bend cables at sharp angles.!
•
Do not apply force or pressure to any connector beyond what’s necessary to insert or
remove that connector.!
•
Inspect the device before every use, and do not use the device if there is any visible
damage to any of the parts.!
•
Contact customer support if you suspect any product damage.!
•
Playing sustained single-frequency tones at high intensity may cause the device
to overheat and shutdown. Extended playback of single-frequency tones can cause
permanent damage to the device that is NOT covered by any warranty.!
- -3

2. Main Package Contents
Verify all items are included:!
•
Groove Thing speaker (main unit)!
•
Resonator puck (with attached cable)!
•
Power adapter!
•
North American power cord (and/or other regional cord, if applicable)!
•
Quick Start guide!
•
This user manual!
Note: Resonator attachment shapes may be packaged and/or sold separately.!
Important: If any items are missing or damaged, contact customer support immediately
before using the product.!
- -4

3. Product Overview
Description
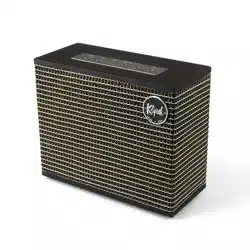
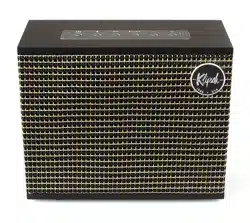
Groove Thing is a Bluetooth-enabled speaker with an integrated vibration system that
enables you to both hear and feel music, simultaneously. This product combines high-
quality audio with synchronized high-fidelity vibration. The music you play through it can
be heard by your ears through the integrated speakers or by connecting wired
headphones (not included); simultaneous vibration is felt in or on your body via a
connected peripheral called the resonator. Groove Thing is designed for personal
wellness and intimate use, alone or with a partner, for an immersive sensory experience
of coordinated sound and vibration. The speaker can also be kept on your nightstand
standalone, as a Bluetooth audio speaker, without the resonator. Interchangeable
resonator attachment shapes enable you to match your own body, mood, and
preferences. We expect to offer many more resonator attachment shapes in the future (in
various sizes, geometries, and textures).!
- -5

Key Features
•
Analog dial control system: Separate analog dials for audio volume and vibration
intensity.!
•
Bluetooth connectivity: Stream music wirelessly from any compatible device.!
•
Auxiliary audio input: Wired connection via 3.5mm audio jack (rear panel).!
•
Headphone port: Private listening via 3.5mm audio jack (front panel).!
•
Resonator: Connects to front panel for vibration synchronized with audio.!
•
Compatible attachments: Supports multiple sold-separately attachments, with
quarter-turn twist lock system.!
•
Multi-region power support: Includes North American power plug, plus additional
regional plugs as needed.!
- -6

What Music Works Best?
This is one of the top questions. Here are our top tips.
#1: It’s not a race!!
You wouldn’t go to a concert with the goal “hear the last song and go home,” would
you? Lay down, drop in, and stay awhile. Groove Thing is a pleasure journey, not a
destination.!
#2: Groove Thing responds to BASS not TREBLE
Low notes from the bottom half of a piano keyboard are felt on the resonator, while
high notes aren’t. So songs with strong bass lines work best. Modern pop, R&B,
EDM, world music, cello, heavy metal… if it has bass, it feels great!!
Fast high energy songs with heavy drums hit hard, with immediate intensity. But
grinding slow sultry tracks create a different intensity, that builds over time.!
Turn the volume UP for your ears! It helps your body perceive the simultaneous
vibration more intensely. If you’re close to climax and wanna tip over: songs with a
steady consistent beat work well for many folks.!
- -7

#3: Expand your taste and try new things
Listening to familiar music will connect you to it in a totally new way. You’ll catch
parts of a song that you never heard before. Bass drop anticipation is really fun!!
But listening to unfamiliar music is a real adventure, where you don’t know what’s
coming next. Unanticipated bass drops are fun!!
New genres and types of music might entrance you. Your body can appreciate music
that your ears alone didn’t find interesting enough :).!
#4: TRY OUR RECOMMENDED PLAYLISTS
We’ve spent two years exploring Groove Thing’s capabilities, and guided well over
100 people through their first experience. Benefit from our research! We’ve collected
a wide range of tracks that work well, including a “first time” playlist that shows off
the full range of Groove Thing’s capabilities.!
- -8
gthing.com/playlists #
Main Components
- -9
Figure 1: Speaker front panel

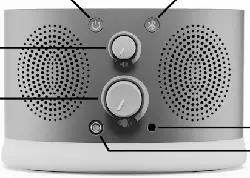
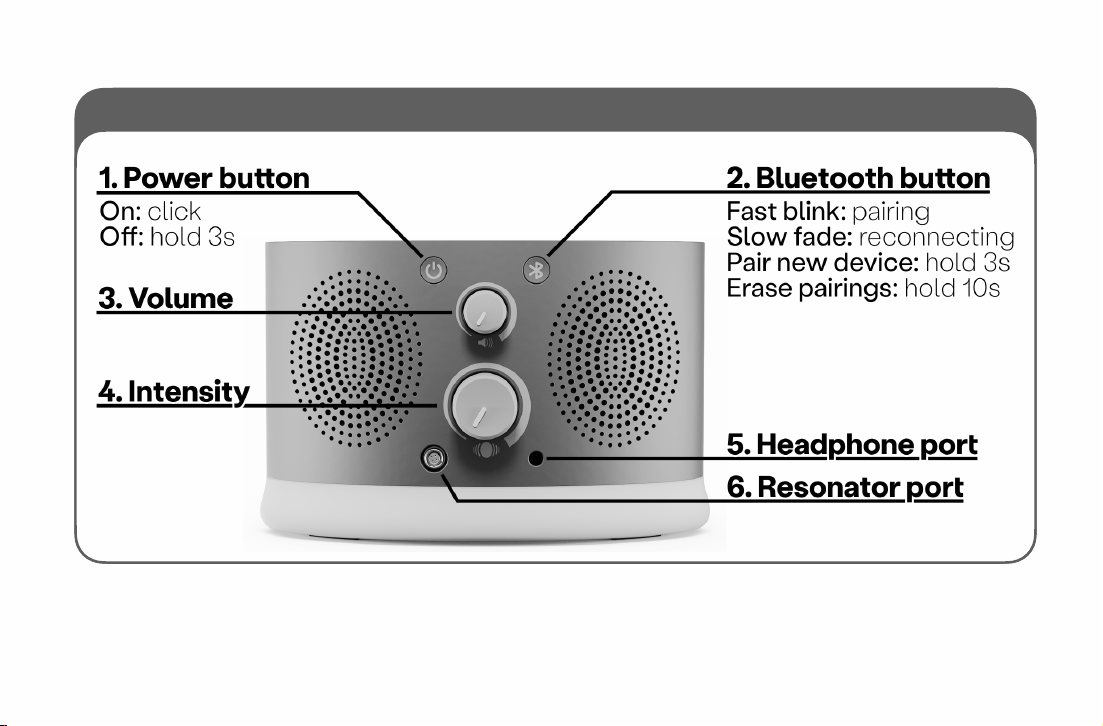
Speaker front panel (see Figure 1)
1. Power button"
───# Solid green: Unit is powered on."
# Slow fade: Resonator intensity reduced, due to overheating."
# Blank/off: Unit is powered off."
TO POWER ON: Single click."
TO POWER OFF: Press and hold for 3 seconds, then release.!
2. Bluetooth button"
───# Solid blue: Bluetooth source device is currently connected."
# Slow fade: Reconnecting to previously-paired device."
- - - - -# Fast blink: Pairing mode, searching for new device."
# Blank/off: Wired aux-in in active. Bluetooth disabled."
TO PAIR NEW DEVICE: press and hold for 3 seconds, then release."
TO ERASE ALL PAIRINGS: press and hold for 10 seconds, then release."
TO SEND MEDIA CONTROL COMMANDS:"
##Play / pause – single click"
##Next track – double click"
##Previous track – triple click"
"
BLUETOOTH FUNCTIONALITY IS DISABLED: anytime a rear aux-in cable is connected.
- -10

3. Audio volume dial"
Turn clockwise to increase volume heard from speakers or headphones. Note that
when connected over bluetooth, most bluetooth devices’ volume buttons will not
function. Exception: lowering your source device's volume to zero may cause your
device to mute.!
4. Vibration intensity dial"
Turn clockwise to increase resonator vibration strength. ALWAYS start with this
dial set low, and wait for music’s bass line to start before turning the intensity up.!
5. Headphone port"
Accepts headphones with standard 3.5mm (1/8 inch) plug, for private listening.!
6. Resonator port"
Accepts resonator cable. To attach cable, see instructions in Resonator puck below.!
- -11
⚠

Speaker rear panel
•
Aux-in port (left)"
For wired auxiliary audio input via standard 3.5mm (1/8 inch) stereo plug. When in use,
bluetooth functions are disabled.!
•
Power port (right)"
Barrel connector for included power adapter. Do not use with any other power adapter.
Groove Thing must be plugged into power to function, and does not contain any
batteries.!
- -12
Resonator puck
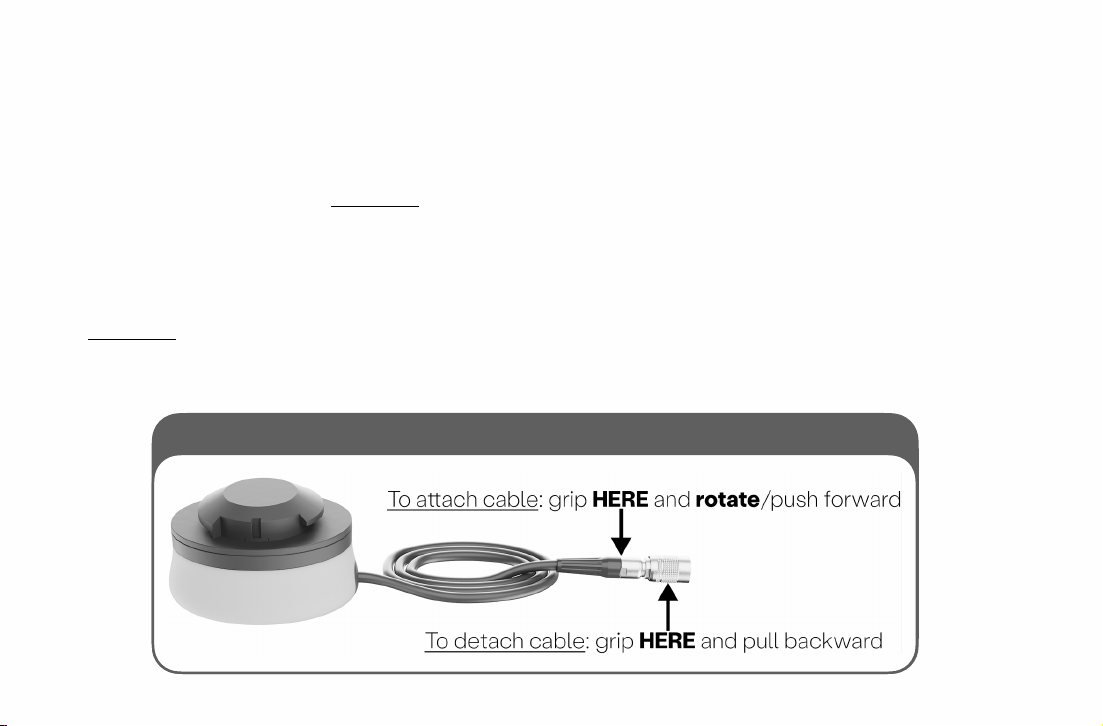
Separate component, which connects to speaker by cable. The top twist-lock
connector surface is used to attach various supported attachment shapes.!
TO ATTACH RESONATOR CABLE TO SPEAKER: grip resonator cable right where black and
silver areas meet (see Figure 2), and gently press cable’s silver connector against
resonator port. Twist cable until silver connector aligns with port and slides in with a
click. You may need to twist a FULL 360° to find the alignment.!
TO DETACH RESONATOR CABLE FROM SPEAKER: grip front-most part of silver collar (see
Figure 2), and gently pull back away from speaker.!
- -13
Figure 2: Resonator puck
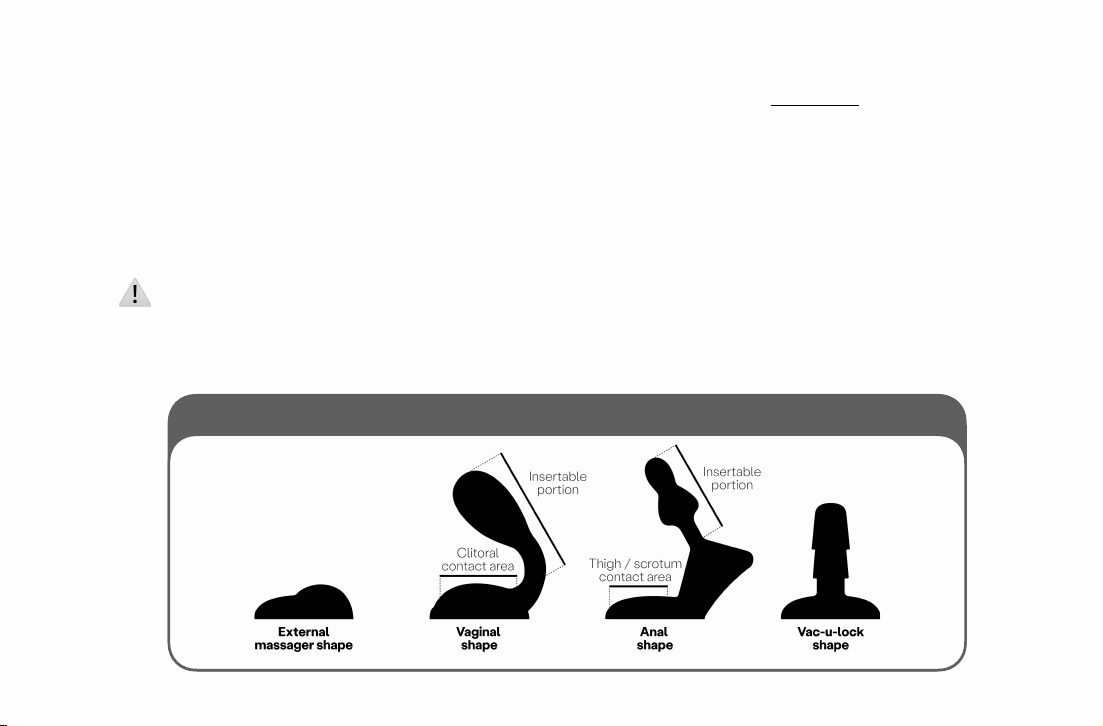
Resonator attachment shapes
A variety of resonator attachment shapes are available (see Figure 3), which twist lock
onto the resonator puck. Some shapes may or may not have been included in your
purchase; others may be sold separately. New shapes will be created and sold in the
future, as well.!
WASH each shape before first use.!
Always apply personal lubricant before inserting a resonator shape.!
NEVER insert vac-u-lock shape directly into your body. It should be used ONLY
with a silicone toy attached. Applying vac-u-lock powder (corn starch) into the
silicone toy’s hole will significantly ease removal.!
- -14
Figure 3: Resonator attachment shape examples
⚠
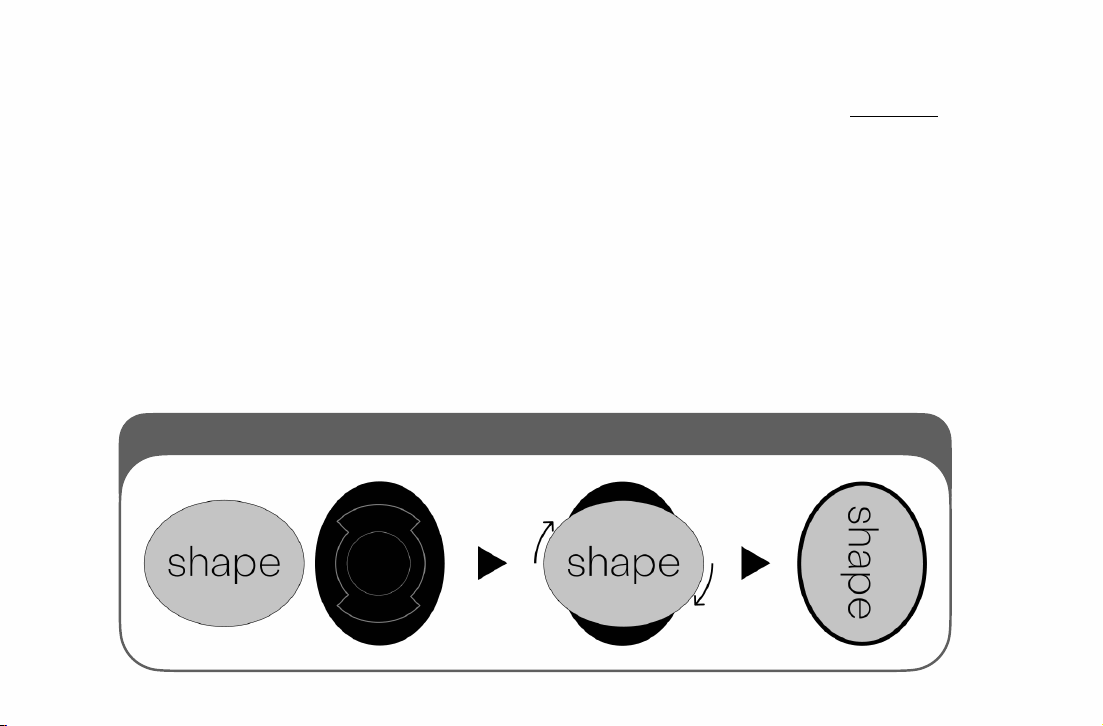
TO ATTACH SHAPE TO RESONATOR PUCK: Place shape on top of puck, with shape’s
twist-lock connector pressed flat against puck’s twist-lock connector, at a 90-degree
angle. Hold puck steady and rotate shape 90 degrees clockwise. See Figure 4.!
TO DETACH SHAPE FROM RESONATOR PUCK: Hold puck steady while rotating shape 90
degrees counter-clockwise, then lift shape away.!
Shapes can be attached facing forwards or backwards, according to personal
preference. There is a gentle “click” that occurs when the shape is fully locked into
place. To achieve the click, firm twisting force may be required.!
- -15
Figure 4: Attaching shape to puck

4. Setup
Step 1: Unpacking
•
Remove all items from protective trays, check against !2. Main Package Contents .!
•
Inspect for any visible damage.!
•
If damage found, do not use the product. Contact customer support instead.!
Step 2: Placement
•
Place the speaker on a stable, level surface. Preferably within reach of where you’ll use
the device. A nightstand next to your bed works well.!
•
Keep away from heat sources and direct sunlight.!
Step 3: Connect Power
•
Attach the appropriate power cord for your region to the AC-DC adapter. North
American, EU, Asia, Australia, China and/or UK plugs may be included, depending on
your region and your purchase choices.!
•
Plug the AC-DC adapter’s barrel connector into power port on'back'of speaker.!
- -16

•
Plug other end of AC/DC power adapter into a wall outlet. (known as “mains power” in
some regions)!
⚠ WARNING:
USE ONLY THE INCLUDED POWER ADAPTER AND POWER CABLES/PLUGS. IF
YOU NEED A DIFFERENT REGIONAL PLUG, CONTACT CUSTOMER SUPPORT.
Step 4: Connect Resonator
•
Find the resonator port on the'front'of the speaker, showing a vibration base icon.!
•
Grip the end of the resonator cable right where its black and silver areas meet, and
gently press the cable’s silver connector against the speaker’s resonator port.!
•
Twist the cable with your thumb and fingers, until the silver connector side aligns with
the speaker’s port and slides in with a click.!
TO DISCONNECT FOR STORAGE: Grip the front-most part of the cable’s silver collar, and
gently pull it backwards, away from the speaker. It will unlatch with a click.!
Step 5: Turn On
•
BEFORE powering on:'Set Volume Dial pointing straight up (12 o’clock) and Intensity
Dial pointing to the left (9 o’clock).!
- -17

•
Click the'Power Button'once, to power on the device. After a few seconds, you should
hear a “power on” voiceover confirmation from the speakers.!
Step 6: Connect Bluetooth
•
On first use, unit should enter pairing mode automatically. Blue Bluetooth button will
flash quickly to reflect this, and a voiceover announces that pairing mode is active.!
•
If NOT in pairing mode: press and hold Bluetooth Button for 3 seconds, then release it,
to enter pairing mode.!
•
Pairing: On your cell phone or other Bluetooth source device, go to Bluetooth settings
and scan for new devices. Select "Groove Thing XXXX” (the XXXX will contain the full
serial number marked on the bottom of your speaker).!
•
Connection confirmed when blue light turns solid and speaker voiceover announces
“new device paired.”!
•
The next time you use Groove Thing with that device, you won’t need to re-pair it. The
speaker automatically reconnects to the previous device, upon power-up.!
Bluetooth Connection Issues? See 7. Troubleshooting for steps to take.
The two most common problems are 1) mixing up pairing mode vs reconnection mode;
and 2) erasing the pairing on only your device, or only on Groove Thing, but not on both.!
- -18
Wiring for Couples Kit
Two Groove Things can be connected together to stream the same music at the same
time. This requires the use of audio cables, to send a signal from one source to both
Groove Things. You will need:!
•
2 × stereo aux cables (3.5mm 1/8” male headphone jacks on each end)!
•
1 × headphone splitter (1 male splitting to two female)!
•
Sound source with a headphone port.!
•
Some cell phones don’t have a headphone port."
They require the use of a USB-C or Lightning to headphone adapter.!
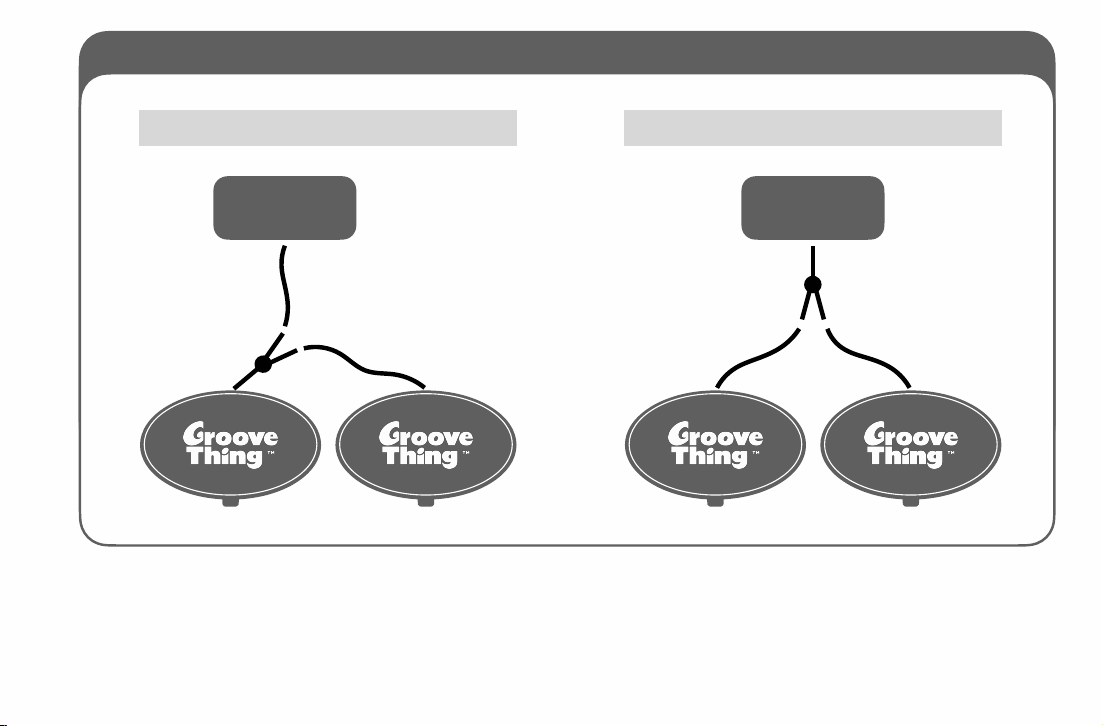
With the above cables, you can connect two units together in either of two ways, as
shown in Figure 5.!
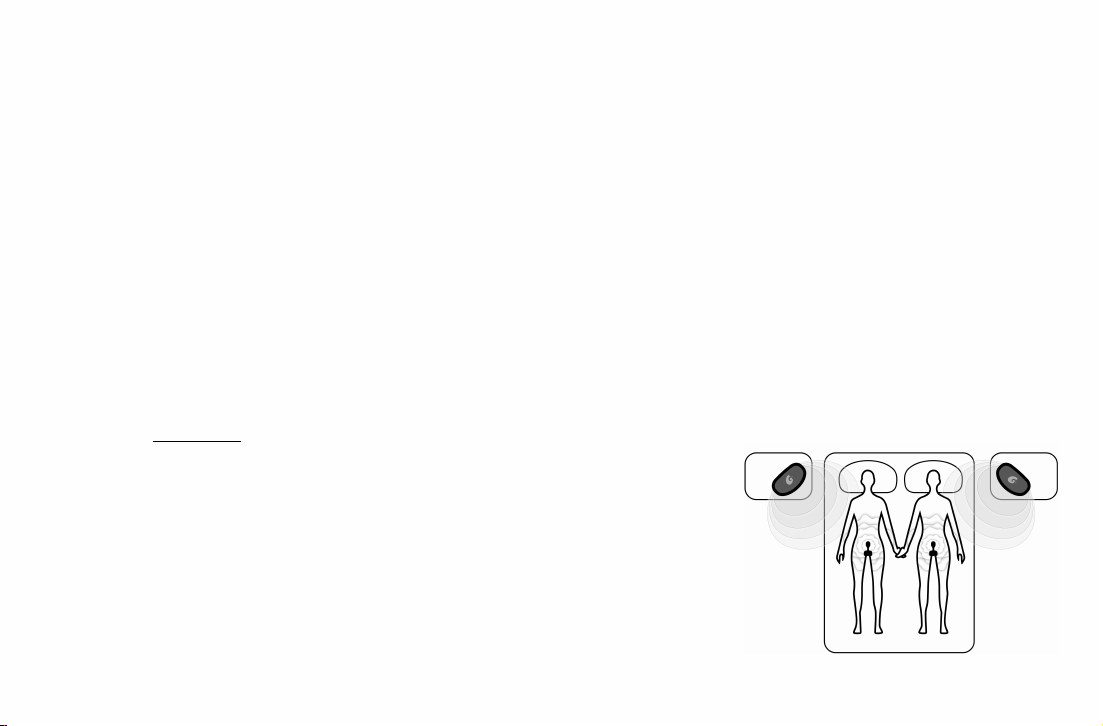
We recommend placing each Groove Thing speaker on either
side of a bed, routing the long aux cable under or behind
your bed. Then position your bodies laying down in parallel
on the mattress, in between the speakers, such that each of
you can reach the controls for the speaker on your side.)
- -19
"
- -20
Figure 5: Couples Kit wiring
OPTION A
OPTION B
Phone
aux cable ➔
aux cable
➔
headphone
splitter
➔
Phone
aux cable
➔
headphone
splitter
➔
aux cable
➔
Both of these options use Groove Thing’s REAR aux-in ports, NOT Groove Thing’s front
headphone ports.

Wiring for External Speakers
To use an external speaker with Groove Thing, there are two requirements:!
1. It must have VERY low latency."
Most modern battery-powered speakers have high latency (>50ms) due to various
signal processing features, which introduce delay into their played sound. If your
speaker has such a delay, then the audio from your speaker will be out of sync
with Groove Thing’s vibration, and the “Groove Thing effect” will be lost.!
2. It must have a wired aux-in."
At this time, Groove Thing does NOT support sending wireless Bluetooth audio to
an external speaker or external headphones.!
If you meet the above requirements, there are two options for connecting your speaker:!
Option A: Drive your speaker from Groove Thing’s headphone output. This lets
you wirelessly stream your phone into Groove Thing, AND it means that Groove
Thing’s volume dial will control your speaker’s volume. Just connect an aux cable
from Groove Thing’s headphone port to your speaker’s aux-in port.!
Option B: Split a wired source into two (with a headphone splitter), and send it in
parallel to your speaker’s aux-in and to Groove Thing’s aux-in. Imitate Figure 5, but
replace one of the Groove Things in the diagram with your speaker."
- -21
5. Operation Guide
Basic Usage
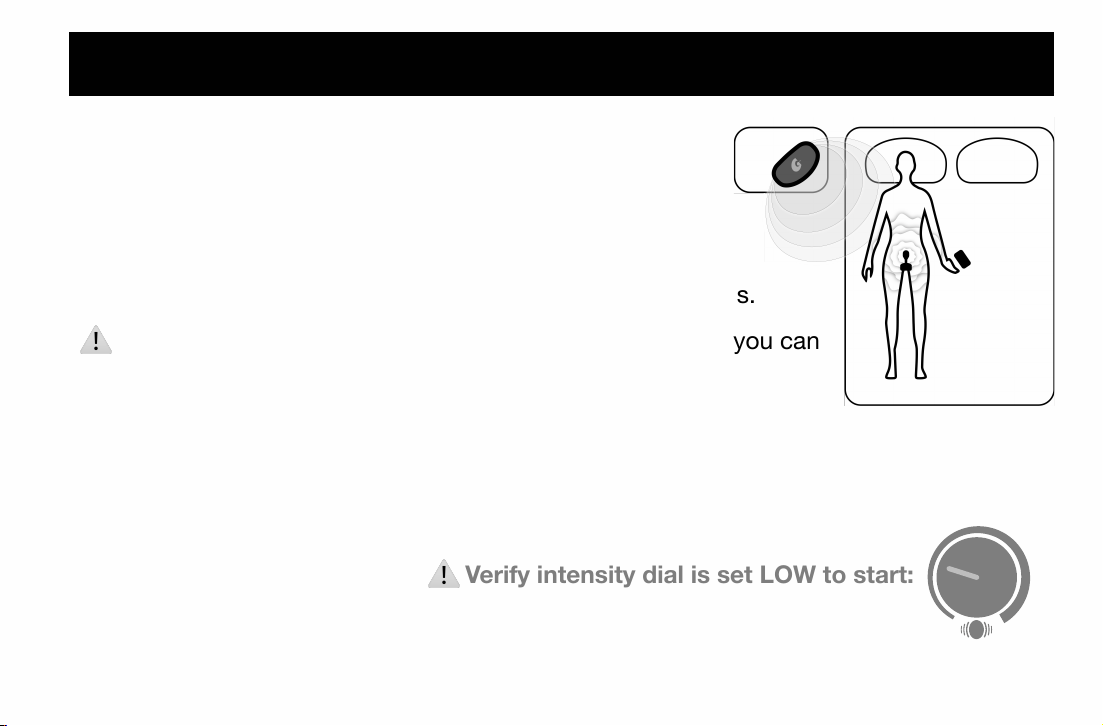
Groove Thing isn’t like other sex toys, and you tend not
to use it like other sex toys.!
WE HIGHLY RECOMMEND starting by laying of your
back, and closing your eyes. Most users strongly prefer this.!
⚠ ALWAYS keep the speaker within easy reach, so that you can
adjust intensity on a moment’s notice.!
QUICK START:
1. Connect power and resonator.!
2. Turn on Groove Thing, pair phone (if not already paired).!
3. Attach resonator shape to puck. !
4. Lube up, insert. Verify intensity dial is set LOW to start:!
5. Stream some bassy music from your phone, and enjoy!!
- -22
⚠

Power Control
TO TURN ON: Briefly click (press and release) power button.!
TO TURN OFF: Press and hold power button for 3 seconds, then release.!
Sound Control
TO CHANGE VOLUME: Turn Groove Thing’s small top dial clockwise to increase, counter-
clockwise to decrease.!
If streaming over Bluetooth, note that your Bluetooth device’s volume controls won’t
work; use Groove Thing’s volume dial. Though if your device’s volume is turned all the
way down to 0%, then some devices will mute and stop sending audio to Groove Thing.!
Vibration Control
TO CHANGE VIBRATION INTENSITY: Turn Groove Thing’s large bottom dial clockwise to
increase, counter-clockwise to decrease.!
During long periods of intense usage, overheat protection might activate. This feature
reduces vibration intensity as needed to prevent resonator damage from high operating
temperatures. The speaker’s power light will slowly fade on/off whenever such protection
is active.!
- -23

Bluetooth Audio Connection
On power-on, after initial setup, Groove Thing will always attempt to reconnect to the
previously-used device. This is called reconnect mode, and is indicated by slow fading of
the Bluetooth button’s blue light as well as a voiceover announcement.!
Pairing new device: While power is on, enter pairing mode by pressing and holding the
Bluetooth button for 3 seconds, then releasing. The blue light will blink rapidly and a
voiceover will announce “Pairing mode, searching for new device.” Now go to your
source device’s Bluetooth menu and select “Groove Thing XXXXX” from the list of new
devices found. Note that XXXXX will actually contain the last five digits of the full serial
number marked on the bottom of the speaker. Connection confirmed when Groove
Thing’s bluetooth light turns solid and speaker voiceover announces “new device
paired.” !
Erasing all Pairings
This will reset Groove Thing’s list of paired devices, if needed. While powered on, hold
Bluetooth button for 10 seconds, then release. Note that you might also need to remove
Groove Thing from those previously paired devices’ list of known Bluetooth pairings.!
- -24

Wired Audio Connections
•
Auxiliary Input"
Connect any audio playback device to the rear aux-in port, using a 3.5mm (1/8in)
stereo cable. Bluetooth functionality is disabled while the cable is plugged in.!
•
Headphone Output"
Connect any standard wired headphones to the front headphone port, for private
listening. This automatically mutes the speaker in favor of the headphones, but
maintains vibration functionality for the resonator. The volume dial now controls
headphone volume instead of speaker volume.!
Controlling Your Music
When playing music from a Bluetooth device, Groove Thing’s Bluetooth button can be
used to send playback commands to your source device, using the same conventions as
many other single-button media controls:!
Play / pause – single click#
Next track – double click#
Previous track – triple click
- -25

6. Maintenance & Care
⚠ WARNING:
NEVER IMMERSE THE SPEAKER OR RESONATOR PUCK IN LIQUID. THEY
CONTAIN UNSEALED ELECTRICAL COMPONENTS THAT COULD BECOME PERMANENTLY
DAMAGED AND/OR PRESENT A SHOCK HAZARD.
⚠ WARNING:
ONLY THE RESONATOR ATTACHMENTS SHAPES CAN BE SUBMERGED
FOR CLEANING, AND ONLY WHEN DETACHED FROM THE RESONATOR PUCK.
Speaker Care (when required)
•
Disconnect all power. Unplug from wall outlet before cleaning.!
•
Using a soft, slightly water dampened cloth, wipe away any residue or liquid or dust on
external surfaces.!
•
Never use cleaners, solvents, or abrasive cloths.!
•
Ensure unit is completely dry before reconnecting power.!
•
Do not allow moisture to enter any ports or openings.!
- -26

Resonator Puck Care (recommended after each use)
•
Disconnect resonator cable from speaker.!
•
Using a soft, slightly water dampened cloth, wipe away any residue or liquid on
external surfaces.!
•
Never use cleaners, solvents, or abrasive cloths.!
•
Ensure resonator and cable are completely dry, before reconnecting.!
The resonator puck will often have external contact with bodily fluids or personal
lubricants during normal use. Always clean and thoroughly dry after each session,
or whenever significant wetness is noticed.
Attachment Shapes Care (required after each use)
•
Remove resonator shape from resonator puck, by rotating the shape a quarter turn
counter-clockwise, then lift the shape off the puck.!
•
While it’s detached, hand wash resonator shape with warm water and mild soap. It can
be submersed or soaked if needed.!
•
Ensure resonator shape is completely dry before reattaching to resonator puck.!
•
Inspect resonator shape for any damage or wear, before each use.!
- -27

Cable Care
Power Adapter Cable:
•
Never pull, stretch, or yank on cables. Avoid bending at sharp right angles.!
•
Do not pinch cables in furniture or doors.!
•
Inspect whenever possible before use for any signs of damage, fraying, or wear.!
•
If any damage is visible, discontinue use immediately and contact customer support.!
Resonator Cable:
•
Store with gentle coiling, avoid tight kinks.!
•
Check connection points/pins regularly to make sure they are not bent or damaged.!
•
Handle gently when connecting/disconnecting. Twist connector when inserting until it
seats correctly, BEFORE applying full connection pressure, to avoid damage.!
Storage
•
Store in a cool and dry location, away from direct sunlight.!
•
Disconnect from power when not in use for extended periods.!
•
Keep accessories separated in clean dry storage.!
•
Keep original packaging, and use it for long-term storage or transportation.!
- -28

Product Lifespan Tips
•
Only use in ambient temperature between 10-35°C (50°F to 95°F).!
•
Always use the correct cables and adapters shipped with the product (never substitute
power adapters from other devices).!
•
Keep the product clean and dry.!
•
Store accessories properly after each use (in a clean, covered, and dry location).!
•
Handle all connections gently with care.!
•
Read the user guide and follow all safety and usage guidelines.!
- -29

When To Contact Support
⚠ WARNING:
DISCONTINUE USE AND CONTACT CUSTOMER SUPPORT IF…
•
Any cable shows signs of damage.!
•
The product heats up excessively during normal use, that seems unchecked by the
temperature control system.!
•
The resonator puck emits unusual noises or vibrations, that seem abnormal compared
to typical use.!
•
You feel the product may cause, or has caused, injury/discomfort.!
•
Device is unresponsive despite following guidance in 7. Troubleshooting .!
•
You don’t have the correct regional power plug to connect it to power.!
•
Any component appears damaged or defective.!
⚠ WARNING:
DO NOT ATTEMPT TO REPAIR THE PRODUCT YOURSELF.!#
CONTACT AUTHORIZED CUSTOMER SUPPORT FOR ALL SERVICE NEEDS.
- -30

7. Troubleshooting
Common Issues & Solutions
PROBLEM
POSSIBLE CAUSE
SOLUTION
Unit won't
power on
No power connection
Verify outlet is working; check all power
connections are secure.
Power adapter not
properly assembled
Ensure regional plug is fully inserted into
adapter and that it is plugged into the wall.
Barrel jack not fully
inserted
Check that rear panel connection is secure,
and pressed in all the way.
Bluetooth
won't pair
Speaker not in pairing
mode
While Groove Thing is powered on, press
and hold the Bluetooth button for 3s, then
release; the speaker will announce “Pairing
mode - searching for new device”. Confirm
that the Bluetooth button is rapidly
flashing.
- -31

Bluetooth
won't pair
Speaker in reconnect
mode
If the Bluetooth button is slowly fading on
and off, this means the speaker is
searching for a previously paired device. It
is NOT trying to pair to a new device. Press
and hold Bluetooth button for 3 seconds,
then release, to enter pairing mode.
Previously paired device
interfering
Perform factory reset procedure described
below.
Device locked/stuck
Perform power cycling procedure
described below.
The speaker says
“pairing failed”
Perform factory reset procedure described
below.
Bluetooth
button
unresponsive
Aux-in cable plugged in
Anytime the aux-in port (on rear of unit) is
in use, bluetooth functions are disabled
and the bluetooth button will not respond.
Unplug your audio cable to re-enable
bluetooth.
PROBLEM
POSSIBLE CAUSE
SOLUTION
- -32

No audio
output
Volume is muted
Double-check that your phone or other
source device doesn’t have volume turned
down to zero. Groove Thing ignores your
source device’s audio volume, however
some devices actually stop sending audio
altogether when you set their volume to
zero.
Volume is too low
Turn small dial (volume control) clockwise.
If using an aux-in cable, you should also
try turning up your audio source’s volume
control. On most phones, you want to set
your phone volume to 100% when using
an aux cable.
Headphones plugged in
Remove headphones if you want speaker
audio.
PROBLEM
POSSIBLE CAUSE
SOLUTION
- -33

No audio
output
Wrong audio destination
selected on source
device
Even when paired/connected over
bluetooth, some phones and other devices
allow you to select different outputs for
audio. Check your device’s settings to
ensure that bluetooth / Groove Thing are
selected for audio output.
Vibration not
working
Resonator puck cable
not connecting fully
Check front panel connection; hold cable
BELOW the movable collar, at the
transition point between the silver and
black areas; twist cable 360° with your
fingers, until you find the angle where the
connector slips inward into the port; then
apply further forward pressure to click it
into port.
Vibration intensity set too
low
Twist large dial clockwise.
PROBLEM
POSSIBLE CAUSE
SOLUTION
- -34

Vibration not
working
No audio AND no
vibration
Start music playback - vibration syncs with
audio
The songs you’re playing
don’t have enough bass
Groove Thing’s resonator responds to low
notes at the bottom half of a piano
keyboard. Music that only has high notes /
high frequencies won’t cause vibration.
Check our recommended playlists for
example tracks that work well.
Aux-in cable plugged in,
source device volume too
low
If using the aux-in cable with a phone,
make sure that your phone’s volume is set
at 90-100%.
Power light fading on/off
in repeating pattern
This indicates that resonator overheat
protection has activated, temporarily
reducing vibration power and intensity.
Turn down intensity dial, or switch to lighter
music temporarily, or turn unit off to allow it
cool down.
PROBLEM
POSSIBLE CAUSE
SOLUTION
- -35

Bluetooth
connection
keeps
dropping
Interference from other
devices
Turn off or move away from other
Bluetooth devices.
Too many Bluetooth
devices connected to
your source
Certain streaming devices have a limit on
the number of active Bluetooth
connections they can hold with other
products; disconnect other Bluetooth
products from your phone or other source
device, and try again.
Source too far from
speaker
Keep your phone or streaming device
within reasonable range of Groove Thing’s
speaker (less than 10 meters / 30 feet
away; this may vary with construction
materials of indoor spaces).
Aux-in not
working
Cable not fully inserted
Check that both ends of your aux cable are
secure.
Wrong input selected
Remove, pause, then reinsert AUX cable.
PROBLEM
POSSIBLE CAUSE
SOLUTION
- -36

Aux-in not
working
Damaged auxiliary cable
Try a different 3.5mm audio cable.
Resonator
shape won't
attach
Not aligned properly
Place resonator shape on top of resonator
puck, with their twist lock areas pressed
against each other, but with their ovals
facing perpendicular to each other. A
gentle quarter turn clockwise should lock
the shape onto the puck.
Not rotated fully
Ensure a full quarter/90-degree turn, until
you hit a stopping point with a mild click.
The click requires fairly firm force.
Device is
locked
System error/fault
Perform power cycling procedure if the
power button has no effect to turn off the
device. Contact support if this issue
persists after 3 tries.
PROBLEM
POSSIBLE CAUSE
SOLUTION
- -37

Power Cycling Procedure
When to use:
•
Speaker seems locked or unresponsive!
•
Bluetooth won't connect or pair!
•
Device is stuck in an error state!
•
After troubleshooting steps don't resolve the issue!
How to cycle power:
Method 1
•
With unit already powered on…!
•
Press and hold the power button for 3 seconds, then let go of button.!
•
Voiceover should announce “Power off.”!
•
Wait for 30 seconds.!
•
Click the power button again. !
•
The device will power up and announce “Power on.”!
- -38

Method 2:
•
Disconnect power from wall outlet.!
•
Set volume dial to 50% (pointing straight up).!
•
Wait 30 seconds.!
•
Reconnect power at wall outlet.!
•
Wait 10 seconds.!
•
Click the power button to turn on.!
•
The speaker should power up and announce “Power on.”!
⚠ !Most issues can be resolved by power cycling the device.
- -39

Factory Reset Procedure
When to use:
•
If Power Cycling Procedure is insufficient to reset device state.!
•
If pairing between Groove Thing and your source device has become mismatched.!
You must complete BOTH (1) and (2) below…!
1) Unpair Groove Thing from your phone/device:
•
On your phone (or other source device), go to your list of bluetooth devices.!
•
Find Groove Thing, and click “Forget this device” or “Unpair this device.” !
2) Unpair your phone/device from Groove Thing:
•
Make sure Groove Thing is powered on (green power light is steady).!
•
Press and hold the Bluetooth button for 10 seconds, then release it, to erase
Groove Thing’s list of paired devices.!
You’ve now reset both your Bluetooth device and Groove Thing’s pairing list, putting
everything back into the state from when you first unpacked it. You can start over from
scratch.!
- -40

8. Technical Specifications
SPECIFICATION
DETAILS
Model Number
GTBK01
Power Adapter Input
100-240V AC, 50/60Hz
Power Adapter Output
12V DC, 5A, 60W
Audio Input
Bluetooth wireless, wired 3.5mm auxiliary input port
Audio Output
Built-in speakers, wired 3.5mm headphone output port,
wired resonator
Controls
Analog audio volume dial, analog vibration intensity dial,
power button, bluetooth control button
- -41
Ambient Operating
Temperature
10°C to 35°C (50°F to 95°F)

Submersible Components
Resonator attachment shapes ONLY, while DETACHED,
can be freely run under flowing water or submerged for
cleaning. Hand-wash only, with hot water and mild
antibacterial hand soap.
Wipeable Components
Speaker, resonator, and resonator cable are wipeable
with a water-dampened (not dripping wet) cloth. NEVER
immerse speaker or resonator puck in water or other
liquids.
Certifications
UKCA / CE,'FCC, RCM, RoHS, cSGSus 803968, WEEE
CALIFORNIA WARNING
This product can expose you to chemicals including
bisphenol-a and lead, which are known to the State of
California to cause'cancer'and birth defects or
other'reproductive harm. For more information go
to'www.P65Warnings.ca.gov.!
The Proposition 65 exposure addressed by this warning
is associated with lead in Groove Thing’s electrical
connectors and bisphenol-a in its speaker box; not the
insertable resonator shapes.
- -42
⚠

9. Warranty
Groove Thing provides a ninety (90) day limited parts and labor warranty for this device and some of its accessories.!
LIMITED WARRANTY STATEMENT
Groove Thing of San Mateo County, California, USA (“Company”) warrants this product and any accessories purchased
with it to be free from defects in materials and workmanship under normal personal use for NINETY (90) DAYS from the
date on which they were delivered to the buyer’s shipping address. Said warranty is provided to the original buyer ONLY
(“Consumer”). This warranty is non-transferrable and does not apply to resold product.!
If a product or accessory is determined to be defective, then Company will either repair the item, replace the item, or
refund its original purchase price to Consumer. The choice of repair, replacement, or refund will be made at Company’s
sole discretion, and performed at "no charge” to Consumer beyond reimbursement for shipping costs incurred by
Company to send replacement or repaired item to Consumer.!
This warranty does not cover normal wear and tear, cosmetic damage, bending or pinching or rough handling of cords, line
power surges, connection to improper voltage supply, misuse, abuse, accidents, mishandling, improper application,
improper cleaning or maintenance, acts of God, attempted modification or repair by an unauthorized service agent,
damage caused by use with third-party power adapters or accessories, use as part of a paid or commercial service,
damage caused by playing constant unchanging tones for long periods of time, or any use or storage or treatment of items
inconsistent with the warnings and instructions contained in this User Guide or other printed materials included with the
product or item.!
In order to receive warranty coverage service, Consumer must first contact Company to request warranty service before
the end of the warranty period, supplying all of the following information:!
•
Detailed description of the covered defect.!
•
Proof of purchase, showing that Consumer is the original purchaser of the item directly from Company.!
•
Consumer’s current shipping address.!
•
Product serial number, applicable if the Speaker or Resonator Puck are the items undergoing warranty service. This
serial number is printed on the bottom of the Speaker as well as on the outside of its main packaging. !
- -43

•
OPTIONAL: Proof of the date of receipt of product (such as a shipment tracking confirmation), to demonstrate that
product is still within the 90-day coverage period. If such proof is not supplied, then product will be presumed
delivered 7 days after Company records show it was shipped.!
At Company’s request, Consumer must in good faith promptly answer any clarifying questions, so that Company can
confirm that the defect is covered under warranty and determine the most appropriate remedy. Consumer must provide
photos and/or videos of the defect, if requested. If Company confirms the defect is covered under warranty, and chooses
to repair or replace a defective item, then Consumer may be required to ship the defective item back to Company
according to Company’s instructions for return. The cost for such shipping shall be paid by Consumer. Company
additionally reserves the right to require Consumer to prepay for potential shipping costs of any repaired/replaced items to
be sent back to Consumer.!
Items must be sent back in their original packaging, or an equivalently-protective substitute, to prevent damage in transit.
Damage to items during shipping will not be covered under warranty. Consumer is advised to purchase shipping insurance
sufficient to cover potential damage during transit.!
There are no express or implied warranties beyond what is listed above, unless required by law.!
REPAIR OR REPLACEMENT OR REFUND, AS PROVIDED UNDER THIS WARRANTY, IS THE EXCLUSIVE REMEDY
OFFERED TO CONSUMER. COMPANY SHALL NOT BE LIABLE FOR ANY INCIDENTAL OR CONSEQUENTIAL DAMAGES
BEYOND REPAIR, REPLACEMENT, OR REFUND UNDER THIS WARRANTY. COMPANY EXPLICITLY DISCLAIMS
MERCHANTABILITY OR FITNESS FOR A PARTICULAR PURPOSE ON THIS PRODUCT AND ITS ACCESSORIES. !
Some jurisdictions do not allow the exclusion or limitation of incidental or consequential damages, or limitations on how
long an implied warranty lasts, so the above exclusions or limitations may not apply to you. This warranty gives you
specific legal rights and you may also have other rights which vary from jurisdiction to jurisdiction.!
Any repaired or replaced item will be covered by a warranty whose duration is the balance of the original warranty. For
example, if warranty service is requested 20 days after warranty coverage began, then a repaired item supplied under that
request will carry 70 days of warranty, and that 70-day limit will begin upon delivery of the item back to Consumer.!
To inquire about out-of-warranty repair options, contact us with the same information as a warranty service
request. We’ll see what we can do for you.
- -44

10. FCC and IC Statements
FCC Compliance
FCC ID: 2BWO3GTBK01!
Caution: The user is cautioned that changes or modifications not expressly approved by the party responsible for
compliance could void the user's authority to operate the equipment.!
This device complies with Part 15 of the FCC Rules. Operation is subject to the following two conditions: (1) this device
may not cause harmful interference, and (2) this device must accept any interference received, including interference that
may cause undesired operation.!
NOTE: This equipment has been tested and found to comply with the limits for a Class B digital device, pursuant to Part
15 of the FCC Rules. These limits are designed to provide reasonable protection against harmful interference in a
residential installation. This equipment generates, uses and can radiate radio frequency energy and, if not installed and
used in accordance with the instructions, may cause harmful interference to radio communications. However, there is no
guarantee that interference will not occur in a particular installation. !
If this equipment does cause harmful interference to radio or television reception, which can be determined by turning the
equipment off and on, the user is encouraged to try to correct the interference by one or more of the following measures:!
-- Reorient or relocate the receiving antenna."
-- Increase the separation between the equipment and receiver. "
-- Connect the equipment into an outlet on a circuit different from that to which the receiver is connected. "
-- Consult the dealer or an experienced radio/TV technician for help.!
FCC Radiation Exposure Statement:!
This equipment complies with FCC radiation exposure limits set forth for an uncontrolled environment. This transmitter
must not be co-located or operating in conjunction with any other antenna or transmitter. This equipment should be
installed and operated with a minimum distance of 20cm between the radiator (Speaker Box) and your body.!
- -45

IC Compliance
IC: 35790-GTBK01!
This device contains licence-exempt transmitter(s)/receiver(s) that comply with Innovation, Science and Economic
Development Canada’s licence-exempt RSS(s). Operation is subject to the following two conditions:!
# (1) This device may not cause interference."
# (2) This device must accept any interference, including interference that may cause undesired operation of the device.!
Le présent appareil est conforme aux CNR d’Industrie Canada applicables aux appareils radio exempts de licence.
L’exploitation est autorisée aux deux conditions suivantes : !
# (1) l’appareil ne doit pas produire de brouillage, et "
# (2) l’utilisateur de l’appareil doit accepter tout brouillage radioélectrique subi, même si le brouillage est susceptible"
# d’en compromettre le fonctionnement.!
IC Radiation Exposure Statement:!
This equipment complies with Canada radiation exposure limits set forth for an uncontrolled environment. This transmitter
must not be co-located or operating in conjunction with any other antenna or transmitter.!
This equipment should be installed and operated with a minimum distance of 20cm between the radiator (Speaker Box)
and your body.!
Déclaration d’IC sur l’exposition aux radiations:!
Cet équipement est conforme aux limites d’exposition aux radiations définies par le Canada pour des environnements non
contrôlés. Cet émetteur ne doit pas être installé au même endroit ni utilisé avec une autre antenne ou un autre émetteur.!
Cet équipement doit être installé et utilisé à une distance minimum de 20cm entre l’antenne (Boîte de haut-parleur) et votre
corps.!
- -46


Online Resources
Visit our website for additional information, recommended playlists, digital version of this
user guide, video tutorials, FAQs, discussion board link, and additional accessories
available to purchase.!
Website: gthing.com!
- -48
This product contains electrical components and must be disposed of according to local electronics
recycling regulations. Do not dispose of with household waste. Check local regulations before disposal.
Contact local waste management authority for electronics recycling options. !
FCC and IC Statements: see page 45 of this user guide.!
CE Marking: This product complies with the essential requirements of applicable European directives.!
Invented in the United States, designed in Canada, made in China.
803968
WARNING: BEFORE USING THIS PRODUCT, READ
ALL SAFETY INFORMATION AND INSTRUCTIONS.
⚠
⚠