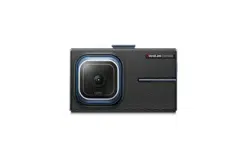
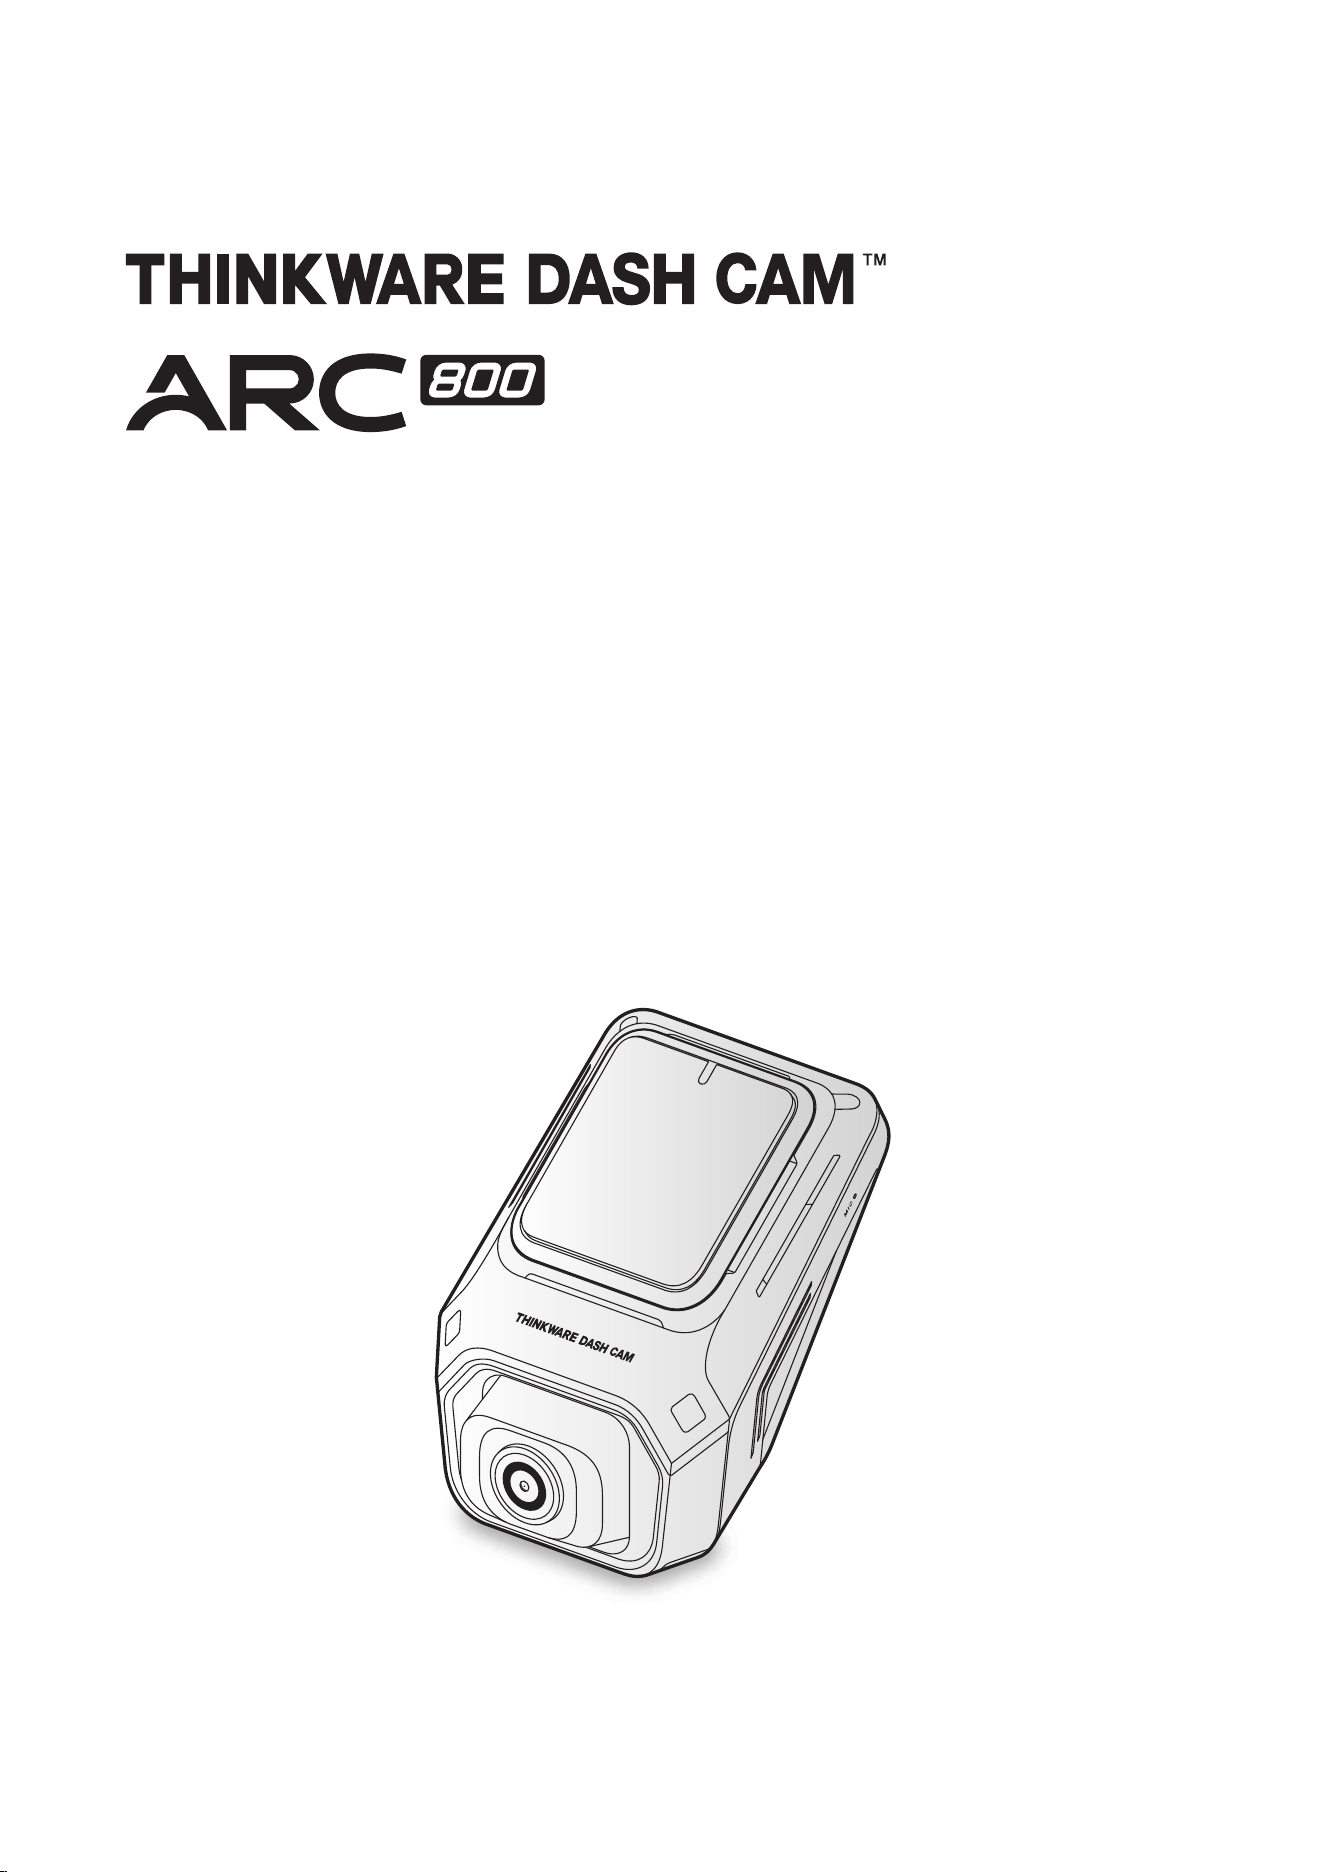
User Guide
This product records videos while the vehicle is operating.
Read and follow the instructions in this guide to properly use and maintain the product.

Before using the product
About the product
This product records videos while the vehicle is operating. Use this product only for reference when
investigating incidents or road accidents. This product is not guaranteed to record all events. The device
may not record accidents with impacts that are too minor to activate the impact sensor or accidents with
massive impacts that cause the vehicle’s battery voltage to deviate.
Please read the user guide thoroughly before using this product. The manufacturer is not responsible for
any accidents that occur due to not reading the user guide thoroughly.
A PC meeting the minimum OS requirements is necessary for using all of this product's functions. Please
check the "Using the mobile viewer" and "Using the PC viewer" sections later for details.
Video recording does not begin until the product is completely turned on (booted up). To ensure that all
vehicle events are recorded, wait until the product is completely booted up after turning it on, and then
begin operating the vehicle.
This product currently displays the product's status with LEDs. People who have difficulty distinguishing
the colors of LEDs, such as those with color blindness or another color vision deficiency, should use it with
caution.
Depending on the vehicle's configuration or operating conditions, such as the installation of remote door
lock devices, ECU settings, or TPMS settings, some product features may not be supported, and different
firmware versions may influence the product's performance or features.
About the user guide
The information provided in the guide may change when the manufacturer updates its service policy.
If the information provided changes, the THINKWARE website (www.thinkware.com) and its app will
provide separate guidance.
This user guide is intended for THINKWARE ARC 800 models only, and it may contain technical errors,
editorial errors, or missing information.
Copyrights
All rights for the content and maps in this guide are reserved by THINKWARE and are protected under
copyright laws. All unauthorized duplication, revision, publication, or distribution of this guide without
written consent from THINKWARE is prohibited and is eligible for criminal charges.
Registered trademarks
THINKWARE ARC 800 is a registered trademark of THINKWARE.
Other product logos and service names in this guide are trademarks of the relevant companies.
Turning voice recording ON or OFF
Some jurisdictions may prohibit recording voice in the vehicle or may require that all passengers have
knowledge of the recording and provide consent before you record voice in the vehicle. It is your
responsibility to know and follow all laws and restrictions for your jurisdiction.
The device can record voice using the integrated microphone while recording video. Voice recording is ON
by default. Please refer to the manual to turn voice recording on or off at any time.

3
Contents
Safety information 4
1. Product overview 6
1.1 Included items 6
1.1.1 Standard items 6
1.1.2 Accessories (sold separately) 6
1.2 Part names 7
1.2.1 Front camera (main unit) - front view 7
1.2.2 Front camera (main unit) - rear view 8
1.2.3 Rear camera 8
1.3 Removing and inserting the memory card 9
1.4 Accessing recorded videos using a USB-C
data cable 9
2. Installing the product 10
2.1 Installing the front camera (main unit) 10
2.1.1 Selecting an installation location 10
2.1.2 Securing the product 10
2.1.3 Connecting the power cable 12
2.2 Installing the rear camera 15
2.2.1 Selecting an installation location 15
2.2.2 Securing the rear camera 15
2.2.3 Connecting the rear camera cable 16
3. Using recording features 18
3.1 Turning the product on or off 18
3.2 Using the LCD display 18
3.3 Learning about the LED indicator and file
storage locations 18
3.4 Using the continuous recording feature 19
3.5 Recording manually 19
3.6 Using the SOS recording feature (optional) 20
3.7 Using parking mode 20
3.8 Using the Night Vision 21
3.9 Using the High Dynamic Range (HDR) 22
3.10 About the screen layout 22
3.10.1 Live view screen 22
3.10.2 Quick menu screen 23
3.11 Playing videos 24
4. Using the road safety and ADAS features 26
4.1 Road safety features 26
4.2 ADAS features 26
4.2.1 Identifying the vehicle type 26
4.2.2 ADAS safety features 27
5. Settings 28
5.1 Setting the Camera 28
5.2 Setting road safety features and ADAS
features 28
5.3 Setting recording features 29
5.4 Configuring the system settings 30
5.5 Managing the memory card 31
6. Using the mobile viewer 32
6.1 Connect the product to a smartphone 32
7. Using THINKWARE CONNECTED (optional) 33
7.1 Installing the THINKWARE CONNECTED LTE
Module (optional) 33
7.2 Connecting the product to THINKWARE
CONNECTED 34
8. Using the PC viewer 35
8.1 System requirements 35
8.2 Learning about the PC viewer 35
8.2.1 Downloading the PC viewer 35
8.2.2 PC viewer screen layout 36
9. Upgrading the firmware 37
10. Troubleshooting 38
11. Specifications 39
4
Safety information
Read the following safety information to properly use the product.
Safety symbols in this guide
"Warning" - Indicates a potential hazard which, if not avoided, may result in injury or death.
"Caution" - Indicates a potential hazard which, if not avoided, may result in minor injury or property damage.
"Note" - Provides useful information to help users better utilize the product’s features.
Safety information for proper use
Driving and product operation
• Do not operate the product while driving a vehicle. Distraction while driving may cause accidents and
result in injury or death.
• Install the product in places where the driver’s view is not obstructed. Obstruction of the driver’s vision
may cause accidents and result in injury or death. Check with your state and municipal laws before
mounting the product to the windshield.
Power supply
• Do not operate or handle the power cable with wet hands. Doing so may result in an electrocution.
• Do not use damaged power cables. Doing so may result in an electrical fire or electrocution.
• Keep the power cable away from all heat sources. Failure to do so may cause the power cord insulation to
melt, resulting in electrical fire or electrocution.
• Use the power cable with the correct connector and make sure the power cable is connected securely
and is firmly in place. Failure to do so may result in an electrical fire or electrocution.
• Do not modify or cut the power cable. Also, do not place heavy objects on the power cable or pull, insert,
or bend the power cable using excessive force. Doing so may result in an electrical fire or electrocution.
• Use only genuine accessories from THINKWARE or an authorized THINKWARE dealer. THINKWARE does not
guarantee compatibility and normal operation of third-party accessories.
• When connecting the power cable to the product, ensure that the connection between the cable plug
and the power cable connector on the product is secure. If the connection is loose, the power cable may
become disconnected due to vehicle vibration. Video recording is not available if the power connector is
disconnected.

5
Children and pets
Ensure that the product is out of the reach of children and pets. If the product breaks, it may result in fatal
damage.
Other information about the product
Product management and operation
• Do not expose the product to direct sunlight or intense light. The lens or internal circuitry may fail
otherwise.
• Use the product at a temperature between 14°F and 140°F (-10°C to 60°C) and store the product at a
temperature between -4°F and 158°F (-20°C to 70°C). The product may not function as designed and some
permanent physical damages may result if it is operated or stored out of the specified temperature ranges.
Such damages are not covered by the warranty.
• Frequently check the product for the proper installation position. Impact caused by extreme road conditions
may alter the installation position. Ensure that the product is positioned as instructed in this guide.
• Do not apply excessive force when pressing the buttons. Doing so may damage the buttons.
• Do not use chemical cleaners or solvents to clean the product. Doing so may damage plastic components
of the product. Clean the product using a clean, soft, and dry fabric.
• Do not disassemble the product or subject the product to impact. Doing so may damage the product.
Unauthorized disassembly of the product voids the product warranty.
• Handle with care. If you drop, mishandle, or expose the product to external shocks, it may cause damage
and/or result in the malfunction of the product.
• Do not attempt to insert foreign objects into the device. Doing so may damage the product.
• Avoid excessive humidity and do not allow any water to enter the product. Electronic components inside
the product may fail if exposed to humidity or water.
• Depending on the make and model of your car, the power may be constantly supplied to the dash cam even
when the ignition is turned off. Installation of the device to a continuously powered 12V outlet could result
in vehicle battery drainage.
• This device is designed to record video while the vehicle is in operation. The quality of the video might be
affected by weather conditions and the road environment, such as whether it is day or night, presence of
street lighting, entering/exiting tunnels, and the surrounding temperature.
• THINKWARE is NOT responsible for the loss of any recorded video during operation.
• Although the device was designed to withstand high-impact car collisions, THINKWARE does not guarantee
the recording of accidents when the device is damaged as a result of the accident.
• Keep the windshield and camera lens clean for optimal video quality. Particles and substances on the
camera lens or windshield may reduce the quality of the recorded videos.
• This device is intended to be used inside the vehicle only.
6
1. Product overview
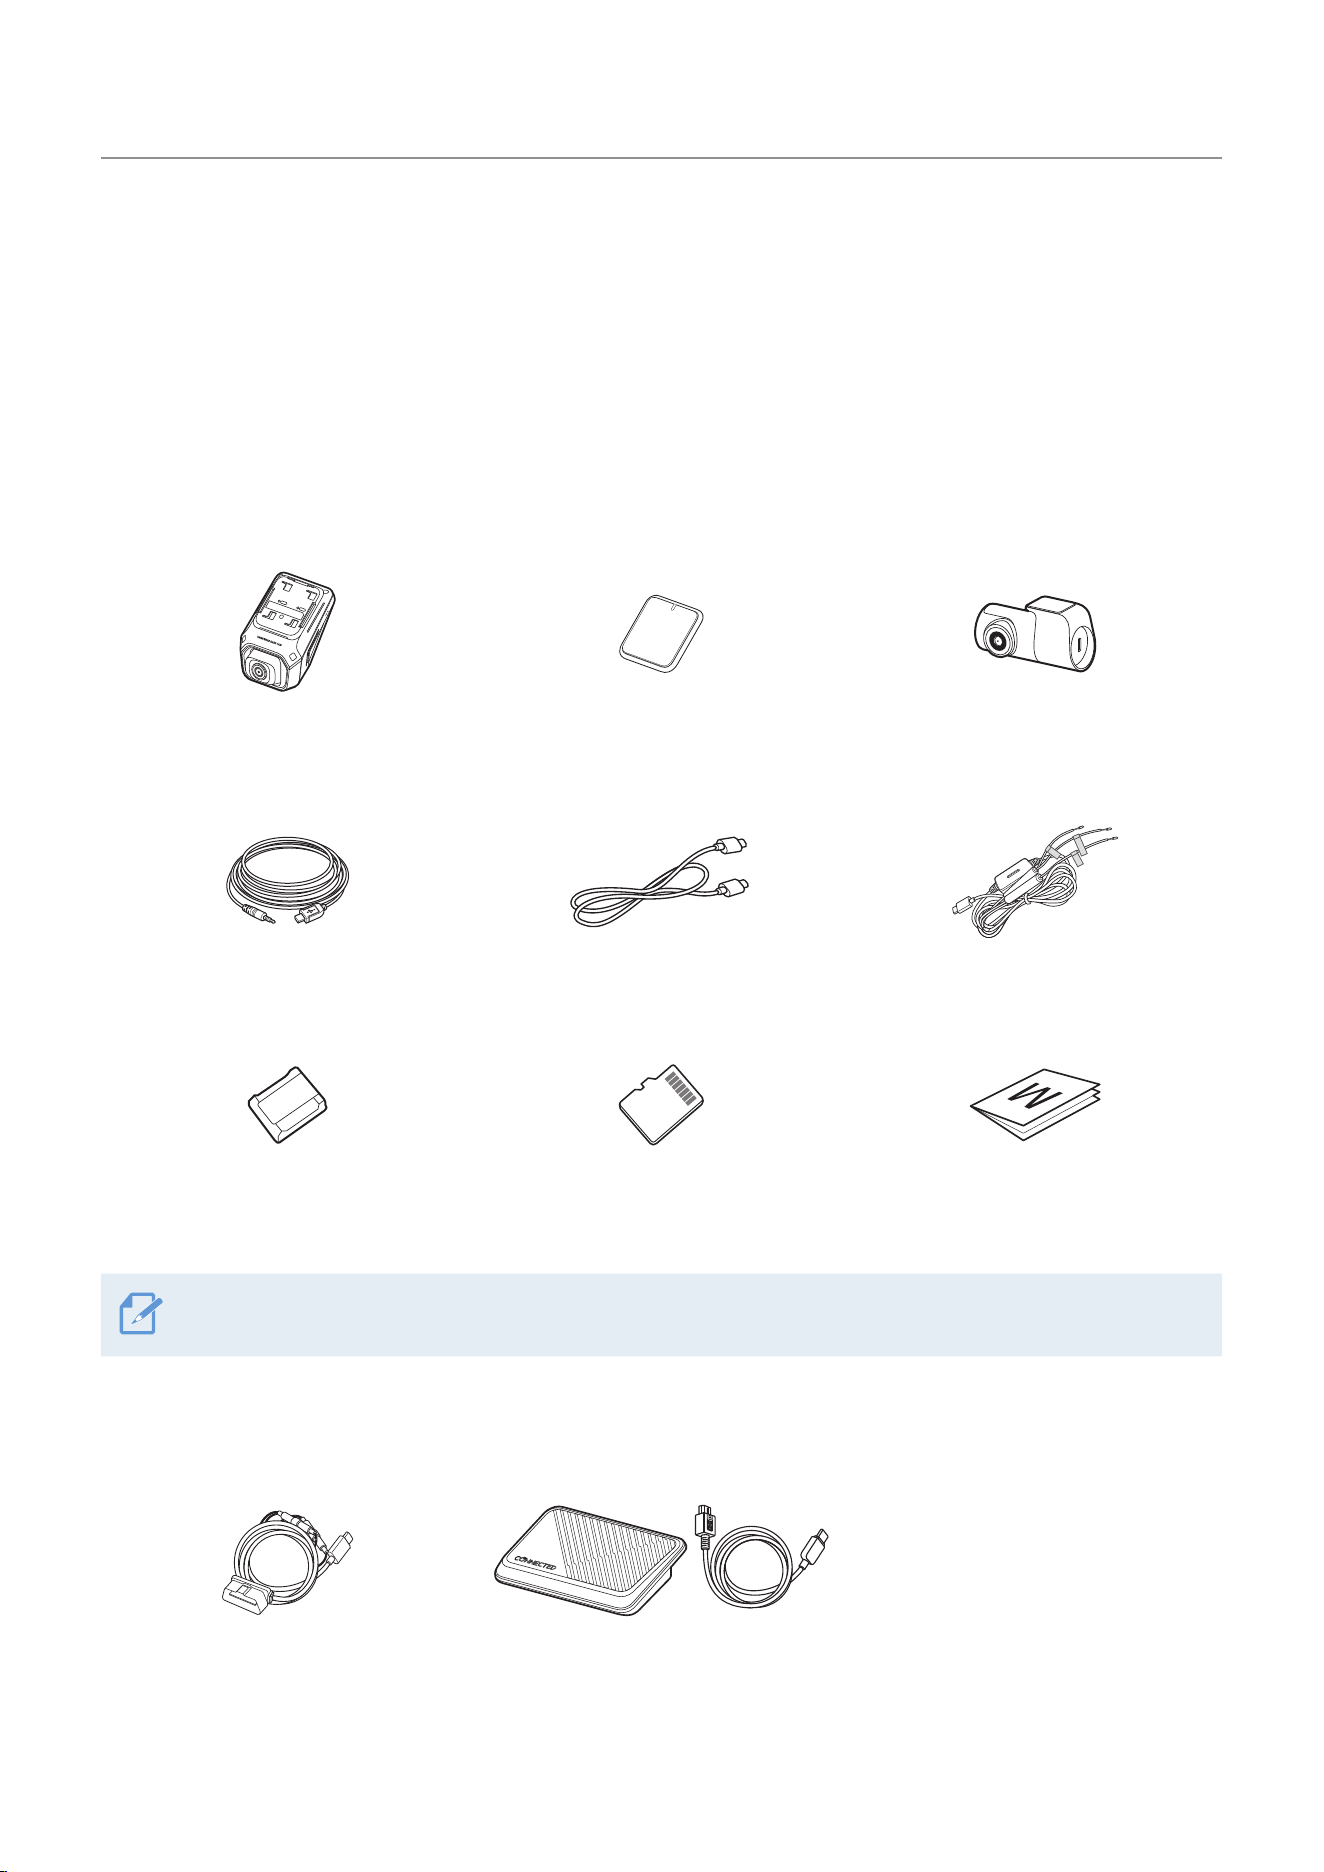
1.1 Included items
Ensure that all the items are included when you open the product box.
1.1.1 Standard items
Front camera (main unit) Mount Rear camera
ACC
BATTERY
GND
Rear camera cable USB-C to USB-C cable Hardwiring cable
Adhesive cable holder
microSD memory card
(consumable)
Warranty & Quick Start Guide
The standard items may change without prior notice.
1.1.2 Accessories (sold separately)
OBD-ll cable
THINKWARE CONNECTED
LTE Module (TCM-LTE) & cable
Product overview
7
1.2 Part names
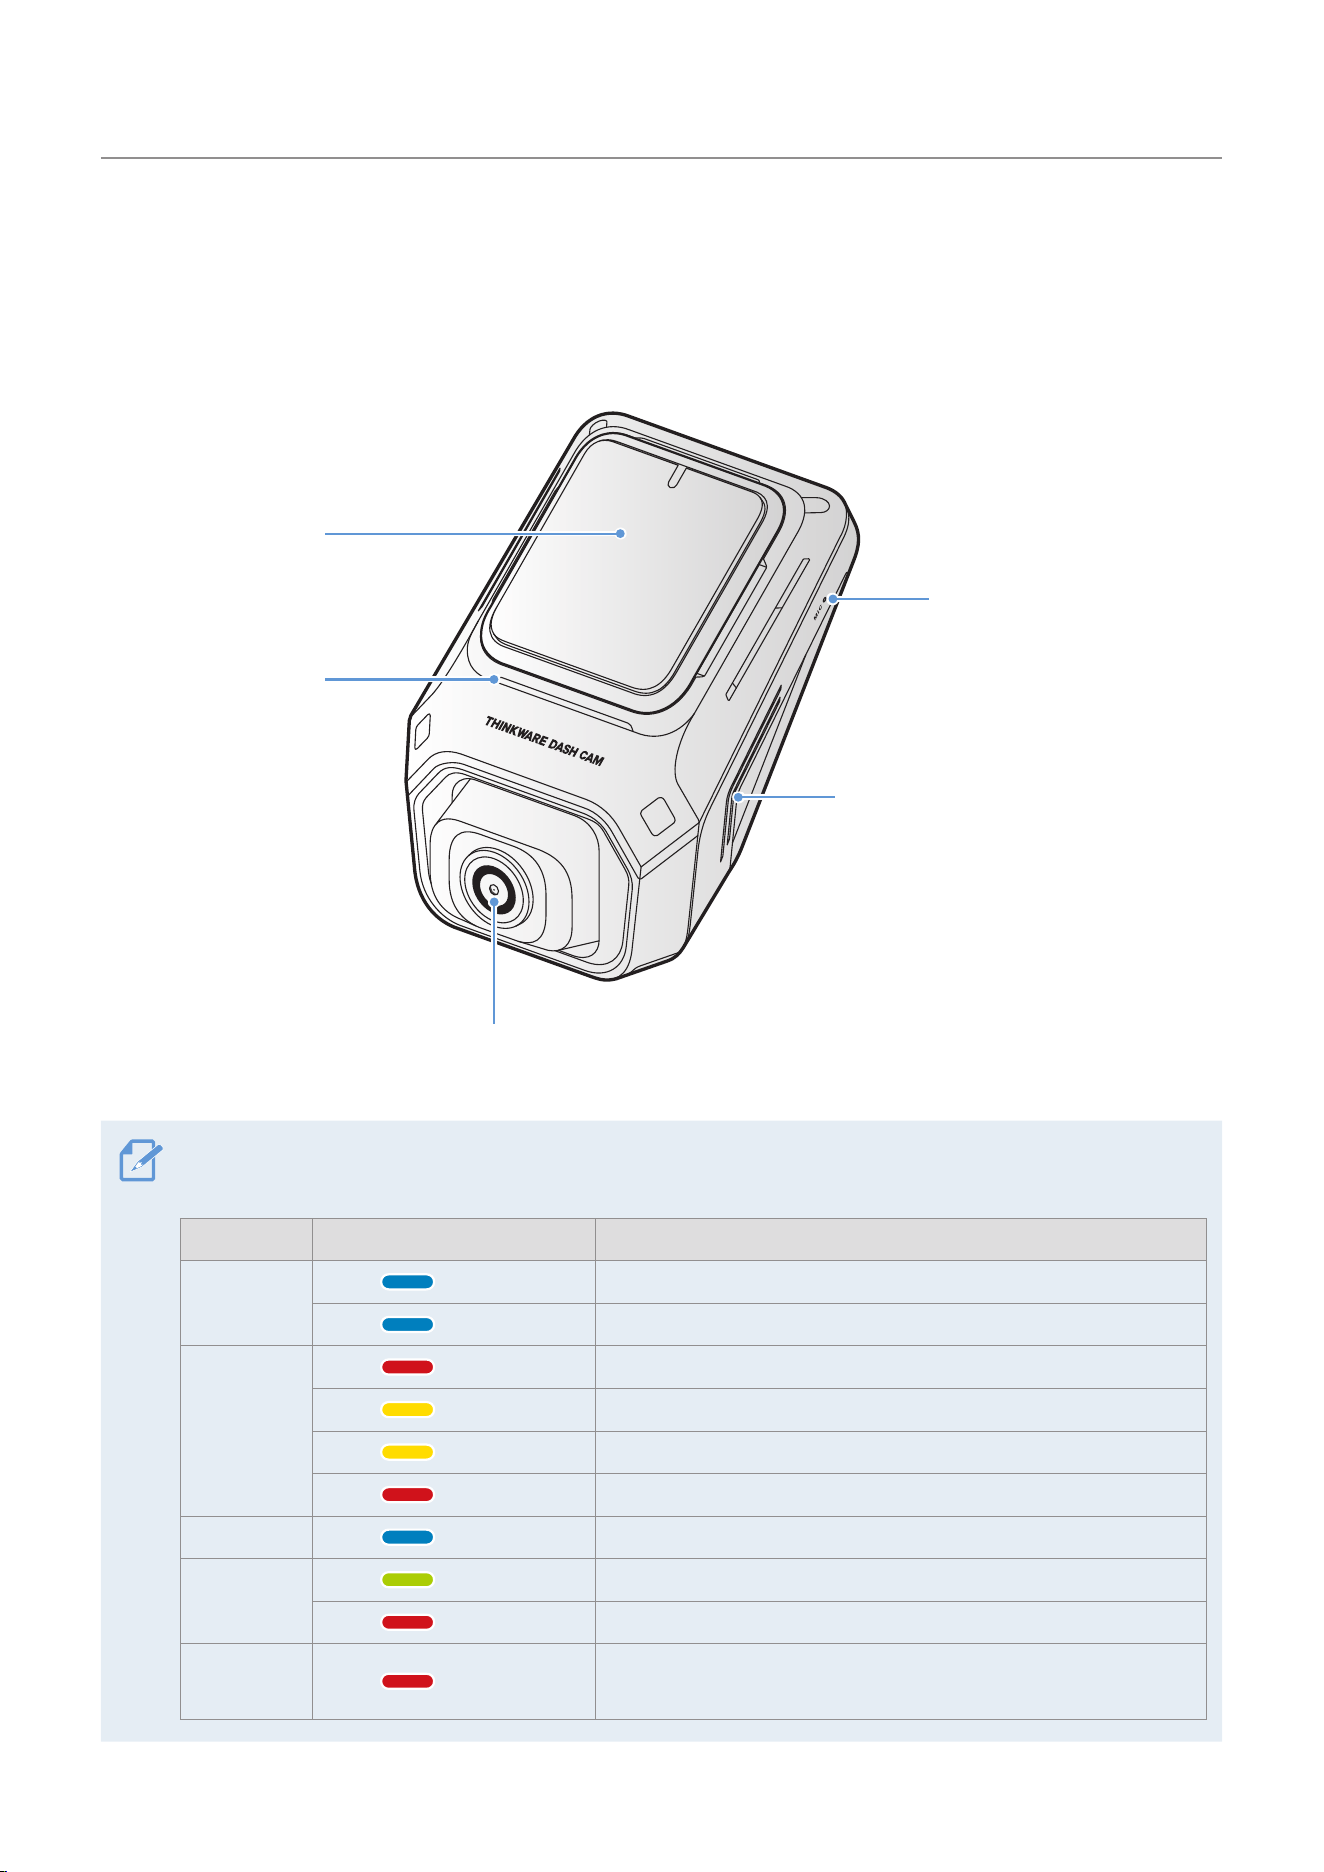
1.2.1 Front camera (main unit) - front view
Microphone
Used for voice recording.
Speaker
Outputs the voice guide and
buzzer sounds to indicate the
product’
s status.
Front camera lens
Records the front view.
Security LED
Indicates that video is
being recorded.
Adhesive mount
Used to fix the front
camera in the vehicle.
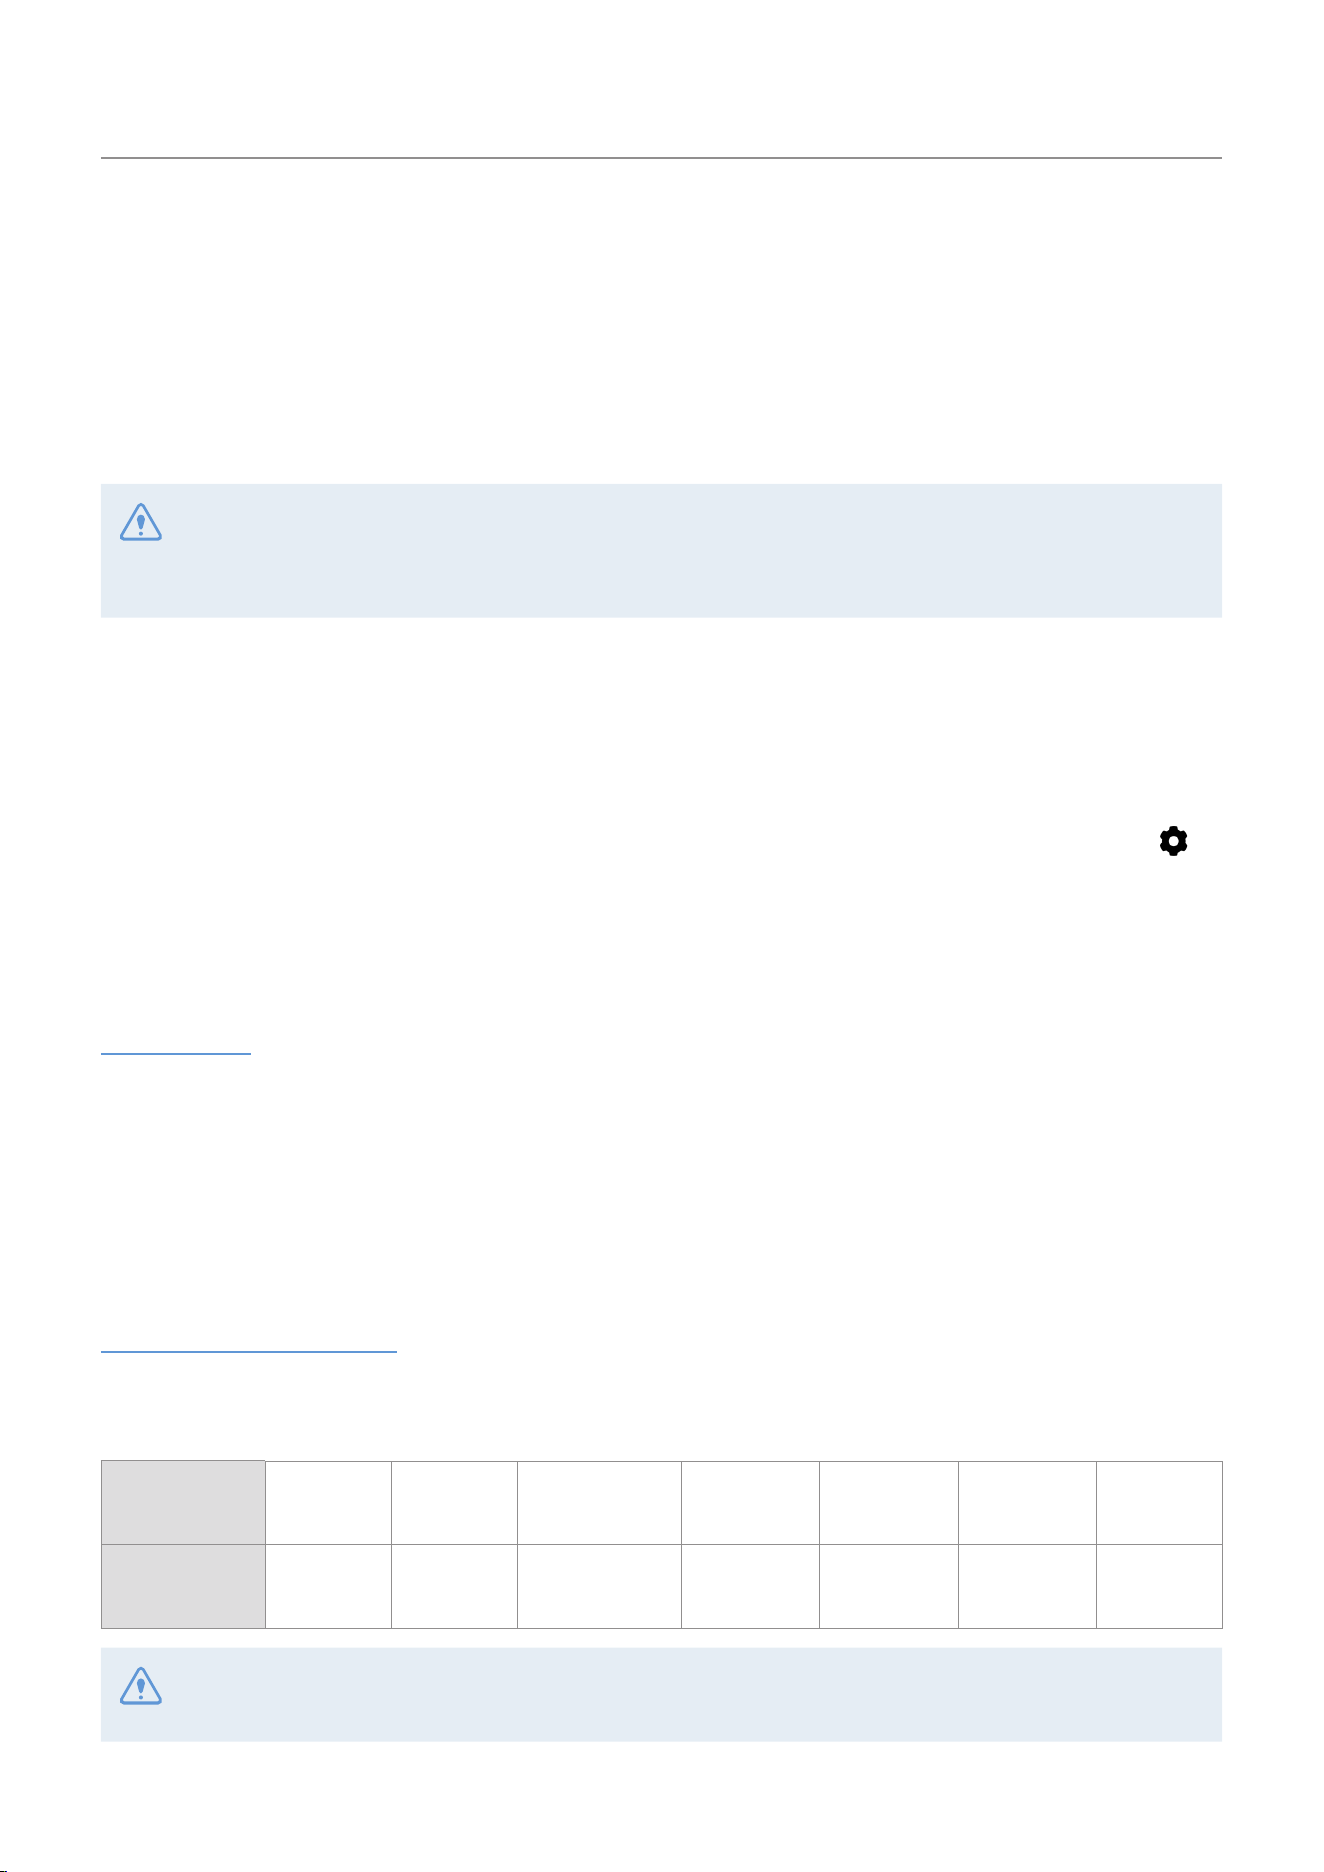
Refer to the following table to check the status of the product using the LED indicators. For more information
about the REC LED, refer to "3.4 Using the continuous recording feature" on page 19.
Features STATUS LED (status) Operation description
Wi-Fi
(flickers) Wi-Fi QR code on
(light on) Wi-Fi connected
LTE
(flickers) LTE not connected
(flickers) Waiting for LTE connection/Connecting to LTE
(light on) LTE connected
(light on) Powered off due to high temperature
USB
(light on) USB connected
Firmware
(light on) Firmware updating/Update complete
(light on) Firmware update error
Error
(flickers)
System error/SD card error/
High temperature protection mode
Product overview
8
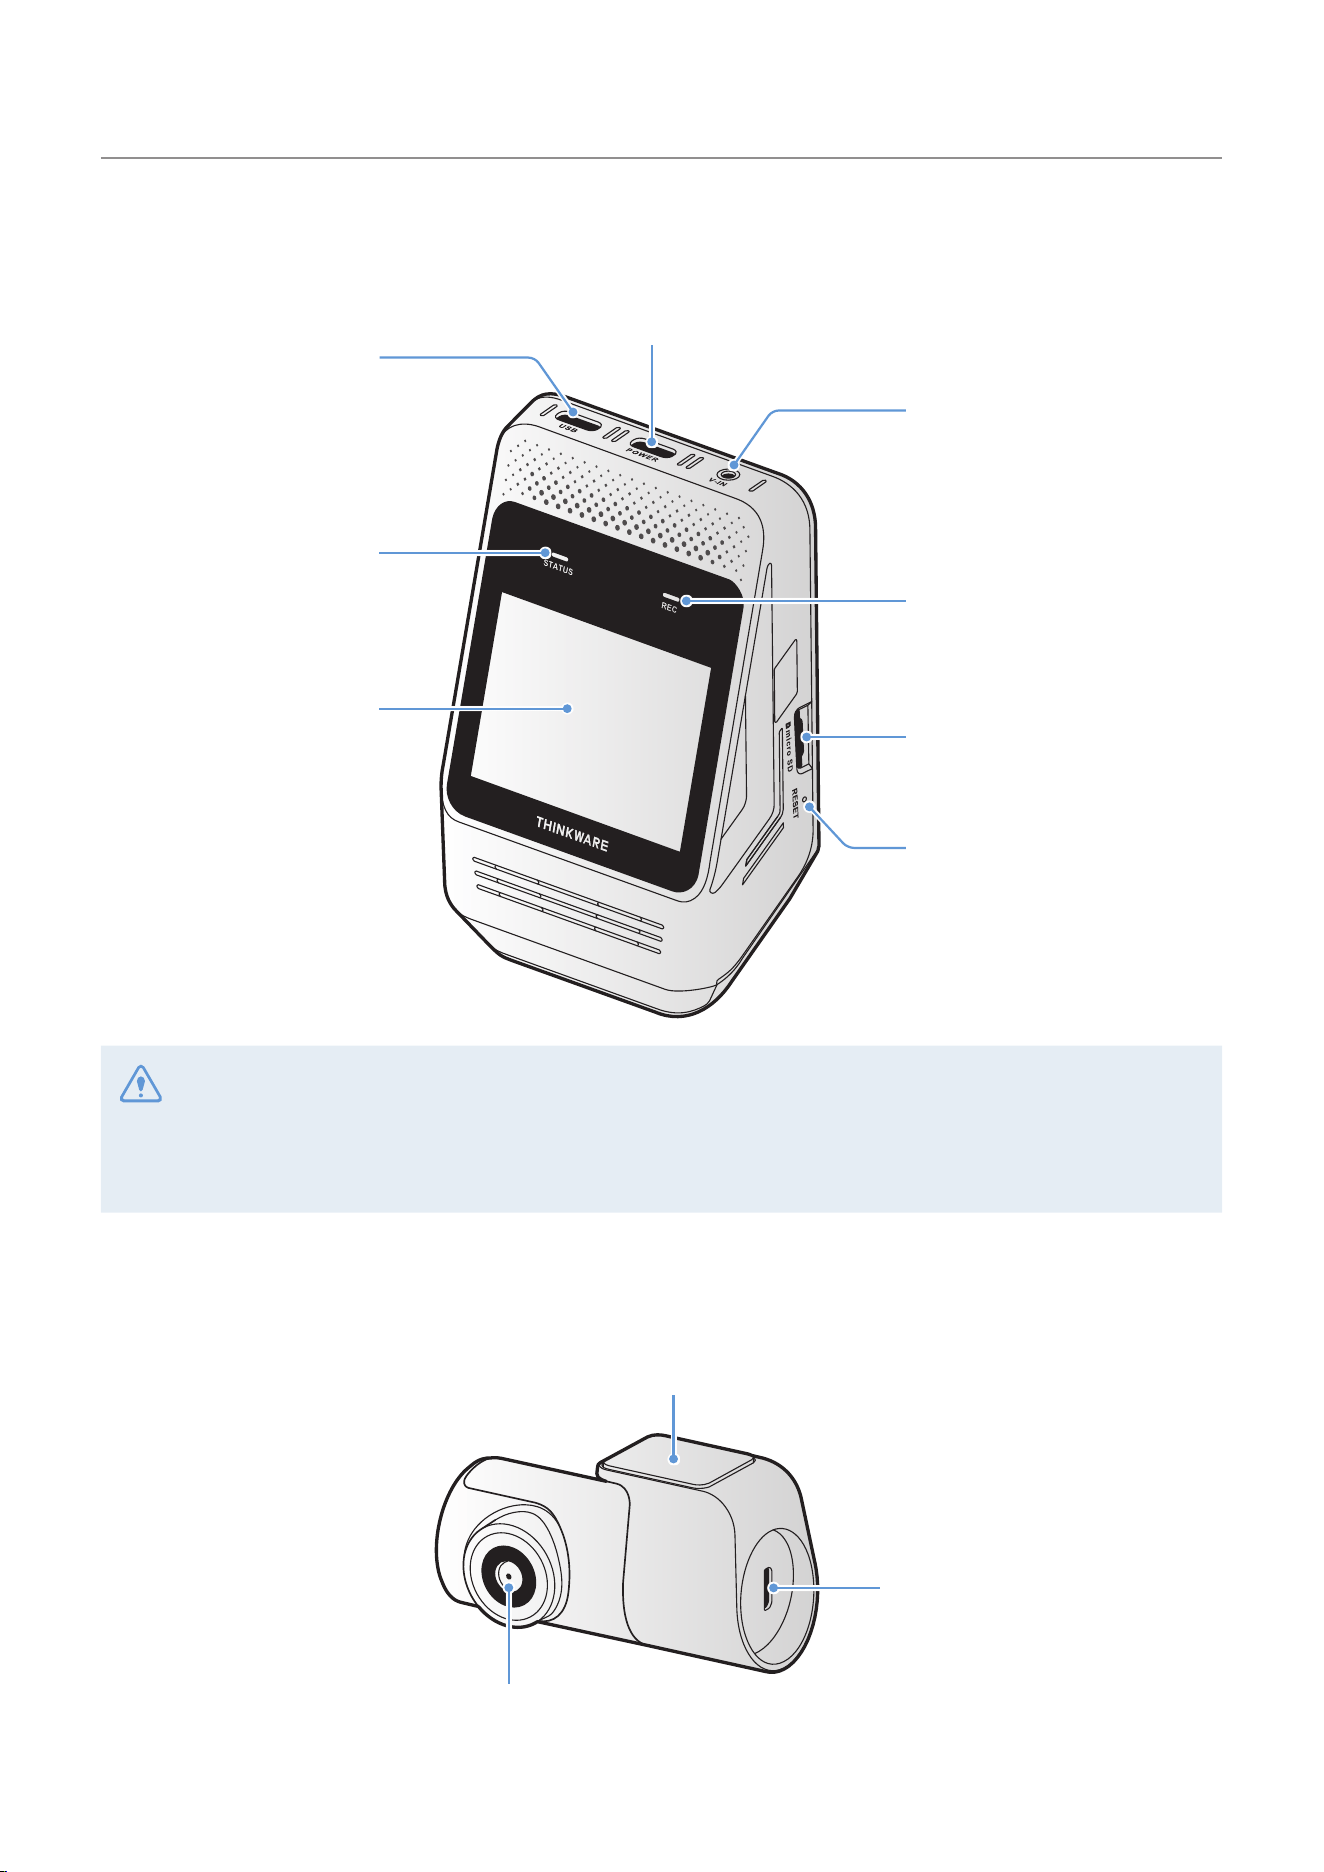
1.2.2 Front camera (main unit) - rear view
Power port
Used to connect the power cable.
Touchscreen
Used for setting the
product or viewing the
recorded videos.
Status LED
Indicates the operating
status
of the product.
USB-C port
Used to connect a USB-C
cable or the THINKW
ARE
CONNECTED LTE Module.
REC LED
Indicates the recording status.
V
-IN input port
Used to connect the
rear
camera.
Memory card slot
Insert a memory card to save
recordings.
Reset button
Insert the tip of a sharp
object to reset the product
when an error occurs.
• This product uses a Capacitive Touch Panel. Use appropriate pressure to press the touchscreen, as
touches may not be detected if it isn't pressed hard enough.
• Remove the protective film before use. Touching the screen with the protective film left on may result in a
malfunction.
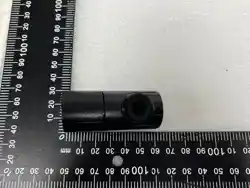
1.2.3 Rear camera
Adhesive mount
Used to fix the rear camera in the vehicle.
Rear camera lens
Records the rear view.
Connection port
Used to connect the rear camera
to the front camera using a
rear
camera cable.
Product overview
9
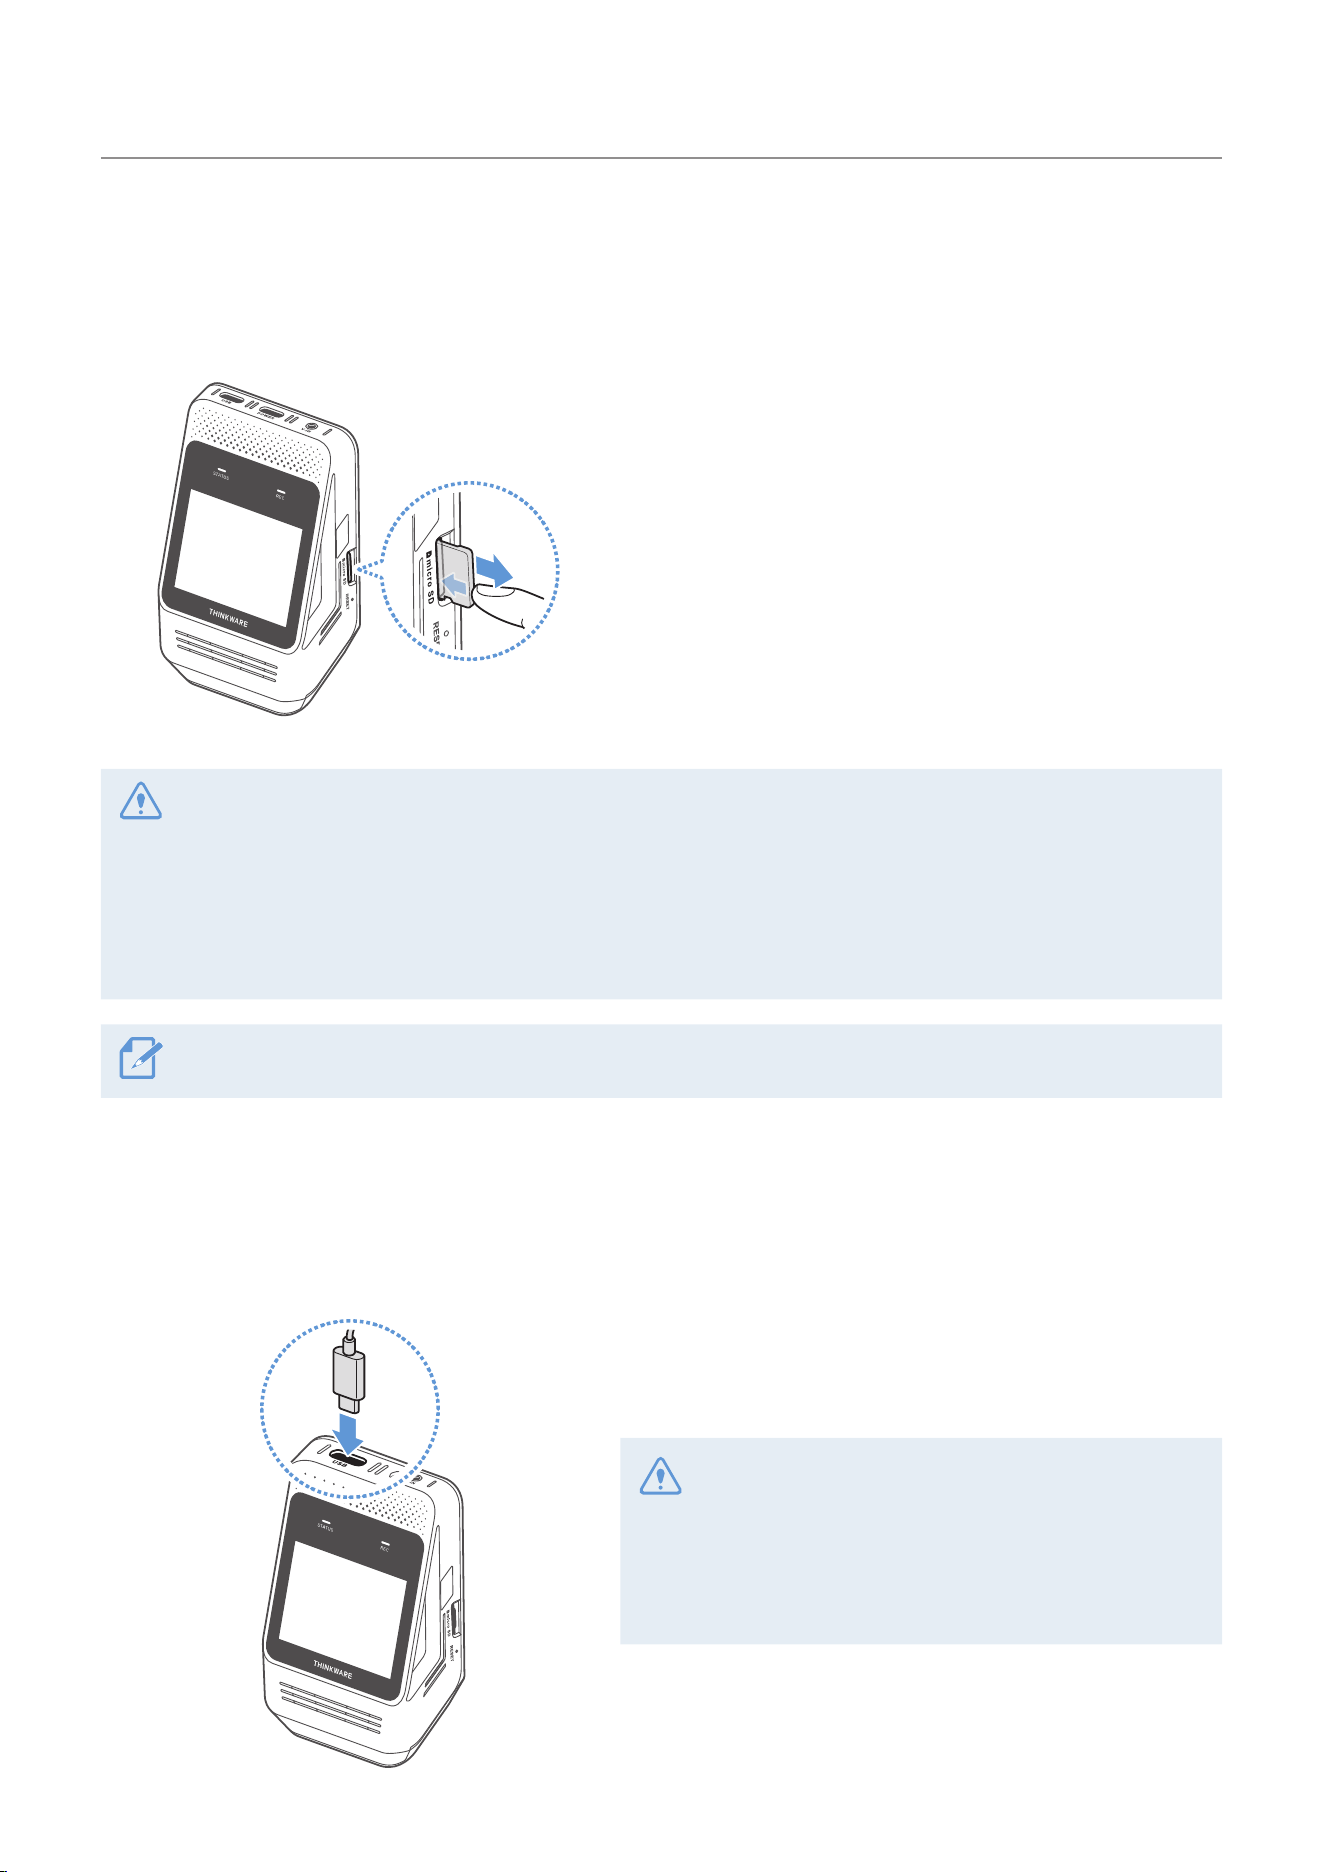
1.3 Removing and inserting the memory card
Follow the instructions to remove the memory card from the product or to insert the memory card into the
product.
Before removing the memory card, ensure that the
product is turned off. Gently push the bottom of the
memory card with your fingernail to release it, and then
remove it from the product.
To insert the memory card, check the insertion direction
marked on the product. Then insert the memory card into
the memory card slot in the correct direction and press it
until you hear a click.
• Ensure that the product is turned off before removing the memory card. The recorded video files may be
corrupted or lost if you remove the memory card while the product is on.
• Ensure that the memory card is in the correct direction before inserting it into the product. The memory
card slot or the memory card may be damaged if it is inserted incorrectly.
• Use only authentic memory cards from THINKWARE. THINKWARE does not guarantee the compatibility and
normal operation of third-party memory cards.
To prevent loss of recorded video files, periodically back up the video files on a separate storage device.
1.4 Accessing recorded videos using a USB-C data cable
You can view or save recorded videos without removing the memory card by using a USB-C data cable to
connect the product to a smartphone. Recording stops when the USB-C data cable is connected.
With the product powered on, connect the USB-C data
cable to the USB-C port on the product and to your
smartphone.
• Do not connect a USB-C charging cable to the
USB-C port.
• Use only an authentic USB-C data cable.
• Use only an authentic USB OTG adapter when
connecting an iOS device.
10
2. Installing the product
2.1 Installing the front camera (main unit)
Follow the instructions to properly install the product.
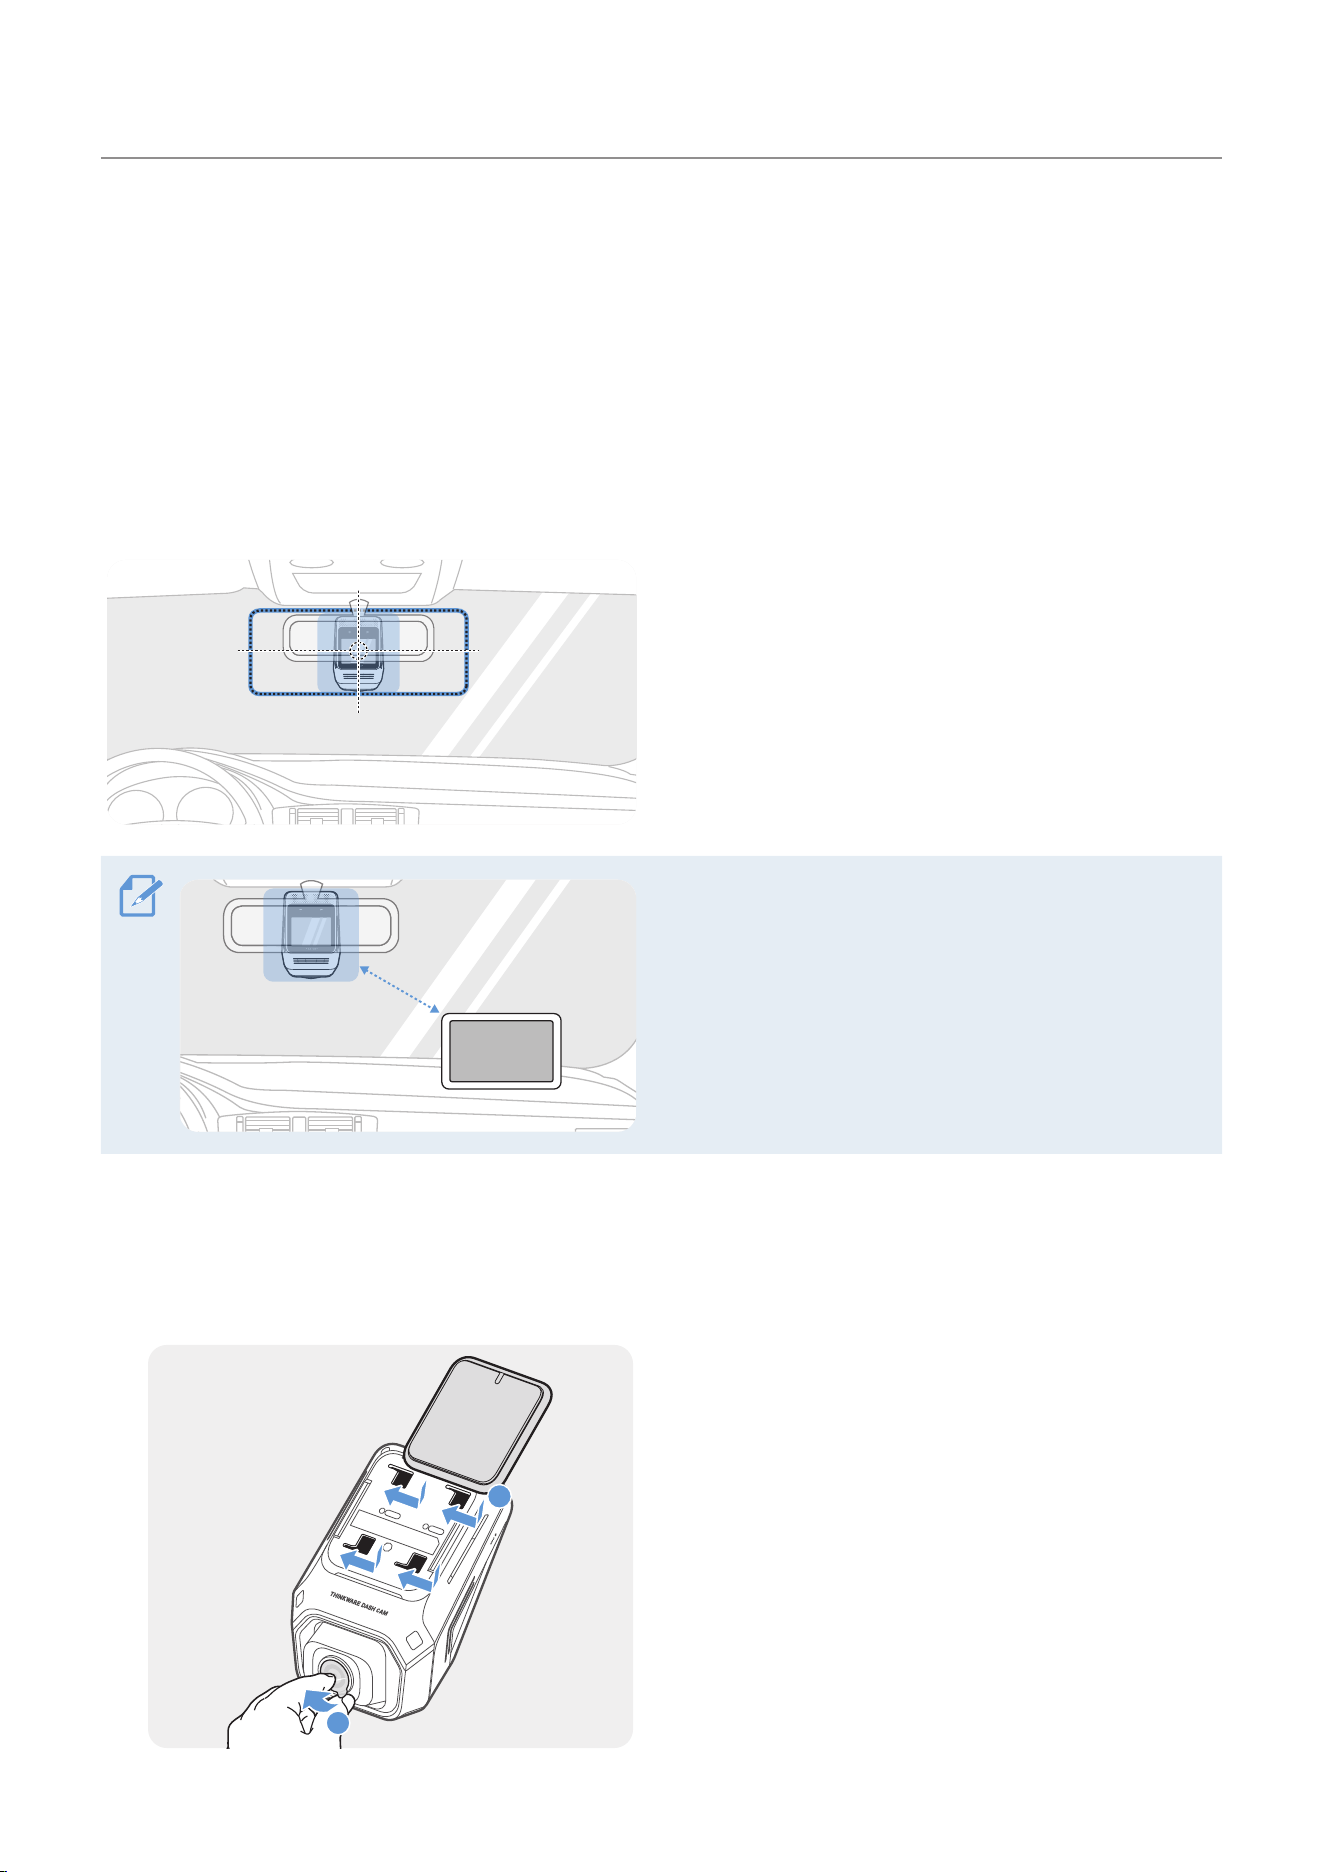
2.1.1 Selecting an installation location
Select an installation location that can record the
entire view in front of the vehicle without obstructing
the driver’s vision. Ensure that the front camera lens
is located in the center of the windshield.
20 cm
If a GPS navigating device is installed on the dashboard,
its GPS reception may be affected depending on the
dashboard camera’s installation location.
Adjust the installation location of the GPS navigating
device to ensure that the two devices are separated by
at least 20 centimeters (approximately 8 inches).
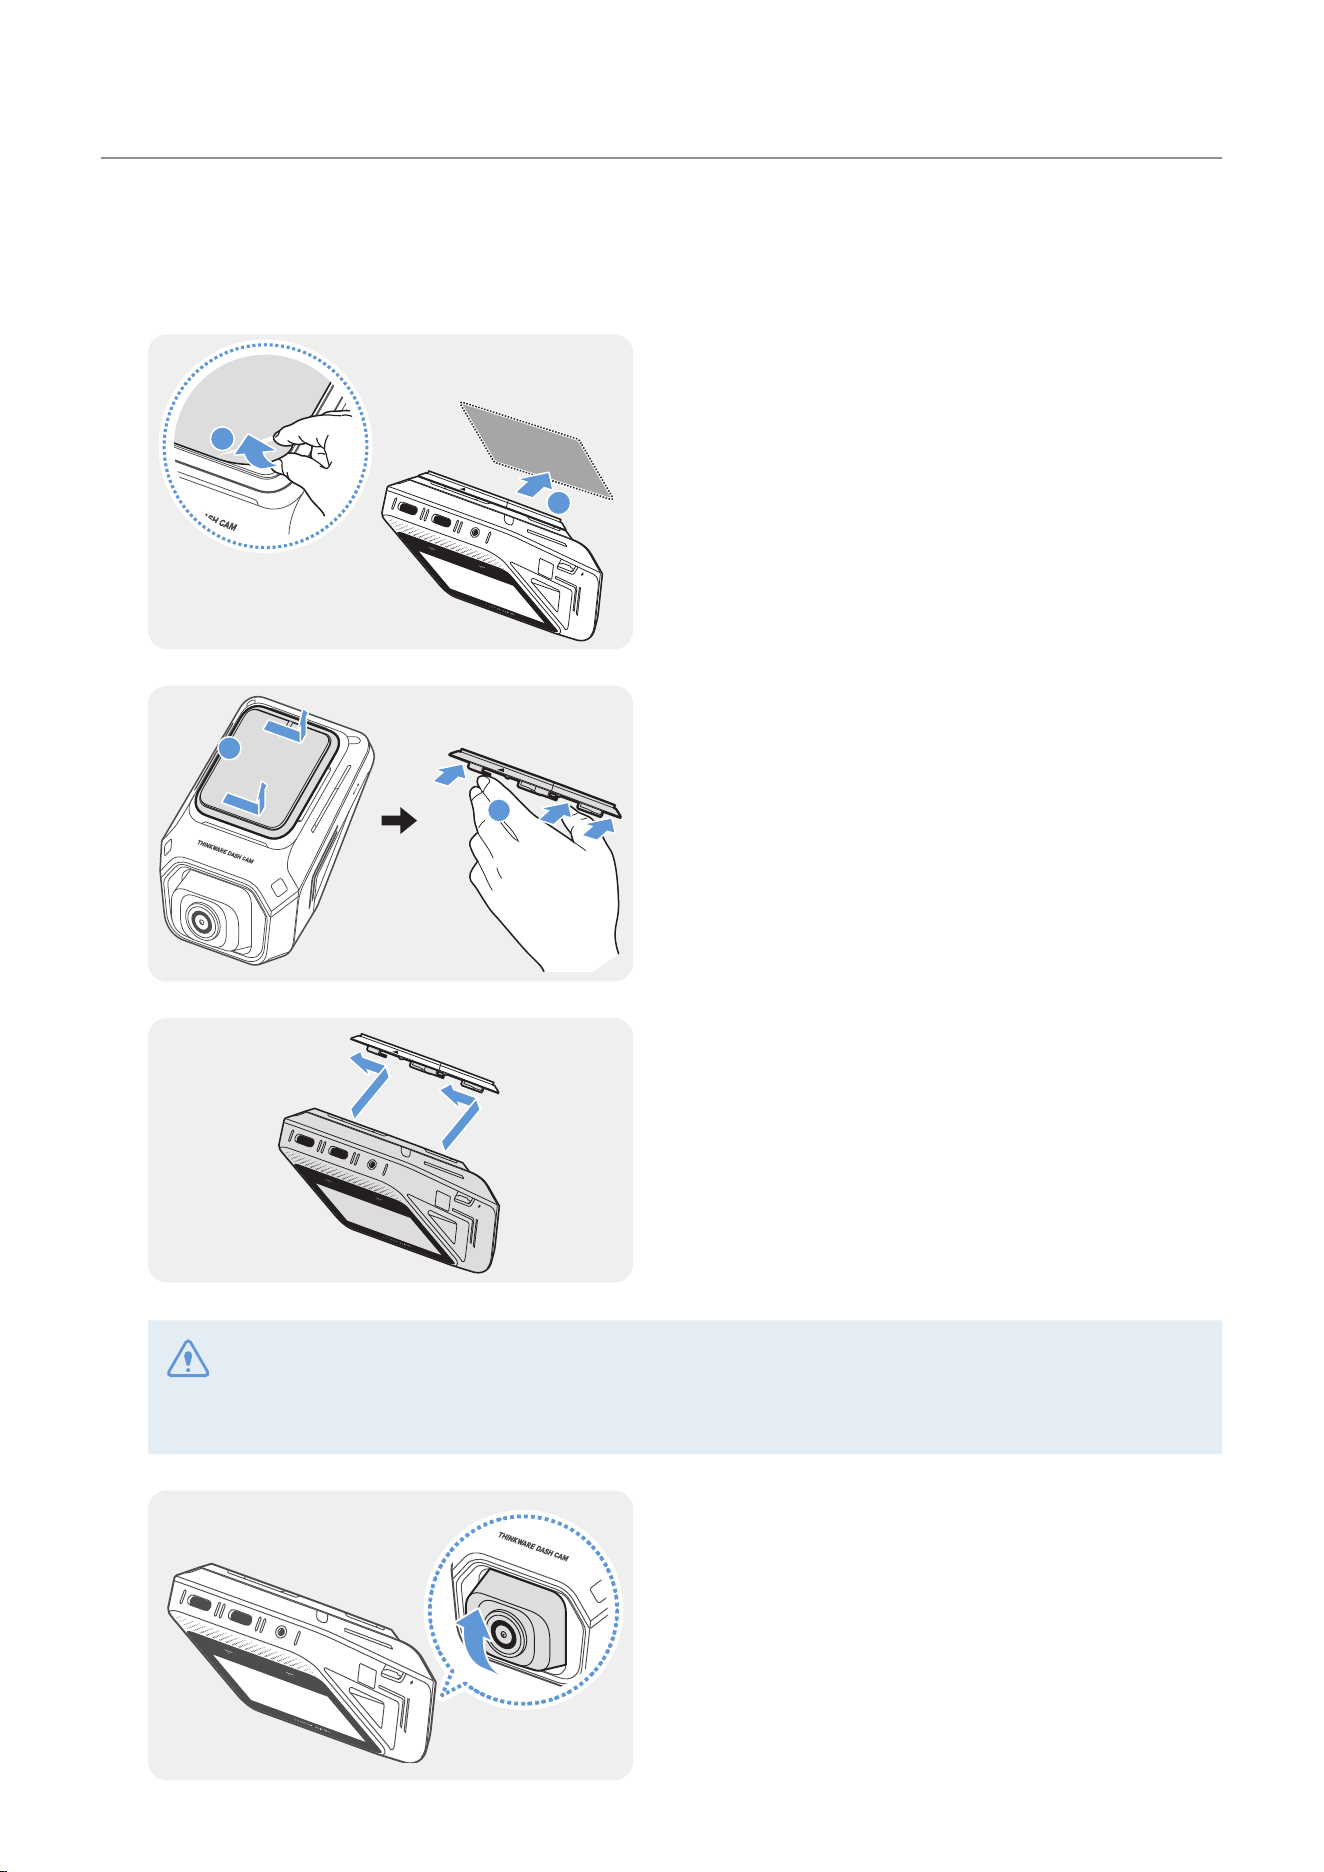
2.1.2 Securing the product
Follow the instructions to secure the product at the installation location.
1
1
2
➊➊
➋➋
Align the mount to the mount rail on the product,
and then slide it until you hear a click (
➊➊
). Then,
carefully remove the protective film (
➋➋
).
Installing the product
11
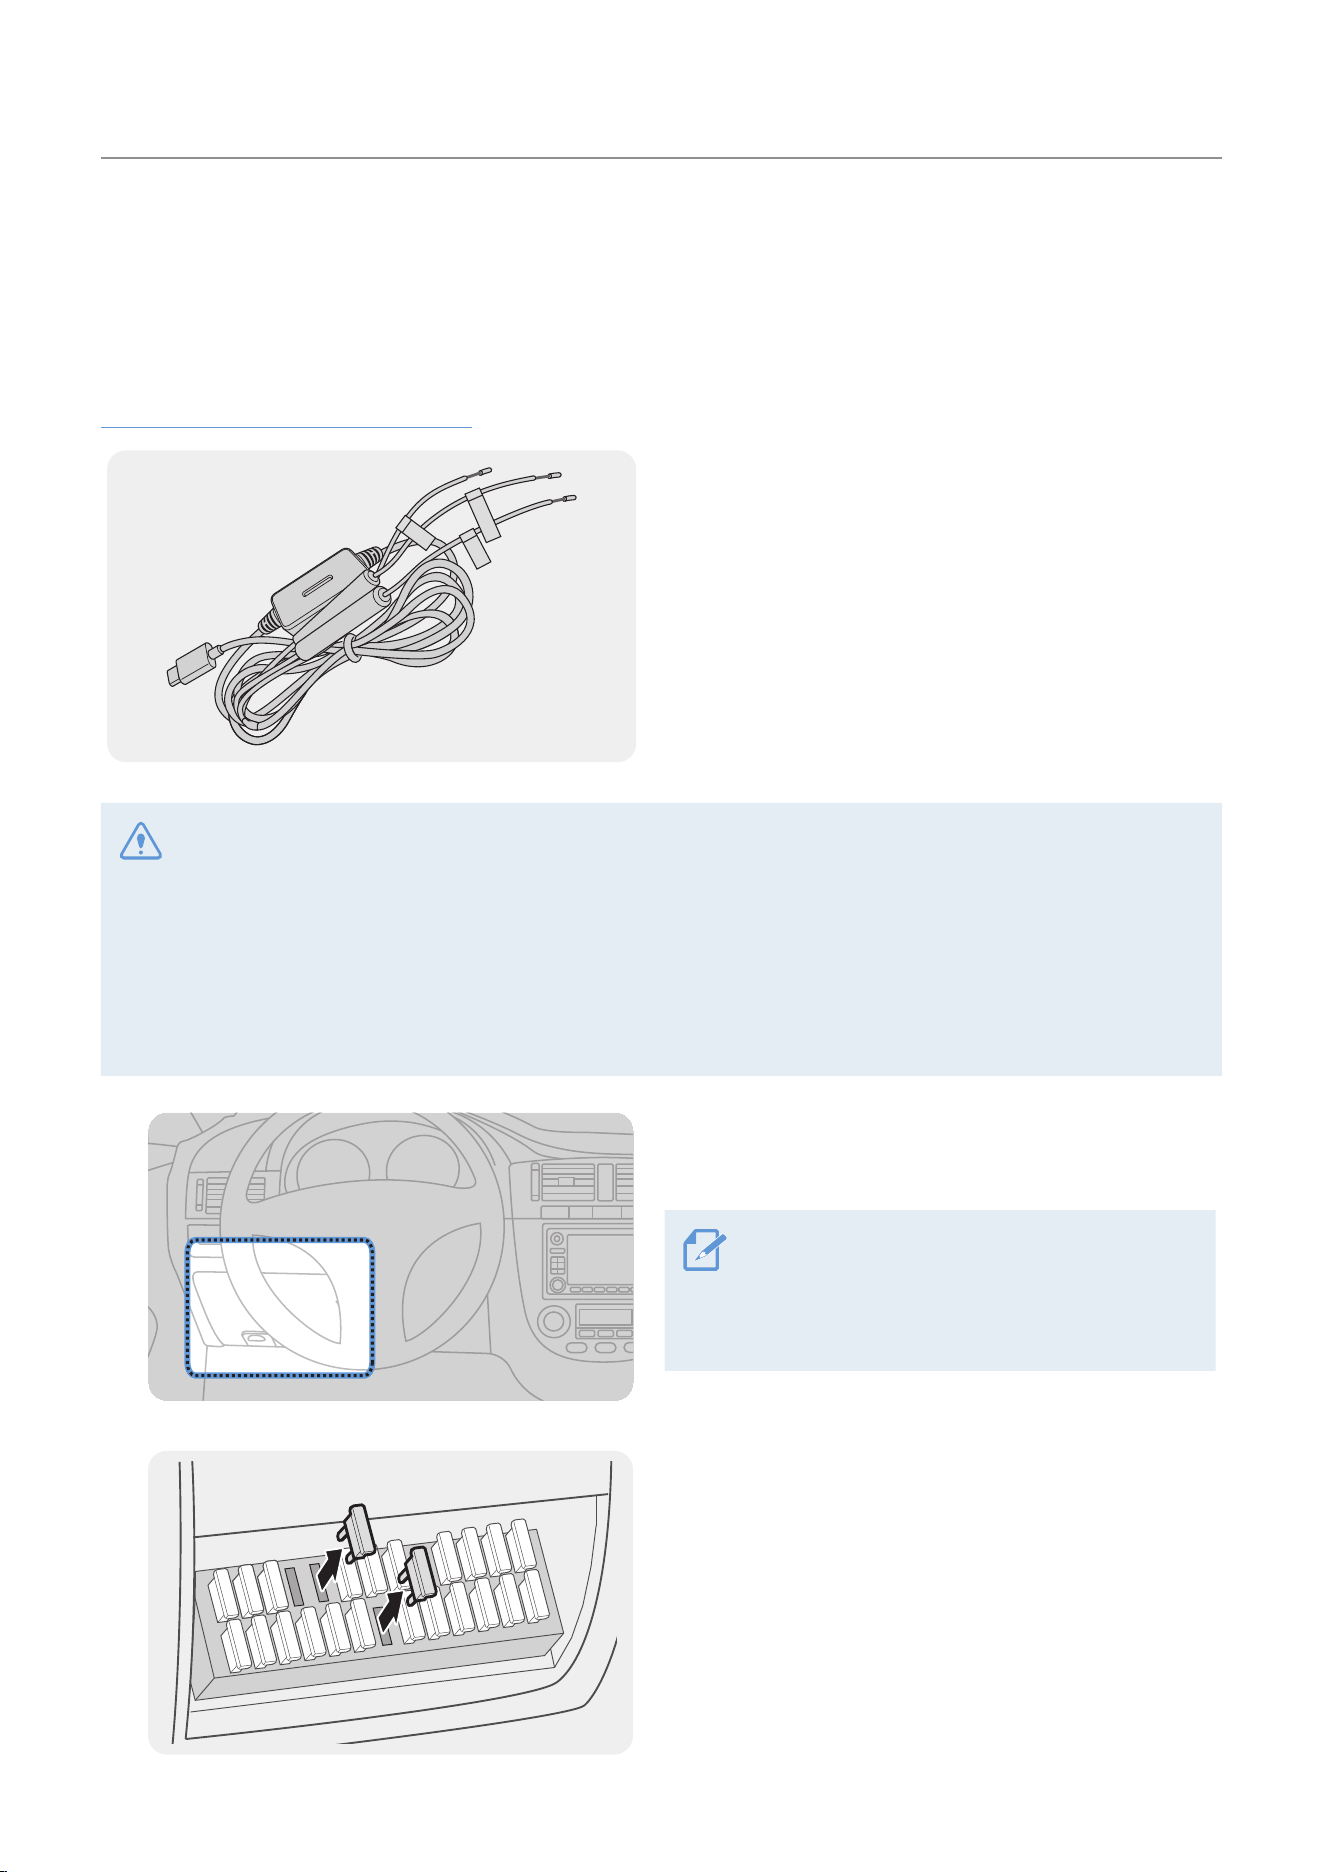
2
After determining the installation location, wipe the installation location on the windshield with a dry
cloth.
3
2
1
➊➊
➋➋
Remove the protective film from the adhesive mount,
and then press the mount to the installation location.
4
1
2
➊➊
➋➋
Remove the product from the mount and push the
mount against the windshield to ensure that the
mount is firmly fixed.
5
Align the product to the mount, and then slide it into
the locking position until you hear a click.
• The product may fall and be damaged during vehicle operation if it is not firmly fixed to the mount.
• If you need to remove the mount from the windshield to alter the installation location, be careful not to
damage the windshield’s film coat.
6
Set the vertical angle of the camera appropriately.
Installing the product
12
2.1.3 Connecting the power cable
When the engine and electrical accessories are turned off, connect the hardwiring cable or the USB-C to
USB-C cable to the product.
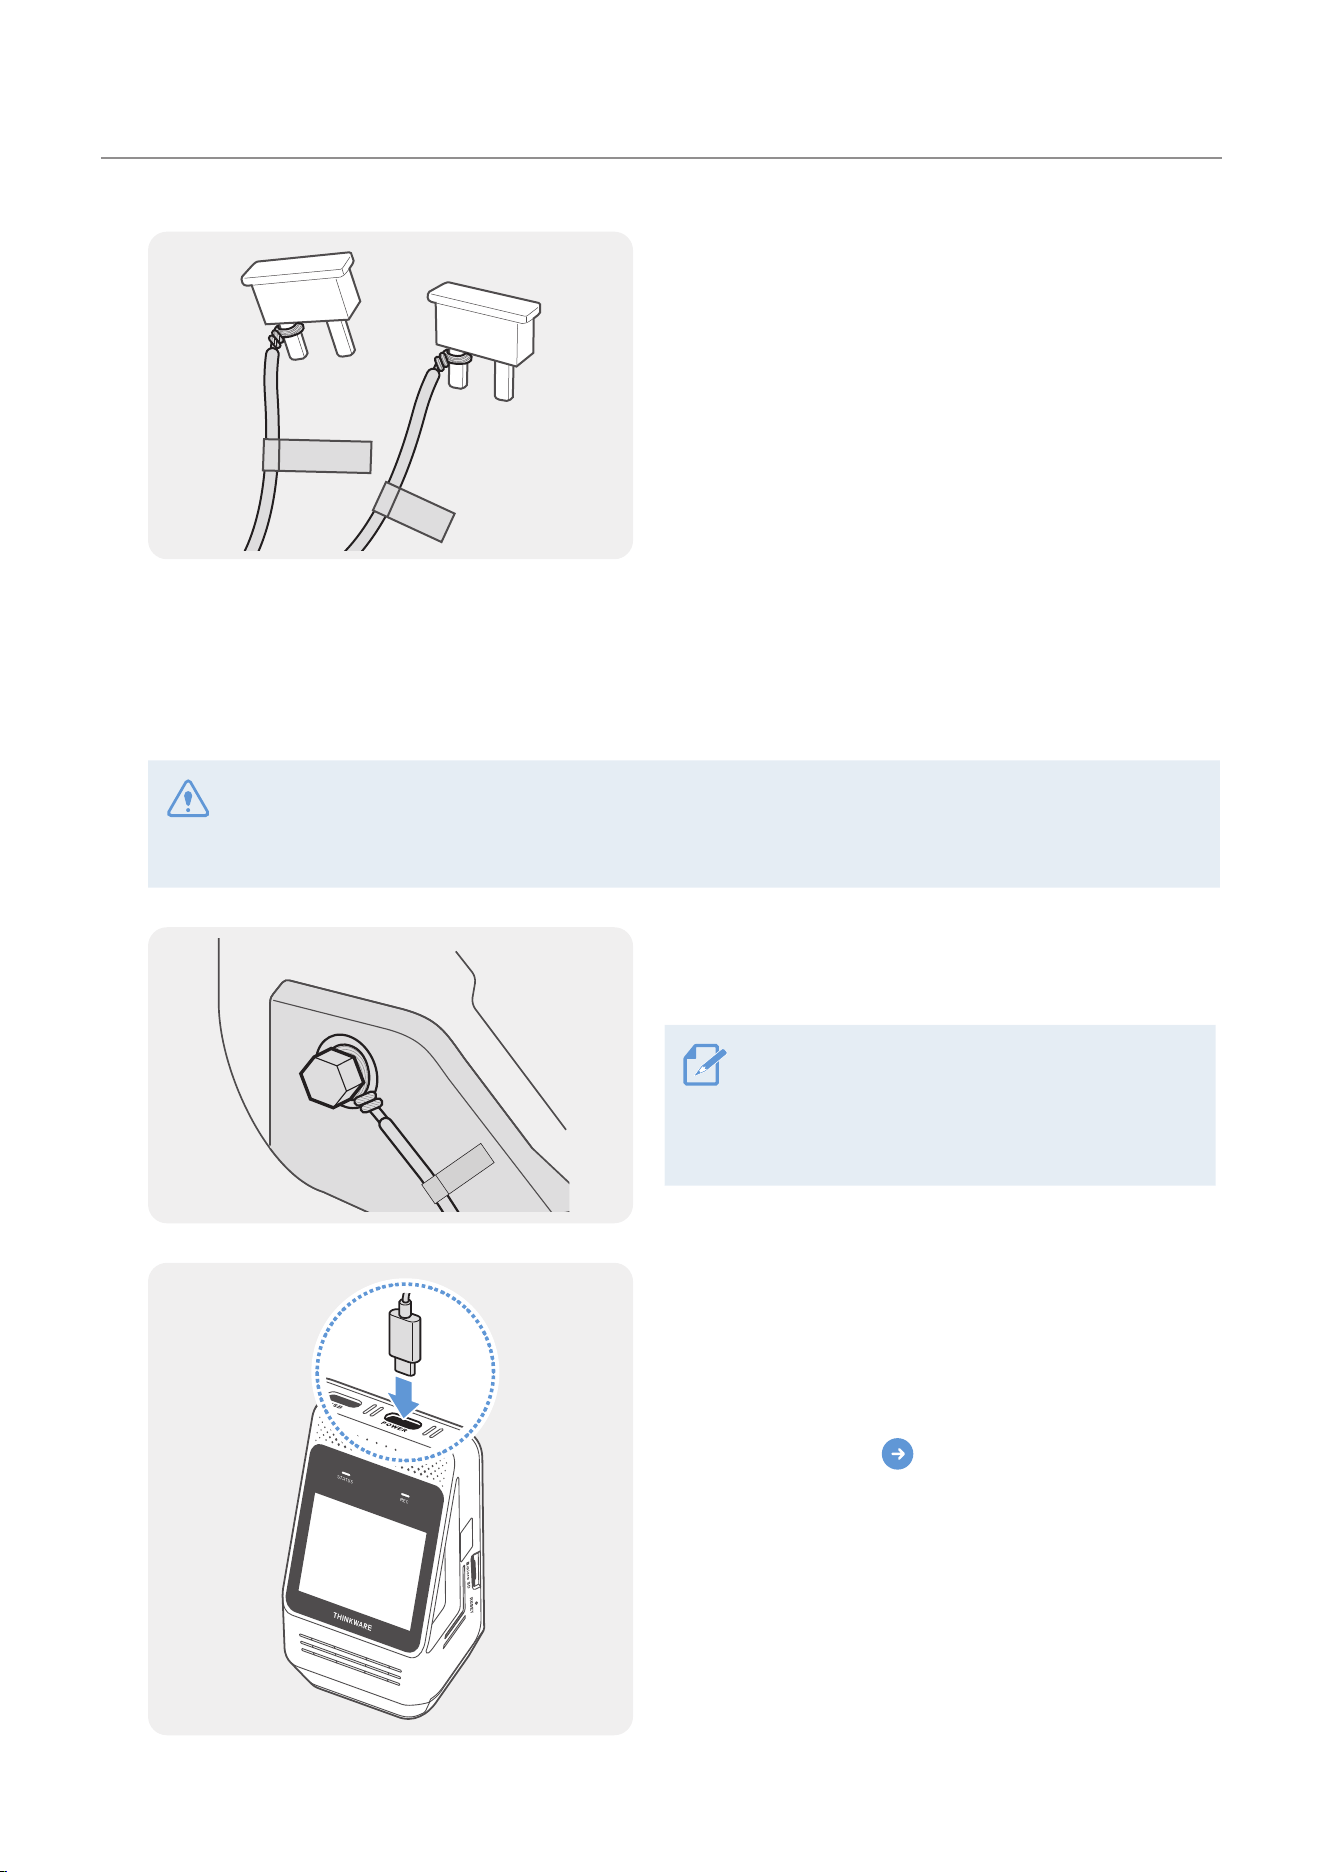
Connecting the hardwiring cable
ACC
BATTERY
GND
If you connect the product to the vehicle with the
hardwiring cable, the camera continues operating
even when the vehicle is not operating (parking
mode). In parking mode, the camera detects impacts
to the vehicle and nearby motion and records video.
For more information about parking mode, refer to
"3.7 Using parking mode" on page 20.
• We strongly recommend professional installation by a trained mechanic. Contact an authorized service
center to connect the hardwiring cable to the vehicle. If the product is not installed properly, the product
may be damaged, or an electrical fire or electrocution may occur.
• Use the authentic THINKWARE hardwiring cable only. Using other manufacturer’s cable may damage the
product or cause electrocution due to the voltage difference.
• When connecting the hardwiring cable, pay special attention to wiring. If the wires are connected
incorrectly, the product or the vehicle may be damaged.
1
Find the vehicle’s fuse box. Usually the fuse box is
installed under the driver’s seat.
The location of the fuse box may differ
depending on the make and model of the
vehicle. For more information, refer to your
vehicle’s owner’s manual.
2
Open the fuse box, find the continuous power
terminal (which supplies power when the vehicle
is off) and the ACC terminal (which supplies power
when the ignition status is "ACC ON") by using an
electrical tester, and detach the fuses from the
terminals.
Installing the product
13
3
BATTERY
ACC
Connect the BATTERY wire to a fuse leg of the
continuous power terminal and connect the ACC
wire to a fuse leg of the normal (ACC) terminal.
4
Check the fuse panel’s input and output contact points by using an electrical tester.
5
Place the fuses back into their locations on the fuse panel, connecting each fuse leg with the wire to
the output contact point and taking care not to change the fuse position.
When you install the fuses on the fuse panel, the fuse legs for the BATTERY wire and the ACC wire
must be connected to the output terminals respectively. If the fuse leg with the wire is connected to an
input terminal, the product or vehicle may be damaged or electrical fire may result.
6
GND
Connect the ground wire (the GND wire) to a bolt
attached to a metallic part of the vehicle’s body.
Normally, the metallic bolt that you can
connect the ground wire to (the GND wire) is
fitted nearby fuse box or the driver seat’s door
interior.
7
Connect the hardwiring cable to the power port and
start the engine to make sure the product operates
normally.
When the product is powered on, the initial settings
screen appears. Tap
to complete the settings.
Installing the product
14
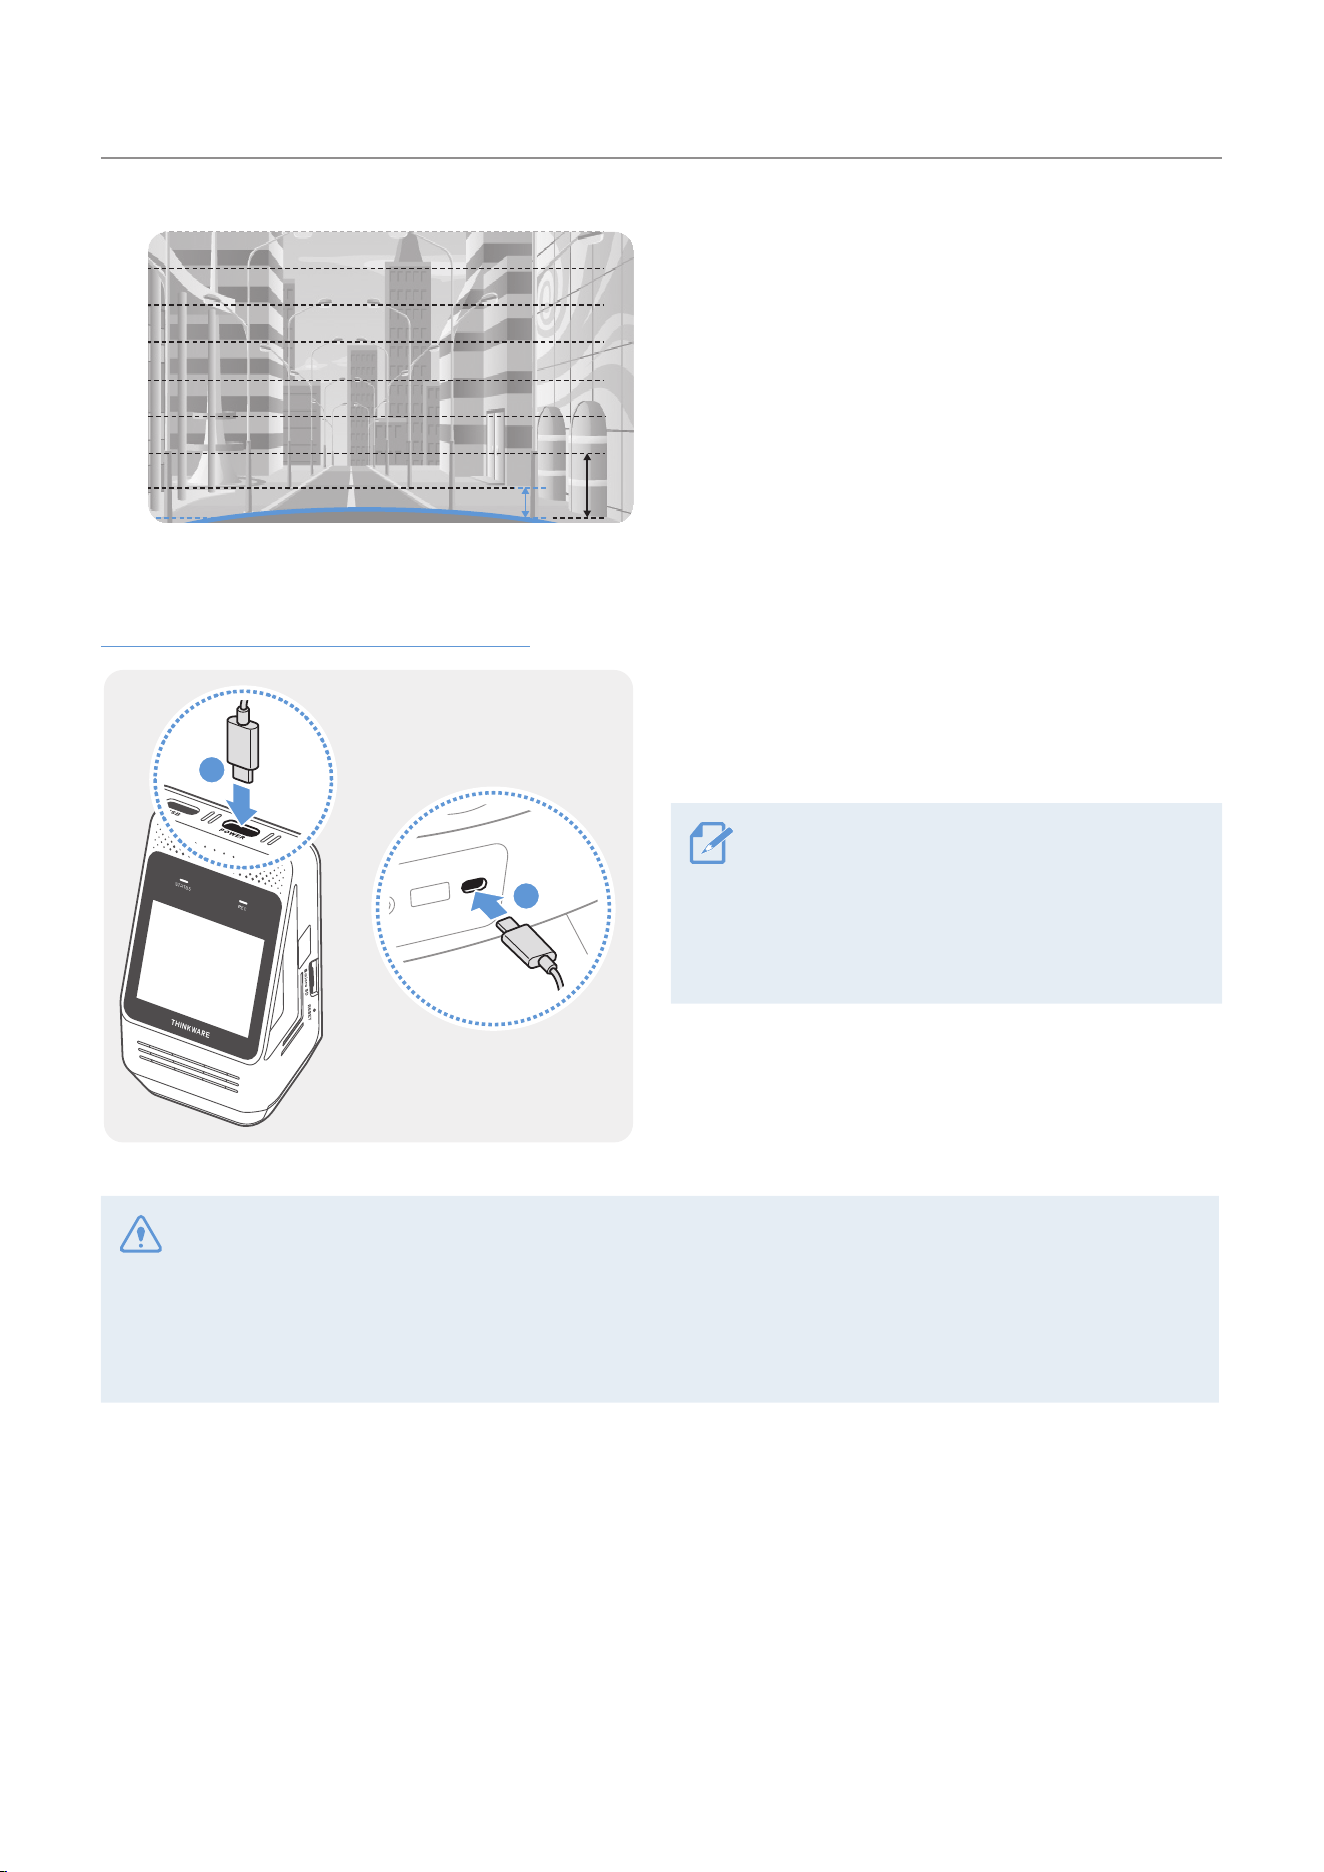
8
1/8
1/4
Adjust the camera angle so that the hood of the
vehicle covers 1/4 - 1/8 of the screen while viewing
the Live view on the LCD screen, as shown in the
image to the left.
Connecting the USB-C to USB-C cable
2
1
➊➊
➋➋
Connect one end of the included USB-C cable to the
product's power port, and then connect the other
end to the vehicle's USB-C port.
• The location and specifications of the power
socket may differ by vehicle make and model.
• The initial settings are the same as for the
hardwiring cable. Refer to Step 7 on the
previous page.
• Use the authentic THINKWARE USB-C to USB-C cable. Use of third party power cables may damage the
product and result in an electrical fire or electrocution due to the voltage difference.
• Do not cut or modify the power cable yourself. Doing so may damage the product or the vehicle.
• For safe driving, arrange the cables to prevent the driver's vision from being obstructed or interfering with
driving. For more information about arranging cables, visit www.thinkware.com.
Installing the product
15
2.2 Installing the rear camera
Refer to the following instructions to properly install the rear camera.
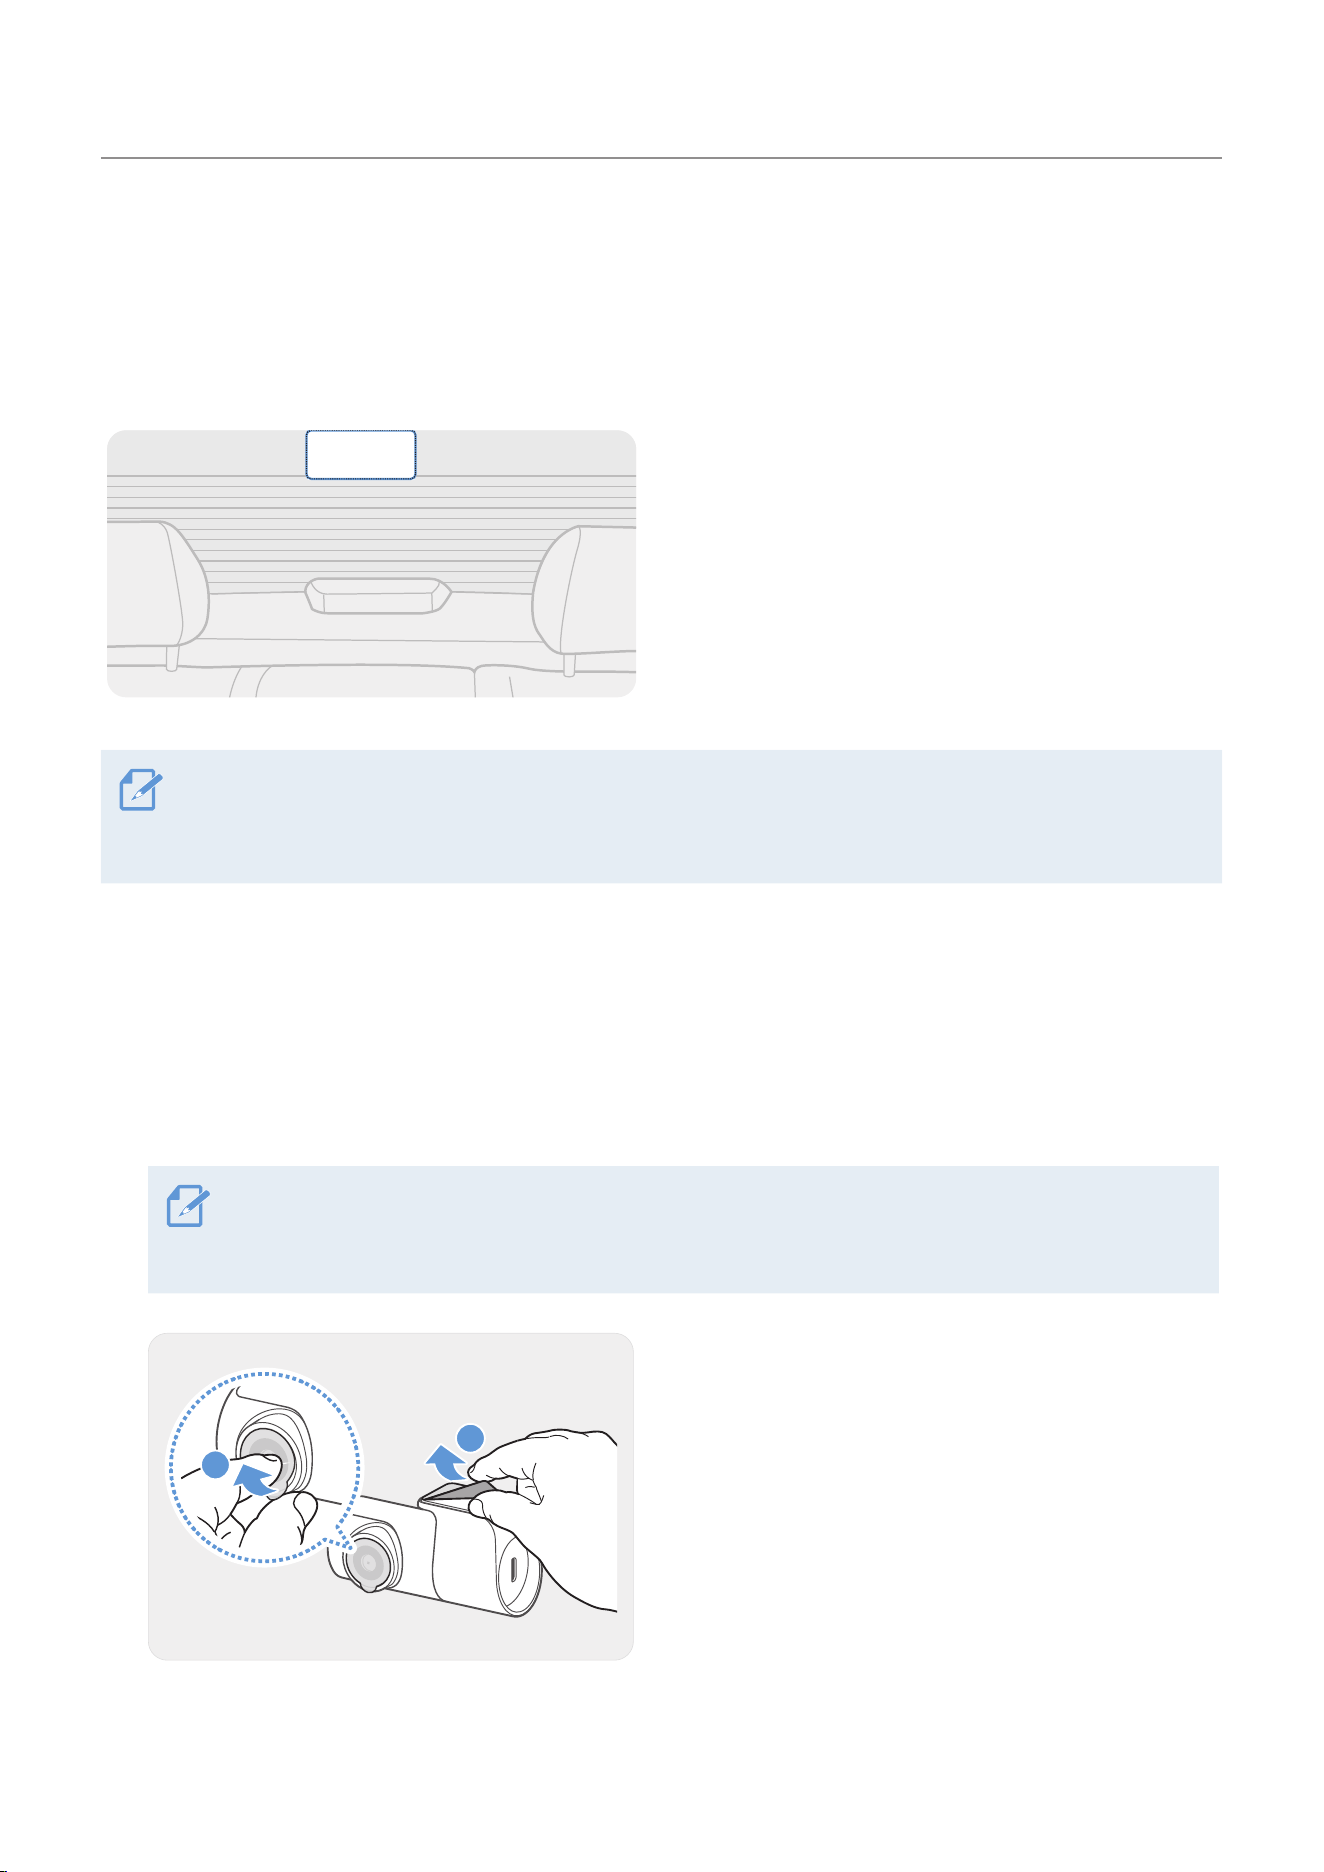
2.2.1 Selecting an installation location
Select a location on the rear windshield where there
is no defrost grid wire and the camera can record
the entire rear view.
• For vehicles with a sunshade attached to the rear windshield, you must select a location where using the
sunshade will not interfere with camera operation.
• The adhesive part of the rear camera should not touch the defrost grid.
2.2.2 Securing the rear camera
Refer to the following instructions to secure the product to the installation location.
1
After determining the installation location, wipe the installation surface of the windshield with a dry
cloth.
Check the installation location before you secure the rear camera to the rear windshield. After
securing the rear camera to the windshield, it is hard to remove the camera or change the installation
location due to the strong adhesive.
2
2
1
➊➊
➋➋
Remove the protective film from the adhesive mount
and camera lens.
Installing the product
16
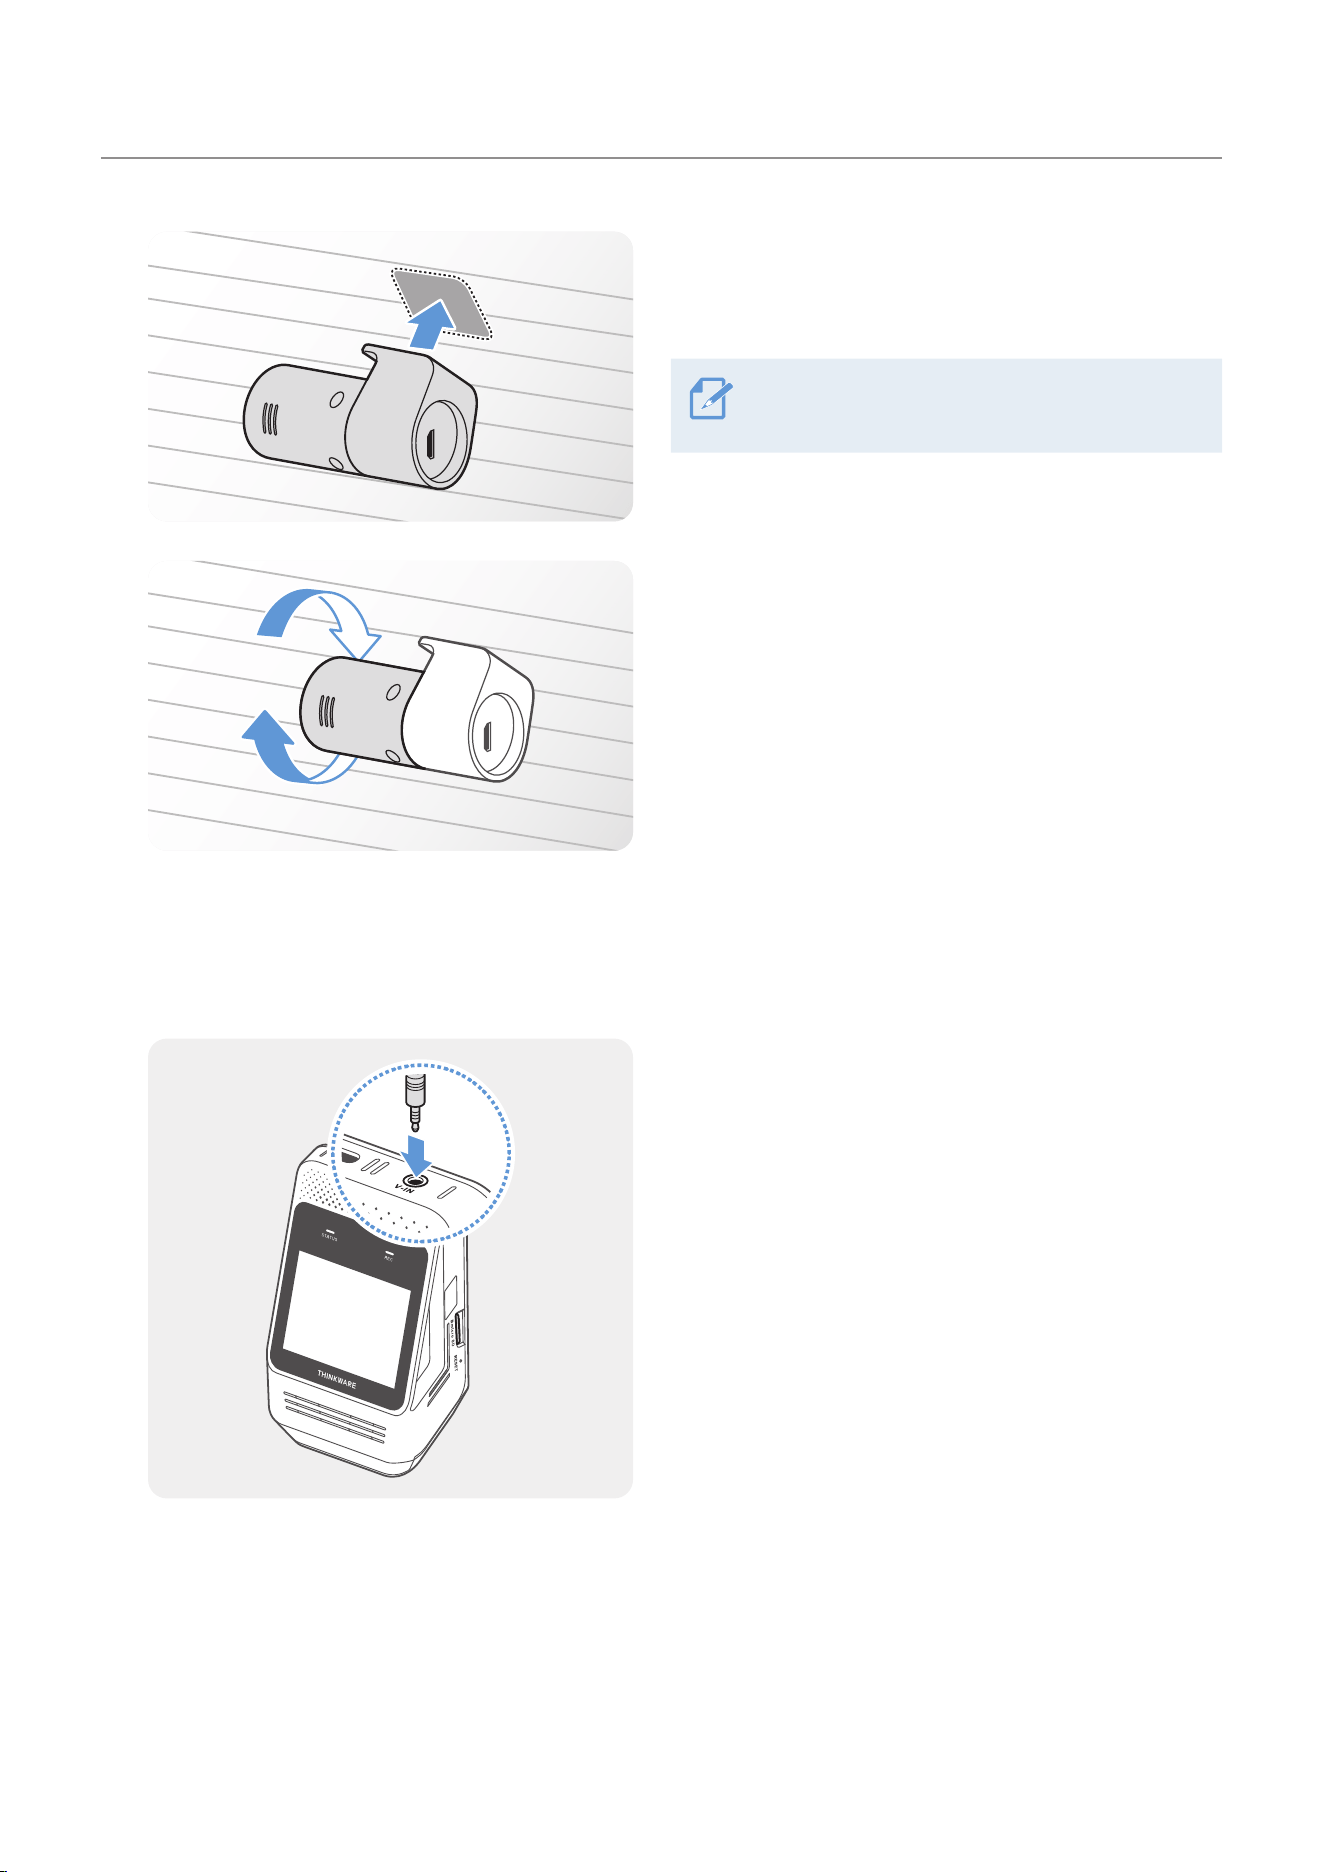
3
THINKWARE
Attach the product with the THINKWARE logo facing
indoors and press the adhesive tape firmly to secure
the camera.
If the product is fixed in reverse, the rear view
will be recorded upside down.
4
THINKWARE
Adjust the camera’s vertical angle.
2.2.3 Connecting the rear camera cable
Power off the product and connect the rear camera cable to the front camera (main unit).
1
Connect one end of the rear camera cable to the
front camera’s V-IN port.
Installing the product
17
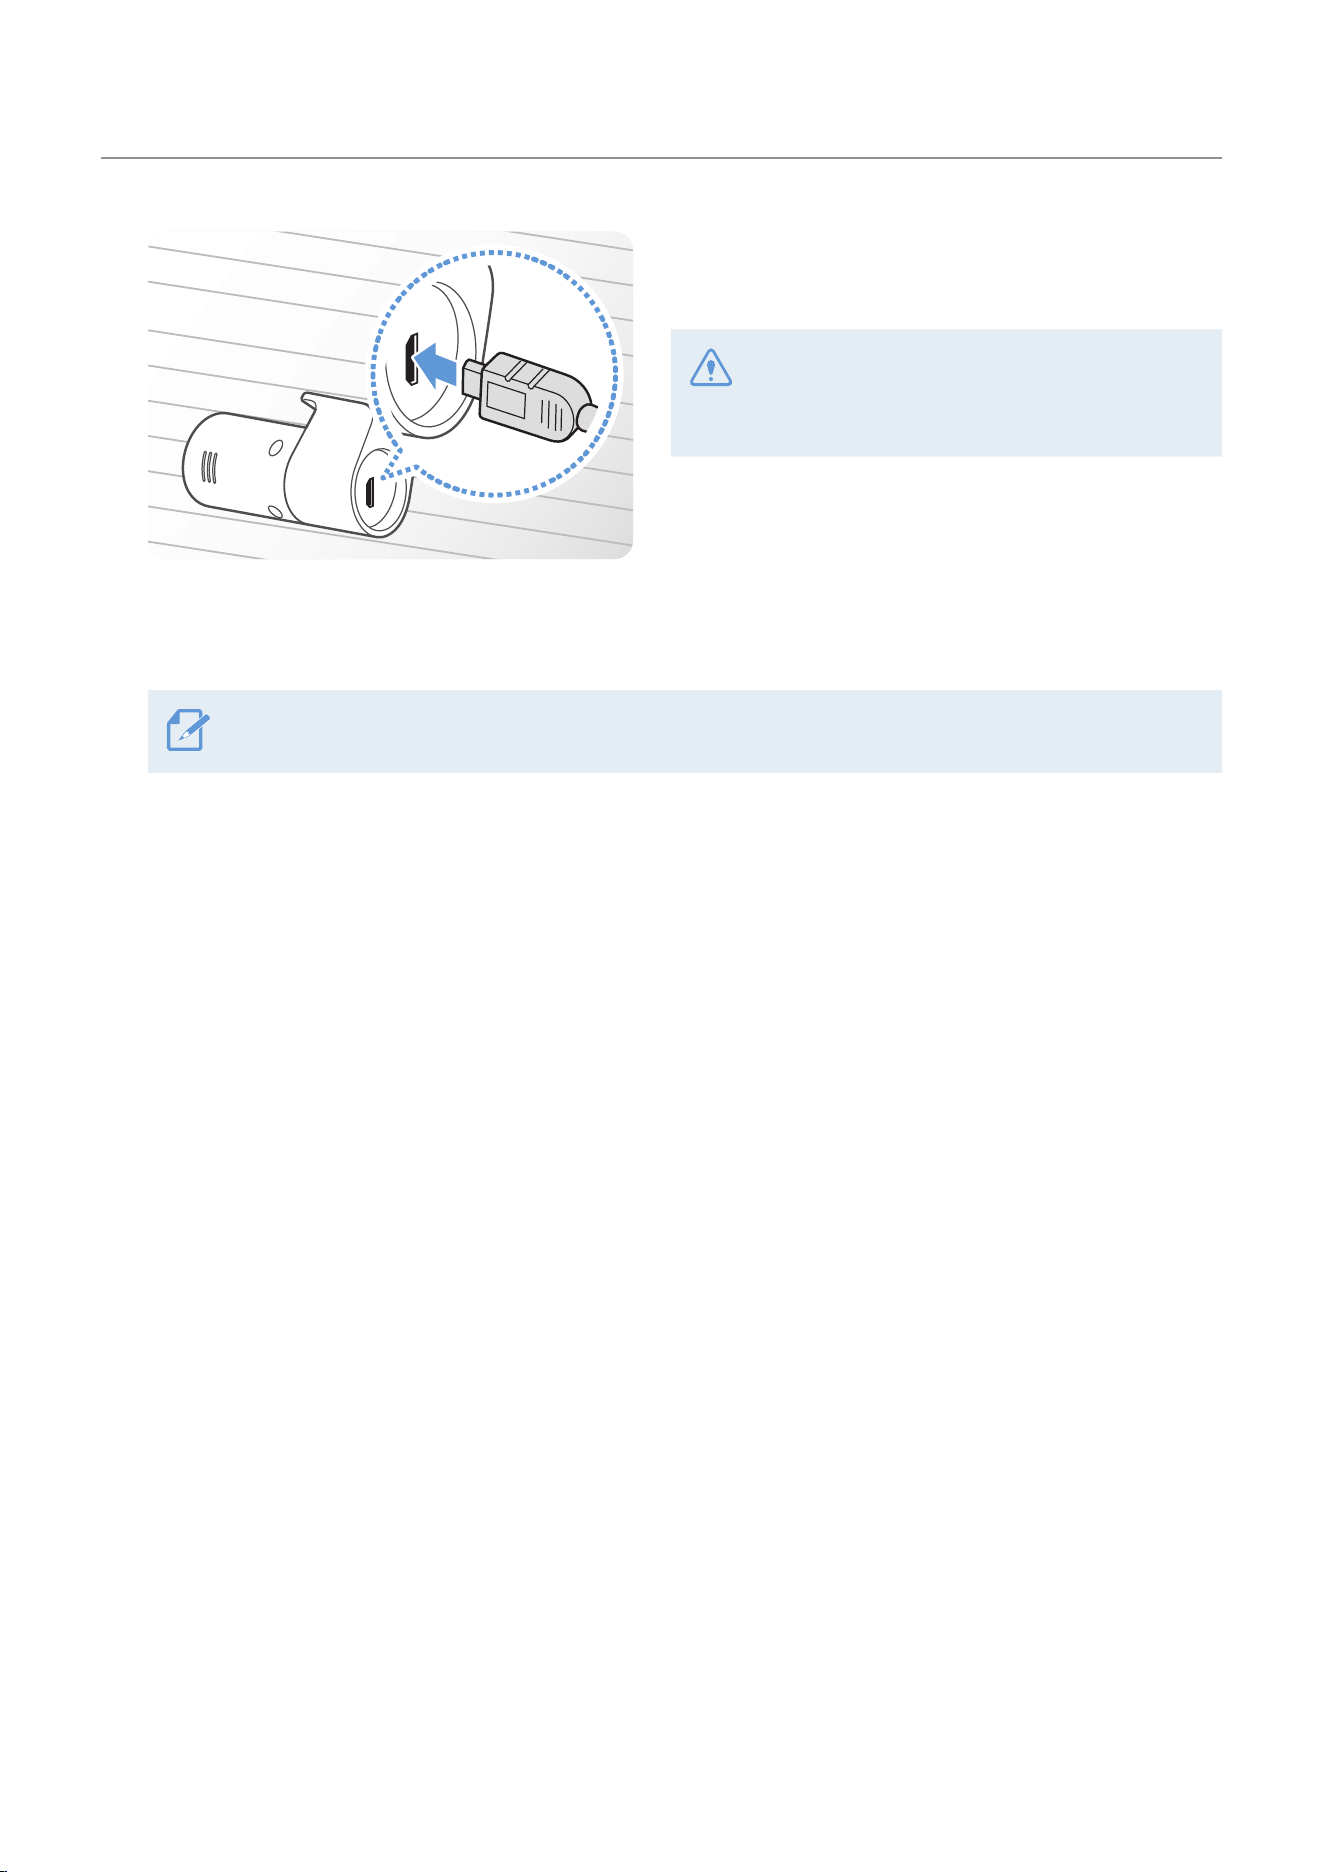
2
THINKWARE
Connect the other end of the rear camera cable to
the rear camera’s connection port.
For safe driving, arrange the cables to prevent
the driver’s vision from being obstructed or
interfering with driving.
3
Turn on the ACC or start the engine to check if the product is powered on. After the product is powered
on, the status LED and the voice guidance will turn on.
The product is powered on when the ACC mode is turned on or when the engine starts.
4
Check the Live view screen on the LCD display and adjust the camera angle as necessary.
18
3. Using recording features
3.1 Turning the product on or off
The product is turned on automatically and continuous recording starts when you turn on the ACC or start
the engine.
• Use the power switch on the side of the product to force the product to power on or off.
• Wait until the product is completely booted up after turning it on, and then begin operating the vehicle. The
video recording does not begin until the product is completely turned on (booted up).
3.2 Using the LCD display
This product allows you to check recorded videos in real time on the LCD display by providing the Live view
feature.
You can set the time that the LCD will turn off automatically. Swipe down on the Live view screen, tap
>
System
>
LCD Auto-off, and select the desired screen off time from 30 sec/1 min/10 min.
3.3 Learning about the LED indicator and file storage locations
LED indicator
You can check the operating status, even when the LCD is turned off, by checking the LED indicator on the
rear of the product.
For more information about what the LED indicates in each recording mode, refer to the corresponding section
of the recording mode (the continuous recording, the manual recording, the SOS recording (optional), and the
parking mode recording).
Video file storage location
Videos are stored in the following folders according to their recording mode. The folder names displayed on
the screen and created in the memory card are as follows.
On the product
screen
Continuous C Impact Parking P Impact Manual
Saved
Videos
SOS
(optional)
In the memory
card
cont_rec evt_rec
motion_
timelapse_rec
parking_rec manual_rec safety_box sos_rec
Play videos on the product or a computer only. If you play videos by inserting the memory card in devices
such as a smartphone or a tablet PC, the video files may be lost.
Using recording features
19
3.4 Using the continuous recording feature
Connect the power cable to the product’s power port and then turn on the vehicle’s electrical accessories
or start the engine. The status LED and the voice guidance will turn on, and the continuous recording starts.
When the Live view screen is displayed, the continuous recording will start automatically.
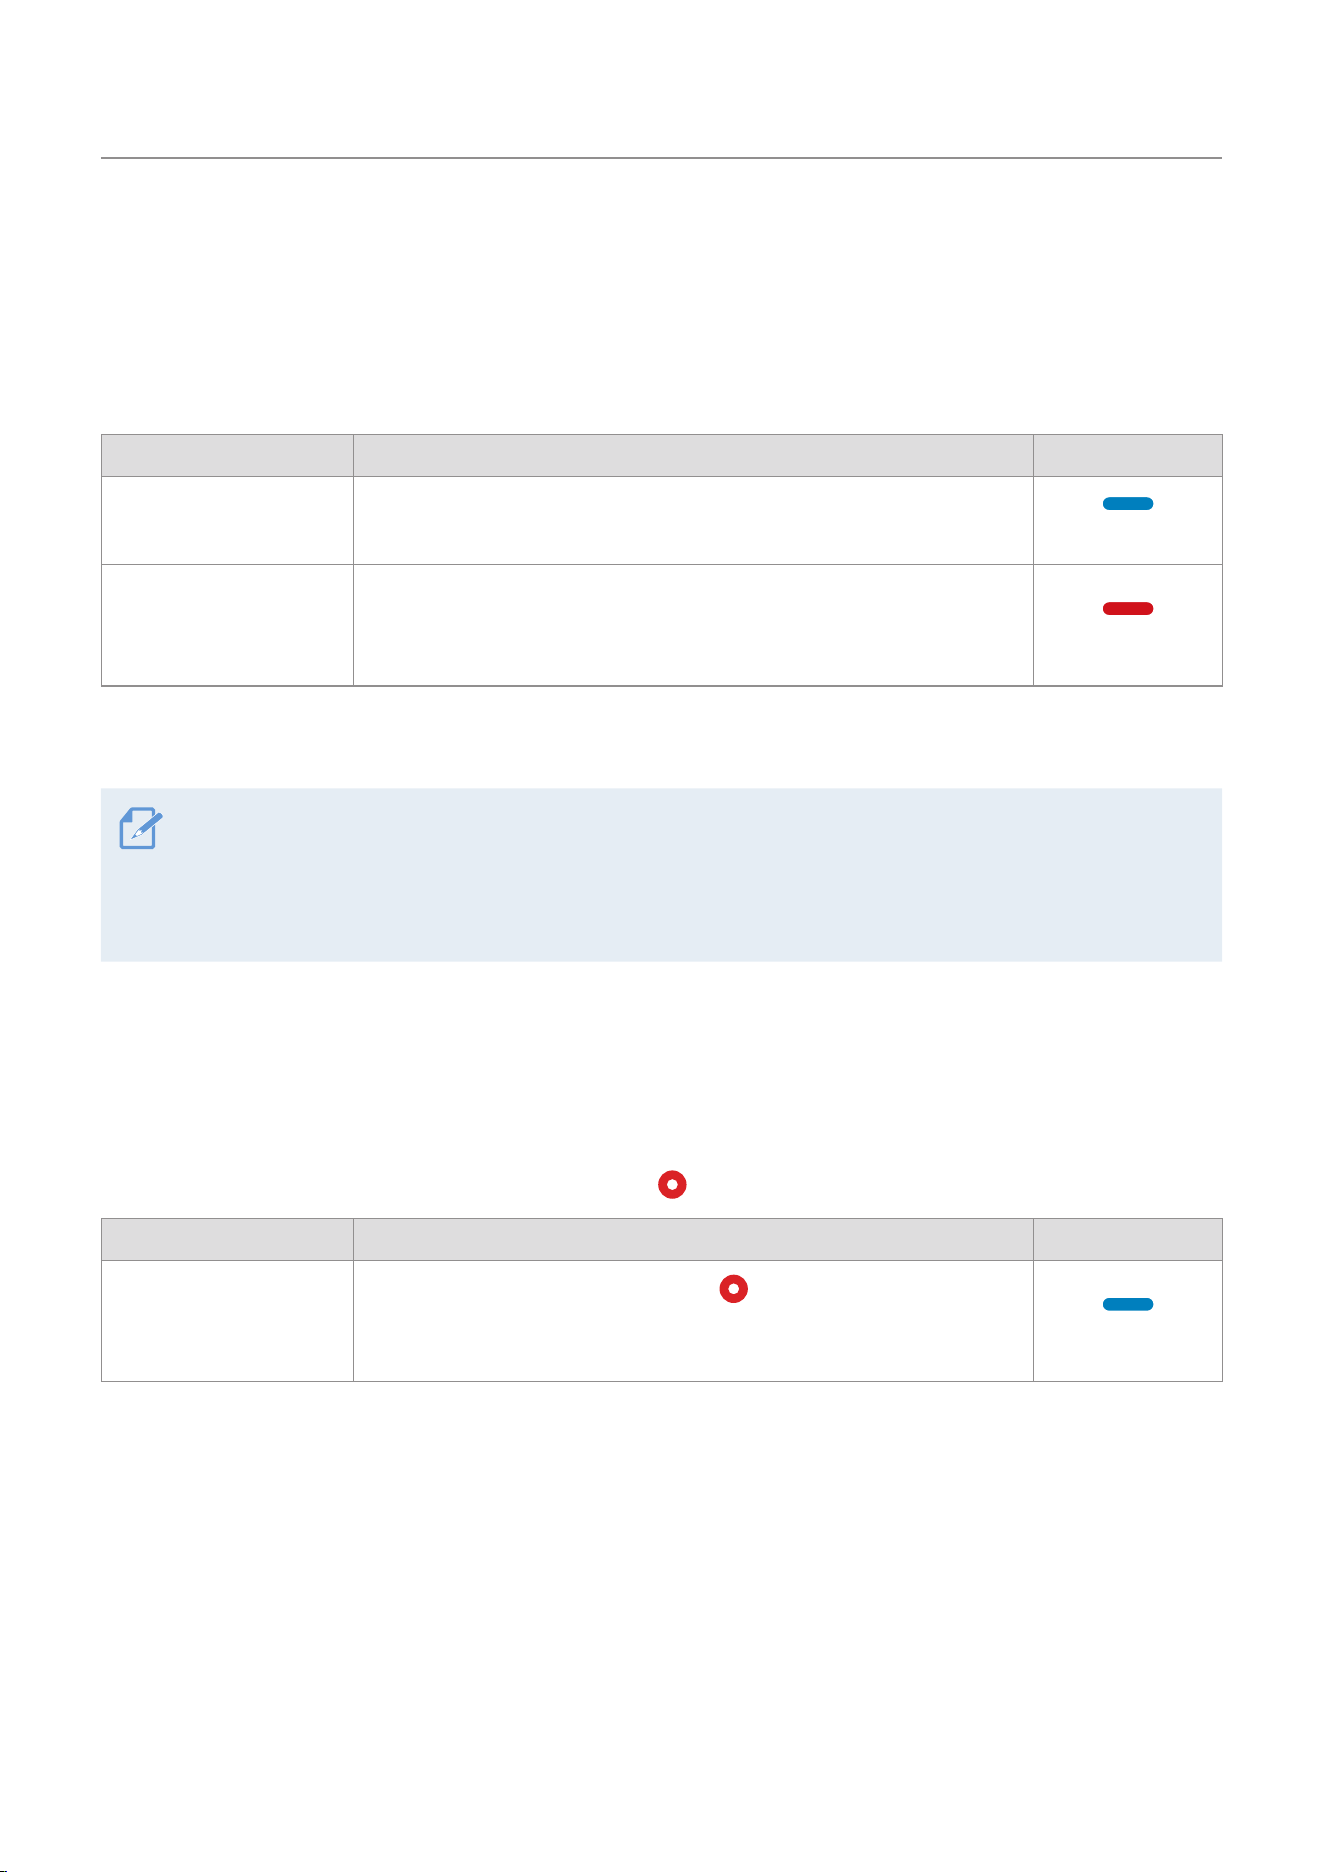
Mode Operation description REC LED
Continuous recording
During driving, videos are recorded in 1 minute segments and stored
in the "cont_rec" folder.
(light on)
Incident continuous
recording*
When an impact to the vehicle is detected, a video is recorded for
20 seconds, from 10 seconds before the detection to 10 seconds after
the detection, and stored in the "evt_rec" folder.
(flickers)
* When an impact to the vehicle is detected during continuous recording, incident continuous recording starts with a
buzzer sound.
• Wait until the product is completely booted up after turning it on, and then begin operating the vehicle. The
video recording does not begin until the product is completely turned on (booted up).
• When incident continuous recording starts, the buzzer sounds as a notification.
• To use all recording modes, insert a memory card into the product.
3.5 Recording manually
You can record a scene you want to capture while driving and store it as a separate file. Manually recorded
videos are stored in the "manual_rec" folder to prevent important data loss due to insufficient storage.
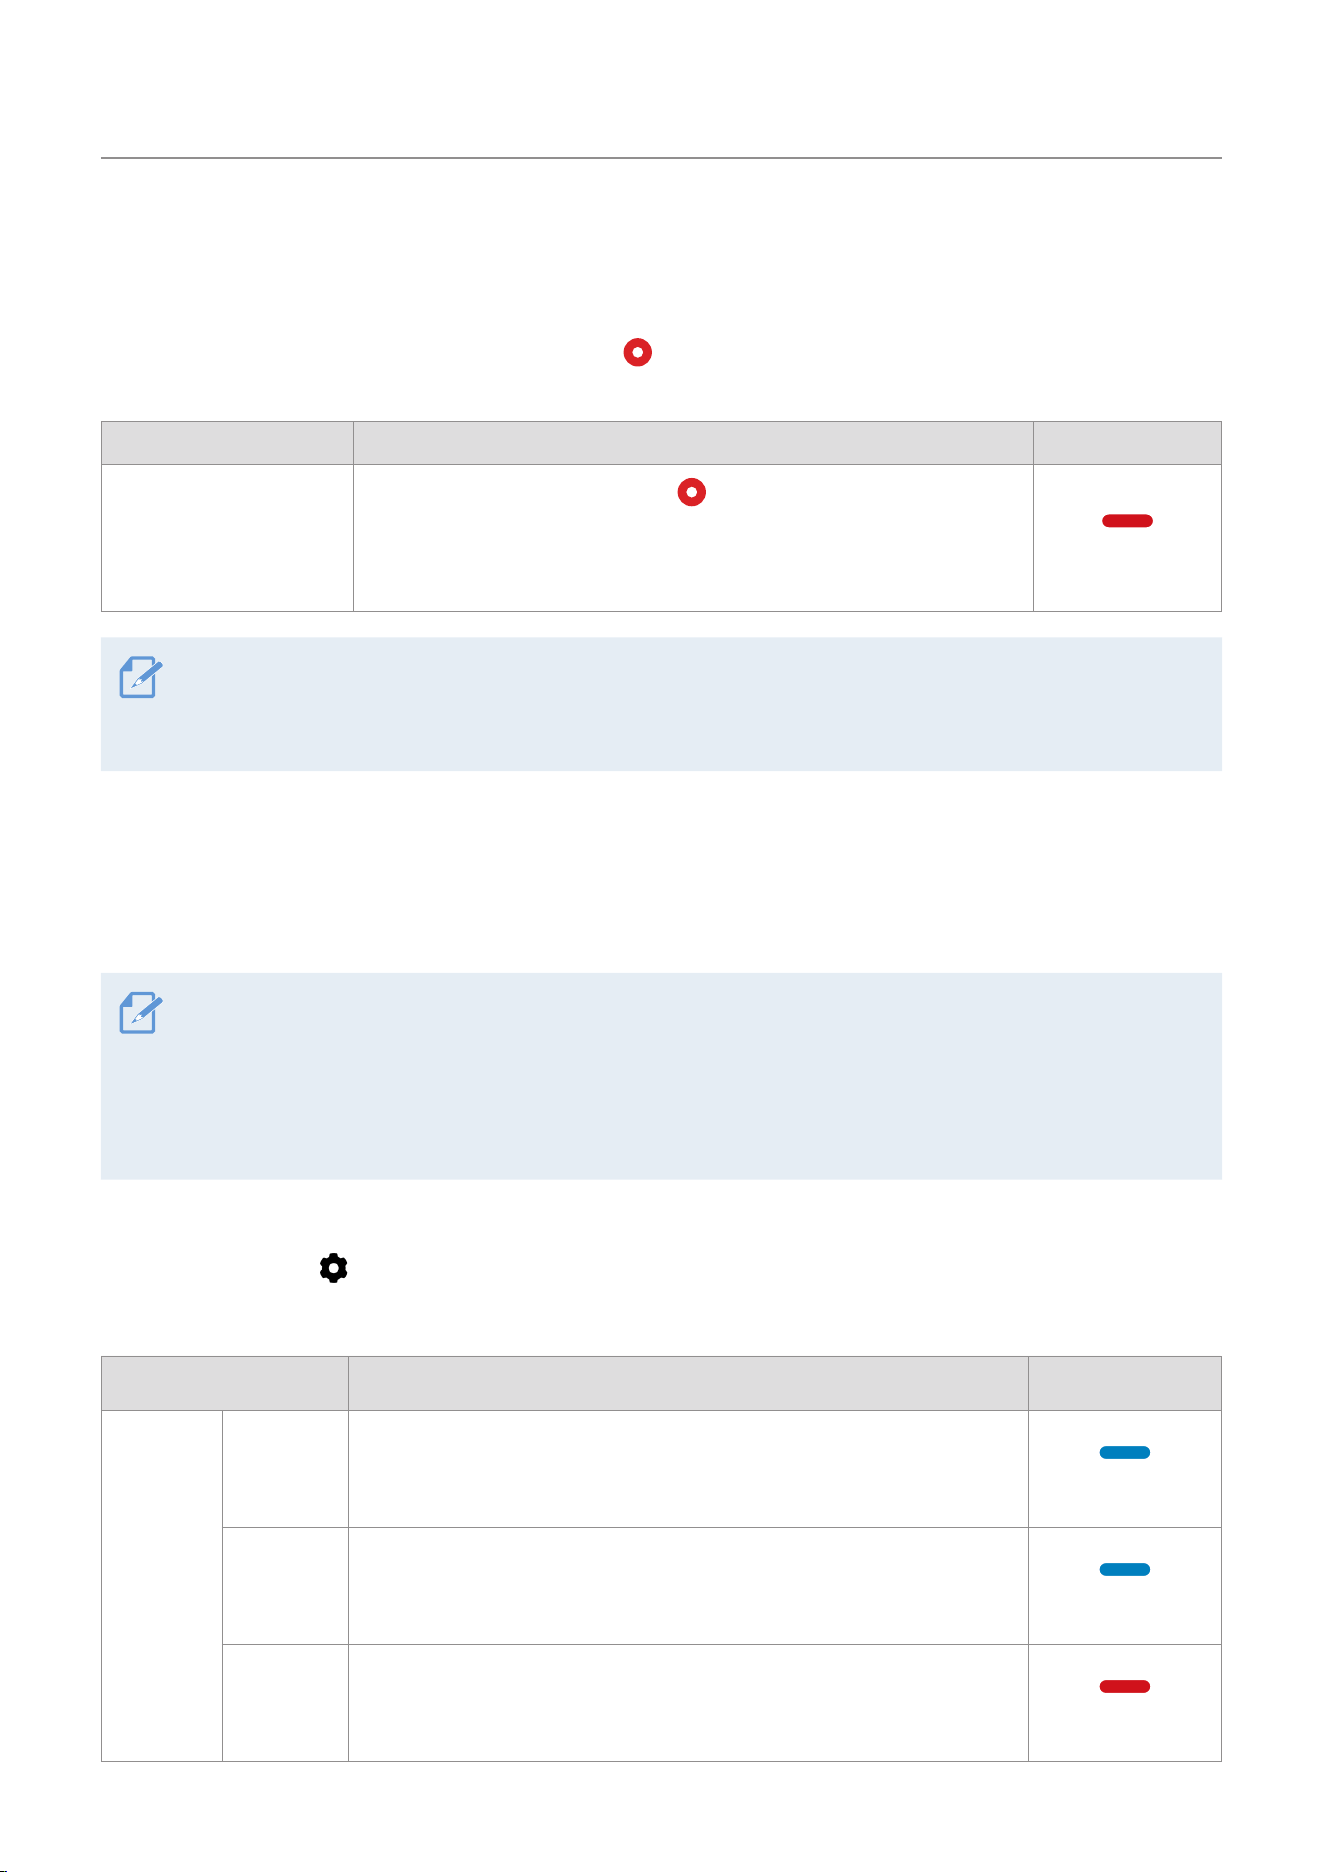
To start manual recording, tap the Manual recording (
) button on the Live view screen.
Mode Operation description REC LED
Manual recording
When you tap the Manual recording (
) button, a video will be
recorded for 1 minute, from 10 seconds before to 50 seconds after
tapping the button, and stored in the "manual_rec" folder.
(flickers)
To watch a manually recorded video, swipe up on the Live view screen, tap Manual, and select a video to
view.
Using recording features
20
3.6 Using the SOS recording feature (optional)
You can record a scene when an accident occurs while driving and store it as a separate file.
To start SOS recording, tap the Manual recording (
) button for 3 seconds. During SOS recording, the
product operates as follows.
Mode Operation description STATUS/REC LED
SOS recording
If you tap the Manual recording (
) button for 3 seconds when
an accident occurs, a video will be recorded for 10 seconds (from
5 seconds before the accident to 5 seconds after tapping the button)
and stored in the "sos_rec" folder.
(flickers)
• To use this feature, you must sign in to the THINKWARE CONNECTED application.
• The video will be uploaded to the THINKWARE CONNECTED application with the location where the
accident occurred.
3.7 Using parking mode
When the product is connected to the vehicle via the hardwiring cable, the operating mode is switched to
parking mode with the voice guide after the engine or electrical accessories are turned off.
• Parking mode operates only when the hardwiring cable is connected. We strongly recommend
professional installation by a trained mechanic.
• To use all recording modes, insert a memory card into the product.
• Depending on the battery charging status of the vehicle, the duration of parking mode may differ. If you
want to use parking mode for an extended period, check the battery level to prevent battery depletion.
If you do not want to use parking mode or you want to change the mode settings, swipe down on the Live
view screen and tap
>
Recording
>
Parking Mode.
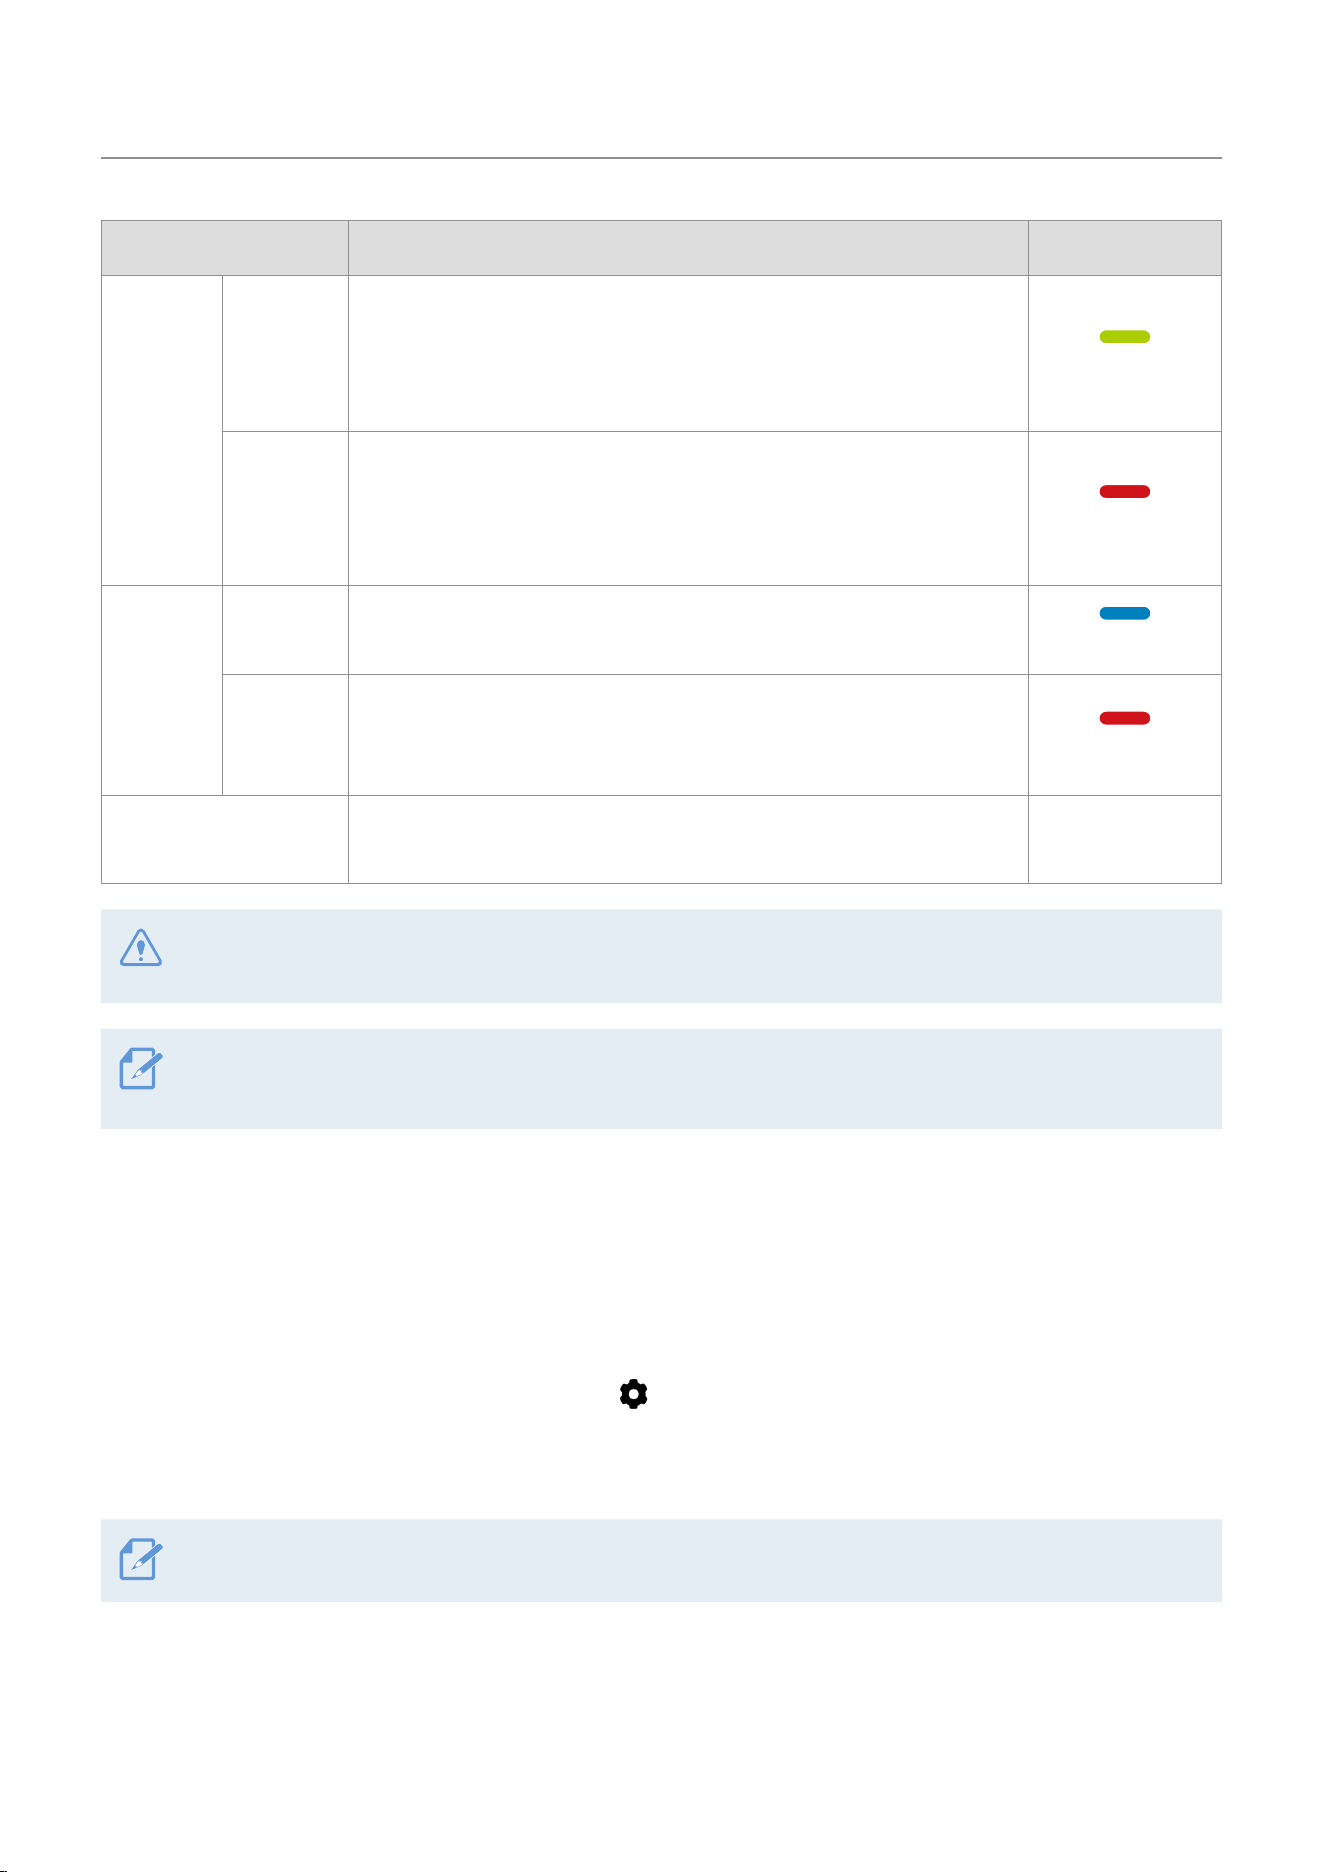
Refer to the following table to set the Parking Mode options.
Option Operation description REC LED
Motion
Detection
No motion
or impact
detected
Monitors movement in the area or impacts to the vehicle. Video will
be recorded only when motion or an impact is detected.
(light on)
Motion
detected
When a moving object is detected while parked, a video is recorded
for 20 seconds, from 10 seconds before detection to 10 seconds after
detection, and stored in the "motion_timelapse_rec" folder.
(flickers)
Impact
detected
When an impact is detected while parked, a video is recorded
for 20 seconds, from the moment 10 seconds before detection to
10 seconds after detection, and stored in the "parking_rec" folder.
(flickers)
Using recording features
21
Option Operation description REC LED
Time
Lapse
No impact
detected
A video is recorded at a rate of 2 fps for 5 minutes, compressed into
a 1-minute long file, and stored in the
"motion_timelapse_rec" folder.
Since the video file recorded with this option is small, you can record
a long video.
(light on)
Impact
detected
When an impact is detected while parked, a video is recorded for
100 seconds at a rate of 2 fps, from the moment 50 seconds before
detection to 50 seconds after detection, and stored in the
"parking_
rec" folder after being compressed into a 20-second long file.
(flickers)
Energy
Saving
No impact
detected
Monitors impacts to the vehicle. Video will be recorded only when an
impact is detected.
(light on)
Impact
detected
When an impact is detected while parked, a video is recorded for
20 seconds (after collision detection) and stored in the "parking_rec"
folder.
(flickers)
OFF
The product is powered off when electric accessories and the
engine are turned off.
Off
If parking mode settings are changed, the videos recorded with the previous settings will be deleted. To
prevent data loss, back up all parking mode videos before changing parking mode settings.
• You cannot use Motion Detection, Time Lapse, or Energy Saving at the same time.
• You can record bright, clear videos when parking at night with the Night Vision feature enabled.
3.8 Using the Night Vision
With the Night Vision feature, you can record videos that are much brighter than those recorded without
this feature. This feature is enabled by real-time image signal processing (ISP) that improves the video
brightness.
1
Swipe down on the Live view screen and tap
>
Camera.
2
From Camera mode, select AI Night Vision or Super Night Vision for the Night Vision feature.
This feature is only available in parking mode.
Using recording features
22
3.9 Using the High Dynamic Range (HDR)
The Clear HDR feature works by simultaneously capturing a low-gain image in the bright region and a high-
gain image in the dark region, which are then overlapped and synthesized. This method effectively solves
artifact issues, even in motion.
1
Swipe down on the Live view screen and tap
>
Camera.
2
From HDR, select ON or OFF for the HDR feature.
• This feature is only available in continuous mode.
• This feature is supported by both the front and rear cameras.
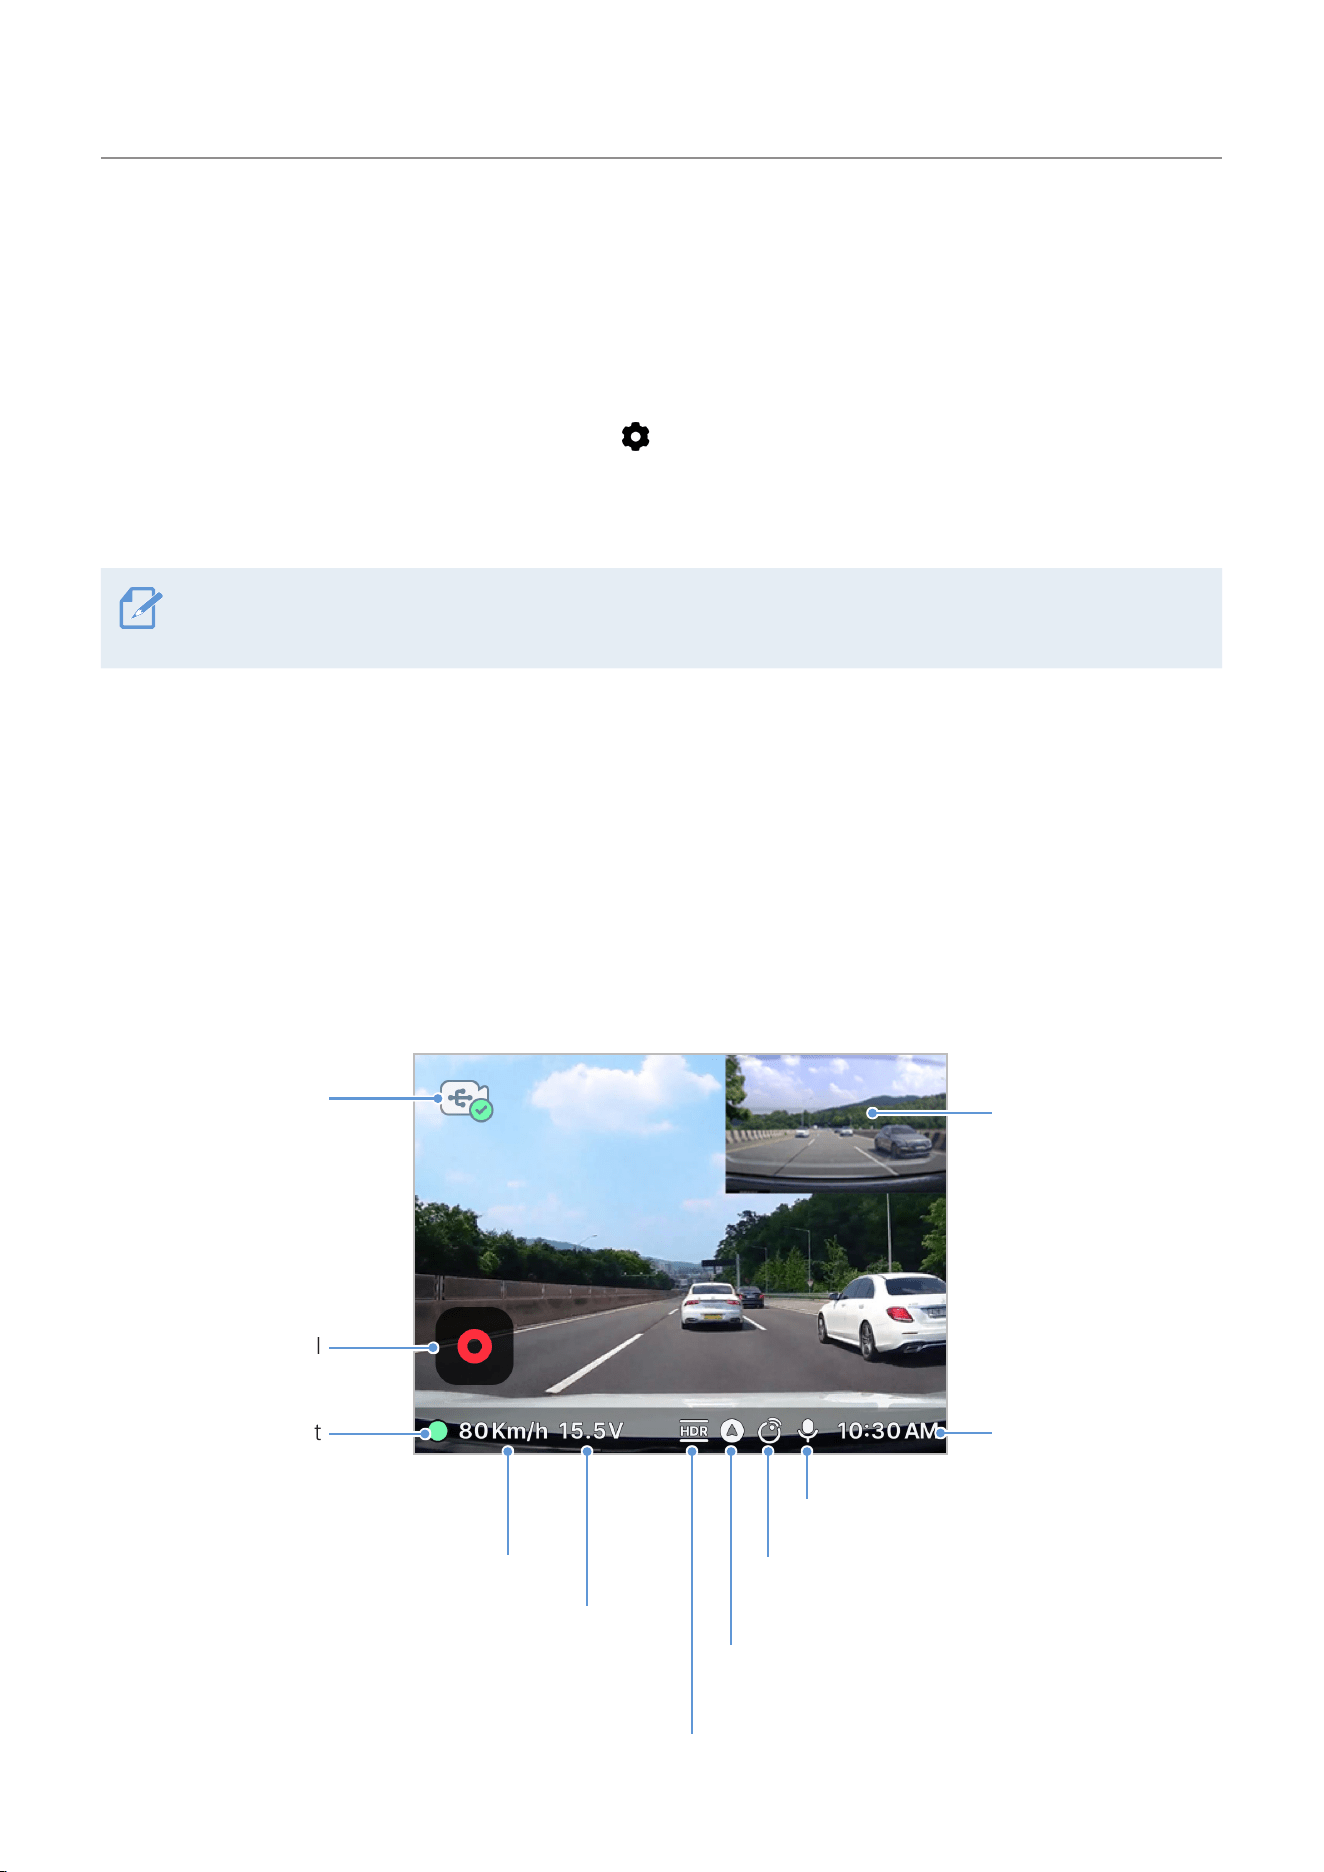
3.10 About the screen layout
The following are layout descriptions of the Live view and Home screens.
3.10.1 Live view screen
On the Live view screen, you can view the currently recorded video and operate the product by tapping on
the LCD display. When you turn on electrical accessories and start the engine, the Live view screen will be
displayed.
Displays the video that
the rear camera is
recording.
Starts manual
recording.
Displays the icon when
the interior IR camera
(optional) is installed.
Displays the current
recording status.
Displays the
current time.
Displays the voice recording status.
Displays the icon when the THINKWARE
CONNECTED LTE module (optional) is installed.
Displays the current driving speed.
Displays the GPS icon when the built-in
GPS mount is installed.
Displays the current vehicle voltage.
Displays the HDR icon when the HDR function is enabled.
Using recording features
23
Wait until the product is completely booted up after turning it on, and then begin operating the vehicle.
The video recording does not begin until the product is completely turned on (booted up).
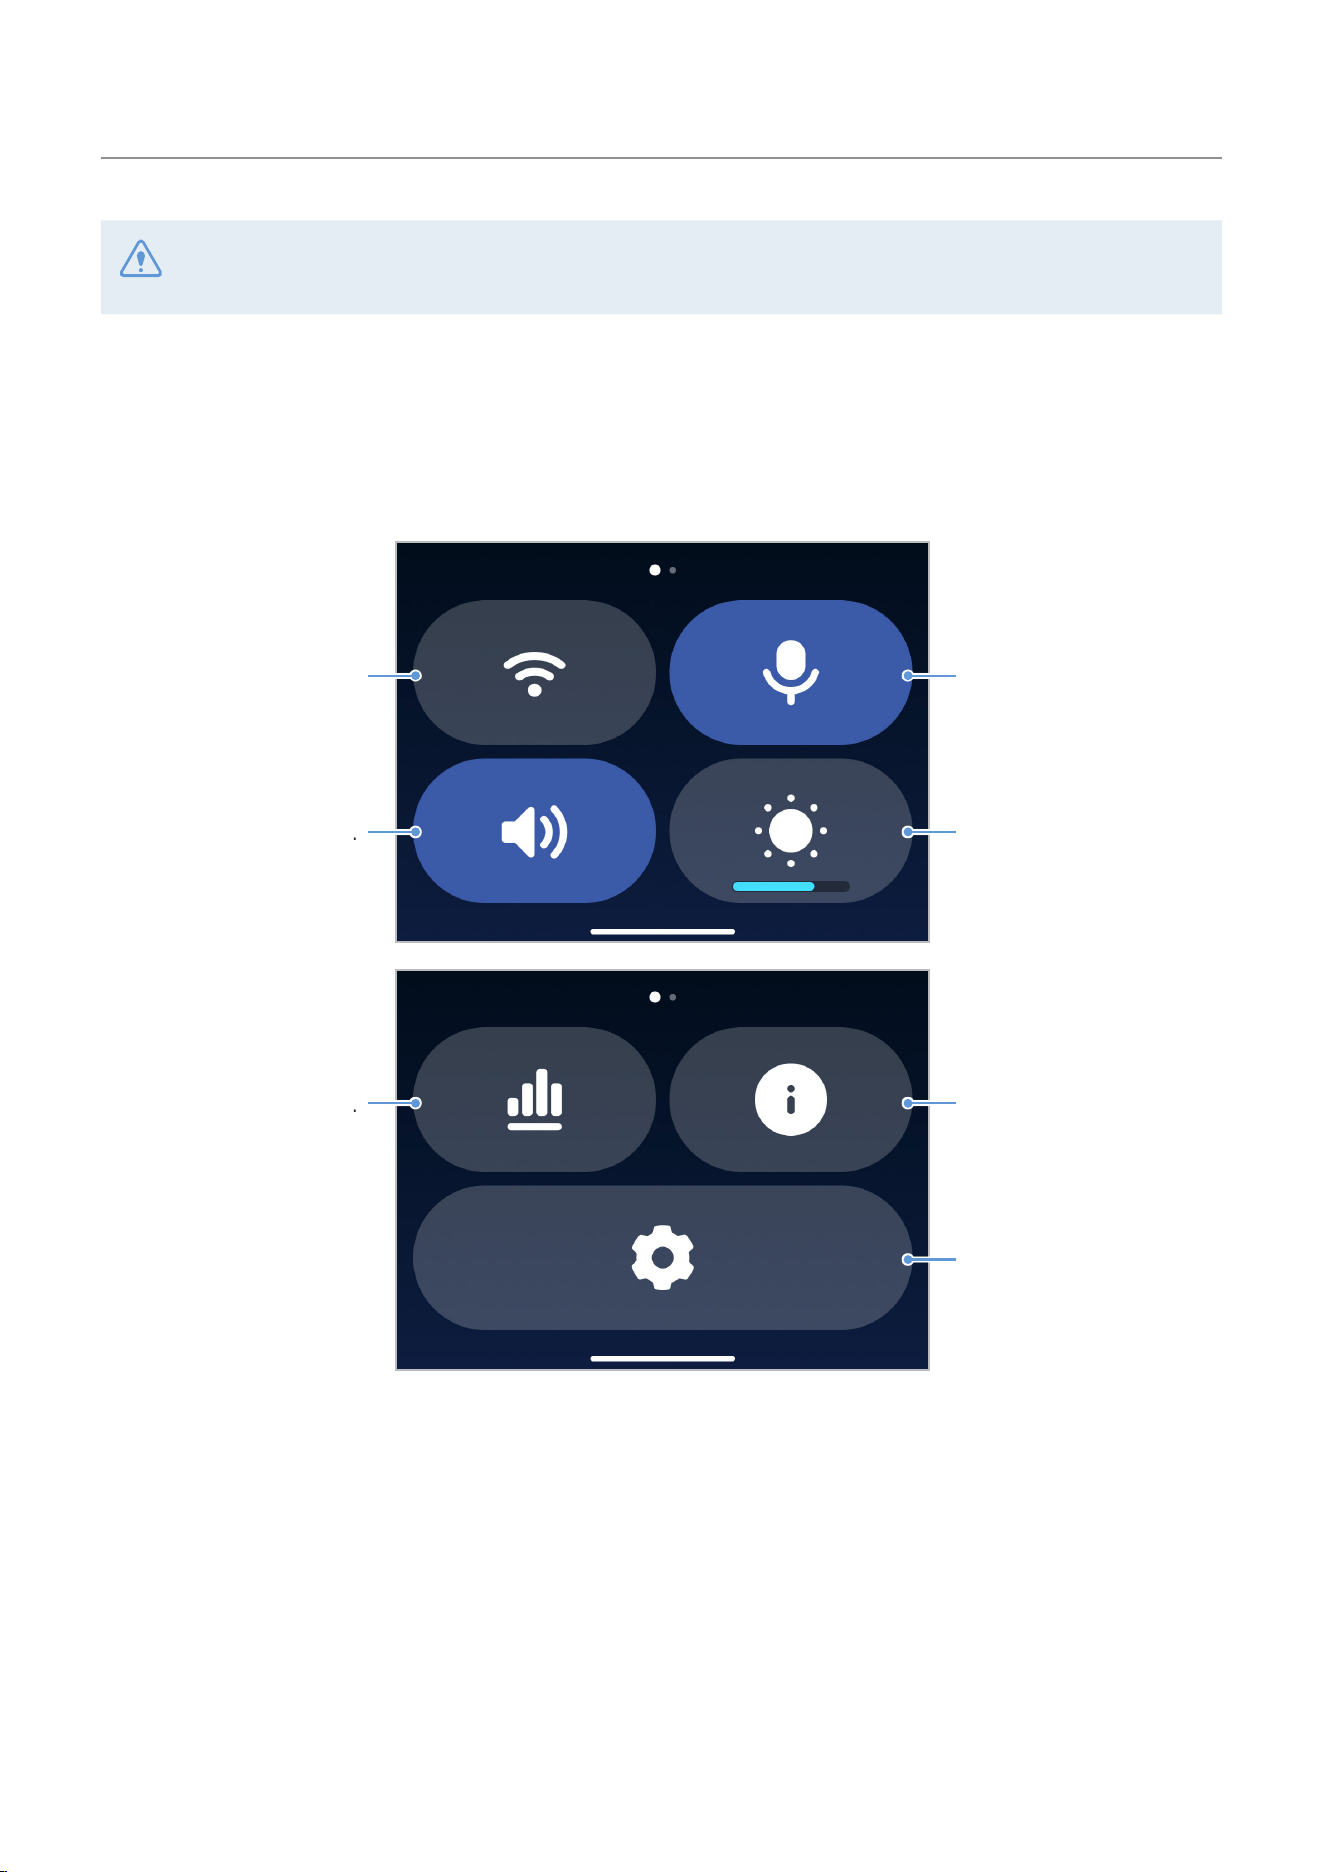
3.10.2 Quick menu screen
You can open the Quick menu screen by swiping down on the Live view screen. Swipe left or right on the
screen to view all menu options.
Provides a QR code for
connecting your product
to the THINKWARE DASH
CAM LINK.
Manages the memory card.
Turns the sound on or off.
Turns voice recording
on or off.
Provides guides and
product information.
Adjusts the LCD brightness.
Configures the system
and features. (Refer to
"5. Settings" on page 28.)
Using recording features
24
3.11 Playing videos
You can play recorded videos on the product or PC viewer. Refer to "8. Using the PC viewer" to learn how to
play videos on the PC viewer. Follow the instructions to play the videos.
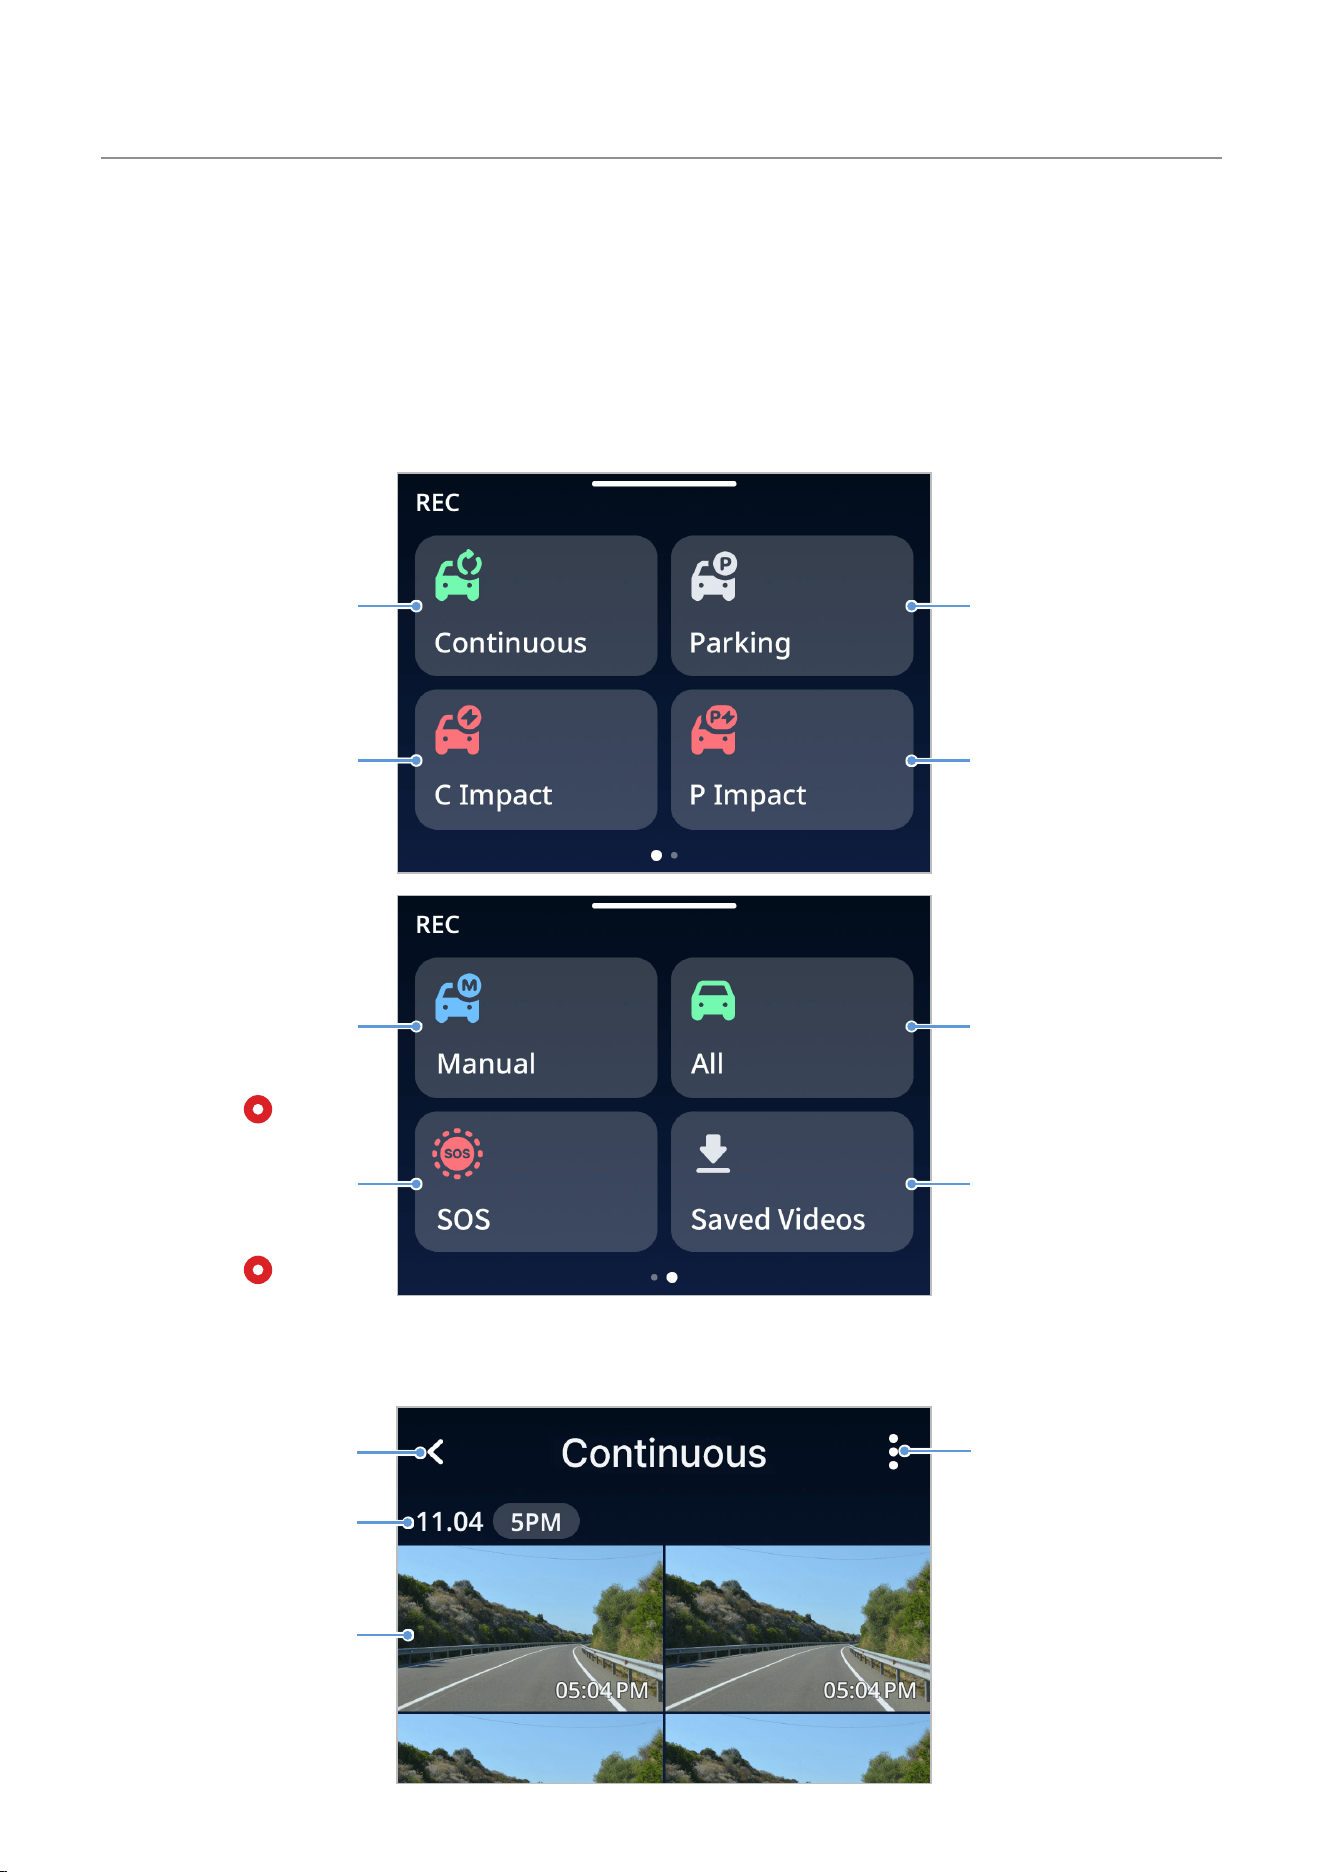
1
Swipe up on the Live view screen to display the recording mode categories. Swipe left or right on the
screen to view all categories.
Shows 1-minute video
segments recorded
while driving.
Shows videos recorded
when an impact is
detected while driving.
Shows videos recorded in
parking mode according to
settings other than impact
detection.
Shows videos recorded
when an impact is
detected while parked.
Shows videos
manually recorded by
tapping the Manual
recording ( ) button
on the LCD screen.
Shows SOS videos
recorded by pressing
and holding the Manual
recording (
) button
for 3 seconds (optional).
Shows all videos except
saved videos.
Shows saved videos.
2
When you select a category, the video file list will appear. Select the video you want to play.
Selects videos to delete or
move to Saved Videos.
Displays a list of
recorded videos.
Sorts recorded videos
by date and time.
Returns to the category
screen.
Using recording features
25
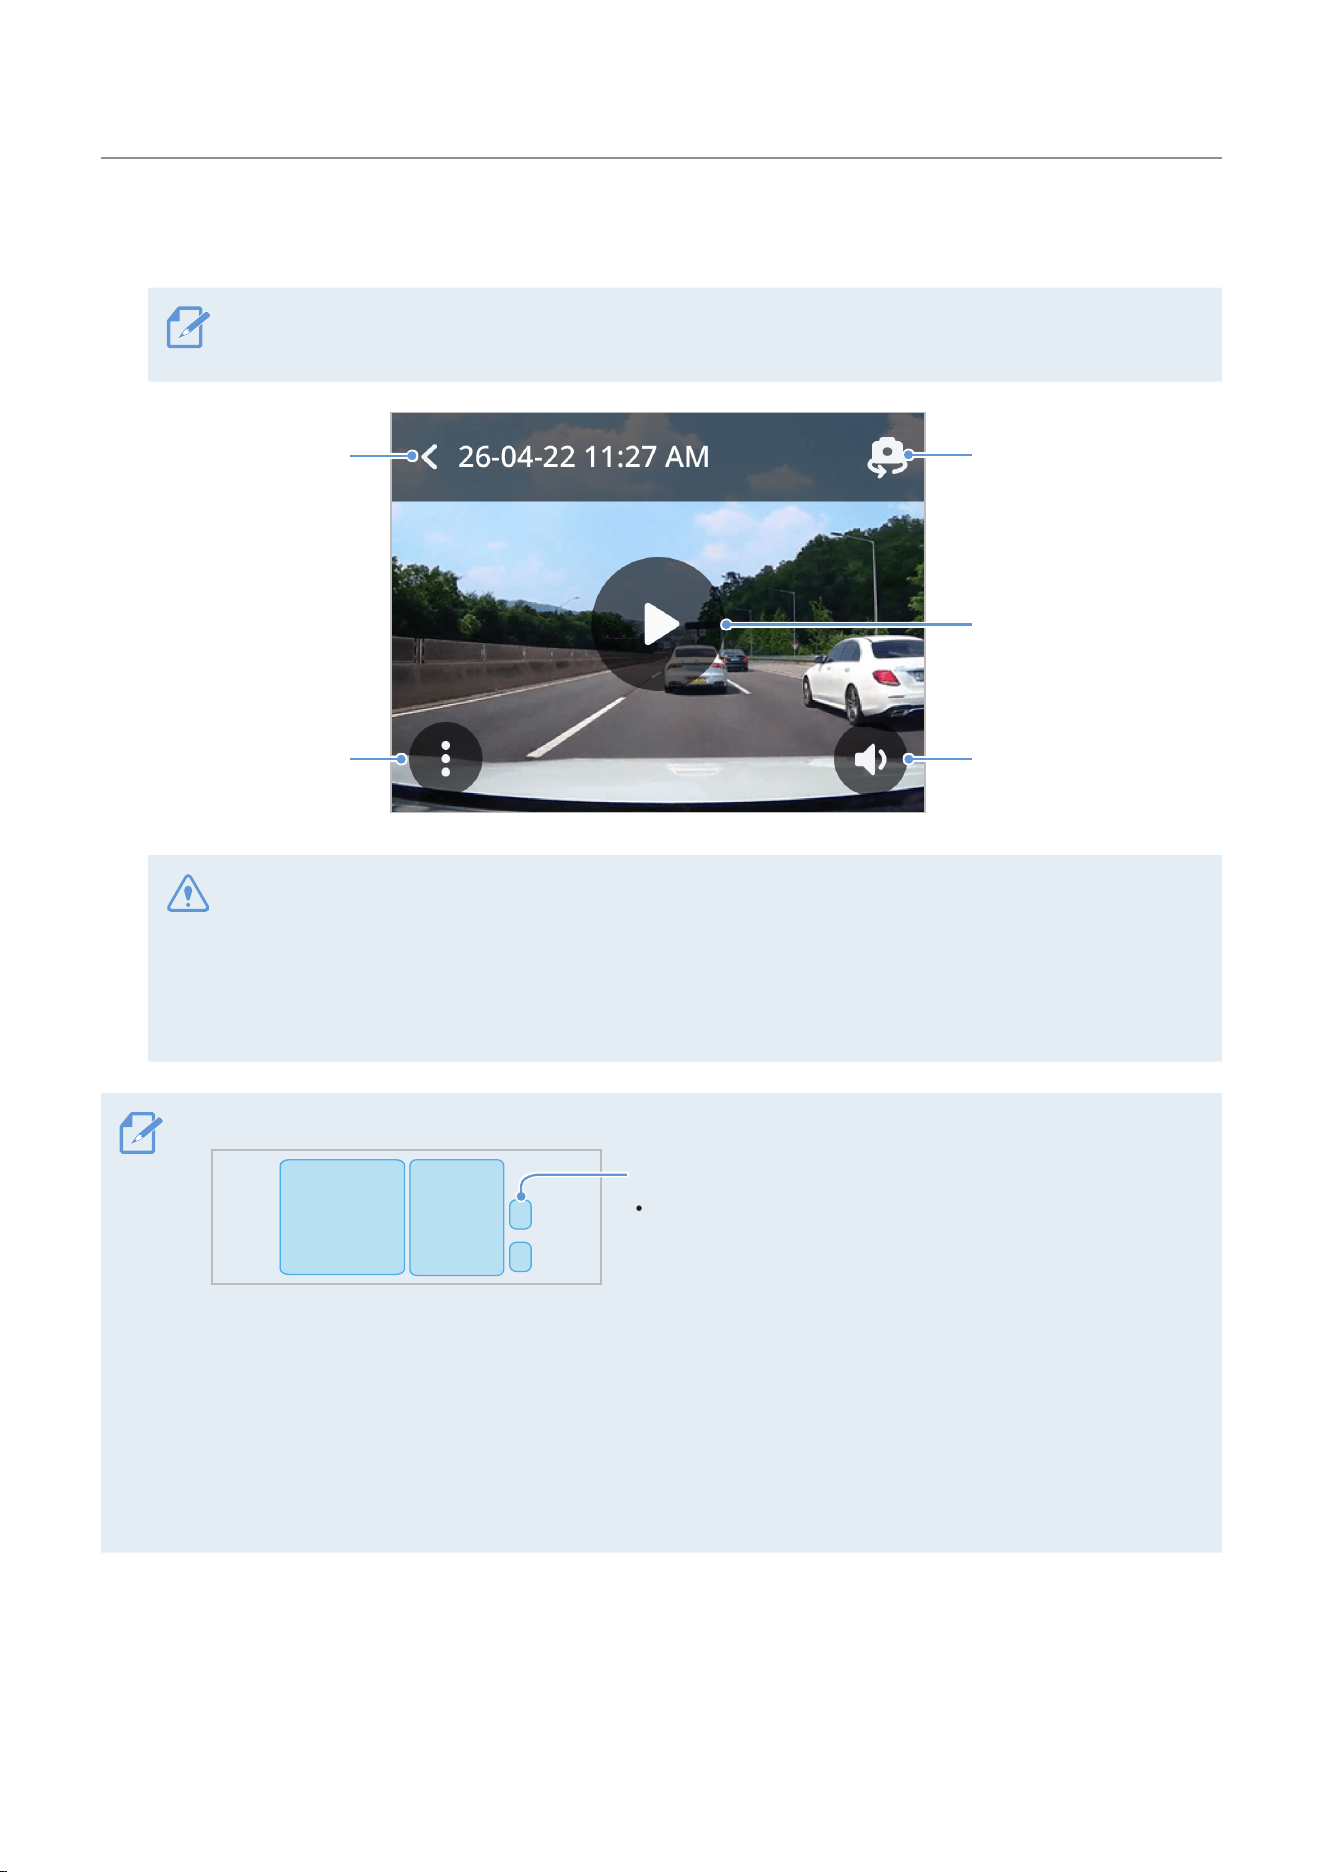
3
Tap a button on the playback screen to control the video player or other functions.
If you touch the LCD display's playback area, the screen will switch to full screen mode. To exit full
screen mode, touch the screen again.
Turns the video sound
on or off.
Plays or pauses a video.
Moves to the file
list screen.
Deletes the
video or moves it to
Saved Videos.
Switches to the rear
camera view.
• While you are checking the video file list or playing a video, the product will stop recording.
• Play videos only on the product or a computer. If you play videos by inserting the memory card in a
device, such as a smartphone or a tablet PC, video files may be lost.
• During playback, vehicle license numbers may not be identifiable due to the relative vehicle speed or
lighting conditions.
• A file name is composed of the recording start date and time, and the recording option.
REC_20261219_125815_F.MP4
REC_20261219_125815_R.MP4
YYYYMMDD_HHMMSS
Recording conditions
• F: Front camera
• R: Rear camera
• If the memory card runs out of space while recording, previously recorded videos will be deleted to create
sufficient storage. To prevent data loss, back up important videos on additional storage devices.
- When the continuous recording storage is insufficient: The oldest continuous recording file will be
deleted and replaced with the new video file.
Event video files (incident recording and manual recording files) will not be deleted.
- When the storage is insufficient (for event video files only): Event video files will be deleted
chronologically from the oldest to the most recent.
26
4. Using the road safety and ADAS features
• The surrounding environment, such as the road and weather conditions, can affect the system's
recognition and performance.
• Any situation that covers part or all of the camera lens may result in reduced system functionality.
4.1 Road safety features
The road safety features include the Safety Cameras and the Mobile Speed Zone.
To deactivate road safety features, swipe down on the Live view screen, tap
>
Road Safety, and then set
the Safety Cameras or Mobile Speed Zone to OFF.
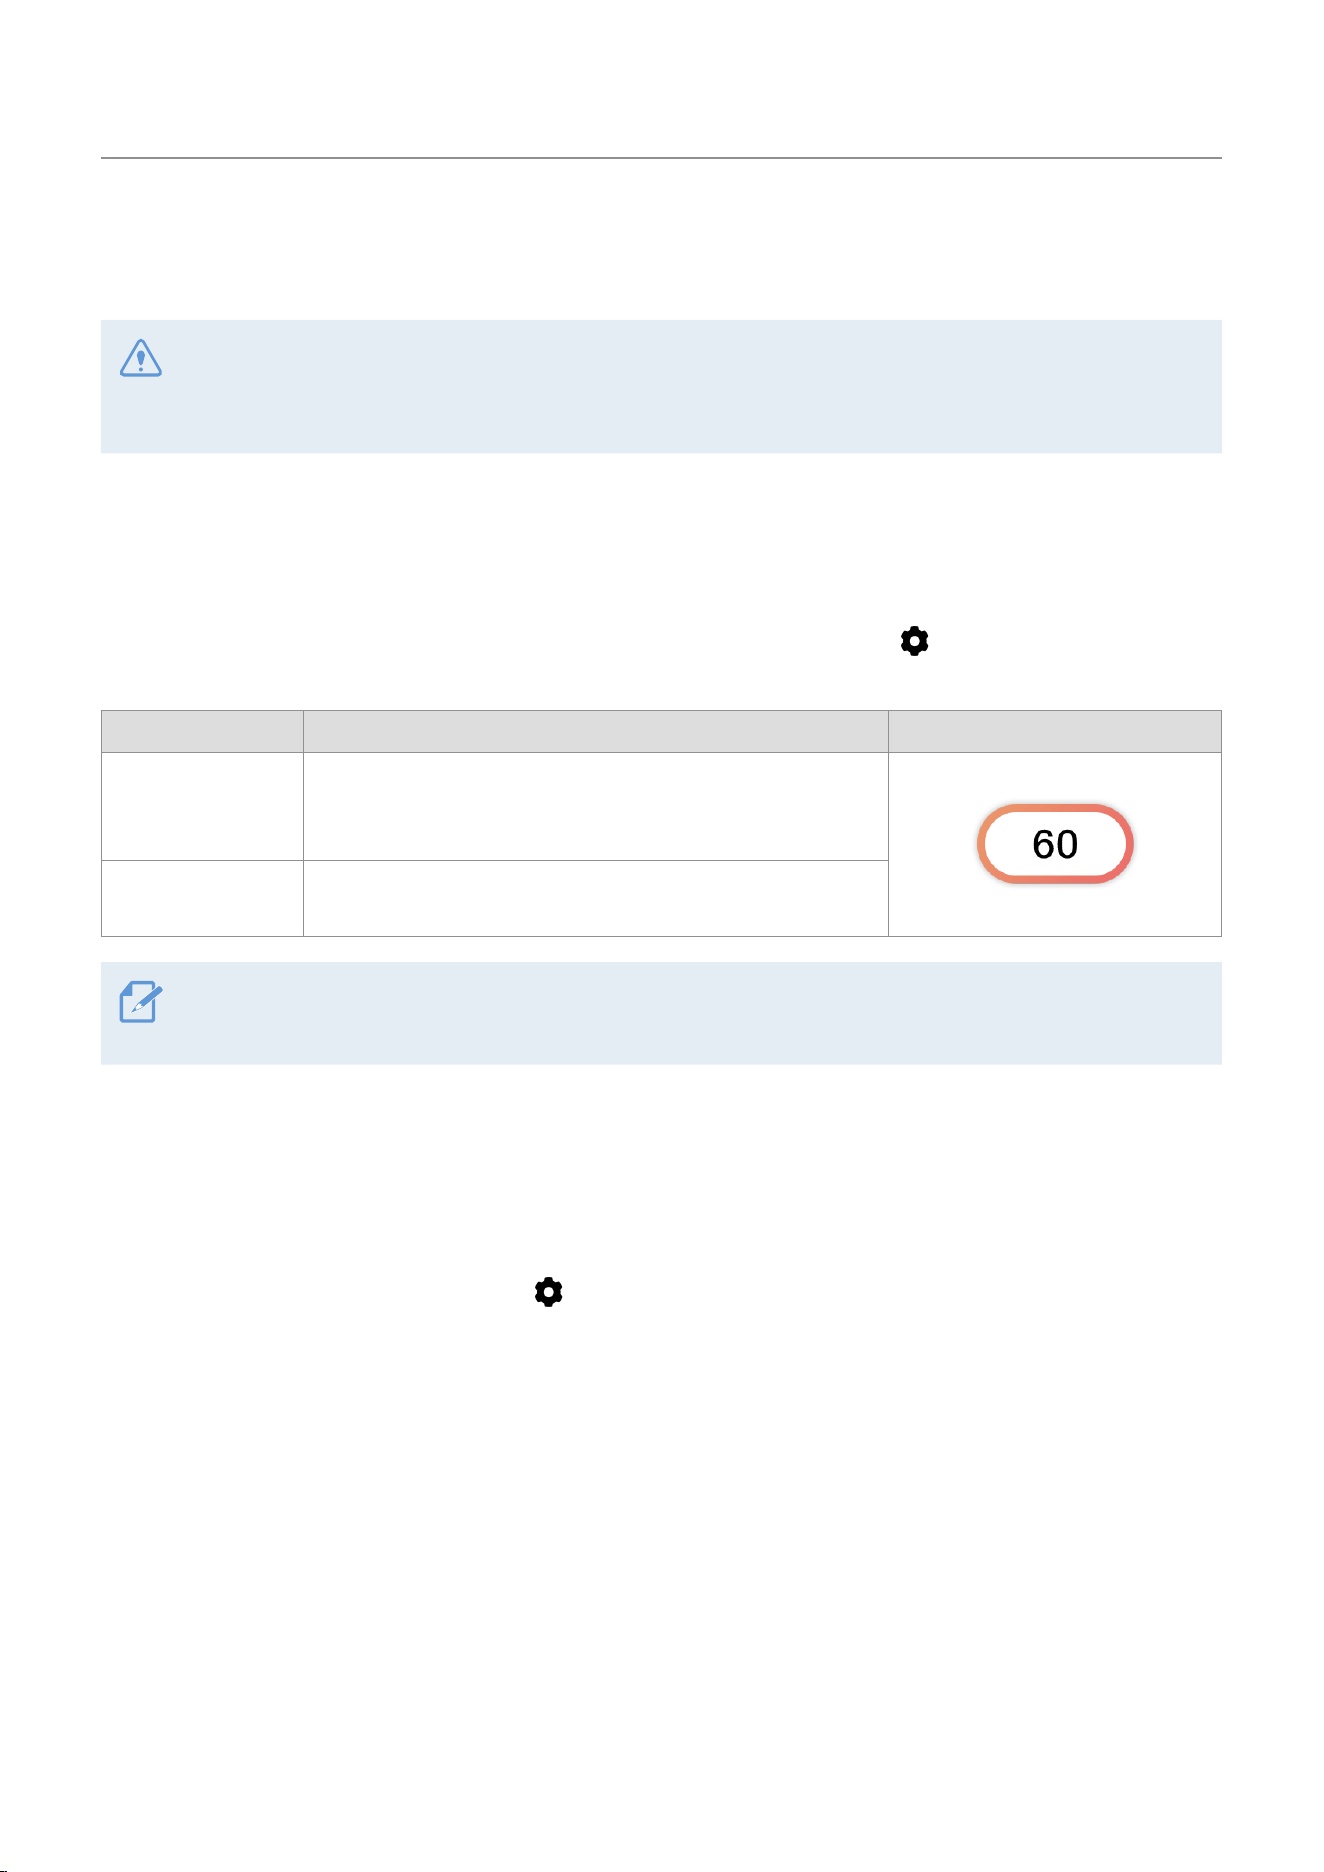
Features Description Notification icons
Safety Cameras
When the vehicle approaches the speed limit zone, the
speed limit will be displayed on the screen. It also provides
road information in real time to assist you while driving.
Mobile Speed
Zone
Provides a guide to speed zones in each country.
• Safety Cameras provides guidance on speed zones in each country.
• Mobile Speed Zone can be set only when the Safety Cameras setting is set to
ON.
4.2 ADAS features
4.2.1 Identifying the vehicle type
Swipe down on the Live view screen, tap
>
Road Safety, and then select a Vehicle Type from Sedan /
SUV / Truck (Bus) under ADAS Features.
Using the road safety and ADAS features
27
4.2.2 ADAS safety features
Refer to the following table for the ADAS safety features.
To deactivate ADAS safety features, swipe down on the Live view screen, tap
>
Road Safety, and then
set the features you want to deactivate to OFF.
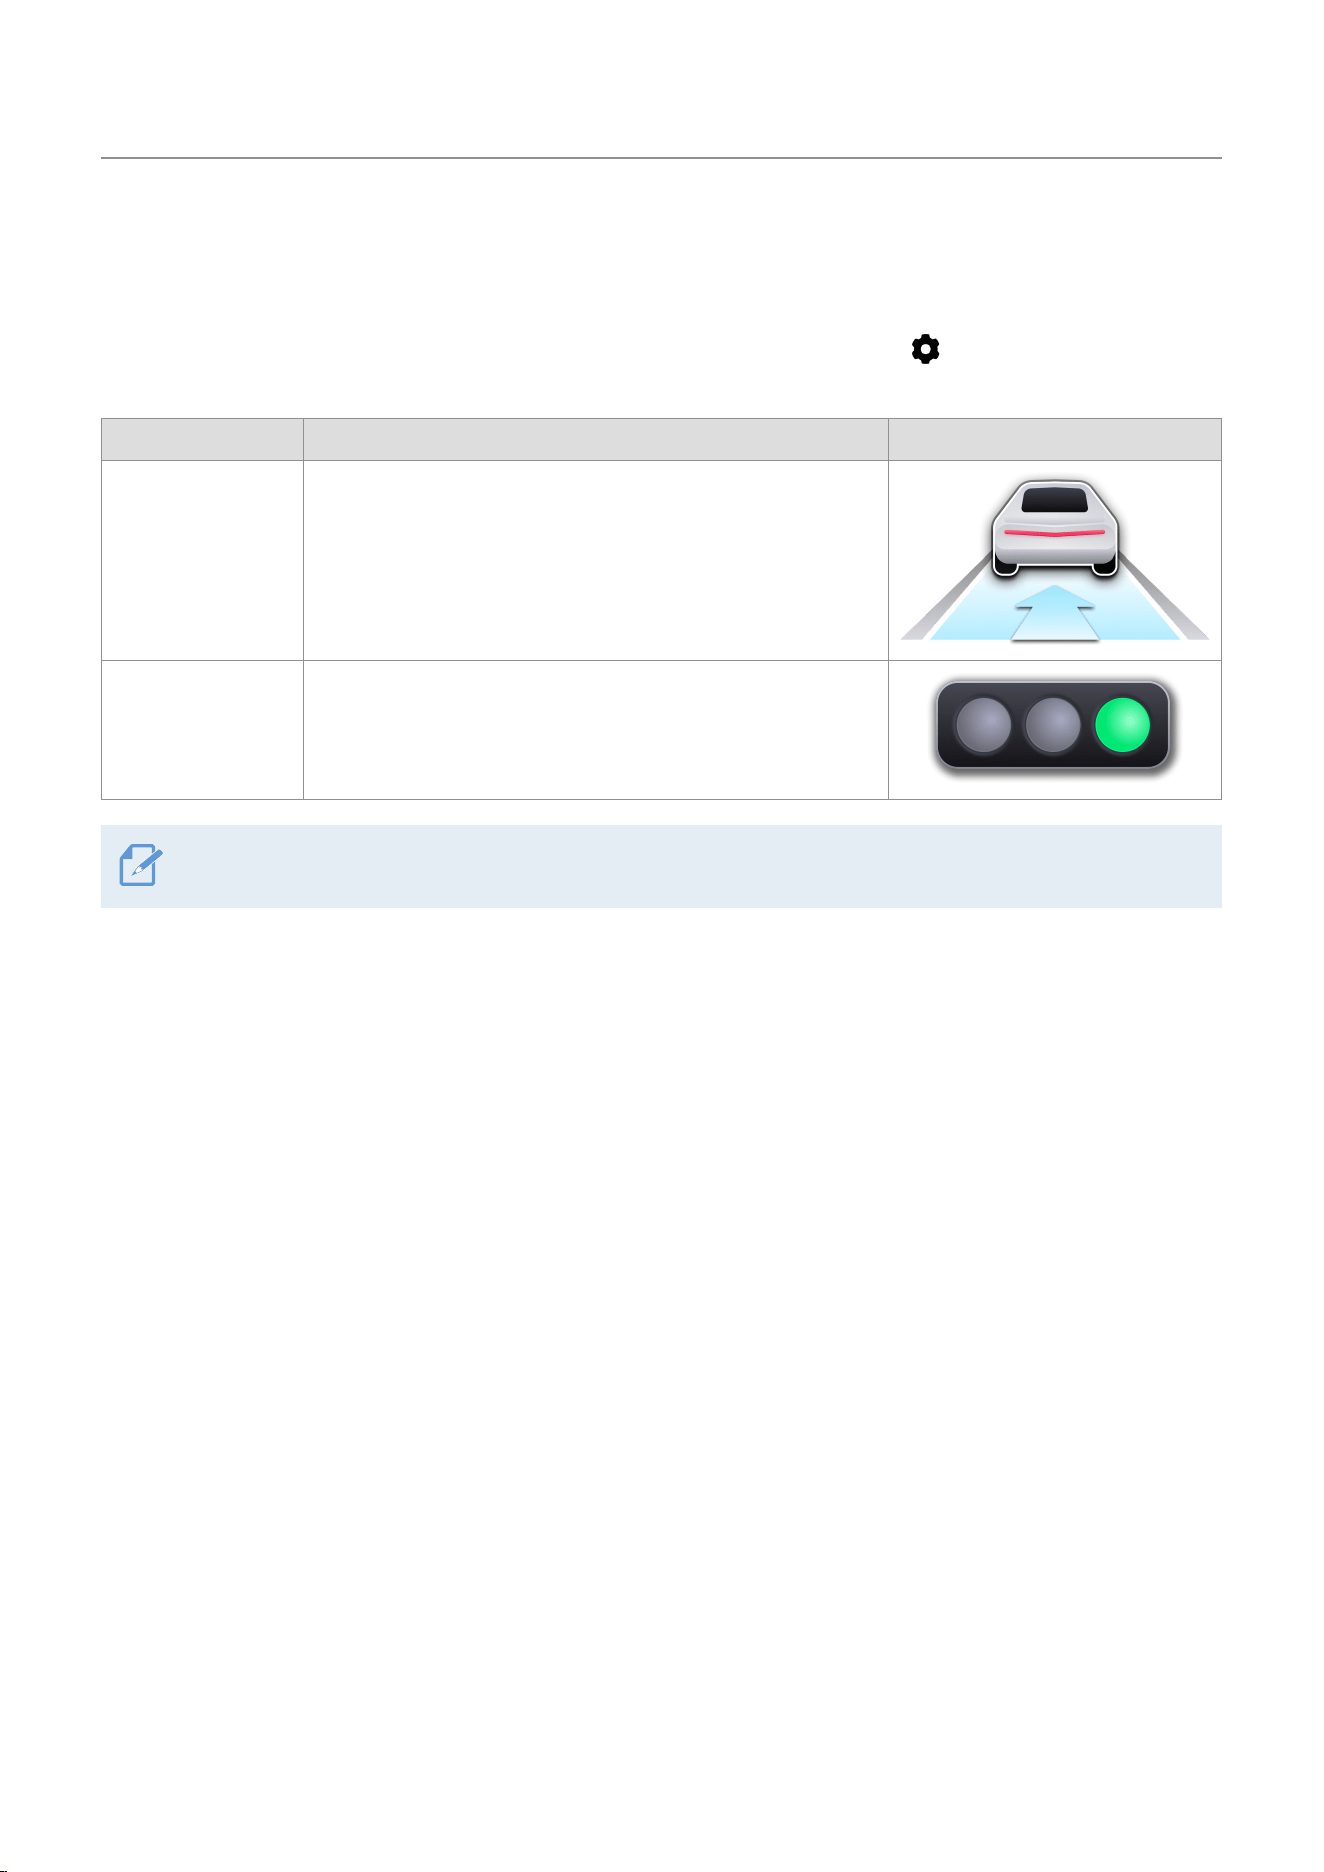
Features Description Notification icons
FVSA
(Front Vehicle
Start Alert)
Alerts the driver when the vehicle ahead starts moving.
TLCA
(Traffic Light
Change Alert)
Alerts the driver when the traffic light changes while the
vehicle is stopped.
TLCA is only supported in the US and Canada.
28
5. Settings
You can set the product features according to your needs and preferences using the settings menu.
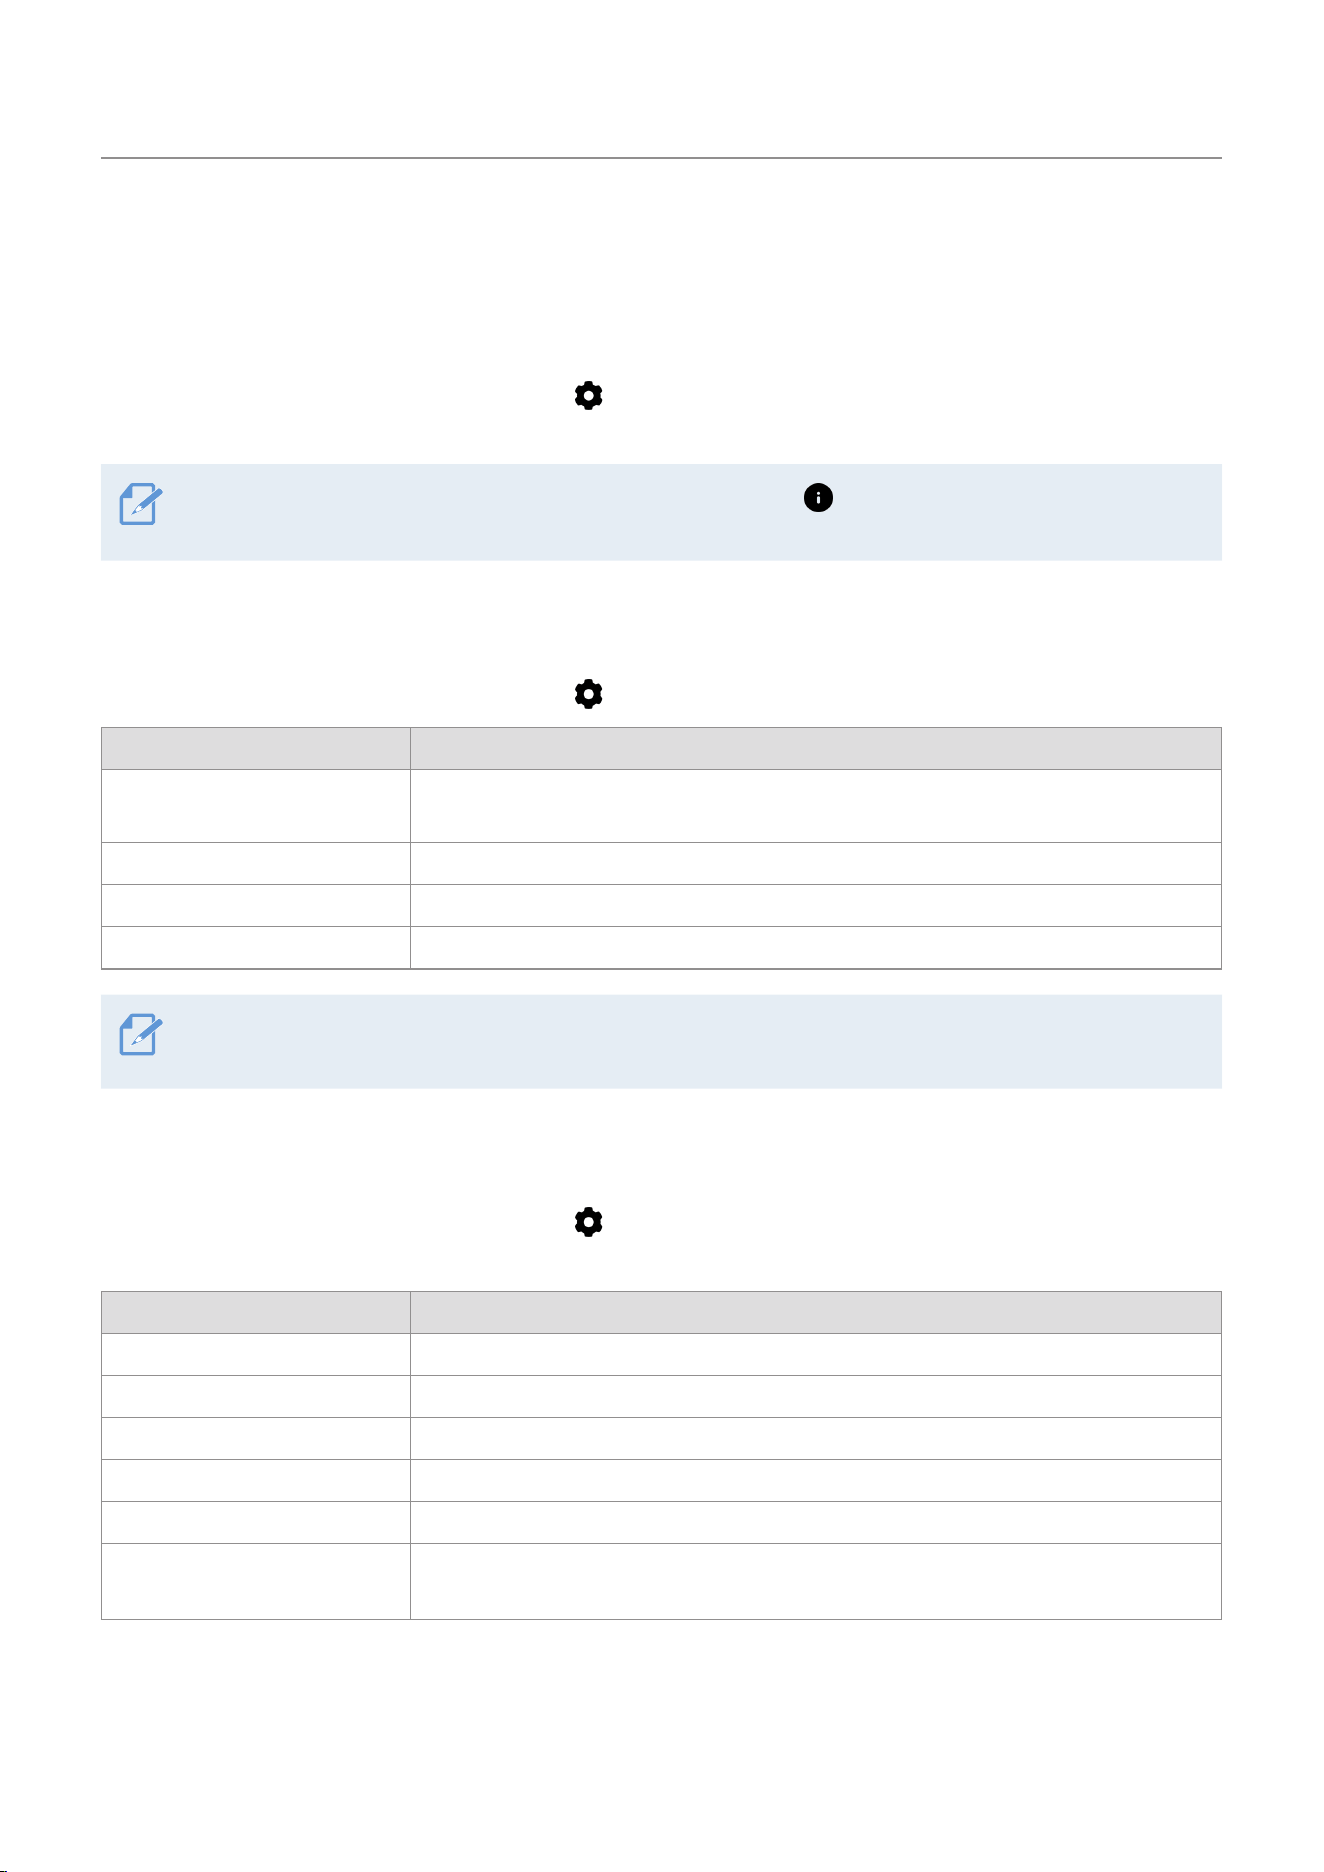
Swipe down on the Live view screen and tap
to display the setting categories. Swipe left or right on the
screen to view all the categories.
To reset all settings, swipe down on the Live view screen and tap
>
Device Info
>
Restore Settings
>
Confirm.
5.1 Setting the Camera
Swipe down on the Live view screen and tap
>
Camera to adjust the camera settings.
Options Description
Resolution
Select from 4K 30fps + FHD 30fps / QHD 60fps + FHD 30fps / 4K 30fps (1CH) /
QHD 60fps (1CH) for the desired front/rear resolution.
Rotate Rear camera Select from ON/OFF.
HDR Select from ON/OFF.
Camera mode Select from AI Night Vision/Super Night Vision.
For more information about the Night Vision and HDR features, refer to "3.8 Using the Night Vision" on page 21
and "3.9 Using the High Dynamic Range (HDR)" on page 22.
5.2 Setting road safety features and ADAS features
Swipe down on the Live view screen and tap
>
Road Safety to customize Safety Camera alerts and
ADAS settings.
Options Description
Safety Cameras Select from ON/OFF for the safety cameras.
Mobile Speed Zone Select from ON/OFF for the mobile speed zone.
Vehicle Type Select the vehicle type from Sedan/SUV/Truck (Bus).
Initialize ADAS In Initialize ADAS, tap Confirm to proceed with initializing.
FVSA (Front Vehicle Start Alert) Select from ON/OFF for the FVSA feature.
TLCA (Traffic Light Change
Alert)
Select from ON/OFF for the TLCA feature.
Settings
29
5.3 Setting recording features
Swipe down on the Live view screen and tap
>
Recording to change the recording settings.
Options Description
Continuous Impact Sensitivity Select one of the five continuous impact detection sensitivity levels.
Privacy Recording
You can set the privacy recording feature to delete your recorded files after a set
amount of time to protect the privacy of others. Select from G-Shock only/1min
(max. 2min)/3min (max. 4min)/OFF for the privacy recording setting. If it is set to
G-Shock only mode, then it is not consistently recorded.
Voice Recording Select from ON/OFF. (Audio is recorded inside the cabin.)
Parking Mode Select from Motion Detection/Time Lapse/Energy Saving/OFF for the parking mode.
Parking Mode Waiting Time
Select from 30 sec/1 min/2 min/3 min/4 min/5 min for the parking mode waiting
time (time to switch to parking mode).
Parking Sensitivity Select one of the five parking mode sensitivity levels.
Motion Sensitivity Select one of the five motion detection sensitivity levels.
Off Timer Select the desired off time. To turn off the off timer, select OFF.
Battery Protection Select from ON/OFF for the battery protection.
Vehicle Type Select from Regular car/Hybrid car/Electric car for the vehicle type.
Off Voltage Set the off voltage according to the vehicle type.
• If the continuous impact detection sensitivity is too high, the product will record a video even when a
minor impact caused by the road condition and your driving is detected. This may shorten the memory
card’s life.
• If the continuous impact detection sensitivity is too low, the product may not record a video when a minor
accident occurs.
• If you record in parking mode for an extended period, the vehicle’s battery may be depleted and you may
not be able to start the vehicle.
• Vehicle Type and Off Voltage can be set only when the Battery Protection setting is set to ON.
• If the off voltage value is too low, the product may consume the battery completely depending on the
conditions like the vehicle type or temperature.
• For vehicles using a 12 V battery (most passenger vehicles), set the voltage to 12 V. For vehicles using the
24 V battery (like most trucks and large vehicles), set the voltage to 24 V.
• Thermal Protection is a smart feature that prevents heat-related damage by automatically switching the
dash cam to the energy saving mode if the temperature inside the vehicle gets too high during Parking
mode.
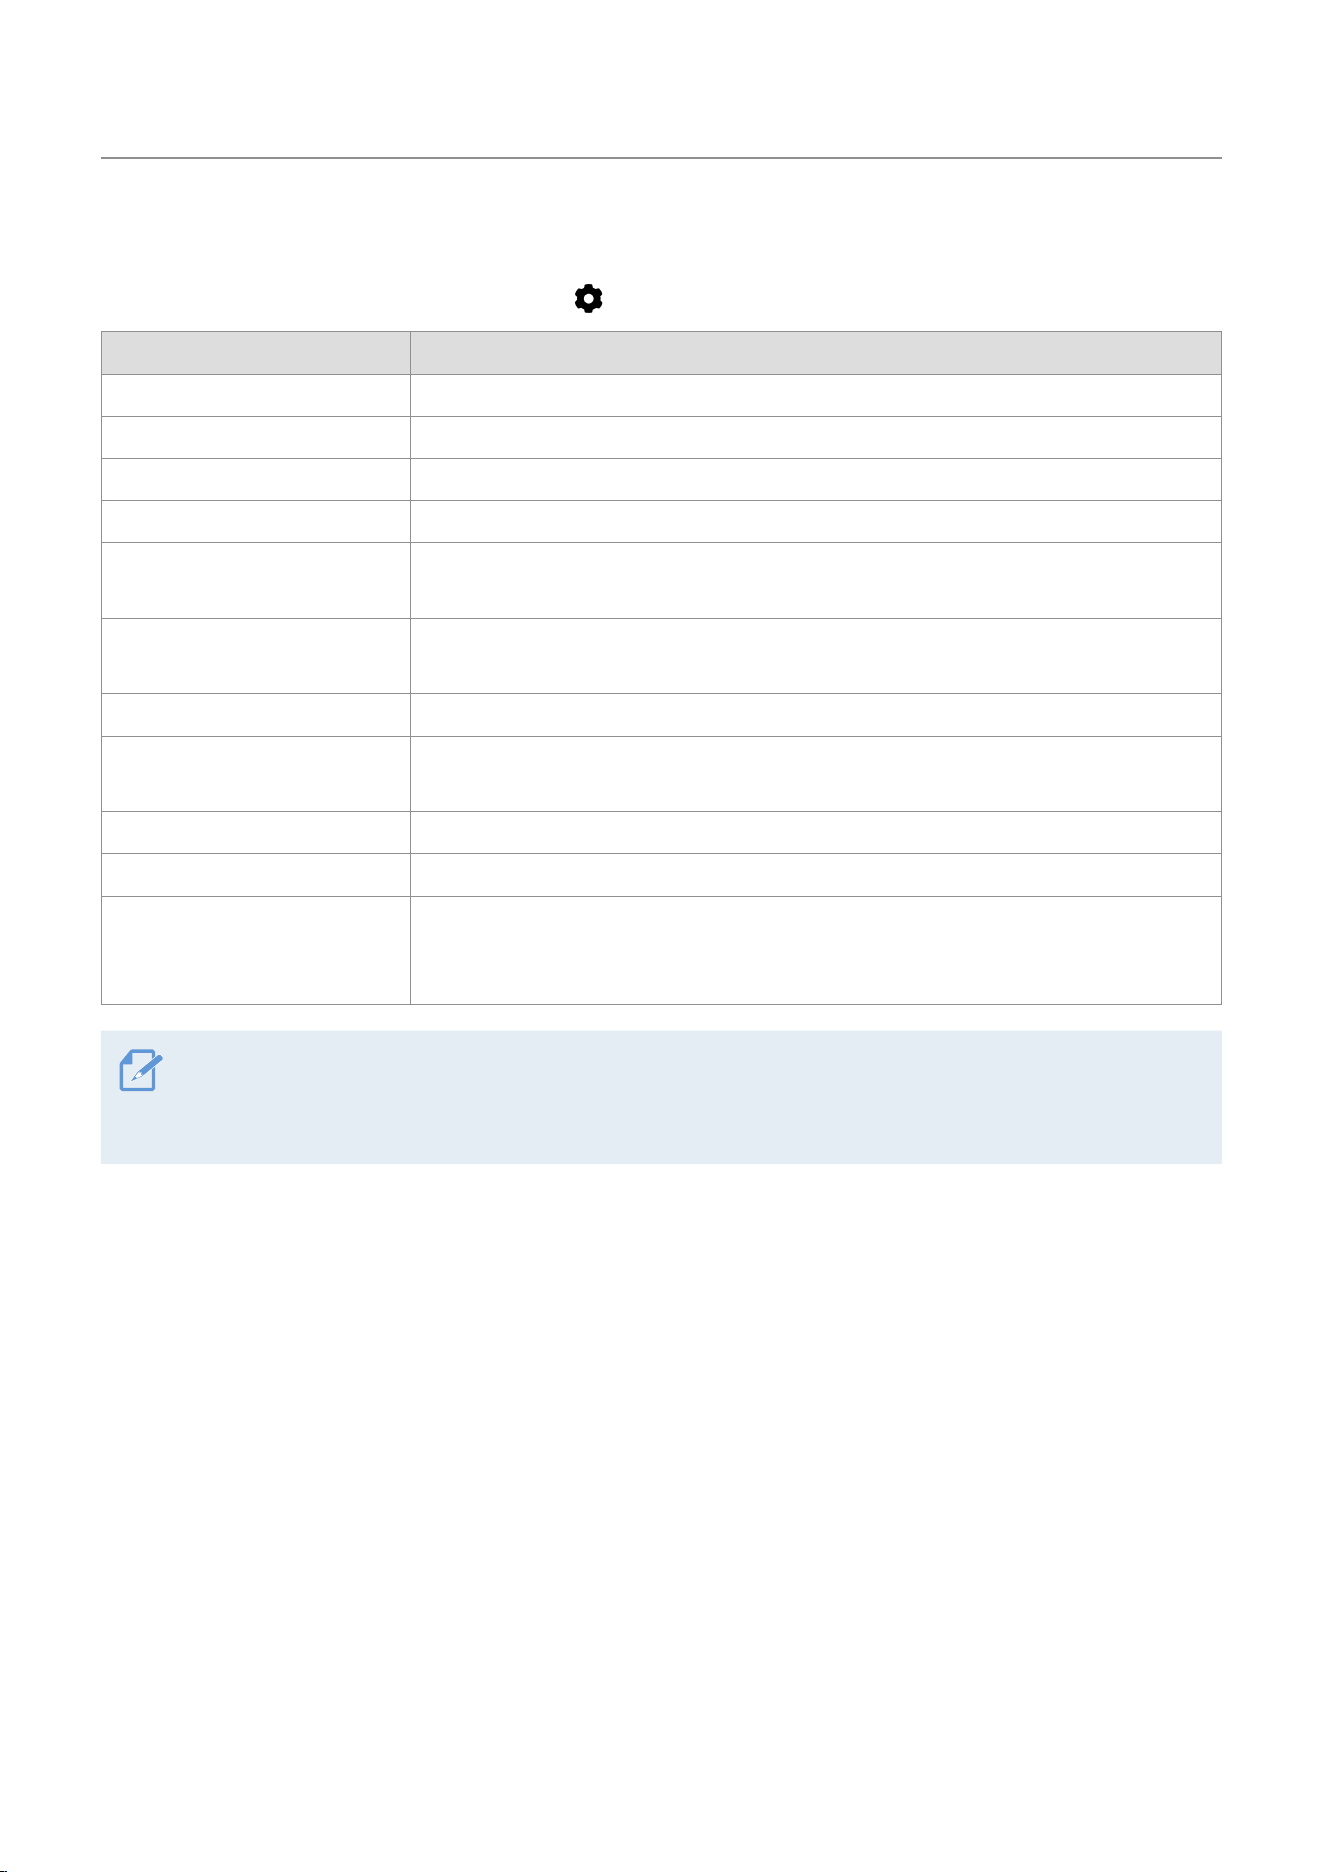
Settings
30
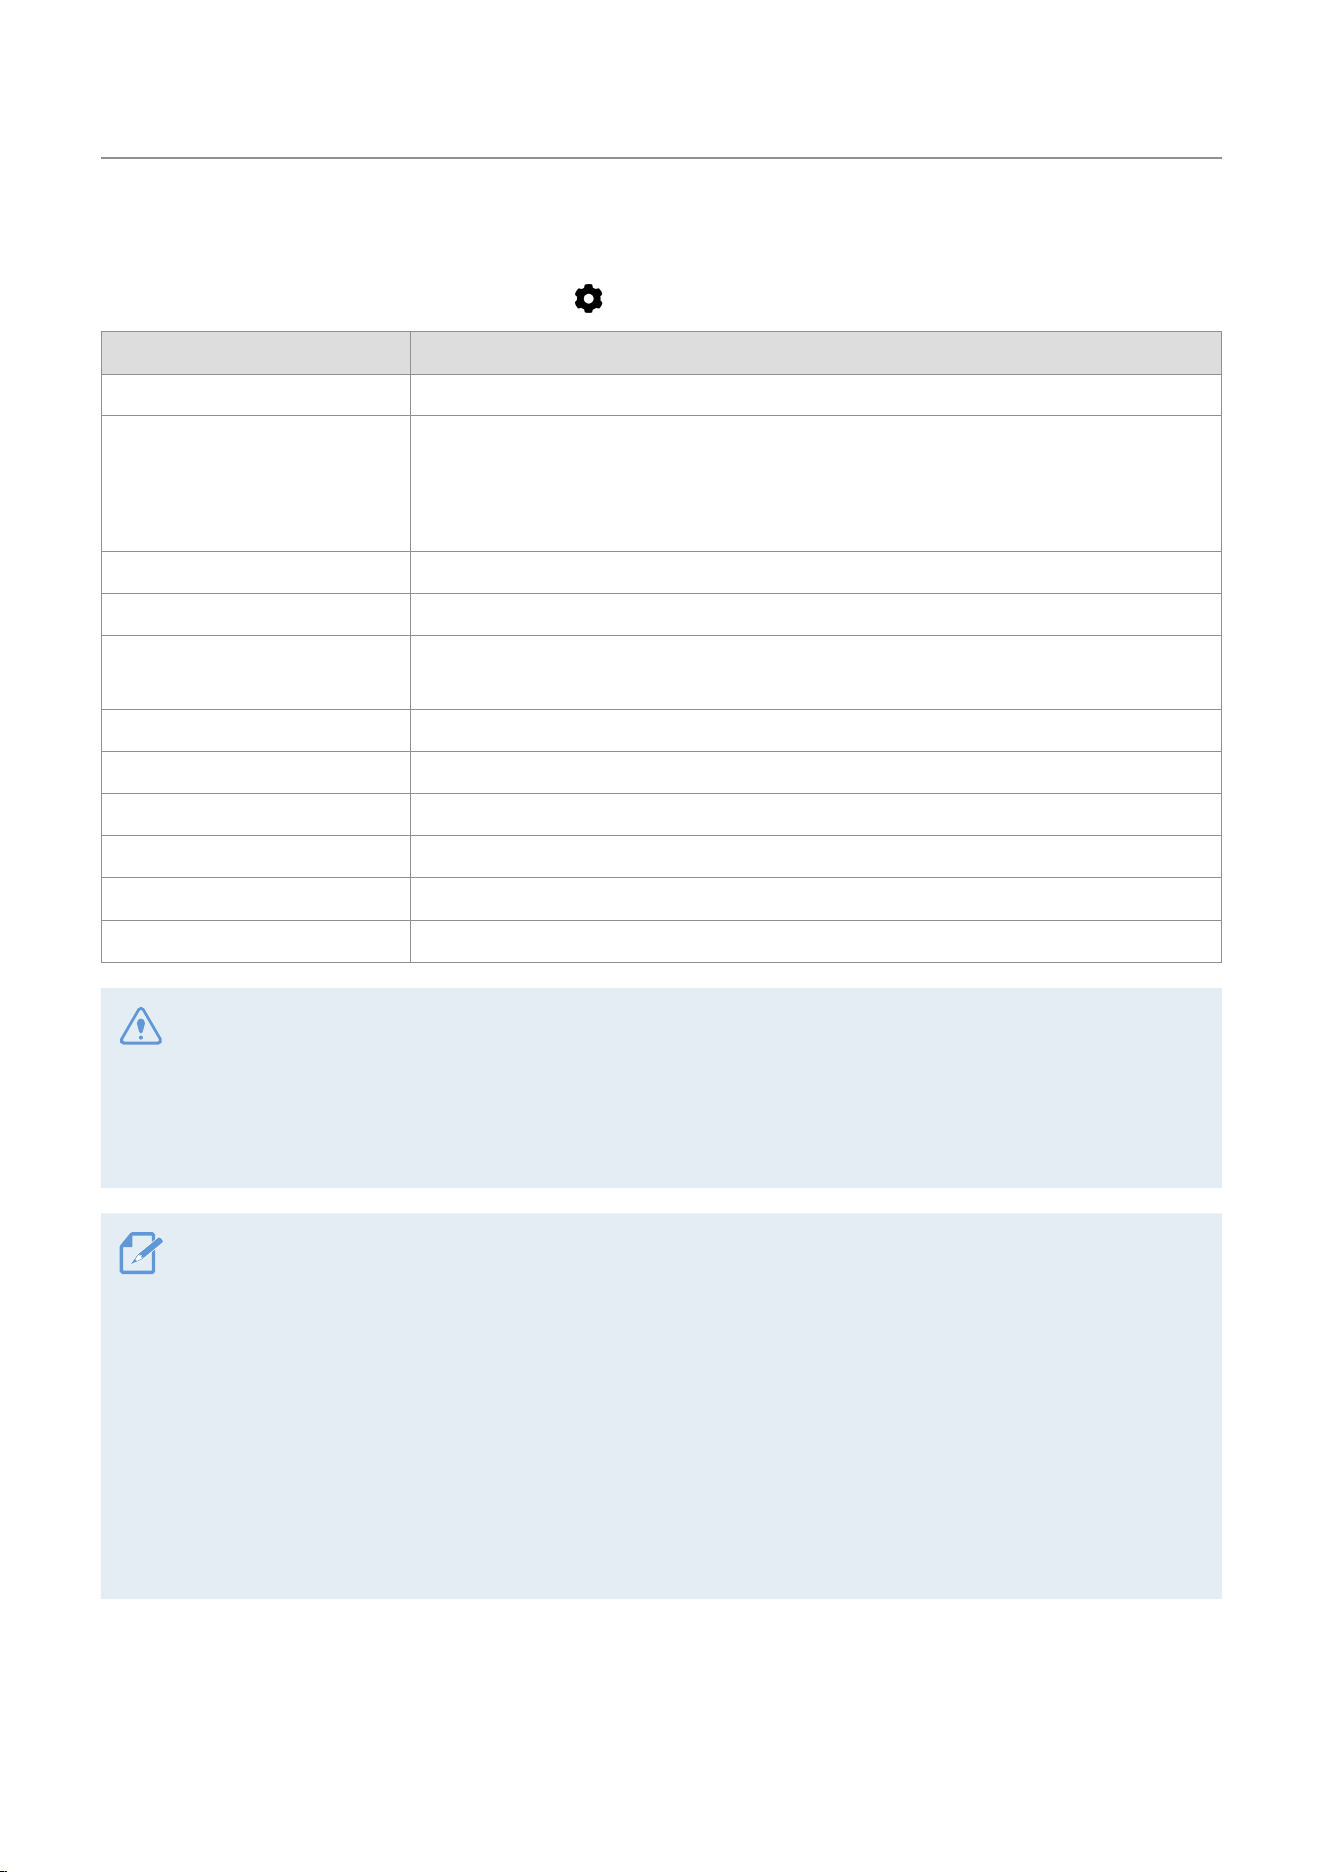
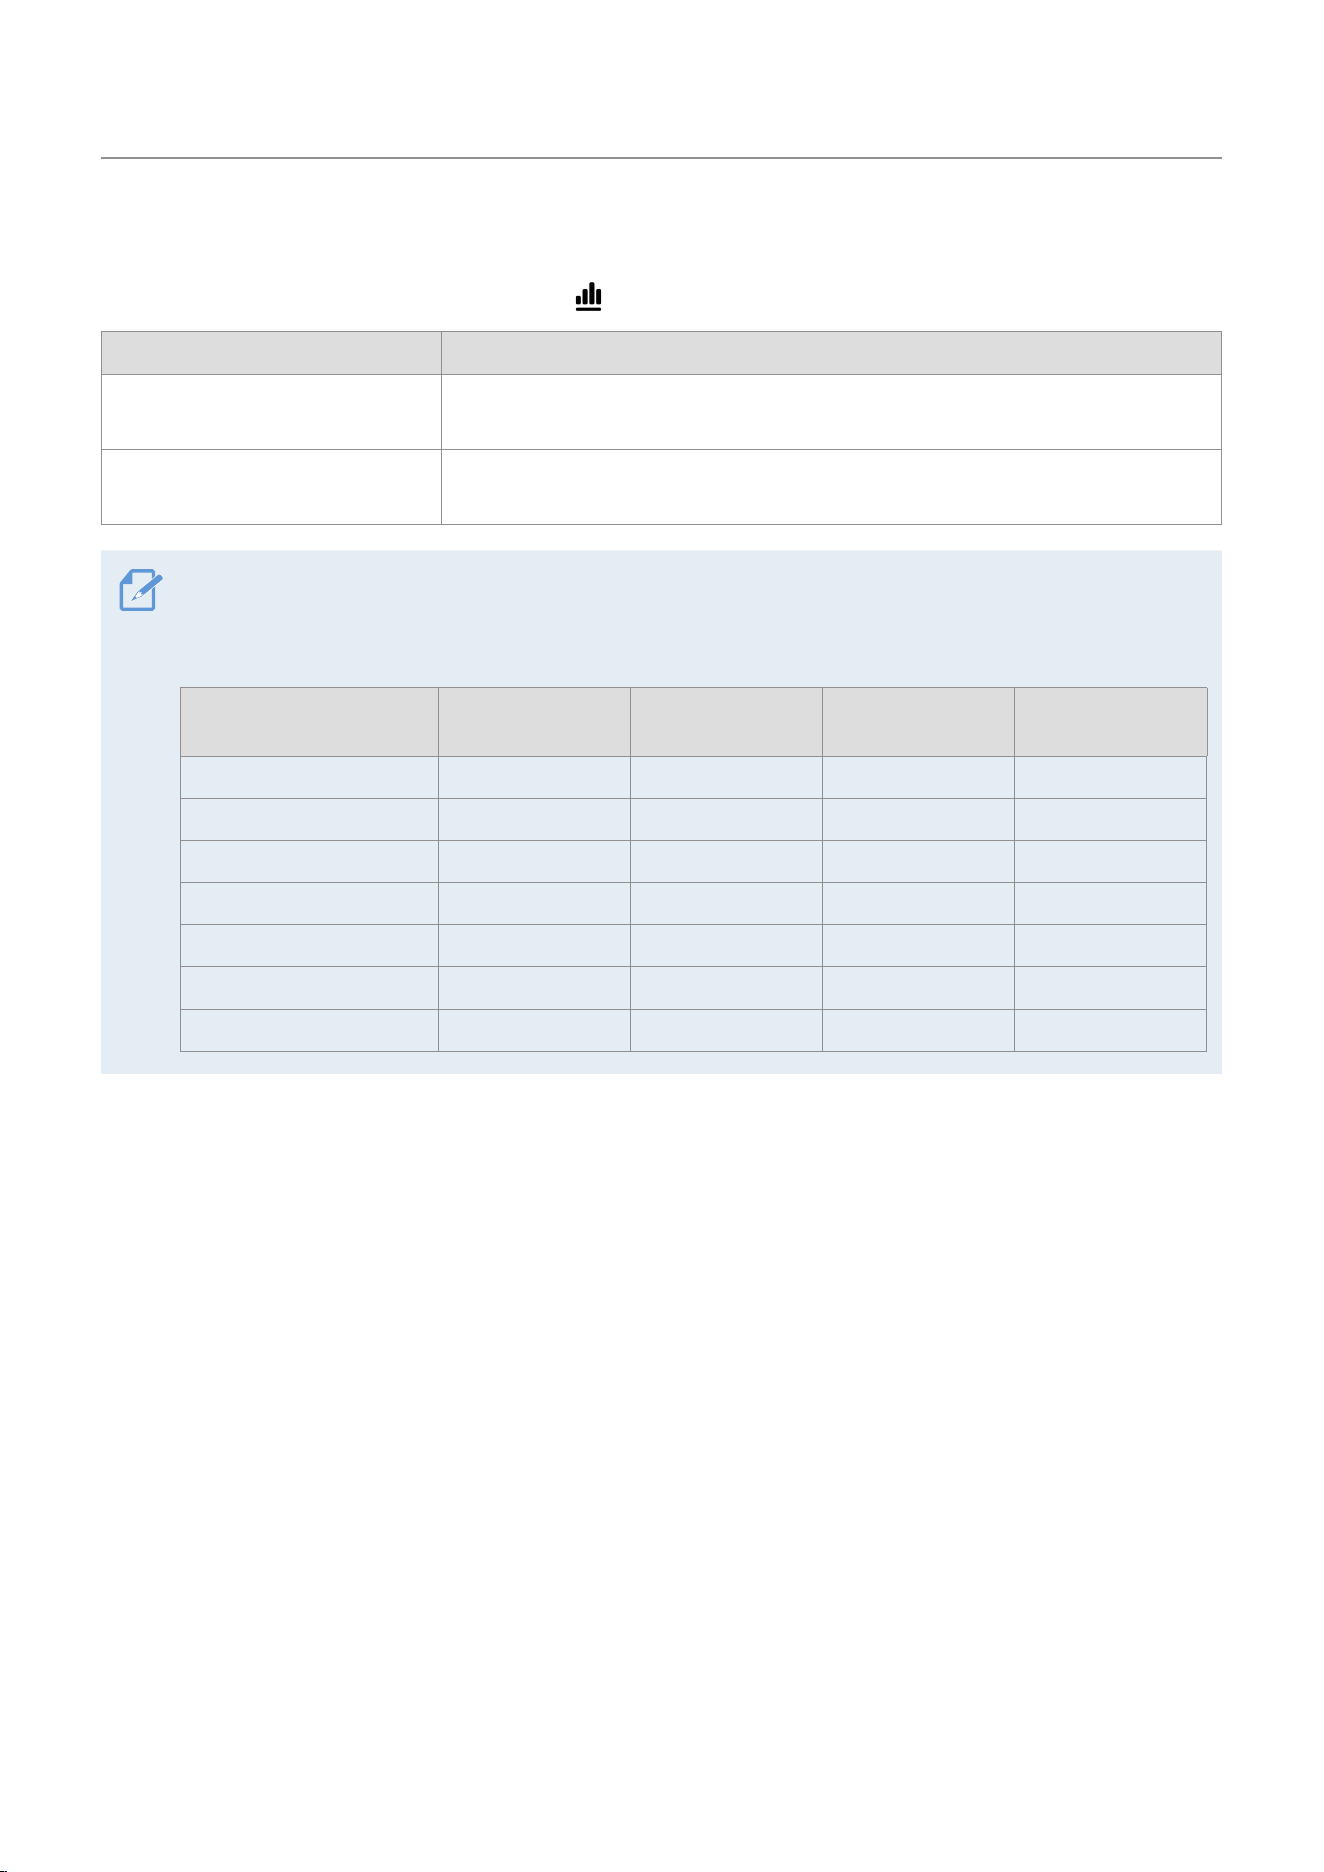
5.4 Configuring the system settings
Swipe down on the Live view screen and tap
>
System to configure the hardware system settings.
Options Description
Language Select the desired language.
Volume Select the desired volume level for each feature (Road Safety/System and Others).
LCD Brightness Select a brightness level.
LCD Auto-off Select from 30 sec/1 min/10 min.
Front Security LED
Select from Continuous Mode/Parking Mode/Continuous+Parking/OFF for the front
security LED. You can set the LED effect for the selected mode.
Time Zone
Set your local time zone. The dash cam automatically sets the date, so only the
time zone needs to be changed.
Daylight Saving Select from ON/OFF for the daylight saving.
Speed Unit
The driving speed is displayed at the bottom of the recorded video. Select from
km/h/mph for the speed unit.
Speed Stamp Select from ON/OFF for the speed stamp.
Wi-Fi Frequency Band Select from 2.4GHz/5GHz for the Wi-Fi frequency.
USB-C
Select from Disabled/LTE Modem/USB Camera for the USB-C port. If you use the
THINKWARE CONNECTED LTE Module, select LTE Modem. If you use the interior IR
camera, select USB Camera.
• If you select 0 for the volume level, the voice guidance will be disabled.
• This product features Format Free 2.0, allowing you to store video for extended periods of time without
frequent memory formatting.
Settings
31
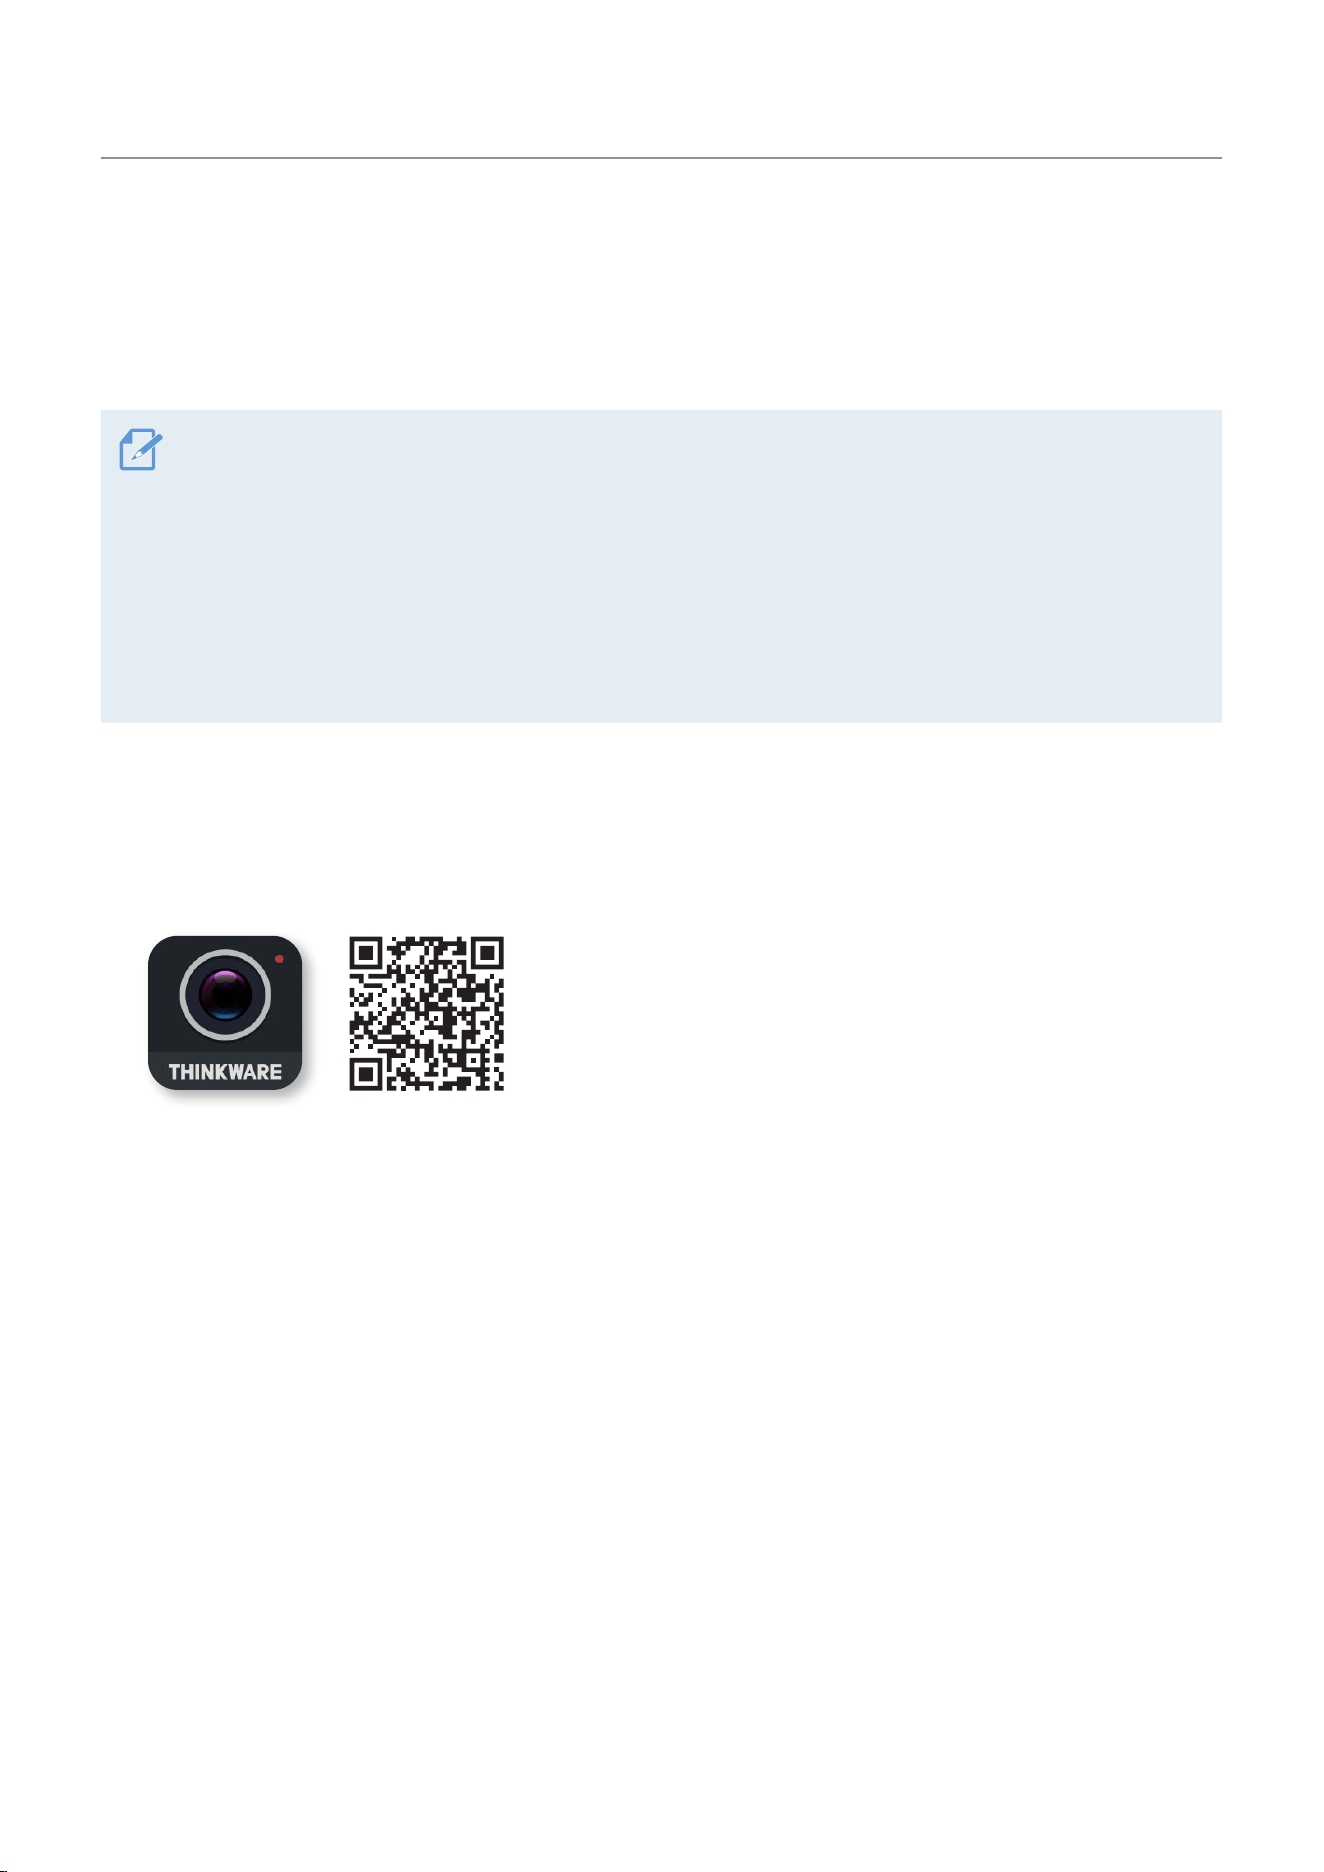
5.5 Managing the memory card
Swipe down on the Live view screen and tap to manage the memory card settings.
Options Description
Partitions
Select from Continuous Priority/Impact Priority/Parking Priority/Driving
Recording Only for the memory partition type.
Format memory
In Format memory, tap Confirm to proceed with formatting the memory card.
Formatting the memory card will delete all recorded videos.
• Once the formatting is performed, all data stored on the memory card will be deleted. To cancel the format,
tap Cancel.
• Refer to the following table for the storage space allocation of each memory partition setting.
Folders
Continuous
Priority
Impact Priority Parking Priority
Driving
Recording Only
/cont_rec 62.5% 45% 35% 81.5%
/motion_timelapse_rec 12% 14% 41.5% -
/evt_rec 12% 21% 10% 10%
/parking_rec 5% 11.5% 5% -
/manual_rec 6% 6% 6% 6%
/safety_box 2% 2% 2% 2%
/sos_rec (optional) 0.5% 0.5% 0.5% 0.5%
32
6. Using the mobile viewer
You can view and manage recorded videos and configure various product features on your smartphone. For
proper installation, download the THINKWARE DASH CAM LINK application.
• One of the following environments is required to use THINKWARE DASH CAM LINK application:
- Android 9.0 or later
- iOS 15 or later
• The services and features provided by THINKWARE DASH CAM LINK application may change according to
the service policy. Refer to the THINKWARE website (https://www.thinkware.com) for more information.
• According to the service policy, if the minimum OS requirement increases, the app will not be updated to
the latest version for users using older OS versions, and services provided through app updates will not be
available. However, existing apps can continue to be used.
6.1 Connect the product to a smartphone
1
On your smartphone, search for the THINKWARE DASH CAM LINK app on the Google Play Store or
Apple App Store, or scan the QR code below to download and install the app.
2
Run THINKWARE DASH CAM LINK.
3
Tap Dash cam connection is required. at the bottom of the screen and follow the on-screen instructions
to connect the product to a smartphone.
33
7. Using THINKWARE CONNECTED (optional)
To use the features of THINKWARE CONNECTED, the THINKWARE CONNECTED LTE Module and an LTE SIM
card must be properly installed in the dash cam.
Depending on your service plan, the following features may be available in the THINKWARE CONNECTED
application:
• Vehicle status monitoring while driving and parking
• Driving and parking impact notifications with video backup
• Last parking location and image capture transmission
• Remote live view
• SOS notifications and SMS transmission
• Geo-fence feature
• The THINKWARE CONNECTED application requires Android 7 or later / iOS 16 or later.
• The OS version requirements may change according to the policies of the Google Play Store and Apple App
Store.
• The services and features provided by the THINKWARE CONNECTED application may vary depending on the
service policy and your service plan. Refer to the THINKWARE website (https://www.thinkware.com) for
more information.
7.1 Installing the THINKWARE CONNECTED LTE Module (optional)
Refer to the following instructions to properly install the LTE Module.
1
1
2
➊➊
➋➋
Open the SIM card slot cover and insert the SIM
card until it is fully inserted.
2
Connect the front camera’s USB-C port to the THINKWARE CONNECTED LTE Module using the USB-C to
Micro USB (Micro 5-Pin) cable. Then, turn on the ACC or start the engine to power on the product.
3
On the mobile viewer, tap Dash Cam Settings
>
System Settings, then set the USB-C option to LTE
Modem.

Using THINKWARE CONNECTED (optional)
34
7.2 Connecting the product to THINKWARE CONNECTED
To use the THINKWARE CONNECTED service, you must first register your dash cam in the THINKWARE DASH
CAM LINK app. After registration, you can access the Connected features in the THINKWARE CONNECTED
app.
1
On your smartphone, search for the THINKWARE CONNECTED app on the Google Play Store or Apple
App Store.
2
Log in to the THINKWARE CONNECTED app, tap Register Dash Cam
>
Wi-Fi type, and follow the on-
screen instructions to register your dash cam.

35
8. Using the PC viewer
You can view and manage the recorded videos and configure various product features on your PC.
8.1 System requirements
The following are the system requirements for running the PC viewer.
• Processor: Intel Core i5 or higher
• Memory: 4 GB or more
• Operating system: Windows 7 or later (64-bit is recommended), Mac OS X 10.10 or later
• Other: DirectX 9.0 or later / Microsoft Explorer version 7.0 or later
The PC viewer will not operate properly on PC systems running an operating system other than those listed
in the system requirements.
8.2 Learning about the PC viewer
8.2.1 Downloading the PC viewer
You can download the latest PC viewer software from the THINKWARE website.
1
On your PC, open a web browser and go to https://thinkware.com/global/support/download.
2
Select a model name.
3
Click Select OS to select your OS, then click DOWNLOAD.
• The new PC viewer for Mac can be downloaded from the Apple App Store without visiting the THINKWARE
website. Search for "Thinkware Dashcam Viewer" in the Apple App Store.
• If you are using Mac OS X 10.13 or earlier, you can only download the PC viewer from the website.
Using the PC viewer
36
8.2.2 PC viewer screen layout
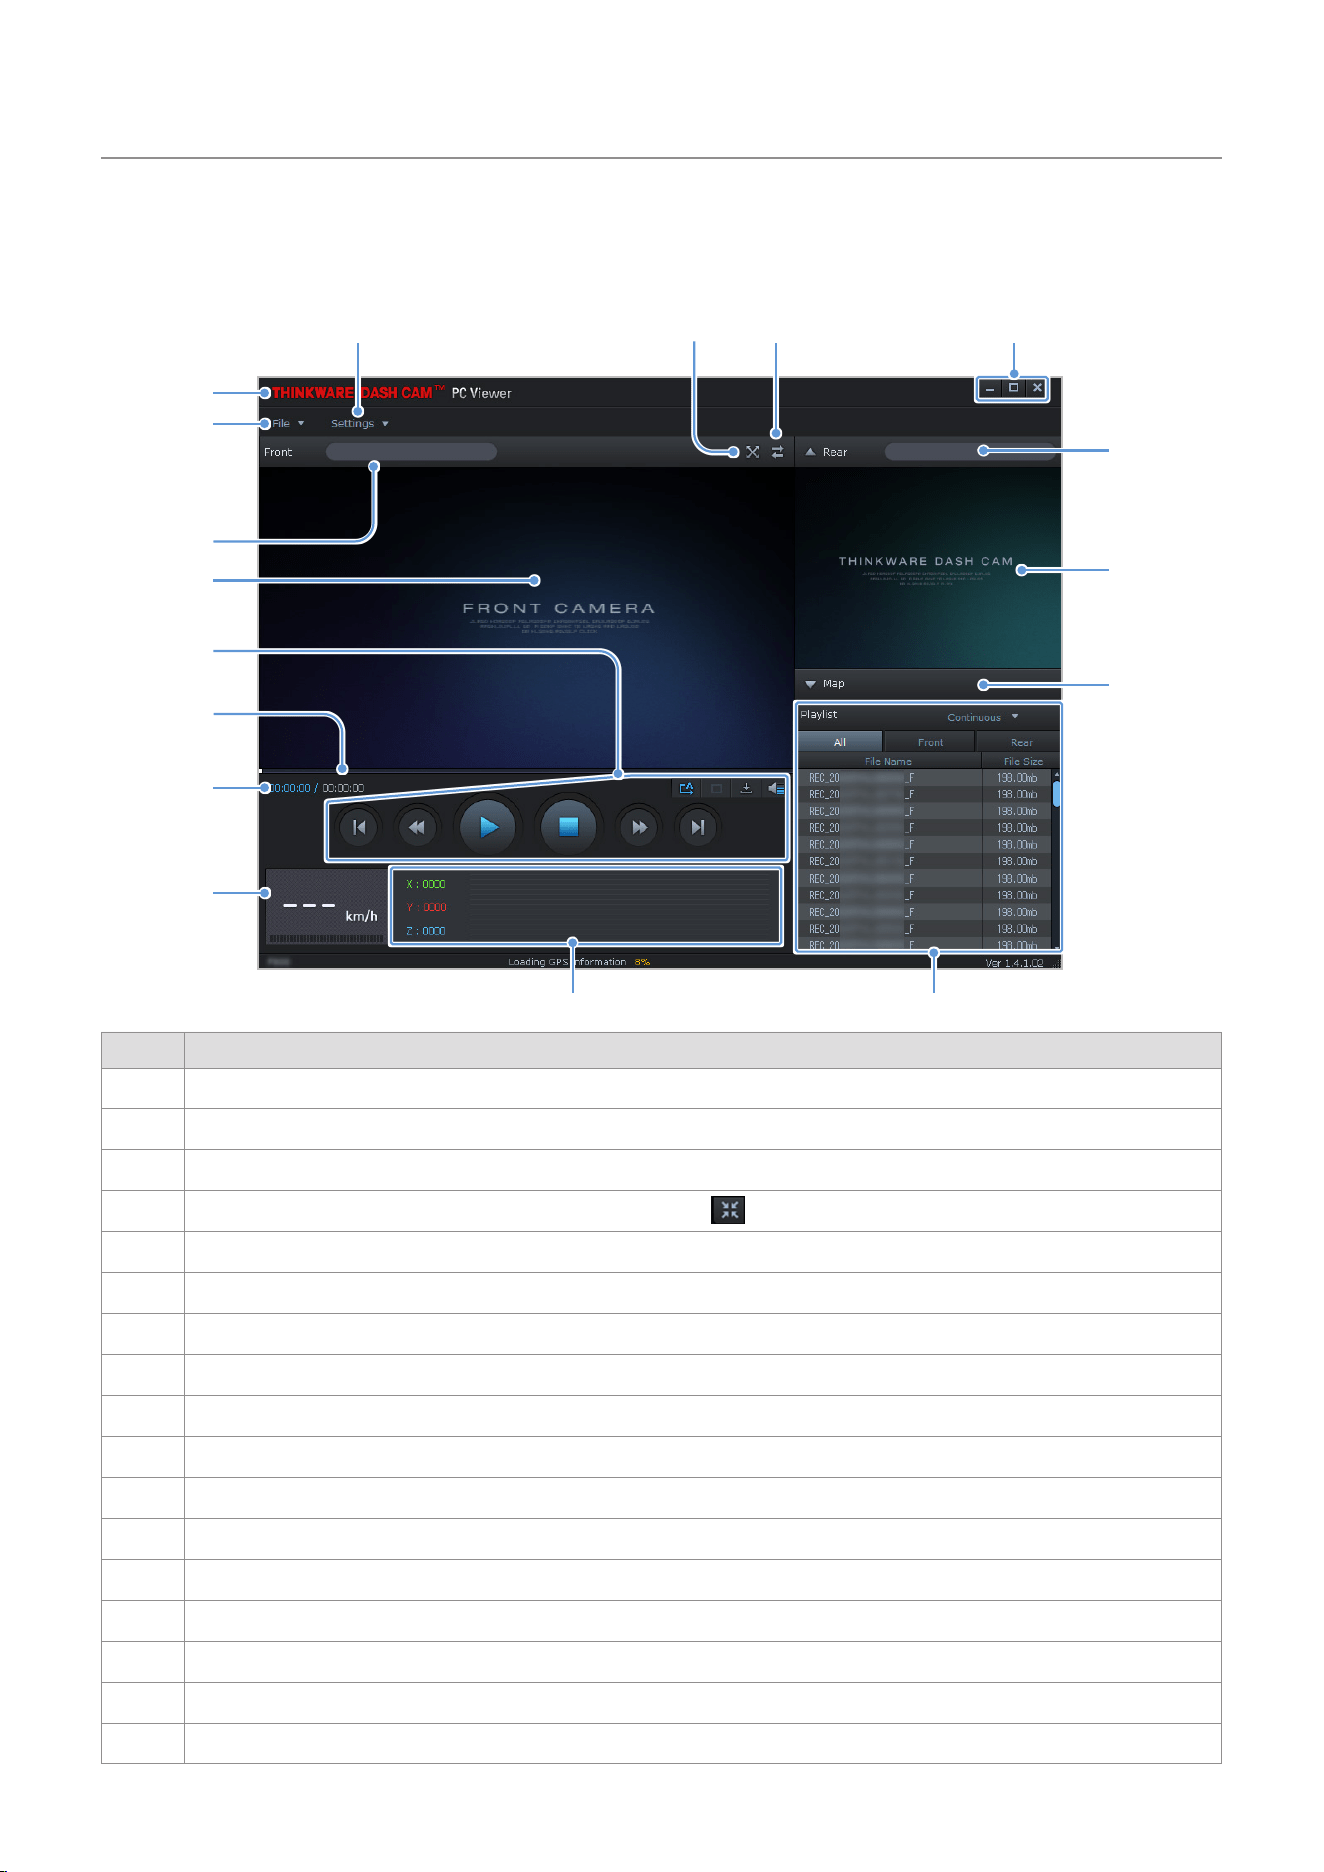
The following provides brief information about the PC viewer’s screen layout.
➋➋
➌➌
➍➍
➓➓
➊➊
➎➎ ➏➏
➐➐
➑➑
➒➒
Number Description
➊➊
Open a file, or save a video with a different name.
➋➋
Visit the THINKWARE website.
➌➌
View or configure the dashcam settings, and set the language for the PC viewer.
➍➍
Display the current video in full screen. Tap the Back ( ) button to return to the previous screen.
➎➎
Switch between the front and rear videos.
➏➏
Minimize, expand, or close the software.
➐➐
Displays the rear camera video file name.
➑➑
Displays the recorded rear camera video.
➒➒
Display the map screen.
➓➓
Displays the playlist.
Indicates the G sensor value at the time of recording.
Indicates the vehicle’s driving speed at the time of recording.
Displays the current and total running time of the current video.
Displays the progress of video playback.
Play or control a video.
Displays the recorded front camera video.
Displays the front camera video file name.

37
9. Upgrading the firmware
A firmware upgrade is provided to enhance the product’s features, operation or to increase stability. For
optimal operation of the product, ensure that you keep the firmware up to date.
Follow the instructions to upgrade the firmware.
You can also download the firmware from the mobile viewer and the PC viewer. After downloading the file
using the method below, proceed from step 6.
• Mobile viewer: Connect the product to the THINKWARE DASH CAM LINK application, then tap MORE
>
Support to check for and download the latest firmware.
• PC viewer: Connect the memory card to your PC and launch the PC viewer. A notification pop-up will
be displayed on the PC viewer screen when the latest firmware is available, and you can download the
update.
1
On your PC, open a web browser and go to https://www.thinkware.com/Support/Download.
2
Select the product and download the latest firmware upgrade file.
3
Unzip the downloaded file.
4
Disconnect power to the product and remove the memory card.
5
Open the memory card on a PC and copy the firmware upgrade file to the root folder of the memory
card.
6
While the power is disconnected from the product, insert the memory card into the memory card slot
on the product.
7
Connect the power cable to the product, and then turn on the power (ACC ON) or start the engine to
turn on the product. The firmware upgrade starts automatically, and the system will restart once the
firmware update is completed.
Do not disconnect the power or remove the memory card from the product during the upgrade. Doing
so may cause serious damage to the product, or to the data stored in the memory card.

38
10. Troubleshooting
The following table lists the problems users may encounter while using the product and measures to
resolve them. If the problem persists after taking the measures provided in the table, contact the customer
service center.
Problems Solution
Cannot power on the product
• Make sure the power cable (the hardwiring cable or the USB-C to USB-C
cable) is connected to the vehicle and the product properly.
• Check the vehicle’s battery level.
The voice guide and/or buzzer
do not sound.
Check if the volume is set to 0.
The video is unclear or hardly
visible.
• Ensure that the protective film on the camera lens has been removed. The
video may look unclear if the protective film is still on the camera lens.
• Check the installation location of the front or rear camera, turn on the product,
and then adjust the camera’s viewing angle.
The memory card cannot be
recognized.
• Ensure that the memory card has been inserted in the correct direction. Before
inserting the memory card, check the metal contacts on the memory card and
the insertion direction marked on the product.
• Turn off the power, remove the memory card, and then check to ensure that the
contacts in the memory card slot are not damaged.
• Ensure that the memory card is an authentic product distributed by
THINKWARE. THINKWARE does not guarantee compatibility and normal
operation of third-party memory cards.
The recorded video cannot be
played on a PC.
The recorded videos are stored as MP4 video files. Ensure that the video player
installed on your PC supports the playback of MP4 video files.
GPS signal cannot be received.
The GPS signal may not be received in out-of-service areas, or if the product is
located between tall buildings. Also, GPS signal reception may not be available
during storms or heavy rain. Try again on a clear day at a location that is known
to have a good GPS reception. It may take up to 5 minutes until GPS reception is
established.
Before contacting a service center
Please back up all important data stored in the memory card. The data in the memory card may be deleted
during repair. Every product requested for repair is regarded as a device that has had its data backed up.
The customer service center does not back up your data. THINKWARE is not responsible for any loss, such
as data loss.
39
11. Specifications
To see the product specifications, refer to the following table.
Item Specification Remarks
Model name ARC 800 Rear camera: BCFH-80U
Dimension 71.4 x 44.5 x 105.9 mm Rear Camera (BCFH-80U): 61 x 27 x 25 mm
Memory microSD memory card 64 GB, 128 GB, 256 GB, 512 GB
Display panel 2.3" IPS (480*360)
Camera sensor 8.4 Megapixel, 1/1.8' Rear Camera: 2.0 M, 1/2.8
Video
• Front: 4K UHD (3840x2160) @30fps + Rear: FHD (1920x1080) @30fps
• Front: QHD (2560x1440) @60fps + Rear: FHD (1920x1080) @30fps
• Front: 4K UHD (3840x2160) @30fps
• Front: QHD (2560x1440) @60fps
• H.264 / MP4 / AAC
Recording mode
Continuous Rec, Incident Rec, Manual Rec, SOS Rec (optional), Parking Mode (Motion
Detection / Time Lapse / Energy Saving)
Features AI Night Vision, Super Night Vision, HDR, Battery Protection, Thermal Protection
Acceleration sensor 3-axis acceleration sensor (3D, ±3G) 5 levels for sensitivity adjustment available
GPS Embedded GPS Supports ADAS features (FVSA, TLCA)
GNSS GPS, GLONASS
Wi-Fi
Standard
2.4 GHz (802.11 b/g/n)
5 GHz (802.11 a/n/ac)
Frequency
2.400 GHz – 2.4835 GHz
5.150 GHz – 5.850 GHz
Power input
DC 5 V
supported Rear Camera (BCFH-80U): DC 5 V supported
Power consumption 2ch: 5.78 W / 1ch: 3.93 W (mean)
• Actual power consumption may vary depending
on the usage conditions and environment.
• Rear Camera (BCFH-80U): 0.59W
Auxiliary power unit Super Capacitor
LED indicators STATUS, REC, Security
Alarm Built-in speakers Voice guide (buzzer sounds)
Operating temperature 14 – 140℉ / -10 – 60℃
Storage temperature -4 – 158℉ / -20 – 70℃

FCC Compliance Statement
This device complies with part 15 of the FCC rules. Operation is subject to the following two conditions:
(1) This device may not cause harmful interference, and (2) this device must accept any interference
received, including interference that may cause undesired operation.
FCC Interference Statement
This equipment has been tested and found to comply with the limits for a Class B digital device, pursuant
to part 15 of the FCC Rules. These limits are designed to provi
de reasonable protection against harmful
interference in a residential installation. This equipment generates, uses and can radiate radio frequency
energy and, if not installed and used in accordance with the instructions, may cause harmful interference
to radio communications. However, there is no guarantee that interference will not occur in a particular
installation. If this equipment does cause harmful interference to radio or television reception, which can
be determined by turning the equipment off and on, the user is encouraged to correct the interference by
one of the following measures:
• Reorient or relocate the receiving antenna.
• Increase the separation between the equipment and receiver.
• Connect the equipment into an outlet on a circuit different from which the receiver is connected.
• Consult the dealer or an experienced radio/TV technician for help.
FCC Caution
Any changes or modifications not expressly approved by the party responsible for compliance could void
the user'
s authority to operate this equipment. This transmitter must not be co-located or operating in
conjunction with any other antenna or transmitter.
FCC Radiation Exposure Statement
This equipment complies with FCC radiation exposure limits set forth for an uncontrolled environment.
This equipment should be installed and operated with minimum distance 20 cm between the radiator and
your body
. This transmitter must not be co-located or operating in conjunction with any other antenna or
transmitter.
IEEE 802.11b/g/n operation of this product in the USA & CANADA is firmware-limited to channels 1 through 11.
FCC ID: 2ADTG-ARC800
Responsible Party – U.S. Contact Information
• Company Name : Thinkware Systems USA Inc.
• Company Address : 18021, Sky Park Circle, STE J2, Irvine, CA, 92614, USA
• E-mail : [email protected]

Industry Canada Statement
This device complies with RSS-247 of the Industry Canada Rules. Operation is subject to the following
two conditions: (1) This device may not cause harmful interference, and (2) this device must accept any
interference received, including interference that may cause undesired operation.
Ce dispositif est conforme à la norme CNR-247 d’Industrie Canada applicable aux appareils radio exempts
de licence. Son fonctionnement est sujet aux deux conditions suivantes: (1) le dispositif ne doit pas produire
de brouillage préjudiciable, et (2) ce dispositif doit accepter tout brouillage reçu, y compris un brouillage
susceptible de provoquer un fonctionnement indésirable.
Industry Canada Radiation Exposure Statement
This equipment complies with IC radiation exposure limits set forth for an uncontrolled environment. This
equipment should be installed and operated with minimum distanc
e 20 cm between the radiator & your
body.
Déclaration d’exposition aux radiations
Cet équipement est conforme aux limites d’exposition aux rayonnements IC établies pour un environnement
non con trôlé. Cet équipement doit être installé et utilisé avec un minimum de 20 cm de distance entre la
source de rayonnement et votre corps.
IC: 12594A-ARC800
Canadian Representative
•
Company Name: Mondo System Technology Canada Inc.
• Contact Name: Youngtae Song
• Company Address: 210-1580 BRIGANTINE DRIVE COQUITLAM BC, V3K7C1, CANADA
• ISED Company Number: 9737B
• Telephone: 604.544.2741
• Email: andy[email protected]

Canada Availability Guarantee
Garantie de disponibilité (Canada)
Repairability and Availability Information
To comply with Québec’s
Consumer Protection Act
(Bill 29), this product includes information on the
availability of spare parts, repair services, and repair instructions.
Spare parts are covered under Thinkware’s limited warranty and available for purchase after the warranty
period.
Information sur la réparabilité et la disponibilité
Conformément à la
Loi sur la protection du consommateur
du Québec (projet de loi 29), ce produit
comprend des renseignements sur la disponibilité des pièces de rechange, des services de réparation et
des instructions de réparation.
Les pièces de rechange sont couvertes par la garantie limitée de Thinkware et disponibles à l’achat après
la période de garantie.
Scan the QR code here for more information.
Scannez le code QR ici pour plus d’informations.
Hereby, THINKWARE declares that the radio equipment type ARC 800 is in compliance with Directive
2014/53/EU.
• WIFI (IEEE 802.11b/g/n) in the 2.4GHz ISM band (2402-2438.5MHz), Maximum Power (22 dBm/159 mW
(EIRP))
• WIFI (IEEE 802.11a/an/ac) in the 5GHz ISM band (5150-5850MHz), Maximum Power (17 dBm/51 mW
(EIRP))
Important information on handling electrical and electronic equipment
Thank you for purchasing a THINKWARE brand product. To ensure that you can dispose of the device
properly and in an environmentally friendly manner, we would like to draw your attention to the
statutory provisions of the European Waste of Electrical and Electronic Equipment (WEEE) directive and
its national implementations.
1. Separate disposal
The WEEE directive and related national laws stipulate that electrical equipment must not be disposed of with
household waste. Instead, it must be disposed of properly. Please hand in the device at a public collection point or
your local recycling center. There it will be handled properly and recycled in an environmentally friendly manner.
2. Labeling
Electrical appliances are marked with a symbol (crossed-out dustbin on wheels) indicating that the appliance must
not be disposed of with household waste.
3. Data erasure
Before disposing of the electrical device, you must ensure that all personal data stored on the device has been
deleted. To do this, you can reset the device to the factory settings or delete the data manually.
4. Return and collection systems
You also have the option of returning the electrical device free of charge to municipal collection points, recycling
centers or retailers. There, the device will be properly handled and recycled.
We hope that you are satisfied with your electrical product and that it will serve you well. If you have any further
questions, please do not hesitate to contact us or one of our local distributors.

UK PSTI
Statement of Compliance
1. Product Type : Car Dash Cam
2. Manufacturer
Manufacturer’s Address
: THINKWARE CORPORATION
: 9FL., Samwhan Hipex A, 240, Pangyoyeok-ro, Bundang-gu,
Seongnam-si, Gyeonggi-do, South Korea
3. This declaration of compliance is prepared by the manufacturer of this product.
4. Object of the declaration : ARC 800
5. We declare that, in our opinion, the product meets the applicable security requirements.
Schedule 1 of the Product Security and Telecommunications Infrastructure (Security Requirements for
Relevant Connectable Products) Regulation 2023.
6. References to the relevant harmonized standards or other technical specifications in relation to which
conformity is declared : ETSI EN 303 645 V2.1.1 (2020-06) ref. REN/CYBER-0048
7. Defined support period : 2025. 10. 15 - 2028. 10. 14
(3 years from the first product supplied date)
8.
Weblink for latest information and to report security issues : www.thinkware.com/PSTIpolicy
Signed for and on behalf of
Date
: THINKWARE CORPORATION
: 2025. 09. 23
Name : Jinwoo Jung Function : Project Manager Signature :