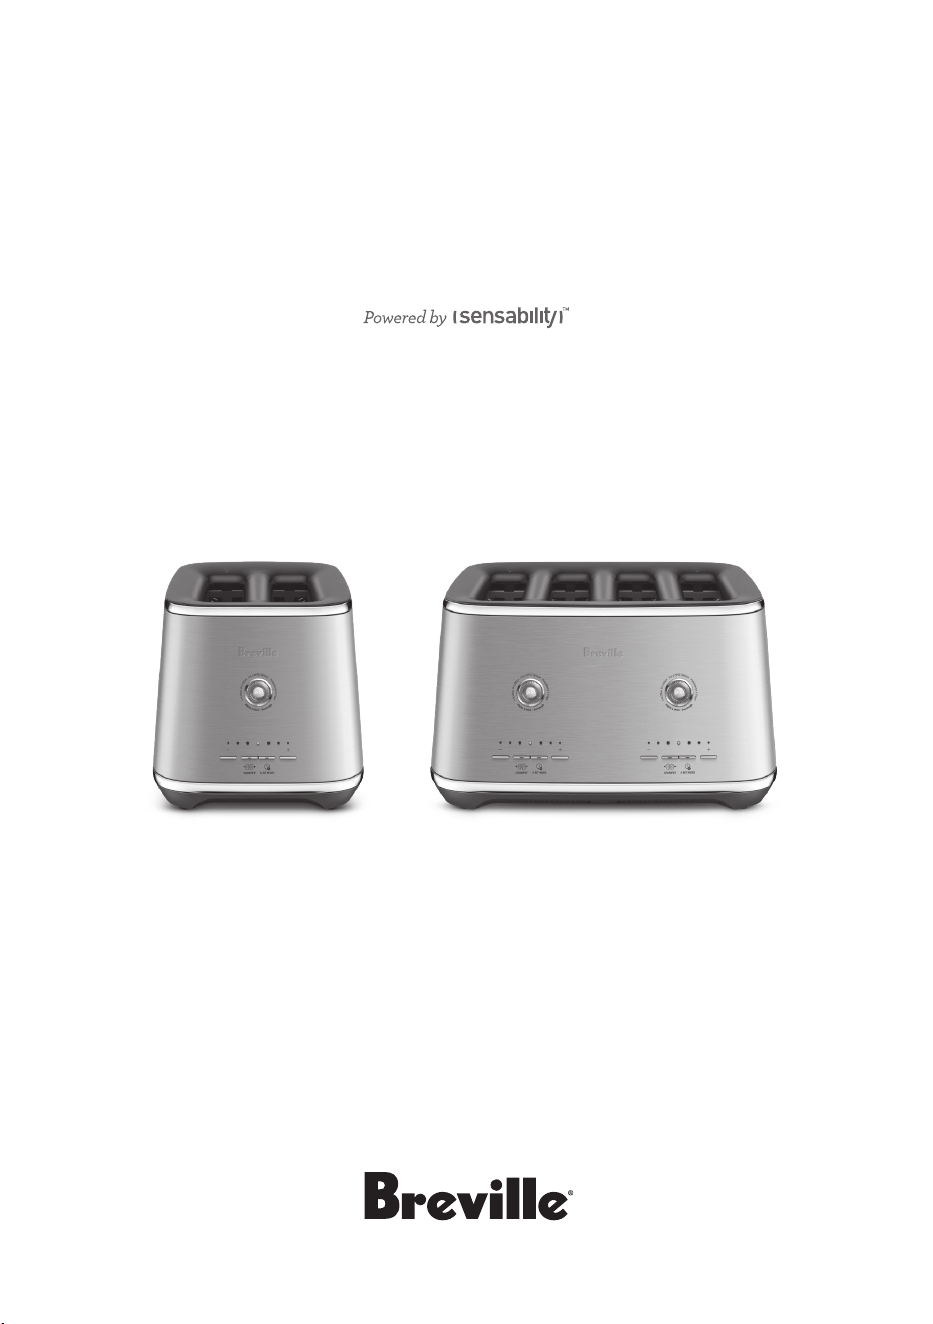
the Eye Q
™
Auto 2 and 4 Slice
Instruction Book – BTA850 & BTA870
BTA870BTA850
2
BREVILLE
®
RECOMMENDS
SAFETY FIRST
At Breville
®
we are very
safety conscious. We design
and manufacture appliances
with your safety foremost in
mind. We also ask that you
exercise a degree of care
when using any electrical
appliance and adhere to
the following precautions.
IMPORTANT
SAFEGUARDS
Read all instructions
before use and save for
future reference.
• Before using for the rst
time please ensure that
your electricity supply is the
same as shown on the rating
label on the underside of the
appliance. If you have any
concerns, please contact your
local electricity company.
• Remove and safely
discard any packaging
materials before rst use.
• To eliminate a choking hazard
for young children, safely
discard the protective cover
tted to the power plug.
• Do not place the toaster near
the edge of a table, counter or
bench top during operation.
Contents
2 Limited Product Warranty
2 Breville
®
recommends safety rst
6 Components
7 The Eye Q
™
Features
8 Functions
11 Care & Cleaning
12 Troubleshooting
Breville's warranty for this product covers
the repair or replacement if it’s found
to be defective due to faulty materials,
workmanship, or function within the
warranty period. All legal warranty rights
under applicable national legislation will be
respected and will not be impaired by our
warranty. For details on length of warranty,
to obtain a printed copy or to read full terms
and conditions please
scan the QR code or visit
www.breville.com.
Alternatively, call the
Breville Service Centre
(see back cover for
contact details).
Limited Product
Warranty
QR149

3
EN
Ensure the surface is level,
clean and free of water.
• Do not place the toaster on
or near a hot gas, or electric
burner, or where it could
touch a heated oven.
• The bread may burn, therefore
do not use the toaster
near or below combustible
material, such as curtains.
The toaster should be
attended when in use.
• Always ensure the
toaster is properly
assembled before use.
• The appliance is not intended
to be operated by means of
an external timer or separate
remote-control system.
• Ensure that bread to be
toasted is the correct size
for the toaster and does not
protrude above the bread
slice opening. Ensure the
bread is not too thick or
too long that it will jam or
wedge the bread carriage.
• Oversized foods, metal foil
packages, or utensils must
not be inserted into the
toaster as they may cause a
re or risk of electric shock.
• Metal utensils such as a knife,
should not be inserted into
the toaster to remove jammed
toast, bagels, or any other
items from the toaster. This can
damage the heating elements
as well as lead to electrocution.
• Do not attempt to dislodge food
when the toaster is plugged in.
• Never cover the toaster
whilst it is plugged into the
power outlet or while hot.
• Do not place toast directly
on top of toaster slots to
warm toast, as this may
prevent correct air circulation
and damage the toaster.
• Do not move the toaster while
in operation or when hot.
• The outer housing of the
appliance may be hot during
and after use. Always keep the
power cord of this products
and those of other appliances
nearby, clear from the housing.
• Do not use the toaster
on a sink drainboard.
• The appliance is not suitable
to be used in a small
appliance enclosure. Ensure
to leave adequate space
all around the appliance.
• Always switch o at the power
outlet, then remove the plug
from the outlet and allow
cooling the unit completely
before storing. Store in an
upright position, on a at
surface, on your bench top or
in an accessible cupboard.
Do not store anything
on top of the toaster.

4
• Do not use the toaster
without the slide out crumb
tray in place. Do not allow
breadcrumbs to accumulate
in the bottom of the
toaster. Failure to clean the
crumb tray regularly may
result in a re hazard.
• The toaster crumb tray is not
dishwasher safe. Cleaning
it in the dishwasher will
cause cosmetic damage,
product malfunction or
even electric shock.
• When heating toaster
pastries, always use the
lowest shade setting.
• Do not clean with metal
scouring pads. Pieces can
break o the pad and touch
electrical parts creating an
electric shock hazard.
CAUTION
To prevent damage to the
appliance, do not use alkaline
cleaning agents when cleaning,
use a soft cloth.
• Keep the toaster clean.
• Do not leave the toaster
unattended when toasting.
IMPORTANT SAFEGUARDS
FOR ALL ELECTRICAL
APPLIANCES
• Fully unwind the power
cord before operating.
• Do not let the power cord
hang over the edge of a
table or counter, touch hot
surfaces, or become knotted.
• This appliance is not intended
for use by persons (including
children) with reduced physical
sensory or mental capabilities,
or lack of experience and
knowledge, unless they have
been given supervision or
instruction concerning use
of the appliance by a person
responsible for their safety.
• This appliance can be used
by children aged from 8 years
and above and persons with
reduced physical, sensory
or mental capabilities or
lack of experience and
knowledge if they have
been given supervision
or instruction concerning
use of the appliance in a
safe way and understand
the hazards involved.
• Children should be supervised
to ensure that they do not
play with the appliance.
• Cleaning and user
maintenance shall not be
undertaken by children
unless they are older
than 8 and supervised.
• Keep the appliance and
its cord out of reach of
children less than 8 years.
• This appliance is for
household use only. Do not
5
EN
FOR HOUSEHOLD USE ONLY
SAVE THESE INSTRUCTIONS
use the appliance for anything
other than its intended use. Do
not use in moving vehicles or
boats. Do not use outdoors.
Misuse may cause injury.
• It is recommended to regularly
inspect the appliance. Do not
use the appliance if the power
cord, power plug or appliance
becomes damaged in any way.
Return the entire appliance
to the nearest authorised
Breville Service Centre for
examination and / or repair.
• Any maintenance other
than cleaning should be
performed at an authorised
Breville Service Centre.
• The installation of a residual
current device (safety switch)
is recommended to provide
additional safety protection
when using electrical
appliances. It is advisable
that the safety switch with
a rated residual operating
current not exceeding 30mA
be installed in the electrical
circuit supplying the appliance.
See your electrician for
professional advice.
• The appliance must be used
on a properly grounded outlet.
If you are not sure if the power
outlets are properly grounded,
please consult your electrician.
• Do not, under any
circumstances, modify the
power plug or use an adapter.
WARNING
• Do not carry or move the
toaster by holding the
top metal cover between
toasting slots as sharp
edges may cause injury.
• Never operate the
toaster on its side.
• Never add any food substance
to the bread, muns or
crumpets as this can lead
to electrocution or re.
• To prevent electric shock,
unplug before cleaning.
• The temperature of accessible
surfaces may be high when
the appliance is operating.
To protect against, re,
electric shock; do not
immerse the power cord, power
plug or appliance in water or any
other liquid.
NOTE
This toaster is electronically
controlled; the toaster will not
operate until it is plugged into
a 220/240-volt power point and
switched on.
6
A
B
E
D
F
I
H
G
C
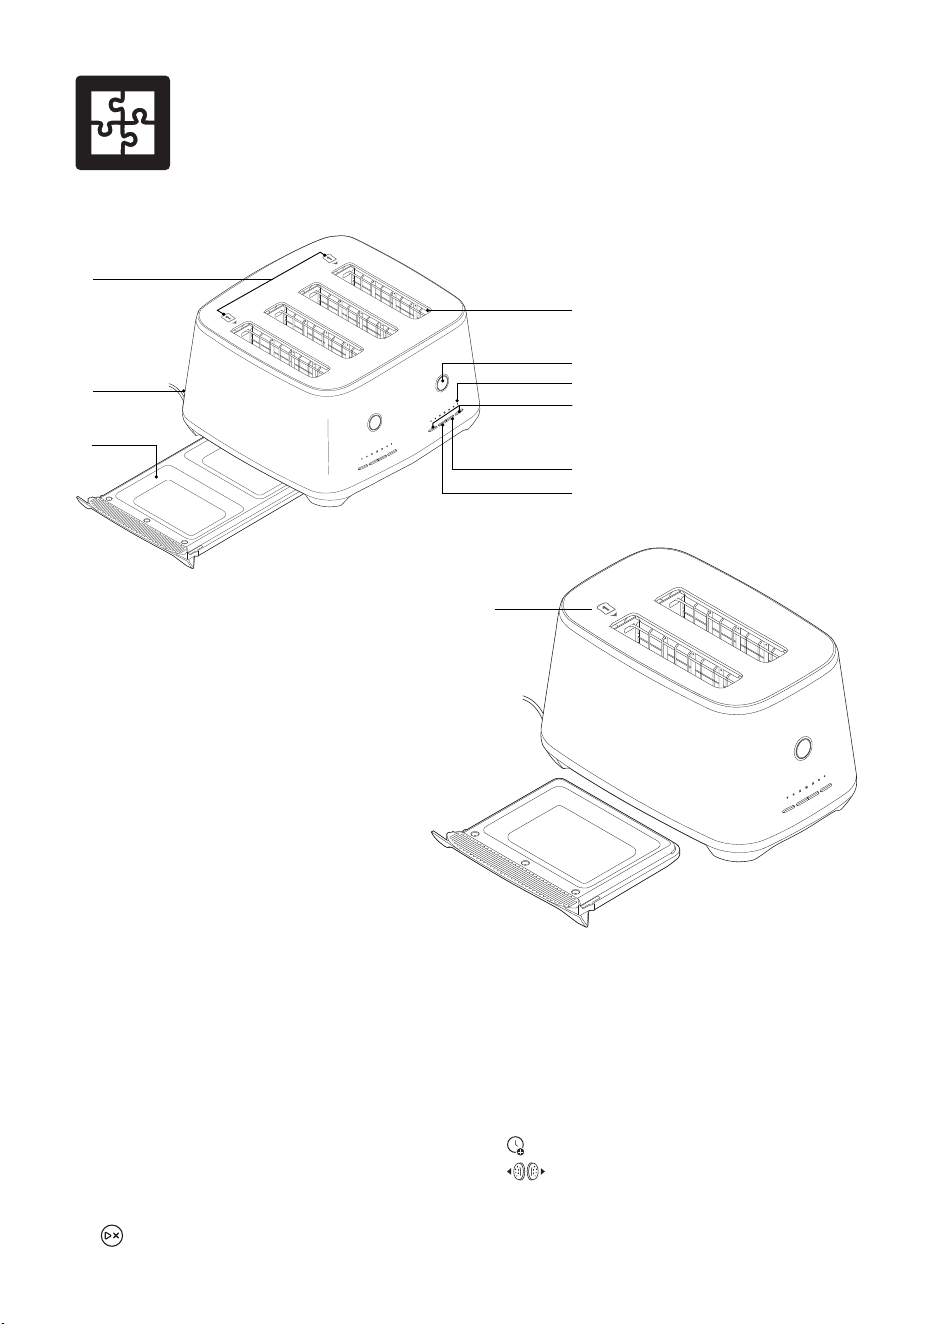
Components
A. Sensing slot - use this slot when toasting one
piece of bread. This slot contains the optic
sensor that accurately detects the colour
change of bread during the toasting cycle.
B. Power Cord Compartment
C. Fully Removable Catch-all Crumb Tray
D. Extra Wide Toasting Slots
E.
Start | Cancel button
F. LED Toast Shade Selection lights
G. Plus (+) | Minus (-) shade selection
toast buttons
H.
A Bit More™ button
I.
Bagel | Crumpet | English Muffin
mode button
A

7
EN
The Eye Q
™
Features
EYE Q™ TOASTING SYSTEM
POWERED BY SENSABILITY™
Determines toast shade by continuously
monitoring the surface colour of the bread then
toasting it to the selected level of brownness.
AUTOMATED ONE TOUCH
LOWERING
Automatically lowers and raises the bread
carriage to begin and complete the toasting
cycle.
SOURDOUGH MODE
Automatically adjusts the toasting cycle to
reduce the chance of burnt crusts.
ENGINEERED EASY CLEAN
Clearway Cavity
Designed to ensure any crumbs fall straight
through the toasting slot and onto the crumb
tray; preventing crumbs from catching and
burning inside the toaster.
Catch All Crumb Tray
Extra-large crumb tray catches all crumbs that
fall through the toasting cavity, making for an
easy clean-up.
Ceramic Coated Top Cap
The ceramic coated top surface has no crumb
traps and can be easily wiped clean.
BAGEL / CRUMPET / ENGLISH
MUFFIN MODE
Provides additional heat on one side to perfectly
cook bagels, crumpets, and English muffins.
MANUAL TIMER MODE
Ideal for toasting waffles or toaster pastries that
require specific cooking times or don’t change
colour while toasting.
A BIT MORE™ FUNCTION
If toast comes up too light, one press of this
button adds a little extra toasting time. This
feature can be selected after the toasting cycle.
VOLUME CONTROL
Set the sound volume of the toaster from high to
low or mute.
ONBOARD CORD STORAGE
A storage compartment at the rear of the
toaster neatly houses the cord when not in use,
helping to save space. However, never operate
the toaster while the cord is inside the storage
compartment.
8
BEFORE FIRST USE
Remove and safely discard any packaging and
promotional material attached to your toaster.
Fully remove the power cord from the power
cord storage. Insert the power plug into a
power outlet and turn the power on; the Shade
Selection lights will illuminate, and the toaster
will beep, indicating it is ready for use.
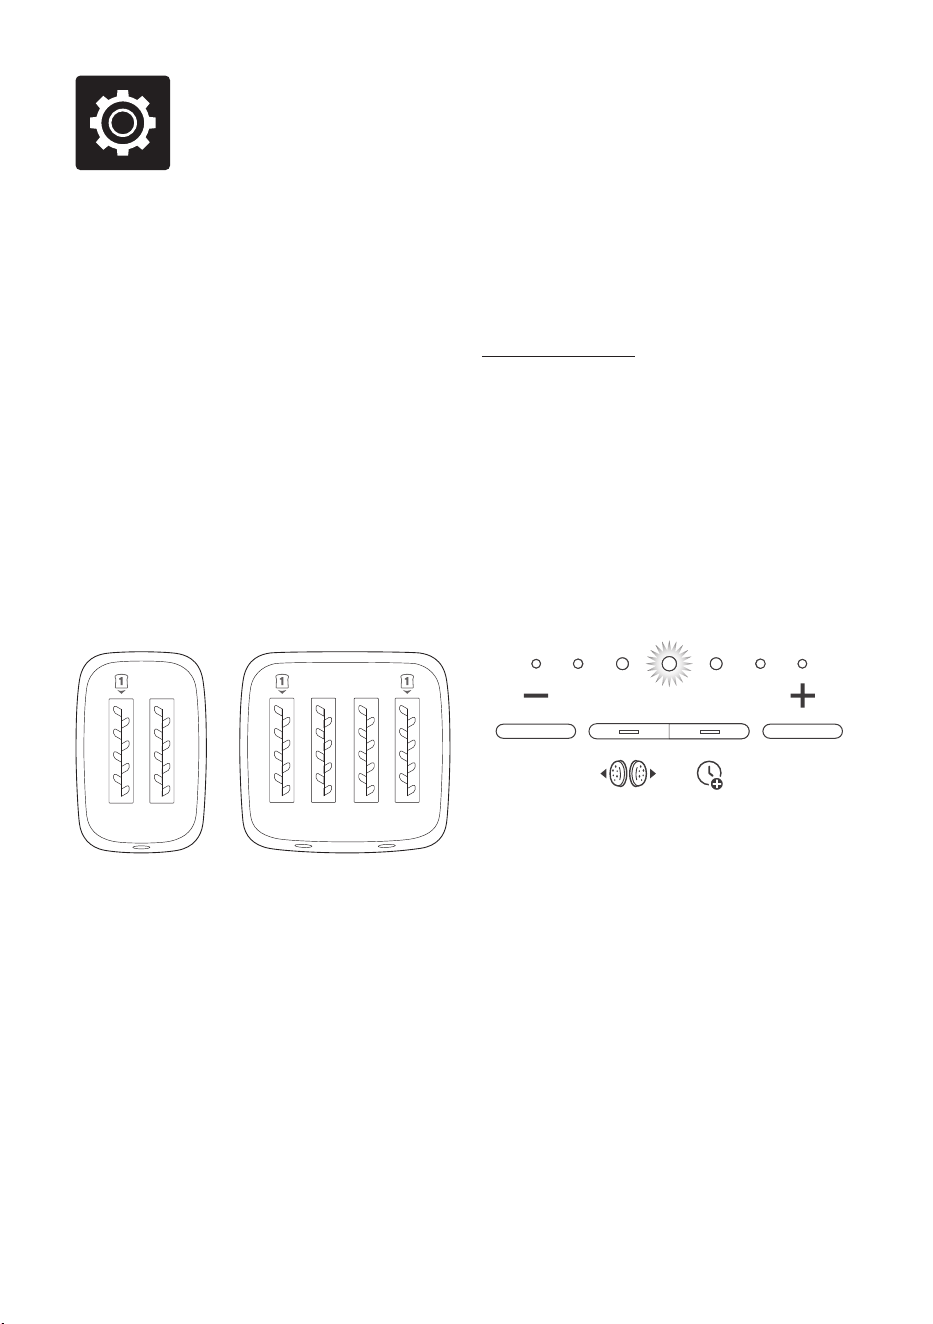
SENSOR LOCATION
The Eye Q Auto toaster has optical sensors
that measure colour change 10 times a second
during the toasting cycle.
Bread must be positioned in front of the sensor
throughout the toasting cycle. If bread is not
placed in front of the sensors, the toaster will
not operate.
The sensors are located in the slots marked
with the bread symbol containing the digit '1.'
2 Slice 4 Slice
During a toasting cycle, the green lights of the
sensors can be seen measuring the bread
colour.
TOASTING MODES
The Eye Q Auto toaster has 3 unique toasting
modes to achieve your desired result: Eye Q
Toast Mode, Eye Q Sourdough Mode and Timer
Mode.
Eye Q Toast Mode
This mode is the default setting and is suitable
for most bread types. It uses the optical sensor
to monitor the surface colour of bread during the
toasting cycle and determines when the target
shade is met.
1. Place bread into the toasting slot, ensuring
it is centred in the slot. Press the plus (+) or
minus (-) shade selection toast buttons to
select the desired shade.
For first use, it is recommended to start on
the middle setting as indicated below. From
there you can then determine your ideal
toasting shade.
A BIT MORECRUMPET
2. Press the Start | Cancel button to begin the
toasting cycle. The toaster will automatically
lower the bread.
When toasting is in progress, the Start |
Cancel button will illuminate in green and
swirl gently to indicate that the sensors are
operating.
The shade selection lights will also illuminate
to communicate progress towards target
shade.
3. The toaster will detect when the bread has
achieved the selected shade of toasting and
will automatically end the toasting cycle. The
toast ready alert will sound, and the carriage
will rise.
Functions
9
EN
Eye Q Sourdough Mode
This mode has been specially developed to toast
sourdough and other artisanal bread. These
types of bread typically have a dense centre and
a dry crust. The toasting algorithms in this mode
have been modified to stop toasting a little earlier
to reduce the chance of burnt crusts.
1. Place bread into the toasting slot, ensuring
it is centred in the slot. Press the plus (+) or
minus (-) shade selection toast buttons to
select the desired shade.
2. Press and hold Start | Cancel button until it
illuminates in blue, the light will swirl gently
to indicate that the sensors are operating in
sourdough mode.
3. The toaster will detect when the bread has
achieved the selected shade of toasting and
will automatically end the toasting cycle. The
alert will sound once the toast is ready, and
the carriage will rise.
Timer Mode
This mode disables the sensor so that the
toasting cycle is based on time, as per a
conventional toaster. Ideal for toasting waffles
or pastries that require specific cooking times or
don't change colour while toasting
1. Place bread into the toasting slot, ensuring
it is centred in the slot. Press the plus (+) or
minus (-) shade selection toast buttons to
select the desired shade.
2. Press the Start | Cancel button twice, it will
illuminate in a solid red colour (it will not swirl
like the previous sensors modes) to indicate
that the toaster is now in Timer mode
3. The toaster will operate for a set amount of
time. The toast ready alert will sound, and the
carriage will rise.
NOTE
When heating toaster pastries, always use the
lowest shade setting.
NOTES
• The toast shade selection plus (+) or minus
(-) buttons can be pressed at any time during
the toasting cycle. If required, the Start |
Cancel button can also be pressed at any
time to cancel the toasting cycle.
• The toasting modes can be changed
dynamically at anytime during the toasting
cycle by pressing the Start | Cancel button to
enter an alternative toasting mode.
WARNING
Do not leave the toaster unattended when in
use as toast may jam. In the unlikely event that
bread, crumpet, bagels or muffins become
jammed in the toasting slots, switch the toaster
off at the power outlet, remove the power plug
and allow the toaster to cool completely before
carefully easing the bread out of slots.
Be cautious not to damage the heating
elements during this process.
TOASTING ONE SLICE
When toasting one slice of bread, it must be
placed in the toasting slot that has the Toast
Shade Sensors marked with the icon showing a
piece of bread with the digit '1' inside.
If the sensors do not detect bread once the
bread carriage has lowered, the toaster will emit
an error beep and the bread carriage will raise.
The toaster will return to ready mode.
Ensure that the toast is in the correct toasting
slot and positioned in front of the sensors.
FROZEN BREAD
When toasting frozen bread, follow the same
steps as toasting fresh / non-frozen bread. The
shade sensors in the toaster will detect the
change of shade and will toast accordingly.
10
TOASTING BAGELS, CRUMPETS
OR ENGLISH MUFFINS
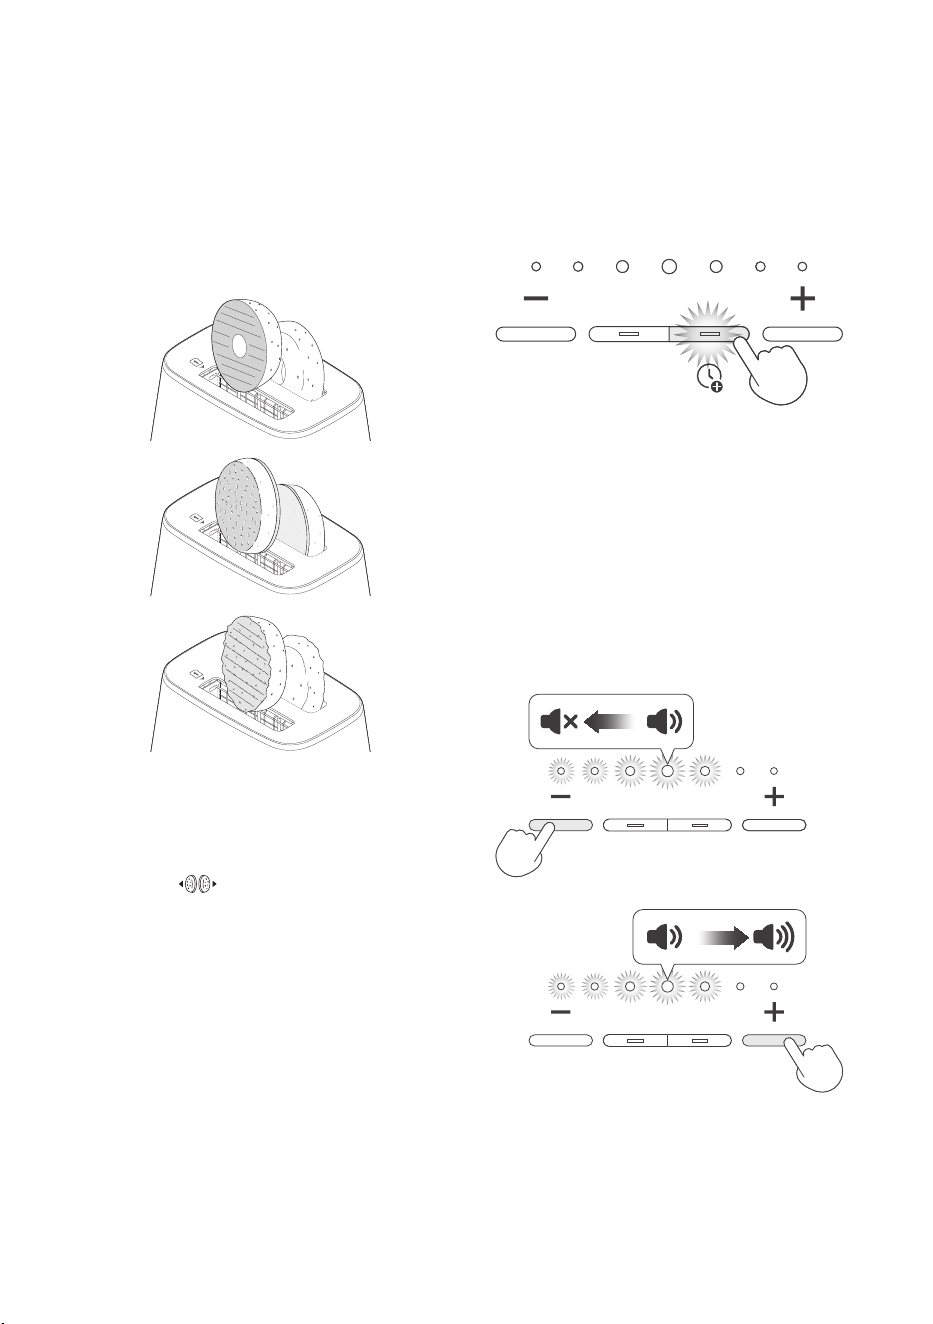
When toasting bagels, crumpets, english
muffins or similar bread products where
additional heat is required on one side; ensure
that the surface requiring more toasting is facing
outwards. When in this mode more power is
sent to the the outer heating elements, closer to
the edge of the toaster than the inner elements
that are closer to the middle of the toaster.
Crumpets
Bagels
English
Muffins
To use this mode:
1. Place the bread product into the toasting
slots, ensuring the correct surface is facing
the sensor / outwards.
2. Press the
button, the button will
illuminate indicating that it has been
selected.
3. Press the toast shade selection plus (+) or
minus (-) button to select the desired shade.
4. Press the Start | Cancel button to begin the
toasting cycle.
5. The toaster will detect when the selected
shade has been achieved and will
automatically end the toasting cycle.
6. Once the carriage has risen fully, the toast
ready alert will sound.
7. If required, the Start | Cancel button can be
pressed at any time to cancel the toasting
cycle.
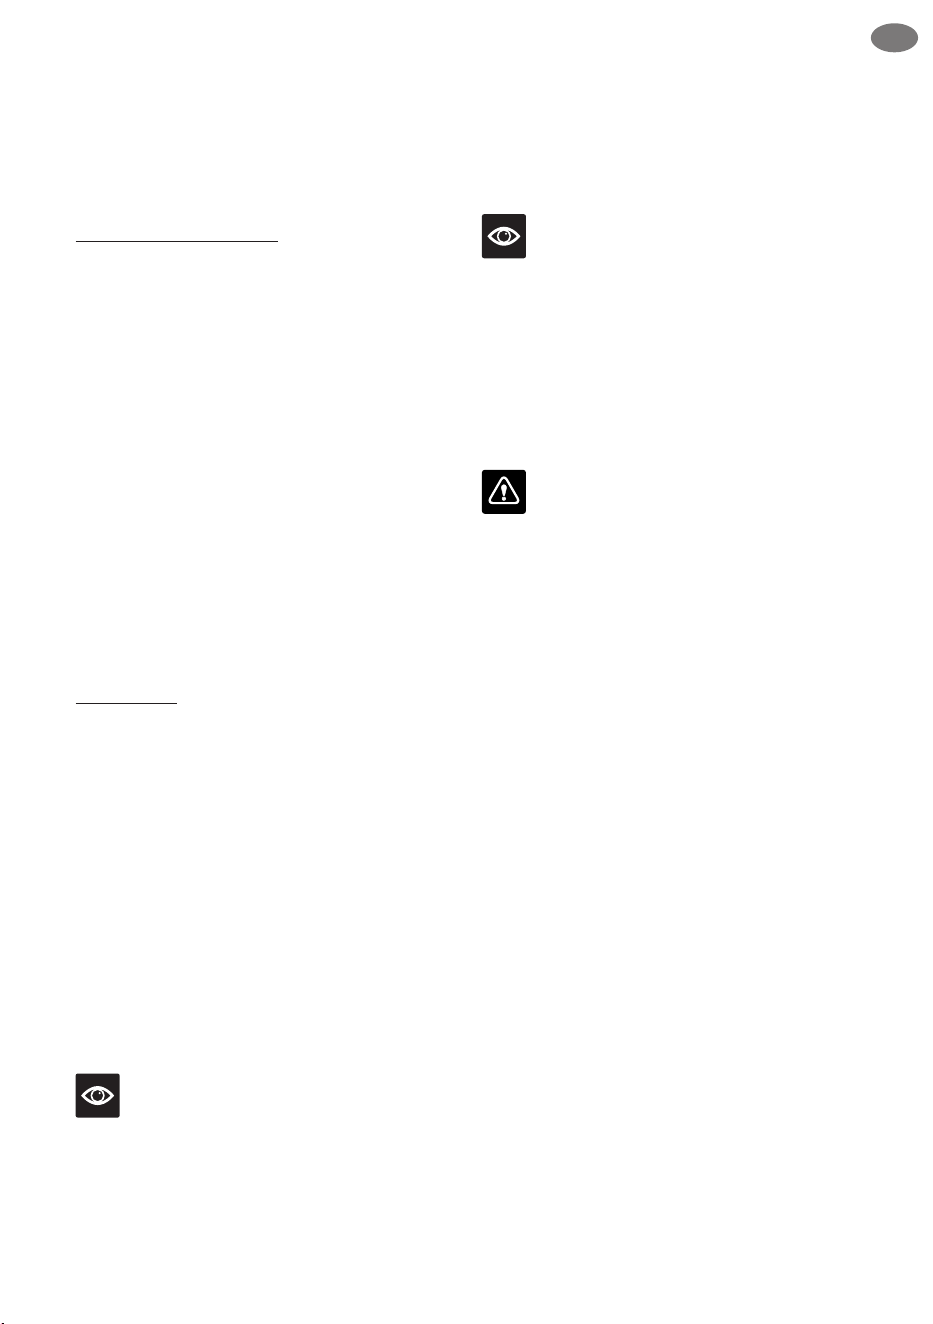
A BIT MORE™ FUNCTION
Use this feature after the toasting cycle has
completed.
After pressing the A BIT MORE™ button, the
toaster will beep once and the carriage will
automatically lower and begin the additional
toasting time. Only the A BIT MORE™ button
light pulses.
A BIT MORE
POWER SAVING MODE
When the toaster is plugged in but not used
for a few minutes, it will go into Power Saving
Mode. Press one of the buttons to return to
ready mode.
HOW TO ADJUST THE VOLUME
Press and hold either the plus (+) or minus
(-) buttons for 2 seconds to adjust the volume
selection. If all lights are illuminated, that
indicates the maximum volume is selected.
2s
2s
11
EN
Care & Cleaning
CLEANING YOUR EYE Q™
TOASTER
Switch the toaster off at the power outlet and
then remove the power plug. Allow the toaster to
cool completely before cleaning or storing.
Engineered Easy Clean Features
This toaster is specifically designed to minimise
time and effort required when cleaning.
The top cap and toasting slots are designed for
crumbs to fall straight through the toaster and
into the extra-large crumb tray.
Cleaning the Top Cap
The black top cap of the toaster is ceramic
coated, ensuring that any food that remains
on the surface can be easily wiped off and not
result into stains or discolouration.
Wipe the top cap with a damp soft cloth and
with a soft dry cloth before storing.
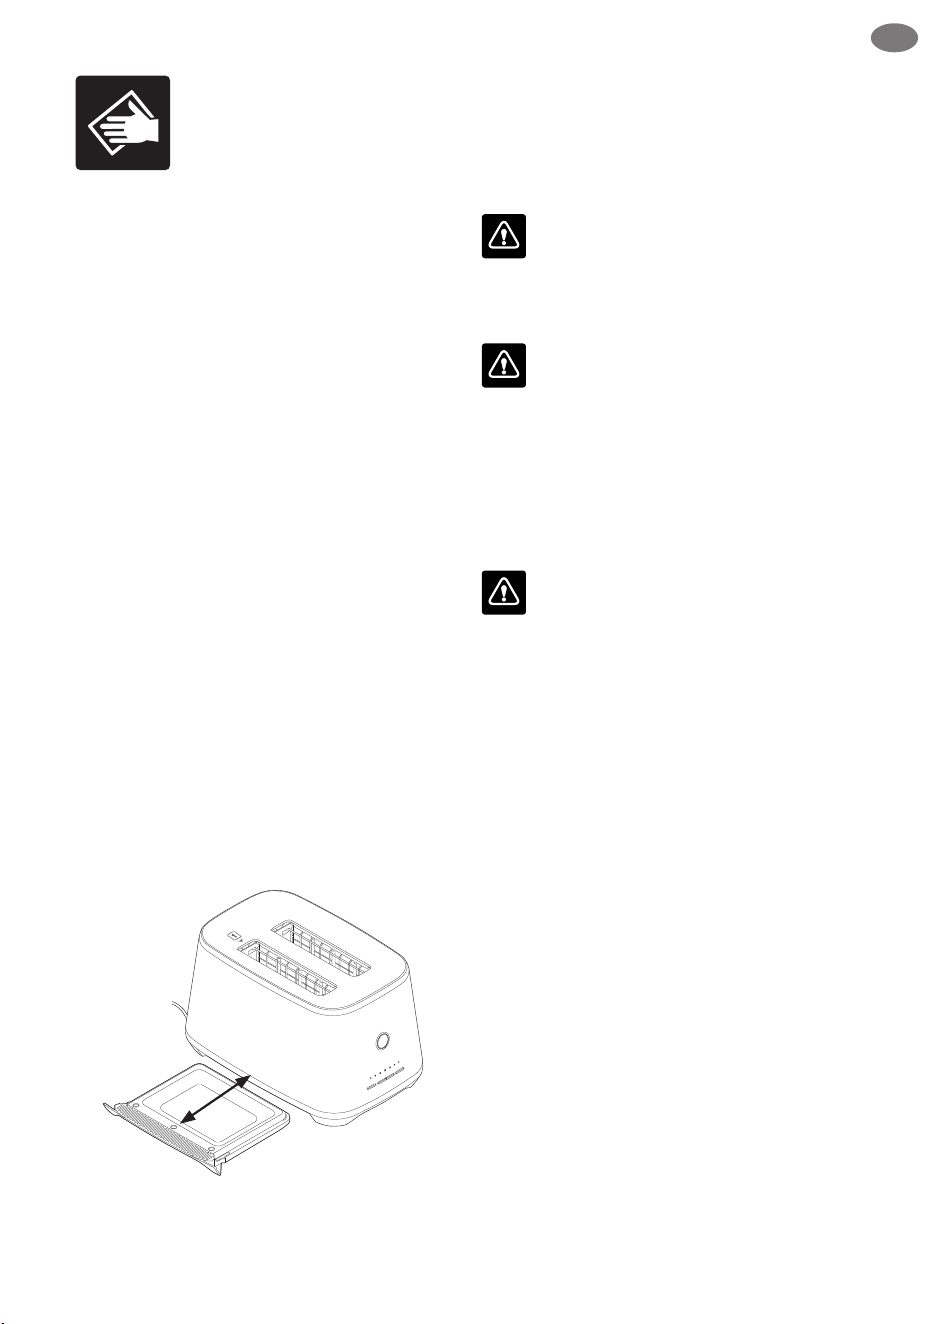
Cleaning the Crumb Tray
The toaster crumb tray should be removed and
cleaned frequently. The crumb tray is located on
the left side of the toaster.
Slide the crumb tray out by pulling outward,
away from the toaster until it is clear of the
appliance. Remove any crumbs and wipe of the
crumb tray with a dry cloth. Replace the crumb
tray back into the toaster by sliding it back in
until it clicks firmly into place.
If the crumb tray is not properly reinserted into
the toaster, it will not operate.
WARNING
Do not allow crumbs to build up in the crumb
tray. Failure to clean the crumb tray regularly
may result in a fire hazard.
WARNING
Do not put the crumb tray or any part of the
toaster in the dishwasher.
Cleaning the Outer Housing
Wipe the outside and top cap of the toaster with
a slightly dampened soft cloth and then dry it
with a soft dry cloth.
WARNING
Do not clean the toaster with metal scouring
pads. Pieces can break off the pad and touch
electrical parts creating an electric shock
hazard.
STORAGE
Ensure the toaster is completely cool before
storing.
Replace the cord into the cord storage in the
base of the toaster.
Store in an upright position on a flat surface.
Do not store anything on top of the toaster.

12
Troubleshooting
PROBLEM POSSIBLE CAUSES EASY SOLUTION
Toaster lights are not
illuminated.
• Toaster has gone into standby
mode.
• Toaster is not properly
connected to a power source.
• Crumb tray isn’t correctly
inserted into the toaster.
• Press any button to return to ready
mode.
• Ensure the toaster is plugged into a
power outlet and switched on.
• Ensure the crumb tray is firmly
clicked into position.
Toaster Start | Cancel
button flashing green,
• Crumb tray is not correctly
inserted.
• Reinsert the crumb tray.
Bread carriage doesn’t
stay lowered (rises
straight after starting
cycle).
• The sensor has not detected
any bread.
• Ensure the bread is positioned in the
correct toasting slot; refer to ‘Sensor
Location’.
• Ensure the bread is positioned in
front of the sensor.
Bagels / Crumpets /
English Muffins aren’t
toasting properly.
• Bagel / Crumpet / English
Mun mode hasn’t been
activated.
• Bread hasn’t been inserted into
the toaster correctly.
• Press the Bagel / Crumpet / English
Mun mode button prior to starting
the toasting cycle. Button will
illuminate when selected.
• Refer to “Toasting Bagels, Crumpets,
and English Muns for correct
orientation.
Toasting bread products
that don’t change colour
with heat.
• The Manual Timer Mode
needs to be activated.
• Activate Manual Time Mode.
Sensors will be deactivated, and the
toaster will operate based on time;
refer to ‘Manual Timer Mode’.

13
EN
Notes

14
Notes

15
EN
Notes

Breville, the Breville Logo, is trademark of Breville Pty Ltd (“Breville”) and Breville's products
are distributed in Australia and New Zealand under license.
Copyright Breville Pty. Ltd. 2025.
Due to continued product improvement, the products illustrated/photographed
in this brochure may vary slightly from the actual product.
B##### ANZ – #24
Breville Service Centre
Australian Customers
Phone:
1300 139 798
Web: www.breville.com
New Zealand Customers
Phone:
0800 273 845
Web: www.breville.com
BTA850 & BTA870 ANZ – A25v12



