
OWNER’S GUIDE & SERVICE MANUAL
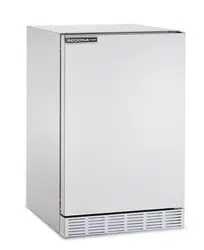
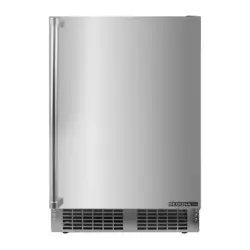
SEDONA UNDERCOUNTER REFRIGERATION
Model: S24REF
2
CONTENTS
Contents
Welcome ............................................................................. 3
Important Safety Instructions .............................................. 4
Unpacking Your Appliance ................................................. 5
Electrical ............................................................................. 6
Cutout and Product Dimensions ......................................... 7
Installing Your Appliance .................................................... 9
Door Reversal .................................................................. 10
Using Your Electronic Control ........................................... 12
Care and Cleaning ............................................................ 13
Stainless Steel Maintenance ............................................ 14
Energy Saving Tips ........................................................... 15
Extended Non-Use ........................................................... 16
Obtaining Service ............................................................. 17
Troubleshooting ............................................................... 18
Wire Diagram ................................................................... 20
R600a Specications ....................................................... 21
Warranty ........................................................................... 25
3
WELCOME
Welcome to Lynx
Thank you for choosing our quality product to add to your
home. We are thrilled to welcome you to our growing
community of Lynx owners, who trust in our products
and our support.
The information in this guide is intended to help you install
and maintain your new Lynx undercounter model to
protect and prolong its lifetime. We encourage you to
contact our Technical Support team at 888.289.5969 with
any questions.
Welcome to Lynx
It is important you register your product warranty after
taking delivery of your appliance. You can register online at
www.lynxgrills.com.
The following information will be
required when registering your
appliance:
Serial Number
Date of Purchase
Dealer’s name and address
4
IMPORTANT SAFETY INSTRUCTIONS
Important Safety Instructions
Warnings and safety instructions appearing in this guide
are not meant to cover all possible conditions and
situations that may occur. Common sense, caution and
care must be exercised when installing, maintaining or
operating this appliance.
Recognize Safety Symbols,
Words and Labels
!
WARNING
WARNING - You can be killed or seriously injured
if you do not follow these instructions.
!
CAUTION
CAUTION - Hazards or unsafe practices which could
result in personal injury or property/product damage.
NOTE
NOTE - Important information to help assure a
problem-free installation and operation.
!
WARNING
State of California Proposition 65 Warning:
This product contains one or more chemicals known
to the State of California to cause birth defects or
other reproductive harm.
!
WARNING
State of California Proposition 65 Warning:
This product contains one or more chemicals known
to the State of California to cause cancer.
!
WARNING
WARNING - This unit contains R600a (isobutane)
which is a ammable hydrocarbon. It is safe for
regular use. Do not use sharp objects to expedite
defrosting. Do not damage refrigerant circuit.
5
UNPACKING YOUR APPLIANCE
!
WARNING
EXCESSIVE WEIGHT HAZARD
Use two or more people to move product.
Failure to do so can result in personal injury.
Remove Interior Packaging
Your appliance has been packed for shipment with all parts
that could be damaged by movement securely fastened.
Remove internal packing materials and any tape holding
internal components in place. The getting started guide is
shipped inside the product in a plastic bag along with the
warranty registration card and other accessory items.
Important
Keep your carton and packaging until your appliance has
been thoroughly inspected and found to be in good condi-
tion. If there is any damage, the packaging will be needed
as proof of damage in transit. Afterwards, please dispose of
all items responsibly.
!
WARNING
WARNING - Dispose of the plastic bags which can
be a suocation hazard.
Note to Customer
This merchandise was carefully packed and thoroughly
inspected before leaving out facility. Responsibility for its
safe delivery was assumed by the retailer upon acceptance
of the shipment. Claims for loss or damage sustained in
transit must be made to the retailer.
DO NOT RETURN DAMAGED MERCHANDISE TO THE
MANUFACTURER - FILE THE CLAIM WITH THE
RETAILER.
NOTE
!
CAUTION
If the appliance was shipped, handled or stored in other
than an upright position for any period of time, allow the
appliance to sit upright for a period of at least 24 hours
before plugging in. This will assure oil returns to the
compressor. Plugging the appliance in immediately may
cause damage to internal parts.
!
WARNING
WARNING - Help Prevent Tragedies
Child entrapment and suocation are not problems of
the past. Junked or abandoned refrigerators are still
dangerous, even if they sit outside for “just a few hours”.
If you are getting rid of your old refrigerator, please
follow the instructions below to help prevent accidents.
Before you throw away your old refrigerator or freezer:
• Take o the doors or remove the drawers.
• Leave the shelves in place so children may not
easily climb inside.
!
CAUTION
Damages caused by ambient temperatures of 40°F (4°C)
or below are not covered by the warranty.
3
CARE AND USE/INSTALLATION
NOTE
!
CAUTION
UNPACKING YOUR APPLIANCE
Warranty Registration
Remove Interior Packaging
XXXXXXXXXXXXXX
XXXXXXXXXXXXXX
XXXXXXXXXXX
It is important you send in your warranty registration card
immediately after taking delivery of your appliance or you
can register online at:
www.lynxgrills.com/support/registration
The following information will be required when registering
your appliance.
Service/Model Number
Serial Number
Date of Purchase
Dealer’s name and address
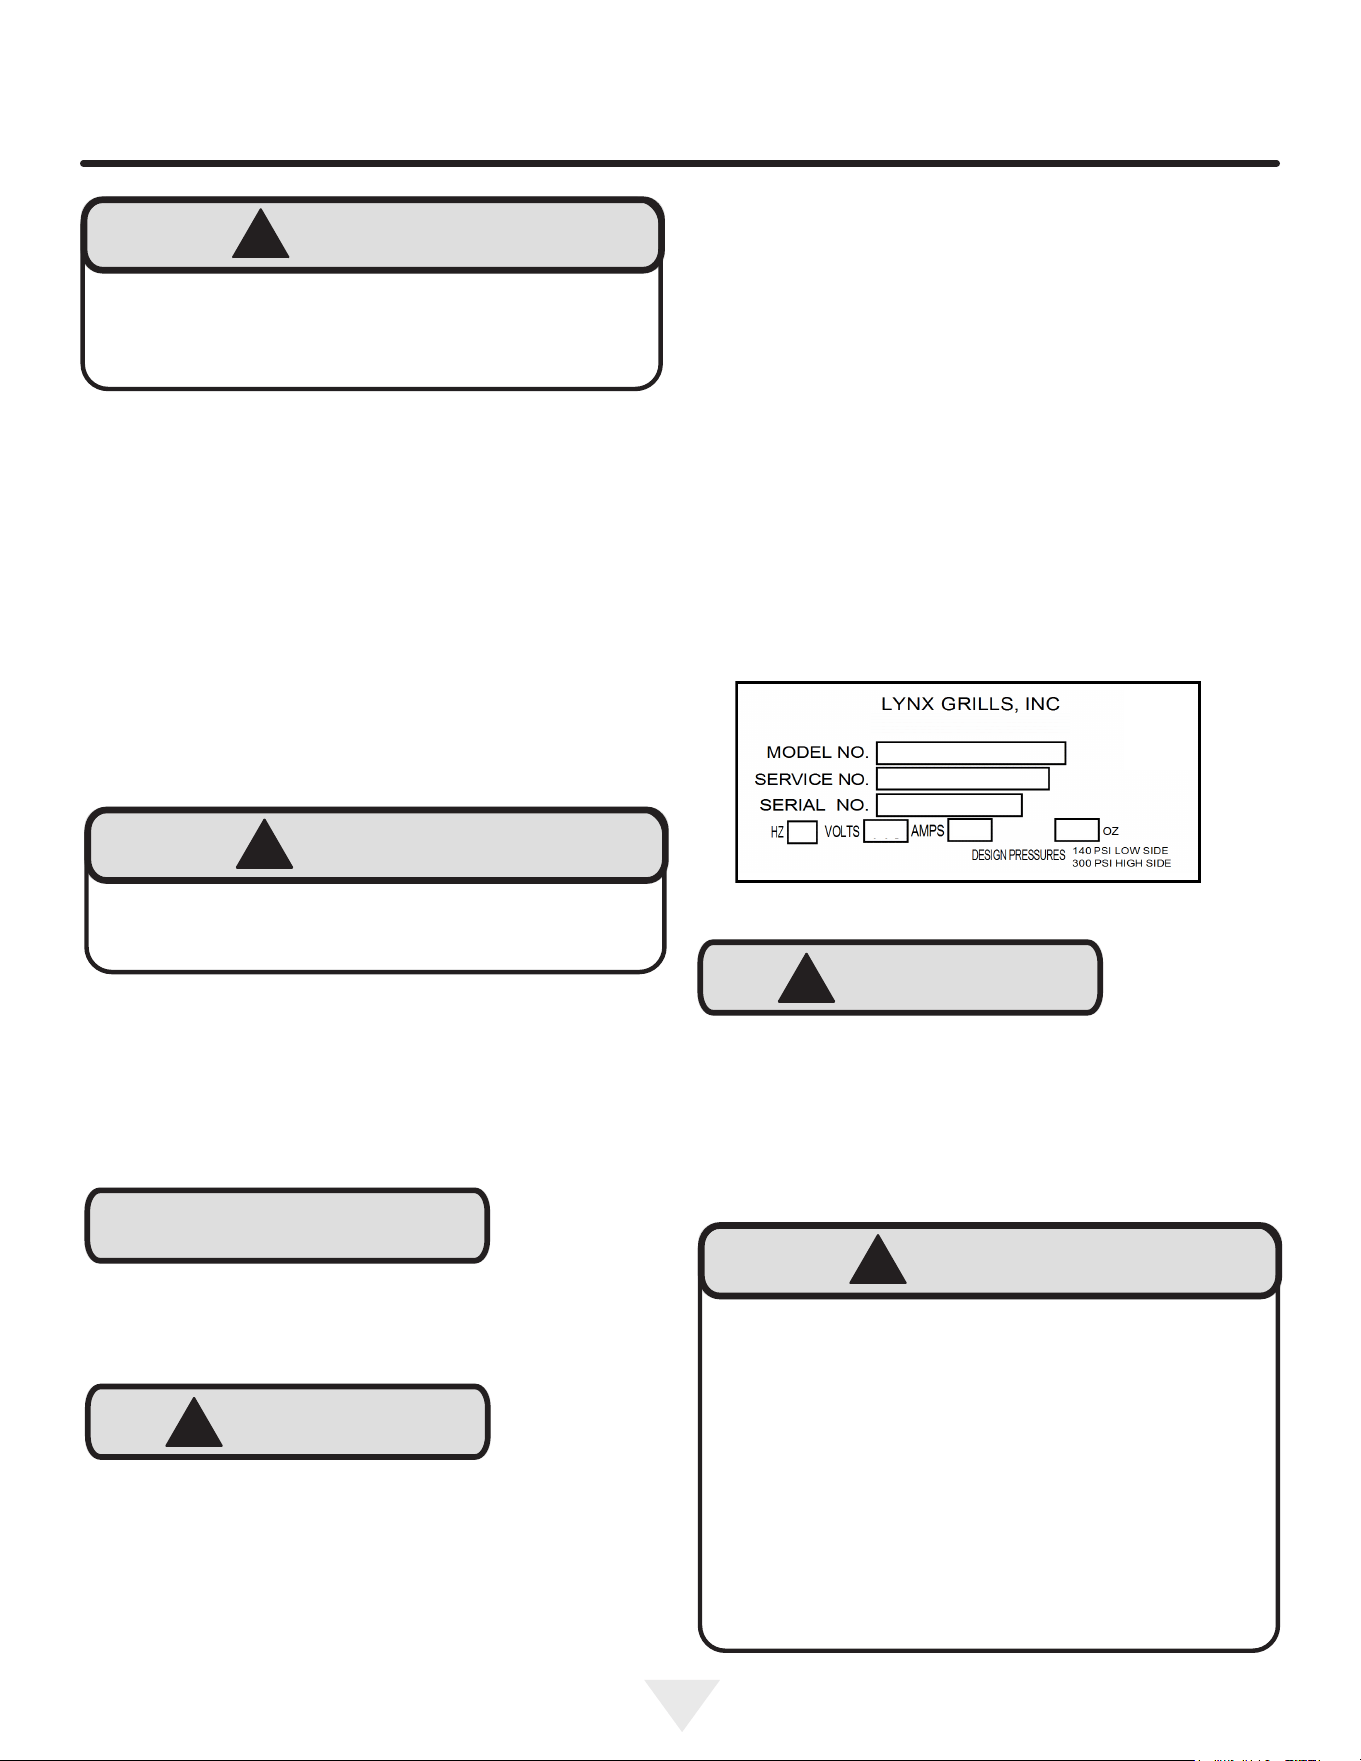
The service/model number and serial number can be found
on the serial plate which is located inside the cabinet on
the left side near the top. (See Figure 1).
!
WARNING
EXCESSIVE WEIGHT HAZARD
Use two or more people to move product.
Failure to do so can result in personal injury.
Your appliance has been packed for shipment with all parts
that could be damaged by movement securely fastened.
Remove internal packing materials and any tape holding in-
ternal components in place. The owners manual is shipped
inside the product in a plastic bag along with the warranty
registration card, and other accessory items.
Important
Keep your carton and packaging until your appliance has
been thoroughly inspected and found to be in good condi-
tion. If there is damage, the packaging will be needed as
proof of damage in transit. Afterwards please dispose of all
items responsibly.
Note to Customer
This merchandise was carefully packed and thoroughly
inspected before leaving our plant. Responsibility for its
safe delivery was assumed by the retailer upon acceptance
of the shipment. Claims for loss or damage sustained in
transit must be made to the retailer.
DO NOT RETURN DAMAGED MERCHANDISE TO THE
MANUFACTURER - FILE THE CLAIM WITH THE
RETAILER.
If the appliance was shipped, handled, or stored in other
than an upright position for any period of time, allow the ap-
pliance to sit upright for a period of at least 24 hours before
plugging in. This will assure oil returns to the compressor.
Plugging the appliance in immediately may cause damage
to internal parts.
Figure 1
!
WARNING
WARNING - Help Prevent Tragedies
Child entrapment and suocation are not problems of
the past. Junked or abandoned refrigerators are still
dangerous - even if they sit out for "just a few hours".
If you are getting rid of your old refrigerator, please
follow the instructions below to help prevent acci-
dents.
Before you throw away your old refrigerator or
freezer:
• Take o the doors or remove the drawers.
• Leave the shelves in place so children may not
easily climb inside.
!
WARNING
WARNING - Dispose of the plastic bags which can
be a suocation hazard.
Greenwood, MS 38930
R600A
Warranty Registration
It is important you send in your warranty registration card
immediately after taking delivery of your appliance, or you
can register online at:
www.lynxgrills.com.
The following information will be required when registering
your applicance.
Service/Model Number
Serial Number
Date of Purchase
Dealer’s name and address
The service/model number and serial number can be found
on the back of the machine near the top.
6
ELECTRICAL
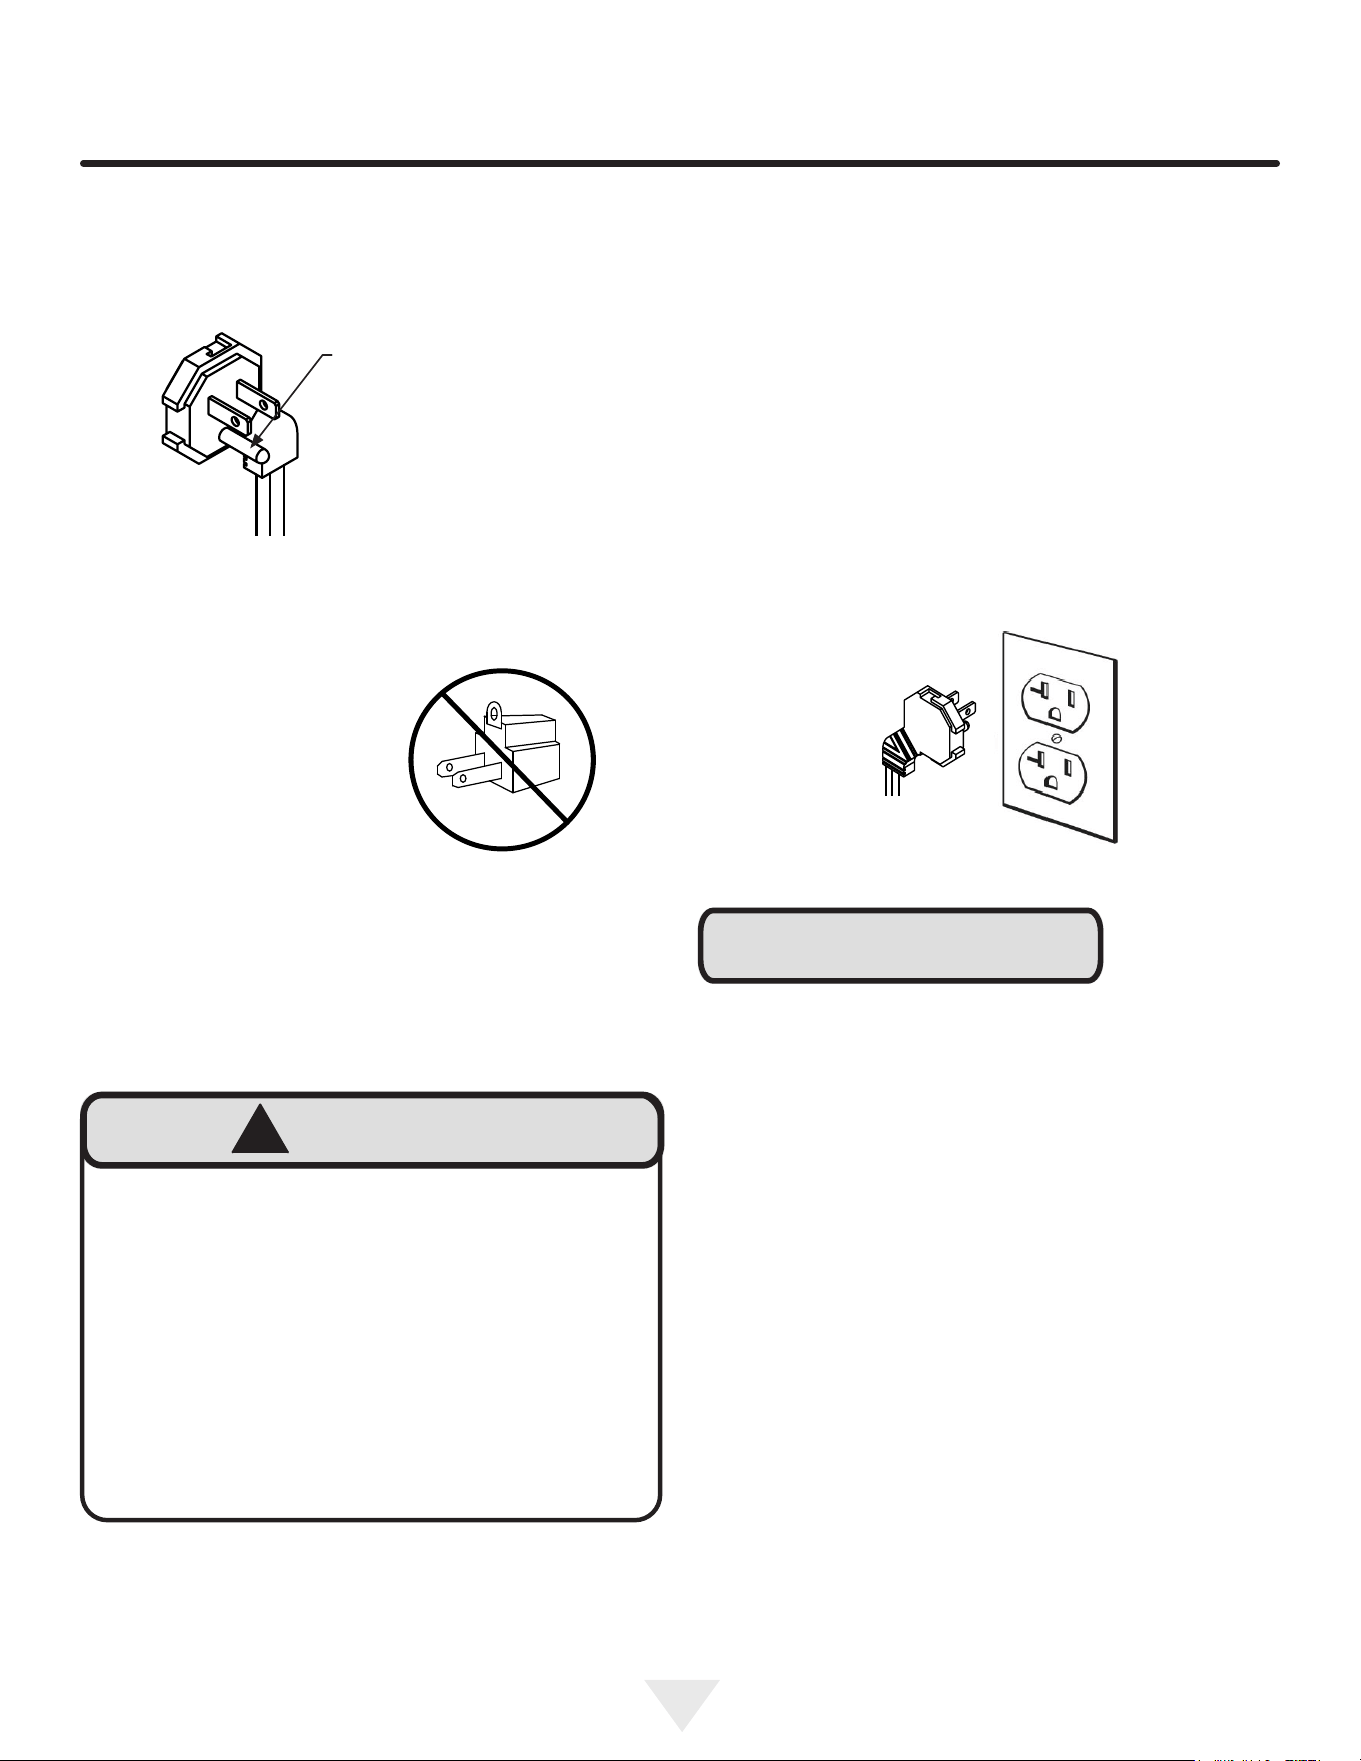
Do not remove
ground prong
!
WARNING
Electrical Shock Hazard
• Do not use an extension cord with this appliance.
They can be hazardous and can degrade product
performance.
• This appliance should not, under any
• circumstances, be installed to an un-grounded
• electrical supply. Do not remove the grounding
prong from the power cord.
• Do not use an adapter.
• Do not splash or spray water from a hose on the
appliance. Doing so may cause an electrical shock,
which may result in severe injury or death.
Electrical Connection
A grounded 115 volt, 15 amp dedicated circuit is required.
This product is factory equipped with a power supply
cord that has a three-pronged, grounded plug. It must be
plugged into a mating grounding type receptacle in
accordance with the National Electrical Code and
applicable local codes and ordinances. If the circuit does
not have a grounding type receptacle, it is the responsibility
and obligation of the customer to provide the proper power
supply. The third-ground prong should not, under any
circumstances, be cut or removed.
NOTE
Ground Fault Circuit Interrupters (GFCI) are prone to
nuisance tripping which will cause the appliance to shut
down. GFCI’s are generally not used on circuits with power
equipment that must run unattended for long periods of
time, unles required to meet local building codes and
ordinances.
7
CUTOUT AND PRODUCT DIMENSIONS
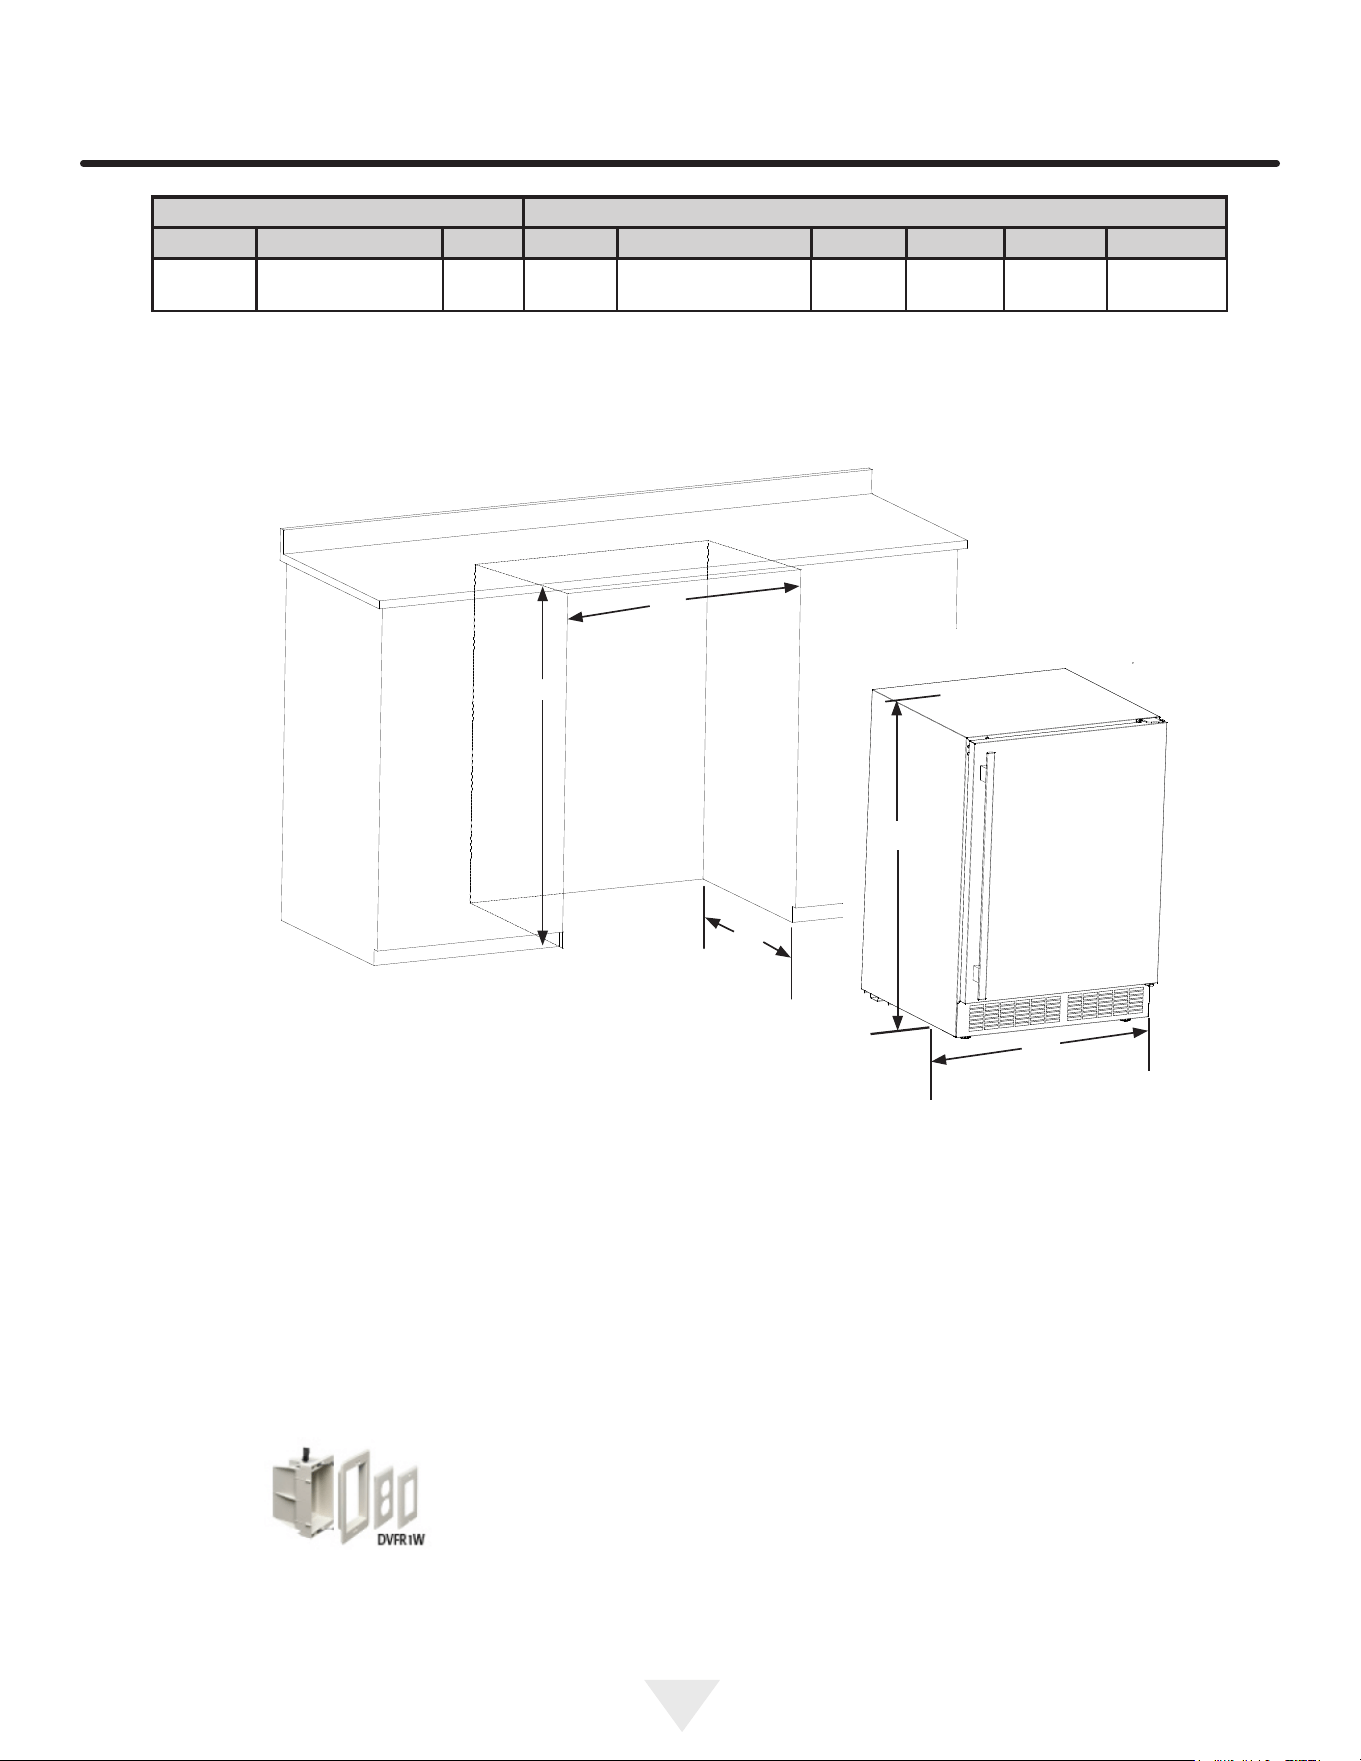
ROUGH-IN OPENING DIMENSIONS CABINET DIMENSIONS
“A” “B” “C” “D” “E” “F” “G” “H” “J”
24 1/4”
(61.6 cm)
34 1/8” to 35 1/8”
(86.7 cm to 89.2 cm)
24”
(61 cm)
24”
(61 cm)
33 5/8” to 34 5/8”
(85.4 cm to 88 cm)
21 1/4”
(54 cm)
22 3/4”
(57.8 cm)
24”
(61 cm)
47 1/2”
(120.7 cm)
If necessary, to gain clearance inside the rough-in
opening, a hole can be cut through the adjacent
cabinet and the power cord routed through this hole to
a power outlet. Another way to increase the available
opening depth is to recess the power outlet into the
rear wall to gain the thickness of the power cord plug.
Not all recessed outlet boxes will work for this
application as they are too narrow, but a recessed
outlet box equivalent to Arlington #DVFR1W us
recommended for this application.
“A”
“B”
“C”
“D”
“E”
8
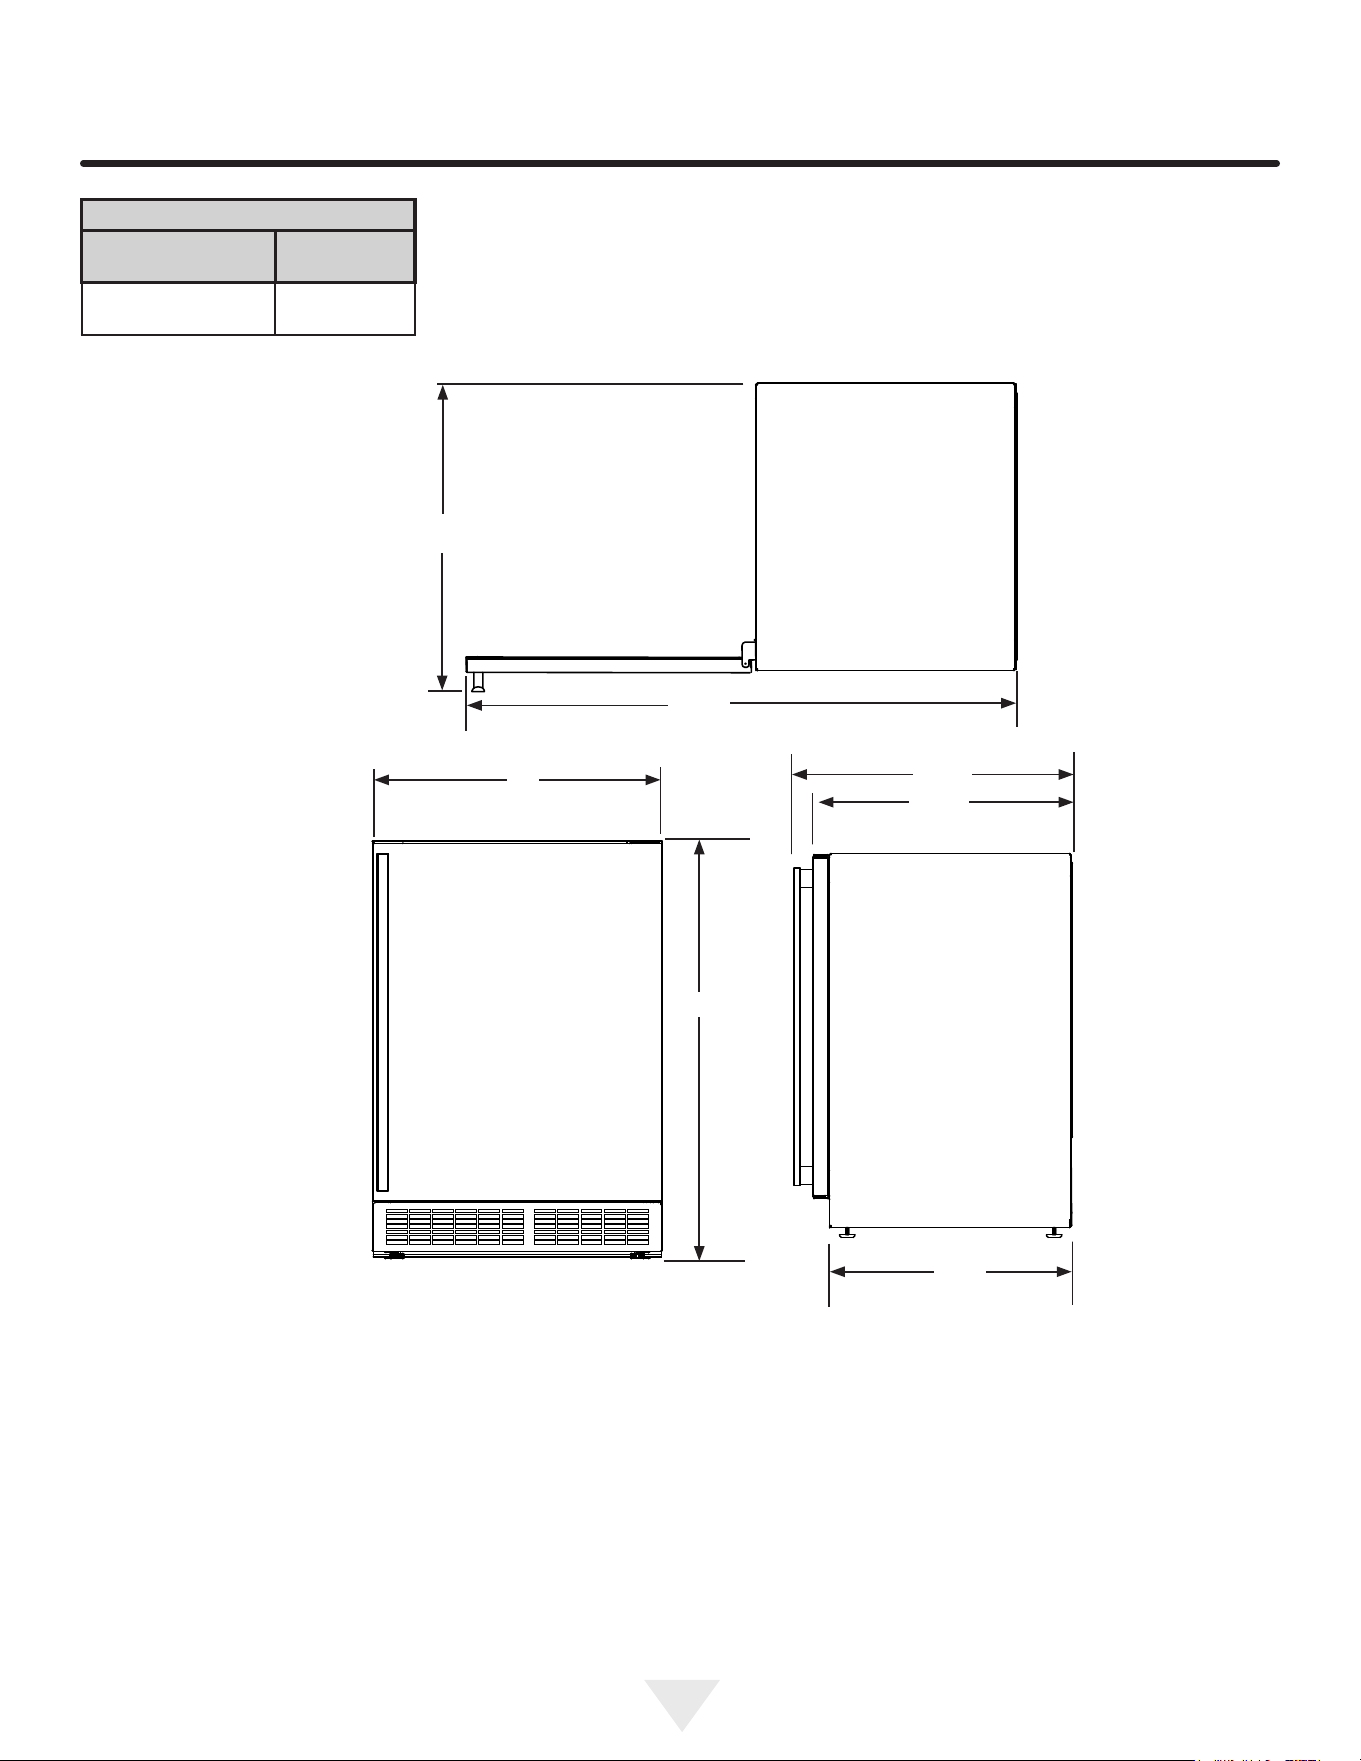
CUTOUT AND PRODUCT DIMENSIONS
PRODUCT DATA
ELECTRICAL
REQUITEMENTS #
PRODUCT
WEIGHT
115V/60Hz/15A
125 lbs
(56.7 kg)
Minimum rough-in opening is required to be larger than the
adjusted height of the cabinet.
A grounded 15-amp dedication circuit is required. Follow all
local building codes when installing electrical and
appliance.
“D”
“E”
“G”
21 1/2”
(54.6 cm)
“H”
“J”
“F”
9
Cabinet Clearance
Ventilation is required from the bottom front of the appli-
ance. Keep this area open and clear of any obstructions.
Adjacent cabinets and counter top can be installed around
the appliance as long as the front grille remains
unobstructed.
Select Location
The proper location will ensure peak performance of your
appliance. We recommend a location where the unit will be
out of direct sunlight and away from heat sources. To
ensure your product performs to specications, the recom-
mended installation location temperature range is from 55
to 100°F (13 to 38°C).
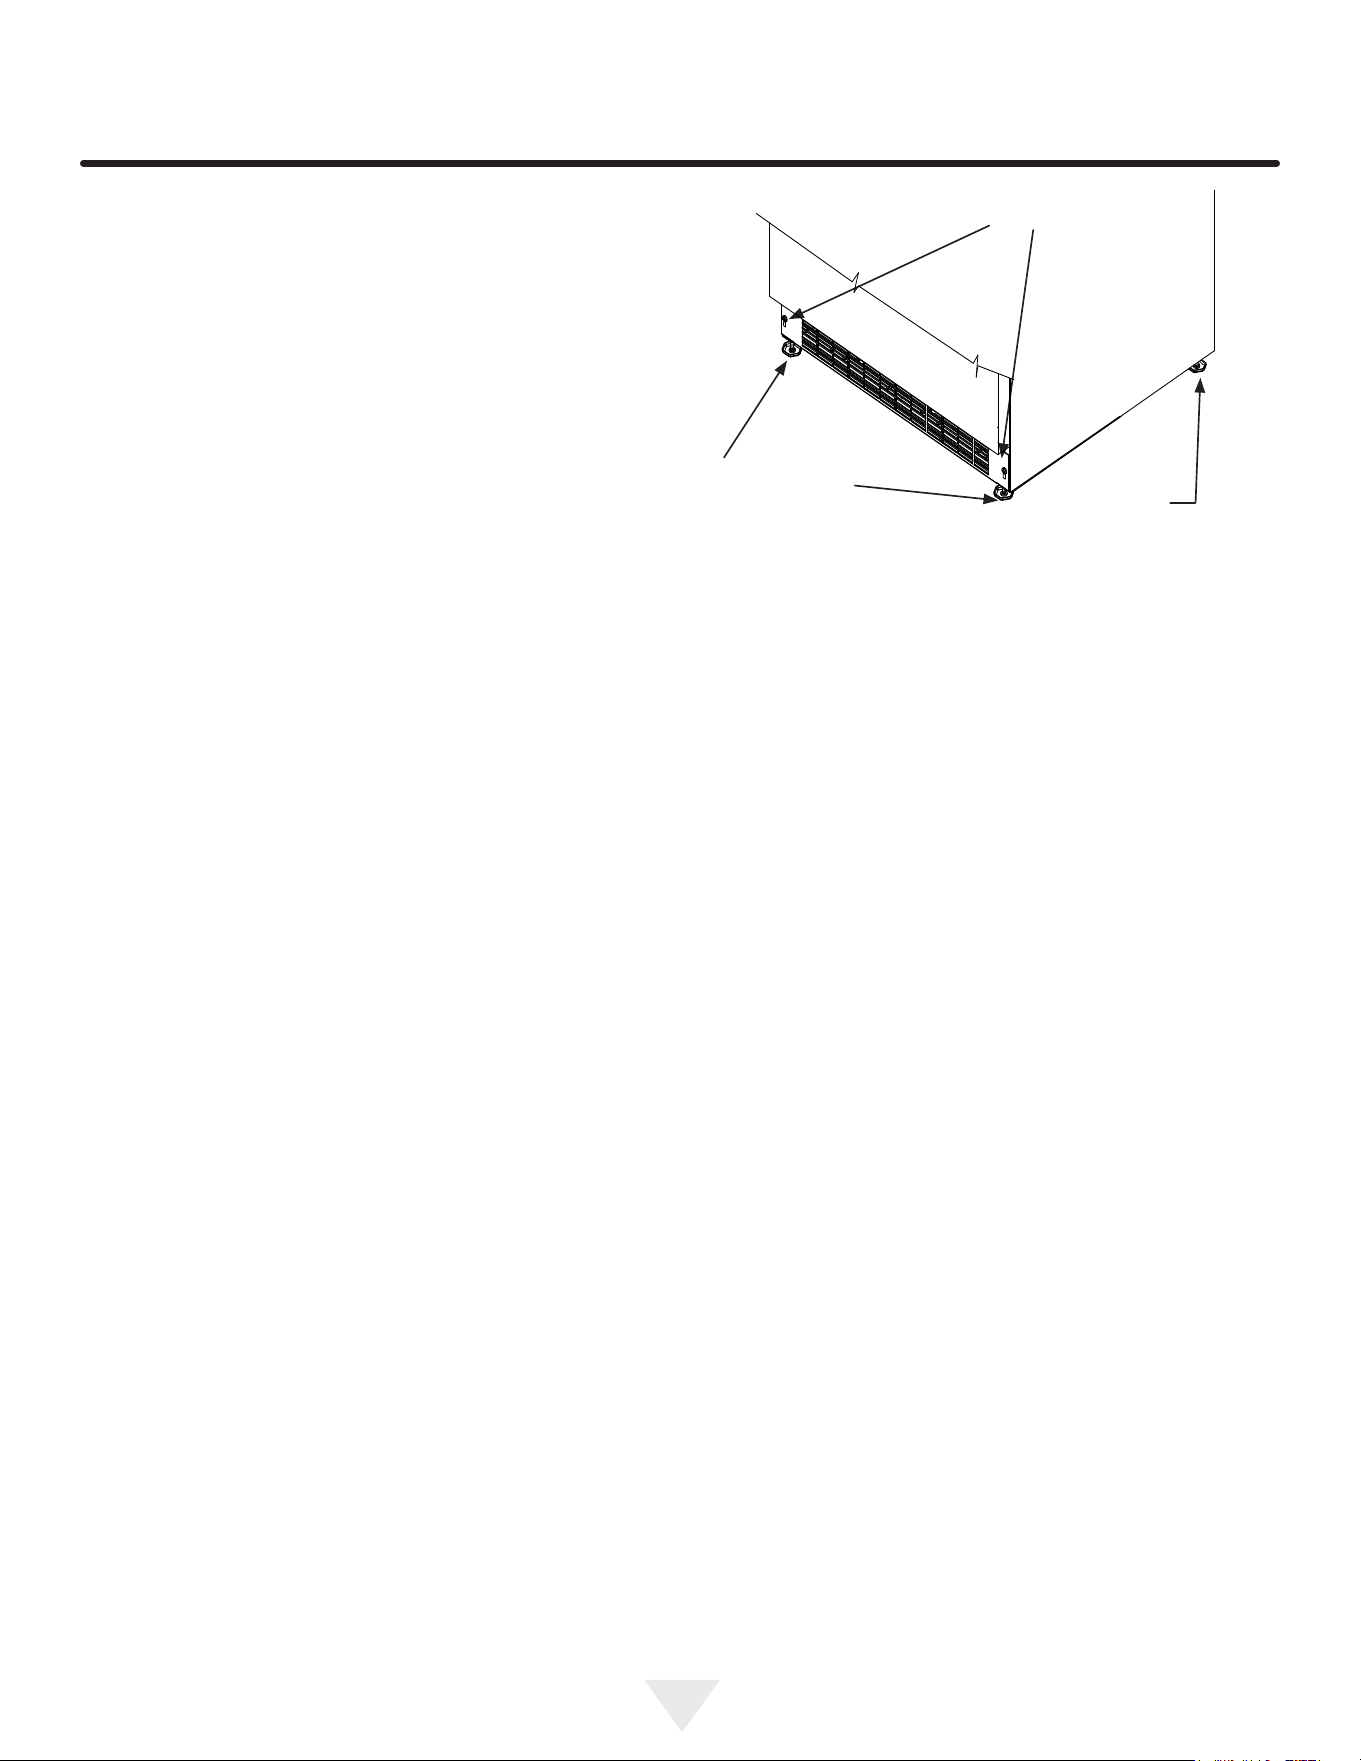
Leveling Legs
Adjustable legs at the front and rear corners of the appli-
ance should be set so the unit is rmly positioned on the
oor and level from side to side and front to back. The over-
all height of your Lynx appliance may be adjusted higher
(by turning the leveling leg out, CCW) and lower (by turning
the leveling leg in, CW).
To adjust the leveling legs, place the appliance on a solid
surface and protect the oor beneath the legs to avoid
scratching the oor. With the assistance of another person,
lean the appliance back to access the front leveling legs.
Raise or lower the legs to the required dimension by turning
the legs. Repeat this process for the rear by tilting the appli-
ance forward using caution. On a level surface check the
appliance for levelness and adjust accordingly.
The front grille screws may be loosened and the grille ad-
justed to the desired height. When adjustment is complete
tighten the two front grille screws.
Front Grille
Do not obstruct the front grille. The openings within the
front grille allow air to ow through the condenser heat ex-
changer. Restrictions to this air ow will result in increased
energy usage and loss of cooling capacity. For this reason
it is important this area to not be obstructed and the grille
openings kept clean. Lynx does not recommend the use of
a custom made grille as air ow may be restricted.
INSTALLING YOUR APPLIANCE
Rear
Leveling
Legs
Front Leveling
Legs
Front grille
screws
10
DOOR REVERSAL
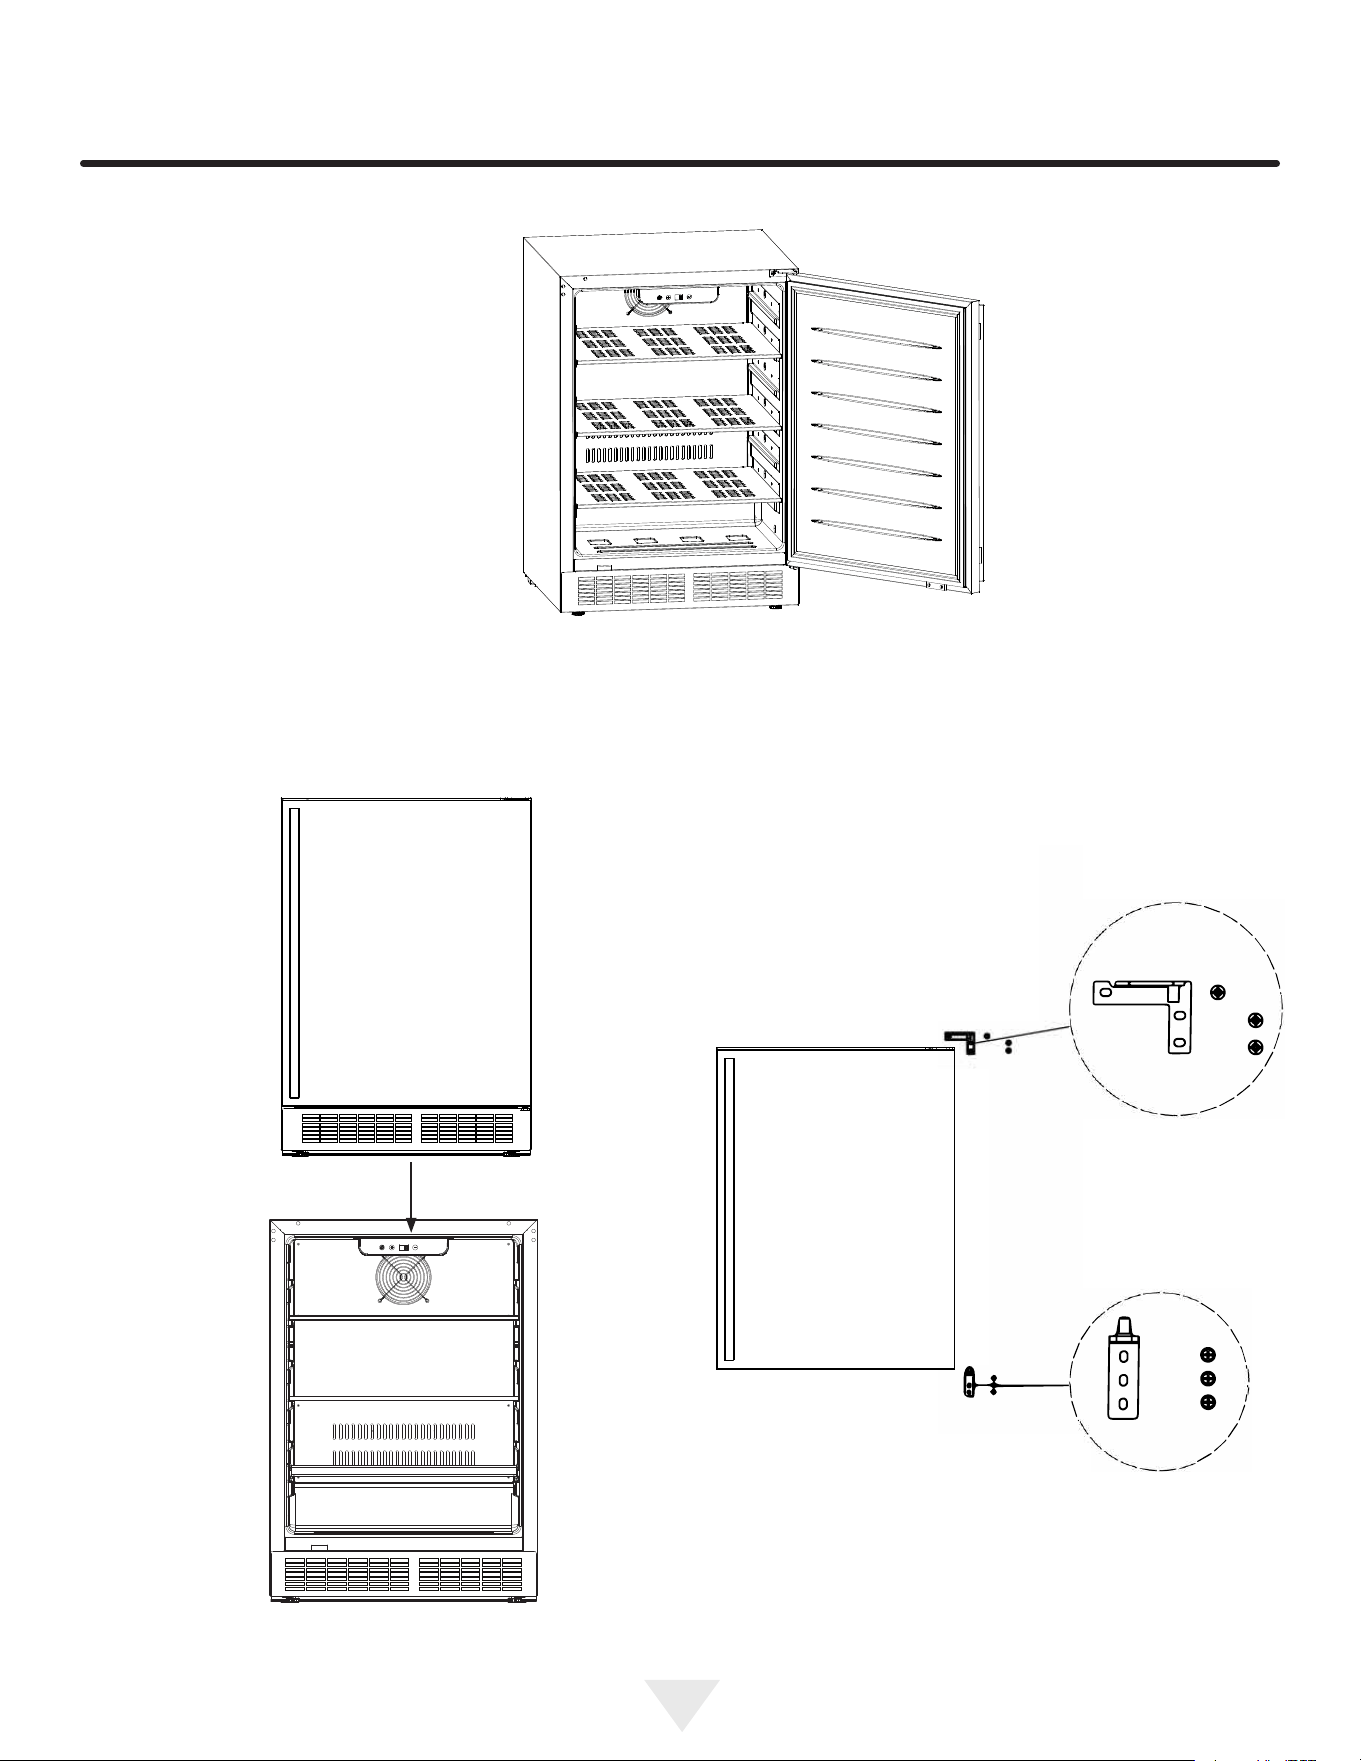
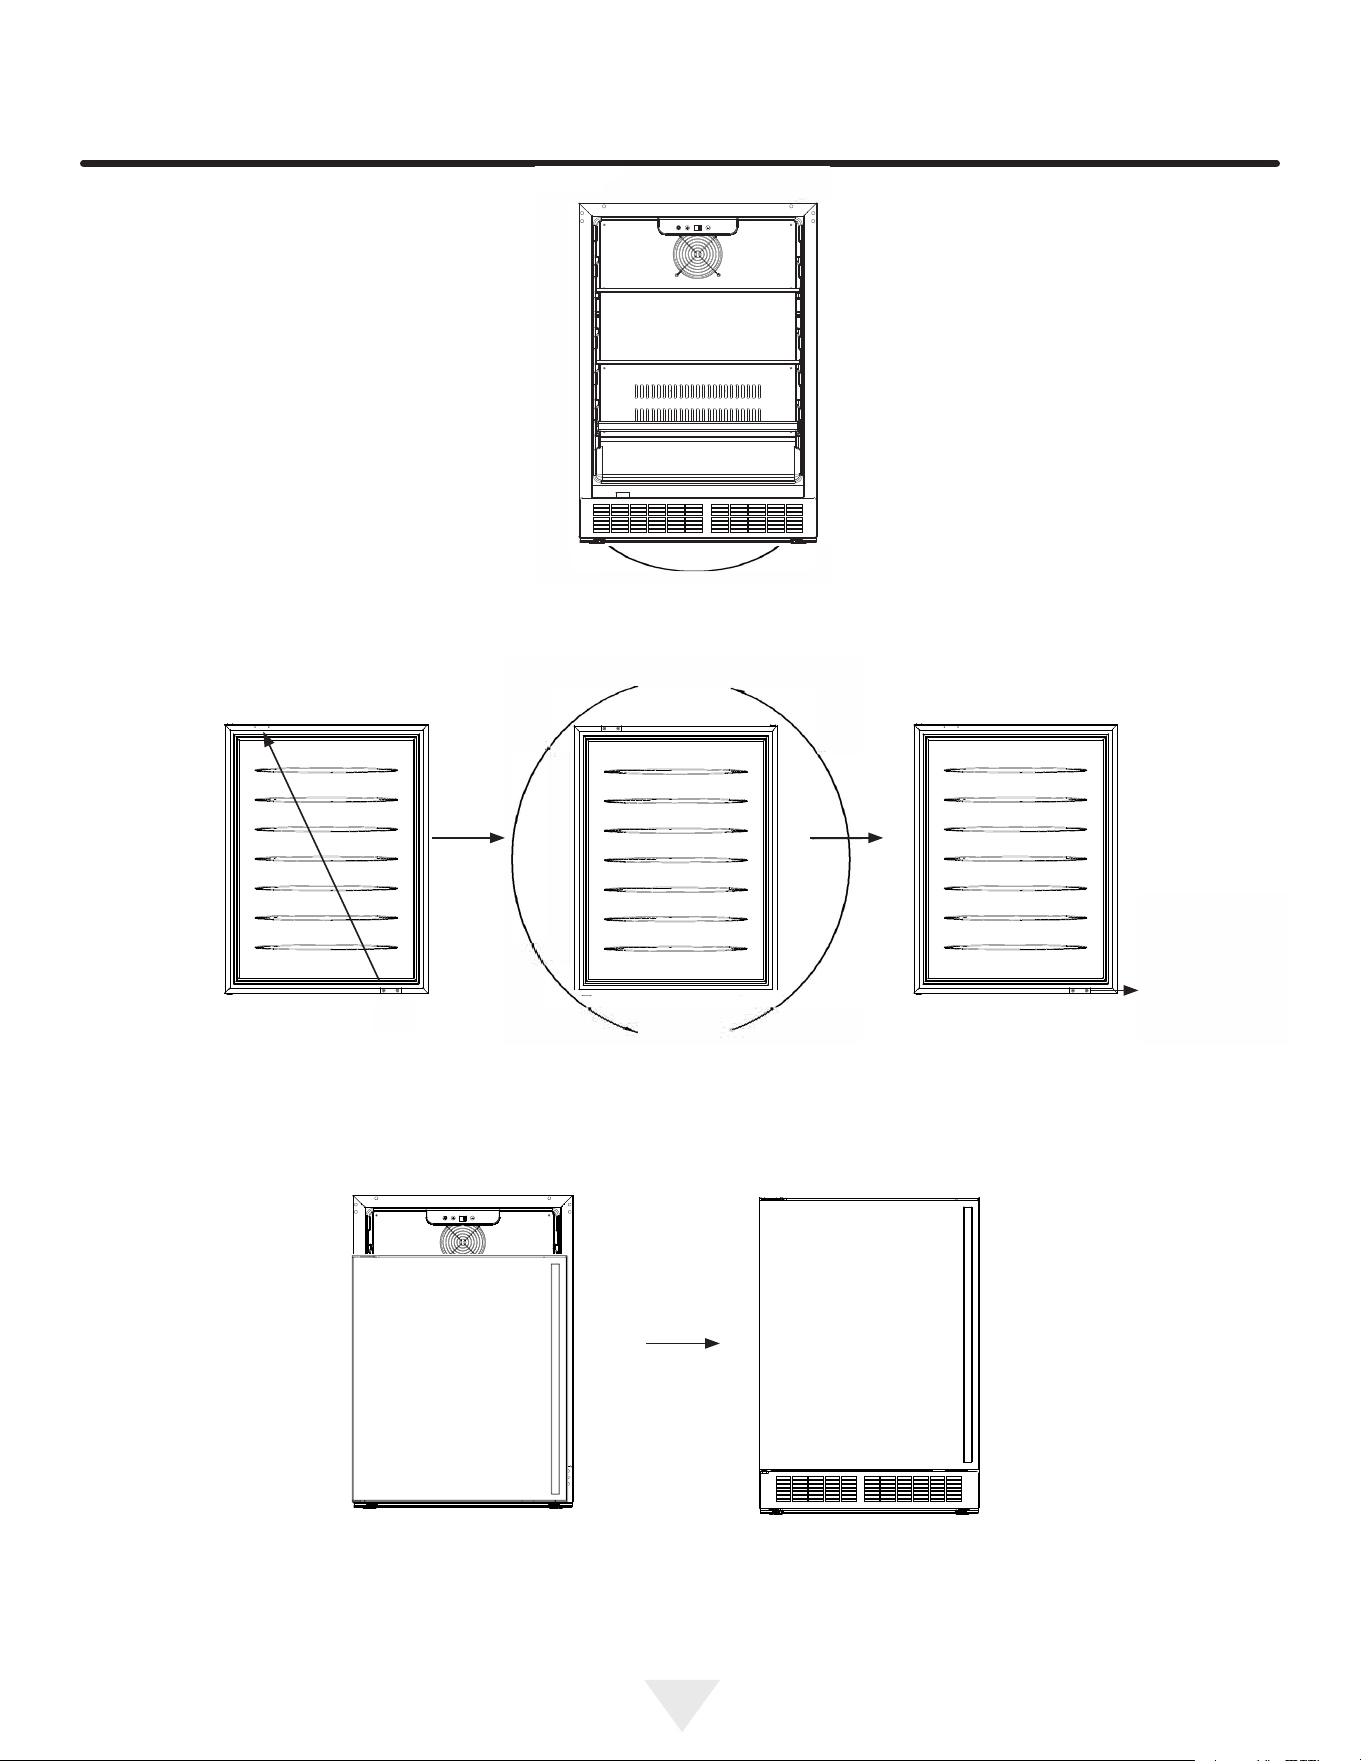
1. Open the door
2. While holding the door, securely remove the 3 screws from the lower hinge.
3. Once the lower hinge is removed, the door will drop out of the upper hinge pin and be o of the cabinet.
4. Lay the door in a secure place.
5. Remove upper hinge by removing the 3 screws.
6. Locate the lefthand hinges in the literature packet that was included with your product.
Door Reversing Instructions
「————————————————————————————————————————— 7
�烽�f
1
1
1
_
1
1
1
-
:
粗�所示,拆下門磁�,装在�前�;
然屈机�180度,�門磁�在下沿;
口
拆下左�上下哉�礼的俱�礼塞及毋�,炭在右�』位上;
俗屈装上卧情的左上航�,装上門休,装上下航�;
哺找�
沙/
.
.
畸 匾
. .
. .
一 ·
一 ·
畸 圈
咖 咖
..
. .
. .
-
一 ·
. .
/---—
I
\
二
\
\
o
o)
\-//
-
1
:1
_
向
;
L————————————————— 一一一一一一一一一一 ———————————— __」
La
down
the
product,
remove
the
lower
hinge,
remove
the
door
od ,
and
remove
th
e
upp r
hing
s
shown
in
the
figure,
remov
e
the
magnet
on
the
door,
install
it
diagonall ,
and
then
flip
it
degrees
to
place
the
door
magnet
at
the
lower
end
Remove
the
hole
plugs
and
screws
from
the
screw
holes
of
the
upper
and
lower
hinges
on
the
left,
and
install
them
in
the
holes
on
the
right,
Then
install
the
upper
left
hinge
of
the
attachment,
install
the
door
rest,
and
install
the
lower
hinge,
Left
and
right
door
interchange
completed
「
—————————————————————————————————————————
7
�烽�f
1
1
1
_
1
1
1
-
:
粗�所示,拆下門磁�,装在�前�;
然屈机�180度,�門磁�在下沿;
口
拆下左�上下哉�礼的俱�礼塞及毋�,炭在右�』位上;
俗屈装上卧情的左上航�,装上門休,装上下航�;
哺找�
沙/
.
.
畸 匾
. .
. .
一 ·
一 ·
畸 圈
咖 咖
..
. .
. .
-
一 ·
. .
/---—
I
\
二
\
\
o
o)
\-//
-
1
:1
_
向
;
L
—————————————————
一一一一一一一一一一
————————————
__」
La
down
the
product,
remove
the
lower
hinge,
remove
the
door
od ,
and
remove
the
upp r
hing
s
shown
in
the
figure,
remove
the
magnet
on
the
door,
install
it
diagonall ,
and
then
flip
it
degrees
to
place
the
door
magnet
at
the
lower
end
Remove
the
hole
plugs
and
screws
from
the
screw
holes
of
the
upper
and
lower
hinges
on
the
left,
and
install
them
in
the
holes
on
the
right,
Then
install
the
upper
left
hinge
of
the
attachment,
install
the
door
rest,
and
install
the
lower
hinge,
Left
and
right
door
interchange
completed
「
—————————————————————————————————————————
7
�烽�f
1
1
1
_
1
1
1
-
:
粗�所示,拆下門磁�,装在�前�;
然屈机�180度,�門磁�在下沿;
口
拆下左�上下哉�礼的俱�礼塞及毋�,炭在右�』位上;
俗屈装上卧情的左上航�,装上門休,装上下航�;
哺找�
沙/
.
.
畸 匾
. .
. .
一 ·
一 ·
畸 圈
咖 咖
..
. .
. .
-
一 ·
. .
/---—
I
\
二
\
\
o
o)
\-//
-
1
:1
_
向
;
L
—————————————————
一一一一一一一一一一
————————————
__」
La
down
the
product,
remove
the
lower
hinge,
remove
the
door
od ,
and
remove
the
upp r
hing
s
shown
in
the
figure,
remove
the
magnet
on
the
door,
install
it
diagonall ,
and
then
flip
it
degrees
to
place
the
door
magnet
at
the
lower
end
Remove
the
hole
plugs
and
screws
from
the
screw
holes
of
the
upper
and
lower
hinges
on
the
left,
and
install
them
in
the
holes
on
the
right,
Then
install
the
upper
left
hinge
of
the
attachment,
install
the
door
rest,
and
install
the
lower
hinge,
Left
and
right
door
interchange
completed
11
DOOR REVERSAL
「
—————————————————————————————————————————
7
凇烽员f
放倒箱体,拆下下铁链,钊下门休,拆下右上哉链;
1
1
1
_
1
1
1
口
拆下左边上下哉链礼的俱钉礼塞及毋钉,炭在右边』位上;
俗屈装上卧情的左上航链,装上门休,装上下航链;
哺找贱
沙/
.
.
I
�,
\
\
/
\
/
@
@
/
\
/
/
[
@
\
『
畸匾
..
..
一·
一·
畸圈
咖咖
1
.
I
\
/
\
/
\
/
\
O
OO
/
/
..
..
..
-
一·
. .
.
/---—
I
\
二
\
\
o
o)
\-//
■■
-
■
1
:1
_
向
;
L
—————————————————
一一一一一一一一一一
————————————
__」
LLaayy
ddoowwnn
tthhee
pprroodduucctt,,
rreemmoovvee
tthhee
lloowweerr
hhiinnggee,,
rreemmoovvee
tthhee
ddoooorr
bbooddyy,,
aanndd
rreemmoovvee
tthhee
uuppppeerr
hhiinnggee
Remove
the
hole
plugs
and
screws
from
the
screw
holes
of
the
upper
and
lower
hinges
on
the
left,
and
install
them
in
the
holes
on
the
right,
Then
install
the
upper
left
hinge
of
the
attachment,
install
the
door
rest,
and
install
the
lower
hinge,
Left
and
right
door
interchange
completed
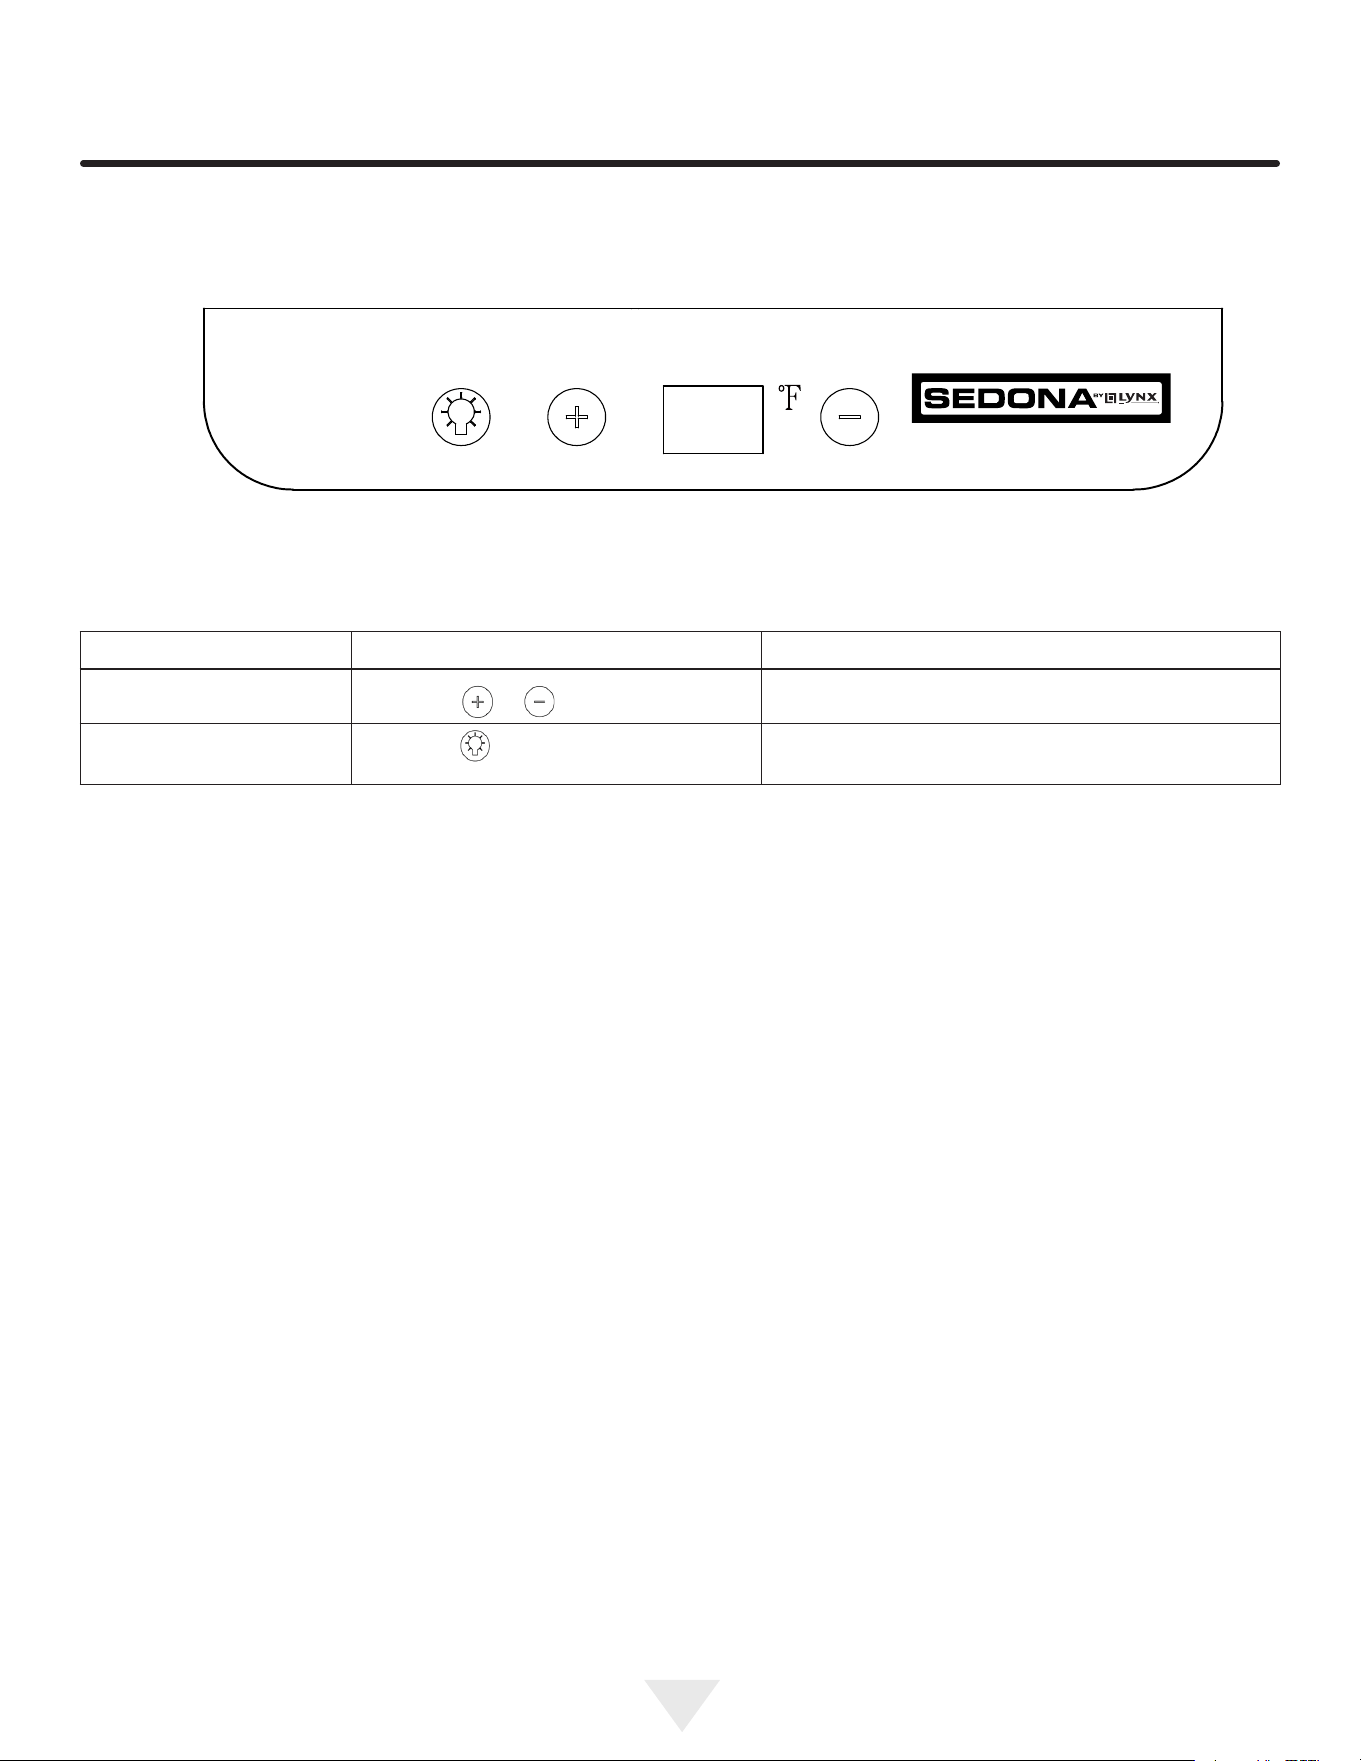
13. Install the upper hinge with 3 screws.
14. With the door turned to its new position, hold the door upward to the upper hinge.
15. Place the lower hinge on the bottom of the door.
16. Attach the lower hinge with 3 screws.
17. Door reversal is now complete.
「
————————————————————————————————————————— 7
凇烽员f
放倒箱体,拆下下铁链,钊下门休,拆下右上哉链;
1
1
1
_
1
1
1
口
拆下左边上下哉链礼的俱钉礼塞及毋钉,炭在右边』位上;
俗屈装上卧情的左上航链,装上门休,装上下航链;
哺找贱
沙/
.
.
I
�,
\
\
/
\
/
@
@
/
\
/
/
[
@
\
『
畸匾
..
..
一·
一·
畸圈
咖咖
1
.
I
\
/
\
/
\
/
\
O
OO
/
/
..
..
..
-
一·
. .
.
/---—
I
\
二
\
\
o
o)
\-//
■■
-
■
1
:1
_
向
;
L—————————————————
一一一一一一一一一一
————————————
__」
LLaayy
ddoowwnn
tthhee
pprroodduucctt,,
rreemmoovvee
tthhee
lloowweerr
hhiinnggee,,
rreemmoovvee
tthhee
ddoooorr
bbooddyy,,
aanndd
rreemmoovvee
tthhee
uuppppeerr
hhiinnggee
Remove
the
hole
plugs
and
screws
from
the
screw
holes
of
the
upper
and
lower
hinges
on
the
left,
and
install
them
in
the
holes
on
the
right,
Then
install
the
upper
left
hinge
of
the
attachment,
install
the
door
rest,
and
install
the
lower
hinge,
Left
and
right
door
interchange
completed
9. Remove the door magnet by removing the 2 screws
10. Once removed, place the magnet on the opposite end of the door.
11. Install using the 2 screws
12. The door is now ready to be rotated 180°.
7. From the left side, remove all 6 of the gray hole plugs from the screw holes of the upper and lower hinges.
8. Place the hole plugs in the screw holes on the right side where the hinges were removed.
「
—————————————————————————————————————————
7
凇烽员f
放倒箱体,拆下下铁链,钊下门休,拆下右上哉链;
1
1
1
_
1
1
1
口
拆下左边上下哉链礼的俱钉礼塞及毋钉,炭在右边』位上;
俗屈装上卧情的左上航链,装上门休,装上下航链;
哺找贱
沙/
.
.
I
�,
\
\
/
\
/
@
@
/
\
/
/
[
@
\
『
畸匾
..
..
一·
一·
畸圈
咖咖
1
.
I
\
/
\
/
\
/
\
O
OO
/
/
..
..
..
-
一·
. .
.
/---—
I
\
二
\
\
o
o)
\-//
■■
-
■
1
:1
_
向
;
L
—————————————————
一一一一一一一一一一
————————————
__」
LLaayy
ddoowwnn
tthhee
pprroodduucctt,,
rreemmoovvee
tthhee
lloowweerr
hhiinnggee,,
rreemmoovvee
tthhee
ddoooorr
bbooddyy,,
aanndd
rreemmoovvee
tthhee
uuppppeerr
hhiinnggee
Remove
the
hole
plugs
and
screws
from
the
screw
holes
of
the
upper
and
lower
hinges
on
the
left,
and
install
them
in
the
holes
on
the
right,
Then
install
the
upper
left
hinge
of
the
attachment,
install
the
door
rest,
and
install
the
lower
hinge,
Left
and
right
door
interchange
completed
「
—————————————————————————————————————————
7
凇烽员f
放倒箱体,拆下下铁链,钊下门休,拆下右上哉链;
1
1
1
_
1
1
1
口
拆下左边上下哉链礼的俱钉礼塞及毋钉,炭在右边』位上;
俗屈装上卧情的左上航链,装上门休,装上下航链;
哺找贱
沙/
.
.
I
�,
\
\
/
\
/
@
@
/
\
/
/
[
@
\
『
畸匾
..
..
一·
一·
畸圈
咖咖
1
.
I
\
/
\
/
\
/
\
O
OO
/
/
..
..
..
-
一·
. .
.
/---—
I
\
二
\
\
o
o)
\-//
■■
-
■
1
:1
_
向
;
L
—————————————————
一一一一一一一一一一
————————————
__」
LLaayy
ddoowwnn
tthhee
pprroodduucctt,,
rreemmoovvee
tthhee
lloowweerr
hhiinnggee,,
rreemmoovvee
tthhee
ddoooorr
bbooddyy,,
aanndd
rreemmoovvee
tthhee
uuppppeerr
hhiinnggee
Remove
the
hole
plugs
and
screws
from
the
screw
holes
of
the
upper
and
lower
hinges
on
the
left,
and
install
them
in
the
holes
on
the
right,
Then
install
the
upper
left
hinge
of
the
attachment,
install
the
door
rest,
and
install
the
lower
hinge,
Left
and
right
door
interchange
completed
12
USING YOUR ELECTRONIC CONTROL
FUNCTION COMMAND NOTES
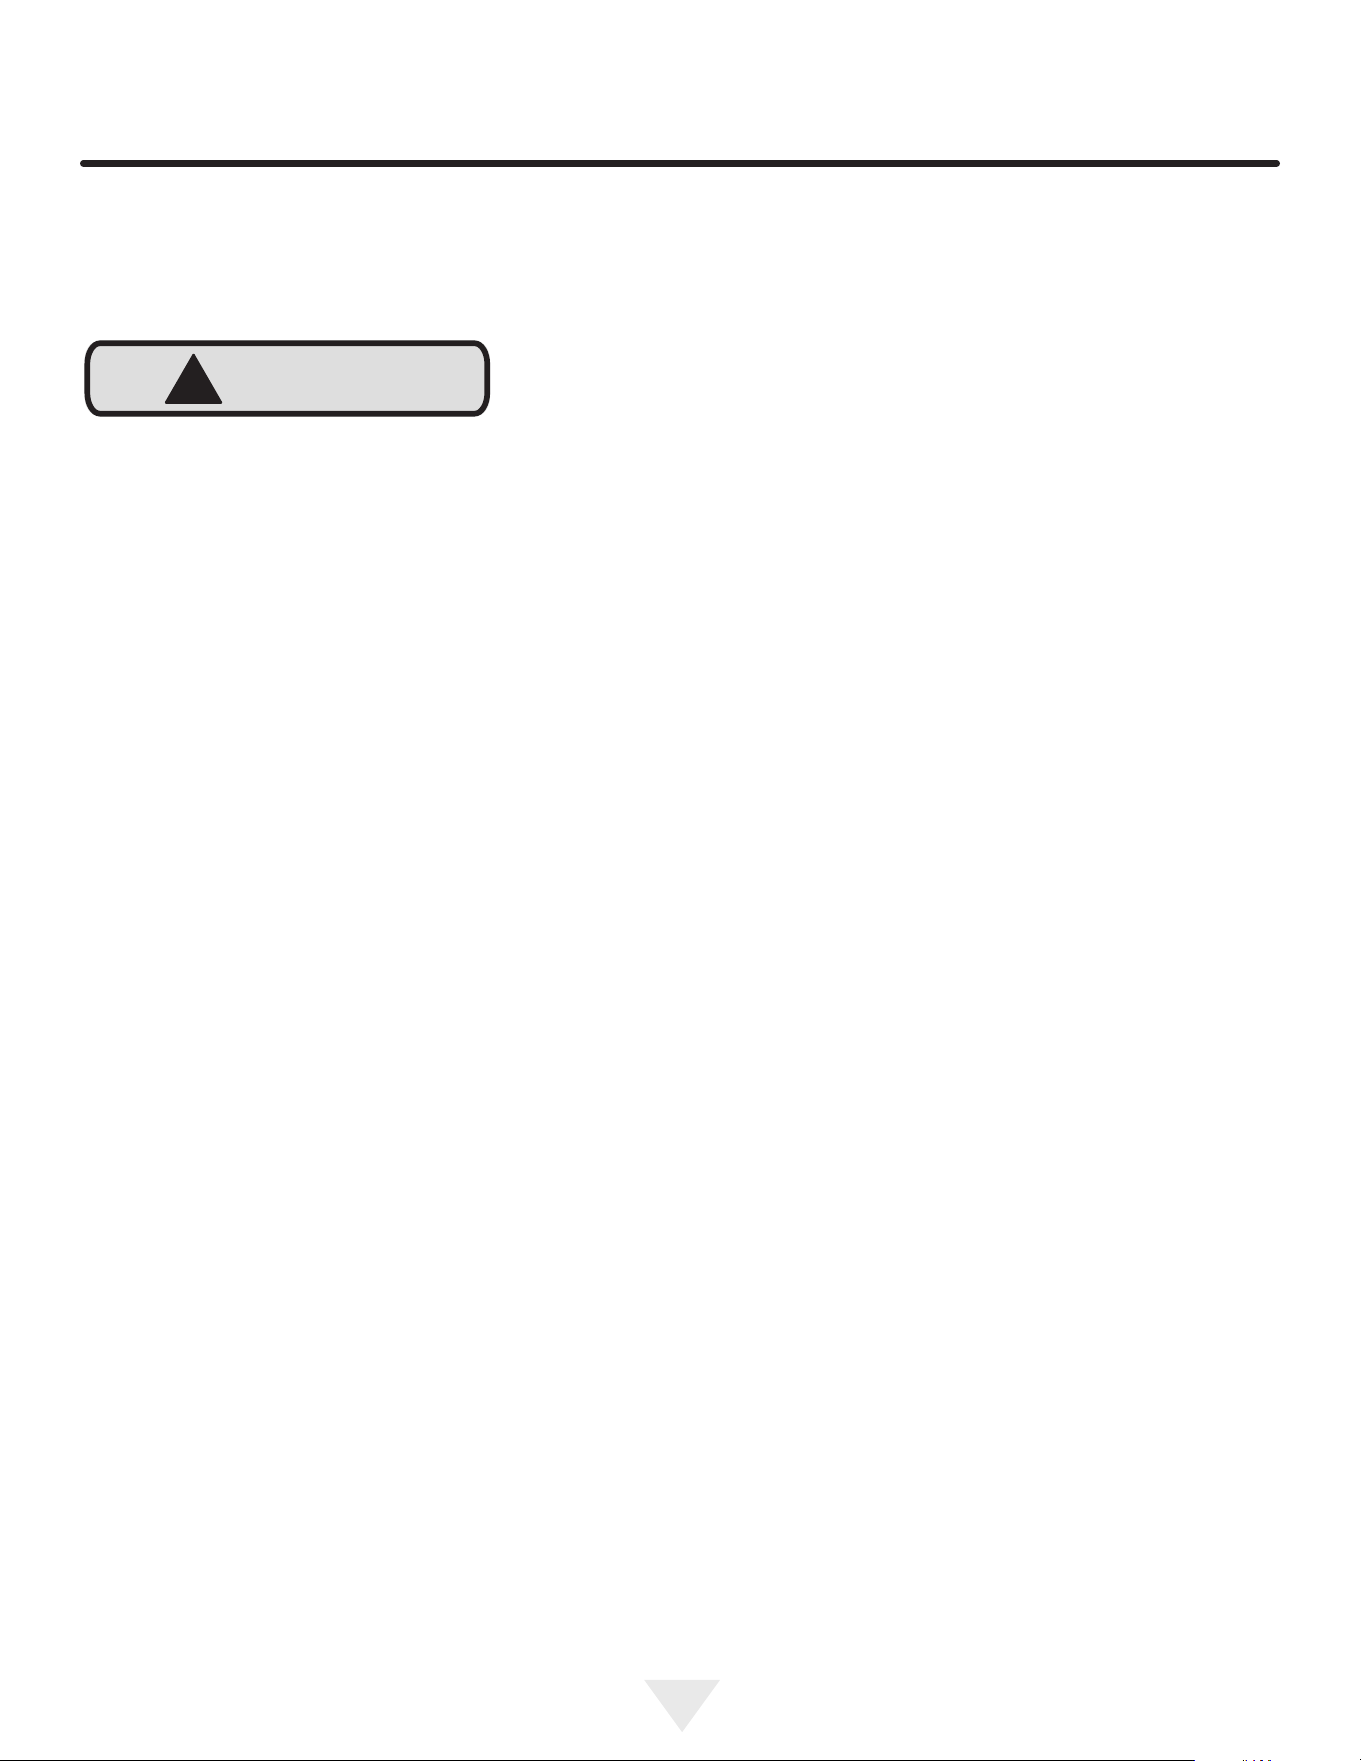
Adjust Temperature Press the or buttons. Set a temperature from 32°F-50°F.
Adjust Interior Light Color
Press the button to toggle interior
lighting color.
Toggle between blue, white, and teal LED lighting.
Control Operation
CONTROL FUNCTION GUIDE
13
Front Grille
Be sure that nothing obstructs the required air ow open-
ings in front of the cabinet. At least once or twice a year,
brush or vacuum lint and dirt from the front grille area.
SHOCK HAZARD: Disconnect electrical power from the
appliance before cleaning with soap and water.
Cabinet
The painted cabinet can be washed with either a mild soap
and water and thoroughly rinsed with clear water. NEVER
use abrasive scouring cleaners.
Interior
Wash interior compartment with mild soap and water. Do
NOT use an abrasive cleaner, solvent, polish cleaner or
undiluted detergent.
Care of Appliance
1. Avoid leaning on the door, you may bend the door hing-
es or tip the appliance.
2. Exercise caution when sweeping, vacuuming or mop-
ping near the front of the appliance. Damage to the
grille can occur.
3. Periodically clean the interior of the appliance as need-
ed.
4. Periodically check and/or clean the front grille as need-
ed.
In the Event of a Power Failure
If a power failure occurs, try to correct it as soon as possi-
ble. Minimize the number of door openings while the power
is o so as not to adversely aect the appliance's tempera-
ture.
Light assembly replacement
All models use LED lamps to illuminate the interior of the
appliance. This component is very reliable, but should one
fail, contact a qualied service technician for replacement
of the LED.
!
CAUTION
CARE AND CLEANING
14
STAINLESS STEEL MAINTENANCE
Background
Stainless steel does not stain, corrode, or rust as easily as
ordinary steel, but it is not stain or corrosion proof. Stain-
less steels can discolor or corrode if not maintained prop-
erly.
Stainless steels dier from ordinary carbon steels by the
amount of chromium present. It is this chromium that
provides an invisible protective lm on the surface called
chrome-oxide. This protective chrome-oxide lm on the
surface can be damaged or contaminated, which may
result in discoloration, staining, or corrosion of the base
metal.
Care & Cleaning
Routine cleaning of the stainless steel surfaces will serve to
greatly extend the life of your product by removing contam-
inants. This is especially important in coastal areas which
can expose the stainless to severe contaminants such as
halide salts, (sodium chloride).
It is strongly recommended to periodically inspect and thor-
oughly clean crevices, weld points, under gaskets, rivets,
bolt heads, and any locations where small amounts of liquid
could collect, become stagnant, and concentrate contami-
nates. Additionally, any mounting hardware that is showing
signs of corrosion should be replaced.
Frequency of cleaning will depend upon the installation
location, environmental, and usage conditions.
Choosing a Cleaning Product
The choice of a proper cleaning product is ultimately that
of the consumer, and there are many products from which
to choose. Depending upon the type of cleaning and the
degree of contamination, some products are better than
others.
Typically the most eective and ecient means for routine
cleaning of most stainless steel products is to give the
surfaces a brisk rubbing with a soft cloth soaked in warm
water and a gentle detergent, or mild mixture of ammonia.
Rubbing should, to the extent possible, follow the polish
lines of the steel, and always insure thorough rinsing after
cleaning.
Although some products are called "stainless steel clean-
ers," some may contain abrasives which could scratch the
surface, (compromising the protective chrome-oxide lm),
and some many contain chlorine bleach which will dull,
tarnish or discolor the surface if not completely removed.
After the stainless surfaces have been thoroughly cleaned,
a good quality car wax may be applied to help maintain the
nish.
Stainless steel products should never be installed, or stored
in close proximity to chlorine chemicals.
Whichever cleaning product you chose, it should be used
in strict accordance with the instructions of the cleaner
manufacturer.
15
ENERGY SAVING TIPS
The following suggestions will minimize the
cost of operating your refrigeration appliance.
1. Do not install your appliance next to a hot appliance
(cooker, dishwasher, etc.), heating air duct, or other
heat sources.
2. Install product out of direct sunlight.
3. Ensure the front grille vents at front of appliance be-
neath door are not obstructed and kept clean to allow
ventilation for the refrigeration system to expel heat.
4. Plug your appliance into a dedicated power circuit. (Not
shared with other appliances).
5. When initially loading your new product, or whenever
large quantities of warm contents are placed with-
in refrigerated storage compartment, minimize door
openings for the next 12 hours to allow contents to pull
down to compartment set temperature.
6. Maintaining a relatively full storage compartment will
require less appliance run time than an empty compart-
ment.
7. Ensure door closing is not obstructed by contents
stored in your appliance.
8. Allow hot items to reach room temperature before plac-
ing in product.
9. Minimize door openings and duration of door openings.
10. Use the warmest temperature control set temperature
that meets your personal preference and provides the
proper storage for your stored contents.
11. When on vacation or away from home for extended
periods, set the appliance to warmest acceptable tem-
perature for the stored contents.
12. Set the control to the “o” position if cleaning the ap-
pliance requires the door to be open for an extended
period of time.
13. For wine storage products:
When serving temperatures are not required, return
the compartment(s) set temperature to the ideal
red and white wine long term storage temperature
of 13°C / 55°F.
16
EXTENDED NON-USE
2. Unplug the unit from the power outlet
3. It is also recommended that the power to the outlet be
turned-o if the circuit is not required for other items
during the Winter season.
4. Remove all contents.
5. If necessary, move the unit so you can gain access to
the rear of the product.
6. When cleaning unit pay particular attention to any
cracks and crevices that may have accumulated dirt
and debris.
7. Remove the front toe-grille, and use a brush and vacu-
um to clean dirt and debris from beneath the unit.
8. Thoroughly clean the toe-grille and re-install on the
unit.
9. Remove the rear access cover, and use a brush and
vacuum to clean dirt and debris from the machine com-
partment.
10. Thoroughly clean the rear access cover and re-install
on the unit.
11. Wipe down all interior surfaces with anti-bacterial
cleaner to be followed with clean rinse water to remove
any residual chemicals which could cause staining. Do
not use any abrasive cleaners or scouring pads.
12. Leave the door open and allow to completely dry out
before closing the door.
13. Thoroughly clean the door gasket with anti-bacterial
cleaner to be followed with clean rinse water to remove
any residual chemicals.
14. Thoroughly clean the exterior with a cleaner approved
for stainless steel. Do not use any abrasive cleaners or
scouring pads. See "Stainless Steel Maintenance".
15. Any mounting hardware / fasteners that are showing
signs of corrosion should be replaced.
16. Once the exterior has been thoroughly cleaned, you
may want to apply a coating of car wax to help protect
against spotting from moisture, dirt, and debris that
may accumulate on the surfaces during the Winteriza-
tion period.
17. Do not place a cover on the unit, as this can trap con-
densation.
• If the plastic defrost drain pan located under the
compressor contains water, use a sponge to
remove as much water as possible.
Start-Up After Long-Term Storage:
1. If stored outside, it is recommended that the unit again
be thoroughly inspected per the storage instructions
above to address any dirt or debris from the weather
and/or animals/insects.
2. Connect the unit to electrical power.
3. Turn unit on and conrm your desired control settings.
4. Allow 24-hrs for the unit to stabilize before loading
contents.
Outdoor Product Long-Term Storage / Winter-
ization:
1. Time to Winterize, when the daily low ambient tempera-
ture is at or below 38°F (3.3°C).
!
CAUTION
Operation of the unit at ambient temperatures below the
recommended Winterization temperature will void your
warranty.
After completion of these steps, you may choose to store
the unit indoors, although this is not required.
17
OBTAINING SERVICE
If Service is Required:
• If the product is within the rst year warranty period,
please go to www.lynxgrills.com or call Lynx Customer
Service at 888.289.5969 for directions on how to obtain
warrantycoverage in your area.
• If the product is outside the rst year warranty period,
Lynx Customer Service can provide recommendations
of service centers in your area.
• In all correspondence regarding service, be sure to
give the serial number and proof of purchase.
• Try to have information or description of nature of the
problem, how long the appliance has been running, the
room temperature, and any additional information that
may be helpful in quickly solving the problem.
18
Before Calling for Service
If you think your product is malfunctioning, read the Control
Operation section to clearly understand the function of the
control.
If the problem persists, read the Normal Operating Sounds
and Troubleshooting Guide sections below to help you
quickly identify common problems and possible causes and
remedies. Most often, this will resolve the problem without
the need to call for service.
If Service is Required
If you do not understand a troubleshooting remedy, or
your product needs service, contact Lynx directly at
888.289.5969.
When you call, you will need your product Model and Serial
Numbers. This information appears on the Model and Serial
number plate of your product.
Normal Operating Sounds
All models incorporate rigid foam insulated cabinets to
provide high thermal eciency and maximum sound
reduction for its internal working components. Despite this
technology, your model may make sounds that are
unfamiliar.
Normal operating sounds may be more noticeable because
of the unit’s environment. Hard surfaces such as cabinets,
wood, vinyl or tiled oors and paneled walls have a
tendency to reect normal appliance operating noises.
Listed below are common refrigeration components with a
brief description of the normal operating sounds they
make. NOTE: Your product may not contain all the
components listed.
• Compressor: The compressor makes a hum or pulsing
sound that may be heard when it operates.
• Evaporator: Refrigerant owing through an evaporator
may sound like boiling liquid.
• Condenser Fan: Air moving through a condenser may
be heard.
• Automatic Defrost Drain Pan: Water may be heard
dripping or running into the drain pan when the unit is
in the defrost cycle.
Troubleshooting Guide
Troubleshooting - What to check when problems occur:
!
WARNING
WARNING - ELECTROCUTION HAZARD. Never
attempt torepair or perform maintenance on the unit
before disconnecting the main electrical power.
TROUBLESHOOTING
Problem Possible Cause and Remedy
Interior Light
Does Not
Illuminate
Ensure the unit is plugged in and cooling.
Unit Develops
Frost on
Internal
Surfaces.
Ensure the door is closing and sealing
properly.
Unit Develops
Condensation
on External
Surfaces.
The unit is exposed to excessive
humidity. Moisture will dissipate as
humidity levels decrease.
Product is Not
Cold Enough
Air temperature does not indicate
product temperature. See CHECKING
PRODUCT TEMPERATURE below.
Adjust the temperature to a cooler set
point. Ensure unit is not located in excessive
ambient temperatures or in direct
sunlight. Ensure the door is closing and sealing
properly. Ensure the interior light has not
remained on too long. Ensure nothing is blocking
the front grille, found at the bottom of the unit.
Ensure the condenser coil is clean and
free of any dirt or lint build-up.
19
TROUBLESHOOTING
Checking Product Temperature
To check the actual product temperature in the unit:
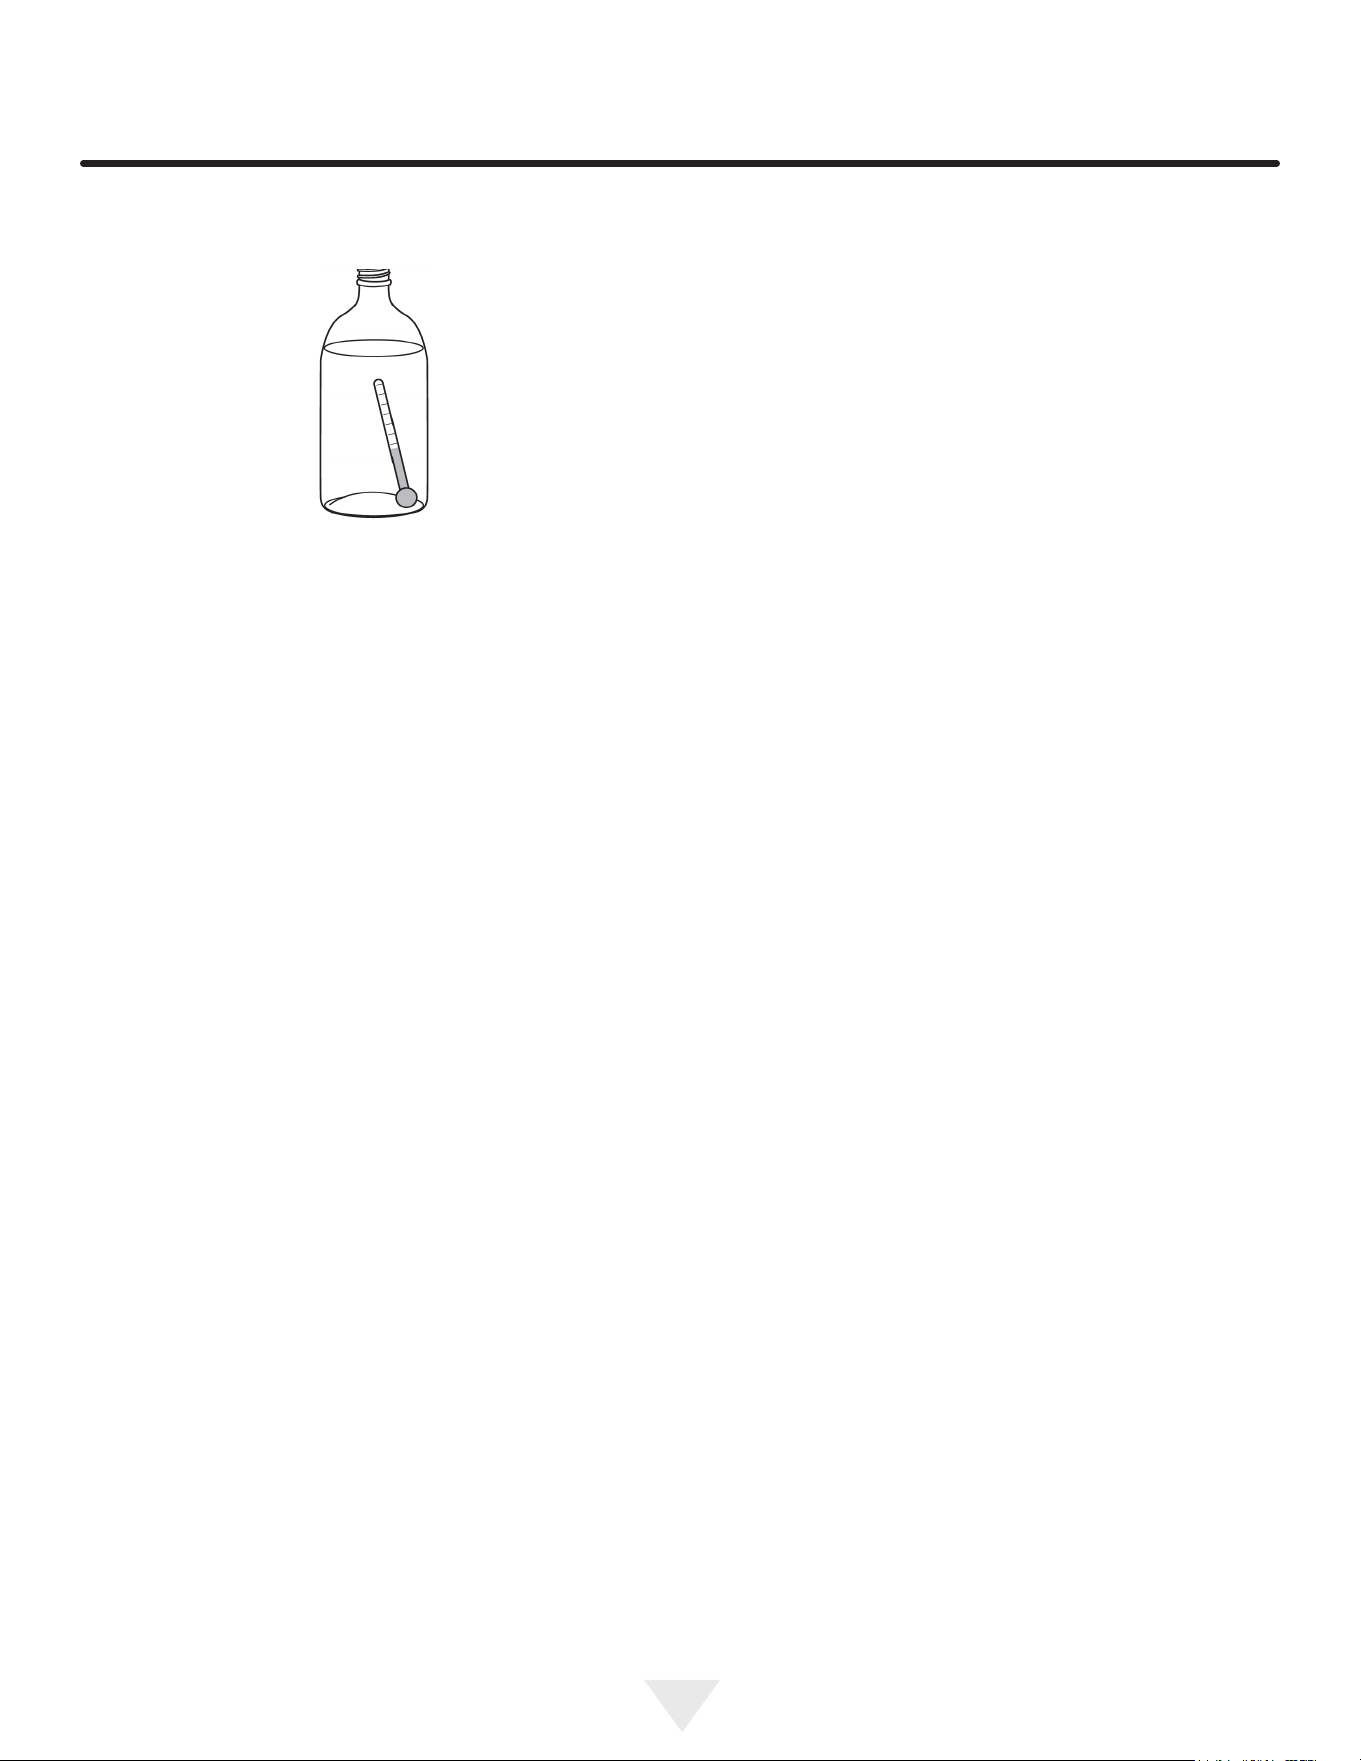
1. Partially ll a plastic (nonbreakable) bottle with water
2. Insert an accurate thermometer.
3. Tighten the bottle cap securely.
4. Place the bottle in the desired area for 24 hours.
5. Avoid opening the unit during the testing period.
6. After 24 hours, check the temperature of the water.
If required, adjust the temperature control in a small
increment (see Control Operation).
Causes which aect the internal temperatures of the
cabinet include:
• Temperature setting.
• Ambient temperature where installed.
• Installation in direct sunlight or near a heat source.
• The number of door openings and the time the door is
open.
• The time the internal light is illuminated. (This mainly
aects product on the top rack or shelf.)
• Obstruction of front grille or condenser
20
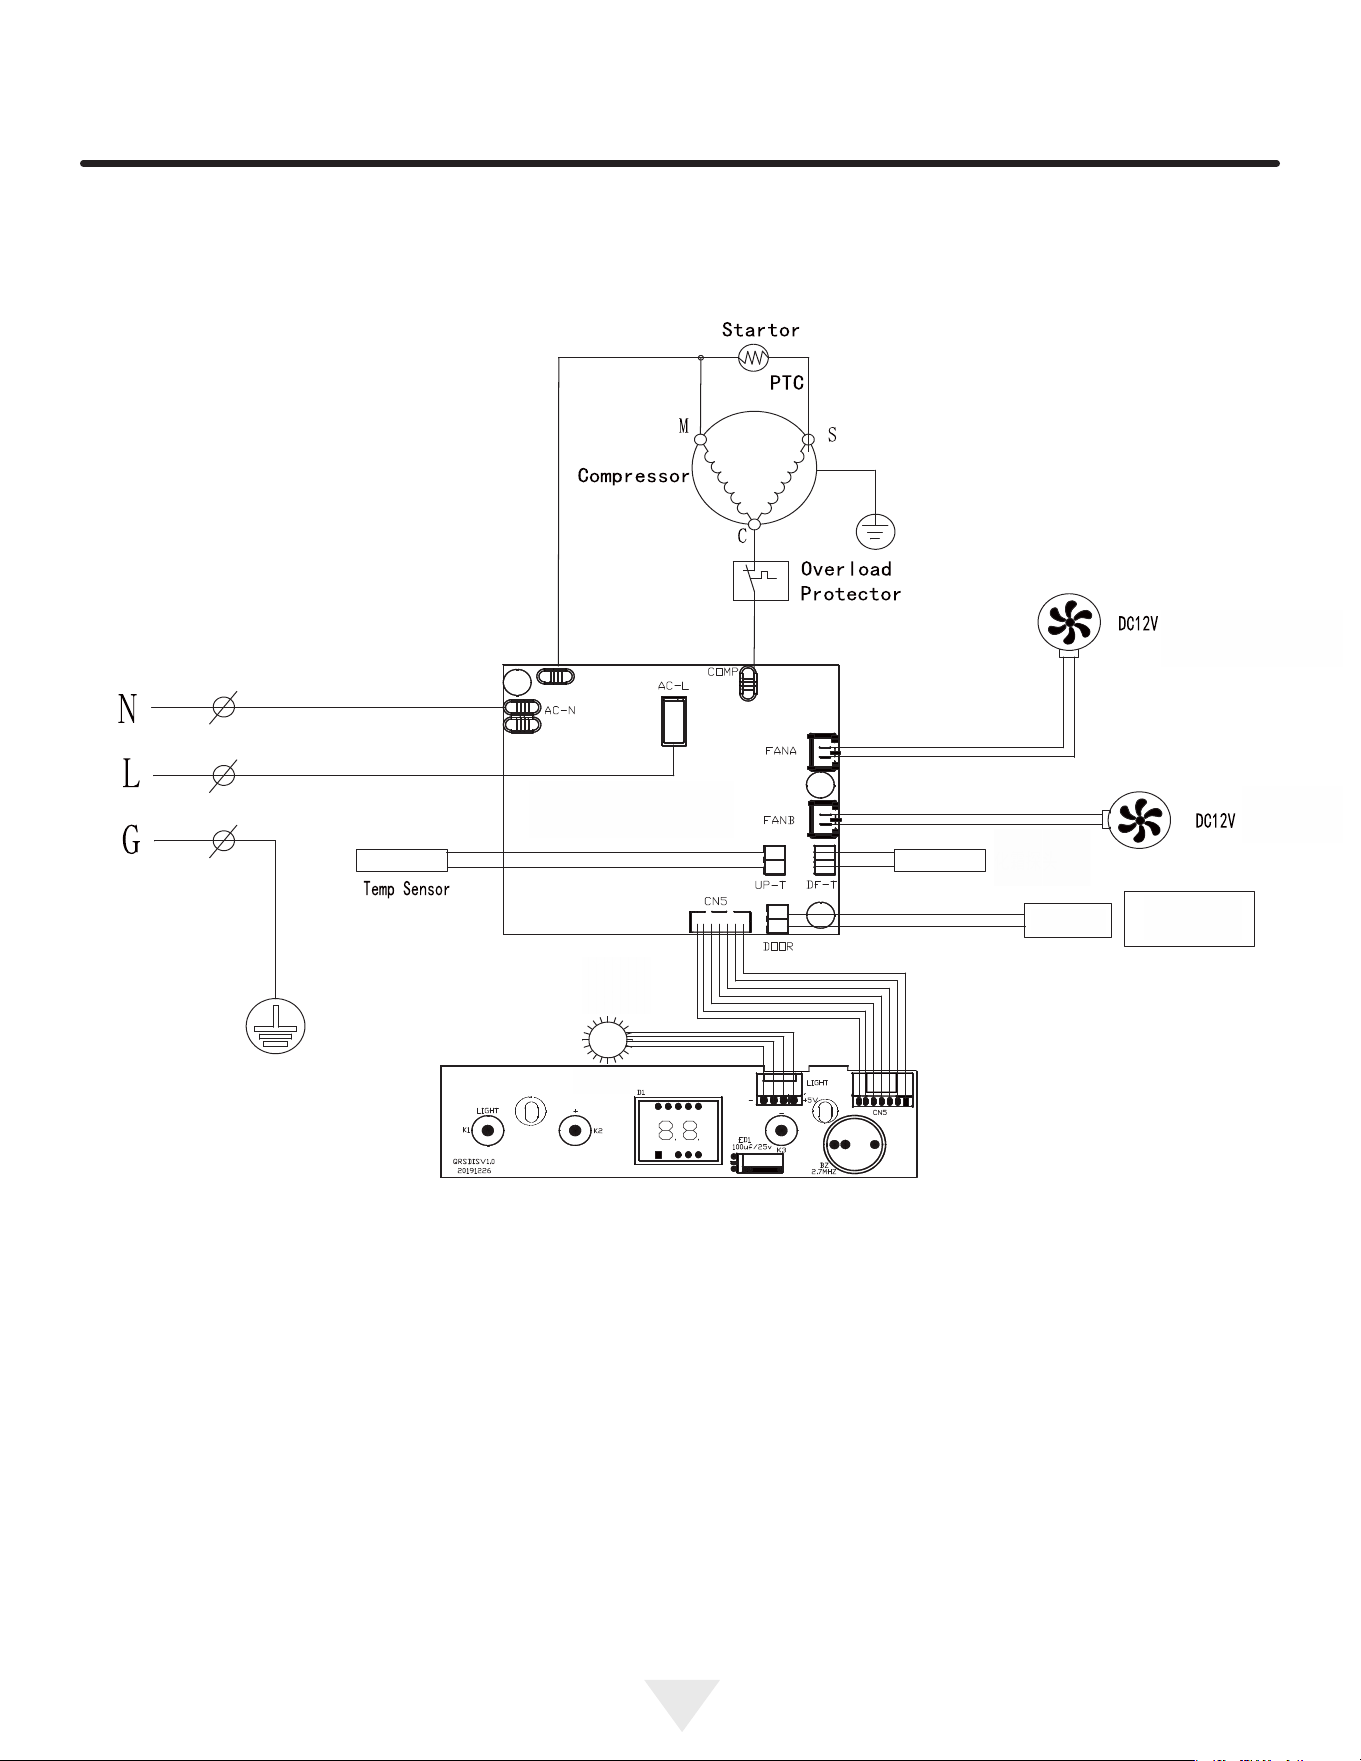
WIRE DIAGRAM
Model:15REF-SS01A
15BEV-SG01A
15WIN-SG01A
24REF-SS01A
24BEV-SG01A
24WIN-SG01A
Model:24WID-SG01A
21
R600A Specications & Handling
!
WARNING
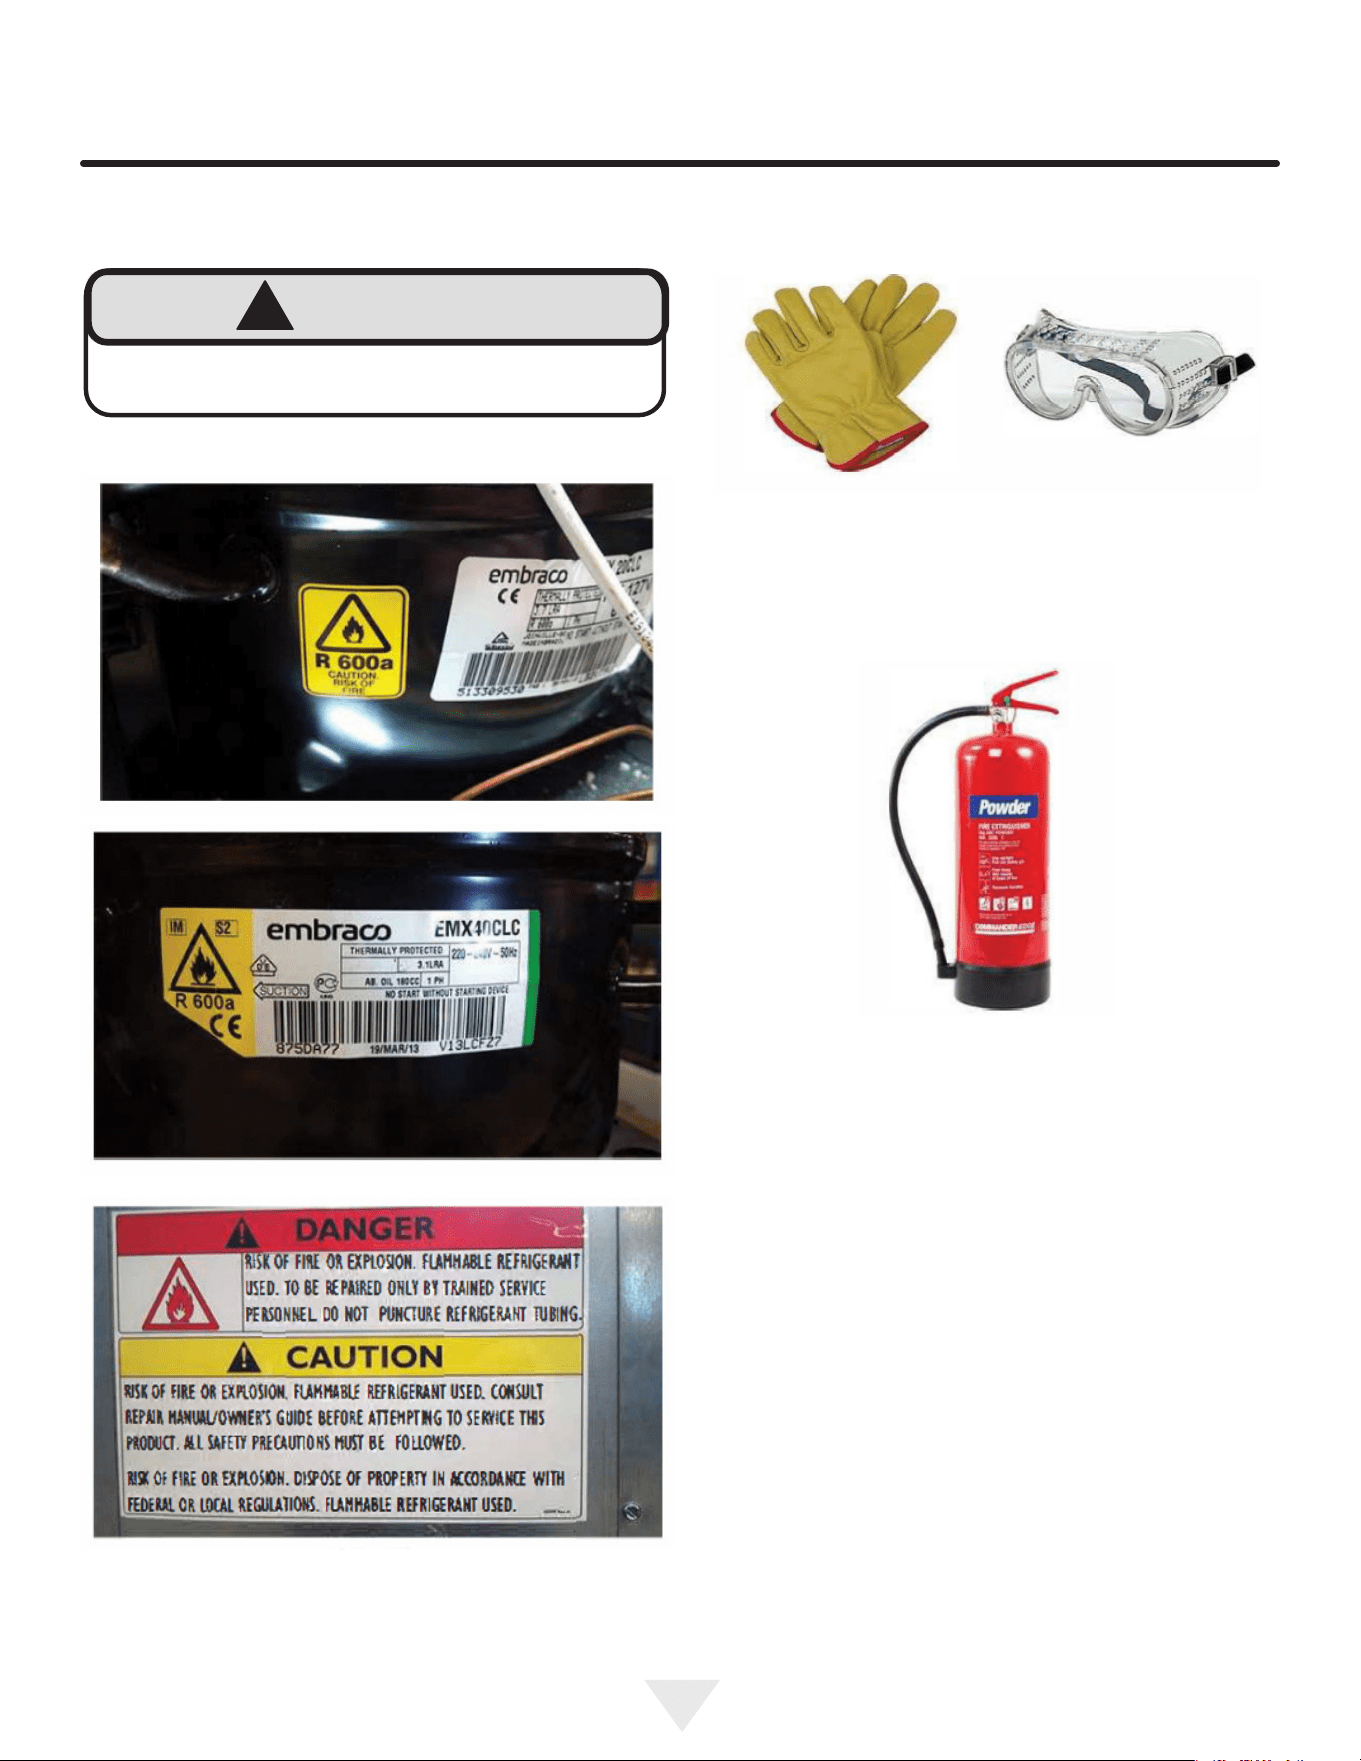
Flammability warnings for a pure-iso-butane
refrigerant.
Gloves and Eye Protection must be used.
R-600a is considered non-toxic, but is ammable when
mixed with air.
Keep a dry powder type re extinguisher in the work area.
R-600a is heavier than air, do not allow any leakage/migra-
tion to low areas such as basements and stairs.
Never use a torch on a fully charged refrigeration system.
Never substitute Lynx OEM replacement parts or methods
of construction.
R-600a must be stored and transported in approved
containers.
R600A SPECIFICATIONS
22
!
WARNING
Only skilled and well trained service technicians
permitted to service R-600a equipped products.
All tools and equipment must be approved for use with
R-600a refrigerant.
Local, state and federal laws, standards must be
observed along with proper certication and licensing.
Ventilation is required during servicing.
No conversions to R-600a from any other refrigerants.
OEM R-600a equipped unit only.
Service area must be free of ignition sources.
No smoking is allowed in the service area.
All replacement electrical components must be OEM
and installed properly (sealed and covered).
If the evaporator is cold prior to service, it must be
thawed prior to service.
When using a vacuum pump, start pump before
opening refrigeration system.
Vacuum pump and recovery equipment should be at
least 10 feet from the work area.
It is recommended that a simple LPG gas detector is
on site during service.
Ensure that all R-600a is removed from the system
prior to brazing any part of the sealed system.
Only a clean, dry leak free system should be charged
with R-600a.
R-600A Specications/Labeling
R-600a equipped products are labeled (both the unit and
the compressor).
R-600a is colorless and odorless.
R-600a is considered non-toxic, but is ammable when
mixed with air.
Do not remove or alter any R-600a labeling on the product.
Use only a refrigerant grade R-600a from a properly
labeled container.
Recovering/Reclaiming R-600A
(R-600a has been exempted from recovery/reclaiming
requirements by the US EPA)
Recovery/Reclaiming equipment must be approved for use
with R-600a.
Ensure the evaporator is at room temperature prior to
recovery/reclaiming R-600a.
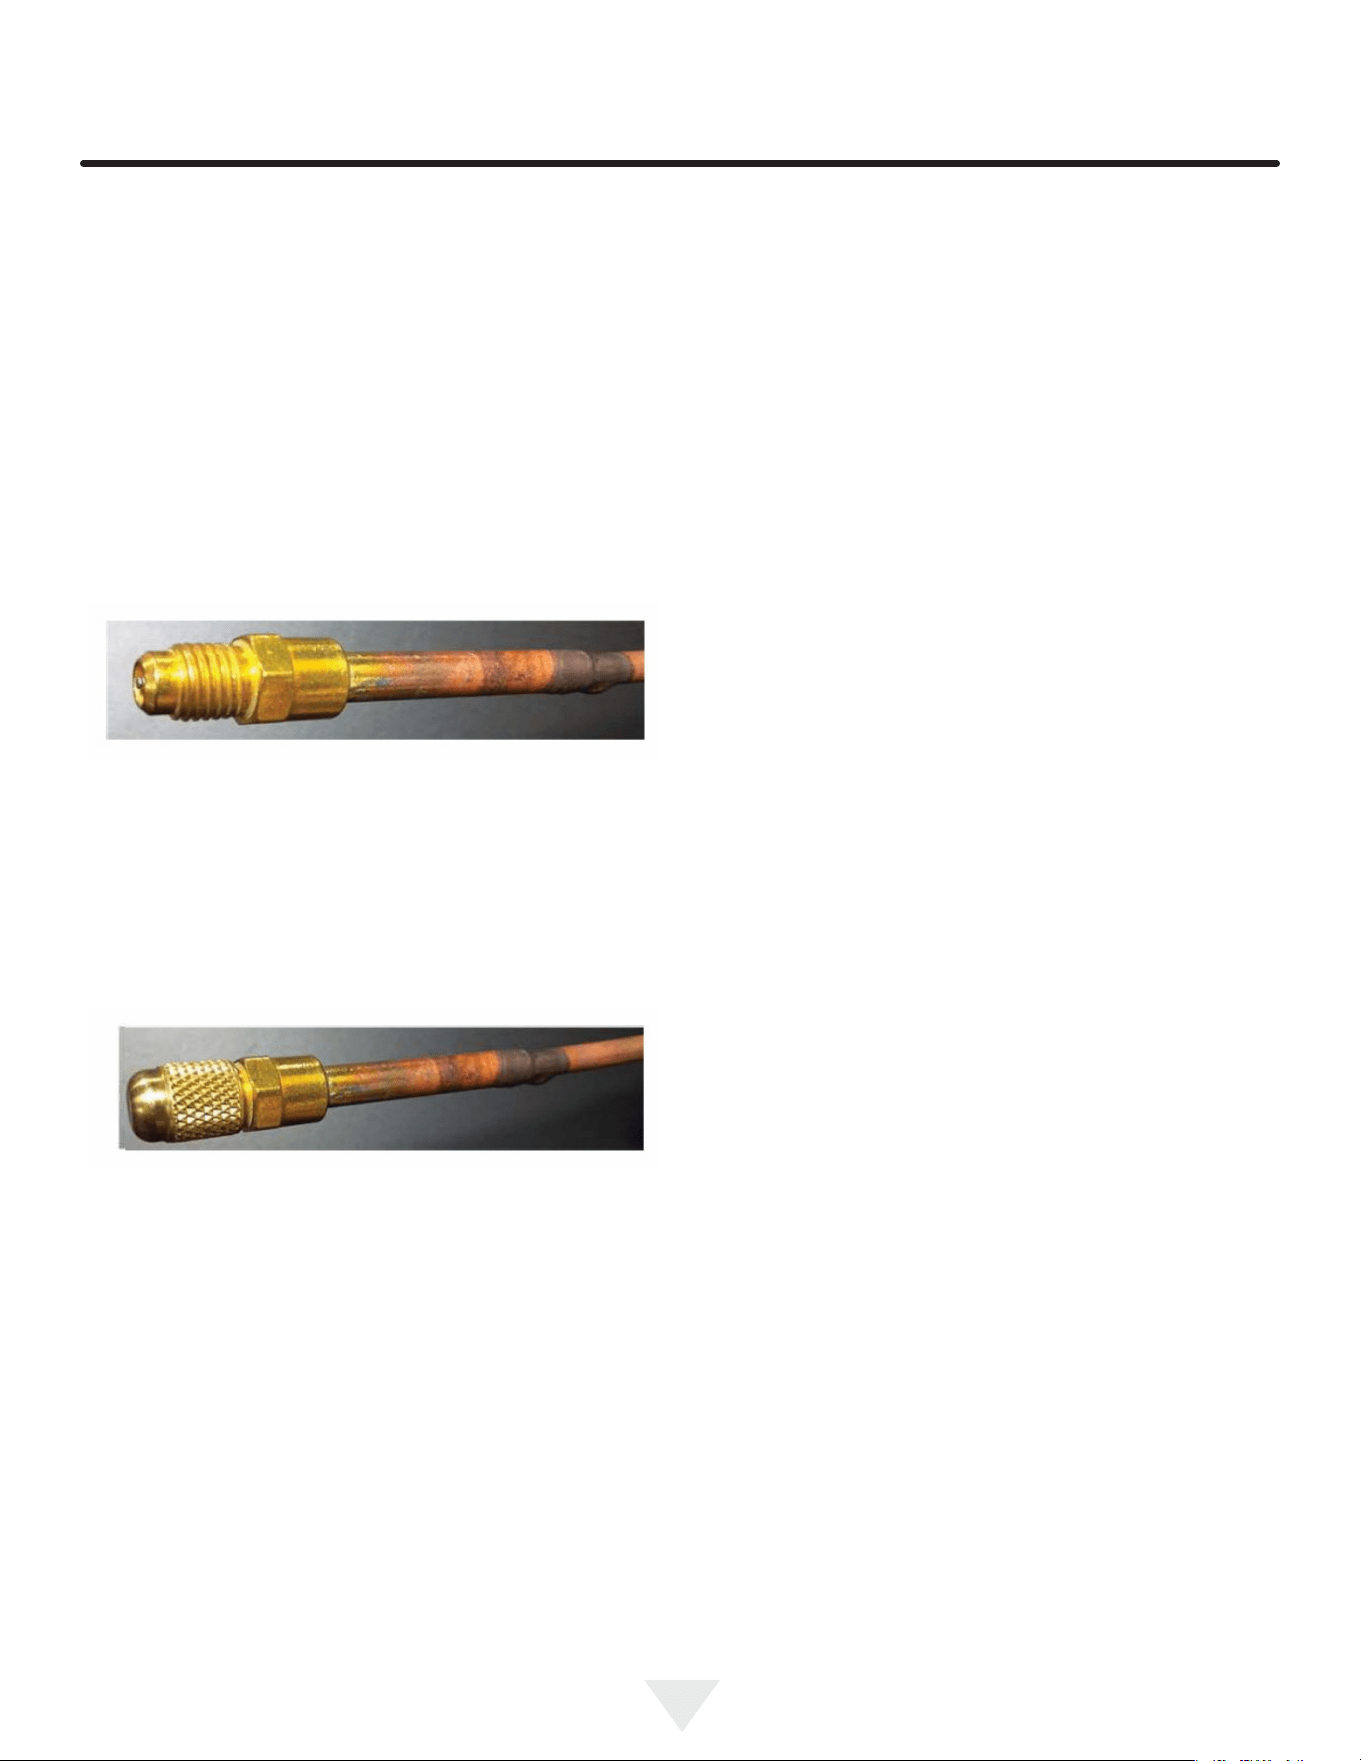
Use a common piercing pliers or piercing valve to remove
R-600a from the compressor process tube. (Note: Pierc-
ing devices must not be left on the system and must be
replaced with a Schrader type valve).
R600A SPECIFICATIONS
23
Evacuate/reclaim via the piecing pliers to ensure the
system is empty of R-600a before any system work is
performed.
The recovery cylinder must be evacuated (no air inside)
prior to accepting R-600a.
The recovery cylinder must not be lled more than 45%
safe ll level and refrigerants must not be mixed.
The recovery cylinder must be clearly marked with R600a
and Flammable Warning labels.
Ensure proper ventilation during recovery/reclaiming of
R600a.
Start vacuum pump/recovery pump prior to piercing the
compressor process tube.
Follow recovery/reclaim OEM instructions for the specic
equipment used.
System Repair
Ensure no residual R-600a refrigerant is left within the
system prior to repair (simple venting is not sucient).
Evacuate and charge with dry nitrogen for leak checks.
Repair leaks or replace system parts as required.
When re-brazing, the system must be purged with dry nitro-
gen and at least one access point open to the atmosphere.
When re-brazing, proper ventilation is required along with
constant monitoring for the presence of R600a refrigerant.
The lter dryer must be replaced any time the sealed
system is serviced.
No system should be open to the atmosphere for longer
than 15 minutes to avoid moisture migration into the system
components.
Leak Detection
After removal of the R-600a, the unit can be charged with
dry nitrogen or helium.
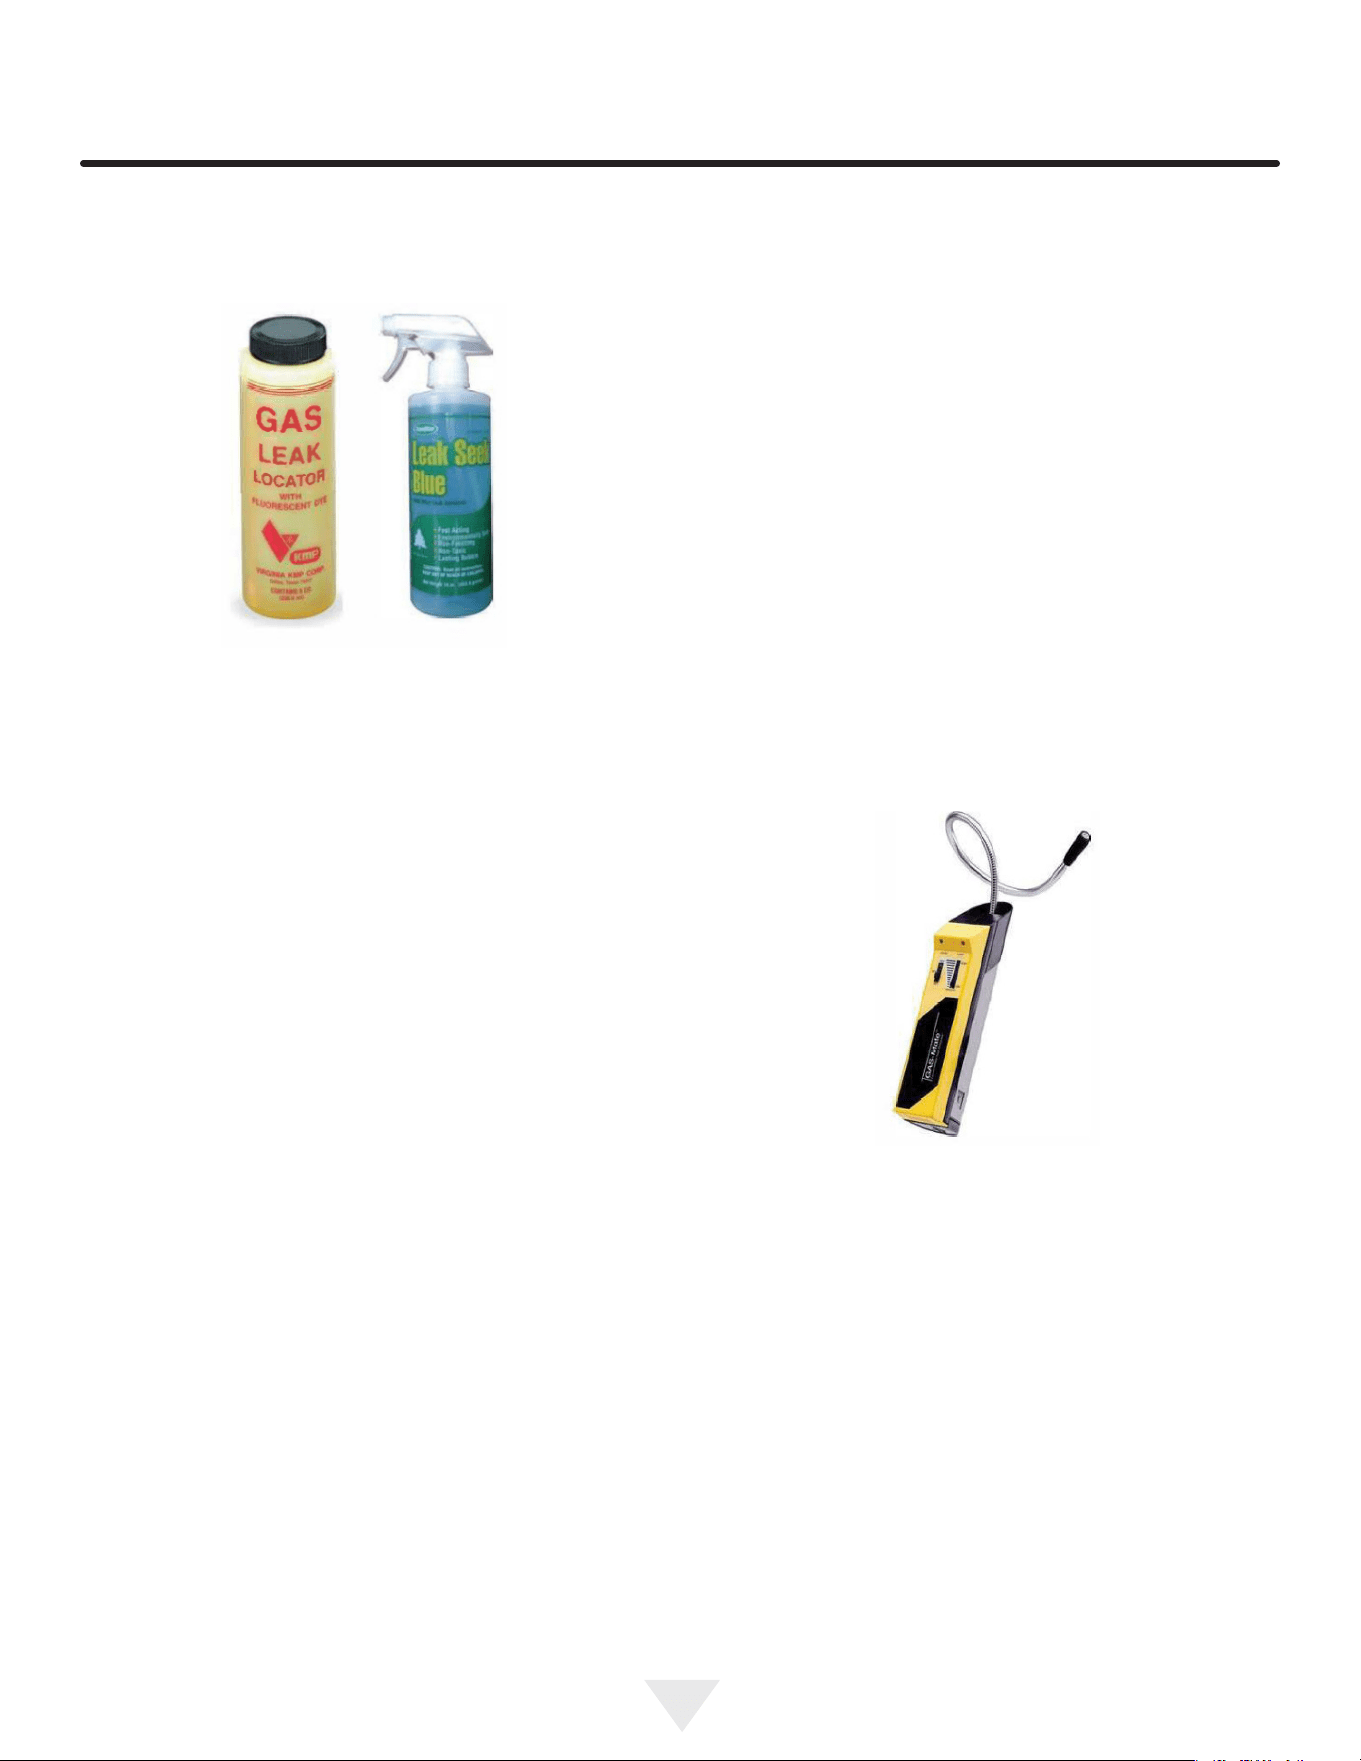
Electronic leak detection or soap solution can be used
tocheck for nitrogen/helium leaks.
Never use a halide torch or lighted match to check the
system for leaks at any time.
The high side of the refrigeration system (compressor
discharge to outlet of drier) must be leak tested with the
compressor running.
R600A SPECIFICATIONS
24
The low side of the refrigeration system (evaporator,
compressor and suction line) must be leak tested with the
compressor o (equalized pressure).
Recharging
No air is ever to be allowed inside the refrigeration system
(R-600a refrigerant or dry nitrogen only).
Never use a torch on a fully charged refrigeration system.
Install a Schrader Type access port on the compressor
process stub.
Evacuate the system to 100 microns prior to charging.
Weigh in the R-600a charge using a refrigerant scale (run
compressor an extra two minutes to clear the charging
hoses).
Seal the Schrader Type access port, a proper cap and seal
must be used to close the system.
Summary
Safely handling R-600a requires proper procedures and
training.
R-600a approved service tools must be used.
R-600a labeling must not be removed or altered.
Proper ventilation during service is required.
Never apply a torch to a charged R-600a refrigeration
system.
Use OEM replacement service parts and do not alter the
construction of the unit.
Proper ventilation during service is required.
Never apply a torch to a charged R600a refrigeration
system.
Use OEM replacement service parts and do not alter the
construction of the unit.
No air is ever to be allowed inside the refrigeration system
(R600a refrigerant or dry nitrogen only).
Never use a torch on a fully charged refrigeration system.
Install a Schrader Type access port on the compressor
process stub.
The lter dryer must be replaced any time the sealed sys-
tem is serviced.
No system should be open to the atmosphere for longer
than 15 minutes to avoid moisture migration into the system
components.
Leak Detection
After removal of the R600a, the unit can be charged with
dry nitrogen or helium.
Electronic leak detection or soap solution can be used to
check for nitrogen/helium leaks. Evacuate and charge with
dry nitrogen for leak checks.
R600A SPECIFICATIONS
25
WARRANTY
HOUSEHOLD PRODUCT WARRANTY
UNDERCOUNTER REFRIGERATOR / BEVERAGE CENTER WARRANTY
ONE YEAR FULL WARRANTY
Undercounter refrigerators / Beverage Centers and all of their component parts, except as detailed below*†, are warranted to be free from defective materials or
workmanship in normal residential use for a period of one (1) year from the date of original retail purchase. Lynx, warrantor, agrees to repair or replace, at its
option, any part which fails or is found to be defective during the warranty period.
*FULL NINETY (90) DAY COSMETIC WARRANTY: Product is warranted to be free from cosmetic defects in materials or workmanship (such as scratches on
stainless steel, paint/porcelain blemishes, etc.) for a period of ninety (90) days from the date of original retail purchase or closing date for new
construction, whichever period is longer. Any defects must be reported to the selling dealer within ninety (90) days from date of original retail purchase.
Lynx uses high quality processes and materials available to produce all color finishes. However, slight color variation may be noticed because of the
inherent differences in painted parts and porcelain parts as well as differences in kitchen lighting, product locations, and other factors. Therefore, this
warranty does not apply to color variation attributable to such factors.
†FULL NINETY (90) DAY WARRANTY IN “RESIDENTIAL PLUS” APPLICATIONS: Lynx products are designed and certified for residential use only. They are
not intended for use in commercial applications. Lynx products should only be used in accordance to national and local codes. Lynx is not responsible
for property damage or injury resulting from use in a commercial application. To support the manufacturing quality of its appliance’s Lynx will provide a
full 90 day warranty for products used in “Residential Plus “applications. This “Residential Plus” warranty applies to applications where use of the product
extends beyond residential use but is in compliance with national and local code. In some jurisdictions these applications are zoned as residential.
Examples of, but not limited to, such applications covered by this warranty are bed and breakfasts, fire stations, private clubs, churches, condominium/
apartment common areas etc. Under this "Residential Plus" warranty, the product, its components and accessories are warranted to be free from
defective material or workmanship for a period of ninety (90) days from the date of original retail purchase. Lynx warranter agrees to repair or replace, at
its option, any part which fails or is found to be defective during the warranty period. This warranty covers parts and labor. This warranty excludes use of
the product in all commercial locations such as restaurants, food service locations and institutional food service locations.
TWO YEAR LIMITED WARRANTY ON SEALED REFRIGERATION PARTS AS LISTED
Any sealed refrigeration system component, as listed below, which fails due to defective materials or workmanship in normal household use during the second year
from the date of original retail purchase will be repaired or replaced, free of charge for the part itself, with the owner paying all other costs, including labor.
Sealed Refrigeration System Components: Compressor, Evaporator, Condenser, Connecting Tubing, Dryer/Strainer
WARRANTY TERMS
This warranty extends to the original retail purchaser of the product warranted hereunder and to each transferee owner of the product during the term of the
original purchaser's warranty. The warranty is transferable by the original retail purchaser via home sale only. If a transferee owner i
s unable to provide proof of
purchase from the original purchaser and the product has not been previously registered, the production date of the product, located in the serial number of the
product, will serve as the effective warranty start date.
The activation date of the warranty begins from the date of original retail purchase. In the case of new product purchase via building development sales, activation
begins from the earlier date of either certificate of occupancy or 24 months from date of manufacture. Note date of manufacture is identified by serial tag on
product.
This warranty does not cover units purchased as b-stock, liquidation, salvage, seconds, refurbished, as-is, used products.
This warranty shall apply to products purchased in the United States and Canada. Products must be purchased in the country where service is requested. Warranty
service must be performed by a Lynx authorized service agency or representative. Warranty shall not apply to damage resulting from abuse, accident, natural
disaster, loss of electrical power to the product for any reason, alteration, improper installation, improper operation, or repair service of the product by anyone
other than a Lynx authorized service agency or representative. This warranty does not apply to commercial usage. Warrantor is not responsible for consequential or
incidental damage whether arising out of breach of warranty, breach of contract or otherwise. Some jurisdictions do not allow the exclusion or limitation of
incidental or consequential da
mages, if so, the above limitations do not apply to you.
Owner shall be responsible for proper installation, providing normal care and maintenance, providing proof of purchase upon request, and making the product
reasonably accessible for service. If the product or one of its component parts contains a defect or malfunction during the warranty period, after a reasonable
number of attempts by the warrantor to remedy the defects or malfunctions, the owner is entitled to either a refund or replacement, at the warrantor’s discretion
of the product or its component part or parts. Warrantor’s liability on any claim of any kind, with respect to the goods or services covered hereunder, shall in no
case exceed the price of the goods or service or part thereof which gives rise to the claim.
WARRANTY SERVICE
Under the terms of this warranty, service must be performed by a Lynx authorized service agent or representative. Service will be provided during normal business
hours. Labor performed at overtime or premium rates shall not be covered by the warranty. To obtain warranty service contact Lynx Customer Care at
1-888-289-5969. Please have model number, serial number, and date of original purchase available when calling. IMPORTANT: Retain proof of original purchase to
establish warranty period. The return of the owner registration card is not a condition of warranty coverage. You should, however, return the
owner registration card
so Lynx can contact you should any question of safety arise which could affect you. Any implied warranties of merchantability and fitness applicable to the above
described and stainless steel parts are limited in duration to the period of coverage of the applicable express written limited warranties set forth above. Some
jurisdictions do not allow limitations on how long an implied warranty lasts, if so, the above limitations may not apply to you. This warranty gives you specific legal
rights, and you may also have other rights which may vary from jurisdiction to jurisdiction.
Specifications subject to change without notice.
22
WARRANTY
All specications and product designs subject to change without notice. Such revisions do not entitle
the buyer to corresponding changes, improvements, additions, replacements or compensation for
previously purchased products.
The best outdoor kitchen products come from:
Lynx Grills
62201 Highway 82 West Greenwood, MS 38930
Service: 888.289.5969
www.lynxgrills.com
Rev A
3/11/24