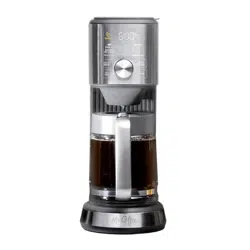
Perfect Brew
Hot & Cold Coffee & Tea Brewer
User Guide
BVMC-IHCTM08SS
User Guide
BVMC-IHCTM08SS
BVMC-IHCTM08SS_24EM2.indd 1
BVMC-IHCTM08SS_24EM2.indd 1
2024/4/10 08:51
2024/4/10 08:51

2 3
Xxx
IMPORTANT SAFEGUARDS
XxxTable of Contents
2 - 4 Important Safeguards
5 - 7 Features of your Mr. Coffee Perfect Brew
8 Before First Use
8 - 9 Guide to making Hot Coffee
9 - 10 Guide to making Iced Coffee
10 - 11 Guide to making Hot Tea
11 - 12 Guide to making Iced Tea
12 Guide to making Express Cold Brew
13 Set your Mr. Coffee Perfect Brew to brew later
13 Descale your Mr. Coffee Perfect Brew Hot & Cold Coffee & Tea Brewer
14 Troubleshooting Guide
15 Warranty and limitation of liability
When using electrical appliances,
basic safety precautions should always
be followed to reduce the risk of fire,
electric shock, and/or injury to persons
including the following:
1. Read all instructions.
2. Do not touch hot surfaces. Use
handles or knobs.
3. To protect against electric shock, do
not place or immerse cord, plugs, or
appliance in water or other liquid.
4. This appliance is not intended for
use by children or by persons with
reduced physical, sensory, or mental
capabilities, or lack of experience
and knowledge. Close supervision
is necessary when any appliance is
used near children. Children should
be supervised to ensure that they
do not play with the appliance. Keep
the appliance and its cord out of
reach of children.
5. Unplug from outlet when either
the appliance or display clock (if
provided) is not in use, and before
cleaning. Allow to cool before
putting on or taking off parts, and
before cleaning the appliance.
6. Do not operate any appliance with a
damaged cord or plug or after the
appliance malfunctions, or has been
damaged in any manner. Return
appliance to an Authorized Service
Center for examination, repair
or adjustment. Do not attempt to
replace or splice a damaged cord.
7. The use of an accessory not
recommended by the appliance
manufacturer for use with this
appliance may result in fire, electric
shock or injury to persons.
8. Do not use outdoors.
9. Do not let cord hang over edge
of table or counter, or touch hot
surfaces.
10. Do not place on or near a hot gas or
electric burner, or in a heated oven.
11. Always attach plug to appliance
first, then plug cord into the
wall outlet (for appliances with
detachable cords). To disconnect,
turn any control to the off position,
SAVE THESE INSTRUCTIONS
HOUSEHOLD USE ONLY
then remove plug from wall outlet.
12. Do not use appliance for other than
intended use.
13. All lids should be closed during use.
14. Scalding may occur if the lid is
removed or brew basket door is
opened during or immediately after
the brewing cycles. Contents may be
hot. Allow to cool before opening the
lid.
For models capable of using sealed
capsules
15. WARNING: To avoid the risk of injury,
never open or disengage the brew
chamber during the brew cycle.
16. The sharp needles on the top lid
and bottom of capsule holder used
to puncture the capsules may cause
injury. Keep hands away from the
sharp needles and use caution while
using, cleaning, or handling the
capsule holder.
17. Only use capsules intended for this
appliance. If the capsule does not
fit, do not force the capsule into the
appliance.
For appliances with glass containers:
18. The container is designed for use with
this appliance. It must never be used
on or near an external heat source
such as a range top, hot plate, heated
oven or similar.
19. Do not set a hot container on a wet
or cold surface.
20. Avoid sudden temperature changes,
such as rinsing, washing, filling, or
immersing a hot container with cold
liquids.
21. Do not use a cracked or chipped
container or a container having a
loose or weakened handle.
22. Do not clean container with
cleansers, steel wool pads, or other
abrasive material.
For appliances with service panels:
23. WARNING: TO REDUCE THE RISK
OF FIRE OR ELECTRIC SHOCK, DO
NOT REMOVE THIS COVER. NO USER–
SERVICEABLE PARTS INSIDE. REPAIR
SHOULD BE DONE BY AUTHORIZED
SERVICE PERSONNEL ONLY.
POLARIZED PLUG
This appliance has a polarized plug, (one blade is wider
than the other). As a safety feature to reduce the risk of
electrical shock, this plug is intended to fit in a polarized
outlet only one way. If the plug does not fit fully in the outlet, reverse the plug.
If it still does not fit, contact a qualified electrician. Do not attempt to defeat
this safety feature or modify the plug in any way. If the plug fits loosely into
the AC outlet or if the AC outlet feels warm do not use that outlet.
BVMC-IHCTM08SS_24EM2.indd 2-3
BVMC-IHCTM08SS_24EM2.indd 2-3
2024/4/10 08:51
2024/4/10 08:51
4 5
POWER CORD INSTRUCTIONS:
A short power-supply cord (or detachable power-supply cord) may be provided to
reduce risks resulting from becoming entangled in or tripping over a longer cord.
Longer detachable power-supply cords or extension cords are available and may
be used if care is exercised in their use. If a long detachable power-supply cord
or extension cord is used:
a. The marked electrical rating of the detachable power-supply cord or
extension cord should be at least as great as the electrical rating of the
appliance;
b. If the appliance is of the grounded type, the extension cord should be a
grounding type 3-wire cord; and
c. The longer cord should be arranged so that it will not drape over the
counter top or table top where it can be pulled on by children or tripped over
unintentionally.
Do not pull, twist or otherwise abuse the power cord.
PRODUCT NOTICES
1. Place the appliance on a hard, flat, level surface to avoid interruption of airflow
underneath the coffeemaker.
2. Glass decanters only: Discard the decanter immediately if it is ever boiled dry.
3. Glass decanters only: Protect the decanter from sharp blows, scratches or
rough handling.
4. Do not operate the appliance with an empty water tank.
5. Keep the area above the appliance clear during use, as hot steam will escape
the appliance.
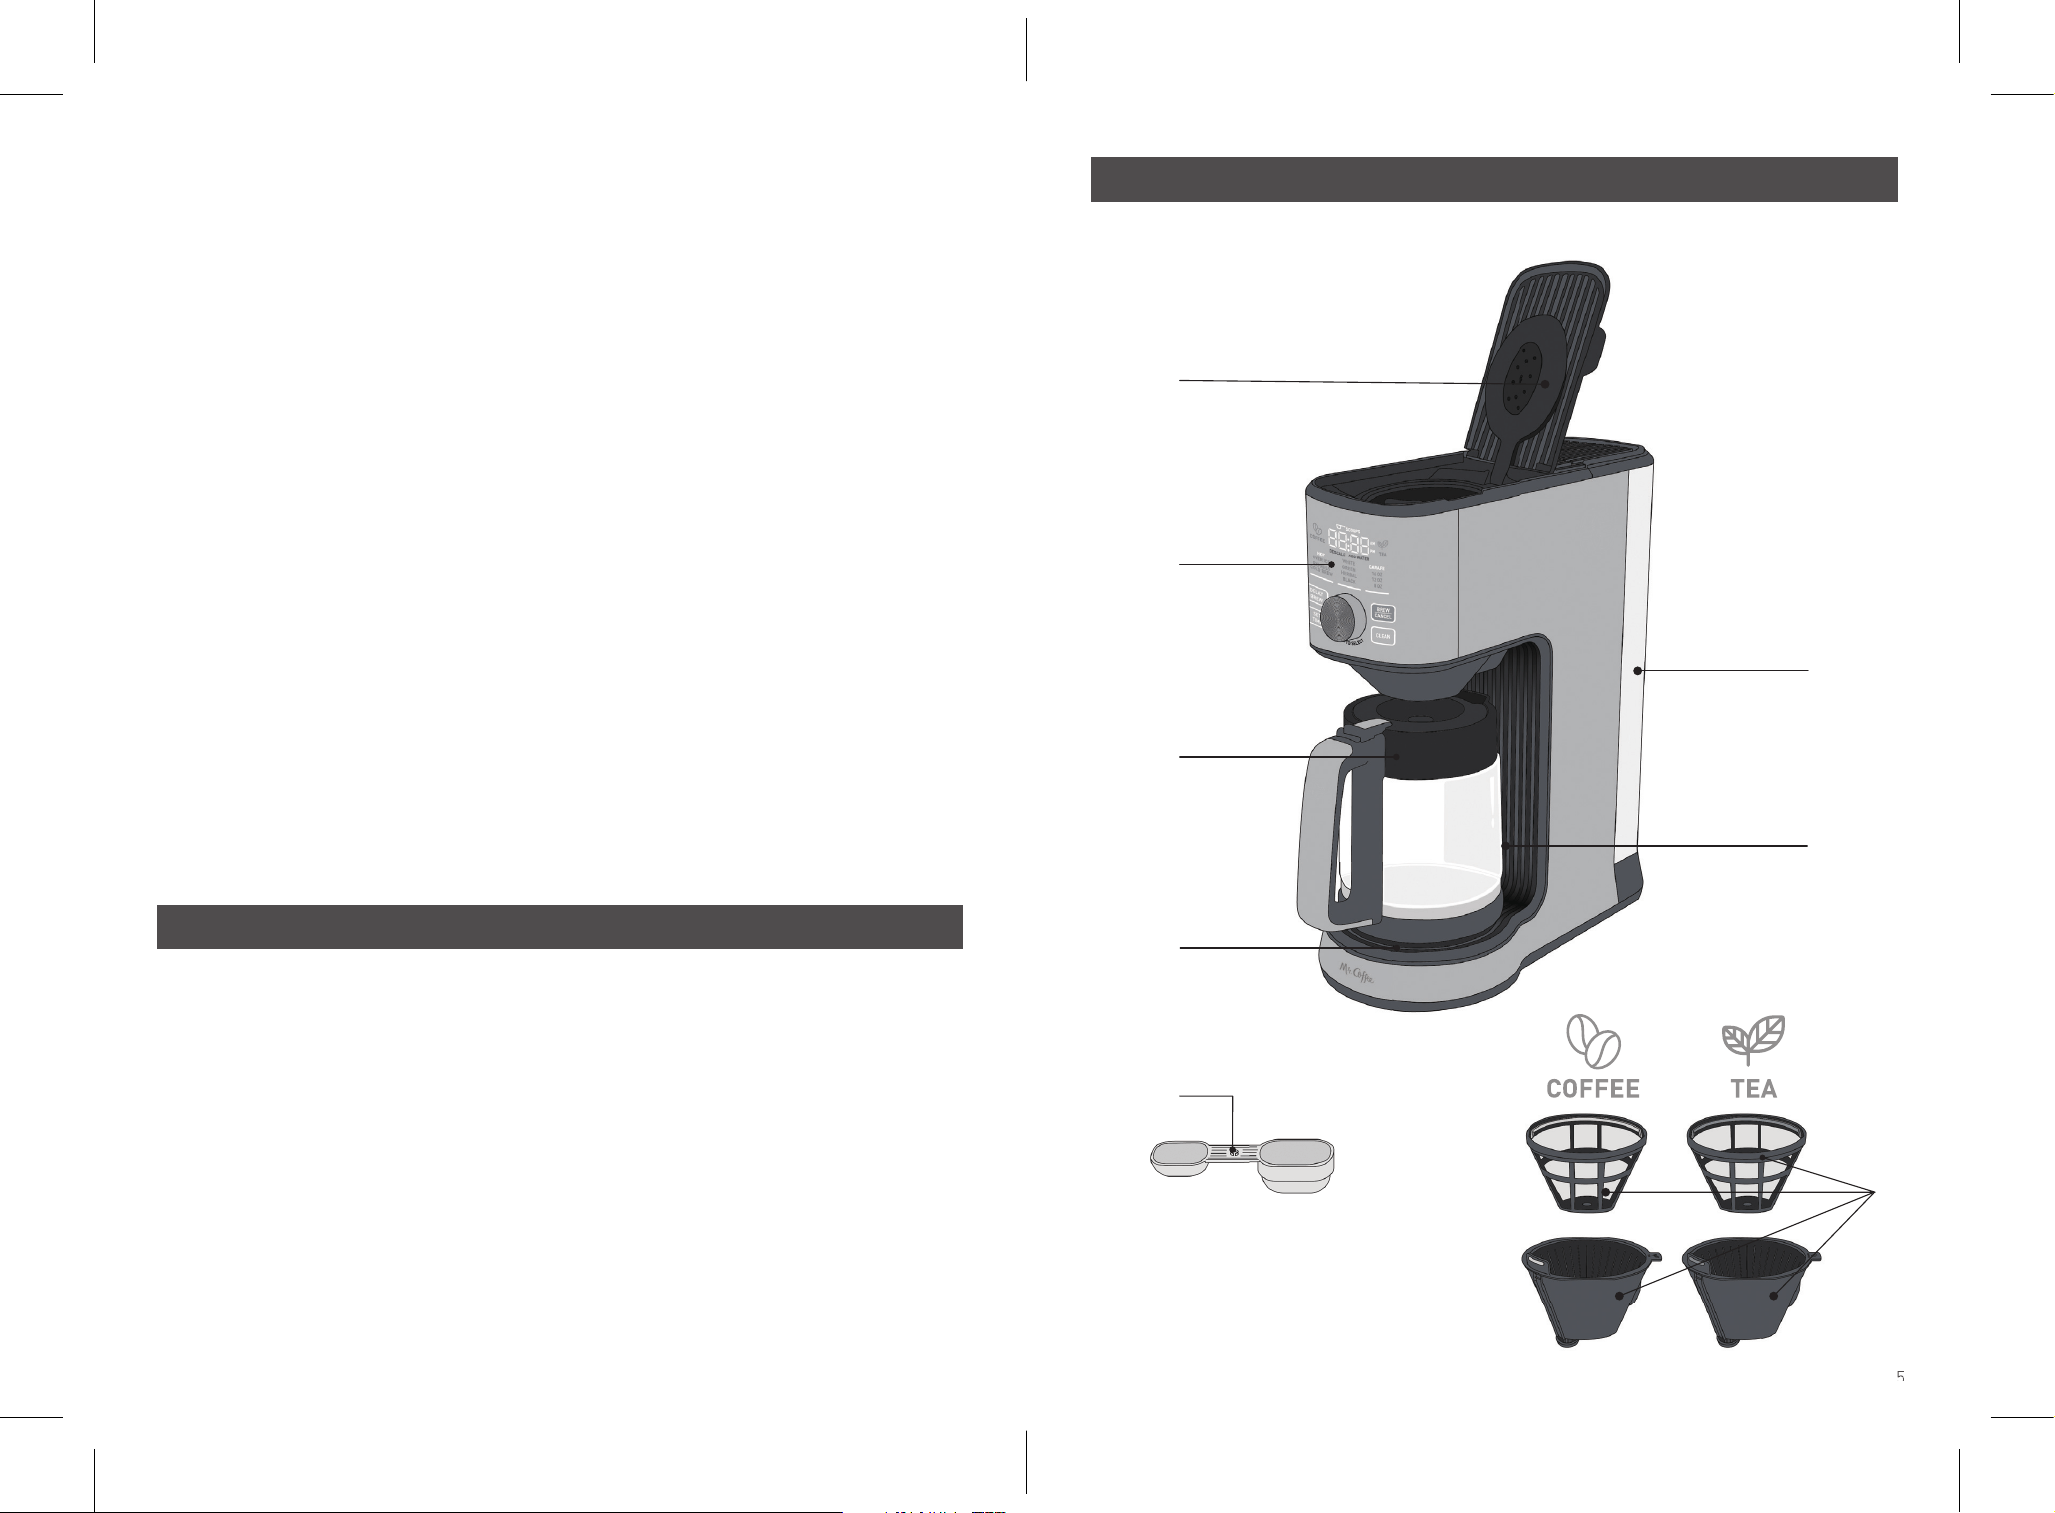
Features of your Mr. Coffee Perfect Brew Hot & Cold Coffee & Tea Brewer
A
B
C
D
E
G
5
H
F
Features of your Mr. Coffee Perfect Brew Hot & Cold Coffee & Tea Brewer
A – Optimized showerhead
Uniformly saturates loose tea or coffee
for optimal flavor extraction.
B – Intuitive interface
Recognizes the Brew Basket used for
effortless brewing.
C – 8-cup glass carafe (40 oz)
Includes "OVER ICE" and "EXPRESS
COLD BREW" markings for ice for the
perfect ratio of concentrated coffee or
tea over ice.
D – Intelligent warming plate
Activates when using Hot Coffee Carafe.
E – Removable water reservoir
Remove the lid and fill with cold water,
or remove the Water Reservoir by
removing the Lid, lifting upwards using
the Handle located inside.
F- Carafe sensor
Detects when the carafe is in place to
activate or stop brewing in Carafe mode.
G – Tea and coffee scoop
For the right amount of tea or coffee
based on drink size.
H – Separate tea (green) and coffee
(orange) brew baskets and filters
Prevents flavor transfer between coffee
and tea.
BVMC-IHCTM08SS_24EM2.indd 4-5
BVMC-IHCTM08SS_24EM2.indd 4-5
2024/4/10 08:51
2024/4/10 08:51
6 7
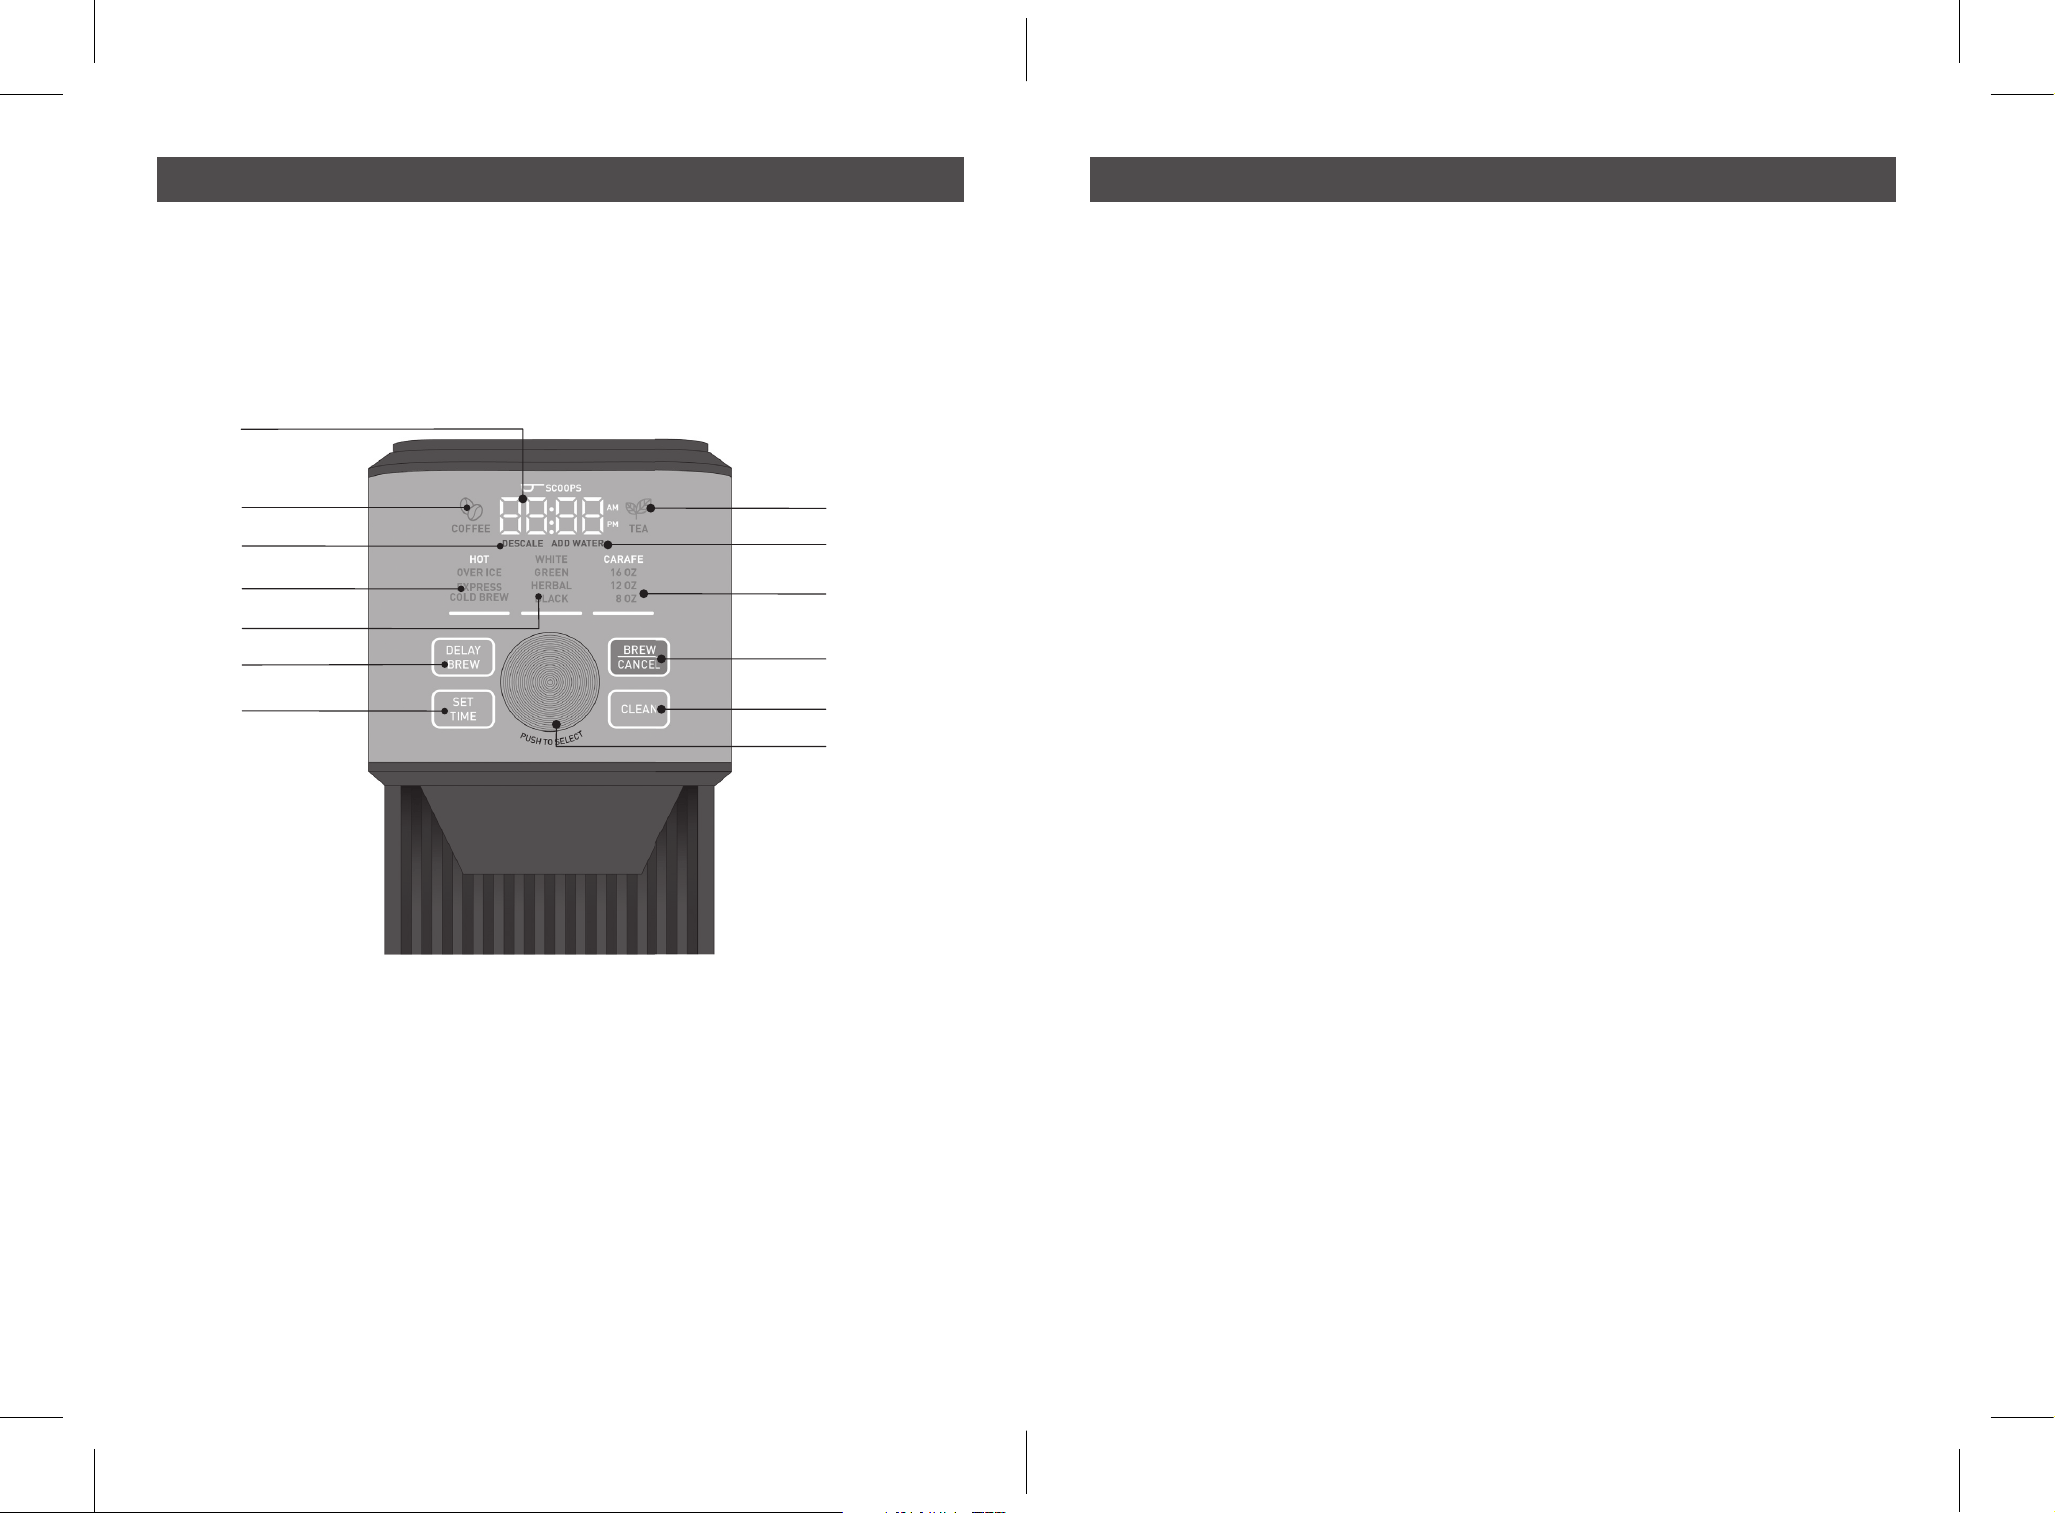
Features
I
J
K
L
M
N
O
P
Q
R
S
T
U
Features
I – Digital display
•
In sleep mode, shows the current
time (programmable)
•
When selecting the brew function and
beverage size, the display indicates
the number of tea or coffee scoops
needed for the perfect ratio.
•
During the brew cycle, the display
shows a countdown timer until drink
completion.
•
Once a carafe brew cycle is over,
displays the time the carafe has been
sitting on the warming plate since
brewing (freshness timer).
J – Coffee Mode Indicator
Lights up when the coffee brew basket
is inserted and indicates that only
coffee functions will be available.
K – DESCALE light
Flashes when descaling or cleaning of
the unit is required. Flashes when the
cleaning / descaling cycle is ongoing.
(for cleaning / descaling instructions,
see page 13)
L – Brew Type Menu
Select brew type (hot, over ice or
express cold brew) in this menu by
rotating the knob and pressing to
select. The machine will automatically
adjust brew temperature and time, and
display ideal tea or coffee amount for
consistently great tasting beverages.
M – Tea Type Menu
Select tea type (white, green, black,
herbal) in this menu by rotating the
knob and pressing to select. The
machine will automatically adjust
steep temperature and time based on
selection.
N – DELAY BREW button
Use the DELAY BREW button to
schedule brewing at a set time (for
instructions on how to brew later, see
p.13).
O - SET TIME button
This button is used to set the unit at
the correct time (for instructions on
how to set the time, see part 4. of the
"Before first use" section p.8).
P – Tea Mode Indicator
Lights up when the Tea brew basket
is inserted and indicates that only tea
functions will be available.
Q – ADD WATER light
Flashes when the water reservoir is
almost empty.
R - Brew Size Menu
Select brew size (8, 12, 16 oz or 8-cup
carafe) in this menu by rotating the
knob and pressing to select.
S – BREW/CANCEL button
Press to start brewing once brew type
and size have been selected. Press
again to cancel the brew cycle.
T – CLEAN button
Press to start the Clean or descale
cycle (for cleaning / descaling
instructions, see p.13).
U – Knob
Rotate the knob to navigate through
the Brew Type, Tea Type and Brew Size
menus. Press to select and move to
the next menu.
BVMC-IHCTM08SS_24EM2.indd 6-7
BVMC-IHCTM08SS_24EM2.indd 6-7
2024/4/10 08:51
2024/4/10 08:51
8 9
1. Remove Packaging
Ensure all packaging has been removed.
Important: Remove the red plug found at
the base of the Water Reservoir.
2. Position Machine
Ensure the machine is positioned onto a
dry, stable, flat and horizontal countertop.
3. Clean the Machine
• Wash and Dry Parts
Wash the parts listed below in warm water
with a mild detergent:
- Glass Carafe
- Coffee and Tea Brew Baskets
- Coffee and Tea reusable filters
- Water Reservoir
- Coffee and Tea Scoop
Rinse and allow thorough air drying.
• Fill Water Reservoir
- Remove the Water Reservoir lid and lift
upwards using the Handle inside.
- Fill with cold water from the tap, not
exceeding the MAX line.
- Insert the Water Reservoir into position
and close the Lid.
NOTE: Make sure that the Water Reservoir
is clean and free of any debris, as any fine
particles can block the water flow.
• Power
- Insert the Power Plug into a 120V
AC power outlet. The machine will
automatically turn on.
• Cleaning Cycle
- Insert the Coffee Brew Basket.
- Place the carafe under the brew spout to
collect the cleaning water.
- In the Brew Type menu, select “HOT”
by rotating the knob and pressing it to
select. The machine will automatically
switch to the Brew size menu.
- In the Brew Size menu, select Carafe by
rotating the knob.
- Press the “BREW/CANCEL” button to
start the cleaning cycle.
- Once the cleaning cycle is complete, the
unit beeps. Discard the content of the
carafe in the sink.
4. Set the time
- Plug the unit in. The time display will
start flashing.
- Press “SET TIME” button once to set the
hour. Rotate the knob to adjust hours.
Push the knob to select the correct hour
and move to minutes setting.
- Rotate the knob to adjust minutes. Push
the knob to select the correct minutes
move to AM/PM setting.
- Rotate the knob to select AM or PM.
NOTE: if needed, push the knob again to
go back to hour selection.
- Press “SET TIME” to confirm time.
Before First Use
1. Fill the water reservoir with cold water,
not exceeding the MAX line.
NOTE: Always use fresh, cold water
that is filtered and free of impurities –
avoid hard water or well water.
2. Plug the unit it.
3. Press any button or turn the knob to
wake up the machine from sleep mode.
4. Insert the Coffee brew basket and
filter. The “COFFEE” light turns on.
NOTE: If you wish, you can also use
a paper coffee filter size #4 instead
of the reusable filter provided. Simply
place the paper filter directly in the
Coffee Brew Basket, making sure to
fold the crimped edges. Never use a
paper filter and the Mr. Coffee reusable
filter at the same time.
5. In the Brew Type menu, select “HOT”
by rotating the knob and pressing it to
select. The machine will automatically
switch to the Brew size menu.
6. In the Brew Size menu, select the
desired brew size (8, 12, 16 oz or
8-cup carafe) by rotating the knob and
pressing it to select.
7. The display will show how many coffee
Guide to making Hot Coffee
scoops are needed for flavorful hot coffee
based on the drink size selected. With the
“Coffee” side of the Mr. Coffee scoop, add
the corresponding amount of ground
coffee to the reusable coffee filter.
NOTE: Changing the brew size will
change the displayed number of scoops.
NOTE:
for best tasting coffee, we
recommend using freshly roasted whole
beans and grind them medium/coarse
with a burr grinder before you brew.
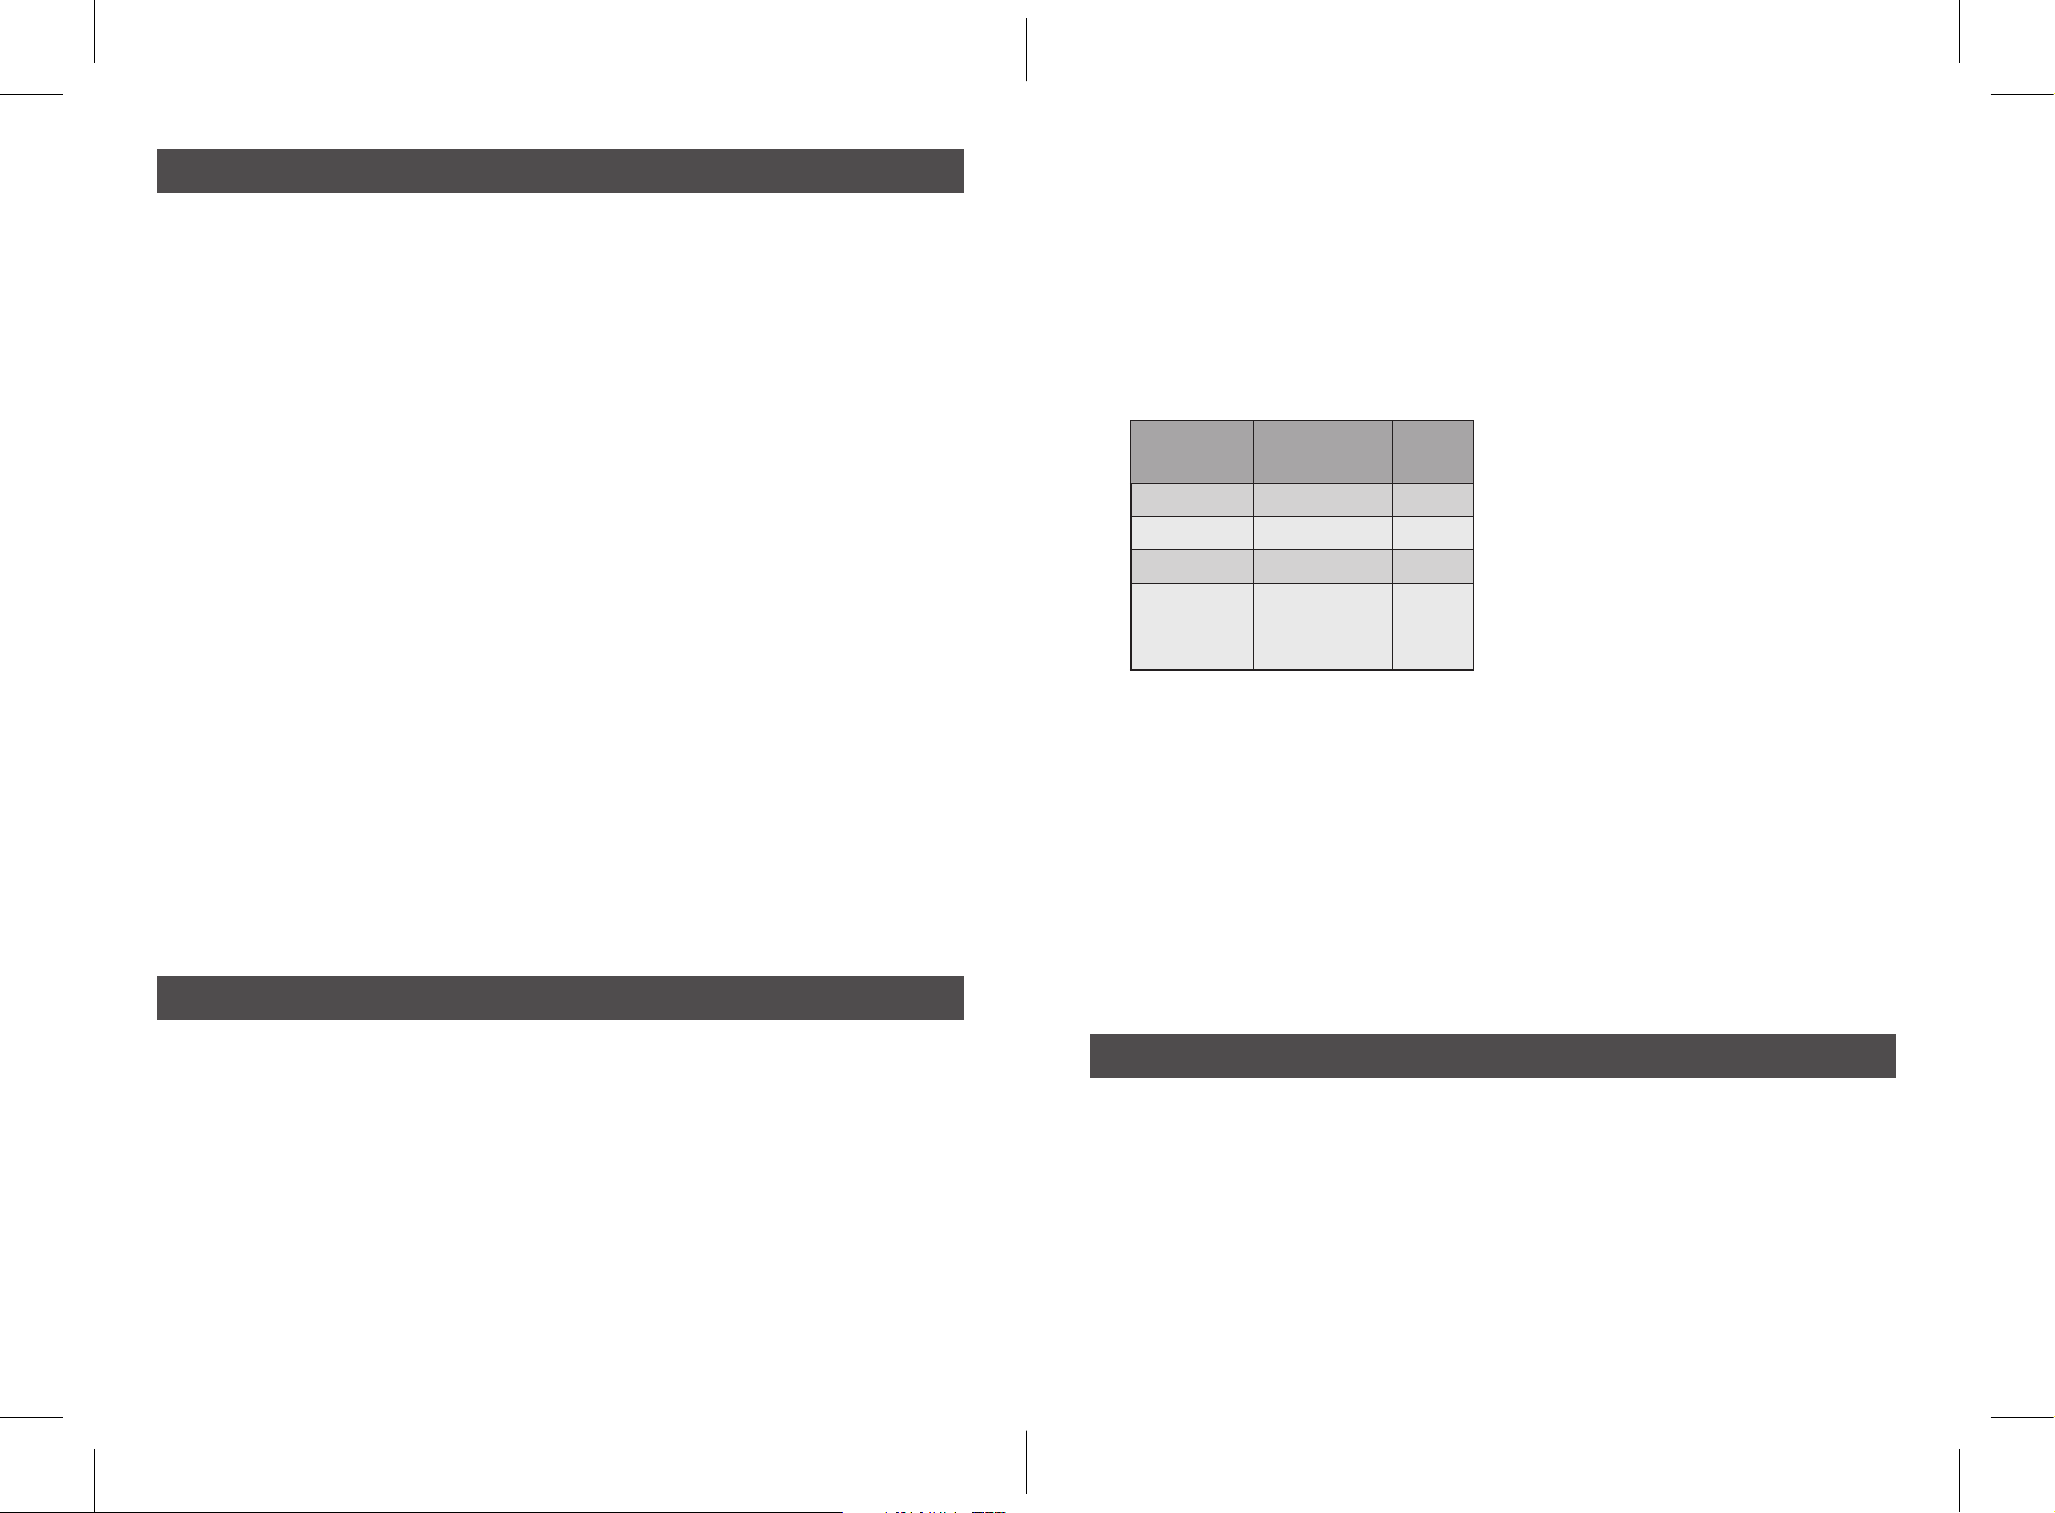
Brew Size
Number of
Coffee scoops
Grams
8oz
1
13
12oz
1.5 20
16oz
2 26
8-cup
Carafe
(40oz)
5 66
NOTE:
your Mr. Coffee Perfect Brew Hot &
Cold Coffee & Tea Brewer follows the Golden
Cup coffee-to-water ratio recommended by
the Specialty Coffee Association.
8. Place your cup, travel mug or carafe
under the brew spout.
IMPORTANT: use care when placing a
ceramic mug on the warming plate to
limit scratches.
NOTE:
if using the carafe, ensure the
metal band is clean and dry to allow
the unit to detect it.
9. Press the “BREW/CANCEL” button
to start brewing hot coffee. The unit
automatically blooms the coffee
grounds for 24 Seconds 8 Cup Carafe
and 40 seconds for all single serve
drinks before starting to brew at the
ideal time and temperature settings.
NOTE: thanks to the carafe sensor,
you can remove the carafe during a
carafe brew cycle to pour yourself a
cup: brewing will stop until the carafe
is back in place.
NOTE: you can press the “BREW /
CANCEL” button again at any time to
cancel brewing.
NOTE: the intelligent warmnig plate only
turns on when the coffee Hot carafe size
is selected.
NOTE: if the water level in the tank is too
low, the machine will stop brewing and
the “ADD WATER” light will start flashing.
Add cold water to the Water Tank and the
brew cycle will resume automatically. If
water is not added to the tank after 2 min,
for Carafe Size, the unit will empty the
coffee left in the brew cycle and start the
freshness timer. For Singe Serve, the until
will empty coffee left in the brew cycle
and cancel the cycle.
10. Once the brew cycle is over, the
machine beeps meaning your coffee is
ready to be sipped on.
NOTE: after brewing a carafe of coffee,
the Freshness Timer automatically
starts. The unit displays how long it has
been since the coffee was brewed. For
best flavor, we recommend drinking your
coffee under 30 min. The warming plate
will automatically turn off after 60 min.
1. Fill the water reservoir with cold water,
not exceeding the MAX line.
NOTE: Always use fresh, cold water
that is filtered and free of impurities –
avoid hard water or well water.
2. Plug the unit it.
3. Press any button or turn the knob to
wake up the machine from sleep mode.
4. Insert the Coffee brew basket and
filter. The “COFFEE” light turns on.
NOTE: If you wish, you can also use
a paper coffee filter size #4 instead
of the reusable filter provided. Simply
place the paper filter directly in the
Coffee Brew Basket, making sure to
fold the crimped edges. Never use a
paper filter and the Mr. Coffee reusable
filter at the same time.
5. In the Brew Type menu, select “OVER
ICE” by rotating the knob and pressing it
to select. The machine will automatically
switch to the Brew size menu.
Guide to making Iced Coffee
BVMC-IHCTM08SS_24EM2.indd 8-9
BVMC-IHCTM08SS_24EM2.indd 8-9
2024/4/10 08:51
2024/4/10 08:51
10 11
6. In the Brew Size menu, select the
desired brew size (12, 16 oz or 8-cup
carafe) by rotating the knob and
pressing it to select.
7. The display will show how many coffee
scoops are needed for flavorful iced coffee
based on the drink size selected. With the
“Coffee” side of the Mr. Coffee scoop, add
the corresponding amount of ground
coffee to the reusable coffee filter.
NOTE: changing the brew size will
change the displayed number of scoops.
NOTE: for best tasting coffee, we
recommend using freshly roasted
whole beans and grind them medium/
coarse with a burr grinder before you
brew.
Brew
Size
Number of
Coffee scoops
Grams
12oz
1.5 20
16oz
2 26
8-cup
Carafe
(40oz)
5 66
8. Fill your cup to the top, or the carafe up
to the “OVER ICE” line with ice cubes.
9. Place your cup, travel mug or carafe
under the brew spout.
NOTE: if using the carafe, ensure the
carafe metal band is clean to allow the
unit to detect it.
10. Press the “BREW/CANCEL” button to
start brewing. The unit automatically
blooms the coffee grounds for 40
seconds before starting to brew at the
ideal time and temperature settings.
NOTE: the machine brews the perfect
ratio of hot concentrated coffee over
ice for flavorful iced coffee that is not
watered down.
NOTE: you can press the “BREW/
CANCEL” button again at any time to
cancel brewing.
NOTE: if the water level in the tank is
too low, the machine will stop brewing
and the “ADD WATER” light will start
flashing. Add cold water to the Water
Tank and the brew cycle will resume
automatically. If water is not added to
the tank after 2 min, the unit will empty
the coffee left in the brew basket and
cancel the brew cycle.
11. Once the brew cycle is over, the machine
beeps meaning your coffee is ready to be
sipped on.
1. Fill the water reservoir with cold water,
not exceeding the MAX line.
NOTE:
Always use fresh, cold water
that is filtered and free of impurities –
avoid hard water or well water.
2. Plug the unit it.
3. Press any button or turn the knob to
turn the machine on.
4. Insert the Tea brew basket and filter.
The “TEA” light turns on.
5. In the Brew Type menu, select “HOT”
by rotating the knob and pressing it to
select. The machine will automatically
switch to the Tea Type menu.
6. In the Tea Type menu, select which tea
type you want to brew (white, green, black,
herbal) by rotating the knob and pressing it
to select. The machine will automatically
switch to the Brew size menu.
NOTE:
selecting the tea type will
automatically adjust steep time and
temperature for optimal extraction as
shown in the table below.
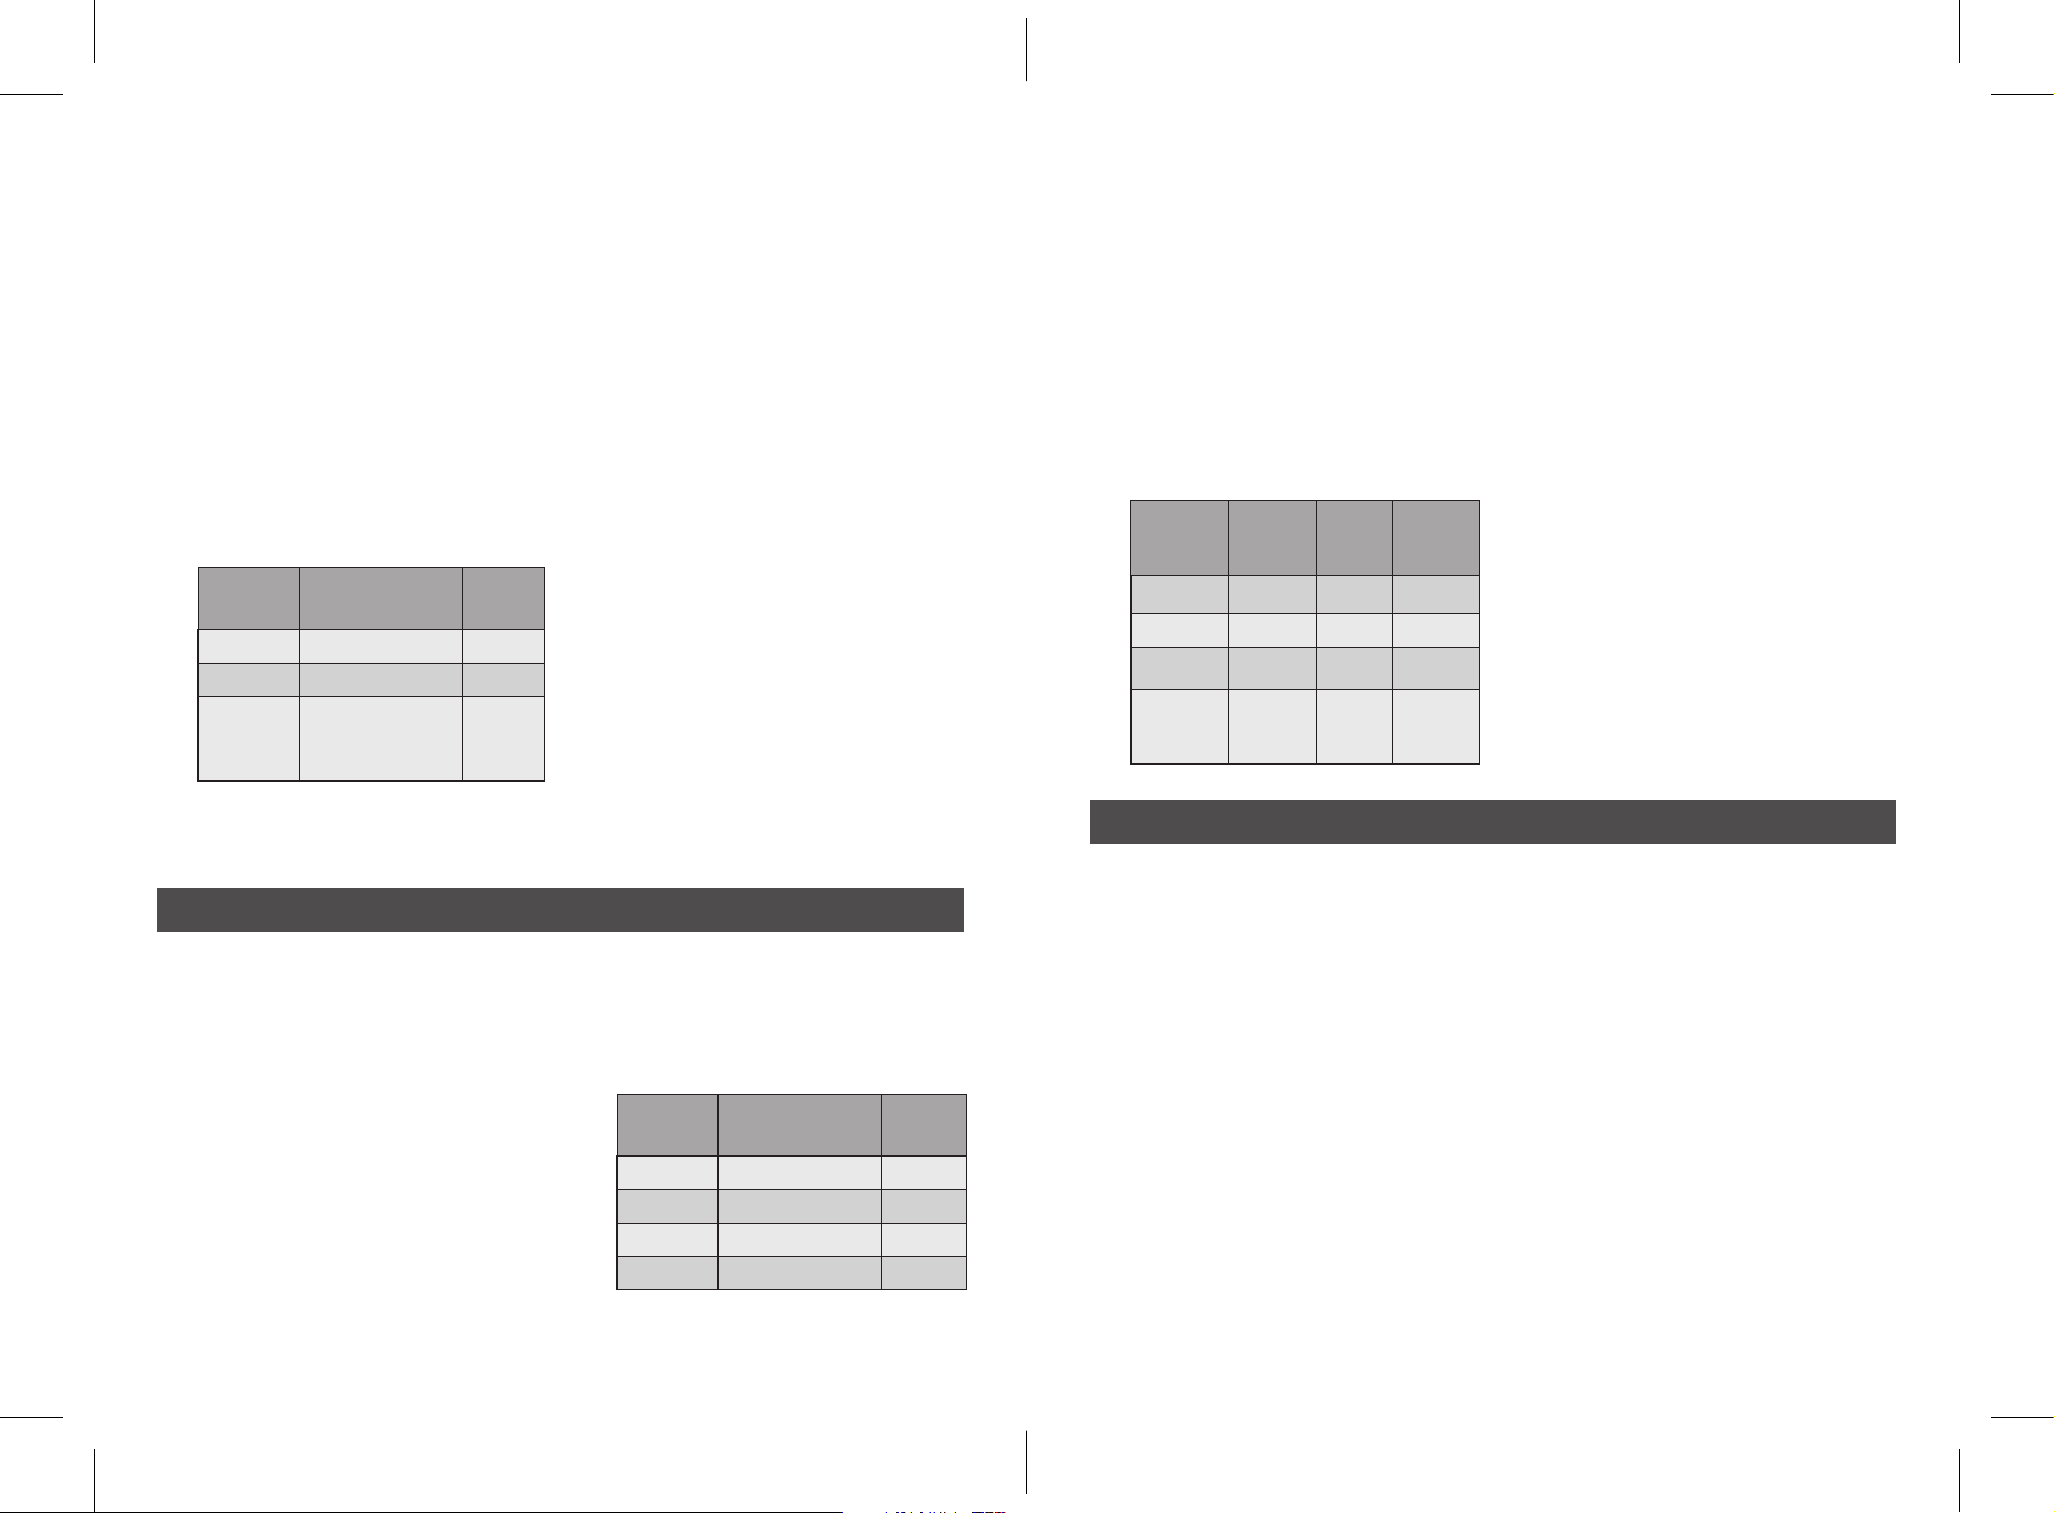
Steep
Temperature
Steep
Time
White
175-185 °F
5 min
Green
175-185 °F
3 min
Herbal
212 °F 6 min
Black
212 °F 4 min
7. In the Brew Size menu, select the desired
Guide to making Hot Tea
brew size (8, 12, 16 oz or 8-cup carafe) by
rotating the knob and pressing it to select.
8. The display will show how many tea
scoops are needed for flavorful hot tea
based on the drink size selected. With
the “Tea” side of the scoop, add the
corresponding amount of loose tea to
the reusable tea filter.
NOTE: Changing the brew size will
change the displayed number of scoops.
NOTE: if you prefer using tea bags, you
can follow the below guidelines based on
volume selected. Simply place the tea
bag(s) in the tea filter.
Brew Size
Number
of Tea
scoops
Grams
Number
of tea
bags
8oz
0.5 2
1
12oz
1 4 2
16oz
1.5 6 3
8-cup
Carafe
(40oz)
3 12 6
9. Place your cup, travel mug or carafe
under the brew spout.
IMPORTANT: use care when placing a
ceramic mug on the warming plate to
limit scratches.
10. Press the “BREW/CANCEL” button to
start brewing hot tea.
NOTE: you can press the “BREW/
CANCEL” button again at any time to
cancel brewing.
NOTE: if the water level in the tank is
too low, the machine will stop brewing
and the “ADD WATER” light will start
flashing. Add cold water to the Water
Tank and the brew cycle will resume
automatically. If water is not added to
the tank after 2 min, the unit will empty
the tea left in the brew basket and
cancel the steep cycle.
11. Once the brew cycle is over, the machine
beeps meaning your tea is ready to be
sipped on.
1. Fill the water reservoir with cold water,
not exceeding the MAX line.
NOTE: Always use fresh, cold water
that is filtered and free of impurities –
avoid hard water or well water.
2. Plug the unit it.
3. Press any button or turn the knob to
turn the machine on.
4. Insert the Tea brew basket and filter.
The “TEA” light turns on.
5. In the Brew Type menu, select “OVER
ICE” by rotating the knob and pressing it
to select. The machine will automatically
switch to the Tea Type menu.
6. In the Tea Type menu, select which tea
type you want to brew (white, green,
black, herbal) by rotating the knob and
pressing it to select. The machine will
automatically switch to the Brew size
menu.
NOTE: selecting the tea type will
automatically adjust steep time and
temperature for best results.
7. In the Brew Size menu, select the
desired brew size (12, 16 oz or 8-cup
carafe) by rotating the knob and
pressing it to select.
8. The display will show how many tea
scoops are needed for flavorful iced tea
based on the drink size selected. With
the “Tea” side of the scoop, add the
corresponding amount of loose tea to
the reusable tea filter.
NOTE:
Changing the brew size will
change the displayed number of scoops.
NOTE:
if you prefer using tea bags, you
can follow the below guidelines based on
volume selected. Simply place the tea
bag(s) in the tea filter.
Guide to making Iced Tea
BVMC-IHCTM08SS_24EM2.indd 10-11
BVMC-IHCTM08SS_24EM2.indd 10-11
2024/4/10 08:51
2024/4/10 08:51

12 13
Brew
Size
Number
of Tea
scoops
Grams
Number of
tea bags
12oz
2 4 2
16oz
3 12 6
8-cup
Carafe
(40oz)
6 24 12
9. Fill your cup to the top, or the carafe up
to the “OVER ICE” line with ice cubes.
10. Place your cup, travel mug or carafe
under the brew spout.
11. Press the “BREW/CANCEL” button to
start brewing iced tea.
NOTE: you can press the “BREW/
CANCEL” button again at any time to
cancel brewing.
NOTE: if the water level in the tank is too
low, the machine will stop brewing and
the “ADD WATER” light will start flashing.
Add cold water to the Water Tank and
the brew cycle will resume automatically.
If water is not added to the tank after 2
min, the unit will empty the tea left in the
brew basket and cancel the steep cycle.
12. Once the brew cycle is over, the machine
beeps meaning your tea is ready to be
sipped on.
1. Fill the water reservoir with cold water,
not exceeding the MAX line.
NOTE:
Always use fresh, cold water
that is filtered and free of impurities –
avoid hard water or well water.
2. Plug the unit it.
3. Press any button or turn the know to
turn the machine on.
4. Insert the Coffee brew basket and filter.
5. In the Brew Type menu, select
“EXPRESS COLD BREW” by rotating
the knob and pressing it to select. The
machine will automatically switch to
the Brew size menu.
6. In the Brew Size menu, select the
desired brew size (12, 16 oz or 8-cup
carafe) by rotating the knob and
pressing it to select.
7. The display will show how many coffee
scoops are needed for flavorful express
cold brew based on the drink size selected.
NOTE:
for best tasting coffee, we
recommend using freshly roasted
whole beans and grind them coarse
with a burr grinder before you brew.
Brew
Size
Number of
Coffee scoops
Grams
12oz
1.5 20
16oz
2 26
8-cup
Carafe
(40oz)
4 52
NOTE: Changing the brew size will
change the displayed number of scoops.
Add the corresponding amount of ground
coffee to the reusable tea filter.
8. Fill your cup with 1/4 to 1/3 of ice, or
the carafe with ice up to the “EXPRESS
COLD BREW” line.
NOTE: this ice will melt during the
brewing process, allowing to cool
down the brew. This will not result in a
watered down coffee, as the unit brews a
concentrated express cold brew.
9. Place your cup, travel mug or carafe
under the brew spout.
10. Press the “BREW/CANCEL” button to
start brewing.
NOTE: the machine brews express
cold brew at a lower temperature than
regular drip coffee.
NOTE: you can press the “BREW/
CANCEL” button again at any time to
cancel brewing.
NOTE: if the water level in the tank is
too low, the machine will stop brewing
and the “ADD WATER” light will start
flashing. Add cold water to the Water
Tank and the brew cycle will resume
automatically. If water is not added to
the tank after 2 min, the unit will empty
the coffee left in the brew basket and
cancel the brew cycle.
11. Once the brew cycle is over, the machine
beeps meaning your coffee is ready. Add
additional ice to your cup to keep cooling
coffee.
Guide to making Express Cold Brew
NOTE:
You must set the clock if you want to
use the DELAY BREW feature.
1. Fill the water reservoir with cold water,
not exceeding the MAX line.
2. Plug the unit it. Set time following steps
in the "Before first use" section on p.8.
3. Press any button or turn the knob to
turn the machine on.
4. Insert the Coffee or Tea brew basket
and filter.
5. Select your Brew Type and Size
following the previous brewing guides
(Iced or Hot coffee or tea, or express
cold brew). Remember to place your
cup or carafe under the brew spout.
6. Press the “DELAY BREW” button once
to set the hour. The Hours display
starts flashing. Rotate the knob to
adjust to the hour you need brewing to
start at. Push the knob to confirm hour
and move to minutes setting.
7. The Minutes display starts flashing.
Rotate the knob to adjust to the
minutes you need brewing to start at.
Push the knob to select minutes and
move to AM/PM setting.
8. Rotate the knob to select AM or PM.
9. Press “DELAY BREW” to confirm time,
or wait 3 seconds and time will be set
automatically. The DELAY BREW light
will stay on, indicating the machine is
programmed to brew later.
NOTE: you can press the “DELAY
BREW” button again at any time to
cancel scheduled brewing.
10. The brewer will automatically start
brewing at the set time. Once the brew
cycle is over, the machine will beep
meaning your coffee is ready to be
sipped on.
Set your Mr. Coffee Coffee / Tea brewer to brew later
Minerals found in water will leave deposits in
your appliance and can affect performance.
We recommend descaling your Mr. Coffee
Perfect Brew Hot & Cold Coffee & Tea
Brewer every 2-3 months, although this
period will depend on the hardness of water
and frequency of use.
Your Mr. Coffee Perfect Brew Hot & Cold Coffee
& Tea Brewer features a descaling sensor that
will alert you when the machine needs cleaning.
• When it is time to decalcify your
coffeemaker, the DESCALE light will
start flashing.
• Fill the glass carafe up to the 8-cup
line with a solution of equal parts water
and white vinegar or use a descaling
solution. Pour the solution into the
Water Reservoir.
• Place Glass Carafe on the Warming
Plate. Press the CLEAN button. The
screen will turn off and the “DESCALE”
light will keep flashing until the
cleaning cycle is over.
• Once the cleaning cycle is complete, the
unit will beep. Discard the content of the
glass carafe and rinse with water.
• Fill the Glass Carafe with fresh water
to the 8-cup line and pour the water
into the water reservoir.
• In the Brew Size menu, select “8-cup
carafe” by rotating the knob
• Press the BREW/CANCEL button to
rinse the machine.
• Once the brewing cycle is complete the
unit will beep. Discard the content of
the Glass Carafe in the sink.
• Remove and wash the Glass Carafe,
Water Reservoir, Brew Baskets,
Reusable Filters and Scoop in a mixture
of mild detergent and water. Rinse each
with clean water, and dry thoroughly.
• Repeat if vingear smells is still present.
NOTE:
While a single clean cycle is likely
to address calcium buildup, in rare cases
the clean alert may still show requiring a
second clean cycle.
CAUTION: Never immerse the coffeemaker
itself in water, in any other liquid or place in
the dishwasher.
This appliance has no user serviceable
parts. Any servicing beyond that described
in the Cleaning Section should be
performed by an Authorized Service
Representative only. See Warranty Section.
Descale your Mr. Coffee Perfect Brew Hot & Cold Coffee & Tea Brewer
BVMC-IHCTM08SS_24EM2.indd 12-13
BVMC-IHCTM08SS_24EM2.indd 12-13
2024/4/10 08:51
2024/4/10 08:51
14 15
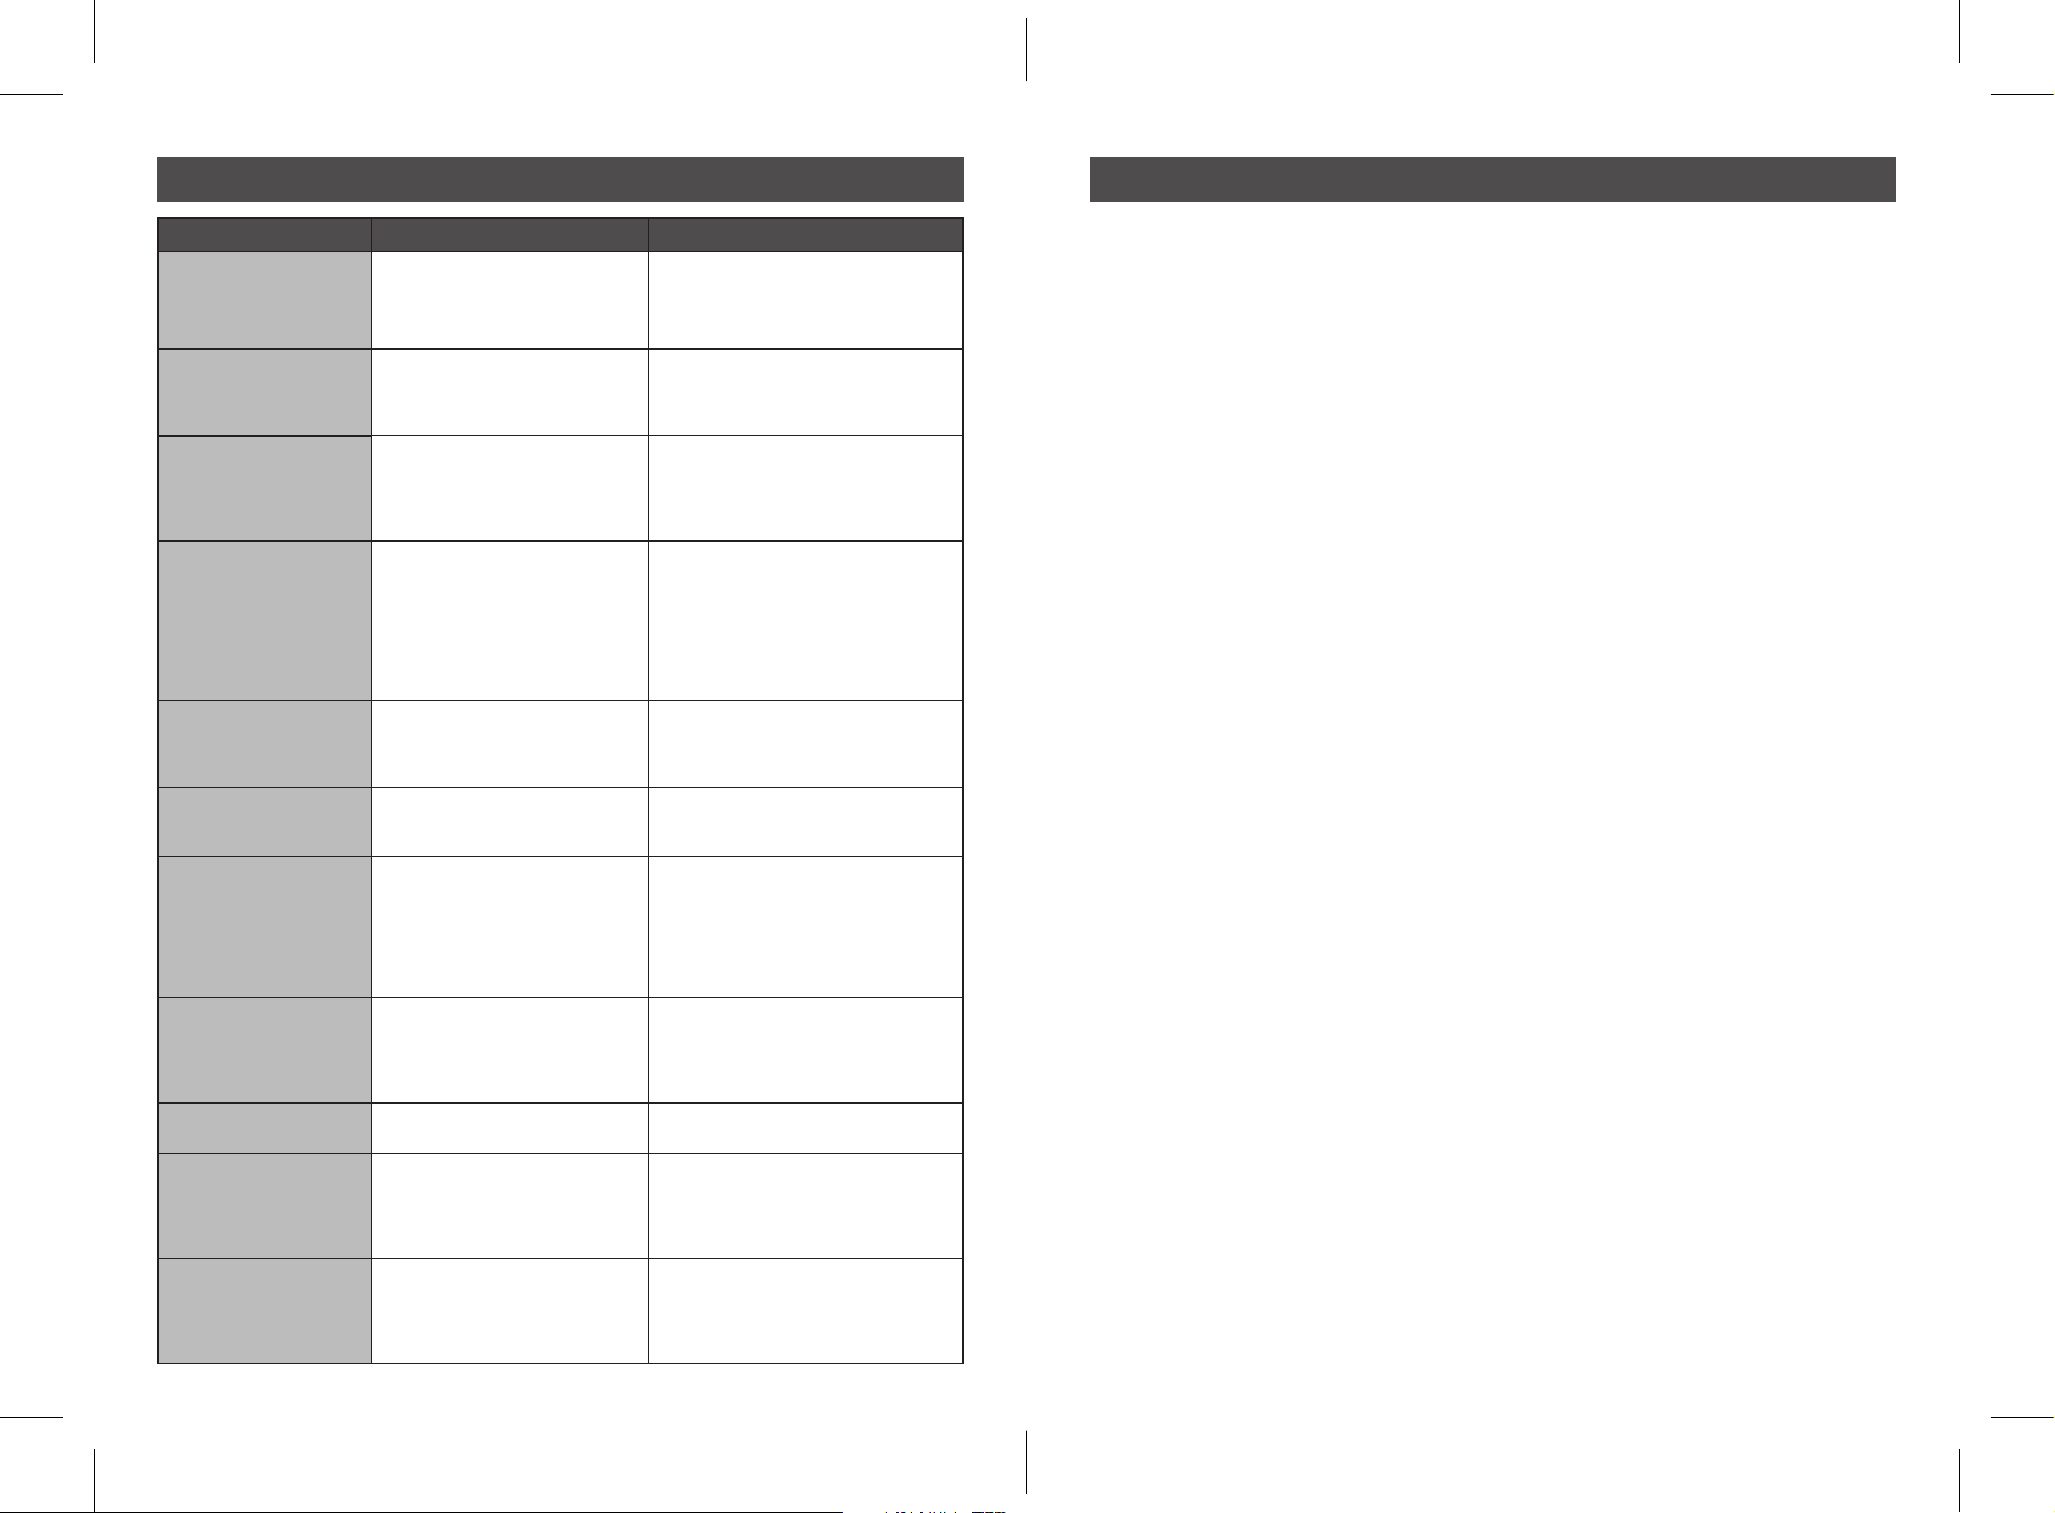
Troubleshooting Guide
Problem Possible Cause What To Do
ADD WATER light
flashes
The water level in the tank is
low.
Fill the water tank up to the max
line. Replace the water tank. If a
brewing cycle got stopped, it will
resume automatically.
DESCALE light flashes It is time to descale / clean
your Mr. Coffee Perfect Brew
Hot & Cold Coffee & Tea
Brewer.
Follow the instructions of the
“Descale your Mr. Coffee Perfect
Brew Hot & Iced Coffee & Tea
Brewer section p.13.
There is sediment in
my coffee
If using the Mr. Coffee
reusable filter, the sediment
at the bottom of the brewed
coffee may be due to using
finely ground coffee.
Use a slightly coarser grind.
OVER ICE and
EXPRESS COLD BREW
beverages are not
cold.
There was not enough ice
in the cup or carafe. The
cycles brew hot concentrated
beverages over ice, so
maintaining the ice/ beverage
ratio is important.
For OVER ICE brew cycle, fill your cup
all the way up with ice, or the carafe
up to the “OVER ICE” line.
For EXPRESS COLD BREW, fill 1/4 to
1/3 of your cup with ice, or the carafe
up to the “EXPRESS COLD BREW”
line before brewing. Add additional ice
to taste after brewing cycle is over.
Coffee or tea is too
weak.
• There is not enough coffee
grounds or tea in the filter.
• Coffee grounds are too
coarse.
• Add an additional ½ or 1 scoop of
coffee grounds or tea.
• Use finer coffee grounds.
Coffee or tea is too
strong.
• There is too much coffee
grounds or tea in the filter.
• Coffee grounds are too fine.
• There is too much coffee grounds
or tea in the filter.
• Use coarser grounds
Coffee overflowing
from the basket
• Grind size is too fine.
• Too much coffee grounds in
the basket.
• Putting paper into reusable
filter.
•
Use coarser grounds. Never use
espresso grounds.
•
Reduce the amount of grounds used
•
Only use the Mr. Coffee reusable
filer or a paper filter directly in
the brew basket, do not use both
simultaneously.
The carafe brew cycle
does not start
• There is no water in the
water tank.
• The carafe sensor cannot
read the metal band
•
Fill up the water tank.
• Wipe the carafe metal ban clean;
ice in the carafe may lead to sweat
on the band making it difficult for
the sensor to read.
The clock does not
remember time
The clock is cleared every time
the unit is unplugged.
Keep the unit plugged.
My coffee or tea does
not come out right
away after the unit
starts brewing
This is part of the normal
brew or steep cycles. The unit
starts by blooming coffee, or
steeps tea for a few minutes to
extract all the flavors.
No action required, just wait until
machine beeps indicating the brew or
steep cycle is over.
There is water left in
the brew basket after
brewing
During a brew cycle,
condensation forms on the
showerhead and brewer lid,
which can drip down in the
brew basket.
No action required, this is perfectly
normal when brewing.
Warranty and limitation of liability
3 Year Limited Warranty
Sunbeam Products, Inc. or if in Canada Newell Brands Canada ULC (collectively “Sunbeam”)
warrants that for a period of three years from the date of delivery to the original end user
purchaser, this product will be free from defects in material and workmanship. Sunbeam, at
its option, will repair or replace, free of charge, this product or any component of the product
found to be defective during the warranty period. Replacement will be made with a new
product or new component at no cost to the consumer. If the product is no longer available,
replacement may be made with a similar product of equal or greater value. This is your
exclusive warranty. Do NOT attempt to repair or adjust any electrical or mechanical functions
on this product. Sunbeam reserves all rights to decline coverage if the defect or damage
was caused by unauthorized components or service. This warranty is valid for the original
retail purchaser from the date of delivery and is not transferable. Keep the original proof of
purchase. Dealers, service centers, or retail stores selling Sunbeam products do not have
the right to alter, modify, or any way change the terms and conditions of this warranty. This
warranty does not cover normal wear of parts or damage resulting from any of the following:
negligent use or misuse of the product; use on improper voltage or current; use contrary to
the operating instructions provided by Sunbeam; disassembly, repair, or alteration by anyone
other than Sunbeam or an authorized Sunbeam service center. Sunbeam expressly excludes
from this warranty and denies liability for defects or damage caused by repair or alteration by
anyone other than Sunbeam or an authorized Sunbeam service center. Further, the warranty
does not cover: Acts of God, such as fire, flood, hurricanes and tornadoes.
No terms of this warranty may be construed to apply to non-warranty service and
maintenance. Accordingly, Sunbeam also denies liability for defects and damage caused by
repair or alteration outside the terms of this warranty.
There are no warranties which extend beyond those stated herein. ANY IMPLIED
WARRANTIES THAT MAY BE APPLICABLE TO PRODUCTS, INCLUDING IMPLIED WARRANTIES
OF MERCHANTABILITY OR FITNESS FOR A PARTICULAR PURPOSE, ARE LIMITED IN
DURATION TO THE DURATION OF THIS WARRANTY. Some States do not allow limitations on
how long an implied warranty lasts, so the above limitation may not apply to you.
UNDER NO CIRCUMSTANCES SHALL SUNBEAM BE LIABLE FOR ANY SPECIAL, INCIDENTAL,
OR CONSEQUENTIAL DAMAGES BASED UPON BREACH OF THIS LIMITED WARRANTY,
BREACH OF CONTRACT, OR STRICT LIABILITY. Some States do not allow the exclusion or
limitation of incidental or consequential damages, so the above limitation or exclusion may not
apply to you.
This warranty gives you specific legal rights, and you may also have other rights which vary
from State to State.
How to Obtain Warranty Service
In the U.S.A.
If you have any questions regarding this warranty or would like to obtain warranty support,
please call 1-800-672-6333 or visit the Mr.Coffee
®
Website. Proof of purchase and proof of
delivery date if different than your date of purchase is required to obtain warranty performance.
In Canada
If you have any question regarding this warranty or would like to obtain warranty service,
please call 1-800-672-6333.
In the U.S.A. this warranty is offered by Sunbeam Products, Inc, located at 6655 Peachtree
Dunwoody Rd, Atlanta, GA 30328. In Canada, this warranty is offered by Newell Brands Canada
ULC, located at 20B Hereford Street, Brampton, Ontario L6Y 0M1. If you have any other problem
or claim in connection with this product, please write our consumer service department.
To view the complete suite of products, please visit our website:
www.Mrcoffee.com
BVMC-IHCTM08SS_24EM2.indd 14-15
BVMC-IHCTM08SS_24EM2.indd 14-15
2024/4/10 08:51
2024/4/10 08:51

© 2024 Sunbeam Products, Inc. All rights reserved. Distributed by Sunbeam Products, Inc.
6655 Peachtree Dunwoody Rd, Atlanta, GA 30328. Made in China.
BVMC-IHCTM08SS_24EM2_GCDS-LD P/N: NWL0001643876 Rev A
Need help with your appliance?
Contact our Customer Care Team or
visit our website for information and tips
on getting the most from your appliance.
www.mrcoffee.com
1-800-672-6333
BVMC-IHCTM08SS_24EM2.indd 16
BVMC-IHCTM08SS_24EM2.indd 16
2024/4/10 08:51
2024/4/10 08:51