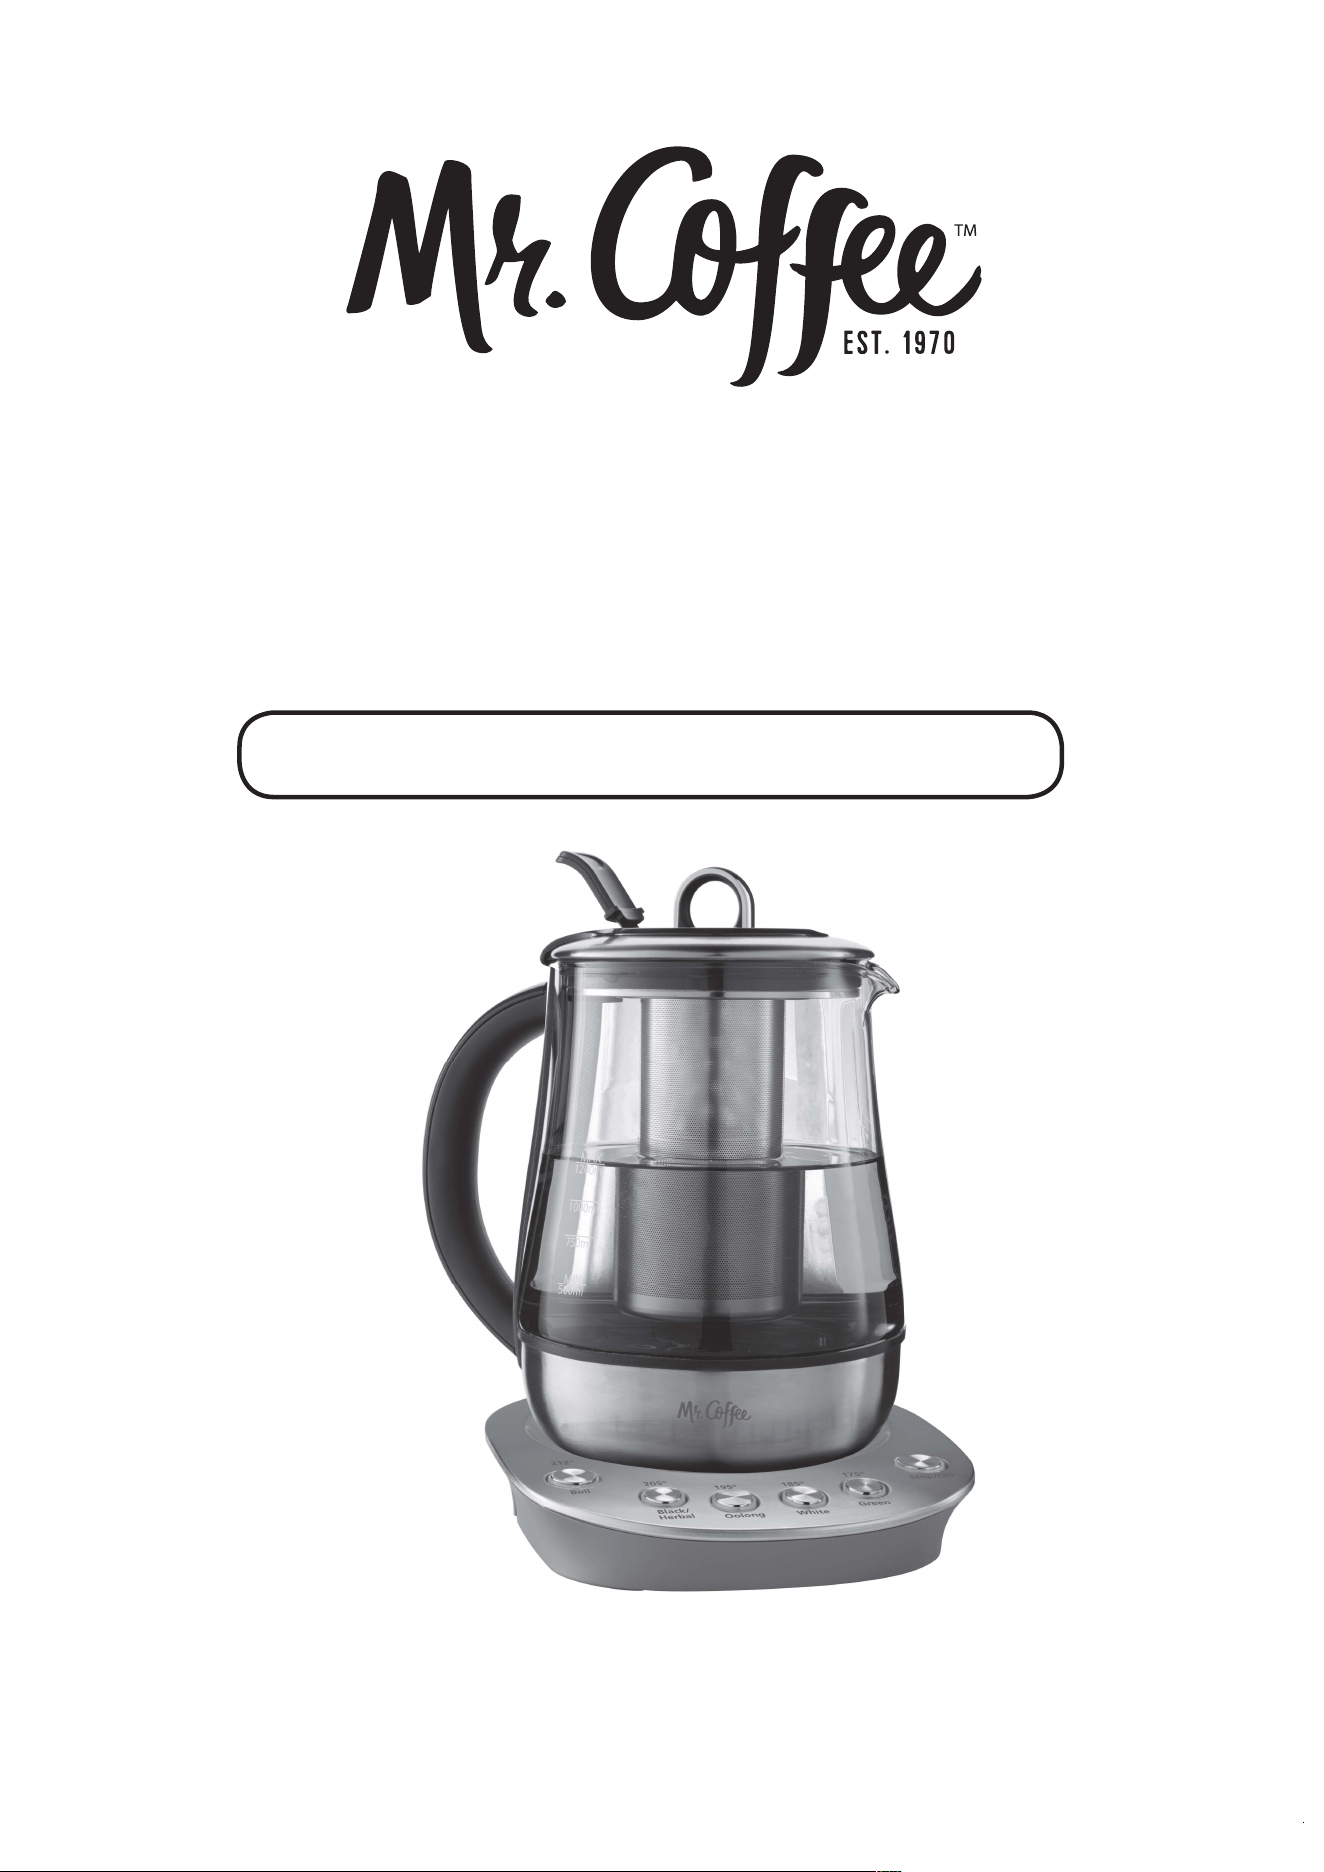
MODEL/MODELO BVMC-HTK Series
User Manual
www.mrcoffee.com
TEA MAKER + KETTLE
TETERA + HERVIDOR ELÉ CTRICO
Manual del Usuario

-2-
IMPORTANT SAFEGUARDS
When using electrical appliances, basic safety
precautions should always be followed to reduce the
risk of fire, electric shock, and/or injury to persons,
including the following:
1. Read all instructions before using.
2. Do not touch hot surfaces. Use handles or knobs.
3. To protect against electric shock, do not immerse
this appliance, in water or any other liquid.
4. Close adult supervision is necessary when this
appliance is used by or near children.
5. Unplug the power base or detachable cord
from the power outlet when not in use, before
repositioning and before cleaning. Allow to cool
before putting on or taking off parts and before
cleaning the appliance.
6. Do not operate any appliance with a damaged
cord or plug or after the appliance malfunctions,
or has been damaged in any manner. Return this
appliance only to the nearest authorized service
center for examination, repair or adjustment.
7. The use of accessory attachments not recommended
by Sunbeam may cause hazards or injuries.
8. Do not use outdoors.
9. Do not let cord hang over edge of table or
counter, or touch hot surfaces.
10. Do not place this appliance on or near a hot gas
or electric burner or in a heated oven.
11. Ensure that the kettle is properly located on the
power base, before switching on.

-3-
12. Remove the kettle from power base or unplug
the power base from wall outlet before filling or
pouring. Do not attempt to remove the kettle
from the power base or unplug from wall outlet
until it is switched off, manually or automatically.
13. Use the tea maker + kettle only with the power
based supplied.
14. Do not use appliance for other than intended use.
15.
This tea maker + kettle is intended for boiling WATER
ONLY. Do not heat any other liquid or attempt to cook
any food in this appliance.
16.
Use on a hard, flat level surface only, to avoid
interruption of air flow underneath the appliance.
17. Extreme caution must be used when handling or
moving tea maker + kettle and pouring from tea
maker + kettle containing boiling water or tea.
18. Scalding may occur if the lid is removed during the
heating cycle.
19. Keep spout away from persons as scalding can result
from steam.
20. The water level in the appliance must not exceed the
“MAX” mark on the water level gauge.
21. Place the tea maker + kettle well back from the edge of
the counter.
SAVE THESE INSTRUCTIONS

-4-
FOR HOUSEHOLD USE ONLY
POWER CORD INSTRUCTIONS
1. A short power supply cord is provided to reduce
the hazards resulting from becoming entangled in or
tripping over a longer cord.
2. An extension cord may be purchased and used if
care is exercised in its use.
3. If an extension cord is used, the marked electrical
rating of the extension cord must be at least as
great as the electrical rating of the appliance (please
check the rating label directly on the appliance). The
resulting extended cord must be arranged so that it
will not drape over the counter top or table where
it can be pulled on by children or tripped over
accidentally.
4. The extension cord should be a grounding type
3-wire cord.
NOTICE
1. Do not switch on the appliance unless there is at least 0.5 liters
of water in it.
2. Do not hold the switch on as this may damage the auto shut-off
mechanism.

-5-
Table of Contents
Important Safeguards ......................................................... 2
Power Cord Instructions ..................................................... 4
Table Of Contents ............................................................... 5
Diagram Of Parts ................................................................. 5
Before First Use ................................................................... 6
Using Your Tea Maker + Kettle ............................................ 6
Turn Off The Unit .............................................................. 10
Anti boil-dry device .......................................................... 10
Care And Cleaning Instructions ......................................... 10
Maintenance .................................................................... 11
Limited Warranty .............................................................. 12
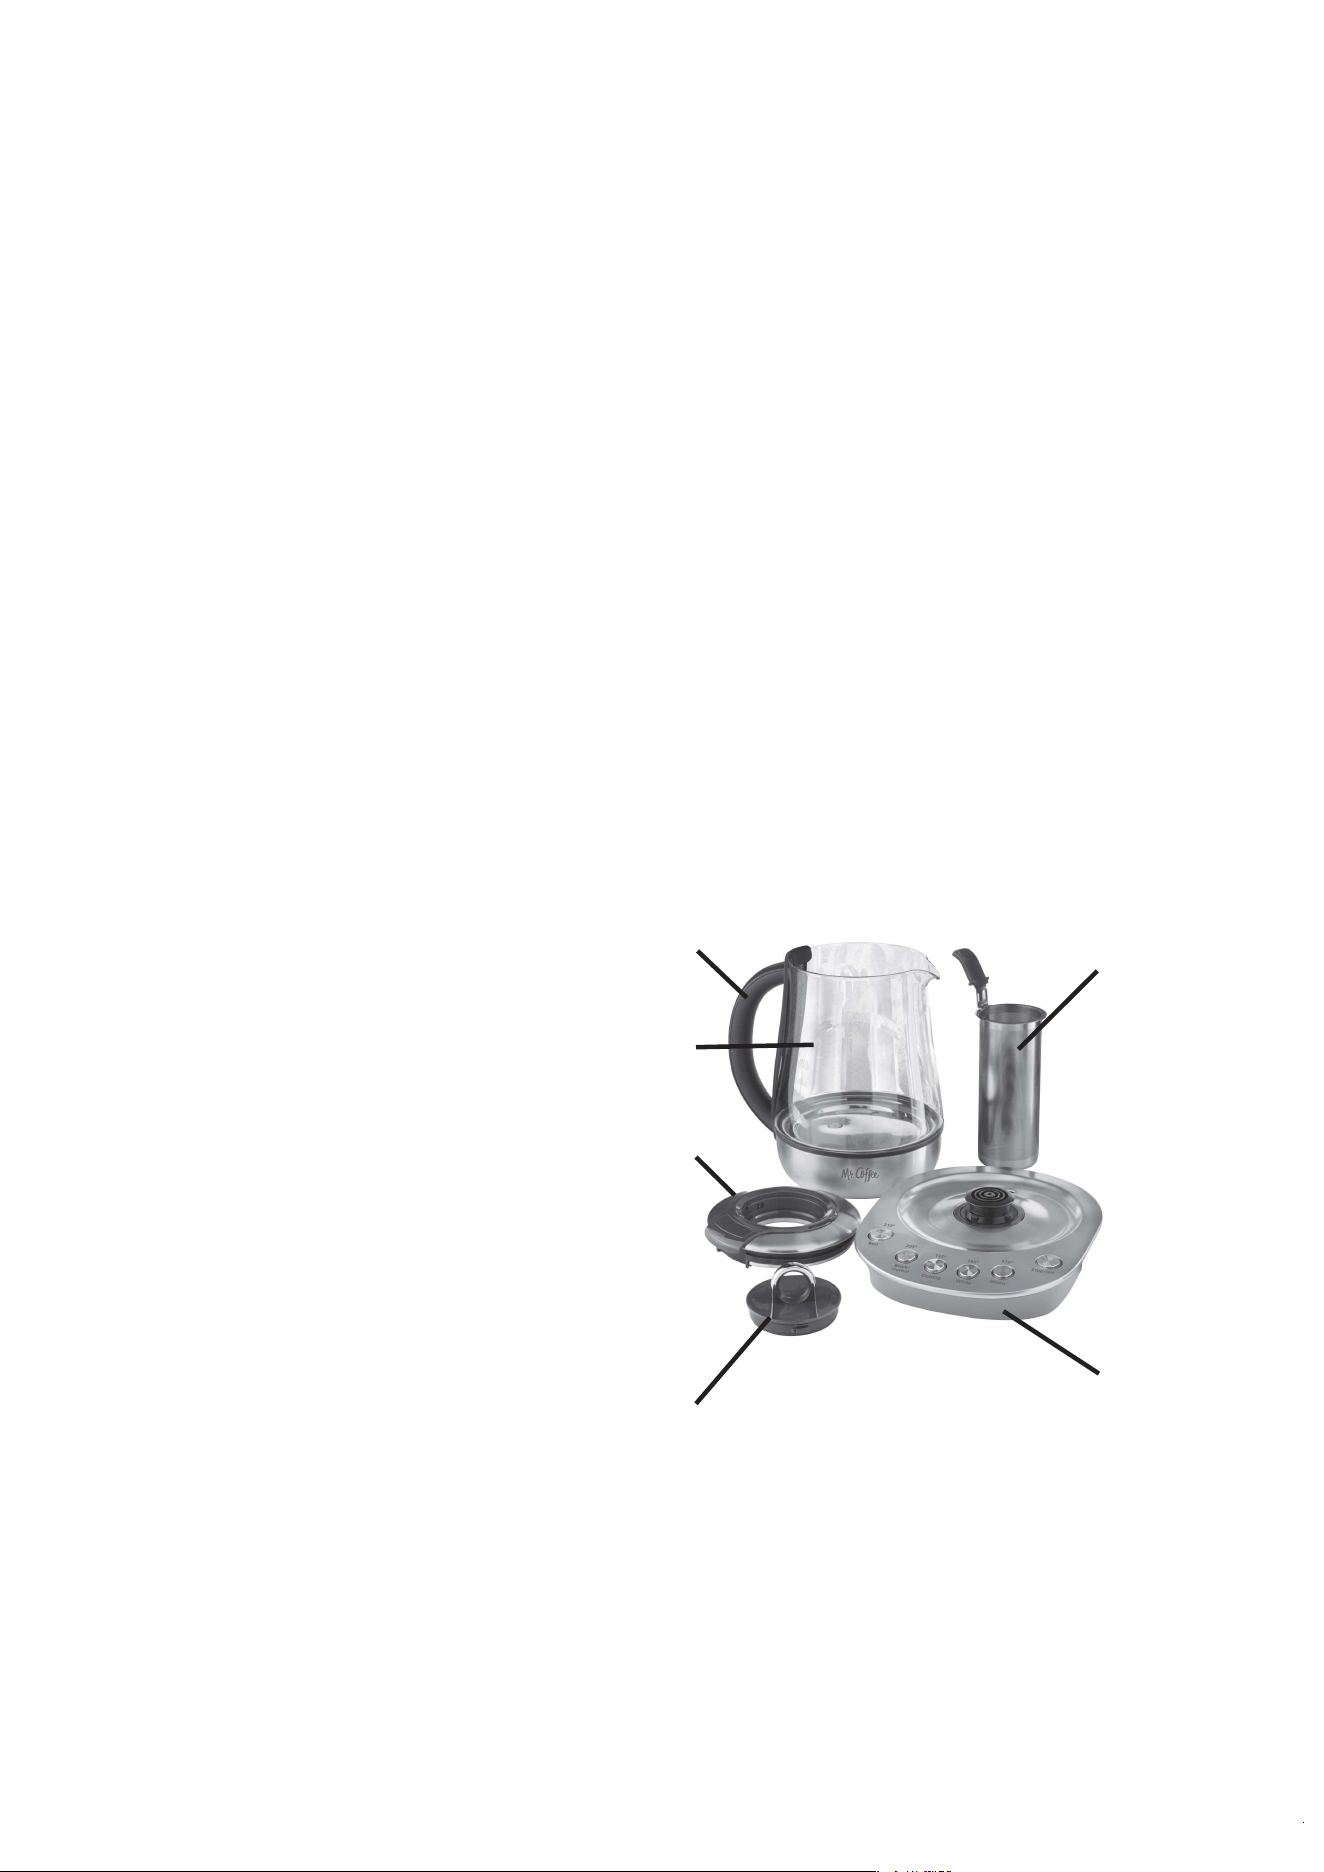
DIAGRAM OF PARTS
1. Handle
2. Kettle
3. Lid
4. Infuser Lid
5. Tea Infuser
6. Power Base
1.
2.
3.
4.
5.
6.
-6-
CONGRATULATIONS ON YOUR BRAND NEW TEA
MAKER!
We know taste matters. For us, bringing a rich steeping
experience into your home is an obsession. This Tea Maker
is designed for the tea drinker who appreciates true taste
steeped to perfection. Enjoy!
Before first use
Always clean your kettle before first use
1. Wash the inside of the kettle, the tea infuser and lid with
mild detergent and water. Rinse each thoroughly. The tea
infuser is the ONLY item dishwasher safe.
CAUTION: Do not immerse the kettle or
power base in water or any other liquid.
2. Do not use scouring pads, steel wool or any
form of strong solvents or abrasive cleaning
agents to clean the appliance, as they can
damage the external surfaces of the appliance.
3. Allow the appliance to dry fully after cleaning
before using.
CAUTION:
The appliance must not be
used if the base or the underside of the
appliance is wet.
4. Your tea maker + kettle is now ready for use!
USING YOUR TEA MAKER + KETTLE
SETUP
1. Position the power base on a flat, heat
resistant surface, as close as possible to a
power outlet.
2. Follow cord routing in power base according
to exit patterns. Proper cord routing will result
in the power base laying flat when kettle is
placed in base.
Figure 1
Figure 2
Figure 3
-7-
CAUTION: Do not operate kettle if power
base is not flat. If power base is not flat,
remove kettle from power base and repeat
cord placement instructions.
3.
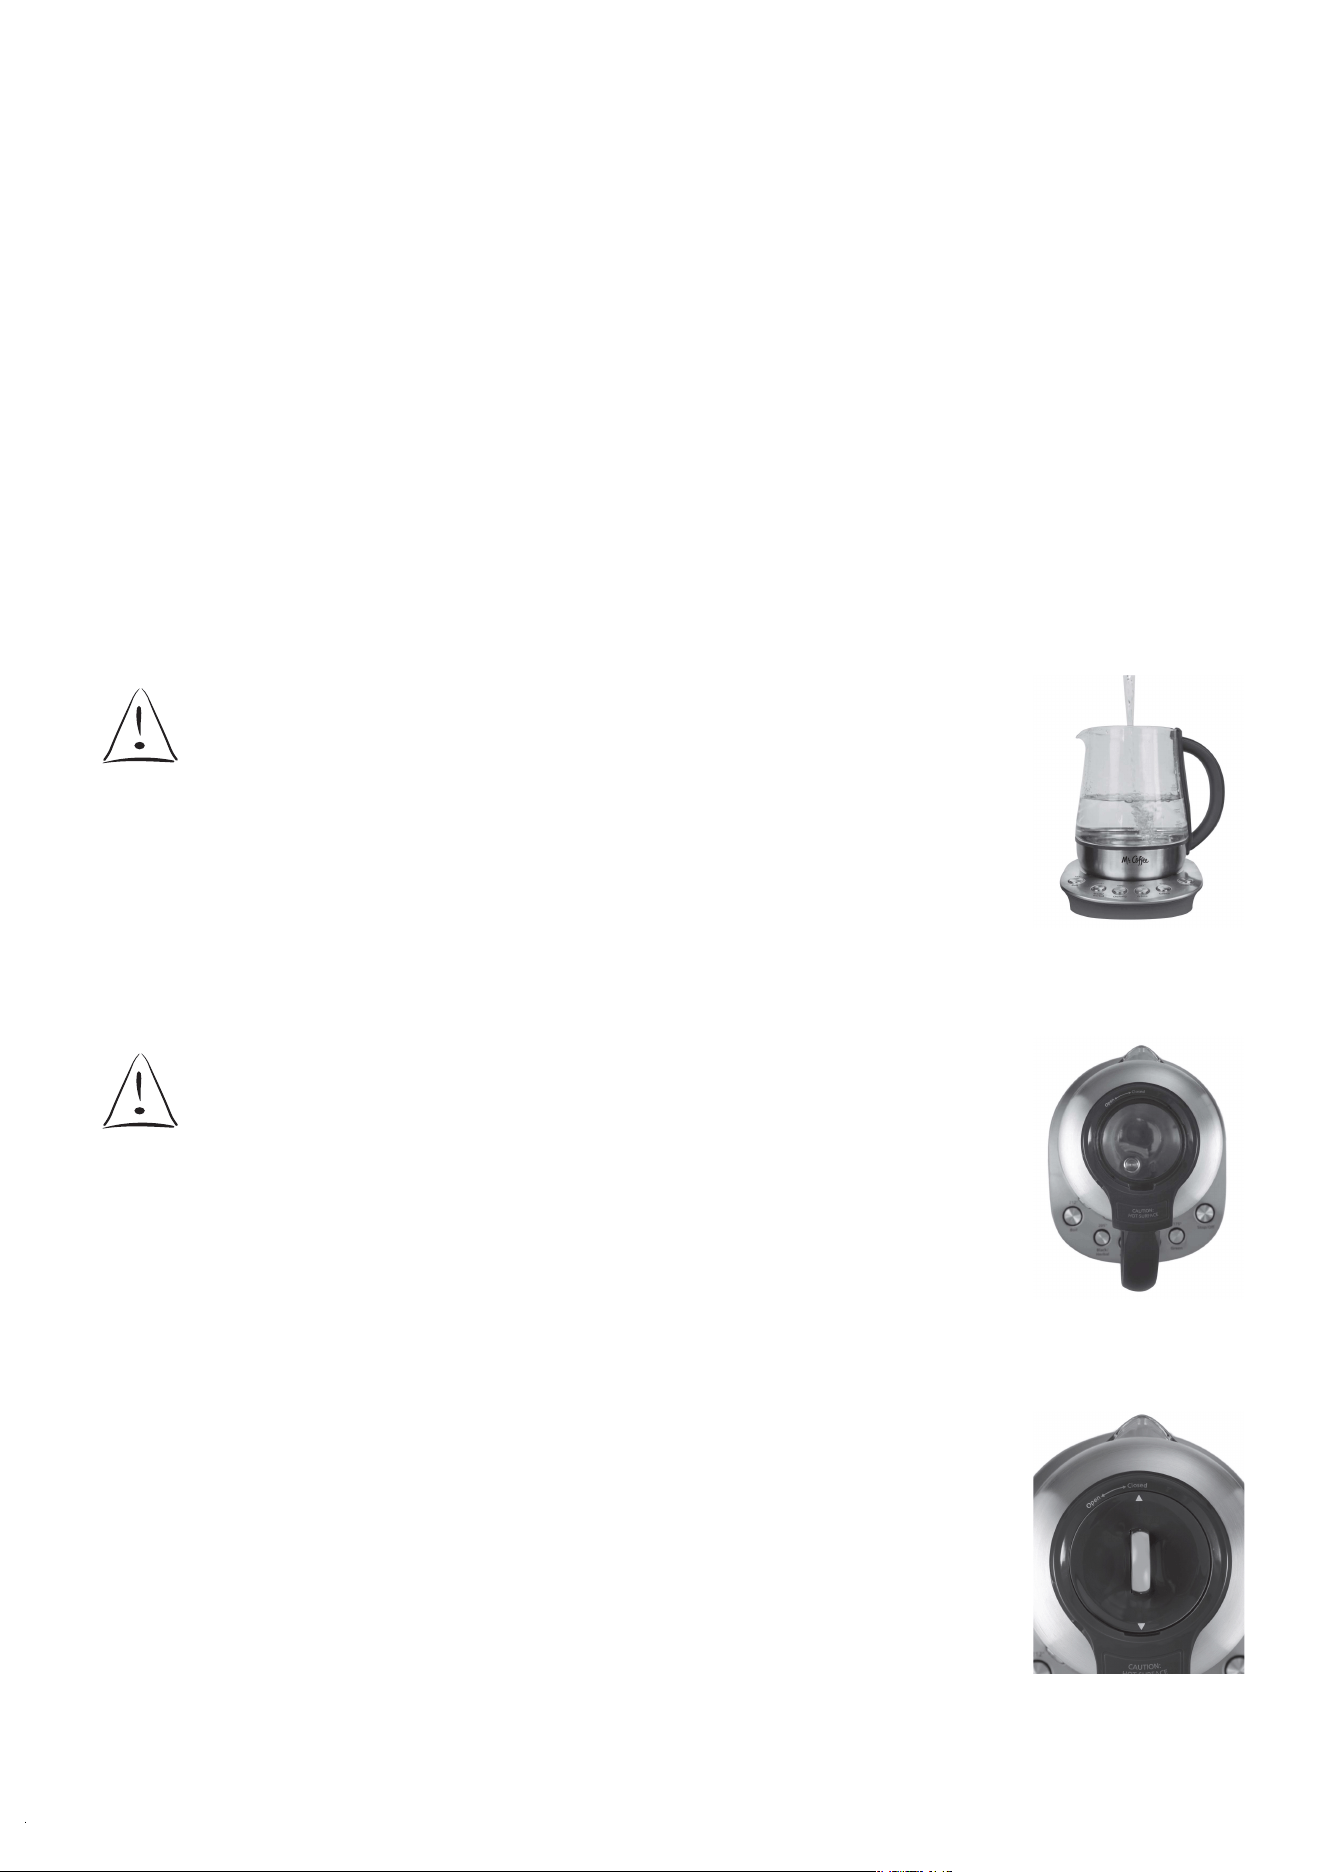
Add fresh cold water to the desired level (Figure 1)
CAUTION: Do not exceed the “MAX” water
level mark indicated on the kettle.
4. Add the kettle lid on top make sure it lines up with the
handle. (Figure 2)
5.
Then, add the infuser lid on the infuser holder. To lock this lid
turn it until the arrow lines up with “closed”. (Figure 3)
Note: Do not install the tea infuser unless you are
making tea.
6.
Plug the electric cord into an electric outlet. All
lights will go ON, then OFF and the Stop button
will remain ON-Blue indicating its ready mode.
7. Kettle is ready to use! (Figure 4)
BOIL WATER
1. To boil water, press the “BOIL” button to start the heating
process. During heating the Boil button will light up, and
the Stop button will PULSE-Red.
2. When the water has reached boiling, the kettle will beep
3 times and automatically switch to keep warm mode.
Note: Kettle can be removed from base anytime during
keep warm mode for use but should be returned to base to
maintain the keep warm functionality. Once the water has
cooled slightly, the unit will turn on and off to maintain the
temperature at a constant 195F. For your convenience the
unit will automatically switch off after 30 minutes.
3. To turn off the keep warm mode at any time simple press
“STOP”. (Figure 5)
4. Hot water is ready to use!
Figure 4
Figure 5

-8-
MAKE TEA
To make tea, after setting up the tea maker + kettle follow
these steps:
Heat Water
1. After adding cold water, select the button that
corresponds to the tea type of your preference by
pressing it one time.
Note: During the heating process the tea button will
PULSE and the Stop button will be ON red.
2. When the water has reached the proper temperature, the
kettle will BEEP and the tea button will FLASH to let you
know it’s time to add your favorite tea!
Add Tea
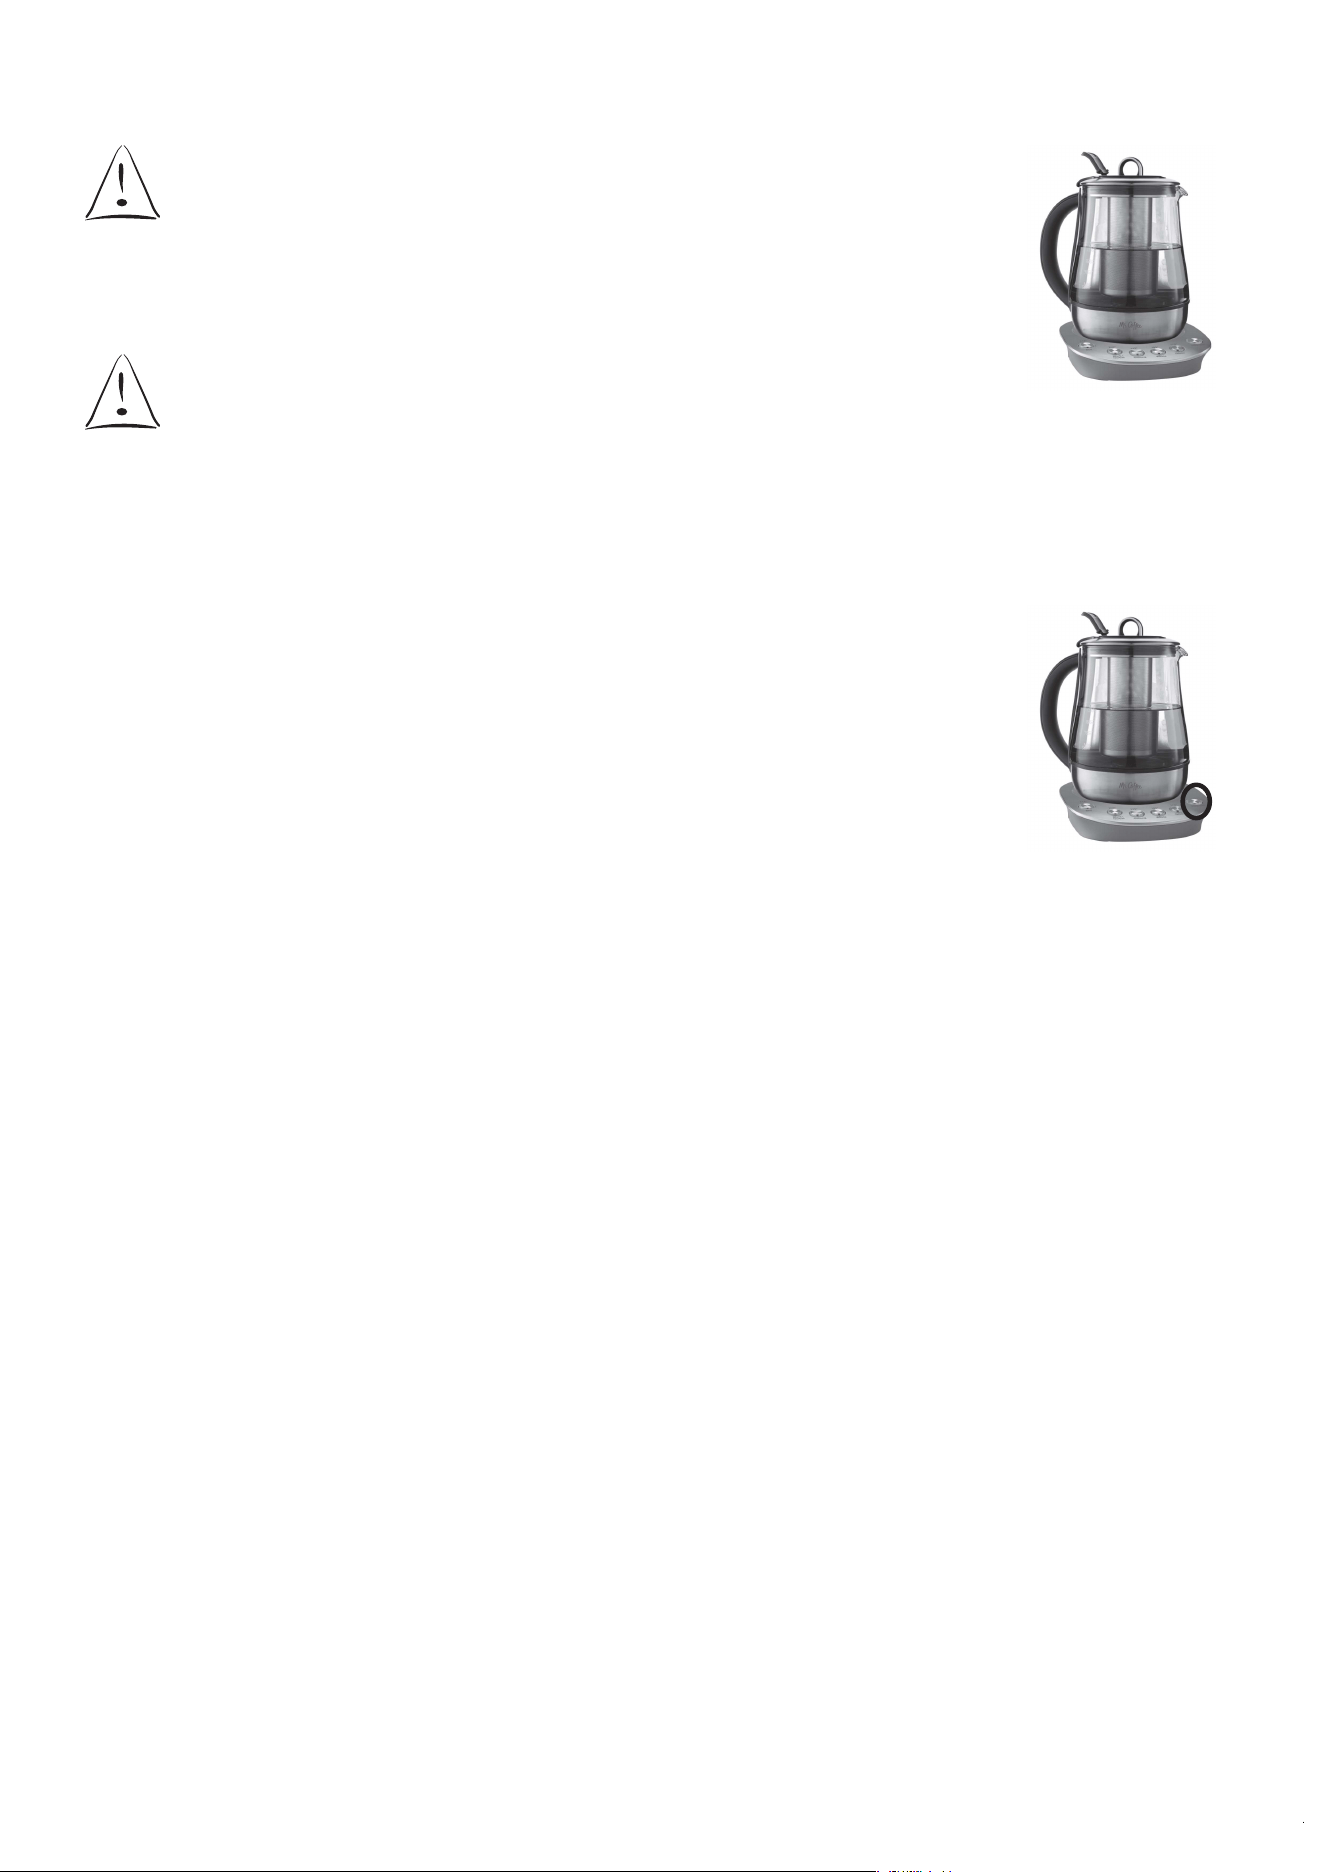
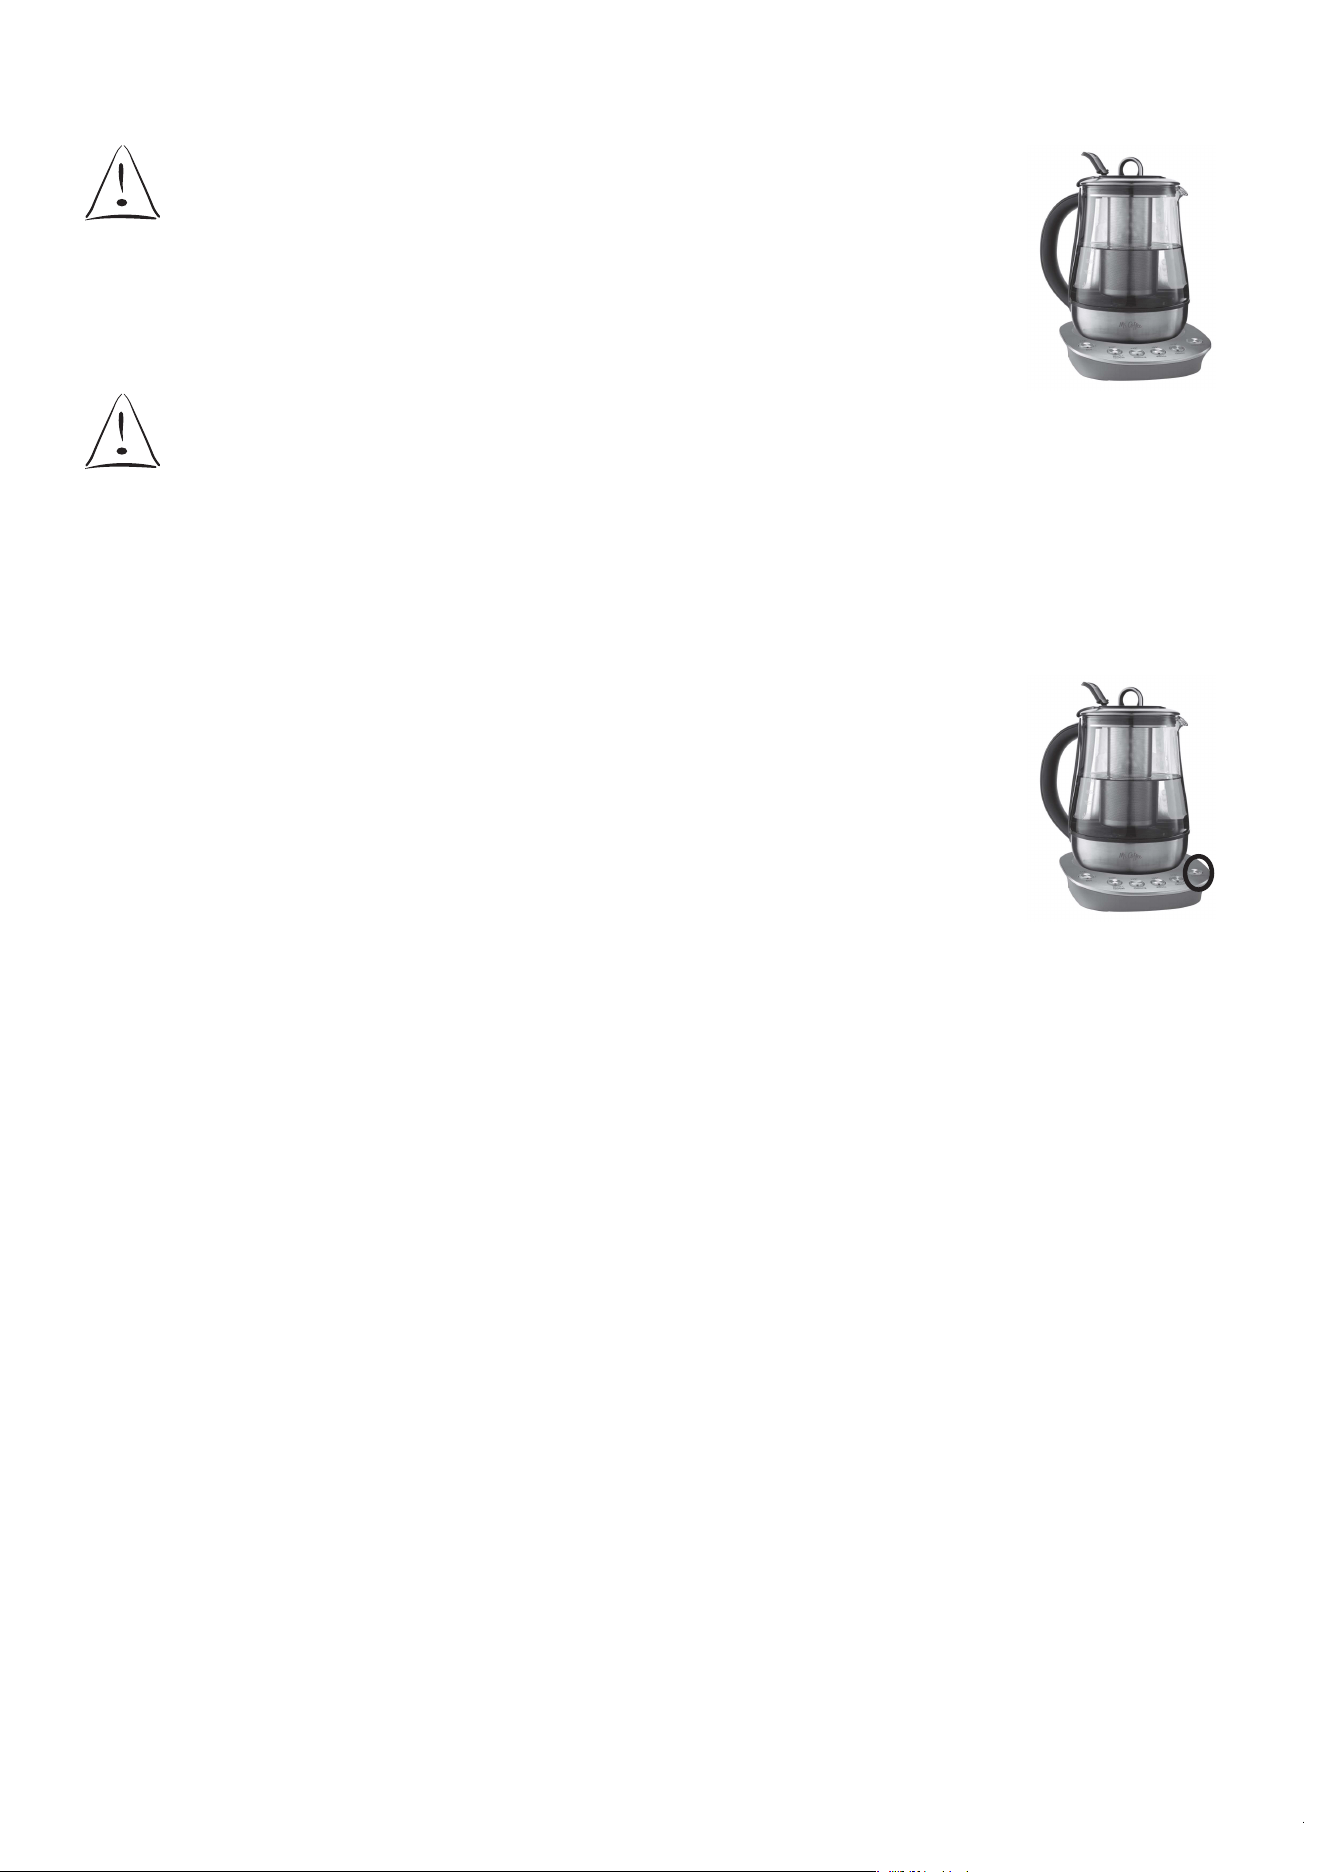
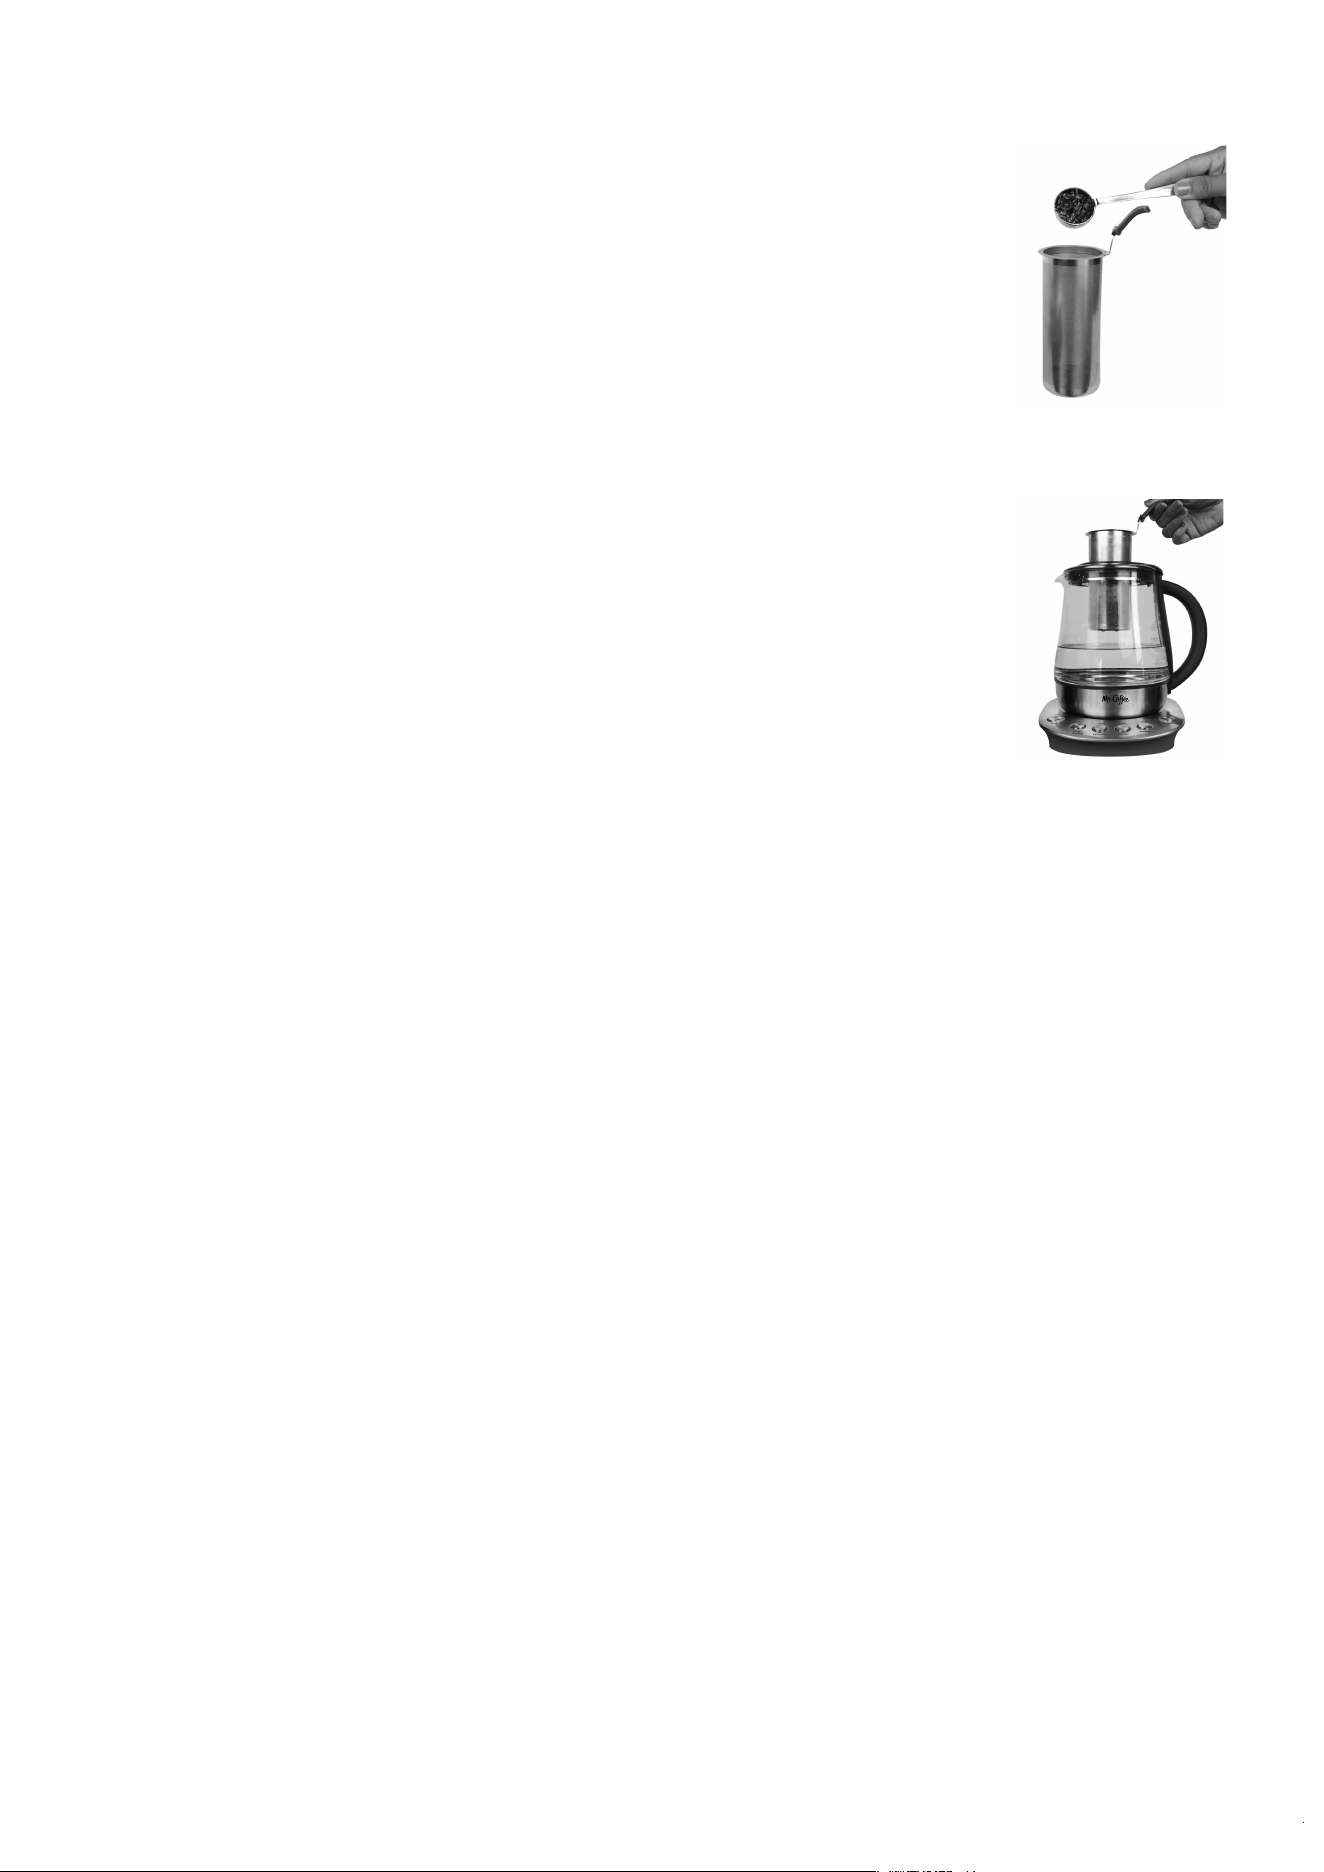
3. Fill the tea infuser with desired amount of
tea (Figure 6). Taste of tea is personal, but
for most tea types it is recommended to
use 1 tsp to 1.5 tsps. or 1 bag per cup of
water. We suggest you follow the tea supplier
recommendations for optimal results.
4. Open the tea infuser lid by turning it, so the
arrow lines up with “open” mark.
5. Place the tea infuser into the infuser holder
by lining up the infuser handle with the kettle
handle. (Figure 7)
6. Gently press ingredients down with a spoon
to make sure they are fully immerse in water
during the steeping process.
Temperature Tea Type Default Steeping Time
205°F Herbal / Black Tea 2 minutes
195°F Oolong Tea 3 minutes
185°F White Tea 3 minutes
175°F Green Tea 1 minute
Figure 6
Figure 7

-9-
7. Add the lid on top of the tea infuser and to lock this lid
turn it until the arrow lines up with “closed”.
Set Steeping Time
8. To set the default steeping time, press the same button
again.
9. Once the steeping time is completed the kettle will beep
and lights will flash indicating it’s time to remove the tea
infuser. It is recommended to remove the tea infuser to
avoid over steeping the tea.
10. Press the same button again to set the keep warm mode.
Note: Kettle can be removed from base anytime during
keep warm mode for use but should be returned to
base to maintain the keep warm functionality. Once the
water has cooled slightly, the unit will turn on and off to
maintain the temperature warm. For your convenience
the unit will automatically switch off after 60 minutes.
11. If you do not want to set up the keep warm mode simply
press “STOP”.
12.Tea is ready, pour and enjoy!
CUSTOM STEEPING TIME
To set custom steeping time, replace step 8 with:
8.a. Press same button again, then one time for each minute
you want to add. When done the kettle will beep once for
each minute of steeping time you selected to let you know
the setting.
For example- if you want to steep for 4 minutes, press the
button 5 times. 1 time to enter custom mode + 4 times for
the 4 minutes. The kettle will beep 4 times.
KEEP WARM MODE
The Tea Maker + Kettle incorporate a keep-warm function,
which maintains the tea at a pre-determined temperature for
60 minutes and water for 30 minutes. The keep warm feature
is ideal for different tea steeping, family breakfast and
cooking. The keep warm feature will not boil the water.

-10-
1. Once the steeping time is completed the kettle will beep,
to set up the keep warm press the same button you
selected according to the tea type steeped Note: Kettle
can be removed from base anytime during keep warm
mode for use but should be returned to base to keep
warm.
2. After 60 minutes the keep warm will shut off for tea and
after 30 minutes the keep warm will shut off for boiling
water.
3. If you do not want the Keep Warm mode simply press
STOP.
Turn Off The Unit
If you want to stop the heating process simply press STOP/OFF
once. If you want to turn off the unit, press and hold STOP/OFF
until the light goes off.
Anti boil-dry device
If you switch the appliance on without there being any water
in it or when the water level is too low, the anti boil-dry
device will automatically switch it off. The appliance can be
switched on normally as soon as it is filled with a sufficient
amount of water.
Care And Cleaning Instructions
Cleaning Your Kettle
1. Mineral deposits in tap water may cause scale deposits
to form inside the electric kettle after frequent use. To
remove this scale build-up, fill the kettle with a solution
of 3 cups of white vinegar and 3 cups water. Let sit
overnight.
2. Empty the vinegar solution from the electric kettle.
Remove any stain remaining inside by rubbing with a
damp cloth.

-11-
3. Fill the electric kettle with clean water. Place kettle on
power base and bring to a boil, then discard water.
Repeat and the electric kettle will be ready to use.
4. The electric kettle will not operate again until the Power
Button is pressed downward.
5. The outside of the electric kettle can be wiped with a
soft damp cloth.
CAUTION: Do not immerse kettle or power base in
water or other liquid.
Note: Never use any chemical, steel wool, or abrasive
cleaners to clean any part of the kettle, including the
power base.
MAINTENANCE
This appliance has no user serviceable parts beyond the
care and cleaning described in the Care and Cleaning
section. Any other servicing should be performed only by
an authorized service representative.

-12-
WARRANTY INFORMATION
1-YEAR LIMITED WARRANTY
Sunbeam Products, Inc. doing business as Jarden Consumer
Solutions or if in Canada, Sunbeam Corporation (Canada) Limited
doing business as Jarden Consumer Solutions (collectively
“JCS”) warrants that for a period of one year from the date of
purchase, this product will be free from defects in material and
workmanship. JCS, at its option, will repair or replace this product
or any component of the product found to be defective during
the warranty period. Replacement will be made with a new or
remanufactured product or component. If the product is no
longer available, replacement may be made with a similar product
of equal or greater value. This is your exclusive warranty. Do NOT
attempt to repair or adjust any electrical or mechanical functions
on this product. Doing so will void this warranty.
This warranty is valid for the original retail purchaser from the date
of initial retail purchase and is not transferable. Keep the original
sales receipt. Proof of purchase is required to obtain warranty
performance. JCS dealers, service centers, or retail stores selling
JCS products do not have the right to alter, modify or any way
change the terms and conditions of this warranty.
This warranty does not cover normal wear of parts or damage
resulting from any of the following: negligent use or misuse of
the product, use on improper voltage or current, use contrary
to the operating instructions, disassembly, repair or alteration by
anyone other than JCS or an authorized JCS service center. Further,
the warranty does not cover: Acts of God, such as fire, flood,
hurricanes and tornadoes.
What are the limits on JCS’s Liability?
JCS shall not be liable for any incidental or consequential damages
caused by the breach of any express, implied or statutory warranty
or condition. Except to the extent prohibited by applicable law,
any implied warranty or condition of merchantability or fitness for
a particular purpose is limited in duration to the duration of the
above warranty. JCS disclaims all other warranties, conditions or
representations, express, implied, statutory or otherwise.
JCS shall not be liable for any damages of any kind resulting from

-13-
the purchase, use or misuse of, or inability to use the product
including incidental, special, consequential or similar damages
or loss of profits, or for any breach of contract, fundamental or
otherwise, or for any claim brought against purchaser by any
other party. Some provinces, states or jurisdictions do not allow
the exclusion or limitation of incidental or consequential damages
or limitations on how long an implied warranty lasts, so the above
limitations or exclusion may not apply to you. This warranty gives
you specific legal rights, and you may also have other rights that
vary from province to province, state to state or jurisdiction to
jurisdiction.
How to Obtain Warranty Service
In the U.S.A.
I
f you have any question regarding this warranty or would like to
obtain warranty service, please call
1-800-MR COFFEE
(1-800-672-6333)
and a convenient service center address will be
provided to you.
In Canada
If you have any question regarding this warranty or would like
to obtain warranty service, please call 1-800-667-8623 and a
convenient service center address will be provided to you.
In the U.S.A., this warranty is offered by Sunbeam Products, Inc.
doing business as Jarden Consumer Solutions located in Boca
Raton, Florida 33431. In Canada, this warranty is offered by
Sunbeam Corporation (Canada) Limited doing business as Jarden
Consumer Solutions, located at 20 B Hereford Street, Brampton,
Ontario L6Y 0M1. If you have any other problem or claim in
connection with this product, please write our Consumer Service
Department.
PLEASE DO NOT RETURN THIS PRODUCT TO ANY OF THESE
ADDRESSES OR TO THE PLACE OF PURCHASE.

-14-
PRECAUCIONES
IMPORTANTES
Cuando use algú n artefacto elé ctrico siempre deben
seguirse precauciones bá sicas de seguridad para disminuir
riesgos de incendio, descargas elé ctricas yo algunas
lesiones a personas, incluyendo las siguientes:
1. Lea todas las instrucciones antes de usar la má quina.
2. No toque las superficies calientes. Use los guantes o
agarraderas.
3. Para protegerse contra una descarga elé ctrica, no sumerja
este artefacto en agua o en cualquier otro líquido.
4. La supervisió n de adultos cercana es necesaria cuando se
utilice cualquier artefacto por niñ os o cerca de ellos.
5. Desenchufe la base de potencia o cable de extensió n
del tomacorriente cuando no lo esté utilizando, antes
de cambiarlo de sitio y antes de limpiarlo. Permita que
se enfríe antes de colocar o quitar piezas y antes de
limpiar el artefacto.
6. No opere ningú n artefacto con un cable o enchufe
dañ ado ni despué s de un mal funcionamiento del
artefacto, o si se ha dañ ado de alguna manera.
Devuelva este artefacto solamente al centro de servicio
autorizado má s cercano para examinarlo, repararlo o
ajustarlo.
7. El uso de accesorios distintos a los recomendados por
Sunbeam podría ocasionar riesgos o lesiones.
8. No lo use a la intemperie.
9. No deje que el cable cuelgue sobre el borde de
la mesa o del mostrador o que toque superficies
calientes.
10. No coloque el artefacto sobre o cerca de una hornilla
caliente de gas o elé ctrica, ni dentro de un horno
caliente.

-15-
11. Asegú rese de que el hervidor de agua está colocado
correctamente en la base, antes de encenderlo.
12. Retire el hervidor de la base o desconecte la base
del tomacorriente antes de llenarlo o vaciarlo. No
intente retirar el hervidor de la base o desenchufar del
tomacorriente hasta que se haya apagado, de forma
manual o automá tica.
13. Utilice la tetera + hervidor de agua só lo con la
base suministrada.
14.
No utilice el artefacto para otro uso distinto al
indicado.
15.
Esta tetera + hervidor de agua está diseñ ada para
hervir AGUA SOLAMENTE. No caliente ningú n otro
líquido o intente cocinar cualquier alimento en este
artefacto.
16. Use solamente en una superficie dura y nivelada para
evitar la interrupció n del flujo de aire debajo del
artefacto.
17. Debe tener mucho cuidado al manipular o mover la
tetera + hervidor y al verter de ella porque contiene
agua hirviendo o té .
18. Pueden ocurrir quemaduras si se retira la tapa durante
el ciclo de calentamiento.
19. Mantenga el pico del hervidor lejos de las personas ya
que podrían producirse quemaduras provenientes del
vapor.
20. El nivel de agua en el aparato no debe superar el nivel
“MAX” en el indicador de nivel de agua.
21. Coloque la tetera + hervidor de agua bien atrá s y
alejado del borde del mostrador.
GUARDE ESTAS
INSTRUCCIONES

-16-
SÓ LO PARA USO DOMÉ STICO
INSTRUCCIONES DEL CABLE ELÉ CTRICO
1. El cable elé ctrico suministrado es corto para reducir
los riesgos resultantes de enredarse o tropezarse
con un cable má s largo.
2. Un cable de extensió n puede ser comprado y
utilizado si se tiene cuidado en su uso.
3. Si se utiliza un cable de extensió n, la clasificació n
elé ctrica marcada del cable de extensió n debe ser
al menos tan grande como la clasificació n elé ctrica
del artefacto (por favor, compruebe la etiqueta de
clasificació n directamente en el artefacto). El cable
de extensió n debe ser colocado de manera que
no cuelgue del mostrador o mesa donde pueda ser
halado por niñ os o tropezarse accidentalmente.
4. El cable de extensió n debe ser un cable con línea
de tierra.
NOTA
1. No conecte el aparato a menos que haya al menos
0,5 litros de agua en ella.
2. No sostenga el interruptor de encendido, ya que
podría dañ ar el mecanismo de apagado automá tico.
-17-
Tabla de Contenidos
Precauciones Importantes ................................................ 14
Instrucciones del Cable Elé ctrico ...................................... 16
Tabla de Contenidos ........................................................ 17
Diagrama De Las Partes ..................................................... 17
Antes del Primer Uso ........................................................ 18
Uso de la Tetera + Hervidor de Agua ............................... 18
Có mo apagar la unidad ................................................... 22
Dispositivo de No hervido en seco ................................... 23
Instrucciones de Cuidado y Limpieza .............................. 23
Mantenimiento ................................................................. 23
Garantía Limitada ............................................................. 24
Diagrama De Las Partes
1. Asa
2. Hervidor de Agua
3. Tapa
4. Tapa del Infusor
5. Infusor de Té
6. Base
1.
2.
3.
4.
5.
6.

-18-
FELICITACIONES POR SU NUEVA TETERA!
Sabemos que los sabores son esenciales. Para nosotros, traer
una rica experiencia de infusiones a su casa es una obsesió n.
Esta Tetera está diseñ ada para el bebedor de té que aprecia el
verdadero sabor macerado a la perfecció n. Disfrute!
Antes del Primer Uso
Siempre limpie el hervidor antes del primer uso
1. Lave el interior del hervidor, el infusor y la tapa con un
detergente suave y agua. Enjuague a fondo. El infusor de té
es la Ú NICA pieza apta para el lavaplatos.
PRECAUCIÓ N: No sumerja el hervidor ni la base en agua o
cualquier otro líquido.
2. No utilice esponjas o pañ os de alambre, ni
solventes fuertes o agentes de limpieza abrasivos
para limpiar el aparato, ya que pueden dañ ar las
superficies externas del aparato.
3. Deje que el aparato se seque completamente
despué s de la limpieza y antes de usar.
PRECAUCIÓ N:
El aparato no debe ser
utilizado si la base o la parte inferior del
aparato está mojado.
4. Su tetera + hervidor ya está listo para su uso!
USO DE LA TETERA + HERVIDOR DE AGUA
PREPARARACIÓ N
1. Coloque la base sobre una superficie plana,
resistente al calor, lo má s cerca posible a un
tomacorriente.
2. Siga el enrutamiento del cable de la base
de acuerdo a los patrones de salida. Enrutar
correctamente el cable se traducirá en que la
base esté en posició n plana cuando el hervidor
de agua se coloca en ella.
Figure 1
Figure 2
Figure 3
-19-
PRECAUCIÓ N: No utilice el hervidor si la base
no está en posició n plana. Si la base no está
en posició n plana, retire el hervidor de la base
y repita las instrucciones de colocació n del
cable.
3. Añ ada agua fría hasta el nivel deseado (Figura 1)
PRECAUCIÓ N: No exceda la marca del nivel
de agua “MAX” indicado en la tetera.
4. Ponga encima la tapa del hervidor asegurá ndose de que se
alinee con el asa. (Figura 2)
5. A continuació n, ponga la tapa del infusor sobre el soporte
del infusor. Para cerrar esta tapa gire hasta que la flecha se
alinee con “cerrado”. (Figura 3)
Nota: No instale el infusor de té a menos que
usted esté haciendo té .
6. Conecte el cable elé ctrico a un tomacorriente.
Todas las luces se encenderá n, luego se apagará n
y el botó n de Detener permanecerá ON-azul
indicando que está en la modalidad de listo.
7. La tetera + hervidor de agua esta listo para usar!
(Figura 4)
PARA HERVIR AGUA
1. Para hervir el agua, presione el botó n “BOIL” para iniciar
el proceso de calentamiento. Durante el calentamiento el
botó n Hervir se iluminará , y el botó n Stop titilará en rojo.
2. Cuando el agua ha alcanzado la ebullició n, el hervidor
sonará 3 veces y automá ticamente cambia a modo de
mantener caliente.
Nota: El hervidor se puede quitar de la base en cualquier
momento para su uso durante la modalidad de mantener
caliente, pero deberá ser devuelto a la base para mantener
la funcionalidad de mantener caliente. Una vez que el agua
se haya enfriado un poco, la unidad se enciende y se apaga
para mantener la temperatura a 195F constante. Para su
comodidad, la unidad se apagará automá ticamente despué s
de 30 minutos.
Figura 5
Figura 4
-20-
3. Para desactivar la modalidad de mantener caliente
simplemente pulse “STOP” en cualquier momento. (Figura 5)
4. El agua caliente está listo para usar!
PARA HACER TÉ
Para hacer té , despué s de instalar la Tetera + Hervidor de Agua,
siga estos pasos:
Para Calentar Agua
1. Despué s de añ adir agua fría, seleccione el botó n
que corresponde con el tipo de té de su preferencia
presionando una vez.
Nota: Durante el proceso de calentamiento el botó n de té
titilará y el botó n de parada (Stop) se pondrá en rojo.
2. Cuando el agua ha alcanzado la temperatura adecuada, la
tetera emitirá un SILBIDO y el botó n de té DESTELLARA para
hacerle saber que es hora de añ adir su té favorito!
Para Añ adir Té
3. Llene el infusor de té con la cantidad deseada de té (Figura
6). El sabor de té es personal, pero para la mayoría de
tipos de té se recomienda usar de 1 cucharadita a 1.5
cucharaditas o 1 bolsa por taza de agua. Le sugerimos que
siga las recomendaciones del proveedor de té para obtener
resultados ó ptimos.
4. Abra la tapa del infusor de té girá ndola, de modo que la
flecha se alinee con la marca “abrir”.
Temperatura Tipo de Té Tiempo de
Maceració n
Predeterminado
205°F Herbal / Té Negro 2 minutos
195°F Té Oolong 3 minutos
185°F Té Blanco 3 minutos
175°F Té Verde 1 minuto
-21-
5. Coloque el infusor de té en el soporte del
infusor alineando el asa del infusor con el asa
del hervidor de agua. (Figura 7)
6. Presione suavemente hacia abajo los
ingredientes con una cuchara para asegurarse
de que se sumerjan totalmente en el agua
durante el proceso de maceració n.
7. Agregue la tapa en la parte superior del infusor
de té y para cerrar esta tapa gire hasta que la
flecha se alinee con “cerrado”.
Para Ajustar el Tiempo de Maceració n
8. Para ajustar el tiempo predeterminado
maceració n, pulse el mismo botó n otra vez.
9. Una vez que se haya completado el tiempo
de maceració n la tetera emitirá un silbido y las
luces destellará n, indicando que es hora de quitar el infusor
de té . Se recomienda quitar el infusor de té para evitar el
exceso de maceració n del té .
10. Pulse el mismo botó n para ajustar el modo de mantener
caliente.
Nota: El hervidor se puede quitar de la base en cualquier
momento durante la modalidad de mantener caliente para
su uso, pero deberá ser devuelto a la base para mantener
la funcionalidad de mantener caliente. Una vez que el agua
se haya enfriado un poco, la unidad se enciende y se apaga
para mantener la temperatura caliente. Para su comodidad,
la unidad se apagará automá ticamente despué s de 60
minutos.
11. Si no desea configurar la modalidad de mantener caliente
simplemente pulse “STOP”.
12.El Té está listo, vierta y disfrute!
TIEMPO DE MACERACIÓ N PERSONALIZADO A SU GUSTO
Para establecer el tiempo de maceració n a su gusto, reemplace
el paso 8 con:
Figura 6
Figura 7

-22-
8.a. Presione el mismo botó n otra vez, luego una vez por cada
minuto que desee agregar. Cuando esté listo la tetera sonará
una vez por cada minuto de tiempo de maceració n que ha
seleccionado para hacerle saber el ajuste.
Por ejemplo- si quiere macerar durante 4 minutos, pulse el
botó n 5 veces. 1 vez para entrar en el modo personalizado + 4
veces por los 4 minutos. La tetera sonará 4 veces.
MODALIDAD DE MANTENER CALIENTE
La Tetera + Hervidor incorpora una funció n de mantenimiento
del calor, que mantiene el té a una temperatura
predeterminada durante 60 minutos y el agua durante 30
minutos. La funció n de mantenimiento de calor es ideal para
diferentes maceraciones de té , desayuno y comidas familiares.
La funció n de mantenimiento de calor no hervirá el agua.
1. Una vez que se haya completado el tiempo de maceració n
la tetera silbará , para configurar el botó n de mantener
caliente presione el mismo botó n que ha seleccionado en
funció n del tipo de té a macerar.
Nota: El hervidor se puede quitar de la base en cualquier
momento para su uso durante la modalidad de mantener
caliente, pero deberá ser devuelto a la base para mantener el
calor.
2. Despué s de 60 minutos, el mantenimiento de calor
se apagará para el té y despué s de 30 minutos, el
mantenimiento de calor se apagará para el hervido del
agua.
3. Si no desea que la modalidad de mantener caliente pulse
STOP.
Có mo apagar la unidad
Si desea detener el proceso de calentamiento, simplemente
presione STOP / OFF una vez. Si quiere apagar la unidad,
mantenga presionado STOP / OFF hasta que se apague la luz.

-23-
Dispositivo de ebullició n en seco
Si se prende el aparato sin que haya agua adentro o cuando el
nivel del agua es demasiado bajo, el dispositivo de ebullició n
en seco automá ticamente lo apagará . El aparato se puede
conectar normalmente tan pronto como se llene con una
cantidad suficiente de agua.
Instrucciones de Cuidado y Limpieza
Limpieza del Hervidor
1. Los depó sitos minerales en el agua de grifo pueden causar
depó sitos de cal en el interior del hervidor de agua despué s
de un uso frecuente. Para eliminar esta acumulació n de
sarro, llene el hervidor con una solució n de 3 tazas de
vinagre blanco y 3 tazas de agua. Deje reposar durante la
noche.
2. Vacíe la solució n de vinagre del hervidor elé ctrico. Quite
cualquier mancha restante adentro frotando con un pañ o
hú medo.
3. Llene el hervidor de agua con agua limpia. Ponga el hevidor
sobre la base y llé velo a ebullició n, luego deseche el agua.
Repita y el hervidor de agua estará listo para usar.
4. El hervidor elé ctrico no funcionará de nuevo hasta que se
presione el Botó n de Encendido hacia abajo.
5. El exterior del hervidor elé ctrico se puede limpiar con un
pañ o suave y hú medo.
PRECAUCIÓ N: No sumerja el hervidor ni la base en agua o
cualquier otro líquido.
Nota: No utilice ningú n producto químico, pañ o de alambre
o limpiadores abrasivos para limpiar las piezas del hervidor,
incluyendo la base.
MANTENIMIENTO
Este aparato no contiene piezas reparables por el usuario má s
allá del cuidado y limpieza que se describen en la secció n
Cuidado y Limpieza. Cualquier otro servicio debe ser realizado
solamente por un representante de servicios autorizados.

-24-
INFORMACIÓ N DE GARANTÍA
GARANTÍA LIMITADA DE 1 AÑ O
Sunbeam Products, Inc. operando bajo el nombre de Jarden
Consumer Solutions, o en Canadá , Sunbeam Corporation (Canada)
Limited operando bajo el nombre de Jarden Consumer Solutions,
(en forma conjunta, “JCS”), garantiza que por un período de un
añ o a partir de la fecha de compra, este producto estará libre
de defectos de materiales y mano de obra. JCS, a su elecció n,
reparará o reemplazará este producto o cualquier componente
del mismo que presente defectos durante el período de garantía.
El reemplazo se realizará por un producto o componente nuevo
o reparado. Si el producto ya no estuviera disponible, se lo
reemplazará por un producto similar de valor igual o superior.
É sta es su garantía exclusiva. No intente reparar o ajustar ninguna
funció n elé ctrica o mecá nica de este producto. Al hacerlo
elimínará é sta garantía.
La garantía es vá lida para el comprador minorista original a
partir de la fecha de compra inicial y la misma no es transferible.
Conserve el recibo de compra original. Para solicitar servicio en
garantía se requiere presentar un recibo de compra. Los agentes
y centros de servicio de JCS o las tiendas minoristas que venden
productos de JCS no tienen derecho a alterar, modificar ni
cambiar de ningú n otro modo los té rminos y las condiciones de
esta garantía.
Esta garantía no cubre el desgaste normal de las piezas ni los
dañ os que se produzcan como resultado de uso negligente
o mal uso del producto, uso de voltaje incorrecto o corriente
inapropiada, uso contrario a las instrucciones operativas, y
desarme, reparació n o alteració n por parte de un tercero ajeno
a JCS o a un Centro de Servicio autorizado por JCS. Asimismo,
la garantía no cubre actos fortuitos tales como incendios,
inundaciones, huracanes y tornados.

-25-
¿Cuá l es el Límite de Responsabilidad de JCS?
JCS no será responsable de dañ os incidentales o
emergentes causados por el incumplimiento de alguna
garantía o condició n expresa, implícita o legal. Excepto
en la medida en que lo prohíba la ley aplicable, cualquier
garantía o condició n implícita de comerciabilidad o
aptitud para un fin determinado se limita, en cuanto a
su duració n, al plazo de la garantía antes mencionada.
JCS queda exenta de toda otra garantías, condiciones o
manifestaciones, expresa, implícita, legal o de cualquier
otra naturaleza. JCS no será responsable de ningú n tipo
de dañ o que resulte de la compra, uso o mal uso del
producto, o por la imposibilidad de usar el producto,
incluidos los dañ os incidentales, especiales, emergentes
o similares, o la pé rdida de ganancias, ni de ningú n
incumplimiento contractual, sea de una obligació n esencial
o de otra naturaleza, ni de ningú n reclamo iniciado contra
el comprador por un tercero. Algunas provincias, estados
o jurisdicciones no permiten la exclusió n o limitació n de
los dañ os incidentales o emergentes ni las limitaciones
a la duració n de las garantías implícitas, de modo que
es posible que la exclusió n o las limitaciones antes
mencionadas no se apliquen en su caso. Esta garantía le
otorga derechos legales específicos y es posible que usted
tenga otros derechos que varían de un estado, provincia o
jurisdicció n a otro.

-26-
Có mo Solicitar el Servicio en Garantía
En los Estados Unidos
Si tiene alguna pregunta sobre esta garantía o desea recibir
servicio de garantía, llame al
1-800-MR COFFEE
(1-800-672-6333)
y podrá obtener la direcció n del centro
de servicio que le resulte má s conveniente.
En Canadá
Si tiene alguna pregunta sobre esta garantía o desea recibir
servicio de garantía, llame al 1-800-667-8623 y podrá
obtener la direcció n del centro de servicio que le resulte
má s conveniente.
En los Estados Unidos, esta garantía es ofrecida por
Sunbeam Products, Inc. operando bajo el nombre de
Jarden Consumer Solutions, Boca Rató n, Florida 33431. En
Canadá , esta garantía es ofrecida por Sunbeam Corporation
(Canada) Limited operando bajo el nombre de Jarden
Consumer Solutions, 20 B Hereford Street, Brampton,
Ontario L6Y 0M1. Si usted tiene otro problema o reclamo
en conexió n con este producto, por favor escriba al
Departamento de Servicio al Consumidor
POR FAVOR NO DEVUELVA ESTE PRODUCTO A NINGUNA
DE ESTAS DIRECCIONES NI AL LUGAR DE COMPRA.

Printed in China/Impreso en China P.N. 178571
BVMC-HTK Series_15ESM1 GCDS-MRC40013-SL
©2015 Sunbeam Products, Inc. doing business as Jarden
Consumer Solutions. All rights reserved. Distributed by
Sunbeam Products, Inc. doing business as Jarden Consumer
Solutions, Boca Raton, Florida 33431. Sunbeam Products,
Inc.is a subsidiary of Jarden Corporation (NYSE:JAH).
©2015 Sunbeam Products, Inc. operando bajo el nombre
de Jarden Consumer Solutions. Todos los derechos
reservados. Distribuido por Sunbeam Products, Inc.
operando bajo el nombre de Jarden Consumer Solutions,
Boca Raton, Florida 33431. Sunbeam Products, Inc. es una
subsidiaria de Jarden Corporation (NYSE:JAH).
U.S. 1-800-MR COFFEE (1-800-672-6333) Canada 1-800-667-8623
Visit us at www.mrcoffee.com / Visítenos en www.mrcoffee.com
You will find exciting and entertainment tips and ideas, including
great recipes.
Ahí encontrará consejos e ideas interesantes y entretenidas,
incluyendo excelentes recetas.