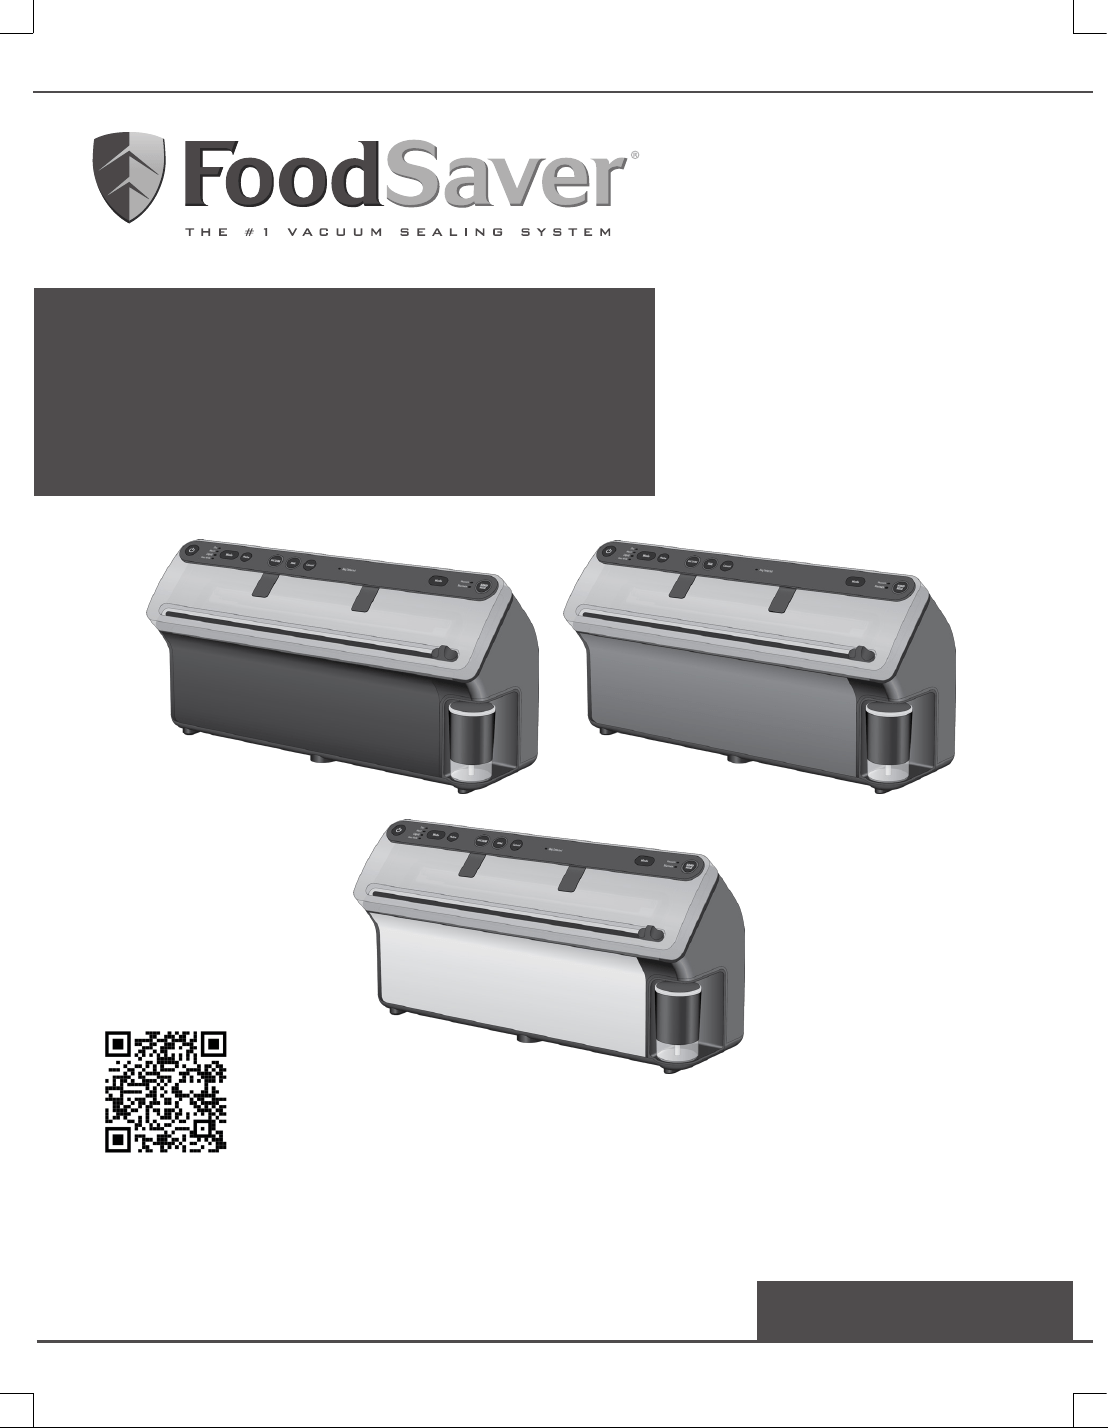
Owner’s Manual
Manuel du propriétaire
Manual del Propietario
VS5900 Series/Séries
Scan for Quick Start Guide
Balayez pour obtenir le guide de démarrage rapide
Escanee para la guía de inicio rápido
VS5900 Series_23EFSM1.indd 1VS5900 Series_23EFSM1.indd 1 2023/4/17 09:582023/4/17 09:58

Contents
Important Safety Instructions ................................... 2
Product Features ...................................................... 5
“How To” .................................................................... 7
Install a FoodSaver
®
Roll
Make a Bag from a FoodSaver
®
Roll (Express Bag Making)
Vacuum Seal a FoodSaver
®
Bag
Use FoodSaver
®
Preserve & Marinate Containers
Vacuum Seal with FoodSaver
®
Accessories
Care & Cleaning .....................................................14
Guidelines ................................................................15
Vacuum Sealing and Food Safety
Food Preparation and Reheating Tips
Sealing Non-Food Items
Troubleshooting .......................................................21
Replacement Parts ................................................. 23
Warranty .................................................................. 24
Register today at www.foodsaver.com/register
to receive exclusive access to FoodSaver deals and discounts!*
*Applicable to US residents only
VS5900 Series_23EFSM1.indd 2-2VS5900 Series_23EFSM1.indd 2-2

2
Consumer Service: US: 1-877-777-8042 CA: 1-877-804-5383 MX: +52 55 5366 0800
IMPORTANT SAFETY INSTRUCTIONS
For your own safety, always follow these basic precautions when using a
FoodSaver
®
appliance:
1. Read the Owner’s Manual carefully for operating instructions. Read all
instructions in this manual before use.
2. When using an electrical appliance, basic precautions are required to
always be followed, including the following:
Read all instructions before using this appliance.
DANGER – To reduce the risk of electric shock:
1. Do not reach for an appliance that has fallen into water. Unplug
immediately from receptacle.
2. Do not use while bathing or in a shower.
3. Do not place or store appliance where it is able to fall or be pulled into a
tub or sink. Do not place in or drop into water or other liquid.
4. Always unplug this appliance from the electrical outlet immediately after
using.
5. Unplug this appliance before cleaning.
WARNING – To reduce the risk of burns, fire, electric shock:
1. Do not use appliance on wet surfaces or outdoors.
2. To protect against electric shock, do not immerse any part of appliance,
power cord or plug in water or other liquid. Unplug from outlet when not
in use and before cleaning.
3. To disconnect, unplug power cord from electrical outlet. Do not
disconnect by pulling on cord.
4. Do not operate appliance with a damaged power cord or plug. Do not
operate appliance if it malfunctions or is in any way, damaged.
For details, contact Consumer Services at number listed below.
1. Use appliance only for its intended use.
2. Closely supervise children when using any electrical appliance. Do not
allow appliance to be used as a toy.
3. For adult use only.
4. Caution: A short power cord is provided to reduce risks from entanglement
or tripping over a longer cord. An extension cord may be used when
marked electrical rating is no less than electrical rating of this appliance.
5. No cords should drape over counter or tabletop, where cords can be
tripped over or pulled on unintentionally, especially by children.
2023/4/17 09:582023/4/17 09:58

3
US: www.FoodSaver.com | CA: www.FoodSaver.ca | MX: www.oster.com.mx/foodsaver
6. Do not place on or near a hot gas or electric burner, or heated oven.
Extreme caution must be used when moving products containing hot
liquids.
7. Lid closes down automatically with force. Do not obstruct the lid from
closing. Do not manually force the lid to close.
8.
Do not put fingers or any foreign objects inside of Vacuum View
Window while vacuum sealing.
Important Tips
1. Vacuum sealing is NOT a substitute for the heat process of canning.
Perishables still need to be refrigerated or frozen.
2. For best results, use only with FoodSaver
®
Bags, Rolls, Containers and
Accessories.
3. During the vacuum sealing process, small amounts of liquids, crumbs
or food particles can be inadvertently pulled into the Vacuum Channel.
Empty the Drip Tray after each use.
4. Avoid overfilling; always leave at least 3 inches (7.62 cm) of bag material
between bag contents and top of bag. This allows room for the bag
material to cinch tightly against the food and prevents the bag from
pulling out of the Vacuum Channel during the sealing process. Then
leave at least one additional inch (2.54 cm) of bag material for each
time you plan to reuse bag.
5. Do not create your own side seams for a FoodSaver
®
Bag. These bags
are manufactured with a special side seam, which is sealed all the way
to the outer edge.
6. To prevent wrinkles in the seal when vacuum sealing bulky items, gently
stretch bag flat while inserting bag into Vacuum Channel and continue
to hold bag until Vacuum Pump starts.
7. When you are vacuum sealing items with sharp edges (dry spaghetti,
silverware, etc.), protect bag from punctures by wrapping item in soft
cushioning material, such as a paper towel. You may want to use a
FoodSaver
®
Container or Mason jar instead of a FoodSaver
®
Bag.
8. When using accessories, remember to leave one inch (2.54 cm) of
space at top.
9. Pre-freeze fruits and blanch vegetables before vacuum sealing for best
results. (See “Guidelines” for food storage safety, pg 15-20.)
10. Wait 20 seconds between seals to allow appliance to cool.
11. Never store lid in Operate position as gaskets may become compressed.
VS5900 Series_23EFSM1.indd 3-4VS5900 Series_23EFSM1.indd 3-4

4
Consumer Service: US: 1-877-777-8042 CA: 1-877-804-5383 MX: +52 55 5366 0800
POWER CORD INSTRUCTIONS:
A short power-supply cord (or detachable power-supply cord) is provided
to reduce risks resulting from becoming entangled in or tripping over a
longer cord. Longer detachable power-supply cords or extension cords
are available and may be used if care is exercised in their use. If a long
detachable power-supply cord or extension cord is used:
a. The marked electrical rating of the detachable power-supply cord or
extension cord should be at least as great as the electrical rating of the
appliance;
b. If the appliance is of the grounded type, the extension cord should be a
grounding type 3-wire cord; and
c. The longer cord should be arranged so that it will not drape over the
counter top or table top where it can be pulled on by children or tripped
over unintentionally.
This appliance has a polarized plug (one blade is wider
than the other). As a safety feature to reduce the risk
of electrical shock, this plug is intended to fit in a
polarized outlet only one way. If the plug does not fit
fully into the outlet, reverse the plug. If it still does not
fit, contact a qualified electrician. Do not attempt to modify the plug in
any way. If the plug fits loosely into the AC outlet or if the AC outlet feels
warm do not use that outlet.
SAVE THESE INSTRUCTIONS
HOUSEHOLD USE ONLY
2023/4/17 09:582023/4/17 09:58

5
US: www.FoodSaver.com | CA: www.FoodSaver.ca | MX: www.oster.com.mx/foodsaver
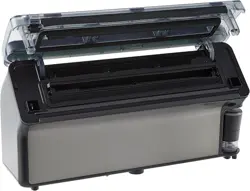
FEATURES
Product Features
A
B
C
D
E
F
G
H
I
J
K
A
Control Buttons and Indicator Lights
Indicate current setting and vacuum progress for added control or to call attention to an action.
B
Bag Cutter
Built-In to simplify making custom-sized bags from rolls.
C
Vacuum View Window
Provides visibility to vacuum channel, drip tray and sealing strip.
D
Vacuum Channel / Auto Bag Sensing
Simply insert open end of bag into the Vacuum Channel and the appliance will detect bag and
close the appliance lid.
E
Built-In Retractable Handheld Sealer
For use with FoodSaver
®
Zipper Bags, Preserve & Marinate Containers, Bottle Stoppers, and
other accessories.
F
Upper Gasket
Non-Removable.
G
Removable Drip Tray
Catches overflow liquids and is dishwasher-safe.
H
Lower Gasket
Non-Removable.
I
Sealing Strip
Creates extra secure, air-tight seal.
J
Appliance Lid
Opens to access drip tray and to pull roll through appliance to make bags. Must be closed and
locked to Vacuum, Seal, or use Handheld.
K
Built-in Roll Storage and Door
For storage of FoodSaver
®
Vacuum Sealing Rolls (Fits all widths and lengths).
VS5900 Series_23EFSM1.indd 5-6VS5900 Series_23EFSM1.indd 5-6
6Consumer Service: US: 1-877-777-8042 CA: 1-877-804-5383 MX: +52 55 5366 0800
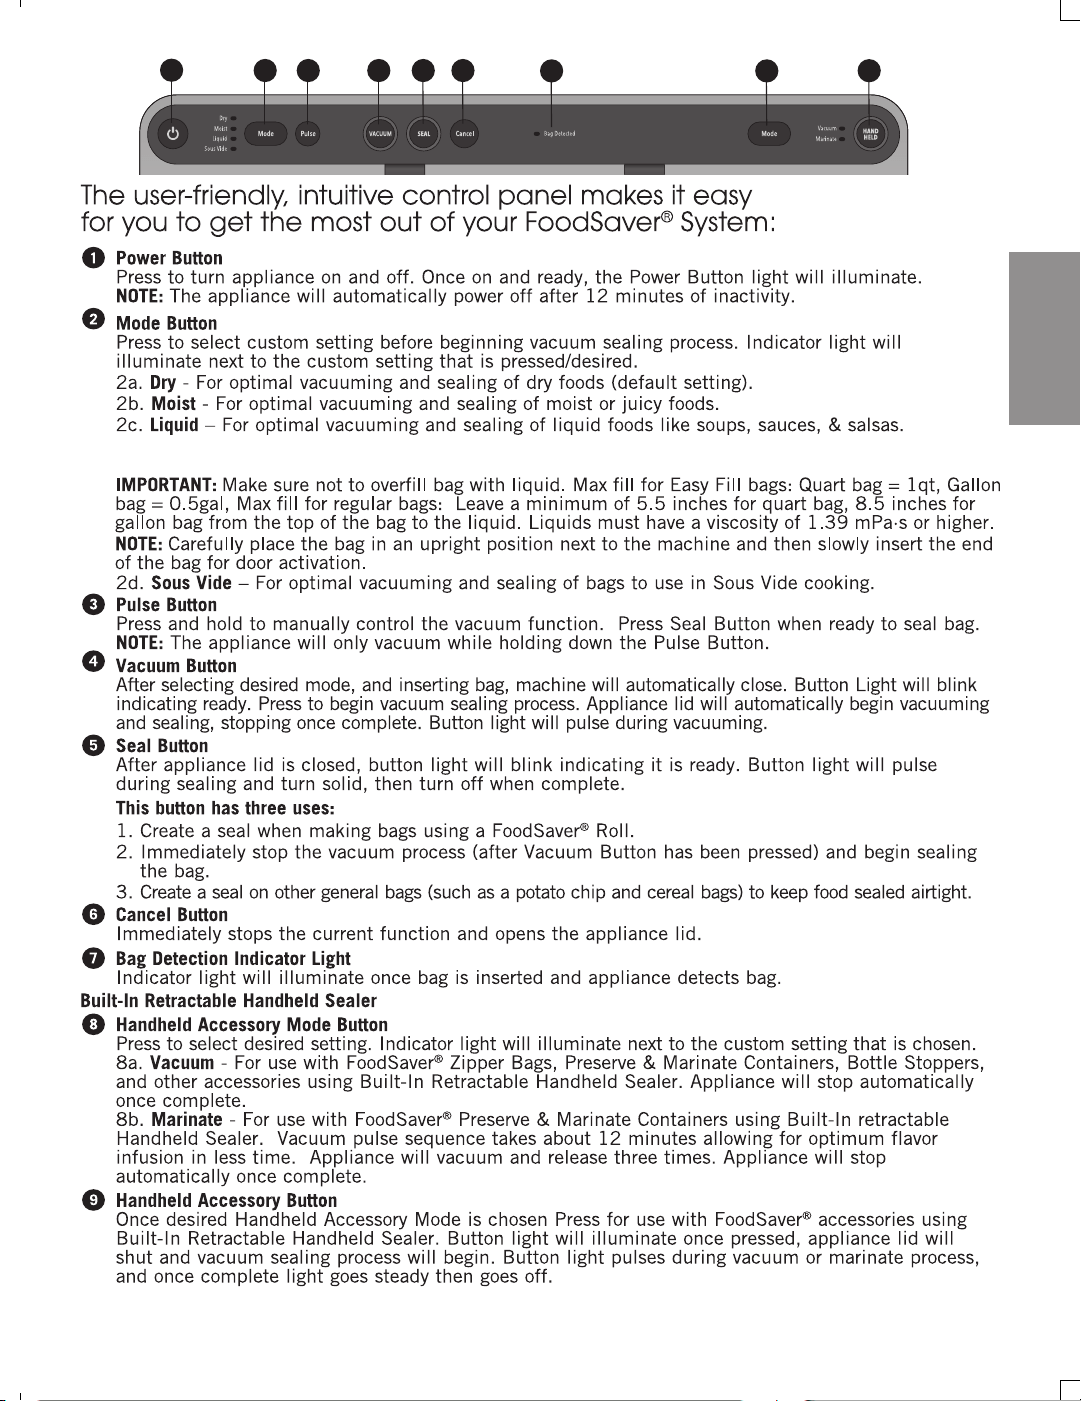
FEATURES
1
Power Button
Press to turn appliance on and off. Once on and ready, the Power Button light will illuminate.
NOTE: The appliance will automatically power off after 12 minutes of inactivity.
2
Mode Button
Press to select custom setting before beginning vacuum sealing process. Indicator light will
illuminate next to the custom setting that is pressed/desired.
2a. Dry - For optimal vacuuming and sealing of dry foods (default setting).
2b. Moist - For optimal vacuuming and sealing of moist or juicy foods.
2c. Liquid – For optimal vacuuming and sealing of liquid foods like soups, sauces, & salsas.
IMPORTANT: Make sure not to overfill bag with liquid. For quart bags recommend filling with max of
1 quart and for gallon bags ½ gallon of liquid. Liquids must have a viscosity of 1.39 mPa·s or higher
2d. Sous Vide – For optimal vacuuming and sealing of bags to use in Sous Vide cooking.
3
Pulse Button
Press and hold to manually control the vacuum function. Press Seal Button when ready to seal bag.
NOTE: The appliance will only vacuum while holding down the Pulse Button.
4
Vacuum Button
After selecting desired mode, and inserting bag, machine will automatically close. Button Light will blink
indicating ready. Press to begin vacuum sealing process. Appliance lid will automatically begin vacuuming
and sealing, stopping once complete. Button light will pulse during vacuuming.
5
Seal Button
After appliance lid is closed, button light will blink indicating it is ready. Button light will pulse
during sealing and turn solid, then turn off when complete.
This button has three uses:
1. Create a seal when making bags using a FoodSaver
®
Roll.
2. Immediately stop the vacuum process (after Vacuum Button has been pressed) and begin sealing
the bag.
3. Create a seal on other general bags (such as a potato chip and cereal bags) to keep food sealed airtight.
6
Cancel Button
Immediately stops the current function and opens the appliance lid.
7
Bag Detection Indicator Light
Indicator light will illuminate once bag is inserted and appliance detects bag.
Built-In Retractable Handheld Sealer
8
Handheld Accessory Mode Button
Press to select desired setting. Indicator light will illuminate next to the custom setting that is chosen.
8a. Vacuum - For use with FoodSaver
®
Zipper Bags, Preserve & Marinate Containers, Bottle Stoppers,
and other accessories using Built-In Retractable Handheld Sealer. Appliance will stop automatically
once complete.
8b. Marinate - For use with FoodSaver
®
Preserve & Marinate Containers using Built-In retractable
Handheld Sealer. Vacuum pulse sequence takes about 12 minutes allowing for optimum flavor
infusion in less time. Appliance will vacuum and release three times. Appliance will stop
automatically once complete.
9
Handheld Accessory Button
Once desired Handheld Accessory Mode is chosen Press for use with FoodSaver
®
accessories using
Built-In Retractable Handheld Sealer. Button light will illuminate once pressed, appliance lid will
shut and vacuum sealing process will begin. Button light pulses during vacuum or marinate process,
and once complete light goes steady then goes off.
1
2
3 4 5 6
7 8
9
The user-friendly, intuitive control panel makes it easy
for you to get the most out of your FoodSaver
®
System:
2023/4/17 09:58
6Consumer Service: US: 1-877-777-8042 CA: 1-877-804-5383 MX: +52 55 5366 0800
FEATURES
1
Power Button
Press to turn appliance on and off. Once on and ready, the Power Button light will illuminate.
NOTE: The appliance will automatically power off after 12 minutes of inactivity.
2
Mode Button
Press to select custom setting before beginning vacuum sealing process. Indicator light will
illuminate next to the custom setting that is pressed/desired.
2a. Dry - For optimal vacuuming and sealing of dry foods (default setting).
2b. Moist - For optimal vacuuming and sealing of moist or juicy foods.
2c. Liquid – For optimal vacuuming and sealing of liquid foods like soups, sauces, & salsas.
IMPORTANT: Make sure not to overfill bag with liquid. For quart bags recommend filling with max of
1 quart and for gallon bags ½ gallon of liquid. Liquids must have a viscosity of 1.39 mPa·s or higher
2d. Sous Vide – For optimal vacuuming and sealing of bags to use in Sous Vide cooking.
3
Pulse Button
Press and hold to manually control the vacuum function. Press Seal Button when ready to seal bag.
NOTE: The appliance will only vacuum while holding down the Pulse Button.
4
Vacuum Button
After selecting desired mode, and inserting bag, machine will automatically close. Button Light will blink
indicating ready. Press to begin vacuum sealing process. Appliance lid will automatically begin vacuuming
and sealing, stopping once complete. Button light will pulse during vacuuming.
5
Seal Button
After appliance lid is closed, button light will blink indicating it is ready. Button light will pulse
during sealing and turn solid, then turn off when complete.
This button has three uses:
1. Create a seal when making bags using a FoodSaver
®
Roll.
2. Immediately stop the vacuum process (after Vacuum Button has been pressed) and begin sealing
the bag.
3. Create a seal on other general bags (such as a potato chip and cereal bags) to keep food sealed airtight.
6
Cancel Button
Immediately stops the current function and opens the appliance lid.
7
Bag Detection Indicator Light
Indicator light will illuminate once bag is inserted and appliance detects bag.
Built-In Retractable Handheld Sealer
8
Handheld Accessory Mode Button
Press to select desired setting. Indicator light will illuminate next to the custom setting that is chosen.
8a. Vacuum - For use with FoodSaver
®
Zipper Bags, Preserve & Marinate Containers, Bottle Stoppers,
and other accessories using Built-In Retractable Handheld Sealer. Appliance will stop automatically
once complete.
8b. Marinate - For use with FoodSaver
®
Preserve & Marinate Containers using Built-In retractable
Handheld Sealer. Vacuum pulse sequence takes about 12 minutes allowing for optimum flavor
infusion in less time. Appliance will vacuum and release three times. Appliance will stop
automatically once complete.
9
Handheld Accessory Button
Once desired Handheld Accessory Mode is chosen Press for use with FoodSaver
®
accessories using
Built-In Retractable Handheld Sealer. Button light will illuminate once pressed, appliance lid will
shut and vacuum sealing process will begin. Button light pulses during vacuum or marinate process,
and once complete light goes steady then goes off.
1
2
3 4 5 6
7 8
9
The user-friendly, intuitive control panel makes it easy
for you to get the most out of your FoodSaver
®
System:
2023/4/17 09:58
IMPORTANT: When using liquid mode, if vacuum sealing thicker sauces, soups, or creams (i.e. cream of
mushroom) keep inside walls of bag above liquid clear from food debris or drips as much as possible.
7
US: www.FoodSaver.com | CA: www.FoodSaver.ca | MX: www.oster.com.mx/foodsaver
HOW TO
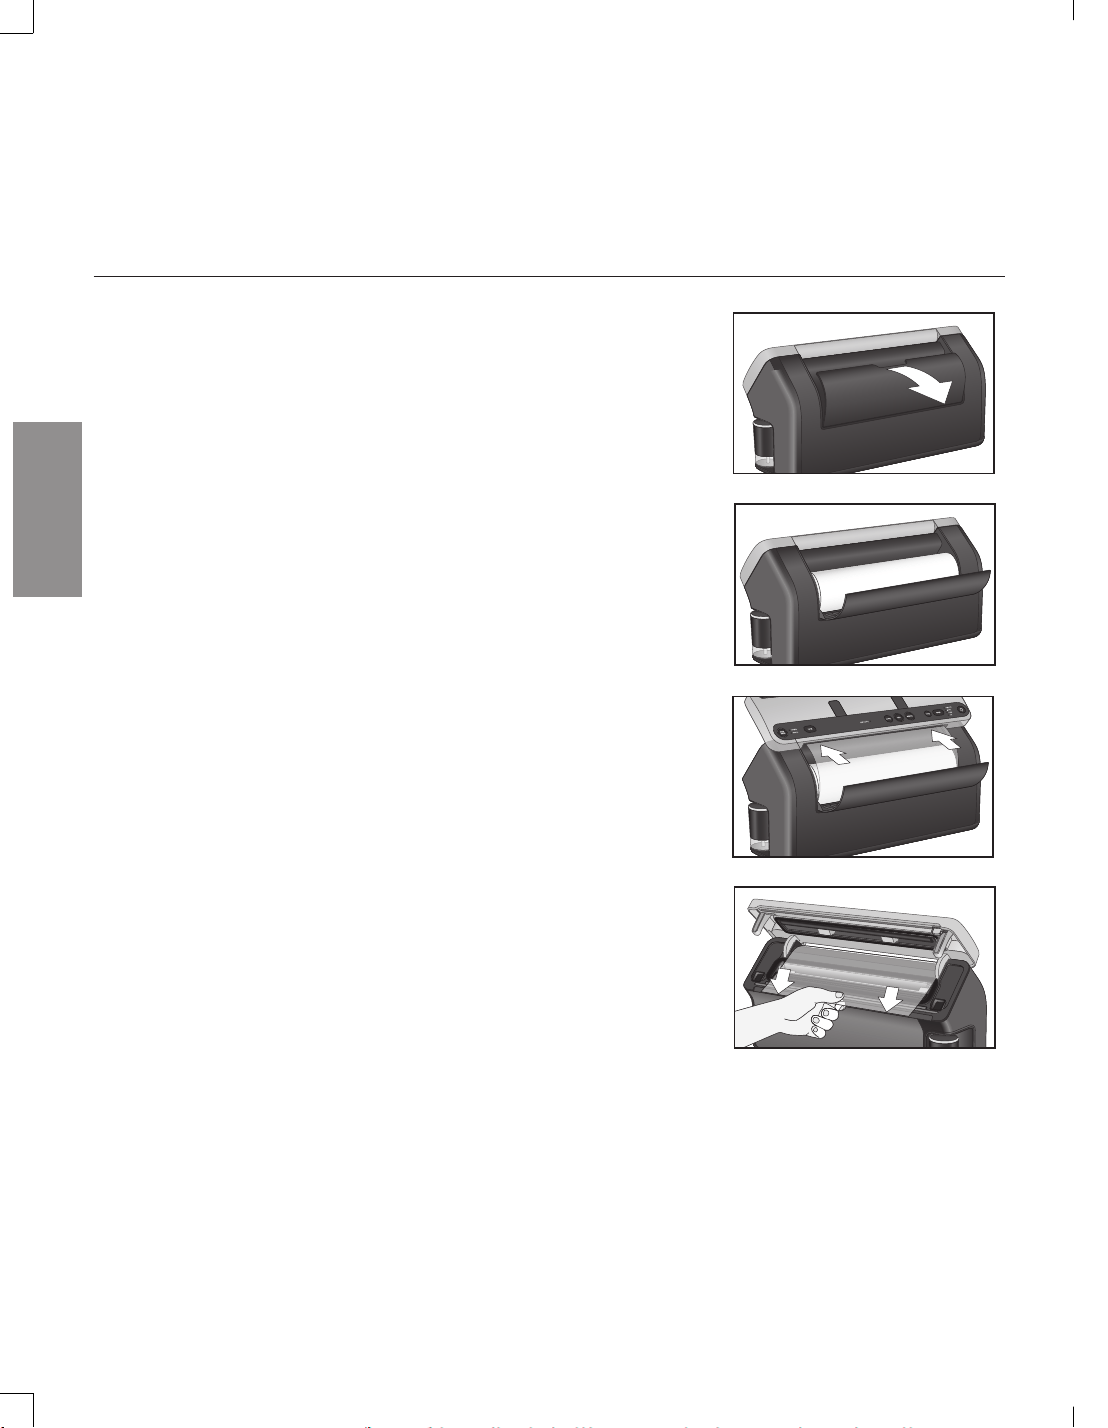
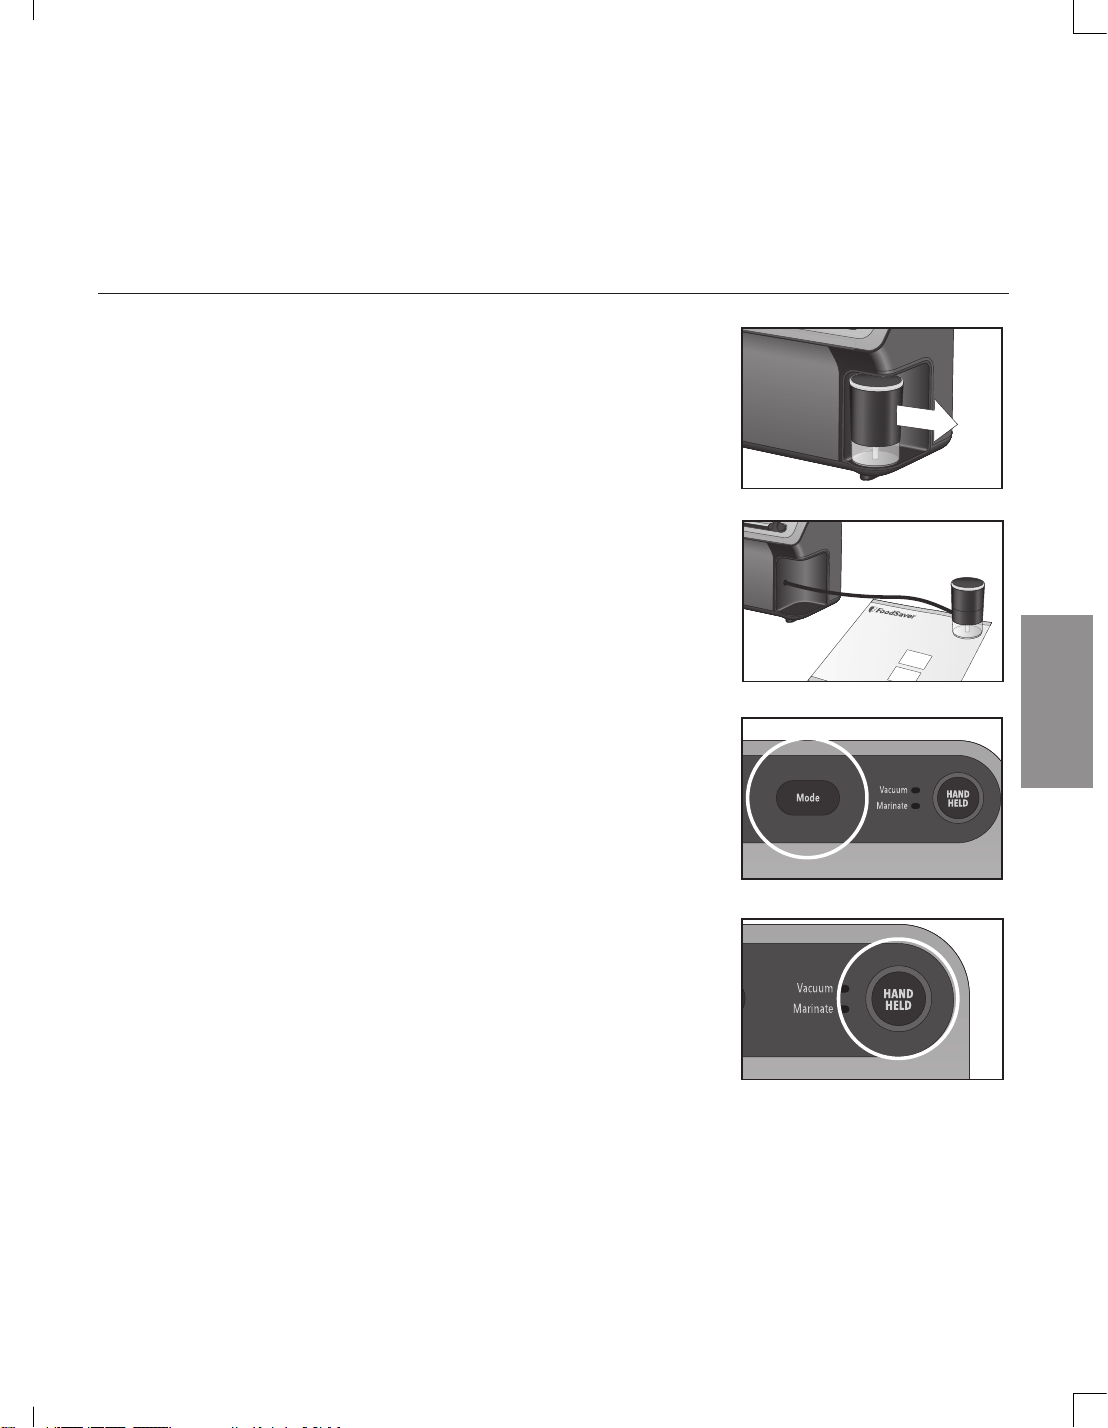
1. Install a FoodSaver
®
Roll
1. Pull open the built-in roll storage door in the back
of the appliance.
2. Insert the roll into the back of the appliance as
pictured.
3. Open up appliance lid fully so that it stays in place.
4. Thread end of roll forward through the opening on
the back between lid and appliance. pull through
the appliance until the end of roll is at the front
edge.
5. See next section for how to make a bag from a
FoodSaver Roll.
How to...
VS5900 Series_23EFSM1.indd 7-8VS5900 Series_23EFSM1.indd 7-8
8
Consumer Service: US: 1-877-777-8042 CA: 1-877-804-5383 MX: +52 55 5366 0800
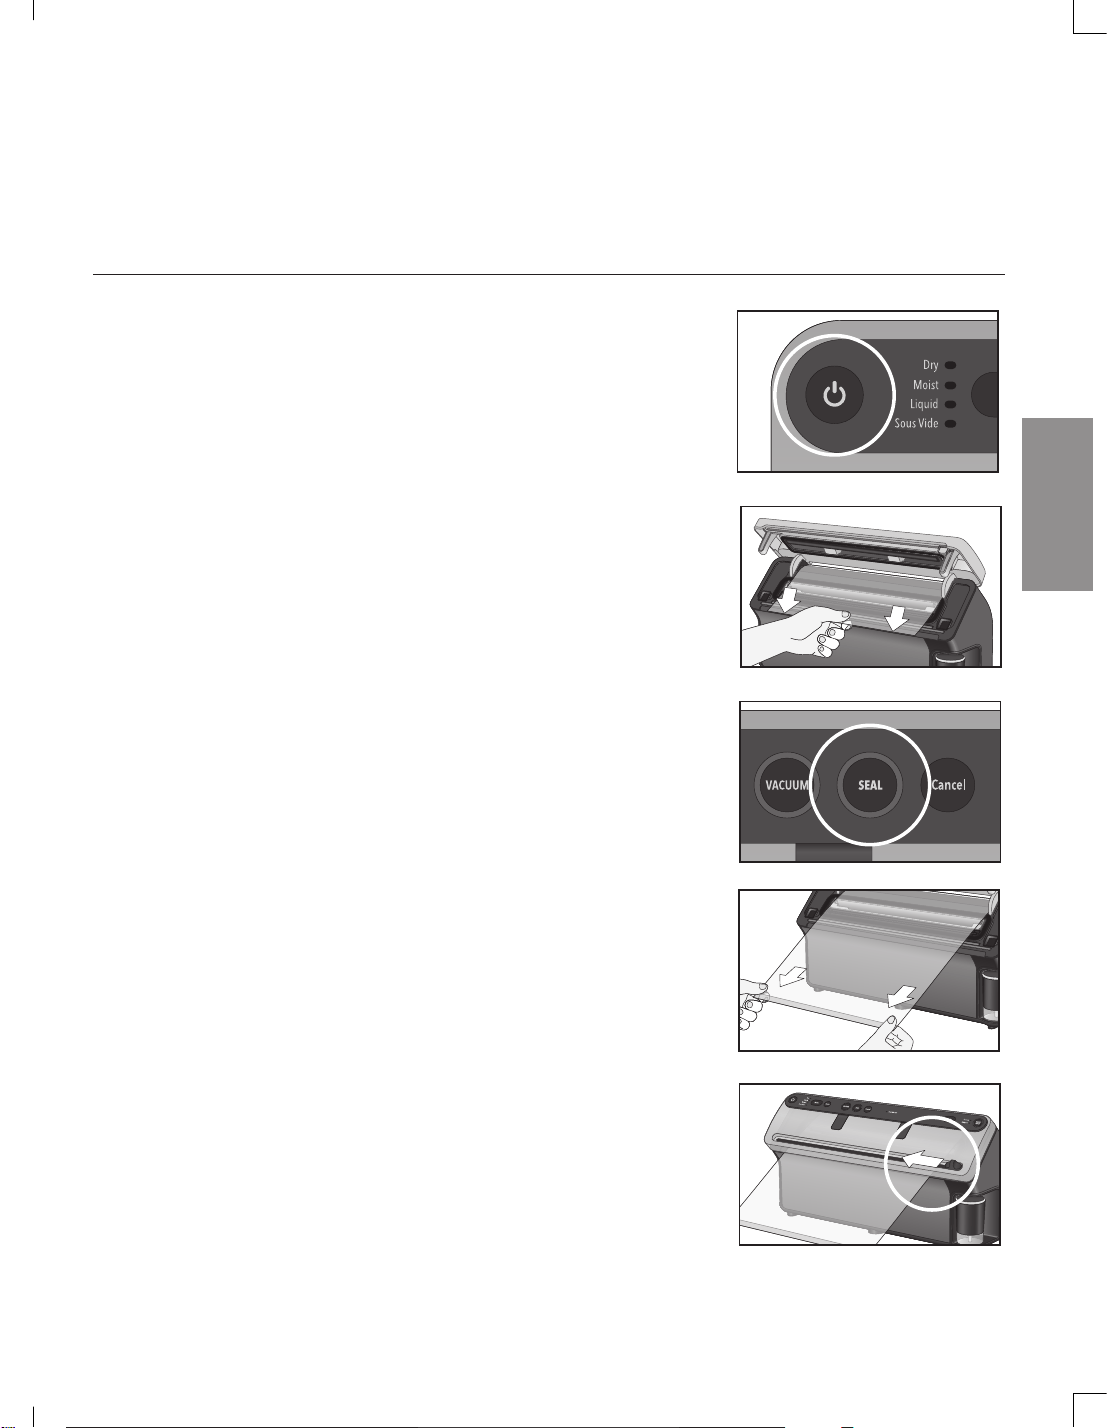
2. Make a Bag from a FoodSaver
®
Roll (Express Bag Making)
HOW TO
1. Press Power Button to turn appliance on. Power
button and default mode selection will illuminate.
2. Once Roll is installed and appliance lid is fully
opened, thread end of roll forward through the
opening on the back between lid and appliance.
3. Pull roll down just past the Sealing Strip.
4. Using two hands, pull down appliance lid (from the
all the way up position) and with both hands firmly
press down both sides of lid until appliance begins
to automatically close and lock.
5. Press Seal Button, sealing the end of the bag will
begin. Button light will pulse until complete and
then light will turn off.
6. Appliance lid will automatically open once seal is
complete.
7. Pull out now sealed end of roll to length of bag
desired.
8. Again, using both hands firmly press down both
sides of lid, until appliance begins to automatically
close and lock.
9. Before using cutter bar to cut this first bag, press
Seal Button to seal end of next bag.
10.While appliance is sealing the next bag, cut first
bag by sliding the built-in Cutter Bar.
TIP: After making this first bag from the roll, if the
above steps are followed, the seal should already be
made for the next bag. Each time you seal, you are
making the seal for the next bag while using cutter
bar to cut the current bag.
11.After finished making bag(s) from roll, open built-
in roll storage door in the back of appliance and
manually roll up the excess roll that may still be
inside the appliance, so that no roll or material is
left inside the appliance.
12.Close Built-in Roll Storage and Door.
SEALED END
SEALED END
2023/4/17 09:582023/4/17 09:58
9 US: www.FoodSaver.com | CA: www.FoodSaver.ca | MX: www.oster.com.mx/foodsaver
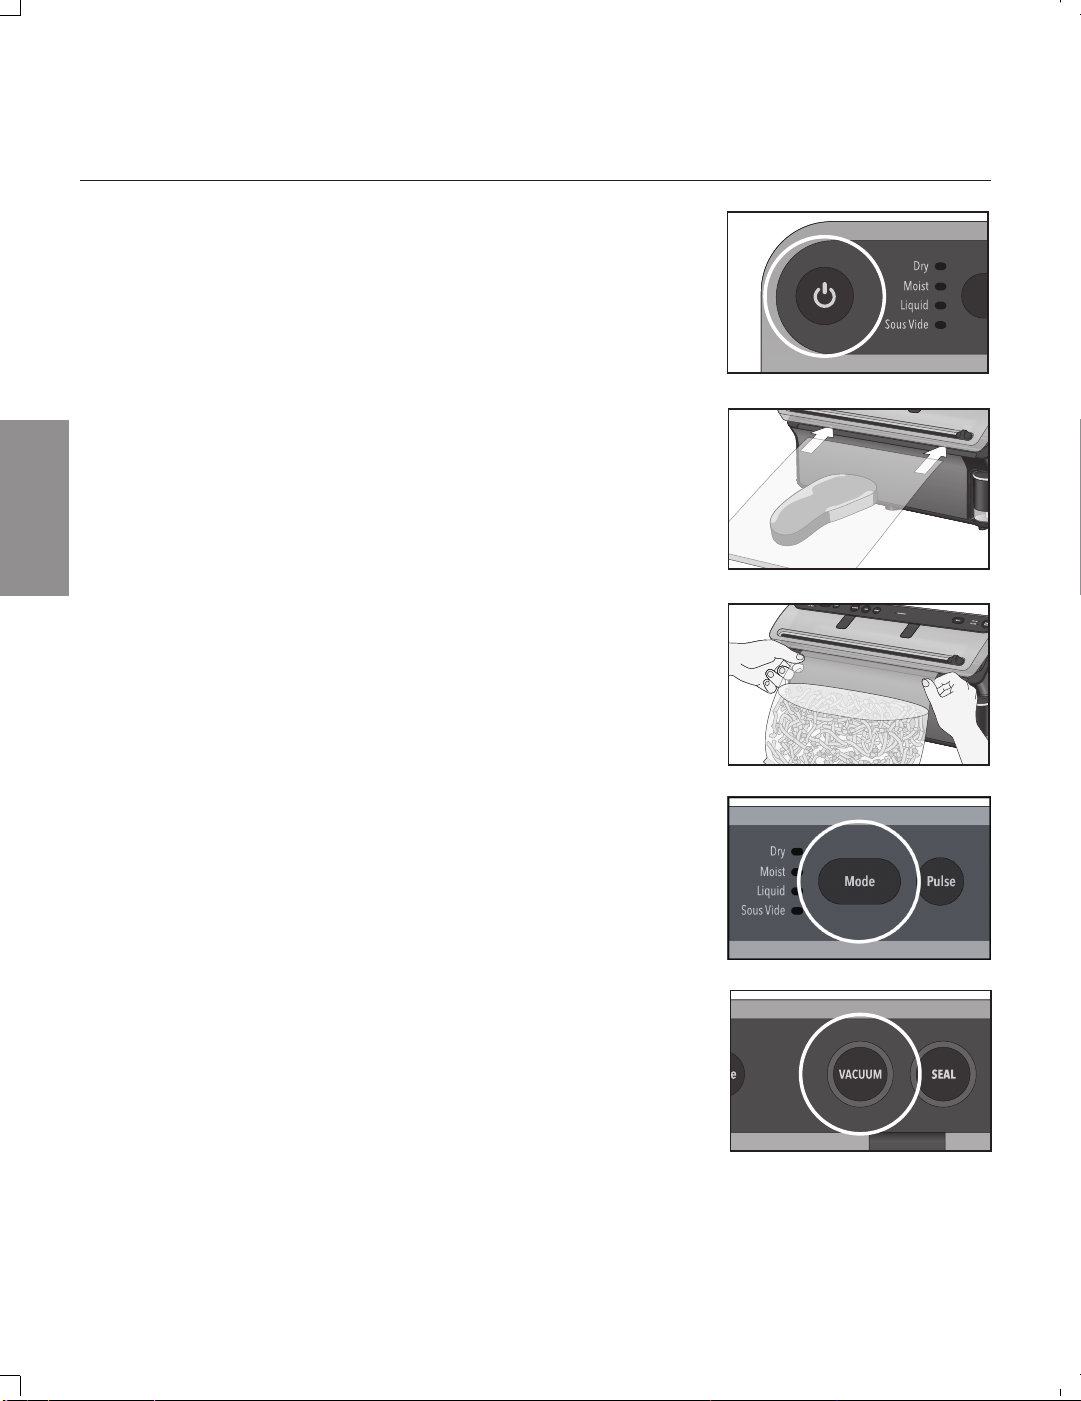
3. Vacuum Seal a FoodSaver
®
Bag
1. Press Power Button to turn appliance on. Power button and
default mode selection will illuminate.
2. With both hands, slowly insert the open end of filled bag
through the bottom of the Vacuum View Window into Drip
Tray.
NOTE: The appliance lid should Not be completely open
HINT: If having trouble getting bag inside appliance, wiggle it
from side to side while inserting.
IMPORTANT TIP: When inserting open end of filled bag, center
the bag in the middle of the appliance for best results. The
Vacuum View Window allows you to easily see where the end
of the bag is when inserting. Continue to insert and hold
bag until appliance automatically detects and lid closes and
locks.
3. The appliance will automatically detect bag insertion &
Appliance Lid will close and lock. Bag Detected indicator
light will blink then become steady to confirm the bag has
automatically been sensed. Vacuum and Seal Button Lights
will blink.
CAUTION: Lid closes down automatically. Remove hands or
any other objects that may be obstructing the lid before
closing. Do not manually force the lid to close.
4. Select desired Vacuum Mode (Dry, Moist, Liquid, or Sous
Vide) depending on the food that is being vacuum sealed by
pressing Mode Button. Indicator light will illuminate next to
selected mode.
5. Once desired mode is selected, press Vacuum Button to
begin vacuum sealing process. Vacuum Button light will
pulse until complete.
6. After vacuum is complete, Vacuum button light will go steady
and appliance will automatically begin sealing. Seal Button
light will pulse until complete.
7. Once vacuumed and sealed, vacuum and seal button lights
will go steady then turn off. Appliance lid will automatically
open and release the bag.
8. Refrigerate, freeze or store as needed. (See “Guidelines” for
food storage safety tips on pg 15.)
IMPORTANT TIP: At any time during vacuum sealing, the
Cancel Button can be pressed and the appliance lid will open
automatically. When Dry and Moist lights flash, the drip tray is
full. Please empty it. Vacuum and Seal function will function
normally after drip tray is emptied.
HOW TO
SEALED END
OPEN END
VS5900 Series_23EFSM1.indd 9-10
9 US: www.FoodSaver.com | CA: www.FoodSaver.ca | MX: www.oster.com.mx/foodsaver
3. Vacuum Seal a FoodSaver
®
Bag
1. Press Power Button to turn appliance on. Power button and
default mode selection will illuminate.
2. With both hands, slowly insert the open end of filled bag
through the bottom of the Vacuum View Window into Drip
Tray.
NOTE: The appliance lid should Not be completely open
HINT: If having trouble getting bag inside appliance, wiggle it
from side to side while inserting.
IMPORTANT TIP: When inserting open end of filled bag, center
the bag in the middle of the appliance for best results. The
Vacuum View Window allows you to easily see where the end
of the bag is when inserting. Continue to insert and hold
bag until appliance automatically detects and lid closes and
locks.
3. The appliance will automatically detect bag insertion &
Appliance Lid will close and lock. Bag Detected indicator
light will blink then become steady to confirm the bag has
automatically been sensed. Vacuum and Seal Button Lights
will blink.
CAUTION: Lid closes down automatically. Remove hands or
any other objects that may be obstructing the lid before
closing. Do not manually force the lid to close.
4. Select desired Vacuum Mode (Dry, Moist, Liquid, or Sous
Vide) depending on the food that is being vacuum sealed by
pressing Mode Button. Indicator light will illuminate next to
selected mode.
5. Once desired mode is selected, press Vacuum Button to
begin vacuum sealing process. Vacuum Button light will
pulse until complete.
6. After vacuum is complete, Vacuum button light will go steady
and appliance will automatically begin sealing. Seal Button
light will pulse until complete.
7. Once vacuumed and sealed, vacuum and seal button lights
will go steady then turn off. Appliance lid will automatically
open and release the bag.
8. Refrigerate, freeze or store as needed. (See “Guidelines” for
food storage safety tips on pg 15.)
IMPORTANT TIP: At any time during vacuum sealing, the
Cancel Button can be pressed and the appliance lid will open
automatically. When Dry and Moist lights flash, the drip tray is
full. Please empty it. Vacuum and Seal function will function
normally after drip tray is emptied.
HOW TO
SEALED END
OPEN END
VS5900 Series_23EFSM1.indd 9-10
automatically. When all lights ash, the drip tray is full. Please
empty it. Vacuum and Seal function will function normally after
drip tray is emptied.
When using liquid mode, if vacuum sealing
thicker sauces, soups, or creams (i.e. cream of mushroom)
keep inside walls of bag above liquid clear from food debris or
drips as much as possible.
IMPORTANT
TIP:

10Consumer Service: US: 1-877-777-8042 CA: 1-877-804-5383 MX: +52 55 5366 0800
HOW TO
4. Use FoodSaver
®
Preserve & Marinate Containers
a. To Vacuum Seal
i. Prepare Container according to Guidelines, included
with container purchase (turn valve on container to
vacuum).
ii. Press Power Button to turn appliance on. Power button
and default mode selection will illuminate.
iii. Pull out the Built-In Retractable Handheld Sealer to
desired length. CAUTION: When pulling hose Do Not
extend beyond red line marked on hose.
iv. Place end of Built-In Retractable Handheld Sealer over
container valve.
v. On right side of appliance press Mode Button for Built-
In Retractable Handheld Accessory once. Vacuum
Mode is the default. Vacuum Mode indicator light will
illuminate and Handheld button will blink.
vi. Press Handheld Button to begin vacuum. Appliance lid
will automatically close. Hold Handheld sealer in place
on container. Handheld Button light will pulse until
complete.
vii. Appliance will automatically stop vacuuming once all air
has been removed from container and Appliance Lid will
automatically open.
viii. To put Handheld sealer back in appliance, gently pull
out & it will automatically retract.
IMPORTANT TIP: At any time during vacuum sealing, the
Cancel Button can be pressed and the appliance lid will open
automatically.
2023/4/17 09:58
11 US: www.FoodSaver.com | CA: www.FoodSaver.ca | MX: www.oster.com.mx/foodsaver
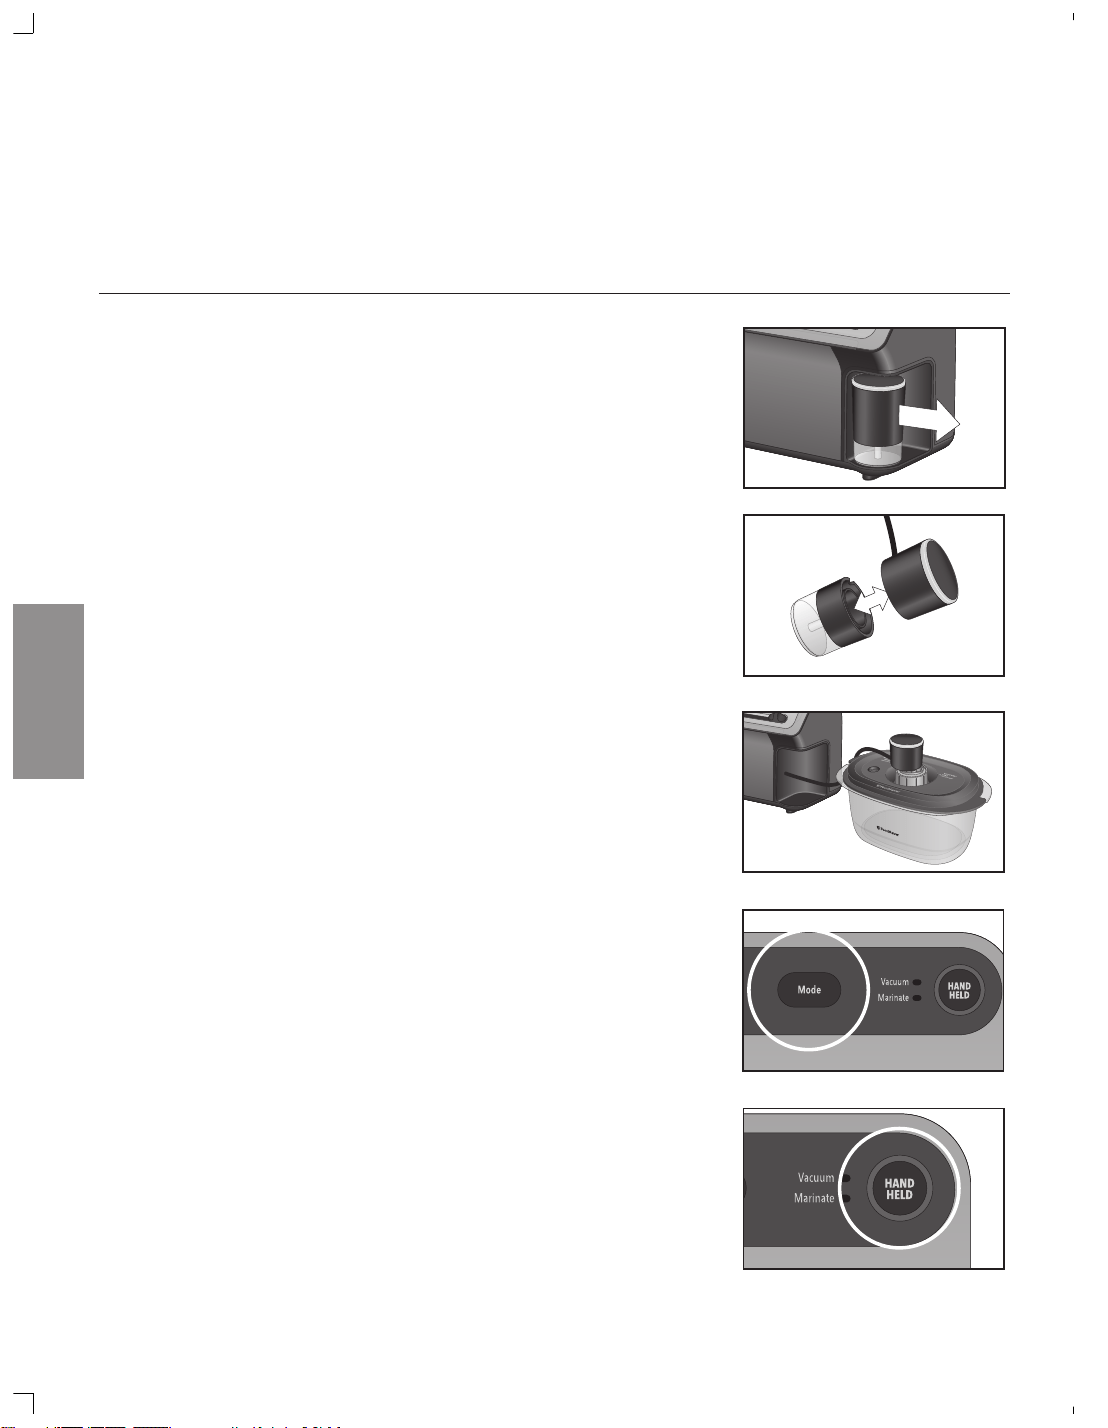
4. Use FoodSaver
®
Preserve & Marinate Containers Continued
b. To Marinate
i. Prepare FoodSaver
®
Preserve & Marinate Container
according to Guidelines, included with container purchase
(turn valve on container to marinate).
ii. Press Power Button to turn appliance on. Power button
and default mode selection will illuminate.
iii. Pull out the Built-In Retractable Handheld Sealer to
desired length. CAUTION: When pulling hose Do Not
extend beyond red line marked on hose.
iv. Remove clear bottom portion of Retractable Handheld
Sealer from top handle by pulling apart with two hands.
Insert the tip of the top half into container valve.
v. On right side of appliance press Mode Button for Built-In
Retractable Handheld Accessory two times for Marinate
Mode. Marinate Mode indicator light will illuminate solid
and Handheld button will blink.
vi. Press Handheld Button to begin. Appliance lid will
automatically close and begin marinating process.
Appliance lid will automatically open during process and
then close and lock again. Handheld Button light will
pulse until complete.
vii. Reconnect the bottom of Handheld Sealer and to put
Handheld sealer back in appliance, gently pull out & it
will automatically retract.
IMPORTANT TIP: Appliance will run for about 12 minutes. The
appliance will vacuum, then stop vacuuming & appliance lid will
open, then close again and begin vacuuming a total of 3 times.
Do not interrupt this process, even if you think that appliance
has canceled.
IMPORTANT TIP: At any time during vacuum sealing, the
Cancel Button can be pressed and the appliance lid will open
automatically.
HOW TO
VS5900 Series_23EFSM1.indd 11-12
During marinating, ensure the handheld
accessory hose stays clear of lid (When appliance lid opens and
closes during marinating do not let hose get caught in between
lid and appliance).
IMPORTANT TIP:
12
Consumer Service: US: 1-877-777-8042 CA: 1-877-804-5383 MX: +52 55 5366 0800
5. Vacuum Seal with FoodSaver
®
Accessories
a. For Zipper Bags
i. Prepare zipper bags according to FoodSaver
®
Accessory
Guidelines, included with accessory purchases (Ensure
bag is thoroughly zipped shut).
IMPORTANT TIP: Make sure no food is under the valve
and press zipper closed while bag is lying down on a
flat surface.
ii. Press Power Button to turn appliance on. Power button
and default mode selection will illuminate.
iii. Pull out the Built-In Retractable Handheld Sealer to
desired length. CAUTION: When pulling hose Do Not
extend beyond red line marked on hose.
iv. Place end of Built-In Retractable Handheld Sealer over
zipper bag valve.
v. On right side of appliance press Mode Button for Built-
In Retractable Handheld Accessory once. Vacuum
Mode is the default. Vacuum Mode indicator light will
illuminate solid and Handheld button will blink.
vi. Press Handheld Button to begin vacuum. Appliance
lid will automatically close. Hold Handheld sealer in
place on bag. Handheld Button light will pulse until
complete.
vii. Appliance will automatically stop vacuuming once
all air has been removed from zipper bag and lid will
automatically open.
viii. To put Handheld sealer back in appliance, gently pull
out & it will automatically retract.
IMPORTANT TIP: At any time during vacuum sealing, the
Cancel Button can be pressed and the appliance lid will open
automatically.
HOW TO
2023/4/17 09:582023/4/17 09:58

13
US: www.FoodSaver.com | CA: www.FoodSaver.ca | MX: www.oster.com.mx/foodsaver
b. For Jar Sealers & Bottle Stoppers
i. Prepare accessory according to FoodSaver
®
Accessory
Guidelines, included with accessory purchases.
ii. Press Power Button to turn appliance on. Power button
and default mode selection will illuminate.
iii. Pull out the Built-In Retractable Handheld Sealer to
desired length. CAUTION: When pulling hose Do Not
extend beyond red line marked on hose.
iv. Remove clear bottom portion of Retractable Handheld
Sealer from top handle. Insert the tip of top into the
port on the Jar Sealer or Bottle Stopper.
v. Repeat steps aV-aViii above.
NOTE: FoodSaver
®
Jar Sealers are for use with Ball
®
and Kerr
®
brand Mason jars only. This is not a replacement for traditional
canning methods and if food is perishable will need to be
refrigerated.
IMPORTANT TIP: Do not include screw bands when vacuum
sealing jars. To open, wedge spoon between Mason jar lid and
highest part of threaded rim. Twist spoon gently to release
vacuum. FoodSaver
®
Bottle Stoppers: To release vacuum and
open, twist and pull up on Bottle Stopper.
HOW TO
5. Vacuum Seal with FoodSaver
®
Accessories Continued
VS5900 Series_23EFSM1.indd 13-14VS5900 Series_23EFSM1.indd 13-14
14
Consumer Service: US: 1-877-777-8042 CA: 1-877-804-5383 MX: +52 55 5366 0800
CARE & CLEANING
Of your Vacuum Sealer
Care & Cleaning
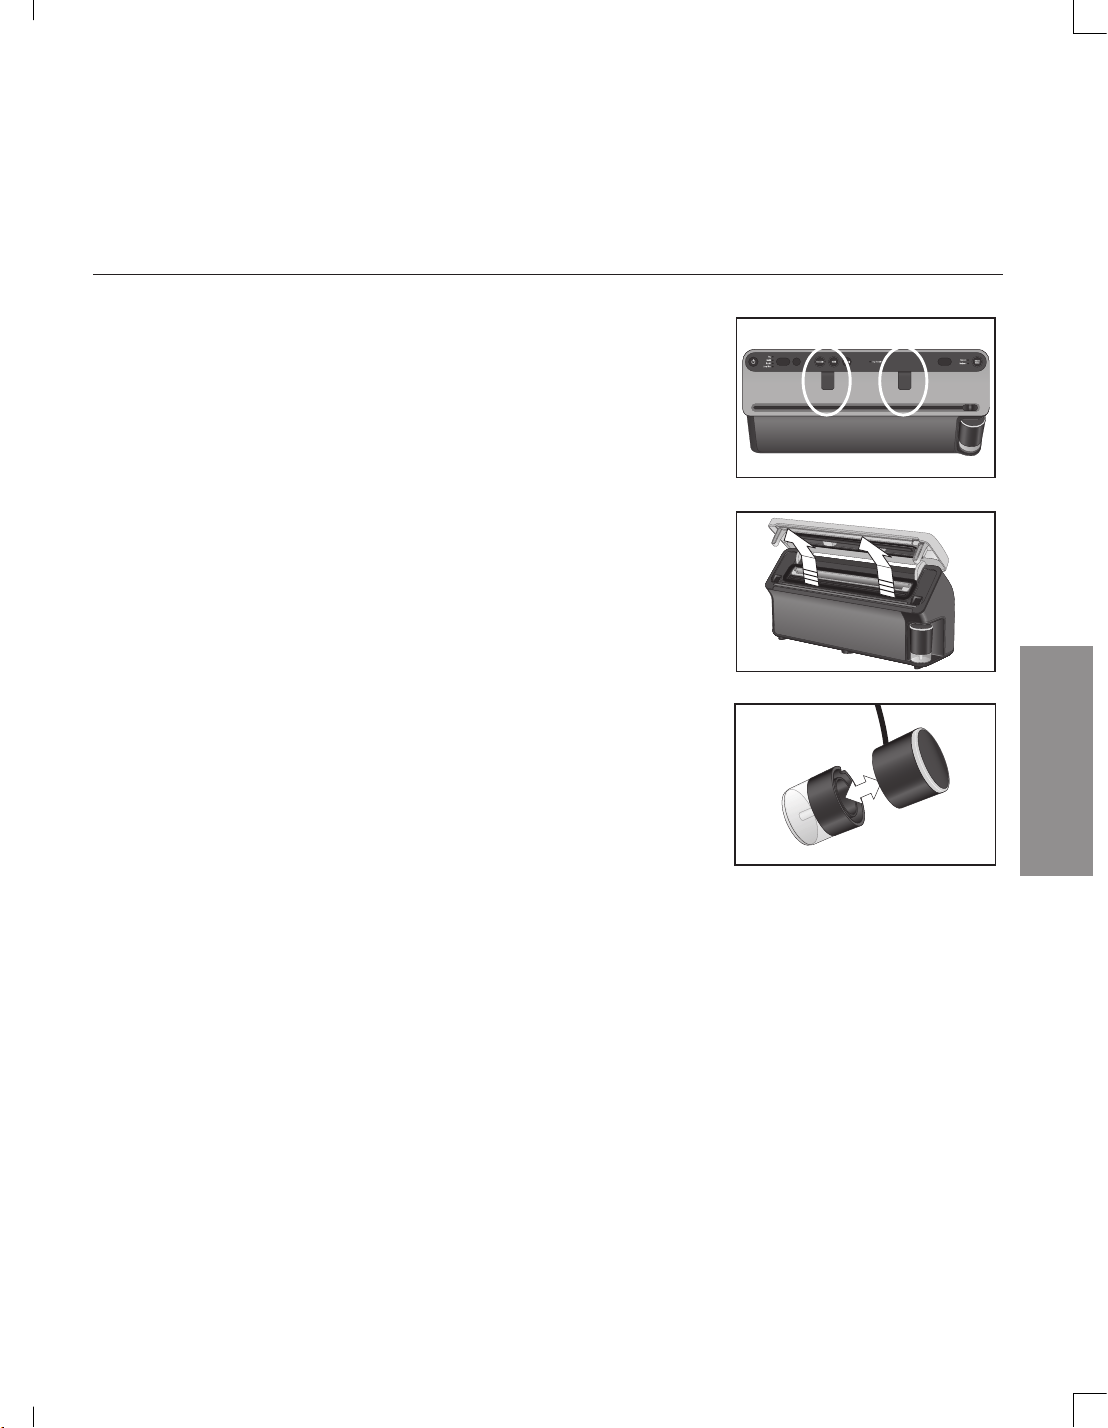
To Clean Appliance:
Remove Power Cord from electrical outlet. Do not immerse in liquid.
Check Gaskets and around Drip Tray to make sure they are free from
food materials. Wipe off Upper and Lower Gasket with warm soapy
cloth if needed. Also wipe off underneath the two black tabs on the
underside of Appliance Lid (automatic bag detection sensors).
The Removable Drip Tray makes cleanup easy when small amounts of
liquids are pulled into the Vacuum Channel during vacuum process.
Empty Drip Tray after each use. To remove, push in the tabs on each
side of the drip tray and lift up and out. Wash in warm soapy water
or place on top rack of dishwasher. Check for food residues in Drip
Tray Slot. Clean if needed. Dry thoroughly before reinserting into
appliance.
To Clean Retractable Handheld Sealer Reservoir:
Empty Reservoir after each use. Wash in warm soapy water. Air dry
before replacing. To remove Reservoir from Handheld sealer, holding
top portion firmly, pull lower reservoir down and off.
NOTE: Always clean after each use when fluid is visible.
ModePulseMode
2023/4/17 09:582023/4/17 09:58

15
US: www.FoodSaver.com | CA: www.FoodSaver.ca | MX: www.oster.com.mx/foodsaver
Vacuum Sealing and Food Safety
Guidelines
The vacuum sealing process extends the life of foods by removing most of the air from the sealed container,
thereby reducing oxidation, which affects nutritional value, flavor and overall quality. Removing air can also
inhibit growth of microorganisms, which can cause problems under certain conditions:
Mold – Easily identified by its fuzzy characteristic. Mold cannot grow in a low oxygen environment; therefore
vacuum sealing can slow the growth of mold.
Yeast – Results in fermentation, which can be identified by smell and taste. Yeast needs water, sugar and a
moderate temperature to grow. It can also survive with or without air. Slowing the growth of yeast requires
refrigeration, while freezing stops it completely.
Bacteria – Results in an unpleasant odor, discoloration and/or soft or slimy texture. Under the right
conditions, anaerobic bacteria such as Clostridium Botulinum (the organism that causes Botulism) can grow
without air and sometimes cannot be detected by smell or taste. Although it is extremely rare, it can be very
dangerous.
To preserve foods safely, it is critical that you maintain low temperatures. You can significantly reduce the
growth of microorganisms at temperatures of 40°F (4°C) or below. Freezing at 0°F (-17°C) does not kill
microorganisms, but stops them from growing. For long-term storage, always freeze perishable foods that
have been vacuum sealed, and keep refrigerated after thawing.
It is important to note that vacuum sealing is NOT a substitute for canning and it cannot reverse the
deterioration of foods. It can only slow down the changes in quality. It is difficult to predict how long foods
will retain their top-quality flavor, appearance or texture because it depends on age and condition of the food
on the day it was vacuum sealed.
IMPORTANT:
Vacuum sealing is NOT a substitute for refrigeration or freezing.
Any perishable foods that require refrigeration must still be refrigerated or frozen after vacuum sealing.
GUIDELINES
VS5900 Series_23EFSM1.indd 15-16VS5900 Series_23EFSM1.indd 15-16
16
Consumer Service: US: 1-877-777-8042 CA: 1-877-804-5383 MX: +52 55 5366 0800
GUIDELINES
Food Preparation & Reheating Tips
Thawing and Reheating
Vacuum-Sealed Foods
Always thaw foods in either refrigerator or microwave — do not thaw perishable foods at room
temperature.
To reheat foods in a microwave in a FoodSaver
®
Bag, always cut corner of the bag before placing
it on a microwave-safe dish. However, to avoid hot spots, do not reheat bone-in meat or greasy
foods in microwave within a FoodSaver
®
Bag. You can also reheat foods in FoodSaver
®
Bags by
placing them in water at a low simmer below 170°F (75°C).
Preparation Guidelines
for Meat and Fish:
For best results, pre-freeze meat and fish for 1-2 hours before vacuum sealing in a FoodSaver
®
Bag. This helps retain the juice and shape, and guarantees a better seal.
If it’s not possible to pre-freeze, place a folded paper towel between meat or fish and top of
bag, but below seal area. Leave paper towel in bag to absorb excess moisture and juices during
vacuum sealing process.
NOTE: Beef may appear darker after vacuum sealing due to the removal of oxygen. This is not an
indication of spoilage.
Preparation Guidelines for Hard Cheeses:
To keep cheese fresh, vacuum seal it after each use. Make your FoodSaver
®
Bag extra long,
allowing one inch (2.54 cm) of bag material for each time you plan to open and reseal in
addition to the three inches (7.62 cm) of extra space you normally leave between contents and
seal edge. Simply cut sealed edge and remove cheese. When you’re ready to reseal the cheese,
just drop it in bag and reseal.
IMPORTANT:
Due to the risk of anaerobic bacteria, soft cheeses should never be vacuum sealed.
2023/4/17 09:582023/4/17 09:58
17
US: www.FoodSaver.com | CA: www.FoodSaver.ca | MX: www.oster.com.mx/foodsaver
GUIDELINES
Food Preparation & Reheating Tips
IMPORTANT:
Due to the risk of anaerobic bacteria, fresh mushrooms, onions and garlic should never be
vacuum sealed.
Preparation Guidelines
for Vegetables:
Vegetables need to be blanched before vacuum sealing. This process stops the enzyme action
that could lead to loss of flavor, color and texture.
To blanch vegetables, place them in boiling water or in the microwave until they are cooked, but
still crisp. Blanching times range from 1 to 2 minutes for leafy greens and peas; 3 to 4 minutes
for snap peas, sliced zucchini or broccoli; 5 minutes for carrots; and 7 to 11 minutes for corn
on the cob. After blanching, immerse vegetables in cold water to stop the cooking process.
Finally, dry vegetables on a towel before vacuum sealing.
NOTE: All vegetables (including broccoli, brussels sprouts, cabbage, cauliflower, kale, turnips)
naturally emit gases during storage. Therefore, after blanching, they must be stored in freezer
only.
When freezing vegetables, it is best to pre-freeze them for 1-2 hours or until solidly frozen.
To freeze vegetables in individual servings, first place on a baking sheet and spread them out
so they are not touching. This prevents them from freezing together in a block. Once they are
frozen, remove from baking sheet and vacuum seal vegetables in a FoodSaver
®
Bag. After they
have been vacuum sealed, return them to the freezer.
Preparation Guidelines
for Leafy Vegetables:
For best results, use a FoodSaver
®
Container to store leafy vegetables. First wash the vegetables,
and then dry with a towel or salad spinner. After they are dried, put them in a container and
vacuum seal as normal. Store in refrigerator.
VS5900 Series_23EFSM1.indd 17-18VS5900 Series_23EFSM1.indd 17-18
18
Consumer Service: US: 1-877-777-8042 CA: 1-877-804-5383 MX: +52 55 5366 0800
GUIDELINES
IMPORTANT:
When vacuum sealing apples, they must be sliced, and put a small bit of lemon juice on
the slices to prevent them from browning.
Because of their natural ripening, bananas may actually decay faster under a vacuum seal.
Food Preparation & Reheating Tips
Preparation Guidelines for Fruits:
When freezing soft fruits or berries, it is best to pre-freeze them for 1-2 hours or until solidly
frozen. To freeze fruit in individual servings, first place on a baking sheet and spread them out
so they are not touching. This prevents them from freezing together in a block. Once they are
frozen, remove from baking sheet and vacuum seal fruit in a FoodSaver
®
Bag. After they have
been vacuum sealed, return them to the freezer.
You can vacuum seal portions for baking or in your favorite combinations for easy fruit salad all
year round. If storing in the refrigerator, we recommend using a FoodSaver
®
Container.
Preparation Guidelines
for Baked Goods:
To vacuum seal soft or airy baked goods, we recommend using a FoodSaver
®
Container so they
will hold their shape. If using a bag, pre-freeze for 1-2 hours or until solidly frozen. To save time,
make cookie dough, pie shells, whole pies, or mix dry ingredients in advance and vacuum seal
for later use.
Preparation Guidelines for
Coffee and Powdery Foods:
To prevent food particles from being drawn into Vacuum Pump, place a coffee filter or paper
towel at top of bag or container before vacuum sealing. You can also place the food in its
original bag inside a FoodSaver
®
Bag to vacuum seal.
2023/4/17 09:582023/4/17 09:58

19
US: www.FoodSaver.com | CA: www.FoodSaver.ca | MX: www.oster.com.mx/foodsaver
GUIDELINES
Food Preparation & Reheating Tips
Preparation Guidelines for Make-ahead
Meals and Leftovers:
Efficiently store your make-ahead meals and leftovers in the stackable, lightweight
FoodSaver
®
Containers. These convenient FoodSaver
®
Containers are nestable, crack and shatter
resistant, dishwasher safe, and bases are microwave safe for reheating only.
Preparation Guidelines
for Snack Foods:
Your snack foods will maintain their freshness longer when you vacuum seal them. For best
results, use a FoodSaver
®
Container for crushable items like crackers.
VS5900 Series_23EFSM1.indd 19-20VS5900 Series_23EFSM1.indd 19-20

20
Consumer Service: US: 1-877-777-8042 CA: 1-877-804-5383 MX: +52 55 5366 0800
GUIDELINES
Vacuum Sealing Non-Food Items
Silverware
To vacuum seal silver, wrap fork tines in soft cushioning material, such as a paper towel, to
avoid puncturing bag, and seal as normal. Your silver will be clean, fresh and untarnished right
when you need it for your next dinner gathering.
Camping
Your FoodSaver
®
Bags are ideal for outdoor excursions. For camping and hiking, keep your
matches, maps and food dry and compact.
Water
To have fresh water for drinking, simply fill a FoodSaver
®
Bag with ice, seal it, and when
needed, let the ice pack melt. You can trim the corner off the bag to make a spout for drinking
or pouring.
Boating
If you’re going sailing or boating, you can vacuum seal your food, extra batteries, memory cards,
cash, identification cards, boating license and a dry change of clothes. Just remember to bring
scissors or a knife to open the bags when you need them!
Emergency
To keep emergency kits safe and dry, vacuum seal flares, batteries, flashlights, matches,
candles, first aid kits, extra food and other necessities. Your emergency items will stay dry and
organized in your home, car, boat or RV.
The FoodSaver
®
Vacuum Sealing System also protects non-food items from oxidation, corrosion and
moisture. Simply follow directions to vacuum seal items using FoodSaver
®
Bags, Containers and Accessories.
2023/4/17 09:582023/4/17 09:58

21 US: www.FoodSaver.com | CA: www.FoodSaver.ca | MX: www.oster.com.mx/foodsaver
Tro ubl eshooting
Problem Solution
Seal LED
flashing
• Always wait 20 seconds between seals.
• Vacuum pump running more than 120 seconds. Under heavy usage
appliance will shut off automatically and Light will flash. See next section
‘Vacuum Pump is running, but bag is not evacuating air.
Vacuum Pump is
running, but bag is
not evacuating air
• If making a bag from a Roll, make sure one end of the bag is sealed. (See
“How to Make a FoodSaver
®
Bag” on pg 8.
• Adjust the bag and try again. Make sure the open end of the bag is
curved down inside the Drip Tray.
• Check for wrinkles in bag along Sealing Strip. To prevent wrinkles in the
seal, gently stretch bag flat while inserting bag into Drip Tray.
• Open unit and make sure upper gasket has no foreign objects, dirt or
debris on it (See “Care & Cleaning” on pg. 14.
Bag is not sealing
• Check for food debris around seal area. If present, clean Gasket (See
“Care & Cleaning” on pg. 14.
• Bag has wrinkles: To prevent wrinkles in the seal, gently stretch bag flat
while inserting bag into Vacuum Channel.
• Make sure unit is turned on.
• Unit overheated. Wait several minutes for unit cool down.
No lights on the
control paneL
• Make sure unit is plugged in.
• Make sure wall outlet is functional.
• Make sure Appliance lid is down and fully closed
• Make sure unit is turned on.
Upper Gasket is
loose or has a
tear.
• Contact consumer services at the number or website listed below.
Nothing happens
when appliance lid
is closed/locked.
• Make sure unit is plugged in.
• Make sure unit is turned on.
• Make sure wall outlet is functional.
• Lightly press down on lid.
Liquid sucked out
and filled the drip
tray.
• Make sure that you are using the liquid mode if you have vac/sealing
soups, sauces, marinade, or salsas in a vacuum bag.
• Make sure not to overfill bag with liquid. For quart bags recommend
filling with max of 1 quart and for gallon bags ½ gallon of liquid. Liquids
must have a viscosity of 1.39 mPa·s or higher
• Make sure that the liquid is not too thin. A good reference is no thinner
than chicken noodle soup.
TROUBLESHOOTING
VS5900 Series_23EFSM1.indd 21-22
21 US: www.FoodSaver.com | CA: www.FoodSaver.ca | MX: www.oster.com.mx/foodsaver
Troubleshooting
Problem Solution
Seal LED
flashing
• Always wait 20 seconds between seals.
• Vacuum pump running more than 120 seconds. Under heavy usage
appliance will shut off automatically and Light will flash. See next section
‘Vacuum Pump is running, but bag is not evacuating air.
Vacuum Pump is
running, but bag is
not evacuating air
• If making a bag from a Roll, make sure one end of the bag is sealed. (See
“How to Make a FoodSaver
®
Bag” on pg 8.
• Adjust the bag and try again. Make sure the open end of the bag is
curved down inside the Drip Tray.
• Check for wrinkles in bag along Sealing Strip. To prevent wrinkles in the
seal, gently stretch bag flat while inserting bag into Drip Tray.
• Open unit and make sure upper gasket has no foreign objects, dirt or
debris on it (See “Care & Cleaning” on pg. 14.
Bag is not sealing
• Check for food debris around seal area. If present, clean Gasket (See
“Care & Cleaning” on pg. 14.
• Bag has wrinkles: To prevent wrinkles in the seal, gently stretch bag flat
while inserting bag into Vacuum Channel.
• Make sure unit is turned on.
• Unit overheated. Wait several minutes for unit cool down.
No lights on the
control paneL
• Make sure unit is plugged in.
• Make sure wall outlet is functional.
• Make sure Appliance lid is down and fully closed
• Make sure unit is turned on.
Upper Gasket is
loose or has a
tear.
• Contact consumer services at the number or website listed below.
Nothing happens
when appliance lid
is closed/locked.
• Make sure unit is plugged in.
• Make sure unit is turned on.
• Make sure wall outlet is functional.
• Lightly press down on lid.
Liquid sucked out
and filled the drip
tray.
• Make sure that you are using the liquid mode if you have vac/sealing
soups, sauces, marinade, or salsas in a vacuum bag.
• Make sure not to overfill bag with liquid. For quart bags recommend
filling with max of 1 quart and for gallon bags ½ gallon of liquid. Liquids
must have a viscosity of 1.39 mPa·s or higher
• Make sure that the liquid is not too thin. A good reference is no thinner
than chicken noodle soup.
TROUBLESHOOTING
VS5900 Series_23EFSM1.indd 21-22
When using liquid mode, if vacuum sealing thicker sauces, soups, or creams
(i.e. cream of mushroom) keep inside walls of bag above liquid clear from
food debris or drips as much as possible.
21 US: www.FoodSaver.com | CA: www.FoodSaver.ca | MX: www.oster.com.mx/foodsaver
Troubleshooting
Problem Solution
Seal LED
flashing
• Always wait 20 seconds between seals.
• Vacuum pump running more than 120 seconds. Under heavy usage
appliance will shut off automatically and Light will flash. See next section
‘Vacuum Pump is running, but bag is not evacuating air.
Vacuum Pump is
running, but bag is
not evacuating air
• If making a bag from a Roll, make sure one end of the bag is sealed. (See
“How to Make a FoodSaver
®
Bag” on pg 8.
• Adjust the bag and try again. Make sure the open end of the bag is
curved down inside the Drip Tray.
• Check for wrinkles in bag along Sealing Strip. To prevent wrinkles in the
seal, gently stretch bag flat while inserting bag into Drip Tray.
• Open unit and make sure upper gasket has no foreign objects, dirt or
debris on it (See “Care & Cleaning” on pg. 14.
Bag is not sealing
• Check for food debris around seal area. If present, clean Gasket (See
“Care & Cleaning” on pg. 14.
• Bag has wrinkles: To prevent wrinkles in the seal, gently stretch bag flat
while inserting bag into Vacuum Channel.
• Make sure unit is turned on.
• Unit overheated. Wait several minutes for unit cool down.
No lights on the
control paneL
• Make sure unit is plugged in.
• Make sure wall outlet is functional.
• Make sure Appliance lid is down and fully closed
• Make sure unit is turned on.
Upper Gasket is
loose or has a
tear.
• Contact consumer services at the number or website listed below.
Nothing happens
when appliance lid
is closed/locked.
• Make sure unit is plugged in.
• Make sure unit is turned on.
• Make sure wall outlet is functional.
• Lightly press down on lid.
Liquid sucked out
and filled the drip
tray.
• Make sure that you are using the liquid mode if you have vac/sealing
soups, sauces, marinade, or salsas in a vacuum bag.
• Make sure not to overfill bag with liquid. For quart bags recommend
filling with max of 1 quart and for gallon bags ½ gallon of liquid. Liquids
must have a viscosity of 1.39 mPa·s or higher
• Make sure that the liquid is not too thin. A good reference is no thinner
than chicken noodle soup.
TROUBLESHOOTING
VS5900 Series_23EFSM1.indd 21-22
• If using food with a lot of liquid, use the Liquid mode to prevent excessive
amount of juices or liquid from being sucked out of the bag.
21 US: www.FoodSaver.com | CA: www.FoodSaver.ca | MX: www.oster.com.mx/foodsaver
Troubleshooting
Problem Solution
Seal LED
flashing
• Always wait 20 seconds between seals.
• Vacuum pump running more than 120 seconds. Under heavy usage
appliance will shut off automatically and Light will flash. See next section
‘Vacuum Pump is running, but bag is not evacuating air.
Vacuum Pump is
running, but bag is
not evacuating air
• If making a bag from a Roll, make sure one end of the bag is sealed. (See
“How to Make a FoodSaver
®
Bag” on pg 8.
• Adjust the bag and try again. Make sure the open end of the bag is
curved down inside the Drip Tray.
• Check for wrinkles in bag along Sealing Strip. To prevent wrinkles in the
seal, gently stretch bag flat while inserting bag into Drip Tray.
• Open unit and make sure upper gasket has no foreign objects, dirt or
debris on it (See “Care & Cleaning” on pg. 14.
Bag is not sealing
• Check for food debris around seal area. If present, clean Gasket (See
“Care & Cleaning” on pg. 14.
• Bag has wrinkles: To prevent wrinkles in the seal, gently stretch bag flat
while inserting bag into Vacuum Channel.
• Make sure unit is turned on.
• Unit overheated. Wait several minutes for unit cool down.
No lights on the
control paneL
• Make sure unit is plugged in.
• Make sure wall outlet is functional.
• Make sure Appliance lid is down and fully closed
• Make sure unit is turned on.
Upper Gasket is
loose or has a
tear.
• Contact consumer services at the number or website listed below.
Nothing happens
when appliance lid
is closed/locked.
• Make sure unit is plugged in.
• Make sure unit is turned on.
• Make sure wall outlet is functional.
• Lightly press down on lid.
Liquid sucked out
and filled the drip
tray.
• Make sure that you are using the liquid mode if you have vac/sealing
soups, sauces, marinade, or salsas in a vacuum bag.
• Make sure not to overfill bag with liquid. For quart bags recommend
filling with max of 1 quart and for gallon bags ½ gallon of liquid. Liquids
must have a viscosity of 1.39 mPa·s or higher
• Make sure that the liquid is not too thin. A good reference is no thinner
than chicken noodle soup.
TROUBLESHOOTING
VS5900 Series_23EFSM1.indd 21-22

22
Consumer Service: US: 1-877-777-8042 CA: 1-877-804-5383 MX: +52 55 5366 0800
g
TROUBLESHOOTING
Troubleshooting
Problem Solution
Cannot insert bag
into machine
• Make sure there is enough bag material to reach center of Drip Tray. Always
allow three inches (7.62 cm) of extra space to allow the bag to seal tightly
around food contents.
• Gently stretch bag flat while inserting. Insert bag curled down into Drip Tray.
Appliance Lid will
not automatically
close
• If trying to insert bag right after removing or pressing Cancel Button, wait a
few seconds, and then try to insert or re-insert.
• Food or debris may be obstructing the sensors that are used to automatically
close the appliance lid. Fully open up appliance lid and wipe off with a
damp towel the bottom underneath two black tabs on appliance lid. See
Care and Cleaning Section on page 14.
Air was removed
from the bag,
but now air has
re-entered
• Examine the seal. A wrinkle along the seal may cause air to re-enter the bag.
To prevent wrinkles in the seal, gently stretch bag flat while inserting bag
into Drip Tray.
• Sometimes moisture or food material (such as juices, grease, crumbs,
powders, etc.) along seal prevents bag from sealing properly. Cut bag open,
wipe top inside of bag and re-seal.
• If using food with a lot of liquid, use the Liquid mode to prevent excessive
amount of juices or liquid from being sucked out of the bag.
• Sharp food items may have punctured bag. Use a new bag if there is a hole.
Cover sharp food items with a soft cushioning material, such as a paper
towel, and re-seal.
• Fermentation or the release of natural gases from inside the foods may have
occurred. When this happens, food may have begun to spoil and should be
discarded.
• Faulty bag. Bag could be punctured. Try another bag.
Bag melts
• Sealing Strip may have become too hot. Always wait at least 20 seconds
between seals for appliance to cool down before you vacuum seal another item.
• Use FoodSaver
®
brand bags. Our FoodSaver
®
Bags and Rolls are specially.
• designed for FoodSaver
®
units.
Container does not
vacuum
• The FoodSaver
®
Container Lid must be correctly aligned with the Container
opening. (See “Owner’s Manual” provided with accessory.)
• Make sure you press the HandHeld button.
• Make sure Container Lid is closed securely on all 4 sides of the Container.
• Make sure rubber Gasket on inside of Lid is free from food residues.
• Examine Container rim for cracks or scratches and make sure Container
valve is clean.
Drip Tray Full
• When this happens the liquid, dry, moist and sous vide lights will flash.
Drip tray needs to be emptied and dried before installing it back into the
appliance.
If you need further
assistance:
• Contact consumer services at the number below or visit the website and
click the ‘Support’ tab.
2023/4/17 09:582023/4/17 09:58
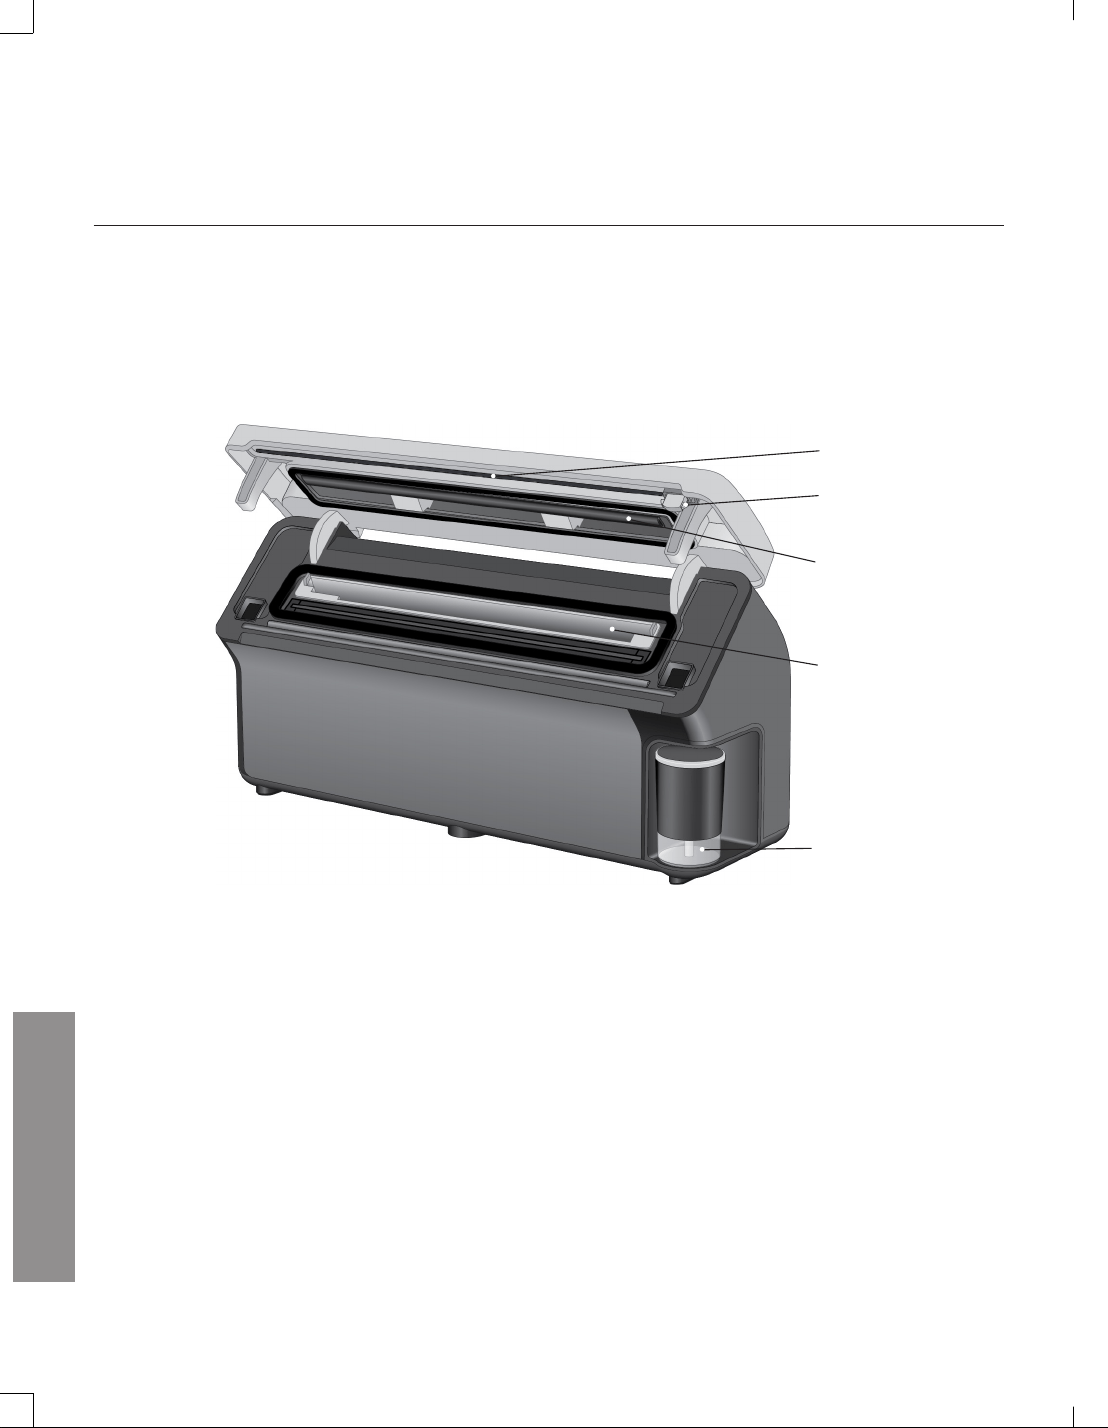
23
US: www.FoodSaver.com | CA: www.FoodSaver.ca | MX: www.oster.com.mx/foodsaver
Replacement Parts
REPLACEMENT PARTS
For replacement parts, please visit the website or call consumer services.
Wiper
Bag Cutter
Profile
Drip tray
Handheld Reservoir
VS5900 Series_23EFSM1.indd 23-24VS5900 Series_23EFSM1.indd 23-24

24
Consumer Service: US: 1-877-777-8042 CA: 1-877-804-5383 MX: +52 55 5366 0800
s
Sunbeam Products, Inc. or if in Canada, Newell Brands Canada ULC, and in Mexico, Newell Brands de
Mexico, S.A. de C.V. (collectively “Sunbeam”) warrants that for a period of five (5) years from the date of
initial retail purchase, this product will be free from defects in material and workmanship, when used in
accordance with the instructions provided. Sunbeam, at its option, will repair or replace, free of charge, this
product or any component of the product found to be defective during the warranty period. Replacement will
be made with a new or remanufactured product or component at no cost to the consumer. If the product is
no longer available, replacement may be made with a similar product of equal or greater value. This is your
exclusive warranty. Do NOT attempt to repair or adjust any electrical or mechanical functions on this product.
Doing so will void this warranty. Sunbeam reserves all rights to decline coverage if the defect or damage
was caused by unauthorized components or service. For Mexico, the warranty is from the date the customer
receives the product that is presumed to be the date of the invoice or voucher, or the stamped date of the
guarantee, unless proven otherwise. This warranty is valid for the original retail purchaser from the date of
initial retail purchase and is not transferable (not applicable for the Mexican market where transferable). Keep
the original sales receipt. Proof of purchase is required to obtain warranty performance. For purchases made in
Mexico, showing purchase invoice (sale receipt) or a seal stamped in the warranty card is preferred. Dealers,
service centers, or retail stores selling Sunbeam products do not have the right to alter, modify or any way
change the terms and conditions of this warranty. This warranty does not cover normal wear of parts or damage
resulting from any of the following: a). negligent use or misuse of the product, b). use on improper voltage
or current, c). use contrary to the operating instructions, d). disassembly, repair or alteration by anyone other
than Sunbeam or an authorized Sunbeam service center. Sunbeam expressly excludes from this warranty
and denies liability for defects or damage caused by repair or alteration by anyone other than Sunbeam or
an authorized Sunbeam service center. Further, the warranty does not cover: e) Acts of God, such as fire,
flood, hurricanes and tornadoes. No terms of this warranty may be construed to apply to non-warranty service
and maintenance. Accordingly, Sunbeam also denies liability for defects and damage caused by repair or
alteration outside the terms of this warranty.
What are the limits on Sunbeam’s Liability?
Sunbeam shall not be liable for any incidental or consequential damages caused by the breach of any
express, implied or statutory warranty or condition. Except to the extent prohibited by applicable law,
any implied warranty or condition of merchantability or fitness for a particular purpose is limited in
duration to the duration of the above warranty. Sunbeam disclaims all other warranties, conditions or
representations, express, implied, statutory or otherwise. Sunbeam shall not be liable for any damages
of any kind resulting from the purchase, use or misuse of, or inability to use the product including
incidental, special, consequential or similar damages or loss of profits, or for any breach of contract,
fundamental or otherwise, or for any claim brought against purchaser by any other party. Some provinces,
states or jurisdictions do not allow the exclusion or limitation of incidental or consequential damages or
limitations on how long an implied warranty lasts, so the above limitations or exclusion may not apply
to you. This warranty gives you specific legal rights, and you may also have other rights that vary from
province to province, state to state or jurisdiction to jurisdiction.
5-Year Limited Warranty
WARRANTY
2023/4/17 09:58
24Consumer Service: US: 1-877-777-8042 CA: 1-877-804-5383 MX: +52 55 5366 0800
s
Sunbeam Products, Inc. or if in Canada, Newell Brands Canada ULC, and in Mexico, Newell Brands de
Mexico, S.A. de C.V. (collectively “Sunbeam”) warrants that for a period of five (5) years from the date of
initial retail purchase, this product will be free from defects in material and workmanship, when used in
accordance with the instructions provided. Sunbeam, at its option, will repair or replace, free of charge, this
product or any component of the product found to be defective during the warranty period. Replacement will
be made with a new or remanufactured product or component at no cost to the consumer. If the product is
no longer available, replacement may be made with a similar product of equal or greater value. This is your
exclusive warranty. Do NOT attempt to repair or adjust any electrical or mechanical functions on this product.
Doing so will void this warranty. Sunbeam reserves all rights to decline coverage if the defect or damage
was caused by unauthorized components or service. For Mexico, the warranty is from the date the customer
receives the product that is presumed to be the date of the invoice or voucher, or the stamped date of the
guarantee, unless proven otherwise. This warranty is valid for the original retail purchaser from the date of
initial retail purchase and is not transferable (not applicable for the Mexican market where transferable). Keep
the original sales receipt. Proof of purchase is required to obtain warranty performance. For purchases made in
Mexico, showing purchase invoice (sale receipt) or a seal stamped in the warranty card is preferred. Dealers,
service centers, or retail stores selling Sunbeam products do not have the right to alter, modify or any way
change the terms and conditions of this warranty. This warranty does not cover normal wear of parts or damage
resulting from any of the following: a). negligent use or misuse of the product, b). use on improper voltage
or current, c). use contrary to the operating instructions, d). disassembly, repair or alteration by anyone other
than Sunbeam or an authorized Sunbeam service center. Sunbeam expressly excludes from this warranty
and denies liability for defects or damage caused by repair or alteration by anyone other than Sunbeam or
an authorized Sunbeam service center. Further, the warranty does not cover: e) Acts of God, such as fire,
flood, hurricanes and tornadoes. No terms of this warranty may be construed to apply to non-warranty service
and maintenance. Accordingly, Sunbeam also denies liability for defects and damage caused by repair or
alteration outside the terms of this warranty.
What are the limits on Sunbeam’s Liability?
Sunbeam shall not be liable for any incidental or consequential damages caused by the breach of any
express, implied or statutory warranty or condition. Except to the extent prohibited by applicable law,
any implied warranty or condition of merchantability or fitness for a particular purpose is limited in
duration to the duration of the above warranty. Sunbeam disclaims all other warranties, conditions or
representations, express, implied, statutory or otherwise. Sunbeam shall not be liable for any damages
of any kind resulting from the purchase, use or misuse of, or inability to use the product including
incidental, special, consequential or similar damages or loss of profits, or for any breach of contract,
fundamental or otherwise, or for any claim brought against purchaser by any other party. Some provinces,
states or jurisdictions do not allow the exclusion or limitation of incidental or consequential damages or
limitations on how long an implied warranty lasts, so the above limitations or exclusion may not apply
to you. This warranty gives you specific legal rights, and you may also have other rights that vary from
province to province, state to state or jurisdiction to jurisdiction.
5-Year Limited Warranty
WARRANTY
2023/4/17 09:58

25
US: www.FoodSaver.com | CA: www.FoodSaver.ca | MX: www.oster.com.mx/foodsaver
How to Obtain Warranty Service
In the U.S.A.
If you have any question regarding this warranty or would like to obtain warranty service, please call
1.877.777.8042 and a convenient service center address will be provided to you. In the U.S.A., this
warranty is offered by Sunbeam Products, Inc. located in 6655 Peachtree Dunwoody Rd. Atlanta, GA
30328.
In Canada
If you have any question regarding this warranty or would like to obtain warranty service, please call
1.877.804.5383 and a convenient service center address will be provided to you. In Canada, this
warranty is offered by Newell Brands Canada ULC, located at 20 B Hereford Street, Brampton, Ontario
L6Y 0M1. If you have any other problem or claim in connection with this product, please write our
Consumer Service Department.
In Mexico
If you have any question regarding this warranty or would like to obtain warranty service, please contact
Newell Brands de Mexico, S.A. de C.V. located in Boulevard Manuel Ávila Camacho No. 32 Piso 14,
Colonia Lomas de Chapultepec III Sección, Alc. Miguel Hidalgo, C.P. 11000 Ciudad de México, México.
Consumer Service: 55 5366-0800 /800 506 1700 and/or a convenient service center.
PLEASE DO NOT RETURN THIS PRODUCT TO ANY OF THESE ADDRESSES OR TO THE PLACE OF PURCHASE.
For inquiries regarding recycling and proper disposal of this product, please contact your local waste
management facility.
WARRANTY
VS5900 Series_23EFSM1.indd 25-26VS5900 Series_23EFSM1.indd 25-26

Table des matières
Mesures de protection importantes ..................... 27
Caractéristiques du produit ...................................31
« Comment… » ........................................................ 33
Installer un rouleau FoodSaver
MD
Fabriquer un sac à partir d’un rouleau d’emballage FoodSaver
MD
(Fabrication de sac express)
Mettre un sac FoodSaver
MD
sous vide
Utiliser les contenants de conservation et de marinade FoodSaver
MD
Emballer sous vide avex les accessoires FoodSaver
MD
Nettoyage et entretien .......................................... 40
Consignes .................................................................41
Emballage sous vide et sécurité alimentaire
Conseils en matière de préparation alimentaire et de réchauffage
Emballage sous vide d’articles non alimentaires
Dépannage ............................................................ 47
Pièces de rechange .............................................. 49
Garantie .................................................................. 50
Inscrivez-vous dès aujourd’hui sur www.foodsaver.com/register pour
bénéficier d’un accès exclusif aux offres et aux rabais FoodSaver!*
*S’applique aux résidents des États-Unis seulement
2023/4/17 09:582023/4/17 09:58

27
US: www.FoodSaver.com | CA: www.FoodSaver.ca | MX: www.oster.com.mx/foodsaver
CONSIGNES DE SÉCURITÉ IMPORTANTES
Pour votre propre sécurité, toujours suivre les précautions de base
suivantes à l’utilisation d’un appareil FoodSaver
MD
:
1. Lire attentivement le manuel du propriétaire de l’utilisateur pour
connaître le mode d’emploi. Lire toutes les consignes de ce manuel
avant l’utilisation.
2. Lors de l’utilisation d’un appareil électrique, il est important de toujours
suivre des précautions de base, y compris les suivantes :
Lire toutes les consignes avant d’utiliser cet appareil.
DANGER – Pour réduire le risque de choc électrique :
1. Ne pas mettre la main sur un appareil qui est tombé dans l’eau. Le
débrancher immédiatement de la prise de courant.
2. Ne pas utiliser dans le bain ou sous la douche.
3. Ne pas placer ou entreposer l’appareil dans un endroit où il risque de
tomber ou d’être tiré dans une baignoire ou un évier. Ne pas le placer
ou le laisser tomber dans l’eau ou tout autre liquide.
4. Toujours débrancher l’appareil de la prise électrique immédiatement
après l’utilisation.
5. Débrancher cet appareil avant de le nettoyer.
MISE EN GARDE – Pour réduire le risque de brûlures, d’incendie et de choc
électrique :
1. Ne pas utiliser l’appareil sur des surfaces humides ou à l’extérieur.
2. Pour éviter tout choc électrique, ne pas immerger le câble
d’alimentation, la fiche ou quelque partie que ce soit de l’appareil dans
l’eau ou tout autre liquide. Le débrancher de la prise après l’utilisation et
avant le nettoyage.
3. Pour déconnecter l’appareil, débrancher le câble d’alimentation de la
prise de courant. Ne pas déconnecter en tirant sur le câble.
4. Ne pas utiliser l’appareil avec une fiche ou un câble d’alimentation
endommagé. Ne pas utiliser l’appareil s’il ne fonctionne pas
correctement ou s’il est endommagé de quelque manière que ce soit.
Pour obtenir plus de détails, appeler le service à la clientèle en composant
le numéro apparaissant ci-dessous.
1. N’utiliser l’appareil que pour l’usage auquel il est destiné.
2. Surveiller attentivement les enfants lors de l’utilisation de n’importe quel
appareil électrique. L’appareil ne doit pas être utilisé comme un jouet.
3. Pour adultes seulement.
VS5900 Series_23EFSM1.indd 27-28VS5900 Series_23EFSM1.indd 27-28

28
Service à la clientèle : US: 1-877-777-8042 CA: 1-877-804-5383 MX: +52 55 5366 0800
4. Attention : Un petit câble d’alimentation est fourni pour réduire le risque
de s’emmêler ou de trébucher sur un câble plus long. Une rallonge peut
être utilisée lorsque la puissance électrique nominale de la rallonge n’est
pas inférieure à la puissance électrique nominale de l’appareil.
5. Aucun câble ne doit être disposé de telle sorte qu’il pende d’un
comptoir ou d’un plan de travail, afin qu’il ne soit pas possible,
en particulier pour des enfants, de trébucher ou de le tirer
involontairement.
6. Ne pas placer sur ou à proximité d’un brûleur à gaz ou électrique
chaud, ou d’un four chauffé. Les produits contenant des liquides
chauds doivent être déplacés avec une extrême précaution.
7. Le couvercle se ferme automatiquement avec force. Ne pas empêcher
la fermeture du couvercle. Ne pas forcer manuellement la fermeture du
couvercle.
8. Ne pas mettre les doigts ou un corps étranger dans la fenêtre
de visualisation de l’emballage sous vide pendant le processus
d’emballage sous vide.
Conseils importants
1. L’emballage sous vide n’est PAS un substitut au processus thermique de
mise en conserve. Les denrées périssables doivent quand même être
réfrigérées ou congelées.
2. Pour obtenir de meilleurs résultats, utiliser uniquement avec les sacs,
rouleaux, contenants et accessoires FoodSaver
MD
.
3. Pendant le processus d’emballage sous vide, de petites quantités de
liquide, des miettes ou des particules alimentaires peuvent être attirés
dans la fente d’aspiration. Vider le ramasse-gouttes après chaque
utilisation.
4. Éviter de trop remplir, toujours laisser au moins 7,62 cm (3 pouces) de
matériau du sac entre le contenu du sac et le haut du sac. Cela laisse
de l’espace au matériau du sac pour se resserrer hermétiquement
contre les aliments et empêche le sac de sortir de la fente d’aspiration
pendant le processus de mise sous vide. Laisser ensuite 2,54 cm
(1 pouce) additionnels de matériau de sac pour chaque fois que vous
prévoyez de réutiliser le sac.
2023/4/17 09:582023/4/17 09:58

29
US: www.FoodSaver.com | CA: www.FoodSaver.ca | MX: www.oster.com.mx/foodsaver
5. Ne pas créer vos propres coutures latérales sur un sac FoodSaver
MD
.
Ces sacs sont fabriqués avec une couture latérale spéciale qui est
fermée hermétiquement tout le long du bord extérieur.
6. Pour empêcher que le sac ne se froisse au niveau de la partie
scellée lorsque vous mettez sous vide des articles volumineux, étirer
délicatement le sac de manière à ce qu’il soit bien plat au moment de
l’insérer dans la fente d’aspiration et continuer à le maintenir jusqu’à ce
que la pompe de mise sous vide démarre.
7. Lorsque vous emballez sous vide des articles avec des bouts pointus
(spaghettis secs, coutellerie, etc.), protéger le sac des perforations en
enveloppant l’article dans un matériau de rembourrage doux, comme
un essuie-tout. Il pourrait être conseillé d’utiliser une contenant ou un
bocal Mason à la place d’un sac.
8. Lorsque vous utilisez des accessoires, n’oubliez pas d’en laisser un
pouce (2,54 cm) d’espace en haut.
9. Pour de meilleurs résultats, précongeler les fruits et faire blanchir les
légumes avant de les emballer sous vide. (Consulter les consignes pour
l’emballage sous vide, pages 41-46.)
10. Patienter 20 secondes entre deux opérations de scellement afin de
laisser l’appareil refroidir.
11. Ne jamais ranger l’appareil avec le loquet en position « Operate »
(fonctionnement), car cela comprimerait les joints.
CONSERVER CES INSTRUCTIONS
Réservé à l’usage domestique
VS5900 Series_23EFSM1.indd 29-30VS5900 Series_23EFSM1.indd 29-30

30
Service à la clientèle : US: 1-877-777-8042 CA: 1-877-804-5383 MX: +52 55 5366 0800
CONSIGNES RELATIVES AU CÂBLE D’ALIMENTATION :
Un câble d’alimentation court (ou câble d’alimentation détachable) est
fourni pour réduire le risque de s’emmêler ou de trébucher avec un
câble plus long. Il est possible d’employer des câbles d’alimentation plus
longs et détachables ou des rallonges si l’on fait attention lors de leur
utilisation. Si une rallonge ou un long câble d’alimentation détachable est
utilisé :
a. La puissance électrique nominale du câble d’alimentation détachable ou
de la rallonge doit être au moins équivalente à la puissance électrique
nominale de l’appareil;
b. Si l’appareil nécessite une mise à la terre, la rallonge doit être un câble de
mise à la terre à trois fils; et
c. le câble plus long doit être disposé de telle sorte qu’il ne pende pas du
comptoir ou du plan de travail, afin qu’il soit impossible, pour des enfants
notamment, de le tirer involontairement ou de trébucher.
Ce produit est doté d’une fiche polarisée (une lame
est plus large que l’autre). Par mesure de sécurité,
pour réduire le risque de choc électrique, cette fiche
est destinée à ne s’insérer dans une prise polarisée
que d’une seule façon. Si la fiche ne s’insère pas
complètement dans la prise de courant, inverser la fiche. Si la fiche
ne s’insère toujours pas, contacter un électricien qualifié. Ne pas
essayer de contourner ce dispositif de sécurité ou de modifier la fiche
de quelque façon que ce soit. Si la fiche semble pouvoir se déplacer
facilement une fois insérée dans la prise CA ou si la prise CA est
chaude, ne pas utiliser celle-ci.
2023/4/17 09:582023/4/17 09:58
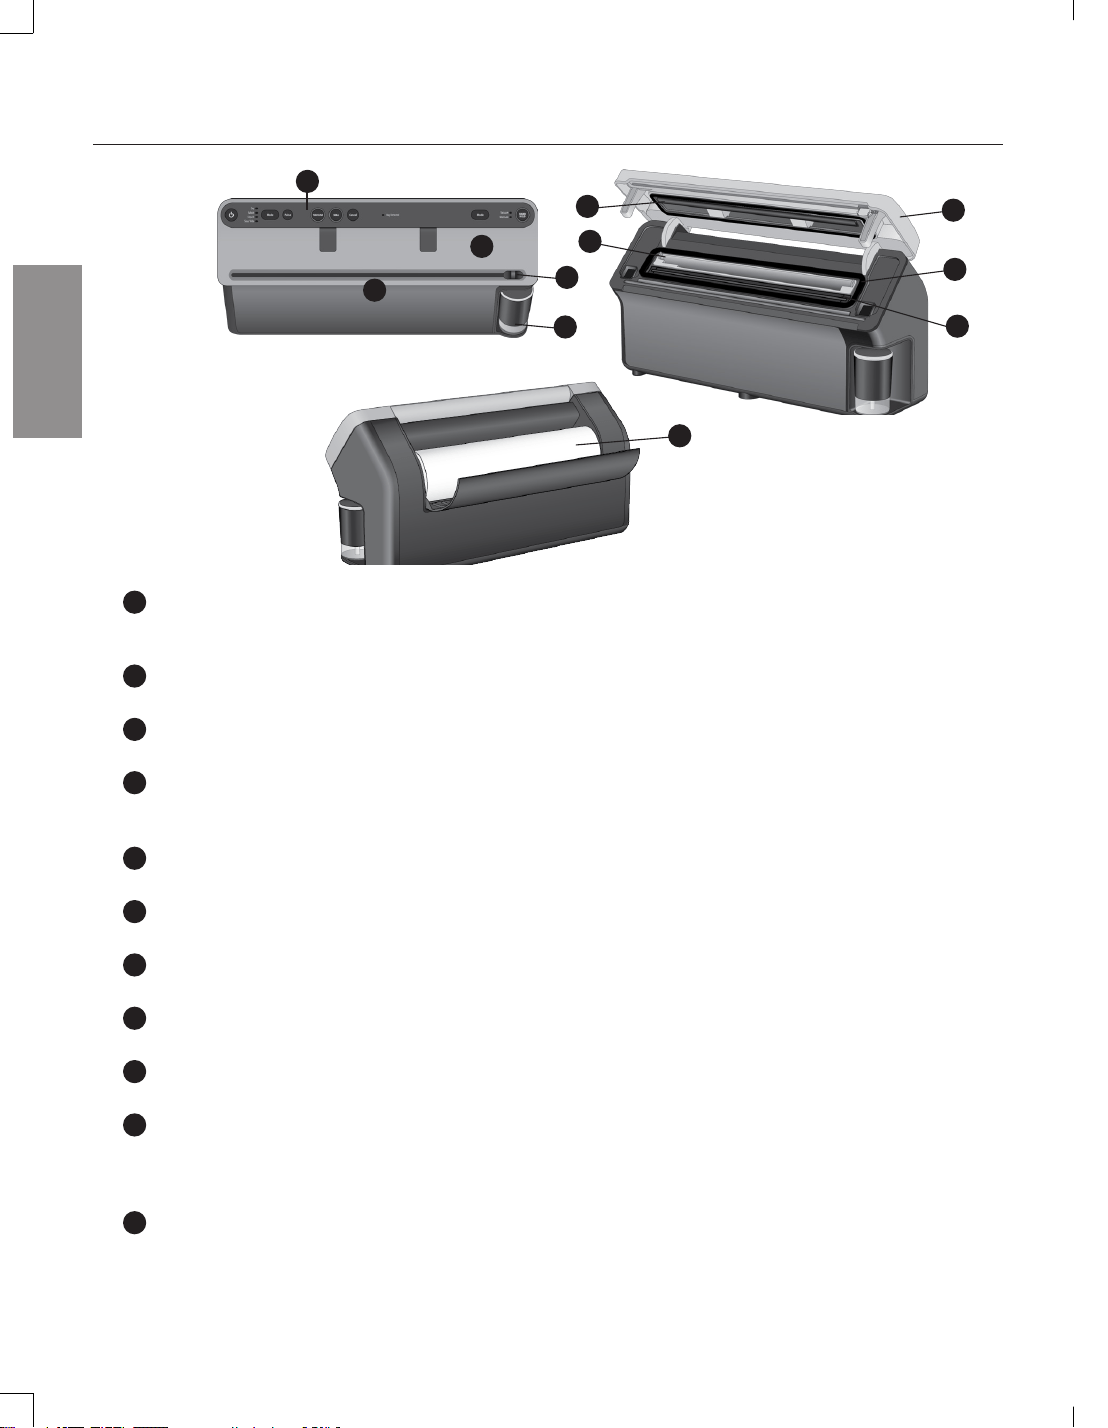
31
US: www.FoodSaver.com | CA: www.FoodSaver.ca | MX: www.oster.com.mx/foodsaver
CARACTÉRISTIQUES
Caractéristiques du produit
A
B
C
D
E
F
G
H
I
J
K
A
Voyants lumineux de contrôle et d’indication
Indiquent le réglage actuel et la progression de l’emballage sous vide pour un meilleur contrôle
ou pour indiquer qu’une action est en cours.
B
Coupe-sac
Intégré pour simplifier la fabrication de sacs à la taille voulue à partir de rouleaux.
C
Fenêtre de visualisation de l’emballage sous vide
Permet de visualiser la fente d’aspiration, le ramasse-gouttes et la bande de scellement.
D
Fente d’aspiration / Détecteur automatique de sac
Il suffit d’insérer l’extrémité ouverte d’un sac dans la fente d’aspiration pour que l’appareil
détecte le sac et ferme le couvercle.
E
Scelleuse à main escamotable
Fonctionne avec les sacs à glissière, contenants, et accessoires FoodSaver
MD
.
F
Joint supérieur
Inamovible.
G
Ramasse-gouttes amovible
Récupère tout liquide excédentaire et va dans le lave-vaisselle.
H
Joint inférieur
Inamovible.
I
Bandes de scellement
Fournit un scellement plus hermétique et sûr.
J
Couvercle de l’appareil
S’ouvre pour accéder au ramasse-gouttes et pour tirer le rouleau à l’intérieur de l’appareil en
vue de fabriquer des sacs. doit être fermé et verrouillé pour emballer sous vide, sceller ou
utiliser la scelleuse à main.
K
Compartiment pour rouleau intégré avec porte
Pour ranger les rouleaux d’emballage sous vide FoodSaver
MD
(s’adapte à toutes les largeurs et
longueurs).
VS5900 Series_23EFSM1.indd 31-32VS5900 Series_23EFSM1.indd 31-32
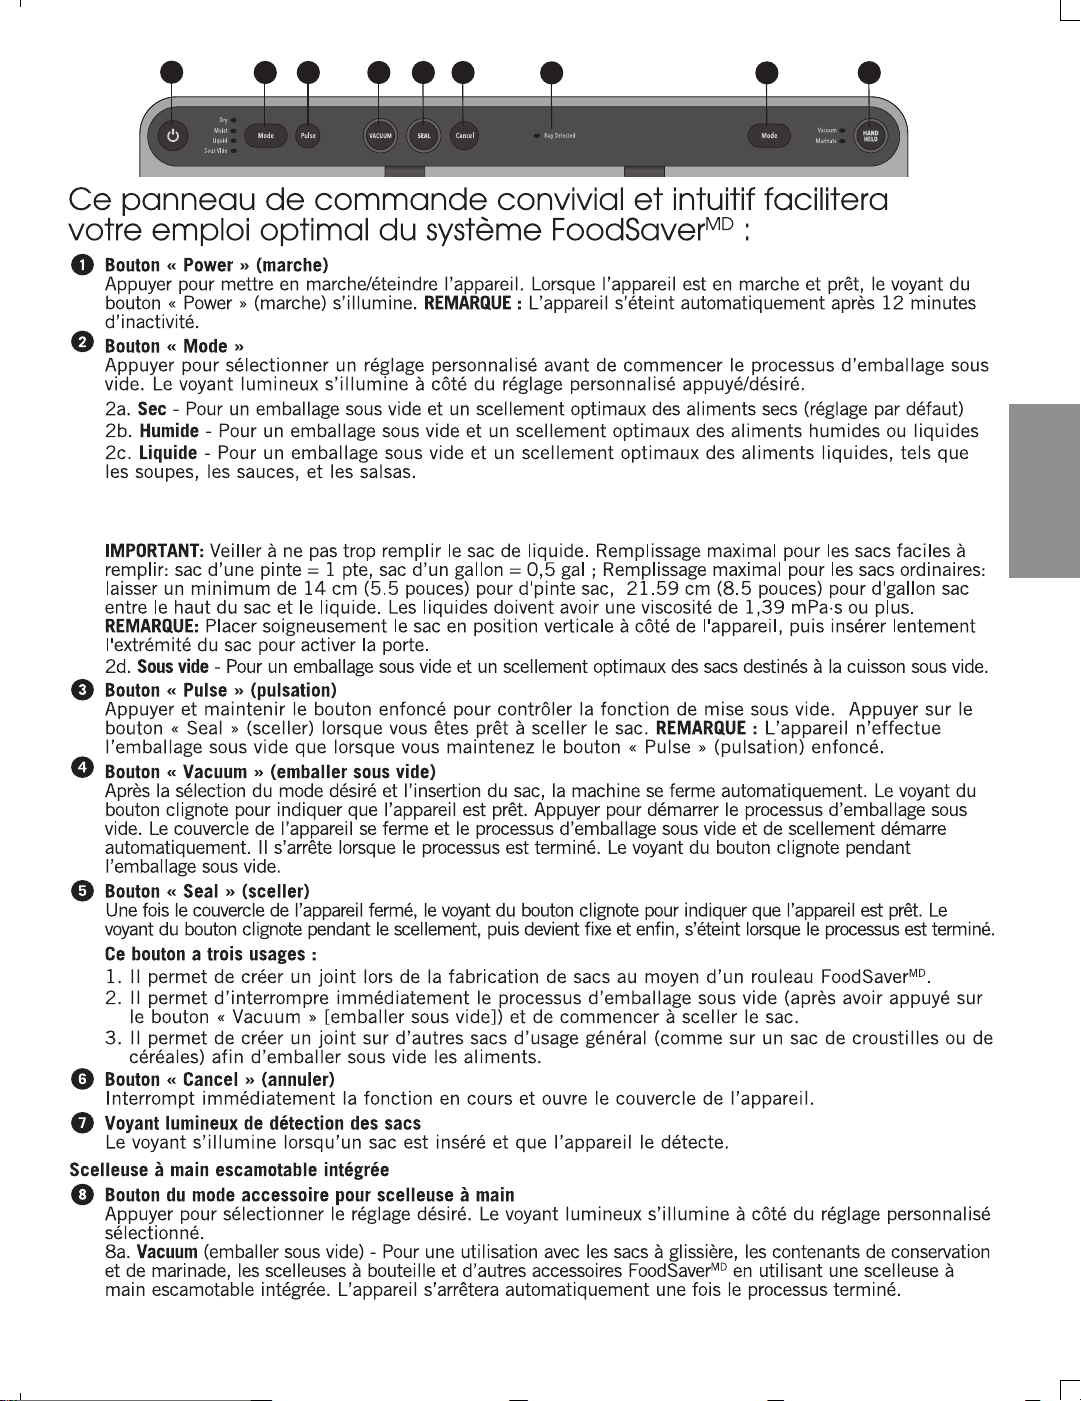
32Service à la clientèle : US: 1-877-777-8042 CA: 1-877-804-5383 MX: +52 55 5366 0800
CARACTÉRISTIQUES
1
Bouton « Power » (marche)
Appuyer pour mettre en marche/éteindre l’appareil. Lorsque l’appareil est en marche et prêt, le voyant du
bouton « Power » (marche) s’illumine. REMARQUE : L’appareil s’éteint automatiquement après 12 minutes
d’inactivité.
2
Bouton « Mode »
Appuyer pour sélectionner un réglage personnalisé avant de commencer le processus d’emballage sous
vide. Le voyant lumineux s’illumine à côté du réglage personnalisé appuyé/désiré.
2a. Sec - Pour un emballage sous vide et un scellement optimaux des aliments secs (réglage par défaut)
2b. Humide - Pour un emballage sous vide et un scellement optimaux des aliments humides ou liquides
2c. Liquide - Pour un emballage sous vide et un scellement optimaux des aliments liquides, tels que
les soupes, les sauces, et les salsas.
IMPORTANT: Veiller à ne pas trop remplir le sac de liquide. Pour les sacs d’une pinte, il est recommandé
de les remplir au maximum avec 1 pinte et pour les sacs d’un gallon, il est recommandé de les remplir
au maximum avec 1/2 gallon de liquide. Les liquides doivent avoir une viscosité de 1,39 mPa·s ou plus.
2d. Sous vide - Pour un emballage sous vide et un scellement optimaux des sacs destinés à la cuisson sous vide.
3
Bouton « Pulse » (pulsation)
Appuyer et maintenir le bouton enfoncé pour contrôler la fonction de mise sous vide. Appuyer sur le
bouton « Seal » (sceller) lorsque vous êtes prêt à sceller le sac. REMARQUE : L’appareil n’effectue
l’emballage sous vide que lorsque vous maintenez le bouton « Pulse » (pulsation) enfoncé.
4
Bouton « Vacuum » (emballer sous vide)
Après la sélection du mode désiré et l’insertion du sac, la machine se ferme automatiquement. Le voyant du
bouton clignote pour indiquer que l’appareil est prêt. Appuyer pour démarrer le processus d’emballage sous
vide. Le couvercle de l’appareil se ferme et le processus d’emballage sous vide et de scellement démarre
automatiquement. Il s’arrête lorsque le processus est terminé. Le voyant du bouton clignote pendant
l’emballage sous vide.
5
Bouton « Seal » (sceller)
Une fois le couvercle de l’appareil fermé, le voyant du bouton clignote pour indiquer que l’appareil est prêt. Le
voyant du bouton clignote pendant le scellement, puis devient fixe et enfin, s’éteint lorsque le processus est terminé.
Ce bouton a trois usages :
1. Il permet de créer un joint lors de la fabrication de sacs au moyen d’un rouleau FoodSaver
MD
.
2. Il permet d’interrompre immédiatement le processus d’emballage sous vide (après avoir appuyé sur
le bouton « Vacuum » [emballer sous vide]) et de commencer à sceller le sac.
3. Il permet de créer un joint sur d’autres sacs d’usage général (comme sur un sac de croustilles ou de
céréales) afin d’emballer sous vide les aliments.
6
Bouton « Cancel » (annuler)
Interrompt immédiatement la fonction en cours et ouvre le couvercle de l’appareil.
7
Voyant lumineux de détection des sacs
Le voyant s’illumine lorsqu’un sac est inséré et que l’appareil le détecte.
Scelleuse à main escamotable intégrée
8
Bouton du mode accessoire pour scelleuse à main
Appuyer pour sélectionner le réglage désiré. Le voyant lumineux s’illumine à côté du réglage personnalisé
sélectionné.
8a. Vacuum (emballer sous vide) - Pour une utilisation avec les sacs à glissière, les contenants de conservation
et de marinade, les scelleuses à bouteille et d’autres accessoires FoodSaver
MD
en utilisant une scelleuse à
main escamotable intégrée. L’appareil s’arrêtera automatiquement une fois le processus terminé.
1
2
3 4 5 6
7 8
9
Ce panneau de commande convivial et intuitif facilitera
votre emploi optimal du système FoodSaver
MD
:
2023/4/17 09:58
Lorsque vous utilisez le mode liquide, sivousscellez sous vide des sauces plus épaisses, des
soupes ou des crèmes (par exemple, de la crème de champignons), veillez à ce que les parois intérieures
du sac au-dessus du liquidesoient le plus possible à l'abri des débris alimentaires ou des gouttes.
IMPORTANT:
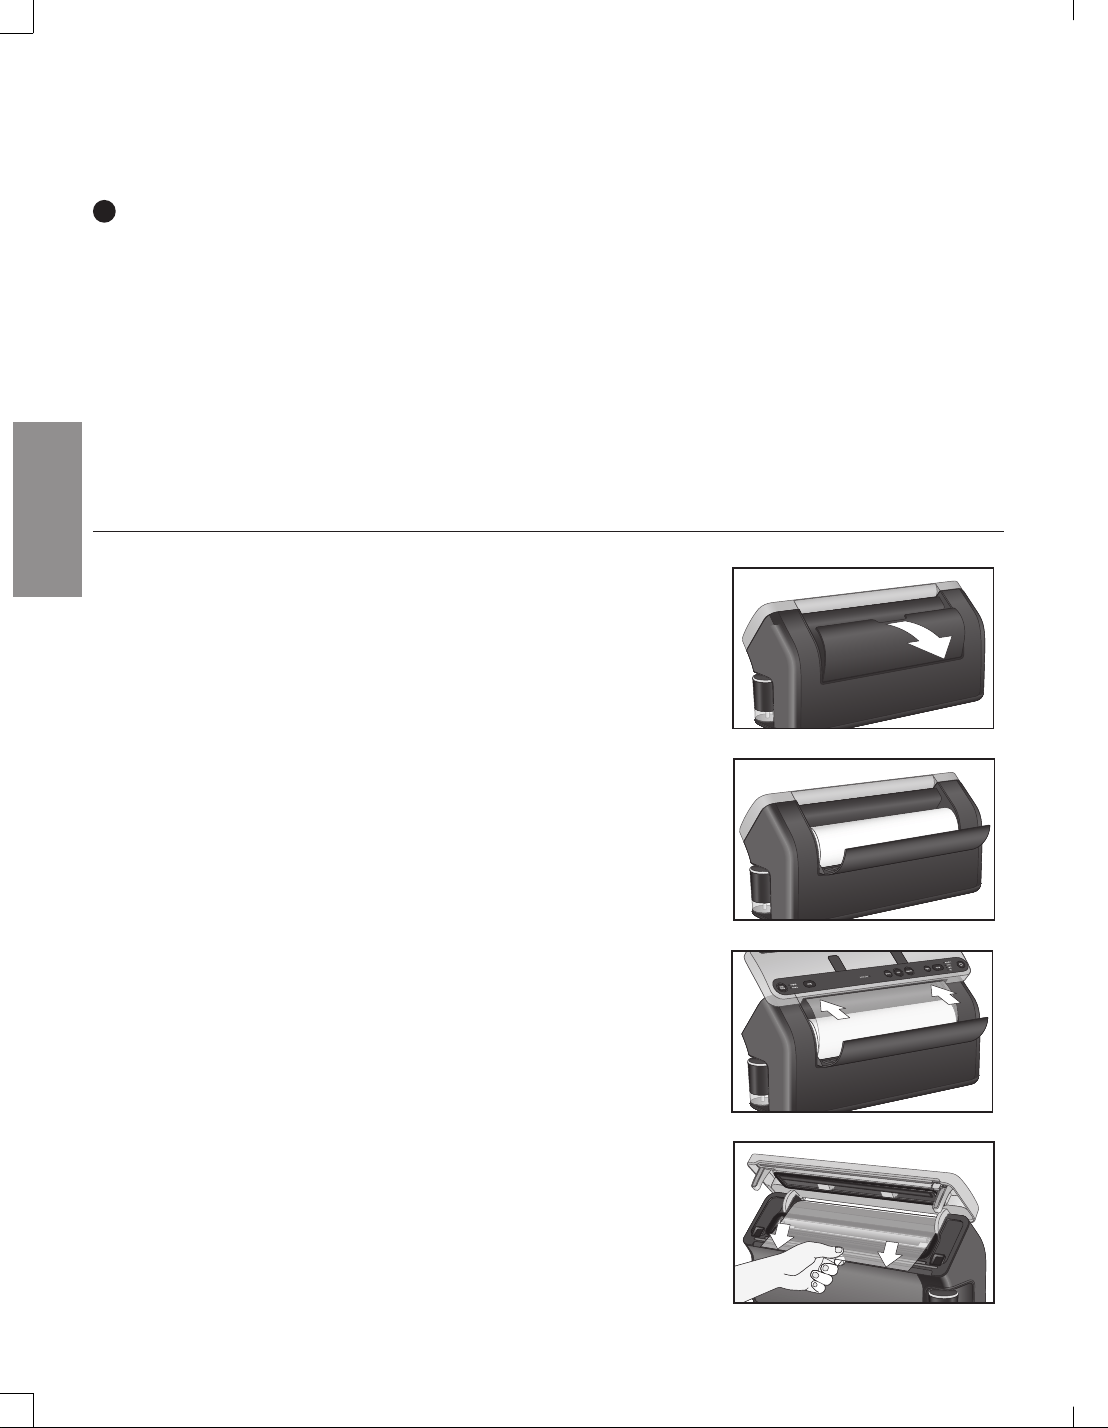
33
US: www.FoodSaver.com | CA: www.FoodSaver.ca | MX: www.oster.com.mx/foodsaver
COMMENT…
Comment...
1. Installer un rouleau FoodSaver
MD
1. Ouvrir la porte du compartiment pour rouleau
intégré à l’arrière de l’appareil.
2. Insérer le rouleau à l’arrière de l’appareil, comme
illustré.
3. Ouvrir complètement le couvercle de l’appareil pour
qu’il reste en place.
4. Introduire l’extrémité du rouleau dans l’ouverture
à l’arrière, entre le couvercle et l’appareil. Tirer
à travers l’appareil, jusqu’à ce que l’extrémité du
rouleau soit sur le bord avant.
5. Consulter la section suivante pour savoir comment
fabriquer un sac à partir d’un rouleau d’emballage
FoodSaver
MD
.
8b. Marinate (mariner) - Pour une utilisation avec les contenants de conservation et de marinade
FoodSaver
MD
en utilisant une scelleuse à main escamotable intégrée. La séquence d’emballage sous
vide par pulsation prend environ 12 minutes. Elle permet une infusion de saveur optimale en moins de
temps. L’appareil aspirera et relâchera trois fois. L’appareil s’arrêtera automatiquement une fois le
processus terminé.
9
Bouton pour accessoire pour scelleuse à main
Une fois le mode accessoire pour scelleuse à main sélectionné, appuyer pour une utilisation avec des
accessoires FoodSaver
MD
au moyen de la scelleuse à main escamotable intégrée. Après avoir appuyé sur le
bouton, le voyant s’illumine, le couvercle de l’appareil se ferme et le processus d’emballage sous vide
démarre. Le voyant du bouton clignote pendant le processus d’emballage sous vide ou de marinade. Une
fois le processus terminé, le voyant devient fixe puis s’éteint.
VS5900 Series_23EFSM1.indd 33-34VS5900 Series_23EFSM1.indd 33-34
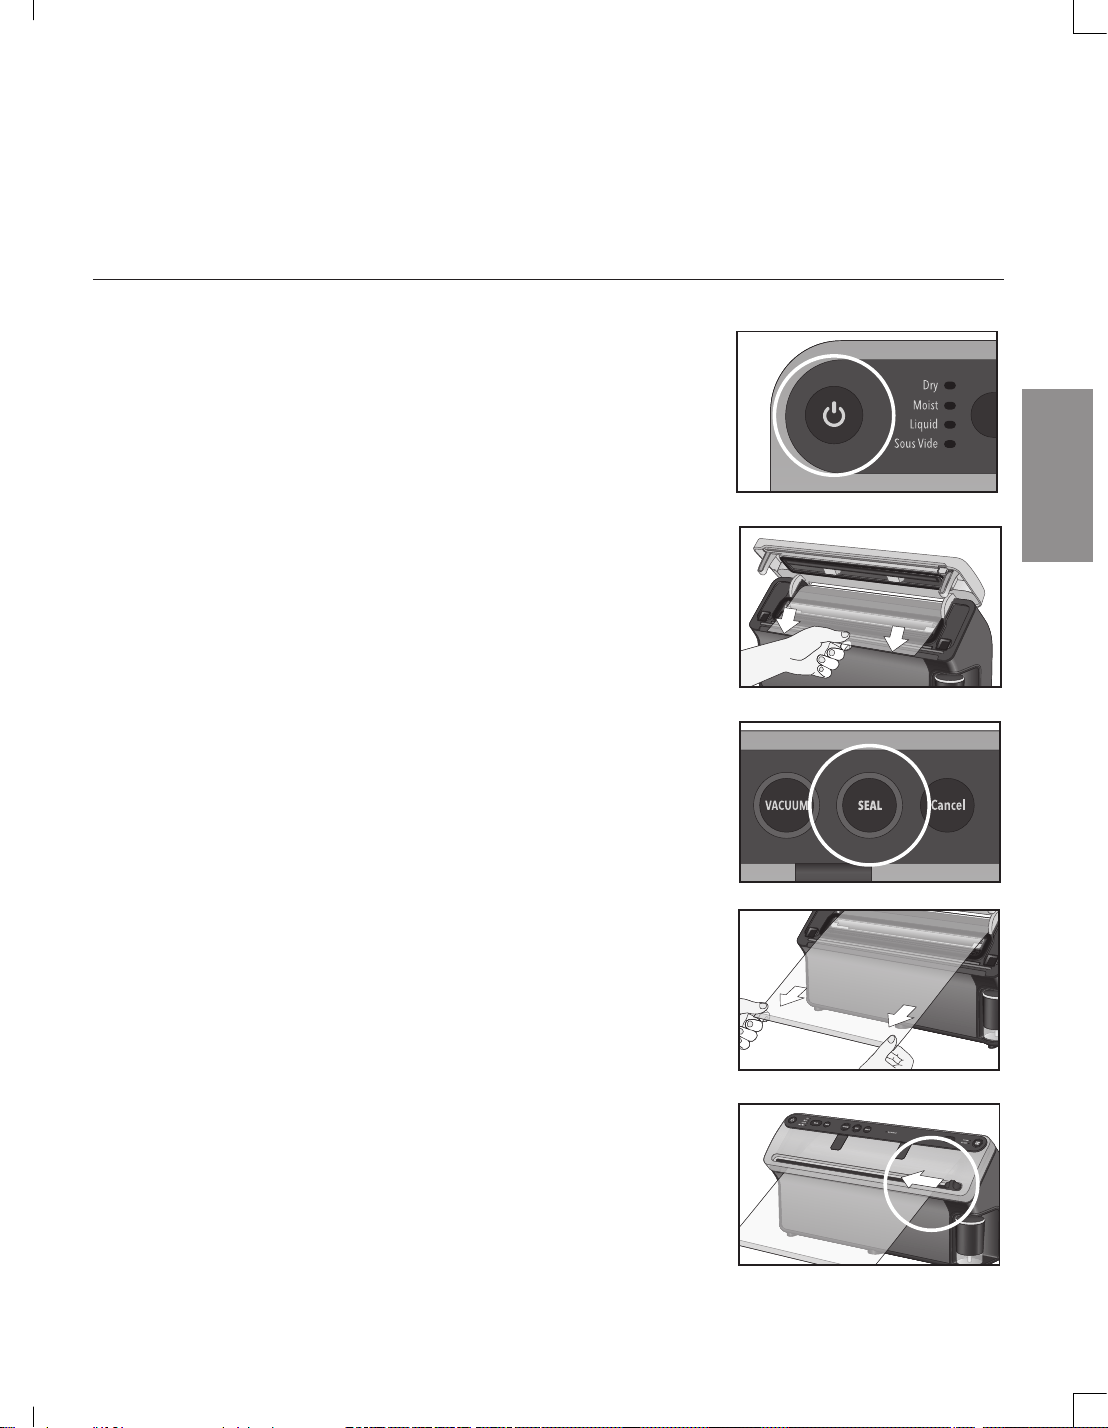
34
Service à la clientèle : US: 1-877-777-8042 CA: 1-877-804-5383 MX: +52 55 5366 0800
COMMENT…
2. Fabriquer un sac à partir d’un rouleau d’emballage
FoodSaver
MD
(Fabrication de sac express)
1. Appuyer sur le bouton « Power » (marche) pour allumer
l’appareil. Le bouton « Power » (marche) et le mode par
défaut s’illuminent lorsque sélectionnés.
2. Une fois le rouleau installé et le couvercle de l’appareil
complètement ouvert, introduire l’extrémité du rouleau dans
l’ouverture à l’arrière, entre le couvercle et l’appareil.
3. Tirer le rouleau vers le bas jusqu’à dépasser la bande de
scellement.
4. À l’aide de vos deux mains, arabattre le couvercle de l’appareil
(depuis la position complètement ouverte) et, avec les deux
mains, appuyez fermement sur les deux côtés du couvercle
jusqu’à ce que l’appareil commence à se fermera et se
verrouilleraverrouiller automatiquement.
5. Appuyer sur le bouton « Seal » (sceller) pour démarrer le
processus de scellement de l’extrémité du sac. Le voyant du
bouton clignote puis s’éteint lorsque le processus est terminé.
6. Le couvercle de l’appareil s’ouvre automatiquement une
fois le scellement terminé.
7. Tirer sur l’extrémité scellée du rouleau jusqu’à la longueur
de sac désirée.
8. Encore une fois, à l’aide des deux mains, appuyez
fermement sur les deux côtés du couvercle jusqu’à ce
que l’appareil commence à se fermer et à se verrouiller
automatiquement.
9. Avant d’utiliser la barre coupe-sac pour couper ce premier
sac, appuyer sur le bouton « Seal » (sceller) pour sceller
l’extrémité du prochain sac.
10.Pendant que l’appareil scelle le prochain sac, couper le
premier sac et faisant glisser la barre coupe-sac intégrée.
CONSEIL : Après avoir réalisé ce premier sac à partir du
rouleau, si vous suivez les étapes ci-dessus, le scellement
devrait déjà être réalisé pour le prochain sac. À chaque
fois que vous scellez un sac, vous réalisez le scellement du
prochain sac au moment où vous utilisez la barre coupe-sac
pour couper le sac en cours.
11.Une fois la création de sac(s) à partir du rouleau terminée,
ouvrir la porte du compartiment pour rouleau intégré à
l’arrière de l’appareil et enrouler l’excédent de rouleau qui
peut se trouver à l’intérieur de l’appareil, afin de ne laisser
aucun rouleau ou matériau à l’intérieur de l’appareil.
12.Fermer la porte du compartiment pour rouleau intégré.
EXTRÉMITÉ SCELLÉE
EXTRÉMITÉ SCELLÉE
2023/4/17 09:582023/4/17 09:58
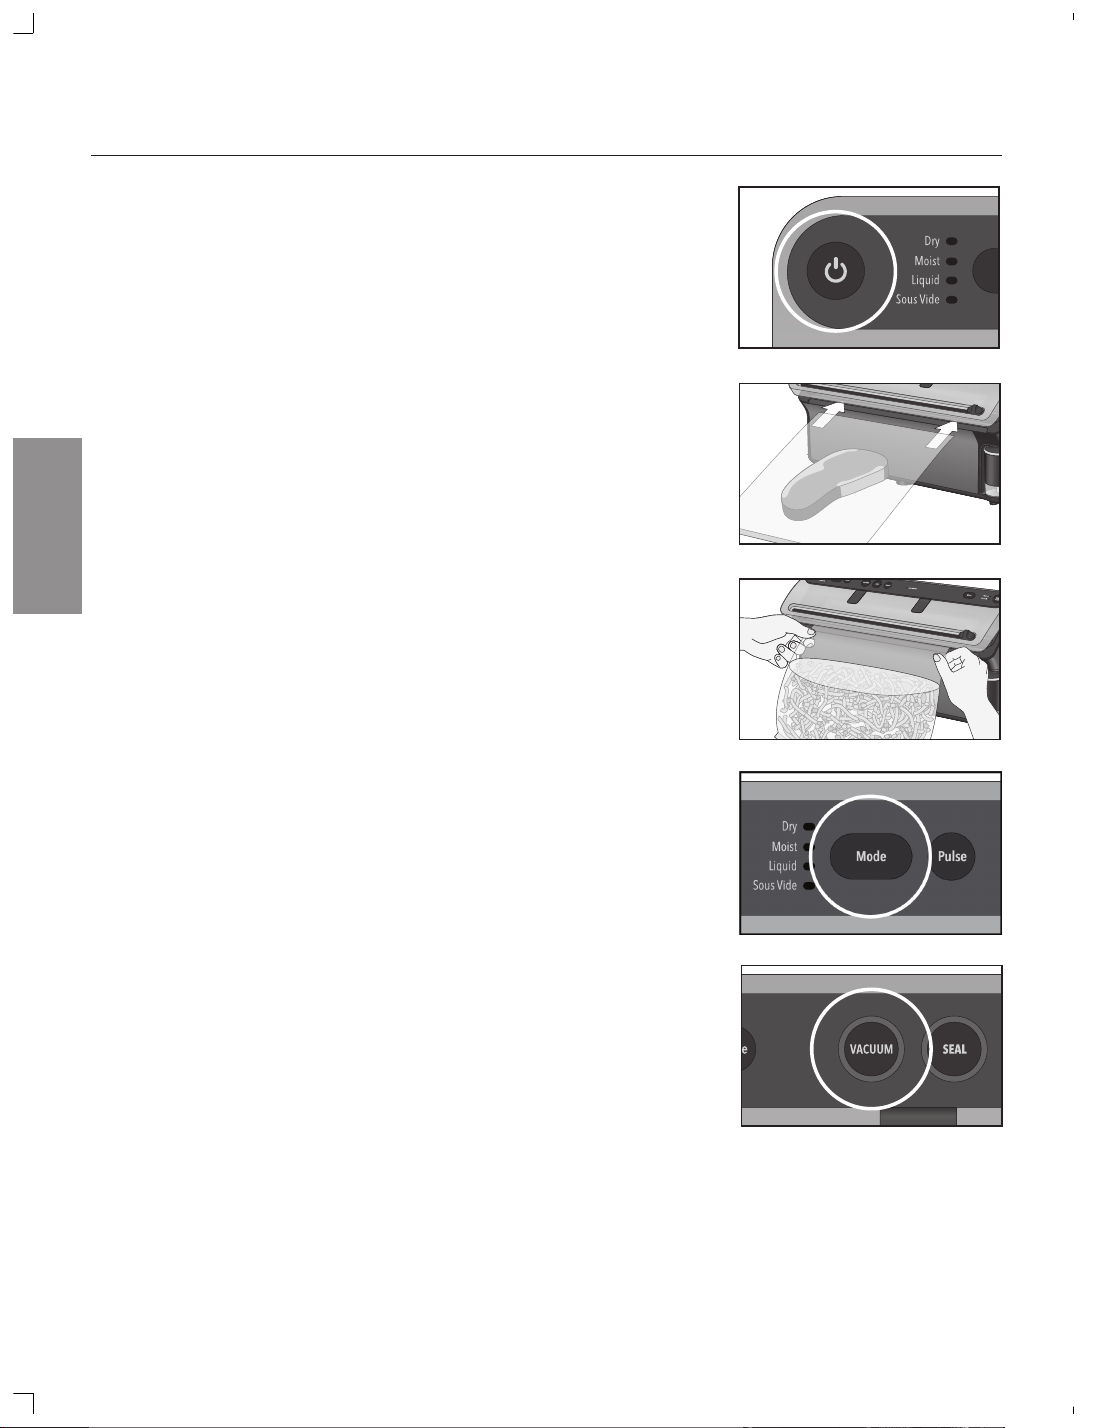
35 US: www.FoodSaver.com | CA: www.FoodSaver.ca | MX: www.oster.com.mx/foodsaver
COMMENT…
3. Mettre un sac FoodSaver
MD
sous vide
1. Appuyer sur le bouton « Power » (marche) pour allumer
l’appareil. Le bouton « Power » (marche) et le mode par
défaut s’illuminent lorsque sélectionnés.
2. Avec les deux mains, insérer lentement l’extrémité ouverte
du sac rempli à travers la partie inférieure de la fenêtre de
visualisation de l’emballage sous vide dans le ramasse-gouttes.
REMARQUE : Le couvercle de l’appareil ne devrait pas être
complètement ouvert.
ASTUCE : Si vous avez des difficultés à insérer le sac à
l’intérieur de l’appareil, bougez-le d’un côté à l’autre au
moment de l’insertion.
CONSEIL IMPORTANT : Lorsque vous insérez l’extrémité
ouverte du sac rempli, centrez le sac au milieu de l’appareil
pour de meilleurs résultats. La fenêtre de visualisation de
l’emballage sous vide vous permet de voir facilement où se
trouve l’extrémité du sac au moment de l’insertion. Continuer
l’insertion et tenir le sac jusqu’à ce que l’appareil le détecte
automatiquement et que le couvercle se ferme et se verrouille.
3. L’appareil détectera automatiquement le sac et le couvercle de
l’appareil se fermera et se verrouillera. Le voyant de détection
des sacs clignote puis devient fixe pour confirmer que le sac
a été automatiquement détecté. Les voyants du bouton «
Vacuum and Seal » (emballer sous vide et sceller) clignotent.
ATTENTION : Le couvercle se ferme automatiquement. Avant
de fermer le couvercle, retirer vos mains ou tout objet qui
pourrait empêcher la fermeture. Ne pas forcer manuellement
la fermeture du couvercle.
4. Sélectionner le mode d’emballage sous vide désiré (sec,
liquide humide ou sous vide) en fonction des aliments à
emballer sous vide, en appuyant sur le bouton « Mode ». Le
voyant lumineux s’illumine à côté du mode sélectionné.
5. Une fois le mode désiré sélectionné, appuyer sur le bouton
« Vacuum » (emballer sous vide) pour démarrer le processus
d’emballage sous vide. Le voyant du bouton « Vacuum »
(emballer sous vide) clignote jusqu’à la fin du processus.
6.
Après le processus d’emballage sous vide, le voyant du bouton
« Vacuum » (emballer sous vide) devient fixe et l’appareil
démarre le scellement automatiquement. Le voyant du bouton
« Seal » (sceller) clignote jusqu’à la fin du processus.
7. Une fois l’emballage sous vide et le scellement terminés, les
voyants du bouton « Vacuum and seal » (emballer sous vide
et sceller) deviennent fixes puis s’éteignent. Le couvercle de
l’appareil s’ouvre automatiquement pour libérer le sac.
8. Réfrigérer, congeler ou ranger au besoin. (Consulter les
« consignes » pour la sécurité en matière de conservation des
aliments à la page 41).
CONSEIL IMPORTANT : Vous pouvez, à tout moment durant
l’emballage sous vide, appuyer sur le bouton « Cancel »
(annuler) et le couvercle s’ouvrira automatiquement. Lorsque
le voyant des modes pour aliments secs et humides clignote,
cela indique que le ramasse-gouttes est plein. Le vider. La
fonction d’emballage sous vide et de scellement fonctionnera
correctement une fois le ramasse-gouttes vidé.
EXTRÉMITÉ SCELLÉE
EXTRÉMITÉ OUVERTE
VS5900 Series_23EFSM1.indd 35-36
Lorsque vous utilisez le mode liquide,
sivousscellez sous vide des sauces plus épaisses, des soupes ou
des crèmes (par exemple, de la crème de champignons),veillez
à ce que les parois intérieures du sac au-dessus du liquidesoient
le plus possible à l'abri des débris alimentaires ou des gouttes.
CONSEIL IMPORTANT :
CONSEIL IMPORTANT : Vous pouvez, à tout moment durant
l’emballage sous vide, appuyer sur le bouton « Cancel »
(annuler) et le couvercle s’ouvrira automatiquement. Lorsque
Tous les voyants,cela indique que le ramasse-gouttes est plein.
Le vider. La fonction d’emballage sous vide et de scellement
fonctionnera correctement une fois le ramasse-gouttes vidé.
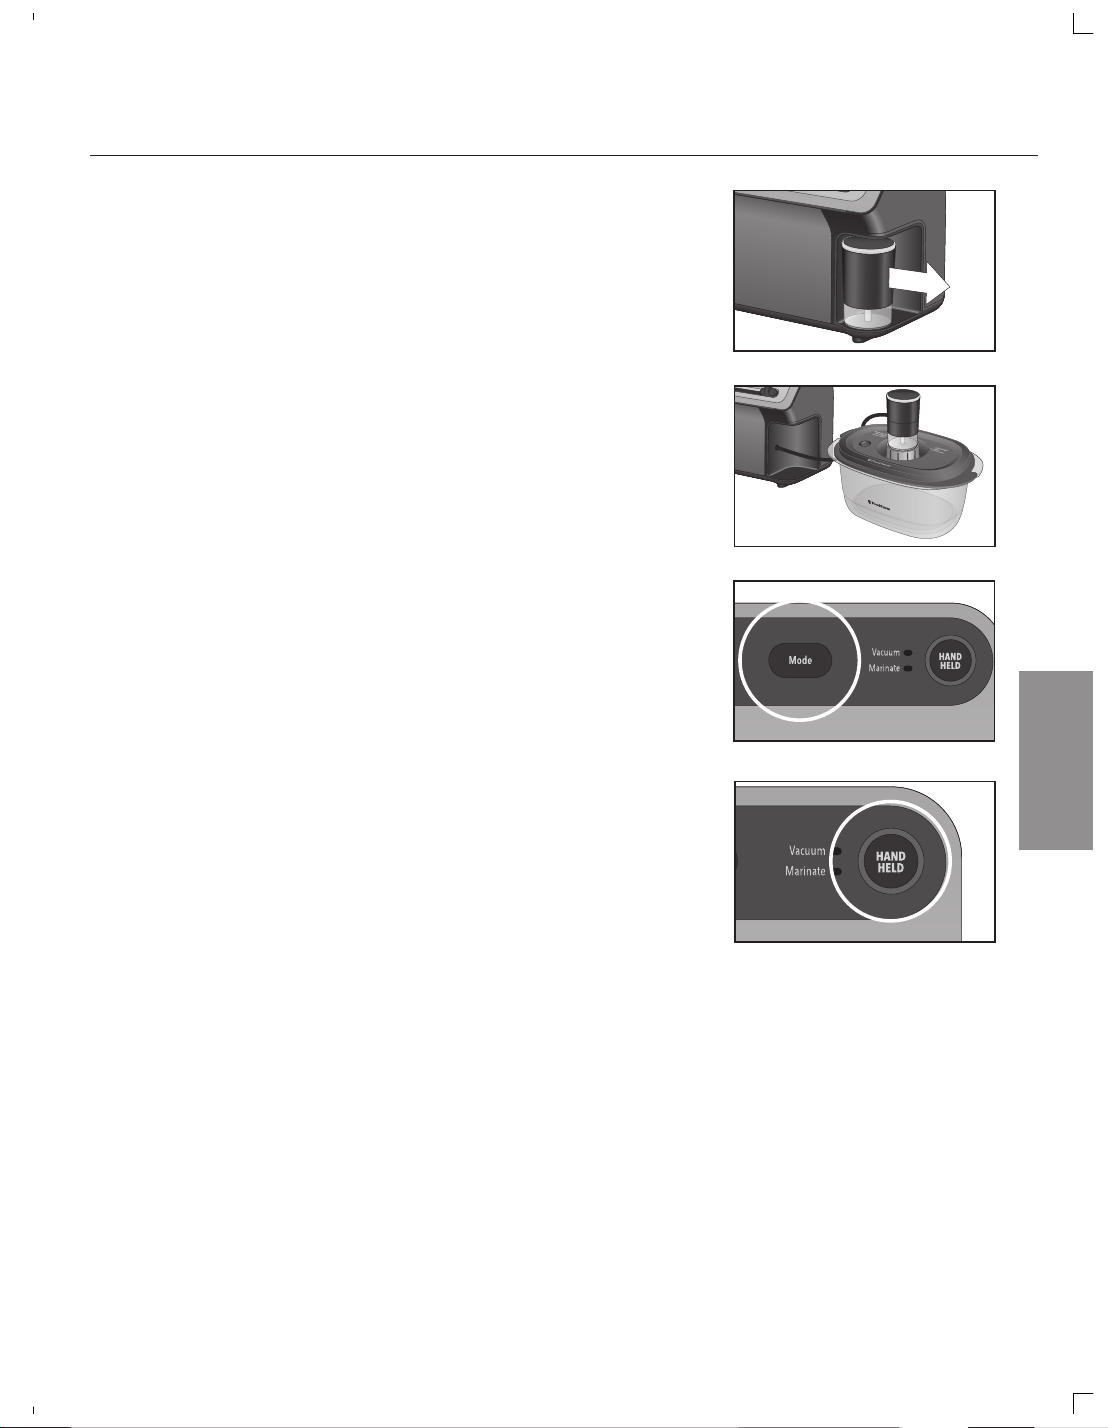
36Service à la clientèle : US: 1-877-777-8042 CA: 1-877-804-5383 MX: +52 55 5366 0800
COMMENT…
4. Utiliser les contenants de conservation et de marinade FoodSaver
MD
a. Pour sceller sous vide
i. Préparer le contenant de conservation et de marinade
FoodSaver
MD
selon les Consignes qui sont incluses à
l’achat du contenant. (tourner la valve du contenant sur
le réglage « emballer sous vide »)
ii. Appuyer sur le bouton « Power » (marche) pour allumer
l’appareil. Le bouton « Power » (marche) et le mode
par défaut s’illuminent lorsque sélectionnés.
iii. Tirer sur la scelleuse à main escamotable intégrée
jusqu’à la longueur désirée. ATTENTION: Au moment de
tirer le tuyau, ne pas étendre au-delà de la ligne rouge
sur le tuyau.
iv. Placer l’extrémité de la scelleuse à main escamotable
sur la valve du contenant.
v. Sur le côté droit de l’appareil, appuyer une fois sur le
bouton « Mode » pour accessoire pour scelleuse à main
escamotable intégrée. Le mode emballer sous vide
est le mode par défaut. Le voyant lumineux du mode
emballer sous vide s’illumine et reste fixe tandis que le
bouton de la scelleuse à main clignote.
vi. Appuyer sur le bouton de la scelleuse à main pour
démarrer l’emballage sous vide. Le couvercle de
l’appareil se ferme automatiquement. Maintenir la
scelleuse à main bien en place sur le sac. Maintenir
la scelleuse à main bien en place sur le contenant.
Le voyant du bouton de la scelleuse à main clignotera
jusqu’à la fin du processus.
vii. L’appareil arrêtera l’emballage sous vide
automatiquement une fois que tout l’air aura été retiré
et le couvercle se refermera automatiquement.
viii. Pour remettre la scelleuse à main dans l’appareil, tirer
délicatement pour qu’elle se rétracte automatiquement.
CONSEIL IMPORTANT :
Interrompt immédiatement la fonction en cours et ouvre le
couvercle de l’appareil.
2023/4/17 09:58
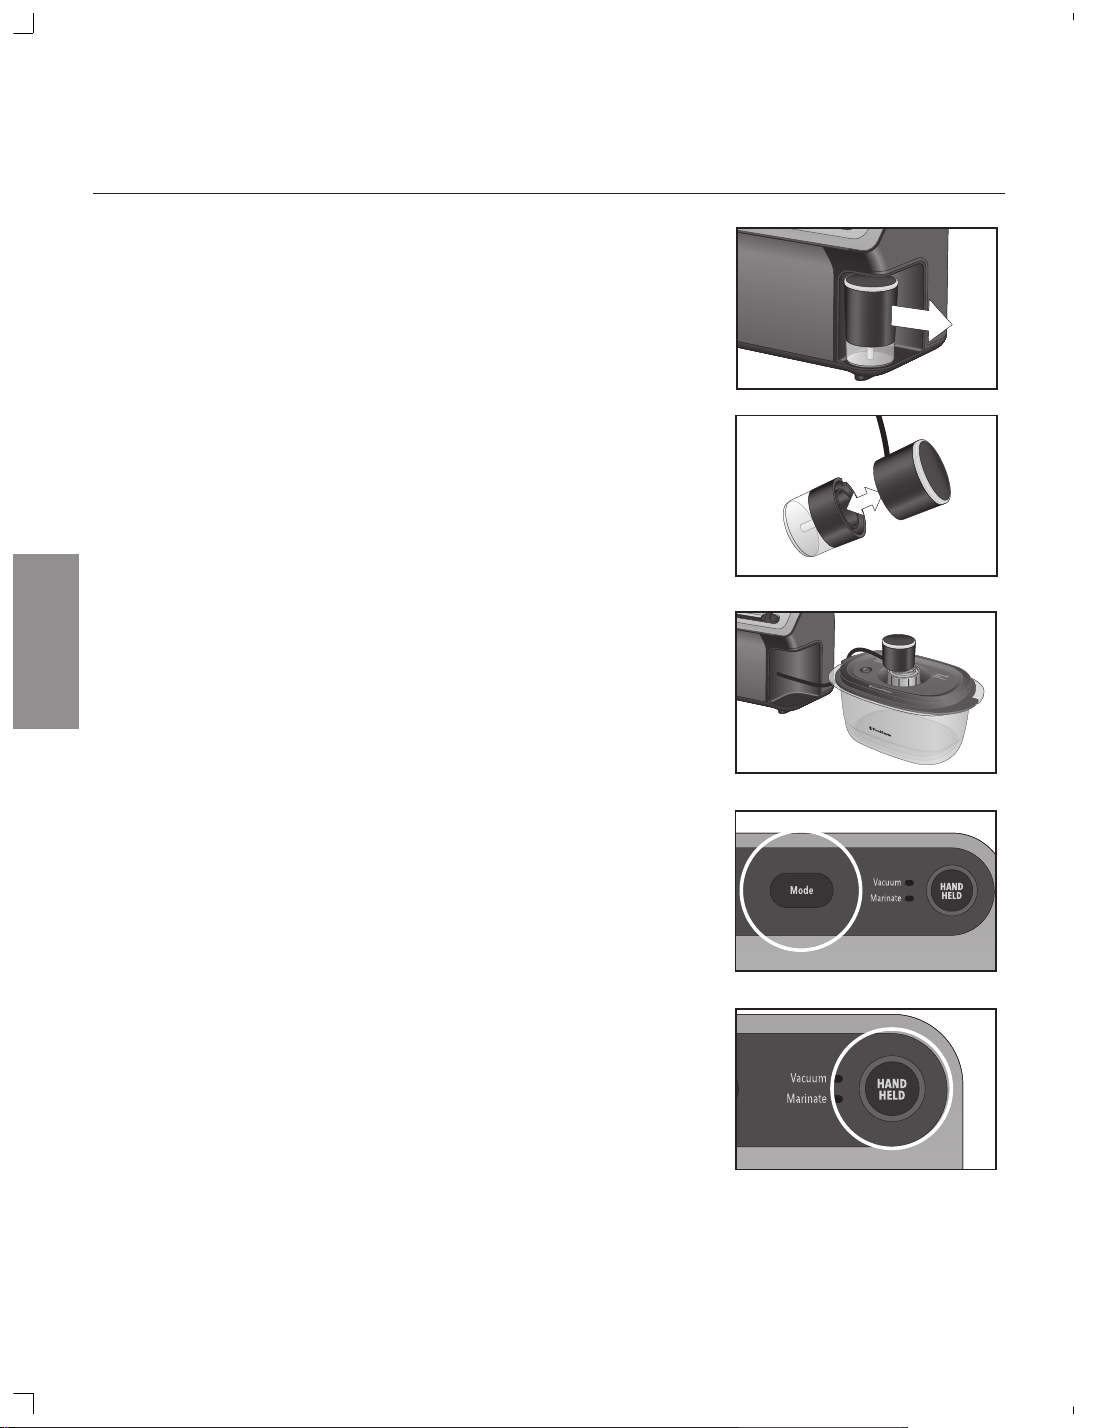
37 US: www.FoodSaver.com | CA: www.FoodSaver.ca | MX: www.oster.com.mx/foodsaver
COMMENT…
b. Pour mariner
i. Préparer le contenant de conservation et de marinade
FoodSaver
MD
selon les Consignes qui sont incluses à
l’achat du contenant. (tourner la valve du contenant sur
le réglage « mariner »)
ii. Appuyer sur le bouton « Power » (marche) pour allumer
l’appareil. Le bouton « Power » (marche) et le mode par
défaut s’illuminent lorsque sélectionnés.
iii. Tirer sur la scelleuse à main escamotable intégrée jusqu’à
la longueur désirée. ATTENTION: Au moment de tirer le
tuyau, ne pas étendre au-delà de la ligne rouge sur le
tuyau.
iv. Retirer la partie transparente inférieure de la scelleuse à
main escamotable de la poignée supérieure en tirant de
chaque côté avec les deux mains. Insérer l’extrémité de la
moitié supérieure dans la valve du contenant.
v. Sur le côté droit de l’appareil, appuyer deux fois sur le
bouton « Mode » pour accessoire pour scelleuse à main
escamotable intégrée pour sélectionner le mode mariner.
Le voyant lumineux du mode mariner s’illumine et reste
fixe tandis que le bouton de la scelleuse à main clignote.
vi. Appuyer sur le bouton de la scelleuse à main pour
démarrer. Le couvercle de l’appareil se ferme
automatiquement et le processus de marinade démarre.
Le couvercle de l’appareil s’ouvrira automatiquement
pendant le processus, puis se refermera et se verrouillera
à nouveau. Le voyant du bouton de la scelleuse à main
clignotera jusqu’à la fin du processus.
vii. Reconnecter la partie inférieure de la scelleuse à main
et, pour remettre la scelleuse à main dans l’appareil, tirer
délicatement pour qu’elle se rétracte automatiquement.
CONSEIL IMPORTANT: L’appareil fonctionnera pendant environ 12
minutes. L’appareil aspire, puis s’arrête et le couvercle s’ouvre,
puis se ferme à nouveau. L’appareil réalisera 3 séquences
d’aspiration au total. Ne pas interrompre ce processus, même si
vous pensez que l’appareil s’est arrêté.
CONSEIL IMPORTANT :
Interrompt immédiatement la fonction en cours et ouvre le
couvercle de l’appareil.
4.
Utiliser les contenants de conservation et de marinade FoodSaver
MD
VS5900 Series_23EFSM1.indd 37-38
Pendant la marinade, assurez-vous que le
tuyau de l'accessoire portable reste à l'écart du couvercle
(lorsque le couvercle de l'appareils'ouvre et se ferme pendant la
marinade, ne laissez pas le tuyau se coincer entre le couvercle
et l'appareil).
CONSEIL IMPORTANT:
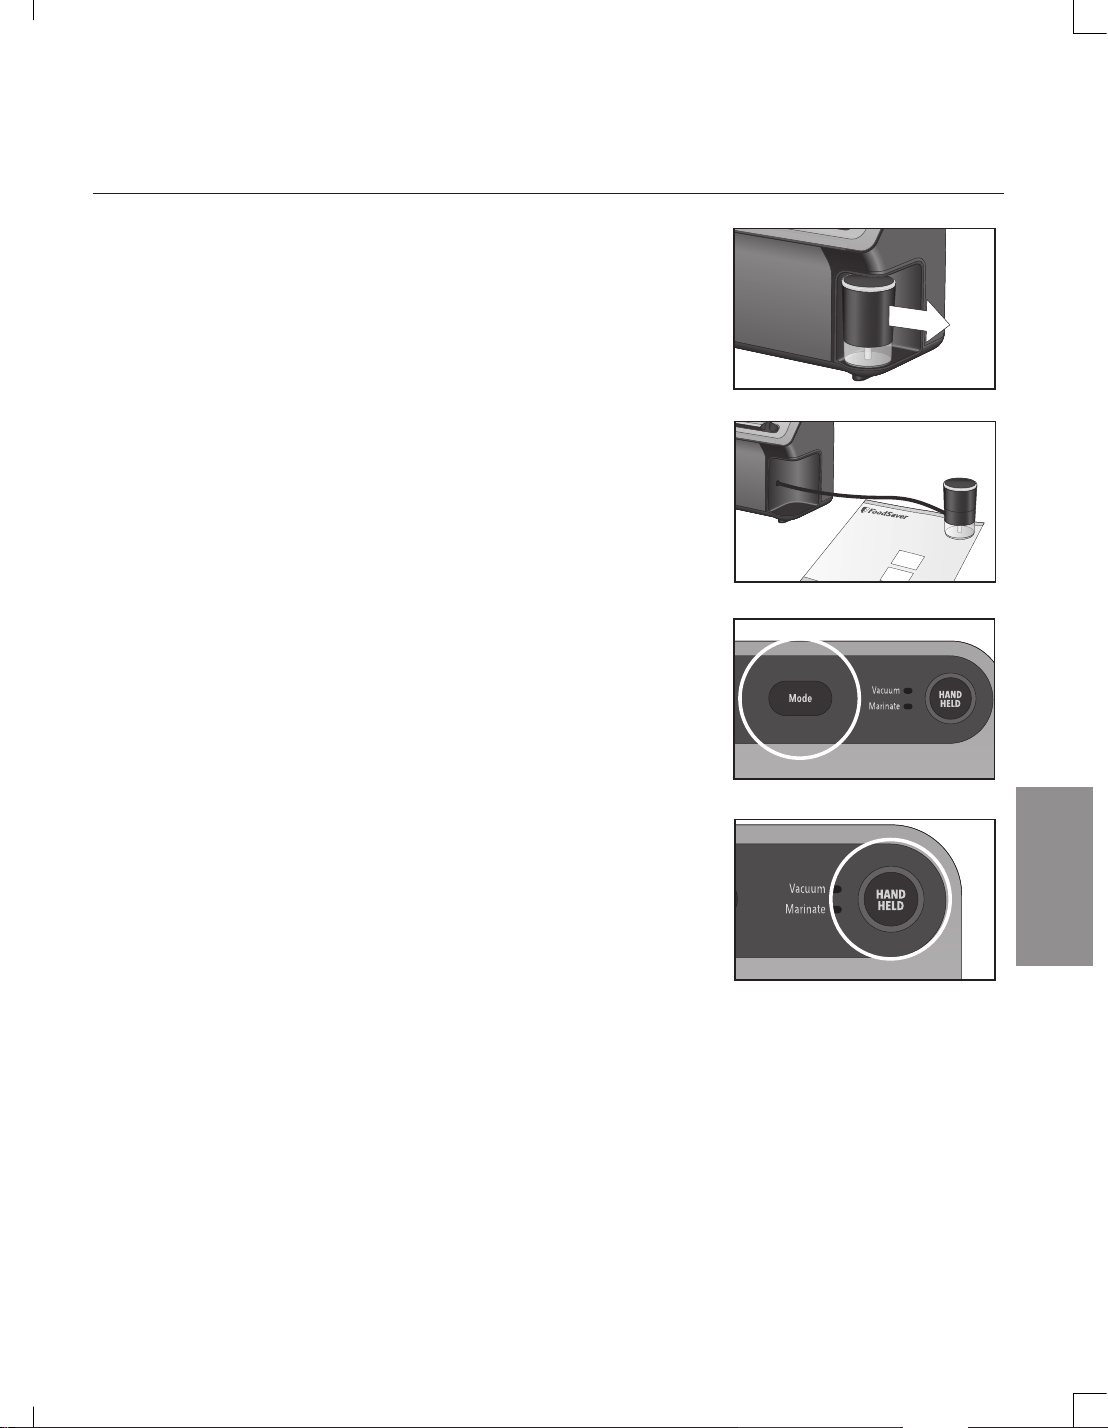
38
Service à la clientèle : US: 1-877-777-8042 CA: 1-877-804-5383 MX: +52 55 5366 0800
COMMENT…
5. Emballer sous vide avex les accessoires FoodSaver
MD
a. Pour les sacs à glissière
i. Préparer les sacs à glissière selon sur les accessoires
FoodSaver
MD
qui accompagnent tout achat d’accessoire.
CONSEIL IMPORTANT: Pour les sacs à glissière, ne
pas mettre d’aliment sous la valve et appuyer sur la
glissière avec le doigt pour la fermer lorsque le sac est
posé sur une surface plane.
ii. Appuyer sur le bouton « Power » (marche) pour allumer
l’appareil. Le bouton « Power » (marche) et le mode
par défaut s’illuminent lorsque sélectionnés.
iii. Tirer sur la scelleuse à main escamotable intégrée
jusqu’à la longueur désirée. ATTENTION: Au moment de
tirer le tuyau, ne pas étendre au-delà de la ligne rouge
sur le tuyau.
iv. Placer l’extrémité de la scelleuse à main escamotable
sur la valve du sac à glissière.
v. Sur le côté droit de l’appareil, appuyer une fois sur le
bouton « Mode » pour accessoire pour scelleuse à main
escamotable intégrée. Le mode emballer sous vide
est le mode par défaut. Le voyant lumineux du mode
emballer sous vide s’illumine et reste fixe tandis que le
bouton de la scelleuse à main clignote.
vi. Appuyer sur le bouton de la scelleuse à main pour
démarrer l’emballage sous vide. Le couvercle de
l’appareil se ferme automatiquement. Maintenir la
scelleuse à main bien en place sur le sac. Le voyant du
bouton de la scelleuse à main clignotera jusqu’à la fin
du processus.
vii. L’appareil arrêtera l’emballage sous vide
automatiquement une fois que tout l’air aura été
retiré du sac à glissière et le couvercle se refermera
automatiquement.
viii. Pour remettre la scelleuse à main dans l’appareil, tirer
délicatement pour qu’elle se rétracte automatiquement.
CONSEIL IMPORTANT :
Interrompt immédiatement la fonction en cours et ouvre le
couvercle de l’appareil.
2023/4/17 09:582023/4/17 09:58
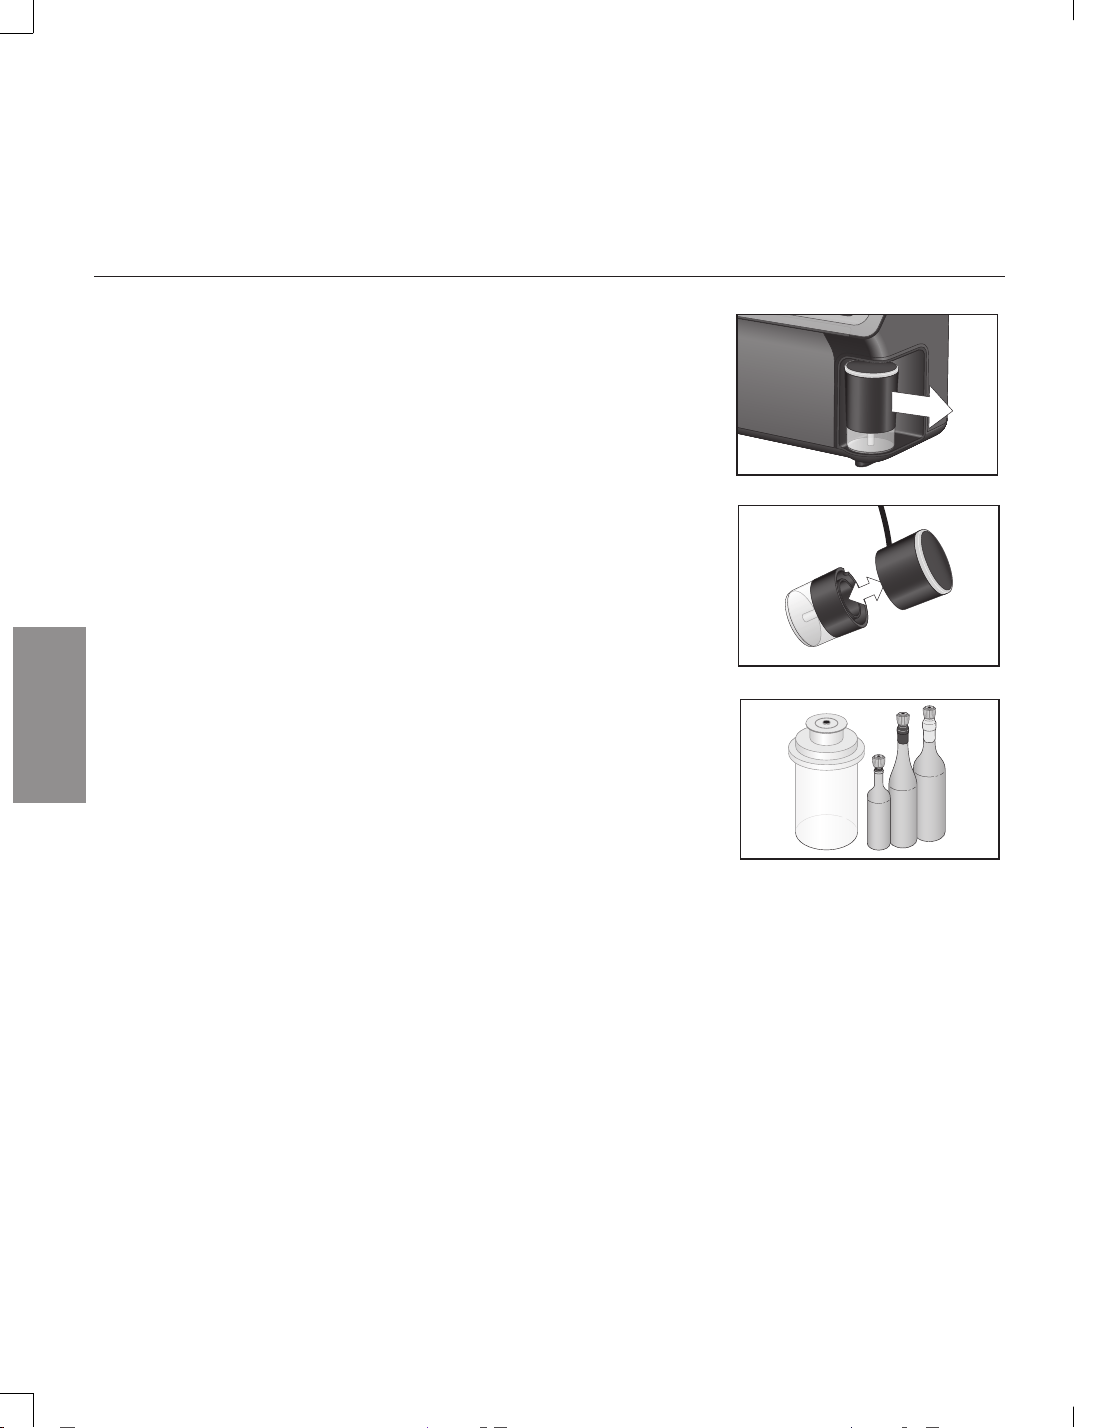
39
US: www.FoodSaver.com | CA: www.FoodSaver.ca | MX: www.oster.com.mx/foodsaver
b. Pour les scelleurs de pots et les bouchons de
bouteilles
i. Préparer l’accessoire selon les consignes sur les
accessoires FoodSaver
MD
qui accompagnent tout achat
d’accessoire.
ii. Appuyer sur le bouton « Power » (marche) pour allumer
l’appareil. Le bouton « Power » (marche) et le mode par
défaut s’illuminent lorsque sélectionnés.
iii. Tirer sur la scelleuse à main escamotable intégrée
jusqu’à la longueur désirée. ATTENTION: Au moment de
tirer le tuyau, ne pas étendre au-delà de la ligne rouge
sur le tuyau.
iv. Retirer la partie transparente inférieure de la scelleuse
à main escamotable de la poignée supérieure en tirant
de chaque côté avec les deux mains. Insérer l’extrémité
dans le port des Pot scellant ou bouchon de bouteille.
v. Répéter les étapes aV à aViii ci-dessus.
REMARQUE: Les scelleuses à bocaux FoodSaver
MD
ne sont
compatibles qu’avec les bocaux Mason de marque Ball
MD
et
Kerr
MD
. Ceci n’est pas une solution de remplacement aux
méthodes de mise en conserve traditionnelles et si l’aliment
est périssable, il doit être réfrigéré.
IMPORTANT: Ne PAS utiliser les bandes vissables lors de la
mise sous vide des bocaux. Pour ouvrir, placer une cuillère
entre le couvercle du bocal Mason et la partie supérieure de
l’embout fileté. Tourner doucement la cuillère pour relâcher.
Scelleuse à bouteilles FoodSaver
MD
: Pour relâcher et ouvrir,
tourner et soulever sur la scelleuse à bouteilles.
COMMENT…
5. Emballer sous vide avex les accessoires FoodSaver
MD
VS5900 Series_23EFSM1.indd 39-40VS5900 Series_23EFSM1.indd 39-40
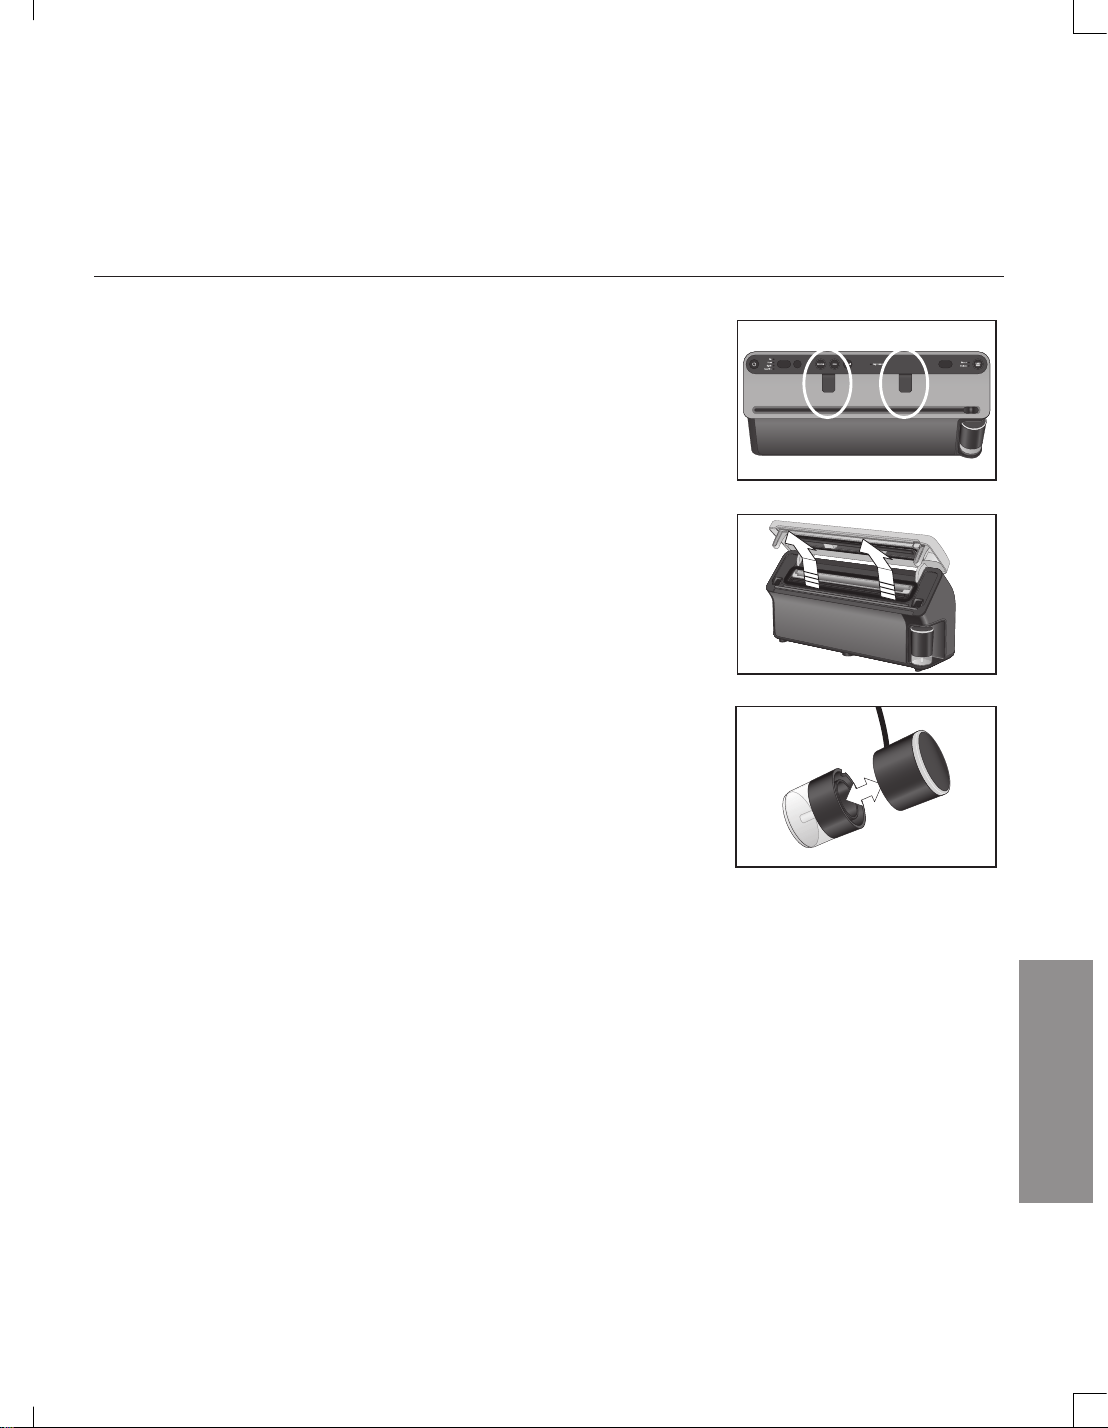
40
Service à la clientèle : US: 1-877-777-8042 CA: 1-877-804-5383 MX: +52 55 5366 0800
NETTOYAGE ET ENTRETIEN
et entretien de votre système d’emballage sous vide
Nettoyage
Appareil:
Débrancher de la prise de courant et laisser refroidir avant le
nettoyage.
AVERTISSEMENT: Ne pas immerger le câble d’alimentation, la fiche
ou quelque partie que ce soit de l’appareil dans l’eau ou tout autre
liquide.
Vérifier les joints et le pourtour du ramasse-gouttes pour vérifier qu’ils
ne contiennent pas de matières alimentaires. Si nécessaire, essuyer
les joints avec un chiffon trempé dans de l’eau savonneuse chaude.
Le joint supérieur ne peut pas être retire. Essuyer aussi sous les
deux languettes noires situées en dessous du couvercle de l’appareil
(capteurs de détection automatique des sacs).
Le ramasse-gouttes amovible facilite le nettoyage lorsque de petites
quantités de liquide s’échappent par inadvertance dans la fente
d’aspiration lors du processus de mise sous vide.
Vider le ramasse-gouttes après chaque utilization. Pour enlever,
pousser les languettes de chaque côté du ramasse-gouttes et sortir le
tout en soulevant. Laver à l’eau chaude savonneuse ou placer dans le
panier supérieur du lave-vaisselle. Sécher complètement le ramasse-
gouttes avant de le réinsérer dans l’appareil.
Réservoir de la scelleuse à main escamotable:
Vider le réservoir après chaque usage. Laver à l’eau chaude
savonneuse. Laisser sécher à l’air libre avant de le remettre en place.
Pour enlever le réservoir de la scelleuse à main, maintenir fermement
la partie supérieure (pièce supérieure de couleur noire), puis tirer sur
le réservoir inférieur pour le détacher.
REMARQUE: Toujours nettoyer le réservoir lorsque des liquides sont
visibles.
ModePulseMode
2023/4/17 09:582023/4/17 09:58

41
US: www.FoodSaver.com | CA: www.FoodSaver.ca | MX: www.oster.com.mx/foodsaver
CONSIGNES
Emballage sous vide et sécurité alimentaire
Consignes
Le processus d’emballage sous vide prolonge la conservation des aliments en expulsant presque tout l’air du
contenant scellé, ce qui réduit l’oxydation qui affecte la valeur nutritionnelle, le goût et la qualité générale
des aliments. Retirer l’air peut aussi empêcher la prolifération des microorganismes, qui peuvent être un
problème dans certaines conditions :
Moisissure – Facilement reconnaissable à son aspect un peu mousseux. La moisissure ne peut pas se
développer dans un environnement où il y a peu d’oxygène, voilà pourquoi l’emballage sous vide peut ralentir
la prolifération des moisissures.
Levure – Mène à une fermentation, que l’on reconnaît à l’odeur et au goût. La levure a besoin d’eau, de
sucre et d’une température modérée pour se développer. Elle peut aussi survivre avec ou sans air. La
réfrigération ralentit la prolifération des levures et la congélation l’arrête complètement.
Bactéries – Elles donnent une mauvaise odeur, décolorent le produit et/ou lui donnent une texture molle ou
gluante. Dans les bonnes conditions, les bactéries anaérobies comme le Clostridium botulinum (l’organisme
qui cause le botulisme) peuvent se développer sans air et sont parfois indétectables au goût ou à l’odeur.
Bien que cette bactérie soit assez rare, elle peut être très dangereuse.
Pour conserver les aliments en toute sécurité, il est indispensable de maintenir des températures basses. La
prolifération des microorganismes peut être réduite considérablement à des températures de 4 °C (40 °F) ou
moins. La congélation à -17 °C (0 °F) ne tue pas les microorganismes, mais les empêche de se développer.
Pour une conservation longue durée, toujours congeler les aliments périssables qui ont été emballés sous
vide et les garder réfrigérés après décongélation.
Il est important de noter que l’emballage sous vide ne remplace PAS la mise en conserve et ne peut pas
inverser la détérioration des aliments. Il peut seulement ralentir l’altération de la qualité. Il est difficile de
prédire combien de temps les aliments garderont leur qualité et leur goût, leur apparence ou leur texture, car
tout cela dépend de l’âge et de l’état des aliments au moment où ils ont été emballés sous vide.
IMPORTANT :
L’emballage sous vide n’est PAS un substitut à la réfrigération ou à la congélation. Tout aliment
périssable qui nécessite une réfrigération doit toujours être réfrigéré ou congelé après l’emballage sous
vide.
VS5900 Series_23EFSM1.indd 41-42VS5900 Series_23EFSM1.indd 41-42
42
Service à la clientèle : US: 1-877-777-8042 CA: 1-877-804-5383 MX: +52 55 5366 0800
Conseils en matière de préparation alimentaire et de
réchauffage
Décongeler et réchauffer
les aliments emballés sous vide
Toujours décongeler les aliments au réfrigérateur ou au micro-ondes — ne pas décongeler les
aliments périssables à température ambiante.
Pour réchauffer des aliments au micro-ondes dans un sac FoodSaver
MD
, toujours couper le coin
du sac avant de le placer dans un plat qui va au micro-ondes. Toutefois, pour éviter les points
chauds, ne pas réchauffer, au micro-ondes et dans un sac FoodSaver
MD
, les viandes avec os
ou les aliments riches en graisses. Il est aussi possible de réchauffer des aliments dans un sac
FoodSaver
MD
en les plaçant dans de l’eau à faible ébullition, à moins de 75 °C (170 °F).
Consignes de préparation pour
les viandes et les poissons :
Pour de meilleurs résultats, précongeler les viandes et les poissons pendant 1 à 2 heures avant
de les emballer sous vide dans un sac FoodSaver
MD
. Cela permet de retenir le jus et la forme
et garantit une meilleure mise sous vide. Si la précongélation n’est pas possible, placer un
essuie-tout plié entre la viande ou le poisson et le haut du sac, mais sous la zone de scellement.
Laisser l’essuie-tout dans le sac pour absorber l’excès d’humidité et les jus pendant le processus
de mise sous vide.
REMARQUE : Le bœuf peut apparaître plus foncé après l’emballage sous vide en raison de
l’absence d’oxygène. Cela n’indique en rien que le produit est gâché.
Consignes de préparation pour les fromages à pâte dure :
Pour préserver la fraîcheur du fromage, emballer sous vide après chaque utilisation. Veiller à
fabriquer un sac FoodSaver
MD
très long, en laissant 2,54 cm (1 pouce) d’espace pour chaque
fois que l’on prévoit d’ouvrir et de sceller le sac à nouveau en plus des 7,62 cm (3 pouces)
d’espace supplémentaire qu’il faut normalement laisser entre le contenu du sac et le bord
scellement. Il suffit de couper l’extrémité scellée pour sortir le fromage. Lorsqu’il est temps de
sceller le fromage à nouveau, il suffit de le mettre dans le sac et de sceller celui-ci à nouveau.
IMPORTANT :
En raison du risque de bactéries anaérobies, les fromages à pâte molle ne doivent jamais
être emballés sous vide.
CONSIGNES
2023/4/17 09:582023/4/17 09:58
43
US: www.FoodSaver.com | CA: www.FoodSaver.ca | MX: www.oster.com.mx/foodsaver
CONSIGNES
Conseils en matière de préparation alimentaire et de
réchauffage
IMPORTANT :
En raison du risque de bactéries anaérobies, les champignons, les oignons et l’ail frais ne
doivent jamais être emballés sous vide.
Consignes de préparation
pour les légumes :
Les légumes doivent être blanchis avant d’être emballés sous vide. Ce processus arrête l’action
de l’enzyme qui peut causer une perte de saveur, de couleur et de texture.
Pour blanchir les légumes, les placer dans de l’eau bouillante ou au micro-ondes jusqu’à ce
qu’ils soient cuits mais encore croquants. La durée de blanchiment varie de 1 à 2 minutes pour
les légumes verts à feuilles et les pois; 3 à 4 minutes pour les pois mange-tout, les rondelles
de courgette ou le brocoli; 5 minutes pour les carottes; et 7 à 11 minutes pour le maïs sur épi.
Après les avoir blanchis, plonger les légumes dans l’eau froide pour interrompre le processus de
cuisson. Enfin, sécher les légumes sur une serviette avant de les emballer sous vide.
REMARQUE : Tous les légumes (y compris les brocolis, les choux de Bruxelles, le chou, le chou-
fleur, le chou frisé, les navets) produisent naturellement des gaz pendant leur conservation.
Ainsi, après le blanchiment, ils doivent être conservés uniquement au congélateur.
Quand vous congelez vos légumes, il est préférable de les précongeler pendant 1 à 2 heures
ou jusqu’à ce qu’ils soient solidement congelés. Pour congeler des légumes en portions
individuelles, placer d’abord les légumes sur une plaque de cuisson et les étaler de façon à ce
qu’ils ne se touchent pas. Ainsi, cela évitera qu’ils congèlent en un seul bloc. Une fois congelés,
retirer les légumes de la plaque de cuisson et les emballer sous vide dans un sac FoodSaver
MD
.
Une fois mis sous vide, les remettre au congélateur.
Consignes de préparation pour
les légumes à feuilles :
Pour de meilleurs résultats, utiliser un Contenant pour conserver les légumes à feuilles. D’abord,
laver les légumes, puis les sécher avec une serviette ou une essoreuse à salade. Une fois
secs, les placer dans un contenant et les emballer sous vide comme d’habitude. Ranger au
réfrigérateur.
VS5900 Series_23EFSM1.indd 43-44VS5900 Series_23EFSM1.indd 43-44

44
Service à la clientèle : US: 1-877-777-8042 CA: 1-877-804-5383 MX: +52 55 5366 0800
IMPORTANT:
Lorsque vous mettez des pommes sous vide, elles doivent être tranchées, et mettre un peu
de jus de citron dessus les tranches pour éviter qu’elles ne brunissent.
En raison de leur maturation naturelle, les bananes peuvent en fait se décomposer plus
rapidement sous un emballage sous vide.
Conseils en matière de préparation alimentaire et de
réchauffage
Consignes de préparation pour les fruits :
Pour congeler des fruits ou des baies, il est préférable de les précongeler pendant 1 à 2
heures ou jusqu’à ce qu’ils soient solidement congelés. Pour congeler des fruits en portions
individuelles, placer d’abord les fruits sur une plaque de cuisson et les étaler de façon à ce
qu’ils ne se touchent pas. Ainsi, cela évitera qu’ils congèlent en un seul bloc. Une fois congelés,
retirez les fruits de la plaque de cuisson et les emballer sous vide dans un sac FoodSaver
MD
. Une
fois mis sous vide, les remettre au congélateur.
Ces portions peuvent être mises sous vide pour les pâtisseries ou pour les combiner et réaliser
des salades de fruits faciles à préparer toute l’année. Pour la conservation au réfrigérateur, nous
recommandons d’utiliser un contenant FoodSaver
MD
.
CONSIGNES
Consignes de préparation pour
les produits de boulangerie :
Pour emballer sous vide des produits de boulangerie moelleux ou aérés, nous recommandons,
pour qu’ils gardent leur forme, d’utiliser un contenant de marinade et de conservation
FoodSaver
MD
. Si un sac est utilisé, précongeler pendant 1 à 2 heures ou jusqu’à ce qu’ils soient
solidement congelés. Pour gagner du temps, réaliser les pâtes à biscuits, les fonds de tarte, les
tartes entières ou les mélanges d’ingrédients secs à l’avance et les emballer sous vide pour une
utilisation ultérieure.
Consignes de préparation pour
le café et les aliments en poudre :
Pour éviter que des particules alimentaires soient aspirées dans la pompe de mise sous vide,
placer un filtre à café ou un essuie-tout en haut du sac ou du contenant avant de faire le vide. Il
est aussi possible de placer l’aliment dans son emballage d’origine directement à l’intérieur du
sac FoodSaver
MD
pour ensuite réaliser la mise sous vide.
2023/4/17 09:582023/4/17 09:58

45
US: www.FoodSaver.com | CA: www.FoodSaver.ca | MX: www.oster.com.mx/foodsaver
CONSIGNES
Conseils en matière de préparation alimentaire et de
réchauffage
Consignes de préparation pour les repas
préparés à l’avance et les restes de table :
Les repas préparés à l’avance et les restes peuvent être conservés de façon efficace grâce
aux contenants légers et empilables FoodSaver
MD
. Ces contenants FoodSaver
MD
pratiques sont
empilables, résistants aux bris et aux fissures, vont au lave-vaisselle et les bases vont au micro-
ondes pour un réchauffage sécuritaire.
Consignes de préparation
pour les collations :
Les collations conservent leur fraîcheur plus longtemps lorsqu’elles sont emballées sous vide.
Pour de meilleurs résultats, utiliser une boîte FoodSaver
MD
, en particulier pour les produits
friables comme les craquelins.
VS5900 Series_23EFSM1.indd 45-46VS5900 Series_23EFSM1.indd 45-46

46
Service à la clientèle : US: 1-877-777-8042 CA: 1-877-804-5383 MX: +52 55 5366 0800
Emballage sous vide d’articles non alimentaires
Argenterie
Pour mettre sous vide des couverts en argent, envelopper les dents des fourchettes avec du
matériau de rembourrage doux, comme un essuie tout, pour éviter de percer le sac, et faire
le vide comme d’habitude. Les couverts en argent seront propres, frais et immaculés quand
viendra le temps de les utiliser lors de la prochaine réception.
Camping
Les sacs FoodSaver
MD
sont parfaits pour toutes les excursions de plein air. Pour les activités de
randonnée et de camping, les allumettes, les cartes et la nourriture peuvent être conservées à
l’abri de l’humidité et de façon compacte.
L’eau
Pour avoir de l’eau fraîche à boire, il suffit de remplir un sac FoodSaver
MD
de glaçons, de le
sceller et de le laisser fondre au besoin. Le coin du sac peut être coupé pour en faire un bec
pour verser ou boire.
Nautique
Que ce soit pour faire de la voile ou de la navigation de plaisance, les plaisanciers peuvent
emballer sous vide de la nourriture, des piles supplémentaires, des cartes-mémoires, de l’argent
comptant, leurs cartes d’identité, leur permis pour conduire un bateau et des vêtements secs de
rechange. Il ne faut juste pas oublier d’emporter des ciseaux ou un couteau pour ouvrir les sacs
au besoin!
Urgence
Pour conserver les trousses d’urgence au sec, emballer sous vide les fusées éclairantes,
les piles, les lampes torches, les allumettes, les bougies, les trousses de premiers soins, la
nourriture supplémentaire et d’autres produits de première nécessité. Les articles d’urgence
resteront secs et bien rangés à la maison, ainsi que dans la voiture, le bateau ou le VR.
Le système d’emballage sous vide FoodSaver
MD
protège aussi les articles non alimentaires de l’oxydation, de
la corrosion et de l’humidité. Il suffit de suivre le mode d’emploi pour emballer sous vide ces articles grâce
aux sacs, boîtes et accessoires FoodSaver
MD
.
CONSIGNES
2023/4/17 09:582023/4/17 09:58
47 US: www.FoodSaver.com | CA: www.FoodSaver.ca | MX: www.oster.com.mx/foodsaver
GUIDE DE DÉPANNAGE
Guide de dépannage
Problème Solution
Le voyant à DEL
de scellement
clignote
• Toujours patienter 20 secondes entre deux opérations de scellement.
• La pompe de mise sous vide fonctionne pendant plus de 120 secondes. En cas
d’utilisation intensive, l’appareil s’éteint automatiquement et le voyant clignote.
Consulter la section suivante : « La pompe de mise sous vide fonctionne, mais l’air
ne s’évacue pas du sac ».
La pompe de
mise sous vide
fonctionne, mais
l’air ne s’évacue
pas du sac
• Si le sac est fabriqué à partir d’un rouleau, vérifier qu’une extrémité du sac est
bien scellée. (Consulter la section « Comment fabriquer un sac à partir d’un
rouleau d’emballage FoodSaver
MD
», page 34).
• Ajuster le sac et essayer à nouveau. Veiller à ce que l’extrémité ouverte du sac
se situe bien dans le ramasse-goutes.
• Vérifier que le sac n’est pas froissé le long de la bande de scellement. Pour
empêcher que le sac ne se froisse au niveau de la partie scellée, étirer
délicatement le sac de manière à ce qu’il soit bien plat au moment de l’insérer
dans le ramasse-goutes.
• Ouvrir l’appareil et veiller à ce que le joint supérieur soit bien de corps étranger, de
saleté ou de debris (consulter la section « Nettoyage et entretien », page 40).
Le sac ne scelle
pas correctement
• Vérifier qu’il n’y a pas de débris alimentaires autour de la zone de scellement.
S’il y en a nettoyez le Joint (consulter la section « Nettoyage et entretien »,
page 40).
• Le sac est froissé : pour empêcher que le sac ne se froisse au niveau de la
partie scellée, étirer délicatement le sac de manière à ce qu’il soit bien plat au
moment de l’insérer dans la fente d’aspiration.
• Vérifier que l’appareil est bien en marche.
• Appareil en surchauffe. Attendre quelques minutes que l’appareil refroidisse.
Aucun voyant
ne s’allume sur
le panneau de
commande
• Vérifier que l’appareil est bien branché.
• Vérifier que la prise murale fonctionne.
• Vérifier que la fenêtre de visualisation de l’emballage sous vide est bien fermée.
• Vérifier que l’appareil est bien en marche.
Le joint supérieur
se déplace ou est
déchiré
• Contactez le service à la clientèle au numéro ou visitez le site Web indiqué
ci-dessous.
Rien ne se
passe lorsque
le couvercle de
l’appareil est
fermé/verrouillé
• Vérifier que l’appareil est bien branché.
• Vérifier que l’appareil est bien en marche.
• Vérifier que la prise murale fonctionne.
• Appuyer légèrement sur le couvercle.
Le liquide est
aspiré et remplit
le ramasse-
gouttes
• Vous assurer d’utiliser le mode liquide si vous emballez sous vide des soupes,
des sauces, des marinades ou des salsas dans un sac d’emballage sous vide.
• Veiller à ne pas trop remplir le sac de liquide. Pour les sacs d’une pinte, il
est recommandé de les remplir au maximum avec 1 pinte et pour les sacs
d’un gallon, il est recommandé de les remplir au maximum avec 1/2 gallon de
liquide. Les liquides doivent avoir une viscosité de 1,39 mPa·s ou plus.
• S’assurer que le liquide n’est pas trop fluide. Pour se faire une idée, le liquide
ne doit pas être plus fluide qu’une soupe au poulet et aux nouilles.
VS5900 Series_23EFSM1.indd 47-48
Lorsque vous utilisez le mode liquide, sivousscellez sous vide des sauces plus
épaisses, des soupes ou des crèmes (par exemple, de la crème de champignons),
veillez à ce que les parois intérieures du sac au-dessus du liquidesoient le plus
possible à l'abri des débris alimentaires ou des gouttes.
• Si vous utilisez des aliments contenant beaucoup de liquide, utiliser le mode
liquide an d’éviter que de trop grosses quantités de jus ou de liquides ne soient
aspirées à l’extérieur du sac.

48
Service à la clientèle : US: 1-877-777-8042 CA: 1-877-804-5383 MX: +52 55 5366 0800
Guide de dépannage
Problème Solution
Impossible d’insérer
un sac dans l’appareil
• Veiller à ce que la quantité de matériau de sac soit suffisante pour atteindre le
milieu du ramasse-gouttes. Veiller à ce qu’il y ait toujours un espace libre d’au
moins 7,62 cm (3 pouces) dans le sac pour permettre à celui-ci de bien emballer
les aliments.
• Il convient d’aplanir délicatement le sac au moment de l’insérer dans le ramasse-
goutes. Insérer le sac le côté BOMBÉ VERS LE BAS dans le ramasse-goutes.
Le couvercle de
l’appareil ne se ferme
pas automatiquement
• Si vous essayez d’insérer le sac juste après l’avoir retiré ou avoir appuyé sur le
bouton Annuler, attendez quelques secondes, puis essayez d’insérer ou de réinsérer.
• Des aliments ou des résidus alimentaires peuvent obstruer les capteurs utilisés pour
fermer automatiquement le couvercle de l’appareil. Ouvrir complètement le couvercle
de l’appareil et essuyer la zone sous les deux languettes noires du couvercle avec un
essuie-tout humide. Consulter la section Nettoyage et entretien à la page 40.
Le vide a été fait
dans le sac, mais l’air
pénètre à nouveau à
l’intérieur
• Vérifier le scellement. Si le sac est froissé au niveau de la partie scellée, de l’air
pourrait pénétrer de nouveau à l’intérieur. Pour empêcher que le sac ne se froisse
au niveau de la partie scellée, étirer délicatement le sac de manière à ce qu’il soit
bien plat au moment de l’insérer dans le ramasse-goutes.
• Il arrive parfois que de l’humidité ou des matières alimentaires (jus, graisse,
miettes, poudres, etc.) présentes le long de la partie scellée empêchent de sceller
le sac correctement. Découper le sac pour l’ouvrir, essuyer la partie supérieure à
l’intérieur du sac et le sceller à nouveau.
• Si vous utilisez des aliments contenant beaucoup de liquide, utiliser le mode
liquide afin d’éviter que de trop grosses quantités de jus ou de liquides ne soient
aspirées à l’extérieur du sac.
• Des produits alimentaires pointus pourraient avoir percé le sac. Si le sac est troué,
en utiliser un autre. Couvrir les produits alimentaires pointus avec un matériau de
rembourrage doux, comme un essuie-tout, puis sceller à nouveau le sac.
• Il est possible que les aliments aient fermenté ou que des gaz naturels provenant
de l’intérieur des aliments se soient dégagés. Le cas échéant, les aliments
pourraient avoir commencé à s’avarier et devraient être jetés.
• Sac défectueux. Le sac pourrait être percé. Essayer un nouveau sac.
Le sac fond
• La bande de scellement est trop chaude. Toujours patienter au moins 20 secondes
que l’appareil refroidisse avant d’emballer sous vide un autre article.
• Utiliser des sacs de la marque FoodSaver
MD
. Les sacs et rouleaux FoodSaver
MD
sont
spécialement conçus pour les appareils FoodSaver
MD
.
Le vide ne se fait pas
dans le contenant
• Le couvercle du contenant doit être correctement placé sur le contenant et aligné
avec celui-ci. (Voir « Manuel du propriétaire » fourni avec l’accessoire)
• S’assurer d’appuyer sur le bouton pour accessoire pour scelleuse à main.
• S’assurer que le couvercle est bien fermé sur les 4 côtés du contenant.
• S’assurer que le joint en caoutchouc à l’intérieur du couvercle ne contient pas de
résidus alimentaires.
• Vérifier si le rebord du contenant contient des craques et des égratignures.
S’assurer que la valve est propre.
Ramasse-gouttes
amovible plein
• Lorsque cela se produit, les voyants liquide, sec, humide et sous vide clignotent.
La ramasse-gouttes amovible doit être vidée et séchée avant de la réinstaller dans
l’appareil.
Si une aide
supplémentaire
s’avère nécessaire
• Contactez le service à la clientèle au numéro ou visitez le site Web indiqué
ci-dessous et cliquez sur l’onglet « Support ».
GUIDE DE DÉPANNAGE
e
2023/4/17 09:582023/4/17 09:58
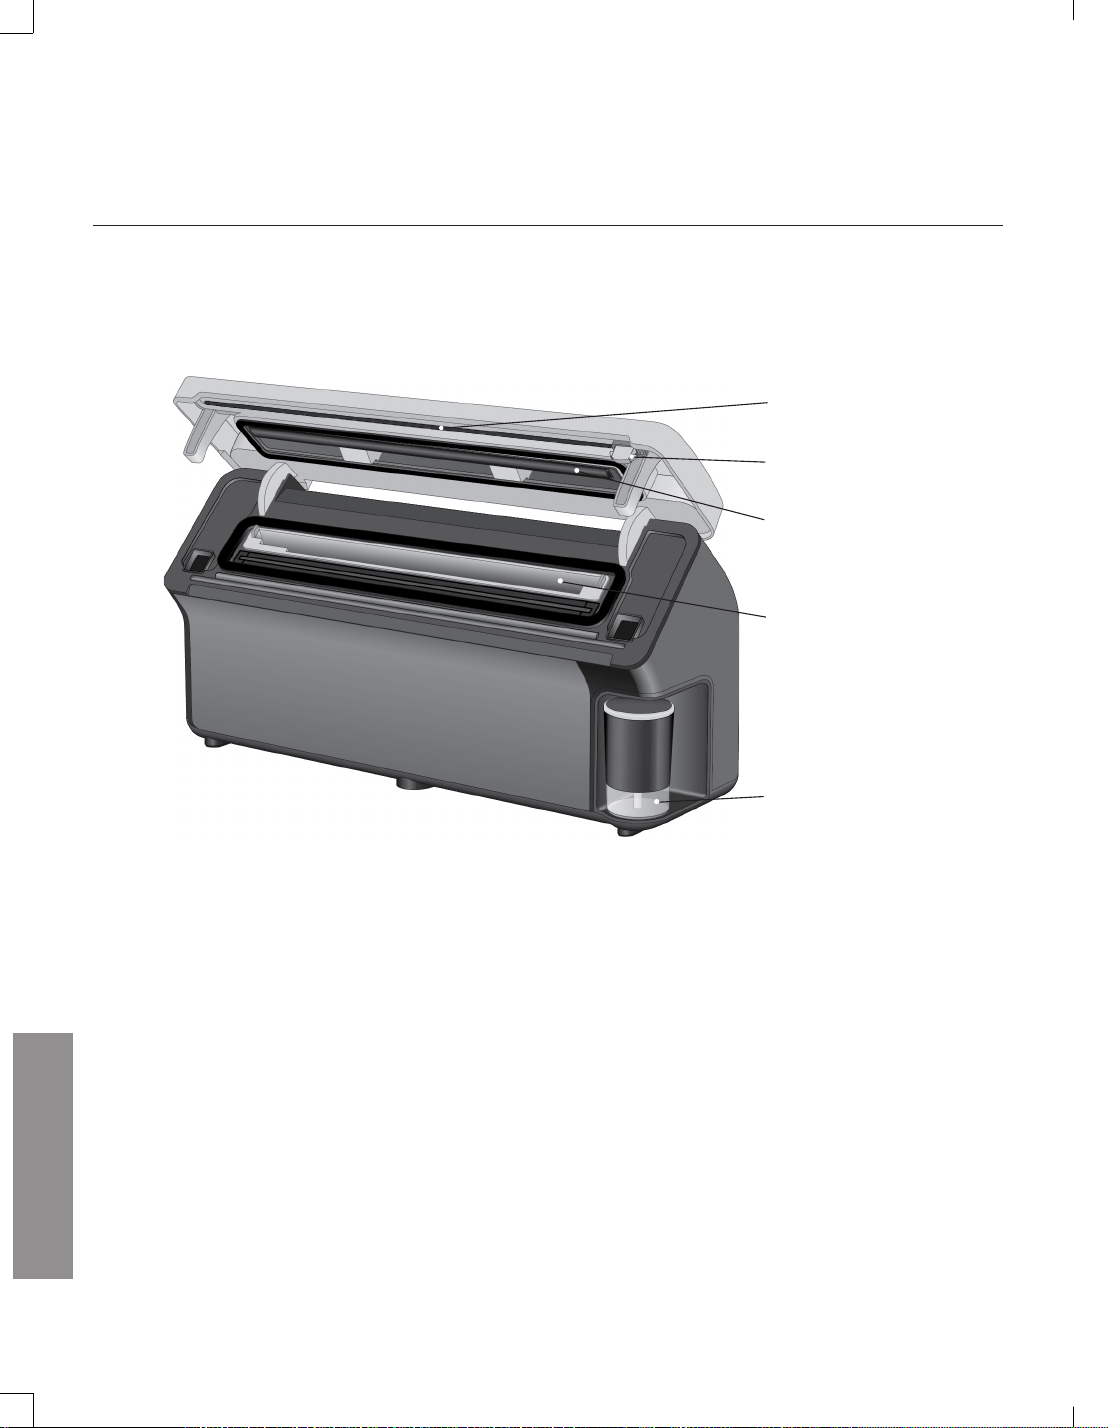
49
US: www.FoodSaver.com | CA: www.FoodSaver.ca | MX: www.oster.com.mx/foodsaver
PIÈCES DE RECHANGE
Pièces de rechange
Pour obtenir des pièces de rechange, veuillez visiter le site Web ou appeler le service à la clientèle.
Bande de maintien
Coupe-sac
Profil
Ramasse-gouttes
Réservoir (scelleuse à main)
VS5900 Series_23EFSM1.indd 49-50VS5900 Series_23EFSM1.indd 49-50

50
Service à la clientèle : US: 1-877-777-8042 CA: 1-877-804-5383 MX: +52 55 5366 0800
Sunbeam Products, Inc. ou, au Canada, Newell Brands Canada ULC, et au Mexique, Newell Brands de
Mexico, S.A. de C.V. (collectivement « Sunbeam ») garantit que pendant une période de cinq (5) ans
à compter de la date d’achat au détail initiale, ce produit sera exempt de défauts de matériaux et de
fabrication, lorsqu’il est utilisé conformément aux instructions fournies. Sunbeam, à son choix, réparera
ou remplacera gratuitement ce produit ou tout composant du produit jugé défectueux pendant la période
de garantie. Le remplacement sera effectué avec un produit ou un composant neuf ou réusiné, sans
frais pour le consommateur. Si le produit n’est plus disponible, le remplacement peut être effectué
avec un produit similaire de valeur égale ou supérieure. C’est votre garantie exclusive. NE PAS tenter de
réparer ou d’ajuster les fonctions électriques ou mécaniques de cet appareil. Cela annulerait la garantie.
Sunbeam se réserve le droit de refuser la garantie si le défaut ou le dommage a été causé par des
composants ou des services non autorisés. Pour le Mexique, la garantie prend effet à la date de réception
du produit par le consommateur, qui est présumée être la date de la facture ou du bon, ou la date du
tampon de la garantie, sauf preuve contraire. Cette garantie est valable pour l’acheteur au détail d’origine
à compter de la date d’achat au détail initiale et n’est pas transférable (ne s’applique pas au marché
mexicain pour lequel la garantie est transférable). Conservez l’original du reçu de caisse. Une preuve
d’achat est requise pour obtenir l’exécution de la garantie. Pour les achats effectués au Mexique, il est
préférable de présenter la facture d’achat (reçu de caisse) ou un tampon apposé sur la carte de garantie.
Les distributeurs, les centres de service ou les magasins de détail qui vendent des produits Sunbeam
n’ont pas le droit de modifier ou de changer de quelque façon que ce soit les modalités de la présente
garantie. Cette garantie ne couvre pas l’usure normale des pièces ou les dommages résultant de l’un des
éléments suivants : a) utilisation négligente ou mauvaise utilisation du produit; b) utilisation sur une
tension ou un courant inapproprié; c) utilisation contraire au mode d’emploi; d) démontage, réparation
ou altération par quiconque autre que Sunbeam ou un centre de service Sunbeam autorisé. Sunbeam
exclut expressément de cette garantie et décline toute responsabilité en cas de défauts ou de dommages
causés par une réparation ou une modification effectuée par quiconque autre que Sunbeam ou un centre
de service Sunbeam autorisé. De plus, cette garantie ne couvre pas : e) les désastres naturels, comme
les incendies, les inondations, les ouragans et les tornades. Aucune modalité de la présente garantie ne
peut être interprétée comme s’appliquant à un service et à un entretien non couverts par la garantie. Par
conséquent, Sunbeam décline également toute responsabilité pour les défauts et les dommages causés
par des réparations ou des modifications effectuées en dehors des modalités de la présente garantie.
Quelles sont les limites de la responsabilité de Sunbeam?
Sunbeam n’est pas responsable des dommages accessoires ou consécutifs résultant de la violation
d’une garantie ou condition expresse, implicite ou statutaire. Sauf dans la mesure où la loi applicable
l’interdit, toute garantie ou condition implicite de qualité marchande ou d’adaptation à un usage
particulier est limitée dans le temps à la durée de la garantie ci-dessus. Sunbeam décline toute
autre garantie, condition ou représentation, expresse, implicite, statutaire ou autre. Sunbeam n’est
pas responsable des dommages de toute nature résultant de l’achat, de l’utilisation, de la mauvaise
utilisation ou de l’incapacité à utiliser le produit, y compris des dommages accessoires, particuliers,
consécutifs ou similaires ou la perte de profits, ou de toute violation de contrat, fondamentale ou autre,
ou de toute réclamation intentée contre l’acheteur par toute autre partie. Certaines provinces, certains
États ou territoires de compétence n’autorisent pas l’exclusion ou la limitation des dommages indirects
ou consécutifs ou la limitation de la durée d’une garantie implicite, de sorte que les limitations ou
exclusions ci-dessus peuvent ne pas s’appliquer à vous. Cette garantie vous donne des droits légaux
spécifiques, et vous pouvez également avoir d’autres droits qui varient d’une province à une autre, d’un
État à un autre ou d’un territoire de compétence à un autre.
Garantie limitée de 5 ans
GARANTIE
2023/4/17 09:582023/4/17 09:58

Comment obtenir un service de garantie
Aux États-Unis
Si vous avez la moindre question concernant cette garantie ou si vous aimeriez obtenir un service de
garantie, veuillez composer le 1-877-777-8042. L’adresse d’un centre de service proche vous sera
fournie. Aux États-Unis, cette garantie est offerte par Sunbeam Products, Inc., situé à 6655 Peachtree
Dunwoody Rd. à Atlanta en Géorgie 30328.
Au Canada
Si vous avez la moindre question concernant cette garantie ou si vous aimeriez obtenir un service de
garantie, veuillez composer le 1-877-804-5383. L’adresse d’un centre de service proche vous sera
fournie. Au Canada, cette garantie est offerte par Newell Brands Canada ULC, situé au 20 B Hereford
Street, Brampton (Ontario) L6Y 0M1. Si vous avez d’autres problèmes ou réclamations en rapport avec ce
produit, veuillez écrire à notre service à la clientèle.
Au Mexique
Si vous avez la moindre question concernant cette garantie ou si vous aimeriez obtenir un service de
garantie, veuillez contacter Newell Brands de Mexico, S.A. de C.V. situé au Boulevard Manuel Ávila
Camacho No. 32 Piso 14, Colonia Lomas de Chapultepec III Sección, Alc. Miguel Hidalgo, C.P. 11000
Ciudad de México, México. Service aux consommateurs : 55 5366-0800/800 506 1700 et/ou un centre
de service pratique.
VEUILLEZ NE PAS RETOURNER CE PRODUIT À L’UNE DE CES ADRESSES OU AU LIEU D’ACHAT.
Pour toute demande de renseignements concernant le recyclage et la mise au rebut appropriée de ce
produit, veuillez communiquer avec votre installation locale de gestion des déchets.
GARANTIE
VS5900 Series_23EFSM1.indd 51-52VS5900 Series_23EFSM1.indd 51-52

Contenido
Importantes medidas de seguridad .................... 53
Características del product .................................. 56
“Cómo” .................................................................... 58
Instalar un Rollo FoodSaver
®
Hacer una bolsa con un rollo FoodSaver
®
(Fabricación de bolsas exprés)
Sellar al vacío una bolsa FoodSaver
®
Para marinar:
Selle al vacío con los accesorios FoodSaver
®
Cuidado y limpieza ................................................ 65
Indicaciones ........................................................... 66
Sellado al vacío y seguridad alimentaria
Consejos para preparar y recalentar los alimentos
Sellado de artículos no alimentarios
Solución de problemas .......................................... 72
Repuestos .................................................................74
Garantía .................................................................. 75
¡Regístrese hoy en www.foodsaver.com/register para recibir un
acceso exclusivo a ofertas y descuentos de FoodSaver!*
*Aplicable sólo a residentes de los EE.UU.
2023/4/17 09:582023/4/17 09:58

53
US: www.FoodSaver.com | CA: www.FoodSaver.ca | MX: www.oster.com.mx/foodsaver
Por su propia seguridad, siga siempre estas precauciones básicas al
utilizar un aparato FoodSaver
®
:
1. Lea atentamente el manual del propietario para consultar las
instrucciones de funcionamiento. Lea todas las instrucciones de este
manual antes de usarlo.
2. Al utilizar un aparato eléctrico, es necesario seguir siempre las
precauciones básicas, incluso las siguientes:
Lea todas las instrucciones antes de utilizar este aparato.
PELIGRO - Para reducir el riesgo de una descarga eléctrica:
1. No intente agarrar un aparato que se haya caído al agua. Desenchúfelo
inmediatamente de la toma de corriente.
2. No lo utilice ni en el baño ni en la regadera.
3. No coloque ni guarde el aparato donde pueda caerse o ser arrastrado a
una bañera o lavabo. No lo coloque ni lo deje caer en agua u otro líquido.
4. Desenchufe siempre este aparato de la toma de corriente
inmediatamente después de utilizarlo.
5. Desenchufe este aparato antes de limpiarlo.
ADVERTENCIA - Para reducir el riesgo de quemaduras, incendio, descargas
eléctricas:
1. No utilice el aparato ni en superficies mojadas ni en el exterior.
2. Para protegerse contra las descargas eléctricas, no sumerja ninguna
parte del aparato, el cable de alimentación o el enchufe en agua u
otro líquido. Desenchufe de la toma de corriente cuando no se utilice y
antes de limpiarlo.
3. Para desconectarlo, desenchufe el cable de alimentación de la toma de
corriente. No lo desconecte tirando del cable.
4. No utilice el aparato si el cable de alimentación o el enchufe están
dañados. No utilice el aparato si funciona mal o si está dañado de
alguna manera.
Para más detalles, póngase en contacto con el Servicio de Atención al
Cliente llamando al siguiente número.
1. Utilice el aparato sólo para el uso previsto.
2. Supervise de cerca a los niños al utilizar cualquier aparato eléctrico. No
permita que el aparato se utilice como un juguete.
3. Solo para uso de adultos.
INSTRUCCIONES IMPORTANTES DE SEGURIDAD
VS5900 Series_23EFSM1.indd 53-54VS5900 Series_23EFSM1.indd 53-54

54
Servicio al Cliente: US: 1-877-777-8042 CA: 1-877-804-5383 MX: +52 55 5366 0800
4. Precaución: Se proporciona un cable de alimentación corto para reducir
los riesgos de enredos o tropiezos con un cable más largo. Se puede
utilizar un cable de extensión cuando la clasificación eléctrica marcada
no sea inferior a la clasificación eléctrica de este aparato.
5. No debe haber cables que cuelguen de la encimera ni de la mesa,
donde se pueda tropezar con ellos o tirar de ellos sin querer,
especialmente en el caso de los niños.
6. No lo coloque sobre o cerca de un quemador de gas o eléctrico
caliente, o de un horno caliente. Se debe extremar la precaución al
mover productos que contengan líquidos calientes.
7. La tapa se cierra automáticamente con fuerza. No obstruya el cierre de
la tapa. No fuerce manualmente la tapa para cerrarla.
8. No ponga los dedos ni ningún objeto extraño dentro de la ventana
de visualización del vacío mientras se está sellando al vacío.
Consejos importantes
1. El sellado al vacío NO es un sustituto del proceso térmico del enlatado.
Los productos perecederos todavía deben ser refrigerados o congelados.
2. Para obtener los mejores resultados, utilice únicamente bolsas, rollos,
recipientes y accesorios FoodSaver
®
.
3. Durante el proceso de envasado al vacío, pequeñas cantidades de
líquidos, migas o partículas de alimentos pueden ser arrastradas sin
querer al canal de vacío. Vacíe la bandeja de goteo después de cada uso.
4. Evite el sobrellenado; deje siempre al menos tres pulgadas (7.62 cm) de
material de la bolsa entre el contenido y la parte superior de la bolsa.
Esto permite que el material de la bolsa se ajuste bien a los alimentos
y evita que la bolsa se salga del canal de vacío durante el proceso
de sellado. Después, deje al menos una pulgada (2.54 cm) más de
material de la bolsa cada vez que piense reutilizarla.
5. No cree sus propias costuras laterales para una bolsa FoodSaver
®
.
Estas bolsas se fabrican con una costura lateral especial, que se sella
hasta el borde exterior.
6. Para evitar que se formen arrugas en el sello al sellar al vacío artículos
voluminosos, estire suavemente la bolsa para aplanarla mientras la
introduce en el canal de vacío y continúe sujetándola hasta que la
bomba de vacío se ponga en marcha.
7. Al sellar al vacío artículos con bordes afilados (espaguetis secos,
cubiertos, etc.), proteja la bolsa de los pinchazos envolviendo el artículo
en un material amortiguador suave, como una toalla de papel. Puede
utilizar un Recipientes o un tarro Mason en lugar de una bolsa.
2023/4/17 09:582023/4/17 09:58
55
US: www.FoodSaver.com | CA: www.FoodSaver.ca | MX: www.oster.com.mx/foodsaver
8. Al utilizar accesorios, recuerde dejar un espacio de una pulgada (2.54
cm) en la parte superior.
9. Precongele las frutas y blanquee las verduras antes de sellarlas al vacío
para obtener los mejores resultados. (Consulte las indicaciones para el
sellado al vacío en las páginas 66 a 71.)
10. Espere 20 s entre cada sellado para permitir que el aparato se enfríe.
11. Nunca almacene la tapa en posición de FUNCIONAMIENTO ya que las
juntas pueden comprimirse.
GUARDE ESTAS INSTRUCCIONES
Sólo para uso doméstico
INSTRUCCIONES PARA EL CABLE DE ALIMENTACIÓN:
Se proporciona un cable de alimentación corto (o un cable de
alimentación desmontable) para reducir los riesgos derivados de enredos
o tropiezos con un cable más largo. Existen cables de alimentación
desmontables más largos o cables de extensión que pueden utilizarse
siempre y cuando se utilicen con cuidado. Si se utiliza un cable de
alimentación desmontable largo o un cable de extensión:
a. La clasificación eléctrica marcada del cable de alimentación desmontable
o del cable de extensión debe ser al menos la misma que la clasificación
eléctrica del aparato;
b. Si el aparato es del tipo con conexión a tierra, el cable de extensión debe
ser un cable de 3 alambres con conexión a tierra; y
c. El cable más largo debe colocarse para que no cuelgue de la encimera o la
mesa, donde los niños se pueden tropezar con el cable o tirar de él sin querer.
Este aparato tiene un enchufe polarizado (una clavija
es más ancha que la otra). Como medida de seguridad
para reducir el riesgo de descarga eléctrica, este
enchufe está diseñado para entrar en una toma de
corriente polarizada únicamente de una forma. Dé la
vuelta al enchufe si no entra completamente en la toma de corriente. Si
sigue sin entrar, póngase en contacto con un electricista autorizado. No
intente manipular esta característica de seguridad ni modificar el enchufe
de ninguna manera. Si el enchufe no entra bien en la toma de corriente
alterna o si la toma de corriente está caliente, no utilice esa toma.
VS5900 Series_23EFSM1.indd 55-56VS5900 Series_23EFSM1.indd 55-56
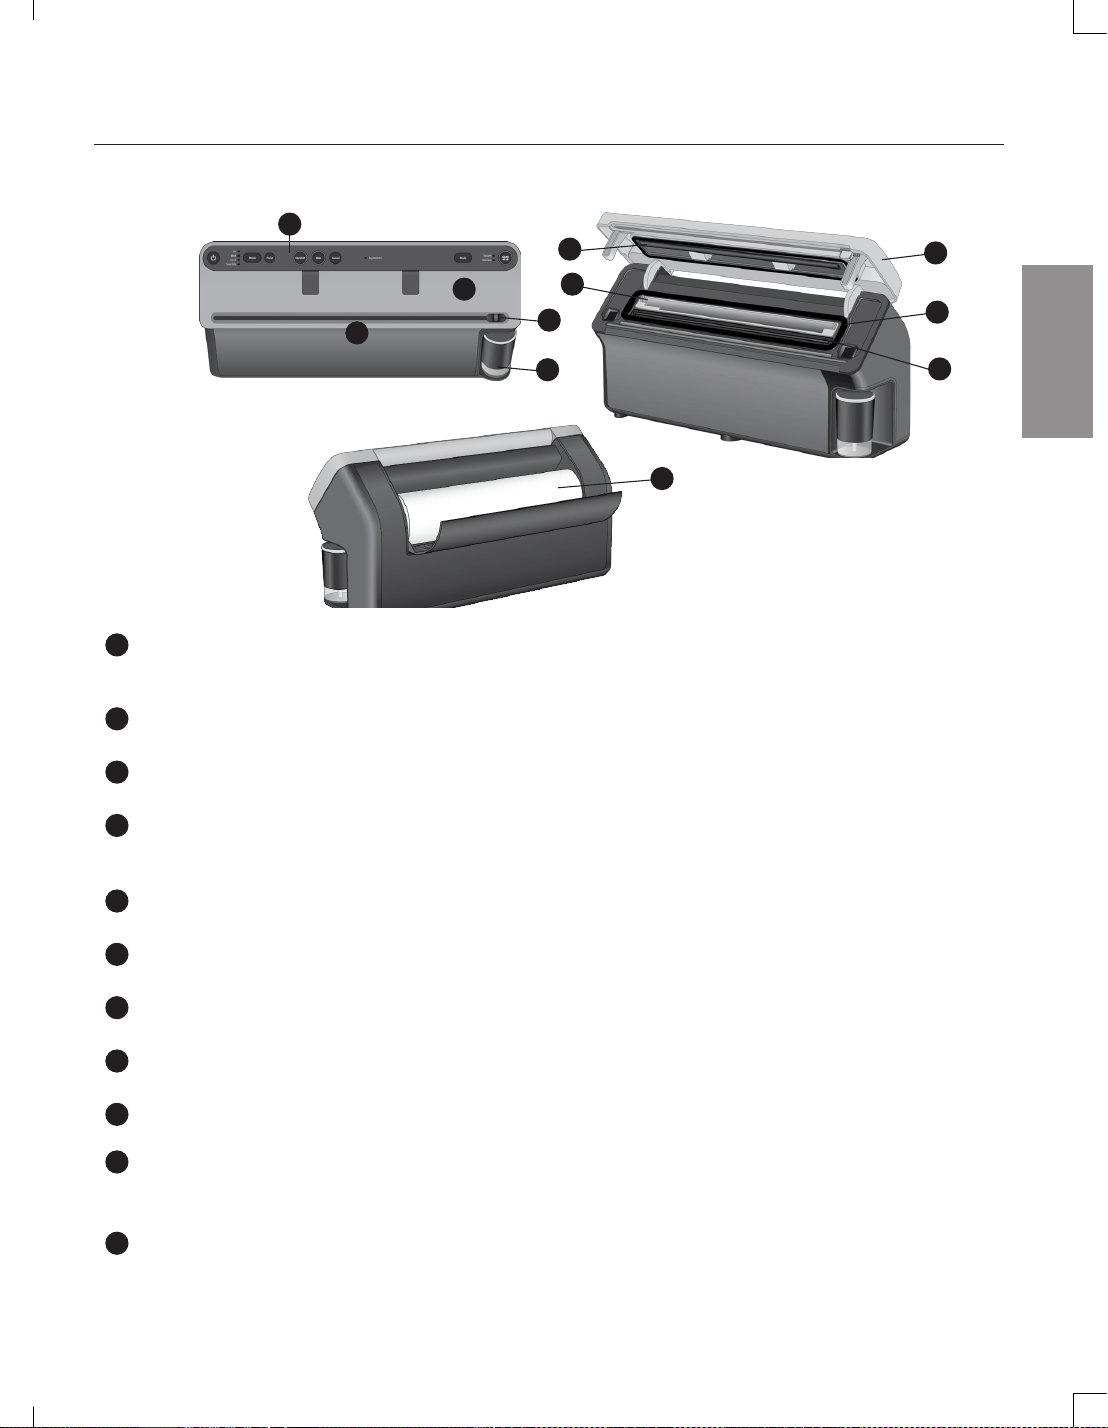
56
Servicio al Cliente: US: 1-877-777-8042 CA: 1-877-804-5383 MX: +52 55 5366 0800
Características del product
CARACTERÍSTICAS
A
B
C
D
E
F
G
H
I
J
K
A
Controles y luces indicadora
Indican el ajuste actual y el progreso del vacío para un mayor control o para llamar la atención
sobre una acción.
B
Cortador de bolsas
Incorporado para simplificar la fabricación de bolsas a medida a partir de rollos.
C
Ventana de visualización de vacío
Proporciona visibilidad del canal de vacío, la bandeja de goteo y la banda de sellado.
D
Ventana de visualización de vacío / Detección automática de bolsa
Simplemente introduzca el extremo abierto de la bolsa en el canal de vacío y el aparato
detectará la bolsa y cerrará la tapa del aparato.
E
Sellador de mano retráctil
Funciona con bolsas con cremallera, recipientes y accesorios FoodSaver
®
.
F
Junta superior
No extraíble.
G
Bandeja de goteo extraíble
Atrapa los líquidos que se desbordan y es apta para el lavavajillas.
H
Junta inferior
No extraíble.
I
Banda de sellado
Proporciona un sellado extra seguro y hermético.
J
Tapa del aparato
Se abre para acceder a la bandeja de goteo y para pasar el rollo por el aparato para hacer
bolsas. debe estar cerrada y bloqueada para envasar al vacío, sellar o usar en modo manual.
K
Compartimento de almacenamiento de rollos incorporado con puerta
Para el almacenamiento de los rollos de sellado al vacío FoodSaver
®
(se adapta a todos los
anchos y largos).
2023/4/17 09:582023/4/17 09:58
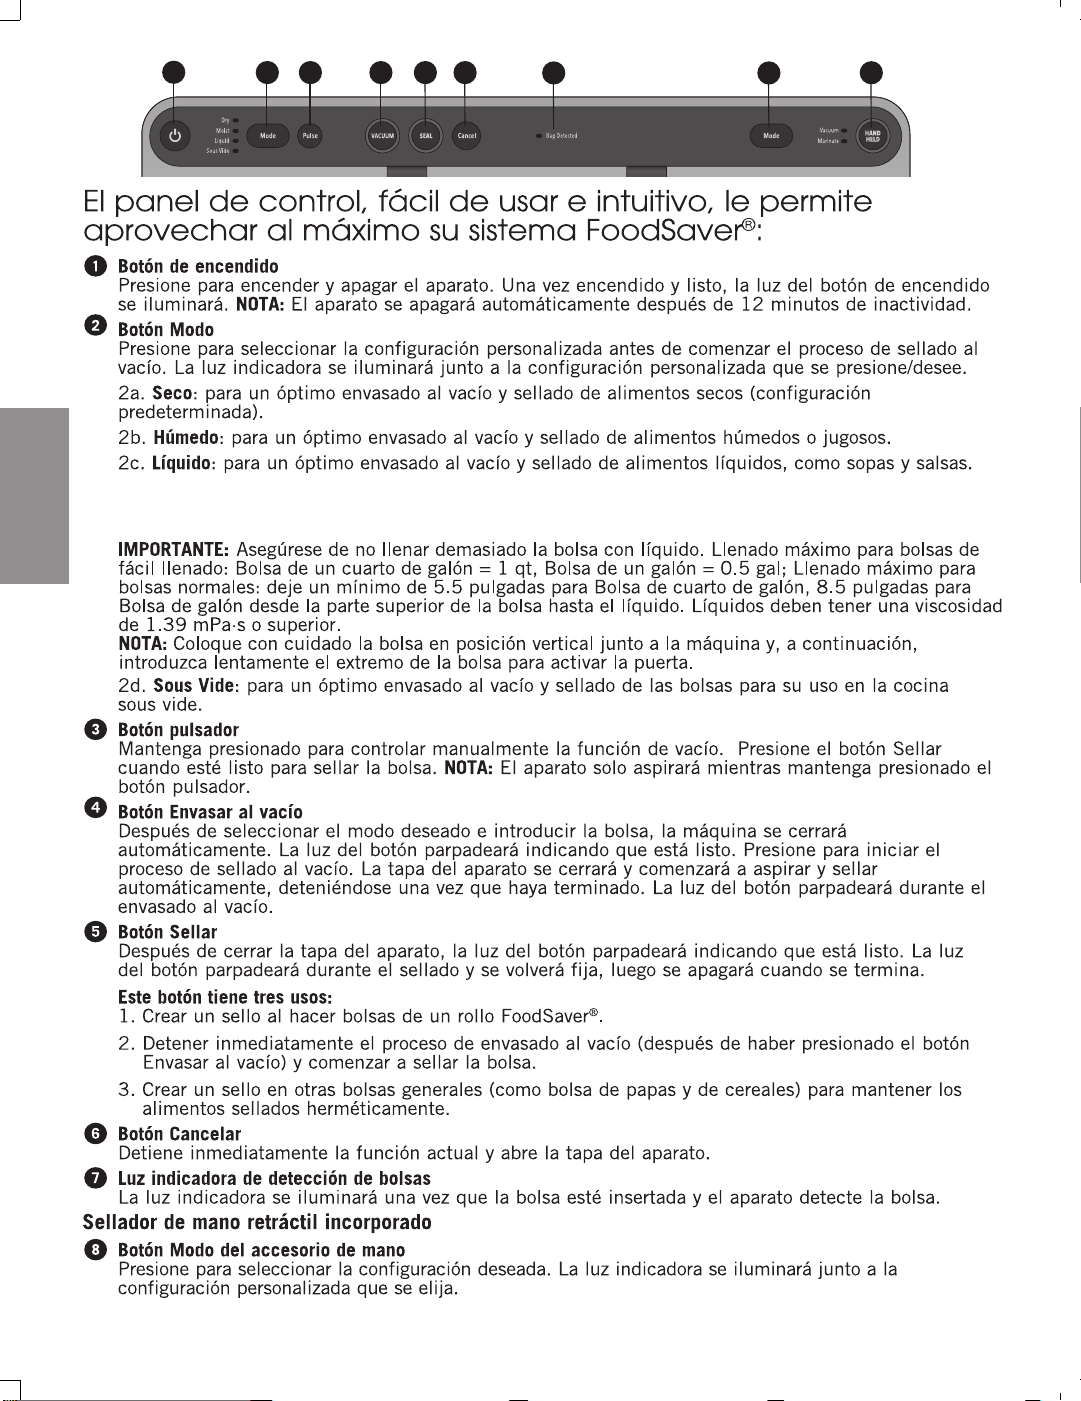
57 US: www.FoodSaver.com | CA: www.FoodSaver.ca | MX: www.oster.com.mx/foodsaver
CARACTERÍSTICAS
1
Botón de encendido
Presione para encender y apagar el aparato. Una vez encendido y listo, la luz del botón de encendido
se iluminará. NOTA: El aparato se apagará automáticamente después de 12 minutos de inactividad.
2
Botón Modo
Presione para seleccionar la configuración personalizada antes de comenzar el proceso de sellado al
vacío. La luz indicadora se iluminará junto a la configuración personalizada que se presione/desee.
2a. Seco: para un óptimo envasado al vacío y sellado de alimentos secos (configuración
predeterminada).
2b. Húmedo: para un óptimo envasado al vacío y sellado de alimentos húmedos o jugosos.
2c. Líquido: para un óptimo envasado al vacío y sellado de alimentos líquidos, como sopas y salsas.
IMPORTANTE: Asegúrese de no llenar demasiado la bolsa con líquido. Para las bolsas de un cuarto de
galón (946 ml) se recomienda llenarlas con un máximo de un cuarto de galón y para las de un galón
con ½ galón de líquido. Los líquidos deben tener una viscosidad de 1.39 mPa·s o superior.
2d. Sous Vide: para un óptimo envasado al vacío y sellado de las bolsas para su uso en la cocina
sous vide.
3
Botón pulsador
Mantenga presionado para controlar manualmente la función de vacío. Presione el botón Sellar
cuando esté listo para sellar la bolsa. NOTA: El aparato solo aspirará mientras mantenga presionado el
botón pulsador.
4
Botón Envasar al vacío
Después de seleccionar el modo deseado e introducir la bolsa, la máquina se cerrará
automáticamente. La luz del botón parpadeará indicando que está listo. Presione para iniciar el
proceso de sellado al vacío. La tapa del aparato se cerrará y comenzará a aspirar y sellar
automáticamente, deteniéndose una vez que haya terminado. La luz del botón parpadeará durante el
envasado al vacío.
5
Botón Sellar
Después de cerrar la tapa del aparato, la luz del botón parpadeará indicando que está listo. La luz
del botón parpadeará durante el sellado y se volverá fija, luego se apagará cuando se termina.
Este botón tiene tres usos:
1. Crear un sello al hacer bolsas de un rollo FoodSaver
®
.
2. Detener inmediatamente el proceso de envasado al vacío (después de haber presionado el botón
Envasar al vacío) y comenzar a sellar la bolsa.
3. Crear un sello en otras bolsas generales (como bolsa de papas y de cereales) para mantener los
alimentos sellados herméticamente.
6
Botón Cancelar
Detiene inmediatamente la función actual y abre la tapa del aparato.
7
Luz indicadora de detección de bolsas
La luz indicadora se iluminará una vez que la bolsa esté insertada y el aparato detecte la bolsa.
Sellador de mano retráctil incorporado
8
Botón Modo del accesorio de mano
Presione para seleccionar la configuración deseada. La luz indicadora se iluminará junto a la
configuración personalizada que se elija.
1
2
3 4 5 6
7 8
9
El panel de control, fácil de usar e intuitivo, le permite
aprovechar al máximo su sistema FoodSaver
®
:
VS5900 Series_23EFSM1.indd 57-58
Cuandoutiliceel modo líquido, sivaaenvasar al vacío salsas, sopas o cremasmásespesas
(porejemplo, crema de champiñones) mantengael interior de las paredes de la bolsaporencima del
líquido librede restos de comida o goteosen la medida de lo posible.
IMPORTANTE:
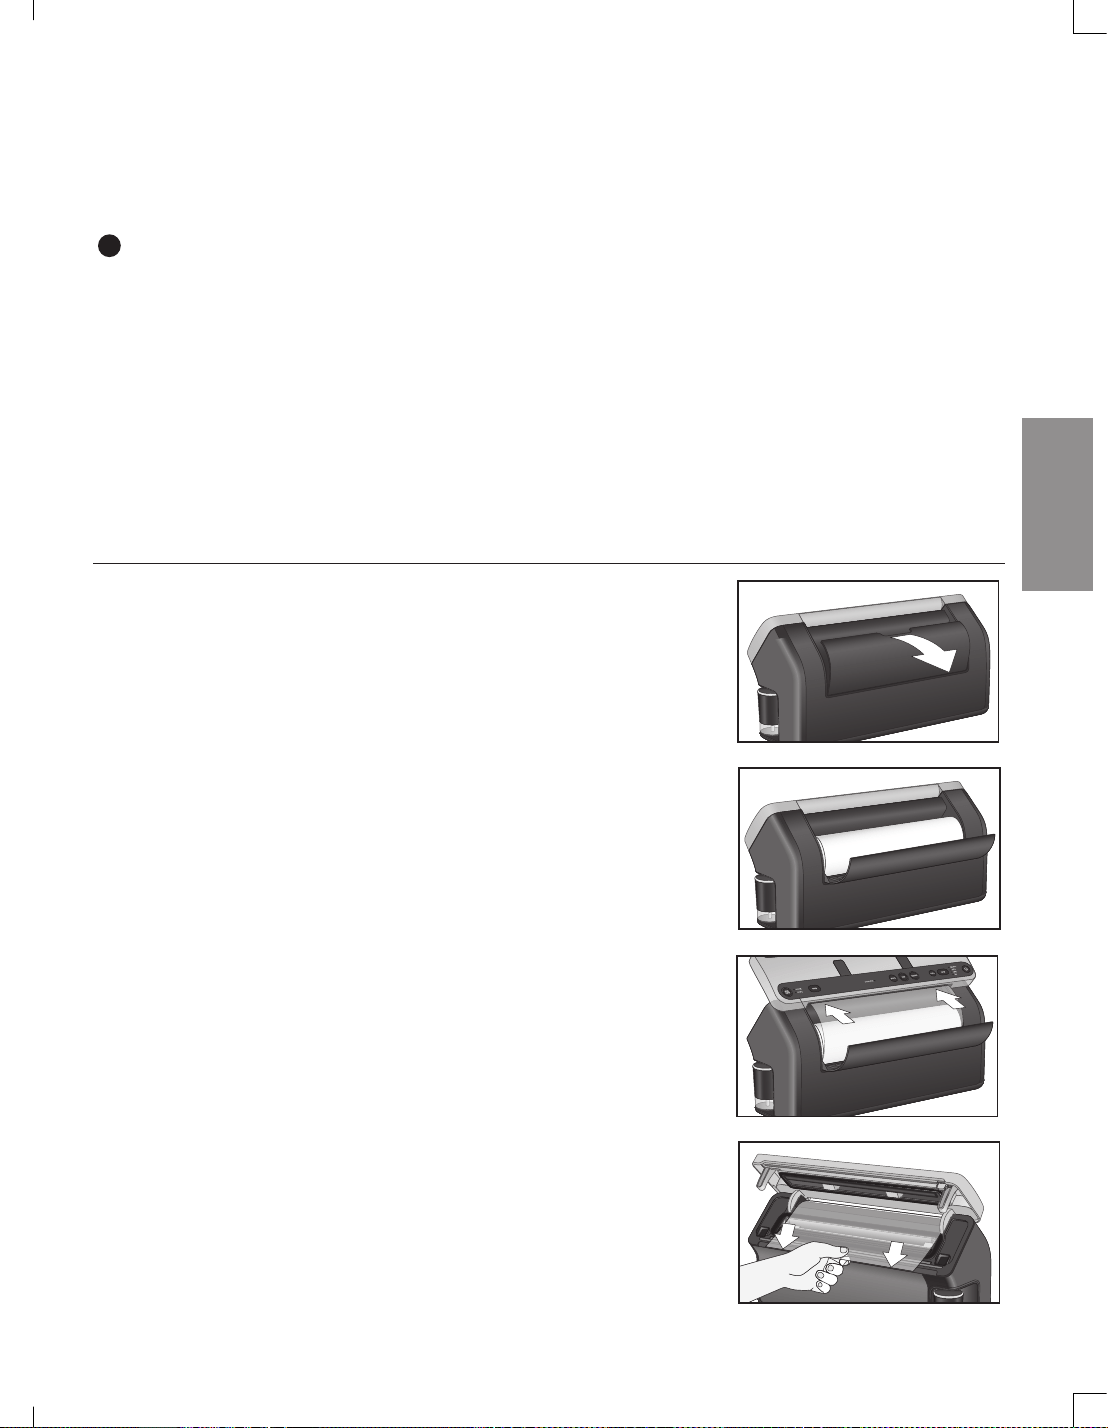
58
Servicio al Cliente: US: 1-877-777-8042 CA: 1-877-804-5383 MX: +52 55 5366 0800
CÓMO
1. Instalar un Rollo FoodSaver
®
Cómo
1. Abra la puerta del compartimento de
almacenamiento de rollos incorporado en la parte
trasera del aparato.
2. Introduzca el rollo en la parte posterior del aparato
como se muestra en la imagen.
3. Abra completamente la tapa del aparato para que
se mantenga en su sitio.
4. Pase el extremo del rollo hacia adelante a través de
la abertura situada en la parte trasera entre la tapa
y el aparato. Tire a través del aparato hasta que el
extremo del rollo esté en el borde delantero.
5. Consulte la siguiente sección para saber cómo
hacer una bolsa con un rollo FoodSaver
®
.
8a. Envasar al vacío: para utilizar con las bolsas con cremallera FoodSaver
®
, los recipientes para
conservar y marinar, los tapones de botellas y otros accesorios que utilizan el sellador de mano retráctil
incorporado. El aparato se detendrá automáticamente una vez completado.
8b. Marinar: para usar con los recipientes para conservar y marinar FoodSaver
®
utilizando el sellador de
mano retráctil incorporado. La secuencia del control pulsador de envasado al vacío dura unos 12
minutos, lo que permite una infusión óptima del sabor en menos tiempo. El aparato aspirará y liberará
tres veces. El aparato se detendrá automáticamente una vez completado.
9
Botón de accesorios de mano
Una vez elegido el modo de accesorio de mano deseado, presione para usar con los accesorios
FoodSaver
®
utilizando el sellador de mano retráctil incorporado. La luz del botón se iluminará una vez
presionado, la tapa del aparato se cerrará y comenzará el proceso de sellado al vacío. La luz del botón
parpadea durante el proceso de envasado al vacío o marinado, y una vez completado la luz se queda
fija y luego se apaga.
2023/4/17 09:582023/4/17 09:58
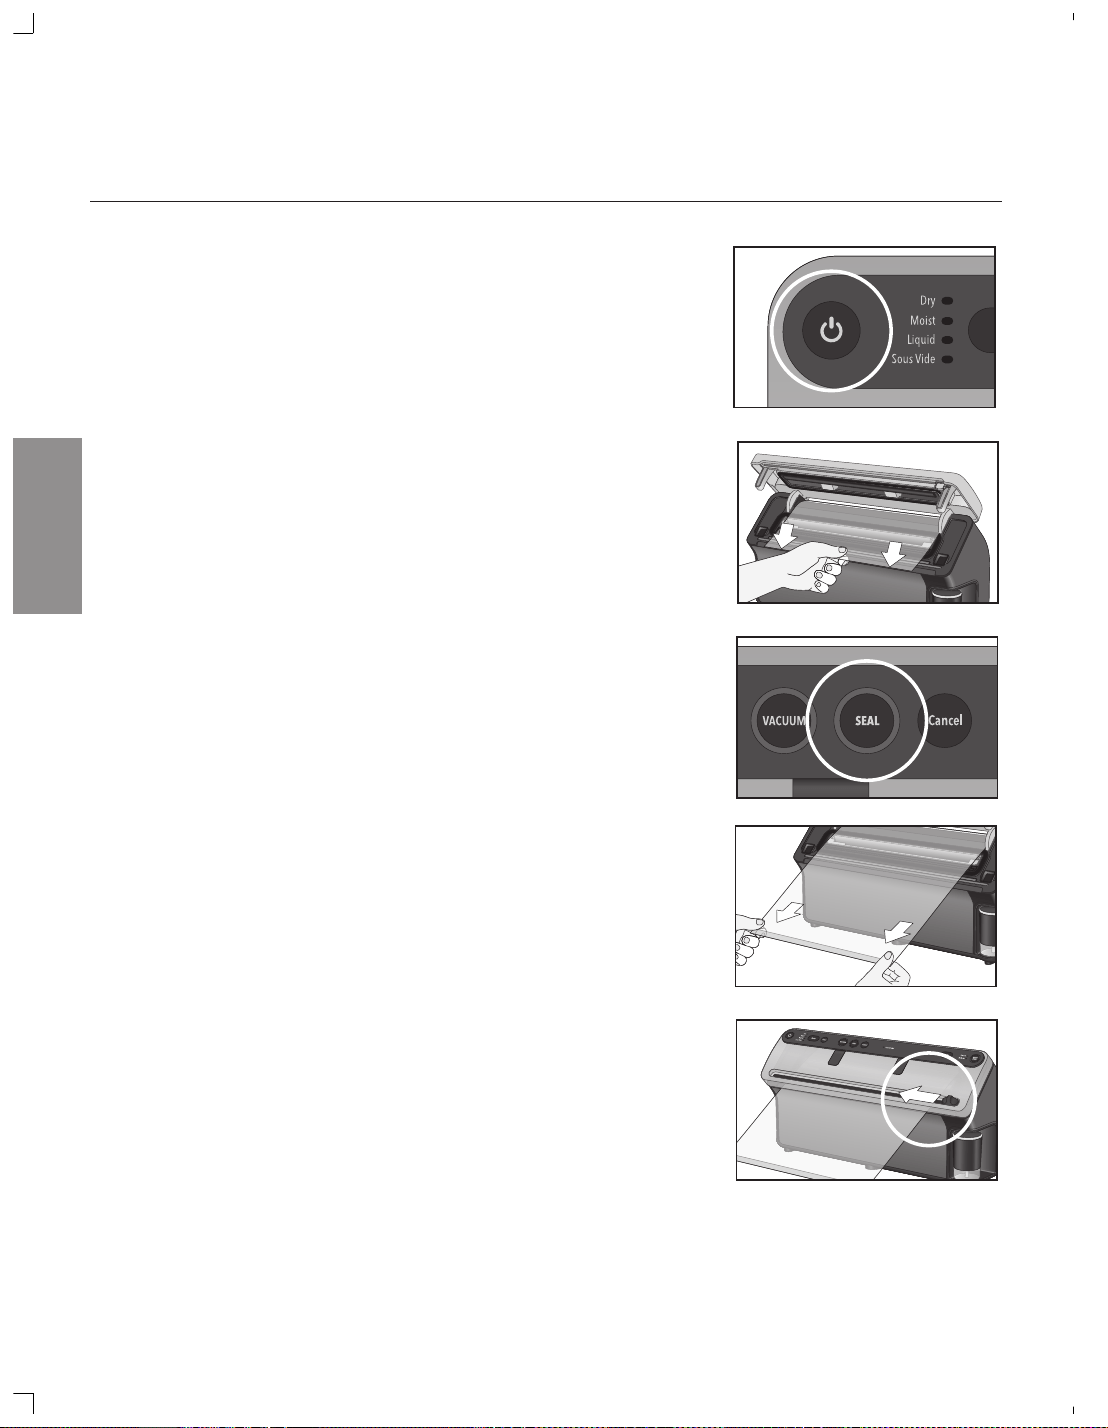
59 US: www.FoodSaver.com | CA: www.FoodSaver.ca | MX: www.oster.com.mx/foodsaver
CÓMO
2. Hacer una bolsa con un rollo FoodSaver
®
(Fabricación de
bolsas exprés)
1. Presione el botón de encendido para encender el
aparato. El botón de encendido y la selección de modo
predeterminado se iluminarán.
2. Una vez que el rollo esté instalado y la tapa del aparato
esté completamente abierta, pase el extremo del rollo
hacia adelante a través de la abertura en la parte posterior
entre la tapa y el aparato.
3. Tire del rollo hacia abajo justo después de la banda de
sellado.
4. Con las dos manos, baje la tapa del aparato (desde
la posición superior) y con ambas manos presione
firmemente hacia abajo en ambos lados de la tapa
hasta que el aparato comience a cerrarse y bloquearse
automáticamente.
5. Presione el botón Sellar y comenzará a sellarse el extremo
de la bolsa. La luz del botón parpadeará hasta que se
complete y luego se apagará.
6. La tapa del aparato se abrirá automáticamente una vez
que se haya completado el sellado.
7. Saque el extremo del rollo ahora sellado hasta la longitud
de la bolsa deseada.
8. Nuevamente, usando ambas manos, presione firmemente
en ambos lados de la tapa hasta que el dispositivo
comience a cerrarse y bloquearse automáticamente.
9. Antes de utilizar la barra cortadora para cortar esta
primera bolsa, presione el botón Sellar para sellar el
extremo de la siguiente bolsa.
10. Mientras el aparato está sellando la siguiente bolsa,
corte la primera bolsa deslizando la barra cortadora
incorporada.
CONSEJO: Después de hacer esta primera bolsa del rollo,
si se siguen los pasos anteriores, el sello ya debería estar
hecho para la siguiente bolsa. Cada vez que sella, está
haciendo el sello para la siguiente bolsa mientras usa la
barra cortadora para cortar la bolsa actual.
11. Una vez que haya terminado de hacer la(s) bolsa(s)
con el rollo, abra la puerta del compartimento de
almacenamiento de rollos incorporado en la parte trasera
del aparato y enrolle manualmente el rollo sobrante que
pueda quedar dentro del aparato, de modo que no quede
ningún rollo o material dentro del aparato.
12. Cierre la puerta del compartimento de almacenamiento de
rollos incorporado.
EXTREMO DE SELLADO
EXTREMO DE SELLADO
VS5900 Series_23EFSM1.indd 59-60
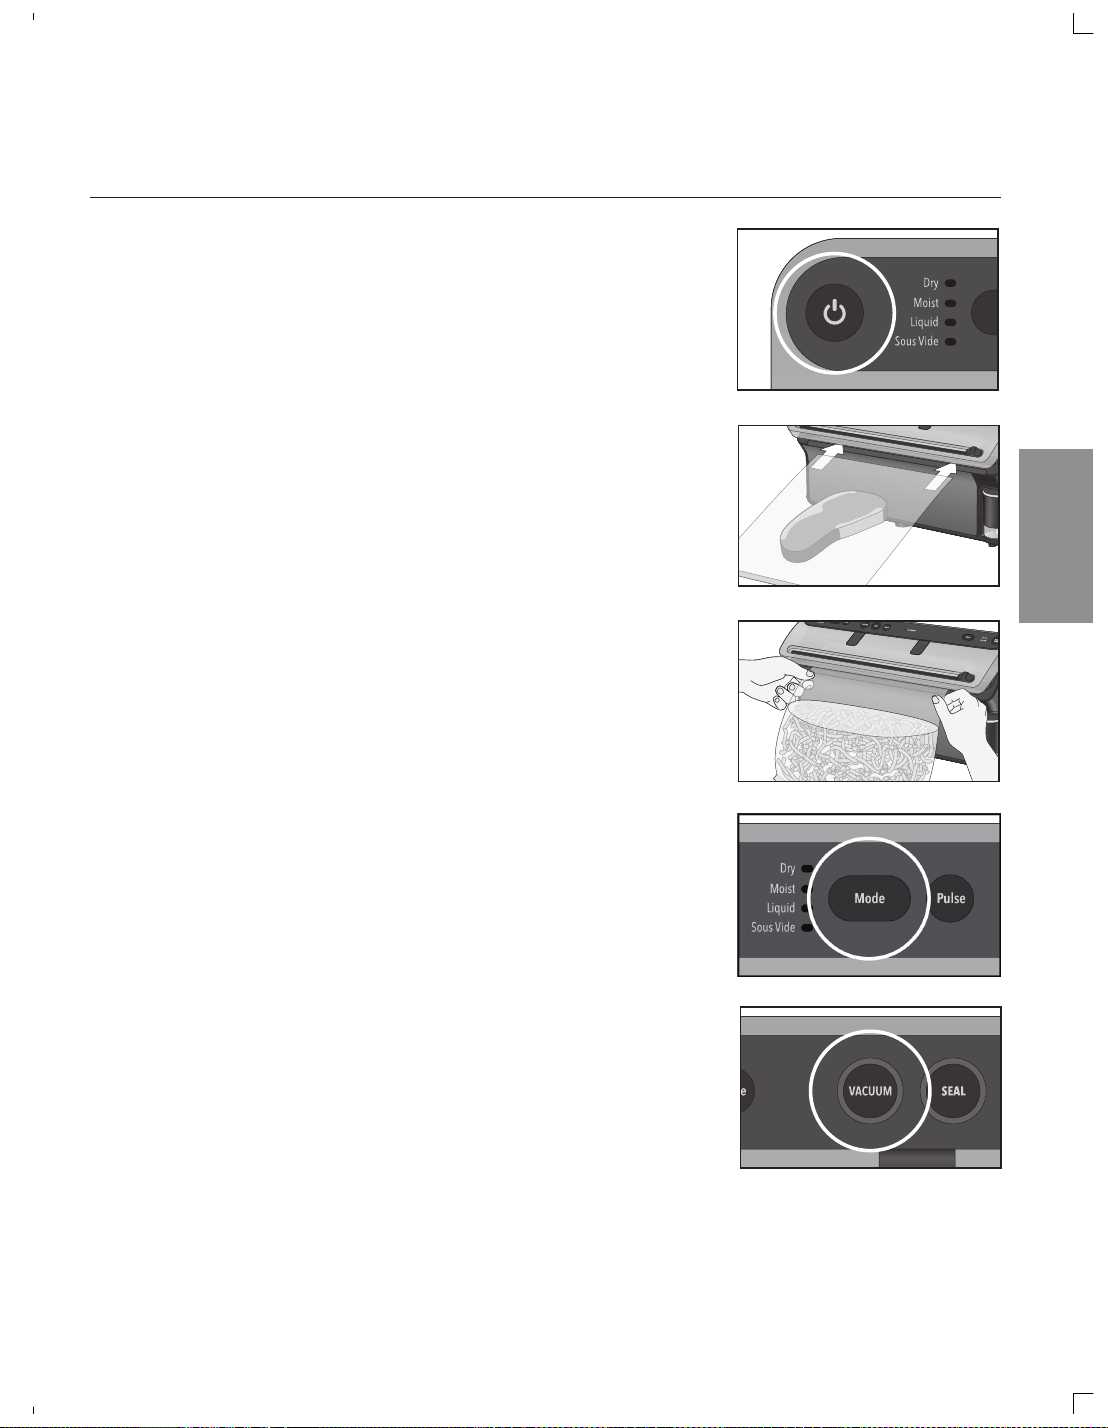
60Servicio al Cliente: US: 1-877-777-8042 CA: 1-877-804-5383 MX: +52 55 5366 0800
CÓMO
3. Sellar al vacío una bolsa FoodSaver
®
1. Presione el botón de encendido para encender el aparato. El
botón de encendido y la selección de modo predeterminado
se iluminarán.
2. Con ambas manos, introduzca lentamente el extremo abierto
de la bolsa llena a través de la parte inferior de la ventana de
visualización del vacío en la bandeja de goteo.
NOTA: La tapa del aparato no debe estar completamente abierta.
SUGERENCIA: Si tiene problemas para introducir la bolsa en el
aparato, muévala de un lado a otro mientras la introduce
CONSEJO IMPORTANTE: Al insertar el extremo abierto de la
bolsa llena, centre la bolsa en el medio del aparato para
obtener mejores resultados. La ventana de visualización del
vacío le permite ver fácilmente dónde está el extremo de la
bolsa al introducirla. Continúe introduciendo y sosteniendo la
bolsa hasta que el aparato la detecte automáticamente y la
tapa se cierre y bloquee.
3. El aparato detectará automáticamente la bolsa introducida y
la tapa del aparato se cerrará y bloqueará. La luz indicadora
de bolsa detectada parpadeará y luego se quedará fija para
confirmar que la bolsa ha sido detectada automáticamente.
Las luces de los botones Envasar al vacío y Sellar parpadearán.
PRECAUCIÓN: La tapa se cierra automáticamente. Retire las
manos o cualquier otro objeto que pueda obstruir la tapa antes
de cerrarla. No fuerce manualmente la tapa para cerrarla.
4. Seleccione el modo de envasado al vacío deseado (Seco,
Líquido húmedo o Sous Vide) en función del alimento que
se vaya a sellar al vacío presionando el botón Modo. La luz
indicadora se iluminará junto al modo seleccionado.
5. Una vez que se seleccione el modo deseado, presione el botón
Envasar al vacío para iniciar el proceso de envasado al vacío
y sellado. La luz del botón Envasar al vacío parpadeará hasta
que se complete.
6. Después del sellado al vacío, la luz del botón Envasar
al vacío se encenderá y el aparato comenzará a sellar
automáticamente. La luz del botón Sellar parpadeará hasta
que se complete.
7. Una vez envasado al vacío y sellado, las luces de los botones
Envasar al vacío y Sellar se quedarán fijas y luego se apagarán.
La tapa del aparato se abrirá automáticamente y liberará la bolsa.
8. Refrigere, congele o guarde según sea necesario. (Ver las
“Indicaciones” para obtener consejos de seguridad para el
almacenamiento de alimentos en la página 66).
CONSEJO IMPORTANTE: En cualquier momento durante el sellado
al vacío, se puede presionar el botón Cancelar y la tapa del
aparato se abrirá automáticamente. Cuando las luces de Seco
y Húmedo parpadean, la bandeja de goteo está llena. Vacíela.
La función de Envasar al vacío y Sellar funcionará normalmente
después de vaciar la bandeja de goteo.
EXTREMO DE SELLADO
EXTREMO ABIERTO
2023/4/17 09:58
aparato se abrirá automáticamente. Cuando Todas las luces
parpadean, la bandeja de goteo está llena. Vacíela.
CONSEJO IMPORTANTE: Cuandoutiliceel modo líquido,
sivaaenvasar al vacío salsas, sopas o cremasmásespesas
(porejemplo, crema de champiñones) mantengael interior de
las paredes de la bolsaporencima del líquido librede restos de
comida o goteosen la medida de lo posible.
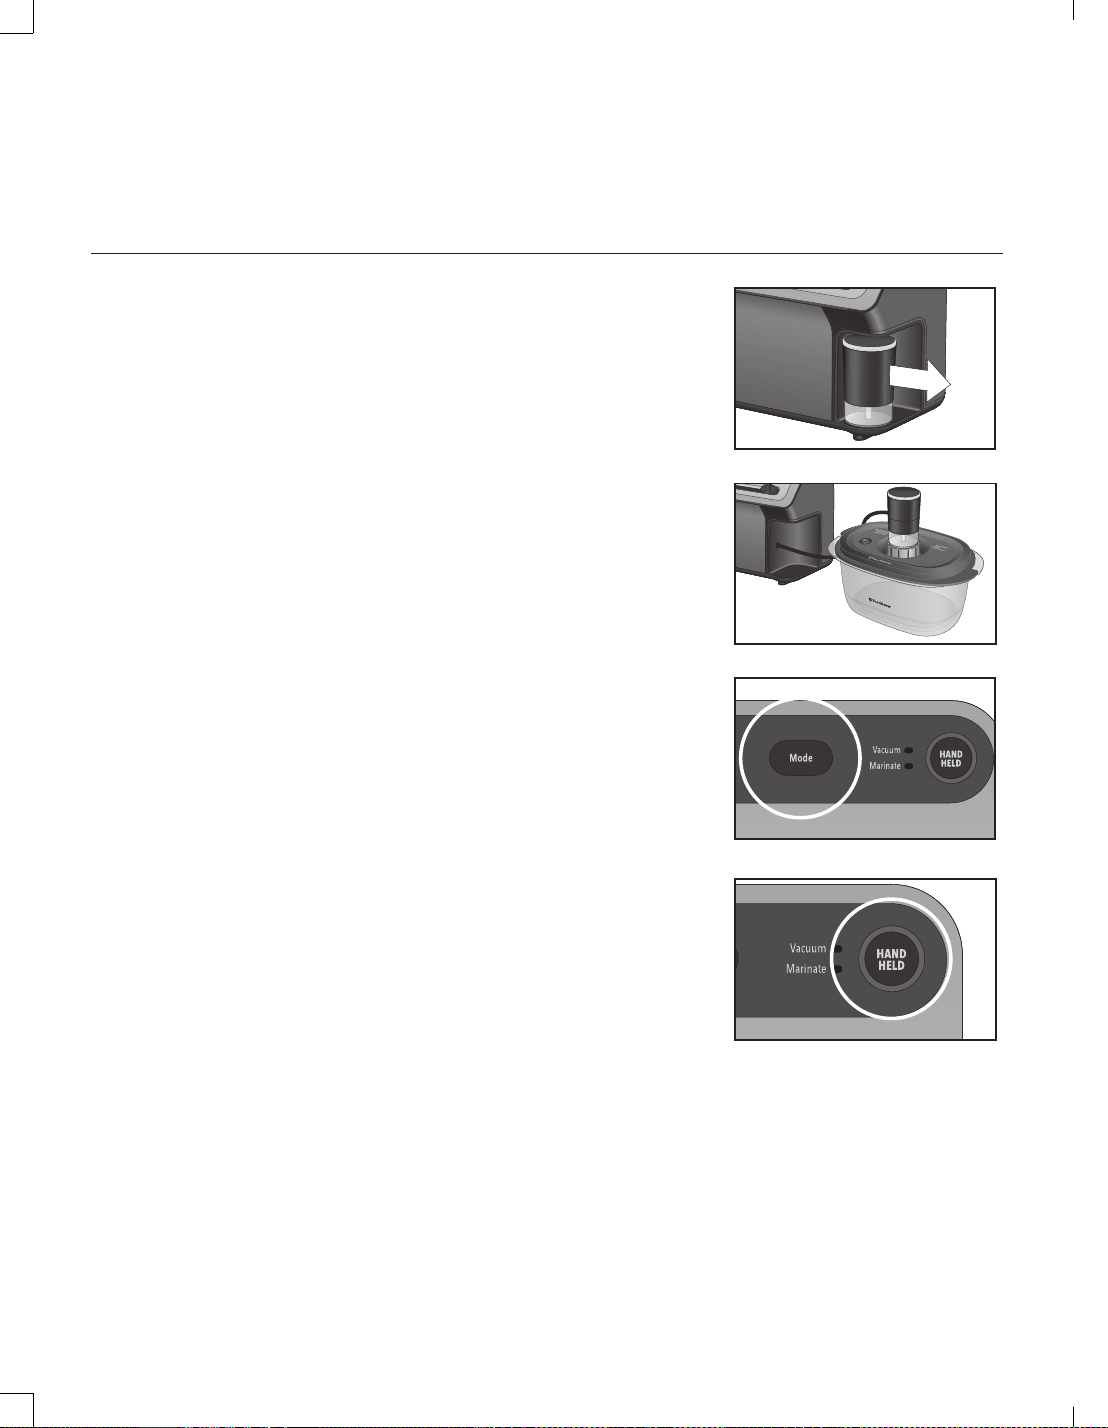
61
US: www.FoodSaver.com | CA: www.FoodSaver.ca | MX: www.oster.com.mx/foodsaver
4. Usar los Recipientes para Marinar y Conservas FoodSaver
®
a. Para sellar al vacío
i. Prepare el recipiente para conservar y marinar
FoodSaver
®
de acuerdo con las indicaciones, que se
incluyen con la compra del recipiente. (gire la válvula
del recipiente para hacer el vacío).
ii. Presione el botón de encendido para encender el
aparato. El botón de encendido y la selección de modo
predeterminado se iluminarán.
iii. Extraiga el sellador de mano retráctil incorporado a
la longitud deseada. PRECAUCIÓN: Cuando tire de la
manguera, no la extienda más allá de la línea roja
marcada en la manguera.
iv. Coloque el extremo del sellador de mano retráctil sobre
la válvula del contenedor.
v. En el lado derecho del aparato, presione una vez
el botón Modo del accesorio de mano retráctil
incorporado. El modo Envasar al vacío es la
configuración predeterminada. La luz indicadora
del modo Envasar al vacío se iluminará de forma
permanente y el botón manual parpadeará.
vi. Presione el botón manual para empezar a envasar al
vacío. La tapa del aparato se cerrará automáticamente.
Mantenga el sellador de mano en su lugar sobre el
contenador. La luz del botón manual parpadeará hasta
que se complete.
vii. El aparato dejará de aspirar automáticamente cuando
se haya eliminado todo el aire de la bolsa con
cremallera y la tapa se abrirá automáticamente.
viii. Para volver a colocar el sellador de mano en el
aparato, tire suavemente hacia fuera y se retraerá
automáticamente.
CONSEJO IMPORTANTE:
Detiene inmediatamente la función actual y abre la tapa del
aparato.
VS5900 Series_23EFSM1.indd 61-62VS5900 Series_23EFSM1.indd 61-62
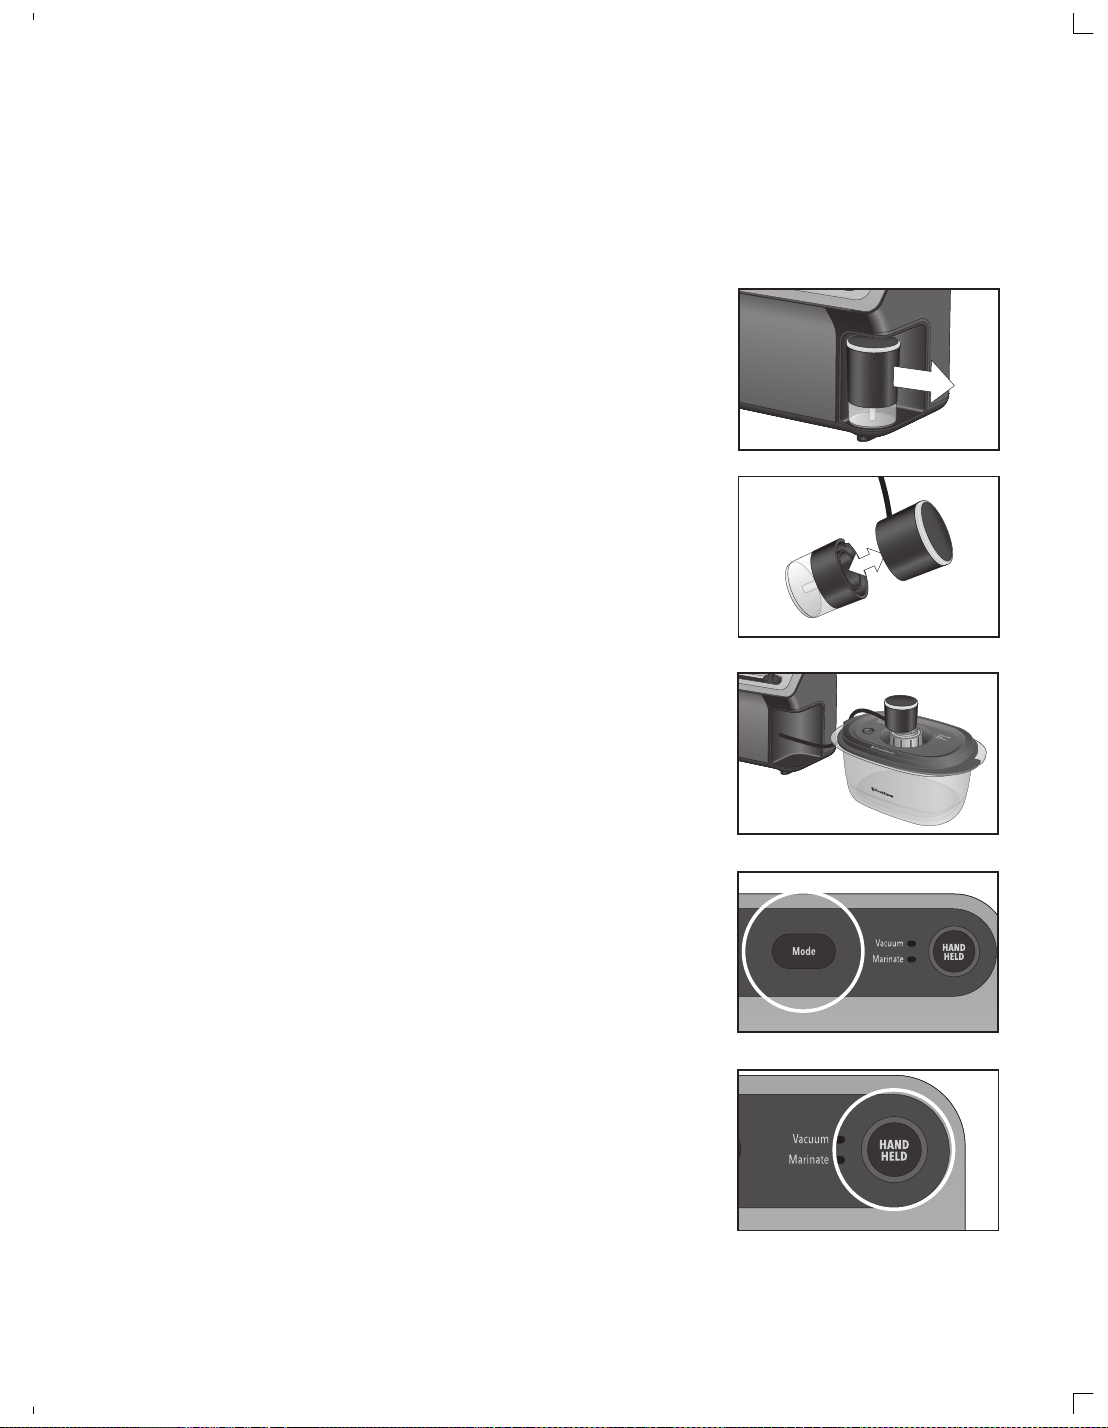
62Servicio al Cliente: US: 1-877-777-8042 CA: 1-877-804-5383 MX: +52 55 5366 0800
b. Para marinar:
i. Prepare el recipiente para conservar y marinar FoodSaver
®
de acuerdo con las indicaciones, que se incluyen con la
compra del recipiente. (gire la válvula del recipiente para
marinar)
ii. Presione el botón de encendido para encender el
aparato. El botón de encendido y la selección de modo
predeterminado se iluminarán.
iii. Extraiga el sellador de mano retráctil incorporado a
la longitud deseada. PRECAUCIÓN: Cuando tire de
la manguera, no la extienda más allá de la línea roja
marcada en la manguera.
iv. Retire la parte inferior transparente del sellador de mano
retráctil del mango superior, separándolo con las dos
manos. Introduzca la punta de la mitad superior en la
válvula del recipiente del contendaor.
v. En el lado derecho del aparato, presione dos veces el
botón Modo del accesorio de mano retráctil incorporado
para el modo Marinar. La luz indicadora del modo Marinar
se iluminará de forma fija y el botón manual parpadeará.
vi. Presione el botón manual para empezar. La tapa del
aparato se cerrará automáticamente y empezará el
proceso de marinado. La tapa del aparato se abrirá
automáticamente durante el proceso y luego se cerrará
y se bloqueará de nuevo. La luz del botón manual
parpadeará hasta que se complete.
vii. Vuelva a conectar la parte inferior del sellador de
mano y para volver a colocar el sellador de mano en
el aparato, tire suavemente hacia fuera y se retraerá
automáticamente.
CONSEJO IMPORTANTE: El aparato funcionará durante unos 12
minutos. El aparato aspirará, luego dejará de aspirar y la tapa
del aparato se abrirá, luego se cerrará de nuevo y comenzará a
aspirar un total de 3 veces. No interrumpa este proceso, incluso
si cree que el aparato ha cancelado.
CONSEJO IMPORTANTE:
Detiene inmediatamente la función actual y abre la tapa del
aparato.
2023/4/17 09:58
Durante elmarinado, asegúrese de que la
manguera del accesorio de mano permanecealejada de la tapa
(cuando la tapa del aparato se abra y se cierreduranteelmarinado,
no deje que la mangueraquedeatrapada entre la tapa y elaparato).
CONSEJO IMPORTANTE:
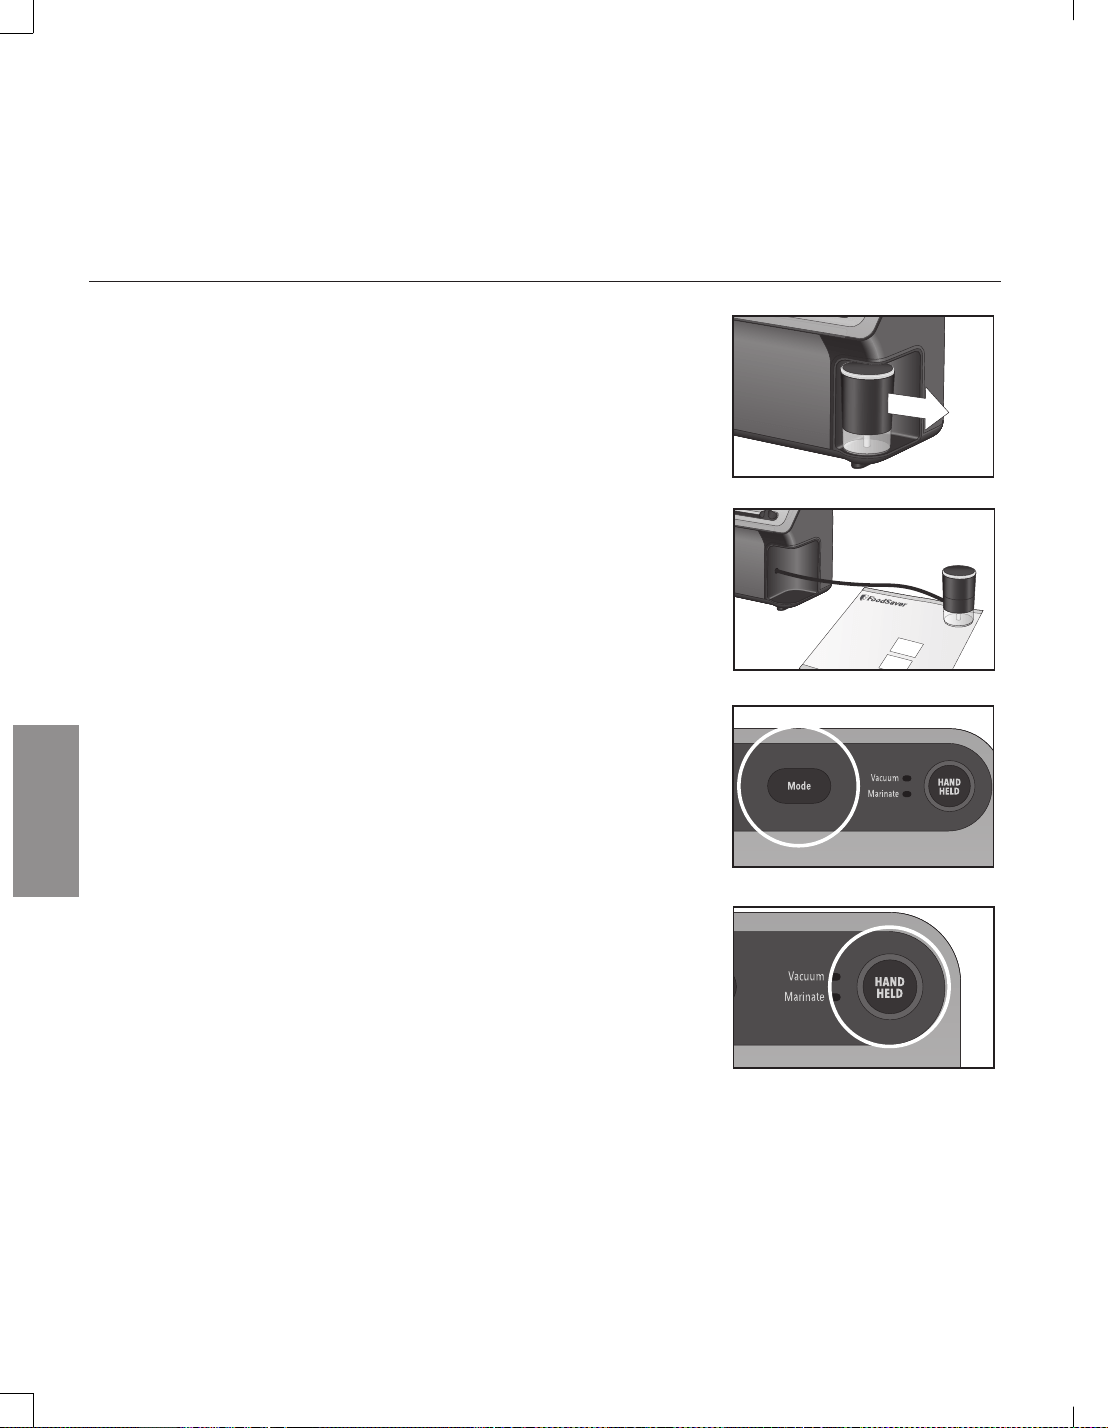
63
US: www.FoodSaver.com | CA: www.FoodSaver.ca | MX: www.oster.com.mx/foodsaver
CÓMO
5. Selle al vacío con los accesorios FoodSaver
®
a. Para bolsas con cremallera:
i. Prepare las bolsas con cremallera de acuerdo con las
indicaciones de los accesorios FoodSaver
®
, que se
incluyen con la compra de los accesorios.
CONSEJO IMPORTANTE: En el caso de las bolsas con
cremallera, asegúrese de no poner ningún alimento
debajo de la válvula y presione la cremallera para
cerrarla con el dedo mientras la bolsa está apoyada en
una superficie plana.
ii. Presione el botón de encendido para encender el
aparato. El botón de encendido y la selección de modo
predeterminado se iluminarán.
iii. Extraiga el sellador de mano retráctil incorporado a
la longitud deseada. PRECAUCIÓN: Cuando tire de la
manguera, no la extienda más allá de la línea roja
marcada en la manguera.
iv. Coloque el extremo del sellador de mano retráctil sobre
la válvula de la bolsa.
v. En el lado derecho del aparato, presione una vez
el botón Modo del accesorio de mano retráctil
incorporado. El modo Envasar al vacío es la
configuración predeterminada. La luz indicadora
del modo Envasar al vacío se iluminará de forma
permanente y el botón manual parpadeará.
vi. Presione el botón manual para empezar a envasar al
vacío. La tapa del aparato se cerrará automáticamente.
Mantenga el sellador de mano en su lugar sobre la
bolsa. La luz del botón manual parpadeará hasta que
se complete.
vii. El aparato dejará de aspirar automáticamente cuando
se haya eliminado todo el aire de la bolsa con
cremallera y la tapa se abrirá automáticamente.
viii. Para volver a colocar el sellador de mano en el
aparato, tire suavemente hacia fuera y se retraerá
automáticamente.
CONSEJO IMPORTANTE:
Detiene inmediatamente la función actual y abre la tapa del
aparato.
VS5900 Series_23EFSM1.indd 63-64VS5900 Series_23EFSM1.indd 63-64
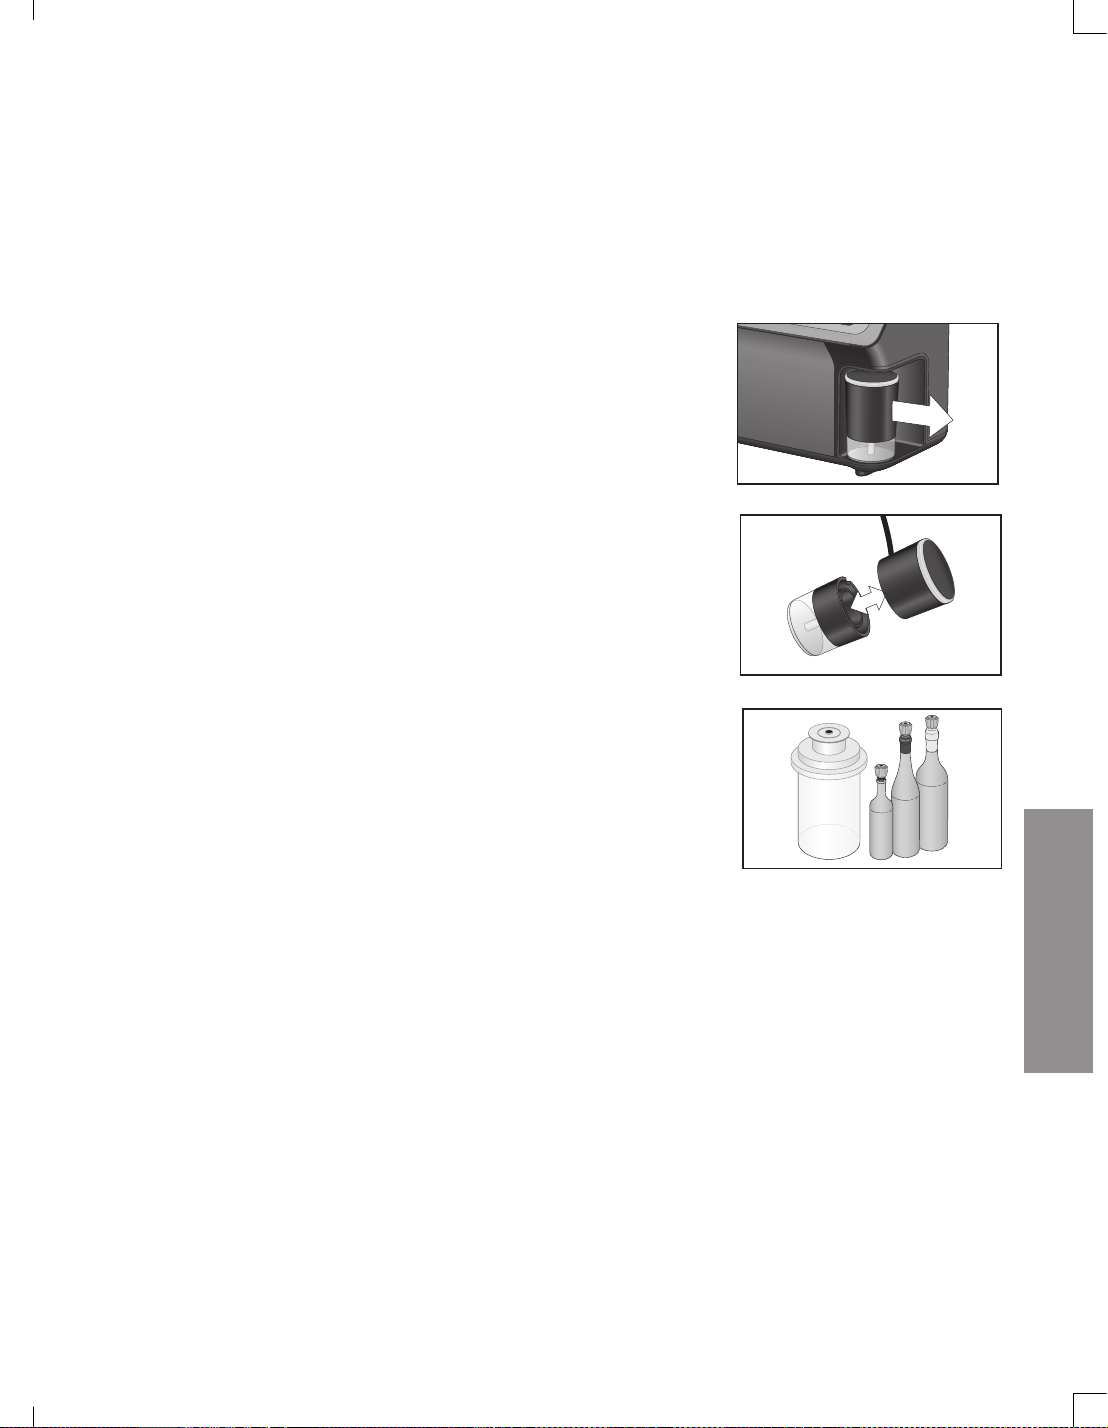
64
Servicio al Cliente: US: 1-877-777-8042 CA: 1-877-804-5383 MX: +52 55 5366 0800
CUIDADO Y LIMPIEZA
b. Para selladores de tarros y tapones de botellas:
i. Prepare de acuerdo con las indicaciones de los
accesorios FoodSaver
®
, que se incluyen con la compra
de los accesorios.
ii. Presione el botón de encendido para encender el
aparato. El botón de encendido y la selección de modo
predeterminado se iluminarán.
iii. Extraiga el sellador de mano retráctil incorporado a
la longitud deseada. PRECAUCIÓN: Cuando tire de la
manguera, no la extienda más allá de la línea roja
marcada en la manguera.
iv. Retire la parte inferior transparente del sellador de
mano retráctil del asa superior. Inserte la punta en el
puerto del tarro o tapon de botella.
v. Repita los pasos aV-aViii anteriores.
NOTA: Los selladores de tarros FoodSaver
®
sólo pueden
utilizarse con tarros para conservas Mason de las marcas
Ball
®
y Kerr
®
. Esto no sustituye a los métodos tradicionales
de enlatado y, si los alimentos son perecederos, habrá que
refrigerarlos.
IMPORTANTE: NO use bandas con rosca cuando selle al
vacío tarros. Para abrir, meta una cuchara entre la tapa del
tarro Mason y la parte más alta del borde roscado. Gire la
cuchara ligeramente para liberar el vacío. Tapones de botellas
FoodSaver
®
Para liberar el vacío y abrir, gire y tire hacia arriba
del tapón de botella.
2023/4/17 09:582023/4/17 09:58
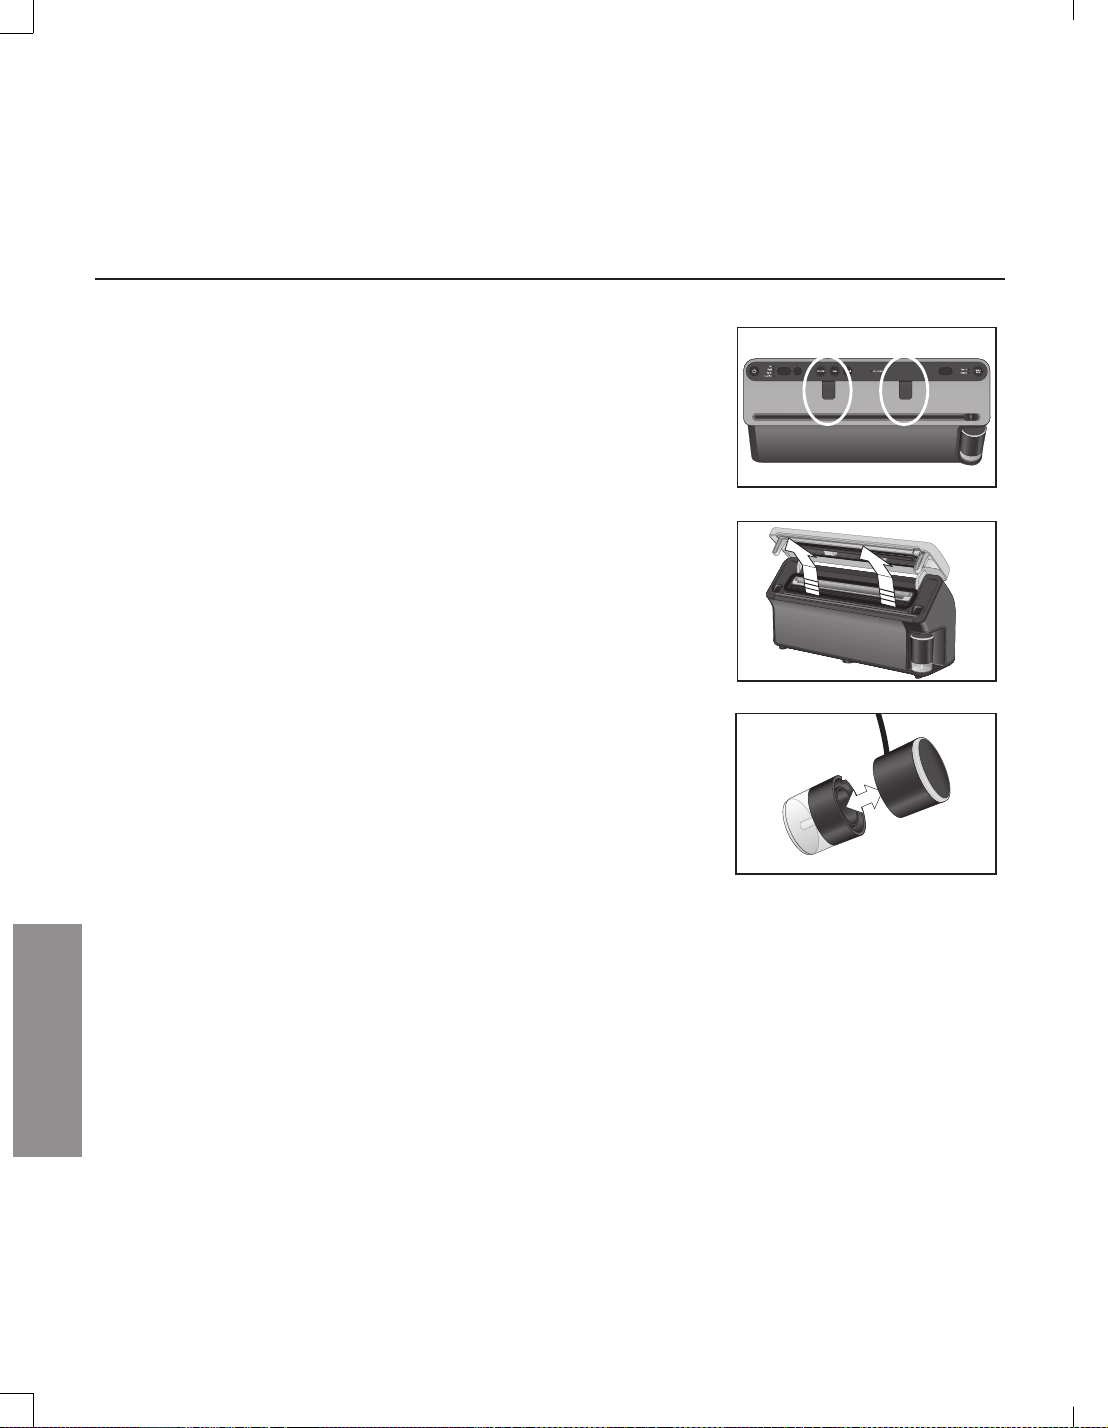
65
US: www.FoodSaver.com | CA: www.FoodSaver.ca | MX: www.oster.com.mx/foodsaver
GUÍA DE ALMACENAMIENTO
y limpieza de su máquina de sellado al vacío
Cuidado
Aparato:
Desconecte de la toma de corriente y deje enfriar antes de limpiar.
ADVERTENCIA: No sumerja ninguna parte del aparato, cable de
alimentación o enchufe en agua o en cualquier otro líquido.
Revise las juntas y alrededor de la bandeja de goteo para asegurarse
de que están libres de materiales alimenticios. Limpie las juntas con
un paño tibio y jabón si es necesario. La junta superior no se puede
retirar. Limpie también debajo de las dos lengüetas negras de la parte
inferior de la tapa del aparato (sensores de detección automática de
bolsas).
La bandeja de goteo extraíble facilita la limpieza cuando se
introducen pequeñas cantidades de líquidos en el canal de vacío
durante el proceso de vacío.
Vacíe la bandeja de goteo después de cada uso. Para extraerla,
presione las lengüetas de cada lado de la bandeja de goteo y
levántela para sacarla. Lávela con agua tibia y jabón o colóquela
en la rejilla superior del lavavajillas. Séquela bien antes de volver a
colocarla dentro del aparato.
Depósito extraíble del sellador de mano:
Vacíe el depósito después de cada uso. Lávelo con agua tibia y jabón.
Séquelo al aire antes de volver a colocarlo. Para retirar el depósito del
sellador de mano, sosteniendo firmemente la parte superior (pieza
negra superior), tire del depósito inferior hacia abajo y sáquelo.
NOTA: Limpie siempre después de cada uso cuando se vea líquido.
ModePulseMode
VS5900 Series_23EFSM1.indd 65-66VS5900 Series_23EFSM1.indd 65-66

66
Servicio al Cliente: US: 1-877-777-8042 CA: 1-877-804-5383 MX: +52 55 5366 0800
Sellado al vacío y seguridad alimentaria
Indicaciones
El proceso de sellado al vacío prolonga la duración de los alimentos al eliminar la mayor parte del aire del
recipiente sellado, reduciendo así la oxidación, que afecta al valor nutricional, al sabor y a la calidad general.
La eliminación del aire también puede inhibir el crecimiento de microorganismos, que pueden causar
problemas en determinadas condiciones:
Moho – Se identifica fácilmente por su característica peluda. El moho no puede crecer en un entorno con
poco oxígeno, por lo que el sellado al vacío puede frenar su crecimiento.
Levadura – Provoca la fermentación, que puede identificarse por el olfato y el gusto. La levadura necesita
agua, azúcar y una temperatura moderada para crecer. También puede sobrevivir con o sin aire. Para
frenar el crecimiento de la levadura es necesaria la refrigeración, mientras que la congelación la detiene por
completo.
Bacterias – Producen un olor desagradable, decoloración y/o textura blanda o viscosa. En condiciones
adecuadas, las bacterias anaerobias como el Clostridium Botulinum (el organismo que causa el botulismo)
pueden crecer sin aire y a veces no pueden detectarse por el olfato o el gusto. Aunque es extremadamente
raro, puede ser muy peligroso.
Para conservar los alimentos de forma segura, es fundamental mantener temperaturas bajas. Puede reducir
significativamente el crecimiento de los microorganismos a temperaturas de 40 °F (4 °C) o inferiores.
La congelación a 0 °F (-17 °C) no mata a los microorganismos, pero impide su crecimiento. Para el
almacenamiento a largo plazo, congele siempre los alimentos perecederos que hayan sido sellados al vacío, y
manténgalos refrigerados después de descongelarlos.
Es importante tener en cuenta que el sellado al vacío NO es un sustituto del enlatado y no puede revertir el
deterioro de los alimentos. Sólo puede ralentizar los cambios de calidad. Es difícil predecir cuánto tiempo
conservarán los alimentos su sabor, aspecto o textura de máxima calidad, ya que depende de la edad y el
estado de los alimentos el día en que se sellaron al vacío.
IMPORTANTE:
El sellado al vacío NO sustituye a la refrigeración o la congelación.
Cualquier alimento perecedero que requiera refrigeración debe seguir siendo refrigerado o congelado
después del sellado al vacío.
INDICACIONES
2023/4/17 09:582023/4/17 09:58

67
US: www.FoodSaver.com | CA: www.FoodSaver.ca | MX: www.oster.com.mx/foodsaver
INDICACIONES
Consejos para preparar y recalentar los alimentos
Descongelación y recalentamiento
de alimentos sellados al vacío
Descongele siempre los alimentos en el refrigerador o en el microondas; no descongele los
alimentos perecederos a temperatura ambiente.
Para recalentar alimentos en el microondas dentro de una bolsa FoodSaver
®
, corte siempre la
esquina de la bolsa antes de colocarla en un plato apto para microondas. Sin embargo, para
evitar puntos calientes, no recaliente carne con hueso o alimentos grasos en el microondas
dentro de una bolsa FoodSaver
®
. También puede recalentar los alimentos en las bolsas
FoodSaver
®
colocándolas en agua a fuego lento por debajo de los 170 °F (75 °C).
Indicaciones para la preparación
de la carne y el pescado:
Para obtener los mejores resultados, congele previamente la carne y el pescado durante 1 a 2
horas antes de sellarlos al vacío en una bolsa FoodSaver
®
. Esto ayuda a conservar el jugo y la
forma, y garantiza un mejor sellado. Si no es posible la precongelación, coloque una toalla de
papel doblada entre la carne o el pescado y la parte superior de la bolsa, pero por debajo de la
zona de sellado. Deje la toalla de papel en la bolsa para que absorba el exceso de humedad y los
jugos durante el proceso de sellado al vacío.
NOTA: La carne de res puede parecer más oscura después del sellado al vacío debido a la
eliminación del oxígeno. Esto no es una indicación de deterioro.
Indicaciones para la preparación de los quesos duros:
Para mantener el queso fresco, séllelo al vacío después de cada uso. Haga su bolsa
FoodSaver
®
extra larga, dejando una pulgada (2.54 cm) de material de la bolsa cada vez
que planee abrir y volver a sellar, además del espacio extra de 3 pulgadas (7.62 cm) que
normalmente deja entre el contenido y el borde del sello. Simplemente corte el borde sellado
y saque el queso. Cuando esté listo para volver a sellar el queso, simplemente colóquelo en la
bolsa y vuelva a sellarla.
IMPORTANTE:
Debido al riesgo de bacterias anaerobias, los quesos blandos no deben sellarse nunca al
vacío.
VS5900 Series_23EFSM1.indd 67-68VS5900 Series_23EFSM1.indd 67-68
68
Servicio al Cliente: US: 1-877-777-8042 CA: 1-877-804-5383 MX: +52 55 5366 0800
INDICACIONES
Consejos para preparar y recalentar los alimentos
IMPORTANTE:
Debido al riesgo de bacterias anaerobias, los champiñones, las cebollas y los ajos frescos
no deben sellarse nunca al vacío.
Indicaciones para la preparación
de las verduras:
Las verduras deben ser blanqueadas antes de ser selladas al vacío. Este proceso detiene la
acción de las enzimas que podría provocar la pérdida de sabor, color y textura.
Para blanquear las verduras, colóquelas en agua hirviendo o en el microondas hasta que estén
cocidas, pero todavía crujientes. El tiempo de blanqueo oscila entre 1 min y 2 min para las
verduras de hoja verde y los guisantes; entre 3 min y 4 min para los chícharos dulces, el
calabacín en rodajas o el brócoli; 5 min para las zanahorias; y entre 7 min y 11 min para las
mazorcas de maíz. Después de blanquear las verduras, sumérjalas en agua fría para detener el
proceso de cocción. Por último, seque las verduras en una toalla antes de sellarlas al vacío.
NOTA: Todas las verduras (incluso el brócoli, las coles de Bruselas, la col, la coliflor, la col rizada
y los nabos) emiten gases de forma natural durante su almacenamiento. Por lo tanto, después
de blanquearlas, deben almacenarse únicamente en el congelador.
Al congelar las verduras, lo mejor es precongelarlas durante 1 h a 2 h o hasta que queden
sólidamente congeladas. Para congelar las verduras en porciones individuales, colóquelas
primero en una bandeja de horno y extiéndalas para que no se toquen. Así se evita que se
congelen juntas en bloque. Una vez que estén congeladas, retírelas de la bandeja de hornear y
selle las verduras al vacío en una bolsa FoodSaver
®
. Una vez selladas al vacío, vuelva a ponerlas
en el congelador.
Indicaciones para la preparación
de las verduras de hoja:
Para obtener los mejores resultados, utilice un contenedor para guardar las verduras de hoja.
Primero lave las verduras y luego séquelas con una toalla o un centrifugador de ensaladas. Una
vez secadas, colóquelas en un recipiente y séllelas al vacío de forma normal. Guárdelas en el
refrigerador.
2023/4/17 09:582023/4/17 09:58
69
US: www.FoodSaver.com | CA: www.FoodSaver.ca | MX: www.oster.com.mx/foodsaver
INDICACIONES
IMPORTANTE:
Al sellar al vacío las manzanas, se deben cortar en rodajas y poner un poco de jugo de
limón en las rodajas para evitar que se doren.
Debido a su maduración natural, los plátanos en realidad pueden descomponerse más
rápido bajo un sello de vacío.
Consejos para preparar y recalentar los alimentos
Indicaciones para la preparación de las frutas:
Al congelar frutas blandas o bayas, lo mejor es precongelarlas durante 1 o 2 horas o hasta
que estén sólidamente congeladas. Para congelar frutas en porciones individuales, colóquelas
primero en una bandeja de horno y extiéndalas para que no se toquen. Así se evita que se
congelen juntas en bloque. Una vez que estén congeladas, retírelas de la bandeja de hornear y
selle la fruta al vacío en una bolsa FoodSaver
®
. Una vez selladas al vacío, vuelva a ponerlas en
el congelador.
Puede sellar al vacío porciones para hornear o en sus combinaciones favoritas para una fácil
ensalada de frutas durante todo el año. Si se almacena en el refrigerador, se recomienda utilizar
un recipiente FoodSaver
®
.
Indicaciones para la preparación
de los productos horneados:
Para sellar al vacío productos horneados blandos o esponjosos, recomendamos utilizar un
recipiente para conservas y marinados FoodSaver
®
para que mantengan su forma. Si utiliza una
bolsa, congele previamente durante 1 o 2 horas o hasta que estén sólidamente congelados. Para
ahorrar tiempo, haga la masa de galletas, las bases de tarta, las tartas enteras, o mezcle los
ingredientes secos con antelación y séllelos al vacío para su uso posterior.
Indicaciones para la preparación
del café y alimentos en polvo:
Para evitar que las partículas de comida sean arrastradas a la bomba de vacío, coloque un filtro
de café o una toalla de papel en la parte superior de la bolsa o del recipiente antes de sellar al
vacío. También puede colocar los alimentos en su bolsa original dentro de una bolsa
FoodSaver
®
para sellar al vacío.
VS5900 Series_23EFSM1.indd 69-70VS5900 Series_23EFSM1.indd 69-70

70
Servicio al Cliente: US: 1-877-777-8042 CA: 1-877-804-5383 MX: +52 55 5366 0800
INDICACIONES
Consejos para preparar y recalentar los alimentos
Indicaciones para la preparación
de comidas preparadas y sobras:
Guarde de forma eficiente sus comidas preparadas y las sobras en los recipientes apilables y
ligeros de FoodSaver
®
. Estos prácticos recipientes Foodsaver son encajables, resistentes a las
grietas y roturas, aptos para el lavavajillas y las bases son aptas para el microondas solo para
recalentar.
Indicaciones para la
preparación de snacks:
Sus snacks mantendrán su frescura durante más tiempo si los sella al vacío. Para obtener los
mejores resultados, utilice un bote FoodSaver
®
para los artículos que se pueden aplastar, como
las crackers.
2023/4/17 09:582023/4/17 09:58

71
US: www.FoodSaver.com | CA: www.FoodSaver.ca | MX: www.oster.com.mx/foodsaver
INDICACIONES
Sellado al vacío de artículos no alimentarios
Cubiertos
Para sellar cubiertos al vacío, envuelva las púas de los tenedores en un material blando, como
una toalla de papel, para evitar que se perfore la bolsa, y séllela de forma normal. Sus cubiertos
estarán limpios, frescos y sin manchas justo cuando los necesite para su próxima cena.
Camping
Sus bolsas FoodSaver
®
son ideales para las excursiones al aire libre. Para acampar y hacer
senderismo, mantenga sus fósforos, mapas y alimentos secos y compactos.
Agua
Para tener agua fresca para beber, simplemente llene una bolsa FoodSaver
®
con hielo, séllela
al vacío y, cuando lo necesite, deje que el paquete de hielo se derrita. Se puede recortar la
esquina de la bolsa para hacer un pico para beber o verter.
Boating
Si sale a hacer vela o a pasear en barco, puede envasar al vacío la comida, las pilas de
repuesto, las tarjetas de memoria, el dinero en efectivo, las tarjetas de identificación, la licencia
de navegación y una muda de ropa seca. Sólo recuerde llevar unas tijeras o un cuchillo para
abrir las bolsas cuando las necesite.
Emergencia
Para mantener los kits de emergencia seguros y secos, selle al vacío las bengalas, las pilas,
las linternas, los fósforos, las velas, los botiquines de primeros auxilios, la comida extra y otras
necesidades. Sus artículos de emergencia se mantendrán secos y organizados en su casa,
coche, barco o vehículo recreativo.
El sistema de sellado al vacío FoodSaver
®
también protege los artículos no alimentarios de la oxidación, la
corrosión y la humedad. Sólo tiene que seguir las instrucciones para sellar al vacío los artículos utilizando
bolsas, botes y accesorios FoodSaver
®
.
VS5900 Series_23EFSM1.indd 71-72VS5900 Series_23EFSM1.indd 71-72
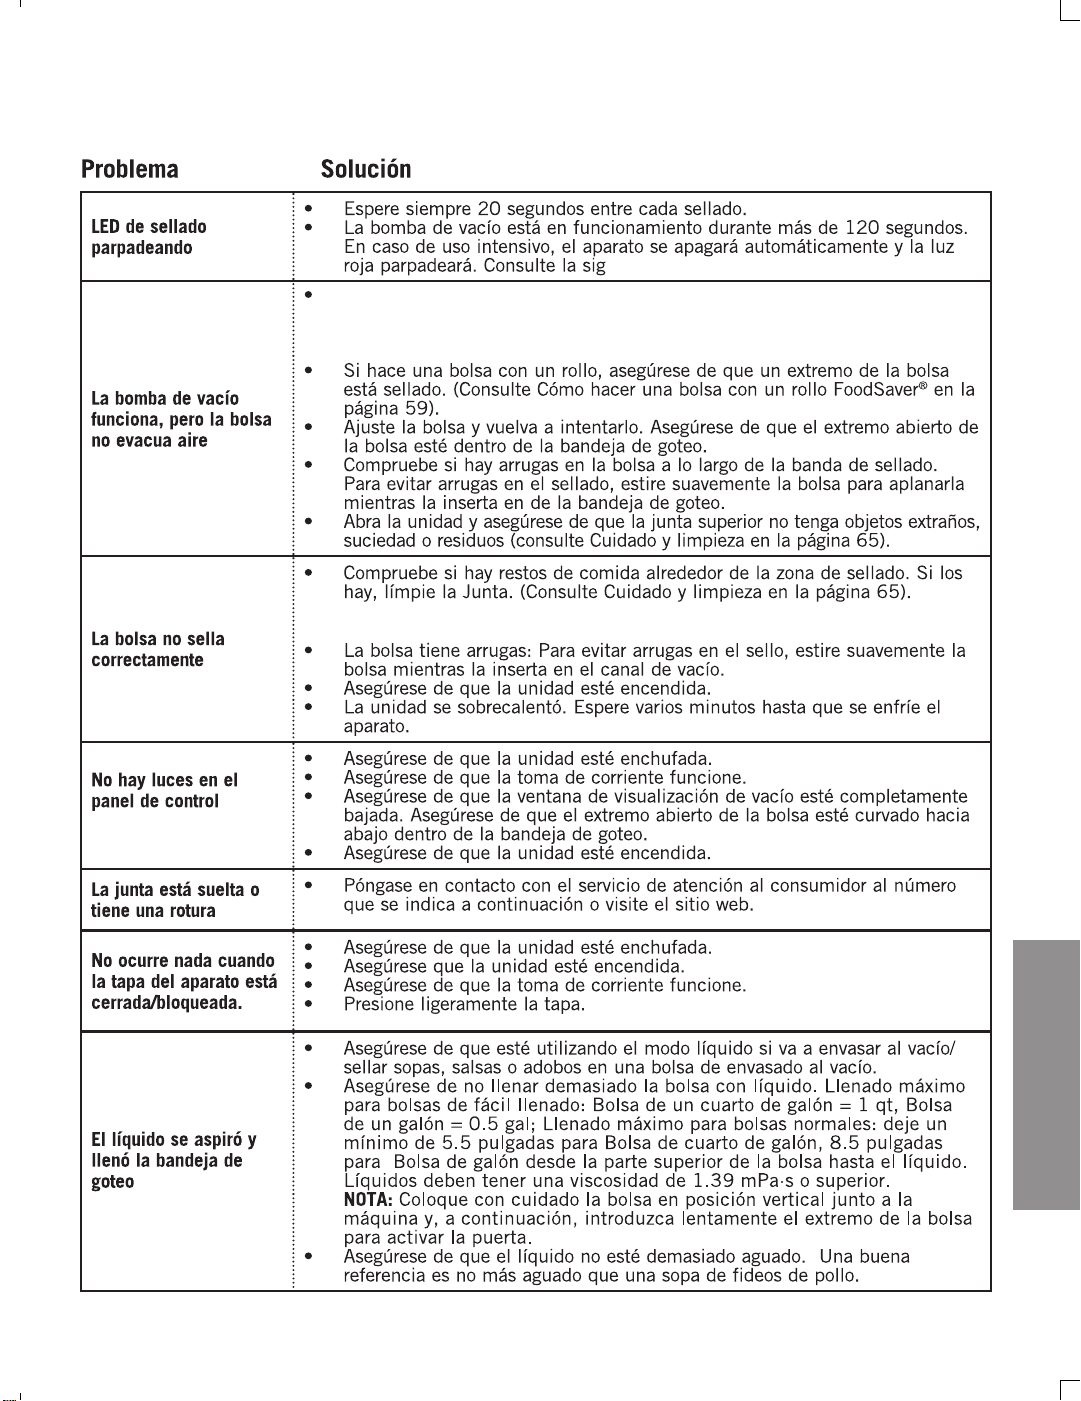
72Servicio al Cliente: US: 1-877-777-8042 CA: 1-877-804-5383 MX: +52 55 5366 0800
Guía de solución de problemas
Problema Solución
LED de sellado
parpadeando
• Espere siempre 20 segundos entre cada sellado.
• La bomba de vacío está en funcionamiento durante más de 120 segundos.
En caso de uso intensivo, el aparato se apagará automáticamente y la luz
roja parpadeará. Consulte la sig
La bomba de vacío
funciona, pero la bolsa
no evacua aire
• Si hace una bolsa con un rollo, asegúrese de que un extremo de la bolsa
está sellado. (Consulte Cómo hacer una bolsa con un rollo FoodSaver
®
en la
página 59).
• Ajuste la bolsa y vuelva a intentarlo. Asegúrese de que el extremo abierto de
la bolsa esté dentro de la bandeja de goteo.
• Compruebe si hay arrugas en la bolsa a lo largo de la banda de sellado.
Para evitar arrugas en el sellado, estire suavemente la bolsa para aplanarla
mientras la inserta en de la bandeja de goteo.
• Abra la unidad y asegúrese de que la junta superior no tenga objetos extraños,
suciedad o residuos (consulte Cuidado y limpieza en la página 65).
La bolsa no sella
correctamente
• Compruebe si hay restos de comida alrededor de la zona de sellado. Si los
hay, límpie la Junta. (Consulte Cuidado y limpieza en la página 65).
• La bolsa tiene arrugas: Para evitar arrugas en el sello, estire suavemente la
bolsa mientras la inserta en el canal de vacío.
• Asegúrese de que la unidad esté encendida.
• La unidad se sobrecalentó. Espere varios minutos hasta que se enfríe el
aparato.
No hay luces en el
panel de control
• Asegúrese de que la unidad esté enchufada.
• Asegúrese de que la toma de corriente funcione.
• Asegúrese de que la ventana de visualización de vacío esté completamente
bajada. Asegúrese de que el extremo abierto de la bolsa esté curvado hacia
abajo dentro de la bandeja de goteo.
• Asegúrese de que la unidad esté encendida.
La junta está suelta o
tiene una rotura
• Póngase en contacto con el servicio de atención al consumidor al número
que se indica a continuación o visite el sitio web.
No ocurre nada cuando
la tapa del aparato está
cerrada/bloqueada.
• Asegúrese de que la unidad esté enchufada.
• Asegúrese que la unidad esté encendida.
• Asegúrese de que la toma de corriente funcione.
• Presione ligeramente la tapa.
El líquido se aspiró y
llenó la bandeja de
goteo
• Asegúrese de que esté utilizando el modo líquido si va a envasar al vacío/
sellar sopas, salsas o adobos en una bolsa de envasado al vacío.
• Asegúrese de no llenar demasiado la bolsa con líquido. Para las bolsas de
un cuarto de galón se recomienda llenarlas con un máximo de un cuarto
de galón y para las de un galón con ½ galón de líquido. Los líquidos deben
tener una viscosidad de 1.39 mPa·s o superior
• Asegúrese de que el líquido no esté demasiado aguado. Una buena
referencia es no más aguado que una sopa de fideos de pollo.
SOLUCIÓN DE PROBLEMAS
2023/4/17 09:58
Cuandoutiliceel modo líquido, sivaaenvasar al vacío salsas, sopas o
cremasmásespesas (porejemplo, crema de champiñones) mantengael
interior de las paredes de la bolsaporencima del líquido librede restos de
comida o goteosen la medida de lo posible.
• Si utiliza alimentos con mucho líquido, utilice el modo Líquido para evitar
que se succione una cantidad excesiva de jugos o líquidos de la bolsa.

73
US: www.FoodSaver.com | CA: www.FoodSaver.ca | MX: www.oster.com.mx/foodsaver
SOLUCIÓN DE PROBLEMAS
Guía de solución de problemas
Problema Solución
No se puede
introducir la bolsa
en la máquina
• Asegúrese de que hay suficiente material de la bolsa para llegar al centro de la
bandeja de goteo. Deje siempre un espacio adicional de tres pulgadas (7.62 cm)
para que la bolsa se cierre bien alrededor del contenido de los alimentos.
• Estire suavemente la bolsa para que quede plana mientras la inserta en de la
bandeja de goteo. Inserte la bolsa CURVA HACIA ABAJO en de la bandeja de goteo.
La tapa del
aparato no
se cerrará
automáticamente
• Si intenta insertar la bolsa justo después de quitarla o presionar el botón
Cancelar, espere unos segundos y luego intente insertar o volver a insertar.
• Los alimentos o los residuos pueden estar obstruyendo los sensores que se
utilizan para cerrar automáticamente la tapa del aparato. Abra completamente
la tapa del aparato y limpie con una toalla húmeda la parte inferior debajo
de las dos lengüetas negras de dicha tapa. Consulte las instrucciones de la
sección de Cuidado y limpieza en la página 65.
Se eliminó el aire
de la bolsa, pero
ahora ha vuelto a
entrar aire
• Examine el sello. Una arruga a lo largo del sello puede hacer que el aire vuelva
a entrar en la bolsa. Para evitar las arrugas en el sello, estire suavemente la
bolsa para aplanarla mientras la inserta en de la bandeja de goteo.
• A veces la humedad o los restos de comida (como jugos, grasa, migas, polvos,
etc.) a lo largo del sello impiden que la bolsa se selle correctamente. Abra la
bolsa cortándola, limpie la parte superior del interior de la bolsa y vuelva a
sellarla.
• Si utiliza alimentos con mucho líquido, utilice el modo Líquido para evitar que
se succione una cantidad excesiva de jugos o líquidos de la bolsa.
• Los alimentos afilados pueden haber perforado la bolsa. Utilice una nueva
bolsa si hay un agujero. Cubra los alimentos punzantes con un material
amortiguador suave, como una toalla de papel, y vuelva a sellar.
• Puede haberse producido la fermentación o la liberación de gases naturales
desde el interior de los alimentos. Cuando esto ocurre, los alimentos pueden
haber empezado a estropearse y deben ser desechados.
• Bolsa defectuosa. La bolsa podría tener un pinchazo. Pruebe otra bolsa.
La bolsa se funde
• Es posible que la banda de sellado se haya calentado demasiado. Espere
siempre al menos 20 segundos para que el aparato se enfríe antes de sellar al
vacío otro artículo.
• Utilice bolsas de la marca FoodSaver
®
. Nuestras bolsas y rollos Foodsaver
®
están
diseñados especialmente para las unidades FoodSaver
®
.
El recipiente no
se puede sellar al
vacío
• La tapa del recipiente FoodSaver
®
debe estar correctamente alineada con
la abertura del recipiente. (Consulte el “Manual del propietario” que se
proporciona con el accesorio).
• Asegúrese de presionar el botón de accesorios de mano.
• Asegúrese de que la tapa esté bien cerrada por los cuatro lados del recipiente.
• Asegúrese de que la junta de goma dentro de la tapa no tenga residuos de
alimentos.
• Examine el borde del recipiente para ver si hay grietas o rayones.Asegúrese de
que la válvula del recipiente esté limpia.
Bandeja de goteo
extraíble lleno
• Cuando esto suceda, las luces de líquido, seco, húmedo y sous vide
parpadearán. Bandeja de goteo debe vaciarse y secarse antes de volver a
instalarla en el electrodoméstico.
Si necesita más
ayuda:
• Póngase en contacto con el servicio de atención al consumidor en el número
que se indica a continuación o visite el sitio web y haga clic en la pestaña
“Soporte”.
VS5900 Series_23EFSM1.indd 73-74VS5900 Series_23EFSM1.indd 73-74
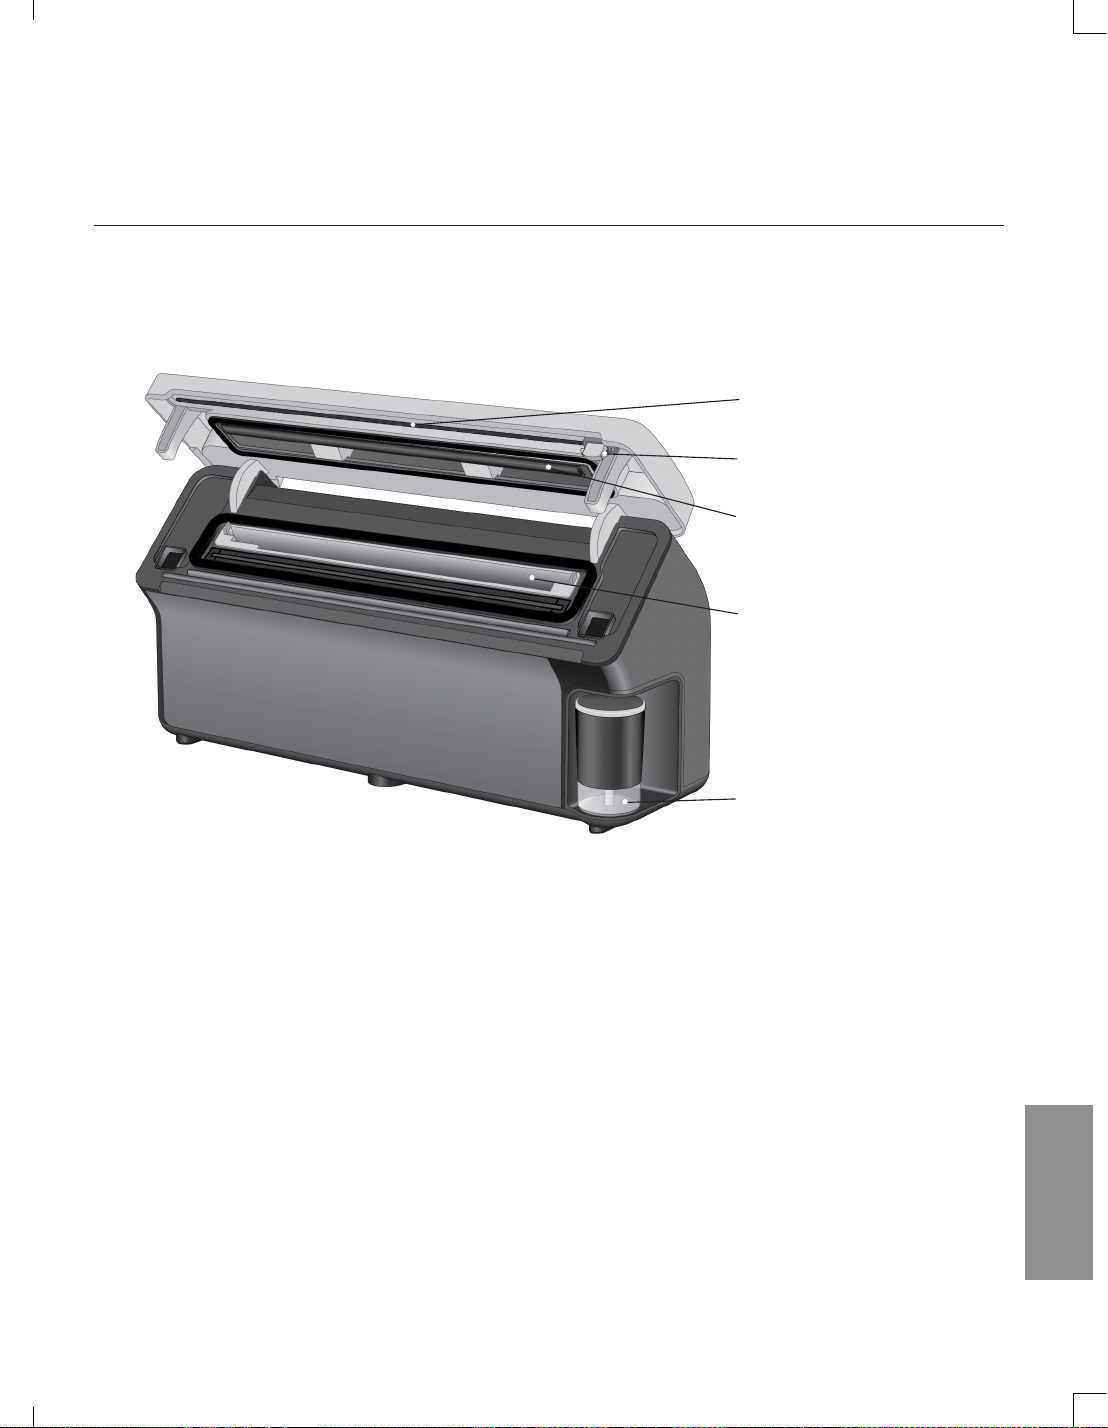
74
Servicio al Cliente: US: 1-877-777-8042 CA: 1-877-804-5383 MX: +52 55 5366 0800
Repuestos
Para obtener repuestos, visite el sitio web o llame al servicio al cliente.
REPUESTOS
Banda de goma
Cortador de bolsas
Perfil
Bandeja de goteo
Depósito (de mano)
2023/4/17 09:582023/4/17 09:58

75
US: www.FoodSaver.com | CA: www.FoodSaver.ca | MX: www.oster.com.mx/foodsaver
GARANTÍA
Sunbeam Products, Inc. o si se encuentra en Canadá, Newell Brands Canada ULC, y en México, Newell
Brands de México, S.A. de C.V. (colectivamente “Sunbeam”) garantiza que durante un período de
cinco (5) años a partir de la fecha inicial de compra, este producto estará libre de defectos de material
y mano de obra, cuando se utilice de acuerdo con las instrucciones proporcionadas. Sunbeam, a su
elección, reparará o sustituirá, sin costo alguno, este producto o cualquier componente del mismo que
resulte defectuoso durante el período de garantía. El reemplazo se hará con un producto o componente
nuevo o remanufacturado sin costo alguno para el consumidor. Si el producto ya no está disponible, el
reemplazo puede hacerse con un producto similar de igual o mayor valor. Esta es su garantía exclusiva.
NO intente reparar o ajustar ninguna función eléctrica o mecánica de este producto. Si lo hace, anulará
esta garantía. Sunbeam se reserva el derecho de rechazar la cobertura si el defecto o el daño ha sido
causado por componentes o servicios no autorizados. Para México, la garantía es a partir de la fecha en
que el cliente recibe el producto que se presume es la fecha de la factura o comprobante, o la fecha
estampada de la garantía, salvo prueba en contrario. Esta garantía es válida para el comprador original
a partir de la fecha de la compra inicial y no es transferible (No es aplicable para el mercado mexicano
donde es transferible). Conserve el recibo de la compra original. Se requiere una prueba de compra para
validar la garantía. Para las compras realizadas en México, se prefiere mostrar la factura de compra
(recibo de venta) o un sello estampado en la tarjeta de garantía. Los distribuidores, centros de servicio
o tiendas minoristas que vendan productos Sunbeam no tienen derecho a alterar, modificar o cambiar
de cualquier manera los términos y condiciones de esta garantía. Esta garantía no cubre el desgaste
normal de las piezas ni los daños resultantes de cualquiera de los siguientes: a). el uso negligente o
incorrecto del producto, b). el uso con un voltaje o corriente inadecuados, c). el uso contrario a las
instrucciones de funcionamiento, d). el desmontaje, la reparación o la alteración por cualquier persona
que no sea Sunbeam o un centro de servicio autorizado de Sunbeam. Sunbeam excluye expresamente de
esta garantía y niega la responsabilidad por los defectos o daños causados por la reparación o alteración
por cualquier persona que no sea Sunbeam o un centro de servicio autorizado de Sunbeam. Además, la
garantía no cubre: e) Actos de Dios, como incendios, inundaciones, huracanes y tornados. Ninguna de las
cláusulas de esta garantía puede interpretarse como aplicable al servicio y al mantenimiento sin garantía.
En consecuencia, Sunbeam también niega la responsabilidad por los defectos y daños causados por la
reparación o alteración fuera de los términos de esta garantía.
¿Cuáles son los límites de la responsabilidad de Sunbeam?
Sunbeam no será responsable de ningún daño incidental o consecuente causado por el incumplimiento
de cualquier garantía o condición expresa, implícita o legal. Salvo en la medida en que lo prohíba la
legislación aplicable, cualquier garantía o condición implícita de comerciabilidad o idoneidad para
un fin determinado se limita a la duración de la garantía anterior. Sunbeam renuncia a cualquier
otra garantía, condición o representación, expresa, implícita, legal o de otro tipo. Sunbeam no será
responsable de ningún tipo de daño resultante de la compra, el uso o el mal uso del producto, o la
imposibilidad de utilizarlo, incluidos los daños incidentales, especiales, consecuentes o similares o la
pérdida de beneficios, o de cualquier incumplimiento de contrato, fundamental o de otro tipo, o de
cualquier reclamación presentada contra el comprador por cualquier otra parte. Algunas provincias,
estados o jurisdicciones no permiten la exclusión o limitación de los daños incidentales o consecuentes,
ni la limitación de la duración de una garantía implícita, por lo que es posible que las limitaciones o
exclusiones anteriores no se apliquen en su caso. Esta garantía le otorga derechos legales específicos,
y también puede tener otros derechos que varían de una provincia a otra, de un estado a otro o de una
jurisdicción a otra.
Garantía limitada de 5 años
VS5900 Series_23EFSM1.indd 75-76VS5900 Series_23EFSM1.indd 75-76

76
Servicio al Cliente: US: 1-877-777-8042 CA: 1-877-804-5383 MX: +52 55 5366 0800
Cómo obtener el servicio de garantía
En los EE.UU.
Si tiene alguna pregunta sobre esta garantía o desea obtener el servicio de garantía, llame al
1.877.777.8042 y se le proporcionará la dirección de un centro de servicio conveniente. En los Estados
Unidos, esta garantía se ofrece por Sunbeam Products, Inc. ubicada en 6655 Peachtree Dunwoody Rd.
Atlanta, GA 30328.
En Canadá
Si tiene alguna pregunta sobre esta garantía o desea obtener el servicio de garantía, llame al
1.877.804.5383 y se le proporcionará la dirección de un centro de servicio conveniente. En Canadá, esta
garantía se ofrece por Newell Brands Canada ULC, ubicada en 20 B Hereford Street, Brampton, Ontario
L6Y 0M1. Si tiene cualquier otro problema o reclamación en relación con este producto, escriba a nuestro
Departamento de Atención al Consumidor. Si tiene cualquier otro problema o reclamación en relación con
este producto, escriba a nuestro Departamento de Atención al Consumidor.
En México
Si tiene alguna pregunta con respecto a esta garantía o desea obtener el servicio de garantía, por favor
póngase en contacto con Newell Brands de México, S.A. de C.V. ubicada en Boulevard Manuel Ávila
Camacho No. 32 Piso 14, Colonia Lomas de Chapultepec III Sección, Alc. Miguel Hidalgo, C.P. 11000
Ciudad de México, México. Atención al Consumidor: 55 5366-0800 /800 506 1700 y/o un centro de
servicio conveniente.
NO DEVUELVA ESTE PRODUCTO A NINGUNA DE ESTAS DIRECCIONES NI AL LUGAR DE SU COMPRA.
Para consultas sobre el reciclaje y la correcta eliminación de este producto, póngase en contacto con su
centro local de gestión de residuos.
GARANTÍA
2023/4/17 09:582023/4/17 09:58


VS5900 Series_23EFSM1_GCDS-LD PKG0001482284
©2023 Sunbeam Products, Inc. Distributed by Sunbeam Products, Inc. 6655 Peachtree Dunwoody Rd. Atlanta, GA 30328, U.S.A
Imported into Canada by: Newell Brands, Canada ULC., 20-B Hereford Street, Brampton, Ontario L6Y 0M1. Printed in China.
Imported and Distributed by: Newell Brands of México, S.A. of C.V. RFC: SME570928G90 Blvd. Manuel Ávila Camacho No. 32 Floor 14,
Col. Lomas de Chapultepec III Section, Alc. Miguel Hidalgo, C.P. 11000 Mexico City, Mexico. Phone: 55 5366-0800 / 800 506 1700.
• Newell Brands of Colombia S.A.S. NIT: 860.002.595-1 Av. Calle 26 No. 69B-45 OF. 503-505, Bogota, D.C. Colombia. Phone: 01 8000 180360.
• Newell Brands of Chile Ltda. RUT: 76.184.070-3 Cerro el Plomo 6000 Offices 501 - 502, Las Condes, Santiago, 7560623 Chile.
Phone: +56 225 945 098 • Newell Brands of Perú SAC. RUC: 20514720127 Av. Miguel Dasso Nro.104 Int. 701 Urb. Santa Isabel, San
Isidro, Lima, Peru. Phone: +51 1 642-9423. Printed in China.
©2023 Sunbeam Products, Inc. Distribué par Sunbeam Products, Ings. du 6655 Peachtree Dunwoody Rd. à Atlanta en Géorgie 30328, U.S.A
Importé au Canada par : Newell Brands, Canada ULC. 20-B Hereford Street, Brampton (Ontario) L6Y 0M1. Imprimé en Chine.
Importé et distribué par : Newell Brands de México, S.A. de CV RFC : SME570928G90 Boulevard Manuel Ávila Camacho n° 32, étage 14,
section du colonel Lomas de Chapultepec III, Alc. Miguel Hidalgo, CP 11000 Mexico, Mexique. Téléphone : 55 5366-0800 / 800 506 1700.
• Newell Brands de Colombia S.A.S. NIT : 860.002.595-1 Av. Calle 26 No. 69B-45 OF. 503-505, Bogota, DC La Colombie.
Téléphone : 01 8000 180360. • Newell Brands de Chile Ltda RUT : 76.184.070-3 Cerro el Plomo 6000 Bureaux 501 - 502, Las Condes,
Santiago, 7560623 Chili. Téléphone : +56 225 945 098 • Newell Brands de Perú SAC. RUC : 20514720127 Av. Miguel Dasso Nro.104
Int. 701 Urb. Santa Isabel, San Isidro, Lima, Pérou. Téléphone : +51 1 642-9423. Imprimé en Chine.
©2023 Sunbeam Products, Inc. Distribuido por Sunbeam Products, Inc. 6655 Peachtree Dunwoody Rd. Atlanta, GA 30328, EE. UU.
Importado en Canadá por: Newell Brands, Canada ULC., 20-B Hereford Street, Brampton, Ontario L6Y 0M1. Impreso en China.
Importado y Distribuido por: Newell Brands de México, S.A. de C.V. RFC: SME570928G90 Blvd. Manuel Ávila Camacho No. 32 Piso 14,
Col. Lomas de Chapultepec III Sección, Alc. Miguel Hidalgo, C.P. 11000 Ciudad de México, México. Telf.: 55 5366-0800 / 800 506 1700.
• Newell Brands de Colombia SAS. NIT: 860.002.595-1 Av. Calle 26 No. 69B-45 OF. 503-505, Bogotá, D.C. Colombia. Telf.: 01 8000 180360.
• Newell Brands de Chile Ltda. RUT: 76.184.070-3 Cerro el Plomo 6000 Oficinas 501 - 502, Las Condes, Santiago, 7560623 Chile. Telf.: +56
225 945 098 • Newell Brands de Perú SAC. RUC: 20514720127 Av. Miguel Dasso Nro.104 Int. 701 Urb. Santa Isabel, San Isidro, Lima, Perú.
Telef.: +51 1 642-9423. Impreso en China.
Registering your appliance is quick and easy at foodsaver.com/register. Applicable to US
residents only.
For important safety information, helpful tips on vacuum sealing, and to order FoodSaver
®
bags, rolls, and accessories, call consumer services or visit the website below.
L’enregistrement de votre appareil est simple et rapide sur www.foodsaver.com/register.
S’applique aux résidents des États-Unis seulement.
Pour obtenir des renseignements importants sur la sécurité et des conseils utiles sur
l’emballage sous vide, et pour commander des sacs, des rouleaux et des accessoires
FoodSaver
MD
, appelez le service à la clientèle ou visitez le site Web ci-dessous.
Registrar su aparato es fácil y rápido en www.foodsaver.com/register.
Aplicable sólo a residentes de los EE.UU.
Para obtener información importante sobre la seguridad, consejos útiles sobre el sellado
al vacío y para pedir bolsas, rollos y accesorios FoodSaver
®
, llame al servicio al cliente o
visite el sitio web que aparece a continuación.
US: 1-877-777-8042 CA: 1-877-804-5383 MX: +52 55 5366 0800
US: www.FoodSaver.com CA: www.FoodSaver.ca MX: www.oster.com.mx/foodsaver
VS5900 Series_23EFSM1.indd 77VS5900 Series_23EFSM1.indd 77 2023/4/17 09:582023/4/17 09:58