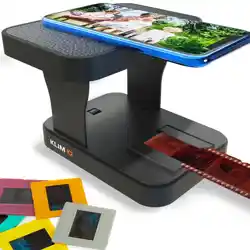
KLIM K2 FILM SCANNER
USER MANUAL - MANUEL D’UTILISATION
BENUTZERHANDBUCH - MANUALE - MANUAL


1
INDEX
ENGLISH
TECHNICAL SPECIFICATIONS.....................
Film Scanner................................................
Product Diagram........................................
INSTALLATION AND DEINSTALLATION....
Installation steps.......................................
Deinstallation steps.................................
SCANNING......................................................
Types of film.............................................
Using your smartphone’s camera......
Using the KLIM Scanner app................
Changing the support brackets..........
CONTACT.........................................................
2
2
2
3
3
4
5
5
5
5
6
6
FRENCH
FICHE TECHNIQUE...............................................
Scanner de film......................................................
Aperçu du produit.................................................
INSTALLATION ET DÉSINSTALLATION................
Étapes de l’installation.........................................
Étapes de désinstallation...............................
NUMÉRISER..............................................................
Types de film.......................................................
Utiliser l'application caméra par défaut.....
Utiliser l’application KLIM Film Scanner......
Changer les supports..........................................
CONTACT....................................................................
7
7
7
8
8
8
10
10
10
11
11
DEUTSCH
TECHNISCHE DATEN.....................................
Filmscanner..................................................
Produkt-Diagramm...................................
INSTALLATION UND DEINSTALLATION....
Installationsschritte..................................
Deinstallationsschritte............................
SCANNEN........................................................
Filmtypen...................................................
Scanne mit der Kameraanwendung.
Scanne mit der KLIM App.......................
Wechseln der Halterungen....................
KONTAKT.........................................................
12
12
12
13
13
14
15
15
15
15
16
16
ITALIANO
SPECIFICHE TECNICHE......................................
Scanner per pellicole...........................................
Diagramma del prodotto...................................
IMONTAGGIO E SMONTAGGIO..............................
Passaggi installazione........................................
Smontaggio.............................................................
SCANSIONE...............................................................
Tipi di pellicole (film)........................................
Utilizzando l’aplicazione di default...............
Utilizzando l’aplicazione KLIM.........................
Cambiare il supporto..........................................
CONTATTI...................................................................
17
17
17
18
18
19
20
20
20
21
21
ESPAÑOL
ESPECIFICACIONES TÉCNICAS..................
Escáner...........................................................
Diagrama del producto............................
INSTALACIÓN Y DESINSTALACIÓN..........
Preparación del escáner.........................
Desinstalación.............................................
ESCANEAR......................................................
Tipos de película......................................
Usando la app por defecto....................
Usando la app KLIM Film Scanner.....
Cambiar los soportes..............................
CONTACTO......................................................
22
22
22
23
23
24
25
25
25
25
26
26
10
20
2
THANK YOU!
Thank you for acquiring the KLIM K2 Film Scanner! We hope you will enjoy
using this product. Remember that we are always at your disposal for any
questions, issues or suggestions. Please don’t hesitate to reach out to us at
2
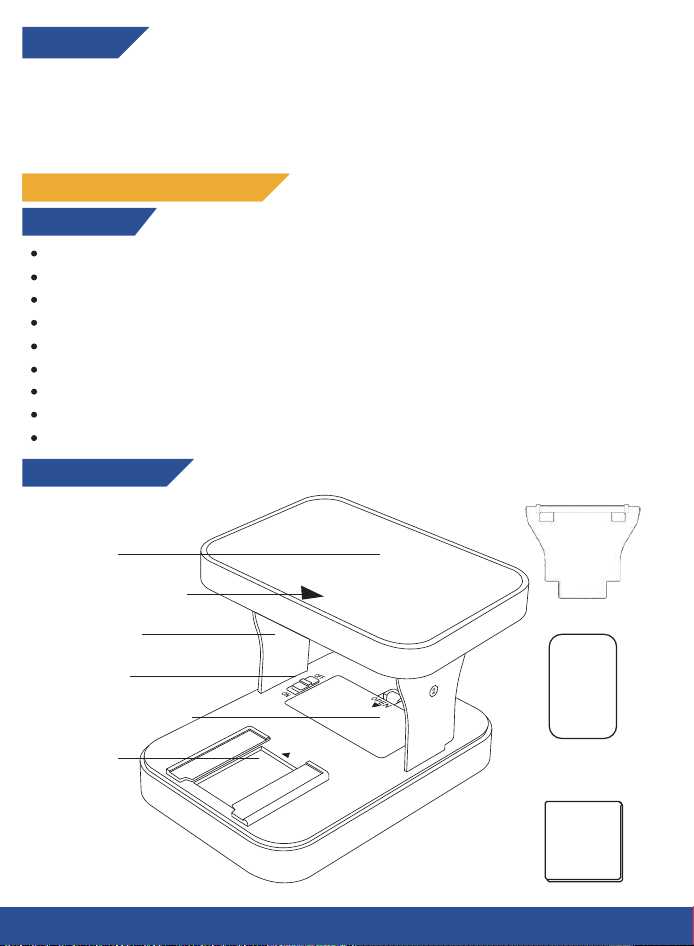
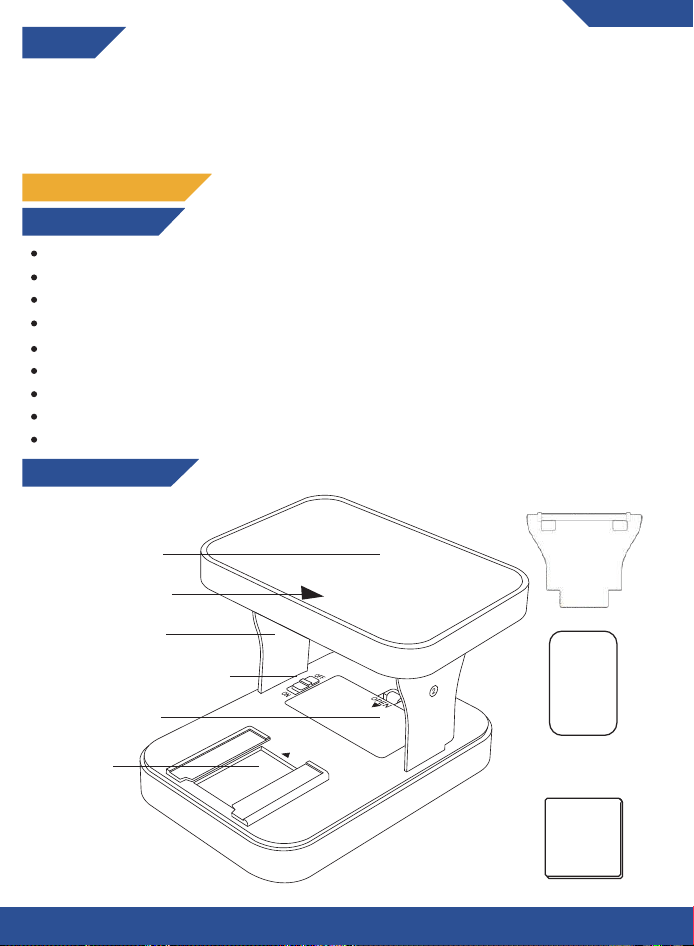
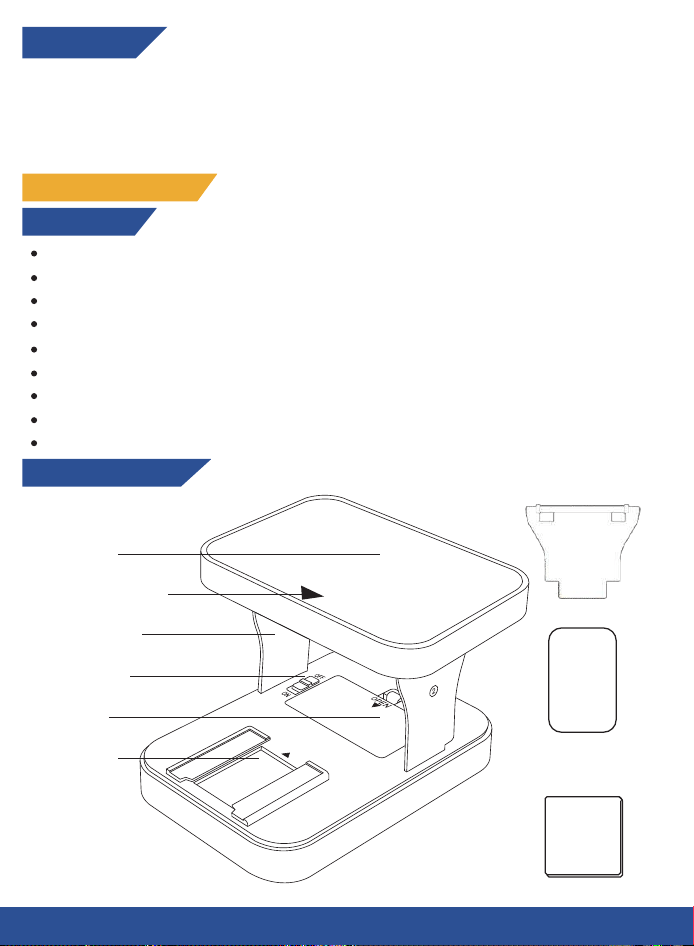
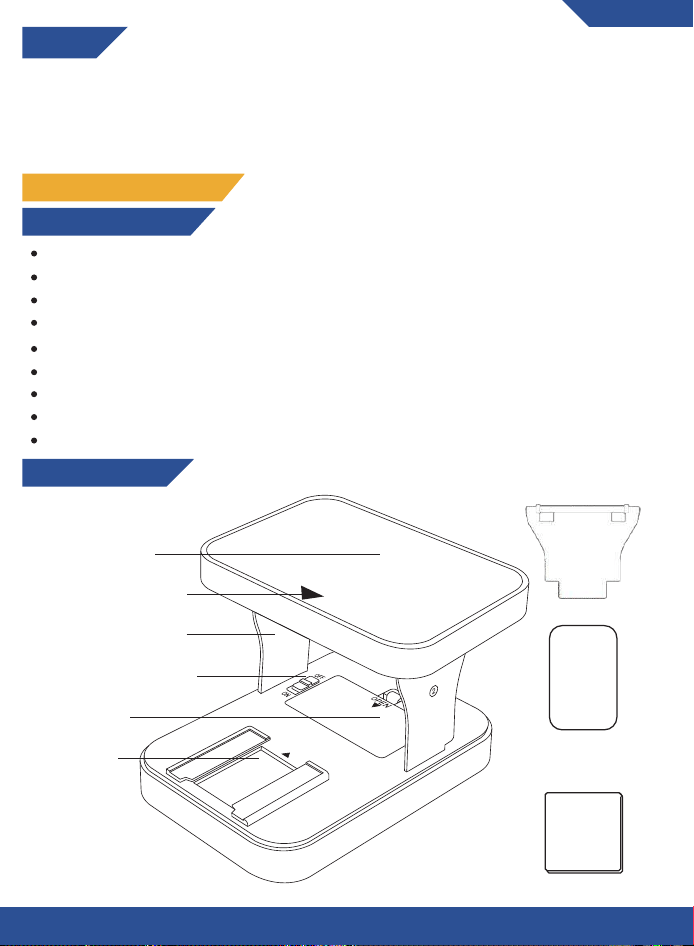
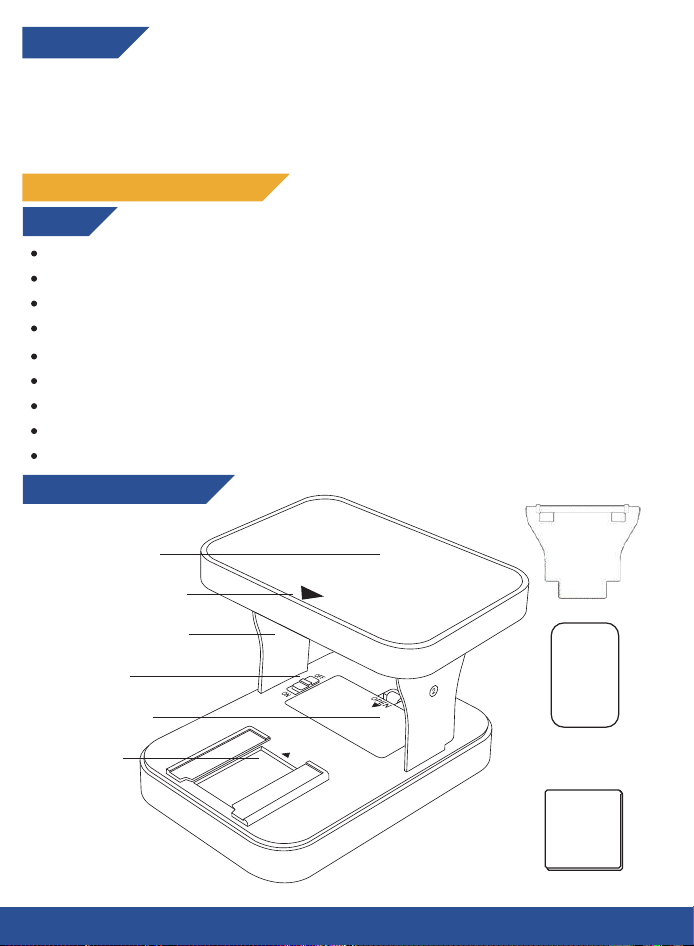
Brackets for shorter
focal length phones
TECHNICAL SPECIFICATIONS
Film Scanner
Working voltage: DC0.8-3.3 V
Working current: ≤0.25A
Product power: 0.35 W
Light color: cool white
Light brightness: 700-3000 cd/㎡
Light illumination: 3000-10000 Lux
LED lifespan: 50.000 hours
Power supply mode: external 2 AA batteries (LR6/AM-3), 1.5 V
Light display window: 41*27 mm / 1.61*1.06 inch
Product Diagram
Upper shell
Power switch
Light plate
Support frame
Battery compartment
Magnetic phone plate
Phone direction arrow
Cleaning cloth
TECHNICAL SPECIFICATIONS
INSTALLATION AND DEINSTALLATION
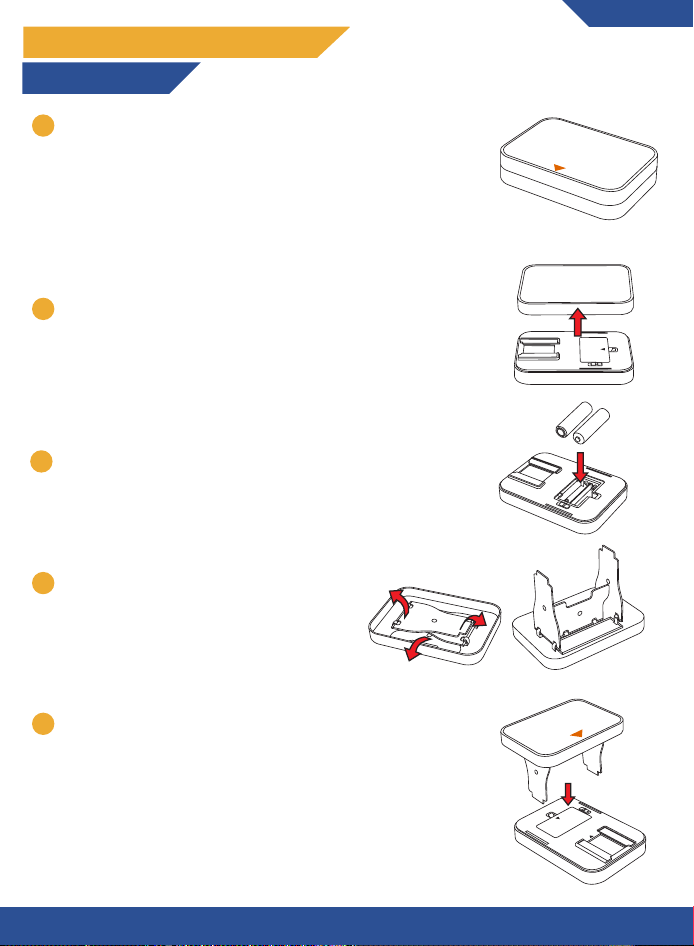
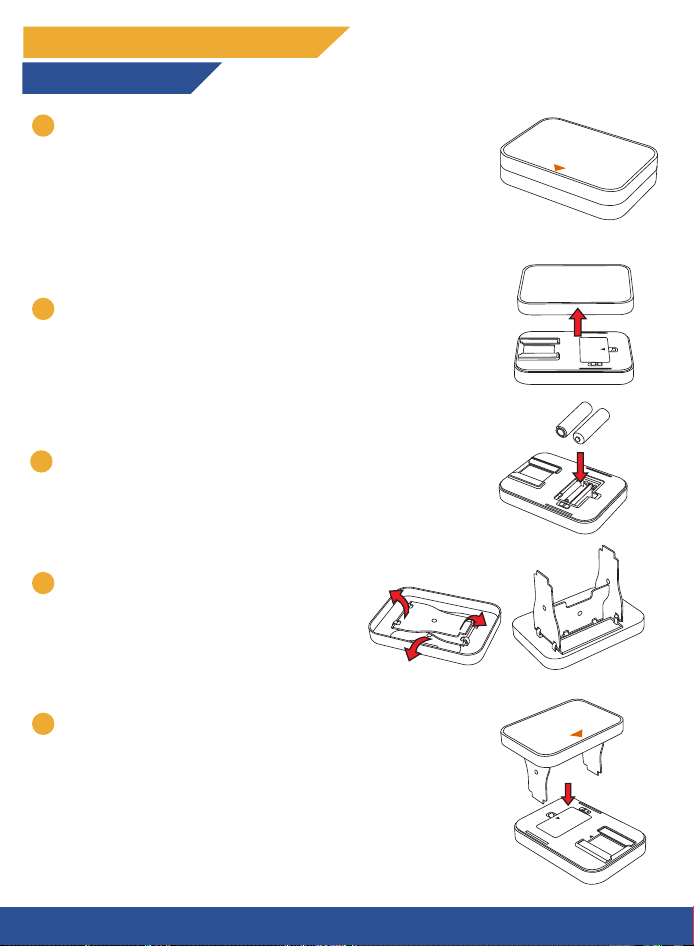
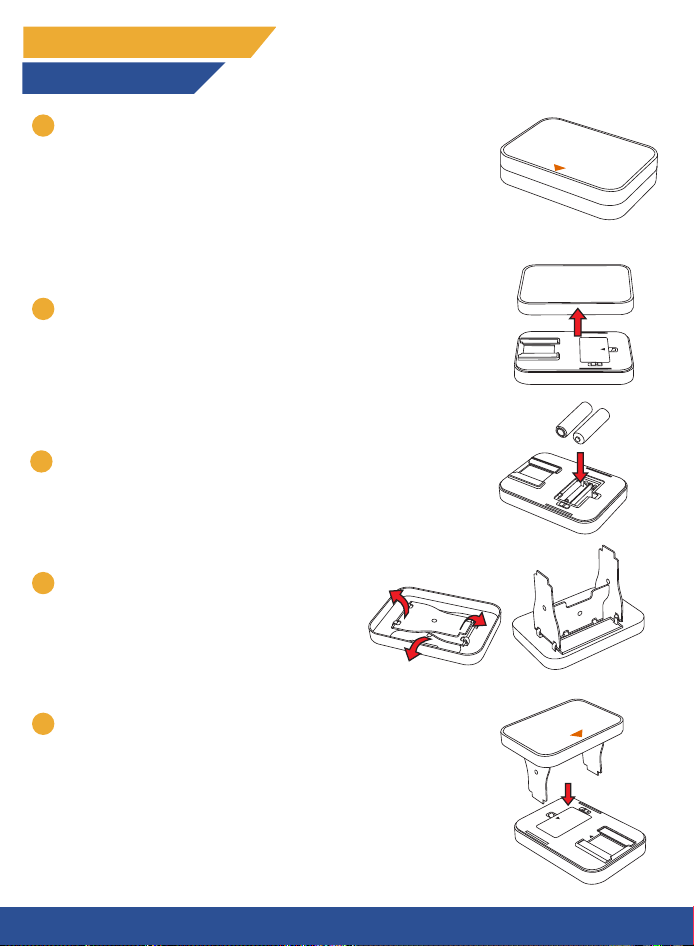
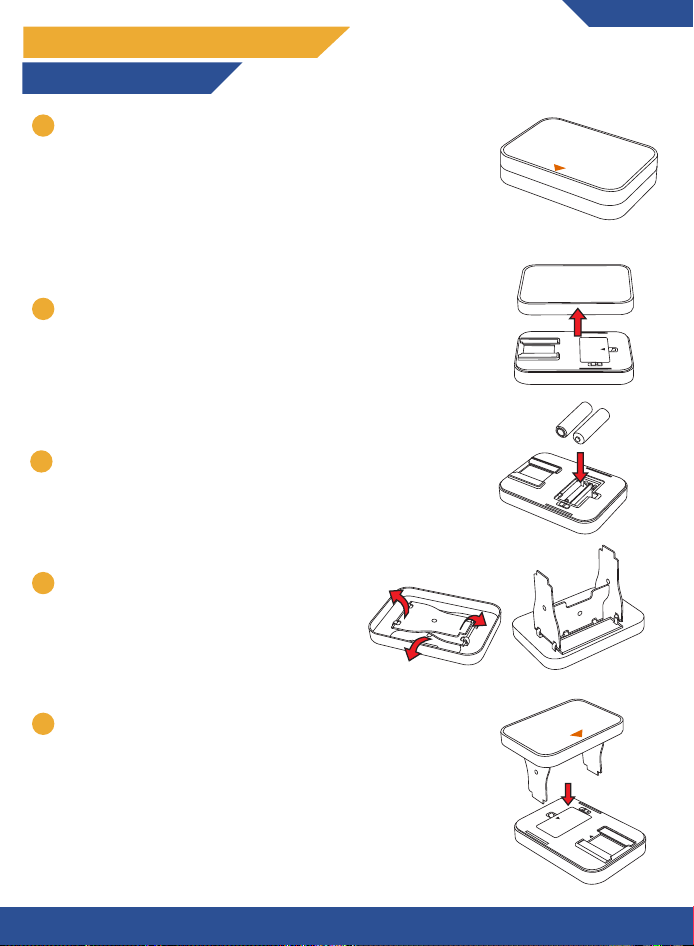
Installation steps
OPEN
OFF
ON
1
2
3
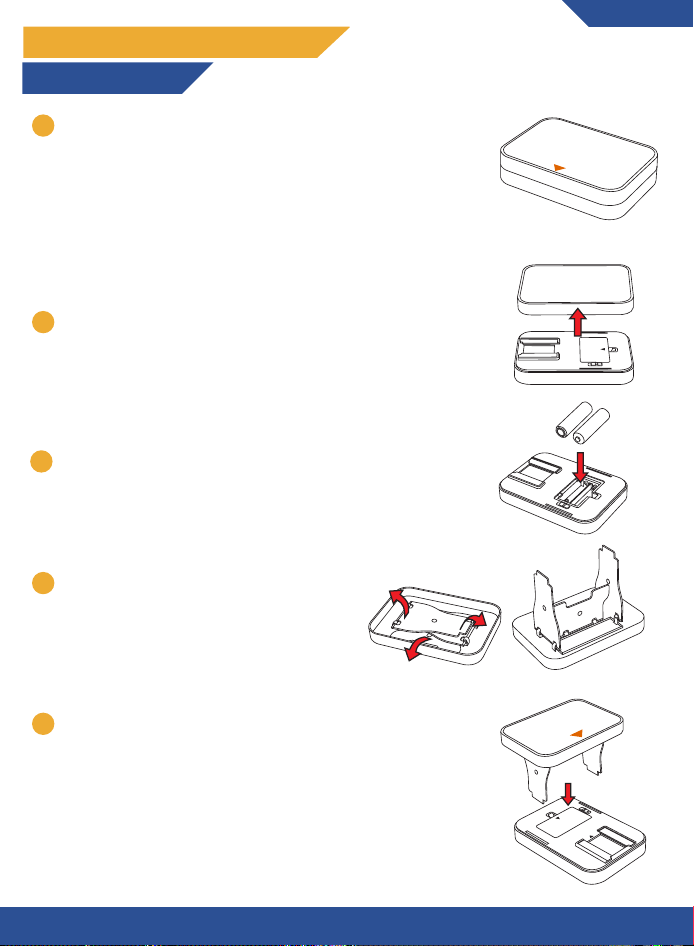
Place the film scanner on a steady and flat surface. The
anti-slip silicon should be facing downwards while the PU
leather top should face upwards. Note that the top also
has an orange arrow;
Note: Optionally you can use the included cleaning cloth
to remove any dust from the bottom of the anti-slip
surface for full stability.
Insert 2 AA batteries into the battery compartment of
the bottom shell.
Flip out the support brackets which are fixed
to the bottom of the upper shell.
ON
OFF
AA
AA
1
3
4
ENGLISH
Open the film scanner by lifting up the upper shell.
2
3
1
5
Place the upper shell onto the bottom shell by carefully
inserting the support brackets into the holes of the
bottom shell whilst having the orange arrow on the top
shell pointed towards the direction of the light plate.
OPEN
OFF
ON
2
3
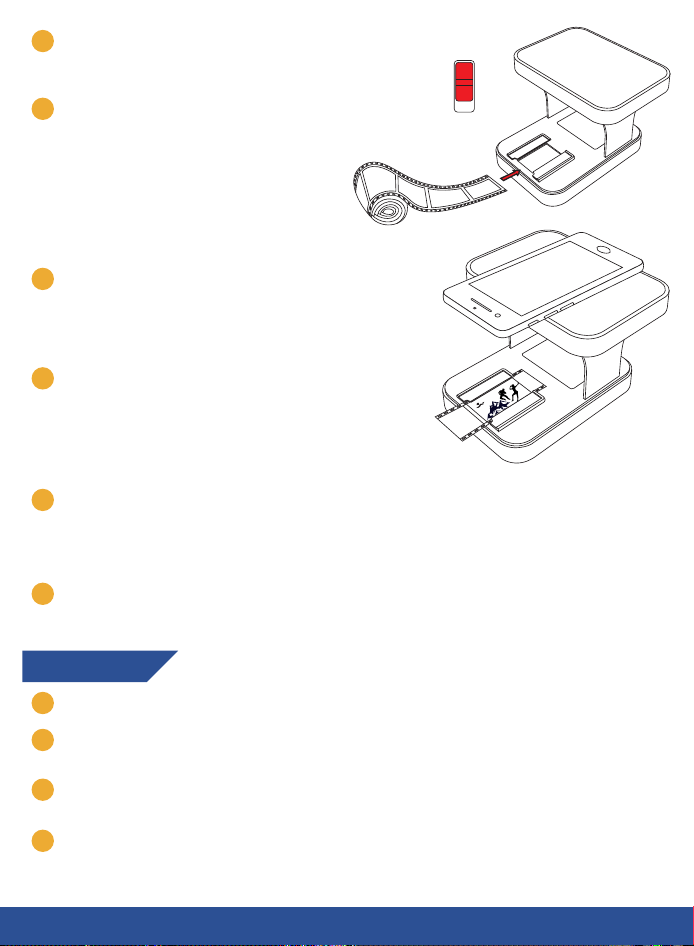
6
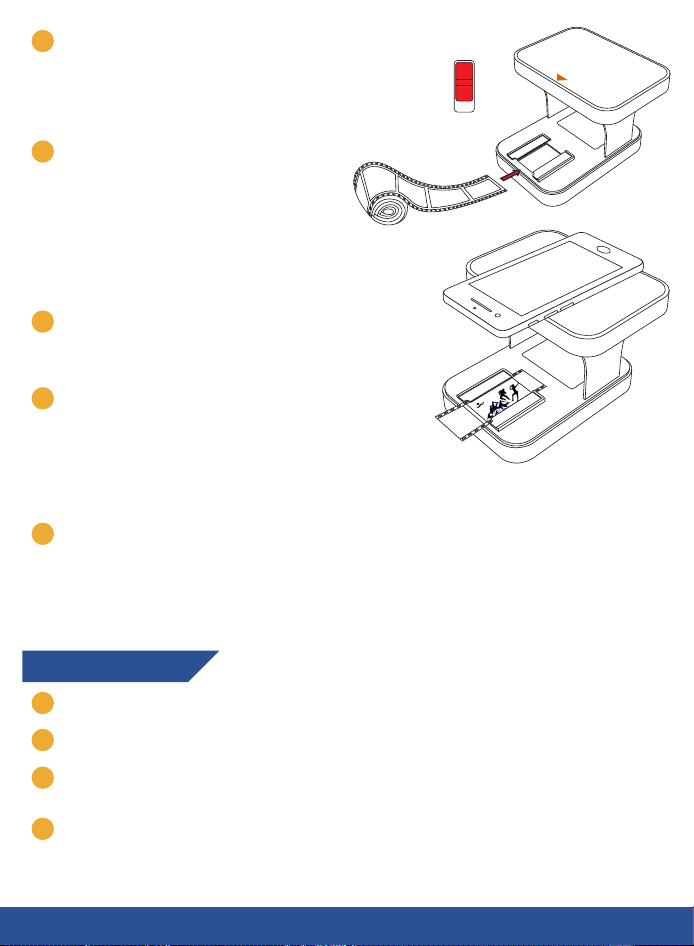
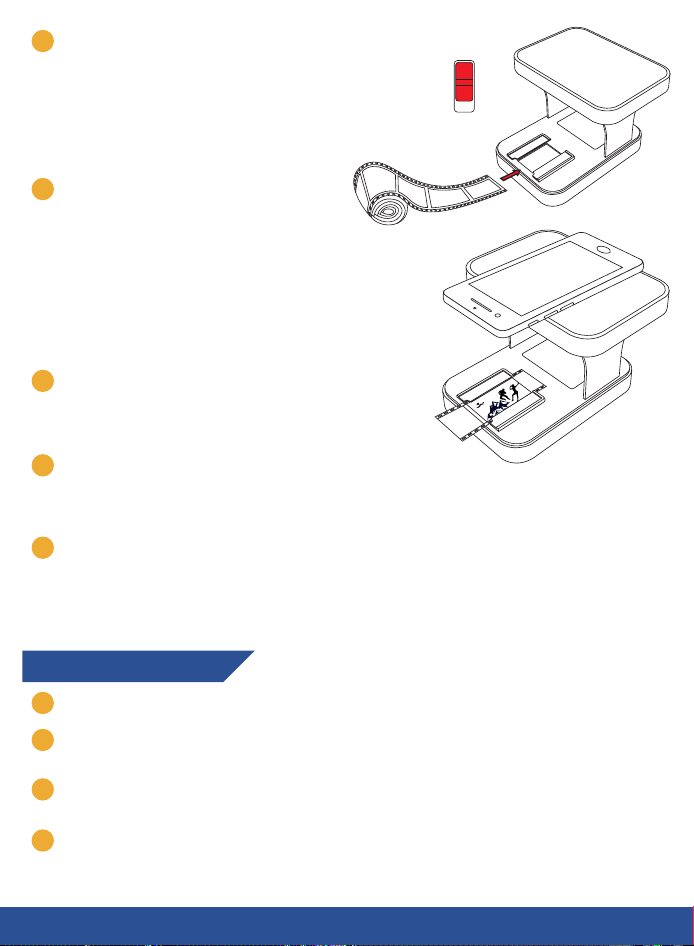
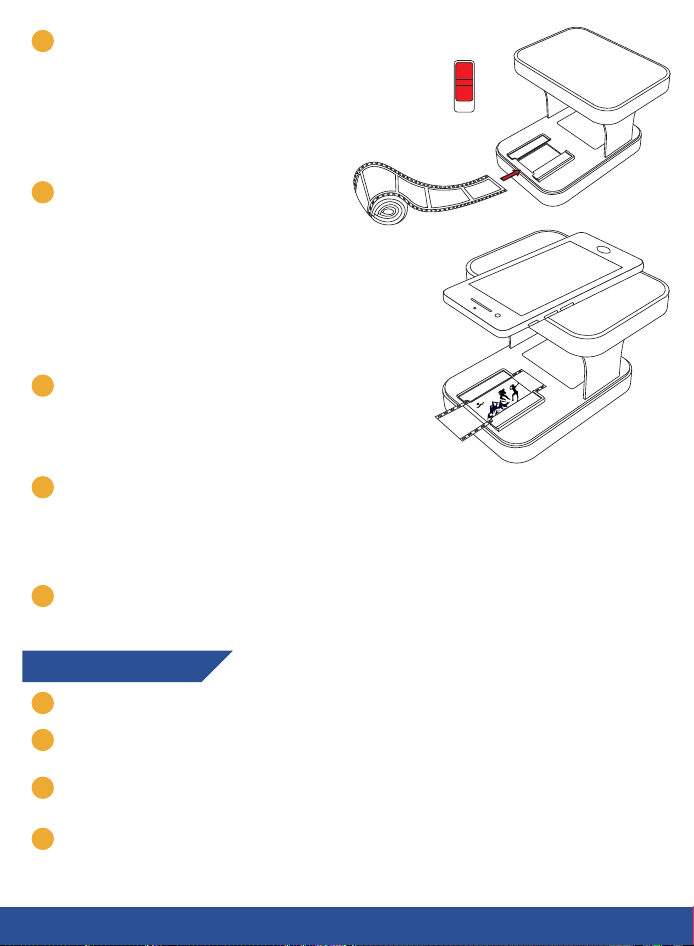
Turn the film scanner on and insert your
film by sliding it onto the light plate.
Note: Optionally you can use the
included cleaning cloth to remove any
dust and/or fingerprints.
ON
OFF
7
This step is optional and serves for
extra stability, especially for larger
smartphones. You can use the included
magnetic phone plate to magnetically
fix your phone to the built-in magnets
in the upper plate. Simply place the
plate between your phone and phone
case.
8
Place your smartphone onto the top
plate with its camera hanging over the
edge so that it aligns with the light
plate.
9
10
Try to decrease the surrounding light
as much as possible by turning off any
other lights and dimming the windows
as much as possible. Limiting the light
to the film scanner will increase the
quality of your scans.
You are now ready to make your first scan! If you need help with scanning your film,
please refer to the section “Scanning” on the next pages.
Deinstallation steps
1
Make sure that the power switch is turned off.
2
To fold the film scanner gently pull up the upper shell from the bottom shell.
3
Fold in the support brackets. Each support bracket has a number on the side
indicating in what order they need to be folded back.
4
Place the upper shell back on the bottom shell.
4

SCANNING
Types of film
There are 2 types of film that work with this film scanner:
Positive 35 mm (color or black & white) - Scan with your default camera app or the
KLIM Film Scanner app.
Negative 35 mm (color or black & white) - Scan with the KLIM Film Scanner app.
ENGLISH
Using your smartphone’s default camera application:
1. Make sure your smartphone’s camera is aligned with the light plate.
2. Optionally zoom in until you have a sharp image.
3. Take a picture on your smartphone’s camera to scan your film.
Note: You can edit your scan by going to your photo gallery. You can for instance
crop the picture to minimize the black border around the scan and adjust colors to
your preference.
Using the KLIM Film Scanner App:
1
2
5
1
2
3
Note: These app usage instructions are accurate at the time of the writing of this
user manual. There may be slight differences with the actual app due to the live
updates as we continuously improve it. Don't hesitate to reach out if you need any
help using our scanning app!
Scan this QR code with your phone’s camera to
download the app OR search for “KLIM Film
Scanner” in the App store for Apple devices or
Google Play for Android devices.
Open the app on your smartphone and press
“Let’s go”. Choose “OK” when the prompt shows
up where the app asks permission to access the
camera.
Read through the instructions.
The app will go in camera mode. At the top you can choose between three angles:
wide, ultra-wide and telephoto. Choose whichever shows the best results on your
camera and press on the scan button at the bottom of your display.
Note: if none of these angles work for your camera you can install the included
shorter brackets as your phone might require a shorter distance to the film. For
instructions on how to change the brackets please refer to the section: “Changing
support brackets for shorter focal lengths”.
1
2
3
4

7
6
8
CONTACT
Do you need additional assistance with your product? Contact us at
[email protected]. Our team of specialists is at your disposal and will
always reply within 24 hours!
Changing support brackets for shorter focal lengths
The preinstalled brackets are suitable for most phones, but shorter brackets are
included for phones with shorter focal lengths to ensure sharp images.
Removing the preinstalled brackets:
Fold out the support brackets.
Gently push with your thumbs left and right of the hinges to push the brackets
out.
Take the shorter brackets and do the opposite of step 2 by placing the new
bracket against the hinges and pulling them gently with your index fingers until
they snap in place.
1
2
3
6
5
Once you’ve made your first scan the app will give you some editing options at the
bottom: Rotate left, Undo, Aspect Ratio, Rotate right. Additionally you can crop the
scan by dragging the corners of the image towards the centre. You can always
undo your actions by pressing on the undo button at the bottom. Once you are
done with your edits you can press on “Choose” in the bottom right corner.
In the next screen you can choose the film type (positive or negative). Additionally
you can select some more advanced edit tools at the bottom of your screen. You
can always reset to the original scan by pressing the reset button at the top left.
When you’re pleased with the results you can choose “Export” at the bottom left
and either save it to your phone or share it.
Note: in this step you will also see a third “About” button. If you want to change
the language you can press on it and select your preferred language there.
To make your next scan simply press on the camera button at the bottom middle
of your screen and repeat the process.
7
MERCI !
Merci d'avoir acquis le scanner de film KLIM K2 ! Nous espérons que vous
prendrez plaisir à utiliser ce produit. N'oubliez pas que nous sommes
toujours à votre disposition pour toute question, problème ou suggestion.
N'hésitez pas à nous contacter à l'adresse [email protected].
FRANÇAIS
Supports pour téléphones
à focale plus courte
FICHE TECHNIQUE
Scanner de film
Tension nominale : DC0.8-3.3 V
Courant nominal de fonctionnement : ≤0.25A
Puissance du produit : 0,35 W
Couleur de la lumière : blanc froid
Luminosité de la lumière : 700-3000 cd/㎡.
Éclairage lumineux : 3000-10000 Lux
Durée de vie des LED : 50.000 heures
Mode d'alimentation : 2 piles AA externes (LR6/AM-3), 1,5 V
Vitre : 41*27 mm / 1,61*1,06 pouce
Aperçu du produit
Coque supérieure
Interrupteur d'alimentation
Plaque
d'éclairage
Cadre de support
Compartiment de
la batterie
Plaque de téléphone
magnétique
Flèche de direction
du téléphone
Chiffon de nettoyage
INSTALLATION ET DÉSINSTALLATION
Étape d’installation
OPEN
OFF
ON
1
2
3
Placez le scanner de film sur une surface plane et stable.
Le silicone antidérapant doit être orienté vers le bas,
tandis que le dessus en cuir synthétique doit être orienté
vers le haut. Notez que le dessus comporte également
une flèche orange. Remarque : vous pouvez, également,
utiliser le chiffon de nettoyage inclus pour retirer toute
poussière située sur la partie inférieure de la surface
antidérapante pour une stabilité totale.
Insérez 2 piles AA dans le compartiment à piles de la
coque inférieure.
Sortez les supports qui sont fixés sous la
coque supérieure.
ON
OFF
AA
AA
1
3
4
Ouvrez le scanner de film en soulevant la coque
supérieure.
2
3
1
5
Placez la coque supérieure sur la coque inférieure en
insérant soigneusement les supports dans les trous de
la coque inférieure tout en maintenant la flèche orange
pointée vers la direction de la plaque d'éclairage.
8
OPEN
OFF
ON
2
6
Allumez le scanner de film et insérez
votre film en le faisant glisser sur la
plaque lumineuse.
Remarque : vous pouvez utiliser le
chiffon de nettoyage fourni pour
éliminer la poussière et/ou les traces de
doigts.
ON
OFF
7
Cette étape est facultative et sert à
assurer une stabilité supplémentaire,
notamment pour les smartphones de
grande taille. Vous pouvez utiliser la
plaque magnétique pour téléphone
incluse pour fixer magnétiquement
votre téléphone aux aimants intégrés
dans la plaque supérieure. Il suffit de
placer la plaque entre votre téléphone
et la coque du téléphone.
8
Placez votre smartphone sur la plaque
supérieure, la caméra dépassant du
bord de manière à ce qu'elle soit
alignée avec la plaque lumineuse.
9
10
Essayez de réduire au maximum la lumière environnante en éteignant toutes les
autres lumières et en tamisant les fenêtres autant que possible. En limitant la
lumière sur le scanner de film, vous améliorerez la qualité de vos numérisations.
Vous êtes maintenant prêt à effectuer votre première numérisation ! Si vous avez
besoin d'aide pour numériser votre film, veuillez vous reporter à la section
"Numérisation" des pages suivantes.
Étape de désinstallation
1
Vérifiez que l'appareil est éteint.
2
Pour plier le scanner de film, tirez doucement la coque supérieure de la coque
inférieure.
3
Repliez les supports. Chaque support a un numéro sur le côté indiquant dans quel
ordre il doit être replié.
4
Replacez la coque supérieure sur la coque inférieure.
9

NUMÉRISER
Types de film
Il y a 2 types de film qui fonctionnent avec ce scanner de film :
Positif 35 mm (couleur ou noir et blanc) - Scannez avec votre application appareil
photo par défaut ou l'application KLIM Film Scanner.
Négatif 35 mm (couleur ou noir et blanc) - Numérisez avec l'application KLIM Film
Scanner.
Utiliser l'application caméra par défaut de votre smartphone :
1. Assurez-vous que la caméra de votre smartphone est alignée avec la plaque
lumineuse.
2. Vous pouvez éventuellement zoomer jusqu'à obtenir une image nette.
3. Prenez une photo avec l'appareil photo de votre smartphone pour numériser votre
film.
Remarque : vous pouvez éditer votre numérisation en vous rendant dans votre galerie
de photos. Vous pouvez par exemple recadrer l'image pour minimiser la bordure noire
autour du scan et ajuster les couleurs selon vos préférences.
1
2
10
1
2
3
Utiliser l’application KLIM Film Scanner
Note : Les instructions d'utilisation de cette application sont valables au moment
de la rédaction de ce manuel d'utilisation. Il peut y avoir de légères différences
avec l'application réelle en raison des mises à jour en direct alors que nous
l'améliorons en permanence. N'hésitez pas à nous contacter si vous avez besoin
d'aide pour utiliser notre application de numérisation !
Scannez ce code QR avec l'appareil photo de
votre téléphone pour télécharger l'application OU
recherchez "KLIM Film Scanner" dans l'App store
pour les appareils Apple ou Google Play pour les
appareils Android.
Ouvrez l'application sur votre smartphone et
appuyez sur "Let's go". Choisissez "OK" lorsque
l'application vous demande l'autorisation
d'accéder à l'appareil photo.
Lisez les instructions.
L'application passe en mode appareil photo. En haut, vous pouvez choisir entre
trois angles : large, ultra-large et téléobjectif. Choisissez celui qui donne les
meilleurs résultats sur votre appareil photo et appuyez sur le bouton de
numérisation en bas de votre écran.
1
2
3
4

Remarque : si aucun de ces angles ne convient à votre appareil photo, vous pouvez
installer les supports plus courts fournis, car votre téléphone pourrait avoir besoin
d'une distance plus courte par rapport à la pellicule. Pour savoir comment changer
les supports, veuillez vous référer à la section : "Changer les supports pour des
longueurs focales plus courtes".
Une fois que vous avez effectué votre première numérisation, l'application vous
propose des options d'édition en bas de l'écran : Rotation à gauche, Annuler,
Rapport d'aspect, Rotation à droite. En outre, vous pouvez recadrer la numérisation
en faisant glisser les coins de l'image vers le centre. Vous pouvez toujours annuler
vos actions en appuyant sur le bouton d'annulation en bas de l'écran. Une fois que
vous avez terminé vos modifications, vous pouvez cliquer sur "Choisir" dans le coin
inférieur droit.
Dans l'écran suivant, vous pouvez choisir le type de film (positif ou négatif). En
outre, vous pouvez sélectionner des outils d'édition plus avancés en bas de l'écran.
Vous pouvez toujours revenir au scan original en appuyant sur le bouton de
réinitialisation en haut à gauche.
Lorsque vous êtes satisfait des résultats, vous pouvez choisir "Exporter" en bas à
gauche et l'enregistrer sur votre téléphone ou le partager.
Remarque : à cette étape, vous verrez également un troisième bouton "À propos".
Si vous voulez changer la langue, vous pouvez appuyer dessus et sélectionner
votre langue.
Pour effectuer le prochain scan, appuyez simplement sur le bouton de l'appareil
photo en bas au milieu de l'écran et répétez le processus.
FRANÇAIS
11
CONTACT
Vous avez besoin d'aide avec votre produit ? Contactez-nous à l'adresse
[email protected]. Notre équipe de spécialistes est à votre disposition et
vous répondra toujours sous 24 heures !
7
8
Changer les supports pour des longueurs focales plus courtes
Les supports préinstallés conviennent à la plupart des téléphones, mais des supports
plus courts sont inclus pour les téléphones ayant une longueur focale plus courte afin
de garantir des images nettes.
Retirer les supports préinstallés :
Déployez les supports
Poussez doucement avec vos pouces à gauche et à droite des charnières pour les
faire sortir
Prenez les supports plus courts et faites l'inverse de l'étape 2 en plaçant les
nouveaux supports contre les charnières et en les tirant doucement avec vos index
jusqu'à ce qu'ils se fixent.
1
2
3
6
5
12
DANKESCHÖN!
Vielen Dank, dass du den KLIM K2 Filmscanner erworben hast! Wir hoffen, dass du viel
Freude mit diesem Produkt haben wirst. Vergiss nicht, dass wir dir bei Fragen,
Problemen oder Anregungen jederzeit zur Verfügung stehen. Bitte zögere nicht, uns
unter [email protected] zu kontaktieren.
TECHNISCHE DATEN
Filmscanner
Betriebsspannung: DC0.8-3,3 V
Betriebsstrom: ≤0.25A
Produktleistung: 0,35 W
Lichtfarbe: Kaltweiß
Lichthelligkeit: 700-3000 cd/㎡
Beleuchtungsstärke: 3000-10000 Lux
LED-Lebensdauer: 50.000 Stunden
Stromversorgung: 2 externe AA-Batterien (LR6/AM-3), 1,5 V
Lichtanzeigefenster: 41*27 mm / 1,61*1,06 Zoll
Produkt-Diagramm
Oberschale
Netzschalter
Lichtplatte
Tragrahmen
Akku-Fach
Magnetische
Telefonplatte
Richtungspfeil für
das Telefon
Reinigungstuch
Halterungen für Telefone
mit kürzerer Brennweite
INSTALLATION UND DEINSTALLATION
Installationsschritte
OPEN
OFF
ON
1
2
3
Lege den Filmscanner auf eine feste und ebene
Oberfläche. Das rutschfeste Silikon sollte nach unten
zeigen, während die PU-Leder Oberseite nach oben zeigen
sollte. Beachte, dass die Oberseite auch einen
orangefarbenen Pfeil hat;
Hinweis: Optional kannst du das mitgelieferte
Reinigungstuch verwenden, um Staub von der Unterseite
der Anti-Rutsch-Oberfläche zu entfernen, damit der
Scanner stabil steht.
Lege 2 AA-Batterien in das Batteriefach der Unterschale
ein.
Klappe die Halterungen aus, die an der
Unterseite der oberen Schale befestigt
sind.
ON
OFF
AA
AA
1
3
4
ENGLISH
Öffne den Filmscanner, indem du die obere Schale
anhebst.
2
3
1
5
Setze die obere Schale auf die untere Schale, indem du
die Halteklammern vorsichtig in die Löcher der unteren
Schale steckst, während der orangefarbene Pfeil auf der
oberen Schale in Richtung der Lichtplatte zeigt.
13
OPEN
OFF
ON
2
DEUTSCH
6
Schalte den Filmscanner ein und lege
deinen Film ein, indem du ihn auf die
Lichtplatte schiebst.
Hinweis: Optional kannst du das
mitgelieferte Reinigungstuch
verwenden, um Staub und/oder
Fingerabdrücke zu entfernen.
ON
OFF
7
Dieser Schritt ist optional und dient der
zusätzlichen Stabilität, besonders bei
größeren Smartphones. Du kannst die
mitgelieferte magnetische Telefonplatte
verwenden, um dein Telefon magnetisch
an den eingebauten Magneten in der
oberen Platte zu befestigen. Platziere
die Platte einfach zwischen deinem
Smartphone und der Tasche.
8
Lege dein Smartphone so auf die obere
Platte, dass die Kamera über den Rand
hängt, so dass sie mit der Lichtplatte
ausgerichtet ist.
9
10
Versuche, das Umgebungslicht so weit wie möglich zu reduzieren, indem du alle
anderen Lichter ausschaltest und die Fenster so weit wie möglich dimmst. Wenn du
den Lichteinfall auf den Filmscanner einschränkst, verbessert sich die Qualität deiner
Scans.
Du bist jetzt bereit, deinen ersten Scan zu machen! Wenn du Hilfe beim Scannen
deines Films brauchst, lies bitte den Abschnitt "Scannen" auf den nächsten Seiten.
Deinstallationsschritte
1
Vergewissere dich, dass der Netzschalter ausgeschaltet ist.
2
Um den Filmscanner zusammenzufalten, ziehe die obere Schale vorsichtig von der
unteren Schale ab.
3
Klappe die Stützbügel ein. Jede Halterung hat eine Nummer auf der Seite, die
angibt, in welcher Reihenfolge sie zurückgeklappt werden muss.
4
Lege die obere Schale wieder auf die untere Schale.
14

SCANNEN
Filmtypen
Es gibt 2 Arten von Filmen/Dias, die mit diesem Filmscanner verwendet werden können:
Positiv 35 mm (Farbe oder Schwarz-Weiß) - Scanne mit Deiner Standard-Kamera-
App oder der KLIM Filmscanner-App.
Negative 35 mm (Farbe oder Schwarz-Weiß) - Scanne mit der KLIM Filmscanner-
App.
ENGLISH
Verwende die Standard Kameraanwendung deines Smartphones
1. Stelle sicher, dass die Kamera deines Smartphones auf die Lichtplatte ausgerichtet ist.
2. Vergrößere das Bild, bis du ein scharfes Bild hast;
3. Nimm ein Foto mit der Kamera deines Smartphones auf, um deinen Film zu scannen;
Hinweis: Du kannst deinen Scan bearbeiten, indem du in deine Fotogalerie gehst. Du
kannst das Bild zum Beispiel zuschneiden, um den schwarzen Rand um den Scan zu
minimieren und die Farben nach deinen Wünschen anpassen.
Scanne mit der KLIM Film Scanner App
1
2
15
DEUTSCH
1
2
3
Hinweis: Diese Anwendungshinweise sind zum Zeitpunkt der Erstellung dieses
Benutzerhandbuchs korrekt. Es kann leichte Unterschiede in der tatsächlichen
Anwendung aufgrund der Live-Updates geben, da wir sie kontinuierlich verbessern.
Zögere nicht, dich zu melden, wenn du Hilfe bei der Verwendung unserer Scan-App
benötigst!
Scanne diesen QR-Code mit der Kamera Deines
Telefons, um die App herunterzuladen ODER
suche nach "KLIM Film Scanner" im App-Store für
Apple-Geräte oder bei Google Play für Android-
Geräte.
Öffne die App auf Deinem Smartphone und
drücke "Los geht's".Wähle "OK", wenn die
Aufforderung erscheint, dass die App um
Erlaubnis zum Zugriff auf die Kamera bittet.
Lese Dir die Anweisungen durch.
Die App wechselt in den Kameramodus. Oben kannst Du zwischen drei Winkeln
wählen: Weitwinkel, Ultraweitwinkel und Teleobjektiv. Wähle denjenigen aus, der
die besten Ergebnisse auf Deiner Kamera zeigt und drücke auf den Scan-Button
am unteren Rand des Displays.
1
2
3
4

16
KONTAKT
Brauchst du zusätzliche Hilfe für dein Produkt? Kontaktiere uns unter
[email protected]. Unser Spezialistenteam steht dir zur Verfügung
und antwortet immer innerhalb von 24 Stunden!
7
8
Wechseln der Halterungen für kürzere Brennweiten
Die vorinstallierten Halterungen sind für die meisten Handys geeignet. Für Handys mit
kürzeren Brennweiten sind jedoch kürzere Halterungen enthalten, um scharfe Bilder zu
gewährleisten.
Entfernen der vorinstallierten Halterungen:
Klappe die Halteklammern aus.
Drücke mit dem Daumen vorsichtig links und rechts auf die Scharniere, um die
Halterungen herauszudrücken.
Nimm die kürzeren Halterungen und führe das Gegenteil von Schritt 2 aus, indem
du die neue Halterung gegen die Scharniere drückst und sie vorsichtig mit deinen
Zeigefingern ziehst, bis sie einrastet.
1
2
3
6
5
Hinweis: Wenn keiner dieser Winkel für Deine Kamera funktioniert, kannst Du die
mitgelieferten kürzeren Halterungen installieren, da Dein Telefon möglicherweise
einen kürzeren Abstand zum Film benötigt. Eine Anleitung zum Wechseln der
Halterungen findest Du im Abschnitt: "Wechseln der Halterungen für kürzere
Brennweiten".
Sobald Du Deinen ersten Scan gemacht hast, bietet Dir die App unten einige
Bearbeitungsoptionen an: Nach links drehen, Rückgängig machen, Seitenverhältnis,
Nach rechts drehen. Außerdem kannst Du den Scan zuschneiden, indem Du die
Ecken des Bildes in die Mitte ziehst. Du kannst Deine Aktionen jederzeit rückgängig
machen, indem Du auf die Schaltfläche Rückgängig am unteren Rand drückst.
Wenn Du mit Deinen Änderungen fertig bist, kannst Du auf "Auswählen" in der
unteren rechten Ecke klicken.
Auf dem nächsten Bildschirm kannst Du den Filmtyp (positiv oder negativ)
auswählen. Außerdem befinden sich am unteren Rand des Bildschirms einige
erweiterte Bearbeitungswerkzeuge. Durch Drücken der Schaltfläche "Zurücksetzen"
oben links kannst Du jederzeit den Originalscan wiederherstellen.
Wenn Du mit dem Ergebnis zufrieden bist, kannst Du unten links "Exportieren"
wählen und es entweder auf Deinem Handy speichern oder teilen.
Hinweis: In diesem Schritt siehst Du auch eine dritte Schaltfläche "Über". Wenn Du
die Sprache ändern möchtest, kannst Du darauf drücken und Deine bevorzugte
Sprache auswählen.
Um den nächsten Scan durchzuführen, drückst Du einfach auf die Kamerataste
unten in der Mitte Deines Bildschirms und wiederholst den Vorgang.
17
GRAZIE!
Grazie per aver scelto lo scanner per pellicole KLIM K2! Speriamo che ti
piacerà. Ricorda che siamo sempre a tua disposizione per qualsiasi
domanda, problema o suggerimento. Non esitare a contattarci all’indirizzo
ITALIANO
SPECIFICHE TECNICHE
Scanner per pellicole
Tensione operativa: 0.8 - 3,3 V CC
Corrente operativa: ≤0.25A
Potenza : 0,35 W
Colore luce: bianco freddo
Luminanza: 700-3000 cd/㎡
Illuminamento: 3000-10000 Lux
Durata della vita LED: 50.000 hours
Alimentazione: 2 batterie AA esterne (LR6/AM-3) 1,5 V
Finestra per la luce: 41*27 mm / 1,61*1,06 pollici
Product Diagram
Scocca superiore
Pulsante d’accensione
Finestra per
la luce
Struttura di supporto
Vano batterie
Piastra magnetica
per telefono
Direzione inserimento
telefono
Panno per la pulizia
Supporto per telefoni con
ridotta distanza focale
MONTAGGIO E SMONTAGGIO
Passaggi installazione
OPEN
OFF
ON
1
2
3
Posiziona lo scanner su una superficie piatta e piana. La
superficie antiscivolo dovrebbe essere rivolta verso il
basso, mentre la copertura in similpelle verso l’alto. Nota
la presenza di una freccia arancione sulla parte superiore.
Se preferisci, puoi utilizzare il panno incluso per rimuovere
la polvere dal fondo della superficie antiscivolo per
migliorare ulteriormente la stabilità.
Inserisci due batterie AA nel vano dedicato all’interno
della scocca inferiore.
Ribalta i piedini di supporto che sono
collegati alla parte inferiore della scocca
superiore.
ON
OFF
AA
AA
1
3
4
Apri lo scanner di pellicole sollevando la scocca
superiore.
2
3
1
5
Posiziona la scocca superiore sopra quella inferiore
facendo attenzione ad inserire i piedini di supporto nelle
apposite fessure presenti sulla scocca inferiore,
assicurandoti che la freccia arancione sulla scocca
superiore punti verso la finestra per la luce.
18
OPEN
OFF
ON
2

6
Accendi lo scanner per pellicole ed
inserisci la tua pellicola facendola
scorrere sulla finestrella per la luce.
Nota: puoi utilizzare il panno incluso per
rimuovere polvere e/o impronte.
ON
OFF
7
Questo passaggio è facoltativo ed è
utile per dare una maggiore stabilità,
soprattutto agli smartphone più grandi.
Puoi utilizzare la piastra magnetica per
telefono per fissare il telefono
magneticamente alla scocca superiore:
Posiziona la piastra tra il telefono e la
sua cover.
8
Posiziona lo smartphone sulla piastra
superiore con la fotocamera sporgente
oltre il bordo in modo che sia allineata
con la finestra per la luce.
9
10
Diminuisci la luminosità dell’ambiente il
più possibile spegnendo le luci ed
abbassando le persiane. Limita la luce
esterna migliorerà la qualità delle
scansioni.
Sei pronto ad effettuare la tua prima scansione! Se hai bisogno di aiuto con la
procedura di scansione, gentilmente fai riferimento alla sezione dedicata
“Scansione” nelle prossime pagine.
Smontaggio
1
Assicurati che il pulsante d’accensione sia in posizione OFF.
2
Per ripiegare lo scanner per pellicole, estrai verticalmente la scocca superiore da
quella inferiore.
3
Ripiega i piedini di supporto. I piedini sono numerati per indicare l’ordine in cui
devono essere ripiegati.
4
Posiziona la scocca superiore su quella inferiore.
19
ITALIANO

SCANSIONE
Tipi di pellicole (film)
Ci sono 2 tipi di pellicole che si possono utilizzare con questo scanner per pellicole:
Positive 35 mm (colore o bianco e nero) - Scansiona con l’app fotocamera del tuo
telefono o con l’app KLIM Film Scanner.
Negative 35 mm (colore o bianco e nero) - Scansiona con l’app KLIM Film Scanner.
Utilizzando l’app fotocamera di default del tuo smartphone
Assicurati che la fotocamera del tuo smartphone sia allineata con la finestra per
la luce.
Usa lo zoom se necessario fino a quando non hai un’immagine nitida.
Scatta la foto con l’app fotocamera del tuo telefono per eseguire la scansione.
Nota: Puoi modificare le scansioni dall’app Galleria del telefono. Per esempio è possibile
ritagliare la foto per ridurre o eliminare il bordo nero intorno alla foto o regolare i colori
a seconda delle tue preferenze.
Utilizzando l’applicazione KLIM Film Scanner
1
2
20
1
2
3
Nota: Queste istruzioni per l'app sono accurate al momento della redazione di
questo manuale. Ci potrebbero essere delle lievi differenze rispetto alla versione
corrente dell'app per via dei continui aggiornamenti man mano che la miglioriamo.
Non esitare a contattarci se hai bisogno di aiuto nell'utilizzo della nostra app di
scansione!
Scansiona questo codice QR con la fotocamera
del tuo telefono per scaricare l’applicazione
oppure cerca “KLIM Film Scanner” nell’App Store
per dispositivi Apple o su Google Play per
dispositivi Android.
Avvia l’applicazione sul telefono e premi su “Let’s
go”. Premi “OK” quando ti viene richiesto di
fornire l’autorizzazione per l’accesso alla
fotocamera da parte dell’app.
Leggi le istruzioni.
L’applicazione entrerà in modalità fotocamera. In alto potrai selezionare tra tre
impostazioni per l’angolo di campo: wide, ultra-wide e teleobiettivo. Seleziona
quella che fornisce i risultati migliori in base alla fotocamera del tuo telefono e
premi sul pulsante in basso sul tuo schermo per scansionare.
1
2
3
4

ENGLISH
21
ITALIANO
CONTATTI
Hai bisogno di ulteriore assistenza con il tuo prodotto? Contattaci da
[email protected]. Il nostro Team di Specialisti è a tua disposizione e
risponderà sempre entro 24 ore!
7
8
Cambiare il supporto per distanze focali ridotte
Il supporto preinstallato è adatto alla maggior parte dei telefoni, ma includiamo un
supporto più corto per fotocamere che hanno una distanza focale ridotta, in modo da
avere sempre immagini nitide.
Rimuovere il supporto preinstallato:
Estendi i piedini del supporto.
Premi delicatamente con i pollici a sinistra e a destra delle cerniere per spingere i
piedini verso l'esterno.
Prendi il supporto più piccolo e fai l'opposto del passo 2: posiziona i nuovi piedini
contro le cerniere e tira delicatamente con le dita finché non scattano in posizione.
1
2
3
6
5
Nota: Se nessuna delle angolazioni funziona bene con la tua fotocamera, puoi
installare il supporto più piccolo; il tuo telefono potrebbe aver bisogno di stare ad
una distanza inferiore dalla pellicola. Per istruzioni su come cambiare la struttura
di supporto, gentilmente fai riferimento alla sezione “Cambiare il supporto per
distanze focali ridotte”.
Una volta effettuata la tua prima scansione potrai selezionare all’interno dell’app
tra varie opzioni per modificare l’immagine, selezionando nel lato inferiore dello
schermo: Ruota a sinistra, Annulla, Aspect Ratio, Ruota a destra. Inoltre potrai
ritagliare l’immagine scansionata trascinando gli angoli dell’immagine verso il
centro. Puoi sempre annullare le azioni premendo sul pulsante Annulla. Una volta
finito con le modifiche, premi su “Choose” in basso a destra.
Nella schermata successiva puoi scegliere il tipo di pellicola (positivo o negativo).
Inoltre puoi utilizzare strumenti di modifica più avanzati nella parte inferiore dello
schermo. Puoi sempre ritornare alla scansione originale premendo il tasto reset in
alto a sinistra.
Quando il risultato ti soddisfa, puoi scegliere “Export” in basso a sinistra e salvare
sul tuo telefono oppure condividere direttamente. Nota: in questa schermata è
presente un terzo pulsante “About”. Da qui puoi cambiare la lingua
dell’applicazione.
Per eseguire una nuova scansione, premi semplicemente nel pulsante centrale in
basso e ripeti la procedura da capo.
22
¡GRACIAS!
¡Gracias por adquirir el escáner de negativos KLIM K2! Esperamos que
disfrutes utilizando este producto. Recuerda que estamos siempre a tu
disposición para cualquier pregunta, problema o sugerencia que tengas. No
dudes en escribirnos a [email protected].
ESPECIFICACIONES TÉCNICAS
Escáner
Voltaje: CC 0.8-3.3 V
Corriente: ≤0.25A
Potencia: 0,35 W
Color de la luz: blanco frío
Intensidad luminosa: 700-3000 cd/㎡
Iluminancia: 3000-10000 lux
Vida útil de los LED: 50.000 horas
Alimentación: 2 pilas AA (LR6/AM-3), 1,5
Ventana de luz: 41 x 27 mm
Diagrama del producto
Carcasa superior
Interruptor
Placa de luz
Pestañas de sujeción
Compartimento
para las pilas
Placa magnética
Indicador de dirección
del teléfono
Gamuza de limpieza
Soporte para teléfonos
con menor distancia focal
INSTALACIÓN Y DESINSTALACIÓN
Preparación del escáner
OPEN
OFF
ON
1
2
3
Coloca el escáner en una superficie firme y plana. La
silicona antideslizante debe estar abajo, en contacto con
la superficie, y la carcasa superior, arriba. La parte
superior tiene también una flecha naranja.
Nota: opcionalmente. puedes usar la gamuza incluida
para retirar el polvo de la parte inferior de la superficie
antideslizante para una mayor estabilidad.
Inserta 2 pilas AA en el compartimento para pilas de la
carcasa inferior.
Despliega las pestañas de sujeción de la
carcasa superior.
ON
OFF
AA
AA
1
3
4
ESPAÑOL
Abre el escáner levantando la carcasa superior.
2
3
1
5
Acopla la carcasa superior a la carcasa inferior
insertando con cuidado las pestañas de sujeción en las
ranuras de la carcasa inferior. Asegúrate de que la flecha
indicadora naranja de la carcasa superior apunta hacia la
placa de luz.
23
OPEN
OFF
ON
2
6
Enciende el escáner e inserta el rollo de
película deslizándolo en la placa de luz.
ON
OFF
7
Este paso es opcional y sirve para darle
más estabilidad al teléfono,
especialmente a modelos grandes.
Puedes usar la placa magnética incluida
para acoplar el teléfono a los imanes
integrados en la carcasa superior. Solo
tienes que colocar la placa magnética
entre la carcasa superior y el teléfono.
8
Coloca tu teléfono encima de la placa
superior de forma que la cámara
sobresalga por el borde y quede
alineada con la placa de luz.
9
Inserta la película deslizándola en la
placa de luz.
Nota: opcionalmente, puedes usar la
gamuza para limpiar restos de polvo,
suciedad o huellas dactilares.
10
Intenta reducir la luz ambiente todo lo que puedas apagando cualquier otra fuente
de luz y bajando las persianas. Limitar la cantidad de luz que le llega al escáner
aumenta la calidad de los resultados.
11
¡Ya estás listo para hacer tu primer escaneo! Si necesitas ayuda para escanear tu
película, consulta la sección "Escanear" en la siguiente página.
Desinstalación
1
Asegúrate de que el interruptor está apagado (posición OFF).
2
Para plegar el escáner, tira suavemente de la carcasa superior hacia arriba para
separarla de la parte inferior.
3
Dobla las pestañas de sujeción. Cada pestaña tiene un número en el lateral que
indica el orden en que debe ser plegada.
4
Coloca de nuevo la carcasa superior en la carcasa inferior.
24

ESCANEAR
Tipos de película
Hay dos tipos de película compatibles con este escáner:
Positivas de 35 mm (color o blanco y negro) - Escanea con la aplicación
predeterminada de tu cámara o con la app KLIM Film Scanner.
Negativas de 35 mm (color o blanco y negro) - Escanea con la app KLIM Film
Scanner.
ESPAÑOL
Usando la aplicación de cámara por defecto de tu teléfono:
1. Asegúrate de que la cámara de tu teléfono está alineada con la placa de luz.
2. Opcionalmente, haz zoom hasta que la imagen se vea nítida.
3. Toma una foto con la cámara de tu teléfono para realizar el escaneo.
Nota: puedes editar el escaneo yendo a la galería de fotos. Por ejemplo, puedes
recortar la imagen para eliminar los bordes negros y ajustar los colores como prefieras.
Usando la app KLIM Film Scanner
1
2
25
Nota: Estas instrucciones de uso de la aplicación son precisas en el momento de la
redacción de este manual del usuario. Puede haber pequeñas diferencias con la
aplicación real debido a las actualizaciones que realizamos para su mejora
constante. ¡No dudes en ponerte en contacto si necesitas ayuda para usar nuestra
aplicación de escaneo!
Escanea este código QR con la cámara de tu
teléfono para descargar la aplicación o busca
"KLIM Film Scanner" en la App Store para
dispositivos Apple o en Google Play en
dispositivos Android.
Abre la aplicación en tu teléfono y pulsa en
“LET’S GO”. Elige "Aceptar" cuando la app solicite
permiso para acceder a la cámara.
Lee las instrucciones.
La app entrará en modo cámara. Desde la parte superior, puedes elegir entre tres
ángulos: gran angular, ultra gran angular y teleobjetivo. Elige la que muestre
mejores resultados con tu cámara y pulsa el botón de escaneado en la parte
inferior de la pantalla.
Nota: si ninguno de estos ángulos funciona con tu cámara, puedes instalar los
soportes más cortos incluidos, ya que tu teléfono podría necesitar una distancia
más corta para enfocar la película. Para obtener instrucciones sobre cómo cambiar
los soportes, consulta la sección "Cambio de soportes para distancias focales más
cortas".
1
2
3
4

26
CONTACTO
¿Necesitas asistencia adicional para tu producto? Contáctanos a través del e-mail
[email protected]. ¡Nuestro equipo de especialistas está a tu disposición y
te responderá en menos de 24 horas!
7
8
Cambiar los soportes para teléfonos con una menor distancia focal
Los soportes preinstalados son adecuados para la mayoría de teléfonos, pero también
se incluyen unos soportes más cortos para teléfonos con una menor distancia focal,
para obtener siempre imágenes nítidas.
Instalación de los soportes cortos:
Despliega los soportes preinstalados.
Separa cuidadosamente los soportes de las bisagras empujando con los pulgares
hacia la izquierda y hacia la derecha para sacarlos.
Coloca los soportes cortos repitiendo el paso 2 a la inversa: pon los soportes
contra las bisagras usando los dedos índices hasta que estén en su sitio.
1
2
3
6
5
Una vez que hayas hecho tu primer escaneo, la aplicación te dará algunas opciones
de edición en la parte inferior: Rotar a la izquierda, Deshacer, Relación de aspecto,
Rotar a la derecha. Además, puedes recortar el escaneado arrastrando las
esquinas de la imagen hacia el centro. Siempre podrás deshacer tus acciones
pulsando el botón de deshacer en la parte inferior.Cuando hayas terminado de
editar, pulsa "Elegir" en la esquina inferior derecha.
En la siguiente pantalla puedes elegir el tipo de película (positivo o negativo),
Además, contarás con algunas herramientas de edición más avanzadas en la parte
inferior. Siempre podrás restaurar el escaneo original pulsando el botón de reinicio
en la parte superior izquierda.
Cuando estés satisfecho con los resultados, haz clic en "Exportar" en la parte
inferior izquierda y guárdalo en tu teléfono o compártelo.
Nota: en este paso también verás un tercer botón llamado "Acerca de". Si deseas
cambiar el idioma, púlsalo y selecciona el que prefieras.
Para realizar el siguiente escaneo, pulsa el botón de la cámara situado en la parte
inferior central de la pantalla y repite el proceso.