Operating instructions Page 14
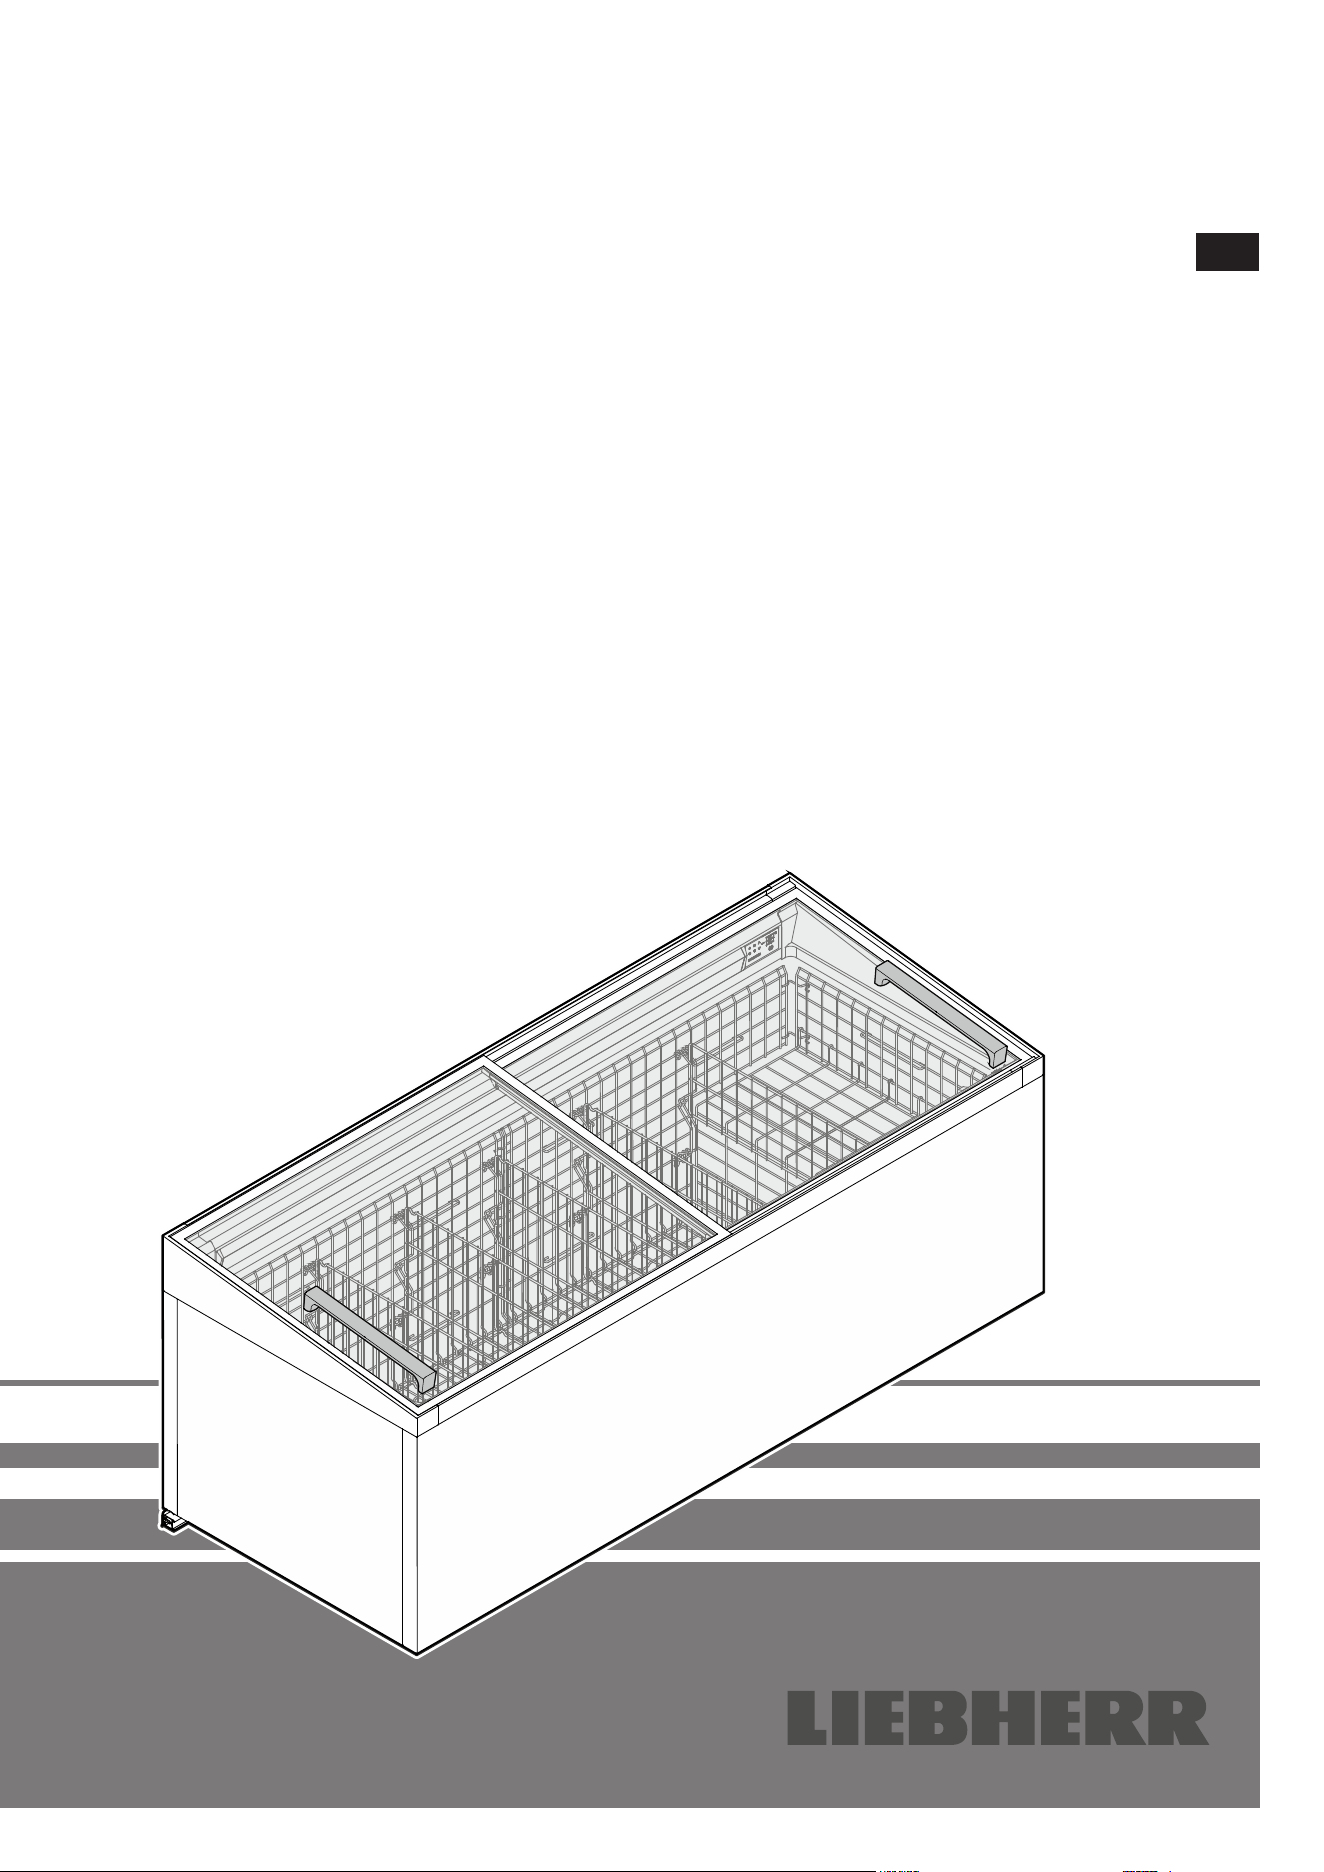
Supermarket cabinet
Read the operating instructions before switching on for the rst time
EN
7084 808-01
14
Content
Description of the appliance ...................................................14
Safety instructions and warnings ...........................................15
Disposal instructions for packaging material .........................15
Range of appliance use ..........................................................15
Appliance dimensions ............................................................15
EPREL database .................................................................... 15
Climate class .......................................................................... 16
Noise emissions from the appliance ......................................16
Display in indicating mode .....................................................16
Setup mode ............................................................................ 16
Activating setup mode ............................................................16
Setting the real time clock ...................................................... 17
Changing the temperature setting .......................................... 17
Activating the defrost function manually ................................17
Interior light .............................................................................17
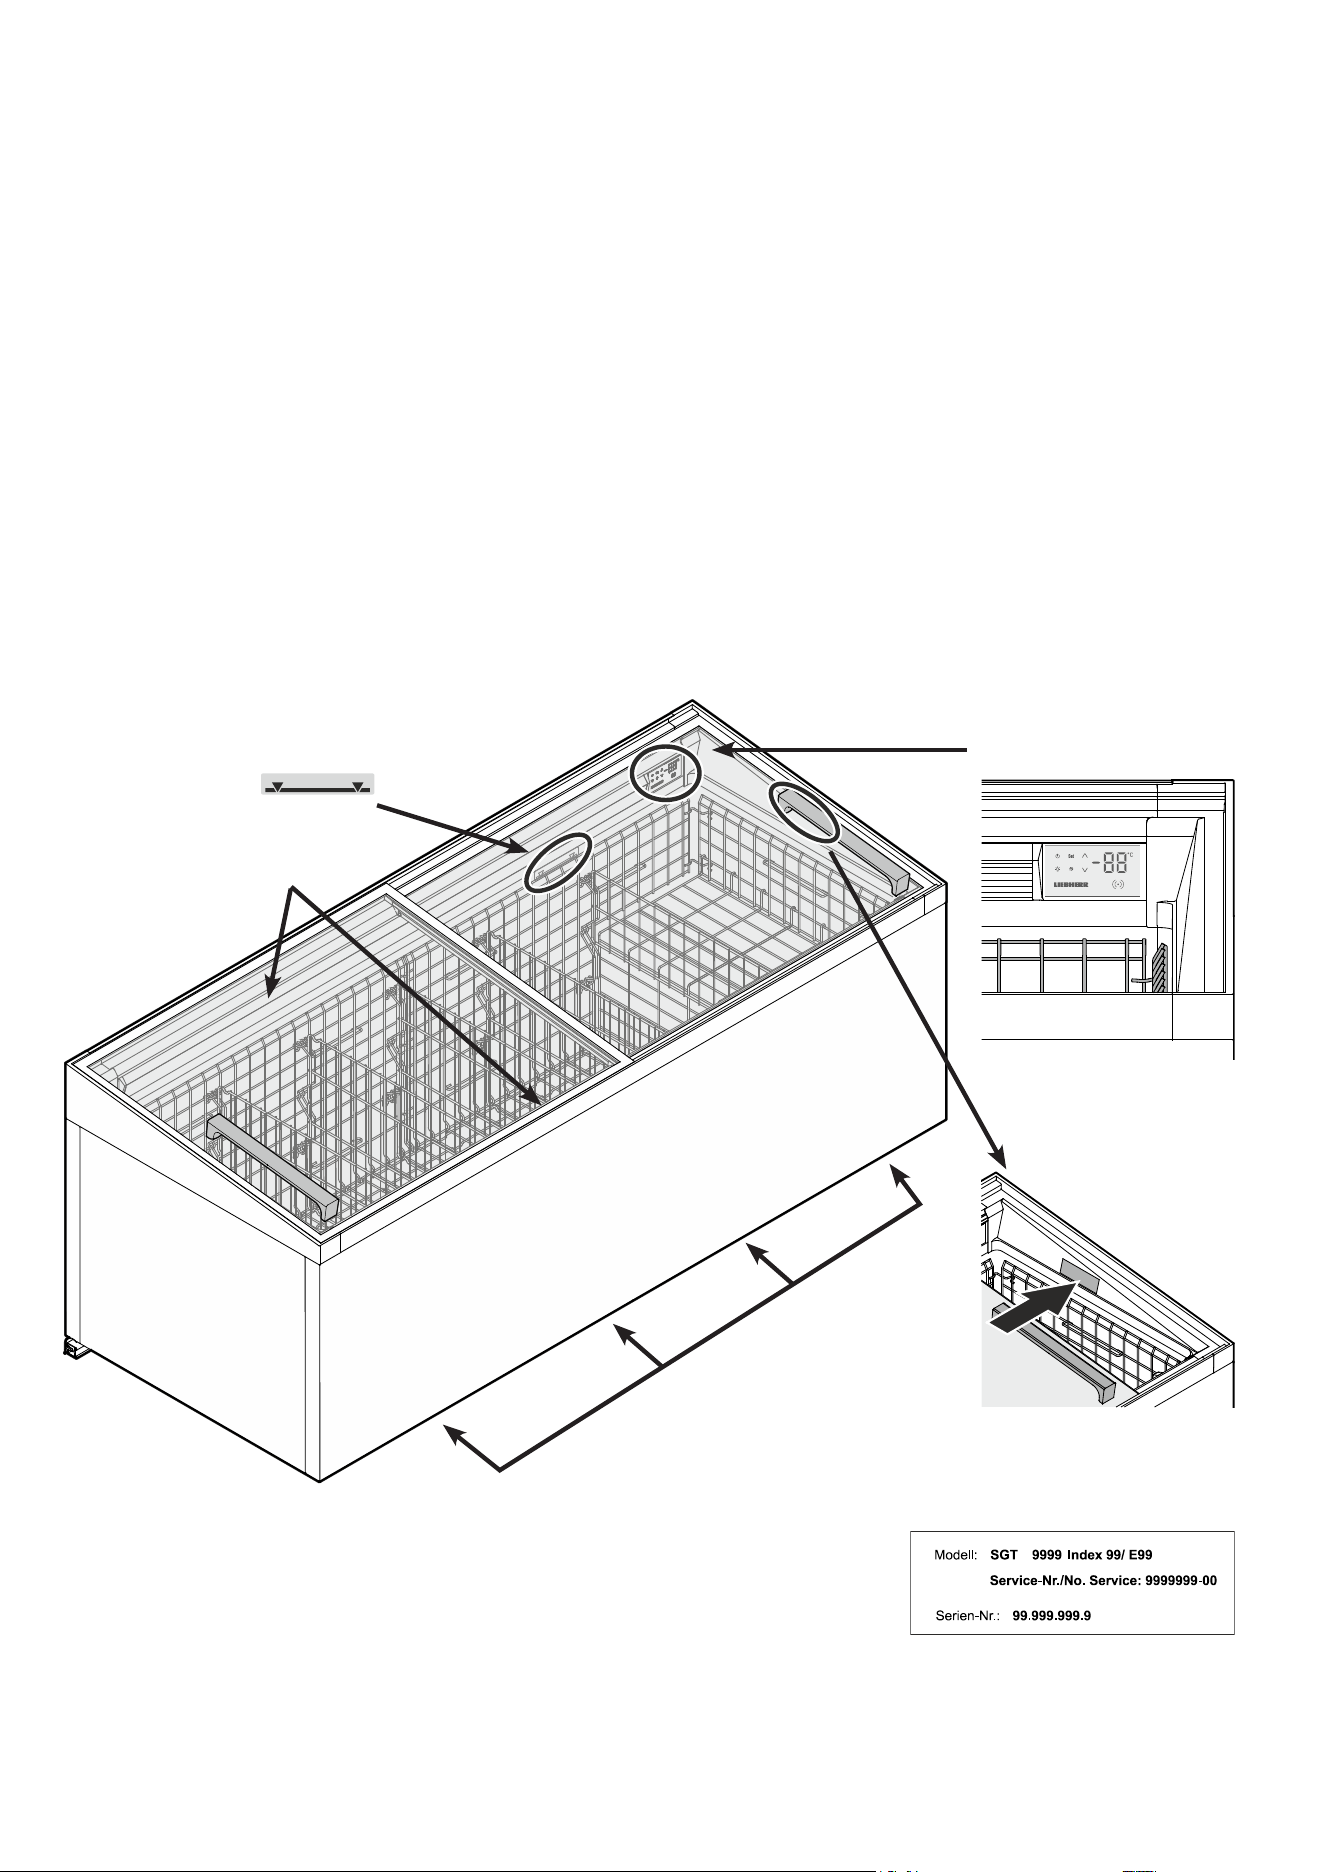
Description of the appliance
Interior light
(LED light strips)
Ventilation openings
Operating and control display
Important note
The ventilation openings on the
front of the appliance must not
be covered.
Stacking limit marking
The appliance may be lled up to the
stacking limit marking .
Service type plate
In the event that the appliance is de-
fective, provide the customer service
department with these details.
Malfunctions ...........................................................................18
Switching the appliance o ....................................................18
Switching the appliance on ....................................................18
Cleaning .................................................................................18
Removing the lids ...................................................................19
Fitting the lids .........................................................................19
Removing the grids ................................................................19
Cleaning the interior ...............................................................21
Inserting the grids ...................................................................21
Repositioning the support brackets .......................................23
Customer service ...................................................................24
Shutting down the appliance .................................................. 24
Disposal notes ........................................................................24
Additional information:............................................................24
15
EN
Range of appliance use
This appliance is only suitable for storing food
that has already been frozen.
The appliance is not suitable for freezing
fresh food.
Any misuse of the appliance may result in damage
to or spoilage of stored goods.
Appliance dimensions
Width
[mm]
Height
[mm]
Depth
[mm]
SGTEs 772 1800 840 850
SGTs 872/852 2100 840 850
SGTEm 872 1800 890 850
SGTm 972/952 2100 890 850
SGTs 1072/1052 2500 840 850
SGTm 1172/1152 2500 890 850
Safety instructions and warnings
• If there is obvious transport damage on the ap-
pliance after it has been unpacked, contact the
supplier. Do not start the appliance.
• Disconnect the appliance from the mains if any
fault occurs. Trip the fuse upstream of the appli-
ance. Transfer food to other appliances.
• Any repairs and work on the appliance should
only be carried out by the customer service
department, as unauthorised work could prove
highly dangerous for the user. The same applies
to changing the mains power cable.
• Do not allow naked flames or ignition sources
to enter the appliance. When transporting and
cleaning the appliance, ensure that the refrigerant
circuit is not damaged. In the event of damage,
make sure that there are no ignition sources
nearby and keep the room well ventilated.
• Avoid prolonged skin contact with cold surfaces or
chilled/frozen food. This could cause pain, numb-
ness and frostbite. In the case of prolonged skin
contact, protective measures should be taken,
e.g. gloves should be worn.
• Do not store food whose use-by date has expired
in the appliance. Eating such goods can cause
food poisoning.
• Do not store explosive substances or spray cans
with inflammable propellants in the appliance.
Electrical components might cause leaking gas
to ignite.
• Do not use electrical appliances inside the ap-
pliance.
• The appliance is designed for use in enclosed
areas. Do not operate the appliance outdoors or
in areas where it is exposed to splash water or
damp conditions.
• The LED light strips illuminate the interior of the
appliance. They are not suitable for lighting a
room.
• Do not place objects on the appliance and do
not place heavy loads on the sliding glass lids.
The lids could be damaged.
• Do not use any mechanical devices or other
artificial aids for defrosting other than those
recommended by the manufactur er.
• Do not cover the ventilation openings.
Disposal instructions for packaging material
WARNING
Danger of suocation due to packing material
and plastic lm!
Do not allow children to play with packaging
material.
Dispose of the packaging material in compliance
with current regulations.
EPREL database
As from 1 March 2021, information about energy labelling and
ecodesign requirements will be available in the European product
database (EPREL). You can access the product database using
the following link: https://eprel.ec.europa.eu/. You will be asked
to enter the model identier. You will nd the model identier on
the type plate.
16
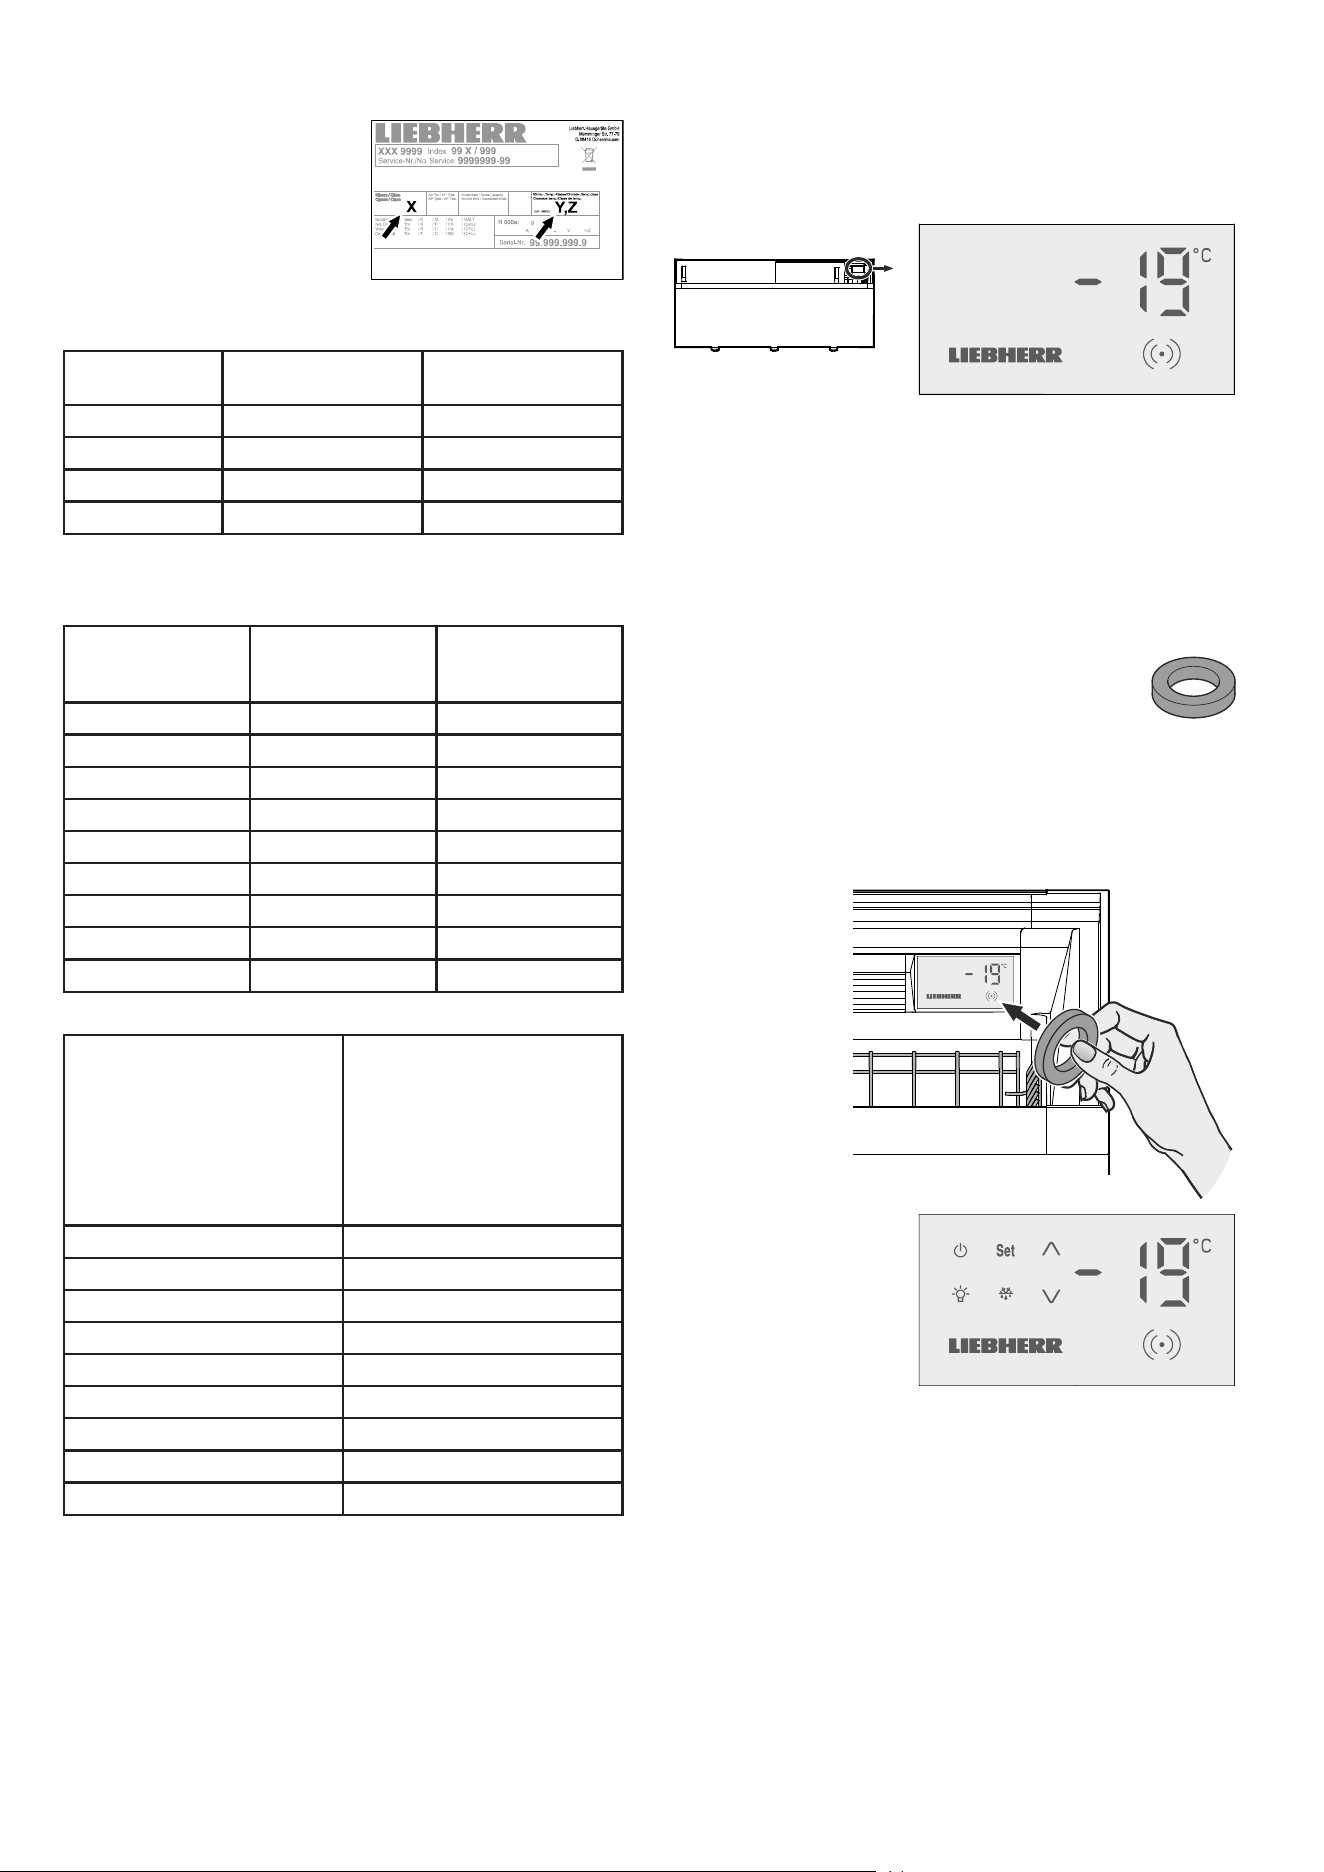
Activating setup mode
• Touch the activation point on the display with the release key.
Setup mode
The supplied release key is required to activate setup
mode.
The operating symbols are
displayed.
Note
If no button is pressed for 2 minutes, the electronic control system
will automatically switch back to indicating mode.
Display in indicating mode
After being commissioned by the team of technicians, the display
will be in indicating mode.
The display shows the current interior temperature.
Important note
The goods must not be inserted until -18°C is shown
in the display.
An audible warning
signal will sound for
1 second.
Noise emissions from the appliance
The noise level while the appliance is operating is below 70 dB(A)
(relative noise level 1 pW).
The appliance complies with the relevant safety regulations and
EU Directives 2014/30/EU and 2006/42/EG.
Climate class
The climate class [X] specifies the
ambient conditions in which the
appliance can be operated safely.
The climate class [Y] and tempera-
ture class [Z] define the maximum
outline conditions in which the
appliances will operate perfectly.
The climate rating is indicated on the type plate.
[X]
Climate class
Max. room
temperature
Max. relative
humidity
3 25 °C 60 %
4 30 °C 55 %
5 40 °C 40 %
7 35 °C 75 %
The minimum room temperature at the place of installation is 10°C.
[Y]
Climate class
Temperature
[°C]
Relative humid-
ity
[%]
0 20 50
1 16 80
8 24 55
2 22 65
3 25 60
6 30 55
6 27 70
5 40 40
7 35 75
Recommended temperature setting:
[Z]
Temperature class
Temperature setting
[°C]
L1 -18
L2 -18
L3 -15
M0 +4
M* 6
M1 +5
M2 +7
H1 +10
H2 +10

17
EN
Setting the real time clock
• Activate setup mode using the release key
• Press and hold the Set button for 5 seconds. Display =
• Press . Display =
• Press Set. Display =
• Set the hour by pressing the buttons.
• Press Set. Display =
• Set the minute by pressing the buttons.
• Press Set. The new setting will be saved.
The electronic control system will switch back to indicating mode.
• Press and hold the Set button for 5 seconds. Display =
• Press . Display =
• Press . Display =
• Press Set. Display =
• Set the year by pressing the buttons.
• Press Set. Display =
• Set the month by pressing the buttons.
• Press Set. Display =
• Set the day by pressing the buttons.
• Press Set. The new setting will be saved.
The electronic control system will switch back to indicating mode.
Changing the temperature setting
The desired temperature is set to -18°C.
It may be set to -23°C.
Depending on the customer's version, dierent control areas may
be blocked or released.
Proceed as follows:
• Activate setup mode using the release key
The current temperature inside the appliance is displayed.
• Press -23 flashes.
• Press Set The new setting will be saved.
The electronic control system will switch back to indicating mode.
Note
Repeat these steps to reset the temperature to -18°C.
Press the button instead of the button.
Activating the defrost function manually
The appliance defrosts automatically.
Increased frost may form on the interior container in high ambient
temperature and humidity.
In this case, activate the defrost function manually.
Proceed as follows:
• Activate setup mode using the release key
• Press flashes.
• Press Set The defrosting process will be started.
The electronic control system will switch
back to indicating mode. The LED will
be lit until the defrosting process is nished.
Interior light
(depending on options)
Switch the interior light on or o as required.
Switching on the interior light
• Activate setup mode using the release key
• Press flashes.
• Press Set The interior light is switched on.
Note
Repeat these steps to switch o the interior light again.
Lighting
Class
1
Light source
SGTs 872, SGTm 972:
This product contains a light source that meets
energy eciency rating E
LED
SGTs 1072, SGTm 1172:
This product contains a light source that meets
energy eciency rating F
LED
SGTEs 772, SGTEm 872:
This product contains a light source that meets
energy eciency rating G
LED
1
The appliance may contain light sources with dierent
energy eciency classes. The lowest energy eciency class
is indicated.

18
Malfunctions
The release key symbol (dot) will ash in
the event of a malfunction or if the appli-
ance is defective.
Proceed as follows::
• Activate setup mode using the release key
Either a ashing temperature display or an error code will
appear in the display.
Action to take if the temperature display is
ashing
• First check whether the appliance lids are closed.
If the temperature falls after closing the lids, no further action is
required.
If no drop in temperature is apparent after approx. 10 minutes:
• Transfer the goods immediately to other appliances.
• Notify the customer service department.
Action to take if an error code is displayed
Error code F1, F2, F4 or F5
The temperature sensor in the appliance is defective.
Action
• Notify the customer service department.
The goods can be left in the appliance since the temperature is
maintained by the appliance being in emergency mode.
Error code Ht
The temperature inside the appliance is too high (warm).
Action
• Transfer the goods immediately to other appliances.
• Notify the customer service department.
Error code nA
A mains failure has occurred.
Action
• Press Set The maximum (warmest) temperature
during the mains failure is displayed.
• Decide whether the goods can be used depending on the level
of the temperature rise.
Cleaning
The appliance may only be cleaned by
authorised, trained personnel.
Clean the appliance at least twice per year.
Do not use steam cleaning equipment to clean
the appliance. This may cause damage or
injuries.
Do not use acidic, highly alkaline or abrasive
cleaning products.
Do not use chemical solvents.
Do not use abrasive cleaning cloths or
sponges.
Use a damp cloth only around the electronic
display. Ensure that no moisture gets into the
electrical components.
Before cleaning, always disconnect the
appliance from the mains. Switch o the fuse.
Switching the appliance o
• Activate setup mode using the release key
• Press and hold the button for 5 seconds.
The temperature display will go out.
The interior light will go out.
The release key symbol (dot) will still be lit
to show that the appliance is connected to
the electricity supply.
Important note
If the appliance has been switched o using the
button, the refrigeration system is switched off but
the appliance has not been fully disconnected from
the mains.
Before cleaning, always disconnect the appliance
from the mains. Switch o the fuse.
Switching the appliance on
• Activate setup mode using the release key
Press the button.
The display will show the current tempera-
ture inside the appliance.
19
EN
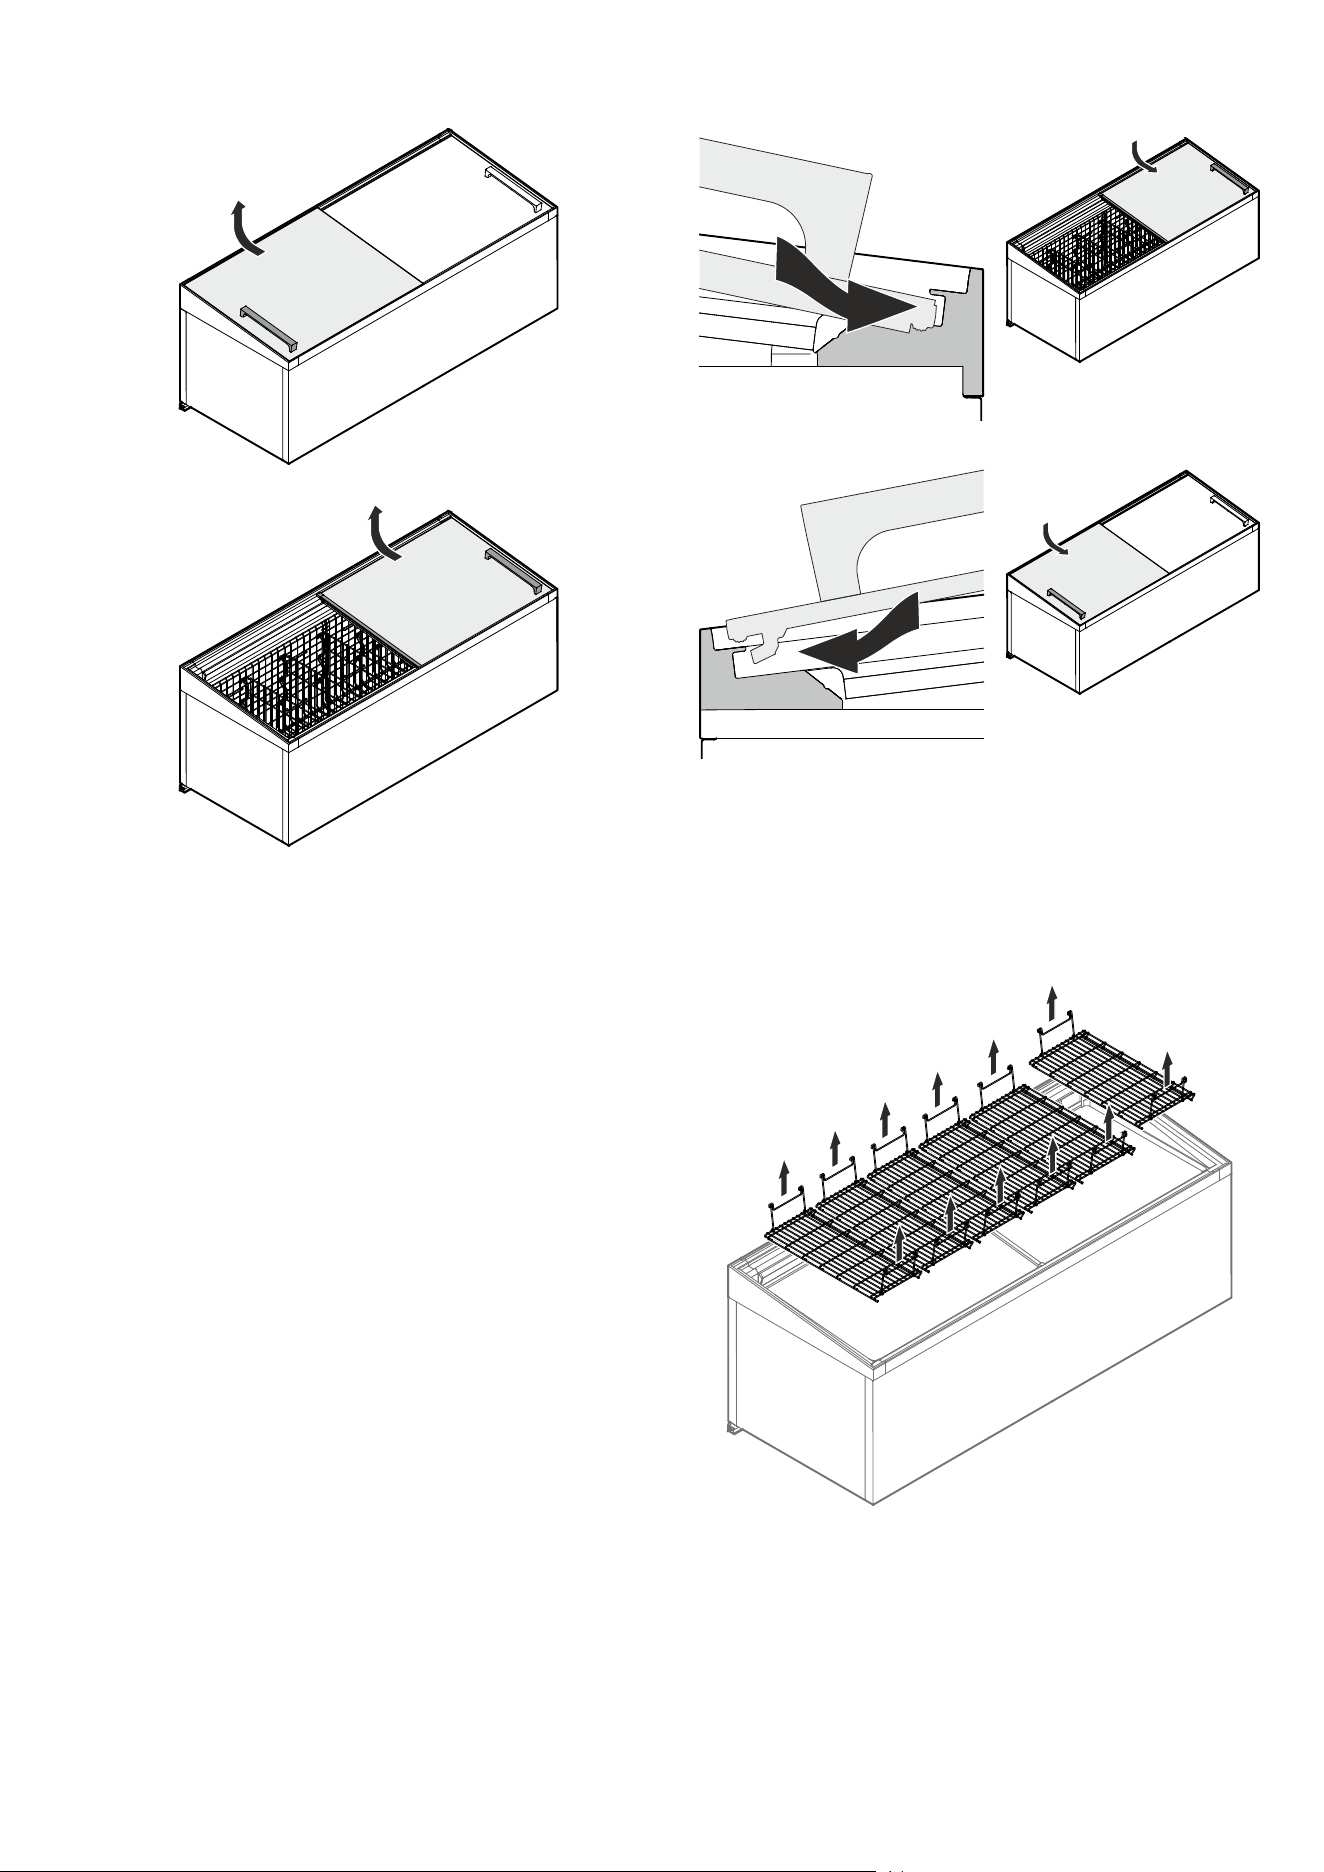
Removing the lids
• Clean the glass surfaces with glass cleaner. Clean the handles
and plastic strips with water and detergent. Then dry the lids.
1.
2.
Fitting the lids
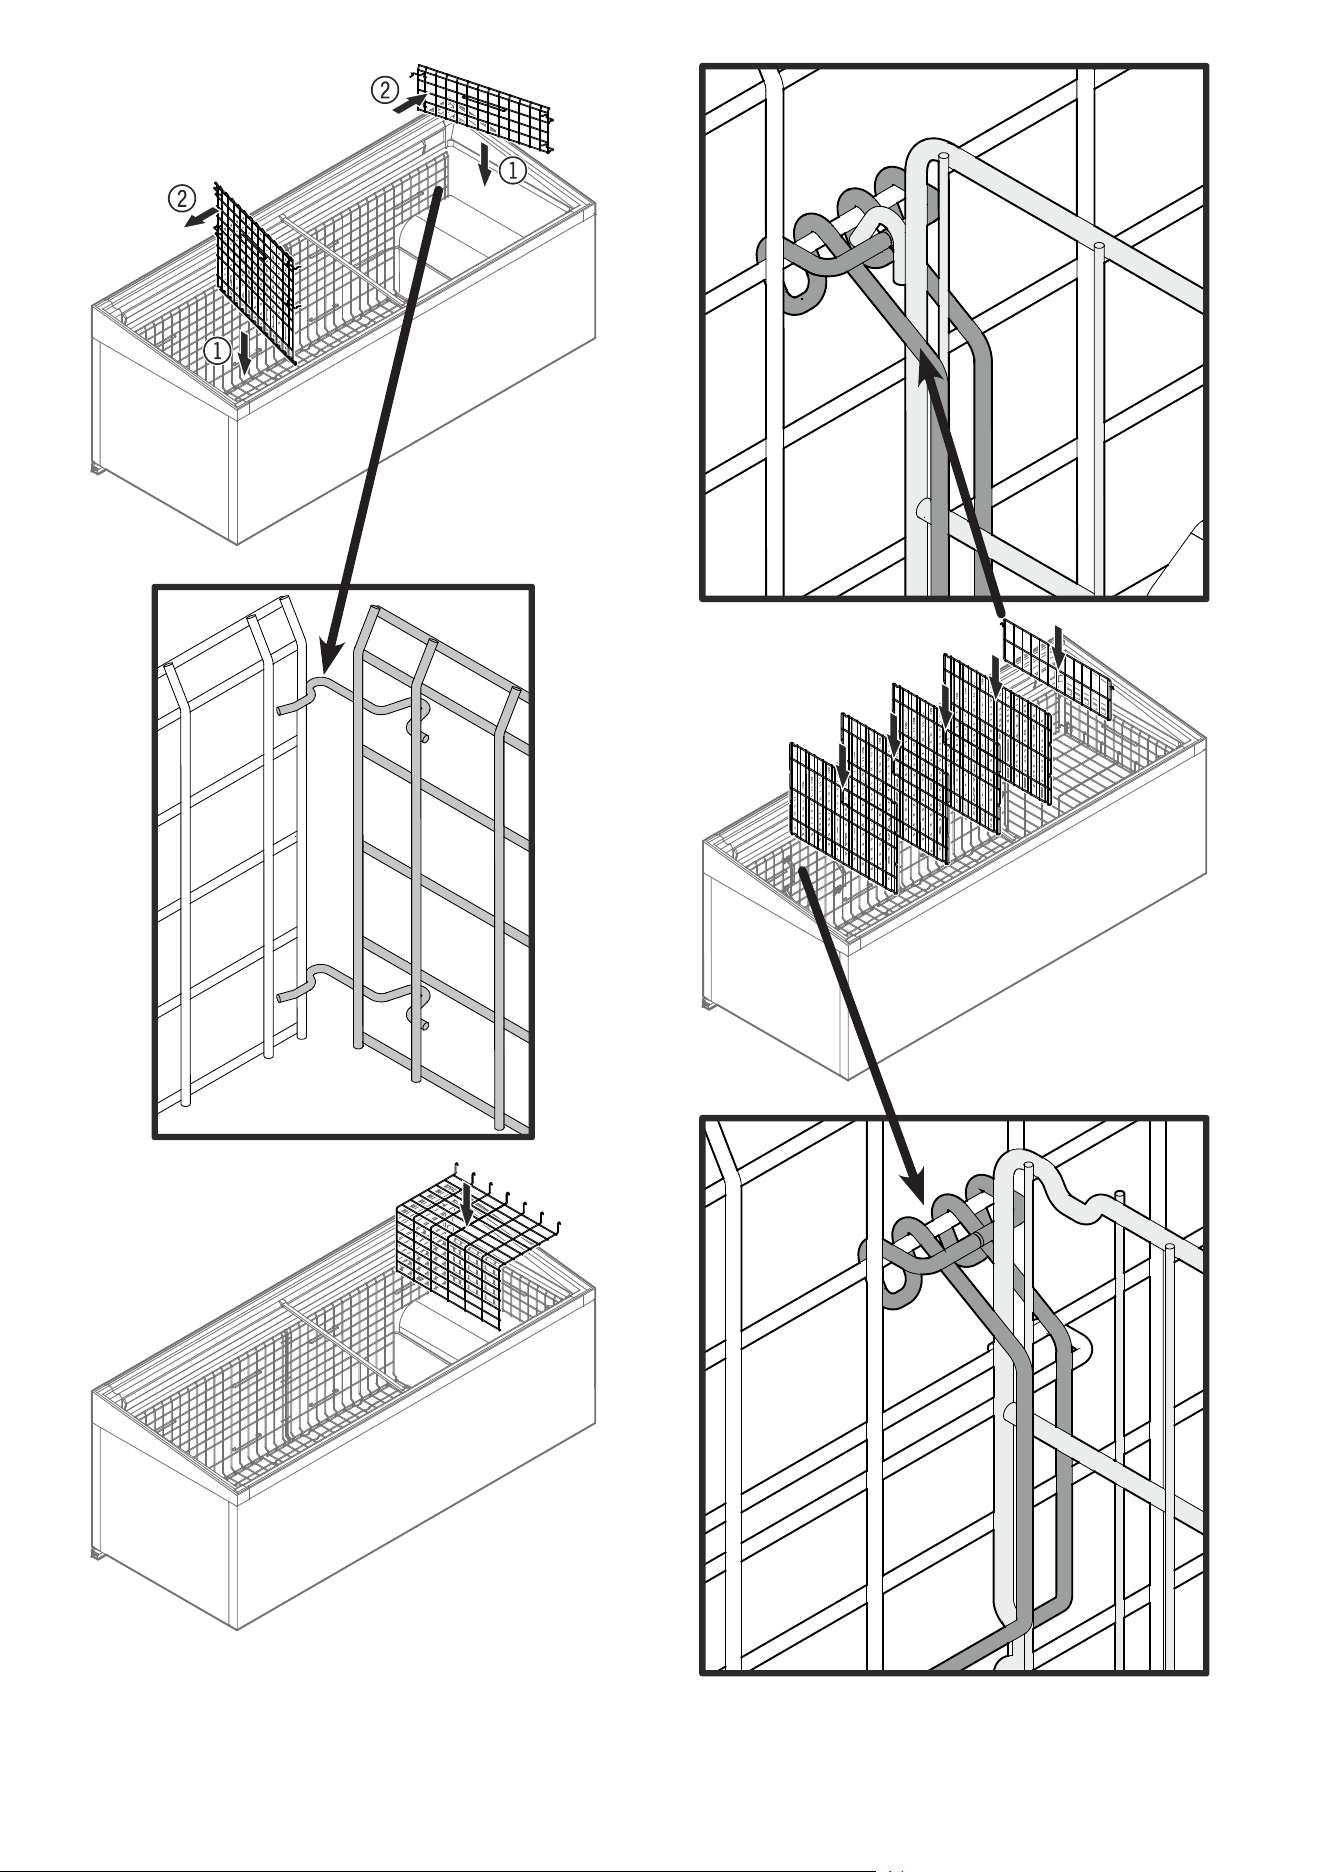
• Remove the grids in the sequence shown below.
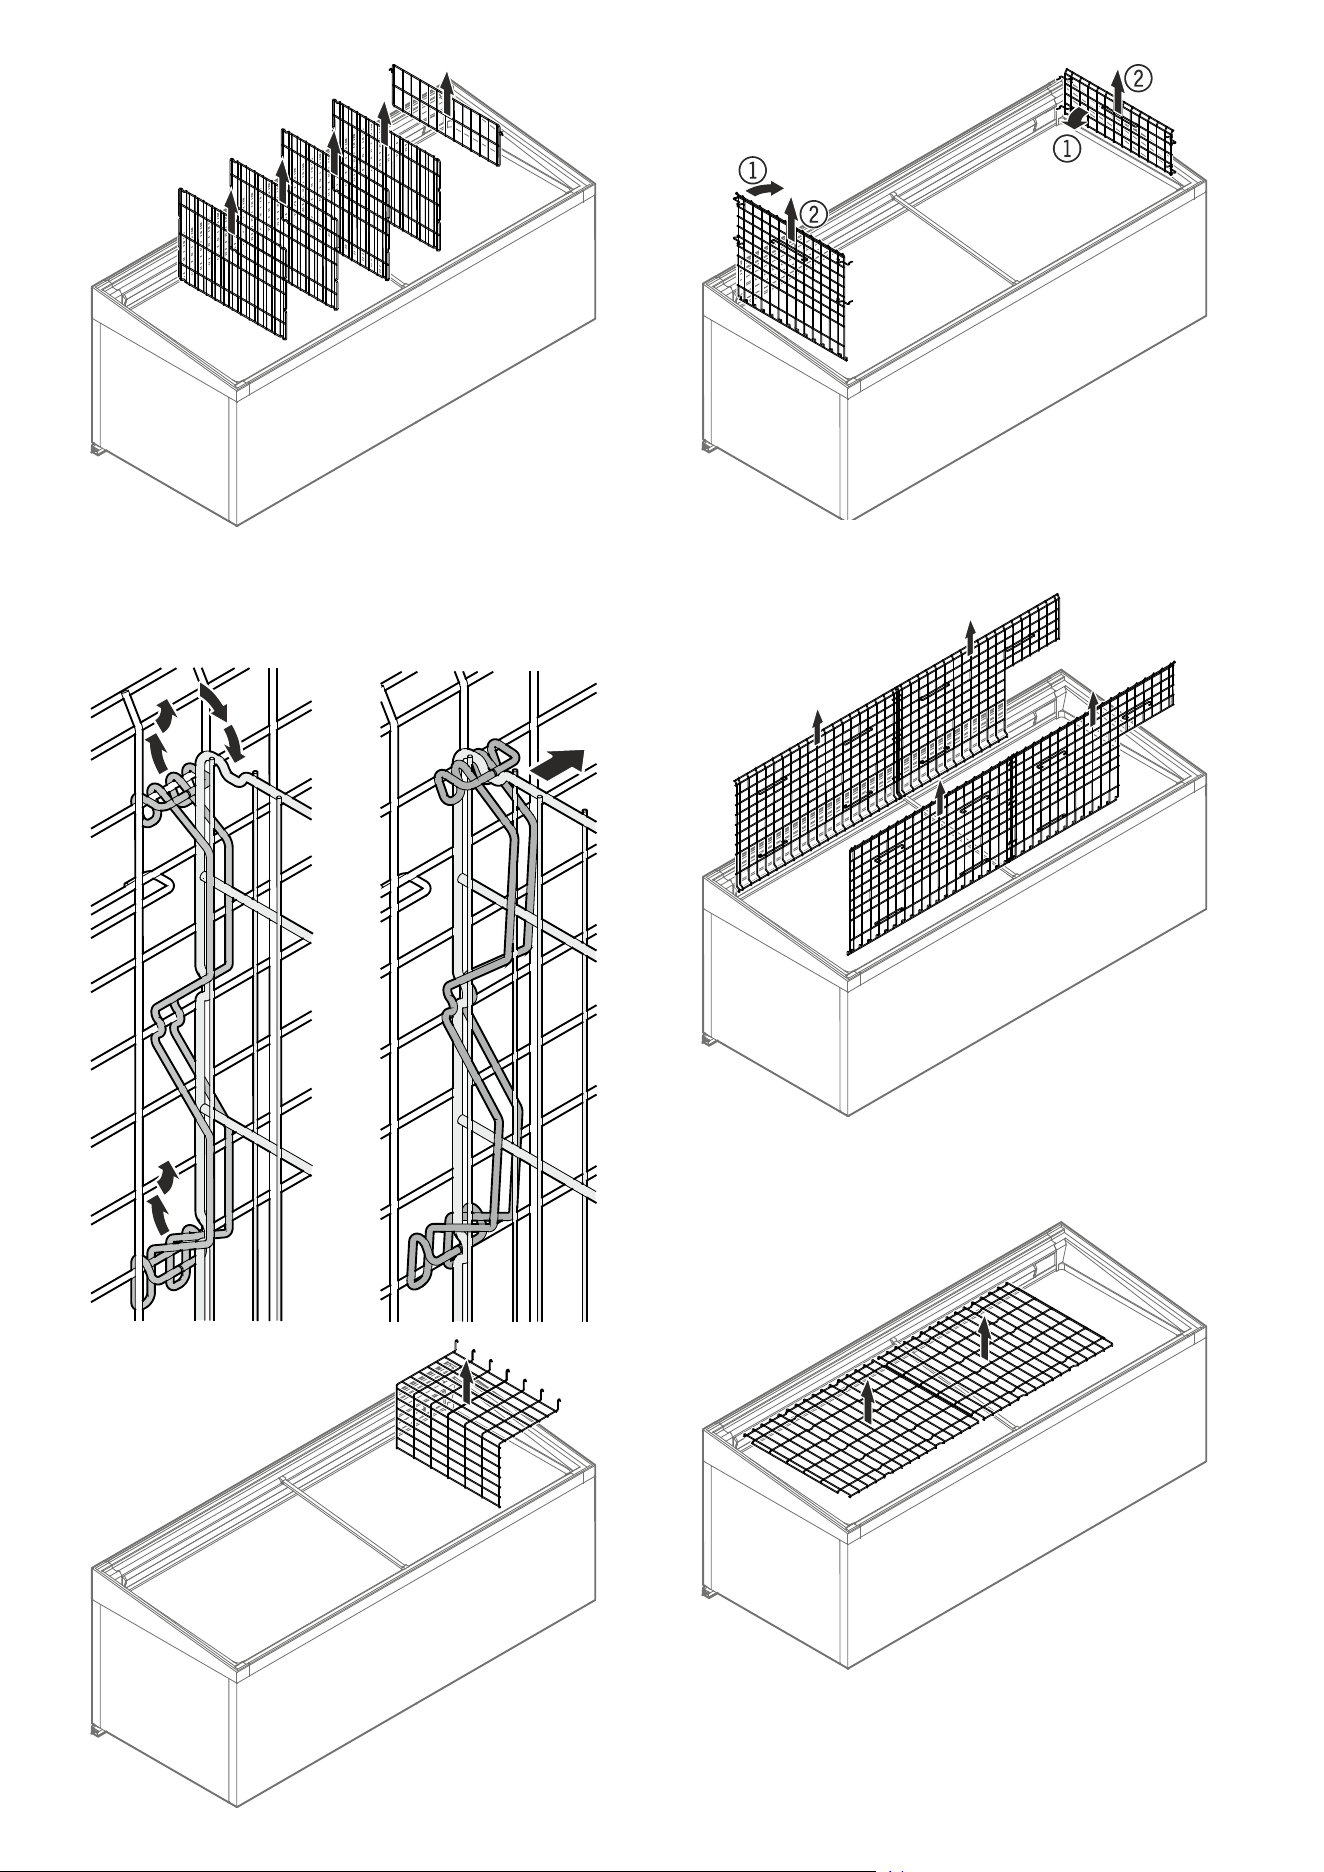
Removing the grids
1.
2.
1.
20
2.
3.
Removing the separators if there is a shortage of space due to
display units above the appliance
• Unhook one of the support brackets,
• Place it on the separator,
• Swivel the separator to the side.
• Clean the grids with water and detergent, then dry them.
4.
5.
6.
21
EN
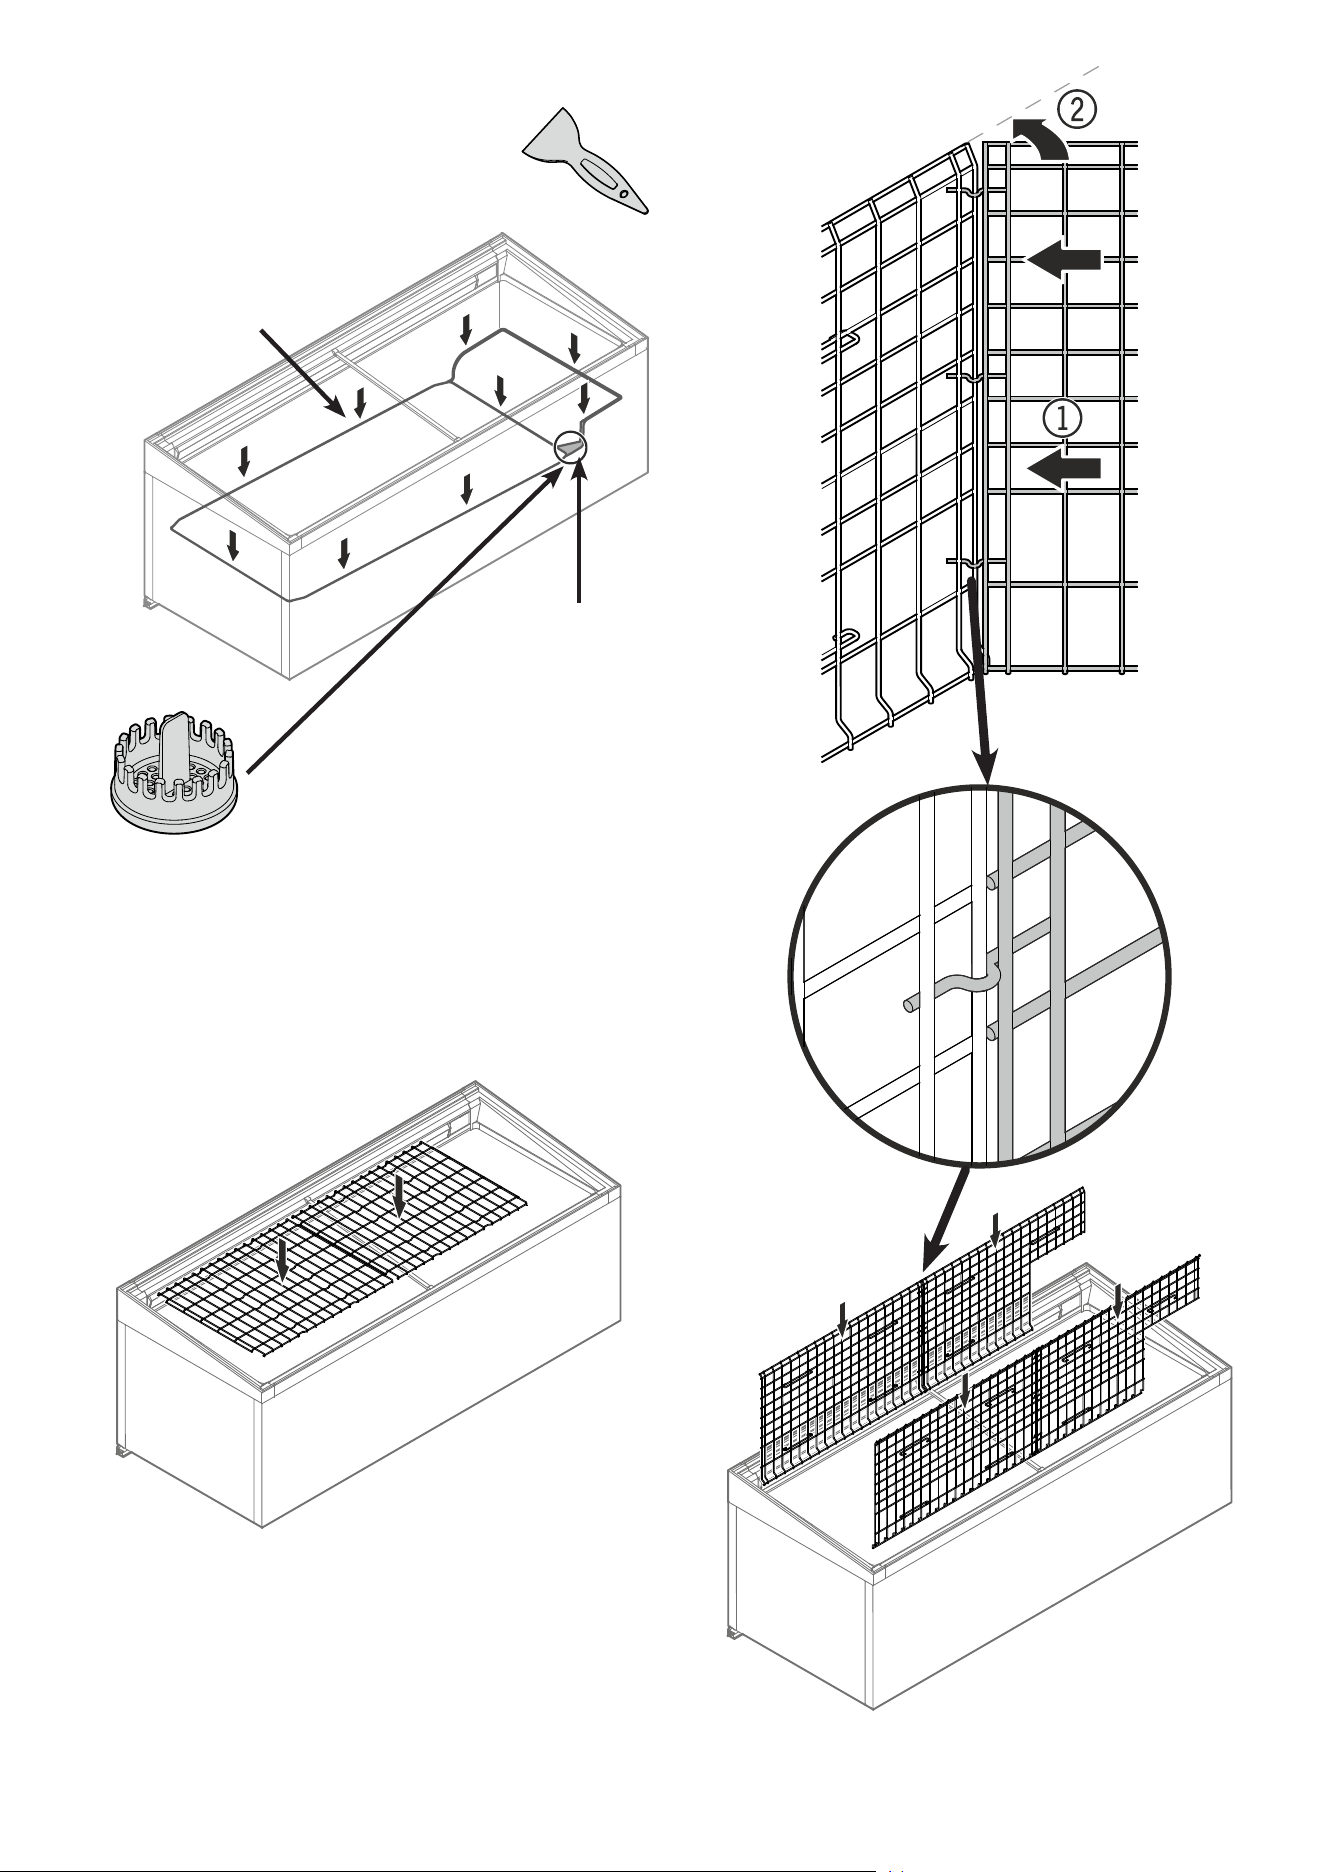
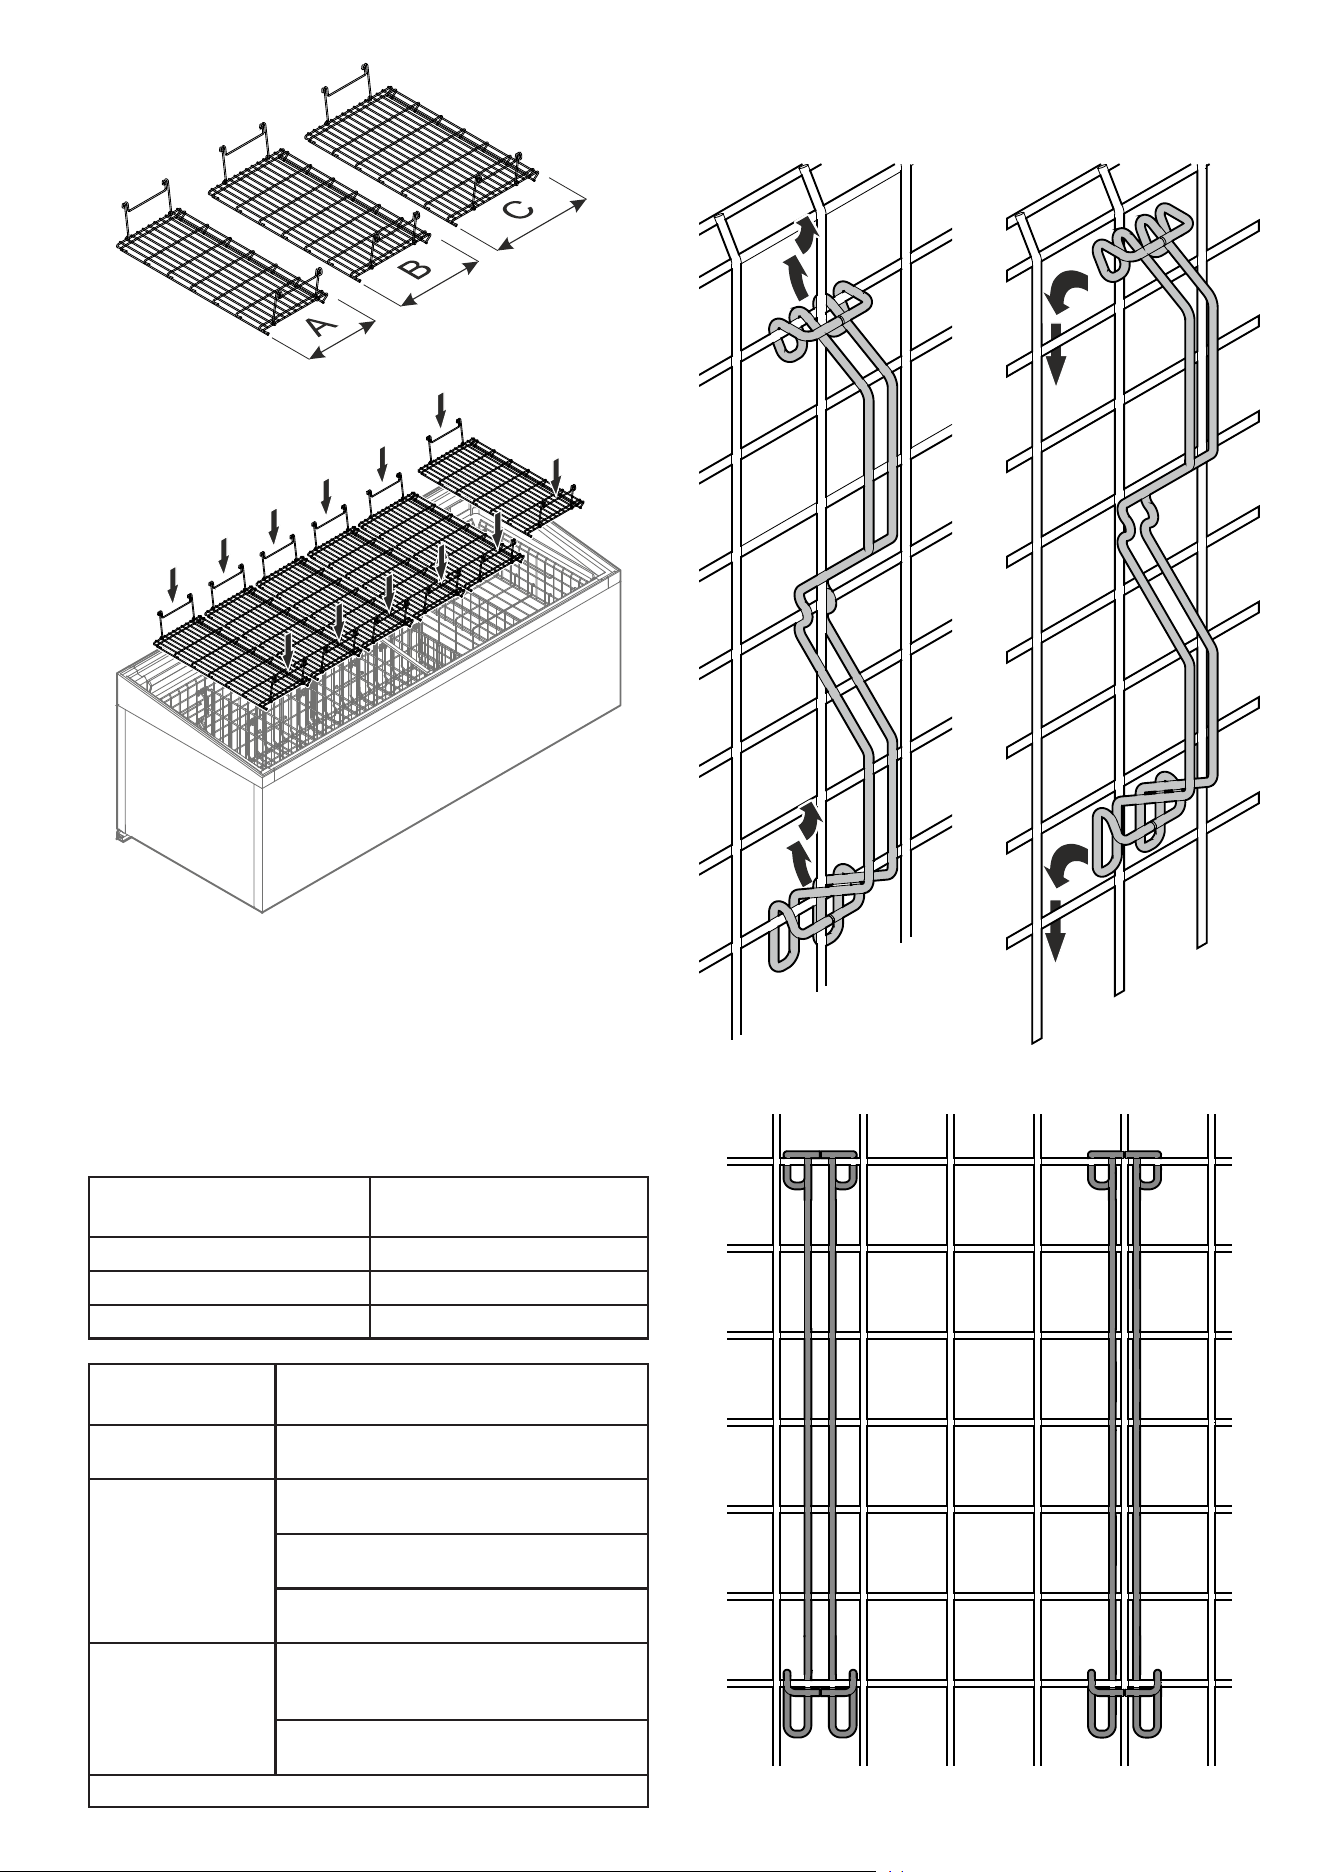
Inserting the grids
Cleaning the interior
• Clean the defrost drain
gulley.
• The defrost drain open-
ing must be clear.
• Clean the interior container walls.
• Dry the interior of the appliance.
• Remove the frost from the interior container walls
using the supplied ice scraper.
• Clean the filter.
1.
Important note
The storage grids must be tted.
No goods may be placed on the baseplates.
2.
22
3.
4.
5.
23
EN
6.
Width of intermediate
grid
mm
A
280
B
330
C
380
Chest width
[mm]
[No. of parts] x [width of
intermediate grid]
1800
3x A
2x B
2100
4x A
2x B
1x A
4x C
5x A
1x C
2500
1x C
4x A
2x B
5x C
1x A
Other combinations are possible
NOTICE
Excessive load!
Damage to property.
The maximum load per intermediate grid is 31 kg.
Repositioning the support brackets
1.
2.
3.
24
Shutting down the appliance
If the appliance is shut down for a lengthy period of time:
Switch o the fuse.
Clean the appliance and leave the lids open to prevent odour
formation.
Disposal notes
The appliance contains reusable materials and should
be disposed of properly - not simply with unsorted
household refuse.
Appliances which are no longer needed must be
disposed of in a professional and appropriate way, in
accordance with the current local regulations and laws.
When disposing of the appliance, ensure that the refrigerant circuit
is not damaged to prevent uncontrolled escape of the refrigerant
it contains (data on type plate) and oil.
Customer service
If the appliance suers a malfunction:
• Transfer the stored goods to other appliances.
• Switch off the appliance.
See section entitled Switching the appliance off.
• Disconnect the appliance from the mains > switch off the fuse.
• Notify the customer service department quoting the appliance
details.
The appliance details are shown on the service type plate.
The position of the service type plate is shown in the section
entitled Description of the appliance.
Additional information:
- Food will remain fresh for longer if stored at the correct tempera-
ture. This can prevent having to discard food needlessly.
- If the condenser coil is not cleaned every year, it will significantly
reduce the appliance's efficiency.
- The period during which spare parts, necessary for the repair
of the refrigerating appliance with a direct sales function, are
available is 10 years.
- The minimum duration of the guarantee of the refrigerating ap-
pliance with a direct sales function offered by the manufacturer,
importer or authorised representative is 2 years.

25
EN
64
Liebherr Hausgeräte Lienz GmbH
Dr.-Hans-Liebherr-Strasse 1
A-9900 Lienz
Österreich
www.liebherr.com
*708480801*
