

Roller Shade Driver E1 User Manual
Мотор рулонных штор E1: Руководство по
эксплуатации
Bedienungsanleitung für Rollladenmotor E1
Moteur de Volet Roulant E1 Manuel de
l’utilisateur
Manual de instrucciones para el Control de
Cortinas Enrollables E1
Motore per tende a rullo E1 Manuale di
Istruzioni
ローラーシェードドライバーE1ユーザーマニュアル
스마트�블라 E1 사용�설명서
智能捲簾伴侶E1 用戶手冊
·1
·9
·19
·28
·37
·46
·55
·62
·69
Product Introduction
Roller Shade Driver E1 is a Zigbee 3.0 smart product that can
help you control the bead chain of your shades/blinds and
transform your existing roller shade into a smart one. With an
Aqara Zigbee 3.0 hub, it can realize functions such as remote
control and timing control via the Aqara Home app, and work
with other smart devices to form a smart home system.
Warnings
1.This appliance can be used by children aged from 8 years and
above and persons with reduced physical, sensory or mental
capabilities or lack of experience and knowledge if they have
been given supervision or instruction concerning use of the
appliance in a safe way and understand the hazards involved.
2.Children shall not play with the appliance.
3.Cleaning and user maintenance shall not be made by children
without supervision.
4.WARNING: the drive shall be disconnected from its power
source during cleaning, maintenance and when replacing parts.
5.It must only be supplied at Separated or Safety Extra-Low
Voltage (SELV).
6.WARNING: Important safety instructions. It is important for the
safety of persons to follow these instructions. Save these
instructions.
*An Aqara Zigbee 3.0 hub is required. Some functions require specific
models of hubs. Please consult www.aqara.com/support for more details.
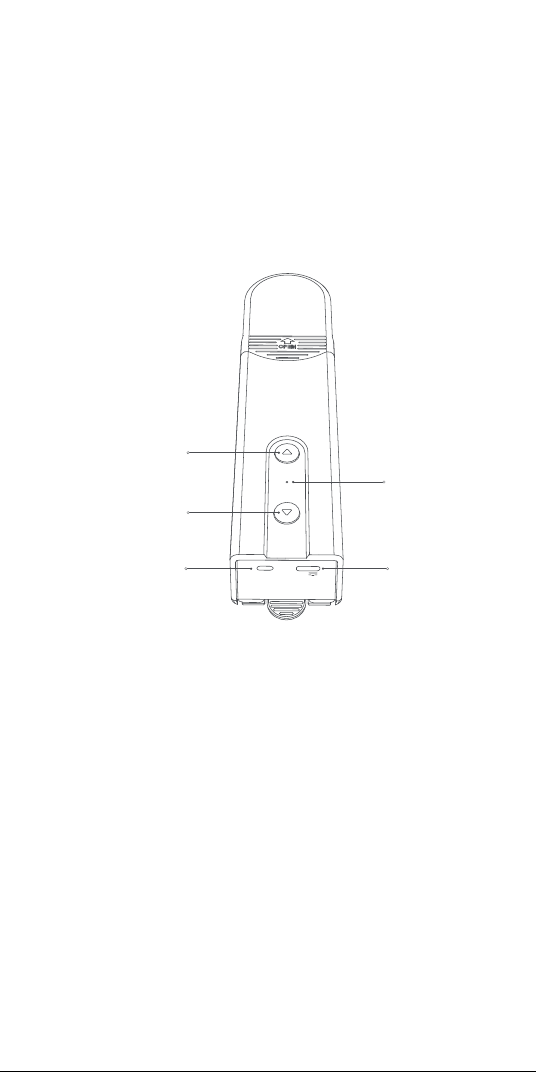
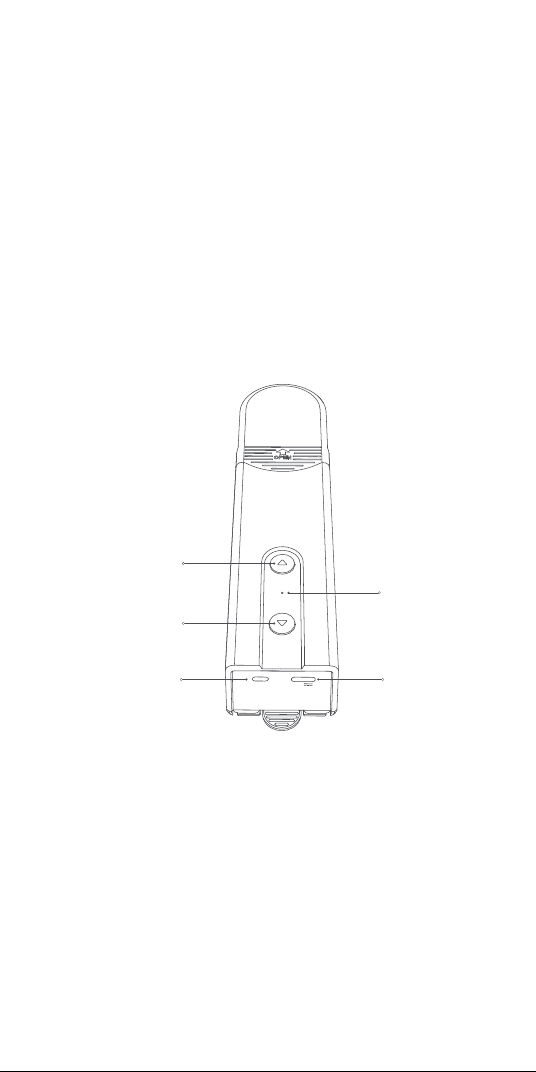
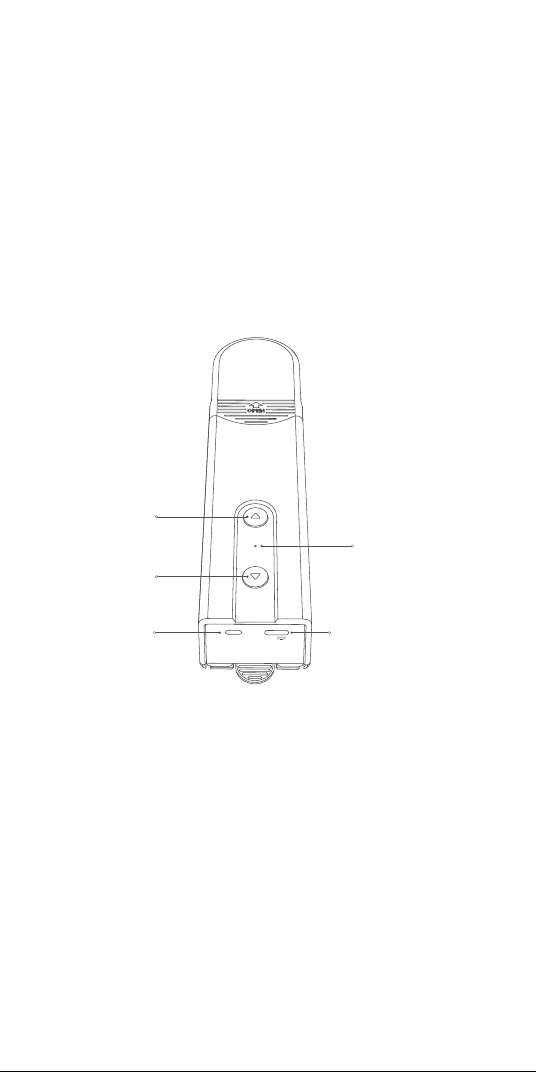
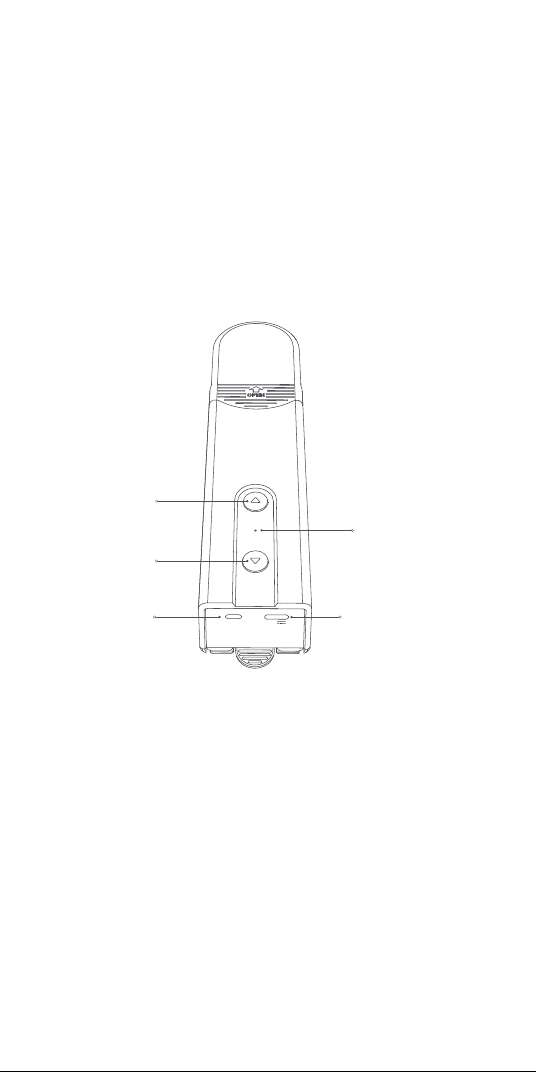
RESET
5V
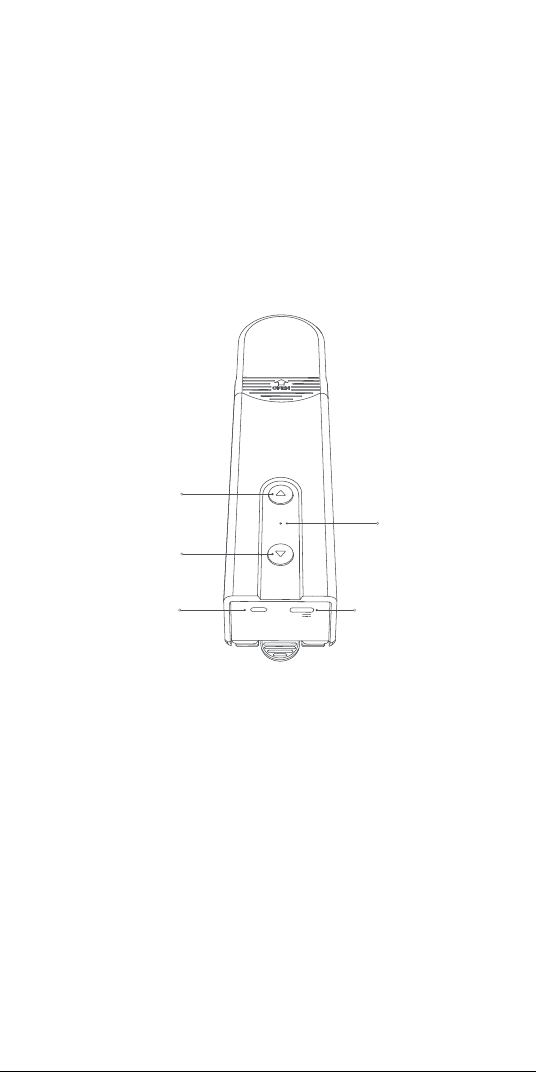
Indicator
Down Button
Up Button
RESET Button
USB Type-C Port
1
7.Do not allow children to play with fixed controls.
8.Frequently examine the installation for imbalance and signs
of wear or damage to cables springs and fixings. Do not use if
repair or adjustment is necessary.
9.Do not operate when maintenance, such as window cleaning,
is being carried out in the vicinity.
10.WARNING: Important safety instructions. Follow all
instructions since incorrect installation can lead to severe injury.
11.Before installing the drive, remove any unnecessary cords or
components and disable any equipment not needed for
powered operation.
12.That the characteristics of the driven part must be
compatible with the rated load and rated operating time.
13.This appliance contains batteries that are non-replaceable.
14.Fixed controls have to be clearly visible aer installation.
Preparation before Use
1. A smartphone or tablet that supports Wi-Fi or a cellular
network (with iOS or Android system) is required.
2. An Aqara Zigbee 3.0 hub is required (The distance between
this product and your hub should be within 30 m).
3. Download and install the Aqara Home app.
4. A drilling machine is required (must be equipped with a φ5
drill bit).
5. Please make sure that there is a Wi-Fi connection and your
internet connection is stable.
6. Please charge the Roller Shade Driver E1 for about 2 hours
and 30 minutes.
7. The mass and the dimension of the shade to be driven shall
be compatible with the rated torque and rated operating time.
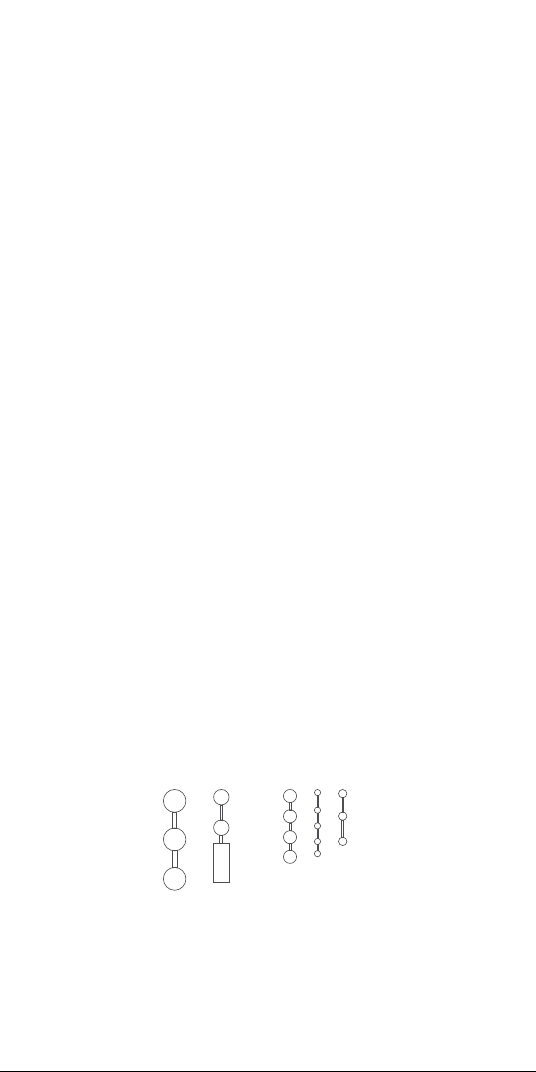
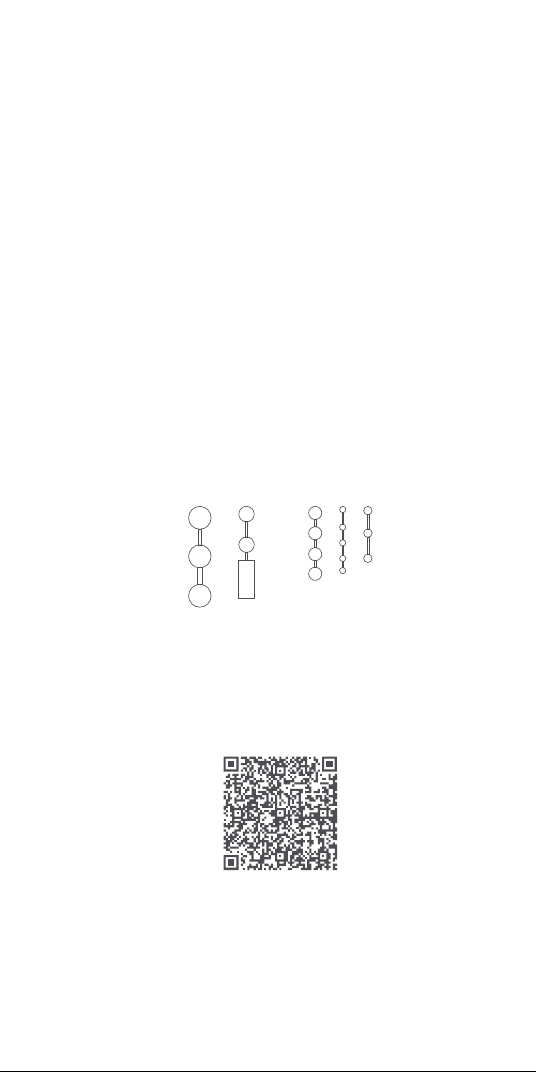
8. Note: The accessories are only compatible with bead chains
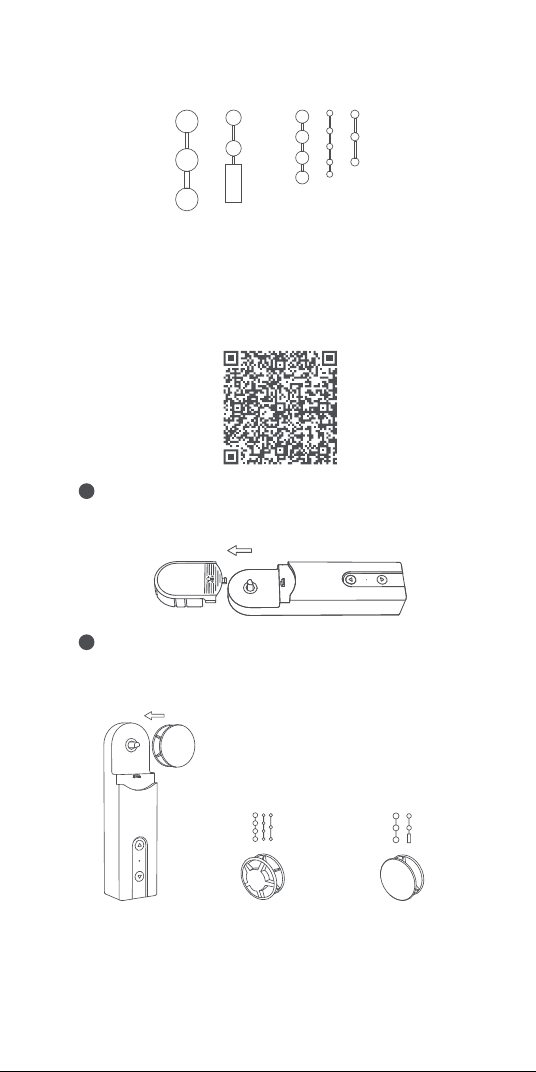
that meet the following standards:
Plastic/metal beads with a thickness of 3-6 mm
2
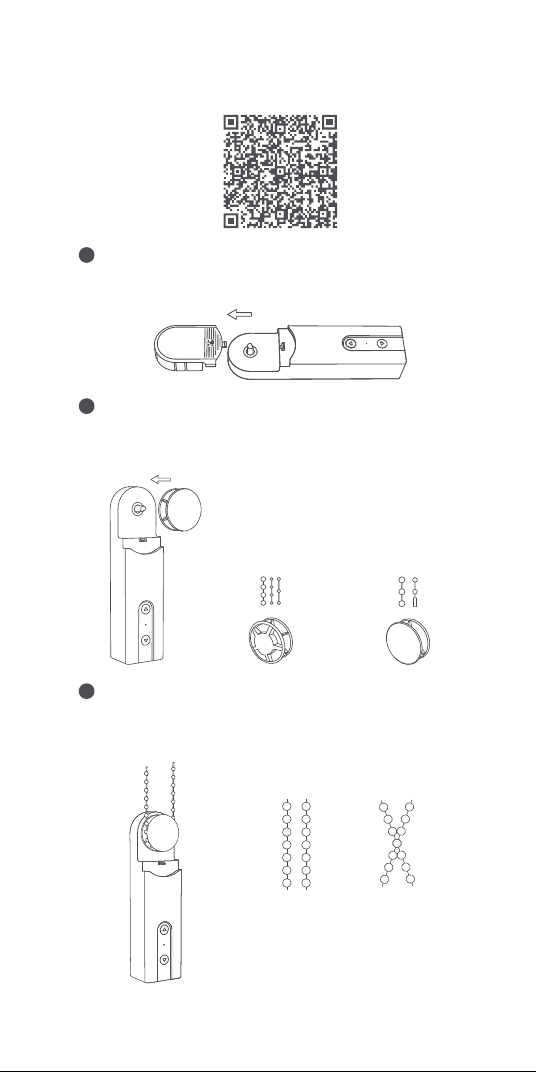
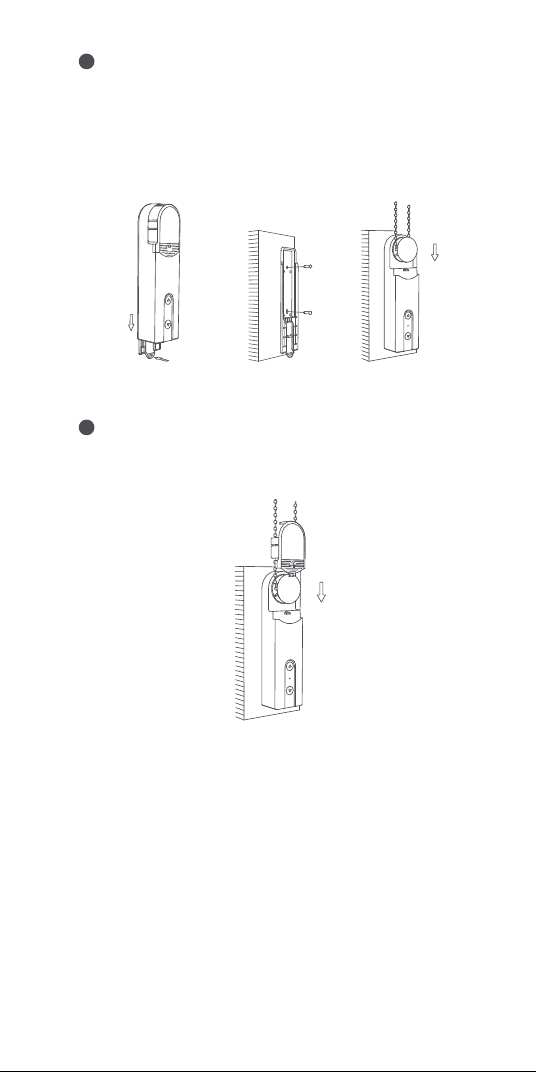
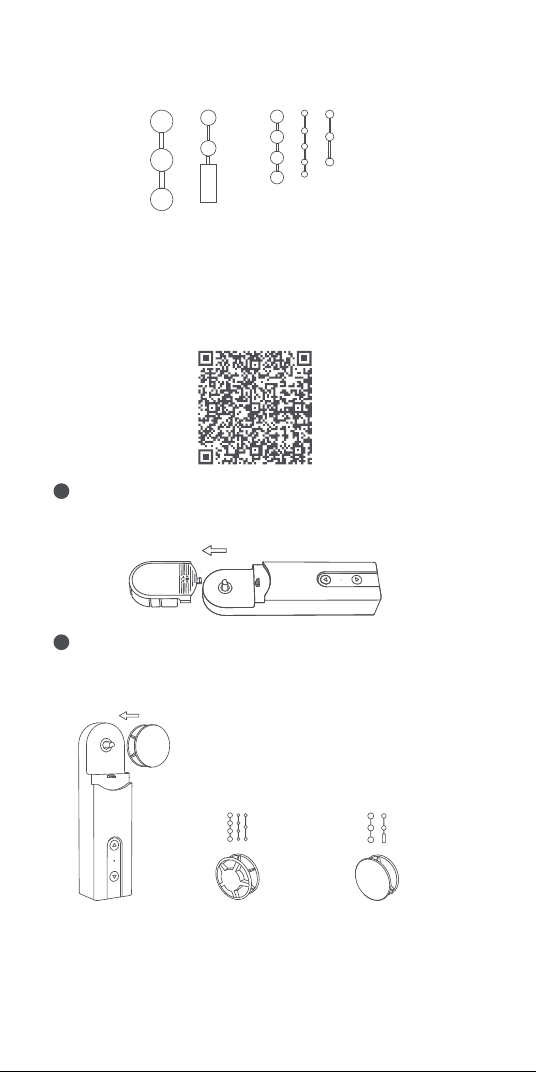
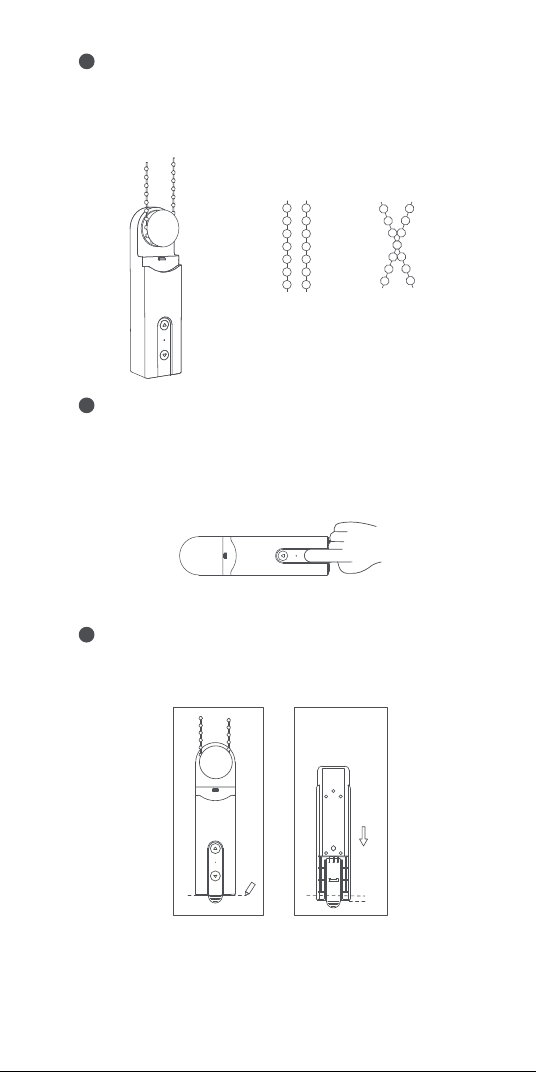
Device Installation
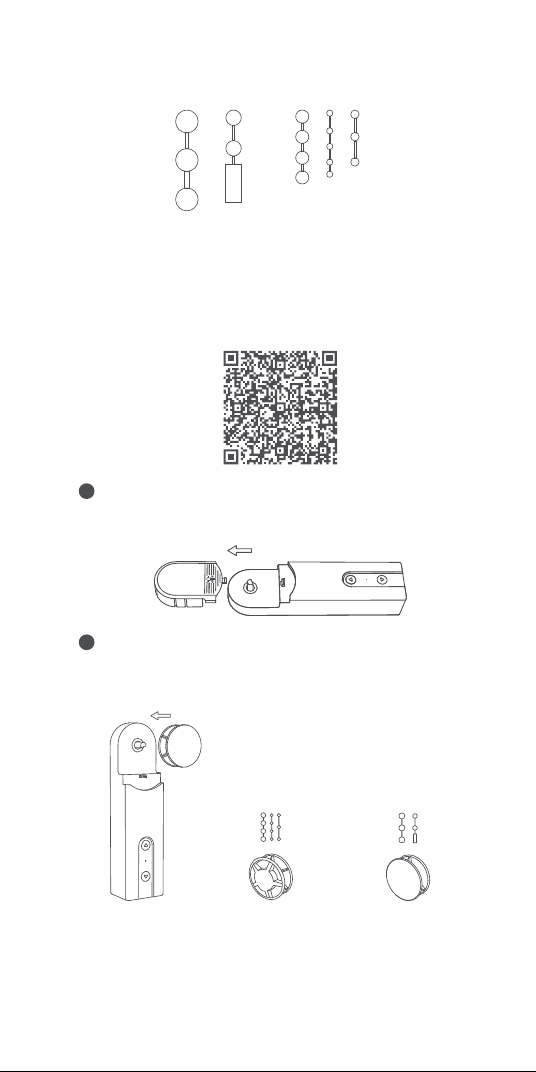
Scan the QR code below to watch the installation guide.
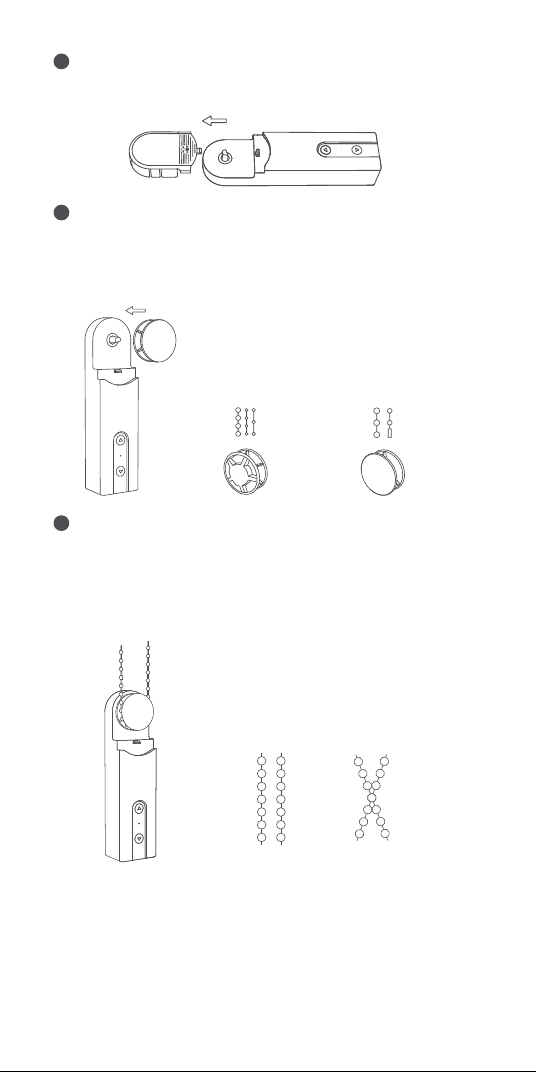
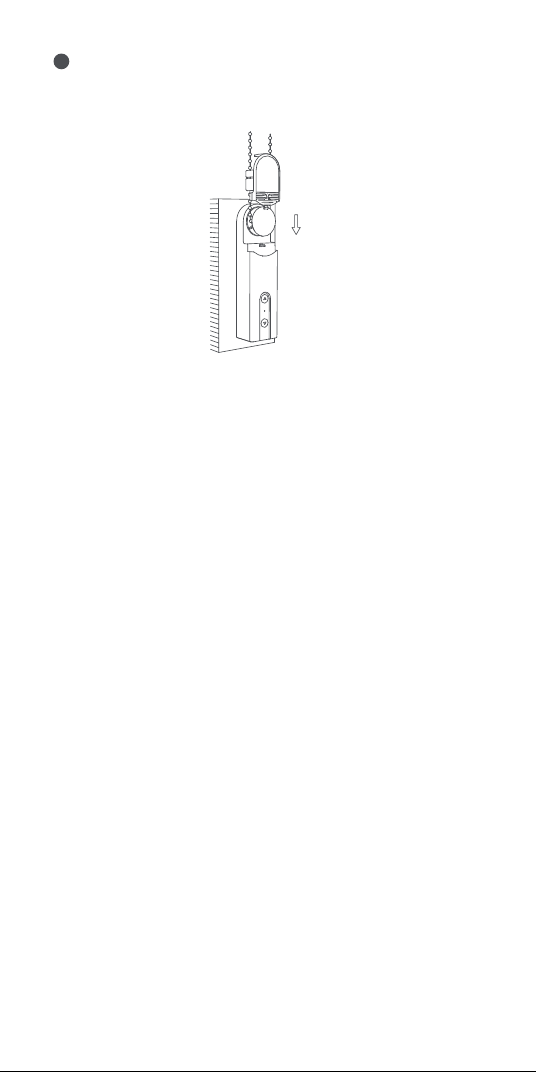
Choose the installation location.
1
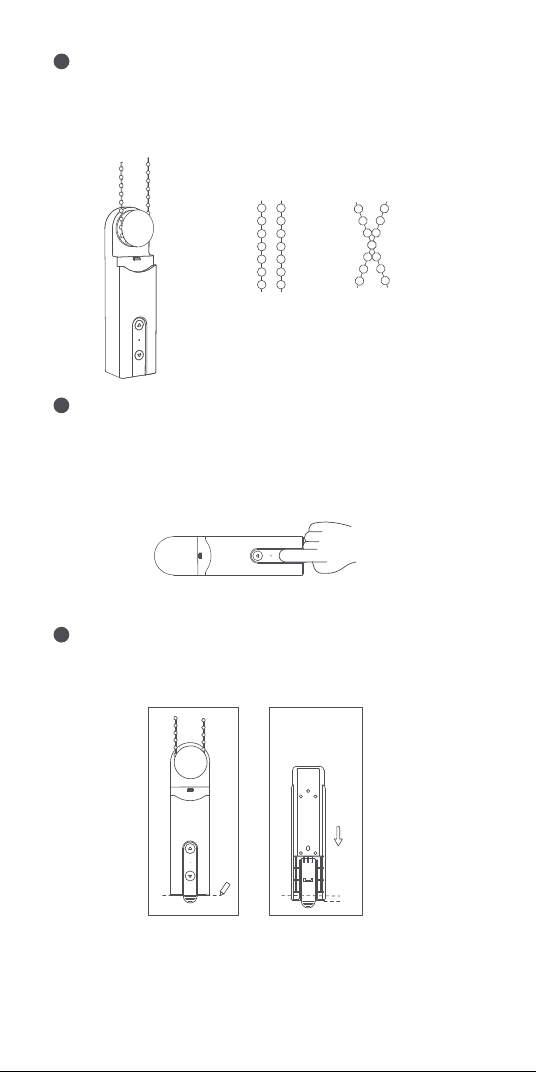
Select the plate according to the following plate-bead
matching relationship, and install it on the output sha of
the device.
2
Hang the bead chain on the plate of the device and pull it
down tightly (not too tight), keep the bead chain tight and hold
the device on the wall, and find a suitable installation location.
3
First, remove the head cover of the device.
Beads with a
diameter of 3 - 4.5
mm (most popular)
Beads with a diameter of 4.5
– 6mm, and beaded cords
with the connector (the
thickness of the connector
should be less than 6mm)
×
√
Please make sure that the bead chain is
put in the selected installation position
properly and does not cross.
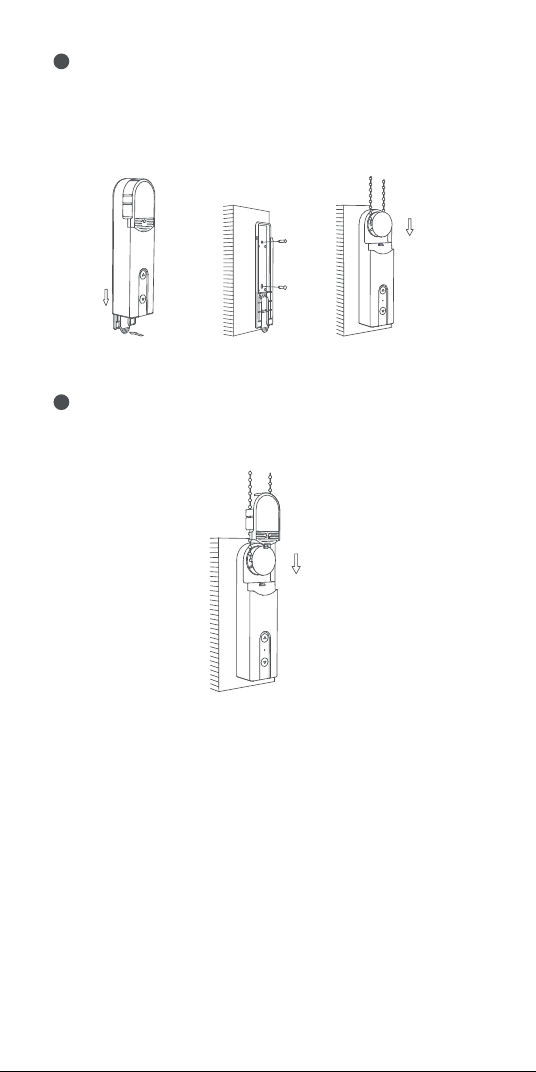
3
Attention: do not make the bead too tight
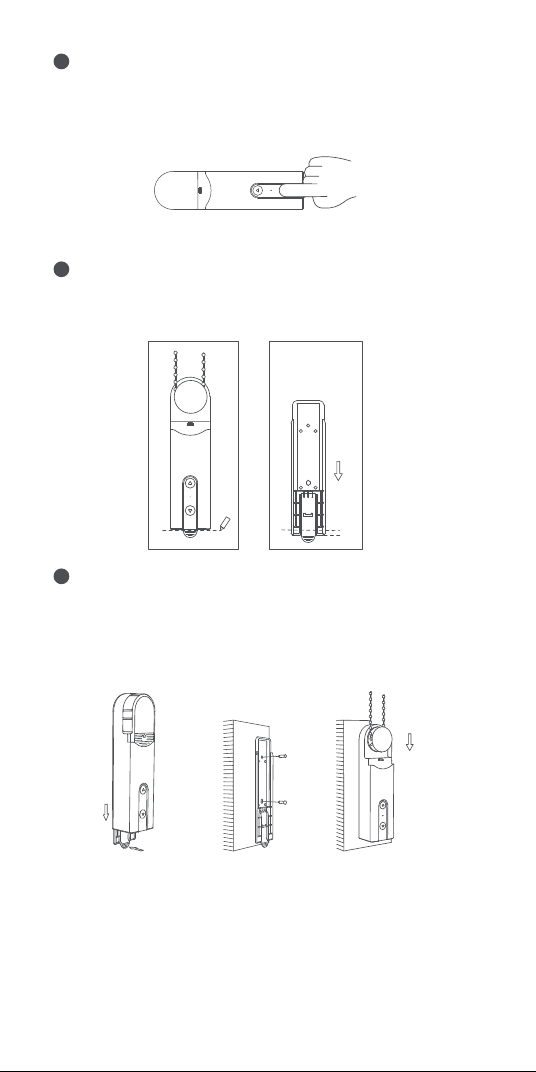
Hold the device in a suitable position, and press the up or
down button of the device to ensure that the bead chain
rotates in a stable manner and does not slip (press the up or
down button again to stop the motor while rotating).
4
Hold the device on the selected installation position, and
outline the shape of the device along its bottom on the wall
with a pencil.
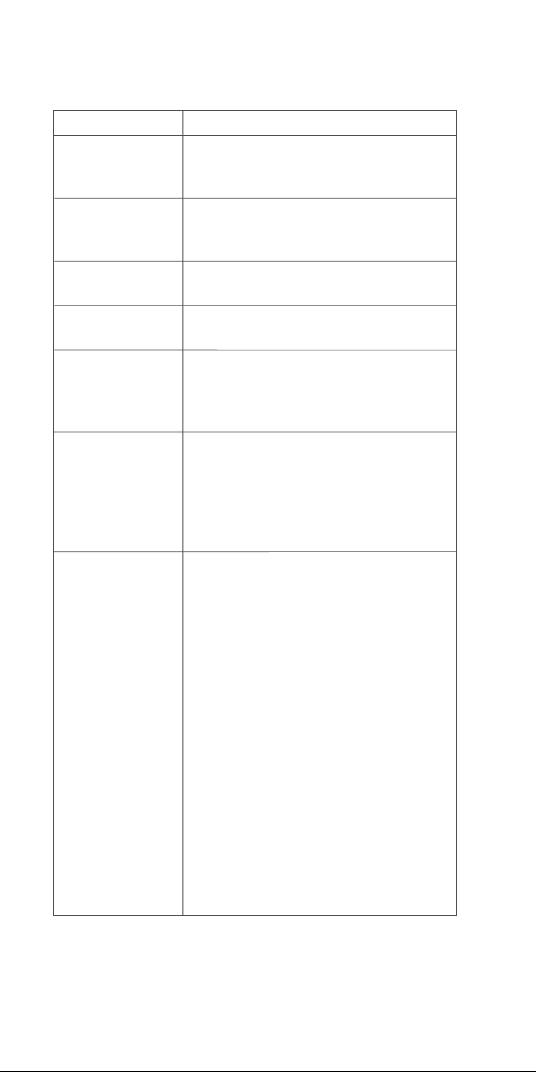
5
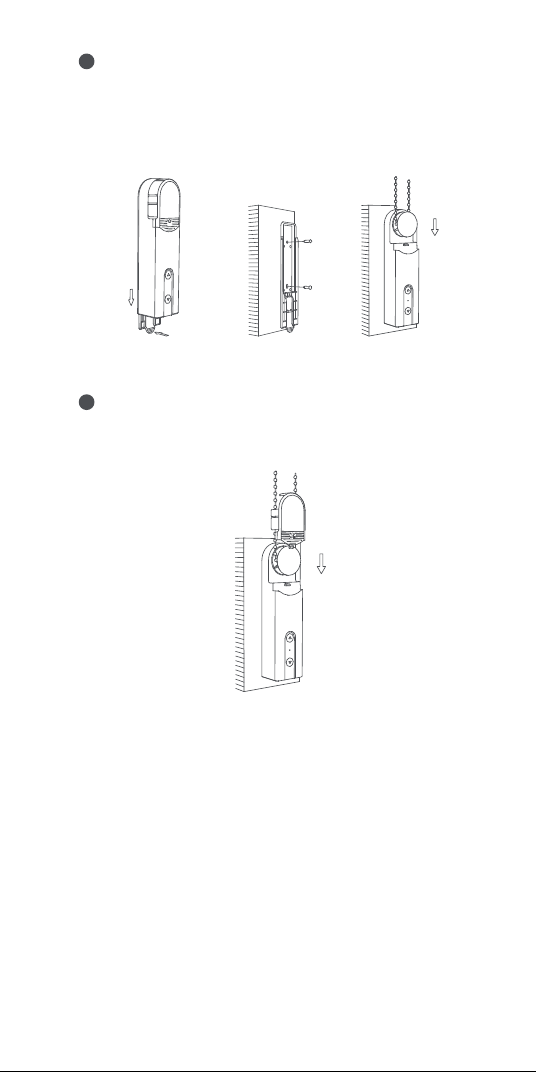
Remove the back cover of the device and fix it at the position
about 3-5 mm down from the mark.
Use screws to fix the product. Aer fixing the back cover,
install the device together with the bead chain back on the
back cover.
6
Push the handle to
remove the back cover
5mm
4
Device Binding & Initialization
1. Before activating the accessory, please make sure you have
the Aqara Home app and the Aqara Zigbee 3.0 hub installed.
2. Please open the app, tap “Home” and then tap “+” in the top
right corner to enter the “Add Device (Accessory)” page. Select
“Roller Shade Driver E1” and the hub to be connected to, and
add it according to instructions in the Aqara Home app. Press
and hold the RESET button for 5 seconds, and wait for the
voice prompt from the Hub.
Device Rotating Range Setup
1. Aer the device is connected to the network, you can set the
device rotating range via the Aqara Home app, click the device
card on the homepage of Aqara Home app, and follow the
instructions on the page to set the rotating range;
2. When the device is not connected to the network, the device
rotating range can also be set by pressing the buttons;
Button Operations
Rotating Range Settings
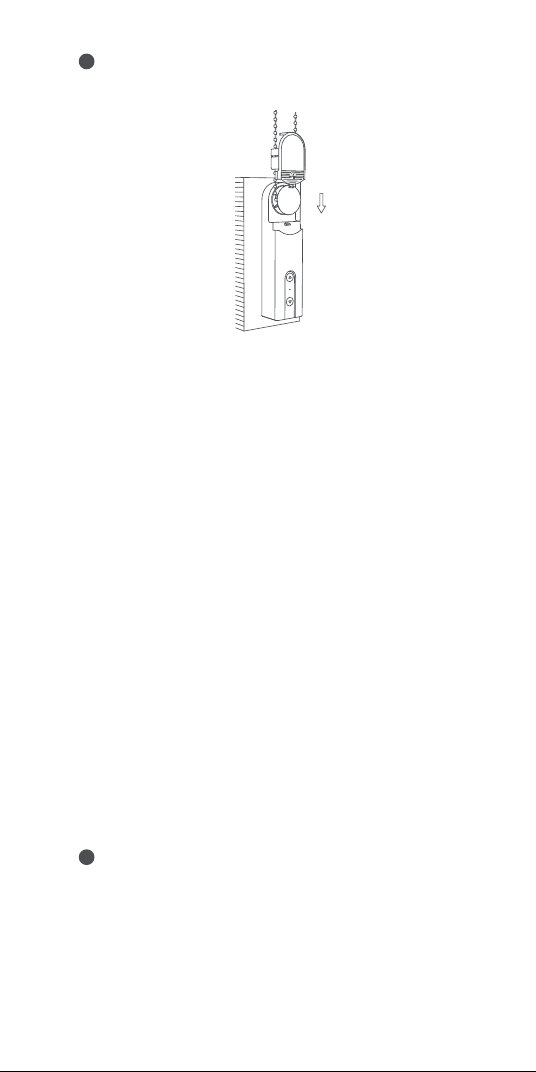
Remove the protection sheet on the head cover, and install the
head cover back on the device. The installation is complete.
7
Delete rotating range
1
Aer the device is installed, press the Up and Down button at
the same time for 3 seconds until the indicator light turns blue,
and then release it.
5
Device control (aer rotating range is set)
Set the fully open position
2
Aer deleting the rotating range, adjust the actual position of
the shade to fully open by pressing the Up or Down button, and
then press the Up button 5 times in succession. If the indicator
light turns blue and flashes 3 times, it indicates that the setting
is successful.
Set the fully closed position
3
Aer setting the fully open position , adjust the actual position
of the curtain to fully closed by pressing the Up or Down button,
and then press the Down button 5 times in succession. If the
indicator light turns blue and flashes 3 times, it indicates that
the setting is successful.
Aer setting the fully open and fully closed positions, the
rotating range setting is complete.
Remap the buttons to rotate the motor in the opposite direction
4
If you press the button of which the direction is opposite to the
actual rolling direction of the roller shade, the rotating direction
of the motor can be reversed by pressing the RESET button
three times; and then, if the indicator turns to blue and lasts for
1 second, it indicates that the rolling direction of the motor is
reversed.
Purpose
Roll the roller
shade
Unroll the
roller shade
Click Up Button - the motor keeps moving
upwards till the shade is fully opened
Click Down Button - the motor keeps moving
downwards till the shade is fully closed
Delete rotating
range
Press and hold the Up button and the Down
button at the same time for three seconds
Reverse motor
rotating direction
Press the RESET button 3 times in a row,
(aer the operation, the blue indicator will
be on for 1 second and then o)
Check network
status
Click the RESET button, if the indicator is
blue, it indicates that it is connected to the
network
Click the RESET button, if the indicator is red,
it indicates that it is not connected to the
network
Stop the roller
shade
Roller shade stopped
Operation
6

To charge the device
When the USB cable is plugged in, the indicator will turn to blue
and blink for 3 times.
With the USB cable plugged in, the indicator will turn to red
until the battery is fully charged.
If the battery is fully charged, the indicator will be turned o.
Device Settings
Enter the homepage of the device, click the "..." icon in the
upper right corner to enter the device settings page, where you
can set the timer, automation, roller shade type, etc.
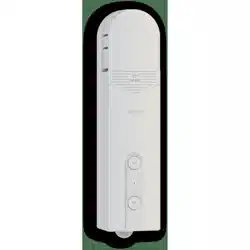
Product Specifications
Roller Shade Driver E1
Color: White
Product Model: RSD-M01
(R-Roller, S-Shade, D-Driver, M-Motor, 01-The First Generation)
Wireless Protocol: Zigbee 3.0 IEEE 802.15.4
Dimensions: 43×38.5×175 mm (1.69×1.52×6.89 in.)
Operating Temperature: -10°C ~ 55°C (14°F ~ 131°F)
Operating humidity: 0-95% RH, no condensation
What is in the box: Roller Shade Driver E1 × 1, Screw × 2,
Expansion Tube × 2, Double-Faced Adhesive Tape × 1, Spare
Rotating Plate × 3, USB-C to USB-A Cable × 1
Battery Type: Lithium battery (not replaceable)
Restore the
device to factory
settings & enter
network
configuration
status
Long press RESET button for 5 seconds, till
the indicator turns to blue and flashes
continuously:
At the moment, the device is restored to
factory settings and enters network
configuration status.
Network configuration status can last for 30
seconds, and in this period:
a.If the device is connected to the network
successfully, the indicator will stop
flashing.
b.If something goes wrong and the device
failed to connect to the network, the red
indicator will be on shortly and then o.
c. If there is no operation, the indicator will
be o aer 30 seconds and the network
connection will end.
7
Zigbee Warnings
Zigbee Operation Frequency: 2405-2480 MHz
Zigbee Maximum Output Power ≤ 13 dBm
Under normal use of condition, this equipment should be kept a
separation distance of at least 20cm between the antenna and
the body of the user.
Rated Input: 5V 1A
Total Power Consumption: 5W
Standby Time: Two months (supposed to control a roller shade
of 1.8m*1.8m up and down once a day)
EU Declaration of Conformity
Hereby, Lumi United Technology Co., Ltd. declares that the radio
equipment type Roller Shade Driver E1, RSD-M01 is in compliance with
Directive 2014/53/EU. The full text of the EU declaration of conformity is
available at the following internet address: https://www.aqara.com/DoC/
WEEE Disposal and Recycling Information
All products bearing this symbol are waste electrical and
electronic equipment (WEEE as in directive 2012/19/EU) which
should not be mixed with unsorted household waste. Instead, you should
protect human health and the environment by handing over your waste
equipment to a designated collection point for the recycling of waste
electrical and electronic equipment, appointed by the government or local
authorities. Correct disposal and recycling will help prevent potential
negative consequences to the environment and human health. Please
contact the installer or local authorities for more information about the
location as well as terms and conditions of such collection points.
UK Declaration of Conformity
Hereby,Lumi United Technology Co., Ltd. declares that the
radio equipment type Roller Shade Driver E1, RSD-M01, is in compliance
with Directive 2017 (SI 2017 No. 1206, as amended by SI 2019 No. 696).
The full text of the UK declaration of conformity is available at the
following internet address: http://www.aqara.com/DoC/.
Online Customer Service: www.aqara.com/support
Customer Support Email: support@aqara.com
Website: www.aqara.com
Manufacturer: Lumi United Technology Co., Ltd.
Address: 8th Floor, JinQi Wisdom Valley, No.1 Tangling Road, Liuxian Ave,
Taoyuan Residential District, Nanshan District, Shenzhen, China.
Made in China
8
RESET
5V
Индикатор
Кнопка вниз
Кнопка вверх
Кнопка сброса
Порт USB Тип-C
Описание продукта
Мотор рулонных штор E1 - это умное устройство на
основе Zigbee 3.0, которое позволит Вам управляя
шариковой цепочкой от штор/жалюзи превратить их
в умные. С Центром умного дома Aqara с поддержкой
Zigbee 3.0 он может реализовывать такие функции,
как дистанционное управление через приложение
Aqara Home, контроль при помощи таймеров, а также
работа с другими умными устройствами Aqara в
автоматизациях умного дома.
Внимание
1.Данное устройство могут использовать дети в
возрасте от 8 лет и старше, а также лица с
ограниченными физическими, сенсорными или
умственными способностями или с недостатком
опыта и знаний, только если они находятся под
наблюдением или получили инструкции
относительно безопасного использования
устройства и понимания связанных с этим
опасностей.
* Требуется Центр умного дома Aqara с поддержкой Zigbee 3.0.
Для некоторых функций требуются определенные модели
Центра умного дома. Для получения более подробной
информации посетите www.aqara.com/support
9

2.Не разрешайте детям играть с устройством.
3.Дети не должны производить очистку и
техническое обслуживание без присмотра.
4.ВНИМАНИЕ: Во время очистки, технического
обслуживания и при замене деталей привод
должен быть отключен от источника питания.
5.Он должен питаться только при изолированном
или безопасном сверхнизком напряжении (SELV).
6.ВНИМАНИЕ: Важные инструкции по технике
безопасности. Важно, чтобы люди следовали
данным инструкциям. Сохраните эти инструкции.
7.Регулярно проверяйте установку на предмет
несбалансированности и признаков износа или
повреждения пружин и креплений кабелей. Не
используйте, если требуется ремонт или
регулировка.
8.Не эксплуатируйте устройство, если в
непосредственной близости проводится
обслуживание, например, уборка окон.
9.ВНИМАНИЕ: Важные инструкции по технике
безопасности. Следуйте всем инструкциям,
поскольку неправильная установка может
привести к серьезным травмам.
10.Перед установкой привода уберите все ненужные
шнуры или компоненты и отключите все
оборудование, не требующееся для работы с
питанием.
11.Характеристики приводной части должны быть
совместимы с номинальной нагрузкой и
номинальным временем функционирования.
12.В этом приборе установлены батареи несменного
типа.
13.Фиксированные элементы управления должны
быть четко видны после установки.
10
Пластиковые/металлические шарики толщиной 3-6 мм.
Установка устройства
Отсканируйте приведенный ниже QR-код для
просмотра руководства по установке.
Подготовка перед использованием
1. Требуется смартфон или планшет с поддержкой
Wi-Fi или сотовой сети (с системой iOS или Android).
2. Требуется концентратор Aqara Zigbee 3.0
(расстояние между этим устройством и вашим
концентратором должно быть в пределах 30 м).
3. Загрузите и установите приложение Aqara Home.
4. Требуется перфоратор (должен быть оснащен
сверлом диаметром 5 мм).
5. Убедитесь в наличии соединения Wi-Fi и
стабильности интернет-соединения.
6. Заряжайте Мотор рулонных штор E1 в течение
примерно 2 часа 30 минут.
7. Вес и размеры приводимой в движение шторы
должны соответствовать номинальному крутящему
моменту и номинальному времени работы.
8. Примечание: аксессуары совместимы только с
шариковыми цепочками, которые отвечают
следующим стандартам:
11
Выберите соответствующую Вашей шариковой
цепочке вращающуюся пластину, согласно
рекомендациям на иллюстрации, и установите ее
на выходной вал устройства.
2
Повесьте шариковую цепочку на вращающуюся
пластину устройства и потяните устройство вниз
(но не слишком сильно), крепко держите
шариковую цепочку и удерживая устройство на
стене, и найдите подходящее место установки.
3
Шарики диаметром
3‒4,5 мм (наиболее
популярные)
Шарики диаметром
4,5‒6 мм, и шариковые
шнуры с соединителем
(толщина соединителя
должна быть менее 6 мм)
×
√
Убедитесь, что шариковая цепочка установлена верно и не
перекрещивается.
Выберите место установки.
1
Сначала снимите крышку устройства.
12

Удерживая устройство в выбранном месте
установки, обведите нижнюю часть устройства на
стене карандашом.
5
Снимите заднюю крышку устройства и
зафиксируйте ее примерно на 5 мм ниже отметки.
Используйте винты, чтобы закрепить крышку.
Закрепив заднюю крышку, установите устройство
вместе с цепочкой обратно на заднюю крышку.
Нажмите на ручку, чтобы
снять заднюю крышку
5mm
Удерживая устройство в подходящем положении,
нажмите кнопку вверх или вниз на устройстве,
чтобы убедиться, что шариковая цепочка
вращается стабильно и не соскальзывает (нажмите
кнопку вверх или вниз еще раз, чтобы остановить
мотор во время поворота).
4
Внимание: не затягивайте цепочку слишком сильно;
6
13
Отломите защитные листы от крышки
вращающейся пластины и установите эту крышку
на устройство. Установка завершена.
7
14
Привязка и инициализация устройства
1. Перед активацией аксессуара убедитесь, что у вас
установлено приложение Aqara Home и Центр
умного дома Aqara на основе Zigbee 3.0.
2. Откройте приложение, нажмите «Home», затем
нажмите «+» в правом верхнем углу для перехода на
страницу «Добавить устройство (аксессуар)».
Выберите «Мотор рулонных штор E1» и
концентратор для подключения, и добавьте его в
соответствии с инструкциями в приложении Aqara
Home. Нажмите и удерживайте кнопку RESET в
течение 5 секунд и дождитесь голосовой подсказки
от концентратора.
Настройка диапазона поворота устройства
1. После подключения устройства к сети можно
настроить диапазон поворота устройства через
приложение Aqara Home, нажмите карту
устройства на домашней странице приложения
Aqara Home и следуйте инструкциям на странице ;
2. Когда устройство не подключено к сети, диапазон
поворота устройства можно также настроить
нажатием кнопок;

Операции с кнопками
Настройки диапазона поворота
Удаление диапазона поворота
1
После установки устройства одновременно нажмите и
удерживайте кнопки Вверх и Вниз в течение 3 секунд,
пока индикатор не станет синим, а затем отпустите .
Настройка полностью открытого положения
2
После удаления диапазона поворота отрегулируйте
фактическое положение шторы до полного открытия,
нажав кнопку Вверх или Вниз, а затем 5 раз подряд
нажмите кнопку Вверх. Если индикатор загорится
синим и мигнет 3 раза, это означает, что настройка
успешно завершена.
Изменение направления мотора на обратное
4
При нажатии кнопки направление которой
противоположно фактическому направлению
поворота рулонной шторы, направление поворота
мотора можно изменить, нажав кнопку RESET три
раза; затем, если индикатор становится синим и
горит 1 секунду, это означает, что направление
поворота мотора было изменено на обратное.
Настройка полностью закрытого положения
3
После настройки полностью открытого положения
отрегулируйте фактическое положение шторы до
полностью закрытого, нажав кнопку Вверх или Вниз,
затем 5 раз подряд нажмите кнопку Вниз. Если
индикатор загорится синим и мигнет 3 раза, это
означает, что настройка успешно завершена.
После установки полностью открытых и полностью
закрытых положений, настройка диапазона поворота
завершена.
15
16
Зарядка батареи
Когда подключен USB-кабель, индикатор станет
синим и мигнет 3 раза.
Когда подключен USB-кабель, индикатор станет
красным, пока батарея не будет полностью заряжена.
Когда батарея полностью зарядится, индикатор погаснет.
Цель
Свернуть
рулонную
штору
Развернуть
рулонную
штору
Нажмите кнопку Вверх ‒ мотор
продолжит двигаться вверх, пока штора
полностью не откроется.
Нажмите кнопку Вниз ‒ мотор
продолжит двигаться вниз, пока штора
полностью не закроется.
Нажмите и удерживайте кнопку Вверх
и Вниз одновременно в течение трех
секунд
3 раза подряд нажмите кнопку RESET
(после операции синий индикатор
загорится на 1 секунду, а затем погаснет)
Нажмите кнопку RESET, если индикатор
синий, это означает, что устройство
подключено к сети
Нажмите кнопку RESET, если индикатор
красный, это означает, что устройство не
подключено к сети
Нажмите и удерживайте кнопку RESET в
течение 5 секунд, пока индикатор не
станет синим и не начнет непрерывно
мигать:
На данный момент устройство
восстанавливается до заводских настроек
и переходит в состояние конфигурации
сети.
Состояние конфигурации сети может
длиться 30 секунд, и в этот период:
а. Если устройство успешно подключено
к сети, индикатор перестанет мигать.
b. Если что-то пойдет не так и устройству
не подключится к сети, красный
индикатор ненадолго загорится, а
затем погаснет.
с. В случае отсутствия операции
индикатор выключится через 30 секунд
и подключение к сети прекращается.
Обратное
направление
поворота мотора
Остановить
рулонную штору
Удалить
диапазон
поворота
Проверить статус
сети
Восстановить
до заводских
настроек
устройства и
войти в
состояние
конфигурации
сети.
Нажмите кнопку Вниз или Вверх, пока
штора находится в движении - мотор
остановится.
Операция
Управление устройством (после установки
диапазона поворота)

Предостережения
1.Этот прибор - НЕ игрушка. Пожалуйста, не
допускайте к нему детей.
2.Данный прибор предназначен только для
использования внутри помещений. Не используйте
его во влажных средах или на открытом воздухе.
3.Оберегайте прибор от воздействия влаги, не
допускайте попадания воды или других жидкостей
на устройство.
4.Не размещайте прибор вблизи источников тепла.
5.Не помещайте прибор в закрытый корпус, если там
нет нормальной вентиляции.
6.Не пытайтесь отремонтировать прибор
самостоятельно. Все ремонтные работы должны
выполняться авторизованным специалистом. Этот
прибор предназначен только для повышения
удобства, качества домашних развлечений и
напоминания о статусе устройства. Он не
предназначен для использования в качестве
охранного оборудования для дома, здания, склада
или любых других мест. Если пользователь
нарушает инструкции по использованию прибора,
производитель не несет никакой ответственности
за риски и повреждения имущества.
17
Правила и условия хранения и
транспортировки
Оборудование должно быть защищено от внешних
воздействий. Допустимая температура окружающего
воздуха: -10°C ~ 55°C(14°F ~ 131°F)
Настройки устройства
Войдите на домашнюю страницу устройства,
нажмите на значок «...» в правом верхнем углу для
перехода на страницу настроек устройства, где вы
можете установить таймер, автоматизацию, тип
рулонных штор и др.

18
Информация о мерах при неисправности
оборудования
В случае обнаружения неисправности оборудования:
1. Извлеките элемент питания;
2. Обратитесь в сервисный центр для получения
консультации или ремонта оборудования
Спецификация устройства
Онлайн-служба поддержки клиентов:
www.aqara.com/support
Эл. почта поддержки клиентов: support@aqara.com
Сайт: www.aqara.com
Производитель: Lumi United Technology Co., Ltd.
Адрес: Китай, Шэньчжэнь, район Наньшань, жилой
район Таоюань, проспект Люсянь, дорога № 1,
Цзиньци Висдом Вэлли, 8-й этаж
Сделано в Китае
Мотор рулонных штор E1
Цвет: белый
Модель устройства: RSD-M01
Протокол беспроводной связи: Zigbee 3.0 IEEE 802.15.4
Размеры: 43×38.5×175мм (1,69×1,52×6,89 дюйма)
Рабочая температура: -10°C~55℃ (14°F~131°F)
Влажность при эксплуатации: 0-95% относительной
влажности, без конденсации
Комплектация: Мотор рулонных штор E1 × 1, винт ×
2, расширительная трубка × 2, двусторонняя клейкая
лента × 1, запасная вращающаяся пластина × 3,
кабель USB-C ‒ USB-A × 1
Тип батареи: литиевая батарея (не заменяемая)
Питание (вход): 5 В 1 А
Общая потребляемая мощность: 5 Вт
Длительность работы : два месяца (предполагается,
что рулонная штора 1,8 м*1,8 м поднимается и
опускается один раз в день)
* Оборудование не нуждается в периодическом обслуживании
в течение срока службы
19
Produkteinführung
Rollladenmotor E1 ist ein intelligentes Zigbee 3.0-Produkt, das
Ihnen helfen kann, die Perlenkette Ihrer Rollos/Jalousien zu
kontrollieren und Ihren vorhandenen Rollo in ein intelligentes
zu verwandeln. Mit einem Aqara Zigbee 3.0 Hub kann er
Funktionen wie Fernbedienung und Zeitsteuerung über die
Aqara Home App realisieren und mit anderen Smart Devices zu
einem Smart Home System zusammenarbeiten.
Warnhinweise
1.Dieses Gerät kann von Kindern ab 8 Jahren und Personen mit
eingeschränkten körperlichen, sensorischen oder geistigen
Fähigkeiten oder Mangel an Erfahrung und Wissen verwendet
werden, wenn sie beaufsichtigt oder in Bezug auf den sicheren
Gebrauch des Geräts unterwiesen wurden und die damit
verbundenen Gefahren verstehen.
2.Kinder dürfen nicht mit dem Gerät spielen.
3.Reinigung und Benutzerwartung dürfen nicht von Kindern
ohne Aufsicht durchgeführt werden.
4.WARNUNG: Der Antrieb muss während der Reinigung, Wartung
und beim Austausch von Teilen von seiner Stromquelle
getrennt werden.
*Ein Aqara Zigbee 3.0 Hub ist erforderlich. Einige Funktionen erfordern
spezifische Modelle von Hubs. Bitte konsultieren Sie www.aqara.com/sup-
port für weitere Details.
RESET
5V
Anzeige
Abwärts-Taste
Aufwärts-Taste
Reset-Taste
USB-Typ-C-Anschluss

Zubereitung vor Gebrauch
1. Erforderlich ist ein Smartphone oder Tablet, das WLAN oder
ein Mobilfunknetz (mit iOS- oder Android-System) unterstützt.
2. Eine Aqara Zigbee 3.0 Nabe ist erforderlich (Die Entfernung
zwischen diesem Produkt und Ihrer Nabe sollte innerhalb von
30 m liegen).
3. Laden Sie die Aqara Home App herunter und installieren Sie sie.
4. Eine Bohrmaschine ist erforderlich (muss mit einem φ
5-Bohrmeißel ausgestattet sein).
5. Bitte stellen Sie sicher, dass es eine WLAN-Verbindung gibt
und Ihre Internetverbindung stabil ist.
6. Bitte laden Sie den Rollladenmotor E1 für ca. 2 Stunden und
30 Minuten auf.
7. Die Masse und die Abmessung der anzutreibenden Rollobahn
müssen mit dem Nenndrehmoment und der Nennbetriebszeit
kompatibel sein.
20
5.Es darf nur mit getrennter oder Schutzkleinspannung (SELV)
versorgt werden.
6.WARNHINWEIS: Wichtige Sicherheitshinweise. Für die
Sicherheit von Personen ist es wichtig, diese Anweisungen zu
befolgen. Bewahren Sie diese Anweisungen auf.
7.Unter lassen Sie Kinder nicht mit feststehenden Bedienele-
menten spielen.
8.Überprüfen Sie die Installation häufig auf Unwucht und
Anzeichen von Verschleiß oder Beschädigung von
Kabelfedern und Befestigungen. Nicht verwenden, wenn eine
Reparatur oder Einstellung erforderlich ist.
9.Betreiben Sie nicht in Betrieb nehmen, wenn in der Nähe
Wartungsarbeiten, wie z. B. Fensterreinigung, durchgeführt
werden.
10.WARNHINWEIS: Wichtige Sicherheitshinweise. Befolgen Sie
alle Anweisungen, da eine falsche Installation zu schweren
Verletzungen führen kann.
11.Entfernen Sie vor der Installation des Laufwerks alle
unnötigen Kabel oder Komponenten und deaktivieren Sie alle
Geräte, die nicht für den Betrieb mit Strom benötigt werden.
12.Dass die Eigenschaen des angetriebenen Teils mit der
Nennlast und der Nennbetriebszeit kompatibel sein müssen.
13.Dieses Gerät enthält Batterien, die nicht austauschbar sind.
14.Feste Bedienelemente müssen nach dem Einbau gut sichtbar
sein.
Geräteinstallation
Scannen Sie den folgenden QR-Code, um die Installationsanlei-
tung anzusehen.
Wählen Sie den Installationsort.
1
Wählen Sie die Platte gemäß der folgenden Plattenper-
len-Anpassungsbeziehung aus und installieren Sie sie auf der
Ausgangswelle des Geräts.
2
Entfernen Sie zuerst die Kopfabdeckung des Geräts.
Perlen mit einem
Durchmesser von 3 -
4,5 mm(beliebteste)
Perlen mit einem Durchmesser
von 4,5 - 6 mm; und Perlkabel
mit dem Verbinder(die Dicke
des Verbinders sollte weniger
als 6 mm betragen)
Kunststo-/Metallperlen mit einer Dicke von 3-6 mm
21
8. Anmerkung: Das Zubehör ist nur mit Perlenketten
kompatibel, die folgende Standards erfüllen:

22
Hängen Sie die Wulstkette an die Platte des Geräts und ziehen
Sie sie fest nach unten (nicht zu fest), halten Sie die Wulstkette
fest und halten Sie das Gerät an der Wand und finden Sie einen
geeigneten Einbauort.
3
×
√
Bitte achten Sie darauf, dass die Wulstkette
richtig in die gewählte Einbaulage gebracht
wird und sich nicht kreuzt.
Attention: do not make the bead too tight, just make sure ;
Halten Sie das Gerät in einer geeigneten Position und drücken
Sie die Aufwärts- oder Abwärtstaste des Geräts, um
sicherzustellen, dass sich die Perlenkette stabil dreht und nicht
verrutscht (drücken Sie die Aufwärts- oder Abwärtstaste
erneut, um den Motor während der Drehung anzuhalten).
4
Halten Sie das Gerät an der gewählten Einbauposition und
skizzieren Sie die Form des Geräts entlang seines Bodens an
der Wand mit einem Bleisti.
5
5mm
Gerätebindung und -initialisierung
1. Bevor Sie das Zubehör aktivieren, stellen Sie bitte sicher, dass
Sie die Aqara Home App und den Aqara Zigbee 3.0 Hub
installiert haben.
2. Bitte önen Sie die App, tippen Sie auf “Home” und dann auf
“+” in der oberen rechten Ecke, um die Seite “Add Accessory"
aufzurufen. Wählen Sie “Roller Shade Driver E1”und die zu
verbindende Nabe und fügen Sie sie gemäß den Anweisungen
in der Aqara Home App hinzu. Halten Sie die RESET-TASTE 5
Sekunden lang gedrückt und warten Sie auf die Sprachauf-
forderung vom Hub.
Entfernen Sie die Schutzfolie an der Kopfabdeckung und
montieren Sie die Kopfabdeckung wieder auf dem Gerät. Die
Installation ist abgeschlossen.
7
23
Entfernen Sie die hintere Abdeckung des Geräts und
befestigen Sie es an der Position, die etwa 5 mm von der
Markierung entfernt ist.
Befestigen Sie das Produkt mit Schrauben. Installieren Sie das
Gerät nach dem Befestigen der hinteren Abdeckung zusammen
mit der Perlenkette wieder auf der hinteren Abdeckung.
6
Drücken Sie den Gri, um die
hintere Abdeckung zu entfernen

Einrichtung des Gerätedrehbereichs
1. Nachdem das Gerät mit dem Netzwerk verbunden ist, können
Sie den Drehbereich des Geräts über die Aqara Home App
einstellen, auf die Gerätekarte auf der Startseite der Aqara
Home App klicken und den Anweisungen auf der Seite folgen,
um den Drehbereich einzustellen;
2. Wenn das Gerät nicht mit dem Netzwerk verbunden ist, kann
der Drehbereich des Geräts auch durch Drücken der Tasten
eingestellt werden;
24
Tastenbedienung
Drehbereichseinstellungen
Drehbereich löschen
1
Drücken Sie nach der Installation des Geräts 3 Sekunden lang
gleichzeitig die Aufwärts- und Abwärts-Taste, bis die
Kontrollleuchte blau leuchtet, und lassen Sie sie dann los.
Stellen Sie die vollständig geönete Position ein
2
Stellen Sie nach dem Löschen des Drehbereichs die
tatsächliche Position der Jalousie so ein, dass sie sich
vollständig önet, indem Sie die Aufwärts- oder Abwärts-Taste
drücken, und drücken Sie dann die Aufwärts-Taste 5 Mal
hintereinander. Wenn die Kontrollleuchte blau leuchtet und
dreimal blinkt, zeigt dies an, dass die Einstellung erfolgreich ist.
Stellen Sie die vollständig geschlossene Position ein
3
Nachdem Sie die vollständig geönete Position eingestellt
haben, stellen Sie die tatsächliche Position des Vorhangs durch
Drücken der Aufwärts- oder Abwärtstaste auf vollständig
geschlossen ein und drücken Sie dann die Abwärtstaste 5 Mal
hintereinander. Wenn die Kontrollleuchte blau leuchtet und
dreimal blinkt, zeigt dies an, dass die Einstellung erfolgreich ist.
Nach dem Einstellen der vollständig geöneten und vollständig
geschlossenen Positionen ist die Drehbereichseinstellung
abgeschlossen.
Motor in die entgegengesetzte Richtung drehen
4
Wenn Sie die Taste drücken, deren Richtung entgegengesetzt
zur tatsächlichen Rollrichtung des Rollos ist, kann die
Drehrichtung des Motors durch dreimaliges Drücken der
RESET-TASTE umgekehrt werden; und dann, wenn die Anzeige
blau wird und für 1 Sekunde anhält, zeigt sie an, dass die
Rollrichtung des Motors umgekehrt ist.
25
Gerätesteuerung (nach Einstellung des Drehbereichs)
Zweckbestimmung
Rollen Sie das
Rollo
Entrollen Sie
das Rollo
Klicken Sie auf die Aufwärts-Taste - der
Motor bewegt sich weiter nach oben,
bis der Rollo vollständig geönet ist
Click Down Button - der Motor bewegt
sich weiter nach unten, bis die Jalousie
vollständig geschlossen ist
Halten Sie die Aufwärts-Taste und die
Abwärts-Taste gleichzeitig drei
Sekunden lang gedrückt
Drücken Sie die RESET-TASTE dreimal
hintereinander (nach der Operation
leuchtet die blaue Anzeige für 1 Sekunde
und dann aus)
Klicken Sie auf DIE RESET-TASTE, wenn
die Anzeige blau ist, zeigt sie an, dass sie
mit dem Netzwerk verbunden ist
Klicken Sie auf DIE RESET-TASTE, wenn
die Anzeige rot ist, zeigt sie an, dass sie
nicht mit dem Netzwerk verbunden ist
Halten Sie DIE RESET-TASTE 5 Sekunden
lang gedrückt, bis die Anzeige blau wird
und kontinuierlich blinkt:
Im Moment wird das Gerät auf die
Werkseinstellungen zurückgesetzt und gibt
den Netzwerkkonfigurationsstatus ein.
Der Netzwerkkonfigurationsstatus kann
30 Sekunden dauern und in diesem
Zeitraum:
a.Wenn das Gerät erfolgreich mit dem
Netzwerk verbunden ist, blinkt die
Anzeige nicht mehr.
b.Wenn etwas schief geht und das Gerät
keine Verbindung zum Netzwerk
hergestellt hat, leuchtet die rote
Anzeige kurz auf und dann aus.
c. Wenn kein Betrieb stattfindet, ist die
Anzeige nach 30 Sekunden
ausgeschaltet und die
Netzwerkverbindung endet.
Umkehrung der
Motordrehrichtung
Anhalten Sie das
Rollo
Drehbereich
löschen
Netzwerkstatus
prüfen
Stellen Sie das
Gerät auf die
Werkseinstellun-
gen zurück und
geben Sie den
Netzwerkkonfigu-
rationsstatus ein
Rollo angehalten
Bedienung

Zigbee-Warnungen
Zigbee-Betriebshäufigkeit: 2405-2480 MHz
Zigbee Maximale Ausgangsleistung ≤ 13 dBm
Unter normalen Bedingungen sollte dieses Gerät einen Abstand
von mindestens 20 cm zwischen der Antenne und dem Körper
des Benutzers einhalten.
EU-Konformitätserklärung
Hiermit bestätigt Lumi United Technology Co., Ltd., dass das
Funkgerät des Typs Rollladenmotor E1, RSD-M01 mit der Verordnung
26
Laden Sie Ihr Gerät auf
Wenn das USB-Kabel angeschlossen ist, wird die Anzeige blau
und blinkt 3 Mal. Wenn das USB-Kabel eingesteckt ist, wird die
Anzeige rot, bis der Akku vollständig aufgeladen ist.
Wenn der Akku vollständig aufgeladen ist, wird die Anzeige
ausgeschaltet.
Geräteeinstellungen
Geben Sie die Startseite des Geräts ein, klicken Sie auf das
Symbol "..." in der oberen rechten Ecke, um die Geräteeinstel-
lungsseite aufzurufen, auf der Sie den Timer, die Automatis-
ierung, den Rollotyp usw. einstellen können.
Produktspezifikationen
Rollladenmotor E1
Farbe: Weiß
Produktmodell: RSD-M01
(R-Roller, S-Shade, D-Driver, M-Motor, 01 - Die erste Generation )
Drahtloses Protokoll: Zigbee 3.0 IEEE 802.15.4
Abmessung: 43×38.5×175 mm(1.69×1.52×6.89 in.)
Betriebstemperatur: -10°C ~ 55°C (14°F ~ 131°F)
Betriebsfeuchtigkeit: 0-95% RH, keine Kondensation
Lieferumfang: Rollladenmotor E1 × 1, Schraube × 2, Dehnrohr ×
2, doppelseitiges Klebeband × 1, Ersatzdrehplatte × 3, USB-C auf
USB-A-Kabel × 1
Batterietyp: Lithium-Batterie (nicht austauschbar)
Nenneingang: 5V 1A
Gesamtstromverbrauch: 5W
Standby-Zeit: Zwei Monate (soll einmal täglich ein Rollo von
1,8m*1,8m auf und ab steuern)

27
2014/53/EU in Einklang steht. Der vollständige Wortlaut der EU-Konfor-
mitätserklärung ist unter der folgenden Internetadresse abrufbar:
https://www.aqara.com/DoC/
WEEE-Informationen zur Entsorgung und zum Recycling
Alle mit diesem Symbol gekennzeichneten Produkte sind
Elektroschrott und Elektrogeräte (WEEE entsprechend
EU-Richtlinie 2012/19/EU) und dürfen nicht mit unsortiertem
Haushaltsmüll vermischt werden. Schützen Sie stattdessen Ihre
Mitmenschen und die Umwelt, indem Sie Ihre zu entsorgenden Geräte an
eine dafür vorgesehene, von der Regierung oder einer lokalen Behörde
eingerichtete Sammelstelle zum Recycling von Elektroschrott und
Elektrogeräten bringen. Eine ordnungsgemäße Entsorgung und Recycling
helfen, negative Auswirkungen auf die Gesundheit von Umwelt und
Menschen zu vermeiden. Wenden Sie sich bitte an den Installateur oder
lokale Behörden, um Informationen zum Standort und den allgemeinen
Geschäsbedingungen solcher Sammelstellen zu erhalten.
Online-Kundendienst: www.aqara.com/support
Kundendienst-E-Mail: support@aqara.com
Webseite: www.aqara.com
Fabrikat: Lumi United Technology Co., Ltd.
Anschri: 8th Floor, JinQi Wisdom Valley, No.1 Tangling Road, Liuxian Ave,
Taoyuan Residential District, Nanshan District, Shenzhen, China.
Made in China
28
Présentation du produit
Moteur de Volet Roulant E1 est un produit intelligent Zigbee 3.0
qui peut vous aider à contrôler la chaîne de perles de vos stores /
stores et à transformer votre store à rouleau existant en un
produit intelligent. Avec un hub Aqara Zigbee 3.0, il peut réaliser
des fonctions telles que la télécommande et le contrôle de la
synchronisation via l'application Aqara Home, et travailler avec
d'autres appareils intelligents pour former un système de
maison intelligente.
Avertissements
1. Cet appareil peut être utilisé par des enfants âgés de 8 ans et
plus et des personnes ayant des capacités physiques,
sensorielles ou mentales réduites ou un manque d’expérience
et de connaissances s’ils ont reçu une supervision ou une
instruction concernant l’utilisation de l’appareil de manière
sécuritaire et comprennent les dangers en cause.
2. Les enfants ne doivent pas jouer avec l’appareil.
3. Le nettoyage et l’entretien de l’utilisateur ne doivent pas être
eectués par des enfants sans supervision.
4. AVERTISSEMENT : le lecteur doit être déconnecté de sa source
d’énergie pendant le nettoyage, l’entretien et le remplace-
ment des pièces.
*Un hub Aqara Zigbee 3.0 est nécessaire. Certaines fonctions nécessitent
des modèles spécifiques de hubs. Veuillez consulter www.aqara.com/sup-
port pour plus de détails.
RESET
5V
Voyant
Bouton Bas
Bouton Hau
Bouton de
réinitialisation
Port USB Type-C

29
Préparation avant utilization
1. Un smartphone ou une tablette qui prend en charge le Wi-Fi
ou un réseau cellulaire (avec système iOS ou Android) est
nécessaire.
2. Un hub Aqara Zigbee 3.0 est nécessaire (la distance entre ce
produit et votre hub doit être à moins de 30 m).
3. Téléchargez et installez l’application Aqara Home.
4. Une perceuse est nécessaire (Elle doit être équipée d'un foret
φ5).
5. Veuillez-vous assurer qu'il existe une connexion Wi-Fi et que
votre connexion Internet est stable.
6. Veuillez charger le Moteur de Volet Roulant E1 pendant
environ 2 heures et 30 minutes.
7. La masse et la dimension du store à entraîner doivent être
compatibles avec le couple nominal et le temps de
fonctionnement nominal.
5. Il ne doit être fourni qu’à la tension extra-basse séparée ou
de sécurité (SELV).
6. AVERTISSEMENT : Instructions de sécurité importantes. Il est
important que la sécurité des personnes suive ces
instructions. Enregistrez ces instructions.
7. Ne laissez pas les enfants jouer avec des commandes fixes.
8. Examiner fréquemment l’installation pour le déséquilibre et
les signes d’usure ou de dommages aux ressorts et aux
fixations des câbles. Ne pas utiliser si la réparation ou
l’ajustement est nécessaire.
9. N'utilisez pas l'appareil lorsque des travaux d'entretien, tels
que le nettoyage des vitres, sont en cours à proximité.
10. AVERTISSEMENT : Instructions de sécurité importantes.
Suivez toutes les instructions car une installation incorrecte
peut entraîner des blessures graves.
11. Avant d’installer le lecteur, retirez les cordons ou
composants inutiles et désactivez tout équipement non
nécessaire au fonctionnement alimenté.
12. Les caractéristiques de la pièce entraînée doivent être
compatibles avec la charge nominale et le temps d’exploita-
tion nominal.
13. Cet appareil contient des batteries qui ne sont pas
remplaçables.
14. Les commandes fixes doivent être clairement visibles après
l’installation.

30
Installation de l’appareil
Scannez le code QR ci-dessous pour regarder le guide
d’installation.
Choisissez l’emplacement de l’installation.
1
Sélectionnez la plaque en fonction de la relation de
correspondance plaque-perle suivante et installez-la sur
l'arbre de sortie de l'appareil.
2
Tout d'abord, retirez le capot de l'appareil.
Perles d'un diamètre
de 3 à 4,5 mm (les plus
populaires)
Perles d'un diamètre de 4,5 à 6
mm ,et cordons perlés avec le
connecteur (l'épaisseur du
connecteur doit être inférieure
à 6 mm)
Perles en plastique/métal d’une épaisseur de 3 à 6 mm
8. Remarque: Les accessoires ne sont compatibles qu'avec les
chaînes à talons qui répondent aux normes suivantes:

31
Accrochez la chaîne de perles sur la plaque de l’appareil et
tirez-la vers le bas étroitement (pas trop serré), gardez la
chaîne de perles serrée et maintenez l’appareil sur le mur, et
trouvez un emplacement approprié d’installation.
3
×
√
Veuillez-vous assurer que la chaîne de perles
est correctement placée dans la position
d'installation sélectionnée et ne se croise pas.
Attention : ne pas trop serrer la perle;
Maintenez l'appareil dans une position appropriée et appuyez
sur le bouton haut ou bas de l'appareil pour vous assurer que
la chaîne de perles tourne de manière stable et ne glisse pas
(appuyez à nouveau sur le bouton haut ou bas pour arrêter le
moteur tout en tournant).
4
Tenez l'appareil sur la position d'installation choisie, et tracez
la forme de l'appareil le long de son fond sur le mur avec un
crayon.
5
5mm

32
Liaison et initialisation de l’appareil
1. Avant d'activer l'accessoire, assurez-vous que l'application
Aqara Home et le hub Aqara Zigbee 3.0 sont installés.
2. Veuillez ouvrir l'application, appuyez sur “Home”, puis sur
“+”dans le coin supérieur droit pour accéder à la page “Add
Accessory”. Sélectionnez “Roller Shade Driver E1”et le hub
auquel vous souhaitez vous connecter, puis ajoutez-le
conformément aux instructions de l'application Aqara Home.
Appuyez sur le bouton REINITIALISER et maintenez-le enfoncé
pendant 5 secondes et attendez l'invite vocale du hub.
Retirez la feuille de protection du couvercle de la tête, et
remettez le couvercle de la tête sur l'appareil. L'installation est
terminée.
7
Retirez le couvercle arrière de l'appareil et fixez-le à
l'emplacement situé à environ 5 mm du repère.
Utilisez des vis pour fixer le produit. Après avoir fixé le
couvercle arrière, installez le dispositif avec la chaîne de perles
sur le couvercle arrière.
6
Poussez la poignée pour
retirer le couvercle arrière

33
Configuration de la plage de rotation de l'appareil
1. Une fois l'appareil connecté au réseau, vous pouvez définir la
plage de rotation de l'appareil via l'application Aqara Home,
cliquez sur la carte de l'appareil sur la page d'accueil de
l'application Aqara Home et suivez les instructions de la page
pour définir la plage de rotation;
2. Lorsque l'appareil n'est pas connecté au réseau, la plage de
rotation de l'appareil peut également être définie en
appuyant sur les boutons;
Fonctionnement des boutons
Paramètres de plage de rotation
Supprimer la plage de rotation
1
Une fois l'appareil installé, appuyez simultanément sur les
boutons Haut et Bas pendant 3 secondes jusqu'à ce que le
voyant lumineux devienne bleu, puis relâchez-le.
Réglez la position complètement ouverte
2
Après avoir supprimé la plage de rotation, ajustez la position
réelle du store pour ouvrir complètement en appuyant sur le
bouton Haut ou Bas, puis appuyez sur le bouton Haut 5 fois de
suite. Si le voyant devient bleu et clignote 3 fois, cela indique
que le réglage est réussi.
Réglez la position complètement fermée
3
Après avoir réglé la position complètement ouverte, réglez la
position réelle du rideau sur complètement fermé en appuyant
sur le bouton Haut ou Bas, puis appuyez sur le bouton Bas 5 fois
de suite. Si le voyant devient bleu et clignote 3 fois, cela indique
que le réglage est réussi.
Après avoir réglé les positions complètement ouverte et
complètement fermée, le réglage de la plage de rotation est
terminé.
Faites tourner le moteur dans le sens opposé
4
Si vous appuyez sur le bouton dont le sens est opposé au sens
de roulement réel du store enrouleur, le sens de rotation du
moteur peut être inversé en appuyant trois fois sur le bouton
REINITIALISER; puis, si le voyant devient bleu et dure 1 seconde,
cela indique que le sens de roulement du moteur est inversé.
34
Contrôle de l'appareil (après le réglage de la plage de rotation)
Objectif
Roulez le store
enrouleur
Déroulez le
store enrouleur
Cliquez sur le bouton Haut - le moteur
continue de se déplacer vers le haut jusqu'à
ce que le store soit complètement ouvert
Cliquez sur le bouton Bas - le moteur
continue de se déplacer vers le bas jusqu'à
ce que le store soit complètement fermé
Appuyez simultanément sur les
boutons Haut et Bas et maintenez-les
enfoncés pendant trois secondes
Appuyez sur le bouton REINITIALISER 3
fois de suite, (après l'opération, le
voyant bleu sera allumé pendant 1
seconde puis s’éteindra)
Cliquez sur le bouton REINITIALISER, si le
voyant est bleu, cela indique qu'il est
connecté au réseau
Cliquez sur le bouton REINITIALISER, si le
voyant est rouge, cela indique qu'il n'est
pas connecté au réseau
Appuyez longuement sur le bouton
REINITIALISER pendant 5 secondes,
jusqu'à ce que le voyant devienne bleu et
clignote en continu:
Pour le moment, l'appareil est restauré
aux paramètres d'usine et entre dans
l'état de configuration du réseau.
L'état de la configuration du réseau peut
durer 30 secondes, et pendant cette
période:
a. Si l'appareil est connecté au réseau
avec succès, le voyant arrêtera de
clignoter.
b. Si quelque chose ne va pas et que
l'appareil ne parvient pas à se
connecter au réseau, le voyant rouge
s'allume brièvement, puis s'éteint.
c. S'il n'y a pas d'opération, le voyant
s'éteint après 30 secondes et la
connexion réseau s'arrête.
Inversez le sens de
rotation du moteur
Arrêtez le store
enrouleur
Supprimez la
plage de rotation
Vérifier l'état du
réseau
Restaurez
l'appareil aux
paramètres
d'usine et entrez
dans l'état de
configuration du
réseau
Arrêt du store enrouleur
Opération

35
Avertissements de Zigbee
Fréquence de fonctionnement de Zigbee : 2405-2480 MHz
Puissance de sortie maximale de Zigbee ≤ 13 dBm
Dans des conditions normales d'utilisation, cet équipement doit
être maintenu à une distance de séparation d'au moins 20 cm
entre l'antenne et le corps de l'utilisateur.
Pour Charger l’ Appareil
Lorsque le câble USB est branché, le voyant devient bleu et
clignote 3 fois.
Une fois le câble USB branché, l'indicateur devient rouge
jusqu'à ce que la batterie soit complètement chargée.
Si la batterie est complètement chargée, le voyant s'éteint.
Réglages de l'appareil
Accédez à la page d'accueil de l'appareil, cliquez sur l'icône ‘...’
dans le coin supérieur droit pour accéder à la page des
paramètres de l'appareil, où vous pouvez régler la minuterie,
l'automatisation, le type de store enrouleur, etc.
Spécifications du produit
Moteur de Volet Roulant E1
Couleur blanche
Modèle de produit: RSD-M01
(R-Rouleau, S-Store, D-Conducteur, M-Moteur, 01-La première
génération)
Protocole sans fil: Zigbee 3.0 IEEE 802.15.4
Dimensions: 43×38.5×175 mm (1,69 × 1,52 × 6,89 pouces)
Température de fonctionnement: -10 ° C ~ 55 ° C (14 ° F ~ 131 ° F)
Humidité de fonctionnement: 0-95% HR, sans condensation
Contenu de la boîte: Moteur de Volet Roulant E1 × 1, Vis × 2,
Tube d'extension × 2, ruban adhésif double face × 1, plaque
tournante de rechange × 3, câble USB-C vers USB-A × 1
Type de batterie: batterie au lithium (non remplaçable)
Entrée nominale: 5V 1A
Consommation électrique totale: 5 W
Temps d'attente: deux mois (censé contrôler un store à rouleau
de 1,8 m * 1,8 m de haut en bas une fois par jour)
36
Informations sur la réglementation DEEE sur la mise au rebut et
le recyclage
Tous les produits portant ce symbole deviennent des déchets
d’équipements électriques et électroniques (DEEE dans la Directive
européenne2012/19/UE) qui ne doivent pas être mélangés aux déchets
ménagers non triés. Vous devez contribuer à la protection de
l’environnement et de la santé humaine en apportant l’équipement usagé
à un point de collecte dédié au recyclage des équipements électriques et
électroniques, agréé par le gouvernement ou les autorités locales. Le
recyclage et la destruction appropriés permettront d’éviter tout impact
potentiellement négatif sur l’environnement et la santé humaine.
Contactez l’installateur ou les autorités locales pour obtenir plus
d’informations concernant l’emplacement ainsi que les conditions
d’utilisation de ce type de point de collecte.
Service clientèle en ligne : www.aqara.com/support
Courriel du service clientèle : support@aqara.com
Site Internet : www.aqara.com
Fabricant : Lumi United Technology Co., Ltd.
Adresse: 8ème étage, JinQi Wisdom Valley, No.1 Route Tangling, Avenue
Liuxian,District résidentiel de Taoyuan, district de Nanshan, Shenzhen,
Chine.
Made in China
Déclaration de conformité pour l’Union européenne
Par la présente, Lumi United Technology Co., Ltd., déclare que cet
équipement radio de type Moteur de Volet Roulant E1, RSD-M01 est
conforme à la Directive européenne2014/53/UE. L’intégralité de la
déclaration de conformité pour l’UE est disponible à l’adresse suivante:
https://www.aqara.com/DoC/

37
Introducción del producto
Control de Cortinas Enrollables E1 es un producto inteligente
Zigbee 3.0 que puede ayudarte a controlar la cadena de tus
cortinas / persianas y transformar su persiana enrollable
manual en una inteligente. Con un hub Aqara Zigbee 3.0, puede
realizar funciones como control remoto y control de tiempo a
través de la aplicación Aqara Home, y trabajar con otros
dispositivos inteligentes para formar un sistema de domótica.
Advertencias
1.Este dispositivo puede ser utilizado por niños a partir de 8
años y personas con capacidades físicas, sensoriales o
mentales reducidas o con falta de experiencia y conocimiento
si han recibido supervisión o instrucciones sobre el uso del
aparato de forma segura y comprenden los peligros.
involucrado.
2.Los niños no deben jugar con el aparato.
3.Los niños no deben realizar la limpieza y el mantenimiento sin
supervisión.
4.ADVERTENCIA: el variador debe desconectarse de su fuente de
alimentación durante la limpieza, el mantenimiento y la
sustitución de piezas.
*Se requiere un hub Aqara Zigbee 3.0. Algunas funciones requieren
modelos específicos de hubs. Consulte www.aqara.com/support para
obtener más detalles.
RESET
5V
indicador
botón abajo
Botón arriba
botón de reinicio
puerto USB tipo C

38
Preparación antes del uso
1. Se requiere un smartphone o tableta que admita Wi-Fi o un
dispositivo (con sistema iOS o Android).
2. Se requiere un hub Aqara Zigbee 3.0 (la distancia entre este
producto y su hub debe estar dentro de los 30 m).
3. Descargue e instale la aplicación Aqara Home.
4. Se requiere un taladro (debe estar equipada con una broca de
φ5).
5. Asegúrese de que haya una conexión Wi-Fi y de que su
conexión a Internet sea estable.
6. Cargue el Control de Cortinas Enrollables E1 durante
aproximadamente 2 horas y 30 minutos.
7. La masa y la dimensión de la persiana que se accionará
deberán ser compatibles con el par nominal y el tiempo de
funcionamiento nominal.
5.Solo debe suministrarse a voltaje extrabajo de seguridad o
separado (SELV).
6.ADVERTENCIA: Instrucciones de seguridad importantes. Es
importante para la seguridad de las personas seguir estas
instrucciones. Guarde estas instrucciones.
7.No permita que los niños jueguen con controles fijos.
8.Examine con frecuencia la instalación en busca de
desequilibrios y signos de desgaste o daños en los resortes y
las fijaciones de los cables. No lo utilice si es necesario
repararlo o ajustarlo.
9.No lo utilice cuando se estén realizando tareas de
mantenimiento, como la limpieza de ventanas, en las
inmediaciones.
10.ADVERTENCIA: Instrucciones de seguridad importantes. Siga
todas las instrucciones, ya que una instalación incorrecta
puede provocar lesiones graves.
11.Antes de instalar la unidad, retire cualquier cable o
componente innecesario y desactive cualquier equipo que no
sea necesario para el funcionamiento con alimentación.
12.Que las características de la parte accionada deben ser
compatibles con la carga nominal y el tiempo de operación
nominal.
13.Este aparato contiene baterías que no son reemplazables.
14.Los controles fijos deben ser claramente visibles después de
la instalación.
39
Instalación del dispositivo
Escanee el código QR a continuación para ver la guía de
instalación.
Elija la ubicación de la instalación.
1
Seleccione la placa de acuerdo con la siguiente relación de
coincidencia placa-cordón e instálala en el eje de salida del
dispositivo.
2
Primero, retire la tapa de la cabeza del dispositivo.
Cuentas con un
diámetro de 3 - 4,5 mm
(las más populares)
Cuentas con un diámetro de 4,5
- 6 mm , y cordones con
cuentas con el conector (el
grosor del conector debe ser
inferior a 6 mm)
Perlas de plástico / metal con un grosor de 3-6 mm
8.Nota: Los accesorios solo son compatibles con cadenas de
cuentas que cumplan con los siguientes estándares:
40
Cuelgue la cadena de cuentas en la placa del dispositivo y tire
de ella con fuerza (no demasiada), mantenga la cadena de
cuentas apretada y sostenga el dispositivo en la pared, y
busque una ubicación de instalación adecuada.
3
×
√
Asegúrese de que la cadena esté colocada
correctamente en la posición de instalación
seleccionada y no se cruce.
Atención: no aprietes demasiado el cordón;
Mantenga el dispositivo en una posición adecuada y presione
el botón hacia arriba o hacia abajo del dispositivo para
asegurarse de que la cadena de gire de manera estable y no se
deslice (presione el botón hacia arriba o hacia abajo
nuevamente para detener el motor mientras gira) .
4
Sostenga el dispositivo en la posición de instalación
seleccionada y dibuje la forma del dispositivo a lo largo de su
parte inferior en la pared con un lápiz.
5
5mm
41
Enlace e inicialización de dispositivos
1. Antes de activar el accesorio, asegúrese de tener la aplicación
Aqara Home y el hub Aqara Zigbee 3.0 instalados.
2. Abra la aplicación, toque “Home” y luego toque “+” en la
esquina superior derecha para ingresar a la página “Add
Accessory”. Seleccione "Roller Shade Driver E1" y el hub al
que conectarse, y agréguelo de acuerdo con las instrucciones
de la aplicación Aqara Home. Mantenga presionado el botón
RESET durante 5 segundos y espere el mensaje de voz del
Hub.
Retire la hoja de protección de la cubierta del cabezal e instale
la cubierta del cabezal nuevamente en el dispositivo. La
instalación está completada.
7
Retire la cubierta trasera del dispositivo y fíjela en la posición
a unos 5 mm hacia abajo de la marca.
Utilice tornillos para fijar el producto. Después de fijar la
cubierta trasera, instale el dispositivo junto con la cadena de
cuentas en la cubierta trasera.
6
Empuje la manija para
quitar la tapa trasera

42
Configuración del rango de rotación del dispositivo
1. Una vez que el dispositivo está conectado a la red, puede
configurar el rango de rotación del dispositivo a través de la
aplicación Aqara Home, hacer clic en la tarjeta del dispositivo
en la página de inicio de la aplicación Aqara Home y seguir las
instrucciones de la página para configurar el rango de rotación;
2. Cuando el dispositivo no está conectado a la red, el rango de
rotación del dispositivo también se puede configurar
presionando los botones;
Operaciones de botones
Configuración de rango giratorio
Eliminar rango giratorio
1
Una vez instalado el dispositivo, presione el botón Arriba y
Abajo al mismo tiempo durante 3 segundos hasta que la luz
indicadora se vuelva azul y luego suéltalo.
Establezca la posición completamente abierta
2
Después de borrar el rango de rotación, ajuste la posición real
de la persiana para que se abra completamente presionando el
botón Arriba o Abajo, y luego presione el botón Arriba 5 veces
seguidas. Si la luz indicadora se vuelve azul y parpadea 3 veces,
indica que la configuración se ha realizado correctamente.
Establecer la posición completamente cerrada
3
Después de establecer la posición completamente abierta,
ajuste la posición real de la cortina a completamente cerrada
presionando el botón Arriba o Abajo, y luego presione el botón
Abajo 5 veces seguidas. Si la luz indicadora se vuelve azul y
parpadea 3 veces, indica que la configuración se ha realizado
correctamente.
Después de configurar las posiciones completamente abierta y
completamente cerrada, el ajuste del rango de rotación está
completo.
Gire el motor en la dirección opuesta
4
Si presiona el botón cuya dirección es opuesta a la dirección de
rodadura real de la persiana enrollable, la dirección de rotación
del motor se puede invertir presionando el botón RESET tres
veces; y luego, si el indicador se vuelve azul y dura 1 segundo,
indica que la dirección de giro del motor está invertida.
43
Control de dispositivo (después de configurar el rango de
rotación)
Propósito
Enrollar la persiana
enrollable
Desenrollar la
persiana enrollable
Haga clic en el botón Arriba: el motor sigue
moviéndose hacia arriba hasta que la
persiana se abre por completo
Haga clic en el botón Abajo: el motor sigue
moviéndose hacia abajo hasta que la
persiana está completamente cerrada
Mantenga presionado el botón Arriba y
el botón Abajo al mismo tiempo
durante tres segundos
Presione el botón RESET 3 veces
seguidas (después de la operación, el
indicador azul se encenderá durante 1
segundo y luego se apagará)
Haga clic en el botón RESET, si el
indicador es azul, indica que está
conectado a la red
Haga clic en el botón RESET, si el
indicador está rojo, indica que no está
conectado a la red
Mantenga presionado el botón RESET
durante 5 segundos, hasta que el
indicador se vuelva azul y parpadee
continuamente:
Por el momento, el dispositivo se
restaura a la configuración de fábrica y
entra en estado de configuración de red.
El estado de configuración de la red
puede durar 30 segundos y en este
período:
a.Si el dispositivo se conecta a la red
correctamente, el indicador dejará de
parpadear.
b.Si algo sale mal y el dispositivo no se
conecta a la red, el indicador rojo se
encenderá en breve y luego se apagará.
c.Si no hay ninguna operación, el
indicador se apagará después de 30
segundos y la conexión de red
finalizará.
Dirección de
rotación del motor
inverso
Detén la persiana
enrollable
Eliminar rango
giratorio
Verificar el
estado de la red
Restaurar el
dispositivo a la
configuración de
fábrica e ingresar
al estado de
configuración de
la red
Cortina enrollable detenida
Operación

44
Advertencias de Zigbee
Frecuencia de operación Zigbee: 2405-2480 MHz
Potencia de salida máxima de Zigbee ≤ 13 dBm
En condiciones normales de uso, este equipo debe mantenerse
a una distancia de separación de al menos 20 cm entre la
antena y el cuerpo del usuario.
Para Cargar el Dispositivo
Cuando el cable USB está enchufado, el indicador se volverá
azul y parpadeará 3 veces.
Con el cable USB enchufado, el indicador se volverá rojo hasta
que la batería esté completamente cargada.
Si la batería está completamente cargada, el indicador se apagará.
Configuración de dispositivo
Ingrese a la página de inicio del dispositivo, haga clic en el icono
"..." en la esquina superior derecha para ingresar a la página de
configuración del dispositivo, donde puede configurar el
temporizador, la automatización, el tipo de persiana enrollable, etc.
Especificaciones del producto
Control de Cortinas Enrollables E1
Color blanco
Modelo de producto: RSD-M01
(R-Roller, S-Shade, D-Driver, M-Motor, 01-La primera generación)
Protocolo inalámbrico: Zigbee 3.0 IEEE 802.15.4
Dimensiones: 43×38.5×175 mm (1,69 × 1,52 × 6,89 pulg.)
Temperatura de funcionamiento: -10 ° C ~ 55 ° C (14 ° F ~ 131 ° F)
Humedad de funcionamiento: 0-95% RH, sin condensación
Contenido de la caja: Control de Cortinas Enrollables E1 × 1,
Tornillo × 2, Tubo de expansión × 2, Cinta adhesiva de doble
cara × 1, Placa giratoria de repuesto × 3, Cable USB-C a USB-A × 1
Tipo de batería: batería de litio (no reemplazable)
Entrada clasificada: 5V 1A
Consumo total de energía: 5 W
Tiempo en espera: dos meses (se supone que controla una
persiana enrollable de 1,8 m * 1,8 m hacia arriba y hacia abajo
una vez al día)
45
Información sobre reciclaje y eliminación de RAEE
Todos los productos que llevan este símbolo son residuos de
aparatos eléctricos y electrónicos (RAEE según la directiva
2012/19 / UE) que no deben mezclarse con residuos domésticos sin
clasificar. En su lugar, debe proteger la salud humana y el medio ambiente
entregando sus equipos de desecho a un punto de recolección designado
para el reciclaje de equipos eléctricos y electrónicos de desecho,
designado por el gobierno o las autoridades locales. La eliminación y el
reciclaje correctos ayudarán a prevenir posibles consecuencias negativas
para el medio ambiente y la salud humana. Comuníquese con el instalador
o las autoridades locales para obtener más información sobre la ubicación,
así como los términos y condiciones de dichos puntos de recolección.
Servicio al cliente en línea: www.aqara.com/support
Correo electrónico de atención al cliente: support@aqara.com
Sitio web: www.aqara.com
Fabricante: Lumi United Technology Co., Ltd.
Dirección: 8th Floor, JinQi Wisdom Valley, No.1 Tangling Road, Liuxian Ave,
Taoyuan Residential District, Nanshan District, Shenzhen, China.
Declaración de conformidad de la UE
Por la presente, Lumi United Technology Co., Ltd. declara que el
equipo de radio tipo Control de Cortinas Enrollables E1, RSD-M01 cumple
con la Directiva 2014/53 / EU. El texto completo de la declaración de
conformidad de la UE está disponible en la siguiente dirección de Internet:
https://www.aqara.com/DoC/
46
Introduzione al prodotto
La Motore per tende a rullo E1 è un prodotto smart Zigbee 3.0
che può aiutarti a controllare la catena di perline delle tue
tende/persiane e trasformare la tua tenda a rullo esistente in
una smart. Grazie ad un hub Aqara Zigbee 3.0 è possibile
realizzare funzioni come il controllo remoto e il controllo del
tempo tramite l'app Aqara Home e lavorare con altri dispositivi
snart per creare un sistema di casa intelligente.
Avvertenze
1. Questo dispositivo può essere utilizzato da bambini di età
pari o superiore a 8 anni e da persone con ridotte capacità
fisiche, sensoriali o mentali o con mancanza di esperienza e
conoscenza se sono stati supervisionati o istruiti sull'utilizzo
del dispositivo in maniera sicura e ne comprendono i pericoli
coinvolti.
2. I bambini non devono giocare con il dispositivo.
3. La pulizia e la manutenzione dell'utente non devono essere
eseguite da bambini senza supervisione.
4. AVVERTENZA: il convertitore di frequenza deve essere
scollegato dalla fonte di alimentazione durante la pulizia, la
manutenzione e la sostituzione di parti.
*È richiesto un hub Aqara Zigbee 3.0. Alcune funzioni richiedono modelli
specifici di hub. Si prega di consultare il sito www.aqara.com/support per
maggiori dettagli.
RESET
5V
Indicatore
Pulsante Giù
Pulsante Su
Pulsante di Reset
Porta USB di tipo C

47
Preparazione prima dell’uso
1. È necessario uno smartphone o un tablet che supporti Wi-Fi o
una rete cellulare (con sistema iOS o Android).
2. È necessario un hub Aqara Zigbee 3.0 (la distanza tra questo
prodotto e l'hub deve essere entro 30 m).
3. Scaricare e installare l'app Aqara Home.
4. È necessario un trapano (deve essere dotato di una punta da
trapano φ5).
5. Assicurarsi che sia presente una connessione Wi-Fi e che la
tua connessione Internet sia stabile.
6. Caricare la Motore per tende a rullo E1 per circa 2 ore e 30
minuti.
7. La massa e le dimensioni della tenda da guidare devono
essere compatibili con la coppia nominale e il tempo di
funzionamento nominale.
5. Deve essere fornito solo a tensione separata o a bassissima
tensione di sicurezza (SELV).
6. AVVERTENZA: importanti istruzioni di sicurezza. È
importante per la sicurezza delle persone seguire queste
istruzioni.Conservare queste istruzioni.
7. Non permettere ai bambini di giocare con i comandi fissi.
8. Esaminare frequentemente l'installazione per rilevare
eventuali squilibri e segni di usura o danni alle molle e ai
fissaggi dei cavi.Non utilizzare se fosse necessaria la
riparazione o la regolazione.
9. Non mettere in funzione quando si eseguono operazioni di
manutenzione, come la pulizia di finestre, nelle vicinanze.
10. AVVERTENZA: importanti istruzioni di sicurezza. Seguire
tutte le istruzioni poiché un'installazione errata può causare
gravi lesioni.
11.Prima di installare il prodotto, rimuovere eventuali cavi o
componenti non necessari e disabilitare qualsiasi
apparecchiatura non necessaria per il funzionamento
alimentato.
12.Le caratteristiche della parte guidata devono essere
compatibili con il carico nominale e il tempo di operazione
nominale.
13.Questo dispositivo contiene batterie non sostituibili.
14.I controlli fissi devono essere chiaramente visibili dopo
l'installazione.
48
Installazione del dispositivo
Scansionare il codice QR qui sotto per vedere la guida
all'installazione.
Scegliere la posizione di installazione.
1
Selezionare la piastra in base alla seguente relazione di
corrispondenza piastra-perlina e installarla sull'albero di
uscita del dispositivo.
2
Innanzitutto, rimuovere il coperchio della testa del dispositivo.
Perline con un
diametro di3-4,5 mm
(le più diuse)
Perline con un diametro di
4,5-6mm e corde con perline
con il connettore (lo spessore
del connettore deve essere
inferiore a 6 mm)
Perline in plastica/metallo con uno spessore di3-6mm.
8. Nota: gli accessori sono compatibili solo con catene di perline
che soddisfano i seguenti standard:
49
Appendere la catena delle perline sulla piastra del dispositivo e
tirarla verso il basso con fermezza (non troppo stretta),
mantenere la catena tesa e tenere il dispositivo sulla parete e
trovare una posizione di installazione adeguata.
3
×
√
Assicurarsi che la catena di perline sia
posizionata correttamente nella posizione di
installazione selezionata e non si incroci.
Attenzione: non stringere troppo le perline;
Tenere il dispositivo in una posizione adatta e premere il
pulsante su o giù del dispositivo per assicurarsi che la catena
delle perline ruoti in modo stabile senza che scivoli (premere
nuovamente il pulsante su o giù per arrestare il motore
durante la rotazione).
4
Tenere il dispositivo nella posizione di installazione
selezionata e delineare la forma del dispositivo lungo la parte
inferiore sulla parete con una matita.
5
5mm
50
Vincolo e inizializzazione del dispositivo
1. Prima di attivare l'accessorio, assicurati di aver installato
l'app Aqara Home e l'hub Aqara Zigbee 3.0.
2. Aprire l'app, toccare "Home" e dopo di che toccare "+"
nell'angolo in alto a destra per accedere alla pagina "Add
Accessory". Selezionare "Roller Shade Driver E1" (Guida delle
Tende a Rullo E1) e l'hub a cui connettersi e aggiungerlo
secondo le istruzioni nell'app Aqara Home. Tenere premuto il
pulsante RESET per 5 secondi e attendere il messaggio vocale
dall'Hub.
Rimuovere la copertura di protezione dal coperchio della testa
e reinstallare il coperchio della testa sul dispositivo.
L'installazione è completa.
7
Rimuovere il coperchio posteriore del dispositivo e fissarlo in
una posizione a circa 5 mm dal segno.
Utilizzare le viti per fissare il prodotto. Dopo aver fissato il
coperchio posteriore, installare il dispositivo insieme alla
catena di perline sul coperchio posteriore.
6
Spingere il manico per
rimuovere il coperchio posteriore

51
Impostazione del campo di rotazione del dispositivo
1. Dopo che il dispositivo è connesso alla rete, è possibile
impostare il campo di rotazione del dispositivo tramite l'app
Aqara Home, fare clic sulla scheda del dispositivo nella home
page dell'app Aqara Home e seguire le istruzioni sulla pagina
per impostare il campo di rotazione;
2. Quando il dispositivo non è connesso alla rete, è possibile
impostare il campo di rotazione del dispositivo anche
premendo i pulsanti;
Operazioni con i pulsanti
Impostazioni del campo di rotazione
Elimina campo di rotazione
1
Dopo aver installato il dispositivo, premere contemporanea-
mente i pulsanti Su e Giù per 3 secondi fino a quando
l'indicatore luminoso non diventa blu, quindi rilasciarlo.
Impostare la posizione completamente aperta
2
Dopo aver eliminato il campo di rotazione, regolare la posizione
eettiva della tenda in modo che si apra completamente
premendo il pulsante Su o Giù, quindi premere il pulsante Su 5
volte di seguito.Se l'indicatore luminoso diventa blu e
lampeggia 3 volte, indica che l'impostazione è riuscita.
Impostare la posizione completamente chiusa
3
Dopo aver impostato la posizione completamente aperta,
regolare la posizione eettiva della tenda su completamente
chiusa premendo il pulsante Su o Giù, quindi premere il
pulsante Giù 5 volte in successione.Se l'indicatore luminoso
diventa blu e lampeggia 3 volte, indica che l'impostazione è
riuscita.
Dopo aver impostato le posizioni completamente aperta e
completamente chiusa, l'impostazione del campo di rotazione
è completa.
Ruotare il motore nella direzione opposta
4
Se si preme il pulsante il cui senso di rotazione è opposto a
quello eettivo di rotolamento della tenda avvolgibile, è
possibile invertire il senso di rotazione del motore premendo
tre volte il pulsante RESET;quindi, se l'indicatore diventa blu e
dura 1 secondo, indica che il senso di rotazione del motore è
invertito.
52
Controllo del dispositivo (dopo aver impostato il campo di
rotazione)
Scopo
Ruotare la tenda
avvolgibile
Srotolare la tenda a
rullo
Cliccare pulsante Su: il motore continua a
muoversi verso l'alto fino a quando la
tenda non è completamente aperta
Fare clic sul pulsante Giù: il motore
continua a muoversi verso il basso finché
la tenda non è completamente chiusa
Tenere premuti contemporaneamente i
pulsanti Su e Giù per tre secondi
Premere il pulsante RESET 3 volte di
seguito (dopo l'operazione, l'indicatore
blu si accenderà per 1 secondo e poi si
spegnerà)
Cliccare sul pulsante RESET, se
l'indicatore è blu, indica che è connesso
alla rete
Cliccare sul pulsante RESET, se
l'indicatore è rosso, indica che non è
connesso alla rete
Premere a lungo il pulsante RESET per 5
secondi, fino a quando l'indicatore
diventa blu e lampeggia continuamente:
Al momento, il dispositivo viene
ripristinato alle impostazioni di fabbrica
ed entra nello stato di configurazione di
rete.
Lo stato della configurazione di rete può
durare 30 secondi e in questo periodo:
a. Se il dispositivo è connesso alla rete
con successo, l'indicatore smetterà di
lampeggiare.
b.Se qualcosa va storto e il dispositivo
non è riuscito a connettersi alla rete,
l'indicatore rosso si accenderà a breve e
poi si spegnerà.
c. Se non viene eseguita alcuna
operazione, l'indicatore si spegnerà
dopo 30 secondi e la connessione di
rete terminerà.
Invertire la
direzione di
rotazione del
motore
Fermare la tenda a
rullo
Elimina campo
di rotazione
Verificare lo
stato della rete
Ripristina il
dispositivo alle
impostazioni di
fabbrica ed entra
nello stato di
configurazione di
rete
La tenda a rullo si è fermata
Operazione

53
Avvertenze Zigbee
Frequenza operativa Zigbee: 2405-2480 MHz
Potenza di uscita massima Zigbee ≤ 13 dBm
In condizioni d'uso normali, questa apparecchiatura deve
essere mantenuta a una distanza di almeno 20 cm tra l'antenna
e il corpo dell'utente.
Per Caricare il Dispositivo
Quando il cavo USB è collegato, l'indicatore diventerà blu e
lampeggerà per 3 volte.
Con il cavo USB collegato, l'indicatore diventerà rosso fino a
quando la batteria non sarà completamente carica.
Se la batteria è completamente carica, l'indicatore si spegnerà.
Impostazioni del dispositivo
Entrare nella home page del dispositivo, cliccare sull'icona "..."
nell'angolo in alto a destra per accedere alla pagina delle
impostazioni del dispositivo, dove è possibile impostare il timer,
l'automazione, il tipo di tenda a rullo, ecc.
Specifiche del prodotto
Motore per tende a rullo E1
Colore: Bianco
Modello del prodotto: RSD-M01
(R-Roller (Rullo), S-Shade (Ombra), D-Driver (Guida), M-Motor
(Motore), 01-The First Generation (Prima generazione) )
Protocollo wireless: Zigbee 3.0 IEEE 802.15.4
Dimensioni: 43×38.5×175 mm (1,69×1,52×6,89 in.)
Temperatura di operazione: -10°C ~ 55°C (14°F ~ 131°F)
Umidità di operazione: 0-95% di umidità relativa, senza condensa
Cosa c’è nella confezione: Motore per tende a rullo E1 × 1, Vite ×
2, Tubo di espansione × 2, Nastro biadesivo × 1, Piastra rotante
di ricambio × 3, Cavo da USB-C a USB-A × 1
Tipo di batteria: Batteria al litio (non sostituibile)
Ingresso nominale: 5V 1A
Consumo energetico totale: 5W
Tempo di standby: Due mesi (supponendo che controlli una
tenda a rullo di 1,8 m * 1,8 m su e giù una volta al giorno)

54
Informazioni sullo smaltimento e il riciclaggio dei RAEE
Tutti i prodotti che riportano questo simbolo sono apparecchia-
ture elettriche ed elettroniche (WEEE come nella direttiva2012/19/
UE) che non devono essere mescolate con i rifiuti domestici indierenziati,
ed è necessario proteggere la salute umana e l'ambiente consegnando le
apparecchiature di scarto a un punto di raccolta designato per il riciclaggio
dei rifiuti di apparecchiature elettriche ed elettroniche, designato dal
governo o dalle autorità locali. Lo smaltimento e il riciclaggio corretti
aiuteranno a prevenire potenziali conseguenze negative per l'ambiente e la
salute umana. Contattare l'installatore o le autorità locali per ulteriori
informazioni sulla ubicazione, nonchè i termini e le condizioni di tali punti
di raccolta.
Servizio clienti online:www.aqara.com/support
E-mail di assistenza clienti:support@aqara.com
Sito web:www.aqara.com
Produttore: Lumi United Technology Co., Ltd.
Indirizzo: Ottavo piano, JinQi Wisdom Valley, Via Tangling Road n.1, Strada
Liuxian, Distretto residenziale di Taoyuan, Distretto di Nanshan, Shenzhen,
Cina.
Made in China
Dichiarazione di conformità UE
Con la presente, Lumi United Technology Co., Ltd. dichiara che il
tipo di apparecchiatura radio Guida delle Tende a Rullo E1, RSD-M01 è
conforme alla Direttiva2014/53/ UE. Il testo completo della dichiarazione
di conformità UE è disponibile sul seguente indirizzo internet:
https://www.aqara.com/DoC/
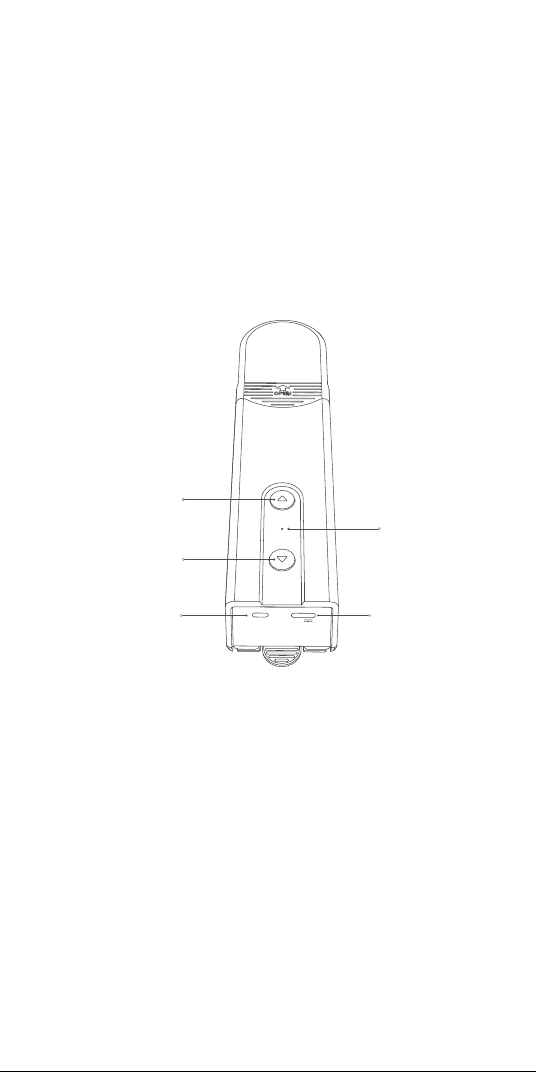
55
RESET
5V
インジケー タ
下 ボタン
上 ボタン
リ セット ボ タ ン
USB Type-Cポート
製品の概要
ローラーシェードドライバーE�は、Zigbee�.�スマート製品で、シ
ェード/ブラインドのビーズチェーンを制 御し、既 存 のローラーシェ
ードをスマートな シェードに 変 換 するの に 役 立ちます。A q a r a の
Zigbee�.�ハブを使って、Aqara Homeアプリを介してリモート
コントロ ー ル や タイミン グ コントロ ー ル な ど の 機 能 を 実 現 し 、他 の
スマ ートデバ イスと連 携 してスマ ートホ ームシステムを 形 成 する
ことが できる。
警告
�.この器具は、�歳以上の小児および身体的、感覚的または精
神的能力が低下している、または経験や知識が不足している
人が、安全な方法で器具の使用に関する監督または指導を
受け、危険性を理解している場合に使用できます。
�.子供は遊ばないこと。
�.清掃および使用者のメンテナンスは、子供の監督なしに行って
はならない。
�.警告:ドライブは、清掃、メンテナンスおよび部品交換の際に電
源から切断するものとする。
�.絶縁または安全特別低電圧(SELV)でのみ供給してください。
�.警告: 重要な安全上の注意事項人の安全のためには、これら
の指示に従うことが重要です。これらの指示を保存します。
*Aqara Zigbee�.�ハブが必要です。機能によっては、特定のモデルのハブ
が必要になります。詳細については、www.aqara.com/supportを参照
してくだ さ い 。
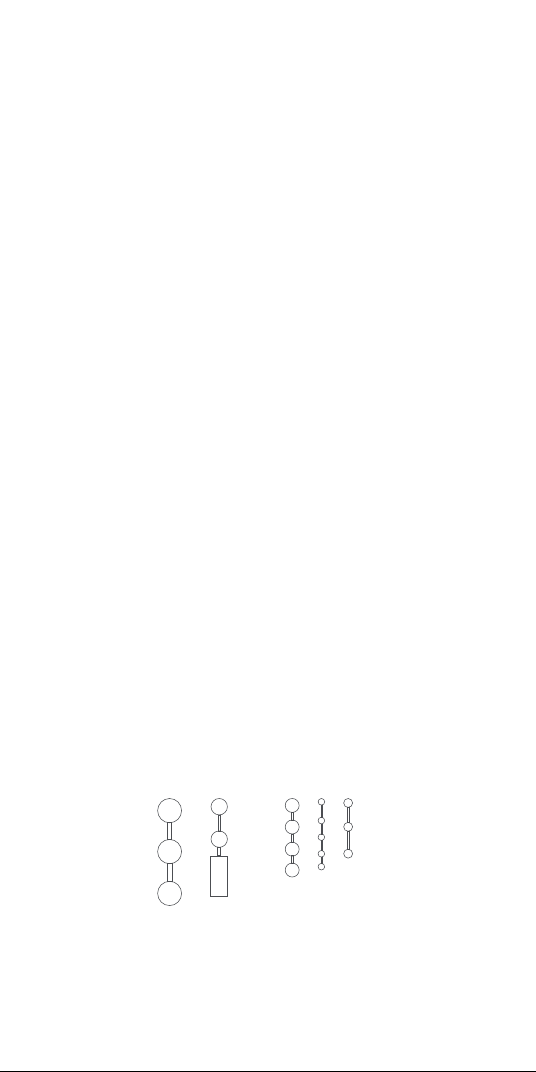
56
�.固定コントロールで子供を遊ばせないでください。
�.ケーブル・スプリングおよび固定具のアンバランス、摩耗また
は損傷の徴候がないか、頻繁に点検する。修理や調整が必
要な場合は使用しないでください。
�.周辺でゴンドラなどのメンテナンスを行っている場合は使用
しな いでくだ さい 。
��.警告: 重要な安全上の注意事項正しく取り付けないと、重傷
を負う可能性がありますので、必ずご使用ください。
��.ドライブを取り付ける前に、不要なコードまたはコンポーネン
トをすべて取り外し、電源が入った状態での操作に不要な装
置をすべて無効にしてください。
��.被駆動部の特性が定格荷重及び定格作動時間に適合する
こと。
��.このアプライアンスには交換不能なバッテリが含まれています。
��.固定されたコントロールは、インストール後にはっきり見える
ようにする必 要 が あります。
使用前の準備
�.Wi-Fiに対応したスマートフォンまたはタブレット、または携帯
電話ネットワーク(iOSまたはAndroidシステム)が必要です。
�.Aqara Zigbee�.�ハブが必要です(この製品とハブ間の距離
は��m以内でなければなりません)。
� . A q a r a ホ ームアプリをダウンロードしてインストー ルします。
�.穴あけ機が必要です(φ�のドリルビットが必要)。
�.Wi-Fi接続とインターネット接続が安定していることを確認して
ください。
�. ローラーシェードドライバーE�に�時間��分程度充電してくだ
さい。
�.駆動するシェードの質量および寸法は、定格トルクおよび定格
作動時間に適合するものとする。
�.注: アクセサリーは、以下の基準を満たすビーズチェーンにの
み適 合します。
厚さ�~�mmのプラスチック/金属ビーズ
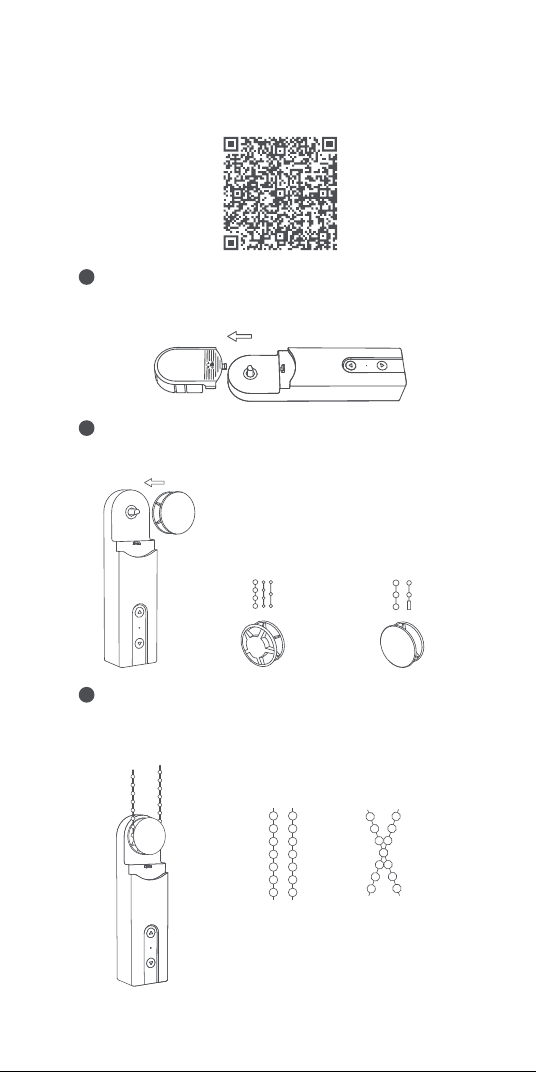
57
デバイスのインストール
下記のQRコードをスキャンしてインストール ガイドをご覧くださ
い 。
インストール 場 所を選択します。
1
以下のプレート-ビードマッチング関係に従ってプレートを選択
し、装置の出力軸に取り付けてください。
2
ビードチェーンを装置のプレートに掛け、(きつくしすぎないよ
うに )しっかりと下 に 引 き、ビードチェーンをしっかりと、装 置を
壁に固定して、適切な取り付け位置を見つけます。
3
まず、本体のヘッドカバーを外します。
直径�~�.�mmの
ビーズ(最も一般的)
直径�.�~�mmのビー
ズ 、お よ び コ ネ ク タ ー 付
きビーズコード(コネクタ
ーの厚さは�mm未満
であることが必要)
×
√
ビ ード チェー ン が 正 し い 取り 付 け 位 置 に
配置され、交差していないことを確認し
てくだ さ い 。
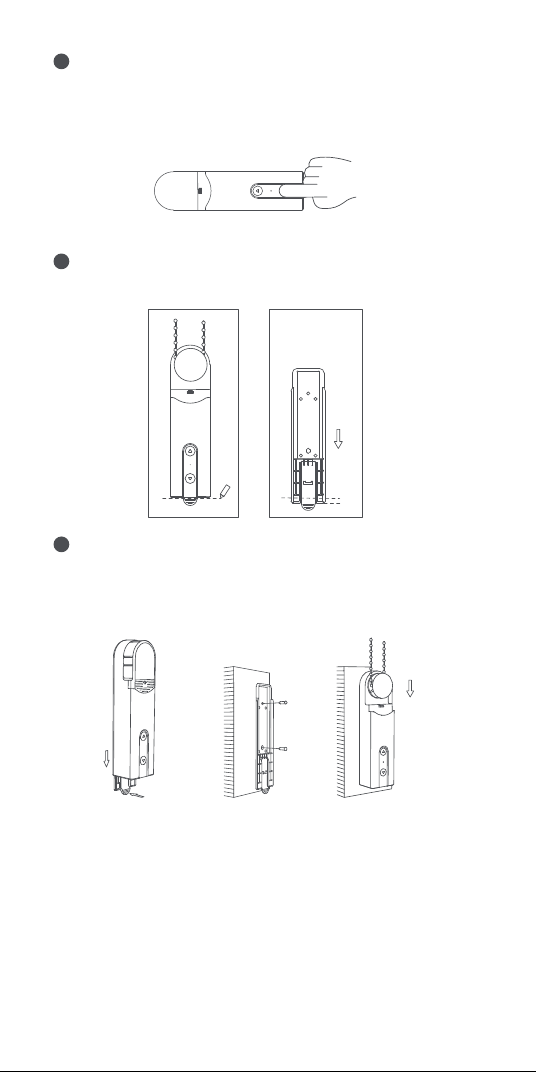
装置を適切な位置に保持し、装置の上または下のボタンを
押して、ビードチェーンが安定して回転し、スリップしないこと
を確認します(回転中にモーターを停止するには、もう一度上
また は 下 の ボタンを押します) 。
4
選択したインストール位置にデバイスを置き、壁の底に沿って
デバイスの形状を鉛筆で描きます。
5
装置の背面カバーを取り外し、マークから約�mm下の位置
に固 定します。
ネジで固定してください。背面カバーを固定した後、ビーズチ
ェーンバックと共 に 装 置を 背 面カバ ーに取り付けます。
6
58
注意:ビーズをきつくしすぎないように注意してください。
5mm
ハ ンド ル を 押して 背
面カバーを取り外す
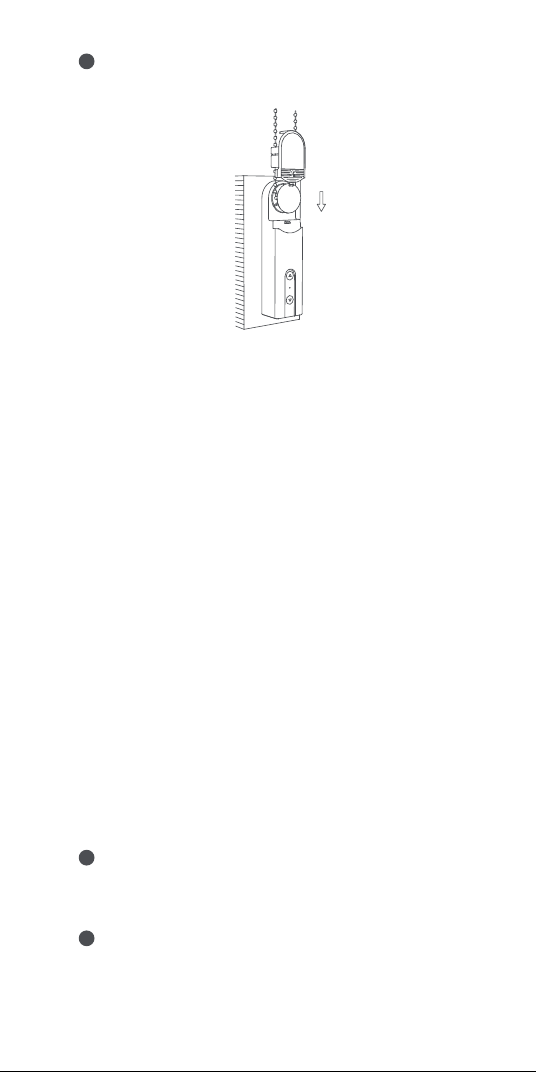
ヘ ッド カ バ ー の 保 護 シ ート を 取 り 外 し 、ヘ ッド カ バ ー を 装 置 に
取り付けます。インストール が完 了しました。
7
59
デバイスバインドと初期化
�.アクセサリを起動する前に、AqaraホームアプリとAqara
Zigbee�.�ハブがインストールされていることを確認してくだ
さい。
�.アプリを開いて、「Home」をタップし、右上の「+」をタップして「
Add Accessory」ページを入力してください。「Roller Shade
Driver E�」と接続するハブを選択し、Aqaraホームアプリの指
示に従って追加します。リセットボタンを�秒間押したままにし
て 、ハ ブ か ら の 音 声 プ ロ ン プ ト を 待 ち ま す 。
装置回転範囲設定
�.装置をネットワークに接続した後、Aqaraホームアプリで装置
の回転範囲を設定し、Aqaraホームアプリのホームページで
装置カードをクリックし、画面の指示に従って回転範囲を設定
します。
�.装置がネットワークに接続されていない場合は、ボタンを押す
ことによって装置の回転範囲を設定することもできる。
ボタン操 作
回転範囲の設定
回転範囲の削除
1
デバイスをインストールした後、UpボタンとDownボタンを同時
に�秒間押し同時に�秒間押してから放します。
全開位置に設定する
2
回転範囲を削除した後、アップボタンまたはダウンボタンを押し
60
て、シェードの実際の位置が全開になるように調整した後、アップ
ボタンを�回連続して押します。 表示ランプが青くなって�回点
滅すれば、設定 が成功したことになります。
全閉位置に設定する
3
全開に設定した後、上ボタンまたは下ボタンで実際のカーテン
の位置を全閉に調整し、下ボタンを�回連続して押します。表示
ランプが青くなって�回点滅すれば、設定完了です。
全開位置と全閉位置を設定したら、回転範囲の設定は完了で
す。
モーターを逆方向に回転させる
4
ローラシェードの実際の回転方向と逆方向のボタンを押すと、
RESETボタンを�回押すことでモータの回転方向を反転させる
ことができます。その後、インジケータが青色になり�秒間継続す
ると、モータの回転方向が反転していることを示します。
デバイスコントロール(回転範囲設定後)
目的
ロ ー ラ ー シェード
を回転させる
ロ ー ラ ー シェード
の展開
[上へ]ボタンをクリックします。モーターは日陰が完
全に開くまで上に移動し続けます。
[Down]ボタンをクリックします。モーターは、シェード
が完全に閉じるまで下に移動し続けます。
回転範囲を削除 [Up]ボタンと[Down]ボタンを同時に�秒間押し続ける
モータ回転方向反
転
RESETボタンを�回続けて押します(操作後、青色の
インジケーターが�秒間点灯し、その後消灯します)。
ネット ワ ー ク ス テ
ー タ ス の チェック
RESETボタンをクリックします。インジケータが青色
の場合は、ネットワークに接続されていることを示し
ます。
RESETボタンをクリックします。インジケータが赤色
の場合は、ネットワークに接続されていないことを
示します。
デバ イスを 出 荷
時の設定に復
元 し 、ネ ット ワ ー
ク構成ステータ
スを入力する
RESETボタンを�秒間長押ししと、インジケータが青
色に変わり、連続的に点滅します。
現在、デバイスは出荷時の設定に復元され、ネットワ
ーク設定ステータスになります。
ネットワーク構成ステータスは��秒間続くことがあり
ます。この 期 間次 のようになります。
a.デバイスがネットワークに正常に接続されると、イ
ンジケータの点滅が停止します。
b.何らかの問題が発生し、デバイスがネットワークに
接続できなかった場合、赤色のインジケータがす
ぐに点灯し、その後消灯します。
c.何も操作場合、インジケータは��秒後にオフにな
り、ネットワーク接続 が終了します。
ロ ー ラ ー シェード
を停止する
ロ ー ラ ー シェード 停 止
操作

61
本体の充電設備
ケーブルを接続すると、インジケータが青色に変わり、�回点滅し
ます。
ケーブルを接続すると、バッテリが完全に充電されるまでインジ
ケータが 赤 に変 わります。
バッテリが完全に充電されている場合、インジケータは消灯しま
す。
デバ イスの 設 定
デバイスのホームページを入力し、右上隅の[...]アイコンをクリッ
クすると、デバイス設定ページが表示されます。このページでは、
タイマー、オートメーション、ローラーシェードなどを設 定 できます。
製品仕様
ロ ー ラ ー シェードドライバ ー E �
色: 白
製品モデル: RSD-M��
(R-ローラー、S-シェード、D-ドライバー、M-モーター、��第�世代)
ワイヤレス・プロトコル: Zigbee �.� IEEE ���.��.�
寸法: ��×��.�×��� mm(�.��×�.��×�.��インチ)
動作時温度: -��°C~��°C(��°F~���°F)
動作時湿度: �~��%RH、結露なきこと
ボックス内の内容: ローラーシェードドライバーE�×�、ネジ×�、
エクスパンションチューブ×�、両面粘着テープ×�、予備回転板
×�、USB-C-USB-Aケーブル×�
バッテリタイプ: リチウム電池(交換不可)
定格入力: �V �A
総電力消費量: �W
スタンバイ時間: �ヶ月間(�日�回上下に�.�m*�.�mのローラー
シェード を 制 御 すること に なって い る )
オンラインカスタマーサービス:www.aqara.com/support
カスタマー・サポートEメール:support@aqara.com
ウェブサイト:www.aqara.com
メーカー: Lumi United Technology Co., Ltd.
アドレス: �th Floor, JinQi Wisdom Valley, No.� Tangling
Road, Liuxian Ave, Taoyuan Residential District,
Nanshan District, Shenzhen, China.
Made in China
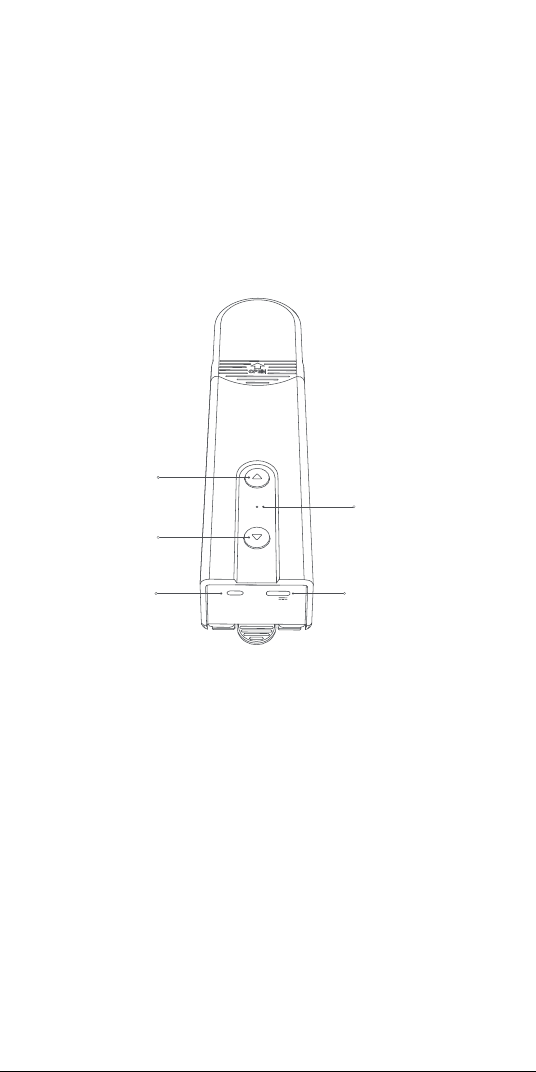
62
RESET
5V
인디케이터
아래쪽 버튼
위쪽 버튼
재설정 버튼
USB Type-C 포트
제품 소개
스마트 블라 E1은 Zigbee 3.0 스마트 제품으로
쉐이드/블라인드의 비드 체인을 제어하여 기존 롤러 쉐이드를
스마트한 쉐이드로 변환할 수 있습니다. Aqara Zigbee 3.0
허브로 Aqara Home 앱을 사용한 원격 제어 및 타이밍 제어와
같은 기능을 구현하고 다른 스마트 장치와 연동하여 스마트 홈
시스템을 구축할 수 있습니다.
경고
1.이 기기는 8세 이상의 어린이와 신체적, 감각적 또는 정신적인
능력이 저하되거나 경험 또는 지식이 부족한 사용자가 안전한
방식으로 기기 사용에 대한 감독이나 지시를 받아 위험을 알고
있는 경우에 사용할 수 있습니다.
2.어린이가 기기를 가지고 놀면 안 됩니다.
3.감독 없이 어린이가 청소 및 유지 보수를 해서는 안 됩니다.
4.경고: 청소, 유지 보수 및 부품 교체 시에는 드라이브를 전원에서
분리해야 합니다.
5.기기는 분리 또는 안전 초 저전압(SELV)으로만 공급해야 합니다.
6.경고: 안전 지침은 중요합니다. 사용자의 안전을 위해 이 지침을
따르는 것이 중요합니다. 이 지침을 저장하세요.
7.아이들이 고정된 컨트롤을 가지고 놀지 못하게 하세요.
*Aqara Zigbee 3.0 허브가 필요합니다. 일부 기능은 특정 모델의 허브가
있어야 합니다. 자세한 사항은
www.aqara.com/support를 참조해 주세요.
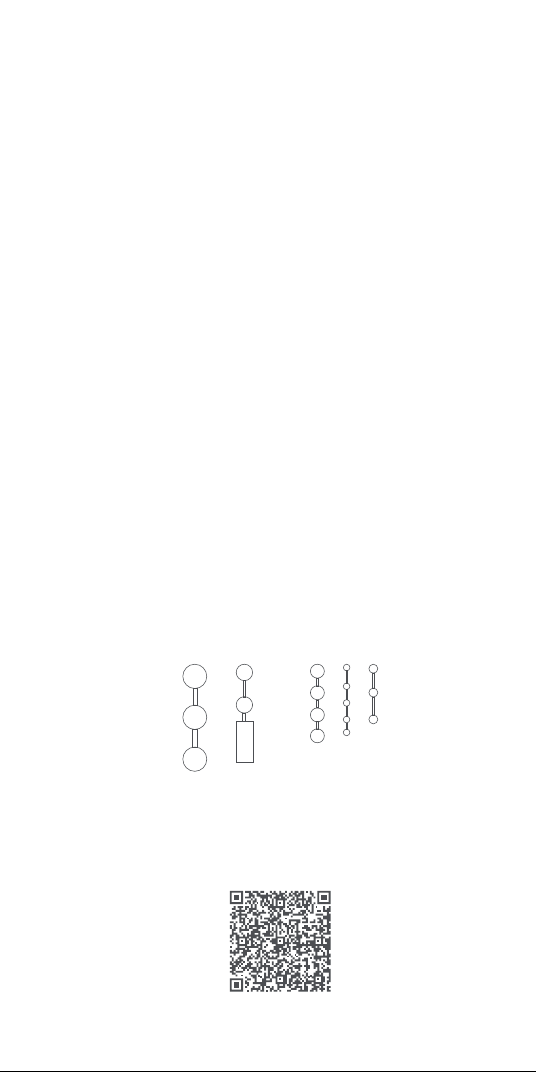
63
사용 전 준비
1. Wi-Fi 또는 셀룰러 네트워크(iOS 또는 Android 시스템)를
지원하는 스마트폰 또는 태블릿이 필요합니다.
2. Aqara Zigbee 3.0 허브가 필요합니다(이 제품과 허브의
거리는 30m 이내여야 합니다).
3. Aqara Home 앱을 다운로드하여 설치하세요.
4.드릴링 머신이 필요합니다(φ5 드릴 비트가 장착되어 있어야 함).
5. Wi-Fi가 연결되어 있고 인터넷 연결이 안정적인지 확인하세요.
6. 스마트 블라 E1을 2시간 30분가량 충전해 주세요.
7.구동 쉐이드의 질량 및 치수는 정격 토크 및 정격 작동 시간과
호환되어야 합니다.
8. 참고: 액세서리는 다음 규격을 충족하는 비드 체인과만 호환:
장치 설치
설치 가이드를 보려면 다음 QR 코드를 스캔하세요.
8.설치 불균형 및 케이블 스프링과 고정 장치에 마모 또는 손상의
징후가 있는지 자주 확인하세요. 수리나 조정이 필요한 경우는
사용하지 마세요.
9.근처에서 창문 청소와 같은 유지 보수 작업이 진행 중일 때는
기기를 조작하지 마세요.
10.경고: 안전 지침은 중요합니다. 설치를 잘못하면 중상을 입을 수
있으므로 모든 지침에 따라 주세요.
11.드라이브를 설치하기 전에, 불필요한 코드나 구성 요소를
제거하고 전원 작동에 불필요한 기기는 비활성화하세요.
12.구동 부품의 특성이 정격 부하 및 정격 작동 시간과 호환되어야
합니다.
13.이 기기의 배터리는 교체할 수 없습니다.
14.고정 컨트롤은 설치 후 명확하게 표시되어야 합니다.
두께가 3~6mm인 플라스틱/금속 비즈
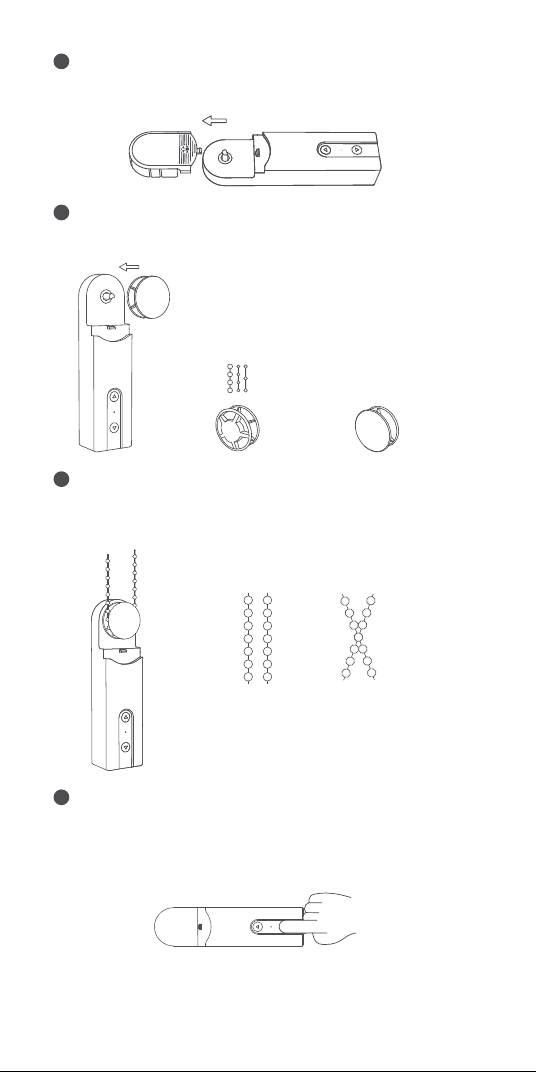
64
설치 위치를 선택하세요.
1
다음의 플레이트-비드 매칭 관계에 따라 플레이트를 선택하고
장치의 출력축에 장착합니다.
2
비드 체인을 장치의 플레이트에 걸어 단단히 잡아당기고(너무
꽉 당기지 않도록), 비드 체인을 단단히 유지해 장치를 벽에
붙인 다음, 적절한 설치 위치를 찾습니다.
3
먼저 장치의 헤드 커버를 제거합니다.
직경 3~4.5mm
비즈(가장 보편적인
비즈)
경 4.5~6mm 비즈 및
커넥터 포함 비즈
코드(커넥터 두께는
6mm 미만이어야 함)
×
√
최종 설치 위치에 비드 체인이 바르게
배치되어 교차하지 않는지 확인해 주세요.
장치를 적절한 위치에 두고 장치의 위쪽 또는 아래쪽 버튼을
눌러 비드 체인이 안정적으로 회전하며 미끄러지지 않도록
합니다(위 또는 아래 버튼을 다시 누르면 회전 중에 모터가
중지됩니다).
4
주의: 비드를 너무 꽉 당기지 말고 이렇게 하세요.
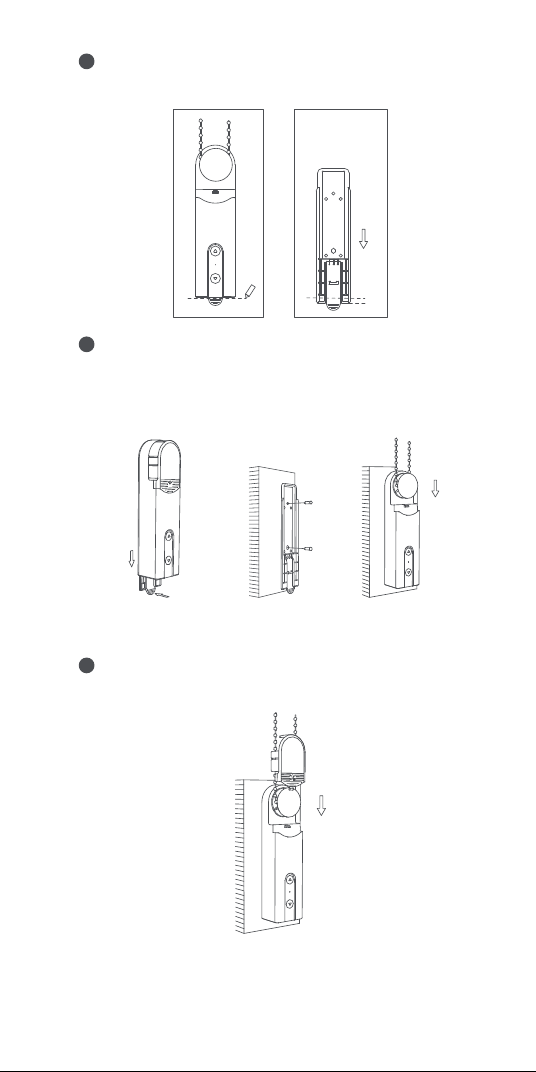
65
최종 설치 위치에서 장치를 잡고 연필로 벽의 밑면을 따라 장치
모양의 윤곽을 그립니다.
5
장치의 뒷면 커버를 분리하고 표시된 부분에서 약 5mm 아래
위치에 고정합니다.
나사를 사용하여 제품을 고정하세요. 뒷면 커버를 고정한 후,
뒷면 커버의 뒷면에 비드 체인과 함께 장치를 설치합니다.
6
5mm
핸들을 눌러 뒷면
커버를 분리합니다
헤드 커버의 보호 시트를 떼어내고 헤드 커버를 장치 뒷면에
설치합니다. 설치가 완료되었습니다.
7

66
장치 바인딩 및 초기화
1.액세서리를 활성화하기 전에, Aqara 홈 앱과 Aqara Zigbee 3.0
허브가 설치되어 있는지 확인해 주세요.
2.앱을 열고 “홈”을 눌러 우측 상단의 “+”를 터치하여 “장치
추가(액세서리)” 페이지에 접속하세요. “Roller Shade Driver
E1”과 연결할 허브를 선택하고 Aqara Home 앱의 지침에 따라
추가합니다. 재설정(RESET) 버튼을 5초간 누르고 허브의 음성
안내를 기다립니다.
장치 회전 범위 설정
1. 장치를 네트워크에 연결한 후 Aqara Home 앱에서 장치의
회전 범위를 설정하고 Aqara Home 앱 홈페이지에서 단말기
카드를 클릭하여 페이지의 지침에 따라 회전 범위를 설정합니다.
2. 장치가 네트워크에 연결되어 있지 않다면 버튼을 눌러 장치의
회전 범위를 설정할 수도 있습니다.
버튼 작동
회전 범위 설정
회전 범위 삭제
1
장치를 설치하고 나면, 인디케이터가 파란색이 될 때까지 위쪽
버튼과 아래쪽 버튼을 동시에 3초간 눌렀다 놓으세요.
전체 열림 위치 설정
2
회전 범위를 삭제한 후, 위 또는 아래 버튼을 눌러 쉐이드의 실제
위치를 완전히 열리도록 조정하고, 위 버튼을 연달아 5번
누릅니다. 인디케이터가 파란색으로 바뀌고 3번 깜빡이면 설정이
완료된 것입니다.
반대 방향으로 모터 회전
4
롤러 쉐이드의 실제 롤링 방향과 반대 방향의 버튼을 누르면
재설정(RESET) 버튼을 3회 눌러 모터의 회전 방향을 반대로 할 수
있습니다. 이후 인디케이터가 파란색으로 바뀐 상태로 1초간
지속되면 모터의 롤링 방향이 반대로 됐음을 나타내는 표시입니다.
전체 닫힘 위치 설정
3
전체 열림 위치를 설정한 후, 위 또는 아래 버튼을 눌러 커튼의 실제
위치를 완전히 닫히도록 조정하고, 아래 버튼을 연달아 5번
누릅니다. 인디케이터가 파란색으로 바뀌고 3번 깜빡이면 설정이
완료된 것입니다.
전체 열림 및 전체 닫힘 위치를 설정하면 회전 범위 설정이
완료됩니다.
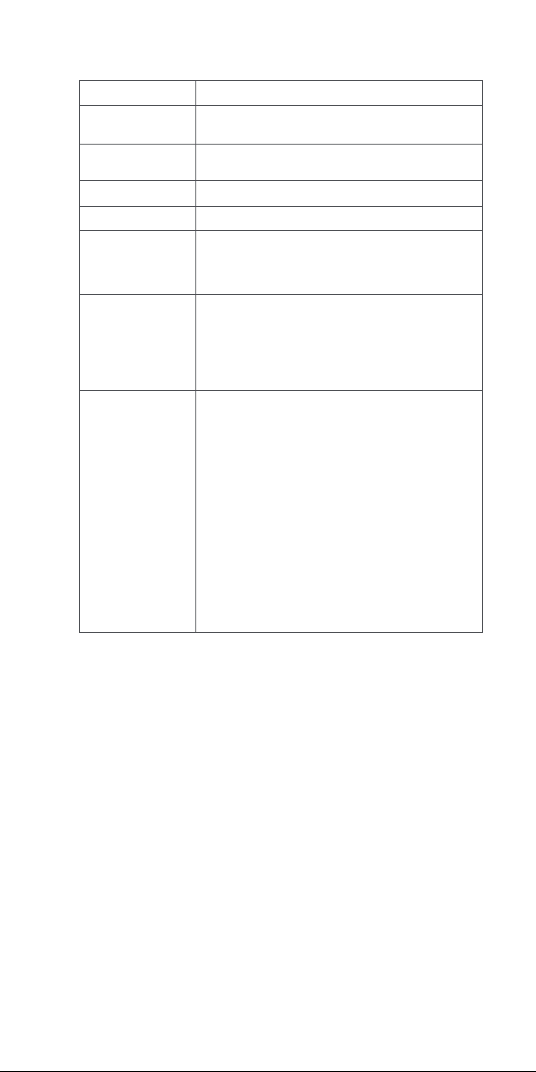
67
설비를 충전한다
케이블이 연결되면 인디케이터가 파란색으로 바뀌고 3회
깜빡입니다.
케이블이 연결되면 배터리가 완전히 충전될 때까지 인디케이터가
빨간색으로 바뀝니다.
배터리가 완전히 충전되면 인디케이터가 꺼집니다.
장치 설정
장치의 홈페이지로 들어가 오른쪽 상단의 “...” 아이콘을 클릭하여
장치 설정 페이지로 이동합니다. 이 페이지에서 타이머, 자동화,
롤러 쉐이드 유형 등을 설정할 수 있습니다.
장치 제어(회전 범위 설정 후)
목적
롤러 쉐이드 회전
롤러 쉐이드
비회전
위로 버튼 클릭 - 모터는 쉐이드가 완전히 열릴 때까지
위로 계속 움직입니다
아래 버튼 클릭 - 모터는 쉐이드가 완전히 닫힐 때까지
아래로 계속 움직입니다
회전 범위 삭제
위로 버튼과 아래 버튼을 동시에 3초간 누릅니다
역방향 모터 회전
재설정(RESET) 버튼을 3회 연속으로 누릅니다(작동
후 인디케이터가 파란색으로 1초간 점등 후
꺼집니다).
네트워크 상태
확인
재설정(RESET) 버튼을 클릭합니다. 인디케이터가
파란색인 경우 네트워크에 접속된 것을 나타냅니다
재설정(RESET) 버튼을 클릭합니다. 인디케이터가
빨간색인 경우 네트워크에 접속되어 있지 않은 것을
나타냅니다
장치를 공장 출하
시 설정으로
되돌리고 네트워크
구성 상태를
시작합니다
인디케이터가 파란색으로 바뀌고 계속 깜빡일 때까지
재설정(RESET) 버튼을 5초간 누르세요.
이 시점에서, 장치는 공장 출하 시의 설정으로 돌아와
네트워크 구성 상태가 됩니다.
네트워크 구성 상태는 30초간 지속되며 이 동안의
현상:
a. 장치가 네트워크에 정상적으로 접속되면,
인디케이터의 깜빡임이 멈춥니다.
b. 어떠한 문제가 발생해 장치가 네트워크에 접속할
수 없는 경우, 곧바로 인디케이터가 빨간색으로
잠시 켜졌다가 꺼집니다.
c. 작동하지 않는 경우, 30초 후에 인디케이터가
꺼지고 네트워크 연결이 종료됩니다.
롤러 쉐이드 멈춤
롤러 쉐이드가 멈췄습니다
작동

68
Zigbee Warnings
Zigbee Operation Frequency: 2405-2480 MHz
Zigbee Maximum Output Power ≤ 13 dBm
Under normal use of condition, this equipment should
be kept a separation distance of at least 20cm between
the antenna and the body of the user.
제품 상세 사항
스마트 블라 E1
색상: 하얀색
제품 모델: RSD-M01
(R-롤러, S-쉐이드, D-드라이버, M-모터, 01-1세대 )
무선 프로토콜: Zigbee 3.0 IEEE 802.15.4
치수: 43×38.5×175 mm (1.69×1.52×6.89 in.)
작동 온도: -10°C~55℃ (14°F~131°F)
작동 습도: 0~95% RH, 결로 없음
박스 내용물: 스마트 블라 E1 × 1, 나사 × 2, 확장 튜브 × 2,
양면 접착테이프 × 1, 예비 회전판 × 3, USB-C to USB-A
케이블 × 1
배터리 유형: 리튬 배터리(교체 불가)
정격 입력: 5V 1A
총소비 전력: 5W
대기 시간: 2개월(1.8m*1.8m 롤러 쉐이드를 1일 1회 상하로
제어한다고 가정)
온라인 고객 서비스: www.aqara.com/support
고객 지원 이메일: support@aqara.com
웹사이트: www.aqara.com
제조업체: Lumi United Technology Co., Ltd.
주소: 8th Floor, JinQi Wisdom Valley, No.1 Tangling Road,
Liuxian Ave, Taoyuan Residential District, Nanshan
District, Shenzhen, China.
Made in China
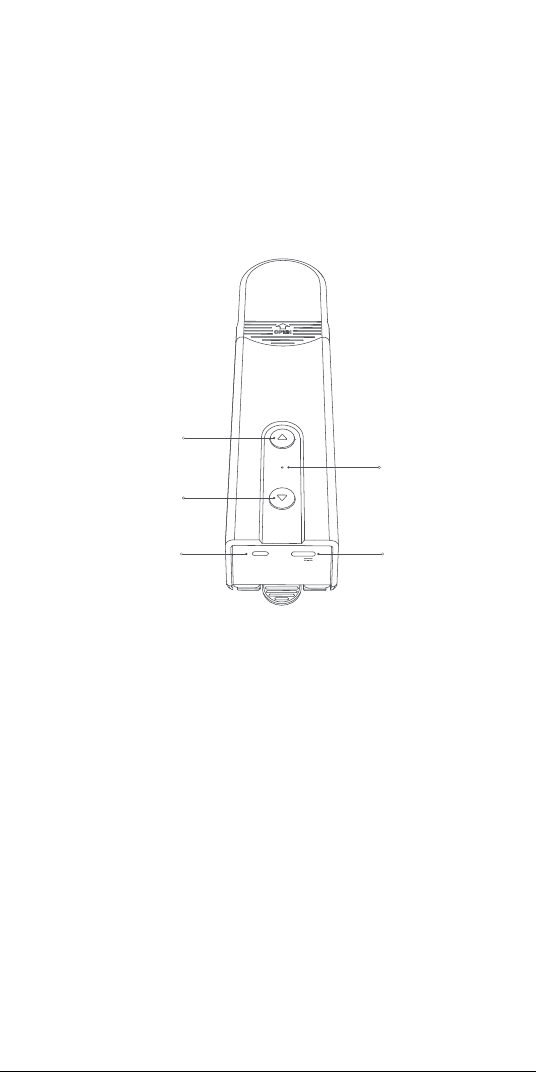
69
RESET
5V
指示燈
向下按鈕
向上按鈕
重置按鈕
USB Type-C端口
产品介绍
智能捲簾伴侶E1是Zigbee 3.0智慧產品,可幫助您控制遮陽簾
/百葉窗的珠鏈,並將現有捲簾轉換為智慧捲簾。借助Aqara
Zigbee 3.0 hub,它可以通過Aqara Home app實現遠程控制
和定時控制等功能,並與其他智慧設備協同工作,形成智能家
居系統。
警告語
1.8歲及以上的兒童,以及體能、感官能力或腦力下降或缺乏經
驗和知識的人可以使用本產品,但前提是其使用行為在監督
之下,或其已經接受有關安全使用本產品的指導並瞭解相關
風險。
2.兒童不應將本產品視作玩具。
3.無人監督的情况下,禁止兒童清潔和維護本產品。
4.警告:清潔、維護和更換零件之前,應斷開驅動器的電源。
5.只能採用單獨或額定安全低電壓(SELV)供電。
6.警告:重要的安全訓示。遵守這些訓示,對確保人員安全十分
重要。請妥善保存這些訓示。
7.切勿让儿童将固定的控制装置视作玩具玩耍。
8.經常檢查裝置是否不平衡,且電纜彈簧和固定件是否出現磨
損或受損迹象。如需修理或調整,請勿使用。
9.在附近進行維護工作(例如擦窗)時,請勿操作。
*需要Aqara Zigbee 3.0閘道器。有些功能需要特定型號的閘道器。關於
更多詳情,請訪問www.aqara.com/support。
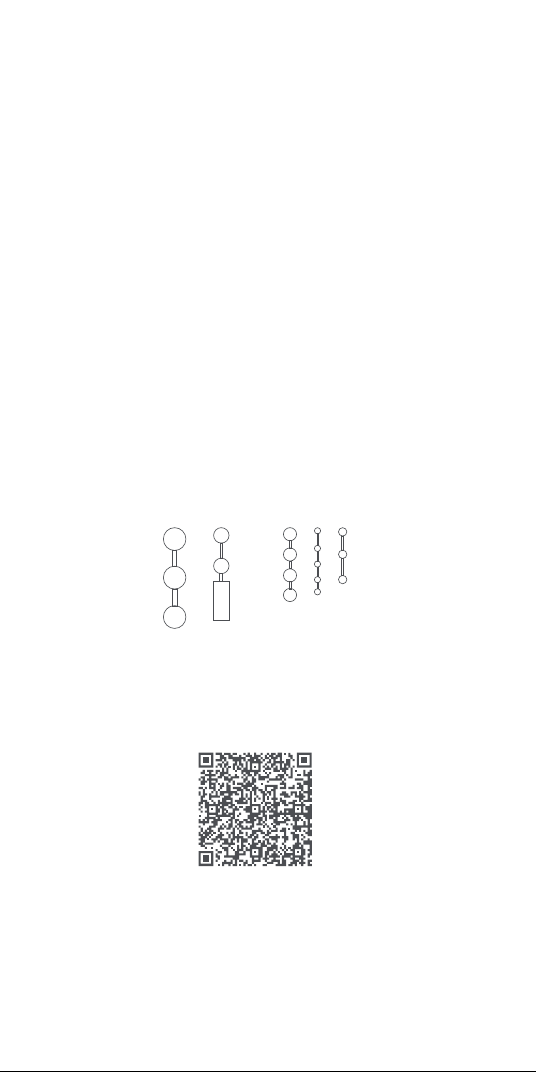
70
厚度為3-6mm的塑膠/金屬珠子
設備安裝
掃描下方的二維碼,查看安裝指南。
使用前的準備
1. 需要可支持Wi-Fi或蜂窩網絡(配iOS或Android系統)的智能
手機或平板電腦。
2. 需要一個Aqara Zigbee 3.0閘道(該產品與閘道之間的距離
應在30m內)。
3. 下載並安裝Aqara Home app。
4. 需要一臺鑽孔機(必須配備φ5鑽頭)。
5. 請確保,Wi-Fi連接和互聯網連接均保持穩定。
6. 請對智能捲簾伴侶E1充電,時間約為2小時30分。
7. 待驅動遮陽簾的質量和尺寸應與額定扭矩和額定工作時間相
容。
8. 注意:附件僅與符合以下標準的珠簾相兼容:
10.警告:重要的安全訓示。遵循所有的訓示,因為錯誤按照會
造成嚴重傷害。
11.安裝驅動器之前,請拆下所有不必要的線纜和零件,並禁用
任何無需通電操作的設備。
12.被驅動部件的特性必須與額定荷載和額定工作時間相相容。
13.本設備包含不可更換的電池。
14.安裝後,固定控制裝置必須清晰可見。
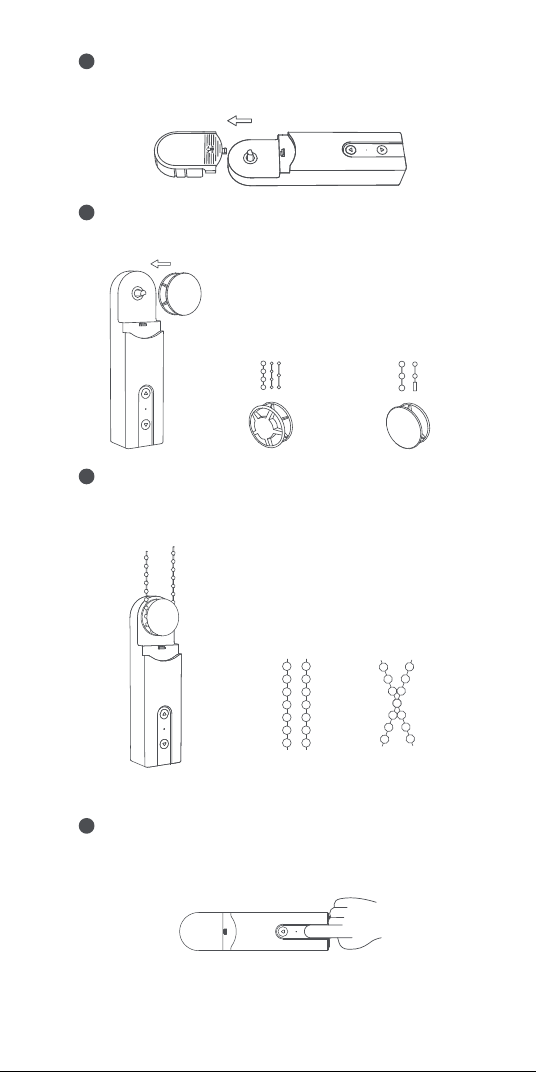
71
根據以下的轉盤-拉珠匹配關係選擇合適的轉盤,並將其安
裝在設備的輸出軸上。
2
將珠簾懸掛在設備轉盤上,並向下拉緊(切勿太緊),使珠簾
處於拉緊狀態並將設備靠在牆上,然後找到合適的安裝位
置。
3
直徑在3-4.5mm的拉珠
(最常用)
直徑在4.5-6mm的大拉珠,
以及帶線夾的拉珠(線夾厚
度不應大於6mm)
×
√
請確保將珠簾正確放置在選中的安裝位置,避免交叉。
選擇安裝位置
1
首先,拆下設備的頂蓋。
將設備放在合適的位置,然後按設備的上下按鈕,確保珠簾
正常轉動,不會發生滑移(轉動過程中再次按上下按鈕,停
下電機)。
4
注意:切勿使拉珠過緊;
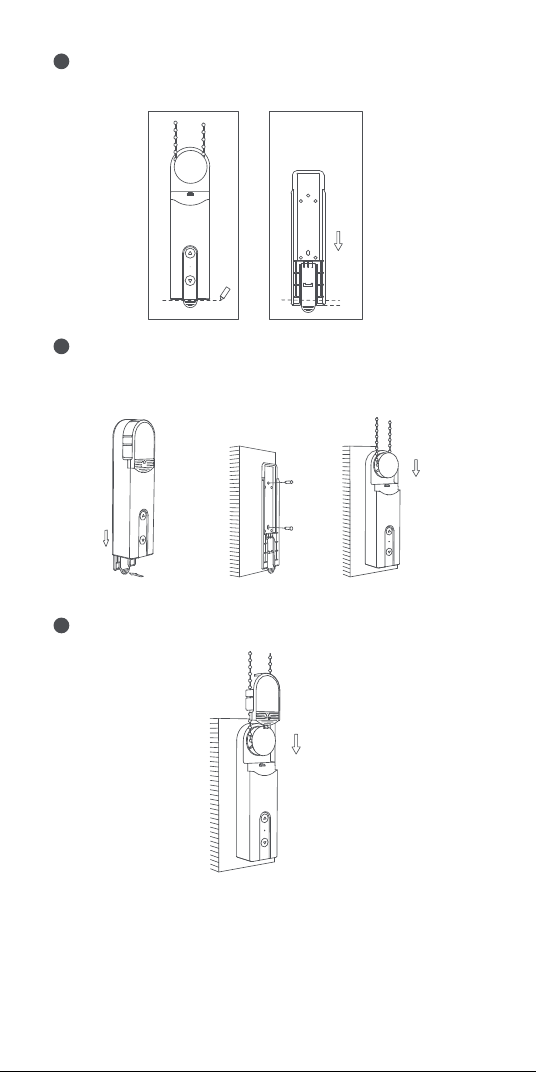
72
將設備放在選中的安裝位置,然後用鉛筆沿著設備的底部,
在牆上勾勒出設備的形狀。
5
取下設備的後蓋,然後將其固定在標記下方約5mm的位置。
使用螺絲釘固定產品。安裝完後蓋後,將設備連同珠簾一同
安裝回後蓋。
推動手柄,取下後蓋
5mm
6
取下頂蓋上的保護板,將頂蓋安裝回設備。安裝工作結束。
7

73
設備旋轉範圍設定
1. 設備連網後,可以通過Aqara Home 應用程序設定設備的旋
轉範圍。 點擊Aqara Home 應用程序主頁上的設備卡片,按
照頁面上的訓示設定旋轉範圍。
2. 當設備未連網時,也可通過按按鍵的管道設定其旋轉範圍。
設備入網和初始化
1.啟動附件之前,請確保已安裝Aqara Home 應用程序和
Aqara Zigbee 3.0閘道器。
2.請打開應用程序,輕按“主頁(Home)”,然後輕按右上角的
“+”,進入“添加設備(Add Accessory)”頁面。選擇“智能捲
簾伴侶E1(Roller Shade Driver E1)”和要連接的閘道,並
根據Aqara Home應用程序中的說明添加設備。按住重置
按鈕5秒鐘,等待閘道器的語音提示。
按鈕操作
旋轉範圍設定
删除旋轉範圍
1
設備安裝完畢後,同時按下向上和向下按鈕3秒鐘,直到指示燈
變為藍色,然後鬆開。
設定全開位置
2
删除旋轉範圍後,通過按上或下按鈕,將實際的遮陽簾位置調
整至全開狀態,然後按連續按向上按鈕5次。如果指示燈變藍並
閃爍三次,即意味著設定成功。
反向轉動電機
4
如果按下的按鍵的方向與實際的捲簾滾動方向相反,則按壓
重置按鈕三次即可反轉電機的轉動方向。之後,如果指示燈
變藍並維持1s,則意味著電機的轉動方向反向。
設定全閉位置
3
全開位置設定成功後,通過按上或下按鈕,調整遮陽簾的實
際位置至全閉狀態。然後連續按向下按鈕5次。如果指示燈變
藍並閃爍三次,即意味著設定成功。
全開和全閉位置設定成功後,旋轉範圍的設定結束。
74
設備充電
插上USB電纜後,指示燈將變藍並閃爍3次。
插上USB電纜後,指示燈將變紅,直到電池充滿電為止。
如果電池已充滿電,指示燈將熄滅。
設備設定
進入設備主頁,點擊右上角的“�”圖標,進入設備設定頁面。在
該頁面,您可以設定計时器、自動化、捲簾類型等。
目的
打開捲簾
關閉捲簾
單擊“向上”按鈕-電機一直向上移動,
直到捲簾完全打開
單擊“向下”按鈕-電機繼續向下移動,
直到捲簾完全關閉
同時按住向上按鈕和向下按鈕三秒鐘
連續按“重置”按鈕3次(操作後,藍色指
示燈將點亮1秒鐘,然後熄滅)
單擊“重置”按鈕,如果指示燈為藍色,
則表明它已連接到網絡。
單擊“重置”按鈕,如果指示燈為紅色,
則表明未連接到網絡。
長按重置鍵5s,直到指示燈變藍並不斷
閃爍:
此時,將設備恢復出廠設定並進入網絡
配寘狀態。
網絡配置狀態可以持續30秒,在此期間:
a. 如果設備與網絡成功連接,則指示燈
將停止閃爍。
b. 如果出現問題,,導致設備未能連網,
則紅色指示燈將很快亮起,然後熄滅。
c. 如果未進行任何操作,指示燈將在30s
後熄滅,網絡連接將結束。
使電機的轉動方
向反向
停止捲簾
刪除旋轉範圍
檢查網絡狀態
將設備恢復出
廠設定並進入
網絡配寘狀態
捲簾停下
操作
設備控制(選擇範圍設定成功以後)

75
產品參數資訊
智能捲簾伴侶E1
顏色:白色
產品型號:RSD-M01
(R-滾軸,S-遮陽簾,D-驅動器,M-電機,01-第一代)
無線協定:Zigbee 3.0 IEEE 802.15.4
尺寸:43×38.5×175 mm(1.69×1.52×6.89英寸)
工作溫度:-10°C ~ 55℃(14°F ~ 131°F)
工作濕度:0-95%相對濕度,無冷凝
包裝盒中的物品:智能捲簾伴侶E1×1,螺釘×2,膨脹管×2,
雙面膠帶×1,備用旋轉盤×3,USB-C轉USB-A電纜×1
電池類型:鋰電池(無法更換)
額定輸入:5V 1A
總功耗:5W
待機時間:2個月(能夠每天控制1.8m*1.8m的捲簾上下調節一
次)
線上客戶服務:www.aqara.com/support
客服電子郵箱:support@aqara.com
网址:www.aqara.com
製造商:深圳綠米聯創科技有限公司
地址:中國深圳市南山區桃源街道留仙大道塘嶺路1號金騏智
穀大廈8樓
Made in China


