1
DNA LAUNAM NOITAREPO
INSTALLATION INSTRUCTIONS
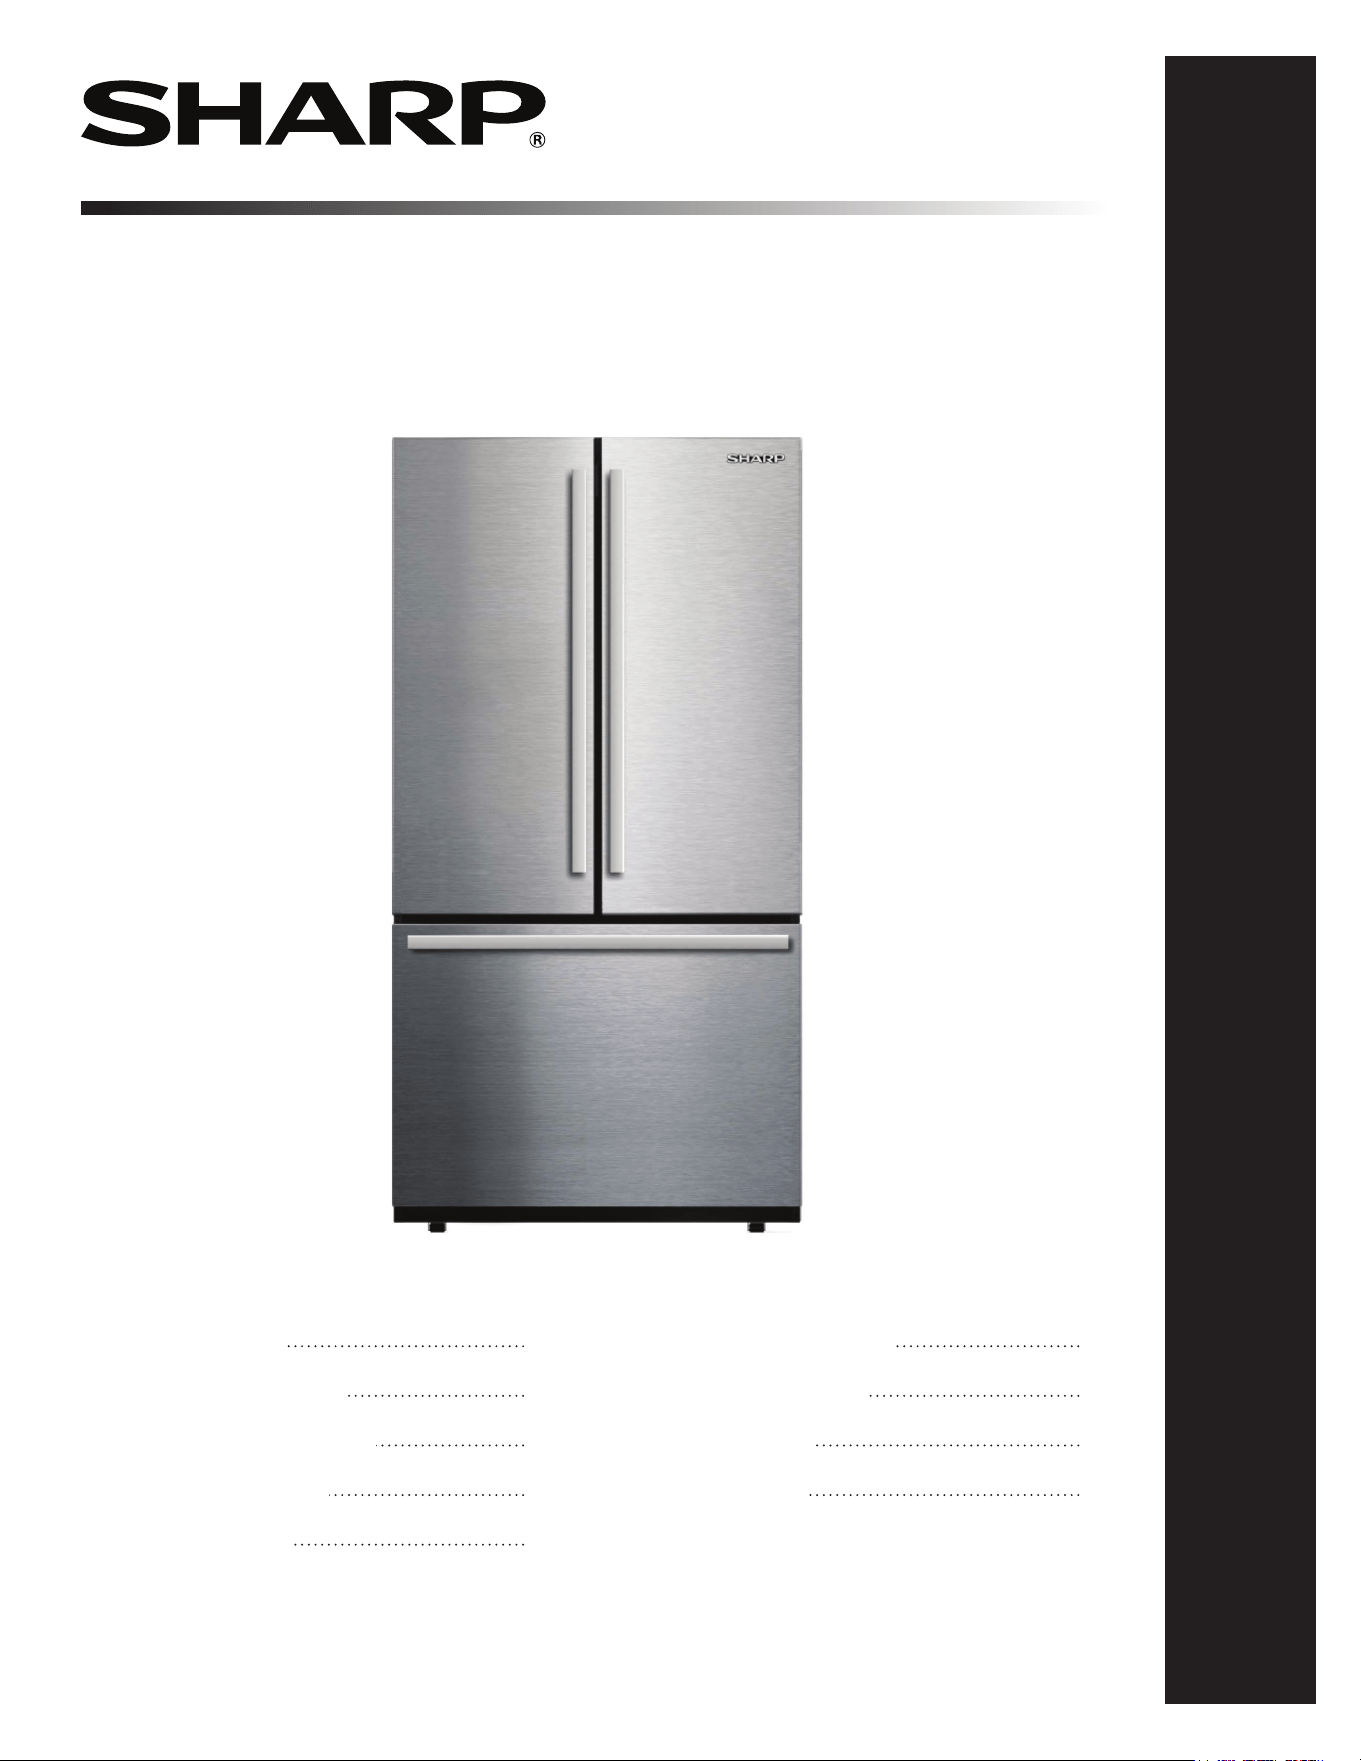
REFRIGERATOR
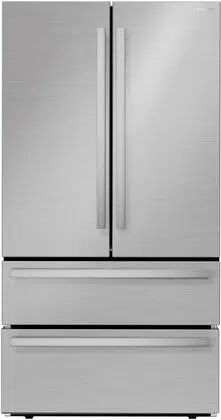
MODEL: SJF2752MS
V
Refrigerator: Model SJF2752MS
CUSTOMER ASSISTANCE
CONSUMER LIMITED WARRANTY
IMPORTANT SAFETY INSTRUCTIONS
INSTALLATION INSTRUCTIONS
APPEARANCE OVERVIEW
CONTROL AND DISPLAY PANEL
OPERATING REFRIGERATOR
CARE AND CLEANING
TROUBLESHOOTING
2
3
4
7
14
16
17
19
21
2
CUSTOMER ASSISTANCE UNITED STATES ONLY
REGISTER YOUR PRODUCT
Convenience
Communication
Support: Quickly access support content including Owner’s Manuals, FAQ’s,
3 EASY WAYS TO REGISTER TODAY!
PRODUCT SUPPORT
FAQ’s and How-To Videos
Extended Warranty Options
CONTACT US
Scan this QR Code on your mobile device Visit http://www.sharpusa.com/register
ONLINE
Visit our sites to
your product at
See the Contact Us section on our sites U.S. | www.sharpusa.com/support Contact a Sharp Advisor on the phone
Contact a Sharp Advisor on the phone
CALL US
US 800-BE-SHARP
800-237-4277
CALL US
US 800-BE-SHARP
800-237-4277
EMAIL CHAT ONLINE
SCAN
QR code scanning
TGANEB010MRR1 Aug 26, 2024
CONSUMER LIMITED WARRANTY
IMPLIED WARRANTIES INCLUDING THE WARRANTIES OF MERCHANTABILITY AND FITNESS FOR USE ARE
Product model number &
description:
Warranty period for this product:
Additional item(s) excluded from
warranty coverage:
What to do to obtain service:
3
4
IMPORTANT SAFETY INSTRUCTIONS
MEANING OF SAFETY WARNING SYMBOLS
This is a prohibition symbol. Failure to follow instructions marked
with this symbol may result in damage to the product or endanger the
personal safety of the user.
RISK OF FIRE/FLAMMABLE MATERIALS
PROHIBIT
This is a warning symbol. All instructions marked with the warning
symbol must be strictly followed. Failure to do so may result in dam-
age to the product or personal injury.
WARNING
This is a caution symbol. Instructions marked with this symbol require
VSHFLDOFDXWLRQ,QVXI¿FLHQWFDXWLRQPD\UHVXOWLQVOLJKWRUPRGHUDWH
injury, or damage to the product.
CAUTION
State of California Proposition 65 Warnings:
WARNING: This product contains one or more chemicals known to
the State of California to cause cancer.
WARNING: This product contains one or more chemicals known to
the State of California to cause birth defects or other reproductive
harm.
SAFETY WARNINGS
WARNING
• This appliance is intended for use in residential environments for
the storage of food items. It may also be used in similar
HQYLURQPHQWVVXFKDVVWDIINLWFKHQDUHDVLQRIÀFHVVKRSV
IDUPKRXVHVDQGKRVSLWDOLW\ORFDWLRQVVXFKDVKRWHOVPRWHOVDQG
bed and breakfast establishments. It is NOT intended for
FRPPHUFLDOLQGXVWULDOHQYLURQPHQWVWREHXVHGDVVWRUDJHIRU
non-food items or medical.
• This appliance is not intended for use by persons (including chil-
GUHQZLWKUHGXFHGSK\VLFDOVHQVRU\RUFDSDELOLWLHVRUODFNRI
H[SHULHQFHDQGNQRZOHGJHXQOHVVWKH\KDYHEHHQJLYHQVXSHU-
vision or instruction concerning use of the appliance by a person
responsible for their safety. Children should be supervised to
ensure that they do not play with the appliance.
• ,IWKHVXSSO\FRUGLVGDPDJHGLWPXVWEHUHSODFHGE\WKH
PDQXIDFWXUHULWVVHUYLFHDJHQWRUVLPLODUO\TXDOLÀHGSHUVRQVLQ
order to avoid a hazard.
• Do not store explosive substances such as aerosol cans with
ÁDPPDEOHSURSHOODQWLQWKLVDSSOLDQFH
• The appliance has to be unplugged after use and before carrying
out user maintenance on the appliance.
• Do not use extension cords or ungrounded (two prong) adapters.
• The refrigerator must be disconnected from the source of
electrical supply before attempting the installation of accessory.
WARNING
• .HHSYHQWLODWLRQRSHQLQJVLQWKHDSSOLDQFHHQFORVXUHRU
LQWKHEXLOWLQVWUXFWXUHFOHDURIREVWUXFWLRQ
• Do not use mechanical devices or other means such as
EORZGU\HUVSRUWDEOHKHDWHUVKHDWJXQVKRWZDWHUHWF
WRDFFHOHUDWHWKHGHIURVWLQJSURFHVVRWKHUWKDQWKRVH
recommended by the manufacturer.
• Do not damage the refrigerant system.
• Do not use electrical appliances inside the food storage
FRPSDUWPHQWVRIWKHUHIULJHUDWRUXQOHVVWKH\DUHRIWKH
type recommended by the manufacturer.
• Follow all local laws and regulations to properly dispose
of refrigerators as units contain environmentally
KD]DUGRXVDQGÁDPPDEOHPDWHULDOVDQGUHIULJHUDQW
• :KHQSRVLWLRQLQJWKHDSSOLDQFHHQVXUHWKHVXSSO\FRUG
is not trapped or damaged.
• Do not use multiple outlet power strips or portable power
supplies at the rear of the appliance.
WARNING
• Take off the doors.
• Leave the shelves in place so that children may not easily
climb inside.
• 7RSUHYHQWDFKLOGIURPEHLQJHQWUDSSHGNHHSRXWRI
reach of children or keep a child away from the vicinity
of the appliance.
Risk of child entrapment. Before you throw away your
refrigerator or freezer:
Refrigerant and cyclopentane foaming material used for the
DSSOLDQFHDUHÀDPPDEOH7KHUHIRUHZKHQWKHDSSOLDQFHLV
VFUDSSHGLWVKDOOEHNHSWDZD\IURPDQ\¿UHVRXUFHDQGEH
UHFRYHUHGE\DTXDOL¿HGFRPSDQ\ZLWKSURSHUHTXLSPHQW
rather than disposed of by any other means to prevent damage
to the environment or any other harm.
Children should be supervised to ensure that they do not play
with the appliance.
This appliance can be used by children aged from 8 years and
older and persons with reduced physical sensory or mental
capabilities or lack of experience and knowledge if they have
been given supervision or instruction concerning use of the
appliance in a safe manner and understand the hazards
involved. Cleaning and required maintenance shall not be
made by children without supervision. Children should not be
allowed to load and unload refrigerating appliances.
FOOD FOR SAFETY
To avoid contamination of food, please follow these instructions:
• 2SHQLQJWKHGRRUIRUORQJSHULRGVFDQFDXVHDVLJQLÀFDQW
increase of the temperature in the compartments of
the appliance.
• Regularly clean surfaces that come in contact with food
and accessible drainage systems.
5
IMPORTANT SAFETY INSTRUCTIONS
• Flush the water system connected to a water supply if water has
not been used for 5 days.
•
so that they do not come in contact with or drip onto other food.
•
mold developing inside the appliance.
WARNING
• To avoid tipping hazard due to instability of the
instructions.
• Connect to potable water supply only. (Suitable for ice
making machine.)
ELECTRICITY RELATED WARNINGS
• Do not pull the power cord when pulling the power plug of the
electrical outlet directly.
•
power cord when it is damaged or worn.
WARNING
•
shared with other electrical appliances. The power plug
• Please ensure that the grounding electrode of the
circuit.
•
gas and then open the doors and windows. Do not unplug
the refrigerator and other electrical appliances. This
PROHIBIT
• Do not use electrical appliances on the top of the
refrigerator, unless they are of the type recommended
by the manufacturer.
WARNINGS FOR USING
PROHIBIT
• Do not arbitrarily disassemble or reconstruct the
refrigerator, nor damage the refrigerant circuit;
maintenance of the appliance must be conducted
• Damaged power cord must be replaced by the
manufacturer, its maintenance department or
• Do not allow any child to get into or climb on the
refrigerator; suffocation or injury from falling
may occur.
WARNING
• The space between the refrigerator doors and the
internal compartments is small. Use caution to avoid
-
ing inside for items.
• Close refrigerator door gently to avoid causing
items to fall over within the appliance.
• Do not touch or handle foods or containers in the
freezer with wet hands when the refrigerator is run-
injury.
CAUTION
• Do not place heavy objects on the top of the
refrigerator considering that objects may fall when
serious injury.
• Disconnect power supply in case of power failure or
cleaning. Do not connect the refrigerator to power
compressor due to successive starts.
6
IMPORTANT SAFETY INSTRUCTIONS
WARNING FOR PLACEMENT OF ITEMS
WARNING
• 'RQRWSXWÁDPPDEOHH[SORVLYHYRODWLOHDQGKLJKO\
corrosive items in the refrigerator to prevent damage to
WKHDSSOLDQFHDQGWRDYRLGFDXVLQJÀUH
• 'RQRWSODFHÁDPPDEOHLWHPVQHDUWKHUHIULJHUDWRUWR
DYRLGÀUHV
• 7KHUHIULJHUDWRULVLQWHQGHGIRUKRXVHKROGXVHVXFKDV
VWRUDJHRIIRRGVLWVKDOOQRWEHXVHGIRURWKHUSXUSRVHV
VXFKDVVWRUDJHRIEORRGPHGLFLQDOVXSSO\RUELRORJLFDO
SURGXFWVHWF
• 'RQRWVWRUHEHHUFDUERQDWHGEHYHUDJHVRURWKHUÁXLGV
stored in pressurized containers in the freezer of the
refrigerator; the bottles or enclosed containers may crack
due to freezing causing damage to the appliance and other
food items.
• Do not store items in refrigerator or freezer for time
periods exceeding food manufacturer’s recommended
expiration dates.
WARNINGS FOR ENERGY
1 Refrigerating appliances might not operate consistently (possibly
of defrosting of contents of temperature becoming too warm in
the freezer) when sitting for an extended period of time in an
environment in which the ambient temperature is too far above
or below the recommended ambient temperature in which the
appliance was designed to be used.
2 Use necessary precautions to prevent an undue rise in the
WHPSHUDWXUHRIWKHIUR]HQIRRGZKLOHGHIURVWLQJWKHIUHH]HUVXFK
as wrapping the frozen food in several layers of newspaper or
transferring items to a cooler temporarily. Rising temperatures
could result in frozen foods defrosting when performing
PDLQWHQDQFHRUFOHDQLQJVKRUWHQLQJWKHIRRGV·VWRUDJHOLIH
WARNINGS FOR DISPOSAL
PROHIBIT
Refrigerator and cyclopentane foaming material used
IRUWKHUHIULJHUDWRUDUHÀDPPDEOH7KHUHIRUHZKHQWKH
refrigerator is recycled, it shall be kept away from any
¿UHVRXUFHDQGEHUHFRYHUHGE\DTXDOL¿HGUHFRYHULQJ
company with proper equipment to prevent damage to
the environment or any other harm.
WARNING
When the refrigerator is recycled, disassemble the
doors, and remove gasket of doors and shelves; put
the doors and shelves in a proper place, to prevent
trapping of any child.
Correct Disposal of This Product
This marking indicates that this product
should not be disposed of with other
household wastes. To prevent possible
harm to the environment or human
health from uncontrolled waste dispos-
al, recycle it responsibly to promote the
sustainable reuse of material resources.
To return your used device, please use
the return and collection systems or
contact the retailer where the product was purchased. They
can take this product for environmentally safe recycling.
WARNING
WARNING: Cancer and Reproductive Harm -
www.P65Warnings.ca.gov
7
INSTALLATION INSTRUCTIONS
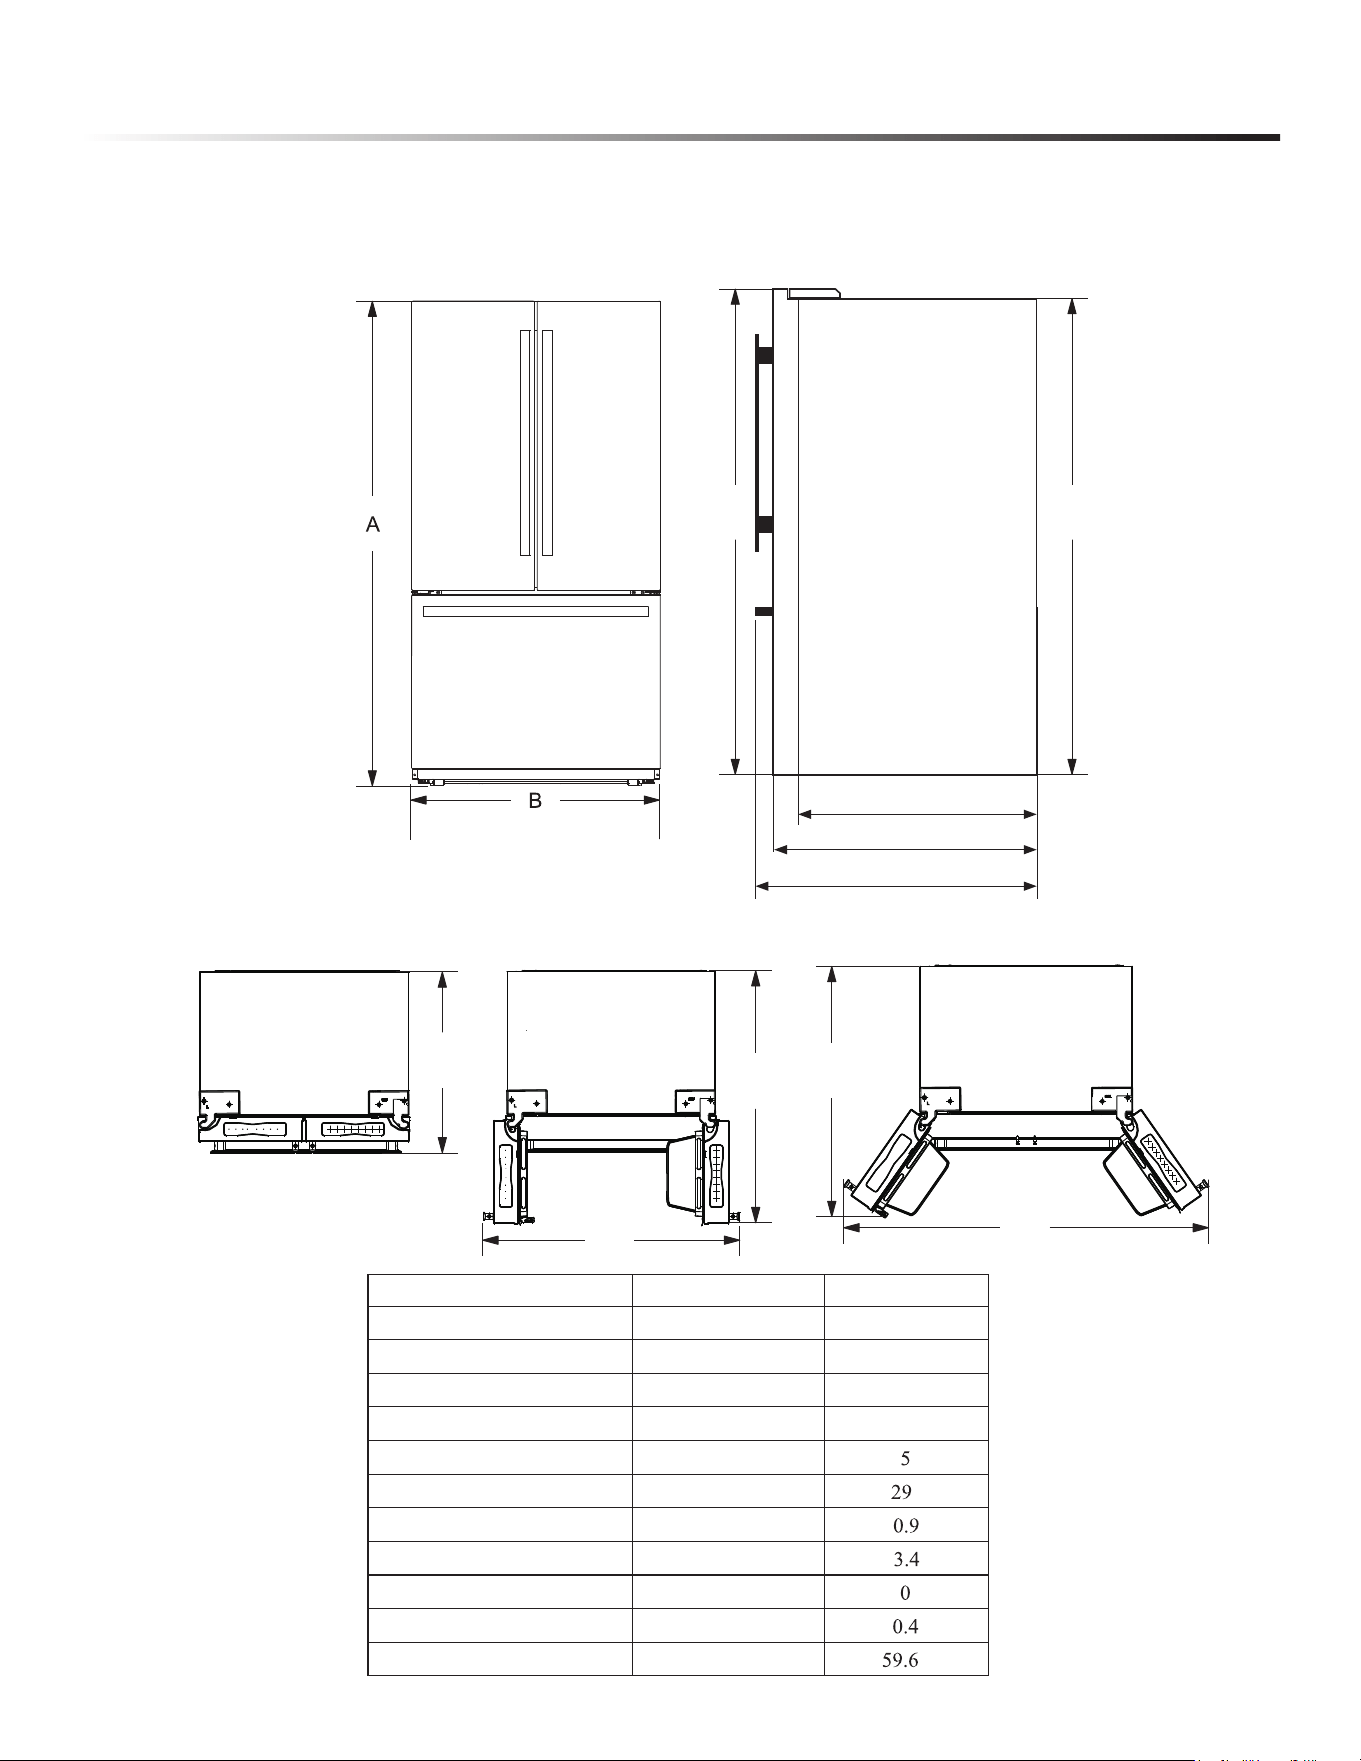
APPLIANCE/INSTALLATION DIMENSIONS
7
INSTALLATION INSTRUCTIONS
A
B
FRONT VIEW SIDE VIEW
TOP VIEW
C
F
G
C2
C1
C
E
D
APPLIANCE/INSTALLATION DIMENSIONS
DIMENSIONS SIZE (INCHES)
Overall height to top of door A 69.9
Height to top of hinge cover A1 69.9
Height to top of case A2 68.8
Width B 35.8
Depth without Doors C2 29.7
Depth without Handles C1 34.3
Depth with Handles C 36.5
Door open 90° Depth D 48.5
Door open 90° Width E 44.8
Door open 135° Depth F 46.5
Door open 135° Width G 64.7
FRONT VIEW SIDE VIEW
C2
C
C1
A1 A2
Replace the table with
a table requested to
Midea
DIMENSIONS SIZE (INCHES)
Overall height to top of door A 69.9
Height to top of hinge cover A1 69.9
Height to top of case A2 68.8
Width B 35.8
Depth without Doors C2 2
Depth without Handles C1
Depth with Handles C 3
Door open 90° Depth D 4
Door open 90° Width E 4
Door open 135° Depth F 4
Door open 135° Width G
8
INSTALLATION INSTRUCTIONS
WARNING
Precaution before installation:
Before installation or adjusting of accessories, it shall be
ensured that the refrigerator is disconnected from power.
Precautions shall be taken to ensure that the handle has been
securely attached in order to prevent personal injury when
opening the door.
INSTALLATION LOCATION
• This refrigerator is designed for indoor, household use only.
• Keep away from heat and avoid direct sunlight or places near a
heat source, such as an oven or a radiator.
• Do not place the refrigerator in moist or damp places to prevent
rust or reduction of its insulating function of the electrical
components and food storage compartments.
• The refrigerator should be placed in a dry and well-ventilated
indoor place.
• The ground shall be level, and sturdy (rotate the adjustable leg
left or right to adjust for leveling if unstable).
• The ambient temperature of the appliance’s location should
range from a minimum of 55°F to a maximum of 110°F.
However, for better energy usage and superior cooling, the tem-
perature is recommended to be between 60°F and 90°F.
• For proper air circulation and electric connections, 4” of clear-
ance from each adjacent wall and the ceiling is recommended
when installing the refrigerator. If not available, minimum 2” of
clearance is strongly recommended.
• Spare enough space for convenient opening of the doors and
drawers, especially when the refrigerator is installed next to a
DISASSEMBLY OF REFRIGERATOR
DOORS/DRAWERS
In some cases you need to remove the fridge doors and drawer doors
to move the refrigerator through a doorway. The doors can be removed
by the following steps. IF NOT NECESSARY,
DO NOT REMOVE THOSE DOORS.
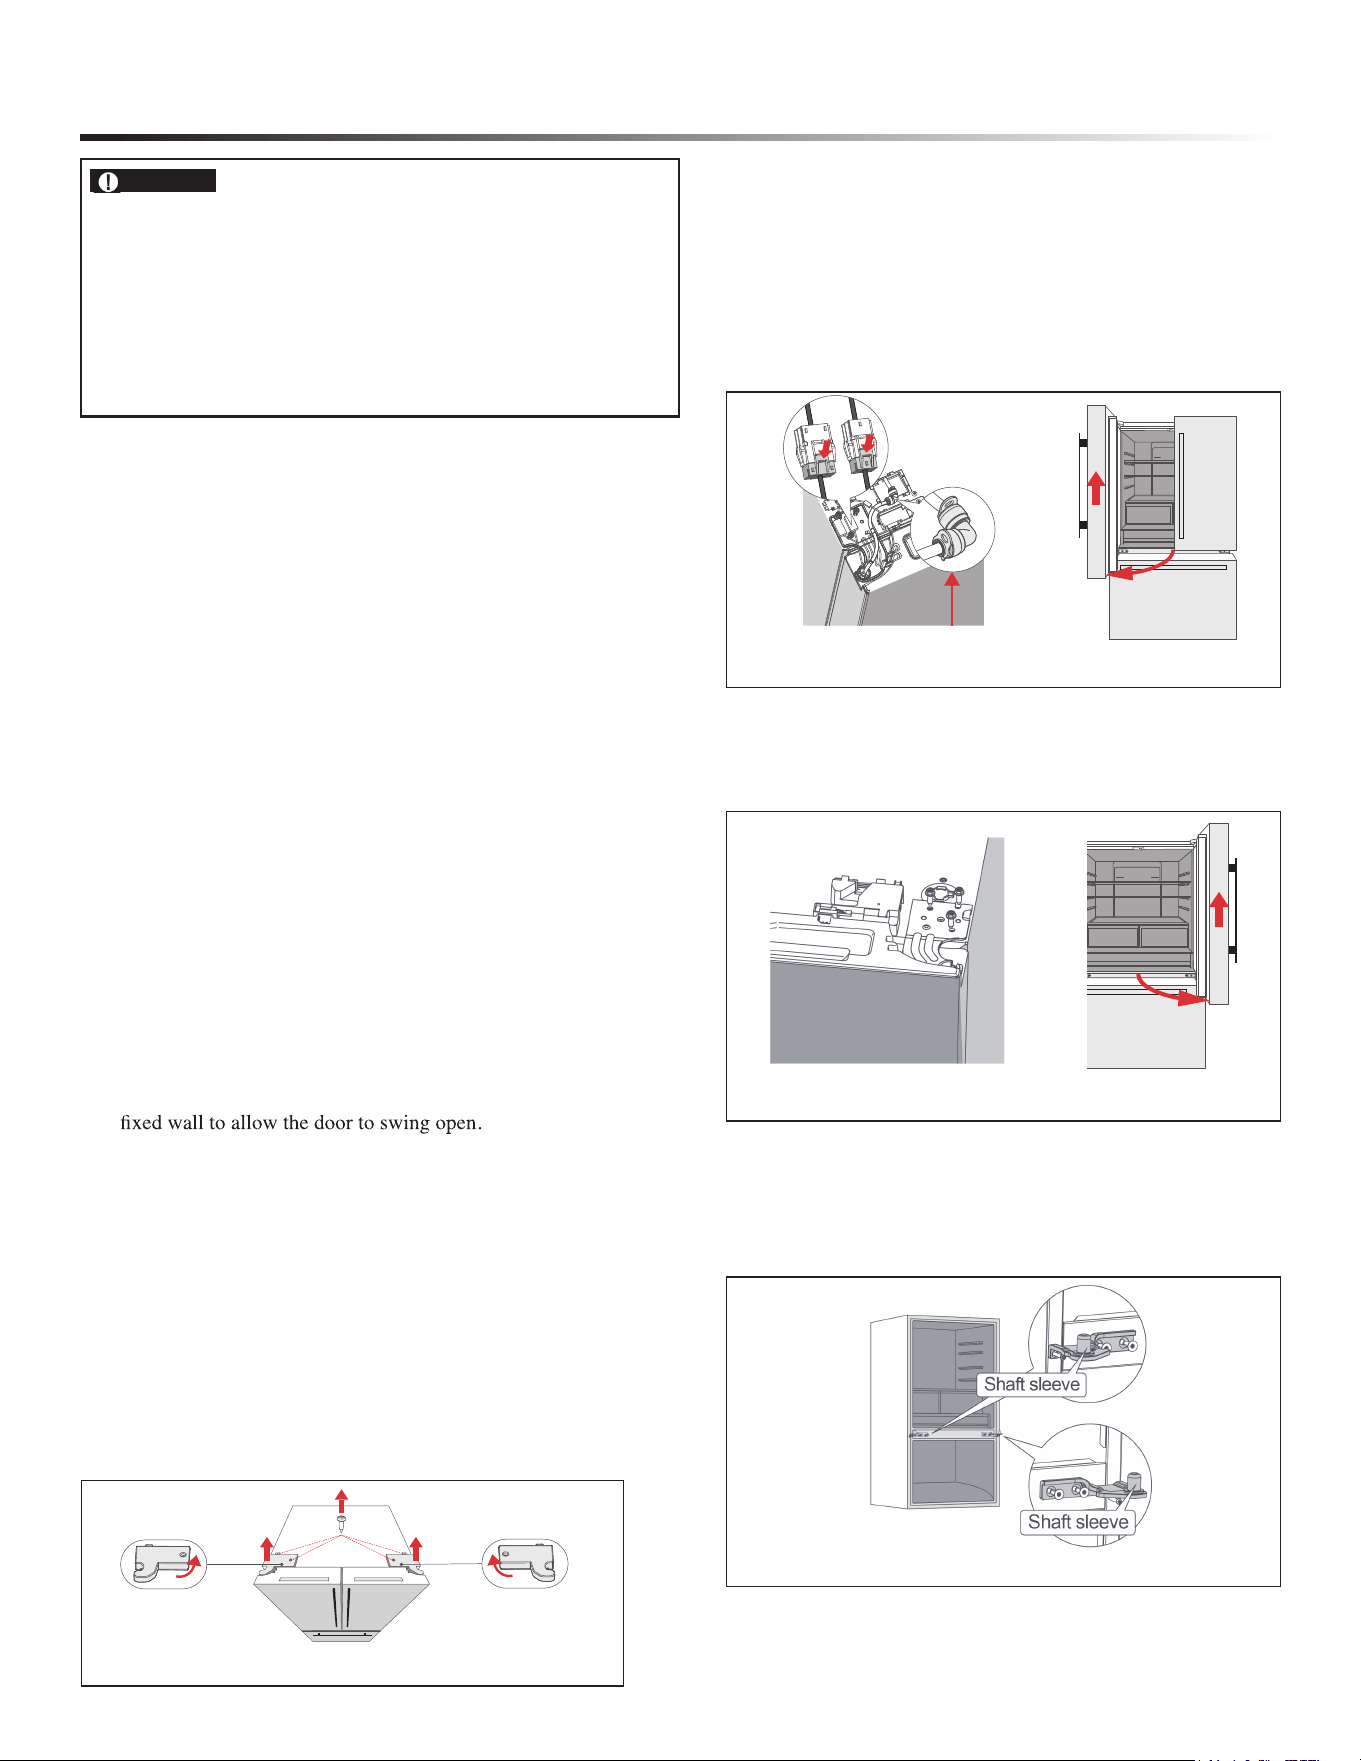
DISASSEMBLY OF REFRIGERATOR DOORS
1 A. Remove the 4 screws from the top hinge cover.
B.The hinge cover and hinge are fixed with clips. Rotate
the hinge cover in the direction of the arrow and lift it up.
See Figure 1.
2 A. Disconnect the 2 harness quick connectors by pressing
the position indicated by the arrow shown in the right figure.
B. Pull out the blue retaining clip from the quick release
one way valve, press the gray plastic ring. Remove the door
water line.
C. Remove the 3 screws with socket wrench set from the
product.
D. Open the left door 90°, lift it up, then remove the door
from the product. See Figure 2.
3 A. Remove the 3 screws with socket wrench set from the
product.
B. Open the right door 90°, lift it up, then remove the door
from the product. See Figure 3.
4 Remove the middle hinge with allen wrench and phillips
screwdriver from the product. Note: When the width of the
door is less than 32 inches, remove the middle hinge. When
the width of the door is more than 32 inches, don’t remove
middle hinge. See Figure 4.
Figure 2
Blue retain pilc gni
Figure 3
Figure 4
Rotate the hinge
cover in this direction
(1)
(2) (2)
Rotate the hinge
cover in this direction
Figure 1
9
INSTALLATION INSTRUCTIONS
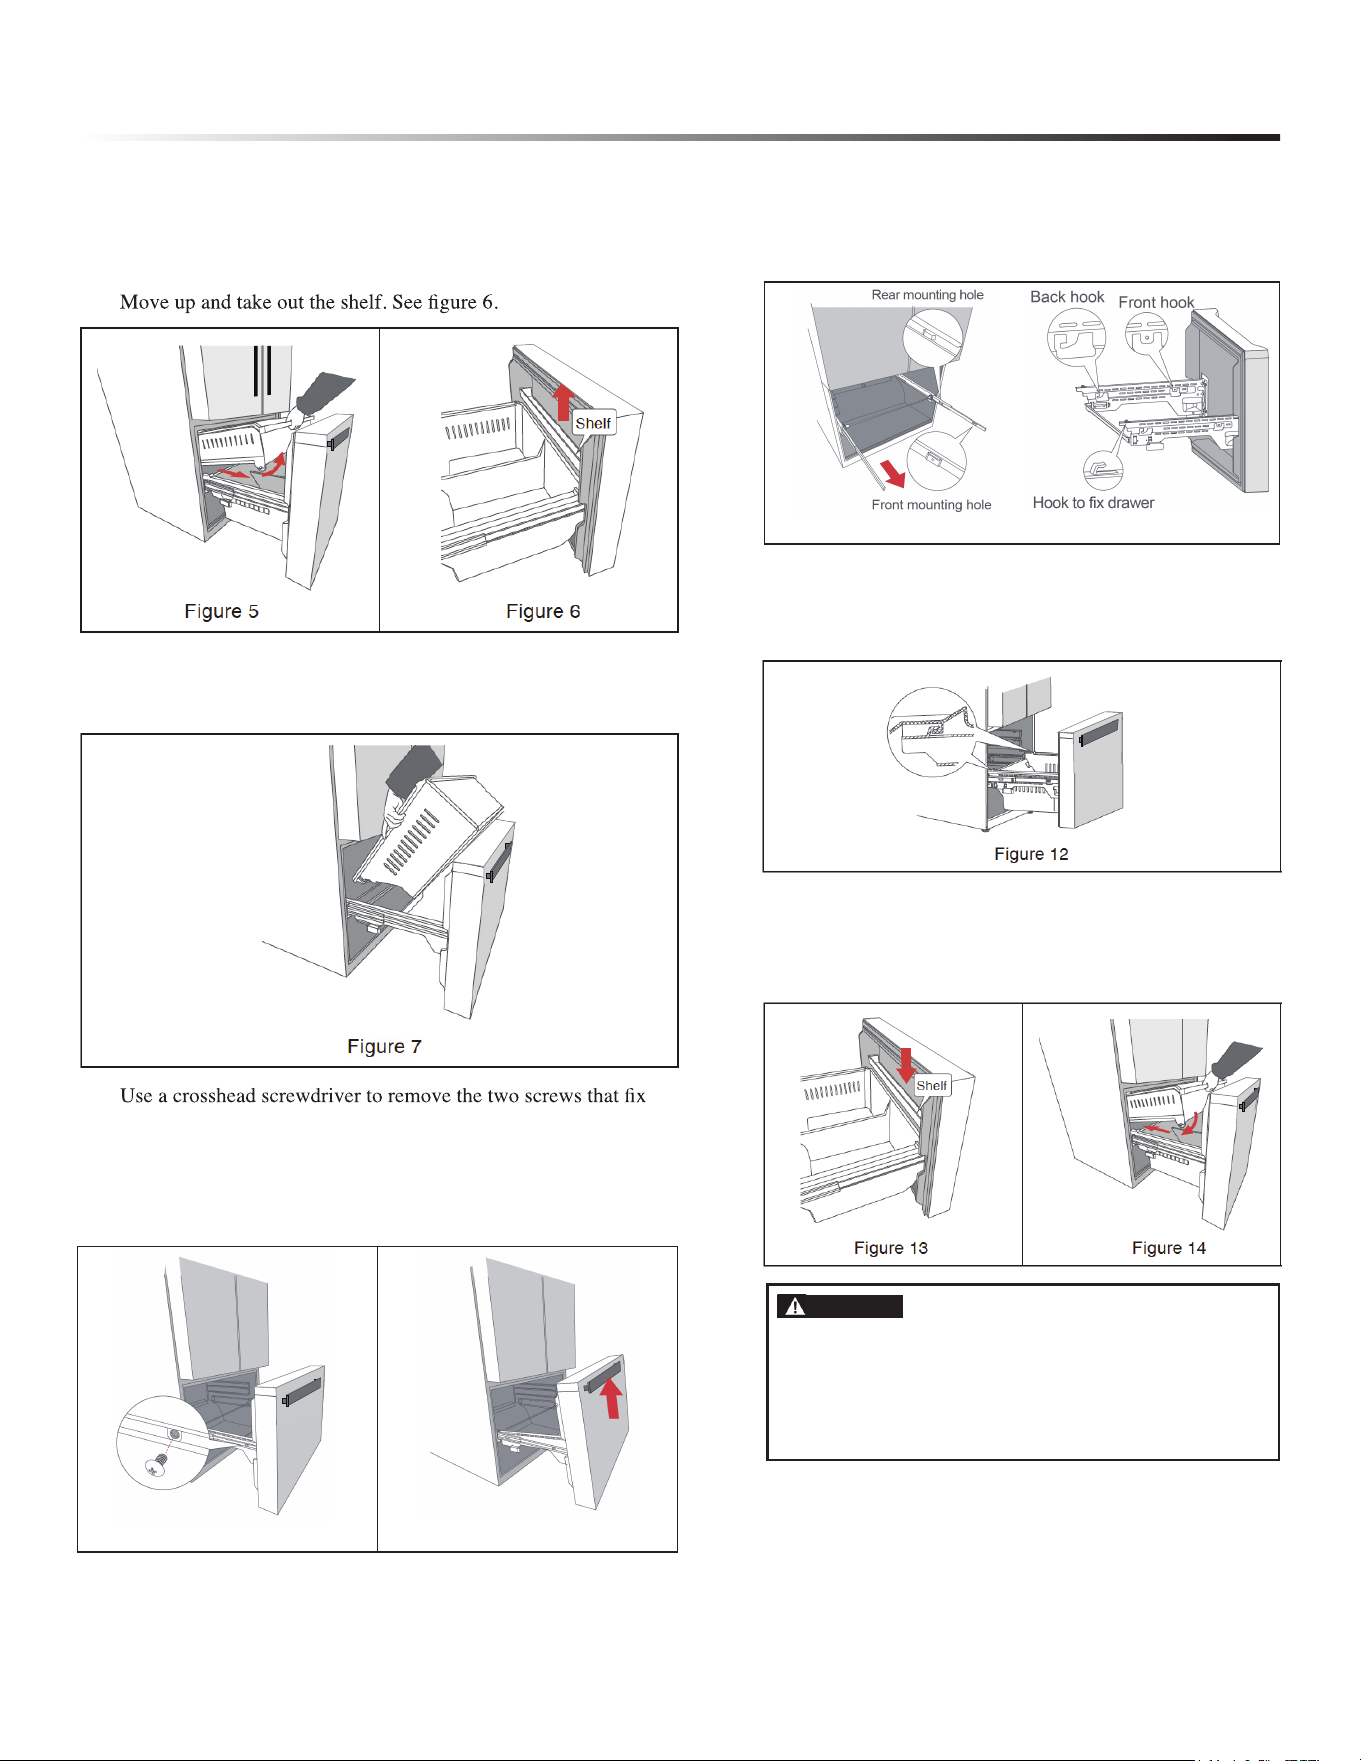
DISASSEMBLY OF FREEZER DRAWER
1 Fully open freezer door, take out the upper drawer. Operating
instructions: Pull the drawer out for a distance, and then rotate it
upwards to take it out. See Figure 5.
2
3 Take out the lower drawer. Operating instructions: Pull the
drawer out for a distance, move it up, then rotate it upwards and
take it out. See Figure 7.
4
the supporters and rails. Note: Do not discard the screws, which
need to be reinstalled when reattaching the freezer door. See
Figure 8.
5 Rotate the freezer door upwards and take it out. See Figure 9.
FREEZER DOOR ASSEMBLY
1 Fully open the rails. See Figure 10. Gently pick up the
freezer door and insert the hooks of supporters into the
holes of rails. See Figure 11.
2 Reattach the two screws. See Figure 8. Insert the
lower drawer back into its position. Note: the lower
drawer should be inserted into the supporter’s hooks
on both sides. See Figure 12.
3 Insert the shelf back into its position. See Figure 13.
Insert the upper drawer back into its position. Note:
the front wheel should be inside the side wall of the
lower drawer. See Figure 14.
CAUTION
• Be careful not to scratch or dent the rail
assembly.
• Make sure you mount the freezer baskets in
the correct position.
Figure 8 Figure 9
Figure 10 Figure 11
10
INSTALLATION INSTRUCTIONS
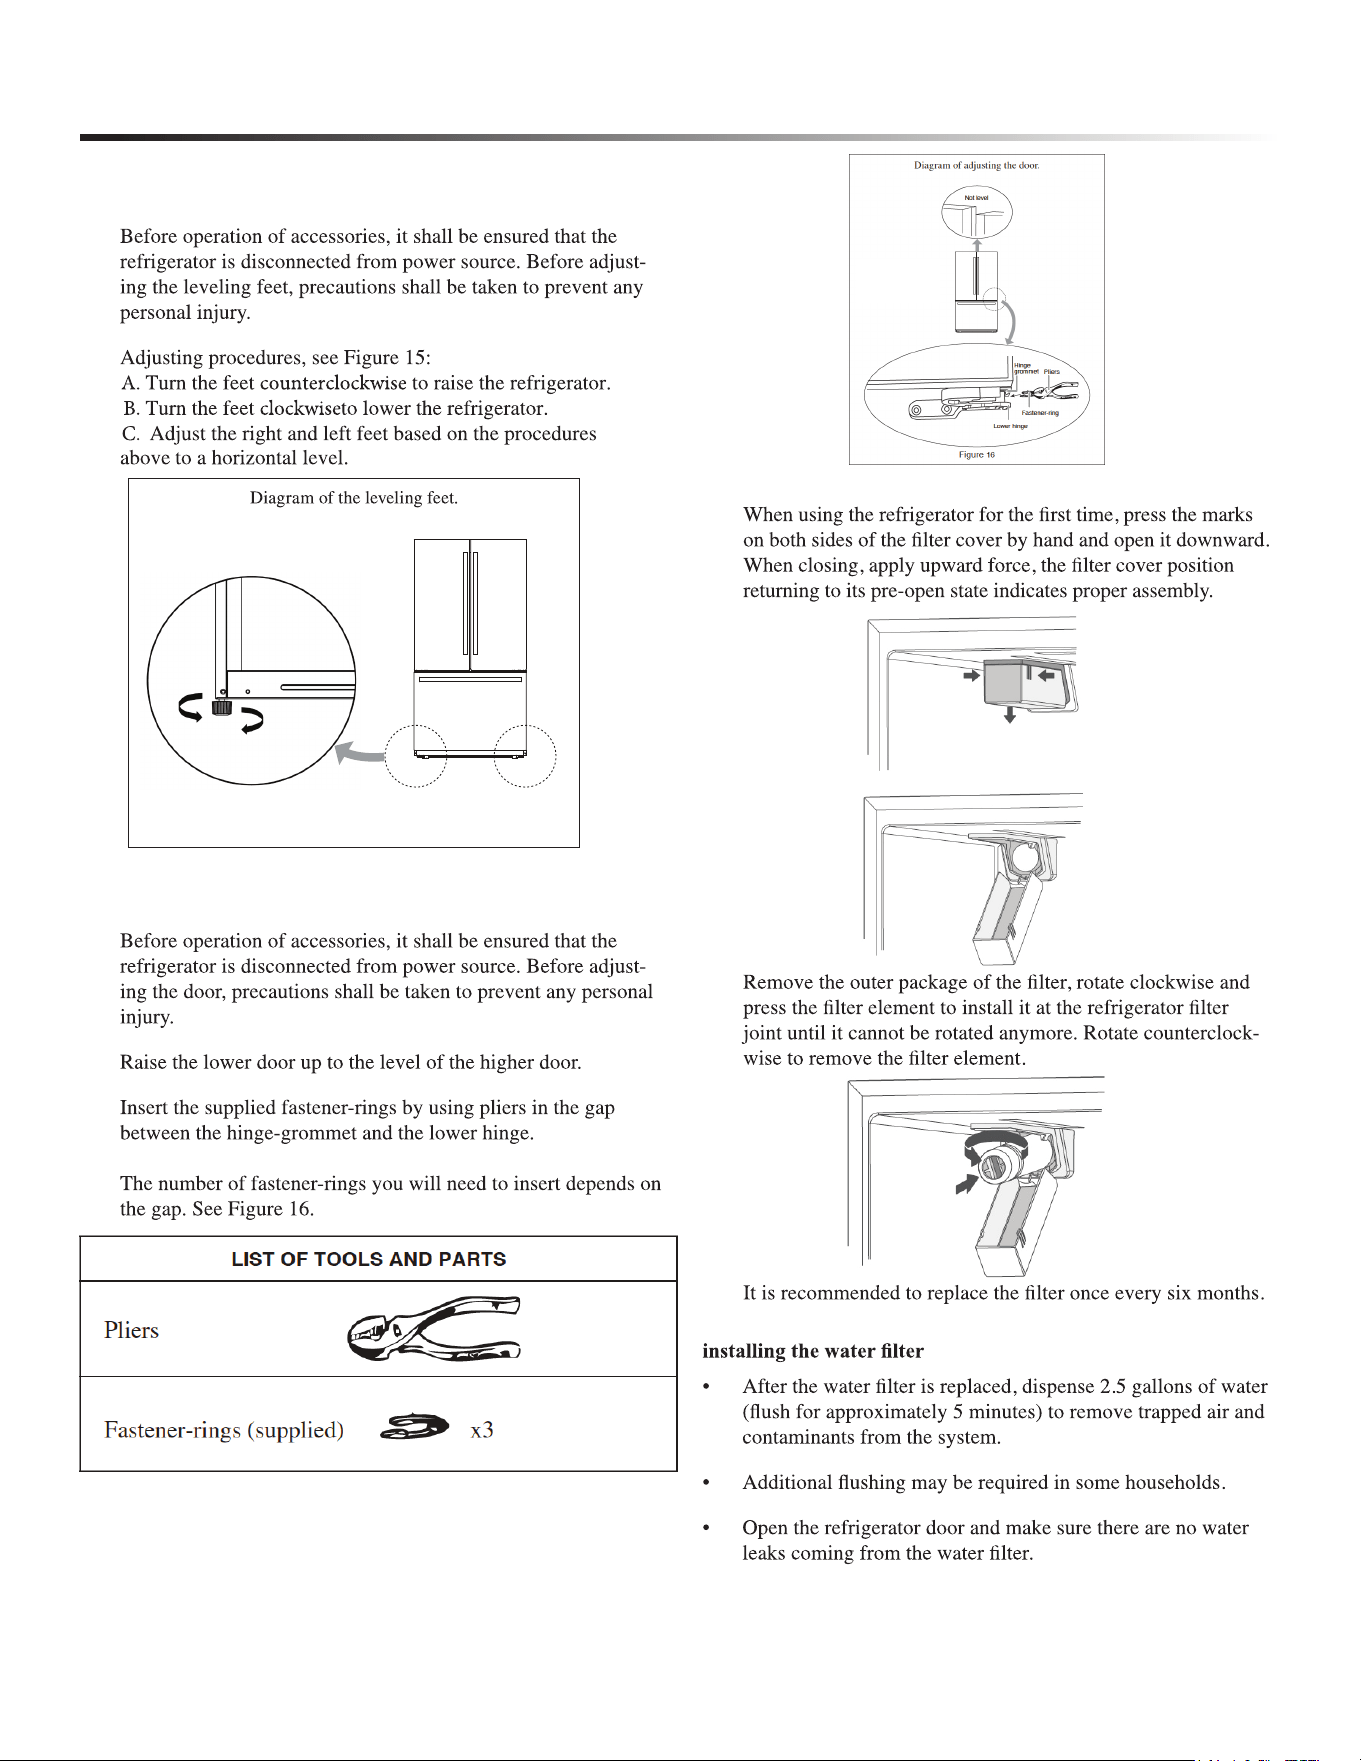
LEVELING THE REFRIGERATOR
Precautions before operation
1
2
LEVELING THE DOORS
Precaution before operation
1
2
3
INSTALLING THE WATER FILTER
1
2
3
Removing any residual matter inside the water line after
NOTE:
Do not dispense the entire 2.5 gallon amount continuously. Depress
and release the dispenser pad for cycles of 30 seconds ON and 60
seconds OFF.
Lower
Higher
Figure 15
11
INSTALLATION INSTRUCTIONS
CONNECTING THE WATER LINE
WATER CONNECTION
WARNING
Risk of electric shock and damage to the appliance:
• Disconnect the appliance from the power source
before performing any work on the water
connection.
•
connect the appliance to the water supply in
accordance with plumbing and relevant water
utility company regulations.
Connect the appliance to a drinking water line only:
•
•
•
pressure limiter between drinking water connection
and hose set.
The water supply should be connected only by a competent
plumber according to the local regulations of the appropriate
water supply company.
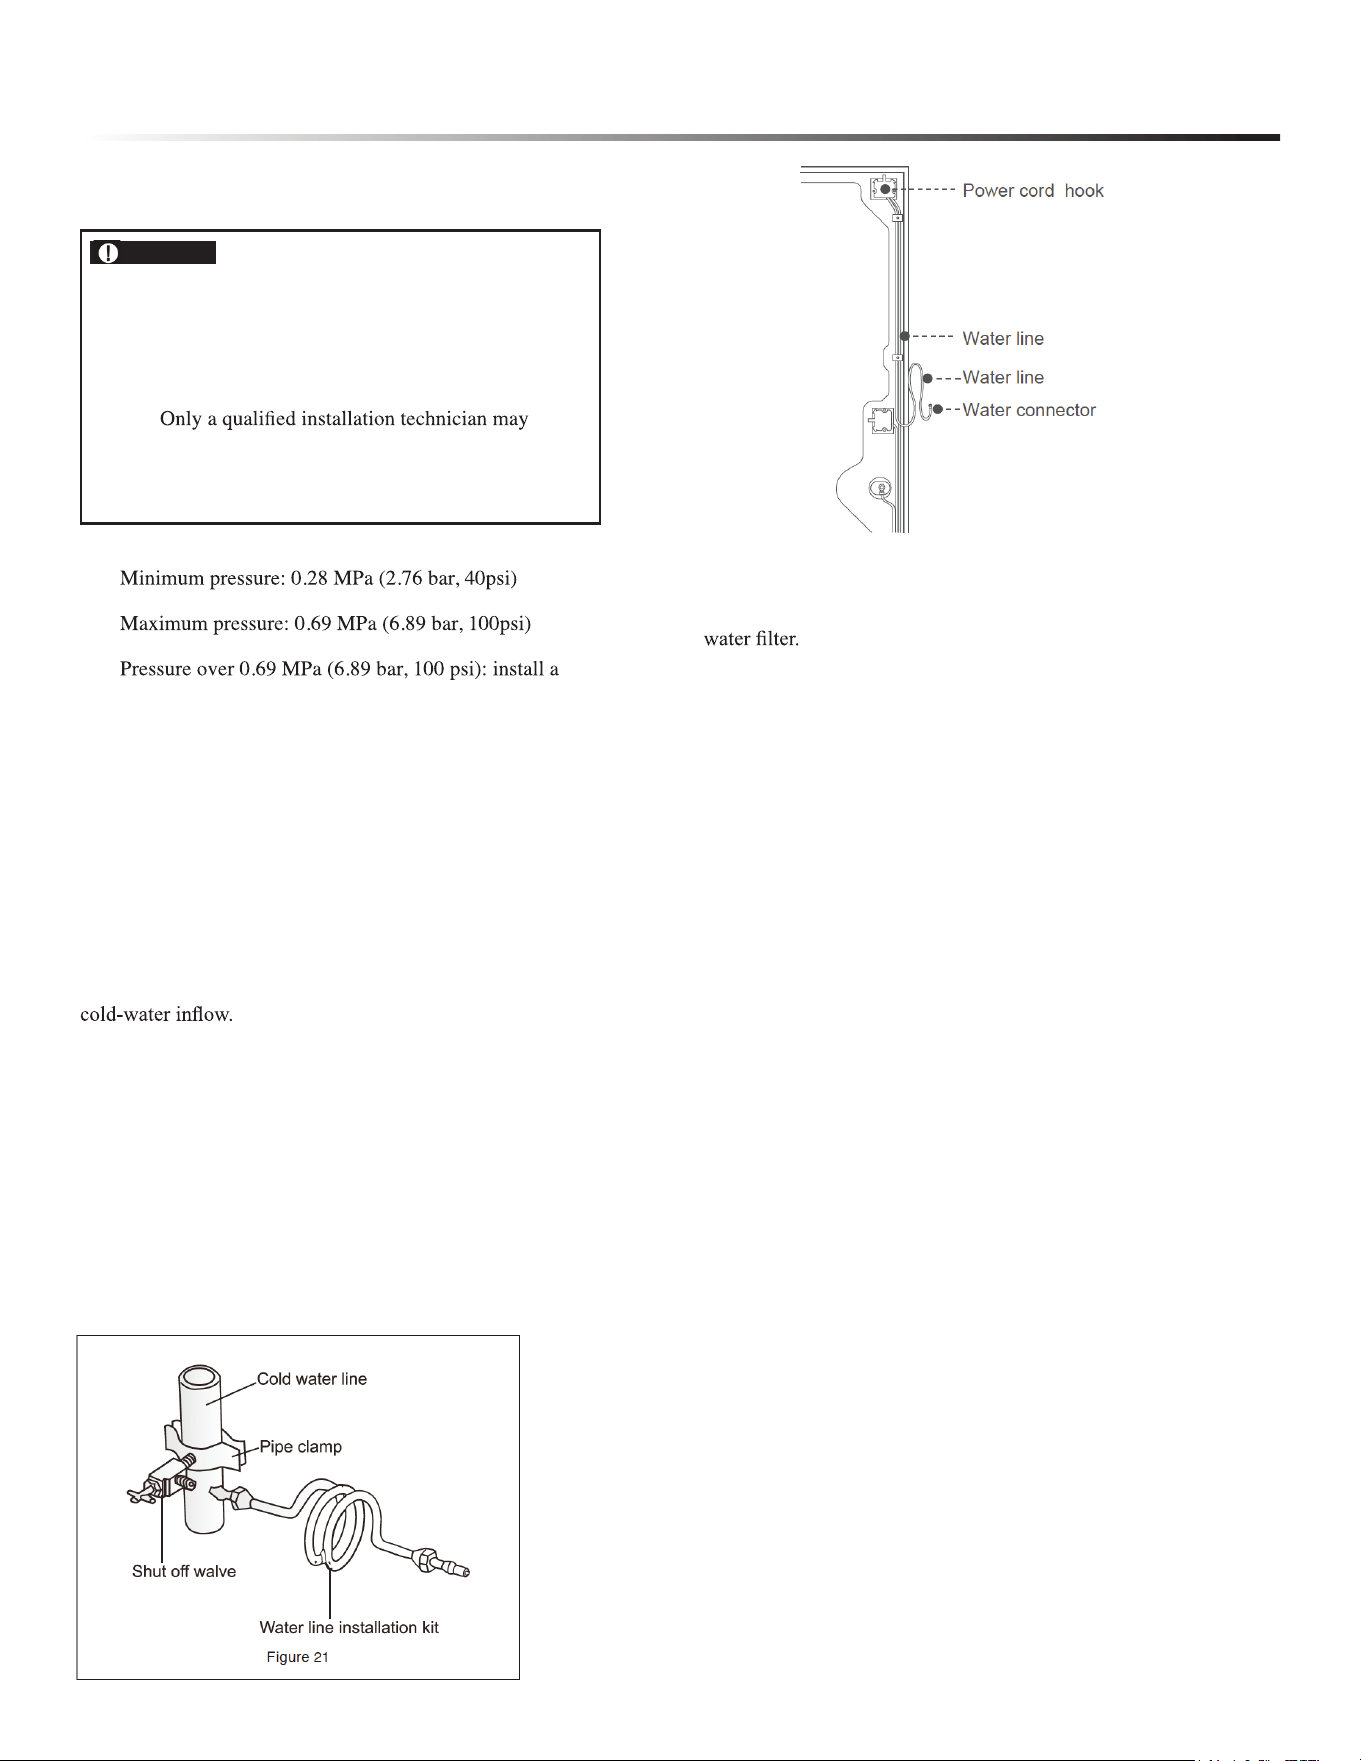
A cold water connection is necessary for operating the ice
maker. The water pressure must be between 0.28 MPa (2.76
bar, 40 psi) and 0.69 MPa (6.89 bar, 100 psi).
The installation must correspond to the local plumbing
regulations.
A separate shut-off valve should be installed in the
The shut-off valve should not be located behind
the appliance. It is recommended that you mount the shut-off
valve directly next to the appliance or at another place that is
easily accessible. See Figures 21-22.
When installing the water connection, pay attention to the
permissible installation area for the water line.
For connection to the drinking water line, use only water
pipes that are suitable for drinking water. Observe local
regulations and the connection conditions of the local water
supply companies.
Connecting the Water Line to A Drinkable
Water Source
If your water line is not drinkable, please add an external
If you must repair or disassemble the water line, cut off
the plastic tubing to make sure you get a snug, leak-free
connection.
Figure 22
12
INSTALLATION INSTRUCTIONS
CONNECTING THE WATER LINE
Water line installation kits are available as an additional accessory
from your dealer or at a local hardware store.
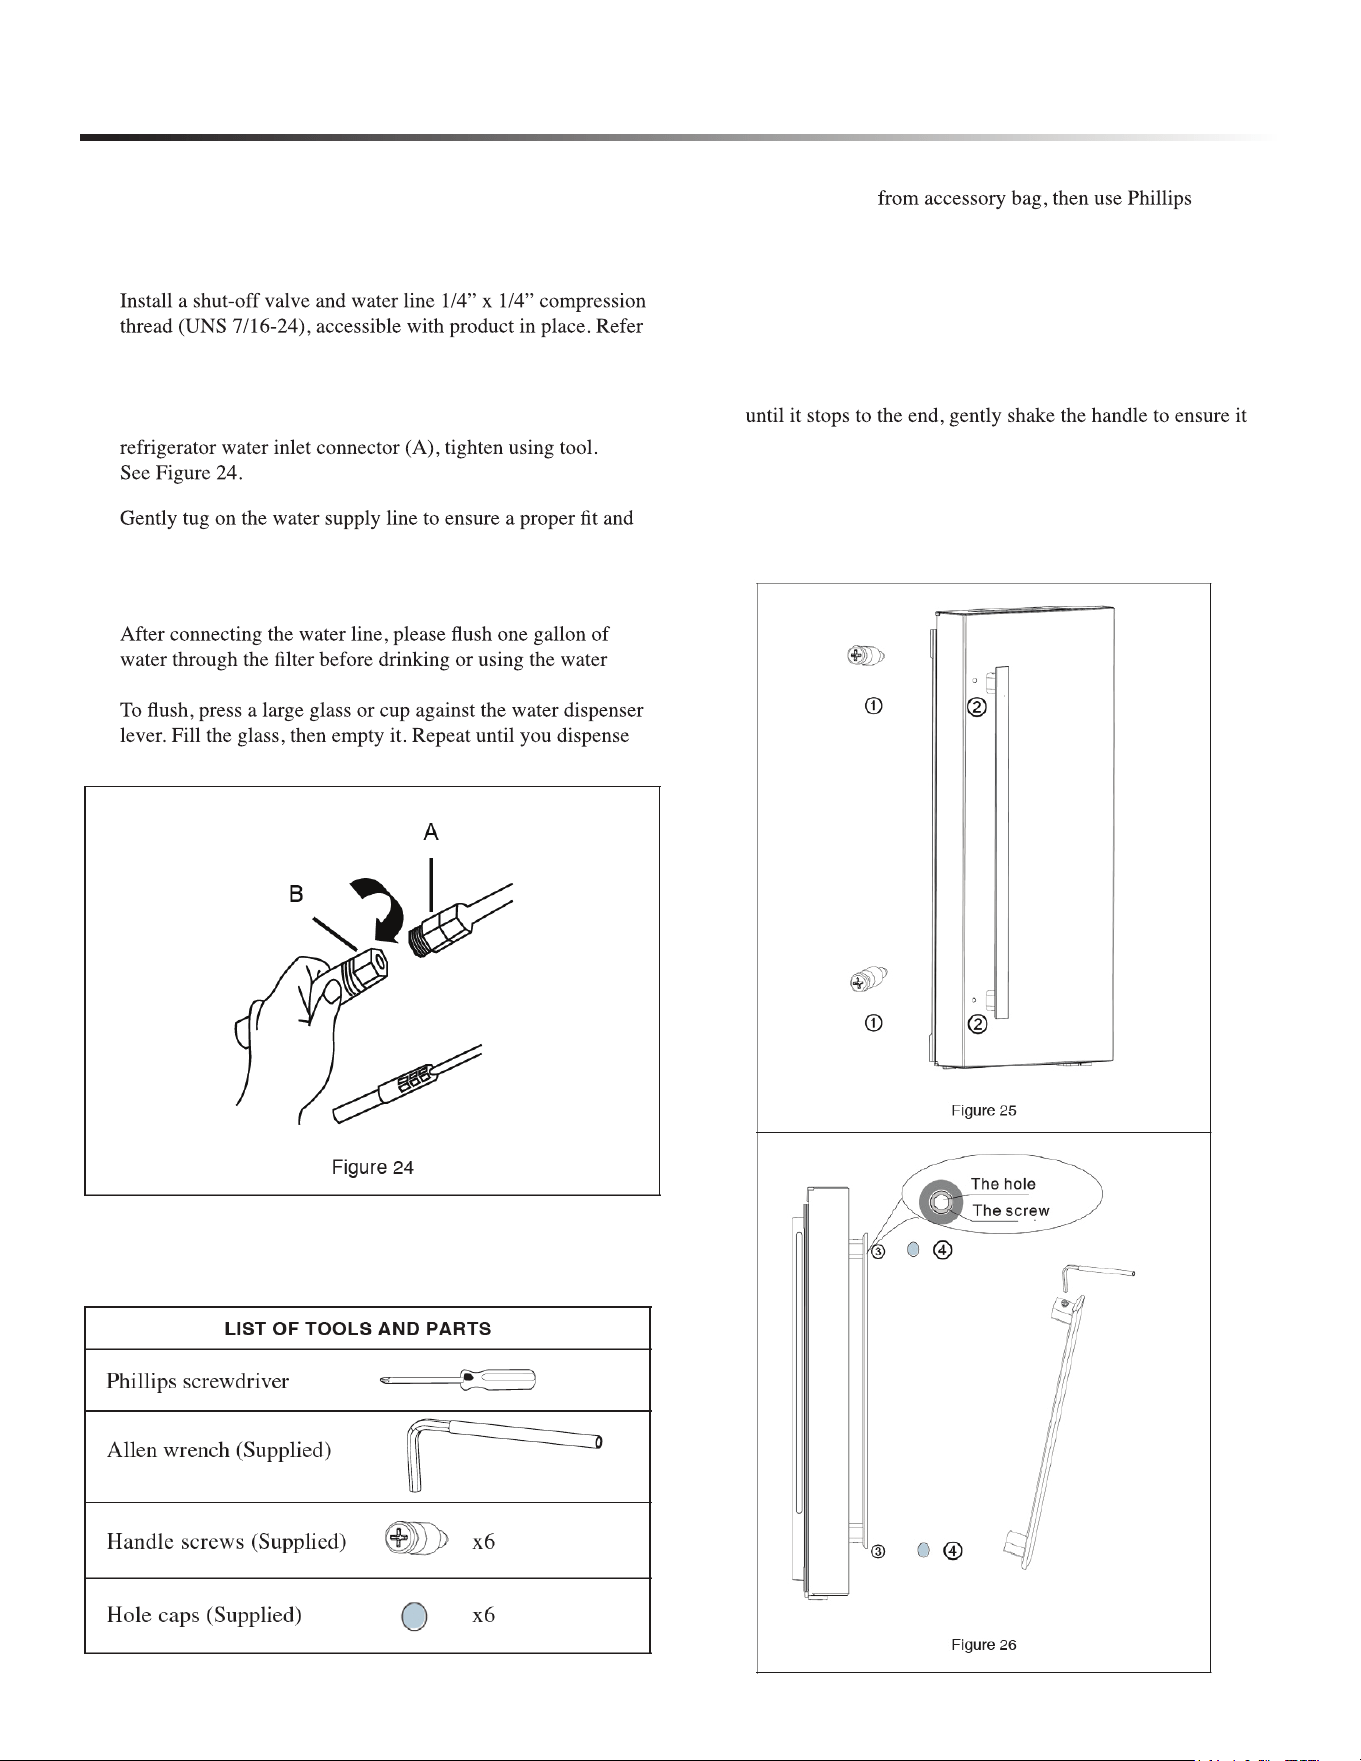
1 Shut off the main water supply line.
2
to local code and instructions with water line installation kit
(not included)
3 Connect the newly installed water supply line (B) to the
4
risk of damage when pulling or pushing the unit for cleaning.
5 Turn main water back on and check for leaks.
6
from your refrigerator. (Flush approximately 5 minutes.)
about one gallon of water.
INSTALLING DOOR HANDLES
Precautions shall be taken to prevent handle falling off and causing
any personal injury.
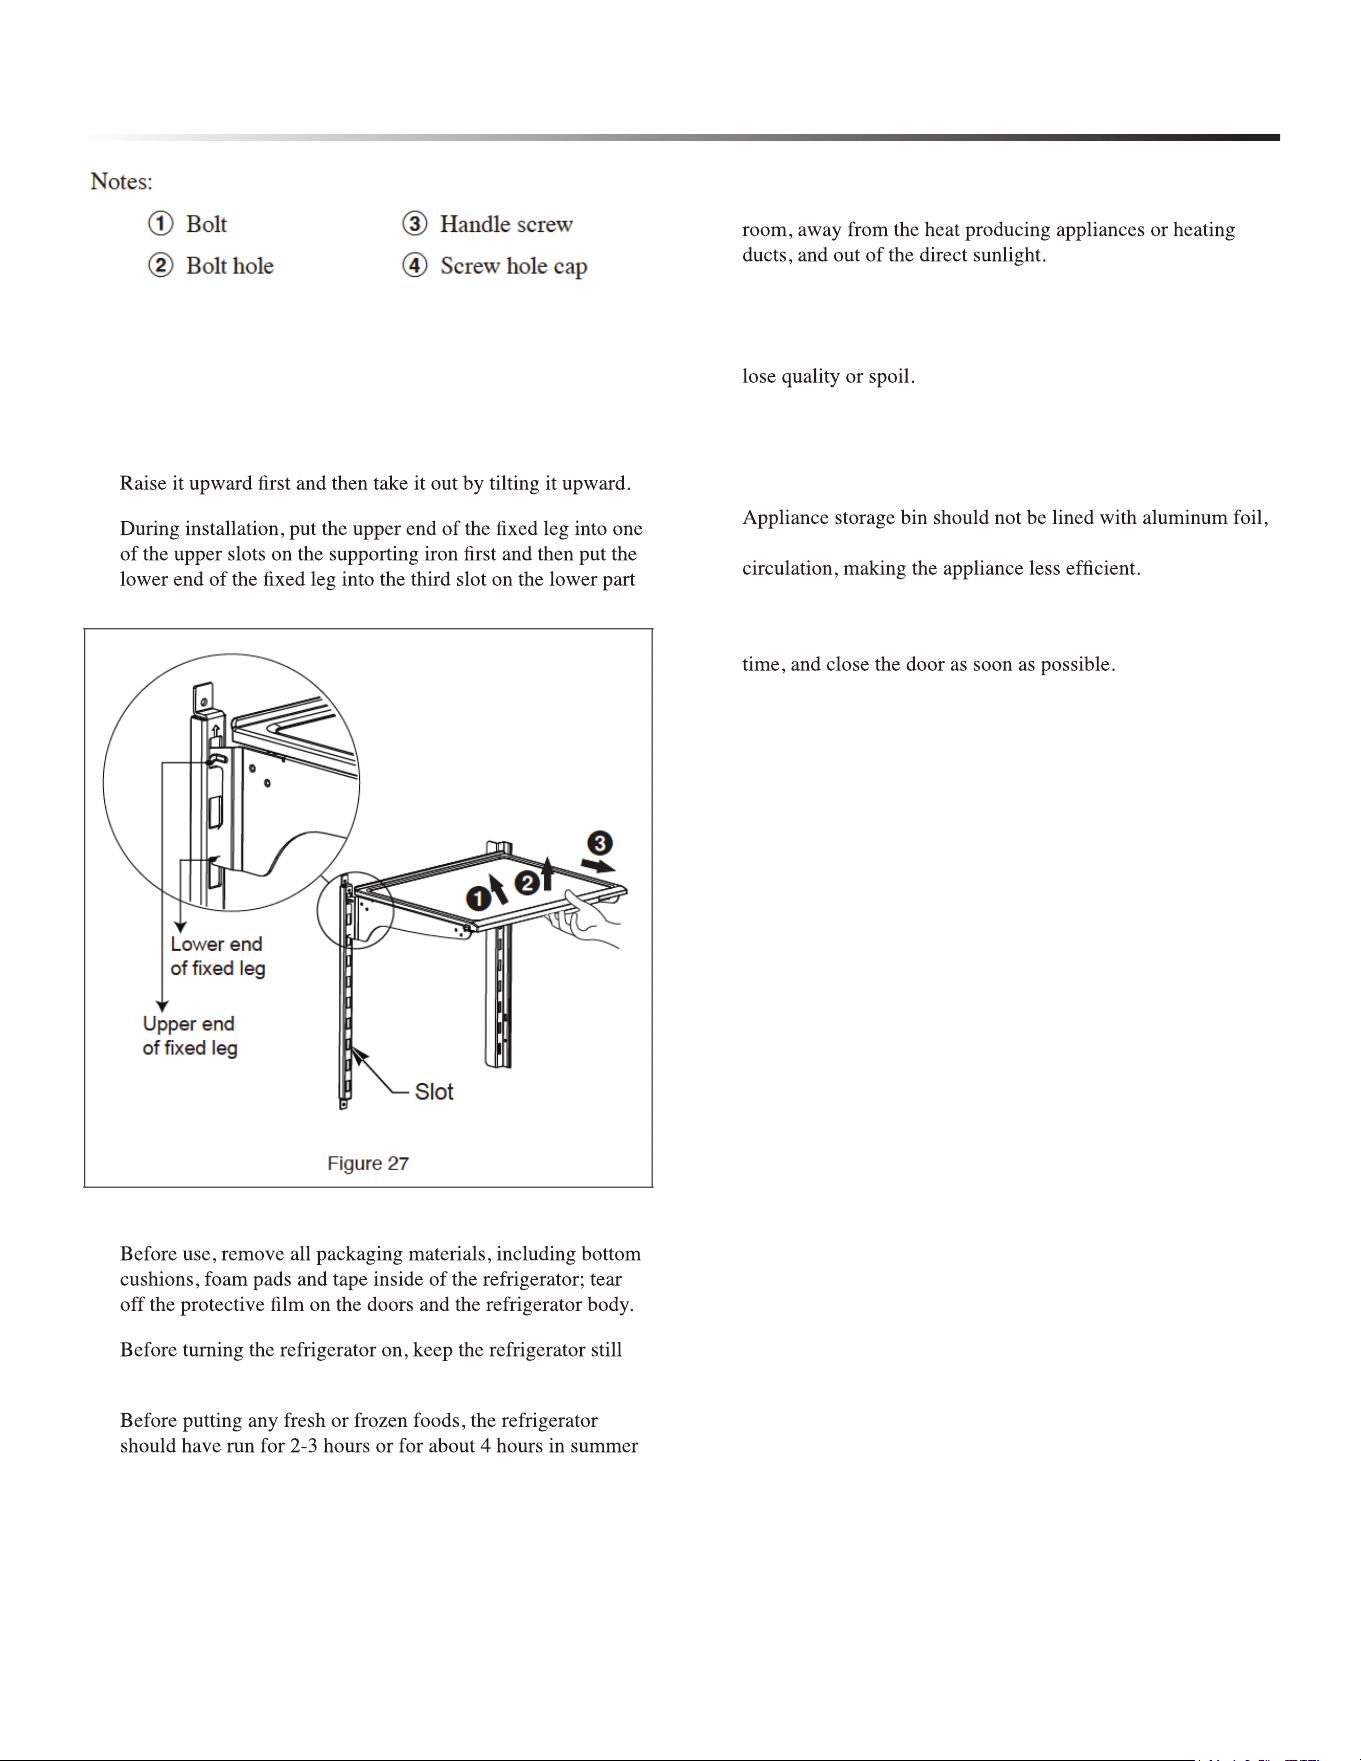
INSTALLING PROCEDURES
1 Take out bolt 1
screwdriver to secure the bolt 1 into the bolt hole 2 of
refrigerator doors. See Figure 25.
2 Attach the handle of the door through the bolt hole 1 and
make sure that the handle makes contact to the door surface
closely. See Figure 26.
3 Attach the handle by rotating the handle screw 3 clockwise
has been attached securely.
4 Put the screw hole cap 4 on the handle screw hole to
complete this installation.
Note: The screw hole cap is not removable once applied.
13
INSTALLATION INSTRUCTIONS
ADJUSTING THE SHELVES
The cantilever rack could be adjusted to the proper height as
required by food.
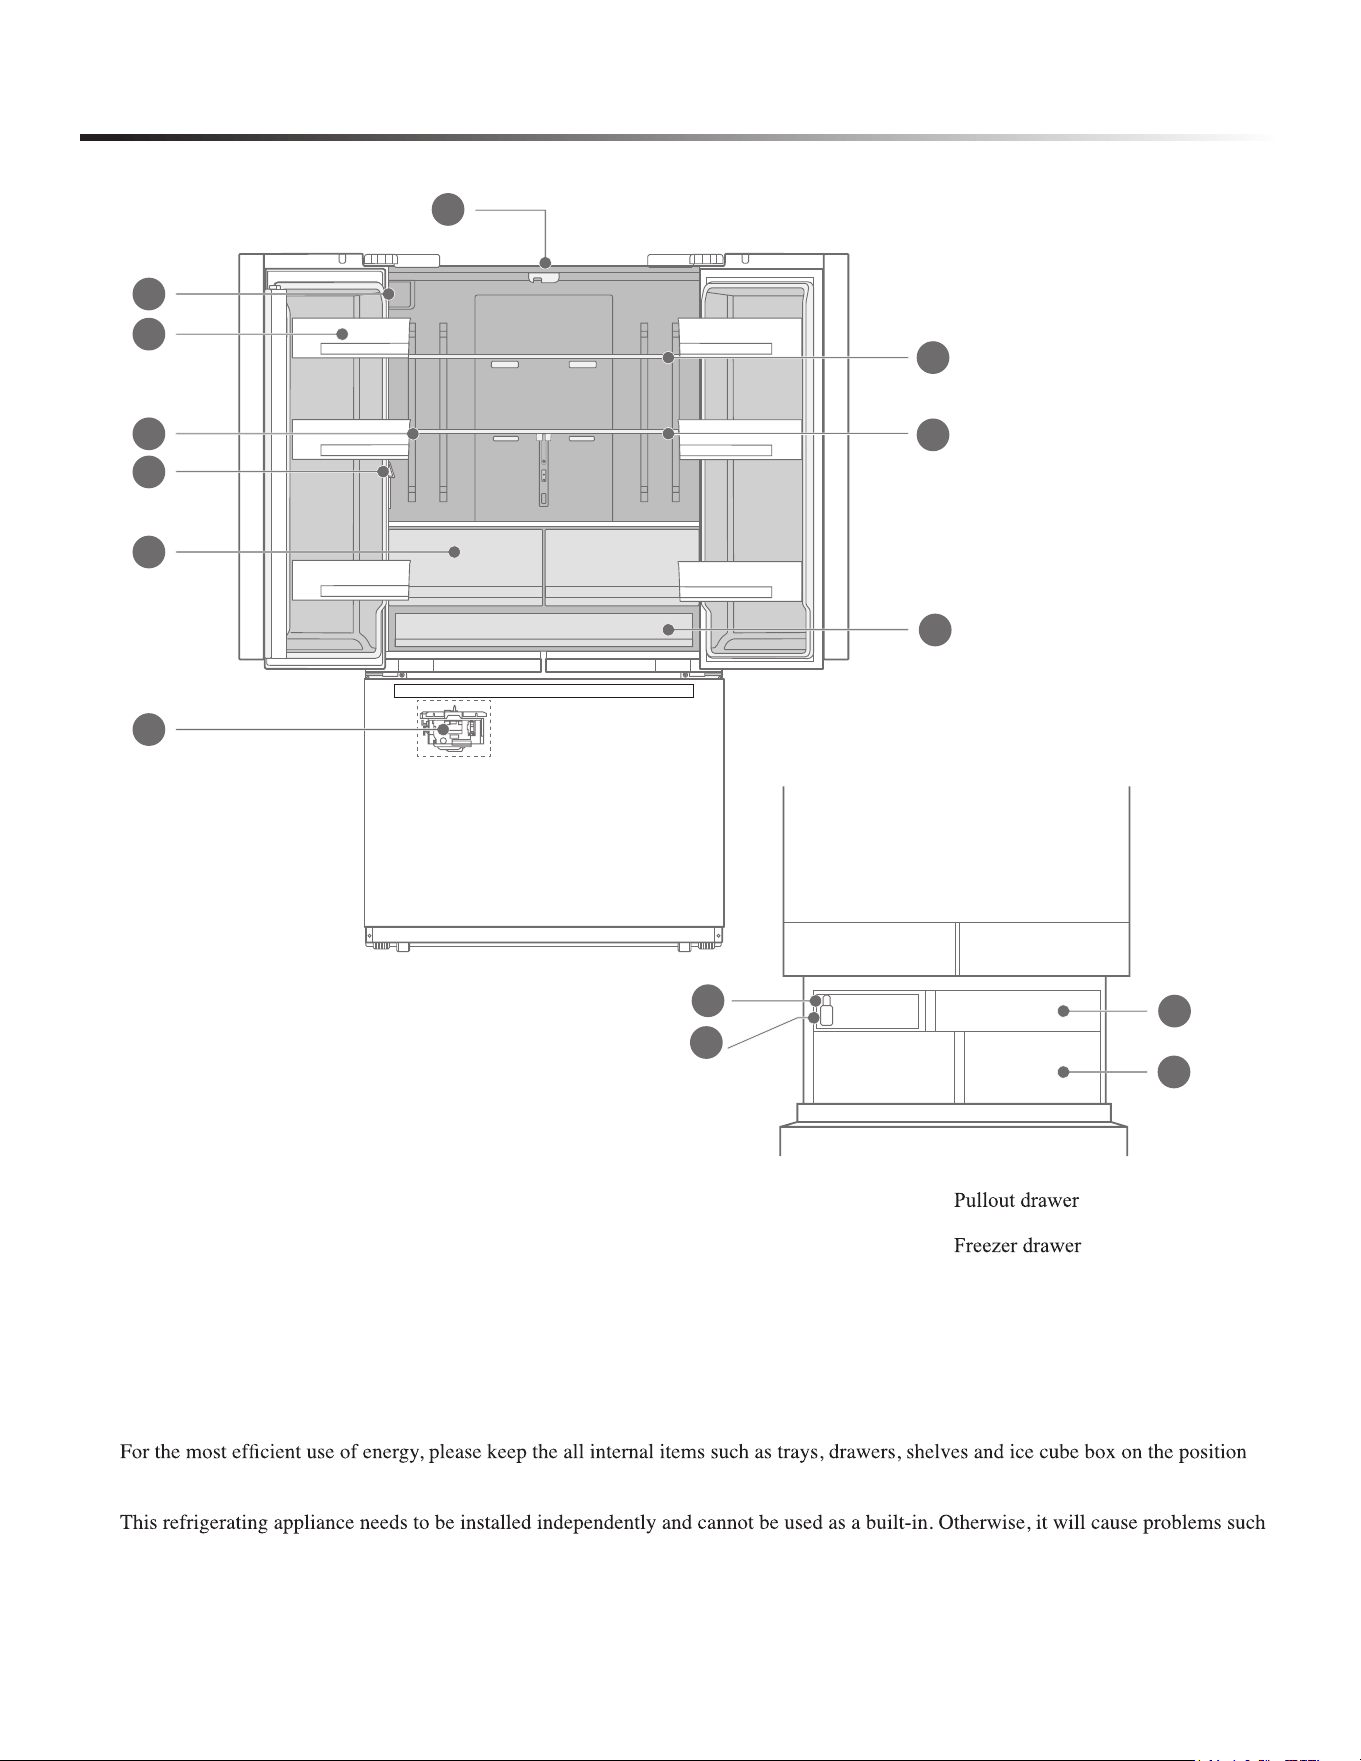
• To adjust the cantilever rack please follow the arrows as show
in Figure 27.
•
•
of the supporting iron.
BEFORE USING THE REFRIGERATOR
•
•
for 2 hours before connecting it to the power supply.
•
when the ambient temperature is high.
ENERGY SAVING TIPS
• The appliance should be located in the coolest area of the
• Let hot foods cool down to the room temperature before
placing in the appliance. Overloading the appliance forces the
compressor to run longer. Foods the freeze too slowly may
• Be sure to wrap foods properly and wipe containers dry
before placing them in the appliance. This cuts down on frost
build-up inside the appliance.
•
wax paper or paper toweling. Liners interfere with cold air
• Organize and label food to reduce door openings and
extended searches. Remove as many items as needed at one
14
APPEARANCE OVERVIEW
PARTS AND FUNCTIONS
1 LED Lighting
2 Filter
3 Door bin
4 Left adjustable shelf
5 Inner water dispenser
6 Crispy drawer
7 Ice maker
8 Big shelf
9 Right adjustable shelf
10 Full-width drawer
11
12
13 Ice Scooper
14 Ice storage box
•
supplied by manufacturer.
•
the performance and life of the appliance are reduced. And the manufacturer does not provide basic appliance warrant.
10
1
8
9
2
3
6
5
4
7
11
13
14
12
15
CLEANING & MAINTENANCE
REFRIGERATOR
•
short term.
• Cooked foods should not be put in the refrigerator until
cooled down to the room temperature.
• Foods are recommended to be sealed in appropriate
containers before placing inside the refrigerator.
• The glass shelves can be adjusted up or down for a desired
storage space and ease of use.
FREEZER DRAWER
• The freezer drawer may keep food fresh for a long time and
is primarily used to store frozen foods.
•
frozen entrées and intended for foods that will not be con-
sumed in the short term.
• It is recommended to divide large cuts of meat into smaller
portions for easier defrosting.
foods before expiration date.
Note: Storage of too much food during operation after the initial
connection to power may adversely affect the freezing
performance of the appliance. Food stored should not block the air
outlet or otherwise the freezing performance will also be adversely
affected.
16
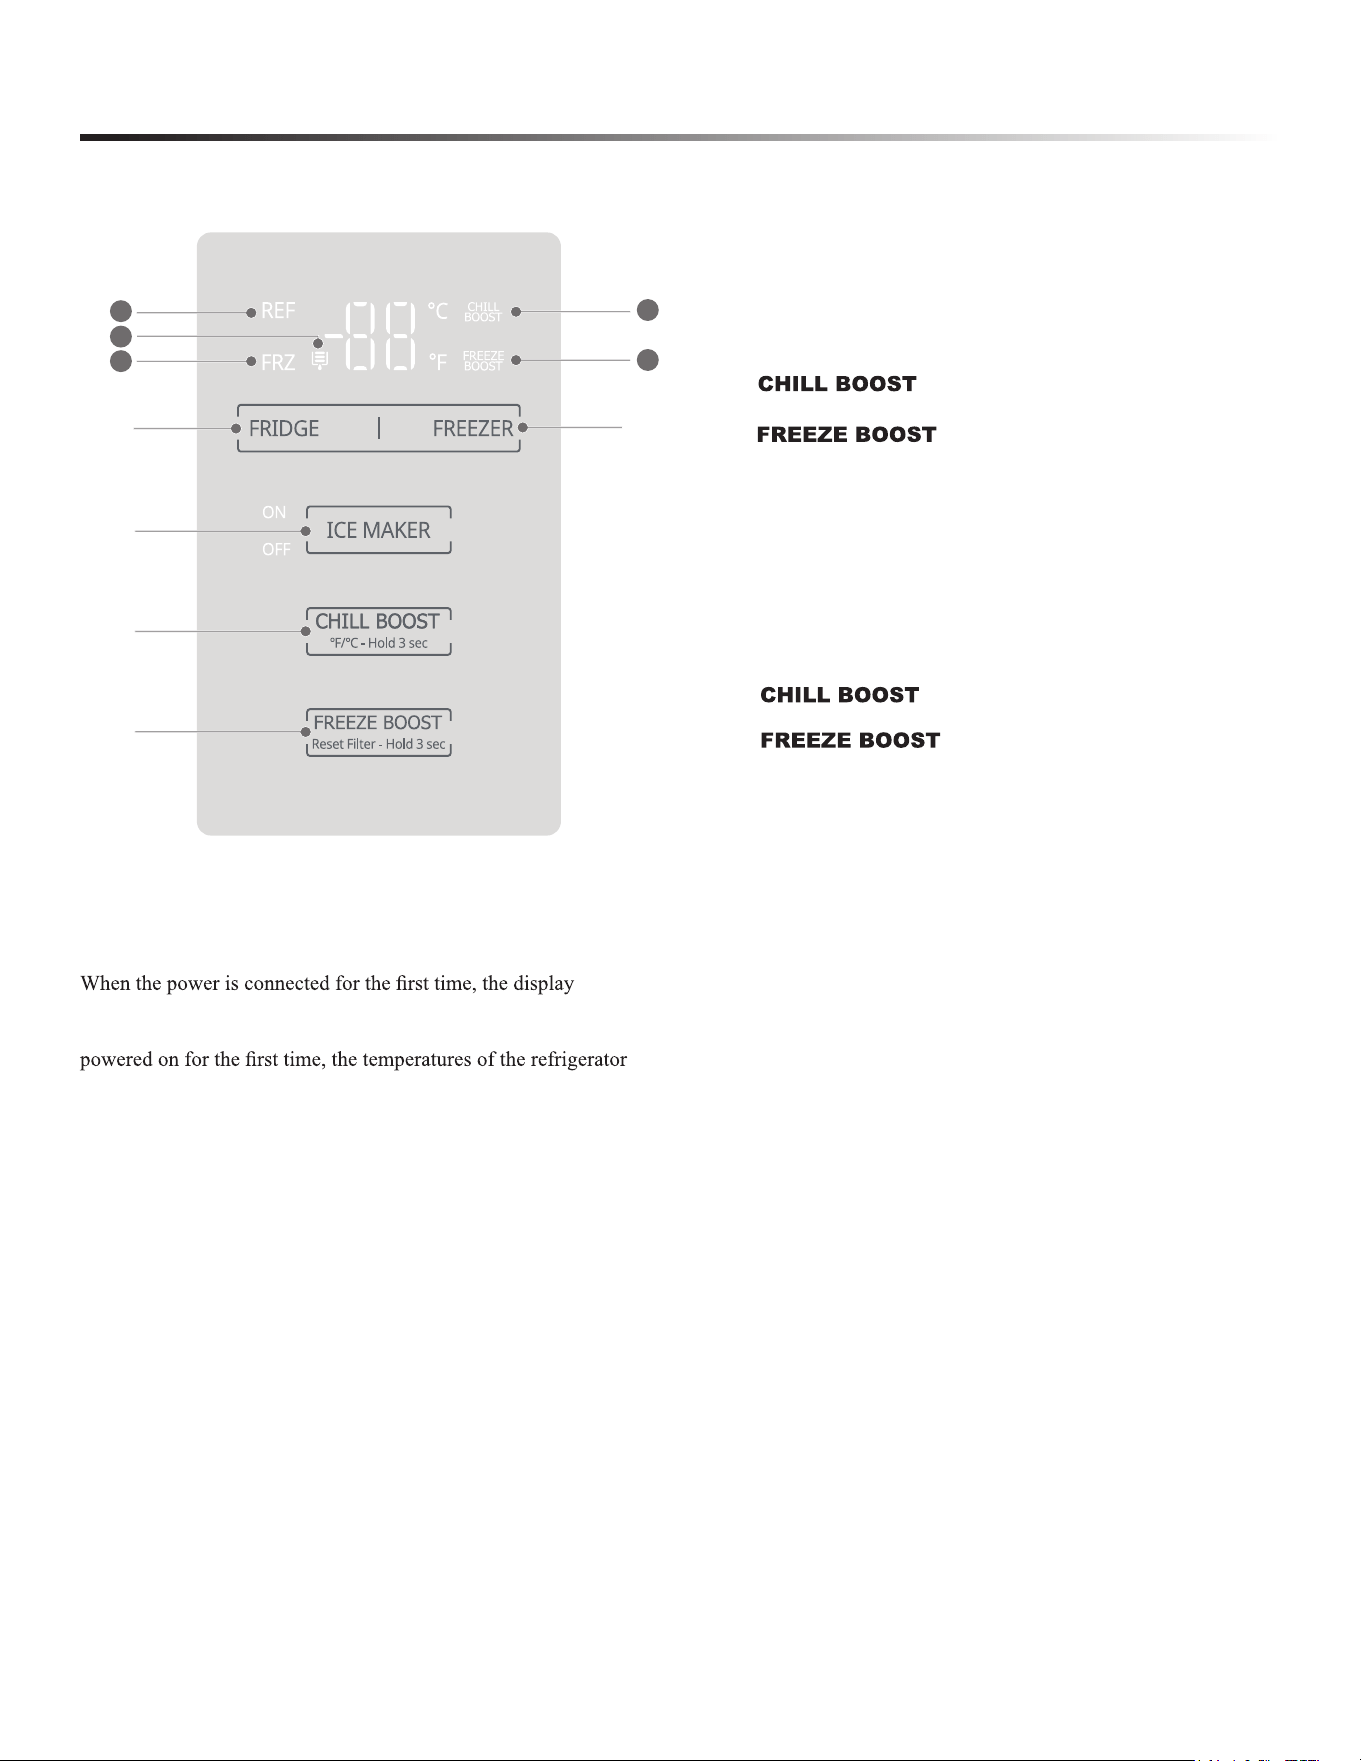
CONTROL AND DISPLAY PANEL
CONTROL PANEL BUTTON
A Refrigerator temperature adjustment key
B Freezer temperature adjustment key
C Ice maker key
D
key
E
key
ICON
1 Refrigerator icon
2 Filter icon
3 Freezing icon
4 icon
5 icon
DISPLAY
Main Display Control (display control on refrigerator
left door).
will illuminate and the start-up chime will sound, and then the
display will enter normal operation. (When the appliance is
and the freezer are set at 37°F/-4°F respectively.)
Under normal conditions, if no doors are opened and no keys
are pressed for 30 seconds, the control panel will be locked,
and the display will turn off after 30 seconds. If any key is
pressed when the display is off, the display screen will wake
up and show the current status.
1
2
3
A
C
D
E
4
5
B
17
OPERATING REFRIGERATOR
TEMPERATURE MODE
To change the temperature default mode to Celsius or Fahrenheit,
press “CHILL BOOST” and hold for 3 seconds.
FILTER ELEMENT TIME RESET
After 330 days of use, the will light up to remind the user to
press and hold the “ ” for 3 seconds to activate
SABBATH MODE
Press and hold the “ ” button and the “ICE
MAKER” for 3 seconds to enter/exit Sabbath mode. After the
buttons are activated, “ON” or “OF” will be displayed for 2
seconds respectively, then it will automatically return to the
normal display interface. It will take effect after being locked (no
button operation for 10 seconds).
ICE MAKER ON/OFF
Press “ICE MAKER” to turn ON or OFF the ice maker and the
indicators of the activated ice maker will illuminate on the control
panel.
TEMPERATURE SETTINGS
REFRIGERATOR
Press “FRIDGE” to adjust the temperature downward from
44°F/7°C to 34°F/1°C. The temperature will go back to 44°F/7°C
from 34°F/1°C.
FREEZER DRAWER
Press “FREEZER” to adjust the temperature downward from
7°F/-14°C to -7°F/-22°C. The temperature will go back to
7°F/-14°C frin -7°F/-22°C.
BOOST MODE SETTINGS
CHILL BOOST
When “REF” on the display panel illuminates. press “CHILL
BOOST” to turn on the CHILL BOOST mode.
The refrigerator room is set at 34°F/1°C automatically, and the
CHILL BOOST icon illuminates. When the CHILL BOOST mode
is deactivated, the refrigerator temperature automatically returns
to the temperature set before the CHILL BOOST mode was
activated.
FREEZE BOOST
When “FRZ” on the display panel illuminates, press “FREEZE
BOOST” to turn on the FREEZE BOOST mode. The freezer room
is set at -7°F/-22°C automatically, and the FREEZE BOOST icon
illuminates. When the FREEZE BOOST mode is deactivated, the
freezer temperature automatically returns to the temperature set
before the FREEZE BOOST mode was activated.
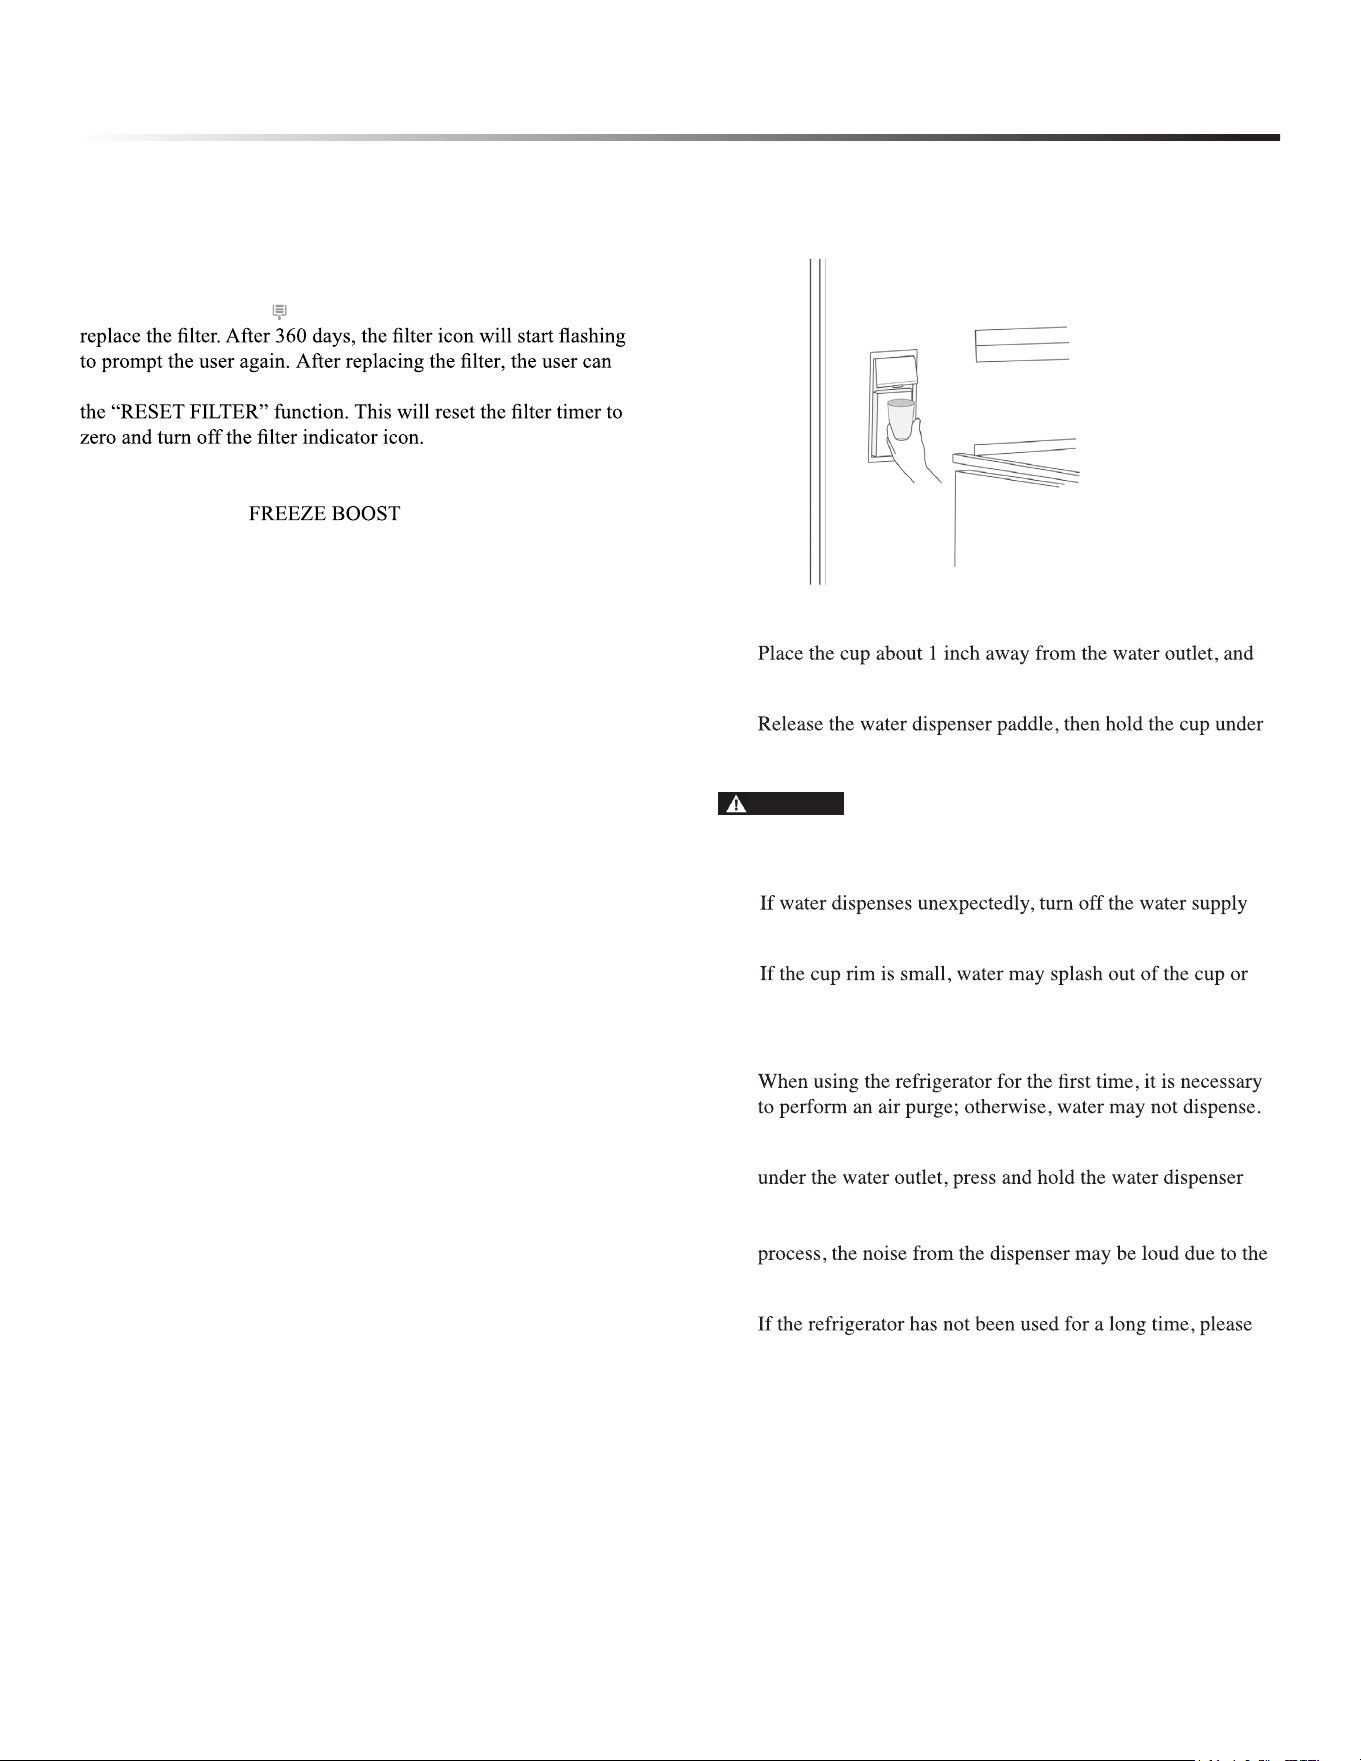
GET WATER
The water dispenser is located on the left wall inside the
refrigerator compartment.
1 Hold the cup against the dispenser.
2
press the dispenser lever to get water.
3
the dispenser for 2-3 seconds to catch all the water.
CAUTION
• Keep children away from the dispenser to prevent children
playing with or damaging the controls.
•
and contact customer support.
•
miss it completely.
NOTE:
•
• Air purge steps: Place a container with a large opening
button for at least 5 minutes to (approximately 2.5gallon)
expel the air and impurities from the water lines. During this
air being expelled.
•
repeat the above steps to remove impurities.
FREEZE BOOST
18
OPERATING REFRIGERATOR
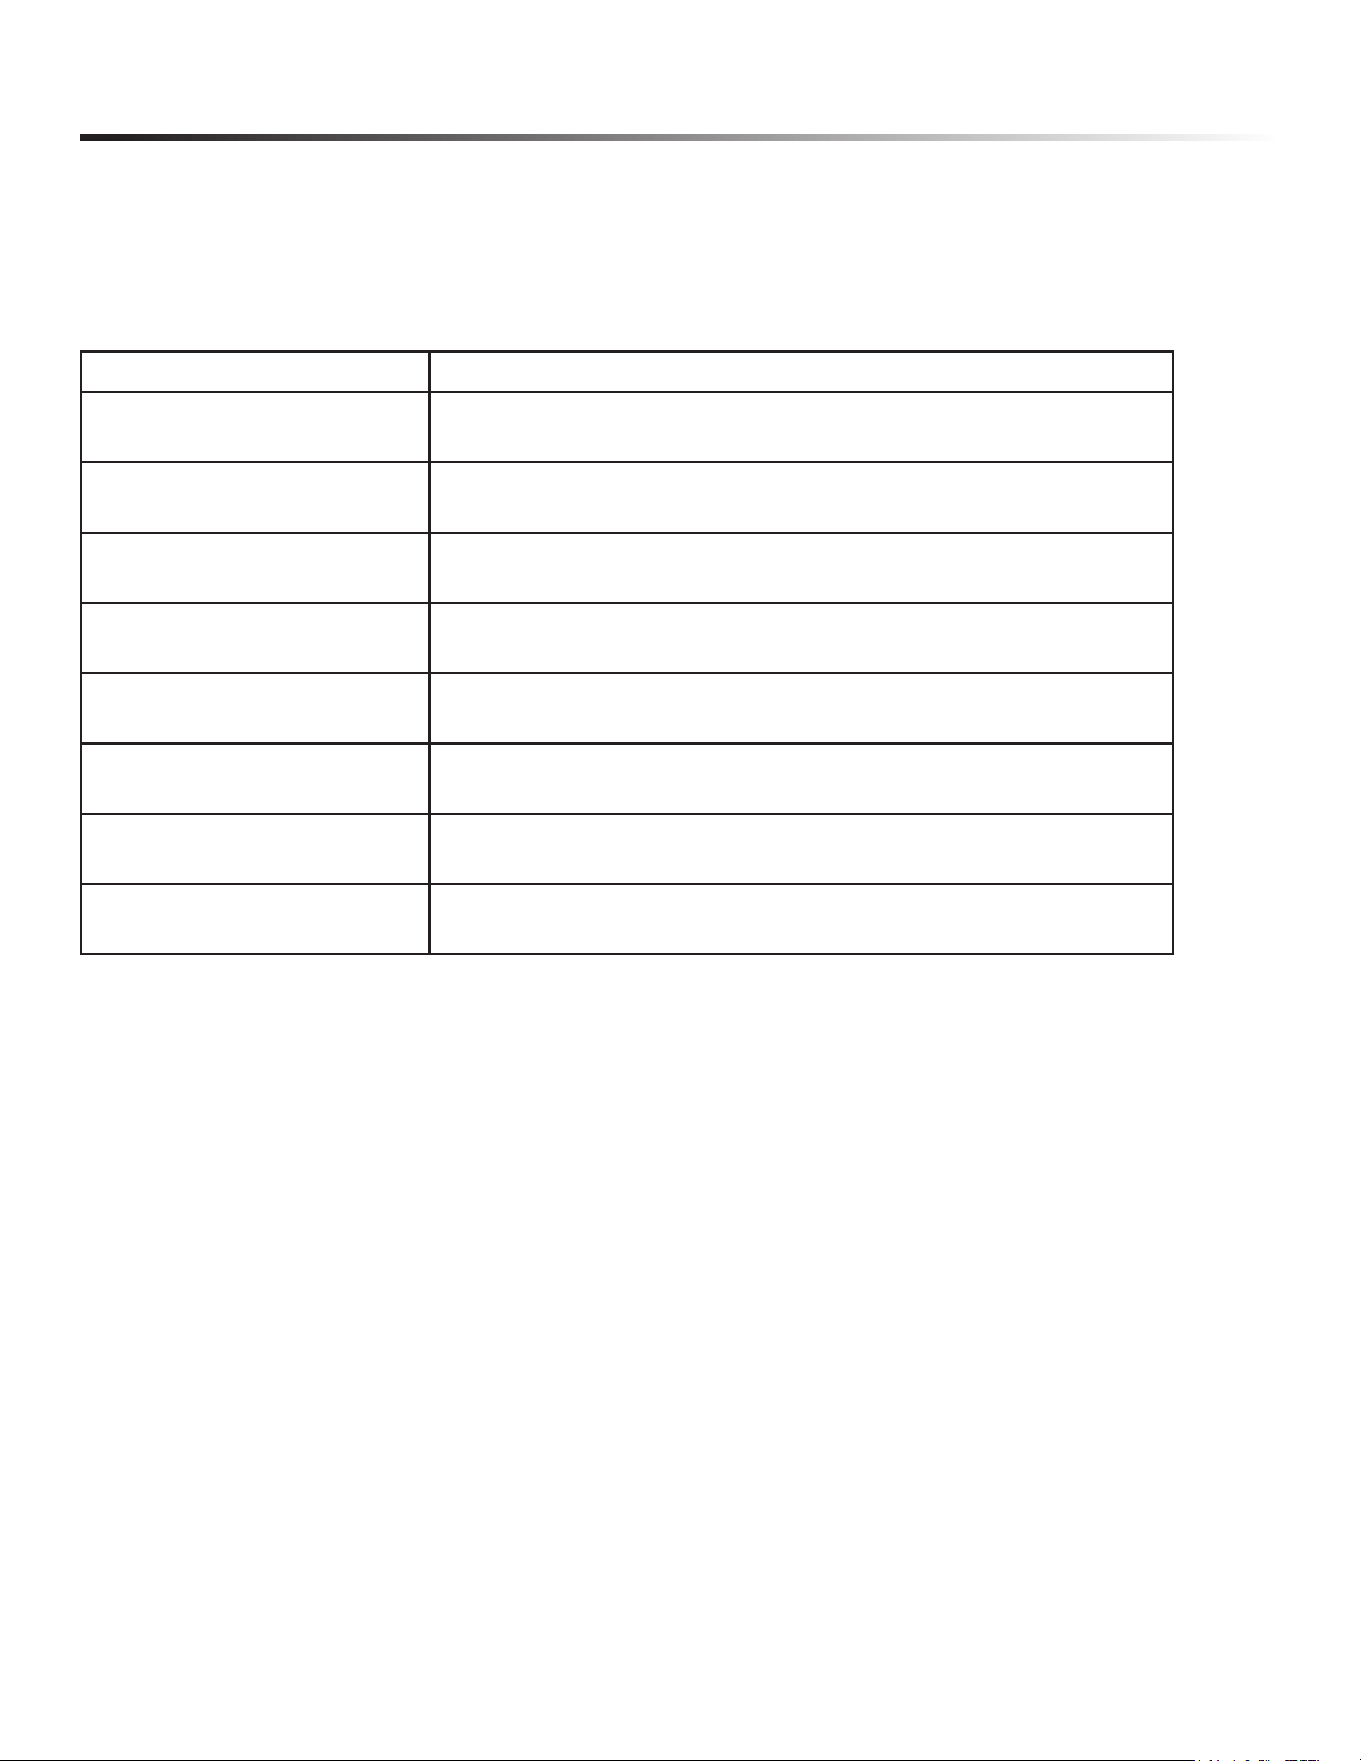
ERROR CODE
CODE NAME
E1 The temperature sensor in the refrigerator chamber fails
E2 The temperature sensor in the freezer chamber fails
E5 Frosting sensor for freezer fails
E6 The communication between display board and main control board fails
E7 The ambient temperature fails
EH The humidity sensor fails
E0 The initialization of ice maker fails
EE The sensor at the bottom of freezer ice maker fails
When the following tips to appear on the display screen, it indicates a problem with the refrigerator. Although the refrigerator in the
following fault case can still provide cool/freeze functions, but the user should contact maintenance personnel, ensure the normal use
of refrigerator.
19
CARE AND CLEANING
OVERALL CLEANING
• Regularly clean the dust and debris behind the refrigerator
DSSOLDQFHDQGWKHÁRRUWRLPSURYHFRROLQJSHUIRUPDQFHDQG
energy savings.
• Check the door gasket regularly to make sure there is no
debris. Clean the door gasket with a soft cloth dampened
with soapy water or diluted detergent.
• The interior of the refrigerator should be cleaned regularly to
avoid odor.
• 3OHDVHXQSOXJWKHSRZHUVXSSO\EHIRUHFOHDQLQJLQWHULRU
UHPRYHDOOIRRGVGULQNVVKHOYHVGUDZHUVHWF
• Use a soft cloth or sponge to clean the inside of the
UHIULJHUDWRUZLWKWZRWDEOHVSRRQVRIEDNLQJVRGDDQGDTXDUW
of warm water. Then rinse with water and wipe clean. After
FOHDQLQJRSHQWKHGRRUDQGOHWLWDLUGU\EHIRUHDSSO\LQJ
power supply.
• )RUDUHDVWKDWDUHGLIÀFXOWWRFOHDQLQWKHUHIULJHUDWRUVXFKDV
QDUURZVSDFHVJDSVRUFRUQHUVLWLVUHFRPPHQGHGWRZLSH
WKHPUHJXODUO\ZLWKDVRIWUDJVRIWEUXVKHWFDQGZKHQ
QHFHVVDU\FRPELQHGZLWKVRPHDX[LOLDU\WRROVVXFKDVWKLQ
sticks) to ensure no contaminants or bacterial accumulation
are in these areas.
• 'RQRWXVHVRDSGHWHUJHQWVFUXESRZGHUVSUD\FOHDQHUHWF
as these may cause odors in the interior of the refrigerator or
contaminate food.
• &OHDQWKHERWWOHIUDPHVKHOYHVDQGGUDZHUVZLWKDVRIWFORWK
dampened with soapy water or diluted detergent. Dry with a
soft cloth or air dry.
• Wipe the outer surface of the refrigerator with a soft cloth
GDPSHQHGZLWKVRDS\ZDWHUGHWHUJHQWHWFDQGWKHQZLSH
dry.
• 'RQRWXVHKDUGEUXVKHVFOHDQVWHHOEDOOVZLUHEUXVKHV
DEUDVLYHVVXFKDVWRRWKSDVWHVRUJDQLFVROYHQWVVXFKDV
DOFRKRODFHWRQHEDQDQDRLOHWFERLOLQJZDWHUDFLGRU
DONDOLQHLWHPVZKLFKPD\GDPDJHWKHUHIULJHUDWRULQWHULRU
Boiling water and organic solvents such as benzene may
deform or damage plastic parts.
• 'RQRWULQVHGLUHFWO\ZLWKZDWHURURWKHUOLTXLGVGXULQJ
cleaning to avoid short circuits or damage to electrical
insulation after immersion.
DANGER
Please unplug the refrigerator for defrost and cleaning.
CLEANING OF DOOR BINS
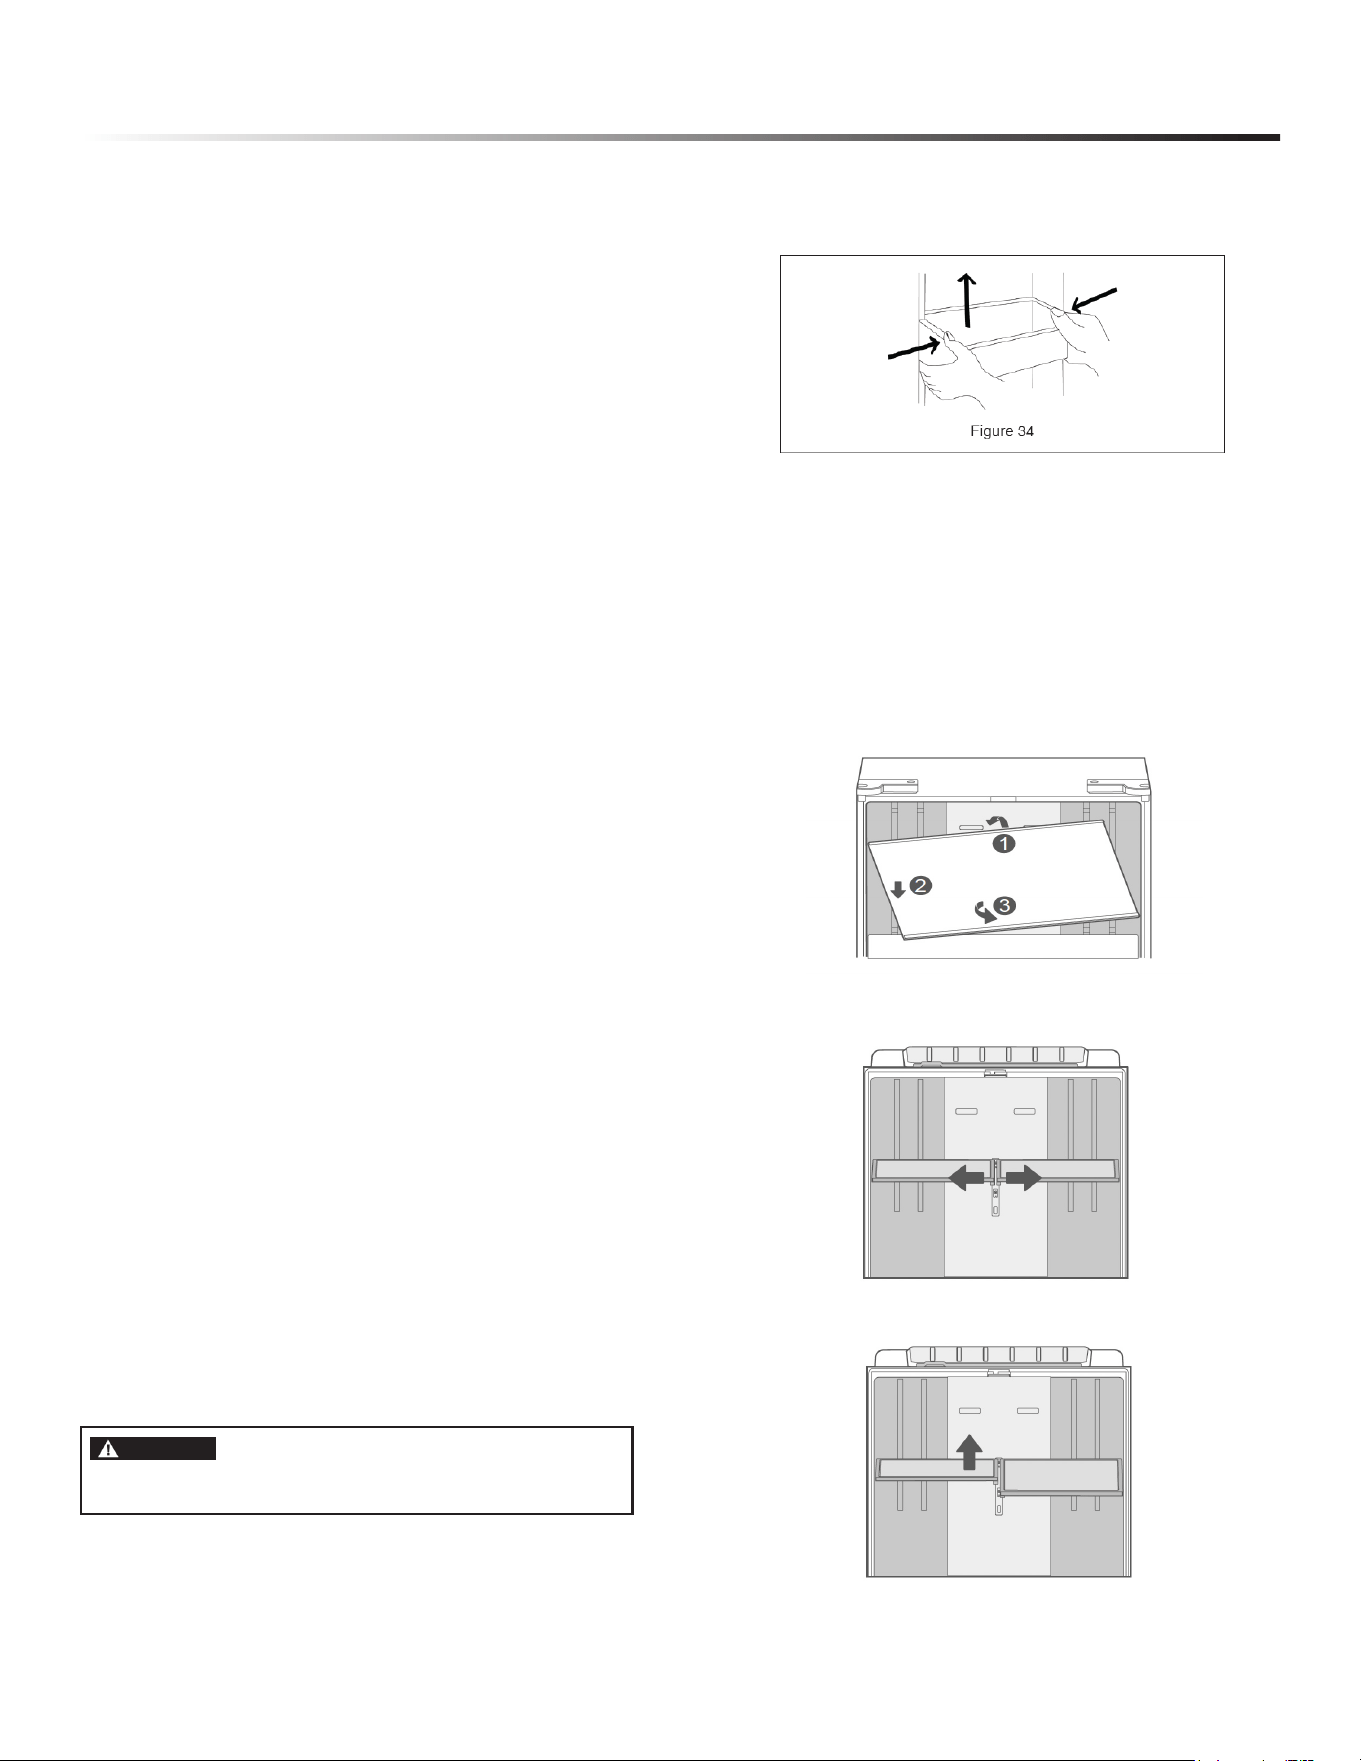
• 8VHERWKKDQGVWRKROGDQGVTXHH]HWKHELQSXVKLWXSZDUG
WKHQUHPRYH6HH)LJXUH
• $IWHUZDVKLQJWKHELQUHLQVWDOODQGDGMXVWKHLJKWDVQHHGHG
CLEANING OF BIG SHELF
1 Hold the front end of the glass shelf with both hands and
rotate it in the direction of the arrow until the back end is
lifted.
2 Grasp the shelf with both hands and slowly slide it towards
you.
3 Rotate the shelf as indicated by the arrow in the diagram
and completely remove it.
CLEANING OF ADJUSTABLE SHELF
1 Pull the two shelves apart in the middle.
2 Tilt up the front of the shelf you want to remove until it‘s
free from the other shelf.
3 Gently wipe the area that needs cleaning with a damp cloth.
4 7RDVVHPEOHWLOWWKHIURQWRIWKHVKHOIXSDQGJXLGHWKHVKHOI
hooks into the slots at a desired height.
20
CARE AND CLEANING
CLEANING OF FREEZER DRAWER
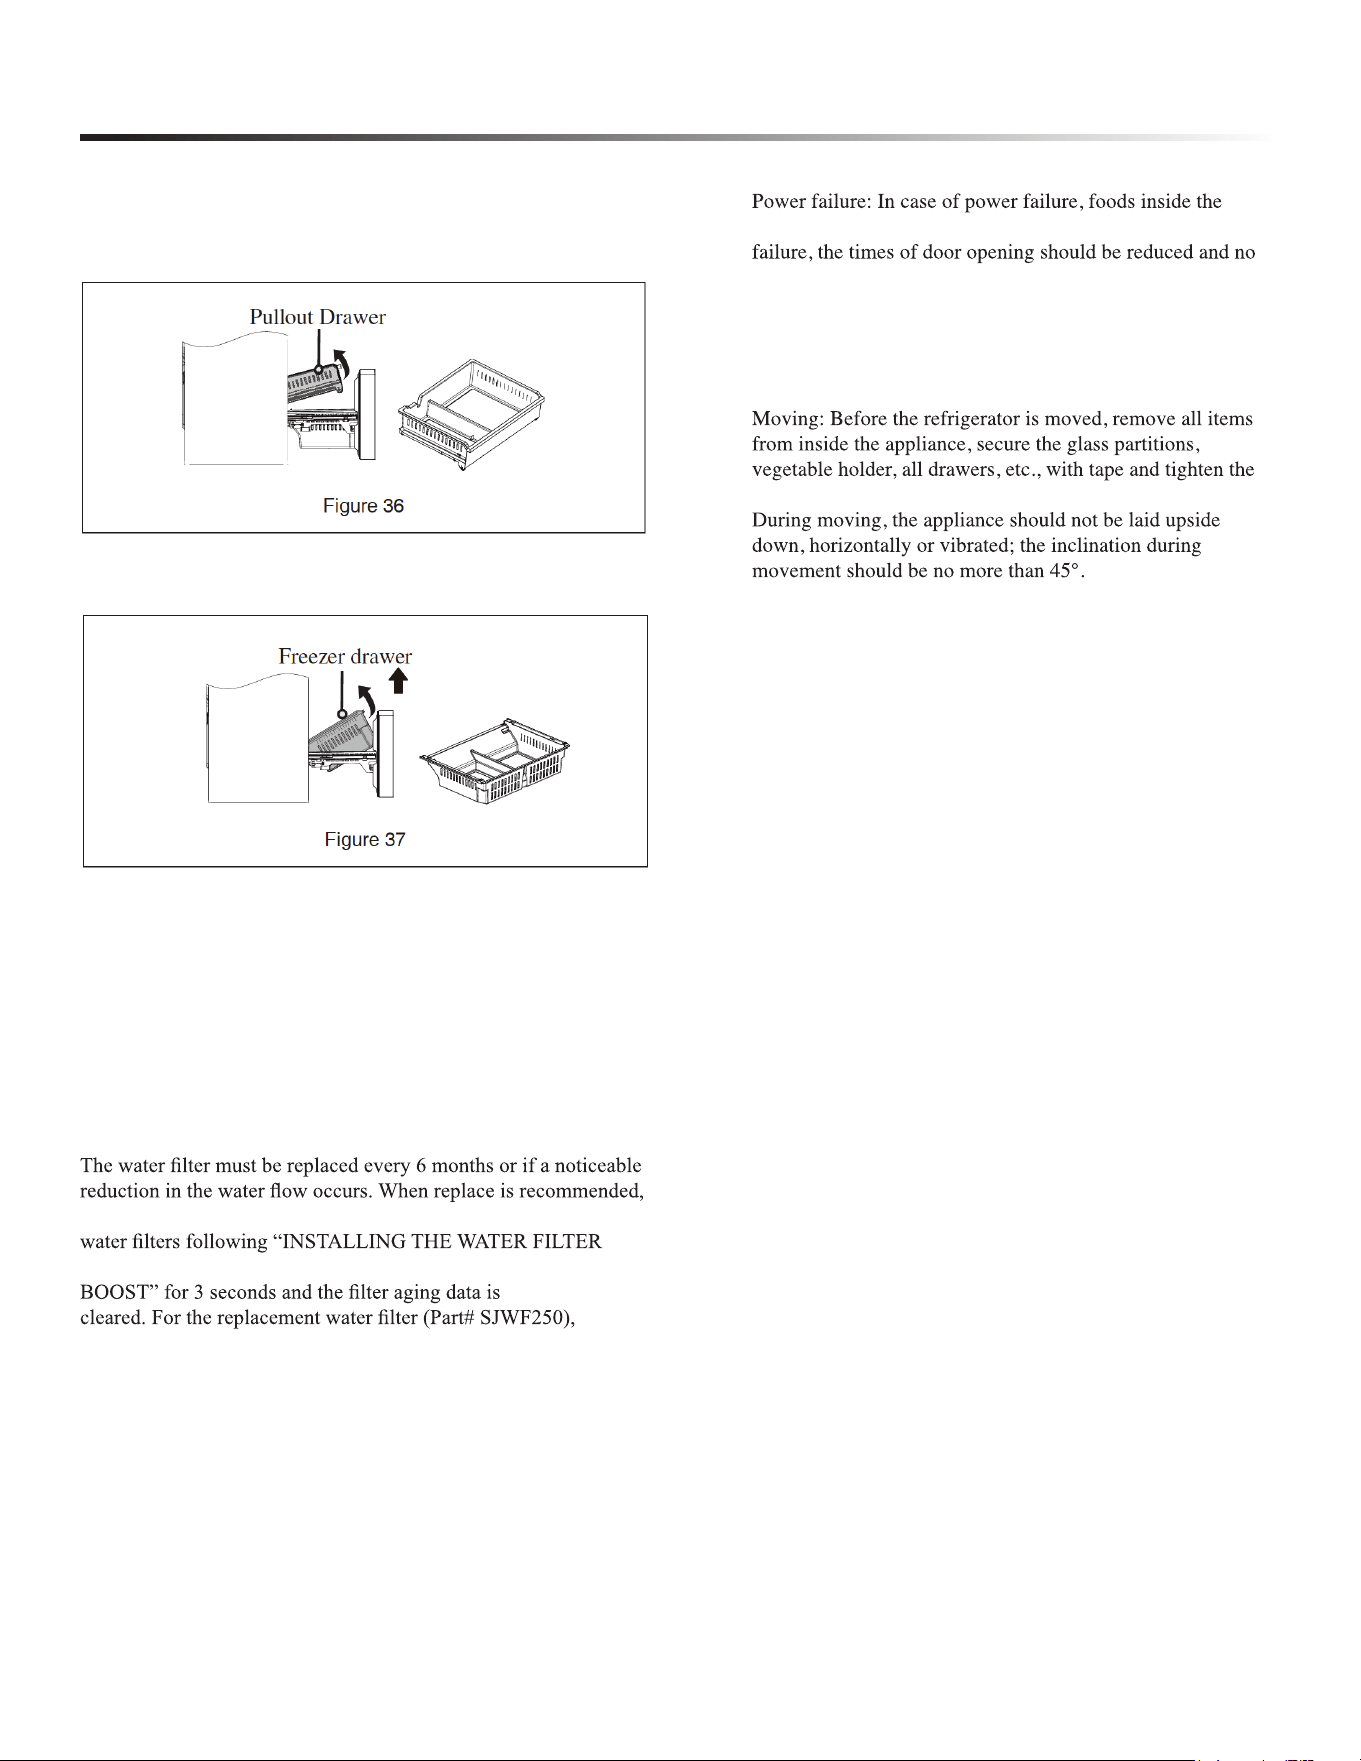
Pullout drawer: Open the freezer door to the maximum stroke,
lift the tail of the upper drawer of the freezing chamber, take out
the pullout drawer. See Figure 36.
Freezer drawer: Open the freezer door to the maximum stroke,
Lift the end of the freezer drawer and lift it up. See Figure 37.
Note: Don’t remove the lower freezer drawer if not necessary.
DEFROSTING
The refrigerator is designed based on the air-cooling principle
and thus has an automatic defrosting function. Frost formed
due to change of season or temperature may also be manually
removed by disconnecting the appliance from power supply or
by wiping with a dry towel.
REPLACING THE WATER FILTER
the Filter Replacement icon will be lit. At this time, replace the
(P10). To reset the Filter Replacement icon, hold down “FREEZE
please call 1-800-BE-SHARP.
CHANGING THE LIGHT
Any replacement or maintenance of the LED Lamps and others,
please call 1-800-BE-SHARP.
OUT OF OPERATION
•
appliance can be kept for several hours; during the power
more fresh food should be put into the appliance.
• Not use for extended time: The appliance should be un-
plugged and then cleaned; the doors should be left open to
prevent odor.
•
leveling feet; close the doors and secure them with tape.
21
TROUBLESHOOTING
Before calling for service, the following information may help determine potential cause of appliance concern. Please contact your local
dealer or 1-800-BE-SHARP for further assistance.
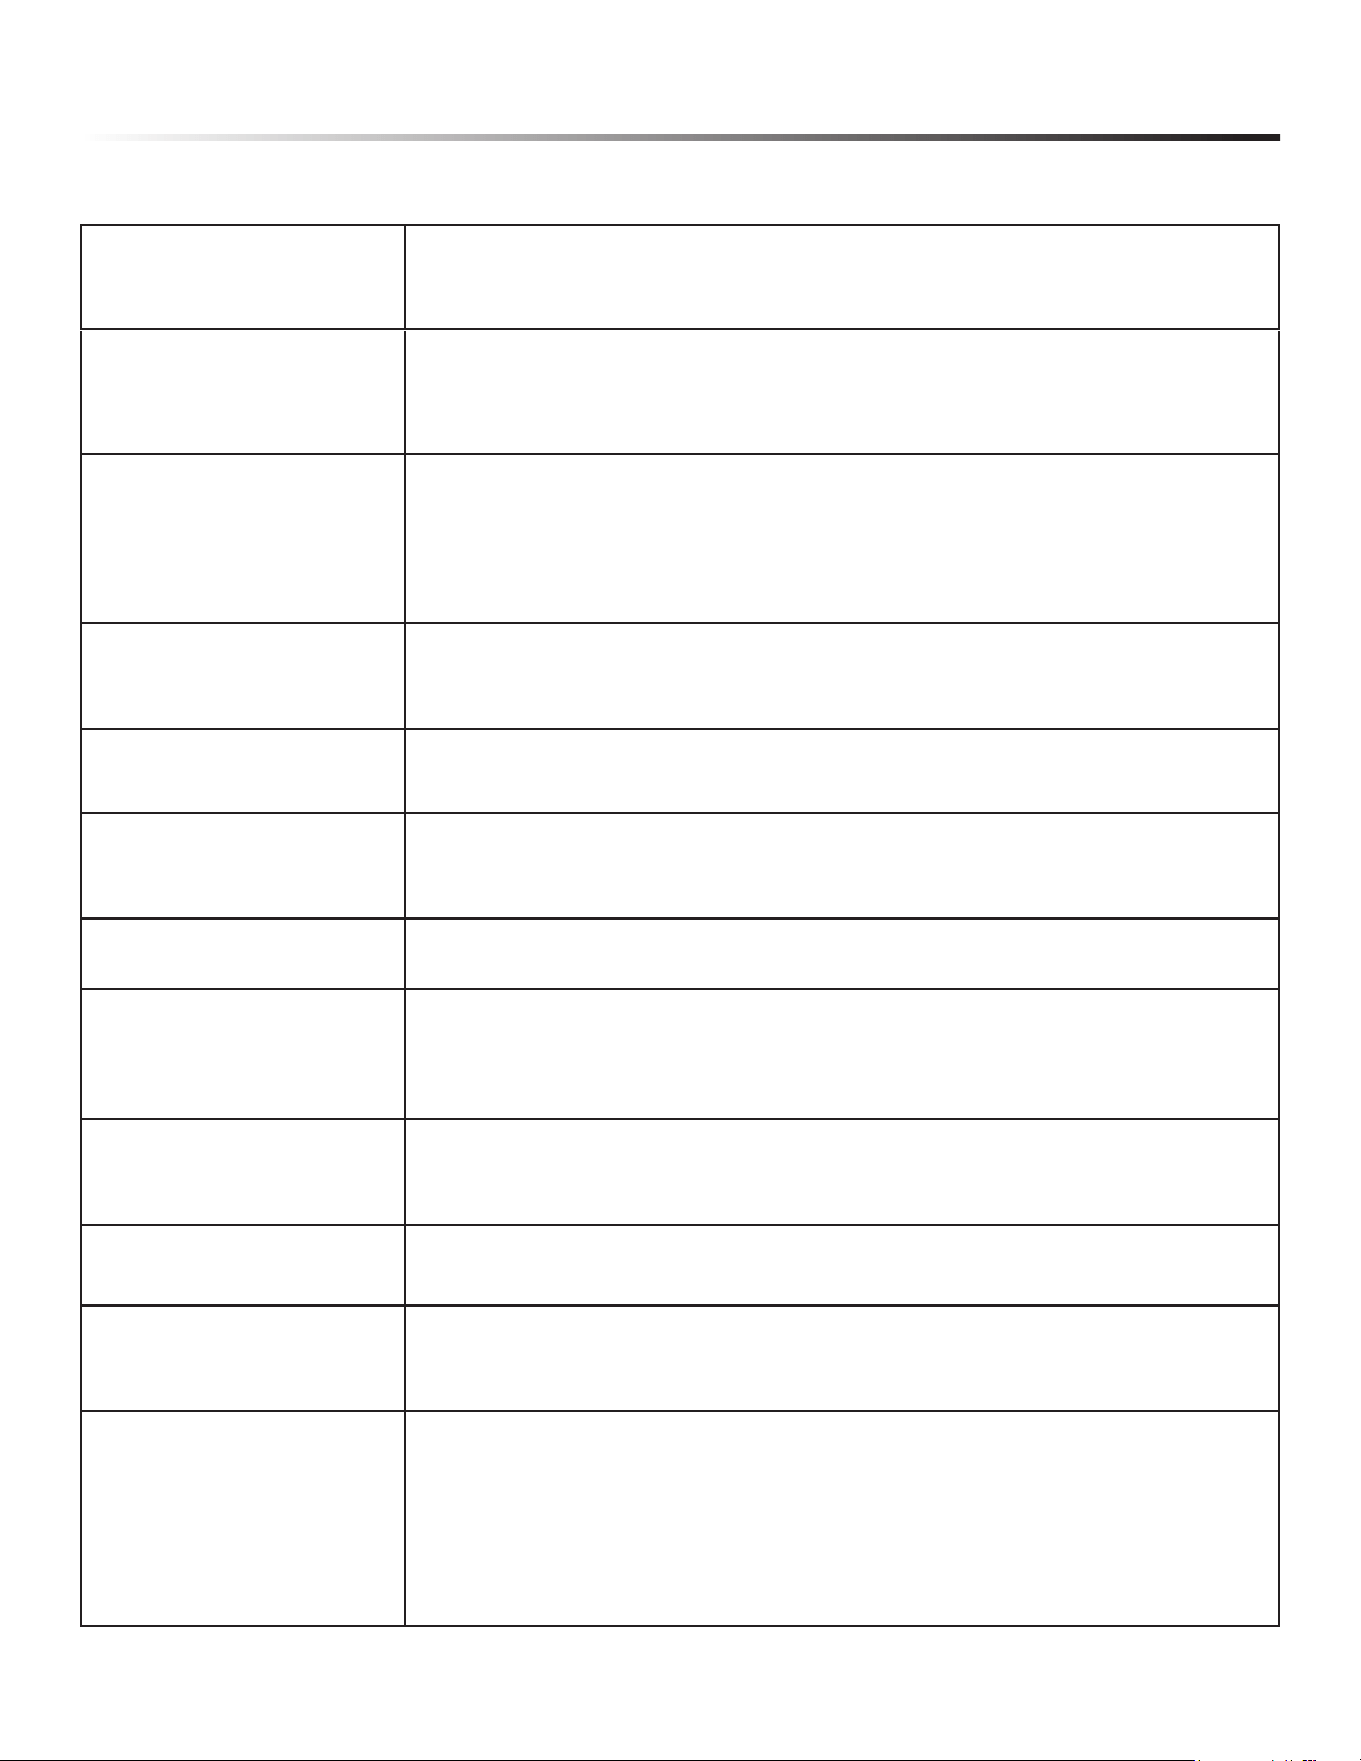
Appliance has no power
• &RQÀUPWKHDSSOLDQFHLVFRQQHFWHGWRDSRZHUVRXUFHDQGVHFXUHO\SOXJJHGLQWRDQ
electrical outlet.
• &RQÀUPHOHFWULFDORXWOHWKDVSRZHULIQRWFKHFNFLUFXLWEUHDNHUER[IRUWULSSHGFLUFXLW
Order from refrigerator or freezer
compartments
• Foods not securely sealed in containers.
• Spoiled foods inside appliance.
• $SSOLDQFHKDVQRWEHHQSURSHUO\FOHDQHGLHIRRGDQGGLUWKDYHDFFXPXODWHGLQVLGHWKHXQLW
Excessive compressor operation
• Long operation of the refrigerator is normal in summer when the ambient temperature is high.
• 7RRPDQ\IRRGLWHPVKDYHEHHQSODFHGLQVLGHWKHDSSOLDQFHLQFUHDVLQJHQHUJ\GHPDQG
• Foods not properly cooled before placing inside appliance.
• 7KHGRRUVDUHRSHQHGWRRIUHTXHQWO\
Light does not come on
• &RQÀUPDSSOLDQFHLVFRQQHFWHGWRSRZHUVXSSO\DQGWKDWWKHOLJKWLVQRWGDPDJHG
• +DYHWKHOLJKWUHSODFHGE\DTXDOLÀHGVHUYLFHWHFKQLFLDQ
Doors do not close properly
• Food is obstructing the door operation.
• The refrigerator is not level.
Rattling noise
• &RQÀUPÁRRUDQGUHIULJHUDWRUDUHOHYHODQGDSSOLDQFHLVQRWWLOWHG
• &RQÀUPZDWHUÀOWHULVVHFXUHO\LQVWDOOHG
Door does not seal properly
• &RQÀUPGRRUVHDOVDUHFOHDQDQGIUHHRIREVWUXFWLRQ
:DWHUSDQRYHUÀRZV
• 7KHUHLVWRRPXFKIRRGLQWKHIUHH]HURUIRRGVWRUHGFRQWDLQVWRRPXFKZDWHUUHVXOWLQJLQ
heavy defrosting.
• 7KHGRRUVDUHQRWFORVHGSURSHUO\UHVXOWLQJLQIURVWLQJGXHWRHQWU\RIDLUDQGLQFUHDVHGZDWHU
due to defrosting.
Hot housing
• +HDWGLVVLSDWLRQRIWKHEXLOWLQFRQGHQVHUYLDKRXVLQJZKLFKLVQRUPDO
• :KHQKRXVLQJEHFRPHVKRWGXHWRKLJKDPELHQWWHPSHUDWXUHDQGVWRUDJHRIWRRPXFKIRRGLW
is recommended to provide proper ventilation to facilitate heat dissipation.
Surface condensation
• Condensation on the exterior surface and door seals of the refrigerator is normal when the
ambient humidity is too high. Remove the condensation with a clean towel.
Abnormal Noise
• Buzz: The compressor may produce buzzing sound during operation and the buzzing is loud
particularly upon start or stop. This is normal.
• &UHDN5HIULJHUDQWÁRZLQJLQVLGHRIWKHDSSOLDQFHPD\SURGXFHFUHDNZKLFKLVQRUPDO
Ice maker does not make ice
• $IWHU\RXLQVWDOOWKHZDWHUOLQHDQGVWDUWWKHUHIULJHUDWRULWWDNHVKRXUVWRVWDUWLFHPDNLQJ
• Please turn on the ice making function (see page 17 instructions).
• &KHFNZKHWKHUWKHZDWHUSUHVVXUHPHHWVSVLDQGZKHWKHUWKHOLQHLVFRQQHFWHGSURSHUO\
• Check whether the water supply valve is open and whether the water pipe has a restriction.
• Check whether the ice storage box is installed properly.
22
TROUBLESHOOTING
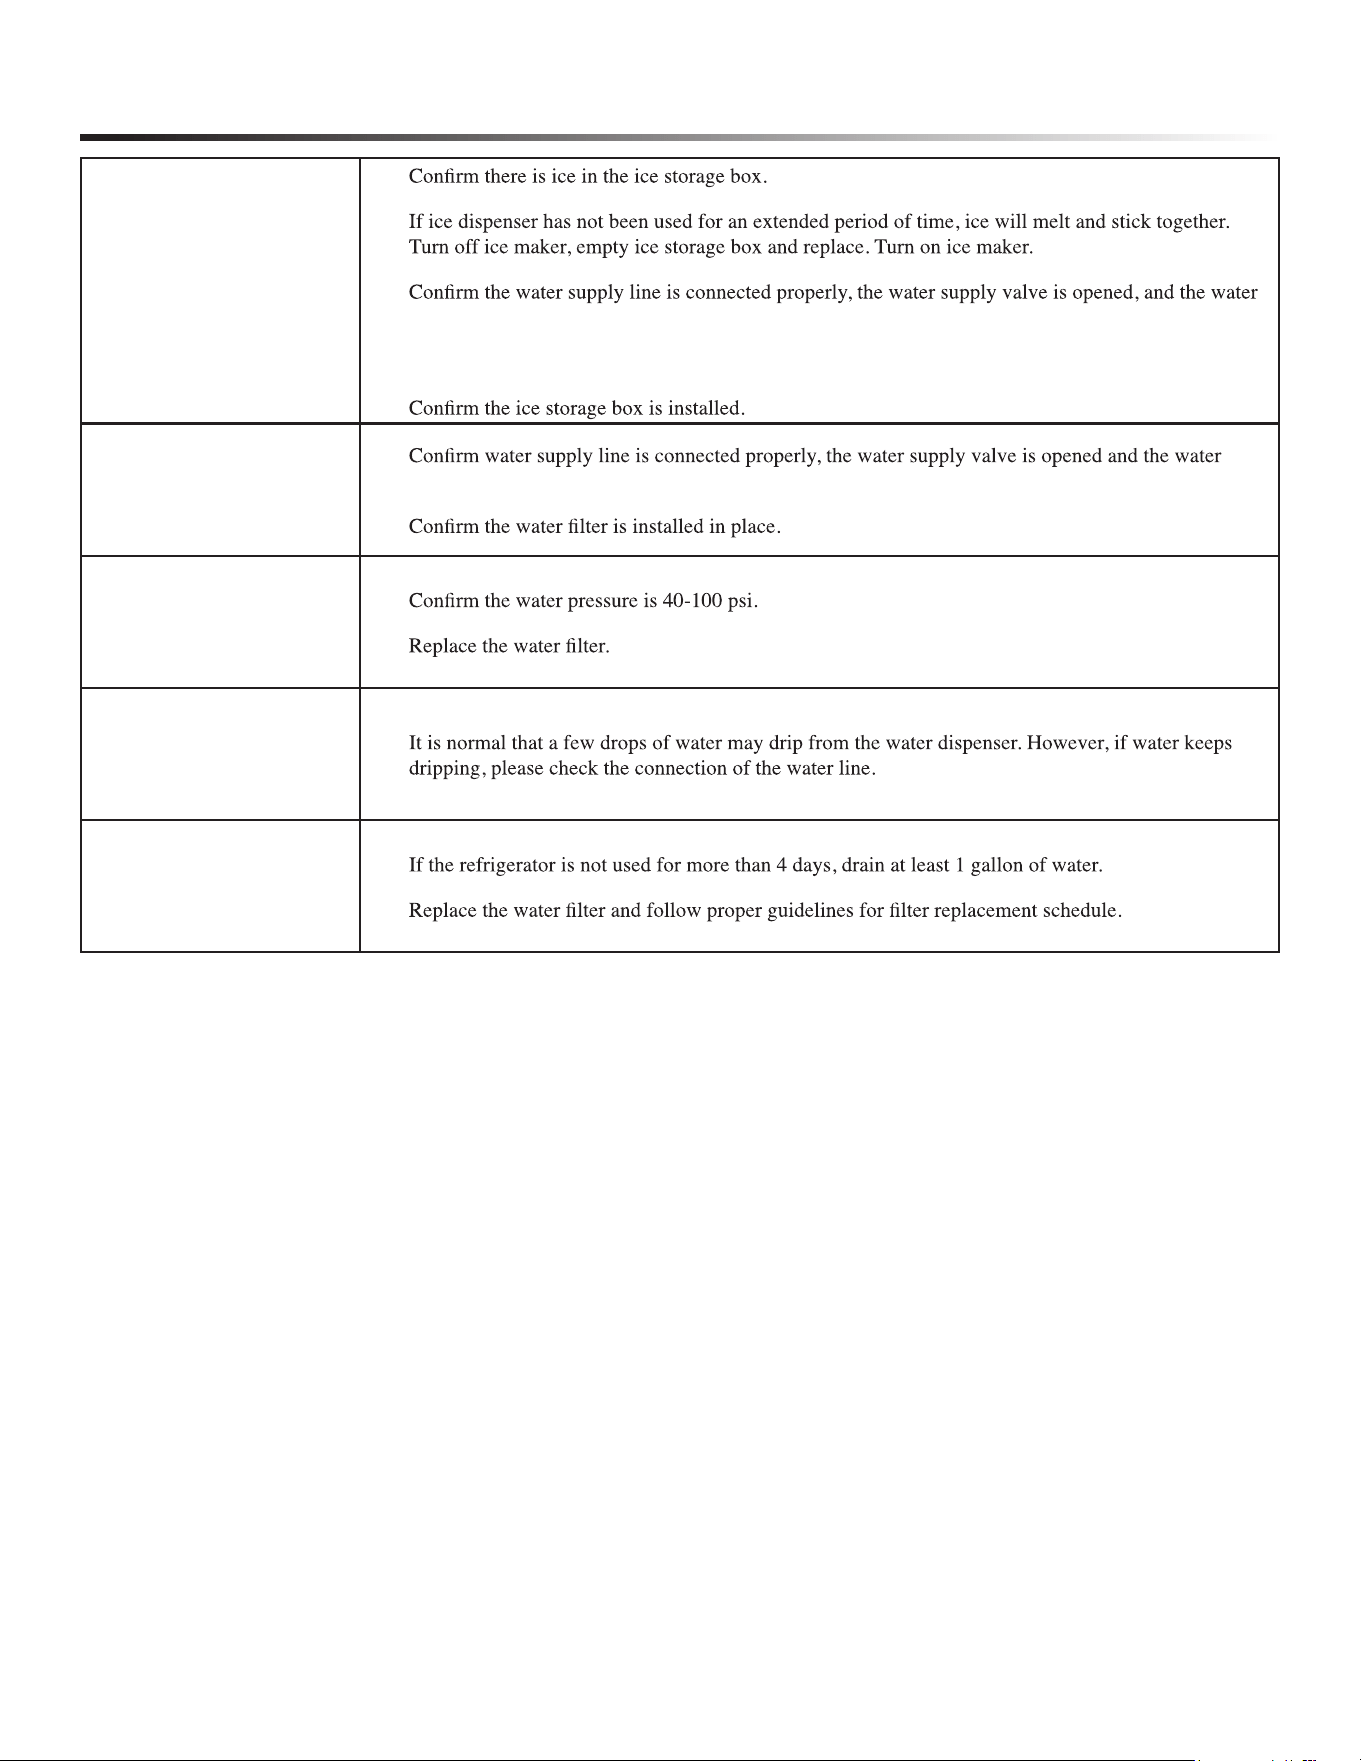
Ice dispenser does not work
•
•
•
pipe has no restrictions.
• The ice dispenser can only be used when the refrigerator door is closed.
•
Water dispenser does not work
•
pipe has no restrictions.
•
Water dispenser is too slow
•
•
Water drips from the water
dispenser
•
The water tastes bad
•
•

SHARP ELECTRONICS CORPORATION • 100 Paragon Drive • Montvale, New Jersey 07645 • USA
800-BE-SHARP (800-237-4277)
January 10, 2026