4358-8895
06.24.26
shadeventure
2-in-1 convertible car seat
KEEP INSTRUCTIONS FOR FUTURE
USE. Read all instructions before
using this car seat.
WARNING: Failure to follow the
warnings on the labels and in the
instruction manual can result in serious
injury or death to your child. Serious
injury may include paralysis and/or
permanent brain injury.
Text 1-812-652-2525
(US and Canada only, carrier fees may apply)
Visit coscokids.com
Email [email protected]
Call 1-800-544-1108
(Toll free, US and Canada only)
For parts availability and questions, text, chat, call, or email.
If requested color is not available, a similar color will be substituted.
Applicable tax and shipping & handling will also be added.
©2026 Dorel Juvenile Group, Inc. (800) 544-1108 www.coscokids.com. Styles and colors may vary. Los estilos y los colores pueden variar. Made in USA from American and imported
parts (including seat pad). Hecho en EE.UU. a partir de piezas americanas e importadas (incluyendo la almohadilla del asiento). Distributed by (distribuido por) Dorel Juvenile Group, Inc.,
2525 State St., Columbus, IN 47201-7494. Dorel Juvenile Canada, 2233 Argentia Road, Suite 110, Mississauga, ON L5N 2X7. Representante exclusivo en Chile: DOREL JUVENILE
CHILE S.A. Av. del Parque 4161, oficina 602 A, Huechuraba, Santiago, Chile - Fono: 56 2 24971500 - www.infanti. cl - www.dorel.cl. Importado y distribuido en Perú por: COMEXA
COMERCIALIZADORA EXTRANJERA S.A. SUCURSAL DEL PERÚ - Los Libertadores 455, San Isidro, Lima 27, Lima, Perú RUC 20431062870 – Fono: 4413029 – www.infanti.com.pe. En
Centro América, Caribe y Ecuador por: Best Brands Group S.A. – Av. Balboa, Bay Mall Plaza, Planta Baja, local 9, Panamá. - Fono: (507) 300 2884. En Colombia
por: Baby Universe S.A.S. - Vía 40 No. 77-29, Barranquilla, Colombia - Fono: (575) 353 1110 Importador: DJGM, S.A. DE C.V. Gabriel Mancera No. 1041 Col. Del
Valle, Benito Juárez C.P. 03100 México, Ciudad de México R.F.C. DJG140305GN9 Tel. (55) 671 99202
Replacement Parts List
• Buckle Assembly
• Harness Strap
• Seat Pad Set
• Chest Clip
• Cup Holder
• Tether Kit
• Lower Anchor Belt
• Instructions
5
4
*
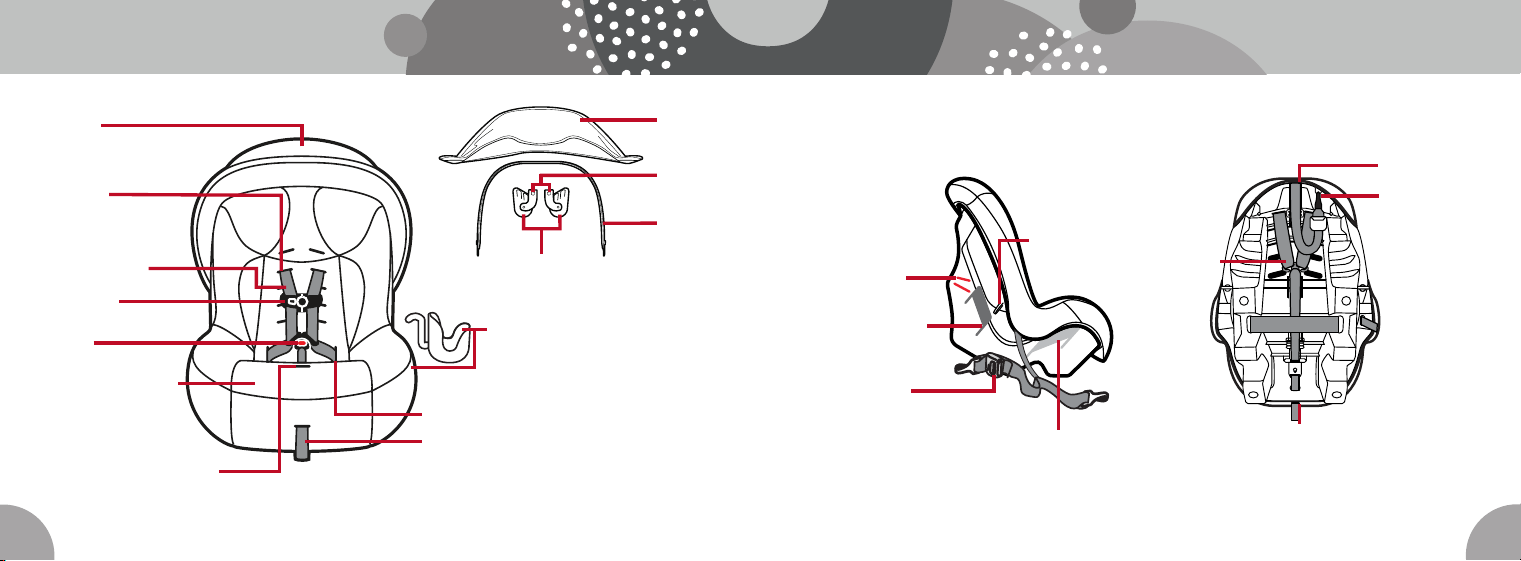
See page 6 for Accessory Use.
Forward-Facing
Belt Path
Rear-Facing
Level Lines
Rear-Facing Belt Path
Tether Strap
Splitter
Plate
Harness
Adjustment Strap
Tether
Attachment
for Storage
Lower Anchor
Storage
Lower Anchor
Belt
Parts of the Car Seat
Canopy
Canopy
Hoops
Canopy Clamp
Assemblies
Canopy
Hubs
Harness Strap
Chest Clip
Buckle
Removable Cup Holder*
(attachment under
seat pad)
Hip Harness Slots
Harness Release Lever
(through opening in seat pad)
Harness Adjustment Strap
Shoulder
Harness
Slots
Instruction Manual
Storage
(under seat pad)
Canopy
(Rear-Facing mode only)
7
6
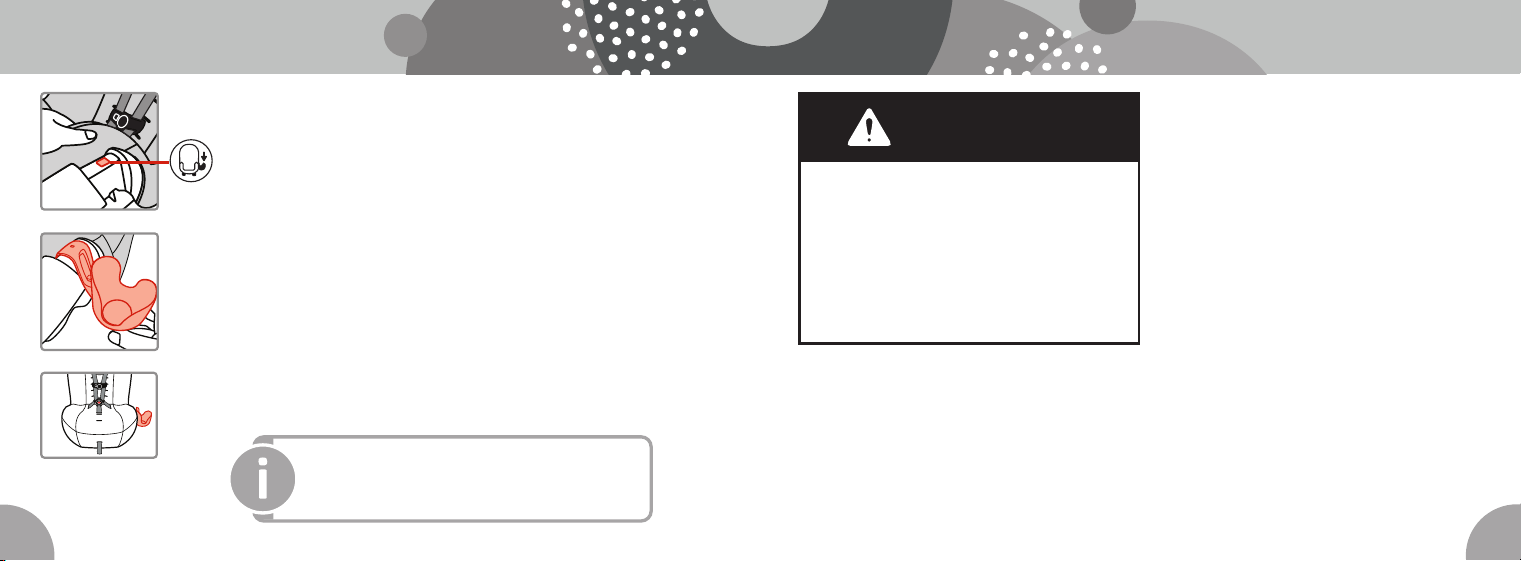
Cup Holder
The cup holder can be attached to either side of the car seat.
1. Lift the seat pad on the side where you want to install
the cup holder. Align the symbol on the cup holder with
the symbol on the car set.
2. Hook the bottom of the cup holder under the edge on
the side of the car seat. Snap the top of the cup holder
over the edge of the car seat.
3. Pull the seat pad down over the cup holder attachment,
making sure it is tucked around the bottom and sides of
the car seat.
Your child’s height, weight, and age determine
how the car seat should be placed in the vehicle.
Children vary widely in body size, shape, and
temperament—please consult your doctor
before switching between any modes
within the limits and fit requirements of the
car seat.
Failure to follow these instructions may
result in serious injury or death to your
child. Serious injury can include
paralysis and/or permanent brain injury.
Be certain to measure your child’s
weight and height (do not guess) before
choosing this car seat’s mode.
WARNING
Choosing a
Car Seat Mode
For details on installing, removing, or using
the canopy see Canopy Use on page 9.
Accessory Use
Infants and Toddlers
Children must ride rear-facing and remain
rear-facing until they reach the maximum
weight or height limits for rear-facing mode.
Rear-facing child restraints installed behind
another vehicle seat must be installed
touching the back of the vehicle seat in
front of it, or be as close as possible.
Toddlers and Preschoolers
Children can only use a forward-facing
car seat once they outgrow rear-facing
weight or height limits. Once they are
forward-facing, children must use their
child restraint in forward-facing mode with
a harness until they reach the maximum
weight or height limits for forward-facing
harness mode.
continued on next page
11
10
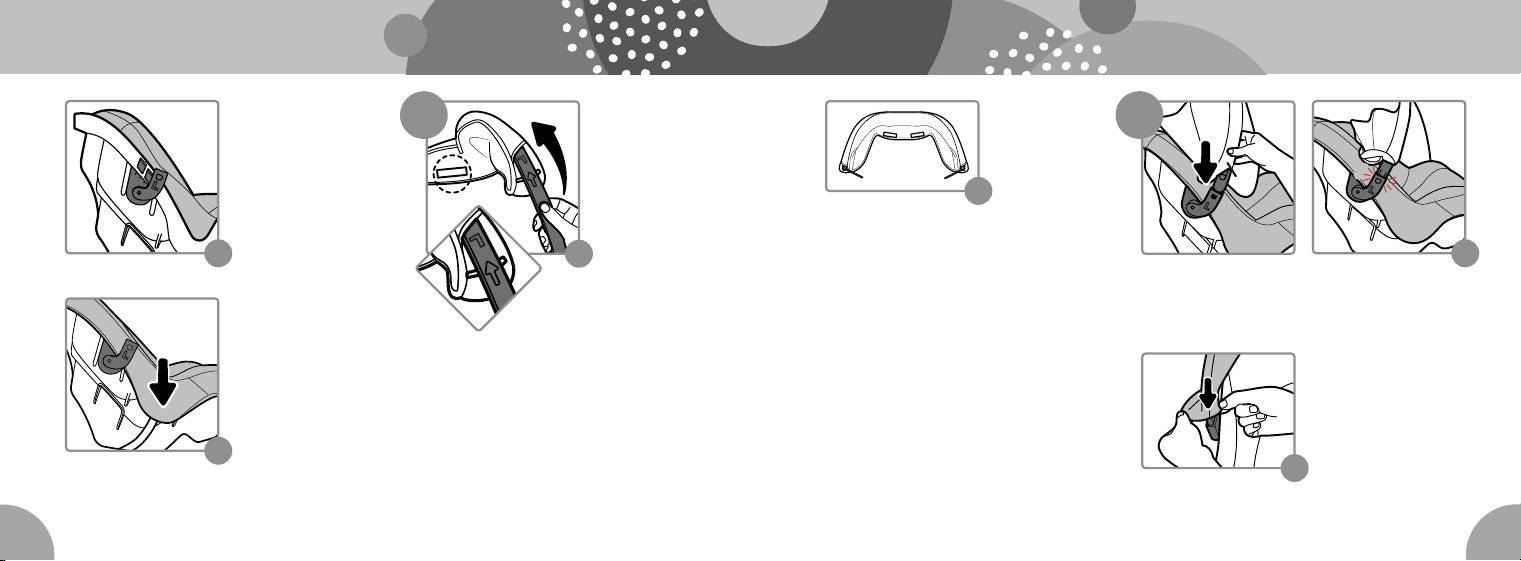
c.
Slide the clamp up
until it clicks into
the two slots on the
side of the car seat.
Pull down on the
clamp to ensure it is
completely attached.
d.
Pull the seat pad down,
sliding it between the
clamp and the canopy
hub. Tuck the seat pad
around the side of
the car seat.
c
d
e.
Repeat steps a–d to install the right canopy clamp on
the other side of the car seat.
a. Position the
canopy fabric so
the circled
hook-and-loop
fastening strip
is pointed
towards you.
Starting with the
2
a
end of the hoop marked L
and holding it with the arrow
facing up, insert the hoop into
the right side of the canopy fabric.
a. Insert the end of the left canopy post into
the left canopy hub until it clicks into place.
b. Pull the canopy
fabric down over
the post, tucking it
between the hub
and the side of the
car seat.
CLICK
a
CLICK
3
L
CLICK
b
b
L R
b.
Continue
to slide the
canopy fabric
around the
hoop until
the hoop comes through the pocket
on the other end. Make sure the side
of the canopy hoop marked L is on
the left and the side marked R is on
the right (you may need to lift up the
fabric slightly to see the markings).
continued on next page
13
12
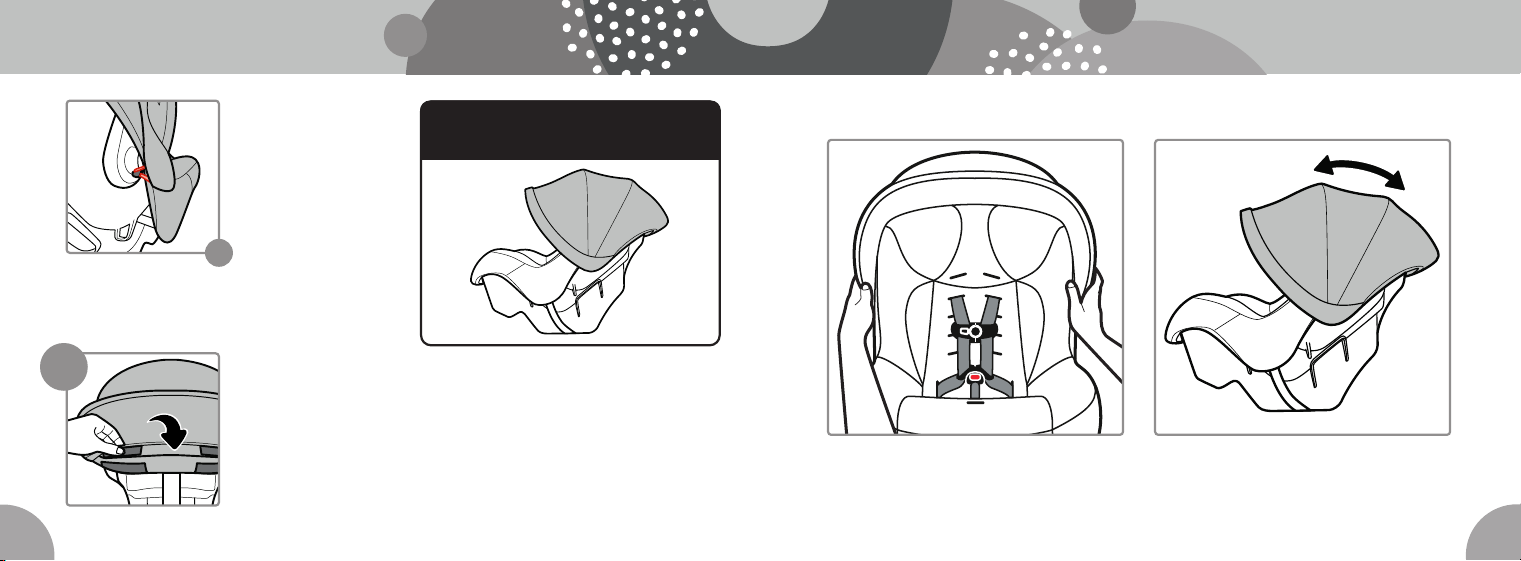
c. Fasten the elastic
on the canopy onto
the peg on the
canopy hub.
d. Repeat steps a–c
to install the right
canopy post into
the right canopy
hub on the other
side of the car seat.
CLICK
c
Attach the fastening
strips on the canopy
to the seat pad on
the back of the car
seat. Check to make
sure the fastening
is secure.
CLICK
4
FINISHED!
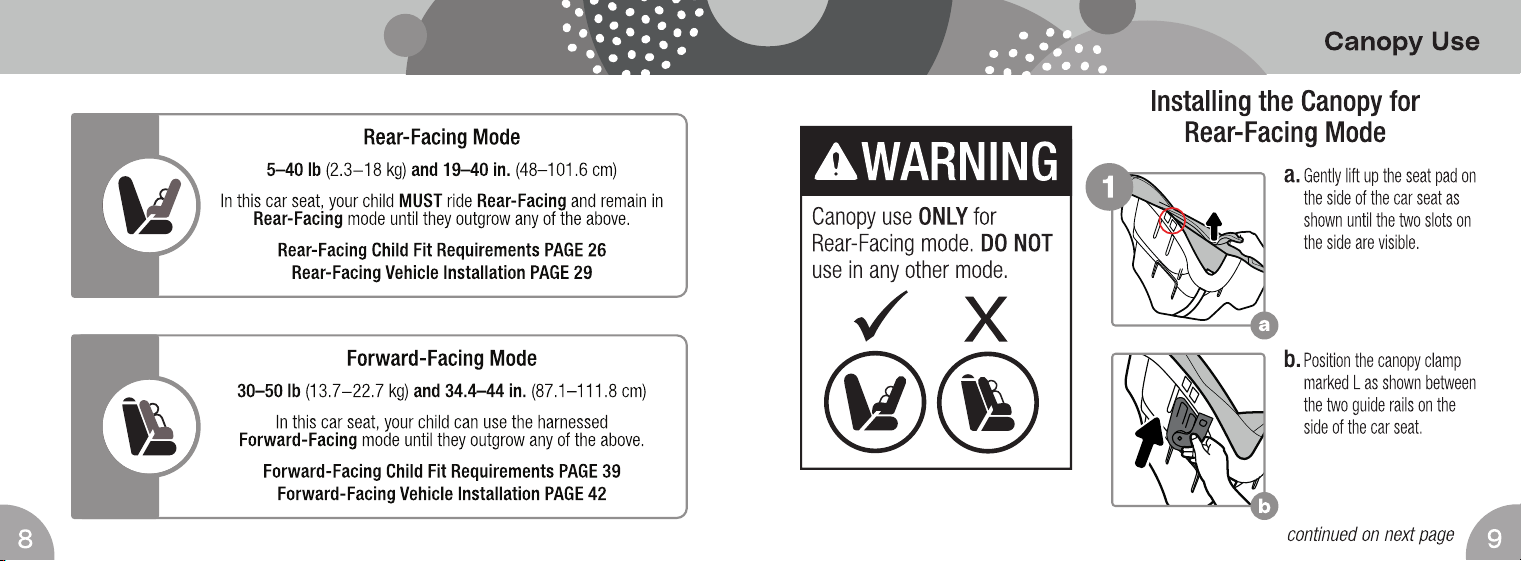
The canopy can be used in Rear-Facing
mode only. Remove the canopy before
using the car seat in Forward-Facing
mode. See page 14.
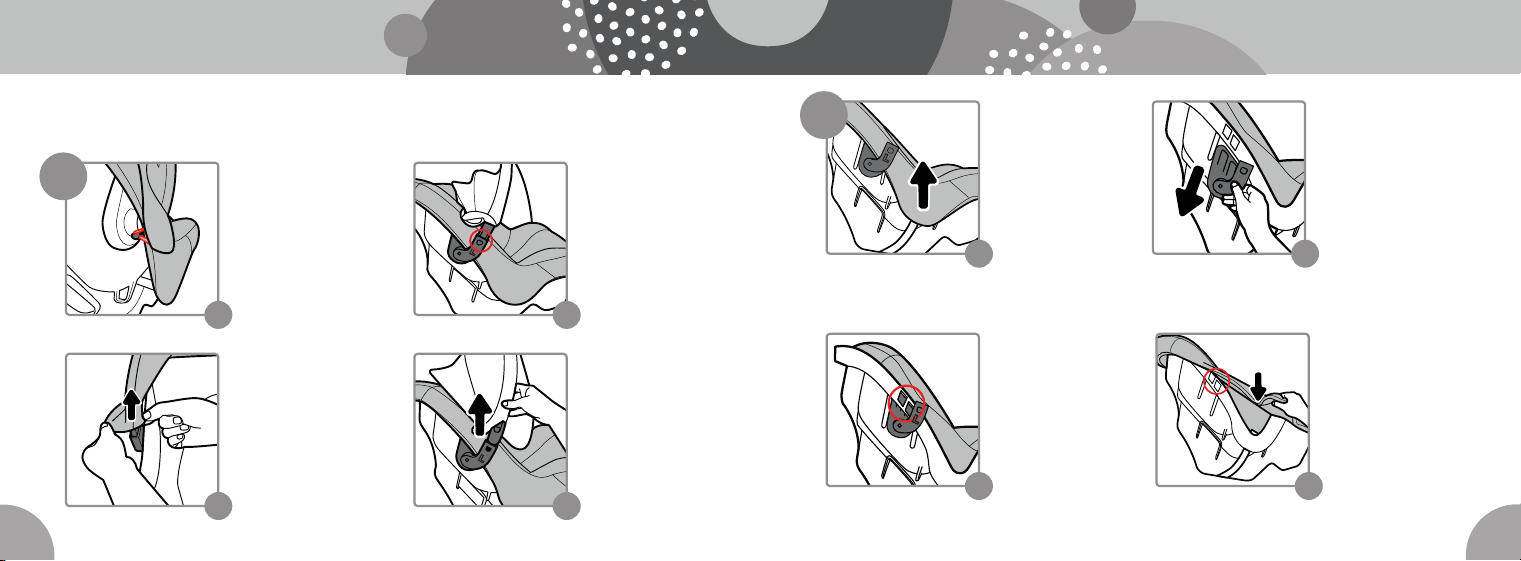
Adjusting the Canopy
Grasp both sides of the canopy and move it front to back to the desired position.
15
14
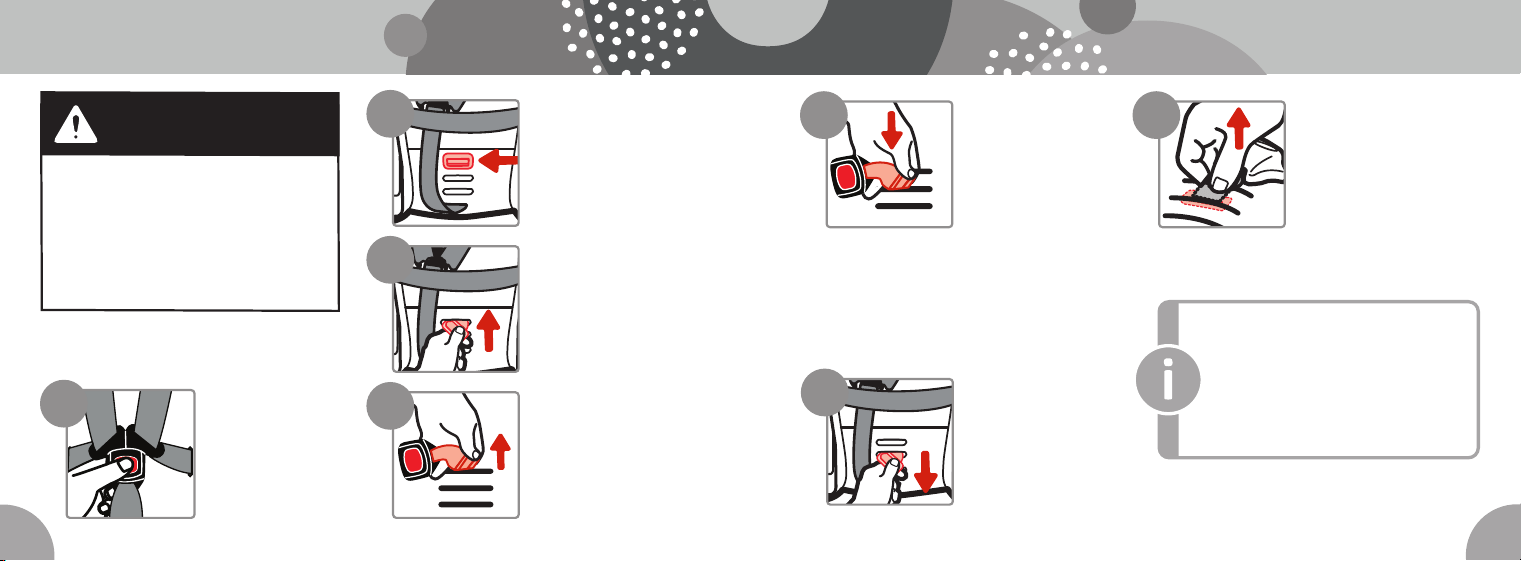
Removing the Canopy
The canopy MUST be removed before using the car seat in Forward-Facing mode.
a
1
b
a.
Unfasten the elastic
from the peg on the
canopy hub.
b.
Lift the canopy
fabric up from
between the
canopy hub and
side of the car
seat to access
the post.
c
d
c. Press in on the
tab connecting
the canopy to the
canopy hub.
d.
Lift the canopy post
out of the canopy
hub.
e.
Repeat steps a–d on
the other side.
c
d
c. Slide the canopy
hub out from the
car seat.
d.
Pull the seat pad
down and tuck it
around the side of the
car seat.
e.
Repeat steps a–d on
the other side of the
car seat.
2
a
b
a.
Gently lift up the
side of the seat pad.
b.
Push in on both
tabs on the
canopy hub.
17
16
Turn the Car Seat Over
Locate the buckle’s metal
retainer on the bottom of
the car seat.
Unbuckle the
harness
Press the red
button to release the
buckle tongues.
Rotate the Metal
Retainer and Push it
Up through the Buckle
Slot in the Car Seat
Turn the Car Seat Over
and Pull the Buckle out
of the Car Seat and the
Seat Pad
Failure to place buckle’s metal
retainer completely through pad
and child restraint can result in
serious injury or death. Serious
injury can include paralysis and/or
permanent brain injury.
WARNING
1
1
2
3
2
1
2
3
3
1
2
3
4
Changing the
Buckle Position
Pull the Metal
Retainer
Completely
through the
Seat Pad and
the Car Seat
Check the Buckle
Pull up on the buckle to
make sure it is secured.
The buckle MUST not
pull out.
1
2
3
Insert the Metal
Retainer into the
Slot Closest to
Your Child
The buckle MUST
face out.
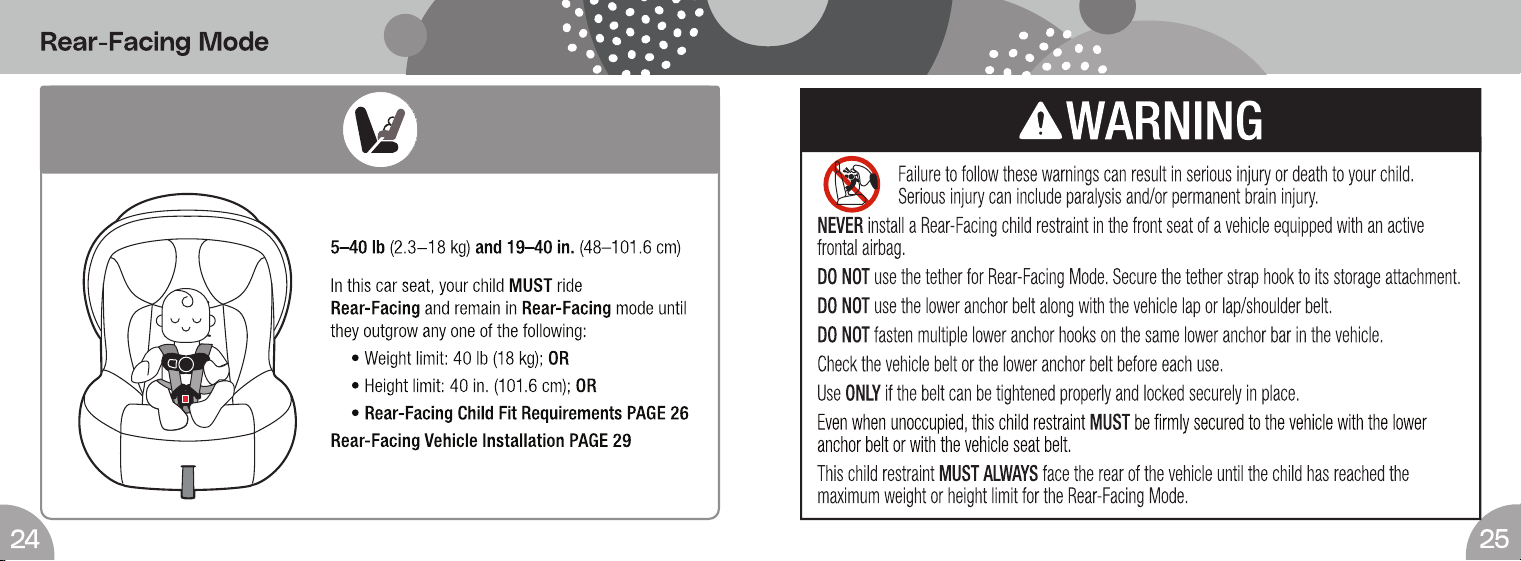
In Rear-Facing mode: You MUST use
the first or second buckle slot.
In Forward-Facing mode: You can
use any slot.
1
2
3
1
2
3
75
6
Check your child’s fit often.
If you cannot achieve a snug harness fit
for your child, see pages 20−23.
To learn how to check harness
tightness, see pages 50−52.
19
18
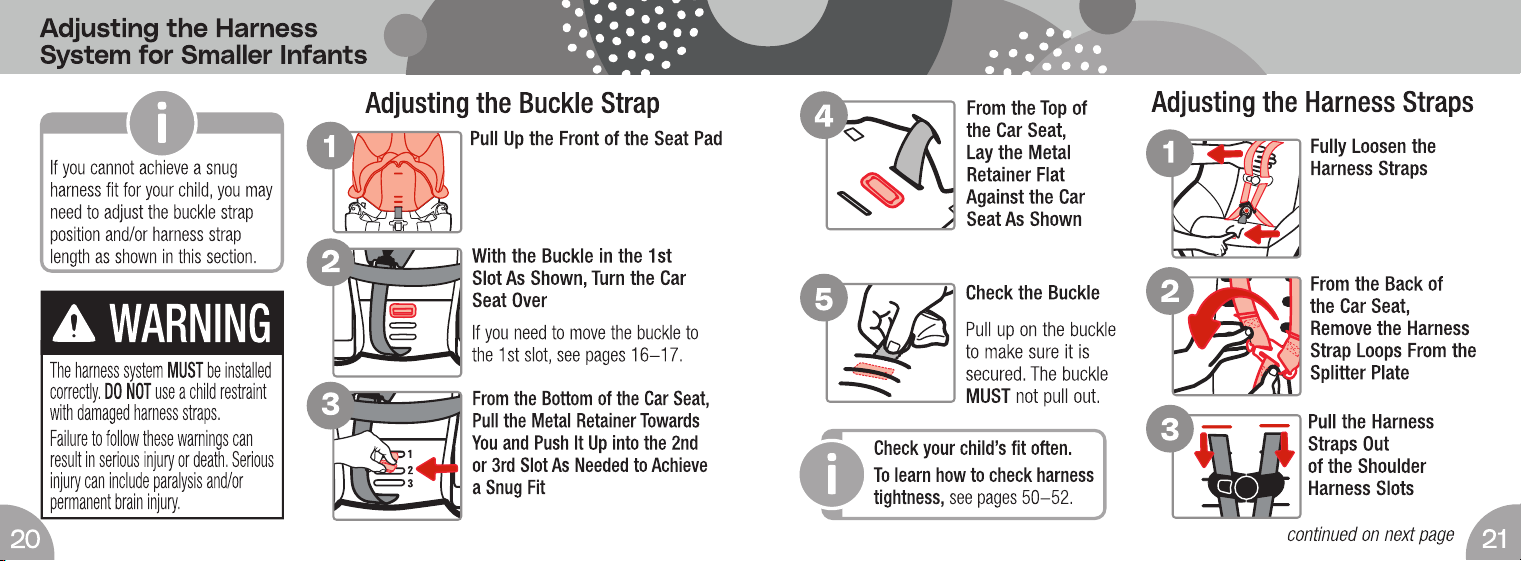
Fully the Loosen
Harness Straps
Push down on the
harness release lever
(through the opening
in the seat pad) while
pulling out on the harness straps as shown.
sewn
end
1
From the Back of
Seat, Remove the
Harness Straps
Loops From the
Splitter Plate
sewn
end
2
Pull the Harness
Straps Out
of the Shoulder
Harness Slots
sewn
end
3
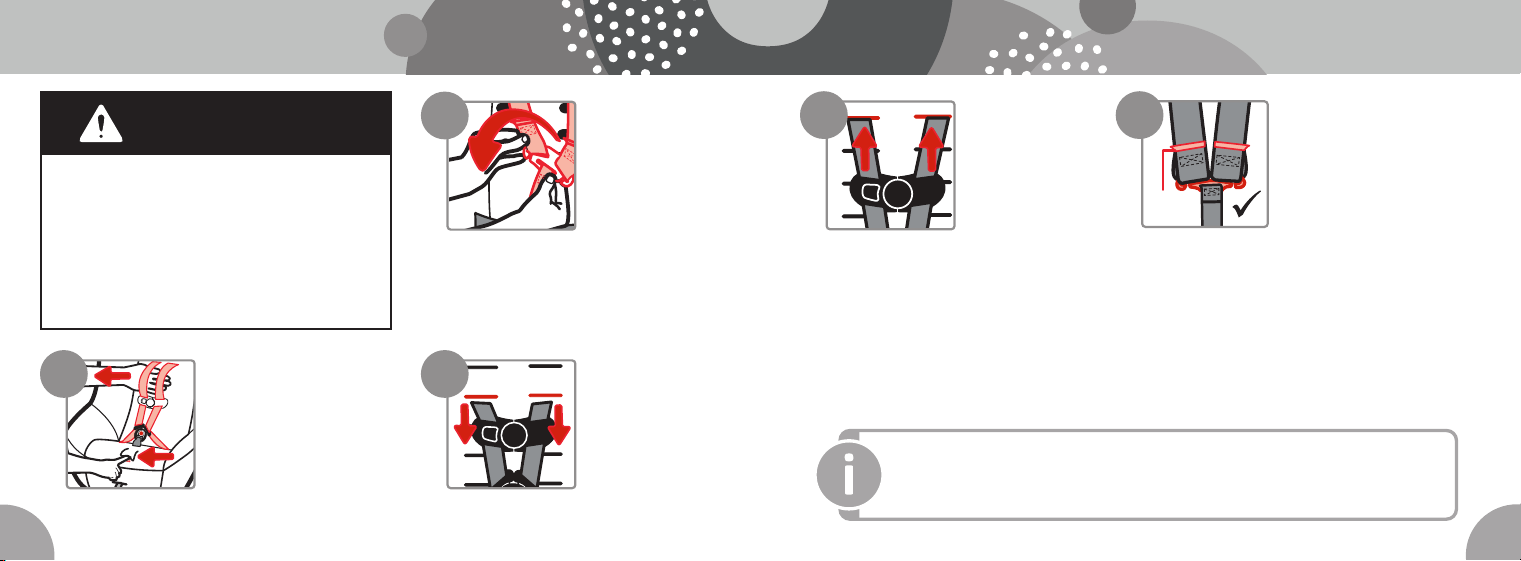
The harness system MUST be installed
correctly. DO NOT use a child restraint
with damaged harness straps.
Failure to follow these warnings can
result in serious injury or death.
Serious injury can include paralysis and/
or permanent brain injury.
WARNING
Changing the Shoulder
Harness Strap Position
Attach the Harness Strap
Loops to the Splitter Plate
The sewn ends of the
harness strap loops MUST
face towards you.
DO NOT twist the harness
straps or the harness adjustment strap.
Make sure the harness strap loops are fitted
completely on both sides of the splitter plate.
Check your child’s fit often.
Make sure the harness height is correct for
your child’s size.
sewn
end
Rethread the
Harness Straps
into the Correct
Shoulder
Harness Slots
For Your Child
For Rear-Facing Child Fit
Requirements, see page 26.
For Forward-Facing Child Fit
Requirements, see page 39.
sewn
end
5
4
If you cannot achieve a snug harness fit for your child, see pages 20−23.
To learn how to check harness tightness, see pages 50−52.
Check the harness straps often for any wear or damage.
27
26
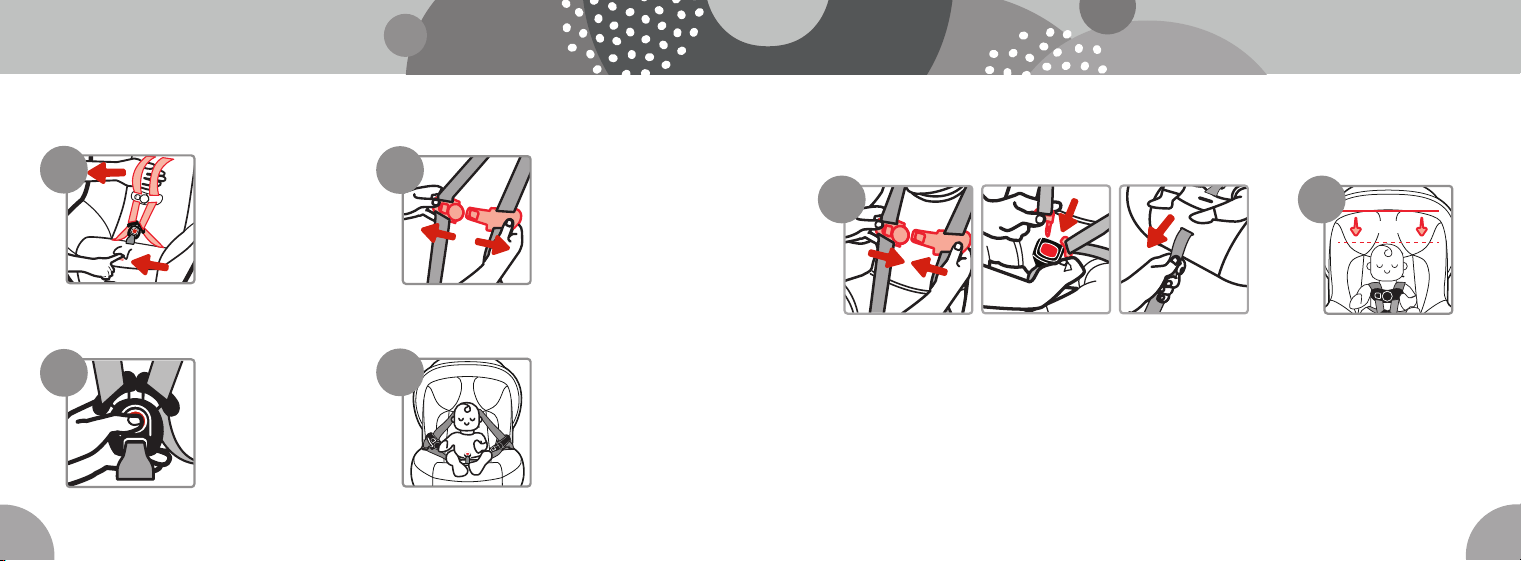
Place Your Child in
the Car Seat
Your child’s bottom and
back should be flat
against the car seat.
Fully Loosen the
Harness Straps
Push down on the
harness release
lever (through the
opening in pad) while pulling out on
the harness straps as shown.
Release the
Chest Clip
While holding both
sides of the chest
clip, press the release
button with your thumb and pull the
chest clip apart.
Unbuckle the
Harness
Press the red button
to release the
buckle tongues.
1
3
4
2
Rear-Facing
Child Fit Requirements
Fasten the Chest Clip and Buckle the Harness
Pull the harness adjustment strap straight out to snugly tighten the
harness. Position the chest clip mid-chest (even with the armpits)
and away from your child’s neck. See Securing Your Child in the
Car Seat on page 50 for details on the chest clip position and
checking harness tightness.
5
1
2
1 in. (2.5 cm)
6
Check the Head
Position
The top of your child’s
head MUST be at least
1 in. (2.5 cm) below the
top of the car seat.
continued on next page
29
28
1
2
1 in. (2.5 cm)
8
Check the Buckle Position
• Use the slot closest to your child.
• The buckle strap should not be
underneath or behind your child.
DO NOT use the third buckle slot in
Rear-Facing mode. To change the
buckle position, see page 16.
1
2
1 in. (2.5 cm)
7
Check the Harness Strap Position
When Rear-Facing, the harness
strap MUST be placed at the
shoulder when possible, or slightly
below; NEVER above.
To change the harness strap
position, see page 18.
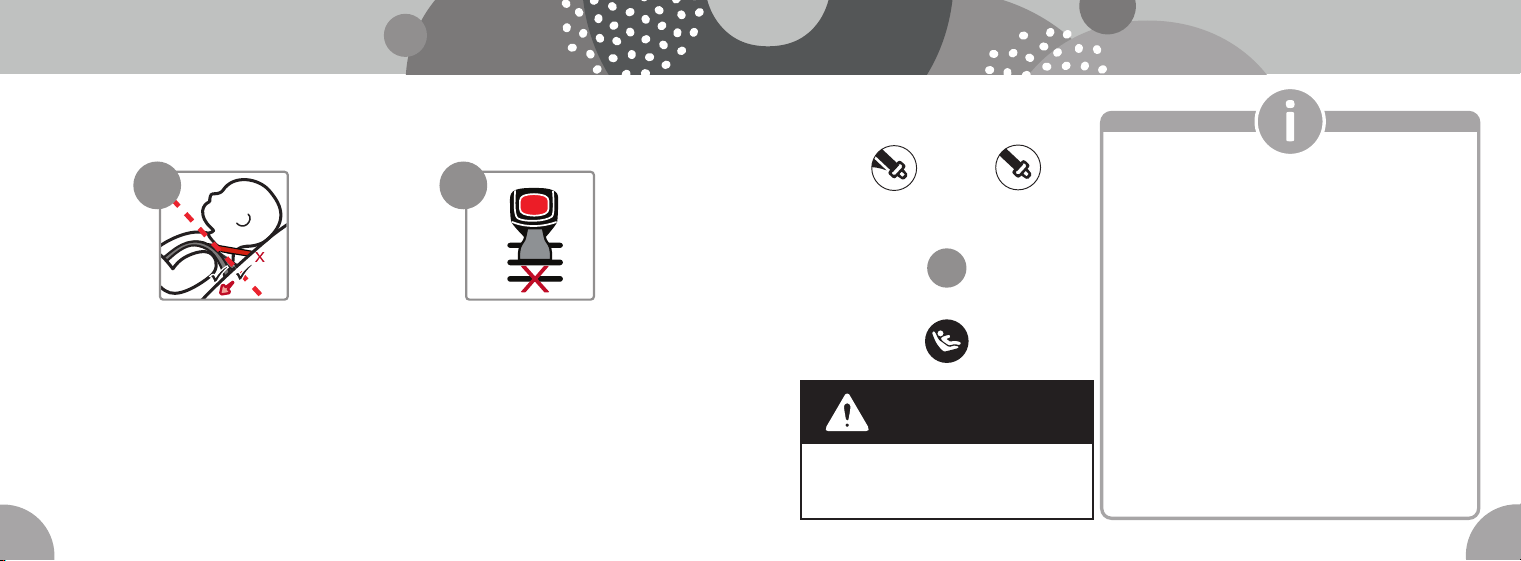
DO NOT use both the LATCH: lower anchor belt
and vehicle belt at the same time to install the
car seat.
WARNING
There are two methods for installing the car
seat in your vehicle. Use only one:
Lap/Shoulder
Belt
Lap Belt
LATCH: Lower Anchor Belt
OR
Before installing the car seat:
• Check the child fit requirements on pages 26–28
and make any necessary adjustments to the shoulder
harness strap position or the buckle position. You can’t
make these adjustments while the seat is installed.
• Review your vehicle owner’s manual to determine the
type of vehicle belts in your car and how to use them
to lock a car seat in place OR to locate the LATCH:
lower anchor seating positions. See also Vehicle Belts
on page 64 and LATCH: Lower Anchor Belt on page 68.
• If you are using a vehicle belt to install the seat, make
sure the lower anchor belt is stored away.
• Make sure the tether strap is properly stored away (see
page 73).
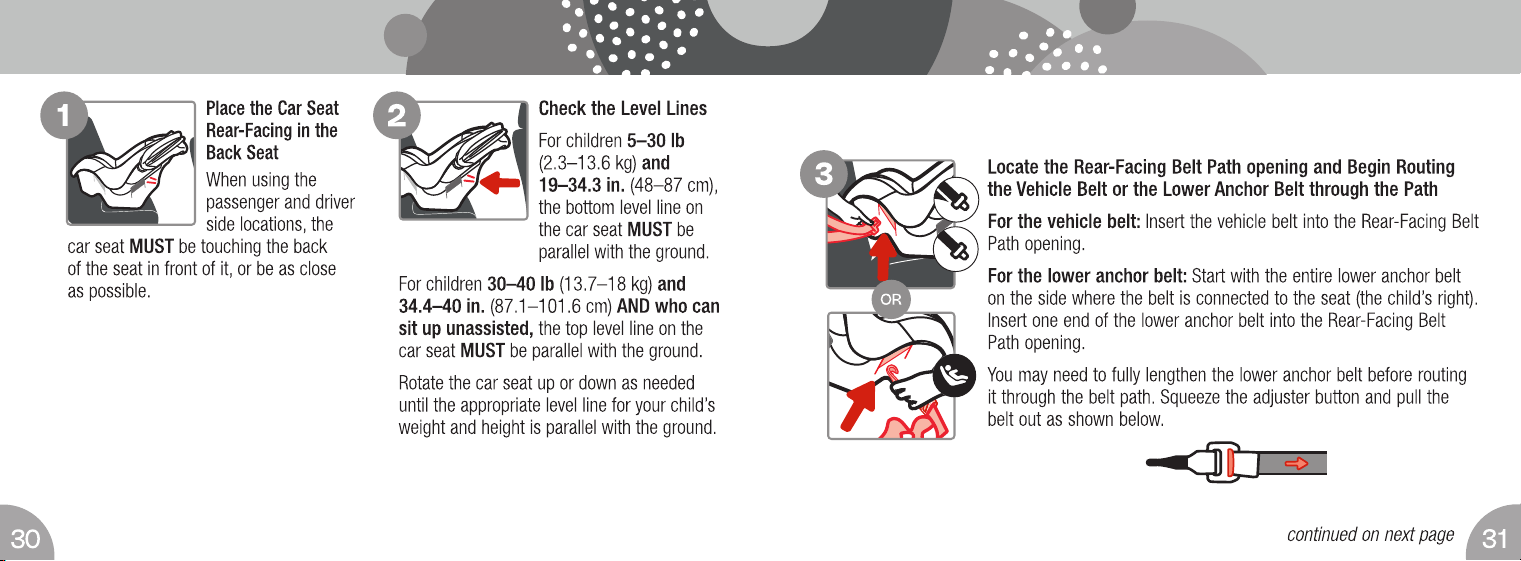
Rear-Facing
Vehicle Installation
continued on next page
1
2
1
2
1
2
1
2
1
2
1
2
1
2
1
2
39
38
Failure to follow these warnings can result in serious injury or death to your child.
Serious injury can include paralysis and/or permanent brain injury.
When anchors are available, you MUST ALWAYS attach, adjust, and secure the
tether (top anchorage) strap when installing the car seat in the Forward-Facing
Mode with internal harness.
DO NOT use the lower anchor belt along with the vehicle lap or lap/shoulder belt.
Check the vehicle belt or the lower anchor belt before each use.
Use ONLY if the belt can be tightened properly and locked securely in place.
DO NOT fasten multiple lower anchor hooks on the same lower anchor bar in the vehicle.
Even when unoccupied, this child restraint MUST be firmly secured to the vehicle
with the lower anchor belt or with the vehicle seat belt.
Before using this car seat in Forward-Facing Mode, your child must have outgrown
the car seat in Rear-Facing Mode.
WARNING
Forward-Facing
Child Fit Requirements
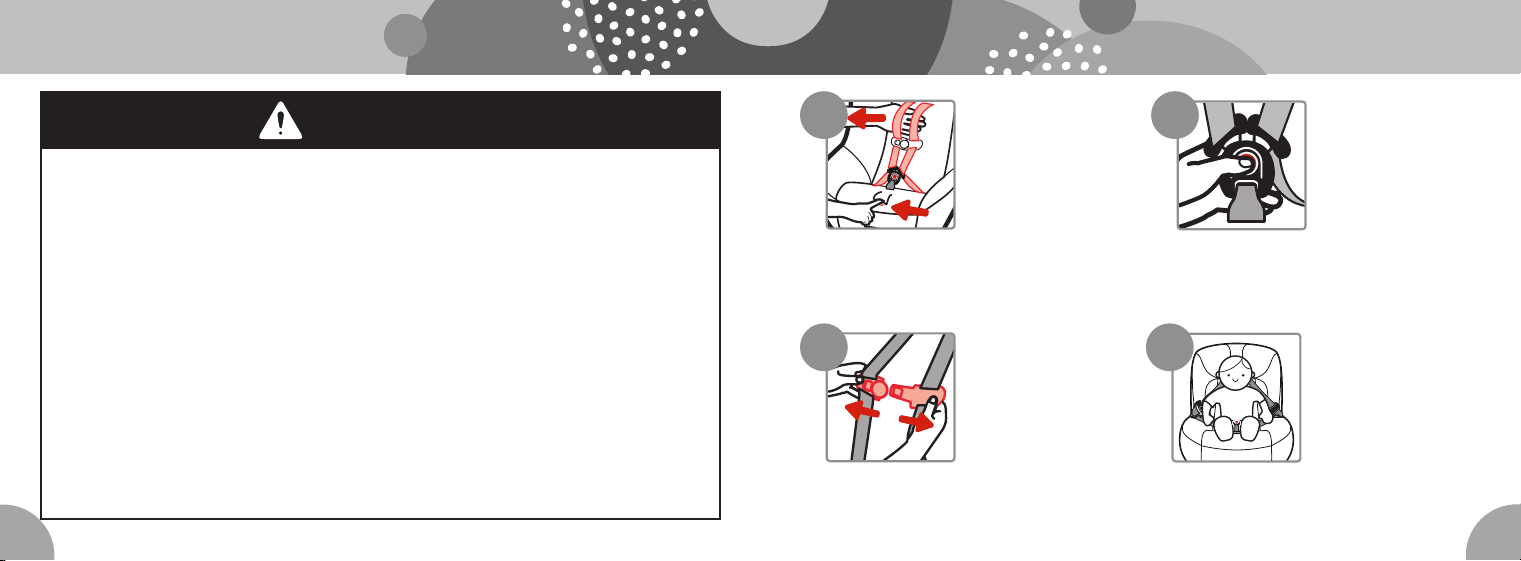
Fully Loosen the
Harness Straps
Push down on the
harness release
lever (through the
opening in pad) while pulling out on
the harness straps as shown.
1
Release the
Chest Clip
While holding both
sides of the chest
clip, press the
release button with your thumb and
pull the chest clip apart.
3
Place Your Child in
the Car Seat
Your child’s bottom
and back should
be flat against the
car seat.
4
Unbuckle the
Harness
Press the red button
to release the
buckle tongues.
2
continued on next page
41
40
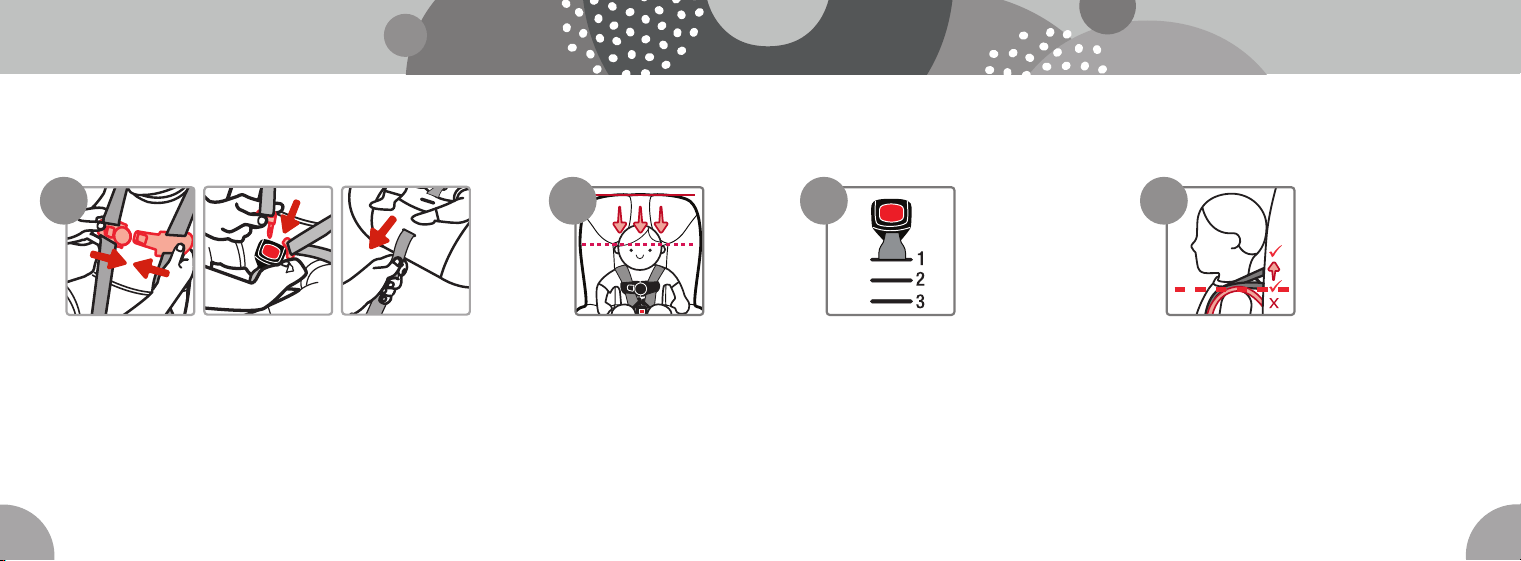
Check the
Head Position
The top of your child’s
ears MUST be below
the top of the car seat.
6
Check the Harness
Strap Position
When Forward-Facing,
the harness strap
MUST be placed at the
shoulder when possible,
or slightly above; NEVER
below.
To change the harness
strap position, see
page 18.
8
Check the Buckle
Position
• Use the slot closest
to your child.
• The buckle strap
should not be
underneath or
behind your child.
The buckle can be use in any buckle slot.
To change the buckle position, see page 16.
7
Fasten the Chest Clip and Buckle the Harness
Pull the harness adjustment strap straight out to snugly tighten the
harness. Position the chest clip mid-chest (even with the armpits)
and away from your child’s neck. See Securing Your Child in the
Car Seat on page 50 for details on the chest clip position and
checking harness tightness.
5
43
42
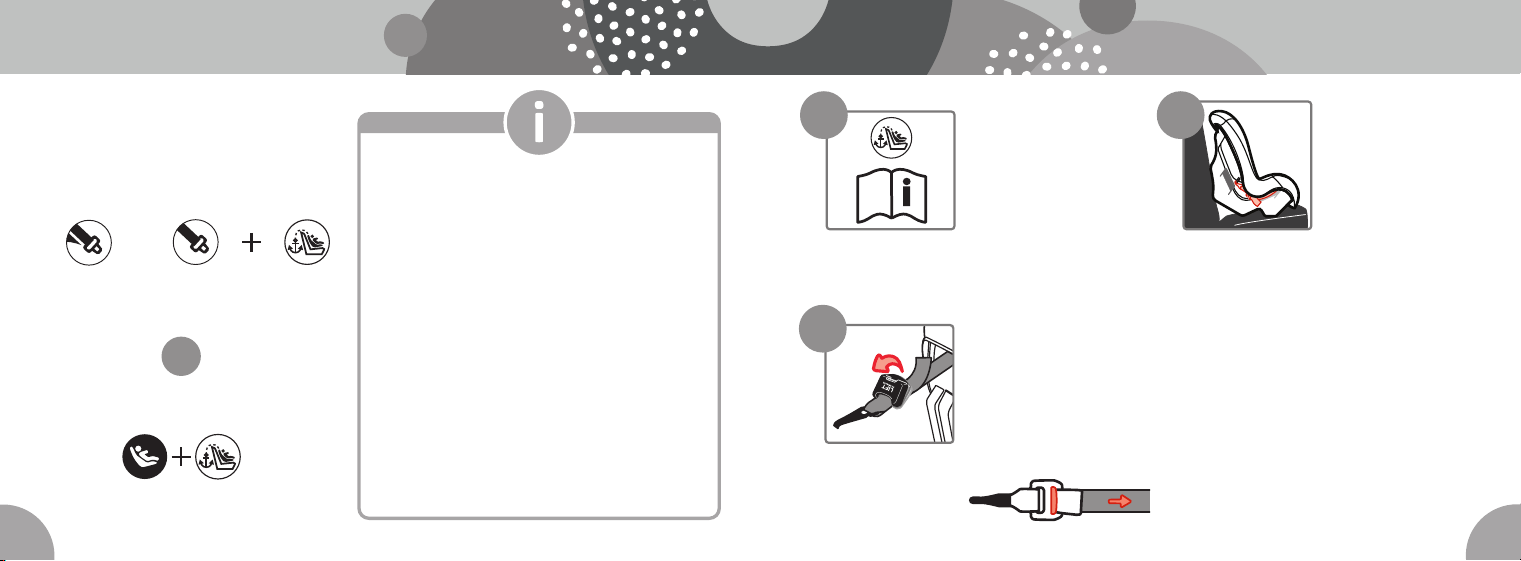
Before installing the car seat:
• Check the child fit requirements on pages 39–41
and make any necessary adjustments to the shoulder
harness strap position or the buckle position. You can’t
make these adjustments while the seat is installed.
• Review your vehicle owner’s manual to determine the
type of vehicle belts in your car and how to use them to
lock a car seat in place OR to locate the LATCH: lower
anchor seating positions. See also Vehicle Belts on page
64 and LATCH: Lower Anchor Belt on page 68.
• If you are using a vehicle belt to install the seat, make
sure the lower anchor belt is stored away.
• If you are using the lower anchor belt to install the seat,
remove it from the storage location if necessary (see
LATCH: Lower Anchor Belt on page 69).
There are two methods for installing the
car seat in your vehicle. Use only one:
Vehicle Belt + Tether
LATCH: Lower Anchor Belt + Tether
OR
Lap/Shoulder
Belt
Lap Belt
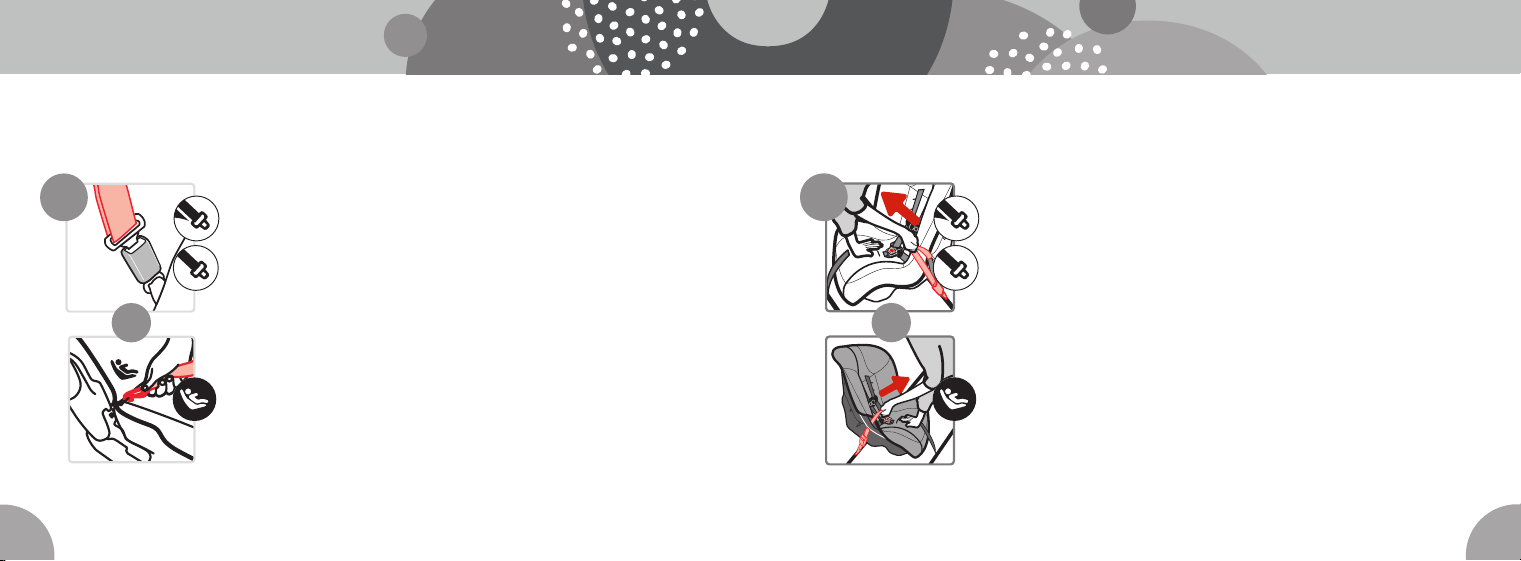
Place the Car Seat
Forward-Facing
Flush Against
Vehicle Seat Back
The vehicle seat back
MUST be in the upright
position, but you can adjust the angle
slightly to better match the angle of the car
seat. Refer to the vehicle owner’s manual
for how to adjust the vehicle seat back.
3
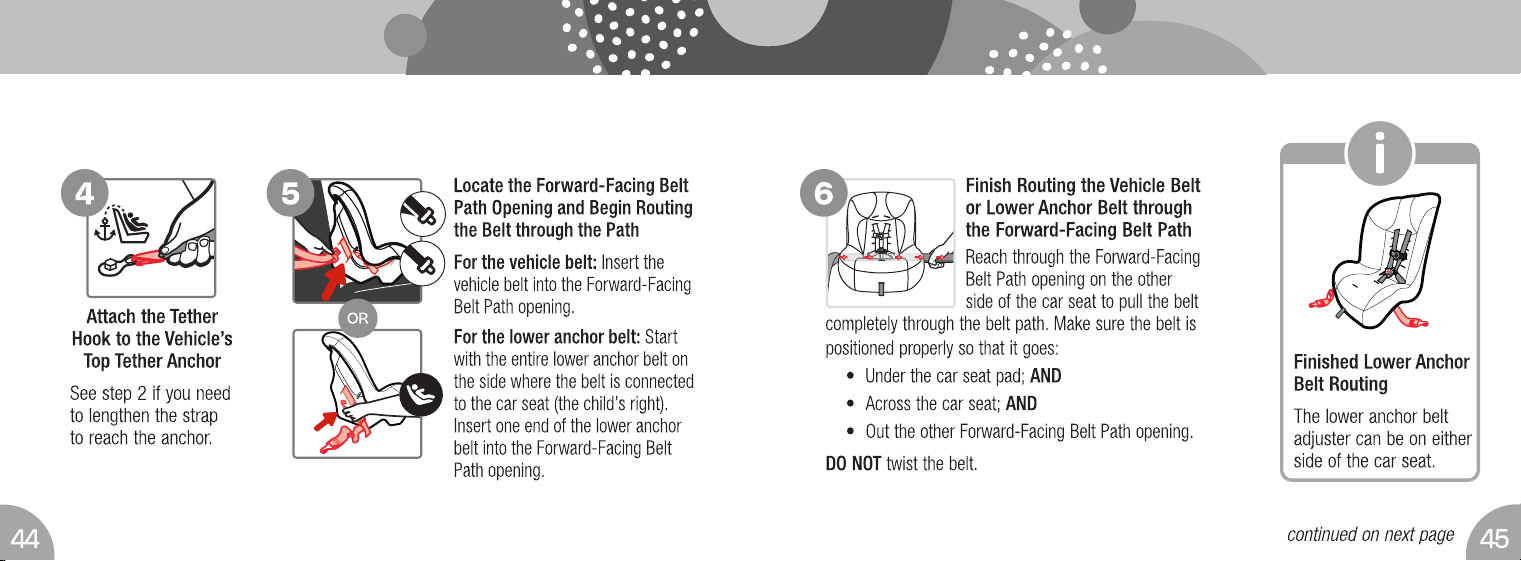
Loosen the Tether Strap
Lift the tether adjuster to
loosen the strap. Or, if your
car seat has an adjuster with
a button, then squeeze the
adjuster button and pull the
strap to loosen it as shown.
Locate the Vehicle Top
Tether Anchors
Review your vehicle
owner’s manual for top
tether anchor locations
and how to route the
tether strap when there
are vehicle headrests.
1
2
Forward-Facing
Vehicle Installation
continued on next page
1
2
47
46
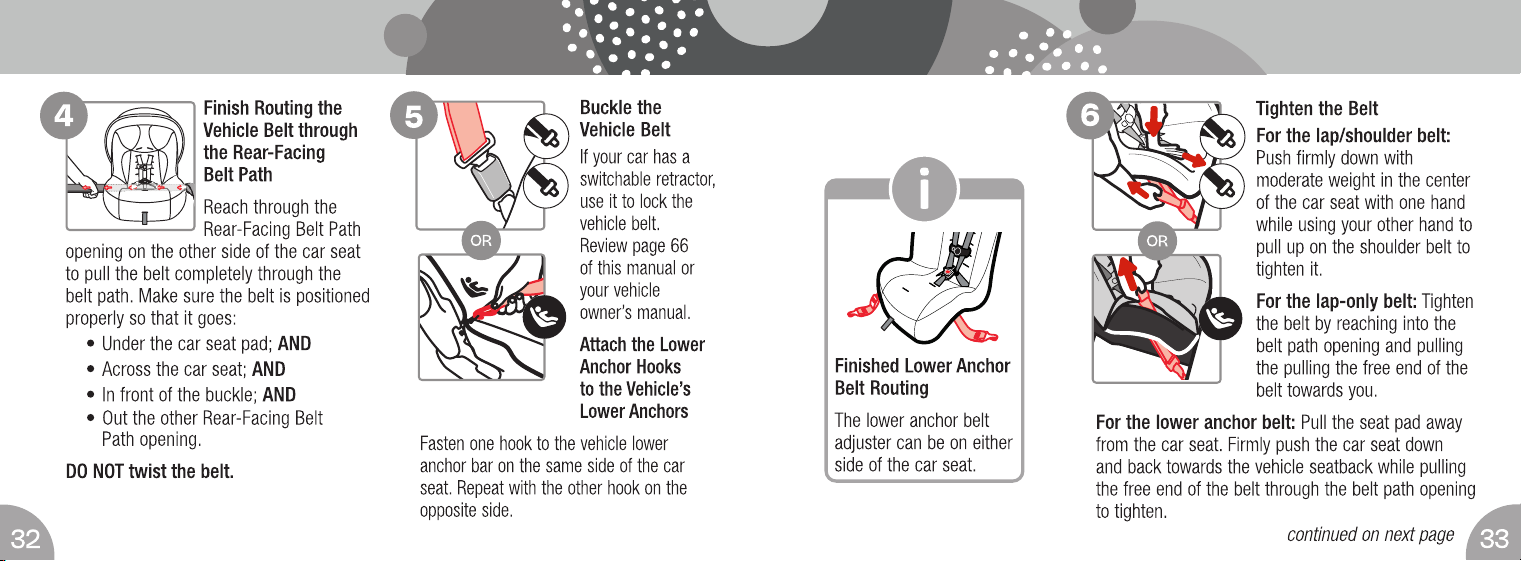
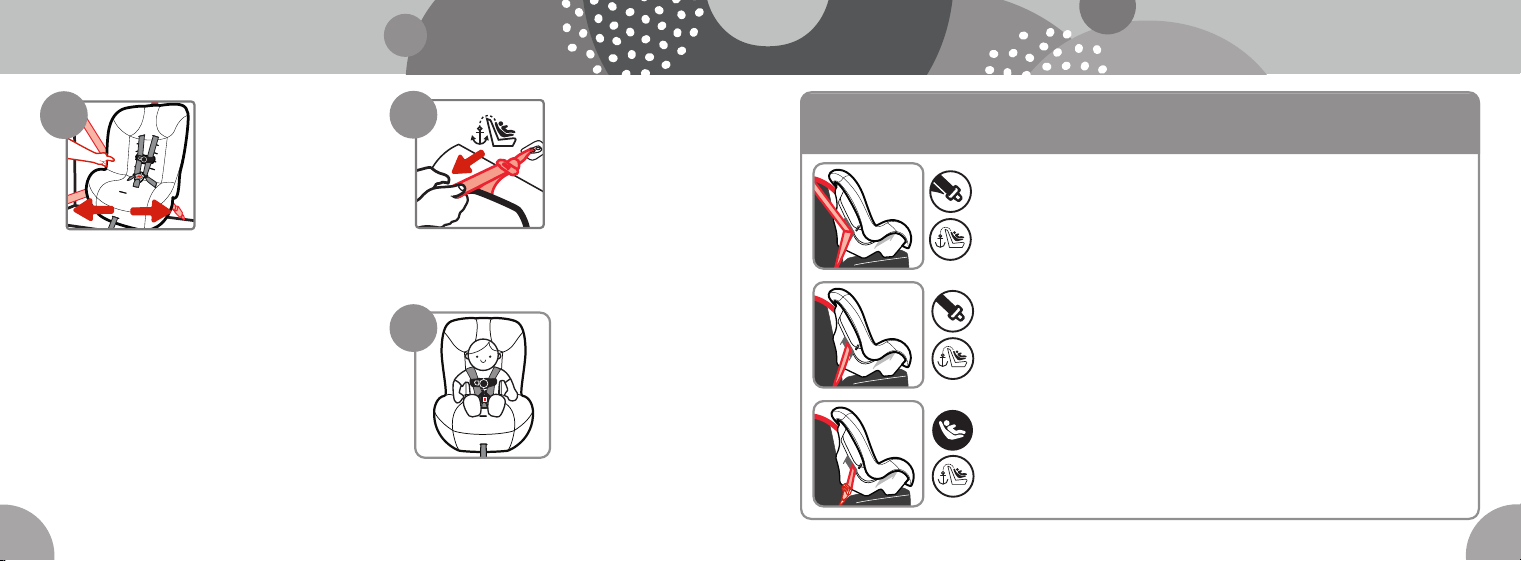
Tighten the Belt
For the lap/shoulder belt: Push firmly down with moderate weight in
the center of the car seat with one hand while using your other hand
to pull up on the shoulder belt to tighten it.
For the lap-only belt: Tighten the belt by reaching into the belt path
opening and pulling the pulling the free end of the belt towards you.
For the lower anchor belt: Pull back the seat pad away from the
car seat. Firmly push the car seat down and back towards the vehicle
seatback while pulling the free end of the belt through the belt path
opening to tighten.
8
OR
Buckle the Vehicle Belt
If your car has a switchable retractor, use it to lock the vehicle belt.
Review page 66 of this manual or your vehicle owner’s manual.
Attach the Lower Anchor Hooks to the Vehicle’s Lower Anchors
Fasten one hook to the vehicle lower anchor bar on the same side of
the car seat. Repeat with the other hook on the opposite side.
1
2
7
1
2
OR
continued on next page
49
48
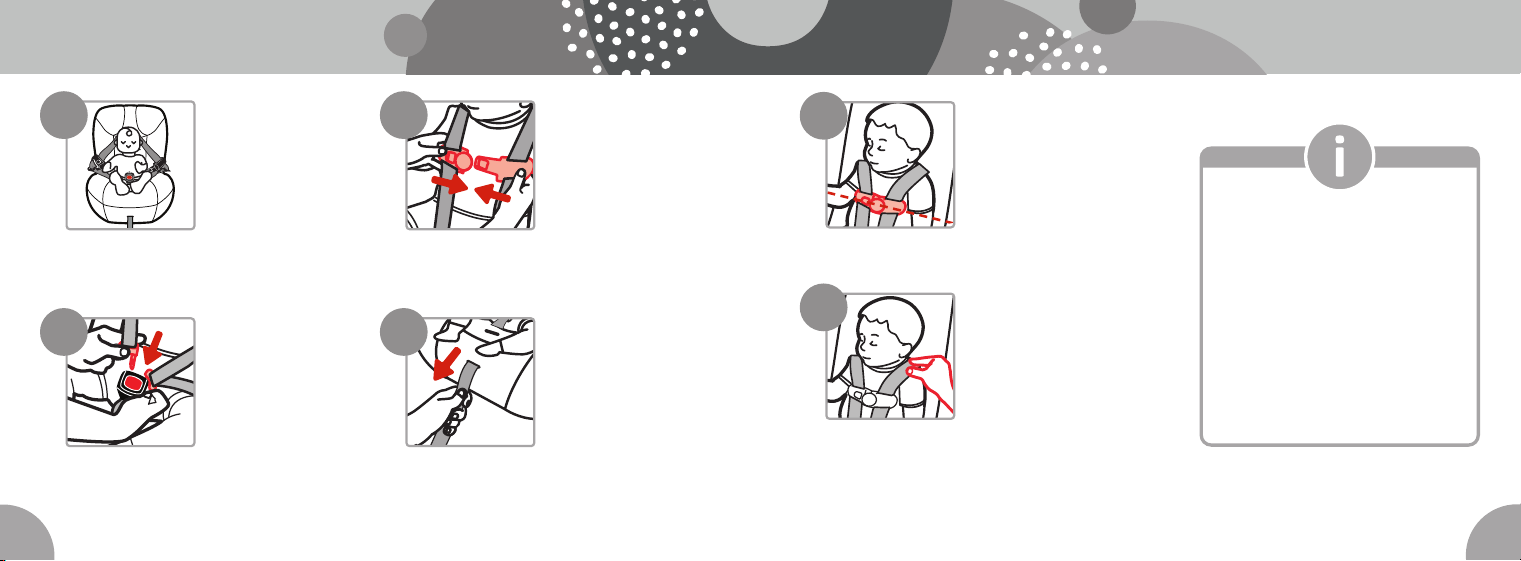
Tighten the Tether
Push firmly on the back
of the car seat and pull
the free end of the tether
strap to remove all
the slack.
Secure Your Child in
the Car Seat
For complete details
on properly securing
your child in the car
seat, including how
to position the chest
clip and check for harness tightness, see
pages 50−52.
10
11
FINISHED!
•
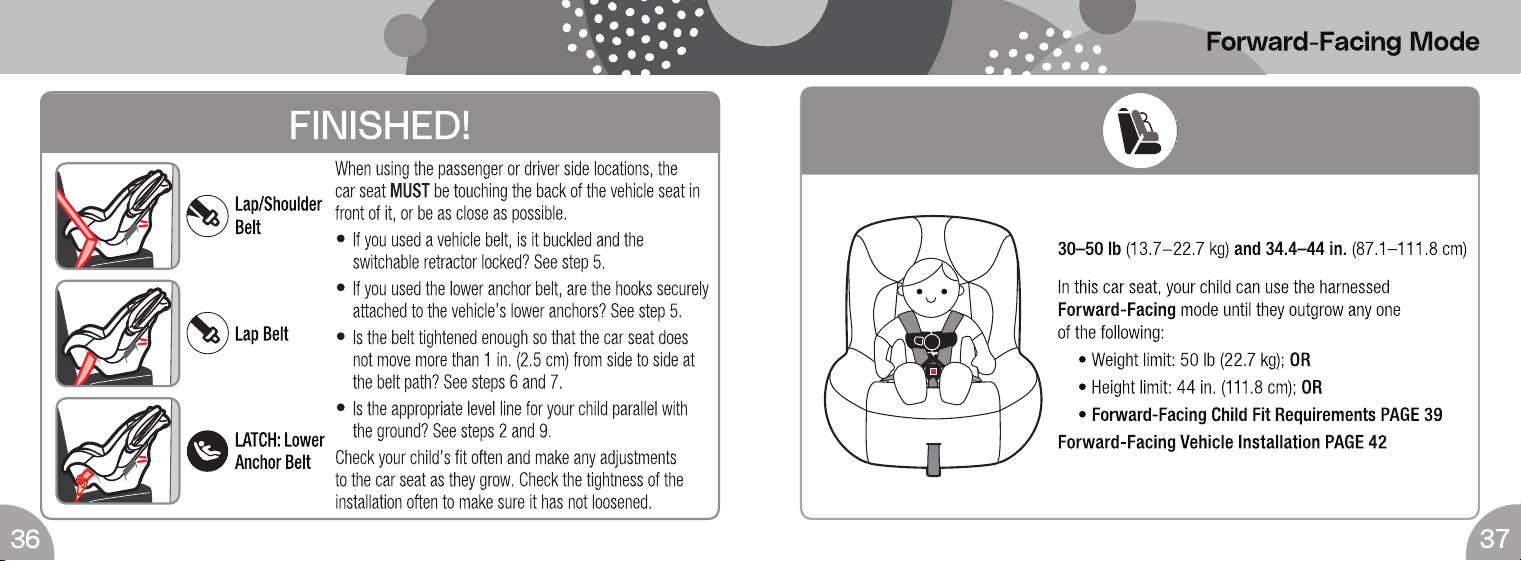
If you used a vehicle belt, is it buckled and is
the switchable retractor locked? See step 7.
•
If you used the lower anchor belt, are the
hooks securely attached to the vehicle’s lower
anchors? See step 7.
•
Is the belt tightened enough so that the car seat
does not move more than 1 in. (2.5 cm) from
side to side at the belt path? See steps 8 and 9.
•
Has the tether been installed and tightened?
See steps 4 and 10.
Check your child’s fit often and make any
adjustments to the car seat as they grow. Check
the tightness of the installation often to make sure
it has not loosened.
Lap/Shoulder Belt + Tether
Lap Belt + Tether
LATCH: Lower Anchor Belt + Tether
Check the Belt
Tightness
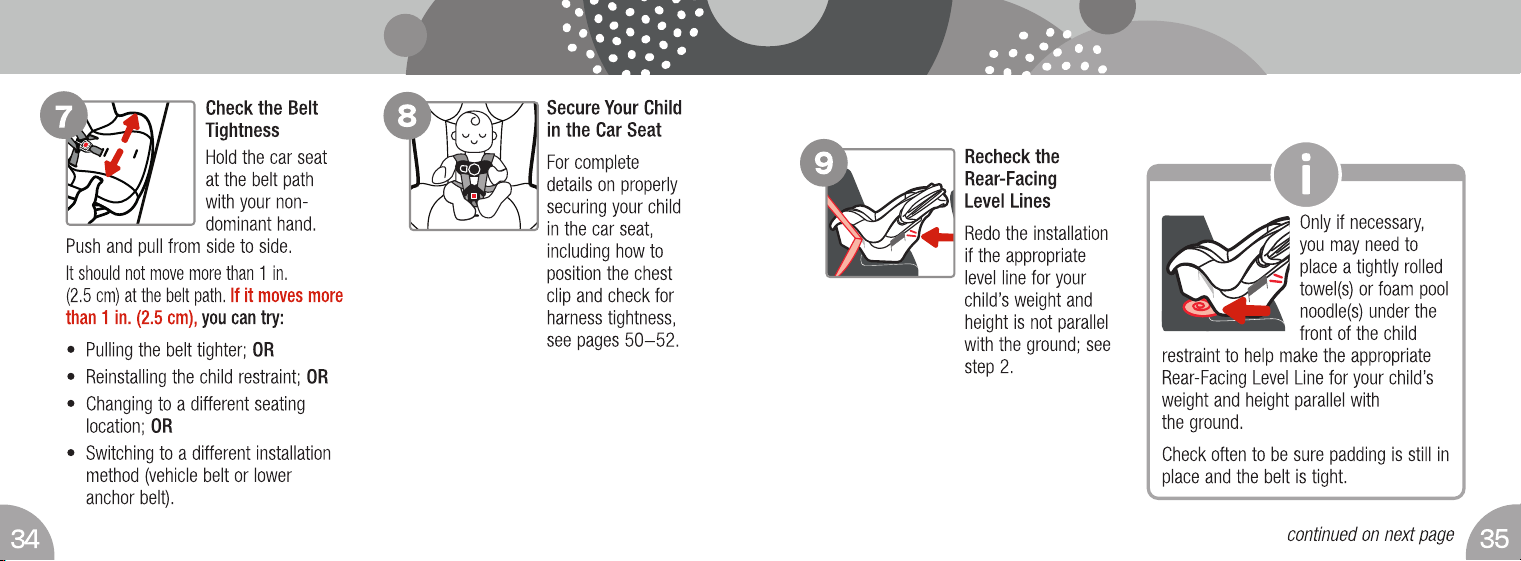
Hold the car seat at
the belt path with your
non-dominant hand.
Push and pull from side
to side. It should not move more than
1 in. (2.5 cm) at the belt path.
If it moves more than 1 in. (2.5 cm),
you can try:
• Putting your knee in the seat and pulling
the belt tighter; OR
• Reinstalling the child restraint; OR
• Changing to a different seating location; OR
• Switching to a different installation
method (vehicle belt or lower
anchor belt).
9
51
50
Place Your Child in
the Car Seat
Your child’s bottom
and back should be
flat against the
car seat.
Buckle
the Harness
Push the buckle
tongues into the buckle
until they click. Pull up
on the harness strap to
make sure the buckle
is locked.
Fasten the
Chest Clip
Insert the right half
of the chest clip into
the left half and snap
them together.
Tighten the Harness
Pull the harness
adjustment strap
straight out to snugly
tighten the harness.
1 3
4
2
Position the Chest Clip
Slide the chest clip up
the harness straps and
position it at mid-chest
(even with the armpits)
and away from your
child’s neck.
Check the Harness
Tightness
Try to pinch the harness
at the shoulders vertically
between index finger and
thumb as shown.
If your fingers slip off, the harness is tight
enough. If you can pinch the harness strap,
tighten more.
5
6
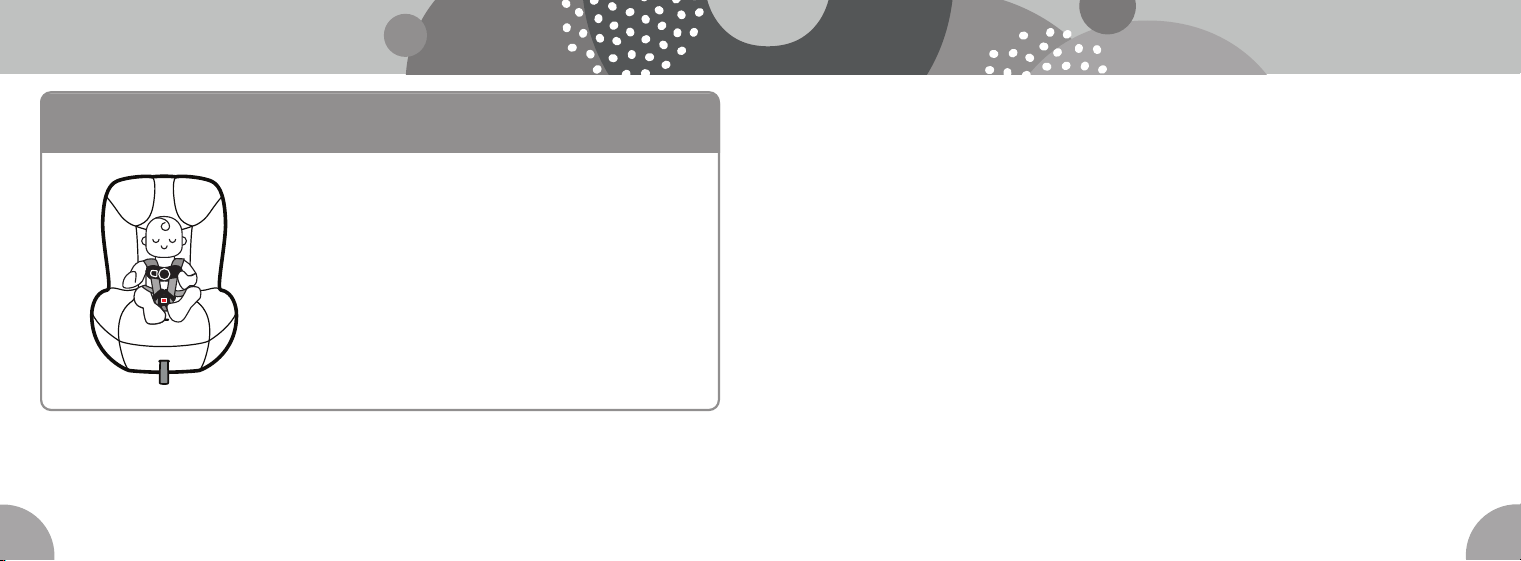
The harness strap should be snug
throughout its length. A snug strap
should not allow any slack. It lies
in a relatively straight line without
sagging. It does not press on the
child’s flesh or push the child’s
body into an unnatural position. If
one side of the harness is tighter
than the other, lengthen the tighter
side by pulling up the harness near
the hip slot.
Securing Your Child
in the Car Seat
continued on next page
53
52
Troubleshooting
If the buckle or harness release lever sticks:
DO NOT lubricate. Check for dropped food, sticky spilled drinks, dirt, leaves, etc. Clean with
warm water and/or remove the object with tweezers. If you cannot get the harness to adjust
and remain tight with the buckle securely locked, DO NOT use this car seat.
If your harness twists:
Straighten the harness each time you put your child in the car seat. When you remove your
child from the seat, lock the buckle and tighten the harness so it will be ready for next use.
1. Loosen the harness strap.
2. Unbuckle the harness.
3. Release the chest clip.
4. Remove your child.
To Remove Your Child from Car Seat:
FINISHED!
Your child is now secured in the car seat.
Check your child’s fit often and make any needed
adjustments to the car seat as they grow.
continued on next page
55
54
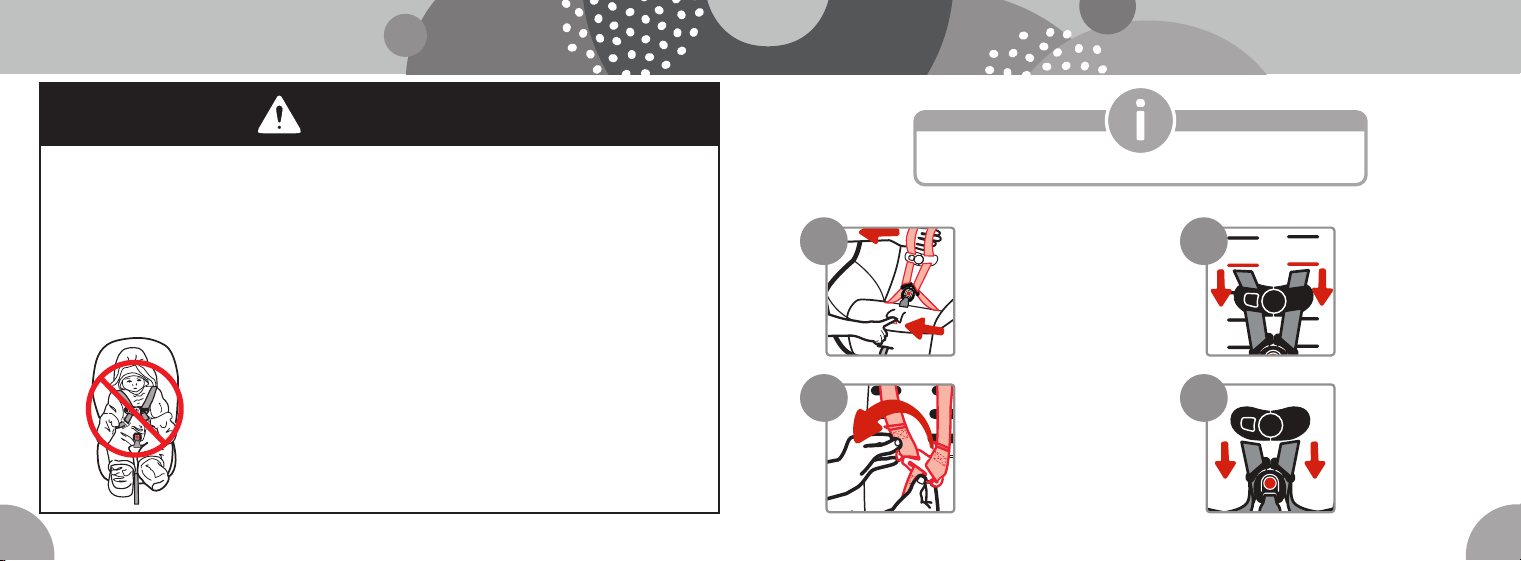
Failure to fasten and tighten the harness system correctly may allow
the child to be ejected from the child restraint in a crash or sudden stop
causing serious injury or death. Serious injury can include paralysis and/
or permanent brain injury.
DO NOT mistake comfort for safety. Harness system must be
snugly adjusted.
DO NOT put snowsuits or bulky garments on your child
when placing them in the child restraint.
Bulky clothing can prevent the harness straps from
being tightened properly.
WARNING
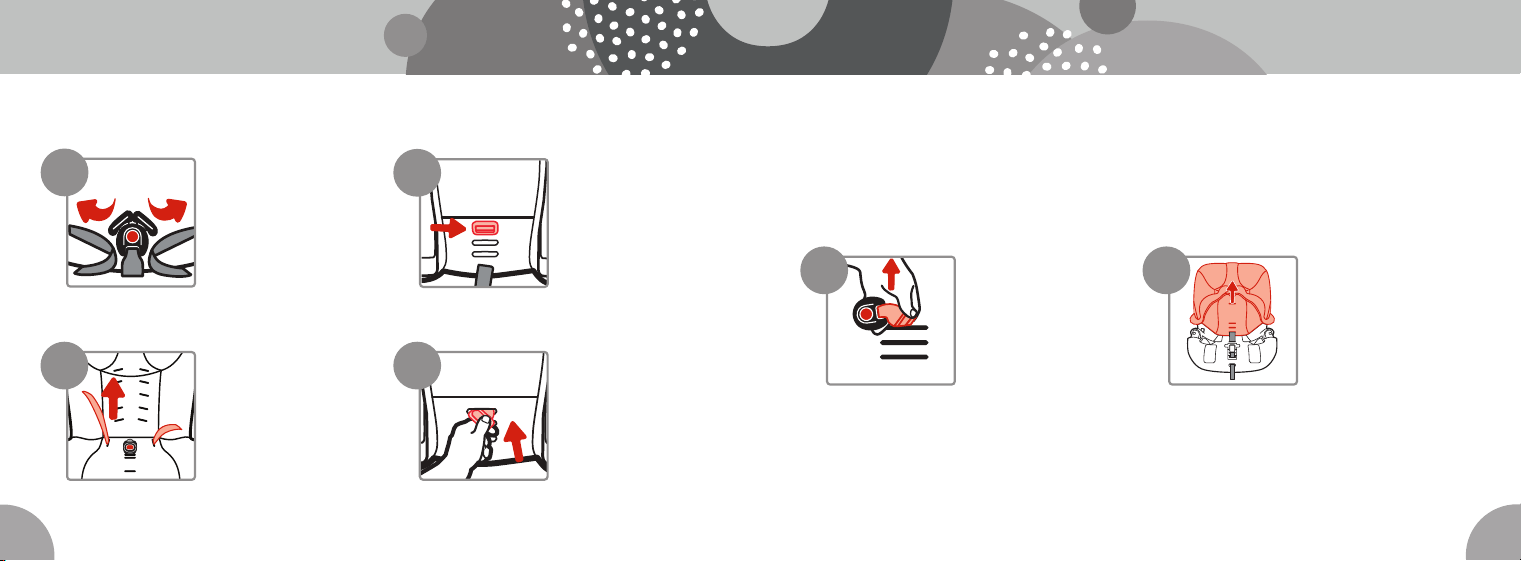
From the back of the
Car Seat, Remove the
Harness Strap Loops
from the Splitter Plate
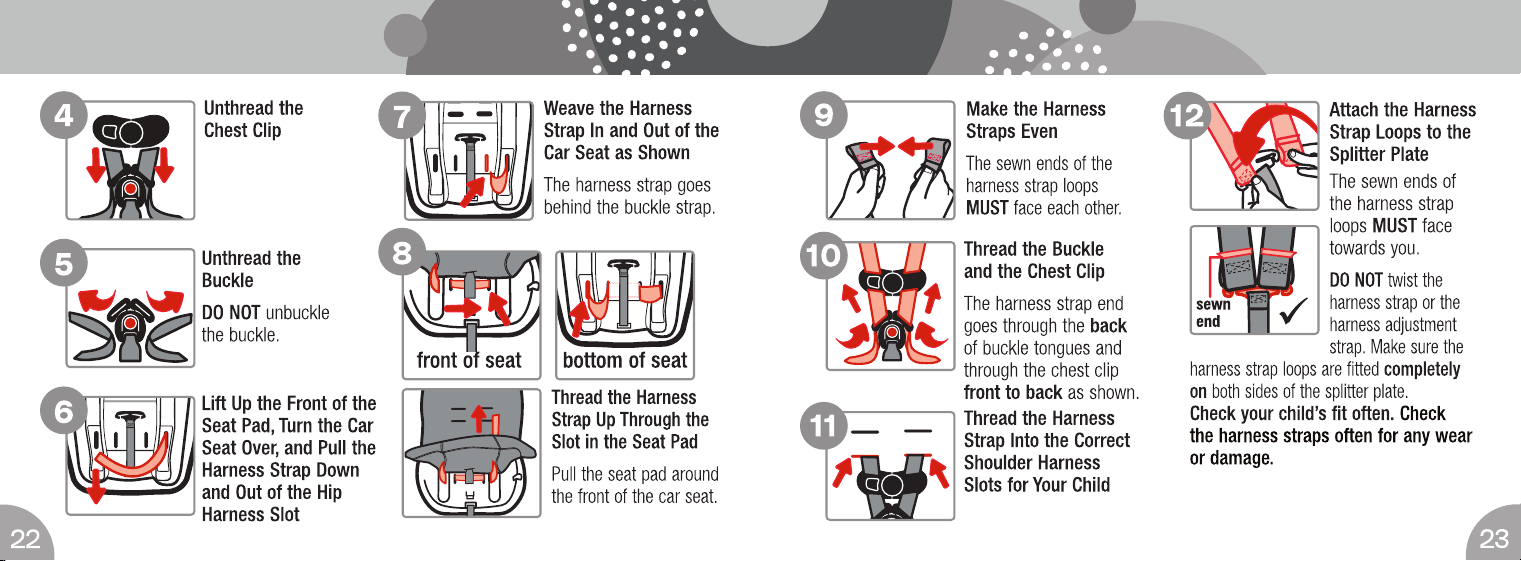
Unthread the
Chest Clip
Pull the Harness
Strap Out of
the Shoulder
Harness Slots
Fully Loosen the
Harness Straps
1
sewn
end
3
sewn
end
4
sewn
end
2
Only remove the harness system to clean the seat pad.
Removing the Harness
System and Seat Pad
continued on next page
57
56
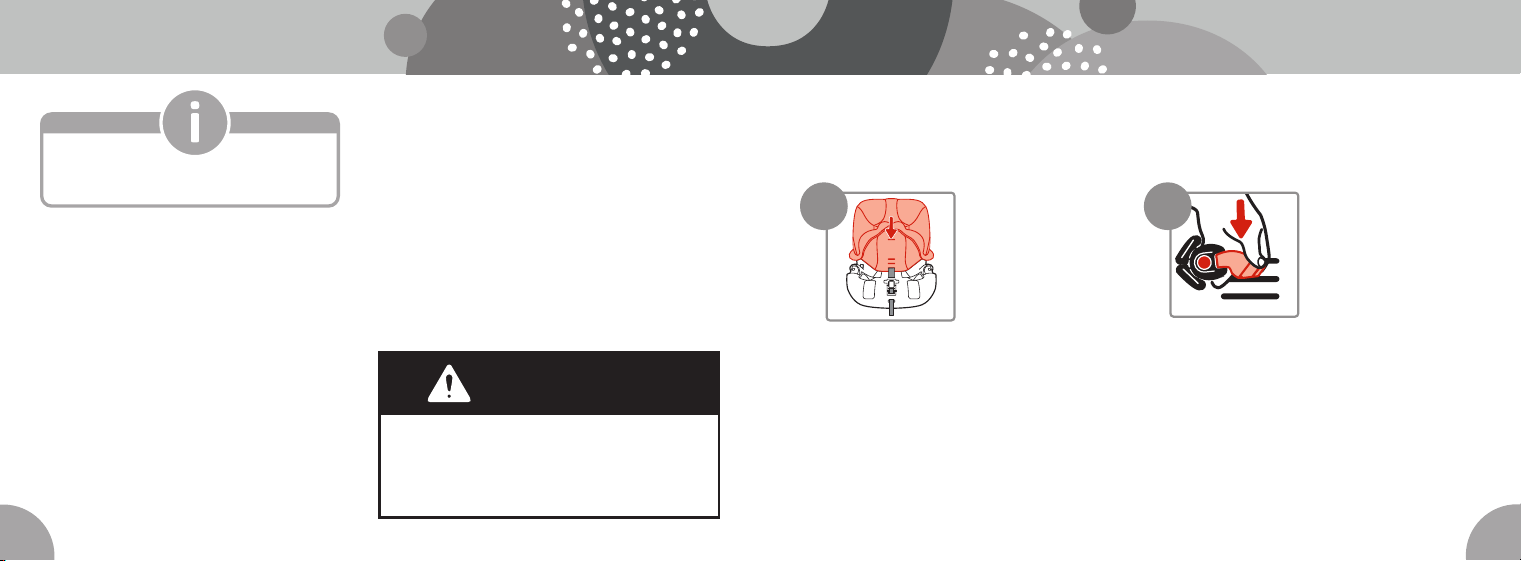
Pull the Harness
Strap Out of the
Car Seat
Turn the Car
Seat Over
Locate the buckle’s
metal retainer on
bottom of the car seat.
Unthread
the Buckle
DO NOT unbuckle
the buckle.
sewn
end
5
sewn
end
7
sewn
end
6
Rotate the Metal
Retainer and Push It
Up Through the Car
Seat and Seat Pad
sewn
end
8
From the Top of the
Car Seat, Pull the
Buckle Out
sewn
end
9 10
Remove the Seat Pad
Pull the seat pad off the
bottom of the car seat
and then gently lift it up
to remove it.
59
58
To clean the seat pad:
Machine wash separately with cold water on
a gentle cycle. DO NOT use bleach. Tumble
dry separately for 10−12 minutes on low heat.
Remove immediately.
To clean the harness strap:
Check the harness straps often for any wear
or damage.
Spot clean using warm sudsy water and damp
cloth. Spilled food and liquids on the child restraint
may result in mold or bacterial growth over time.
These spills could also attract insects or rodents.
To clean the buckle and the car seat:
Spot clean using warm sudsy water and a damp
cloth. DO NOT submerge into water. The cup holder is
dishwasher-safe.
To clean the canopy:
Hand wash only using warm sudsy water. Line dry.
DO NOT use child restraint without the seat pad or
with damaged harness straps. Failure to do this can
result in serious injury or death. Serious injury can
include paralysis and/or permanent brain injury.
WARNING
You MUST remove the harness system to remove
the seat pad for cleaning. See pages 55−57.
Replace the
Seat Pad
Pull the seat pad over
the car seat. Pull the
harness adjustment
strap through the slot
in the seat pad. Wrap the seat pad around
the top of the car seat.
1
Insert the Buckle’s
Metal Retainer
into the Slot Closest
to Your Child
The buckle MUST
face out.
For Rear-Facing Mode: You MUST use
the first or second buckle slots closest to
the back of the car seat.
For Forward-Facing Mode: You can use
any of the three slots.
sewn
end
1
2
3
2
Cleaning the Seat Pad
and Parts of the Car Seat
Installing the Seat Pad
and Harness System
continued on next page
61
60
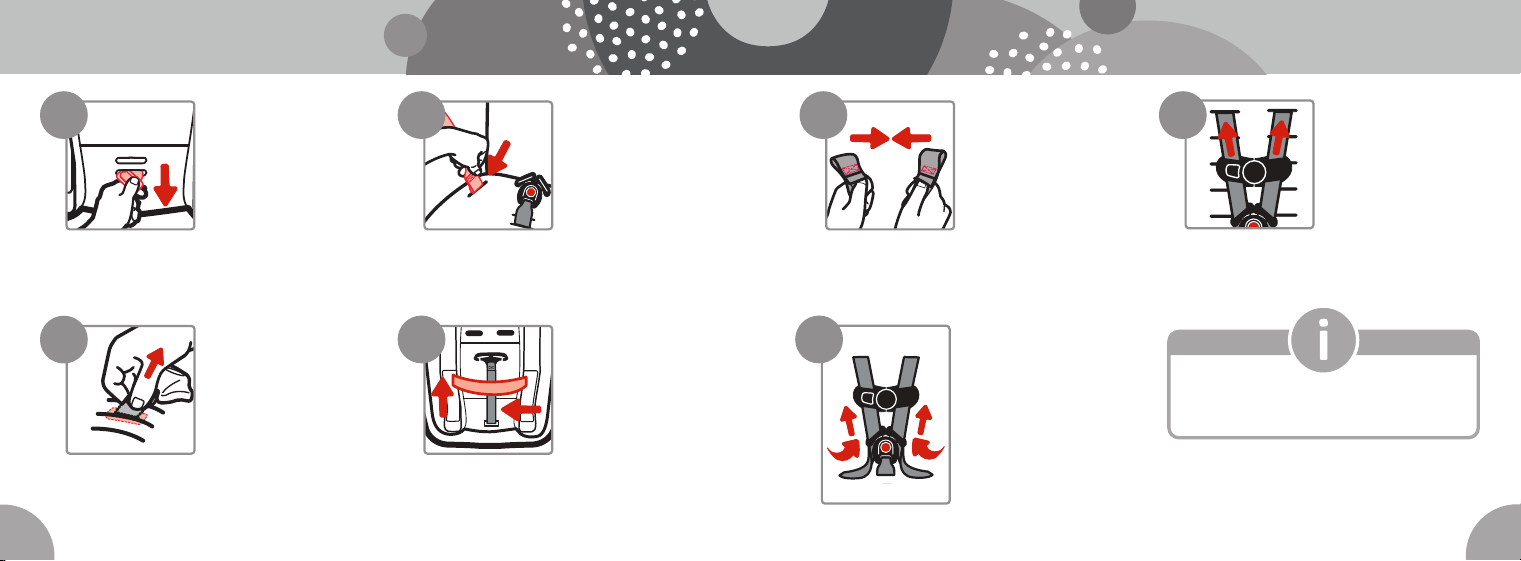
Check the Buckle
Pull up on the buckle
to make sure it
is secured.
The buckle MUST not
pull out.
Pull the Metal
Retainer Completely
through the Seat Pad
and Car Seat
Rethread the
Harness Strap
With the sewn end
of the harness
strap loop facing
the buckle, thread
the harness strap down through the hip
harness slot.
sewn
end
1
2
3
4
sewn
end
1
2
3
3
sewn
end
1
2
3
5
Make Sure the
Harness Straps
Are Even
The sewn ends
of the harness strap
loops MUST face
each other.
Pull the Harness
Strap Across the
Bottom of the
Car Seat
The harness strap
MUST lay in front of
the harness adjustment strap as shown.
Push the harness strap up through the
other hip harness slot.
Thread the Buckle
and Chest Clip
The harness strap ends
go through the back
of buckle tongues and
through the chest clip
front to back as shown.
sewn
end
1
2
3
8
sewn
end
1
2
3
6
sewn
end
1
2
3
7
Thread the Harness
Straps Into the
Correct Shoulder
Harness Slots For
Your Child
sewn
end
1
2
3
9
For Rear-Facing Child Fit, see page 26.
For Forward-Facing Child Fit, see page 39.
continued on next page
63
62
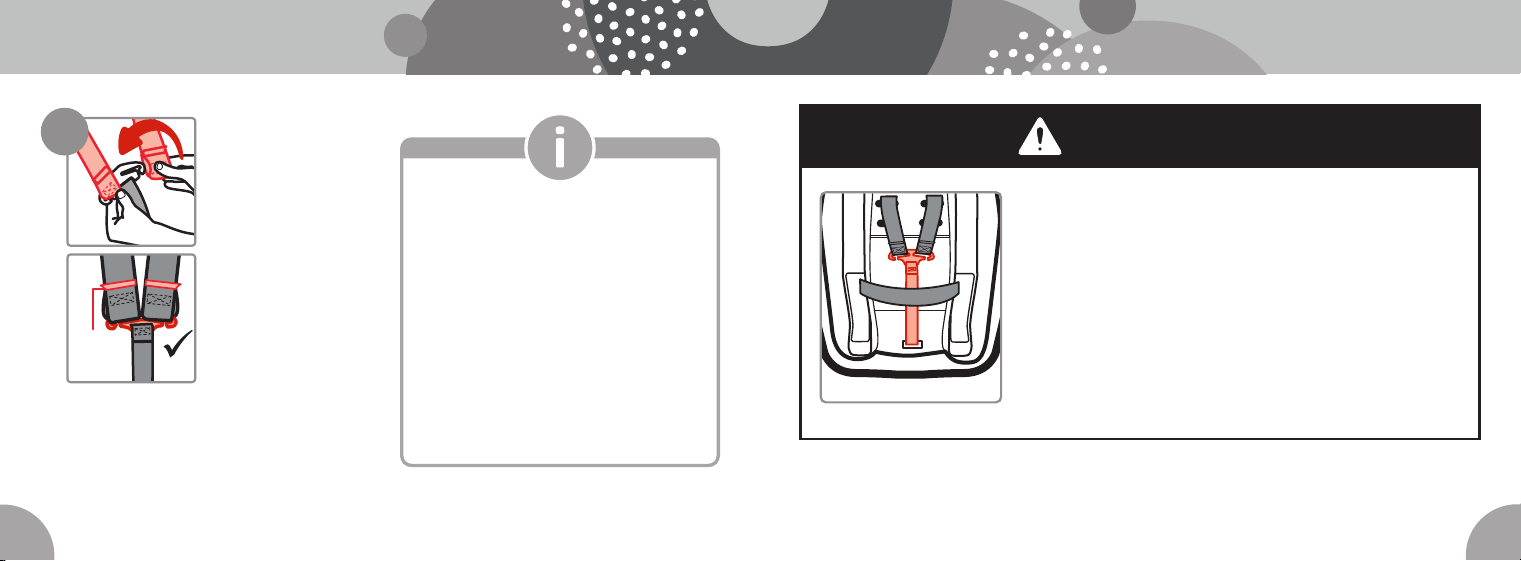
Attach the Harness
Strap Loops to the
Splitter Plate
The sewn ends of
the harness strap
loops MUST face
towards you.
DO NOT twist the
harness strap
or the harness
adjustment strap.
Make sure the harness strap loops are
fitted completely on both sides of the
splitter plate.
sewn
end
1
2
3
sewn
end
1
2
3
sewn
end
1
2
3
10
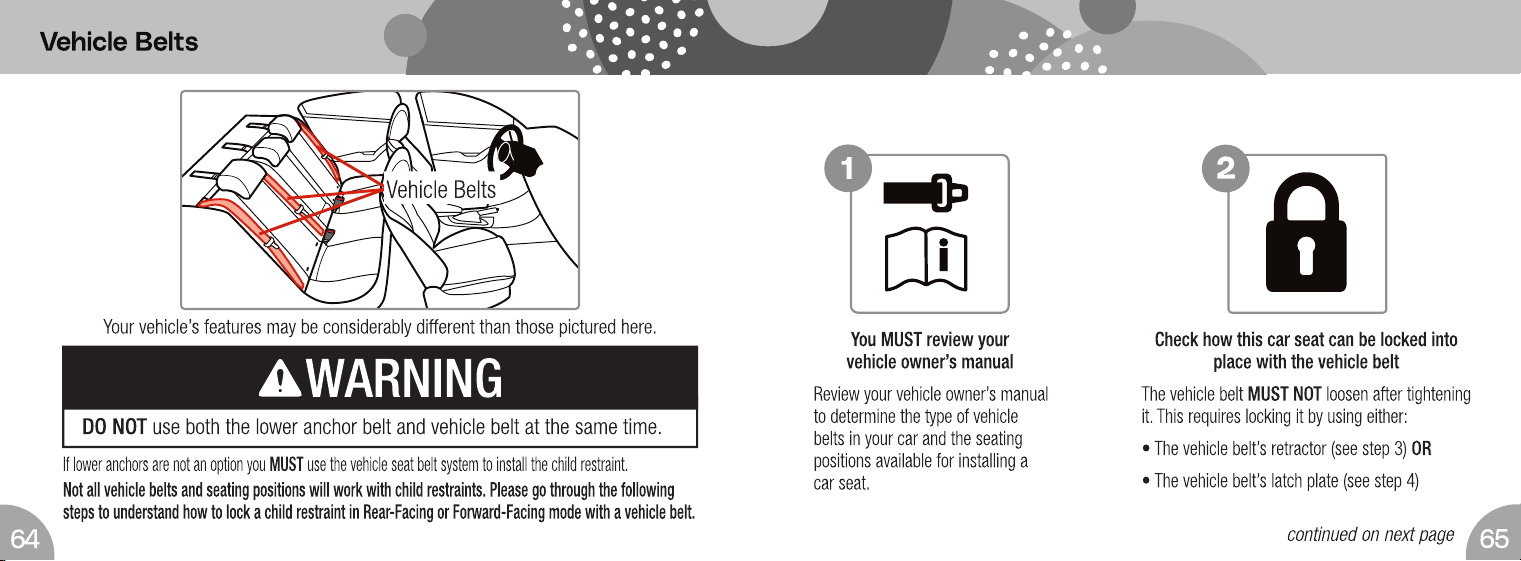
Failure to place harness adjustment strap behind
the harness strap as shown can result in serious
injury or death.
Serious injury can include paralysis
and/or permanent brain injury.
DO NOT use a child restraint with damaged
harness straps.
WARNING
Check your child’s fit often.
If you cannot achieve a snug
harness fit for your child, you may
need to adjust the harness system.
See pages 20−23.
To learn how to check harness
tightness, see pages 50−52.
Check the harness straps often for
any wear or damage.
69
68
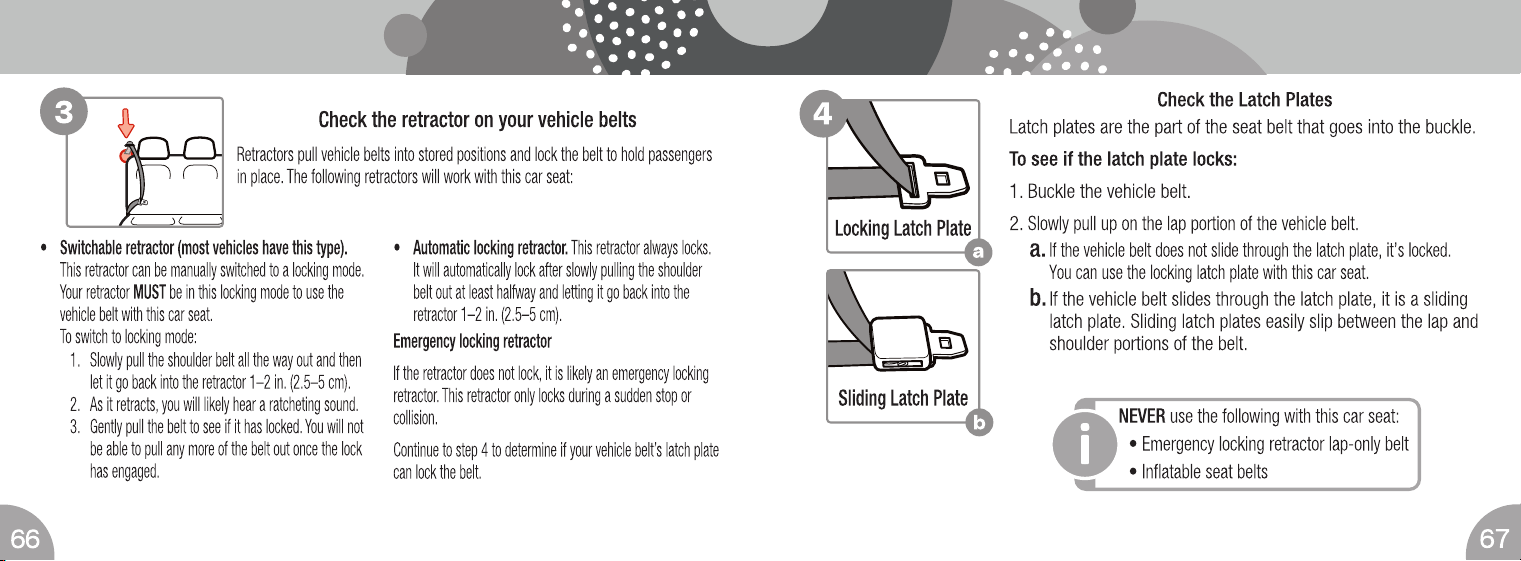
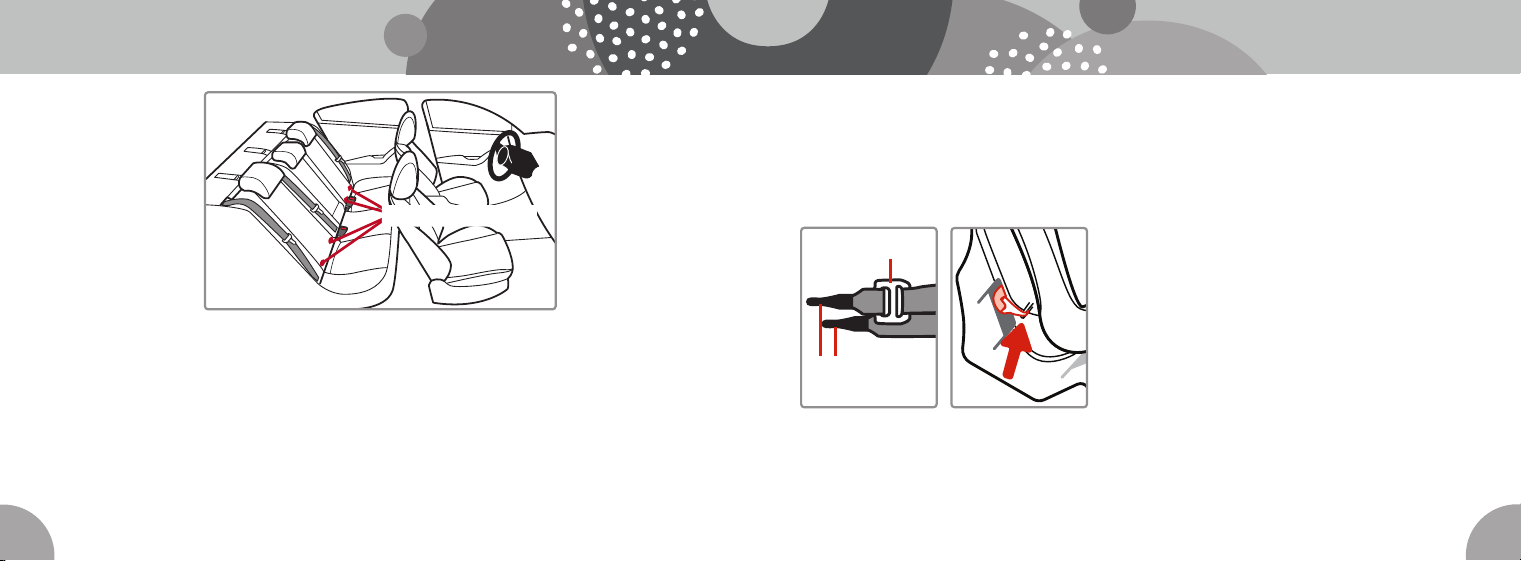
The lower anchors of LATCH (Lower Anchors and Tethers for CHildren) is a universal system for
installing child restraints without using vehicle seat belts.
The lower anchor can ONLY be used in vehicles that have the lower anchor bars installed in
designated seating positions. Most vehicles manufactured after September 2002 are equipped
with lower anchor bars. Check your vehicle owner’s manual to see which seating positions may
be equipped with LATCH: lower anchor bars.
Lower Anchor Bars
Your vehicle’s features may be considerably different than those pictured here.
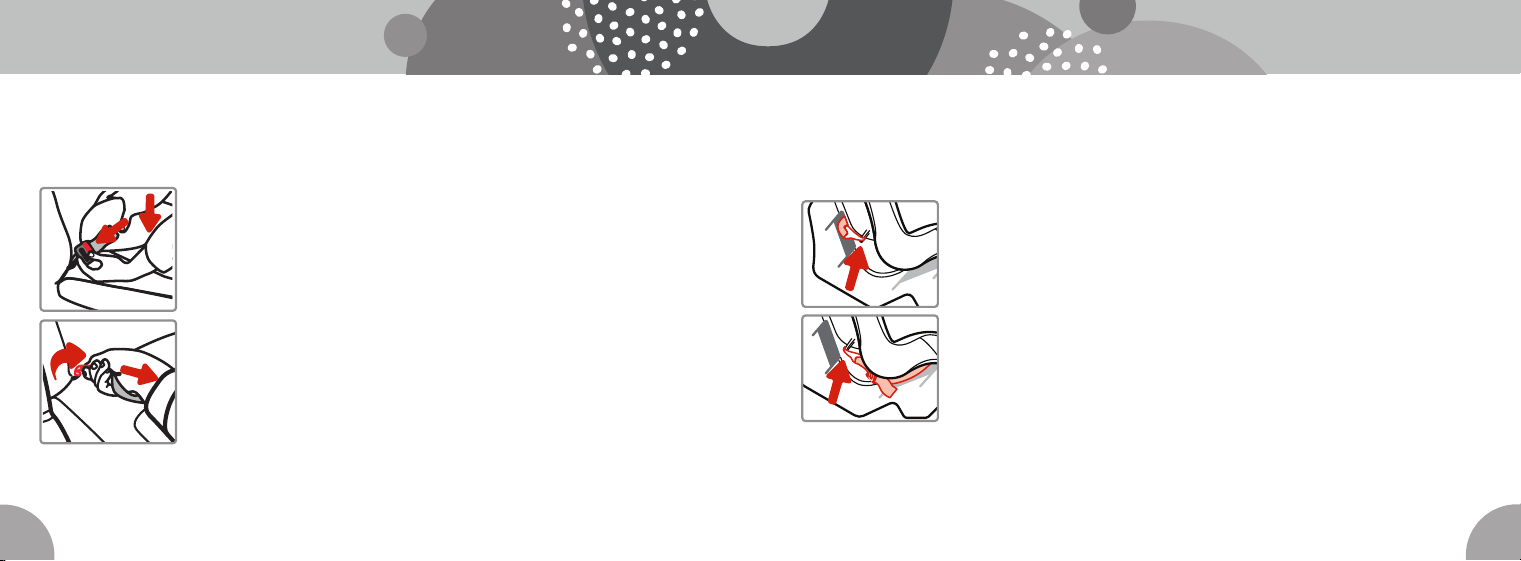
LATCH: Lower Anchor Belt
Lower Anchor
Hooks
Adjuster
To Remove the Lower Anchor Belt from the
Storage Location on the Car Seat:
Squeeze the spring lever on the hooks and remove
the hooks from the storage attachments.
When installing this child restraint with vehicle
belts, the lower anchor hooks and belt MUST
be properly stored.
71
70
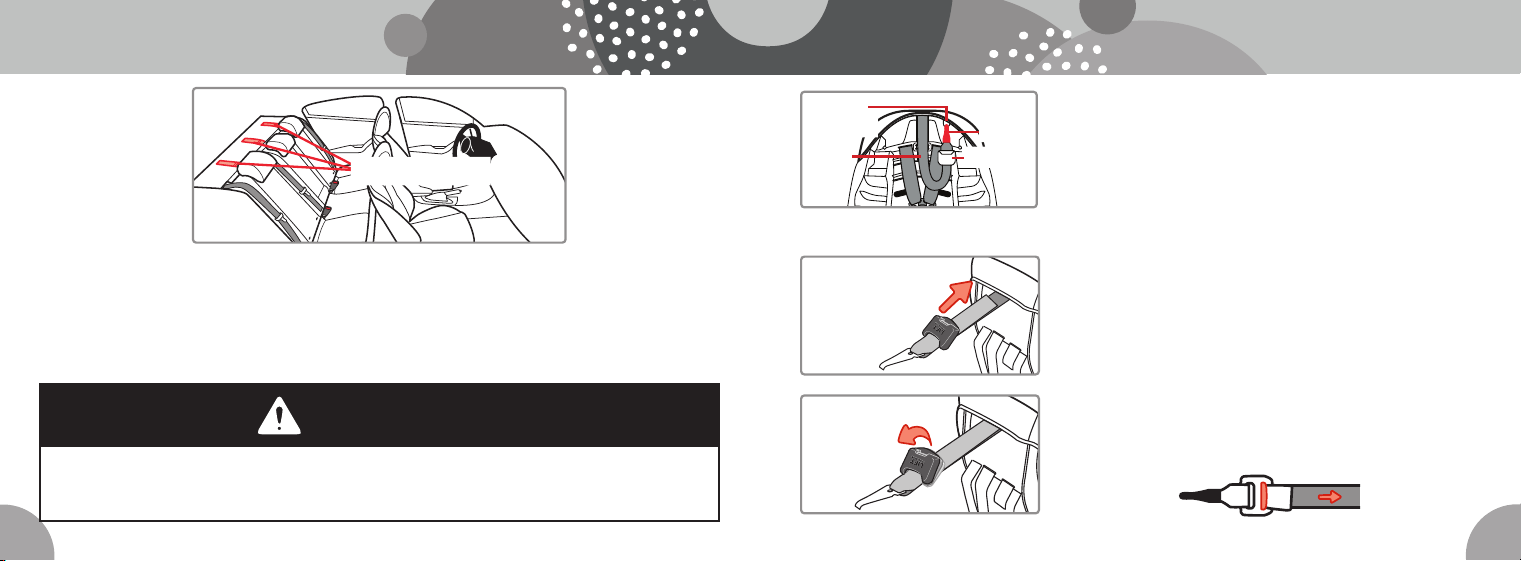
Storing the Lower Anchor Belt
The lower anchor belt MUST be properly stored in its storage
location when:
• Using the vehicle belts to install the car seat OR
• The car seat is not installed in a vehicle.
To store the lower anchor belt, route the belt through the Forward-
Facing Belt Path when the car seat is in Rear-Facing mode or through
the Rear-Facing Belt Path when the car seat is in Forward-Facing
mode. Secure the hooks to the storage attachments on both sides of
the car seat. Gently pull the free end of the belt to remove the slack.
To Remove the Lower Anchor Belt from the Vehicle’s Anchor Bars:
Remove the tension from the belt by pushing down on the side of the car
seat with the adjuster. Press the adjuster button to loosen the belt.
Squeeze the spring lever on one of the hooks, push the hook into the
vehicle seat, and then rotate it to the side to pull the hook out of the
vehicle seat. Repeat with the other hook.
73
72
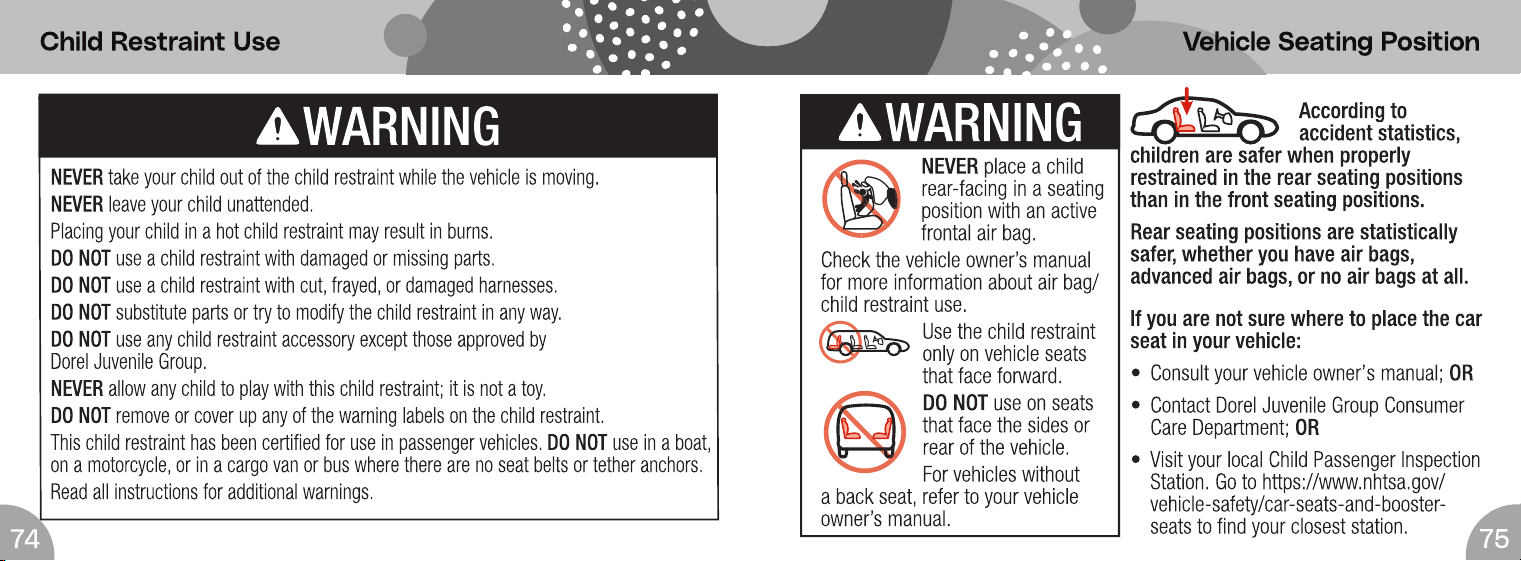
When anchors are available, you MUST always attach, adjust, and secure the top anchorage (tether) strap when installing
the child restraint forward-facing with internal harness. Tethers improve the installation and stability of child restraints and
reduce the risk of injury. Attach the tether hook to the tether anchor designated by your vehicle manufacturer for that seating
position. Check your vehicle owner’s manual for more information. If the seating position does not have a tether anchor, use a
different seating position or see your dealer or a qualified mechanic and have one installed.
Tether Anchors
Storing the Tether Strap
The tether strap MUST be properly stored in its storage
location when:
• installing in Rear-Facing Mode; OR
• the car seat is not installed in a vehicle.
Attach the tether hook to its storage attachment on the back of
the car seat as shown. Gently tighten to remove the slack.
Adjuster
Strap
Hook
Storage
Location
Tether Storage and Parts
Adjusting the Tether Strap
To tighten: After the car seat is locked into place with the lower
anchor belt or vehicle belt, push down on the car seat and gently
pull on the free end of the tether strap.
To loosen: Lift up on the tether adjuster and push it
towards the tether hook.
If the car seat has an adjuster with a button, then squeeze the
adjuster button and pull the strap to loosen it as shown.
Pull free end of
belt to tighten
Lift adjuster up
to loosen
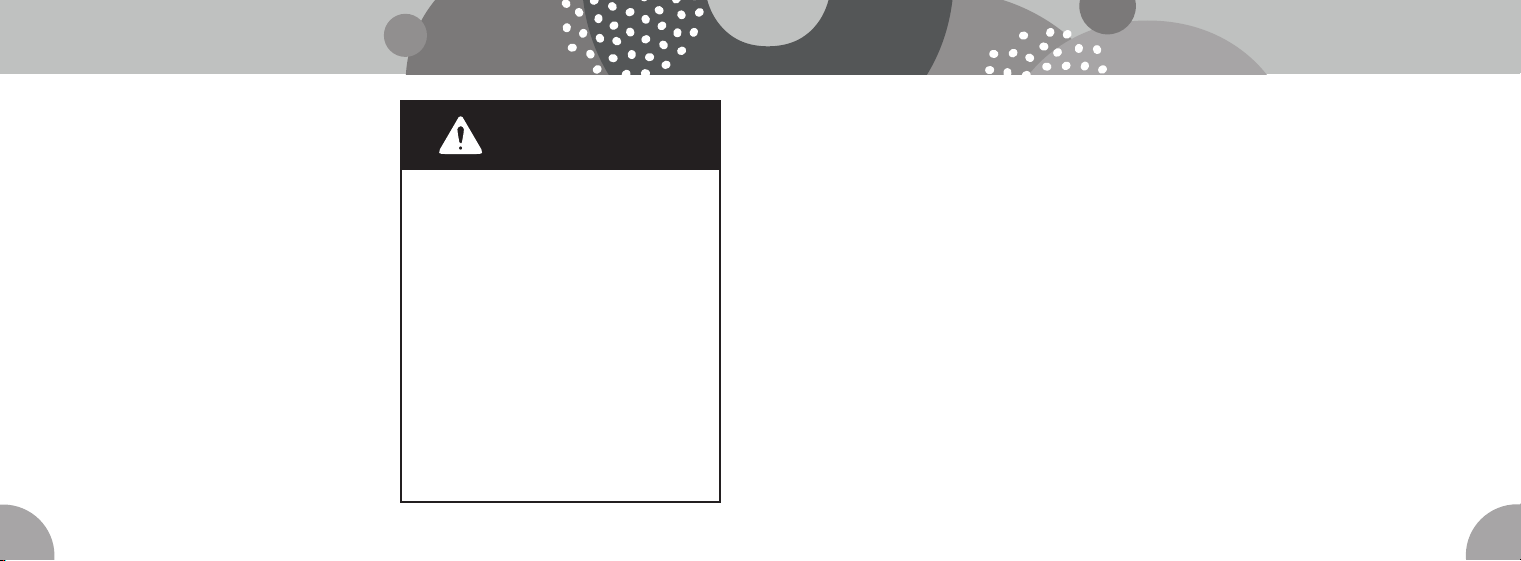
Using this child restraint without the tether strap anchored as required by the manufacturer would be a misuse of the child restraint
and, in a sudden stop or crash, could result in serious injury or death. Serious injury can include paralysis and/or permanent brain
injury. DO NOT fasten multiple tether hooks on the same tether anchor in the vehicle.
WARNING
Your vehicle’s features may be considerably different than those pictured here.
Tether Strap
77
76
DO NOT risk your child’s safety.
To keep your child as safe as possible, Dorel Juvenile Group strongly recommends
replacing the car seat even after a minor crash, even if it was not occupied at the time.
Replacement After a Minor Crash
The National Highway Traffic Safety Administration states that for a crash to be
considered minor ALL of the following MUST be true:
• Vehicle able to drive away from the crash site; AND
• Vehicle door nearest the car seat was not damaged; AND
• No passengers were injured; AND
• Airbags did not deploy; AND
• There is no visible damage to the car seat.
To avoid your child being seriously
burned, take the following precautions:
• Park in the shade or where the sun does
not directly hit the car seat.
• Cover the car seat with a sheet or
blanket when not in use.
• Check for hot seat and buckles before
placing child in car seat.
To help protect your vehicle seat’s
upholstery from damage: You may use
an accessory approved by Dorel Juvenile
Group or a single layer towel underneath
and behind car seat.
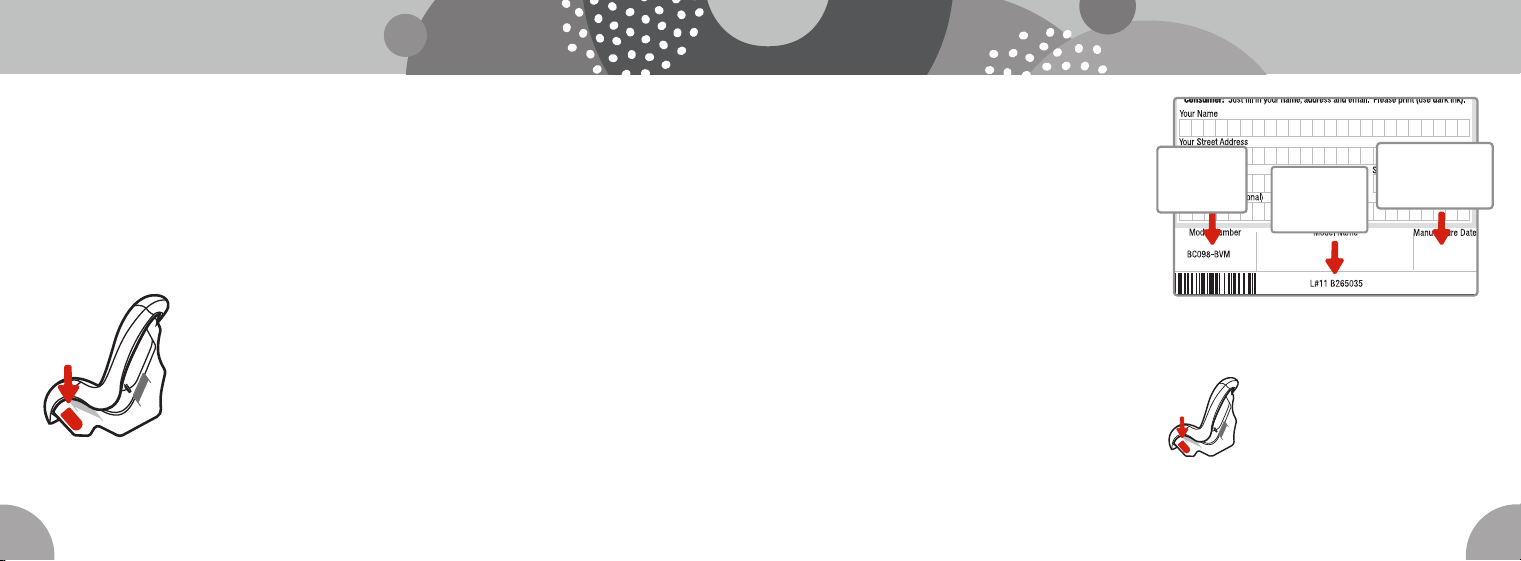
Check the vehicle belt or lower
anchor belt before each use. Use
only if the belt can be tightened
properly and locked securely
in place.
Even when unoccupied, this child
restraint MUST be firmly secured
to the vehicle with the lower anchor
belt or with the vehicle seat belt.
In a crash or sudden stop, an
unsecured child restraint or booster
seat could injure occupants.
WARNING
Installation in Vehicle Replacement and Expiration
continued on next page
79
78
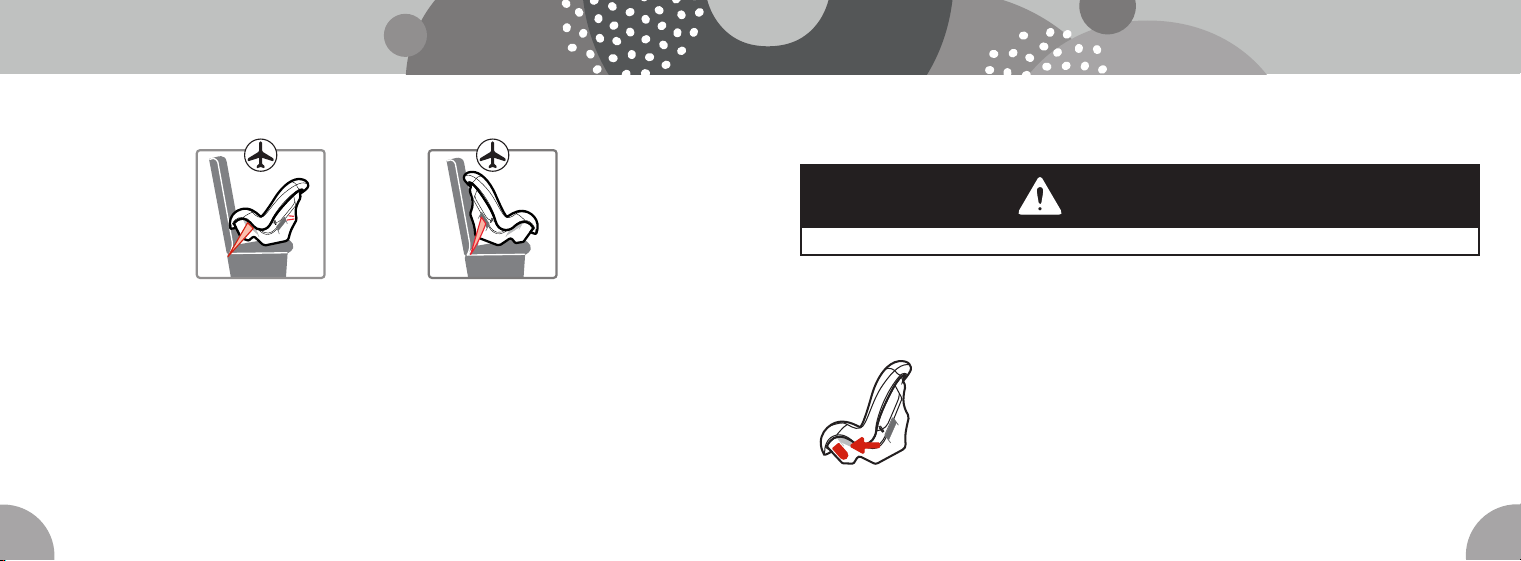
If you don’t have the card or
if your address changes, you
will find the model number,
manufacture date, and line
code on the label located on
side of the car seat.
2026|05|01
Brand Car Seat
Example of model number, line code,
and manufacture date.
Please complete the postage-paid registration
card that came with your child restraint,
and send it to us. Child restraints could be
recalled for safety reasons. You must register
this restraint to be reached in a recall.
Send your name, address, e-mail address if
available and the restraint’s model number
and manufacturing date to:
Dorel Juvenile Group, Inc.
Consumer Care Department
PO Box 2609
Columbus, IN 47202-2609
or call 1-800-544-1108 or register online at
www.djgusa.com/registration/carseat/us.
For recall information, call the U.S.
Government’s Vehicle Safety Hotline at
1-888-327-4236 (TTY: 1-800-424-9153), or
go to www.NHTSA.gov.
2026|05|01
Brand Car Seat
Manufacture
Date
Line
Code
Model
Number
If the crash your car seat was involved in meets ALL the criteria, you may not need to replace the car seat.
If one or more of these criteria are not true or if you are uncertain of any of your answers, replace the car
seat immediately.
Replacement After a Moderate to Severe Crash
You MUST replace this car seat if it has been in a moderate to severe car crash.
This car seat is intended to protect a child in a single crash. During a crash, the
car seat and all of its parts absorb crash energy which can deform or weaken it.
Damage is not always visible. A damaged car seat must be replaced immediately.
Expiration
On the side of the child restraint there is a date of manufacture label as shown.
DO NOT use this child restraint more than 10 years after the date of manufacture.
2024|05|01
COSCO SCENERA NEXT
Registration and Safety Notices
81
80
Use only on forward facing aircraft seats. Contact the airline for their specific policies.
Some airlines may ask to see a label stating that this child restraint is certified for
aircraft use.
There is an airplane certification label located on the side of this child
restraint as shown.
WARNING
You MUST store lower anchor belt and tether strap when installing with aircraft belts.
This restraint is certified for aircraft use.
Install the child restraint in a window seat to avoid blocking the aisle. If the aircraft lap
belt is too short, ask the flight attendant for a belt extender.
Forward-Facing
Aircraft Installation
Follow the vehicle belt
install steps on pages
42−48, skipping the
tether strap steps.
Rear-Facing
Aircraft Installation
Follow the vehicle
belt install steps on
pages 29−35.
Aircraft Information

83
82
Dorel Juvenile Group, Inc. (DJG) warrants this product to the original retail purchaser
as follows:
This product is warranted against defective materials or workmanship for one year
from the date of original purchase. An original receipt is required to validate your
warranty. DJG will, at its option, provide replacement parts or replace this product.
DJG reserves the right to substitute if the part or model has been discontinued.
To make a claim under this warranty, please contact our Consumer Care Department
by phone: 1-800-544-1108; text: 1-812-652-2525; or chat with us:
www.coscokids.com. Our hours of operation are from 8:00 a.m. to 6:00 p.m. EST
Monday through Thursday and from 8:00 a.m. to 4:30 p.m. on Friday.
Proof of purchase is required and shipping charges are the responsibility
of the consumer.
Warranty Limitations: This warranty does not include damages which arise from
misuse or abuse of this product.
Limitation of Damages: The warranty and remedies as set forth are exclusive and
in lieu of all others, oral or written, expressed or implied. In no event will DJG or the
dealer selling this product be liable to you for any damages, including incidental or
consequential damages, arising out of the use or inability to use this product.
Limitation of warranties and other warranty terms and state law rights:
Any implied warranties, including implied warranties of the merchantability and fitness
for a particular purpose, shall be limited to the duration and terms of the express
written warranty. Some states do not allow limitations as to how long an implied
warranty lasts or the exclusion or limitation of incidental or consequential damages, so
the above limitations may not apply to you.
This warranty gives you specific legal rights, and you may have other rights, which
vary from state to state. Neither DJG nor the dealer selling this product authorized
any person to create for it any other warranty, obligation, or liability in connection with
this product.
Warranty