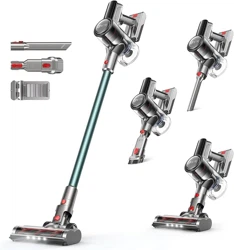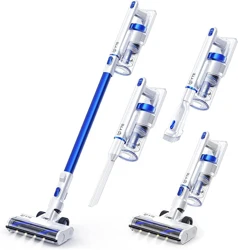
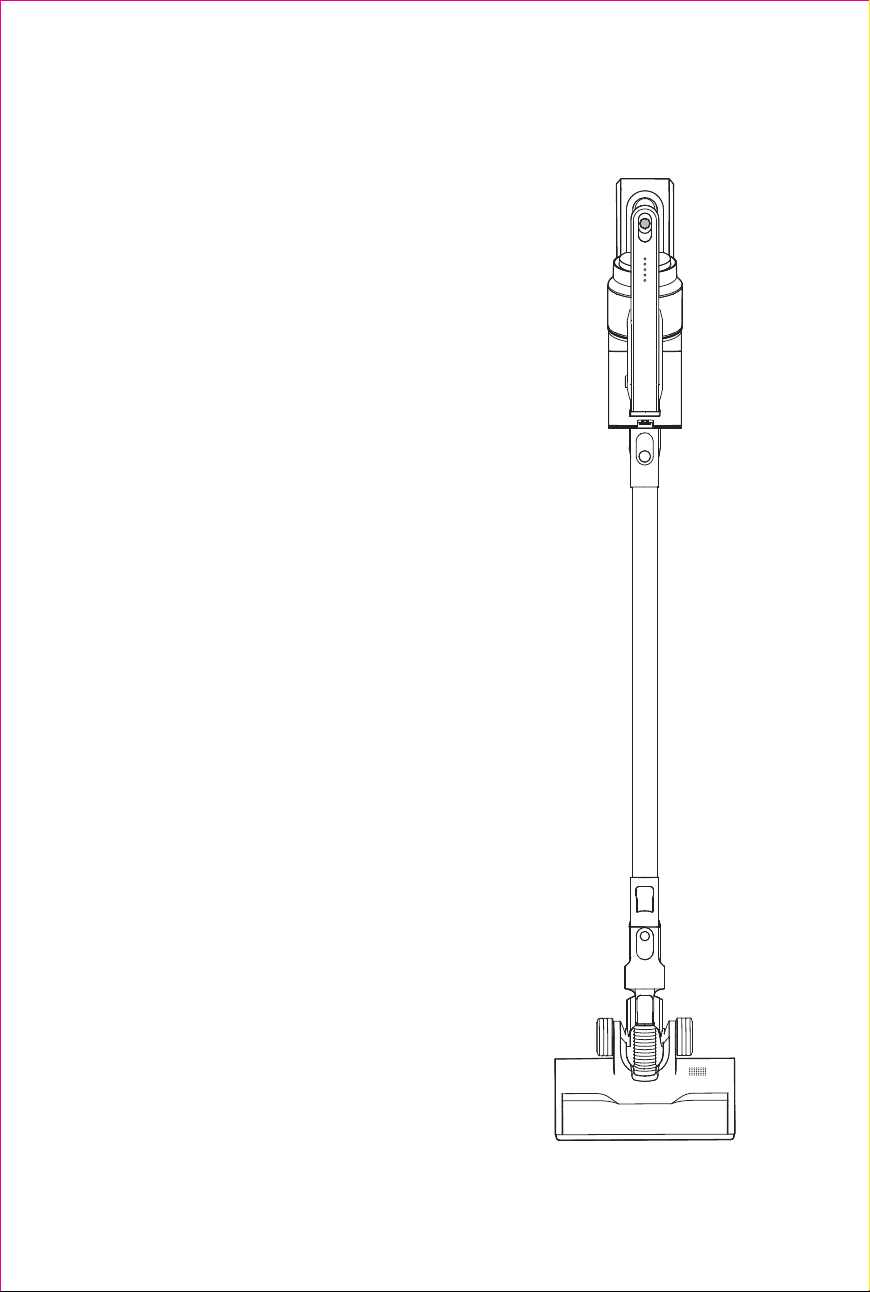
HC-1810D
Cordless Vacuum
Cleaner
User Manual
Thank you for purchasing our products. This manual
addresses the safety guidelines, warranty, and operating
instructions. Please review this manual thoroughly before
operating your device.
All pictures in this manual are for illustration purpose only.
Actual product may vary due to product upgrade.

Table of Contents
01 Important Safety Instructions
02 Warranty
03 Getting to Know Your Device
What’s in the Box
At a Glance
06 Using Your Vacuum Cleaner
Wall Mounting
Assembling
Charge Your Vacuum
Cleaning
09 Maintenance
Recommended Cleaning / Replacement Frequency
Clean the Dust Box and Filters
Clean the Rolling Brush
13 Troubleshooting
13 Specifications

Important Safety Instructions
To reduce the risk of injury or damage, read these safety instructions carefully and keep
them at hand when setting up, using, and maintaining this device.
• Recharge only with the charger specified by the manufacturer. A charger that is suitable
for one type of battery pack may cause a risk of fire when used with another battery
pack.
• This device is not intended for use by persons (including children) with reduced physical,
sensory or mental capabilities, or lack of experience and knowledge, unless they have
been given supervision or instruction concerning use of the device by a person responsi-
ble for their safety.
• Children should be supervised to ensure they do not play with this device.
• Cleaning and maintenance shall not be performed by children without adult supervision.
• The battery must be removed from the device before the device is disposed of.
• This appliance must be disconnected from the mains supply when removing the battery.
• The used battery should be placed in a sealed plastic bag and disposed of safely
according to local environmental regulations.
• Fully assemble before operating.
• Intended for household use only.
• Do not use outdoors or on wet surfaces.
• Do not leave this appliance unattended when it is plugged in. Unplug it from the outlet
when you are not using it and before servicing.
• Do not allow to be used as a toy. Close attention is necessary when used by or near
children.
• Use only as described in this manual. Use only manufacturer recommended attach-
ments.
• For the purposes of recharging the battery, only use the detachable power supply unit
provided with this device.
• Do not use with a damaged cord or plug. If the appliance is not working as it should, or
has been dropped, damaged, or submerged in water, contact our customer service for
advice.
• Do not handle the plug or appliance with wet hands.
• Do not unplug the adapter by pulling on the cord. To unplug, grasp the plug, not the cord.
• Do not pull the cord around sharp edges or corners. Do not run the appliance over the
cord. Keep the cord away from heated surfaces.
• Do not put any object into openings or vents. Do not use if any opening is blocked. Keep
free of dust, lint, hair, and anything else that may reduce airflow.
• Keep hair, loose clothing, fingers, and other body parts away from openings and moving
parts.
• Turn off all controls before unplugging.
• Use extra care when cleaning on stairs.
01

• Always turn off this appliance before connecting or disconnecting the motorized floor
brush.
• To prevent unintentional starting, ensure the appliance is switched off before installing
the battery pack, picking up or carrying the appliance. Do not carry the appliance with
your finger on the power switch, doing so may cause accidents.
• Do not use to pick up flammable or combustible liquids, such as gasoline, or use in
areas where they may be present.
• Do not pick up anything that is burning or smoking, such as cigarettes, matches, or
hot ashes.
• Do not pick up hard or sharp objects such as glass, nails, screws, coins, etc.
• Do not use without the dust box and/or filters in place.
• Store this appliance indoors, in a cool and dry area.
• Make sure that the outlet voltage corresponds to the voltage rating on the charger's
label.
• Do not attempt to repair or disassemble this appliance. There are no user-serviceable
parts inside. Repair or service must be performed by a qualified repairman and only
identical replacement parts can be used. This will ensure the safety of the appliance.
• This appliance includes a rechargeable lithium-ion battery pack. Do not expose the
battery pack or appliance to fire or excessive temperature (above 130°C/265°F), as it
may catch fire and/or explode.
• Do not use a damaged or modified battery pack, as it may catch fire and/or explode.
• Follow all the charging instructions and do not charge the battery pack out of the
temperature range specified in the instructions, otherwise, it may damage the battery
and increase the risk of fire.
• Do not attempt to disassemble the battery pack.
Warranty
We strive to build our products with the highest attention to detail and craftsmanship.
However, sometimes there are occurrences of a defect, so we are happy to offer a
ONE-year hassle-free warranty on all our devices as we continue to make amazing
products. Please contact us if you have any questions about our devices.
02
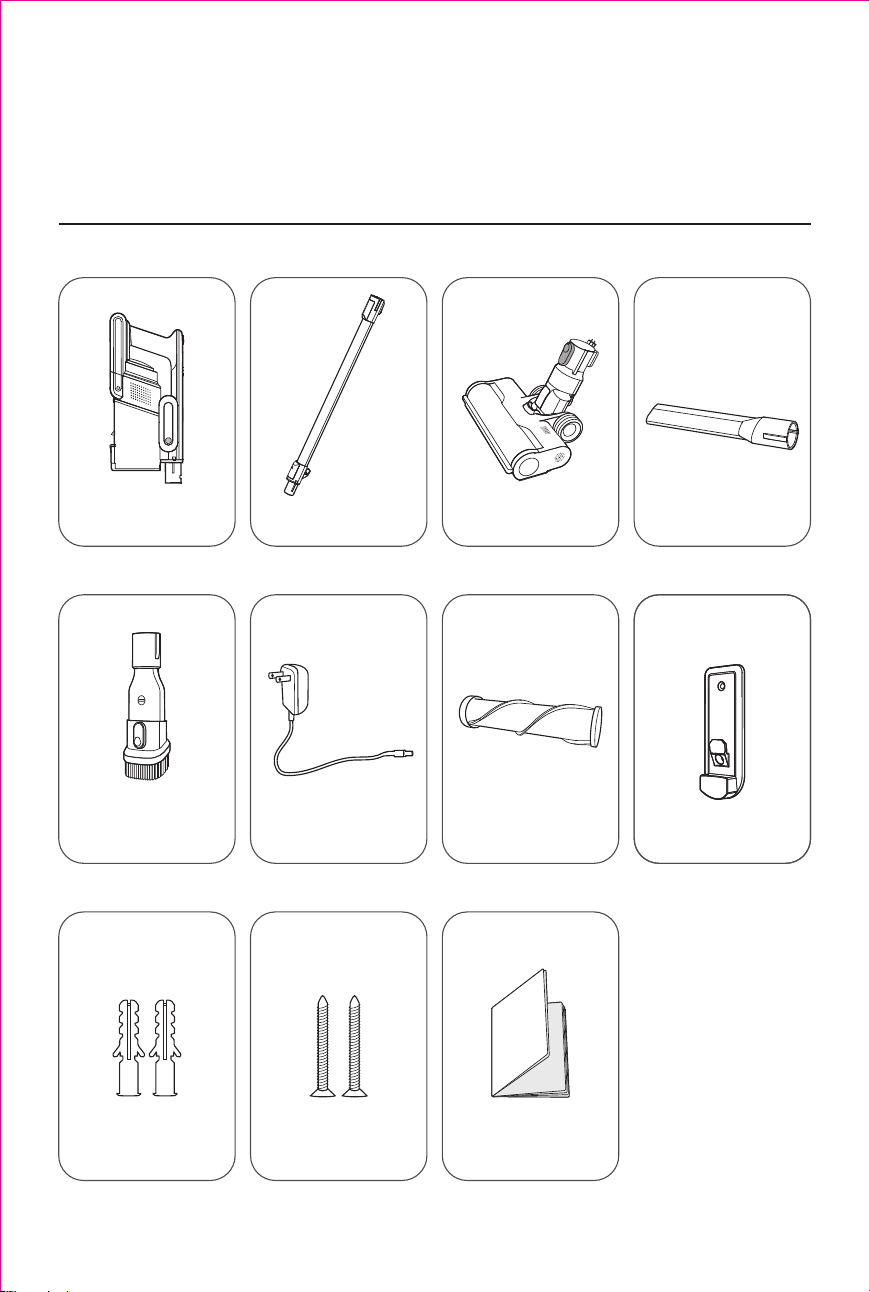
Long Crevice Tool
Getting to Know Your Device
What’s in the Box
03
Metal Tube
Cordless Vacuum
Cleaner
Floor Brush
2-in-1 Cleaning Tool Charger Rolling Brush
(preinstalled)
User ManualWall Plugs Screws
Wall Mount BracketWall Mount Bracket
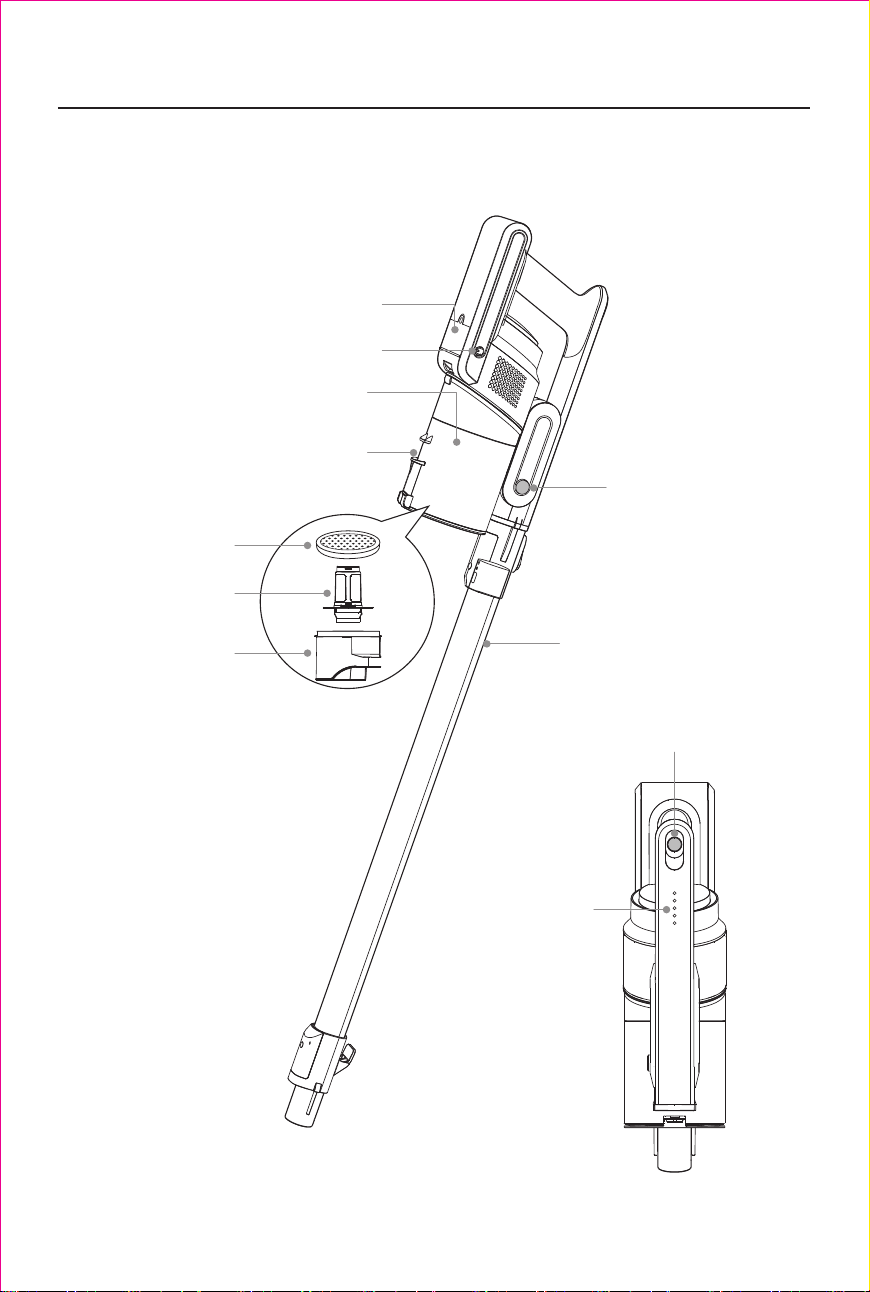
At a Glance
• Main Unit
04
Charging port
Off / Suction strength button
Power indicators
Lithium battery pack
Metal tube
Dust box
Dust box release button
Dust empty button
Pre-filter
High-efficiency
filter box
High-efficiency filter
05
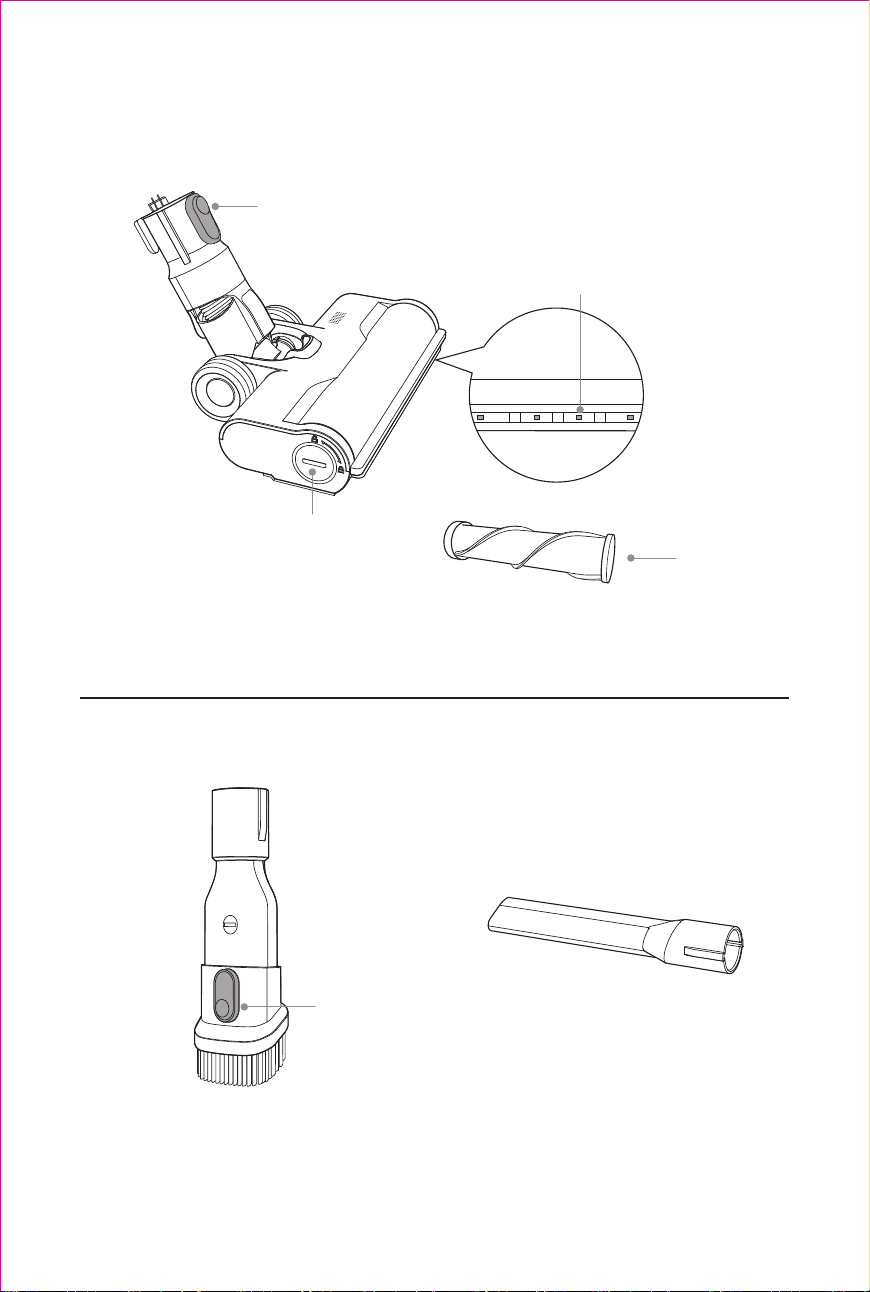
• Floor Brush
LED headlights
Floor brush release button
Rolling brush locking lid
Long crevice tool
2-in-1 Cleaning Tool
Release button
Rolling Brush
(preinstalled)
06
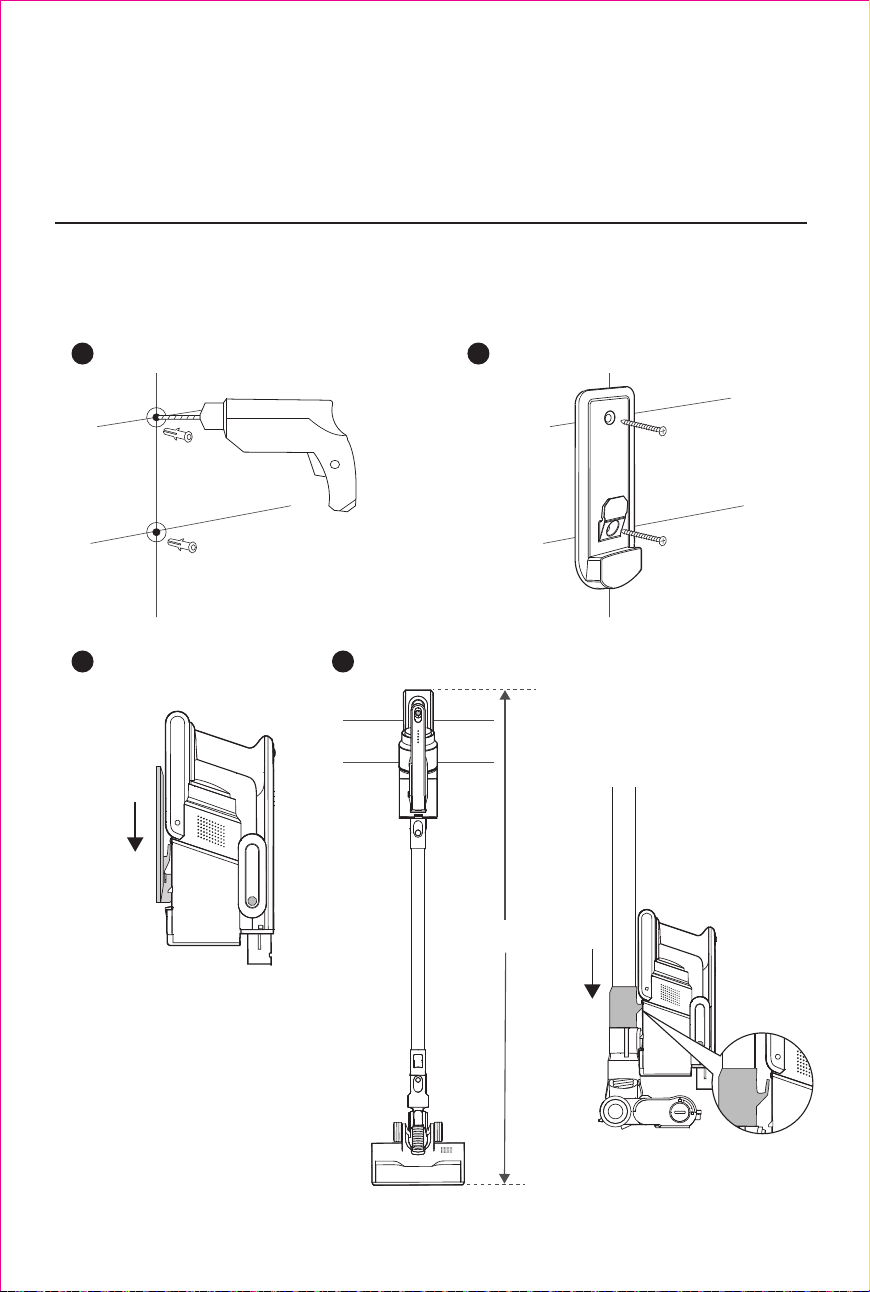
The vacuum cannot stand on its own. Make sure it is mounted securely.
1 2
3
4
Using Your Vacuum Cleaner
Wall Mounting
132 cm / 4.33 ft
You can also hang the main
unit on the metal tube.
07
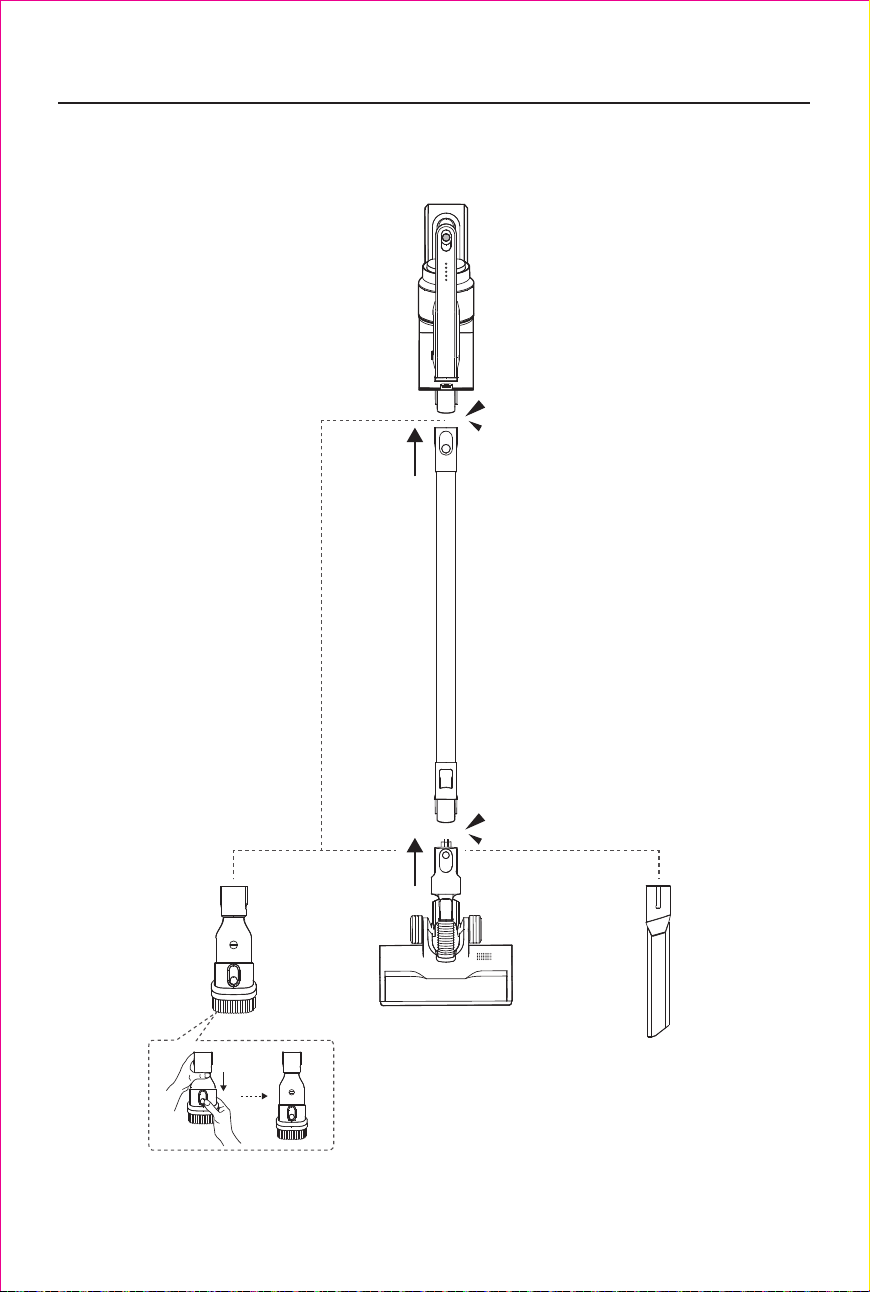
Attach your desired cleaning accessory to the metal tube or main unit of the vacuum as illustrated.
Click
Click
Assembling
08
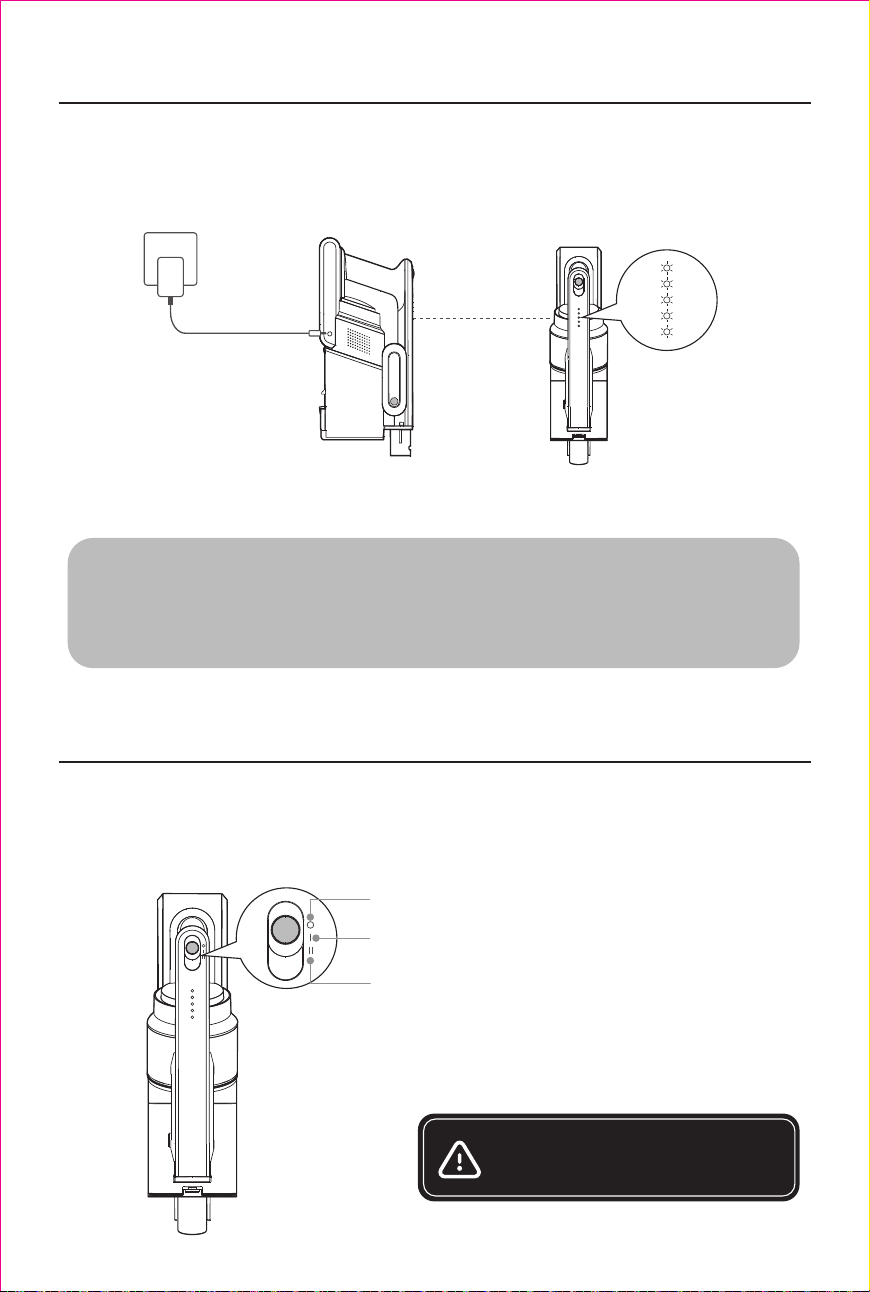
Before use, make sure that the vacuum is fully charged and the dust box and filters are cleaned, dried,
and fixed in place.
Notes:
• The vacuum cannot work while charging.
• The vacuum cannot be charged when the ambient temperature is below 10℃/50°F or above
45℃/113°F.
• The power indicator(s) is(are) flashing during charging, and go(es) off when fully charged.
Off
Medium suction strength
High suction strength
The vacuum is powered by the built-in lithium battery. Before first use, charge the battery for at least 3.5 hours.
CAUTION
Do not use the vacuum to clean up water.
Charge Your Vacuum
Cleaning
09
Note:
We manufacture various replacement parts and assemblies. If you think you need a replacement
part, please contact our customer service for more information.
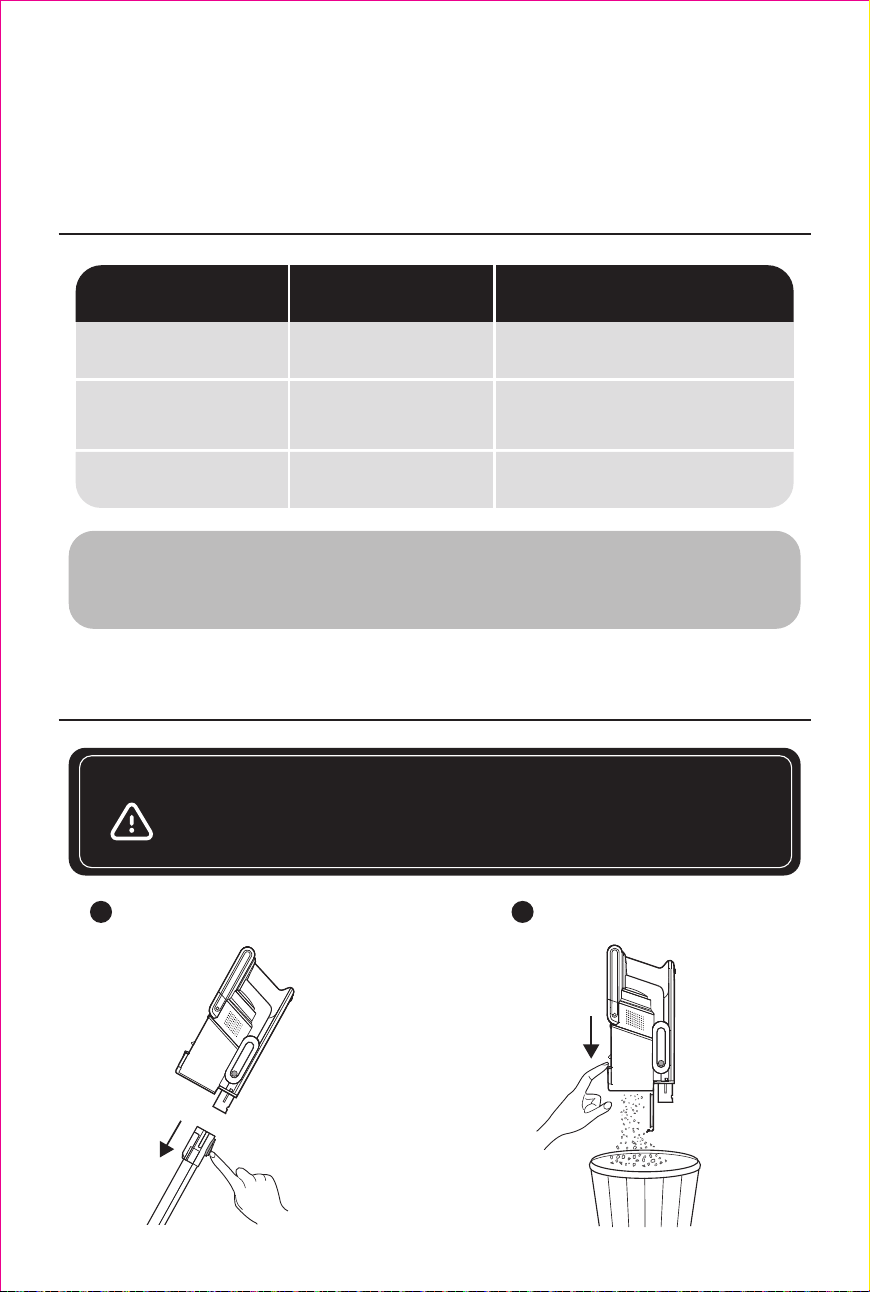
CAUTION
• Turn off the vacuum before cleaning it.
• If the dust box is filled with dust, the vacuum may stop to prevent overheating.
• Clean the dust box before it fills to the MAX line.
Vacuum Part Cleaning Frequency Replacement Frequency
Dust Box
Filters
Rolling Brush
Once every week
(Twice a week if you
have a pet)
After each use _
Every 6-12 months
Every 6-12 months
Once every week
1 2
Dissemble the metal tube. Press the dust empty button to
empty the dust box.
Maintenance
Recommended Cleaning / Replacement Frequency
Clean the Dust Box and Filters
For optimal performance, follow the instructions below to clean and maintain the vacuum regularly. The
cleaning/replacement frequency will depend on your usage habits of the vacuum.
10
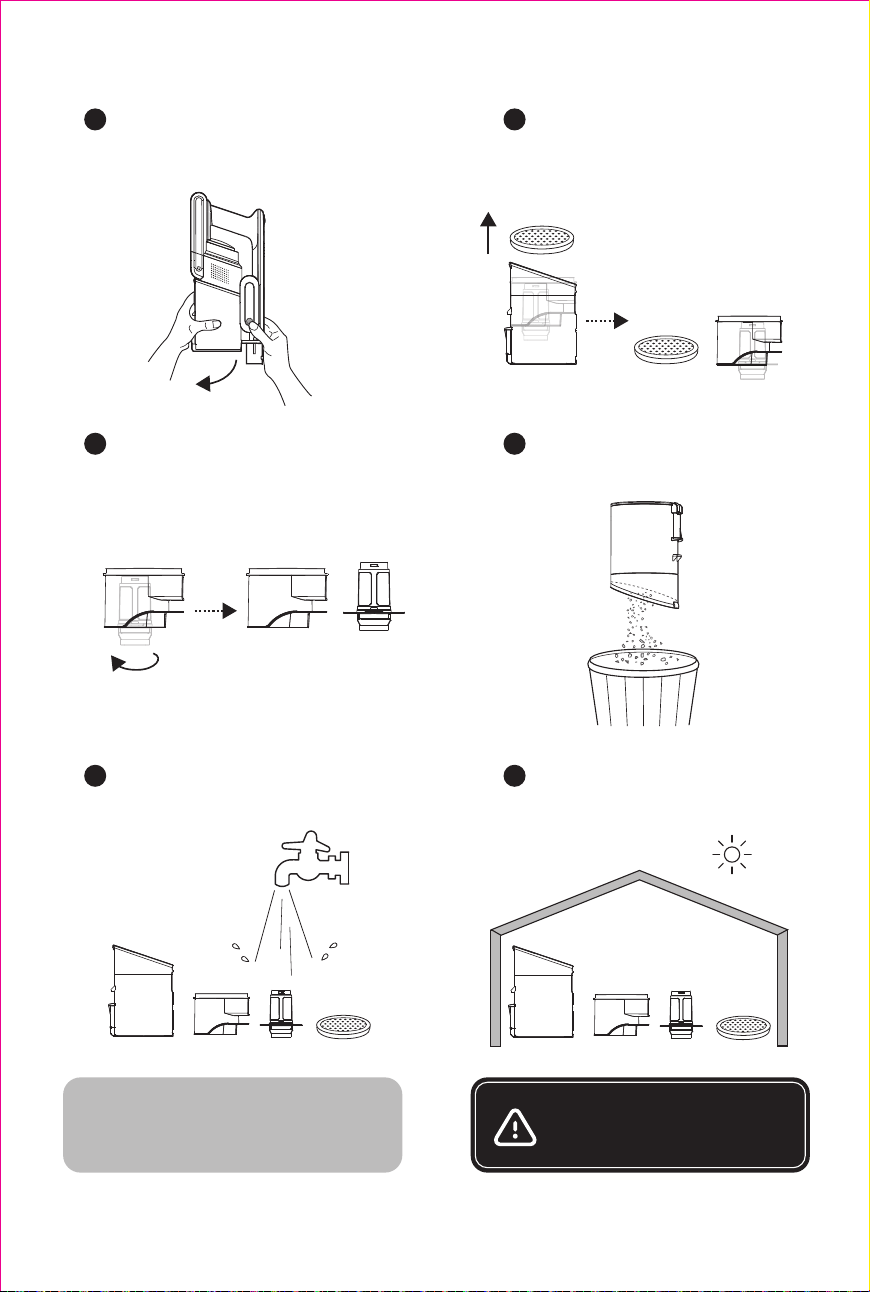
Note:
Do not use a brush, hot water, or any
detergent to clean the filters.
3
4
Press and hold the dust box release
button and pull the dust box out in the
direction as illustrated.
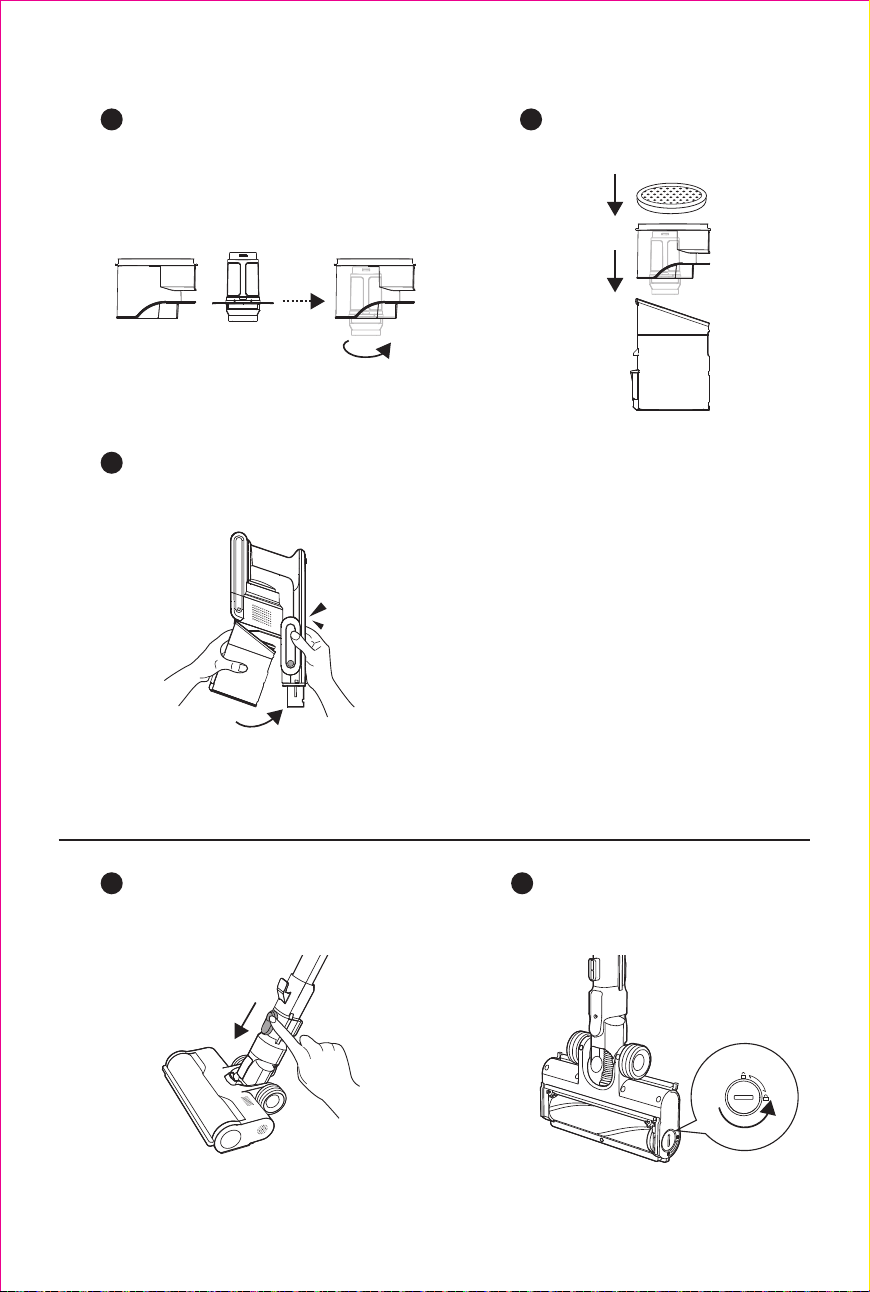
Take out the pre-filter and the
high-efficiency filter box.
5
6
Turn the high-efficiency filter
counter-clockwise to take it out.
Shake off debris by tapping the
filters against your trash container.
7
8
Rinse the dust box, high-efficiency
filter box and filters
Air-dry the dust box, high-efficien-
cy filter box and filters completely
before reassembly.
CAUTION
• Keep away from direct sunlight.
• All parts must be completely dry
before reassembly.
11
9
10
Turn the high-efficiency filter clockwise
to install it in the high-efficiency filter box.
Put the high-efficiency filter box and
pre-filter back into the dust box.
Push the dust box back into the vacuum
in the direction as illustrated until you
hear it click.
11
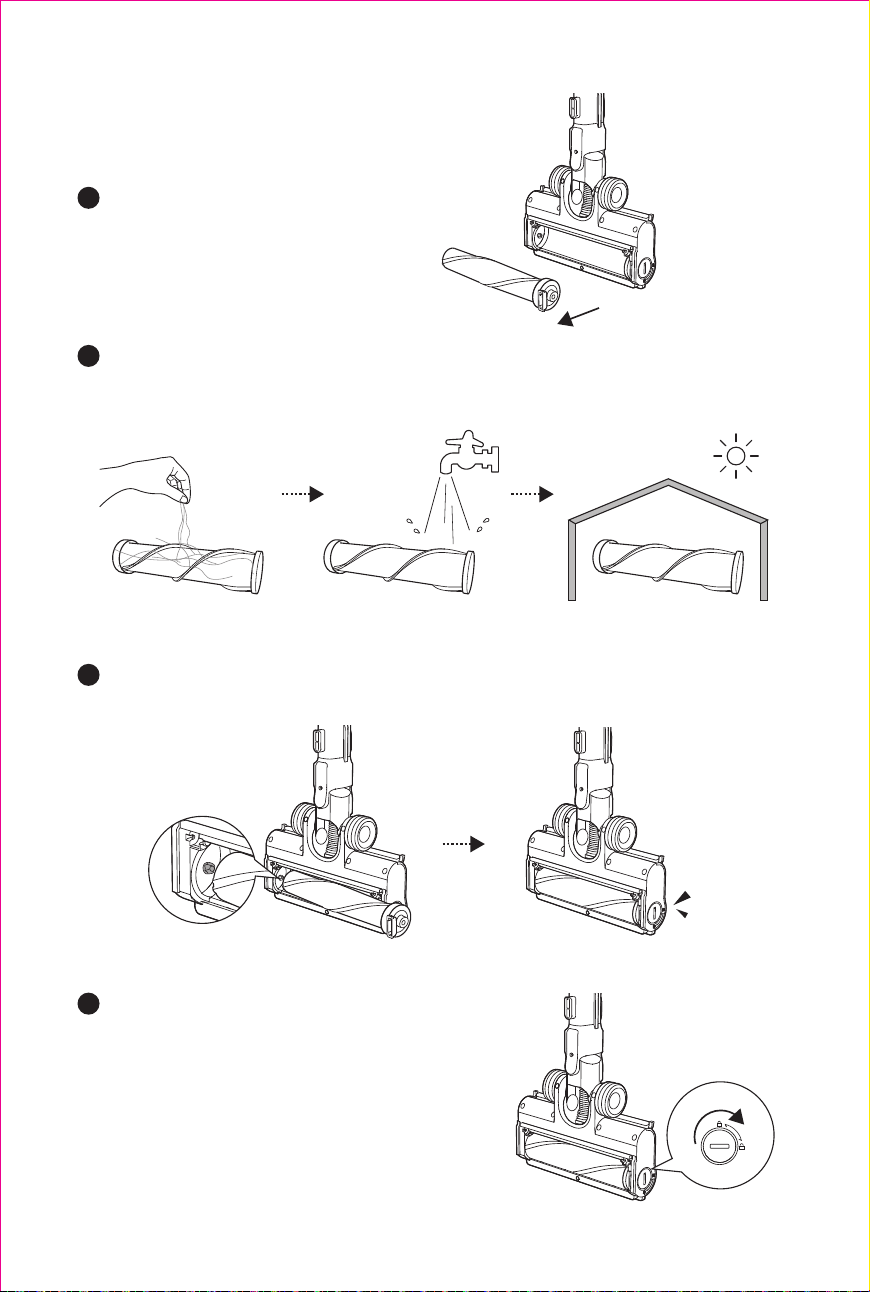
1
Turn off the vacuum, press the floor brush
release button to remove the floor brush
from the metal tube.
2
Use a coin to turn the rolling brush
locking lid counter-clockwise to
unlock the rolling brush as illustrated.
Clean the Rolling Brush
Click
12
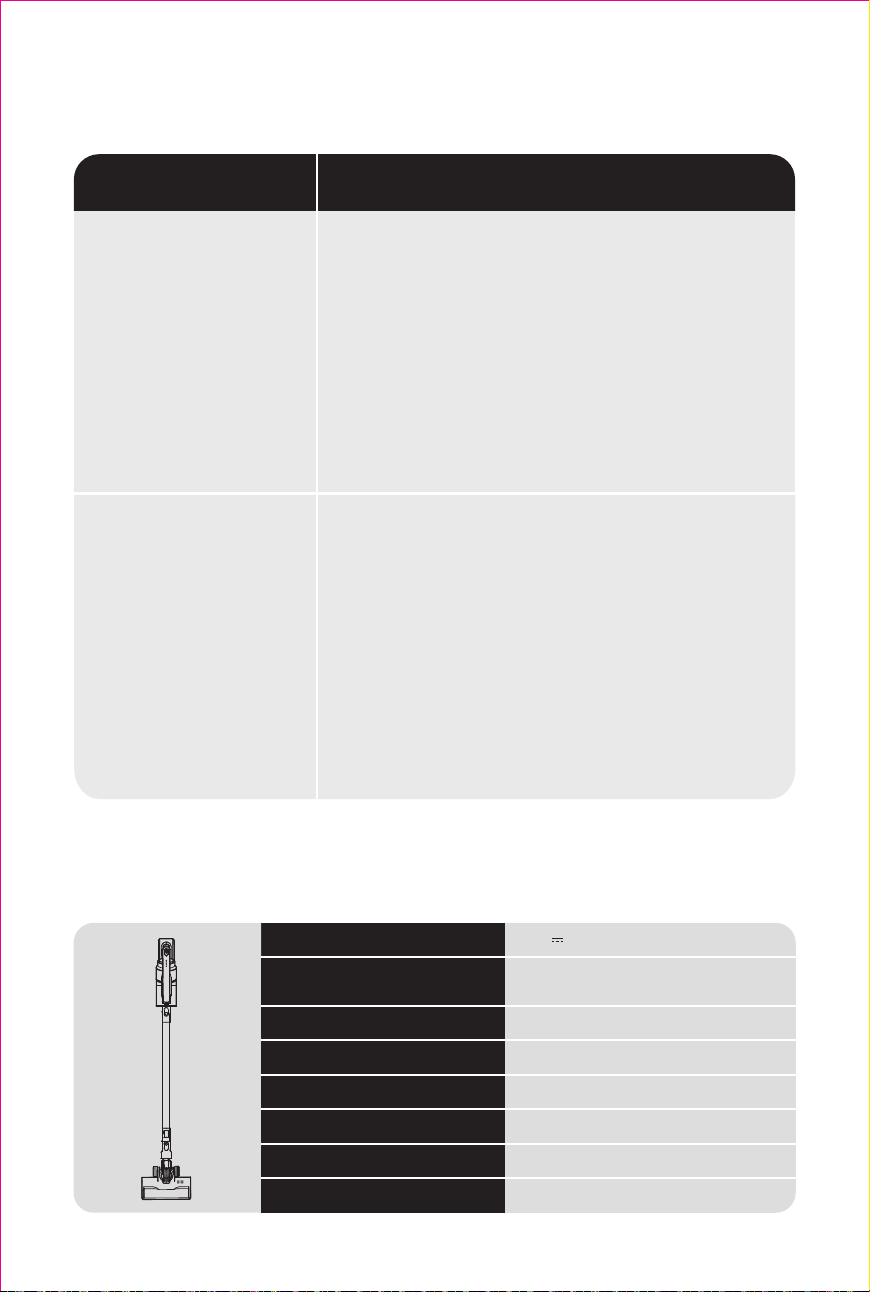
3
Lift the rolling brush to remove.
5
Reinstall the rolling brush by inserting the fixed protruding end first and then clicking into place.
6
Use a coin to turn the rolling brush locking lid clockwise
to lock the rolling brush.
4
Clean the rolling brush using scissors or other tools, rinse and then air-dry the rolling brush.
Click
13
Problems Solutions
Vacuum is not picking
up debris. No suction
or light suction.
Vacuum turns off on
its own.
• Dust box may be full; empty the dust box.
• Check crevice tool nozzle and floor brush for blockages;
clear blockages if required.
• Remove any string, carpet fibers, or hair that may be
wrapped around the rolling brush.
• Check connection between the main unit and metal tube for
blockages; clear blockages if required.
• Check the metal tube for any blockages and clear any
debris.
• Check filters to see if they need cleaning. Follow instruc-
tions for rinsing and completely air-drying the fillers before
reassembling.
There are several possible reasons for the vacuum turning
off on its own, including blockages, battery issues, and
overheating. If vacuum turns off on its own, perform the
following steps:
1. Turn on the vacuum and check the battery indicator lights.
If recharging is needed, plug in while vacuum is in the off
position.
2. Empty the dust box and clean filters.
3. Check the metal tube, accessories, and inlet openings and
remove any blockages.
4. Allow the main unit of the vacuum to cool for at least 45
minutes, until they return to room temperature.
5. Restart the vacuum.
Troubleshooting
Specifications
Input
Rated Power
Battery Type
Dust Box Capacity
Charging Time
Max Running Time
Operating Temperature
Product Net Weight
26V 0.4A
140W MAX (Main unit)
30W MAX (Floor brush)
Lithium-ion 22.2 V, 2200 mAh, 6 cells
1 L
5-5.5 hours
45 mins
0℃/32°F to 40℃/104°F
2.3 kg/5.1 lb