
INSTRUCTION MANUAL
MANUAL DE INSTRUCCIONES
Cordless Polisher Scrubber
Pulidora Limpiadora Inalámbrica
GSP01
CAUTION: Read the instructions before using the machine.
PRECAUCIÓN: Lea las instrucciones antes de usar la máquina.
2 ENGLISH
ENGLISH (Original instructions)
WARNING
• This appliance is not intended for use by persons (including children) with reduced physical, sensory or mental
capabilities, or lack of experience and knowledge.
• Children should be supervised to ensure that they do not play with the appliance.
• CAUTION: Before carrying out any maintenance operation, disconnect the appliance from the power supply.
Perform maintenance on the appliance periodically.
• See the section “Important safety instructions for battery cartridge” for prohibited matters or important matters
of the battery cartridge.
• See the section “Assembly” for the appropriate details of precautions during before installation of the appliance.
• See the section “Installing and removing battery cartridge” for how to install or remove the battery.
INTRODUCTION
Specications
Model: GSP01
Brush diameter 190 mm (7-1/2″)
Pad diameter 200 mm (8″)
No load speed 3 (High) 600 /min
2 (Medium) 350 /min
1 (Low) 150 /min
Dimensions (L x W x H) without accessory and splash
guard, with front handle
1,081 - 1,435 mm x 204 mm x 361 mm
(42-1/2″ - 56-1/2″ x 8″ x 14-1/4″)
Rated voltage D.C. 36 V - 40 V max
Net weight 4.4 - 5.6 kg (9.7 - 12.3 lbs)
• Due to our continuing program of research and development, the specications herein are subject to change
without notice.
• The weight does not include accessory and splash guard but front handle and battery cartridge. The lightest
and heaviest combination weight of the appliance and battery cartridge is shown in the table.
• Specications and battery cartridge may dier from country to country.
Applicable battery cartridge and charger
Battery cartridge BL4020* / BL4025* / BL4040* / BL4040F* / BL4050F / BL4080F
* : Recommended battery
Charger DC40RA / DC40RB / DC40RC / DC40WA
• Some of the battery cartridges and chargers listed above may not be available depending on your region of
residence.
WARNING: Only use the battery cartridges and chargers listed above. Use of any other battery cartridges
and chargers may cause injury and/or re.
WARNING: Do not use a corded power supply such as battery adapter or portable power pack with
this appliance. Battery cover will not close.
Symbols
The followings show the symbols which may be used
for the equipment. Be sure that you understand their
meaning before use.
Read instruction manual.
Take particular care and attention.
Never throw water over the head of the
appliance.
Do not let the battery cartridge contact with
chemical liquid such as cleaning agent or
solvent.
3 ENGLISH
Adjust the height of the splash guard as fol-
lows. When the appliance is placed on the
oor, the accessory does not contact the
oor rst, and the gap between the bottom
of the accessory and the tip of the splash
guard bristles is 0 - 7 mm (0″ - 1/4″).
A representative battery applicable to this
appliance.
Ni-MH
Li-ion
Only for EU countries
Due to the presence of hazardous com-
ponents in the equipment, waste electrical
and electronic equipment, accumulators
and batteries may have a negative impact
on the environment and human health.
Do not dispose of electrical and electronic
appliances or batteries with household
waste!
In accordance with the European Directive
on waste electrical and electronic equip-
ment and on accumulators and batteries
and waste accumulators and batteries,
as well as their adaptation to national law,
waste electrical equipment, batteries and
accumulators should be stored separately
and delivered to a separate collection point
for municipal waste, operating in accor-
dance with the regulations on environmen-
tal protection.
This is indicated by the symbol of the
crossed-out wheeled bin placed on the
equipment.
Intended use
The appliance is intended for cleaning oor. The appli-
ance is suitable for commercial use, for example in
hotels, schools, hospitals, factories, shops, oces and
rental businesses.
Safety warnings
Cordless polisher scrubber safety
warnings
WARNING: Read all safety warnings and
all instructions. Failure to follow the warnings and
instructions may result in electric shock, re and/or
serious injury.
1. Operators shall be adequately instructed on
the use of the polisher scrubber.
2. Only use the accessories provided with the
appliance or those specied in the instruc-
tions. The use of other accessories may impair
safety.
3. This appliance shall be stored indoors only.
Additional safety warnings
1. Do not operate the appliance in water tempera-
ture above 50 °C (122 °F).
2. Install the front handle securely. If the thumb
nut is loose, the angle or position of the front han-
dle may slip during use and may cause personal
injury.
3. Install the accessory rmly. If the accessory
is loosely installed, it may come o when the
appliance is lifted or rotation is stopped.
4. Make sure that the accessory does not pro-
trude from the splash guard. If the accessory
protrudes, water and cleaning agent may
splash or cause postural sway due to reaction
force.
5. When replacing the accessory manually or
inspecting, make sure to switch o the appli-
ance and remove the battery cartridge.
6. When installing or removing the accessory
manually, wear rubber gloves. Depending on
the condition of the accessory, cleaning agent may
adhere to your skin, which could result in personal
injury.
7. When removing the accessory by using the
accessory removing button, touch the acces-
sory to the oor and lightly press the appli-
ance. If the accessory does not touch the oor, the
accessory cannot be removed because the acces-
sory and adapter of the appliance rotate together.
8. Before pulling the switch trigger, make sure
that the mode is not in the accessory removing
mode by checking the rotation speed indicator.
The accessory may come o.
9. Hold the appliance rmly during operation.
Using the appliance without the splash guard or
using the appliance at the maximum speed may
cause postural sway depending on the condition
of the oor.
10. When not using the splash guard, always
tighten two levers. Brush and/or pad may rotate
unsteady and cause personal injury.
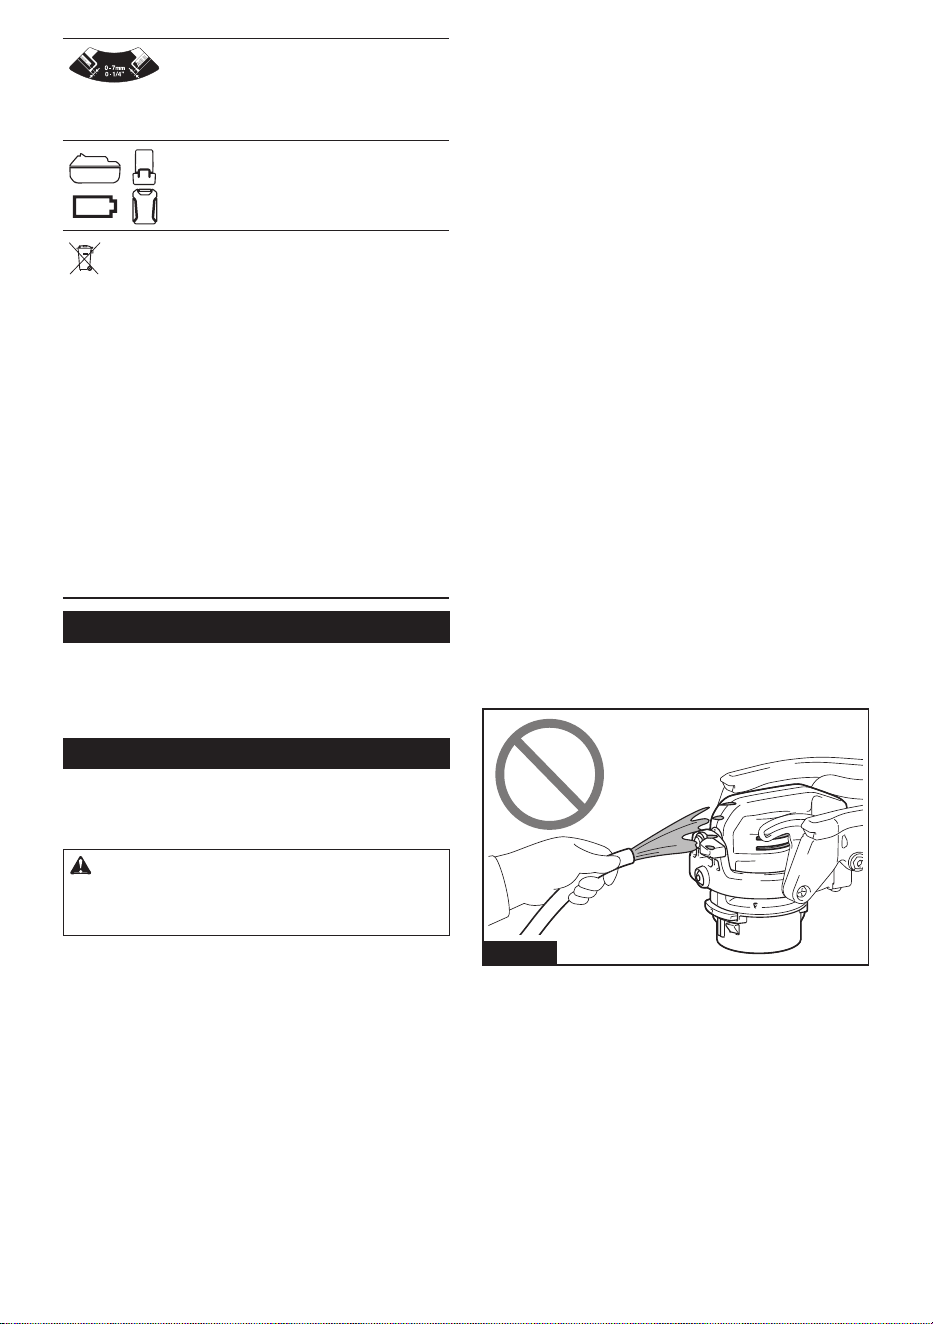
11. Never throw water over the head of the appli-
ance. If water enters the vents, it may cause
breakdown and electric shock.
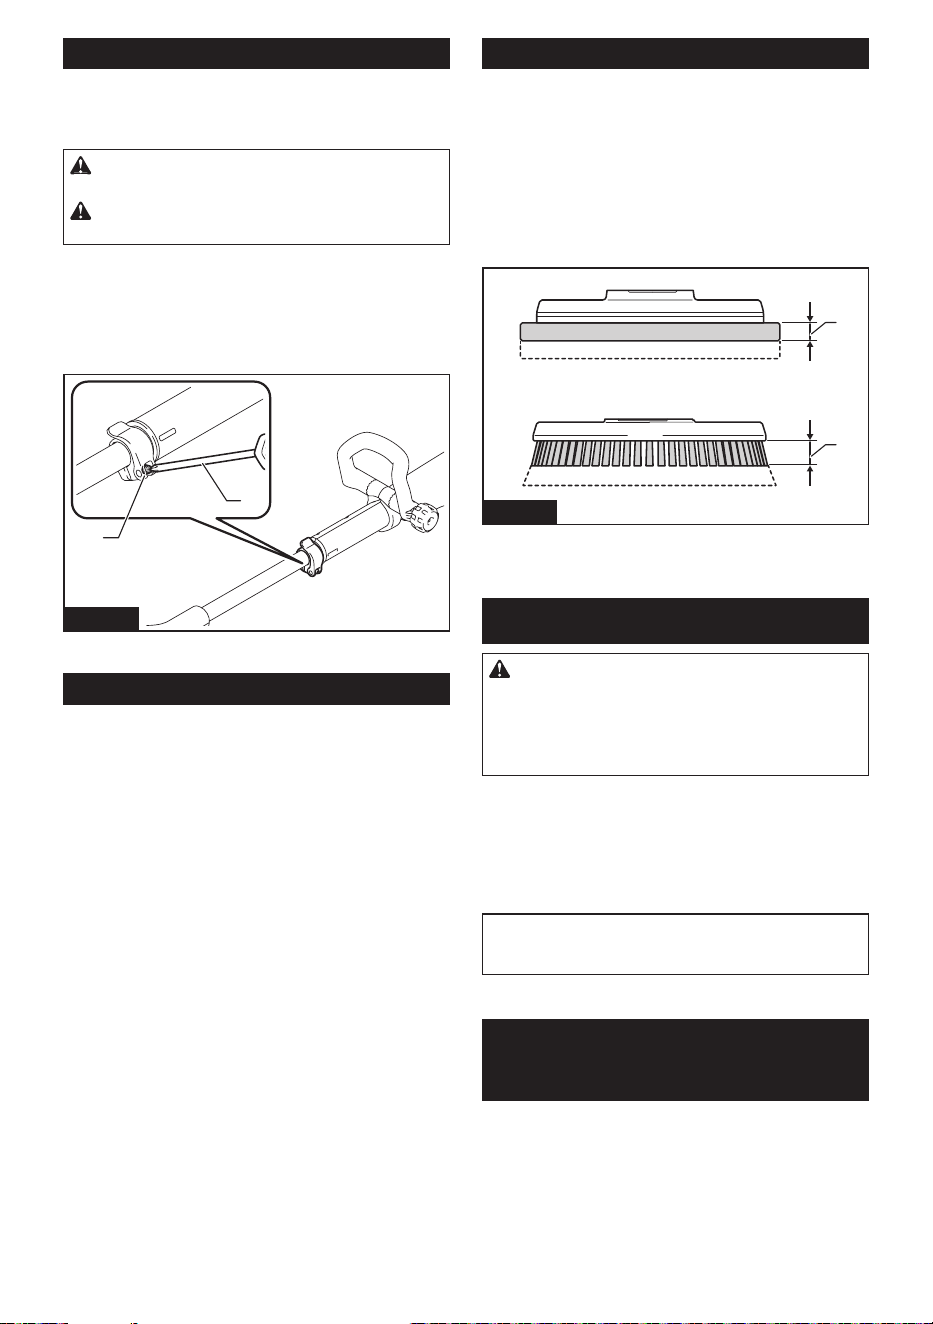
Fig.1
12. Do not lean on the appliance. The appliance
may fall down.
13. Do not work in an improper position. It may
cause personal injury.
14. Wear protective equipment such as a mask,
glasses, rubber gloves, boots, long-sleeved
shirt and long pants to avoid exposing your
skin during work. Touching cleaning agent
directly may cause personal injury. If the cleaning
agent gets into your eyes or adheres to your skin,
rinse with clean water and seek medical attention
if necessary.
15. Ventilate your work area well during operation.
16. Do not use the appliance in an area with gaso-
line and thinner.
4 ENGLISH
17. Use commercially available oor care cleaning
agent appropriate for the oor material.
18. Some oor care cleaning agent is strong
and may deteriorate the appliance. Read the
instructions for the cleaning agent and make
sure it does not aect the appliance before
use.
19. Do not let the battery cartridge contact with
chemical liquid such as cleaning agent or
solvent. Doing so may damage the battery case
and result in re or electric shock.
20. Use an appropriate amount of cleaning agent.
It may splash depending on the rotation speed of
the appliance.
21. Make sure to close the battery cover. If cleaning
agent adheres to the battery cartridge, it may be
damaged and you may get an electric shock.
22. When storing the appliance, remove all acces-
sories and store the appliance in a stable state.
If you lean the appliance against the wall with the
brush installed, the appliance may fall and cause
personal injury.
23. After using cleaning agent, wipe the appliance
and wash out the accessory. Cleaning agent
may deteriorate the appliance.
Battery tool use and care
1. Prevent unintentional starting. Ensure the
switch is in the o-position before connecting
to battery pack, picking up or carrying the
appliance. Carrying the appliance with your nger
on the switch or energizing appliance that have
the switch on invites accidents.
2. Disconnect the battery pack from the appli-
ance before making any adjustments, chang-
ing accessories, or storing appliance. Such
preventive safety measures reduce the risk of
starting the appliance accidentally.
3. Recharge only with the charger specied by
the manufacturer. A charger that is suitable for
one type of battery pack may create a risk of re
when used with another battery pack.
4. Use appliances only with specically desig-
nated battery packs. Use of any other battery
packs may create a risk of injury and re.
5. When battery pack is not in use, keep it away
from other metal objects, like paper clips,
coins, keys, nails, screws or other small metal
objects, that can make a connection from one
terminal to another. Shorting the battery termi-
nals together may cause burns or a re.
6. Under abusive conditions, liquid may be
ejected from the battery; avoid contact. If con-
tact accidentally occurs, ush with water. If
liquid contacts eyes, additionally seek medical
help. Liquid ejected from the battery may cause
irritation or burns.
7. Do not use a battery pack or appliance that is
damaged or modied. Damaged or modied
batteries may exhibit unpredictable behavior
resulting in re, explosion or risk of injury.
8. Do not expose a battery pack or appliance to
re or excessive temperature. Exposure to
re or temperature above 130 °C may cause
explosion.
9. Follow all charging instructions and do not
charge the battery pack or appliance outside
of the temperature range specied in the
instructions. Charging improperly or at tempera-
tures outside of the specied range may damage
the battery and increase the risk of re.
10. Have servicing performed by a qualied repair
person using only identical replacement parts.
This will ensure that the safety of the product is
maintained.
11. Do not modify or attempt to repair the appli-
ance or the battery pack except as indicated in
the instructions for use and care.
Symbols
The followings show the symbols used for tool.
volts
direct current
no load speed
revolutions or reciprocation per minute
diameter
Important safety instructions for
battery cartridge
1. Before using battery cartridge, read all instruc-
tions and cautionary markings on (1) battery
charger, (2) battery, and (3) product using
battery.
2. Do not disassemble or tamper with the battery
cartridge. It may result in a re, excessive heat,
or explosion.
3. If operating time has become excessively
shorter, stop operating immediately. It may
result in a risk of overheating, possible burns
and even an explosion.
4. If electrolyte gets into your eyes, rinse them
out with clear water and seek medical atten-
tion right away. It may result in loss of your
eyesight.
5. Do not short the battery cartridge:
(1) Do not touch the terminals with any con-
ductive material.
(2) Avoid storing battery cartridge in a con-
tainer with other metal objects such as
nails, coins, etc.
(3) Do not expose battery cartridge to water
or rain.
A battery short can cause a large current
ow, overheating, possible burns and even a
breakdown.
6. Do not store and use the tool and battery car-
tridge in locations where the temperature may
reach or exceed 50 °C (122 °F).

5 ENGLISH
7. Do not incinerate the battery cartridge even if
it is severely damaged or is completely worn
out. The battery cartridge can explode in a re.
8. Do not nail, cut, crush, throw, drop the battery
cartridge, or hit against a hard object to the
battery cartridge. Such conduct may result in a
re, excessive heat, or explosion.
9. Do not use modied or damaged batteries.
10. The contained lithium-ion batteries are subject
to the Dangerous Goods Legislation require-
ments.
For commercial transports e.g. by third parties,
forwarding agents, special requirement on pack-
aging and labeling must be observed.
For preparation of the item being shipped, consult-
ing an expert for hazardous material is required.
Please also observe possibly more detailed
national regulations.
Tape or mask o open contacts and pack up the
battery in such a manner that it cannot move
around in the packaging.
11. When disposing the battery cartridge, remove
it from the tool and dispose of it in a safe
place. Follow your local regulations relating to
disposal of battery.
12. Use the batteries only with the products
specied by Makita. Installing the batteries to
non-compliant products may result in a re, exces-
sive heat, explosion, or leak of electrolyte.
13. If the tool is not used for a long period of time,
the battery must be removed from the tool.
14. During and after use, the battery cartridge may
take on heat which can cause burns or low
temperature burns. Pay attention to the han-
dling of hot battery cartridges.
15. Do not touch the terminal of the tool imme-
diately after use as it may get hot enough to
cause burns.
16. Do not allow chips, dust, or soil stuck into the
terminals, holes, and grooves of the battery
cartridge. It may cause heating, catching re,
burst and malfunction of the tool or battery car-
tridge, resulting in burns or personal injury.
17. Unless the tool supports the use near
high-voltage electrical power lines, do not use
the battery cartridge near high-voltage electri-
cal power lines. It may result in a malfunction or
breakdown of the tool or battery cartridge.
18. Keep the battery away from children.
SAVE THESE INSTRUCTIONS.
CAUTION: Only use genuine Makita batteries.
Use of non-genuine Makita batteries, or batteries that
have been altered, may result in the battery bursting
causing res, personal injury and damage. It will
also void the Makita warranty for the Makita tool and
charger.
Tips for maintaining maximum
battery life
1. Charge the battery cartridge before completely
discharged. Always stop tool operation and
charge the battery cartridge when you notice
less tool power.
2. Never recharge a fully charged battery car-
tridge. Overcharging shortens the battery
service life.
3. Charge the battery cartridge with room tem-
perature at 10 °C - 40 °C (50 °F - 104 °F). Let
a hot battery cartridge cool down before
charging it.
4. When not using the battery cartridge, remove
it from the tool or the charger.
5. Charge the battery cartridge if you do not use
it for a long period (more than six months).
6 ENGLISH
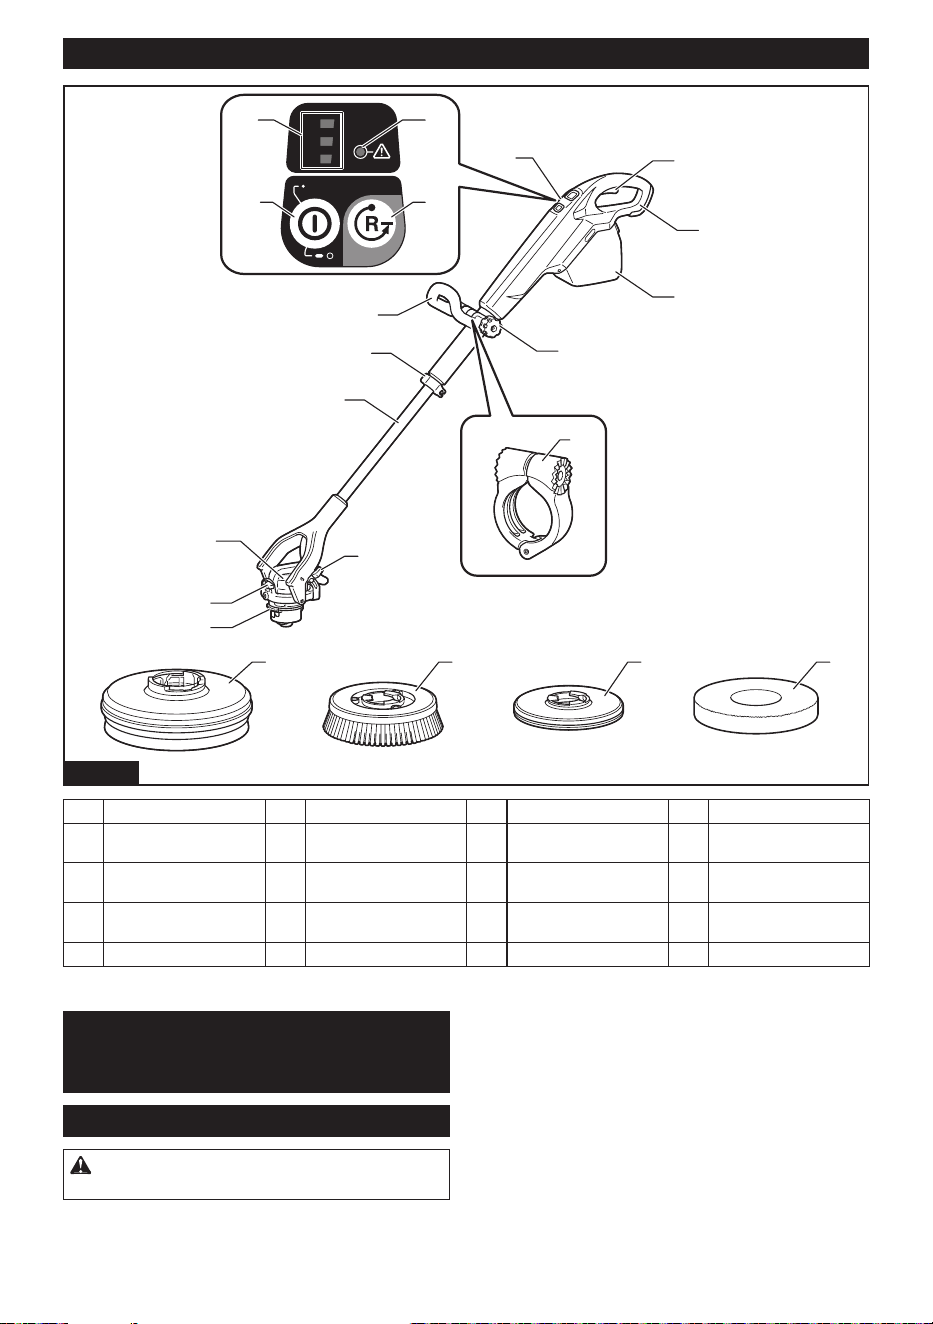
Names of parts
3
1
2
1/2/3
1
12
11
19 20
10
17 18
9
8
7
6
5
4
3
2
10
1413
1615
Fig.2
1 Switch trigger 2 Handle 3 Battery cover 4 Thumb nut
5 Control panel 6 Front handle 7 Lever (for xing exten-
sion pole)
8 Extension pole
9 Head 10 Lever (for xing head) (2
places)
11 Splash guard removing
button
12 Handle base
13 Main power button 14 Accessory removing
button
15 Rotation speed indicator 16 Caution lamp
17 Splash guard 18 Medium brush 19 Pad holder 20 Pad
PREPARATIONS
FOR USE
Accessories
CAUTION: Always use accessories specied
by Makita.
Combine and use accessories depending on your uses
or environment.
7 ENGLISH
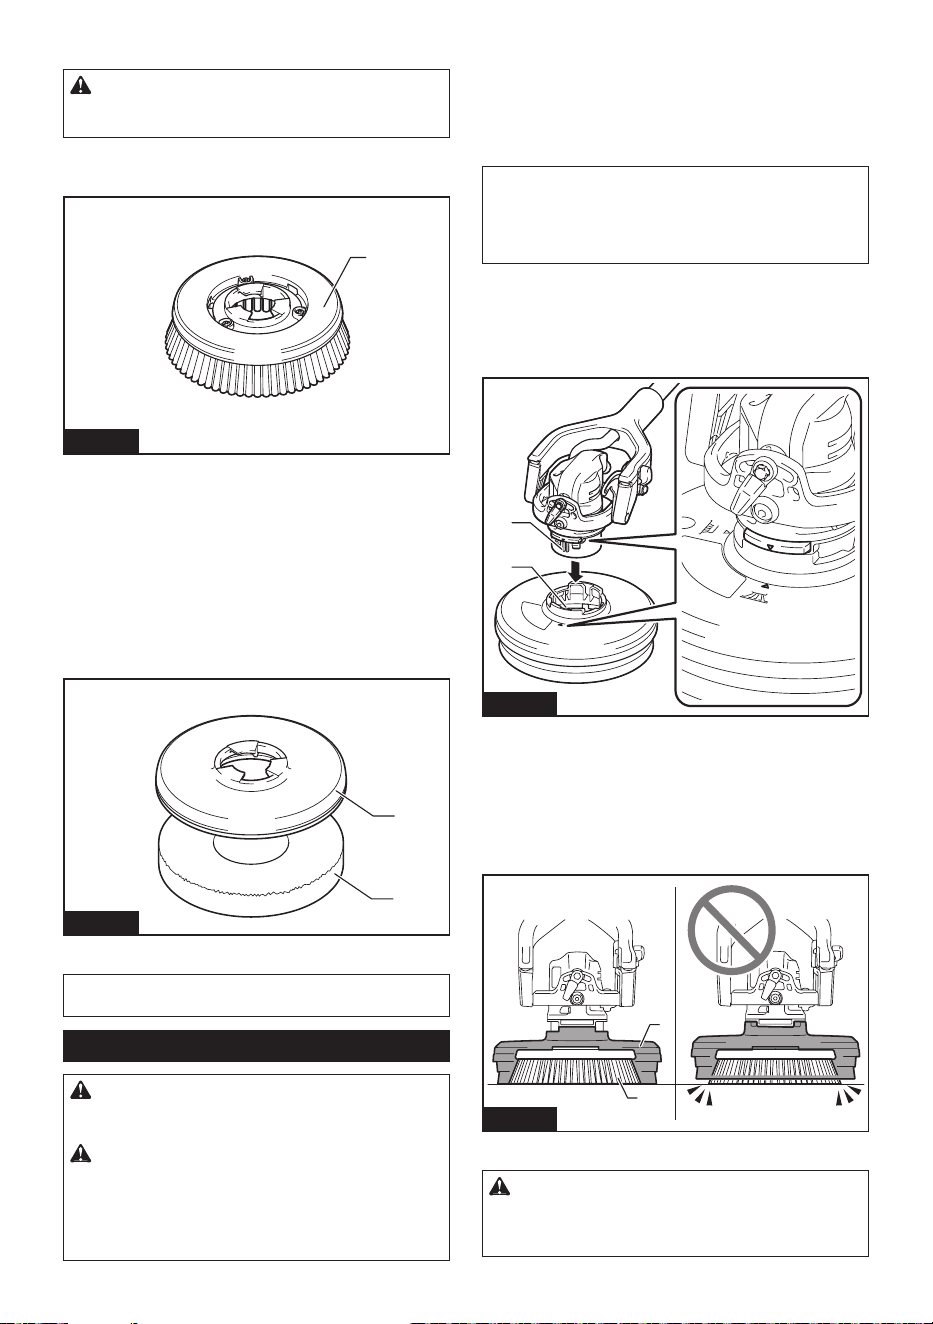
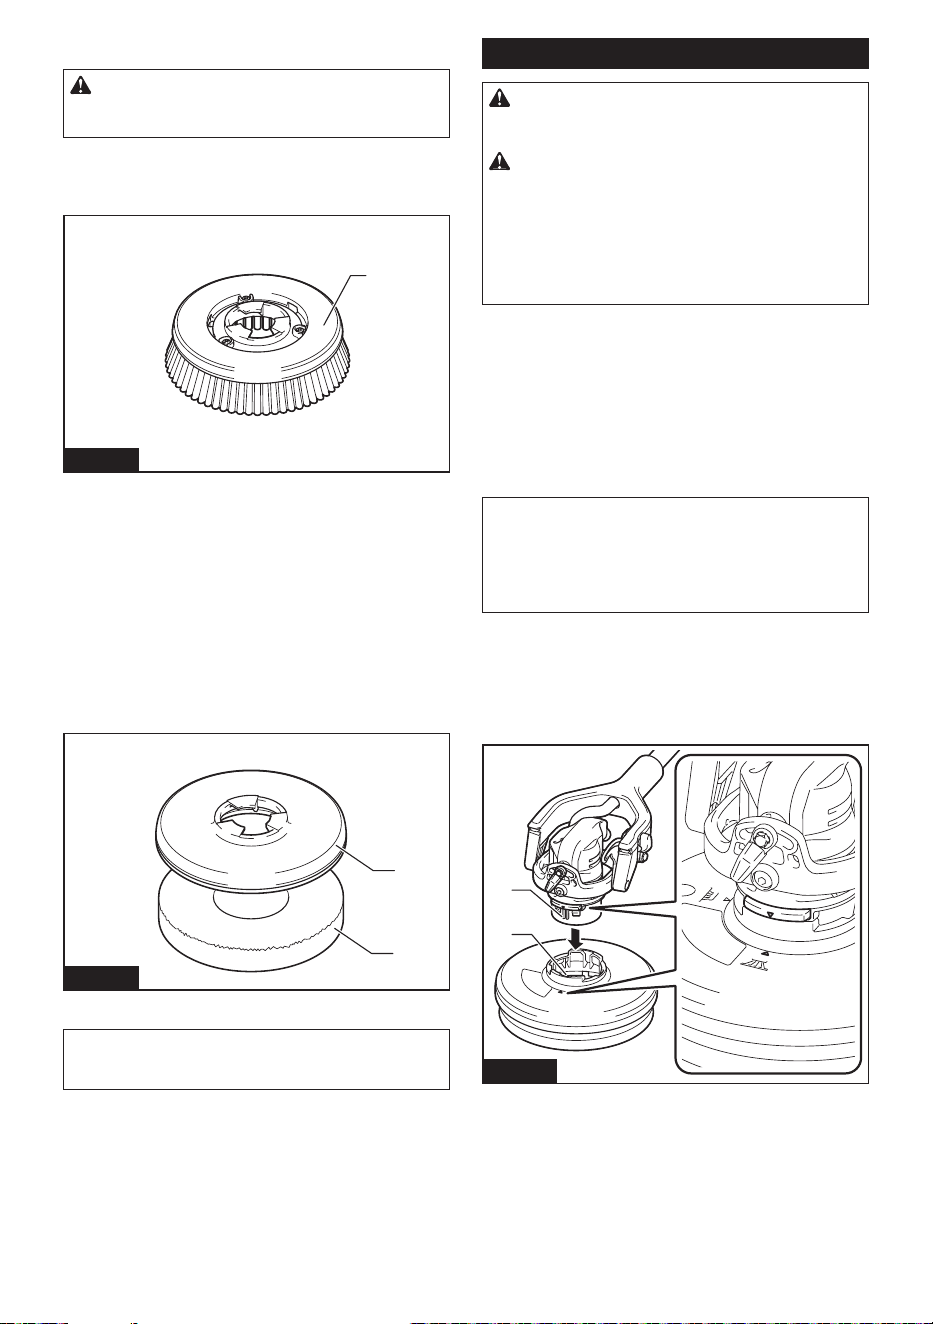
Brush
CAUTION: The brush may damage ooring.
Conrm the instruction manual of ooring before
operation.
Brush cleaning is suitable for following operation.
• Cleaning of general interior ooring
1
Fig.3
► 1. Medium brush
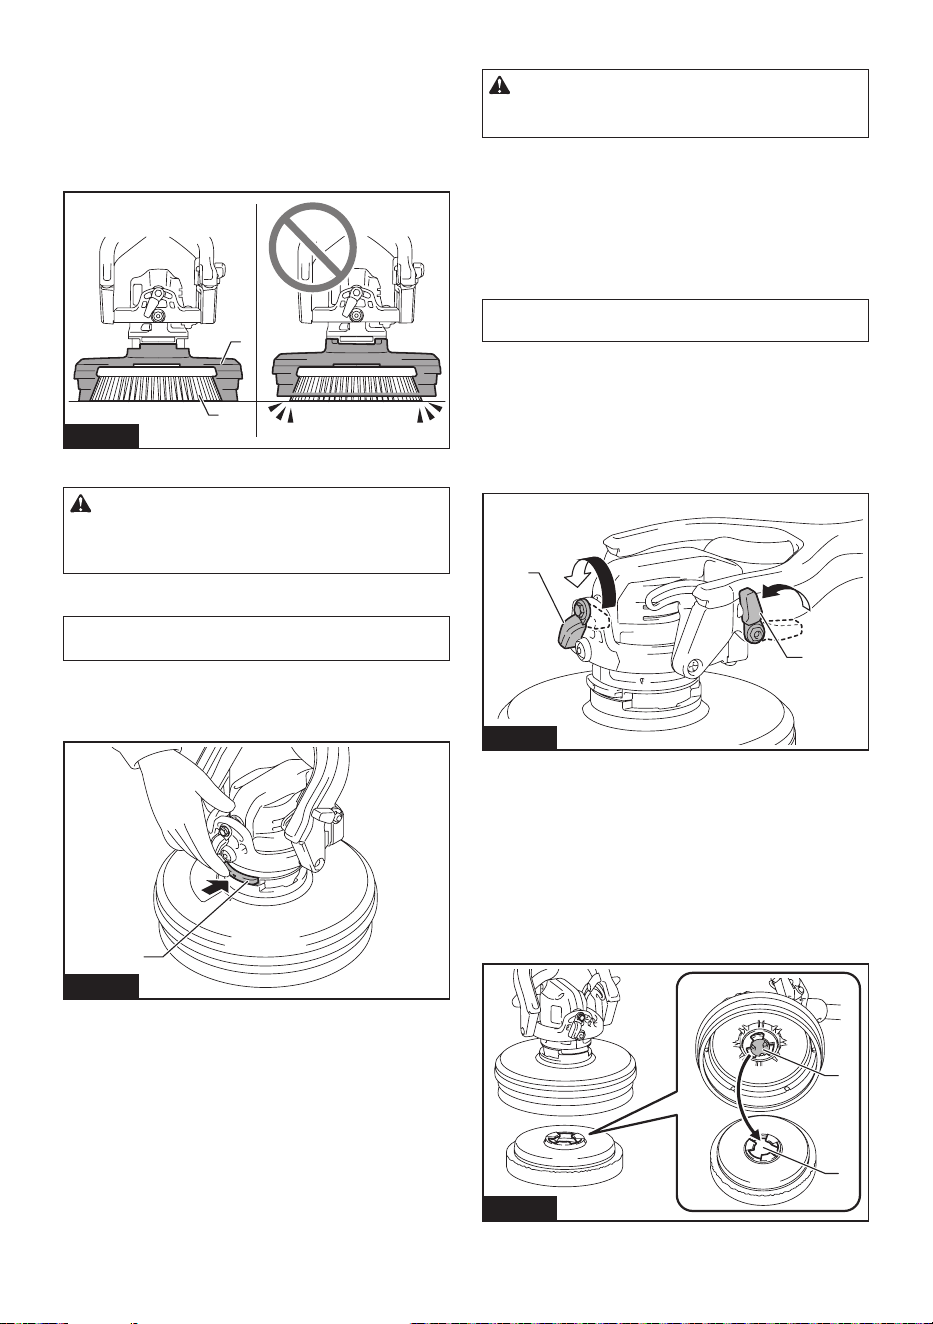
Pad holder/Pad
Pad is suitable for following operation. Select a pad
depending on your work.
• Surface polishing
• Washing
When using a pad for the rst time, remove the center
of the pad along a cutline before use. Removed center
part of the pad can be used as a hand pad.
2
1
Fig.4
► 1. Pad holder 2. Pad
NOTE: For more details of accessories, refer to the
catalog or contact the dealer or our sales oce.
Assembly
CAUTION: Before operating the appliance,
make sure that the appliance is switched o and
the battery cartridge is removed.
CAUTION:
Wear protective equipment such
as a mask, glasses, rubber gloves, boots, long
sleeves and long pants to avoid exposing your
skin during work. Touching cleaning agent directly
may cause personal injury. If cleaning agent gets into
your eyes or adheres to your skin, wash out with water.
Installing and removing splash guard
Using the splash guard with the brush or pad prevents
water or cleaning agent from splashing.
With the splash guard installed on the head and the
also levers loosened, you can reduce swaying and
move steadily toward your destination.
NOTE: You can use the appliance without the splash
guard when cleaning baseboards and other wall
edges, tiled-oor joints, or grooves. When using the
appliance without the splash guard, always lock the
head of the appliance with levers.
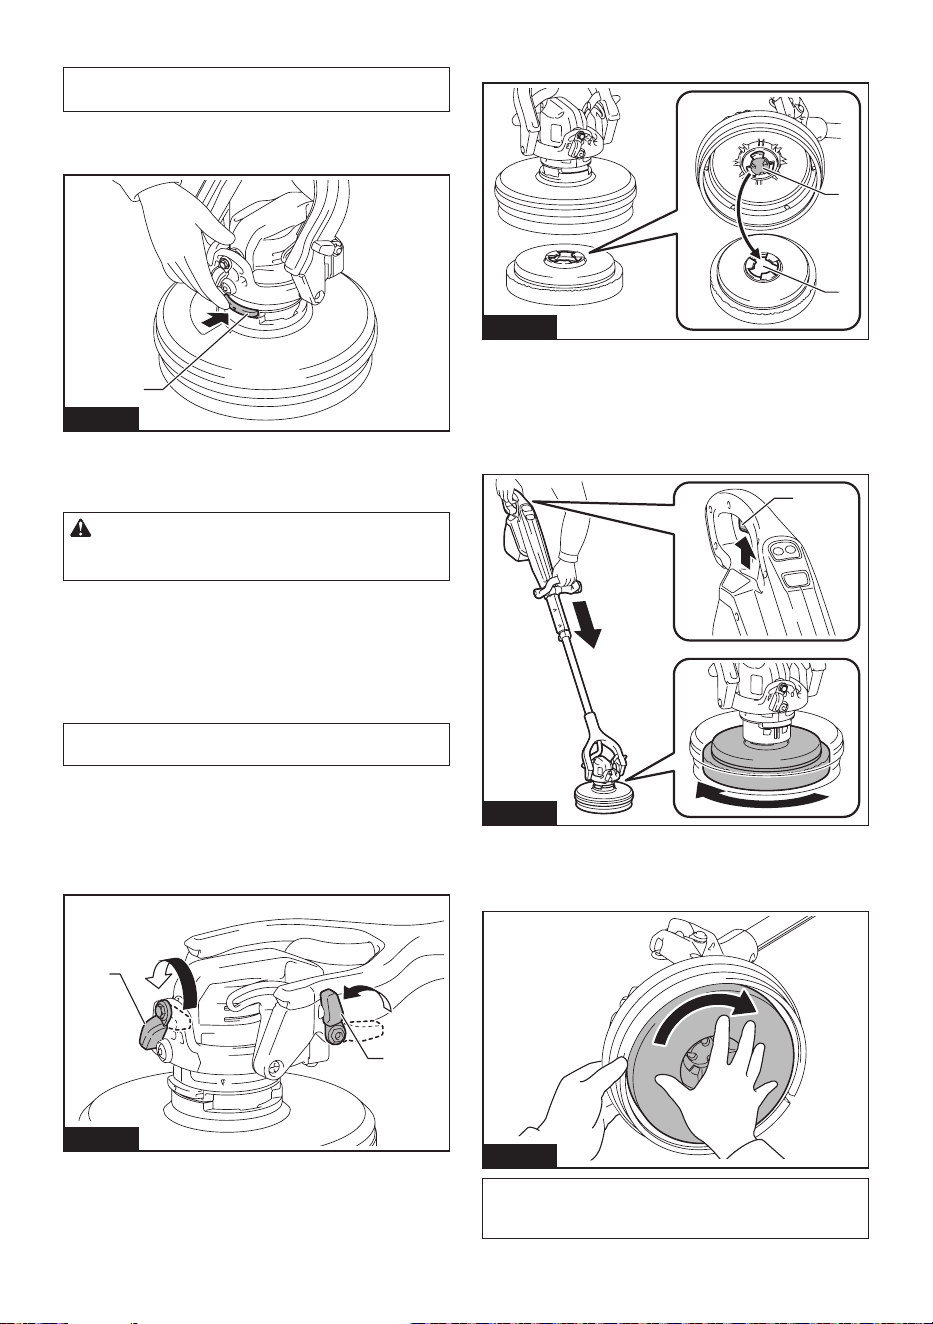
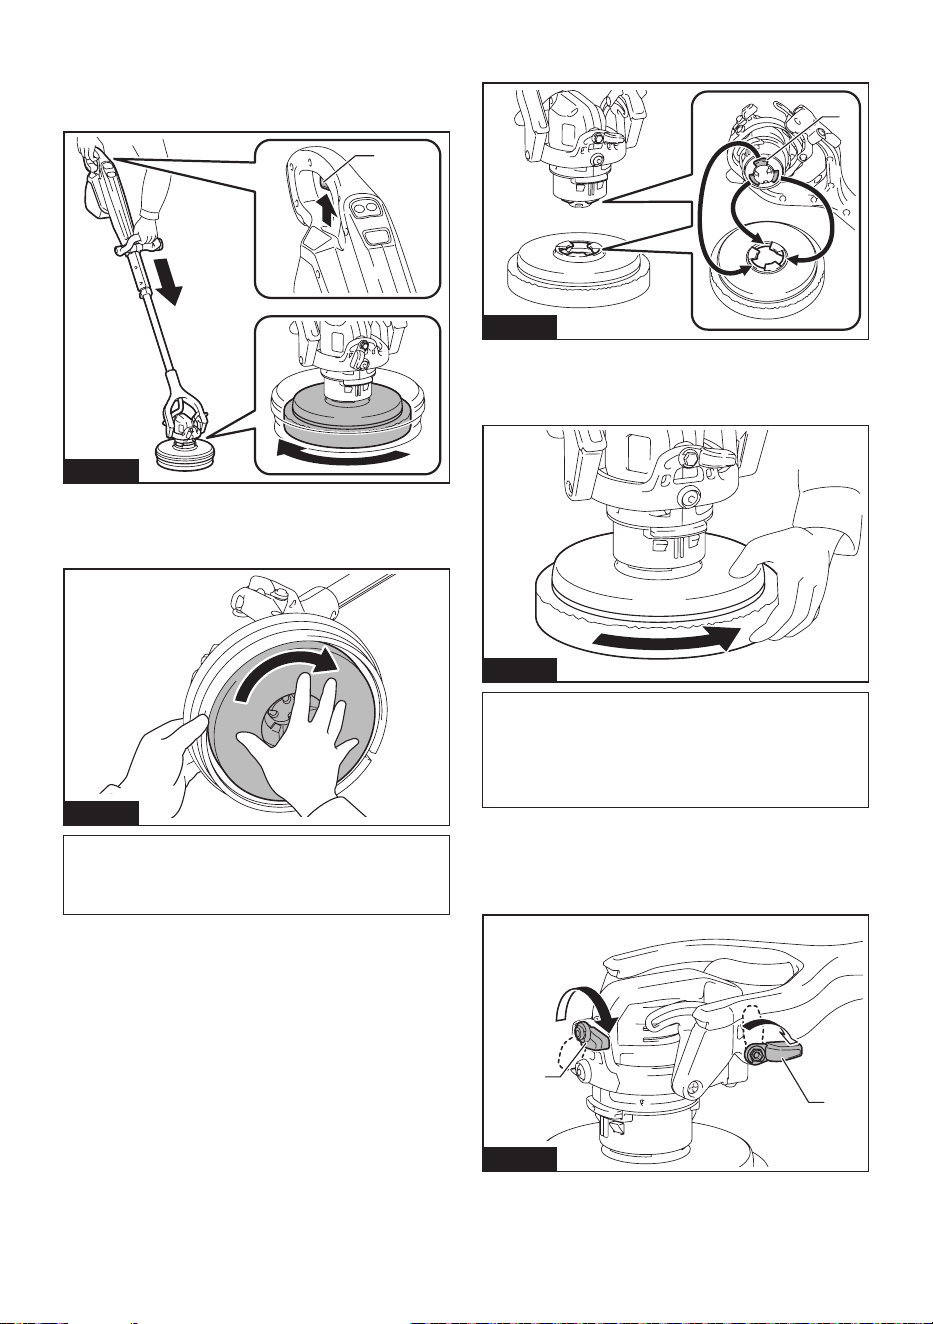
Installing
Engage the protrusions of the head and a groove of the
splash guard until they click.
Make sure that the splash guard does not come o.
1
2
Fig.5
► 1. Protrusion 2. Groove 3. Splash guard
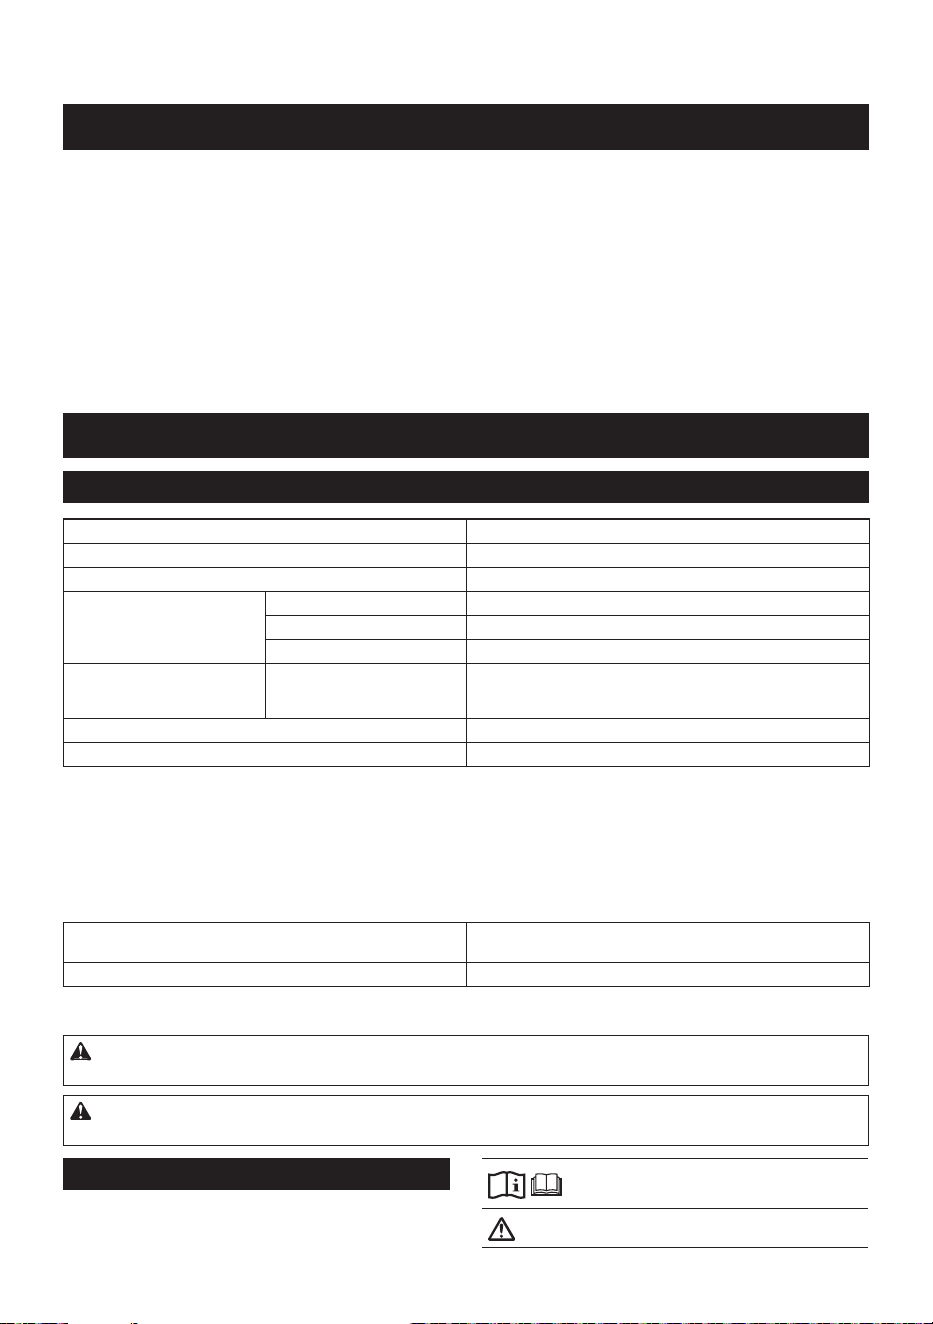
The splash guard is available in two heights, depending
on wear of the accessory. Adjust the height of the splash
guard as follows. When the appliance is placed on the
oor, the accessory does not contact the oor rst, and
the gap between the bottom of the accessory and the tip
of the splash guard bristles is 0 - 7 mm (0″ - 1/4″).
1
2
Fig.6
► 1. Splash guard 2. Accessory
CAUTION: If the accessory protrudes from
the splash guard, water and cleaning agent may
splash or cause postural sway due to reaction
force.
8 ENGLISH
Removing
NOTICE: Remove the accessory before remov-
ing the splash guard.
Press the splash guard removing button.
The splash guard will come o from the appliance.
1
Fig.7
► 1. Splash guard removing button
Installing and removing accessory
CAUTION: When installing and removing the
accessory manually, always switch o the appli-
ance and remove the battery cartridge.
When using the splash guard, you can install the acces-
sory by switch operation.
When not using the splash guard, manual installation is
recommended.
When removing the accessory, you can select either
switch operation or manual operation regardless of
whether the splash guard is installed or not.
NOTE: When using the pad, attach the pad to the pad
holder before installing them to the appliance.
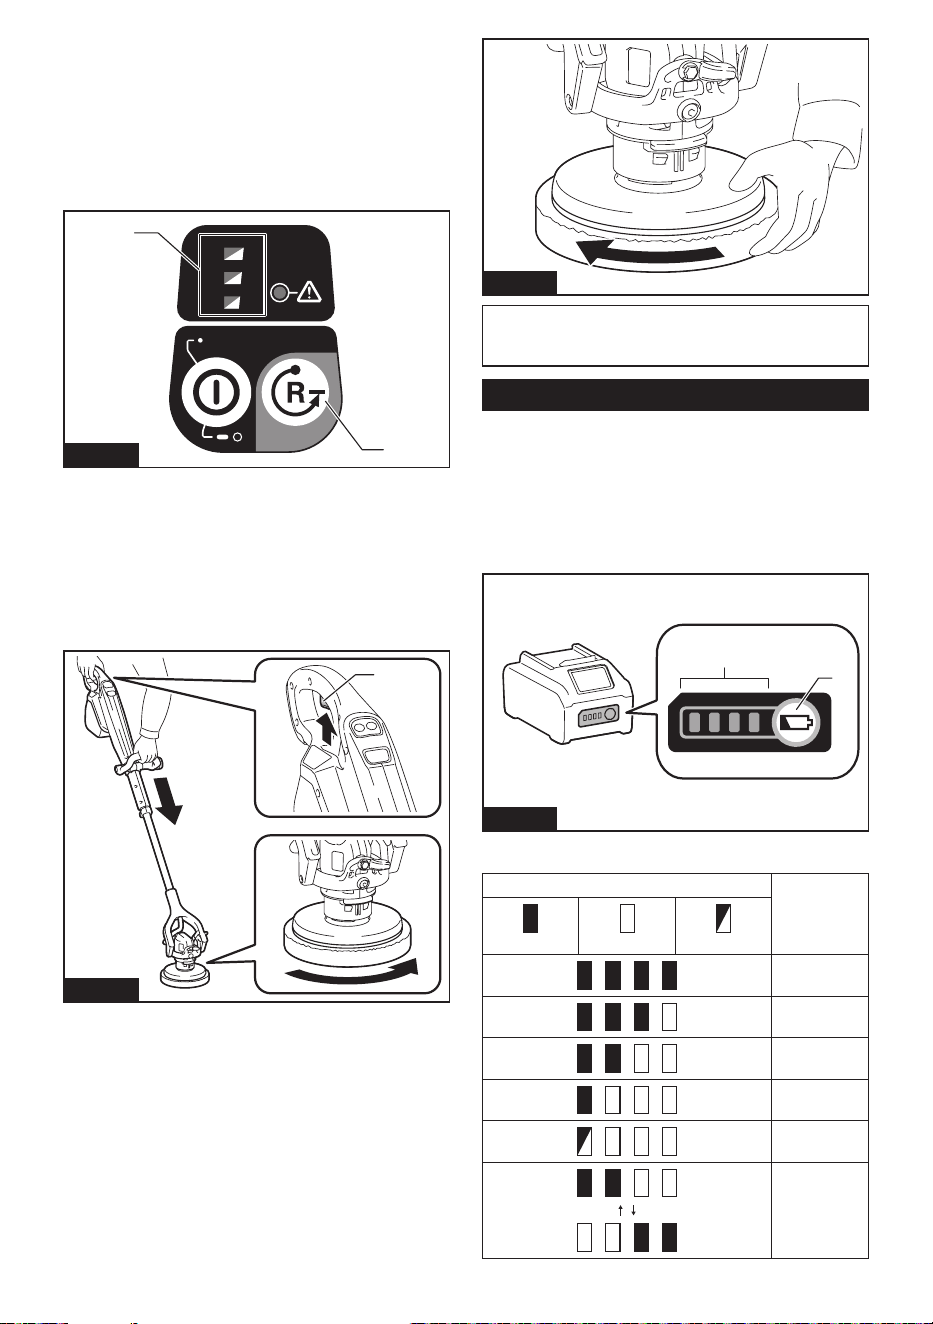
Installing
When using the splash guard
1. Loosen the two levers (for xing head).
The head will be unxed.
1
1
Fig.8
► 1. Lever
2. Install the splash guard. (Refer to page 7.)
3. Install the battery cartridge. (Refer to page 11.)
4.
Turn on the main power button. (Refer to page 12.)
5. Align the adapter of the head and center of the
accessory.
1
2
Fig.9
► 1. Adapter 2. Center
6. Press the appliance lightly to the oor and briey
pull the switch trigger.
The accessory will be installed to the head.
Make sure that the accessory does not come o.
1
Fig.10
► 1. Switch trigger
When installing the accessory manually, turn the acces-
sory quickly in the direction indicated by the arrow.
Fig.11
NOTE: After manual installation, perform step 3, 4
and 6. Otherwise, the accessory may not be installed
securely and come o unintendedly.
9 ENGLISH
When not using the splash guard
1. Tightened the two levers (for xing head).
The head will be xed.
2. Align the protrusions of the head to the guides of
the accessory.
1
Fig.12
► 1. Protrusion
3. Turn the accessory quickly in the direction indi-
cated by the arrow.
Fig.13
NOTE:
After manual installation, perform steps 3, 4
and 6 in the section of "When using the splash guard"
to install the accessory rmly. Otherwise, the accessory
may not be installed securely and come o unintendedly.
Removing
1. When the splash guard is not in use, make sure
the levers (for xing head) are tightened.
1
1
Fig.14
► 1. Lever
2. Install the battery cartridge. (Refer to page 11.)
3.
Turn on the main power button. (Refer to page 12.)
4. Press the accessory removing button on the con-
trol panel.
All lamps of the rotation speed indicator will be blinking.
1/2/3
3
1
2
1
2
Fig.15
►
1. Accessory removing button 2. Rotation speed indicator
5. Press the appliance lightly to the oor and pull the
switch trigger.
The accessory will be removed. If the accessory slips
on the oor and cannot be removed, press the appli-
ance harder to the oor and try the same operation
again, or remove it manually.
1
Fig.16
► 1. Switch trigger
You can remove the accessory manually. Turn the
accessory quickly in the direction indicated by the arrow.
Fig.17
10 ENGLISH
NOTE: If you turn the accessory slowly, the adapter
of the appliance will also rotate, so the accessory
cannot be removed.
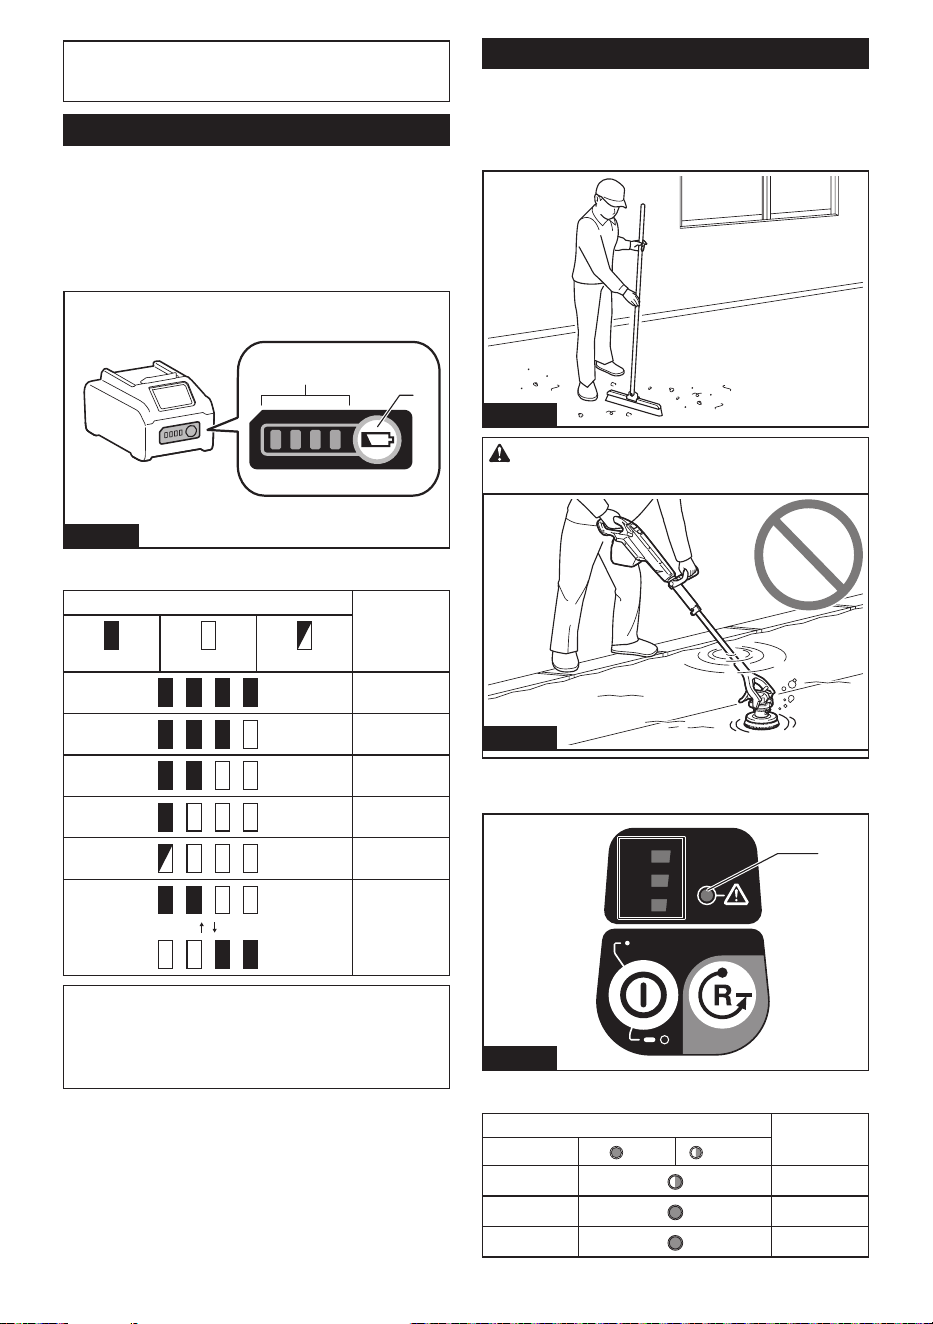
Battery status
Indicating the remaining battery
capacity
Press the check button on the battery cartridge to indi-
cate the remaining battery capacity. The indicator lamps
light up for a few seconds.
1
2
Fig.18
► 1. Indicator lamps 2. Check button
Indicator lamps Remaining
capacity
Lighted O Blinking
75% to 100%
50% to 75%
25% to 50%
0% to 25%
Charge the
battery.
The battery
may have
malfunctioned.
NOTE: Depending on the conditions of use and the
ambient temperature, the indication may dier slightly
from the actual capacity.
NOTE: The rst (far left) indicator lamp will blink when
the battery protection system works.
Things to know before use
Work environment
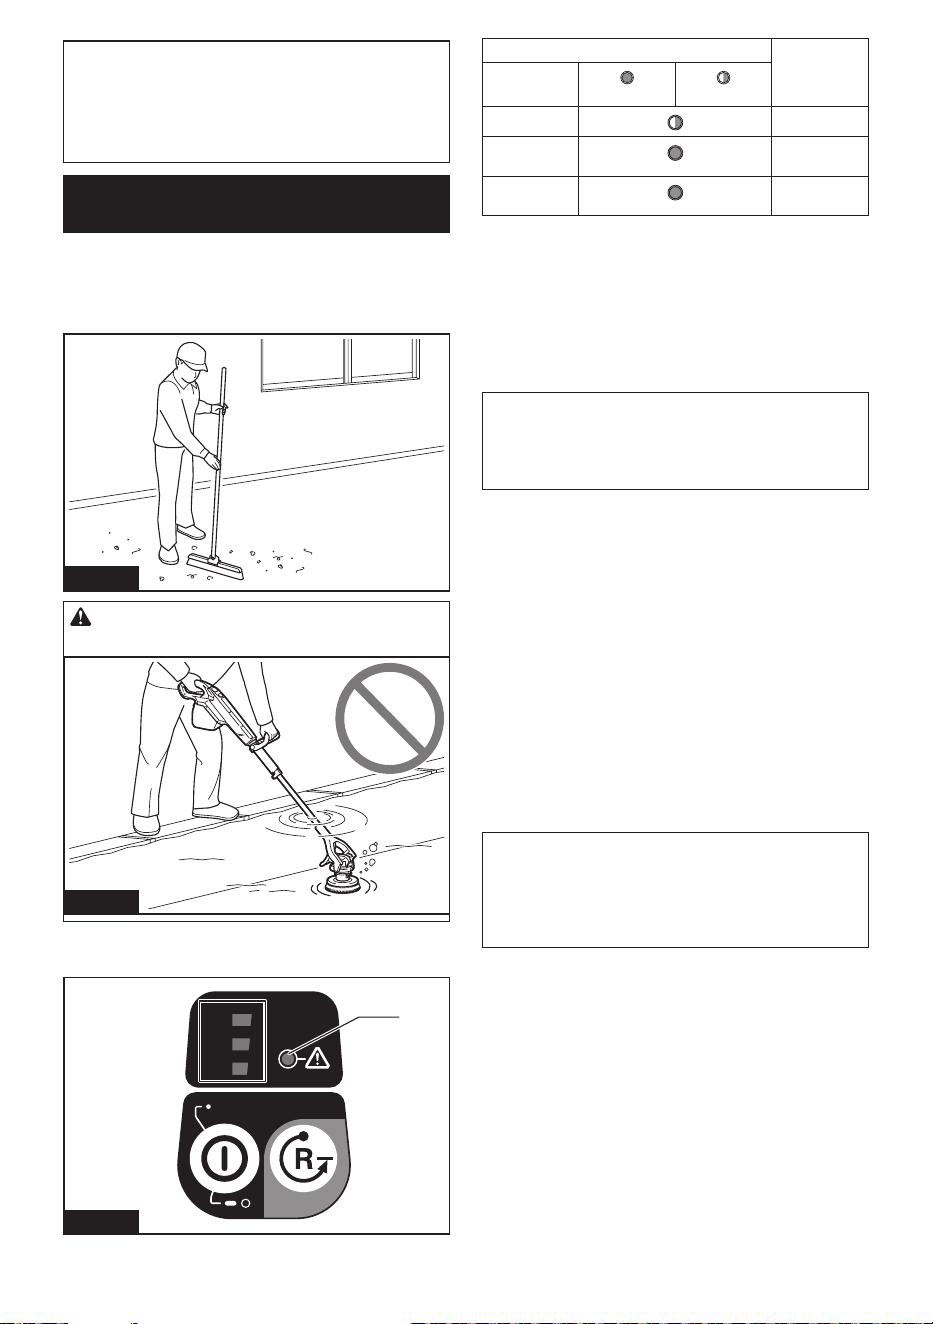
If there are large or string-like refuse in the cleaning
area, remove them before operation.
Fig.19
CAUTION: Never use the appliance under
water.
Fig.20
Protection function
1/2/3
3
1
2
1
Fig.21
► 1. Caution lamp
Caution lamp Status
Color
On Blinking
Green
Overload
Red
Overheat
Red
Overdischarge
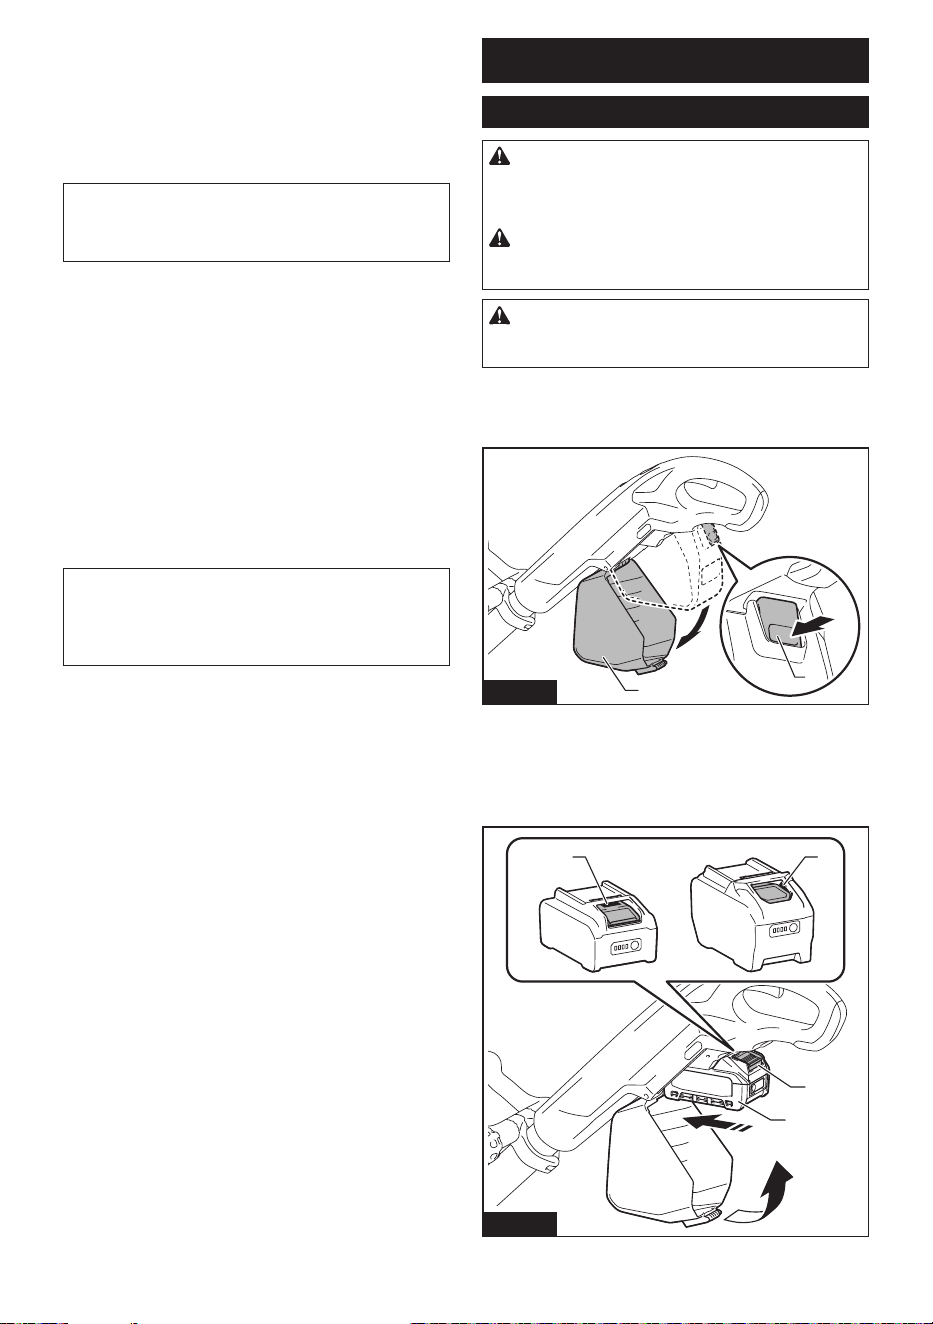
11 ENGLISH
Overload protection
When the appliance is operated in a manner that
causes it to draw an abnormally high current, the appli-
ance automatically stops and the caution lamp blinks
in green. In this situation, turn the appliance o and
remove the battery cartridge to eliminate the cause of
the overload. Then turn the appliance on to restart.
NOTE: Some combinations of oor conditions and
accessories are more likely to occur overload protec-
tion. In this case, change the type of the accessory or
use the appliance at lower rotation speed.
Overheat protection
When the appliance is overheated, the appliance
automatically stops and the caution lamp lights in red
and also front lamp blinks at the same time. When the
battery is overheated, the appliance automatically stops
and the caution lamp lights in red. In this case, switch
o and remove the battery cartridge, then let the appli-
ance and the battery cartridge cool.
Overdischarge protection
When the battery capacity is not enough, the appliance
automatically stops and the caution lamp lights in red.
In this case, remove the battery cartridge from the
appliance and recharge or replace with a fully charged
battery cartridge.
NOTE: When the remaining battery capacity is low,
the caution lamp blinks before working the overdis-
charge protection. However, depending on the oper-
ating conditions, the appliance may stop without the
caution lamp blinking.
Protections against other causes
Protection system is also designed for other causes that
could damage the appliance and allows the appliance to
stop automatically. Take all the following steps to clear
the causes, when the appliance has been brought to a
temporary halt or stop in operation.
1. Turn the appliance o, and then turn it on again to
restart.
2. Charge the battery(ies) or replace it/them with
recharged battery(ies).
3. Let the appliance and battery(ies) cool down.
If no improvement can be found by restoring protection
system, then contact your local Makita Service Center.
Electronic function
Soft start feature
When pulling the switch trigger, reduces the starting
reaction and rotates the accessory smoothly.
Constant speed control
Maintain constant speed under load condition. Possible
to get high working performance.
Restart prevention
When turning on the main power button while the switch
trigger is pulled, the caution lamp blinks in green and
the tool does not start. To start the tool, release the
switch trigger, and pull it again after the caution lamp
turns o and the rotation speed indicator lights.
USAGE
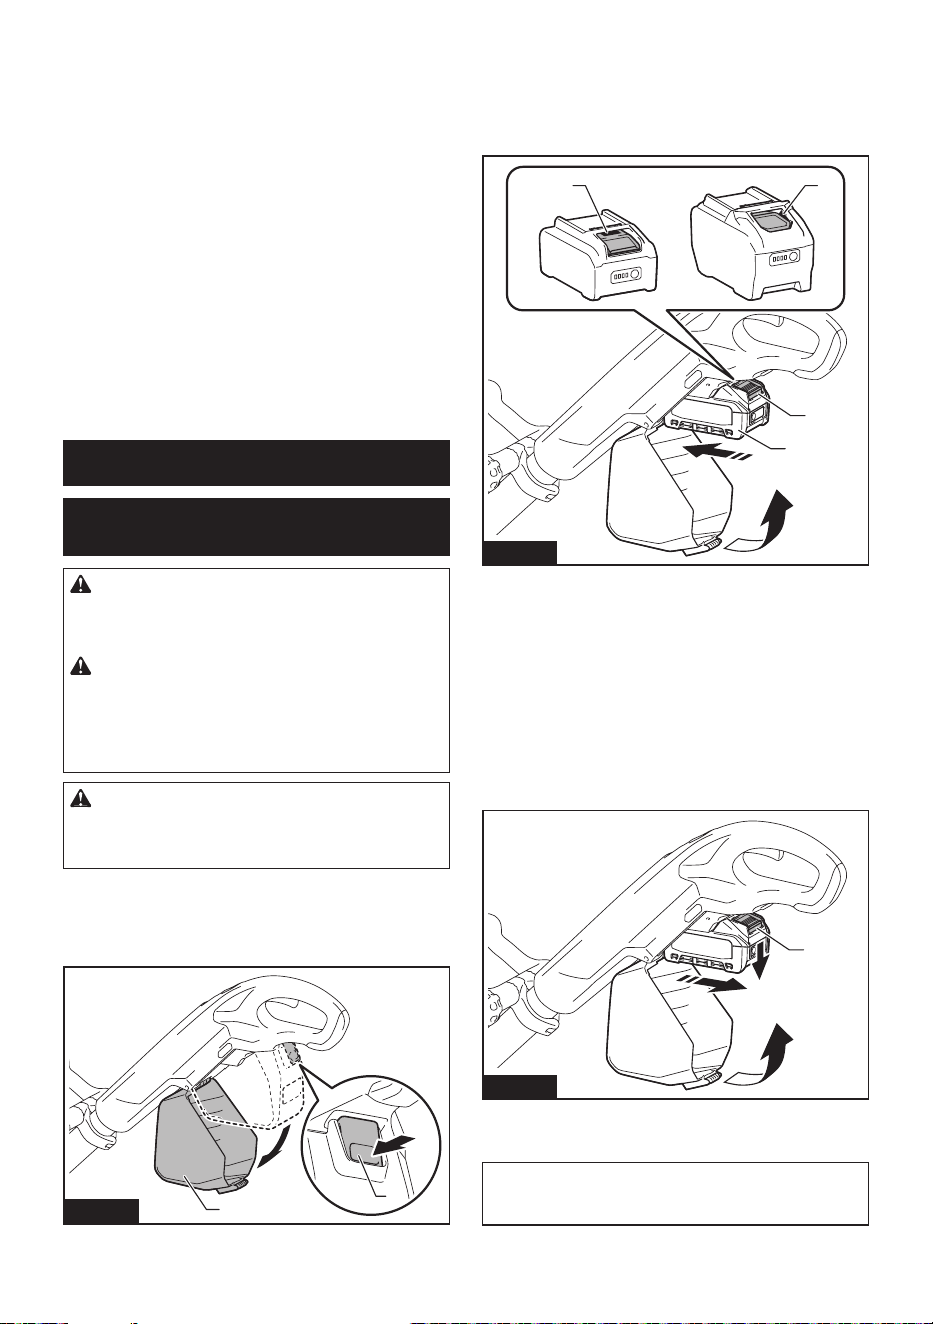
Installing and removing battery cartridge
WARNING: Always switch o the appliance
before installing or removing of the battery car-
tridge. If install the battery cartridge with the appli-
ance is on, it may cause an accident.
WARNING:
Always install the battery cartridge fully
until the red indicator cannot be seen. If not, it may accidentally
fall out of the tool, causing injury to you or someone around you.
CAUTION: Do not use battery adapter. If the
battery adapter is installed, the battery cover dose not
close and cause personal injury.
Installing
1. Open the battery cover while pressing the button.
2
1
Fig.22
► 1. Button 2. Battery cover
2.
Align the tongue on the battery cartridge with the groove
in the housing and slip it into place. Insert it all the way until it
locks in place with a little click. If you can see the red indicator
as shown in the gure, it is not locked completely.
1 1
2
3
Fig.23
► 1. Red indicator 2. Button 3. Battery cartridge
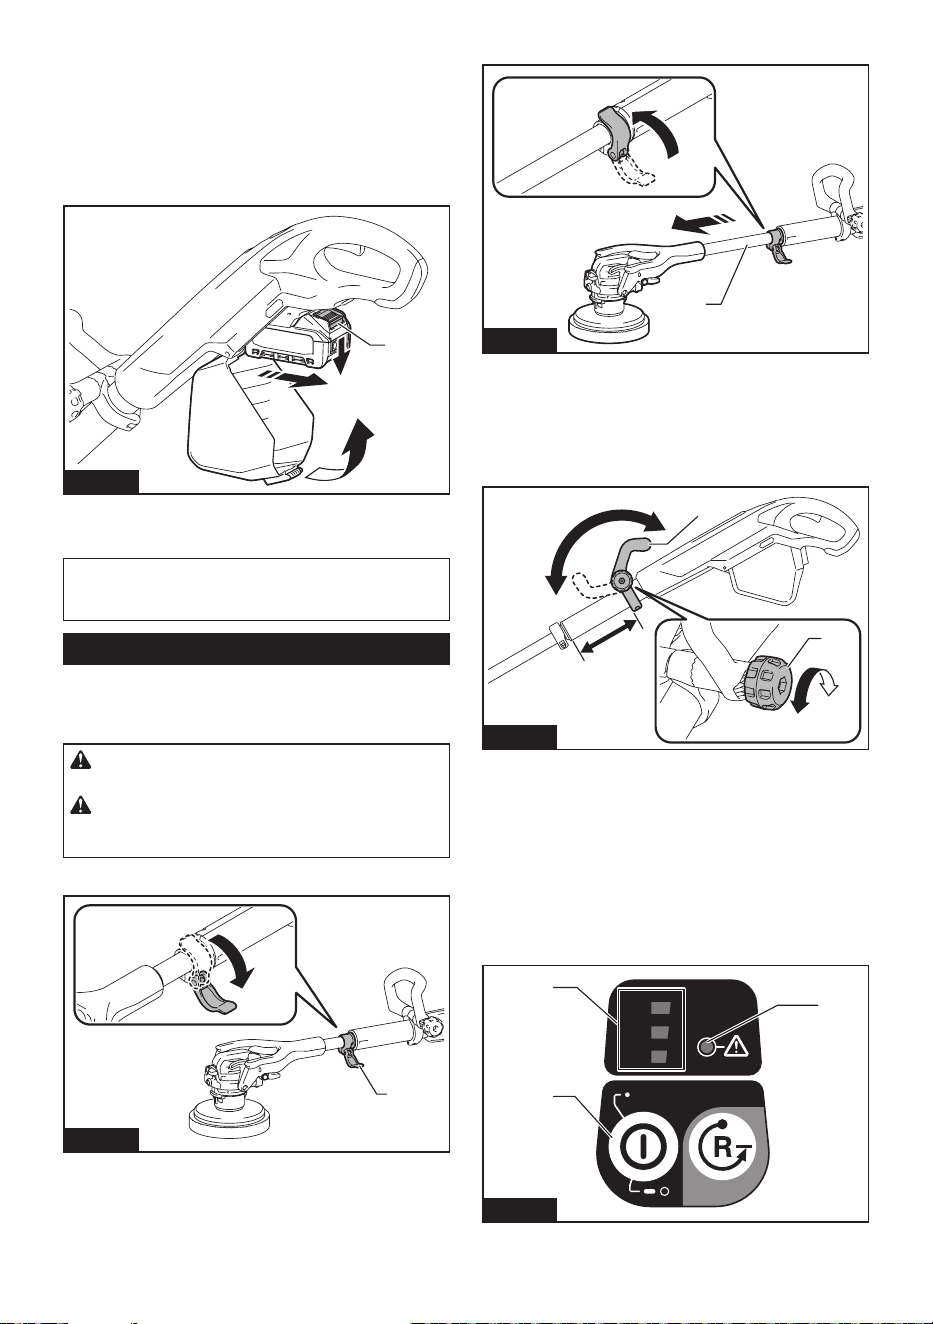
12 ENGLISH
3. Close the battery cover rmly.
Removing
1. Open the battery cover while pressing the button.
2. Slide the battery cartridge from the tool while
sliding the button on the front of the battery cartridge.
1
Fig.24
► 1. Button
3. Close the battery cover rmly.
NOTICE: Be careful not to get your ngers
caught when opening and closing the battery
cover.
Operating the appliance
Install the accessory before use.
Adjusting extension pole
CAUTION: Be careful not to get your ngers
caught when adjusting the extension pole.
CAUTION: Do not extend the extension pole
beyond the limit. Failure to do so may cause a mal-
function of the appliance.
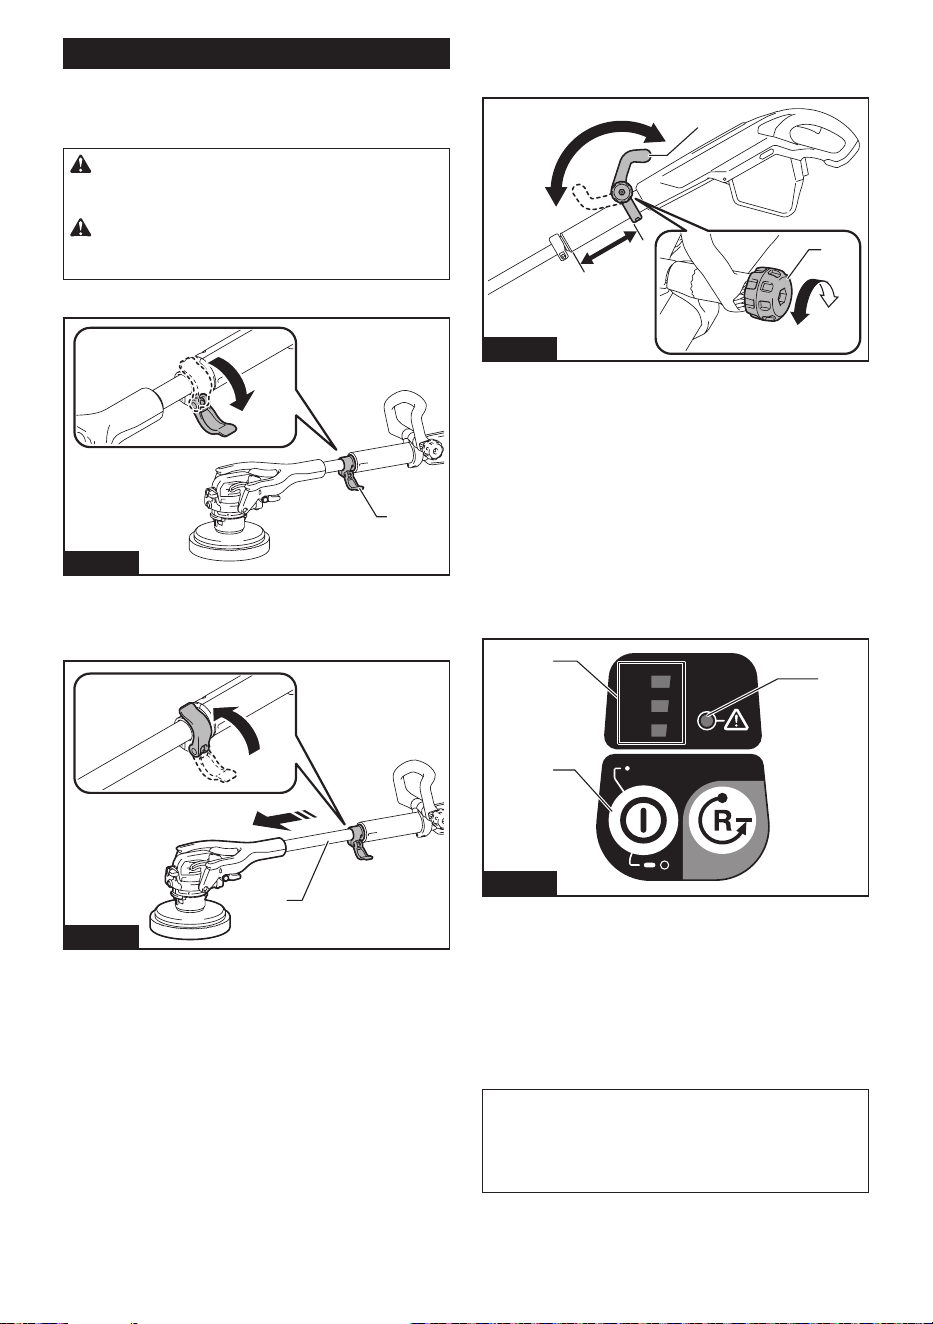
1. Loosen the lever (for xing extension pole).
1
Fig.25
► 1. Lever
2. Adjust the extension pole to the desired length.
1
Fig.26
► 1. Extension pole
3. Tighten the lever.
Adjusting front handle
1. Loosen the thumb nut.
1
4
3
2
Fig.27
► 1. Thumb nut 2. Front handle 3. Loosen 4. Tighten
2. Adjust the position and angle of the front handle.
3. Tighten the thumb nut.
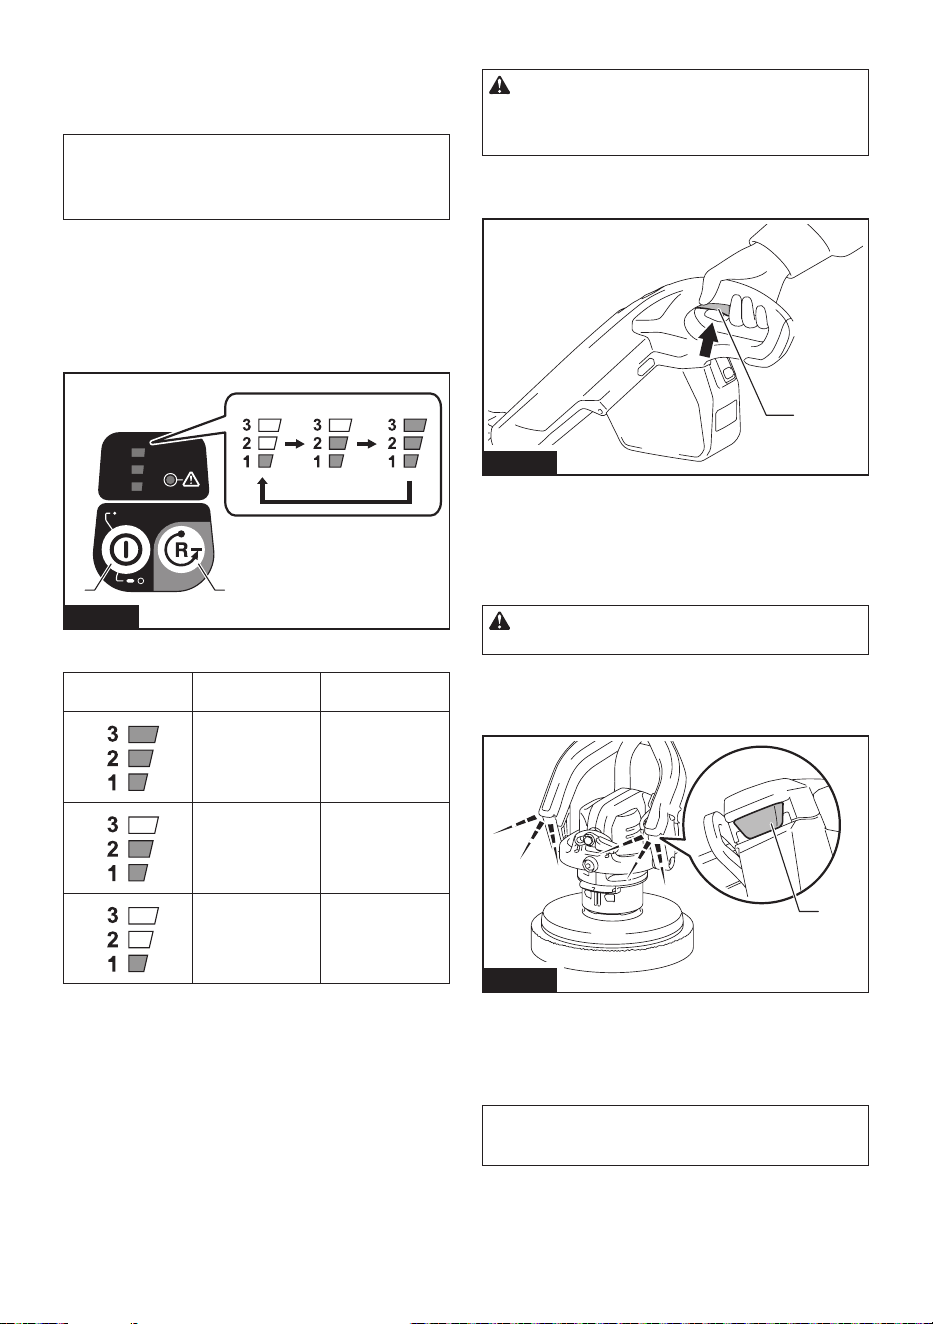
Turning main power button ON/OFF
Turning on
Press the main power button.
The switch turns on and rotation speed indicator lights in green.
1/2/3
3
1
2
1
2
3
Fig.28
► 1. Main power button 2. Rotation speed indicator
3. Caution lamp
13 ENGLISH
Turning o
Press and hold the main power button.
The switch turns o and the rotation speed indicator
goes o.
NOTE: The power automatically turns o a preset
time after without any operation.
In the accessory removing mode, the power turns o
earlier than in the normal mode.
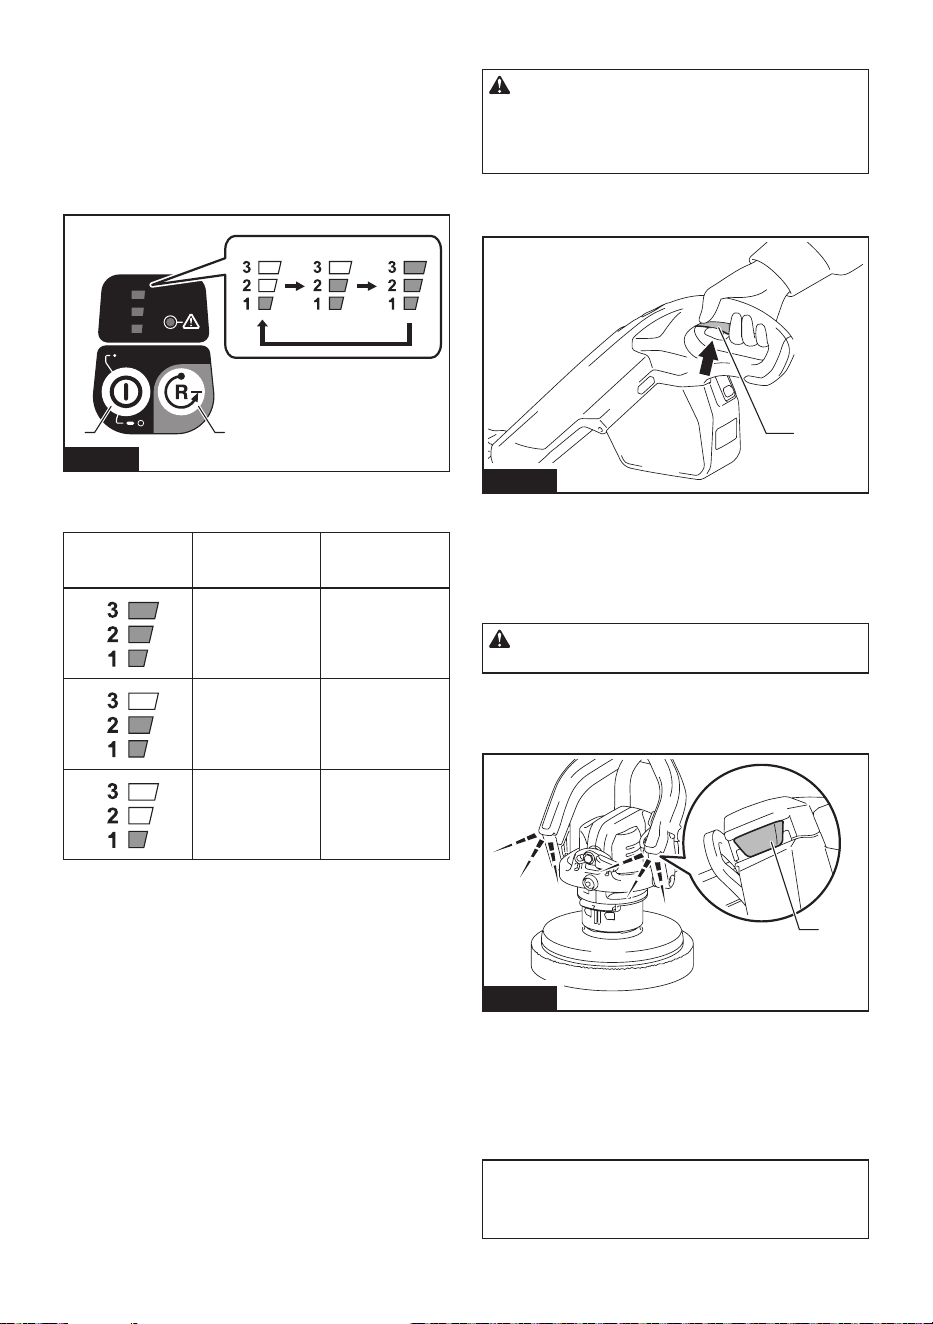
Changing rotation speed/mode
• Normal mode
You can change the rotation speed in three levels:
low, medium and high.
— The rotation speed changes each time you
press the main power button.
1/2/3
3
1
2
1 2
Fig.29
► 1. Main power button 2. Accessory removing button
Speed indicator Mode Rotation speed
(min
-1
(/min))
High 600
Medium 350
Low 150
• Accessory removing mode
You can remove the accessory by switch
operation.
— Press the accessory removing button again
to return to the normal mode.
Switch action
WARNING: Before installing the battery car-
tridge into the tool, always check to see that the
switch trigger actuates properly and returns to
the "OFF" position when released.
1. Pull the switch trigger.
Motor will rotate.
1
Fig.30
► 1. Switch trigger
2. Release the switch trigger.
Motor will stop.
Lighting up the front lamps
CAUTION: Do not look in the light or see the
source of light directly.
1. Pull the switch trigger when the main power switch
is on.
Motor will rotate and lamps will light up.
1
Fig.31
► 1. Front lamp
2. Lamps will go o in the following state.
• When main power button is turned o
• Several seconds after releasing the switch trigger
NOTE: Use a dry cloth to wipe the dirt o the lens
of the lamp. Be careful not to scratch the lens of the
lamp, or it may lower the illumination.

14 ENGLISH
Cleaning operation
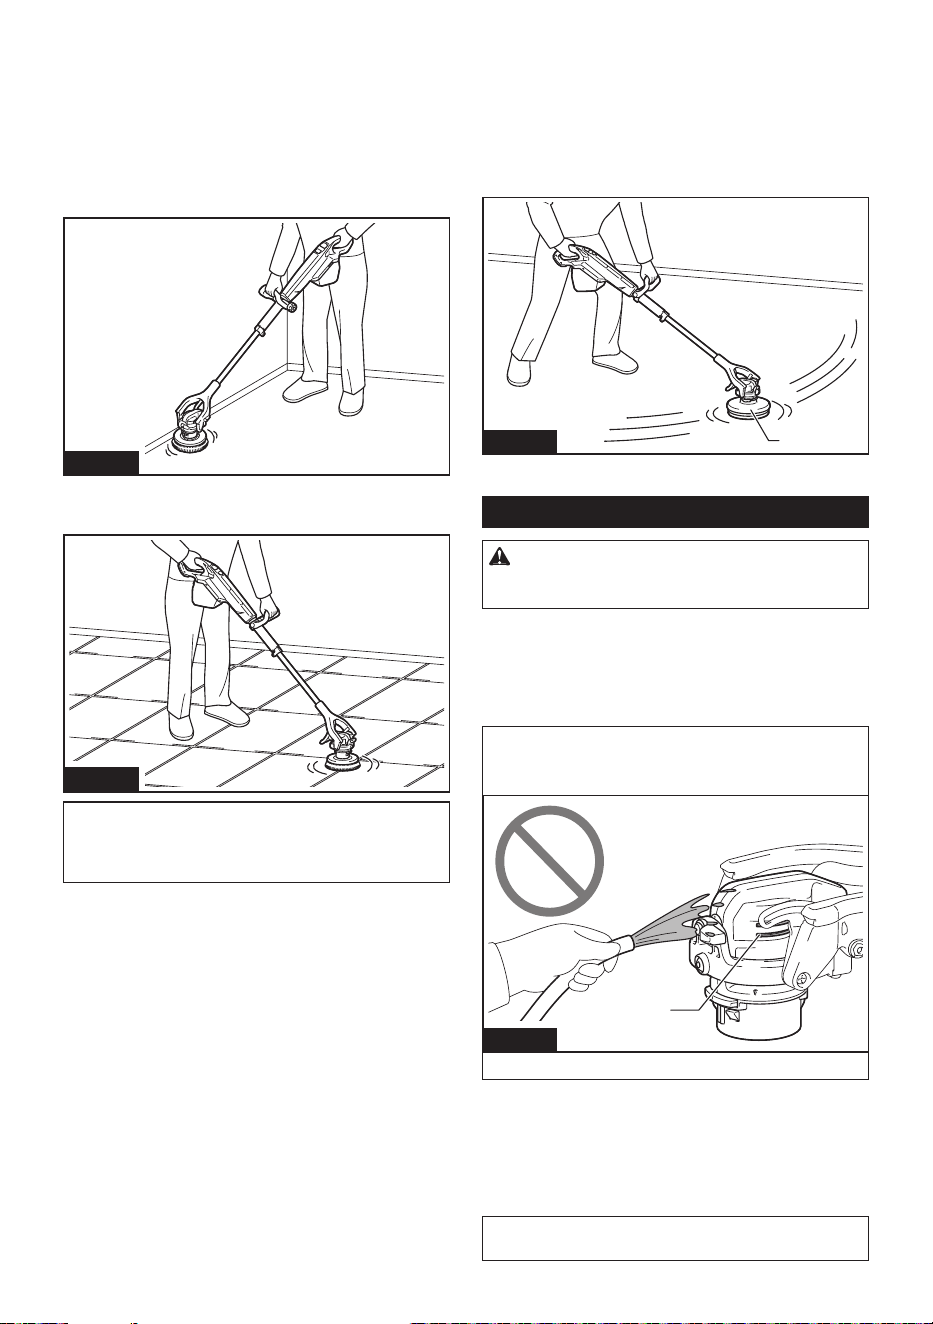
Cleaning wall edges/tiled-oor joints
For more ecient cleaning, use the appliance with the
head of the appliance xed and without the splash guard.
Cleaning wall edges and baseboards
Fig.32
Cleaning tiled-oor joints and grooves
Fig.33
NOTICE: Hold the appliance rmly. Using the
appliance without the splash guard may cause pos-
tural sway due to reaction force.
Prevent water and cleaning agent from
splashing/reduce swaying and operate
steadily
With the splash guard installed on the head and the
levers loosened, it prevents water and cleaning agent
from splashing and you can reduce swaying and move
steadily toward your destination.
1
Fig.34
► 1. Splash guard
Handling after use
CAUTION: If the appliance will not be in use,
make sure the appliance is switched o and the
battery cartridge is removed.
Accessory
Wash out the accessory and dry in the shade.
Head of the appliance
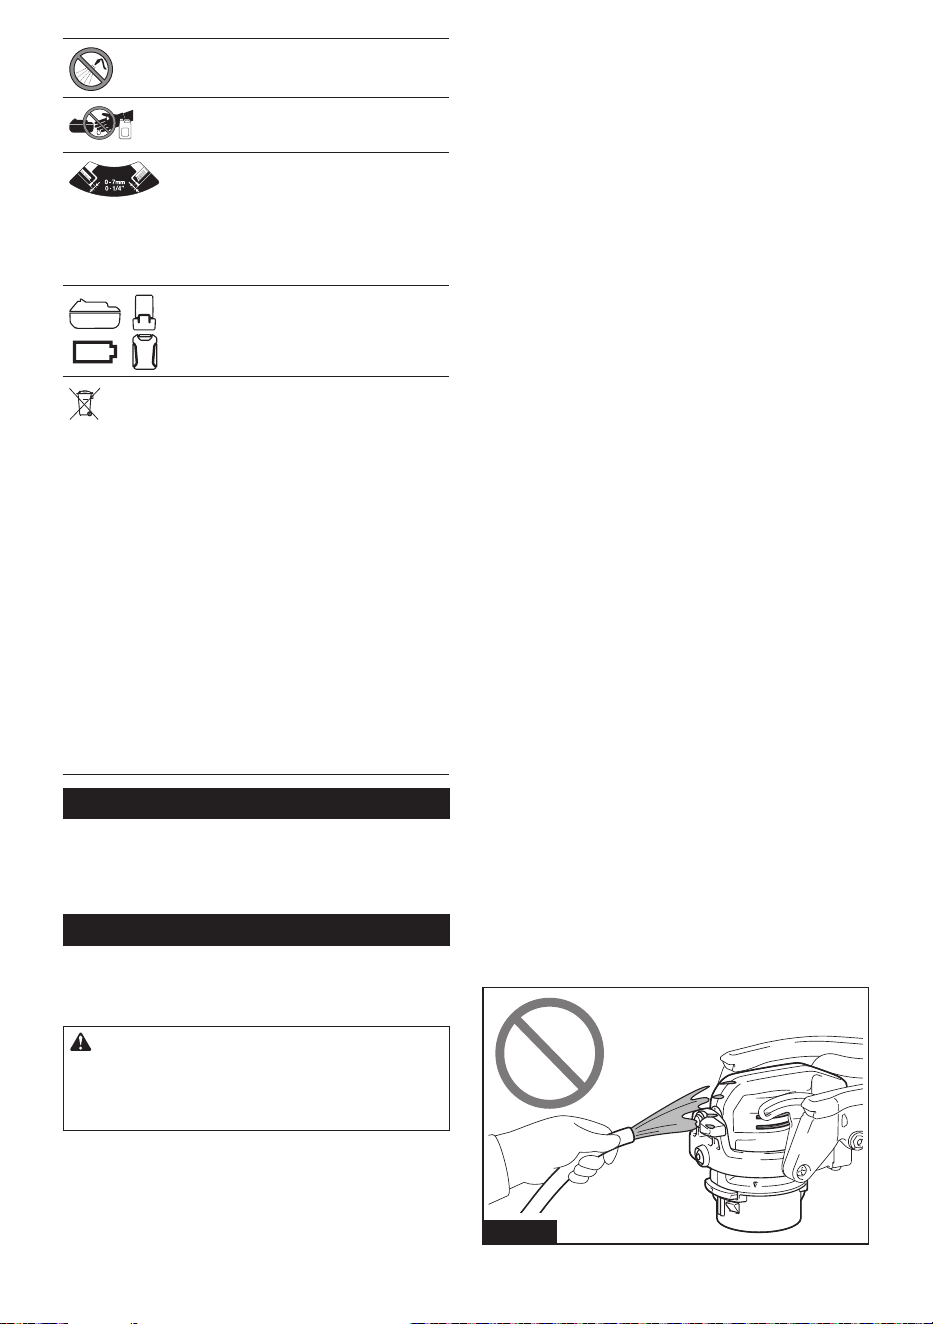
NOTICE: Never throw water over the head of
the appliance. Water entering the vents may cause
breakdown and electric shock.
1
Fig.35
► 1. Vent
Wipe o any cleaning agent that has adhered to the
head of the appliance with a cloth wrung out of in water.
Storage
When storing the appliance, always remove all
accessories.
NOTICE: Storing the appliance with the brush
installed may cause the brush bristles to bend.
MAINTENANCE/
INSPECTION
CAUTION: Always be sure that the appli-
ance is switched o and the battery cartridge is
removed before attempting to perform inspection
or maintenance.
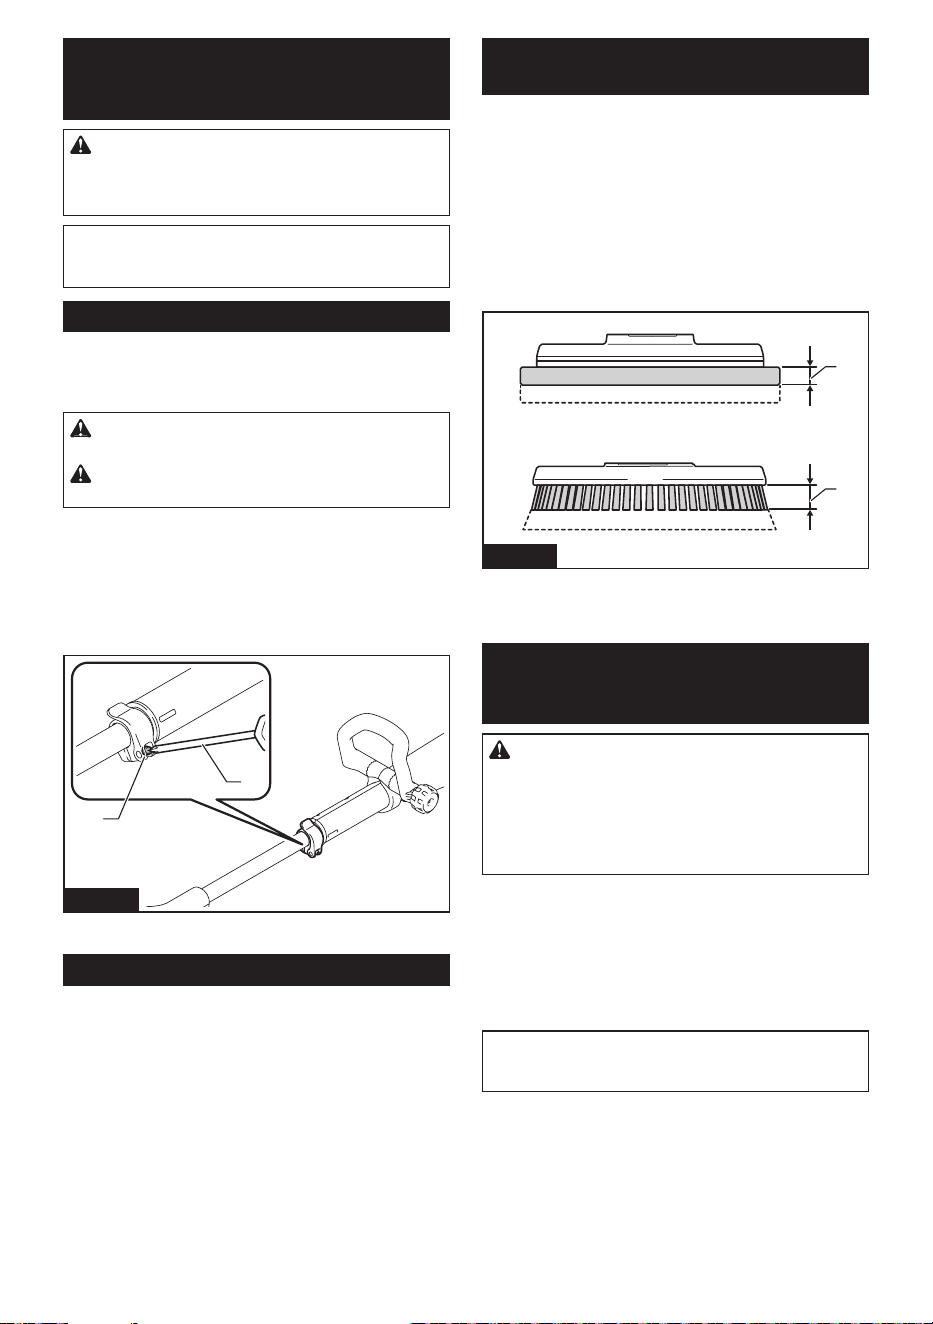
NOTICE: Never use gasoline, benzine, thinner,
alcohol or the like. Discoloration, deformation or
cracks may result.
15 ENGLISH
Maintenance
When the lever of the extension pole
comes loose
CAUTION: Adjust the screw with the lever
tightened.
CAUTION: Do not overtighten the screws.
Doing so may damage the screw.
Using the lever (for xing extension pole) repeatedly
may cause the lever to loosen. In this case, tighten the
screw with a screwdriver.
After adjusting the screw, make sure that the exten-
sion pole does not slip when the lever is tightened and
moves smoothly when the lever is loosened.
1
2
Fig.36
► 1. Screw 2. Screw driver
Periodic inspections
To ensure a long service life for the appliance and
safety usage, perform the inspections.
• Before operation: inspect the following items.
Body of the appliance, splash guard, brush, pad
holder, pad, battery cartridge
• After operation: clean the following items.
Body of the appliance, splash guard, brush, pad
holder, pad
Replacement of consumable items
Brush/pad replacement
Use the brush and pad so that the brush base and pad
holder does not touch the oor surface. When they are
worn out, refer to the following for replacement.
• Pad thickness: 10 mm (3/8″) or less
• Bristles height: 20 mm (3/4″) or less
See "Installing and removing accessory" for
replacement.
2
1
Fig.37
► 1. 10 mm (3/8") or less 2. 20 mm (3/4″) or less
OPTIONAL ACCESSORIES
CAUTION: These accessories or attachments
are recommended for use with your Makita tool
specied in this manual. The use of any other
accessories or attachments might present a risk of
injury to persons. Only use accessory or attachment
for its stated purpose.
For details of separately sold items, refer to the catalog
or contact the dealer or our sales oce.
• Brush
• Pad
• Accessory bag
• Makita genuine battery and charger
NOTE: Some items in the list may be included in the
tool package as standard accessories. They may
dier from country to country.
MAKITA LIMITED
WARRANTY
Please refer to the annexed warranty sheet for the
most current warranty terms applicable to this product.
If annexed warranty sheet is not available, refer to the
warranty details set forth at below website for your
respective country.
United States of America: www.makitatools.com
Canada: www.makita.ca
Other countries: www.makita.com
16 ESPAÑOL
ESPAÑOL (Instrucciones originales)
ADVERTENCIA
• Este aparato no está diseñado para ser utilizada por personas (incluidos niños) con discapacidades físicas,
sensoriales o mentales, o que carezcan de experiencia y conocimientos.
• Hay que asegurarse de que los niños no jueguen con el aparato.
• PRECAUCIÓN: Antes de realizar cualquier operación de mantenimiento, desconecte el aparato de la fuente de
alimentación. Realice periódicamente el mantenimiento del aparato.
• Consulte la sección “Instrucciones importantes de seguridad para el cartucho de batería” sobre asuntos prohi-
bidos o asuntos importantes del cartucho de batería.
• Consulte la sección “Montaje” para obtener detalles adecuados sobre las precauciones que se deben tomar
antes de la instalación del aparato.
• Consulte la sección “Instalación y extracción del cartucho de batería” para saber cómo instalar o quitar la
batería.
INTRODUCCIÓN
Especicaciones
Modelo: GSP01
Diámetro del cepillo 190 mm (7-1/2″)
Diámetro de la almohadilla 200 mm (8″)
Velocidad sin carga 3 (Alto) 600 r/min
2 (medio) 350 r/min
1 (bajo) 150 r/min
Dimensiones (La x An x Al) sin accesorio y protector
antisalpicaduras, con manija
frontal
1 081 mm - 1 435 mm x 204 mm x 361 mm
(42-1/2″ - 56-1/2″ x 8″ x 14-1/4″)
Tensión nominal 36 V - 40 V (máx.) c.c.
Peso neto 4,4 kg - 5,6 kg (9,7 lbs - 12,3 lbs)
• Debido a nuestro continuo programa de investigación y desarrollo, las especicaciones aquí incluidas están
sujetas a cambio sin previo aviso.
• El peso no incluye accesorio ni protector antisalpicaduras, pero sí manija frontal y cartucho de batería. La
combinación de menor y mayor peso del aparato y del cartucho de batería se muestra en la tabla.
• Las especicaciones y el cartucho de batería pueden variar de país a país.
Cartucho de batería y cargador aplicables
Cartucho de batería BL4020* / BL4025* / BL4040* / BL4040F* / BL4050F / BL4080F
* : Batería recomendada
Cargador DC40RA / DC40RB / DC40RC / DC40WA
• Algunos de los cartuchos de batería y cargadores enumerados arriba podrían no estar disponibles depen-
diendo de su área de residencia.
ADVERTENCIA: Use únicamente los cartuchos de batería y los cargadores indicados arriba. El uso de
cualquier otro cartucho de batería y cargador podría ocasionar una lesión y/o un incendio.
ADVERTENCIA: No use ningún alimentador con cableado eléctrico, como un adaptador para batería
o una unidad portátil de alimentación eléctrica, con este aparato. La cubierta de la batería no cerrará.
Símbolos
A continuación se muestran los símbolos que pue-
den ser utilizados para el equipo. Asegúrese de que
entiende su signicado antes de utilizar.
Lea el manual de instrucciones.
Ponga especial atención y tenga cuidado.
17 ESPAÑOL
Nunca arroje agua sobre el cabezal del
aparato.
No deje que el cartucho de batería entre
en contacto con líquidos químicos, como
agentes de limpieza o disolventes.
Ajuste la altura del protector antisalpica-
duras de la siguiente manera. Cuando el
aparato se coloca en el suelo, el accesorio
no entra en contacto con el suelo primero,
y el espacio entre la parte inferior del
accesorio y la punta de las cerdas del
protector antisalpicaduras es de 0 mm - 7
mm (0″ - 1/4″).
Una batería representativa aplicable a este
producto.
Ni-MH
Li-ion
Exclusivamente para países de la Unión
Europea
Debido a la presencia de componentes peli-
grosos en el equipo, los equipos eléctricos
y electrónicos de desecho, acumuladores y
baterías podrían tener un impacto negativo
en el medio ambiente y en la salud humana.
¡No se deshaga de los aparatos eléctricos
y electrónicos o baterías con la basura
doméstica!
De acuerdo con la Directiva Europea
de Residuos de Aparatos Eléctricos y
Electrónicos y sobre acumuladores y
baterías y sobre acumuladores y baterías
de desecho, así como su adaptación a la
legislación nacional, los aparatos eléc-
tricos, las baterías y acumuladores de
desecho deberán guardarse por separado
y entregarse en un punto de recolección
separado para residuos municipales, que
opere de acuerdo con las normas sobre
protección medioambiental.
Esto se indica mediante el símbolo del
contenedor con ruedas tachado colocado
en el equipo.
Uso pretendido
El aparato sirve para limpiar pisos. El aparato es
adecuado para uso comercial, por ejemplo en hote-
les, escuelas, hospitales, fábricas, tiendas, ocinas y
empresas de alquiler.
Advertencias de seguridad
Advertencias de seguridad para la
pulidora limpiadora inalámbrica
ADVERTENCIA: Lea todas las advertencias
de seguridad, al igual que todas las instruccio-
nes. El no seguir las advertencias e instrucciones
podrá ocasionar descargas eléctricas, incendios o
lesiones graves.
1. Los operadores deberán recibir las instruc-
ciones adecuadas sobre el uso de la pulidora
limpiadora.
2. Utilice únicamente los accesorios suminis-
trados con el aparato o los especicados en
las instrucciones. El uso de otros accesorios
podría perjudicar la seguridad.
3. Este aparato debe almacenarse únicamente en
interiores.
Advertencias de seguridad adicionales
1. No utilice el aparato con agua a una tempera-
tura superior a 50 °C (122 °F).
2. Instale la manija frontal de forma segura. Si
la tuerca de mariposa está oja, el ángulo o la
posición de la manija frontal podrían deslizarse
durante el uso y causar lesiones personales.
3. Instale el accesorio rmemente. Si el accesorio
está instalado de forma suelta, podría despren-
derse cuando se levanta el aparato o se detiene la
rotación.
4. Asegúrese de que el accesorio no sobresalga
del protector antisalpicaduras. Si el accesorio
sobresale, el agua y el agente de limpieza
podrían salpicar o provocar un desequilibrio
de postura debido a la fuerza de reacción.
5. Al reemplazar el accesorio manualmente o ins-
peccionarlo, asegúrese de apagar el aparato y
quitar el cartucho de batería.
6. Al instalar o retirar el accesorio manualmente,
use guantes de goma. Dependiendo del estado
del accesorio, el agente de limpieza podría adhe-
rirse a su piel, lo que podría provocar lesiones
personales.
7. Para retirar el accesorio utilizando el botón
para remoción de accesorio, que el accesorio
toque el piso y presione ligeramente el apa-
rato. Si el accesorio no toca el piso, no se puede
quitar porque el accesorio y el adaptador del
aparato giran juntos.
8. Antes de apretar el gatillo interruptor, asegú-
rese de que el modo no esté en el modo de
remoción de accesorio vericando el indicador
de velocidad de rotación. El accesorio podría
desprenderse.
9. Sujete el aparato rmemente durante su fun-
cionamiento. El uso del aparato sin el protector
antisalpicaduras o el uso del aparato a la veloci-
dad máxima podría provocar cambios de postura,
dependiendo del estado del piso.
10. Cuando no utilice el protector antisalpicadu-
ras, apriete siempre las dos palancas. El cepillo
o la almohadilla podrían girar de manera inestable
y provocar lesiones personales.
11. Nunca arroje agua sobre el cabezal del apa-
rato. Si entra agua en las rejillas de ventilación,
podría provocar averías y descargas eléctricas.
Fig.1

18 ESPAÑOL
12. No se recargue sobre el aparato. El aparato
podría caerse.
13. No trabaje en una posición inadecuada. Podría
causar lesiones personales.
14. Use equipo de protección como mascarilla,
gafas, guantes de goma, botas, camisa de
manga larga y pantalones largos para evitar
exponer su piel durante el trabajo. Tocar direc-
tamente el agente de limpieza podría causar lesio-
nes personales. Si el agente de limpieza entra
en contacto con sus ojos o se adhiere a su piel,
enjuáguelo con agua limpia y busque atención
médica si es necesario.
15. Ventile bien su área de trabajo durante la
operación.
16. No utilice el aparato en una zona donde haya
gasolina o disolvente.
17. Utilice un agente de limpieza para el cuidado
de pisos disponible en el mercado que sea
adecuado para el material del piso.
18. Algunos agentes de limpieza para el cuidado
de pisos son fuertes y podrían deteriorar el
aparato. Lea las instrucciones del agente de
limpieza y asegúrese de que este no afecte al
aparato antes de usarlo.
19. No deje que el cartucho de batería entre en
contacto con líquidos químicos, como agentes
de limpieza o disolventes. Hacerlo podría dañar
la carcasa de la batería y provocar un incendio o
una descarga eléctrica.
20. Utilice una cantidad adecuada de agente de
limpieza. Dependiendo de la velocidad de rota-
ción del aparato, podrían producirse salpicaduras.
21. Asegúrese de cerrar la tapa de la batería. Si
el agente de limpieza se adhiere al cartucho de
batería, podría dañarse y usted podría recibir una
descarga eléctrica.
22. Al guardar el aparato, retire todos los acce-
sorios y guárdelo en un estado estable. Si
apoya el aparato contra la pared con el cepillo
instalado, este podría caerse y provocar lesiones
personales.
23. Después de utilizar el agente de limpieza,
limpie el aparato y lave el accesorio. El agente
de limpieza podría deteriorar el aparato.
Uso y cuidado de la herramienta a batería
1. Evite un arranque accidental. Asegúrese de
que el interruptor esté en la posición apagada
antes de conectar el paquete de batería, levan-
tar el aparato o cargarlo. Cargar el aparato con
su dedo en el interruptor o pasar energía al apa-
rato con el interruptor encendido puede propiciar
accidentes.
2. Desconecte el paquete de baterías del apa-
rato antes de hacer cualquier ajuste, cambiar
accesorios o almacenar el aparato. Tales
medidas de seguridad preventivas reducirán el
riesgo de que el aparato sea puesto en marcha
accidentalmente.
3. Recargue sólo con el cargador especicado
por el fabricante. Un cargador que es adecuado
para un solo tipo de paquete de baterías puede
generar riesgo de incendio al ser utilizado con otro
paquete de baterías.
4. Use los aparatos únicamente con los paquetes
de baterías designados especícamente para
ellos. El uso de cualquier otro paquete de batería
puede generar riesgo de lesión e incendio.
5. Cuando no se esté usando el paquete de
batería, manténgalo alejado de otros objetos
metálicos, como sujetapapeles (clips), mone-
das, llaves, clavos, tornillos u otros objetos
pequeños de metal que puedan crear una
conexión entre una terminal y otra. Causar un
cortocircuito en las terminales de la batería puede
provocar quemaduras o incendio.
6. En condiciones de mal uso, podría escapar
líquido de la batería; evite el contacto. Si toca
el líquido accidentalmente, enjuague con agua.
Si hay contacto del líquido con los ojos, soli-
cite atención médica adicionalmente. Puede
que el líquido expulsado de la batería cause irrita-
ción o quemaduras.
7. No utilice un paquete de baterías o aparato
que esté dañado o haya sido modicado.
Las baterías dañadas o modicadas podrían
exhibir un comportamiento impredecible que
resulte en incendio, explosión o riesgo de
lesiones.
8. No exponga un paquete de baterías o aparato
al fuego o a una temperatura excesiva. La
exposición al fuego o a una temperatura supe-
rior a 130 °C podría causar una explosión.
9. Siga todas las instrucciones relativas a la
carga y no cargue el paquete de baterías o el
aparato fuera del rango de temperatura especi-
cado en las instrucciones. Cargar de manera
inapropiada o a temperaturas fuera del rango
especicado podría dañar la batería e incrementar
el riesgo de incendio.
10. Pida que el servicio lo realice un técnico en
reparaciones calicado y que utilice única-
mente piezas de repuesto idénticas a las
originales. Esto garantizará que se mantenga la
seguridad del producto.
11. No modique ni intente reparar el aparato ni el
paquete de baterías salvo como se indique en
las instrucciones para el uso y cuidado.
Símbolos
A continuación se muestran los símbolos utilizados
para la herramienta.
volts o voltios
corriente directa o continua
velocidad sin carga
revoluciones o alternaciones por minuto,
frecuencia de rotación
diámetro
19 ESPAÑOL
Instrucciones importantes de
seguridad para el cartucho de batería
1. Antes de utilizar el cartucho de batería, lea
todas las instrucciones e indicaciones de
precaución en el (1) el cargador de batería, (2)
la batería, y (3) el producto con el que se utiliza
la batería.
2. No desarme ni modique el cartucho de bate-
ría. Podría ocurrir un incendio, calor excesivo o
una explosión.
3. Si el tiempo de operación se ha acortado en
exceso, deje de operar de inmediato. Podría
correrse el riesgo de sobrecalentamiento,
posibles quemaduras e incluso explosión.
4. En caso de que ingresen electrolitos en sus
ojos, enjuáguelos bien con agua limpia y con-
sulte de inmediato a un médico. Esto podría
ocasionar pérdida de visión.
5. Evite cortocircuitar el cartucho de batería:
(1) No toque las terminales con ningún mate-
rial conductor.
(2) Evite guardar el cartucho de batería en un
cajón junto con otros objetos metálicos,
tales como clavos, monedas, etc.
(3) No exponga el cartucho de batería al
agua o la lluvia.
Un cortocircuito en la batería puede causar
un ujo grande de corriente, sobrecalenta-
miento, posibles quemaduras e incluso una
descompostura.
6. No guarde ni utilice la herramienta y el cartu-
cho de batería en lugares donde la tempera-
tura pueda alcanzar o exceder los 50 °C (122
°F).
7. Nunca incinere el cartucho de batería incluso
en el caso de que esté dañado seriamente o
ya no sirva en absoluto. El cartucho de batería
puede explotar si se tira al fuego.
8. No clave, corte, aplaste, lance o deje caer el
cartucho de batería, ni golpee un objeto sólido
contra el cartucho de batería. Dicha acción
podría resultar en un incendio, calor excesivo o en
una explosión.
9. No utilice baterías modicadas o dañadas.
10. Las baterías de ión de litio están sujetas a los
requisitos reglamentarios en materia de bie-
nes peligrosos.
Para el trasporte comercial, por ej., mediante
terceros o agentes de transporte, se deben tomar
en cuenta los requisitos especiales relativos al
empaque y el etiquetado.
Para efectuar los preparativos del artículo que se
va a enviar, se requiere consultar a un experto
en materiales peligrosos. Si es posible, consulte
además otras regulaciones nacionales más deta-
lladas.
Pegue o cubra con cinta adhesiva los contactos
abiertos y empaque la batería de manera que ésta
no pueda moverse dentro del paquete.
11. Para deshacerse del cartucho de batería,
sáquelo de la herramienta y deséchelo en un
lugar seguro. Siga las regulaciones locales
relacionadas al desecho de las baterías.
12. Utilice las baterías únicamente con los pro-
ductos especicados por Makita. Instalar las
baterías en productos que no cumplan con los
requisitos podría ocasionar un incendio, un calen-
tamiento excesivo, una explosión o una fuga de
electrolito.
13. Si no se utiliza la herramienta por un
período largo, debe extraerse la batería de la
herramienta.
14. El cartucho de batería podría absorber calor
durante y después de su uso, lo que ocasiona-
ría quemaduras o quemaduras a baja tempe-
ratura. Tenga cuidado con la manipulación de
los cartuchos de batería que estén calientes.
15. No toque el terminal de la herramienta inme-
diatamente después de su uso, ya que el
mismo podría estar lo sucientemente caliente
como para provocarle quemaduras.
16. No permita que las rebabas, el polvo o la tierra
queden atrapados en los terminales, oricios
y ranuras del cartucho de batería. Podría pro-
vocar calentamiento, incendio, explosión y mal
funcionamiento de la herramienta o del cartucho
de batería, lo que resultaría en quemaduras o
lesiones personales.
17. No utilice el cartucho de batería cerca de
cables eléctricos de alto voltaje, a menos que
la herramienta sea compatible con el uso cer-
cano a estos cables eléctricos de alto voltaje.
Esto podría ocasionar una avería o descompos-
tura de la herramienta o del cartucho de batería.
18. Mantenga la batería alejada de los niños.
GUARDE ESTAS
INSTRUCCIONES.
PRECAUCIÓN: Utilice únicamente baterías
originales de Makita. El uso de baterías no origina-
les de Makita, o de baterías alteradas, puede ocasio-
nar que las baterías exploten causando un incendio,
lesiones personales y daños. Asimismo, esto inva-
lidará la garantía de Makita para la herramienta y el
cargador Makita.
Consejos para alargar al máximo
la vida útil de la batería
1. Cargue el cartucho de batería antes de que
se descargue completamente. Pare siem-
pre la operación y cargue el cartucho de
batería cuando note menos potencia en la
herramienta.
2. No cargue nunca un cartucho de batería que
esté completamente cargado. La sobrecarga
acortará la vida de servicio de la batería.
3. Cargue el cartucho de batería a una tempera-
tura ambiente de 10 °C - 40 °C (50 °F - 104 °F).
Si un cartucho de batería está caliente, déjelo
enfriar antes de cargarlo.
4. Cuando no utilice el cartucho de batería,
sáquelo de la herramienta o del cargador.
5. Cargue el cartucho de batería si no va a utili-
zarlo durante un período prolongado (más de
seis meses).

20 ESPAÑOL
Nombre de las piezas
3
1
2
1/2/3
1
12
11
19 20
10
17 18
9
8
7
6
5
4
3
2
10
1413
1615
Fig.2
1 Gatillo interruptor 2 Manija 3 Cubierta de la batería 4 Tuerca de mariposa
5 Panel de control 6 Manija frontal 7 Palanca (para jar el
poste de extensión)
8 Poste de extensión
9 Cabezal 10 Palanca (para jar el
cabezal) (2 lugares)
11 Botón de remo-
ción de protector
antisalpicaduras
12 Base de la manija
13 Botón de encendido
principal
14 Botón para remoción de
accesorio
15 Indicador de velocidad
de rotación
16 Luz indicadora de
precaución
17 Protector
antisalpicaduras
18 Cepillo del medio 19 Sujetador de almohadilla 20 Almohadilla
PREPARATIVOS PARA
EL USO
Accesorios
PRECAUCIÓN: Utilice siempre los acceso-
rios especicados por Makita.
Combine y utilice accesorios según sus usos o entorno.
21 ESPAÑOL
Cepillo
PRECAUCIÓN: El cepillo podría dañar el
piso. Conrme el manual de instrucciones del
piso antes de su operación.
La limpieza del cepillo es adecuada para la siguiente
operación.
• Limpieza de pisos interiores en general
1
Fig.3
► 1. Cepillo del medio
Sujetador de almohadilla/almohadilla
La almohadilla es adecuada para la siguiente opera-
ción. Seleccione una almohadilla dependiendo de su
trabajo.
• Pulido de supercies
• Lavado
Cuando utilice una almohadilla por primera vez, retire el
centro de la almohadilla a lo largo de una línea de corte
antes de usarla. La parte central removida de la almo-
hadilla se puede utilizar como almohadilla de mano.
2
1
Fig.4
► 1. Sujetador de almohadilla 2. Almohadilla
NOTA: Para más detalles sobre los accesorios,
consulte el catálogo o póngase en contacto con el
distribuidor o nuestra ocina de ventas.
Montaje
PRECAUCIÓN: Antes de utilizar el aparato,
asegúrese de que esté apagado y de que el cartu-
cho de batería se haya extraído.
PRECAUCIÓN: Use equipo de protección
como mascarilla, gafas, guantes de goma, botas,
mangas largas y pantalones largos para evitar
exponer su piel durante el trabajo. Tocar directa-
mente el agente de limpieza podría causar lesiones
personales. Si el agente de limpieza entra en con-
tacto con sus ojos o se adhiere a su piel, lávese con
agua.
Instalación y extracción del protector
antisalpicaduras
El uso del protector antisalpicaduras con el cepillo o
la almohadilla evita que salpique agua o agente de
limpieza.
Con el protector antisalpicaduras instalado en el cabe-
zal y las palancas aojadas, puede reducir el balanceo
y avanzar de manera constante hacia su destino.
NOTA: Puede utilizar el aparato sin el protector anti-
salpicaduras para limpiar zócalos y otros bordes de
paredes, boquillas de suelos de baldosas o ranuras.
Cuando utilice el aparato sin el protector antisalpica-
duras, bloquee siempre el cabezal del aparato con
palancas.
Instalación
Encaje las protuberancias del cabezal y una ranura del
protector antisalpicaduras hasta que encajen.
Asegúrese de que el protector antisalpicaduras no se
desprenda.
1
2
Fig.5
► 1. Protuberancia 2. Ranura 3. Protector
antisalpicaduras
22 ESPAÑOL
El protector antisalpicaduras está disponible en dos
alturas, dependiendo del desgaste del accesorio. Ajuste
la altura del protector antisalpicaduras de la siguiente
manera. Cuando el aparato se coloca en el suelo, el
accesorio no entra en contacto con el suelo primero, y
el espacio entre la parte inferior del accesorio y la punta
de las cerdas del protector antisalpicaduras es de 0 mm
- 7 mm (0″ - 1/4″).
1
2
Fig.6
► 1. Protector antisalpicaduras 2. Accesorio
PRECAUCIÓN: Si el accesorio sobresale del
protector antisalpicaduras, el agua y el agente de
limpieza podrían salpicar o provocar un desequili-
brio de postura debido a la fuerza de reacción.
Extracción
AVISO: Retire el accesorio antes de quitar el
protector antisalpicaduras.
Oprima el botón de remoción de protector
antisalpicaduras.
El protector antisalpicaduras se zafará del aparato.
1
Fig.7
► 1. Botón de remoción de protector antisalpicaduras
Instalación y extracción del accesorio
PRECAUCIÓN: Al instalar y extraer el acce-
sorio manualmente, asegúrese de apagar el apa-
rato y quitar el cartucho de batería.
Al utilizar el protector antisalpicaduras, puede instalar el
accesorio mediante la operación del interruptor.
Cuando no se utilice el protector antisalpicaduras, se
recomienda realizar la instalación manual.
Al retirar el accesorio, puede seleccionar entre el fun-
cionamiento por interruptor o el funcionamiento manual,
independientemente de si el protector antisalpicaduras
está instalado o no.
NOTA: Al utilizar la almohadilla, colóquela en el suje-
tador de almohadilla antes de instalarla en el aparato.
Instalación
Cuando utilice el protector
antisalpicaduras
1. Aoje las dos palancas (para jar el cabezal).
El cabezal se zafará.
1
1
Fig.8
► 1. Palanca
2. Instale el protector antisalpicaduras. (Consulte la
página 21).
3. Instale el cartucho de batería. (Consulte la página
26).
4. Encienda el botón de encendido principal.
(Consulte la página 27).
5. Alinee el adaptador del cabezal y el centro del
accesorio.
1
2
Fig.9
► 1. Adaptador 2. Centro
23 ESPAÑOL
6. Presione el aparato ligeramente contra el suelo y
apriete brevemente el gatillo interruptor.
El accesorio se instalará en el cabezal.
Asegúrese de que el accesorio no se desprenda.
1
Fig.10
► 1. Gatillo interruptor
Al instalar el accesorio manualmente, gire el accesorio
rápidamente en la dirección indicada por la echa.
Fig.11
NOTA: Después de la instalación manual, realice el
paso 3, 4 y 6. De lo contrario, es posible que el acce-
sorio no se instale de forma segura y se desprenda
accidentalmente.
Cuando no utilice el protector
antisalpicaduras
1. Las dos palancas apretadas (para jar el cabezal).
El cabezal se jará.
2. Alinee las protuberancias del cabezal con las
guías del accesorio.
1
Fig.12
► 1. Protuberancia
3. Gire el accesorio rápidamente en la dirección
indicada por la echa.
Fig.13
NOTA: Después de la instalación manual, realice
los pasos 3, 4 y 6 en la sección "Cuando utilice el
protector antisalpicaduras" para instalar el accesorio
rmemente. De lo contrario, es posible que el acce-
sorio no se instale de forma segura y se desprenda
accidentalmente.
Extracción
1. Cuando no se utilice el protector antisalpicaduras,
asegúrese de que las palancas (para jar el cabezal)
estén bien apretadas.
1
1
Fig.14
► 1. Palanca
24 ESPAÑOL
2. Instale el cartucho de batería. (Consulte la página
26).
3. Encienda el botón de encendido principal.
(Consulte la página 27).
4. Presione el botón para remoción de accesorio del
panel de control.
Todas las luces del indicador de velocidad de rotación
parpadearán.
1/2/3
3
1
2
1
2
Fig.15
► 1. Botón para remoción de accesorio 2. Indicador
de velocidad de rotación
5. Presione el aparato ligeramente contra el suelo y
apriete el gatillo interruptor.
El accesorio se zafará. Si el accesorio se resbala hacia
el suelo y no se puede quitar, presione el aparato con
más fuerza contra el suelo e intente realizar la misma
operación nuevamente, o retírelo manualmente.
1
Fig.16
► 1. Gatillo interruptor
Puede quitar el accesorio manualmente. Gire el acce-
sorio rápidamente en la dirección indicada por la echa.
Fig.17
NOTA: Si gira el accesorio lentamente, el adaptador
del aparato también girará, por lo que no se podrá
quitar el accesorio.
Estado de la batería
Indicación de la capacidad restante
de la batería
Oprima el botón de vericación en el cartucho de la
batería para que indique la capacidad restante de la
batería. Las luces indicadoras se iluminarán por algu-
nos segundos.
1
2
Fig.18
► 1. Luces indicadoras 2. Botón de vericación
Luces indicadoras Capacidad
restante
Iluminadas Apagadas Parpadeando
75% a 100%
50% a 75%
25% a 50%
0% a 25%
Cargar la
batería.
La batería
pudo haber
funcionado
mal.
25 ESPAÑOL
NOTA: Dependiendo de las condiciones de uso y
la temperatura ambiente, la indicación podrá diferir
ligeramente de la capacidad real.
NOTA: La primera luz indicadora (extrema izquierda)
parpadeará cuando el sistema de protección de
batería esté en funcionamiento.
Cosas que necesita saber antes
del uso
Entorno de trabajo
Si hay residuos grandes o en forma de lamentos en el
área de limpieza, retírelos antes de la operación.
Fig.19
PRECAUCIÓN: Nunca use el aparato bajo el
agua.
Fig.20
Función de protección
1/2/3
3
1
2
1
Fig.21
► 1. Luz indicadora de precaución
Luz indicadora de precaución Estado
Color
Encendido
Parpadeando
Verde
Sobrecarga
Rojo
Sobrecalenta-
miento
Rojo
Descarga
excesiva
Protección contra sobrecarga
Cuando el aparato se utiliza de una manera que hace
que consuma una corriente anormalmente alta, el
aparato se detiene automáticamente y la luz indicadora
de precaución parpadea en verde. En esta situación,
apague el aparato y retire el cartucho de batería para
eliminar la causa de la sobrecarga. Luego, encienda el
aparato para volver a arrancarlo.
NOTA: Algunas combinaciones de condiciones
de piso y accesorios tienen mayor probabilidad de
generar protección contra sobrecarga. En este caso,
cambie el tipo de accesorio o utilice el aparato a una
velocidad de rotación menor.
Protección contra sobrecalentamiento
Cuando el aparato se sobrecalienta, se detiene auto-
máticamente y la luz indicadora de precaución se
enciende en rojo y la luz frontal también parpadea al
mismo tiempo. Cuando la batería se sobrecalienta, el
aparato se detiene automáticamente y la luz indicadora
de precaución se enciende en rojo. En este caso, apa-
gue y retire el cartucho de batería, luego deje que el
aparato y el cartucho de batería se enfríen.
Protección en caso de sobredescarga
Cuando la capacidad de la batería no es suciente, el
aparato se detiene automáticamente y la luz indica-
dora de precaución se enciende en rojo. En este caso,
retire el cartucho de batería del aparato y recárguelo o
reemplácelo con un cartucho de batería completamente
cargado.
NOTA: Cuando la capacidad restante de la batería es
baja, la luz indicadora de precaución parpadea antes
de activar la protección contra sobredescarga. Sin
embargo, dependiendo de las condiciones de funcio-
namiento, el aparato podría detenerse sin que la luz
indicadora de precaución parpadee.
Protección contra otras causas
El sistema de protección también está diseñado para
otras causas que podrían dañar el aparato, y permite
que el aparato se detenga automáticamente. Siga
todos los pasos a continuación para eliminar las causas
cuando el aparato se haya detenido temporalmente o
se haya detenido durante el funcionamiento.
1. Apague el aparato, y luego enciéndalo nueva-
mente para reiniciarlo.
2. Cargue la(s) batería(s) o reemplácela(s) con
batería(s) recargada(s).
3. Deje que el aparato y la(s) batería(s) se enfríen.
Si no hay ninguna mejora al restaurar el sistema de
protección, comuníquese con su centro local de servi-
cio Makita.
26 ESPAÑOL
Función electrónica
Función de arranque suave
Al apretar el gatillo interruptor, se reduce la reacción de
arranque y gira el accesorio suavemente.
Control de velocidad constante
Mantener la velocidad constante bajo condiciones
de carga. Es posible obtener un alto desempeño de
trabajo.
Prevención de rearranque
Al encender el botón de encendido principal mientras
se aprieta el gatillo interruptor, la luz indicadora de
precaución parpadea en verde y la herramienta no
arranca. Para poner en marcha la herramienta, suelte
el gatillo interruptor y tire de él nuevamente después
de que la luz indicadora de precaución se apague y el
indicador de velocidad de rotación se encienda.
USO
Instalación y extracción del
cartucho de batería
ADVERTENCIA: Apague siempre el aparato
antes de instalar o extraer el cartucho de bate-
ría. Si instala el cartucho de batería con el aparato
encendido, podría provocar un accidente.
ADVERTENCIA: Siempre introduzca com-
pletamente el cartucho de batería hasta que el
indicador rojo no pueda verse. De no hacerlo, este
podría salirse y caer accidentalmente de la herra-
mienta ocasionándole lesiones a usted o a alguien
cerca de usted.
PRECAUCIÓN: No utilice el adaptador de
batería. Si el adaptador de batería está instalado,
la tapa de la batería no se cierra y provoca lesiones
personales.
Instalación
1. Abra la cubierta de la batería al mismo tiempo que
presiona el botón.
2
1
Fig.22
► 1. Botón 2. Cubierta de la batería
2. Alinee la lengüeta en el cartucho de batería con la
ranura en la carcasa y deslícelo en su lugar. Insértelo
por completo hasta que quede asegurado en su lugar
haciendo un pequeño clic. Si puede ver el indicador rojo
como se muestra en la ilustración, este no ha quedado
asegurado por completo.
1 1
2
3
Fig.23
► 1. Indicador rojo 2. Botón 3. Cartucho de batería
3. Cierre rmemente la cubierta de la batería.
Extracción
1. Abra la cubierta de la batería al mismo tiempo que
presiona el botón.
2. Deslice el cartucho de batería de la herramienta
mientras desliza el botón de la parte delantera del
cartucho de batería.
1
Fig.24
► 1. Botón
3. Cierre rmemente la cubierta de la batería.
AVISO: Tenga cuidado de que sus dedos no
queden atrapados al abrir y cerrar la cubierta de
la batería.
27 ESPAÑOL
Operación del aparato
Instale el accesorio antes del uso.
Ajuste del poste de extensión
PRECAUCIÓN: Tenga cuidado de que sus
dedos no queden atrapados al ajustar el poste de
extensión.
PRECAUCIÓN: No extienda el poste de
extensión más allá del límite. El hacerlo podría
ocasionar una avería al aparato.
1. Aoje la palanca (para jar el poste de extensión).
1
Fig.25
► 1. Palanca
2. Ajuste el poste de extensión a la longitud
deseada.
1
Fig.26
► 1. Poste de extensión
3. Apriete la palanca.
Ajuste de la manija frontal
1. Aoje las tuercas de mariposa.
1
4
3
2
Fig.27
► 1. Tuerca de mariposa 2. Manija frontal 3. Aojar
4. Apretar
2. Ajuste la posición y el ángulo de la manija frontal.
3. Apriete la tuerca de mariposa.
Cómo encender y apagar el botón de
encendido principal
Encendido
Oprima el botón de encendido principal.
El interruptor se enciende y el indicador de velocidad de
rotación se ilumina en verde.
1/2/3
3
1
2
1
2
3
Fig.28
► 1. Botón de encendido principal 2. Indicador
de velocidad de rotación 3. Luz indicadora de
precaución
Apagado
Oprima y mantenga oprimido el botón de encendido
principal.
El interruptor se apaga y el indicador de velocidad de
rotación se apaga.
NOTA: La energía se apaga automáticamente
después de un tiempo preestablecido sin ninguna
operación.
En el modo de remoción de accesorio, la alimenta-
ción se apaga antes que en el modo normal.
28 ESPAÑOL
Cambiar la velocidad/modo de
rotación
• Modo normal
Puede cambiar la velocidad de rotación en tres
niveles: baja, media y alta.
— La velocidad de rotación cambia cada
vez que presiona el botón de encendido
principal.
1/2/3
3
1
2
1 2
Fig.29
► 1. Botón de encendido principal 2. Botón para
remoción de accesorio
Indicador de
velocidad
Modo Velocidad de
rotación
(min
-1
(r/min))
Alta 600
Media 350
Baja 150
• Modo de remoción de accesorio
Puede quitar el accesorio accionando el
interruptor.
— Presione nuevamente el botón para remo-
ción de accesorio para volver al modo
normal.
Accionamiento del interruptor
ADVERTENCIA: Antes de insertar el car-
tucho de batería en la herramienta, compruebe
siempre y cerciórese de que el gatillo interruptor
se acciona debidamente y que vuelve a la posi-
ción “OFF” (apagado) cuando lo suelta.
1. Jale del gatillo interruptor.
El motor girará.
1
Fig.30
► 1. Gatillo interruptor
2. Suelte el gatillo interruptor.
El motor se detendrá.
Encendido de las luces frontales
PRECAUCIÓN: No mire a la luz ni vea a la
fuente de luz directamente.
1. Jale el gatillo interruptor una vez que el interruptor
de alimentación principal se haya encendido.
El motor girará y las luces se encenderán.
1
Fig.31
► 1. Luz frontal
2. Las luces se apagarán en el siguiente estado.
• Cuando el botón de encendido principal está
apagado
• Varios segundos después tras haber soltado el
gatillo interruptor
NOTA: Utilice un paño seco para quitar la suciedad
de la lente de la lámpara. Tenga cuidado de no rayar
la lente de la lámpara ya que la iluminación podría
disminuir.
29 ESPAÑOL
Operación de limpieza
Limpieza de bordes de paredes y
boquillas de suelos de baldosas
Para una limpieza más ecaz, utilice el aparato
con el cabezal del aparato jo y sin el protector
antisalpicaduras.
Limpieza de bordes de paredes y zócalos
Fig.32
Limpieza de boquillas de suelos de baldosas y
muescas
Fig.33
AVISO: Sujete el aparato rmemente. El uso
del aparato sin el protector antisalpicaduras podría
provocar cambios de postura debido a la fuerza de
reacción.
Evite que el agua y el agente de limpieza
salpiquen/reduzcan el balanceo, y opere
de manera constante
Con el protector antisalpicaduras instalado en el cabezal
y las palancas aojadas, evita que el agua y el agente
de limpieza salpiquen y usted puede reducir el balanceo
y avanzar de manera constante hacia su destino.
1
Fig.34
► 1. Protector antisalpicaduras
Manejo después del uso
PRECAUCIÓN: Si no va a utilizar el aparato,
asegúrese de que esté apagado y de que el cartu-
cho de batería esté retirado.
Accesorio
Lave el accesorio y séquelo a la sombra.
Cabezal del aparato
AVISO: Nunca arroje agua sobre el cabezal del
aparato. El agua que entre en las rejillas de ventila-
ción podría provocar averías y descargas eléctricas.
1
Fig.35
► 1. Rejilla de ventilación
Limpie cualquier agente de limpieza que se haya adhe-
rido al cabezal del aparato con un paño humedecido en
agua y exprimido.
Almacenamiento
Al guardar el aparato, retire siempre todos los accesorios.
AVISO:
Guardar el aparato con el cepillo instalado
podría provocar que las cerdas del cepillo se doblen.
30 ESPAÑOL
MANTENIMIENTO/
INSPECCIÓN
PRECAUCIÓN: Asegúrese siempre de que
el aparato esté apagado y de que el cartucho de
batería se haya retirado antes de intentar realizar
cualquier inspección o mantenimiento.
AVISO: Nunca use gasolina, bencina, diluyente
(tíner), alcohol o sustancias similares. Puede que
esto ocasione grietas o descoloramiento.
Mantenimiento
Cuando la palanca del poste de
extensión se aoja
PRECAUCIÓN: Ajuste el tornillo con la
palanca mientras está apretada.
PRECAUCIÓN: No apriete los tornillos de
más. El hacerlo podría dañar el tornillo.
El uso repetido de la palanca (para jar el poste de
extensión) podría provocar que la palanca se aoje. En
este caso, apriete el tornillo con un destornillador.
Después de ajustar el tornillo, asegúrese de que el
poste de extensión no se deslice cuando se aprieta la
palanca y se mueva suavemente cuando se aoja la
palanca.
1
2
Fig.36
► 1. Tornillo 2. Destornillador
Inspecciones periódicas
Para garantizar una larga vida útil del aparato y un uso
seguro, realice las inspecciones.
• Antes de la operación: inspeccione los
siguientes elementos.
Cuerpo del aparato, protector antisalpicaduras,
cepillo, sujetador de almohadilla, almohadilla,
cartucho de batería
• Después del funcionamiento: limpie los
siguientes elementos.
Cuerpo del aparato, protector antisalpicaduras,
cepillo, sujetador de almohadilla, almohadilla
Reemplazo de artículos
consumibles
Reemplazo del cepillo/almohadilla
Utilice el cepillo y la almohadilla, de modo que la base
del cepillo y el sujetador de almohadilla no toquen la
supercie del piso. Cuando estén desgastados, con-
sulte lo siguiente para reemplazarlos.
• Grosor de la almohadilla: 10 mm (3/8″) o menos
• Altura de las cerdas: 20 mm (3/4″) o menos
Consulte "Instalación y extracción del accesorio" para
su reemplazo.
2
1
Fig.37
► 1. 10 mm (3/8") o menos 2. 20 mm (3/4″) o menos
ACCESORIOS
OPCIONALES
PRECAUCIÓN: Estos accesorios o aditamen-
tos están recomendados para utilizarse con su
herramienta Makita especicada en este manual.
El empleo de cualquier otro accesorio o aditamento
puede conllevar el riesgo de lesiones personales.
Utilice los accesorios o aditamentos solamente para
su n establecido.
Para obtener detalles sobre los artículos que se venden
por separado, consulte el catálogo o comuníquese con
el distribuidor o nuestra ocina de ventas.
• Cepillo
• Almohadilla
• Bolsa para accesorio
• Batería y cargador originales de Makita
NOTA: Algunos de los artículos en la lista pueden
incluirse en el paquete de la herramienta como acce-
sorios estándar. Éstos pueden variar de país a país.

31 ESPAÑOL
GARANTÍA LIMITADA DE
MAKITA
Ésta Garantía no aplica para México
Consulte la hoja de la garantía anexa para ver los
términos más vigentes de la garantía aplicable a este
producto. En caso de no disponer de esta hoja de
garantía anexa, consulte los detalles sobre la garantía
descritos en el sitio web de su país respectivo indicado
a continuación.
Estados Unidos de América: www.makitatools.com
Canadá: www.makita.ca
Otros países: www.makita.com

Some dust created by power sanding, sawing, grinding, drilling, and other
construction activities contains chemicals known to the State of California
to cause cancer, birth defects or other reproductive harm. Some examples
of these chemicals are:
• lead from lead-based paints,
• crystalline silica from bricks and cement and other masonry products, and
• arsenic and chromium from chemically-treated lumber.
Your risk from these exposures varies, depending on how often you do this
type of work. To reduce your exposure to these chemicals: work in a well
ventilated area, and work with approved safety equipment, such as those
dust masks that are specially designed to filter out microscopic particles.
WARNING
< USA only >
ADVERTENCIA
Algunos polvos creados por el lijado, aserrado, esmerilado, taladrado y
otras actividades de la construcción contienen sustancias químicas
reconocidas por el Estado de California como causantes de cáncer, defectos
de nacimiento y otros peligros de reproducción. Algunos ejemplos de estos
productos químicos son:
• plomo de pinturas a base de plomo,
• sílice cristalino de ladrillos y cemento y otros productos de albañilería, y
• arsénico y cromo de maderas tratadas químicamente.
El riesgo al que se expone varía, dependiendo de la frecuencia con la que
realice este tipo de trabajo. Para reducir la exposición a estos productos
químicos: trabaje en un área bien ventilada y póngase el equipo de seguridad
indicado, tal como las máscaras contra polvo que están especialmente
diseñadas para filtrar partículas microscópicas.
< Sólo en los Estados Unidos >
Makita Corporation
3-11-8, Sumiyoshi-cho,
Anjo, Aichi 446-8502 Japan
www.makita.com
885A86-946
GSP01-1
EN, ESMX
20240823
