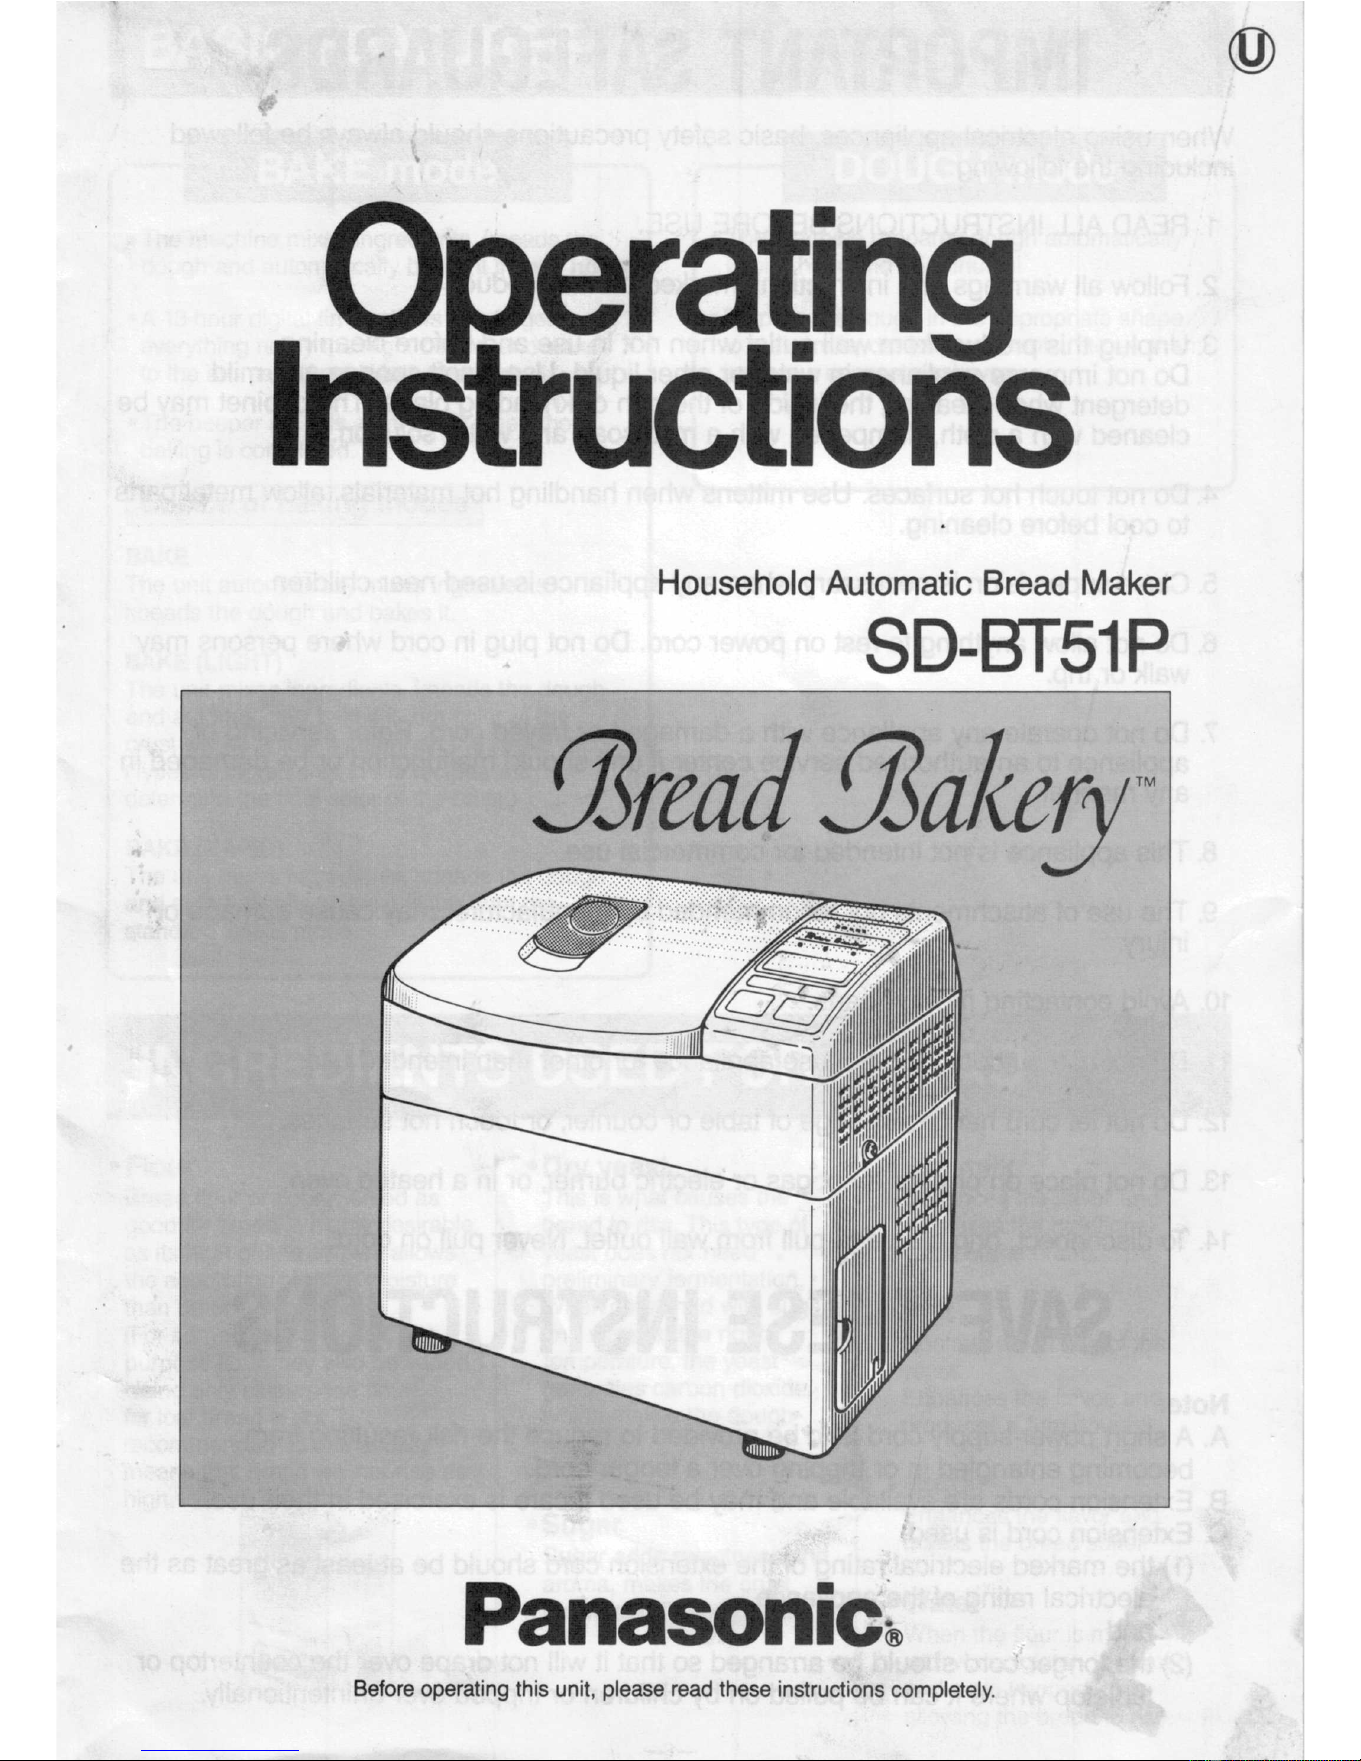
Operating
Instructions
Household
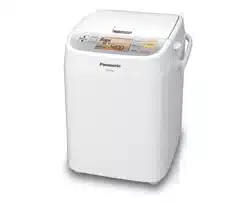
Automatic Bread Maker
SD-BT51
P
rmd
f/3a/<5”/yi
ll“
ll
j<
ll
P»
P - Q
anasomc-®
Before operating this unit, please read these
instructions completely.
IMPORTANT
SAFEGUARDS
When
using
electrical
appliances,
basic
safety
precautions
should
always
be followed
including the
following:
1.
READ
ALL INSTRUCTIONS
BEFORE
USE.
2.
Follow
all warnings
and
instructions
marked
on the
product.
3.
Unplug
this
product
from
wall
outlet
when not
in
use and
before
cleaning.
Do
not immerse
appliance
in water
or
other
liquid.
Use
a soft
sponge
and
mild
detergent
when
cleaning
the
inside
of
the
pan or
kneading
blade.
The cabinet
may
be
cleaned
with a
cloth,
dampened
with
a
mild
soap
and water
solution.
4.
Do not
touch
hot surfaces.
Use
mittens
when
handling
hot
materials,
allow
metal
parts
to cool
before
cleaning.
5.
Close supervision
is
necessary
when
any appliance
is used
near
children.
6.
Do not
allow
anything
to rest
on power
cord.
Do
not plug
in
cord where
persons
may
walk
or
trip.
7. Do
not
operate
any appliance
with
a damaged
or frayed
cord.
Refer
sen/icing
of
appliance
to an
authorized
service
center
if unit
should
malfunction
or be damaged
in
any
manner.
8. This
appliance
is
not intended
for commercial
use.
9. The
use
of attachments
not
recommended
by manufacturer
may
cause
damage
or
ll'l]Ul'y.
10. Avoid
contacting
moving
parts.
11. Do
not use outdoors.
Do not
use
appliance
for other
than
intended
use.
12.
Do not
let cord
hang
over edge
of
table
or counter,
or touch
hot surfaces.
13. Do
not place
on or
near
a hot gas
or
electric
burner,
or in
a heated
oven.
14.
To disconnect,
grip plug
and
pull
from
wall
outlet.
Never
pull on
cord.
SAVE
THESE
INSTRUCTIONS
A. A
short power-supply
cord
is
to be
provided
to
reduce
the risk
resulting
from
becoming
entangled
in or
tripping
over
a longer
cord.
B. Extension
cords
are
available
and
may
be used
if care
is
exercised
in
their use.
C. Extension
cord
is used.
(1) the
marked
electrical
rating
of the
extension
cord
should
be at
least
as great
as
the
electrical
rating
of the
appliance,
and
(2)
the
longer
cord
should
be
arranged
so
that
it will not
drape
over
the countertop
or
tabletop
where
it can
be
pulled
on by
children
or tripped
over
unintentionally.
_1_
1‘?
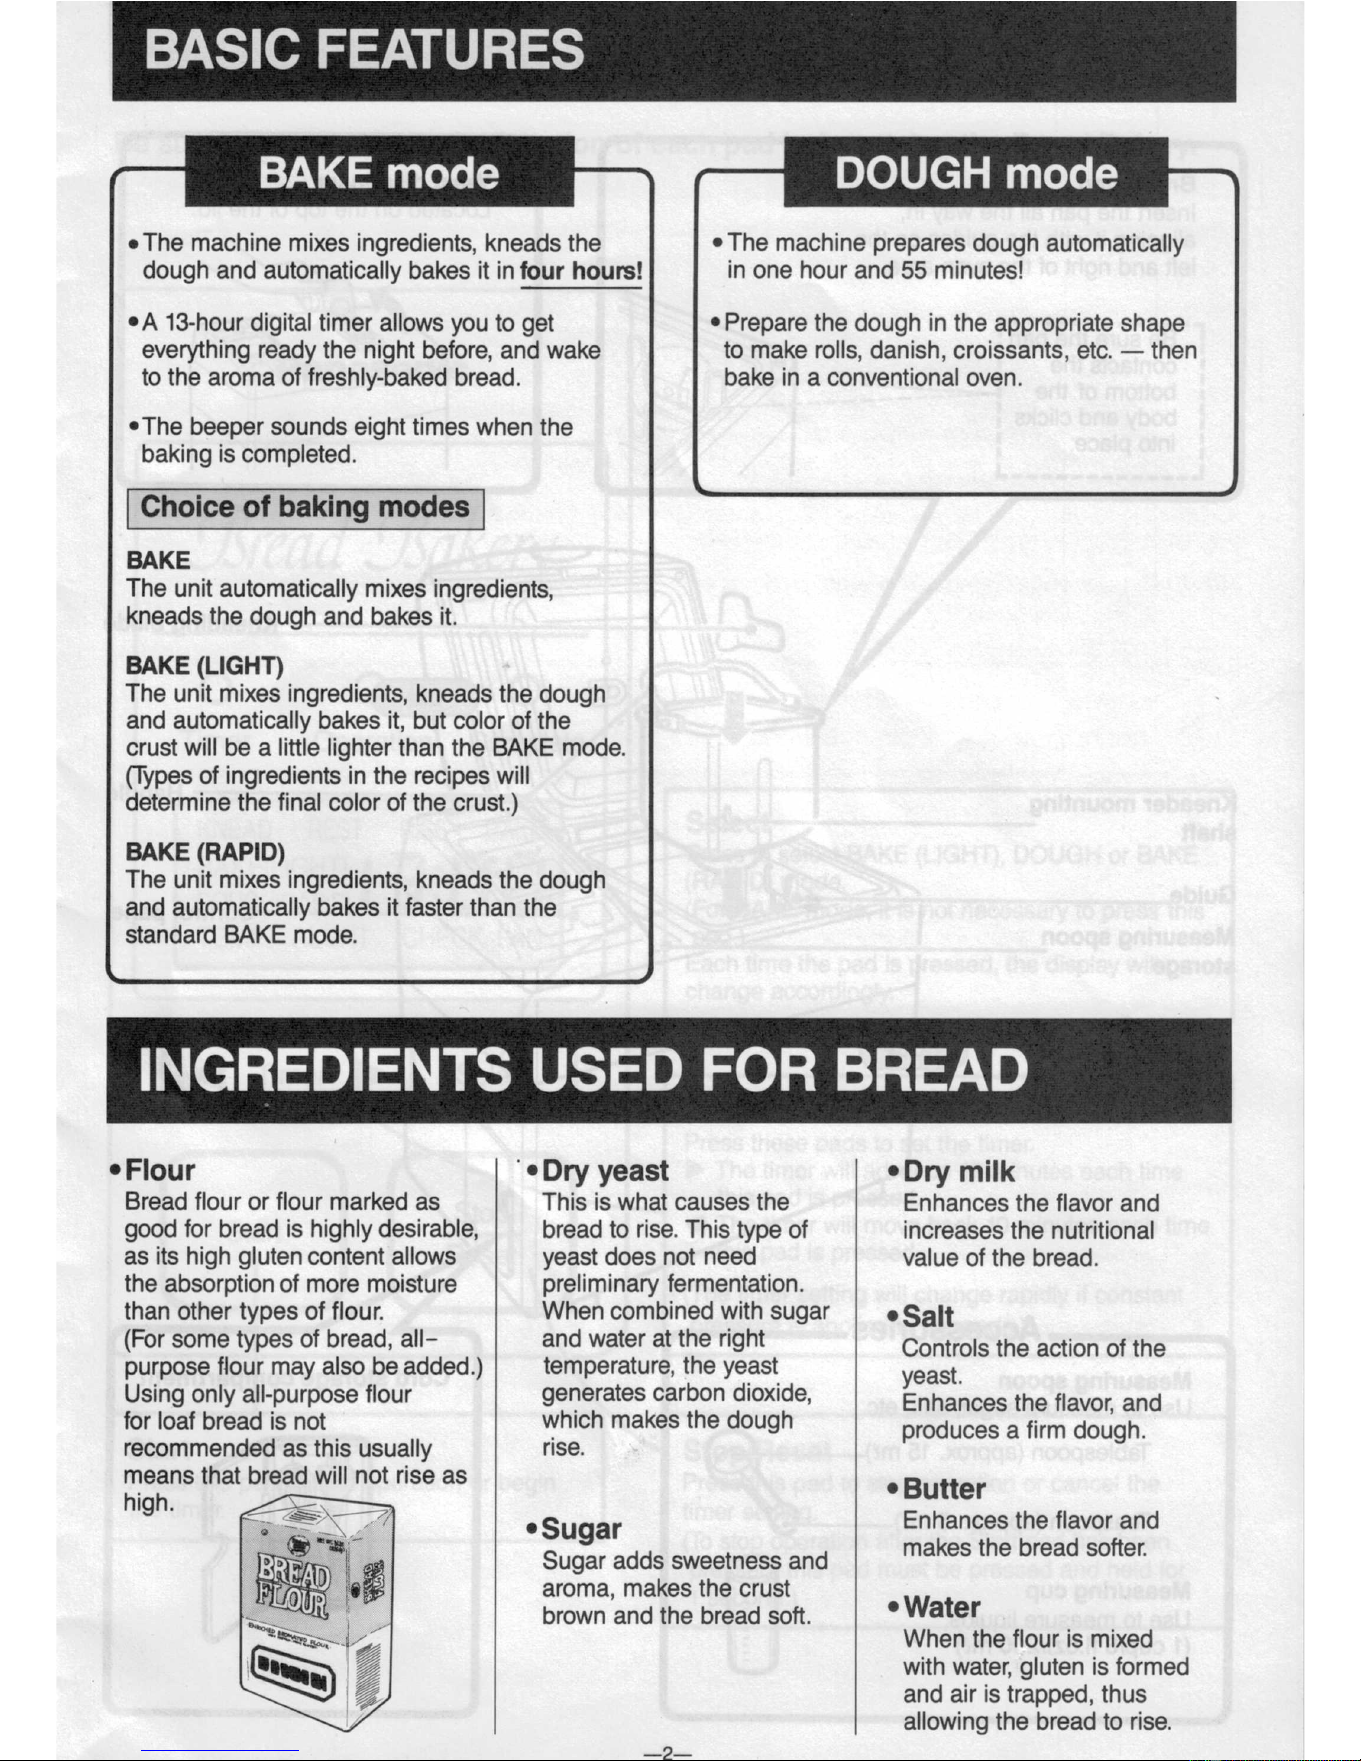
¢The
machine mixes ingredients,
kneads the
¢The machine prepares dough
automatically
dough and
automatically bakes it in
four hours!
in one hour and 55
minutes!
~A 13-hour
digital timer allows
you to get
'Prepare the dough in the appropriate shape
everything ready the night before,
and wake to
make rolls, danish,
croissants, etc. — then
to the aroma of freshly-baked
bread. bake in a conventional oven.
'The
beeper sounds
eight times when
the
baking is completed.
Q
4
I Choice of
baking
modes |
BAKE
The unit automatically
mixes ingredients,
kneads
the dough
and
bakes it.
BAKE
(LIGHT)
The unit mixes ingredients, kneads
the dough
and automatically bakes it,
but
color
of the
crust will be a little lighter than
the BAKE
mode.
(Types of
ingredients in the recipes will
determine the final color of the crust.)
BAKE (RAPID)
The
unit mixes ingredients, kneads the
dough
and automatically bakes it faster
than the
standard BAKE mode.
t
I
INGREDIENTS
USED
FOR
BREAD
~Flour
'~Dry yeast
~Dry milk
Bread flour
or flour marked as This is what
causes the
Enhances the flavor and
good for bread is highly
desirable,
bread to
rise.
This type of
increases
the nutritional
as its high gluten content allows
yeast does not
need
value of
the bread.
the absorption
of more moisture
preliminary fermentation.
than other types of flour. When combined
with sugar
O
$3“
(For some types of bread, all- and
water at the right Cohhme the echoh
of the
purpose
flour may also be added.)
temperature, the yeast
yeast
Using only all-purpose flour
generates carbon dioxide,
Ehheheee the avor and
f°'
'°af bread is "°t which
makes the dough produces a firm dough.
recommended
as this usually
rise.
means
that bread will
not rise as
hi h_
~Butter
g
,Su ar
Enhances
the flavor
and
BR _ at Sugar adds sweetness and makes
the bread softer‘
aroma, makes the crust
\
brown and the bread soft.
‘water
When the flour is mixed
with
water, gluten is formed
and air is trapped, thus
allowing the bread to rise.
.17"=1
5'";.
\ Ԥ
_2_
B
d
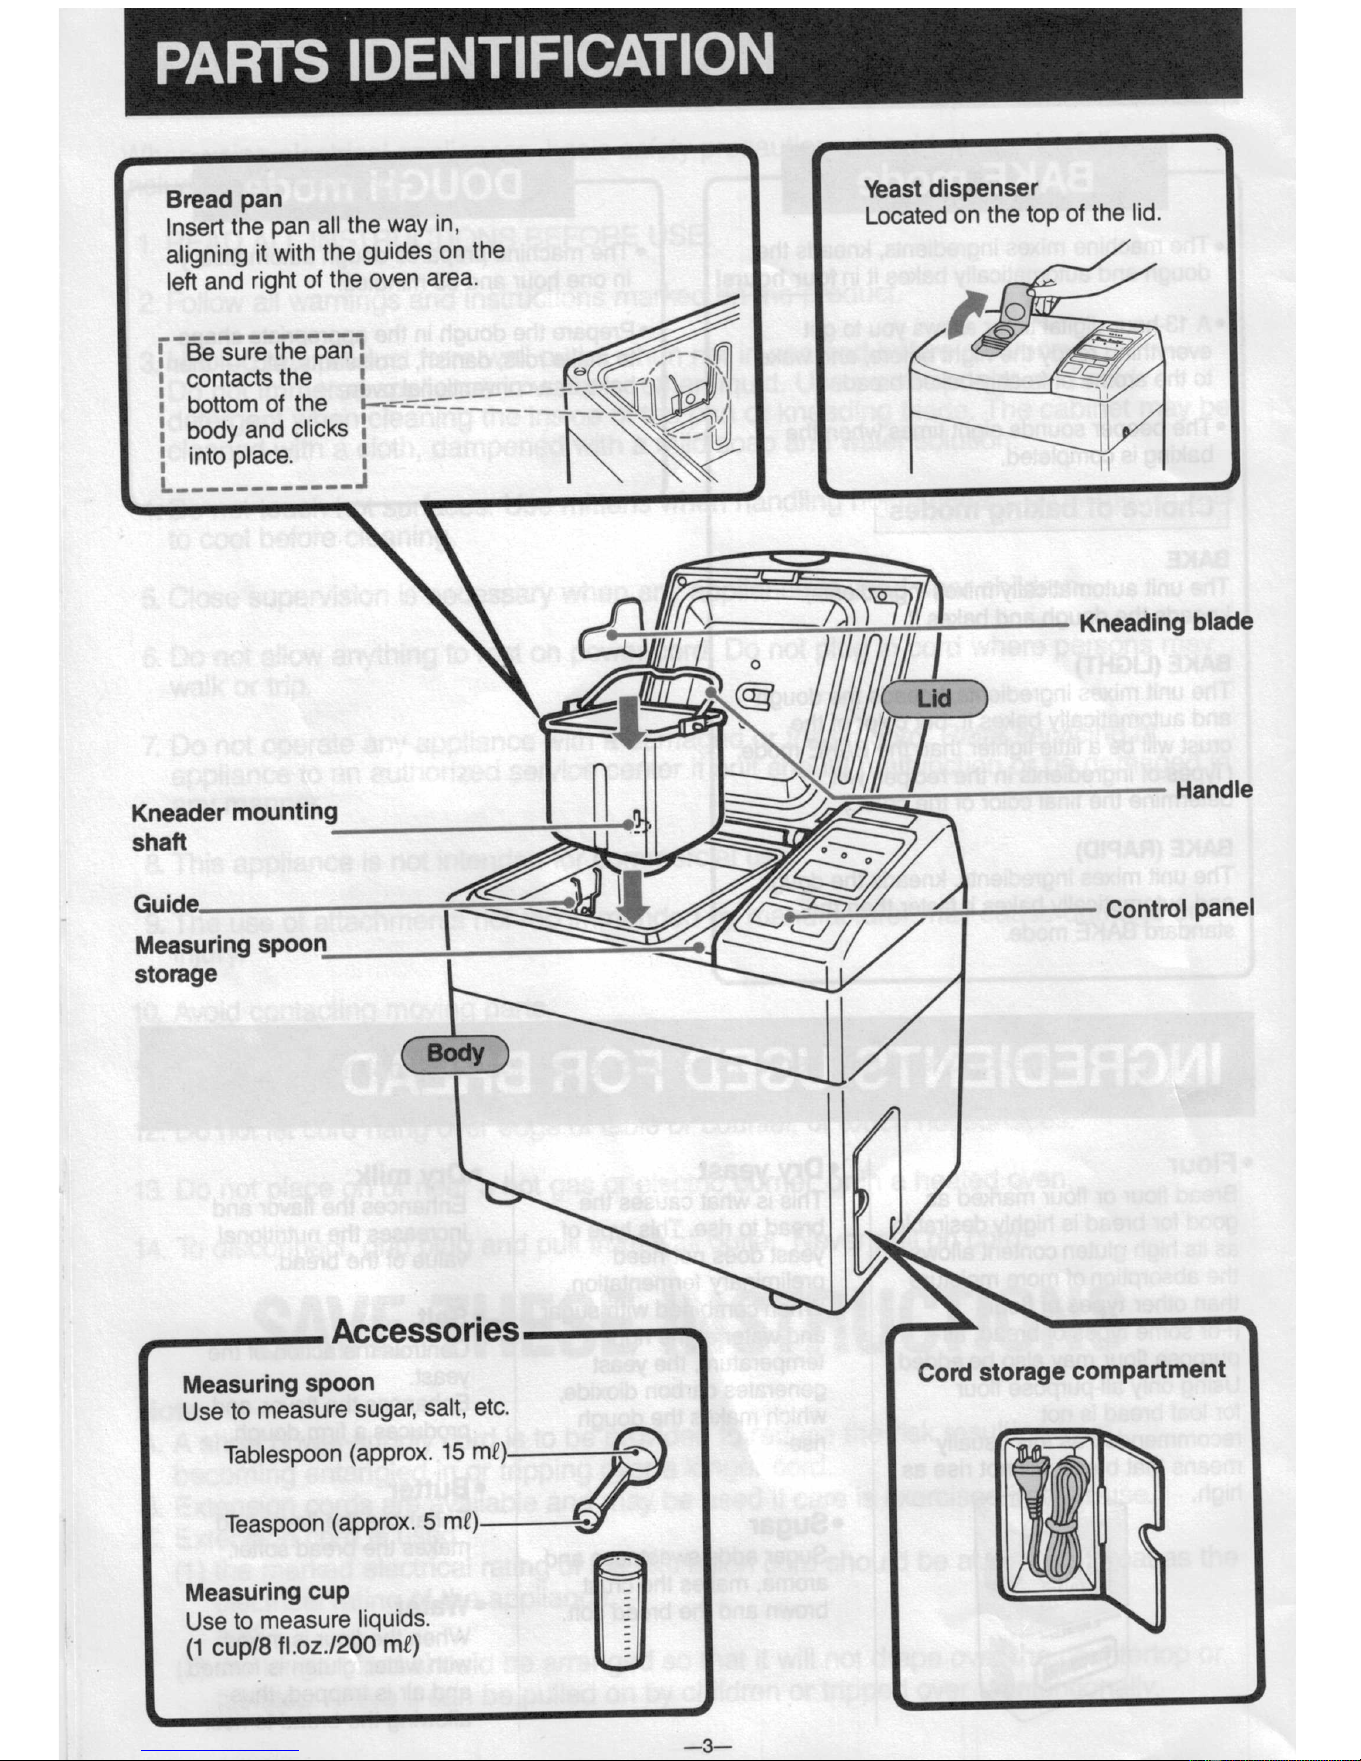
an
Yeast
dispenser
aligning
it with
the
guides
on the
left
and
right
of
the
oven
area.
‘-
Kneader
mountin
H
Z
Handle
Guide
/i
Control
panel
Measuring Spoon
storage
.
I
/
shaft
__.-...-_.-.-I
I
I
I
I
I
I
I
I
I
I
I
3|
_-I
-___i”_?;-
%K
rea
p
Insert
the
pan
all
the
way
in,
Located
on
the
top
of
the
lid.
’
gm,-
Be
sure
the pa
_\
/.57
contacts
the
‘
‘~
bottom
of
the
body
and
click
into
place.
K\J/
Accessories
Measuring
spoon
Tablespoon
(approx.
15 mE)__j-~
Teaspoon
(approx.
5 m€)___-
=1
Measuring
cup
Use
to
measure
liquids.
(1 cup/8
fl.oz./200
ml)
110
_3_
l
e»
Cord
storage
compartment
Use
to
measure
sugar,
salt,
etc.
Fa
15?
[<=s<.=~::-e
_/
\
THE
CONTROL
PANEL-DISPLAY/FU
NCT
IONS
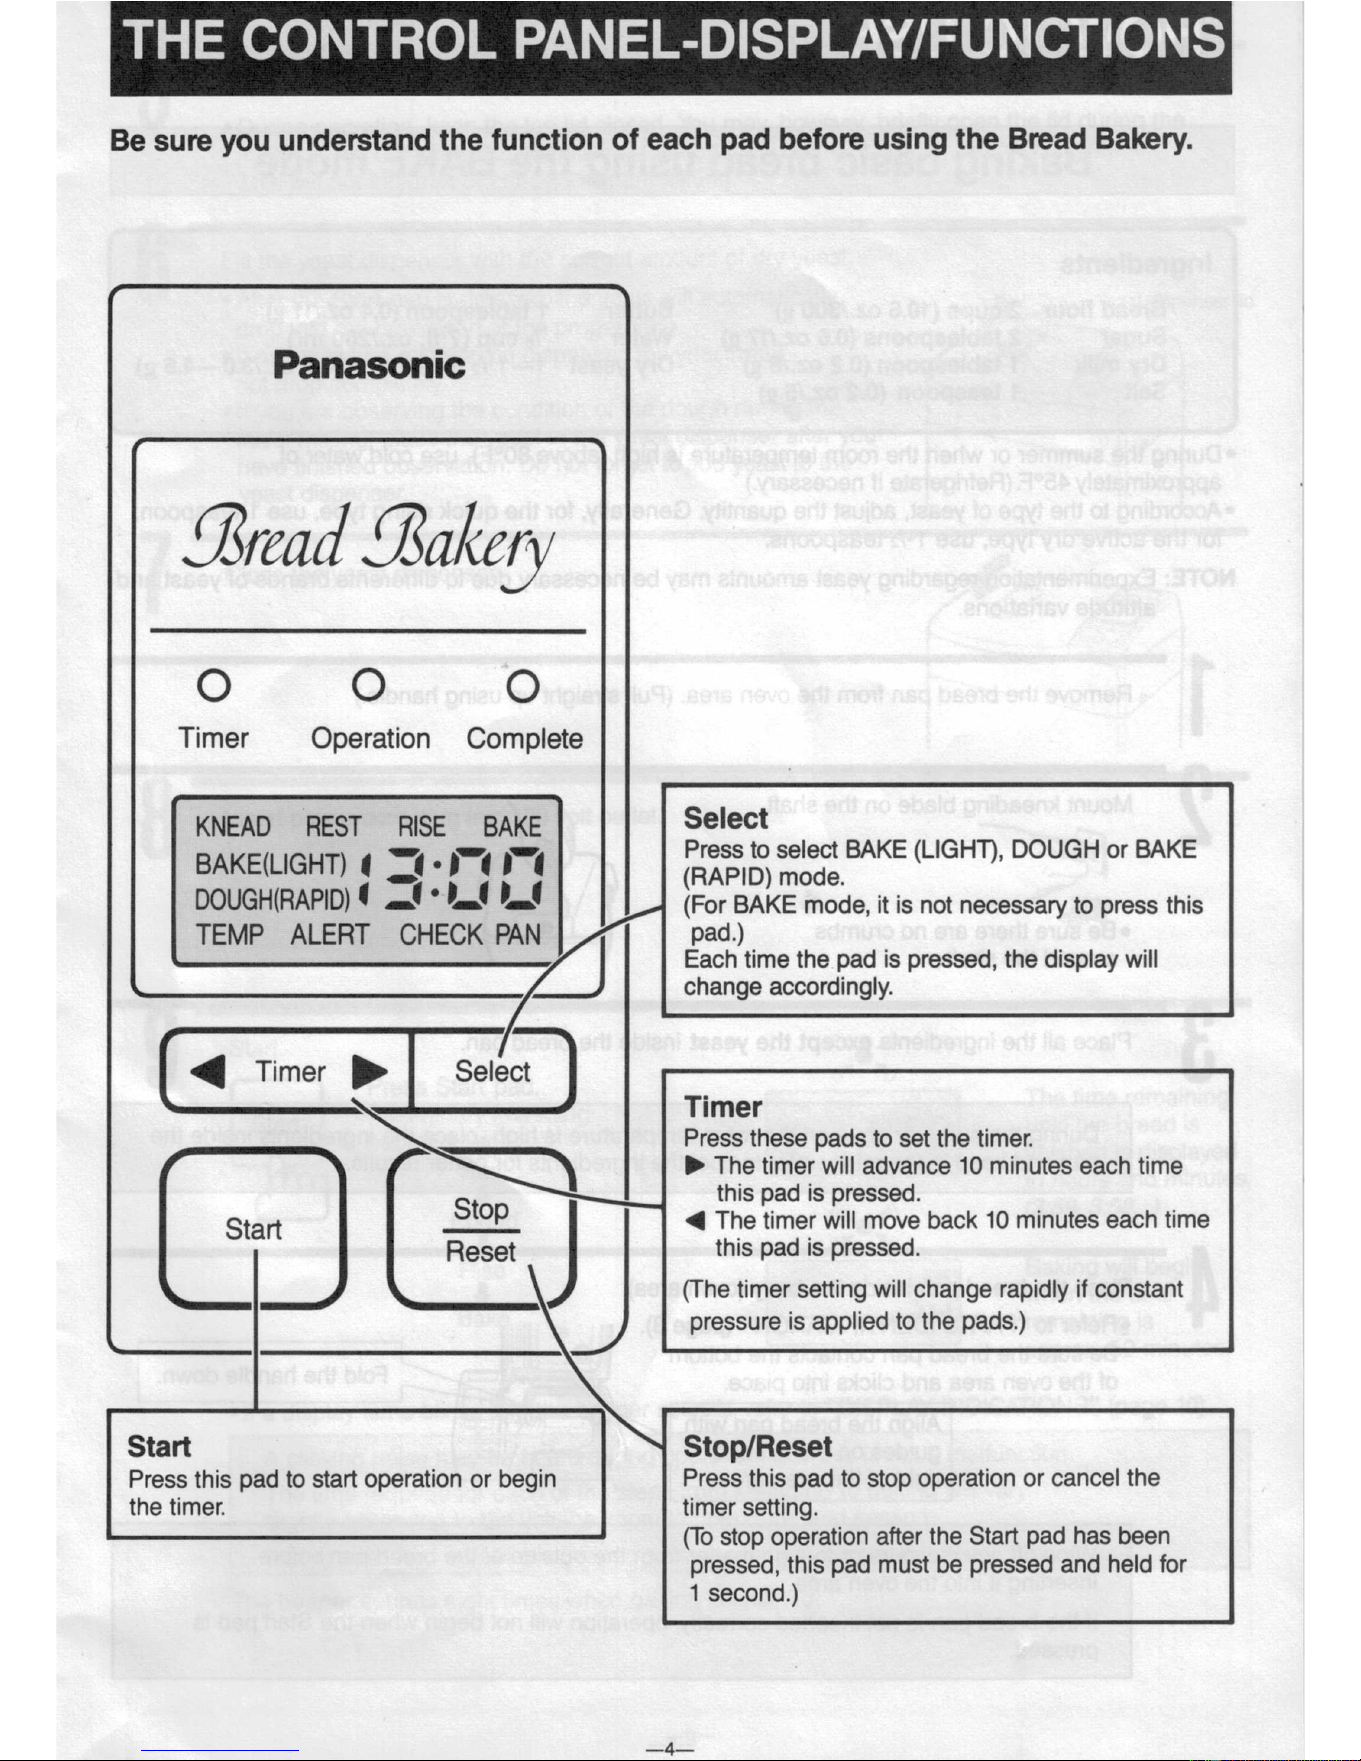
Be sure you understand
the
function of each
pad before using the Bread Bakery.
f #
Panasonic
02%’
02.1/<65.
O O
O
Timer
Operation Complete
KNEAD
REST RISE BAKE Sele
BAKEMGHT) ' :'
'-' .11 {;e\s;s|lt)<))snt1el)edc;.BAKE
(LIGHT),
DOUGH
or BAKE
DOUGH(RAP|D) ' —'
' U ’—' (For BAKE
mode,
it
is not necessary to press this
TEMP
ALERT CHECK PAN
Pad-)
Each time the pad is pressed, the display will
t
4 change
accordingly.
‘ 4
Timer
Select
N
Timer
Press
these pads
to set
the timer.
\ D The
timer will advance 10 minutes each time
Sto this pad is pressed.
Stan
__& 1
The
timer will
move back 10 minutes
each time
Reset this pad is pressed.
(The timer setting will change rapidly
if constant
J pressure
is applied to the pads.)
#
Start
Stop/Reset
Press
this pad
to start
operation
or begin
Press this
pad to stop operation
or cancel
the
the timer. timer setting.
(To stop
operation after the
Start pad has been
pressed, this pad must
be pressed and held for
1 second.)
_4_
l
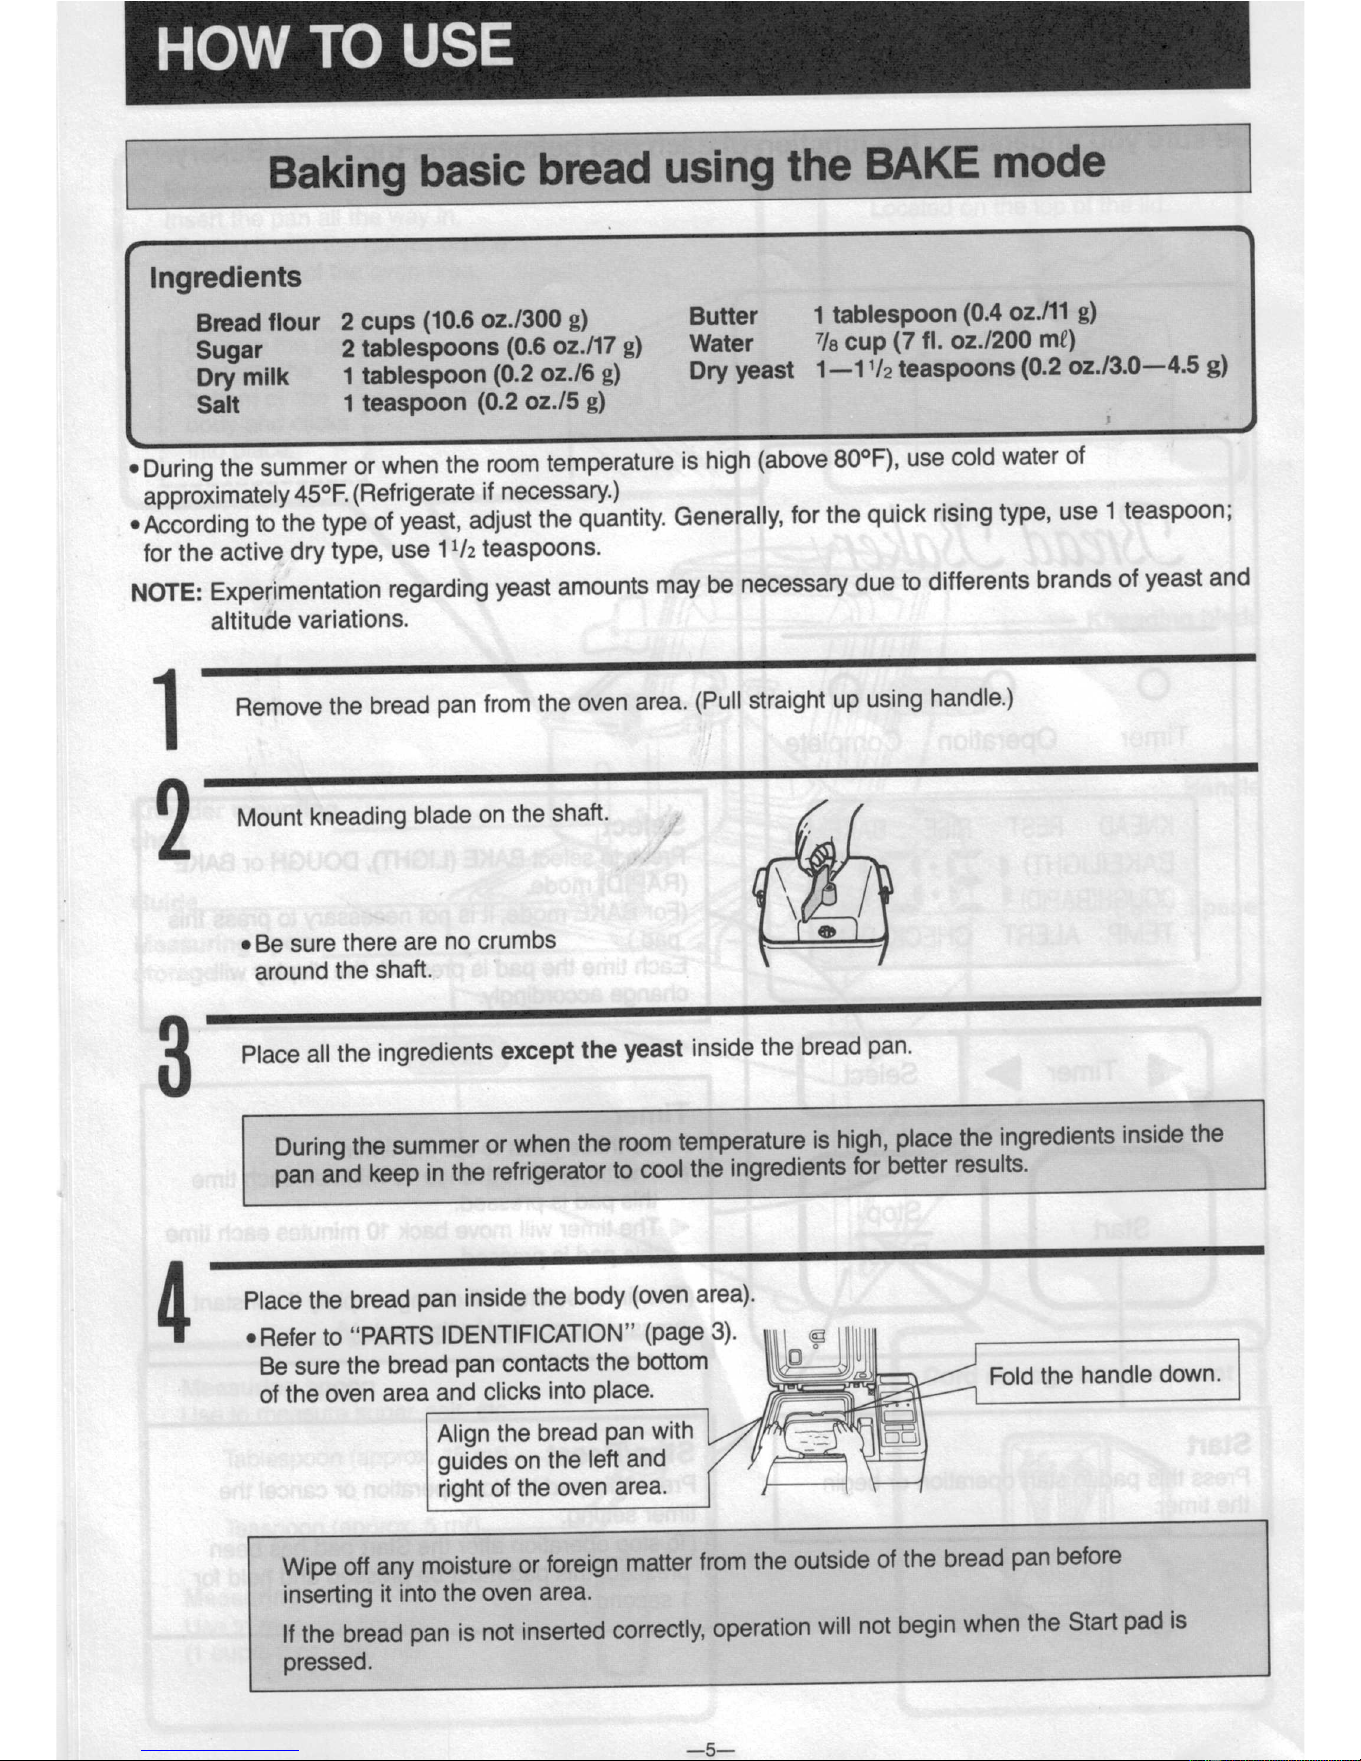
Baking
basic
bread
using
the
BAKE
mode
I
Ingredients
Bread
flour
2
cups
(10.6
oz./300
g)
Butter
1
tablespoon
(0.4
oz./11
g)
Sugar
2
tablespoons
(0.6
oz./17
g)
Water
7/8
cup
(7
fl. oz./200
mt)
Dry milk
1
tablespoon
(0.2
oz./6
g)
Dry
yeast
1-1
‘/2 teaspoons
(0.2
oz./3.0-4.5
g)
Salt
1 teaspoon
(0.2
oz.l5
g)
~ During
the
summer
or when
the
room
temperature
is high
(above
80°F),
use
cold
water
of
approximately
45°F.
(Refrigerate
if
necessary.)
~According
to
the
type
of
yeast,
adjust
the
quantity.
Generally,
for
the
quick
rising
type,
use
1 teaspoon;
for
the
active
dry type,
use
11/2
teaspoons.
NOTE:
Experimentation
regarding
yeast
amounts
may
be
necessary
due
to
differents
brands
of yeast
and
altitude
variations.
Remove
the
bread
pan
from
the
oven
area.
(Pull
straight
up
using
handle.)
9?)
1'/4‘
¢Be
sure
there
are
no
crumbs
around
the
shaft.
2
Mount
kneading
blade
on
the
shaft.
3
Place
all the
ingredients
except
the
yeast
inside
the
bread
pan.
pan
and
keep
in the
refrigerator
to
cool
the
ingredients
for
better
results.
l
During
the
summer
or
when
the
room
temperature
is high,
place
the
ingredients
inside
the
\
4
Place
the
bread
pan
inside
the
body
(oven
area).
~Reier
to “PARTS
IDENTIFICATION"
(page
3).
Be
sure
the
bread
pan
contacts
the
bottom
of the
oven
area
and
clicks
into
place.
“
Align
the bread
pan
with
guides
on the
left
and
right
of the
oven
area.
__
Fold
the
handle
down
Inuit!‘
_4
Wipe
off any
moisture
or
foreign
matter
from
the
outside
of the
bread
pan
before
inserting
it into
the
oven
area.
If the
bread
pan
is
not
inserted
correctly,
operation
will
not
begin
when
the
Start
pad
is
pressed.
_5_
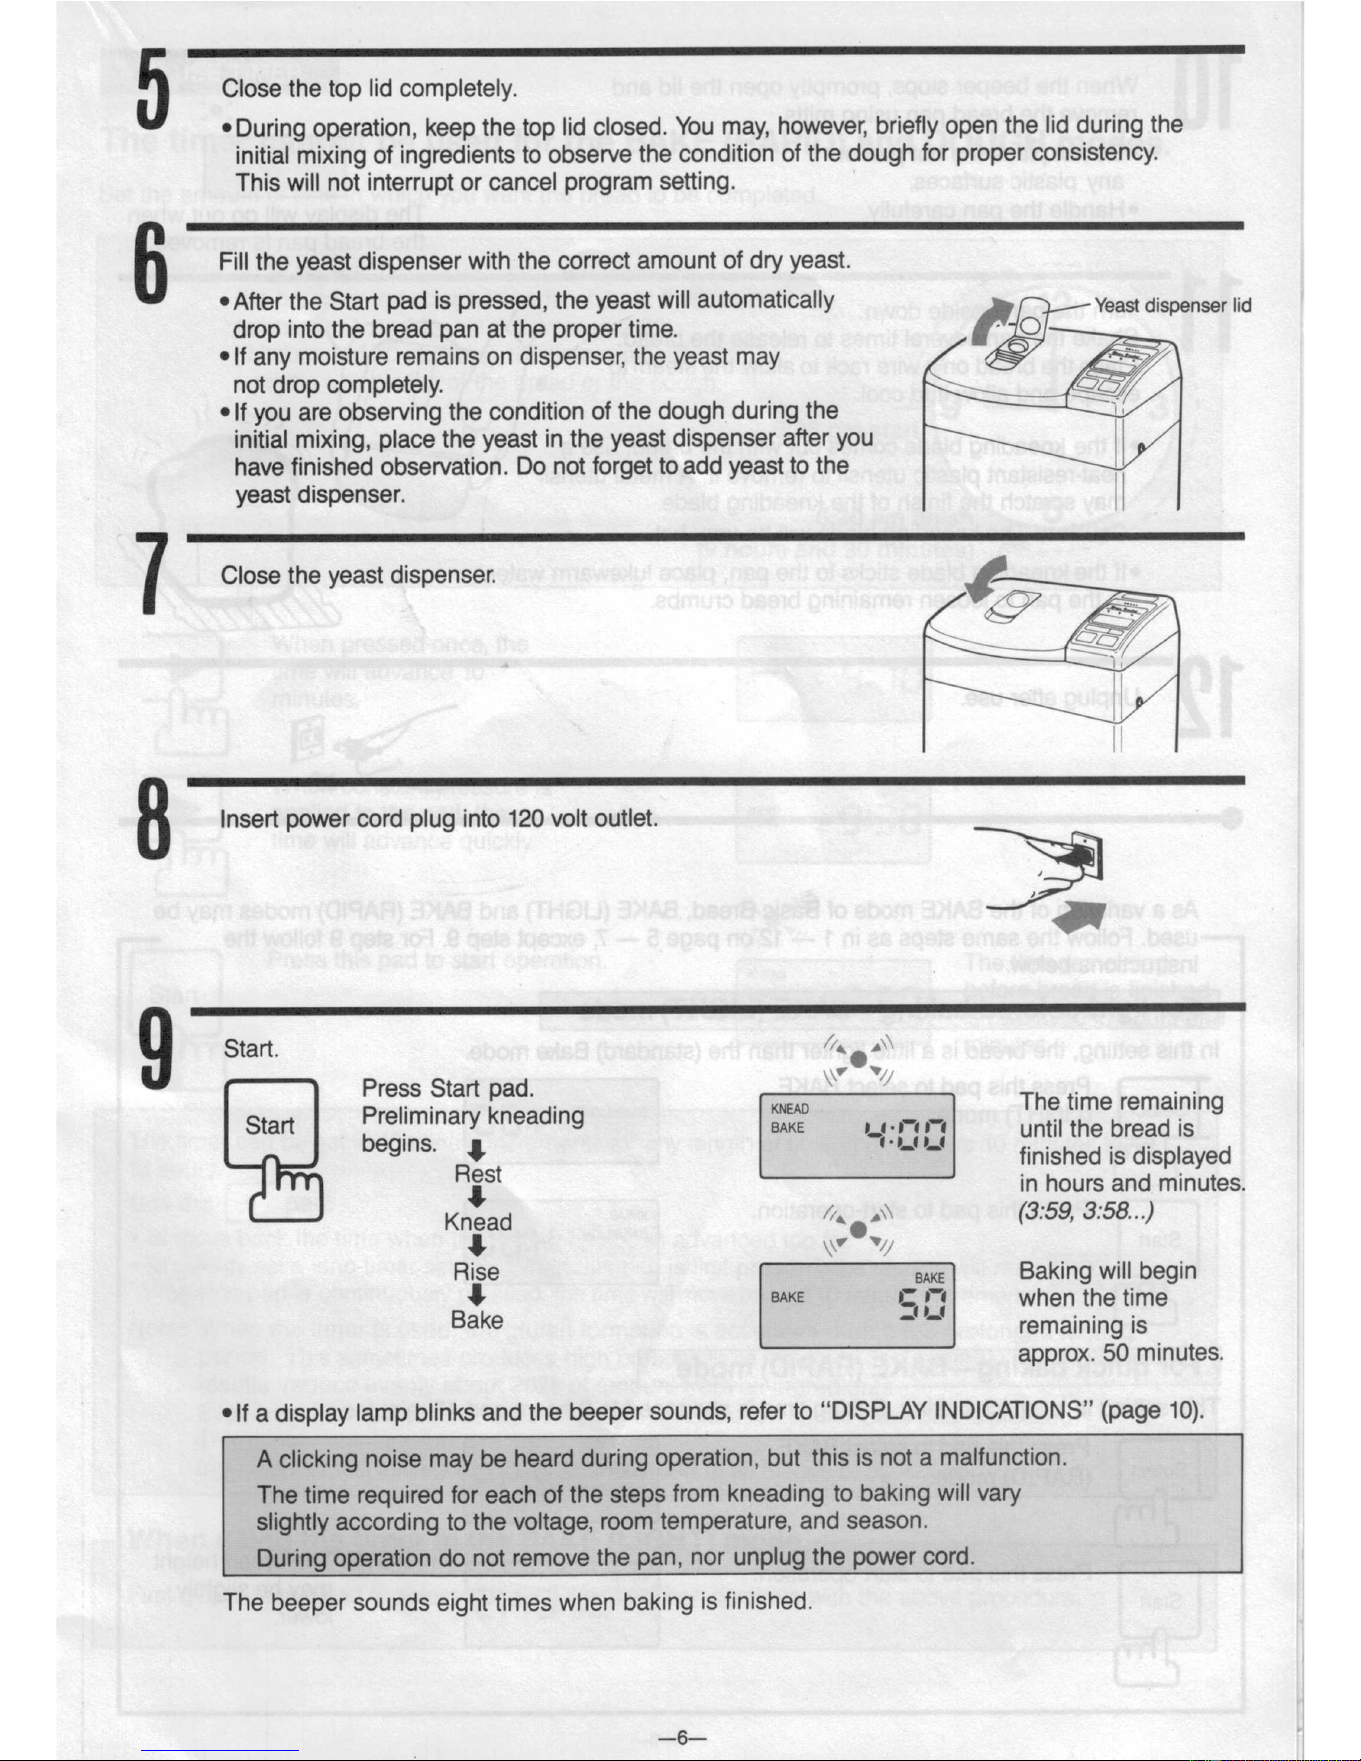
Close
the top lid completely.
‘During
operation, keep
the top lid closed.
You
may, however,
briey open
the lid during
the
initial mixing of ingredients
to observe
the condition
of the
dough for proper
consistency.
This will
not interrupt or cancel
program
setting.
Fill the yeast dispenser
with the correct
amount of dry
yeast.
~Alter the Start
pad
is pressed, the
yeast will automatically
Yeas, dispense,
|,d
drop into the bread pan at
the proper time.
elf any moisture remains
on dispenser, the yeast may
not drop completely.
~ If you are
observing the condition
of the
dough during
the
initial mixing, place
the yeast in the
yeast
dispenser after you
have finished observation.
Do not forget to
add yeast to the
yeast
dispenser.
Close the
yeast dispenser.
,
Insert
power cord plug into 120 volt
outlet.
Start.
//~
.*\\
\ 7
Y
sf(
~
L \\
M
grelsfs
Stan
Bad‘ d. Km, \\ 4/
The time remaining
Start
bg‘;:r';'"a'Y
"ea
‘"9 BAKE
__
-
-
until the bread
is
‘ ‘
“ T finished is
displayed
M
l
Rest
in hours and
minutes.
Knead
//_
.\\
(3:59, 3:58. . .)
¥
\\
//
TV
Ftise
@
BAKE
'
Bake
- -
vlf a display
lamp blinks
and the beeper
sounds,
refer to “DISPLAY
lND|CATlONS" (page
10).
Baking will
begin
when
the time
remaining is
approx.
50
minutes.
II,
Tb>
-_a
A clicking noise
may be heard during
operation,
but this is
not a malfunction.
The time required for each of the
steps
from kneading
to baking
will vary
slightly according
to
the voltage,
room temperature,
and season.
During
operation do not remove
the
pan,
nor
unplug
the power cord.
The
beeper
sounds
eight times when
baking
is finished.
_6_
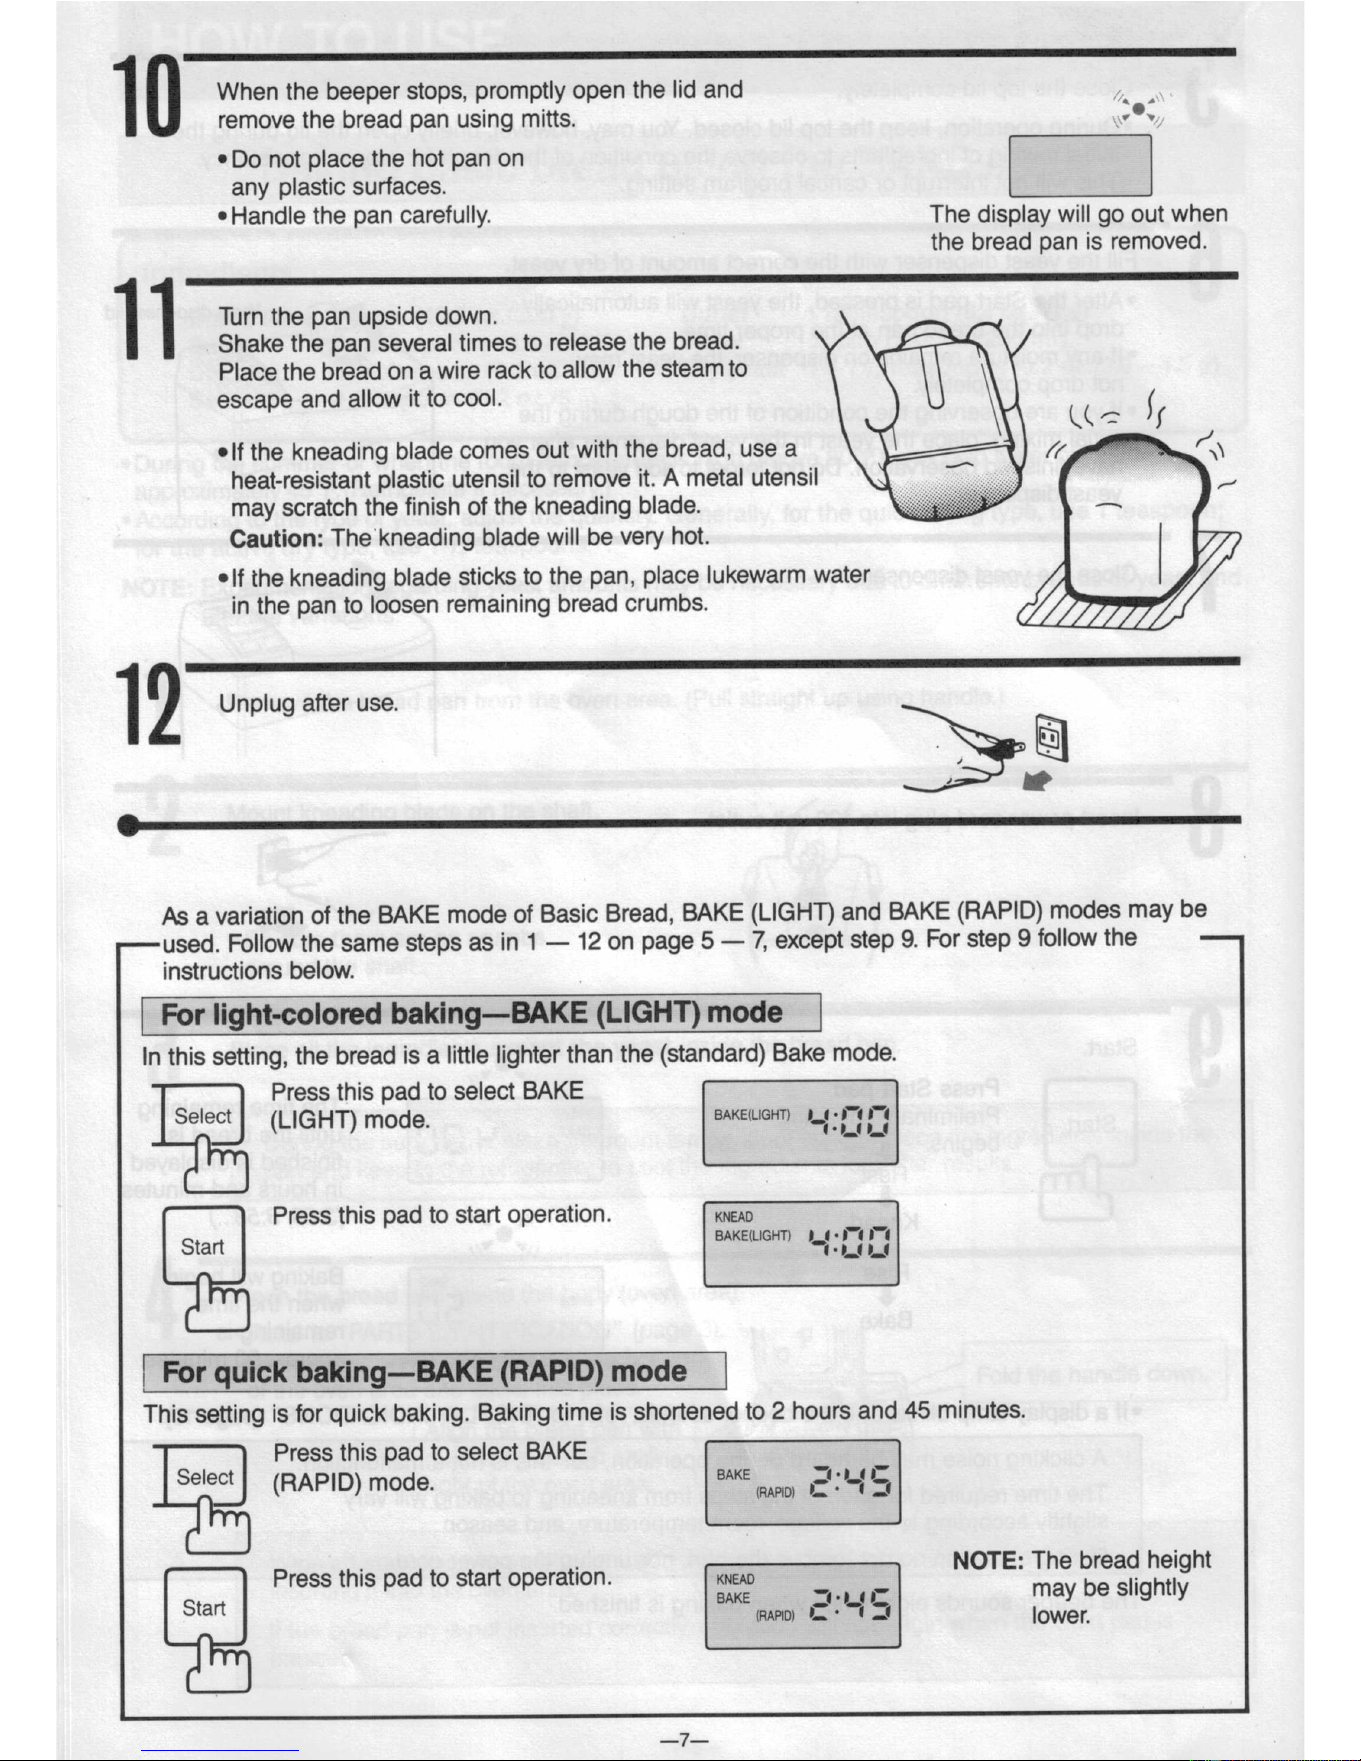
When the
beeper stops,
promptly
open the
lid and
remove
the bread pan
using
mitts.
.,,1'~/
~Do
not
place the hot
pan on
any
plastic
surfaces.
C2
° Handle
the
pan carefully.
The
display
will go gut
when
the
bread pan
is removed.
1 1
Turn the pan upside
down.
Shake
the pan
several
times to release
the bread.
55
Place the
bread
on a
wire rack
to allow
the
steam
to
‘
‘
escape
and
allow
it to cool.
fr
vlf
the kneading
blade
comes
out with
the bread,
use
a
‘
//
/\\
heat-resistant
plastic
utensil to
remove
it. A
metal utensil
,_,
may
scratch
the finish
of the kneading
blade.
Caution:
Thekneading
blade
will be
very hot.
V
~lf
the kneading
blade
sticks
to the
pan,
place lukewarm
water
I
in the
pan
to loosen
remaining
bread
crumbs.
12
Unplug
alter use.
I I
§
As a variation
of the
BAKE
mode of
Basic
Bread,
BAKE
(LIGHT)
and BAKE
(RAPID)
modes
may be
——used.
Follow
the
same
steps as
in 1 —
12 on
page 5 —
7, except
step
9. For
step 9
follow the
-
instructions
below.
| For
light-colored
baking—BAKE
(LIGHT)
mode I
In
this setting,
the
bread is a
little lighter than
the
(standard)
Bake
mode.
Press this pad
to select
BAKE
(LIGHT)
mode.
B*KE<L'<="T>
''
Press
this pad to
start
operation.
KNEAD
Stan
BAKE(LlGHT) _, I '"
l For quick baking—BAKE
(RAPID) mode l
This
setting is
for quick
baking. Baking
time
is shortened
to 2 hours
and 45
minutes.
Press
this pad
to select
BAKE
Select
BAKE
1' '
.
.
NOTE:
The bread
height
Press this pad
to start operation.
:23:
be slightly
a
M0) -
-
lower.
4?
T‘:
J1
J1
_7_
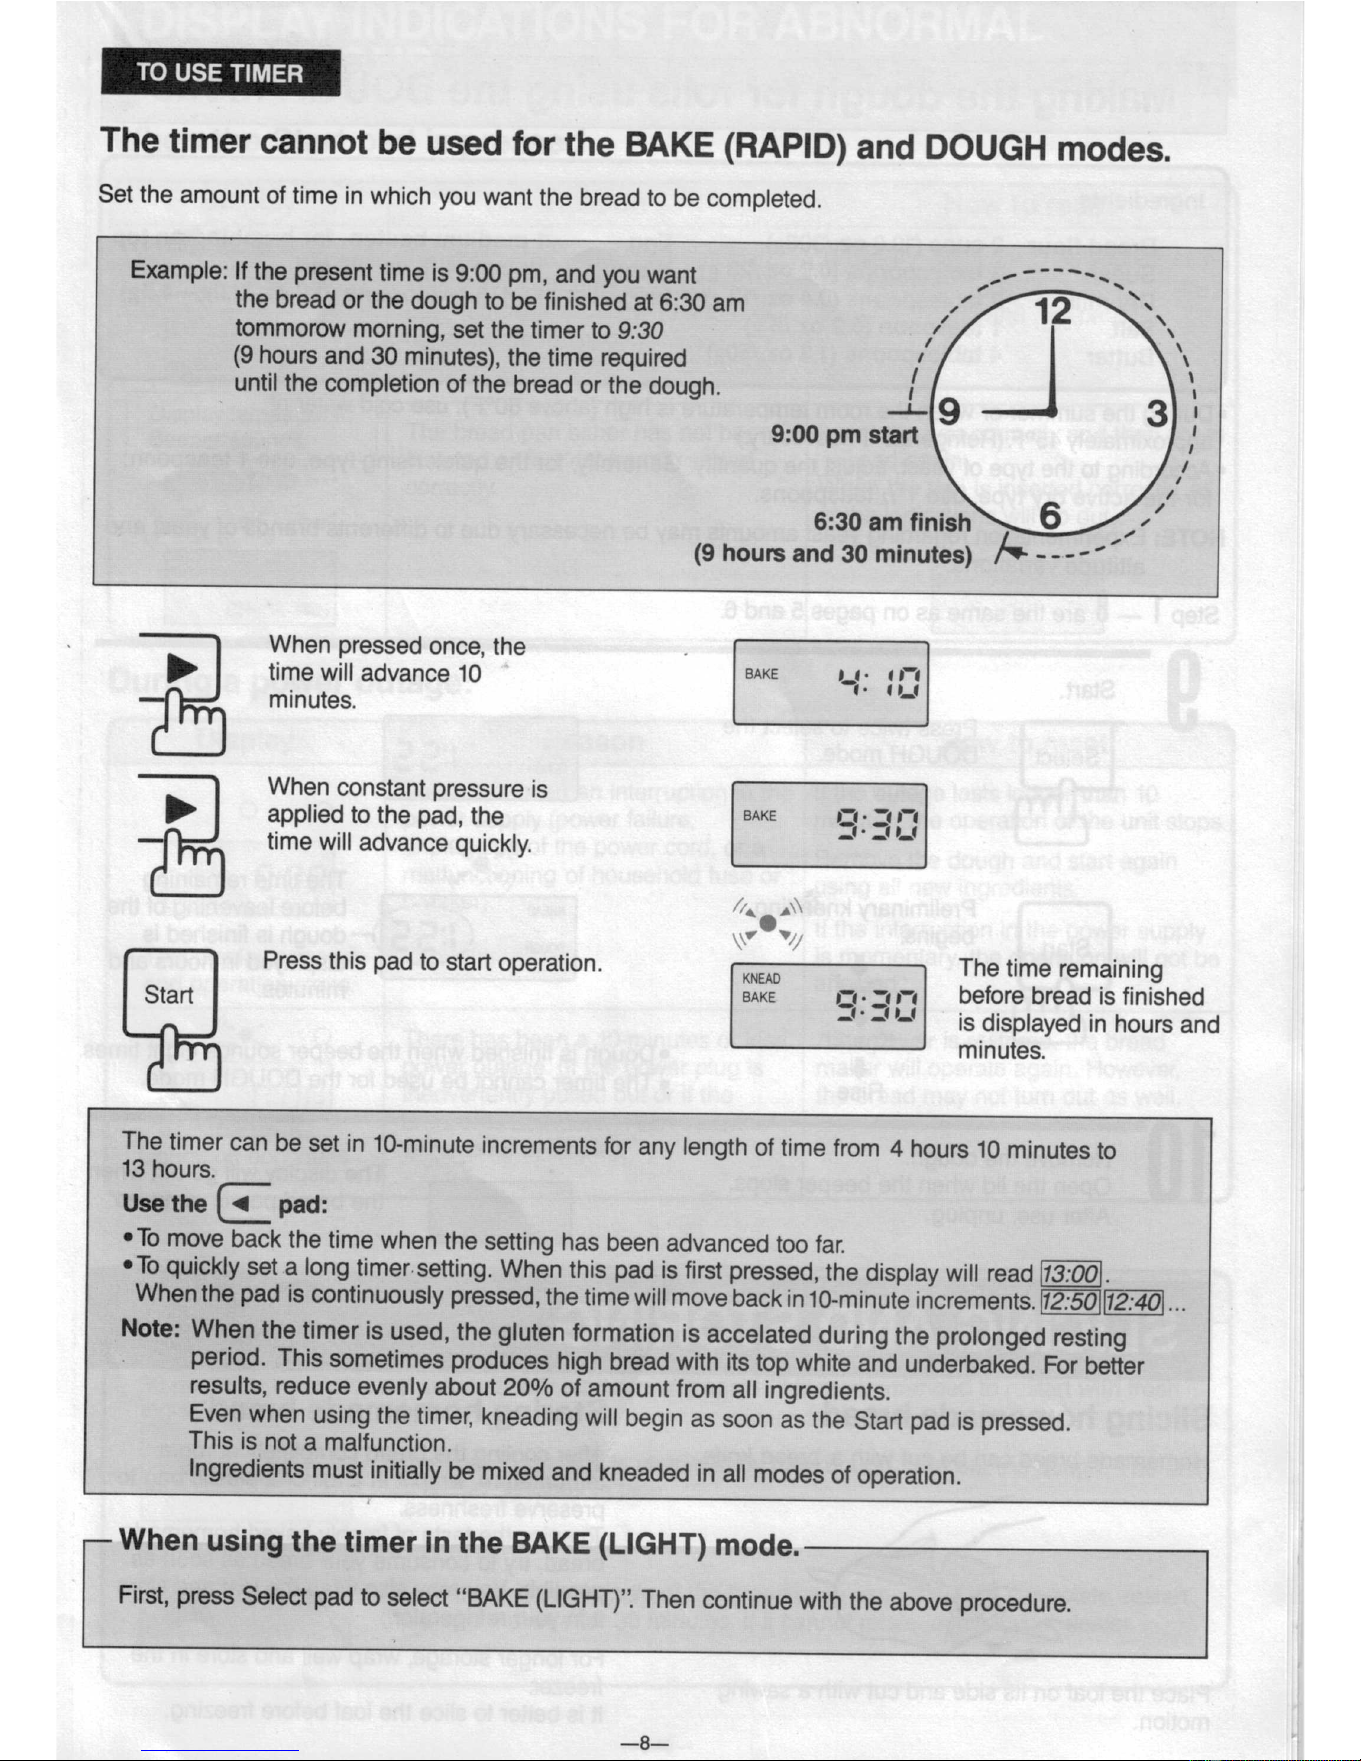
TO
USE
TIMER
The
timer
cannot
be used
for the
BAKE
(RAPID)
and
DOUGH
modes.
Set the
amount of
time in
which you
want
the bread
to be
completed.
tommorow
morning,
set
the timer to
9:30
(9
hours
and
30 minutes),
the time
required
until
the
completion
of the
bread
or the
dough.
Example:
If
the present
time
is 9:00
pm, and
you
want
,.~
"“‘~\
the
bread
or
the dough
to be
finished
at
6:30 am
’
9:00
pm s
I
6:30 am
finish
I,
/'
(9 hours
and
30
minutes)
/Q
- - -'
'
\
1'
\
I
\
I
\
§l~\
I
1
When
pressed
once,
the .
'
I 1-
'
i -
time
will
advance
10
BAKE
-
minutes.
>
applied
to the
pad,
the
BAKE
When
constant
pressure
is
time
will
advance
quickly.
‘
' ‘ ‘
//‘ ,\\
l_\v
v/,1
\ /
Press
this pad
to
start operation.
mm
The
time
remaining
Stan
BAKE
13- 3 '
before bread
is finished
-" -
-
is displayed
in hours
and
__
cw
-Q
-
in
-Q
-
an
an
minutes.
13
hours.
Use the | 4 pad:
This
is
not a
malfunction.
The
timer
can
be
set
in 10-minute
increments
for any
length
of time
from
4
hours
10
minutes
to
‘T0 move
back
the time
when
the
setting
has
been
advanced
too
far.
‘To quickly
set a
long timersetting.
When
this pad
is first
pressed,
the
display
will read
.
When
the pad
is continuously
pressed,
the
time
will move
back
in
10-minute
increments.
12:50
Note:
When
the
timer
is used,
the
gluten
formation
is accelated
during
the
prolonged
resting
.
period.
This
sometimes
produces
high
bread with
its top
white
and underbaked.
For
better
results, reduce
evenly
about
20%
of amount
from
all
ingredients.
Even
when
using
the
timer,
kneading
will begin
as
soon
as
the
Start
pad
is pressed.
Ingredients
must
initially
be
mixed
and
kneaded
in all
modes
of operation.
— When
using
the timer
in
the BAKE
(LIGHT)
mode.
First,
press
Select
pad
to select
“BAKE
(LlGHT)”.
Then
continue
with
the
above
procedure.
_3_
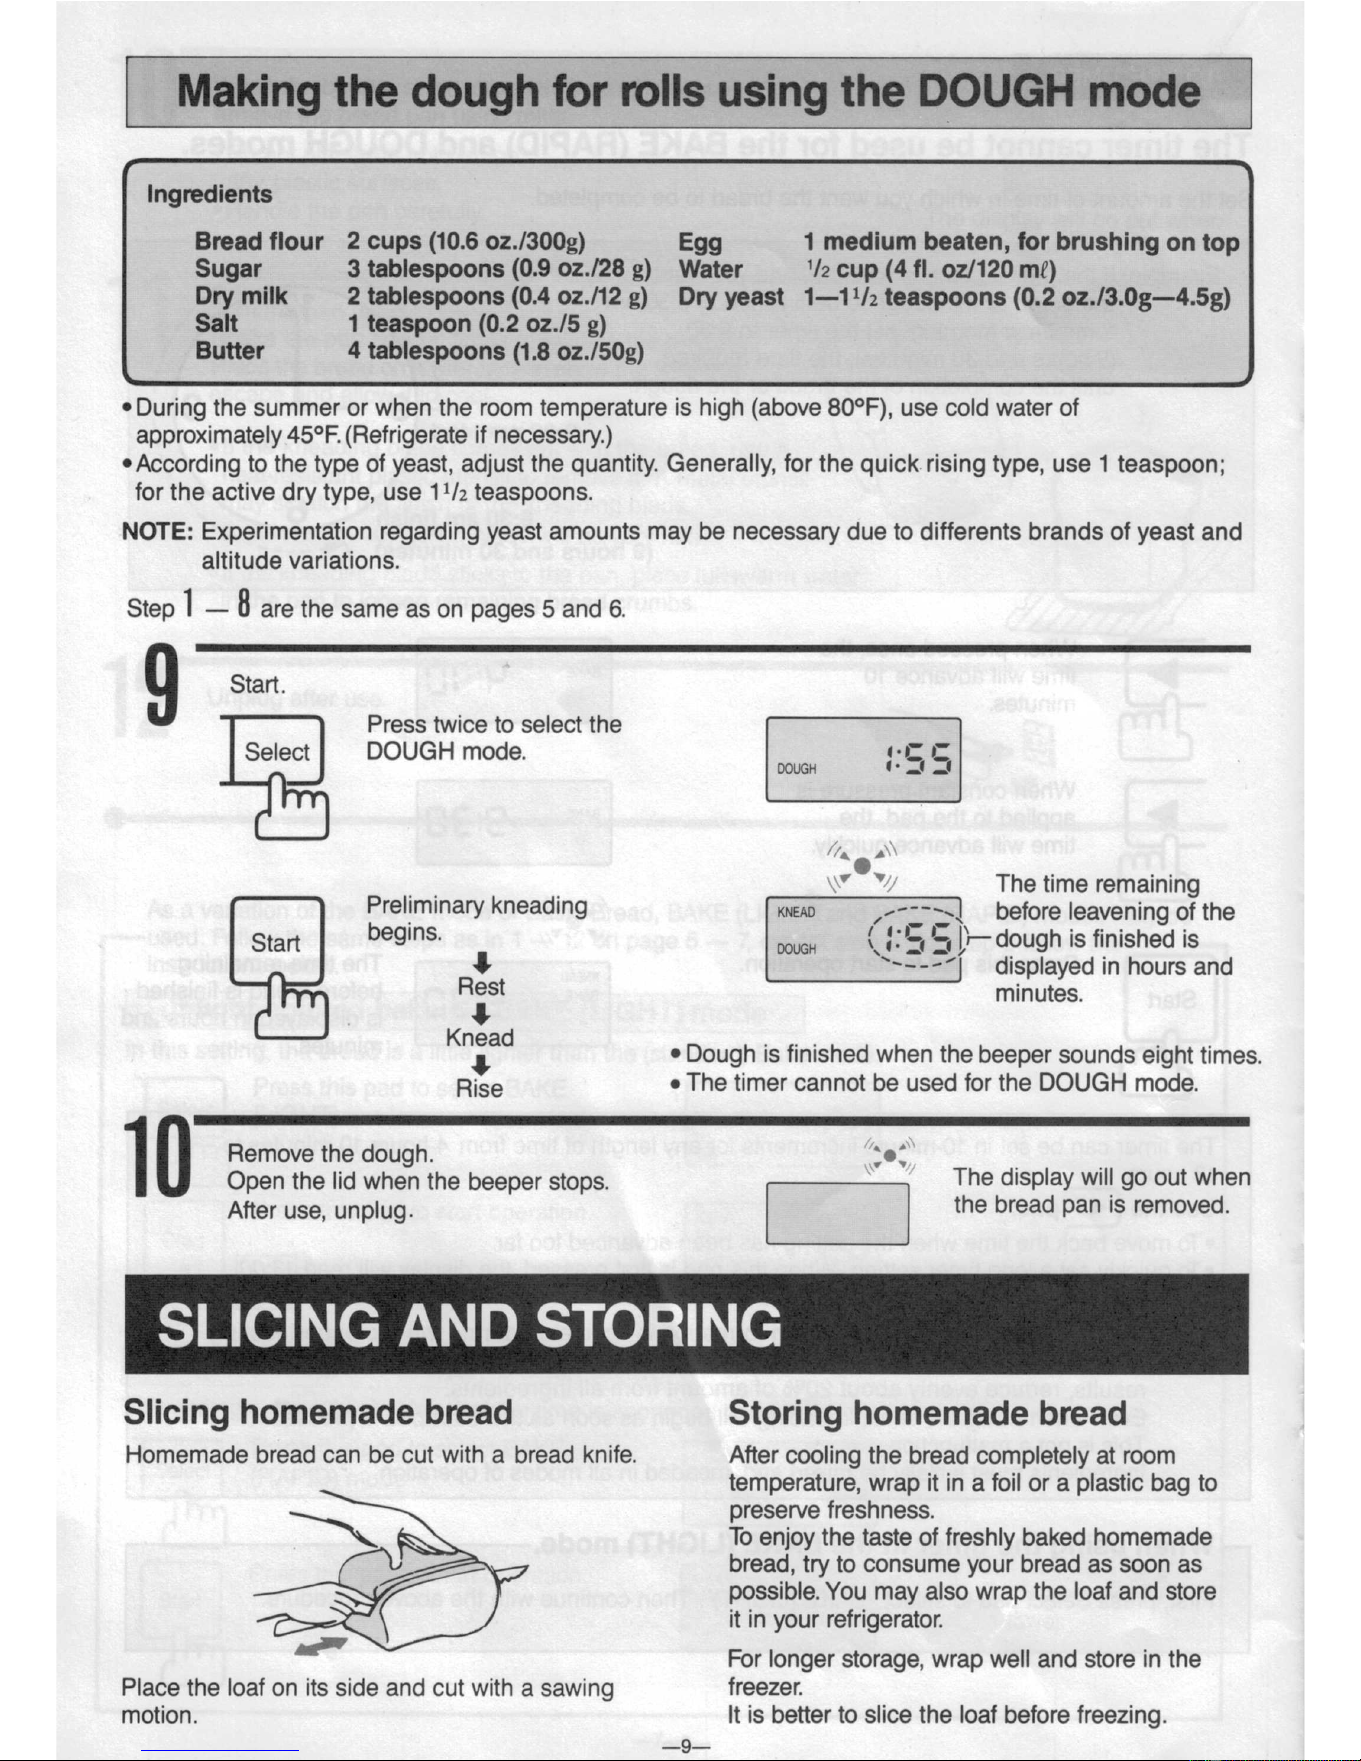
Making
the
dough
for rolls using the
DOUGH mode
r
w
Ingredients
Bread flour
2 cups (10.6 oz./300g)
Egg 1
medium beaten, for brushing
on
top
Sugar 3 tablespoons
(0.9 oz./28
g)
Water ‘/2 cup (4 fl. oz/120
mi?)
Dry milk
2 tablespoons (0.4 oz./12
g)
Dry yeast
1-1 1/1 teaspoons (0.2 oz./3.0g—4.5g)
Salt 1 teaspoon (0.2 oz./5 g)
Butter
4 tablespoons
(1.8 oz./50g)
J
\
~During the summer or when the room temperature is high (above 80°F), use
cold
water of
approximately 45°F. (Refrigerate if necessary.)
~According
to the type of yeast, adjust the quantity. Generally, for the quick rising type,
use 1 teaspoon;
for the active dry type, use 11/2 teaspoons.
NOTE: Experimentation regarding yeast amounts may be necessary due to differents brands of yeast and
altitude
variations.
Step l — 8 are
the same as on pages 5 and 6.
9 Start.
Press twice to select the
Select
DOUGH mode.
DOUGH 1- -1 -1
///‘.“i
‘*' ‘ The
time remaining
Plelfmlnal Kneading i<~e»w ,/I;
before leavening
of the
Stan begins DOUG, :; ; dough is finished is
J —-— displayed
in hours and
RES‘ minutes.
K
. .
.
. .
niad v Dough IS finished when
the beeper sounds
eight times
Rise o The timer
cannot be used for the DOUGH mode.
I,‘
,/_-
-
-.
-
\-I
‘T’
Remove
the dough.
juj
Open
the lid when the
beeper
stops. The
display Wi"
9° out when
After use_ unp|ug_ ‘: the bread pan is removed.
Slicing homemade bread
Storing homemade
bread
Homemade
bread can be cut with a bread knife.
After cooling
the bread completely at room
temperature, wrap it in a foil or a plastic bag to
preserve freshness.
\
To enjoy
the taste of freshly baked homemade
bread, try to consume your bread as soon as
possible. You
may also wrap
the loaf and store
it in your refrigerator.
‘€'
For longer storage, wrap well and store in the
Place the loaf on its side and cut
with a sawing
freezer.
motion.
It is better to slice the loaf before freezing.
_g_
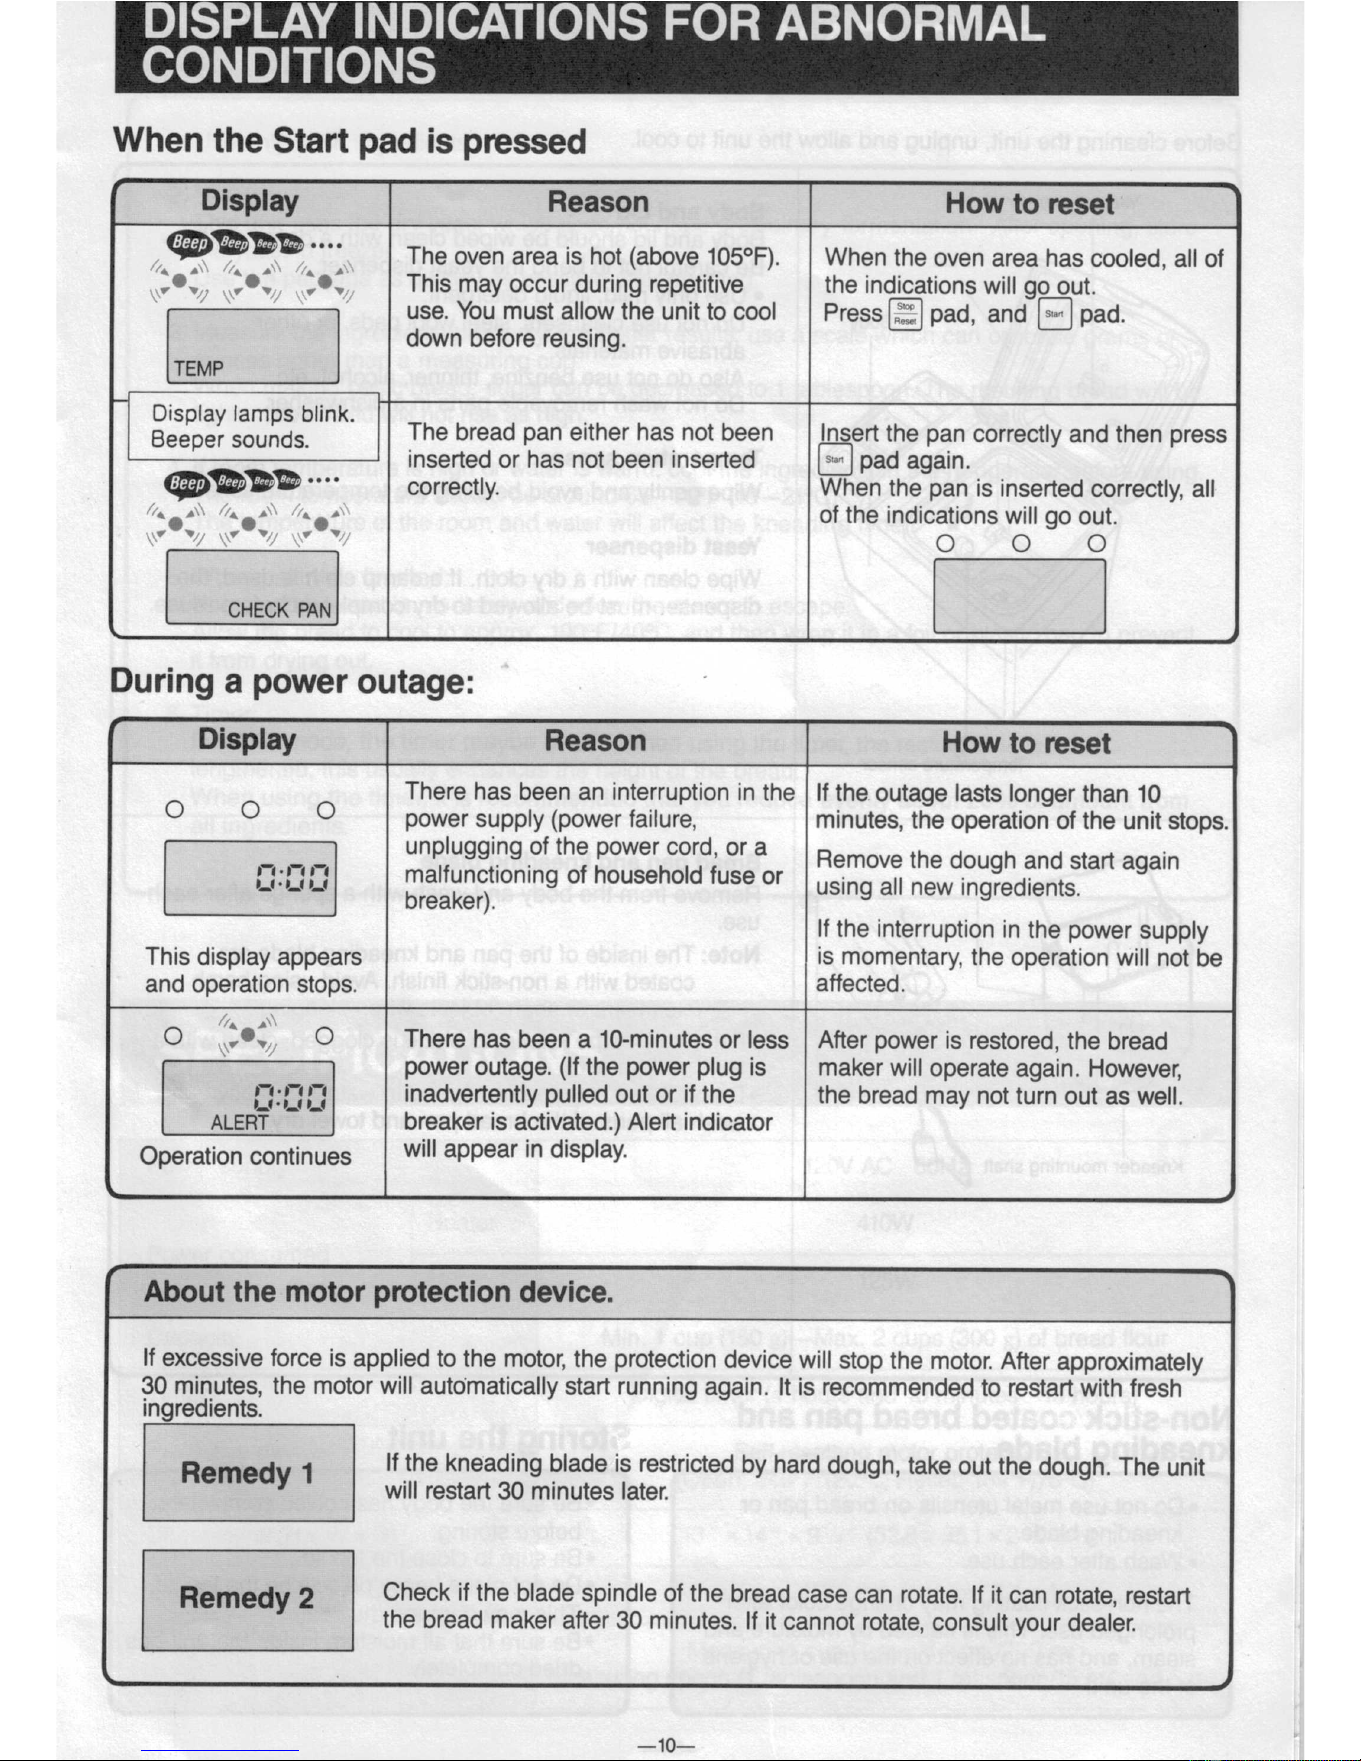
When
the Start
pad is
pressed
'
Display
Reason
How to
reset
\
.,_ ,e .
~.
9 ,
>
Jr
B
.
....
.
J,
_
The oven area is hot (above
105°F). When
the oven
area has cooled,
all of
1'3. 2'2
2'1
'
This may occur
during repetitive
the indications
will go out.
W use. You must
allow the unit to cool
Press
pad,
and pad.
down
before reusing.
TEMP
D‘ l l
bl’ k.
.
Béseppg
szg?§3s_ m
The bread pan either has not been
insert
the pan
correctly and
then press
inserted or has not been inserted
pad again.
W
correctly.
When
the pan
is inserted
correctly, all
\\ //‘.;\
k.‘
' I
'
V
V 1 V
1
Y
O O
O
of
the indications
will
go out.
During
a power outage:
'
Display
Reason
How
to reset
\
This
display
and operatio
O
O
O
There has been an
interruption
in the
If the outage lasts
longer than
10
power supply (power
failure,
minutes,
the operation of
the unit stops
unp'u99'ng
of the power
Cord‘ or a
Remove
the dough
and start
again
malfunctioning of
household
fuse or
using an new
ingredients
breaker).
if the interruption
in the power
supply
appears
is momentary,
the
operation will
not be
n stops,
affected.
.
/,
//‘ ‘Q,
0 ,0‘ 0
breaker
is activated.) lert indi
o
Operation
continues
w'" appear
in dismal’-
\
4
There has been
a 10-minutes or
less After power is
restored,
the bread
power outage.
(If the power plug is
maker will
operate again.
However,
inadvertently pulled out
or if the
the bread may
not turn out as
well.
A
cat r
f
About the motor protection device.
ingredients.
If excessive force is applied
to the motor,
the protection
device will
stop the
motor. After
approximately
30 minutes, the motor will automatically
start running
again. lt is recommended
to restart with
fresh
Remed 1
|f_the kneading
blade
is restricted
by hard
dough,
take
out the
dough.
The unit
y
will
restart
30 minutes later.
Remedy
2 Check if
the blade spindle
of the
bread case
can rotate.
If it can rotate,
restart
the bread
maker after
30 minutes.
If it cannot
rotate,
consult your
dealer.
s
J
__10_
\
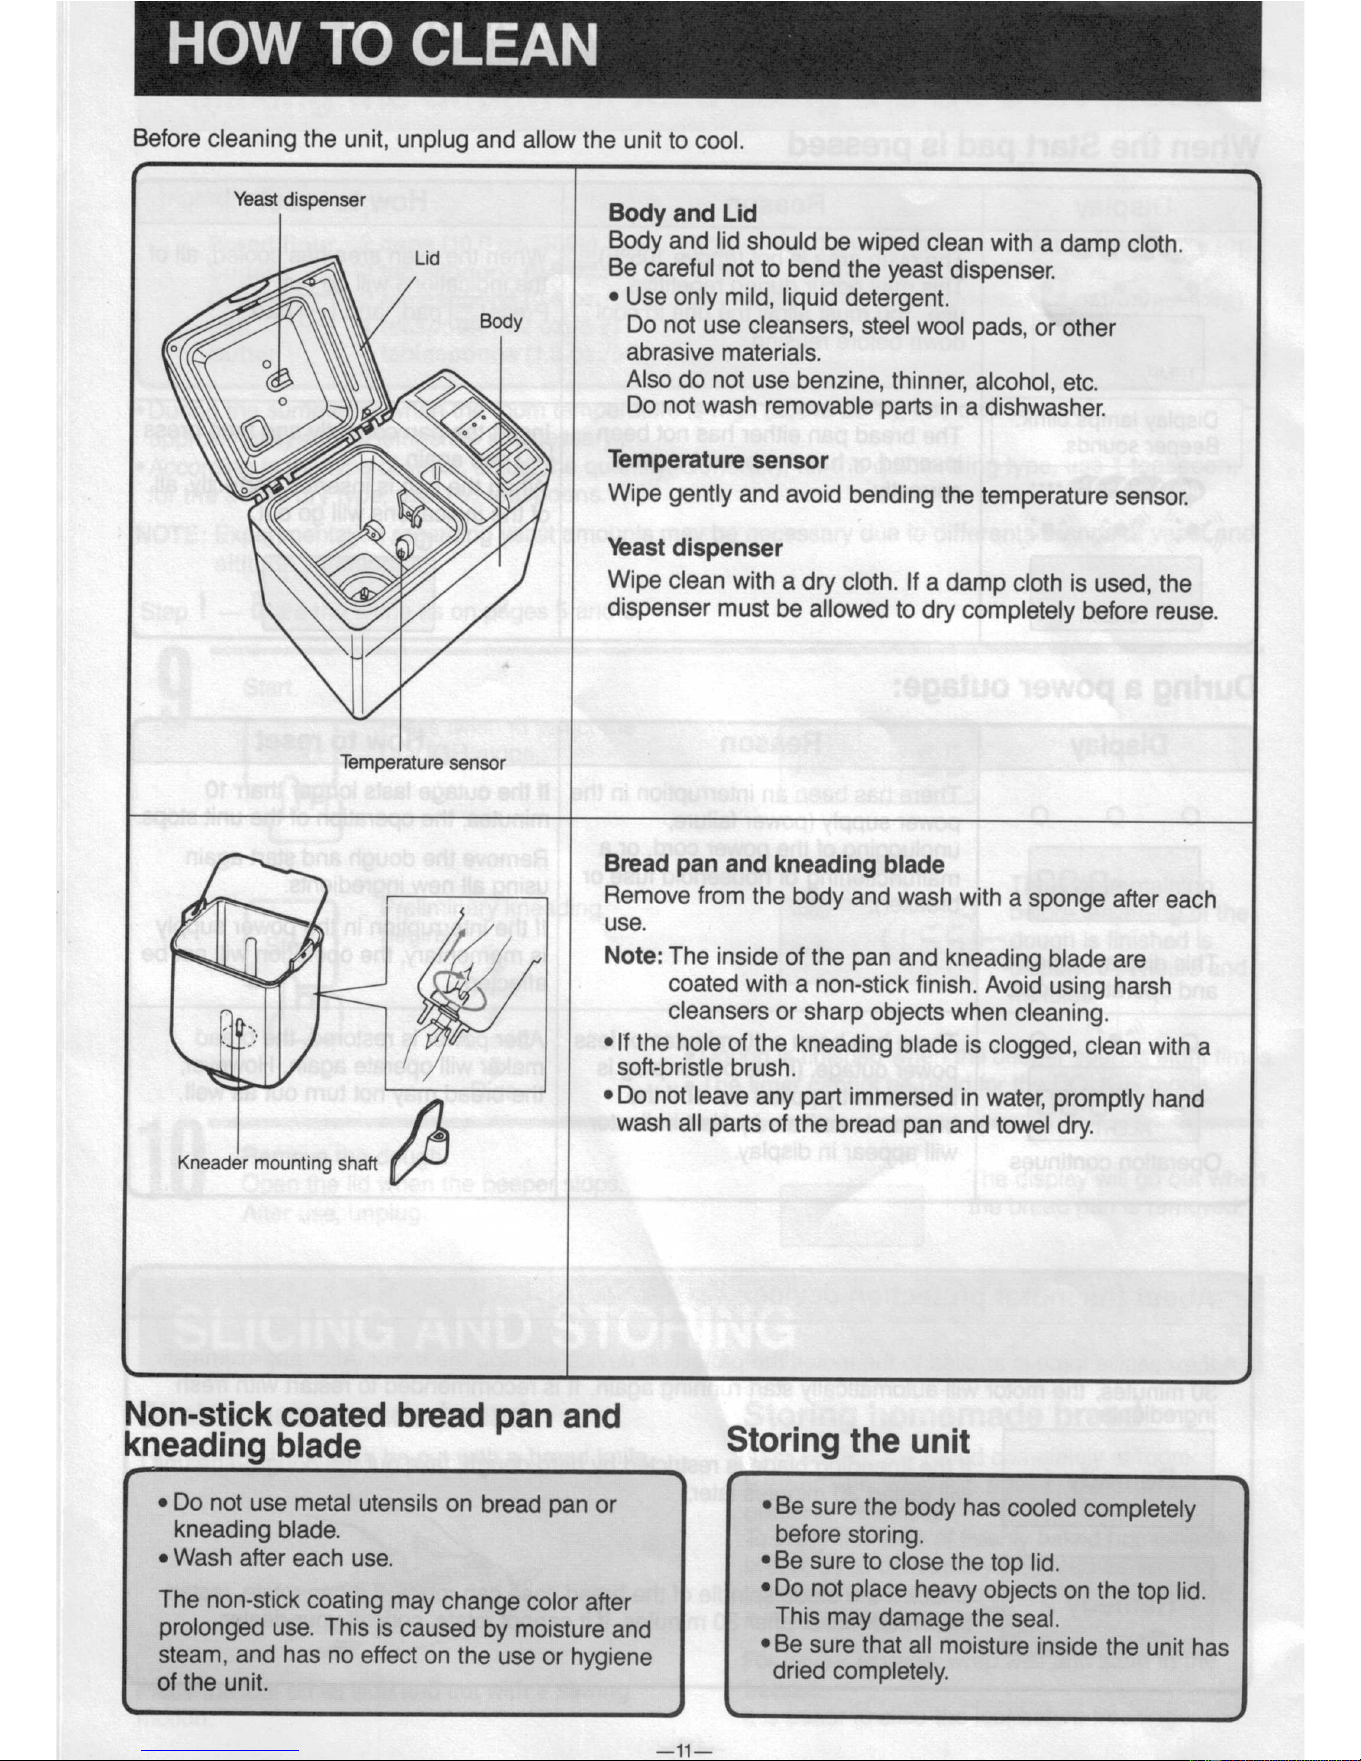
Before
cleaning the unit,
unplug and
allow the unit
to cool.
Yeast
dispenser
Lid
f
i
Body and Lid
Body and
lid should
be
wiped clean
with
a damp
cloth.
Be careful
not
to bend
the yeast
dispenser.
0 Use only mild,
liquid
detergent.
Body
Do not
use cleansers,
steel
wool
pads,
or other
Q5»
§
>
Temperature
sensor
abrasive
materials.
Also do
not use benzine, thinner,
alcohol,
etc.
Do not
wash removable
parts
in a dishwasher.
Temperature
sensor
Wipe
gently
and
avoid bending
the
temperature
sensor.
Yeast
dispenser
Wipe
clean
with
a dry cloth.
If
a damp
cloth is
used, the
dispenser
must be
allowed to
dry
completely
before reuse.
Kneader
mounting
shaft
k
Bread pan
and
kneading blade
Remove from
the body
and
wash with
a
sponge
after
each
soft bristle
brush.
~ Do not
leave any
part
immersed
in water,
promptly
hand
wash
all parts
of the
bread
pan and towel
dry.
"ll
B O
use.
/
/
Note:
The
inside
of the pan
and
kneading
blade
are
1
coated
with
a non-stick
finish.
Avoid using
harsh
cleansers
or sharp objects
when cleaning.
~ It
the hole of
the kneading
blade
is clogged,
clean
with
a
\-
Non-stick
coated
bread
pan and
.
.
kneading
b|ade
$tOl'll1g lhé
Unit
kneading
blade.
before
storing.
0 Wash alter each
use.
~Be
sure
to close
the top
lid.
~Do not
place
heavy
objects
on the
top lid.
Steam’
and
has
eect
on the
hygiene
¢Be sure
that
all moisture
inside
the unit
has
of the
unit.
dried
completely.
0 Do not
use metal
utensils on
bread pan
or ]
[
~Be
sure the
body
has
cooled completely
_11_
HINTS
FOR
BAKING DELICIOUS
HOMEMADE
BREAD
1.
Use
only fresh
ingredients.
I
2.
Yeast:
This unit
uses the dry yeast
which does not need
preliminary fermentation.
After
opening,
store
the yeast in freezer.
Use
the package
as
quickly
as possible after
opening.
3. Measure
the ingredients precisely.
For better
results,
use a
scale which
can calibrate
grams
or
ounces
rather
than
a measuring
cup.
When making basic
bread, sugar
can be decreased
to
1 tablespoon.
The
resulting
bread will
be
lighter brown and will not rise as high.
4. If room temperature
is high or water
is warm, cool
the ingredients
in the refrigerator
before using.
The room temperature
should be around
65——70°F
(18—21°C).
The temperature
of the room
and water will affect
the
kneading
time.
5. When
baking is finished:
Remove the bread immediately
and allow
the steam
to escape.
Allow the bread to cool to
approx. 100°F/40°C,
and then wrap
it in a foil
or plastic bag
to prevent
it from
drying out.
6. Timer:
ln
BAKE mode, the timer
maybe used.
When
using
the timer,
the resting
time
will be
lengthened,
this usually enhances
the height
of the
bread.
When using the-timer,
it is recommended
that
you reduce
evenly about
20% of amount
from
all ingredients.
t
J
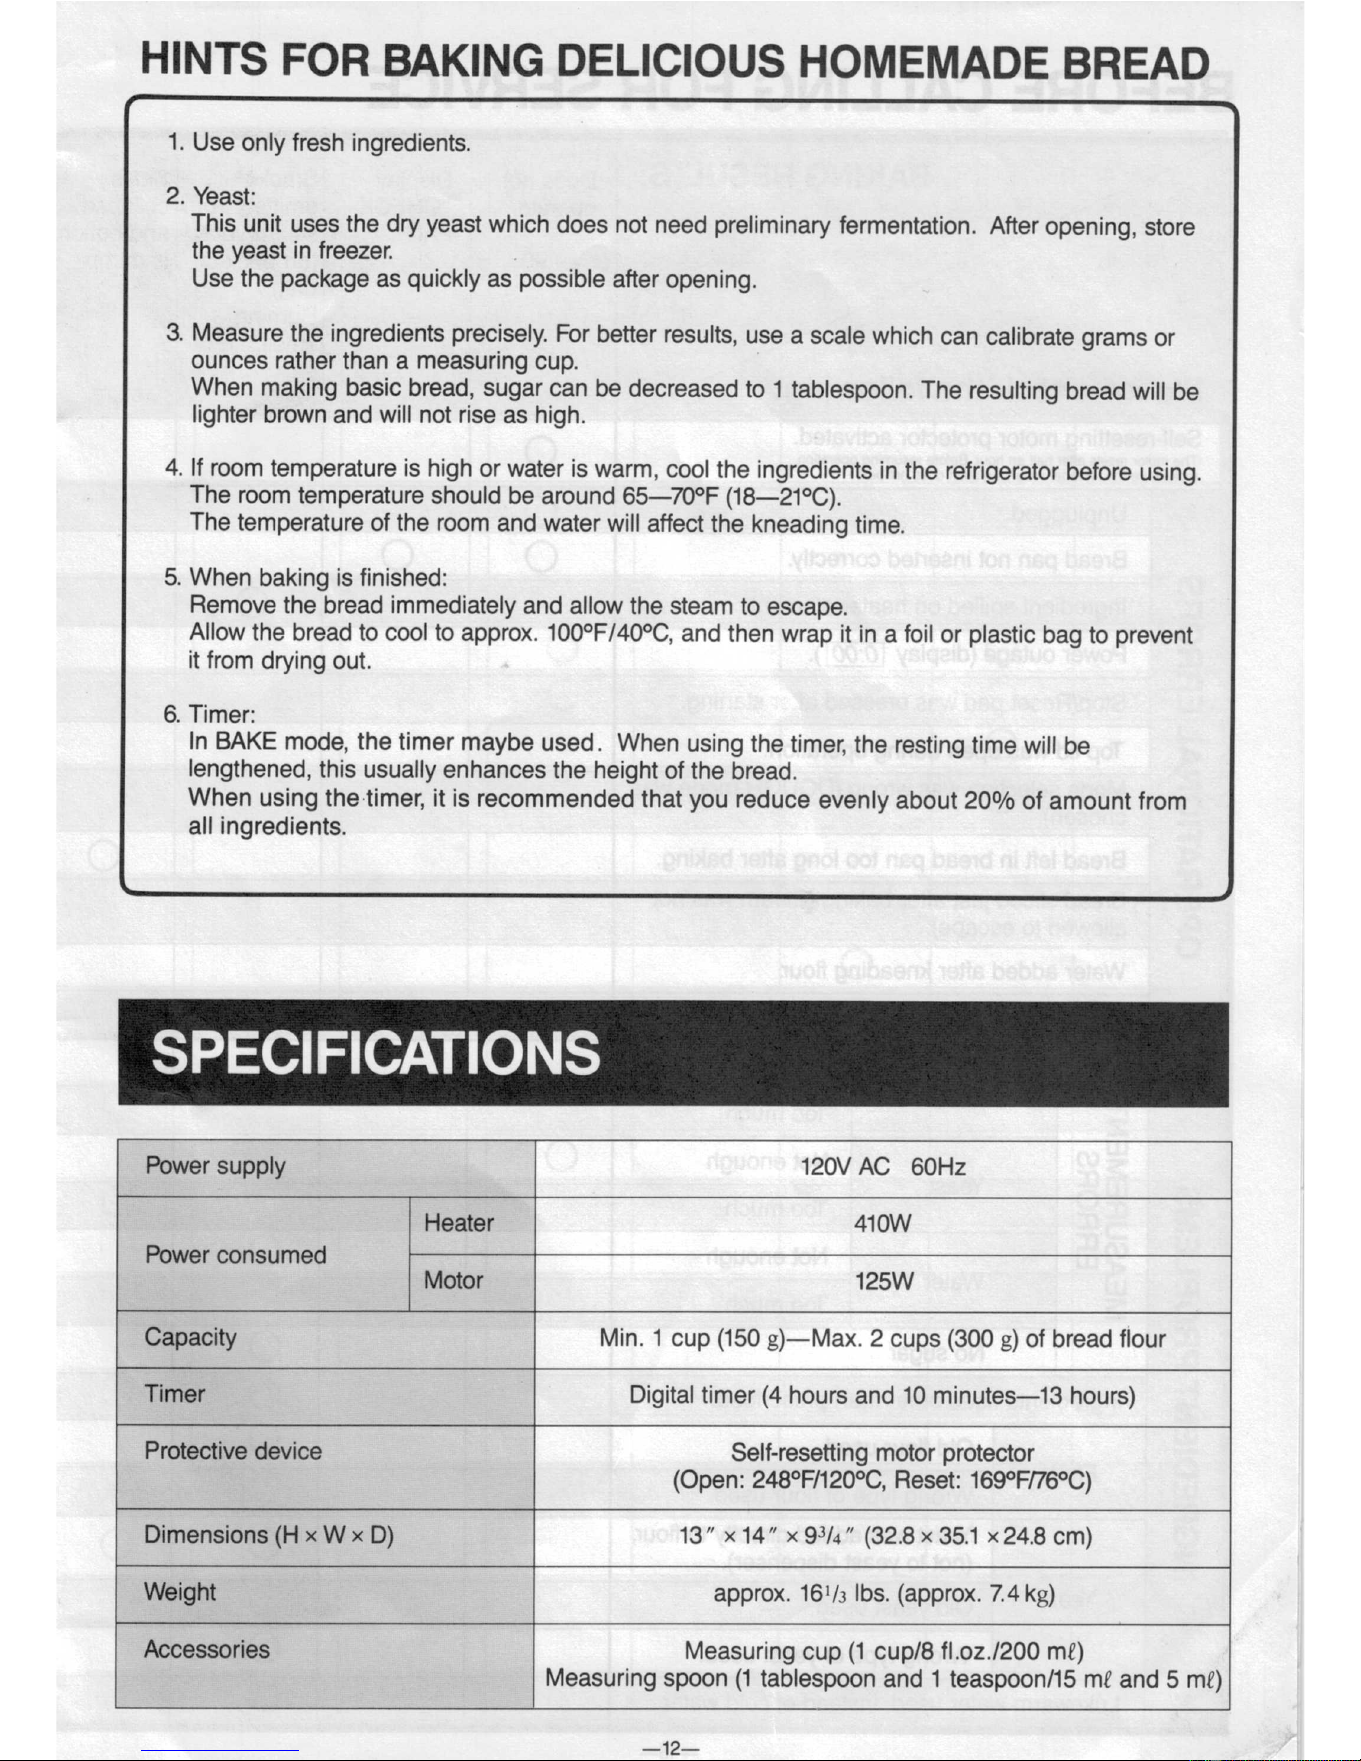
SPECIFICATIONS
Power
supply
120V
AC 60Hz
Heater
410W
Power consumed
Motor
125W
Capacity Min.
1 cup (150
g)—Max. 2 cups (300
g) of bread flour
Timer
Digital timer (4
hours and 10 minutes—13
hours)
Protective
device
Self-resetting motor protector
(Open: 248°F/120°C, Reset:
169°F/76°C)
Dimensions
(H
x W x
D)
13” >< 14” >< 91/4” (32.8
>< 35.1 >< 24.8 cm)
Weight
approx.
161/; lbs.
(approx.
7.4 kg)
Accessories
Measuring
cup
(1 cup/8
fl.oz./200 mt)
Measuring spoon (1 tablespoon
and 1 teaspoon/15
mt and
5 ml?)
_12_
\ r
J
B
v
\
" '
~ -
I
PANASONIC COMPANY, PANASONIC
SALES
COMPANY, DIVISION
DIVISION
OF MATSUSHITA
ELECTRIC
OF MATSUSHITA
ELECTRIC
OF
CORPORATION OF AMERICA
PUERTO
RICO, INC. (“PSC”)
1 Panasonic Way
P.O.Box 184, Caguas
Secaucus, New Jersey 07094 Puerto
Rico 00626
DY03A101
MUBQOGO Printed in Japan