Epson® Label Boost™
User Manual
Page 1 of 21
060-04-URM-001
R1.24
Form: F-730-028 v1.00
Trademarks
EPSON and ColorWorks are registered trademarks of Seiko Epson Corporation. Label Boost is a trademark of Epson America,
Incorporated. All other product and brand names are trademarks and/or registered trademarks of their respective companies. Epson
disclaims any and all rights in these marks. Copyright 2024 Seiko Epson Corporation.
060-04-URM-001
Epson® Label Boost™
User Manual

Epson® Label Boost™
User Manual
Page 2 of 21
060-04-URM-001
R1.24
Form: F-730-028 v1.00
Trademarks
Table of Contents
1. Introduction ................................................................................................................. 3
2. Overview ...................................................................................................................... 3
3. Installation ................................................................................................................... 4
3.1. System Requirements .......................................................................................................................... 4
3.2. Epson ColorWorks Printer and Printer Driver Setup ............................................................................ 4
3.3. Installing Label Boost ............................................................................................................................ 5
3.4. Adjusting the Label Boost driver media settings .................................................................................. 7
4. Operation ..................................................................................................................... 8
4.1. Initial Startup ......................................................................................................................................... 8
4.1.1. Accept the EULA ............................................................................................................................ 8
4.1.2. Licensing ........................................................................................................................................ 8
4.1.3. Welcome Screen ............................................................................................................................ 8
4.1.4. The Graphical User Interface (GUI) application ............................................................................. 9
4.2. Selecting the Printer and Printer Settings........................................................................................... 10
4.3. Changing the printer on your shipping label software ........................................................................ 11
4.4. Creating a Label Enhancement Group ............................................................................................... 12
4.5. Creating a Condition ........................................................................................................................... 13
4.6. Creating an Action .............................................................................................................................. 14
4.6.1. Insert image ................................................................................................................................. 14
4.6.2. Selecting Text Options (Color and Highlight) ............................................................................... 15
4.7. Managing sets of Rules ...................................................................................................................... 16
4.8. Controlling the Label Boost service .................................................................................................... 17
4.8.1. The Status indicator ..................................................................................................................... 17
4.8.2. The Operation menu .................................................................................................................... 17
4.8.3. Apply Changes ............................................................................................................................. 17
4.9. The Help menu ................................................................................................................................... 18
4.9.1. About ............................................................................................................................................ 18
5. Troubleshooting ....................................................................................................... 19
5.1. Accessing the Log File........................................................................................................................ 19
5.2. The Label Boost installation fails to complete .................................................................................... 19
5.3. The Label Boost printer is not selectable or the printout is not as expected ...................................... 19
5.4. Label Boost is not receiving print jobs ................................................................................................ 20
5.5. The shipping label is cutoff or is the incorrect size ............................................................................. 20
5.6. Additional Support .............................................................................................................................. 20
6. Open Source Software Credits ................................................................................ 21
Epson® Label Boost™
User Manual
Page 3 of 21
060-04-URM-001
R1.24
Form: F-730-028 v1.00
Trademarks
1. Introduction
Label Boost software can help grow your business with increased customer engagement, reduced material
and labor costs, and streamlined operations. Transform your existing black-and-white shipping labels by
adding full-color coupons, targeted ads, and secondary labels such as regulatory or shipping-and-handling
labeling. You can also highlight critical information, such as parcel count or expedited shipping, to promote
accuracy and timeliness of delivery.
Label Boost is designed for hassle-free deployment, and it allows the bulk of your label creation process to
remain the same, modifying your existing label only at the very last step before printing. It works alongside
your existing shipping software so your delivery operation can continue to run seamlessly. Label Boost is
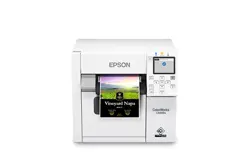
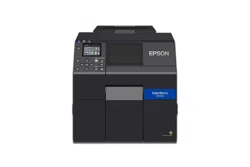
compatible with most Epson ColorWorks® printers, ensuring your labels are printed with exceptional image
quality that’s worthy of your brand.
2. Overview
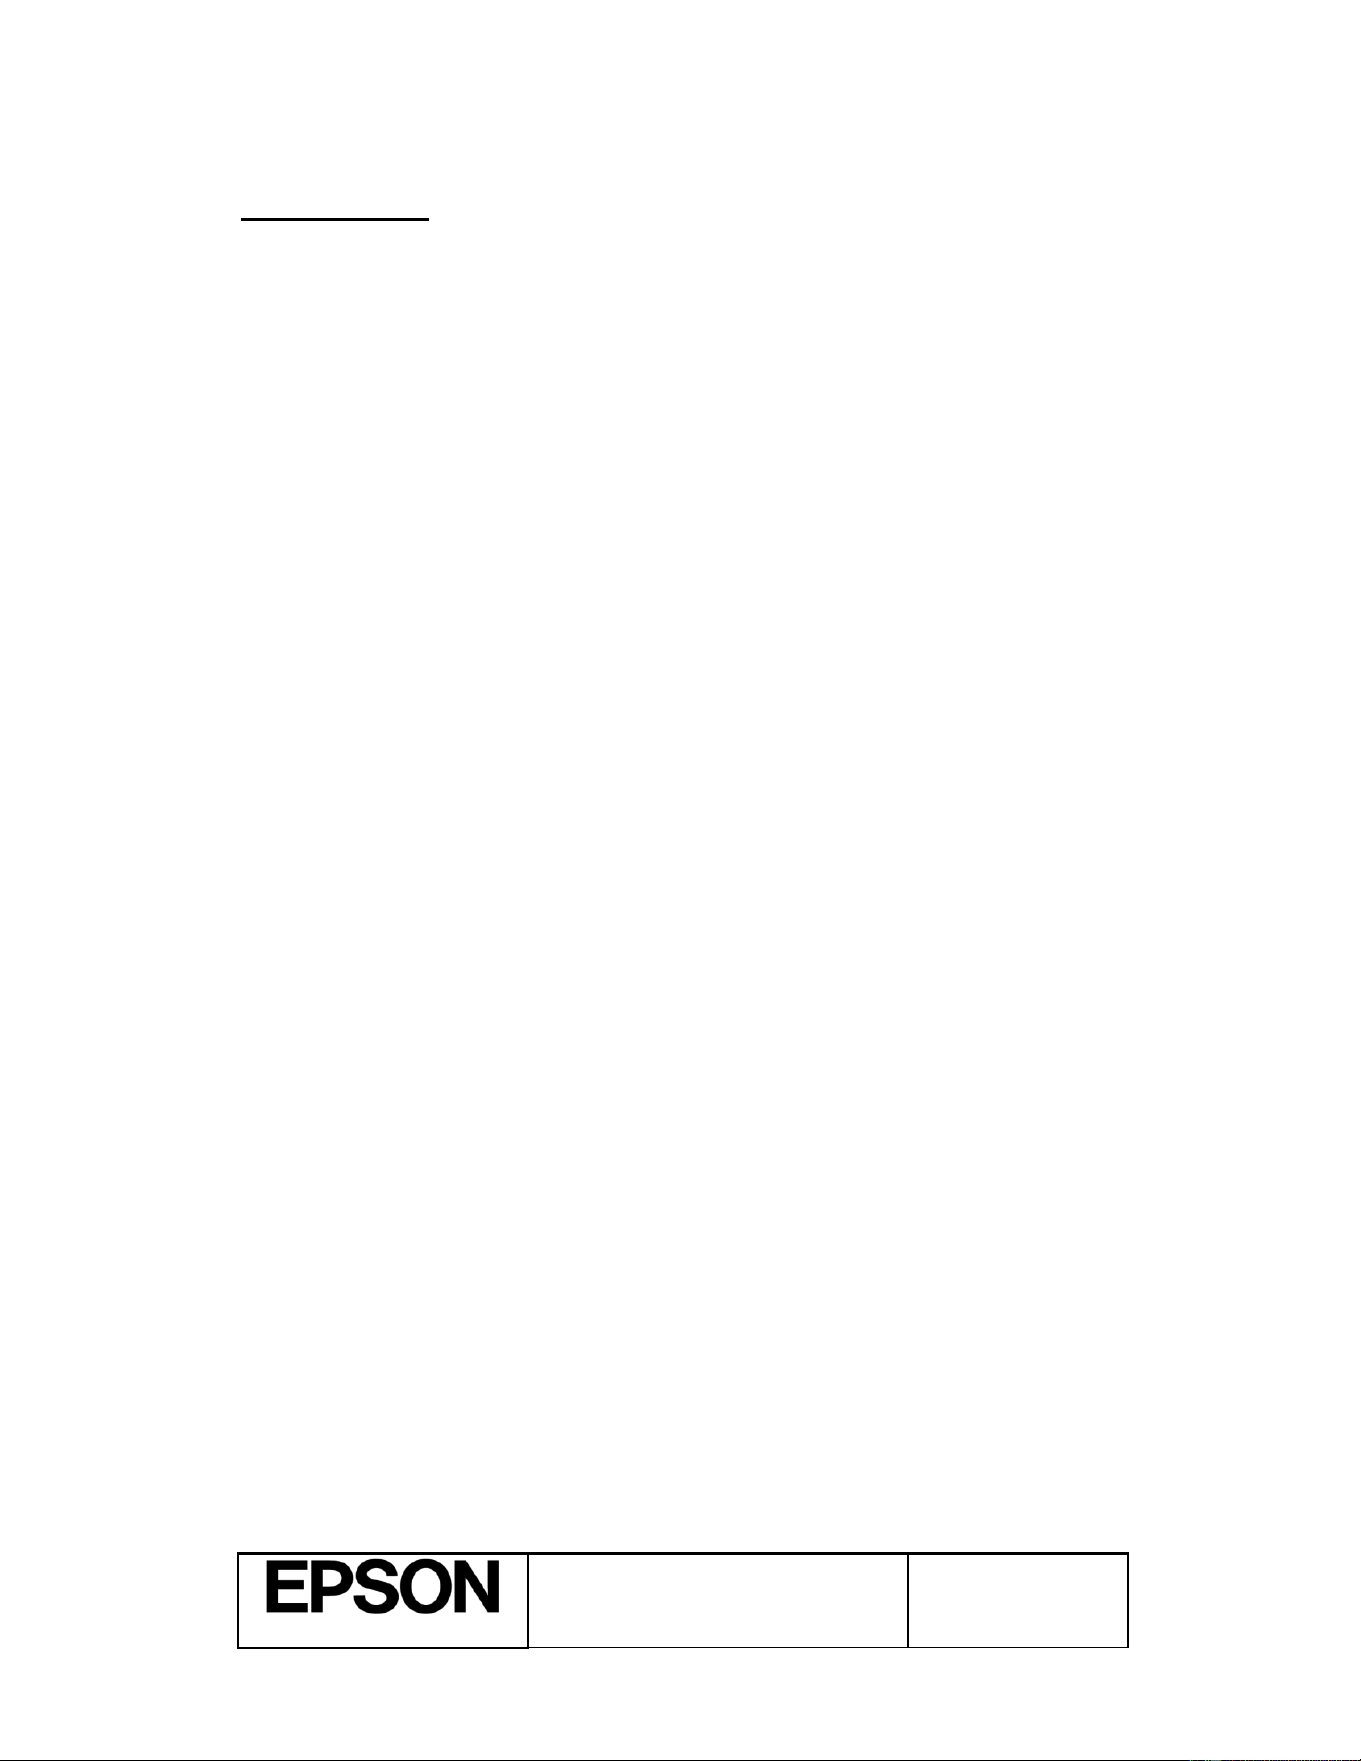
Label Boost intercepts a standard ZPL shipping label print job. It analyzes the ZPL print data and then either
enhances the data or interjects new data into the data stream. This functionality is achieved without having to
change the label template in the shipping software. The following diagram gives an overview of this process:
Epson® Label Boost™
User Manual
Page 4 of 21
060-04-URM-001
R1.24
Form: F-730-028 v1.00
Trademarks
3. Installation
3.1. System Requirements
• Printers:
o Epson ColorWorks CW-C4000, CW-C6000, or CW-C6500 Series
• Operating Systems:
o Windows 10 Professional 64-bit (version 22H2 or higher)
o Windows 10 Enterprise 64-bit (version 22H2 or higher)
o Windows 11 Professional 64-bit (version 22H2 or higher)
o Windows 11 Enterprise 64-bit (version 22H2 or higher)
• Computer hardware:
o Intel® Core™ i5 8th gen processor at 2GHz or higher
o 8GB DDR4 RAM
o 1GB free HDD space
• Access:
o Administrator rights required for installation & setup.
• Interfaces: USB & Network
o Specific limitations are dictated by what the printer will support.
• Label Apps:
o Fedex Ship Manager®
o UPS Worldship®
o ShipStation
o Stamps.com
3.2. Epson ColorWorks Printer and Printer Driver Setup
Refer to the installation manual that came with your Epson ColorWorks printer. Follow the installation
procedure for setting up the printer and installing its printer driver.
IMPORTANT: You must install the ColorWorks printer driver before installing Label Boost. It is
highly recommended that you print a test label using your shipping label application after installing
the driver. This will ensure that the printer is functioning properly before Label Boost installation
and setup.
Epson® Label Boost™
User Manual
Page 5 of 21
060-04-URM-001
R1.24
Form: F-730-028 v1.00
Trademarks
3.3. Installing Label Boost
To install Label Boost, visit https://epson.com/LabelBoostDownload and run the downloaded file. Note that
Windows administrator privileges are needed for installation. Enter the administrator credentials when
prompted.
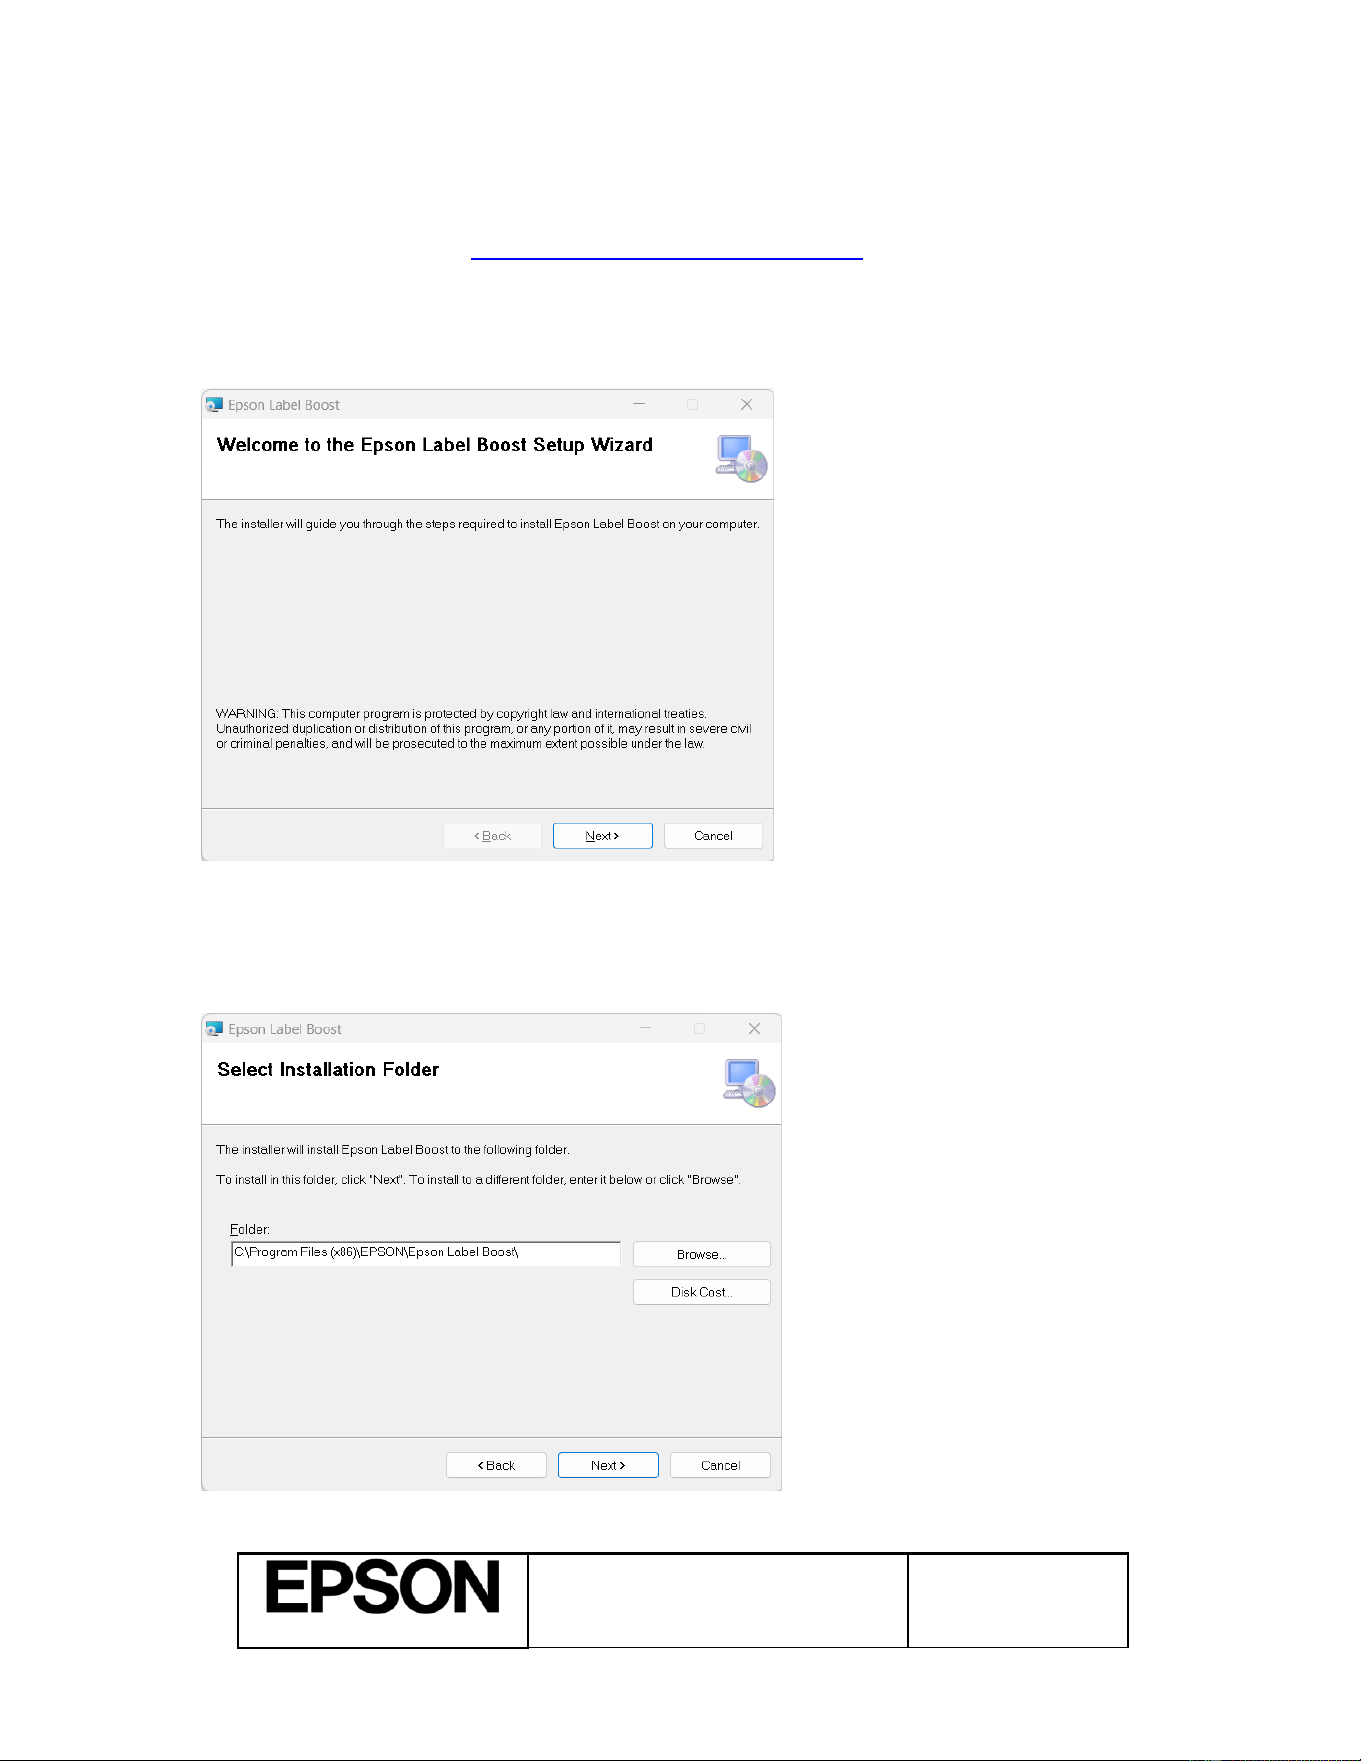
The installer Welcome Screen will appear. Click Next to continue.
The Select Installation Folder dialog will appear. In most cases, the default installation folder should be
used. Alternatively, click Browse… to select a different installation folder. The Disk Cost… button can be
used to confirm the available space in the locally connected disk drives. When you’re happy with your
selection, click Next to continue.
Epson® Label Boost™
User Manual
Page 6 of 21
060-04-URM-001
R1.24
Form: F-730-028 v1.00
Trademarks
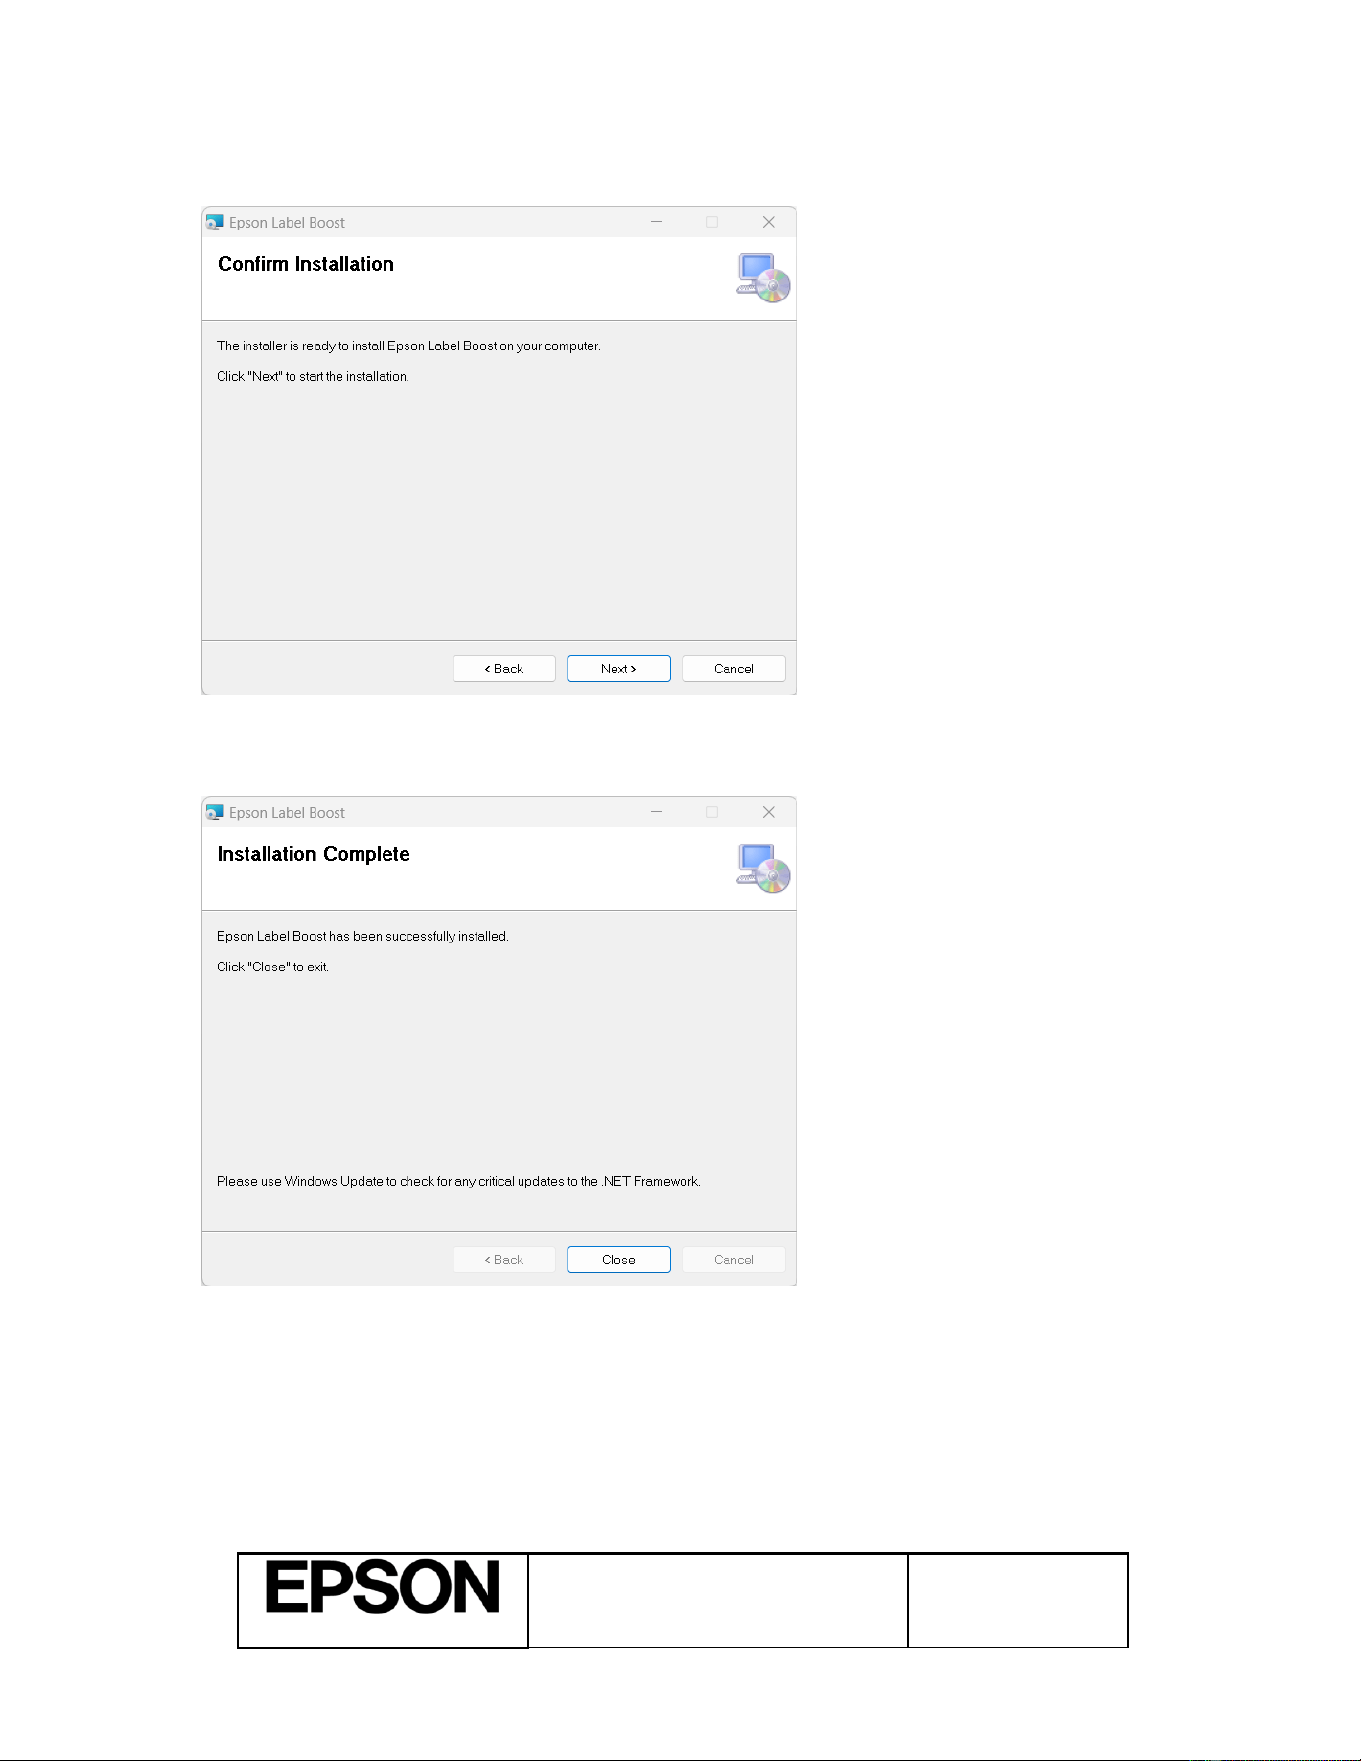
Click Next to start the installation.
As the installation progresses, various windows may pop up temporarily. This is normal. When the insllation
is complete the following dialog will appear. Click Close to exit. Label Boost is now installed.

Epson® Label Boost™
User Manual
Page 7 of 21
060-04-URM-001
R1.24
Form: F-730-028 v1.00
Trademarks
3.4. Adjusting the Label Boost driver media settings
On Label Boost installation the installer will import the initial settings from your ColorWorks driver. The
resulting Label Boost driver settings may require adjustment to ensure a correct printout. The following steps
outline the procedure to make this adjustment to the media size. They are written for Windows 11 but are
equivalent in Windows 10.
1. Click on the Windows Start button.
2. Type Printers.
3. Click on Printers & scanners.
4. Click on EPSON Label Boost Printer (with Zebra Emulation).
5. Click on Printing preferences.
6. In the General tab, under the Media Setting section, click on the Media Name drop-down menu.
Select Custom.
7. The value of Length should be 6.00 inches. If this is not the case, adjust it by either typing in the
correct value or using the arrows to the right of the setting box.
8. Ensure that the value of Width is 4.25 inches. Adjust the value if necessary.
9. Click OK to close the Printer Preferences dialog box and apply the setting.
10. Click OK to close the Properties dialog box.
11. Click the Close button (the “X” in the upper-right corner) to close the Settings window.
12. Click the Close button (the “X” in the upper-right corner) to close the Control Panel window.
Epson® Label Boost™
User Manual
Page 8 of 21
060-04-URM-001
R1.24
Form: F-730-028 v1.00
Trademarks
4. Operation
4.1. Initial Startup
After successful installation, the application can be started by clicking on Label Boost under All Apps.
4.1.1. Accept the EULA
The first time you run Label Boost, a dialog will appear with the EULA (“End User License Agreement”).
Please review the contents carefully. If you agree to the terms of the agreement, click Accept to continue.
4.1.2. Licensing
Label Boost requires a license for usage. A 30-day free trial is available if you wish to use the software for
evaluation purposes. Otherwise, a license key must be purchased to continue using Label Boost beyond the
initial trial period. When prompted, follow the instructions on screen to either select the trial license, or enter
your license key. Internet access is required for online activation. An option to activate offline is also
available if Internet access is unavailable on the target machine. A USB key and an additional machine with
internet access is required for offline activation.
4.1.3. Welcome Screen
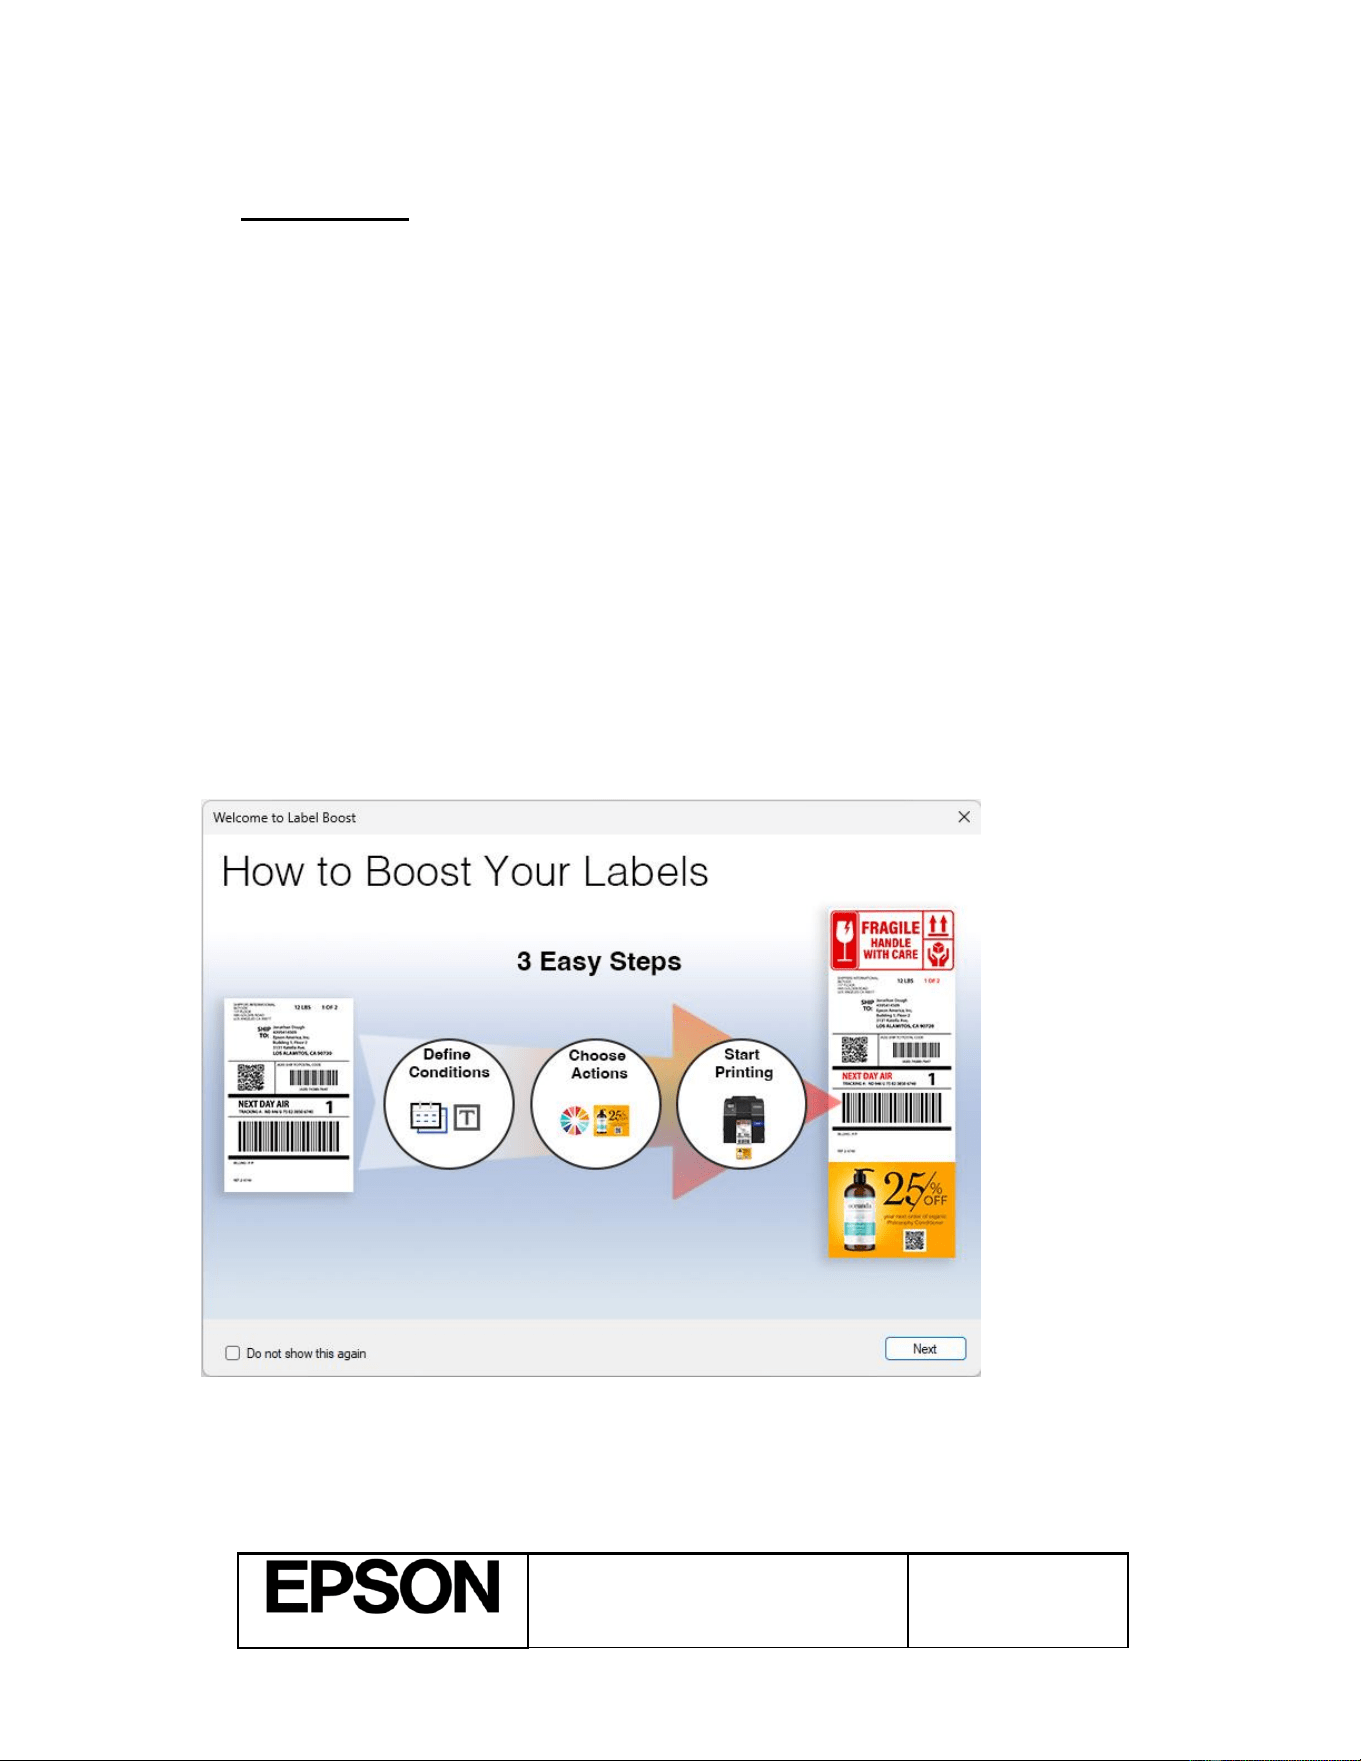
After the EULA is accepted, a Welcome Screen will be displayed. This gives some initial information about
Label Boost usage. Additional screens can be navigated using the Next and Back buttons. After all screens
have been displayed, click the Close button. If you do not wish to view these screens again, ensure the Do
not show this again checkbox is checked before closing the dialog.
Epson® Label Boost™
User Manual
Page 9 of 21
060-04-URM-001
R1.24
Form: F-730-028 v1.00
Trademarks
4.1.4. The Graphical User Interface (GUI) application
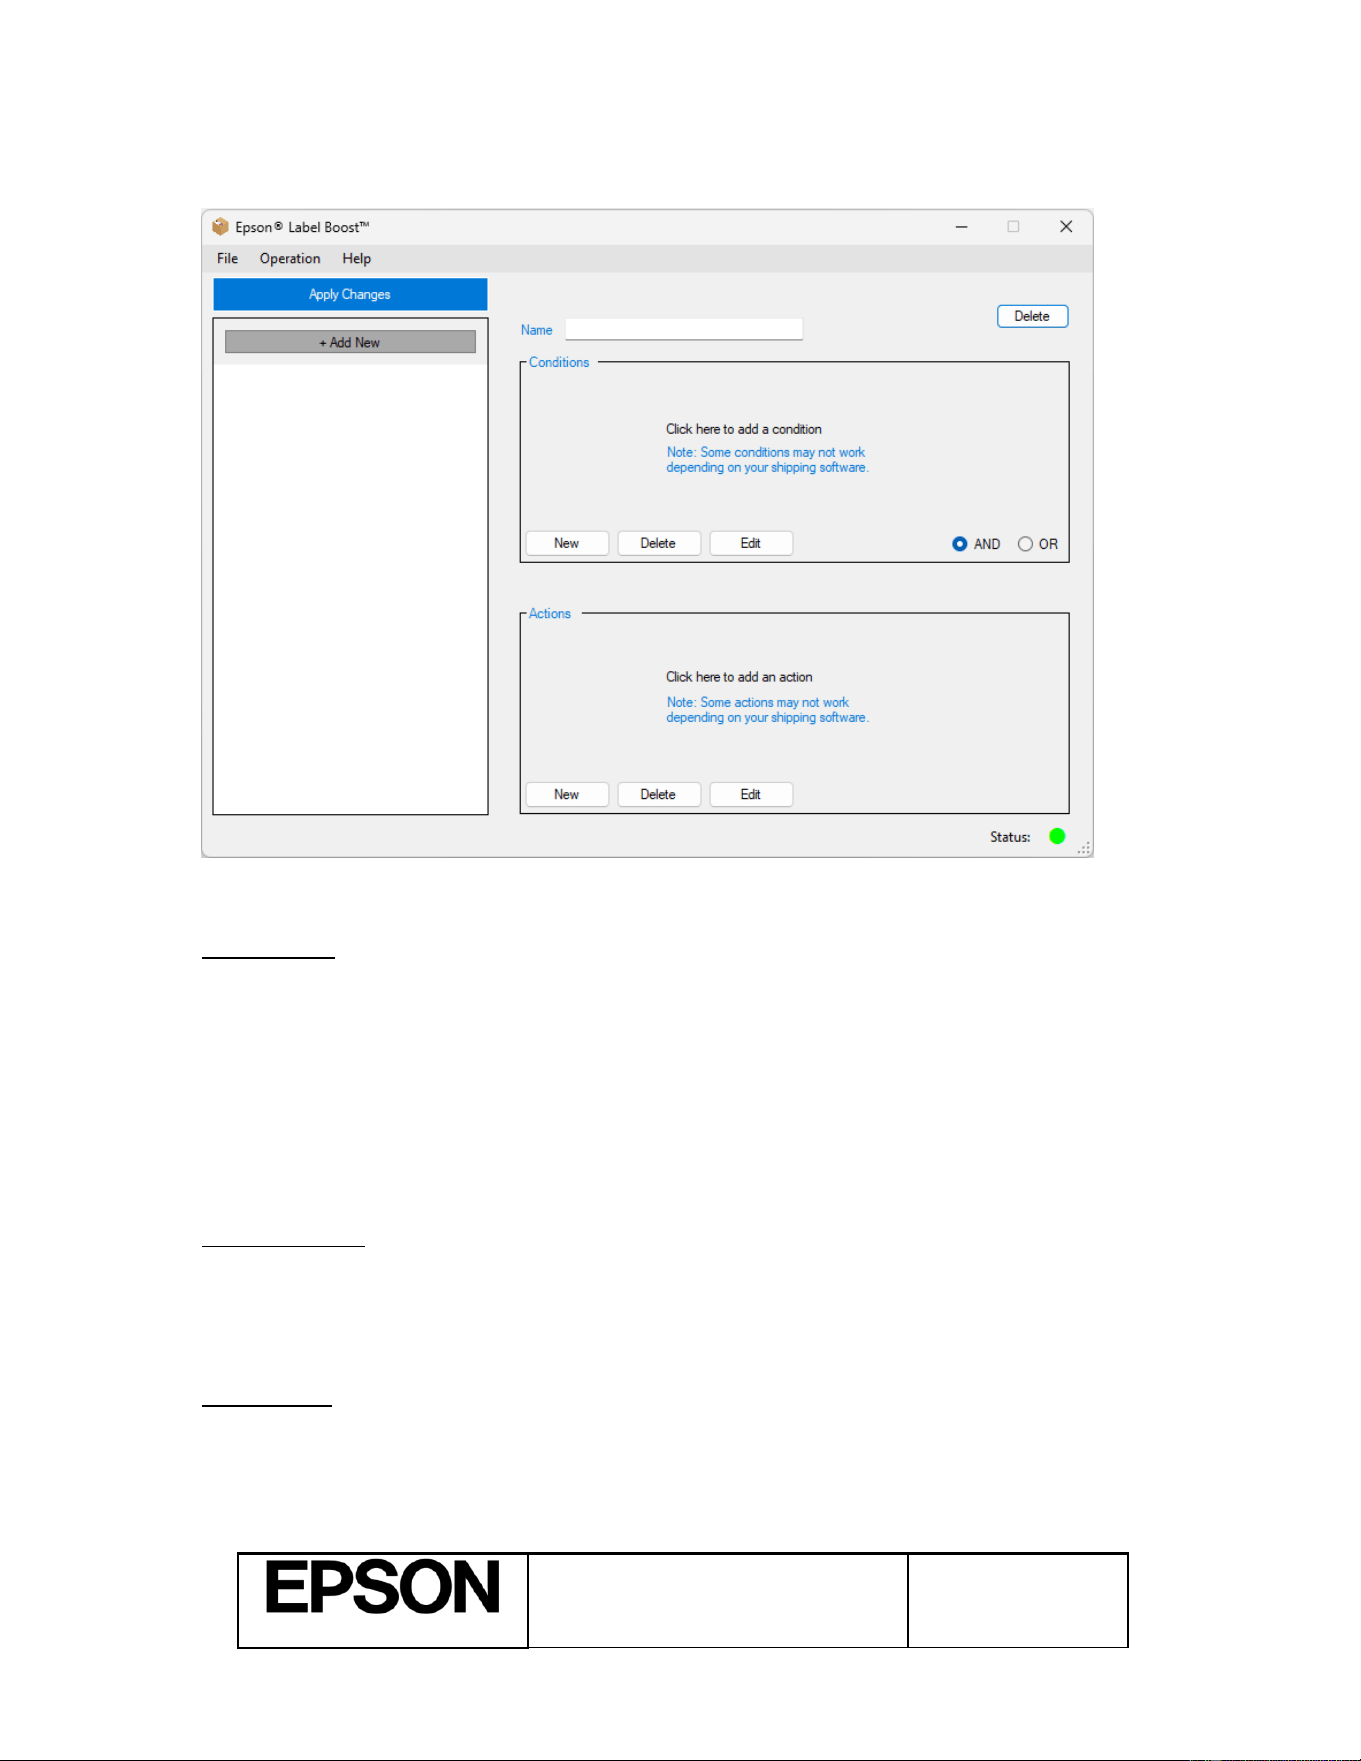
The controls and features of this window are as follows:
Main Window:
• Apply Changes: Apply the current set of rules to the Label Boost Service.
• + Add New: Create a new group of rules.
• Name: Edit the name of the currently selected group.
• Delete: Delete the currently selected group of rules.
• Status indicator: Gives a quick overview of the service operation. Hovering your cursor over the
status indicator provides more information.
o Green: The service is running normally.
o Yellow: The service is running in Bypass mode (Actions are Disabled) or otherwise
unavailable.
Conditions Pane:
• New: Create a new condition.
• Delete: Delete the currently selected condition.
• Edit: Modify the currently selected condition.
• AND/OR Radio Buttons: Control the behavior between conditions.
Actions Pane:
• New: Create a new action.
• Delete: Delete the currently selected action.
• Edit: Modify the currently selected action.
Epson® Label Boost™
User Manual
Page 10 of 21
060-04-URM-001
R1.24
Form: F-730-028 v1.00
Trademarks
4.2. Selecting the Printer and Printer Settings
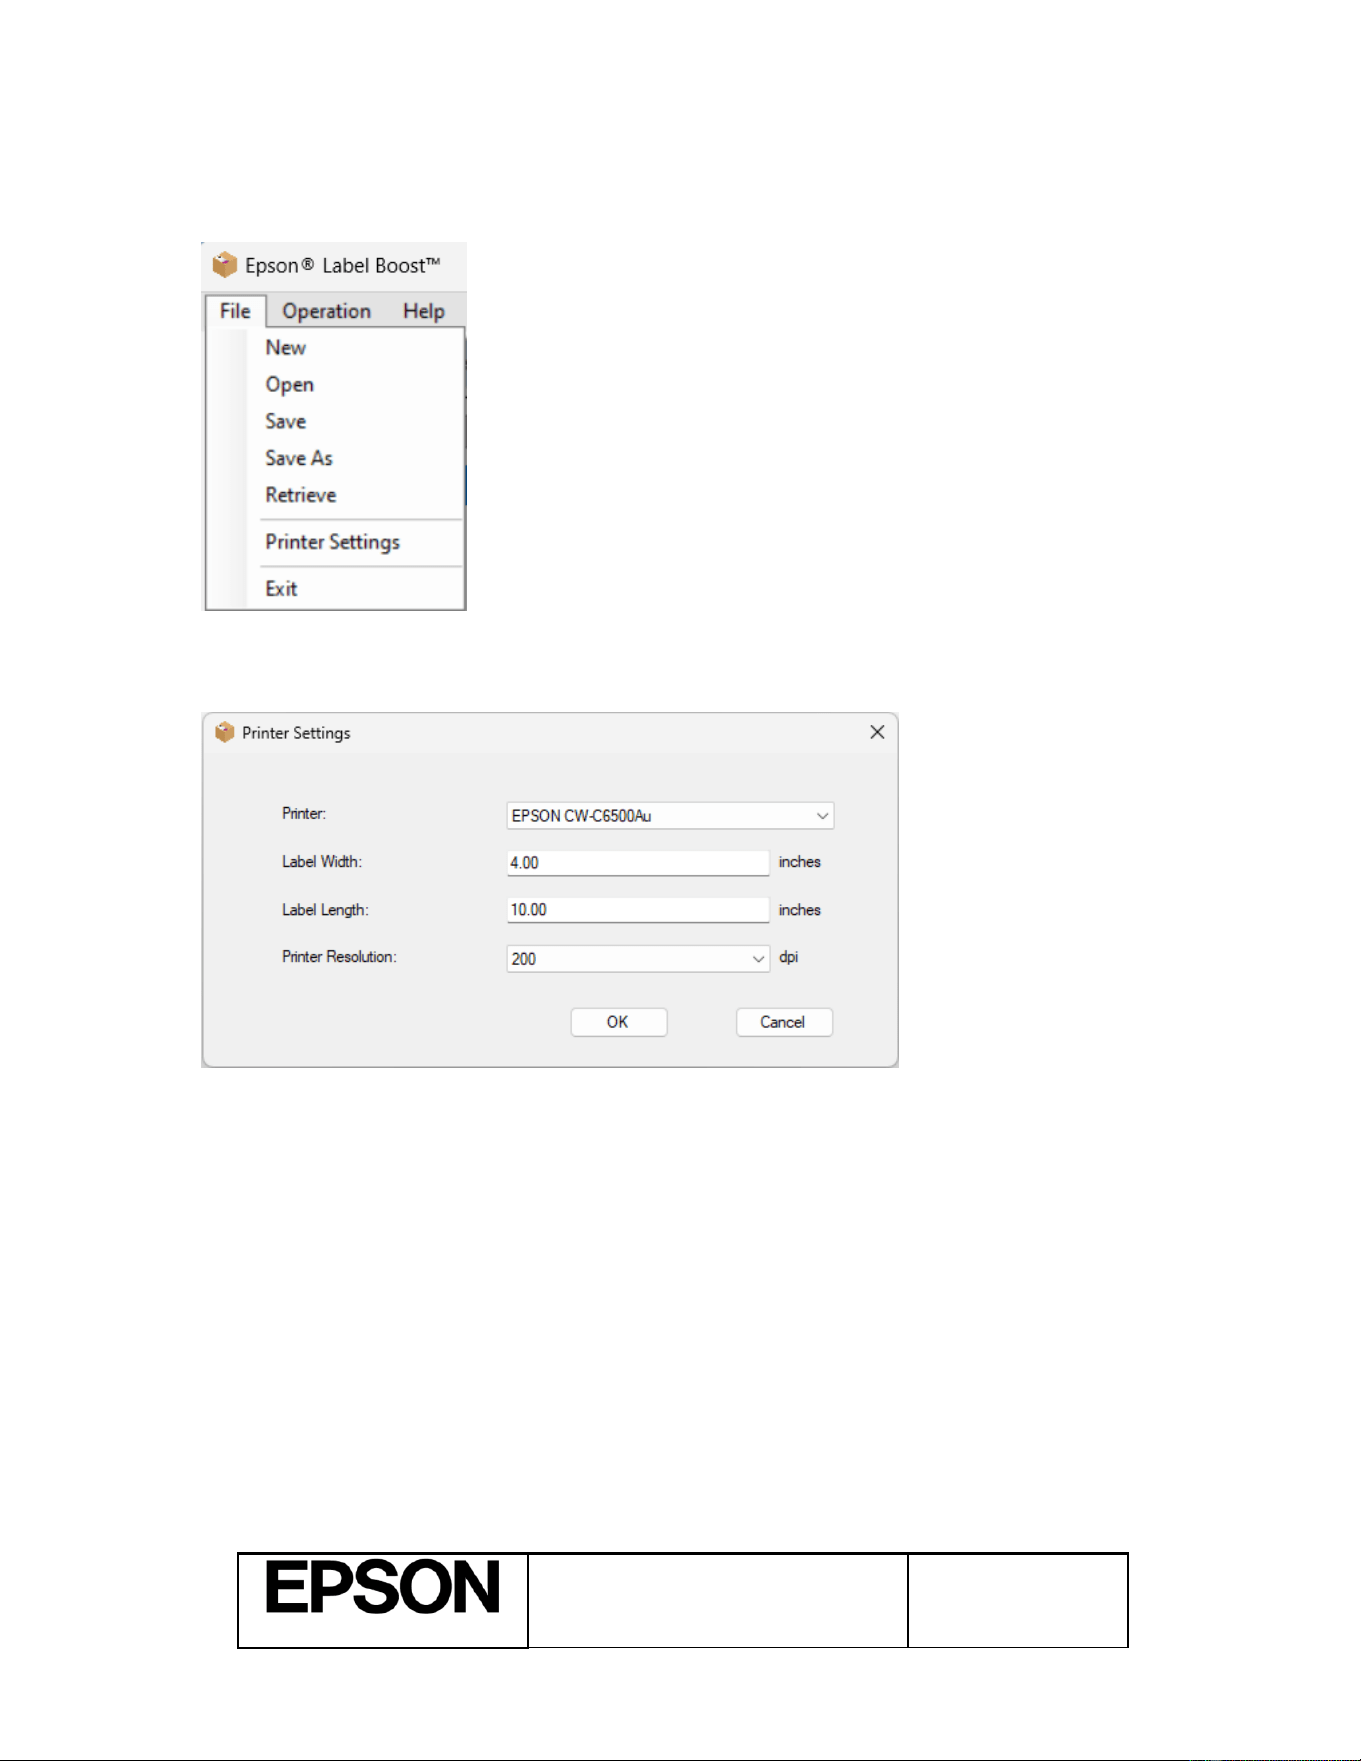
First, you need to select the printer . Click on the File menu in the title bar and select Printer Settings.
This will bring up Printer Settings dialog. Choose the desired printer using the Printer drop-down. Only
Epson ColorWorks printers are supported.
This dialog also allows you to specify the Label Width, Label Length, and Printer Resolution. Enter the
values applicable to the labels that you are planning to print. Click OK to close the dialog and save the
changes.
Epson® Label Boost™
User Manual
Page 11 of 21
060-04-URM-001
R1.24
Form: F-730-028 v1.00
Trademarks
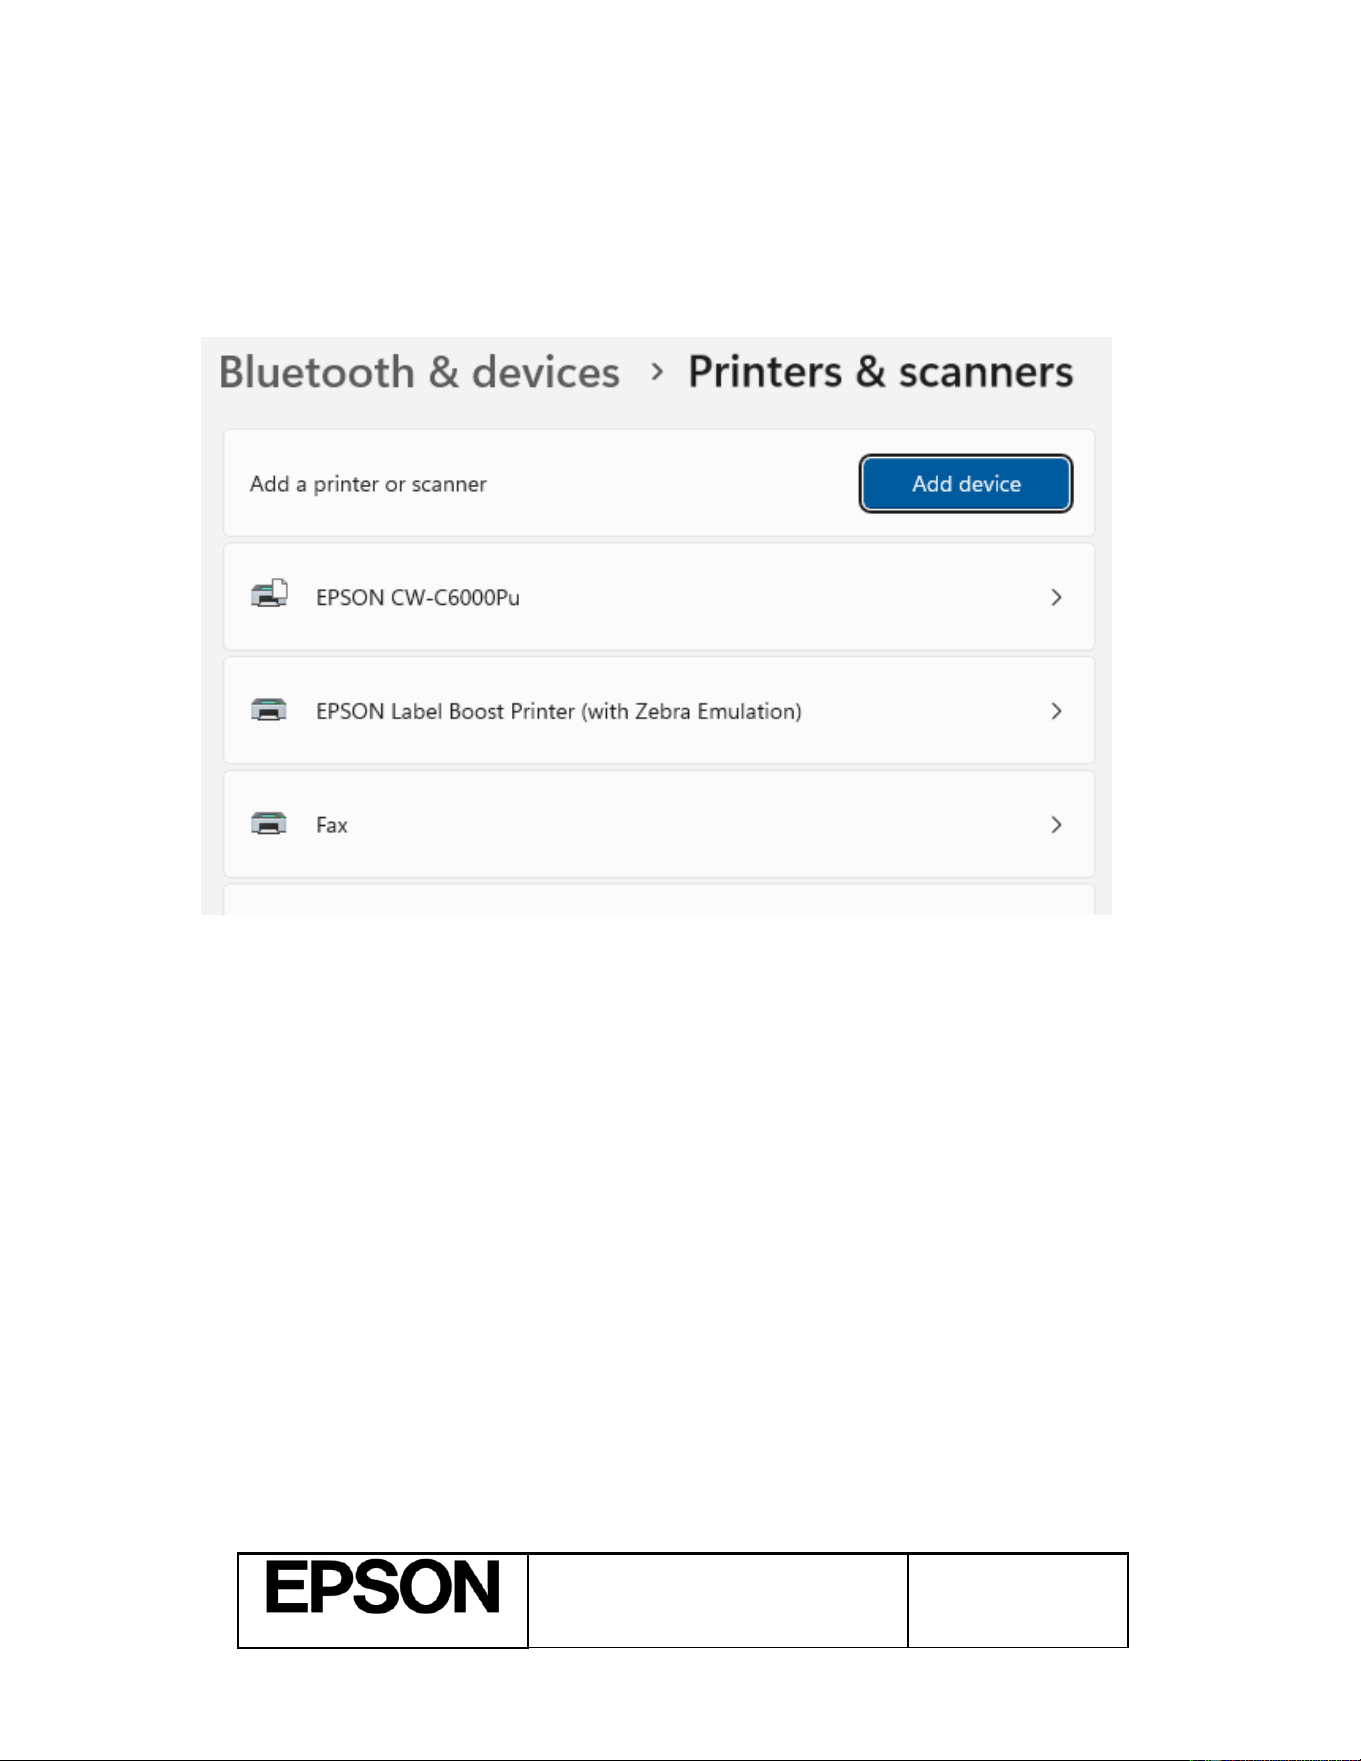
4.3. Changing the printer on your shipping label software
To use the Label Boost software, your shipping label software must be reconfigured to print to the Label
Boost virtual printer. This is done in the print settings (see your label printing software instruction manual for
details). Select the EPSON Label Boost Printer (with Zebra Emulation).
IMPORTANT: Once you make this change, you will not be able to print any labels from your shipping
label application if the Label Boost service is not running. To stop using Label Boost and return to
printing directly to a printer, change your shipping label software print settings to print directly to
your physical printer.
Epson® Label Boost™
User Manual
Page 12 of 21
060-04-URM-001
R1.24
Form: F-730-028 v1.00
Trademarks
4.4. Creating a Label Enhancement Group
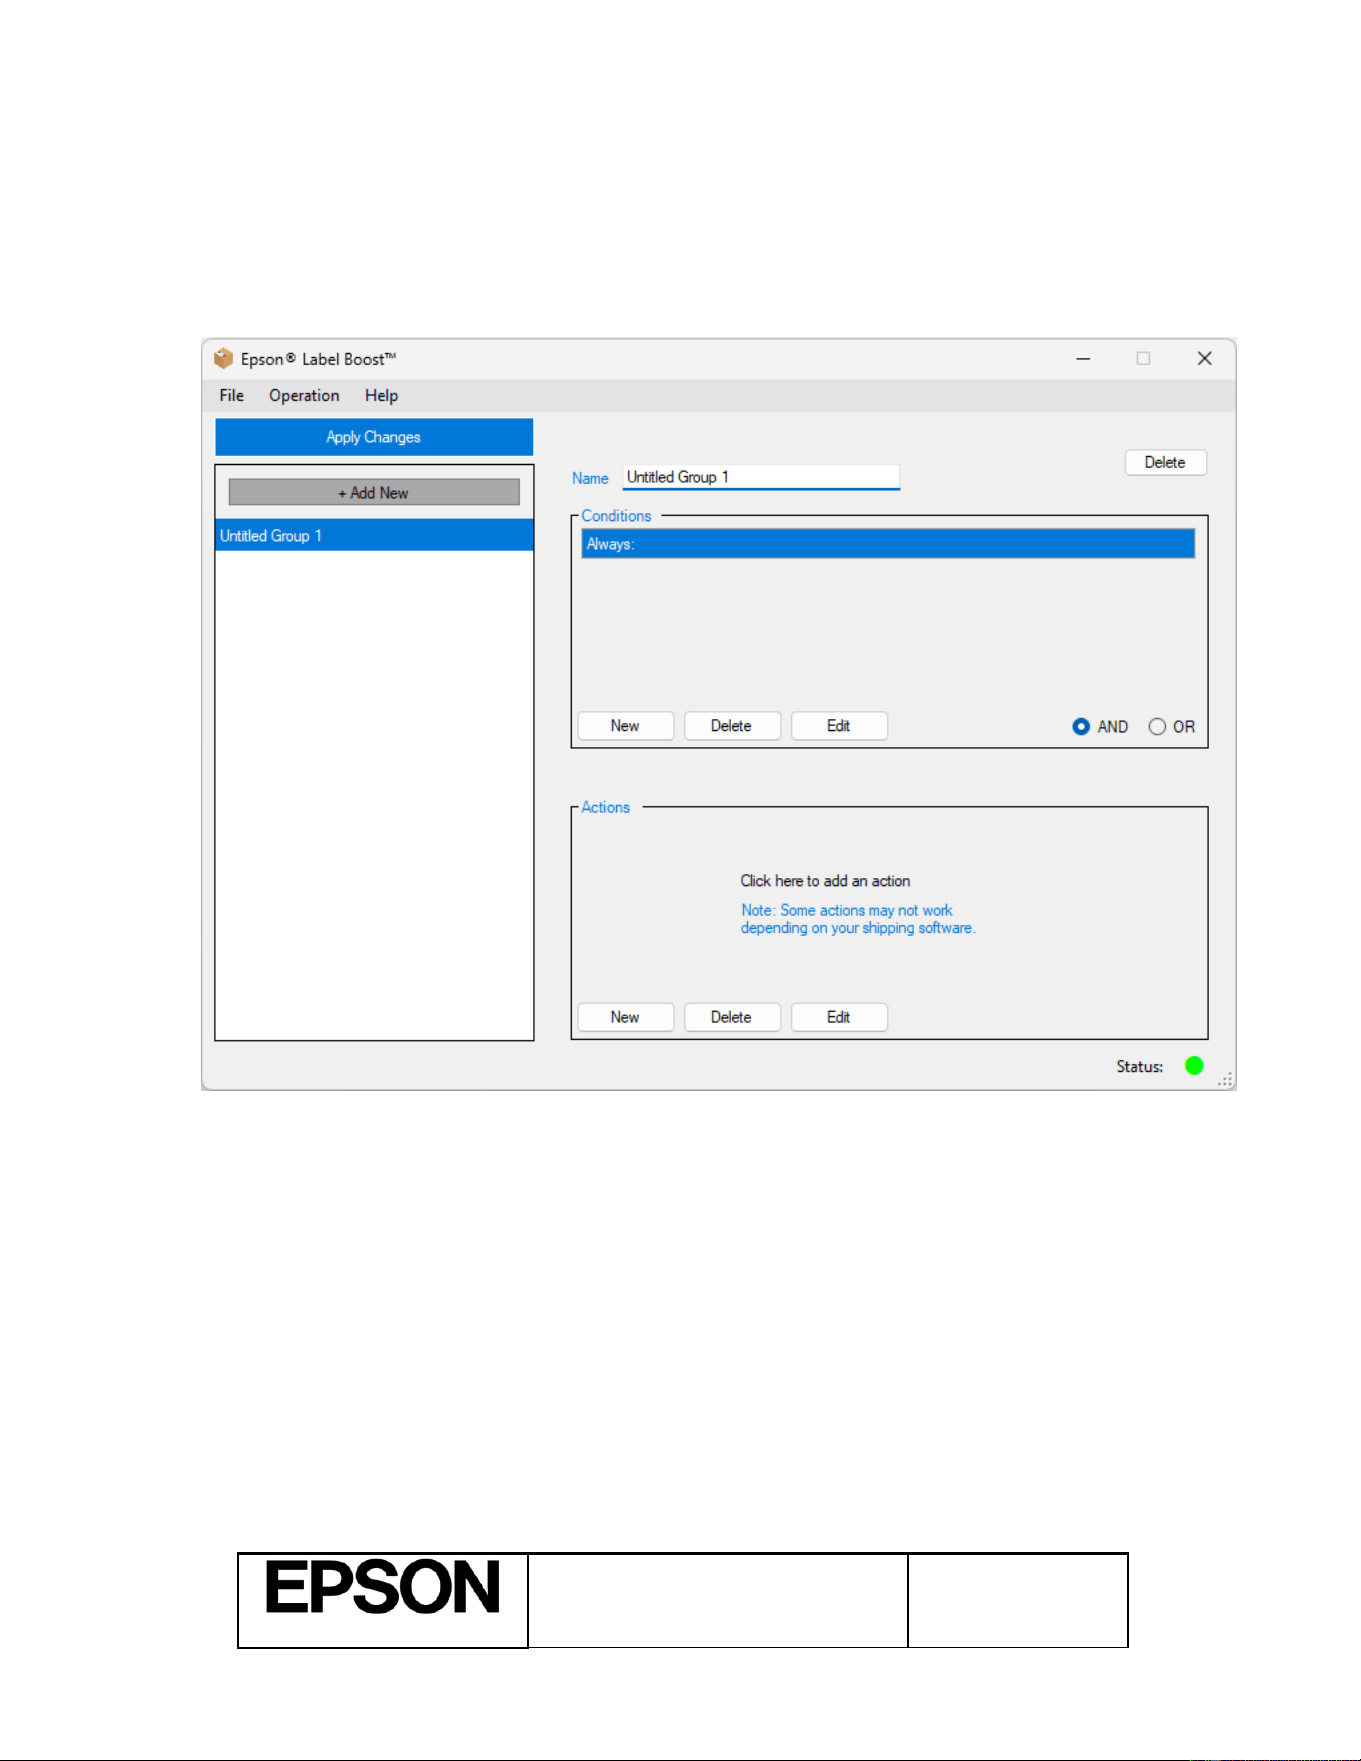
Click the + Add New button. This will create a group named Untitled Group 1. The Group Name can be
modified by changing it in the Name box. If the group is no longer needed, use the Delete button to remove
it.
Epson® Label Boost™
User Manual
Page 13 of 21
060-04-URM-001
R1.24
Form: F-730-028 v1.00
Trademarks
4.5. Creating a Condition
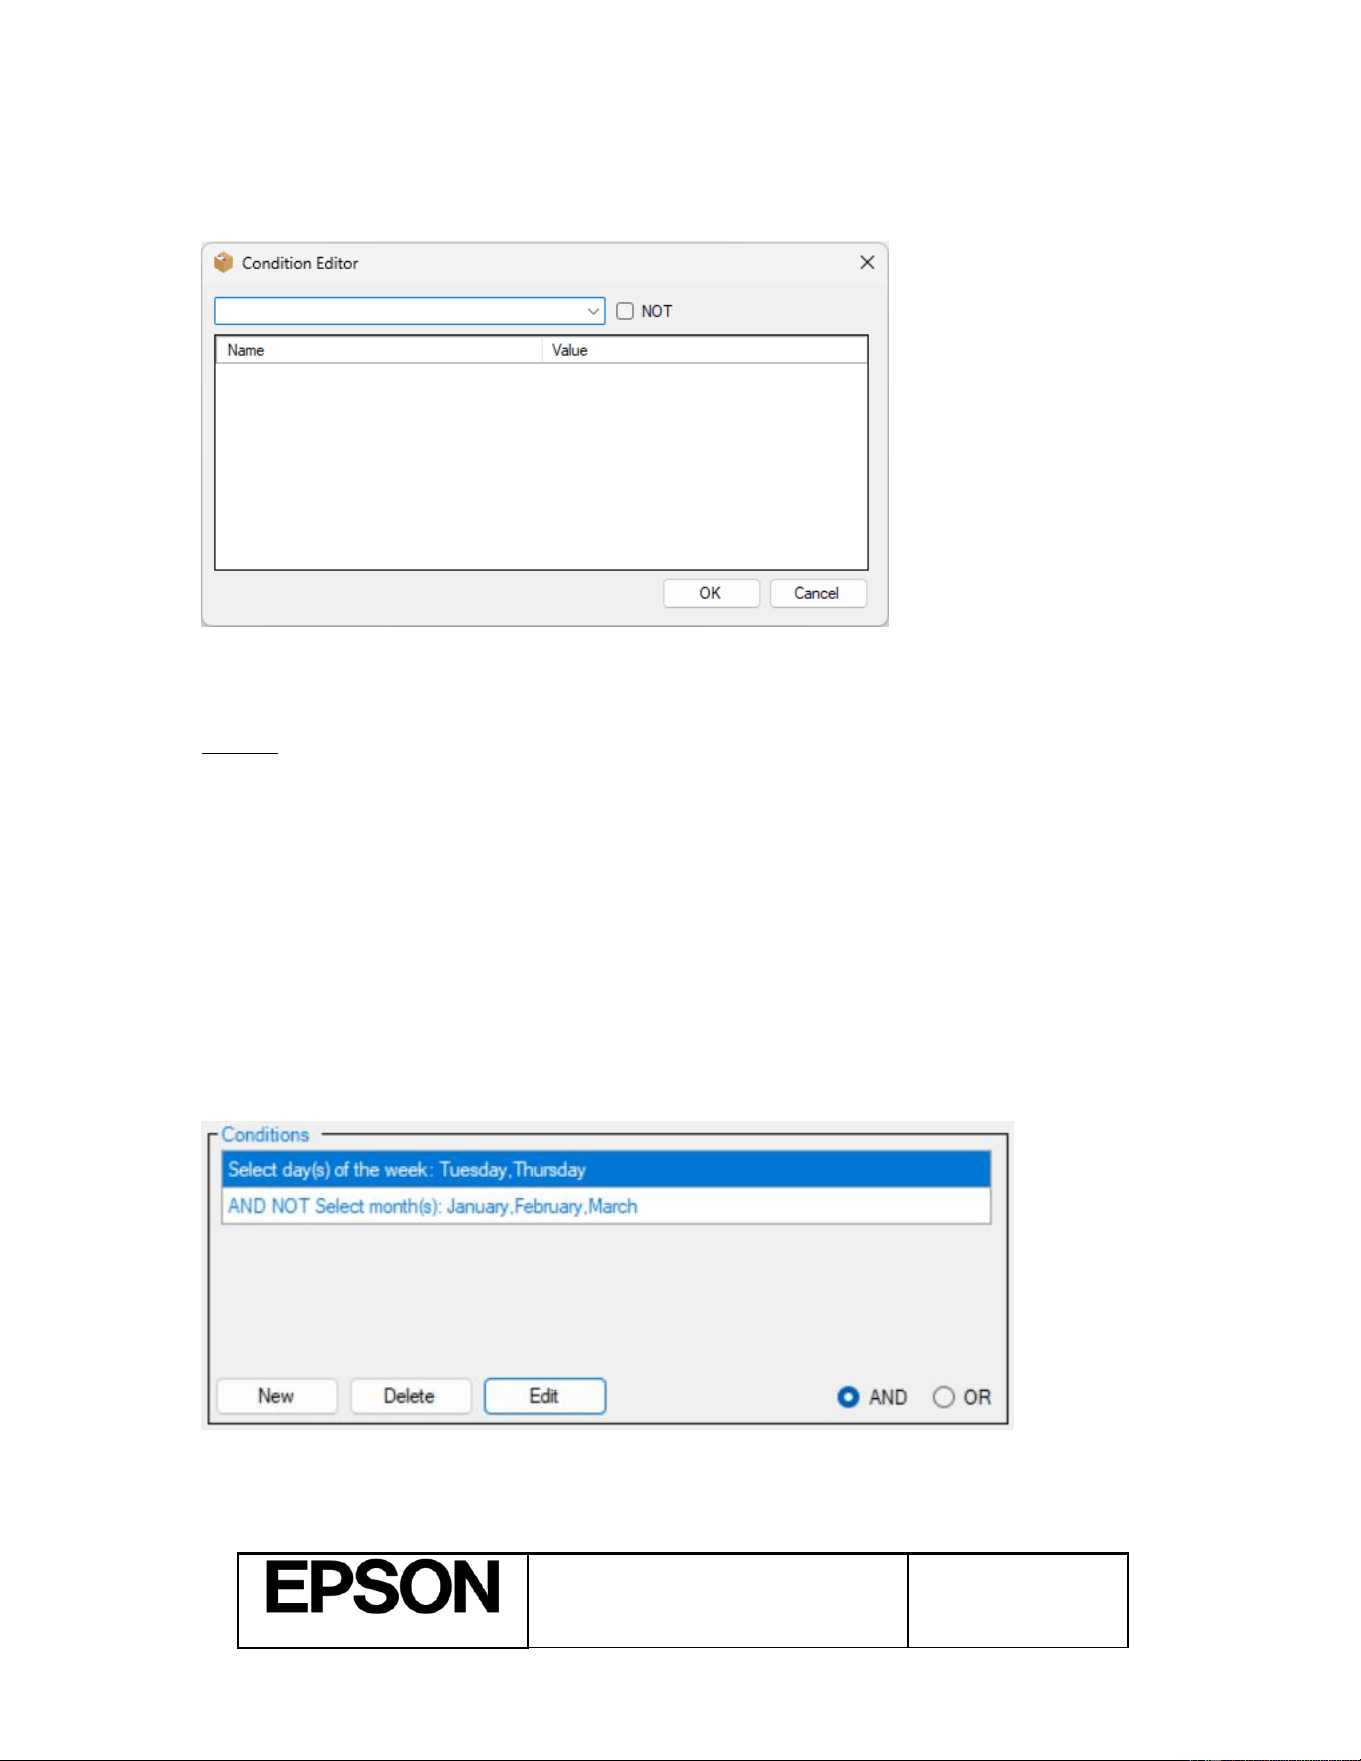
To create a Condition, click on the New button in the Conditions pane. The Condition Editor will open.
Select a Trigger for the condition. The NOT checkbox can be selected to configure a condition when the
Trigger is not true.
Options:
• Always: The condition is always true
• Date Range: The condition is true if the current date is between the input Start and End dates.
• Select day(s) of the week: The condition is true if the current weekday is one of the selected
weekdays.
• Select month(s): The condition is true if the current month is one of the selected months.
• Select destination state(s): The condition is true if the state of the recipients’ address is in the list of
selected states (*US only).
• If text exists: The condition is true if the entered text is found in the label data.
Once the desired condition has been input, click OK to return to the main window. Click Cancel if no further
conditions are needed. Multiple conditions can be created as necessary, using AND and OR to define the
interaction of the conditions. E.g. “If the current weekday is Tuesday or Thursday, AND the current month is
NOT January, February, or March”):
Epson® Label Boost™
User Manual
Page 14 of 21
060-04-URM-001
R1.24
Form: F-730-028 v1.00
Trademarks
4.6. Creating an Action
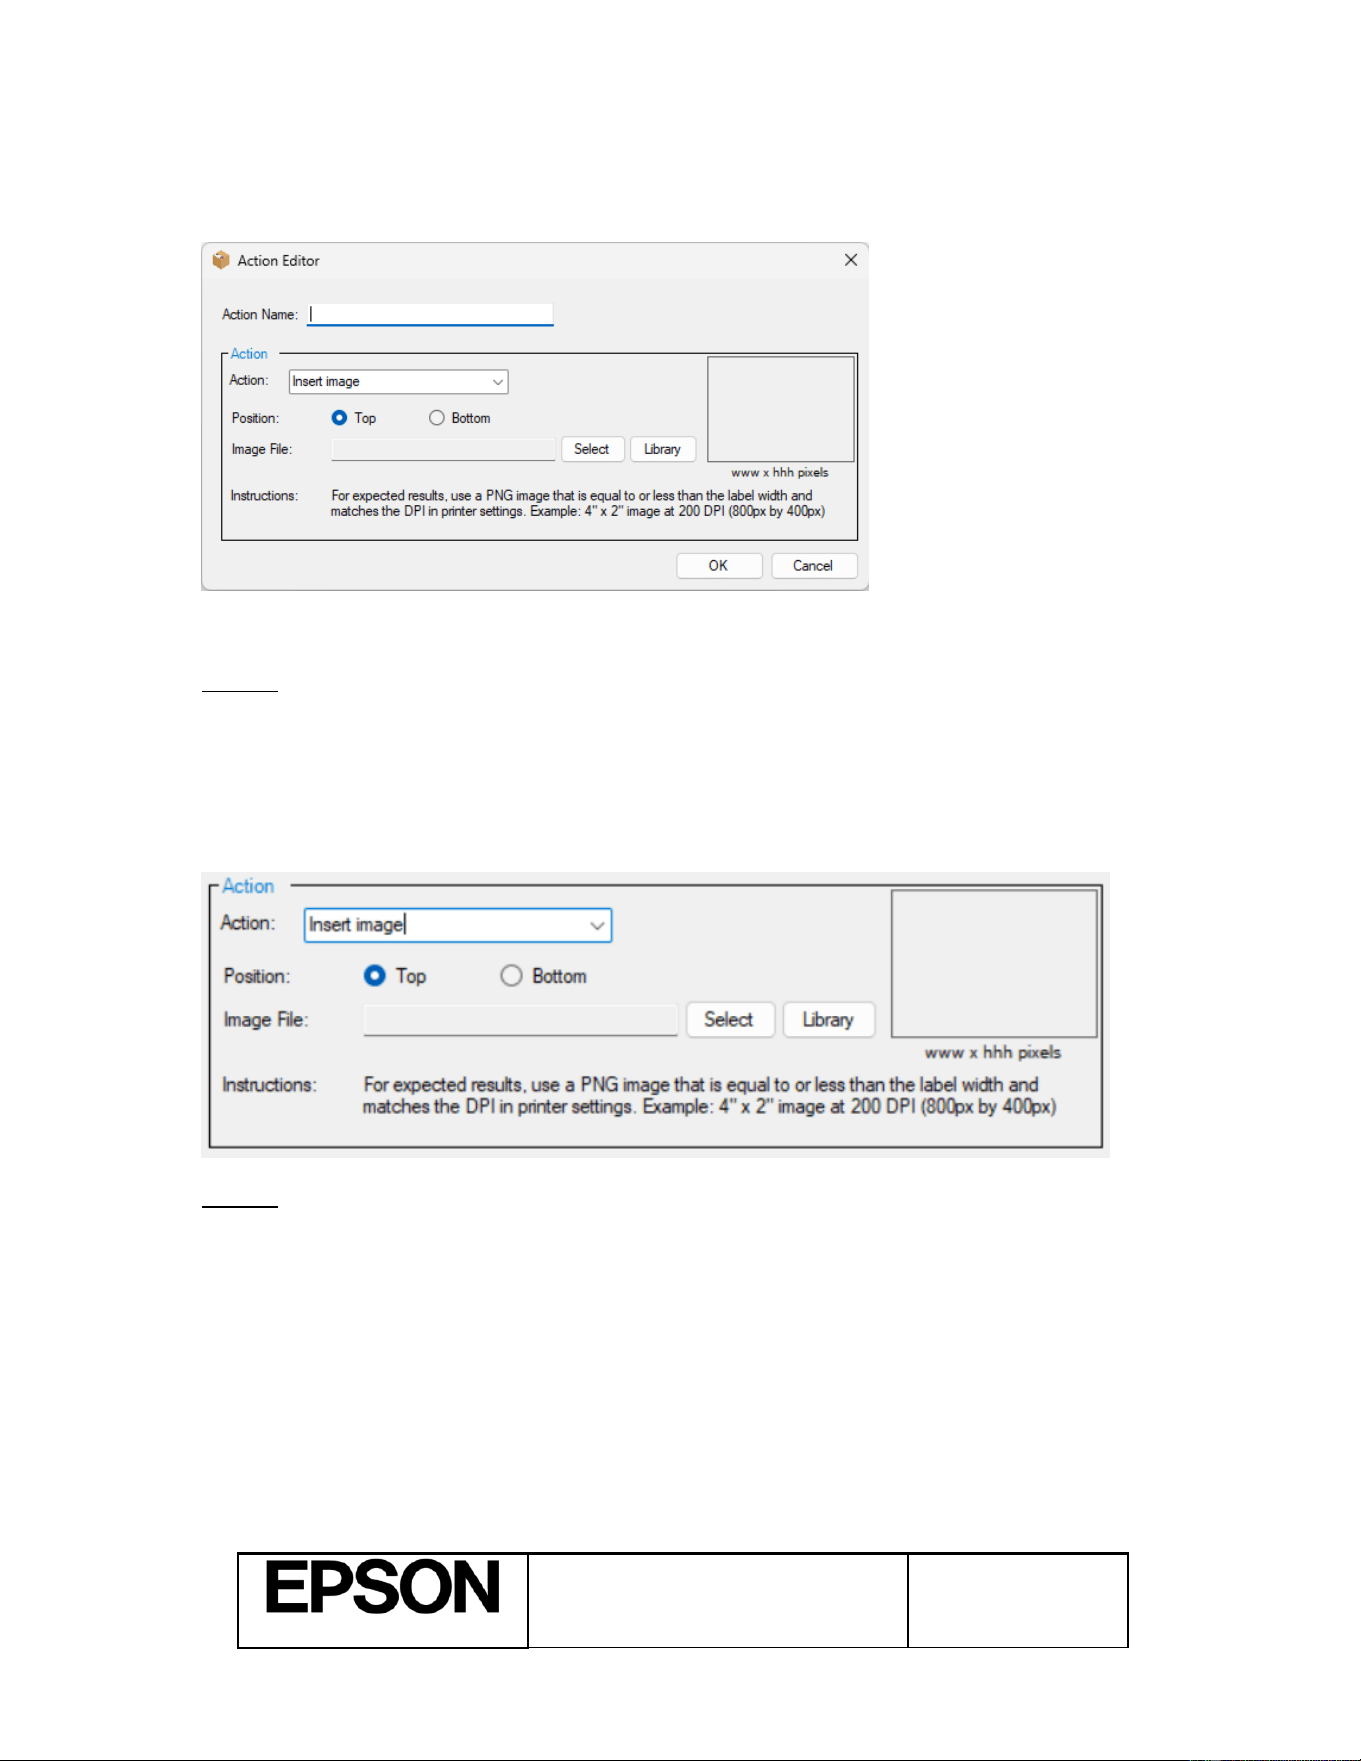
Click on the New button in the Actions pane. The Actions Editor will open.
Enter in a name for the action in the Action Name field. There are several choices for the type of Action.
Options:
• Insert image: Insert an image at the top or bottom of the label.
• Change text color: Change the color of specified text with the specified color.
• Highlight text: Highlight specific text with the specified color.
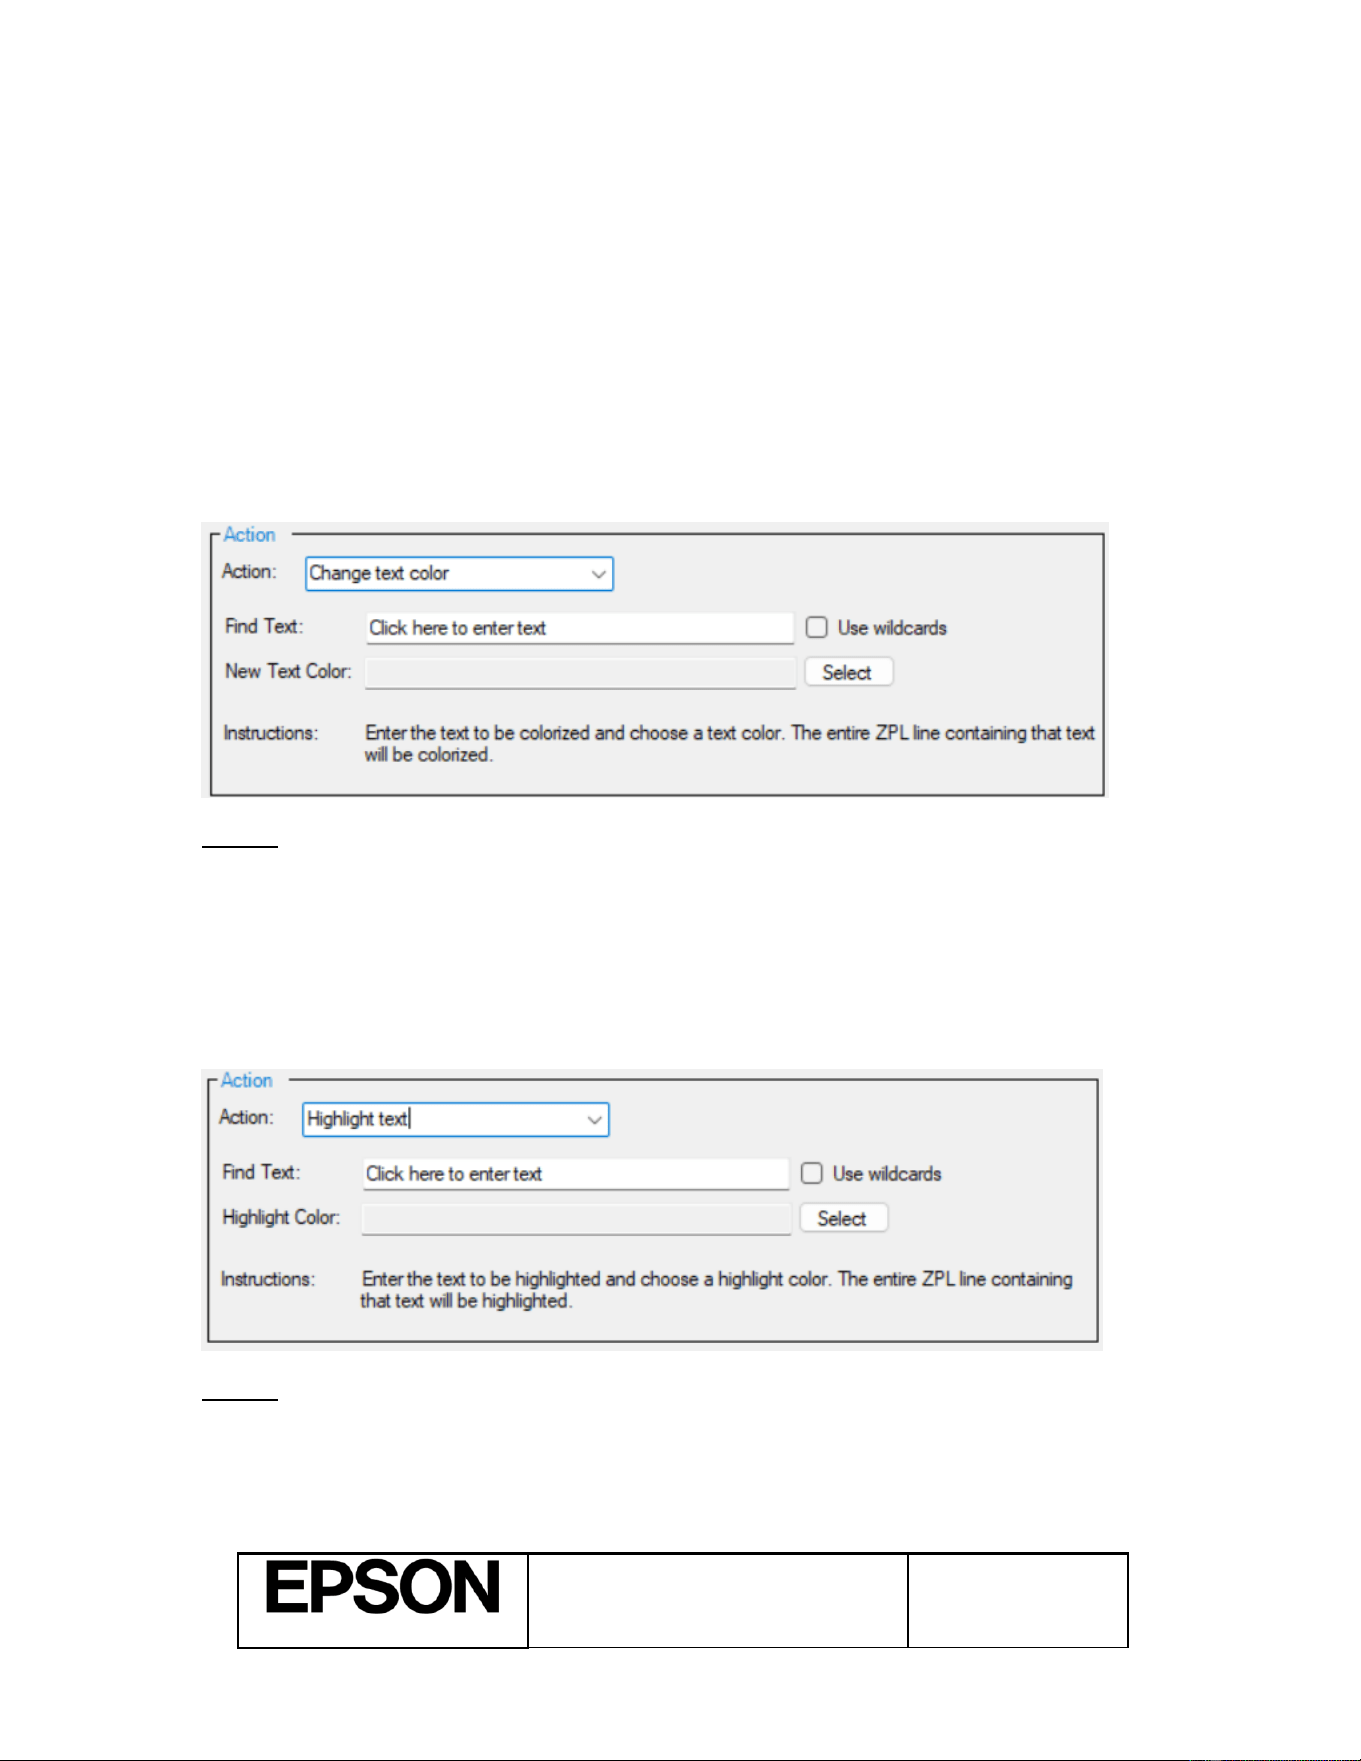
4.6.1. Insert image
Options:
• Position: Controls whether the image will be printed above or below the label. Select Top or
Bottom.
• Image File
o Click Select to choose an image on your local drive.
• Image format: Only PNG is supported.
• Image size: Make sure you select an appropriately-sized image. For example, at
200 DPI printer resolution, an 800 x 400 pixel image will be 4 x 2 inches in size.
o Click Library to choose an image from the built-in library of template images.
Epson® Label Boost™
User Manual
Page 15 of 21
060-04-URM-001
R1.24
Form: F-730-028 v1.00
Trademarks
IMPORTANT: Template images are provided for sample reference only, and Epson disclaims any
liability for use. Please consult local, state, and federal regulations to determine compliance for a
particular use or any use of images for compliance or risk management purposes.
4.6.2. Selecting Text Options (Color and Highlight)
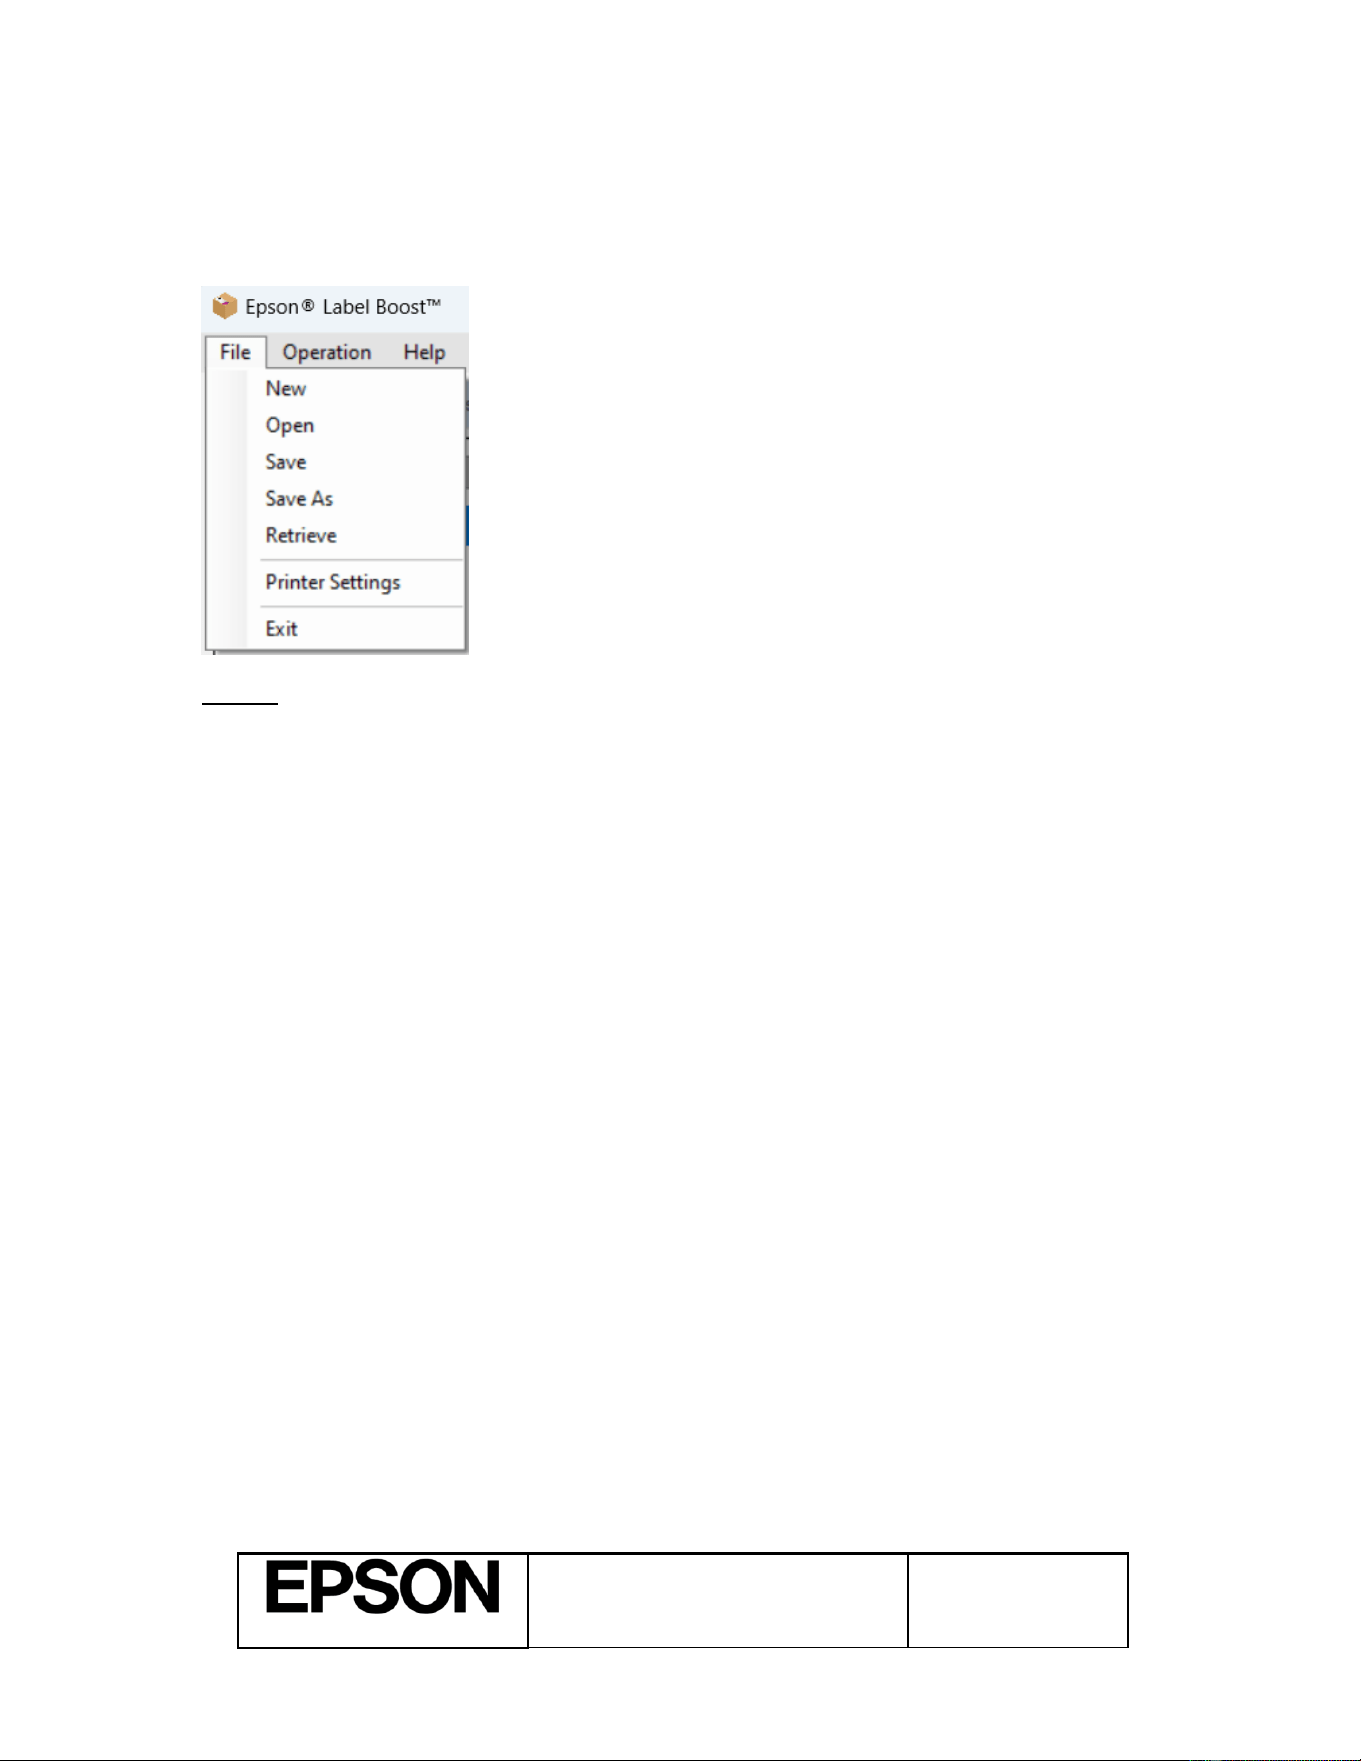
A couple of options to alter the appearance of existing text in the label are provided. Wildcards are optionally
supported by enabling the Use Wildcards checkbox. This will cause asterisk (“*”) and question mark (“?”)
characters to be interpreted as wildcards. Note that text operations are case-sensitive.
4.6.2.1. Change text color
Select the color that will be applied to the text. Please note that the color will apply to the whole ZPL text
element that included the search text and not necessarily to the search text only.
Options:
• Find Text: Enter the text to search for. This operation is case-sensitive.
• New Text Color: Click Select to pick from the color palette. Be sure to choose a color that does not
reduce the readability of the printed label.
4.6.2.2. Highlight text
Select the highlight color that will be applied to the text. Please note that the color will apply to the whole ZPL
text element that included the search text and not necessarily to the search text only.
Options:
• Find Text: Enter the text for search for. This operation is case-sensitive.
• Highlight Color: Click Select to pick from the color palette. Be sure to choose a color that does not
reduce the readability of the printed label.
Epson® Label Boost™
User Manual
Page 16 of 21
060-04-URM-001
R1.24
Form: F-730-028 v1.00
Trademarks
4.7. Managing sets of Rules
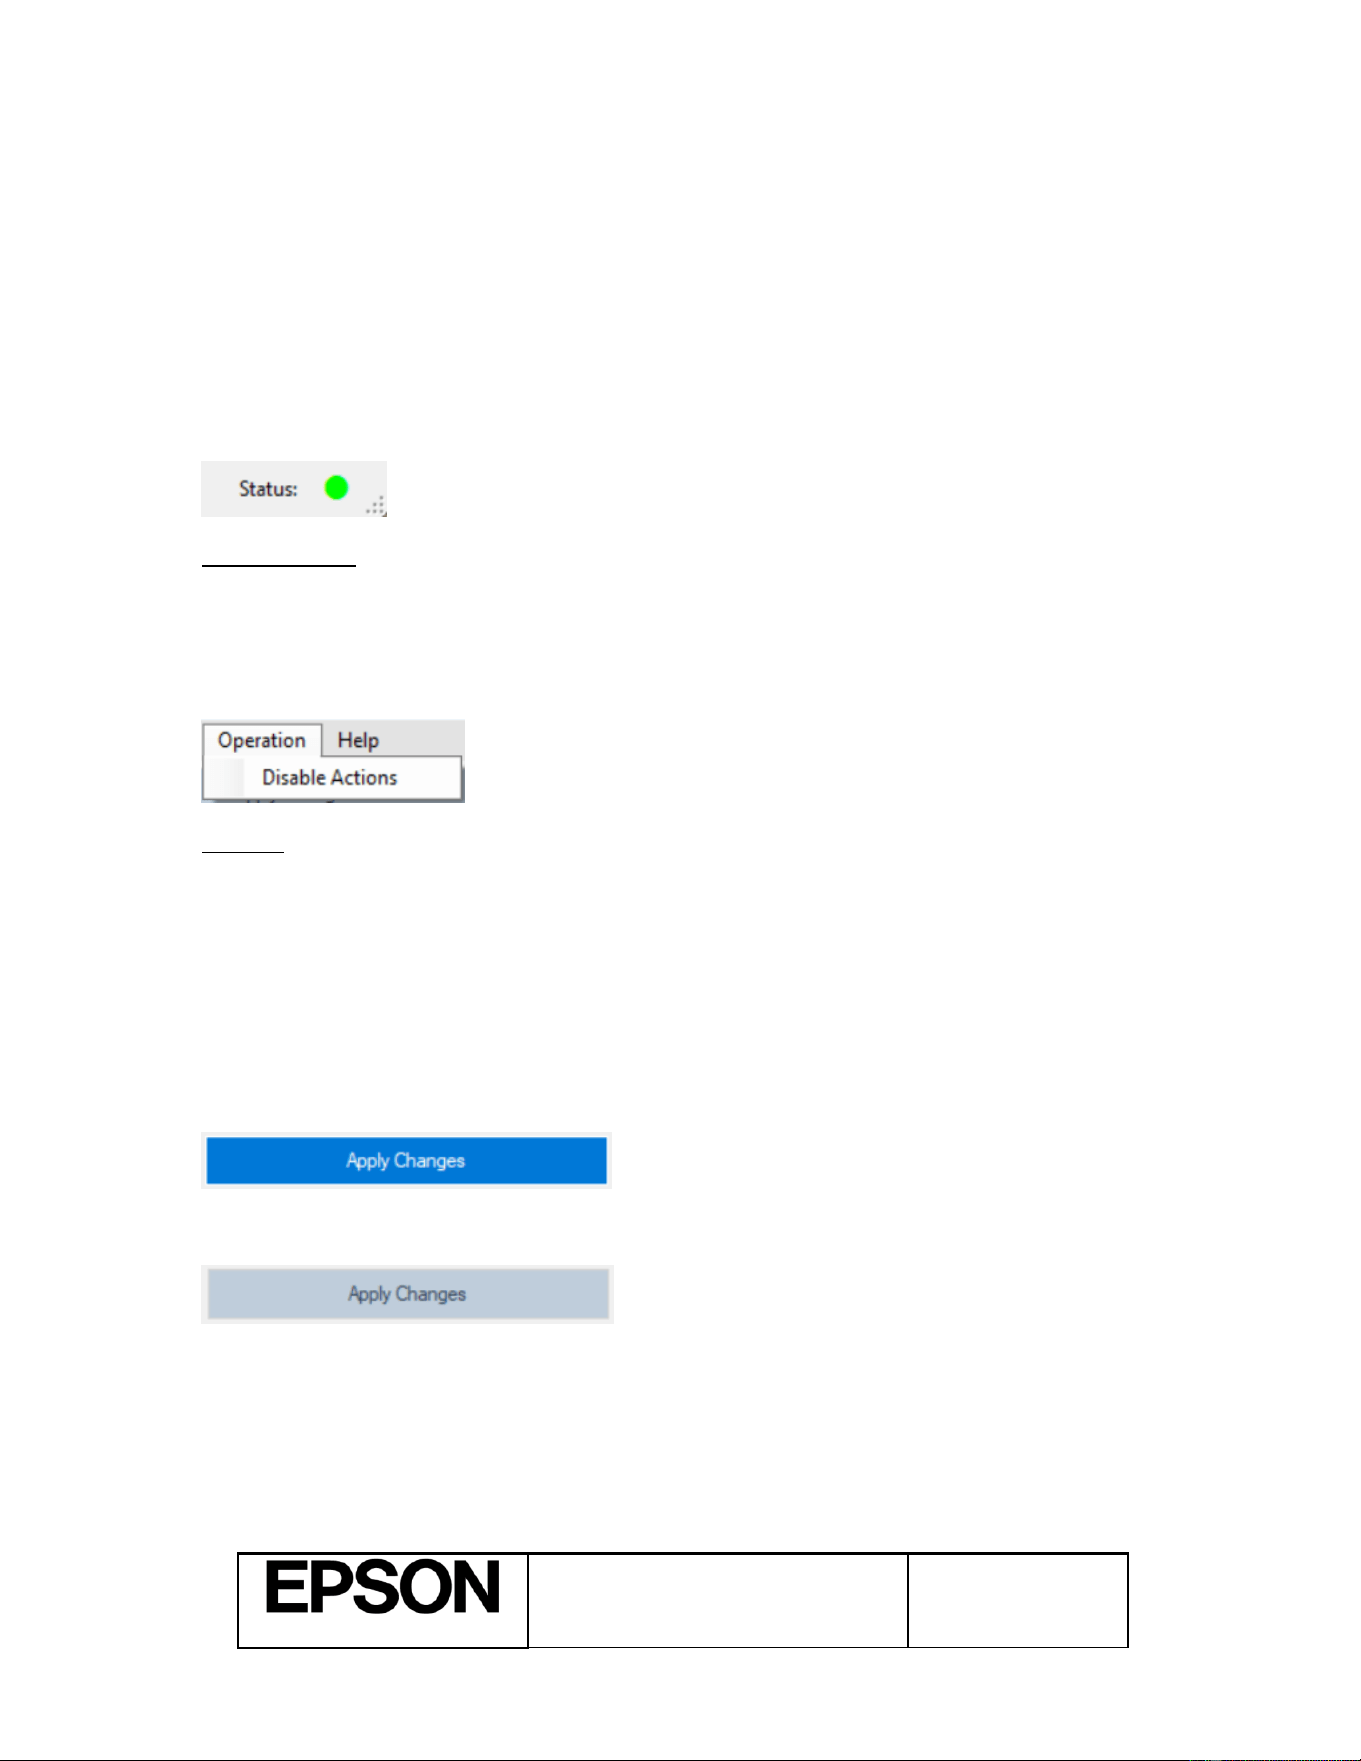
The File menu can be used to manage sets of rules.
Options:
• New: Create a new set of rules. If the current set is not saved, a confirmation dialog will appear.
• Open: Open a file containing an existing set of rules.
• Save: Save the current set of rules. If the current set has not been saved, the user will be prompted
for a file name and location.
• Save As: Save the current set of rules to a specified file and folder.
• Retrieve: Extracts the configuration that is currently saved in the Service into the GUI application, in
order to view it or make changes.
Epson® Label Boost™
User Manual
Page 17 of 21
060-04-URM-001
R1.24
Form: F-730-028 v1.00
Trademarks
4.8. Controlling the Label Boost service
Label Boost has two parts:
1. The GUI application
2. The Windows Service
The Windows Service is invisible, always running in the background, even if you close the GUI application.
4.8.1. The Status indicator
The Status indicator gives a quick overview of the service operation.
States (Colors):
• Green: The service is running normally.
• Yellow: The service is running in Bypass mode (Actions are Disabled) or otherwise unavailable.
4.8.2. The Operation menu
Options:
• Disable Actions: When checked, the service will forward any print job to the printer unchanged.
This is helpful for troubleshooting, or if label printing needs to go on while you are in the process of
creating or editing rules. While the actions are disabled, the status indicator will turn yellow.
4.8.3. Apply Changes
The rules that are currently shown in the list can be sent to the service and activated by clicking on the Apply
Changes button.
When the current rules haven’t been applied, or edits have been made, the button is blue:
After the current set of rules have been applied, the button turns gray:
Epson® Label Boost™
User Manual
Page 18 of 21
060-04-URM-001
R1.24
Form: F-730-028 v1.00
Trademarks
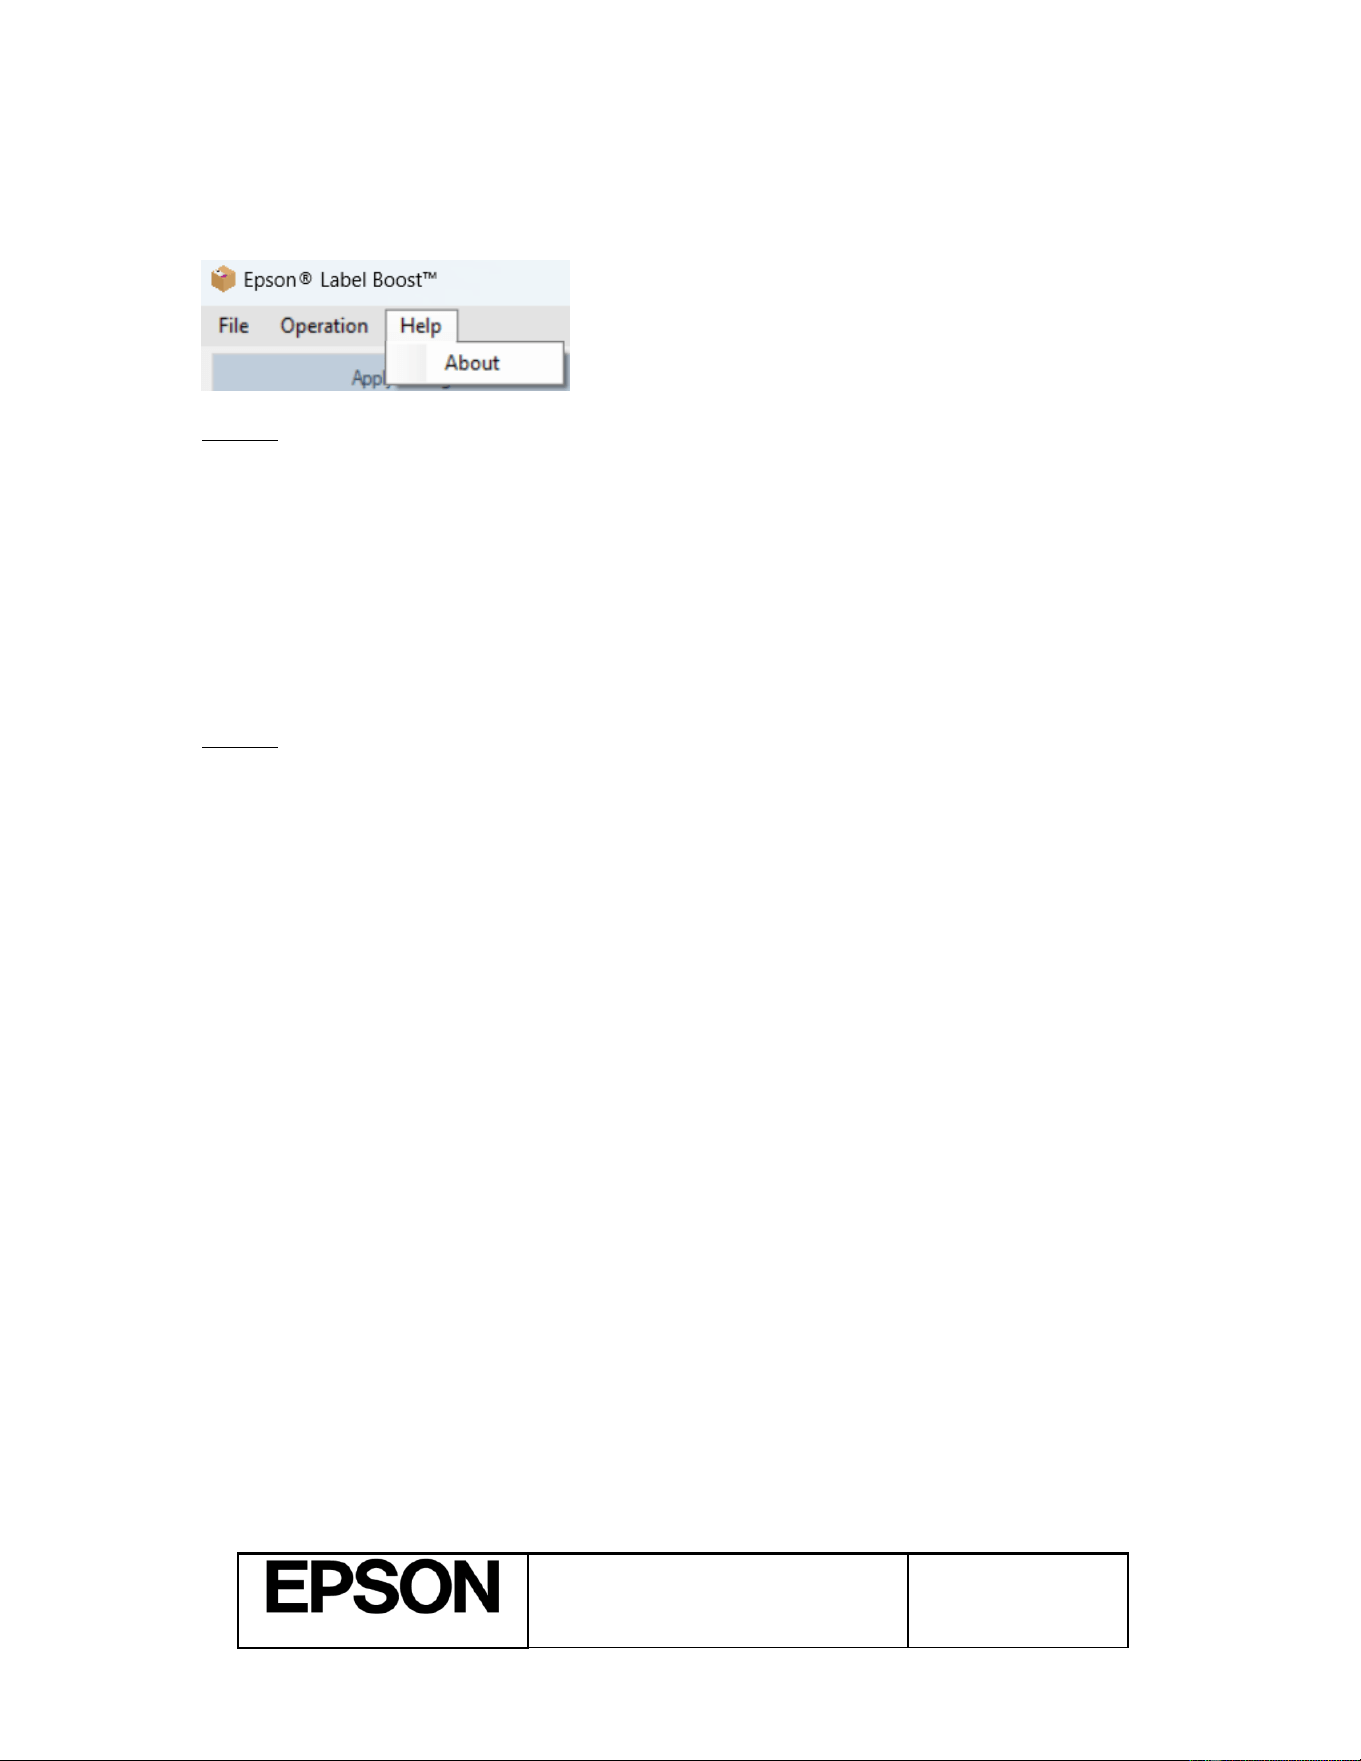
4.9. The Help menu
Options:
• About: Show the About box, with version and other information.
4.9.1. About
The About box displays information about the application, including:
• The application version, copyright, and related information
• Licensing information
o License Status: Trial or Licensed
o Trial Days Remaining (if you are using a trial license)
o License Key
Options:
• Activate: (trial license only) This button allows the user to enter in a license key and upgrade from a
trial license to a full license.
• Deactivate: (full license only) This button allows the user to deactivate the license from the current
machine. This is useful when replacing the current computer, or otherwise uninstalling Label Boost
and moving it to a different computer. Both online and offline options are available.
Epson® Label Boost™
User Manual
Page 19 of 21
060-04-URM-001
R1.24
Form: F-730-028 v1.00
Trademarks
5. Troubleshooting
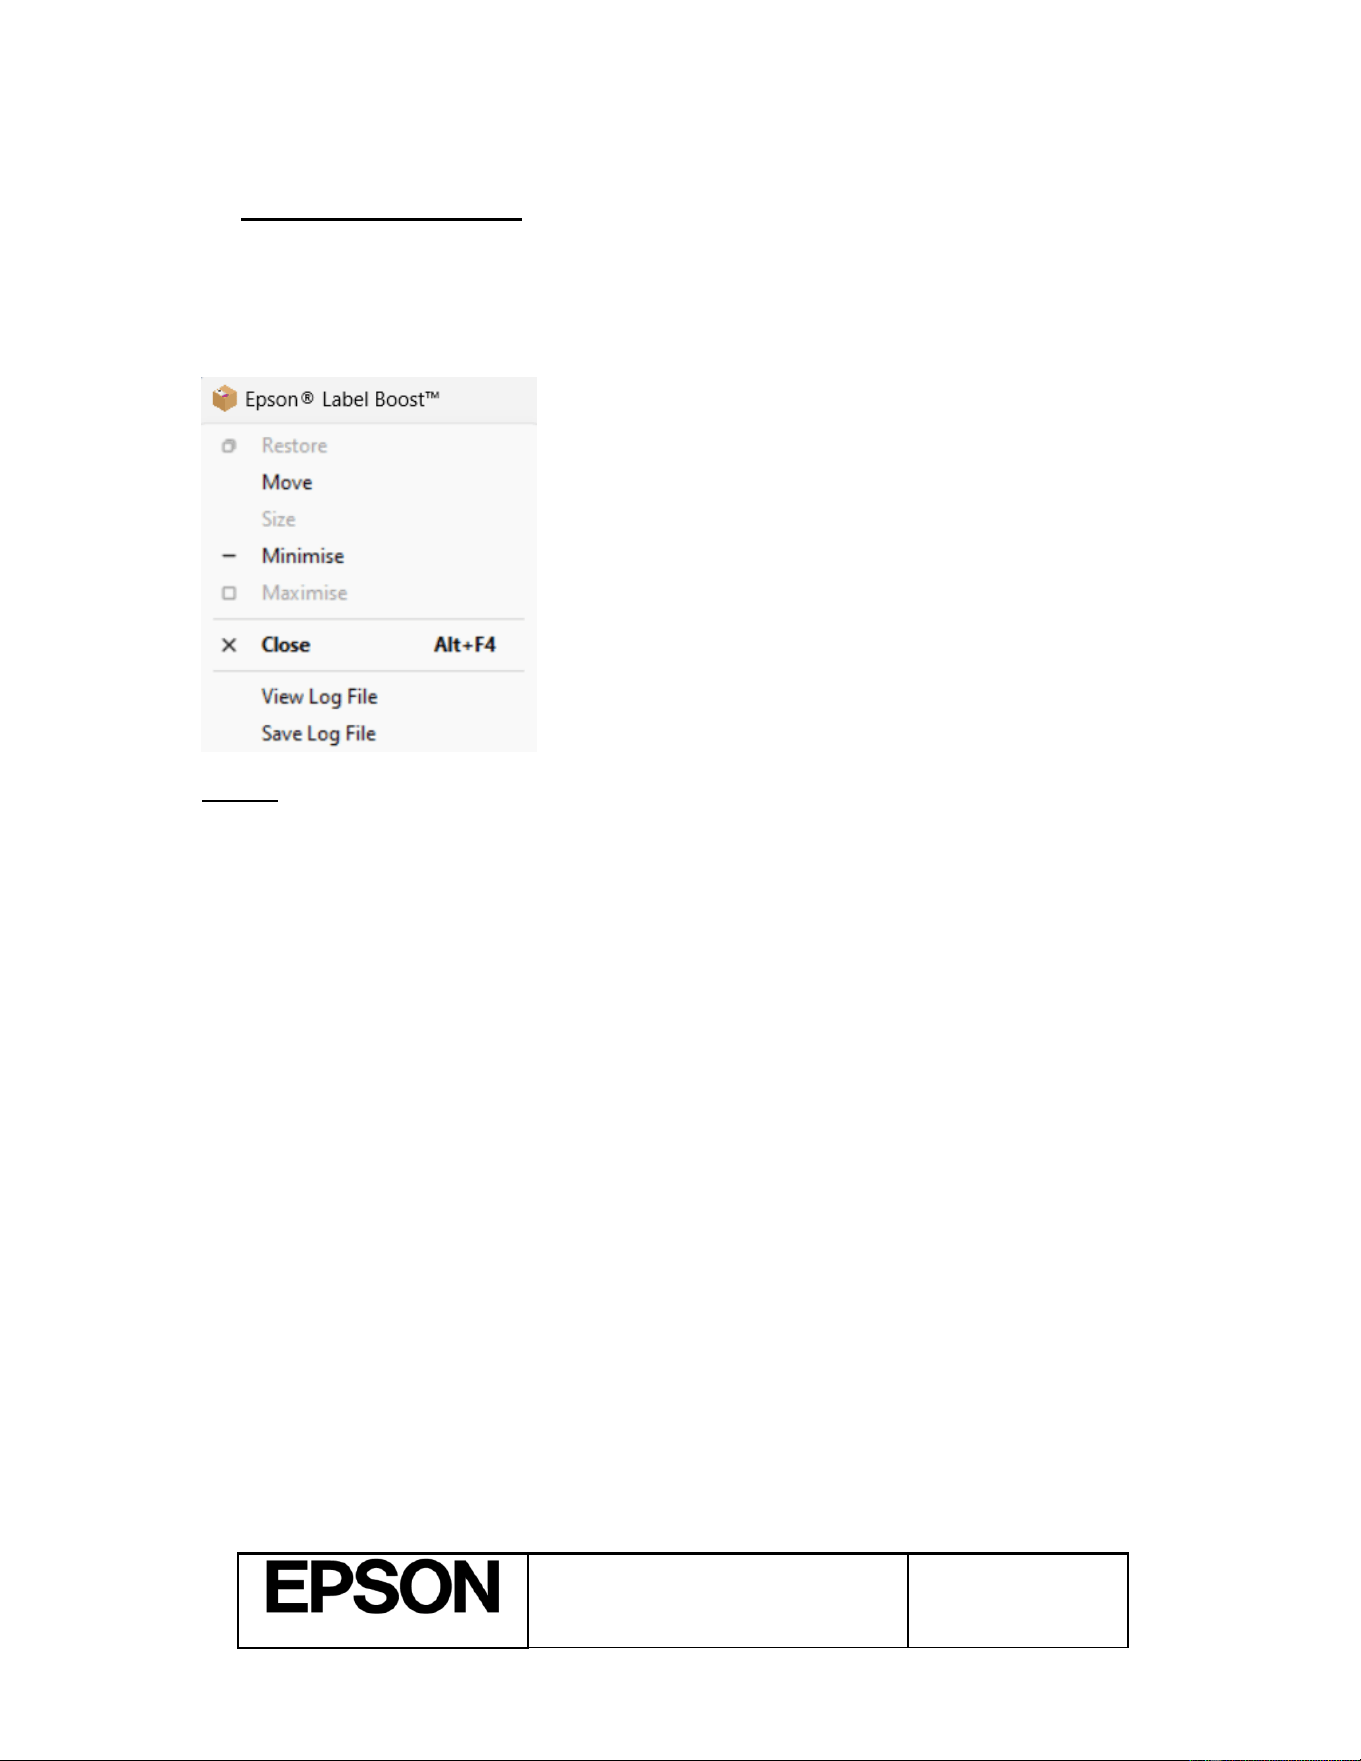
5.1. Accessing the Log File
You can view and save the log file by clicking on the Label Boost icon in the upper-left corner of the
application.
Options:
• View Log File: Open the log file.
• Save Log File: Save the log file to another file. This can be useful for passing the log file to a
technical support representative, when requested.
5.2. The Label Boost installation fails to complete
If you receive an error when installing Label Boost, make sure you have the driver for a supported Epson
ColorWorks printer installed. The printer driver must be installed before installing Label Boost. It is
recommended that you print a test label using your label printing application after installing the driver. This
will ensure the printer is functioning properly before Label Boost installation and setup.
5.3. The Label Boost printer is not selectable or the printout is not as
expected
In some cases, the Label Boost printer may not be selectable in your shipping label application. If selectable,
the printout may not reflect the application of the defined rules or otherwise not be as expected. In this case,
look at the printer settings in your shipping label application. If the Shipping Label application has an option
to “Send to Thermal Printer”, try turning that option on to see if the printer is selectable or if the printed
result is now as expected.

Epson® Label Boost™
User Manual
Page 20 of 21
060-04-URM-001
R1.24
Form: F-730-028 v1.00
Trademarks
5.4. Label Boost is not receiving print jobs
Label Boost listens on port 9100 to intercept print jobs. Firewall software could potentially block access to
this port, preventing print data from making it to Label Boost. If Label Boost is not able load or to receive print
jobs from your Label Application, please check your firewall settings to see if access to port 9100 is being
blocked.
Use the following steps to open the appropriate port on the firewall (these steps are for Windows 11, but are
similar on Windows 10):
1. Click on Start and then Control Panel.
2. Click on Windows Firewall.
3. Select Advanced Settings.
4. Right click on Inbound Rules then on New Rule.
5. Select Port and click on Next.
6. Enter 9100 for the port and click on Next.
7. Click on Next.
8. Name the rule “Epson Label Boost Inbound port 9100” and click on Finish.
9. Do the same steps for Outbound (substituting “Outbound” for “Inbound” in the rule name).
10. Reboot your machine.
5.5. The shipping label is cutoff or is the incorrect size
If images or labels are being cutoff or the resulting label is the incorrect size, it could be the media setting in
the Label Boost driver. On Label Boost installation the installer will import the initial settings from your
ColorWorks driver. The resulting Label Boost driver settings may require adjustment to ensure a correct
printout. The steps in section 3.4 provide information on how to resolve this issue.
5.6. Additional Support
If additional support is needed, please work with your Epson reseller, or contact Epson support using the
information provided below:
Phone:
(562) 276-1340
Hours:
Monday – Friday 7 am – 4 pm (PT)
Epson® Label Boost™
User Manual
Page 21 of 21
060-04-URM-001
R1.24
Form: F-730-028 v1.00
Trademarks
6. Open Source Software Credits
1. log4net logging library, version 2.0.15
https://logging.apache.org/log4net/
License: Apache 2.0
2. Newtonsoft JSON library, version 13.0.3
https://www.newtonsoft.com/json
License: MIT