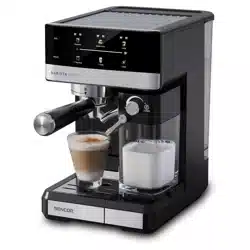

SES 4060BK
EN
ESPRESSO COFFEE MACHINE WITH
AUTO MILK FROTHING
Translation of the original manual
SES 4060BK
A
CLEAN
MAX
1
2
3
4
5
6
7
8
9
10
12
13
14
15
16
17
11
18
20
19
B
4 5 6 7
1 2 3
C1 C2
C3 C4
D1 D2
E
F1
CLEAN
MAX
F2
CLEAN
MAX
CLEAN
MAX


- 1 -
05/2025
2025, .
EN
Espresso Coffee Machine with Auto Milk Frothing
User Manual
IMPORTANT SAFETY INSTRUCTIONS
READ CAREFULLY AND STORE FOR FUTURE USE.
• This appliance may be used by children 8 years of age
and older and by persons with physical, sensory or mental
impairments or by inexperienced persons, if they are
properly supervised or have been informed about how to
use of the product in asafe manner and understand the
potential dangers.
• Children must not play with the appliance.
• Cleaning and maintenance must not be performed by
unsupervised children.
• Keep the appliance and its power cord out of the reach of
children under 8 years of age.
• If the power cord is damaged, have it replaced in
aprofessional service centre in order to prevent
adangerous situation. Never use the appliance if the
power cord is damaged.
• This appliance is intended for household use. It is also
suitable for personal non-commercial use in spaces such as:
– kitchenettes in shops, offices and other workplaces;
– agriculture;
– hotel, motels and other residential areas;
– bed and breakfast establishments.
• The appliance must not be immersed in water when it is
being cleaned.
- 2 -
05/2025
2025, .
WARNING:
The filling hole must not be opened during use.
WARNING:
Prevent the plug from getting wet.
• Always clean the parts of the appliance that come into
contact with food with clean warm water and alittle neutral
dishwashing liquid, rinse them with clean water and wipe
dry.
WARNING:
Incorrect use may lead to injury.
• The outer surface of the appliance heats up during use
and may be hot for some time after use. Be very careful.
• The appliance must not be placed in acabinet when in
use.
. . . . . . . . . . . . . . . . . . . . . . . . . . . . . . . . . . . . . . . . . . . . . . . . . . . . . . . . . . . . . . . . . . . . . . . . . . . . . . . . . . . . . . . . . . . . . . . . . . . . . . . . . . . . . . . . . . . . . . . . . . . . . . . . . . . . . . . . . . . .
Additional Important Safety Instructions forUse of the Appliance
• Before connecting the appliance to apower socket, make sure that its nominal voltage indicated on the rating plate matches the electrical voltage of
the socket.
• Connect the appliance only to aproperly earthed socket. For safety reasons, we do not recommend using adaptors or extension cables.
• Do not place the appliance on windowsills, sink drain trays or unstable surfaces. Always place the appliance on astable, flat and dry surface.
• Do not place the appliance on an electric or gas stove or near an open flame.
• Never use the appliance in the immediate vicinity of abath, shower or swimming pool.
• Use the appliance only for its intended purpose.
• Use the appliance only with the original accessories supplied with it.
• Leave at least 15 cm of free space around and 35 cm above the appliance to ensure proper air circulation during operation.
• Only use the top surface of the appliance to heat up cups. Do not use it to store items.
• Fill the water tank with clean, cold water. Do not pour hot water or other liquids into it or place any objects inside it.
• Before turning on the appliance, make sure that:
– the drip tray and grille are in place;
– the water tank is filled with asufficient amount of water and is properly installed in position. The water level must not exceed the maximum mark.
• Before you begin brewing coffee, check that the portafilter is properly attached to the brew head. Pressure is created in theportafilter during the
coffee brewing process, so do not move it during operation. Otherwise adangerous situation could arise.
• Take extra care when operating the appliance to avoid scalding with hot water or steam.
• When using the appliance, check the water level in the water tank regularly. If the water level falls below the minimum mark, refill the water tank.
Before adding water, first turn the appliance off and disconnect it from the power socket.
• The appliance is equipped with abuilt-in thermal fuse that shuts it off when the pump is idling to prevent damage. If such asituation occurs, unplug
the power cable and allow the appliance to cool down for at least 30 minutes. Then you can use it again.
• Always turn off and unplug the appliance from the power socket when not in use, when left unattended, before disassembly or assembly, before
refilling the tank, before moving or cleaning it. Allow the appliance to fully cool down before cleaning or moving.
• Do not move the appliance when there is acup of coffee on the drip tray grille or with cups on the surface for heating them up.
- 3 -
05/2025
2025, .
• Keep the appliance and its accessories in clean condition. Perform the cleaning and maintenance following the instructions in the Cleaning and
Maintenance section. Do not wash the appliance under running water or submerge it in water or any another liquid.
• Ensure that the power cable does not come into contact withhot surfaces or that the power cable plug is not spilled on.
• Unplug the appliance from the power socket by pulling the plug, not the power cable. Otherwise, damage to the power cable or the socket may
occur.
• To avoid the risk of electric shock, do not repair or modify the appliance yourself. All repairs should be carried out by an authorised service centre.
Tampering with the appliance may result in the loss of your legal rights regarding faulty performance or warranty for quality.
. . . . . . . . . . . . . . . . . . . . . . . . . . . . . . . . . . . . . . . . . . . . . . . . . . . . . . . . . . . . . . . . . . . . . . . . . . . . . . . . . . . . . . . . . . . . . . . . . . . . . . . . . . . . . . . . . . . . . . . . . . . . . . . . . . . . . . . . . . . .
EXPLANATION OF SYMBOLS PLACED ON THE PRODUCT OR INTHE ACCOMPANYING DOCUMENTATION
The product meets all the basic requirements of the applicable EU directives.
This symbol on products or original documents means that used electric or electronic products must not be added to ordinary municipal
waste.
. . . . . . . . . . . . . . . . . . . . . . . . . . . . . . . . . . . . . . . . . . . . . . . . . . . . . . . . . . . . . . . . . . . . . . . . . . . . . . . . . . . . . . . . . . . . . . . . . . . . . . . . . . . . . . . . . . . . . . . . . . . . . . . . . . . . . . . . . . . .
- 4 -
05/2025
2025, .
• Thank you for purchasing our SENCOR product; we hope it will serve
to your satisfaction.
• Prior to using this appliance, please read the user manual thoroughly,
even in cases when you are already familiar with the use of similar
types of appliances. Use the appliance only as described in this
user manual. Keep the manual for future reference. If you pass the
appliance on to another person, ensure that this user manual is
included.
• Carefully unpack the appliance and make sure not to discard any part
of the packaging material until you have removed all components
of the appliance. It is recommended that you keep the original
packaging, packing material, receipt and confirmation of the extent
of the seller'sliability or warranty certificate at least for the duration
of the legal right to file adefect claim or the quality warranty. When
transporting the appliance, we recommend repackaging it in the
original box provided by the manufacturer.
. . . . . . . . . . . . . . . . . . . . . . . . . . . . . . . . . . . . . . . . . . . . . . . . . . . . . . . . . . . . . . . . . . . .
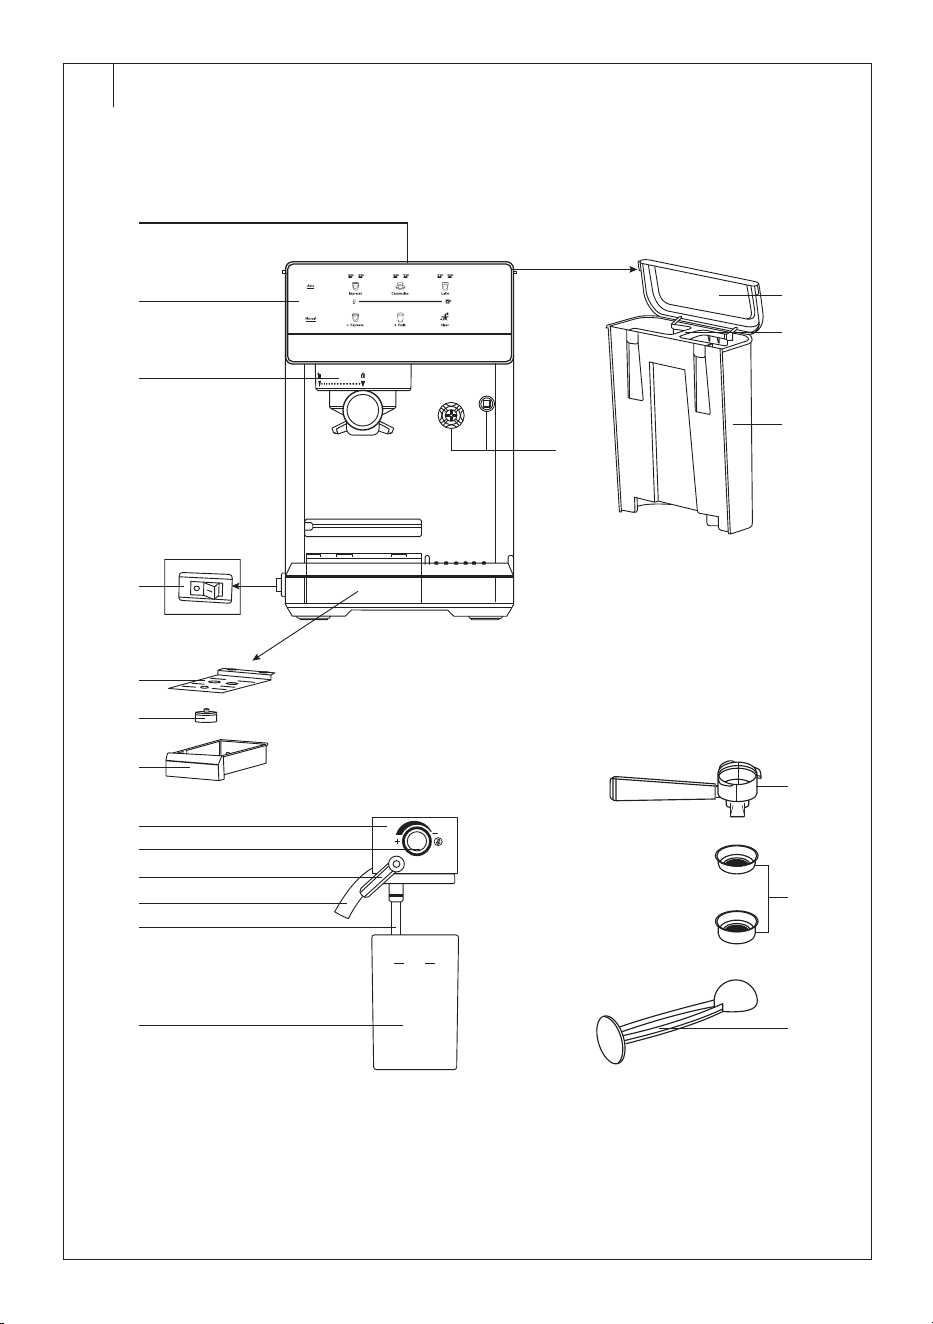
DESCRIPTION OF THE COFFEE MACHINE
A1 Cup warming plate
A2 Control panel
A3 Brew head
A4 Main power switch
A5 Drip tray grille
A6 Full drip tray indicator
A7 Drip tray
A8 Water tank lid
A9 Water tank handle
A10 Water tank
A11 Holes forattaching the milk
container
A12 Milk container lid
A13 Rotary control for hot milk /
milk froth setting
A14 Milk andmilk froth dispensing
nozzle control
A15 Milk and milk froth dispensing
nozzle
A16 Milk tube
A17 Milk container
A18 Portafilter
A19 Strainers (for 1 cup and2
cups)
A20 Coffee measuring scoop
withtamper
. . . . . . . . . . . . . . . . . . . . . . . . . . . . . . . . . . . . . . . . . . . . . . . . . . . . . . . . . . . . . . . . . . . .
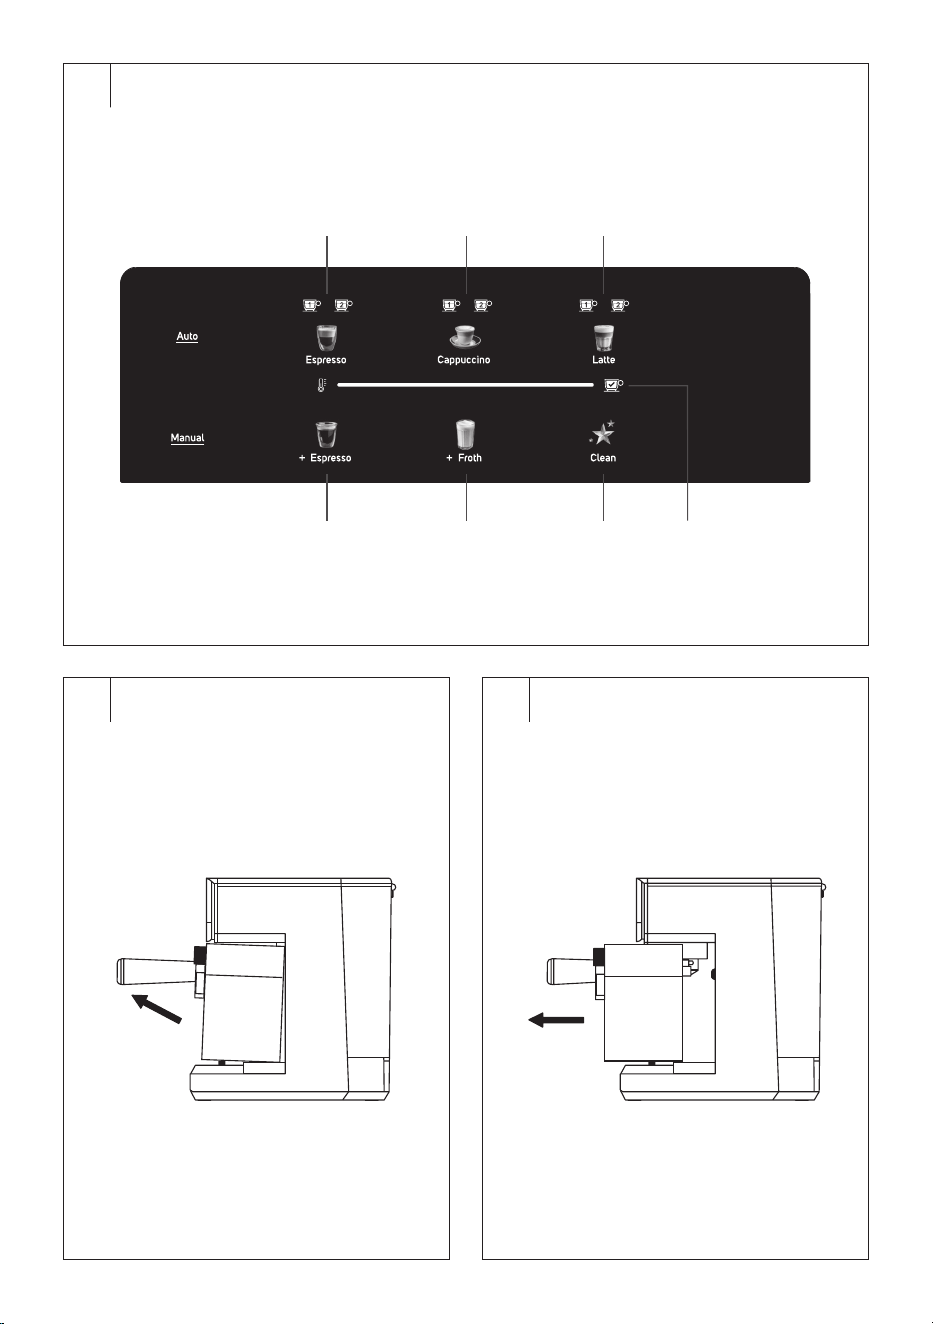
DESCRIPTION OF THE CONTROL PANEL
B1 Espresso button (automatic
mode)
B2 Cappuccino button (automatic
mode)
B3 Latte button (automatic mode)
B4 +Espresso button (manual
mode)
B5 +Froth button (manual mode)
B6 Clean button
B7 Coffee machine heating bar
The meaning of numbers “1” and “2” above the Espresso, Cappuccino,
Latte buttons:
– “1” indicates the preparation of 1 cup;
– “2” indicates the preparation of 2 cups.
. . . . . . . . . . . . . . . . . . . . . . . . . . . . . . . . . . . . . . . . . . . . . . . . . . . . . . . . . . . . . . . . . . . .
BEFORE FIRST USE
• Before first use, remove the appliance and its accessories from the
packaging and discard all promotional labels and tags. Check that
neither the appliance nor any of its components is damaged.
• Place the coffee machine on aflat, dry and clean surface. Make
sure there is aclear space around the coffee machine, at least 35
cm above it and 15 cm on the sides. Wipe the outer surface of the
appliance with aslightly dampened sponge and then wipe dry.
• Remove the water tank from the appliance. Rinse it with clean
water and asmall amount of neutral dishwashing detergent. Then
thoroughly rinse with clean water, dry, and place it back into the coffee
machine.
• Disassemble the milk container according to the instructions inthe
“Milk Container” section. Remove the drip tray and grille from
themachine. Wash the milk container, milk tube, drip tray with grid,
portafilter, coffee measuring scoop and stainless steel filters under
clean running water withabit of kitchen detergent. Then rinse with
clean water and dry.
• Wipe the outer surface of the coffee machine and the milk container
lid with adamp sponge, dry, and place them back into the lower part
of the appliance.
• Attach the grid back onto the drip tray and insert into the coffee
machine. Assemble the milk container following the instructions inthe
“Milk Container” section.
. . . . . . . . . . . . . . . . . . . . . . . . . . . . . . . . . . . . . . . . . . . . . . . . . . . . . . . . . . . . . . . . . . . .
SETUP BEFORE USE
Drip tray
• The drip tray with agrille catches drops of brewed coffee when the
portafilter is removed, hot water used to froth milk, and any spilled
milk during frothing. Therefore, make sure that both parts are correctly
installed andinserted into the appliance.
• We recommend emptying the appliance andwashing the drip tray
after each use. When washing, follow the instructions in the “Cleaning
and Maintenance” section.
Note:
The drip tray is equipped with afullness indicator. It is
afloat. When the liquid level in the drip tray pushes it up,
the drip tray must be emptied.
Filling the water tank
• Open the lid of the water tank. Grasp the tank by the handle and lift it
upwards. Fill it with cold potable water up to the maximum mark and
insert it back. Then close the lid of the water tank. The water tank must
be properly seated in place for water to be pumped into the internal
system.
Note:
The water you pour into the water tank should ideally be
at room temperature (approximately 25 °C). Too cold water
can negatively affect the final taste of the coffee beverage.
Do not leave the remaining water in the water tank for
more than one day. For brewing quality fresh coffee, it is
necessary to use fresh water. Otherwise, the final taste of
the coffee drink may be adversely affected.
Warning:
The maximum capacity of the water tank is 1.8 l. Do
not overfill it. Never fill the water tank with warm, hot
or sparkling water or liquids such as milk. Do not fill
the water tank when it is inserted in the appliance.
You risk splashing the appliance overfilling the water
tank.
Filling the Milk Container
• Fill the milk container andinstall it into the coffee machine in the event
that you prepare Latte or Cappuccino.
• To remove the milk container from the coffee machine, grasp it from
underneath and pull the bottom part upwards from the coffee machine
(Figure C1). This will release the connectors at the back, allowing you
to pull out the entire container from the coffee machine (Figure C2).
• Remove the lid of the container andpour fresh cold whole milk into the
container. Always fill to the MAX mark indicated on the tank.
• Ensure that the milk tube is inserted in the lower part of the lid and
place the lid on the container. Press gently until you hear aclick. This
indicates proper attachment.
• Attach the assembled container to the coffee machine at aslight angle
(Figure C3) until the connectors at the back of the lid fit into the inlet
holes in the coffee machine. Then place the bottom of the container on
the base and push it towards the coffee machine (Figure C4).
EN
Espresso Coffee Machine with Auto Milk Frothing
User Manual
- 5 -
05/2025
2025, .
3. The buttons on the control panel will start flashing slowly and the
coffee machine'sheating bar will gradually light up, which means
that the coffee machine is heating up. Wait until the coffee machine is
preheated.
4. When all buttons on the control panel and the entire heating bar light
up, the coffee machine is ready foruse.
Note:
If the milk container is not inserted or inserted correctly,
Latte andCappuccino will not be available (the buttons will
not light up when the heating is complete).
Note:
You may hear aclicking sound as it heats. This is normal.
Rinsing the Coffee Machine upon First Use
We recommend following these steps when first using the coffee machine
or if the machine has not been used for an extended period.
1. Fill the water tank to the maximum level.
2. Fill the milk container with water up to the maximum level.
3. Insert one of the filters into the portafilter, but do not add any ground
coffee.
4. Insert the portafilter into the brew head.
5. Place abowl under the dispensing nozzle anddirect the milk
dispensing nozzle into the bowl.
6. Plug the power cable into apower socket.
7. Turn on the coffee machine by switching the main power switch to the
Iposition (on). You will hear one short beep.
8. Wait until the coffee machine is preheated.
9. Press the Cappuccino or Latte button and the machine will start. Water
will bedispensed through the dispensing nozzle andthen through the
milk dispensing nozzle.
10. We recommend repeating this process two more times for thorough
rinsing of the coffee machine'sinternal system and milk frothing
system.
11. Then pour out the water in the bowl, remove the portafilter andfilter
andclean them according to the instructions in the “Cleaning and
Maintenance” section.
Warning:
Be careful during rinsing as the discharged water is
very hot and improper handling can cause scalding.
Note:
During coffee brewing, milk dispensing, and frothing, you
will hear the sound of the pump. This is normal.
Preparing Espresso
• The coffee machine is supplied with 2 stainless steel filters: asingle
cup filter and adouble cup filter.
• The single cup filter is suitable for making 1 Espresso, Cappuccino or
Latte.
• The double cup filter is suitable for the preparation of 2 cups of
Espresso or one strong large coffee, Cappuccino or Latte.
1. Insert the single or double cup filter in the portafilter, tamp down the
coffee andinsert the portafilter in the brew head.
2. Make sure the coffee machine is preheated.
3. Place acup/cups or amug/mugs under the portafilter.
4. Press the Espresso button once. The “1” icon (above the button)
flashes, signalling the brewing of one cup of coffee. Wait
approximately 1 to 2 seconds until ashort beep sounds and the
“1” icon stops flashing andlights up. The coffee machine will start
preparing the selected drink.
Press the Espresso button twice in arow. The “2” icon (above the
button) flashes, signalling the brewing of two cups of coffee. Wait
approximately 1 to 2 seconds until ashort beep sounds and the
“2” icon stops flashing andlights up. The coffee machine will start
preparing the selected drink.
Note:
If the milk container is not inserted or inserted correctly,
Latte andCappuccino will not be available (the buttons will
not light up when the heating is complete).
Note:
The area forinserting the milk container is marked on
the coffee machine with guide rails. Insert the container
between the extreme raised rails andfollow the above
instructions toinsert the container.
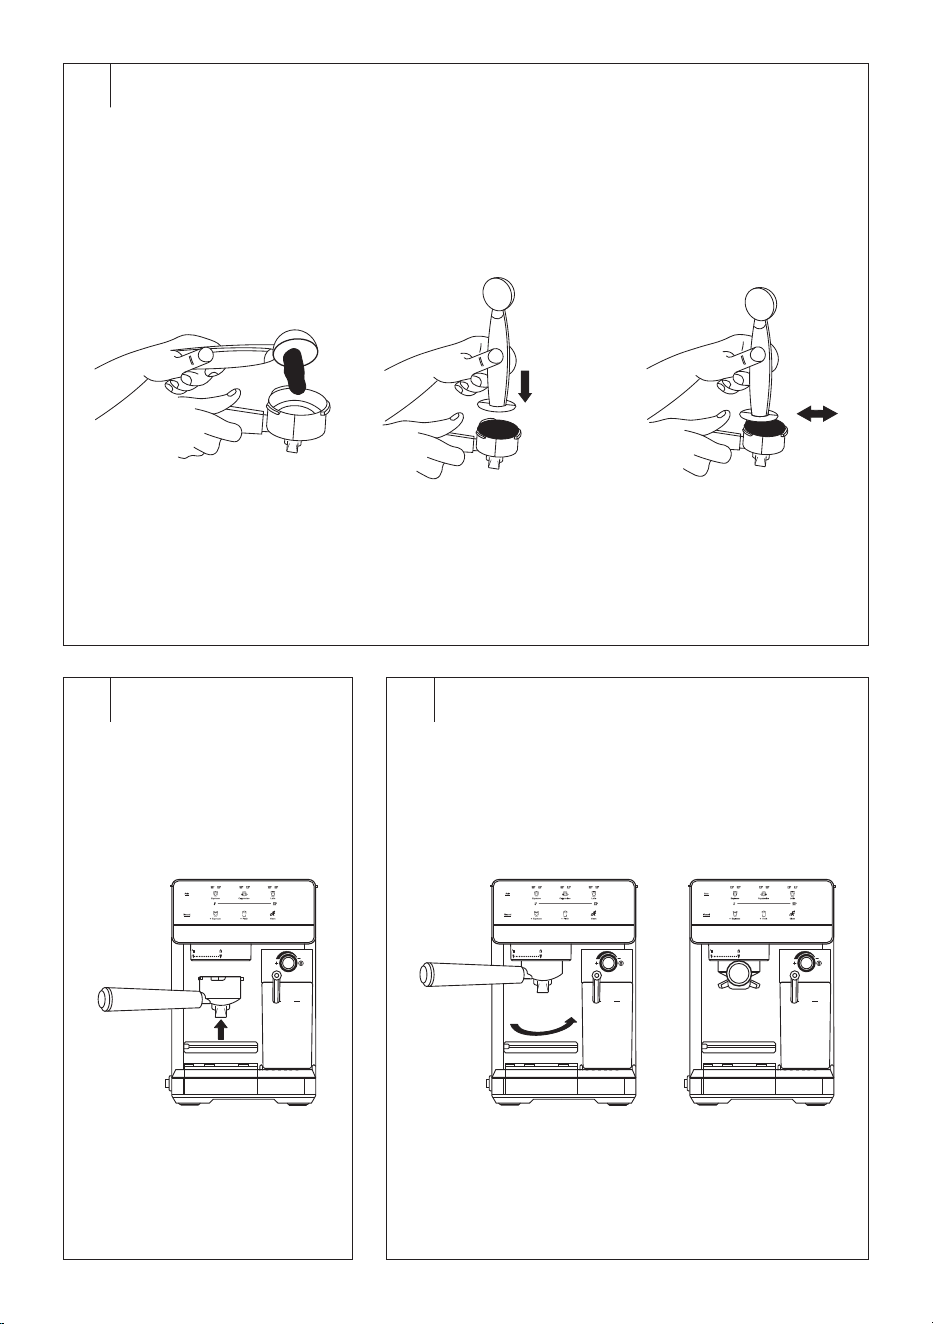
Inserting and removing the filter
• Insert the selected stainless steel filter into the portafilter so that the
protrusion on the filter fits into the hole in the portafilter (Figure D1).
Rotate the filter left or right (Figure D2).
• To remove the filter from theportafilter, rotate the filter in the portafilter
so that the protrusion on the filter aligns with the hole in the portafilter.
Then remove it from theportafilter.
Warning:
Before removing the filter from theportafilter, make
sure that both the filter and theportafilter have cooled
down. Do not remove the filter from the portafilter
immediately after making coffee. They are very hot
andthere is arisk of injury.
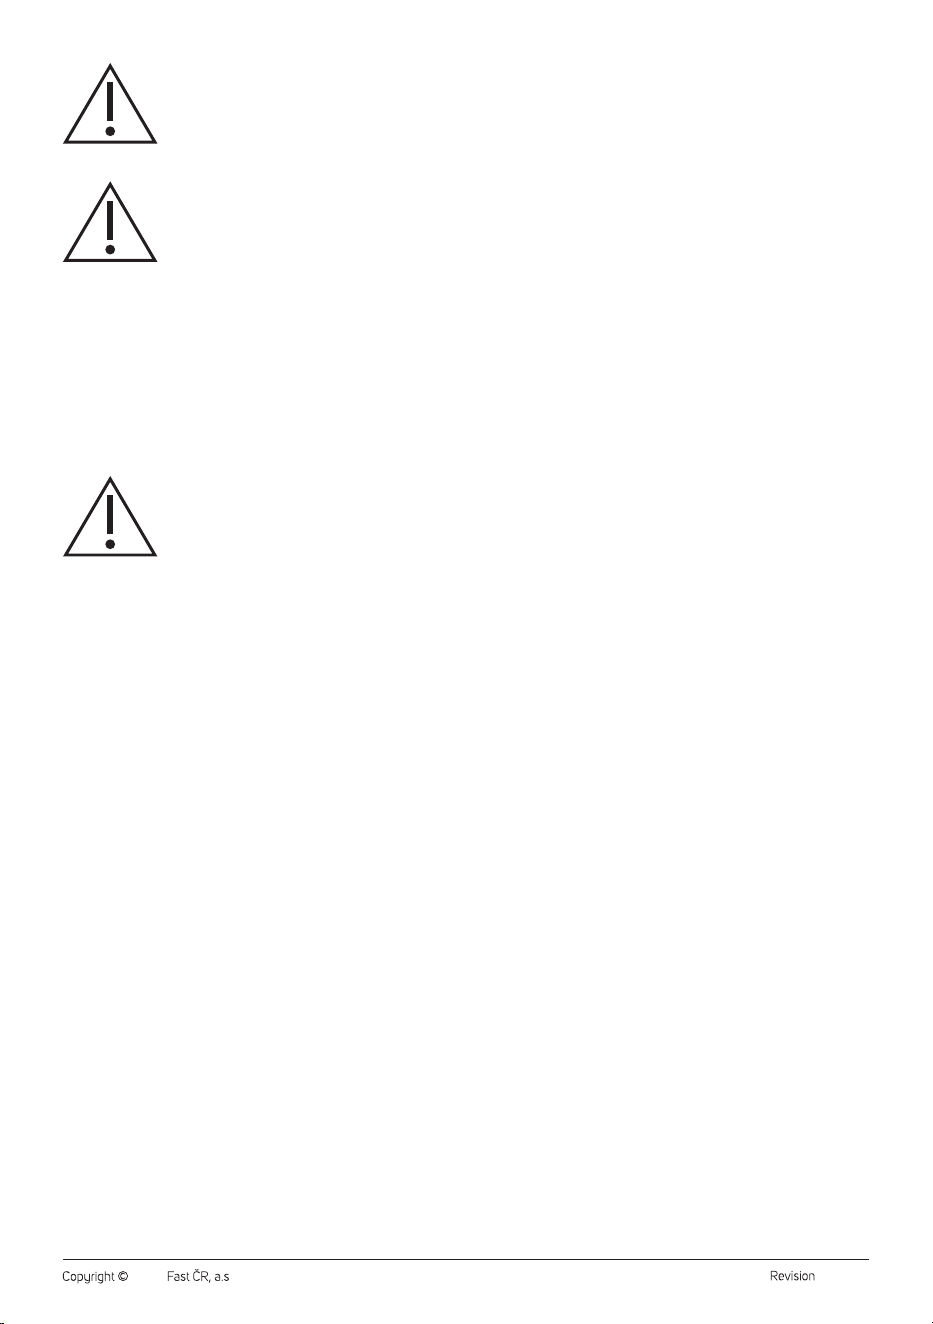
Filling the Filter andTamping the Coffee (Fig. E)
• Place the portafilter on aflat surface and fill the filter with the
appropriate amount of ground coffee. For one cup of coffee, fill the
filter with one level measuring scoop of ground coffee. The double
cup filter is filled with twice the amount of coffee. One levelled scoop
corresponds to about 7 g of ground coffee. Spread the coffee inthe
filter evenly andtamp it with the flat end of the scoop. After tamping,
the coffee inthe filter should be aligned with the MAX line marked on
the inner wall of the filter.
• Clean the edges of the filter thoroughly of any ground coffee residue.
Note:
Use only ground coffee designed for use in espresso
machines. Do not use ground coffee intended for use in
French presses, drip coffee makers, etc.
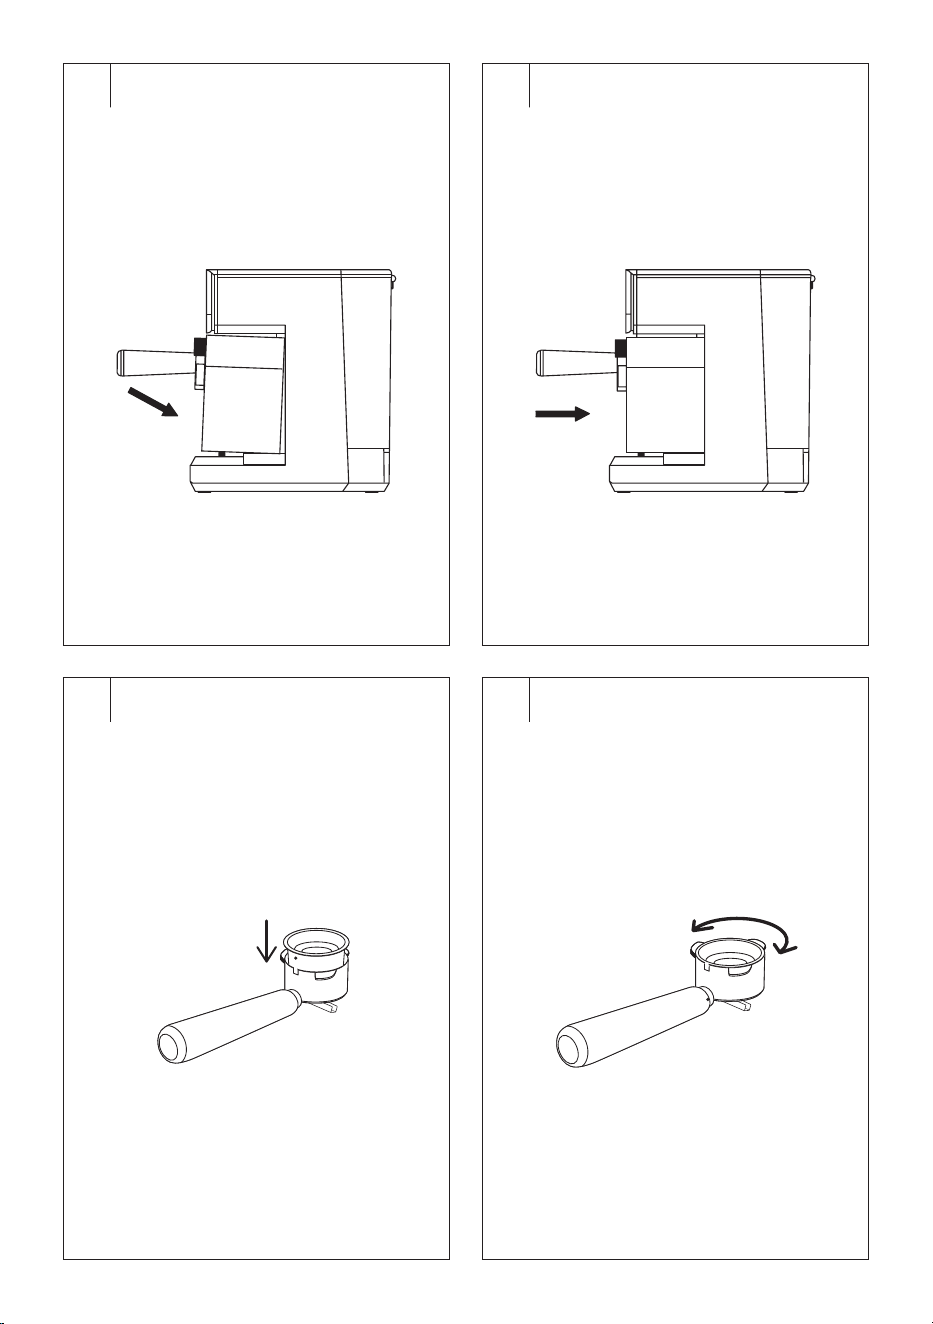
Installing and removing the portafilter
• Place the portafilter underneath the brew head so that the handle
points to the left and aligns with the open lock icon on the brew head
– see Figure F1. To attach the portafilter to the brew head, turn the
handle to the right into the closed lock position – see Figure F2.
• To remove the portafilter from the brew head, rotate the handle
counterclockwise until it aligns with the open lock icon. Remove
it from the brew head and move it above arubbish bin. Rotate the
portafilter so that the filter with the used coffee points downwards. Use
acoffee spoon to remove the coffee grounds. Avoid contact with the
surface of the filter or portafilter as they may still be hot. Before taking
the filter out of theportafilter, cool it under cold running water. Then
rinse the filter and the portafilter under clean running water and dry
them thoroughly.
Warming the cups
• Once you turn on the coffee machine, the cup warming plate will
automatically heat up. Place empty coffee cups upside down on to
surface and let them warm up.
. . . . . . . . . . . . . . . . . . . . . . . . . . . . . . . . . . . . . . . . . . . . . . . . . . . . . . . . . . . . . . . . . . . .
USING THE COFFEE MACHINE
• Place the coffee machine on aflat, dry and clean surface at
asufficient distance from the power socket.
• Make sure that the water tank is filled with fresh water and that the
coffee machine is properly assembled.
Switching on and preheating the coffee machine
1. Plug the power cable into apower socket.
2. Turn the coffee machine on by switching the main power switch to the
Iposition (on). You will hear one short beep.
- 6 -
05/2025
2025, .
If you press the Espresso button three times in arow, the coffee
selection will be cancelled.
5. When the machine starts, it will first brew the coffee by releasing
asmall amount of hot water into the filter toswell the ground coffee in
thefilter. After amoment, full coffee extraction begins.
6. The coffee preparation will stop automatically once the preset amount
of coffee pours into the cup (see the “Recommended cup size” column
in the“Coffee drinks inautomatic modetable”).
7. Remove the cup or mug with thedrink.
8. Remove the portafilter from the brew head andclean it following
the instructions inthe “Cleaning andMaintenance” section. We
recommend waiting for about 5 seconds before removing the
portafilter from the brew head. This will naturally release the pressure
and make it easier to remove the portafilter.
• You can stop brewing coffee at any time by pressing the Espresso
button.
• If you need to adjust the amount of Espresso coffee dispensed, follow
the instructions inthe “Manual Preparation of Espresso” section.
Cappuccino and Latte Preparation
1. Fill the milk container with fresh cold milk.
2. Adjust the amount of hot milk / frothed milk (using the A13 control).
When preparing Cappuccino, turn the rotary control to the left (more
milk froth), when preparing Latte, turn the rotary control to the right
(more hot milk).
3. Insert the filter into the portafilter to prepare 1 portion of coffee or
2 portions of ground coffee, tamp down the coffee and insert the
portafilter into the brewing head.
4. Make sure the coffee machine is preheated.
5. Extend the (A15) milk nozzle over the cup or mug by turning the (A14)
nozzle control.
6. Put acup or mug under the portafilter (temporarily remove the drip
tray if you are using alarger mug).
7. Press the Cappuccino or Latte button once. The “1” icon (above the
button) flashes, signalling the brewing of one cup of coffee. Wait
approximately 1 to 2 seconds until ashort beep sounds and the
“1” icon stops flashing andlights up. The coffee machine will start
preparing the selected drink.
Press the Cappuccino or Latte button twice in arow. The “2” icon
(above the button) flashes, signalling the brewing of abigger amount
of coffee. Wait approximately 1 to 2 seconds until ashort beep sounds
and the “2” icon stops flashing andlights up. The coffee machine will
start preparing the selected drink.
If you press the Cappuccino or Latte button three times in arow, the
coffee selection will be cancelled.
8. The coffee machine will start preparing the selected drink. Milk and
frothed milk will be frothed and dispensed, followed by coffee brewing.
9. The coffee preparation will stop automatically once the preset
amount of coffee and hot milk / milk froth pour into the cup (see the
“Recommended cup size”“ column in the Coffee drinks inautomatic
mode table”).
10. Remove the cup or mug with thedrink.
11. Remove the portafilter from the brew head andclean it following
the instructions inthe “Cleaning andMaintenance” section. We
recommend waiting for about 5 seconds before removing the
portafilter from the brew head. This will naturally release the pressure
and make it easier to remove the portafilter.
12. Clean the milk container following the instructions inthe “Cleaning the
Milk Container“ section below.
• You can stop brewing coffee at any time by pressing the Cappuccino
or Latte button.
• If you prefer ahigher coffee content in your Cappuccino or Latte, use
adouble cup coffee filter.
• If you need to adjust the amount of Espresso dispensed, follow the
instructions inthe “Manual Preparation of Espresso” section. If you
need to adjust the volume of milk dispensed, follow the instructions
inthe “Manual Milk Frothing” section.
Overview of coffee drinks inautomatic mode
(top row of buttons on the control panel)
Coffee drink Recommended cup size
Cup 1 Small Espresso 50 ml
Cup 2 Large Espresso 100 ml
Cup 1 Small Cappuccino 150 ml
Cup 2 Large Cappuccino 300 ml
Cup 1 Small Latte 200 ml
Cup 2 Large Latte 350 ml
Note:
The resulting volume of the coffee drink may differ
dependingon the type of milk and the set volume of hot
milk / milk froth or the coarseness and portion of the ground
coffee.
Manual Preparation of Espresso
1. Insert the single or double cup filter in the portafilter, tamp down the
coffee andinsert the portafilter in the brew head.
2. Make sure the coffee machine is preheated.
3. Put the cup under the handle.
4. Press the +Espresso button to start the espresso making process.
5. Once the desired amount of coffee has flowed into the cup, briefly
press the +Espresso button.
6. Remove the cup with thedrink.
• The coffee machine automatically stops brewing once the maximum
amount of coffee has been poured into the cup (100ml). This is
asafety feature to prevent the coffee machine from overheating.
• Remove the portafilter from the brew head andclean it following
the instructions inthe “Cleaning andMaintenance” section. We
recommend waiting for about 5 seconds before removing the
portafilter from the brew head. This will naturally release the pressure
and make it easier to remove the portafilter.
Manual Milk Frothing
You can use hot milk and milk froth to make hot chocolate, hot cocoa or
other non-coffee drinks.
1. Fill the milk container with fresh cold milk.
2. Adjust the amount of hot milk / frothed milk using the hot milk /
frothed milk control (A13).
3. Place acup on the grid of the drip tray.
4. Extend the (A15) milk nozzle over the cup or mug by turning the (A14)
nozzle control.
5. Make sure the coffee machine is preheated.
6. Press the +Froth button. The dispensing of hot milk and milk froth will
start.
7. Once hot milk andmilk froth have been poured into the cup according
to the settings, the dispensing stops.
8. Remove the cup ofmilk.
9. Clean the milk container following the instructions inthe “Cleaning the
Milk Container“ section below.
Reheating the espresso machine
• Every time it finishes brewing coffee / frothing milk, the espresso
machine automatically reheats to operating temperature. During this
time, the buttons on the control panel will flash and the heating bar
will gradually light up. You may hear aclicking sound as it heats. This
is normal.
• This means the coffee machine can also reheat evenbetween
individual uses. This is normal.
• The coffee machine cannot be started when it is heating up, so always
wait for it to finish.
Turning off the coffee machine
• If you are not going to be using the coffee machine, turn the main
power switch to the 0 (off) position. The coffee machine will shut
down. Unplug the power cord from the power socket.
Automatic shut-off
• If you do not use the coffee machine for more than 25 minutes, it will
automatically switch itself off.
- 7 -
05/2025
2025, .
• Pressing any button will turn it on again andstart heating it up.
Coffee brewing tips
• We recommend using fresh roasted andground coffee beans. Coffee
beans should be ground to the level suitable for Espresso machines.
Grind the coffee beans just before brewing coffee.
• If the ground coffee is too fine, water will not flow through the coffee
even under high pressure. Such finely ground coffee resembles
powder and feels like salt when rubbed between the fingers.
• If the ground coffee is too coarse, water flows through the coffee too
quickly and the full flavour is not extracted. Make sure to use aquality
grinder for consistent grind size.
• Store coffee beans / ground coffee in an air-tight container in acool
anddark place. Store them for amaximum of 4 weeks.
• Do not store coffee beans / ground coffee in thefridge or freezer.
. . . . . . . . . . . . . . . . . . . . . . . . . . . . . . . . . . . . . . . . . . . . . . . . . . . . . . . . . . . . . . . . . . . .
CLEANING AND MAINTENANCE
• Before cleaning, set the main switch to the 0 position (off), unplug the
power cable from the power socket and allow the appliance to cool
down properly.
• Do not use abrasive cleaning agents, solvents, etc. to clean any parts
of the appliance, as these could damage the surface of the appliance.
Warning:
To prevent the risk of electric shock, do not immerse
the appliance, power cable, or plug into water or any
other liquid.
Cleaning the filter, portafilter and brew head
The filter and portafilter must be thoroughly cleaned after each use.
1. Remove the portafilter with the used coffee from the brew head.
Dispose of the coffee grounds in the compost or in regular municipal
waste. If the coffee grounds are difficult to remove from the filter, use
atable knife or spoon.
2. Remove the filter from the portafilter by rotating the filter in
theportafilter so that the protrusion on the filter is aligned with the hole
in theportafilter. Then remove it from theportafilter.
Warning:
Take extra care as the coffee grounds, filter and
portafilter are very hot after use. There is arisk of
burns.
3. Rinse the filter and portafilter under warm running water and wipe
them dry with aclean cloth.
4. Wipe the bottom of the brew head with adamp cloth to remove
ground coffee residues.
5. Insert the portafilter (without the filter) into the brew head.
6. Turn on the coffee machine andlet it heat up. Place acup/bowl under
the portafilter.
7. Press the Espresso button (1 cup) andlet the coffee machine finish
brewing. This will clean the brew head andremove any ground coffee
residues.
8. Remove andrinse the portafilter.
Note:
Place the portafilter and filters on the heating plate so that
they are preheated and ready for the next use.
Caution:
Do not wash the portafilter or filters in thedishwasher.
There is arisk of them being damaged.
Cleaning the drip tray
• The drip tray needs to be emptied and washed after each use of the
appliance.
• First, remove the grille from the tray and then pour out the water.
Wash the tray and grille in warm water with aneutral dishwashing
detergent. Rinse both parts under running water, dry them, and place
them back in their positions.
Cleaning the water tank
• Open the lid of the water tank. Grasp the tank by the handle and lift
it upwards.
• Pour out the remaining water.
• Rinse it with clean water and asmall amount of neutral dishwashing
detergent. Then thoroughly rinse with clean water, dry, and place it
back into the coffee machine.
• Wash the water tank lid in warm water with alittle kitchen detergent.
Rinse and wipe dry.
Cleaning the outer casing
• Wipe the outer surface of the appliance with aslightly damp cloth
and dry it.
Cleaning the Milk Container
1. To remove the milk container from the coffee machine, grasp it from
underneath and pull the bottom part upwards from the coffee machine
(Figure C1). This will release the connectors at the back, allowing you
to pull out the entire container from the coffee machine (Figure C2).
2. Remove the lid of the container andpour the remaining milk into
asuitable container.
3. Fill the milk container with clean water up to the MAX line.
4. Ensure that the milk tube is inserted in the lower part of the lid and
place the lid on the container. Press gently until you hear aclick. This
indicates proper attachment.
5. Attach the assembled container to the coffee machine at aslight angle
(Figure C3) until the connectors at the back of the lid fit into the inlet
holes in the coffee machine. Then place the bottom of the container on
the base and push it towards the coffee machine (Figure C4).
6. Insert the portafilter (without the filter) into the brew head.
7. Place alarger cup/bowl under the brew head and direct the milk
dispensing nozzle into the cup/bowl.
8. Press the Cappuccino or Latte button. The coffee machine begins to
release water and steam through the milk dispensing nozzle.
9. Turn the (A13) milk froth setting control to the Clean (cleaning) position,
then press the Clean button. The coffee machine begins to release
hot steam through the (A15) milk / froth dispensing nozzle. Let the
cleaning cycle take place, repeat the procedure if needed.
10. Repeat steps 5 and 9 until clean water flows out of the milk
dispensing nozzle.
11. Remove the milk container from the coffee machine and pour out the
water.
12. Wash the milk container and tube in warm water with alittle kitchen
detergent. Wipe the lid of the container with aslightly damp sponge.
Wipe dry with aclean cloth.
13. Remove the portafilter from themachine, clean it anddry it. Place on
the cup heating surface.
Note:
The milk container can be washed in thedishwasher inthe
top rack. However, do not insert the lid or tube.
. . . . . . . . . . . . . . . . . . . . . . . . . . . . . . . . . . . . . . . . . . . . . . . . . . . . . . . . . . . . . . . . . . . .
DESCALING
• Over time, minerals from the water can build up in the machine’sinner
circuit. This is anatural process. Therefore, regular descaling is
necessary. Mineral deposits can spoil the taste of your coffee and
negatively impact the functionality and lifespan of the coffee machine.
• We recommend descaling of the coffee maker every 4 to 6 months
depending on the hardness of water and frequency of use. However
the coffee machine will notify you about the need for adescalling
after 300 prepared portions of coffee. In such case, the Espresso
(automatic mode), + Espresso (manual mode), Latte andClean
buttons will flash 5 times quickly. The coffee machine will go back to
regular operation after. The descaling warning will appear every time
you turn the coffee machine on until you descale.
• We recommend using descaling agents for coffee machines, which
are commonly available in shops, for example the SESXD 001 Sencor
Liquid Descaler.

- 8 -
05/2025
2025, .
• Prepare adescaling solution ofwater anddescaling agent according
to the instructions fordilution/preparation on the packaging / package
leaflet.
Note:
You can cancel the descaling process any time by pressing
the main switch to 0 position (off). If you cancel the
descaling process during any step, you will have to restart it
from the beginning.
Preparing for Descaling
• Ensure that the main power switch is in position 0 (off), and the plug of
the power cable is disconnected from the power socket.
• Filll up the water tank and the milk container with descaling solution to
the max mark. Insert them back into the coffee machine.
• Place abowl (with aminimum capacity of 450–500 ml) under the
brew head. Direct the milk dispensing nozzle into the bowl.
• Turn the (A13) rotary control for hot milk setting to the max position.
• Plug the power cable into the power socket and switch the main
power switch to position I(on). Let the coffee machine preheat.
Descaling the milk container, water tank and inner system
1. When the coffee machine is preheated and ready for use, press
the Cappuccino or Latte button and the coffee machine will start
dispensing the descaling solution through the milk dispensing nozzle
and then through the brew head. Repeat 4–5 times.
2. Now press the Espresso button and the coffee machine starts
dispensing the descaling solution through the brew head. Repeat 4–5
times.
3. Repeat steps 1 and 2 until the water tank and the milk container are
empty.
Warning:
Be careful as the descaling solution is very hot and
improper handling can cause scalding.
Caution:
Check the amount of the descaling solution in the
bowl and pour it out as necessary. Be careful not to
get burnt by the hot solution.
Note:
You may hear different sounds of the pump during the
descaling. This is normal.
Flushing the coffee machine
• Once the milk container and water tank are empty, remove them from
the coffee machine, pour out the remaining solution and wash out
properly with clear water.
• Fill the milk container and water tank with clear water up to the may
mark and insert them back into the coffee machine.
• Repeat steps 1 and 2 from the “Descaling the milk container, water
tank and inner system“ section until the milk container and water tank
are empty.
• Then remove them from the coffee machine, pour out the remaining
water, wash out with clear water and fill up with clean water.
• Insert them back into the coffee machine.
Warning:
Be careful as the discharged water is very hot and
improper handling can cause scalding.
Caution:
Check the amount of the descaling solution in the
bowl and pour it out as necessary. Be careful not to
get burnt by the hot water.
Finish the descaling
To finish the descaling process and reset the counting of the coffee
portions, press and hold the Clean button for 3 seconds. The coffee
machine will end the descaling process, the counting of coffee portions
will reset and the coffee machine will preheat so you can use it again.
. . . . . . . . . . . . . . . . . . . . . . . . . . . . . . . . . . . . . . . . . . . . . . . . . . . . . . . . . . . . . . . . . . . .
STORAGE
• If you are not going to use the appliance for an extended period of
time, unplug it from the power socket, allow it to cool down and clean
it according to the instructions in the “Cleaning and Maintenance”
section.
• Before storing, ensure that the appliance and all accessories are
thoroughly clean and dry.
• Store the appliance in adry, clean, and well-ventilated place away
from extreme temperatures and out of the reach of children or pets.
. . . . . . . . . . . . . . . . . . . . . . . . . . . . . . . . . . . . . . . . . . . . . . . . . . . . . . . . . . . . . . . . . . . .
TROUBLESHOOTING
Problem Cause Solution
The coffee
machine does
not switch on.
The power cable plug is
not properly inserted in
the power socket.
Properly insert the plug
into the power socket.
Coffee is not
dispensing.
The water tank is empty. Refill the water tank.
The ground coffee is
too fine.
Adjust the grinding level
to coarser.
There is too much
ground coffee in the filter.
Reduce the amount of
ground coffee.
The coffee machine in
not turned on.
Turn on the coffee
machine.
The ground coffee is
tamped too much in
the filter.
Apply moderate force
when tamping.
The coffee flows
over the edge
of the portafilter
inserted in the
brew head.
The portafilter is not
properly inserted in the
brew head.
Turn the portafilter
until you feel
resistance – the handle
of the portafilter is
perpendicular to the
coffee machine.
The edge of the filter is
dirty from ground coffee
residue.
After tamping, wipe the
ground coffee residue
offthe edge ofthe filter
andthe portafilter.
There is too much
ground coffee in the filter.
Reduce the amount of
ground coffee.
The milk is not
adequately
frothy or
does not flow
through the
milk dispensing
nozzle.
Insufficient steam. Refill the water tank.
The milk is not cold
enough.
Allow the milk to cool to
approximately 5 °C.
The milk frothing system
is clogged.
Clean the milk
container.
The coffee
dispenses too
quickly.
The ground coffee is too
coarse.
Adjust the grinding level
to finer.
There is too little ground
coffee in the filter.
Increase the amount of
ground coffee.
The coffee is
weak.
The single cup filter was
used for to brew adouble
coffee.
Use the double cup
filter tobrew adouble
coffee.
The ground coffee is too
coarse.
Adjust the grinding level
to finer.
If the problem is not listed in the table or if the problem persists, turn off
the coffee machine, disconnect it from the power source, and contact an
authorised service centre.
. . . . . . . . . . . . . . . . . . . . . . . . . . . . . . . . . . . . . . . . . . . . . . . . . . . . . . . . . . . . . . . . . . . .
- 9 -
05/2025
2025, .
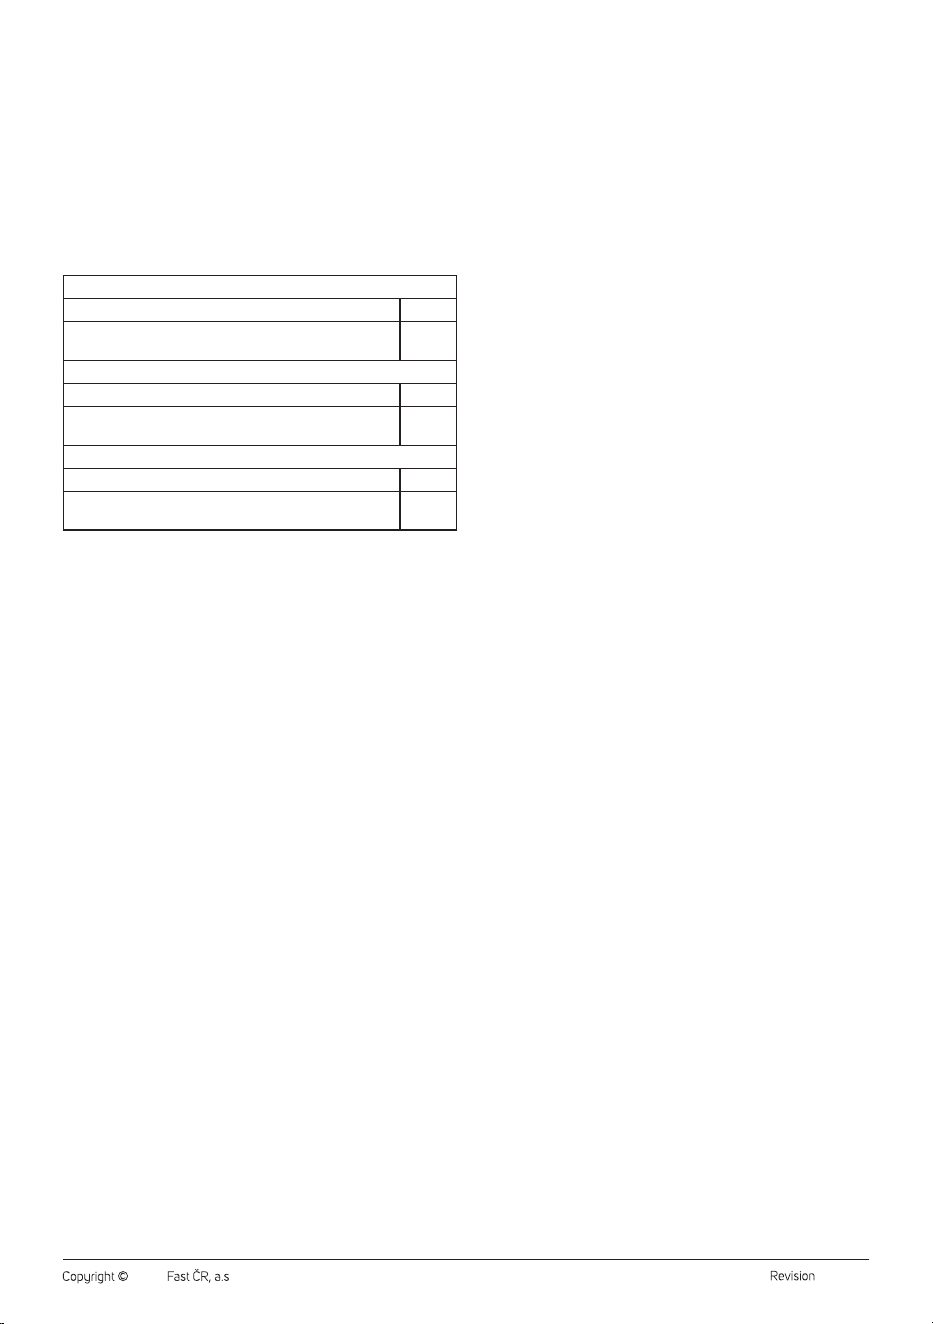
TECHNICAL SPECIFICATIONS
Rated voltage range ..............................................................................220–240 V~
Rated frequency ..........................................................................................50–60 Hz
Rated input ..........................................................................................................1350 W
Noise level .........................................................................................................75 dB(A)
The declared noise emission level of the appliance is ≤ 75 dB(A), which
represents alevel Aof acoustic power with respect to areference acoustic
power of 1 pW.
Values provided according to Commission Regulation EU
2023/826
Off mode
Power consumption in off mode 0.3 W
Time needed for the equipment to automatically reach off
mode
26 min
Standby mode
Power consumption in Standby mode –
Time needed for the equipment to automatically reach
standby mode
–
Networked standby mode (Wi-Fi)
Power consumption in networked standby –
Time needed for the equipment to automatically reach
networked standby mode
–
. . . . . . . . . . . . . . . . . . . . . . . . . . . . . . . . . . . . . . . . . . . . . . . . . . . . . . . . . . . . . . . . . . . .
INSTRUCTIONS AND INFORMATION ON DISPOSAL
OF USED PACKAGING MATERIAL
Dispose used packaging material at the designated municipal waste
disposal site.
. . . . . . . . . . . . . . . . . . . . . . . . . . . . . . . . . . . . . . . . . . . . . . . . . . . . . . . . . . . . . . . . . . . .
DISPOSAL OF USED ELECTRICAL AND ELECTRONIC
EQUIPMENT
Used electrical andelectronic products must not be disposed of in
ordinary municipal waste. To enable the proper disposal and recycling
of these products, deliver them to the designated collection points.
Alternatively, in some European Union states or other European
countries the products can be returned to the local retailer when buying
an equivalent new product. By properly disposing this product, you
help preserve valuable natural resources and help to prevent potential
damage to the environment and human health resulting from improper
waste disposal. For more details, contact your local authority or nearest
collection point. Fines may be imposed for the improper disposal of this
type of waste as per national regulations.
For business entities in European Union States
To dispose of electric or electronic equipment, request the necessary
information from your retailer or supplier.
Disposal in other countries outside the European Union
To dispose of this product elsewhere, request the necessary information
on the correct disposal method from local authorities or your retailer.
. . . . . . . . . . . . . . . . . . . . . . . . . . . . . . . . . . . . . . . . . . . . . . . . . . . . . . . . . . . . . . . . . . . .
Changes to text and technical parameters are reserved.

- 10 -
05/2025
2025, .

www.sencor.com
info@sencor.cz
