
Technical Support and E-Warranty Certificate www.vevor.com/support
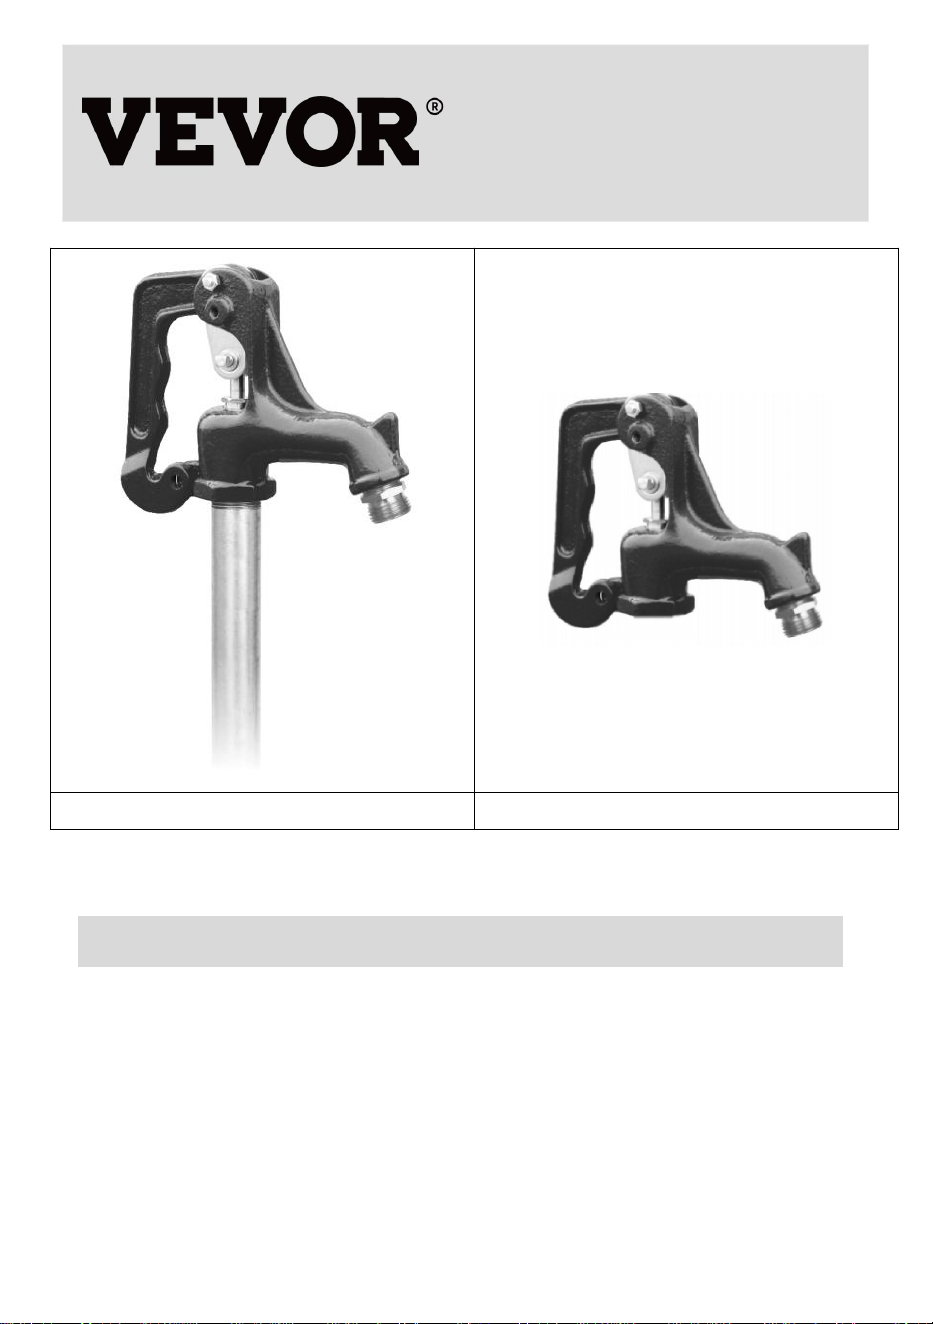
FROST PROOF YARD HYDRAN
We continue to be committed to provide you tools with competitive price.
"Save Half", "Half Price" or any other similar expressions used by us only represents an
estimate of savings you might benefit from buying certain tools with us compared to the major
top brands and doses not necessarily mean to cover all categories of tools offered by us. You
are kindly reminded to verify carefully when you are placing an order with us if you are
actually saving half in comparison with the top major brands.

YH6-1/YH6-2/YH6-3/YH6-4
AYHC
NEED HELP? CONTACT US!
Have product questions? Need technical support?
Please feel free to contact us:
Technical Support and E-Warranty Certificate
www.vevor.com/support
This is the original instruction, please read all manual instructions carefully
before operating. VEVOR reserves a clear interpretation of our user manual.
The appearance of the product shall be subject to the product you received.
Please forgive us that we won't inform you again if there are any technology
or software updates on our product.
FROST PROOF YARD HYDRAN
-1-

Thank you for using this product. In order to make sure that you can operate
the machine correctly, read this instruction carefully before operation and
keep it properly for future reference. Please be sure to read the precautions
and safety rules in this page to ensure your safe use.
The warnings and instructions reviewed in this manual cannot cover all
possible conditions and situations that may occur. Caution and common
sense are not built into this product, since we believe that the uses will comply
with these codes.
PRODUCT PARAMETERS
Model
Overall Inlet Connection Outlet Connection
YH6-1
3/4 in NPT 3/4 NH
3.25FT
G 3/4 in G 3/4 in
YH6-2
3/4 in NPT 3/4 NH
4.25FT
G 3/4 in G 3/4 in
YH6-3
3/4 in NPT 3/4 NH
5.25FT
G 3/4 in G 3/4 in
YH6-4
3/4 in NPT 3/4 NH
6.25FT
G 3/4 in G 3/4 in
AYHC
1 in NPT+3/8-16UNC 3/4 NH
6.8 inch
1 in NPT+3/8-16UNC G 3/4 in
pipelengthType Type
-2-
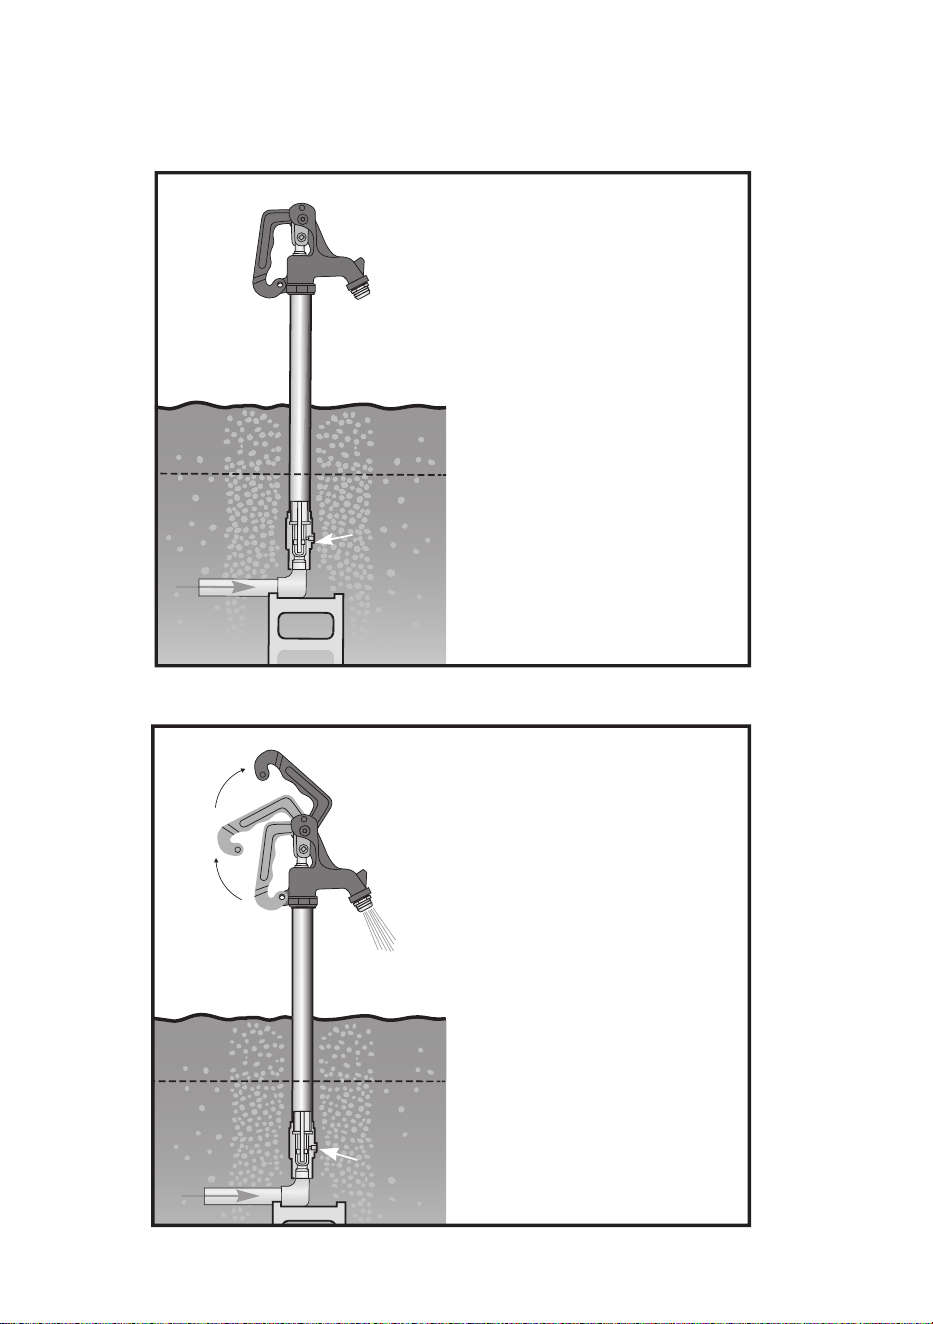
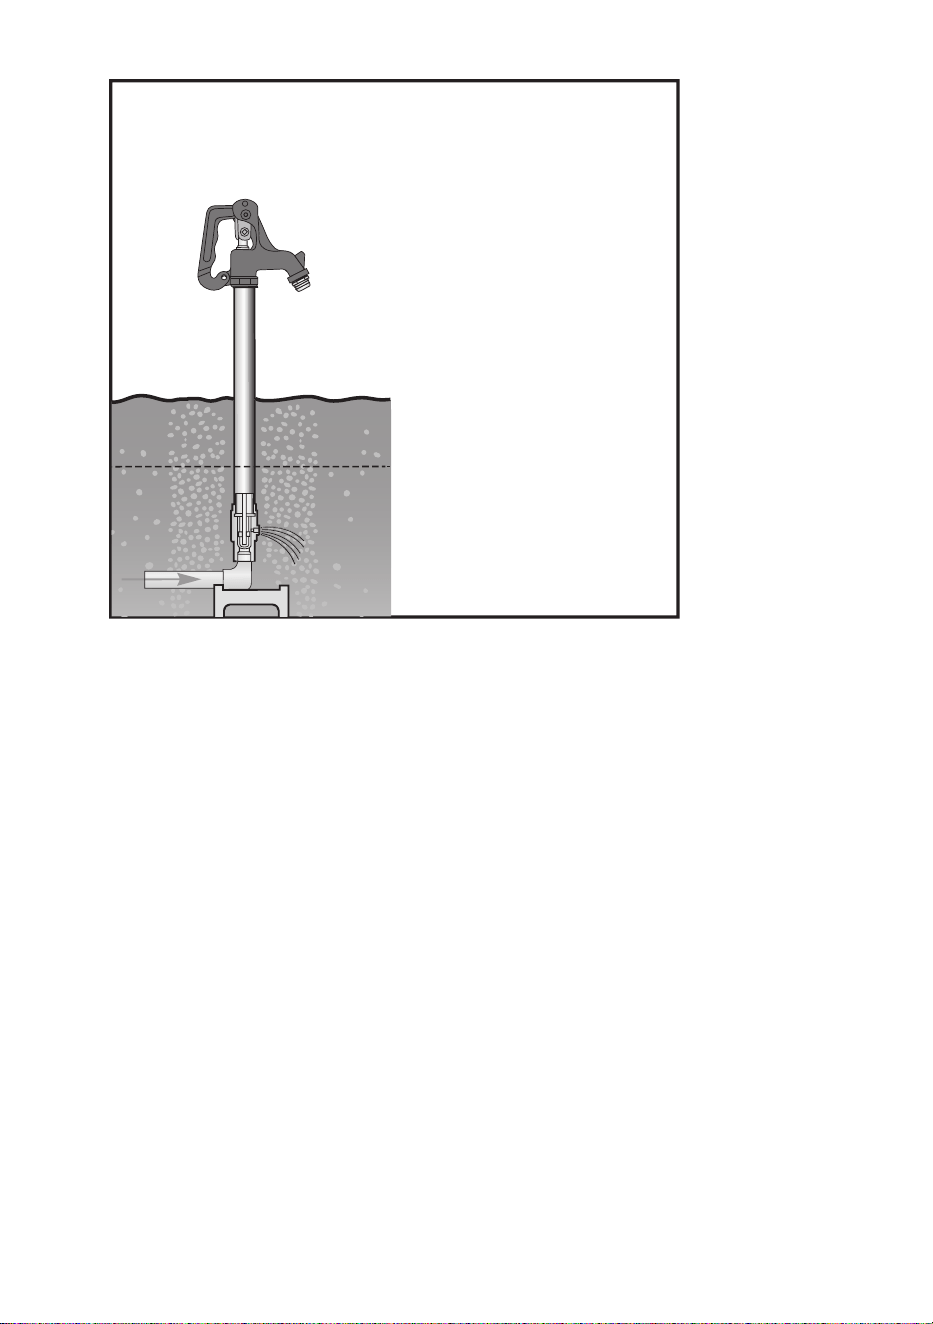
HOW A FROST-PROOF HYDRANT
WORKS
Ready to Use
Easy grip handle
controls an
underground valve,
keeping water below
the frost line.
A bolt or padlock in
the handle loop stops
water loss from
vandals and livestock.
Frost line
Water
supply
Plunger
& valve
Watering
Slowly lift the hydrant
handle to open the
underground valve to
get the water flow you
want.
Just lower the handle
to close the
underground valve
when you’re finished.
Frost line
Water
supply
Plunger
& valve
-3-
INSTALLATION
1. Dig hole for hydrant approximately 2 feet in diameter and 1 foot deeper
than the bury depth.
2. Flush piping before connecting the hydrant to clear any gravel or other
debris that may have collected in the piping during its installation and
assembly. If not flushed out of the piping, this debris may jam the
hydrant mechanism or clog the flow ports.
3. Make the pipe connection but do not bury the hydrant yet. Operate the
hydrant to be sure it is operating properly and the piping connections
are not leaking. Open and close the hydrant and check the flow and
drainage. If leakage continues from the drain port see “adjustment
procedure”.
4. Fill the hole around and below the hydrant with medium size gravel.
This will provide a drain field for the hydrant. Without a drain field, the
hydrant will not empty itself, and it will freeze in cold weather. This will
cause damage to the hydrant and result in loss of water and possible
flooding damage.
Watering
Completed
Closing the underground
valve opens a small
drain hole. Water drains
out of the hydrant into
the gravel around the
hydrant. Now the
hydrant has no water
above the frost line. It
cannot freeze, and is
ready for the next time
you need water.
Frost line
Water
supply
Water
drains
out here
into gravel
-4-
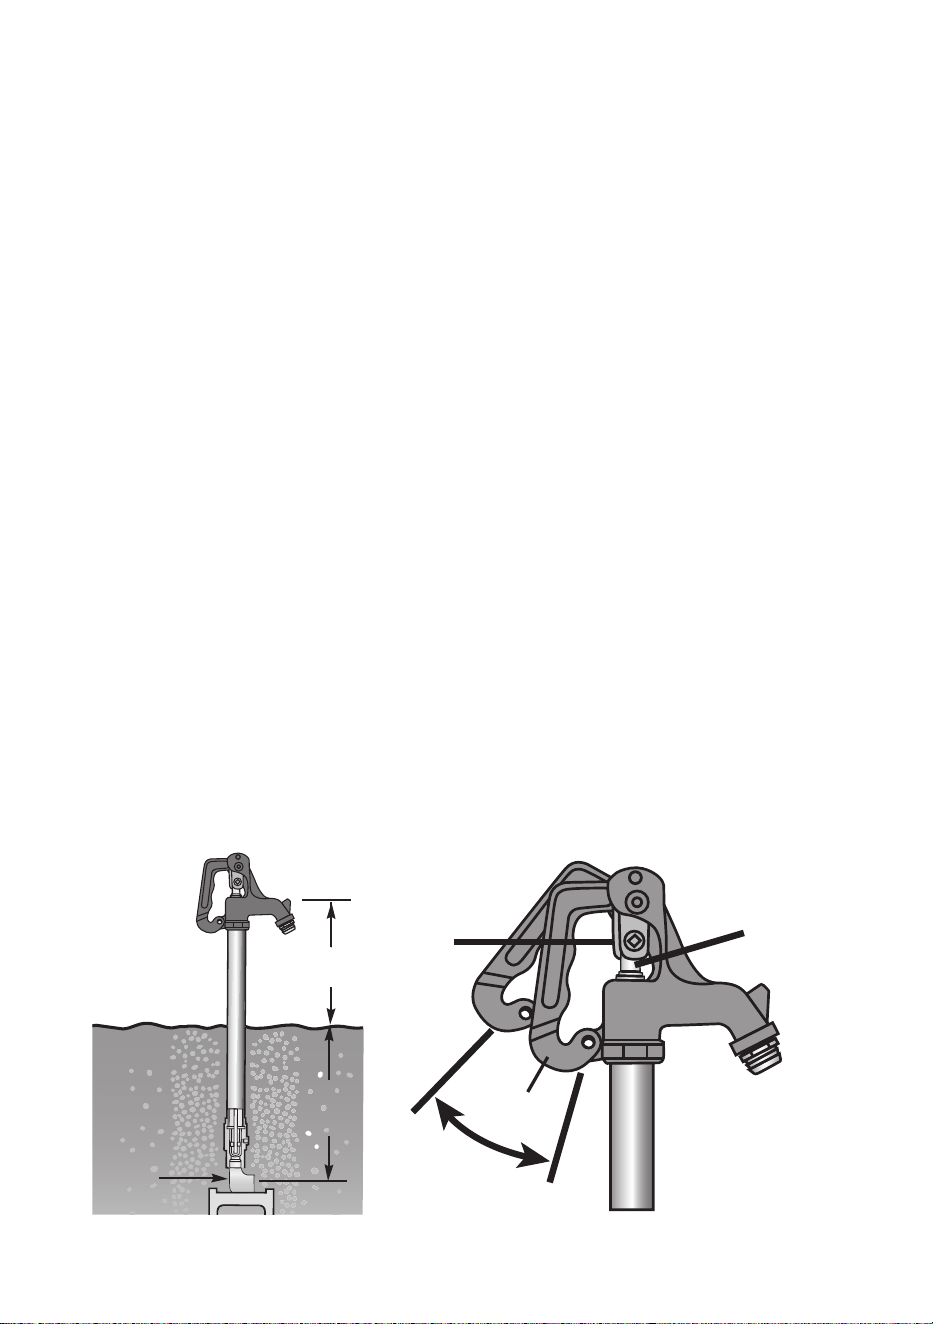
ADJUSTMENT PROCEDURE
1. Turn water supply off!
2. Open hydrant to relieve pressure.
3. Close hydrant and loosen set screw.
4. Push brass rod down as far as it will go (by hand) to be sure that the
plunger is touching the seat.
5. Move handle open approximately 30 degrees from closed position.
6. Tighten setscrew snugly.
7. Turn water supply on.
8. Operate hydrant and make sure the hydrant is shutting off properly and
flowing properly.
9. If hydrant still does not shut off, repeat steps 1 thru 8.
10.Flow water through hydrant and close completely to check for proper
drainage by:
a.Listening for water draining down the pipe; or
b.Putting your hand over the hose connection to feel for a vacuum; if
hydrant does not drain, see step 11.
11.To clear drain hole blockage, close off hydrant spout by using hose cap
or by attaching and kinking a hose. Open and close hydrant to allow
water pressure to clear blockage.
Repeat set 10 to verify proper drainage. If hydrant still does not drain,
repeat steps 1 thru 10 to fully uncover drain hole.
CAUTION: Do not try to adjust all at once or you may over adjust and
cause damage to the plunger. For this reason,adjust in small increments.
BURY DEPTH
APPROX.24''
CLIENTE CODO
BRASS ROD
STEP 3
STEP 5
APPROX. 30°
-5-

HYDRANT TIPS
Never leave a hose attached to hydrant after use. This will prevent the
hydrant from draining properly and will cause the hydrant to freeze.
If the hydrant is to be installed inside a barn or other structure, or if it is
installed in asphalt or concrete such as a driveway, connect a 1/8” drain
pipe or tube to the drain port and dig a remote drain field outside the
structure for the drain pipe to empty into, Without this remote piping
and drain field, the water from the hydrant drainage will percolate up to
the surface around or near the hydrant and will damage the flooring or
cause muddy areas in stalls or walkways.
Water pressure to the hydrant should be regulated no more than 80psi.
Higher pressures will accelerate wear and may cause leakage that will
saturate the ground and drain field and prevent the hydrant from
draining. If the hydrant is not allowed to drain, it can freeze and cause
damage to itself and cause flooding and loss of water. High pressure
will also cause you to have to replace parts and adjust the hydrant
frequently. A normal operating pressure should be 20 to 40 psi.
Saturated ground in the hydrant drain field can prevent the hydrant
from draining and may result in freezing. If the area where your hydrant
is located is low lying or has a tendency to have standing water, a
larger drain field or pit may be required to provide proper drainage.
Vacuum breakers are required by code in most states.
-6-

HYDRANT ADJUSTMENT PROCEDURE
APPROX 30°
BRASS ROD
1. TURN WATER SUPPLY OFF!
2. OPEN HYDRANT TO RELIEVE PRESSURE.
3. CLOSE HYDRANT AND LOOSEN SET SCREW
4. PUSH BRASS ROD DOWN AS FAR AS IT WILL GO (BY HAND) TO BE
SURE THAT THE PLUNGER IS TOUCHING THE SEAT
5. MOVE HANDLE OPEN APPROXIMATELY 30 DEGREES FROM CLOSED
POSITION
6. TIGHTEN SETSCREW SNUGLY.
7. TURN WATER SUPPLY ON.
8. OPERATE HYDRANT AND MAKE SURE THE HYDRANT IS SHUTTING OFF
PROPERLY AND FLOWING PROPERLY
9. IF HYDRANT STILL DOES NOT SHUT OFF,REPEAT STEPS 1 THRU 8
10. FLOW WATER THROUGH HYDRANT AND THEN CLOSE COMPLETELY
TO CHECK FOR PROPER DRAINAGE BY:
A. LISTENING FOR WATER DRAINING DOWN THE PIPE; OR
B. PUTTING YOUR HAND OVER THE HOSE CONNECTION TO FEEL FOR
A VACUUM; IF HYDRANT DOES NOT DRAIN, SEE STEP 11.
11. TO CLEAR DRAIN HOLE BLOCKAGE,CLOSE OFF HYDRANT SPOUT BY
USING HOSE CAP OR BY ATTACHING AND KINKING A HOSE.OPEN AND
CLOSE HYDRANT TO ALLOW WATER PRESSURE TO CLEAR BLOCKAGE.
REPEAT STEP 10 TO VERIFY PROPER DRAINAGE.IF HYDRANT STILL DOES
NOT DRAIN, REPEAT STEPS 1 THRU 10 TO FULLY UNCOVER DRAIN HOLE.
CAUTION: DO NOT TRY TO ADJUST ALL AT ONCE OR YOU MAY OVERAD-
JUST AND CAUSE DAMAGE TO THE PLUNGER.FOR THIS REASON.ADJUST
STEP 3
STEP 5
IN SMALL INCREMENTS.
-7-

Manufacturer: Shanghaimuxinmuyeyouxiangongsi
Address: Baoshanqu Shuangchenglu 803long 11hao 1602A-1609shi Shanghai
Imported to AUS: SIHAO PTY LTD. 1 ROKEVA STREETEASTWOOD NSW 2122
Australia
Imported to USA: Sanven Technology Ltd.
Suite 250,9166 Anaheim Place, Rancho Cucamonga, CA 91730
YH CONSULTING LIMITED.
C/O YH Consulting Limited Office 147,Centurion House,
London Road, Staines-upon-Thames, Surrey, TW18 4AX.
E-CrossStu GmbH.
Mainzer Landstr.69, 60329 Frankfurt am Main.
UK REP
EC REP
-8-