1
2
3
4
1
2 3
4 5
6 7
8 9
10 11
12
13
Printed on 100% recycled paper
de
Sicherheit Sicherheit de
¡
Lesen Sie diese Anleitung sorgfältig.
¡
Beachten Sie die Anleitung des Grundgeräts.
Verwenden Sie das Zubehör nur:
¡
mit einer Küchenmaschine der Baureihe MCC9....
¡
mit Originalteilen und -zubehör.
¡
zum Dampfgaren von Lebensmitteln.
Nicht über das Gerät beugen.
Den Deckel des Geräts und den Deckel des Dampfgaraufsatzes vorsichtig öffnen.
Beim Entnehmen des heißen Dampfgareinsatzes oder den heißen Teilen des Dampf-
garaufsatzes vorsichtig sein.
Das Zubehör nur bei Stillstand des Antriebs und ausgestecktem Gerät aufsetzen und
abnehmen.
Sachschäden vermeidenSachschäden vermeiden
Nie beim Dämpfen Alkohol verwenden.
Kennenlernen des ZubehörsKennenlernen des Zubehörs
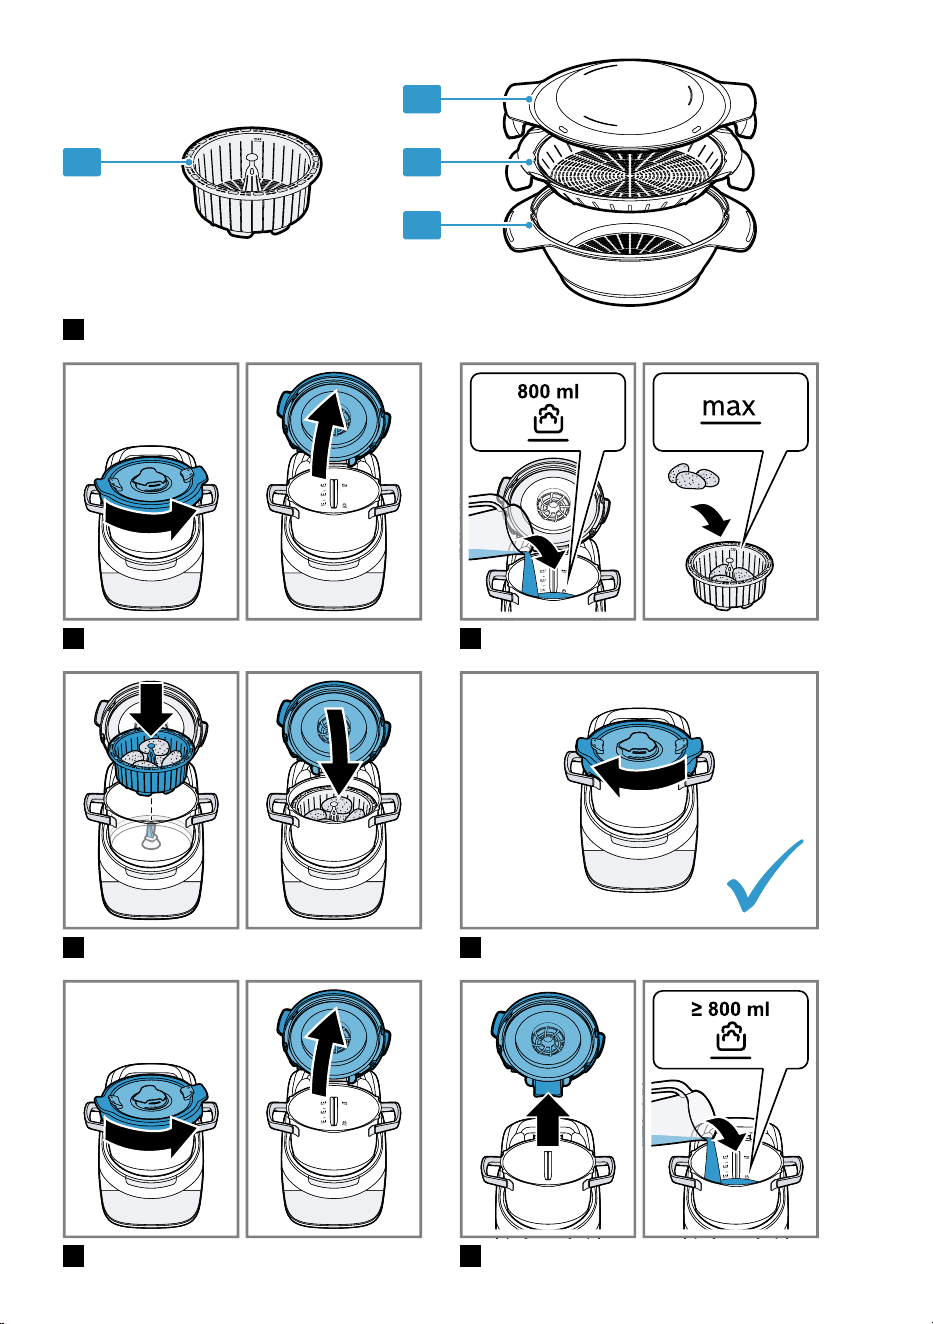
Übersicht
Abb.
1
Dampfgareinsatz
Deckel für Dampfgaraufsatz
Zwischenboden
Dampfgaraufsatz
Symbole
Symbol Beschreibung
Maximale Füllmenge
Minimale Füllmenge Dampfgaren
BedienungBedienung
Dampfgareinsatz vorbereiten
Abb.
2
-
5
Hinweise
Nie ohne den inneren Deckel und den aufgesetz-
ten Messbecher dampfgaren, da sonst zu viel
Dampf entweicht.
Der Dampfgareinsatz kann auch als Sieb oder
zum Kochen von Lebensmittel im Topf verwendet
werden, z.B. Nudeln.
Dampfgaraufsatz vorbereiten
Abb.
6
-
10
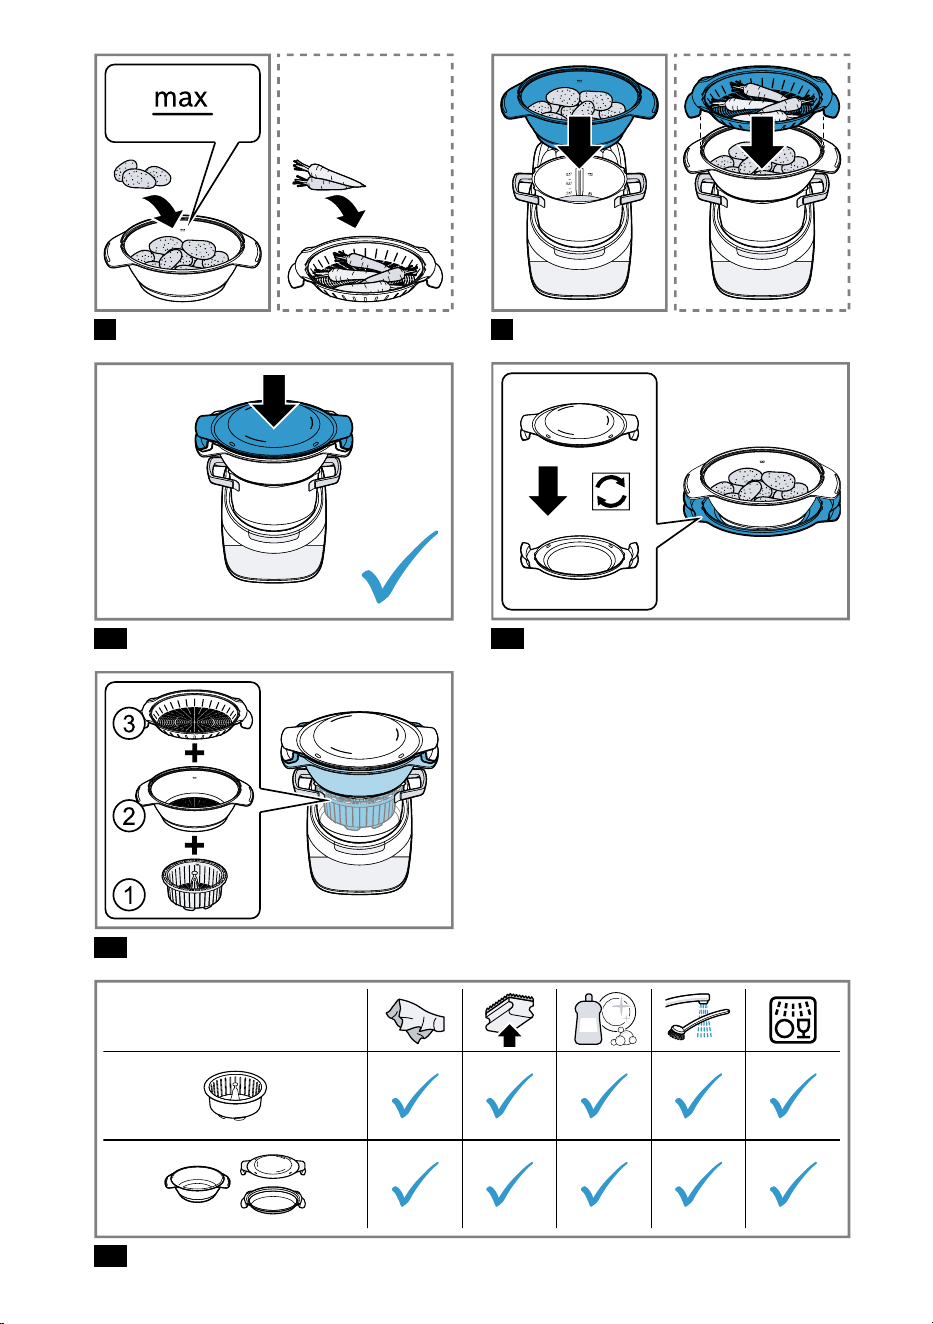
Hinweise
Nie ohne den Deckel für den Dampfgaraufsatz
dampfgaren, da sonst zu viel Dampf entweicht.
Nach der Zubereitung den Deckel für den Dampf-
garaufsatz umdrehen und als Untersetzer für den
Dampfgaraufsatz verwenden.
Abb.
11
Um auf 3 Ebenen gleichzeitig dampfzugaren, den
Dampfgareinsatz mit dem Dampfgaraufsatz und
dem Zwischenboden kombinieren.
Abb.
12
Dampfgaren einstellen
Hinweis: Wenn das Dampfgarzubehör das erste Mal
verwendet wird, im Hauptmenü "Automatikprogram-
me" drücken und "Dampfgaren" wählen. Damit wird
das Zubehör automatisch im Cookit aktiviert.
Voraussetzung: Der Dampfgareinsatz oder der
Dampfgaraufsatz ist vorbereitet.
1. Im Hauptmenü "Automatikprogramme" drücken
und "Dampfgaren" wählen.
2. Das gewünschte Programm "Dampfgaren hohe
Intensität" oder "Dampfgaren niedrige Intensität"
wählen.
Das Display zeigt die empfohlenen Zubereitungs-
zeiten für verschiedene Lebensmittel.
3. Die gewünschte Zubereitungszeit einstellen und
"Start" drücken, um das Automatikprogramm zu
starten.
Wassermenge
Passen Sie bei Verwendung des Dampfgaraufsatzes die Wassermenge an die Zubereitungszeit an.
Hinweis: Wenn der Dampfgareinsatz verwendet wird, max. 800ml Wasser einfüllen, da die Lebensmittel
sonst im Wasser schwimmen.
Zubereitungszeit - hohe Intensi-
tät
Zubereitungszeit - niedrige In-
tensität
Wassermenge
25Min. max. 120Min. 800ml
35Min. max. 120Min. 1000ml
50Min. max. 120Min. 1500ml
105Min. max. 120Min. 3000ml
4
ReinigungsübersichtReinigungsübersicht
Reinigen Sie nach dem Gebrauch sofort alle Teile,
damit die Rückstände nicht antrocknen.
Die einzelnen Teile reinigen, wie in der Tabelle ange-
geben.
Abb.
13
AnwendungsbeispieleAnwendungsbeispiele
Mit dem Automatikprogramm "Dampfgaren" garen Sie Lebensmittel im Wasserdampf bei ca. 100°C scho-
nend und ohne Überdruck. Dadurch verhindern Sie Nährstoffverluste und die Lebensmittel behalten ihre
Form, Farbe und ihr typisches Aroma.
Hinweise
Bei den angegebenen Werten handelt es sich um Empfehlungen. Da sich Lebensmittel in Herkunft, Grö-
ße, Form, Zustand und Marke unterscheiden, kann eine optimale Einstellung für Ihre Lebensmittel von den
Werten abweichen.
Die Werte gelten für die Verwendung des Automatikprogramms "Dampfgaren" in Verbindung mit dem
Dampfgaraufsatz und, wenn nicht anders angegeben, für frische Lebensmittel.
Lebensmittel Wassermenge in
ml
Dampfgarinten-
sität
Dauer in Min.
Blumenkohl, in Röschen, 600g 800 hoch 15-20
Brokkoli, in Röschen, 600g 800 hoch 9-12
tiefgekühlte Erbsen, 1000g 800 hoch 10-15
Karotten, in Scheiben, 500g 800 hoch 8-12
ganze Karotten, 500g 800 hoch 10-15
ganze weiße Spargel, 1000g 800 hoch 20-25
mittelgroße Pellkartoffeln, 1000g 1000 hoch 30-40
geviertelte Salzkartoffeln, 1000g 800 hoch 20-30
Hähnchenbrust, je 150g, 3Stück 1000 hoch 30-35
Kabeljaufilet, je 180g, 2Stück 800 niedrig 32-37
Lachsfilet, je 125g, 4Stück 800 hoch 12-15
Crème brûlée, in Gläsern, 4Stück 800 niedrig 35-45
Tipps
Wenn Sie Lebensmittel auf mehreren Ebenen oder
gefrorene Lebensmittel dampfgaren, verlängert
sich die Zubereitungszeit.
Um ein gleichmäßiges Garergebnis zu erreichen,
die Lebensmittel gleichmäßig verteilen und die
Dampföffnungen nicht vollständig bedecken.
Druckempfindliche Lebensmittel auf mehreren
Ebenen locker verteilen.
Lebensmittel mit einer kürzeren Garzeit erst später
hinzufügen. Durch das Öffnen während des Gar-
vorgangs entweicht heißer Dampf und die Zube-
reitungszeit verlängert sich.
Sie können hitze- und dampfbeständiges Geschirr
im Dampfgareinsatz oder Dampfgaraufsatz ver-
wenden, z.B. zur Zubereitung von Soufflés, Eier-
stich oder Joghurt.
en
Safety Safety en
¡
Read this instruction manual carefully.
¡
Observe the instructions for the main unit.
Only use the accessories:
¡
with a kitchen machine from the same series MCC9....
¡
with genuine parts and accessories.
¡
for steaming food.
Do not lean over the appliance.
Carefully open the appliance lid and the lid of the steaming attachment.
Take care when removing the hot steaming insert or the hot part of the steaming at-
tachment.
Only attach and remove accessories once the drive has stopped and the appliance
has been unplugged.
5
Avoiding material damageAvoiding material damage
Never use alcohol when steaming.
Familiarising yourself with the accessoriesFamiliarising yourself with the accessor-
ies
Overview
Fig.
1
Steaming insert
Lid for steaming attachment
Steaming tray
Steamer attachment
Symbols
Symbol Description
Maximum quantity
Minimum capacity for steaming
OperationOperation
Preparing the steaming insert
Fig.
2
-
5
Notes
Never steam anything without using the inner lid
and without the measuring cup in place, as other-
wise too much steam will escape.
The steaming insert can also be used as a sieve or
to cook food in the pot, e.g. pasta.
Preparing the steaming attachment
Fig.
6
-
10
Notes
Never steam anything without using the lid for the
steaming attachment, as otherwise too much
steam will escape.
After cooking, turn the lid for the steaming attach-
ment over and use it as a mat for the steaming at-
tachment.
Fig.
11
In order to steam on 3 levels at the same time,
combine the steaming insert with the steaming at-
tachment and the steaming tray.
Fig.
12
Setting steaming
Note: If you are using the steaming accessories for
the first time, press "Automatic programmes" in the
main menu and select "Steaming". This automatically
activates the accessory in the Cookit.
Requirement: The steaming insert or steaming at-
tachment is now ready to use.
1. Press "Automatic programmes" in the main menu
and select "Steaming".
2. Use the "High-intensity steaming" or "Low-intensity
steaming"button to select the programme you re-
quire.
The display shows the recommended cooking
times for different types of food.
3. Set the desired cooking time and press "Start" to
start the automatic programme.
Quantity of water
When using the steaming attachment, adjust the quantity of water to the cooking time.
Note: When using the steaming insert, use no more than 800ml of water, as otherwise the food will swim
around in the water.
Cooking time - high intensity Cooking time - low intensity Quantity of water
25mins max. 120mins 800ml
35mins max. 120mins 1000ml
50mins max. 120mins 1500ml
105mins max. 120mins 3000ml
Overview of cleaningOverview of cleaning
Clean all parts immediately after use so that residues
do not dry on.
Clean the individual parts as indicated in the table.
Fig.
13
Application examplesApplication examples
With the automatic programme "Steaming" food is gently cooked in steam without overpressure at approx.
100°C. This prevents loss of nutrients and food retains its shape, colour and typical flavour.
Notes
The values specified here are recommendations. As foods differ in terms of origin, size, shape, condition
and brand, an optimal setting for your food may diverge from these values.
The values apply when using the automatic programme "Steaming" together with the steaming attachment
and, unless otherwise indicated, for fresh food.
Food Volume of water
in ml
Steam cooking
intensity
Cooking time in
min
Cauliflower, in florets, 600g 800 high 15-20
Broccoli, in florets, 600g 800 high 9-12
6
Food Volume of water
in ml
Steam cooking
intensity
Cooking time in
min
Frozen peas, 1000g 800 high 10-15
Carrots, sliced, 500g 800 high 8-12
Whole carrots, 500g 800 high 10-15
Whole white asparagus, 1000g 800 high 20-25
Medium-sized potatoes boiled in the skin,
1000g
1000 high 30-40
Quartered boiled potatoes, 1000g 800 high 20-30
Chicken breast, 150g each, 3 1000 high 30-35
Cod fillet, 180g each, 2 800 low 32-37
Salmon fillet, 125g each, 4 800 high 12-15
Crème brûlée, in jars, 4 800 low 35-45
Tips
If you are steaming food across several levels or
steaming frozen food, the cooking time must be
extended.
In order to obtain a consistent cooking result, dis-
tribute the food evenly and do not completely
cover the steam openings.
Loosely distribute food likely to become squashed
on several levels.
Add food with a shorter cooking time later on.
Opening the appliance during the cooking pro-
cess will cause hot steam to escape, and the food
will take longer to cook.
You can use heat and steam-resistant cookware in
the steaming insert or steaming attachment, e.g.
for cooking soufflés, savoury egg custard or
yogurt.
fr
Sécurité Sécurité fr
¡
Lisez attentivement cette notice.
¡
Observez la notice de l’appareil de base.
Utilisez uniquement l’accessoire:
¡
avec un robot culinaire de la série MCC9....
¡
avec des pièces et accessoires d’origine.
¡
Pour cuire des aliments à la vapeur.
Ne pas se pencher au-dessus de l'appareil.
Ouvrir avec précaution le couvercle de l’appareil et celui de l’accessoire panier va-
peur.
La prudence est de mise lors du retrait de l’accessoire panier vapeur chaud ou des
éléments chauds du panier vapeur.
Mettre en place et retirer l’accessoire uniquement après immobilisation de l’entraîne-
ment et débranchement de l’appareil.
Prévenir les dégâts matérielsPrévenir les dégâts matériels
Ne jamais utiliser d’alcool lors de la cuisson à la
vapeur.
Présentation de l’accessoirePrésentation de l’accessoire
Aperçu
Fig.
1
Panier vapeur
Couvercle du panier vapeur
Plateau vapeur
Accessoire vapeur
Symboles
Symbole Description
Quantité maximale
Quantité minimale pour la cuisson à la
vapeur
UtilisationUtilisation
Préparer le panier vapeur
Fig.
2
-
5
Remarques
Ne jamais cuire à la vapeur sans le couvercle inté-
rieur et le gobelet doseur, car une quantité exces-
sive de vapeur s’échapperait.
Le panier vapeur peut aussi servir de filtre pour la
cuisson d’aliments dans le bol, p.ex. des nouilles.
7

Préparer l’accessoire panier vapeur
Fig.
6
-
10
Remarques
Ne jamais cuire à la vapeur sans le couvercle de
l’accessoire panier vapeur, car une quantité ex-
cessive de vapeur s’échapperait.
Après la préparation, retourner le couvercle de
l’accessoire panier vapeur et l’utiliser comme des-
sous de plat pour l’accessoire panier vapeur.
Fig.
11
Pour cuire simultanément à trois niveaux, combi-
ner le panier vapeur, l’accessoire panier vapeur et
le plateau vapeur.
Fig.
12
Régler la cuisson à la vapeur
Remarque : Lors de la première utilisation de l’ac-
cessoire vapeur, appuyer sur "Mode automatique"
dans le menu principal et sélectionner "Cuire à la va-
peur". L’accessoire sera alors automatiquement acti-
vé dans le Cookit.
Condition : L’accessoire panier vapeur ou le panier
vapeur est prêt.
1. Dans le menu principal, appuyer sur "Mode auto-
matique" et sélectionner "Cuire à la vapeur".
2. Sélectionner le programme souhaité "Cuire à la
vapeur haute intensité" ou "Cuire à la vapeur faible
intensité".
Le tableau d’affichage indique les temps de cuis-
son recommandés pour différents aliments.
3. Régler le temps de cuisson souhaité et appuyer
sur "Démarrer" pour démarrer le programme au-
tomatique.
Quantité d’eau
Lors de l’utilisation du panier vapeur, adapter la quantité d’eau au temps de cuisson.
Remarque : Lorsque le panier vapeur est utilisé, ne pas verser plus de 800ml d’eau, à défaut de quoi les ali-
ments baigneront dans l’eau.
Temps de cuisson – intensité
élevée
Temps de cuisson – faible inten-
sité
Quantité d’eau
25min. max. 120min. 800ml
35min. max. 120min. 1000ml
50min. max. 120min. 1500ml
105min. max. 120min. 3000ml
Guide de nettoyageGuide de nettoyage
Après utilisation, nettoyer immédiatement toutes les
pièces afin d’éviter que les résidus ne sèchent.
Nettoyer les différents composants comme indiqué
dans le tableau.
Fig.
13
Exemples d’utilisationsExemples d’utilisations
Le programme automatique "Cuire à la vapeur" vous permet de cuire des ingrédients à la vapeur, en dou-
ceur et sans surpression à environ 100°C. Vous préservez ainsi les nutriments de la nourriture, qui conserve
sa forme, sa couleur et son parfum.
Remarques
Les valeurs indiquées ne sont que des recommandations. Comme les aliments diffèrent sur les plans de
l’origine, de la taille, de la forme, de la condition et de la marque, le réglage optimal pour vos aliments peut
différer de ces valeurs.
Les valeurs indiquées s’appliquent à l’utilisation du programme automatique "Cuire à la vapeur" avec le
panier vapeur et, sauf indication contraire, à des aliments frais.
Aliments Quantité d’eau
en ml
Intensité de la
cuisson à la va-
peur
Durée en min.
Chou-fleur, en bouquets, 600g 800 haut 15-20
Brocoli, en bouquets, 600g 800 haut 9-12
Pois surgelés, 1000g 800 haut 10-15
Carottes, en tranches, 500g 800 haut 8-12
Carottes entières, 500g 800 haut 10-15
Asperges blanches entières, 1000g 800 haut 20-25
Pommes de terre non pelées de taille moyenne,
1000g
1000 haut 30-40
Pommes de terre coupées en quartiers, 1000g 800 haut 20-30
8

Aliments Quantité d’eau
en ml
Intensité de la
cuisson à la va-
peur
Durée en min.
Filet de poulet, 150g chaque, 3filets 1000 haut 30-35
Filet de cabillaud, 180g chaque, 2filets 800 basse 32-37
Filet de saumon, 125g chaque, 4filets 800 haut 12-15
Crème brûlée, dans des verres, 4pots 800 basse 35-45
Conseils
Si la cuisson vapeur est faite sur plusieurs niveaux
ou avec des aliments surgelés, le temps de cuis-
son se rallonge.
Pour obtenir un résultat de cuisson uniforme, ré-
partir les aliments de manière homogène et ne
pas obstruer complètement les ouvertures de va-
peur.
Répartir sans tasser les aliments sensibles à la
pression sur plusieurs niveaux.
Ajouter ultérieurement les aliments nécessitant un
temps de cuisson plus court. L’ouverture de l’ap-
pareil pendant la cuisson entraîne l’échappement
de vapeur chaude et prolonge le temps de cuis-
son.
Vous pouvez utiliser de la vaisselle résistante à la
chaleur et à la vapeur dans l’accessoire panier va-
peur ou le panier vapeur, par exemple pour prépa-
rer des soufflés, du riz au lait ou du yaourt.
9


Many thanks for choosing a Bosch
home appliance!
Register your new appliance now on MyBosch and benefit directly from:
•
Expert advice and tips to make the most of your appliance
•
Options for warranty extension
•
Discounts on spare parts and accessories
•
Digital information for use and all appliance data to hand
•
Easy access to Bosch Home Appliance Service
Simple to register, free of charge – including on mobile devices:
www.bosch-home.com/welcome
Need some help?
You can find it here.
Expert advice on your Bosch home appliances, help with problems or repairs by professionals
from Bosch.
Discover all the different ways Bosch can assist you:
www.bosch-home.com/service
The contact details of all countries are listed in the attached service directory.
BSH Hausgeräte GmbH
Carl-Wery-Straße 34
81739 München, GERMANY
www.bosch-home.com
A Bosch Company
Valid within Great Britain:
Imported to Great Britain by
BSH Home Appliances Ltd.
Grand Union House
Old Wolverton Road
Wolverton, Milton Keynes
MK12 5PT
United Kingdom
*8001384862*
8001384862 (060619)
de, en, fr