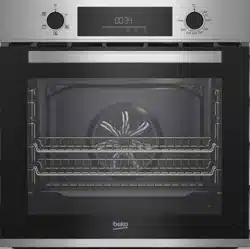
Built-in Oven / User Manual
Horno empotrado / Manual del usuario
Sisseehitatav ahi / Kasutusjuhend
BBCM12300X
385450004_1/ EN/ ES/ ET/ R.AE/ 13.02.24 12:59
7780382906
EN
ES
ET
EN / 2
Welcome!
Dear Customer,
Thank you for choosing the Beko product. We want your product, manufactured with high
quality and technology, to offer you the best efficiency. Therefore, carefully read this
manual and any other documentation provided before using the product.
Keep in mind all the information and warnings stated in the user’s manual. This way, you
will protect yourself and your product against the dangers that may occur.
Keep the user’s manual. If you give the product to someone else, give the manual with it.
The warranty conditions, usage and troubleshooting methods for your product are
provided in this manual.
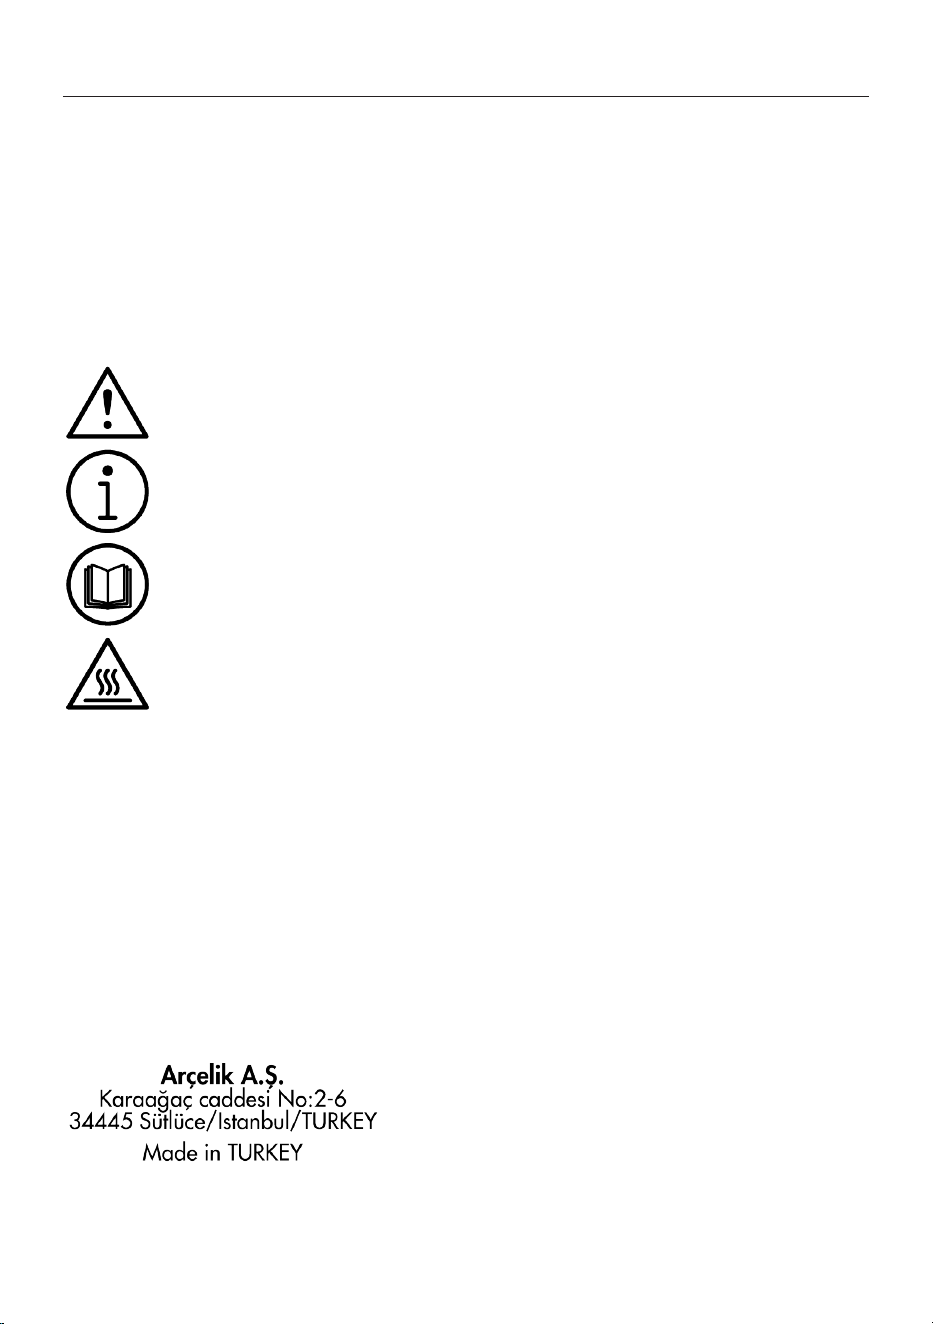
The symbols and their descriptions in the user’s manual:
Hazard that may result in death or injury.
Important information or useful usage tips.
Read the user’s manual.
Hot surface warning.
NOTICE
Hazard that may result in material damage to the product or its environment.

EN / 3
Table of Contents
1 Safety Instructions........................ 4
1.1 Intended Use.................................. 4
1.2 Child, Vulnerable Person and Pet
Safety .............................................
4
1.3 Electrical Safety............................. 5
1.4 Transportation Safety ................... 7
1.5 Installation Safety.......................... 7
1.6 Safety of Use ................................. 8
1.7 Temperature Warnings ................. 8
1.8 Accessory Use............................... 9
1.9 Cooking Safety .............................. 9
1.10 Maintenance and Cleaning Safety 10
2 Environmental Instructions.......... 11
2.1 Waste Directive.............................. 11
2.1.1 Compliance with the WEEE Dir-
ective and Disposing of the
Waste Product ...........................
11
2.2 Package Information..................... 11
2.3 Recommendations for Energy
Saving.............................................
11
3 Your product ................................. 12
3.1 Product Introduction ..................... 12
3.2 Product Control Panel Introduc-
tion and Usage...............................
12
3.2.1 Control Panel.............................. 13
3.2.2 Introduction of the oven control
panel ...........................................
13
3.3 Oven operating functions.............. 13
3.4 Product Accessories..................... 14
3.5 Use of Product Accessories ......... 15
3.6 Technical Specifications............... 17
4 First Use......................................... 18
4.1 First Timer Setting......................... 18
4.2 Initial Cleaning ............................... 18
5 Using the Oven.............................. 19
5.1 General Information on Using the
Oven ...............................................
19
5.2 Operation of the Oven Control
Unit .................................................
19
5.3 Settings .......................................... 21
6 General Information About Bak-
ing...................................................
23
6.1 General Warnings About Baking
in the Oven .....................................
23
6.1.1 Pastries and oven food.............. 23
6.1.2 Meat, Fish and Poultry ............... 25
6.1.3 Grill .............................................. 26
6.1.4 Test foods................................... 26
7 Maintenance and Cleaning........... 27
7.1 General Cleaning Information....... 27
7.2 Cleaning Accessories.................... 29
7.3 Cleaning the Control Panel............ 29
7.4 Cleaning the inside of the oven
(cooking area)................................
29
7.5 Easy Steam Cleaning..................... 29
7.6 Cleaning the Oven Door................. 30
7.7 Removing the Inner Glass of The
Oven Door.......................................
31
7.8 Cleaning the Oven Lamp ............... 31
8 Troubleshooting ............................ 32
EN
ES
ET
EN / 4
1 Safety Instructions
• This section includes the
safety instructions necessary
to prevent the risk of personal
injury or material damage.
• If the product is handed over
to someone else for personal
use or second-hand use pur-
poses, the user’s manual,
product labels and other relev-
ant documents and parts
should also be given.
• Our company shall not be held
responsible for damages that
may occur if these instructions
are not observed.
• Failure to follow these instruc-
tions shall void any warranty.
• Always have the installation
and repair works made by the
manufacturer, the authorised
service or a person that the im-
porter company shall desig-
nate.
• Use original spare parts and
accessories only.
• Do not repair or replace any
component of the product un-
less it is clearly specified in the
user’s manual.
• Do not make technical modific-
ations on the product.
1.1 Intended Use
• This product is designed to be
used at home. It is not suitable
for commercial use.
• Do not use the product in gar-
dens, balconies or other out-
doors. This product is intended
to be used in households and
in the staff kitchens of shops,
offices and other working en-
vironments.
• CAUTION: This product
should be used for cooking
purposes only. It should not be
used for different purposes,
such as heating the room.
• The oven can be used to de-
frost, bake, fry and grill food.
• This product should not be
used for plate heating, drying
by hanging towels or clothes
on the handle.
1.2 Child, Vulnerable
Person and Pet Safety
• This product can be used by
children 8 years of age and
older, and people who are un-
derdeveloped in physical, sens-
ory or mental skills, or who
have lack of experience and
knowledge, as long as they are
supervised or trained about the
safe use and hazards of the
product.
EN
ES
ET

EN / 5
• Children should not play with
the product. Cleaning and user
maintenance should not be
performed by children unless
there is someone overseeing
them.
• This product should not be
used by people with limited
physical, sensory or mental ca-
pacity (including children), un-
less they are kept under super-
vision or receive the necessary
instructions.
• Children should be supervised
to ensure that they do not play
with the product.
• Electrical products are danger-
ous for children and pets. Chil-
dren and pets must not play
with, climb on, or enter the
product.
• Do not put objects that chil-
dren may reach on the
product.
• CAUTION: During use, the ac-
cessible surfaces of the
product are hot. Keep children
away from the product.
• Keep the packaging materials
out of the reach of children.
There is a hazard of injury and
suffocation.
• When the door is open, do not
put any heavy objects on it or
allow children to sit on it. You
may cause the oven to tip over
or damage the door hinges.
• Before discarding worn out
and useless products:
1. Unplug the power plug and
remove it from the socket.
2. Cut off the power cable and
disconnect it with the plug
from the product.
3. Take precautions to prevent
children from entering the
product.
4. Do not allow children to play
with product when it is in idle
mode.
1.3 Electrical Safety
• Plug the product into a groun-
ded outlet protected by a fuse
that matches the current rat-
ings indicated on the type la-
bel. Have the grounding install-
ation made by a qualified elec-
trician. Do not use the product
without grounding in accord-
ance with local / national regu-
lations.
• The plug or the electrical con-
nection of the appliance shall
be in an easily accessible
place. If this is not possible,
there should be a mechanism
(fuse, switch, key switch, etc.)
on the electrical installation to
which the product is connec-
ted, in compliance with the
electrical regulations and sep-
arating all poles from the net-
work.
EN
ES
ET

EN / 6
• Unplug the product or switch
off the fuse before repair,
maintenance and cleaning.
• Plug the product into an outlet
that meets the voltage and fre-
quency values specified on the
type label.
• (If your product does not have
a mains cable) only use the
connecting cable described in
the "Technical specifications"
section.
• Do not jam the power cable un-
der and behind the product. Do
not put a heavy object on the
power cable. The power cable
should not be bent, crushed,
and come into contact with
any heat source.
• Make sure that the power
cable is not jammed while put-
ting the product to its place
after assembly or cleaning.
• The rear surface of the oven
gets hot when it is in use. The
power cables must not touch
the rear surface of the product.
Otherwise it might get dam-
aged.
• Do not jam the electric cables
into the oven door and do not
pass them over hot surfaces.
Otherwise, cable insulation
may melt and cause fire as a
result of short circuit.
• Use original cable only. Do not
use cut or damaged cables.
• Do not use an extension cord
or multi-plug to operate your
product.
• Contact the authorized service
centre or importer to use the
approved adapter in cases
where the use of a converter
adapter (for plug type) is ne-
cessary.
• Contact the importer or the au-
thorized service centre if the
length of the power line is in-
adequate.
• Portable power sources or
multiple plugs may overheat
and catch fire. Keep multiple
plugs and portable power
sources away from the
product.
• If the power cable is damaged,
it must be replaced by the
manufacturer, an authorized
service or a person to be spe-
cified by the importer company
in order to prevent possible
dangers.
• CAUTION: Before replacing
the oven lamp, be sure to dis-
connect the product from the
mains supply to avoid the risk
of electric shock. Unplug the
product or turn off the fuse
from the fuse box.
If your product has a power
cable and plug:
EN
ES
ET
EN / 7
• Never put the product plug into
a broken, loose, or out-of-
socket plug. Make sure the
plug is fully inserted into the
socket. Otherwise the connec-
tions may overheat and cause
a fire.
• Avoid inserting the device into
plugs that are greasy, unclean,
or potentially exposed to water
(such as those near a worktop
where water may escape). Oth-
erwise there is a risk of short
circuit and electrocution.
• Never touch the plug with wet
hands!
• Pull the plug out of the socket
using the plug's body rather
than the cord itself.
1.4 Transportation
Safety
• Disconnect the product from
the mains before transporting
the product.
• The product is heavy, carry the
product with at least two
people.
• Do not use the door and / or
handle to transport or move
the product.
• Do not place items on the ap-
pliance. Carry the appliance
vertically.
• When you need to transport
the product, wrap it with
bubble wrap packaging mater-
ial or thick cardboard and tape
it tightly. Secure the moving
parts of the product firmly to
prevent damage.
• Before the product is installed,
check the product for any dam-
age after transport. Contact
the importer or the authorized
service centre if damaged.
1.5 Installation Safety
• Before beginning the installa-
tion, de-energize the power line
to which the product will be
connected by turning off the
fuse.
• Always wear protective gloves
during transport and installa-
tion. Otherwise there is a risk
of injury from sharp edges!
• Before the product is installed,
check the product for any dam-
age. Do not have it installed if
the product is damaged.
• Avoid using any heat-insulating
materials to cover the interior
of the furniture that will be in-
stalled.
• Direct sunlight and heat
sources, such as electric or
gas heaters, must not be
present in the area where the
product is installed.
• Keep the surroundings of all
ventilation ducts of the
product open.
EN
ES
ET
EN / 8
• To avoid overheating, product
installation should not be car-
ried out behind decorative cov-
ers.
• In cases where a gas hose/
pipe or plastic water pipe is
situated behind the designated
installation area for the
product, it is imperative to
guarantee that there is no con-
tact between the product and
these utility lines. Otherwise
the hose/pipe may be crushed.
• If there is a socket behind the
place where the product will be
installed, it must be ensured
that the product does not
come into contact with the
socket nor with the plug
plugged into the socket.
1.6 Safety of Use
• Ensure that the appliance is
switched off after every use.
• If you will not use the product
for a long time, unplug it or
turn off the power from the
fuse box.
• Don't use the product if it
breaks down or gets damaged
while being used. Disconnect
the product from the electri-
city. Contact the importer or
the authorized service centre.
• Do not use the product if the
front door glass is removed or
cracked. Otherwise there is a
risk of injury and environ-
mental damage.
• Do not step on the appliance
for any reason.
• Never use the product when
your judgement or coordina-
tion is impaired by the use of
alcohol and/or drugs.
• Flammable objects must not
be kept in and around the
cooking area. Otherwise, these
may lead to fire.
• The oven handle is not a towel
dryer. When using the product,
do not hang towels, gloves or
similar textiles on the handle.
• The hinges of the product door
move when opening and clos-
ing the door and might jam.
When opening / closing the
door, do not hold the part with
the hinges.
1.7 Temperature Warn-
ings
• CAUTION: When the product
is in use, the product and its
accessible parts will be hot.
Care should be taken to avoid
touching the product and heat-
ing elements. Children under 8
years of age should be kept
away from the product unless
constantly supervised.
EN
ES
ET

EN / 9
• Do not place flammable / ex-
plosive materials near the
product, as the surfaces will be
hot while it is operating.
• Keep your distance when
opening the oven door during
or at the end of cooking. The
steam may burn your hand,
face and/or eyes.
• During operation the product is
hot. Care should be taken to
avoid touching hot parts, in-
side of the oven and heating
elements.
• Always wear heat-resistant
oven gloves when handling the
product.
1.8 Accessory Use
• It is important that the wire
grill and tray are placed prop-
erly on the wire shelves. For
detailed information, refer to
the section "Usage of ac-
cessories".
• Close the oven door after
pushing the accessories com-
pletely into the cooking space,
otherwise they may hit the
door glass and damage it.
1.9 Cooking Safety
• Be careful when using alco-
holic drinks in your dishes. Al-
cohol evaporates at high tem-
peratures and may cause fire
since it can ignite when it
comes into contact with hot
surfaces.
• Food residues in the cooking
area., such as oil, can ignite.
Clean these residues before
cooking.
• Food Poisoning Hazard: Do not
let food sit in oven for more
than 1 hour before or after
cooking. Otherwise it may
cause food poisoning or dis-
eases.
• Do not heat closed tins and
glass jars in the oven. The
pressure that would build-up in
the tin/jar may cause it to
burst.
• Do not place baking trays,
dishes or aluminium foil dir-
ectly onto the bottom of the
oven. The accumulated heat
might damage the bottom of
the oven.
Be mindful of the following pre-
cautions when using greasy
parchment paper or similar ma-
terials:
• Place the greaseproof paper in
a cookware or on the oven ac-
cessory (tray, wire grill, etc.)
with food and place it in the
preheated oven.
• To prevent the risk of touching
the oven heating elements and
obstructing the flow of hot air,
remove any excess parts of
EN
ES
ET

EN / 10
greaseproof paper that hang
from accessories or contain-
ers. Do not use greaseproof
paper at oven temperatures
higher than the maximum us-
age temperature specified by
the manufacturer. Never place
greaseproof paper on the oven
base.
• Do not place it on top of ac-
cessories during preheating.
• Always press down with a
plate or similar object to pre-
vent the material from flying
around due to the air circula-
tion inside the oven.
• Only cover the necessary sur-
face inside the tray.
• After each use, the tray should
be cleaned, and any
greaseproof paper or similar
materials used in the tray
should be replaced. Otherwise,
liquids dripping onto the tray
can cause smoking or even ig-
nite flames.
• An air flow is generated when
the product lid is opened.
Greaseproof paper can come
into contact with heating ele-
ments and ignite.
• When using a grilling rack for
frying, a tray should be placed
on the lower rack. Otherwise,
the food oil and other compon-
ents that drip onto the oven
bottom can create heavy
smoke and lead to flames.
• Close the oven door during
grilling. Hot surfaces may
cause burns!
• Food not suitable for grilling
carries a fire hazard. Grill only
food that is suitable for heavy
grill fire. Do not place the food
too far in the back of the grill.
This is the hottest area and
fatty foods may catch fire.
1.10 Maintenance and
Cleaning Safety
• Wait for the product to cool be-
fore cleaning the product. Hot
surfaces may cause burns!
• Never wash the product by
spraying or pouring water on it!
There is the risk of electric
shock!
• Do not use steam cleaners to
clean the product as this may
cause an electric shock.
• Do not use harsh abrasive
cleaners, metal scrapers, wire
wool or bleach materials to
clean the oven front door
glass. These materials can
cause glass surfaces to be
scratched and broken.
EN
ES
ET
EN / 11
2 Environmental Instructions
2.1 Waste Directive
2.1.1 Compliance with the WEEE Dir-
ective and Disposing of the
Waste Product
This product complies with EU WEEE Dir-
ective (2012/19/EU). This product bears a
classification symbol for waste electrical
and electronic equipment (WEEE).
This product has been manu-
factured with high quality parts
and materials which can be re-
used and are suitable for recyc-
ling. Therefore, do not dispose
of the waste product with nor-
mal domestic and other wastes at the end
of its service life. Take it to a collection
point for the recycling of electrical and elec-
tronic equipment. You can ask your local
administration about these collection
points. Disposing of the appliance properly
helps prevent negative consequences for
the environment and human health.
Compliance with RoHS Directive:
The product you have purchased complies
with EU RoHS Directive (2011/65/EU). It
does not contain harmful and prohibited
materials specified in the Directive.
2.2 Package Information
Packaging materials of the product are
manufactured from recyclable materials in
accordance with our National Environment
Regulations. Do not dispose of the pack-
aging waste with the household or other
wastes, take it to the packaging material
collection points designated by the local
authorities.
2.3 Recommendations for Energy
Saving
According to EU 66/2014, information on
energy efficiency can be found on the
product receipt supplied with the product.
The following suggestions will help you use
your product in an ecological and energy-ef-
ficient way:
• Defrost frozen food before baking.
• In the oven, use dark or enamelled con-
tainers that transmit heat better.
• If specified in the recipe or user’s manual,
always preheat. Do not open the oven
door frequently during baking.
• Turn off the product 5 to 10 minutes be-
fore the end time of baking in prolonged
bakings. You can save up to 20% electri-
city by using residual heat.
• Try to cook more than one dish at a time
in the oven. You may cook at the same
time by placing two cookers on the wire
rack. In addition, if you cook your meals
one after the other, it will save energy be-
cause the oven will not lose its heat.
EN
ES
ET
EN / 12
3 Your product
3.1 Product Introduction
1
2
3
4
5
6
7
8
9
10
*
**
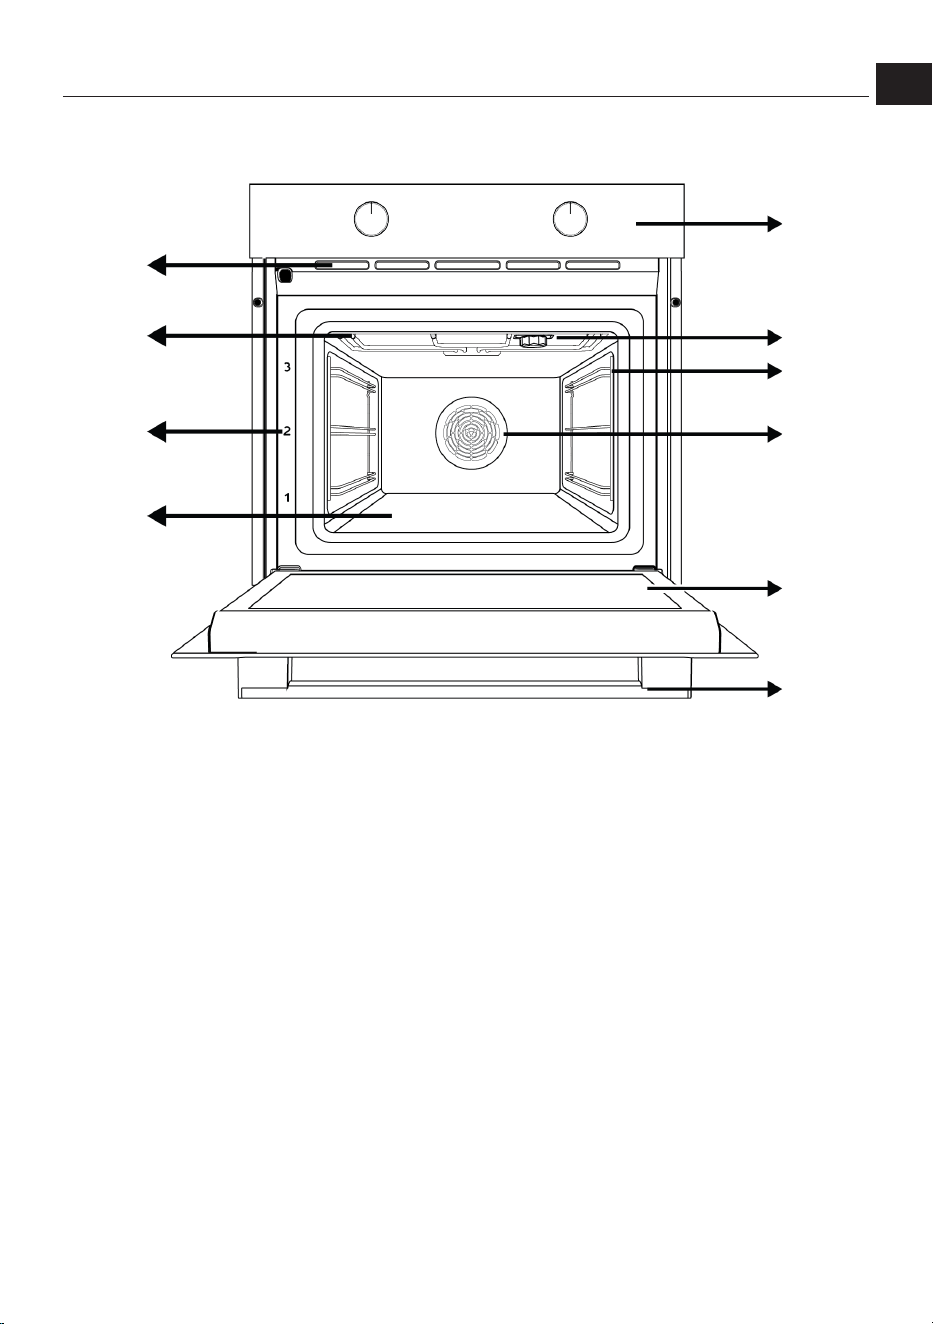
1 Control panel 2 Lamp
3 Wire shelves 4 Fan motor (behind the steel plate)
5 Door 6 Handle
7 Lower heater (under the steel plate) 8 Shelf positions
9 Upper heater 10 Ventilation holes
* Varies depending on the model. Your
product may not be equipped with a lamp,
or the type and location of the lamp may dif-
fer from the illustration.
** Varies depending on the model. Your
product may not be equipped with a wire
rack. In the image, a product with wire rack
is shown as an example.
3.2 Product Control Panel Introduc-
tion and Usage
In this section, you can find the overview
and basic uses of the product's control
panel. There may be differences in images
and some features depending on the type
of product.
EN
ES
ET
EN / 13
3.2.1 Control Panel
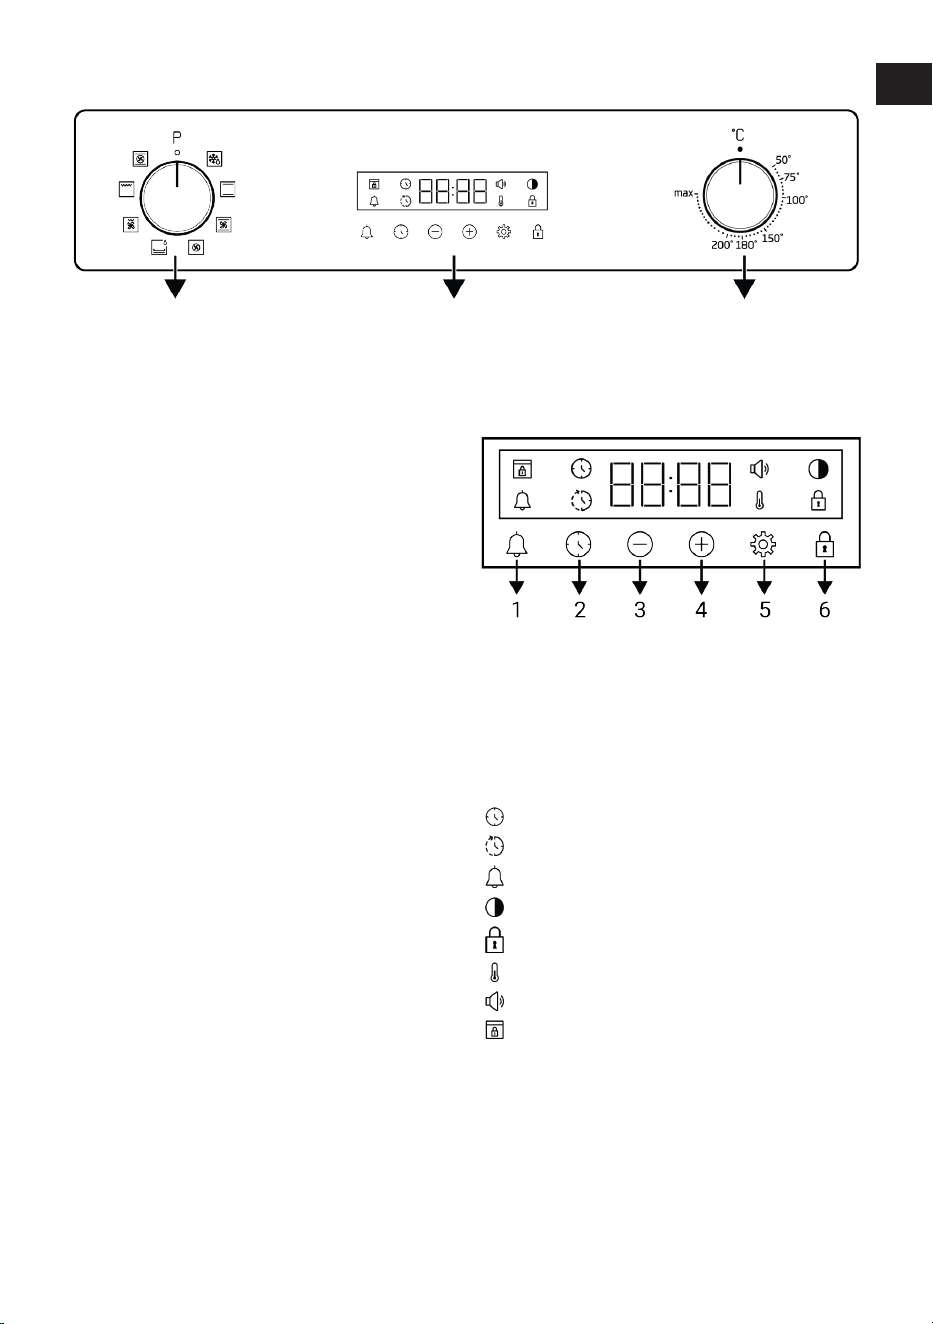
1 2 3
1 Function selection knob 2 Timer
3 Temperature knob
If there are knob(s) controlling your
product, in some models this/these knob(s)
may be so that they come out when pushed
(buried knobs). For settings to be made
with these knobs, first push the relevant
knob in and pull out the knob. After making
your adjustment, push it in again and re-
place the knob.
3.2.2 Introduction of the oven control
panel
Function selection knob
You can select the oven operating func-
tions with the function selection knob. Turn
left / right from closed (top) position to se-
lect.
Temperature knob
You can select the temperature you want to
cook with the temperature knob. Turn
clockwise from the closed (top) position to
select.
Oven inner temperature indicator
You can understand the oven interior tem-
perature from the temperature symbol on
the timer display. The temperature symbol
appears on the display when the cooking
starts, and the temperature symbol disap-
pears when the appliance reaches the set
temperature. When the temperature inside
the oven drops below the set temperature,
the temperature symbol reappears.
Timer
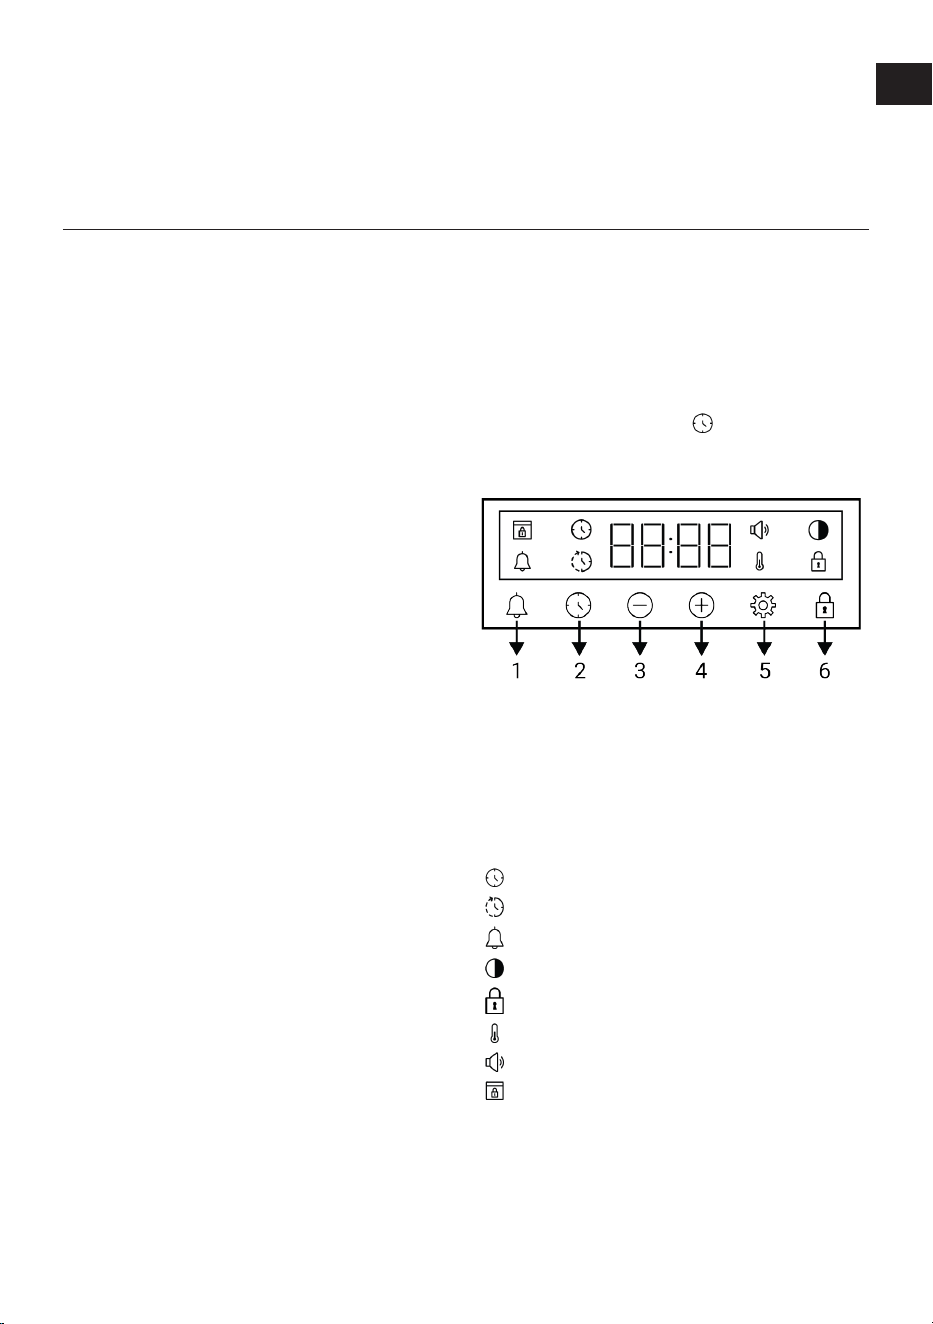
1 Alarm key
2 Time setting key
3 Decrease key
4 Increase key
5 Settings key
6 Key lock key
Display symbols
: Baking time symbol
: Baking end time symbol *
: Alarm symbol
: Brightness symbol
: Key lock symbol
: Temperature symbol
: Volume level symbol
: Door lock symbol *
*It varies depending on the product model. It may not
be available on your product.
3.3 Oven operating functions
On the function table, the operating func-
tions you can use in your oven and the
highest and lowest temperatures that can
be set for these functions are shown. The
EN
ES
ET
EN / 14
order of the operating modes shown here
may differ from the arrangement on your
product.
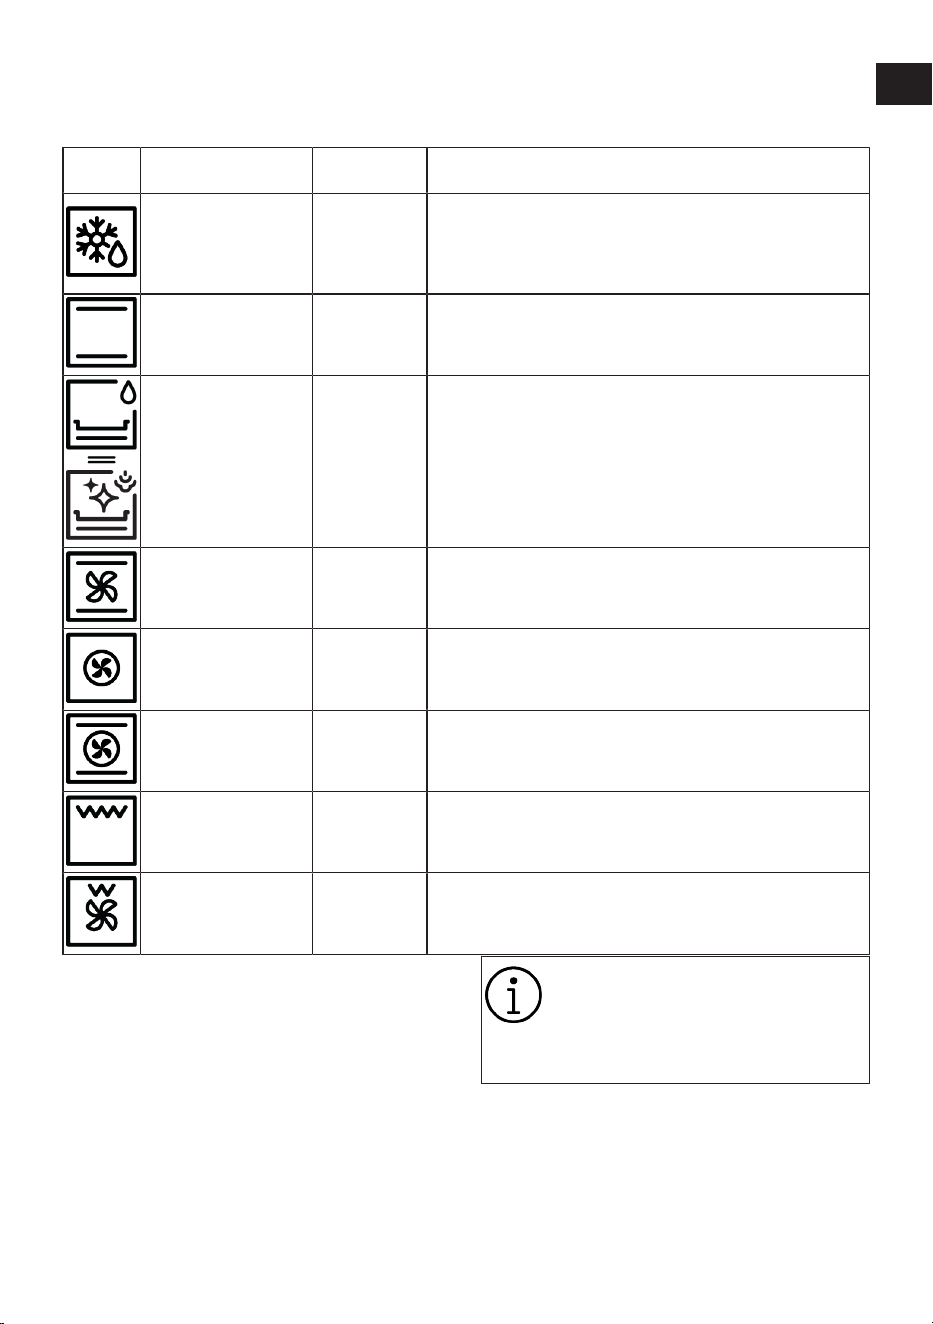
Function
symbol
Function description
Temperature
range (°C)
Description and use
Operating with fan -
The oven is not heated. Only the fan (on the back wall) oper-
ates. Frozen food with granules is slowly defrosted at room
temperature, cooked food is cooled. The time required to de-
frost a whole piece of meat is longer than for foods with
grains.
Top and bottom heat-
ing
*
Food is heated from above and below at the same time. Suit-
able for cakes, pastries or cakes and stews in baking moulds.
Cooking is done with a single tray.
Bottom heating *
Only lower heating is on. It is suitable for foods that need
browning on the bottom. This function should also be used for
easy steam cleaning.
Fan assisted bottom/
top heating
*
The hot air heated by the upper and lower heaters is distributed
equally and rapidly throughout the oven with the fan. Cooking
is done with a single tray.
Fan Heating *
The hot air heated by the fan heater is distributed equally and
rapidly throughout the oven with the fan. It is suitable for multi-
tray cooking at different shelf levels.
"3D" function *
Upper heating, lower heating and fan heating functions oper-
ate. Each side of the product to be cooked is cooked equally
and quickly. Cooking is done with a single tray.
Full grill *
The large grill on the oven ceiling works. It is suitable for
grilling in large amounts.
Fan assisted low grill *
The hot air heated by the small grill is quickly distributed into
the oven with the fan. It is suitable for grilling smaller amounts.
* Your product operates in the temperature
range specified on the temperature knob.
3.4 Product Accessories
There are various accessories in your
product. In this section, the description of
the accessories and the descriptions of the
correct usage are available. Depending on
the product model, the supplied accessory
varies. All accessories described in the
user’s manual may not be available in your
product.
The trays inside your appliance
may be deformed with the effect of
the heat. This has no effect on the
functionality. Deformation disap-
pears when the tray is cooled.
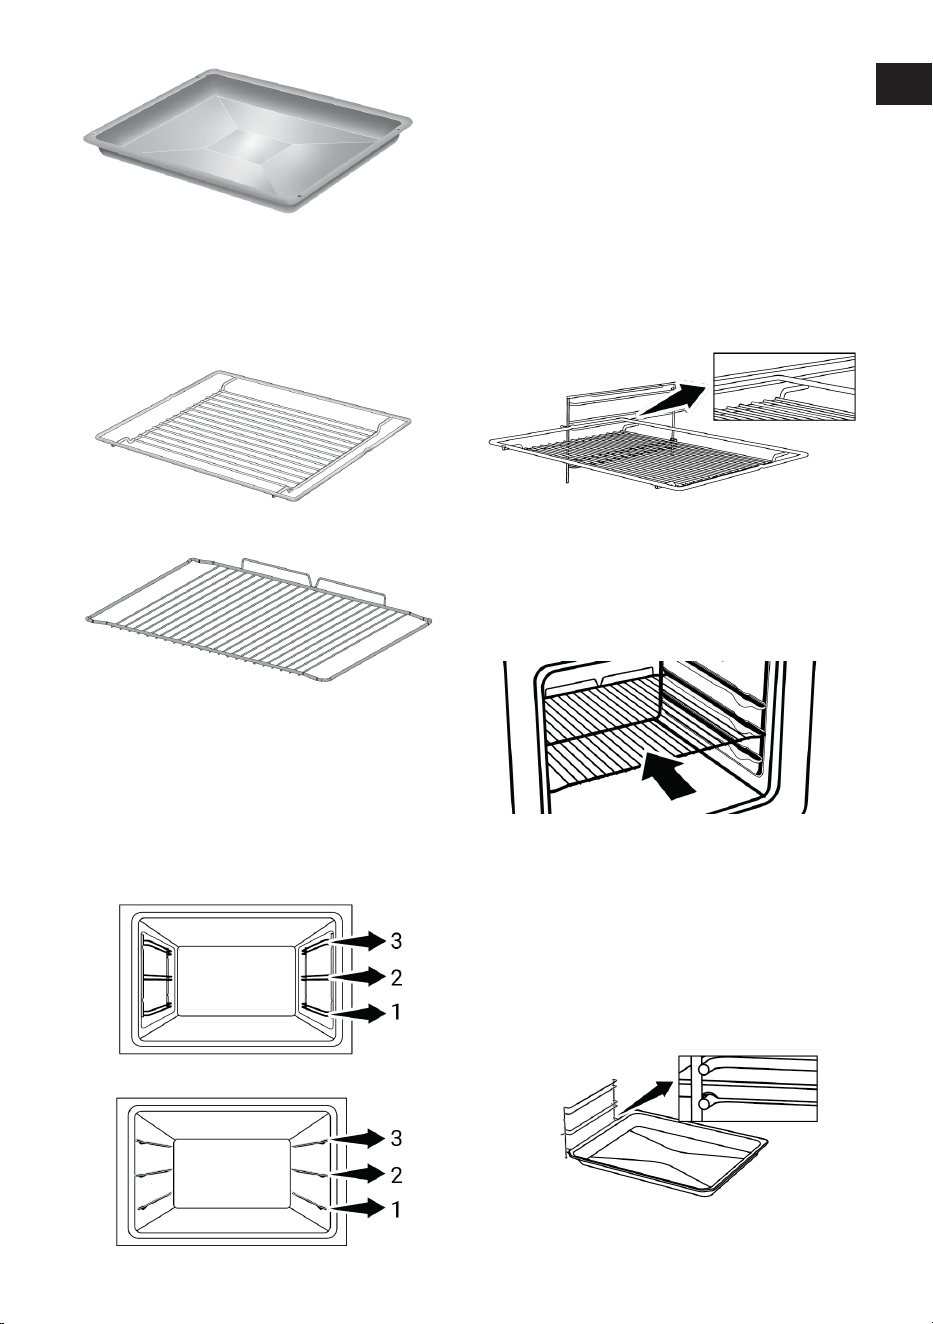
Standard tray
It is used for pastries, frozen foods and fry-
ing large pieces.
EN
ES
ET
EN / 15
Wire grill
It is used for frying or placing the food to be
baked, fried and stewed on the desired
shelf.
On models with wire shelves :
On models without wire shelves :
3.5 Use of Product Accessories
Cooking shelves
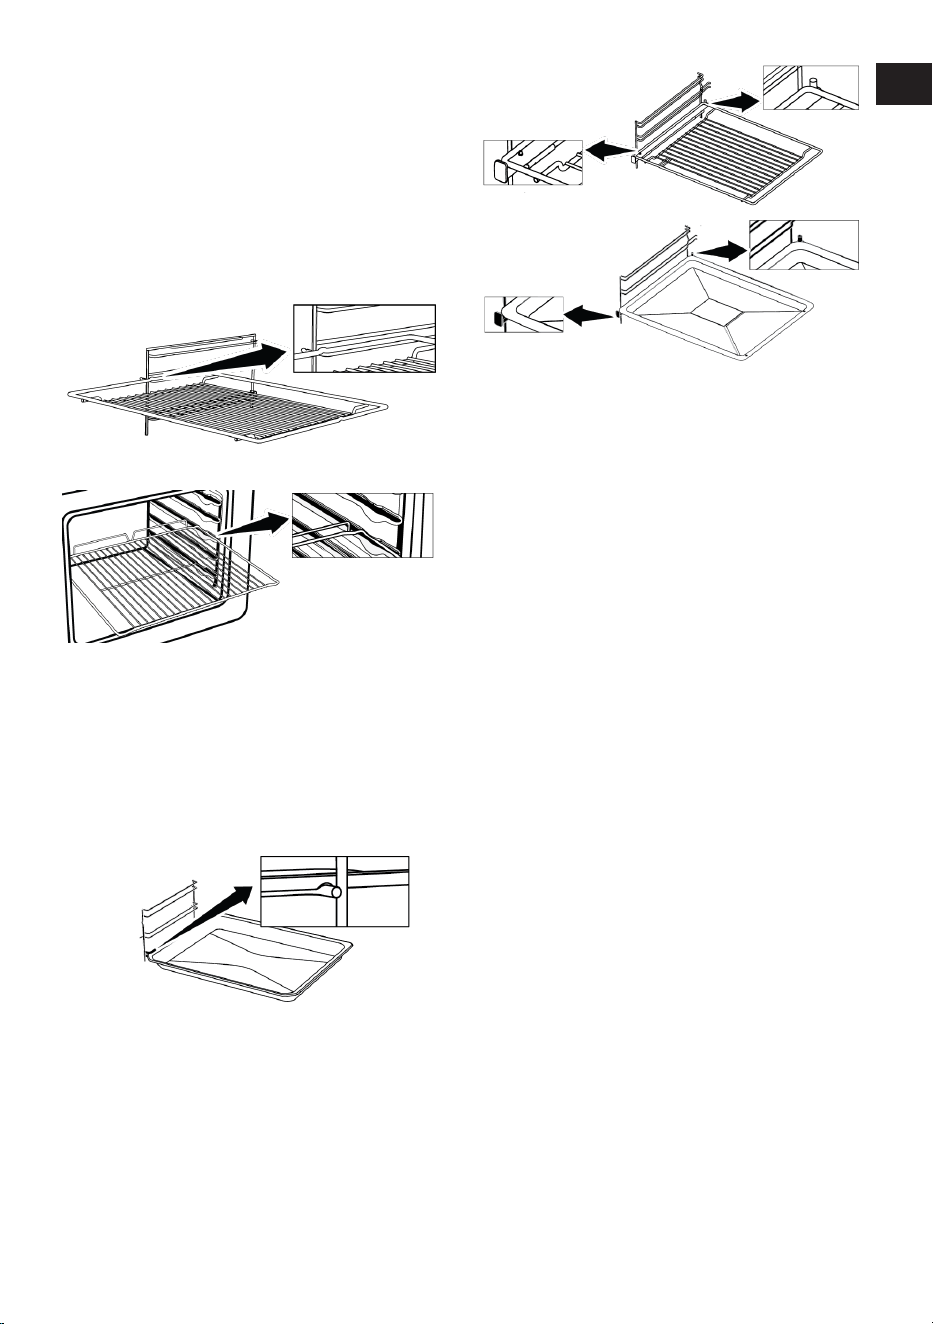
There are 3 levels of shelf position in the
cooking area. You can also see the order of
the shelves in the numbers on the front
frame of the oven.
On models with wire shelves :
On models without wire shelves :
Placing the wire grill on the cooking
shelves
It is crucial to place the wire grill on the
wire side shelves properly. While placing
the wire grill on the desired shelf, the open
section must be on the front. For better
cooking, the wire grill must be secured on
the wire shelf’s stopping point. It must not
pass over the stopping point to contact
with the rear wall of the oven.
On models with wire shelves :
On models without wire shelves :
It is crucial to place the wire grill on the
side shelves properly. The wire grill has one
direction when placing it on the shelf. While
placing the wire grill on the desired shelf,
the open section must be on the front.
Placing the tray on the cooking shelves
It is also crucial to place the trays on the
wire side shelves properly. While placing
the tray on the desired shelf, its side de-
signed for holding must be on the front. For
better cooking, the tray must be secured on
the stopping socket on the wire shelf. It
must not pass over the stopping socket to
contact with the rear wall of the oven.
EN
ES
ET
EN / 16
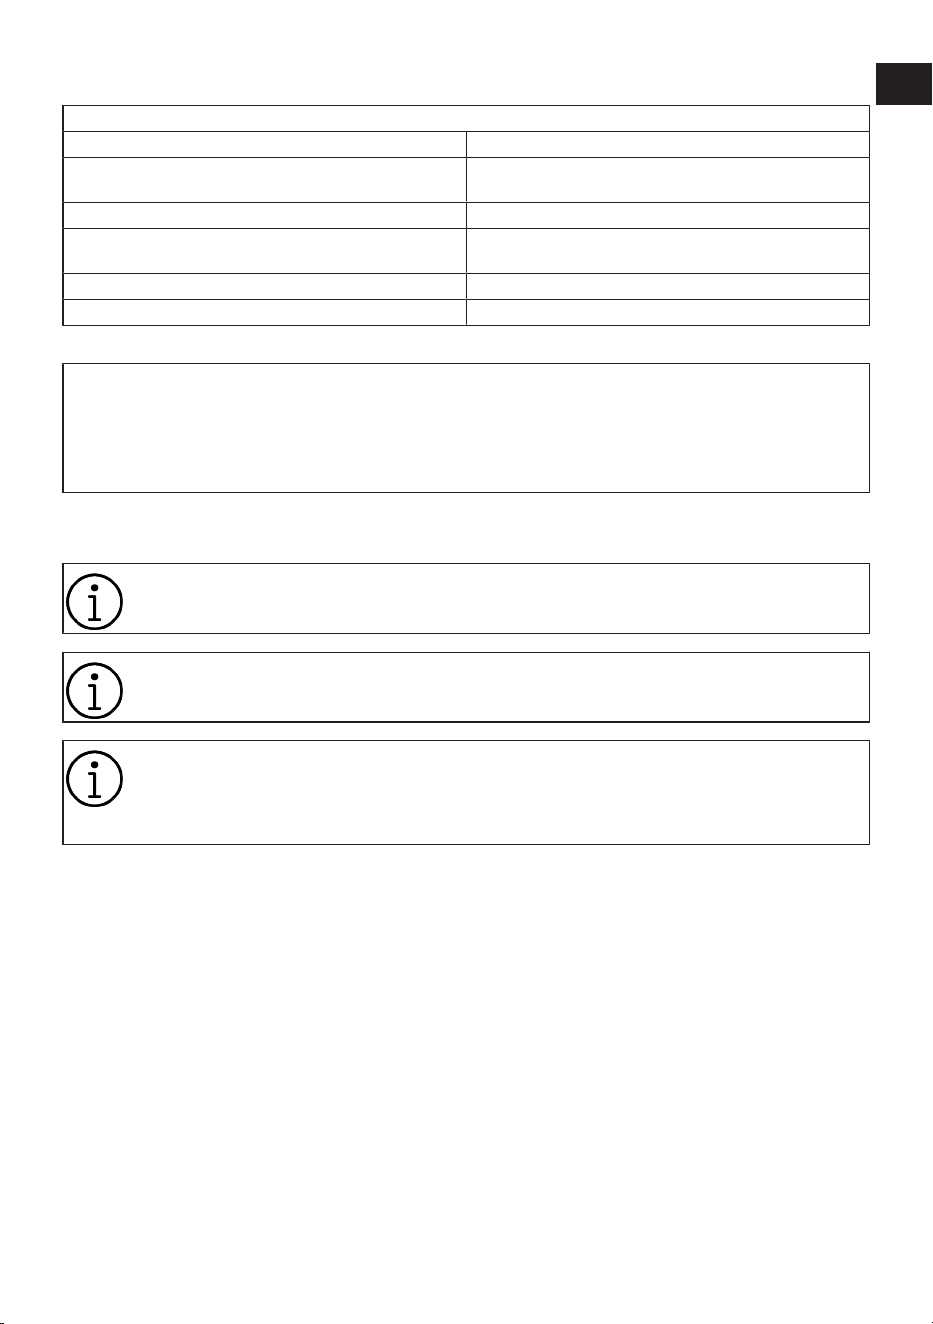
Stopping function of the wire grill
There is a stopping function to prevent the
wire grill from tipping out of the wire shelf.
With this function, you can easily and safely
take out your food. While removing the wire
grill, you can pull it forward until it reaches
the stopping point. You must pass over this
point to remove it completely.
On models with wire shelves :
On models without wire shelves :
Tray stopping function
There is also a stopping function to prevent
the tray from tipping out of the wire shelf.
While removing the tray, release it from the
rear stopping socket and pull it towards
yourself until it reaches the front side. You
must pass over this stopping socket to re-
move it completely.
Proper placement of the wire grill and tray
on the telescopic rails-On models with
wire shelves and telescopic models
Thanks to telescopic rails, trays or the wire
grill can be easily installed and removed.
When using trays and wire grills with the
telescopic rail, care should be taken that
the pins on the front and back of the tele-
scopic rails, rest against the edges of the
grill and the tray (shown in the figure).
EN
ES
ET
EN / 17
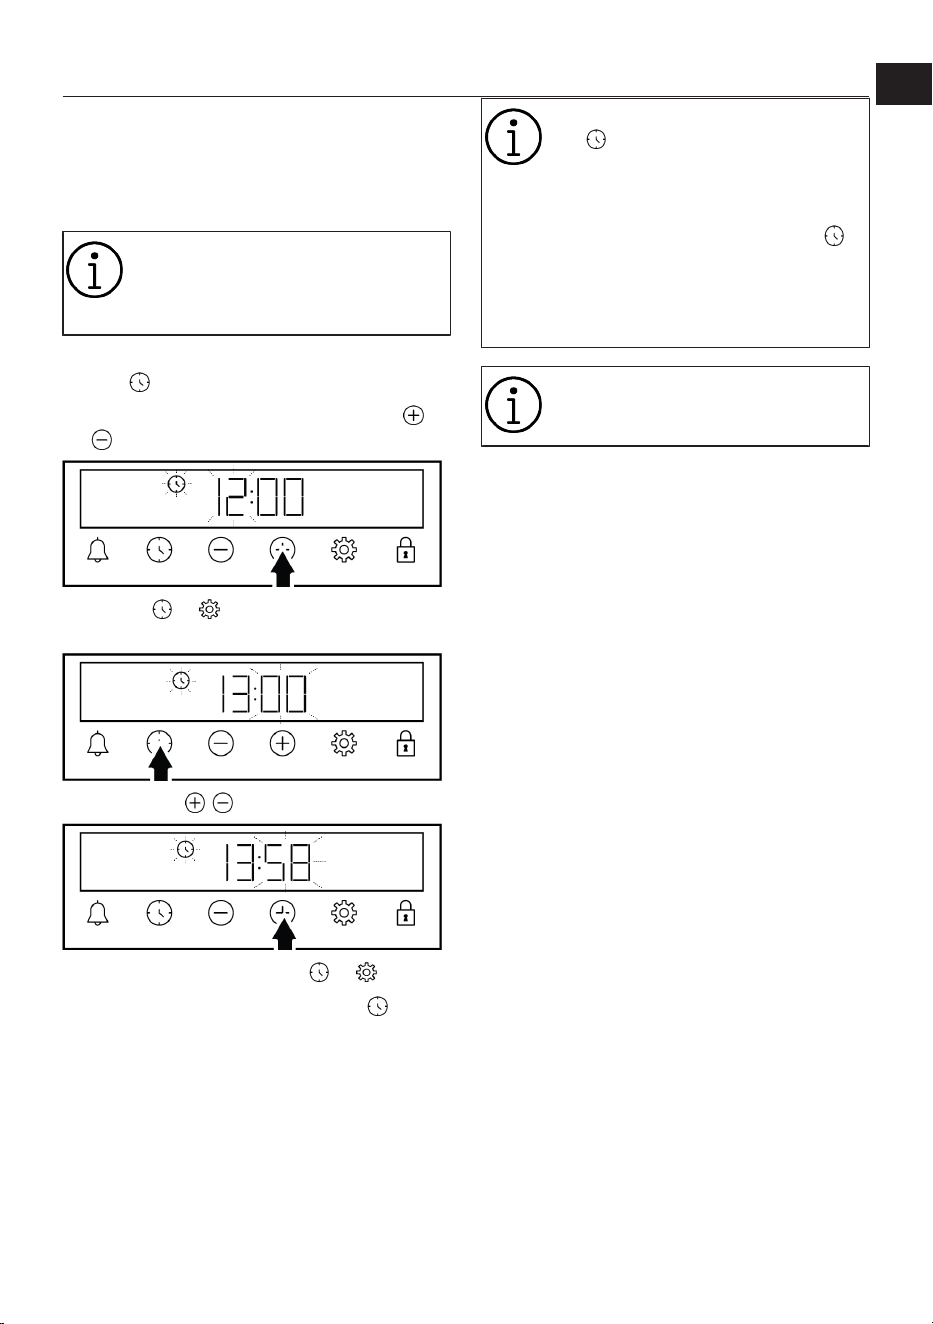
3.6 Technical Specifications
General specifications
Product external dimensions (height/width/depth) (mm) 455 /594 /567
Oven installation dimensions (height / width / depth)
(mm)
450-460 /560 /min. 550
Voltage/Frequency 220-240 V ~; 50 Hz
Cable type and section used/suitable for use in the
product
min. H05VV-FG 3 x 1,5 mm2
Total power consumption (kW) 2,4
Oven type Multifunction oven
Basics: Information on the energy label of home type electrical ovens is given in accordance with the EN 60350-1 /
IEC 60350-1 standard. The values are determined in Top and bottom heating or (if present) Fan assisted bottom/top
heating functions with the standard load.
Energy efficiency class is determined in accordance with the following prioritization depending on whether the relev-
ant functions exist on the product or not. 1-Eco fan heating , 2-Fan Heating , 3-Fan assisted low grill , 4-Top and bot-
tom heating.
Technical specifications may be changed without prior notice to improve the qual-
ity of the product.
Figures in this manual are schematic and may not exactly match your product.
Values stated on the product labels or in the documentation accompanying it are
obtained in laboratory conditions in accordance with relevant standards. Depend-
ing on operational and environmental conditions of the product, these values may
vary.
EN
ES
ET
EN / 18
4 First Use
Before you start using your product, it is re-
commended to do the following stated in
the following sections respectively.
4.1 First Timer Setting
Always set the time of day before
using your oven. If you do not set it,
you cannot cook in some oven
models.
1. When the oven is first started, "12:00"
and symbol will flash on the display.
2. Set the time of day by touching the /
keys.
3. Touch or key to activate the
minutes field.
4. Touch the / keys to set the minute.
5. Confirm by touching the or key.
ð The time of day is set and the sym-
bol disappears on the display.
If the first timer is not set, “12:00”
and symbol continue to flash
and your oven will not start. For
your oven to function, you must
confirm the time of day by setting
the time of day or touching the
key when it is at "12:00". You can
change the time of day setting later
as described in the “Settings” sec-
tion.
In the event of a power outage, the
time of day settings are cancelled.
It should be set again.
4.2 Initial Cleaning
1. Remove all packaging materials.
2. Remove all accessories from the oven
provided with the product.
3. Operate the product for 30 minutes and
then, turn it off. This way, residues and
layers that may have remained in the
oven during production are burned and
cleaned.
4. When operating the product, select the
highest temperature and the operating
function that all the heaters in your
product operate. See “Oven operating
functions [}13]”. You can learn how to
operate the oven in the following sec-
tion.
5. Wait for the oven to cool.
6. Wipe the surfaces of the product with a
wet cloth or sponge and dry with a cloth.
Before using the accessories:
Clean the accessories you remove from the
oven with detergent water and a soft clean-
ing sponge.
NOTICE: Some detergents or cleaning
agents may cause damage to the surface.
Do not use abrasive detergents, cleaning
powders, cleaning creams or sharp objects
during cleaning.
EN
ES
ET
EN / 19
NOTICE: During the first use, smoke and
odour may come up for several hours. This
is normal and you just need good ventila-
tion to remove it. Avoid directly inhaling the
smoke and odours that form.
5 Using the Oven
5.1 General Information on Using the
Oven
Cooling fan ( It varies depending on the
product model. It may not be available
on your product. )
Your product has a cooling fan. The cooling
fan is activated automatically when neces-
sary and cools both the front of the product
and the furniture. It is automatically deac-
tivated when the cooling process is fin-
ished. Hot air comes out over the oven
door. Do not cover these ventilation open-
ings with anything. Otherwise, the oven
may overheat. The cooling fan continues to
operate during oven operation or after the
oven is turned off (approximately 20-30
minutes). If you cook by programming the
oven timer, at the end of the baking time,
the cooling fan turns off with all functions.
The cooling fan running time cannot be de-
termined by the user. It turns on and off
automatically. This is not an error.
Oven lighting
The oven lighting is turned on when the
oven starts baking. In some models, the
lighting is on during baking, while in some
models it turns off after a certain time.
5.2 Operation of the Oven Control
Unit
General warnings for the oven control unit
• The maximum time that can be set for
the baking process is 5 hours 59
minutes. In case of a power failure, the
program is canceled. You will need to re-
program.
• While making any adjustments, the relev-
ant symbols flash on the display. A short
time should be waited for the settings to
be saved.
• If any cooking setting has been made, the
time of day cannot be adjusted.
• If cooking time is set when cooking
starts, the remaining time is displayed on
the display.
• In cases where cooking time or cooking
end time is set; you can cancel automat-
ically by touching the key for a long
time.
Timer
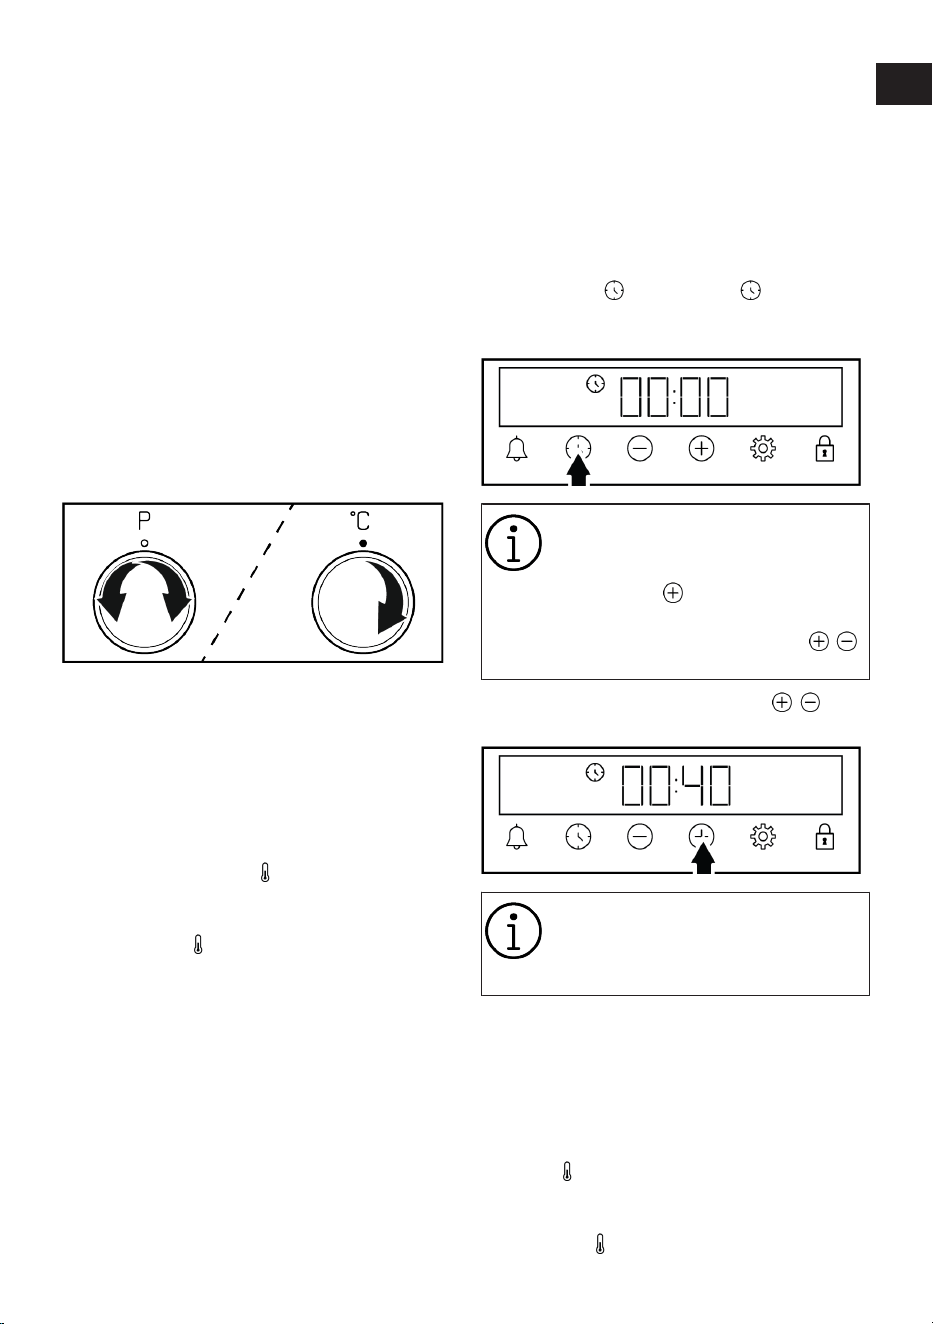
1 Alarm key
2 Time setting key
3 Decrease key
4 Increase key
5 Settings key
6 Key lock key
Display symbols
: Baking time symbol
: Baking end time symbol *
: Alarm symbol
: Brightness symbol
: Key lock symbol
: Temperature symbol
: Volume level symbol
: Door lock symbol *
*It varies depending on the product model. It may not
be available on your product.
EN
ES
ET
EN / 20
Turning on the oven
When you select a operating function you
want to cook with the function selection
knob and set a certain temperature with the
temperature knob, the oven starts operat-
ing.
Turning off the oven
You can turn the oven off by turning the
function selection knob and temperature
knob to the off (up) position.
Manual cooking to select temperature and
oven operating function
You can cook by making a manual control
(at your own control) without setting the
cooking time by selecting the temperature
and operating function specific to your
food.
1. Select the operating function you want
to cook with the function selection
knob.
2. Set the temperature you want to cook
with the temperature knob.
ð Your oven will start operating immedi-
ately at the selected function and tem-
perature, and the symbol will appear
on the display. When the temperature
inside the oven reaches the set temper-
ature, the symbol disappears. The
oven does not switch off automatically
since manual cooking is done without
setting the cooking time. You have to
control cooking and turn it off yourself.
When your cooking is completed, turn
off the oven by turning the function se-
lection knob and the temperature knob
to the off (up) position.
Cooking by setting the cooking time:
You can have the oven turn off automatic-
ally at the end of the time by selecting the
temperature and operating function spe-
cific to your food and setting the cooking
time on the timer.
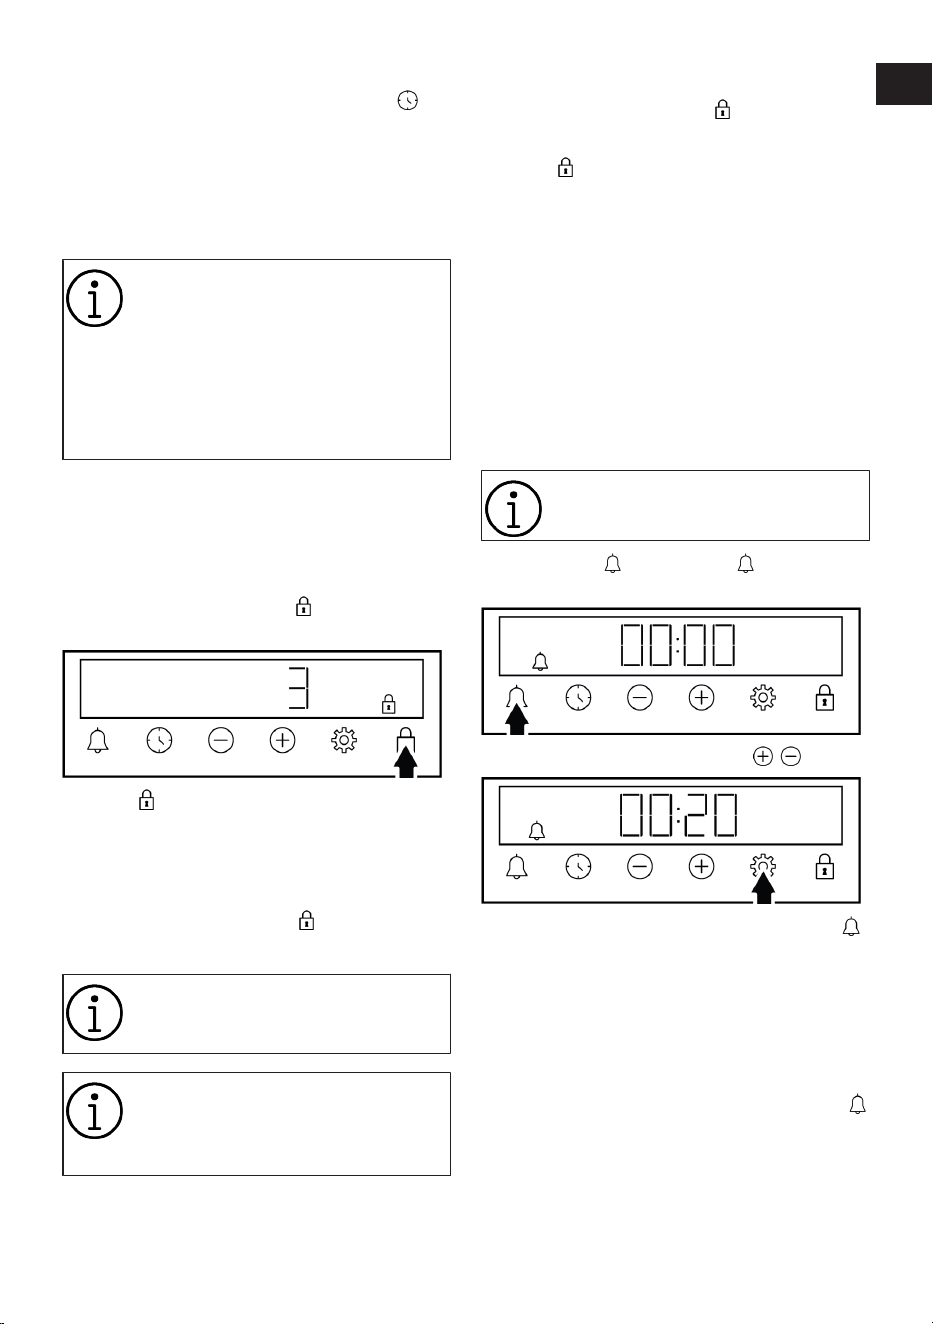
1. Select the operating function for cook-
ing.
2. Touch the key until the symbol ap-
pears on the display for the cooking
time.
After setting the operation function
and temperature, you can set the
cooking time for 30 minutes by
touching the key directly for
quick setting of the cooking time
and change the time with the /
keys.
3. Set the cooking time with the /
keys.
The cooking time increases by 1
minute in the first 15 minutes, after
15 minutes it increases by 5
minutes.
4. Put your food in the oven and set the
temperature with the temperature knob.
ð Your oven will start operating im-
mediately at the selected function
and temperature. The set cooking
time starts to count down and the
symbol appears on the display.
When the temperature inside the
oven reaches the set temperature,
the symbol disappears.
EN
ES
ET
EN / 21
5. After the set cooking time is completed,
on the display, "End" appears, the
symbol flashes and the timer beeps.
6. The warning sounds for two minutes.
Press any key to stop the warning. The
warning stops and the time of day ap-
pears on the display.
If any key is pushed at the end of
the audible warning, the oven will
start operating again. To prevent
the oven from operating again at
the end of the warning, turn off the
oven by turning the temperature
knob and function knob to the “0”
(off) position.
5.3 Settings
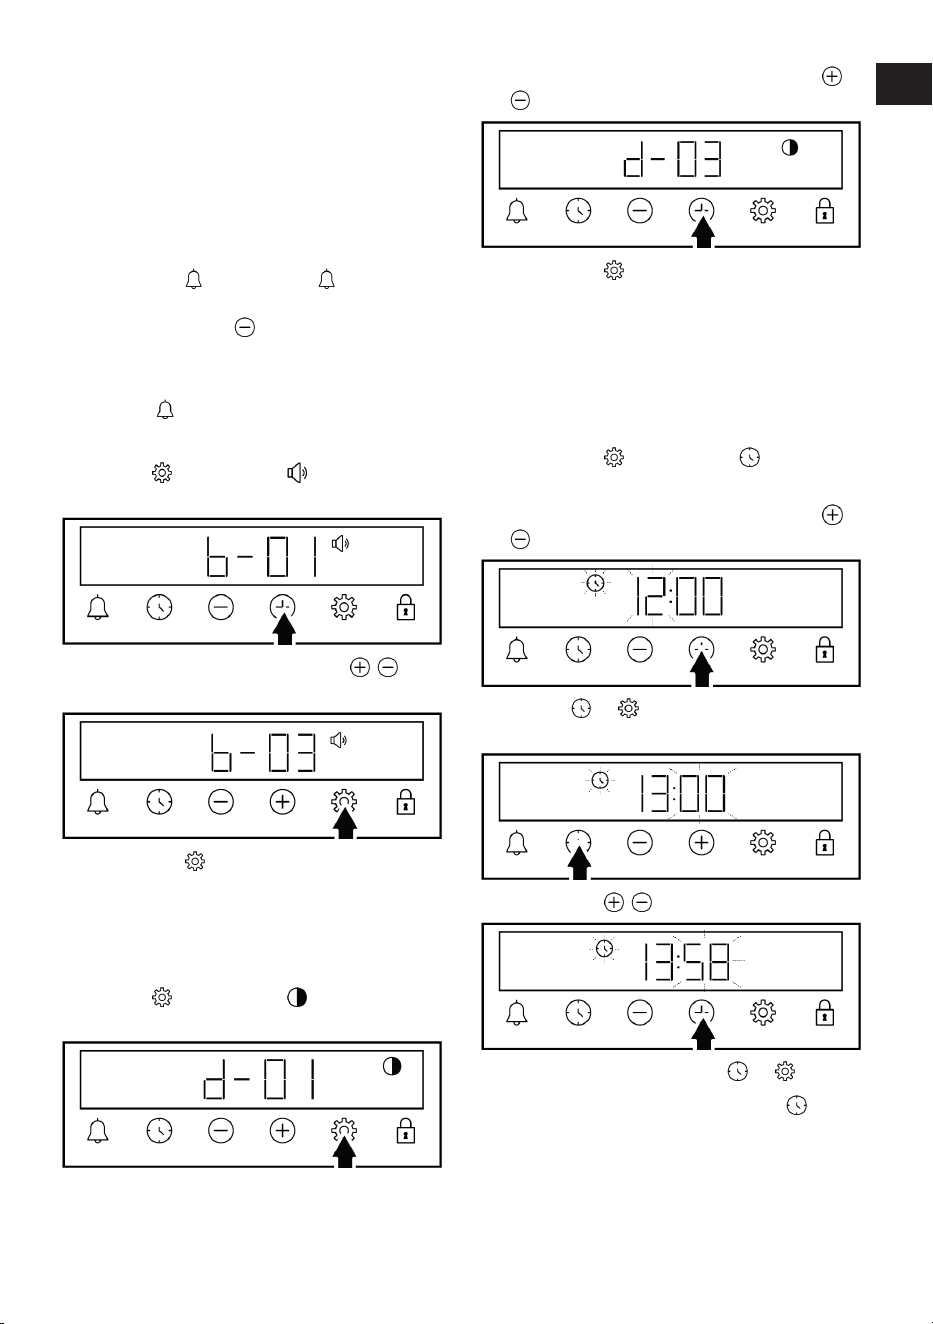
Activating the key lock
By using the key lock feature, you can safe-
guard the timer from interference.
1. Touch the key until the symbol ap-
pears on the display.
ð The symbol is shown on the display
and the 3-2-1 count down starts. The
key lock activates when the countdown
ends. When any key is touched after
the key lock is set, the timer sounds an
audible signal and the symbol
flashes.
If you release the key before the
end of the countdown, the key lock
does not activate.
Timer keys cannot be used when
the key lock is on. The key lock will
not be cancelled in case of power
failure.
Deactivating the key lock
1. Touch the key until the symbol disap-
pears from the display.
ð The symbol disappears from the dis-
play and the key lock is disabled.
Setting the alarm
You can also use the timer of the product
for any warning or reminder other than bak-
ing. The alarm clock has no effect on the
oven operating functions. It is used for
warning purposes. For example, you can
use the alarm clock when you want to turn
the food in the oven at a certain time. As
soon as the time you set has expired, the
timer gives you an audible warning.
The maximum alarm time may be
23 hours 59 minutes.
1. Touch the until the key symbol ap-
pears on the display.
2. Set the alarm time with the / keys.
ð After setting the alarm time, the
symbol remains lit and the alarm
time starts to countdown on the
display. If the alarm time and bak-
ing time are set at the same time,
the shorter time is shown on the
display.
3. After the alarm time is completed, the
symbol starts flashing and gives you an
audible warning.
EN
ES
ET
EN / 22
Turning off the alarm
1. At the end of the alarm period, the warn-
ing sounds for two minutes. Touch any
key to stop the audible warning.
ð The warning stops and the time of day
appears on the display.
If you want to cancel the alarm;
1. Touch the key until the symbol ap-
pears on the display to reset the alarm
time. Touch the key until the “00:00”
symbol appears on the display.
2. You can also cancel the alarm by touch-
ing the key for a long time.
Adjusting the volume
1. Touch key until the symbol ap-
pears on the display.
2. Set the desired level with the / keys.
(b-01-b-02-b-03)
3. Touch the key for confirmation or
wait without touching any key. The
volume set becomes active after a
while.
Setting the display brightness
1. Touch key until the symbol ap-
pears on the display.
2. Set the desired brightness with the /
keys. (d-01-d-02-d-03)
3. Touch the key for confirmation or
wait without touching any key. The
brightness set becomes active after a
while.
Changing the time of day
On your oven to change the time of day that
you have previously set:
1. Touch the key until the symbol ap-
pears on the display.
2. Set the time of day by touching the /
keys.
3. Touch or key to activate the
minutes field.
4. Touch the / keys to set the minute.
5. Confirm by touching the or key.
ð The time of day is set and the sym-
bol disappears on the display.
EN
ES
ET

EN / 23
6 General Information About Baking
You can find tips on preparing and cooking
your food in this section.
Plus, this section describes some of the
foods tested as producers and the most
appropriate settings for these foods. Ap-
propriate oven settings and accessories for
these foods are also indicated.
6.1 General Warnings About Baking in
the Oven
• While opening the oven door during or
after baking, hot-burning steam may
emerge. The steam may burn your hand,
face and/or eyes. When opening the oven
door, stay away.
• Intense steam generated during baking
may form condensed water drops on the
interior and exterior of the oven and on
the upper parts of the furniture due to the
temperature difference. This is a normal
and physical occurrence.
• The cooking temperature and time values
given for foods may vary depending on
the recipe and amount. For this reason,
these values are given as ranges.
• Always remove unused accessories from
the oven before you start cooking. Ac-
cessories that will remain in the oven
may prevent your food from being
cooked at the correct values.
• For foods that you will cook according to
your own recipe, you can reference sim-
ilar foods given in the cooking tables.
• Using the supplied accessories ensures
you get the best cooking performance.
Always observe the warnings and inform-
ation provided by the manufacturer for
the external cookware you will use.
• Cut the greaseproof paper you will use in
your cooking in suitable sizes to the con-
tainer you will cook. Greaseproof papers
that are overflowing from the container
can create a risk of burns and affect the
quality of your baking. Use the
greaseproof paper you will use in the
temperature range specified.
• For good baking performance, place your
food on the recommended correct shelf.
Do not change the shelf position during
baking.
6.1.1 Pastries and oven food
General Information
• We recommend using the accessories of
the product for a good cooking perform-
ance. If you will use an external cook-
ware, prefer dark, non-sticking and heat
resistant ware.
• If preheating is recommended in the
cooking table, be sure to put your food in
the oven after preheating.
• If you will cook by using cookware on the
wire grill, place it in the middle of the wire
grill, not near the back wall.
• All materials used in making pastry
should be fresh and at room temperat-
ure.
• The cooking status of the foods may vary
depending on the amount of food and the
size of the cookware.
• Metal, ceramic and glass moulds extend
the cooking time and the bottom sur-
faces of pastry foods do not brown
evenly.
• If you are using baking paper, a small
browning can be observed on the bottom
surface of the food. In this situation, you
may have to extend your cooking period
by approximately 10 minutes.
• The values specified in the cooking
tables are determined as a result of the
tests carried out in our laboratories. Val-
ues suitable for you may differ from
these values.
• Place your food on the appropriate shelf
recommended in the cooking table. Refer
to the bottom shelf of the oven as shelf
1.
Tips for baking cakes
• If the cake is too dry, increase the tem-
perature by 10°C and shorten the baking
time.
EN
ES
ET

EN / 24
• If the cake is moist, use a small amount
of liquid or reduce the temperature by
10°C.
• If the top of the cake is burnt, put it on
the lower shelf, lower the temperature
and increase the baking time.
• If the inside of the cake is cooked well,
but outside is sticky, use less liquid, de-
crease the temperature and increase the
cooking time.
Hints for pastry
• If the pastry is too dry, increase the tem-
perature by 10 °C and shorten the cook-
ing time. Wet the dough sheets with a
sauce consisting of milk, oil, egg and
yoghurt mixture.
• If the pastry is getting cooked slowly,
make sure that the thickness of the
pastry you have prepared does not over-
flow the tray.
• If the pastry is browned on the surface
but the bottom is not cooked, make sure
that the amount of sauce you will use for
the pastry is not too much at the bottom
of the pastry. For an even browning, try to
spread the sauce evenly between the
dough sheets and the pastry.
• Bake your pastry in the position and tem-
perature appropriate to the cooking table.
If the bottom is still not browned enough,
place it on a bottom shelf for the next
cooking.
Cooking table for pastries and oven foods
Food Accessory to be
used
Operating func-
tion
Shelf position Temperature (°C) Baking time
(min) (approx.)
Cake on the tray Standard tray *
Top and bottom
heating
2 180 20 … 30
Small cakes Standard tray *
Top and bottom
heating
2 150 25 … 35
Small cakes Standard tray * Fan Heating 1 150 … 160 35 … 50
Sponge cake
Round springform
pan, 26 cm in dia-
meter on wire grill
**
Top and bottom
heating
2 160 30 … 40
Sponge cake
Round springform
pan, 26 cm in dia-
meter on wire grill
**
Fan Heating 1 160 35 … 45
Cookie Pastry tray *
Top and bottom
heating
2 170 25 … 35
Cookie Pastry tray * Fan Heating 1 170 30 … 40
Pastry Standard tray *
Top and bottom
heating
2 180 35 … 45
Bun Standard tray *
Top and bottom
heating
2 200 20 … 30
Bun Standard tray * Fan Heating 1 180 20 … 30
Whole bread Standard tray *
Top and bottom
heating
2 200 30 … 40
Whole bread Standard tray * Fan Heating 1 200 30 … 40
EN
ES
ET

EN / 25
Food Accessory to be
used
Operating func-
tion
Shelf position Temperature (°C) Baking time
(min) (approx.)
Lasagne
Glass / metal
rectangular con-
tainer on wire grill
**
Top and bottom
heating
1 or 2 200 30 … 40
Apple pie
Round black
metal mould, 20
cm in diameter on
wire grill **
Top and bottom
heating
2 180 50 … 60
Pizza Standard tray *
Top and bottom
heating
2 200 … 220 10 … 20
Preheating is recommended for all food.
*These accessories may not be included with your product.
**These accessories are not included with your product. They are commercially available accessories.
6.1.2 Meat, Fish and Poultry
The key points on grilling
• Seasoning it with lemon juice and pepper
before cooking whole chicken, turkey and
large pieces of meat will increase cook-
ing performance.
• It takes 15 to 30 minutes more to cook
boned meat than fillet by frying.
• You should calculate about 4 to 5
minutes of cooking time per centimetre
of the meat thickness.
• After the cooking time is expired, keep
the meat in the oven for approximately
10 minutes. The juice of the meat is bet-
ter distributed to the fried meat and does
not come out when the meat is cut.
• Fish should be placed on the medium or
low level shelf in a heat resistant plate.
• Cook the recommended dishes in the
cooking table with a single tray.
Cooking table for meat, fish and poultry
Food Accessory to be
used
Operating func-
tion
Shelf position Temperature (°C) Baking time
(min) (approx.)
Steak (whole) /
Roast (1 kg)
Standard tray * "3D" function 1
15 mins. 250/
max, after 180 …
190
60 … 80
Lamb's shank
(1,5-2 kg)
Standard tray * "3D" function 1 170 85 … 110
Fried chicken
(1,8-2 kg)
Wire grill *
Place one tray on
a lower shelf
"3D" function 1
15 mins. 250/
max, after 190
70 … 90
Turkey (5.5 kg) Standard tray * "3D" function 1
25 mins. 250/
max, after 180 …
190
150 … 210
Fish
Wire grill *
Place one tray on
a lower shelf
"3D" function 1 200 20 … 30
Preheating is recommended for all food.
*These accessories may not be included with your product.
**These accessories are not included with your product. They are commercially available accessories.
EN
ES
ET

EN / 26
6.1.3 Grill
Red meat, fish and poultry meat quickly
turns brown when grilled, holds a beautiful
crust and does not dry out. Fillet meats,
skewer meats, sausages as well as juicy
vegetables (tomatoes, onions, etc.) are par-
ticularly suitable for grilling.
General warnings
• Food not suitable for grilling carries a fire
hazard. Grill only food that is suitable for
heavy grill fire. Also, do not place the
food too far in the back of the grill. This
is the hottest area and fatty foods may
catch fire.
• When the preheating time is 5 minutes in
the grill mode, skip the preheating, do not
wait for the entire preheating time to
pass.
• Close the oven door during grilling.
Never grill with the oven door open.
Hot surfaces may cause burns!
The key points of the grill
• Prepare foods of similar thickness and
weight as much as possible for the grill.
• Place the pieces to be grilled on the wire
grill or wire grill tray by distributing them
without exceeding the dimensions of the
heater.
• Depending on the thickness of the pieces
to be grilled, the cooking times given in
the table may vary.
• Slide the wire grill or the wire grill tray to
the desired level in the oven. If you are
cooking on the wire grill, slide the oven
tray to the lower shelf to collect the oils.
The oven tray you will slide should be
sized to cover the entire grill area. This
tray may not be supplied with the
product. Put some water into the oven
tray for easy cleaning.
Grill table
Food Accessory to be
used
Shelf position Temperature (°C) Baking time (min)
(approx.)
Fish Wire grill 2 250 20 … 25
Chicken pieces Wire grill 2 250 25 … 35
Meatball (veal) - 12
amount
Wire grill 2 250 20 … 30
Lamb chop Wire grill 2 250 20 … 25
Steak - (meat cubes) Wire grill 2 250 25 … 30
Veal chop Wire grill 2 250 25 … 30
Vegetable gratin Wire grill 2 220 20 … 30
Toast bread Wire grill 2 250 3 … 5
It is recommended to preheat for 5 minutes for all grilled food.
Turn pieces of food after 1/2 of the total grilling time.
6.1.4 Test foods
• Foods in this cooking table are prepared
according to the EN 60350-1 standard to
facilitate testing of the product for con-
trol institutes.
EN
ES
ET
EN / 27
Cooking table for test meals
Food Accessory to be
used
Operating func-
tion
Shelf position Temperature (°C) Baking time
(min) (approx.)
Shortbread (sweet
cookie)
Standard tray *
Top and bottom
heating
2 140 20 … 30
Shortbread (sweet
cookie)
Standard tray * Fan Heating 2 140 15 .. 25
Small cakes Standard tray *
Top and bottom
heating
2 150 25 … 35
Small cakes Standard tray * Fan Heating 1 150 … 160 35 … 50
Sponge cake
Round springform
pan, 26 cm in dia-
meter on wire grill
**
Top and bottom
heating
2 160 30 … 40
Sponge cake
Round springform
pan, 26 cm in dia-
meter on wire grill
**
Fan Heating 1 160 35 … 45
Apple pie
Round black
metal mould, 20
cm in diameter on
wire grill **
Top and bottom
heating
2 180 50 … 60
Preheating is recommended for all food.
*These accessories may not be included with your product.
**These accessories are not included with your product. They are commercially available accessories.
Grill
Food Accessory to be
used
Shelf position Temperature (°C) Baking time (min)
(approx.)
Meatball (veal) - 12
amount
Wire grill 2 250 20 … 30
Toast bread Wire grill 2 250 3 … 5
It is recommended to preheat for 5 minutes for all grilled food.
Turn pieces of food after 1/2 of the total grilling time.
7 Maintenance and Cleaning
7.1 General Cleaning Information
General warnings
• Wait for the product to cool before clean-
ing the product. Hot surfaces may cause
burns!
• Do not apply the detergents directly on
the hot surfaces. This may cause per-
manent stains.
• The product should be thoroughly
cleaned and dried after each operation.
Thus, food residues shall be easily
cleaned and these residues shall be pre-
vented from burning when the product is
used again later. Thus, the service life of
the appliance extends and frequently
faced problems are decreased.
• Do not use steam cleaning products for
cleaning.
• Some detergents or cleaning agents
cause damage to the surface. Unsuitable
cleaning agents are: bleach, cleaning
products containing ammonia, acid or
chloride, steam cleaning products, de-
scaling agents, stain and rust removers,
abrasive cleaning products (cream clean-
ers, scouring powder, scouring cream,
EN
ES
ET

EN / 28
abrasive and scratching scrubber, wire,
sponges, cleaning cloths containing dirt
and detergent residues).
• No special cleaning material is needed in
the cleaning made after each use. Clean
the appliance using dishwashing deter-
gent, warm water and a soft cloth or
sponge and dry it with a dry cloth.
• Be sure to completely wipe off any re-
maining liquid after cleaning and immedi-
ately clean any food splashing around
during cooking.
• Do not wash any component of your ap-
pliance in a dishwasher unless otherwise
stated in the user’s manual.
Inox - stainless surfaces
• Do not use acid or chlorine-containing
cleaning agents to clean stainless-inox
surfaces and handles.
• Stainless-inox surface may change col-
our in time. This is normal. After each op-
eration, clean with a detergent suitable
for the stainless or inox surface.
• Clean with a soft soapy cloth and liquid
(non-scratching) detergent suitable for
inox surfaces, taking care to wipe in one
direction.
• Remove lime, oil, starch, milk and protein
stains on the glass and inox surfaces im-
mediately without waiting. Stains may
rust under long periods of time.
• Cleaners sprayed/applied to the surface
should be cleaned immediately. Abrasive
cleaners left on the surface cause the
surface to turn white.
Enamelled surfaces
• The oven must cool down before clean-
ing the cooking area. Cleaning on hot sur-
faces shall create both fire hazard and
damage the enamel surface.
• After each use, clean the enamel sur-
faces using dishwashing detergent,
warm water and a soft cloth or sponge
and dry them with a dry cloth.
• If your product has an easy steam clean-
ing function, you can make easy steam
cleaning for light non-permanent dirt.
(See “Easy Steam Cleaning [}29]”.)
• For difficult stains, an oven and grill
cleaner recommended on the website of
your product brand and a non-scratching
scouring pad can be used. Do not use an
external oven cleaner.
Catalytic surfaces
• The side walls in the cooking area can
only be covered with enamel or catalytic
walls. It varies by model.
• The catalytic walls have a light matte and
porous surface. The catalytic walls of the
oven should not be cleaned.
• Catalytic surfaces absorb oil thanks to its
porous structure and start to shine when
the surface is saturated with oil, in this
case it is recommended to replace the
parts.
Glass surfaces
• When cleaning glass surfaces, do not use
hard metal scrapers and abrasive clean-
ing materials. They can damage the
glass surface.
• Clean the appliance using dishwashing
detergent, warm water and a microfiber
cloth specific for glass surfaces and dry
it with a dry microfiber cloth.
• If there is residual detergent after clean-
ing, wipe it with cold water and dry with a
clean and dry microfiber cloth. Residual
detergent may damage the glass surface
next time.
• Under no circumstances should the
dried-up residue on the glass surface be
cleaned off with serrated knives, wire
wool or similar scratching tools.
• You can remove the calcium stains (yel-
low stains) on the glass surface with the
commercially available descaling agent,
with a descaling agent such as vinegar or
lemon juice.
• If the surface is heavily soiled, apply the
cleaning agent on the stain with a sponge
and wait a long time for it to work prop-
erly. Then clean the glass surface with a
wet cloth.
• Discolorations and stains on the glass
surface are normal and not defects.
EN
ES
ET
EN / 29
Plastic parts and painted surfaces
• Clean plastic parts and painted surfaces
using dishwashing detergent, warm wa-
ter and a soft cloth or sponge and dry
them with a dry cloth.
• Do not use hard metal scrapers and ab-
rasive cleaners. They may damage the
surfaces.
• Ensure that the joints of the components
of the product are not left damp and with
detergent. Otherwise, corrosion may oc-
cur on these joints.
7.2 Cleaning Accessories
Do not put the product accessories in a
dishwasher unless otherwise stated in the
user’s manual.
7.3 Cleaning the Control Panel
• When cleaning the panels with knob-con-
trol, wipe the panel and knobs with a
damp soft cloth and dry with a dry cloth.
Do not remove the knobs and gaskets un-
derneath to clean the panel. The control
panel and knobs may be damaged.
• While cleaning the inox panels with knob
control, do not use inox cleaning agents
around the knob. The indicators around
the knob can be erased.
• Clean the touch control panels with a
damp soft cloth and dry with a dry cloth.
If your product has a key lock feature, set
the key lock before performing control
panel cleaning. Otherwise, incorrect de-
tection may occur on the keys.
7.4 Cleaning the inside of the oven
(cooking area)
Follow the cleaning steps described in the
"General Cleaning Information" section ac-
cording to the surface types in your oven.
Cleaning the side walls of the oven
The side walls in the cooking area can only
be covered with enamel or catalytic walls. It
varies by model. If there is a catalytic wall,
refer to the “Catalytic surfaces” section for
information.
If your product is a wire shelf model, re-
move the wire shelves before cleaning the
side walls. Then complete the cleaning as
described in the "General Cleaning Informa-
tion" section according to the side wall sur-
face type.
To remove the side wire shelves:
1. Remove the front of the wire shelf by
pulling it on the side wall in the opposite
direction.
2. Pull the wire shelf towards you to re-
move it completely.
3. To reattach the shelves, the procedures
applied when removing them must be
repeated from the end to the beginning,
respectively.
7.5 Easy Steam Cleaning
This allows cleaning of the dirt (not remain-
ing for a long time) that is softened by the
steam inside the oven and by the water
droplets condensed in the internal surfaces
of the oven easily.
1. Remove all accessories inside the oven.
2. Add 500 ml water into the tray and place
it on the 2nd shelf of the oven.
3. Set the oven to the easy steam cleaning
operating mode and operate it at 100°C
for 15 minutes.
EN
ES
ET
EN / 30
Immediately open the door and wipe the
oven interiors with a wet sponge or cloth.
Steam will be released when opening the
door. This may pose a risk of burns. Be
careful when opening the door.
For stubborn dirt, clean the product using
dishwashing detergent, warm water and a
soft cloth or sponge and dry it with a dry
cloth.
In the easy steam cleaning func-
tion, it is expected that the added
water evaporates and condenses
on the inside of the oven and the
oven door in order to soften the
light dirt formed in your oven. Con-
densation formed on the oven door
may drip around when the oven
door is opened. As soon as you
open the oven door, wipe off the
condensation.
(It varies depending on the product model.
It may not be available on your product.)
After the condensation inside the oven,
puddle or moisture may occur in the pool
channel under the oven. Wipe this pool
channel with a damp cloth after use and dry
it.
7.6 Cleaning the Oven Door
You can remove your oven door and door
glasses to clean them. How to remove the
doors and windows is explained in the sec-
tions "Removing the oven door” and "Re-
moving the inner glasses of the door".
After removing the door inner glasses,
clean them using a dishwashing detergent,
warm water and a soft cloth or sponge and
dry them with a dry cloth. For lime residue
that may form on the oven glass, wipe the
glass with vinegar and rinse.
Do not use harsh abrasive cleaners,
metal scrapers, wire wool or bleach
materials to clean the oven door
and glass.
Removing the oven door
1. Open the oven door.
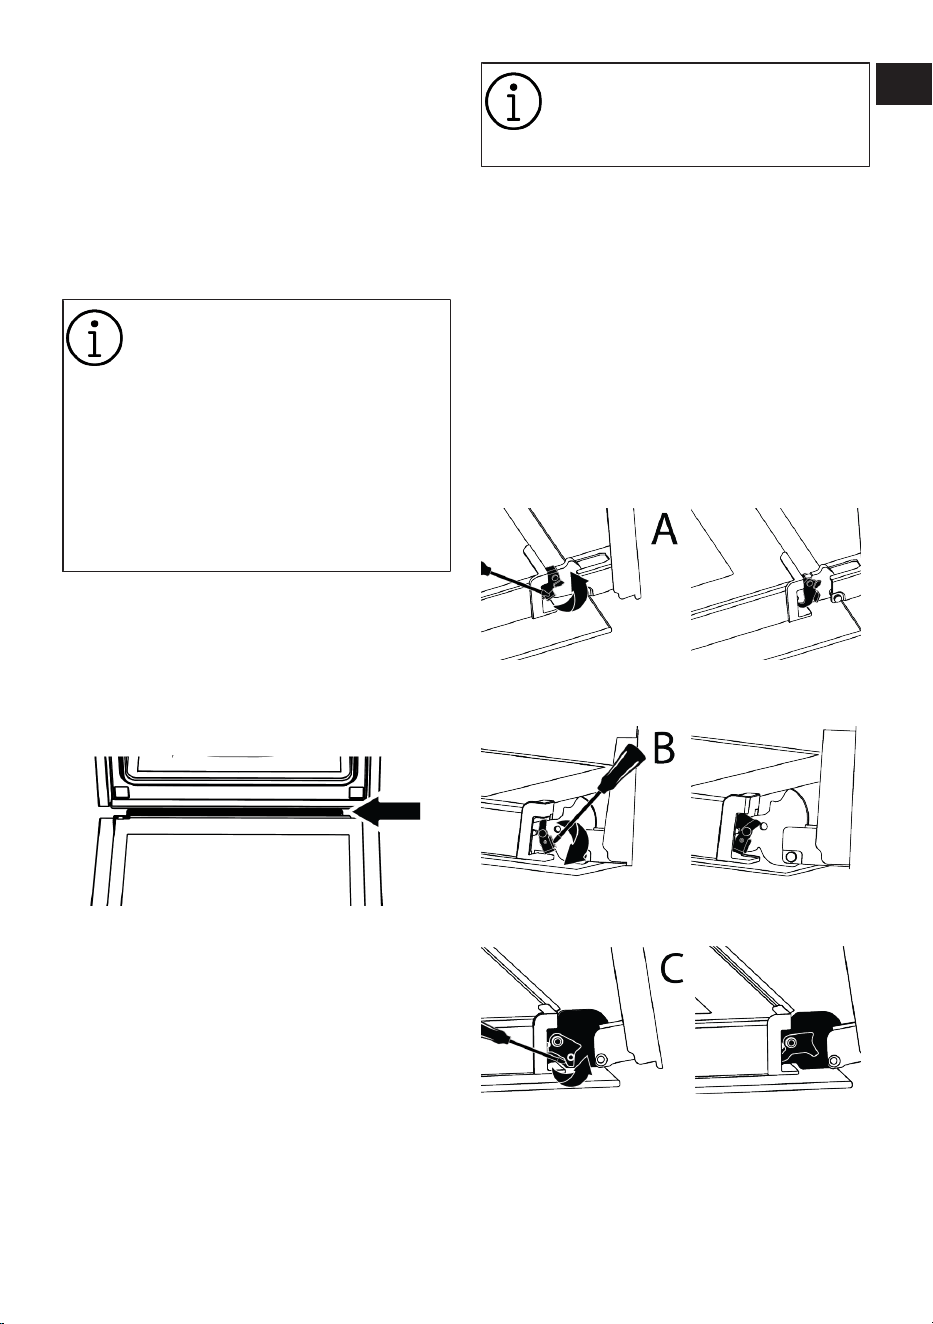
2. Open the clips in the front door hinge
socket on the right and left by pushing
them downwards as shown in the fig-
ure.
3. Hinge types vary as (A), (B), (C) types
according to the product model. The fol-
lowing figures show how to open each
type of hinge.
4. (A) type hinge is available in normal
door types.
5. (B) type hinge is available in soft closing
door types.
6. (C) type hinge is available in soft open-
ing/closing door types.
7. Get the oven door to a half-open posi-
tion.
EN
ES
ET
EN / 31
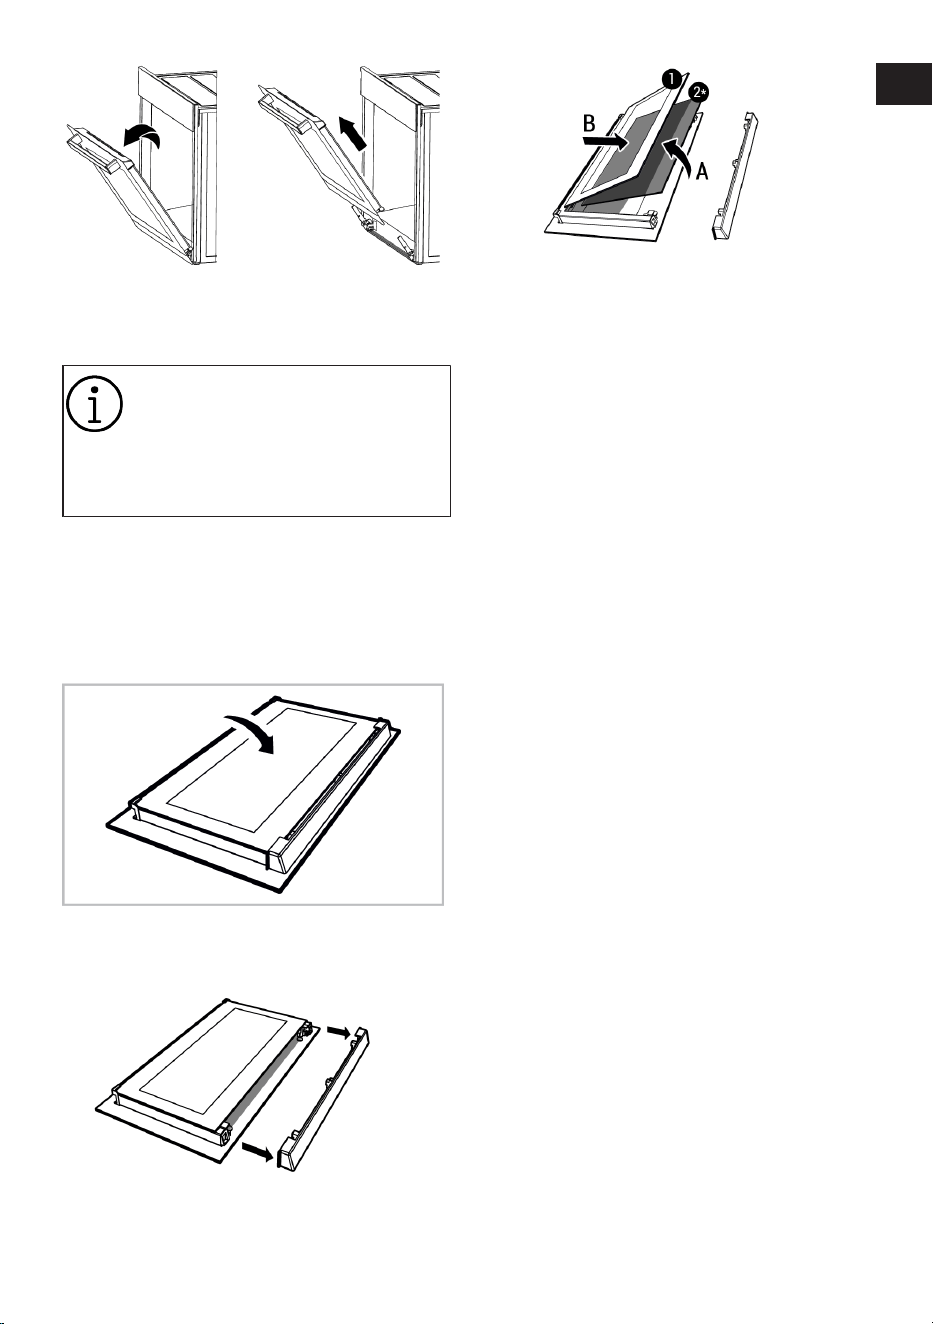
8. Pull the removed door upwards to re-
lease it from the right and left hinges
and remove it.
To reattach the door, the proced-
ures applied when removing it must
be repeated from the end to the be-
ginning, respectively. When in-
stalling the door, be sure to close
the clips on the hinge socket.
7.7 Removing the Inner Glass of The
Oven Door
Inner glass of the product's front door may
be removed for cleaning.
1. Open the oven door.
2. Remove the plastic component attached
on the upper section of the front door by
pulling it towards yourself.
3. As shown in the figure, gently lift the in-
nermost glass (1) towards “A” and then,
remove it by pulling towards “B”.
1 Innermost glass 2* Inner glass (it may
not be available for
your product)
4. If your product has an inner glass (2), re-
peat the same process to detach it (2).
5. The first step of regrouping the door is
to reassemble the inner glass (2). Place
the bevelled edge of the glass to meet
the bevelled edge of the plastic slot. (If
your product has an inner glass). Inner
glass (2) must be attached to the plastic
slot closest to the innermost glass (1).
6. While reassembling the innermost glass
(1), pay attention to place the printed
side of the glass on the inner glass. It is
crucial to place the lower corners of the
innermost glass (1) to meet the lower
plastic slots.
7. Push the plastic component towards the
frame until a "click” sound is heard.
7.8 Cleaning the Oven Lamp
In the event that the glass door of the oven
lamp in the cooking area becomes dirty;
clean using dishwashing detergent, warm
water and a soft cloth or sponge and dry
with a dry cloth. In case of oven lamp fail-
ure, you can replace the oven lamp by fol-
lowing the sections that follow.
Replacing the oven lamp
General Warnings
• To avoid the risk of electric shock before
replacing the oven lamp, disconnect the
product and wait for the oven to cool. Hot
surfaces may cause burns!
• This oven is powered by an incandescent
lamp with less than 40 W, less than 60
mm in height, less than 30 mm in dia-
meter, or a halogen lamp with G9 sockets
with less than 60 W power. Lamps are
EN
ES
ET
EN / 32
suitable for operation at temperatures
above 300 °C. Oven lamps are available
from Authorised Services or licensed
technicians. This product contains a G
energy class lamp.
• The position of the lamp may differ from
that is shown in the figure.
• The lamp used in this product is not suit-
able for use in the lighting of home
rooms. The purpose of this lamp is to
help the user see food products.
• The lamps used in this product must
withstand extreme physical conditions
such as temperatures above 50 °C.
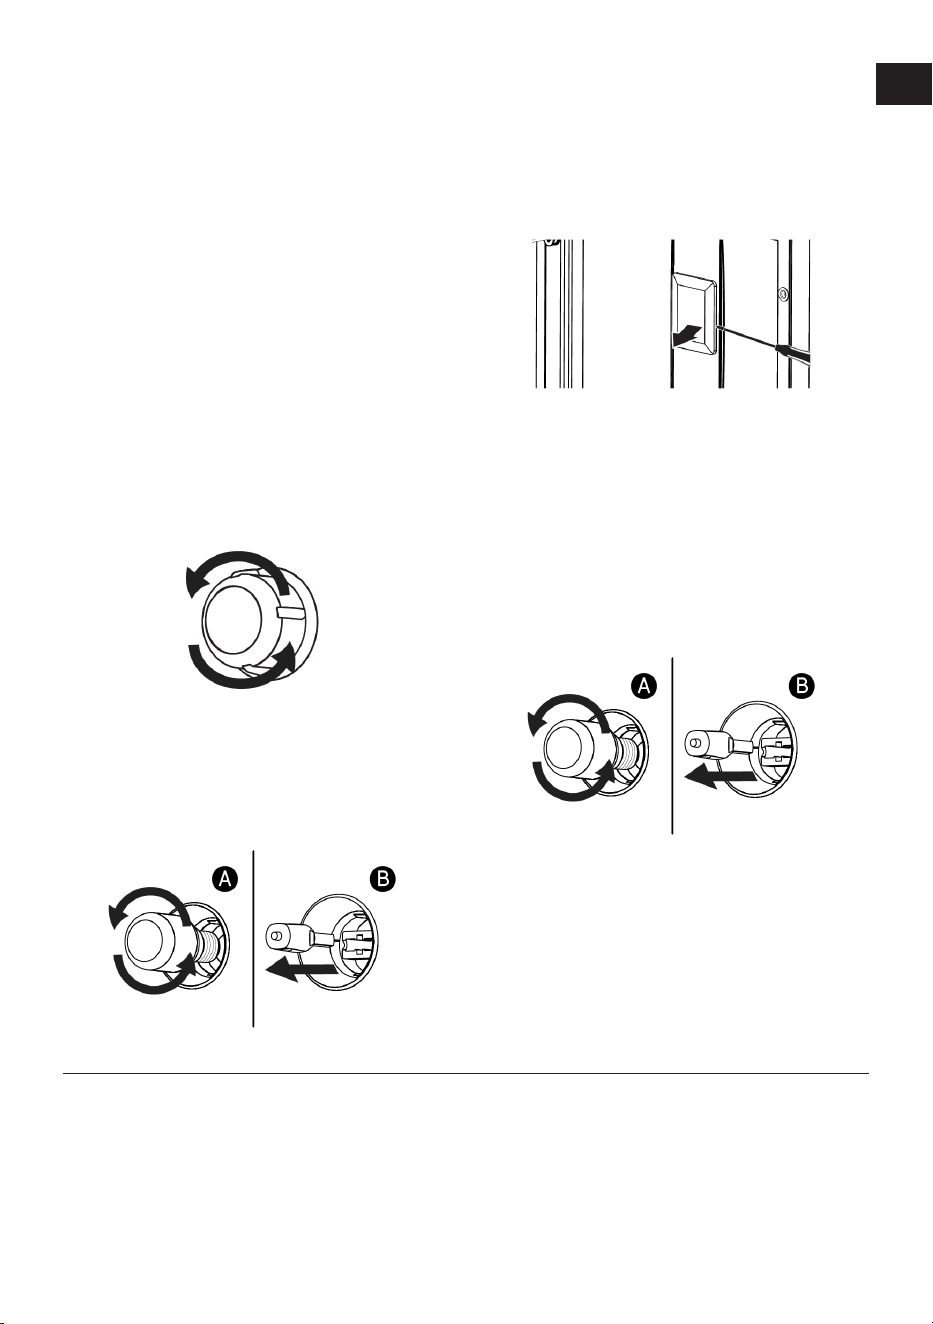
If your oven has a round lamp,
1. Disconnect the product from the electri-
city.
2. Remove the glass cover by turning it
counter clockwise.
3. If your oven lamp is type (A) shown in
the figure below, rotate the oven lamp
as shown in the figure and replace it
with a new one. If it is type (B) model,
pull it out as shown in the figure and re-
place it with a new one.
4. Refit the glass cover.
If your oven has a square lamp,
1. Disconnect the product from the electri-
city.
2. Remove the wire shelves according to
the description.
3. Lift the lamp's protective glass cover
with a screwdriver. Remove the screw
first, if there is a screw on the square
lamp in your product.
4. If your oven lamp is type (A) shown in
the figure below, rotate the oven lamp
as shown in the figure and replace it
with a new one. If it is type (B) model,
pull it out as shown in the figure and re-
place it with a new one.
5. Refit the glass cover and wire shelves.
8 Troubleshooting
If the problem persists after following the
instructions in this section, contact your
vendor or an Authorized Service. Never try
to repair your product yourself.
Steam is emanated while the oven is work-
ing.
• It is normal to see vapour during opera-
tion. >>> This is not an error.
EN
ES
ET

EN / 33
Water droplets appear while cooking
• The steam generated during cooking
condenses when it comes into contact
with cold surfaces outside the product
and may form water droplets. >>> This is
not an error.
Metal sounds are heard while the product
is warming and cooling.
• Metal parts may expand and make
sounds when heated. >>> This is not an
error.
The product does not work.
• Fuse may be faulty or blown. >>> Check
the fuses in the fuse box. Change them if
necessary or reactivate them.
• The appliance may not be plugged to the
(grounded) outlet. >>> Check if the appli-
ance is plugged in to the outlet.
• (If there is timer on your appliance) Keys
on the control panel do not work. >>> If
your product has a key lock, the key lock
may be enabled, disable the key lock.
Oven light is not on.
• Oven lamp may be faulty. >>> Replace
oven's lamp.
• No electricity. >>> Ensure the mains is
operational and check the fuses in the
fuse box. Change the fuses if necessary
or reactivate them.
Oven is not heating.
• The oven may not be set to a specific
cooking function and/or temperature.
>>> Set the oven to a specific cooking
function and/or temperature.
• For the models with timer, the time is not
set. >>> Set the time.
• No electricity. >>> Ensure the mains is
operational and check the fuses in the
fuse box. Change the fuses if necessary
or reactivate them.
(For models with timer) The timer display
flashes or the timer symbol is left open.
• There has been a power outage before.
>>> Set the time / Turn off the product
function knobs and again switch it to the
desired position.
Arcelik A.S.
Karaağaç Caddesi No:2-6 Sütlüce, 34445, Turkey
Made in TURKEY
Importer in Russia: «BEKO LLC»
Address: Selskaya street, 49, Fedorovskoe village, Pershinskoe rural settlement, Kirzhach district, Vladimir region,
Russian Federation 601021
The manufacture date is included in the serial number of a product specified on rating label, which is located on a
product, namely: first two figures of serial number indicate the year of manufacture, and last two – the month. For
example, ”10- 100001-05» indicates that the product was produced in May, 2010.
You can ask for certification number from our Call Center 8-800-200-23-56
The manufacturer reserves the right for making changes in modification, design and specification of an electric
device.
EN
ES
ET
ES / 34
¡Bienvenido!
Estimado cliente,
Gracias por elegir el producto Beko . Queremos que el aparato, fabricado con alta calidad y
tecnología, le ofrezca la mejor eficiencia. Para ello, lea atentamente este manual y cual-
quier otra documentación proporcionada antes de utilizar el producto.
Preste atención a todas las informaciones y advertencias del manual de usuario. De esta
manera, se protegerá a sí mismo y a el aparato contra los peligros que puedan ocurrir.
Guarde el manual de instrucciones. Si le da el aparato a otra persona, entregue el manual
con él. En este manual se indican las condiciones de garantía, el uso y los métodos de re-
solución de problemas de su producto.
Los símbolos y sus descripciones utilizados el manual del usuario:
Peligro que puede provocar la muerte o lesiones.
Información importante o consejos de uso útiles.
Lea el manual de usuario.
Superficie caliente.
AVISO
Peligro que puede provocar daños materiales al aparato o a su entorno.

ES / 35
Tabla de contenidos
1 Instrucciones de Seguridad......... 36
1.1 Uso Previsto................................... 36
1.2 Seguridad de niños, personas vul-
nerables y mascotas.....................
36
1.3 Seguridad Eléctrica ....................... 37
1.4 Seguridad en Transporte .............. 39
1.5 Seguridad en la instalación........... 40
1.6 Seguridad de uso........................... 40
1.7 Avisos de temperatura.................. 41
1.8 Uso de accesorios......................... 41
1.9 Seguridad en la cocción................ 42
1.10 Mantenimiento y limpieza Seguri-
dad..................................................
43
2 Instrucciones medioambientales 44
2.1 Directiva de Residuos.................... 44
2.1.1 Cumplimiento de Directiva WE-
EE y eliminación del producto
de desecho.................................
44
2.2 Información de Embalaje.............. 44
2.3 Recomendaciones para el ahorro
de energía ......................................
44
3 Su aparato ..................................... 45
3.1 Información de Producto.............. 45
3.2 Panel de control del producto In-
troducción y uso............................
45
3.2.1 Panel de control......................... 46
3.2.2 Introducción del panel de con-
trol del horno..............................
46
3.3 Funciones de funcionamiento del
horno ..............................................
47
3.4 Accesorios del Producto............... 47
3.5 Uso de los accesorios del pro-
ducto ..............................................
48
3.6 Especificaciones Técnicas ........... 51
4 Primer uso ..................................... 52
4.1 Primer ajuste del temporizador.... 52
4.2 Limpieza inicial.............................. 52
5 Uso del horno................................ 53
5.1 Información general sobre el uso
del horno ........................................
53
5.2 Funcionamiento de la unidad de
control del horno ...........................
53
5.3 Ajustes ........................................... 55
6 Información general sobre el
horneado ........................................
57
6.1 Advertencias generales sobre la
cocción en el horno .......................
57
6.1.1 Pasteles y alimentos para el
horno...........................................
57
6.1.2 Carne, pescado y aves de co-
rral ...............................................
59
6.1.3 Parrilla......................................... 60
6.1.4 Alimentos de prueba.................. 61
7 Mantenimiento y limpieza............. 62
7.1 Información General de Limpieza. 62
7.2 Limpieza de los accesorios .......... 63
7.3 Limpieza del panel de control....... 63
7.4 Limpiar el interior del horno (área
de cocción).....................................
64
7.5 Fácil limpieza con vapor................ 64
7.6 Limpieza de la puerta del horno ... 65
7.7 Retirar el cristal interior de la
puerta del horno.............................
66
7.8 Limpieza de la lámpara del horno 66
8 Solución de problemas ................. 67
EN
ES
ET

ES / 36
1 Instrucciones de Seguridad
• Esta sección incluye las ins-
trucciones de seguridad nece-
sarias para evitar el riesgo de
lesiones personales o daños
materiales.
• En caso de entregar el produc-
to a otra persona para su uso
personal o vender de segunda
mano, también se debe entre-
gar el manual de usuario, las
etiquetas del producto y otros
documentos y piezas relevan-
tes.
• Nuestra empresa no asumirá
ninguna responsabilidad por
los daños que puedan produ-
cirse por el incumplimiento de
estas instrucciones.
• El incumplimiento de estas ins-
trucciones anulará cualquier
garantía.
• Los trabajos de instalación y
reparación deben ser realiza-
dos siempre por el fabricante,
el servicio técnico autorizado o
una persona que la empresa
importadora designe.
• Utilice únicamente repuestos y
accesorios originales.
• No repare ni sustituya ningún
componente del producto a
menos que esté expresamente
indicado en el manual del
usuario.
• No realice modificaciones téc-
nicas en el producto.
1.1 Uso Previsto
• Este producto está diseñado
para ser utilizado en casa. No
es adecuado para uso comer-
cial.
• No utilice el producto en jardi-
nes, balcones u otros lugares
al aire libre. Este producto está
pensado para ser utilizado en
los hogares y en las cocinas
del personal de tiendas, ofici-
nas y otros entornos laborales.
• ADVERTENCIA Este aparato
debe utilizarse únicamente pa-
ra cocinar. No debe ser usado
para diferentes propósitos, co-
mo calentar la habitación.
• El horno puede usarse para
descongelar, hornear, freír y
asar alimentos.
• Este producto no se debe utili-
zar para el calentamiento de
platos, ni para secar colgando
toallas o ropa en el asa.
1.2 Seguridad de niños,
personas vulnerables y
mascotas
• Este aparato puede ser utiliza-
do por niños de 8 años de
edad y mayores, y por perso-
nas discapacidades físicas,
EN
ES
ET

ES / 37
sensoriales o mentales, o que
carezcan de experiencia y co-
nocimientos, siempre que se-
an supervisados o entrenados
sobre el uso seguro y los peli-
gros del aparato.
• Los niños no deben jugar con
el aparato. La limpieza y el
mantenimiento del usuario no
deben ser realizados por niños
a menos que haya alguien que
los supervise.
• Este aparato no debe ser utili-
zado por personas con capaci-
dad física, sensorial o mental
limitada (incluidos los niños), a
menos que se les mantenga
bajo supervisión o reciban las
instrucciones necesarias.
• Los niños deben ser supervisa-
dos para asegurar que no jue-
guen con el aparato.
• Los aparatos eléctricos son
peligrosos para niños y mas-
cotas. Los niños y las masco-
tas no deben jugar, trepar o en-
trar en el aparato.
• No coloque objetos que los ni-
ños puedan alcanzar sobre el
aparato.
• ADVERTENCIA Durante el
uso, las superficies accesibles
del aparato están calientes.
Mantenga a los niños alejados
del aparato.
• Mantenga los materiales de
embalaje fuera del alcance de
los niños. Existe un riesgo de
lesiones y asfixia.
• Cuando la puerta esté abierta,
no coloque ningún objeto pe-
sado sobre ella ni permita que
los niños se sienten sobre ella.
Puede hacer que el horno se
vuelque o que se dañen las bi-
sagras de la puerta.
• Antes de desechar productos
desgastados e inútiles:
1. Desenchufe el conector de
alimentación y retírelo de la
toma de corriente.
2. Desconecte el cable de ali-
mentación y separe el enchu-
fe del producto.
3. Tome precauciones para evi-
tar que los niños entren en el
producto.
4. No permita que los niños jue-
guen con el producto cuando
esté en modo inactivo.
1.3 Seguridad Eléctrica
• Enchufe el aparato en una to-
ma de corriente con conexión
a tierra protegida por un fusi-
ble que coincida con los valo-
res de corriente indicados en
la etiqueta de tipo. Haga que la
instalación de la toma de tierra
sea hecha por un electricista
calificado. No utilice el aparato
EN
ES
ET

ES / 38
sin conexión a tierra de acuer-
do con las regulaciones loca-
les / nacionales.
• El enchufe o la conexión eléc-
trica del aparato deberán estar
en un lugar fácilmente accesi-
ble. Si esto no es posible, debe
haber un mecanismo (fusible,
interruptor, llave de contacto,
etc.) en la instalación eléctrica
a la que está conectado el pro-
ducto, que cumpla con la nor-
mativa eléctrica y que separe
todos los polos de la red.
• Antes de proceder a la repara-
ción, mantenimiento y limpie-
za, desenchufe el producto o
desconecte el fusible.
• Enchufe el aparato en una to-
ma de corriente que cumpla
con los valores de voltaje y fre-
cuencia especificados en la
etiqueta de tipo.
• (En caso de no disponer de ca-
ble de alimentación) utilice úni-
camente el cable de conexión
descrito en el apartado "Espe-
cificaciones técnicas".
• No atasque el cable eléctrico
debajo y detrás del producto.
No ponga un objeto pesado
sobre el cable de alimentación.
El cable de alimentación no de-
be doblarse, aplastarse ni en-
trar en contacto con ninguna
fuente de calor.
• Asegúrese de que el cable de
alimentación no se atasque
mientras coloca el aparato en
su lugar después del montaje
o la limpieza.
• La superficie trasera del horno
se calienta cuando está en
uso. El cable de alimentación
no debe entrar en contacto
con la superficie posterior del
producto. De lo contrario, po-
dría dañarse.
• No atasques los cables eléctri-
cos en la puerta del horno y no
los pases sobre superficies ca-
lientes. De lo contrario, el aisla-
miento de los cables puede
fundirse y provocar un incen-
dio como resultado de un cor-
tocircuito.
• Utilice sólo el cable original.
No utilice cables cortados o
dañados.
• No utilice un cable de exten-
sión o un enchufe múltiple pa-
ra hacer funcionar su produc-
to.
• En los casos en que sea nece-
sario el uso de un adaptador
convertidor (para tipo de en-
chufe), póngase en contacto
con el centro de servicio auto-
rizado o con el importador pa-
ra utilizar el adaptador homo-
logado.
EN
ES
ET

ES / 39
• Si la longitud de la línea de ali-
mentación es inadecuada, pón-
gase en contacto con el impor-
tador o con el centro de servi-
cio autorizado.
• Las fuentes de alimentación
portátiles o los enchufes múlti-
ples pueden sobrecalentarse e
incendiarse. Mantenga aleja-
dos del producto enchufes
múltiples y fuentes de alimen-
tación portátiles.
• Si el cable de alimentación es-
tá dañado, debe ser sustituido
por el fabricante, por un servi-
cio técnico autorizado o por
una persona que indique la
empresa importadora, para
evitar posibles peligros.
• ADVERTENCIA Antes de sus-
tituir la bombilla del horno,
asegúrese de desconectar el
aparato de la red eléctrica para
evitar el riesgo de descarga
eléctrica. Desenchufe el apara-
to o apague el fusible de la ca-
ja de fusibles.
Si su producto tiene un cable de
alimentación y un enchufe:
• Nunca enchufe el producto en
una toma rota, suelta o desco-
nectada. Asegúrese de que el
enchufe esté totalmente intro-
ducido en la toma. En caso
contrario, las conexiones po-
drían sobrecalentarse y provo-
car un incendio.
• Evite insertar el aparato en en-
chufes con grasa, sucios o po-
tencialmente expuestos al
agua (como los que están cer-
ca de una encimera por la que
pueda filtrarse agua). En caso
contrario, existe riesgo de cor-
tocircuito y electrocución.
• No tocar nunca el enchufe con
las manos húmedas.
• Extraiga el enchufe de la toma
utilizando el cuerpo del enchu-
fe y no tire de su cable.
1.4 Seguridad en Trans-
porte
• Desconecte el aparato de la
red eléctrica antes de transpor-
tarlo.
• El aparato es pesado, cargue
el aparato con al menos dos
personas.
• No utilice la puerta y/o el asa
para transportar o mover el
aparato.
• No ponga objetos sobre el
aparato. Transporte el aparato
en posición vertical.
• Cuando necesite transportar el
aparato, envuélvalo con mate-
rial de embalaje de plástico de
burbujas o cartón grueso y pé-
guelo con cinta adhesiva. Fije
bien las piezas móviles del
producto para evitar daños.
EN
ES
ET

ES / 40
• Antes de instalar el aparato,
compruebe que no esté daña-
do durante el transporte. Si es-
tá dañado póngase en contac-
to con el importador o el servi-
cio técnico autorizado.
1.5 Seguridad en la ins-
talación
• Antes de iniciar la instalación,
desconecte la tensión de la lí-
nea eléctrica a la que se co-
nectará el producto cerrando
el fusible.
• Durante el transporte y la ins-
talación siempre utilice guan-
tes protectores. En caso con-
trario, ¡existe riesgo de lesio-
nes por bordes afilados!
• Antes de instalar el aparato,
compruebe que no esté daña-
do. No lo haga instalar si el
producto está dañado.
• Evite utilizar materiales aislan-
tes del calor para recubrir el in-
terior de los muebles que se
vayan a instalar.
• La luz solar directa y las fuen-
tes de calor, tales como cale-
facciones eléctricas o de gas,
no deben estar presentes en la
zona donde se instale el pro-
ducto.
• Mantenga abiertos los alrede-
dores de todos los conductos
de ventilación del producto.
• Con el fin de evitar el sobreca-
lentamiento, la instalación del
producto no se debe realizar
detrás de cubiertas decorati-
vas.
• En caso de que detrás de la zo-
na de instalación designada
para el producto haya una
manguera/tubería de gas o
una tubería de agua de plásti-
co, es imprescindible garanti-
zar que no haya contacto entre
el producto y estas tuberías de
suministro. De lo contrario, la
manguera/tubo podría aplas-
tarse.
• Si existe una toma de corriente
detrás del lugar donde se va a
instalar el producto, es necesa-
rio asegurarse de que el pro-
ducto no entre en contacto
con la toma ni con el enchufe
conectado a la toma.
1.6 Seguridad de uso
• Asegúrese de apagar el apara-
to después de cada uso.
• En caso de que no vaya a utili-
zar el producto durante un pe-
riodo prolongado, desenchúfe-
lo o desconecte la alimenta-
ción de la caja de fusibles.
• No utilice el producto si se
rompe o estropea durante su
uso. Desconecte el aparato de
la electricidad. Póngase en
EN
ES
ET

ES / 41
contacto con el importador o
el centro de servicio autoriza-
do.
• No utilice el producto si el cris-
tal de la puerta delantera está
desmontado o agrietado. En
caso contrario, corre el riesgo
de sufrir lesiones y daños al
medio ambiente.
• No pise el aparato bajo ningún
concepto.
• No utilice nunca el producto
cuando su juicio o coordina-
ción se vea afectada por el uso
de alcohol y/o drogas.
• Los objetos inflamables no se
deben guardar en la zona de
cocción ni alrededor de ella.
De lo contrario, pueden provo-
car un incendio.
• La manija del horno no es un
secador de toallas. Cuando uti-
lice el producto, no cuelgue to-
allas, guantes o tejidos simila-
res en el mango.
• Las bisagras de la puerta del
producto se mueven al abrir y
cerrar la puerta y pueden atas-
carse. Al abrir/cerrar la puerta,
no sujete la pieza con las bisa-
gras.
1.7 Avisos de tempera-
tura
• ADVERTENCIA Durante el
uso, el producto y sus partes
accesibles estarán calientes.
Se debe tener cuidado para
evitar tocar el producto y los
elementos de calentamiento.
Los niños menores de 8 años
deben mantenerse alejados
del producto a menos que es-
tén supervisados constante-
mente.
• No ponga materiales inflama-
bles / explosivos cerca del pro-
ducto, ya que las superficies
estarán calientes mientras es-
té funcionando.
• Mantenga la distancia al abrir
la puerta del horno durante o al
final de la cocción. El vapor
puede quemarle las manos, la
cara y/o los ojos.
• Durante el funcionamiento, el
producto está caliente. Se de-
be tener cuidado para evitar to-
car las partes calientes, el inte-
rior del horno y los elementos
de calentamiento.
• Para manipular el producto
siempre utilice guantes de hor-
no resistentes al calor.
1.8 Uso de accesorios
• Es importante que la parrilla y
la bandeja se coloquen correc-
tamente en los estantes de re-
jilla. Para obtener información
detallada, consulte el apartado
"Uso de los accesorios".
EN
ES
ET

ES / 42
• Después de introducir comple-
tamente los accesorios en el
espacio de cocción, cierre la
puerta del horno, ya que de lo
contrario podrían golpear el
cristal de la puerta y dañarlo.
1.9 Seguridad en la coc-
ción
• Tenga cuidado cuando utilice
bebidas alcohólicas en sus
platos. El alcohol se evapora a
altas temperaturas y puede
provocar un incendio ya que
puede inflamarse al entrar en
contacto con superficies ca-
lientes.
• Los restos de alimentos pre-
sentes en la zona de cocción,
como el aceite, pueden infla-
marse. Limpie estos residuos
antes de cocinar.
• Peligro de intoxicación alimen-
taria: No deje la comida en el
horno durante más de una ho-
ra antes o después de la coc-
ción. De lo contrario, puede
causar intoxicación alimenta-
ria o enfermedades.
• No caliente en el horno latas
cerradas ni tarros de cristal. La
presión que se acumularía en
la lata/jarra podría hacerla es-
tallar.
• No coloque bandejas, platos o
papel de aluminio directamen-
te en el fondo del horno. El ca-
lor acumulado podría dañar la
parte inferior del horno.
Tenga en cuenta las siguientes
precauciones cuando utilice pa-
pel de pergamino graso o mate-
riales similares:
• Coloque el papel antigrasa en
una batería de cocina o en el
accesorio de horno (bandeja,
parrilla, etc.) con la comida y
colóquela en el horno preca-
lentado.
• Con el fin de evitar el riesgo de
contacto con las resistencias
del horno y de obstrucción del
flujo de aire caliente, quite las
partes sobrantes de papel sul-
furizado que cuelguen de los
accesorios o recipientes. No
utilice papel sulfurizado a tem-
peraturas de horno superiores
a la temperatura máxima de
uso especificada por el fabri-
cante. No colocar nunca papel
antigrasa en la base del horno.
• No lo ponga encima de los ac-
cesorios durante el precalenta-
miento.
• Para evitar que el material sal-
ga volando debido a la circula-
ción de aire en el interior del
horno, presione siempre con
un plato u objeto similar.
EN
ES
ET

ES / 43
• Cubra únicamente la superficie
necesaria dentro de la bande-
ja.
• La bandeja debe limpiarse des-
pués de cada uso y debe susti-
tuirse el papel sulfurizado o
materiales similares utilizados
en la bandeja. En caso contra-
rio, los líquidos que goteen so-
bre la bandeja pueden provo-
car humo o incluso provocar
llamas.
• Al abrir la tapa del producto se
genera un flujo de aire. El pa-
pel sulfurizado puede entrar en
contacto con los elementos
calefactores e inflamarse.
• Cuando se utilice una rejilla de
asar para freír, debe colocarse
una bandeja en la rejilla infe-
rior. En caso contrario, la grasa
de los alimentos y otros com-
ponentes que gotean sobre el
fondo del horno pueden crear
humo denso y provocar lla-
mas.
• Cierre la puerta del horno du-
rante el asado. ¡Las superficies
calientes pueden causar que-
maduras!
• Los alimentos no aptos para
asar a la parrilla conllevan un
riesgo de incendio. Asa sólo la
comida que es adecuada para
el fuego pesado de la parrilla.
No coloque la comida dema-
siado lejos en la parte poste-
rior de la parrilla. Esta es la zo-
na más caliente y los alimen-
tos grasos pueden incendiar-
se.
1.10 Mantenimiento y
limpieza Seguridad
• Espere a que el aparato se en-
fríe antes de limpiarlo. ¡Las su-
perficies calientes pueden cau-
sar quemaduras!
• No lave nunca el aparato pul-
verizándolo o echándole agua.
¡Existe el riesgo de descarga
eléctrica!
• No utilice limpiadores de vapor
para limpiar el producto, ya
que puede provocar una des-
carga eléctrica.
• Para limpiar el cristal de la
puerta delantera del horno, no
utilice limpiadores abrasivos
fuertes, rascadores metálicos,
lana de alambre ni lejía. Estos
materiales pueden causar que
las superficies de vidrio se ra-
yen y se rompan.
EN
ES
ET
ES / 44
2 Instrucciones medioambientales
2.1 Directiva de Residuos
2.1.1 Cumplimiento de Directiva WEEE
y eliminación del producto de
desecho
Este producto cumple con la Directiva WE-
EE de UE (2012/19/UE). Este producto lleva
el símbolo de clasificación de residuo de
aparatos eléctricos y electrónicos (WEEE).
El presente producto ha sido
fabricado con piezas y materia-
les de alta calidad que pueden
ser reutilizados y son aptos pa-
ra el reciclaje. Por lo que, al fi-
nal de su vida útil, no elimine el
producto con los residuos domésticos nor-
males y otros residuos. Llévelo a un punto
de recogida para el reciclaje de aparatos
eléctricos y electrónicos. Puede consultar a
la administración local sobre estos puntos
de recogida. Desechar el aparato correcta-
mente ayuda a evitar consecuencias nega-
tivas para el medio ambiente y la salud hu-
mana.
Cumplimiento de Directiva RoHS:
El producto que ha adquirido cumple con la
Directiva RoHS de UE (2011/65/UE). No
contiene materiales nocivos y prohibidos
especificados en la Directiva.
2.2 Información de Embalaje
El embalaje del producto está fabricado
con materiales reciclables de acuerdo con
nuestra normativa medioambiental nacio-
nal. No elimine los residuos del embalaje
con los residuos domésticos o de otro tipo,
llévelos a los puntos de recogida de mate-
riales de embalaje designados por las auto-
ridades locales.
2.3 Recomendaciones para el ahorro
de energía
De acuerdo con la UE 66/2014, la informa-
ción sobre la eficiencia energética se pue-
de encontrar en el recibo del producto su-
ministrado con el mismo.
Las siguientes sugerencias le ayudarán a
utilizar el aparato de manera ecológica y
eficiente en términos de energía:
• Descongele los alimentos congelados
antes de hornearlos.
• En el horno, utilice recipientes oscuros o
esmaltados que transmitan mejor el ca-
lor.
• Si se especifica en la receta o en el ma-
nual del usuario, precaliente siempre. No
abra la puerta del horno con frecuencia
durante la cocción.
• Apague el producto de 5 a 10 minutos
antes de la hora de finalización del hor-
neado en horneados prolongados. Puede
ahorrar hasta un 20% de electricidad utili-
zando el calor residual.
• Intenta cocinar más de un plato a la vez
en el horno. Puede cocinar al mismo
tiempo colocando dos cocinas en la reji-
lla. Además, si cocina sus comidas una
tras otra, ahorrará energía porque el hor-
no no perderá su calor.
EN
ES
ET
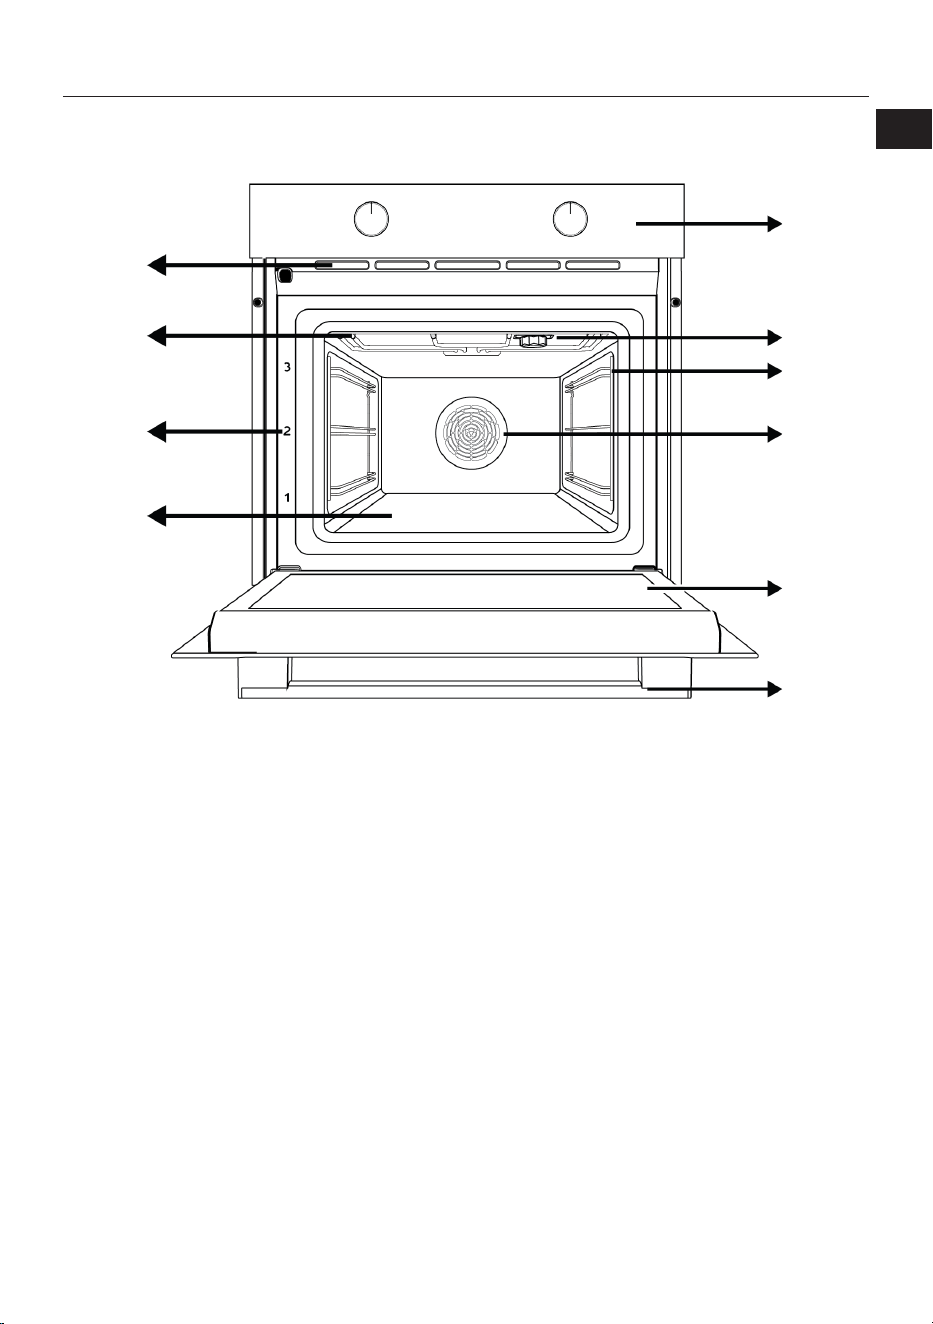
ES / 45
3 Su aparato
3.1 Información de Producto
1
2
3
4
5
6
7
8
9
10
*
**
1 Panel de control 2 Cordero
3 Estantes de rejilla 4 Motor del ventilador (detrás de la pla-
ca de acero)
5 Puerta 6 Mango
7 Calentador inferior (bajo la placa de
acero)
8 Posiciones de estante
9 Calefacción superior 10 Los agujeros de ventilación
* Varía según el modelo. Es posible que su
producto no esté equipado con una lámpa-
ra, o que el tipo y la ubicación de la lámpara
difieran de la ilustración.
** Varía según el modelo. Es posible que su
producto no esté equipado con una rejilla.
En la imagen, se muestra como ejemplo un
producto con rejilla.
3.2 Panel de control del producto In-
troducción y uso
En este apartado encontrará la vista gene-
ral y los usos básicos del panel de mandos
del aparato. En función del tipo o modelo
de aparato, puede haber diferencias en las
imágenes y algunas características.
EN
ES
ET
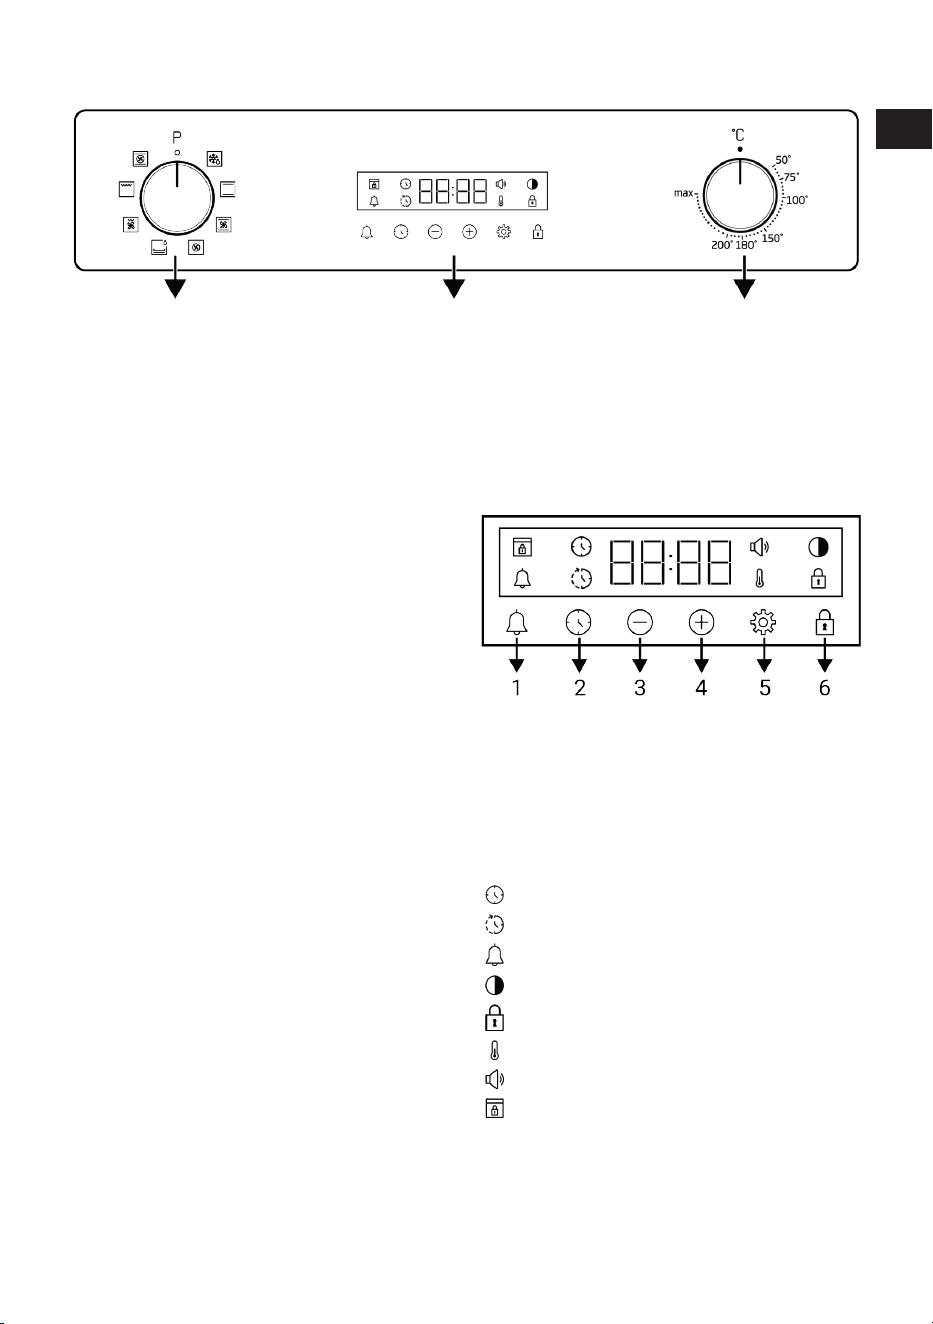
ES / 46
3.2.1 Panel de control
1 2 3
1 Perilla de selección de funciones 2 Temporizador
3 Botón de selección de temperatura
Si hay pomo(s) que controla(n) su produc-
to, en algunos modelos este(s) pomo(s)
puede(n) estar de forma que salga(n) cuan-
do se empuja(n) (pomos enterrados). Para
los ajustes que se hagan con estas perillas,
primero se empuja la perilla correspondien-
te hacia adentro y se saca la perilla. Des-
pués de realizar el ajuste, vuelva a introdu-
cirlo y coloque el mando.
3.2.2 Introducción del panel de control
del horno
Perilla de selección de función
Puede seleccionar las funciones de funcio-
namiento del horno con la perilla de selec-
ción de funciones. Gire a la izquierda/dere-
cha desde la posición cerrada (superior)
para seleccionar.
Perilla de temperatura
Puede seleccionar la temperatura que de-
sea cocinar con la perilla de temperatura.
Gire en el sentido de las agujas del reloj
desde la posición cerrada (superior) para
seleccionar.
Indicador de temperatura interior del horno
Puede comprender la temperatura interior
del horno a partir del símbolo de tempera-
tura en la pantalla del temporizador. El sím-
bolo de temperatura aparece en la pantalla
cuando comienza la cocción y el símbolo
de temperatura desaparece cuando el apa-
rato alcanza la temperatura establecida.
Cuando la temperatura dentro del horno
desciende por debajo de la temperatura es-
tablecida, vuelve a aparecer el símbolo de
temperatura.
Temporizador
1 Tecla de alarma
2 Tecla de ajuste de la hora
3 Tecla de disminución
4 Tecla de aumento
5 Tecla de ajustes
6 Llave de bloqueo de teclas
Símbolos de la pantalla
: Símbolo de tiempo de cocción
: Símbolo de fin de cocción *
: Símbolo de la alarma
: Símbolo de luminosidad
: Símbolo de bloqueo de teclas
: El símbolo de la temperatura
: Símbolo de nivel de volumen
: Símbolo de bloqueo de la puerta *
*Varía según el modelo del aparato. Puede que no es-
té disponible en el aparato.
EN
ES
ET
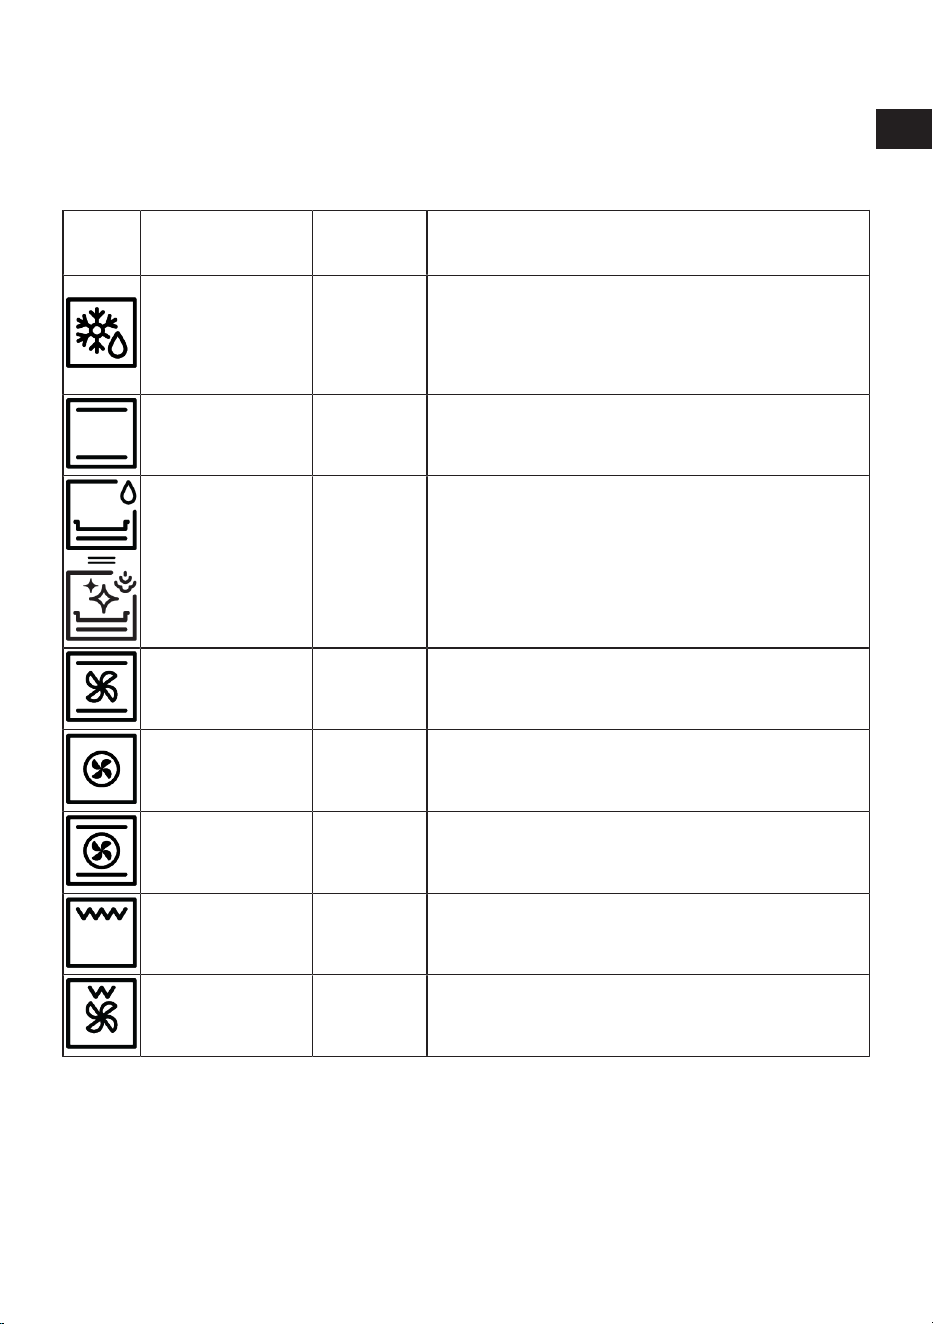
ES / 47
3.3 Funciones de funcionamiento del
horno
En la tabla de funciones, se muestran las
funciones operativas que se pueden utilizar
en el horno y las temperaturas más altas y
más bajas que se pueden ajustar para es-
tas funciones. El orden de los modos de
funcionamiento mostrados aquí puede di-
ferir de la disposición de el aparato.
Símbolo
de la fun-
ción
Descripción de la fun-
ción
Rango de
temperatura
(°C)
Descripción y uso
Operando con el venti-
lador
-
El horno no se calienta. Sólo funciona el ventilador (en la pared
trasera). Los alimentos congelados con gránulos se desconge-
lan lentamente a temperatura ambiente, los alimentos cocina-
dos se enfrían. El tiempo necesario para descongelar una pie-
za entera de carne es más largo que para los alimentos con
granos.
Calentamiento superior
e inferior
*
La comida se calienta por arriba y por abajo al mismo tiempo.
Indicado para tartas, pasteles o tartas y guisos en moldes para
horno. La cocción se realiza con una sola bandeja.
Calentamiento inferior *
Sólo el calentamiento inferior está activado. Es adecuado para
alimentos que necesitan dorarse por la parte inferior. Esta fun-
ción también debe utilizarse para una fácil limpieza con vapor.
Calentamiento inferior/
superior asistido por
ventilador
*
El aire caliente calentado por los calentadores superior e infe-
rior se distribuye igual y rápidamente por el horno con el venti-
lador. La cocina se hace con una sola bandeja.
Calentamiento por ven-
tilador
*
El aire caliente calentado por el calentador de ventilador se dis-
tribuye por igual y rápidamente en todo el horno con el ventila-
dor. Es adecuado para cocinar en varias bandejas en diferen-
tes niveles de estantes.
Función "3D" *
Se activan las funciones de calefacción superior, calefacción
inferior y calefacción por ventilador. Cada lado del producto a
cocinar se cocina por igual y rápidamente. La cocción se reali-
za con una sola bandeja.
Parrilla completa *
La gran parrilla del techo del horno funciona. Es adecuado pa-
ra asar en grandes cantidades.
Parrilla baja asistida
por ventilador
*
El aire caliente calentado por la parrilla pequeña se distribuye
rápidamente en el horno con el ventilador. Es adecuado para
asar a la parrilla cantidades más pequeñas.
* Su producto funciona en el rango de tem-
peratura especificado en la perilla de tem-
peratura.
3.4 Accesorios del Producto
Hay varios accesorios en el aparato. En es-
te apartado encontrará la descripción de
los accesorios y la descripción del uso co-
rrecto. Dependiendo del modelo del apara-
to, el accesorio suministrado varía. Es posi-
ble que todos los accesorios descritos en
manual del usuario no estén disponibles en
el aparato.
EN
ES
ET
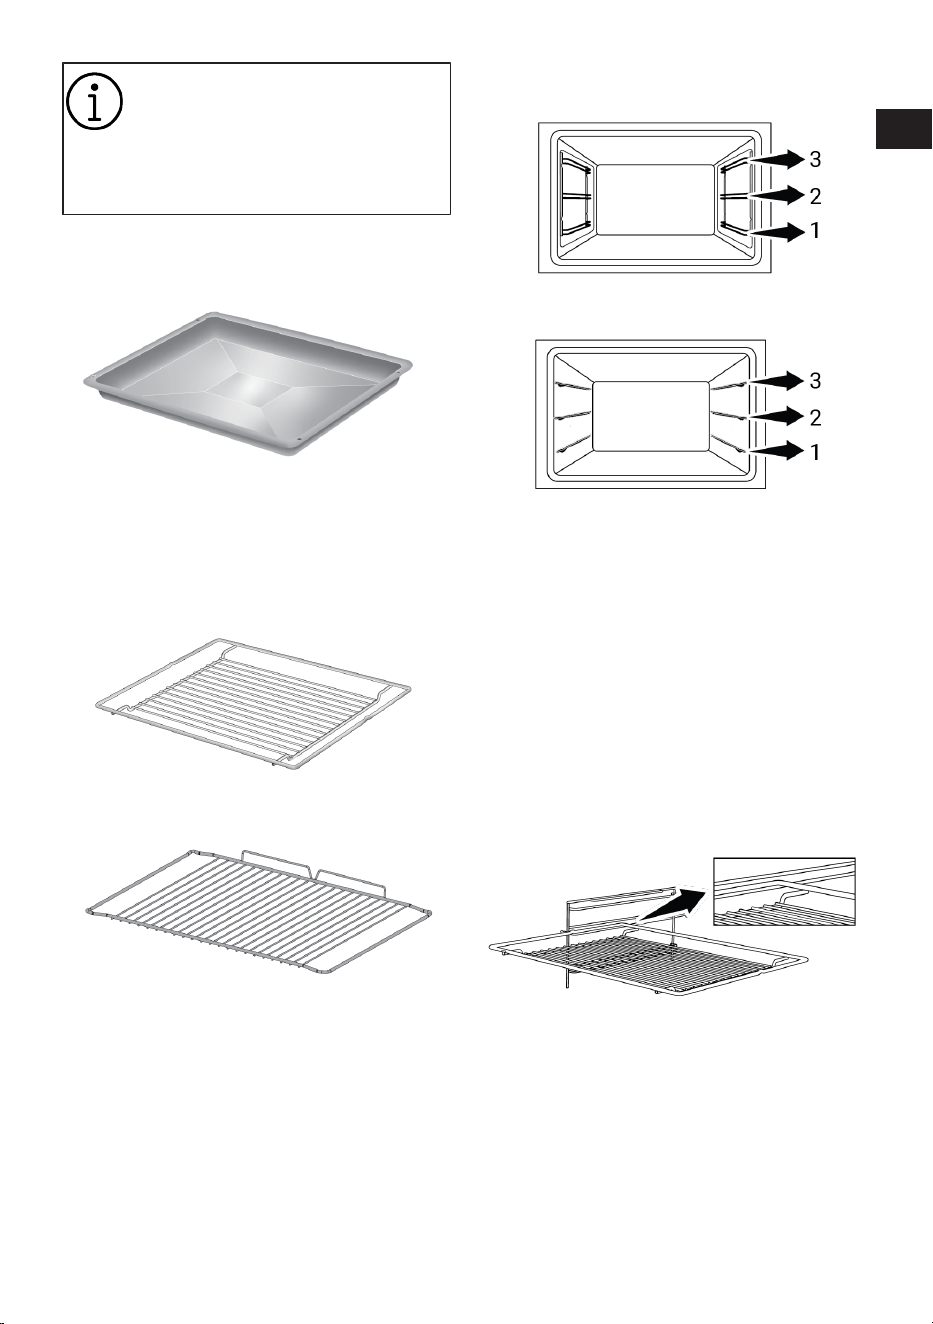
ES / 48
Las bandejas del interior de su apa-
rato pueden deformarse con el
efecto del calor. Esto no afecta a la
funcionalidad. La deformación de-
saparece cuando la bandeja se en-
fría.
Bandeja estándar
Se utiliza para pasteles, alimentos congela-
dos y para freír trozos grandes.
Parrilla
Se utiliza para freír o colocar los alimentos
que se van a hornear, freír y guisar en el es-
tante deseado.
En los modelos con estantes de alam-
bre :
En los modelos sin estantes de alam-
bre :
3.5 Uso de los accesorios del produc-
to
Estantes de cocina
Hay 3 niveles de posición de los estantes
en el área de cocción. También puede ver
el orden de los estantes en los números en
el marco frontal del horno.
En los modelos con estantes de alam-
bre :
En los modelos sin estantes de alam-
bre :
Colocación de la parrilla de alambre en las
parrillas de cocción
Es crucial colocar correctamente la parrilla
de alambre en los estantes laterales de
alambre. Mientras coloca la parrilla de
alambre en el estante deseado, la sección
abierta debe estar en el frente. Para una
mejor cocción, la parrilla de alambre debe
estar asegurada en el punto de tope de la
parrilla de alambre. No debe pasar por enci-
ma del tope para hacer contacto con la pa-
red trasera del horno.
En los modelos con estantes de alam-
bre :
En los modelos sin estantes de alam-
bre :
Es fundamental colocar correctamente la
parrilla de alambre en los estantes latera-
les. La parrilla de alambre tiene una direc-
ción cuando se coloca en el estante. Mien-
tras coloca la parrilla de alambre en el es-
tante deseado, la sección abierta debe es-
tar en el frente.
EN
ES
ET
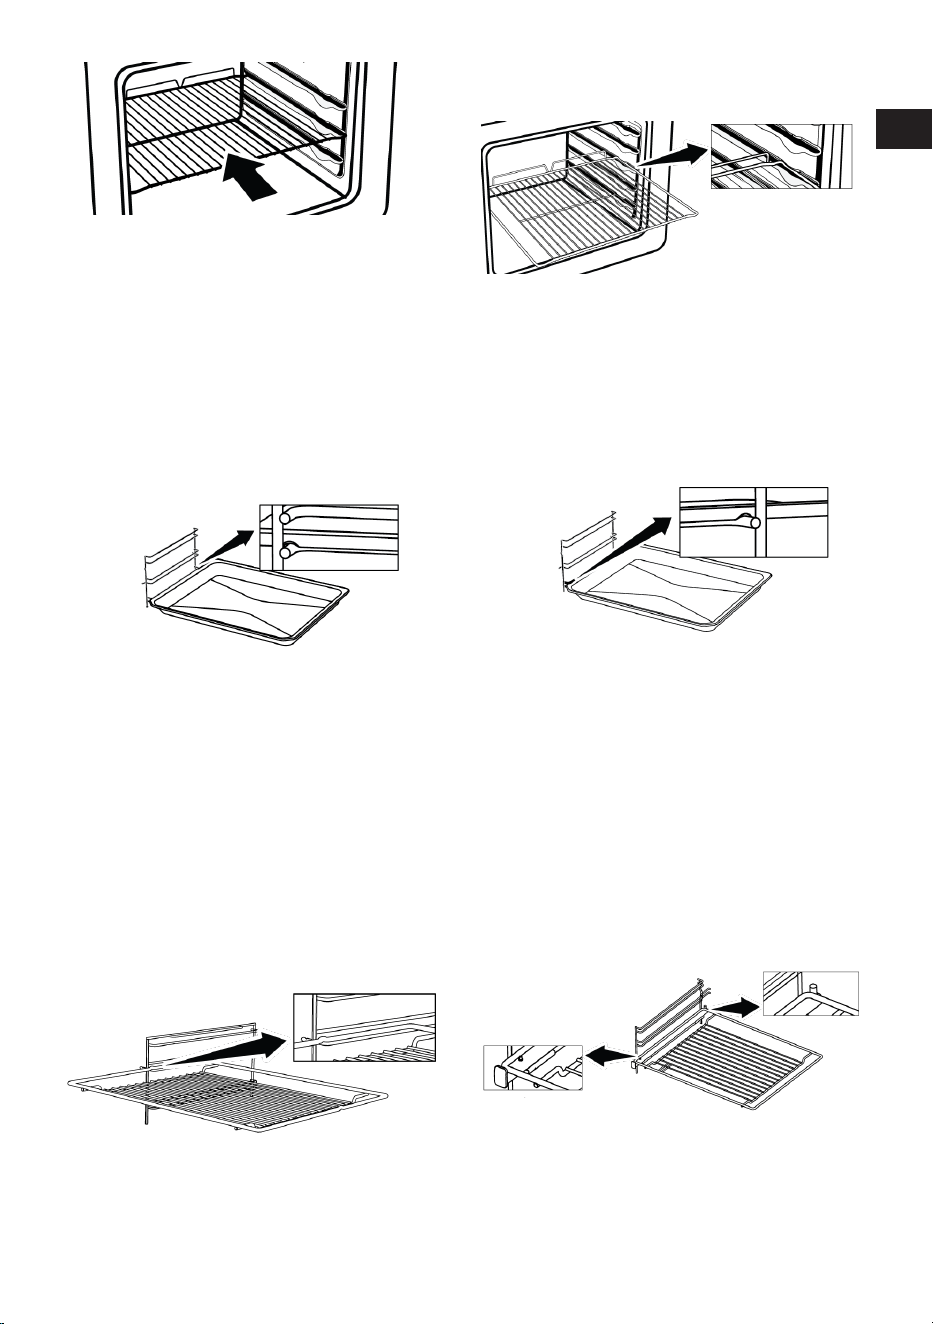
ES / 49
Colocación de la bandeja en las parrillas de
cocción
También es crucial colocar correctamente
las bandejas en los estantes laterales de
alambre. Al colocar la bandeja en el estante
deseado, su lado destinado a la sujeción
debe quedar hacia el frente. Para una mejor
cocción, la bandeja debe estar asegurada
en el tope de la parrilla. No debe pasar por
encima del casquillo de tope para hacer
contacto con la pared trasera del horno.
Función de parada de la parrilla de alam-
bre.
Hay una función de parada para evitar que
la parrilla de alambre se vuelque fuera del
estante de alambre. Con esta función, pue-
de sacar su comida de manera fácil y segu-
ra. Mientras retira la rejilla de alambre, pue-
de tirar de ella hacia adelante hasta que lle-
gue al punto de tope. Debes pasar por enci-
ma de este punto para eliminarlo por com-
pleto.
En los modelos con estantes de alam-
bre :
En los modelos sin estantes de alam-
bre :
Función de parada de bandeja
También hay una función de parada para
evitar que la bandeja se salga de la rejilla.
Mientras retira la bandeja, suéltela del cas-
quillo de tope trasero y tire de ella hacia us-
ted hasta que llegue a la parte delantera.
Debe pasar por encima de este casquillo de
tope para quitarlo por completo.
Colocación adecuada de la parrilla de
alambre y la bandeja en los rieles telescó-
picos.En modelos con estantes de alam-
bre y modelos telescópicos
Gracias a los rieles telescópicos, las bande-
jas o la parrilla de alambre se pueden insta-
lar y quitar fácilmente. Cuando utilice ban-
dejas y parrillas de alambre con el riel teles-
cópico, debe tener cuidado de que los pa-
sadores en la parte delantera y trasera de
los rieles telescópicos se apoyen contra los
bordes de la parrilla y la bandeja (como se
muestra en la figura).
EN
ES
ET
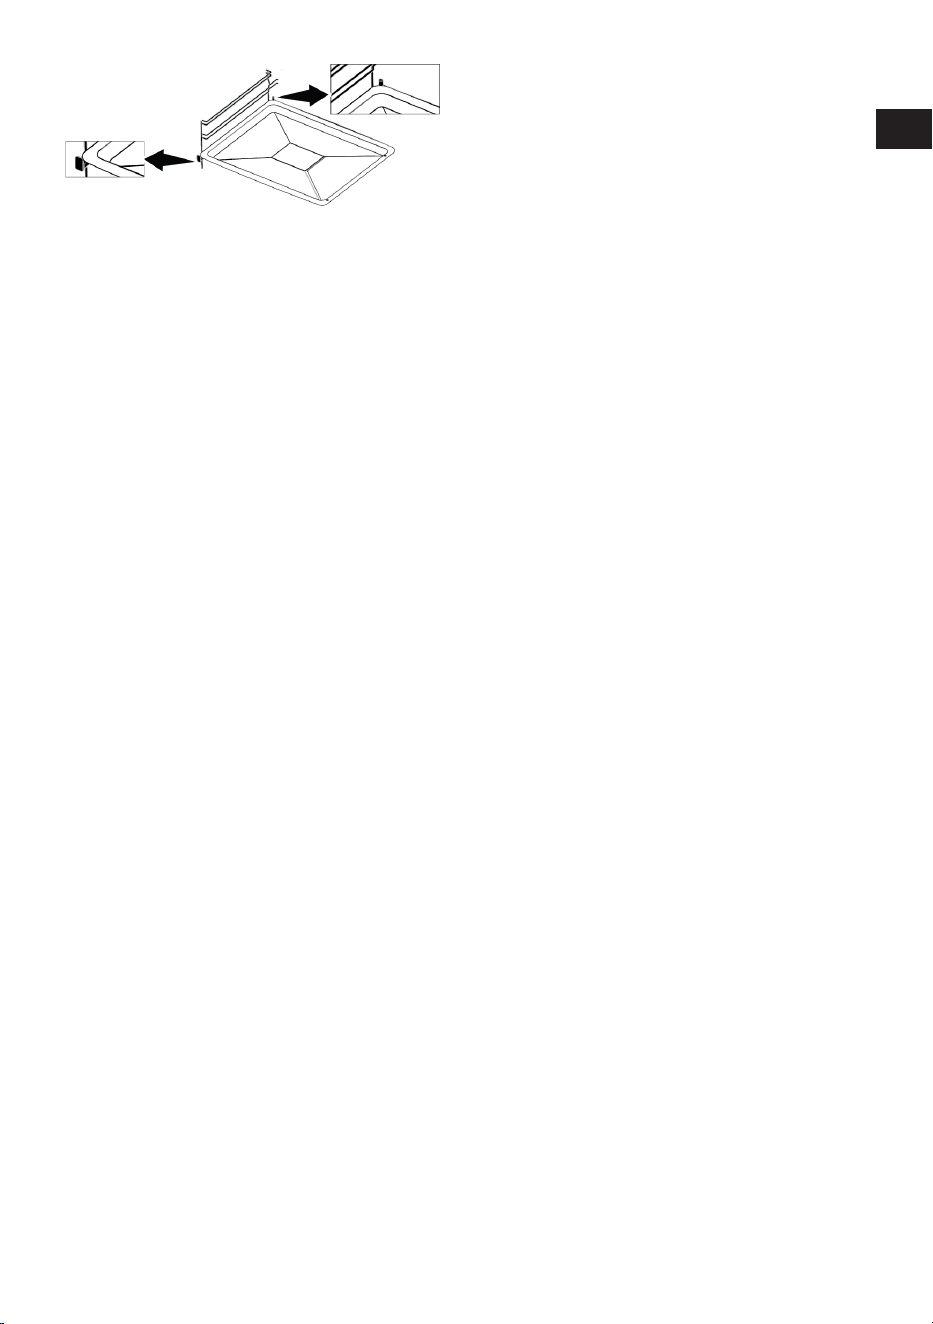
ES / 50
EN
ES
ET
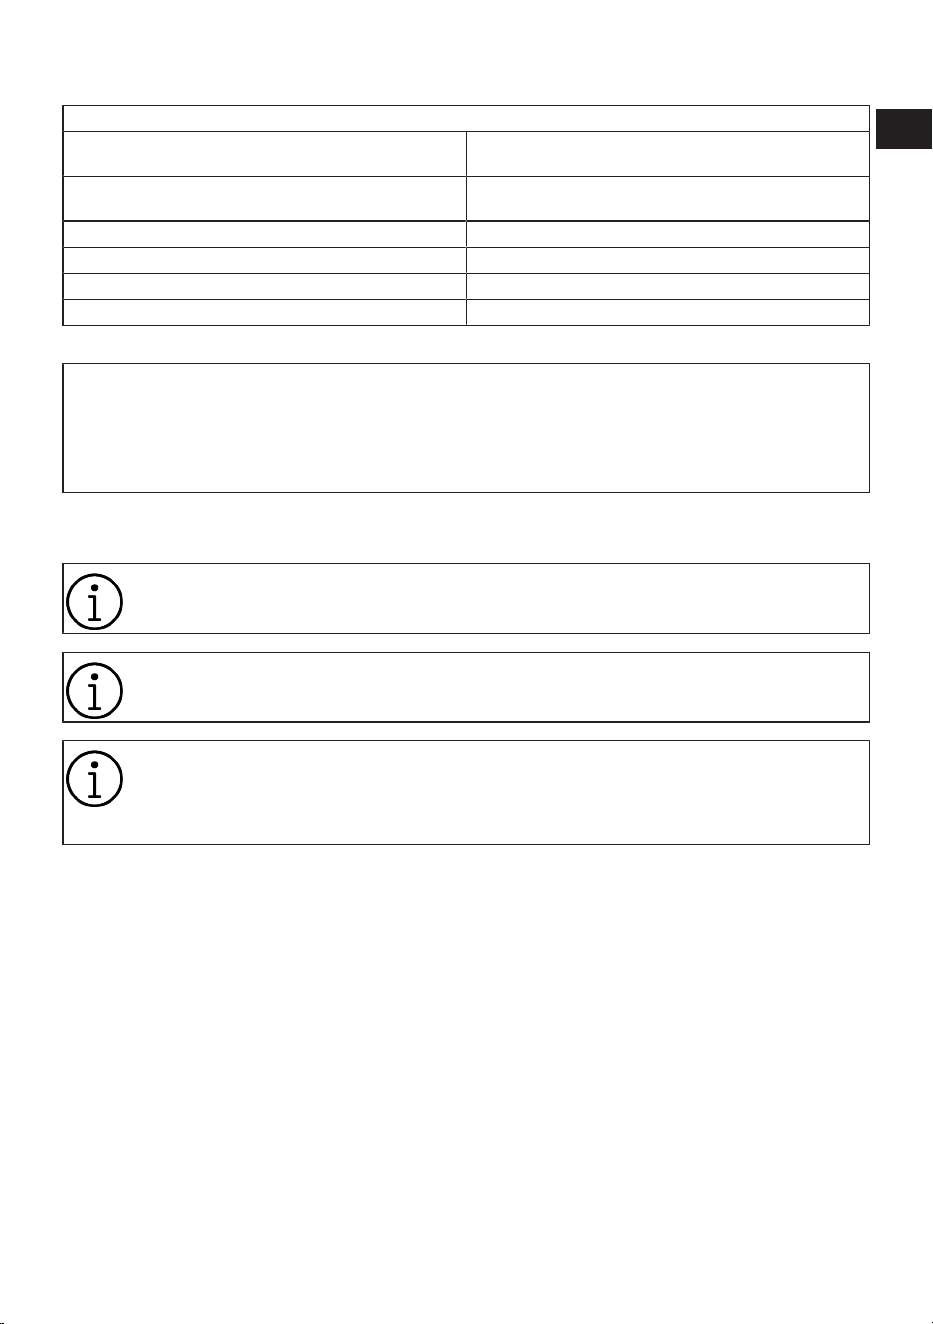
ES / 51
3.6 Especificaciones Técnicas
Características técnicas generales
Dimensiones externas del producto (altura/anchura/pro-
fundidad) (mm)
455 /594 /567
Dimensiones de la instalación del horno (altura / anchu-
ra / profundidad) (mm)
450-460 /560 /min. 550
Tensión/Frecuencia 220-240 V ~; 50 Hz
Tipo y sección del cable utilizado/apto para el producto min. H05VV-FG 3 x 1,5 mm2
Consumo total de energía (kW) 2,4
Tipo de horno Horno multifuncional
Lo básico: La información de la etiqueta energética de los hornos eléctricos de tipo doméstico se ofrece de acuerdo
con la norma EN 60350-1 / IEC 60350-1. Los valores se determinan en las funciones Calentamiento superior e infe-
rior o (si existe) Calentamiento inferior/superior asistido por ventilador f con la carga estándar.
La clase de eficiencia energética se determina de acuerdo con la siguiente priorización, dependiendo de si existen o
no las funciones pertinentes en el producto. 1-Calefacción «eco» por ventilador , 2-Calentamiento por ventilador , 3-
Parrilla baja asistida por ventilador , 4-Calentamiento superior e inferior.
Las especificaciones técnicas pueden modificarse sin previo aviso para mejorar la
calidad del aparato.
Las cifras de este manual son esquemáticas y pueden no coincidir exactamente
con el aparato.
Los valores indicados en las etiquetas de los aparatos o en la documentación que
los acompaña se obtienen en condiciones de laboratorio de acuerdo con las nor-
mas pertinentes. Estos valores pueden variar en función de las condiciones opera-
tivas y ambientales del aparato.
EN
ES
ET
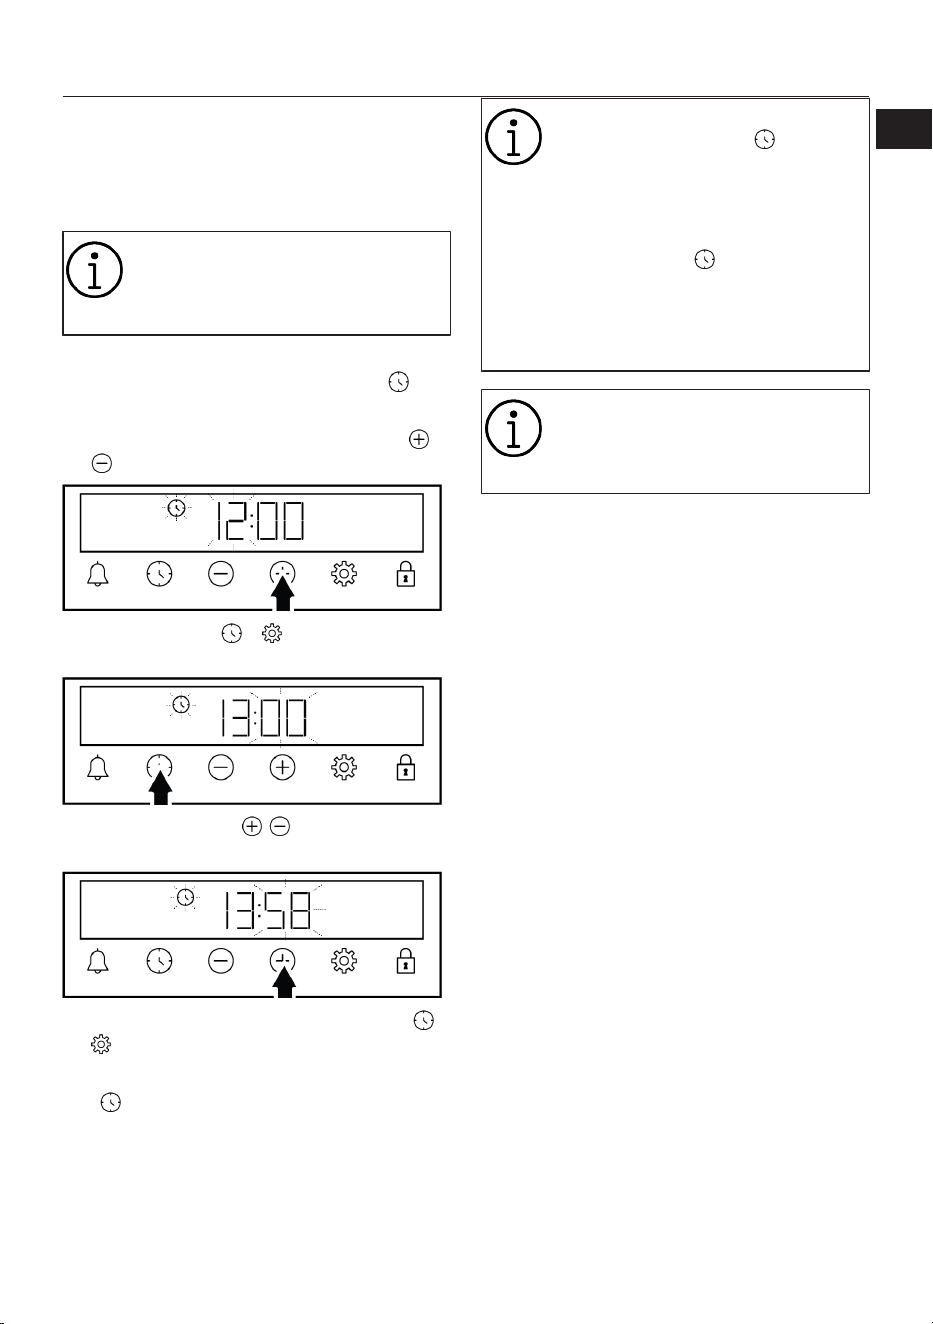
ES / 52
4 Primer uso
Antes de empezar a utilizar el producto, se
recomienda hacer lo que se indica en los si-
guientes apartados respectivamente.
4.1 Primer ajuste del temporizador
Ajuste siempre la hora del día antes
de utilizar su horno. Si no lo progra-
ma, no podrá cocinar en algunos
modelos de horno.
1. Cuando el horno se pone en marcha por
primera vez, "12:00" y el símbolo par-
padean en la pantalla.
2. Ajuste la hora del día con las teclas /
.
3. Toque la tecla o para activar el
campo de los minutos.
4. Toque las teclas / para ajustar los
minutos.
5. Confirme el ajuste pulsando la tecla o
.
ð La hora del día se ajusta y el símbolo
desaparece de la pantalla.
Si la primera vez no está ajustada,
los símbolos "12:00" y continú-
an parpadeando y su horno no se
pondrá en marcha. Para que su hor-
no funcione, debe confirmar la hora
del día ajustando la hora del día o
tocando la tecla cuando esté en
"12:00". Más adelante podrá cam-
biar el ajuste de la hora del día co-
mo se describe en la sección "Ajus-
tes".
En caso de un corte de energía, los
ajustes de la hora del día se cance-
lan. Se debe volver a poner en mar-
cha.
4.2 Limpieza inicial
1. Retire todos los materiales de embalaje.
2. Retire todos los accesorios del horno
suministrados con el producto.
3. Haga funcionar el producto durante 30
minutos y luego, apáguelo. De esta ma-
nera, los residuos y capas que puedan
haber permanecido en el horno durante
la producción se queman y se limpian.
4. Al utilizar el aparato, seleccione la tem-
peratura más alta y la función de todos
los calentadores del aparato. Véase
“Funciones del horno [}47]”. Puede
aprender a manejar el horno en la si-
guiente sección.
5. Espere a que el horno se enfríe.
6. Limpie las superficies del aparato con
un paño o esponja húmedos y séquelas
con un paño.
Antes de utilizar los accesorios:
Limpie los accesorios que retire del horno
con agua detergente y una esponja de lim-
pieza suave.
NOTICE: Algunos detergentes o agentes
de limpieza podrían provocar daño en la su-
perficie. No utilice detergentes abrasivos,
polvos de limpieza, cremas de limpieza ni
objetos punzantes durante la limpieza.
EN
ES
ET
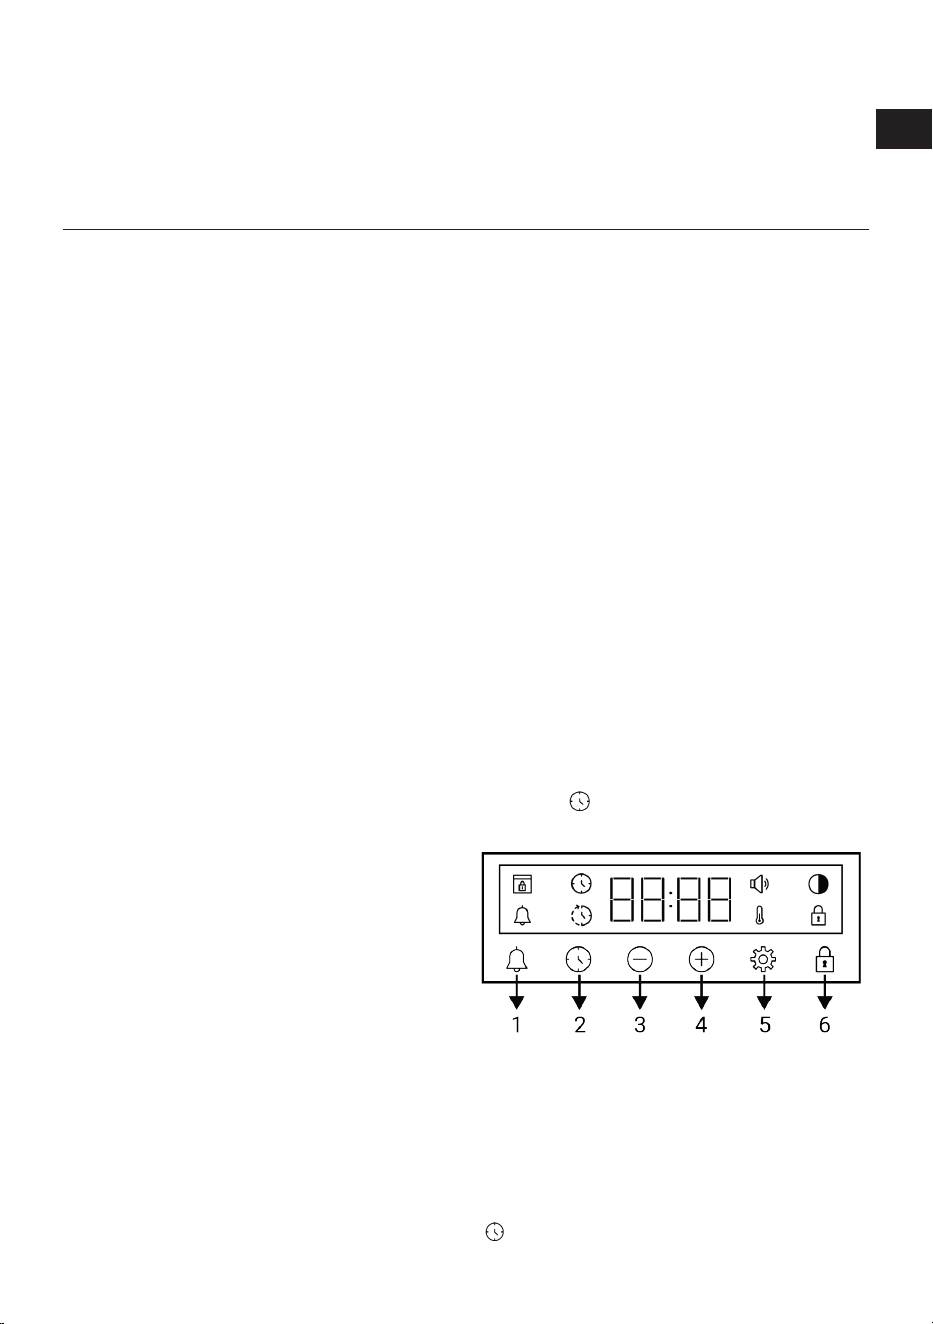
ES / 53
NOTICE: Durante el primer uso, puede salir
humo y olor durante varias horas. Esto es
normal y sólo se necesita una buena venti-
lación para eliminarlo. Evite inhalar directa-
mente el humo y los olores que se forman.
5 Uso del horno
5.1 Información general sobre el uso
del horno
Ventilador de refrigeración ( Varía según
el modelo del aparato. Puede que no es-
té disponible en el aparato. )
El aparato tiene un ventilador de refrigera-
ción. El ventilador de enfriamiento se activa
automáticamente cuando es necesario y
enfría tanto la parte delantera del aparato
como los muebles. Se desactiva automáti-
camente cuando termina el proceso de en-
friamiento. El aire caliente sale por la puer-
ta del horno. No cubra estas aberturas de
ventilación con nada. De lo contrario, el hor-
no puede sobrecalentarse. El ventilador de
enfriamiento continúa funcionando durante
el funcionamiento del horno o después de
que el horno se apaga (aproximadamente
20-30 minutos). Si cocina programando el
temporizador del horno, al final del tiempo
de cocción, el ventilador de refrigeración se
apaga con todas las funciones. El tiempo
de funcionamiento del ventilador de enfria-
miento no puede ser determinado por el
usuario. Se enciende y apaga automática-
mente. Esto no es ningún error.
La luz del horno
La iluminación del horno se enciende cuan-
do el horno comienza a hornear. En algu-
nos modelos, la iluminación está encendi-
da durante la cocción, mientras que en
otros se apaga después de un tiempo de-
terminado.
5.2 Funcionamiento de la unidad de
control del horno
Advertencias generales para la unidad de
control del horno
• El tiempo máximo que se puede ajustar
para el proceso de horneado es de 5 ho-
ras 59. En caso de fallo de alimentación,
el programa se cancela. Tendrá que re-
programar.
• Mientras se hace cualquier ajuste, los
símbolos relevantes parpadean en la
pantalla. Se debe esperar un corto tiem-
po para que se guarden los ajustes.
• Si se ha realizado algún ajuste de coc-
ción, no se puede ajustar la hora del día.
• Si el tiempo de cocción está ajustado
cuando se inicia la cocción, el tiempo
restante se muestra en la pantalla.
• En los casos en que se ajusta el tiempo
de cocción o el tiempo de finalización de
la cocción; puede cancelar automática-
mente pulsando durante mucho tiempo
la tecla .
Temporizador
1 Tecla de alarma
2 Tecla de ajuste de la hora
3 Tecla de disminución
4 Tecla de aumento
5 Tecla de ajustes
6 Llave de bloqueo de teclas
Símbolos de la pantalla
: Símbolo de tiempo de cocción
EN
ES
ET
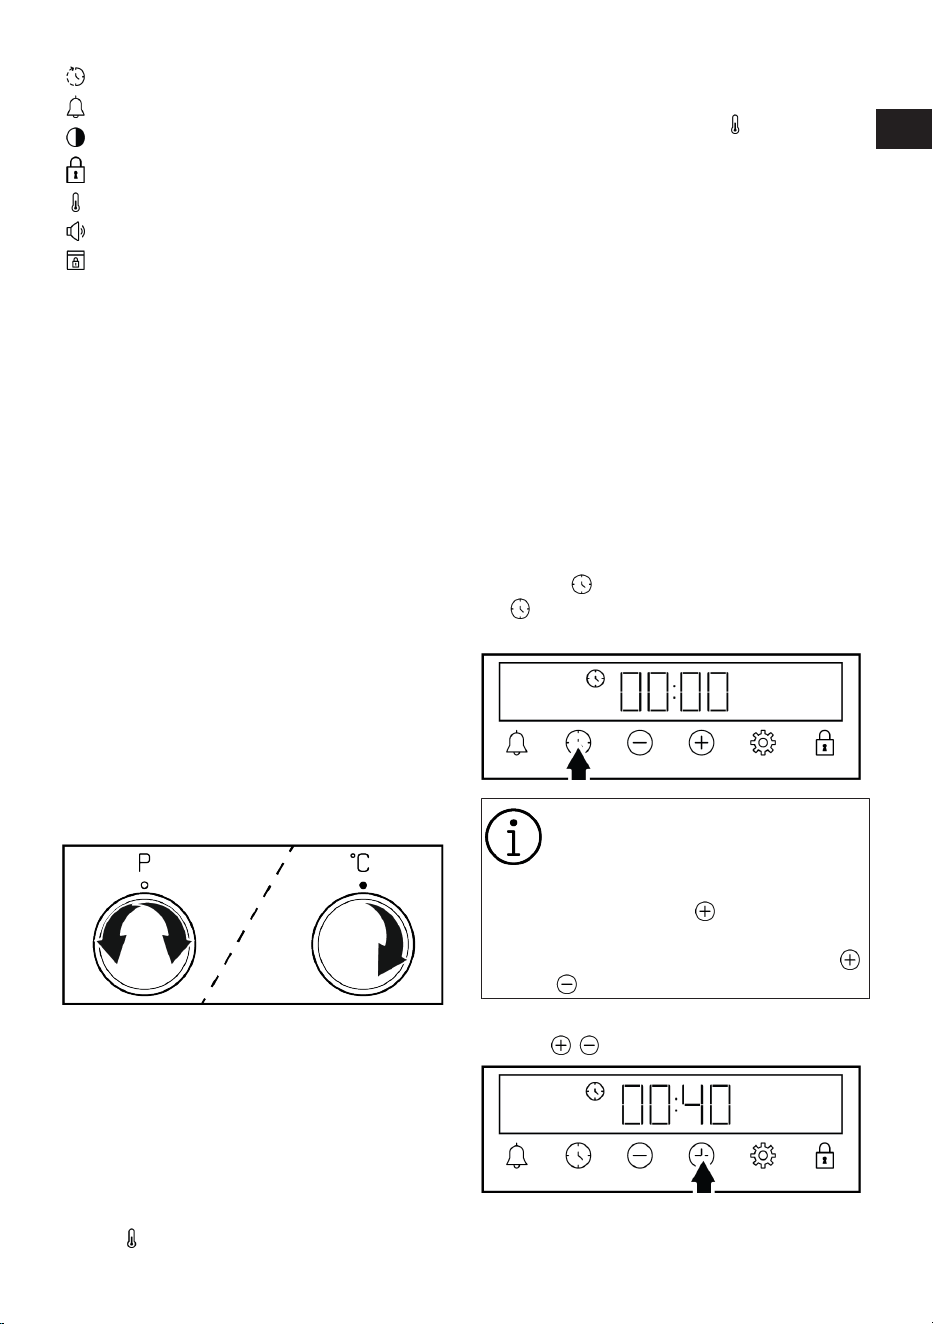
ES / 54
: Símbolo de fin de cocción *
: Símbolo de la alarma
: Símbolo de luminosidad
: Símbolo de bloqueo de teclas
: El símbolo de la temperatura
: Símbolo de nivel de volumen
: Símbolo de bloqueo de la puerta *
*Varía según el modelo del aparato. Puede que no es-
té disponible en el aparato.
Encender el horno
Cuando seleccione una función de funcio-
namiento con la que desee cocinar con el
mando de selección de funciones y fije una
temperatura determinada con el mando de
temperatura, el horno comenzará a funcio-
nar.
Apagar el horno
Puede apagar la cámara de cocción giran-
do el botón de selección de funciones y el
botón de temperatura a la posición de apa-
gado (arriba).
Cocción manual para seleccionar la tempe-
ratura y la función de funcionamiento del
horno
Puede cocinar haciendo un control manual
(con su propio mando) sin ajustar el tiempo
de cocción, seleccionando la temperatura y
la función de funcionamiento específicas
de sus alimentos.
1. Seleccione la función de funcionamien-
to que desea cocinar con el mando de
selección de funciones.
2. Ajuste la temperatura que desea cocinar
con la perilla de temperatura.
ð El horno comenzará a funcionar inme-
diatamente con la función y temperatu-
ra seleccionadas y aparecerá el símbo-
lo en la pantalla. Cuando la tempera-
tura en el interior de la cámara de coc-
ción alcanza la temperatura ajustada,
desaparece el símbolo . La cámara
de cocción no se apaga automática-
mente, ya que la cocción manual se re-
aliza sin ajustar el tiempo de cocción.
Tiene que controlar la cocción y apa-
garla usted mismo. Cuando termine de
cocinar, apague el horno girando la pe-
rilla de selección de funciones y la peri-
lla de temperatura a la posición de apa-
gado (arriba).
Cocine ajustando el tiempo de cocción:
Puede hacer que el horno se apague auto-
máticamente al final del tiempo seleccio-
nando la temperatura y la función de fun-
cionamiento específica de su alimento y
ajustando el tiempo de cocción en el tem-
porizador.
1. Seleccionar la función de cocción.
2. Toque hasta que aparezca el símbolo
en la pantalla para el tiempo de coc-
ción.
Después de ajustar la función de
funcionamiento y la temperatura,
puede ajustar el tiempo de cocción
durante 30 minutos pulsando direc-
tamente la tecla para un ajuste
rápido del tiempo de cocción y
cambiar el tiempo con las teclas
/ .
3. Ajuste el tiempo de cocción con las te-
clas / .
EN
ES
ET
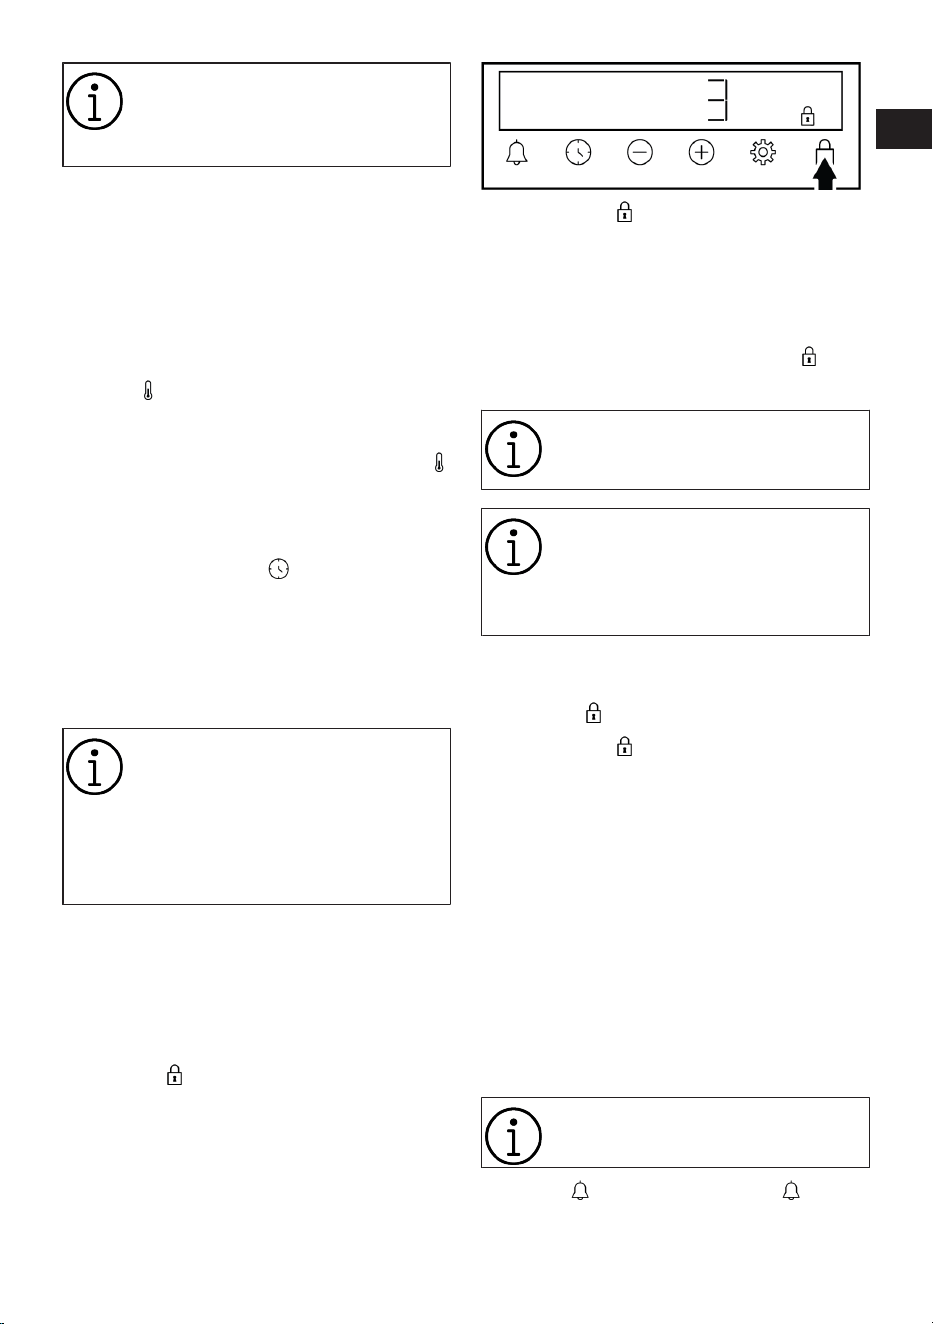
ES / 55
El tiempo de cocción aumenta 1
minuto en los primeros 15 minutos,
después de 15 minutos aumenta 5
minutos.
4. Ponga su comida en el horno y ajuste la
temperatura con la perilla de temperatu-
ra.
ð Su horno comenzará a funcionar
inmediatamente con la función y
temperatura seleccionadas. El
tiempo de cocción ajustado empie-
za a contar hacia atrás y aparece
en la pantalla. Cuando la tempe-
ratura en el interior de la cámara
de cocción alcanza la temperatura
ajustada, desaparece el símbolo
.
5. Una vez finalizado el tiempo de cocción
ajustado, en la pantalla el mensaje "Fin"
aparece, el símbolo parpadea y el
temporizador emite un pitido.
6. La advertencia suena durante dos minu-
tos. Presione cualquier tecla para dete-
ner la alarma. La advertencia se detiene
y la hora del día aparece en la pantalla.
Si se pulsa cualquier tecla al final
del aviso sonoro, el horno volverá a
funcionar. Para evitar que el horno
vuelva a funcionar al final de la ad-
vertencia, apáguelo girando el man-
do de temperatura y el mando de
función a la posición “0”.
5.3 Ajustes
Activar el bloqueo de teclas
Utilizando la función de bloqueo de la llave,
puede proteger el horno de interferencias.
1. Toque la tecla hasta que aparezca el
símbolo en la pantalla.
ð El símbolo aparece en la pantalla y
se inicia la cuenta atrás 3-2-1. El blo-
queo de teclas se activa cuando finali-
za la cuenta atrás. Cuando se toca
cualquier tecla una vez activado el blo-
queo de teclas, el temporizador emite
una señal acústica y el símbolo par-
padea.
Si suelta la tecla antes de que fina-
lice la cuenta atrás, el bloqueo de
teclas no se activa.
Las teclas del temporizador no se
pueden utilizar cuando el bloqueo
de teclas está activado. El bloqueo
de teclas no se cancelará en caso
de un corte eléctrico.
Desactivar el bloqueo de teclas
1. Toque la tecla hasta que desaparezca el
símbolo en la pantalla.
ð El símbolo desaparece de la pantalla
y el bloqueo de teclas se desactiva.
Ajustar la alarma
También puede utilizar el temporizador del
producto para cualquier aviso o recordato-
rio que no sea el horneado. El despertador
no tiene ningún efecto sobre el funciona-
miento del horno. Se utiliza para fines de
advertencia. Por ejemplo, puede utilizar el
reloj despertador cuando quiera girar los
alimentos en el horno a una hora determi-
nada. Tan pronto como la hora establecida
haya expirado, el temporizador le da una
advertencia sonora.
El tiempo máximo de alarma puede
ser de 23 horas y 59 minutos.
1. Toque hasta que el símbolo de la
llave aparezca en la pantalla.
EN
ES
ET
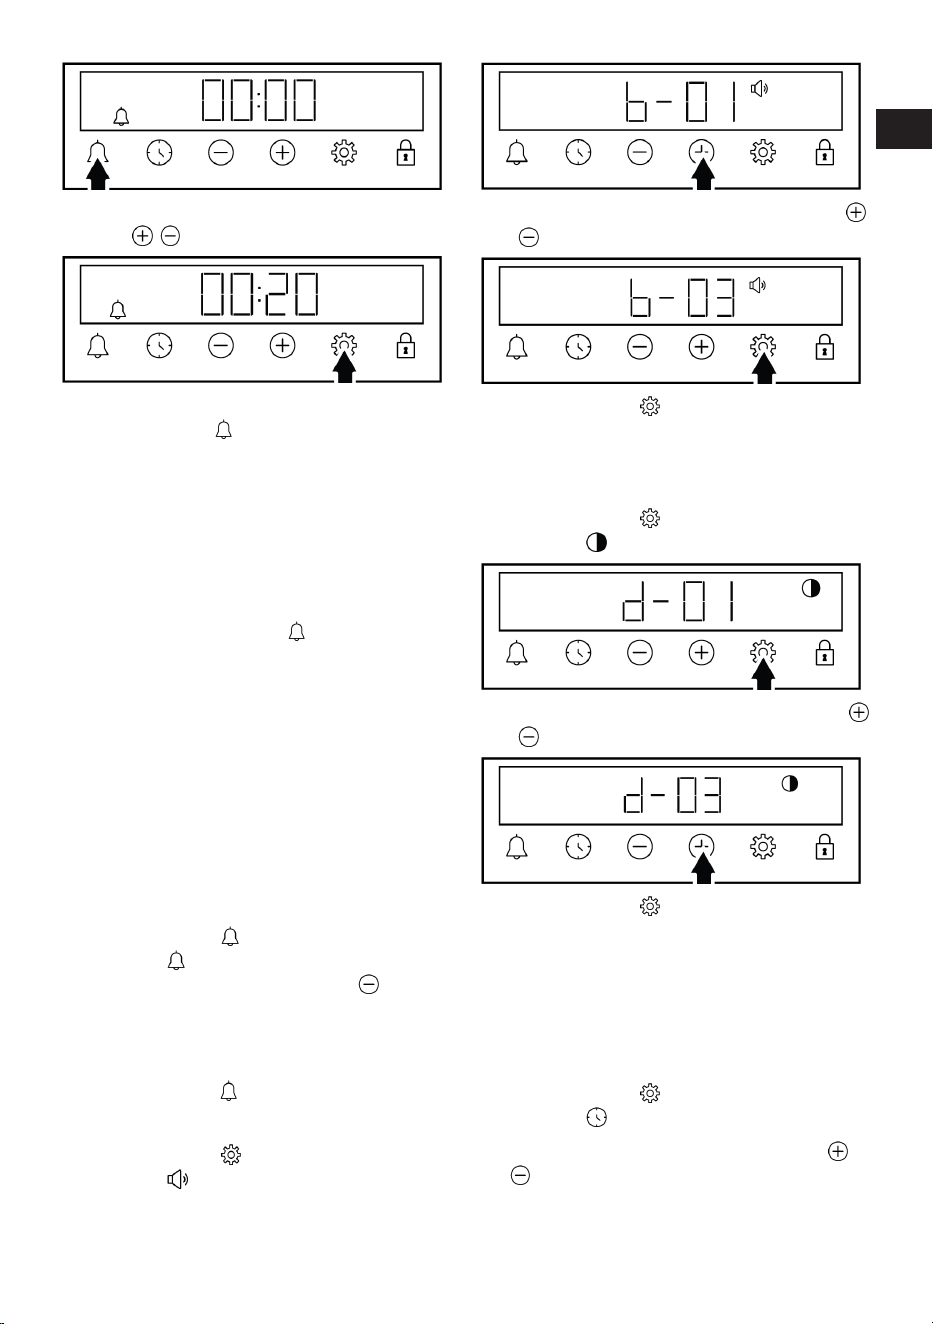
ES / 56
2. Ajuste la hora de la alarma con las te-
clas / .
ð Tras ajustar la hora de la alarma, el
símbolo permanece encendido y
la hora de la alarma comienza la
cuenta atrás en la pantalla. Si la
hora de alarma y el tiempo de coc-
ción se ajustan al mismo tiempo,
el tiempo más corto se muestra en
la pantalla.
3. Después de que la hora de alarma haya
terminado, el símbolo comienza a
parpadear y le da una advertencia sono-
ra.
Apagar la alarma
1. Al final del periodo de alarma, la adver-
tencia suena durante dos minutos. To-
que cualquier tecla para detener la ad-
vertencia sonora.
ð La advertencia se detiene y la hora del
día aparece en la pantalla.
Si desea cancelar la alarma;
1. Toque la tecla hasta que aparezca el
símbolo en la pantalla para reajustar
la hora de la alarma. Toque la tecla
hasta que aparezca el símbolo "00:00"
en la pantalla.
2. También puede cancelar la alarma to-
cando la tecla durante mucho tiempo.
Ajustar el volumen
1. Toque la tecla hasta que aparezca el
símbolo en la pantalla.
2. Ajuste el nivel deseado con las teclas
/ . (b-01-b-02-b-03)
3. Toque la tecla para confirmar o espe-
re sin tocar ninguna tecla. El volumen
ajustado se activa al cabo de un rato.
Ajuste del brillo de la pantalla
1. Toque la tecla hasta que aparezca el
símbolo en la pantalla.
2. Ajuste el brillo deseado con las teclas
/ . (d-01-d-02-d-03)
3. Toque la tecla para confirmar o espe-
re sin tocar ninguna tecla. La luminosi-
dad ajustada se activa al cabo de un ra-
to.
Cambiar la hora del día
En su horno para cambiar la hora del día
que haya ajustado previamente:
1. Toque la tecla hasta que aparezca el
símbolo en la pantalla.
2. Ajuste la hora del día con las teclas /
.
EN
ES
ET
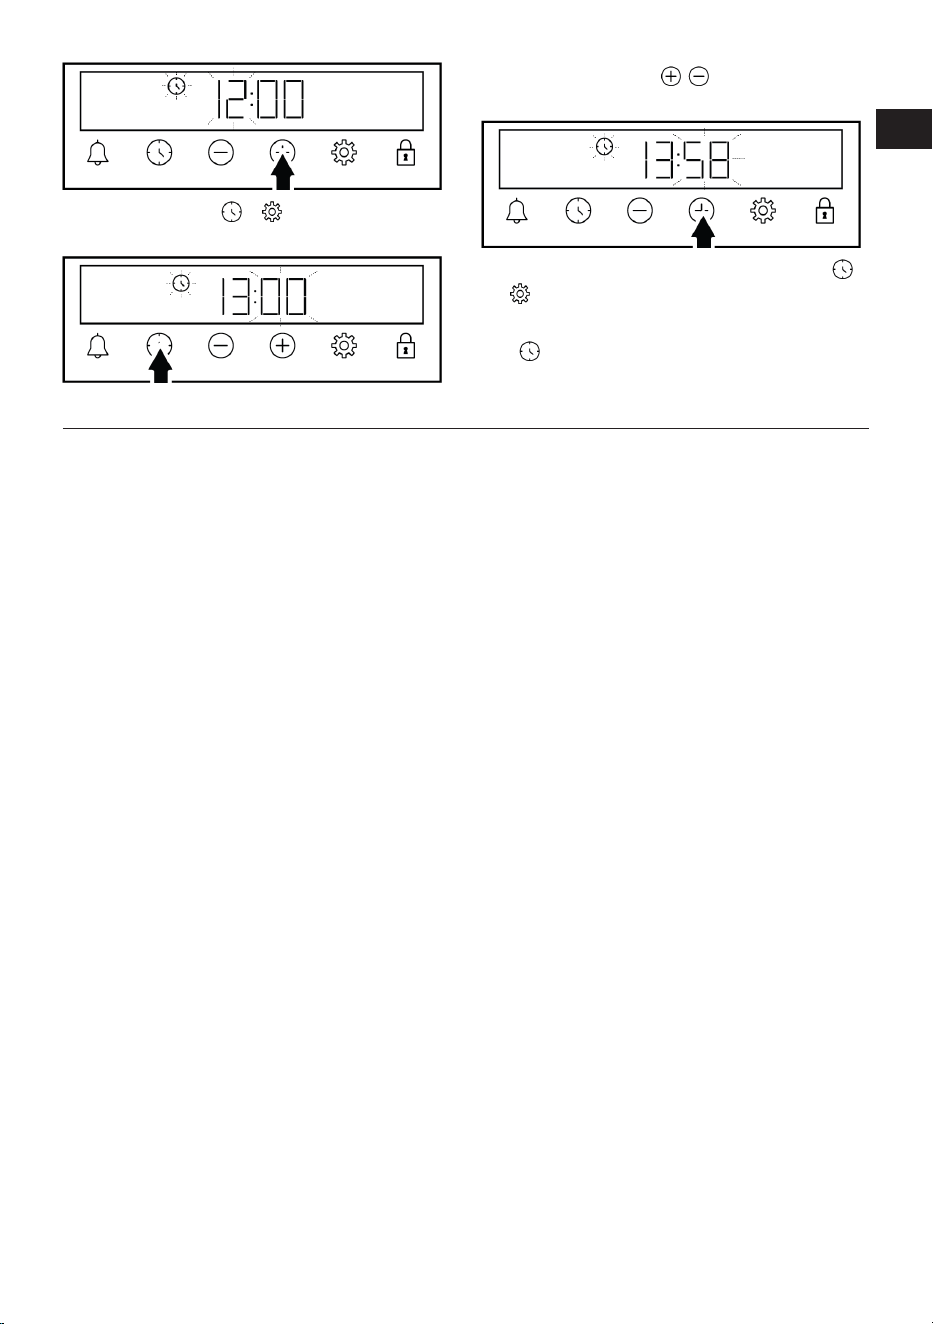
ES / 57
3. Toque la tecla o para activar el
campo de los minutos.
4. Toque las teclas / para ajustar los
minutos.
5. Confirme el ajuste pulsando la tecla o
.
ð La hora del día se ajusta y el símbolo
desaparece de la pantalla.
6 Información general sobre el horneado
En este apartado encontrará consejos para
preparar y cocinar sus alimentos.
Además, en esta sección se describen al-
gunos de los alimentos probados como
productores y los ajustes más adecuados
para estos alimentos. También se indican
los ajustes y accesorios de horno apropia-
dos para estos alimentos.
6.1 Advertencias generales sobre la
cocción en el horno
• Al abrir la puerta del horno durante o des-
pués de la cocción, puede salir vapor ca-
liente. El vapor puede quemarle las ma-
nos, la cara y/o los ojos. Al abrir la puerta
del horno, no se acerque.
• El intenso vapor generado durante la coc-
ción puede formar gotas de agua con-
densada en el interior y exterior del horno
y en las partes superiores del mueble de-
bido a la diferencia de temperatura. Esto
es algo normal y físico.
• Los valores de temperatura y tiempo de
cocción indicados para los alimentos
pueden variar según la receta y la canti-
dad. Por esta razón, estos valores se dan
como rangos.
• Retire siempre del horno los accesorios
no utilizados antes de comenzar a coci-
nar. Los accesorios que permanecen en
el horno pueden impedir que su comida
se cocine a los valores correctos.
• Para los alimentos que cocinará según
su propia receta, puede hacer referencia
a los alimentos similares que se dan en
las tablas de cocina.
• El uso de los accesorios suministrados
asegura que se obtenga el mejor rendi-
miento de la cocina. Tenga en cuenta
siempre las advertencias e informacio-
nes del fabricante para los utensilios de
cocina externos que vaya a utilizar.
• Corte el papel antigrasa que va a utilizar
en su cocina en tamaños adecuados al
recipiente en el que va a cocinar. Los pa-
peles sulfurados que se desbordan del
recipiente pueden crear un riesgo de que-
maduras y afectar a la calidad del horne-
ado. Utilice el papel antigrasa que usará
en el rango de temperatura especificado.
• Para una buena cocción, coloque los ali-
mentos en el estante correcto recomen-
dado. No cambie la posición del estante
durante la cocción.
6.1.1 Pasteles y alimentos para el hor-
no
Información general
• Recomendamos utilizar los accesorios
del aparato para un buen funcionamiento
de la cocina. Si va a utilizar un utensilio
de cocina externo, prefiera utensilios os-
curos, antiadherentes y resistentes al ca-
lor.
EN
ES
ET

ES / 58
• Si se recomienda el precalentamiento en
la mesa de cocción, asegúrese de poner
los alimentos en el horno después del
precalentamiento.
• Si va a cocinar utilizando utensilios de
cocina en la parrilla de alambre, colóque-
los en el centro de la parrilla de alambre,
no cerca de la pared trasera.
• Todos los ingredientes utilizados en la
elaboración de pasteles deben estar fres-
cos y a temperatura ambiente.
• El estado de cocción de los alimentos
puede variar en función de la cantidad de
alimentos y del tamaño de la olla.
• Los moldes de metal, cerámica y vidrio
prolongan el tiempo de cocción y las su-
perficies inferiores de los alimentos de
pastelería no se doran uniformemente.
• Si utiliza papel de horno, puede observar-
se un pequeño dorado en la superficie in-
ferior del alimento. En esta situación, es
posible que tenga que prolongar el perio-
do de cocción unos 10 minutos.
• Los valores especificados en las tablas
de cocción se determinan como resulta-
do de las pruebas realizadas en nuestros
laboratorios. Los valores adecuados para
usted pueden diferir de estos valores.
• Coloque su comida en el estante apropia-
do recomendado en la mesa de cocción.
Consulte el estante inferior del horno co-
mo estante 1.
Consejos para hornear pasteles
• Si el pastel está demasiado seco, aumen-
te la temperatura en 10°C y acorte el
tiempo de cocción.
• Si el pastel está húmedo, utilice una pe-
queña cantidad de líquido o reduzca la
temperatura en 10°C.
• Si la parte superior de la tarta está que-
mada, colóquela en el estante inferior,
baje la temperatura y aumente el tiempo
de horneado.
• Si el interior del pastel está bien cocido,
pero el exterior está pegajoso, utilice me-
nos líquido, disminuya la temperatura y
aumente el tiempo de cocción.
Consejos para la pastelería
• Si la masa está demasiado seca, aumen-
te la temperatura en 10 °C y acorte el
tiempo de cocción. Humedezca las hojas
de masa con una salsa compuesta de le-
che, aceite, huevo y mezcla de yogur.
• Si la masa se está cocinando lentamente,
asegúrese de que el grosor de la que ha
preparado no desborde la bandeja.
• Si la masa está dorada en la superficie
pero el fondo no está cocido, asegúrese
de que la cantidad de salsa que va a utili-
zar para la masa no es demasiado en el
fondo de la masa. Para un dorado unifor-
me, intente repartir la salsa de manera
uniforme entre las hojas de masa y la
masa.
• Hornee su pastelería en la posición y la
temperatura adecuadas según la tabla de
cocción. Si la parte inferior aún no está lo
suficientemente dorada, colóquela en un
estante inferior para la próxima cocción.
Tabla de cocción para alimentos de pastelería y horno
Comida Accesorio a utili-
zar
Función de fun-
cionamiento
Posición de la
estantería
Temperatura (°C) Tiempo de coc-
ción (min)
(aprox.)
Pastel en la ban-
deja
Bandeja estándar
*
Calentamiento su-
perior e inferior
2 180 20 … 30
Pequeños paste-
les
Bandeja estándar
*
Calentamiento su-
perior e inferior
2 150 25 … 35
Pequeños paste-
les
Bandeja estándar
*
Calentamiento
por ventilador
1 150 … 160 35 … 50
EN
ES
ET

ES / 59
Comida Accesorio a utili-
zar
Función de fun-
cionamiento
Posición de la
estantería
Temperatura (°C) Tiempo de coc-
ción (min)
(aprox.)
Bizcocho
Molde redondo de
26 cm de diáme-
tro con pinza so-
bre parrilla de
alambre **
Calentamiento su-
perior e inferior
2 160 30 … 40
Bizcocho
Molde redondo de
26 cm de diáme-
tro con pinza so-
bre parrilla de
alambre **
Calentamiento
por ventilador
1 160 35 … 45
Galletas
Bandeja de repos-
tería *
Calentamiento su-
perior e inferior
2 170 25 … 35
Galletas
Bandeja de repos-
tería *
Calentamiento
por ventilador
1 170 30 … 40
Pastas
Bandeja estándar
*
Calentamiento su-
perior e inferior
2 180 35 … 45
Bollo
Bandeja estándar
*
Calentamiento su-
perior e inferior
2 200 20 … 30
Bollo
Bandeja estándar
*
Calentamiento
por ventilador
1 180 20 … 30
Pan integral
Bandeja estándar
*
Calentamiento su-
perior e inferior
2 200 30 … 40
Pan integral
Bandeja estándar
*
Calentamiento
por ventilador
1 200 30 … 40
Lasaña
Recipiente rectan-
gular de vidrio/
metal en la parri-
lla **
Calentamiento su-
perior e inferior
1 o 2 200 30 … 40
Tarta de manzana
Molde redondo de
metal negro de 20
cm de diámetro
en la parrilla de
alambre **
Calentamiento su-
perior e inferior
2 180 50 … 60
Pizza
Bandeja estándar
*
Calentamiento su-
perior e inferior
2 200 … 220 10 … 20
Se recomienda precalentar todos los alimentos.
*Es posible que estos accesorios no se incluyan en el aparato.
**Estos accesorios no están incluidos en el aparato. Son accesorios disponibles en el mercado.
6.1.2 Carne, pescado y aves de corral
Los puntos clave de la parrilla
• Sazonar con zumo de limón y pimienta
antes de cocinar el pollo entero, el pavo y
las piezas grandes de carne aumentará
el rendimiento de la cocción.
• Se tarda de 15 a 30 minutos más en coci-
nar la carne deshuesada que el filete fri-
to.
• Debe calcular entre 4 y 5 minutos de coc-
ción por cada centímetro de grosor de la
carne.
• Una vez finalizado el tiempo de cocción,
mantenga la carne en el horno durante
aproximadamente 10 minutos. El jugo de
la carne se distribuye mejor a la carne fri-
ta y no sale cuando se corta la carne.
• El pescado debe colocarse en el estante
de nivel medio o bajo en un plato resis-
tente al calor.
EN
ES
ET

ES / 60
• Cocinar los platos recomendados en la
mesa de cocción con una sola bandeja.
Tabla de cocción para carne, pescado y aves
Comida Accesorio a utili-
zar
Función de fun-
cionamiento
Posición de la
estantería
Temperatura (°C) Tiempo de coc-
ción (min)
(aprox.)
Bistec (entero) /
Asado (1 kg)
Bandeja estándar
*
Función "3D" 1
15 mins. 250/
max, después 180
… 190
60 … 80
Jarrete de corde-
ro (1,5-2 kg)
Bandeja estándar
*
Función "3D" 1 170 85 … 110
Pollo frito (1,8-2
kg)
Parrilla *
Coloque una ban-
deja en un estante
inferior.
Función "3D" 1
15 mins. 250/
max, después 190
70 … 90
Pavo (5,5 kg)
Bandeja estándar
*
Función "3D" 1
25 mins. 250/
max, después 180
… 190
150 … 210
Pescados
Parrilla *
Coloque una ban-
deja en un estante
inferior.
Función "3D" 1 200 20 … 30
Se recomienda precalentar todos los alimentos.
*Es posible que estos accesorios no se incluyan en el aparato.
**Estos accesorios no están incluidos en el aparato. Son accesorios disponibles en el mercado.
6.1.3 Parrilla
La carne roja, el pescado y la carne de ave
se doran rápidamente cuando se asan,
mantienen una bonita corteza y no se se-
can. Los filetes de carne, las brochetas de
carne, las salchichas, así como las verdu-
ras jugosas (tomates, cebollas, etc.) son
especialmente adecuados para la parrilla.
Advertencias generales
• Los alimentos no aptos para asar a la pa-
rrilla conllevan un riesgo de incendio. Asa
sólo la comida que es adecuada para el
fuego pesado de la parrilla. Además, no
coloque la comida demasiado lejos en la
parte posterior de la parrilla. Esta es la
zona más caliente y los alimentos grasos
pueden incendiarse.
• Cierre la puerta del horno durante el
asado. No asar nunca con la puerta
del horno abierta. ¡Las superficies ca-
lientes pueden causar quemaduras!
Los puntos clave de la parrilla
• Prepare alimentos de similar grosor y pe-
so tanto como sea posible para la parri-
lla.
• Colocar las piezas a asar en la parrilla o
en la bandeja de la parrilla distribuyéndo-
las sin exceder las dimensiones del ca-
lentador.
• Dependiendo del grosor de las piezas a
asar, los tiempos de cocción indicados
en la tabla pueden variar.
• Deslice la parrilla o la bandeja de la parri-
lla hasta el nivel deseado en el horno. Si
está cocinando en la parrilla, deslice la
bandeja del horno hasta el estante infe-
rior para recoger los aceites. La bandeja
del horno que va a deslizar debe tener un
tamaño que cubra toda el área de la pa-
rrilla. Es posible que esta bandeja no se
suministre con el producto. Ponga un po-
co de agua en la bandeja del horno para
facilitar la limpieza.
EN
ES
ET
ES / 61
Tabla de la parrilla
Comida Accesorio a utilizar Posición de la es-
tantería
Temperatura (°C) Tiempo de cocción
(min) (aprox.)
Pescados Parrilla 2 250 20 … 25
Trozos de pollo Parrilla 2 250 25 … 35
Albóndigas (ternera) -
12 cantidad
Parrilla 2 250 20 … 30
Chuletas de cordero Parrilla 2 250 20 … 25
Bistec - (cubos de car-
ne)
Parrilla 2 250 25 … 30
Chuleta de ternera Parrilla 2 250 25 … 30
Gratén de verduras Parrilla 2 220 20 … 30
Tostar pan Parrilla 2 250 3 … 5
Se recomienda precalentar durante 5 minutos toda la comida a la parrilla.
Dé la vuelta a las piezas de comida después de la mitad del tiempo total de asado.
6.1.4 Alimentos de prueba
• Los alimentos de esta tabla de cocción
se preparan de acuerdo con la norma EN
60350-1 para facilitar las pruebas del
aparato a los institutos de control.
Mesa de cocción para comidas de prueba
Comida Accesorio a utili-
zar
Función de fun-
cionamiento
Posición de la
estantería
Temperatura (°C) Tiempo de coc-
ción (min)
(aprox.)
Shortbread (galle-
ta dulce)
Bandeja estándar
*
Calentamiento su-
perior e inferior
2 140 20 … 30
Shortbread (galle-
ta dulce)
Bandeja estándar
*
Calentamiento
por ventilador
2 140 15 .. 25
Pequeños paste-
les
Bandeja estándar
*
Calentamiento su-
perior e inferior
2 150 25 … 35
Pequeños paste-
les
Bandeja estándar
*
Calentamiento
por ventilador
1 150 … 160 35 … 50
Bizcocho
Molde redondo de
26 cm de diáme-
tro con pinza so-
bre parrilla de
alambre **
Calentamiento su-
perior e inferior
2 160 30 … 40
Bizcocho
Molde redondo de
26 cm de diáme-
tro con pinza so-
bre parrilla de
alambre **
Calentamiento
por ventilador
1 160 35 … 45
Tarta de manzana
Molde redondo de
metal negro de 20
cm de diámetro
en la parrilla de
alambre **
Calentamiento su-
perior e inferior
2 180 50 … 60
EN
ES
ET

ES / 62
Se recomienda precalentar todos los alimentos.
*Es posible que estos accesorios no se incluyan en el aparato.
**Estos accesorios no están incluidos en el aparato. Son accesorios disponibles en el mercado.
Parrilla
Comida Accesorio a utilizar Posición de la es-
tantería
Temperatura (°C) Tiempo de cocción
(min) (aprox.)
Albóndigas (ternera) -
12 cantidad
Parrilla 2 250 20 … 30
Tostar pan Parrilla 2 250 3 … 5
Se recomienda precalentar durante 5 minutos toda la comida a la parrilla.
Dé la vuelta a las piezas de comida después de la mitad del tiempo total de asado.
7 Mantenimiento y limpieza
7.1 Información General de Limpieza
Advertencias generales
• Espere a que el aparato se enfríe antes
de limpiarlo. ¡Las superficies calientes
pueden causar quemaduras!
• No aplique los detergentes directamente
sobre las superficies calientes. Esto pue-
de causar manchas permanentes.
• El producto debe limpiarse y secarse a
fondo después de cada operación. Así,
los restos de comida se limpiarán fácil-
mente y se evitará que estos residuos se
quemen cuando se vuelva a utilizar el
producto más adelante. De este modo,
se prolonga la vida útil del aparato y se
reducen los problemas más frecuentes.
• No utilice aparatos de limpieza a vapor
para la limpieza.
• Algunos detergentes o productos de lim-
pieza dañan la superficie. Los productos
de limpieza inadecuados son: lejía, pro-
ductos de limpieza que contengan amo-
níaco, ácido o cloruro, productos de lim-
pieza a vapor, desincrustantes, quitaman-
chas y óxido, productos de limpieza abra-
sivos (limpiadores en crema, polvo para
fregar, crema para fregar, estropajo abra-
sivo y rascador, alambre, esponjas, pa-
ños de limpieza que contengan restos de
suciedad y detergente).
• Se necesita ningún material de limpieza
especial en la limpieza realizada después
de cada uso. Limpie el aparato con deter-
gente para platos, agua tibia y un paño
suave o una esponja y séquelo con un
paño seco.
• Asegúrese de limpiar completamente
cualquier líquido restante después de la
limpieza y limpie inmediatamente cual-
quier alimento que salpique durante la
cocción.
• No lave ningún componente de su elec-
trodoméstico en un lavavajillas a menos
que se indique lo contrario en el manual
del usuario.
Inox - superficies inoxidables
• No utilice productos de limpieza que con-
tengan ácido o cloro para limpiar las su-
perficies y asas de acero inoxidable.
• La superficie de acero inoxidable puede
cambiar de color con el tiempo. Esto es
normal. Después de cada operación, lim-
pie con un detergente adecuado para la
superficie inoxidable o inox.
• Limpie con un paño suave y jabonoso y
un detergente líquido (que no raye) ade-
cuado para superficies inoxidables, te-
niendo cuidado de limpiar en una sola di-
rección.
• Elimine las manchas de cal, aceite, almi-
dón, leche y proteínas en las superficies
de vidrio e inox inmediatamente sin espe-
rar. Las manchas pueden oxidarse duran-
te largos períodos de tiempo.
EN
ES
ET

ES / 63
• Los limpiadores rociados/aplicados a la
superficie deben limpiarse inmediata-
mente. Los limpiadores abrasivos que se
dejan en la superficie hacen que ésta se
vuelva blanca.
Superficies esmaltadas
• El horno debe enfriarse antes de limpiar
la zona de cocción. La limpieza en super-
ficies calientes puede crear un riesgo de
incendio y dañar la superficie del esmal-
te.
• Después de cada uso, limpie las superfi-
cies esmaltadas con detergente para pla-
tos, agua tibia y un paño suave o una es-
ponja y séquelas con un paño seco.
• Si el aparato tiene una función de limpie-
za con vapor fácil, puede realizar una lim-
pieza con vapor fácil para la suciedad li-
gera no permanente. (ver “Fácil limpieza
con vapor [}64]”.)
• Para las manchas difíciles, se puede utili-
zar un limpiador para hornos y parrillas
recomendado en el sitio web de la marca
de su producto y un estropajo que no ra-
ye. No utilice un limpiador de horno exter-
no.
Superficies catalíticas
• Las paredes laterales del área de cocción
sólo pueden ser cubiertas con esmalte o
paredes catalíticas. Varía según el mode-
lo.
• Las paredes catalíticas tienen una super-
ficie mate y porosa. Las paredes catalíti-
cas del horno no deben ser limpiadas.
• Las superficies catalíticas absorben el
aceite gracias a su estructura porosa y
comienzan a brillar cuando la superficie
está saturada de aceite, en este caso se
recomienda reemplazar las piezas.
Las superficies de vidrio
• Cuando limpie las superficies de vidrio,
no use raspadores de metal duro y mate-
riales de limpieza abrasivos. Pueden da-
ñar la superficie de vidrio.
• Limpie el aparato usando detergente pa-
ra platos, agua tibia y un paño de microfi-
bra específico para superficies de vidrio y
séquelo con un paño de microfibra seco.
• Si hay restos de detergente después de
la limpieza, límpielo con agua fría y sé-
quelo con un paño de microfibra limpio y
seco. Los restos de detergente pueden
dañar la superficie del cristal la próxima
vez.
• En ningún caso se deben limpiar los resi-
duos secos de la superficie de cristal con
cuchillos de sierra, lana metálica o uten-
silios similares para rascar.
• Puede eliminar las manchas de calcio
(manchas amarillas) de la superficie del
vidrio con un agente descalcificador dis-
ponible en el mercado, con un agente
descalcificador como el vinagre o el jugo
de limón.
• Si la superficie está muy sucia, aplique el
producto de limpieza sobre la mancha
con una esponja y espere mucho tiempo
para que actúe correctamente. A conti-
nuación, limpie la superficie del vidrio
con un paño húmedo.
• Las decoloraciones y manchas en la su-
perficie del vidrio son normales y no de-
fectos.
Las piezas de plástico y las superficies
pintadas
• Limpie las piezas de plástico y las super-
ficies pintadas con detergente para vaji-
lla, agua tibia y un paño suave o una es-
ponja y séquelas con un paño seco.
• No utilice raspadores de metal duro ni
limpiadores abrasivos. Pueden dañar las
superficies.
• Asegúrese de que las juntas de los com-
ponentes del producto no queden húme-
das y con detergente. De lo contrario,
puede producirse corrosión en estas jun-
tas.
7.2 Limpieza de los accesorios
No introduzca los accesorios del producto
en el lavavajillas, salvo que se indique lo
contrario en el manual de instrucciones.
7.3 Limpieza del panel de control
• Al limpiar los paneles con mando, limpie
el panel y los mandos con un paño suave
y húmedo y séquelos con un paño seco.
EN
ES
ET
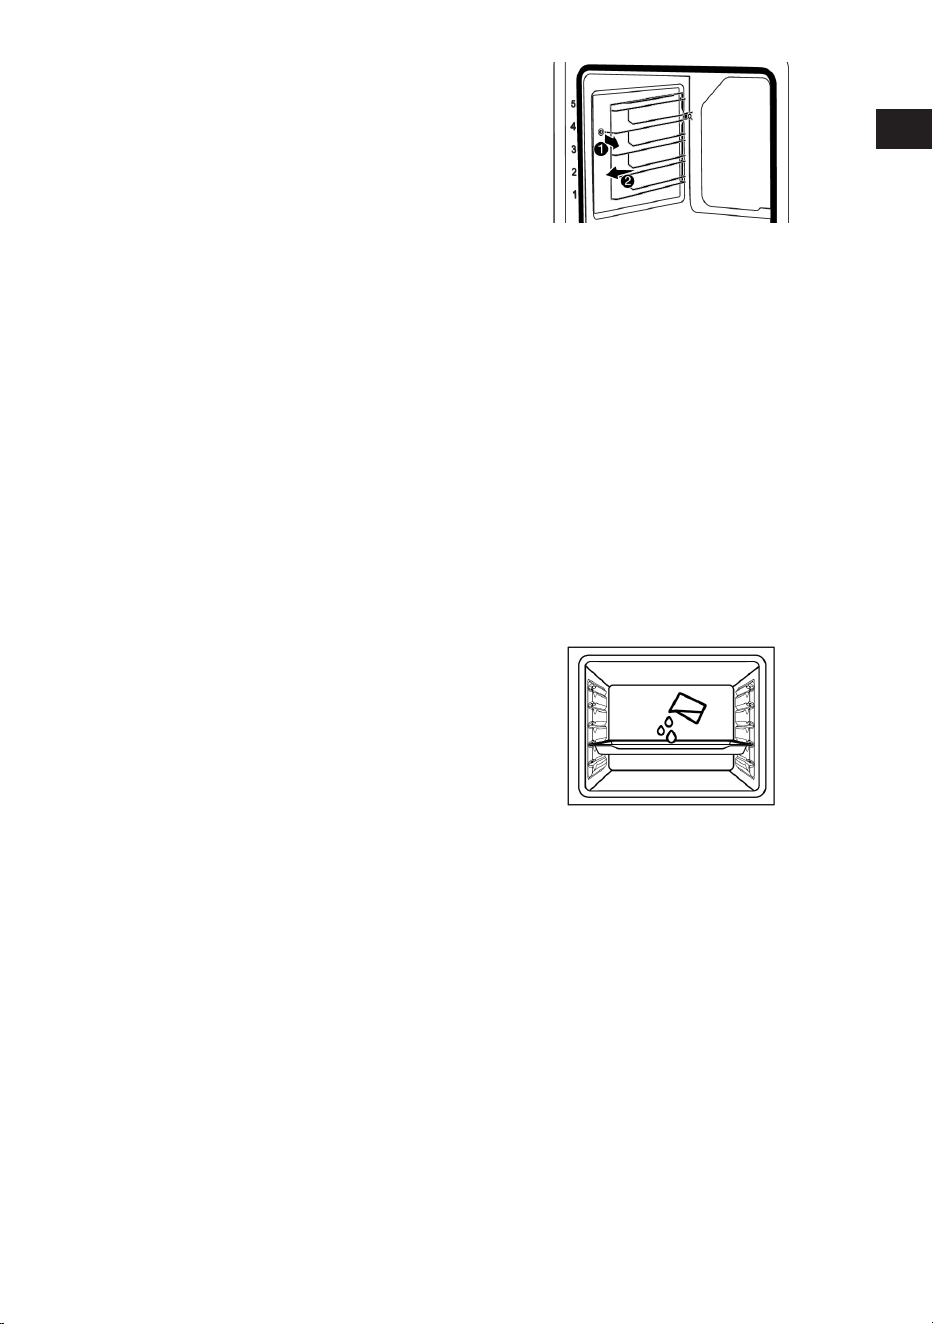
ES / 64
No retire los pomos y las juntas de la par-
te inferior para limpiar el panel. El panel
de control y los mandos pueden estar da-
ñados.
• Durante la limpieza de los paneles inox
con mando, no utilice productos de lim-
pieza inox alrededor del mando. Los indi-
cadores que rodean el mando se pueden
borrar.
• Limpie los paneles de control táctil con
un paño suave húmedo y séquelos con
un paño seco. Si el aparato tiene una ca-
racterística de bloqueo de llave, fije el
bloqueo de llave antes de realizar la lim-
pieza del panel de control. De lo contra-
rio, puede producirse una detección inco-
rrecta en las teclas.
7.4 Limpiar el interior del horno (área
de cocción)
Siga los pasos de limpieza descritos en la
sección "Información general de limpieza"
según los tipos de superficie de su horno.
Limpiar las paredes laterales del horno
Las paredes laterales del área de cocción
sólo pueden ser cubiertas con esmalte o
paredes catalíticas. Varía según el modelo.
Si hay una pared catalítica, consulte la sec-
ción "Superficies catalíticas" para obtener
información.
Si su producto es un modelo con estantes
de alambre, retire los estantes de alambre
antes de limpiar las paredes laterales. A
continuación, complete la limpieza como
se describe en la sección "Información ge-
neral sobre la limpieza" según el tipo de su-
perficie de la pared lateral.
Para quitar los estantes de rejilla latera-
les:
1. Retire la parte delantera del estante de
rejilla tirando de él en la pared lateral en
la dirección opuesta.
2. Tire del estante de rejilla hacia usted pa-
ra retirarlo completamente.
3. Para volver a colocar los estantes, los
procedimientos aplicados al retirarlos
deben repetirse desde el final hasta el
principio, respectivamente.
7.5 Fácil limpieza con vapor
Esto permite limpiar fácilmente la suciedad
(que no permanece durante mucho tiempo)
que es ablandada por el vapor dentro del
horno y por las gotas de agua condensadas
en las superficies internas del horno.
1. Retire todos los accesorios del interior
del horno.
2. Añada 500 ml de agua en la bandeja y
colóquela en el segundo estante del hor-
no.
3. Ponga el horno en el modo de funciona-
miento "Limpieza fácil con vapor" y há-
galo funcionar a 100°C durante 15 minu-
tos.
Abra inmediatamente la puerta y limpie los
interiores del horno con una esponja o pa-
ño húmedo. El vapor saldrá al abrir la puer-
ta. Esto puede suponer un riesgo de que-
maduras. Tenga cuidado al abrir la puerta.
Para la suciedad persistente, limpie el pro-
ducto con detergente para platos, agua ti-
bia y un paño o esponja suave y séquelo
con un paño seco.
EN
ES
ET
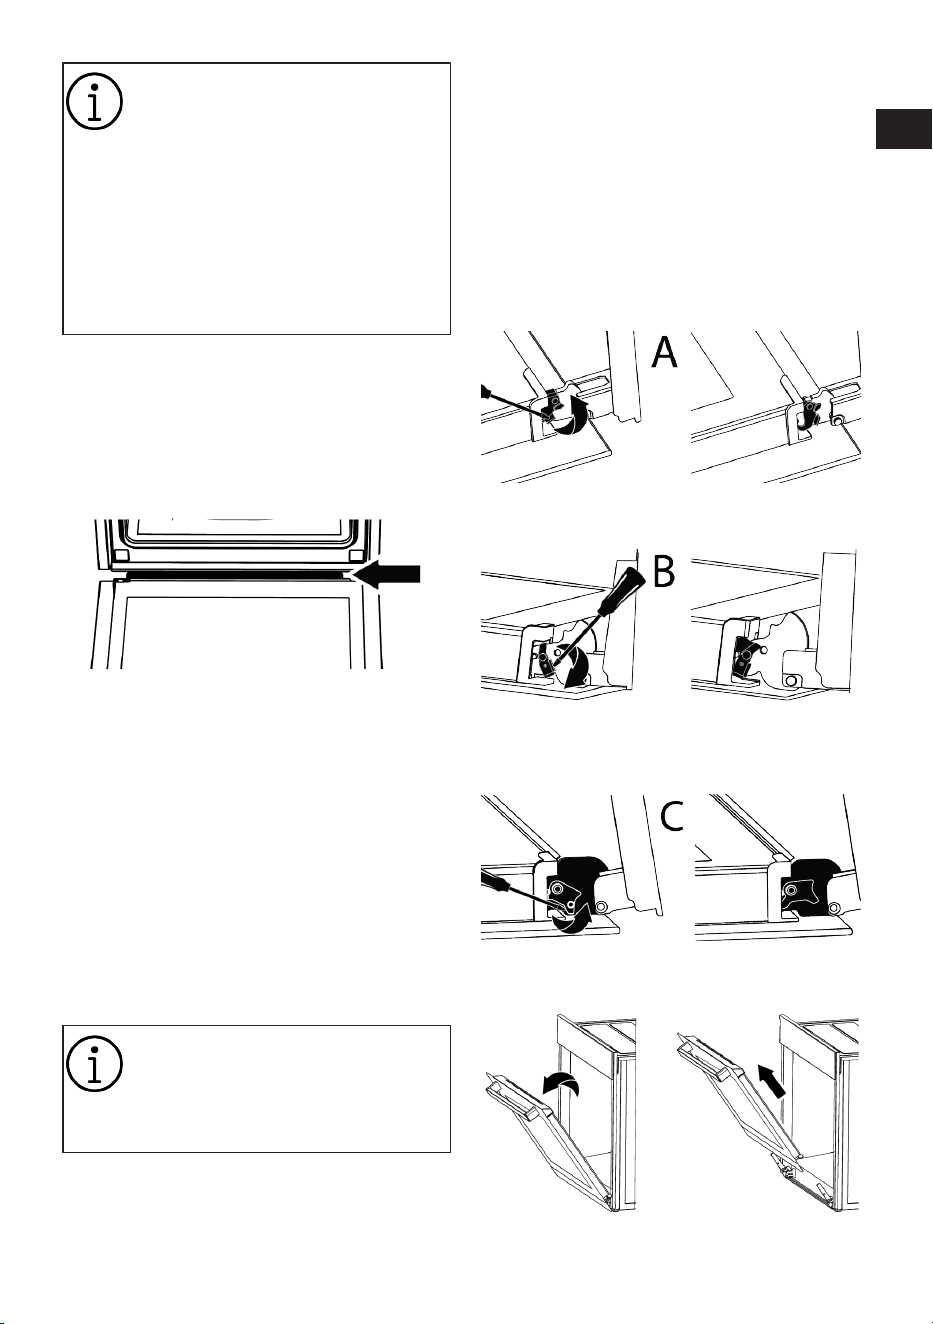
ES / 65
En la función de limpieza a vapor
fácil, se espera que el agua añadida
se evapore y condense en el inte-
rior del horno y en la puerta del hor-
no para ablandar la ligera suciedad
que se forma en su horno. La con-
densación que se forma en la puer-
ta del horno puede gotear alrededor
cuando se abre la puerta del horno.
En cuanto abra la puerta del horno,
limpie la condensación.
(Varía según el modelo del aparato. Puede
que no esté disponible en el aparato.) Des-
pués de la condensación en el interior del
horno, puede producirse un charco o hume-
dad en el canal de la piscina bajo el horno.
Limpie este canal de la piscina con un paño
húmedo después de su uso y séquelo.
7.6 Limpieza de la puerta del horno
Puede quitar la puerta del horno y los vi-
drios de la puerta para limpiarlos. La forma
de retirar las puertas y ventanas se explica
en las secciones "Retirar la puerta del hor-
no" y "Retirar los cristales interiores de la
puerta". Después de quitar los cristales in-
teriores de la puerta, límpielos con un de-
tergente para vajilla, agua tibia y un paño
suave o una esponja y séquelos con un pa-
ño seco. Para los residuos de cal que pue-
dan formarse en el cristal del horno, limpie
el cristal con vinagre y aclare.
No utilice limpiadores abrasivos du-
ros, raspadores de metal, lana de
alambre o materiales blanqueado-
res para limpiar la puerta del horno
y el vidrio.
Quitar la puerta del horno
1. Abra la puerta del horno.
2. Abra los clips en el zócalo de la bisagra
de la puerta delantera a la derecha y a la
izquierda empujándolos hacia abajo co-
mo se muestra en la figura.
3. Los tipos de bisagras varían como (A),
(B), (C) según el modelo del producto.
Las siguientes figuras muestran cómo
abrir cada tipo de bisagra.
4. El tipo de bisagra (A) está disponible en
los tipos de puerta normales.
5. (La bisagra tipo B está disponible en los
tipos de puerta de cierre suave.
6. (C) la bisagra tipo está disponible en los
tipos de puerta de apertura/cierre sua-
ve.
7. Lleve la puerta del horno a una posición
semiabierta.
EN
ES
ET
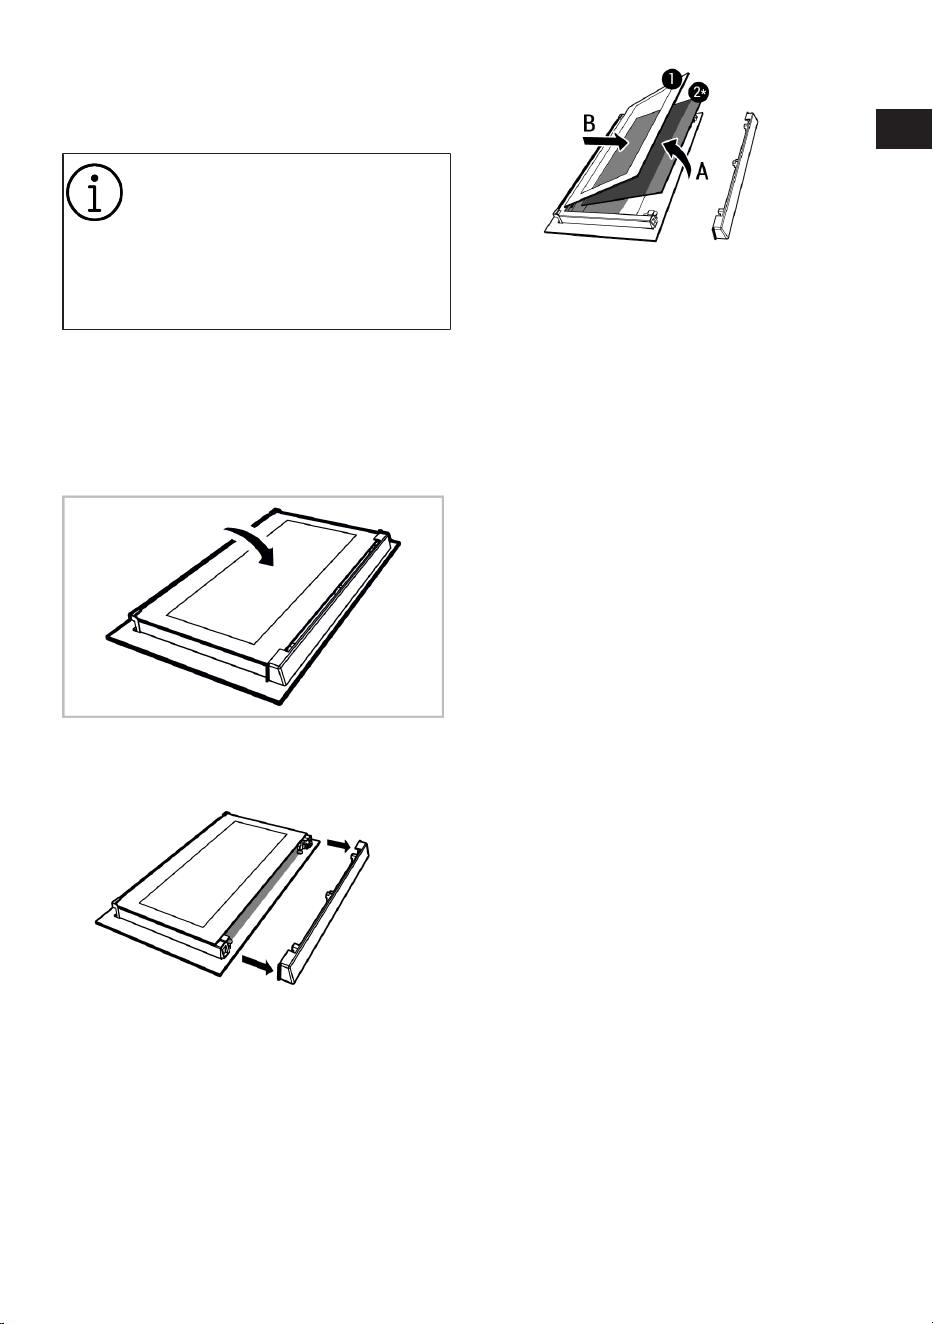
ES / 66
8. Tire de la puerta retirada hacia arriba
para liberarla de las bisagras derecha e
izquierda y retírela.
Para volver a colocar la puerta, los
procedimientos aplicados al retirar-
la deben repetirse desde el final
hasta el principio, respectivamente.
Al instalar la puerta, asegúrese de
cerrar las abrazaderas en el zócalo
de la bisagra.
7.7 Retirar el cristal interior de la
puerta del horno
El vidrio interior de la puerta frontal del pro-
ducto puede ser retirado para su limpieza.
1. Abra la puerta del horno.
2. Retire el componente de plástico de la
sección superior de la puerta delantera
tirando de él hacia usted.
3. Como se muestra en la ilustración, le-
vante suavemente el vaso más interno
(1) hacia 'A' y luego, retírelo tirando ha-
cia 'B'.
1 Vidrio interior 2* Vidrio interior (puede
no estar disponible
para su producto)
4. Si el aparato tiene un vidrio interior (2),
repita el mismo proceso para despren-
derlo (2).
5. El primer paso para reagrupar la puerta
es volver a montar el cristal interior (2).
Coloque el borde biselado del vaso para
que se encuentre con el borde biselado
de la ranura de plástico. (Si el aparato
tiene un cristal interior). El vidrio interior
(2) debe ser fijado a la ranura de plásti-
co más cercana al vidrio interior (1).
6. Al volver a montar el cristal interior (1),
preste atención a colocar la cara impre-
sa del cristal en el cristal interior. Es cru-
cial colocar las esquinas inferiores del
vidrio interior (1) para que se encuen-
tren con las ranuras de plástico inferio-
res.
7. Empuje el componente de plástico hacia
el marco hasta que se oiga un "clic".
7.8 Limpieza de la lámpara del horno
En caso de que se ensucie la puerta de cris-
tal de la bombilla del horno en el área de
cocción, límpiela con detergente para vaji-
lla, agua tibia y un paño suave o una espon-
ja y séquela con un paño seco. En caso de
fallo de la bombilla del horno, puede reem-
plazar la bombilla del horno siguiendo las
secciones que siguen.
Reemplazar la bombilla del horno
Advertencias generales
• Para evitar el riesgo de descarga eléctri-
ca antes de cambiar la lámpara del hor-
no, desconecte el producto y espere a
que el horno se enfríe. ¡Las superficies
calientes pueden causar quemaduras!
EN
ES
ET
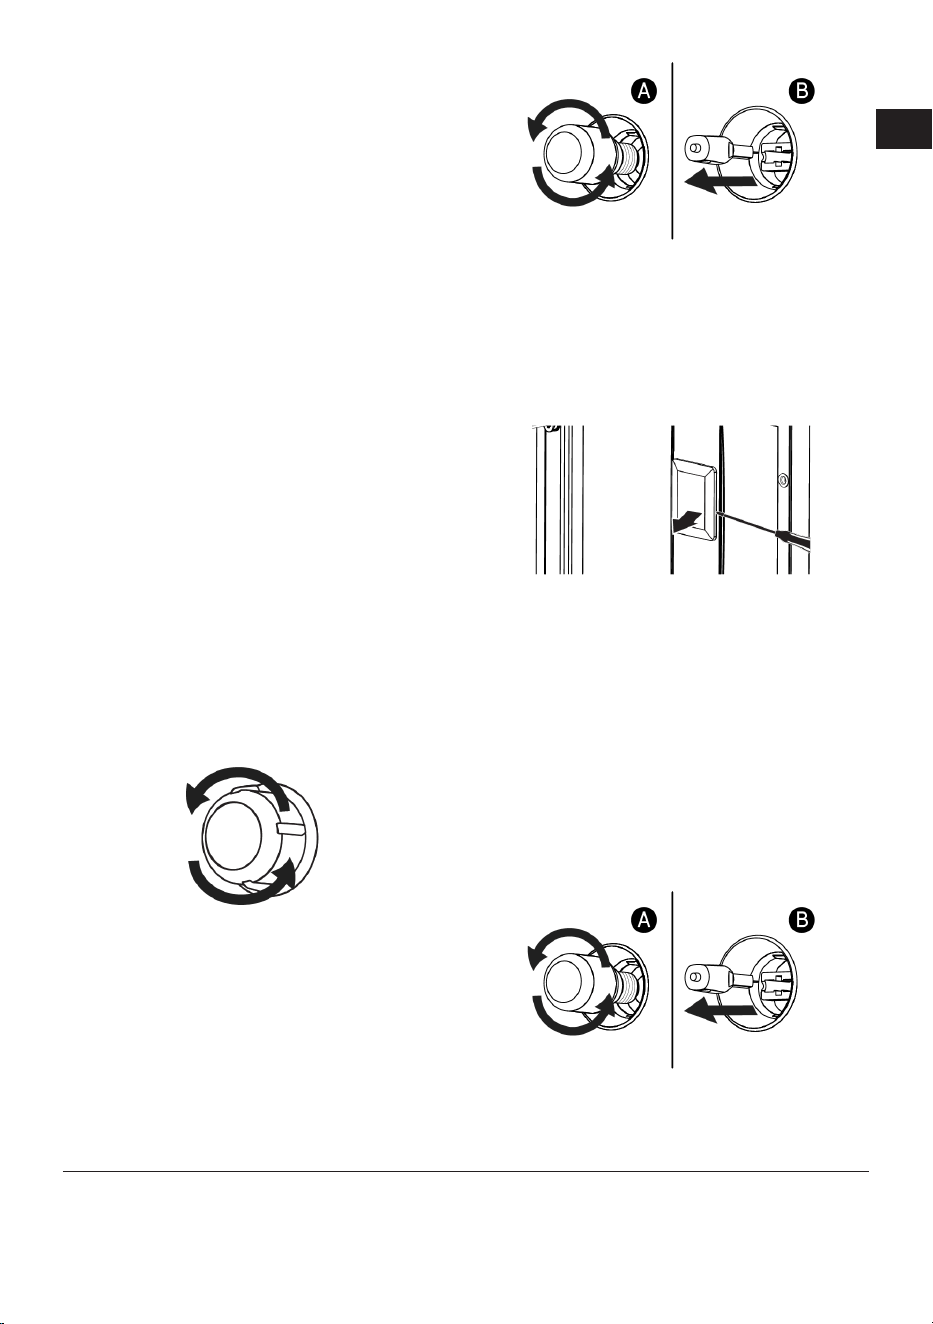
ES / 67
• Este horno se alimenta de una lámpara
incandescente de menos de 40 W, de
menos de 60 mm de altura, de menos de
30 mm de diámetro, o de una lámpara
halógena con casquillos G9 de menos de
60 W de potencia. Las lámparas son ade-
cuadas para el funcionamiento a tempe-
raturas superiores a 300 °C. Las lámpa-
ras para hornos se pueden adquirir en los
Servicios Autorizados o en los técnicos
autorizados. Este producto contiene una
lámpara de clase energética G.
• La posición de la bombilla puede diferir
de la que se muestra en la ilustración.
• La bombilla utilizada en este aparato no
es adecuada para su uso en la ilumina-
ción de las habitaciones del hogar. El
propósito de esta bombilla es ayudar al
usuario a ver la comida.
• Las lámparas utilizadas en este producto
deben soportar condiciones físicas extre-
mas, como temperaturas superiores a 50
°C.
Si su horno tiene una bombilla redonda,
1. Desconecte el aparato de la electrici-
dad.
2. Retire la tapa de cristal girándola en
sentido contrario a las agujas del reloj.
3. Si la bombilla del horno es del tipo (A)
que se muestra en la ilustración de aba-
jo, gire la bombilla del horno como se
muestra en la ilustración y reemplácela
por una nueva. Si se trata de un modelo
de tipo (B), extráigalo como se muestra
en la figura y sustitúyalo por uno nuevo.
4. Vuelva a colocar la cubierta de vidrio.
Si el horno tiene una bombilla cuadrada,
1. Desconecte el aparato de la electrici-
dad.
2. Retire los estantes de rejilla de acuerdo
con la descripción.
3. Levante la cubierta de vidrio protector
de la bombilla con un destornillador.
Quite el tornillo primero, si hay un torni-
llo en la lámpara cuadrada de su pro-
ducto.
4. Si la bombilla del horno es del tipo (A)
que se muestra en la ilustración de aba-
jo, gire la bombilla del horno como se
muestra en la ilustración y reemplácela
por una nueva. Si se trata de un modelo
de tipo (B), extráigalo como se muestra
en la figura y sustitúyalo por uno nuevo.
5. Vuelva a colocar la cubierta de vidrio y
los estantes de rejilla.
8 Solución de problemas
En caso de que el problema persista des-
pués de seguir las instrucciones de esta
sección, póngase en contacto con su pro-
veedor o con un Servicio Técnico Autoriza-
do. Nunca intente reparar su producto us-
ted mismo.
EN
ES
ET

ES / 68
El vapor se emite durante el funcionamien-
to del horno.
• Es normal ver vapores durante el funcio-
namiento. >>> Esto no es un error.
Aparecen gotas de agua durante la cocción
• El vapor generado durante la cocción se
condensa al entrar en contacto con su-
perficies frías del exterior del producto y
puede formar gotas de agua. >>> Esto no
es un error.
Los sonidos metálicos se escuchan mien-
tras el producto se calienta y se enfría.
• Las partes metálicas pueden expandirse
y emitir sonidos cuando se calientan. >>>
Esto no es un error.
El producto no funciona.
• Es posible que el fusible esté defectuoso
o fundido. >>> Revise los fusibles en la
caja de fusibles. Si es necesario, cámbie-
los o reactívelos.
• Es posible que el aparato no esté enchu-
fado a la toma de corriente (con toma de
tierra). >>> Compruebe si el aparato está
conectado a la toma de corriente.
• (Si hay temporizador en su aparato) Las
teclas del panel de control no funcionan.
>>> Si su producto tiene una cerradura de
llave, el bloqueo de llave puede estar acti-
vado, desactive el bloqueo de llave.
La luz del horno no está encendida.
• La lámpara del horno puede estar defec-
tuosa. >>> Reemplace la lámpara del hor-
no.
• No hay electricidad. >>> Asegúrese de
que la red eléctrica está operativa y com-
pruebe los fusibles en la caja de fusibles.
Si es necesario, cambie los fusibles o re-
actívelos.
El horno no está calentando.
• El horno no puede ajustarse a una fun-
ción y/o temperatura de cocción específi-
ca. >>> Ajuste el horno a una función y/o
temperatura de cocción específica.
• En los modelos con temporizador, el
tiempo no se ajusta. >>> Ajustar la hora.
• No hay electricidad. >>> Asegúrese de
que la red eléctrica está operativa y com-
pruebe los fusibles en la caja de fusibles.
Si es necesario, cambie los fusibles o re-
actívelos.
(Para los modelos con temporizador) La
pantalla del temporizador parpadea o el
símbolo del temporizador queda abierto.
• Se ha producido un corte de luz. >>>
Ajuste la hora / Apague los mandos de
función del producto y vuelva a colocar-
los en la posición deseada.
EN
ES
ET

ET / 70
Tere tulemast!
Hea klient,
Aitäh, et valisite Beko toote. Tahame, et teie toode, mis on valmistatud kõrge kvaliteedi ja
tehnoloogiaga, pakuks teile parimat efektiivsust. Seetõttu lugege see juhend ja kõik teised
kaasasolevad dokumendid enne toote kasutamist hoolikalt läbi.
Järgige kogu kasutusjuhendis välja toodud teavet ja hoiatusi. Nii kaitsete ennast ja oma
toodet võimalike ohtude eest.
Hoidke kasutajajuhend alles. Kui te annate selle toote kellelegi teisele, siis andke sellega
ka juhend kaasa. Teie toote garantiitingimused ning kasutus-ja tõrkeotsingu meetodid on
selles juhendis välja toodud.
Kasutusjuhendis olevad sümbolid ja nende kirjeldused:
Oht, mis võib lõppeda surma või vigastusega.
Oluline teave või kasulikud näpunäited toote kasutamiseks:
Lugege kasutajajuhendit.
Kuuma pinna hoiatus.
MÄRKUS
Oht, mis võib põhjustada tootele või selle keskkonnale materiaalset kahju.

ET / 71
Sisukord
1 EE- Ohutusjuhised........................ 72
1.1 Mõeldud kasutamiseks................. 72
1.2 Lapse, haavatavate inimeste ja
lemmikloomade ohutus ................
73
1.3 Elektriohutus.................................. 73
1.4 Transpordiohutus.......................... 75
1.5 Paigaldamise ohutus .................... 76
1.6 Kasutusohutus .............................. 76
1.7 Hoiatused temperatuuri kohta...... 77
1.8 Tarvikute kasutus.......................... 77
1.9 Toiduvalmistamise ohutus ........... 77
1.10 Hooldus- ja puhastusohutus......... 79
2 Keskkonnajuhised ........................ 79
2.1 Jäätmedirektiiv.............................. 79
2.1.1 Elektri- ja
elektroonikaseadmete jäätmeid
käsitlevate määruste (WEEE)
järgimine ja jäätmete
kõrvaldamine..............................
79
2.2 Pakendi teave ................................ 79
2.3 Soovitused energiasäästuks ........ 79
3 Teie toode...................................... 81
3.1 Toote tutvustus ............................. 81
3.2 Toote juhtpaneeli tutvustus ja
kasutamine ....................................
81
3.2.1 Juhtpaneel.................................. 82
3.2.2 Ahju juhtpaneeli tutvustus......... 82
3.3 Ahju tööfunktsioonid..................... 82
3.4 Toote tarvikud................................ 83
3.5 Toote lisaseadmete kasutamine.. 84
3.6 Tehniline kirjeldus ......................... 86
4 Esmakasutus................................. 87
4.1 Esmaseadistus .............................. 87
4.2 Seadme esmane puhastamine..... 87
5 Ahju kasutamine ........................... 88
5.1 Üldteave ahju kasutamise kohta .. 88
5.2 Ahju juhtseadme töö ..................... 88
5.3 Sätted............................................. 90
6 Üldteave küpsetamise kohta ....... 91
6.1 Üldhoiatused mikrolaineahjus
küpsetamise kohta........................
92
6.1.1 Pagaritooted ja ahjutoidud........ 92
6.1.2 Liha, kala ja linnuliha.................. 94
6.1.3 Grill.............................................. 95
6.1.4 Katsetatud road.......................... 95
7 Hooldus ja puhastus ..................... 96
7.1 Üldteave puhastamise kohta ........ 96
7.2 Tarvikute puhastamine.................. 98
7.3 Juhtpaneeli puhastamine.............. 98
7.4 Ahi sisemuse (toiduvalmistamise
ala) puhastamine...........................
98
7.5 Hõlbus aurupuhastus .................... 99
7.6 Ahjuukse puhastamine.................. 99
7.7 Ahjuukse siseklaasi
eemaldamine .................................
100
7.8 Ahjuvalgusti puhastamine............. 101
8 Veaotsing ....................................... 102
EN
ES
ET

ET / 72
1 EE- Ohutusjuhised
• See osa sisaldab
ohutusjuhiseid, mis on
vajalikud kehavigastuste või
materiaalsete kahjude ohu
vältimiseks.
• Kui toode antakse üle kellelegi
teisele isiklikuks- või
taaskasutamiseks, tuleb kaasa
anda ka kasutusjuhend,
tootesildid ja muud
asjakohased dokumendid ja
osad.
• Meie ettevõte ei vastuta
kahjude eest, mis võivad
tekkida nende juhiste
eiramisel.
• Nende juhiste eiramise korral
ei kehti garantii.
• Paigaldus- ja remonditööd
laske alati teha tootjal,
volitatud teenindusel või isikul,
kelle määrab maaletooja
ettevõte.
• Kasutage ainult
originaalvaruosi ja -tarvikuid.
• Ärge parandage ega asendage
ühtegi toote komponenti, välja
arvatud juhul, kui see on
kasutusjuhendis selgelt välja
toodud.
• Ärge tehke tootele tehnilisi
muudatusi.
1.1 Mõeldud
kasutamiseks
• Käesolev seade on mõeldud
koduseks kasutamiseks. See
ei ole mõeldud kasutamiseks
ärilistel eesmärkidel.
• Ärge kasutage seadet
aedades, rõdudel ega muus
väliskeskkonnas. Käesolev
seade on mõeldud
kasutamiseks
kodumajapidamistes ning
kaupluste, kontorite ja muude
töökeskkondade
personaliköökides.
• HOIATUS: Käesolevat seadet
tuleks kasutada ainult toidu
valmistamiseks. Seda ei tohi
kasutada muudel eesmärkidel,
nagu näiteks ruumi kütmine.
• Ahju saab kasutada toidu
sulatamiseks, küpsetamiseks,
praadimiseks ja grillimiseks.
• Seda toodet ei tohi kasutada
taldrikute soojendamiseks,
rätikute või riiete
kuivatamiseks käepidemele
riputades.
EN
ES
ET

ET / 73
1.2 Lapse, haavatavate
inimeste ja
lemmikloomade
ohutus
• Seda toodet võivad kasutada
8-aastased ja vanemad lapsed
ning inimesed, kellel on
vähearenenud füüsilised,
sensoorsed või vaimsed
võimed või kellel puuduvad
kogemused ja teadmised
senikaua, kuni nad on
järelevalve all või kui neid on
õpetatud toodet ohutult
kasutama ja selgitatud selle
kõikvõimalikud ohud.
• Lapsed ei tohiks seadmega
mängida. Lapsed ei tohi toodet
puhastada ega hooldada, välja
arvatud juhul, kui keegi neid
valvab.
• Seda toodet ei tohi kasutada
piiratud füüsilise, sensoorse
või vaimse võimekusega
inimesed (sealhulgas lapsed),
välja arvatud juhul, kui neid
hoitakse järelevalve all või
neile antakse vajalikud juhised.
• Tuleb jälgida, et lapsed
tootega ei mängiks.
• Elektritooted on lastele ja
lemmikloomadele ohtlikud.
Lapsed ja lemmikloomad ei
tohi tootega mängida, sellele
ronida ega sinna siseneda.
• Ärge asetage tootele esemeid,
mida lapsed võiksid kätte
saada.
• HOIATUS: Kasutamise ajal on
seadme juurdepääsetavad
pinnad kuumad. Hoidke lapsed
tootest eemal.
• Hoidke kõik pakkematerjalid
lastele kättesaamatus kohas.
Võib tekkida vigastuste ja
lämbumise oht.
• Kui uks on lahti, ärge pange
sellele raskeid esemeid ega
laske lastel sellel istuda. Võite
põhjustada ahju ümbermineku
või uksehingede kahjustuse.
• Enne kulunud ja kasutute
toodete äraviskamist:
1. Tõmmake toitepistik välja ja
eemaldage see
pistikupesast.
2. Katkestage toitejuhe ja
ühendage see pistikuga
tootest lahti.
3. Võtke ettevaatusabinõud, et
vältida laste sattumist toote
sisse.
4. Ärge lubage lastel mängida
tootega, kui see on
tühikäigul.
1.3 Elektriohutus
• Ühendage toode maandatud
pistikupessa, mis on kaitstud
elektrikorgiga, mille väärtus on
toodud tüübi etiketil.
Maanduspaigaldus peab
EN
ES
ET

ET / 74
olema teostatud
kvalifitseeritud elektriku poolt.
Ärge kasutage toodet ilma
maanduseta vastavalt
kohalikele / riiklikele
eeskirjadele.
• Pistik või seadme
elektriühendus peab olema
kergesti juurdepääsetavas
kohas. Kui see pole võimalik,
peaks elektripaigaldisel,
millega toode on ühendatud,
olema mehhanism (kaitse,
lüliti, pealüliti jne), mis on
vastavuses elektrieeskirjadega
ja ühendab kõik poolused
võrgust lahti.
• Enne remonti, hooldust ja
puhastamist tõmmake toode
vooluvõrgust välja või lülitage
kaitselüliti välja.
• Ühendage toode maandatud
pistikupessa, mis vastab pinge
ja sageduse väärtustele, mis
on välja toodud tüübisildil.
• Kui teie tootel pole kaablit,
kasutage ainult peatükis
"Tehnilised andmed"
kirjeldatud ühenduskaablit.
• Ärge laske toitejuhtmel
seadme alla ja taha kinni
jääda. Ärge asetage
voolujuhtmele raskeid
esemeid. Toitejuhet ei tohiks
painutada, purustada ja see ei
tohi puutuda kokku ühegi
soojusallikaga.
• Toote paika panemisel pärast
monteerimist või puhastamist
veenduge, et toitekaabel ei
jääks kinni.
• Ahju tagumine külg muutub
kasutamisel kuumaks.
Toitekaablid ei tohi puudutada
toote tagumist pinda. Vastasel
juhul võib see kahjustada.
• Ärge laske toitejuhtmel ukse ja
ahju vahele kinni jääda ega
jääda kuumadele pindadele.
Vastasel juhul võib toitejuhtme
isolatsioon sulada ja
põhjustada lühise tagajärjel
tulekahju.
• Kasutage ainult originaaljuhet.
Ärge kasutage lõigatud või
kahjustatud kaableid.
• Ärge kasutage toote
kasutamiseks pikendusjuhet
või mitmepistikut.
• Võtke ühendust volitatud
teeninduskeskusega või
importijaga, et kasutada
heakskiidetud adapterit
juhtudel, kui on vaja kasutada
konverteri adapterit
(pistikutüübi jaoks).
• Võtke ühendust importija või
volitatud teeninduskeskusega,
kui toiteliini pikkus on
ebapiisav.
EN
ES
ET

ET / 75
• Kaasaskantavad toiteallikad
või mitu pistikut võivad üle
kuumeneda ja süttida. Hoidke
mitu pistikut ja kaasaskantavat
vooluallikat tootest eemal.
• Toitejuhtme kahjustamisel
tuleb selle võimalike ohtude
vältimiseks asendada tootja,
volitatud teeninduse või
importija ettevõtte määratud
isiku poolt.
• HOIATUS: Enne ahju lambi
vahetamist ühendage seade
elektrilöögi ohu vältimiseks
kindlasti vooluvõrgust lahti.
Ühendage toode vooluvõrgust
lahti või lülitage kaitse
kaitsmekilbis välja.
Kui Teie seadmel on toitejuhe ja
pistik:
• Ärge kunagi pange toote
pistikut katkisele, lahtisele või
pistikupesast väljunud
pistikule. Veenduge, et pistik
on täielikult pistikupessa
sisestatud. Vastasel juhul
võivad ühendused üle
kuumeneda ja põhjustada
tulekahju.
• Vältige seadme sisestamist
pistikupesadesse, mis on
rasvased, määrdunud või
potentsiaalselt veega
kokkupuutuvad (näiteks
tööpinna lähedusse, kust võib
vett välja voolata). Vastasel
juhul on oht, et tekib lühis ja
elektrilöögi oht.
• Ärge kunagi puudutage pistikut
märgade kätega!
• Tõmmake pistik pistikupesast
välja, kasutades pigem pistiku
korpust kui juhtmest.
1.4 Transpordiohutus
• Ühendage toode enne
transportimist vooluvõrgust
lahti.
• Toode on raske, selle
kandmiseks on vaja vähemalt
kahte inimest.
• Ärge kasutage toote
transportimiseks või
teisaldamiseks ust ja/või selle
käepidet.
• Ärge asetage seadmele
esemeid. Kandke seadet
vertikaalselt.
• Kui teil on vaja toodet
transportida, mähkige see
mullikilega või paksu papiga
ning teipige see tugevalt kinni.
Kinnitage toote liikuvad osad
kindlalt, et vältida kahjustusi.
• Enne toote paigaldamist
kontrollige toodet pärast
transportimist võimalike
kahjustuste suhtes. Vigastuse
korral võtke ühendust importija
või volitatud
teeninduskeskusega.
EN
ES
ET

ET / 76
1.5 Paigaldamise
ohutus
• Enne paigaldamise alustamist
lülitage vooluvõrk, millega
toode ühendatakse,
vooluvõrgust välja, lülitades
kaitsme välja.
• Transportimisel ja
paigaldamisel kandke alati
kaitsekindaid. Vastasel juhul
on teravate servade tõttu
vigastuste oht!
• Enne toote paigaldamist
kontrollige, kas sel on
kahjustusi. Ärge paigaldage
seadet, kui see on kahjustada
saanud.
• Vältige paigaldatava mööbli
sisemuse katmiseks
soojusisolatsioonimaterjalide
kasutamist.
• Toote paigalduspiirkonnas ei
tohi olla otsest päikesevalgust
ja soojusallikaid, näiteks
elektri- või gaasikütte, mis on
paigaldatud.
• Seadme kõigi
ventilatsioonikanalite
ümbruses peab olema
piisavalt vaba ruumi.
• Ülekuumenemise vältimiseks
ei tohiks toodet paigaldada
dekoratiivsete katete taha.
• Juhul, kui gaasivoolik/toru või
plastist veetoru asub toote
jaoks ettenähtud
paigalduskoha taga, tuleb
kindlasti tagada, et toode ei
puutuks kokku nende
kommunaaljuhtmetega.
Vastasel juhul võib voolik/toru
puruneda.
• Kui toote paigalduskoha taga
on pistikupesa, tuleb tagada, et
toode ei puutuks kokku
pistikupesaga ega
pistikupessa ühendatud
pistikuga.
1.6 Kasutusohutus
• Veenduge pärast iga
kasutuskorda, et olete seadme
välja lülitanud.
• Kui te ei kasuta toodet pikemat
aega, ühendage see lahti või
lülitage vool kaitsmekarbist
välja.
• Ärge kasutage toodet, kui see
puruneb või saab kasutamise
ajal kahjustada. ühendage
toode vooluvõrgust lahti. Võtke
ühendust importija või
volitatud teeninduskeskusega.
• Ärge kasutage seadet, kui
esiukse klaas on eemaldatud
või pragunenud. Vastasel juhul
on vigastuste ja
keskkonnakahjustuste oht.
• Ärge astuge mingil põhjusel
seadme peale.
EN
ES
ET
ET / 77
• Ärge kunagi kasutage toodet,
kui Teie otsustusvõime või
koordinatsioon on häiritud
alkoholi ja/või narkootikumide
tarvitamise tõttu.
• Süttivaid esemeid ei tohi hoida
toiduvalmistamiskohas ega
selle ümbruses. Vastasel juhul
võivad need põhjustada
tulekahju.
• Ahjukäepide pole
käterätikuivati. Seadme
kasutamisel ärge riputage
käepidemele rätikuid, kindaid
ega muud sarnast tekstiili.
• Seadme ukse hinged liiguvad
ukse avamisel ja sulgemisel
ning võivad kinni kiiluda. Ukse
avamisel/sulgemisel ärge
haarake hingedega osast.
1.7 Hoiatused
temperatuuri kohta
• HOIATUS: Kui toode on
kasutusel, on toode ja selle
juurdepääsetavad osad
kuumad. Tuleb vältida seadme
ja kuumutuselementide
puudutamist. Alla 8-aastaseid
lapsi tuleb hoida tootest
eemal, kui nad ei ole pidevalt
järelevalve all.
• Ärge asetage toote lähedusse
tuleohtlikke/plahvatusohtlikke
materjale, sest töö ajal on
pinnad kuumad.
• Hoidke ahju ukse avamisel
küpsetamise ajal või selle
lõpus distantsi. Aur võib
põletada käsi, nägu ja/või
silmi.
• Töö ajal on toode kuum. Tuleb
vältida kuumenenud osade,
seadme sisepindade ja
kuumutuselementide
puudutamist.
• Toote käsitsemisel kandke
alati kuumakindlaid
ahjukindaid.
1.8 Tarvikute kasutus
• On oluline, et traatrest ja
ahjuplaat asetseksid
traatriiulitele õigesti
paigutatud. Üksikasjalikku
teavet leiate jaotisest
„Tarvikute kasutus".
• Sulgege ahju uks pärast
tarvikute täielikku toppimist
küpsetusruumi, sest vastasel
juhul võivad need tabada ukse
klaasi ja seda kahjustada.
1.9 Toiduvalmistamise
ohutus
• Olge ettevaatlik oma roogades
alkoholi kasutades. Alkohol
aurustub kõrgel temperatuuril
ja võib tekitada tulekahju, kuna
see võib kuumenenud
pindadega kokku puutudes
süttida.
EN
ES
ET

ET / 78
• Toidualal olevad toidujäägid,
näiteks õli, võivad süttida.
Puhastage need jäägid enne
toiduvalmistamist.
• Toidumürgituse oht: Ärge
hoidke toitu ahjus rohkem kui
tund enne ja pärast
toiduvalmistamist. Vastasel
korral võib see põhjustada
toidumürgitust või haigusi.
• Ärge soojendage ahjus suletud
konserve ega klaaspurke.
Konserv/purk võib tõusva rõhu
tõttu lõhkeda.
• Ärge asetage küpsetusplaate,
taldrikuid ega
alumiiniumfooliumi otse ahju
põhjale. Akumuleeritud
kuumus võib kahjustada ahju
põhja.
Arvestage rasvase
pärgamendipaberi või sarnaste
materjalide kasutamisel järgmisi
ettevaatusabinõusid:
• Asetage rasvakindel paber
kööginõusse või ahju tarvikule
(ahjuplaadile, traatrestile jne)
koos toiduga ja asetage see
eelkuumutatud ahju.
• Et vältida ohtu, et ahju
kütteelemendid võivad
puudutada ja takistada kuuma
õhu liikumist, eemaldage kõik
üleliigsed rasvapaberi osad,
mis ripuvad tarvikute või
mahutite küljes. Ärge kasutage
rasvakindlat paberit ahju
temperatuuril, mis on kõrgem
kui tootja poolt määratud
maksimaalne
kasutustemperatuur. Ärge
kunagi asetage rasvakindlat
paberit ahju põhjale.
• Ärge asetage seda
eelsoojendamise ajal tarvikute
peale.
• Vajutage alati taldrikuga või
sarnase esemega alla, et
materjal ei lendaks ahjus oleva
õhuringluse tõttu ringi.
• Katke ainult vajalik pind salve
sees.
• Pärast igat kasutamist tuleb
salve puhastada ja salves
kasutatud rasvapaber või
muud sarnased materjalid
asendada. Vastasel juhul
võivad kandikule tilkuvad
vedelikud põhjustada
suitsetamist või isegi leekide
süttimist.
• Toote kaane avamisel tekib
õhuvool. Rasvakindel paber
võib sattuda kokkupuutesse
kütteelementidega ja süttida.
• Kui kasutate praadimiseks
grillirestikut, tuleks alumisele
restile asetada salv. Vastasel
juhul võivad ahjupõhjale tilkuv
toiduõli ja muud komponendid
tekitada tugevat suitsu ja
põhjustada tulekahju.
EN
ES
ET
ET / 79
• Sulgege ahjuuks grillimise
ajaks. Kuumad pinnad võivad
põhjustada põletusi!
• Grillimiseks sobimatu toit võib
põhjustada tuleohtu. Grillige
ainult toitu, mis talub tugevat
grillileeki. Ärge asetage toite
ka liiga kaugele resti
tagumisse ossa. See on
kuumim piirkond ja rasvased
toidud võivad süttida.
1.10 Hooldus- ja
puhastusohutus
• Enne toote puhastamist
oodake, kuni toode jahtub.
Kuumad pinnad võivad
põhjustada põletusi!
• Ärge peske toodet pihustades
või valades sellele vett! Võite
saada elektrilöögi!
• Ärge kasutage seadme
puhastamiseks aurupuhastit,
kuna see võib põhjustada
elektrilöögi.
• Ärge kasutage ahju esiukse
klaasi puhastamiseks karmi
abrasiivseid
puhastusvahendeid,
metallikraabitsat, traatvilla või
pleegitusaineid. Need
materjalid võivad põhjustada
klaaspindade kriimustamist ja
purunemist.
2 Keskkonnajuhised
2.1 Jäätmedirektiiv
2.1.1 Elektri- ja elektroonikaseadmete
jäätmeid käsitlevate määruste
(WEEE) järgimine ja jäätmete
kõrvaldamine
See toode vastab Euroopa Liidu WEEE
direktiivile (2012/19/EL) Sellel tootel on
elektri- ja elektroonikaseadmete jäätmete
(WEEE) klassifikatsioonisümbol.
See toode on valmistatud
kvaliteetsetest osadest ja
materjalidest, mida on võimalik
taaskasutada ja mis sobivad
taaskasutamiseks. Seetõttu
ärge visake toodet selle
kasutusaja lõpus ära koos olme- ja muude
jäätmetega. Viige see elektri- ja
elektroonikaseadmete kogumispunkti.
Nende kogumispunktide kohta võite küsida
teavet kohalikult omavalitsuselt. Seadme
õige utiliseerimine aitab vältida negatiivseid
tagajärgi keskkonnale ja inimeste tervisele.
Vastavus RoHS direktiivile:
See toode, mille te ostsite, vastab Euroopa
Liidu RoHS direktiivile (2011/65/EL). See ei
sisalda direktiivis määratletud kahjulikke ja
keelatud materjale.
2.2 Pakendi teave
Toote pakkematerjalid on valmistatud
taaskasutatavatest materjalidest vastavalt
meie riiklikele keskkonnaeeskirjadele. Ärge
visake pakendijäätmeid samasse kohta
koos olme- ja muude jäätmetega, vaid viige
need kohalike omavalitsuste poolt loodud
pakendimaterjalide kogumispunktidesse.
2.3 Soovitused energiasäästuks
EL 66/2014 kohaselt leiate
energiatõhususe teabe seadmega
kaasasolevalt kviitungilt.
EN
ES
ET

ET / 80
Järgmine teave aitab Teil kasutada toodet
ökoloogilisel ja energiat säästvamal viisil.
• Sulatage külmutatud toit enne
küpsetamist.
• Ahjus kasutage tumedaid või emailitud
anumaid, mis edastavad soojust
paremini.
• Eelsoojendage alati, kui see on retseptis
või kasutusjuhendis täpsustatud. Ärge
avage ahjuust sageli küpsetamise ajal.
• Pikaajalisel küpsetamisel lülitage seade
välja 5-10 minutit enne küpsetamise
lõppaega. Saate jääksoojust kasutades
säästa kuni 20% elektrienergiast.
• Üritage valmistada ahjus korraga rohkem
kui üks roog. Saate kahte rooga samal
ajal valmistada, asetades traatrestile
kaks keedunõu. Lisaks, kui valmistate
oma toite üksteise järel, säästab see
energiat, kuna ahi ei kaota oma soojust.
EN
ES
ET
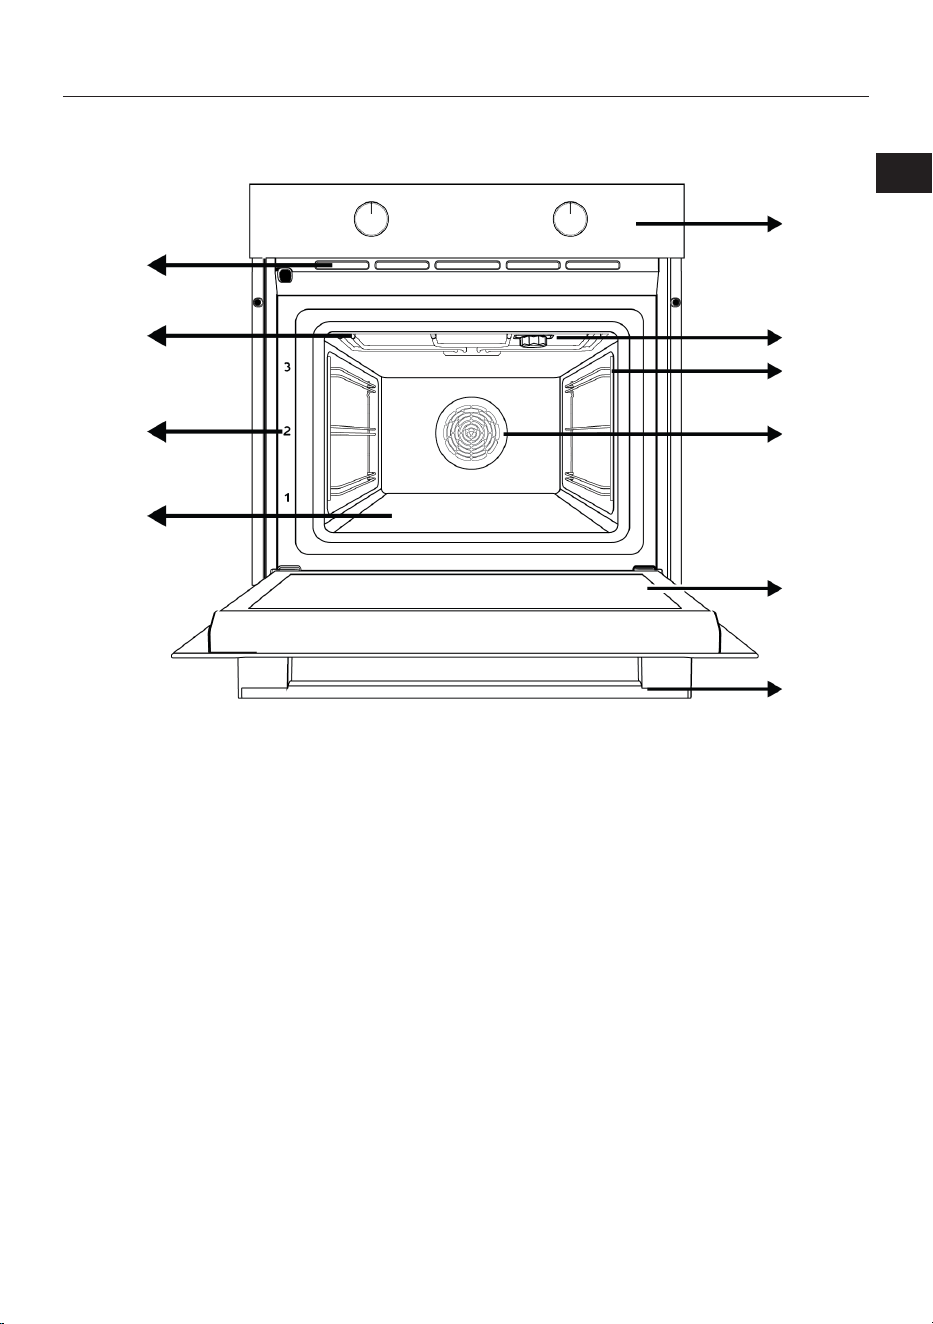
ET / 81
3 Teie toode
3.1 Toote tutvustus
1
2
3
4
5
6
7
8
9
10
*
**
1 Kontrollpaneel 2 Lamp
3 Traadist riiulid 4 Ventilaatori mootor (terasplaadi
taga)
5 Uks 6 Käepide
7 Alumine kütteseade (terasplaadi all) 8 Riiulite positsioonid
9 Ülemine kütteseade 10 Ventilatsiooniavad
* Varieerub olenevalt mudelist. Teie toode ei
pruugi olla varustatud lambiga või lambi
tüüp ja asukoht võivad erineda joonisel
kujutatust.
** Varieerub olenevalt mudelist. Teie toode ei
pruugi olla varustatud traatrestiga. Pildil on
näitena toodud traatrestiga toode.
3.2 Toote juhtpaneeli tutvustus ja
kasutamine
Sellest jaotisest leiate toote juhtpaneeli
ülevaate ja põhilised kasutusvõimalused.
Sõltuvalt toote tüübist võivad pildid ja
mõned funktsioonid erineda.
EN
ES
ET
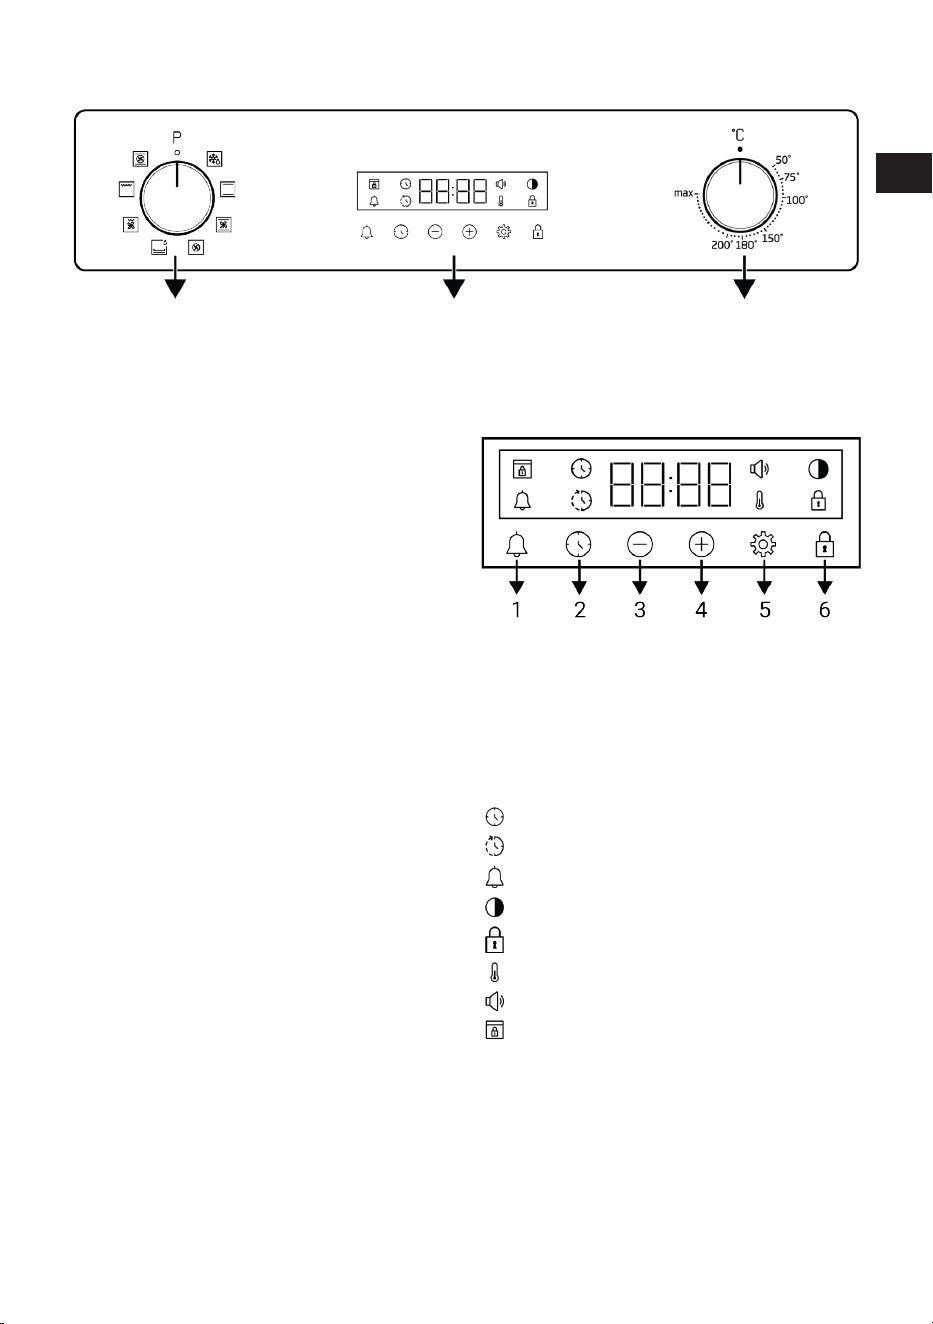
ET / 82
3.2.1 Juhtpaneel
1 2 3
1 Funktsiooni valimise nupp 2 Taimer
3 Temperatuuri valiku nupp
Kui teie toodet kontrollivad nupud (d),
võivad need/need nupud (need) mõnes
mudelis olla nii, et need tuleksid välja
lükates (maetud nupud). Nende nuppudega
seadete valmistamiseks lükake kõigepealt
asjakohane nupp sisse ja tõmmake nupp
välja. Pärast reguleerimise tegemist lükake
see uuesti sisse ja vahetage nupp välja.
3.2.2 Ahju juhtpaneeli tutvustus
Funktsiooni valimise nupp
Funktsioonivaliku nupuga saate valida ahju
tööfunktsioone. Valimiseks keerake suletud
(ülemisest) asendist vasakule/paremale.
Temperatuuri nupp
Temperatuurinupu abil saate valida
temperatuuri, mida soovite küpsetada.
Valimiseks keerake päripäeva suletud
(ülemisest) asendist.
Ahju sisetemperatuuri indikaator
Ahju sisetemperatuuri saate aru taimeri
ekraanil oleva temperatuuri sümboli järgi.
Temperatuuri sümbol ilmub ekraanile, kui
küpsetamine algab, ja temperatuuri sümbol
kaob, kui seade saavutab seatud
temperatuuri. Kui temperatuur ahjus langeb
alla seatud temperatuuri, ilmub uuesti
temperatuuri sümbol.
Taimer
1 Äratusklahv
2 Aja seadmise klahv
3 Vähenda klahv
4 Suurendamisklahv
5 Seadete klahv
6 Klahviluku võti
Kuva sümbolid
: Küpsetusaja sümbol
: Küpsetamise lõpuaja sümbol *
: Häire sümbol
: Heleduse sümbol
: Klahviluku sümbol
: Temperatuuri sümbol
: Helitugevuse taseme sümbol
: Ukseluku sümbol *
*See varieerub sõltuvalt toote mudelist. See ei pruugi
teie tootel saadaval olla.
3.3 Ahju tööfunktsioonid
Funktsioonitabelil kuvatakse
tööfunktsioonid, mida saate oma ahjus
kasutada, ning kõrgeimad ja madalaimad
temperatuurid, mida nende funktsioonide
EN
ES
ET
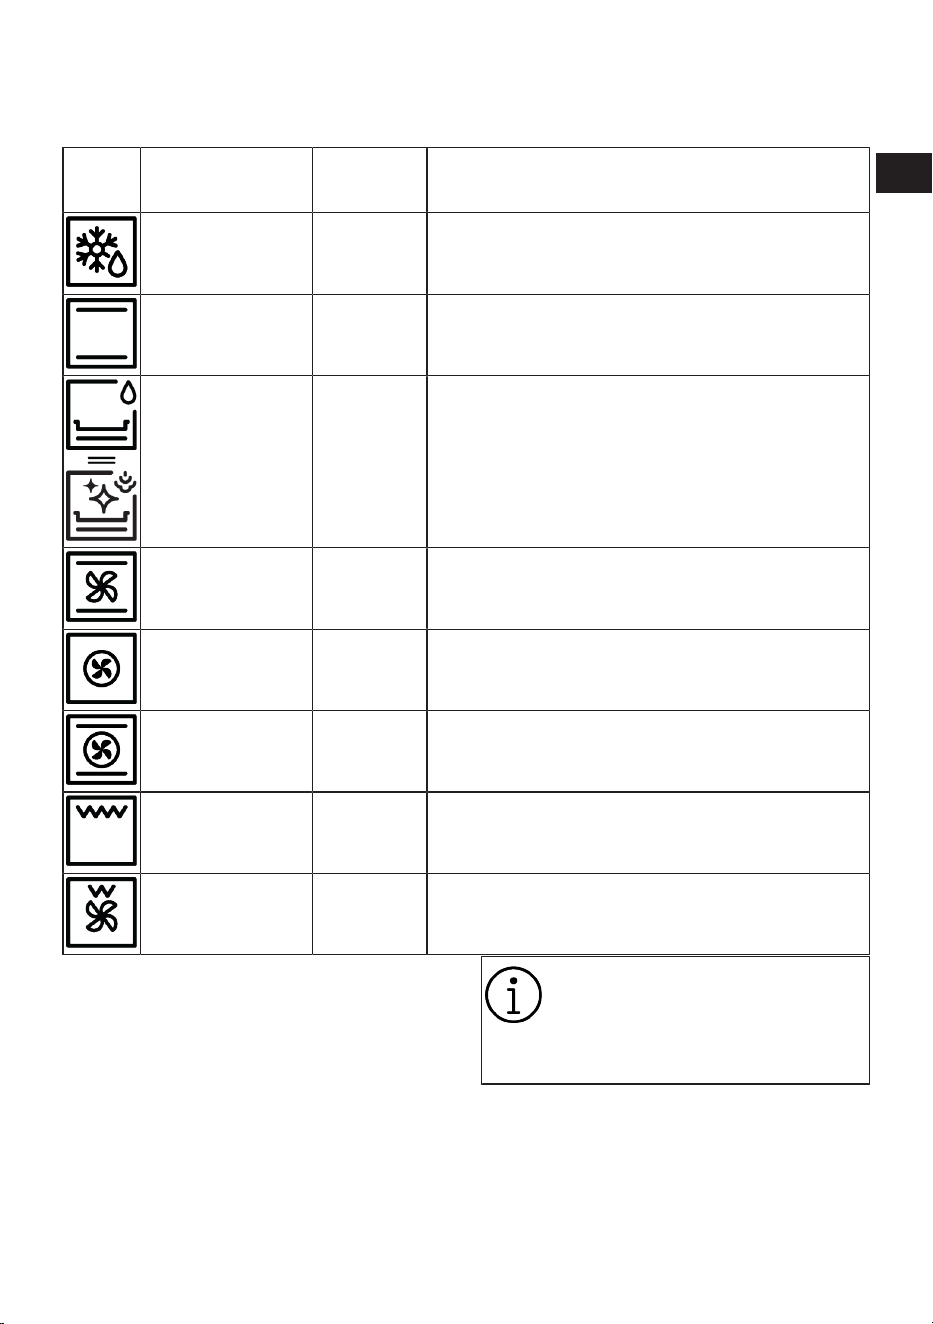
ET / 83
jaoks saab seadistada. Siin näidatud
töörežiimide järjekord võib erineda teie
toote paigutusest.
Funktsio
oni
sümbol
Funktsiooni kirjeldus
Temperatuuri
vahemik (°C)
Kirjeldus ja kasutamine
Töö ventilaatoriga -
Ahju ei köeta. Töötab ainult ventilaator (tagaseinas).
Graanulitega külmutatud toit sulatatakse aeglaselt
toatemperatuuril, küpsetatud toit jahutatakse. Terve lihatüki
sulatamiseks kuluv aeg on pikem kui teraviljaga toitude puhul.
Ülemine ja alumine
kuumutus
*
Toitu soojendatakse korraga ülevalt ja alt. Sobib kookidele,
küpsetistele või kookidele ja hautistele küpsetusvormides.
Küpsetamine toimub ühe kandikuga.
Alumine kuumutus *
Ainult madalam küte on sisse lülitatud. See sobib toitudele,
mis vajavad põhja pruunistamist. Seda funktsiooni tuleks
kasutada ka lihtsaks aurupuhastamiseks.
Ülemine/alumine
kuumutus ventilaatori
toel
*
Ülemise ja alumise küttekeha poolt soojendatav kuum õhk
jaotub koos ventilaatoriga ühtlaselt ja kiiresti kogu ahjus.
Küpsetamine toimub ühe kandikuga.
Kuumutus
ventilaatoriga
*
Ventilaatoriga soojendatav kuum õhk jaotub koos
ventilaatoriga ühtlaselt ja kiiresti kogu ahjus. See sobib mitmel
alusel küpsetamiseks erinevatel riiulitasanditel.
3D-funktsioon *
Töötavad ülemise kütte, alumise kütte ja ventilaatorkütte
funktsioonid. Küpsetatava toote iga pool valmib võrdselt ja
kiiresti. Küpsetamine toimub ühe kandikuga.
Grillimine
täisvõimsusel
*
Ahju laes olev suur grill töötab. Sobib suures koguses
grillimiseks.
Grillimine madalal
võimsusel ventilaatori
toel
*
Väikese grilliga soojendatud kuum õhk jaotub ventilaatoriga
kiiresti ahju. Sobib väiksemate koguste grillimiseks.
* Teie toode töötab temperatuurinupul
määratud temperatuurivahemikus.
3.4 Toote tarvikud
Teie tootes on mitmesuguseid tarvikuid.
Selles jaotises on saadaval tarvikute
kirjeldus ja õige kasutamise kirjeldused.
Sõltuvalt toote mudelist on kaasas olev
tarvik erinev. Kõik kasutusjuhendis
kirjeldatud tarvikud ei pruugi teie tootes
saadaval olla.
Teie seadme sees olevad kandikud
võivad kuumuse mõjul
deformeeruda. See ei mõjuta
funktsionaalsust. Deformatsioon
kaob, kui plaat jahutatakse.
Standard tray
Seda kasutatakse küpsetiste, külmutatud
toitude ja suurte tükkide praadimiseks.
EN
ES
ET
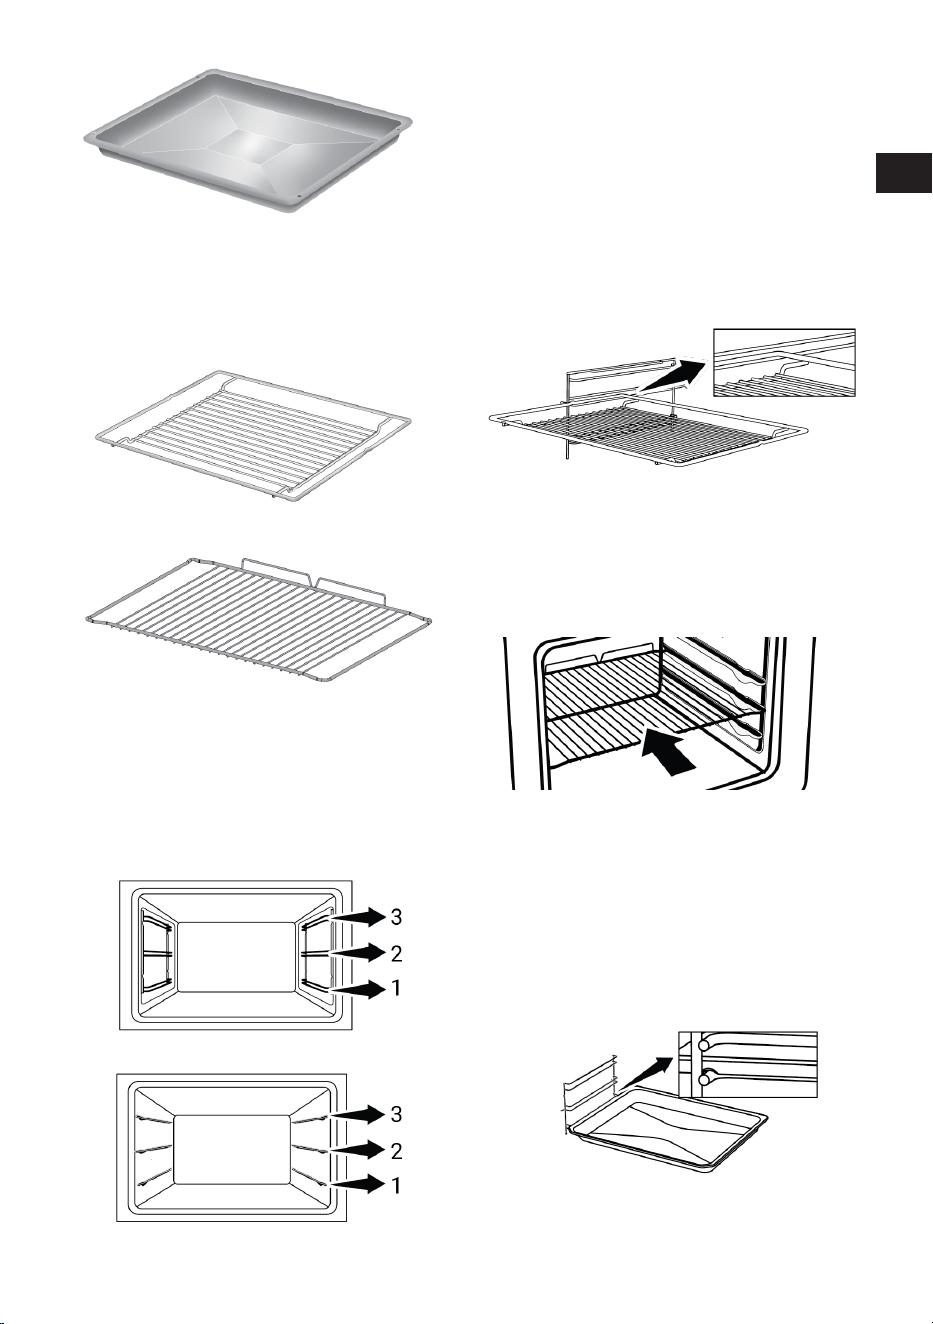
ET / 84
Traatgrill
Seda kasutatakse praadimiseks või
küpsetatava, praaditava ja hautava toidu
soovitud riiulile asetamiseks.
Traatriiuliga mudelitel :
Ilma traatriiuliteta mudelitel :
3.5 Toote lisaseadmete kasutamine
Toiduvalmistamise riiulid
Küpsetusalal on 3 riiuliasendit. Ahju
esipaneelil olevatelt numbritelt näete ka
riiulite järjekorda.
Traatriiuliga mudelitel :
Ilma traatriiuliteta mudelitel :
Traatresti asetamine küpsetusriiulitele
Väga oluline on asetada traatvõre õigesti
traadipoolsetele riiulitele. Traatresti
soovitud riiulile asetades peab avatud osa
olema esiküljel. Parema küpsetamise
tagamiseks tuleb traatrest kinnitada
traatriiuli peatuskohta. See ei tohi minna
üle peatuspunkti, et kokku puutuda ahju
tagaseinaga.
Traatriiuliga mudelitel :
Ilma traatriiuliteta mudelitel :
Väga oluline on asetada traatrest korralikult
külgriiulitele. Traatrestil on riiulile
asetamisel üks suund. Traatresti soovitud
riiulile asetades peab avatud osa olema
esiküljel.
Kandiku asetamine küpsetusriiulitele
Samuti on oluline asetada kandikud õigesti
traadipoolsetele riiulitele. Kandiku soovitud
riiulile asetamisel peab selle hoidmiseks
mõeldud pool olema esiküljel. Paremaks
küpsetamiseks tuleb alus kinnitada
traatriiulil olevale peatuspesale. See ei tohi
minna üle peatamispesa, et puutuda kokku
ahju tagaseinaga.
EN
ES
ET
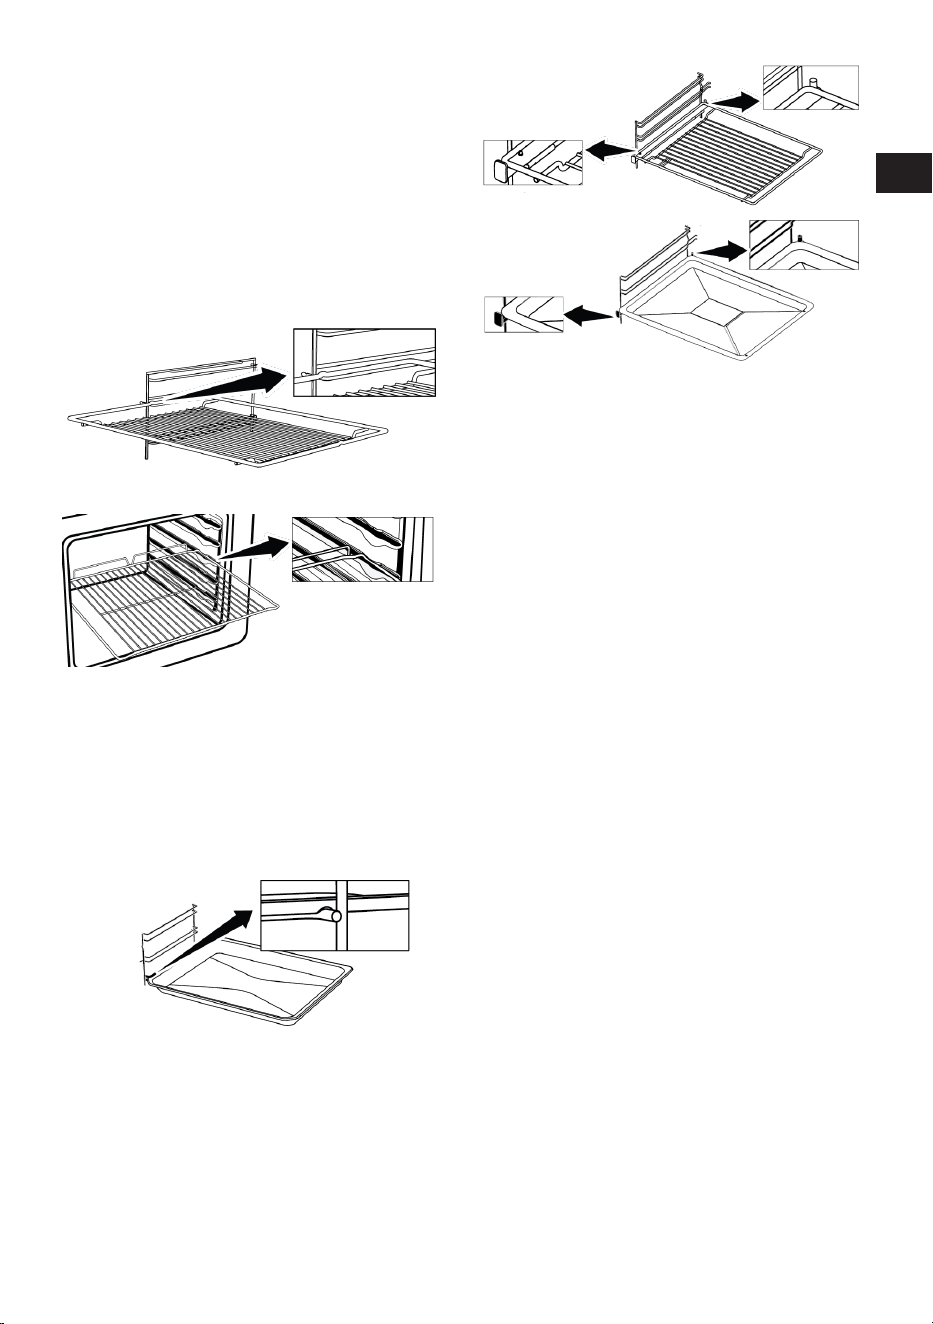
ET / 85
Traatresti peatamisfunktsioon
Seal on peatamisfunktsioon, mis takistab
traatvõre traatriiulist välja kukkumist. Selle
funktsiooniga saate oma toidu lihtsalt ja
turvaliselt välja võtta. Traatvõre
eemaldamise ajal saate seda edasi
tõmmata, kuni see jõuab peatumispunkti.
Selle täielikuks eemaldamiseks peate selle
punkti ületama.
Traatriiuliga mudelitel :
Ilma traatriiuliteta mudelitel :
Salve peatamise funktsioon
Samuti on olemas peatamisfunktsioon, mis
takistab kandiku traatriiulist välja
kukkumist. Salve eemaldamise ajal
vabastage see tagumisest peatuspesast ja
tõmmake seda enda poole, kuni see jõuab
esiküljeni. Peate sellest seiskamispesast
üle minema, et see täielikult eemaldada.
Traatvõre ja aluse õige paigutamine
teleskoopsiinidele-Traatriiulitega
mudelitel ja teleskoopmudelitel
Tänu teleskoopsiinidele saab plaate või
traatresti lihtsalt paigaldada ja eemaldada.
Teleskoopsiiniga plaate ja traatreste
kasutades tuleb jälgida, et teleskoopsiinide
esi- ja tagaküljel olevad tihvtid toetuksid
vastu grilli ja aluse servi (näidatud joonisel).
EN
ES
ET
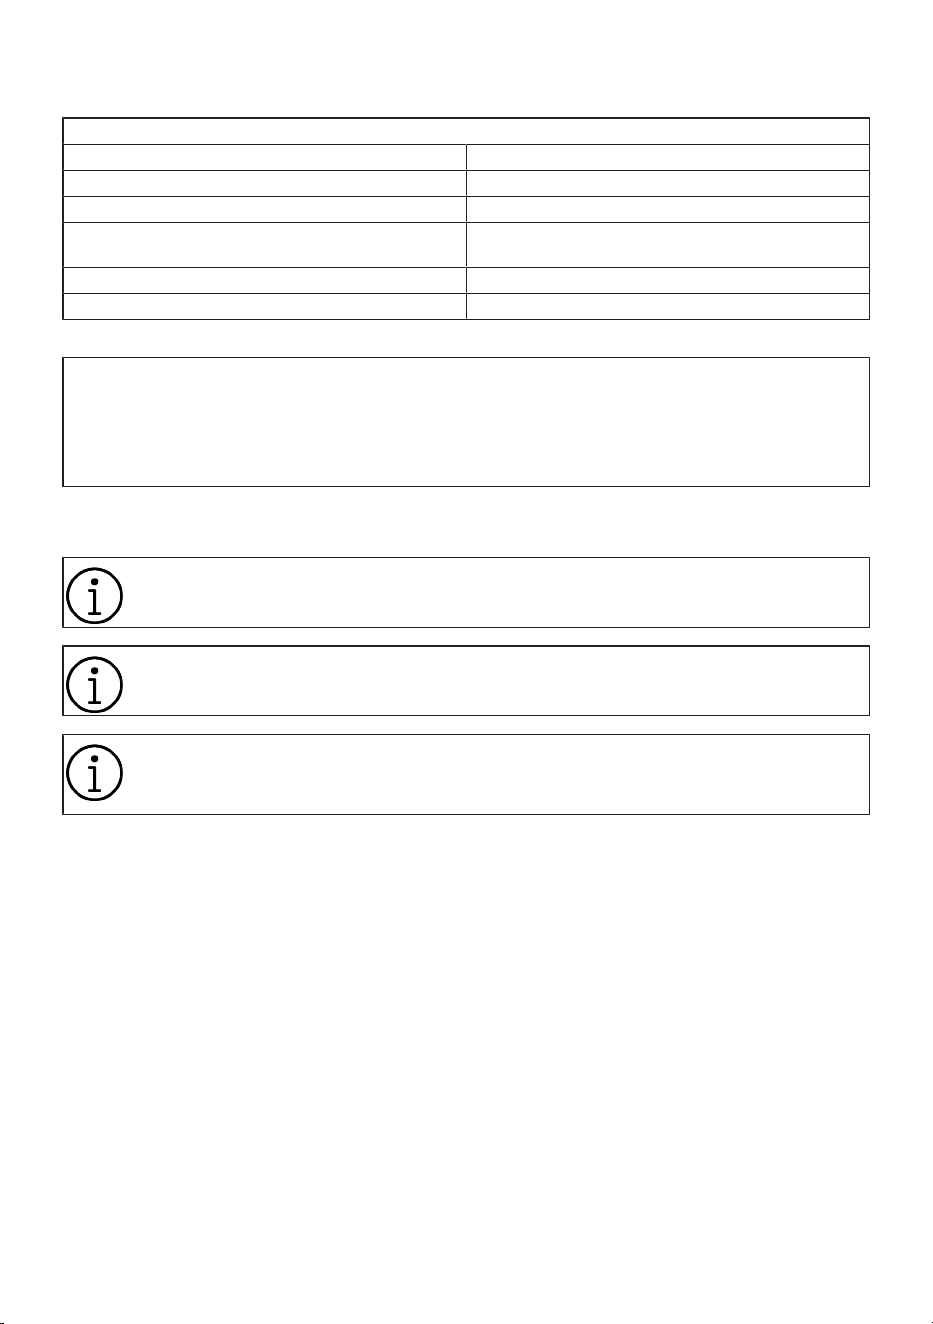
ET / 86
3.6 Tehniline kirjeldus
Üldised kirjeldused
Toote välismõõtmed (kõrgus/laius/sügavus) (mm) 455 /594 /567
Ahju paigaldusmõõtmed (kõrgus/laius/sügavus) (mm) 450-460 /560 /min. 550
Pinge/Sagedus 220-240 V ~; 50 Hz
Juhtme tüüp ja ristlõige, mida kasutatakse / sobib tootes
kasutamiseks
vähemalt H05VV-FG 3 x 1,5 mm2
Energiatarve (kW) 2,4
Ahju tüüp Multifunktsionaalne ahi
Põhiteave: Kodus kasutamiseks mõeldud elektriahjude energiamärgise teave on esitatud vastavalt standardile EN
60350- 1 / IEC 60350- 1. Need väärtused määrati kindlaks funktsioonide Ülemine ja alumine kuumutus or (if
present) Ülemine/alumine kuumutus ventilaatori toel puhul standardkoormusega.
Energiatõhususe klass on määratud kindlaks vastavalt järgmisele tähtsusastmele sõltuvalt sellest, kas tootel on
vastavad funktsioonid olemas või. 1-Säästlik kuumutus ventilaatoriga , 2-Kuumutus ventilaatoriga , 3-Grillimine
madalal võimsusel ventilaatori toel , 4-Ülemine ja alumine kuumutus.
Toote kvaliteedi parandamiseks võidakse tehnilisi andmeid ette teatamata muuta.
Selles juhendis olevad joonised on skemaatilised ja ei pruugi täpselt teie tootega
ühtida.
Toote etiketil või sellega kaasasolevas dokumentatsioonis märgitud väärtused on
saadud laboritingimustes vastavalt asjakohastele standarditele. Need väärtused
võivad erineda sõltuvalt toote töö- ja keskkonnatingimustest.
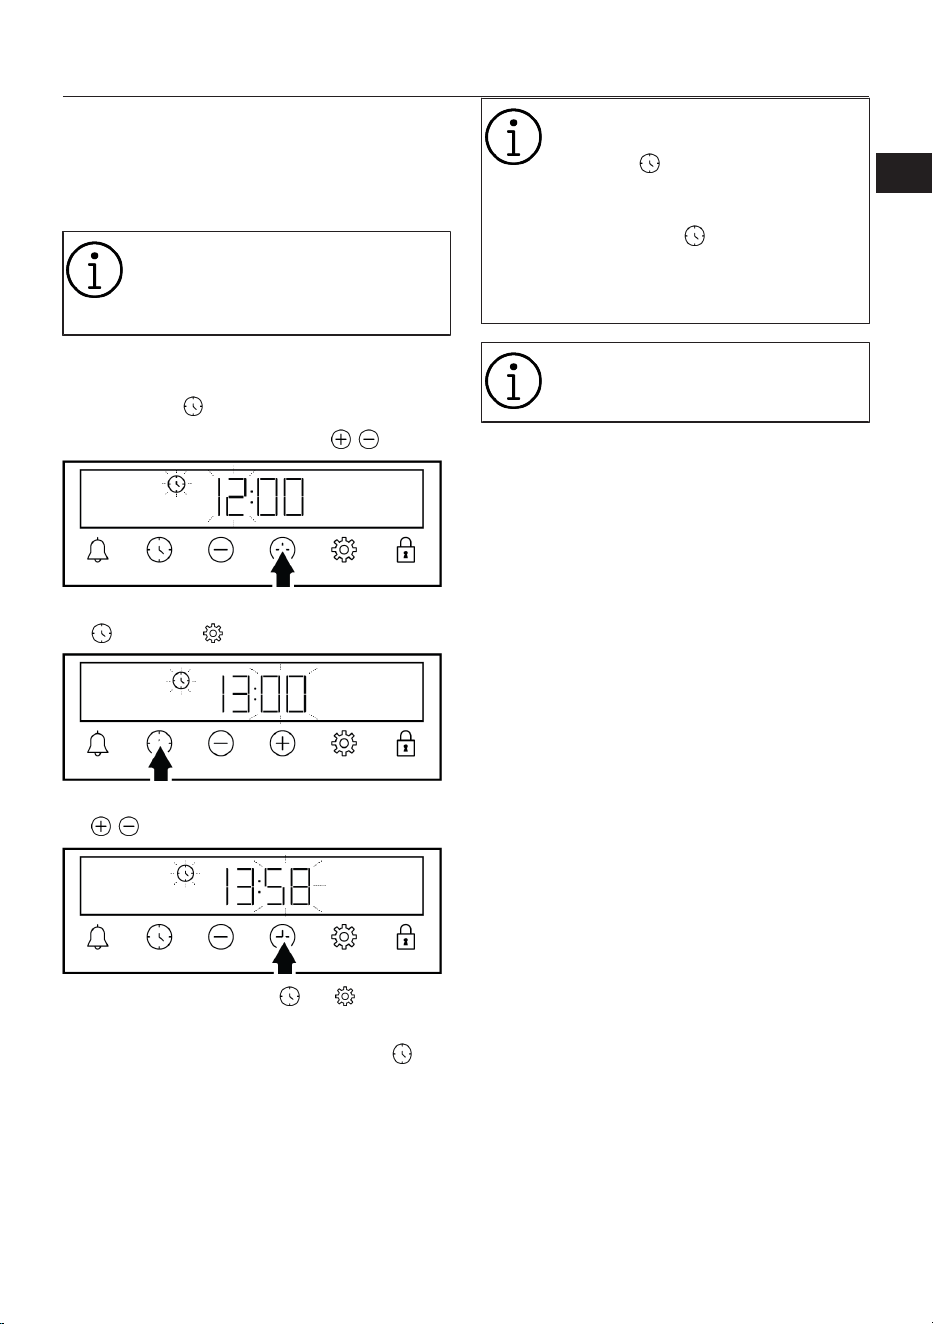
ET / 87
4 Esmakasutus
Enne seadme kasutuselevõttu on
järgmistes jaotistes soovitatav toimida
järgmiselt.
4.1 Esmaseadistus
Enne ahju kasutuselevõttu
seadistage alati kellaaeg. Kui Te
seda ei seadista, ei õnnestu mõne
ahjumudeli puhul toitu valmistada.
1. Pärast ahju esmakordset sisselülitamist
hakkavad ekraanil vilkuma tekst "12:00“
ja sümbol .
2. Määrake kellaaeg klahvide / abil.
3. Minutivälja aktiveerimiseks puudutage
või klahvi .
4. Minutite määramiseks vajutage klahve
/ .
5. Kinnitage säte klahvi või
vajutusega.
ð Kellaaeg on määratud ja sümbol
kaob ekraanilt.
Kui esimest taimerit ei seata, siis
hakkavad vilkuma kellaaeg "12:00"
ja sümbol ning ahi ei käivitu.
Ahju töötamiseks peate kinnitama
kellaaja. Selelks kehtestage see või
vajutage klahvi , kui kellaaeg ongi
"12:00“. Kellaaja sätet saate hiljem
muuta nagu on jaotises „Sätted”
kirjeldatud.
Elektrikatkestuse korral kellaaja
sätted tühistatakse. See tuleb
uuesti seadistada.
4.2 Seadme esmane puhastamine
1. Eemaldage kõik pakkematerjalid.
2. Eemaldage ahjust kõik kaasas olevad
tarvikud.
3. Lülitage toode 30 minutiks sisse ja
seejärel välja. Sel viisil põletatakse ja
eemaldatakse jäägid ja kihid, mis võisid
tootmise ajal ahju jääda.
4. Toote kasutamisel valige kõrgeim
temperatuur ja tööfunktsioon, millega
kõik Teie kuumutuselemendid töötada
saavad. Vt "Ahju tööfunktsioonid [}82].
Järgmisest jaotisest saate teada, kuidas
ahju kasutada.
5. Oodake, kuni ahi jahtub.
6. Pühkige toote pinnad niiske lapiga või
käsnaga ja kuivatage lapiga.
Enne tarvikute kasutamist:
Ahjust eemaldatud tarvikud puhastage
puhastusvahendi, vee ja pehme
puhastuskäsnaga.
MÄRKUS: Mõned pesu- või
puhastusvahendid võivad pinda
kahjustada. Ärge kasutage puhastamise
ajal peeneteralisi puhastusvahendeid,
puhastuspulbreid, puhastuskreeme ega
teravaid esemeid.
MÄRKUS: Esmakordsel kasutuskorral võib
suitsu ja lõhna tekkida mitmeks tunniks.
See on normaalne, ja selle eemaldamiseks
EN
ES
ET
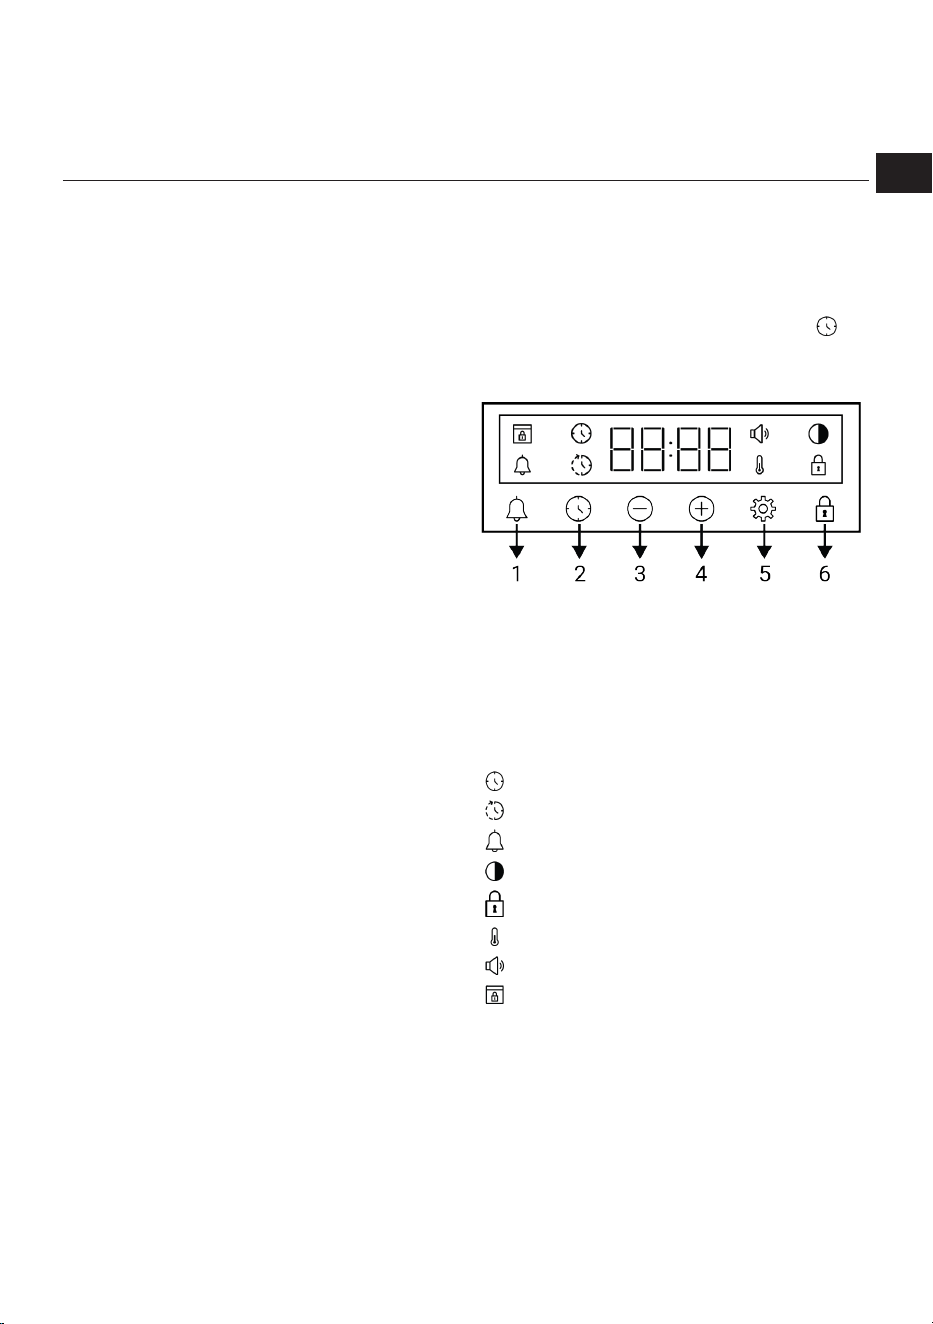
ET / 88
on vaja lihtsalt head ventilatsiooni. Vältige
suitsu ja tekkivate lõhnade otsest
sissehingamist.
5 Ahju kasutamine
5.1 Üldteave ahju kasutamise kohta
Jahutusventilaator ( See varieerub
sõltuvalt toote mudelist. See ei pruugi
teie tootel saadaval olla. )
Teie tootel on olemas jahutusventilaator.
Jahutusventilaator lülitatakse vajaduse
korral automaatselt sisse, ja see jahutab nii
toote esikülge kui ka mööblit. Kui
jahutusprotsess on lõppenud, lülitatakse
see automaatselt välja. Kuum õhk väljub
ahjuuksest. Ärge katke neid
ventilatsiooniavasid millegagi. Vastasel
juhul võib ahi üle kuumeneda.
Jahutusventilaator töötab ahju töötamise
ajal või ka pärast ahju väljalülitamist
(umbes 20- 30 minutit). Kui
toiduvalmistamiseks programmeerite ahju
taimeri, lülitub jahutusventilaator
küpsetusaja lõppedes välja koos kõigi
funktsioonidega. Jahutusventilaatori
tööaega ei saa kasutaja määrata. See
lülitub automaatselt sisse ja välja. See ei
ole tõrge.
Ahju valgustus
Ahju valgustus lülitub sisse, kui ahi hakkab
küpsetama. Mõnedes mudelites valgustus
jääb põlema küpsetusajal, teistes
mudelites lülitub see teatud aja möödudes
välja.
5.2 Ahju juhtseadme töö
Üldhoiatused ahju juhtseadme kohta
• Toiduvalmistamise ajaks saab
maksimaalselt määrata 5 tundi 59
minutit. Elektrikatkestuse korral
programm katkestatakse. Tuleb uuesti
programmeerida.
• Mis tahes muudatuste tegemisel
vilguvad ekraanil vastavad sümbolid.
Sätete salvestamiseks peab natuke
ootama.
• Kui on määratud mõni toiduvalmistamise
säte, ei saa kellaaega reguleerida.
• Kui toiduvalmistamise alguseks on
olemas seatud toiduvalmistamise aeg,
kuvatakse ekraanil järelejäänud aeg.
• Juhtudel, kui on seatud
toiduvalmistamise aeg või lõppaeg, saate
need automaatselt tühistada klahvi
pika vajutamisega.
Taimer
1 Äratusklahv
2 Aja seadmise klahv
3 Vähenda klahv
4 Suurendamisklahv
5 Seadete klahv
6 Klahviluku võti
Kuva sümbolid
: Küpsetusaja sümbol
: Küpsetamise lõpuaja sümbol *
: Häire sümbol
: Heleduse sümbol
: Klahviluku sümbol
: Temperatuuri sümbol
: Helitugevuse taseme sümbol
: Ukseluku sümbol *
*See varieerub sõltuvalt toote mudelist. See ei pruugi
teie tootel saadaval olla.
Ahju sisselülitamine
Kui valite funktsiooni valimise nupu abil
tööfunktsiooni, millega soovite toidu
valmistada, ja määrate temperatuuri nupu
abil teatud temperatuuri, hakkab ahi tööle.
EN
ES
ET
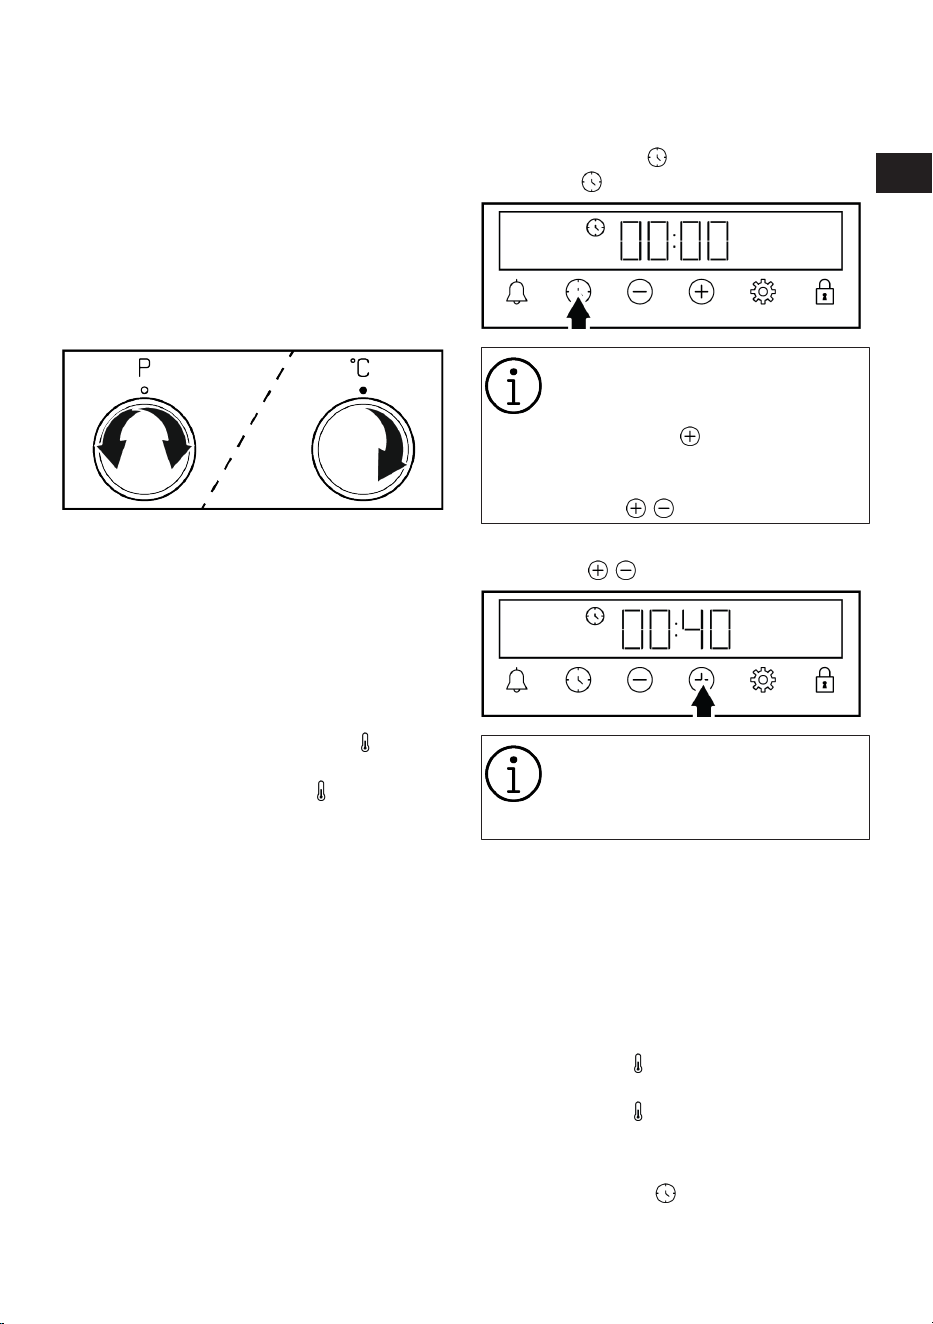
ET / 89
Ahju väljalülitamine
Saate ahju välja lülitada, keerates
funktsiooni valimise nuppu ja temperatuuri
nuppu asendisse „väljas“ (üles).
Käsitsi temperatuuri ja ahju tööfunktsiooni
valimine toiduvalmistamisel
Saate neid toiduvalmistamisel käsitsi
reguleerida (võimaluste piires), ilma
toiduvalmistamise aega määramata,
valides toidule vastava temperatuuri ja
tööfunktsiooni.
1. Valige funktsiooni valimise nupu abil
tööfunktsioon, millega soovite toidu
valmistada.
2. Seadke temperatuuri nupu abil
temperatuur, millega soovite toidu
valmistada.
ð Teie ahi hakkab valitud funktsiooni ja
temperatuuri kasutades kohe tööle
ning ekraanile ilmub sümbol . Kui
temperatuur ahjus jõuab seatud
temperatuurini, sümbol kaob
ekraanilt. Ahi ei lülitu automaatselt
välja, kuna käsitsi toiduvalmistamise
korral on toiduvalmistamise kestus
määramata. Teie peate küpsetamist
kontrollima ja seejärel ahju välja
lülitama. Kui küpsetamine on lõppenud,
lülitage ahi välja, keerates
funktsioonivaliku nupu ja temperatuuri
nupu asendisse „väljas“ (st ülemisse
asendisse).
Toiduvalmistamine toiduvalmistamise aja
määramisega:
Kui soovite, et ahi lülituks
toiduvalmistamise aja lõppedes
automaatselt välja, valige toidule vastava
temperatuur ja tööfunktsioon ning seadke
taimer toiduvalmistamise ajale.
1. Valige tööfunktsioon
toiduvalmistamiseks.
2. Toiduvalmistamise aja nägemiseks
vajutage klahvi , kuni ekraanile ilmub
sümbol .
Pärast tööfunktsiooni ja
temperatuuri määramist saate
toiduvalmistamise aja seada 30-le
minutile klahvi vajutamisega
kiireks toiduvalmistamise aja
määramiseks; selle saab muuta
klahvide / vajutamisega.
3. Määrake toiduvalmistamise aeg
klahvide / abil.
Toiduvalmistamise aja juurdekasv
esimese 15 minuti ulatuses on 1
minut, 15 minuti pärast on
juurdekasvuks 5 minutit.
4. Pange oma toit ahju ja seadke
temperatuur temperatuuri nupuga.
ð Teie ahi hakkab valitud funktsiooni
ja temperatuuri kasutades kohe
tööle. Masin alustab
pöördloenduse, kasutades alusena
määratud toiduvalmistamise
kestust, ning ekraanile ilmub
sümbol . Kui temperatuur ahjus
jõuab seatud temperatuurini,
sümbol kaob ekraanilt.
5. Kui toiduvalmistamise aeg on läbi,
kuvatakse ekraanil teade „End“, hakkab
vilkuma sümbol ja taimer piiksub.
EN
ES
ET
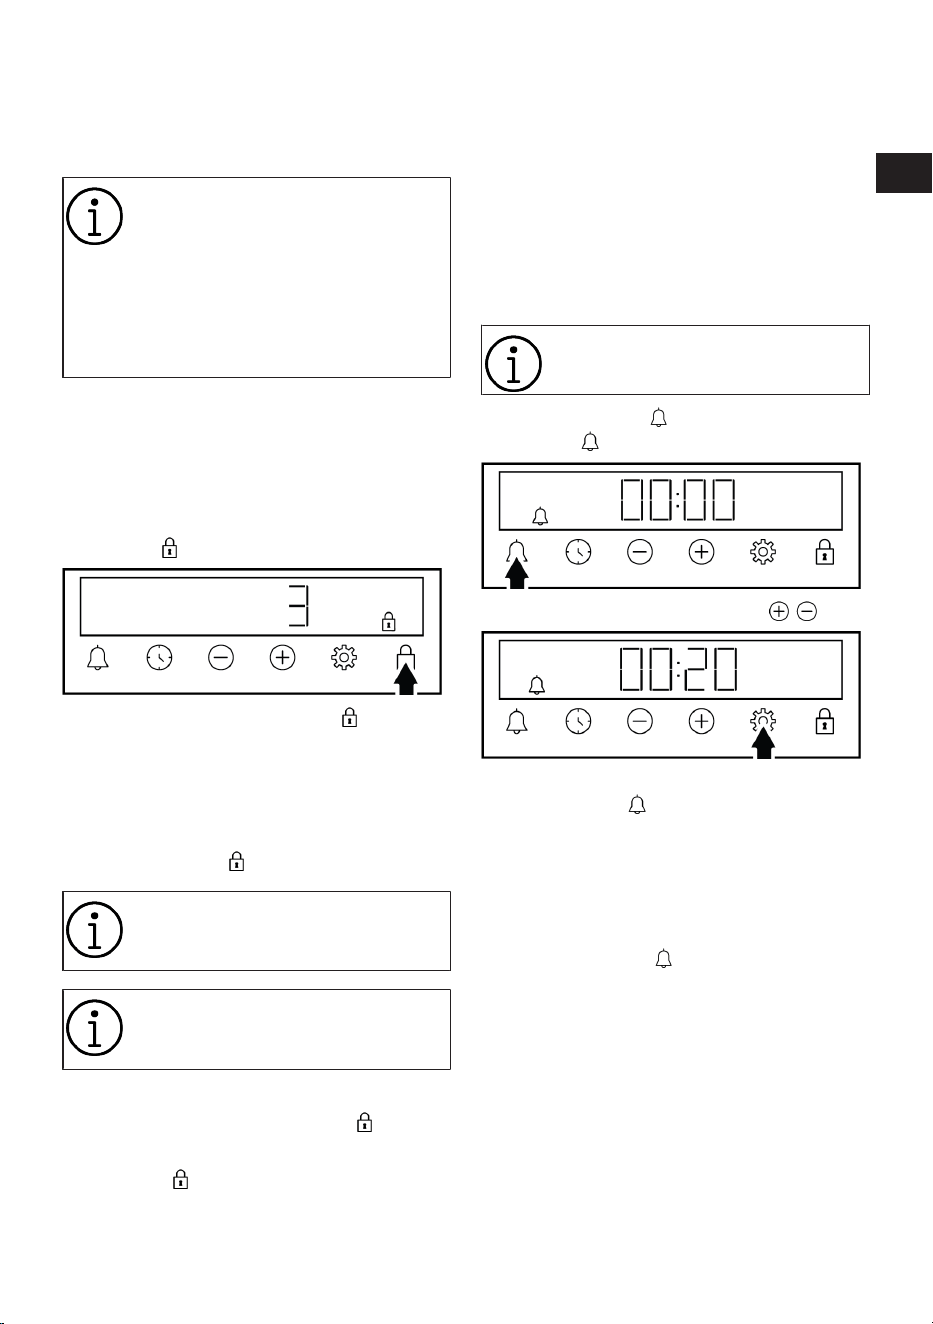
ET / 90
6. Helisignaal kostab kaks minutit.
Hoiatuse peatamiseks vajutage suvalist
nuppu. Hoiatus lõpeb ja ekraanile ilmub
kellaaeg.
Kui helisignaali lõpus vajutatakse
mõnda klahvi, hakkab ahi uuesti
tööle. Ahju taaskäivituse
vältimiseks hoiatuse lõpus lülitage
ahi välja. Selleks keerake
temperatuurinuppu ja
funktsiooninuppu asendisse 0
(väljas).
5.3 Sätted
Klahviluku aktiveerimiseks
Klahviluku funktsiooni abil saate kaitsta
taimerit sekkumiste eest.
1. Hoidke klahvi all, kuni ekraanile ilmub
sümbol .
ð Ekraanil kuvatakse sümbol ja algab
pöörloendus kujul 3-2-1.
Pöördloenduse lõppemisel lülitub sisse
klahvilukk. Kui aktiveeritud klahviluku
korral puudutatakse ükskõik millist
klahvi, annab taimer helisignaali ja
vilgub sümbol .
Klahvi vabastamisel enne
pöördloenduse lõppu klahvilukk ei
lülitu sisse.
Kui klahvilukk on sees, taimeri
klahve kasutada ei saa. Klahvilukku
ei tühistata elektrikatkestuse korral.
Klahviluku desaktiveerimiseks
1. Hoidke klahvi all, kuni sümbol kaob
ekraanilt.
ð Sümbol kaob ekraanilt ning
klahvilukk lülitatakse välja.
Alarmi sätestamiseks
Seadme taimerit saate kasutada mitte
ainult küpsetamise raames, vaid ka muude
hoiatuste või meeldetuletuste jaoks. Alarm
ei mõjuta ahju tööfunktsioone. Seda
kasutatakse hoiatamise eesmärgil. Näiteks
saate alarmi kasutada siis, kui soovite toitu
teatud aja möödudes ahjus keerata. Niipea
kui Teie poolt määratud aeg on möödas,
annab taimer Teile helisignaali.
Kõige hilisem võimalik helisignaal
on 23 tunni ja 59 minuti pärast.
1. Vajutage klahvi kuni ekraanile ilmub
sümbol .
2. Määrake alarmi aeg klahvide / abil.
ð Pärast alarmi aja määramist jääb
sümbol põlema ja ekraanil algab
alarmi aja tagasilugemine. Kui
määrata samaaegselt alarmi aeg
ja küpsetusaeg, kuvatakse ekraanil
lühemat aega.
3. Pärast alarmi aja möödumist hakkab
vilkuma sümbol ja kell annab Teile
kuuldava hoiatussignaali.
Alarmi väljalülitamiseks
1. Alarmi ajavahemiku möödudes kahe
minuti jooksul kostub hoiatussignaal.
Helisignaali peatamiseks vajutage
suvalist klahvi.
ð Hoiatus lõpeb ja ekraanile ilmub
kellaaeg.
EN
ES
ET
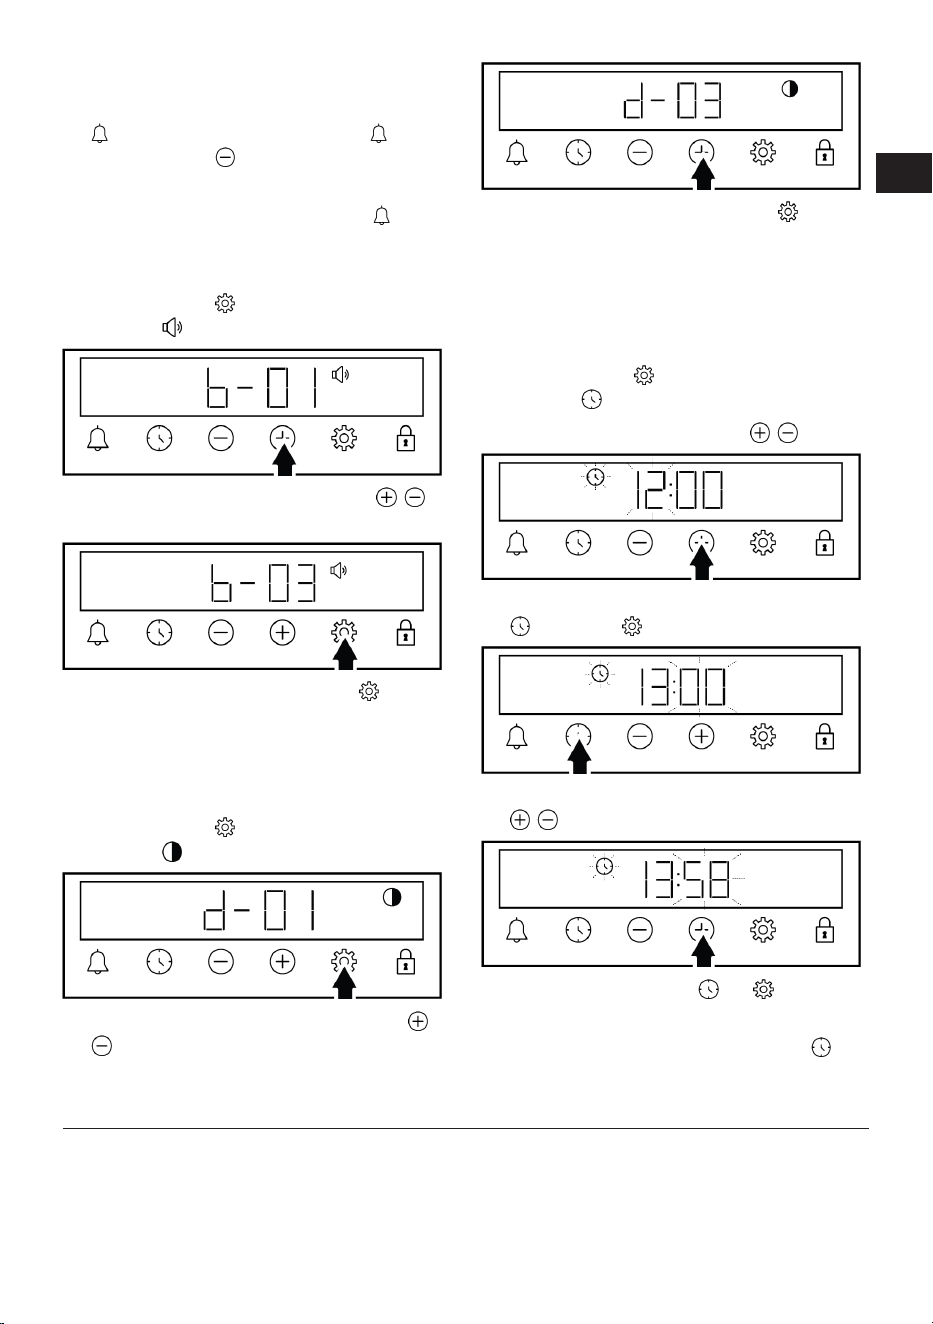
ET / 91
Alarmi tühistamiskes
1. Alarmi aja tühistamiseks vajutage klahvi
, kuni ekraanile ilmub sümbol .
Hoidke klahvi all, kuni ekraanile ilmub
teade „00:00“.
2. Alarmi saab tühistada ka klahvi pika
vajutusega.
Helitugevuse seadistus
1. Hoidke klahvi all, kuni ekraanile ilmub
sümbol .
2. Määrake soovitud tase klahvide /
abil. (b-01-b-02-b-03)
3. Vajutage kinnitamiseks klahvi või
oodake veidi ilma klahve vajutamata.
Helitugevuse säte lülitub mõne aja
pärast sisse.
Ekraani heleduse määramine
1. Hoidke klahvi all, kuni ekraanile ilmub
sümbol .
2. Määrake soovitud heledus klahvide /
abil. (d-01-d-02-d-03)
3. Vajutage kinnitamiseks klahvi või
oodake veidi ilma klahve vajutamata.
Heleduse säte lülitub mõne aja pärast
sisse.
Kellaaja muutmine
Varem määratud ahju kellaaja muutmiseks
1. Hoidke klahvi all, kuni ekraanile ilmub
sümbol .
2. Määrake kellaaeg klahvide / abil.
3. Minutivälja aktiveerimiseks puudutage
või klahvi .
4. Minutite määramiseks vajutage klahve
/ .
5. Kinnitage säte klahvi või
vajutusega.
ð Kellaaeg on määratud ja sümbol
kaob ekraanilt.
6 Üldteave küpsetamise kohta
Sellest jaotisest leiate näpunäiteid
toiduvalmistamise kohta.
Lisaks kirjeldab jaotis ka mõningaid
testitud toite/roogasid ja nende toitude/
roogade jaoks kõige sobivamaid sätteid.
Samuti on äratoodud nende toitudele/
roogadele sobivad ahju sätted ja tarvikud.
EN
ES
ET

ET / 92
6.1 Üldhoiatused mikrolaineahjus
küpsetamise kohta
• Ahjuukse avamisel küpsetamise ajal või
pärast seda võib tekkida kuum aur. Aur
võib põletada käsi, nägu ja/või silmi.
Ahjuukse avamisel hoiduge sellest
eemale.
• Küpsetamise käigus tekkiv intensiivne
aur võib temperatuurierinevuse tõttu
moodustada kondenseerunud veetilku
ahju sise- ja välispinnale ning mööbli
ülaosadele. See on normaalne ja füüsiline
nähtus.
• Toiduvalmistamise temperatuuri ja aja
väärtused võivad retseptist ja kogusest
sõltuvalt erineda. Sel põhjusel on need
väärtused antud vahemikena.
• Enne toiduvalmistamise alustamist
eemaldage alati ahjust tarvikud, mida Te
ei hakka kasutama. Tarvikud, mis jäävad
ahju, võivad takistada Teie toitu
valmimast õigete väärtuste juures.
• Toitude puhul, mida valmistate vastavalt
oma retseptile, vaadake teavet sarnaste
toitude kohta, mis on toodud
toiduvalmistamise nõuannete tabelites.
• Kaasasolevate tarvikute kasutamine
tagab Teile parimat toiduvalmistamist.
Järgige alati Teie poolt kasutatavate
väliste köögitarvete puhul antud hoiatusi
ja teavet.
• Lõigake rasvakindlat paberit, mida
toiduvalmistamisel kasutate,
kasutatavasse köögianumasse
sobivateks tükkideks. Köögianumast
ulatuv rasvakindel paber võib põhjustada
põletusi ja mõjutada Teie küpsetamise
kvaliteeti. Kasutage rasvakindlat paberit
ettenähtud temperatuuride vahemikus.
• Hea tulemuse tagamiseks küpsetamisel
asetage toit soovitatud riiulile. Ärge
muutke küpsetamise ajal riiuliasendit.
6.1.1 Pagaritooted ja ahjutoidud
Üldteave
• Hea toiduvalmistamise tagamiseks
soovitame kasutada toote tarvikuid. Kui
kavatsete kasutada väliseid kööginõusid,
eelistage tumedaid, mittekleepuvaid ja
kuumuskindlaid nõusid.
• Kui toiduvalmistamise nõuannete tabelis
soovitatakse eelsoojendamist, pange toit
pärast eelsoojendamist kindlasti ahju.
• Kui kavatsete süüa teha traatrestil
asuvate kööginõude abil, asetage need
traatresti keskele, mitte tagaseina
lähedusse.
• Kõik pagaritoodete valmistamiseks
kasutatavad materjalid peavad olema
värsked ja toatemperatuuril.
• Toidu valmiduse olek võib varieeruda
sõltuvalt toidu kogusest ja kööginõu
suurusest.
• Metallist, keraamilised ja klaasist vormid
pikendavad toiduvalmistamisele kuluvat
aega, ja küpsetiste alumine pind ei
pruunistu ühtlaselt.
• Küpsetuspaberit kasutades võib toidu
alumisel pinnal täheldada kerget
pruunistumist. Sellises olukorras peate
võib-olla pikendama toiduvalmistamise
aega umbes 10 minuti võrra.
• Toiduvalmistamise nõuannete tabelis
äratoodud väärtused on määratud
kindlaks meie laborites läbi viidud testide
tulemusel. Teie jaoks sobivad väärtused
võivad nendest väärtustest erineda.
• Asetage toit toiduvalmistamise
nõuannete tabelis soovitatud riiulile. Ahju
alumist riiulit käsitletakse 1. riiulina.
Näpunäiteid kookide küpsetamiseks
• Kui kook on liiga kuiv, tõstke
temperatuuri 10 °C võrra ja lühendage
küpsetusaega.
• Kui kook on niiske, kasutage väikest
kogust vedelikku või vähendage
temperatuuri 10 °C võrra.
• Kui koogi ülaosa on kõrbenud, pange see
alumisele riiulile, alandage temperatuuri
ja suurendage küpsetusaega.
EN
ES
ET

ET / 93
• Kui kook on seest hästi küpsenud, kuid
väljast on kleepuv, kasutage vähem
vedelikku, alandage temperatuuri ja
suurendage küpsetusaega.
Vihjeid pagaritoodete kohta
• Kui pagaritoode on liiga kuiv, tõstke
temperatuuri 10 °C võrra ja lühendage
küpsetusaega. Niisutage tainalehed
kastmega, mis koosneb piima, õli, muna
ja jogurti segust.
• Kui pagaritoode valmib aeglaselt,
veenduge, et Teie valmistatud
pagaritoode ei ulatuks oma paksuse tõttu
väljaspoole ahjuplaati.
• Kui pagaritoode on väljast pruunistunud,
kuid põhi pole küpsetatud, veenduge, et
pagaritoote jaoks kasutatav
kastmekogus ei ole kogunenud
pagaritoote põhjas. Ühtlaseks
pruunistumiseks üritage kaste ühtlaselt
taignalehtede ja pagaritoote vahel
jaotada.
• Küpsetage oma pagaritoodet
toiduvalmistamise nõuannete tabelis
äratoodud asendis ja temperatuuri
juures. Kui põhi pole ikka veel piisavalt
pruunistunud, asetage see järgmise
sammuna alumisele riiulile.
Küpsetusnõuannete tabel küpsetiste ja ahjuroogade jaoks
Toit Kasutatav tarvik Tööfunktsioon Riiuli asend Temperatuur
(°C)
Küpsetusaeg
(min) (umbes)
Kook kandikul Standardne salv *
Ülemine ja
alumine
kuumutus
2 180 20 … 30
Väikesed koogid Standardne salv *
Ülemine ja
alumine
kuumutus
2 150 25 … 35
Väikesed koogid Standardne salv *
Kuumutus
ventilaatoriga
1 150 … 160 35 … 50
Biskviidi kook
Ümmargune
koogivorm, 26 cm
läbimõõduga
traatresti
klambriga **
Ülemine ja
alumine
kuumutus
2 160 30 … 40
Biskviidi kook
Ümmargune
koogivorm, 26 cm
läbimõõduga
traatresti
klambriga **
Kuumutus
ventilaatoriga
1 160 35 … 45
Küpsis Kondiitriplaat *
Ülemine ja
alumine
kuumutus
2 170 25 … 35
Küpsis Kondiitriplaat *
Kuumutus
ventilaatoriga
1 170 30 … 40
Kondiitritooted Standardne salv *
Ülemine ja
alumine
kuumutus
2 180 35 … 45
kukkel Standardne salv *
Ülemine ja
alumine
kuumutus
2 200 20 … 30
kukkel Standardne salv *
Kuumutus
ventilaatoriga
1 180 20 … 30
Terve leib Standardne salv *
Ülemine ja
alumine
kuumutus
2 200 30 … 40
Terve leib Standardne salv *
Kuumutus
ventilaatoriga
1 200 30 … 40
EN
ES
ET

ET / 94
Toit Kasutatav tarvik Tööfunktsioon Riiuli asend Temperatuur
(°C)
Küpsetusaeg
(min) (umbes)
Lasanje
Klaasist/metallist
ristkülikukujuline
anum traatrestil **
Ülemine ja
alumine
kuumutus
1 või 2 200 30 … 40
õunapirukas
Ümmargune must
metallvorm, 20
cm läbimõõduga
traatrestil **
Ülemine ja
alumine
kuumutus
2 180 50 … 60
Pitsa Standardne salv *
Ülemine ja
alumine
kuumutus
2 200 … 220 10 … 20
Eelsoojendamine on soovitatav kõikide toiduainete puhul.
*Need tarvikud ei pruugi teie tootega kaasas olla.
**Need tarvikud ei ole teie tootega kaasas. Need on kaubanduslikult saadavad tarvikud.
6.1.2 Liha, kala ja linnuliha
Grillimise põhipunktid
• Kanaliha, kalkuniliha ja suurte lihatükkide
maitsestamine sidrunimahla ja pipraga
enne toiduvalmistamist suurendab
toiduvalmistamise tõhususe.
• Kontidega liha praadimiseks kulub 15–30
minutit rohkem kui filee praadimiseks.
• Liha paksuse iga sentimeetri kohta
peaksite arvutama umbes 4 kuni 5
minutit toiduvalmistamise aega.
• Kui toiduvalmistamise aeg on läbi, jätke
liha umbes 10-ks minutiks ahju. Liha
mahlad jaotuvad paremini praetud liha
sees ja ei tule välja liha lõikamisel.
• Kala tuleks paigutada kuumakindlas
plaadis keskmisele või alumisele riiulile.
• Toiduvalmistamise nõuannete tabelis
toodud roogasid valmistage sama
ahjuplaadi peal.
Küpsetusnõuannete tabel liha-, kala- ja linnuroogade jaoks
Toit Kasutatav tarvik Tööfunktsioon Riiuli asend Temperatuur
(°C)
Küpsetusaeg
(min) (umbes)
Praad (terve) /
Praad (1 kg)
Standardne salv * 3D-funktsioon 1
15 min. 250/
maks., pärast 180
… 190
60 … 80
Lamba sääre
(1,5-2 kg)
Standardne salv * 3D-funktsioon 1 170 85 … 110
Praetud kana
(1,8-2 kg)
Traatgrill *
Asetage üks alus
alumisele riiulile.
3D-funktsioon 1
15 min. 250/
maks., pärast 190
70 … 90
kalkun (5,5 kg) Standardne salv * 3D-funktsioon 1
25 min. 250/
maks., pärast 180
… 190
150 … 210
Kala
Traatgrill *
Asetage üks alus
alumisele riiulile.
3D-funktsioon 1 200 20 … 30
Eelsoojendamine on soovitatav kõikide toiduainete puhul.
*Need tarvikud ei pruugi teie tootega kaasas olla.
**Need tarvikud ei ole teie tootega kaasas. Need on kaubanduslikult saadavad tarvikud.
EN
ES
ET

ET / 95
6.1.3 Grill
Punane liha, kala ja linnuliha pruunistuvad
grillimisel kiiresti, hoiavad kaunist koorikut
ega kuiva ära. Grillimiseks sobivad eriti
hästi fileeliha, vardaliha, vorstid, aga ka
mahlased köögiviljad (tomatid, sibul jne).
Üldhoiatused
• Grillimiseks sobimatu toit võib
põhjustada tuleohtu. Grillige ainult toitu,
mis talub tugevat grillileeki. Ärge asetage
toite ka liiga kaugele resti tagumisse
ossa. See on kuumim piirkond ja
rasvased toidud võivad süttida.
• Sulgege ahjuuks grillimise ajaks.
Hoidke grillimise ajal ahjuuks alati
kinni. Kuumad pinnad võivad
põhjustada põletusi!
Grillimise põhipunktid
• Grillimiseks võite võimalikult sarnase
paksuse ja kaaluga toite.
• Asetage grillitavad tükid traatrestile või
traatresti alusele, jaotades neid nii, et
need ei ulatuks kuumutuselemendi
mõõtmetest väljapoole.
• Sõltuvalt grillitavate tükkide paksusest
võivad tabelis äratoodud
toiduvalmistamise ajad erineda.
• Asetage traatrest või traatresti alus ahjus
soovitud tasemele. Kui valmistate toitu
traatrestil, asetage õlide kogumiseks
alumisele riiulile ahjuplaat. Asetatav
ahjuplaat peaks olema kogu grillimise ala
suurune. See ahjuplaat ei pruugi olla Teie
tootega komplektis. Valage hõlpsa
puhastamise tagamiseks ahjualusele
veidi vett.
Grillimise nõuannete tabel
Toit Kasutatav tarvik Riiuli asend Temperatuur (°C) Küpsetusaeg (min)
(umbes)
Kala Traatgrill 2 250 20 … 25
Kana tükid Traatgrill 2 250 25 … 35
Lihapall (vasikaliha) -
12 summa
Traatgrill 2 250 20 … 30
Lambakarbonaad Traatgrill 2 250 20 … 25
Praad - (lihakuubikud) Traatgrill 2 250 25 … 30
Vasikaliha karbonaad Traatgrill 2 250 25 … 30
Köögiviljagratiin Traatgrill 2 220 20 … 30
Röstleib Traatgrill 2 250 3 … 5
Kõigi grilltoitude puhul on soovitatav eelsoojendada 5 minutit.
Pöörake toidutükke pärast 1/2 kogu grillimisajast.
6.1.4 Katsetatud road
• Selles toiduvalmistamise nõuannete
tabelis olevad road on valmistatud
vastavalt standardile EN 60350- 1,
hõlbustamaks seadme katsetamist
kontrolliasutustes.
EN
ES
ET
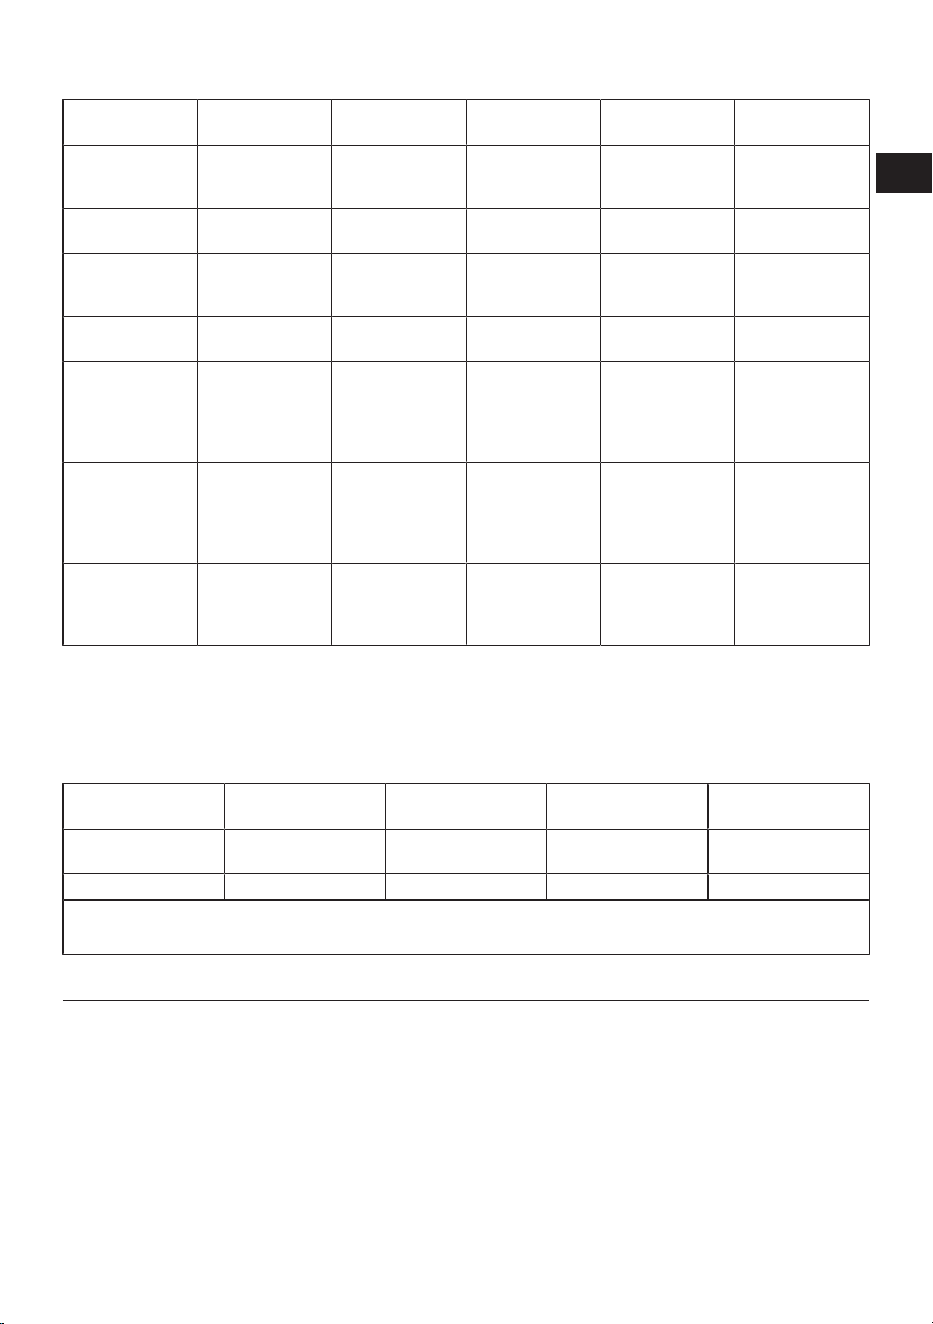
ET / 96
Toiduvalmistamise tabel katsetatud roogadega
Toit Kasutatav tarvik Tööfunktsioon Riiuli asend Temperatuur
(°C)
Küpsetusaeg
(min) (umbes)
Murukook (magus
küpsis)
Standardne salv *
Ülemine ja
alumine
kuumutus
2 140 20 … 30
Murukook (magus
küpsis)
Standardne salv *
Kuumutus
ventilaatoriga
2 140 15 .. 25
Väikesed koogid Standardne salv *
Ülemine ja
alumine
kuumutus
2 150 25 … 35
Väikesed koogid Standardne salv *
Kuumutus
ventilaatoriga
1 150 … 160 35 … 50
Biskviidi kook
Ümmargune
koogivorm, 26 cm
läbimõõduga
traatresti
klambriga **
Ülemine ja
alumine
kuumutus
2 160 30 … 40
Biskviidi kook
Ümmargune
koogivorm, 26 cm
läbimõõduga
traatresti
klambriga **
Kuumutus
ventilaatoriga
1 160 35 … 45
õunapirukas
Ümmargune must
metallvorm, 20
cm läbimõõduga
traatrestil **
Ülemine ja
alumine
kuumutus
2 180 50 … 60
Eelsoojendamine on soovitatav kõikide toiduainete puhul.
*Need tarvikud ei pruugi teie tootega kaasas olla.
**Need tarvikud ei ole teie tootega kaasas. Need on kaubanduslikult saadavad tarvikud.
Grill
Toit Kasutatav tarvik Riiuli asend Temperatuur (°C) Küpsetusaeg (min)
(umbes)
Lihapall (vasikaliha) -
12 summa
Traatgrill 2 250 20 … 30
Röstleib Traatgrill 2 250 3 … 5
Kõigi grilltoitude puhul on soovitatav eelsoojendada 5 minutit.
Pöörake toidutükke pärast 1/2 kogu grillimisajast.
7 Hooldus ja puhastus
7.1 Üldteave puhastamise kohta
Üldhoiatused
• Enne toote puhastamist oodake, kuni
toode jahtub. Kuumad pinnad võivad
põhjustada põletusi!
• Ärge kandke puhastusvahendeid otse
kuumadele pindadele. See võib
põhjustada püsivaid plekke.
• Seade tuleb korralikult puhastada ja
kuivaks pühkida pärast igat töökorda.
Seega tuleb toidujäägid hõlpsasti ära
puhastada, vältimaks nende jääkide
kõrbemist järgmisel töökorral. Tänu
sellele pikeneb seadme kasutusiga ja
sageli esinevad probleemid vähenevad.
• Ärge kasutage puhastamiseks
aurupuhastusvahendeid.
EN
ES
ET

ET / 97
• Mõned pesu- või puhastusvahendid
kahjustavad pinda. Kasutamiseks
mittesobivad puhastusvahendid on
pleegitusained, ammoniaaki, happeid või
kloriide sisaldavad puhastusvahendid,
aurupuhastusvahendid,
katlakivieemaldajad, plekieemaldajad ja
rooste eemaldajad, abrasiivsed
puhastusvahendid (kreemjad
puhastusvahendid, küürimispulber,
küürimiskreem, abrasiivsed ja
kriimustavad küürimisvahendid, traat,
käsnad, mustuse ja pesuainejääke
sisaldavad puhastuslapid).
• Pärast iga kasutuskorda ei ole vaja
spetsiaalset puhastusvahendit.
Puhastage seadet nõudepesuvahendi,
sooja vee ja pehme lapi või käsnaga ning
kuivatage see kuiva lapiga.
• Pärast puhastamist pühkige kindlasti
järelejäänud vedelik täielikult ära ja
puhastage ära toiduvalmistamise ajal
tekkinud pritsmed.
• Ärge peske ühtki seadme komponenti
nõudepesumasinas, kui kasutusjuhendis
pole teisiti öeldud.
Roostevabast terasest pinnad
• Ärge kasutage roostevabast terasest
pindade ja käepidemete puhastamiseks
hapet ega kloori sisaldavaid
puhastusvahendeid.
• Roostevabast terasest pind võib aja
jooksul värvi muuta. See on normaalne.
Puhastage roostevabale pinnale sobiva
pesuvahendiga pärast igat töökorda.
• Puhastage pehme seebi, lapi ja vedelate
(mittekriimustavate)
puhastusvahenditega, mis sobivad
roostevabade pindade jaoks, pühkides
ainult ühes suunas.
• Eemaldage roostevabast terasest ja
klaasist pinnalt lubja-, õli-, tärklise-, piima-
ja valguplekid kohe ja viivitamata. Üle
pika aja võivad plekid roostetada.
• Pinnale pihustatud/rakendatud
puhastusvahendid tuleb viivitamatult
eemaldada. Pinnale jäetud abrasiivsed
puhastusvahendid muudavad pinna
valgeks.
Emailitud pinnad
• Enne puhastamist peab
toiduvalmistamiseks kasutatud ala
jahtuma. Kuumade pindade puhastamine
võib põhjustada tuleohtu ja emailipinna
kahjustusi.
• Pärast iga kasutamist puhastage
emailitud pinnad nõudepesuvahendi,
sooja vee ja pehme lapi või käsnaga ning
pühkige kuivaks kuiva lapiga.
• Kui Teie seadmel on lihtne
aurupuhastusfunktsioon, saate kerge
mittepüsiva mustuse hõlpsasti auruga
ära puhastada. Vt Hõlbus aurupuhastus
[}99]
• Raskelt eemaldatavate plekkide korral
võib kasutada Teie tootemargi
veebisaidil soovitatud ahju- ja grillresti
jaoks mõeldud puhastusvahendeid ning
mittekriimustavat küürimiskäsna. Ärge
kasutage välist ahjupuhastit.
Katalüütilised pinnad
• Toiduvalmistamise ala külgseinad on kas
emailitud või katalüütilised. See varieerub
mudeliti.
• Katalüütilistel seintel on kerge matt ja
poorne pind. Ahju katalüütilisi seinu ei
tohi puhastada.
• Katalüütilised pinnad imavad õli tänu
oma poorsele struktuurile ja hakkavad
särama, kui pind on õliga küllastunud.
Sellisel juhul on soovitatav osad
vahetada.
Klaaspinnad
• Klaaspindade puhastamisel ärge
kasutage tugevast metallist kaabitsaid
ega abrasiivseid puhastusvahendeid.
Need võivad klaasi pinda kahjustada.
• Puhastage seadet nõudepesuvahendi,
sooja vee ja klaasipindadele mõeldud
mikrokiudlapiga ning pühkige need
kuivaks kuiva mikrokiudlapiga.
• Kui pärast puhastamist on pinnal jäänud
pesuvahendit, pühkige see maha külma
veega ja pühkige pind kuivaks puhta ja
kuiva mikrokiudlapiga. Pesuvahendi
jäägid võivad järgmisel töökorral klaasi
pinda kahjustada.
EN
ES
ET
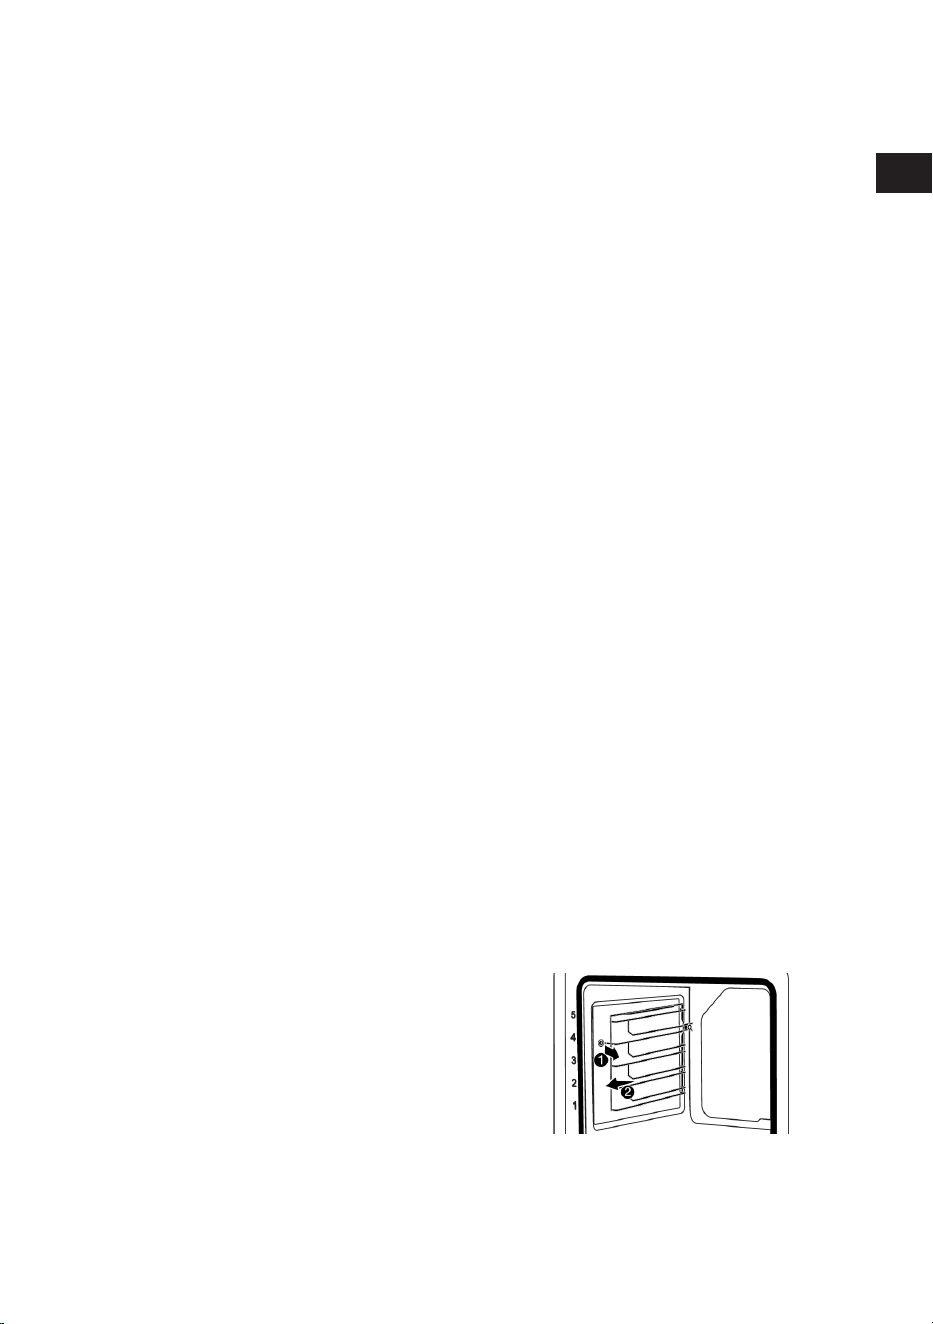
ET / 98
• Mitte mingil juhul ei tohi klaasipinnal
kuivanud jääke puhastada sakiliste
nugade, traatvilla või muude sarnaste
kraapimisvahenditega.
• Kaltsiumiplekid (kollased plekid)
klaaspinnalt saate eemaldada müügis
saadaval oleva
katlakivieemaldusvahendiga, näiteks
äädika või sidrunimahlaga.
• Kui pind on tugevalt määrdunud, kandke
puhastusvahend plekile käsnaga ja
andke sellele piisavalt aega, et see
toimiks. Seejärel puhastage pind märja
lapiga.
• Klaasipinna värvimuutus ja plekid
tekkimine on normaalne, need ei ole
defektid.
Plastosad ja värvitud pinnad
• Puhastage plastdetailid ja värvitud
pinnad nõudepesuvahendi, sooja vee ja
pehme lapi või käsnaga ning pühkige
need kuivaks kuiva lapiga.
• Ärge kasutage tugevast metallist
kaabitsaid ega abrasiivseid
puhastusvahendeid. Need võivad
pindasid kahjustada.
• Veenduge, et seadme osade
ühenduskohad ei jääks niiskeks ja
pesuvahendiga kaetuks. Vastasel juhul
võib nendes ühenduskohtades tekkida
korrosioon.
7.2 Tarvikute puhastamine
Ärge pange toote tarvikuid
nõudepesumasinasse, kui kasutusjuhendis
ei ole sätestatud teisiti.
7.3 Juhtpaneeli puhastamine
• Nuppudega paneelide puhastamisel
pühkige paneel ja nupud niiske pehme
lapiga ja pühkige kuivaks kuiva lapiga.
Ärge eemaldage all olevaid nuppe ja
tihendeid juhtpaneeli puhastamisel.
Juhtpaneel ja nupud võivad kahjustada
saada.
• Kui puhastate nuppudega roostevabast
terasest paneele, ärge kasutage nupu
ümber roostevaba terase jaoks mõeldud
puhastusvahendeid. Märgid nuppude
ümber võivad kuluda.
• Puhastage puutetundlikke juhtpaneele
niiske pehme lapiga ja pühkige kuivaks
kuiva lapiga. Kui Teie tootel on olemas
klahviluku funktsioon, lülitage klahvilukk
sisse enne juhtpaneeli puhastamist.
Vastasel juhul võivad klahvid valesti
reageerida.
7.4 Ahi sisemuse (toiduvalmistamise
ala) puhastamine
Järgige jaotises "Üldteave puhastamise
kohta" kirjeldatud puhastamisetappe
vastavalt ahju pinnatüüpidele.
Ahju külgseinte puhastamine
Toiduvalmistamise ala külgseinad on kas
emailitud või katalüütilised. See varieerub
mudeliti. Kui on olemas katalüütiline sein,
siis lisateabe saamiseks lugege jaotist
“Katalüütilised pinnad”.
Kui Teie toode on traatriiulitega mudel,
eemaldage traatriiulid enne külgseinte
puhastamist. Seejärel järgige jaotises
"Üldteave puhastamise kohta" kirjeldatud
puhastamisetappe vastavalt ahju külgseina
tüüpidele.
Külgtraatriiulite eemaldamiseks toimige
järgmiselt:
1. Eemaldage traatriiuli esiosa, tõmmates
seda külgseinast vastupidises suunas.
2. Selle täielikuks eemaldamiseks
tõmmake traatriiul enda poole.
3. Riiulite uuesti kinnitamiseks tuleb nende
eemaldamisel teostatud toimingud
vastupidises järjekorras korrata.
EN
ES
ET
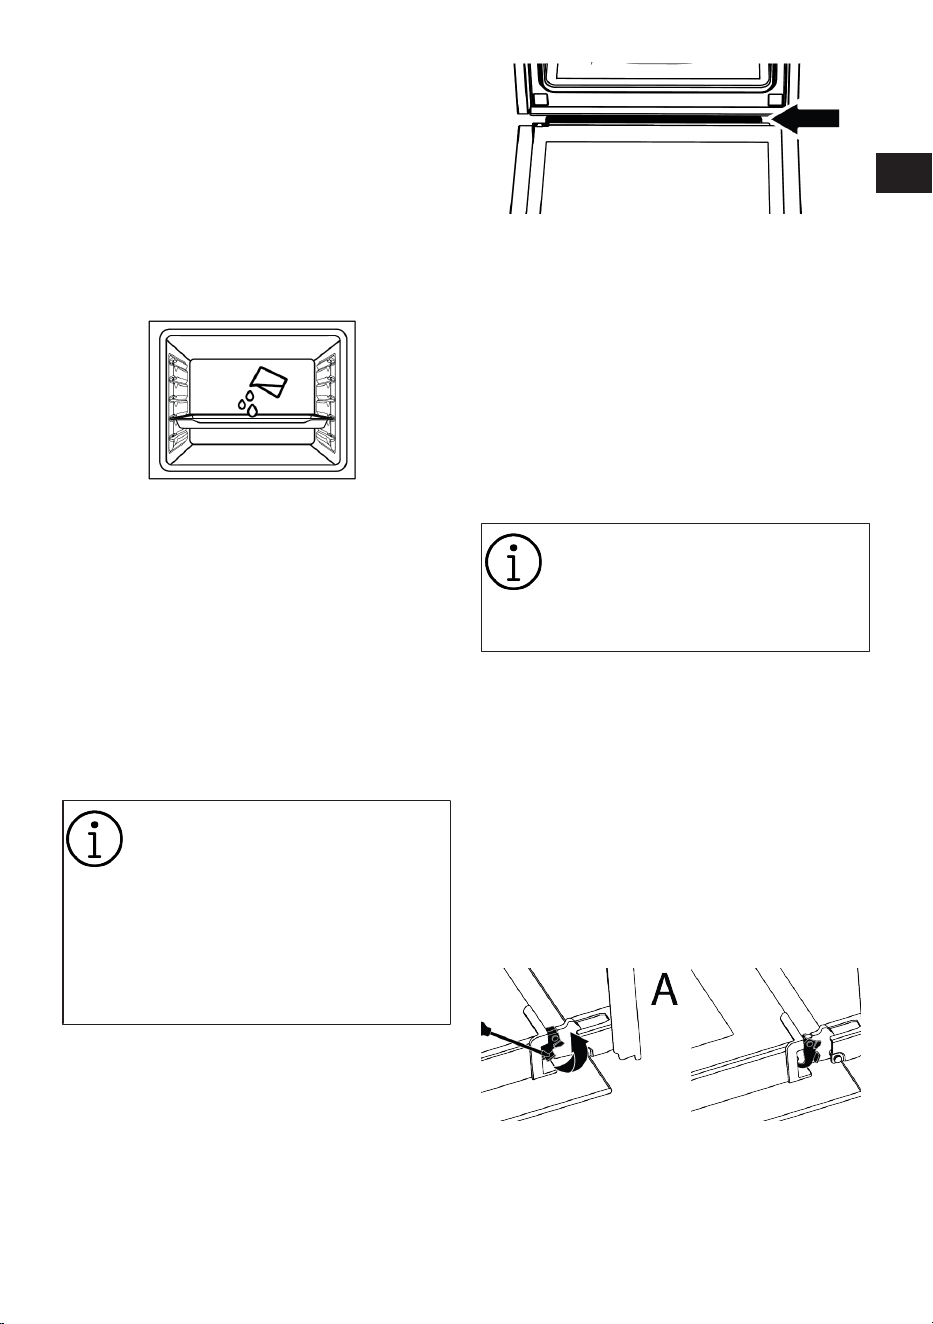
ET / 99
7.5 Hõlbus aurupuhastus
Antud funktsioon pehmendab auru ja ahju
sisepindadele kondenseerunud veepiiskade
abil ahju tekkinud mustust (kui see ei olnud
seal pikka aega) ja hõlbustab selle
eemaldamist.
1. Eemaldage kõik tarvikud ahju seest.
2. Valage ahjuplaadile 500 ml vett ja
asetage see teisele ahjuriiulile.
3. Lülitage ahju hõlpsa aurupuhastuse
režiimile ja laske tal töötada 15 minutit
temperatuuril 100 °C.
Avage kohe ahjuuks ja pühkige ahju
sisepinnad märja käsna või lapiga. Ukse
avamisel ahjust väljub aur. See võib
tekitada põletusohtu. Olge ukse avamisel
ettevaatlik.
Püsivate plekkide puhul puhastage seadet
nõudepesuvahendi, sooja vee ja pehme lapi
või käsnaga ning pühkige see kuivaks kuiva
lapiga.
Hõlpsa aurupuhastuse puhul
eeldatakse, et lisatud vesi aurustub
ja kondenseerub ahju sisepindadele
ning ahju uksele Teie ahju tekkinud
kerge mustuse pehmendamiseks.
Ahjuuksele tekkinud kondensaat
võib ahjuukse avamisel tilkuda.
Niipea, kui avate ahjuukse, pühkige
see kondensaadist kuivaks.
(See varieerub sõltuvalt toote mudelist. See
ei pruugi teie tootel saadaval olla.) Pärast
kondenseerumist ahju sees võib ahju all
olevasse süvendi kanalis tekkida lomp või
niiskus. Pärast kasutamist puhastage see
süvendi kanal niiske lapiga ja pühkige see
kuivaks.
7.6 Ahjuukse puhastamine
Puhastamiseks võite ahjuuksed ja -klaasid
eemaldada. Ahjuukse ja -klaaside
eemaldamist selgitatakse jaotistes
„Ahjuukse eemaldamine“ ja „Ahjuukse
siseklaaside eemaldamine“. Pärast
ahjuukse siseklaaside eemaldamist
puhastage need sooja vee ja pehme riide
või käsna abil ning kuivatage need kuiva
lapiga. Kui ahjuklaasile tekib katlakivi,
pühkige klaasi äädikaga ja loputage.
Ärge kasutage ahjuukse ja -klaasi
puhastamiseks tugevaid
abrasiivseid puhastusvahendeid,
metallikaabitsaid, traatvilla ja
pleegitusaineid.
Ahjuukse eemaldamine
1. Avage ahjuuks.
2. Avage paremal ja vasakul esiukse
hingepesa klambrid, vajutades allapoole,
nagu joonisel näidatud.
3. Hingetüübid on vastavalt tootemudelile
erinevad: (A), (B), (C). Järgmistel
joonistel on näidatud, kuidas avada igat
tüüpi hingeid.
4. A-tüüpi hinge on saadaval tavaliste
uksetüüpide puhul.
5. B-tüüpi hinge on saadaval pehmelt
sulguvate uksetüüpide puhul.
EN
ES
ET
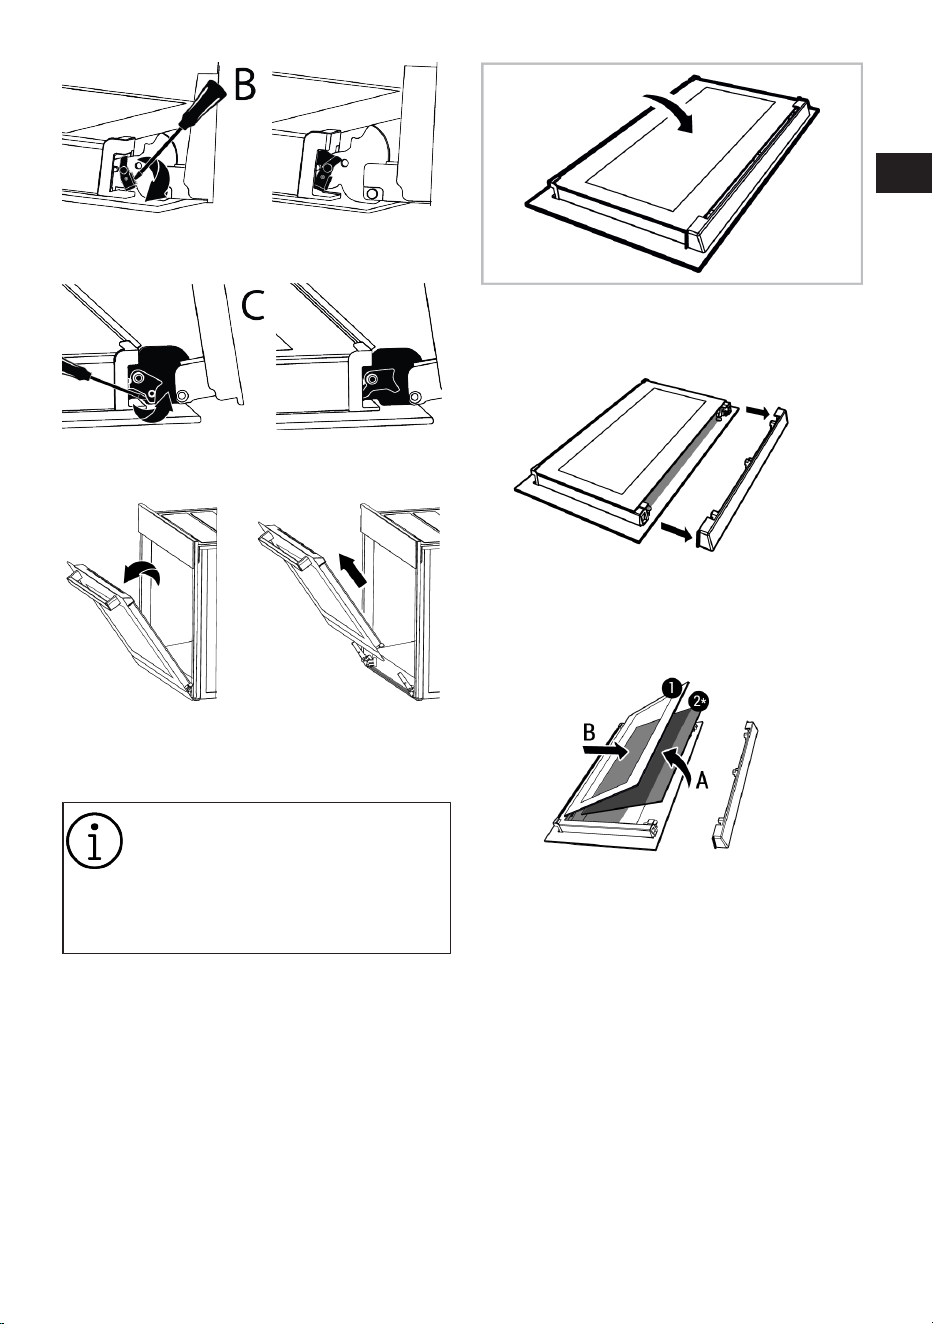
ET / 100
6. C-tüüpi hinge on saadaval pehmelt
avanevate/sulguvate uksetüüpide puhul.
7. Viige ahjuuks pooleldi avatud
asendisse.
8. Tõmmake eemaldatav ahjuuks
ülespoole, et vabastada see paremast ja
vasakust hingest ning eemaldada.
Ahjuukse uuesti kinnitamiseks
tuleb selle eemaldamisel teostatud
toimingud vastupidises järjekorras
korrata. Ukse paigaldamisel
sulgege kindlasti hinge pesa
klambrid.
7.7 Ahjuukse siseklaasi eemaldamine
Toote esiukse siseklaasi võib
puhastamiseks eemaldada.
1. Avage ahjuuks.
2. Eemaldage esiukse ülemise osa külge
kinnitatud plastkomponent, tõmmates
seda enda poole.
3. Nagu joonisel näidatud, tõstke õrnalt
sisim klaas (1) „A“ suunas ja
eemaldage see, tõmmates seda „B“
suunas.
1 Sisim klaas 2* Siseklaas (ei pruugi
Teie tootes saadaval
olla)
4. Kui teie tootel on siseklaas (2), korrake
selle eemaldamiseks (2) sama
protseduuri.
5. Ukse kokkupanemise esimene samm on
siseklaasi (2) paikapanek. Joondage
klaasi kaldlihvitud serv plastist pesa
kaldlihvitud servaga. (Kui teie tootel on
siseklaas). Siseklaas (2) tuleb kinnitada
siseklaasile (1) kõige lähemal asuva
plastpessa.
EN
ES
ET
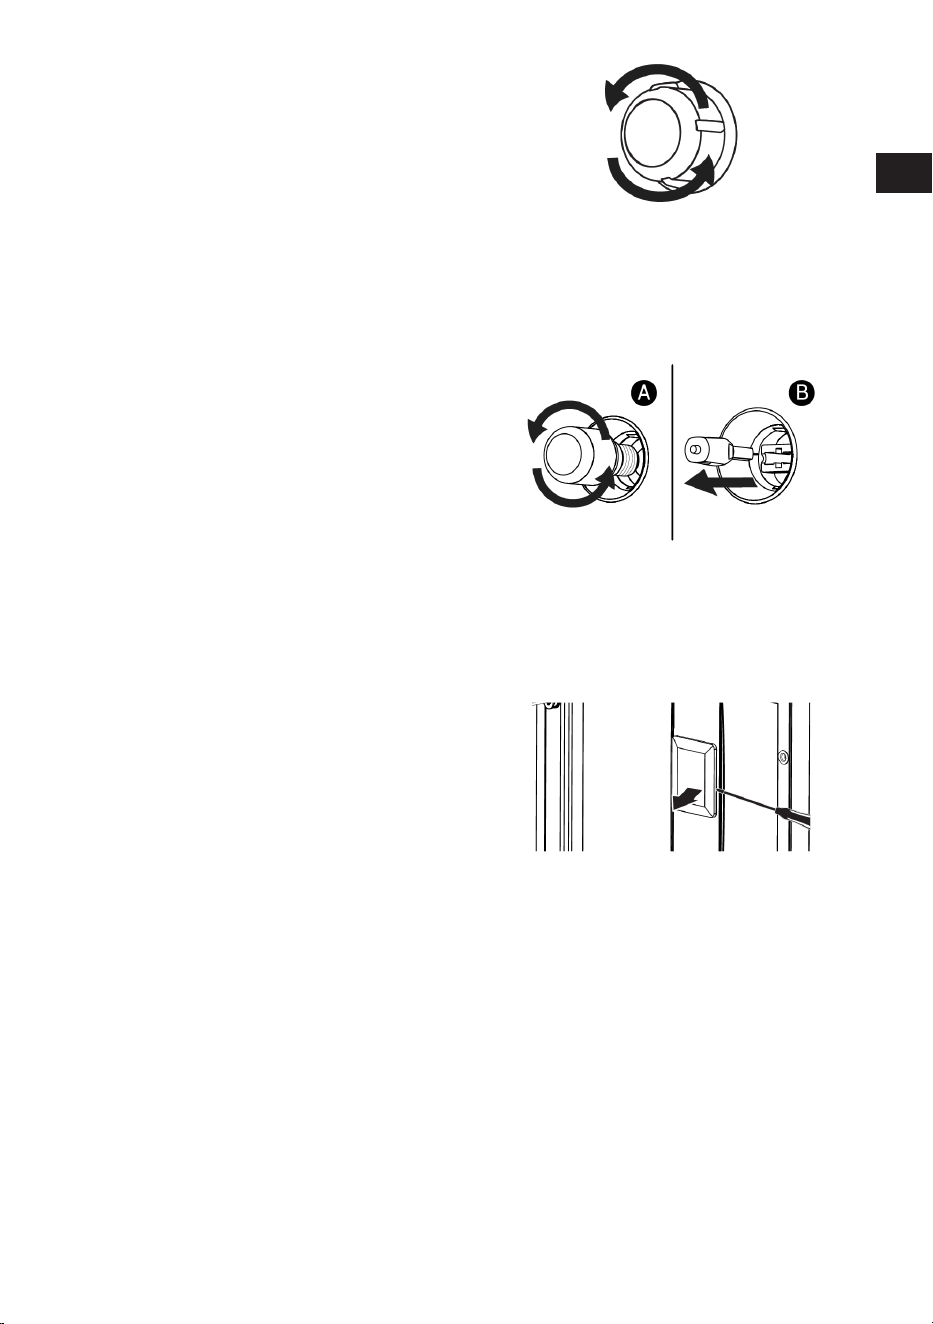
ET / 101
6. Sisima klaasi (1) monteerimisel
veenduge, et klaasi prinditud külg oleks
paigutatud siseklaasile. Ülioluline on
asetada sisima klaasi (1) alumised
nurgad nii, et need oleksid joondatud
alumiste plastpesadega.
7. Lükake plastkomponent raami poole,
kuni kostab klõps.
7.8 Ahjuvalgusti puhastamine
Juhul, kui toiduvalmistamise piirkond
ahjuvalgusti klaasuks määrdub, puhastage
see nõudepesuvahendi, sooja vee ja pehme
riide või käsna abil ning kuivatage kuiva
lapiga. Ahjuvalgusti rikke korral saate selle
välja vahetada, järgides järgmiseid samme.
Ahjuvalgusti väljavahetamine
Üldhoiatused
• Elektrilöögi ohu vältimiseks ühendage
seade lahti ja oodake, kuni ahi jahtub,
enne ahjuvalgusti väljavahetamist.
Kuumad pinnad võivad põhjustada
põletusi!
• Antud ahi on varustatud hõõglambiga
võimsusega alla 40 W, kõrgusega alla 60
mm ja läbimõõduga alla 30 mm, või G9-
sokliga halogeenlambiga võimsusega
alla 60 W. Elektripirnid sobivad
kasutamiseks temperatuuril üle 300 °C.
Ahjulambid on saadaval volitatud
teenindusest või litsentseeritud
tehnikutelt. Antud seade on varustatud G-
energiaklassiga elektripirniga.
• Valgusti asukoht võib erineda joonisel
näidatust.
• Selles tootes kasutatav valgusti ei sobi
kasutamiseks kodutubade valgustuses.
Selle valgusti eesmärk on aidata
kasutajal toiduaineid näha.
• Antud seadmes kasutatavad elektripirnid
peavad vastu pidama ekstreemsetele
füüsilistele tingimustele, näiteks
temperatuuridele üle 50 °C.
Kui teie ahjus on ümmargune valgusti,
1. ühendage toode vooluvõrgust lahti.
2. Eemaldage klaasist kaas, keerates seda
vastupäeva.
3. Kui Teie ahjuvalgusti on joonisel A
näidatud tüüpi elektripirn, siis keerake
ahju see joonisel näidatud viisil ja
vahetage see uue vastu. Kui mudeli tüüp
on B, tõmmake see välja nagu joonisel
näidatud ja asendage see uuega.
4. Pange klaasist kaas tagasi.
Kui Teie ahjus on ruudukujuline valgusti,
1. ühendage toode vooluvõrgust lahti.
2. Eemaldage traatriiulid vastavalt
kirjeldusele.
3. Tõstke valgusti kaitseklaas
kruvikeerajaga üles. Eemaldage
kõigepealt kruvi, kui teie toote kandilisel
lambil on kruvi.
4. Kui Teie ahjuvalgusti on joonisel A
näidatud tüüpi elektripirn, siis keerake
ahju see joonisel näidatud viisil ja
vahetage see uue vastu. Kui mudeli tüüp
on B, tõmmake see välja nagu joonisel
näidatud ja asendage see uuega.
EN
ES
ET

ET / 102
5. Pange klaasist kaas ja traatriiulid tagasi.
8 Veaotsing
Kui probleem püsib pärast selles jaotises
toodud juhiste järgimist, võtke ühendust
müüja või volitatud teenindusega. Ärge
kunagi proovige oma toodet ise parandada.
Ahi töötamise ajal eraldub auru.
• On normaalne, et töö ajal näete auru. >>>
See ei ole viga.
Toiduvalmistamise ajal ilmuvad veepiisad
• Küpsetamise ajal tekkiv aur
kondenseerub, kui see puutub kokku
toote väliste külmade pindadega ja võib
moodustada veepiisku. >>> See ei ole
viga.
Toote soojenemise ja jahutamise ajal on
kuulda metalliheli.
• Metallosad võivad kuumutamisel
laieneda ja tekitada helisid. >>> See ei ole
viga.
Toode ei tööta.
• Kaitse võib olla vigane või läbi põlenud.
>>> Kontrollige kaitsmekarbis olevaid
kaitsmeid. Vajadusel muutke neid või
aktiveerige need uuesti.
• Seade ei tohi olla ühendatud
(maandatud) pistikupessa. >>>
Kontrollige, kas seade on pistikupessa
ühendatud.
• (Kui teie seadmel on taimer) Juhtpaneeli
klahvid ei tööta. >>> Kui teie tootel on
klahvilukk, võib klahvilukk olla lubatud,
keelake klahvilukk.
Ahju tuli ei põle.
• Ahjulamp võib olla vigane. >>> Vahetage
ahju lamp.
• Elektrit pole. >>> Veenduge, et vooluvõrk
on töökorras ja kontrollige kaitsmekarbis
olevaid kaitsmeid. Vajadusel vahetage
kaitsmed või aktiveerige need uuesti.
Ahi ei küta.
• Ahi ei pruugi olla seadistatud kindlale
küpsetusfunktsioonile ja/või
temperatuurile. >>> Seadke ahi kindlale
küpsetusfunktsioonile ja/või
temperatuurile.
• Taimeriga mudelite puhul ei ole kellaaega
määratud. >>> Määrake aeg.
• Elektrit pole. >>> Veenduge, et vooluvõrk
on töökorras ja kontrollige kaitsmekarbis
olevaid kaitsmeid. Vajadusel vahetage
kaitsmed või aktiveerige need uuesti.
(Taimeriga mudelitel) Taimeri ekraan
vilgub või taimeri sümbol jääb avatuks.
• Elektrikatkestusi on varemgi olnud. >>>
Seadke kellaaeg / Lülitage toote
funktsiooninupud välja ja lülitage see
uuesti soovitud asendisse.
EN
ES
ET