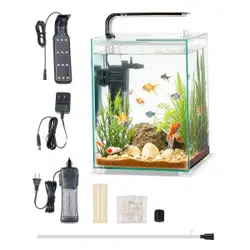

User Manual
Product Introduction
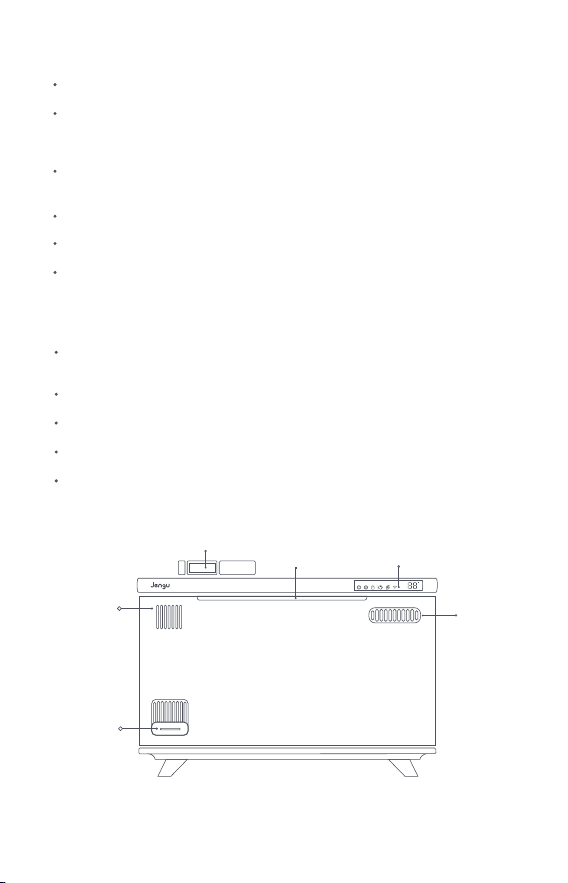
Front View
1
Important Safety Precautions
Instructions for Use
Note: The illustrations of products, accessories, and user interfaces in this user manual are for
illustrative purposes only. Due to product updates and upgrades, the actual product may differ
slightly from the illustrations. Please refer to the actual product.
Please read this manual carefully before using this product for the first time. Keep the
manual handy for future reference.
Other than this product’s water pump and filter, the other main components, including the
LED display and controls, are not user serviceable. Only authorized Jengu repair personnel
can repair the product when under manufacturer’s warranty. Please do not attempt to
repair it yourself to avoid damage and potential injury.
This product should only be connected to power using the supplied original power adapter
and must not be powered with aftermarket power adapters or repurposed adapters from
other consumer electronics products.
When assembling, cleaning, or completing regular maintenance, please disconnect the
power first and, once completed, reconnect power.
Place the aquarium power adapter in a secure and concealed location to prevent children
from touching it.
When assembling, cleaning, or completing regular maintenance, do not attempt to connect
the power adapter with wet hands to avoid electric shock. Avoid plugging the aquarium’s
power adapter into power strips along with other electric devices. Connect to the main
nearby power outlet directly.
The tank body is made of glass material. Please do not place this product in areas where it
may be damaged by flying objects, accidentally pushed over, or come into contact with
corrosive chemical solvents.
The upper cover of this product contains sensitive components, and direct rinsing with
water is prohibited. lf cleaning is necessary, wipe it with a clean dry cloth.
During the fish-keeping process, avoid changing a large amount of water all at once to
prevent destabilizing the water quality.
During the fish-keeping process, if dead fish are found, please promptly remove them to
prevent bacterial contamination of water quality.
When gravel is used in the aquarium, the maximum thickness of the gravel should be lower
than the sand-blocking plate to prevent blockage of the water inlet.
Full-Spectrum
Lighting Assembly
Waterfall
Oxygenator
LCD Display
Screen
Automatic Feeder
Splash Guard
Oil Film
Removal Port
LIGHT
F
PUMP
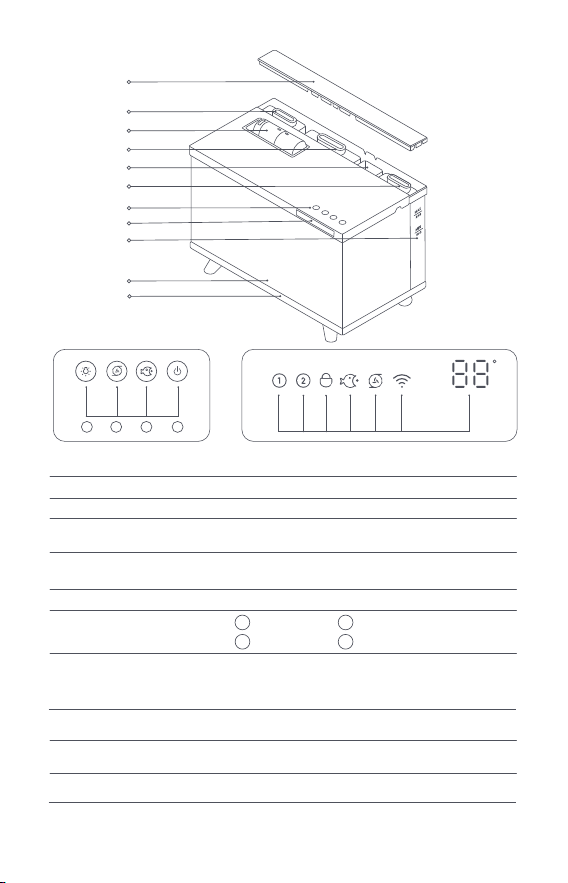
1. Back Filter Compartment
Cover
2. Physical Filtration Module
3. Automatic feeder
4. Biochemical Filtration Module
7. Touch Buttons
8. Intelligent Display
6. Pump Module
9. Water Level Mark
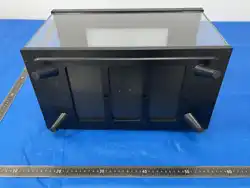
11. Suspended Base
Conceals the module to protect components and to
enhance the overall aesthetics of the aquarium.
Filters out large particle impurities.
Single-click feeding button.
Three stage biochemical filtration to cultivate beneficial
nitrifying bacteria to counteract the build up of fish waste.
Multi-functional pump with one-key drainage function.
MAX for maximum water level.
MIN for minimum water level.
Designed with a suspended base for easy transportation
of the aquarium by users.
From left to right, the indicators are: Filter material
indicator 1, filter material indicator 2, key lock indicator,
feeder indicator, water pump indicator, Wi-Fi indicator,
numeric display area.
2
Functional Diagram
1
2
3 4
Light Button
Pump Button
Feeding Button Power Button
1
2
3
4
6
8*
7*
11
9
10
10. Glass Tank Body
Made of high-definition transparent gold crystal ultra-
clear glass.
5
5. Reserved Compartment
for Heating Module
Reserved area for placing heating rods.
87
1
2
3 4
Note: Do not place any products other than the heating rod in the reserved compartment for
the heating module. It is recommended to purchase the officially recommended heating rod.
LIGHT
PUMP
F
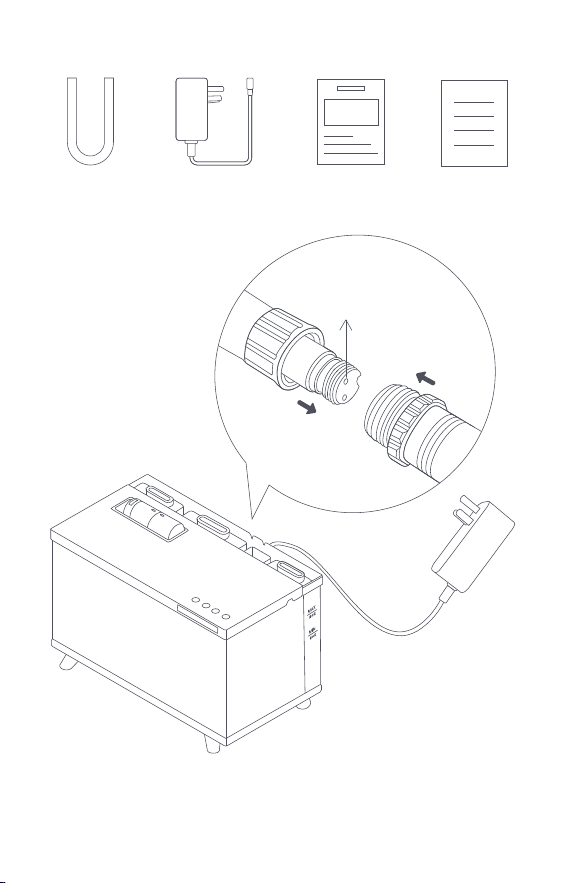
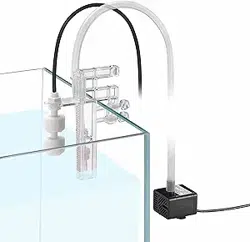
Drainage Pipe
User ManualPower Adapter
Product Accessories
lnstallation
3
Fish Care
Knowledge Cards
Waterproof Connector
Connection Diagram
Please follow the diagram to connect the waterproof connector, then plug in the power
adapter to supply power to the aquarium.
Align the two
corresponding
holes and slot before
tightening
the connectors.
Warning: Do not connect the water pump with liquid inside the waterproof connector, as this
may cause damage.
Warning:
To avoid damaging
the smart aquarium,
please do not connect
the waterproof connector
if it contains liquid.
4
1.
Place the aquarium in an area such as the living room, office, or foyer, on a stable and
level base that will keep the aquarium safe from accidents and easy to access for regular
feeding and cleaning.
2.
Avoid putting the aquarium in a place with direct sunlight, as it can affect the temperature
of the water beyond the ability for the thermostat to control.
3. Before using a new aquarium clean the glass portion of the tank thoroughly and disinfect
it. Use a clean, lint-free cloth or paper towel dampened with plain water to wipe down all
inside surfaces of the empty tank to remove any dust or debris. For a deeper clean, wipe
down the inside with a white vinegar solution (1/2 cup vinegar per 1/2 gallon of water) and
scrub with a soft non-abrasive pad or sponge. Rinse the tank thoroughly with clean plain
water, making sure no vinegar odor or residue remains.
4.
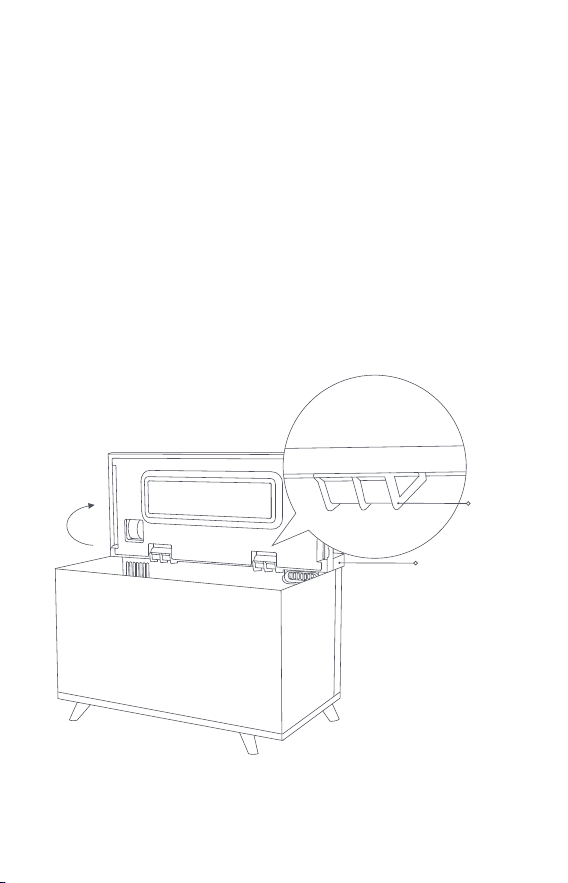
When setting up the tank, as shown in the diagram below, flip the aquarium cover
upwards by 90°and slot it into the groove of the back filter compartment to flip it over. When
flipping the cover, do not forcefully pull the power cord at the connection.
5.
Observe carefully the water level indicators on the back filter panel and pour water into
the tank accordingly. Do not overfill the tank.
Usage
01. Preparing for Use
Note: The biochemical filtration module and the physical filtration module are pre-installed at
the factory. No need to disassemble prior to using.
Press and hold the power button for 3 seconds to turn the device on/off.
02. Power On/Off
Flip Cover Diagram
Groove
Back Filter
Compartment
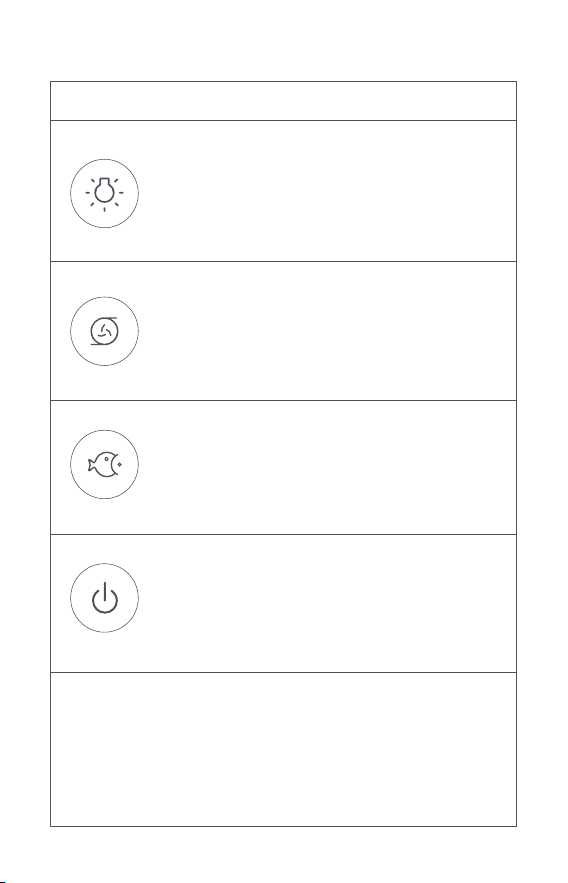
03. Touch Button Instructions
Combination Buttons
1. Single click to turn on the light or switch between
light scene modes.
2. Press and hold for 3 seconds to turn the light off.
Button Names
Usage
Light Button
1. Single click to turn on the pump on or switch
between pump speeds.
2. Press and hold for 3 seconds to turn off the pump off.
Pump Button
1. Single click to feed once.
2. Press and hold for 7 seconds to toggle child lock.
Feeding Button
Press and hold for 3 seconds to power on/off.
Power Button
5
1. Press and hold the light button and the feed button for 7
seconds to return to network configuration mode.
2. Press and hold Light Button + Feeding Button + Pump Button
for 7 seconds to reset to factory settings.
Note: When the aquarium cover is raised at an angle greater
than 15-degrees, the Light Button and Feeding Button
disabled to prevent accidental touching when flipping the cover.
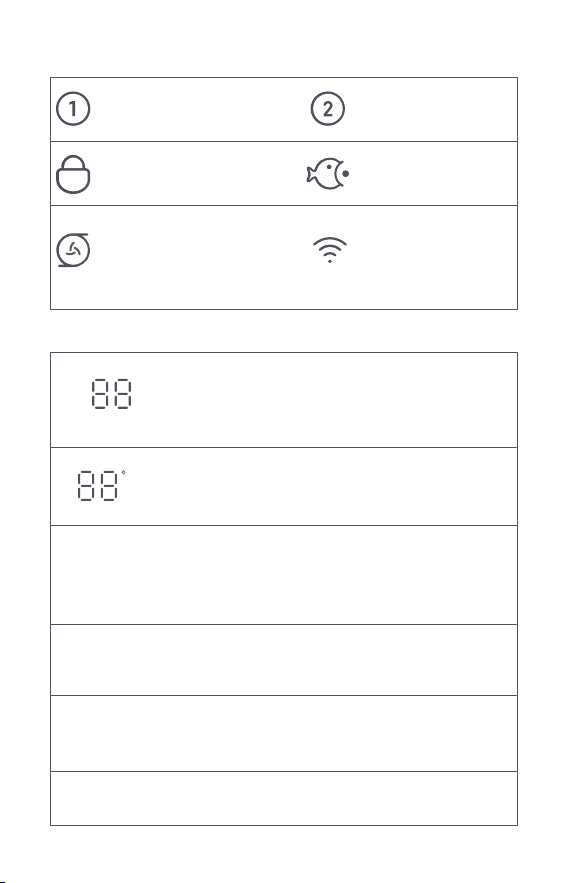
04. Smart Display Instructions
Long Light: Child lock activated.
Off: Child lock deactivated.
Blinking: Key operations are
ineffective due to child lock.
Off: ldle / Feeding.
Blinking: Feeding failure - blinks
for 30 seconds.
Long Light: Filter media expired.
Off: Filter media not expired.
On: Device online
Off: Wi-Fi is off, network
configuration needs to be
restored.
Blinking: waiting for network
configuration, connecting to
the network, or disconnected
6
Long Light on Pump + Number: Displays the pump speed.
Long Light on Light + Number: Displays the light scene number.
Cover Flip Turn Off: When the cover is raised at an angle greater
than 15-degrees, the light automatically turns off to prevent eye
damage vision.
Long Light: Filter media expired.
Off: Filter media not expired.
F
Long Light: Displays the current water temperature.
Off: Pump plug not connected.
Fault: Displays error codes E1, E2, E3, E4.
E1 - Low water
level in the pump
Solution:
1.Check the water level in the fish tank and add water to the
minimum level line.
2.Check and clean or change the physical filter.
E2-Pump blockage
E3-Pump
malfunction
E4-Temperature
probe malfunction
Solution:
1.The water pump is malfunctioning. Please power off and restart it.
2.If the function still cannot be restored after restarting, please
contact after-sales service.
1.The temperature probe may be dirty. Please take the water pump
out and clean the probe promptly.
2.If it still does not work, please contact after-sales service.
Solution:
Remove the water pump protective cover, take out the turbine, and
then rinse it clean with water.
05. Numeric Display Instructions
Long Light: Pump activated.
Off: Pump not connected / Off.
Blinking: Abnormal operation
(low water level / blockage / malfunction).
After resolving the abnormality, the pump
needs to be restarted.
LIGHT
PUMP
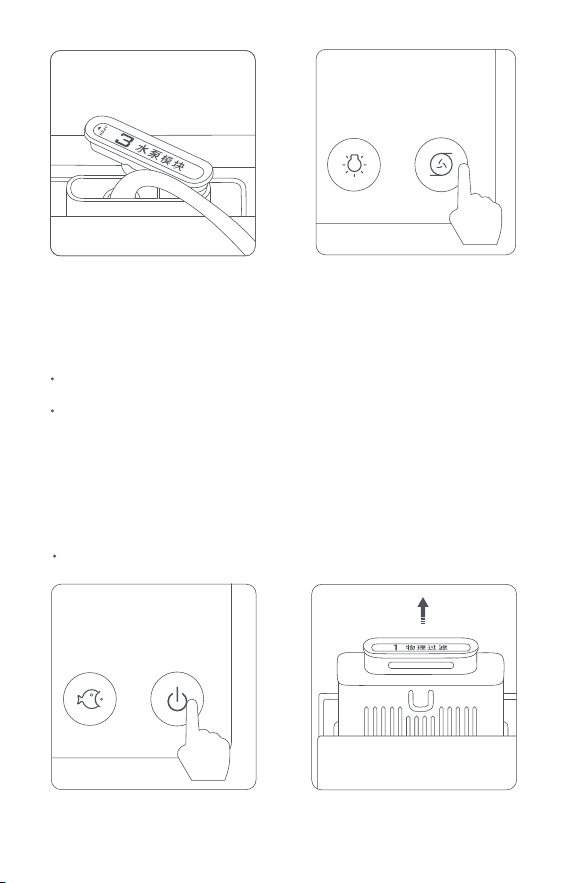
07. One-Key Drainage
The drainage pipe is not included as an pre-assembly accessory and
is only used when water needs to be changed. Please store it properly
between uses.
1.Before draining, press and hold the pump
button for 3 seconds to turn off the pump
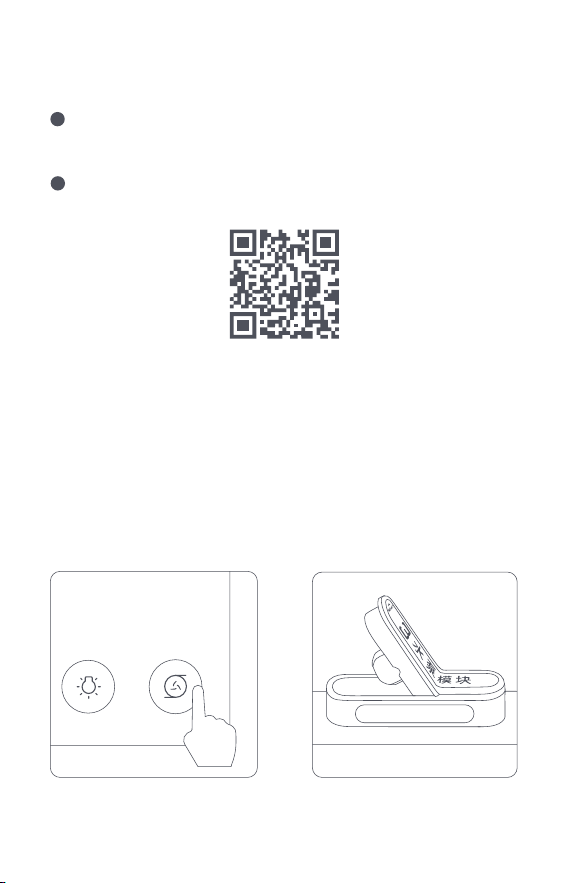
06. Network connection
Download and install the Jengu App. Using the Jengu App, scan the network configuration
QR code. Device users can scan the QR code to view your customized network
configuration guide. Users who have already installed the Jengu App will be directed
straight to the device connection page.
Note:Due to updates and upgrades of the Jengu App, actual operations
may slightly differ from the description above.Please follow the most current
in-app instructions for guidance.
This product has been connected to Jengu and can be controlled through the
Jengu App and interconnected with other smart devices.
1
2
You can also download and install the "Jengu” App from major app stores. Once
installed, open the Jengu homepage, click on the"+" icon in the top right corner, and
follow the app's prompts to add your device.
7
2.Open the back filter compartment cover
and pull up the silicone plug of the pump
module.
Note:
Before draining, turn off the pump to prevent water from spilling when
opening the silicone plug for the pump module.
App download link: https://www.jengusmart.com/jengu/app
8
Maintenance and Care
01. Cleaning the Aquarium
If there are stains on the surface of the tank, use a soft cloth dipped in a small amount of
clean water to wipe them off.
If stains or algae appear on the tank wall during use, please use a professional algae scraper
(purchased separately) or biological algaeremover (both sold separately) for cleaning.
Note: Do not use gasoline, kerosene, ammonia, bleach, or other corrosive, volatile chemical
solvents for cleaning, as they will seriously damage the appearance and internal structure of
the tank. Do not directly rinse the cover (containing electronic components) with tap water.
Ensure that the aquarium is powered off and the power adapter is unplugged during
cleaning to avoid electric shock or serious malfunctions caused by water entering the
electronic components.
It is recommended to clean the physical filter module once a month or replace it every three
months.
02. Maintenance of Filter Media
3. After rotating the silicone plug, insert
the drainage pipe.
4.After maintenance, remove drainage pipe,
replace pump module, and turn pump back
on.
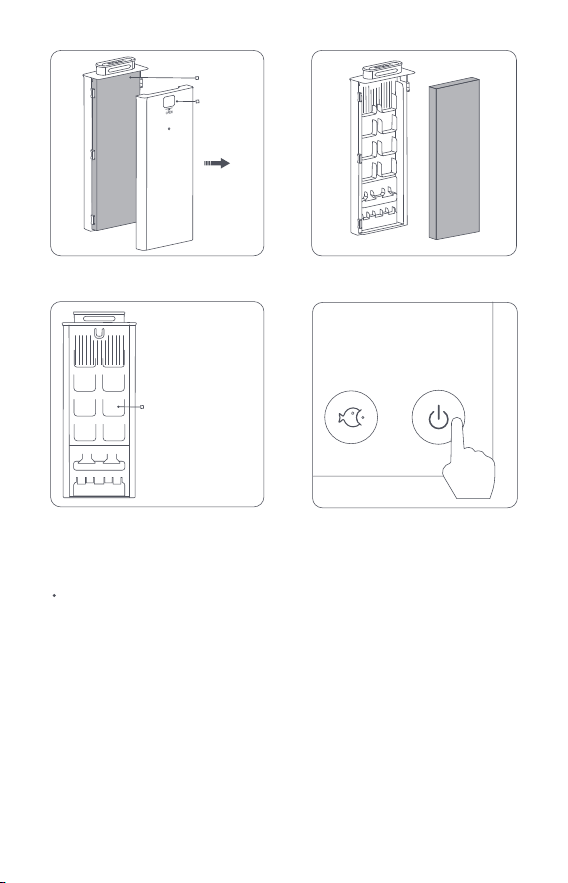
1. Press and hold the power button for 3
seconds to turn off the device or use the
Jengu app.
2. Open the back filter compartment cover
and remove the physical filter module.
9
It is recommended to replace the biochemical filter module (one each in gray, blue, and
red) every six months.
03. Cleaning the Pump
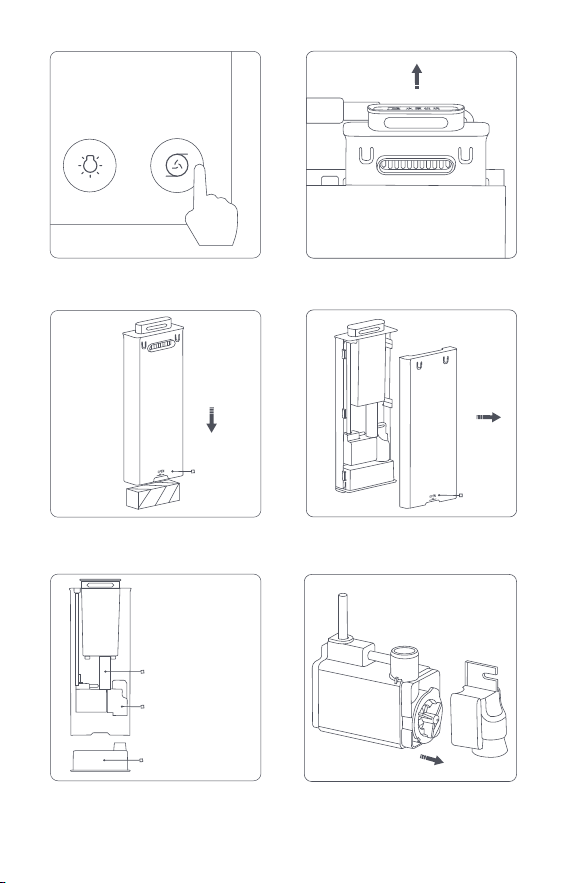
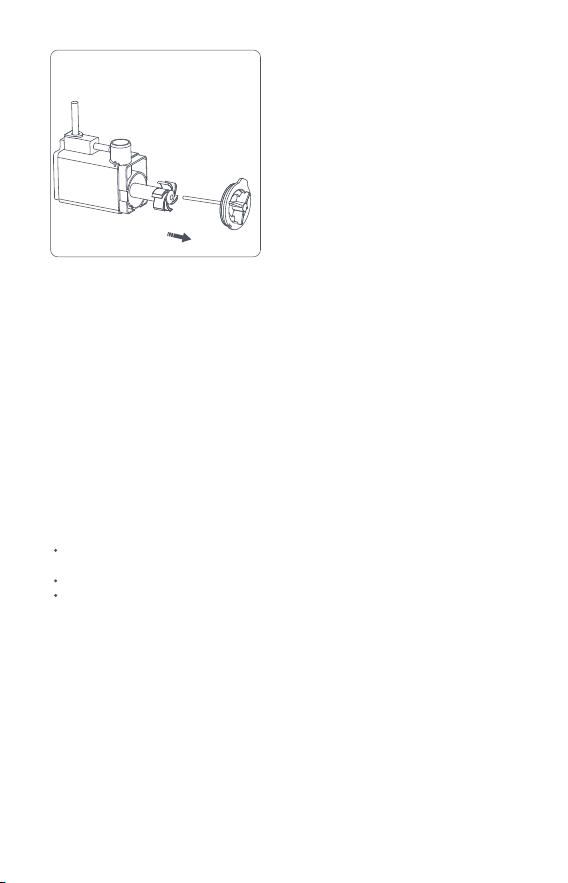
Tips: Clean the filter cotton at the water pump every two months according to steps 1-3. When
the water pump malfunctions, please clean the water pump in time according to steps 1-7.
The pump and the filter cotton at the pump need to be regularly disassembled and cleaned.
Prolonged use of the pump can lead to the accumulation of impurities in the impeller and
rotor, such as fish feces, decaying water plants, and residual feed, which may cause a
decrease in the pump's water flow, an increase in working temperature, increased noise, or
even pump stoppage. Regularly cleaning the filter cotton at the pump can extend the
pump's lifespan.
3. Disassemble the outer casing according
to the diagram.
4. Clean the outer casing and clean or
replace the filter media.
5. With the blue mesh side of the filter cotton
facing the U-shaped groove, install the outer
casing and place it into the back filter
compartment.
6. Close the back filter compartment cover,
press and hold the power button for 3
seconds, and then turn the device on for
normal use.
Filter
cotton
Open
U-shaped groove
Tip: When using filter media, do not use sterilizers, as filter media treated with sterilizers
cannot be cultured again. The frequency of filter media replacement is closely related to the
size of the fish, population density, and feeding amount.
蓝 色 网 对 准 此 面
Blue mesh to this side
10
2. Open the back filter compartment cover,
disconnect the waterproof connector, and
remove the water pump module.
1. Press and hold the water pump button
for 3 seconds to turn off the water pump,
or turn it off through the Jengu app.
3. Remove the water pump filter cotton and
clean it.
4. Disassemble the water pump
compartment as shown.
6. Remove the water pump protective cover
and rinse with clean water.
5. Separate the filter compartment, water
pump, and silicone hose for cleaning.
Open
Silicone hose
Open
Water pump
Filter compartment
Fish Care Tips
For beginners, it's recommended to raise fish such as zebrafish, danios, guppies, molly fish,
platies, pearl fish, and swordtails, which are hardier species more tolerant of environmental
conditions.
Your pet store’s fish specialist can help with any questions on maintaining a proper mix of
fish and environmental elements.
2.
Cleaning the Aquarium
It is recommended to wipe the inner walls of the tank with a light mixture of white vinegar and
water and then rinse completely with clean water.
1.
Dechlorination (Three effective methods to remove chlorine from water)
Sun drying method: Place tap water in a container and expose it to sunlight for 24-48 hours
before use.
Oxygenation method: Use an air pump to oxygenate the water. lt takes 8-12 hours to complete.
Chlorine removal agent: Add an appropriate amount of dechlorination agent to the water.
After 3 hours,the water can be used.
Note: Purified water can be used directly.
01. What kinds of fish are suitable for the Jengu Aquarium?
02. How many fish are suitable for the tank?
03. Proper Tank Setup
11
The maximum capacity of the Jengu Aquarium is 20 liters. It's suggested to keep 10-15 adult
fish with a size of 5-6 cm, 6-9 adult fish with a size of 6-8 cm,or 3-5 adult fish with a size of
8-12 cm.
7. Remove the turbine and rinse it with clean water.
3.
Filling the Tank with Water
It is recommended to use a small-capacity independent container and pour water slowly
multiple times.
4.
Introducing the Fish
When introducing new fish to the tank, they need to be acclimated to the water temperature
and conditions to prevent stress and potential death.
• Temperature acclimation: Place the fish bag in the tank and let it sit for 30 minutes.
• Water acclimation: After temperature acclimation, transfer some water from the tank to the
fish bag.

04. Handy Tips
1.In the following special situations, it's recommended to change the water promptly:
12
2.Feeding Frequency: It is recommended to feed 2-3 times per week, with each feeding session
lasting about 3 minutes. Feeding sparingly but frequently is advised; avoid overfeeding.
Tips: Adjust the frequency of water changes based on actual conditions. lf the temperature is
too high, more frequent water changes are advised. When changing water, complete it over
3 days, replacing one-third of the water each day.
• Dead fish should always be promptly removed, as their bodies decompose, causing the
water to become fouled.
• Multiple fish deaths that occur within a 5 day period.
• A large amount of algae grows on the tank walls within 3-5 days.
• There is a large amount of foam or parasites floating in the tank.
For example: for 15 zebrafish measuring 3-5cm, feed powdered food every other day (rotate
the feeder once).
lmportant for beginners: Pay attention to the frequency and quantity of feeding.Overfeeding
can lead to fish bloating and uneaten food polluting the water.
Note: Do not use fish food, live food, or wet food with a diameter larger than 2mm to prevent
clogging of the feeding port.
3.The feeder has two settings, which can be adjusted based on the amount of food consumed
by the fish in the tank.
4.Avoid keeping the light on for extended periods or placing the tank in direct sunlight to
prevent algae blooms and potential fish deaths due to the impact on the filtration system.

13
Precautions
• Do not place the fish tank near devices prone to electromagnetic interference.Keep away
from other sources of fire or heat. Maintain a distance of at least three feet from nearest heat
register.
• This product is not suitable for use by children or individuals with sensory or mental
disabilities unless they are supervised or instructed by a person responsible for their safety.
• Children should be supervised to ensure they do not treat this product as a toy.
• Children should not clean or maintain this product unsupervised.
• Do not hang the power cord on sharp objects.
• Do not use power accessories other than those provided with this product to avoid injury.
• The light source of the fish tank fixture is not replaceable. When the light source reaches
the end of its life, the fixture should be replaced.
• The light source inside the fish tank fixture should be replaced by the manufacturer, its
service agent, or a similarly qualified person.
01. Usage Restrictions
02. During Cleaning and Maintenance
Warning: Before cleaning and maintaining, unplug or disconnect the power adapter of all
equipment in the fish tank.
• Do not immerse the fish tank cover in water.
• When cleaning or replacing filter media, move the tank carefully and steadily to prevent
tilting and water overflow.
• Do not use hard cleaning tools such as wire balls to clean the fish tank and tank backboard.
• When the fish tank is not in use for a long time, unplug the power adapter, clean the interior
of the tank, and protect against moisture, dust, and insects.
• The table where the fish tank is placed must be cleaned regularly and inspected for wear
and tear.
• When cleaning the water pump, disconnect the waterproof plug of the water pump first
before removing it.Be careful with the blades in the water pump turbine to avoid scratching.
03. When Using Power
• Be sure to unplug the power adapter to disconnect the power to prevent electric shock or
short-circuiting and fire.
• If the power cord is damaged, it must be replaced by a professional from the manufacturer,
its repair department, or a professional department to avoid danger.
• When moving the fish tank, ensure that the power is off and unplug the power adapter.
• Do not use other extension power cords, or power strips, and do not use components not
designated by the company.
• Do not use inferior socket adapters to avoid fires.
04. Before Using the Fish Tank
• Be sure to unplug the power adapter to disconnect the power to prevent electric shock or
short-circuiting and fire.
• If the power cord is damaged, it must be replaced by a professional from the manufacturer,
its repair department, or a professional department to avoid danger.
• When moving the fish tank, ensure that the power is off and unplug the power adapter.
• Do not use other extension power cords, or power strips, and do not use components not
designated by the company.
• Do not use inferior socket adapters to avoid fires.

14
05. When Using the Fish Tanks
• To achieve the best viewing effect, the tabletop where the fish tank is placed must be flat,
and level, as verified with a bubble level tool.
• Do not place any items on top of cover.
• Do not place anything in the tank except fish and decorations designed specifically for an
aquarium environment.
• Do not place any products with painted surfaces, such as dolls or action figures, in the tank.
Prolonged immersion can cause death to live fish and damage to the surface of the dolls or
action figures.
• All electronic devices in the fish tank need to be certified waterproof.
• Avoid powering the fish tank when it is empty to prevent the water pump from running dry.
The water pump must be fully submerged in water during normal operation.
• Strictly follow the standard range to fill the tank with water. Excessive water level may
cause overflow, while low water level may prevent normal water circulation and filtration.
• When using the fish tank, if the cover is not on the tank, first correctly place the tank cover
into the groove on the back filter compartment to secure it, then lower the tank cover.
During this process, avoid the tank cover falling into the water, and ensure that the tank
cover fits firmly after being placed.
• Do not add any other filter materials to the back filter compartment of the fish tank to avoid
affecting the filtration effect of the tank and the lifespan of the water pump.

15
Troubleshooting
Pump not working
1.Check the water pump is turned on, if not then click
the water pump button to turn it on.
2.Check if the fish tank is in a feeding protection mode.
3.Check the water inlet for any debris or blockages.
4.Check if the connection between the water pump and
the silicone tube has come loose.
Faults Method of exclusion
Unstable water flow,
accompanied by bubbles
and noise
1.Check the fish tank water level to make sure it is above
minimum level line.
2.Check and clean or change the physical filter and water
pump filter cotton.
Wi-Fi connection failed
1.Check if the network communication is normal, and make
sure the fish tank is close to a Wi-Fi signal source.
2.Make sure the Wi-Fi source is 2.4GHz.
3.Reset Wi-Fi, press and hold the light button and the feed
button for 7 seconds to restore network configuration mode
and reconnect the device.
Basic Parameters
16
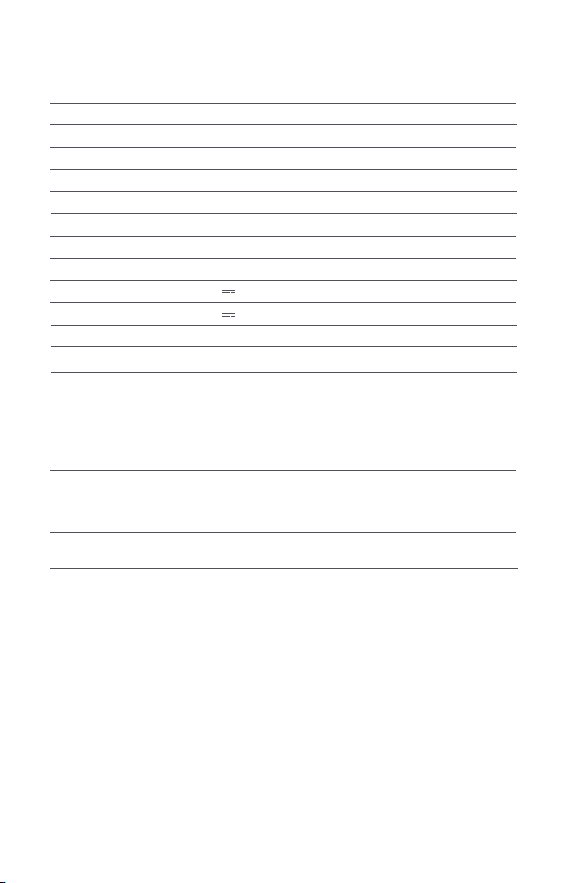
Product Name Smart Aquarium
Product Model M1
Product Material Tank Body Ultra-Clear Glass、
ABS Shell Material
Product Dimensions 446x 246 x 318mm
Product Color Dark Grey/Snow White
Product Net Weight 7.3kg
Product Gross Weight 8.8kg
Execution Standard GB/T 4706.1-2024
Adapter Output 12V 2A
Rated Input 12V 2A
Rated Power 24W
Adapter Input 100-240Vac, 50/60Hz, 0.7A Max
Antenna
Model: MHCWB6G-B,onboard antenna type, with a maximum
antenna gain of 2.6dBi, no line loss involved in the soldering
test seat.
Model: MHCWB6G-IB,external antenna type,using an IPEX seat
for external antenna connection, no maximum gain or line loss
involved.
Manufacturer Desgeo (Shenzhen) Technology Co., Ltd.
Address F10, Building E, Yujing Center, Qingquan Road No. 7, Longhua,
Shenzhen, Guangdong, China
FCC ID 2ANDL-WBR1-IPEX

FCC Compliance Statements
This device complies with Part 15 of the FCC Rules.Operation is subject to the following two
conditions: (1) this device may not cause harmful interference, and (2) this device must accept
any interference received, including interference that may cause undesired operation.
Note:This equipment has been tested and found to comply with the limits for a Class B digital
device, pursuant to Part 15 of the FCC Rules. These limits are designed to provide reasonable
protection against harmful interference in a residential installation.
This equipment generates, uses and can radiate radio frequency energy and,if not installed
and used in accordance with the instructions, may cause harmful interference to radio
communications. However, there is no guarantee that interference will not occur in a particular
installation.
If this equipment does cause harmful interference to radio or television reception, which can
be determined by turning the equipment off and on, the user is encouraged to try to correct
the interference by one or more of the following measures:
-- Reorient or relocate the receiving antenna.
-- lncrease the separation between the equipment and receiver.
--Connect the equipment into an outlet on a circuit different from that to which the
receiver is connected.
--Consult the dealer or an experienced radio/TV technician for help.
Caution: Changes or modifications not expressly approved by the party responsible for
compliance could void the user' s authority to operate the equipment.
FCC Radiation Exposure statement
This equipment complies with FCC radiation exposure limits set forth for an uncontrolled
environment. This equipment should be installed and operated with a minimum distance 20cm
between the radiator and your body. This transmitter must not be co-located or operating in
conjunction with any other antenna or transmitter.
17
18
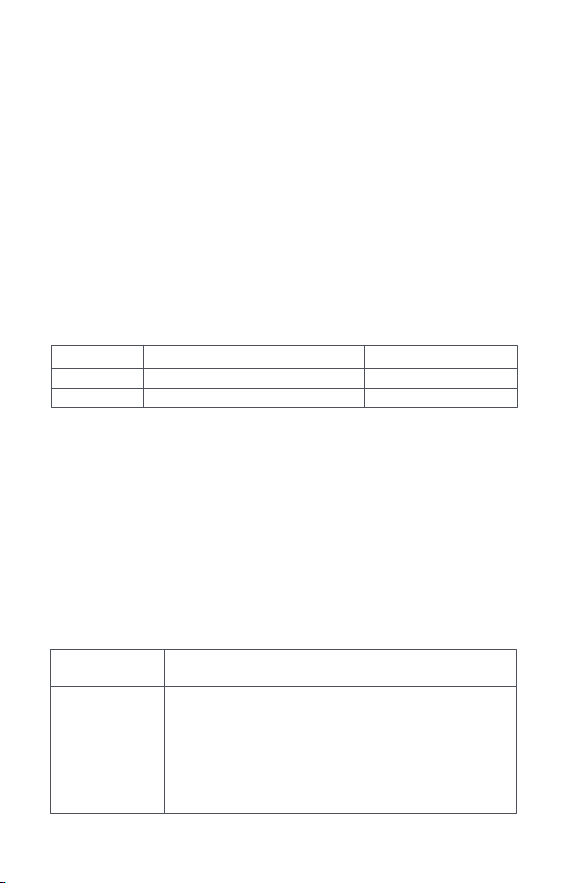
Warranty Period:
Jengu Smart Aquarium Product Performance Failure Table:
The following situations are not covered by the three guarantees:
• Unauthorized repairs, misuse, collisions, negligence, abuse, immersion in liquid,
accidents,modifications, improper use.
• Non-original accessories, or tearing, altering labels, or anti-counterfeiting marks.
• Exceeded the validity period of the three guarantees.
• Damage caused by force majeure such as fire, flood, lightning, etc.
• Cases that do not meet the performance failure conditions listed in the "Jengu
Aquarium Product Performance Failure List."
• Performance failures listed in the "Jengu Aquarium Product Performance Failure
List" caused by human factors.
Warranty Coverage
Type
Main unit
Attachment
Control panel
Power adapter, feeder, water pump
Warranty Period
1 year
1 year
Product Name Performance Malfunctions
After-Sales Service:
• During your use of the aquarium, if you have any questions regarding operation,
maintenance, safety, etc., you can consult and request repairs through various
after-sales service channels provided by Jengu.
• Official customer service email: https://www.jengusmart.com/ .
• This manual's images are for reference only. Please refer to the actual product for
accuracy.
• Due to technological upgrades and firmware updates, the actual product's features
may not completely match the contents of the manual.
For the latest information on features and safety instructions, please contact the
online customer service of the purchasing platform or official service mail.
Jengu Aquarium
1.
Power failure, unable to power on.
2.
Pump malfunction, not functioning.
3.
Light malfunction, missing light color, unable to
switch light colors, lights not turning on.
4.
Switch malfunction, unable to control panel functions.
5.
Feeder malfunction, unable to rotate for feeding.
Warranty Coverage

Note: As packaging boxes are required to ensure the safety of the product during
transportation, it is recommended that you keep the packaging boxes for at least 30
days from the date of receipt.
Website: https://www.jengusmart.com/ .
Manufacturer: Desgeo (Shenzhen) Technology Co., Ltd.
Address: F10, Building E, Yujing Center, Qingquan Road No. 7, Longhua, Shenzhen,
Guangdong, China