DEHUMIDIFIER
Instruction Manual
Before using this product, please read this manual
carefully and keep it for future reference.
Model: D025P-35Pt3/D026P-50Pt3-P

1. Safety Precautions
2. Introduction
3. Water Removal
4. Maintenance
5. Troubleshooting
6. Customer Service
1-2
3-5
5-7
8
9
10
• Make sure hands are dry when connecting the power plug.
• Ensure the three-prong grounded power plug is securely inserted into a properly grounded
wall socket.
• Always inspect the cord for signs of damage before use. If the power cord is damaged, it
must be replaced by the manufacturer or a qualified service technician.
• Do not use an adapter plug or extension cord.
• Do not disassemble or modify the unit.
• Do not start or stop the unit by inserting or pulling out the power plug.
• Unplug the unit if strange sounds, smell, or smoke comes from it.
• If the unit is damaged or malfunctions, immediately cease operation, unplug it from the
electrical outlet. Refer to the Troubleshooting section, and contact the customer support
for assistance.
• Do not use the unit in the immediate surroundings of a bath, a shower, swimming pool, or
clothes dryer.
When using the dehumidifier, please read the following safety instructions:
11
Safty Precautions
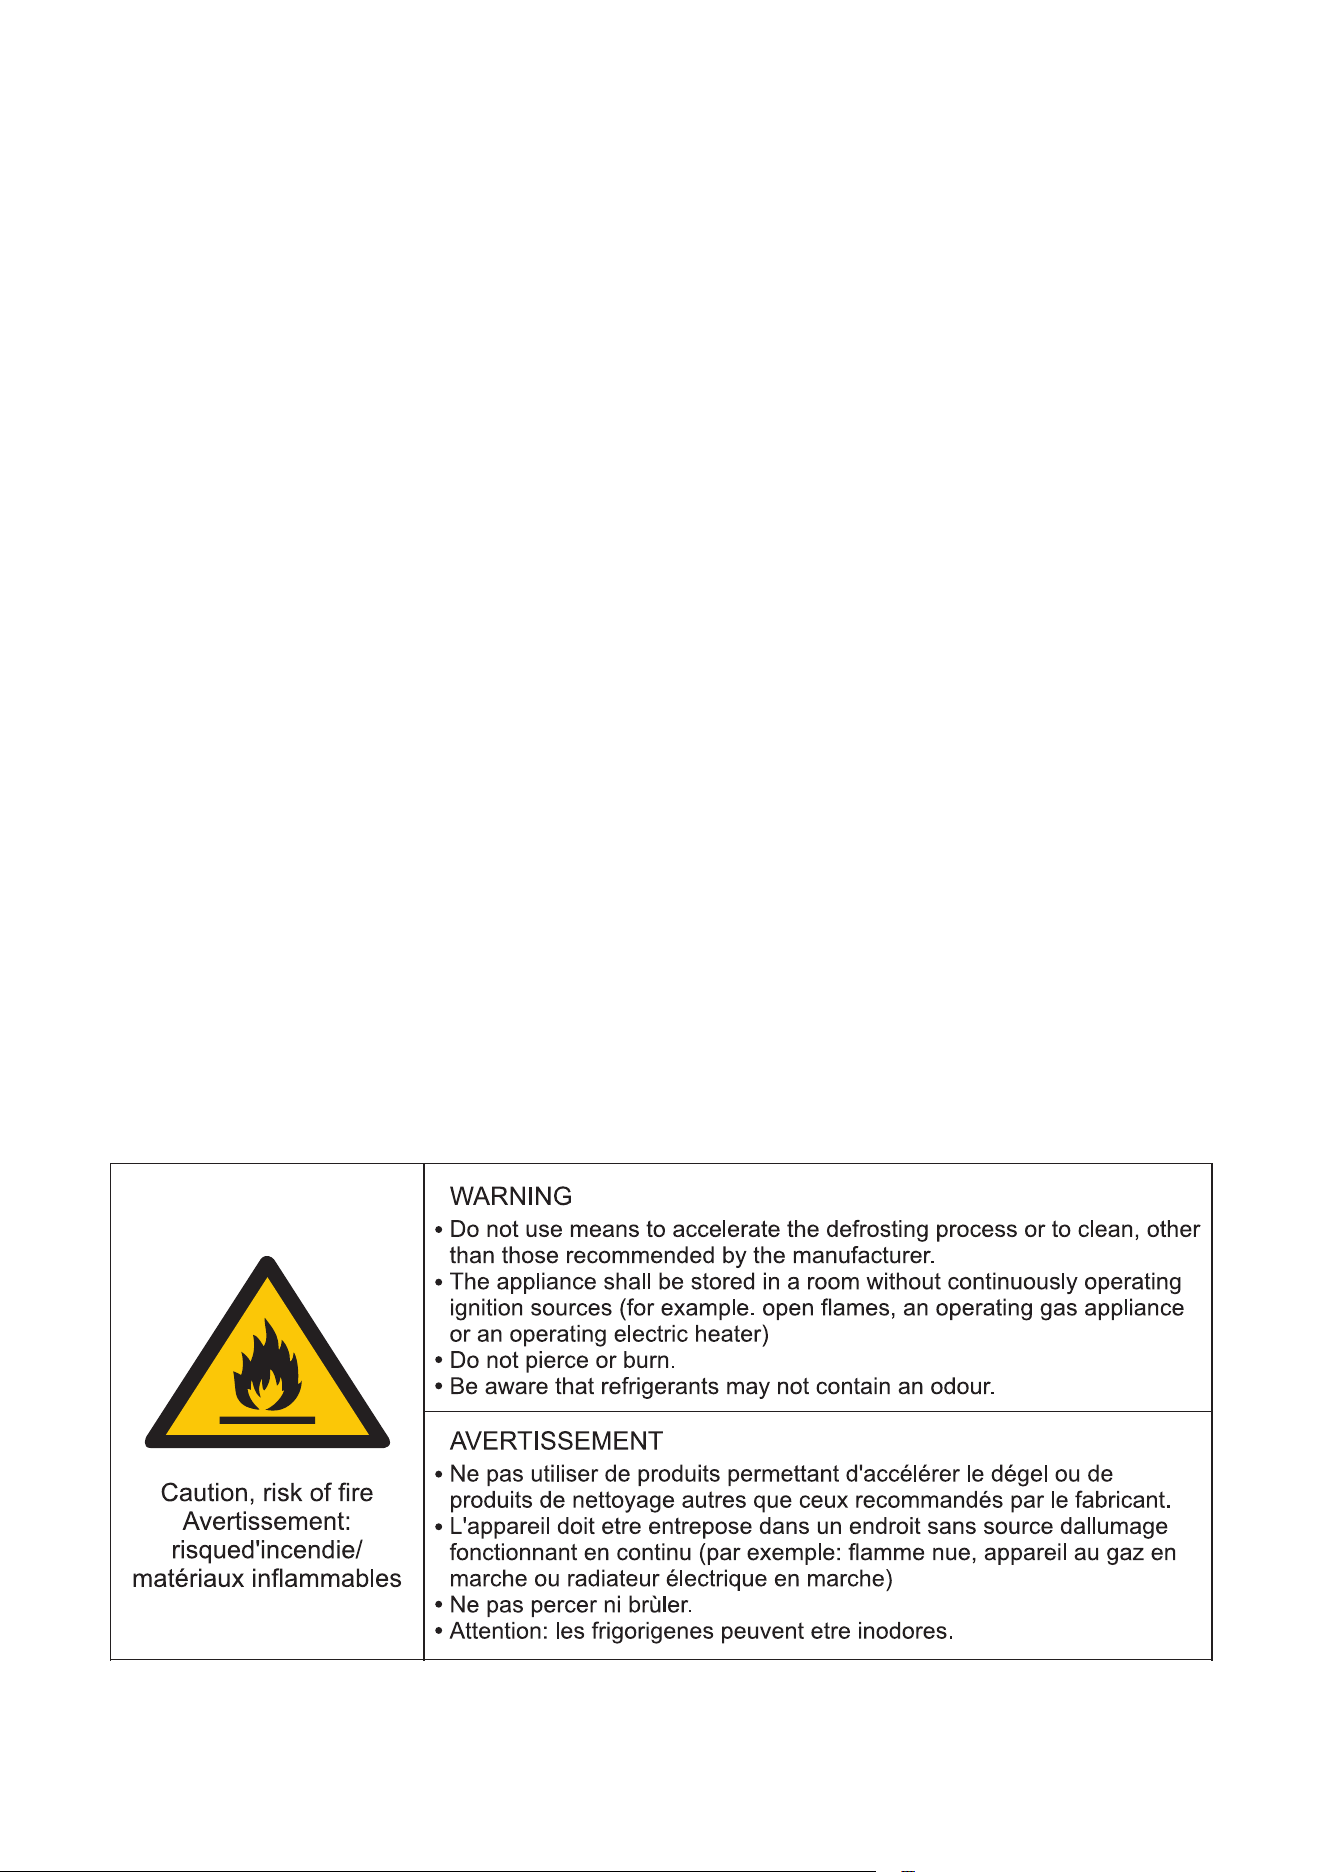
• Never use or store gasoline or other flammable vapor or liquid near this unit.
• Do not use outdoors. The unit is intended for indoor use only.
• Do not climb up on or sit on the unit.
• The unit is not designed to be used by children or people with reduced physical, sensory
or mental capabilities without supervision.
• Children should be supervised to ensure that they do not play with the unit.
• Always place the unit on a level surface strong enough to support the unit with a full bucket
of water.
• Maintain at least 12-18 inches clearance space around this unit.
• Do not insert anything into the air outlet.
• Do not cover the unit's air inlet or outlet to prevent potential unit failure.
• Do not place flower vases or other water containers on top of the unit. Water may spill inside
the unit, causing insulation failure and electrical shock or fire.
• To reduce the risk of fire or electric shock, do not use this dehumidifier with any solid-state
speed control device.
• Place the dehumidifier in an area where the temperature will not fall below 41°F.
• Always unplug the unit before emptying the water bucket.
• Do not take the water bucket out during operation.
• The coils can become covered with frost if the room temperature is too low, which may
reduce performance.
2
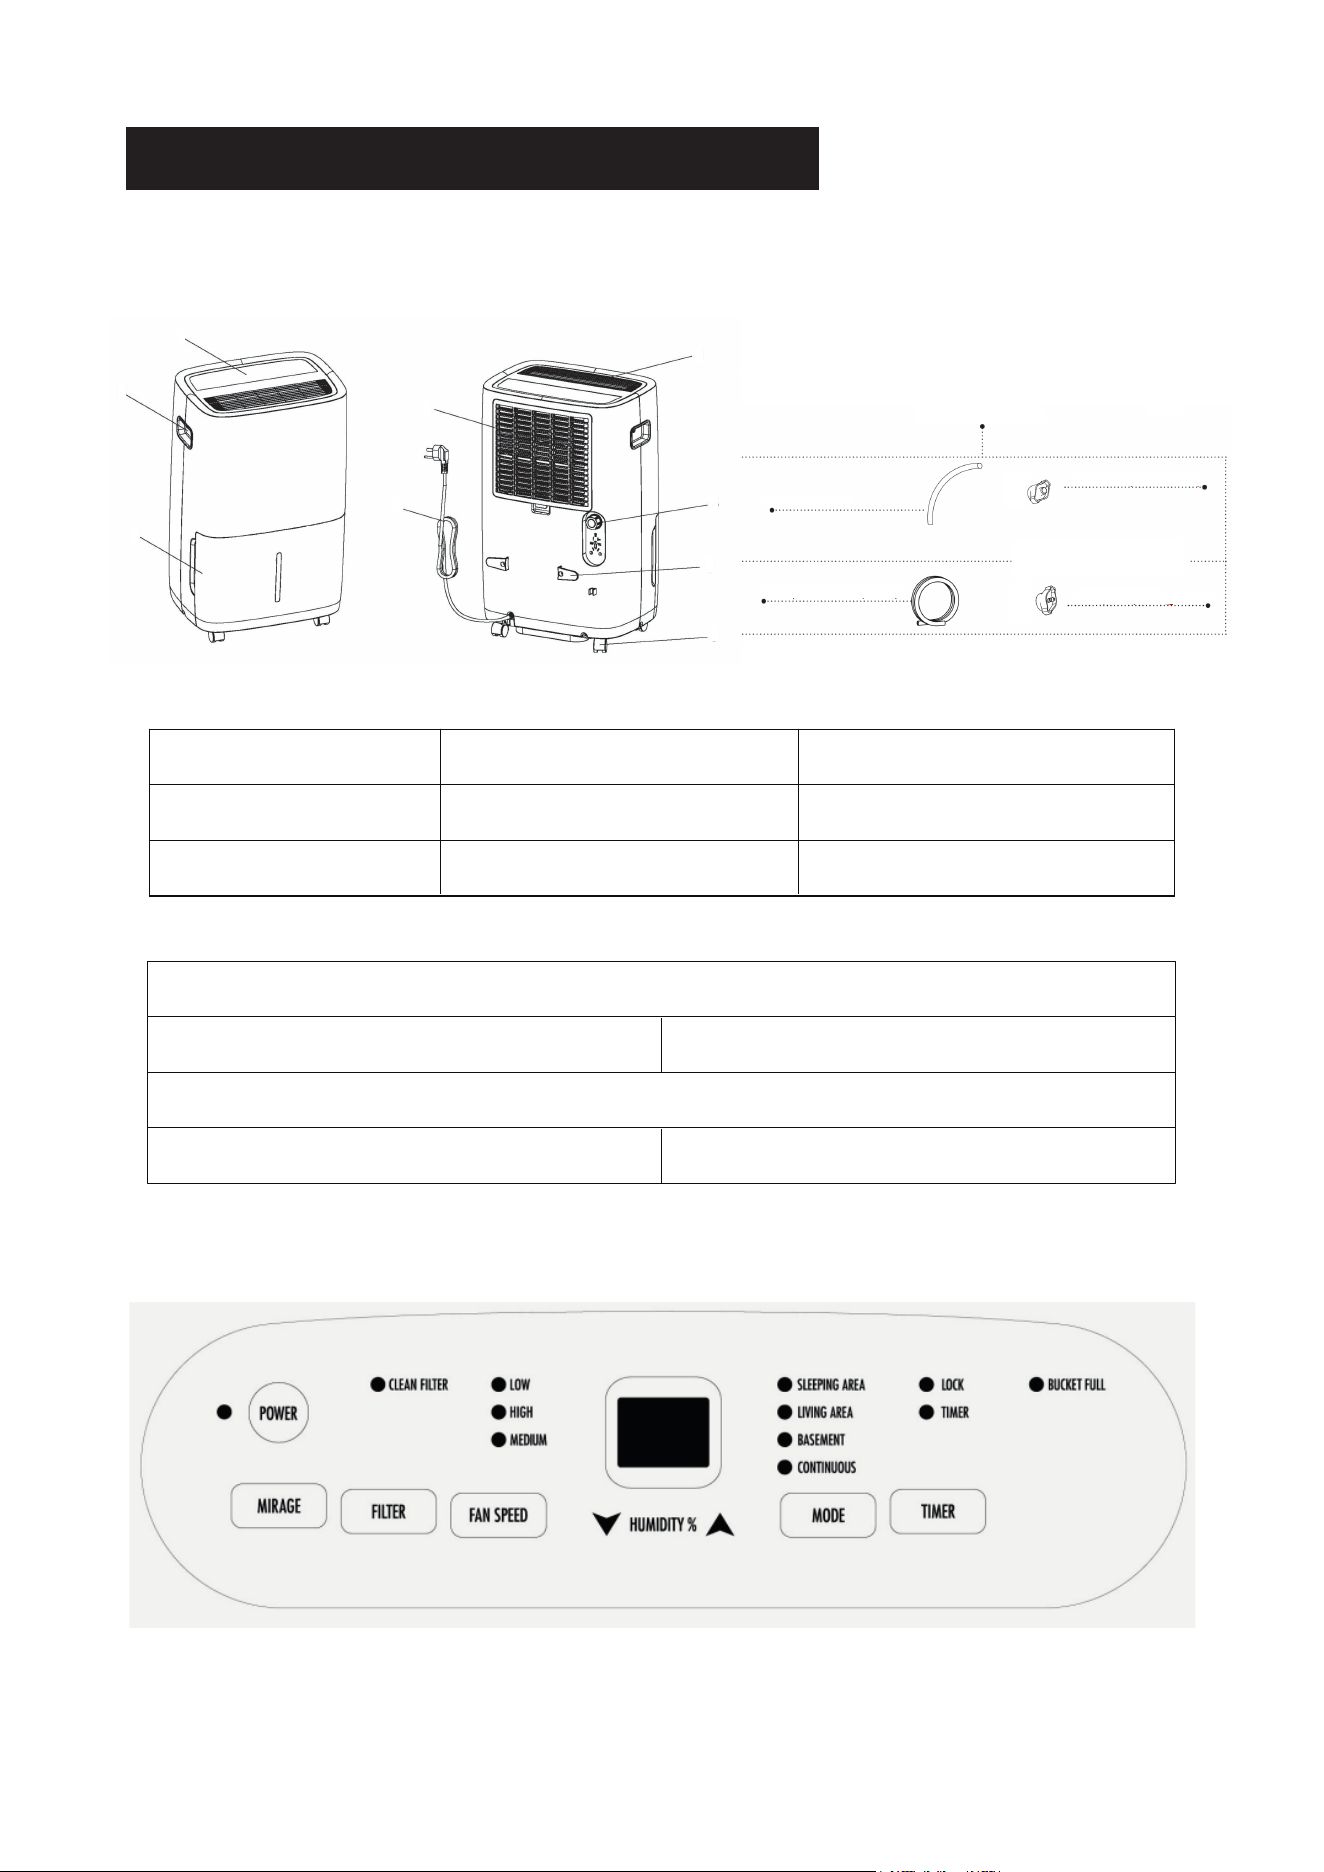
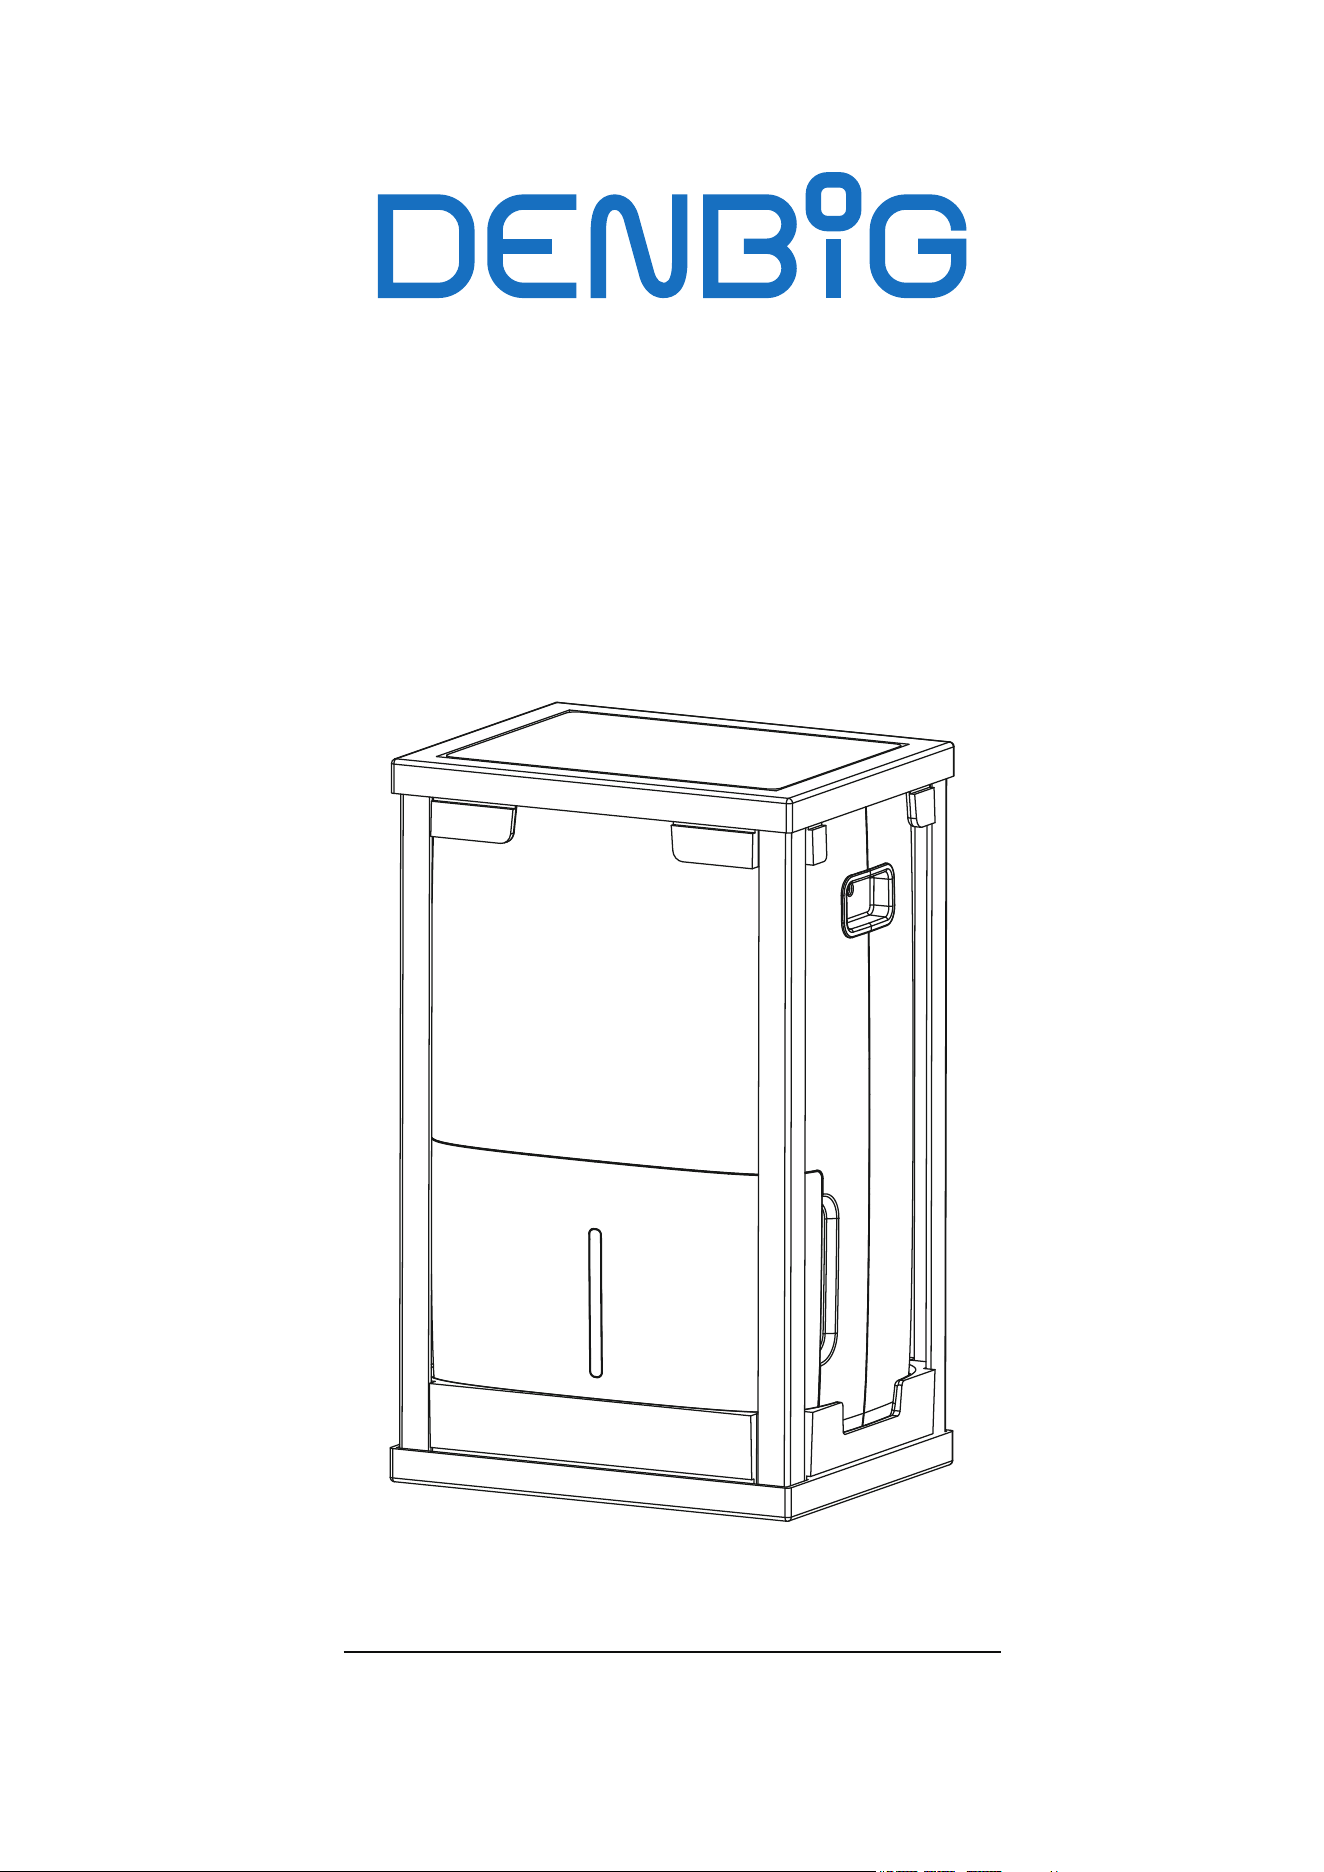
Introduction
Model: D025P-35Pt3
3
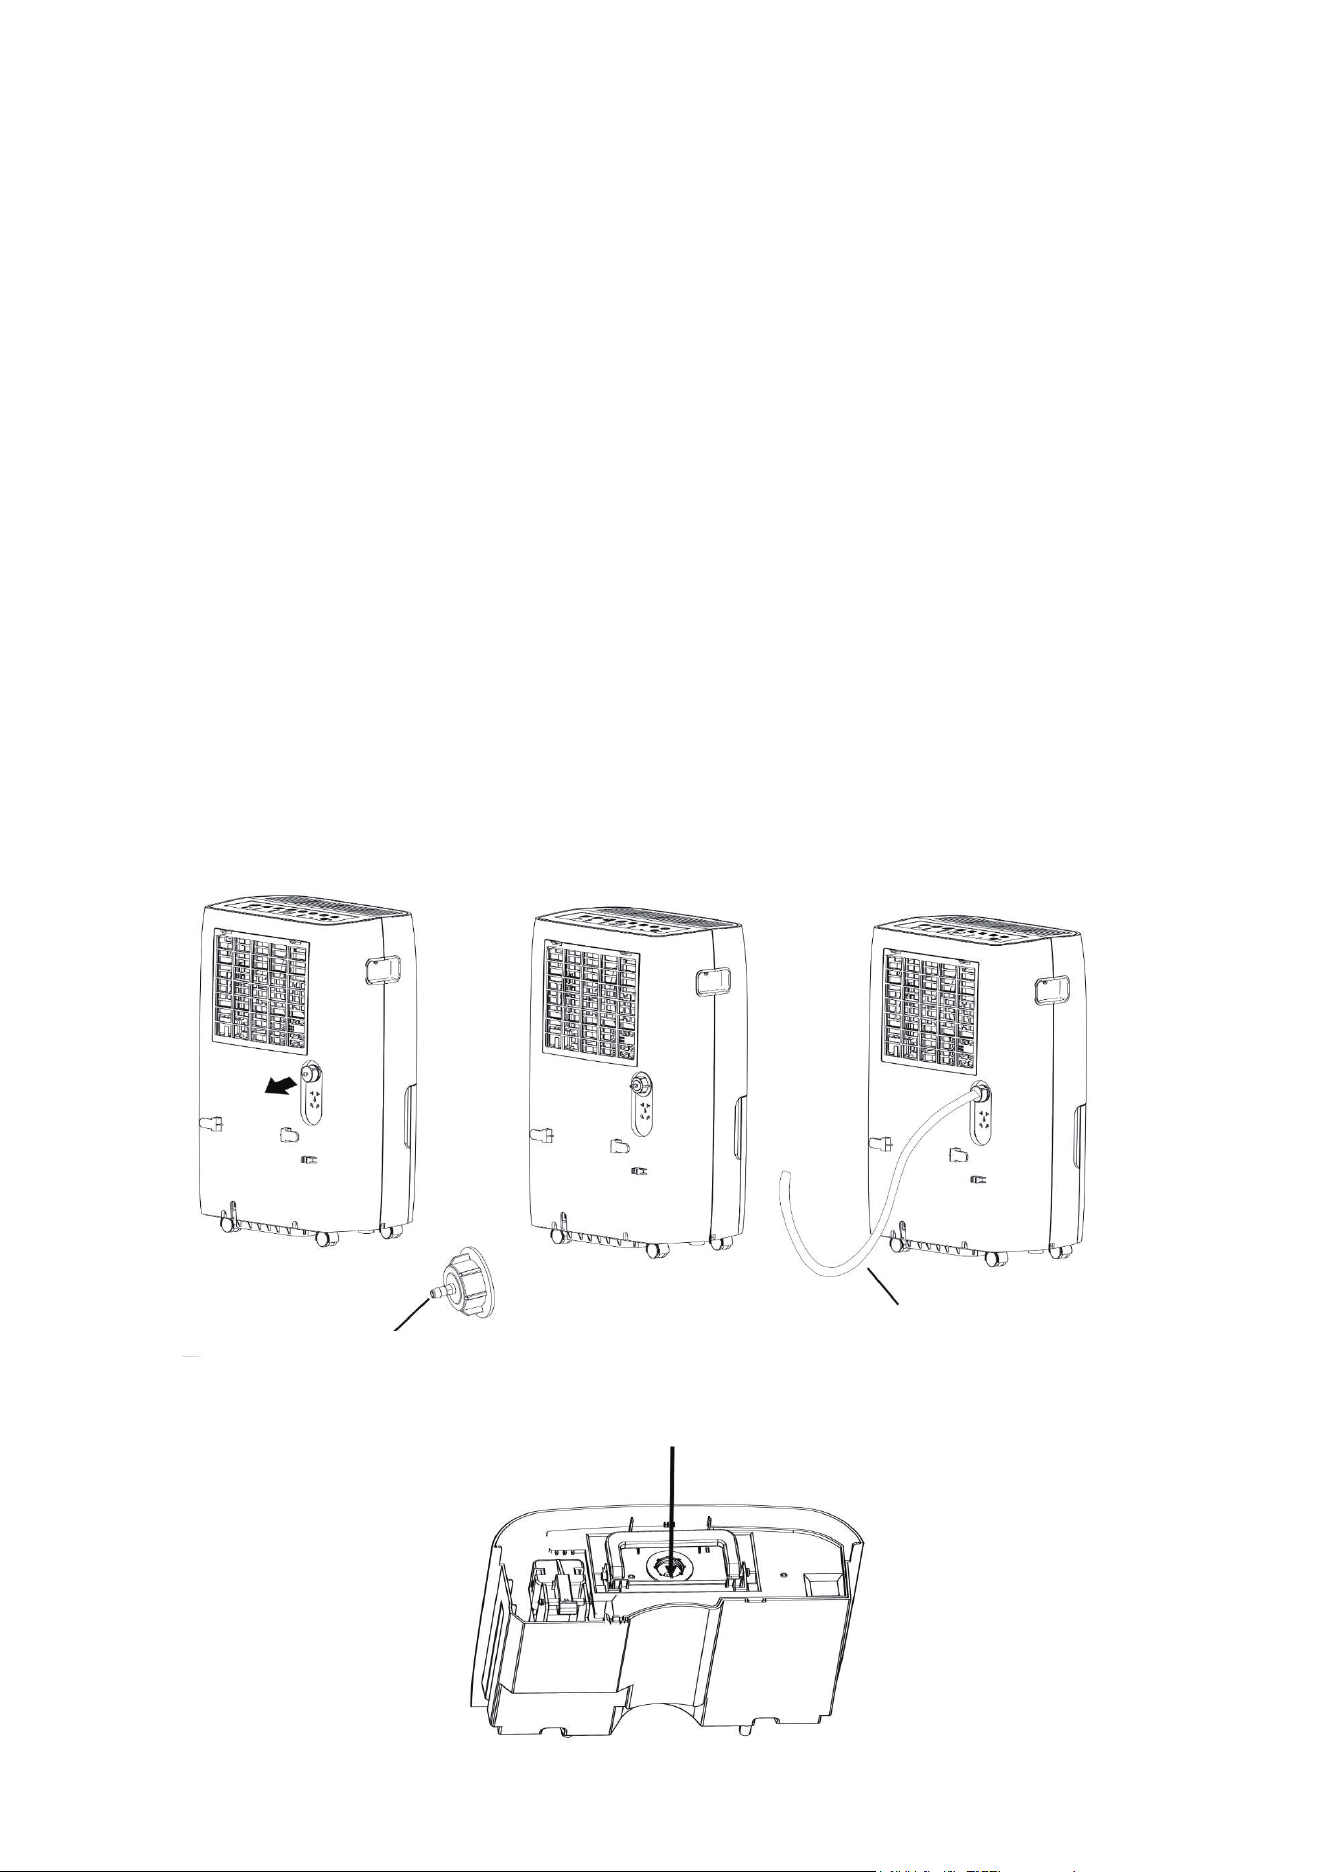
1. Control Panel 2. Handle 3. Water Collection Bucket
4. Filter 5. Air Outlet 6. Drain Outlet
7. Power Cord 8. Power Cord Buckle 9. Caster
Pump Drain Kit (Model D026P-50Pt3-P Only)
10. 1.9 ft Long Drain Hose 11.Drain Adapter
PRODUCT OVERVIEW
Additional Pump Drain Kit
((Model D026P-50Pt3-P Only))
Continuous Drain Kit
10
12
11
13
Continuous Drain Kit
12. 5.9 ft Long Pump Drain Hose 13.Pump Adapter
1
2
3
4
5
6
7
8
9
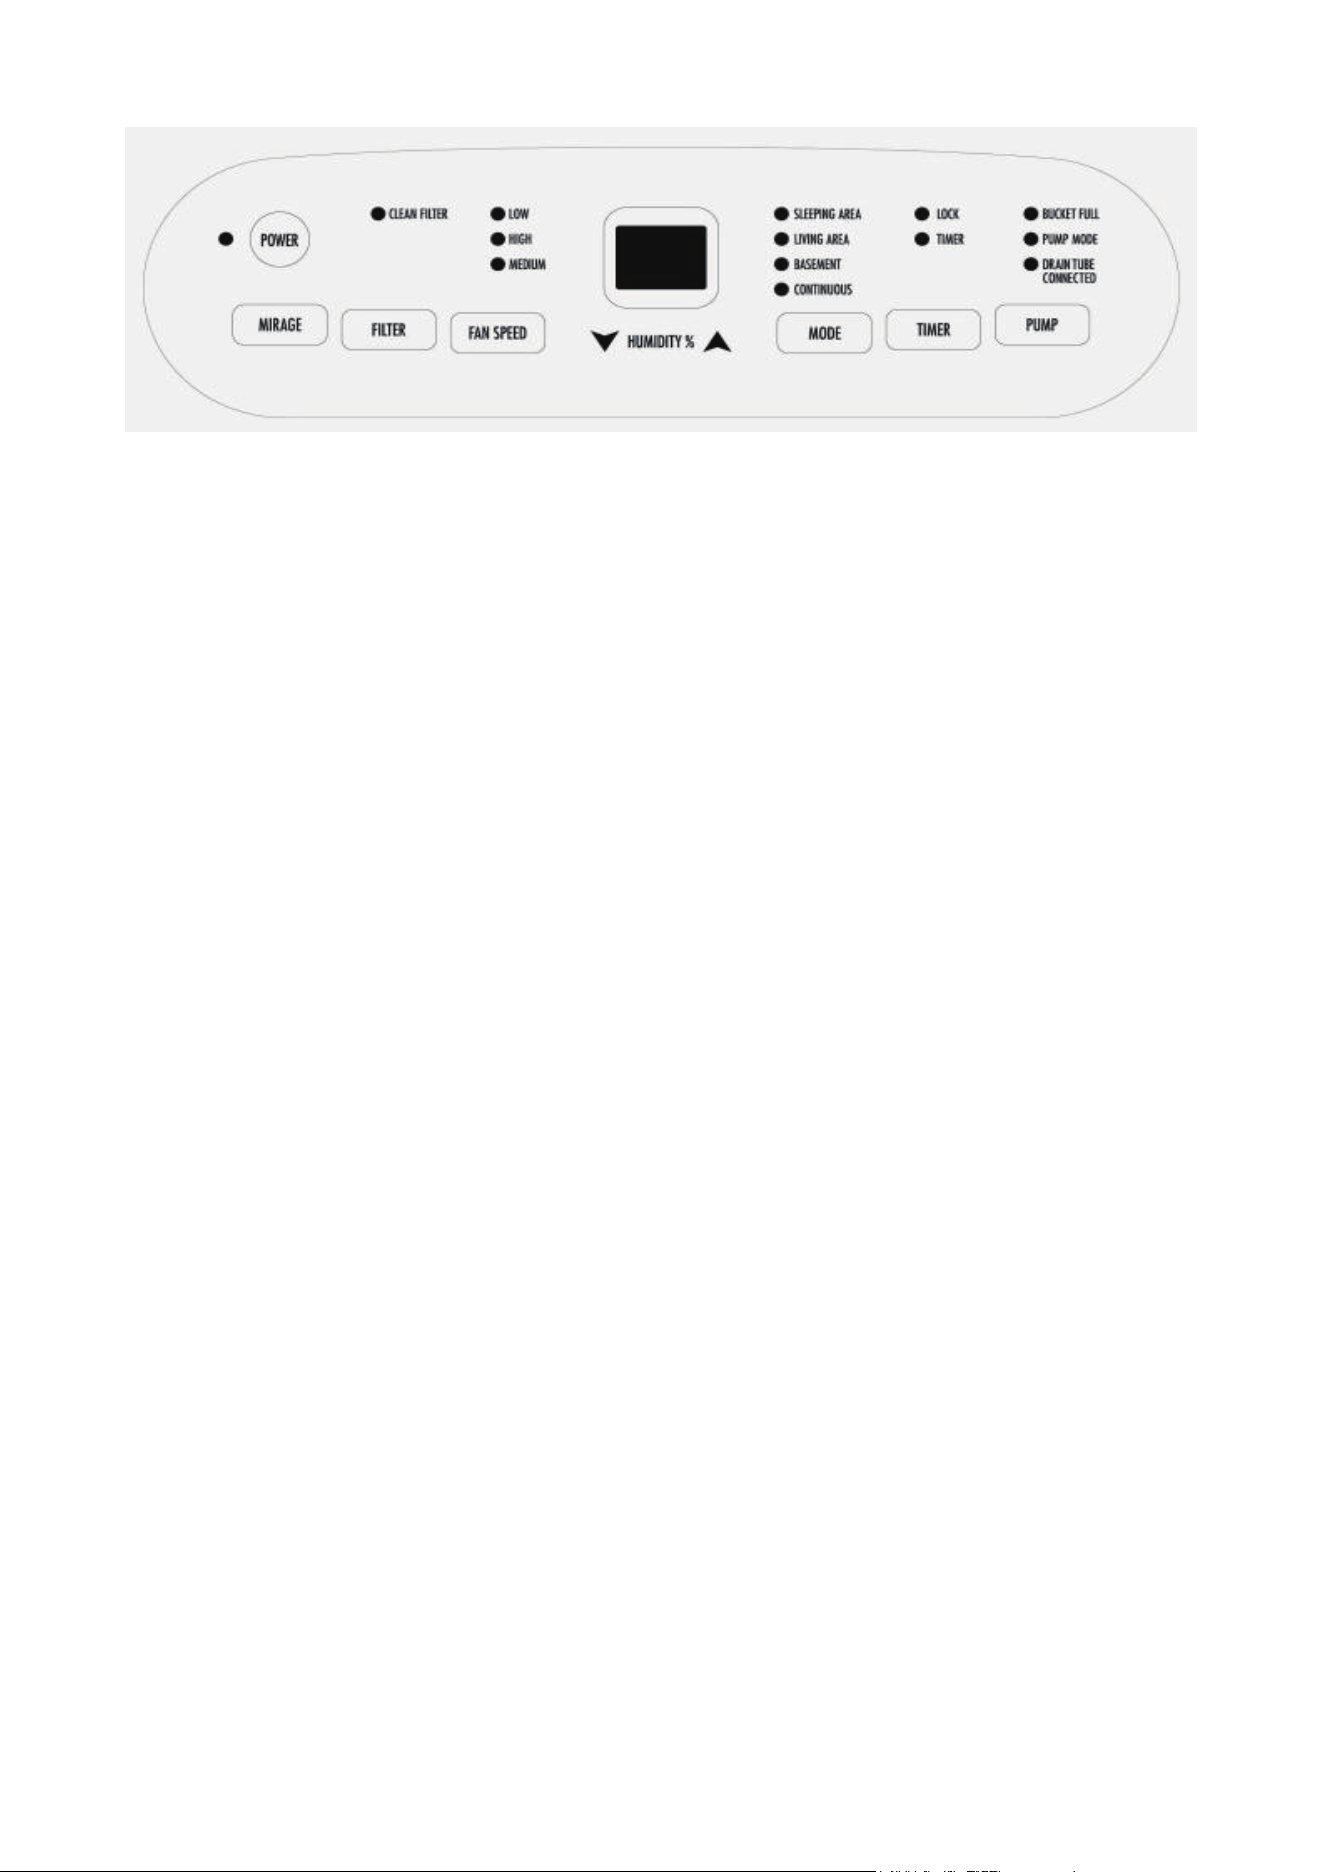
Model: D026P-50Pt3-P
Press to turn the dehumidifier on and off.
The backlit display on the front of the dehumidifier shows the room's actual humidity level.
Press the button to activate or deactivate the humidity display.
When the CLEAN FILTER light is on, clean the filter. Replace the clean filter and switch
on the unit.
POWER Button
MIRAGE Button
FILTER Button
FAN SPEED Button
Press the button to cycle through high, medium, or low fan modes. Choose medium or low
mode for quieter operation.
HUMIDITY Button
When the unit is on, the Display Screen displays the current humidity level. Press ▲ or ▼
to select your desired humidity level in 5% increments, ranging from 35% RH to 80% RH.
MODE Button
Press the button to choose from Sleeping Area (55%), Living Area (50%), Basement (45%)
or Continuous Operation.
TIMER Button
• Timer Auto On: To set automatic startup, press the button when the unit is off. Use ▲ or ▼
to adjust the timer in 30-minute increments up to 10 hours, then in 1-hour increments up to
24 hours. The unit will turn on once the set time is reached.
4
Specifications
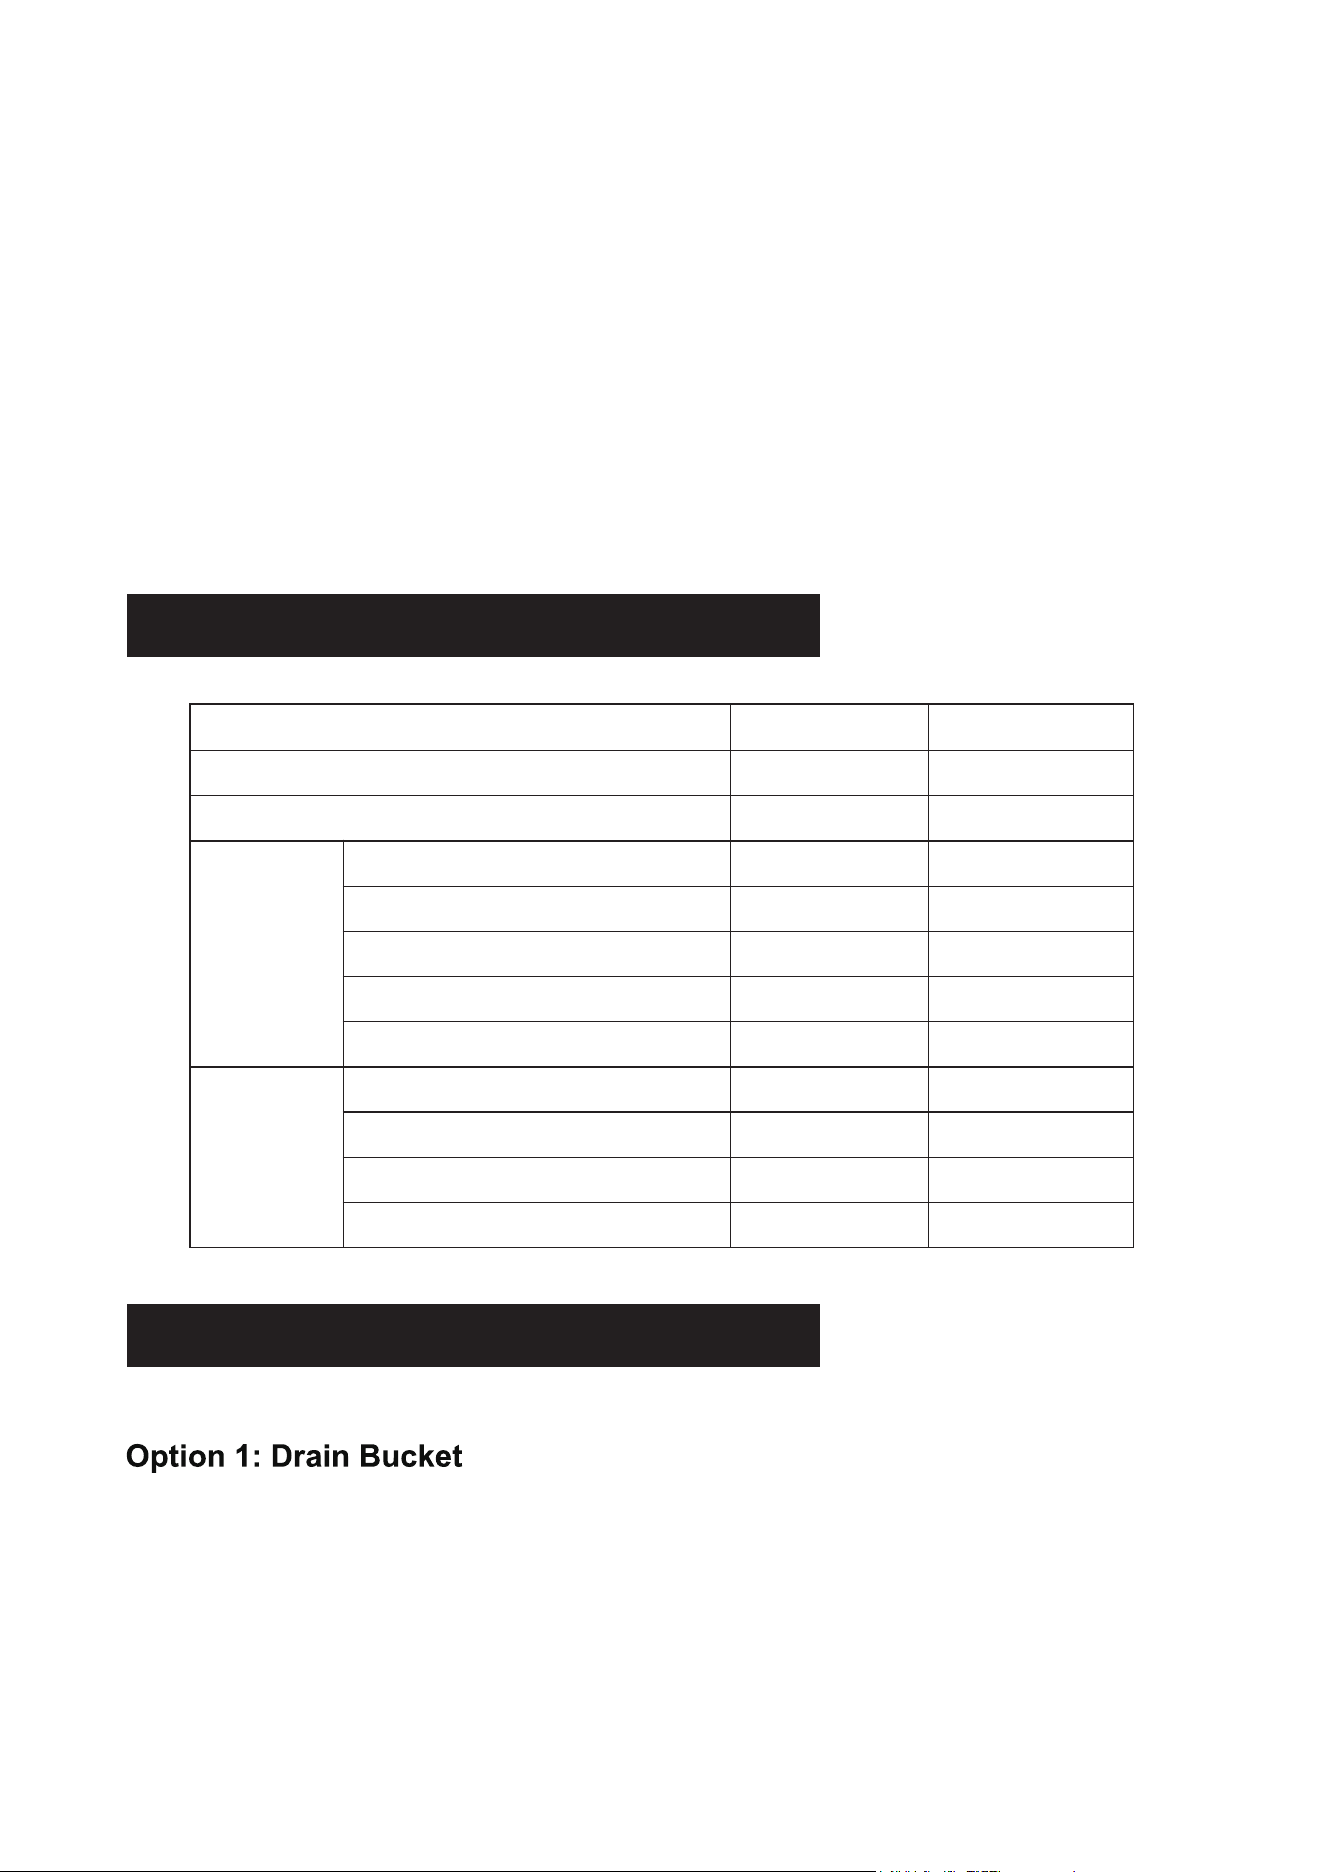
Water Removal
The dehumidifier offers 3 options for removing collected water.
1. Gently press on both sides of the bucket with your hands and pull it out.
2. Empty the collected water.
To empty the water bucket, follow the steps:
When the water bucket becomes full, the BUCKET FULL indicator light will activate, the
operation will automatically stop, and the buzzer will emit three beeps to alert you to empty
the water bucket.
Press the button to activate the pump mode, allowing for continuous water drainage through
the integrated pump system. When engaged, the pump will work automatically to efficiently
remove collected water, ensuring uninterrupted dehumidification.
• Timer Auto Off: To schedule automatic shutdown, press the button when the unit is on.
Adjust the timer in the same way as the automatic startup setting. The unit will power off
when the designated time is up.
• Child-Lock: To lock the control panel, press and hold the TIMER button for 3 seconds, and
the LOCK indicator will be on. To unlock the control panel, press and hold the button for 3
seconds.
PUMP Button (Model D026P-50Pt3-P Only)
5
Performance
System
30 Pints
0-24Hrs
45°F-89°F
≤53dB(A)
2,500 sq.ft
131/116/101 CFM
8.5 Pints
35.57 Pints/Day
3.3A
376W
115V/60Hz
50 Pints with Pump
0-24Hrs
45°F-89°F
≤53dB(A)
3,500 sq.ft
188/168/151 CFM
14.8 Pints
49.72 Pints/Day
4.63A
527W
115V/60Hz
Pints
Power Supply
Rated lnput
Rated Current
Dehumidifying Capacity
Bucket Capacity
Air Flow Volume(High/Low/Quiet)
Recommend Room Size
Noise Level
Timer
Working Temperature
Model D025P-35Pt3 D026P-50Pt3-P
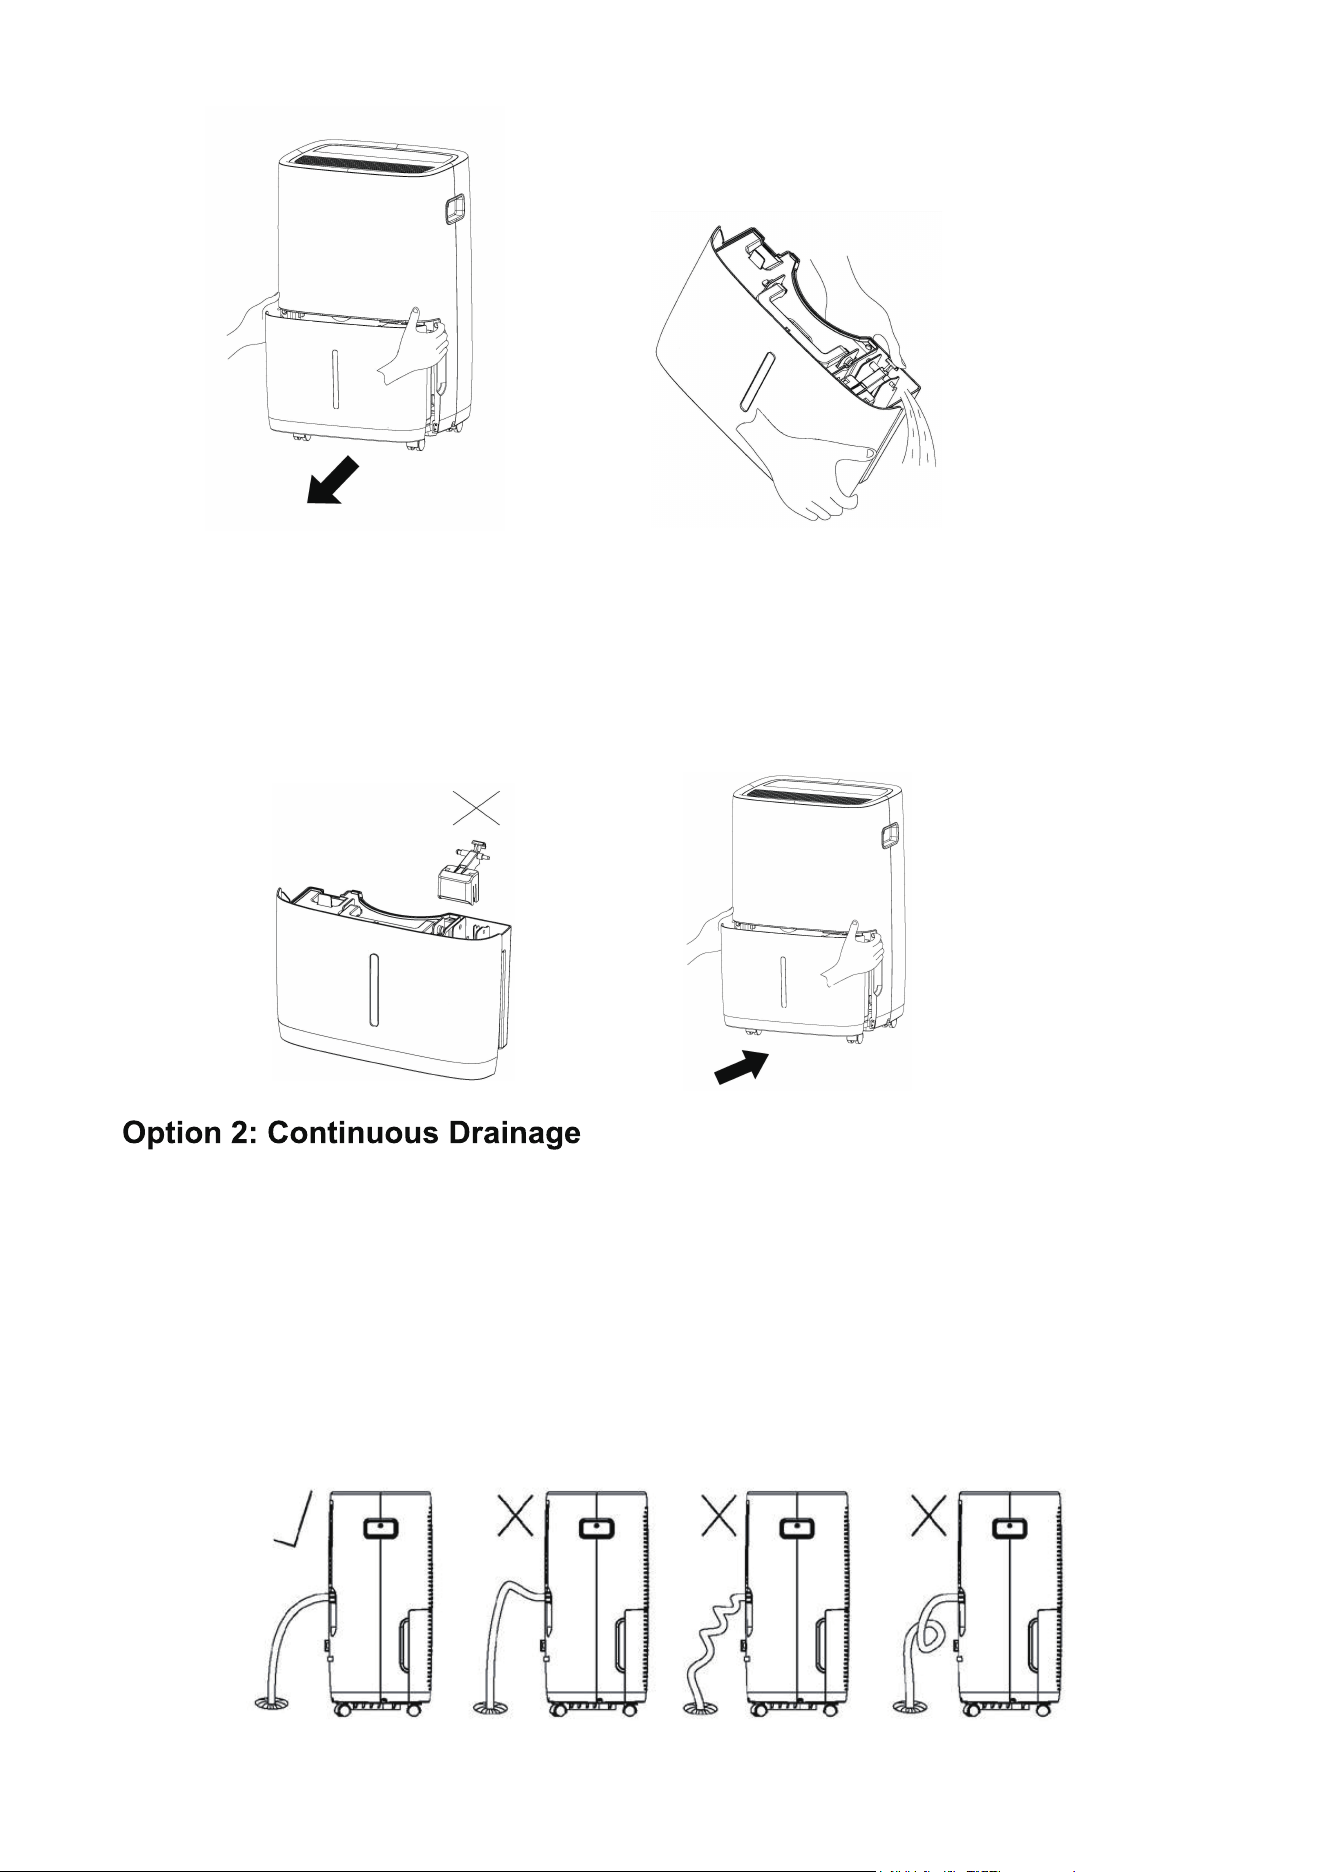
• Do not remove the float from the water bucket, as doing so will prevent the water full sensor
from detecting the water level, potentially causing water leakage.
• If the drain bucket becomes dirty, clean it with cold or lukewarm water. Do not use detergents,
scouring pads, chemically treated dust cloths, gasoline, benzene, thinner, or other solvents, as
they may scratch and damage the bucket, leading to water leakage.
• When reinserting the drain bucket, firmly press it into place using both hands.
Notes:
Water can be automatically drained by attaching a drain hose to the drain outlet located on
the back of the dehumidifier. This setup allows the unit to run continuously, depending on
your selected humidity level, without the need to empty the water bucket.
1. Remove the drain cap.
2. Securing the drain adapter by turning it clockwise onto the drain outlet.
3. Connect a drain hose to the drain adapter.
4. Ensure the hose is free from kinks and confirm a secure hose installation.
5. Turn on the unit and set it to CONTINUOUS mode using the MODE button.
6
Pump Adapter Storage Compartment
Pump Adapter
Pump Drain Hose
Notes:
• Make sure the drain hose is secure so there are no leaks.
• Placing the dehumidifier on an uneven surface or improper hose installation may result
in the water bucket filling up, causing the unit to shut off. If a shut-off occurs, empty the
bucket, and check the dehumidifier's location and the hose for correct setup.
• The bucket must be in place and securely seated for the dehumidifier to operate effectively.
The internal pump allows the unit to operate without having to empty the bucket.
To set up the pump drain hose kit, follow the steps:
Option 3: Pump Drainage (Model D026P-50Pt3-P Only)
• The pump mode is only operational with the pump drain hose and pump adapter. Do not
use the drain hose for continuous drainage, or any other hoses in pump mode.
• Make sure the drain hose is secure so there are no leaks.
Notes:
7
1. Remove the drain cap.
2. Securing the pump adapter by turning it clockwise onto the drain outlet.
3. Connect the pump drain hose to the pump adapter.
4. Ensure the hose is free from kinks and confirm a secure hose installation.
5. Extend the hose to a nearby drain or sink, ensuring it's no higher than 16ft from
the unit's base.
6. Turn on the dehumidifier, and press the pump button to activate the internal pump.
Maintenance
WARNING
•
Always turn off the dehumidifier and unplug it from the electrical outlet before cleaning or
maintenance.
•
Never clean the unit's parts with flammable fluids. Do not use an excessively wet cloth,
industrial solvents, and oil-based products to clean this unit.
•
Do not store or use gasoline or any other flammable vapors and liquids in the vicinity of
this or any other unit.
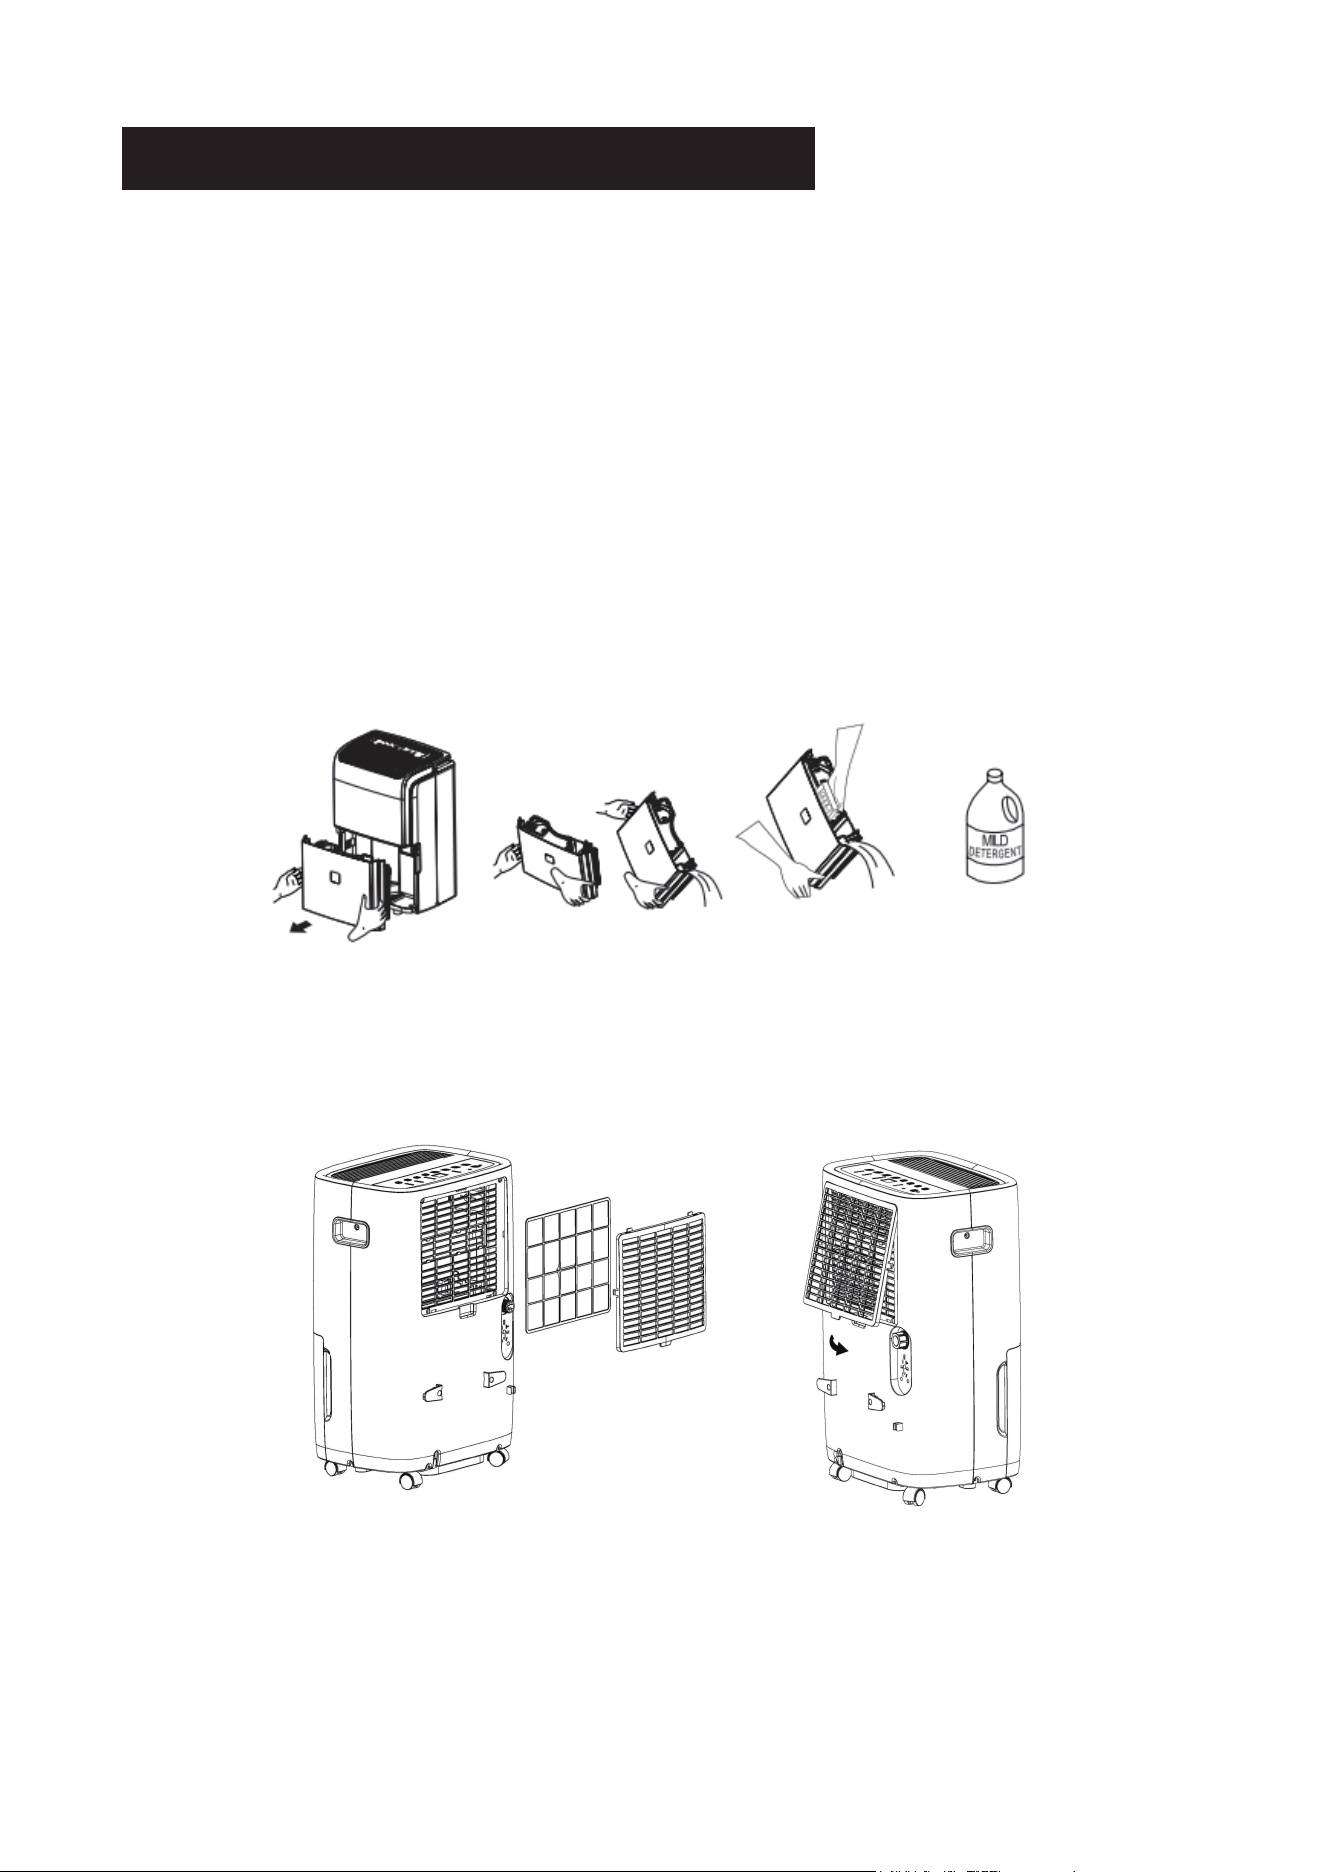
Use water and a mild detergent to clean the case. Avoid using bleach or abrasive cleaners.
Cleaning the Case
Every few weeks, thoroughly clean the bucket to prevent mold, mildew, and bacteria growth.
Fill the bucket with clean water and mild detergent. Swirl it around, then empty and rinse.
Cleaning the Bucket
Cleaning the Air Filter
1. Pull it outwards to removal the filter.
2. Wash the filter with clean water and allow it to dry.
3. Re-install the filter .
Storing the Dehumidifier
• Before storing the unit, allow it to rest for a full day to let the system dry out naturally.
• Clean the unit, water bucket, and air filter.
• Secure the power cord using the power cord buckle.
• Cover the unit with a plastic bag.
• Store the unit in an upright position in a dry, well-ventilated area.
8
Troubleshoot
Self-diagnosing Codes
Troubleshoot your problem by using the chart below. If the dehumidifier
still does not work properly, contact customer service. Customers must
never troubleshoot internal components.
9
Dehumidifier Does Not Dry the Air
as Expected
Continuous Mode with Water in the
Bucket
Note that there is a protective time delay (up to 3 minutes) designed to prevent
overloading the compressor.As a result, the unit may not initiate normal
dehumidification for the first 3 minutes after being powered back on.
Trouble Possible Remedy
The Dehumidifier Does Not Start
Loud Noise During Operation
Frost on Coils
Water on the Floor
Ensure that the dehumidifier's plug is fully inserted into the outlet.
Check the house fuse or circuit breaker box and replace the fuse or reset the
breaker if needed.
Verify if the dehumidifier has reached its preset humidity level or if the water
bucket is full.
Make sure the water bucket is correctly positioned.
ldentify any potential sources of water vapor within the room, as this can affect the
dehumidifier's efficiency.
Ensure that you have allowed enough time for the dehumidifier to remove
moisture from the air effectively.
Check for any obstructions such as curtains, blinds, or furniture that may be blocking
the front or back of the dehumidifier, impeding its performance.
Verify that the humidity control is set to an appropriate and lower level.
Make sure that all doors, windows, and other openings are securely closed to
prevent external moisture from entering the room.
Check the room temperature, ensuring it is not too low and falls below 5C (41°F).
Ensure that you are using a garden hose while operating in Continuous Mode.
Check if the air filter is dirty and clean it. Refer to the Care and Cleaning &
Maintenance section.
Ensure that the unit is placed upright as intended, not tilted.
Confirm that the floor surface is level to reduce vibrations and noise.
This is normal; the dehumidifier has an auto defrost feature.
Check for loose hose-to-connector or hose connection.
Ensure that you are using the bucket to collect water and that the back drain plug is
not removed.
Compressor Overheat Protection
Contact the customer service.
Trouble Possible Cause Possible Remedy
Humidity Sensor Malfunction
Condenser Overheat Protection
lnternal Pump Malfunction
Error Code "E1"
Error Code "E2"
Error Code "EH"
Error Code "E5"
Customer Service
Warranty
• 1-Year Warranty
All DENBIG Products come with a 1-year warnanty from the date of purchase. DENBIG
warrants to the original purchaser that the product will be free from defects in material,
parts and workmanship, and replaces any defective product with a new unit that is
equivalent to your original purchase within the warranty period.
Customer Service
Video Guide
Visit our official website to watch a video tutorial at www.denbig.shop.
If you have any questions or encounter issues with your product, including problems not
covered in the Troubleshooting section, or if the recommended solutions do not resolve
the problem, please reach out to our customer service for assistance.
10

DEHUMIDIFIER
Instruction Manual
Before using this product, please read this manual
carefully and keep it for future reference.