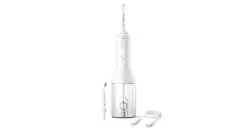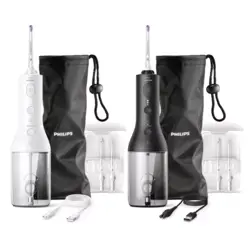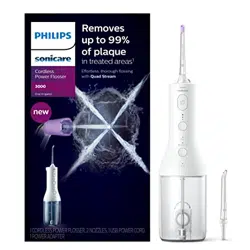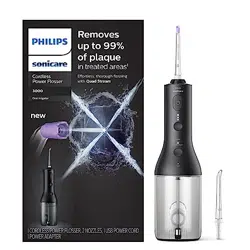
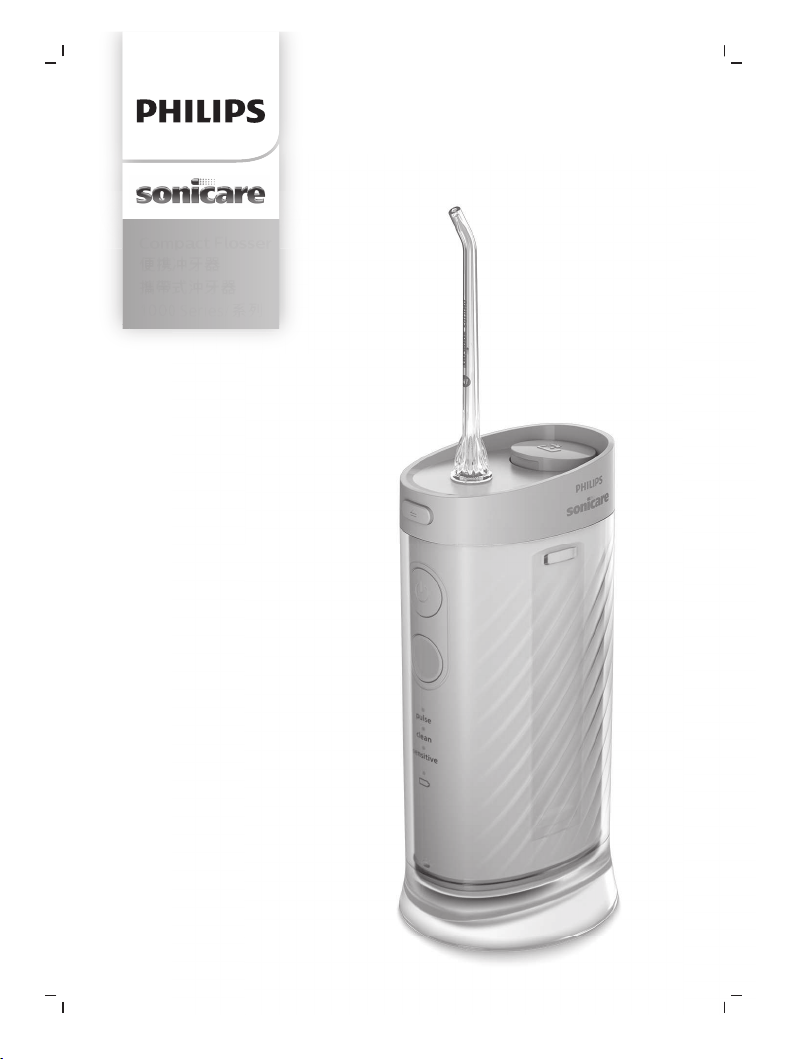
Compact Flosser
ьེԊఖ
ᙳόә˫ኜ
1000 Series/ӻΐ

1
7
8
10
9
2
3
4
5
6
11
1


English
5
English
Introduction
Welcome to Philips! Congratulations on your new Sonicare Compact Flosser.
To fully benefit from the support that Philips offers, register your product at
philips.com/welcome.
Important safety information
Only use the product for its intended purpose. Read this information carefully
before you use the product and its batteries and accessories, and save it for
future reference. Misuse can lead to hazards or serious injuries.
Accessories supplied may vary for different products.
WARNINGS
- This appliance can be used by children and persons with reduced physical,
sensory or mental capabilities or lack of experience and knowledge if they
have been given supervision or instruction concerning use of the appliance
in a safe way and understand the hazards involved. Cleaning and user
maintenance shall not be made by children without supervision.
- Children should be supervised to ensure that they do not play with the
product.
- Only use original Philips accessories or consumables. If supplied, only use
the original USB cable and USB power supply unit.
- This appliance contains no user-serviceable parts. If the appliance is
damaged, stop using it and contact the Consumer Care Center in your
country (see 'Warranty and support').
- Keep charging cables and wall adapters away from water.
- Do not use charging cables and wall adapters outdoors or near heated
surfaces.
- If the charging cable or wall adapter is damaged, stop using it.
- Clean the product (especially inside the reservoir) on regular basis.
- Do not clean any part of the product in the dishwasher unless otherwise
instructed in the Cleaning section.
- After cleaning, make sure the wall adapters and charging cables are
completely dry before connecting to power.
- To avoid physical injury, do not fill the reservoir with hot water. Do not put
foreign objects in the reservoir.
- This appliance has only been designed for cleaning teeth and gums.
- Do not use to clean eyes, ears or nose.
- The maximum altitude of use is 4400 meters.
- Water may accumulate on the counter or floor and present a slipping
hazard if the device is not used over the sink.

6
English
MEDICAL WARNINGS
- Stop using the appliance and consult your dentist/doctor if excessive or
prolonged bleeding occurs after use, or if you experience discomfort or
pain during use.
- If you have a pacemaker or other implanted device, contact your doctor or
the manufacturer of the implanted device prior to use.
- Consult your dental professional before you use this product if you have
had oral or gum surgery in the previous 2 months.
- This appliance is a personal care device and is not intended for use on
multiple patients in a dental practice or institution.
Battery safety instructions
- This appliance contains non-replaceable batteries that are only to be
removed by skilled persons.
- Charge only with Philips WAA1001, WAA2001 safety approved wall
adapters with input ratings (100 -240V~; 50/60Hz; 3.5W) and output
ratings (5Vdc; 2.5W). For the list of approved adapters, please see
philips.com/support.
- Keep product and batteries away from fire and do not expose them to
direct sunlight or high temperatures.
- If the product becomes abnormally hot or smelly, changes color or if
charging takes longer than usual, stop using and charging the product and
contact Philips.
- Do not place products and their batteries in microwave ovens or on
induction cookers.
- Do not open, modify, pierce, damage or dismantle the product or battery
to prevent batteries from heating up or releasing toxic or hazardous
substances. Do not short-circuit, overcharge or reverse charge batteries.
- This appliance contains batteries that are non-replaceable. When the
battery is at end of life, the appliance shall be properly disposed of, see
section on Recycling.
- Charge and use the product at a temperature between 3°C and 40°C (37 °F
and 104 °F).
- This appliance contains Lithium-ion rechargeable cell. MUST BE RECYCLED
OR DISPOSED OF PROPERLY.
Electromagnetic fields (EMF)
This Philips appliance complies with all applicable standards and regulations
regarding exposure to electromagnetic fields.
Storage and transportation conditions
Temperature (Transport and Storage) between -20°C to 60°C (-4°F and 140 °F)
7
English
LIST OF SYMBOLS USED
The following symbols may appear on the product:
This symbol means read the instructions for use, before using the appliance.
Intended use
The Philips Sonicare Compact Flosser is an oral irrigator intended to remove
plaque and food debris between teeth and on the tooth surface in order to
reduce tooth decay and improve and maintain gum health. This product is
intended for consumer home use, normally used at least once a day.
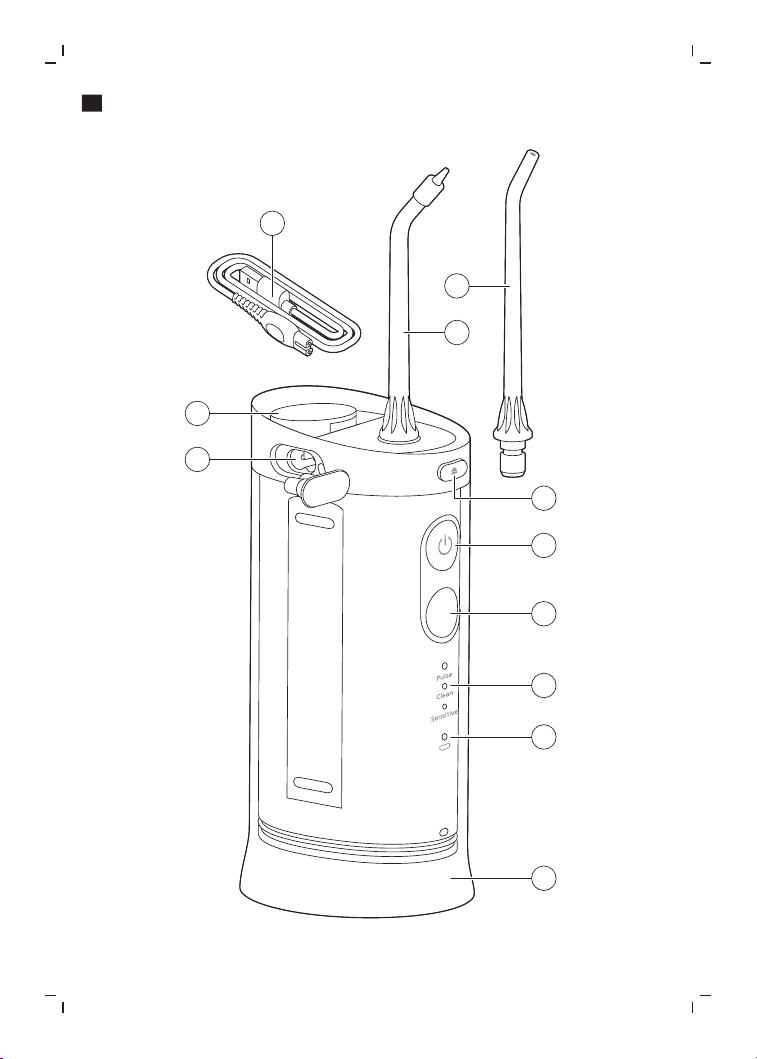
Your Philips Sonicare Compact Flosser
1 Nozzle release button
2 Power on/off button
3 Mode button
4 Mode indicator light
5 Battery indicator light
6 Reservoir
7 Filling port/Nozzle storage
8 Charging port
Accessories
9 Comfort nozzle
10 Standard nozzle
11 USB-A to small plug (wall adapter not included)
Note: Accessories included may vary based on the model purchased.
8
English
Getting started
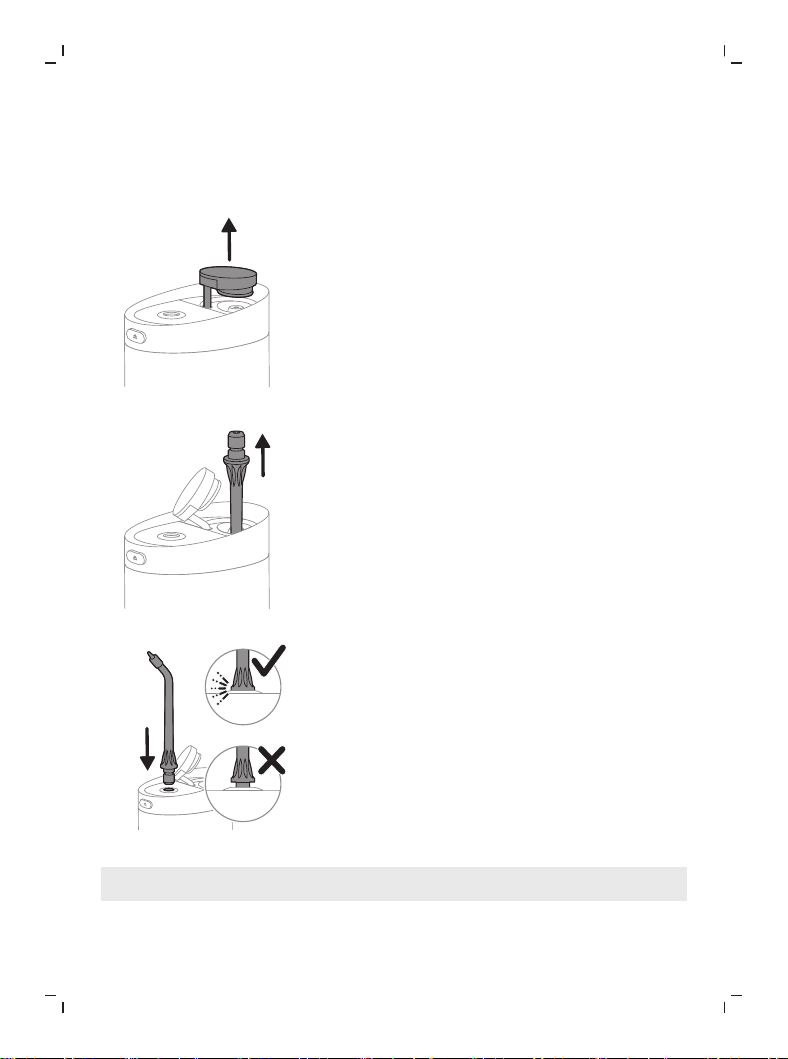
Set up your Compact Flosser
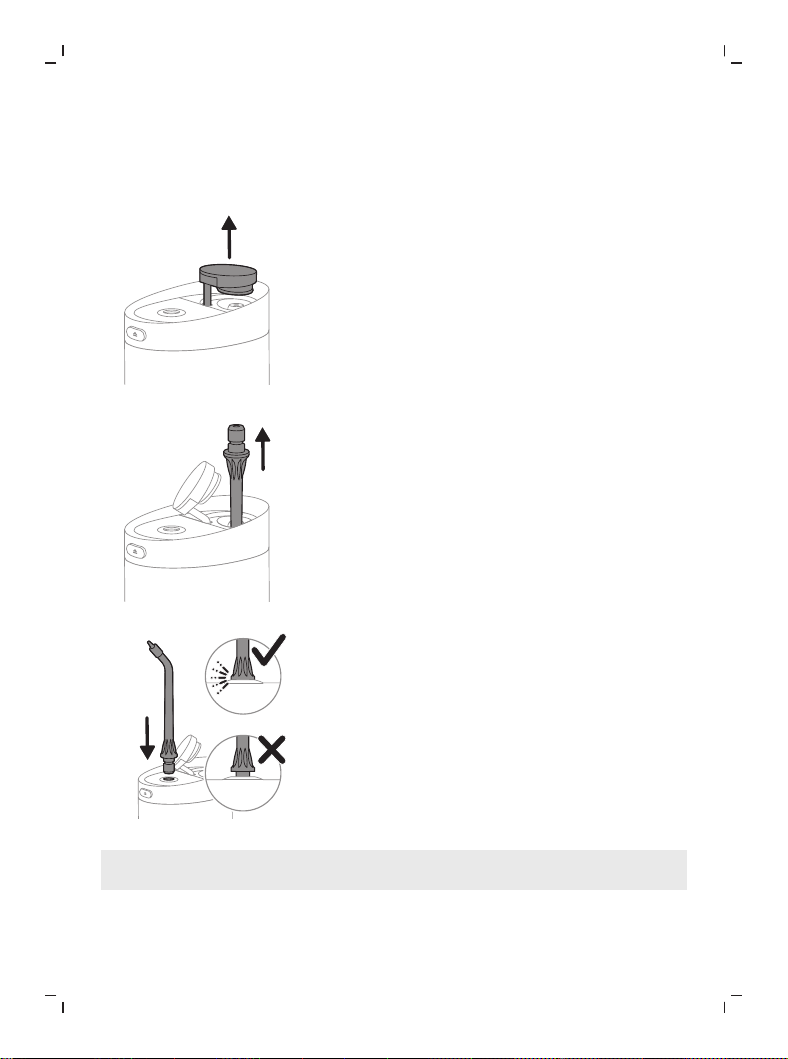
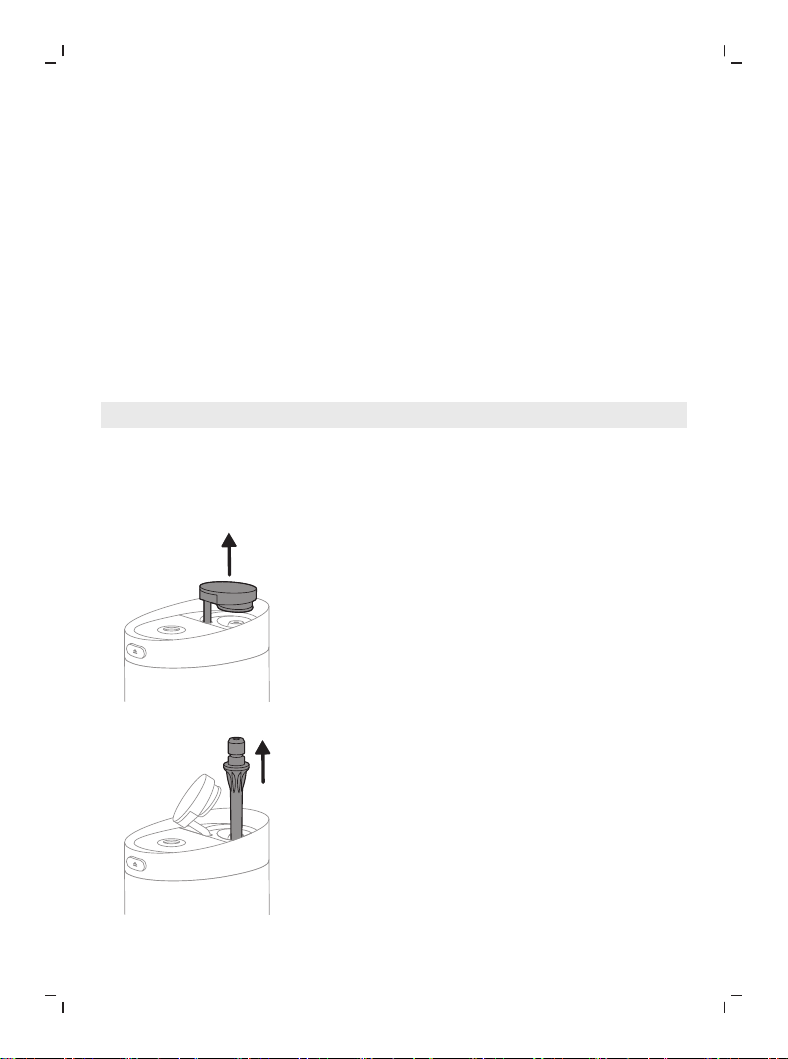
1
Gently pull on the cover of the filling port.
2
Remove the nozzle from the storage compartment.
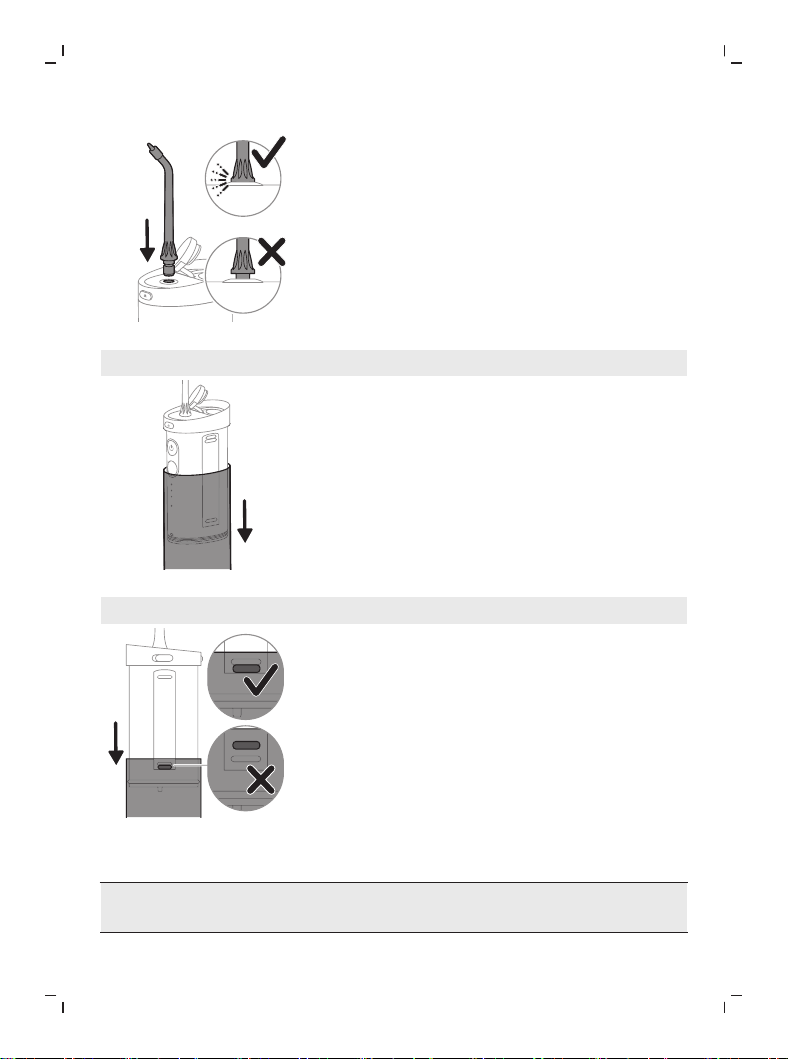
3
Insert your nozzle into the device.
Note: Ensure the nozzle is fully inserted and flush with the top of the
device.
9
English
4
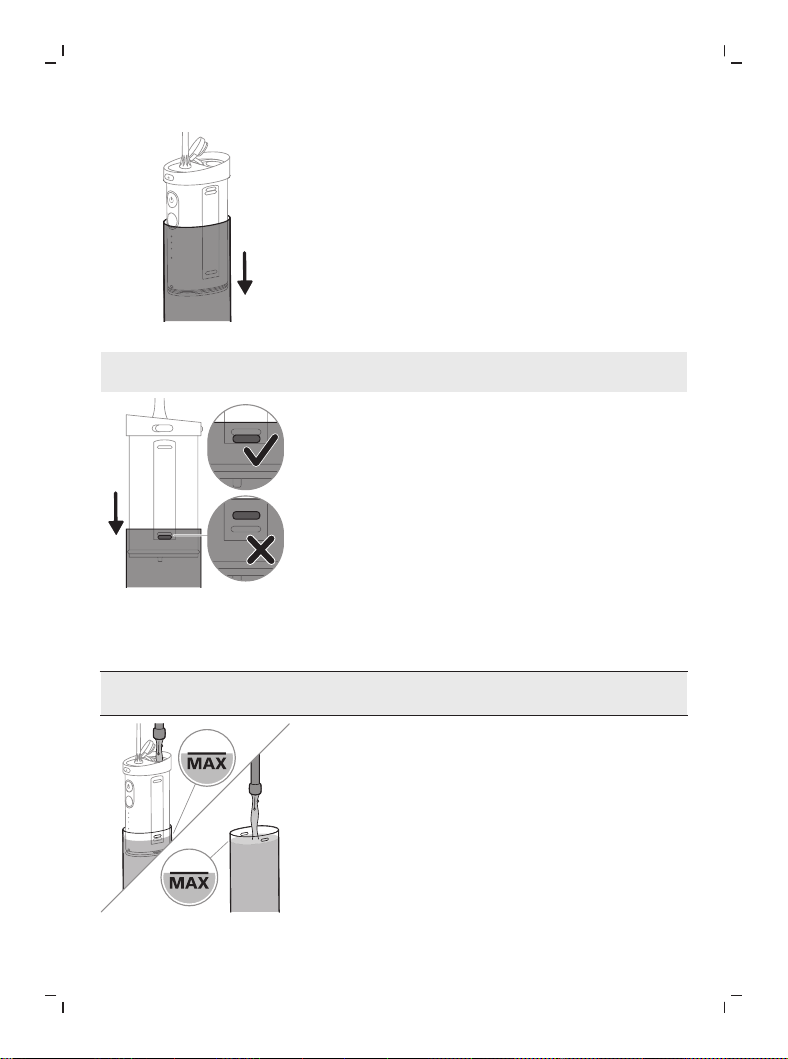
Ensure the cover of the filling port is open and pull down the reservoir.
Note: When the filling port cover is open, it is easier to pull down the
reservoir.
5
Pull down the reservoir until the device's stopper is above the stopper
inside the reservoir.
Filling the reservoir
Warning: Remove the charger from the Compact Flosser prior to
filling the reservoir and using the device.
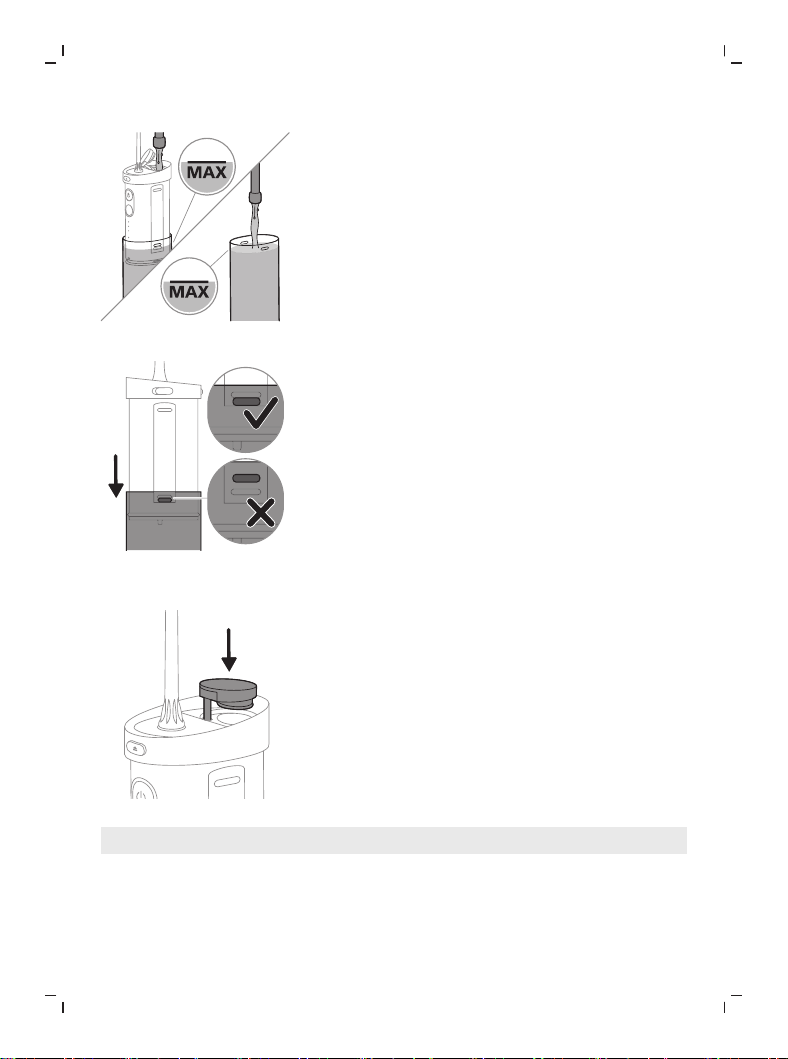
1
Open the filling port and fill the reservoir with lukewarm water.
Or
10
English
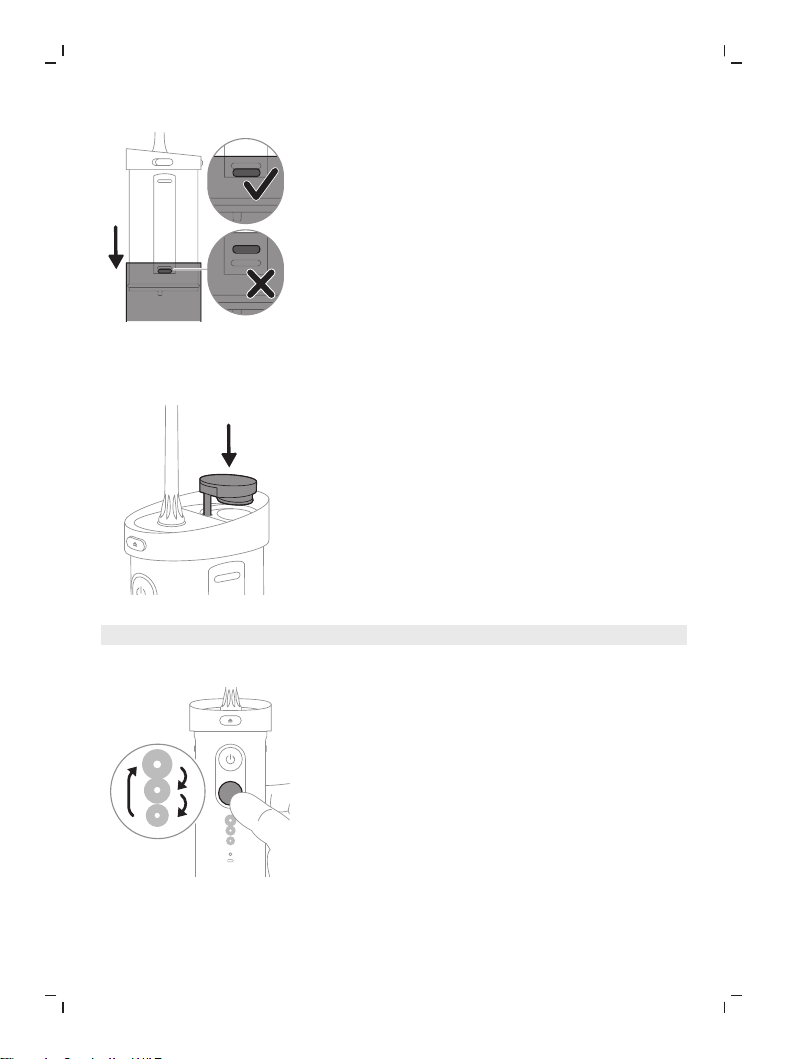
Water can also be filled directly into the reservoir. Gently pull the reservoir
off the Compact Flosser and fill with water to the max fill line. Reattach the
reservoir and make sure the stopper of the device and reservoir are
correctly in place.
2
Gently close the filling port.
Note: When filling reservoir, do not exceed the max fill line (200ml).
Modes
Pulse
Clean
Sensitive
Pulse
Clean
Sensitive
Your Compact Flosser is equipped with three different modes. To toggle
between modes, press the mode button.
The modes have different intensities. Listed from low to high:
Sensitive
11
English
This mode, with pacer, provides gentle water pressure. The pacer indicates
when you are supposed to move to the next section of your mouth via a short
pause in the water flow every 15 seconds.
Pulse
This mode, alternates strong and gentle pulses, and is designed to massage
and stimulate the gums. The pacer indicates when you are supposed to move
to the next section of your mouth via a short pause in the water flow every 15
seconds.
Clean
This mode, with pacer, provides constant water pressure for a great clean. The
pacer indicates when you are supposed to move to the next section of your
mouth via a short pause in the water flow every 15 seconds.
Note: For first time use, start the device in Sensitive mode for the lowest
intensity. It is recommended to increase the intensity you use over the course
of a few weeks. This can give better cleaning benefits as you are able to
tolerate higher intensities.
Note: This Compact Flosser comes with the pacer activated. To activate or
deactivate the pacer with the Compact Flosser off, press and hold the mode
selection button for 3 seconds. When deactivated, the battery indicator light
will flash amber once. When activated, the battery indicator light will flash
green twice.
Using your Compact Flosser
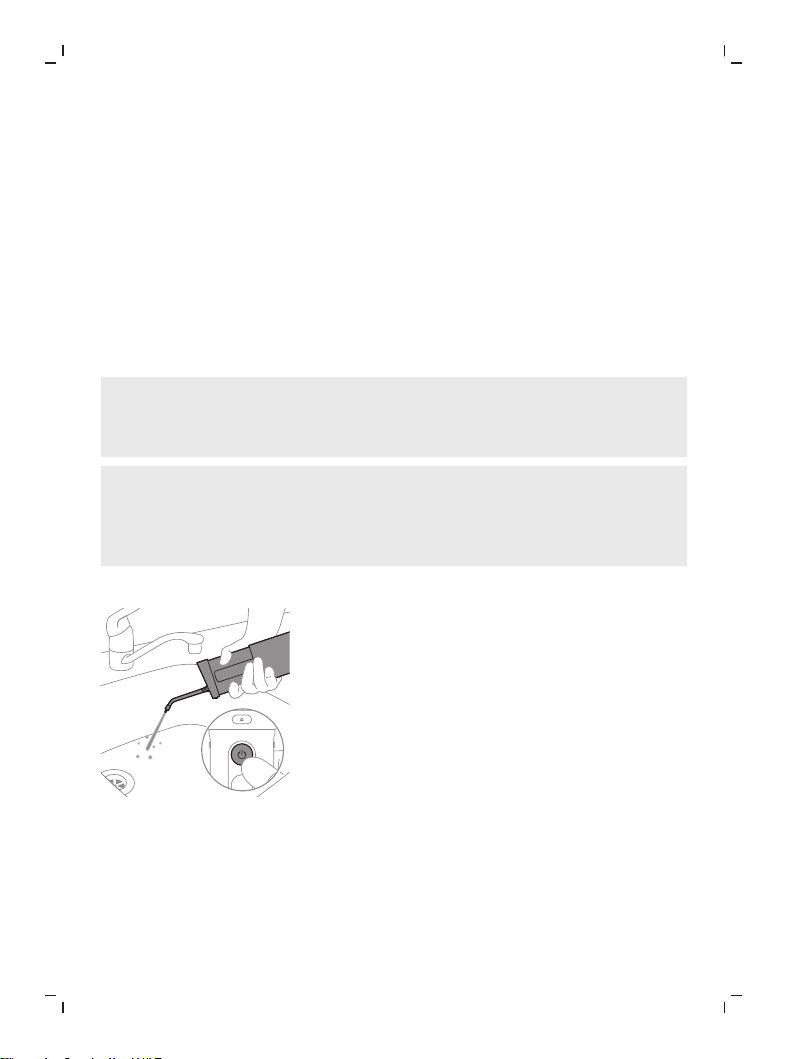
1
Before turning on the device, point the nozzle tip at the sink. Allow water
to spray into the sink. Turn off the device once water dispenses from the
device.
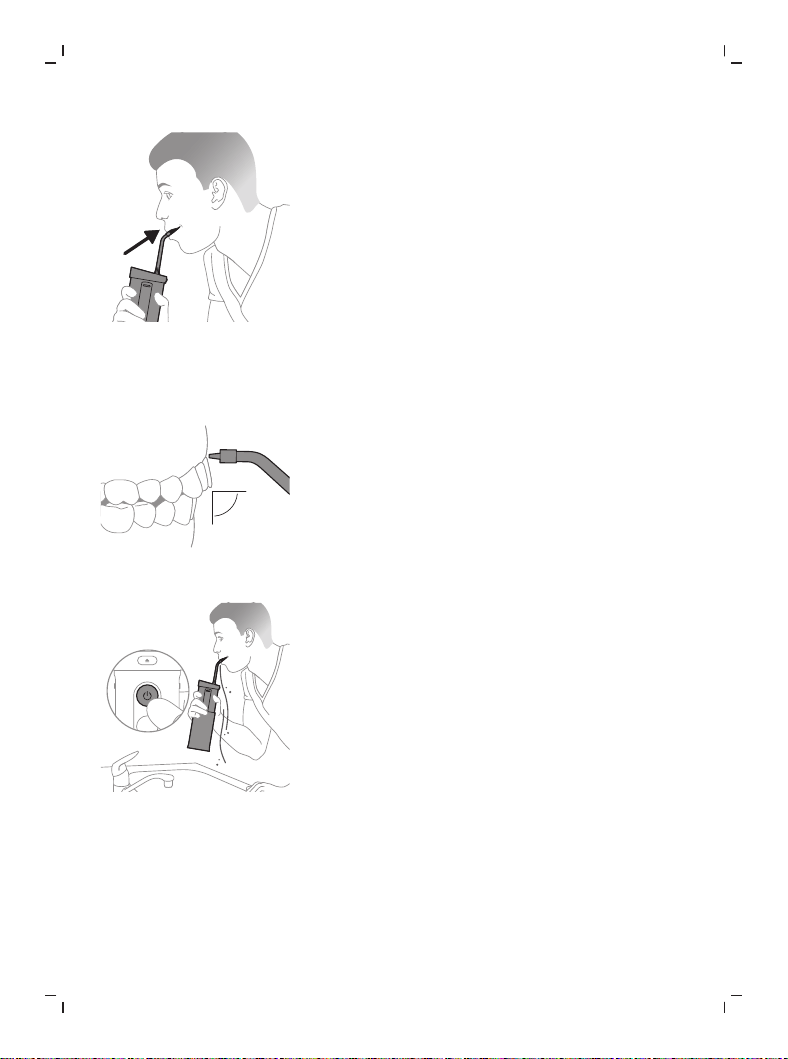
12
English
2
Place the nozzle tip in your mouth. Lean over the sink and partially close
your lips over the nozzle tip to avoid splashing. Leave enough space to
allow water to flow from your mouth into the sink.
90°
3
Position the nozzle tip just above the gum line at a 90° angle.
4
Press the power on/off button on the handle to turn on the Compact
Flosser and to start flossing.
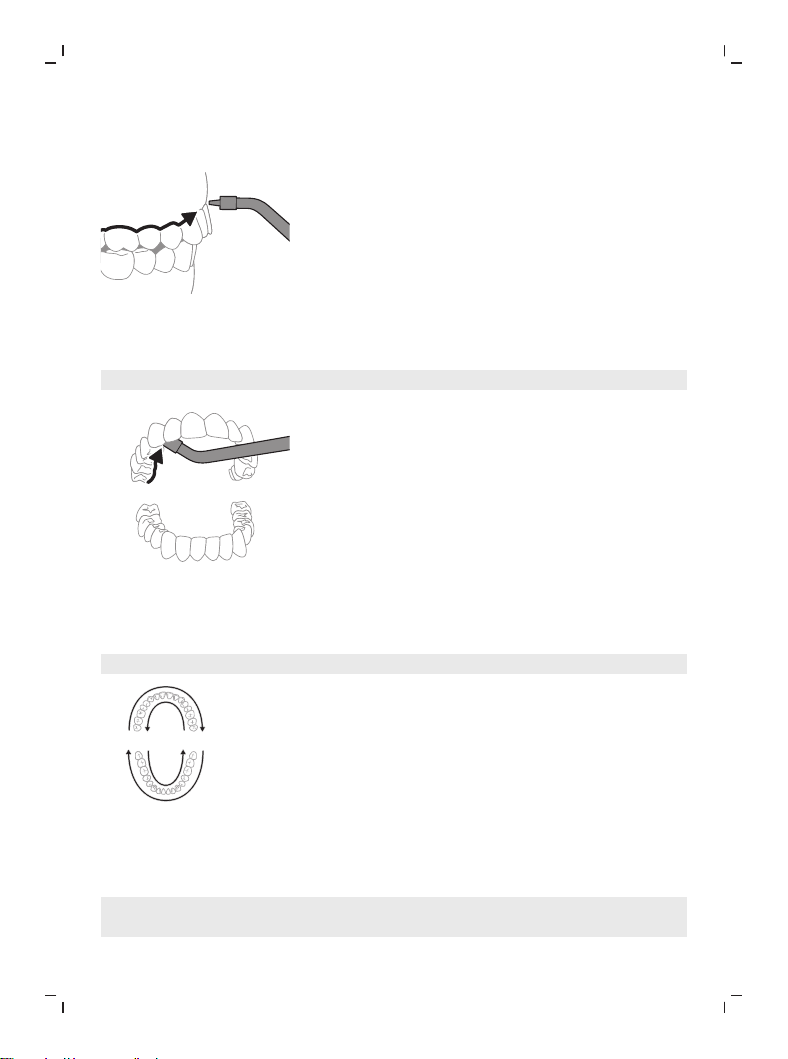
13
English
a Starting from your back teeth in your upper or lower jaw, slide the
nozzle tip along the gum line and pause briefly between each tooth.
Note: Rotate the nozzle as desired for easier positioning along the gumline.
b Follow the pacer to clean both the outside (15 seconds) and the inside
of your teeth (15 seconds) for a total of 30 seconds in one arch of your
mouth.
Note: Remember to clean the insides of your teeth.
15
sec.
15
sec.
15
sec.
15
sec.
c Follow the pacer and repeat in the other arch of your mouth for
another 15 seconds on the inside and 15 seconds on the outside until
all spaces around and between teeth have been cleaned for a total of at
least one minute.
Note: You can stop the water flow during use by pressing the on/off
button on the Compact Flosser.
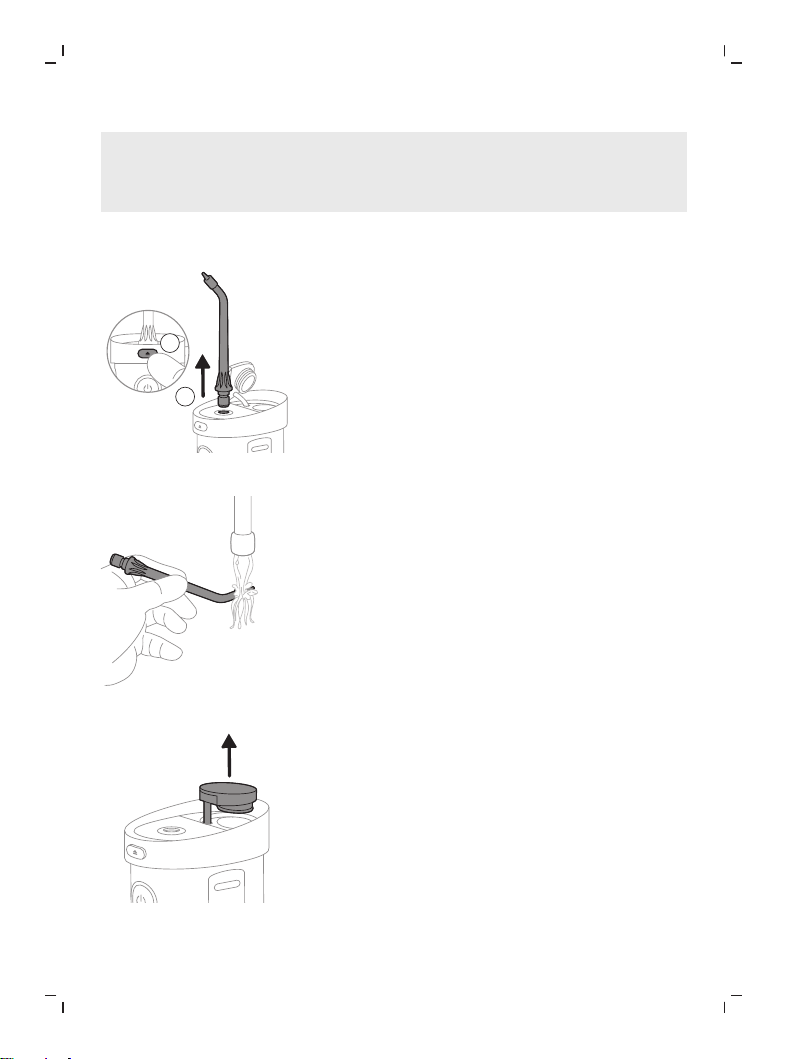
14
English
Note: If you choose to refill the reservoir during use, turn the device off
while refilling the reservoir and then pick up where you left off until all
spaces around and between your teeth have been cleaned for a total of at
least one minute.
After each use
2
1
1
Remove the nozzle by pulling the nozzle and holding the nozzle release
button at the same time.
2
Rinse the tip under warm water.
3
Gently open the filling port on top of the Compact Flosser.
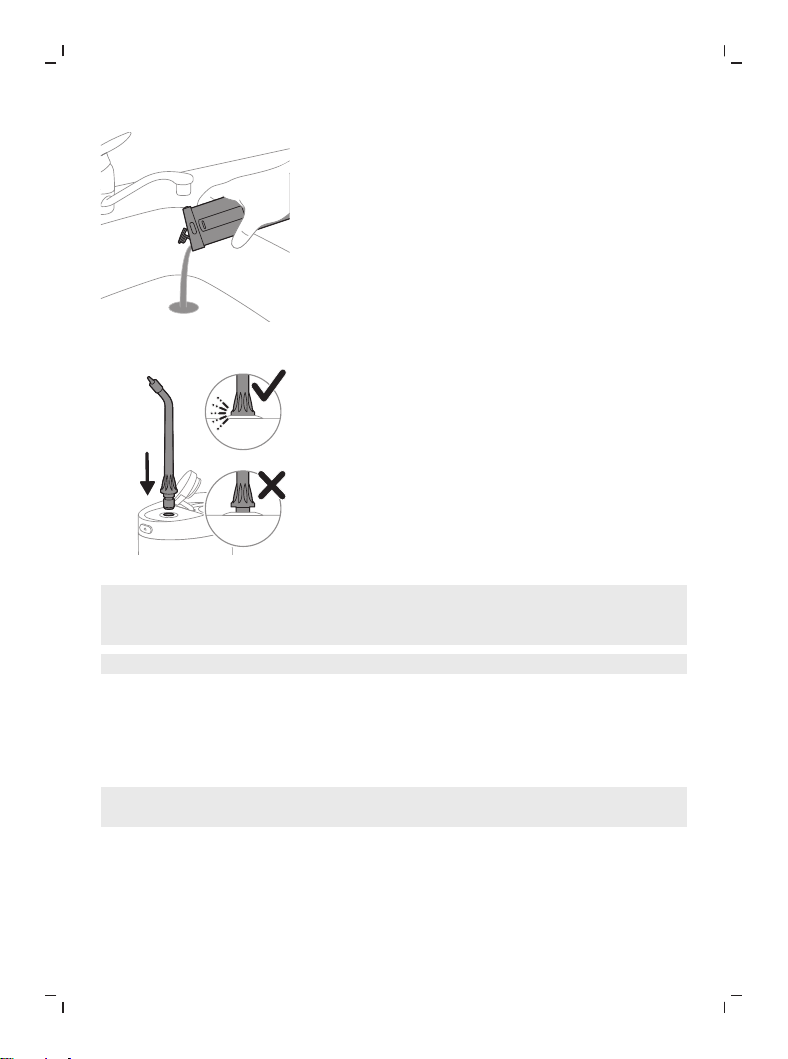
15
English
4
Pour out any excess water. Dry the nozzle, the outside of the handle and
the reservoir.
5
Insert the nozzle back into the handle.
Note: To facilitate drying, keep the filling port open or leave the Compact
Flosser disassembled between uses (the reservoir can be pulled off
completely).
Note: Do not leave the Compact Flosser unassembled longer than necessary.
Charging and battery status
Your Sonicare Compact Flosser is designed to provide at least 24 flossing
sessions, each session lasting 1 minute on a fully charged battery. The device
will shut off after 2 minutes of use.
Note: It can take up to 4 hours to fully charge the battery before first use, but
you can use the Compact Flosser before it is fully charged.
16
English
Charging
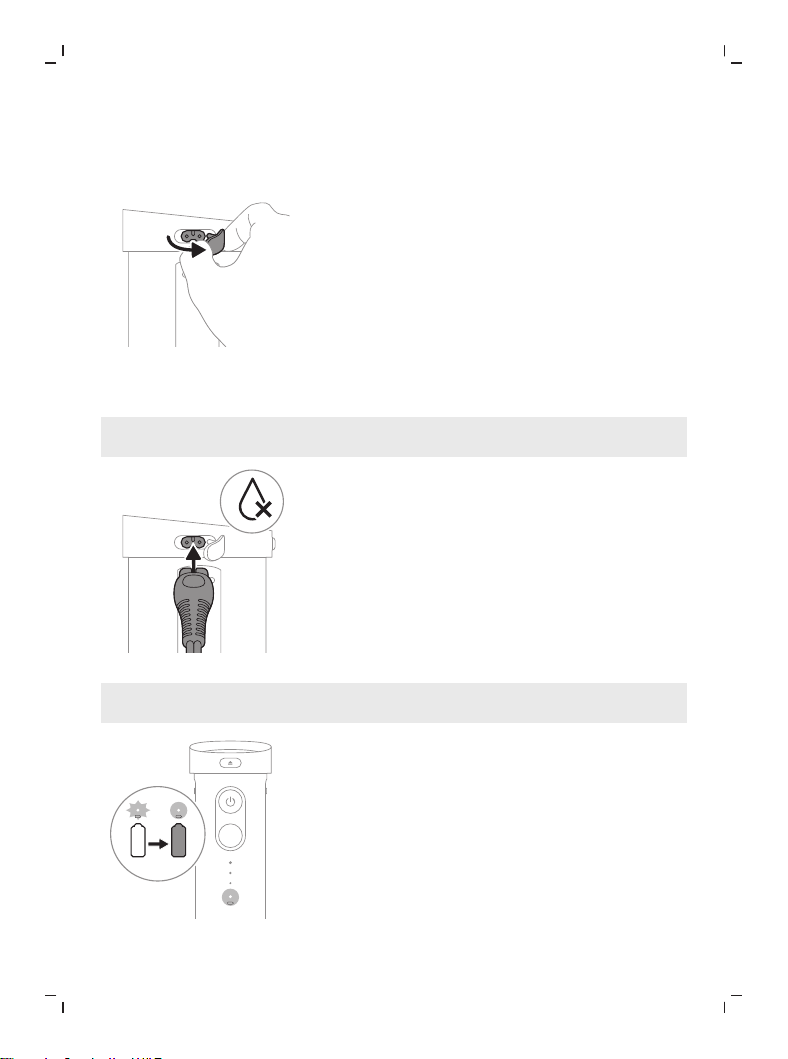
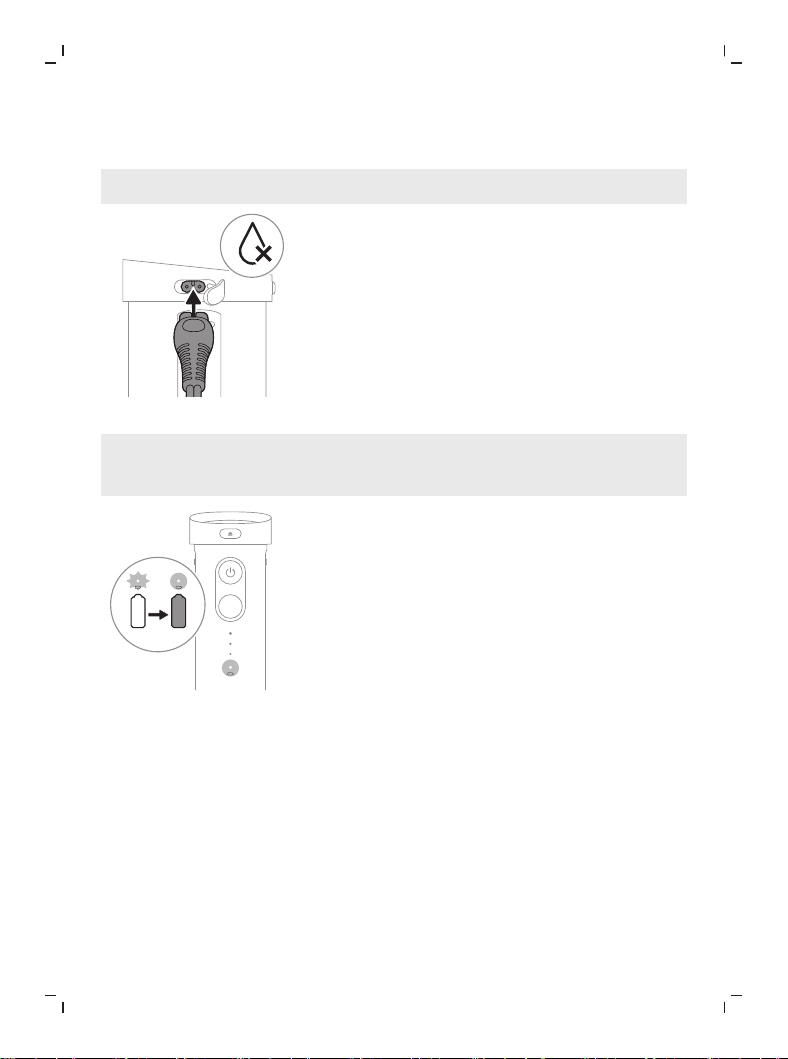
1
Gently pull the charging port cover on the side of the Compact Flosser to
expose the charging port.
2
Connect the USB-A to small plug charging cable into a 5V USB wall adapter.
Note: Wall adapter is not included in all models. Only use a 5V adapter
(Type A).
3
Plug the USB-A to small plug charging cable into the charging port.
Note: Make sure the handle is completely dry before you connect the USB-
A to small plug charging cable.
Pulse
Clean
Sensitive
4
The battery indicator flashes while charging.
17
English
5
Close the charging port cover on the Compact Flosser when not actively
charging.
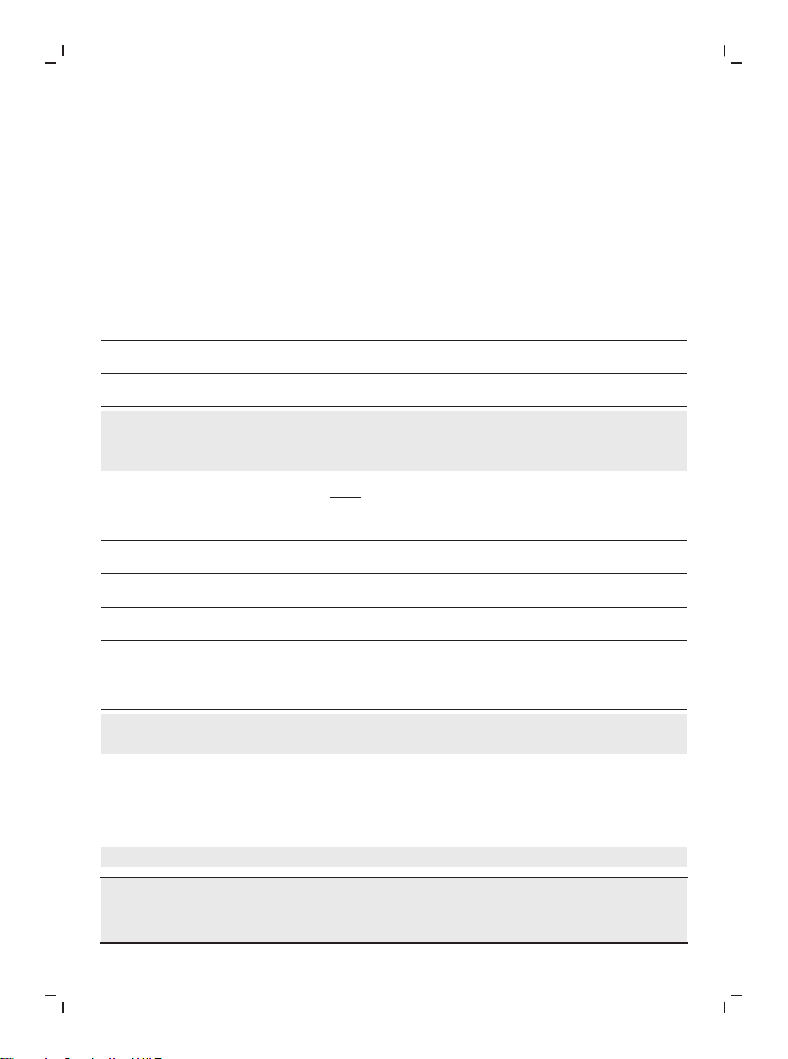
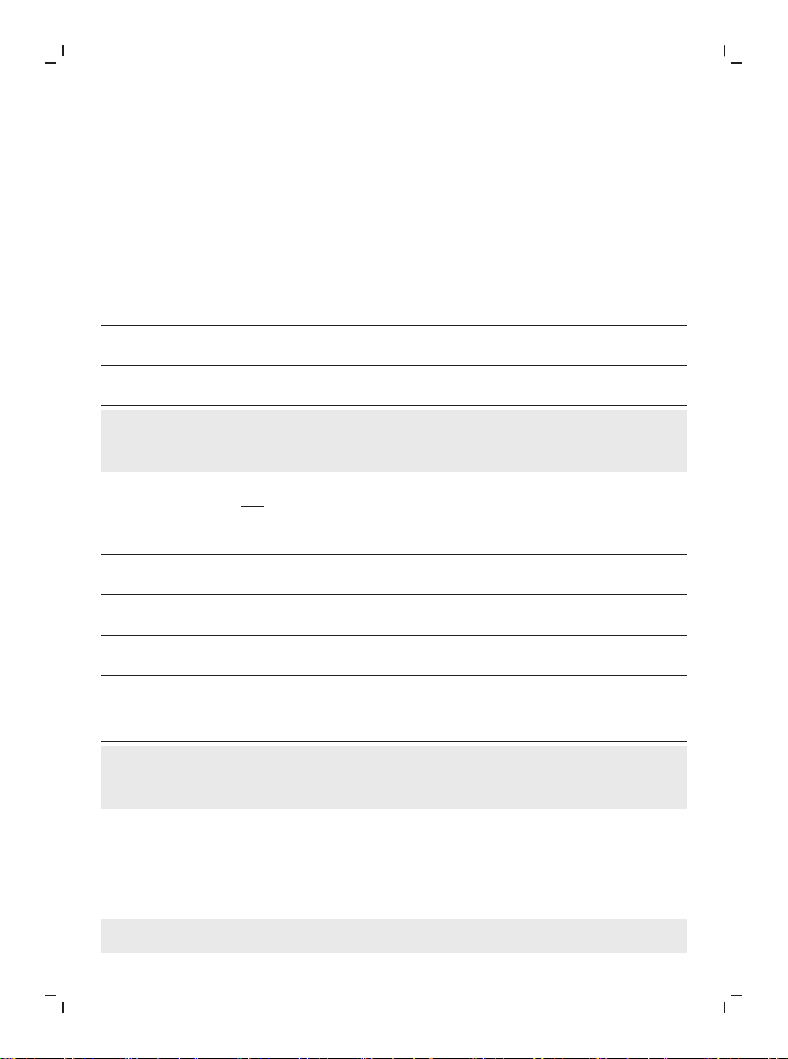
Battery status
Battery Status
The battery indicator shows the battery status when you complete the flossing
session, or when you pause the Compact Flosser.
When the Compact Flosser is charging
Battery status Battery indicator
Full Solid green
Charging Flashing green
Note: The battery indicator will flash until fully charged. When it becomes fully
charged while plugged in, the light will turn solid green for 30 seconds and
then it will turn off.
When the Compact Flosser is not charging
Battery status Battery indicator
Full Solid green
Medium Flashing green
Low Flashing amber
Empty Flashing amber for 5 seconds and the
Compact Flosser turns off
automatically
Note: When the low battery indicator appears, the Compact Flosser is
designed to provide at least 3 flossing sessions, each session lasting 1 minute.
Cleaning
The Compact Flosser needs to be cleaned once a week. Clean the device and
the accessories as follows. Accessories may vary by model.
Note: Do not run or clean device with high alcohol content cleaning solutions.
Warning: Do not clean the Compact Flosser while the USB-A to small
plug charging cable is attached. Unplug the device and close the
charging port cover before cleaning.
18
English
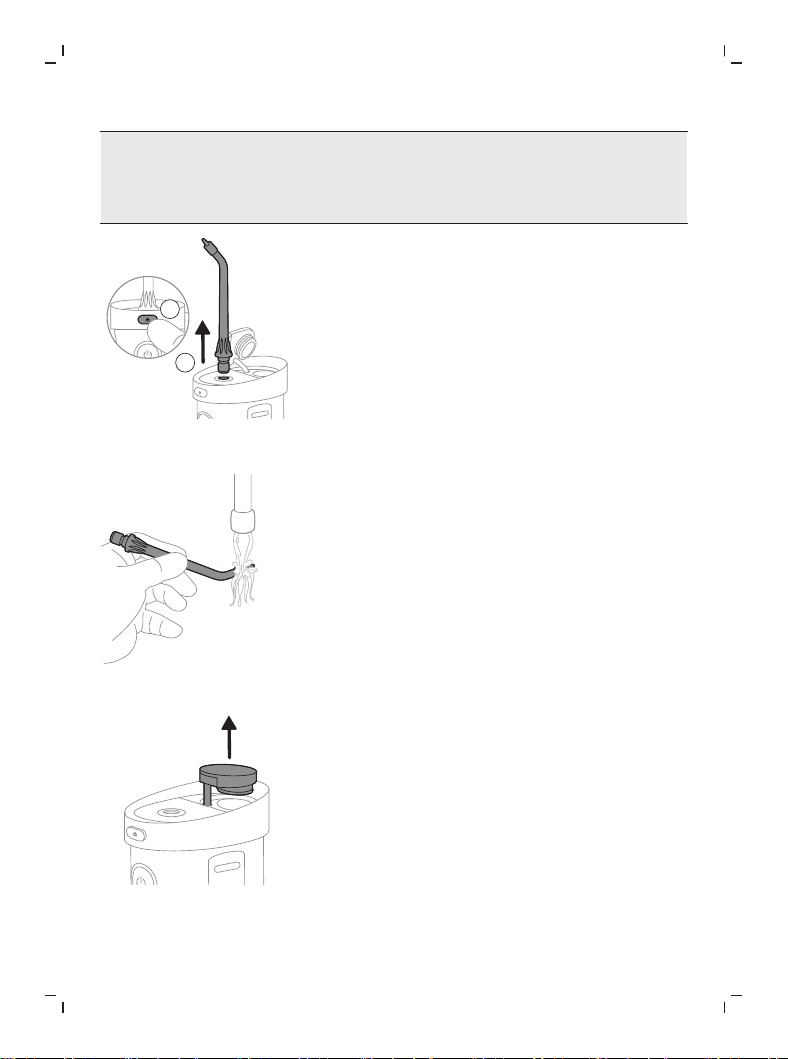
2
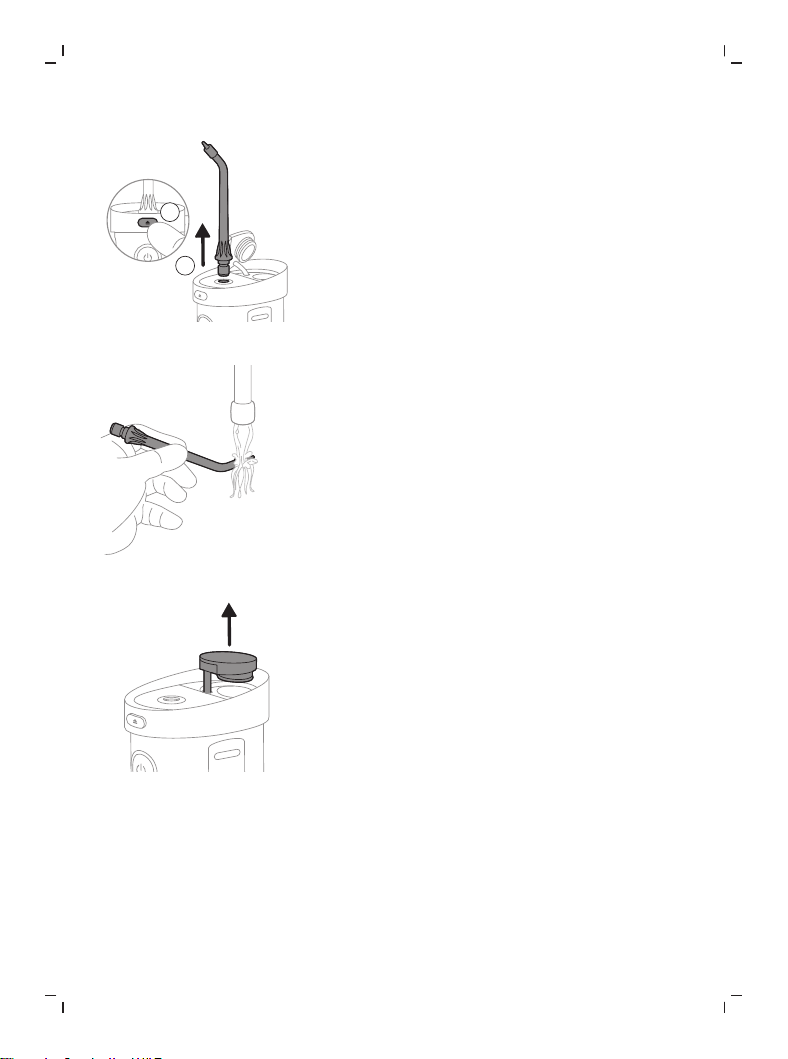
1
1
Remove the nozzle by pulling the nozzle and holding the nozzle release
button at the same time.
2
Rinse the tip under warm water.
3
Gently open the filling port on top of the Compact Flosser.
19
English
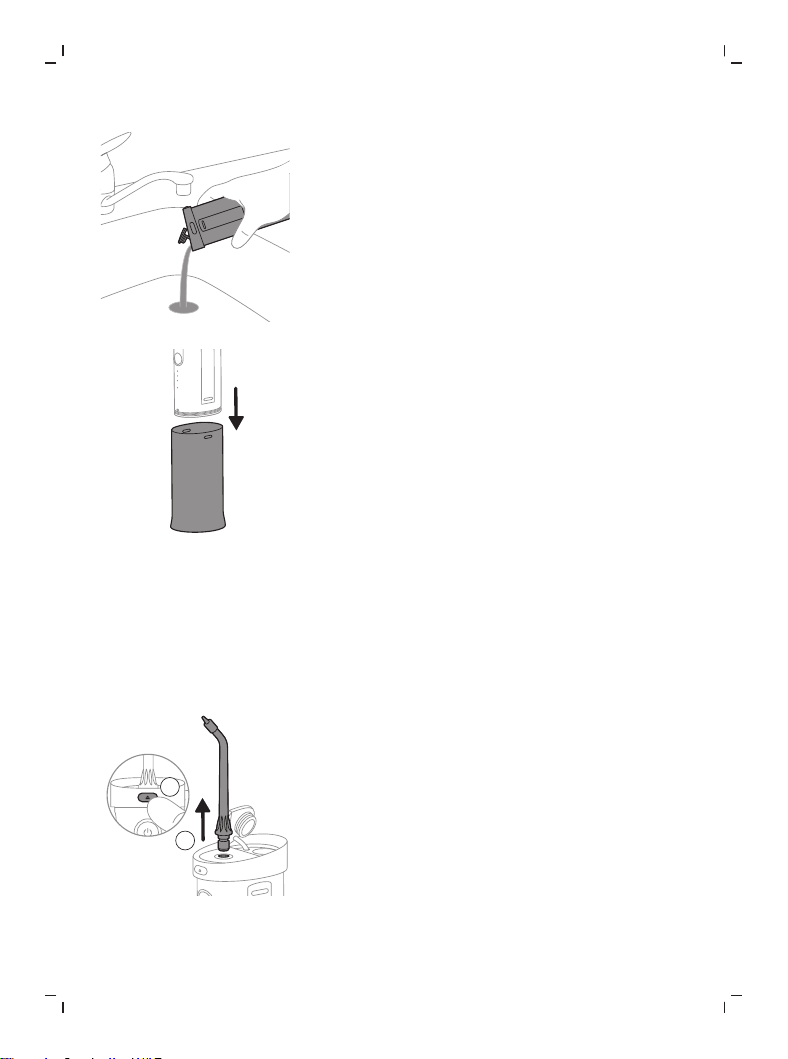
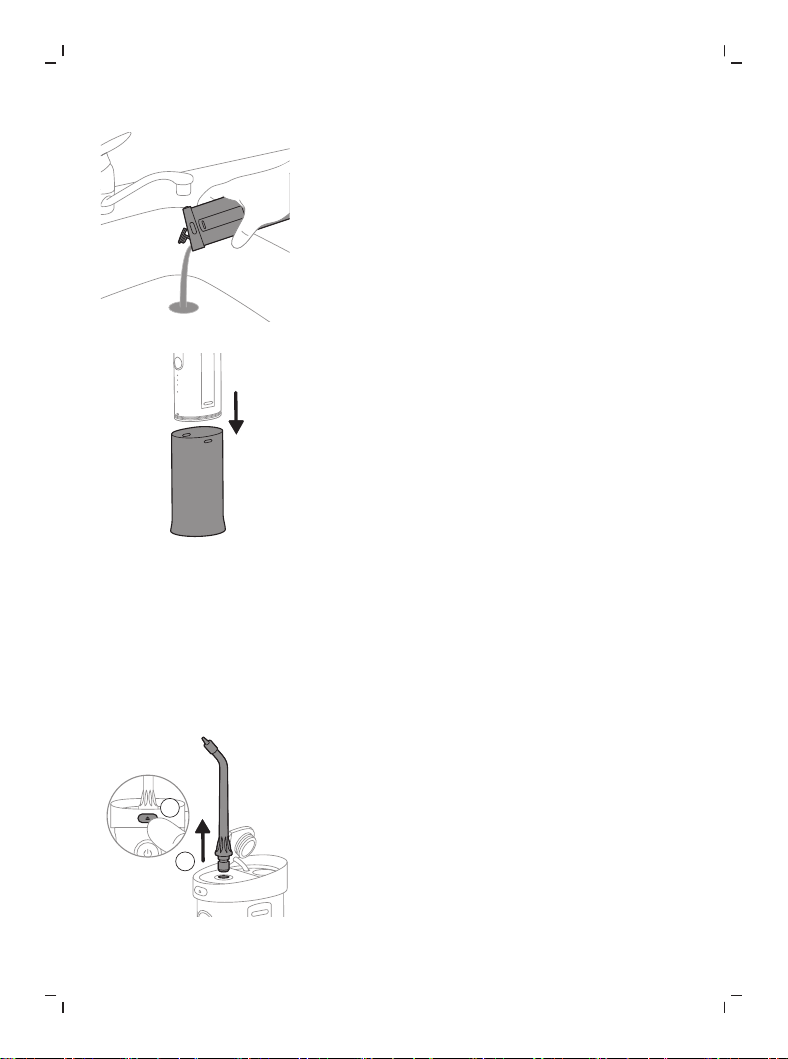
4
Pour leftover water in the sink.
5
Gently remove the reservoir from the Compact Flosser by pulling it off. The
reservoir can be hand washed with warm water and mild soap. When
necessary, you can clean the handle by wiping with a soft cloth and mild
soap.
Storage
Your Compact Flosser is designed such that you can store one nozzle in the
handle. To use this functionality:
2
1
1
Remove the nozzle by pulling the nozzle and holding the nozzle release
button at the same time.
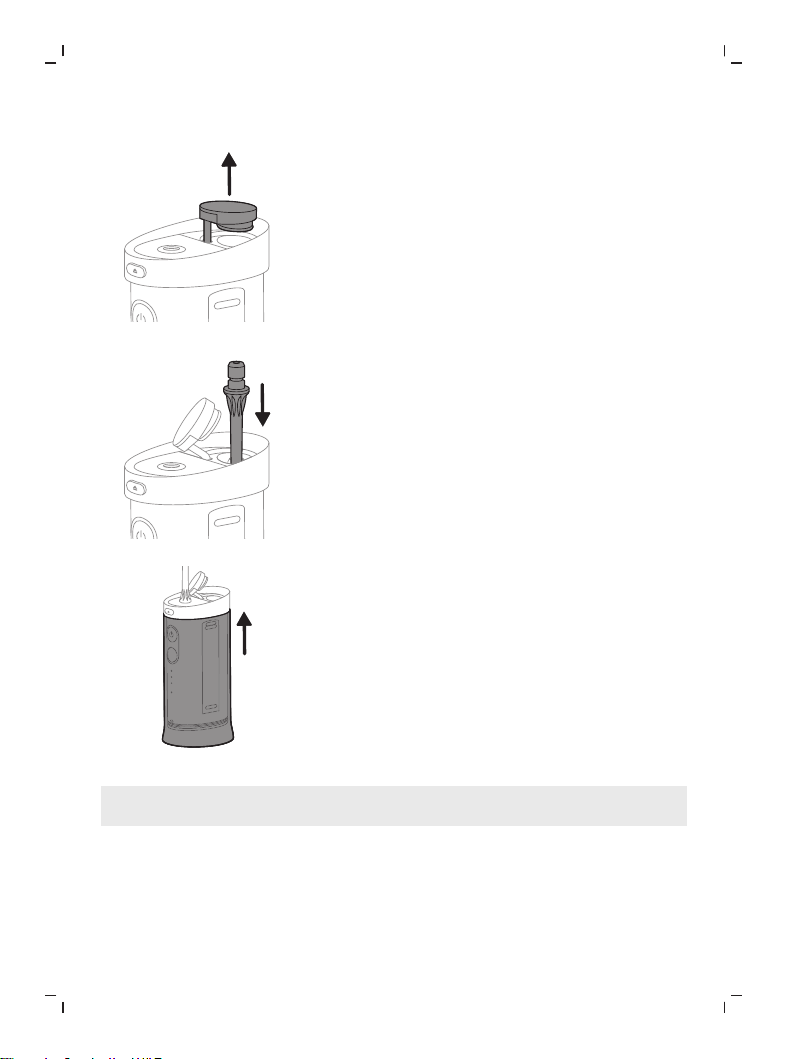
20
English
2
Gently open the filling port on top of the Compact Flosser.
3
Insert the nozzle into the filling port.
4
Collapse the Compact Flosser by pushing the reservoir up.
Note: When the filling port cover is open, it is easier to collapse the
reservoir.
21
English
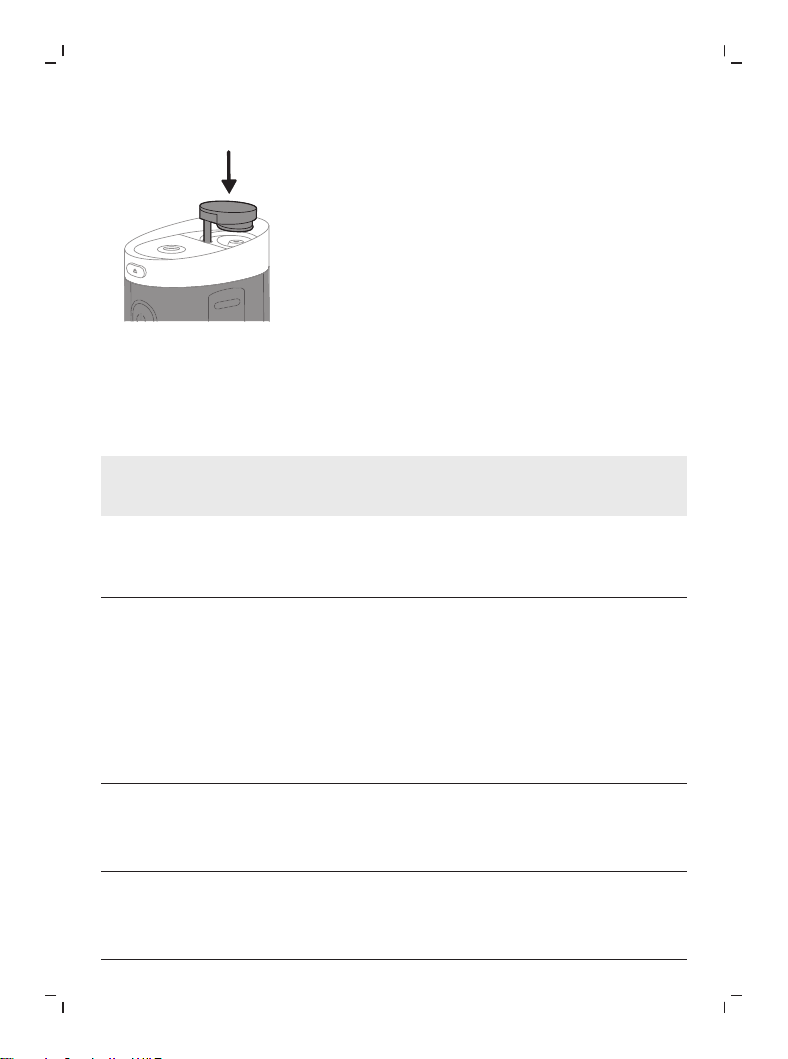
5
Gently close the filling port.
Replacement
Replace nozzles every 6 months or immediately when damaged. To buy
accessories or spare parts, visit philips.com or go to your local Philips Sonicare
dealer.
Note: The Compact Flosser is only compatible with Philips Sonicare Compact
Flosser Nozzles. It is not compatible with other Philips Sonicare nozzles such as
those for the Power Flosser.
Troubleshooting
Question Answer
Can I use mouthwash or essential oils
in my reservoir?
It is not recommended to use
essential oils in the reservoir.
Mouthwash can be mixed with water
and used in the reservoir. After using
mouthwash, rinse the device to
prevent clogging by partially filling
reservoir with warm water and
running product with tip pointed into
sink until reservoir is empty.
Will other nozzles fit on my Philips
Sonicare Compact Flosser?
Only use Philips N1 and N2 nozzles
for this device. Other Philips or non-
Philips nozzles are not compatible
with this product.
How often do I need to replace my
nozzle?
We advise you to replace your nozzle
after 6 months of use. You can find
more information about buying
replacement parts at philips.com
22
English
Question Answer
I’m having difficulty extending the
reservoir
Open the filling port and remove the
nozzle before attempting to extend
the reservoir. This should allow the
reservoir to easily extend.
Warranty and support
Philips offers a 2-year warranty. Warranty exceptions apply. This warranty does
not affect your rights as a consumer under law. For more information, visit
www.philips.com/support or call us.
WARRANTY EXCLUSIONS
What is not covered under warranty:
- Nozzles
- Damage caused by use of unauthorized replacement parts or unauthorized
nozzles
- Damage caused by misuse, abuse, neglect, alterations or unauthorized
repair
- Normal wear and tear, including chips, scratches, abrasions, discoloration
or fading
Recycling
- This symbol means that electrical products and batteries shall not be
disposed of with normal household waste.
- Follow your country’s rules for the separate collection of electrical products
and batteries.
Removing the rechargeable battery
The built-in rechargeable battery must be removed by a qualified professional
when the product is discarded. Before removing the battery, make sure that
the battery is completely empty.
23
English
Take any necessary safety precautions when you handle tools to
open the appliance and when you dispose of the rechargeable
battery.
When you handle batteries, make sure that your hands, the product
and the batteries are dry.
If batteries are damaged or leaking, avoid contact with the skin or
eyes. If this occurs, immediately rinse well with water and seek
medical care.
To avoid accidental short-circuiting of batteries after removal, do not
let battery terminals come into contact with metal objects (e.g. coins,
hairpins, rings). Do not wrap batteries in aluminum foil. Tape battery
terminals or put batteries in a plastic bag before you discard them.
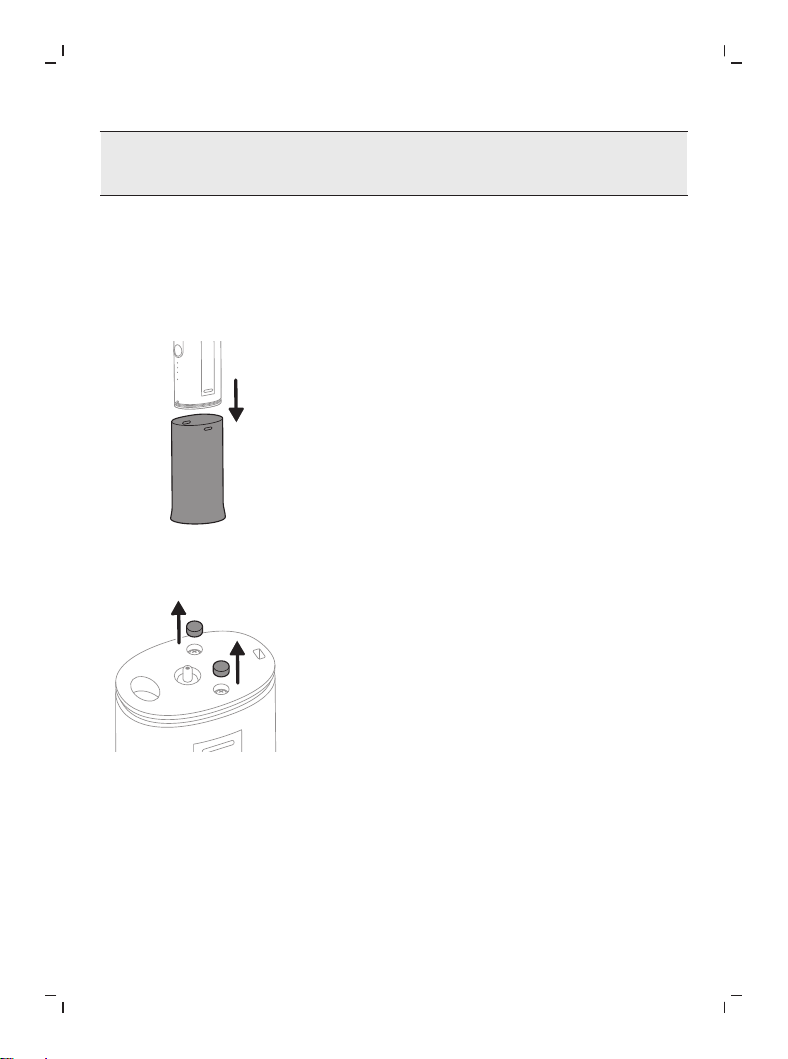
To remove the rechargeable battery, you need a screwdriver and a wire cutter.
Observe basic safety precautions when you follow the procedure outlined
below.
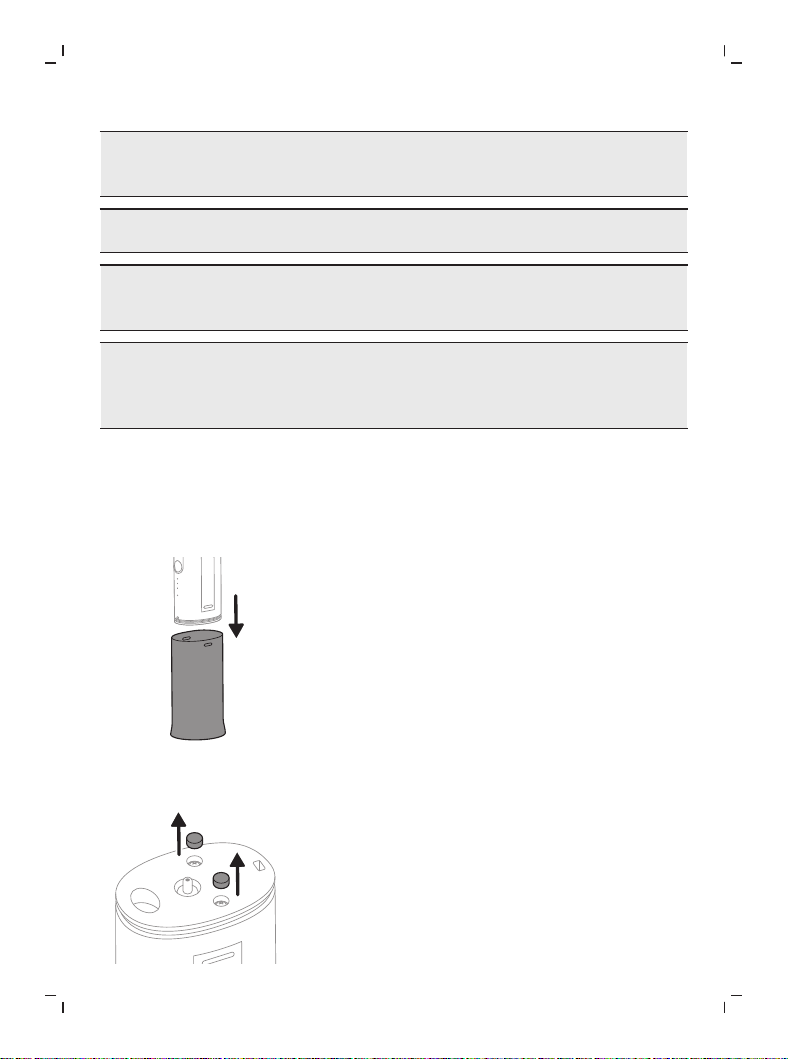
1
To deplete the rechargeable battery of any charge, let the Compact Flosser
run until it stops.
2
Remove the reservoir by pulling it off.
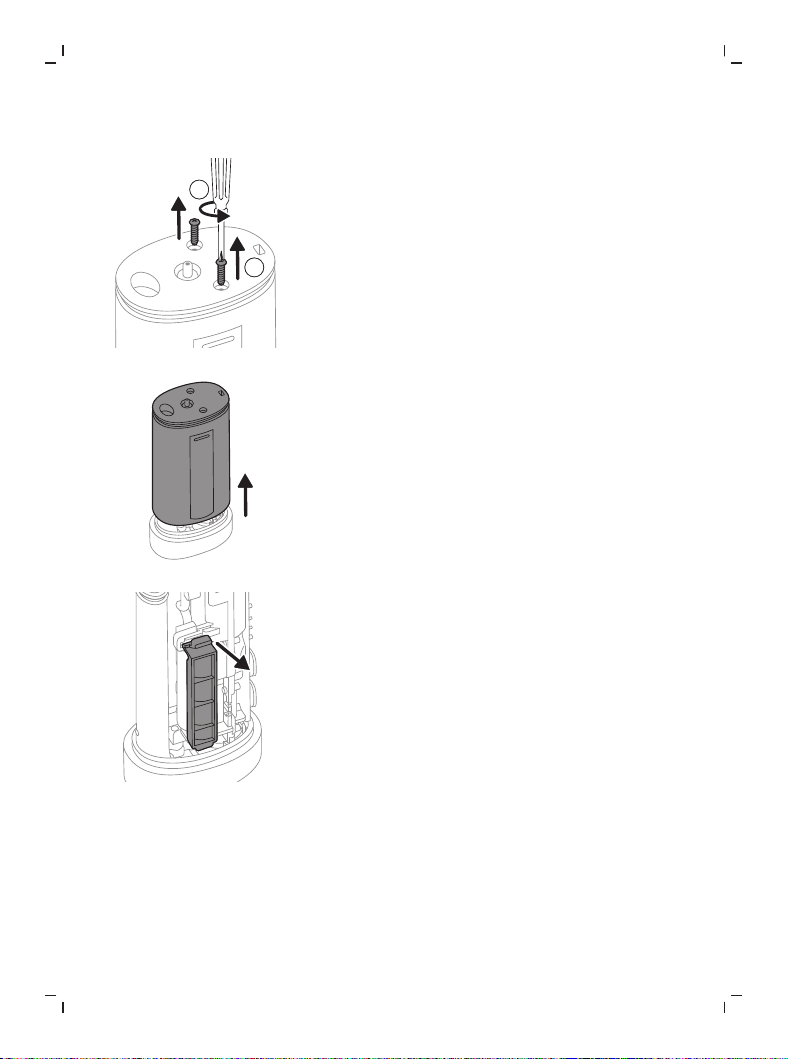
24
English
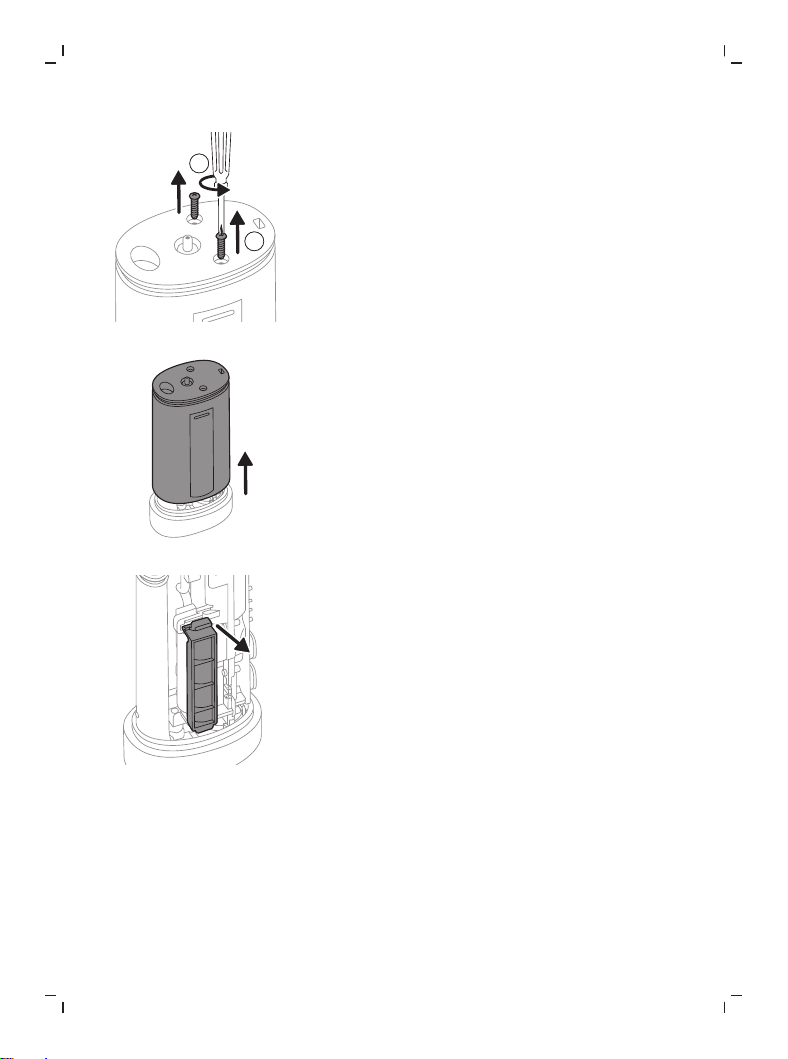
3
Remove the two screw caps.
1
2
1
2
4
Remove the screws.
5
Pull the internal components from the body.
6
Remove the battery cover.
25
English
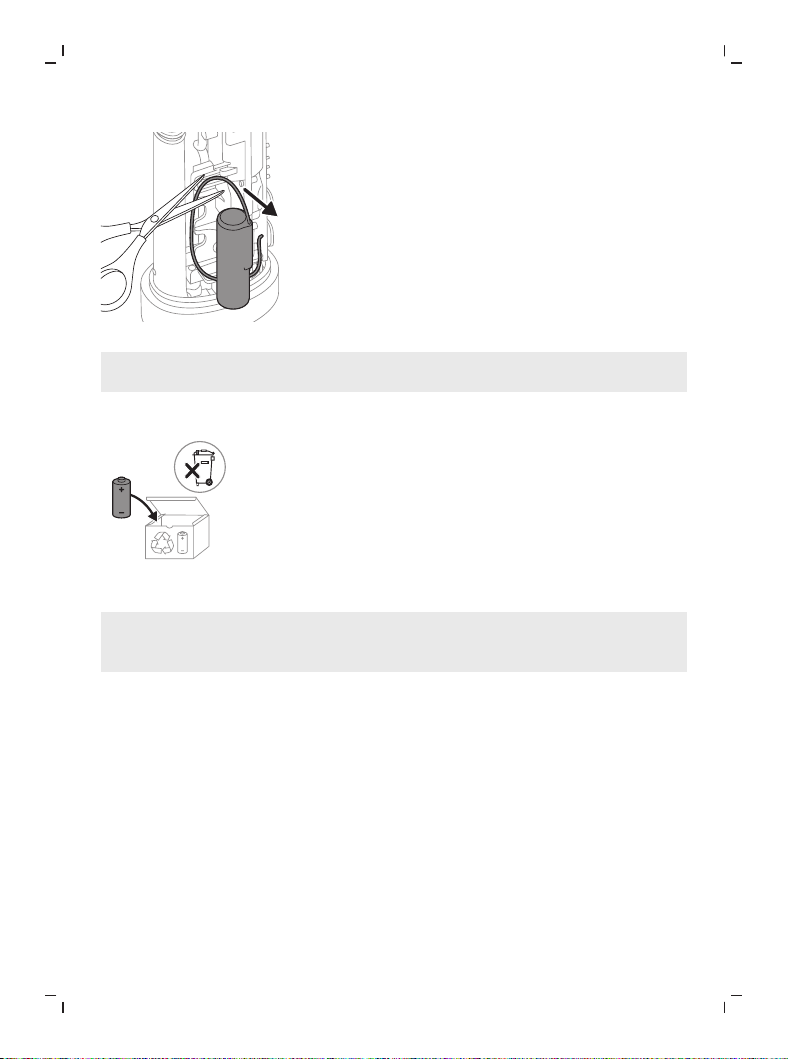
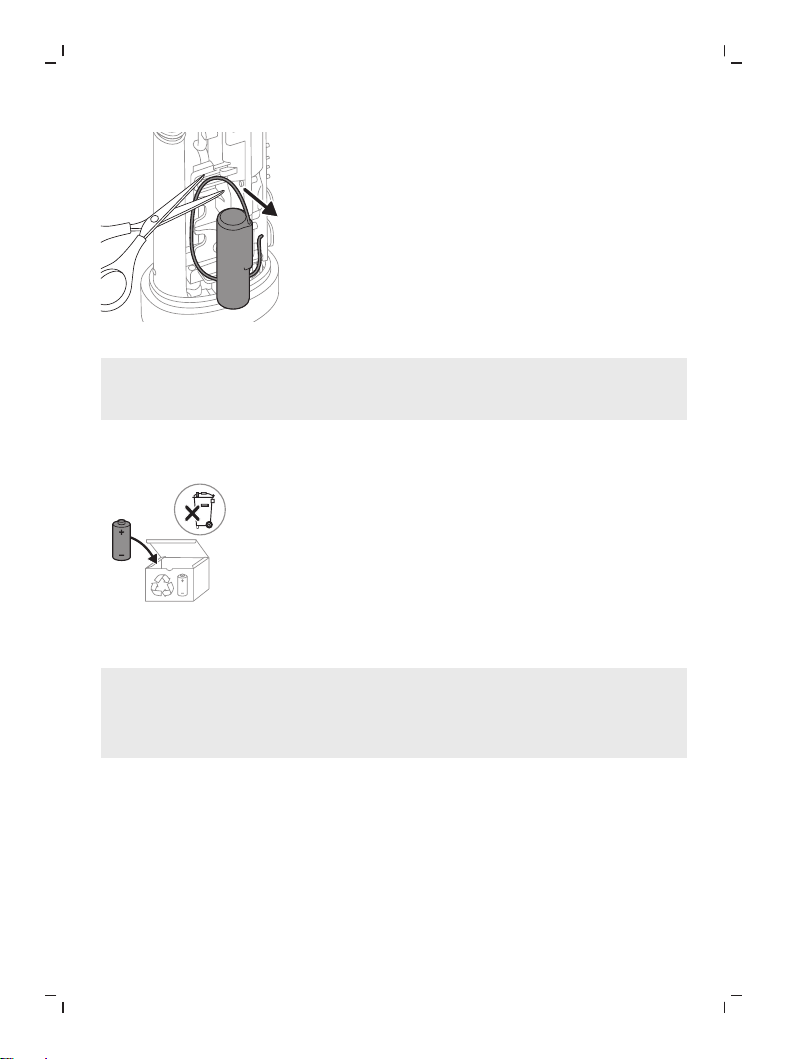
7
Pull the battery from the cradle. Cut wires to remove the battery.
Caution: Be aware of the sharp edges of the battery tabs so as to avoid
injury to your fingers.
8
Cover the battery contacts with tape to prevent any electrical short from
residual battery charge.
9
The rechargeable battery can now be recycled and the rest of the product
discarded appropriately.
Note: Do not throw away the appliance with the normal household waste at
the end of its life, but hand it in at an official collection point for recycling. By
doing this, you help to preserve the environment.

26
简体中文
简介
欢迎选用飞利浦产品!新款 Sonicare 便携冲牙器,您值
得拥有。为了让您能充分享受飞利浦提供的支持,请在
philips.com/welcome 上注册您的产品。
重要安全信息
仅可将本产品用于预期用途。使用本产品及其电池和附件
之前,请仔细阅读本信息,并妥善保管以供日后参考。误
用可能会导致危害或严重伤害。
附件可能因产品而异。
警告
- 器具不打算由存在肢体、感官或精神能力缺陷或缺少
使用经验和知识的人(包括儿童)使用,除非有负责
他们安全的人对他们进行与器具使用有关的监督或指
导。
- 应照看好儿童,确保他们不玩耍本器具。
- 本使用说明所述的供电电源都必须满足以下要求:应
仅使用标记在器具上的安全特低电压供电;请仅使用
随附的Philips原装充电线对产品进行充电;与充电线
连接的供电电源,其额定输出电压为 5V ,额定输
出功率为 ≥2.5W,且同时满足安全特低电压要求。
- 该器具使用的最高海拔是 4400 米。
- 本器具包含只能由技术人员更换的电池。弃置电池
时,请参阅“回收”和“取出内置充电电池”章节,采取
正确的方式处理本产品。
- 人员离开现场时,请将电源断开。
- 产品出现异常噪声、异常气味、异常高温或故障时,
请立即停止使用,关闭开关,断开电源。
- 本产品不应在易燃易爆物品附近或类似环境中使用。

27
简体中文
- 使用者不应自行拆卸家用电器,不应变更内部接线、
部件和保护装置。
- 使用者不应以普通导电体或超出规定电流容量的熔断
体替换家用电器和电源的熔断体。
- 使用者不应自行改变低压断路器或剩余电流动作保护
器的设定值。
- 本产品中不包含用户可维修的部件。如果本产品或
USB 线缆损坏,立即请停止使用,并联系您所在国
家/地区的客户服务中心 (请参见 “保修和支持”)。
- 请把充电座远离水源。
- 切勿在户外或高温表面附近使用充电座。
- 定期清洁本产品(尤其是水箱内部)。
- 请勿使用洗碗机清洗产品的任何配件,除非“清洁”章
节里另有说明。
- 清洁后,务必确保充电座完全干燥,再将其连接到本
使用说明所述的供电电源。
- 为避免受伤,切勿在水槽中注入热水。 切勿将异物放
入水槽。
- 本产品设计仅用于清洁牙齿和牙龈。
- 请勿用于清洁眼睛、耳朵或鼻子。
- 如果不在水槽上方使用本设备,水可能会积聚在台面
或地板上,存在滑倒的危险。
医疗警告
- 如果使用本产品后牙龈大量出血或持续性出血,或者
在使用过程中感觉不适或疼痛,请停止使用本产品并
咨询您的牙医/医生。
- 如果您体内有心脏起搏器或其他植入设备,请在使用
之前咨询医生或相关植入装置的制造商。

28
简体中文
- 如果您前2个月内进行了口腔或牙龈手术,使用本产
品前,请咨询您的牙科专家。
- 本产品为私人用品,不可供牙医诊所或机构对多位患
者使用。
电池安全说明
- 请将产品和电池远离火源,切勿将其暴露于阳光直射
处或高温下。
- 如果产品异常发热或发出异味、变色或充电时间比平
时长,请停止使用并停止为其充电,并联系 Philips。
- 切勿将产品及其电池放置在微波炉中或电磁炉上。
- 为防止电池发热或释放有毒有害物质,切勿打开、改
装、刺穿、损坏或拆卸产品或电池。切勿使电池短
路、过度充电或反向充电。
- 本产品包含的电池不可更换。弃置电池时,请参阅“回
收”一节,采取正确的方式处理本产品。
- 充电和使用本产品的温度应介于 3°C 至 40°C 之
间。
- 本产品包含锂离子充电电池。请务必妥善回收或处
置。
电磁场 (EMF)
本飞利浦产品符合所有有关暴露于电磁场的适用标准和法
规。
存放和运输条件
(运输和储存)温度应介于 -20°C 至 60°C 之间
29
简体中文
使用的符号列表
产品上可能出现以下符号:
此符号表示在使用本产品之前应阅读使用说明。
预期用途
Philips Sonicare 便携冲牙器是一种口腔冲洗器,旨在去
除牙齿之间以及牙齿表面上的牙菌斑和食物残渣,以减少
蛀牙,改善和保持牙龈健康。本产品专为消费者家庭使用
而设计,通常每天至少使用一次。
您的 Philips Sonicare 便携冲牙器
1 喷嘴拆卸按钮
2 电源开/关按钮
3 模式按钮
4 模式指示灯
5 电量指示灯
6 水箱
7 加注端口/喷嘴存储格
8 充电端口
附件
9 Comfort 喷嘴
10 Standard 喷嘴
11 USB-A 转小插头线缆
注意:配件可能因购买的型号而异。
30
简体中文
开始使用
设置您的便携冲牙器
1
轻轻拉开加注端口的盖子。
2
从存储格中取出喷嘴。
3
将喷嘴插入本设备中。
注意:确保喷嘴完全插入并与设备顶部齐平。
31
简体中文
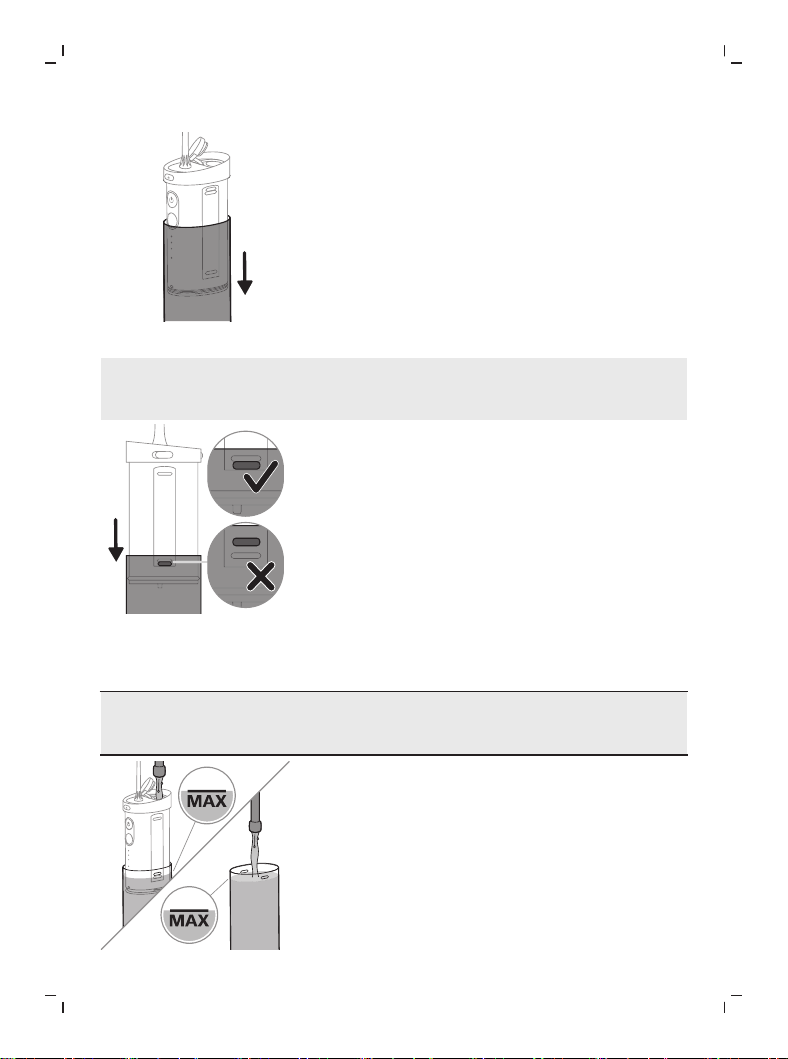
4
确保加注端口的盖子已打开,然后向下拉水箱。
注意:当加注端口的盖子打开时,更容易向下拉水
箱。
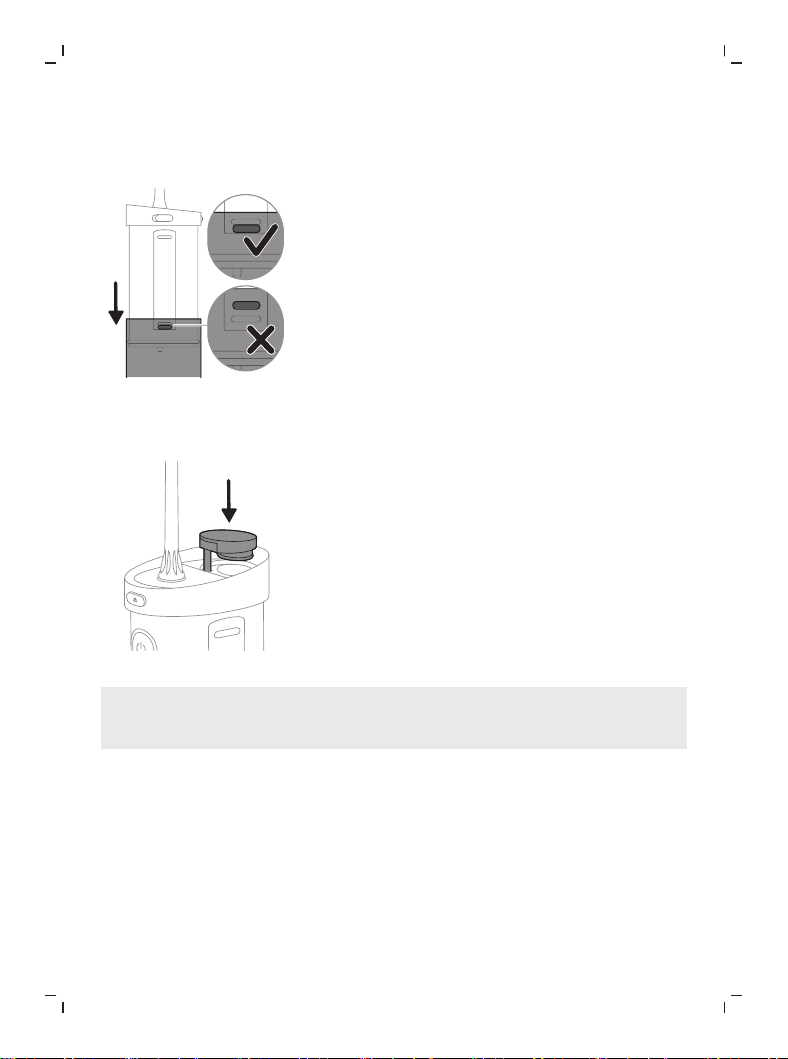
5
向下拉水箱,直到设备的塞子高于水箱内的塞子。
给水箱注水
警告:在给水箱注水和使用设备之前,请断开便携冲牙器
和供电电源的连接。
32
简体中文
1
打开加注端口,向水箱中注入温水。
或者
也可以直接向水箱中注水。 轻轻地将水箱从便携冲牙
器上拔出,然后加水至最高水位标示线。 重新安装水
箱,并确保设备的塞子和水箱放置到位。
2
轻轻合上加注端口。
注意:给水箱注水时,请勿超过最高水位标示线(200 毫
升)。
33
简体中文
模式
Pulse
Clean
Sensitive
Pulse
Clean
Sensitive
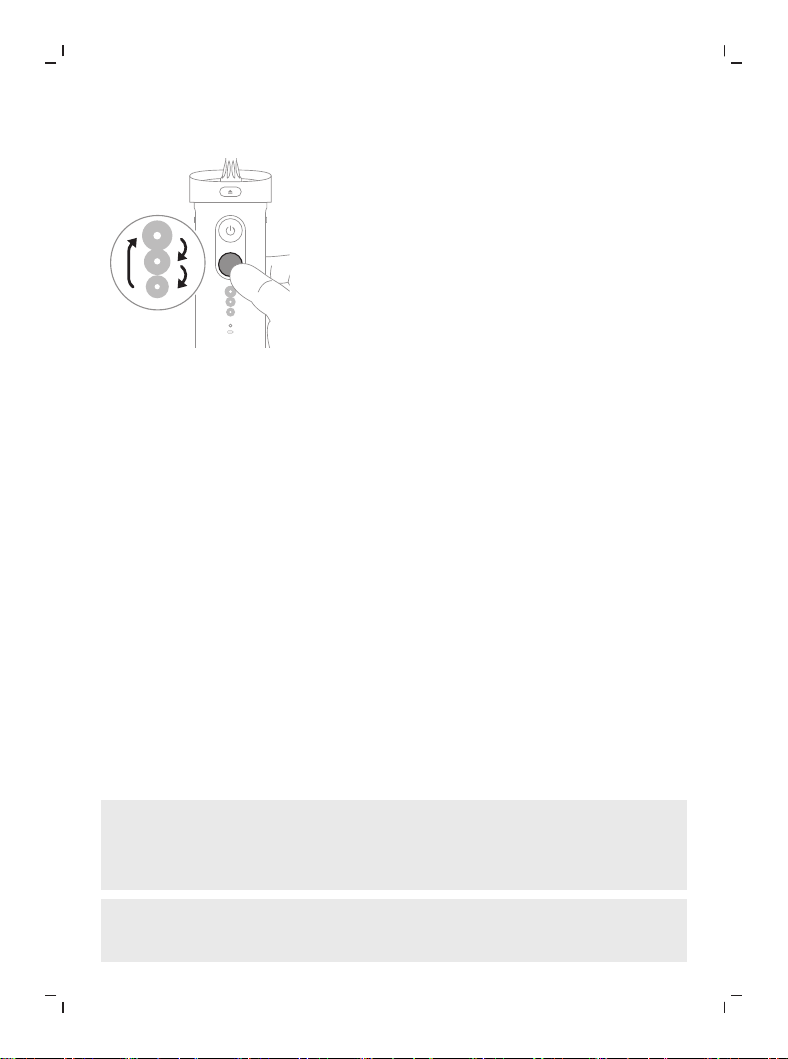
您的便携冲牙器具有以下三种不同的模式。 要在两种模
式之间切换,请按模式按钮。
这些模式的强度各不相同。下面按强度从低到高的顺序列
出了这些模式:
敏感
此模式采用计时器,可提供柔和的水压。 计时器会每 15
秒一次短暂停顿水流,指示您此时应移至口腔的下一部
位。
脉冲
此模式可喷射强弱交替的脉冲水流,旨在按摩和刺激牙
龈。 计时器会每 15 秒一次短暂停顿水流,指示您此时应
移至口腔的下一部位。
清洁
此模式采用计时器,可提供恒定水压,确保实现出色的清
洁效果。 计时器会每 15 秒一次短暂停顿水流,指示您此
时应移至口腔的下一部位。
注意:首次使用时,请以强度最低的敏感模式启动设备。
建议在几周的时间内逐步增加使用强度。 这样做可以让
您能够承受更高强度,从而实现更好的清洁效果。
注意:这款便携冲牙器出厂时已激活了计时器功能。 要
在关闭便携冲牙器后激活或停用计时器,请按住模式选择
34
简体中文
按钮 3 秒钟。 停用时,电池指示灯将呈琥珀色闪烁一
次。 激活时,电池指示灯将呈绿色闪烁两次。
使用您的便携冲牙器
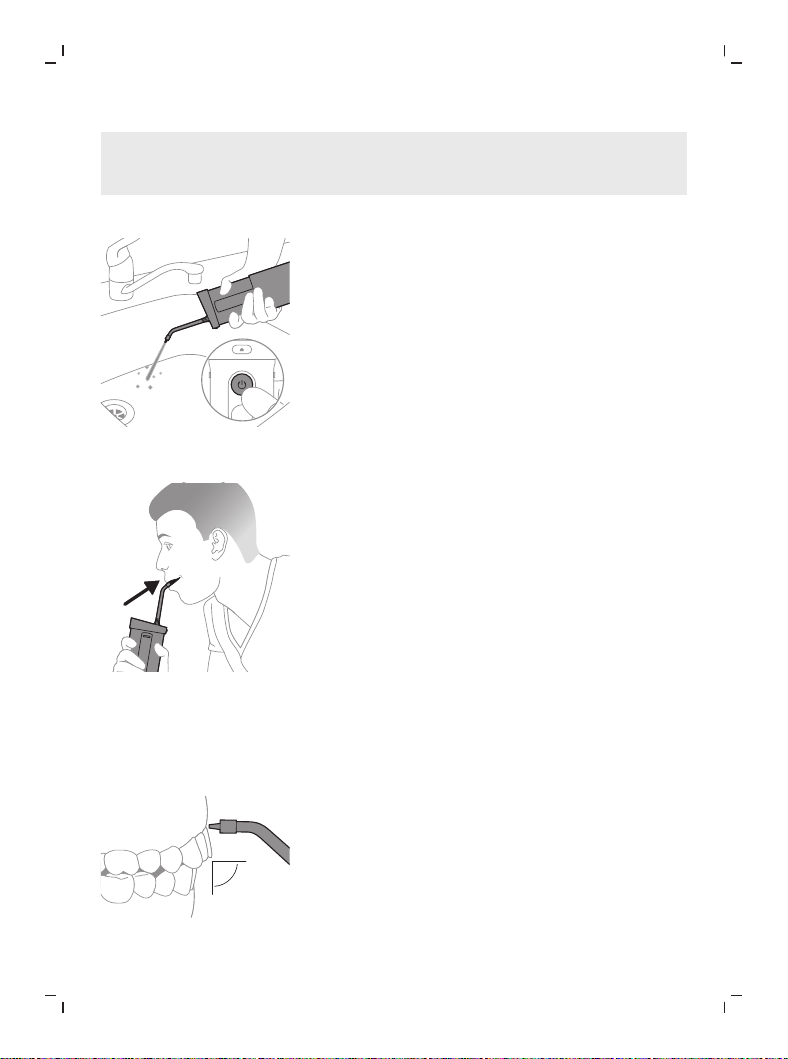
1
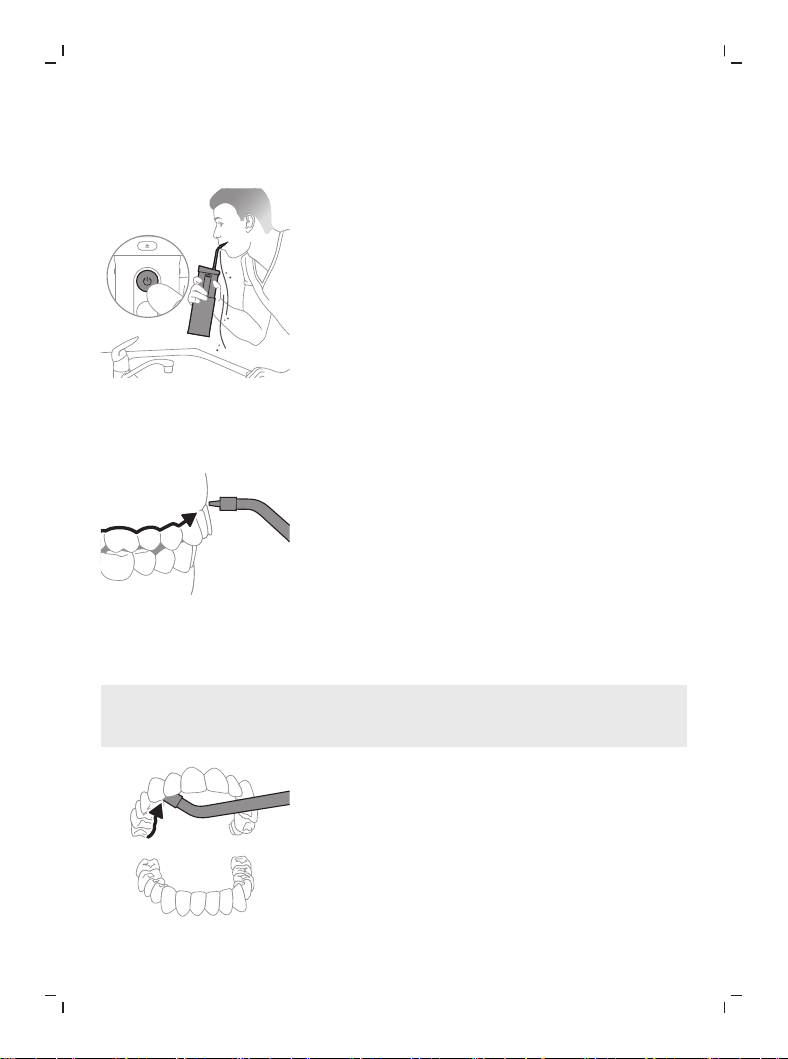
在打开设备之前,将喷嘴尖端对准水槽。让水喷到水
槽中。设备滴水时,请关闭设备。
2
将喷嘴尖端放入口中。俯身在水槽上,略微闭合嘴唇
盖住喷嘴尖端,以免水花飞溅。嘴唇张开的大小应足
以使水从您的口中流入水槽。
90°
35
简体中文
3
放置喷嘴尖端,使喷嘴尖端与牙龈线呈 90° 角且略
高于牙龈线。
4
按下手柄上的电源开/关按钮,打开并开始使用便携
冲牙器。
a 从上颌或下颌的后牙开始,沿牙龈线滑动喷嘴尖
端,并在每个牙缝处停留片刻,
注意:根据需要旋转喷嘴,以便更容易沿牙龈线定
位。
36
简体中文
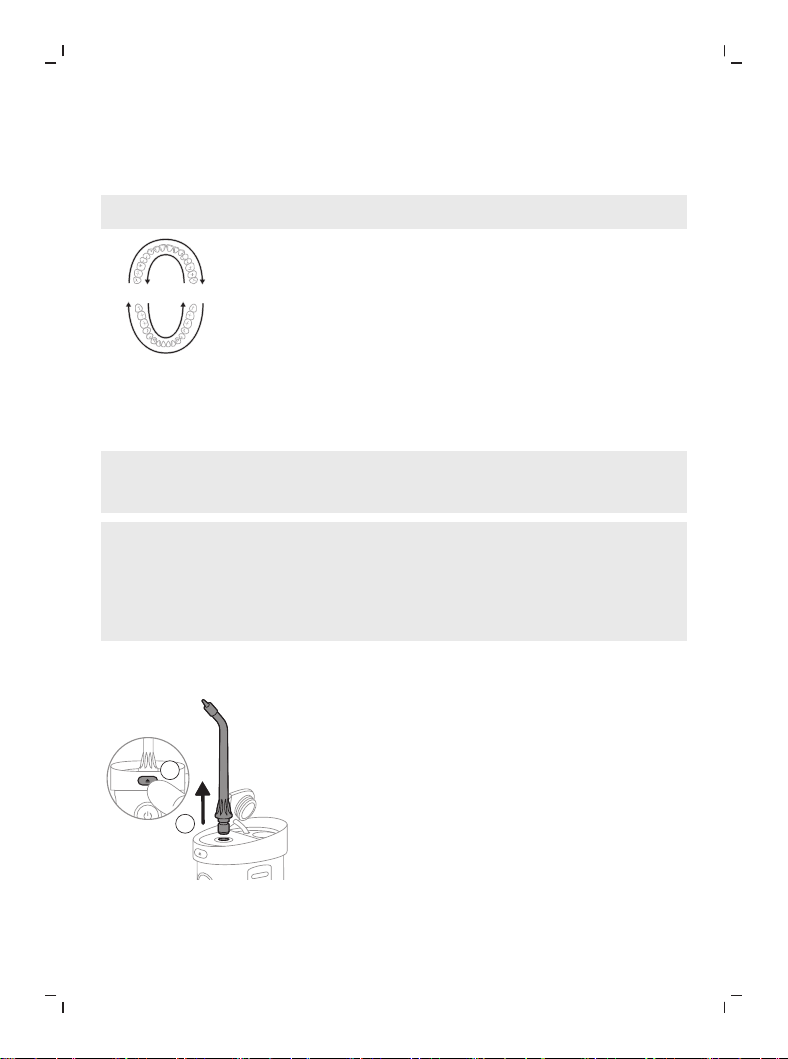
b 按照计时器清洁该侧牙弓上牙齿的外侧(15 秒)
和内侧(15 秒),总共用时 30 秒。
注意:请记得清洁牙齿内侧。
15
sec.
15
sec.
15
sec.
15
sec.
c 按照计时器提示,在口腔的另一侧牙弓对内侧和
外侧分别重复此操作 15 秒,直至清洁完牙齿周围
和牙齿之间的所有缝隙,共用时至少一分钟。
注意:您可以在使用过程中通过按便携冲牙器上的
开/关按钮来停止水流。
注意:如果您选择在使用过程中给水箱重新注水,请
在给水箱重新注水时关闭设备,然后从上次停下的地
方重新开始,直至清洁完牙齿周围和牙齿之间的所有
空间,共用时至少一分钟。
每次使用后
2
1
1
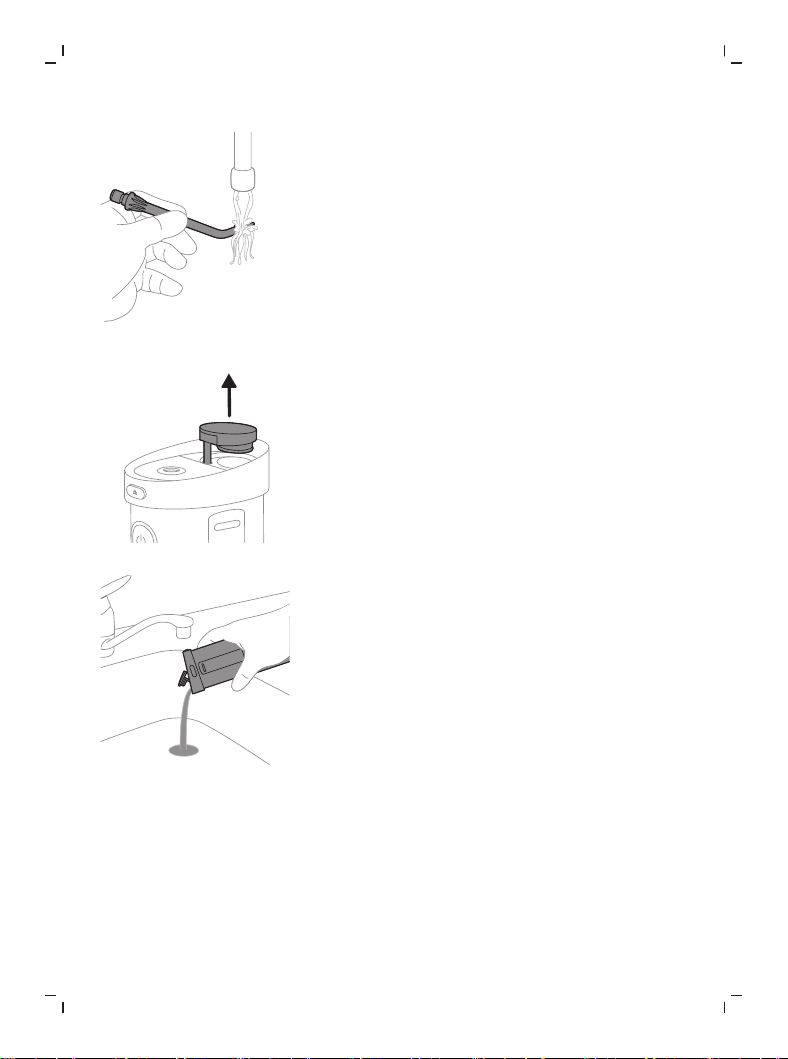
同时按住喷嘴拆卸按钮并向外拉动喷嘴,即可取下喷
嘴。
37
简体中文
2
用温水冲洗尖端。
3
轻轻打开便携冲牙器顶部的加注端口。
4
倒出多余的水。将喷嘴、手柄外侧和水箱擦干。
38
简体中文
5
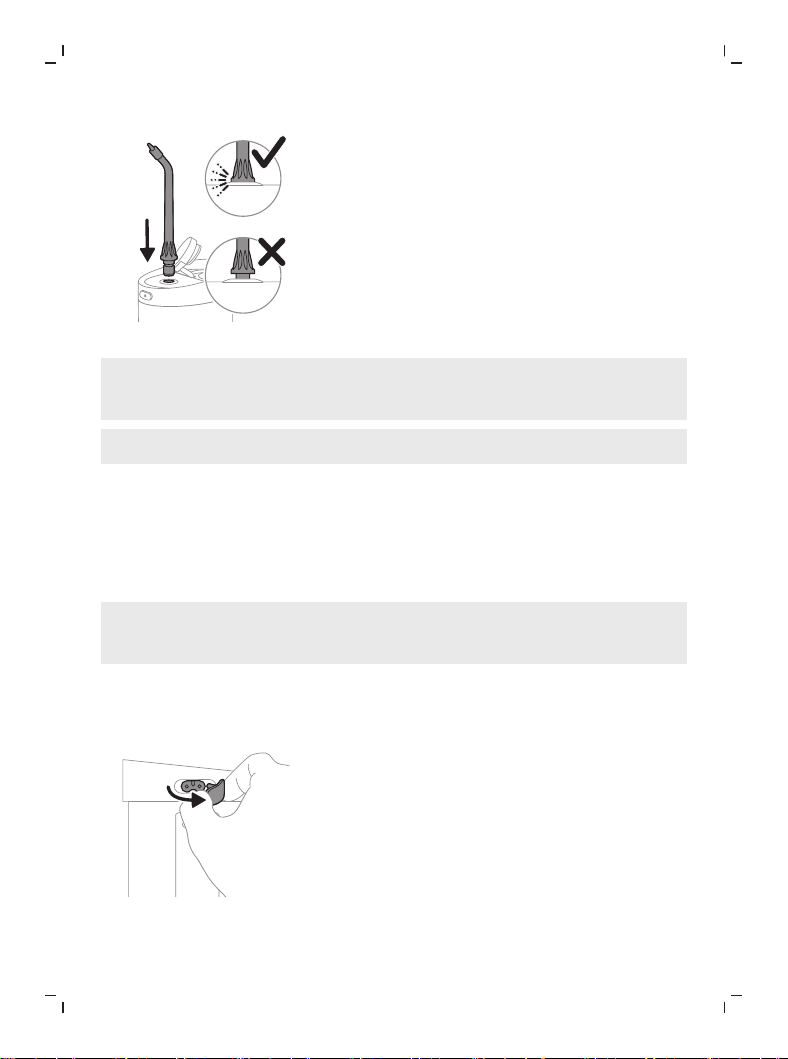
将喷嘴重新插入手柄。
注意:为了便于保持干燥,请在不用时将加注端口保持打
开状态,或者拆卸便携冲牙器(水箱可以完全取下)。
注意:请勿让便携冲牙器长时间处于未组装状态。
充电与电池状态
您的 Sonicare 便携冲牙器在电池充满电的情况下至少可
进行 24 次清洁,每次持续 1 分钟。 使用 2 分钟后,设
备将关闭。
注意:首次使用之前,电池充满电最多需要 4 小时,但
便携冲牙器未充满电时亦可使用。
充电
1
轻轻拉开便携冲牙器侧面的充电端口盖,露出充电端
口。
39
简体中文
2
将 USB-A 转小插头充电线缆连接到供电电源。
注意:请仅使用本使用说明所述的供电电源。
3
将 USB-A 转小插头充电线缆插入充电端口。
注意:在连接 USB-A 转小插头充电线缆之前,请确
保手柄完全干燥。
Pulse
Clean
Sensitive
4
充电期间,电池指示灯将会闪烁。
5
未进行充电时,请合上便携冲牙器上的充电端口盖。
40
简体中文
电池状态
电池状态
当您完成使用或暂停使用便携冲牙器时,电池指示灯将显
示电池状态。
当便携冲牙器正在充电时
电池状态 电池指示灯
已满 绿色常亮
正在充电 呈绿色闪烁
注意:电池指示灯将闪烁,直至充满电。充满电后,指示
灯将变为绿色常亮并保持此状态 30 秒,然后熄灭。
当便携冲牙器未充电时
电池状态 电池指示灯
已满 绿色常亮
中等电量 呈绿色闪烁
低 呈琥珀色闪烁
耗尽 呈琥珀色闪烁 5 秒,然后
便携冲牙器自动关闭
注意:当电池电量不足指示灯亮起时,便携冲牙器至少可
以进行 3 次清洁,每次持续 1 分钟。
清洁
这款便携冲牙器需要每周清洁一次。请按以下方法清洁设
备和附件。附件可能因型号而异。
注意:请勿使用高酒精含量的清洁剂运行或清洁设备。
41
简体中文
警告:在连接了 USB-A 转小插头充电线缆时,不得清洁
便携冲牙器。 清洁之前,请拔下设备插头并合上充电端
口盖。
2
1
1
同时按住喷嘴拆卸按钮并向外拉动喷嘴,即可取下喷
嘴。
2
用温水冲洗尖端。
3
轻轻打开便携冲牙器顶部的加注端口。
42
简体中文
4
将残留的水倒入水槽。
5
从便携冲牙器上拔出水箱,轻轻将其取下。 水箱可以
用温水和温和的肥皂手洗。必要时,可以用软布和中
性肥皂擦拭以清洁手柄。
存放
您的便携冲牙器设计巧妙,可以将一个喷嘴收纳到手柄
中。要使用此功能,请执行以下操作:
2
1
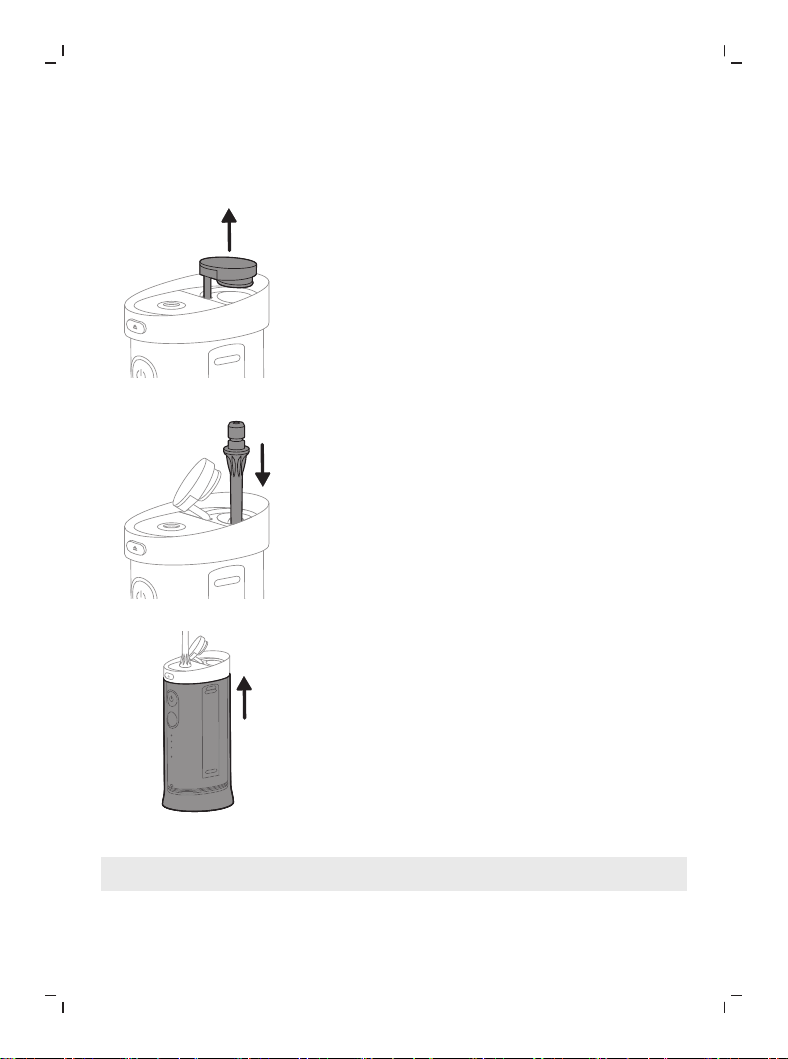
43
简体中文
1
同时按住喷嘴拆卸按钮并向外拉动喷嘴,即可取下喷
嘴。
2
轻轻打开便携冲牙器顶部的加注端口。
3
将喷嘴插入加注端口。
4
向上推水箱,折叠便携冲牙器。
注意:当加注端口的盖子打开时,更容易折叠水箱。
44
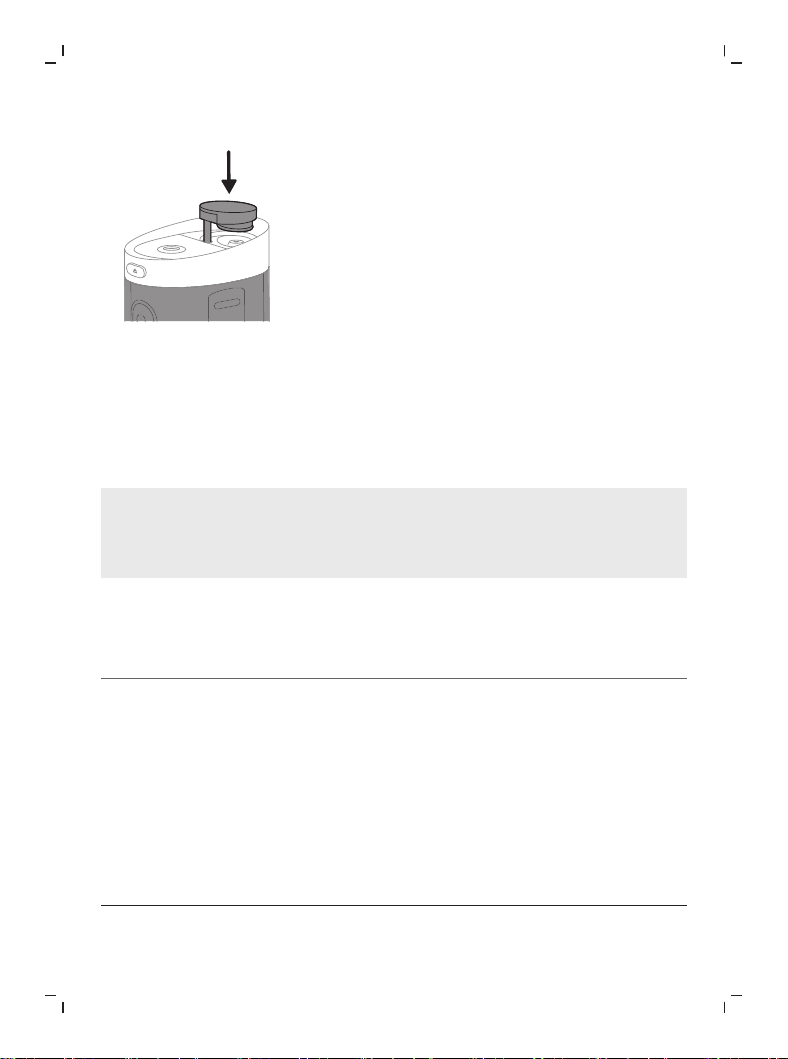
简体中文
5
轻轻合上加注端口。
更换
喷嘴应每 6 个月更换一次,或在损坏时立即更换。 如需
购买附件或备件,请访问 philips.com 或联系当地的
Philips Sonicare 产品经销商。
注意:这款便携冲牙器只与 Philips Sonicare 便携冲牙器
喷嘴兼容。它与其他 Philips Sonicare 喷嘴(例如
Power Flosser 的喷嘴)不兼容。
故障处理方法
问题 回答
我可以在水槽中装入漱口水
或精油使用吗?
建议不要在水槽中装入精
油。 可将漱口水与水混
合,装入水槽中使用。 使
用漱口水后,应冲洗设备以
防止堵塞。方法是在水槽中
注入部分温水,将尖端对准
水池后,运转产品,直至水
槽排空。
45
简体中文
问题 回答
我的 Philips Sonicare 便携
冲牙器上是否可以安装其他
喷嘴?
本设备只能使用 Philips
N1 和 N2 喷嘴。 其他
Philips 或非 Philips 喷嘴均
与本产品不兼容。
我需要多久更换一次喷嘴? 我们建议您在使用 6 个月
后更换一次喷嘴。 有关购
买替换部件的更多信息,请
访问 philips.com
我在展开水箱时遇到了困难 打开加注端口并取下喷嘴,
然后再尝试展开水箱。 这
样应该可以轻松展开水箱。
保修和支持
飞利浦提供 2 年全球联保服务。适用保修免责条款。本
保修服务不会影响您作为消费者的法定权益。如需更多信
息,请访问 www.philips.com/support 或致电 4008
800 008 联系我们。
保修不包括的事项
保修不包含以下内容:
- 喷嘴
- 使用未经授权的替换部件或未经授权的喷嘴造成的损
坏
- 由于误用、滥用、疏忽、改装或擅自修理造成的损坏
- 一般磨损和撕裂,包括裂口、擦痕、磨损、变色或褪
色等
46
简体中文
回收
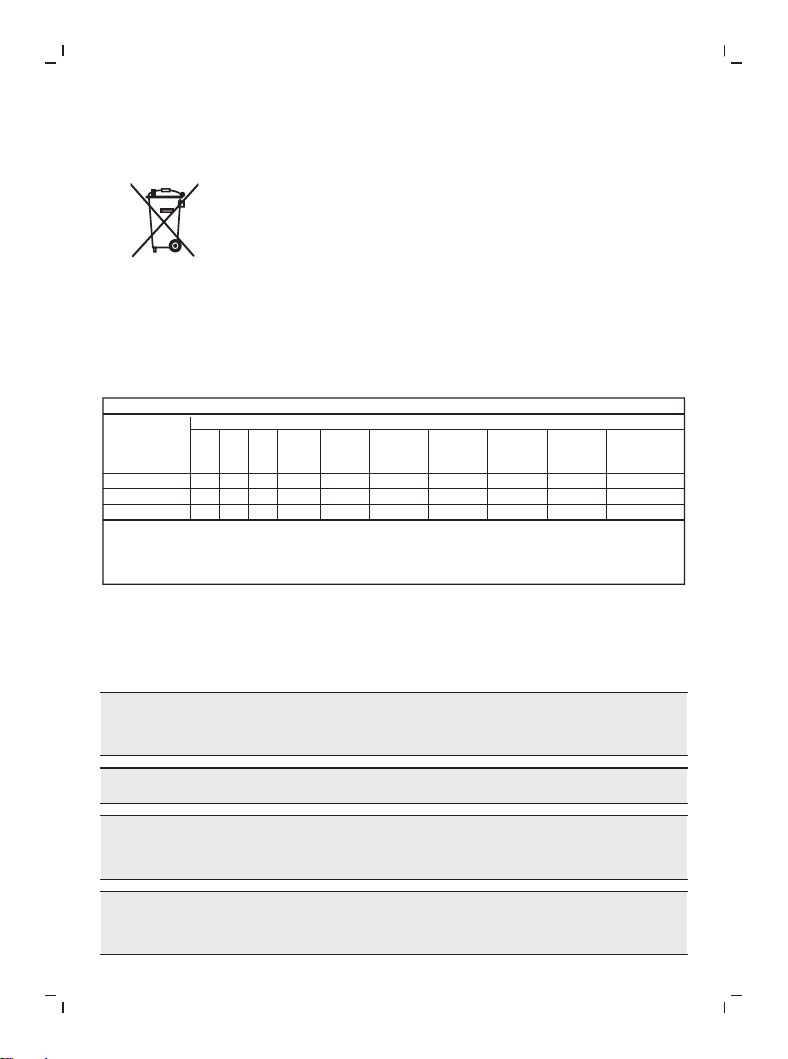
- 此符号表示电器产品和电池不能与普通的生活垃圾一
同处置。
- 请遵守您所在国家/地区有关分类回收电器产品和电
池的规定。
ӁᇏႵݝᇉ֥ӫࠣݣႵ֥ྐ༏і
҆ࡱӫ
Ⴕݝᇉ
ణ
1C
܈
)H
$E
ࡎ۰
$S
؟ᜃ৳Ц
1##T
؟ᜃؽЦ
1#%&T
ඣཌ
ந
64#ԉཌ
9
0
0000
0
0
0
0000
00000
Цؽࡊූ
ؽᆞנᴁ
%#1
0
0
0
Цؽࡊූ
ؽၳנᴁ
%*#1
0
0
0
Цؽࡊ
ූנᴁ
##1
0
0
0
Цؽࡊූؽ
čၙࠎĎ࠭ᴁ
%&)1
0
0
0
ᇿ0іൕھႵݝᇉᄝھ҆ࡱ෮Ⴕᇉҋᇏ֥ݣ҂ӑԛఖሰӁႵݝᇉཋᇅႨݓࡅѓሙေb
ᇿၛഈໃԛ֥҆ࡱđіૼఃႵݝᇉݣ҂ӑԛఖሰӁႵݝᇉཋᇅႨݓࡅѓሙေb
9іൕھႵݝᇉᇀഒᄝھ҆ࡱ֥ଖ၂ᇉҋᇏ֥ݣӑԛఖሰӁႵݝᇉཋᇅႨݓࡅѓሙေb
拆下充电电池
在废弃器具前,必须将电池从器具中取出; 取出电池之
前,请确保电池电量已完全耗尽。
当您使用工具打开产品时以及在您弃置充电电池时,请采
取必要的安全保护措施。
处理电池时,请确保您的双手、产品和电池都是干燥的。
如果电池损坏或出现泄漏,请避免与皮肤或眼睛接触。如
果不慎接触,请立即用清水冲洗并就医。
为避免电池拆卸后发生意外短路,切勿让电池端子接触金
属物体(例如硬币、发夹、戒指)。切勿用铝箔包裹电
47
简体中文
池。在丢弃之前,请用胶带将电池端子粘住或将电池放在
塑料袋中。供电端子不应短路。
要取出充电电池,您需要一把螺丝刀和一把钢丝钳。按照
下面列出的步骤执行操作时,请遵循基本的安全措施。
1
要耗尽充电电池中的任何电量,请让便携冲牙器一直
运行到停止。
2
拔出水箱,将其取下。
3
卸下两个螺帽。
48
简体中文
1
2
1
2
4
卸下螺丝。
5
将内部组件从机身中拔出。
6
卸下电池盖。
49
简体中文
7
从底座中拔出电池。剪断电线以取出电池。
警告:请注意电池卡舌的锋利边缘,以避免手指受
伤。
8
用胶带封住蓄电池触点,以防止因电池中的剩余电量
而造成任何电气短路。
9
现在可以回收充电电池了,产品的其余部分也可以通
过适当方式丢弃。
注意:弃置产品时,请不要将其与一般生活垃圾堆放在一
起,应将其交给政府指定的回收中心。这样做将有利于环
保。
50
简体中文
٦০௵čᇏݓĎሧႵཋ܄ඳ
ഈݚ൧࣡νെݼ"Դ
ಆݓܤڛༀಣཌ
*19
Ӂğ٦০௵ьེԊఖ
ݼğ)9
حקğ7
حקൻೆۿğ8
ളӁರ௹ğ౨Ӂָ҆
ᆜࠏӁֹğᄀଲ
ЧӁЇݣၛ༯҆ࡱğ
൭ѣݼඔğ)9ࡱ
நඔğࡱ
ЧӁ۴ݓѓ(#ᇅᄯ
ᇿğop";၂ႇ໓ሳଛđ
іൕ҂൭ѣ֥ݼ
保留备用 发行日期: 09/12/2025

51
繁體中文
簡介
歡迎來到飛利浦!恭喜您購置全新的飛利浦 Sonicare 攜帶式沖牙器。為充分享
受飛利浦為您提供的協助與客服支援,請至下列網址註冊產
品:philips.com/welcome。
重要安全資訊
請依產品指定用途使用本產品。使用本產品、其電池與配件前,請先仔細閱讀本
資訊,並保留說明以供日後參考。不當使用可能導致危險或嚴重受傷。
提供的配件可能隨產品而異。
警示
- 兒童及身體功能或心智能力退化者,或是經驗與使用知識缺乏者,可在有
人從旁監督或適當指示如何安全使用本產品,以及瞭解潛在危險的狀況下
使用本產品。不要讓兒童在無人監督的情況下對本產品進行清潔和保養。
- 請看管孩童,避免他們將本產品當成玩具。
- 僅能搭配 Philips 原裝零件或消耗零件使用。如有提供,請務必僅使用原廠
USB 纜線與 USB 電源供應裝置。
- 本產品未包含使用者可使用的零件。 本產品如有損壞,請停止使用,並聯
絡您所在國家/地區 (見 「保固與支援」)的客戶服務中心。
- 充電線和插壁充電器應與水源保持距離。
- 請勿在室外或靠近高熱表面的地方使用充電線和牆上電源轉換器。
- 如果充電線或牆上電源轉換器損壞,請停止使用。
- 定期清潔產品 (尤其是集水槽內部)。
- 請勿使用洗碗機清洗產品中的任何零件,除非「清潔」一節另有說明。
- 清潔後,應確保插壁充電器和充電線完全乾燥後,再連接電源。
- 若要避免受傷,請勿以熱水填充集水槽。 請勿將異物放入集水槽。
- 本用品只適用於清潔牙齒與牙齦,
- 絕對不可用來清潔眼睛、耳朵或鼻子。
- 最高使用海拔高度為 4400 公尺。
- 本裝置使用時如果未在洗手槽正上方,則水槽檯面或地板上可能會積水而
造成滑倒危險。
醫療警告
- 如果使用後出現過多或長時間出血,或在使用期間感到不適或疼痛,請停
止使用本產品並諮詢您的牙醫/醫師。
- 若您裝有心律調節器或其他植入裝置,使用本產品之前,請務必先諮詢醫
生或植入裝置製造商。
- 如果曾在過去兩個月內接受口腔或牙齦手術,請先諮詢牙科專業人士後再
開始使用本產品。
- 本產品為個人保健用品,不宜在牙醫診所或醫療機構供多名患者使用。
52
繁體中文
電池安全說明
- 本產品內含不可更換且必須由技術人員拆卸的電池。
- 僅可使用 Philips WAA1001、WAA2001 安全認證的牆上電源轉換器充
電,其輸入額定值須為 (100-240V~;50/60Hz;3.5W);輸出額定值須
為 (5Vdc;2.5W)。如需已認證的電源轉換器清單,請參閱
philips.com/support。
- 本產品和電池應放置遠離火源位置,且不要暴露在直射陽光或高溫下。
- 如果產品異常發熱或散發異味、變色或充電時間比平時長,請停止使用產
品或為其充電,並與飛利浦聯絡。
- 請勿將產品及其電池放進微波爐或放到電磁爐上。
- 請勿打開、改裝、刺穿、損壞或拆解本產品或電池,以防止電池升溫或釋
放有毒或有害物質。請避免讓電池發生短路、過度充電或反向充電。
- 本產品包含無法更換的電池。當電池使用壽命將屆時,本產品必須採用正
確方式丟棄,詳情請參閱回收相關內容。
- 本產品充電與使用時的溫度限制範圍 3°C 至 40°C (37°F 至 104°F)。
- 本產品包含鋰離子充電式電池。必須回收或正確處理。
電磁波 (EMF)
本飛利浦產品符合所有電磁波暴露的相關適用標準和法規。
存放與攜帶條件
溫度 (運輸和儲存) 限制範圍是 -20°C 至 60°C (-4°F 至 140 °F)
使用的符號清單
下面列出可能出現在產品上的符號:
此符號表示在使用裝置之前請先閱讀使用說明。
預期用途
飛利浦 Sonicare 攜帶式沖牙器是一款口腔沖洗器,專門設計有效去除牙縫與牙
齒表面的牙菌斑和食物殘渣,以降低蛀牙機率、改善並維持牙齦健康。本產品適
合消費者全家使用,通常每天至少使用一次。
53
繁體中文
您的飛利浦 Sonicare 攜帶式沖牙器
1 噴嘴釋放鈕
2 電源開關按鈕
3 模式按鈕
4 模式指示燈
5 電池指示燈
6 集水槽
7 注水口/噴嘴儲存槽
8 充電孔
配件
9 舒適噴嘴
10 標準噴嘴
11 USB-A 轉小插頭 (不含插壁充電器)
注意:隨附的配件可能因購買型號而異。
使用指南
設定您的攜帶式沖牙器
1
輕輕拉開注水口的蓋子。
2
從儲存槽中取出噴嘴。
54
繁體中文
3
將噴嘴插入裝置中。
注意:確保噴嘴完全插入並與裝置頂部齊平。
4
確定注水口的蓋子已打開後,再將集水槽往下拉。
注意:當注水口的蓋子打開時,比較容易拉下集水槽。
5
向下拉集水槽,直到裝置的塞子位於集水槽內部的塞子上方。
為集水槽注水
警告:請先將充電器從攜帶式沖牙器卸下,再為集水槽進行注水和使用裝
置。
55
繁體中文
1
打開注水口,並將溫水注入集水槽。
或者
您也可將水直接注入集水槽。 輕輕地將集水槽拉離攜帶式沖牙器,並注水
至最高注水線。 重新將集水槽裝回,並確保裝置和集水槽的塞子正確對齊
到位。
2
輕輕關上注水口。
注意:進行注水時,請勿超過集水槽最大注水線 (200 毫升)。
56
繁體中文
模式
Pulse
Clean
Sensitive
Pulse
Clean
Sensitive
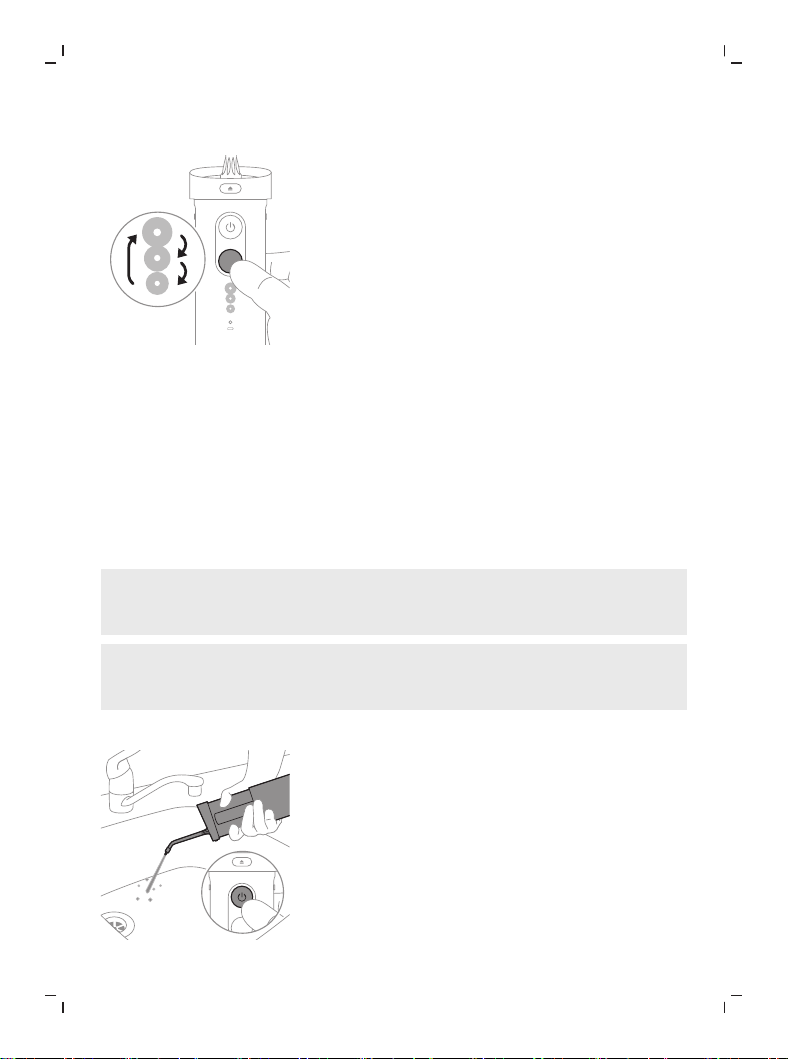
您的攜帶式沖牙器配備三種不同模式。 若要切換模式,請按下模式按鈕。
不同模式有不同強度。排列順序由低至高:
敏感
此模式配有分段計時器,水壓柔和。 透分段計時器會以每 15 秒水流短暫停頓方
式,提示您該移動到口腔的下一個區域。
脈衝
此模式交替進行強烈和柔和的脈衝,專門設計用來按摩並刺激牙齦。 透分段計
時器會以每 15 秒水流短暫停頓方式,提示您該移動到口腔的下一個區域。
清潔
此模式具備分段計時器功能,以穩定水壓徹底清潔口腔。 透分段計時器會以每
15 秒水流短暫停頓方式,提示您該移動到口腔的下一個區域。
注意:首次使用時,請將裝置啟動成「敏感」模式,即最低強度。 建議您在幾
週內逐漸增加使用的強度, 這樣您的口腔就能逐漸適應強度增大,並達到徹底
清潔。
注意:這款攜帶式沖牙器預設啟用分段計時器。 在攜帶式沖牙器關閉的情況
下,按住模式選擇按鈕 3 秒鐘即可啟用或停用分段計時器。 當停用時,電池指
示燈將閃爍一次琥珀色光。 當啟用時,電池指示燈將閃爍兩次綠色光。
使用您的攜帶式沖牙器
57
繁體中文
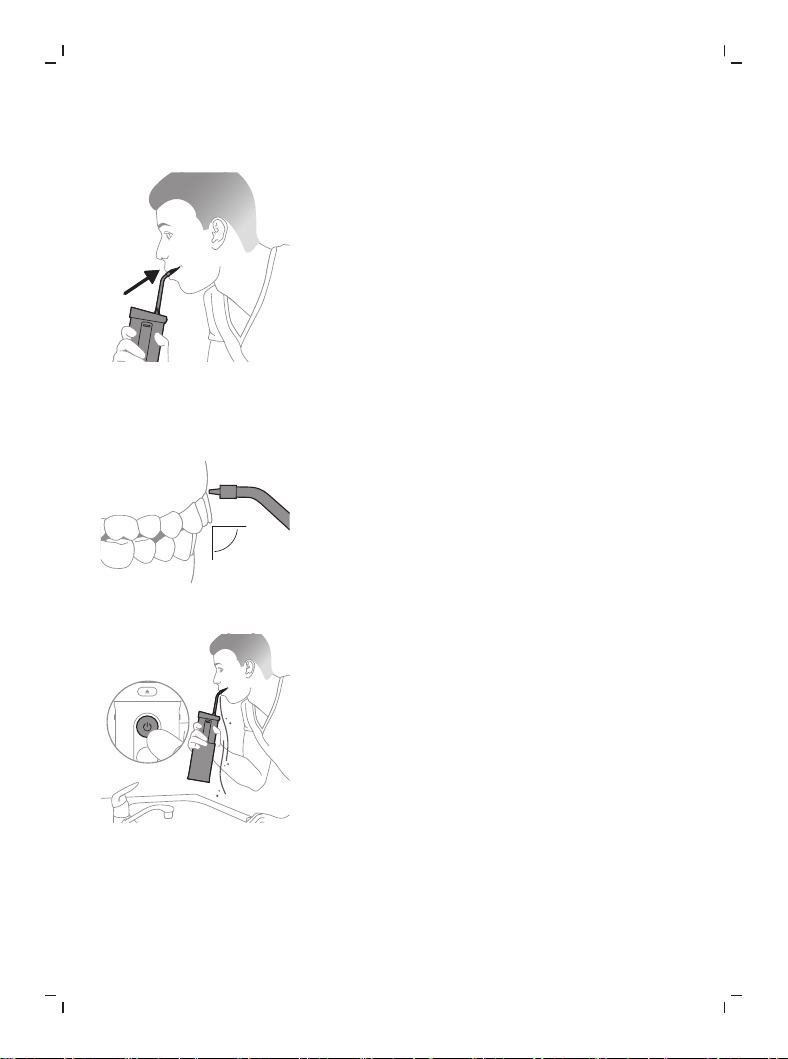
1
開啟裝置電源之前,請將噴嘴尖端對準洗臉槽。讓水噴到洗臉槽中。裝置
開始流水後,請關閉裝置電源。
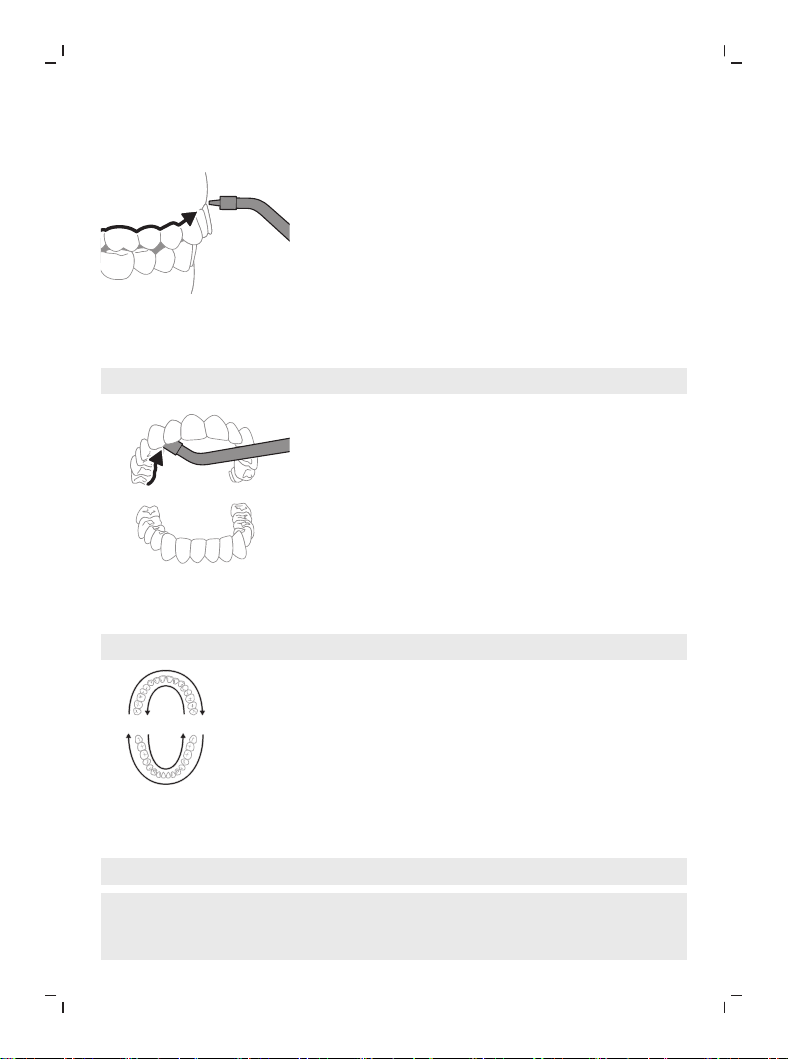
2
將噴嘴尖端放入口中。身體向洗臉槽傾斜,並將嘴巴張小一點包覆住噴嘴
尖端,以免水噴濺出去。嘴巴再稍微張開,保留一點空間,讓水從您的嘴
裡流入洗臉槽。
90°
3
將噴嘴尖端置於牙齦線上方,與牙齦之間呈 90° 角。
4
按下握柄上的電源開/關按鈕打開電源,並開始使用沖牙器。
58
繁體中文
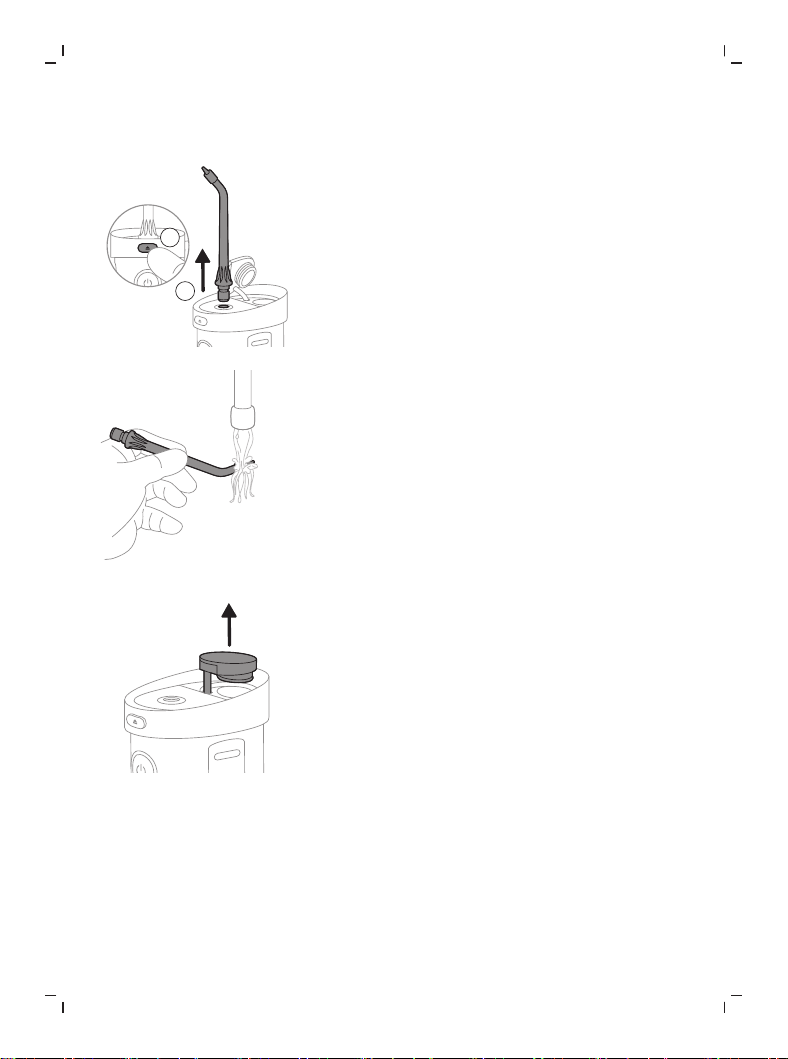
a 從上顎或下顎的臼齒開始,沿著牙齦線移動噴嘴尖端,並在每個牙縫
之間短暫停留。
注意:根據需要旋轉噴嘴,以便更輕鬆地對準牙齦線位置。
b 依照分段計時器的提示,清潔牙齒外側 (15 秒) 與內側 (15 秒),完成
口腔每側清潔共花 30 秒。
注意:請記得清潔牙齒內側。
15
sec.
15
sec.
15
sec.
15
sec.
c 依照分段計時器的提示,在口腔另一側重複相同步驟,內側清潔 15
秒,外側清潔 15 秒,直到清潔完牙齒周圍及縫隙的所有區域,總共
至少清潔一分鐘。
注意:使用期間,按下沖牙器的開/關按鈕就可停止水流。
注意:如果您選擇在使用過程中為集水槽重新注水,請先關閉裝置電源再
重新注水,然後從之前停止的地方開始,直到為所有牙周空間和牙縫總共
清潔至少一分鐘為止。
59
繁體中文
在每次使用後
2
1
1
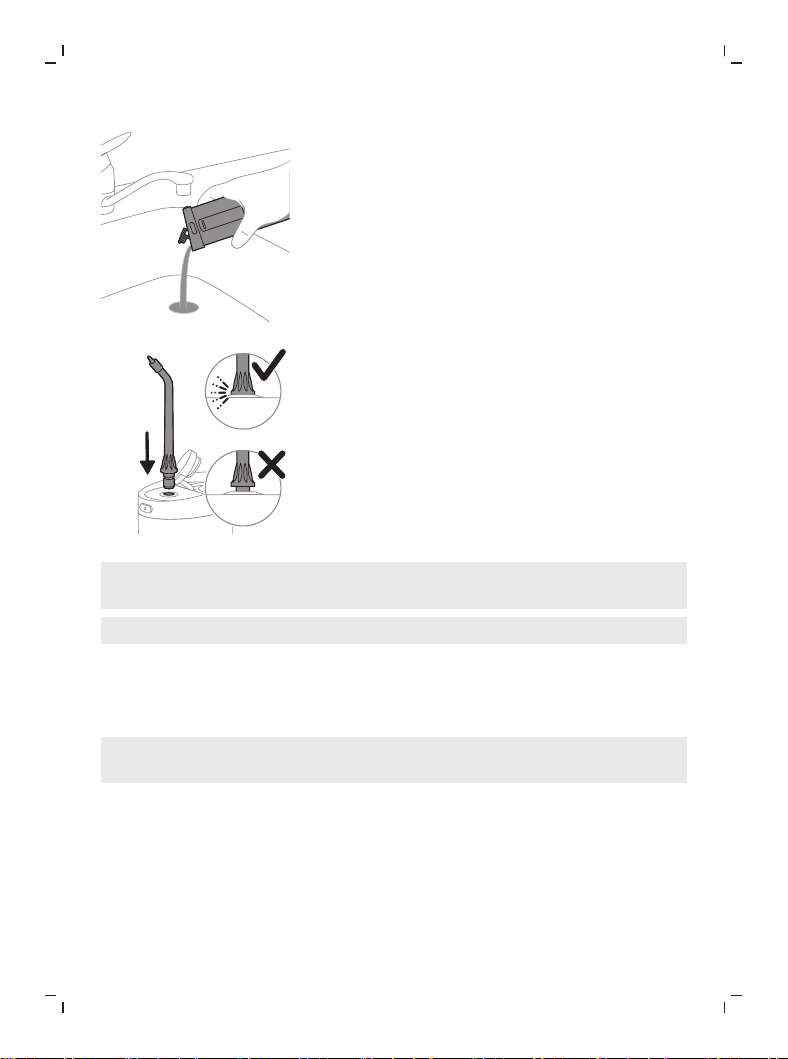
拉動噴嘴並同時按住噴嘴釋放按鈕,即可取下噴嘴。
2
用溫水沖洗尖端。
3
輕輕打開頂部的注水口。
60
繁體中文
4
倒掉多餘的水。維持噴嘴、握柄外部及集水槽乾燥。
5
將噴嘴插回握把。
注意:為了方便晾乾,可將注水口保持開啟,或在每次使用期間拆開攜帶式沖牙
器 (集水槽可以整個卸下)。
注意:請勿讓攜帶式沖牙器長時間保持拆解狀態。
充電與電池狀態
您的飛利浦 Sonicare 攜帶式沖牙器設計可在完全充電的情況下,提供至少 24
次、每次持續 1 分鐘的使用。 裝置電源會在使用 2 分鐘後自動關閉。
注意:首次使用前的電池充電可能需時 4 小時才會充飽電,但是在電池未完全充
飽電時就能開始使用沖牙器。
61
繁體中文
充電
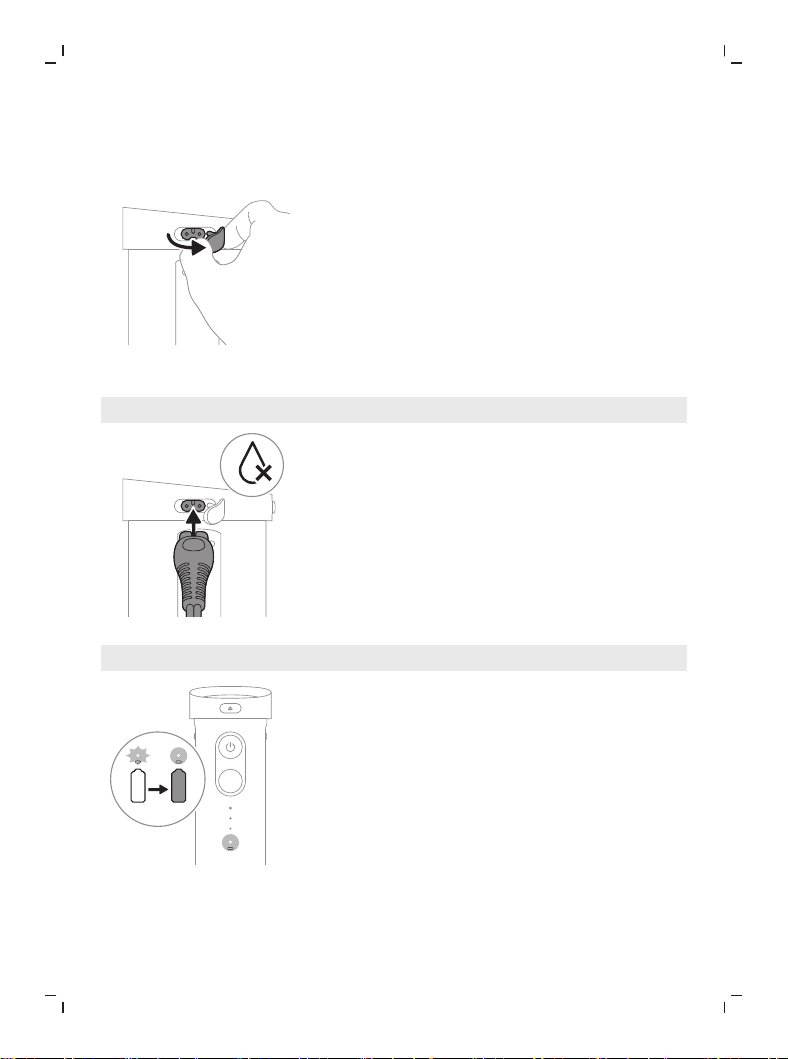
1
輕輕拉開沖牙器側邊的充電孔蓋,並露出充電孔。
2
將 USB-A 轉小插頭的充電纜線連接到 5V USB 插壁充電器。
注意:部分型號未隨附插壁轉換器。務必使用 5V 轉換器 (A 型)。
3
將 USB-A 轉小插頭充電線插入充電口。
注意:請確定握柄已完全乾燥後,再連接 USB-A 對小插頭的充電線。
Pulse
Clean
Sensitive
4
充電時,電池指示燈會閃爍紅燈。
5
不充電期間,請蓋上沖牙器的充電口蓋。
62
繁體中文
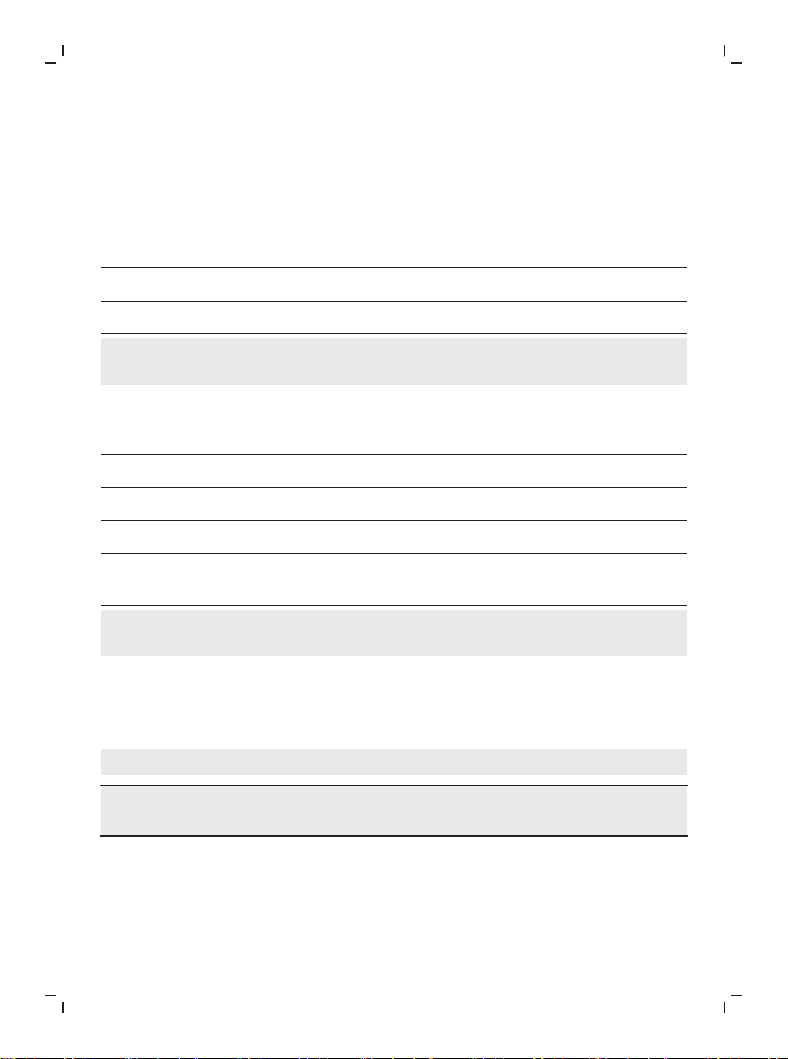
電池狀態
電池狀態
當您完成使用沖牙器或暫停使用沖牙器時,電池指示燈會顯示電池狀態。
當沖牙器進行充電時
電池狀態 電池指示燈
已滿 綠燈持續亮起
充電 閃爍綠燈
注意:電池指示燈會閃爍,直到充飽電為止。在插上電源的狀態下充飽電後,指
示燈將持續亮綠燈 30 秒,接著熄滅。
當沖牙器不在充電時
電池狀態 電池指示燈
已滿 綠燈持續亮起
中 閃爍綠燈
低度 閃爍琥珀色
熄滅 在閃爍琥珀色光 5 秒鐘後,沖牙器會
自動關閉電源
注意:出現電池電力不足指示燈號時,沖牙器仍可提供至少 3 次、持續 1 分鐘
的使用。
清潔
攜帶式沖牙器每週必須清潔一次。請按照下列步驟清潔裝置和配件。配件可能因
型號而異。
注意:請勿使用高濃度酒精成分的清潔劑來操作或清潔裝置。
警告:請勿在 USB-A 轉小插頭充電線連接時清潔沖牙器。 清潔裝置之前,
請拔下電源並蓋上充電連接埠蓋。
63
繁體中文
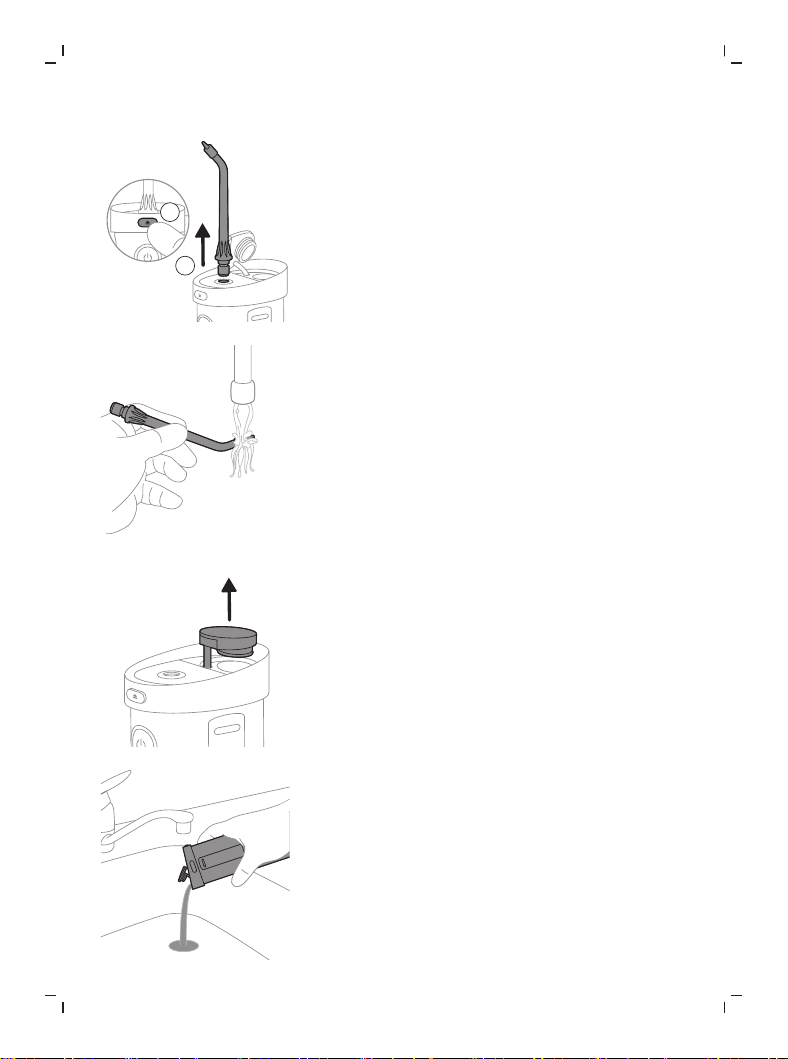
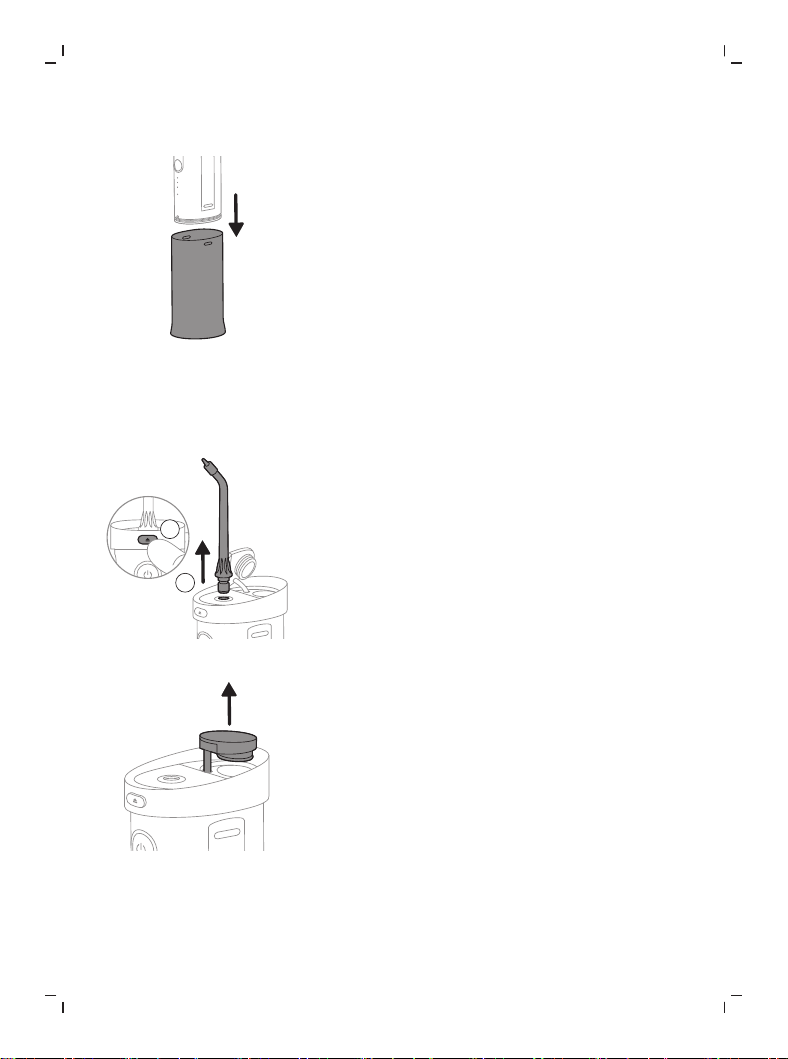
2
1
1
拉動噴嘴並同時按住噴嘴釋放按鈕,即可取下噴嘴。
2
用溫水沖洗尖端。
3
輕輕打開頂部的注水口。
64
繁體中文
4
將剩餘的水倒入水槽中。
5
輕輕地將集水槽從沖牙器卸下。 集水槽可以用溫水和中性肥皂進行手洗。
必要時,可用軟布和中性肥皂擦拭以清潔握柄。
收納
攜帶式沖牙器已設計將一個噴嘴儲放在握柄內。若要使用此功能:
2
1
1
拉動噴嘴並同時按住噴嘴釋放按鈕,即可取下噴嘴。
2
輕輕打開頂部的注水口。
65
繁體中文
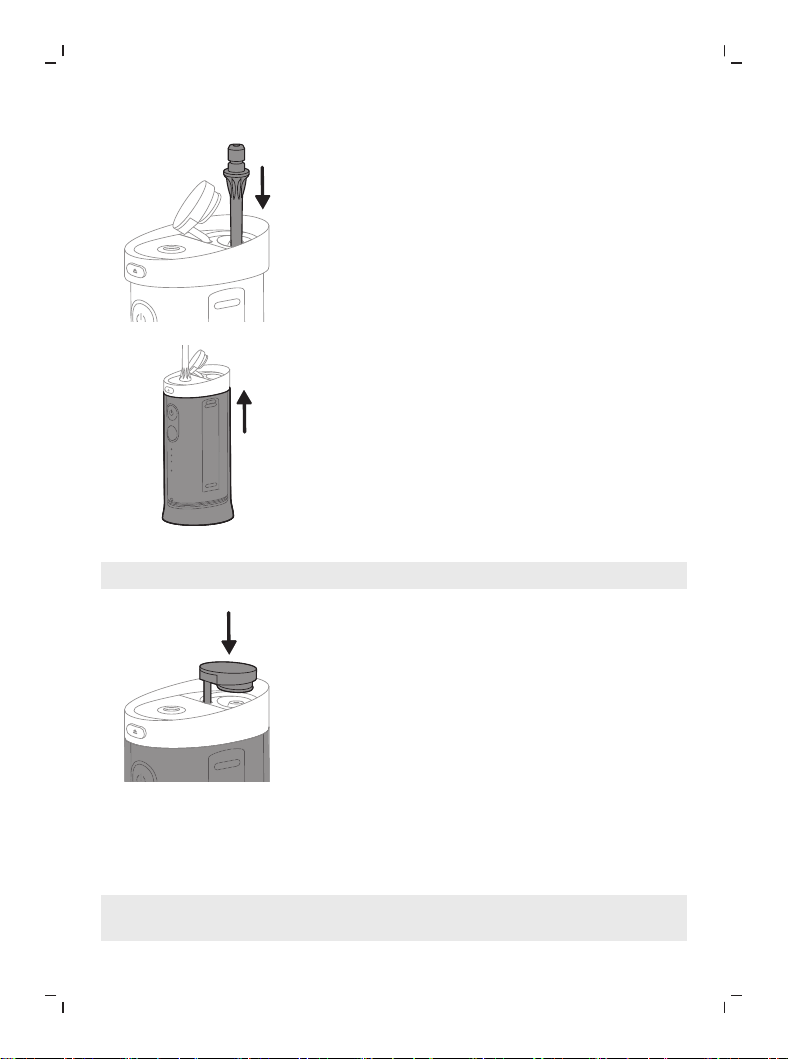
3
將噴嘴插入注水口。
4
將集水槽向上推,即可折疊收合沖牙器。
注意:當注水口蓋打開時,比較容易收合集水槽。
5
輕輕關上注水口。
更換
每隔 6 個月更換噴嘴,或在損壞時立即更換。 若要購買配件或備用零件,請造
訪 philips.com,或洽詢您當地的 Philips Sonicare 經銷商。
注意:攜帶式沖牙器僅與 Philips Sonicare 攜帶式沖牙器噴嘴相容使用。與其他
Philips Sonicare 機型噴嘴無法相容使用 (例如 Power Flosser 的噴嘴)。
66
繁體中文
疑難排解
問題 解答
我可以在集水槽中裝入漱口水或精油
嗎?
我們不建議在集水槽中裝入精油。 您
可用清水稀釋漱口水,然後倒進集水
槽。 使用漱口水後,請在集水槽中倒
入些許溫水,將尖端朝向洗臉槽後開
啟產品電源,直到集水槽清空為止,
藉此沖洗裝置以防堵塞。
我的飛利浦 Sonicare 攜帶式沖牙器是
否可以安裝其他噴嘴?
本裝置必須使用 Philips N1 和 N2 噴
嘴。 其他 Philips 產品或非 Philips 原
廠噴嘴與本產品無法相容使用。
我需要多久換一次噴嘴? 我們建議您在使用 6 個月後更換噴
嘴。 您可以在 philips.com 找到購買
替換零件的詳細資訊
我在伸展集水槽時發生問題 打開注水口,接著卸下噴嘴,再試試
看伸展集水槽。 這樣集水槽應該就能
順利伸展。
保固與支援
Philips 提供 2 年保固。另有保固例外規定。 這份保固服務不會影響您的法定消
費者權益。如需更多資訊,請造訪 www.philips.com/support 或致電
0800-231-099 與我們聯繫。
保固排除條件
非保固範圍者:
- 噴嘴
- 使用未經授權之更換零件或噴嘴所造成的損害
- 因不當使用、濫用、疏忽、改裝或未經授權的維修所造成之損害
- 一般磨損與破損,包括剝落、刮痕、磨損、變色或褪色
回收
- 此符號表示電子產品及電池,不得與一般家用廢棄物一併丟棄。
67
繁體中文
- 請按照您所在國家/地區的規定,分類與回收電子產品與電池。
取出充電式電池
丟棄本產品時,必須由合格的專業人員取出內建充電式電池。 取出電池前,請
確認其電力已完全耗盡。
使用工具打開裝置或棄置充電式電池時,請採取任何必要的安全預防措
施。
拿取電池時,請確保雙手、本產品和電池都處於乾燥狀態。
如果電池損壞或漏液,請避免電池接觸到皮膚或眼睛。如果不慎接觸到皮
膚或眼睛,請立即用水沖洗乾淨並就醫。
為避免電池在取出後意外發生短路,請勿讓電池端子接觸到金屬物體 (例如
硬幣、髮夾、戒指)。 請勿以鋁箔紙包裹電池。 丟棄電池之前,請用膠帶黏
住電池端子,或將電池放進塑膠袋。
若要取出充電式電池,您需要準備螺絲起子和電線剪。進行下列程序時,請遵守
基本安全注意事項。
1
若要讓電池中的電力完全用光,請讓沖牙器持續啟動,直到其自動停止。
2
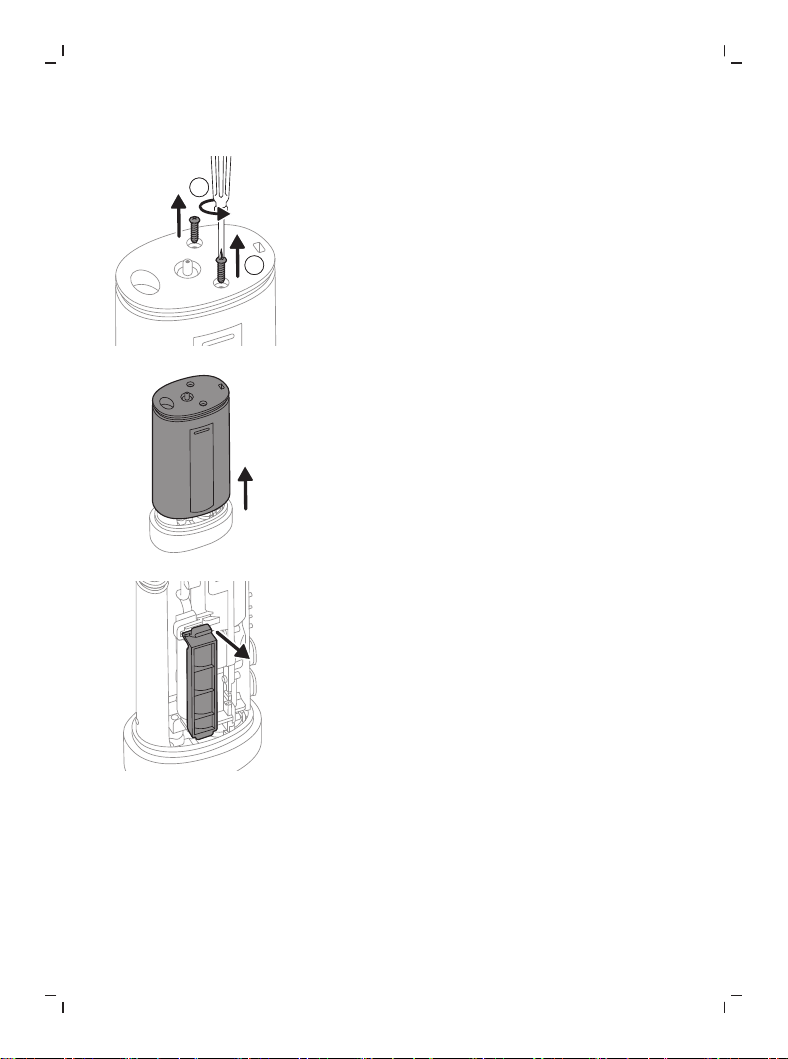
將集水槽拉開並卸下。
68
繁體中文
3
取下兩顆螺帽。
1
2
1
2
4
取出螺絲。
5
將內部組件從機身拉出。
6
取下電池蓋。
69
繁體中文
7
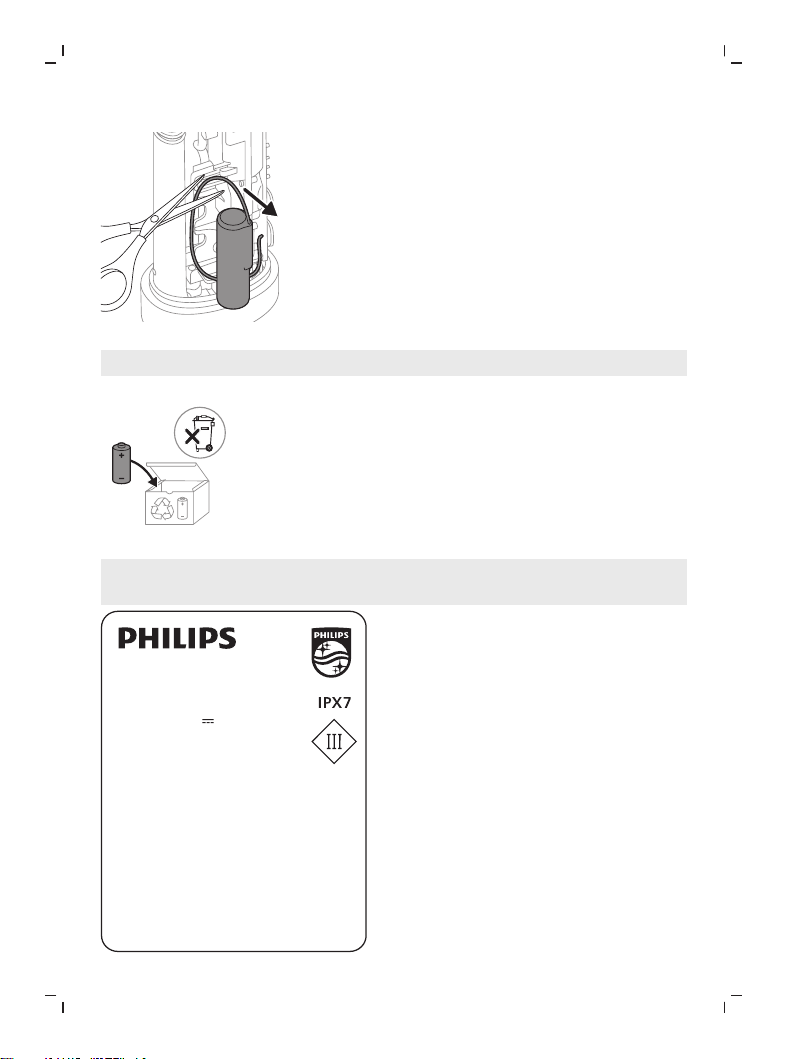
從電池座推出電池。剪斷電線。並取出電池。
注意:電池突片的邊緣很銳利,請小心不要弄傷手指。
8
用膠帶包住電池接點,以免因殘餘電力造成短路。
9
現在可以回收充電式電池,並妥善丟棄產品的其他部分。
注意:本產品使用壽命結束時請勿與一般家庭廢棄物一併丟棄。請將該產品放置
於政府指定的回收站。此舉能為環保盡一份心力。
ପۜΤ၈j࠭л4POJDBSF
ᙳόә˫ኜ
ପۜۨj)9
ᕘ֛ཥᏀj7
ঃཥଟj8
ପήj൳ی
ࣸjཥό
Ⴁிϋ΅ʿᇁjሗԈዚᅺi
ۃՇᇁމГʩϋd
ᇁމႡிᇁ
։Ⴁᅀj1IJMJQT$POTVNFS
-JGFTUZMF#7
ආɹᅀjᝄ࠭лٰ΅Ϟࠢʮ
ήѧjڦ່ɽ༸ݬ
ᅽʘ
ཥ༑j
ၣѧjXXXQIJMJQTDPNUX



www.philips.com/Sonicare
©2025 Koninklijke Philips N.V. (KPNV). All rights reserved. Philips and the
Philips shield are trademarks of KPNV. Sonicare and the Sonicare logo are
trademarks of Philips Oral Healthcare, LLC and/or KPNV.
©2025 Koninklijke Philips N.V. (KPNV)。保留所有权利。飞利浦及飞利浦盾牌
标志是 KPNV 的商标。Sonicare 和 Sonicare 徽标是 Philips Oral Healthcare,
LLC 和/或 KPNV 的商标。
©2025 Koninklijke Philips N.V. (KPNV)。 版權所有。 飛利浦及飛利浦盾牌標誌
為 KPNV 的商標。 Sonicare 及 Sonicare 標誌為飛利浦口腔保健公司和/或 KPNV
的商標。
300016507001 (09/12/2025)
保留备用