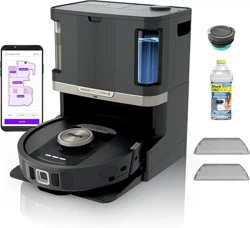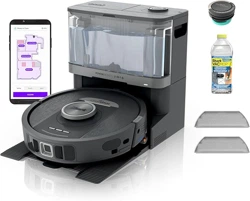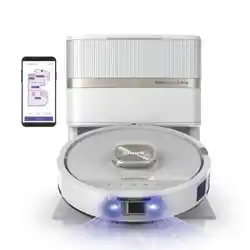
Robot Vacuum
RV3000WD Series
OWNER’S GUIDE
sharkninja.comsharkninja.com
WARNING
To reduce the risk of fire, electric shock, injury, or property damage:
LASER WARNING
This product has a class 1 laser. It is safe under reasonably foreseeable conditions
(as defined in these instructions.) Always turn off the power before lifting the robotic
vacuum cleaner or performing any maintenance on it. Do not look directly into laser.
IMPORTANT SAFETY INSTRUCTIONS
PLEASE READ CAREFULLY BEFORE USE • FOR HOUSEHOLD USE ONLY
If the charging cable plug does not fit fully into the outlet, reverse the plug. If it still does
not fit, contact a qualified electrician. DO NOT force into outlet or try to modify to fit.
GENERAL WARNINGS
When using an electrical appliance, basic precautions should always be followed,
including the following:
1. The robotic vacuum cleaner system
consists of a robotic vacuum and
charging dock with power supply. These
components contain electrical connections,
electrical wiring, and moving parts that
potentially present risk to the user.
2. Before each use, carefully inspect all parts
for any damage. If a part is damaged,
discontinue use.
3. Use only identical replacement parts.
4. This robotic vacuum cleaner contains no
serviceable parts.
5. Use only as described in this Owner’s
Guide. DO NOT use the robotic vacuum
cleaner for any purpose other than those
described in this Owner’s Guide.
6. This appliance can be used by children
ages 8 years and older and persons with
reduced physical, sensory, or mental
capabilities or lack of experience and
knowledge if they have been given
supervision or instruction concerning
use of the appliance in a safe way and
understand the hazards involved. Children
shall not play with the appliance. Cleaning
and user maintenance shall not be made
by children without supervision.
7. Children should be supervised to ensure
that they do not play with the appliance.
8. This appliance contains batteries that are
only replaceable by skilled persons.
USE WARNINGS
9. This product has a Class 1 Laser. It is safe
under reasonably foreseeable conditions
(as defined in this Owner’s Guide). Always
turn off the power before lifting the
robotic vacuum cleaner or performing any
maintenance on it.
10. DO NOT look directly into laser.
11. DO NOT look directly into UV light.
12. DO NOT damage the UV lens. The UV lens
cannot be replaced. If the lens is damaged
the appliance should be scrapped.
13. DO NOT handle plug, charging dock,
charging cable, or robotic vacuum
cleaner with wet hands. Cleaning and user
maintenance shall not be made by children
without supervision.
14. DO NOT damage the charging cord:
a) DO NOT pull or carry charging dock by
the cord or use the cord as a handle.
b) DO NOT unplug by pulling on cord.
Grasp the plug, not the cord.
c) DO NOT close a door on the cord,
pull the cord around sharp corners, or
leave the cord near heated surfaces.
d) If the supply cord is damaged, it must
be replaced by the manufacturer, its
service agent or similarly qualified
persons in order to avoid a hazard.
15. DO NOT put any objects into nozzle or
accessory openings. DO NOT use with any
opening blocked; keep free of dust, lint,
hair, and anything that may reduce airflow.
16. Connect to a properly grounded outlet
only. See Grounding Instructions.
17. DO NOT use robotic vacuum cleaner
if airflow is restricted. If the air paths
become blocked, turn the vacuum cleaner
off and remove all obstructions before
turning on the unit again.
18. Keep nozzle and all vacuum openings
away from hair, face, fingers, uncovered
feet, or loose clothing.
19. DO NOT use if robotic vacuum cleaner
is not working as it should, or has been
dropped, damaged, left outdoors, or
dropped into water.
20. DO NOT place vacuum cleaner on
unstable surfaces.
21. DO NOT use to pick up:
a) Liquids.
b) Large objects.
c) Hard or sharp objects (glass, nails,
screws, or coins).
d) Large quantities of dust (drywall dust,
fireplace ash, or embers.)
e) DO NOT use as an attachment to
power tools for dust collection.
f) Smoking or burning objects (hot coals,
cigarette butts, or matches).
g) Flammable or combustible materials
(lighter fluid, gasoline, or kerosene).
h) Toxic materials (chlorine bleach,
ammonia, or drain cleaner).
i) Toxic materials (high concentrations
of chlorine bleach liquid, high
concentrations of ammonia, or drain
cleaning solution).
22. DO NOT use in the following areas:
a) Wet or damp surfaces.
b) Outdoor areas near fireplaces with
unobstructed entrances.
c) Spaces that are enclosed and may
contain explosive or toxic fumes
or vapors (lighter fluid, gasoline,
kerosene, paint, paint thinners,
mothproofing substances, or
flammable dust.)
d) In an area with a space heater.
e) Near fireplaces with unobstructed
entrances.
23. Remove all spilled or leaked liquid from
the base or floor as it could lead to risk of
electrical shock and/or floor damage.
24. Turn off the robotic vacuum cleaner
before any adjustment, cleaning,
maintenance, or troubleshooting.
25. To prevent corrosion or damage, only use
the Shark branded floor cleaner in the
clean water tank. DO NOT add too much
cleaning fluid to prevent the robot from
working improperly due to slipping.
To avoid water tank deformation,
DO NOT add hot water in the tank,
only room temperature water. If water
marks remain on the water tank, wipe
them clean before reinstallation.
26. Allow all filters to air-dry completely
before reinstalling them to prevent liquid
from being drawn into electric parts.
27. DO NOT modify or attempt to repair the
robotic vacuum cleaner or the battery
yourself, except as indicated in this
Owner’s Guide. DO NOT use the vacuum if
it has been modified or damaged.
28. Keep fingers clear of wheels and
suspension system at all times while robot
is powered on.
29. DO NOT use any household cleaners (all
purpose cleaners, glass cleaners, bleach)
on any of the polished high gloss surfaces
on the docking station or robot vacuum
cleaner as they contain chemical that may
damage these surfaces. Instead use a cloth
dampened with water to gently clean.
30. This appliance consists of a robotic
vacuum cleaner and charging dock with
power supply. These components contain
electrical connections, electrical wiring,
and moving parts that potentially present
risk to the user.
31. DO NOT touch hot surfaces directly after
cleaning missions.
32. With the exception of some filters and
dust bin, DO NOT expose any parts of the
robotic vacuum cleaner to water or
other liquids.
33. Always turn off the robotic vacuum
cleaner before inserting or removing the
filter, dust bin, or fluid reservoir.
34. DO NOT use the robotic vacuum cleaner
without the dust bin and filter in place.
35. If robotic vacuum cleaner is not starting
from the dock, it must be placed in an
unobstructed circle of 1.5 ft.
(45 cm) away from edges and cliffs.
36. To minimise the risk of the robot traveling
beyond an unsafe boundary (stair or cliff
edges, fireplaces, water hazards), establish
these areas as no-go zones using the
mapping feature in the SharkClean mobile
app. Upon setting the boundary, run the
vacuum and visually confirm that the
settings effectively prevent the robot from
passing beyond the set boundary. Adjust
settings as necessary. For nonapp users,
use a boundary to block off an unsafe
boundary.
BAT TERY USE
37. The battery is the power source for the
vacuum. Carefully read and follow all
charging instructions.
38. To prevent unintentional starting, ensure
the vacuum is powered off before picking
it up or carrying it.
39. For Shark® NeverTouch™ Pro dock
replacement, use XDRV3000XLB,
XDRV3000XLW, XDRV3000XL3,
XDRV3000XL4, XDRV3000XL5,
XDRV3000XL6 or equivalent. For
replacement batteries, use RVBAT85013
(40P) or RVBAT85014 (50E) battery packs.
40. Keep the battery away from all metal
objects such as paper clips, coins, keys,
nails, or screws. Shorting the battery
terminals together increases the risk of fire
or burns.
41. Under abusive conditions, liquids may be
ejected from the battery. Avoid contact
with this liquid, as it may cause irritation or
burns. If contact occurs, flush with water. If
liquid contacts eyes, seek medical help.
42. Robotic vacuum cleaner should not be
sharkninja.comsharkninja.com
SAVE THESE INSTRUCTIONS
For the latest warnings and cautions, go to support.sharkninja.com
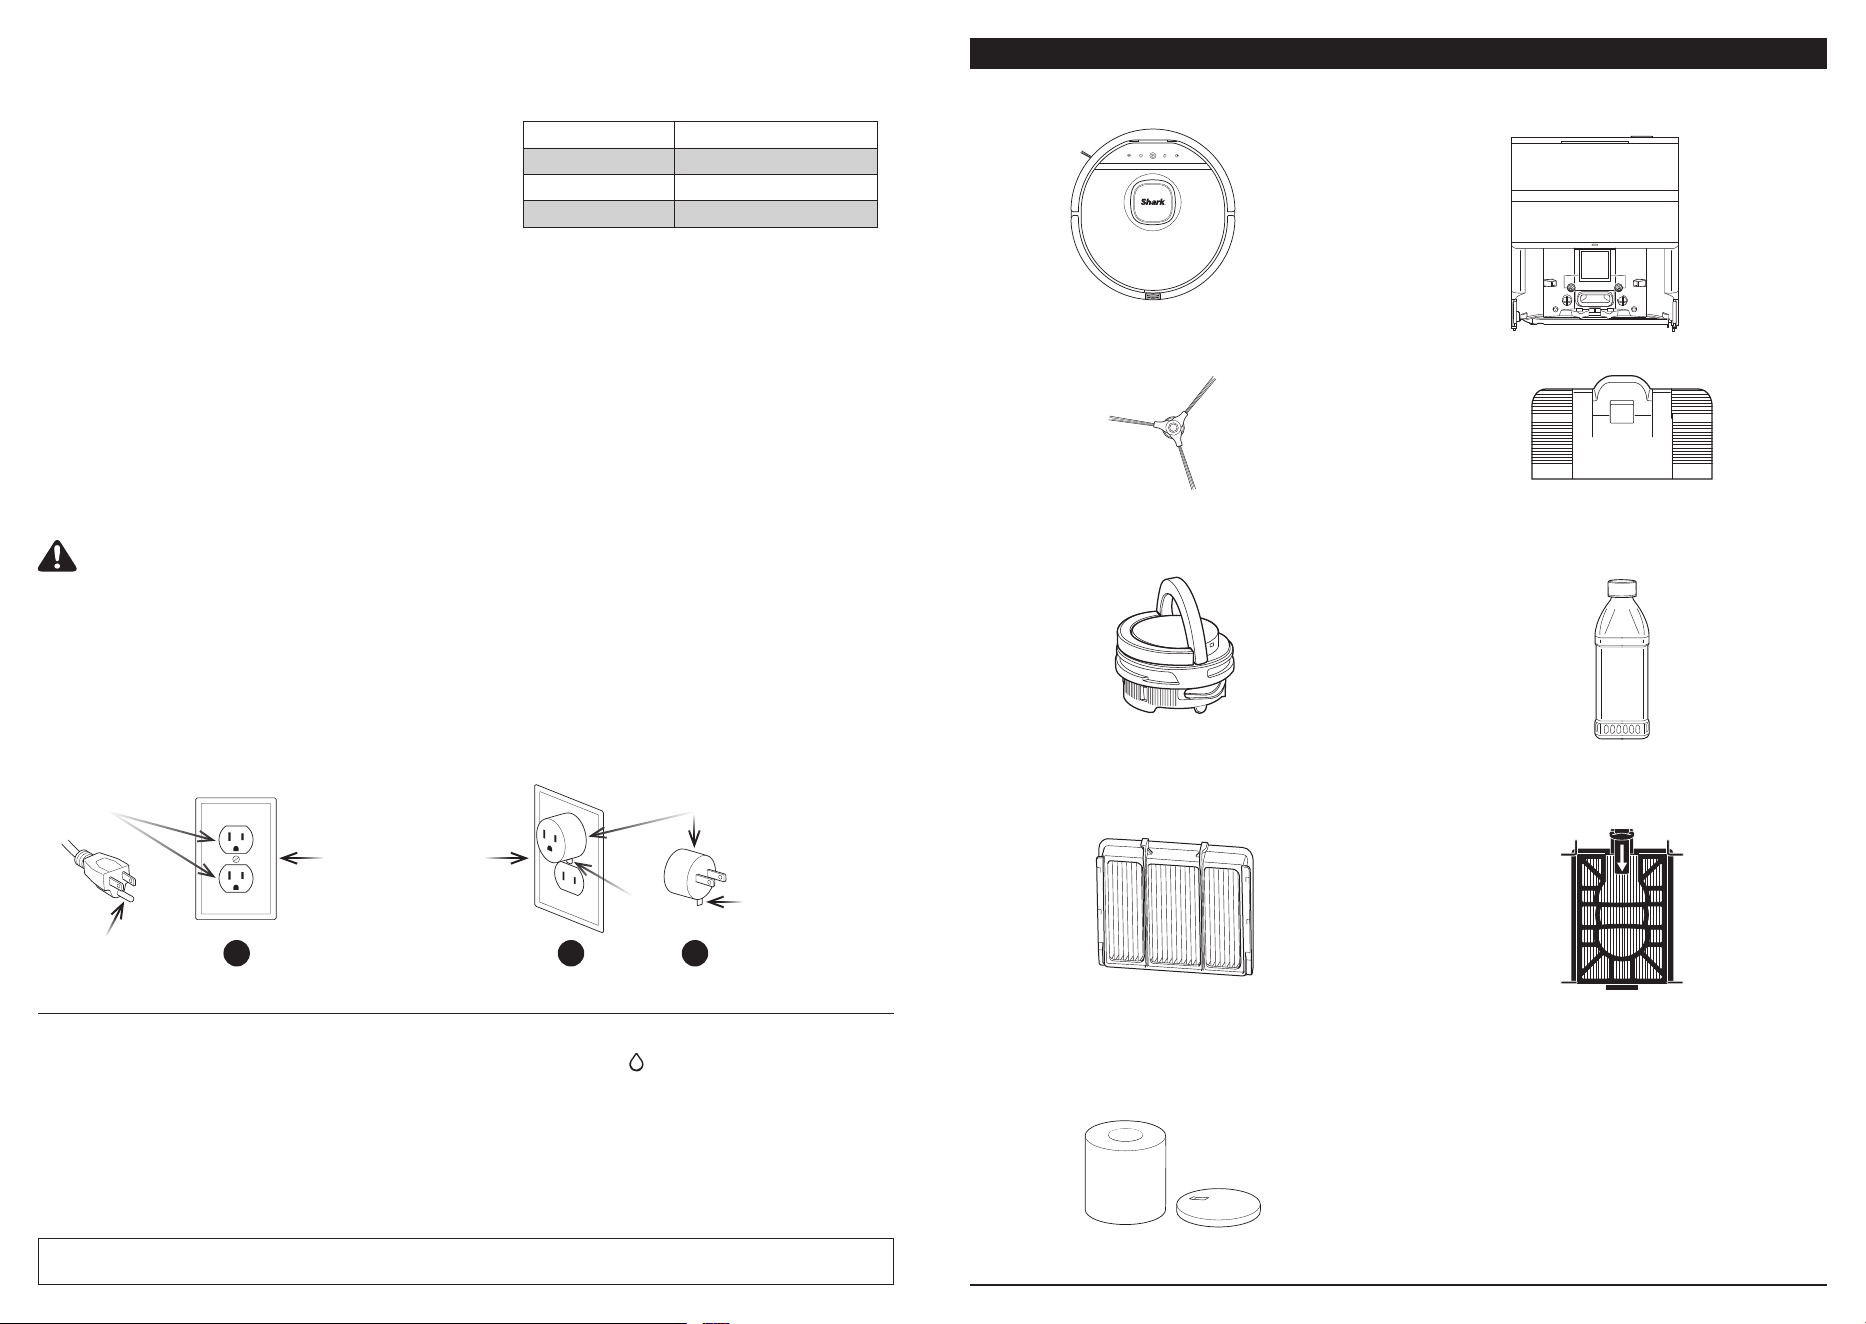
WHAT’S INCLUDED
5. Odor Cartridge Assembly
(quantity varies)
7. Robot Pre-Motor Filter
(quantity varies)
8. Base Post-Motor Filter
(quantity varies)
1. Robot Vacuum & Mop
4. Ramp
2. NeverTouch™ Pro Base
6. Shark® Multi-Surface Cleaner
12 oz. (355 ml) Bottle
3. Side Brush (quantity varies)
MOP PAD SANITIZATION INSTRUCTIONS
To achieve the sanitization benefit on the robot’s mopping pad:
1. Fill the clean water tank on the base with distilled water up to the water
maximum fill line.
2. After each wet cleaning mission, allow the base to completely wash and dry the mopping pad
without interruption.
Note: Not included in all models
At least one filter is included in all
models and comes pre-installed.
At least one filter is included in all
models and comes pre-installed.
9. Base Pre-Motor Filters
(quantity varies)
At least one filter is included in all
models and comes pre-installed.
stored, charged, or used at temperatures
below 50°F (10°C) or above 104°F (40°C).
Ensure the battery and vacuum have
reached room temperature before charging
or use. Exposing the robotic vacuum
cleaner or battery to temperatures outside
of this range may damage the battery and
increase the risk of fire.
43. DO NOT expose the robotic vacuum
cleaner or battery to fire or temperatures
above 265°F (130°C) as it may cause
explosion. Battery usage conditions:
44.
<10˚C (50˚F) Do not store.
>40˚C (104˚F) Do not store.
20˚C –40˚C Normal operating temp.
<0˚C (32˚F) Do not charge.
GROUNDING INSTRUCTIONS
This appliance must be grounded. If it should malfunction or breakdown, grounding provides a
path of least resistance for electric current to reduce the risk of electric shock. This appliance
is equipped with a cord having an equipment-grounding conductor and grounding plug. The
plug must be inserted into an appropriate outlet that is properly installed and grounded in
accordance with all local codes and ordinances.
WARNING
Improper connection of the equipment-grounding conductor can result in a risk of electric
shock. Check with a qualified electrician or service person if you are in doubt as to whether the
outlet is properly grounded. Do not modify the plug provided with the appliance – if it will not
fit the outlet, have a proper outlet installed by a qualified electrician.
This appliance is for use on a nominal 120-V circuit and has a grounding attachment plug that
looks like the plug illustrated in sketch A in the following Figure. Make sure that the appliance
is connected to an outlet having the same configuration as the plug. No adaptor should be
used with this appliance. If the appliance must be reconnected for use on a dierent type of
electric circuit, the reconnection should be made by qualified service personnel.
GROUNDED OUTLET BOX
GROUNDED OUTLET
GROUNDING PIN
ADAPTER
METAL
SCREW
TAB FOR
GROUNDING
SCREW
A
B C
sharkninja.comsharkninja.com
SET UP YOUR SHARK® ROBOT & APPSET UP YOUR SHARK® NEVERTOUCH
™
PRO BASE
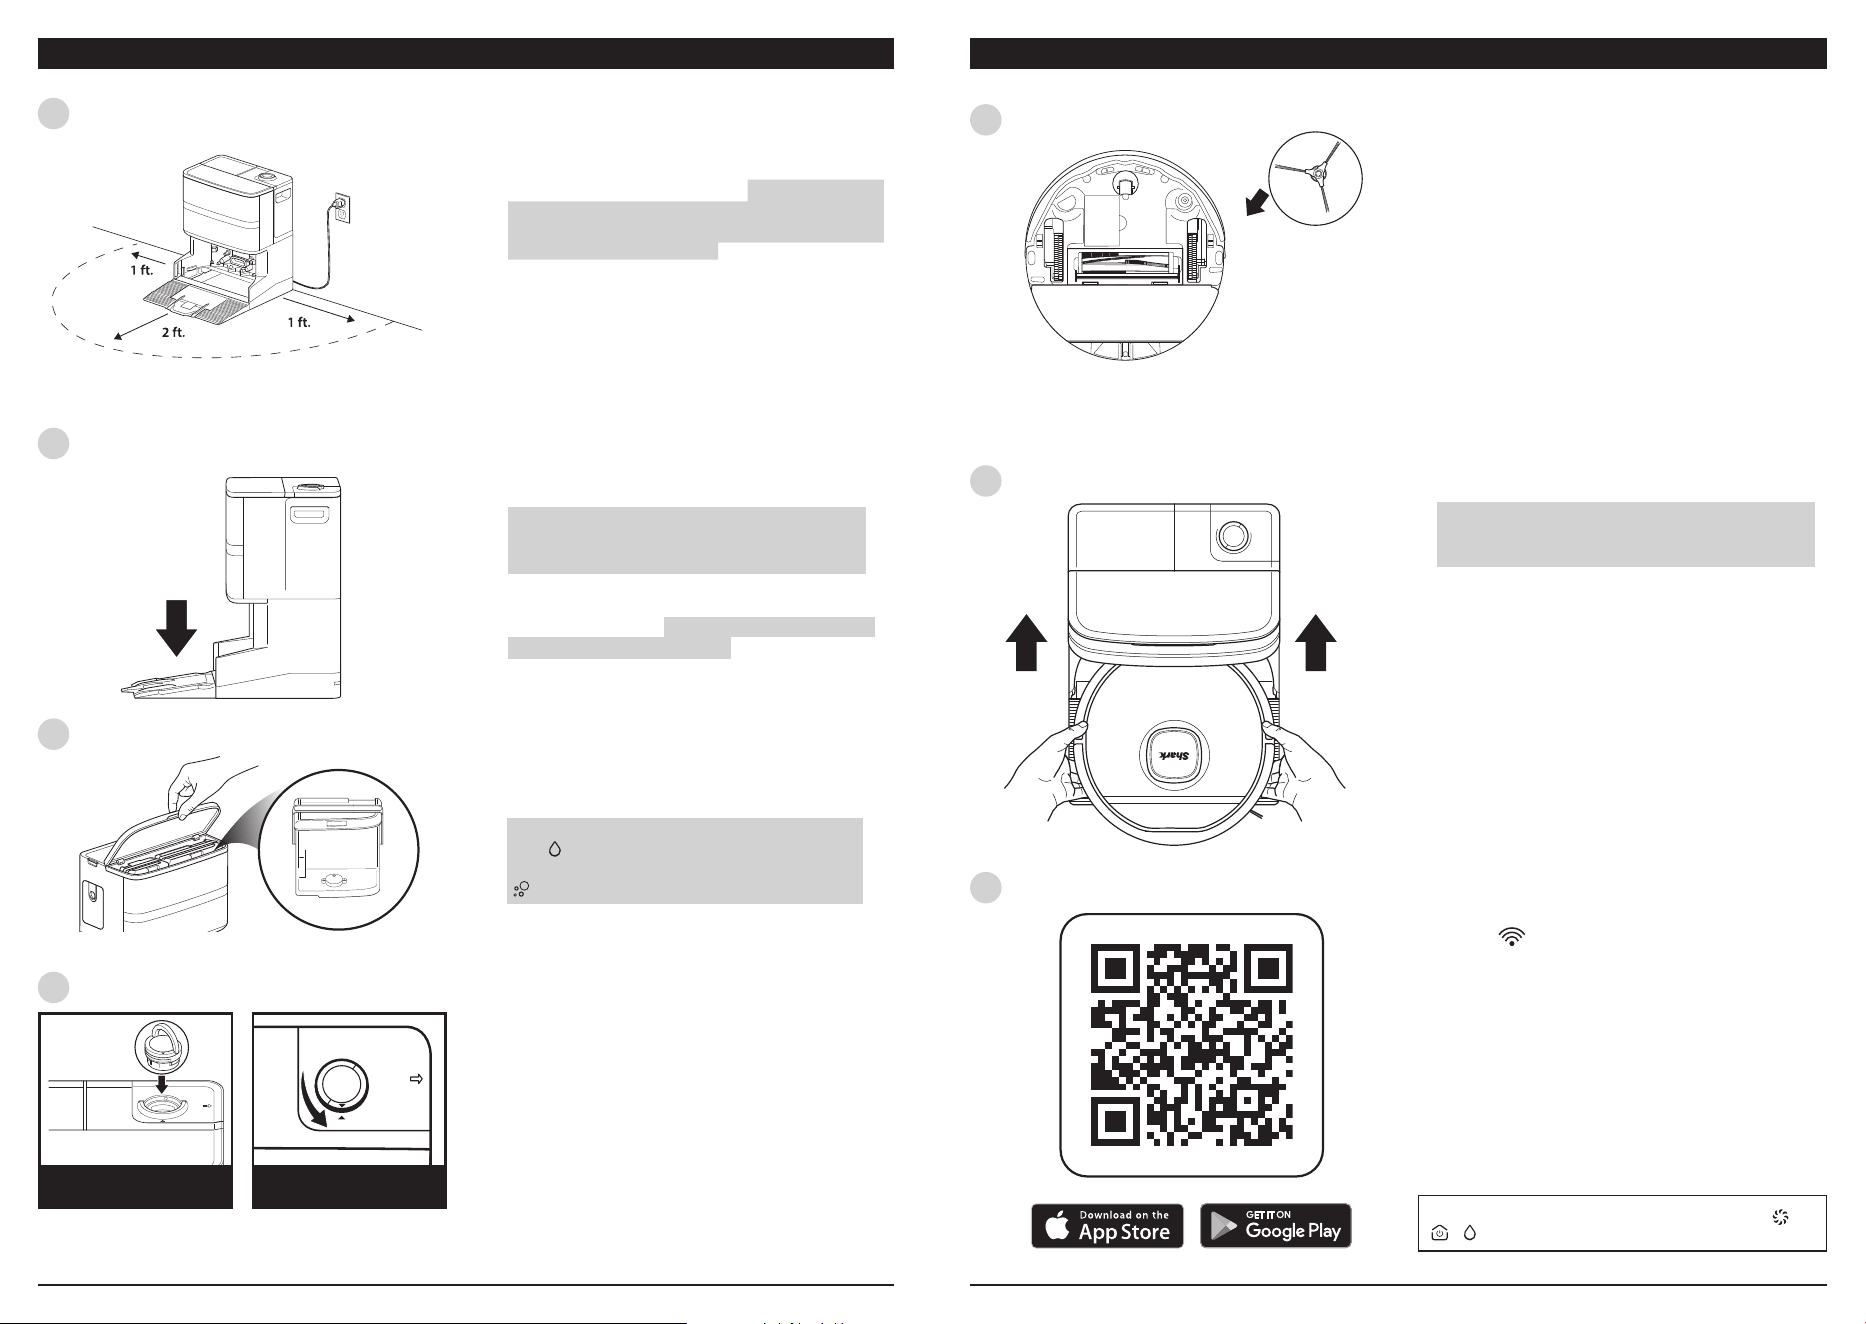
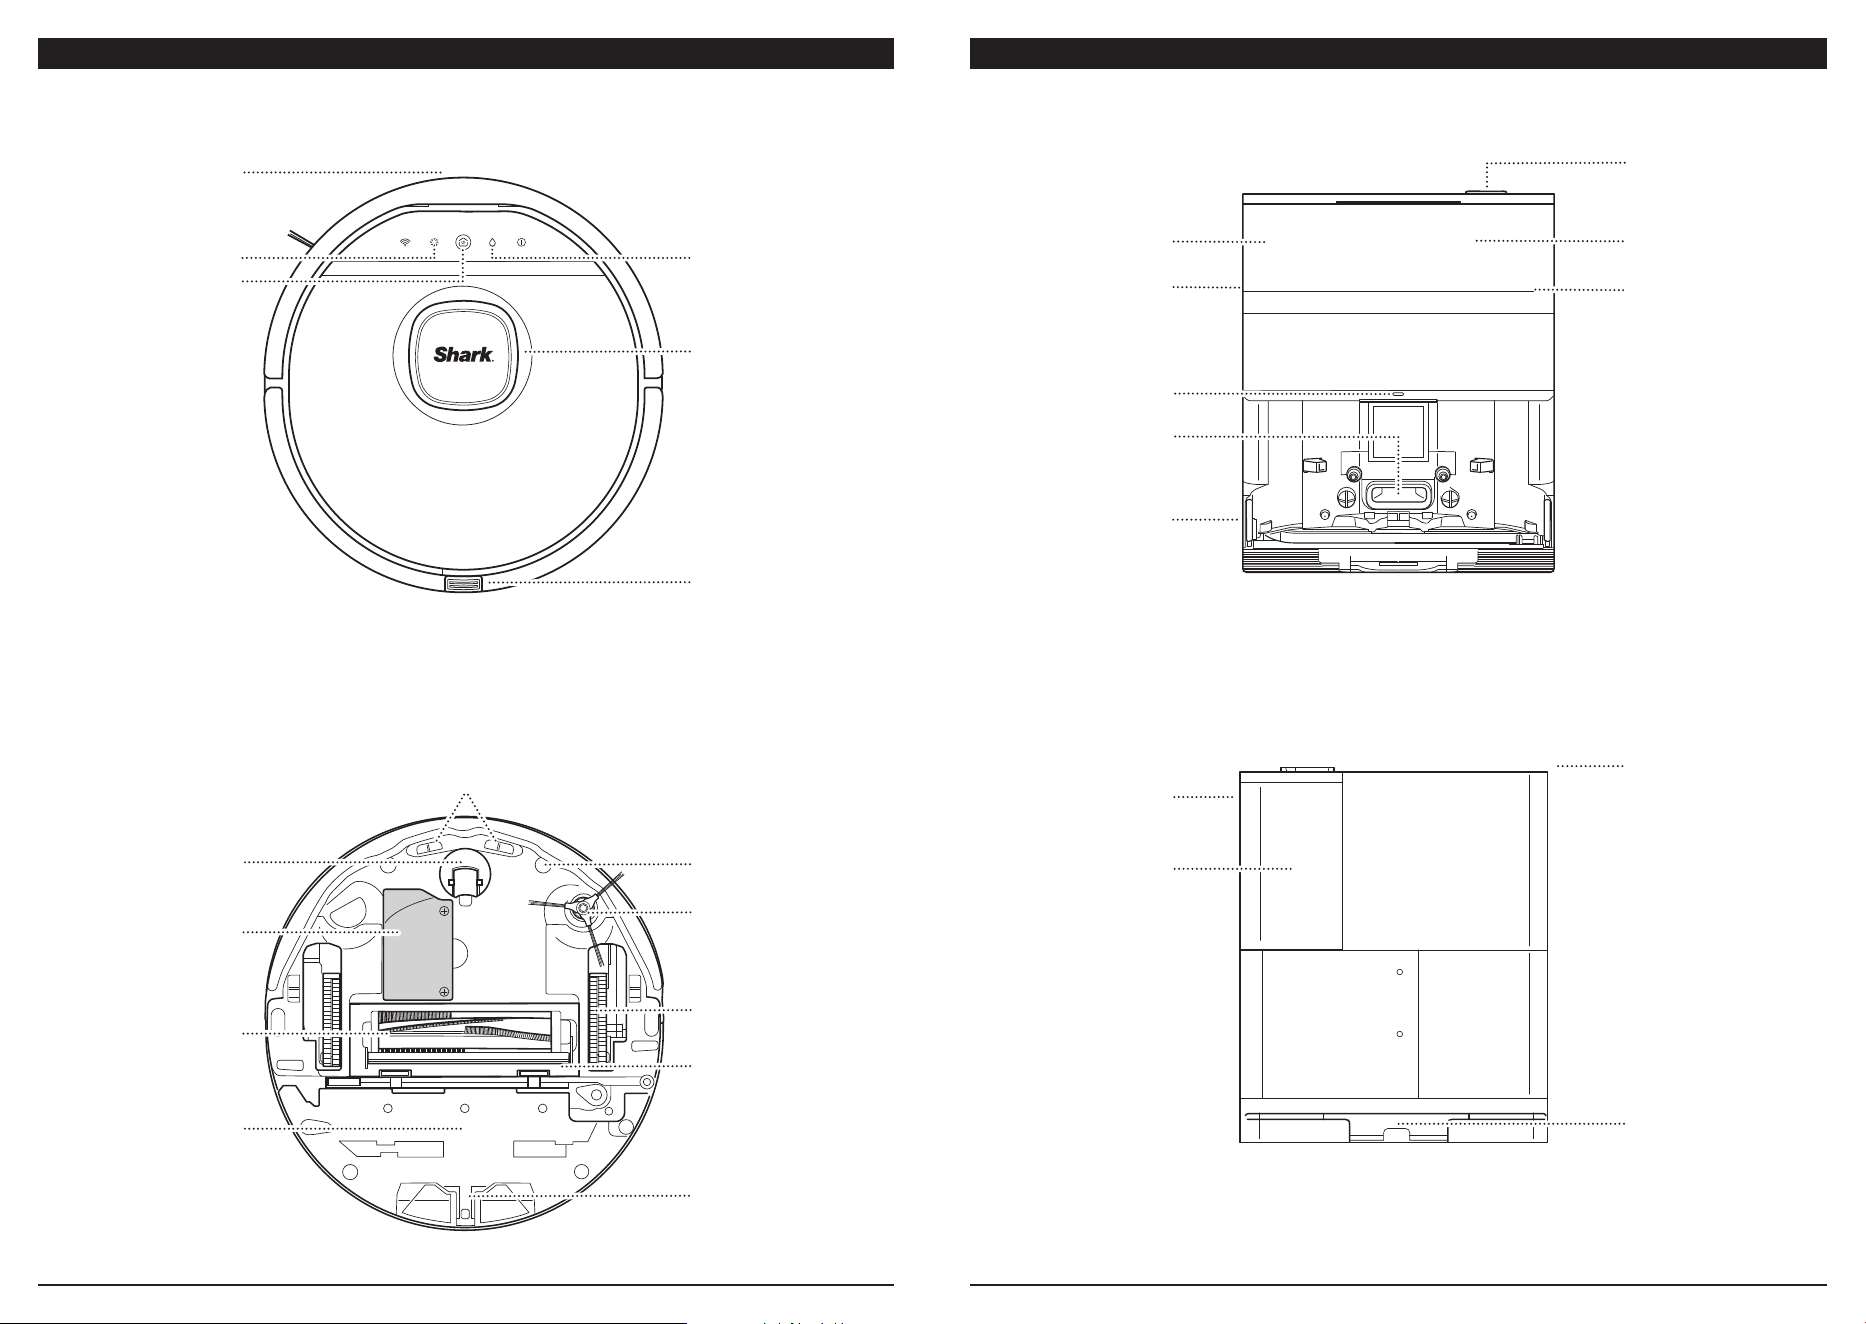
1
Set up Base
1. Remove all plastic wrap and foam.
2. Place the base on a flat, level hard-
floor surface with at least two feet of
clearance in front and one foot on both
sides, away from any objects, furniture,
or a carpeted surface.
3. Place the base close to your router for a
strong Wi-Fi signal and ensure the base is
not placed in an area with direct sunlight.
4. Select a permanent location for the base
because every time you relocate it, your
robot will have to re-map your space.
5. Plug in the base. The base indicator LED will
turn white when the base is powered on.
1
Install One Side Brush
1. Remove all plastic wrap and take one side
brush from the side brush box.
2. Align the hole in the brush over the peg on
the bottom of the robot, then press down
on the brush until it clicks into place.
2
Slide Robot Onto Base to Charge
1. Align the robot with Shark logo upside
down, then slide it up the ramp, onto
the base.
2. The base indicator light will turn
green when the robot is charging.
3
Download the SharkNinja® app
1. When prompted by the app, press the
Wi-Fi button on your robot to enter
Pairing mode. Once in pairing mode, your
robot will say “I am ready to connect to
Wi-Fi”.
Unlock full functionality with the app,
including:
✔ Scheduling
✔ Personalized Routines
✔ Remote Control
✔ Cleaning Reports
✔ No-Go Zones
3
Fill the Clean Water Tank
1. Lift the main lid on the front of the
base. Remove the clean water tank
with the blue handle.
2. Add room-temperature water up to
the
fill line and no more than 12 oz.
of Shark Multi-Surface Cleaner to the
fill line.
1. Align the flat side of the ramp with the
bottom of the base.
2. Lift the ramp slightly above the base,
align, and press down until the ramp
clicks into place.
3. Leave at least 2 feet of hard floor space
in front of the base, starting from the
end of the ramp. Do not place the base
within 2 feet of carpet.
2
Install Ramp on Base
4
Insert Odor Cartridge Assembly
Note: Not included in all models.
Note: Make sure the odor cartridge assembly is
installed in the base before using the robot.
Note: ONLY use the provided Shark-branded
floor cleaner.
Note: Additional side brushes may be included
as replacement parts, but only one should be
installed on the robot.
1. The odor cartridge can be found inside
the robot box in a silver package. Open
the package and remove the odor
cartridge assembly.
2. Flip up the handle on the odor dial. Align
the arrows and insert the assembly into
the slot on the top right side of the base.
3. To lock and engage the cartridge, rotate
it counterclockwise until it clicks at
least once.
4. Continue to rotate the dial toward the
high position to increase the intensity.
ROTATE
COUNTERCLOCKWISE
INSERT CARTRIDGE
ASSEMBLY INTO BASE
NOTE: If the Wi-Fi button is not responding, hold +
+ for 3 seconds to reset Wi-Fi.
sharkninja.comsharkninja.com
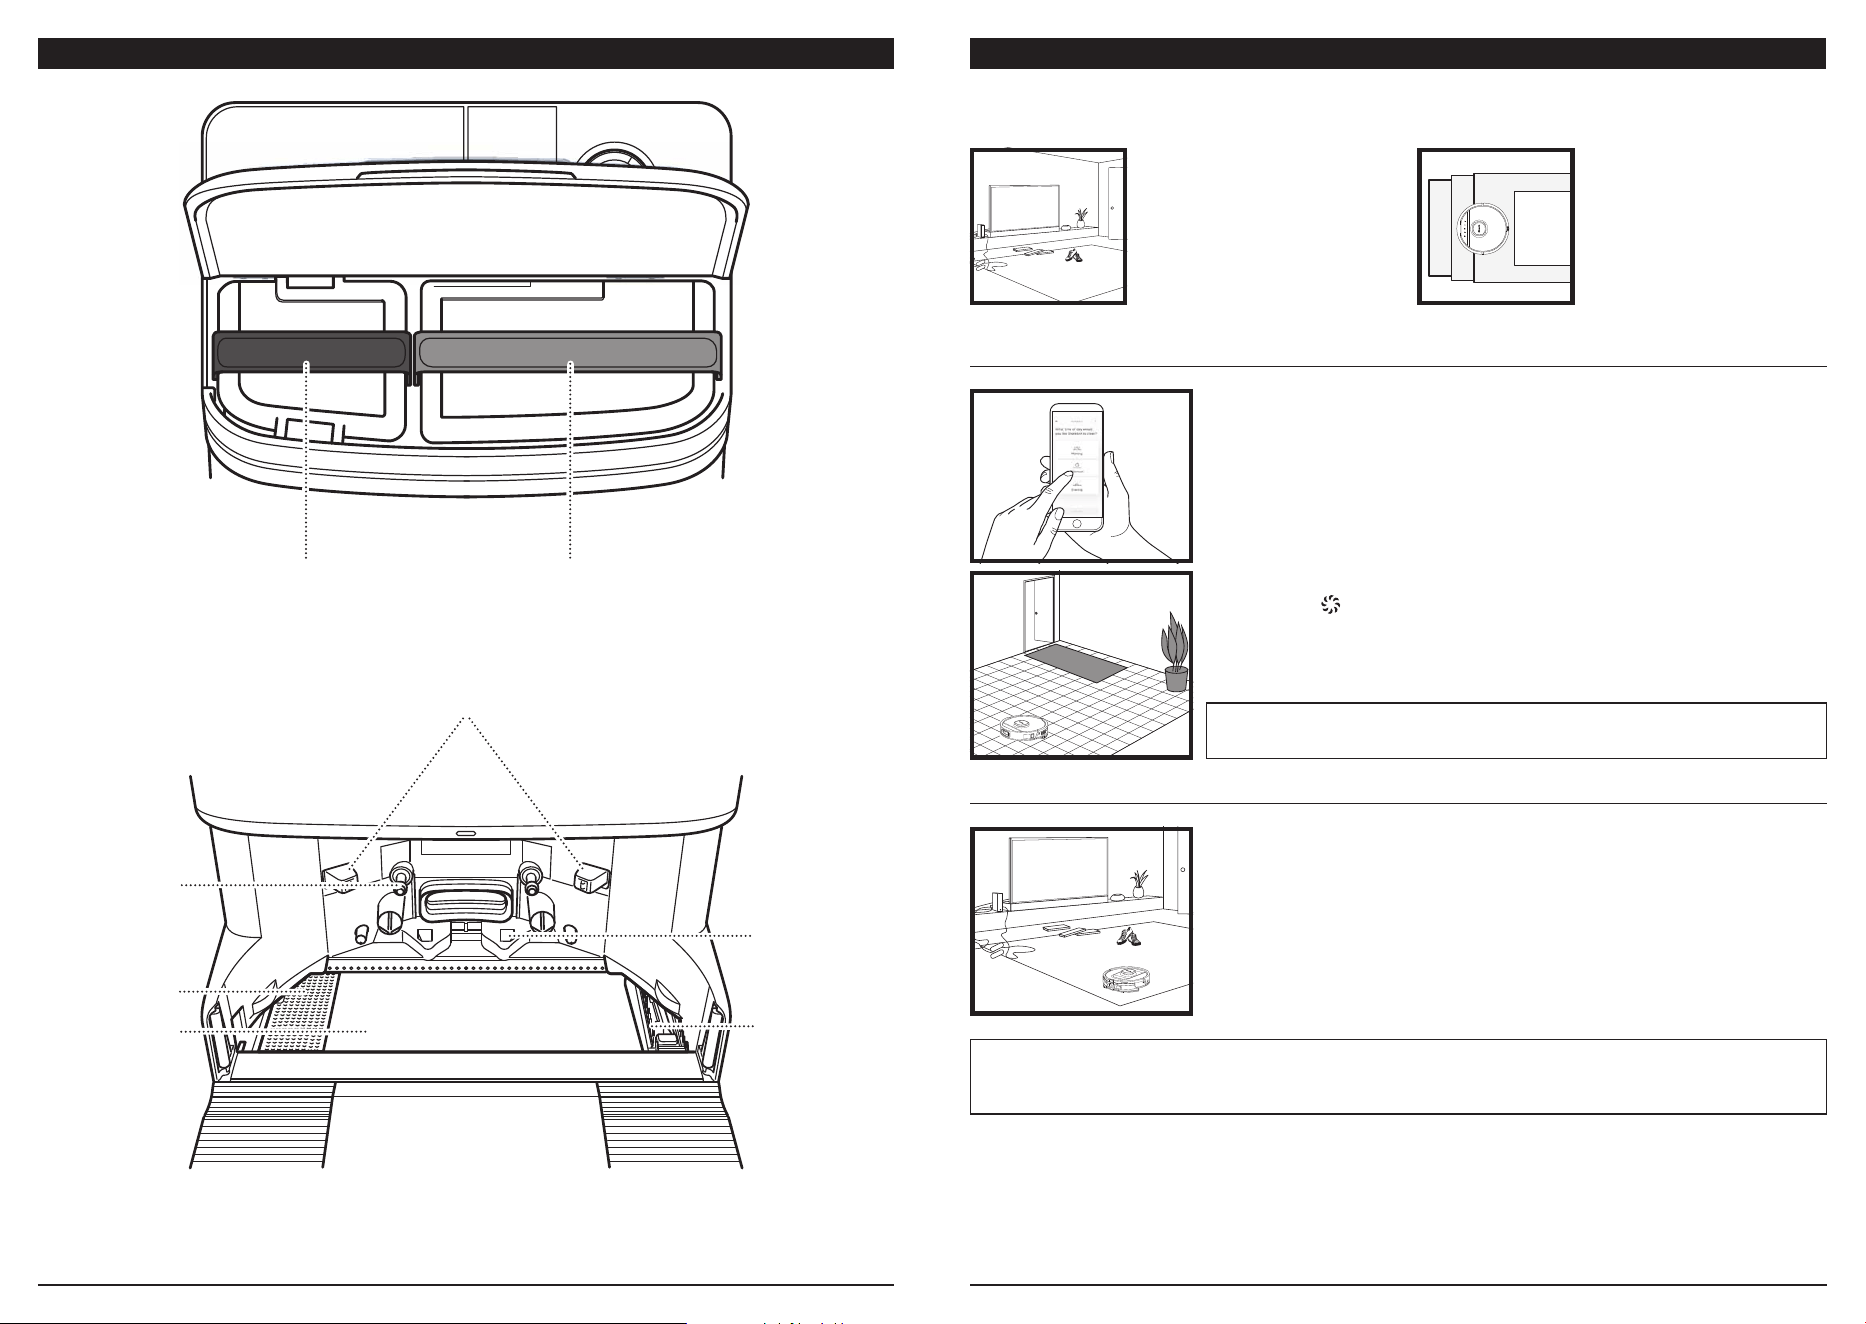
GETTING TO KNOW YOUR SHARK® ROBOT
TOP
BOTTOM
Cli Sensors
Mop Pad
Battery Door
Brushroll
Drive Wheel
Ultrasonic Floor Detect
Sensors (2x)
Front Caster Wheel
Brushroll Door
VACUUM Button
DOCK/POWER Button
LiDAR Module
Robot Combo
Dust Bin & Water Tank
Release Button
Front Sensors
MOP Button
GETTING TO KNOW YOUR NEVERTOUCH™ PRO BASE
Base Dust Bin
Clean Water Tank
Odor Neutralizer
Cartridge
Base Indicator Light
Debris Intake
Post-Motor Filter
Access Door
Pad Dry Fan
Greywater Tank
Pre-Motor Filter Door
Base Dust Bin
Base Dust Bin
Release Button
FRONT
BACK
Cord Storage
Side Brush
Mop Pad Plate
Release Latch
sharkninja.comsharkninja.com
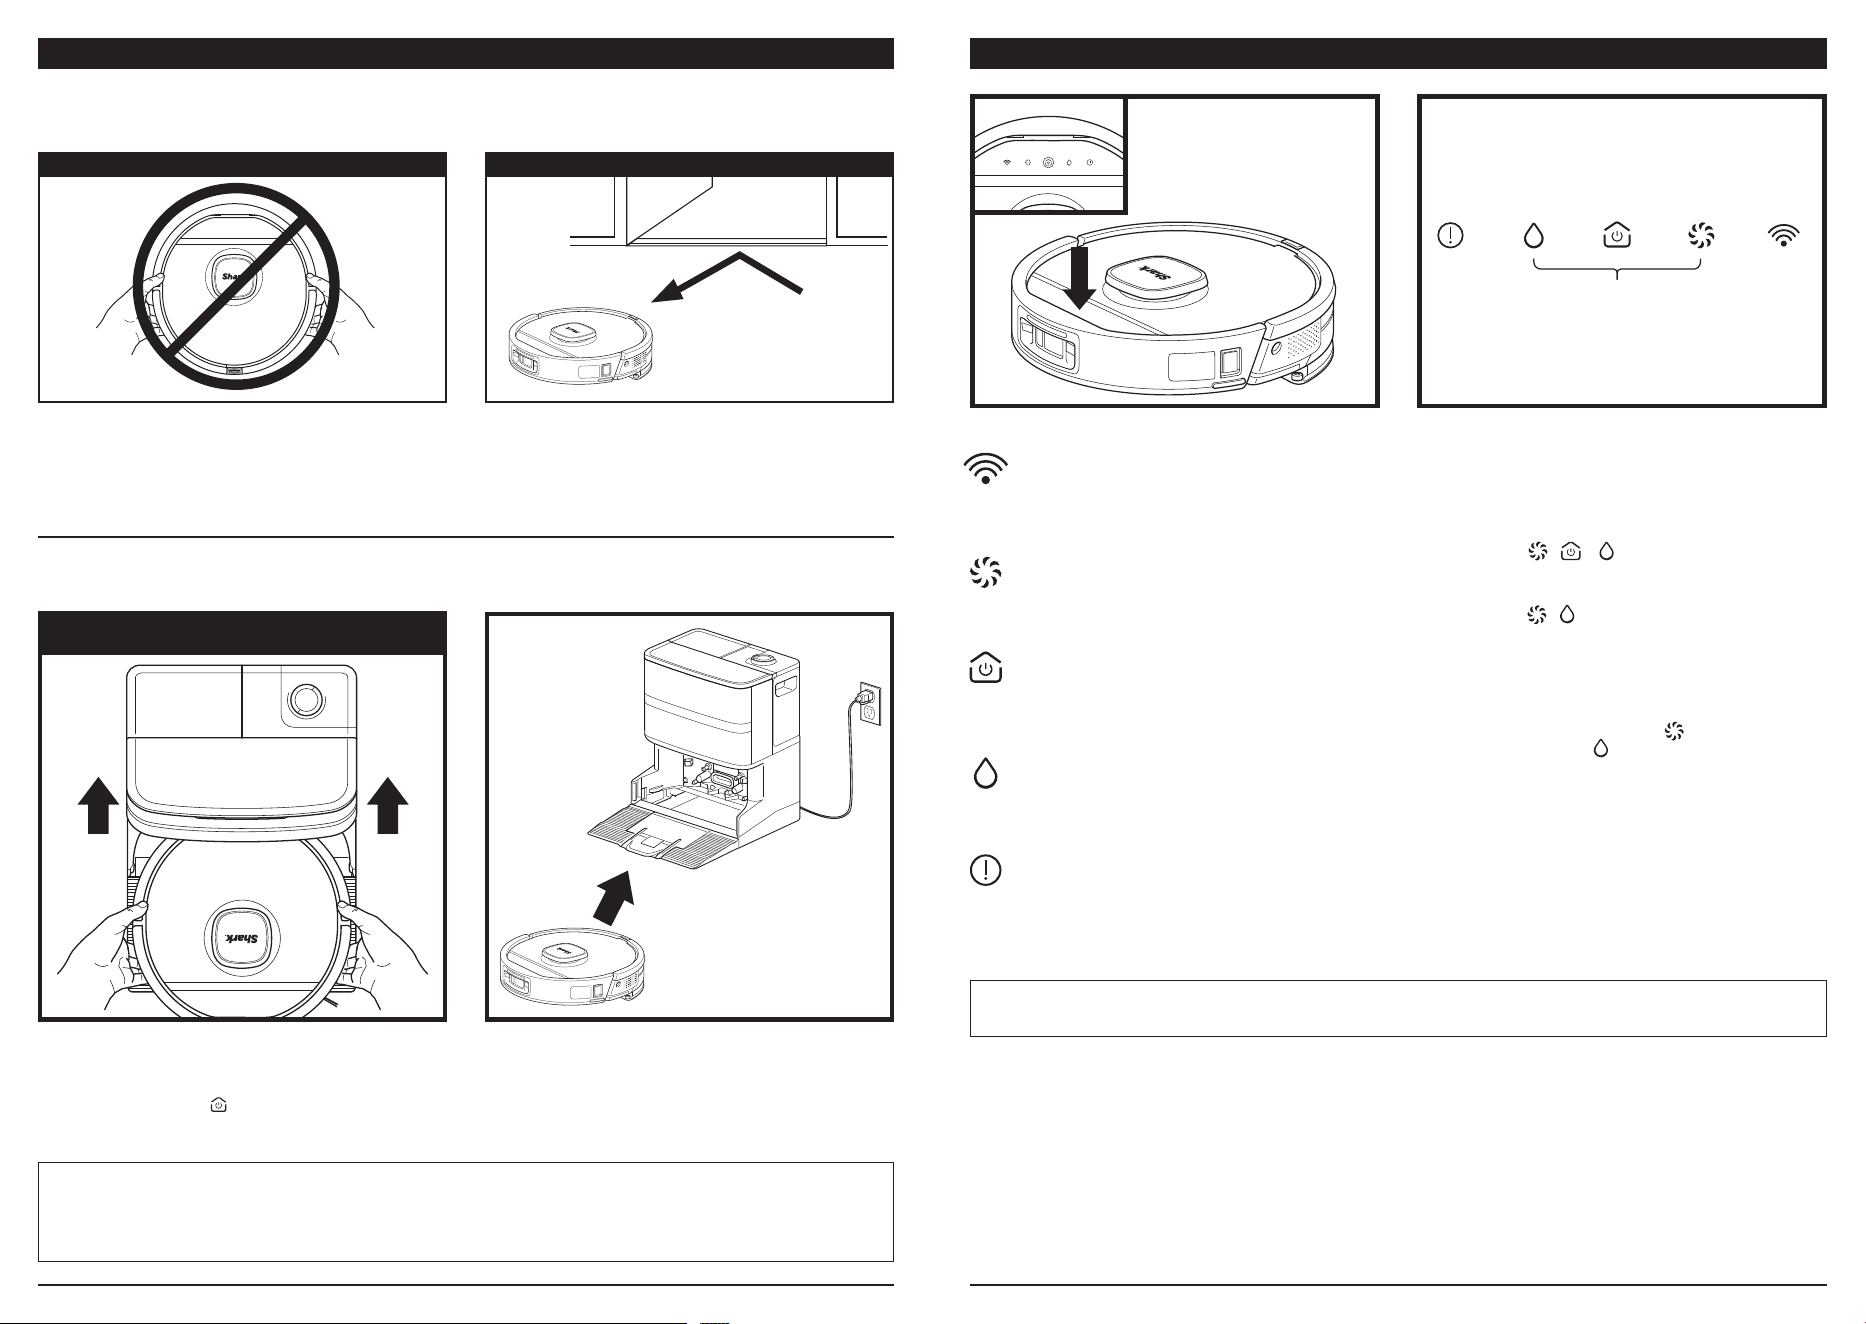
GETTING TO KNOW YOUR NEVERTOUCH™ PRO BASE
Greywater Tank Clean Water Tank
PREPARE YOUR HOME
Your robot uses an array of sensors to navigate around walls, furniture legs, and other obstacles while it
cleans. For best results, prepare your home as indicated below.
OBSTRUCTIONS
Your PowerDetect™ robot
detects obstacles and
navigates around them.
To ensure a complete map
of your home, before the
robot's first Explore Run,
remove objects such as
socks, shoes, and toys and
open all interior doors.
STAIRS
Your robot’s cli sensors will
prevent it from falling o
ledges. For the cli sensors
to work properly in any mode,
all runners, rugs, or carpets
must be at least 8 inches from
any stairs, or must extend
over the edge of the stairs.
MAPPING YOUR HOME
3D SENSOR & AI LASER NAVIGATION
After setup is complete, your robot will conduct an Explore Run to create an
initial map of your home. In your SharkNinja® app select:
Quick Explore:
• The robot will quickly enter and look around each room to identify walls,
furniture, and other obstacles. This should take approximately 10 minutes.
• Following Quick Explore, there is an option to have the robot complete a
Carpet Detection Run in select rooms, which will allow it to accurately map
the carpeted area and avoid them during wet cleaning missions.
While we recommend connecting to the app, you can also manually send your
robot to explore and clean:
• Tap Vacuum
on your robot. On its first run, your robot will automatically
vacuum while mapping, identifying walls, furniture, carpets, and other
obstacles.
• This first run can take up to a few hours depending on the size of your home.
Object Detection: The robot’s object detection technology helps it navigate
around obstacles, as well as some common household objects left on the
ground like cords, cables, shoes, toys, and clothes.
Carpet Mapping: Your robot will detect carpeted areas during its first vacuum
mission. If carpets are moved, you may need to have the robot re-explore
your home.
TIP: Be sure to charge the robot completely before its first clean so that it can explore, map, and clean as much of your
home as possible. It may take up to4hours* to fully charge your robot.
*Battery charge time may vary.
NOTE: It is necessary to send the robot to explore your whole home before it can be
sent on a mopping mission.
Charging Contacts
Water Outlets
Pad Attach/
Detach Hooks
Mop Pad Washing
Brush
Greywater Grate
Wash Tray
sharkninja.comsharkninja.com
ADDITIONAL TIPS & TRICKS
WI-FI RESET
• If the Wi-Fi button is NOT illuminated but
your robot is still not connected to the
app, you will need to reset the Wi-Fi.
• Hold
+ + for 3 seconds to reset
Wi-Fi.
VACUUM + MOP
• Hold + for 3 seconds to begin a whole-
home clean. The robot will first vacuum
carpets, then vacuum and mop hard floors.
SPOT CLEANING
• To clean a 5-foot by 5-foot area of your
home, place the robot on the spot you
wish to clean and hold
for 3 seconds
to vacuum or
for 3 seconds to mop.
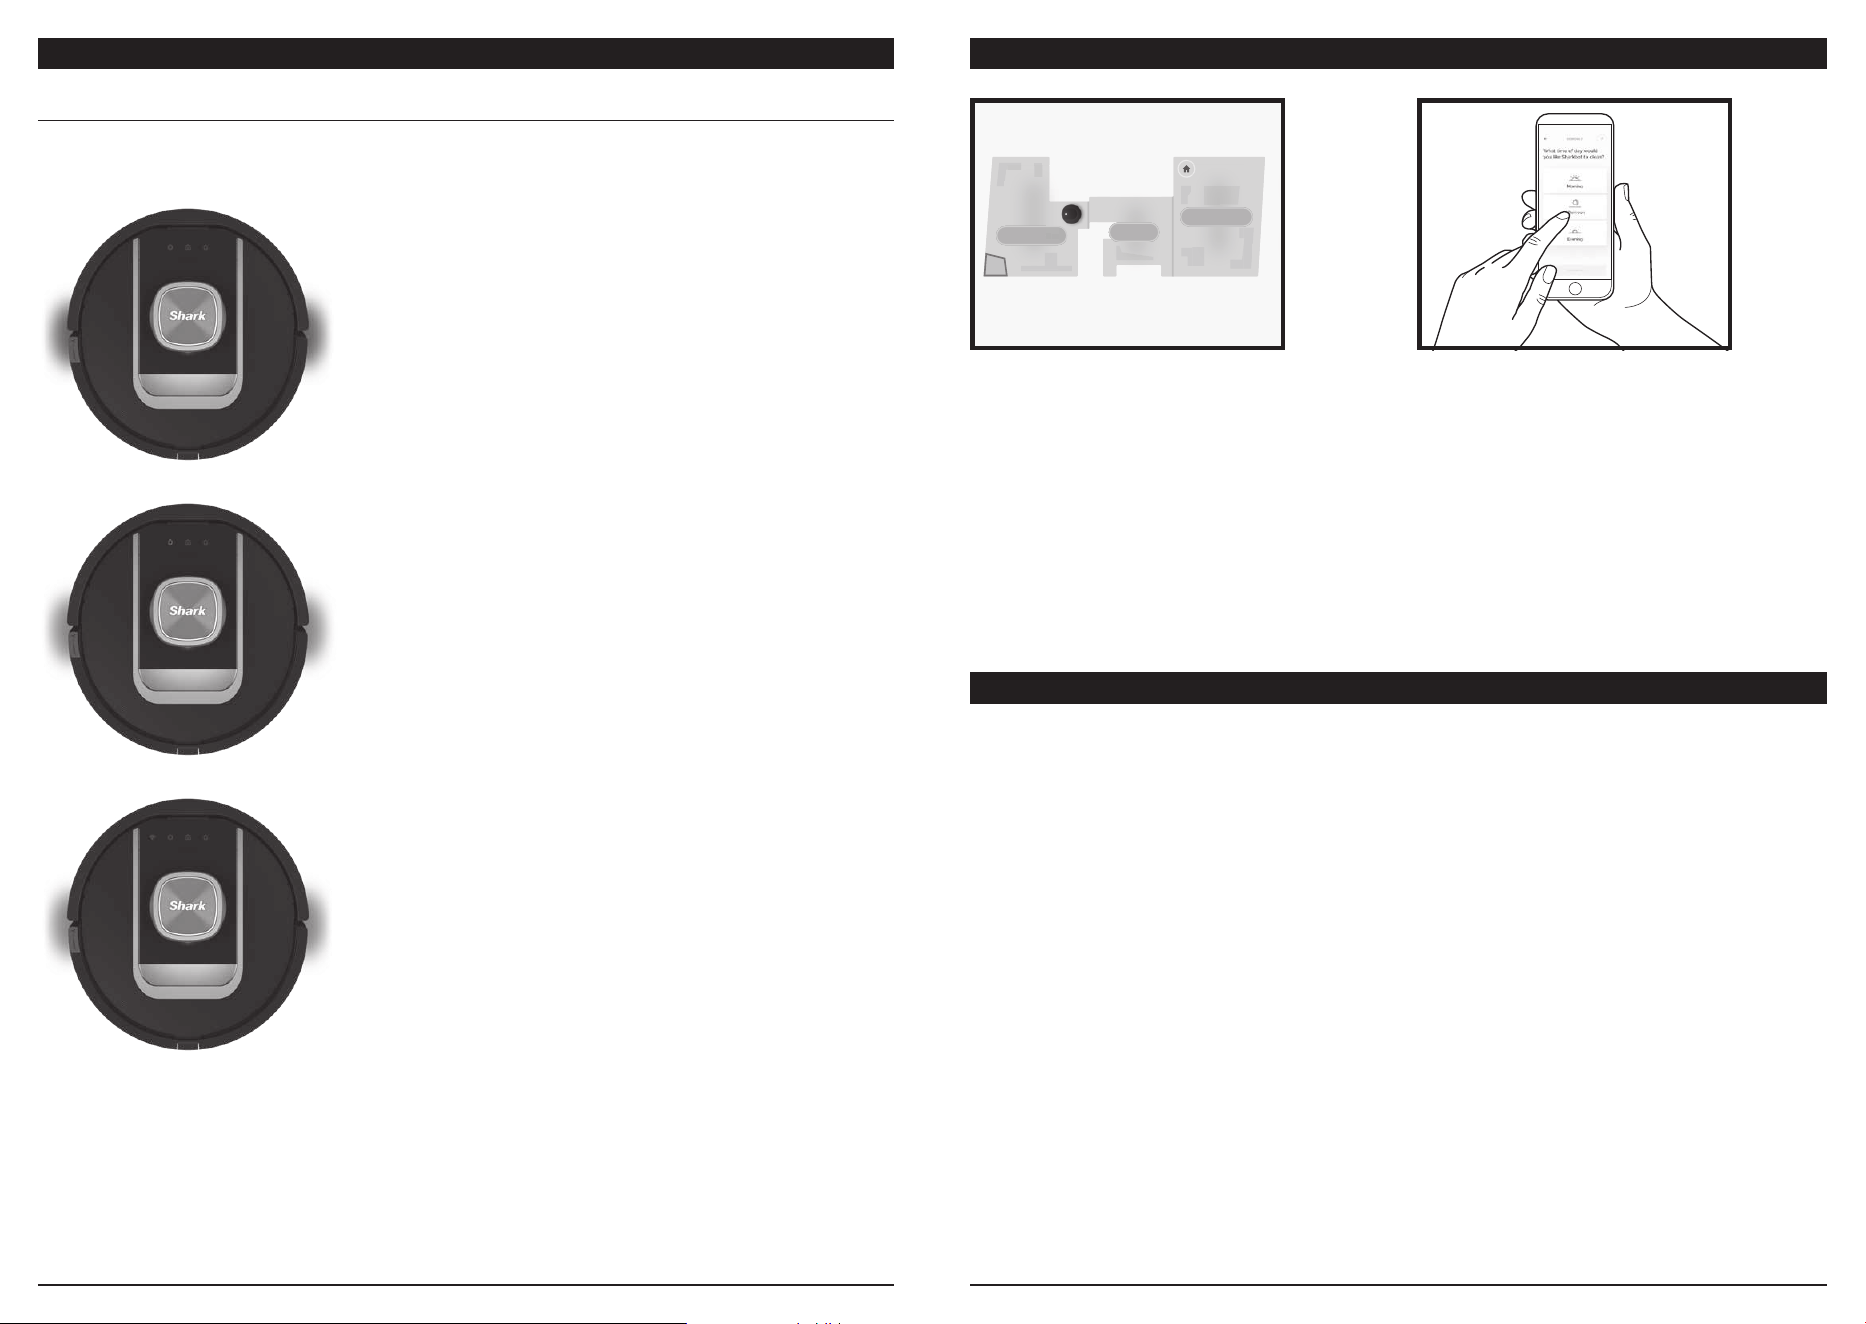
ROBOT USER INTERFACE
ROBOT USER INTERFACE
WI-FI BUTTON
• When illuminated, tap to put the robot in
Pairing mode.
• The icon will breathe BLUE when in pairing
mode and turn OFF once connected.
VACUUM BUTTON
• Tap to start vacuuming. The icon will
illuminate PURPLE while the robot is
vacuuming. Tap again to pause the
cleaning session.
POWER/DOCK BUTTON
• Tap to send the robot back to the base.
Tap again to pause docking.
• Hold for 3 seconds to power the robot
on or o.
MOP BUTTON
• Tap to start vacuuming and mopping
bare floors. The icon will illuminate BLUE
while the robot is mopping. Tap again to
pause the mopping session.
ERROR BUTTON
• When illuminated, tap the button to
repeat the error message.
• RED errors require immediate attention,
and ORANGE errors require maintenance.
Wi-Fi
Power/Dock
Vacuum + Mop
Mop
Error
Vacuum
NOTE: During a mop mission the robot will also vacuum, but only on bare floors. To vacuum carpets, select
Vacuum + Mop mode.
LIVING WITH YOUR ROBOT
AVOID MOVING THE ROBOT OR BASE
POWER/ON OFF
While your robot is cleaning, DO NOT pick it up
and move it, or move the NeverTouch™ Pro Base—
this will impact the robot’s ability to map your
home. If the base is moved, you will need to remap
your home.
Questions? For how-to videos, FAQs, troubleshooting, and tips & tricks, visit: support.sharkninja.com
or call +1-888-668-9600 for robot support.
With NeverStuck™ Technology, your robot can
easily climb over most thresholds, but if one is
higher than 1 inch, set up a no-go zone in the app
to block it o.
DOORWAYS & THRESHOLDS
To power on the robot, place it on the base to
charge. Align the robot with the Shark logo upside
down, then slide it up the ramp onto the base. To
power o the robot, remove it from the base and
hold the Power/Dock
button for 3 seconds.
When the cleaning mission is complete, or if the
battery is running low, the robot will search for
the base and automatically dock itself. If the robot
doesn't return to the base, it may have encountered
trouble along the way. Manually slide the robot
back onto the base to charge and get ready for
the next mission.
IMPORTANT: Be sure to charge the robot completely before its first clean so that it can explore, map,
and clean as much of your home as possible. It may take up to 4 hours* to fully charge your robot.
NOTE: When manually placing the robot on the base, make sure the charging contacts on the back end of the robot are
touching the ones on the base.
NOTE: When picking up the robot, be careful not to place fingers between the bumper and the back of the robot.
*Battery charge time may vary.
CHARGING
sharkninja.comsharkninja.com
ROBOT USER INTERFACE USING THE SHARKNINJA® APP
Please visit support.sharkninja.com or call 1-888-668-9600 for answers to all your app questions.
Get the most out of your Shark® robot vacuum with these app features:
RUMPELSTILTSKIN
Schedule History
EDIT OPTIONS
MapsControl
Shark
Kitchen
Living Room
Dining Room
o
m
Your Shark® PowerDetect™ robot can detect floor types, edges, and debris. There are some helpful indicators
on the robot to notify you when a dirty area has been identified for more intensive cleaning.
DETECT INDICATORS
QUICK EXPLORE
• Your robot will spend a few minutes exploring
and creating an initial map of your home.
VACUUM + MOP
• Full-home cleaning. Vacuuming of carpeted
areas, followed by vacuuming and mopping
of bare floors.
NO-GO ZONES
• Set up no-go zones in the app to keep your robot
out of the areas you would like it to avoid.
SCHEDULING
• Set up whole-home or room-specific cleanings
for any time, any day.
CONTROL FROM ANYWHERE
• Wherever you are, you're in control of your robot.
CUSTOMIZABLE SETTINGS
• Easily adjust suction power, mop pad saturation
level, and notification volume, and much more.
CLEANING REPORTS
• Each time your robot cleans, your app will
generate a cleaning report.
DIRT DETECT senses dense debris areas and automatically boosts
suction and makes extra passes until no more dirt is detected.
• When a mess is detected, the lights underneath the robot will turn
PURPLE to indicate that Dirt Detect has been triggered.
UV STAIN DETECT™ locates and attacks stubborn stuck-on stains with
increased saturation and pad agitation through a specialized wiggle
behavior.
• When stains have been detected, the lights underneath the robot will
turn BLUE to indicate that UV Stain Detect™ is enabled.
• After a mopping mission, your robot will provide a cleaning report
showing where stains were detected and can re-clean those areas if
desired, after washing its mopping pad at the base. UV Stain Detect™
can also be controlled manually through the app or toggled o.
• UV Stain Detect™ works for whole-home cleaning or individual rooms,
and there is also a Spot Clean function for targeted stain removal.
ERROR DETECT is triggered when your robot senses there is
a problem.
• When an error is detected, the lights underneath the robot will
turn RED, indicating immediate attention is required.
• When a warning is detected, the lights underneath the robot will
turn ORANGE, indicating maintenance is required. Please tap the
Error button on the robot's user interface to have the robot repeat
the error message.
SETTING UP VOICE CONTROL
How do I use my robot with Amazon Alexa?
Open the Amazon Alexa app, go to the menu and select Skills. Or go to the Alexa Skills store on the Amazon
website. Search for “Shark Skill”. Select the Shark Skill to open the detail page, then select the Enable Skill
option. Once enabled, you can ask Alexa to control your robot (i.e., “Alexa, tell Shark to start cleaning”).
How do I set up my robot with the Google Assistant on an Apple device?
1. Download, open, and sign into the Google Assistant app. 2. Select the “Explore” icon. Search for “Shark” and
select “Try it.” 3. To allow Google to link to your SharkNinja® account, sign into your SharkNinja account. This is
the same account you used when setting up your Shark robot in the SharkNinja app. Select “Authorize” to link
your SharkNinja account to the Google Assistant. Congratulations! The Google Assistant now works with your
Shark robot. To send your robot into action, use the voice command, “Google, tell Shark to start cleaning.”
How do I set up my robot with the Google Assistant on Android?
1. Download, open, and sign into the Google Assistant app. 2. Select the “Explore” icon. Search for “Shark”
and select “Link.” 3. Sign into your SharkNinja account. This is the same account you used when setting up
your Shark robot in the SharkNinja app. Congratulations! The Google Assistant now works with your Shark
robot. To send your robot into action, use the voice command, “Google, tell Shark to start cleaning.”
Visit support.sharkninja.com for setup instructions, which include how to enable Shark Skill for Amazon
Alexa and using your robot with Google Assistant.
Google Assistant:
Hey Google, start vacuuming.
Hey Google, tell (robot name) to vacuum.
Hey Google, pause vacuuming.
Hey Google, tell (robot name) to go home.
Amazon Alexa:
Alexa, ask Shark to start vacuuming/cleaning
the (room name).
Alexa, start/stop the robot.
Alexa, send the robot to the base.
Please visit support.sharkninja.com or call 1-888-668-9600 for answers to all your app questions.
sharkninja.comsharkninja.com
WI-FI TROUBLESHOOTING
• Typical home Wi-Fi networks support
both 2.4GHz and 5GHz.
• Do not use a VPN or a proxy server. Hotspot
available to connect only at 2.4 GHz.
• Make sure Wi-Fi isolation is turned o on
the router.
Reset your Wi-Fi
• Hold the
+ + on the robot for
3 seconds to reset Wi-Fi.
• If you cannot connect, call 1-888-668-9600.
STILL CAN’T CONNECT?
Restart your phone
• Turn o phone, wait 30 seconds, then turn it back
on and connect to Wi-Fi.
Reboot your robot
• Turn OFF the robot by removing it from the
base and holding the Power/Dock
button for
3 seconds. Wait 30 seconds, then slide the robot
back on the base to power it ON.
Reboot your router
• Unplug the router power cable for 30 seconds,
then plug it back in. Allow several minutes for
your router to reboot completely.
WI-FI TROUBLESHOOTING
NOTE: The following network interfaces and services of the device are enabled by default:
• Bluetooth interface: used for equipment configurations through the app.
• Wi-Fi interface: used for equipment network connection.
• NTP service: used to obtain the time.
What should I do if my Wi-Fi randomly disconnects?
Turn OFF the robot by removing it from the base and holding the Power/Dock
button for 3 seconds. Wait
30 seconds, then turn the robot back on by sliding it onto the base to charge. Turn o your phone. Wait
30 seconds, then turn your phone back on. Open Wi-Fi settings on your phone, find the Shark network, and
select Forget Network. Reopen the SharkNinja app and retry the connection process. It is normal for your
robot to temporarily lose connectivity when it goes under furniture or moves far from your router. Your
Shark® robot will automatically reconnect to Wi-Fi. If the robot does not reconnect, power it o, wait
30 seconds, power it back on, and place it back on the base.
What should I do if my robot is not connected to Wi-Fi, but I do not see the Wi-Fi icon?
Reset your robot's Wi-Fi. Hold
+ + on the robot for 3 seconds to reset Wi-Fi. The Wi-Fi icon will
illuminate BLUE to indicate the robot is in Pairing mode and the robot will say “I am ready to connect to Wi-Fi”.
What should I do if I verified a wireless network password that is incorrect?
Close the app, then reopen it. Make sure to enter the correct Wi-Fi network password this time. In your
phone’s network settings, choose your home 2.4 GHz network, and select Forget. Reconnect to your home
network. Make sure to use the correct password. If you were able to connect to your home network, proceed
to the app setup process. We recommend that you use the eye icon when entering your password to make
sure it is correct. Turn o your router and wait 30 seconds. Turn your router back on. Check to make sure
your 2.4 GHz network is visible in your phone settings. Turn o the robot, then wait 10 seconds. Turn the
robot back on and wait for the voice prompt. Hard-close the app and restart the connection process on the
robot. If you cannot locate your Wi-Fi password, please contact your Internet service provider.
What should I do if my username or password is invalid?
We recommend you select the eye icon next to the password entry to verify you are entering your pass-
word correctly. Select the “Forgot Password” option on the sign-in page. The automated system will email
you a link to reset your password. If you do not see an email, search your inbox and spam folder for emails
from mysharkninja@sharkninja.com. You can use the “Resend code” option to send the email again.
What should I do if there is an issue resetting password (did not receive the email or token was invalid)?
Select the “Forgot Password” option on the sign-in page. The automated system will email you a link
to reset your password. If you do not see an email, search your inbox and spam folder for emails from
mysharkninja@sharkninja.com. You can use the “Resend code” option to send the email again.
What should I do if my robot won't connect to Wi-Fi or loses Wi-Fi connectivity?
If you are an iOS user, you need to enable local network access on your phone for the
SharkNinja app. Please take the following steps to enable.
• Go to your phone settings —> Select Privacy—> Select Local Network —> Toggle SharkNinja
on, then try connecting again.
• Ensure your phone is connected to your home Wi-Fi network before trying to connect your robot.
• Typical home Wi-Fi networks support both 2.4 GHz and 5 GHz. Ensure you are connected to a
2.4 GHz network when you enter your username and password.
• Ensure your robot is turned on and you hear an audio prompt. Do not use a VPN or a proxy server.
Ensure Wi-Fi isolation is turned o on the router.
Note: Shark® robot vacuums cannot connect to 5 GHz band.
WI-FI TROUBLESHOOTING
sharkninja.comsharkninja.com
BASE MAINTENANCE OVERVIEW
Component Frequency Replacement Part(s)
Base Dust Bin
Empty every 60 days,
or as needed.
XDRV29XLDOB
XDRV29XLDOW
Base Pre-Motor Filters
Clean every 30 days,
or as needed.
XMFRV2500S
Base Post-Motor
Filter (HEPA)
Clean every 6 months,
or as needed.
XPSFRV2500
Base Ramp
Clean every 3 months,
or as needed.
XDRV2900RPB
XDRV2900RPG2
Base Wash Tray
Clean every 30 days,
or as needed.
N/A
Greywater Grate
Clean every 30 days,
or as needed.
XMFRV2900WD
Odor Neutralizer
Technology
NOTE: Odor Neutralizer Technology
is not included with all models.
Replace the odor cartridge
every 6 months,
or as needed.
268ZQ3000
Clean Water Tank
Clean every 30 days,
or before every refill.
XDRV29XLCW
Greywater Tank
Clean every 30 days,
or as needed.
XDRV29XLDW
To purchase parts and accessories, visit sharkninja.com/accessories. To purchase parts and accessories, visit sharkninja.com/accessories.
CAUTION: Before performing any maintenance, unplug the base from the electrical outlet.
MOP PAD SANITIZATION INSTRUCTIONS
To achieve the sanitization benefit on the robot’s mopping pad:
1. Fill the clean water tank on the base with distilled water up to the water maximum fill line.
2. After each wet cleaning mission, allow the base to completely wash and dry the mopping pad without interruption.
CAUTION: Before performing any maintenance, power off your robot by holding the Power/Dock
button
on the robot for 3 seconds, then remove the water tank.
ROBOT MAINTENANCE OVERVIEW
Component Frequency Replacement Part(s)
Brushroll
Clean every 30 days,
or as needed.
278KKU2800
278KKU2801
Filter
Clean every 30 days,
or as needed.
XPRFRV2500
Dust Cup
Clean every 30 days,
or as needed.
XDC2900WDB
XDC2900WDW
Mop Pad
NOTE: After every wet cleaning
mission, the base will automatically
wash and dry the robot mop
pad. Additional cleaning in
a washing machine may be
needed occasionally.
Replace every 2 years,
or as needed.
PADRV29WDA
PADRV290WDA
Sensors and Charging Contacts
Clean every 30 days,
or as needed.
N/A
Side Brush Replace as needed. 820KKU2800WD
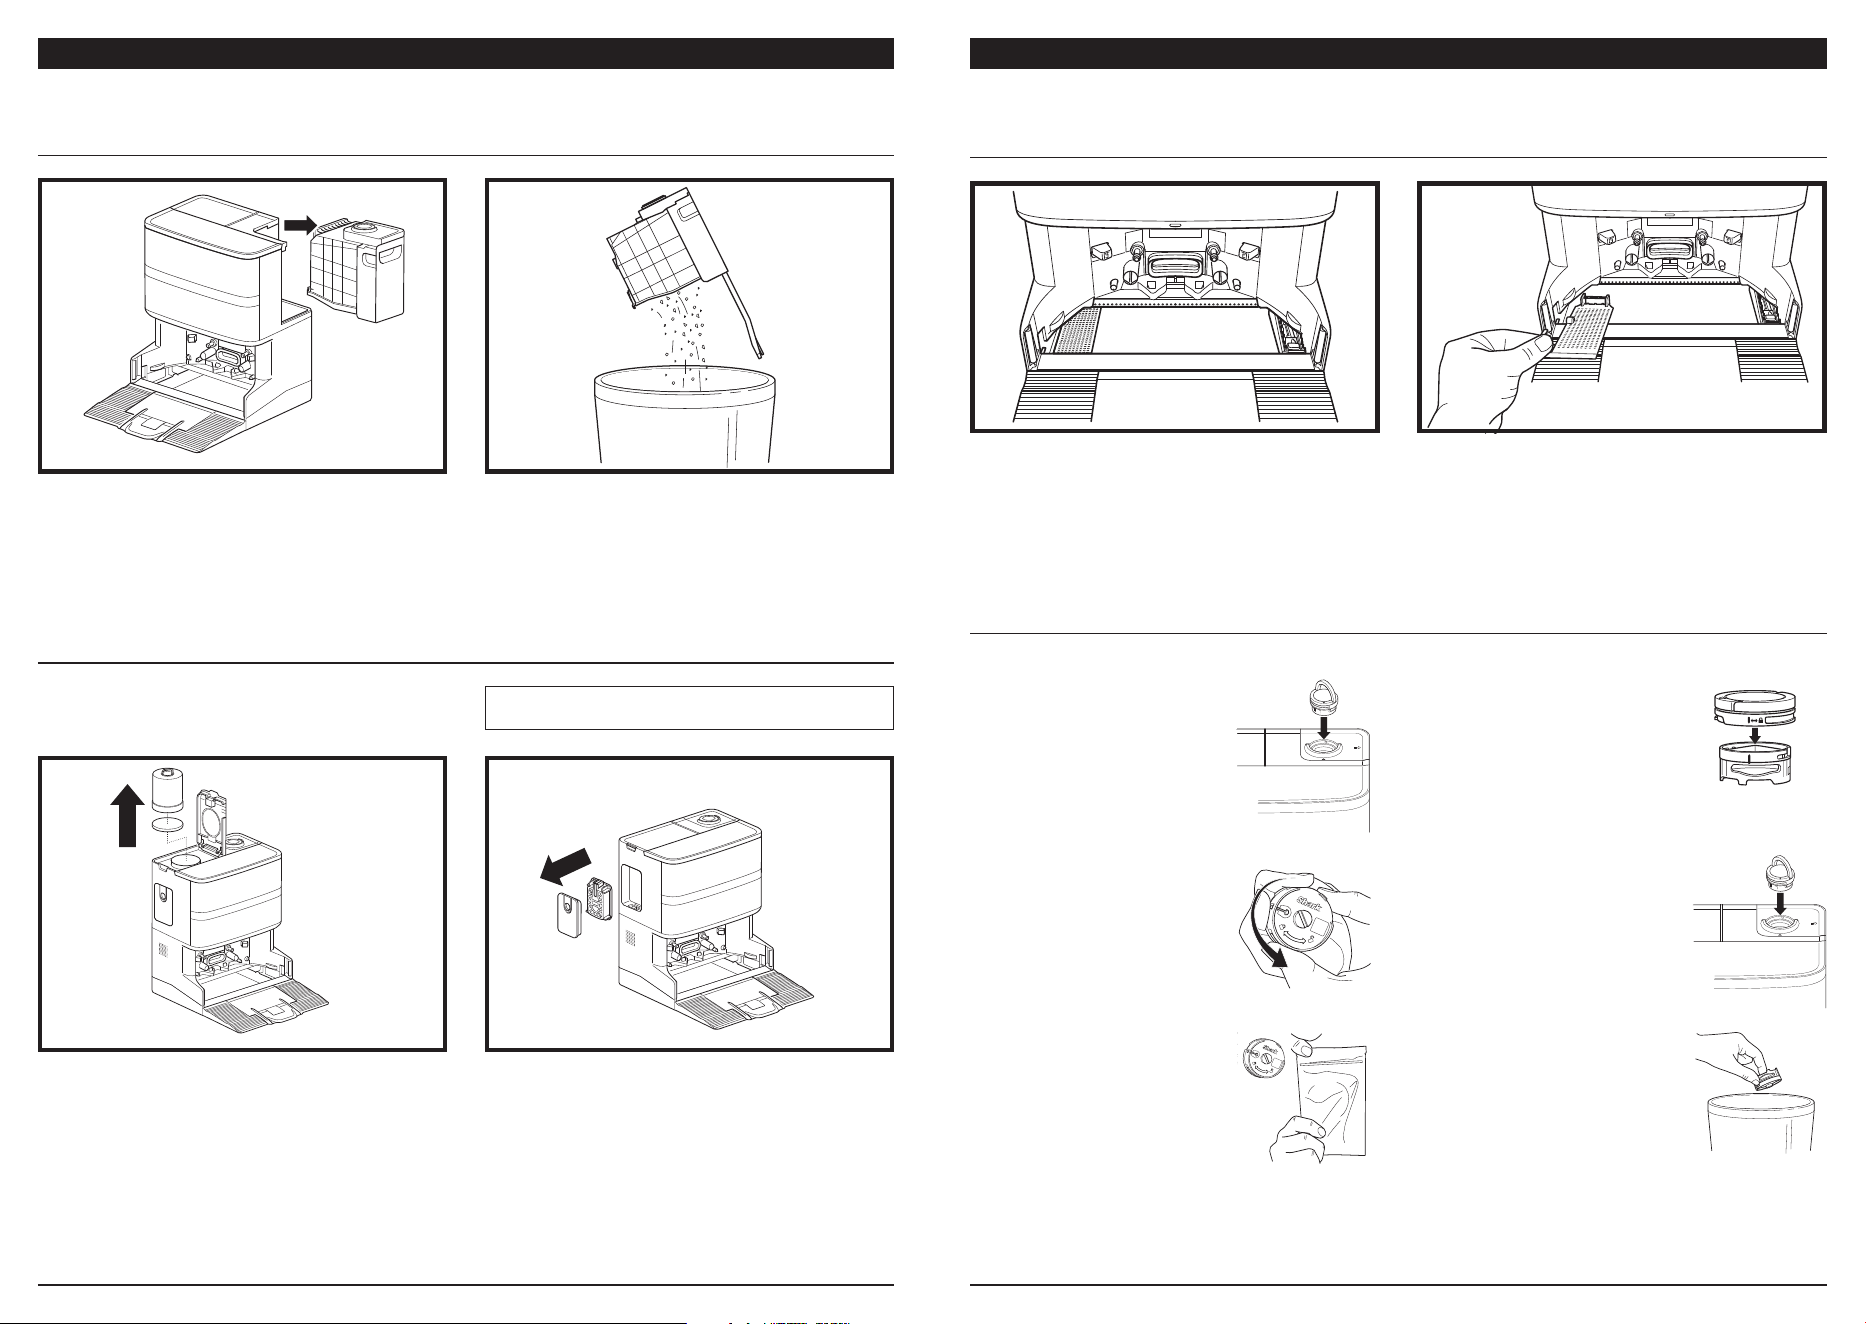
Sensor Name Functional Description
Cli Sensor
Cli sensors use infrared ranging to prevent your robot
from falling o stairs and ledges. If the cli sensors detect
stairs or ledges, the robot will stop moving forward.
LiDAR Sensor
The LiDAR sensor uses laser ranging to help the robot
create maps of your home. Detective distance is 8 m.
RGB 3D Sensor
With one RGB camera, one line-laser and one IR camera,
the 3D sensor scans objects to identify an image through
algorithms. FOV: H = 94.7°, V=75.1°, D=115.6°.
Left Wall Follow Sensor
The left wall follow sensor detects the distance between
objects and the left side of the robot through TOF ranging.
The detective distance is 30 mm.
Right Wall Follow Sensor
The right wall follow sensor detects the distance between
the objects and the right side of the robot through the line
laser. Detective distance is 100 mm.
sharkninja.comsharkninja.com
BASE MAINTENANCE
MAINTAINING THE BASE DUST BIN
CLEANING & REPLACING THE BASE FILTERS
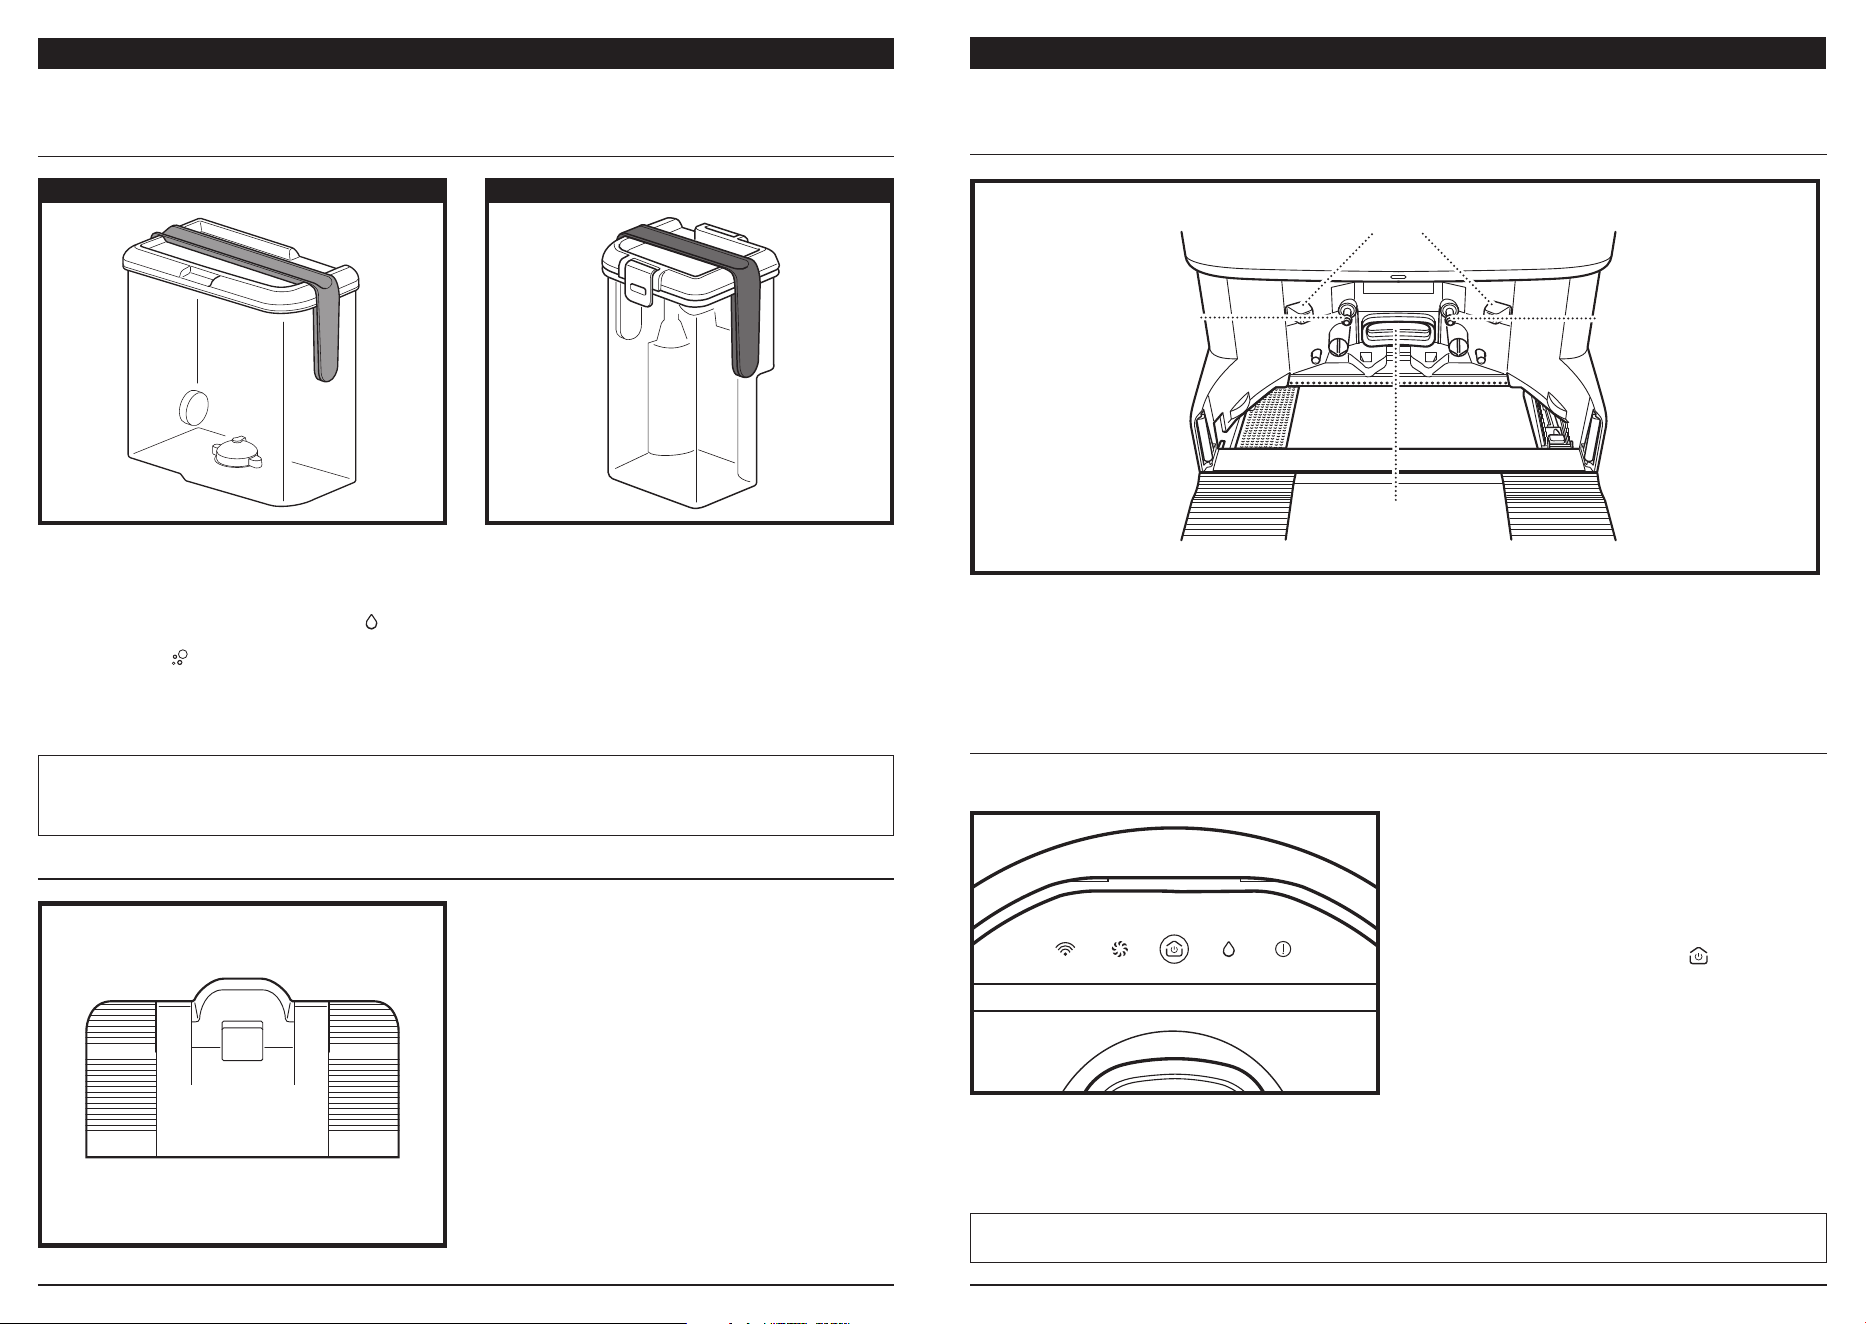
1. Empty the base dust bin every 60 days.
2. To detach the bin, press the Dust Bin Release
button on the back right side of the base, then
slide out the bin.
3. To empty the bin, hold it over the trash, then
press the orange release button on the side of the
bin. Lightly tap the dust bin against the inside of
the trash receptacle to knock o any remaining
debris. Use a dry cloth to wipe o the gray mesh
filters on the inside of the dust bin. Reinstall the
bin by sliding it into the slot in the base until it
clicks into place.
CLEAN POST-MOTOR FILTER EVERY SIX MONTHS
Slide down the tab at the top of the filter door to
remove the door and access the base post-motor
filter. Pull down the teal tab to remove the filter.
Tap the filter clean over the trash. DO NOT use
water or soap to clean this filter, as this will cause
damage. More frequent cleaning may be required
with heavy use.
To reinstall, insert the bottom half of the filter first,
then push in until the filter clicks into place. With the
filter installed, reinsert the filter door into the base.
CLEAN PRE-MOTOR FILTERS ONCE A MONTH
To open the filter housing lid, hold the top left edge
of the base, and pull up on the lid. With the lid open,
remove the foam filter by the top handle, then lift
out the felt filter underneath. Tap the filters clean
over the trash, then rinse with cold water ONLY,
as soap may damage them. Allow filters to air-dry
completely for at least 48 hours before reinstalling
to prevent liquid from being drawn into electrical
parts. The filters must be installed correctly for the
base to work properly. Reinsert the felt filter first,
then the foam filter.
Regularly clean the filters to keep your vacuum’s
suction power optimal. Replace filters every
6–12 months or as needed.
IMPORTANT: DO NOT use soap when cleaning the filters.
CAUTION: Before performing any maintenance, unplug the base from the electrical outlet.
BASE MAINTENANCE
1. With the robot removed, you can access the
base wash tray.
2. To clean the wash tray, wipe it down with a
damp microfiber cloth.
3. Locate the mop pad washing brush on the
right side of the wash tray. Remove any hair
or debris from around the bristles and use a
damp cloth to wipe away any stuck-on debris.
4. Carefully remove the greywater grate on the
left-hand side and wash with water to clear any
debris. Reinstall the grate, ensuring it is seated
properly in its slot. If the grate has wedged out
of place, remove it and reinstall so that it sits
flush in the wash tray.
5. Allow the wash tray to completely dry for at
least 48 hours before reinstalling the robot.
CAUTION: Before performing any maintenance, unplug the base from the electrical outlet.
Replace the Odor Neutralizer Technology cartridge every 6 months, or as needed.
CLEANING THE WASH TRAY
REPLACING THE ODOR CARTRIDGE
1. Flip up the handle and rotate
the dial counterclockwise until
the two arrows are aligned.
Pull the handle to remove the
dial from the base.
4. Align the yellow arrow on the
side of the cartridge with the
yellow arrow on the side of
the dial cover, then insert the
cartridge into the dial. Rotate
the cartridge clockwise to
lock it in place.
2. Rotate the cartridge
counterclockwise in
the dial housing and
pull out the cartridge
to remove it.
5. Align the arrow on the dial
cover with the arrow on the
base, then reinsert the dial
into the base. Rotate the
dial counterclockwise until it
clicks into an intensity setting
to engage. Rotate further to
change the intensity setting.
3. Remove the new odor
cartridge from the sealed
packaging. To maintain the
life of the cartridge, keep it
in the sealed packaging until
you are ready to install it.
6. Dispose of the old cartridge
by dropping it into the trash.
NOTE: Odor Neutralizer Technology is not included in all models.
sharkninja.comsharkninja.com
CAUTION: Before performing any maintenance, unplug the base from the electrical outlet.
Run a base self-cleaning cycle every 6 months or as needed.
CAUTION: Before performing any maintenance, unplug the base from the electrical outlet.
BASE MAINTENANCE
MAINTAINING THE BASE WATER TANKS
CLEANING THE BASE RAMP
NOTE : O NLY use the provided Shark-branded floor cleaner.
DO NOT reinstall any water tanks filled with warm water. Always use room-temperature water in the tanks.
DO NOT move the base while the water tank is full.
1. Clean the base clean water tank before every refill,
or once every 30 days.
2. Wash the clean water tank with warm water and
soap. Rinse thoroughly.
3. Add room-temperature water up to the
fill line
and no more than 12 oz. of Shark Multi-Surface
Cleaner to the
fill line.
1. Send the robot on mopping mission and allow it to
run for at least 5 minutes.
2. While the robot is mopping, empty the clean
water and greywater tanks. Fill the clean water
tank up to the YELLOW fill line with a 1:1 mixture
of water and white vinegar.
3. Reinsert both tanks into the base.
4. After 5 minutes of mopping, tap
on the robot
to initiate docking.
5. Allow the robot to complete a mop pad wash
cycle on the base.
6. Once the wash cycle is complete, empty the
contents of both base water tanks into the sink.
7. Remove the robot from the base and power it o
by holding the Power/Dock [icon] button for 3
seconds. Remove the water tank and empty it in
the sink.
8. Reinstall the water tank on the robot and slide the
robot onto the base with the Shark logo facing
upside down to power it on.
1. The greywater tank collects and stores dirty water
after every pad wash.
2. This tank should be emptied and cleaned every
30 days, or as needed.
3. To empty the tank into a toilet. open the lid and
pour out the dirty water.
4. Add a small amount of soap to the tank and rinse
it thoroughly in the sink with warm water.
5. Allow the tank to air-dry for at least 48 hours
before reinstalling.
Clean the base ramp every three months or as needed.
1. Carefully lift the ramp up and away from the base.
2 Use a damp cloth to wipe down the ramp.
3. To reinstall, lift the ramp slightly above the base,
align, and press down until the ramp clicks into place.
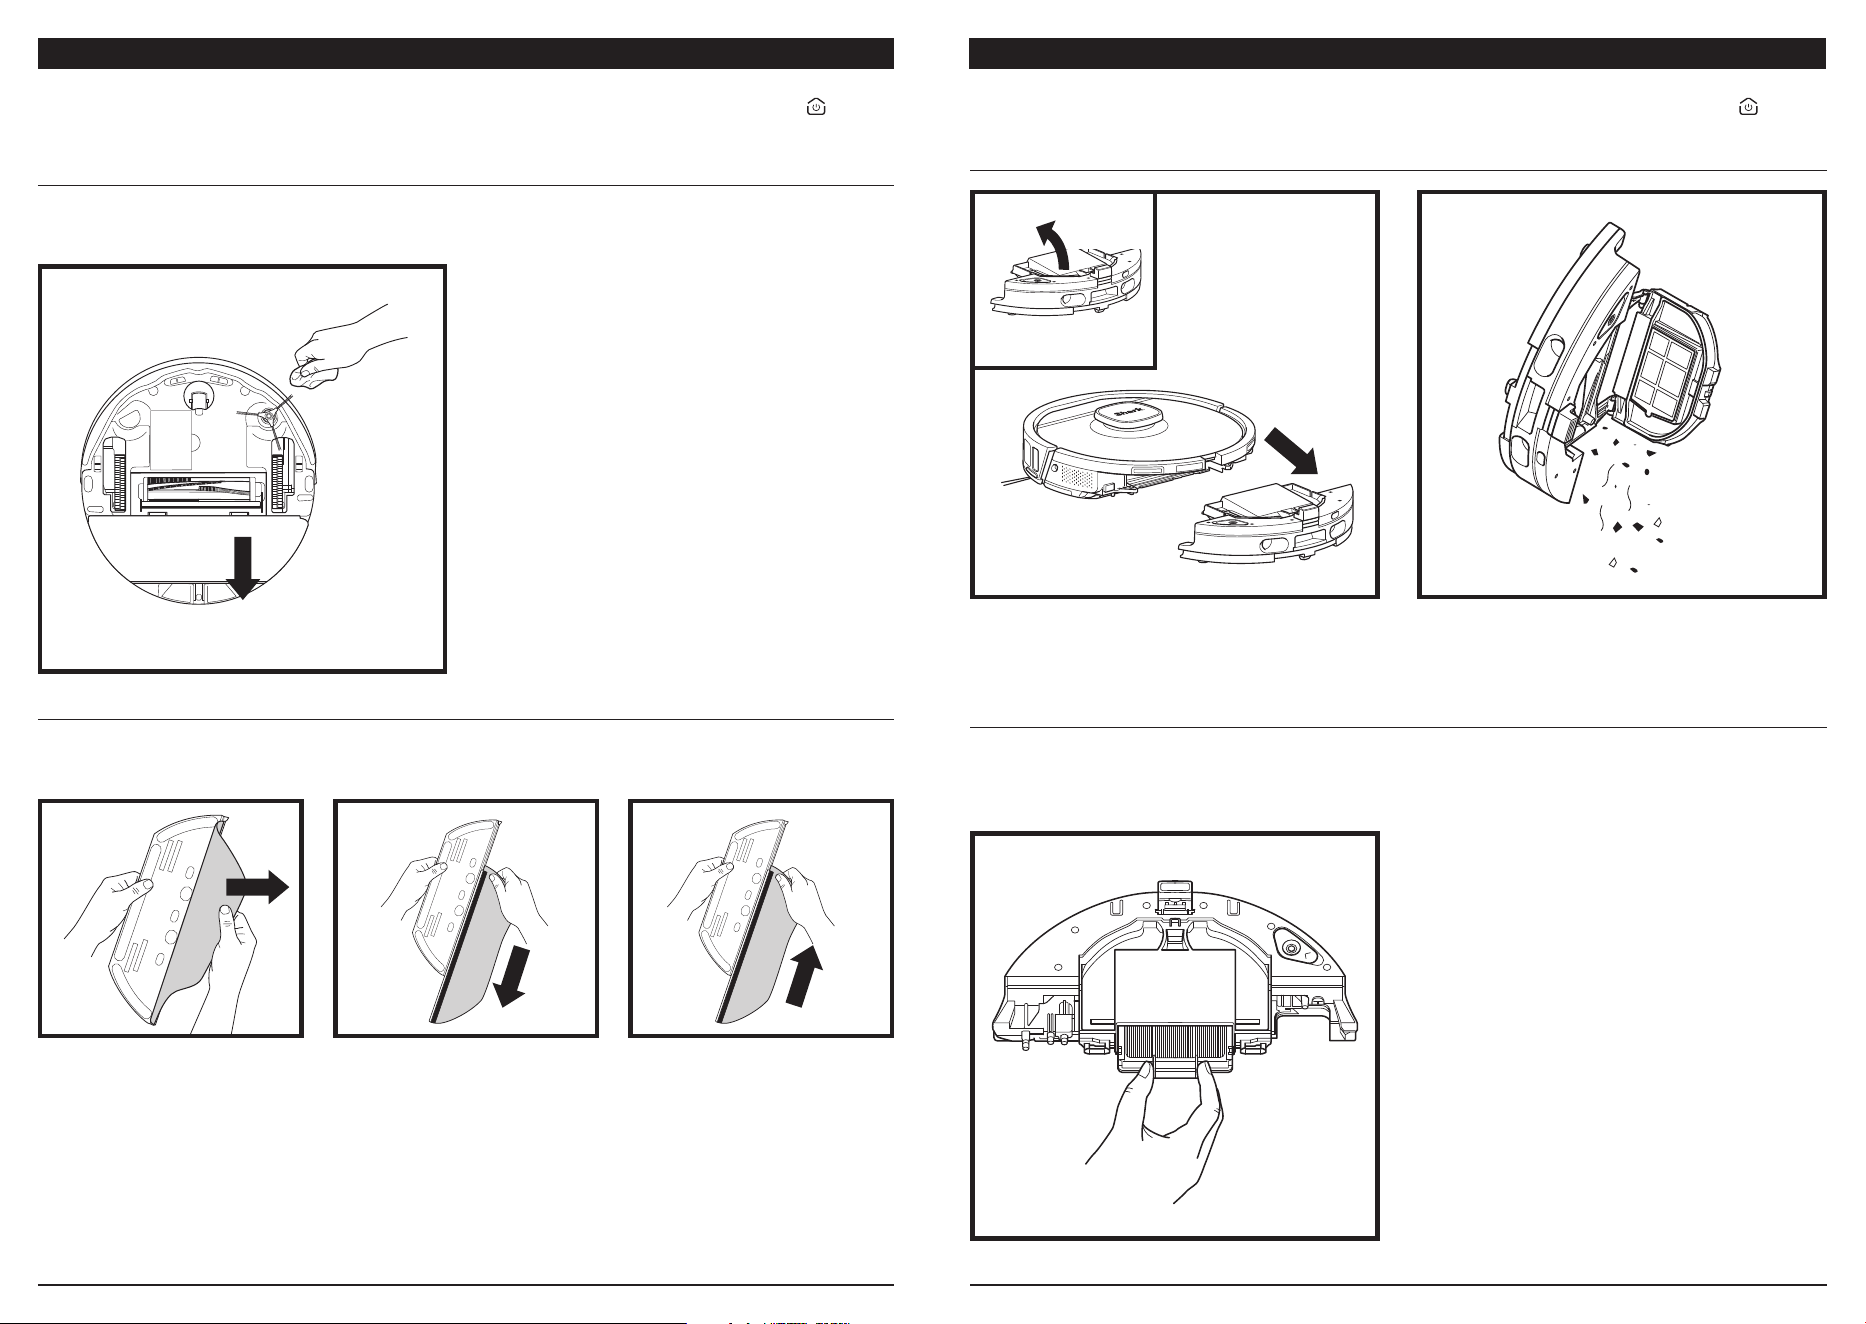
BASE MAINTENANCE
CLEANING THE BASE-TO-ROBOT CONNECTIONS
STARTING A BASE SELF-CLEAN CYCLE
1. Locate the charging contacts, water outlets, and
debris intake.
2. With a dry cloth, gently dust o both charging
contacts on the base. Remove any dust or debris
from the debris intake
3. Use a dry cloth to wipe the water outlet nozzles on
the base to remove any stuck-on debris or other
blockages.
DO NOT put anything other than 5% white vinegar and water into the water tank when performing a self-clean cycle.
DO NOT use 5% white vinegar unless performing a self-clean cycle.
CLEAN WATER TANK GREYWATER TANK
Charging Contacts
Debris Intake
Water Outlets
Water Outlets
sharkninja.comsharkninja.com
ROBOT MAINTENANCE
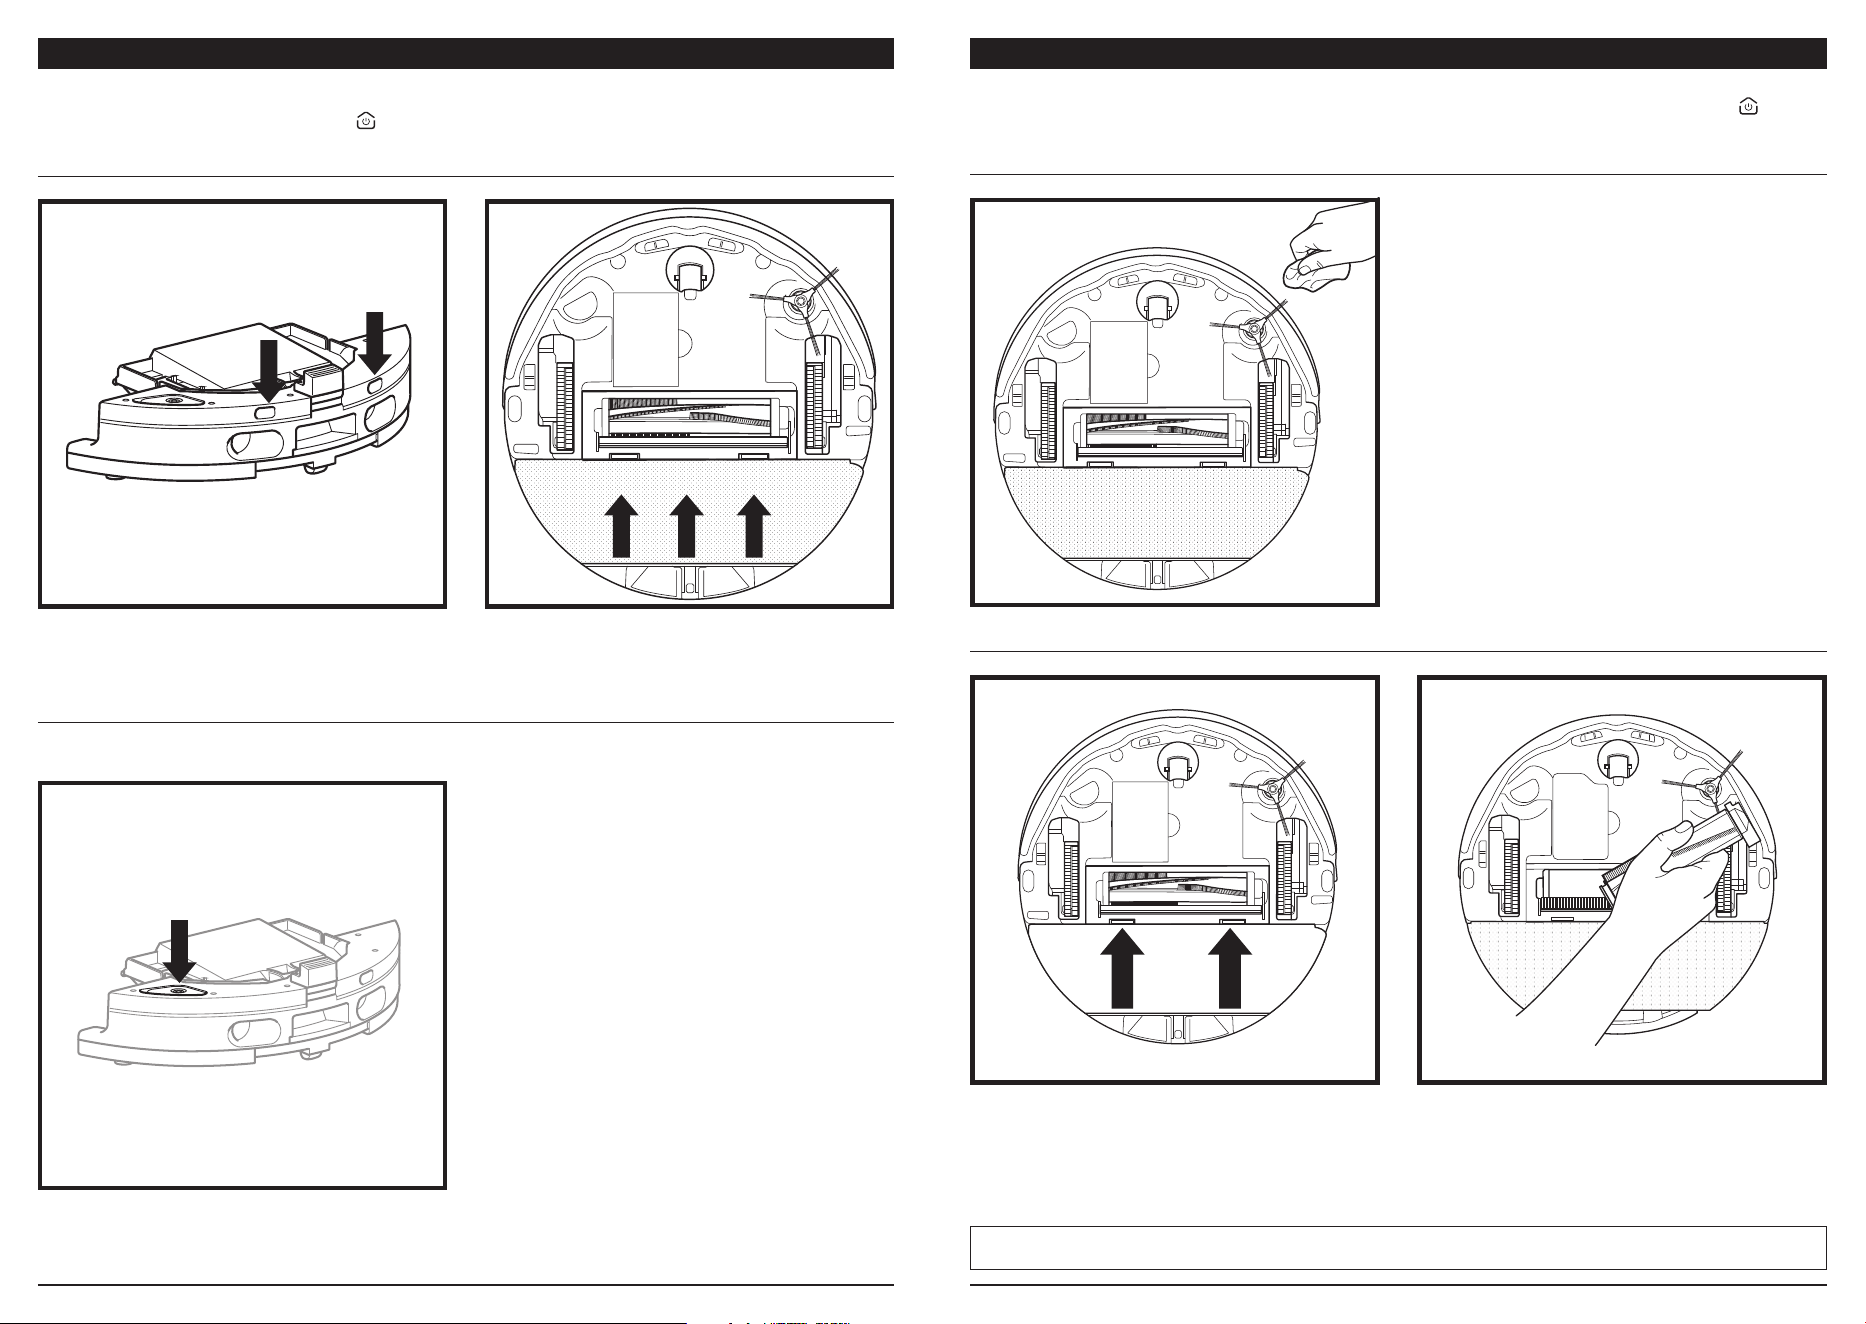
EMPTYING THE ROBOT DUST CUP
1. Press the dust cup release button and slide the
dust cup out from the robot.
2. To open the robot dust cup lid, pinch and lift up
using the finger slots.
3. Empty the dust cup contents into the trash.
4. Using a dry cloth, wipe the mesh filter on the
bottom of the dust cup door.
CLEANING THE ROBOT FILTER
1. Remove the orange filter from the dust cup using
the tabs. Lightly tap the filter over the trash to
remove debris.
2. Rinse the dust cup with water, and allow it to
air-dry for at least 48 hours before reinstalling.
3. Reinsert the filter into the dust cup, then slide
the dust cup back into the robot until it clicks
into place.
Regularly clean the filters to keep your vacuum’s suction power optimal. Replace filters every 6–12 months,
or as needed.
IMPORTANT: DO NOT use soap when cleaning the filters.
ROBOT MAINTENANCE
MOP PAD PLATE REMOVAL & REINSTALLATION
1. To remove the mop pad plate from the bottom
of the robot, gently pull on the gray release latch
and slide the pad plate o the robot.
2. To reinstall the mop pad plate, slide it back in
until it clicks into place.
NOTE: If the pad plate is stuck on the base, gently
lift up from the underside of the gray latch to loosen
it, then remove.
CAUTION: Before performing any maintenance, power off your robot by holding the
Power/Dock button
on the robot for 3 seconds, then remove the water tank.
CAUTION: Before performing any maintenance, power off your robot by holding the
Power/Dock button
on the robot for 3 seconds, then remove the water tank.
Though the base will automatically remove and reinstall the mop pad plate, you can also remove it manually,
if needed.
1. Carefully pull the mop pad away
from the pad plate.
3. Slide a clean or new pad into
the edge of the pad plate. Press
lightly on the pad to secure it to
the plate.
2. Slide the pad o the plate.
After a wet clean mission, the NeverTouch™ Pro base will automatically wash the robot mop pad. The mop
pad should also be cleaned in a washing machine every 3 months or replaced as needed.
CLEANING & REPLACING THE MOP PAD
sharkninja.comsharkninja.com
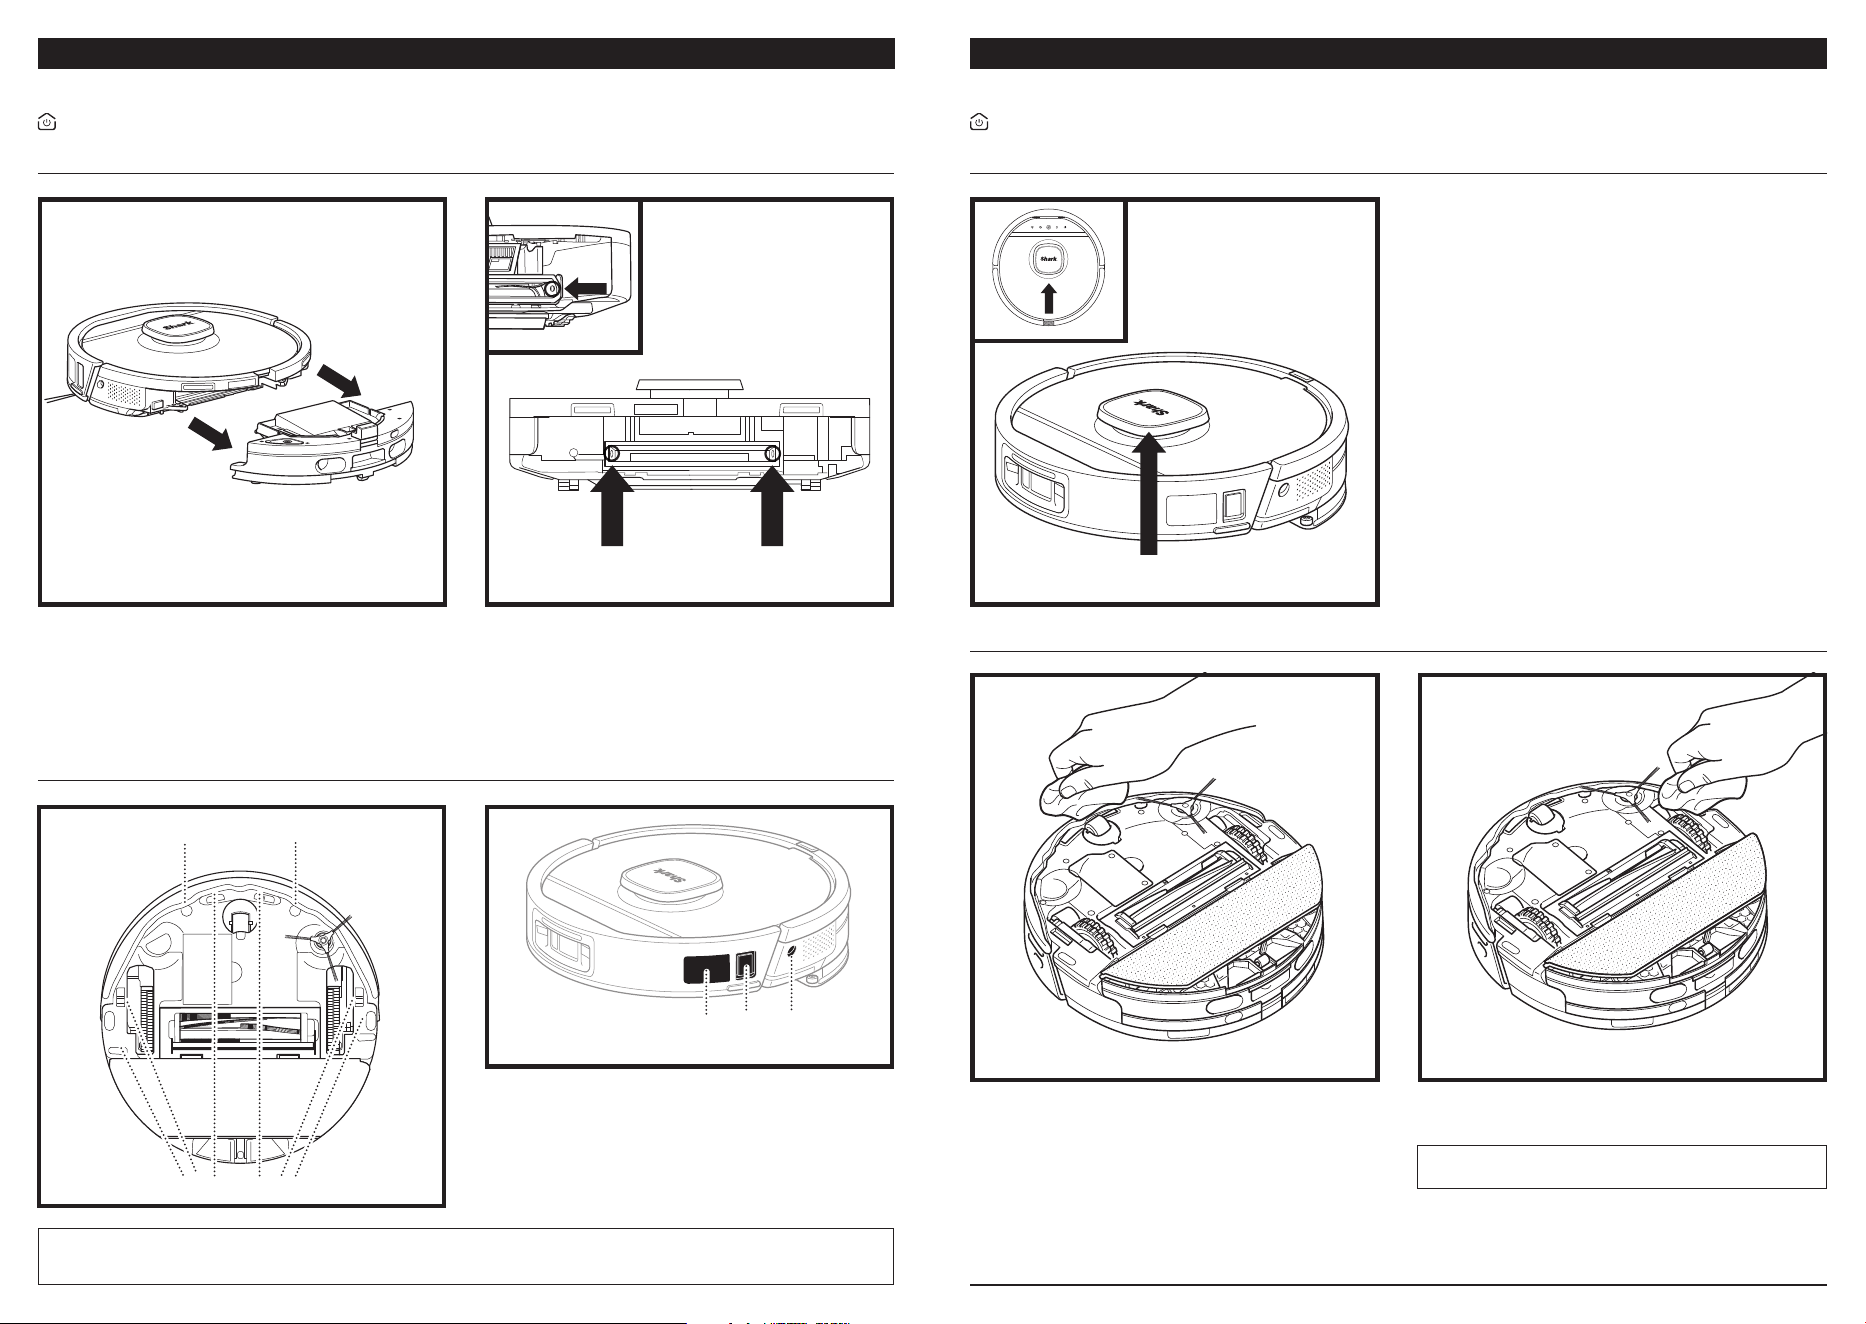
CLEANING THE WATER INLETS & OUTLETS
With a dry cloth, wipe the opening of the water
inlets on the robot dust bin.
Remove the mop pad plate and clean the three
small holes on the bottom of the dust cup with a
toothpick or safety pin.
ROBOT MAINTENANCE ROBOT MAINTENANCE
CAUTION: Before performing any maintenance, unplug the base from the electrical outlet. Power off the robot
by pressing and holding the Power/Dock
button on the robot for 3 seconds, then remove the water tank.
CAUTION: Before performing any maintenance, power off your robot by holding the
Power/Dock button
on the robot for 3 seconds, then remove the water tank.
CLEANING THE SIDE BRUSH
CLEAN SIDE BRUSH AS NEEDED.
1. Pull the side brush o the peg on the bottom
of the robot.
2. Carefully unwind and remove any string or hair
wrapped around the brush or peg.
3. Gently wipe the brush with a dry cloth. To reinstall,
snap the brush over the peg. Spin the brush
manually to make sure it is installed correctly.
FILLING THE ROBOT WATER TANK
1. To fill the tank, open the port by pulling out the
blue rubber seal. Add water through the port,
then push the seal back into place.
2. After filling and sealing the robot water tank,
be sure to wipe the robot port dry with a
microfiber cloth.
Though the base will automatically refill the robot water tank, you can also access and fill it manually, if needed.
CLEANING THE BRUSHROLL
1. To access the brushroll, push up on the tabs on the
brushroll door, then lift o the door.
2. Take out the brushroll and remove the cap on the
end. Clean o any hair or debris, then replace
the cap. Use a dry cloth to clean any debris or
hair buildup in the brushroll cavity. Reinstall the
brushroll, inserting the flat end first. Close the
brushroll access door and press down until both
sides click into place.
NOTE: Replace brushroll every 6–12 months, or when visibly worn. See sharkaccessories.com for replacement parts.
sharkninja.comsharkninja.com
ROBOT MAINTENANCE
CAUTION: Before performing any maintenance, power off the robot by pressing and holding the Power/Dock
button on the robot for 3 seconds, then remove the water tank.
CAUTION: Before performing any maintenance, power off the robot by pressing and holding the Power/Dock
button on the robot for 3 seconds, then remove the water tank.
ROBOT MAINTENANCE
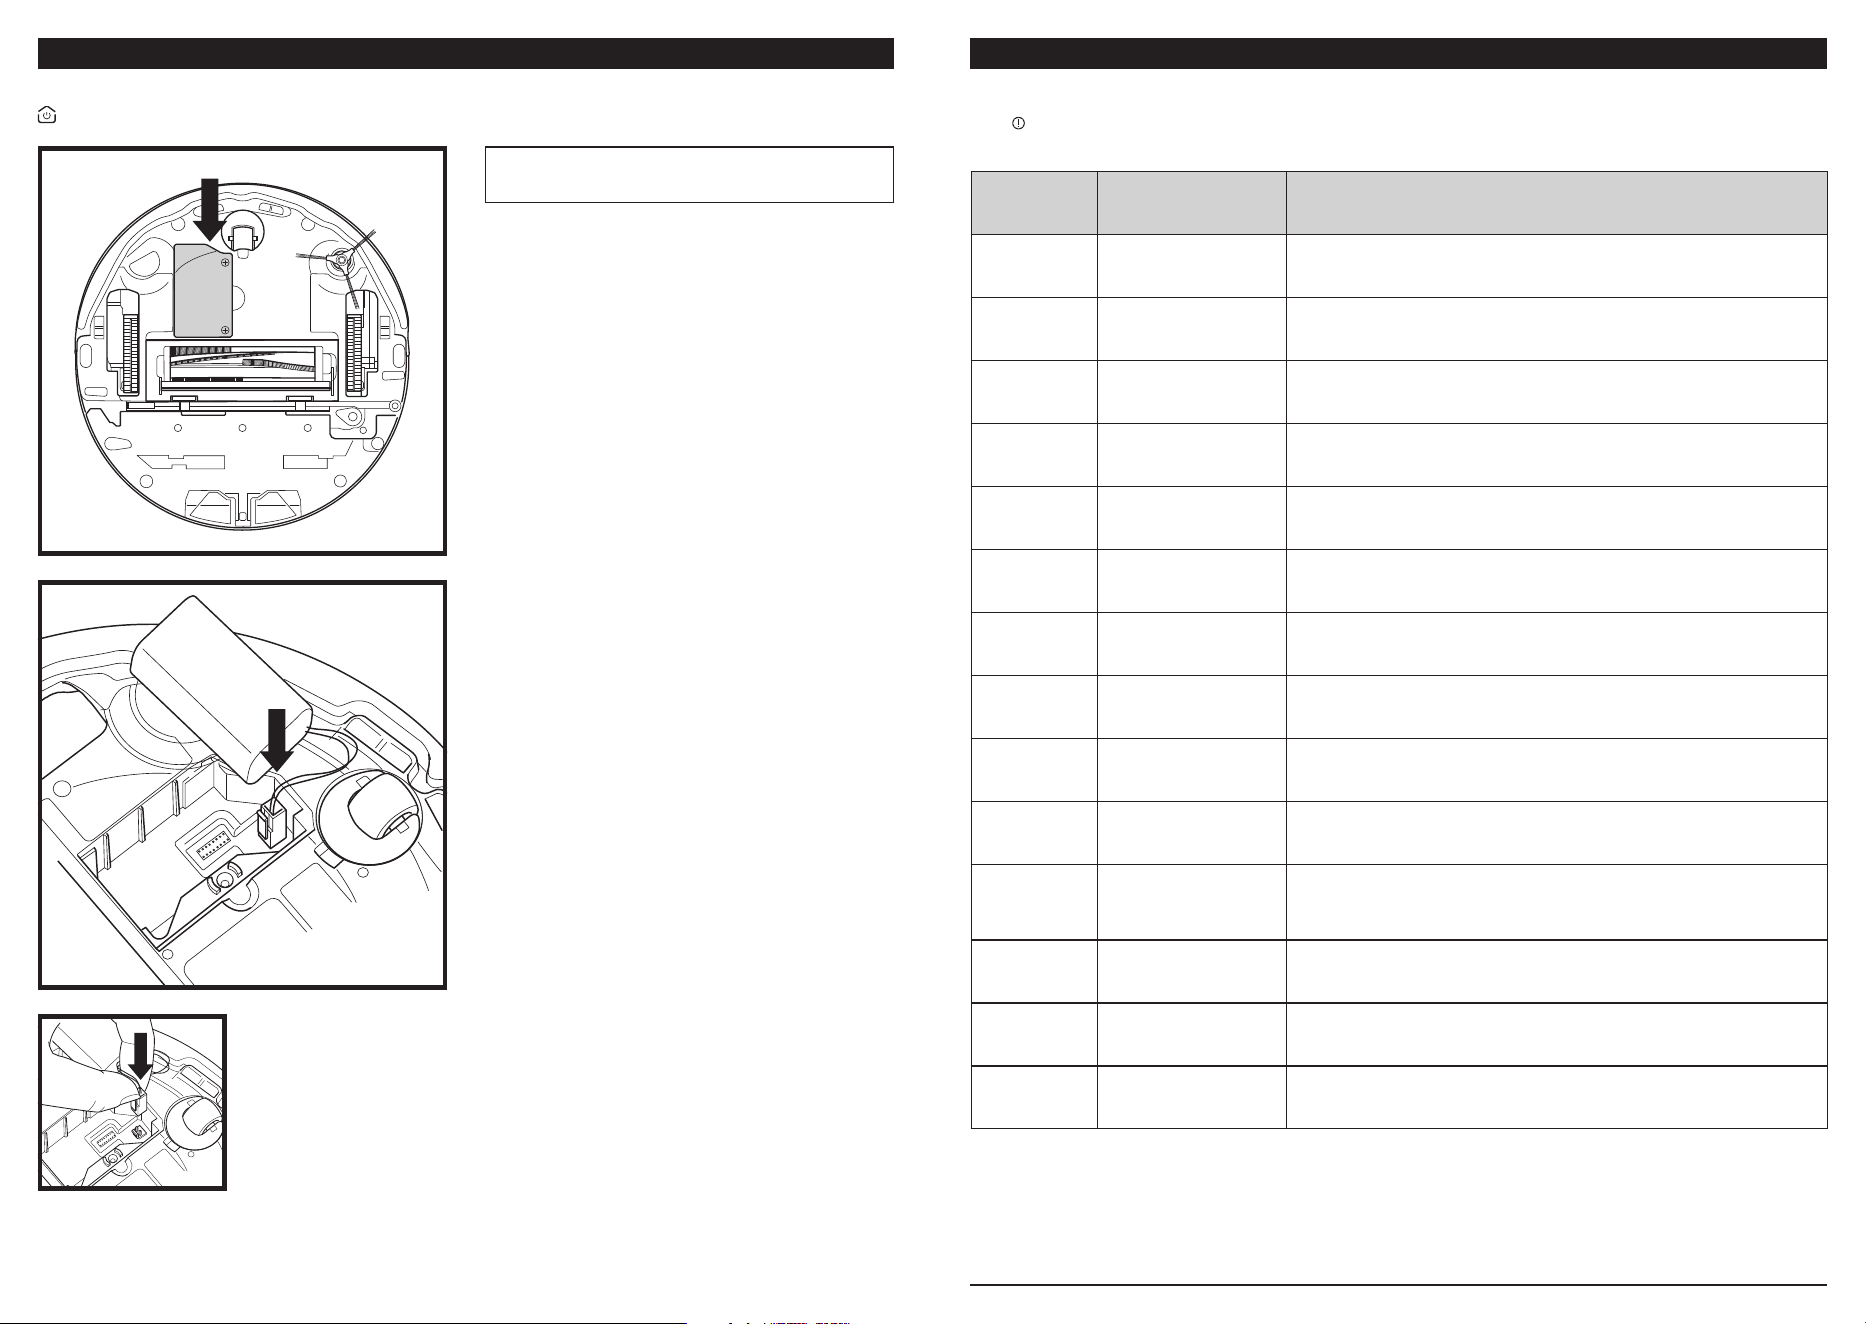
CLEANING THE DIRT DETECT SENSORS
3. With a microfiber cloth, wipe away any debris on
the Dirt Detect sensors. There is one sensor on
each side of the compartment. Be sure to clean
both sensors.
4. Make sure there is no debris blocking the opening
or wrapped around the brushroll, and reinstall the
dust cup.
1. Remove the dust bin from your robot.
2. Locate the Dirt Detect sensors. They can be
found on the interior of the robot brushroll
compartment.
LIDAR MODULE
1. Check the navigation module on top of the
robot and gently remove any hair or debris.
2. For a deeper cleaning of the navigation module,
first place the robot on a level surface and turn
o the power.
3. Use compressed air to blow away any dirt
or debris from the gap around the rotating
LiDAR turret.
4. Wipe the gap around the turret with a cotton
swab while manually rotating the turret 5 times
in both directions.
CLEANING THE WHEELS
1. Rotate the front wheel while lightly brushing
away dirt and debris. Clean the wheel and the
housing around it.
CLEAN FRONT WHEEL HOUSING PERIODICALLY.
2. Periodically clean the drive wheels and the
housing around them. To clean, rotate each
drive wheel while dusting.
NOTE: Brush not included.
IMPORTANT: The robot uses cliff sensors to avoid stairs and other steep drops. Sensors may work less effectively
when they are dirty. For best results, clean sensors once every 30 days or as needed.
CLEAN SENSORS AND CHARGING CONTACTS
AS NEEDED.
1. The sensors on the robot require occasional
maintenance.
2. With a dry cloth or cotton swab, gently dust o
the sensors located on the bottom and sides of
the robot.
CLEANING THE SENSORS
CleanEdge
Opening
Wall Follow
Sensors
Floor Detect Sensors
Cliff Sensors
Lidar Module
sharkninja.com
REMOVING & REINSTALLING THE ROBOT BATTERY
REMOVING THE ROBOT BATTERY
With a Phillips-head screwdriver (not included)
remove the screw(s) securing the battery door on
the underside of the robot. Lift o the door and
set it aside. DO NOT turn the robot right-side-up
to allow the battery to drop out of the unit, as this
could cause damage. Instead, grip the pull tabs on
the battery and lift it out, then place the battery
on the flat underside of the robot with the wire still
connected. Pinch the white connector where the
battery wire meets the robot, and pull up to unplug
the battery pack from the robot.
INSTALLING THE ROBOT BATTERY
Align the white connector at the end of the battery
wire with the connection port on the robot, and plug
the connector into the port until it clicks securely
into place. Insert the battery into its compartment
with the pull tabs facing up. Replace the battery
door and insert the screw(s) into the hole(s) on the
door. Use a Phillips-head screwdriver to tighten the
screw(s) and secure the door.
NOTE: You will need a Phillips-head screwdriver (not
included) to access the battery.
CAUTION: Before performing any maintenance, power o the robot by pressing and holding the Power/Dock
button on the robot for 3 seconds, then remove the water tank.
ERROR
NUMBER
ISSUE SOLUTION
2
Side brush is stuck. Remove any debris from around the side brush so it moves freely.
3
Suction motor failure.
Remove and empty the dust bin, clean the filters, remove the
brushroll and brushroll door, and remove blockages.
4
Blockage in the
brushroll area.
Remove any debris from around the brushroll so that it can
spin freely.
5
A drive wheel
is stuck.
Clean the wheels and remove any debris wrapped around the
axles so they can move freely.
6
Front bumper may
be jammed.
Clean the bumper and make sure it moves in and out freely.
7
Cli sensor error. Move your robot to a new location and clean its cli sensors.
9
Robot dust bin needs
to be reinstalled.
Insert the dust bin until it clicks in place.
10
Robot may be stuck
on an obstacle.
Move robot to a new location on a level surface.
16
Robot is stuck.
Move your robot to a new location and make sure the front bumper
moves in and out freely.
23
Robot cannot find
the base.
Please make sure the base is powered ON and is free of all obstacles.
24
Battery is critically
low and needs
recharging.
Please pick up your robot and place it on the base. Make sure the
base indicator light turns blue to confirm your robot is placed
correctly on the base and is charging.
26
Blockage in dust bin.
Check the debris intake on the base and evacuation port on the
robot dust bin for clogs. Clear any debris and reinstall the base
dust bin, ensuring that it clicks into place.
33
There may be a
blockage with
Active Lift.
Turn o the robot and ensure that there is nothing blocking the
wheels from moving up and down.
34
There may be a
blockage in the base.
Check if the greywater grate is sitting flat and secure in the
wash tray.
If an error is detected, the lights underneath your robot will illuminate red (error) or orange (warning). Tap the
Error
button on your robot to learn more about the error and follow the instructions outlined in the chart below.
For all other issues, please visit support.sharkninja.com or call Customer Service at 1-888-668-9600.
COMMON ERROR CODES
sharkninja.comsharkninja.com
REPLACEMENT PARTS
Brushroll
NeverTouch™ Pro
Base Ramp
Shark® Multi-Surface
Cleaner
Robot Pre-Motor Filter
Robot Dust Bin
Side Brush NeverTouch™ Pro Base
Base Dust Bin
Odor Neutralizer
Cartridge
Battery
NeverTouch™ Pro
Clean Water Tank
Mopping Pad
Base Pre-Motor Filters
Brushroll Door
NeverTouch™ Pro
Greywater Tank
Mop Pad Plate
Base Post-Motor Filter
(HEPA)
Greywater Grate Robot Pod
To order replacement parts visit sharkninja.com/parts-support/home-cleaning-parts/robot-vacuums.
GET HELP RIGHT NOW!
DON’T RETURN TO THE STORE.
Questions or Problems?
CALL
US: 1-888-668-9600
Toll-free customer support line
Other easy ways to get help RIGHT NOW:
ONLINE HELP AND FAQS:
support.sharkninja.com
HOW-TO VIDEOS:
youtube.com/shark
APP DOWNLOAD:
Search “SharkNinja”
in the app store, or scan
the QR code with your
smartphone camera.
Download and install
the SharkNinja® app
CONTACT US:
Contact us on social media
sharkninja.comsharkninja.com
END-USER LICENSE AGREEMENT FOR SHARKNINJA SOFTWARE
IMPORTANT: PLEASE READ THE TERMS AND CONDITIONS OF THIS LICENSE AGREEMENT CAREFULLY
BEFORE CONTINUING WITH THIS PROGRAM INSTALL OR USE OF THIS PRODUCT: SharkNinja Operating
LLC’s (“SharkNinja”) End-User License Agreement (“EULA”) is a legal agreement between You (either a single
entity or an individual) and SharkNinja for SharkNinja’s Software Applications, including those installed by You
onto your SharkNinja products or already installed on your device, including all firmware (referred hereafter
as “SN APPS”). By installing, copying, checking a box, clicking a button confirming your agreement to these
terms, or otherwise continuing to use the SN APPS, You agree to be bound by the terms of this EULA. This
license agreement represents the entire agreement concerning SN APPS between You and SharkNinja, and it
supersedes any prior proposal, representation, or understanding between the parties. If You do not agree to
the terms of this EULA, do not install or use the SN APPS or this product.
The SN APPS are protected by copyright laws and international copyright treaties, as well as other intellectual
property laws and treaties.
1. GRANT OF LICENSE. The SN APPS are licensed as follows:
1.1 Installation and Use. SharkNinja grants You the right to download, install, and use SN APPS on the specified
platform for which the SN APP was designed and in connection with SharkNinja products with which the SN
APPS are designed to operate (“SN Devices”).
1.2 Backup Copies. You may also make a copy of SN APPS downloaded and installed by You for backup and
archival purposes.
2. DESCRIPTION OF OTHER RIGHTS AND LIMITATIONS.
2.1 Maintenance of Copyright Notices. You must not remove or alter any copyright notices on any and all copies
of the SN APPS.
2.2 Distribution. You may not distribute copies of the SN APPS to third parties.
2.3 Prohibition on Reverse Engineering, Decompilation, and Disassembly. You may not reverse engineer,
decompile, or disassemble SN APPS, except and only to the extent that such activity is expressly permitted by
applicable law notwithstanding this limitation.
2.4 Rental. You may not rent, lease, or lend SN APPS without written permission from SharkNinja.
2.5 NOT FOR RESALE SOFTWARE. Applications identified as “Not for Resale” or “NFR,” may not be resold,
transferred, or used for any purpose other than demonstration, test, or evaluation.
2.6 Support Services. SharkNinja may provide You with support services related to SN APPS (“Support
Services”). Any supplemental software code provided to You as part of the Support Services shall be
considered part of SN APPS and subject to the terms and conditions of this EULA.
2.7 Compliance with Applicable Laws. You must comply with all applicable laws regarding use of SN APPS.
3. UPDATES. SharkNinja may provide You with upgrades or updates to SN APPS. This EULA will govern
any upgrades provided by SharkNinja that replace and/or supplement SN APPS, unless such upgrade is
accompanied by a separate EULA, in which case the terms of that EULA will govern. If You decide not to
download and use an upgrade or update provided by SharkNinja, You understand that You could put SN Apps
at risk to serious security threats or cause SN Apps to become unusable or unstable.
4. DATA AND PRIVACY. SharkNinja is committed to ensuring your privacy by adhering to high standards
of fairness and integrity. We are committed to keeping our customers informed about how we use the
information we gather from You through the use of each of our websites or SN APPS. Our privacy practices
are described in SharkNinja’s Privacy Policy, as well as in separate notices given when an app, product, or
service is purchased or downloaded. By using SN APPs or providing us with your personal information, You are
accepting and consenting to the practices, terms, and conditions described in SharkNinja’s Privacy Policy. At
all times your information will be treated in accordance with the SharkNinja Privacy Policy,
which is incorporated by reference into this EULA and can be viewed at the following URL:
http://www.sharkninja.com/privacypolicy.
5. THIRD-PARTY APPLICATION LIBRARIES AND EMBEDDED SOFTWARE.
5.1 You acknowledge that Amazon Web Services, Inc. (“AWS”) has provided certain application libraries that
have been embedded into SN APPS (“AWS Application Libraries”) and enables SN Devices to connect to the
AWS Cloud Service (“AWS Embedded Software”).
5.2 You will not use the AWS Application Libraries except as an incorporated portion of SN APPS, unmodified
from the form provided to You.
5.3 You will not use the AWS Embedded Software except as an incorporated portion of SN Devices,
unmodified from the form provided to You.
5.4 You will not modify, adapt, translate, or create derivative works based on, or decompile, disassemble,
reverse engineer, or otherwise attempt to derive the source code or underlying algorithms of, the AWS
Application Libraries or the AWS Embedded Software.
5.5 SharkNinja retains all ownership of SN APPS (and the AWS Application Libraries contained therein) and
any software installed on SN Devices (including the AWS Embedded Software) and only a license thereto is
granted to You for use in connection with the SN APPS and SN Devices.
END-USER LICENSE AGREEMENT FOR SHARKNINJA SOFTWARE
5.6 You will not use the AWS Application Libraries or AWS Embedded Software to attempt to gain
unauthorized access to or use of the systems/services of SharkNinja’s other licensors; nor will You transmit
viruses, worms, Trojan horses, time bombs, spyware, malware, cancelbots, passive collection mechanisms,
robots, data mining software, or any other malicious or invasive code or program into the systems/services of
SharkNinja’s other licensors.
5.7 You will not use the AWS Application Libraries or AWS Embedded Software to interfere with, breach,
or circumvent any security feature, authentication feature, or any other feature that restricts or enforces
limitations on the use of, or access to, the systems/services of SharkNinja’s other licensors.
5.8 You will not probe, attack, scan, or test the vulnerability of the systems/services of SharkNinja’s other
licensors.
5.9 SharkNinja’s other licensors of the SN APPS, AWS Application Libraries, and the AWS Embedded Software
are the express third-party beneficiaries of this EULA, and the provisions of this Section of this EULA are made
expressly for the benefit of such licensors, and are enforceable by such licensors.
6. TERMINATION. Without prejudice to any other rights, SharkNinja may terminate this EULA if You fail to
comply with the terms and conditions of this EULA. In such event, You must destroy all copies of SN APPS in
your possession.
7. COPYRIGHT. All title, including but not limited to copyrights, in and to SN APPS and any copies thereof are
owned by SharkNinja or its suppliers. All title and intellectual property rights in and to the content which may
be accessed through use of SN APPS are the property of the respective content owner and may be protected
by applicable copyright or other intellectual property laws and treaties. This EULA grants You no rights to use
such content. All rights not expressly granted are reserved by SharkNinja.
8. OPEN SOURCE SOFTWARE. You hereby acknowledge that SN APPS may contain software that is subject
to “open source” or “free software” licenses (“Open Source Software”). The license granted by this EULA
does not apply to Open Source Software contained in the SN APPS. Rather, the terms and conditions in the
applicable Open Source Software license shall apply to the Open Source Software. Nothing in this EULA limits
your rights under, or grants You rights that supersede, any Open Source Software license. You acknowledge
that the Open Source Software license is solely between You and the applicable licensor of the Open Source
Software. To the extent the terms of the licenses applicable to the Open Source Software require SharkNinja
to provide the Open Source Software, in either source or executable form, or to provide copies of applicable
license terms or other required information, You may obtain a copy of the software by contacting SharkNinja
at the below physical address. Additional information about the Open Source Software, and its terms of use,
may be found at www.sharkninja.com/opensource.
9. NO WARRANTIES. SharkNinja expressly disclaims any warranty for SN APPS, AWS Application Libraries, or
AWS Embedded Software. SN APPS, AWS Application Libraries, and AWS Embedded Software are provided
‘As Is’ without any express or implied warranty of any kind, including but not limited to any warranties of
merchantability, noninfringement, fitness of a particular purpose, or title. SharkNinja does not warrant or
assume responsibility for the accuracy or completeness of any information, text, graphics, links, or other items
contained within the SN APPS. SharkNinja makes no warranties respecting any harm that may be caused by
the transmission of a computer virus, worm, logic bomb, or other such computer program. SharkNinja further
expressly disclaims any warranty or representation to any third party.
10. LIMITATION OF LIABILITY. In no event shall SharkNinja or its suppliers be liable for any special, incidental,
punitive, indirect, or consequential damages whatsoever (including, but not limited to, damages for loss of
profits or confidential or other information, for business interruption, for personal injury, for loss of privacy,
for failure to meet any duty including of good faith or of reasonable care, for negligence, and for any other
pecuniary or other loss whatsoever) arising out of or in any way related to the use of or inability to use SN
Devices or SN APPS, the provision of or failure to provide support or other services, information, software, and
related content through the product or otherwise arising out of the use of SN APPS, or otherwise under or in
connection with any provision of this EULA, even in the event of the fault, tort (including negligence), strict
liability, breach of contract, or breach of warranty of SharkNinja or any supplier, and even if SharkNinja or any
supplier has been advised of the possibility of such damages. SharkNinja shall have no liability with respect
to the content of the SN APPS or any part thereof, including but not limited to errors or omissions contained
therein, libel, infringements of rights of publicity, privacy,
trademark rights, business interruption, personal injury, loss of privacy, moral rights, or the disclosure of
confidential information.
11. APPLICABLE LAW. The laws of the Commonwealth of Massachusetts will govern this EULA and You hereby
consent to exclusive jurisdiction and venue in the state and federal courts sitting in the Commonwealth of
Massachusetts.
12. ASSIGNMENT. SharkNinja may assign this EULA without notice to Licensor.
13. ENTIRE AGREEMENT. This EULA (including any addendum or amendment to this EULA which is included
with the SN Devices) is the entire agreement between You and SharkNinja relating to the SN APPS and
supersedes all prior or contemporaneous oral or written communications, proposals and representations with
respect to the SN APPS or any other subject matter covered by this EULA. To the extent the terms of any
SharkNinja policies or programs for support services conflict with the terms of this EULA, the terms of this
EULA shall control.
If You have questions regarding this EULA, please contact SharkNinja at 89 A Street, Suite 100,
Needham, MA 02494.
sharkninja.comsharkninja.com
TWO (2) YEAR LIMITED WARRANTY
The Two (2) Year Limited Warranty applies to purchases made from authorized retailers of SharkNinja
Operating LLC. Warranty coverage applies to the original owner and to the original product only and is
not transferable.
SharkNinja warrants that the unit shall be free from defects in material and workmanship for a period
of two (2) year from the date of purchase when it is used under normal household conditions and
maintained according to the requirements outlined in the Owner’s Guide, subject to the following
conditions and exclusions:
CALIFORNIA RESIDENTS ONLY: The two (2) Year Limited Warranty period begins on the original date
of delivery or pickup.
What is covered by this warranty?
1. The original unit and/or non-wearable components deemed defective, in SharkNinja’s sole discretion,
will be repaired or replaced with a new or refurbished unit of the same or equivalent model, up to one
year from the original purchase date.
2. In the event a replacement unit is issued, the warranty coverage ends six (6) months following the
receipt date of the replacement unit or the remainder of the existing warranty, whichever is later.
SharkNinja reserves the right to replace the unit with one of equal or greater value.
What is not covered by this warranty?
1. Normal wear and tear of wearable parts (e.g., not cleaning the filters, not removing debris from the
brushroll), which require regular maintenance and/or replacement to ensure the proper functioning
of your unit, are not covered by this warranty. Replacement parts are available for purchase at
sharkaccessories.com.
2. Any unit that has been tampered with or used for commercial purposes.
3. Damage caused by misuse (e.g., vacuuming up water or other liquids), abuse, negligent handling, failure
to perform required maintenance (e.g., not cleaning the filters, not removing debris from the brushroll), or
damage due to mishandling in transit.
4. Consequential and incidental damages.
5. Defects caused by repair persons not authorized by SharkNinja. These defects include damages caused
in the process of shipping, altering, or repairing the SharkNinja product (or any of its parts) when the
repair is performed by a repair person not authorized by SharkNinja.
6. Products purchased, used, or operated outside North America.
How to get service
If your appliance fails to operate properly while in use under normal household conditions within the warranty
period, visit sharkninja.com/support for product care and maintenance self-help. Our Customer Service
Specialists are also available at 1-888-668-9600 to assist with product support and warranty service options,
including the possibility of upgrading to our VIP warranty service options for select product categories.
Please register your product and have it with you when contacting Customer Service.
SharkNinja will cover the cost for the customer to send in the unit to us for repair or replacement. A fee of
$25.95 (subject to change) will be charged when SharkNinja ships the repaired or replacement unit.
How to initiate a warranty claim
You must call 1-888-668-9600 to initiate a warranty claim. You will need the receipt as proof of purchase.
A Customer Service Specialist will provide you with return and packing instruction information.
How state law applies
This warranty gives you specific legal rights, and you also may have other rights that vary from state to
state. Some states do not permit the exclusion or limitation of incidental or consequential damages, so the
above may not apply to you.
NOTE: Warranty covers manufacturing defects, internal hardware or software malfunctions, and structural failures
caused by manufacturing defects. It does not cover damage from misuse, accidents, or unauthorized repairs, normal
wear and tear, or consumable parts (unless defective upon first use). Please refer to the table below to understand what
parts are covered by warranty.
ROBOT VACUUM WARRANTY COVERAGE & PARTS GUIDE
Robot Component Maintenance Frequency
Replacement
Frequency
Category Warranty Coverage
Robot Pod
Clean sensors and
charging contacts
monthly, or as needed.
N/A Non-Wearable Yes
Brushroll
Clean monthly, or as
needed.
Every 6–12 months,
or as needed.
Wearable
No (unless
defective)
Filter
Clean monthly, or as
needed.
Every 6-12 months,
or as needed.
Wearable No
Dust Cup
Clean monthly, or as
needed.
As needed. Wearable
No (unless
defective)
Mop Pad
After every wet cleaning
mission, the base will
automatically wash
and dry the mop pad.
Additional cleaning in a
washing machine may
be needed occasionally.
Every 2 years, or as
needed.
Wearable No
Side Brush
Clean monthly, or as
needed.
Every 3–6 months,
or as needed.
Wearable
No (unless
defective)
Battery N/A
Every 12–24
months, or as
needed.
Wearable
Yes (within
warranty)
Base Component Maintenance Frequency
Replacement
Frequency
Category Warranty Coverage
Multi-functional
Base
Clean monthly, or as
needed.
N/A Non-Wearable Yes
Dust Bin
Empty every 60 days, or
as needed.
As needed. Wearable
No (unless
defective)
Pre-Motor Filters
Clean monthly, or as
needed.
Every 6-12 months,
or as needed.
Wearable No
Post-Motor Filter
(HEPA)
Clean every 6 months, or
as needed.
Once a year, or as
needed.
Wearable No
Ramp
Clean monthly, or as
needed.
As needed. Wearable
No (unless
defective)
Greywater Grate
Clean every 30 days, or
as needed.
As needed. Wearable
No (unless
defective)
sharkninja.comsharkninja.com
EXPECTED PERFORMANCE
Expected runtime: 120 minutes
Expected charging time: 4 hours
TIP: You can find the model and serial
numbers on the QR code labels on the
bottom of the robot and Self-Empty Base.
BATTERY REMOVAL AND DISPOSAL
This product uses a battery. When the battery no longer holds a charge, it should be removed from the vacuum and recycled. DO NOT incinerate or
compost the battery.
When your lithium-ion battery needs to be replaced, dispose of it or recycle it in accordance with local ordinances or regulations. In some areas, it is
illegal to place spent lithium-ion batteries in the trash or in a municipal solid waste stream. Return spent battery to an authorized recycling center or to
retailer for recycling. Contact your local recycling center for information on where to drop off the spentbattery.
For more information on battery removal for disposal, please visit sharkninja.com/batterysupport.
The RBRC™ (Rechargeable Battery Recycling Corporation) seal on the lithium-ion battery indicates that the costs to recycle the battery at the end of
its useful life have already been paid by SharkNinja. In some areas, it is illegal to place spent lithium-ion batteries in the trash or municipal solid waste
stream and the RBRC program provides an environmentally conscious alternative.
RBRC, in cooperation with SharkNinja and other battery users, has established programs in the United States and Canada to facilitate the collection
of spent lithium-ion batteries. Help protect our environment and conserve natural resources by returning the spent lithium-ion battery to an
authorized SharkNinja service center or to your local retailer for recycling. You may also contact your local recycling center for information on where
to drop o the spent battery. You can email RBRC, recycling@rbrc.com, or call RBRC toll free at (877) 723-1297 with questions about the program, to
sign up, or to order program materials. You can also find rechargeable battery recycling drop-o locations near you by visiting www.rbrc.org online.
FCC WARNINGS
This equipment has been tested and found to comply with the limits for a Class B digital device, pursuant to parts 15 of the FCC Rules. These limits
are designed to provide reasonable protection against harmful interference in a residential installation. This equipment generates, uses, and can
radiate radio frequency energy and, if not installed and accordance with the instructions, may cause harmful interference to radio communications.
However, there is no guarantee that interference will not occur in a particular installation. If this equipment does cause harmful interference to radio
or television reception, which can be determined by turning the equipment off and on, the user is encouraged to try to correct the interference by
one or more of the following measures:
n
Reorient or relocate the receiving antenna.
n
Increase the separation between the equipment and receiver.
n
Connect the equipment into an outlet on a circuit different from that to which the receiver is connected.
n
Consult the dealer or an experienced radio/TV technician for help.
This Device complies with part 15 of the FCC rules. Operation is subject to the following conditions:
1 This device may not cause harmful interference
2 This device must accept any interference received, including interference that may cause undesired operation.
Changes or modifications not expressly approved by the party responsible for compliance could void the user’s authority to operate this device.
RECORD THIS INFORMATION
Model Number: ����������������������������
Date of Purchase: ��������������������������
(Keep receipt)
Store of Purchase: ��������������������������
REGISTER YOUR PURCHASE
registeryourshark.com
NOTES
PLEASE READ CAREFULLY AND KEEP FOR FUTURE REFERENCE.
This Owner’s Guide is designed to help you keep your Shark® PowerDetect™ UV Reveal™ robot
running at peak performance.
SharkNinja Operating LLC
US: 89 A St #100, Needham, MA 02494
CAN: 4400, Chemin du Bois-Franc, Montreal, QC h4R 2K9
1-888-228-5531
sharkninja.com
Illustrations may differ from actual product. We are constantly striving to improve our products;
therefore the specifications contained herein are subject to change without notice.
This product may be covered by one or more U.S. patents. See sharkninja.com/patents for
more information.
© 2026 SharkNinja Operating LLC. SHARK and SHARKNINJA are registered trademarks of SharkNinja Operating LLC.
NEVERSTUCK, NEVERTOUCH, POWERDETECT, and THERMACHARGED are trademarks of SharkNinja Operating LLC.
RBRC is a trademark of Rechargeable Battery Recycling Corporation. APPLE, the Apple logo, and iPhone are trademarks of Apple
Inc., registered in the U.S. and other countries. APP STORE is a service mark of Apple Inc., registered in the U.S. and other countries.
GOOGLE, GOOGLE ASSISTANT, GOOGLE PLAY, the Google Play logo, and Android are trademarks of GOOGLE LLC.
RV3000WDSeries�IB�MP�Mv6
@sharkhome