
说明书资料
型号: VT75
尺寸: 160(长)*95(宽)mm
材质: 100g书纸(黑白装订)
版本: 1.1
制作人(日期): Tony 2026/1/28
审 核(日期):
核 准(日期):
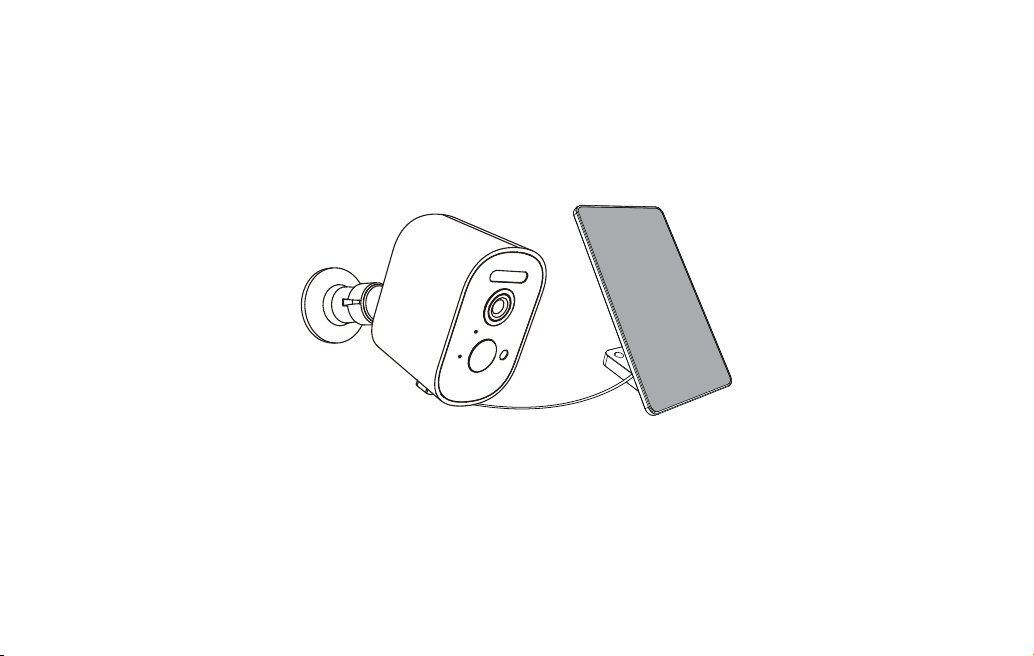
User Manual
Note: All pictures and illustrations in this document are for your reference only and may differ from the
final product due to upgrade of software and hardware!
Ver:1.1
Solar-Powered Wireless Security Camera


1. INTRODUCTION
2. IMPORTANT MAINTENANCE INSTRUCTIONS
Table of Contentt
4. INSTALLATION
5. PRODUCT OVERVIEW
3. WHAT'S IN THE BOX
6. GET STARTED
8. TECHNICAL INFORMATION
10.FCC STATEMENT
9. TROUBLESHOOTING
Contents Page
7. FEATURES
01
01
02
03
06
07
09
11
12
13

1. INTRODUCTION
2. IMPORTANT MAINTENANCE INSTRUCTIONS
Thank you for purchasing our product. Please read this guide thoroughly before use and retain it for future
reference. This device is designed to deliver reliable performance with features such as high-definition
imaging, motion/human detection, and cloud storage. Proper setup and maintenance will ensure optimal
functionality and longevity.
Lens Care: Gently clean the camera lens with a soft, dry cloth to remove dust or smudges. Avoid abrasive
materials that could scratch the surface.
Solar Panel Cleaning: Periodically wipe the solar panel with a soft damp cloth to remove dirt or debris, ensuring
maximum energy efficiency.
Connection Check: Inspect all cables and ports periodically to ensure secure connections and prevent
intermittent issues.
Weather Protection: The housing is rated IP66, meaning it is fully dust-tight and protected against powerful
water jets. This allows it to withstand most outdoor conditions; however, intentional submersion or exposure to
pressurized water should still be avoided.
Storage: When not in use, store the device in a cool, dry place away from direct sunlight.
Damage Inspection: Regularly check for physical damage such as cracks or compromised seals. If any issues
are found, discontinue use and contact support.
Battery Charging: Before initial use or after extended storage, fully charge the battery for at least 12 hours to
ensure optimal performance.
01
INSTALLATION INSTRUCTION
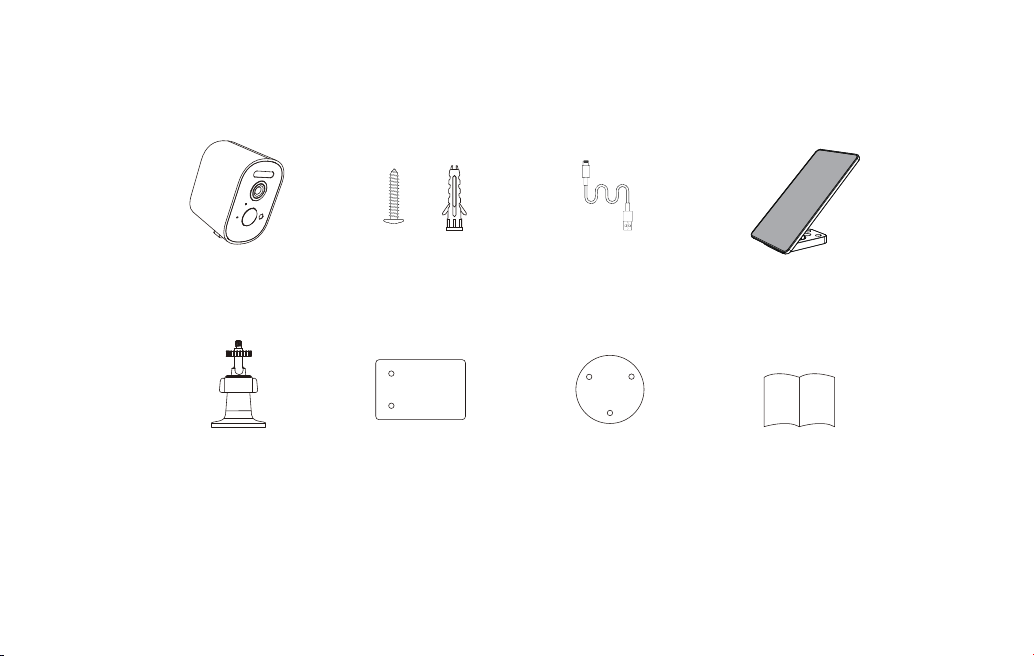
3. WHAT'S IN THE BOX
Camera Screw pack*5
USB-C
Charging Cable
Solar Panel
Camera
Mounting Bracket
Solar Panel
Position Sticker
Camera Position
Sticker
User Manual
02
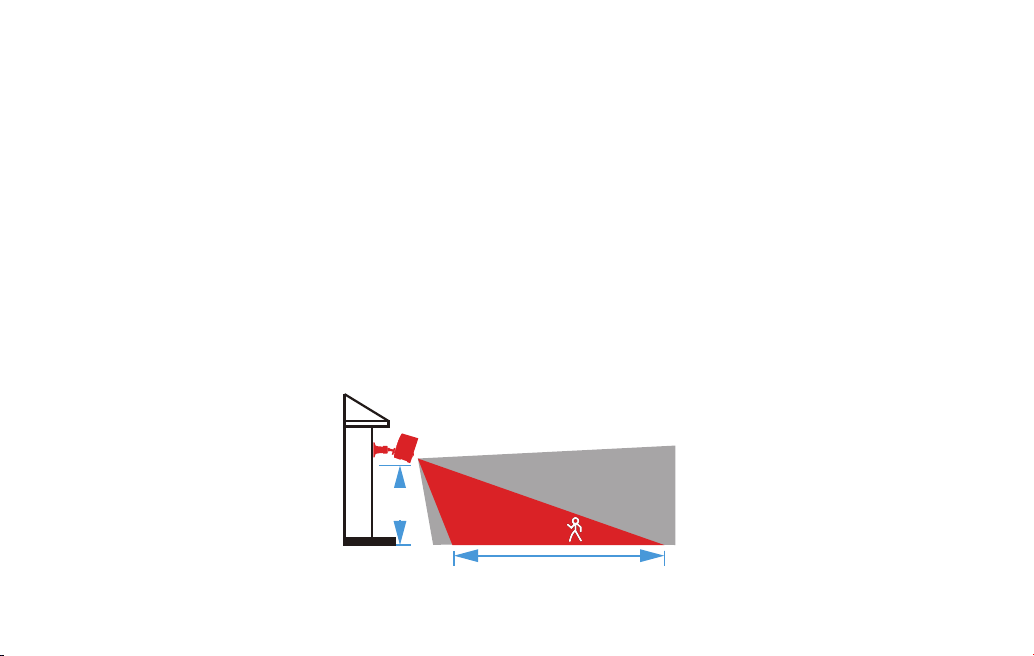
Up to 8m(26ft)
2-3m
(7~10ft)
Motion Detection Zone
Camera Field of View
4. INSTALLATION
Installation Location
1. Check Your Wi-Fi Signal First
● Use your phone to test the Wi-Fi signal at the spot where you plan to install the camera. Make sure the
signal is strong (full or almost full bars) for a stable connection.
2.Solar Panel Orientation & Placement
● Face the panel toward the south if you live in the Northern Hemisphere, or toward the north if you are in
the Southern Hemisphere.
● Position the solar panel at an angle between 30° and 45° relative to the ground, ensuring it faces direct
sunlight. Avoid any partial shading from trees, buildings, or other obstructions, as even limited shadowing
can significantly reduce power generation efficiency.
3. Camera Mounting Height & Environment
● Install the camera 7–10 feet (2–3 meters) above the ground. This height helps the motion sensor work best.
● Try to place the camera in a shaded spot, not in direct sunlight, to avoid glare and overheating.
03
Installation Instruction
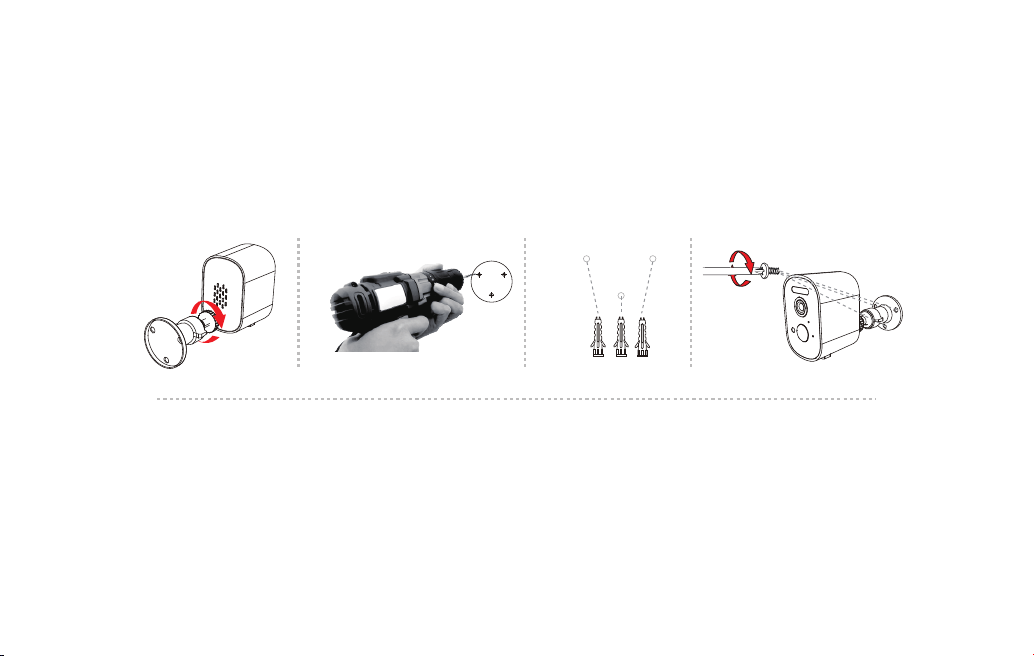
Camera
Solar Panel
1. Screw the mounting bracket onto the threaded port on the back of the camera
2. Use the provided positioning sticker and a 15/64" (6 mm) drill bit to drill holes
3. Insert the plugs into the drilled holes
4. Align the mounting holes with the plugs, insert the screws, and tighten to secure
1. Use the provided positioning sticker and a 15/64" (6 mm) drill bit to drill holes
2. Insert the plugs into the drilled holes
3. Align the mounting holes with the plugs, insert the screws, and tighten to secure
04
①
② ③ ④
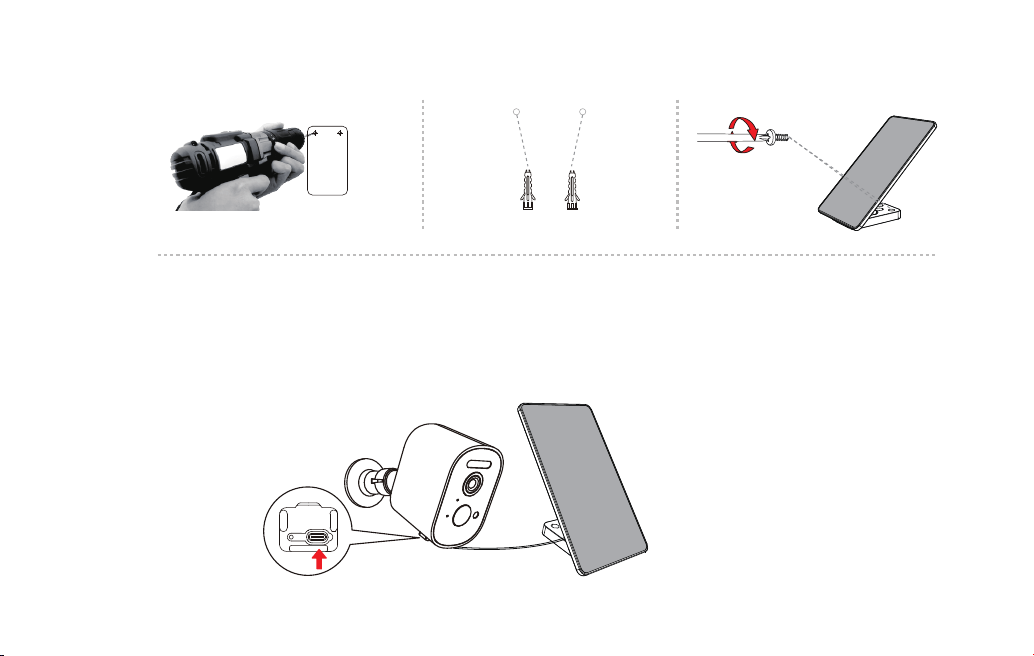
Connecting the Solar Panel to the Camera
1. Open the silicone cover at the bottom of the camera.
2. Open the small central plug from the cover.
3. Insert the solar panel’s power cord through the opening and connect it firmly to the camera’s USB-C port.
4. Close the silicone cover securely, ensuring the power cord is tucked neatly to maintain weather resistance.
05
①
②
③
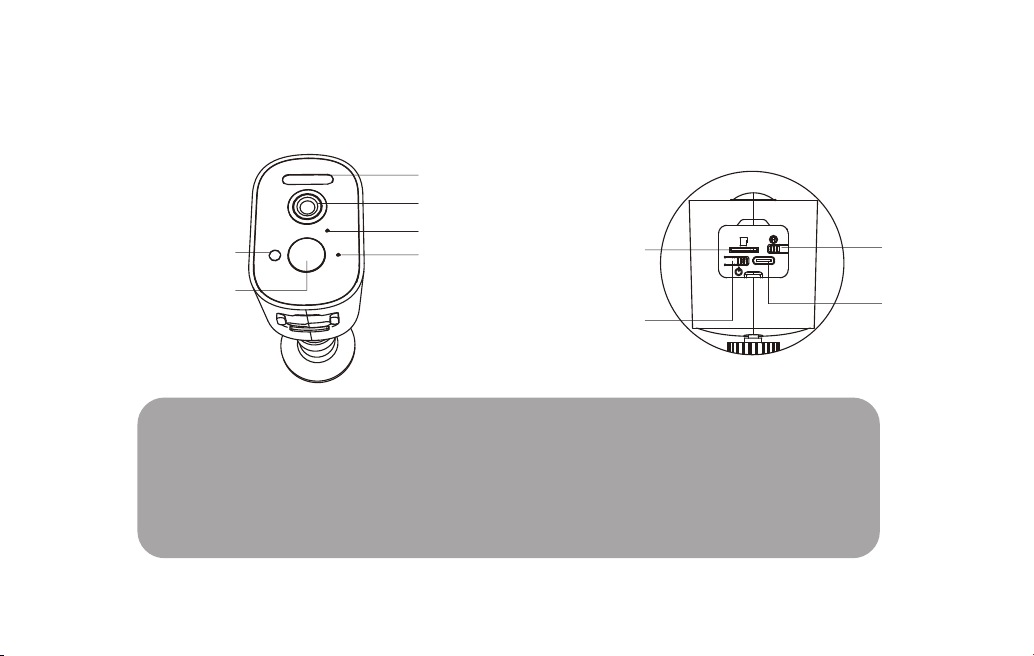
5.PRODUCT OVERVIEW
Lens
Integrated Lights
Status LED
Light Sensor
Integrated Lights: White and infrared lights
SD Card Slot: Supports microSD card storage (up to 128GB)
Power: Press and hold for 1 second to power on, or 3 seconds to power off
Reset: Press and hold for 5 seconds to restore factory default settings
Type-C Port: 5V/1A power input and charging port
SD Card
Slot
Reset
Power
Type-C
Port
Microphone
PIR Sensor
06
6. GET STARTED
Download VTimes Smart App
Scan the QR code provided in the product manual. Alternatively, you can search for 'VTimes Smart' directly in
the Apple App Store or Google Play Store.
1. Press and hold the camera's power button 1s. You will hear the voice prompt: 'Device is starting. Waiting
for network configuration'.
2. Open the VTimes Smart app to the home screen. Ensure your phone's Bluetooth is on and grant the app the
necessary permissions. A prompt saying '1 device found' will automatically appear.
3. Click the botton on the bottom of the screen. Confirm the current Wi-Fi is 2.4GHz, enter the correct
NOTE: The device only supports the 2.4GHz Wi-Fi band for network configuration. Please ensure your router
has this band enabled before you begin.
VTimes Smart
Scan to Download
Pairing Method 1: Automatic Prompt
07

password, and tap 'Next'.
1. Press and hold the power button 1s. You will hear 'Device is starting. Waiting for network configuration'.
2. Open the VTimes Smart app to the home screen. Ensure your phone's Bluetooth is on and grant the app
the necessary permissions.
3. Tap the botton in the upper right corner, select 'Add Device' to enter the Add interface.
4. After the search is complete, a discovered device will be displayed. Directly tap the product icon for 'Smart
Camera'.
5. Confirm the 2.4GHz Wi-Fi information, enter the correct password, and tap 'Next'.
6. Wait for the addition to succeed, then tap the 'Done' button to return to the app home screen, where your
device will now be visible.
1. Open the VTimes Smart app to the home screen. Ensure your phone's Bluetooth is on and grant the app the
necessary permissions.
2. Tap the botton in the upper right corner, select 'Add Device' to enter the Add interface.
3. Scroll down and select 'Security'->'Smart Camera'.
4. Follow the on-screen guide to reset the device. After resetting, the device will play the audio prompt:
'Waiting for network configuration'.
5. Confirm the 2.4GHz Wi-Fi information, enter the correct password, and tap 'Next'.
Pairing Method 2: Search & Add
4. Wait for the device pairing to complete, then tap 'Back to Home' to view the device.
Pairing Method 3: Manual Setup (Connection Guide)
08

6. After a QR code image appears on your phone screen, hold the QR code about 15 cm away, facing the
camera lens, to start scanning.
7. Upon a successful scan, the camera will say 'QR code scanned successfully'. Tap 'Heard QR code scanned
successfully', then tap 'Next' to start connecting.
8. Wait for the search, addition, and initialization to complete, tap the 'Done’ button, and return to the home
screen to view the device.
NOTE:
Quad HD 2K Video Streaming
7. FEATURES
1. Pairing Timeout: The 'Waiting for network configuration' state lasts for 5 minutes. If pairing is not
completed within this time, you will need to restart the device and try again.
2. Device Reset: You will need to reset the device in the following situations before re-pairing:
● Changing the Wi-Fi network or updating the Wi-Fi password after initial pairing.
● The camera was powered off before being properly removed from the app.
● You need to pair the camera with a new app account.
3. Reset Method: Press and hold the camera's reset button for 5 seconds. The device will restart and restore
factory settings. You can then perform the pairing process again.
Experience exceptional clarity with 2K QHD resolution that captures fine details like facial features and
license plates, ensuring you never miss a single detail with crystal-clear image quality.
09

Human Detection
Advanced AI technology intelligently distinguishes human movement from other motion triggers, significantly
reducing false alarms and delivering more accurate security notifications.
24/7 Night Vision
With infrared and full-color night vision capabilities, the camera provides round-the-clock monitoring,
delivering clear black-and-white images in total darkness and color video in low-light conditions.
NOTE: Enabling full-color night vision will activate the white light and result in higher battery consumption.
Dual Power Supply
Combining a rechargeable battery with solar charging options, this camera offers truly wireless installation
with continuous operation capability, making it ideal for remote locations.
Weatherproof Design
Built with IP66-rated protection, the camera withstands harsh weather conditions including heavy rain, dust,
and extreme temperatures for reliable outdoor performance.
Two-Way Audio
Featuring built-in microphone and speaker, the camera enables real-time communication, allowing you to
listen and speak directly through the mobile app.
Flexible Storage Options
Support both local microSD card storage and cloud storage services, giving you complete control over your
data with dual backup solutions.
Smart Power Management
Optimized power consumption enables months of operation on a single charge, while maintaining reliable
performance through intelligent recording modes.
10
8. TECHNICAL INFORMATION
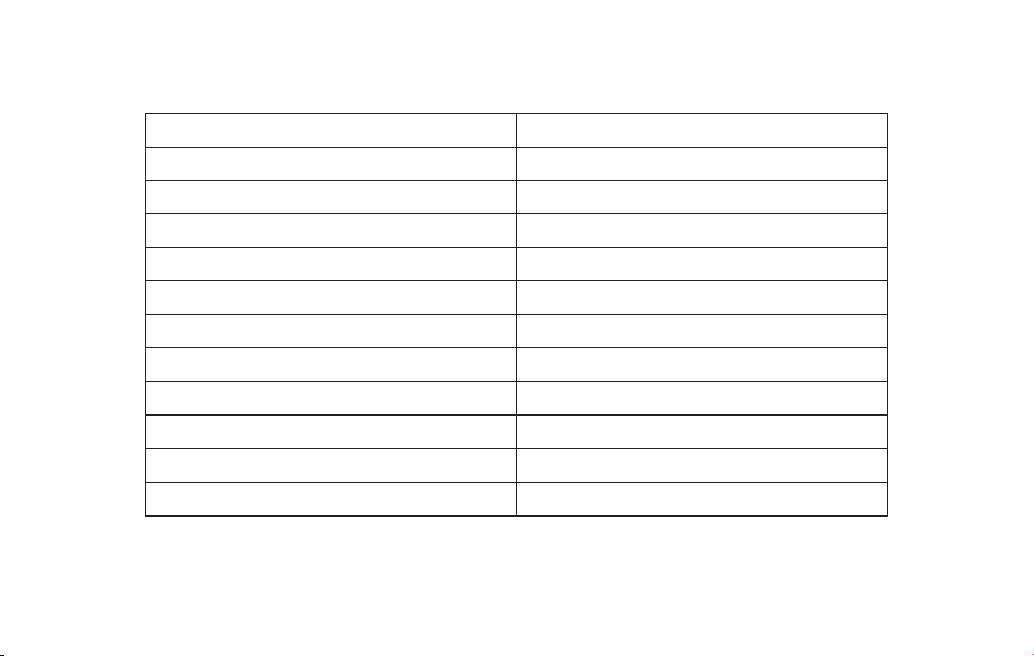
Connectivity
Video Streaming
Video Recording
Night Vision
Input
Solar Panel
Battery
Battery Life
MicroSD Card
PIR Detection
Protection Rating
Operating Temperature
Wi-Fi 2.4 GHz/BLE 5.3
2K QHD (2560 × 1440)
1080P FHD (1920 × 1080)
Auto / B&W / Color
DC 5V 1A
3W
5000mAh
Up to 128GB ( Not Included )
Up to 8m
IP66
+32F~+104F(0°C~40°C)
11
~90 Days (8 events triggered per day) *
*Data sourced from lab testing. Actual battery life will vary depending on real-world usage conditions.

● Ensure you are connecting to a 2.4 GHz Wi-Fi network. This device does NOT support 5 GHz bands.
● Verify that the Wi-Fi password is entered correctly.
● Check your internet connection. If the Wi-Fi signal is weak, try moving the device closer to the router or
restarting your router.
● Ensure your smartphone's Bluetooth is enabled and the app has the necessary permissions.
● Please try the standard pairing process again: power on the device and use the app's automatic discovery
or manual "Add Device" function.
● If pairing continues to fail, the issue may be related to your router settings. Please check if there are any
restrictions, such as MAC address filtering or DHCP limitations, and disable them temporarily for pairing.
9.1 Device Cannot Connect to Wi-Fi
9. TROUBLESHOOTING
9.2 Device Fails to Pair/Bind with the App
12

10. FCC STATEMENT
ISED Statement
Camera: English: This device contains licence-exempt transmitter(s)/receiver(s) that comply with Innovation,
Science and Economic Development Canada’ s licence-exempt RSS(s).
Operation is subject to the following two conditions:
(1) This device may not cause interference.
(2) This device must accept any interference, including interference that may cause undesired operation of the
device.
French:Cet appareil contient des émetteurs/récepteurs exempts de licence qui sont conformes aux CNR exempts
de licence d’Innovation, Sciences et Développement économique Canada. Le fonctionnement est soumis aux
deux conditions suivantes :
(1) Cet appareil ne doit pas causer d’interférences.
(2) Cet appareil doit accepter toute interférence, y compris les interférences susceptibles deprovoquer un
fonctionnement indésirable de l’appareil.
This device complies with RSS 102 of the RF exposure guideline.
Cet appareil est conforme à la norme RSS 102 de la directive sur l'exposition aux RF.
This equipment complies with Canada radiation exposure limits set forth for an uncontrolled environment.
This equipment should be installed and operated with minimum distance 20cm betweenthe radiator & your body.
Cet équipement est conforme Canada limites d'exposition aux radiations dans un environnement non contrôlé.
Cet équipement doit être installé et utilisé avec une distance minimale de 20 cm entre leradiateur et votre corps.
13

FCC Statement
Camera: This equipment has been tested and found to comply with the limits for a Class B digital device,
pursuant to part 15 of the FCC rules. These limits are designed to provide reasonable protection against harmful
interference in a residential installation. This equipment generates, uses and can radiate radio frequency energy
and, if not installed and used in accordance with the instructions, may cause harmful interference to radio
communications. However, there is no guarantee that interference will not occur in a particular installation. If
this equipment does cause harmful interference to radio or television reception, which can be determined by
turning the equipment off and on, the user is encouraged to try to correct the interference by one or more of the
following measures:
- Reorient or relocate the receiving antenna.
- Increase the separation between the equipment and receiver.
- Connect the equipment into an outlet on a circuit different from that to which the receiver is connected.
- Consult the dealer or an experienced radio/TV technician for help.
To assure continued compliance, any changes or modifications not expressly approved by the party.
Responsible for compliance could void the user’s authority to operate this equipment.
(Example- use only shielded interface cables when connecting to computer or peripheral devices).
This equipment complies with Part 15 of the FCC Rules. Operation is subject to the following two conditions:
(1) This device may not cause harmful interference, and
(2) This device must accept any interference received, including interference that may cause undesired operation.
14

FCC Radiation Exposure Statement:
The equipment complies with FCC Radiation exposure limits set forth for uncontrolled environment. This
equipment should be installed and operated with minimum distance 20cm between the radiator and your body.
EU DECLARATION OF CONFORMITY
Hereby, [Videotimes Technology(Hubei) Co., Ltd] declares that the type of radio equipment type [HB6361] is
in compliance complies with Directives 2014/53 / EU, 2014/30 / EU, 2014/35 / EU, and 2011/65 / EU. The full
text of the EU Declaration of Conformity is available at the following internet websites:
[https://www.videotimes.com.hk/#/pages/service]
Responsible Party(US): Startline LLC
Add: 22 Hazelwood Drive, Jericho, NY 11753 Tel: 1-516-681-3729
Authorized UK Representative(UK): APEX CE SPECIALISTS LIMITED
Add: 6f East Union Street, Manchester, England, M16 9AE
15

16
Made in China