Visit Our Website
SCAN ME
PyleUSA.com
USER GUIDE
Questions or Comments?
We are here to help!
Phone: 1.718.535.1800
PyleUSA.com/ContactUs
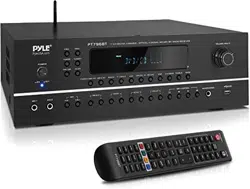
PT865BT
Hi-Fi Wireless BT Home Theater Receiver
www.PyleUSA.com2 www.PyleUSA.com 3
READ ALL INSTRUCTIONS CAREFULLY BEFORE USING THIS PRODUCT.
RETAIN THIS OWNER’S MANUAL FOR FUTURE REFERENCE.
Features:
• 5.2 Channel Receiver System
• AV (Audio/Video) Stereo Amplier
• Hi-Fi Home Theater Surround Sound
• 4K Ultra HD TV Pass-Through Support
• 3D Video & Blu-Ray Video Pass-Through Support
• Digital LED Display with FM Radio
• MP3 Digital Audio Support
• USB Flash Drive Reader
• DAC Digital Interface (Supports Connecting to Computer’s Digital Audio
Signal for Better Sound Quality)
• Built-in Bluetooth Wireless Audio Streaming
• Connection Interface: (2) x (HD), RCA (L&R), Speaker Binding Posts, Optical/
Coaxial Digital Audio
• HD Output + Dedicated RCA Subwoofer Output
• (2) 1/4'' -inch Microphone Inputs
• Mic Echo, Delay, Bass, Treble, Volume Control Adjustment
• Next-Gen Audio DSP Sound Processing Technology
• Connect & Stream Audio from External Devices
• Digital Graphic Audio Output Level Display
• Over Current, Short Circuit, and Over Voltage Protection
• Standby Power Consumption is Less than 0.5W
• Full Remote-Control Function
What’s in the Box:
• AV Receiver
• Remote Control
• Power Cable
• FM Antenna
Wireless Bluetooth Connectivity:
• Simple & Hassle-Free Pairing
• Instantly Receives Wireless Music Streaming
• Works with all of Today’s Latest Devices
(Smartphones, Tablets, Laptops, Computers, etc.)
• Bluetooth Version: 5.0
• Bluetooth Network Name: 'PyleUSA'
• Wireless Range: 30’+ ft.
Technical Specs:
• Construction Materials: Aluminum Alloy Panel + Metal Chassis
• Amplier Receiver Type: 5.2-Channel
• Power Output: 1000 Watt MAX (FL/FR/SW:100Wx3(4Ω);
SL/SR/CEN:20Wx3(4Ω))
• Power Supply: AC 120V-240V, 50/60 Hz
• Frequency Response: 20Hz-20KHz
• Speaker Impedance: 4-8ohm
• SNR: >78dB
• THD (1KHz): <0.5%
• Input Sensitivity: 800mV
• Treble: 9dB (10KHz)
• Bass: 9dB (100KHz)
• Radio Station Memory: 30 Presets
• FM frequency: 88MHz -108MHz
• Digital Audio File Support: MP3 / WMA / APE / FLAC
• Maximum USB Flash Support: Up to 64GB
• Battery Operated Remote Control, Requires (2) x ‘AAA’ Batteries, Not Included
• Power Cable Length: 4.9 ft (1.5m)
• Power Supply: AC 120V-240V, 50-60Hz
• Total Unit Dimensions (L x W x H): 16.9’’ x 19.8’’ x 5.1’’ -inches
California Prop 65 Warning
WARNING:
This product may expose you to chemicals, which is known to
the state of California to cause cancer, birth defects and other
reproductive harm. Do not ingest.
For more info go to: www.P65warnings.ca.gov
www.PyleUSA.com4 www.PyleUSA.com 5
WARNING
We are honored to oer you a high-quality product. Before operating this
machine for the rst time, please carefully read this user manual.
Doing so will ensure a correct understanding of the machine's functions.
SAFETY RECOMMENDATIONS
1. Read the instructions: Before using electrical appliances, carefully review all
safety and operational instructions.
2. Preservation instructions: Retain the safety and operation instructions for
future reference.
3. Caution: Adhere to all warnings provided in the operating instructions.
4. Follow the instructions: Comply with all details outlined in this user manual.
5. Device usage: Ensure adherence to the manufacturer’s instructions for proper
operation.
6. Power supply: Use the appliance only according to the specied power supply
marked on the back panel.
7. Grounding and polarity: This appliance does not require grounding.
Ensure the plug is fully inserted into the wall outlet to avoid exposed pins.
If the plug is not suitable, consult an electrician to replace the outlet without
compromising polarity safety.
8. Power line protection: Arrange the power cord properly, avoiding excessive
pressure or bending. Pay attention to the plug, socket direction, and
positioning behind the electrical outlet.
9. Overload: Avoid overloading power outlets, extension cords, or sockets, as
this may cause re or electric shock.
10. Ventilation: The amplier has a built-in heat dissipation system; avoid
placing it on surfaces such as beds, sofas, or blankets. Do not obstruct the
electrical panel with objects such as tablecloths or newspapers.
11. Heat: Keep the product away from heat sources, including radiators, heaters,
or furnaces, to prevent overheating. Also, avoid placing it near open ames,
such as candles.
12. Wall mounting: Install the product on the wall only as recommended by
the manufacturer.
13. Moisture and water: To prevent re and electric shock, do not expose the
product to rain, water splashes, or use it near water sources.
14. Object and liquid entry: Avoid inserting objects into the product's openings,
as they may come into contact with dangerous voltage components, leading
to re or electric shock. Never allow liquids to spill into the product.
15. Cleaning: Always unplug the power cord before cleaning. If using a cleaner,
spray it onto a cloth before wiping; do not spray directly onto the device.
16. Moving the appliance: When transporting with a handcart, be cautious, as
excessive force or uneven surfaces may cause it to tip over.
17. Extended non-use: During adverse weather conditions or extended periods
of non-use, unplug the power cord.
18. Repairs: Do not attempt to repair the product yourself, as this could expose
you to dangerous voltage. Seek professional maintenance when needed.
19. Replacement parts: Ensure that maintenance personnel use manufacturer-
specied parts or those with equivalent performance. Using unsuitable parts
may lead to hazards.
20. Volume control: Avoid turning up the volume when no audio signal is
present to prevent damage to the speakers.
21. Power disconnection: To completely disconnect power, unplug the power
cord from the socket.
22. Indoor use only: This product is intended for indoor use only.
READ CAREFULLY AND KEEP FOR FUTURE REFERENCE
This symbol is designed to alert users to the presence of uninsulated
"dangerous voltage" within the product's enclosure. This voltage may be of
sucient magnitude to pose a risk of electric shock to individuals.
This symbol indicates the presence of important operating and maintenance
(servicing) instructions provided in the literature accompanying the product.
www.PyleUSA.com6 www.PyleUSA.com 7
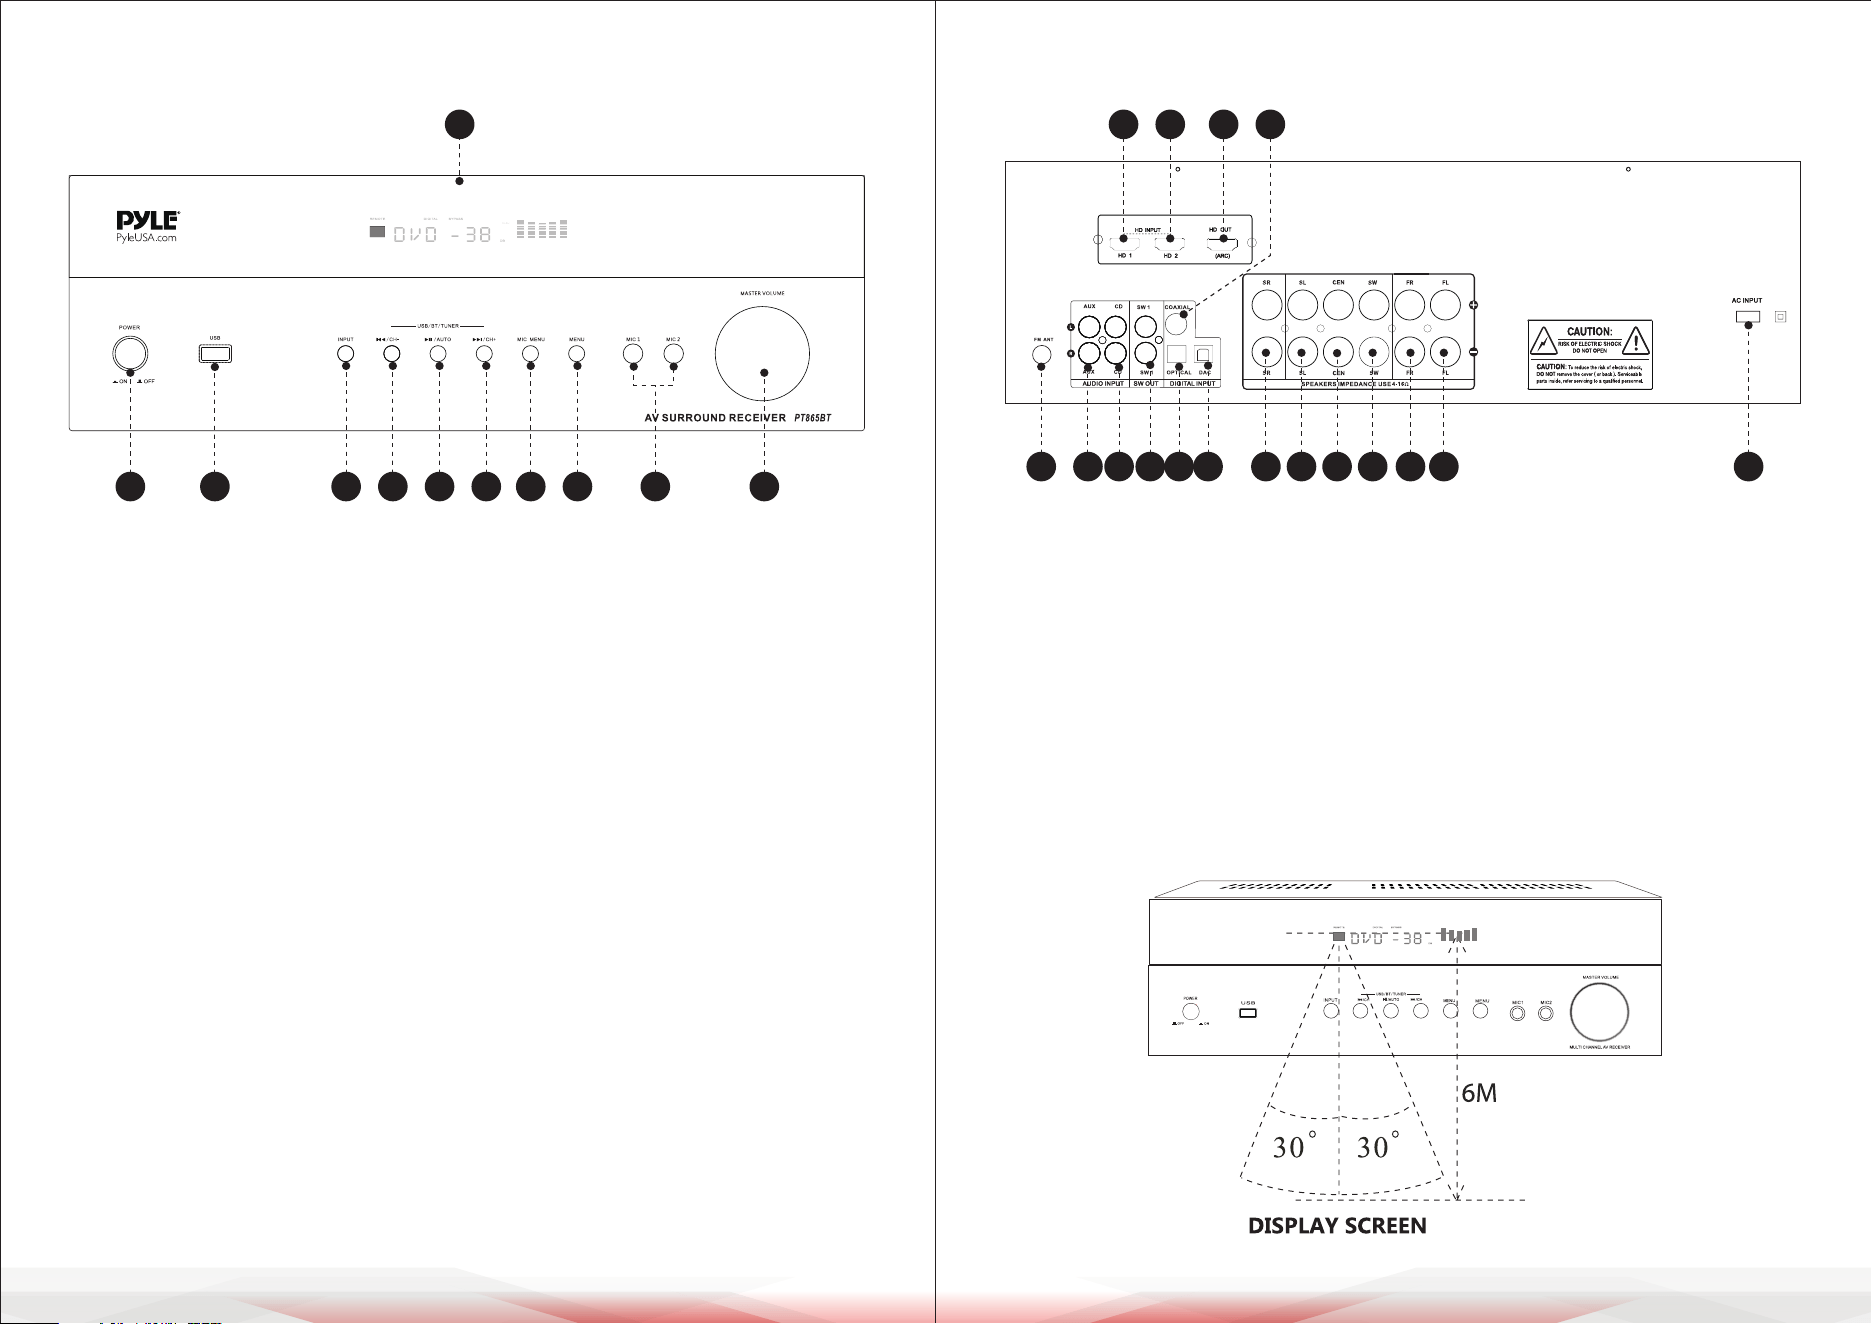
PANEL FUNCTION DESCRIPTION
1. Power switch
2. USB ports
3. Input selection button: Press this button to select input sources:
HD/HD2/COAX/OPT1/FM/CD/AUX/BLUE/USB/ARC/DAC.
Note: The DAC signal display activates only when the signal cable is connected.
4/5/6. Function buttons: ‘/CH-’, ‘/AUTO’, ‘/CH+’
These buttons enable Bluetooth (BT), USB, and FM operations:
• BT (Bluetooth) or USB mode: Press these buttons for previous track, play/
pause, and next track functions.
• FM radio mode: Press these buttons to tune stations (-), auto-save stations,
and tune stations (+).
5. Microphone menu button: Press this button to adjust microphone
parameters using the master volume/multi-function knob.
Adjust microphone volume, treble, bass, echo, and delay settings.
6. Main menu button: Press this button to adjust total volume, bass, and treble
using the master volume/multi-function knob.
7. 6.35mm Microphone jack (Group 2)
8. Master volume/multi-function knob: Rotate this knob to control overall
volume. Use it to adjust music and microphone parameters via the main menu
and microphone menu, respectively.
9. Display screen
REAR PANEL FUNCTION DESCRIPTION
1. FM radio antenna interface
2. AUX audio input
3. CD audio input
4. Active subwoofer output port
5. Digital Optical ber input port
7. Right surround speaker output
8. Left surround speaker output
9. Center speaker output
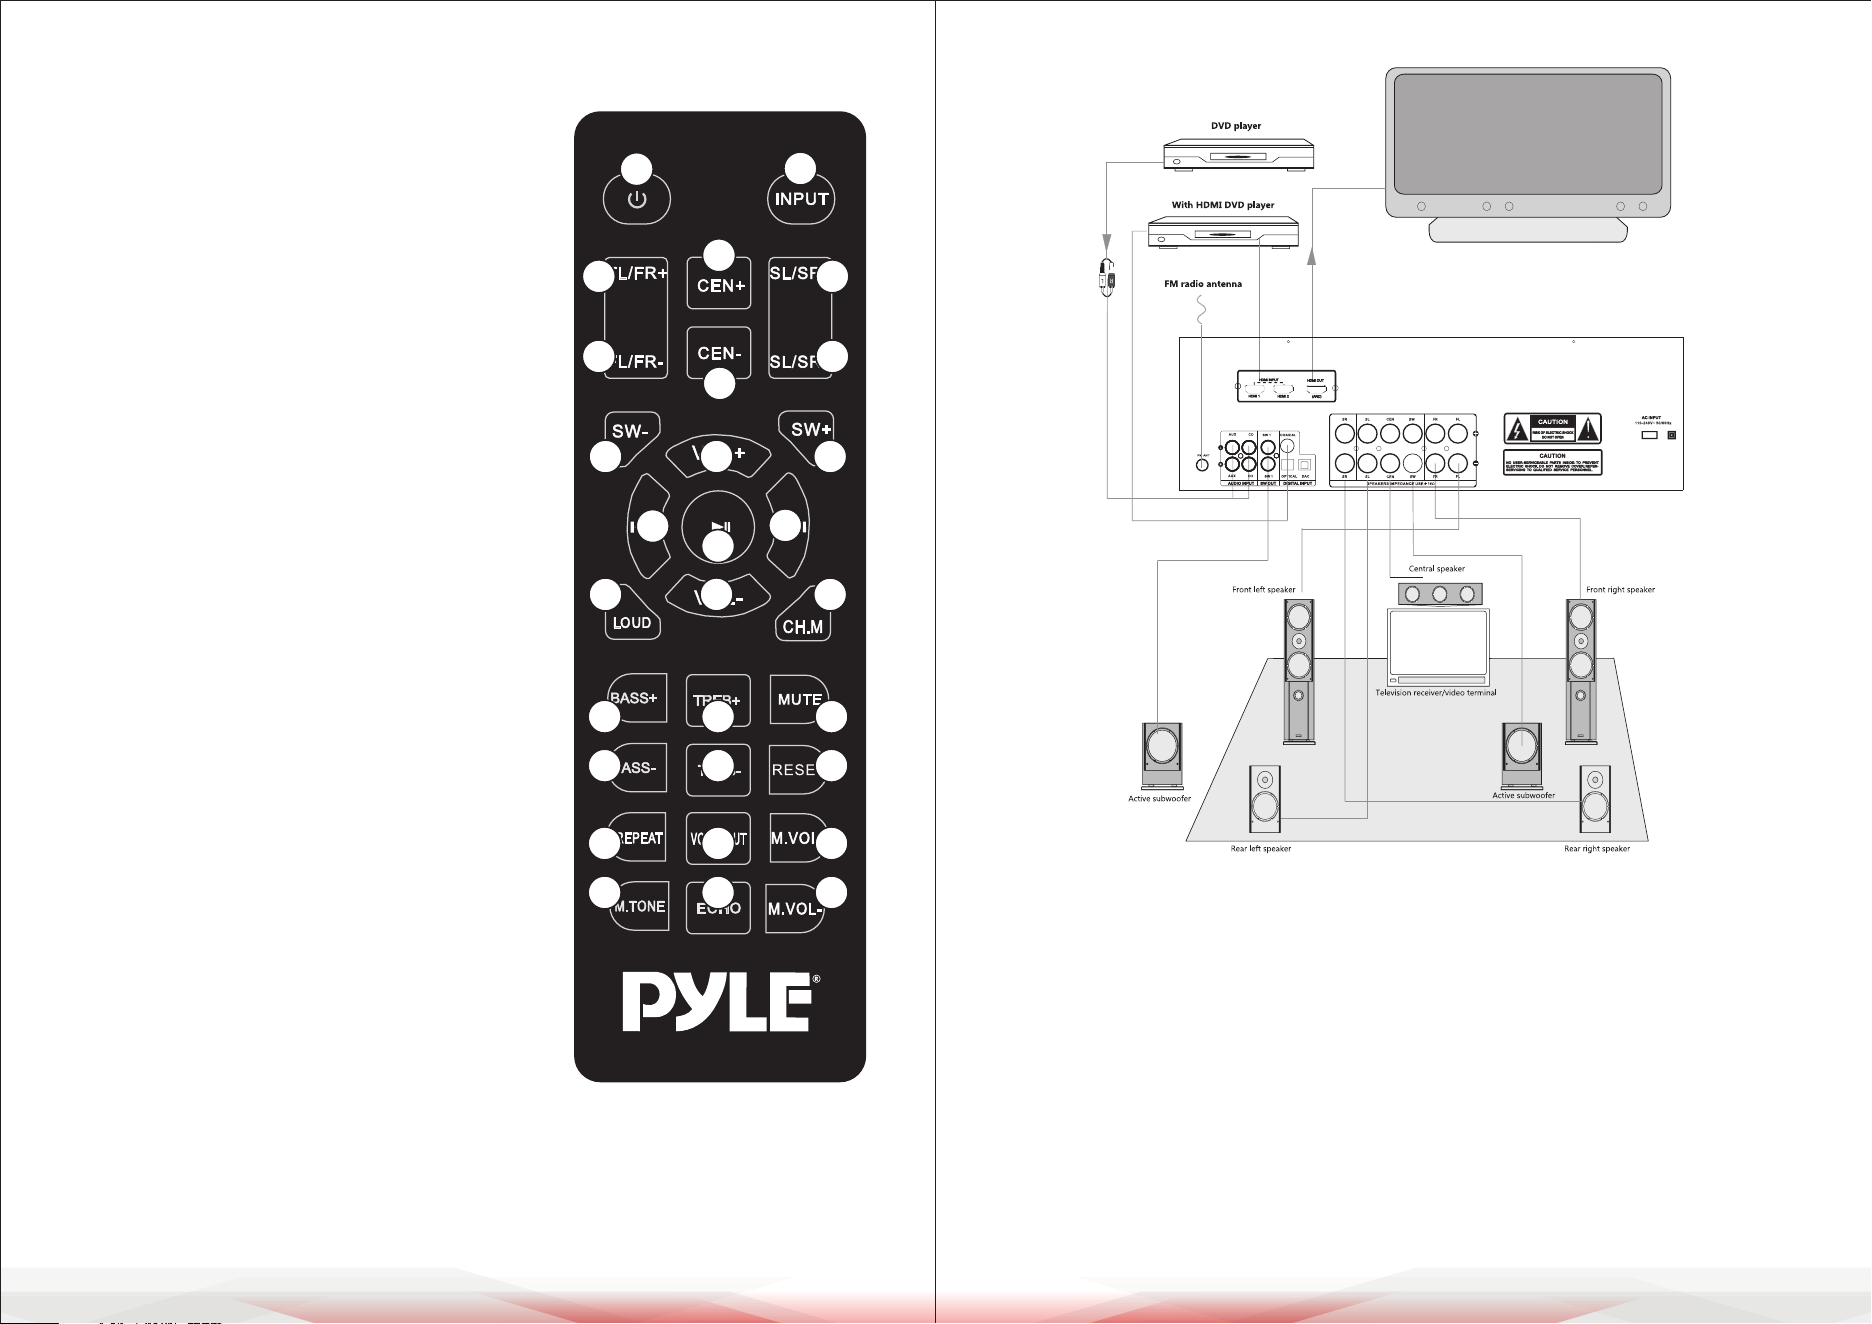
REMOTE CONTROL FUNCTION
1 2 3 4 5 6 7 8 9 10
11
1 2 3 4 5 6 7 8 9 10 11 12 13
14 15 16 17
10. Passive subwoofer output
11. Right front speaker output
12. Left front speaker output
13. Power cable input port
14. HD signal 1 Input port
15. HD signal 2 Input port
16. HD signal output ARC
17. Digital coaxial input port
www.PyleUSA.com8 www.PyleUSA.com 9
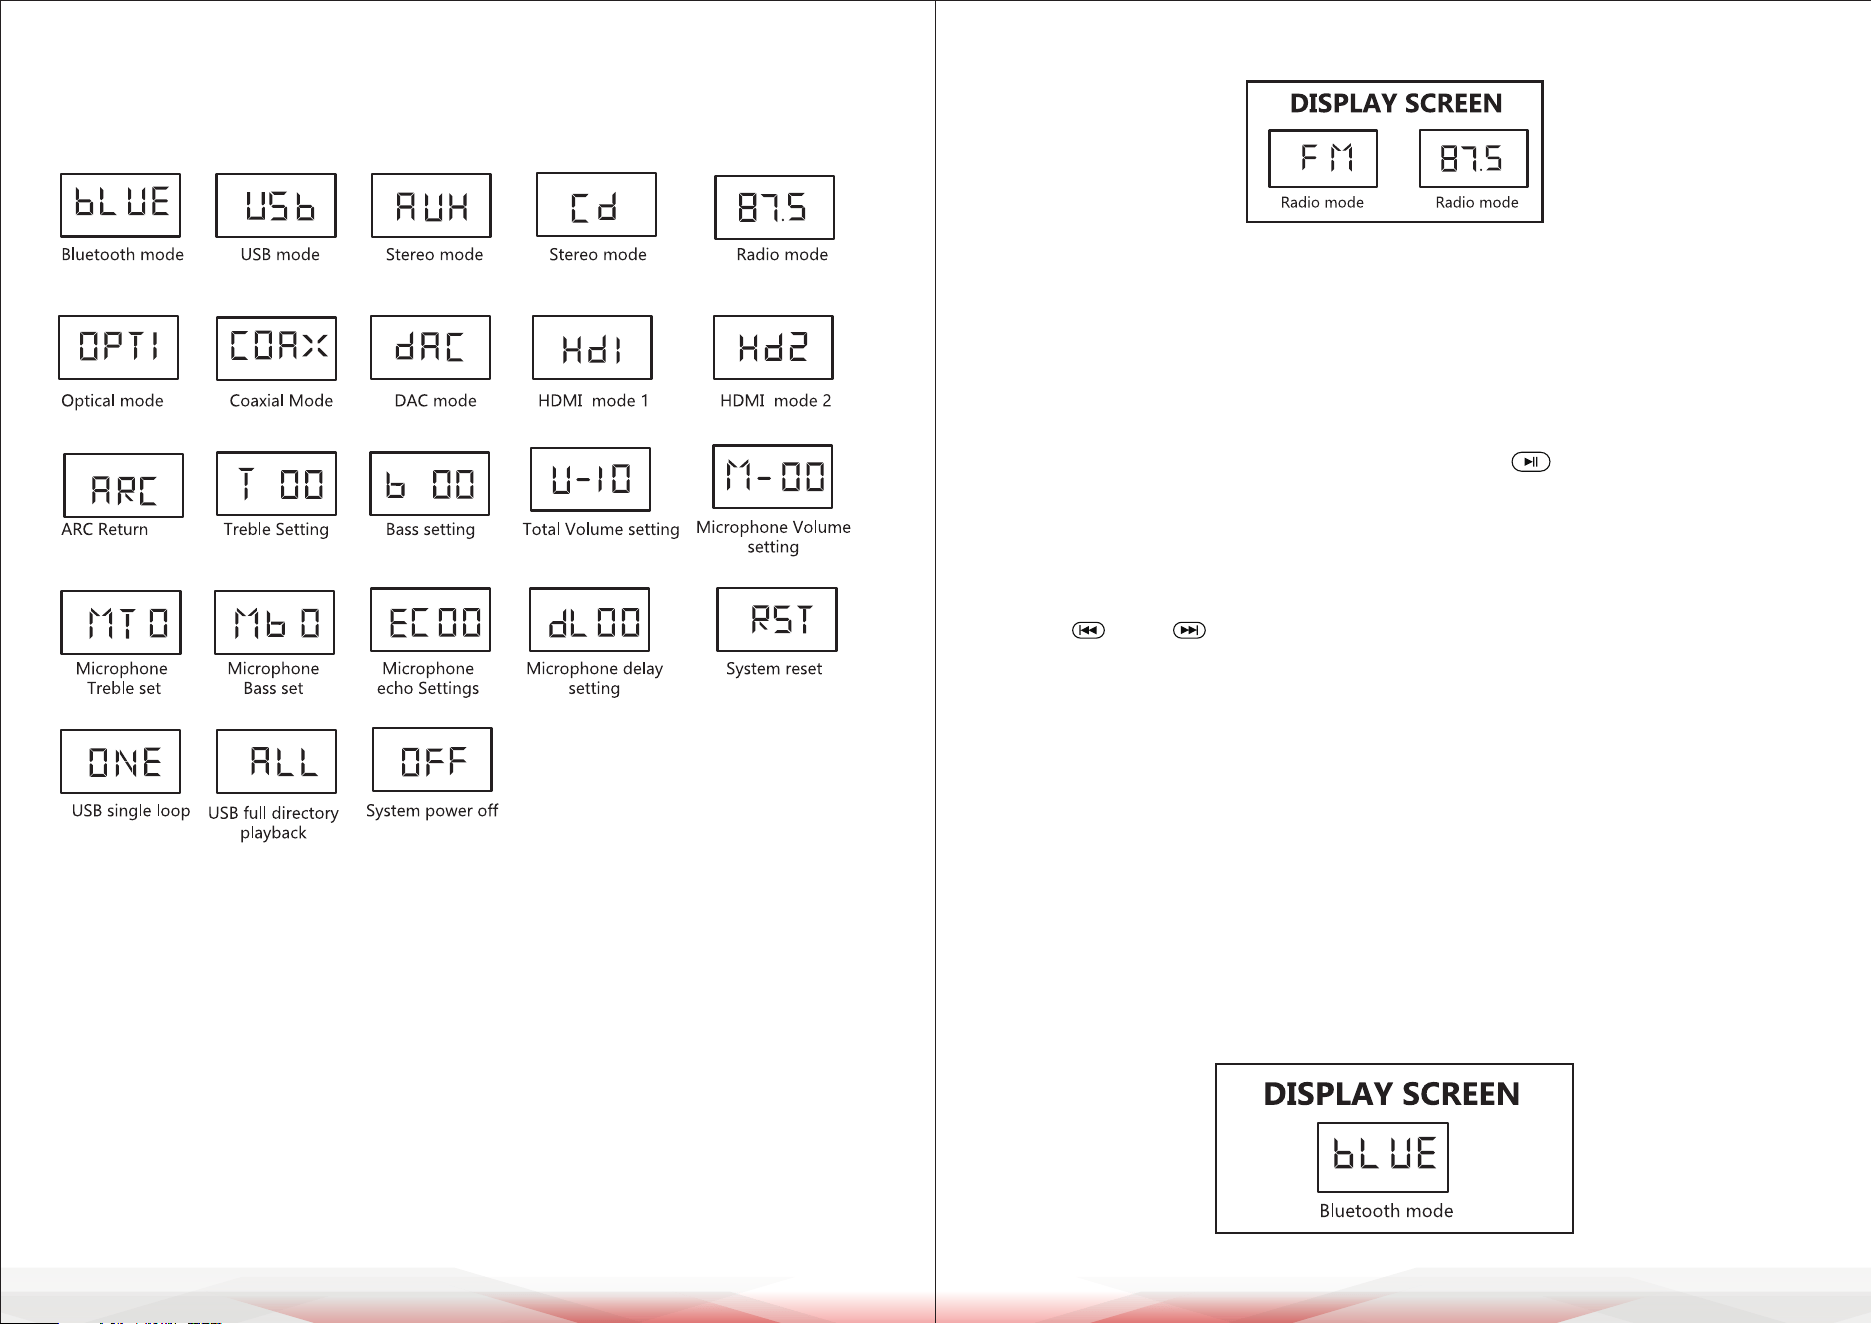
SYSTEM CONNECTION
When connecting audio cables as shown in the illustration, consider the following:
1. Match the colors of the audio cable to the red and black ports of the amplier’s
R and L connections. Ensure consistency in polarity on both ends to prevent
audio distortion or weak bass output.
2. Ensure the stripped wire ends of the audio cable do not touch or cross, as
this may cause a short circuit and damage the system.
3. Insert the audio cable rmly into both the amplier and audio equipment
ports. Tip: Gently tug the cable to conrm a secure connection and avoid
noise caused by movement.
4. Power on the system before connecting the amplier and audio equipment
with the sound cable.
Remote Control Buttons
1. Power button:
Press OFF to shut down (turn o display)
2. Center volume up
3. Front channel volume up
4. Center volume down
5. Front channel volume down
6. Total volume up
7. Sub channel volume down
8. Play/pause (Auto radio search)
9. Previous song (Previous radio station)
10. Total volume down
11. Loudness
12. Treble volume up
13. Bass volume up
14. Treble volume down
15. Bass volume down
16. Signal source switch button
17. Surround channel volume up
18. Surround channel volume down
19. Sub channel volume up
20. Next (Next band radio station)
21. Channel 2.1/5.1 Switch key
22. Mute
23. System reset
24. Microphone volume up
25. Microphone volume down
26. Cancel voice in karaoke
27. Repeat playback on USB ash drive
28. Microphone echo delay setting
29. Microphone volume menu setting
Note:
Some keys must correspond to specic modes to function, otherwise, they will
be invalid.
1
2
3
4
16
5
17
18
7
11
19
21
6
10
9
20
13
15
27
29
12
14
26
28
22
23
24
25
8
www.PyleUSA.com10 www.PyleUSA.com 11
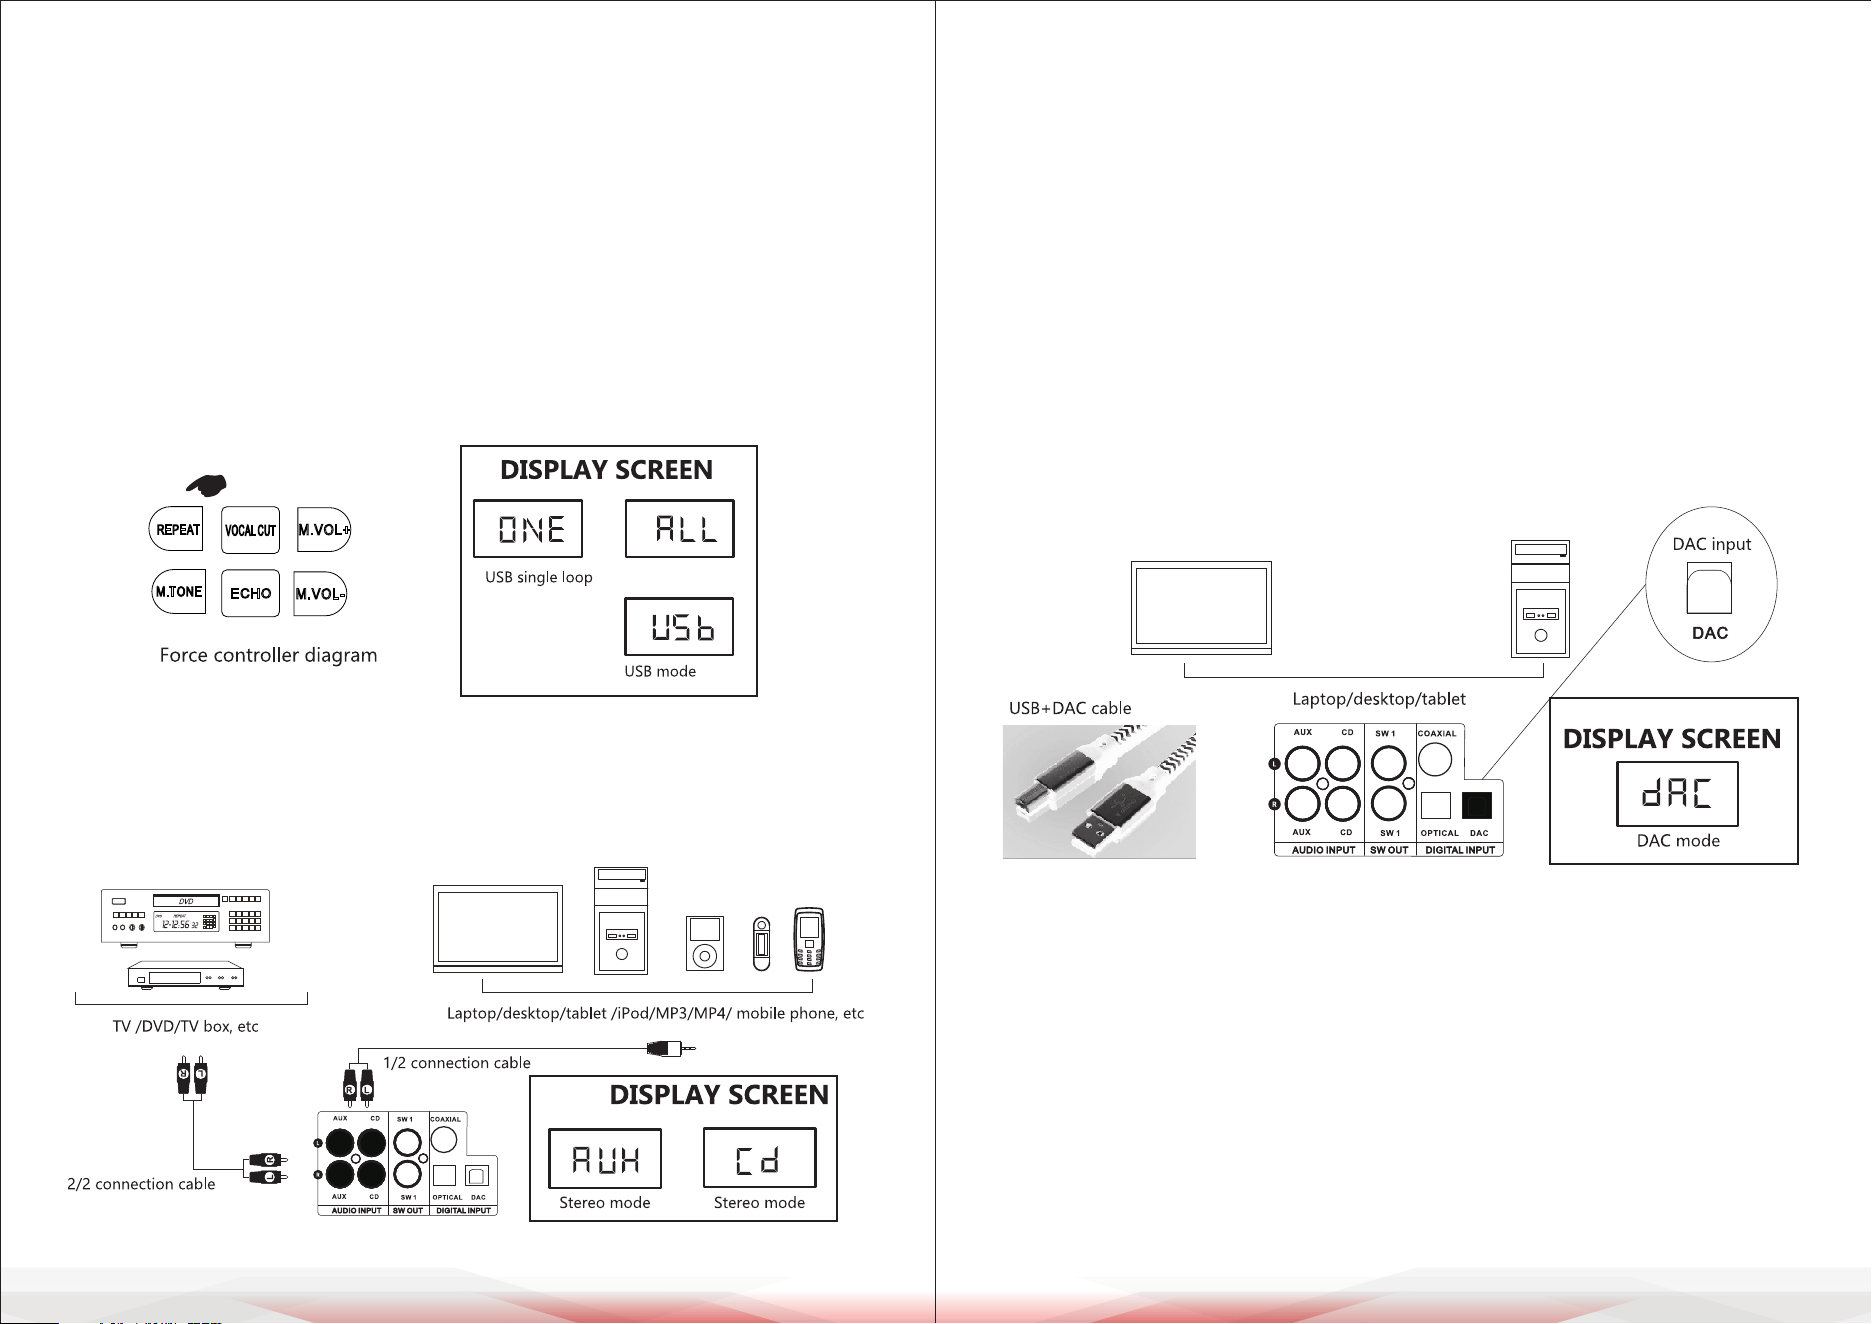
Radio Connection
1. Radio Antenna Setup: Insert the radio antenna securely into the FM port
located at the rear of the machine. Extend the FM antenna outward for
improved radio reception.
2. Switching to Radio Mode: Press the "INPUT" button on the lower panel or
the remote control until "FM" or "87.5" appears on the display, indicating the
switch to radio mode.
3. Automatic Station Search: Press and hold the " " button on the remote
control to initiate an automatic station search. This process may take more
than 5 minutes.
4. Station Selection: After the search is complete, the system will automatically
tune to the rst saved radio station. To manually select a saved station, use
the " " and " " buttons.
Bluetooth Connection
1. Turn on the machine and switch the mode to "BLUE". When the letters ash,
the system is in Bluetooth pairing mode.
2. Activate the Bluetooth function on your mobile device and search for
available devices.
3. Locate "PT865BT" in the search list and connect without a password.
If not found, refresh the search or toggle the phone's Bluetooth o and on.
4. Upon successful connection, the "BLUE" indicator on the screen will stop
blinking, and "Connected" will appear on the mobile phone.
5. Play music on the mobile device while adjusting the volume as needed.
The wireless range is approximately 16-33 feet (5-10 meters).
DISPLAY GRAPHIC INSTRUCTION
The display uses icons and symbols instead of text. Refer to the user manual's
graphical section for an explanation of these symbols.:
OPERATION INSTRUCTION
Connecting Power Supply and Starting Operation
1. Power Supply Connection: Insert one end of the provided power cord
securely into the power input port at the rear of the unit.
Connect the other end to a power socket.
2. Powering On: Press the power switch. The display screen will show "-HELLO"
initially, then transition to the user's last saved settings within 2 seconds.
3. Boot-Up Conrmation: Once the startup process is complete, proceed with
connecting additional equipment as needed.
www.PyleUSA.com12 www.PyleUSA.com 13
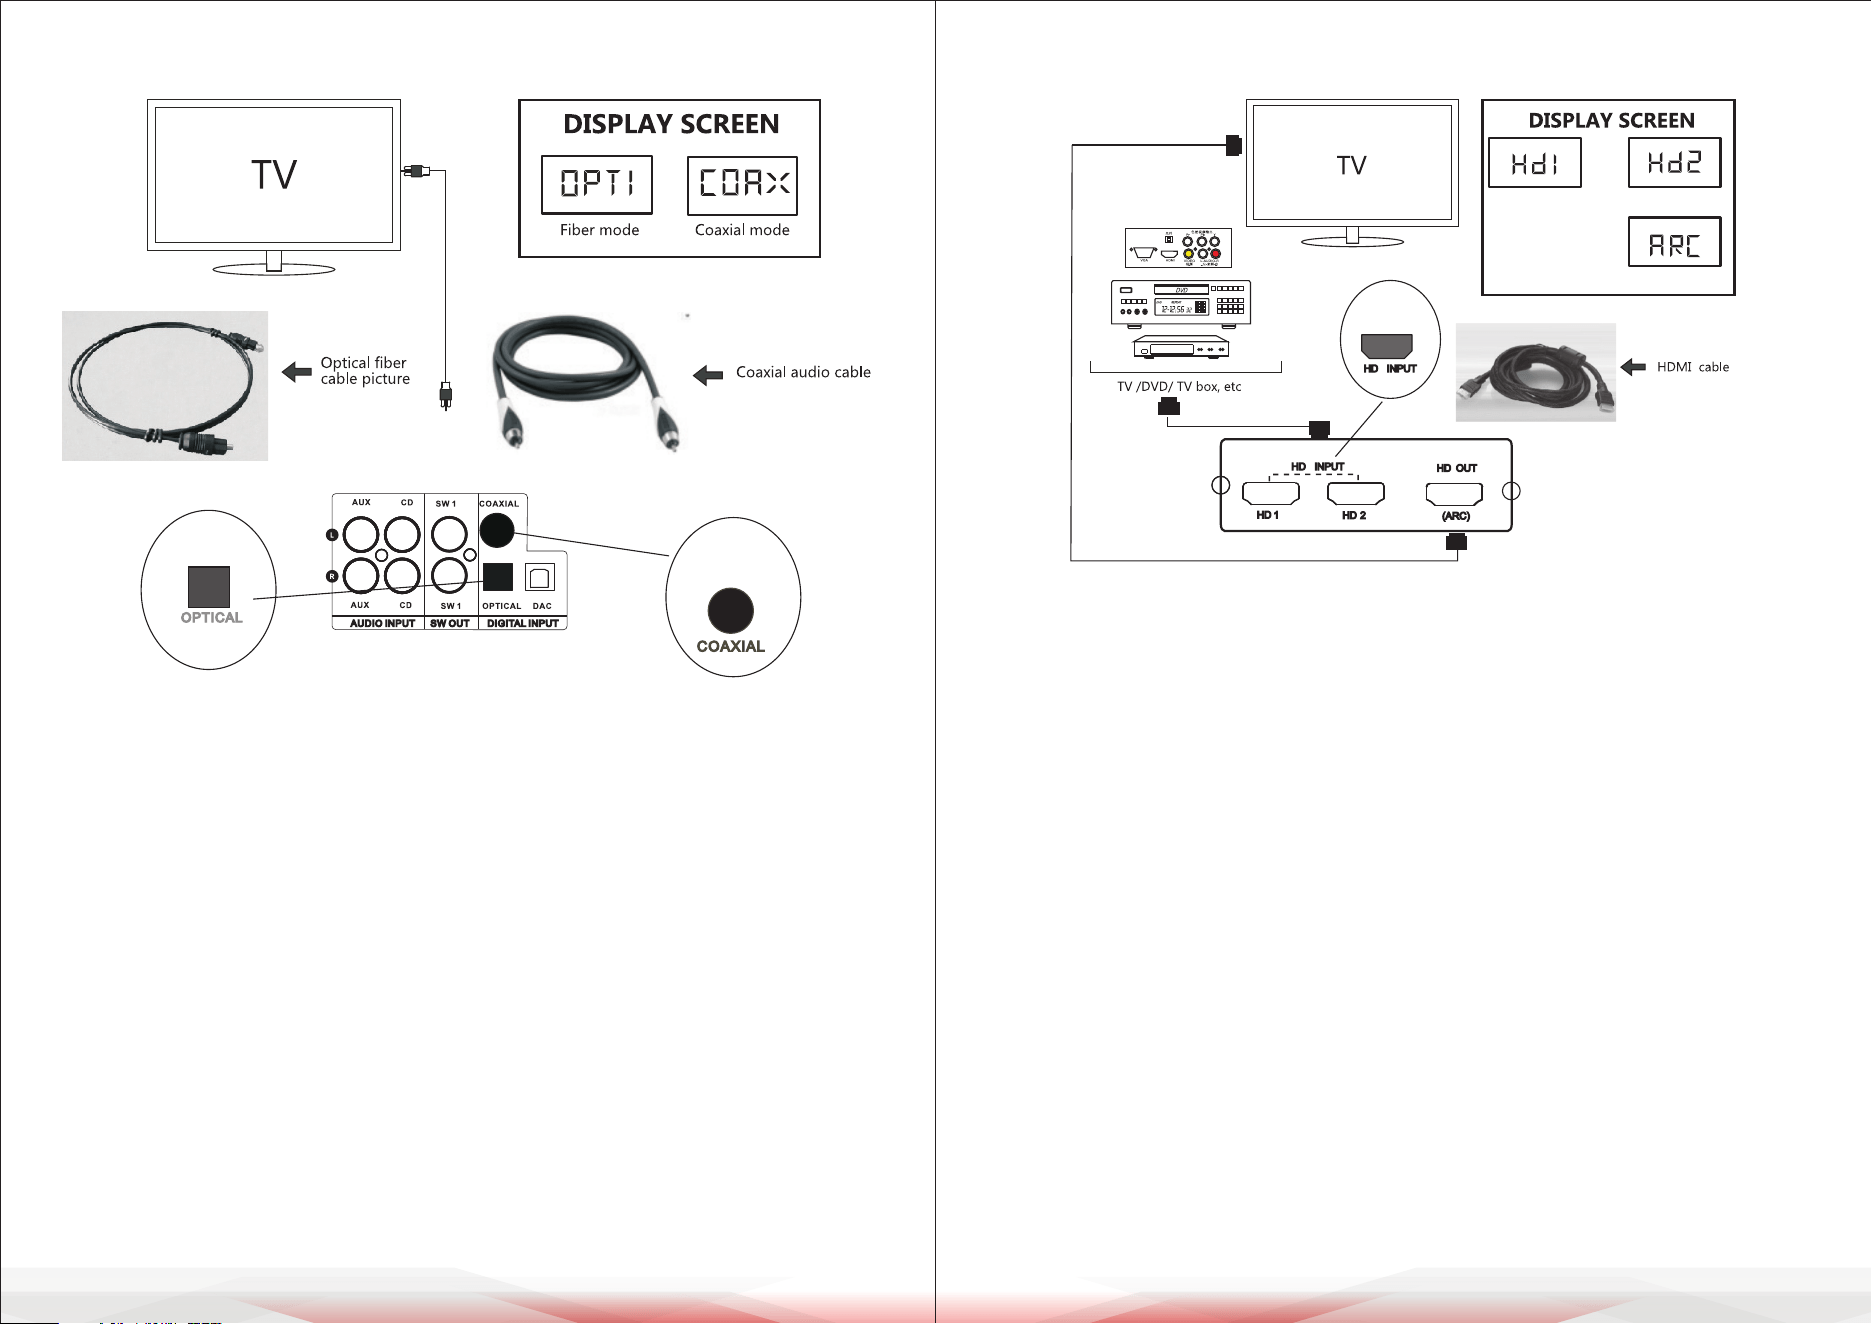
Compatible playback devices include computers, televisions, projectors, TV
boxes, DVDs, and media players. Mobile phones and MP3 players typically
have two types of audio output ports:
a. L/R Red and White RCA Ports: Requires a 2-to-2 audio connection cable.
Ensure correct port matching to avoid distorted sound.
b. 3.5mm Universal Stereo Port: Requires a 1-to-2 audio connection cable.
1. Press the "INPUT" button on the panel or use the remote control until "AUX"
or "CD" appears on the display.
2. Select the appropriate audio cable and connect the playback device to the
audio input.
3. Once connected, adjust the volume to level 17 or above, then start audio
playback on the device.
DAC Audio Connection
1. The system features a Digital-to-Analog Converter (DAC) audio interface,
enabling direct connection to a USB computer sound card.
2. Use the dedicated DAC connection cable to connect the system to the DAC
interface, ensuring both ends are securely plugged in.
3. Press the "INPUT" button until "DAC" appears on the display, indicating the
system is in DAC mode.
4. Once all cables are properly connected, increase the system volume and
begin audio playback.
Note: The amplier intelligently detects DAC signals. Select DAC mode only
after the cables are connected and a signal is being transmitted.
USB Mode
1. Press the "INPUT" button on the panel or remote control to switch to "USB"
mode. If a USB ash drive is inserted while in another mode, the system will
automatically switch to USB mode.
2. When the display shows "00:00" and the seconds begin changing, the system
is reading the les on the USB ash drive.
3. Ensure the USB ash drive contains only audio les stored outside the root
directory and does not include video les. If reading issues persist, consider
formatting the USB ash drive. Maximum supported capacity: 64GB.
4. The system supports power-o memory function and the following audio
formats: MP3, WMA, FLAC, APE.
Note:
1. Do not remove the USB ash drive while music is playing to prevent damage.
2. For the best audio experience, use high-quality, larger-capacity music les.
AUX/CD Audio Connection
www.PyleUSA.com14 www.PyleUSA.com 15
HD Audio Connection
1. Turn on the amplier and press the "INPUT" key on the panel or remote control
until "HDI" is displayed, indicating that the signal has shifted to the rst group
of HD mode. When using the ARC function, switch to "ARC."
2. Select the appropriate audio cable corresponding to the HDMI port connected
to the audio source and link the playback device as shown in the provided
gure.
3. Set the sound volume above 17 and initiate audio playback on the player.
4. If there is no sound, follow these steps:
• Increase the volume on the playback device.
• Ensure that the media source is actively playing.
• Check if the HD cable is securely plugged in and verify that the input/
output connections are correct.
5. If all connections are correct but there is no sound or interference, adjust the
playback device settings:
• Navigate to System Settings > Sound Settings > Select Output Device
(TV speaker, Digital Coaxial, Optical SPDIF, HDMI ARC, Bluetooth) and
choose ARC.
• In Sound Settings, select Audio Output Format and set it to PCM.
• Ensure the ARC return function is supported by the TV. TVs that support this
feature typically label the HDMI port as HDMI (ARC).
Digital Optical/Coaxial Signal Connection
1. Press the "INPUT" button on the panel or remote control until "OPT1" or
"COAX" appears on the display.
2. Select the appropriate audio signal cable to connect the source device to the
system.
3. Once connected, adjust the playback device’s system volume to an
appropriate level.
4. If no sound is heard despite correct connections, adjust the system settings
using the following steps:
A. Navigate to System Settings > Sound Settings > Output Device Selection.
Select the corresponding output device (TV - Digital Coaxial, Optical SPDIF,
HDMI ARC, or Bluetooth).
B. In Sound Settings, choose Audio Output Format and set it to PCM.
Note: The audio signal output format must be set to PCM when using digital
signal connections (optical ber, coaxial, DAC, HDMI/ARC) with the system.
www.PyleUSA.com16 www.PyleUSA.com 17
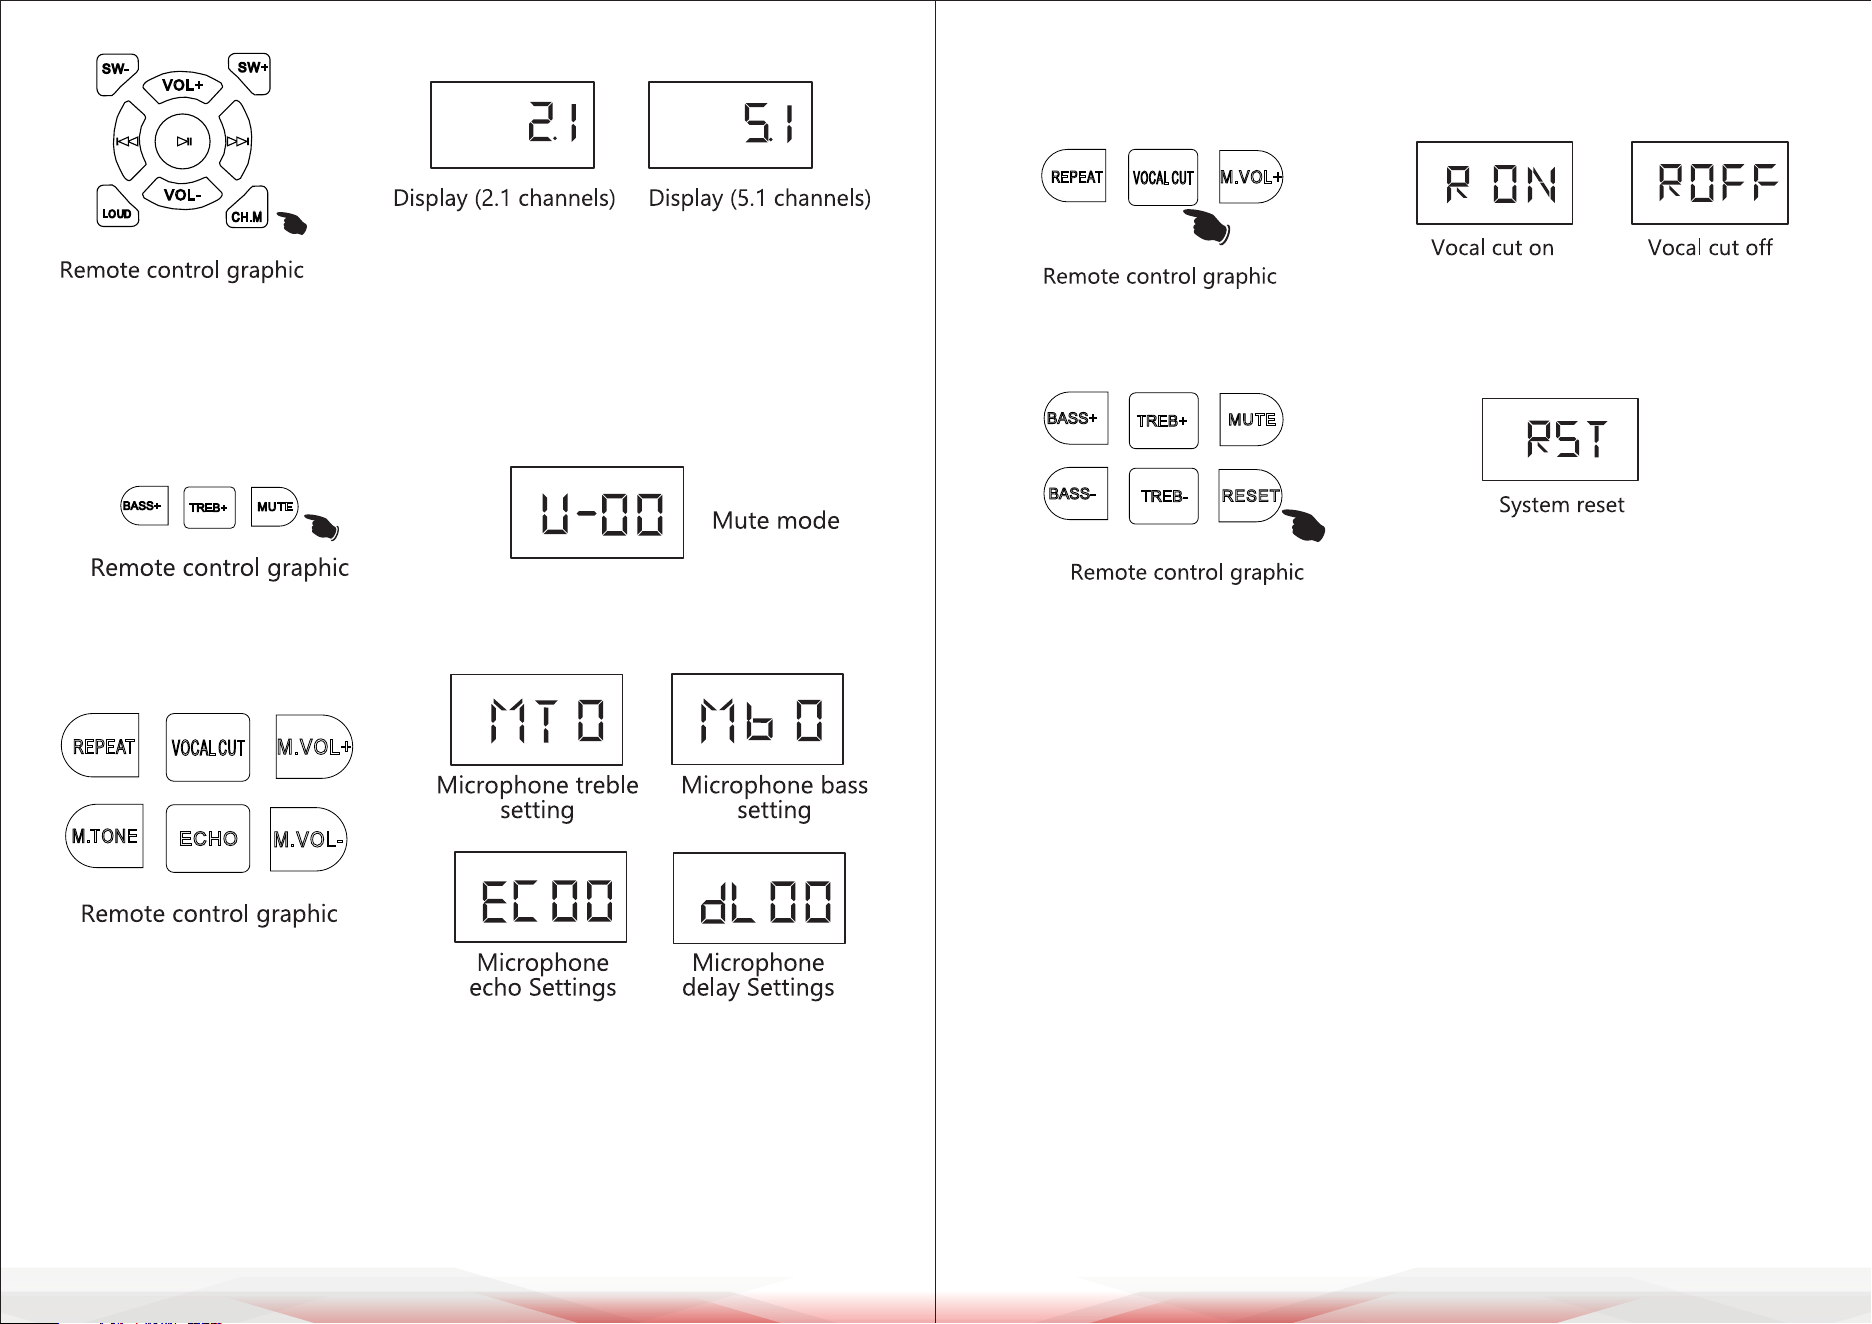
Sound Setting Instructions
A. Treble, Bass, and Overall Volume Settings
1. Adjust the Treble using the TREB+ or TREB- buttons on the remote control.
2. Adjust the Bass using the BASS+ or BASS- buttons on the remote control.
3. The system’s gain is preset to +9.
4. Adjust the Master Volume using VOL+ or VOL- on the remote control
(default: 10, max: 32).
5. Activate Loudness Mode by pressing the LOUD button to boost low
frequencies by 3dB.
B. Channel Volume Setting
Each channel’s volume ranges from 0 to 10 (default: 10 on startup).
• Independently adjust each channel’s volume using the remote control:
• FR (Front Right), FL (Front Left), CEN (Center), SW (Subwoofer),
SL (Surround Left), SR (Surround Right).
• If center and surround channels are not adjustable, press the CH.M button to
toggle between 2.1 and 5.1 channel modes. In 2.1 mode, center and surround
channels are disabled.
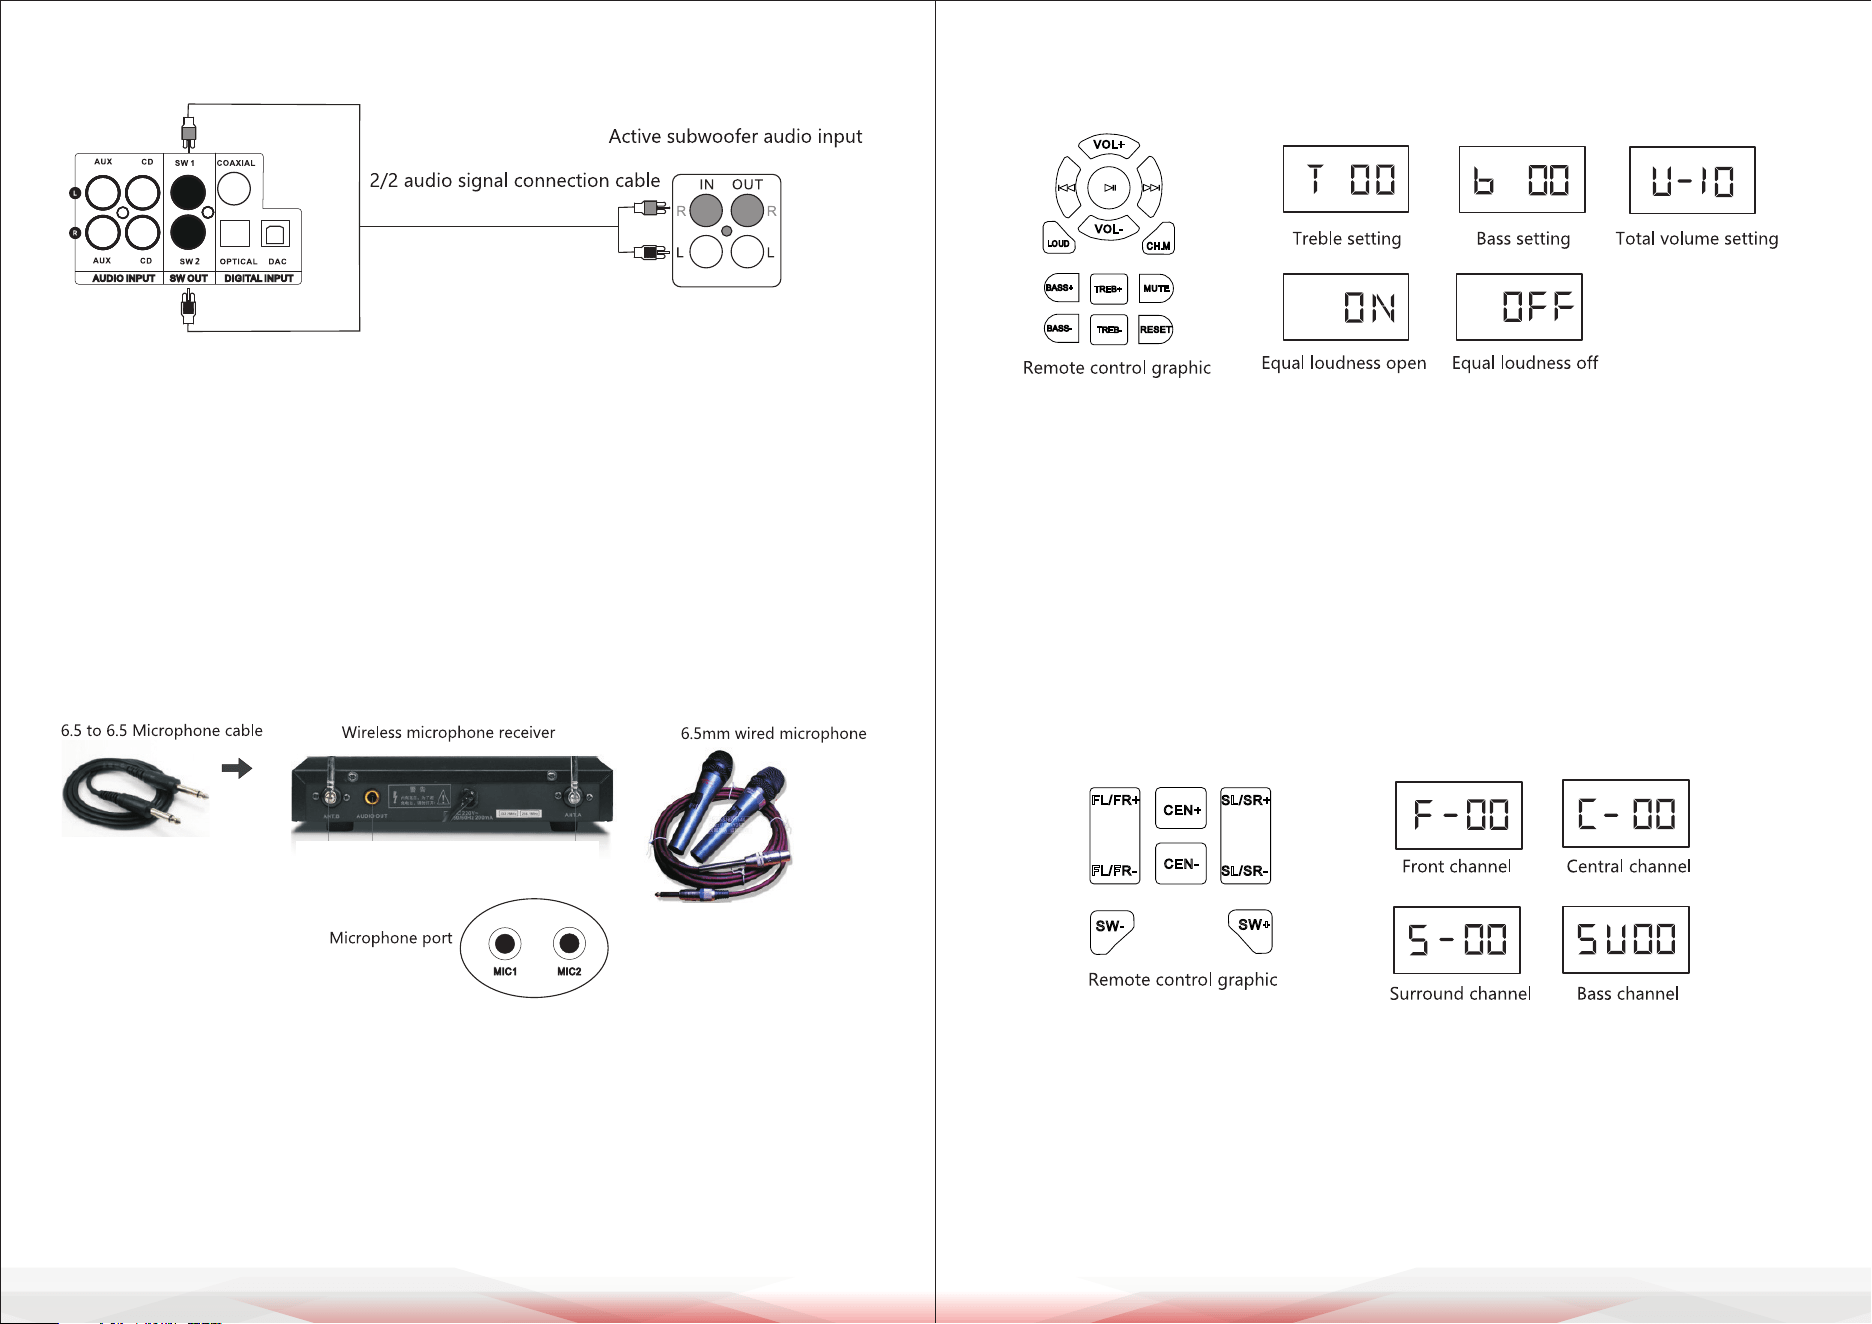
Auxiliary Subwoofer Signal Connection
1. This interface enhances bass output for users with high bass demands.
2. Select the appropriate audio cable for the SW OUT port and connect the
subwoofer to the amplier as shown in the gure.
3. The external subwoofer must be active, preferably with an 8-inch bass driver
and a rated power exceeding 100W.
4. If the subwoofer produces no sound, increase the volume on the subwoofer
and press the BASS+ button on the remote control.
Microphone Connection
1. The system supports both wired and wireless microphone connections.
Insert a 6.5mm audio cable into the microphone input port.
2. The microphone’s sound quality depends on volume settings, microphone
quality, and the surrounding environment. Refer to the manual for detailed
microphone volume settings.
www.PyleUSA.com18 www.PyleUSA.com 19
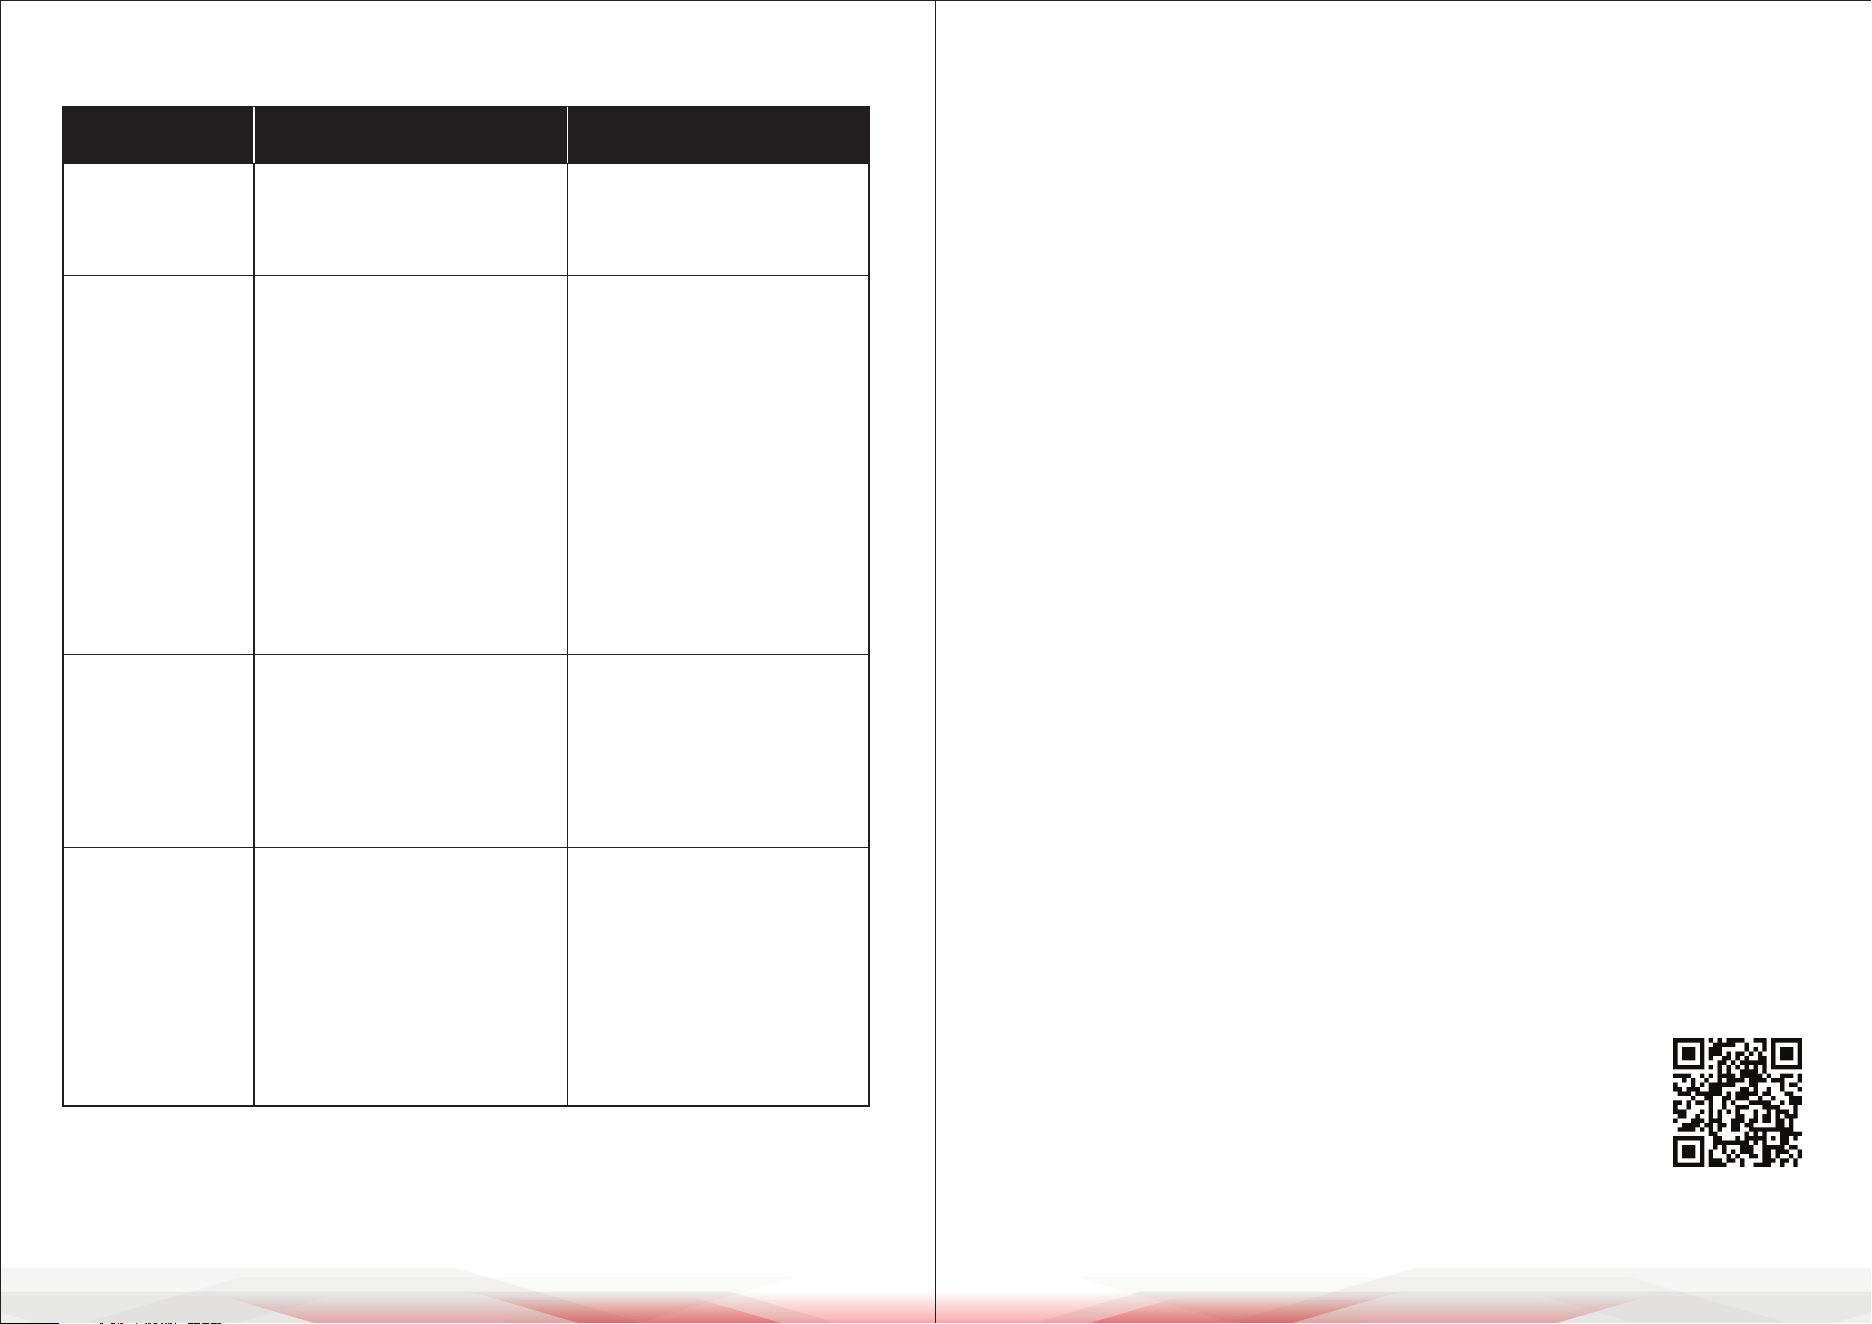
E. Karaoke & Vocal Cut
Refer to the manual for additional karaoke and vocal cut settings.
F. Sound Reset Settings
1. The system automatically saves volume settings. After powering o, it will
revert to the last used settings.
2. To restore factory settings, press the RESET button on the remote control.
CLEANING, MAINTENANCE, AND STORAGE
Cleaning:
Use a soft, dry cloth to wipe the surface of the amplier and speakers. Avoid
using harsh chemicals or abrasive materials.
Maintenance:
Regularly check all connections and cables for wear or loose connections.
Ensure ventilation openings are unobstructed to prevent overheating.
Storage:
Store the amplier and audio components in a cool, dry place away from direct
sunlight and moisture. Cover the equipment when not in use to prevent dust
buildup.
C. Mute Function
1. Press the MUTE button on the remote control. "U-00" will appear on the
display, indicating that sound is muted.
2. The screen will ash while muted. Unmute to restore the display to normal.
D. Microphone Volume Settings
1. Adjust the microphone volume using M.V+ and M.V- on the remote control.
2. Adjust the microphone Treble and Bass: Press M.TONE, then select MTO for
treble or MBO for bass.
3. Adjust Echo and Delay:
• Press ECHO on the remote control.
• Use ECOO for echo and dL00 for delay adjustments with M.VOL+ or M.VOL-.
www.PyleUSA.com20 www.PyleUSA.com 21
Register Product
Thank you for choosing PyleUSA. By registering your product,
you ensure that you receive the full benets of our exclusive
warranty and personalized customer support. Complete the
form to access expert support and to keep your PyleUSA
purchase in perfect condition.
Start Here
Model Number:
PT865BT
PyleUSA.com/pages/register
FCC STATEMENT
This equipment has been tested and complies with the limits for a Class B
digital device, per part 15 of the FCC Rules. These limits are designed to provide
reasonable protection against harmful interference in a residential installation.
This equipment generates, uses, and can radiate radio frequency energy, and if
not installed and used per the instructions, may cause harmful interference to
radio communications. However, there is no guarantee that interference will
not occur in a specic installation. If this equipment does cause harmful
interference to radio or television reception, determined by turning the
equipment o and on, the user is encouraged to correct the interference with
one or more of the following measures: Reorient or relocate the receiving
antenna. Increase the distance between the equipment and the receiver.
Connect the equipment to an outlet on a dierent circuit from the one the
receiver is connected to. Consult the dealer or an experienced radio/TV
technician for help.
Caution:
Changes or modications not explicitly approved by the manufacturer could
void your authority to operate this equipment.
Compliance: This device complies with part 15 of the FCC Rules.
Operation is subject to the following conditions: (1) This device must not cause
harmful interference, and (2) this device must accept any interference received,
including interference that may cause undesired operation.
RF Exposure Information:
The device meets general RF exposure requirements and can be used safely.
TROUBLESHOOTING
Problem Reason Solution
Abnormal or
Faulty Screen
External interference,
CPU issue
Power o the system.
Unplug it, then restart
No Sound
• Improper speaker or audio
device connection
• Power cable not correctly
plugged in
• Mute mode activated
• Speaker short circuit
• Verify speaker and audio
device connections.
• Ensure the power
supply is connected
correctly.
• Adjust volume settings.
• Disable mute mode.
• Power o, reconnect
speakers, and restart.
Sound
Distortion
• Incorrect amplifyer input
• Volume set too high
• Check the amplier
input connection.
• Adjust the volume to a
lower level.
Staccato or
Relay Ticking
Noise
• Speaker impedance below
4 ohms
• Volume set too high
• Speaker short circuit or
improper connection
• Use speakers with
proper impedance.
• Reduce volume to a
moderate level.
• Power o, reconnect
speakers, and restart.