Wireless Door/Window
Contact Sensor User Manual
1. Product Introduction
①
①
②
②
③
⑤④
5. Pairing with Alarm Host 6. Installation Guide 7. Battery Replacement
2. Product Appearance
3. Technical Parameters
4. Operation Instructions
7
1
2
4
5
6
8. Troubleshooting
9. Safety & Maintenance
≤20mm
CR2032
CR2032
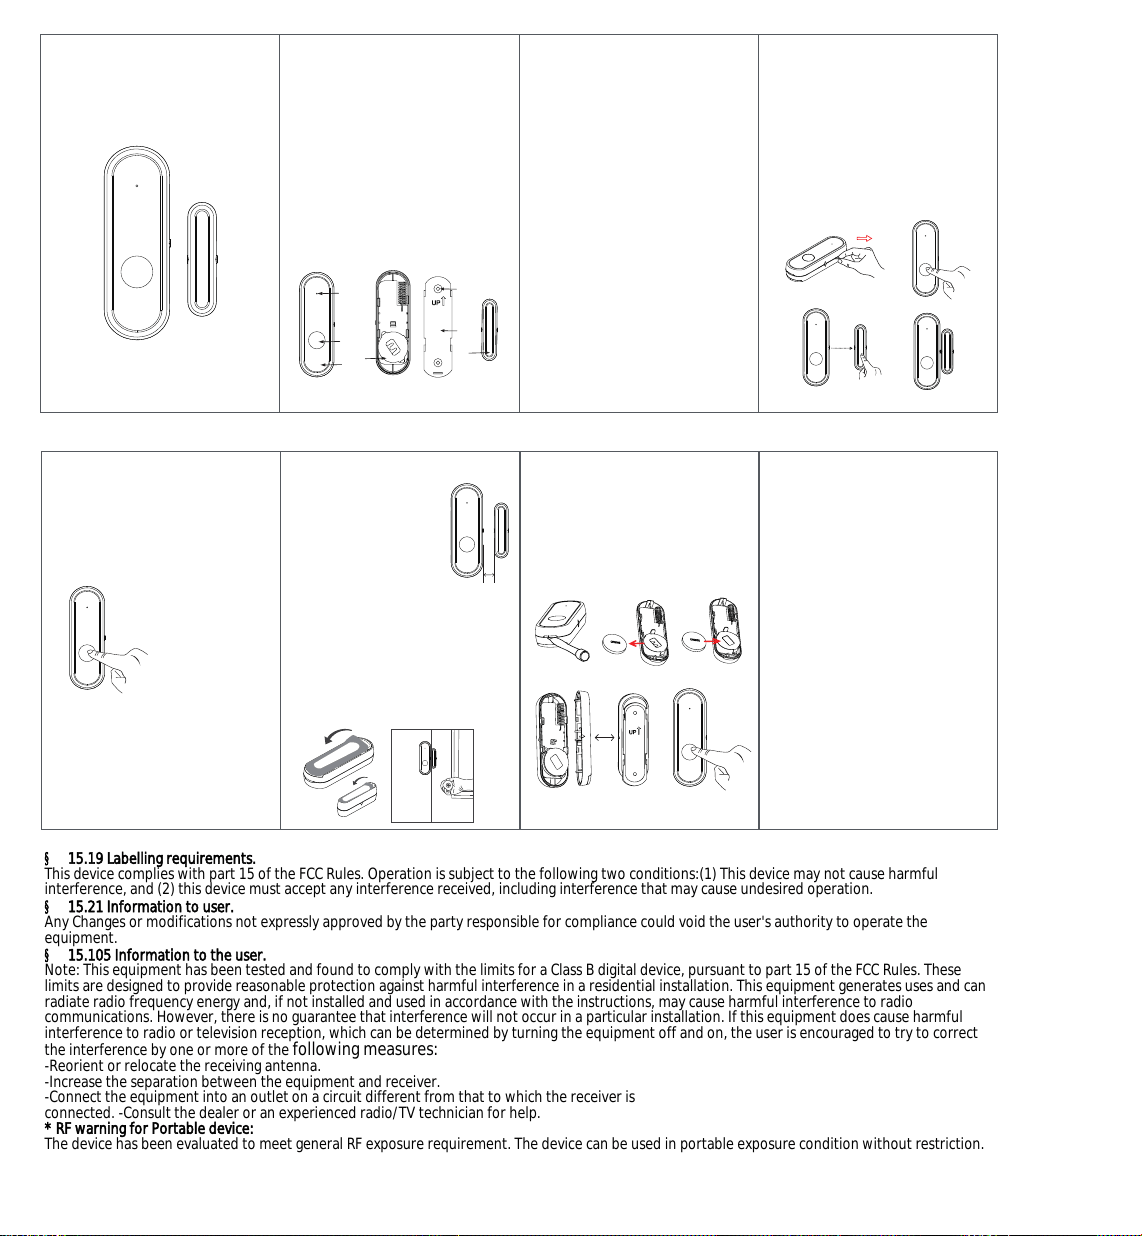
This smart door/window contact sensor
is equipped with high-sensitivity Hall
switch and reliable 433.92 MHz wireless
RF communication technology. It is
designed to monitor the open and closed
status of doors and windows, and is an
essential part of smart home security,
property monitoring and automatic
control systems. When the status of a
monitored door or window changes, the
sensor will instantly transmit signals to
the receiving host wirelessly for
immediate alarm and intelligent linkage.
1. Indicator Light
2. Test Button
3. Sensor
4. Battery Compartment
5. Screw Hole
6. Mounting Bracket
7. Magnetic Strip
Power Supply: DC 3V (CR2032 Lithium
Battery)
Detection Distance: ≤ 50 mm (gap
between sensor and magnetic strip)
Wireless Frequency: 433.92 MHz
Transmission Range: ≥ 100m (in open
areas)
Operating Temperature: -10℃ ~ 55℃
Operating Humidity: Less than 95%
(non-condensing)
(2) Press the test button. A single flash
of the indicator means the sensor
functions normally. If the indicator does
not light up, open the rear cover and
replace the battery.
(3) Separate the magnetic strip from the
sensor to simulate opening the door or
window. One flash of the indicator
indicates the open signal is triggered.
(4) Reunite the magnetic strip with the
sensor. One flash of the indicator
confirms the door or window is closed.
①
②
③ ④
①Follow the alarm host manual to
activate the sensor learning mode on the
host.
②Place the sensor near the host and
press the test button to send a pairing
signal.
③Pairing is completed successfully.
Press the test button. The
indicator flashes once when
sending the pairing signal
Notes:
· The host will exit pairing mode
automatically if pairing fails within 20
seconds.
· Repeat the above steps if pairing is
unsuccessful.
(1) Position Selection: Install
the main sensor on the fixed
frame of doors or windows,
and the magnetic strip on
the movable edge. Keep the
two parts aligned with a gap
within 20 mm. Do not install
on metal surfaces or near
strong magnetic fields to
prevent signal interference.
①Remove the rear cover to open the
battery compartment.
②Take out the old battery.
③Install a new CR2032 battery of the
same specification.
④Secure the rear cover back in place.
⑤Test the sensor to verify normal
operation.
(2) Installation Steps:
① Peel off one side of the release liner
from the two 3M adhesive tapes, and
attach the tapes to the sensor and
magnetic strip respectively.
② Remove the other side of the release
liner, then attach the sensor and
magnetic strip to the preset positions.
(1) Failed to trigger alarm: Check
(1) Safety Warnings
Do not immerse the device in water or
expose it to corrosive environments. Do
not use the device in flammable and
explosive areas.
(2) Maintenance
· Check magnetic attraction and battery
contacts every six months.
· Remove the battery if the device will
not be used for a long time.
alignment of the magnetic strip; replace
the battery; re-pair the device.
(2) Frequent false alarms: Adjust the
installation position; check for loose
magnetic strip.
(3) Signal delay: Reduce the transmission
distance; replace the battery.
3
(1) Test the sensor as follows before
initial use:Pull out the insulating tab
vertically.
§ 15.19 Labelling requirements.
This device complies with part 15 of the FCC Rules. Operation is subject to the following two conditions:(1) This device may not cause harmful
interference, and (2) this device must accept any interference received, including interference that may cause undesired operation.
§ 15.21 Information to user.
Any Changes or modifications not expressly approved by the party responsible for compliance could void the user's authority to operate the
equipment.
§ 15.105 Information to the user.
Note: This equipment has been tested and found to comply with the limits for a Class B digital device, pursuant to part 15 of the FCC Rules. These
limits are designed to provide reasonable protection against harmful interference in a residential installation. This equipment generates uses and can
radiate radio frequency energy and, if not installed and used in accordance with the instructions, may cause harmful interference to radio
communications. However, there is no guarantee that interference will not occur in a particular installation. If this equipment does cause harmful
interference to radio or television reception, which can be determined by turning the equipment off and on, the user is encouraged to try to correct
the interference by one or more of the following measures:
-Reorient or relocate the receiving antenna.
-Increase the separation between the equipment and receiver.
-Connect the equipment into an outlet on a circuit different from that to which the receiver is
connected. -Consult the dealer or an experienced radio/TV technician for help.
* RF warning for Portable device:
The device has been evaluated to meet general RF exposure requirement. The device can be used in portable exposure condition without restriction.