1
Table of Contents
A WARNINGS AND SAFETY NOTICES ..............................................................................................................1
B ERGONOMICS RECOMMANDATIONS ...........................................................................................................7
C WARRANTY TERMS AND EXCLUSIONS ........................................................................................................8
D GENERAL INFORMATION ...............................................................................................................................9
E TRANSPORT, HANDLING, AND STORAGE .................................................................................................. 10
F INSTALLATION AND ASSEMBLY .................................................................................................................. 11
G USE ...............................................................................................................................................................13
H CLEANING AND MAINTAINING THE APPLIANCE .......................................................................................21
I TROUBLESHOOTING ...................................................................................................................................23
A WARNINGS AND SAFETY NOTICES
General Information
To be able to use this appliance safely and understand the Manual correctly, we recommend
you become familiar with the terms and symbols used in the documentation. To easily distin-
guish and recognize the different types of hazard, this Manual uses the following symbols:
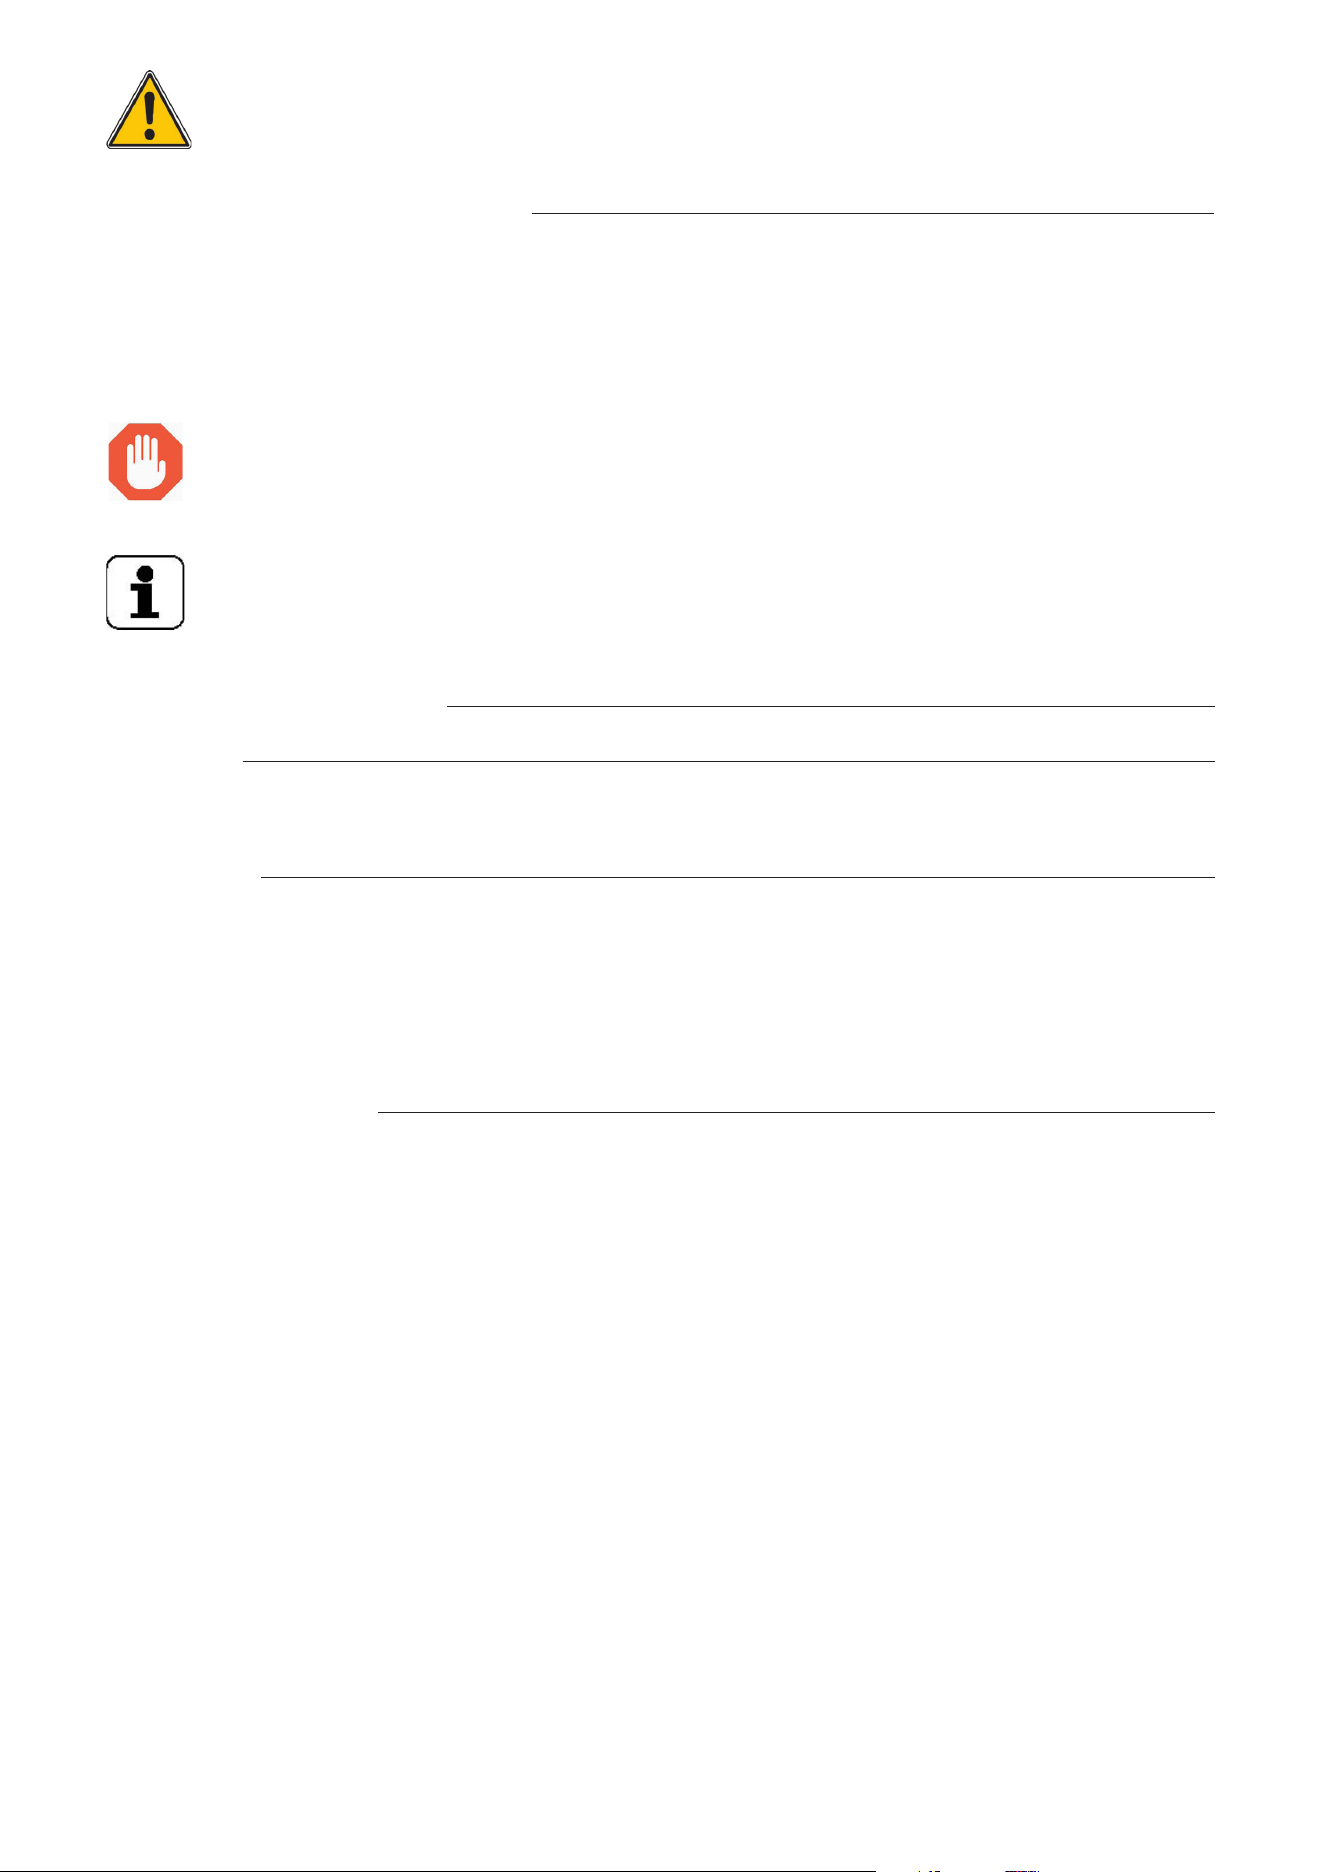
WARNING
Danger to the health and safety of users
WARNING
Risk of electrocution – hazardous voltage.
CAUTION
Risk of deterioration to the appliance or product being processed.
IMPORTANT
Instructions or important information about the product
Electrical bonding
Please read all the instructions before using the appliance
Details and explanations
Manufacturer: Electrolux Professional ZI of MONT 23200 AUBUSSON www.electroluxprofessional.com
EN
05/2022
The reference language for this instruction manual is French.
595J07Q00
2
Important Safety Notices
This User Manual contains practical information for the user on how to work correctly and in com-
plete safety, and is designed to make it easier to use the machine (called “machine” or “appliance”
below).
What follows is in no case intended to be a long list of warnings and constraints, but rather a series of
instructions meant to improve the service provided by the machine in every respect, and particularly to
avoid a series of injuries or damage to equipment that might result from inappropriate procedures for
use and management.
It is essential that all the people responsible for transporting, installing, commissioning, using,
maintaining, repairing, or dismantling the machine should consult this manual and read it care-
fully before proceeding with the various operations, in order to avoid any incorrect or inappropri-
ate handling that might be result in damage to the machine or put people’s safety at risk.
It is just as important that the Manual should always be available to the operator and it should be
kept carefully where the machine is used ready for easy and immediate consultation in case of
any doubt, or in any case, whenever the need arises.
If after reading the Manual, there are still any doubts concerning how to use the machine, please do not
hesitate to contact the Manufacturer or approved after-sales agent, who is constantly on hand to ensure
quick and careful service for improved machine operation and optimum efficiency.
• Read the Manual carefully before using the appliance.
• Keep the Manual in a safe place so it can be referred to after installation.
• Always install the appliance in a well ventilated place.
In an Emergency
• Keep emergency phone numbers in a visible place.
• Installation and maintenance must be carried out only by specialized technicians approved
by the manufacturer. If you need assistance, please contact an approved after-sales agent.
Always use genuine spare parts.
• This appliance can be used by children aged from 8 years and above and persons
with reduced physical, sensory or mental capabilities or lack of experiences and
knowledge if they have been given supervision or instructions concerning use of the
appliance in safe way and understand the hazards involved.
• Cleaning and user maintenance shall not be made by children without supervision.
• Children being supervised not to play with the appliance.
• Personnel using the appliance must have received specific training on the risks involved.
• Use the appliance only under supervision.
• Unplug the appliance in the event of a breakdown or malfunction.
• Do not use products (even if diluted) containing chlorine (sodium hypochlorite, hydrochloric
or muriatic acid, ammonium chloride, etc.) to clean the appliance.
• Do not use metal utensils (Scotch Brite brushes or scouring sponges) to clean the appliance.
• Avoid oil or grease coming into contact with plastic parts.
• Ensure that dirt, grease, food, or other substances do not settle on the appliance.
• Do not wash the appliance with direct water jets or steam cleaners.
• You can obtain this Manual in digital format (PDF) by contacting the dealer or your local af-
ter-sales agent or by scanning the QR code on the appliance.
• Scan the QR code on appliance backside to access videos tutorials, user manuals in other
languages and other support material.
• Install a protective switch upstream of the appliance.
• The opening of contacts and the maximum dispersal current must comply with current reg-
ulations.
• We advise having the appliance inspected by a certified technician at least every 12 months.
• We recommend taking out a service contract.
• People with pacemakers should consult their doctor to see if their safety is guaranteed when
using this type of appliance.

3
• The symbol on the product indicates that it should not be considered as house-
hold waste, but should be disposed of according to applicable standards, in order to
avoid any negative impact on the environment and human health.
For more information on recycling this appliance, contact your local agent or dealer of
the appliance, the after-sales agent or the local authority responsible for the disposal of
waste.
• The “Refer to the User Manual” symbol indicates that the User Manual should be
read before continuing to use the appliance.
• If the power cord is damaged, it must be replaced by the Manufacturer, a certified ser-
vice agent or qualified service personnel, to avoid risk.
• Always start on a slow speed setting (variable speed models).
• Do not try to insert a finger or object while the machine is running.
• Always unplug the machine before any kind of intervention.
• Handle rotors, discs and grills with the utmost care. (Risk of CUTS – ELECTRIC
SHOCK).
• Do not put the motor unit in a dishwasher for cleaning. Wipe the unit with a damp
sponge and a little detergent, then dry it.
• Avoid mishandling the appliance and accessories.
• Be careful not to cut yourself with rotors, discs, or blades during cleaning.
• If the appliance stops during use:
- Unplug it and let it cool down until the heat protection resets or reset the circuit breaker.
See Section “I” for troubleshooting.
If problems persist, contact your local dealer’s after-sales agent.
• These appliances are designed to be used in commercial settings, such as kitchens,
restaurants, canteens, hospitals, or commercial business, such as bakeries, butch-
ers, but not for continuous mass food production.
• Only specialized technicians are allowed to carry out repairs on the appliance.
• Keep all packaging and detergents out of reach of children.
• Do not store explosive substances, such as pressurized containers containing a
flammable product, next to this appliance.
• Do not remove, falsify, or make the machine’s labeling illegible.
• When the appliance comes to be decommissioned, the marking will have to be re-
moved with it.
Failure to comply with the above instructions may compromise the safety of the appli-
ance.
The guarantee is void if these instructions are not followed.
The manufacturer disclaims any responsibility for any damage or malfunctions resulting
from:
• Failure to comply with the instructions given in this Manual
• Incorrect repairs and replacement using parts other than those specified in the
spare parts catalog (the assembly and use of non-genuine parts and accessories
may interfere with the operation of the machine and cause the warranty to expire)
• Unauthorized changes or repairs
• Inadequate maintenance
• Improper use of the machine
• Unforeseeable exceptional events
• Use of the machine by unqualified and untrained personnel
• Non-application of the country’s hygiene, health, and safety provisions in the
workplace.
The manufacturer disclaims any liability for damage resulting from any conversions or
modifications made by the user or the customer.
4
The responsibility for identifying and selecting the appropriate personal protective
equipment to be worn by users is the responsibility of the employer, the person in
charge of the workplace, or the after-sales technician, in accordance with the standards
in force in the country of use.
Electrolux Professional disclaims any responsibility for any inaccuracies that could have
ended up in the Manual, if due to printing or translation errors.
Any future additions to the Installation, Use, and Maintenance Manual that the manufac-
turer considers useful for the customer must be retained with the Manual and will be an
integral part of it.
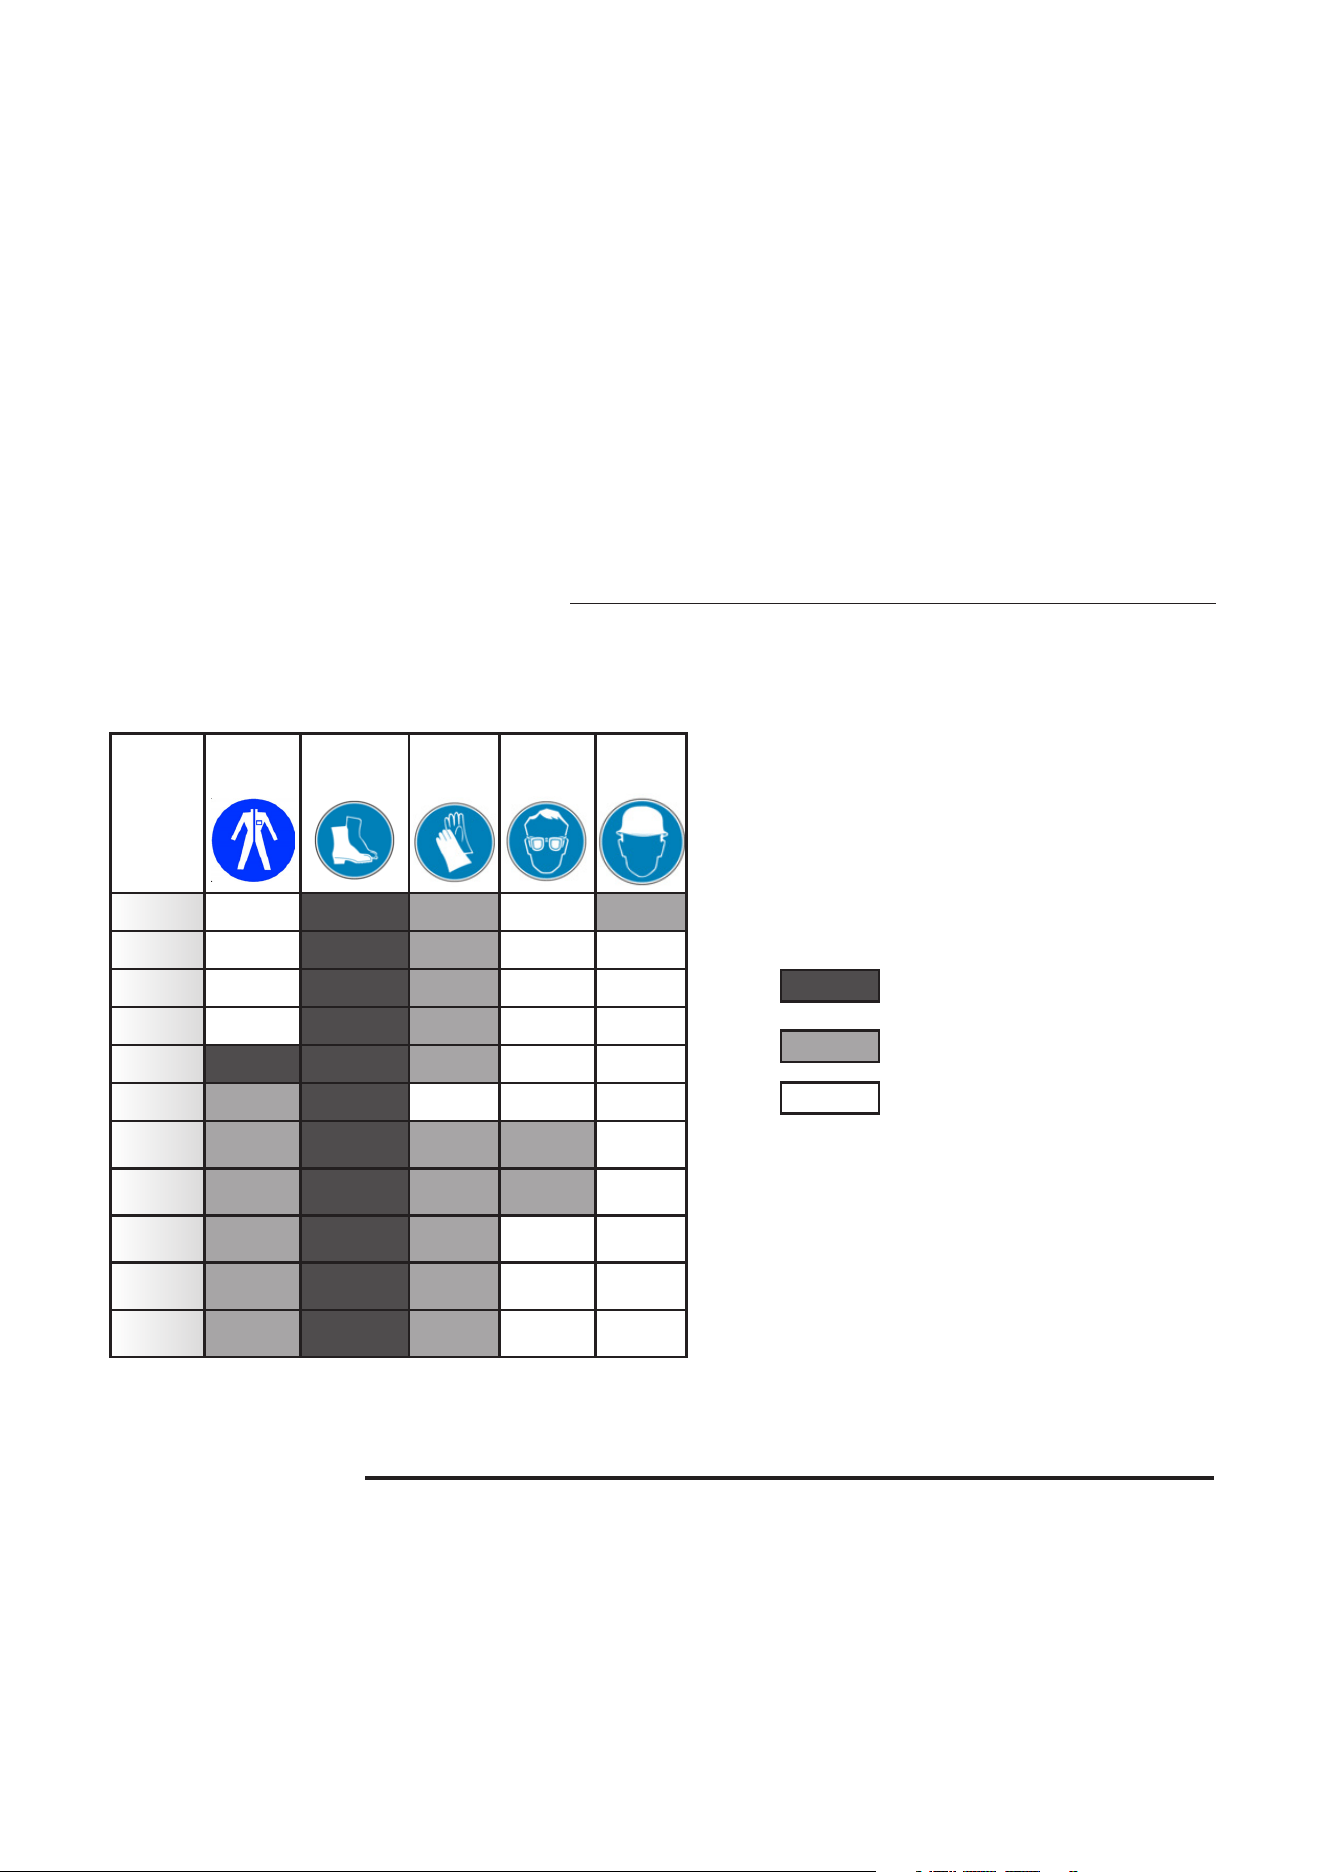
Personal Protective Equipment
Below is a summary of Personal Protective Equip-
ment (PPE) to be used during the various phases of
using the machine.
Phase
Protective
clothing
Safety
shoes
Gloves Glasses
Safety
helmets
Transport
Handling
Unpacking
Assembly
Normal use
Settings
Routine
cleaning
Exceptional
cleaning
Mainte-
nance
Disassem-
bly
Decommis-
sioning
General Safety
• The appliances are equipped with electrical and/or mechanical safety devices designed to
protect users and the appliance.
• It is forbidden to operate the appliance after removing, handling, or damaging the protec-
tive devices or safety features.
• Do not modify the parts provided with the appliance under any circumstances.
• Before any maintenance work, unplug the power cord from the wall socket.
Legend:
EXPECTED PPE
PPE AVAILABLE OR TO BE USED IF NECESSARY
NON-NECESSARY PPE
During routine use, gloves protect the hands from
contact with hot parts of the appliance or hot
foods.
RETAINING THE MANUAL
The Manual must be kept for the entire life of the machine until it is disposed of.
In the event that the machine is decommissioned, sold, leased, rented, or loaned, this Manual must ac-
company the machine.
5
General Safety Guidelines
Under no circumstances can the user remove or modify these safety devices. The Manufac-
turer disclaims any responsibility for the handling or non-use of these devices.
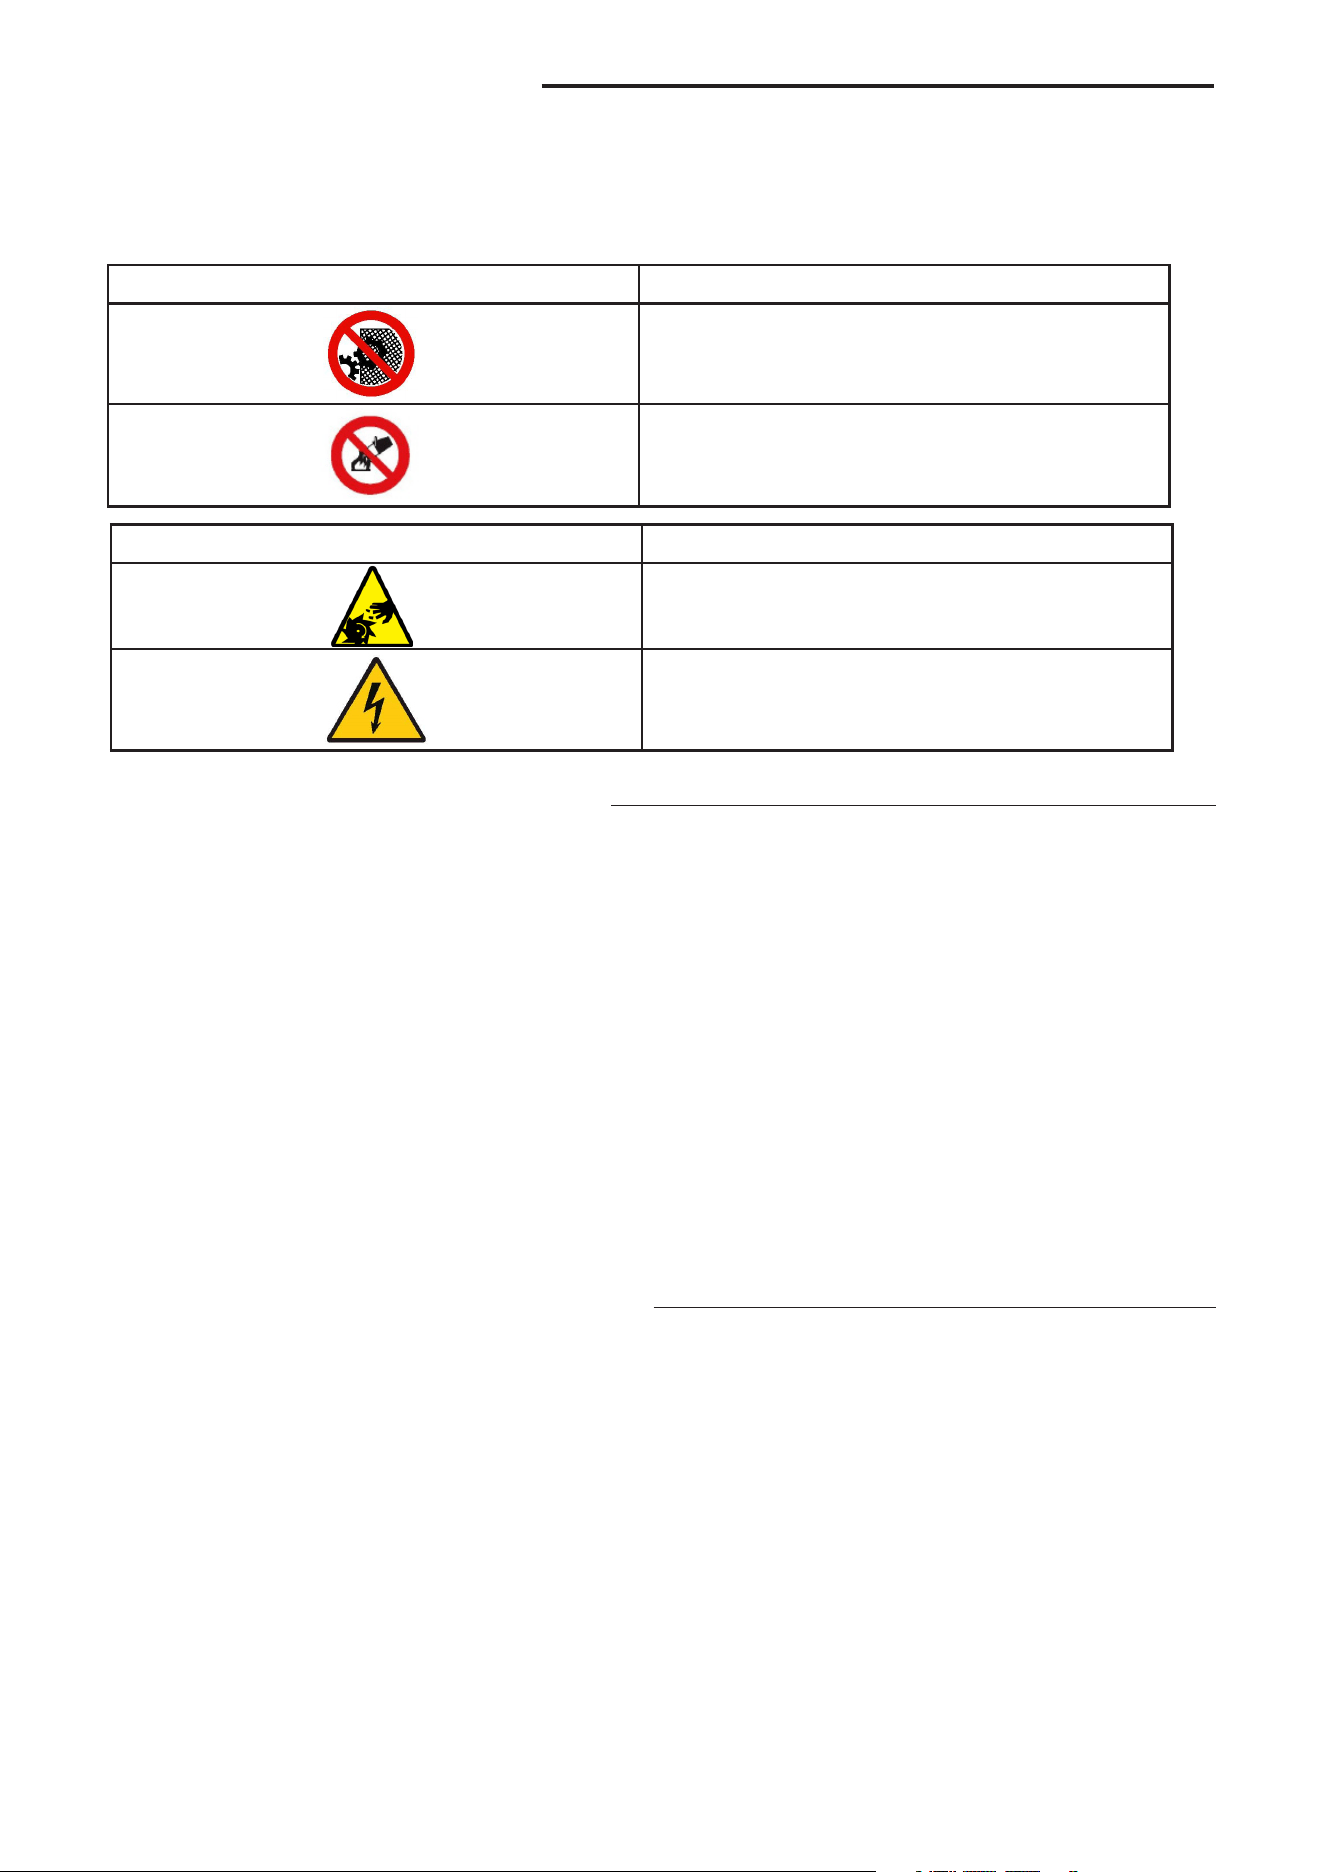
Safety symbols that must be on or near the machine
Prohibited Meaning
Do not remove any safety devices
Do not use water to extinguish fires (on
electrical parts)
Danger Meaning
Risk of cuts
Risk of electrocution (electrical parts)
Warnings for Use and Maintenance
• Risks associated with the machine are of a mainly mechanical or electrical nature. These risks have
been mitigated where possible:
– Either directly by adopting appropriate solutions
– Or indirectly by using screens, guards, and safety devices.
• During maintenance, some risks that cannot be eliminated remain; these must be mitigated by
adopting specific behaviors and precautions.
• Inspection, cleaning, repair and maintenance work on moving parts are prohibited. Users should be
alerted by clearly visible warnings.
• To ensure the performance and smooth operation of the machine, it is essential to perform mainte-
nance work periodically according to the instructions given in this manual.
• It is advisable to regularly check the proper operation of the safety devices, the insulation of the
electrical cables, and the seal which will need to be replaced if necessary.
• Maintenance work on the appliance is reserved exclusively for specialized personnel carrying the
necessary personal protective equipment and with appropriate equipment, tools, and aids.
• It is forbidden to operate the machine after removing, handling, or damaging the safety devices.
Reasonably Foreseeable Improper Use
Any use other than that specified in this Manual is considered improper. During the use of the machine,
any work or activities different from those intended are considered improper and can generally result in
risks to the safety of users and damage to the machine. Reasonably foreseeable improper uses include:
• Lack of maintenance, cleaning, regular checks of the machine
• Changes to the structure or operating logic
• Handling of screens or safety devices
•
Non-use of personal protective equipment by users, specialist personnel, and maintenance personnel
• Non-use of appropriate accessories (e.g. unsuitable equipment)
• Storing combustible or flammable materials near the appliance, or in any case, any items that are
not compatible or unrelated to the work to be done
• Improper installation of the machine
• Putting into the appliance any objects or items that are incompatible with use or that could harm the
machine or people or pollute the environment
• Climbing on the machine
• Non-compliance with the instructions on the intended use of the machine
• Other risky behavior which the Manufacturer cannot rule out
The behaviors described above are prohibited!
6
Residual Risk
• The machine highlights risks that have not been completely eliminated in the design or installation
of appropriate protections. In any event, the user is informed of these risks in this Manual, which spe-
cifically indicates the type of personal protective equipment that personnel involved with the machine
must be equipped with.
To comply with these conditions, the areas around the machine must always:
– Be cleared (no tools, containers, boxes, etc.)
– Be clean and dry
– Be perfectly lit
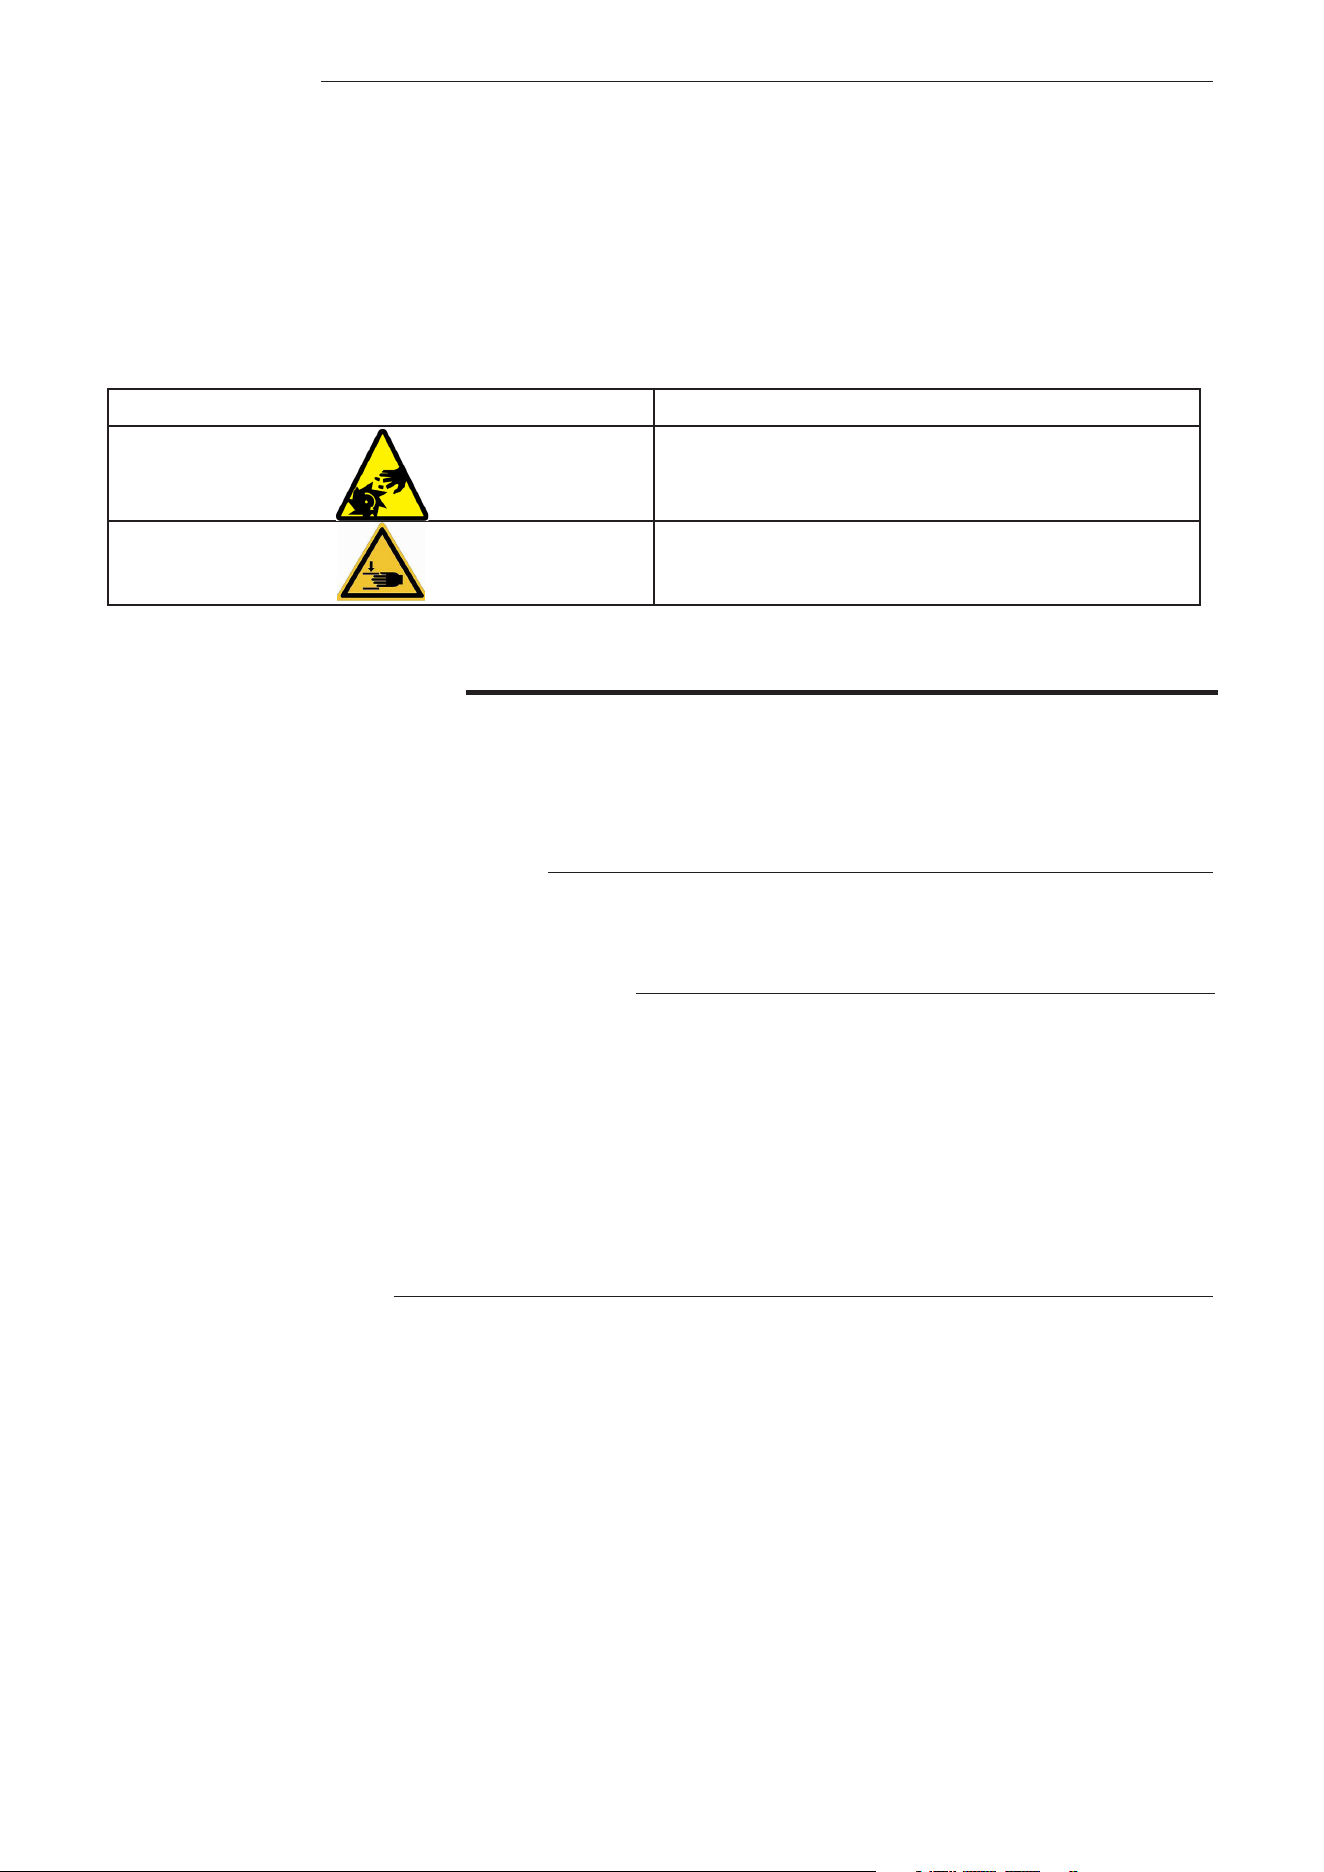
To fully inform the customer, the residual risks on the machine are set out below.
Residual risk Description of a dangerous situation
The user can cut himself/herself with the blade
of the slicer disc or the rotor.
The user can get his/her fingers stuck between
the hopper and the press lever, the pusher.
Normal Machine Use
•
In the event of significant anomalies (e.g. short-circuit, cables disconnected from terminals, motor fail-
ures, deterioration of electrical cable protection ducts), the user must immediately unplug the machine
and notify the personnel in charge of equipment maintenance.
Transport, Handling, and Storage
• Transport (transfer of the machine from one location to another) and handling (moving within the
workplace) must be carried out by personnel with personal protective equipment.
Cleaning and Maintaining the Appliance
• Before cleaning or maintenance, switch off the appliance.
• It is forbidden to remove security devices.
• Use appropriate personal protective equipment.
•
Maintenance, checks, and overhaul work must be carried out by specialized personnel only or by an
after-sales technician, equipped with all appropriate personal protective equipment, tools, and aids.
•
Any repairs on electrical equipment must be carried out exclusively by specialized personnel or by an
after-sales technician.
• Respect the requirements for routine and exceptional maintenance work. Failure to comply with
these warnings can result in risks to personnel.
Routine Maintenance
• Unplug the appliance before cleaning.
• Do not clean the appliance with water jets or steam cleaners.
• Do not immerse the appliance in water.
• Make sure you use suitable cleaning products to keep the appliance in good and safe working order.
•
Before commissioning the appliance, clean all internal parts and accessories with lukewarm water
and neutral soap or with products that are more than 90% biodegradable (to reduce the emission of
pollutants into the atmosphere); then rinse and dry thoroughly.
Some items are dishwasher-proof (see section on cleaning).
• To clean the appliance, do not use solvent products (trichloroethylene, etc.), powders, or abrasive
agents, metal scouring pads, or sponges that can damage surfaces. Avoid using organic solvents
and essential oils. These substances could damage the synthetic elements of the appliance.
• Do not use products (even if diluted) containing chlorine (sodium hypochlorite, hydrochloric or muri-
atic acid, ammonium chloride, etc.).
7
Preventive Maintenance
• To ensure the safety and performance of your equipment, it is recommended that approved tech-
nicians carry out maintenance every 12 months, in accordance with maintenance manuals. For more
details, please contact your local after-sales agent.
Exceptional Repair and Maintenance
• Exceptional repairs and maintenance must be carried out exclusively by authorized specialist
personnel. The manufacturer disclaims any liability in the event of a failure or damage resulting from
measures taken by a technician not authorized by the manufacturer, in which case the manufacturer’s
original warranty will be invalidated.
Parts and Accessories
• Use genuine accessories and/or spare parts only. The use of non-genuine accessories and/or parts
will invalidate the manufacturer’s original warranty in addition to the fact that the machine may no
longer meet the safety standard.
Maintenance Intervals
•
Inspection and maintenance intervals depend on the actual operating conditions of the appliance
and environmental conditions (presence of dust, humidity, etc.)
, which is why we cannot define pre-
cise intervals. In any case, we recommend carrying out regular and particularly careful maintenance
of the appliance in order to minimize machine downtime.
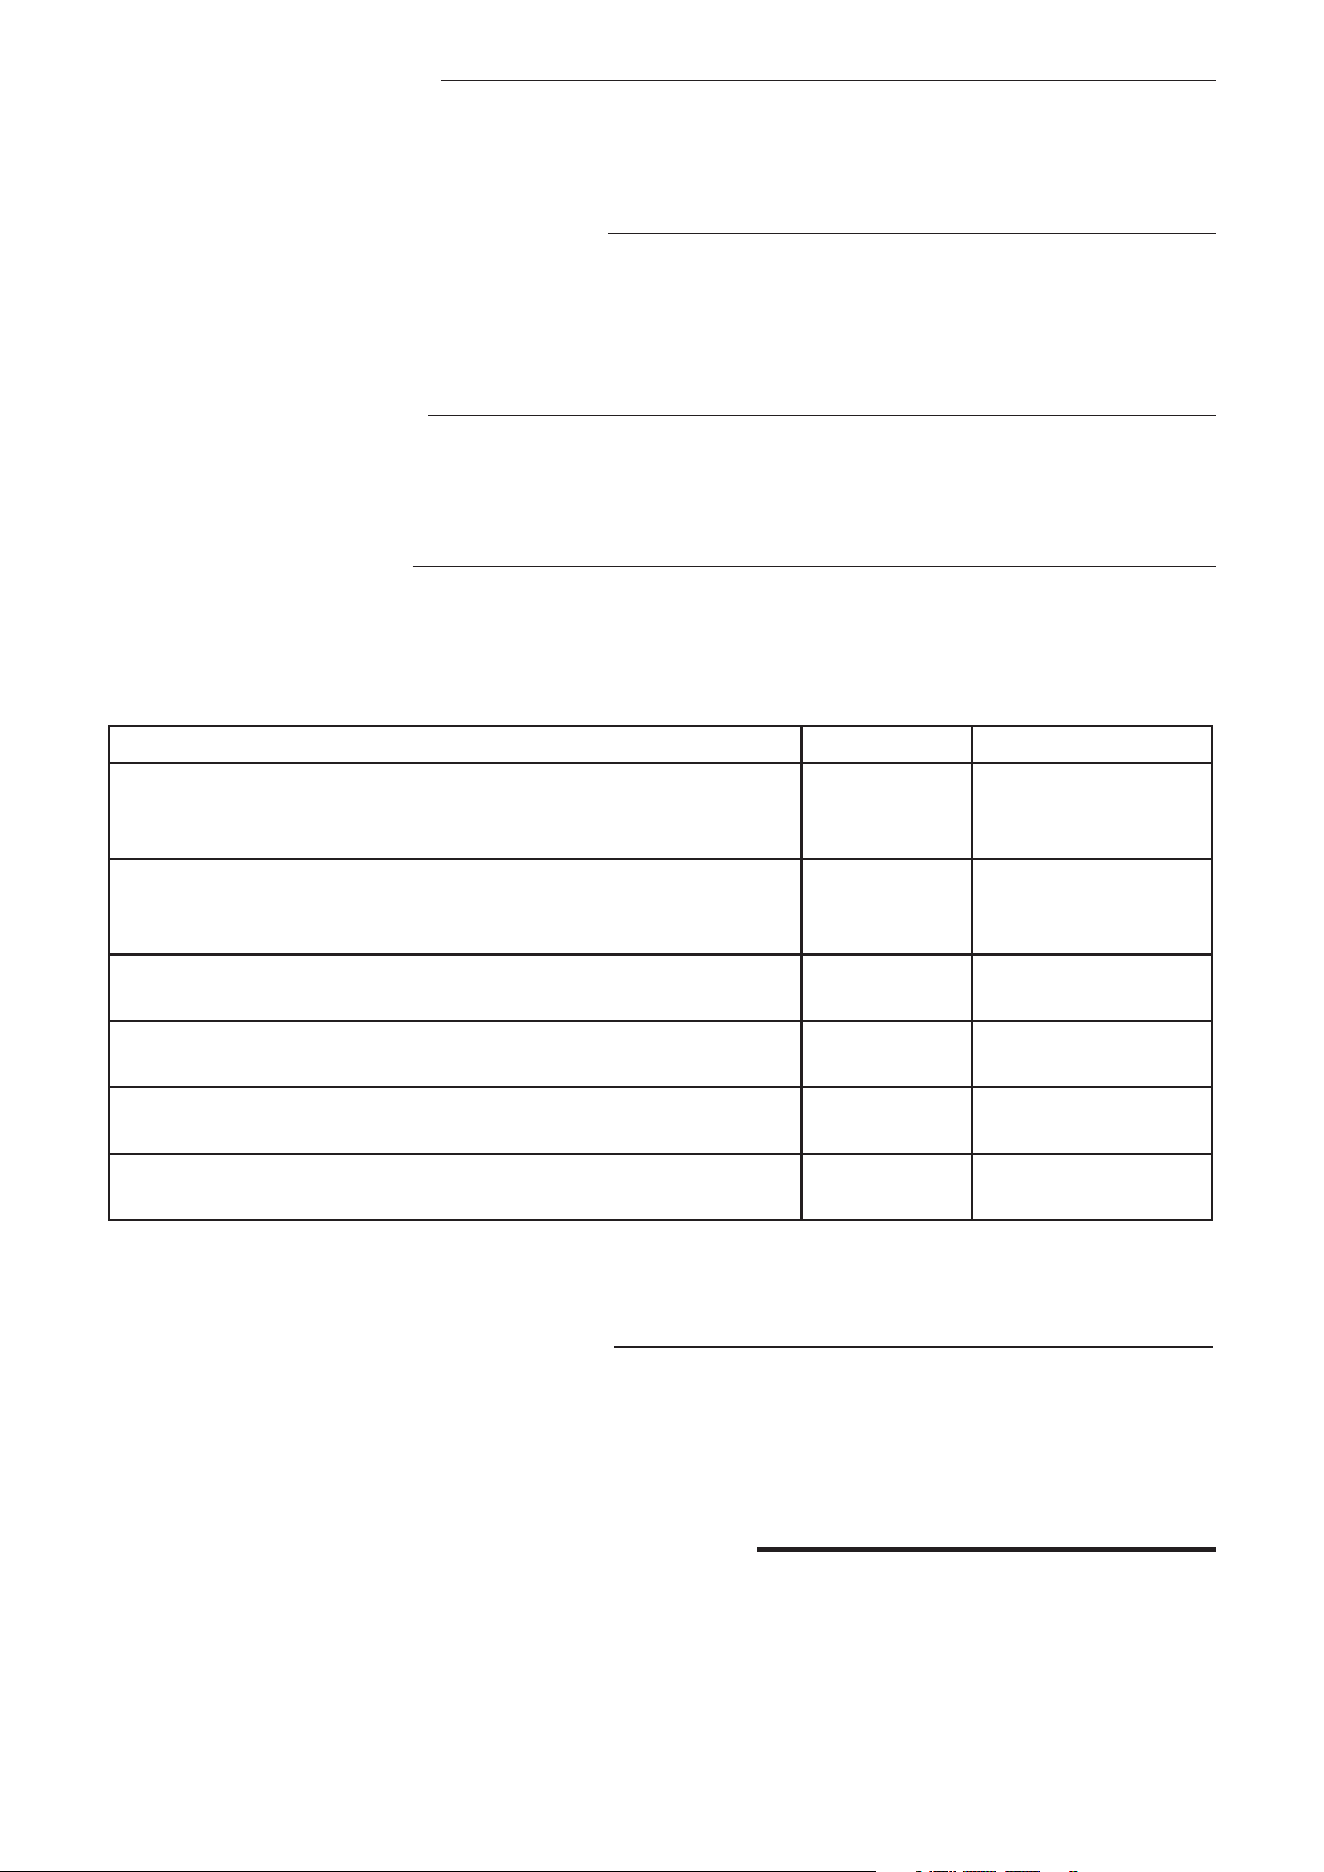
Maintenance, checks, inspections, and cleaning Frequency Responsibility
Ordinary cleaning:
• General cleaning of the appliance and the surrounding
area.
Daily User
Checks:
• Check the mechanical part used to drive the
attachments,rotors, the seal.
Daily User
(have the seal replaced
if defective)
•
Check blades, rotors, shredding discs (wear parts), and
change them regularly to maintain the same quality of cutting.
Daily User
Check the power cable:
• Check the condition of the power cable
Daily User
Appliance structure:
• Check the tightening of screws, fastening systems, etc.
Annually Service team
General overhaul of the appliance:
•
Check all components, electrical equipment, signs of corrosion, etc.
Annually Service team
•
It is also recommended to take out a preventative and scheduled maintenance contract with your after-sales
agent.
Decommissioning the Machine
• Disassembly operations must be carried out by specialized personnel.
• Work on electrical equipment (always powered off) is exclusively reserved for specialized
personnel.
•
Before you dispose of the appliance, make it unusable by cutting off its power cable
.
B - ERGONOMICS RECOMMENDATIONS
The ergonomic features of your product, the ones which may influence your physical and cog-
nitive interaction with it, have been assessed and certified. A product which exhibits ergonomic
features, in fact, shall fulfil specific ergonomic requirements, belonging to three different areas:
Polytechnic, Biomedical and Psychosocial (usability and satisfaction). For each of these areas,
specific tests with real users have been performed. The product was therefore compliant with
the ergonomic acceptability criteria requested by the standards applied.

8
General recommendations:
The vegetable slicer/ cutter that you use is specifically studied and tested in order to minimize
any physical problems associated to the interactions with the product.
Repeated movements for a significant time during machine use operations could lead to
stresses on the shoulders and neck.
We point out some operating procedures that we suggest adopting, if they are possible:
-
place the machine on a work top that can be adjusted according to the height of the operator
-
during prolonged use, take breaks or try to do different tasks (this to avoid continuous operations
in the same posture)
- avoid movement of the motor base if not necessary
- store the accessories/ the various components of the machine near the work-station
C - WARRANTY TERMS AND EXCLUSIONS
If the purchased product is covered by a warranty, this warranty will comply with local
regulations provided that the product is installed and used for its intended purpose and in
accordance with the terms described in the relevant equipment documentation.
The warranty only applies if the customer has used genuine spare parts and carried out
maintenance in accordance with the user guides and maintenance documentation made
available in print or digital format by Electrolux Professional.
Electrolux Professional strongly recommends using Electrolux Professional-approved
detergents, rinsing products, and descalers to achieve the best results and to keep the
product at its maximum efficiency level over time.
The Electrolux Professional warranty does not cover:
• The technician’s travel expenses to deliver or collect the product
• Installation
• Training on use/operation
•
Replacement (and/or supply) of wear parts, unless the replacement is the result of material
or manufacturing defects reported within one (1) week of the defect being identified
• Fixing external wiring
• Fixing unauthorized repairs or damage, defects, or malfunctions caused and/or resulting
from;
– Inadequate and/or abnormal capacity of electrical systems (current/voltage/frequency,
including peaks and/or failures)
– Negligence, misuse, and/or non-compliance by the customer with the instructions for use
and maintenance described in the relevant equipment documentation
– Improper or inadequate installation procedures, repair, maintenance (including handling,
modifications, and repairs by unauthorized third parties) and modification of safety systems
–
Use of non-genuine components (e.g. wear parts or spare parts
– Environmental conditions causing thermal stresses (e.g. over-heating/freezing) or chemical
stresses (e.g. corrosion/oxidation)
– Insertion of foreign objects into the product or adding foreign objects to the product
– Accidents or force majeure
–
Transport and handling, including scratches, bumps, shards and/or other product finish
damage, unless contradictory specifications are noted, if such damage is the result of material
or manufacturing defects reported within one (1) week of delivery
• Products with the serial number deleted, modified, or no longer legible
• Accessories and software not approved or named by Electrolux Professional.
The warranty does not cover any scheduled maintenance activity (including the parts
required for this purpose) or the supply of detergents, unless otherwise stipulated by any
local agreement and under local conditions.
For the list of approved after-sales agents, visit the Electrolux Professional website.
9
D - GENERAL INFORMATION
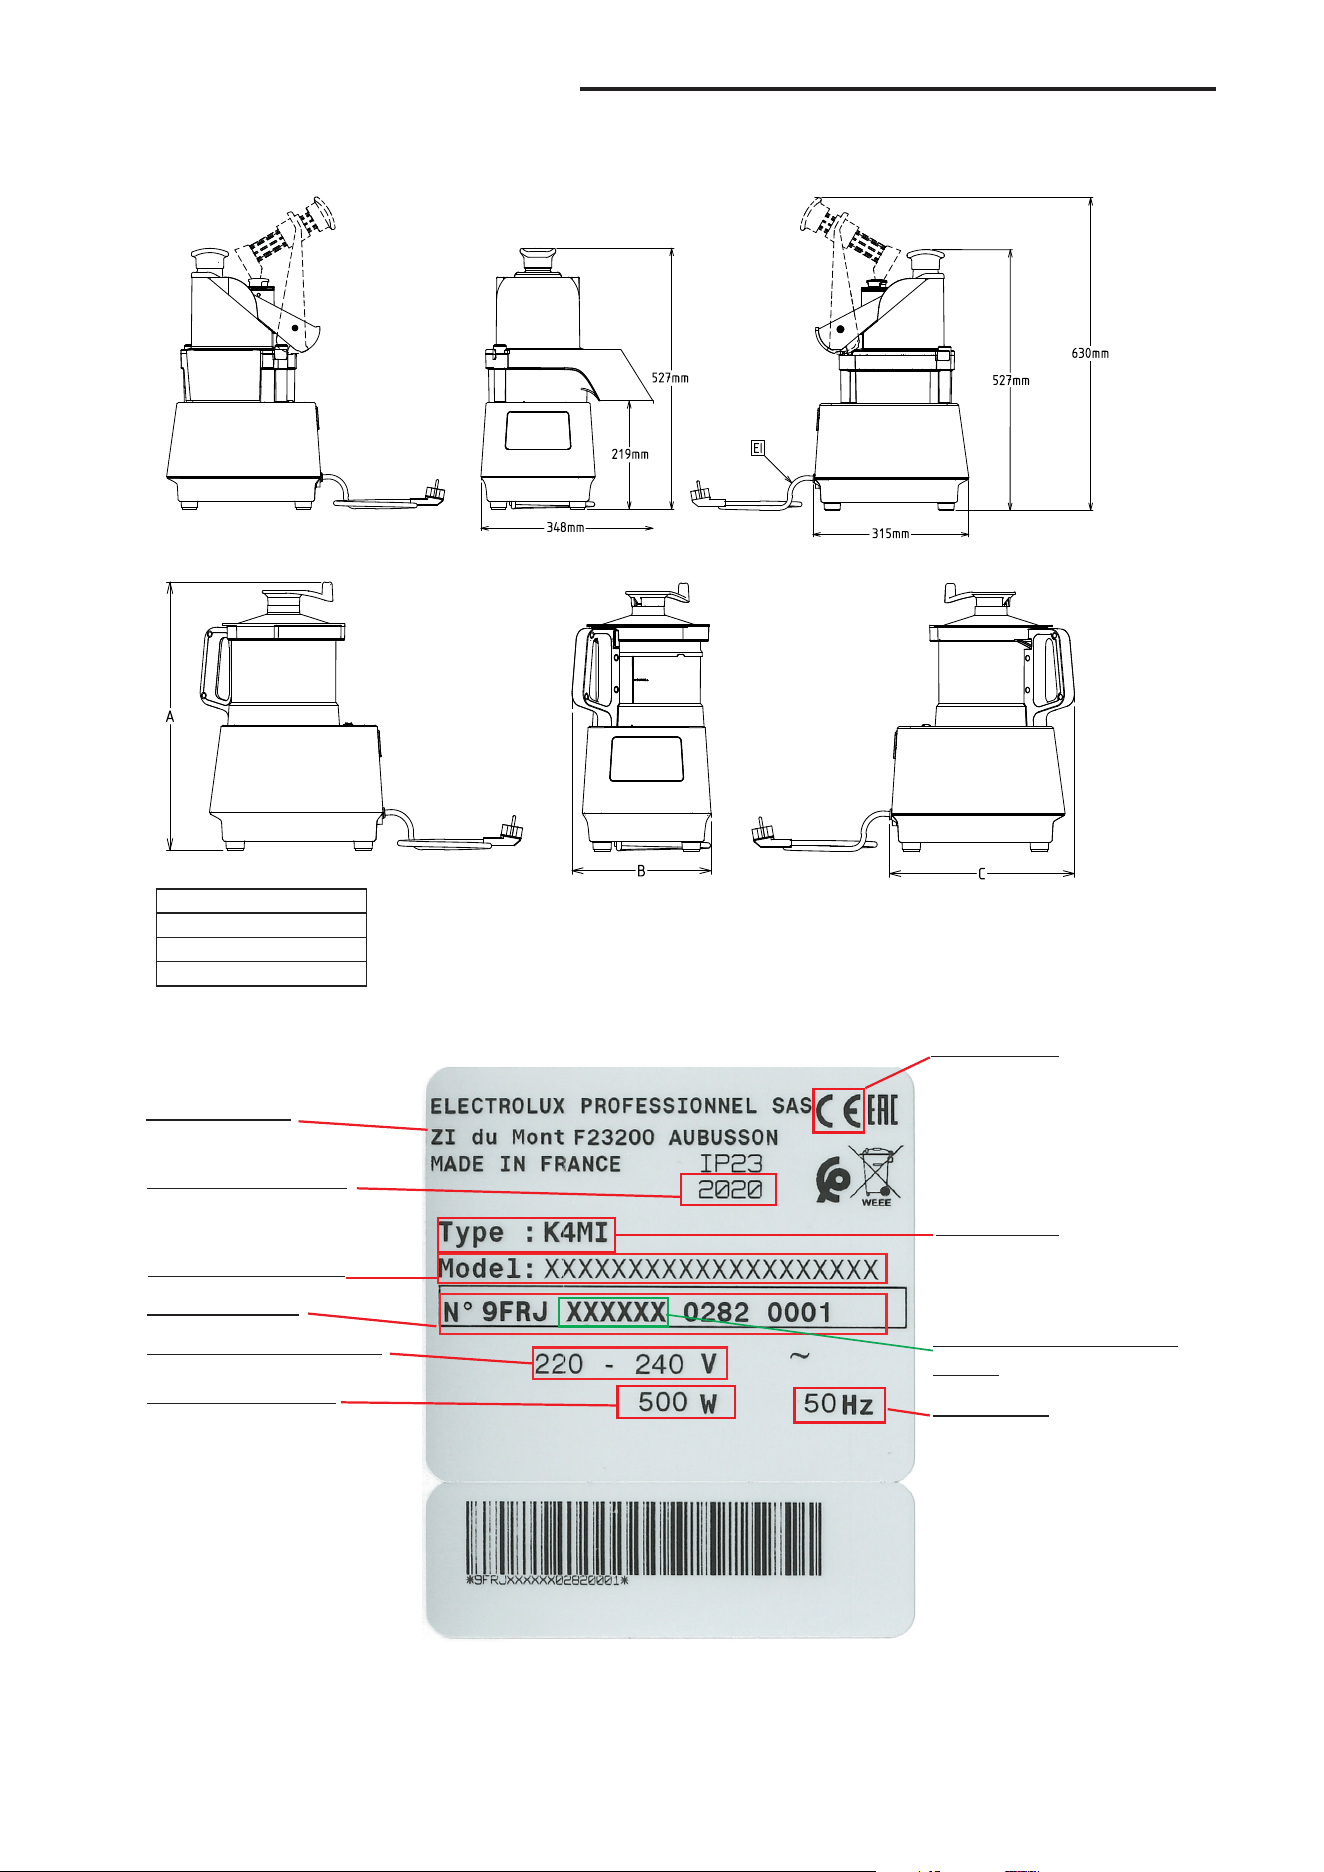
Technical features:
2.6L 3.6L
A 456mm 476mm
B 247mm 252mm
C 328mm 334mm
Product number code
(PNC)
Group type
Model description
Year of production
Manufacturer
Power supply voltage
Max. power input
Frequency
CE marking
Serial number
Scan the QR code on appliance backside to access videos tutorials, user manuals in
other languages and other support material.
10
WARNING
See “Warnings and Safety Notices”.
Intended Use and Constraints
This appliance was designed to chop, mix, emulsify, slice, shred, grate, and dice food prod-
ucts (preparation of hard and soft vegetables, fruits, cheeses, etc.).
Any use other than the one described in this manual is not considered ‘normal’ by the manu-
facturer.
CAUTION
The appliance is not intended for use outdoors or in environments exposed to the elements
(rain, direct sunlight, etc.).
NOTE!
The manufacturer does not accept any responsibility for the use of any appliances other than
that provided.
Installation and Assembly
Setting up
• Install the appliance on a flat, stable surface supporting a weight of 15 kg.
Introduction
• The installation and assembly of the machine must be carried out by specialized personnel only,
equipped with all appropriate personal protective equipment, equipment, tools, and aids.
• The operations described must be carried out in accordance with current safety standards.
• Before any installation or assembly procedure, turn off the electrical supply to the appliance.
Electrical Connection
•
Repairs on electrical systems should be carried out by specialized personnel only.
• The electrical connection of the appliance must be carried out in accordance with the standards
and requirements in force in the country of use.
•
Refer to the nameplate for information about the appliance’s power voltage.
• Any damaged power cable must be replaced by an after-sales technician or specialized personnel
to prevent any risk.
•
The manufacturer disclaims any responsibility for any damage or accidents resulting from non-compliance
with the above guidelines or the electrical safety standards in place in the country of use.
•
The connection point is grounded and the mains voltage and frequency match those given on the
nameplate. If there is any doubt about the effectiveness of the grounding point, ask specialized staff to
check the installation.
• The machine (variable speed appliance) can operate at 50 or 60 Hz and does not need to be con-
figured by the user (see nameplate).
11
E - TRANSPORT, HANDLING, AND STORAGE
WARNING
See “Warnings and Safety Notices”.
Unpacking
IMPORTANT
Check the appliance immediately to ensure that it has not been damaged during transport.
Examine the packaging before and after unloading.
Remove the packaging. When unpacking and handling the appliance, be sure not to cause any
impact.
NOTE!
• The carrier is responsible for the safety of the goods during transport and delivery.
• Report any obvious or hidden damage to the carrier by way of complaint.
• If the goods are damaged or the delivery is incomplete, report it on the delivery order.
• The driver must sign the transport slip: the carrier may not accept claims if the transport slip is not signed
(the carrier can provide the necessary form).
Disposing of Packaging
Packaging must be disposed of in accordance with regulations in the country of use. All materials
used for packaging are environmentally friendly. They can be safely stored, recycled, or burned in a
waste incineration facility. Recyclable plastic parts have the following acronyms:
PE Polyethylene
• Covers of the different parts
• Bag containing instructions
PP Polypropylene
• Straps
• Exterior packaging
The wooden and cardboard elements can be disposed of in accordance with the standards in force
in the country of use.
Storage
The machine and/or its parts must be stored and protected from moisture, in a non-harsh environment,
free of vibrations, and at an ambient temperature of between -25°C and 50°C.
E INSTALLATION AND ASSEMBLY
WARNING
See “Warnings and Safety Notices”.
12
Introduction
To ensure the proper operation of the appliance and to comply with the safety conditions during its
use, follow the instructions given in this section and in Section A carefully.
The manufacturer does not accept responsibility for corrosive effects due to external causes.
Customer Responsibilities
Customer tasks and interventions:
• For more information on the electrical connection, see Electrical Connection
• Check the surface under the machine is level
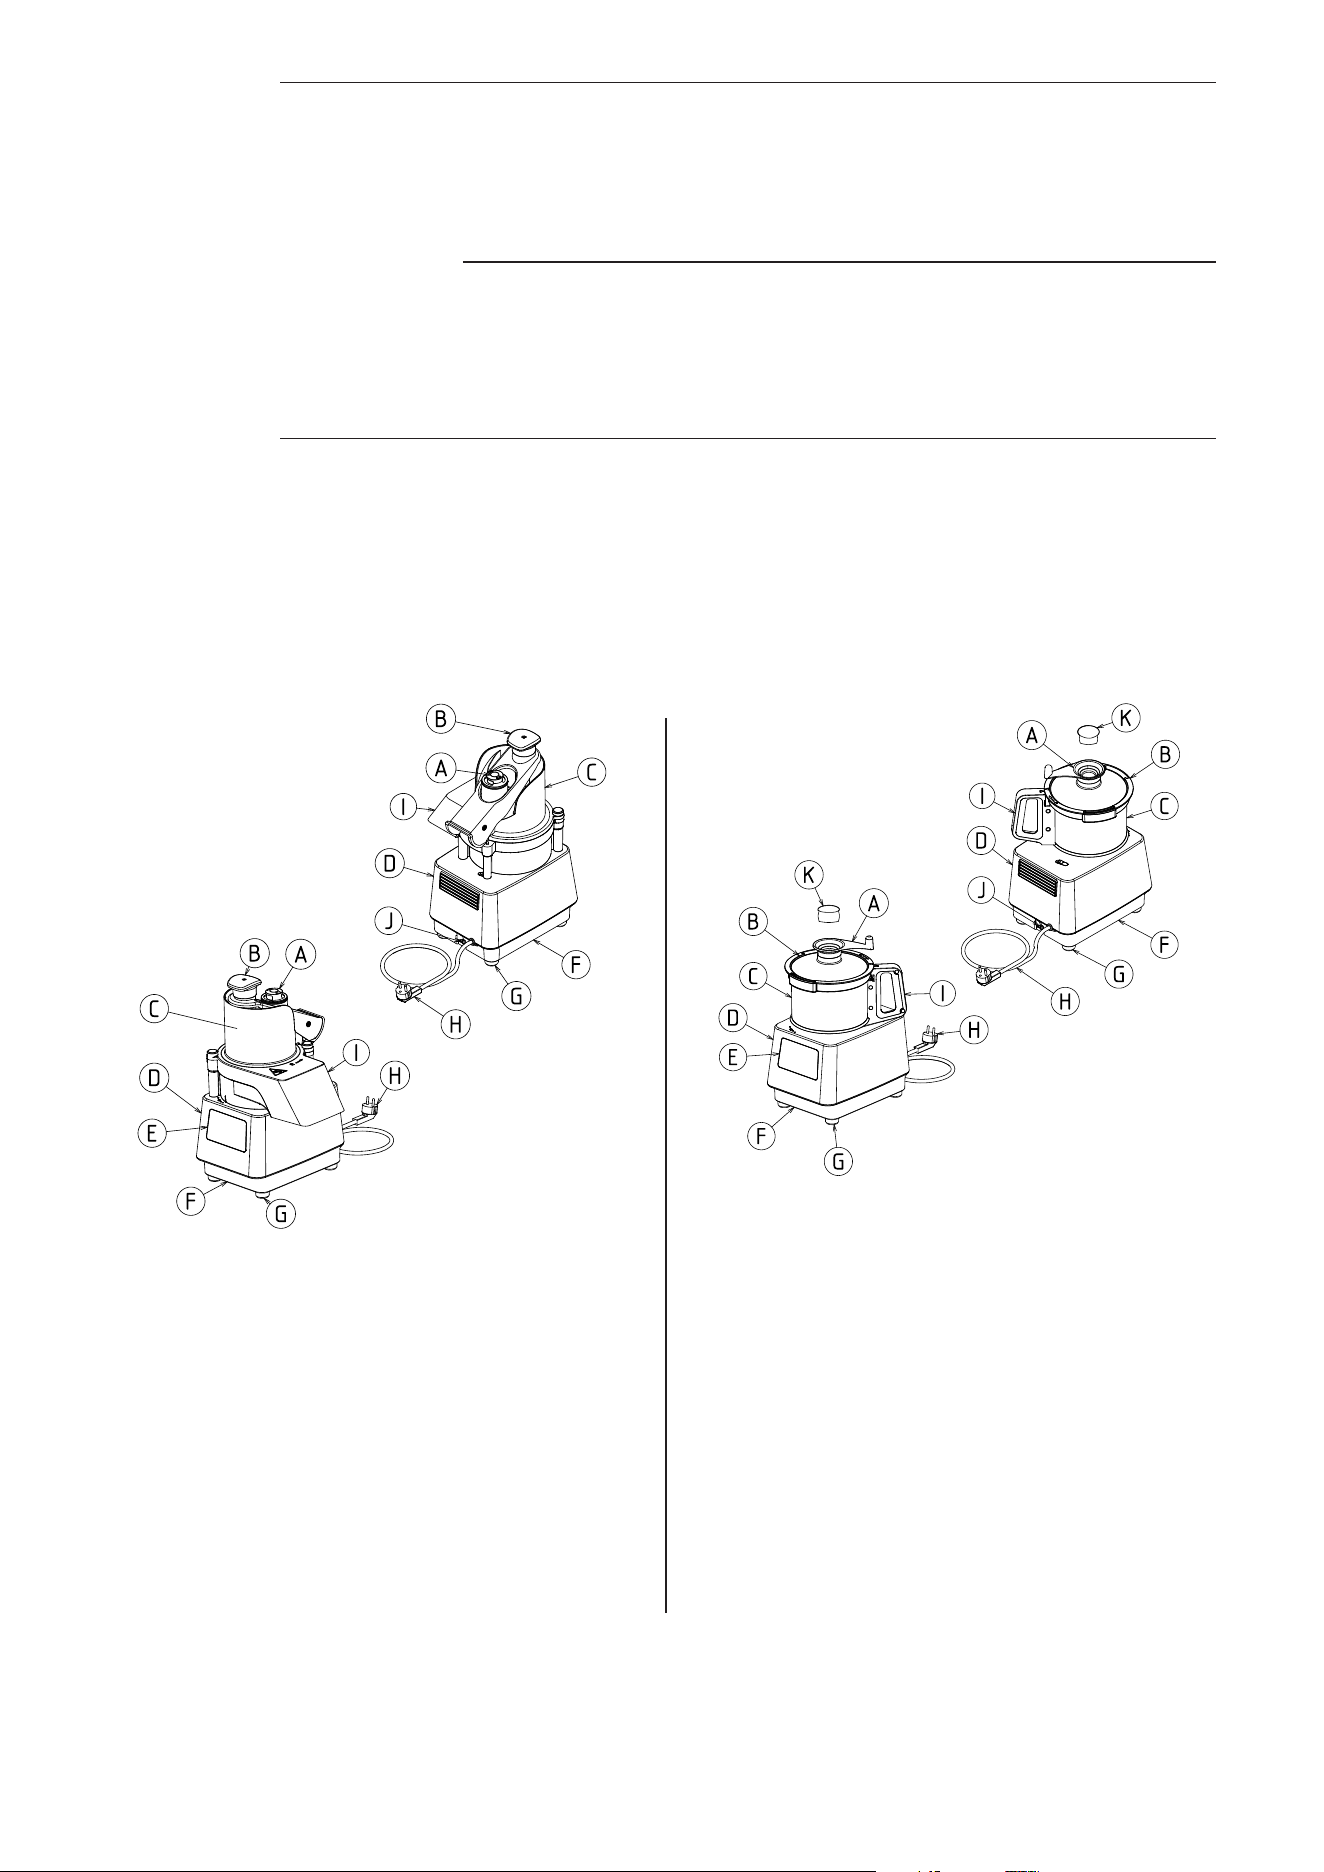
Description
•
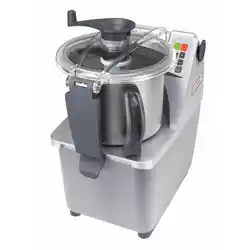
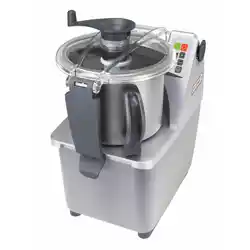
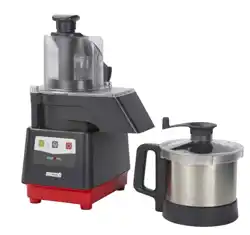
The vegetable slicer/cutter mixer comes with : ejector, cutting chamber, hopper, rotor, bowl, lid, and
scraper.
This vegetable slicer/cutter mixer slices, chops, shreds, grates, dices, minces, emulsifies various
food products (preparation of hard and soft vegetables, fruits, cheeses, etc.).
With its assorted cutting equipment, it will be your partner for all your food prep and will ensure
precise results. It is the professional processor for bars, restaurants, communities.
A - Pusher
B - Lever pusher
C - Moon hopper
D - Main unit
E - Controls
F - Base
G - Feet
H - Power cord
I - Cutting chamber
J - Main Switch
A - Scraper handle
B - Lid
C - Bowl
D - Main unit
E - Controls
F - Base
G - Feet
H - Power cord
I - Bowl handle
J - Main Switch
K - Plug
13
G - USE
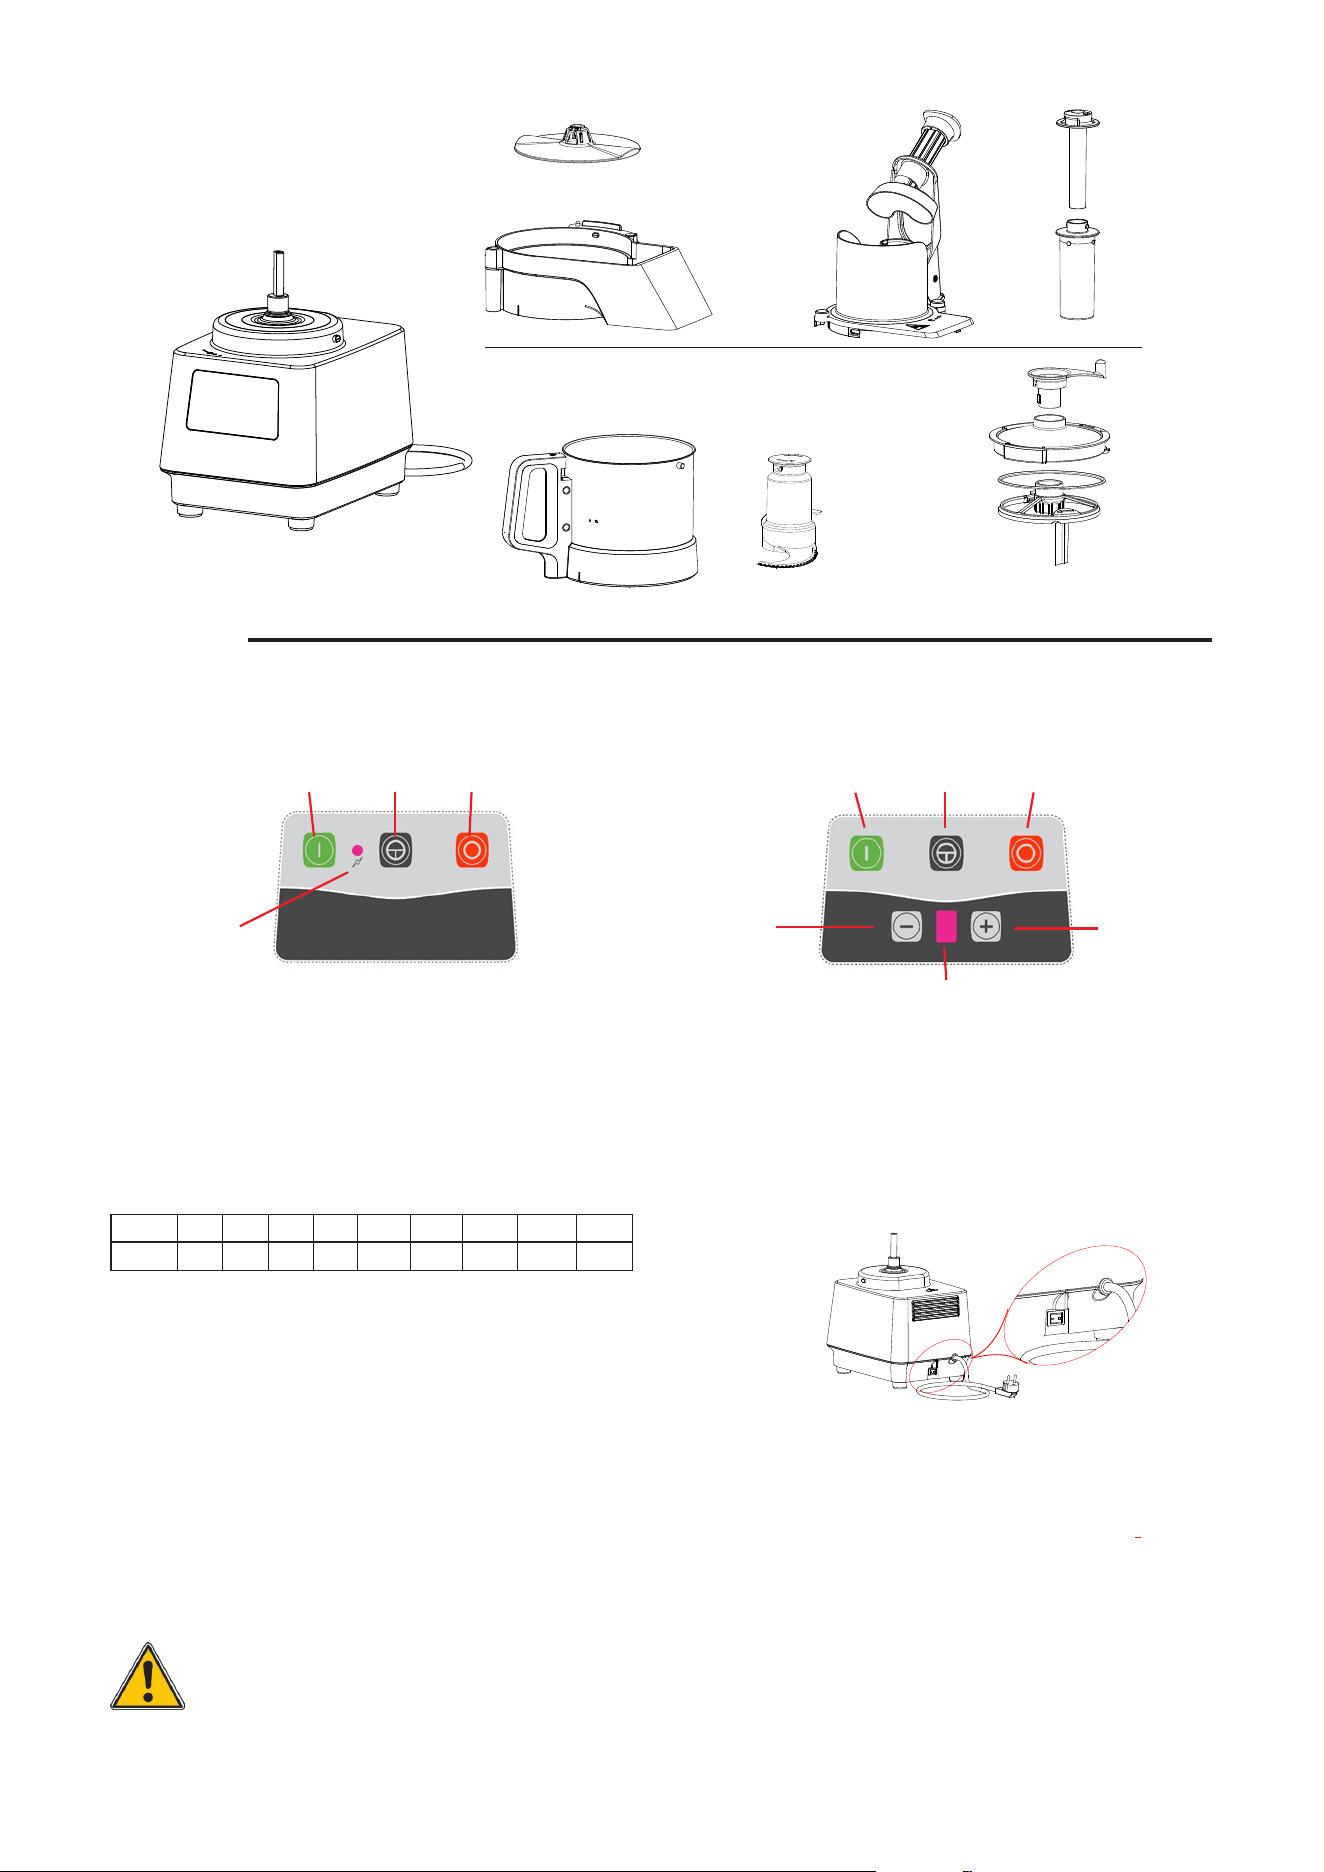
Control panel:
A. Start button
B. Pulse button
C. Stop button
D. Power light
E. Speed variation button +
F. Speed variation button -
G. Speed indicator
A B C A B C
F E
G
D
Motor unit
Ejector
Cutting chamber
Lever pusher
Moon
hopper
Round
pusher
Bowl
Rotor
Scraper
handle
Lid
Scraper
Extra small pusher
Overview
THE USER’S SAFETY is ensured as follows:
- The motor stops when the press lever is opened, for safe loading.
- The motor cannot start if the hopper is not in place.
- The small dimension of the long-vegetable hopper avoids being in contact with cutting parts.
- The motor stops when the lid is opened.
- The motor cannot start if the container and lid are not in place.
-
Compliance with the instructions in this notice on use, cleaning, and maintaining the appliance.
Any use other than the one described in this manual is not considered ‘normal’ by the
manufacturer
.
• Put the on/off switch in position I for start-up.
Speed
1 2 3 4 5 6 7 8 9
Tr/min
516 638 730 830 1180 1600 1850 2940 3600
Speed mapping table :
14
COMMISSIONING/USING THE SLICER
All these actions pose the risk of cutting; never force them in, and always keep hands
away from the blades.
Follow the duty cycle : 40 minutes ON and 20 minutes OFF, to avoid the appliance
overheating.
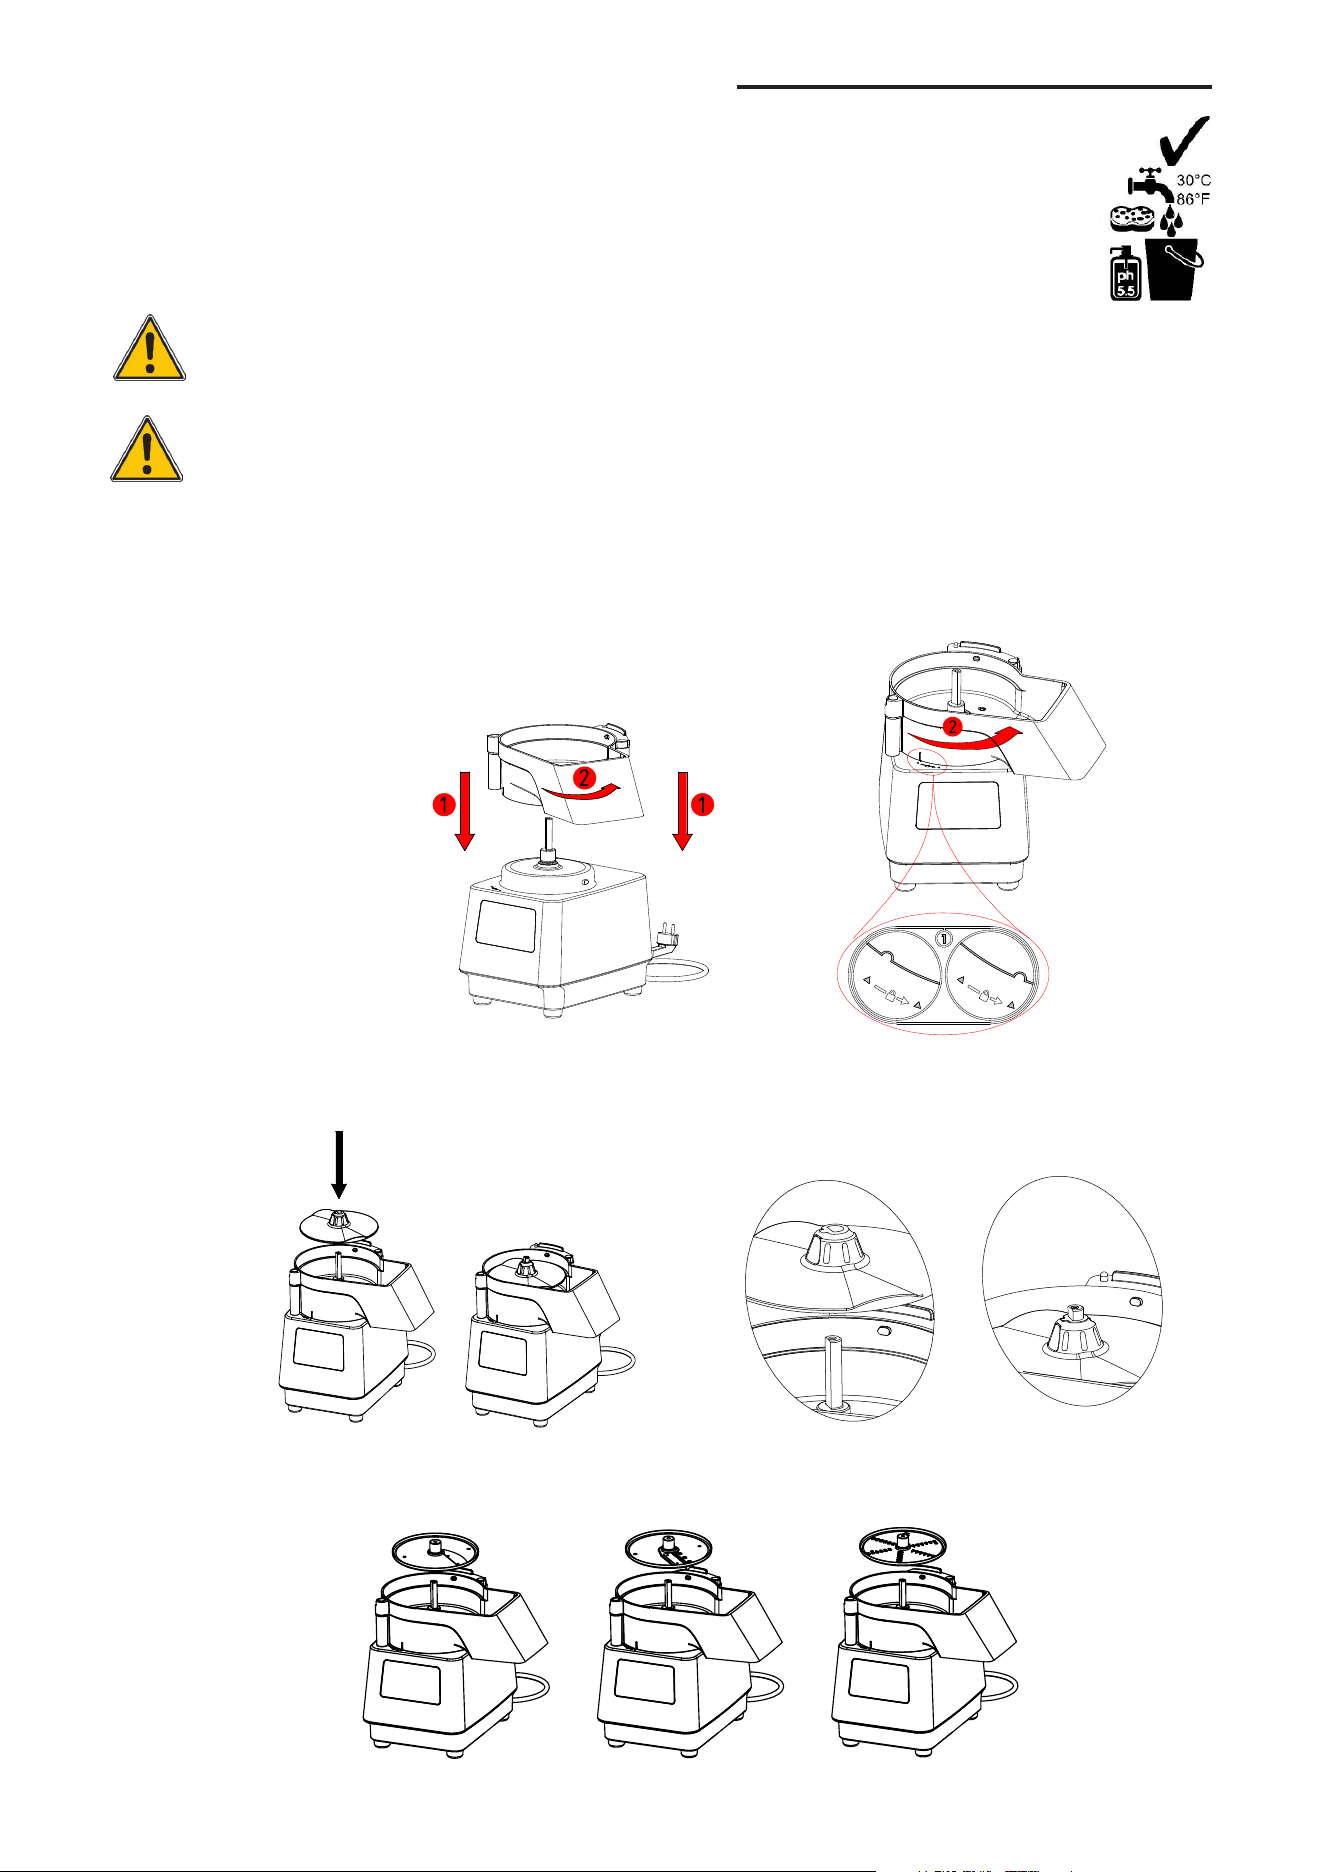
• Before starting work, always check the cleanliness of the recesses on the unit, of the cutting
chamber, hopper, ejector, discs, grating discs and drive shaft.
1) To slice, grate, shred
• Mount the cutting chamber.
• Mount the ejector flat on the drive shaft.
• Place the chosen accessory (slicer, shredder, or grater).
Before commissioning the appliance, clean all internal parts and accessories with hot water and
a little detergent / degreasing agent / disinfectant compatible with the materials or with lukewarm
water and neutral soap. Try to use products that are more than 90% biodegradable to reduce the
emission of pollutants into the atmosphere. After that, rinse with clear water and dry thoroughly. It is
recommended that you use Electrolux Professional products.
15
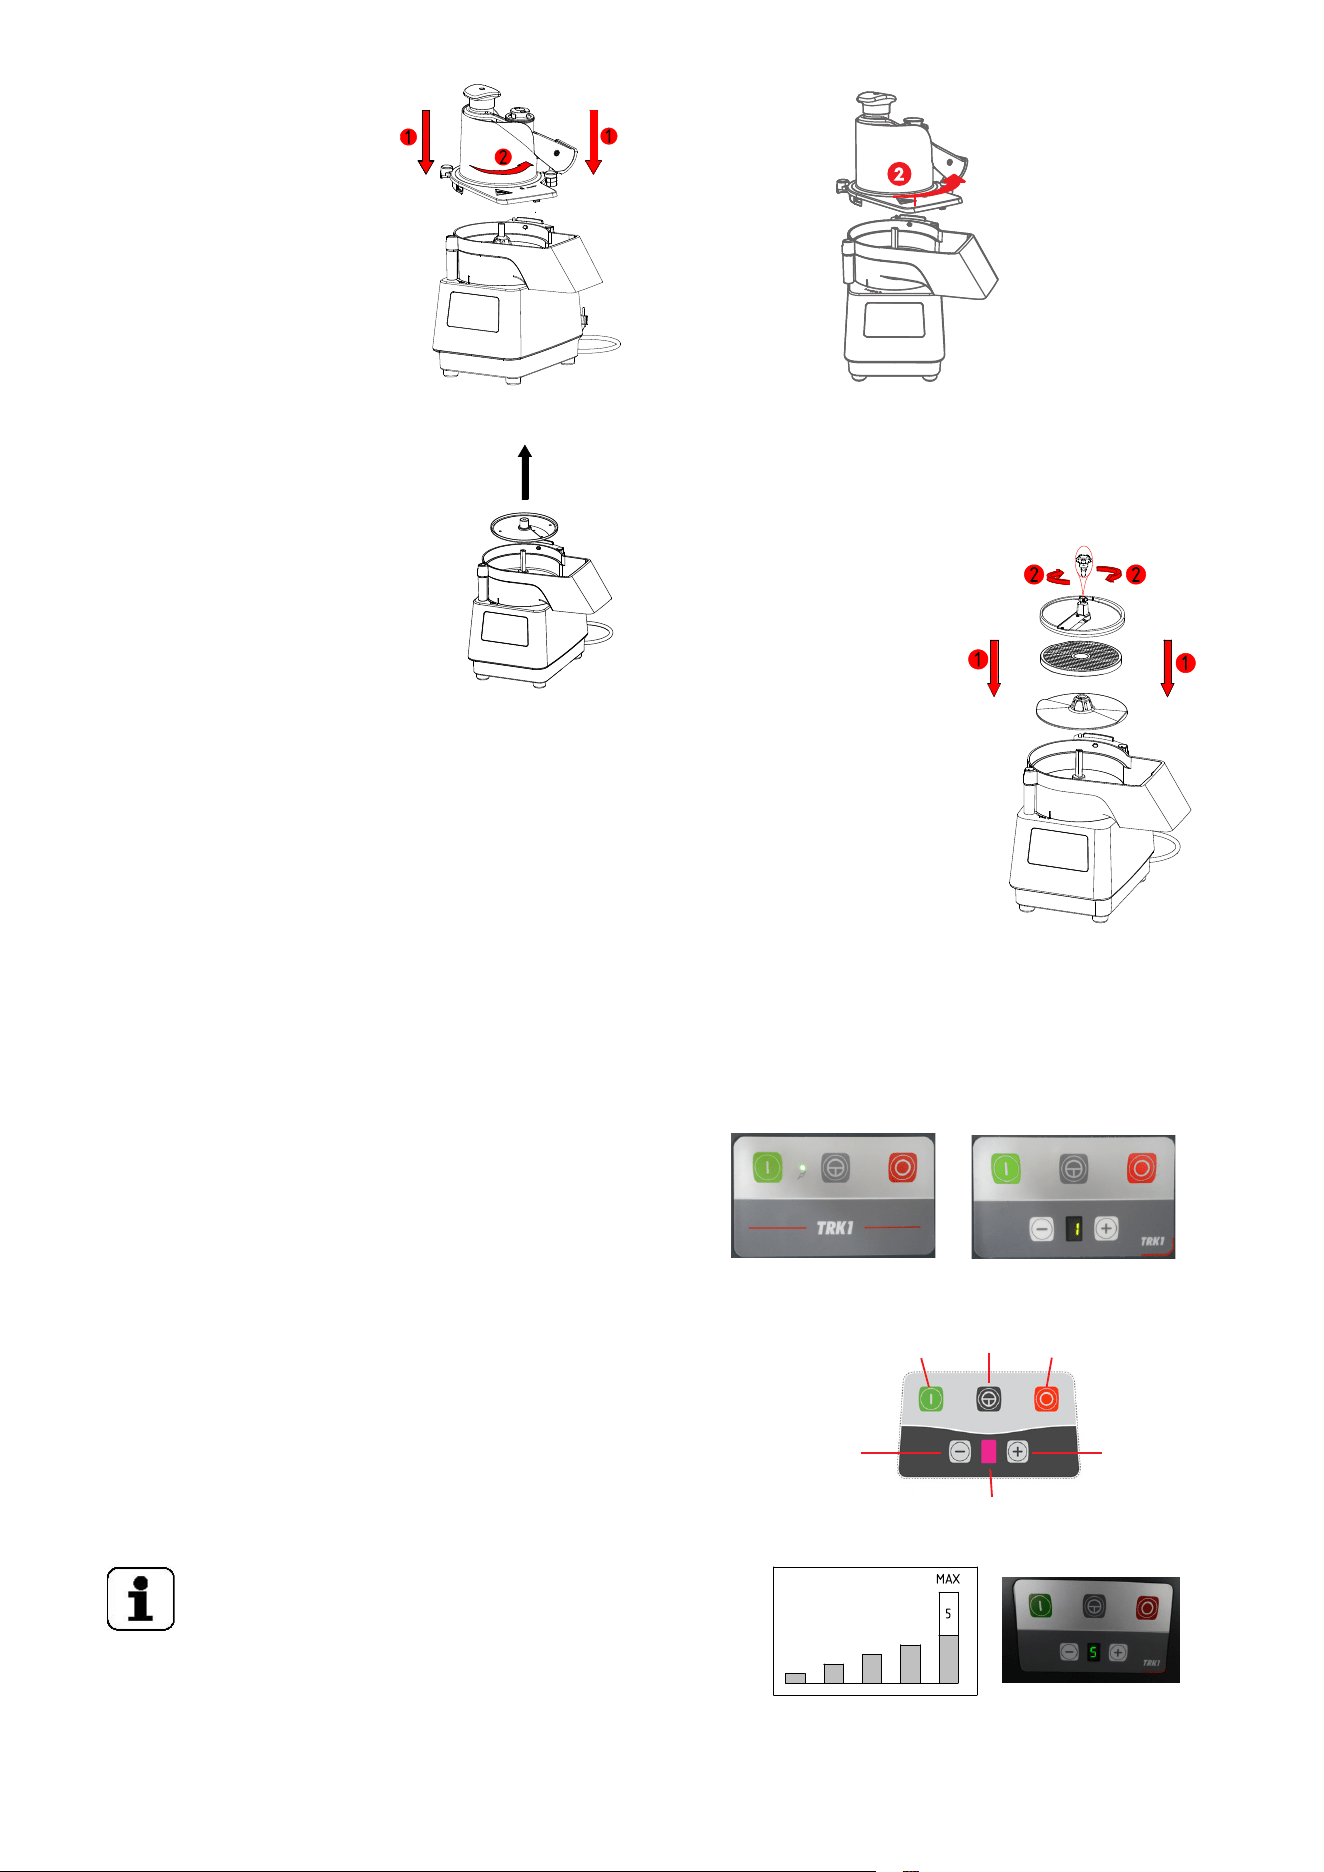
- Close the hopper and make sure it is engaged.
- To remove the disc, disengage the hopper (see above) and lift it off.
2) To dice
• Mount the cutting chamber (see § above).
• Mount the ejector (see § above).
• Place the chosen grid in its holder and check that it does not wobble
(clean supports).
• Then mount the chosen disc, tighten the screw, and close the hopper.
• Tips: To cut products of different hardness with an grid, start by cutting
the soft products first, as these cannot push the diced hard product trapped in the grid. For hard
products such as carrots, celery, we advise using the round hopper.
3) Starting up
The slicer can be started if:
- The switch is in position I.
- The hopper is in position and engaged.
- The lever is lowered.
- The light stays green.
- If the light is orange, (or the speed indicator is
flashing on model VV) one of the safety devices is not
properly engaged, see Section “i” on troubleshooting.
a) Constant mode: press A.
b) Pulse mode: press B.
c) Change speed(variable speed):
-
Select the speed on G by pressing the buttons E and F.
- The appliance automatically detects the vegetable
cutter and sets the max. possible speed to 5.
d) Stop:
- You must use the button C at the end of processing.
Locking
system
1 speed
variable speed
A B C
F E
G
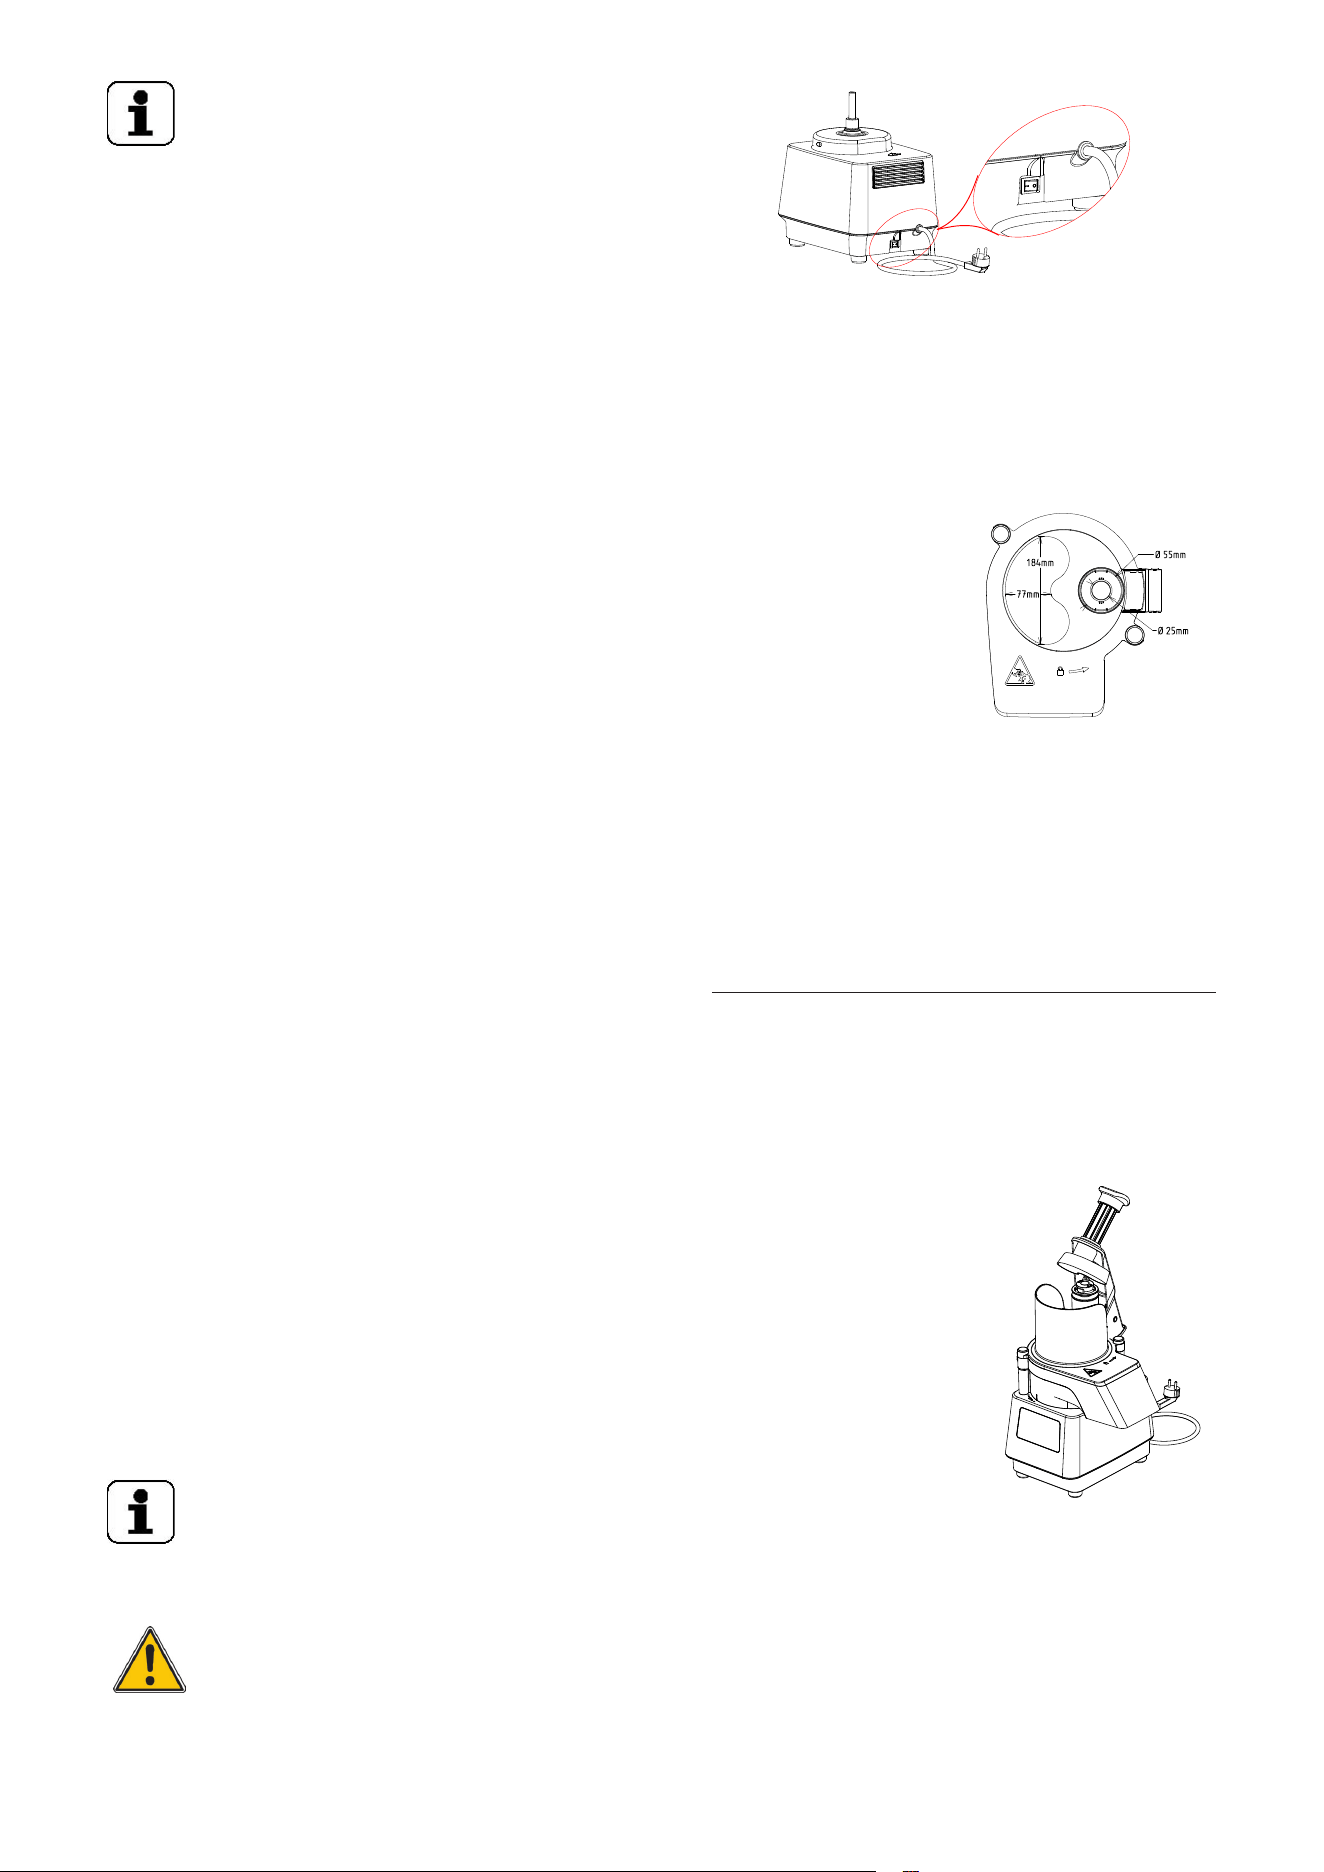
16
If the machine is not in use for several days, position
the switch to O or unplug the appliance so the
electronic speed drive stops running.
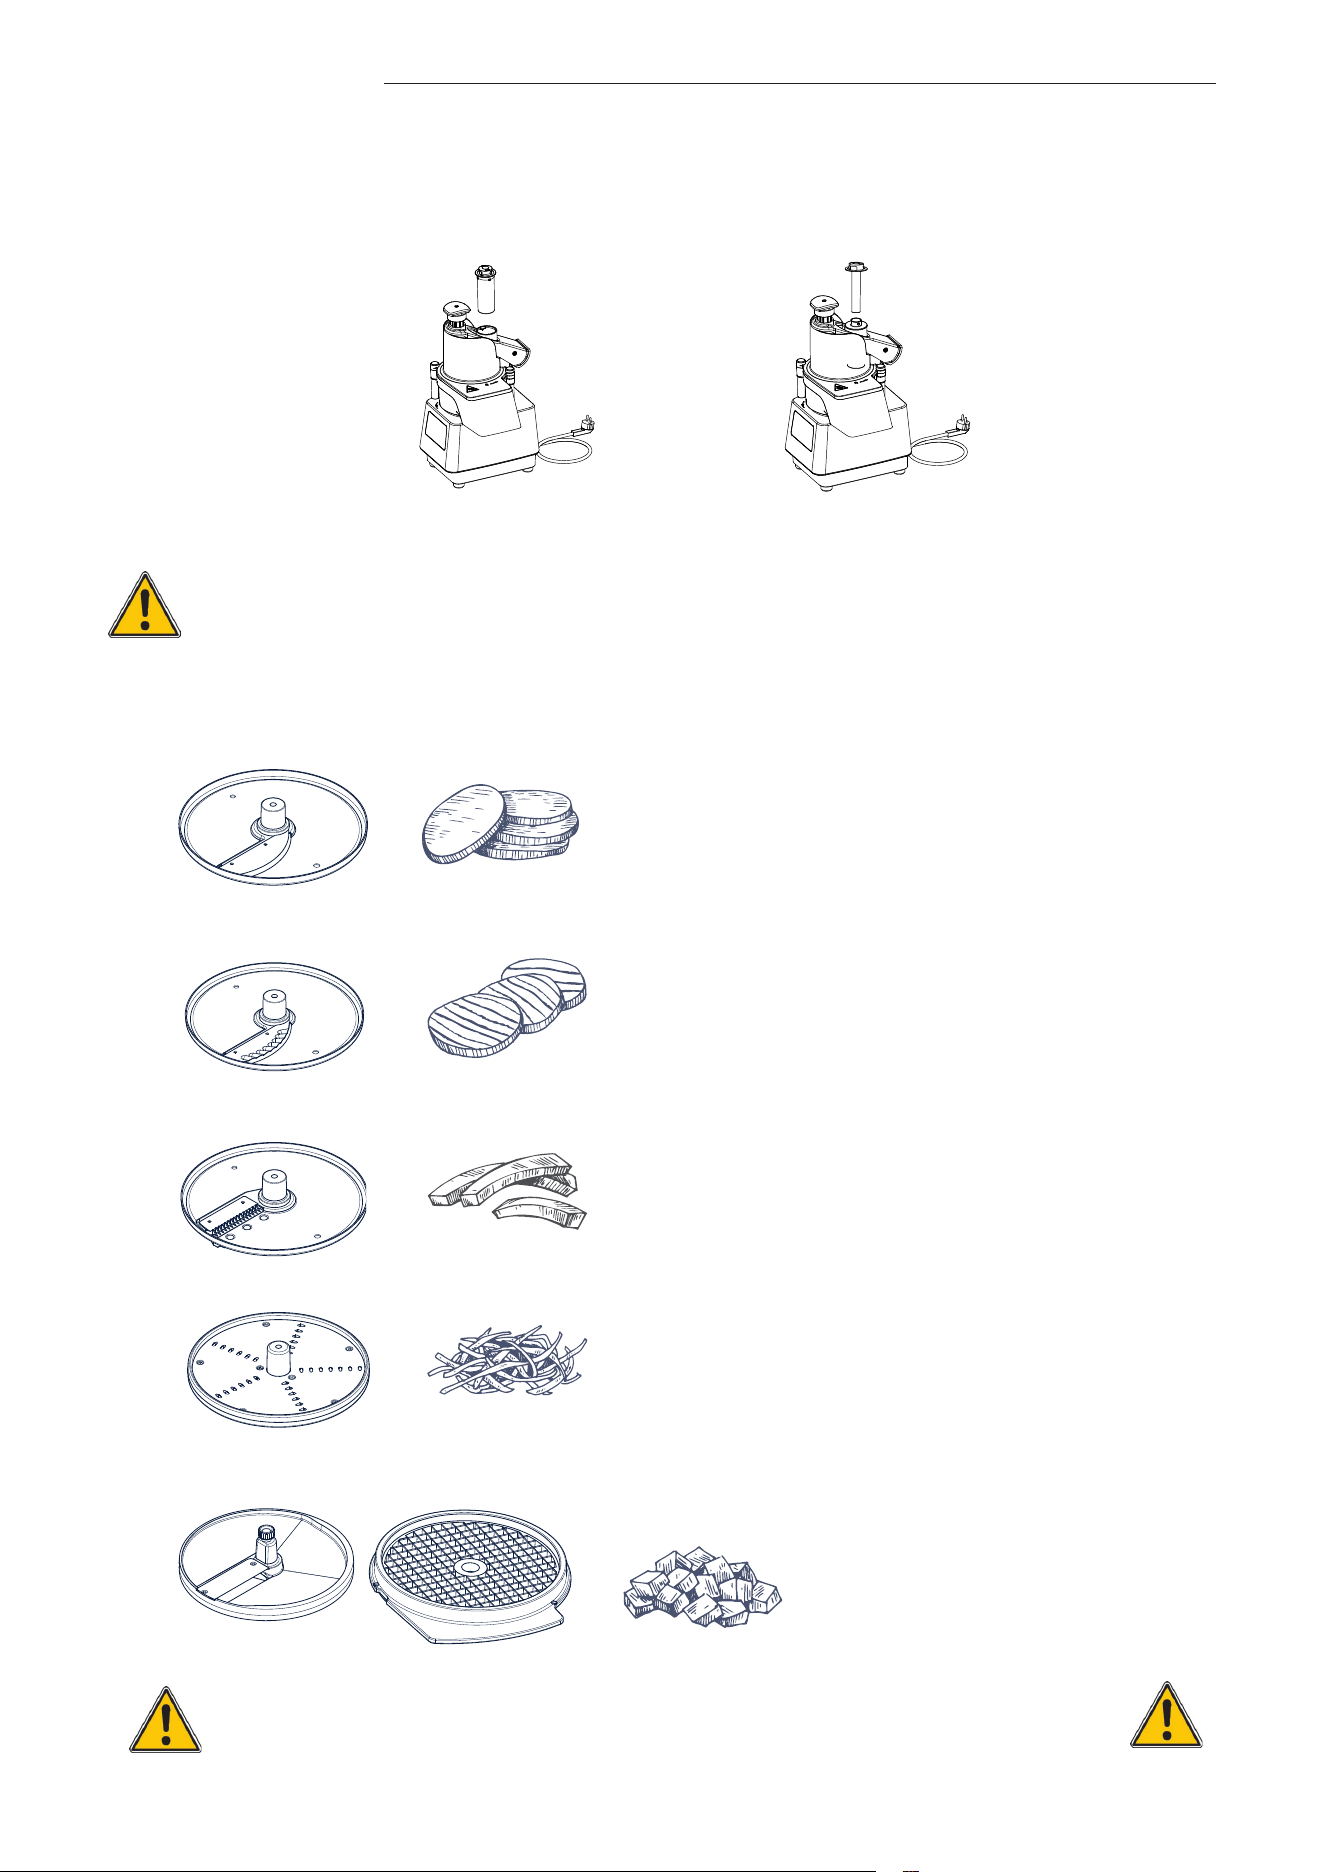
CHOICE AND FUNCTIONS OF THE HOPPER:
1) Hopper with articulated lever pusher.
• Manual loading is done by introducing the products, either as one or in handfuls, making sure
you position them properly to avoid bad cuts. Place ‘delicate’ products (e.g. tomatoes, citrus fruits)
against the wall.
2) - Removable pusher.
• For slicing long products (carrots, endives, cucumbers, leeks, zuchini...)
opening Ø 55 mm
.
-
Auxiliary pusher opening -
Ø 25 mm.
To slice, always feed long products in by their tips.
• Manual loading is done by vertically feeding the products into the hopper.
• Tips to avoid:
- A slanted and irregular cut: arrange thin products ‘tip to toe’.
- Jamming: cut off the ends of vegetables.
USING THE HOPPER AND THE PRESS LEVER
The vegetable slicer can only work if the cutting chamber and hopper are engaged.
For uniform slicing, stop the slicer with the Stop button 'O', place vegetables against the wall of the
hopper, hold pressing (slightly) down, then press the Start button I.
- Leave the pusher engaged to prevent the products from rising up.
- Press the Start button I.
- Raise the lever pusher
- The motor stops as soon as the lever pusher exits the hopper, so you can feed
the products in safely.
- When the lever pusher goes down, the vegetable slicer automatically restarts.
To slice.
- Use the lever pusher to guide the products all the way in the hopper, adapting
the force as you go.
- Replace the lever pusher and start a new cycle.
- At the end of processing, press the Stop button O.
Adapt your force on the lever pusher according to:
- The food you are processing (soft product = little force)
- The chosen cutting disc (a grater requires more force than a slicer disc).
Applying more force does not speed up the processing rate, risk of lock and
motor overheating.
17
USING THE PUSHER
- Leave the lever down and disengage the round pusher.
- Lift the round pusher with one hand and load the food with the other;
- Press the On button I to start.
- Push the food through with the pusher and start a new cycle.
-
At the end of processing, press the Stop button O.
If you are using the extra small pusher, leave the round pusher engaged and push food such as car-
rots, sausages, chilli pepper and green onion.
Never insert your hand or a hard utensil into the hopper with the appliance running.
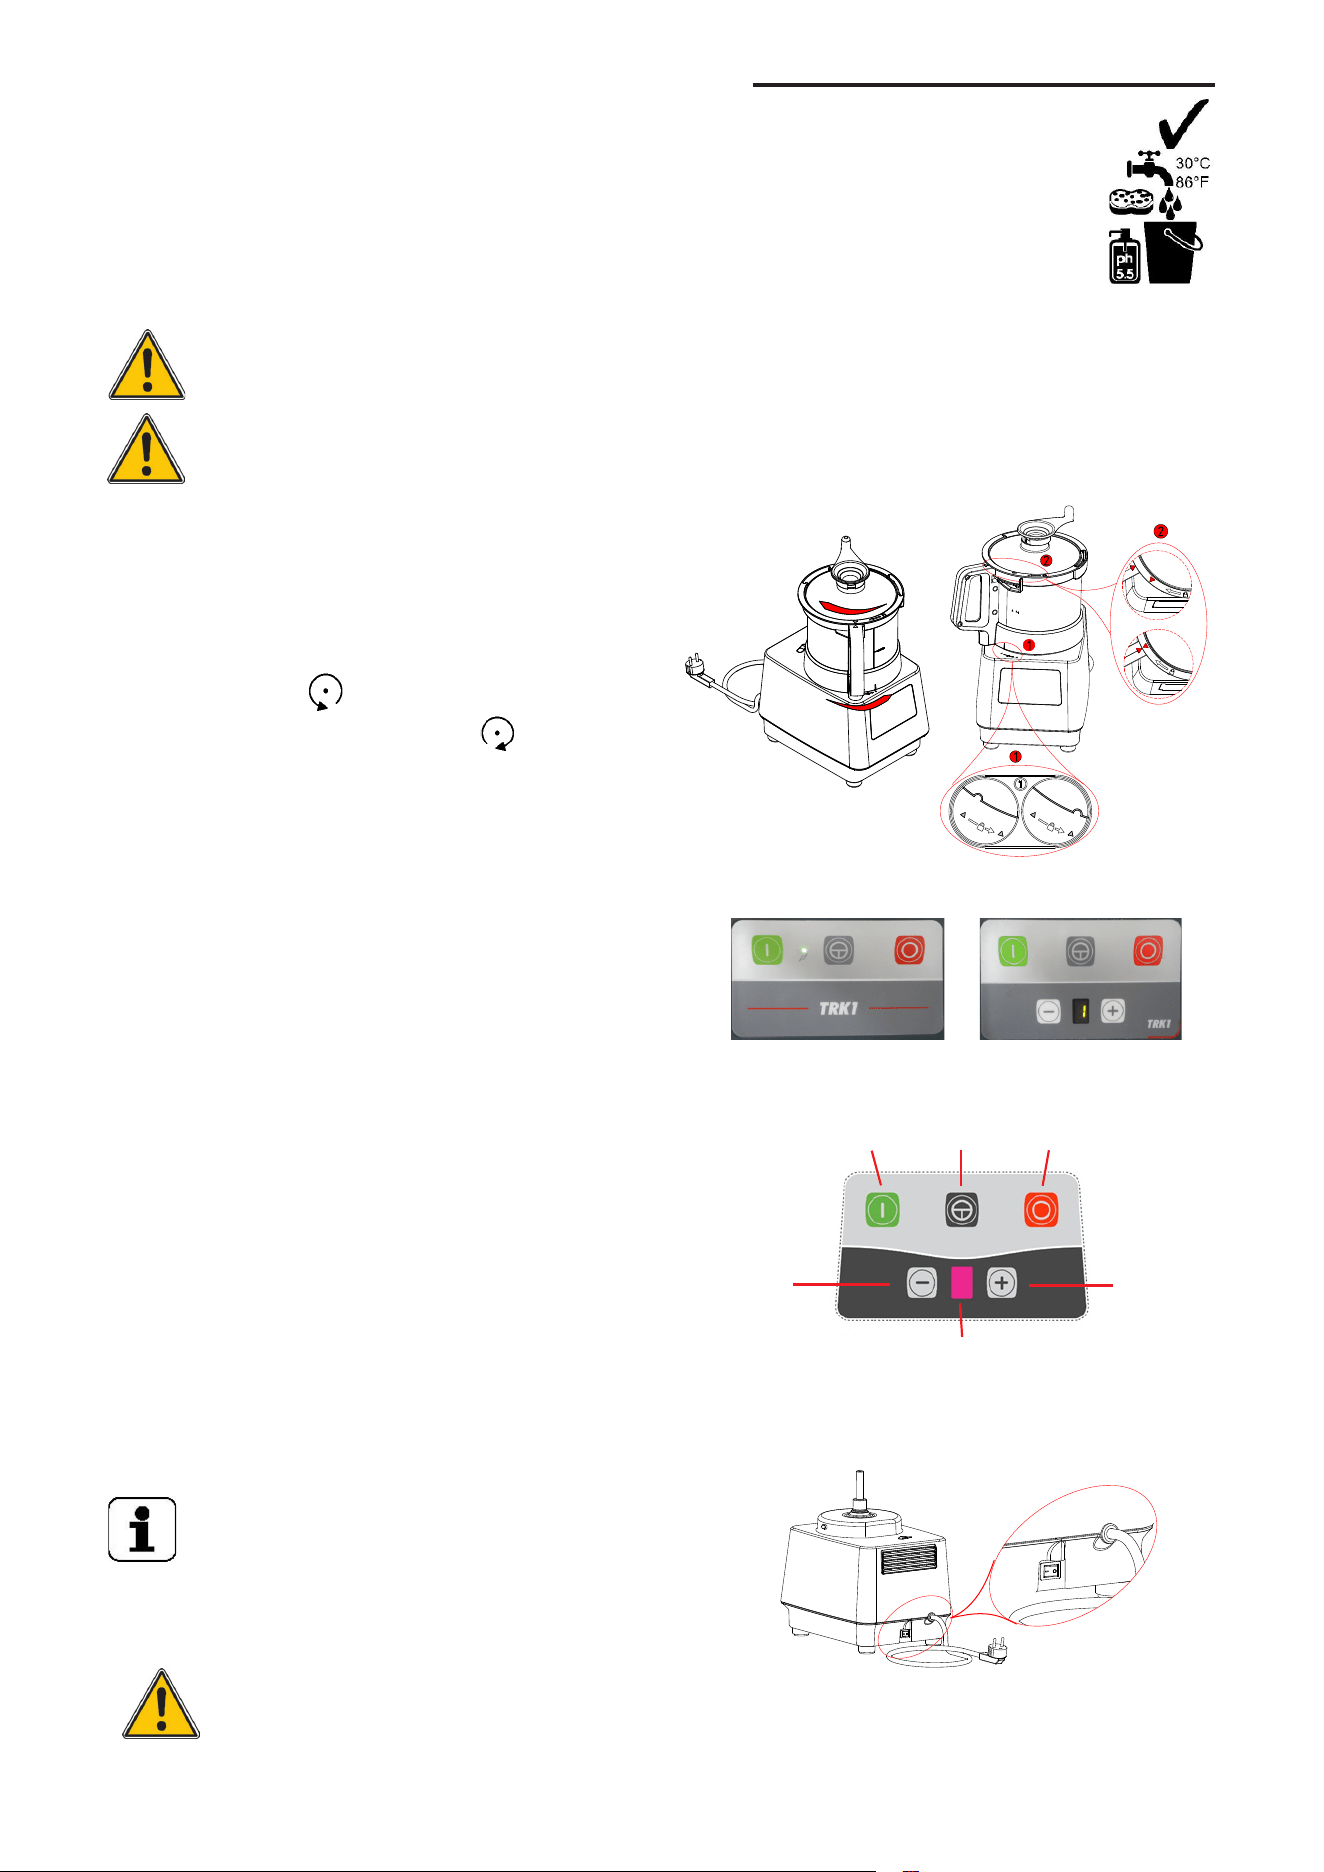
The range of accessories:
A: Slicers
Do not use the shredders or dicing kit with cheese, risk of lock and motor
overheating.
1mm - 2mm - 3mm - 4mm - 5mm - 6mm
Ex :
Carrots / cabbage / cucumbers / onions /
potatoes / leeks / zucchini / peppers / eggplant
/ beets / mushrooms / radishes / tomatoes
3mm - 5mm
Ex : Beets / potatoes / carrots ...
2mm - 4mm - 8mm
Ex : carrots / celery / potatoes / beets /
zucchini / eggplant ...
2mm - 3mm - 4mm - 7mm - P: Parmesan
Ex : Celery / cheese / carrots / cabbage ...
8x8mm - 10x10mm
Ex :
potatoes / carrots / zucchini
/ beetroot / turnip ...
A: Wavy Slicers
B: Shredders
C: Graters
D: Mixed-vegetable kit

18
Some examples of use cutting discs :
Food Cut Suggested discs
cut of speed
(variable speed)
Eggplant Sliced C17X3, C17X4, C17X5, C17X6, C178 1 to 2
Wavy-sliced C17XW3, C17XW5 1 to 2
Carrots Slice C17X1, C17X2, C17X3, C17X4, C17X5, C17X6 1 to 2
Wavy slice C17XW3, C17XW5 1 to 2
Shredded AS172, AS174, AS178 1 to 2
Diced DC8 1 to 2
Grated J172, J173, J174, J177 1 to 5
Celery Sliced C17X2, C17X3, C17X4, C17X5 1 to 2
Diced DC8 1 to 3
Celeriac Shredded AS172, AS174, AS178 1 to 2
Diced DC8 1 to 3
Grated J172, J173, J174, J177 1 to 3
Cabbagge Sliced C17X1, C17X2, C17X3, C17X4, C17X5, C17X6 1 to 2
Grated J174, J177 1 to 5
Cucumber Sliced C17X1, C17X2, C17X3, C17X4, C17X5 1 to 2
Wavy-sliced C17XW3, C17XW5 1 to 2
Shredded AS178 1 to 2
Diced DC8, DC10 1 to 2
Grated J173, J174, J177 1 to 3
Zucchini Sliced C17X1, C17X2, C17X3, C17X4, C17X5, C17X6, C178, C1710 1 to 2
Wavy-sliced C17XW3, C17XW5 1 to 2
Shredded AS172, AS174, AS178 1 to 2
Diced DC8, DC10 1 to 3
Grated J173, J174, J177 1 to 5
Onion Sliced C17X1, C17X2, C17X3, C17X4, C17X5, C17X6 1 to 2
Shredded AS172, AS174 1 to 2
Diced DC8, DC10 1 to 2
Grated J173, J174, J177 1 to 3
Leeks Sliced C17X1, C17X2, C17X3, C17X4, C17X5 1 to 2
Scallions Sliced C17X1, C17X2, C17X3, C17X4, C17X5 1 to 2
Chili peppers Sliced C17X1, C17X2, C17X3, C17X4, C17X5 1 to 2
Bell peppers Sliced C17X2, C17X3, C17X4, C17X5 1 to 2
White radish Sliced C17X1, C17X2, C17X3 1 to 2
Grated J172, J173, J174 1 to 5
Horseradisch Grated J172, J173, J174 1 to 5
Iiceberg salad Sliced C17X4, C17X5, C17X6; C178, C1710 1 to 2
Tomatoes Sliced C17X2, C17X3, C17X4, C17X5, C17X6 1 to 2
Diced DC8, DC10 1 to 2
Potatoes Slice C17X1, C17X2, C17X3, C17X4, C17X5, C176 1 to 2
Wavy-sliced C17XW3, C17XW5 1 to 2
Shredded AS172, AS174, AS178 1 to 2
Diced DC8, DC10 1 to 2
Grated J172, J173, J174, J177 1 to 5
Gherkins Sliced C17X2, C17X3, C17X4 1 to 2
Almonds Sliced C17X1, C17X2 1 to 2
Grated J172, J173 2 to 4
Lemon & orange Sliced C17X2, C17X3, C17X4, C17X5, C17X6, C178 1 to 2
Wavy-sliced C17XW3, C17XW5 1 to 2
Walnuts Grated J17P 3 to 5
Apples Sliced C17X2, C17X3, C17X4, C17X5, C17X6, C178 1 to 2
Shredded AS174, AS178 1 to 2
Diced DC8, DC10 1 to 2
Grated J173, J174, J177 1 to 3
Rhubarb Sliced C17X2, C17X3, C17X4, C17X5, C17X6, C178 1 to 2
Kiwi Slice C17X2, C17X3, C17X4, C17X5, C17X6, C178 1 to 2
Wavy-sliced C17XW3, C17XW5 1 to 2
Breadcrumbs Grated J17P 4 to 5
Chocolate Grated J17P 4 to 5
Semi-hard cheese Grated J172, J173, J174, J177 1 to 3
Hard cheese Grated J17P 4 to 5
Mozzarella cheese Grated J174, J177 1 to 3
19
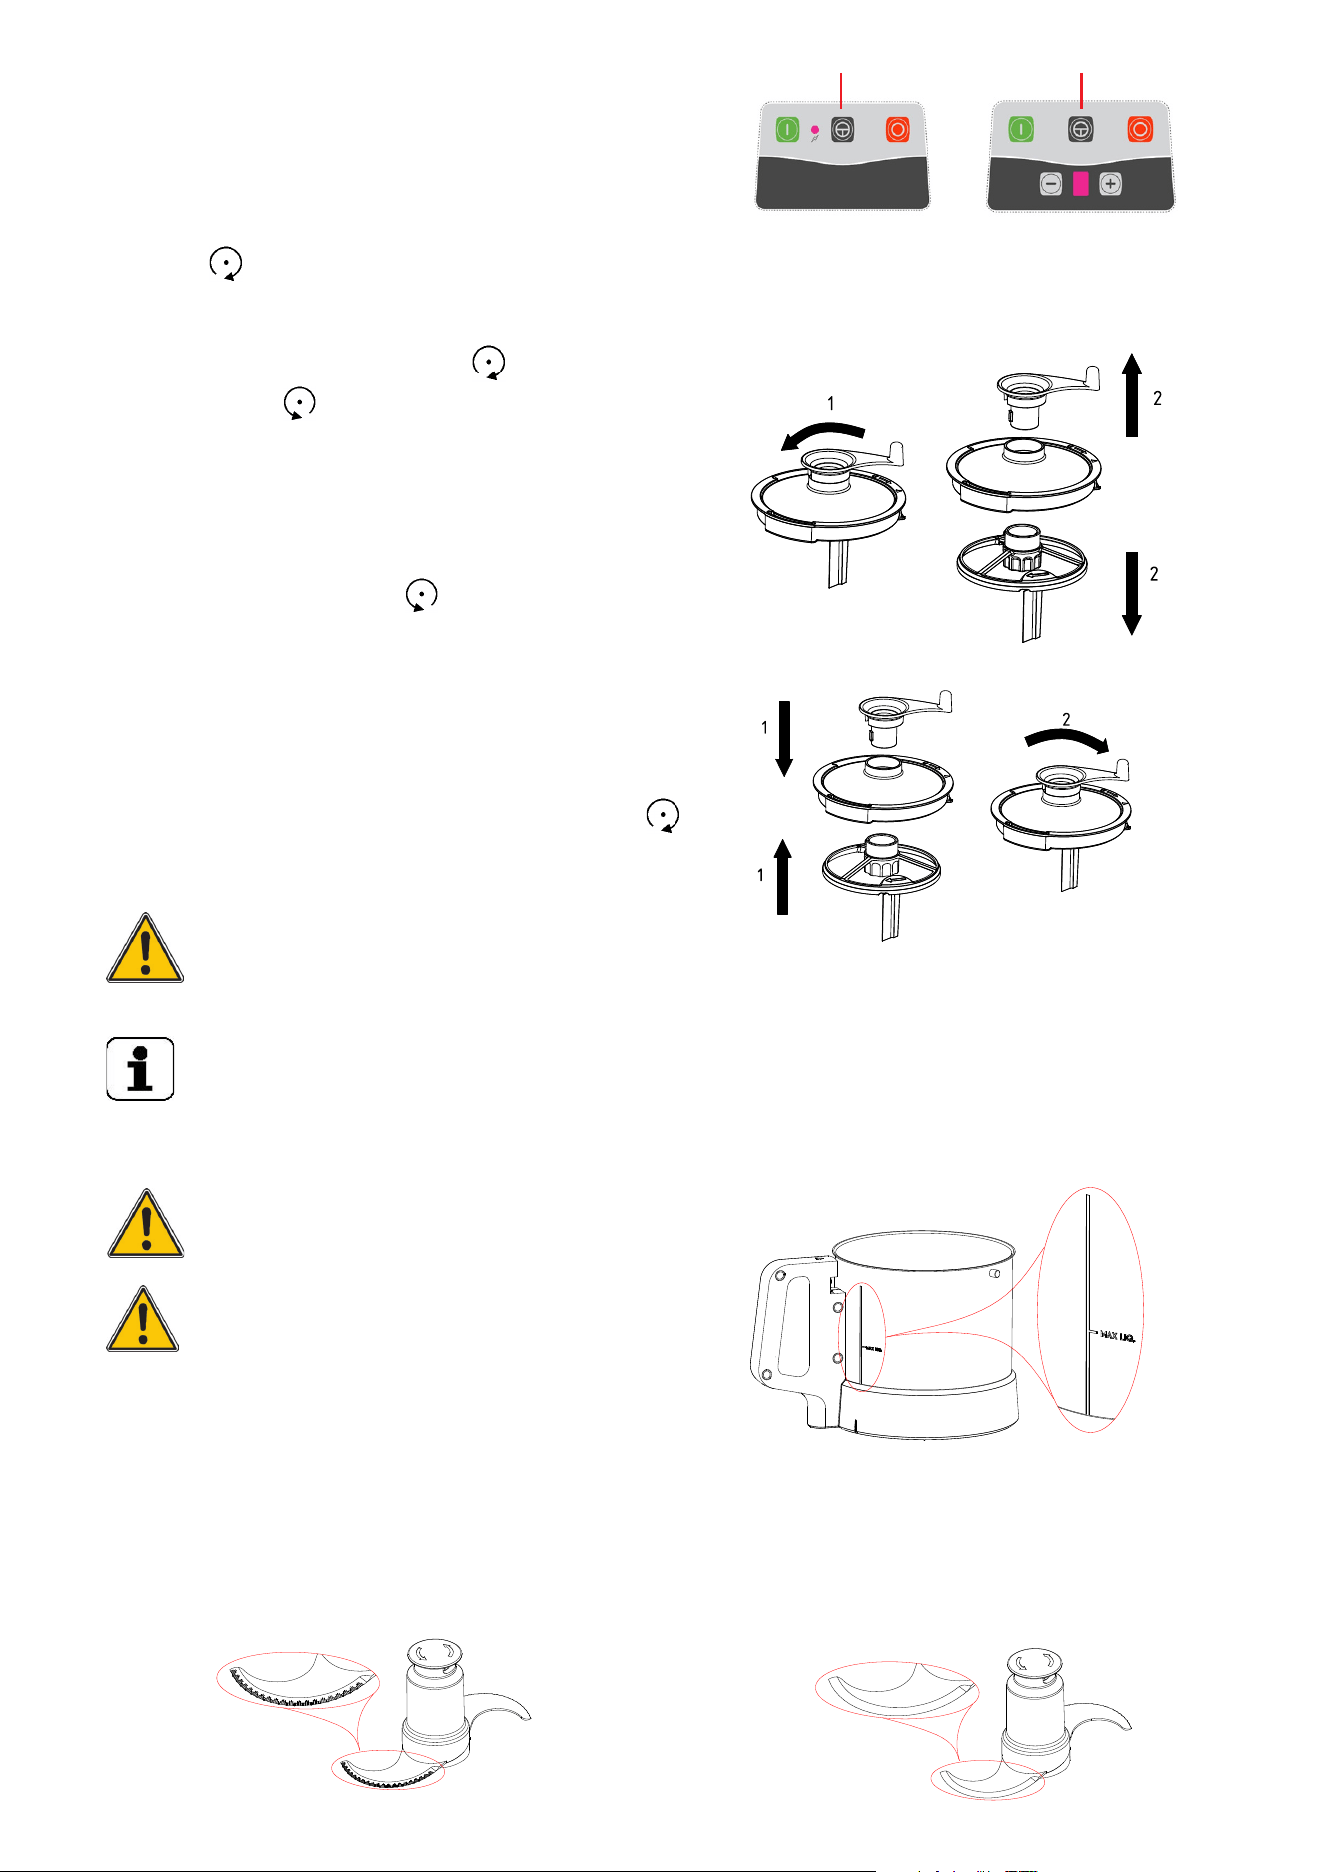
• The cutter comes with rotor, lid, and scraper.
• Before starting work, always check the cleanliness
of the bowl, rotor, lid, scraper, and drive shaft.
•
Mount the bowl on the motor unit, turn
counterclockwise
to engage it, attach the rotor.
• Place the lid and turn clockwise to engage it.
• To disassemble, proceed in reverse.
The cutter can be started if:
- The switch is in position I.
- The container is in position and engaged.
- The lid is secure.
- The light is green.
- If the light is orange, (or the speed indicator is
flashing on model VV) one of the safety devices
is not properly engaged, see Section “i” on
troubleshooting.
a) Constant mode: press A.
b) Pulse mode: press B.
c) Change speed (variable speed):
- Select the speed on G by pressing E or F.
d) Stop:
-
Always use the button C when your work is done.
If the machine is not in use for several
days, position the switch to O or unplug
the appliance so the electronic speed drive
stops running.
A B C
F E
G
COMMISSIONING/USING THE CUTTER
Before commissioning the appliance, clean all internal parts and accessories with hot water and
a little detergent / degreasing agent / disinfectant compatible with the materials or with lukewarm
water and neutral soap. Try to use products that are more than 90% biodegradable to reduce the
emission of pollutants into the atmosphere. After that, rinse with clear water and dry thoroughly.
It is recommended that you use Electrolux Professional products.
1 speed variable speed
Always start a work at a low speed before going up the settings.
All these actions pose the risk of cutting; never force them in, and always keep hands
away from the blades.
Follow the work cycle of 40 minutes on and 20 minutes off, to avoid the appliance
overheating.
20
• Use “Pulse” function to start processing hard products
(nuts, vegetables, meat) or to start or finish a job that required
precise supervision or finishing.
• As you process, turn the handle of the scraper
clockwise (as seen from above) to clean the walls
of the container and lid and to process the product
evenly. To remove pasty products from the scraper,
turn the handle one stroke clockwise and then
counterclockwise .
•
To remove the scraper:
-
Hold the scraper hub with one hand and, while
applying pressure between the 2 parts, turn the
handle counterclockwise (as seen from above)
to disengage the
m.
•
To attach the scraper:
-
Hold the scraper hub with one hand, place the lid over
it, push the scraper handle while applying pressure
between the 2 parts, turn the handle clockwise
(as seen from above) to engage the
m.
Do not process hard products (e.g. whole
vegetables, pieces of meat) with the scraper
mounted.
Risk of damaging the scraper.
When processing with liquids, do not exceed
the line marked “MAX. LIQ.”, risk of overflowing.
For variable speed models: the appliance is
not intended for processing liquid products
at high speeds. If you notice any leaking
around the
lid, reduce the speed or reduce
the contents.
Note:
- Place the supplied plug in the central hole of the lid when the scraper is not in use.
- Liquid products or ingredients can be introduced through the handle chute.
- The tilt of the blades ensures a quick and even mixture.
Type of preparation :
Smooth blade rotor for chopping delicate items like
fresh herbs, for clean cuts like meat tartare and all pre-
parations all where a smooth blade knife is used in the
kichen.
Type of preparation :
Micro-tootedh blade rotor for efficient chopping, mixing, grin-
ding, emulsifying.
Micro-toothed blade rotor included. Smooth blade rotor available as optional accessory.
21
H - CLEANING AND MAINTAINING THE APPLIANCE
WARNING
See “Warnings and Safety Notices”.
Routine Maintenance
Notes on Maintenance
The following maintenance tasks are the responsibility of the appliance owner and/or user.
IMPORTANT
Problems resulting from improper maintenance or lack of maintenance as described below
will void any warranty.
WARNING
Before cleaning or maintenance, switch off the appliance.
Cleaning the Appliance
• To make it easier to clean the unit, systematically clean the appliance and accessories as soon
as you finish working with them.
It is recommended to clean the appliance after each use.
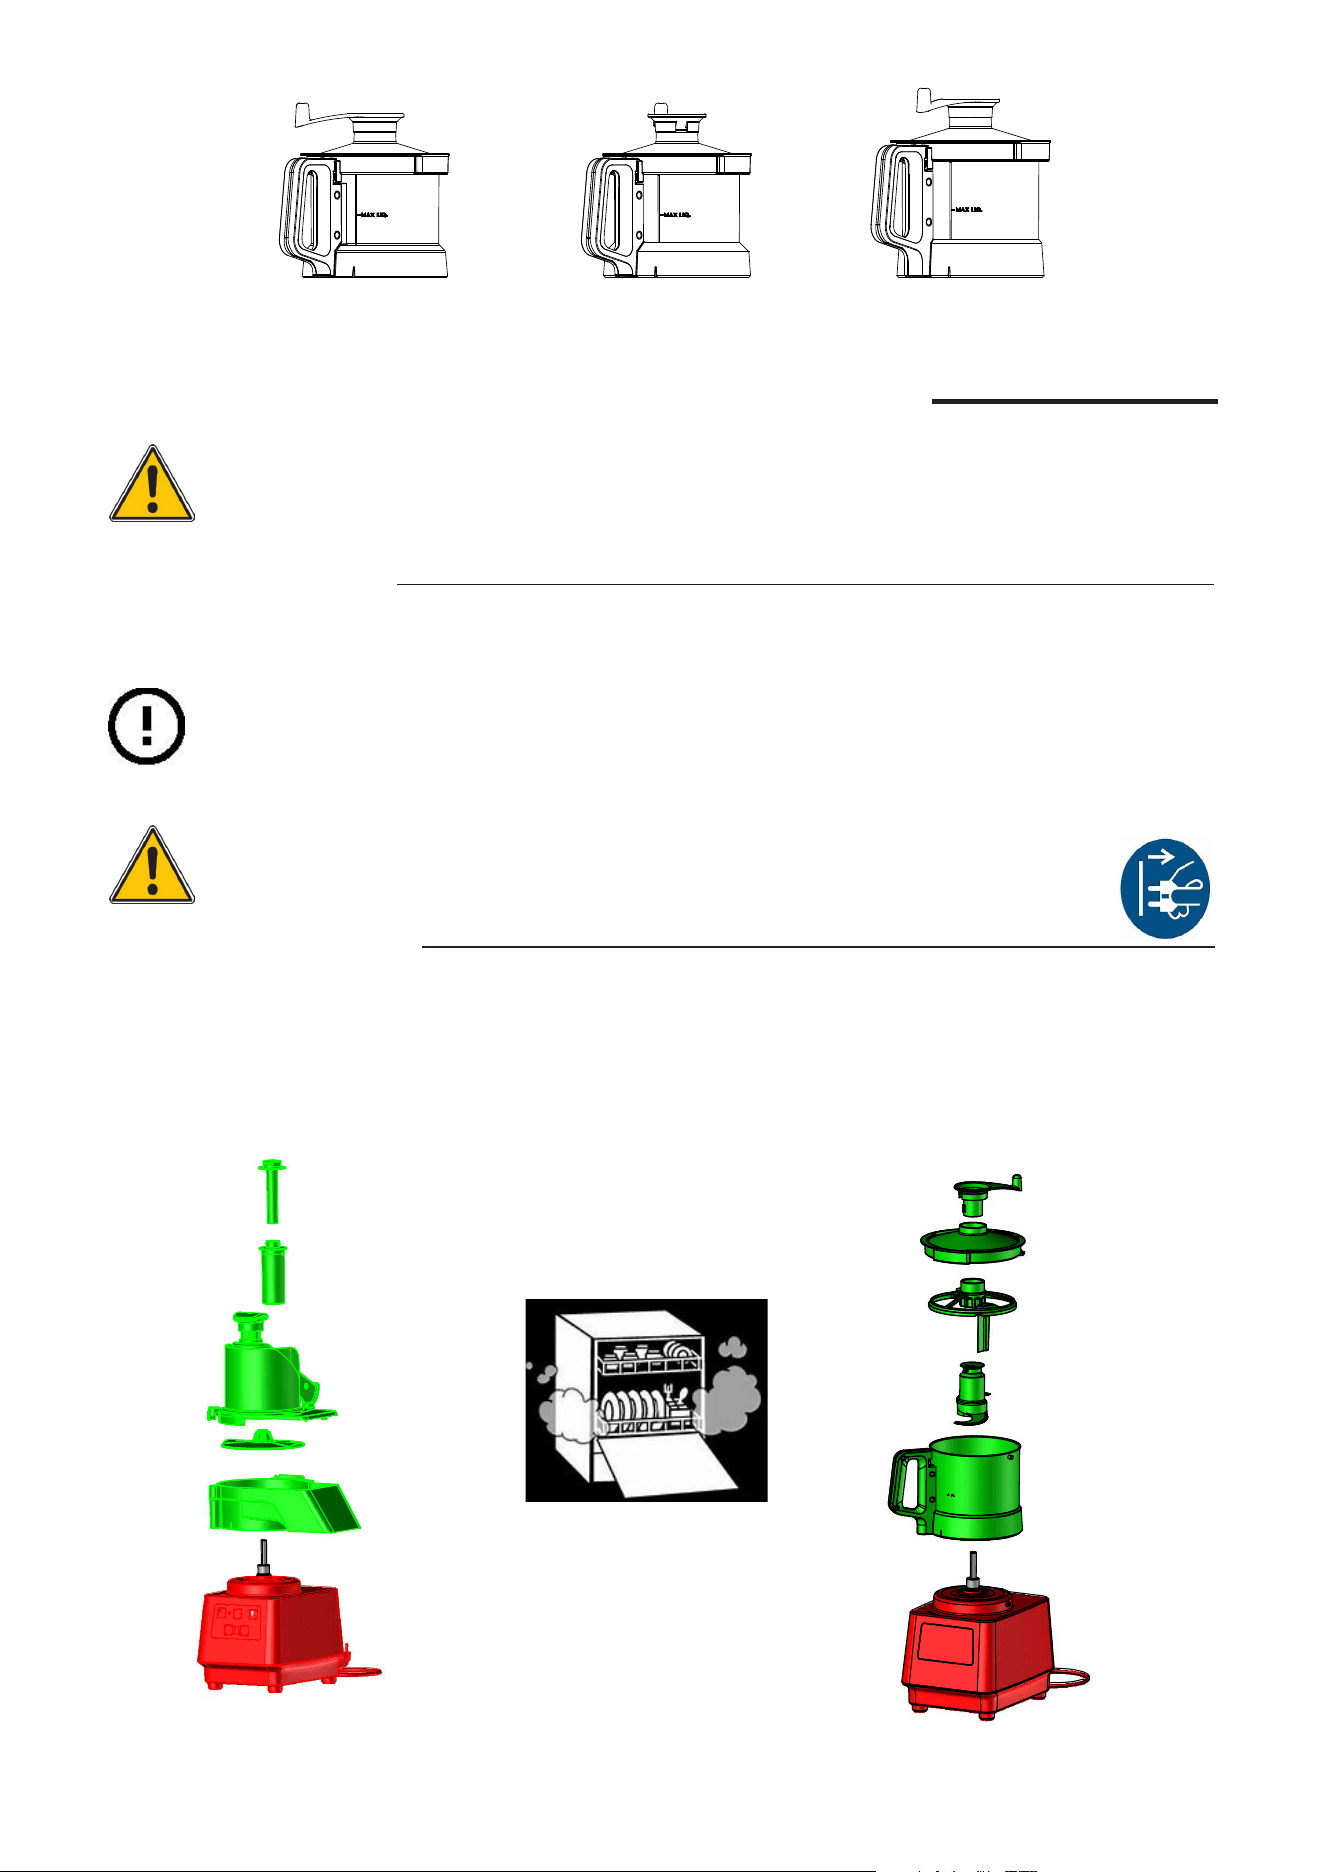
The cutting chamber, ejector, hopper, disc; bowl, lid, and scraper can be cleaned in a dishwasher.
The upper green parts are dishwasher-proof.
}
}
The range of bowls :
2.6L Plastic 2.6L Stainless steel 3.6L Stainless steel
22
Note: - Do not use abrasive detergents that scratch surfaces.
Do not use metal scourers or other similar materials to clean surfaces. It is recommended
that you use Electrolux Professional products.
The use of chlorinated products, and in particular those containing didecyldimethy-
lammonium chloride (CAS 7173-51-5), is strongly discouraged.
If, however, a specific cleaning procedure requires the use of such products, carefully respect the
dosages and instructions recommended by the manufacturer.
Rinse surfaces thoroughly with clean water and then dry.
Misuse (overdosage, inadequate rinsing) can cause irreversible damage to the surfaces (including
aluminum and stainless steel).
The guarantee is void if these instructions are not followed.
ADJUSTMENT TO SAFETY FEATURES
• Before each use, verify the proper functioning of safety devices.
The motor must stop in 2 seconds:
- For Cutter: when the lid and/or the bowl is unlocked.
- For Slicer: when the half moon hopper and/or the cutting chamber is unlocked;
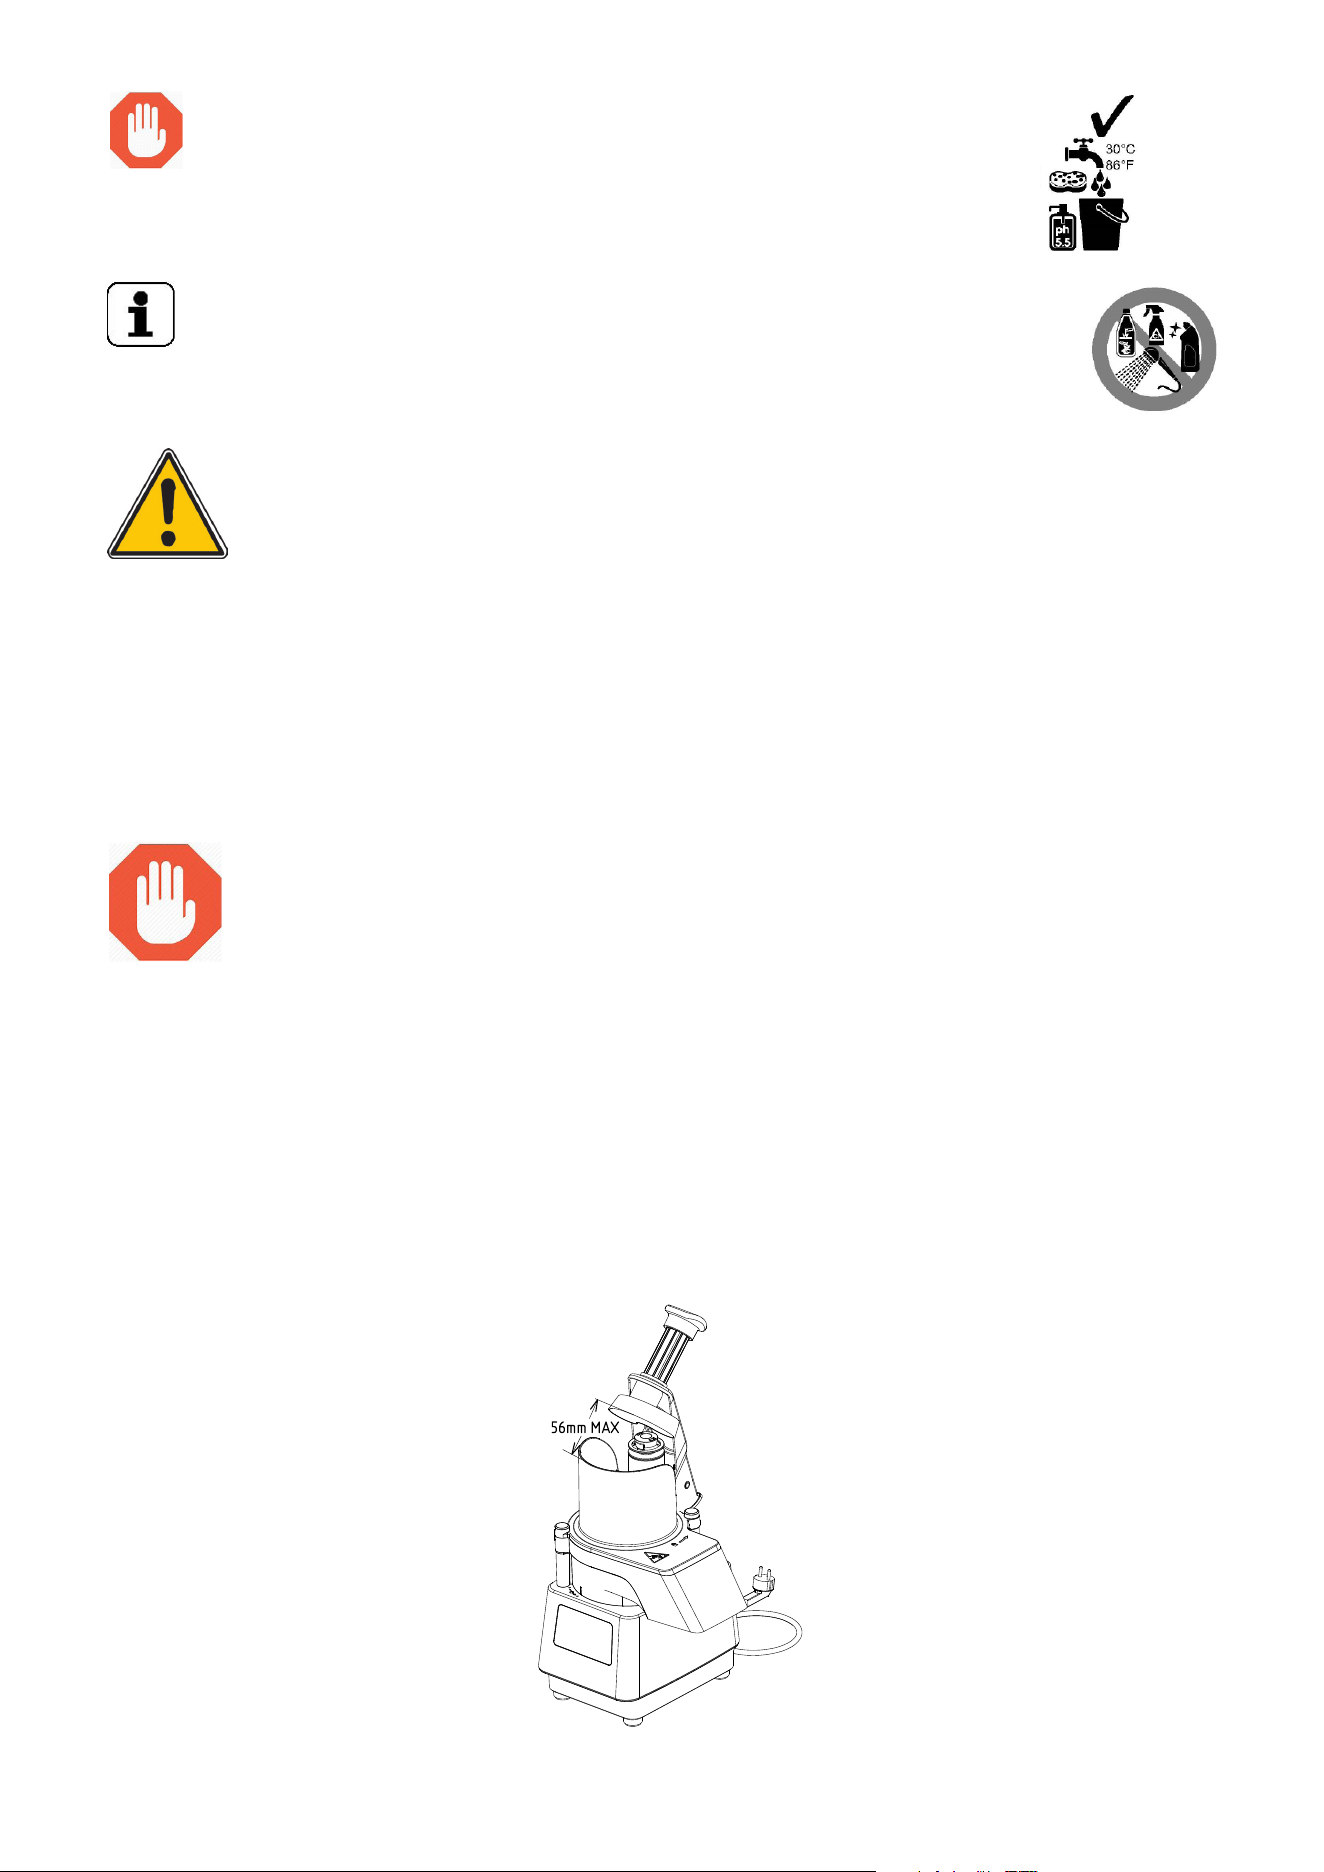
when the presser lever is lifted to maximum 56 mm from the edge of the half-moon hopper.
• If one of these safety functions is not implemented:
- Do not use the appliance.
- Have it adjusted by your local dealer’s service department.
CAUTION
- Clean the outside of the food processor with a damp sponge and mild detergent,
then rinse with a clean sponge and dry.
23
I - TROUBLESHOOTING
Follow the instructions provided and contact your after-sales agent if necessary, remembering to:
1. Unplug the appliance from the main power supply
2. Cut off the protective circuit breaker upstream of the appliance
Some faults can be fixed easily and quickly, just by following the instructions in this troubleshooting
guide:
Anomaly/Description Possible causes Remedy
The appliance does not turn on. 1 There is no power supply.
2 Main switch set to O (Off).
3 Motor overheating and
thermal protection intervention.
1 Be sure to plug the equipement
into a powered socket.
2 Set main switch to I (On).
3 Let the equipement cool down
for 30 min.
4 If the problem persists, call
service
Single speed model : The
appliance is on but the light is
still orange.
Variable speed model : The
appliance is on but the light is
flashing.
1 The container or lid is not
engaged on the appliance.
2 The sensors are faulty.
3 Single speed lodel - The
heat protection of the motor is
activated.
1 Check that these are in place.
2 Call service.
3 Let the equipement cool down
for 30 min.
4 If the problem persists, call
service
Single speed model :The
appliance does not start, the
light is green.
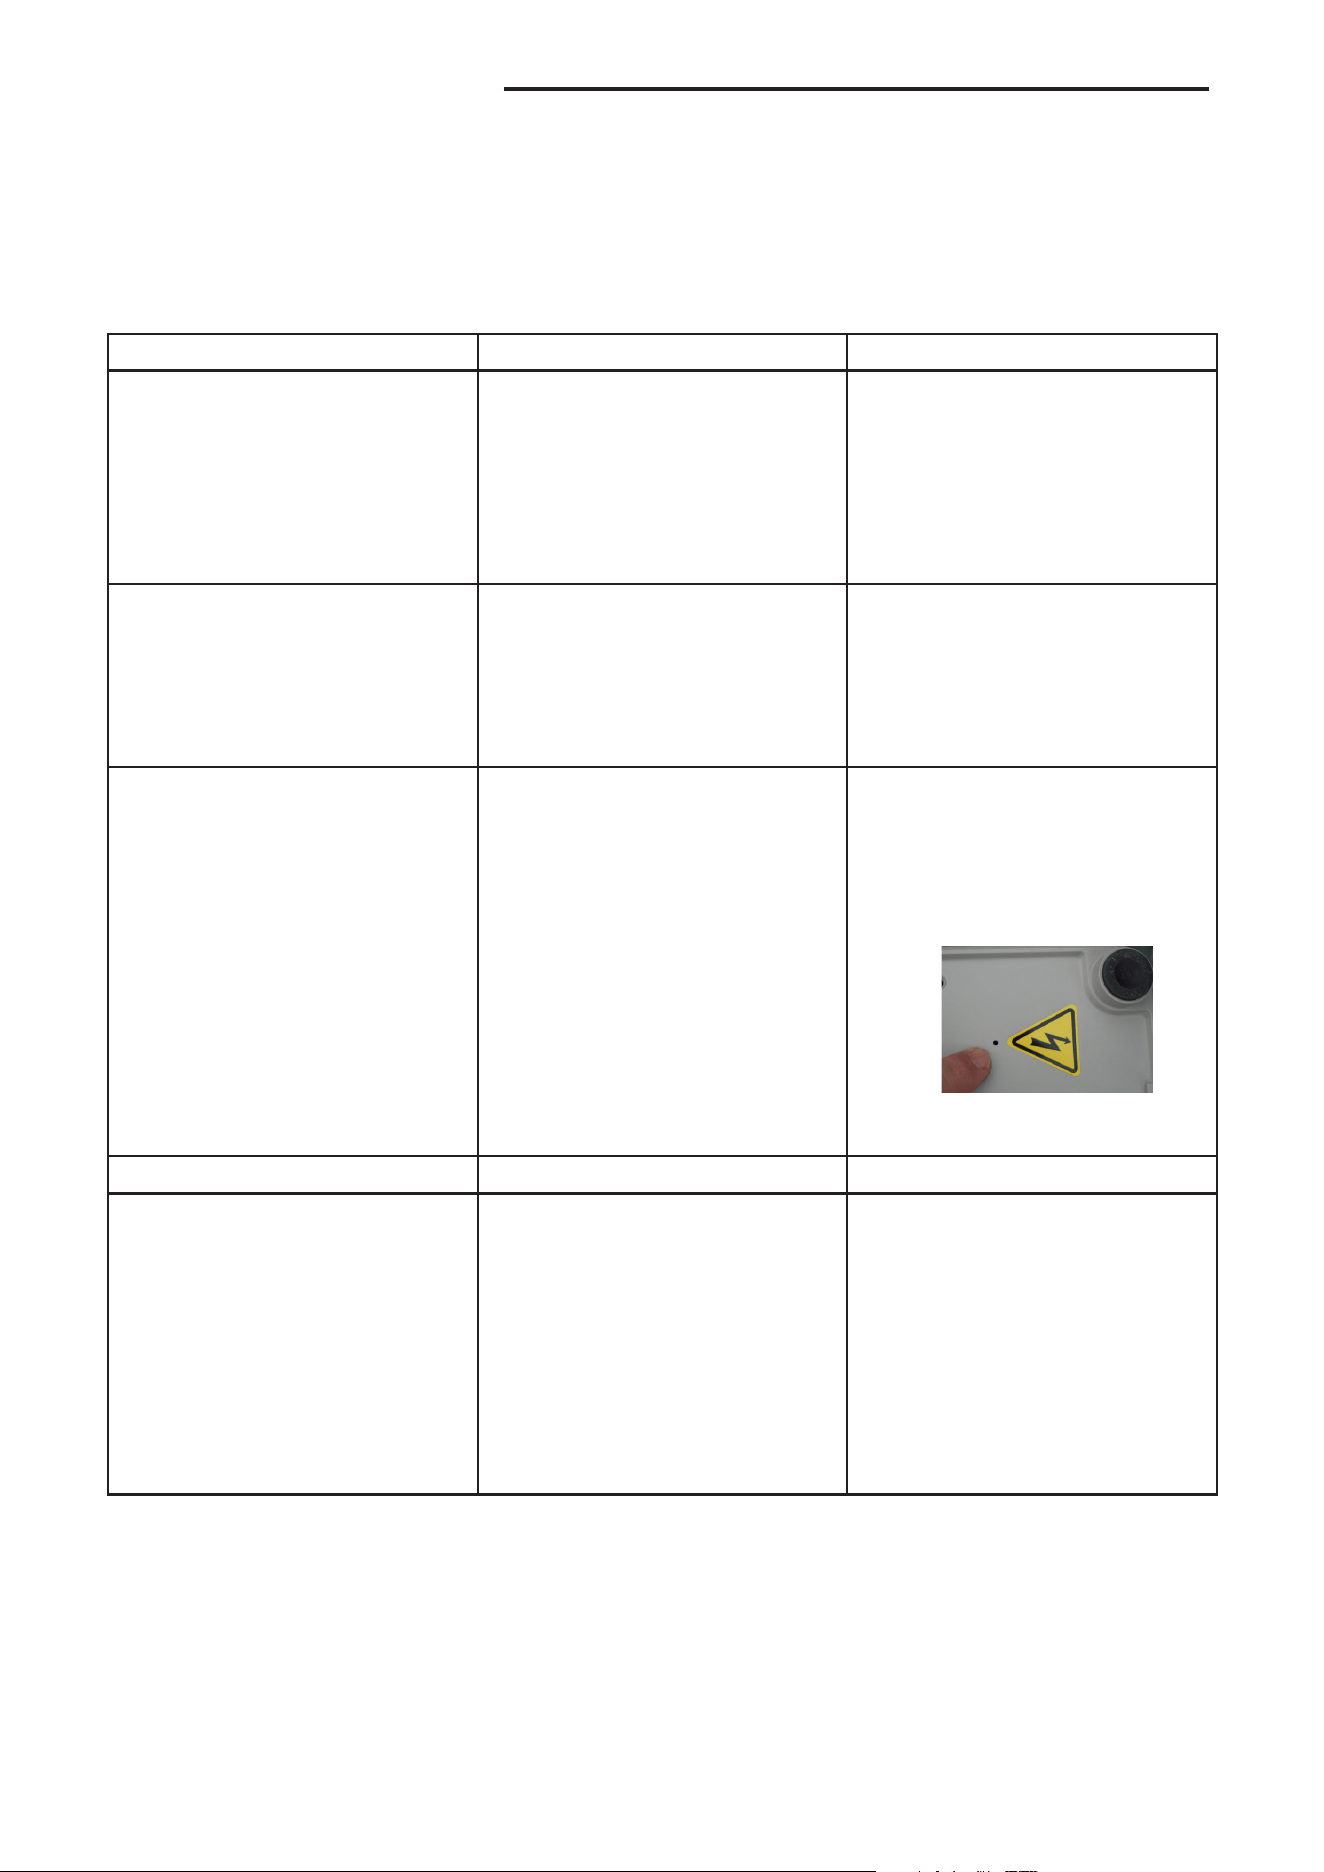
Circuit breaker intervention. Unplug the equipement from
the electric supply.
Manually reset the circuit breaker
by gently inserting a screwdriver
in the reset hole on the bottom of
the motor base.
If the problem persits , call
service
The appliance does not start. Electric or electronic fault. Call service.
Abnormal noise.
1 The motor base is not resting
properly
and firmly on the work
surface.
2 The accessories inside the
hopper or bowl are not properly
fixed
.
3 Scrape off food residues stuck
under the ejector or rotor.
1 Clean the work surface and
make sure the motor base rests
properly on it.
2 Make sure you have
assembled the parts correctly.
3 Clean the inside of the hopper
or bowl making sure to remove
any food residues.
4 If the problem persits, call
service.
If the fault persists after completing the checks described above, contact your after-sales agent, giving
them the following information:
A. The problem
B. PNC (production number code) of the appliance see chapter C.
C. Serial number of the appliance see chapter C.
NOTE!
The PNC and serial number are essential for identifying the type of appliance and its date of manu-
facture.