Instruction Manual
Installation and Operation Guide
Portable AC


Table of Content
Warning and Safety
Name of Parts
Product Specication
04
07
09
26
27
28
29
31
32
Water Drainage
Air Filter
Maintenance Routine
Installation Preview
Installation
10
12
Troubleshooting
Disposal Guideline
Warranty
Power ON / OFF
Operation Modes
- Cool, Dry, Fan, Auto
Change Temperature
Change Humidity Target
Change Fan Speed
Swing Function
Timer
21
21
21
21
21
21
22
22
Sleep Mode
Turbo Mode
Display & LED ON / OFF
°F / °C
Wi-Fi Reset
Child Lock
Clean Filter Reminder
Default Reset
Wi-Fi Pairing
Operation Tips
Front Panel
Remote Control
17
18
19
Before Installation
Care and Maintenance
Having Problems?
Installation
Before Using
Basic Operation
Advance Function
23
23
23
24
24
24
24
24
25
4
Before Installation
Before Installation
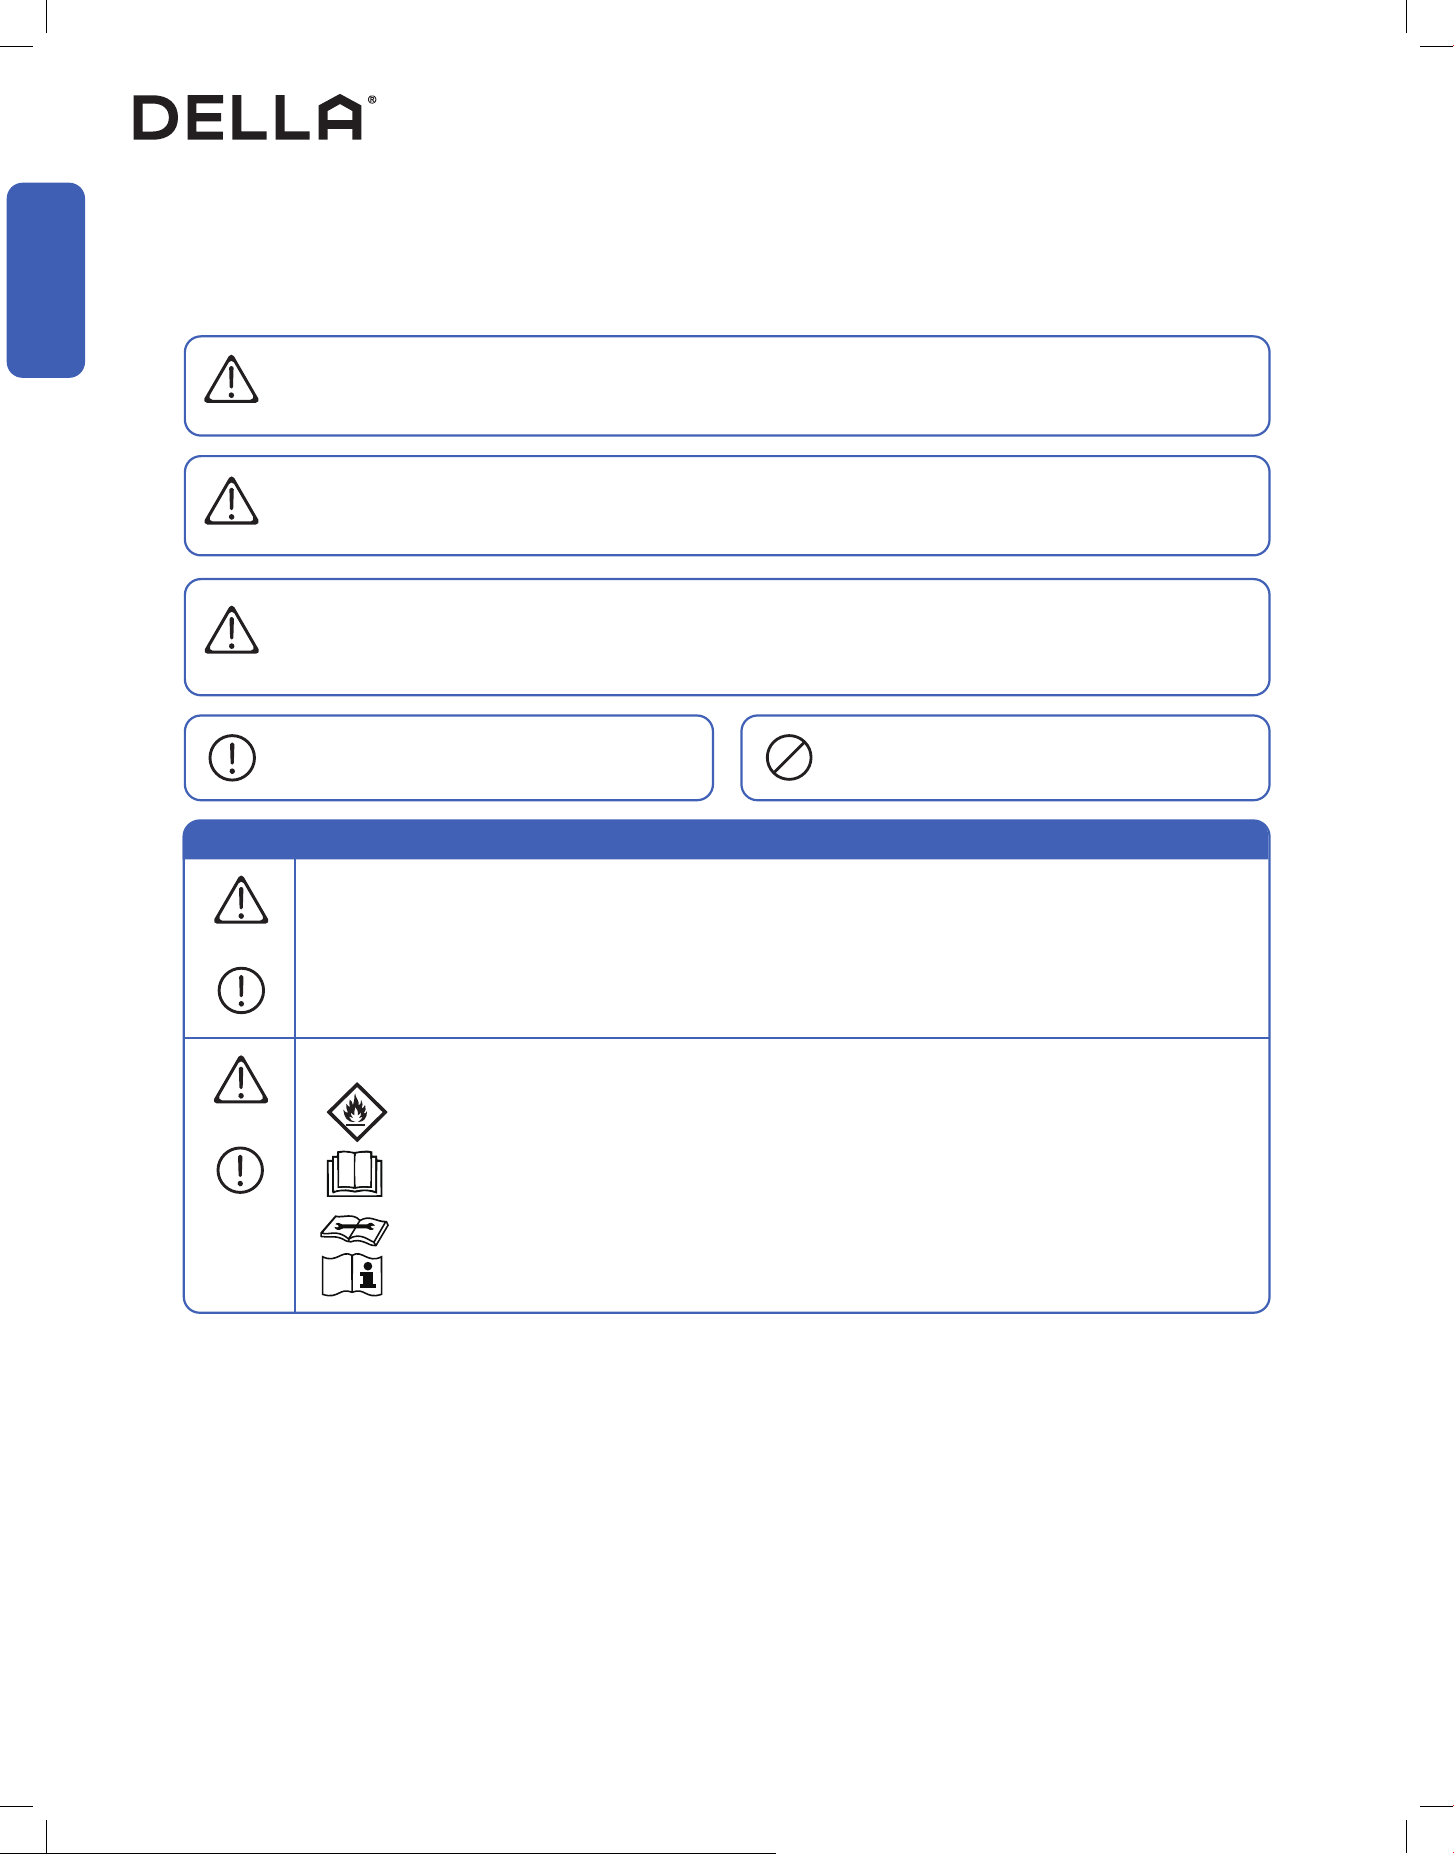
Warning and Safety
• Read this guide before installation. Failure to follow the safety instructions may result in property damage, serious injury, or death.
• Please Keep this manual.
Danger:
Indicates an IMMINENTLY hazardous situation that, if not avoided, will result in death, serious injury, or serious property damage.
Warning:
Indicates an POTENTIALLY hazardous situation that, if not avoided, will result in death, serious injury, or serious property damage.
Caution:
Indicates an POTENTIALLY hazardous situation that, if not avoided, will result in minor to moderate injury. It may also be used to
indicate unsafe practice.
About Refrigerant
Attention:
Pay additional attention to the instruction.
DO NOT:
Indicates prohibited actions and / or practice.
• The air conditioner is pre-charged with refrigerant. Handle the air conditioner with care and check if there is any
refrigerant leakage during installation. Refrigerants have no odor and can be toxic and ammable. Rapid evaporation of
refrigerant may cause frostbite, cardiac arrhythmia, and / or irritation, as well as cause environmental damage.
• In the case of refrigerant leakage, shut down the appliance and disconnect from the power supply. An inspection must
be performed by a qualied technician.
DANGER
DANGER
WARNING
CAUTION
WARNING
• When Installing or using the appliance with R32 refrigerant, beware of the following symbols displayed on the unit.
• This symbol means this appliance uses a ammable refrigerant.
If the refrigerant is leaded and exposed to an external ignition source, there is a risk of re.
• This symbol means that read the operation instruction carefully.
• This symbol means that personnel handling the equipment should reference to the installation manual.
• This symbol means information is available in the installation or operation instruction manual.
5
v.20260130C
Before Installation
Before Installation
About Installation
• Do not install or use this appliance in the bathroom, laundry area, or places that might come into contact with water.
• Do not install or use this appliance near ammable substances such as alcohol, gasoline, paint, etc. Or pressurized
containers such as spray cans.
• Do not store, install or use this appliance in a room with continuously operating ignition sources such as open ames,
gas appliances, or electric heater.
• Do not alter, change, or modify the appliance.
• Before installation, make sure the AC system is placed on a at and stable platform in its upright position for at least 6
hours to prevent lubricating oil from damaging the compressor.
• Prevent children from accessing the work area during installation to prevent unforeseeable accident.
• Carry out a test run after the installation.
• The appliance should not be installed in a location where the air outlet of the unit is obstructed. Obstruction of these
opening may cause damage or malfunctions to the appliance.
• Wear protective gloves and clothing during installation to prevent cuts or injuries.
WARNING
CAUTION
Warning and Safety
About Power and Electricity
• Ensure that the power voltage corresponds to that stamped on the rating plate.
• Make sure this appliance is connected to a properly grounded power outlet to prevent electric shock.
• Do not bend, tug, or compress the power cord during installation to prevent damaging the power cord. Damaged
electrical cord should be replaced by a qualied electrician.
• This appliance must be plugged directly into a wall power socket. Do not use power extensions and / or multi-socket
modules for appliance installation.
WARNING
WARNING

6
Warning and Safety
Before Installation
Before Installation
About Handling and Maintenance
Encountering Troubles
• Do not attempt to disassemble, alter, or modify the appliance.
• Do not ush the air conditioner with water.
• In the case of the appliance emitting smoke, burning smell, leaking water, or making unusual noise, shut down the
appliance and disconnect from the power supply immediately. Contact a qualied technician for inspection and repair.
• Repairs should be carried out by a professional or qualied technician only. Incorrect repair could expose the user to
potential electric shock or other kinds of hazard.
• Before cleaning the unit, the appliance must be shut down and disconnect from the power supply for at least 5 minutes.
WARNING
WARNING
WARNING
About Operation
• Do not disconnect the appliance from the power supply before shutting o the appliance. This might create a spark and
potentially cause a re.
• Do not place ammable substances near the appliance.
• Do not climb onto or place any objects on the appliance.
• Do not insert any objects into the appliance to prevent damage or injury.
• Do not obstruct the air inlet or outlet.
• Do not operate the appliance with wet hands.
• If the appliance is used in areas without the possibility of ventilation, precautions must be taken to prevent any leaks of
refrigerant.
• Only use the appliance as instructed in this booklet. These instructions are not intended to cover every possible
condition and situation. As with any electrical household appliance, common sense and caution are therefore always
recommended for usage and maintenance.
• This appliance is designed and made for air conditioning in domestic environments only. It must not be used for any
other purpose such as drying clothes or cooling foods.
• This appliance can be used by children aged from 8 years or above and persons with reduced physical, sensory, or
mental capabilities, or lack of experience and knowledge if they have been given supervision or instruction concerning
use of the appliance in a safe way and understand the hazards involved.
• Children shall not play with the appliance.
WARNING
CAUTION
7
v.20260130C
Before Installation
Before Installation
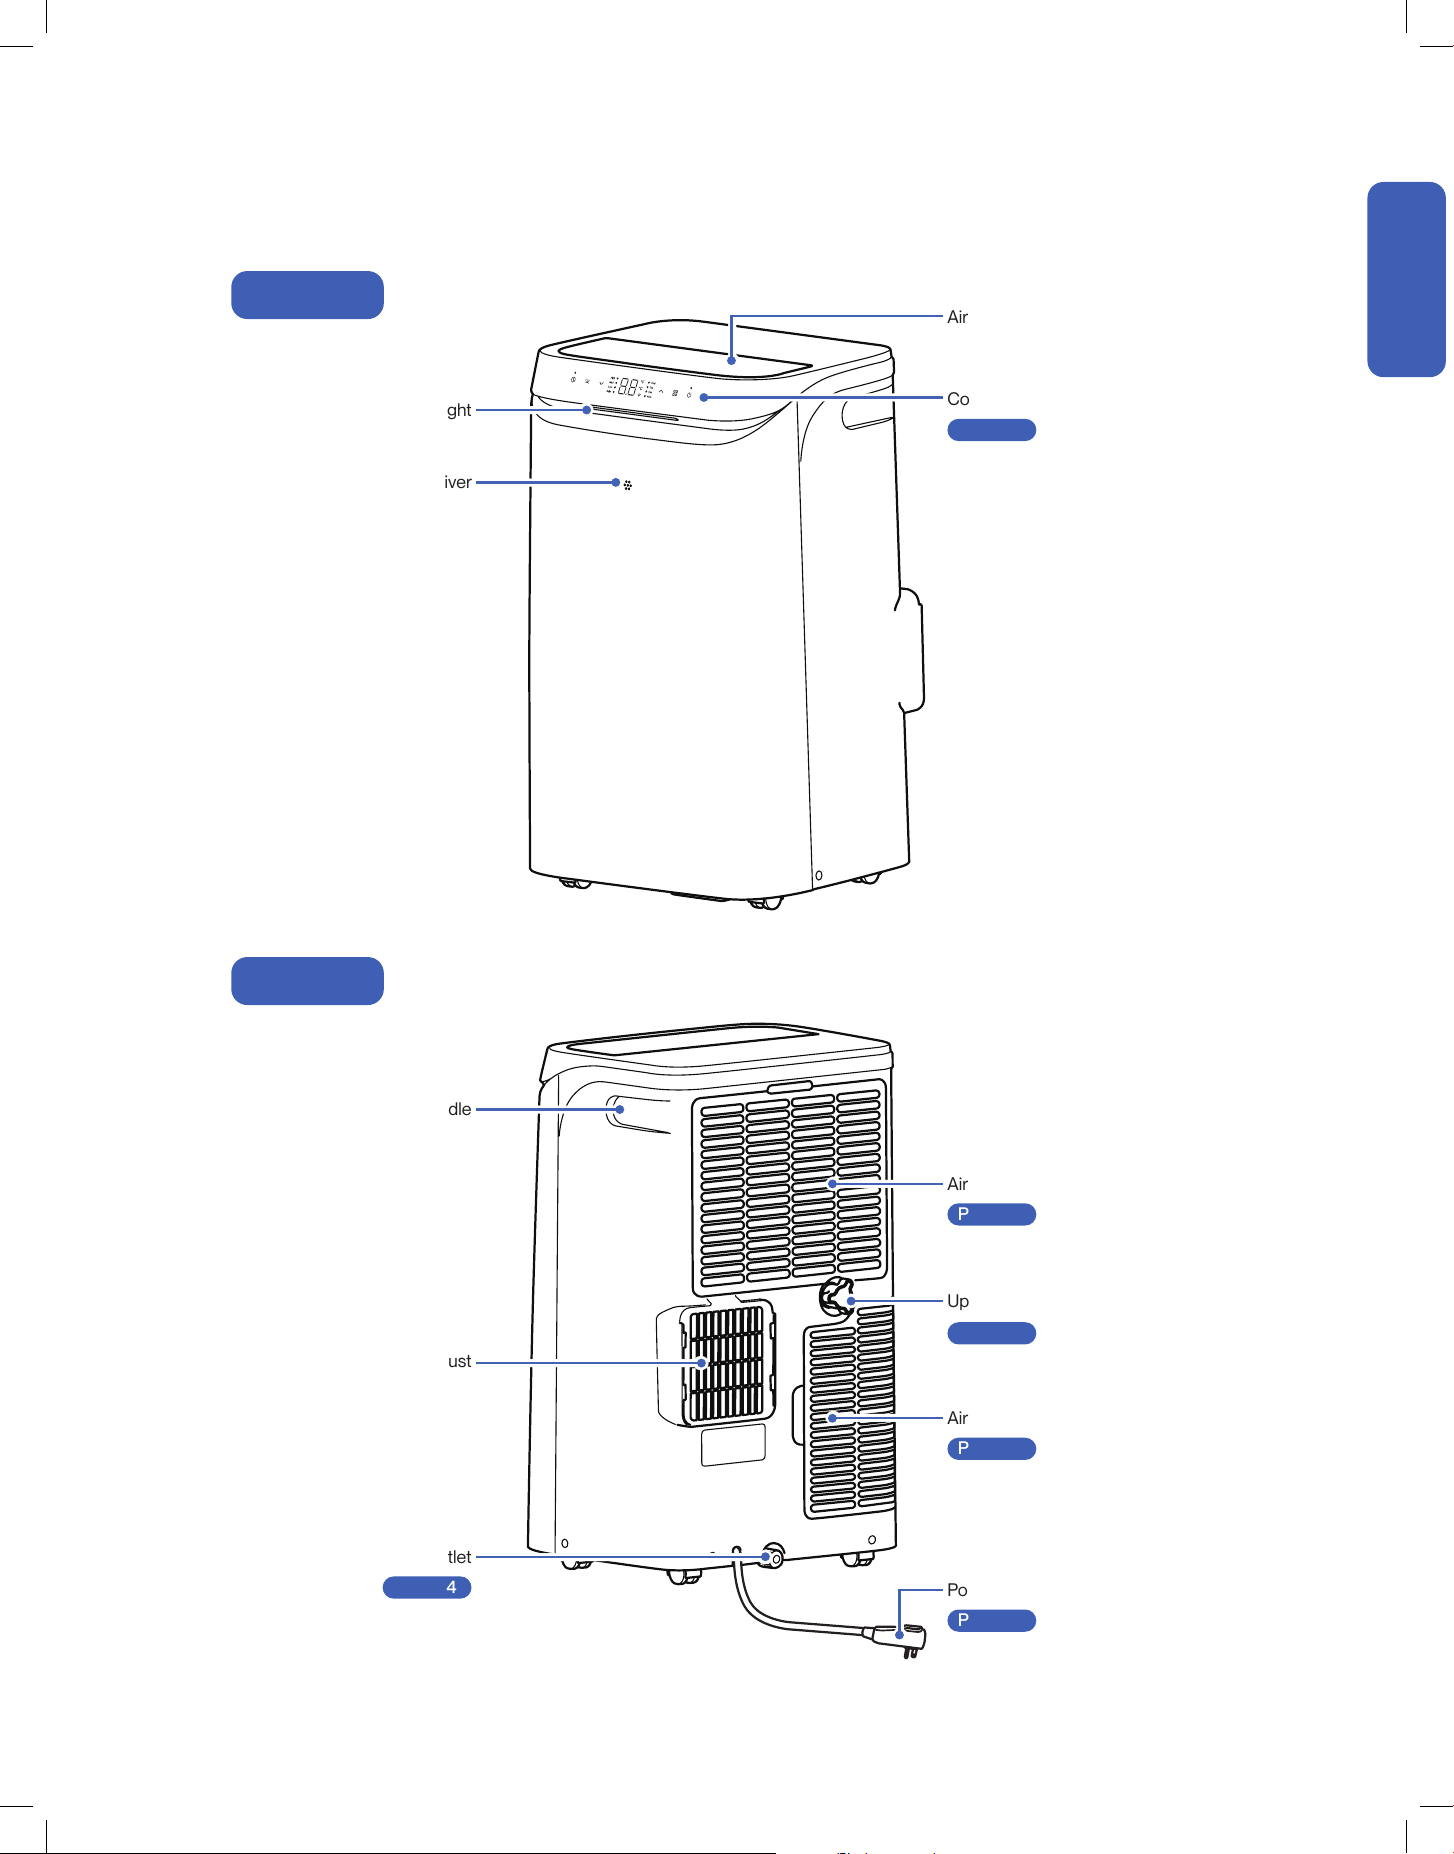
Name of Parts
Front
Back
Ambient Light
Remote Control Receiver
Air Outlet
Carrying Handle
Air Exhaust
Power Plug
-00-
Air Filter
-00-
Air Filter
-00-
Upper Drain Outlet
-00-
Bottom Drain Outlet
-00-
Control Panel
-00-
Page 16
Page 25
Page 25
Page 24
Page 24
Page 14
8
Before Installation
Before Installation
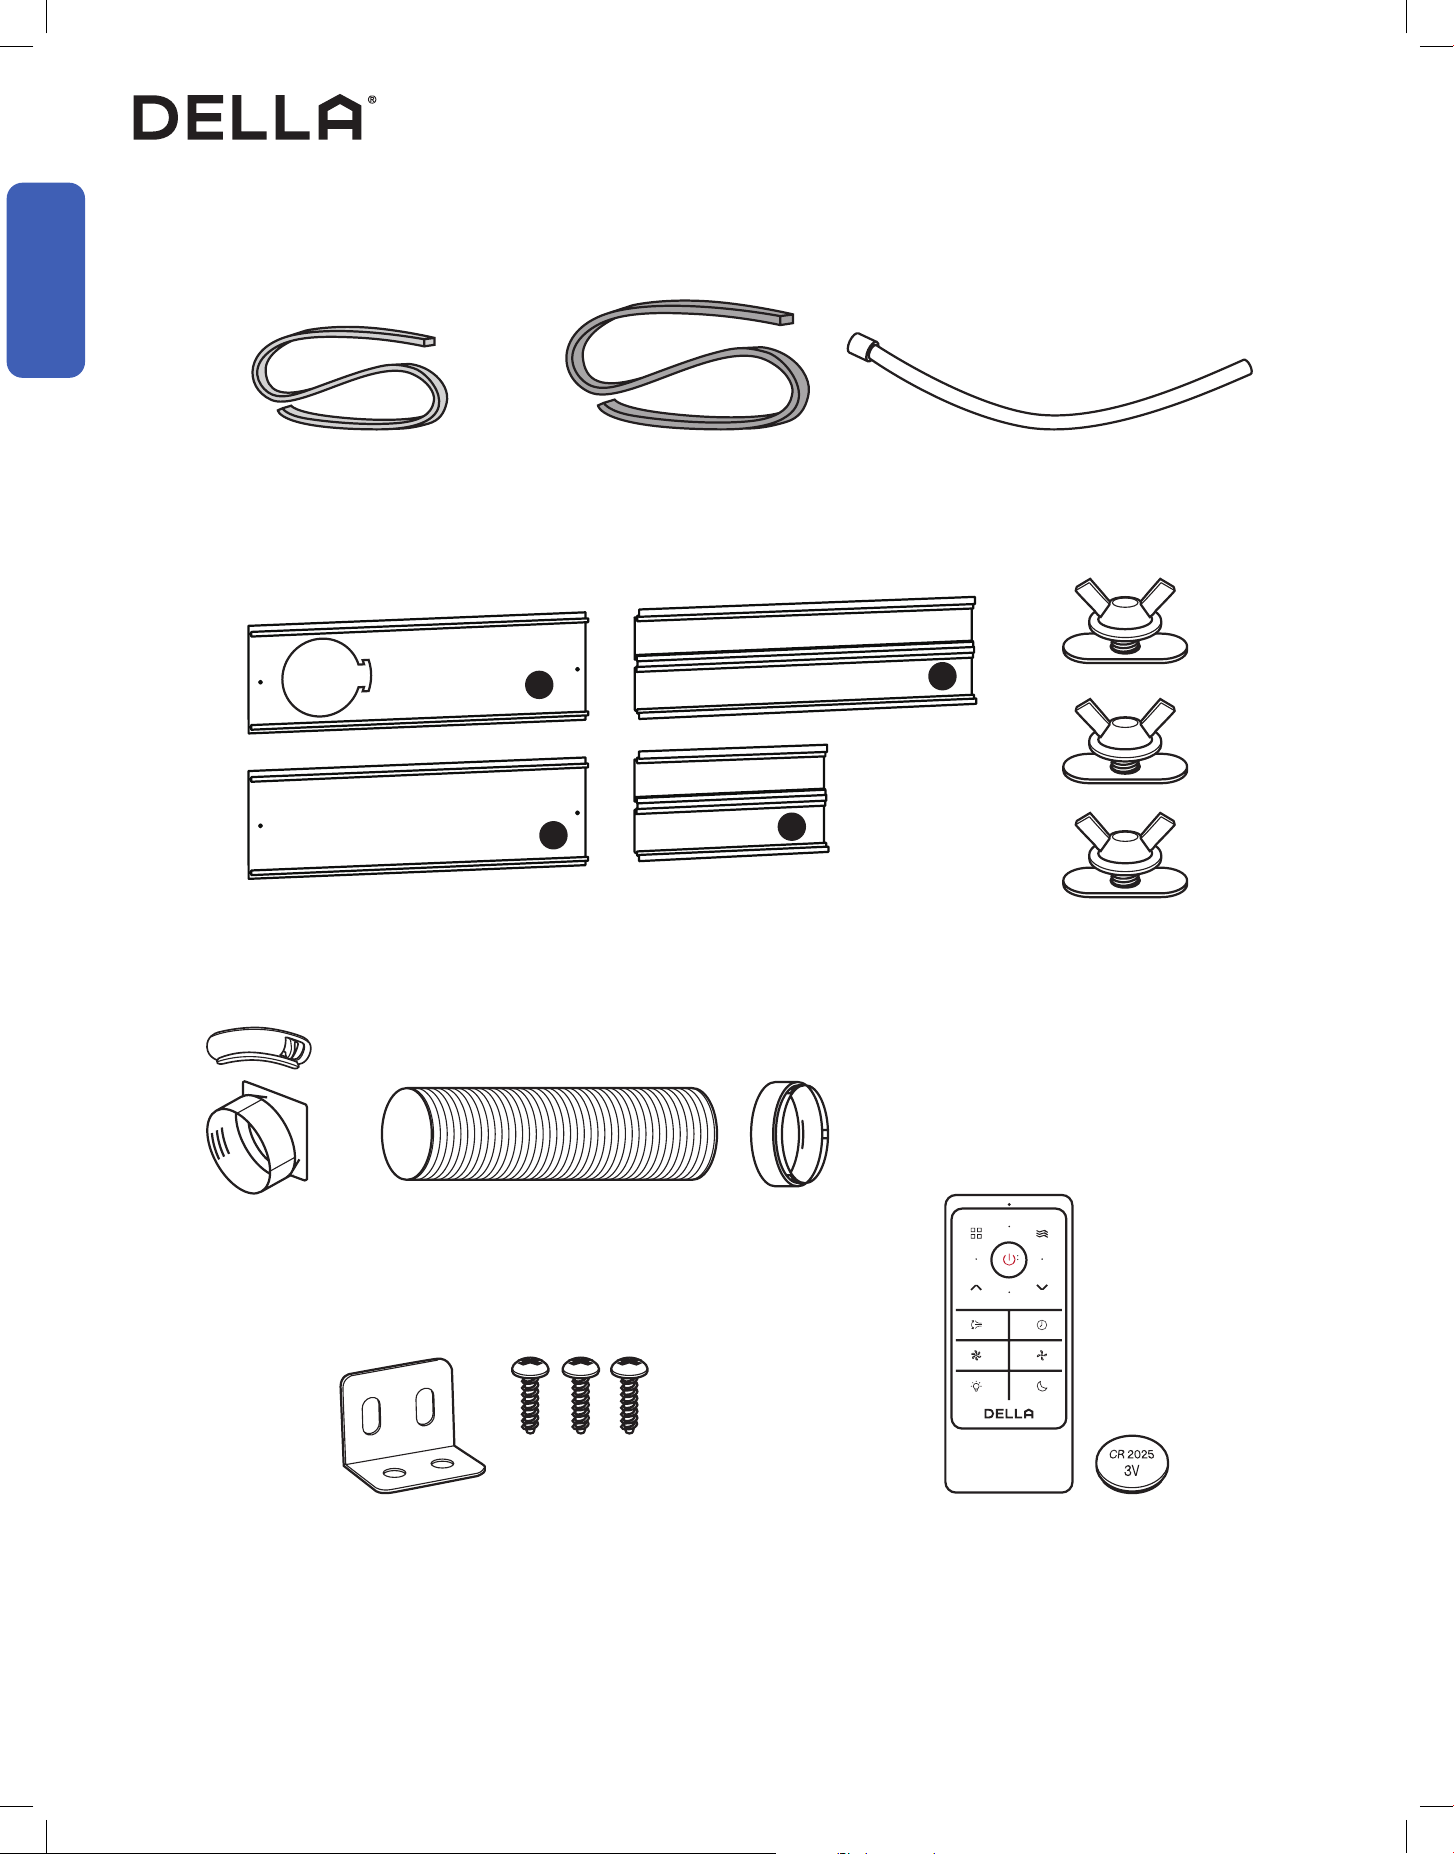
Name of Parts
Package Contents
ø150mm, Length 1500mm
ø14.60mm, Length 1000mm
Foam Seal w/o adhesive
1x
Foam Seal w adhesive
2x
Window Bracket Set
1x
Exhaust Hose Set
1x
Remote Control 1x
CR2025 Battery 1x
Sash Lock 1x
St3.9 x 14 Screw 3x
Drain Hose
1x
1
2
3
4
9
v.20260130C
Before Installation
Before Installation
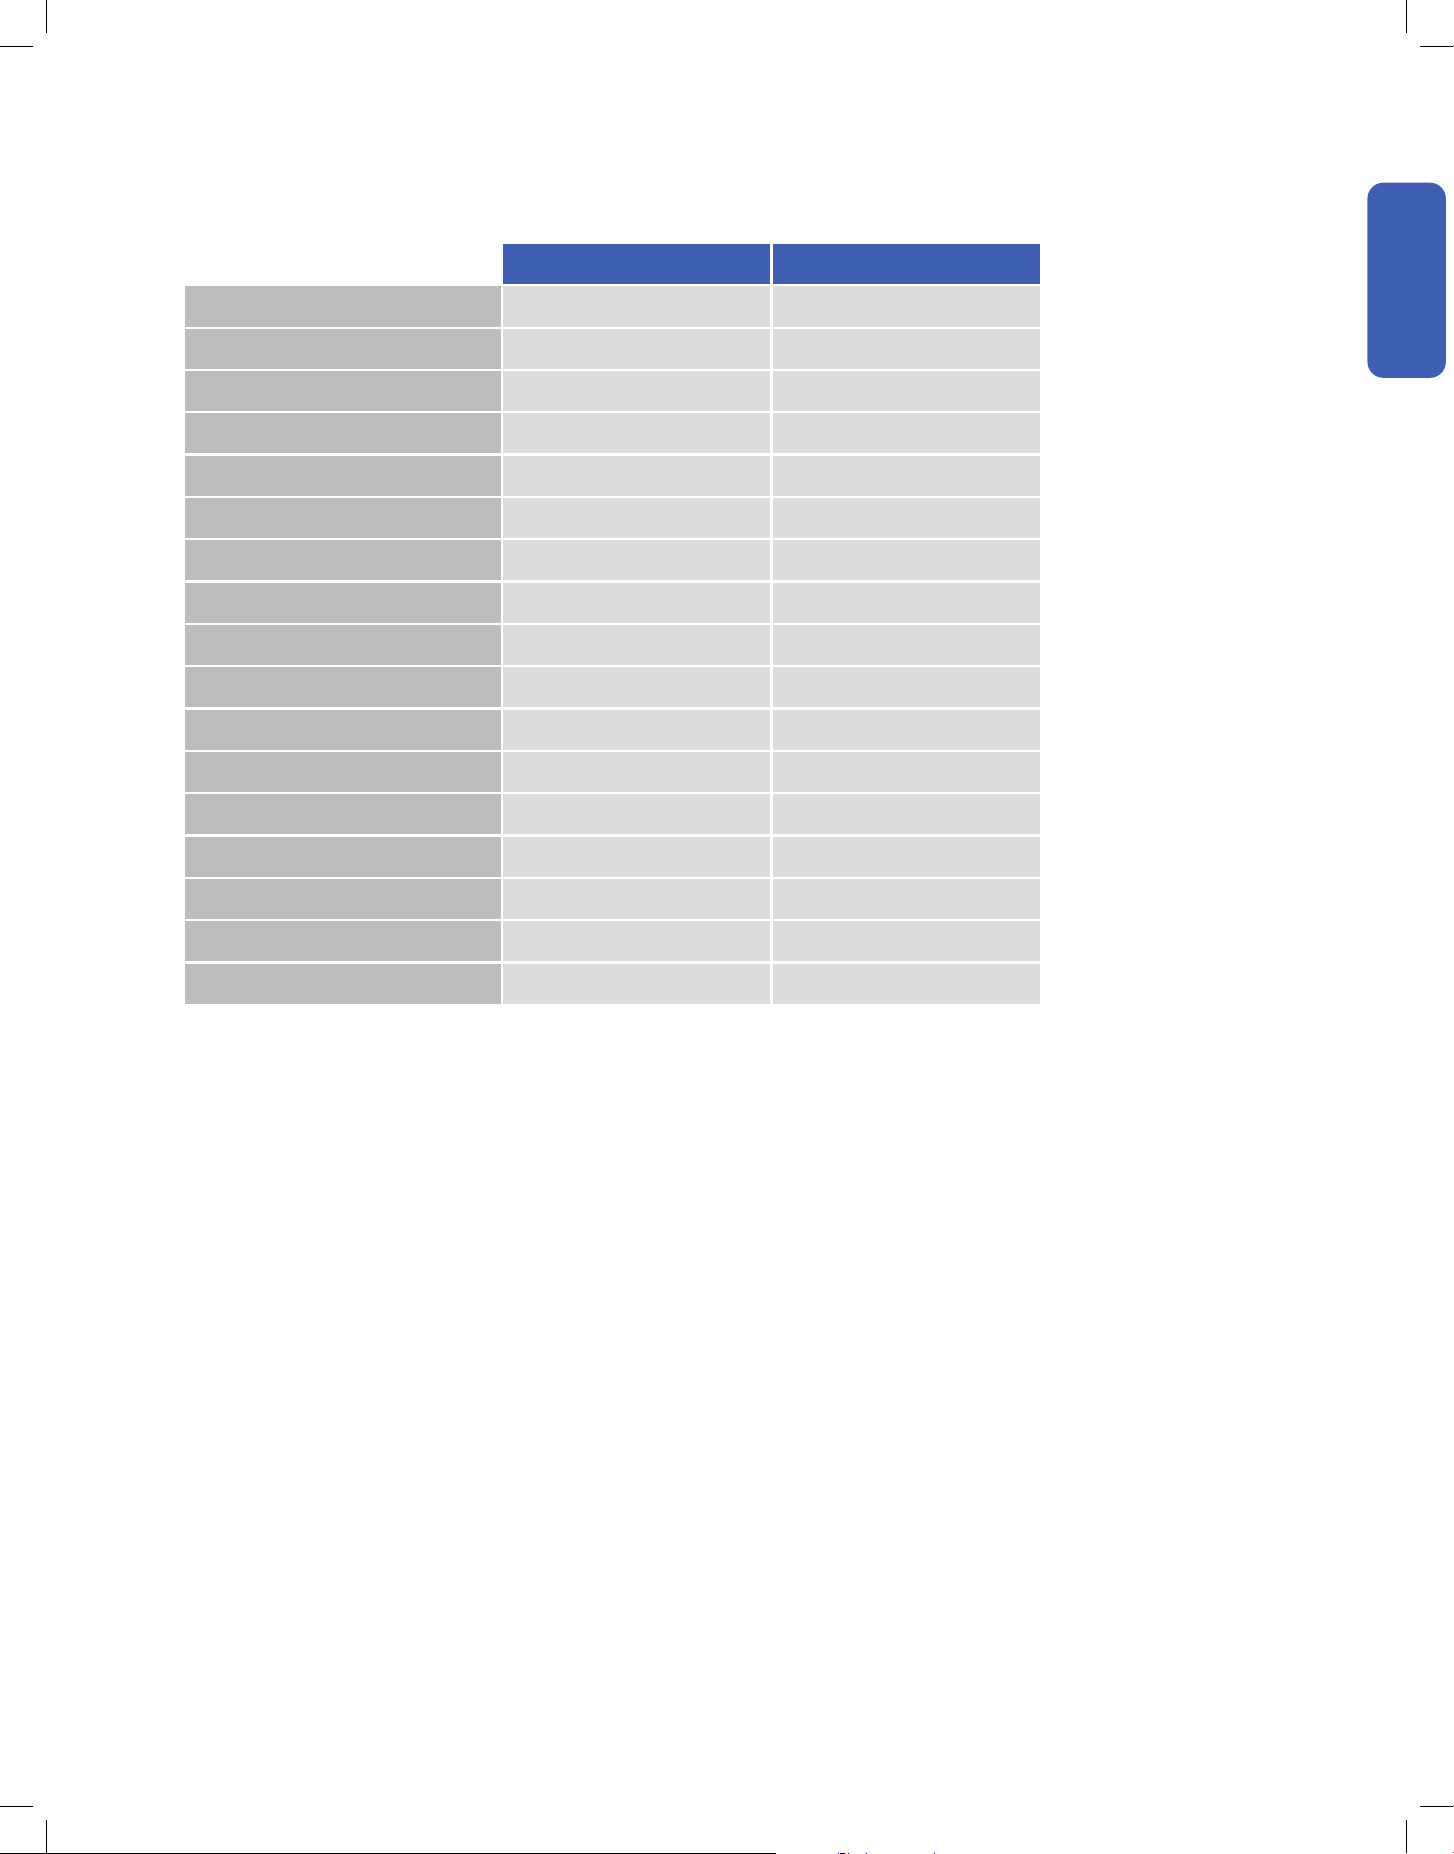
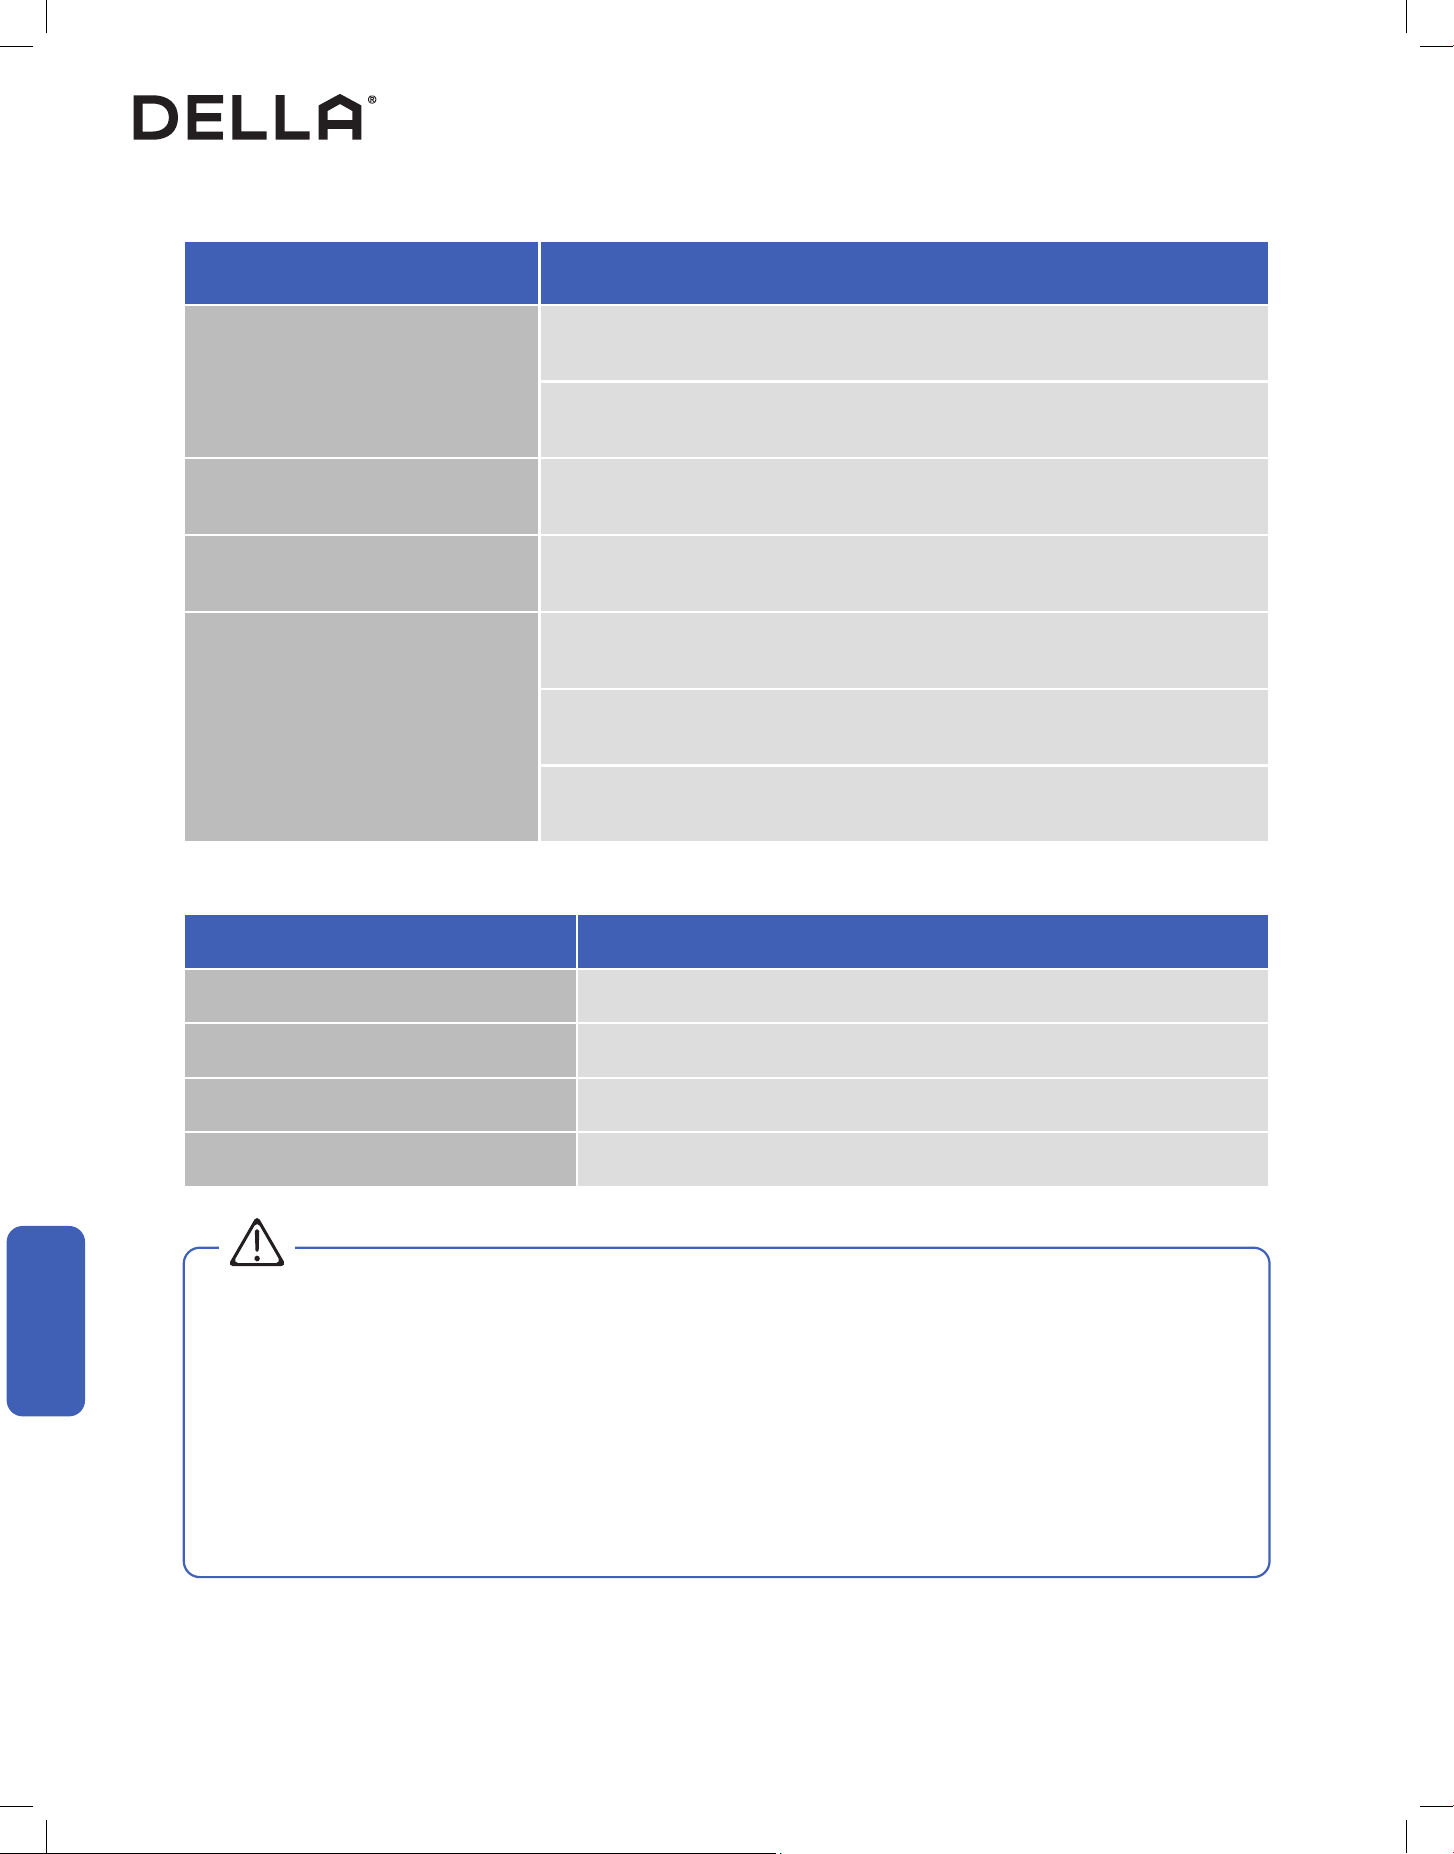
Product Specication
048-DPAC-8 048-DPAC-10
Power Supply 115 V / 60 Hz / 1P 115 V / 60 Hz / 1P
SACC Capacity (Btu/h) 8000 10000
CEER sd (Btu/Wh) 7.22 7.83
Rated Cooling Input Power 1060 W 1250 W
Rated Cooling Input Current 9.5 A 11.0 A
ASHRAE128 Capacity (Btu/h) 12000 14000
Rated Cooling Input Power 1250 W 1300 W
Rated Cooling Input Current 11.2 A 11.8 A
Noise Level 45 - 50 dB(A) 49 - 53 dB(A)
Dimension 14.02" x 16.65" x 27.13" 14.02" x 16.65" x 27.13"
Net Weight 56.8 lb 65.6 lb
Suitable Area 270 sq. ft 290 sq. ft
Moisture Removal (per hour) 3 pints 4 pints
Set Temp. Range 61°F - 86°F / 16°C - 30°C 61°F - 86°F / 16°C - 30°C
Operational Ambient Temp. Range 64°F - 95°F / 18°C - 35°C 64°F - 95°F / 18°C - 35°C
Refrigerant Type R32 R32
Refrigerant Amount 9.52 oz 13.76 oz
10
Installation
Installation
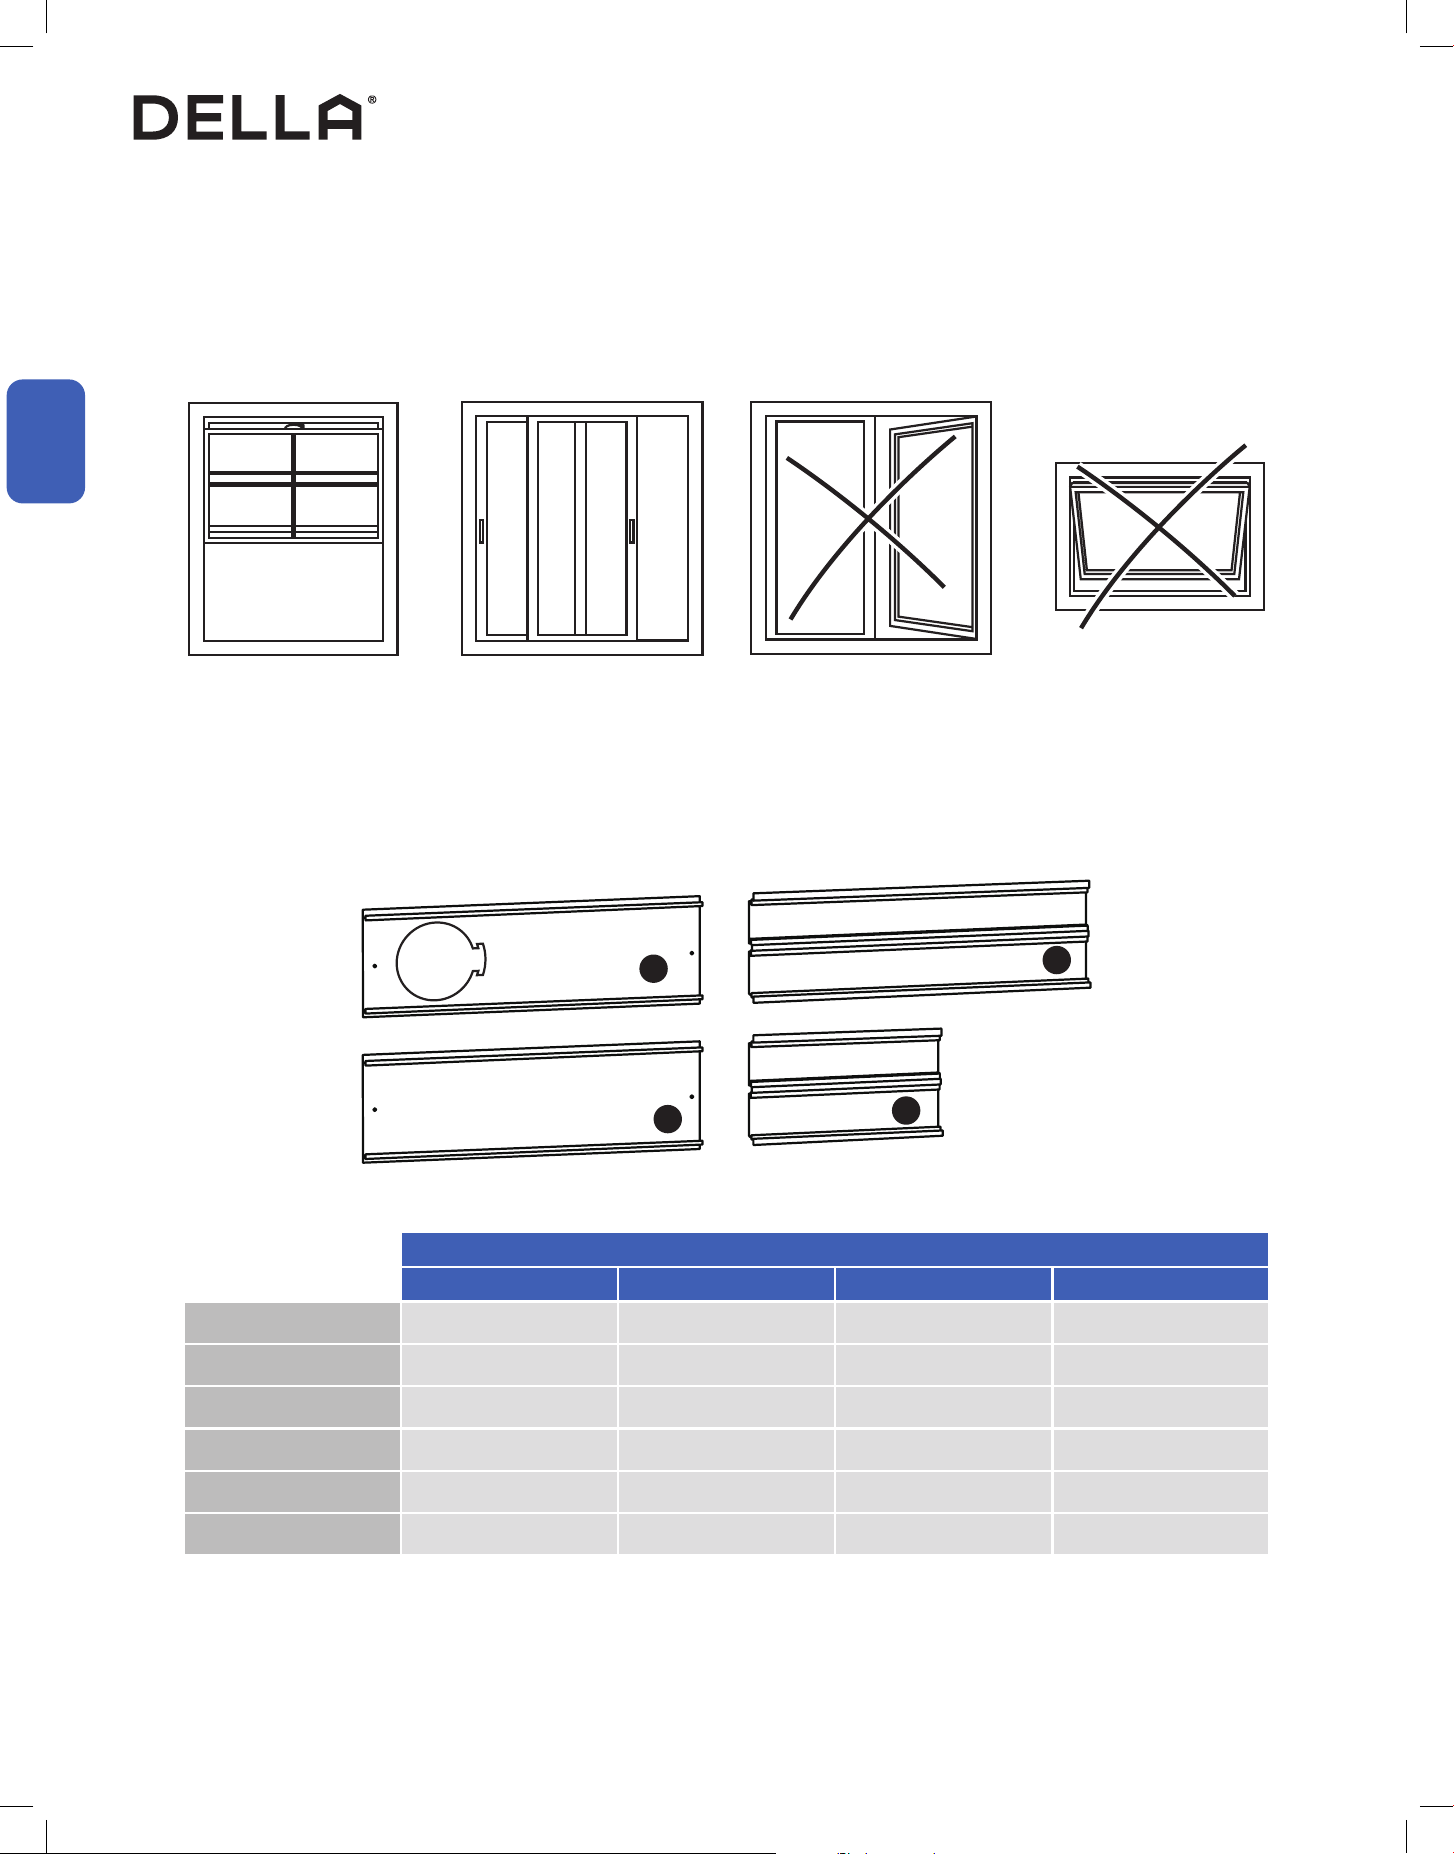
Window Requirement
Window Bracket Combination
The air conditioner is designed to be installed in a standard single-hung, double-hung window or sliding window. The AC would not fit in other
window types.
Single Hung / Double Hung
Window
Sliding Window
20.5" - 67.3"
20.5" - 67.3"
Casement Window Awning Window
Window Bracket Panel to Use
Window Opening Size 1 2 3 4
20.5" ●
20.5" - 30.3" ● ●
28.3 - 40" ● ●
40.9" - 48.8" ● ● ●
40.9" - 57.5" ● ● ●
40.9" - 67.3" ● ● ● ●
Installation Info
1
2
3
4
11
v.20260130C
Installation
Installation
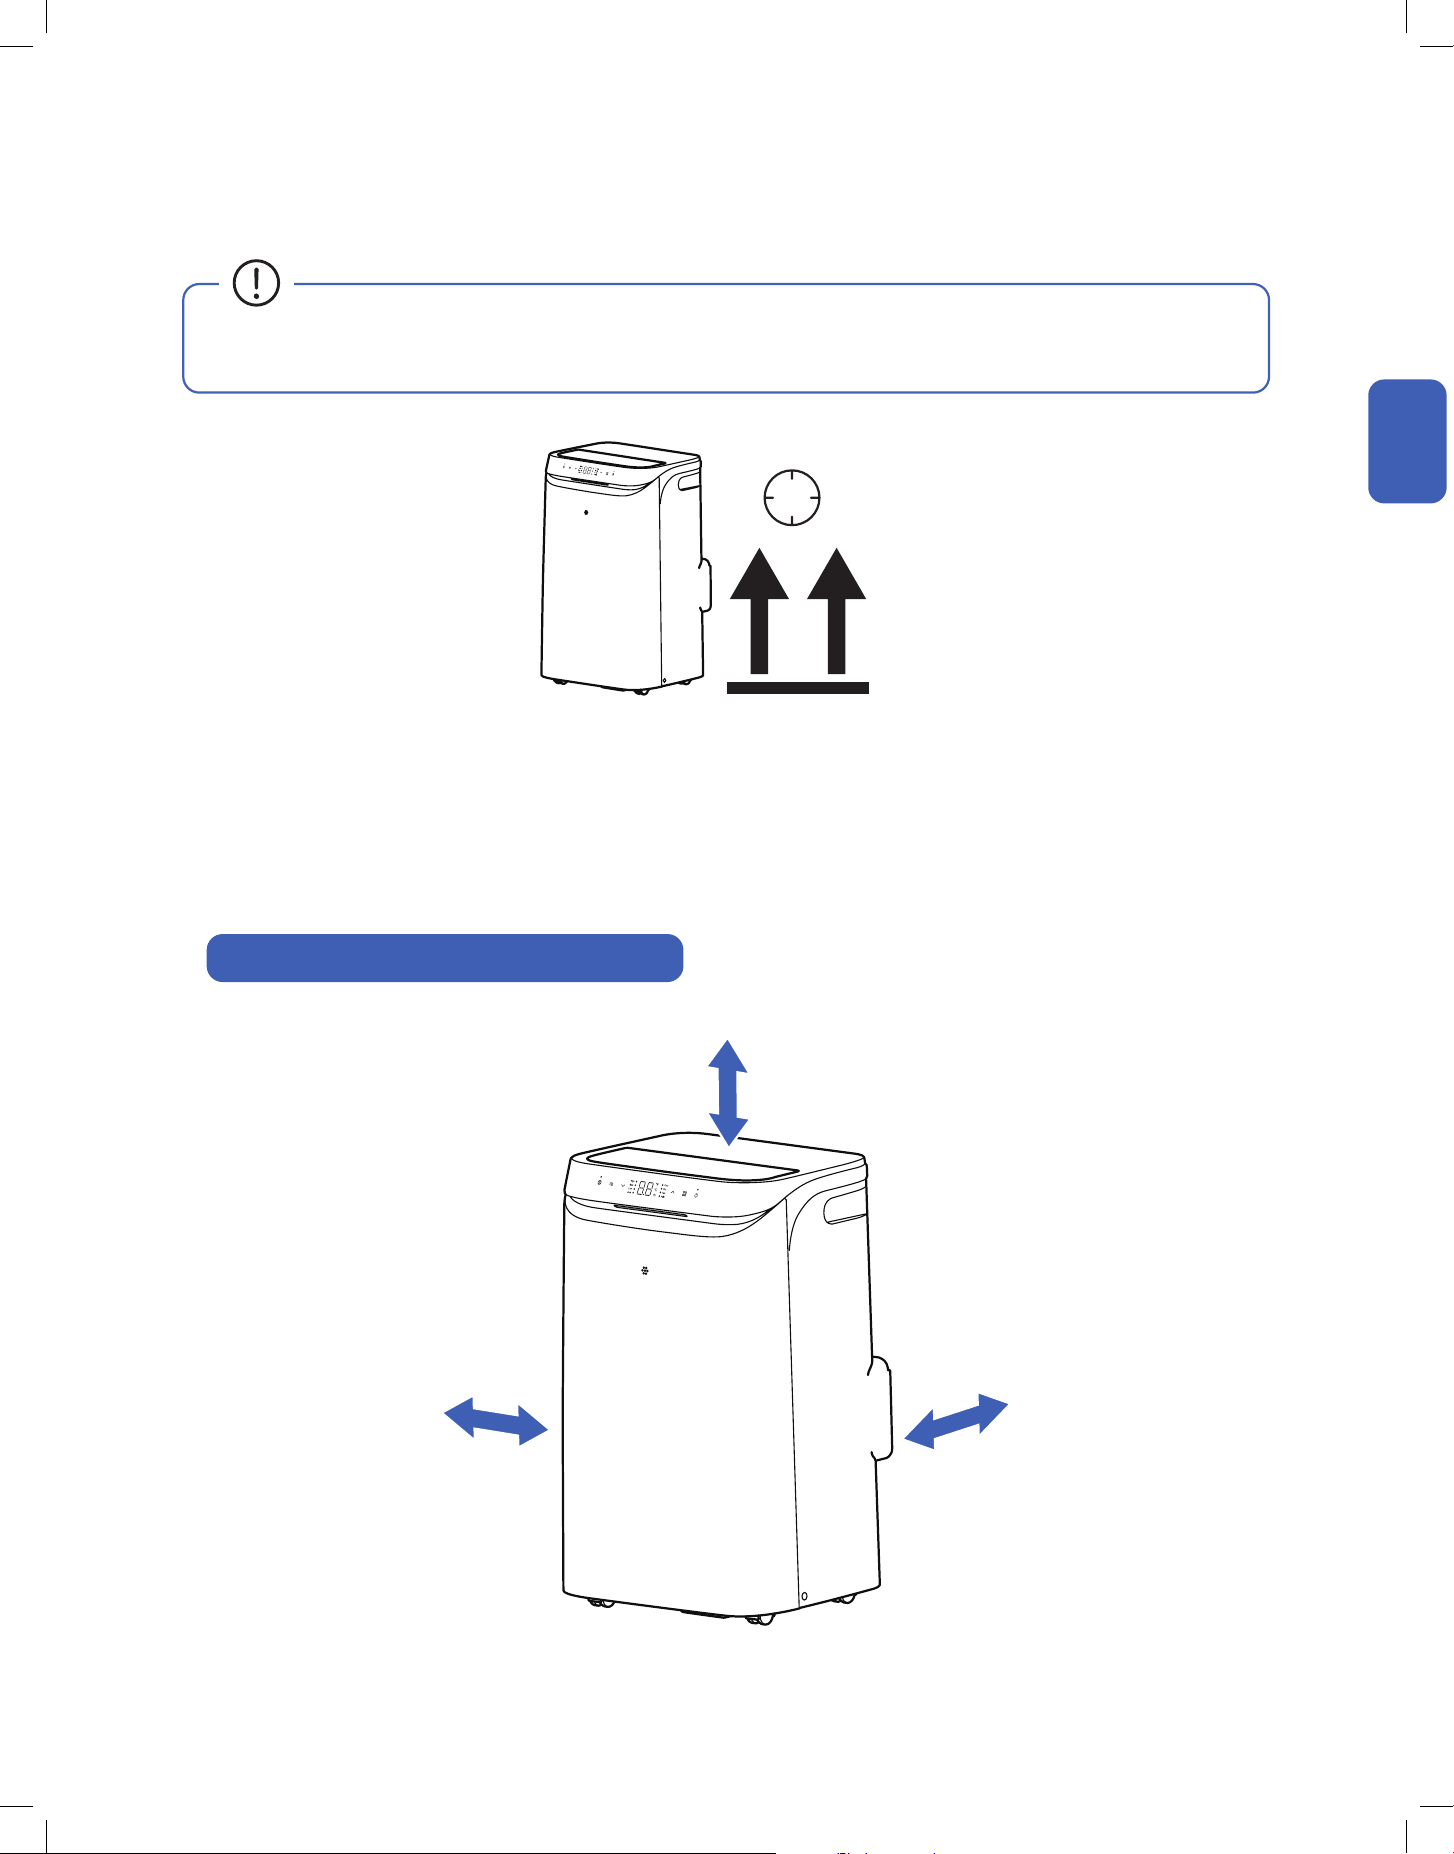
Picking a Installation Location
Clearance Requirement Around the Air Conditioner
• The air conditioner must be placed on a flat ground.
• Keep the air conditioner at least 18" or 45cm from any wall or obstacles.
• Do not place the air conditioner in laundry room or near any open ignition sources such as open flames, gas appliance, or electric heater.
• The air conditioner should be placed near a window where exhaust hose need the least extended distance.
Installation Info
≥ 18" / 45 cm
6H
≥ 18" / 45 cm≥ 18" / 45 cm
• Before installation, make sure the AC system is placed on a at and stable platform in its upright position for at least 6 hours to prevent
lubricating oil from damaging the compressor.
12
Installation
Installation
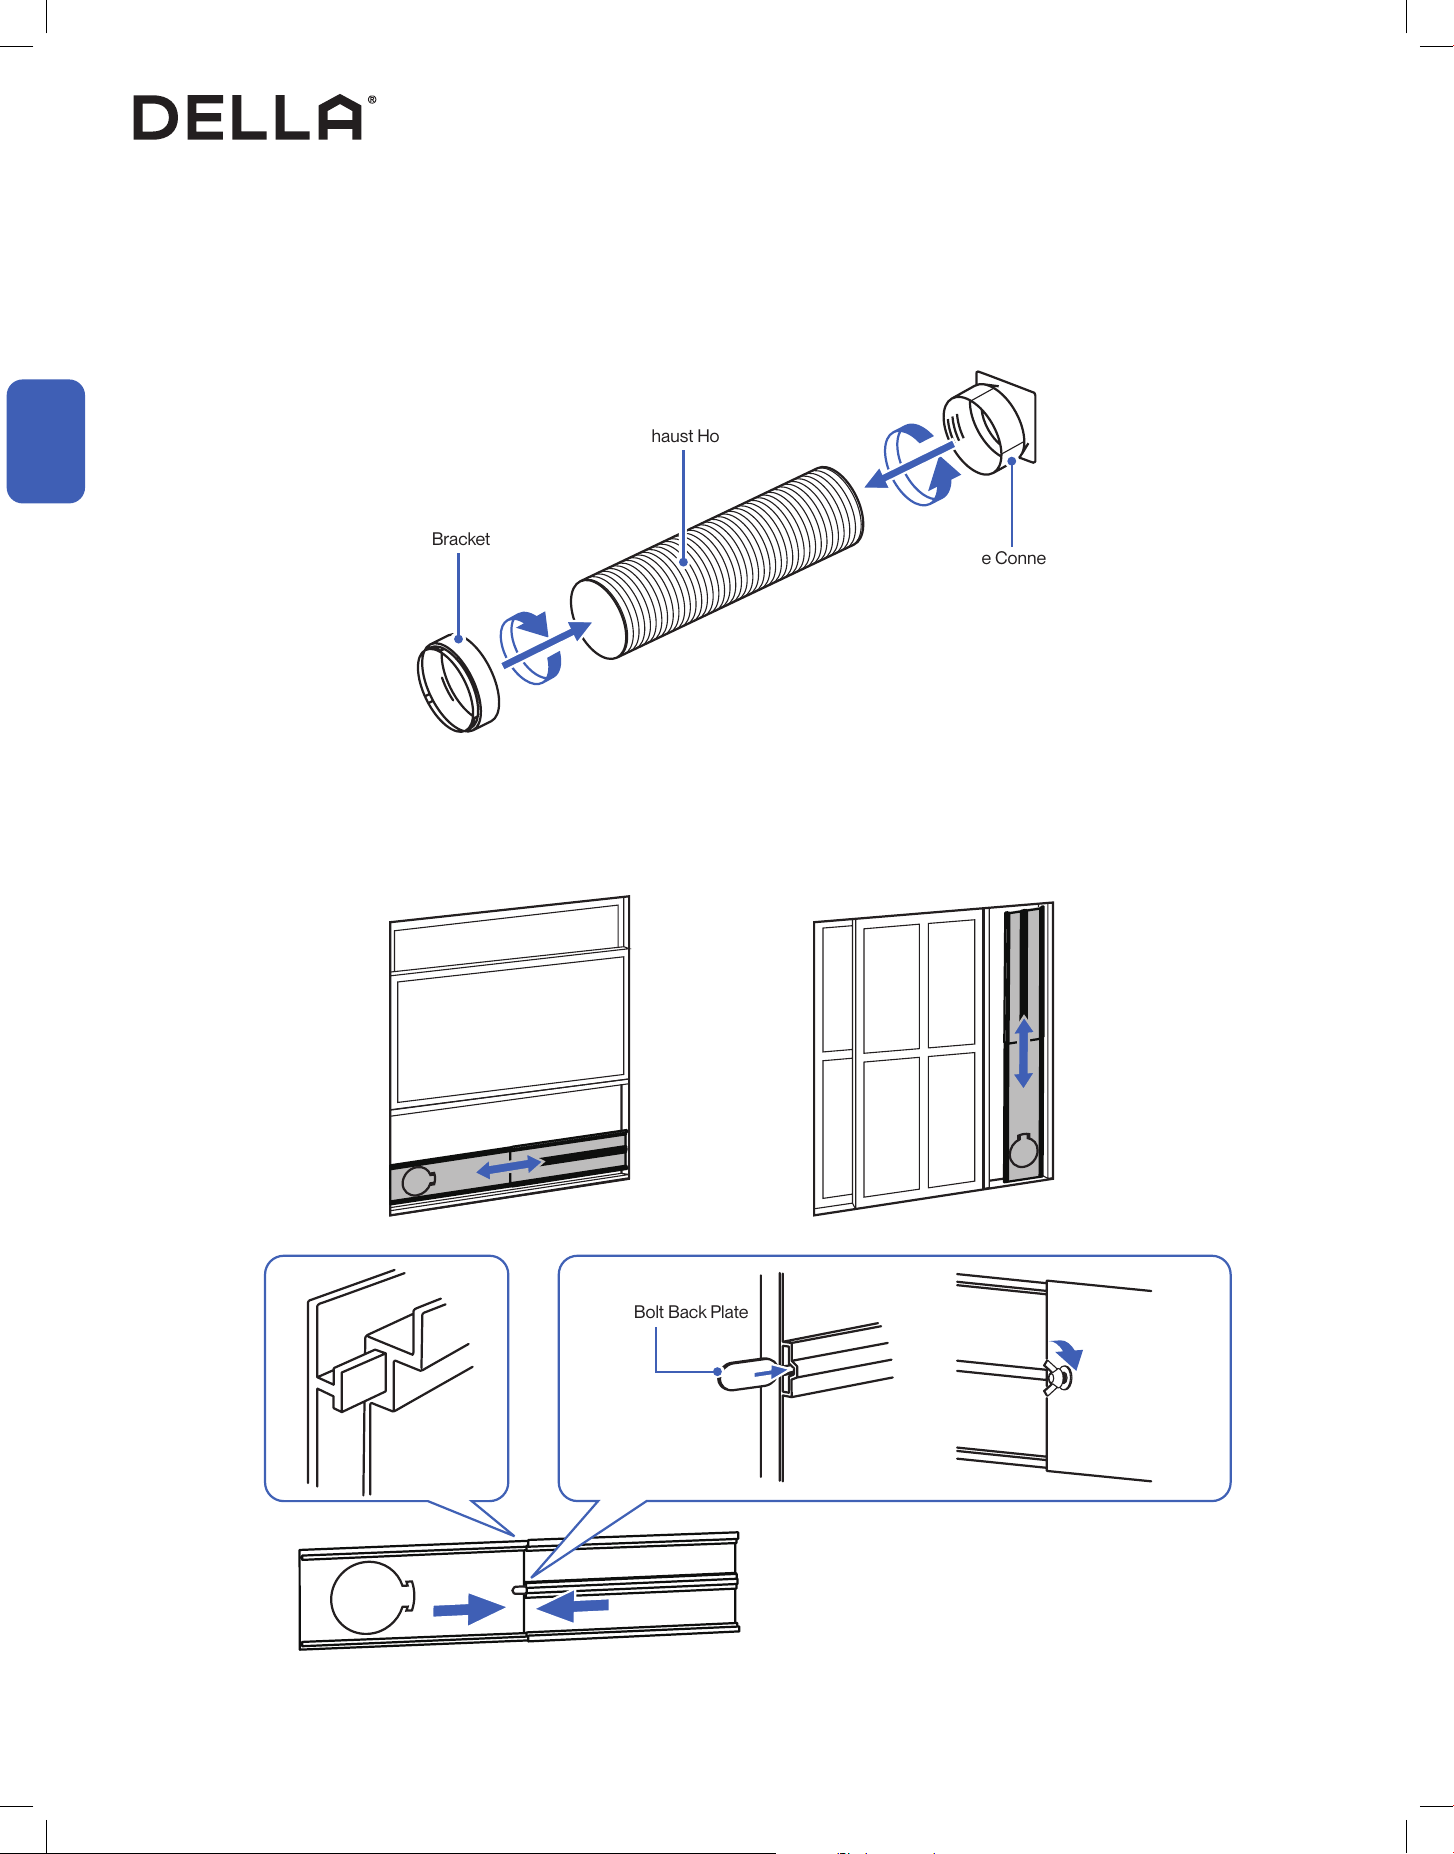
Installation
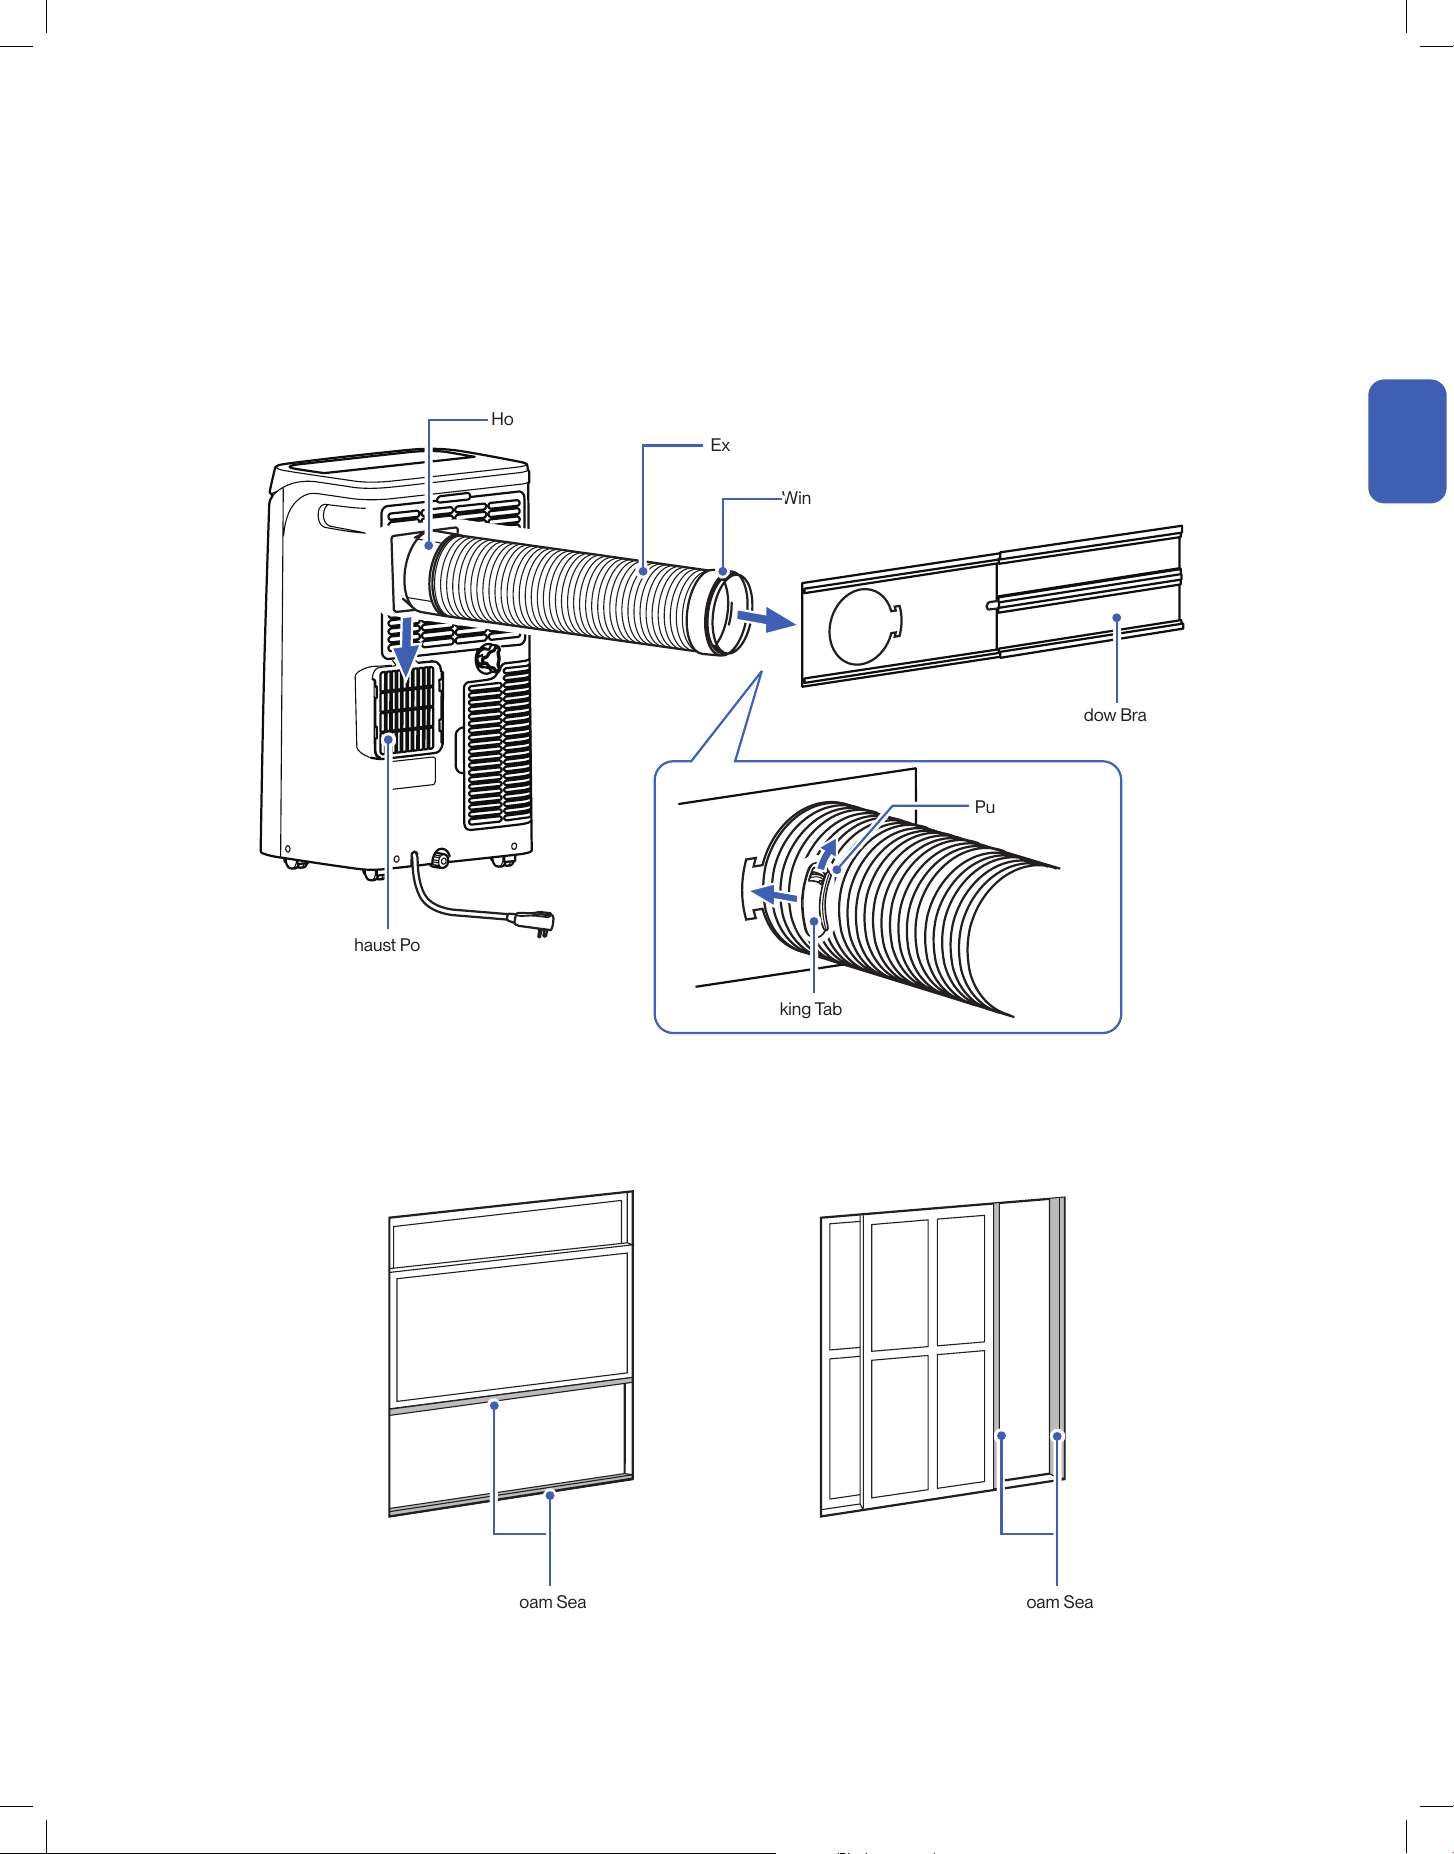
Connect the Exhaust Hose
Extend the Window Bracket
1. Connect the hose connector to one end of the exhaust hose.
2. Connect the window board adapter to the other end of the exhaust hose.
1. Assemble the window bracket and adjust the length of it to fit your window frame.
2. Tighten the butterfly bolts on the board after the bracket is extended to your desired length.
Window Bracket Adapter
Exhaust Hose
Hose Connector
Butterfly Bolt Back Plate
Tighten Butterfly Bolt
13
v.20260130C
Installation
Installation
Installation
Attach Exhaust Hose to Air Conditioner
Attaching Foam Seal
1. Slide the hose connector to the air exhaust port on the air conditioner.
2. Then attach the window bracket adapter to the window bracket.
3. Use the locking tab to lock the exhaust hose in place.
1. Attach form seal to the window sash and the window frame
Exhaust Hose
Hose Connector
Window Bracket
Air Exhaust Port
Foam Seal Foam Seal
Window Bracket Adapter
Locking Tab
Push to Lock
14
Installation
Installation
Installation
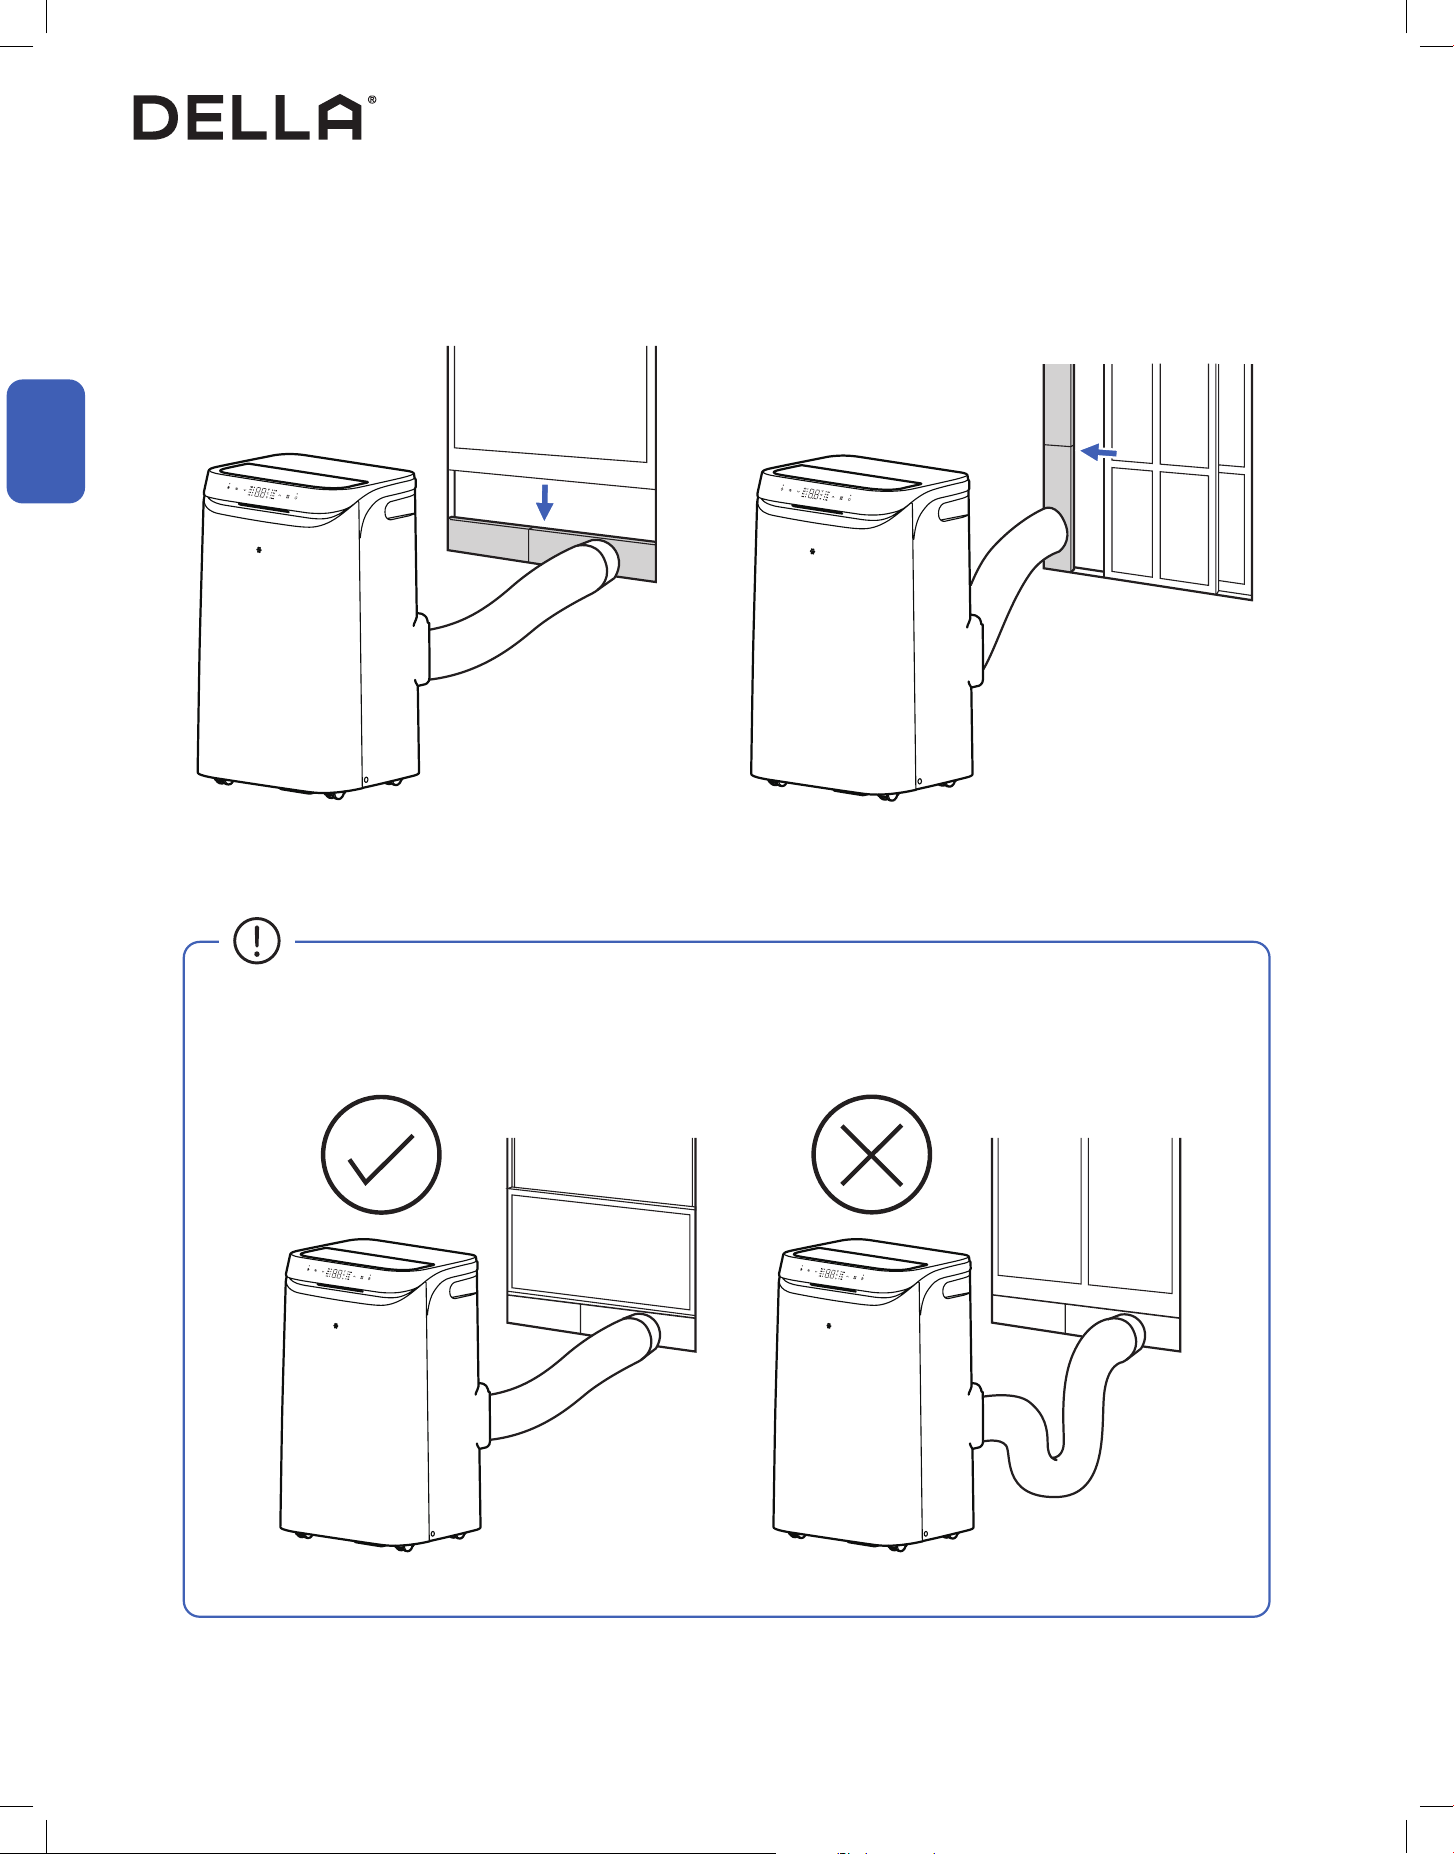
Attach Window Bracket to Window
1. Place the window bracket between the window sash and window frame, and then close the window.
• The exhaust hose should be kept a minimum length and as straight as possible.
• Stretching or bending the hose excessively will decrease cooling eciency.
15
v.20260130C
Installation
Installation
Installation
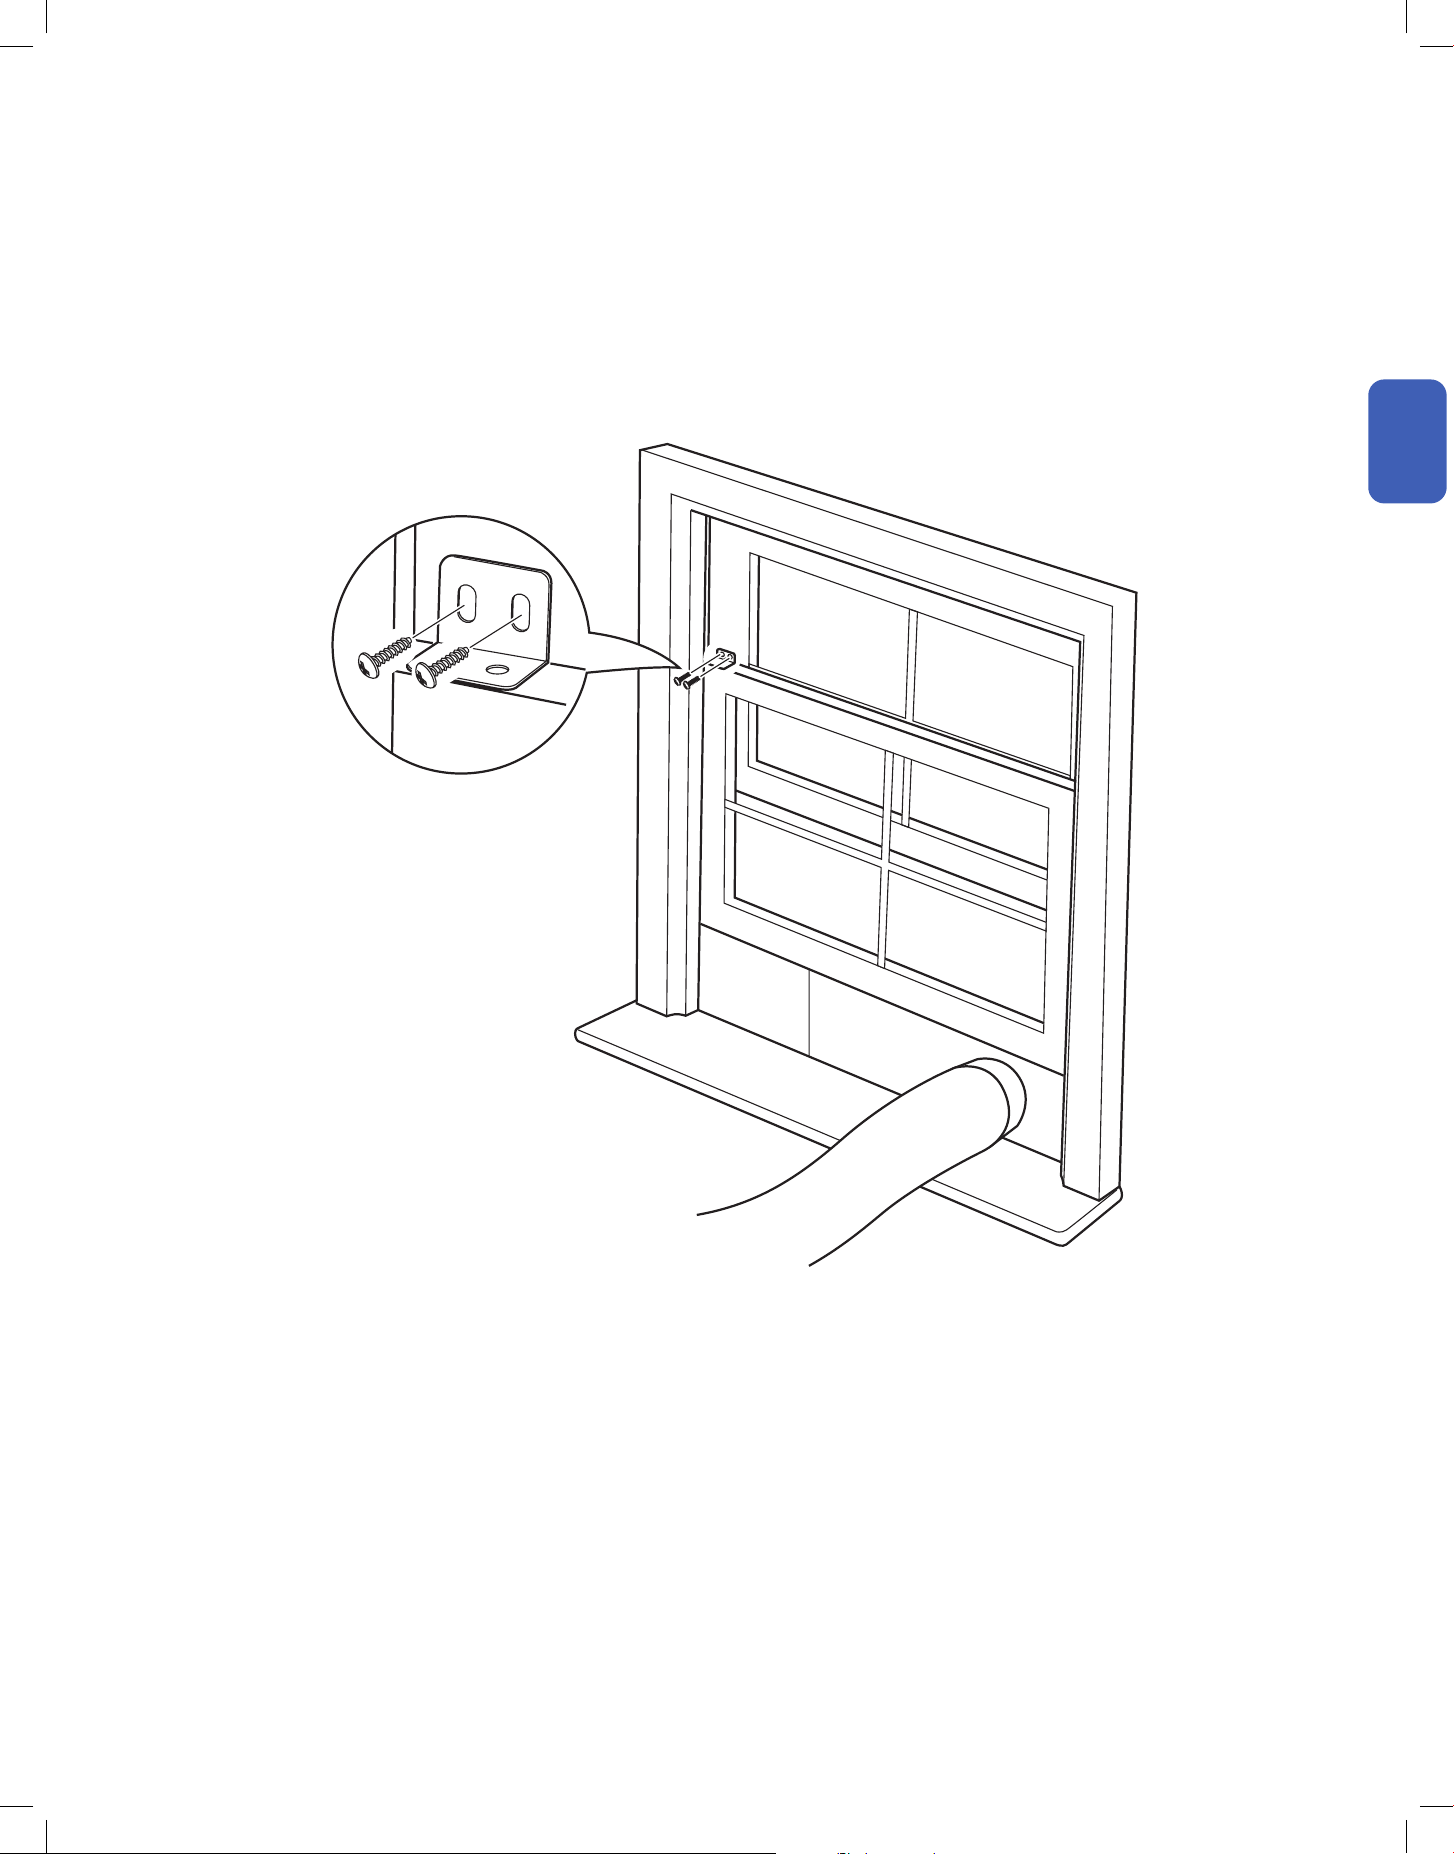
Secure Window Sash (Optional)
1. Attach window sash locks on top of the sash and push against the window bracket .
16
Installation
Installation
Installation
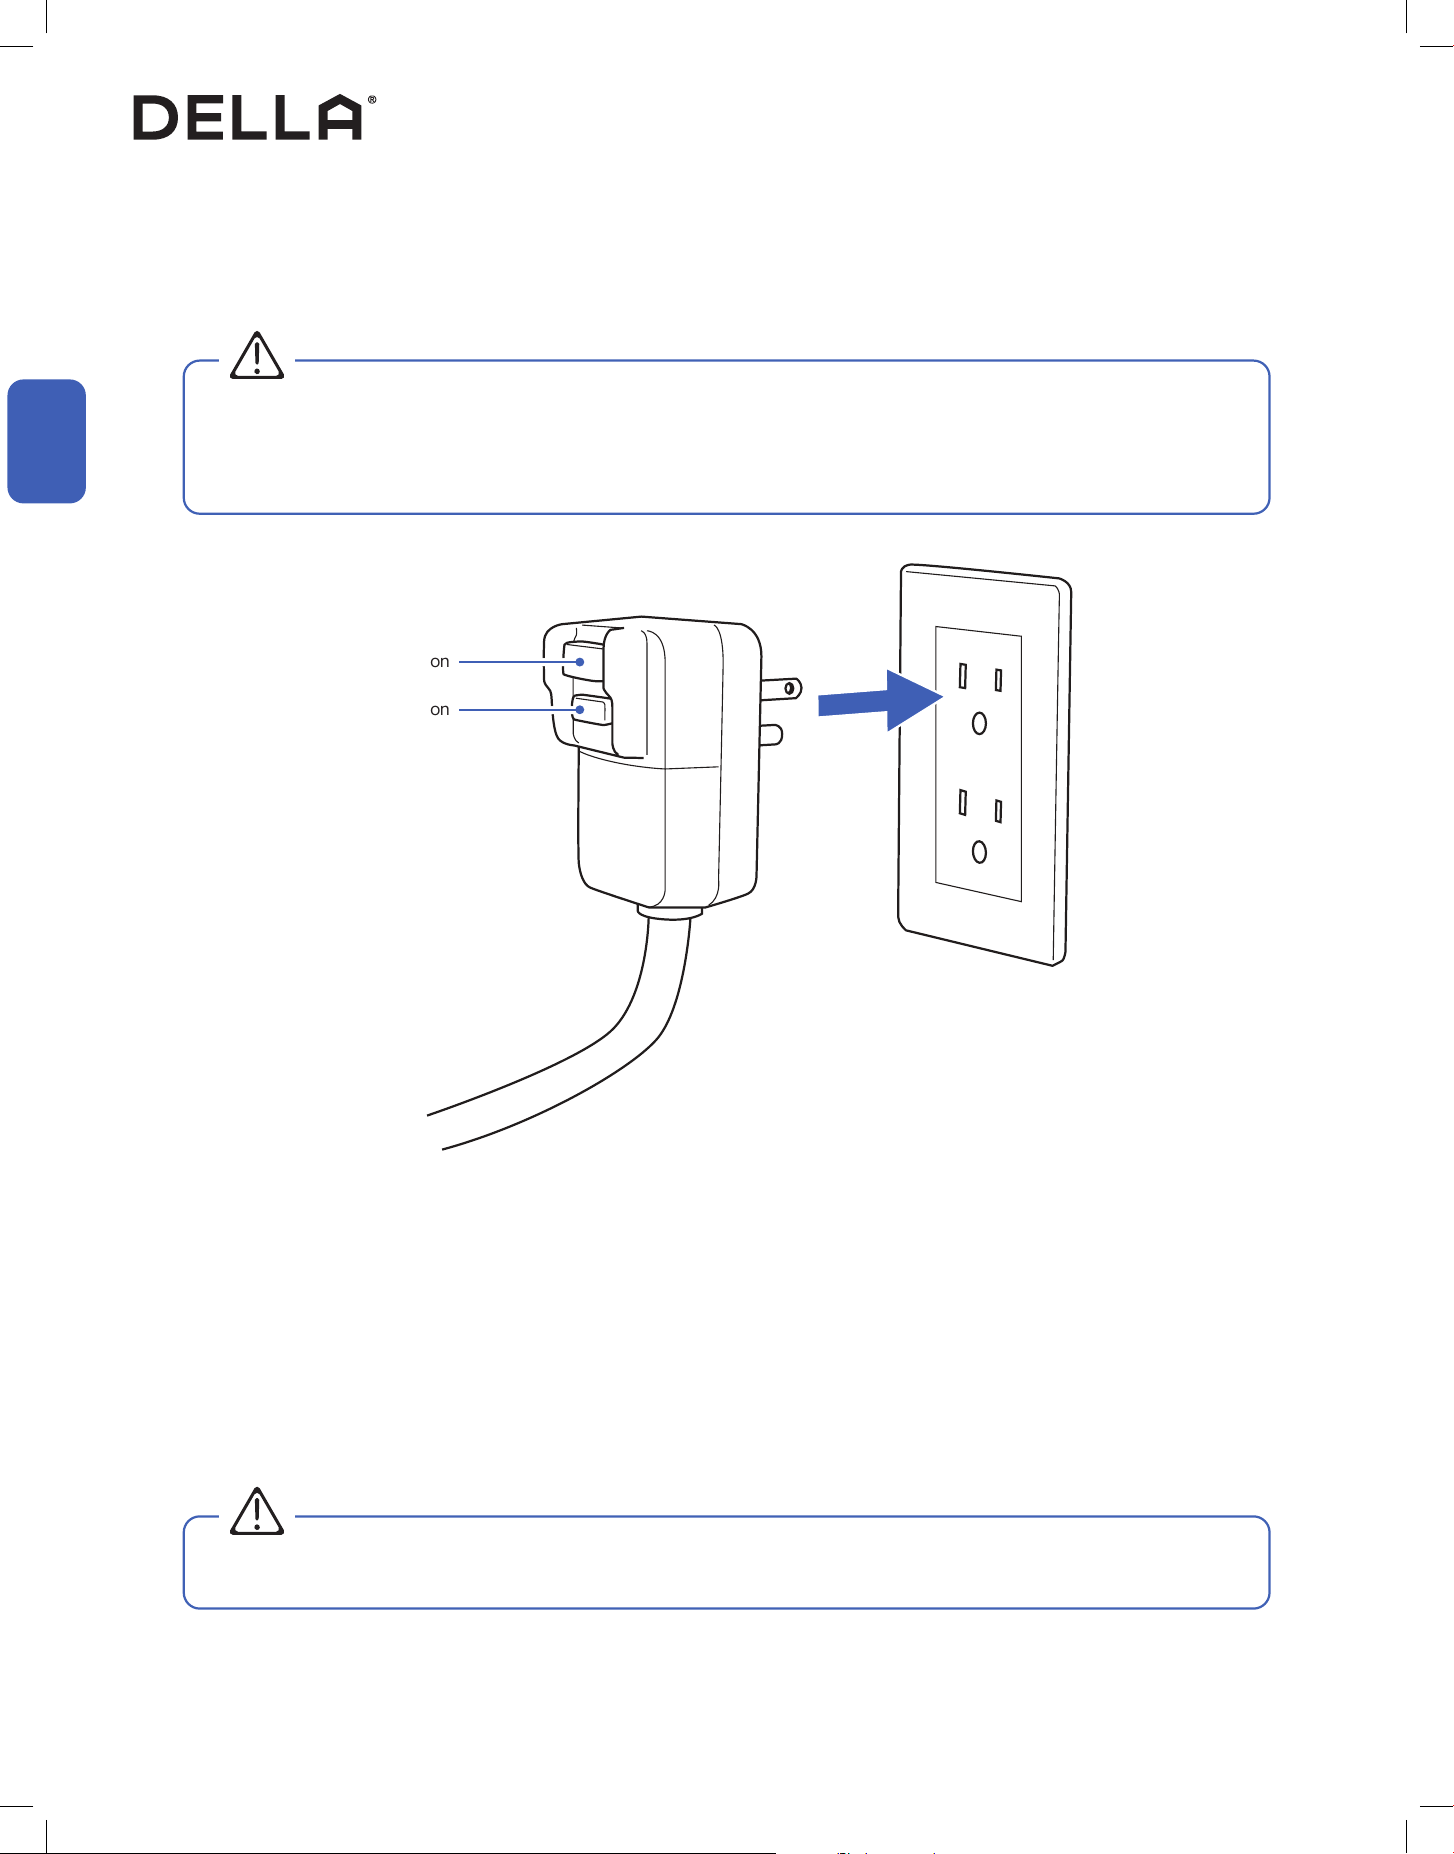
Power Connection
Power Plug Testing
1. Insert the power plug into a wall power socket.
1. Insert the plug into a grounded 3 prong power outlet.
2. Press the RESET button.
3. Press the TEST button. If the plug is functioning properly, the circuit should tripped, cutting power and the appliance should not work.
4. Press the RESET button again, you will hear a click and the appliance should work again without any problem.
This appliance is equipped with a Leakage Current Detection Interrupter (LCDI) plug. LCDI plug will disconnect the unit from power if it senses
leakage current.
Test the LCDI plug to check if the plug is functioning properly.
• The AC should only be plugged into a 3 prong wall outlet. If a 3 prong is not available, it is the customer's responsibility to have a
grounded 3 prong outlet properly installed by a qualied electrician.
• Do not use a power strip or extension cord to minimize the possibility of electrical shocks, sparks, or re.
• Do not operate the appliance with a defective LCDI plug.
WARNING
WARNING
Reset Button
Test Button
17
v.20260130C
Before Using
Before Using
Operation Tips
Before Using
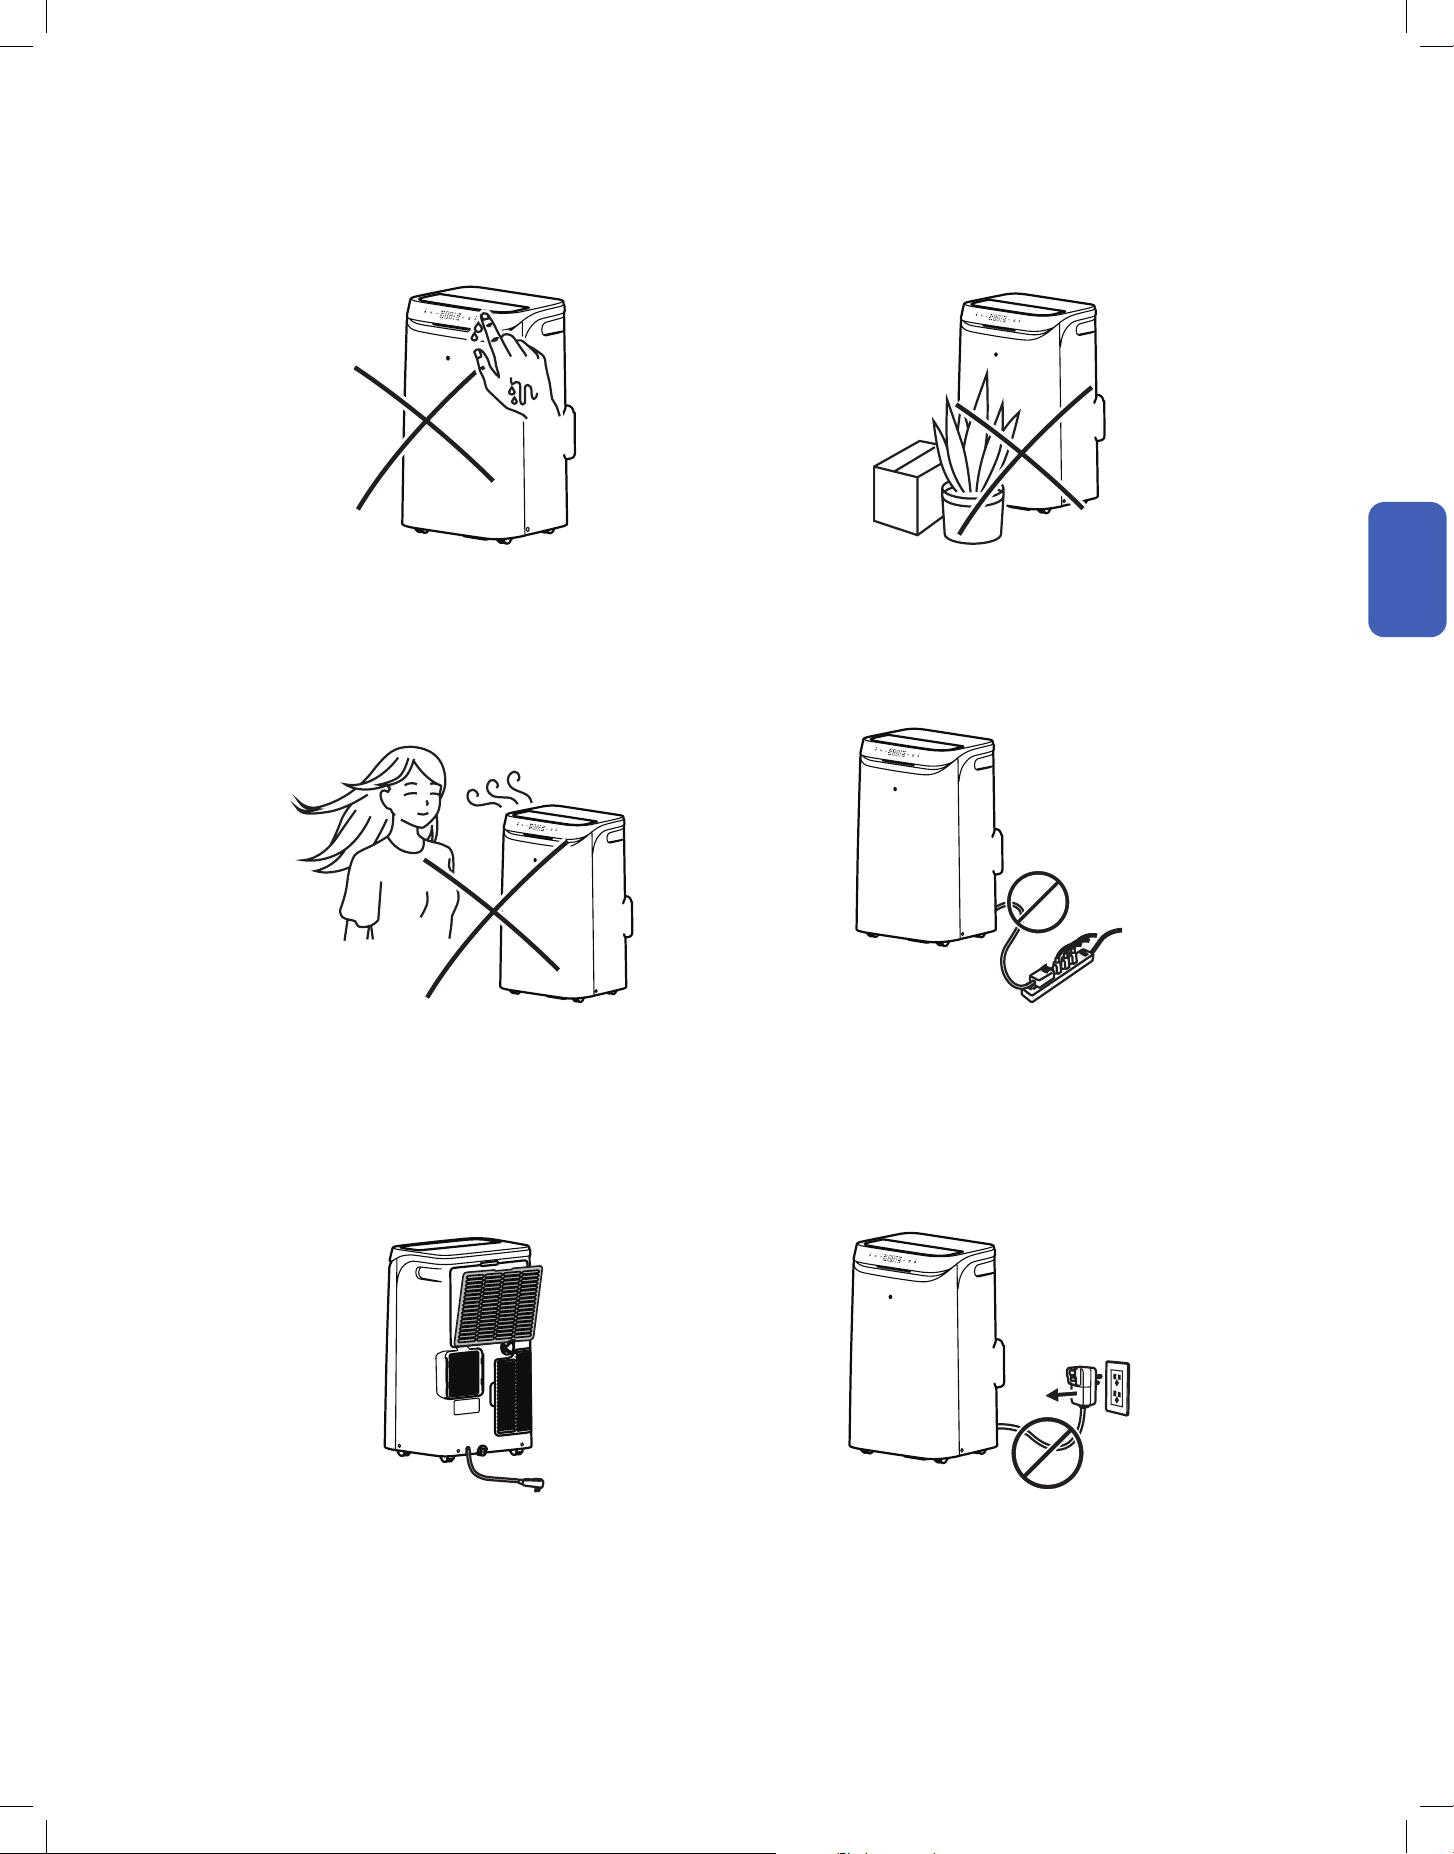
Avoid operating the air conditioner with wet hand. Avoid putting plants or objects around the air conditioner.
DO NOT plug the air conditioner to a power strip.Avoid direct wind flow to people, pets, or plants.
Follow cleaning and maintenance routine. DO NOT disconnect the air conditioner from power socket
before shutting down.
• It may cause electric shock. • It may block air flow and lower the air conditioner efficiency or
cause malfunction.
• It may leads to power strip overload and overheat, potentially
cause electric shock and fire.
• Expose to direct wind flow for extended period of time may
have a negative impact on your health.
• Regular cleaning and maintenance are needed for the best
efficiency and prevent bad odor or water leak.
• It may cause electric spark and fire.
18
Control Panel
Before Using
Before Using
Before Using
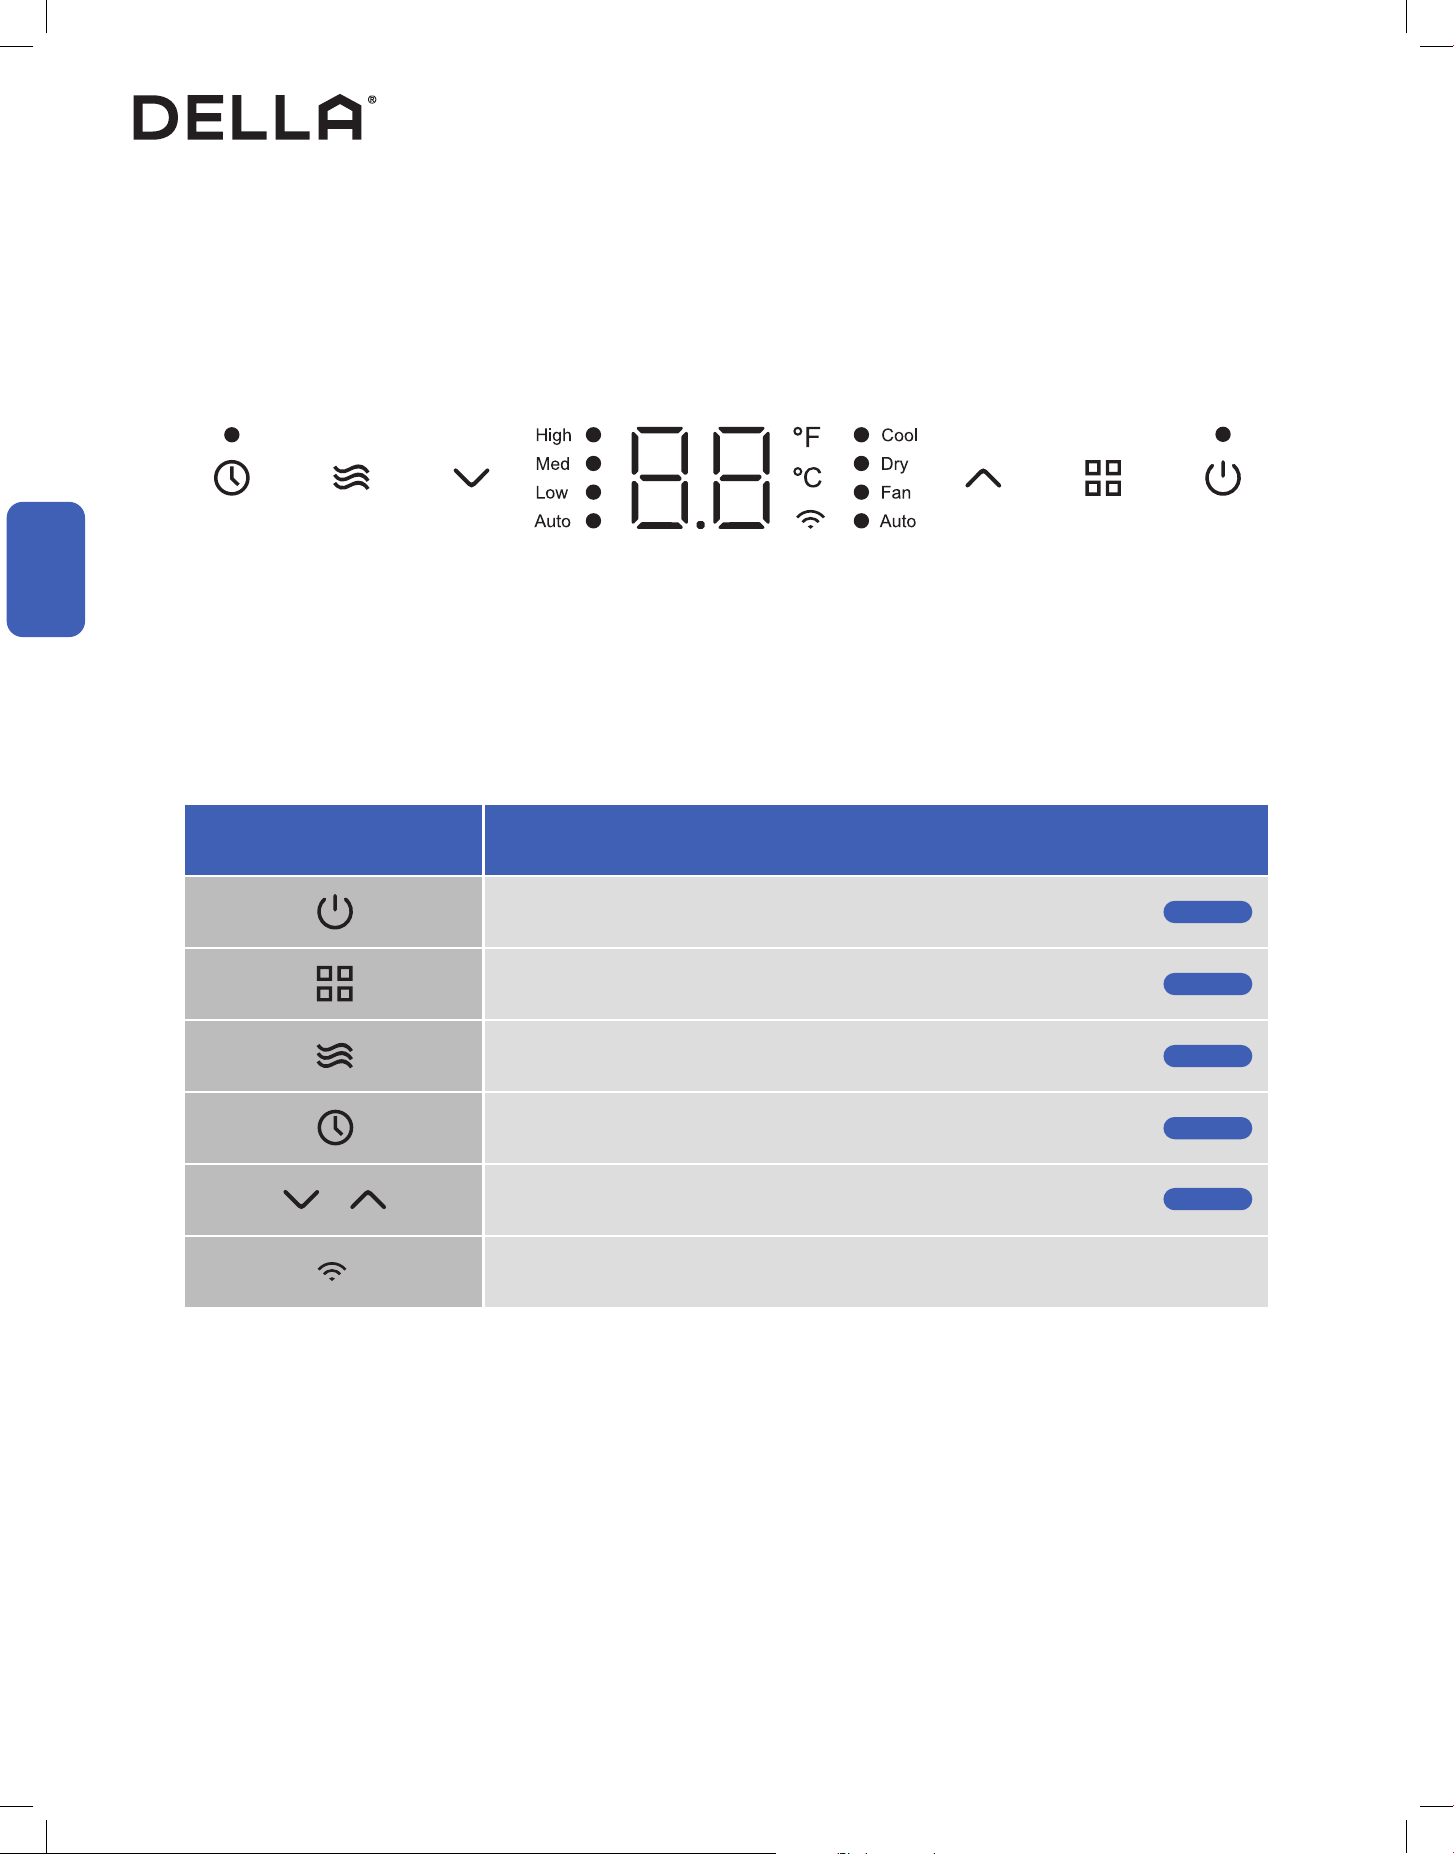
Icon Function
Power Button
Power ON / OFF the air conditioner
Mode Button
Select operation mode
Fan Button
Select fan speed
Timer Button
Enable ON / OFF timer setting
Increase / Decrease Button
Adjust temperature / timer setting value
Wi-Fi Icon
Show Wi-Fi function status
Page 21
Page 21
Page 21
Page 22
Page 21
19
v.20260130C
Before Using
Before Using
Remote Control (Insert Battery)
Remote Control
Before Using
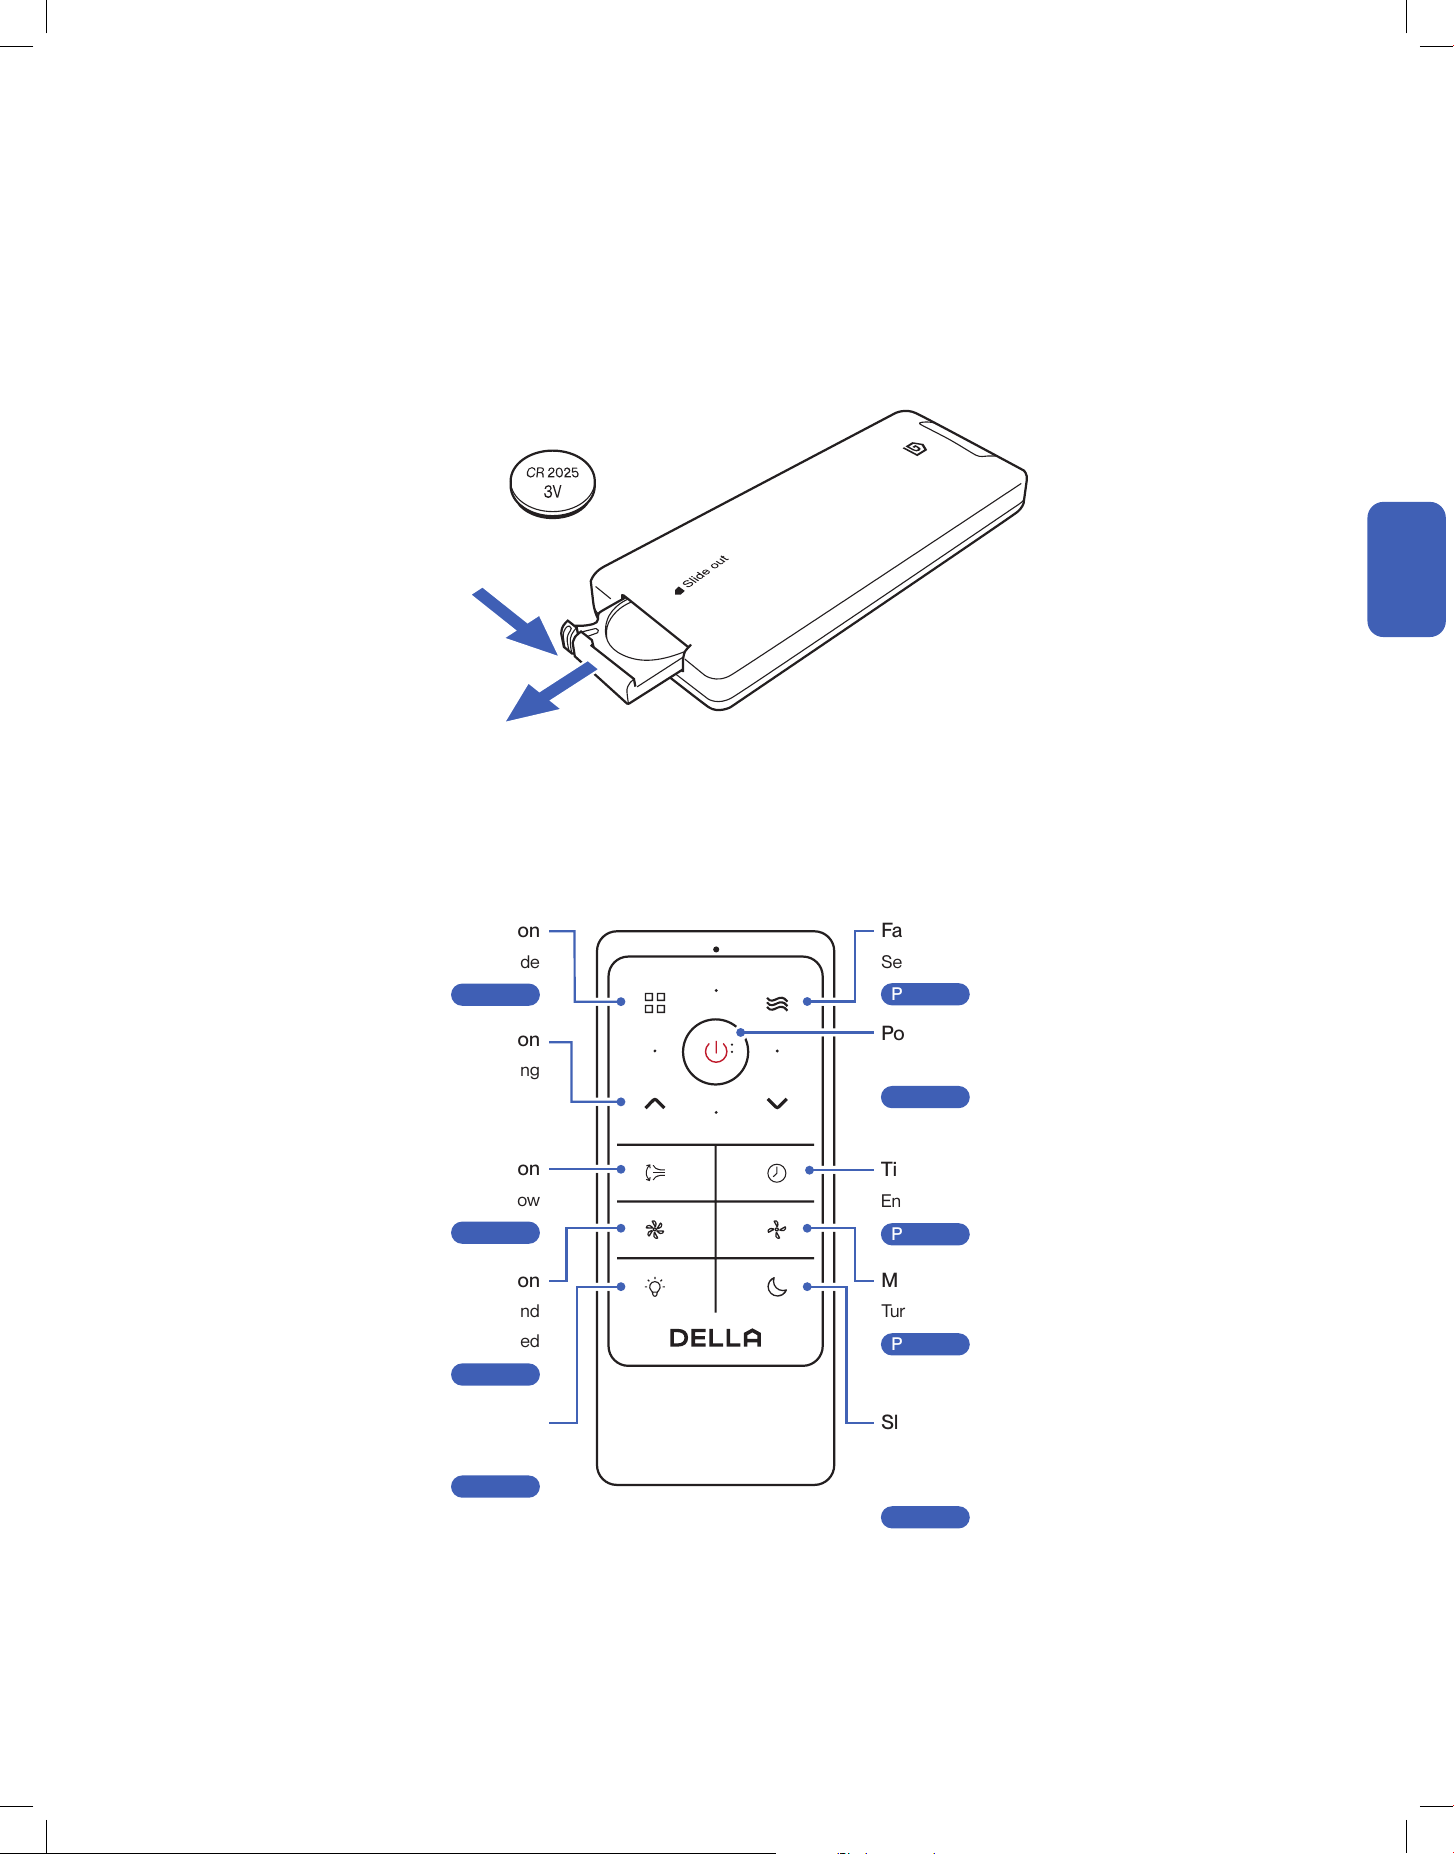
1. Slide and remove the battery tray from the remote control.
2. Place a CR2025 coin battery into the battery compartment.
3. Reinstall the battery tray into the remote control.
Power Button
Turn ON / OFF the air conditioner
-00-
Mute Button
Turn ON / OFF the air conditioner's buzzer
-00-
Page 21
Page 23
Sleep Button
Enable the air conditioner to operate a pre-set
program suited for sleep time
-00-
Turbo Button
Set the temperature to the lowest and
fan speed to the highest speed
-00-
Timer Button
Enable ON / OFF timer setting
-00-
Page 23
Page 22
Page 23
Fan Speed Button
Select fan speed
-00-
Page 21
Mode Button
Select operation mode
-00-
Swing Button
Control deflector to direct air flow
-00-
Light Button
Turn On / OFF display and ambient light
-00-
Page 21
Page 22
Page 23
Increase / Decrease Button
Adjust temperature / timer setting
Push in locking tab
Pull out battery tray
+
−
20
Before Using
Before Using
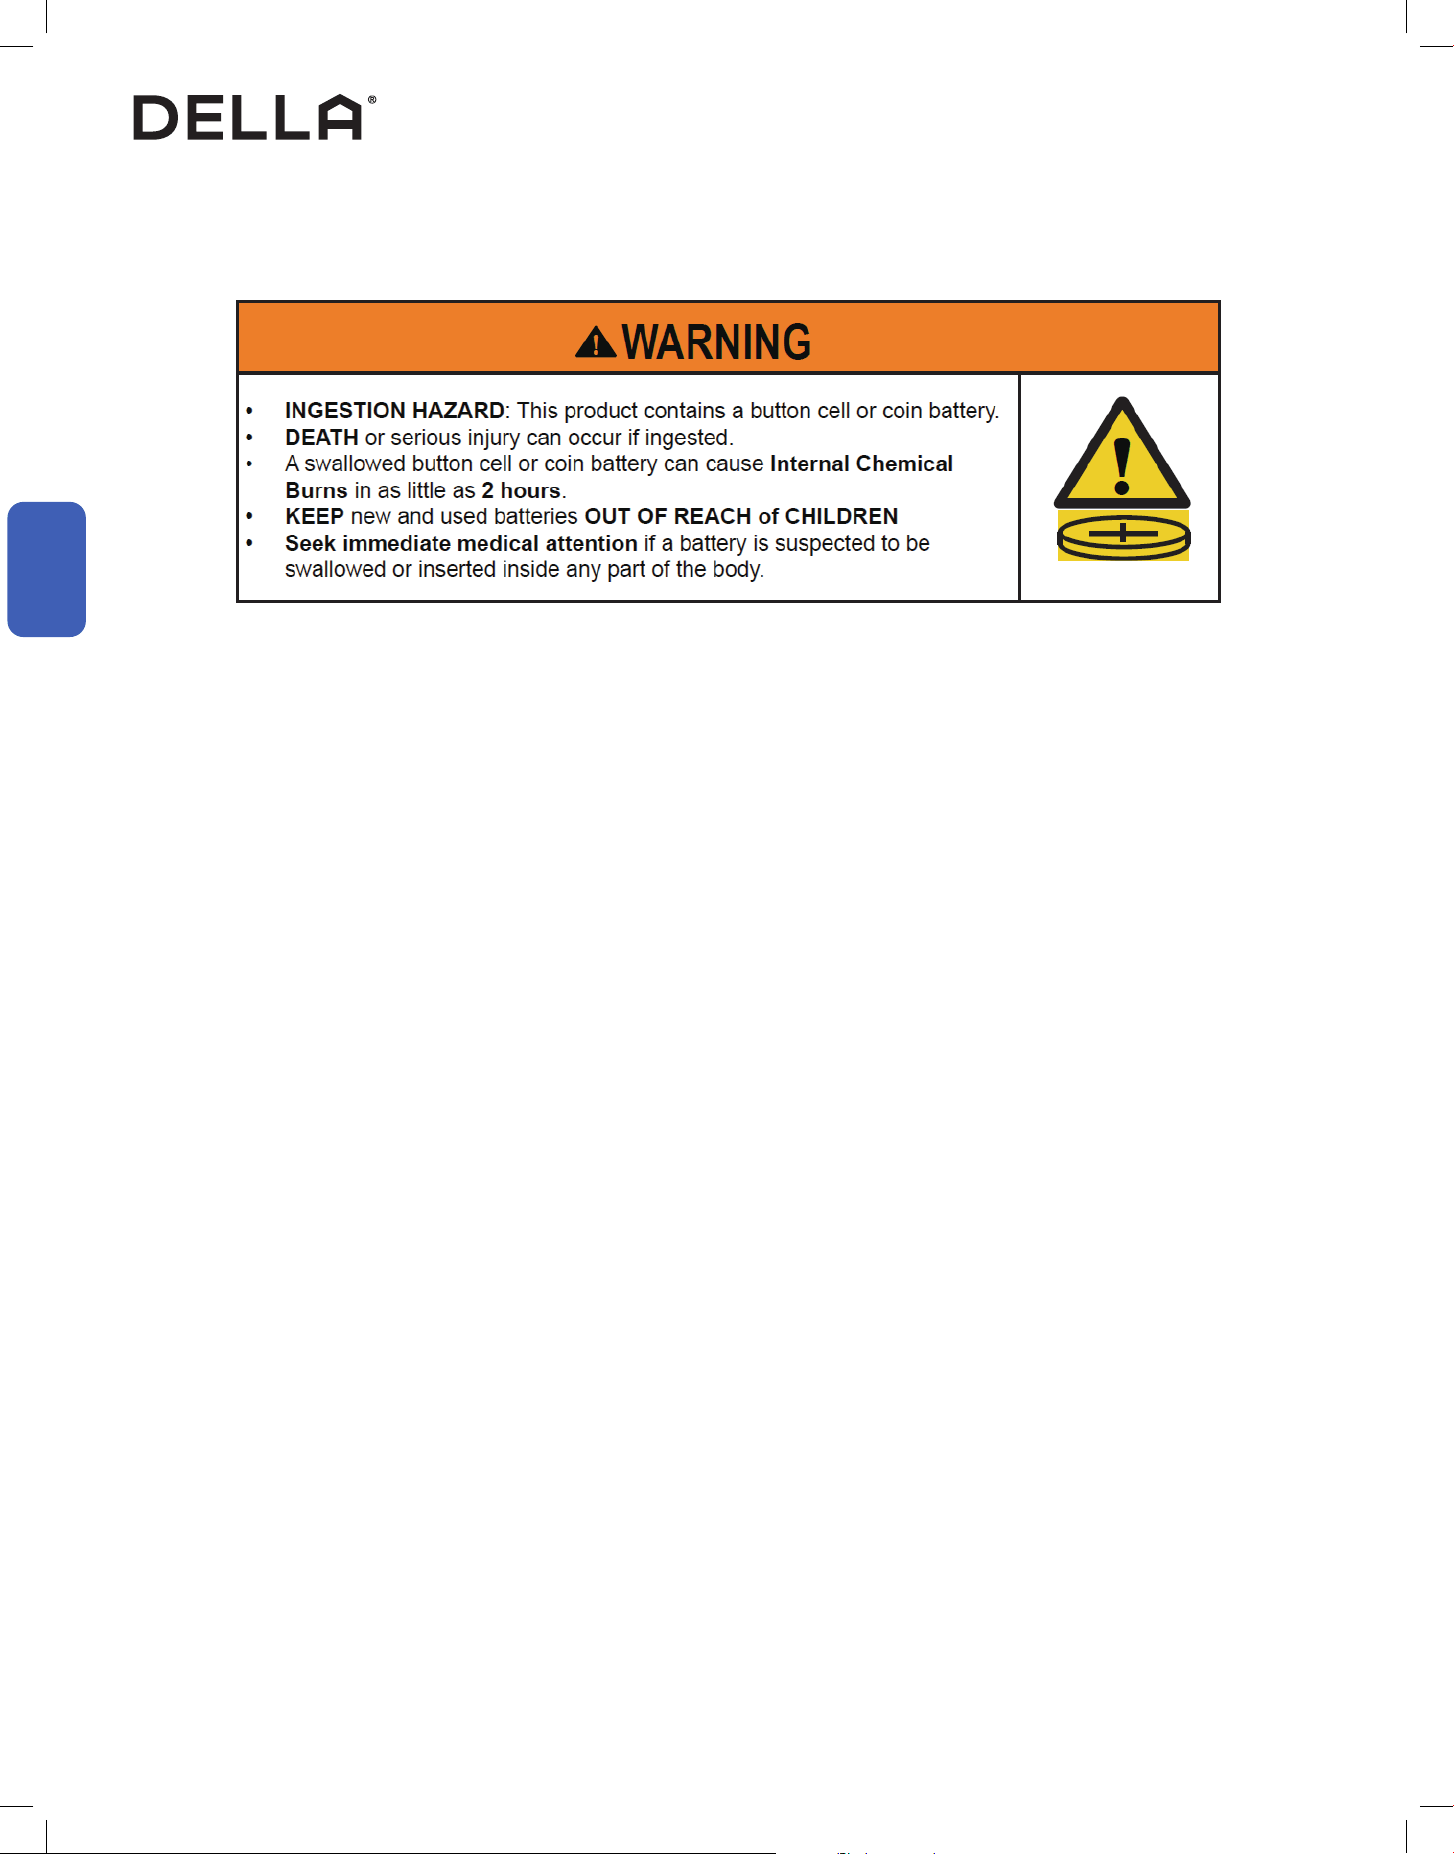
Coin Cell Battery Safety Warning
Remote Control
a)
b)
c)
d)
e)
f)
g)
h)
i)
j)
k)
l)
m)
Remove and immediately recycle or dispose of used batteries according to local regulations
and keep away from children. Do NOT dispose of batteries in household trash or incinerate.
Even used batteries may cause severe injury or death.
Call a local poison control center for treatment information.
Compatible battery type: CR2025, Voltage: 3V.
Non-rechargeable batteries are not to be recharged.
Do not force discharge, recharge, disassemble, heat above manufacturer’s specied
temperature rating or incinerate. Doing so may result in injury due to venting, leakage or
explosion resulting in chemical burns.
Ensure the batteries are installed correctly according to polarity (+ and -).
Do not mix old and new batteries, dierent brands, or types of batteries, such as alkaline,
carbon-zinc, or rechargeable batteries.
Remove and immediately recycle or dispose of batteries from equipment not used for an
extended period of time according to local regulations.
Always completely secure the battery compartment. If the battery compartment does not
close securely stop using the product, remove the batteries, and keep them away from
children.
Do not ingest battery, Chemical Burn Hazard.
This product contains a coin or button cell battery. If the coin or button cell battery is
swallowed, it can cause severe internal burns in just 2 hours and can lead to death.
Keep new and used batteries away from children. If the battery does not close securely,
stop using the product and keep it away from children. If you think batteries might have been
swallowed or placed inside any part of the body, seek immediate medical attention.
21
v.20260130C
Basic Operation
Basic Operation
Basic Operation
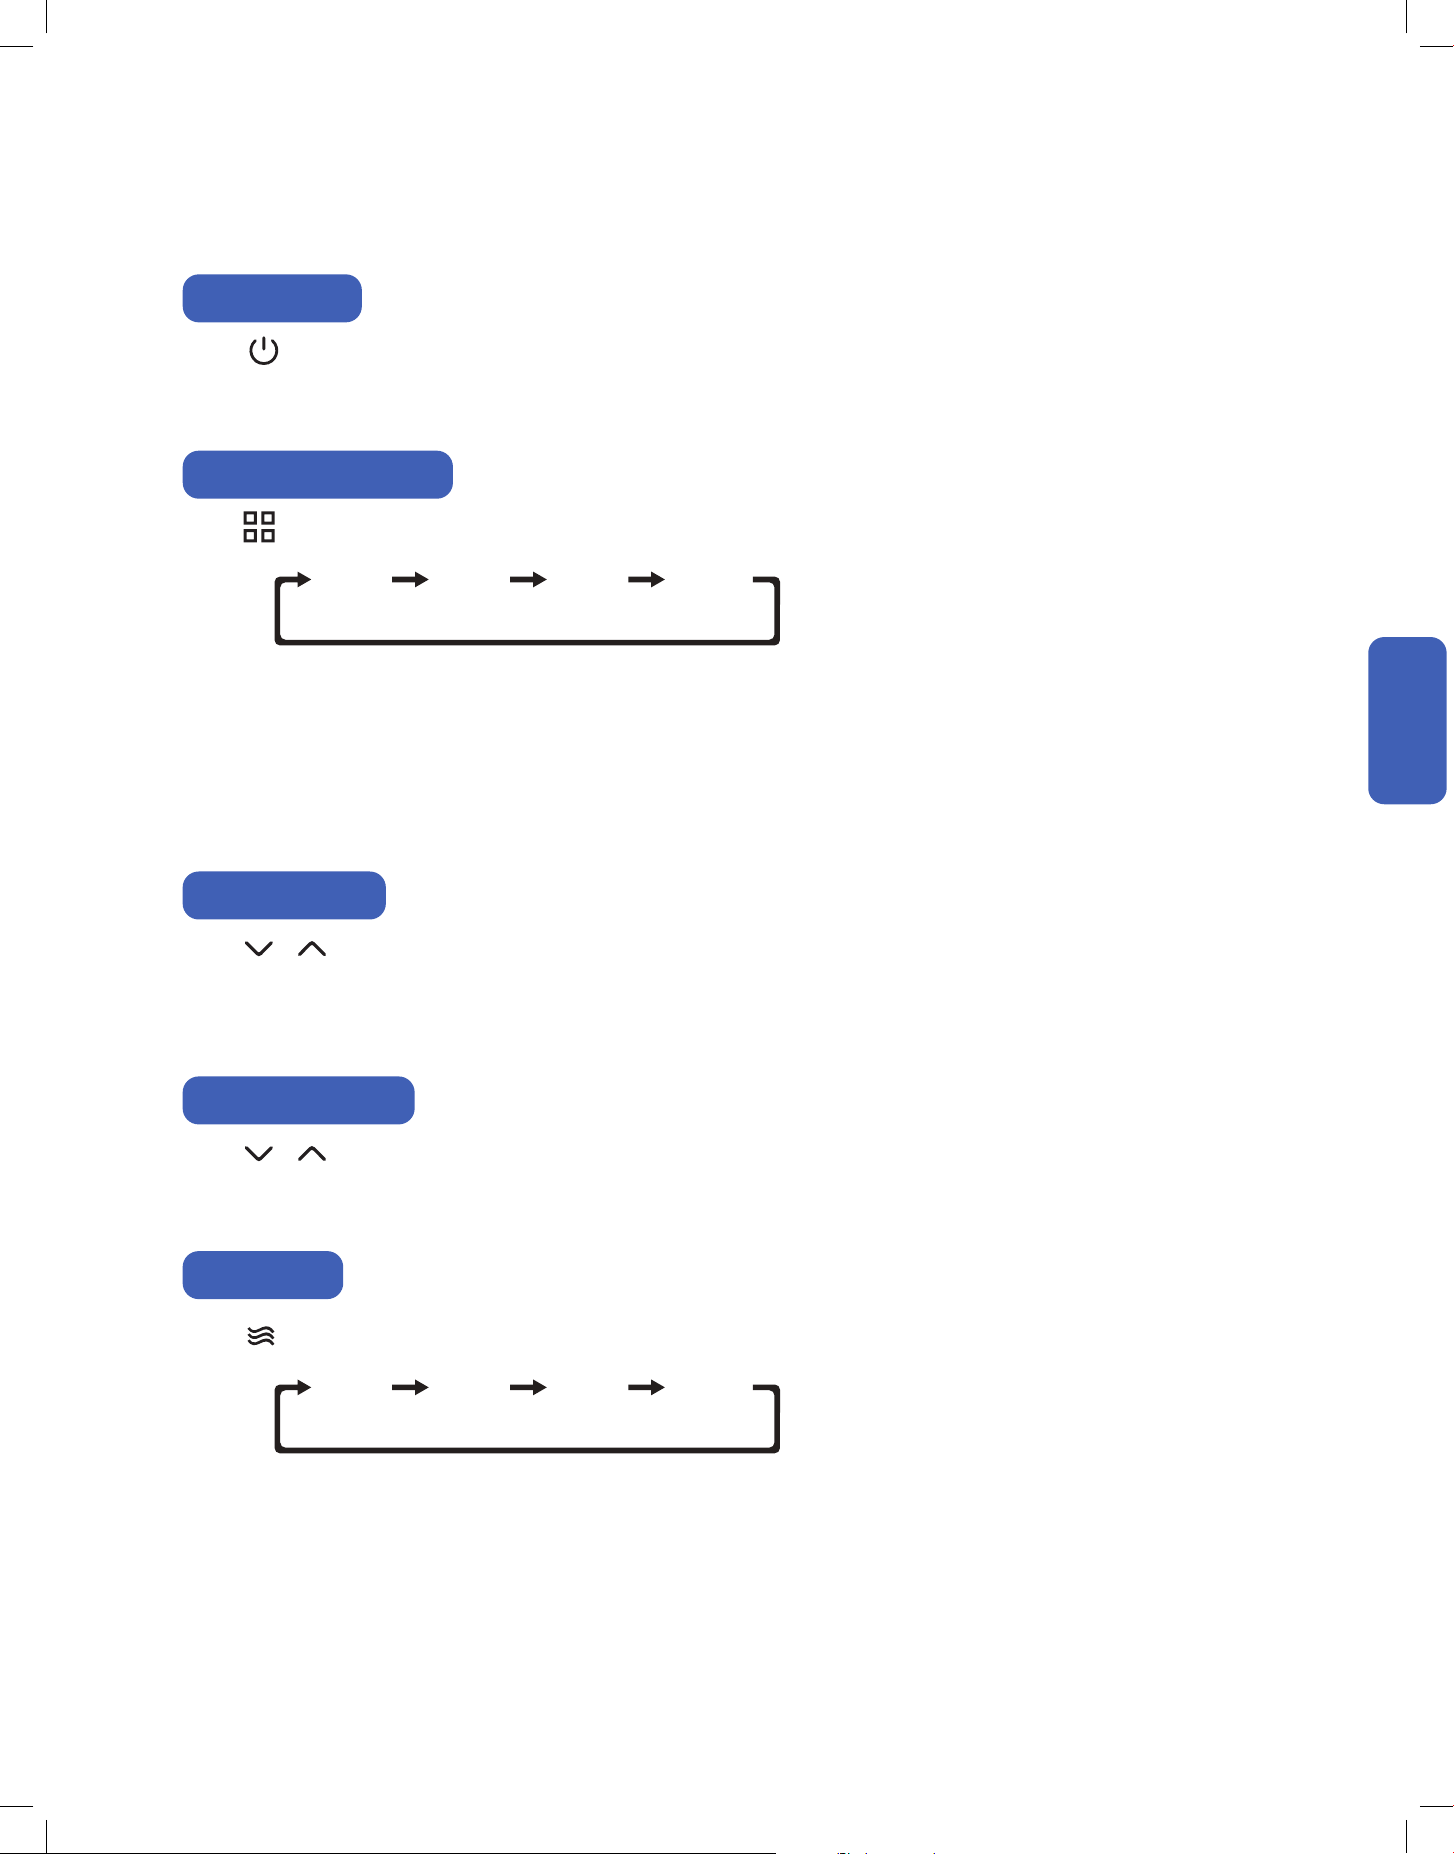
Press on the control panel or the remote control.
• The air conditioner will start operating in the same mode as the last time before shutting down.
Press on the control panel or remote control to select operation mode.
Power ON / OFF
COOL
HIGH
DRY
MED
FAN
LOW
AUTO
AUTO
Select Operation Mode
• Cool Mode:
• Dry Mode:
• Fan Mode:
• Auto Mode:
The air conditioner will cool the room according to your set temperature.
The air conditioner will reduce the humidity in your room.
The air conditioner will circulate air in the room.
The air conditioner will automatically operate in cool mode when room temperature is above 77°F / 25°C or fan mode when
room temperature is below 73°F / 23°C.
Adjust Temperature
Adjust Humidity Target
Press on the control panel or remote control to adjust temperature setting when operating in cool mode.
• Temperature setting will adjust by 1°F / 1°C increment for each time the button is pressed.
• Temperature can only be set between 61°F - 86°F / 16°C - 30°C.
Press on the control panel or remote control to adjust humidity target setting when operating in dry mode.
• Humidity target can be set between 30% - 70%.
Set Fan Speed
Press on the control panel or remote control to select your desired fan speed.
22
Basic Operation
Basic Operation
Basic Operation
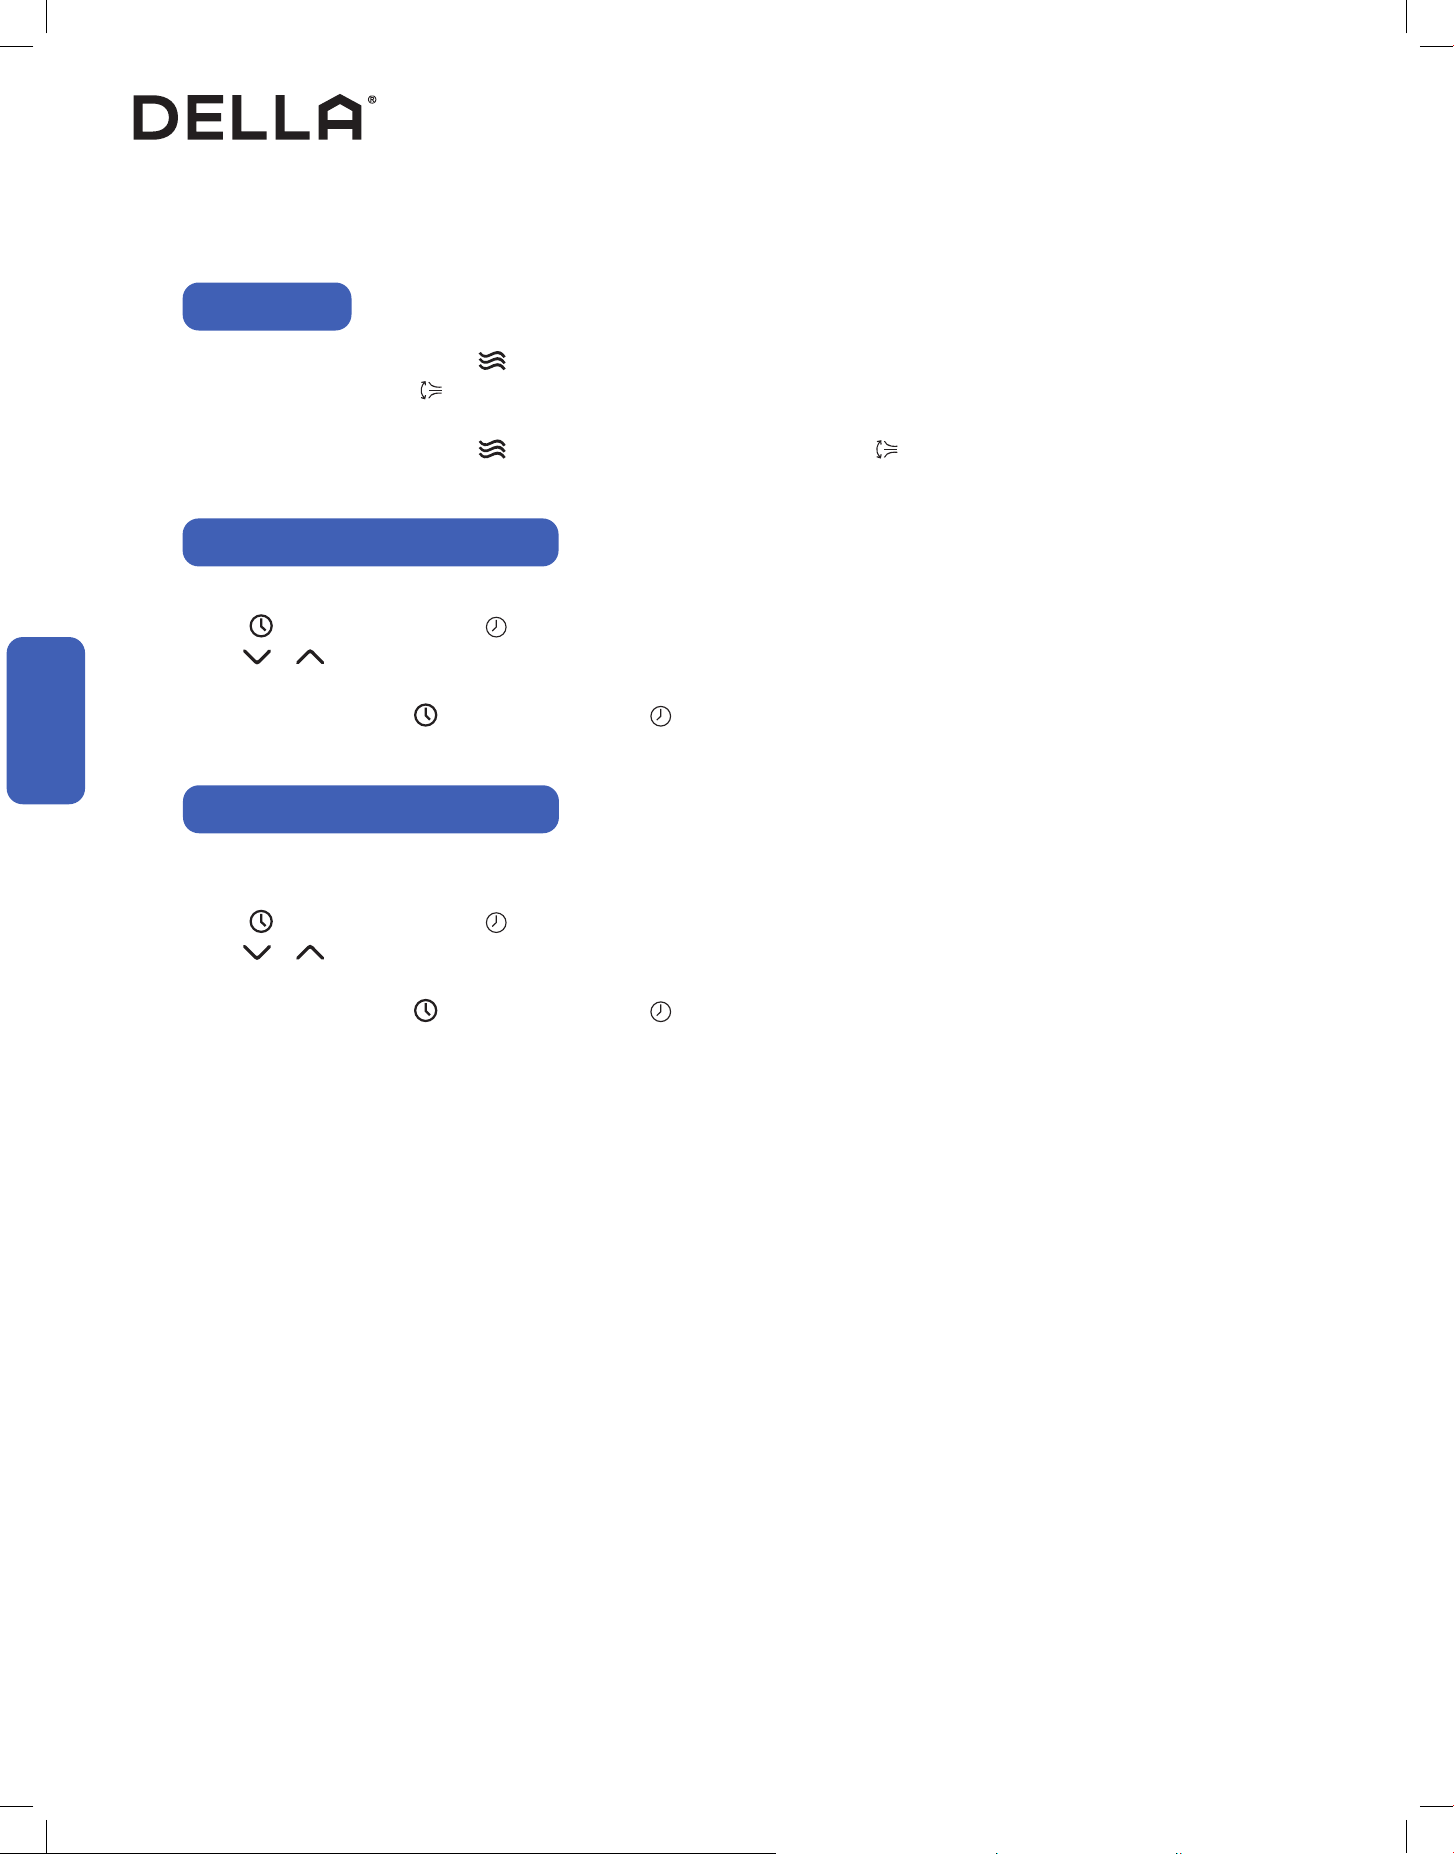
Timer Function (Shutdown Timer)
Swing Function
Timer Function (Start-up Timer)
Set a timer to automatically turn OFF the air conditioner.
Press on the control panel or on the remote control when the air conditioner is ON.
Press to set the desired turn o time. Timer can be set between 0.5 - 24 hours.
Leave the setting for 5 seconds, and the air conditioner will start the timer automatically.
Set the timer to 00 or press on the control panel or on the remote control again to cancel the timer setting.
Turn ON the air conditioner, then choose your desired operation mode, fan speed, and temperature setting.
Turn OFF the air conditioner.
Press on the control panel or on the remote control when the air conditioner is OFF.
Press to set the desired turn o time. Timer can be set between 0.5 - 24 hours.
Leave the setting for 5 seconds, and the air conditioner will start the timer automatically.
Set the timer to 00 or press on the control panel or on the remote control again to cancel the timer setting.
On the control panel, press and hold for 3 seconds.
On the remote control, press .
• The horizontal deector will oscillate up and down.
To stop the deector, p
ress and hold for 3 seconds on the control panel, or press on the remote control again.
23v.20260130C
Advance Function
Advance Function
Advance Function
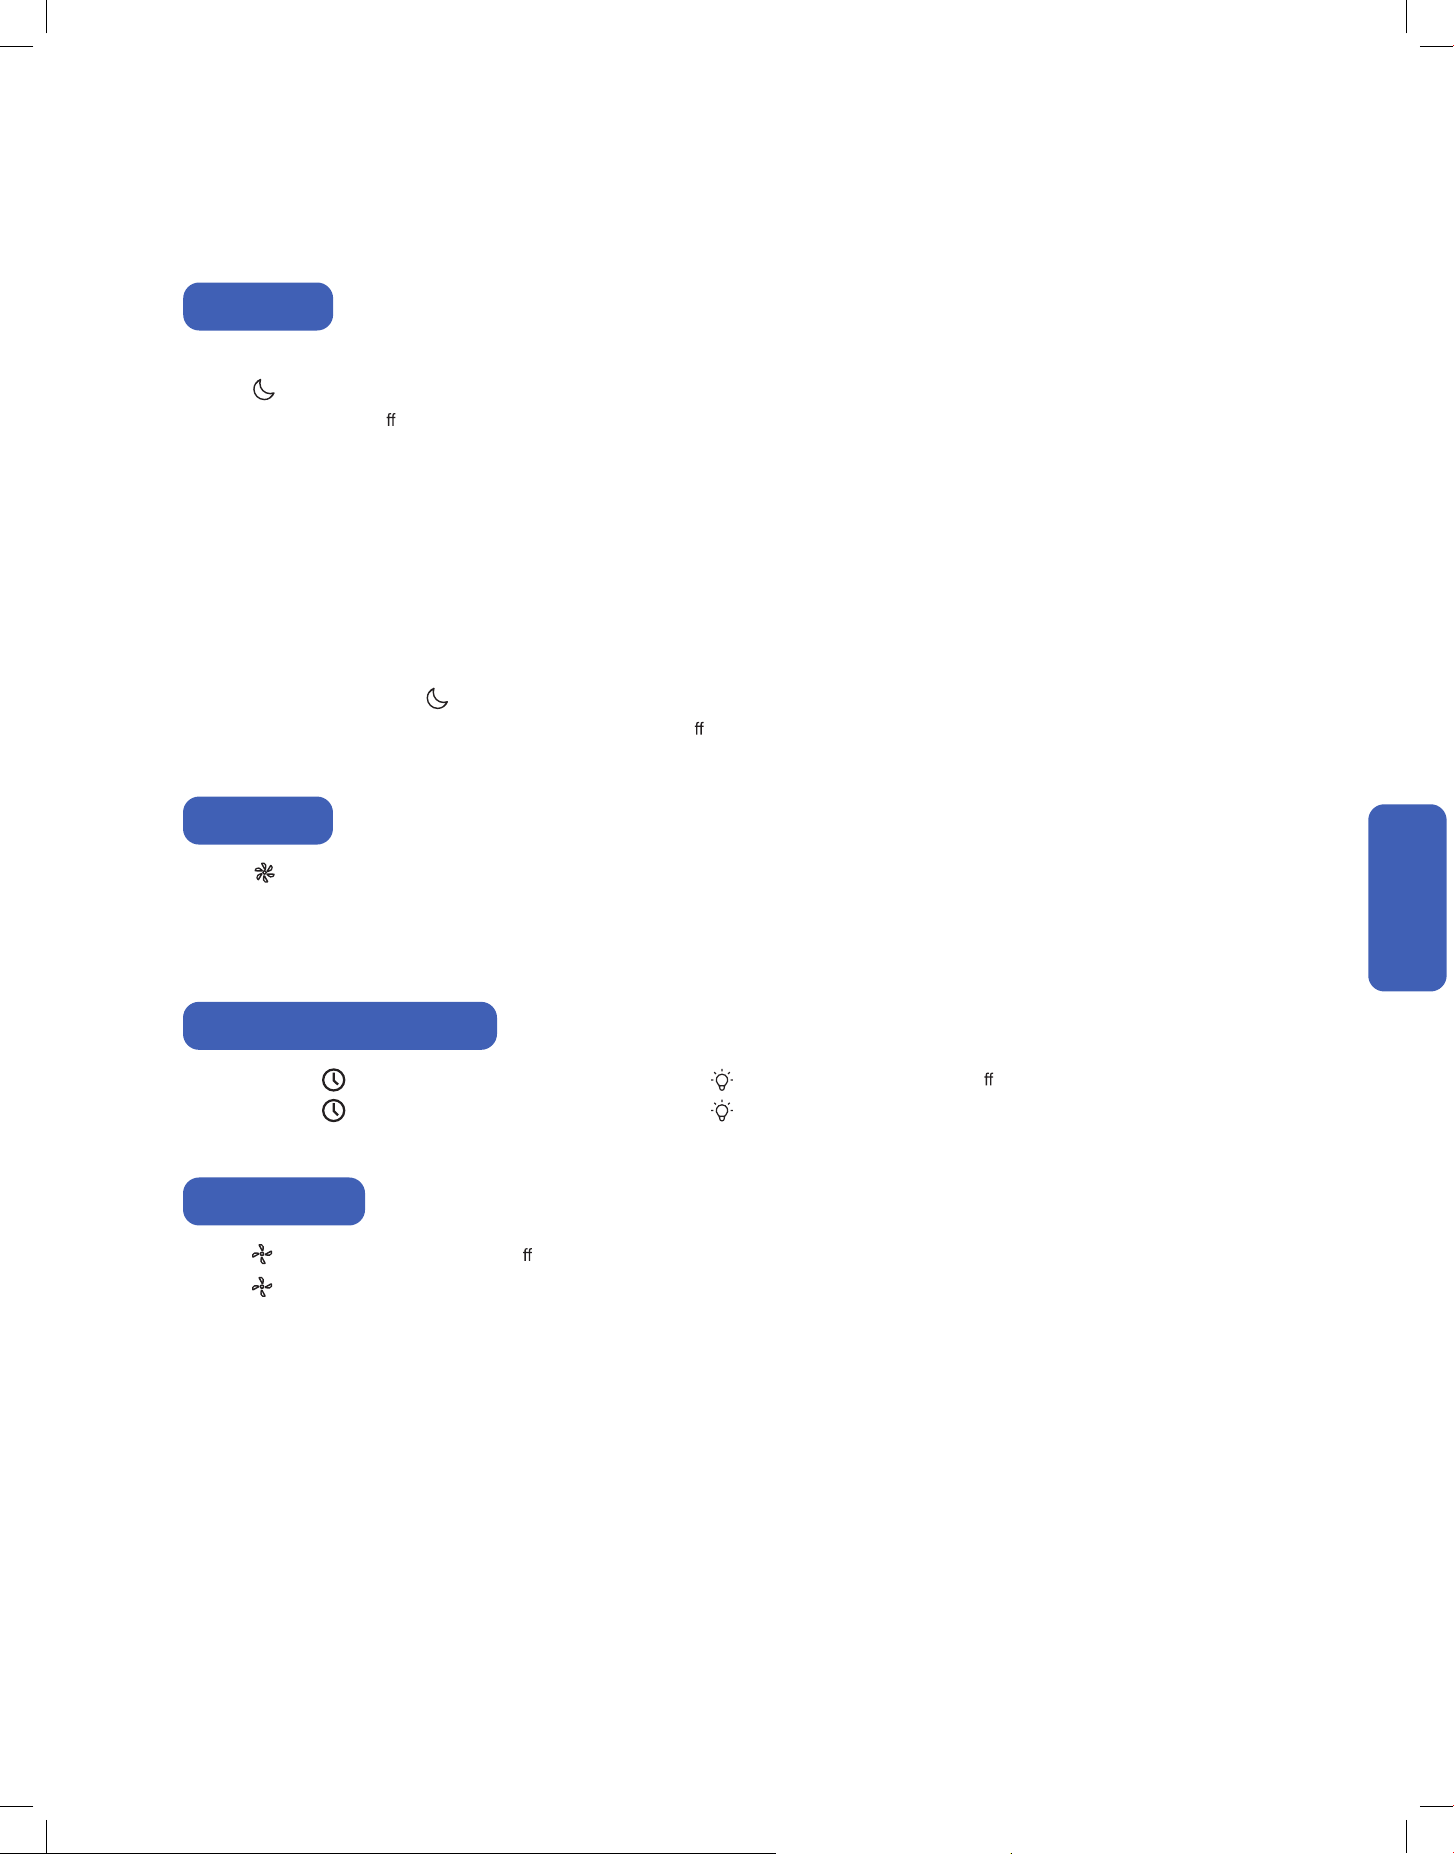
Sleep Mode
In sleep mode, the air conditioner will operate a pre-set program which is suitable during sleep.
Press on the remote control to enable sleep mode.
• This display will turn o
after 1 minute.
When operating the air conditioner during sleep mode, the display will light up to 30% brightness for 1 minute.
• Sleep mode is not available in fan mode.
To disable sleep mode, press again on the remote control.
Changing operation mode, fan speed, using turbo mode, or turning o
the air conditioner will also automatically disable sleep mode.
Turbo Mode
Buzzer ON / OFF
Press on the remote control enable turbo mode.
Alternatively, set the temperature to the lowest and fan speed to the highest on the control panel to enable turbo mode.
• Turbo mode is only available in cool mode.
Press and hold for 3 seconds on the control panel or press on the remote control to turn o the display screen and LED light.
Press and hold for 3 seconds on the control panel or press on the remote control again to turn on the display and LED light
Display and LED Light ON / OFF
Press on the remote control to turn o the buzzer sound.
Press on the remote control again to turn on the buzzer sound.
• Cool Mode:
• Dry Mode:
• Auto Mode:
The air conditioner will automatically set the fan speed to low. The temperature will increase by 1°F after 1st hour and then
another 1°F after the 2nd hour.
The air conditioner will automatically set the fan speed to low. Humidity target will increase by 5% per hour until 10% increase is
reached.
The air conditioner will automatically operate the same way as cool mode or dry mode. If the operating mode changes from
cool mode to dry mode, the temperature will automatically reset to the initial set value and sleep function timer will restart.
24
Advance Function
Advance Function
Advance Function
Clean filter reminder will activate after the air conditioner operate for 600 hours.
• will flashes follow by on the display for 10 seconds, then the display will display temperature setting.
• will flashes for 10 seconds every time the air conditioner is turned on until reminder timer is reset.
To reset reminder, press and hold and simultaneously for 3 seconds on the control panel. The air conditioner make a buzzing
sound to confirm the reset.
Alternatively, the reminder will automatically reset after the air conditioner has operated for 24 hours from the time the reminder was activated.
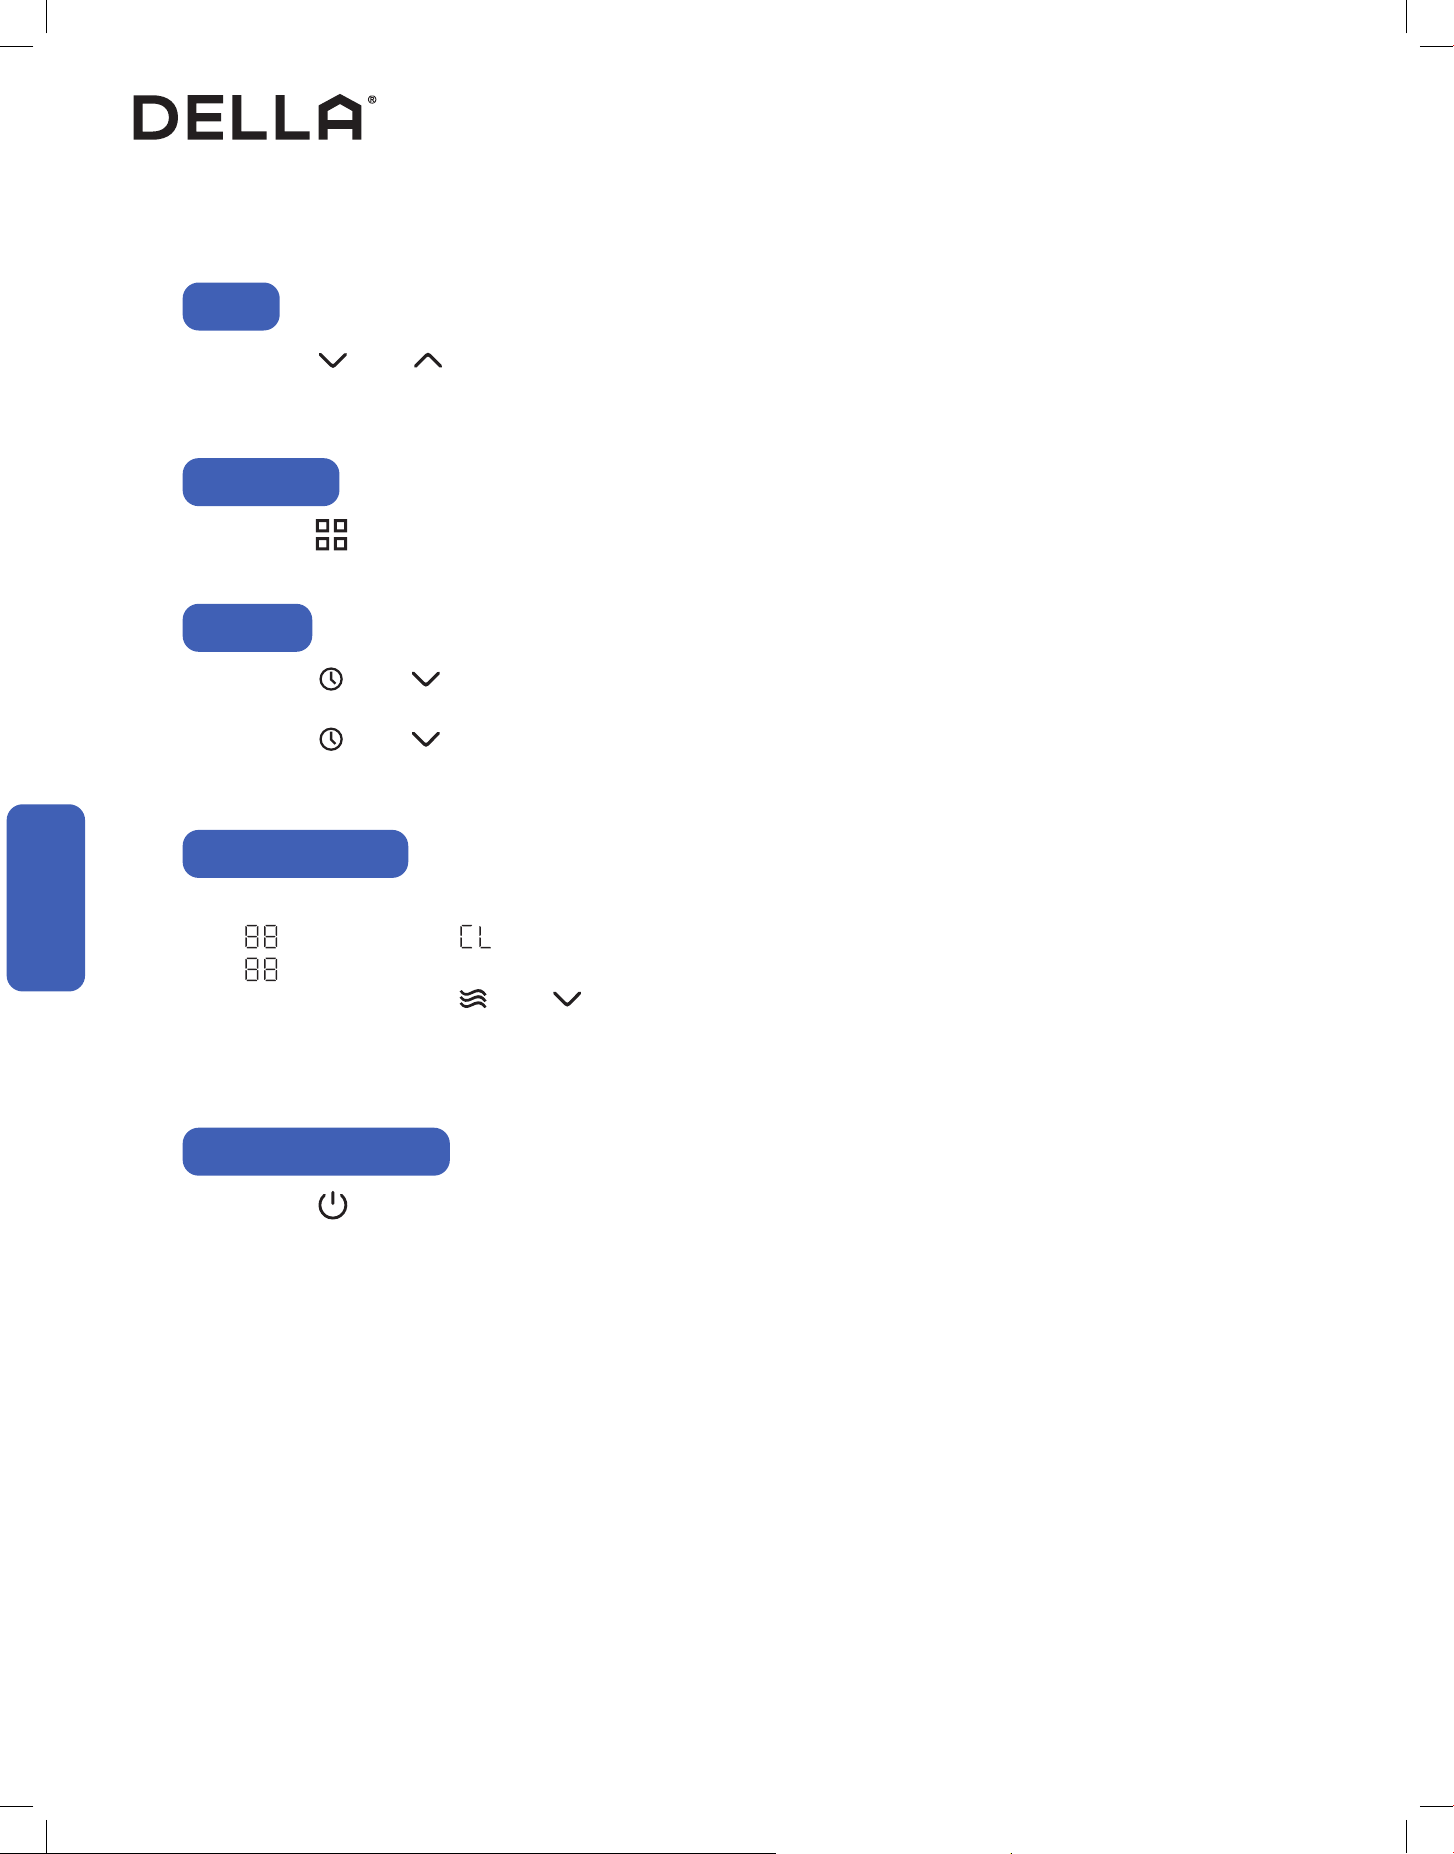
Press and hold for 3 seconds on the control panel to reset and ready for pairing with your air conditioner to the "Della+" app.
Press and hold for 5 seconds on the control panel to reset the air conditioner to factory default.
Wi-Fi Reset
Child Lock
Reset AC to Default Setting
Clean Filter Reminder
Press and hold and simultaneously for 3 seconds on the control panel to change the temperature unit on the display.
• The temperature unit will switch between °F and °C.
°F / °C
Press and hold and simultaneously for 3 seconds on the control panel to enable child lock.
• When child lock is enabled, all other buttons will not function when pressed.
Press and hold and simultaneously for 3 seconds on the control panel again to disable child lock.
NOTE: Child lock function is only accessible on the control panel and is not on the remote control.
25
v.20260130C
Advance Function
Advance Function
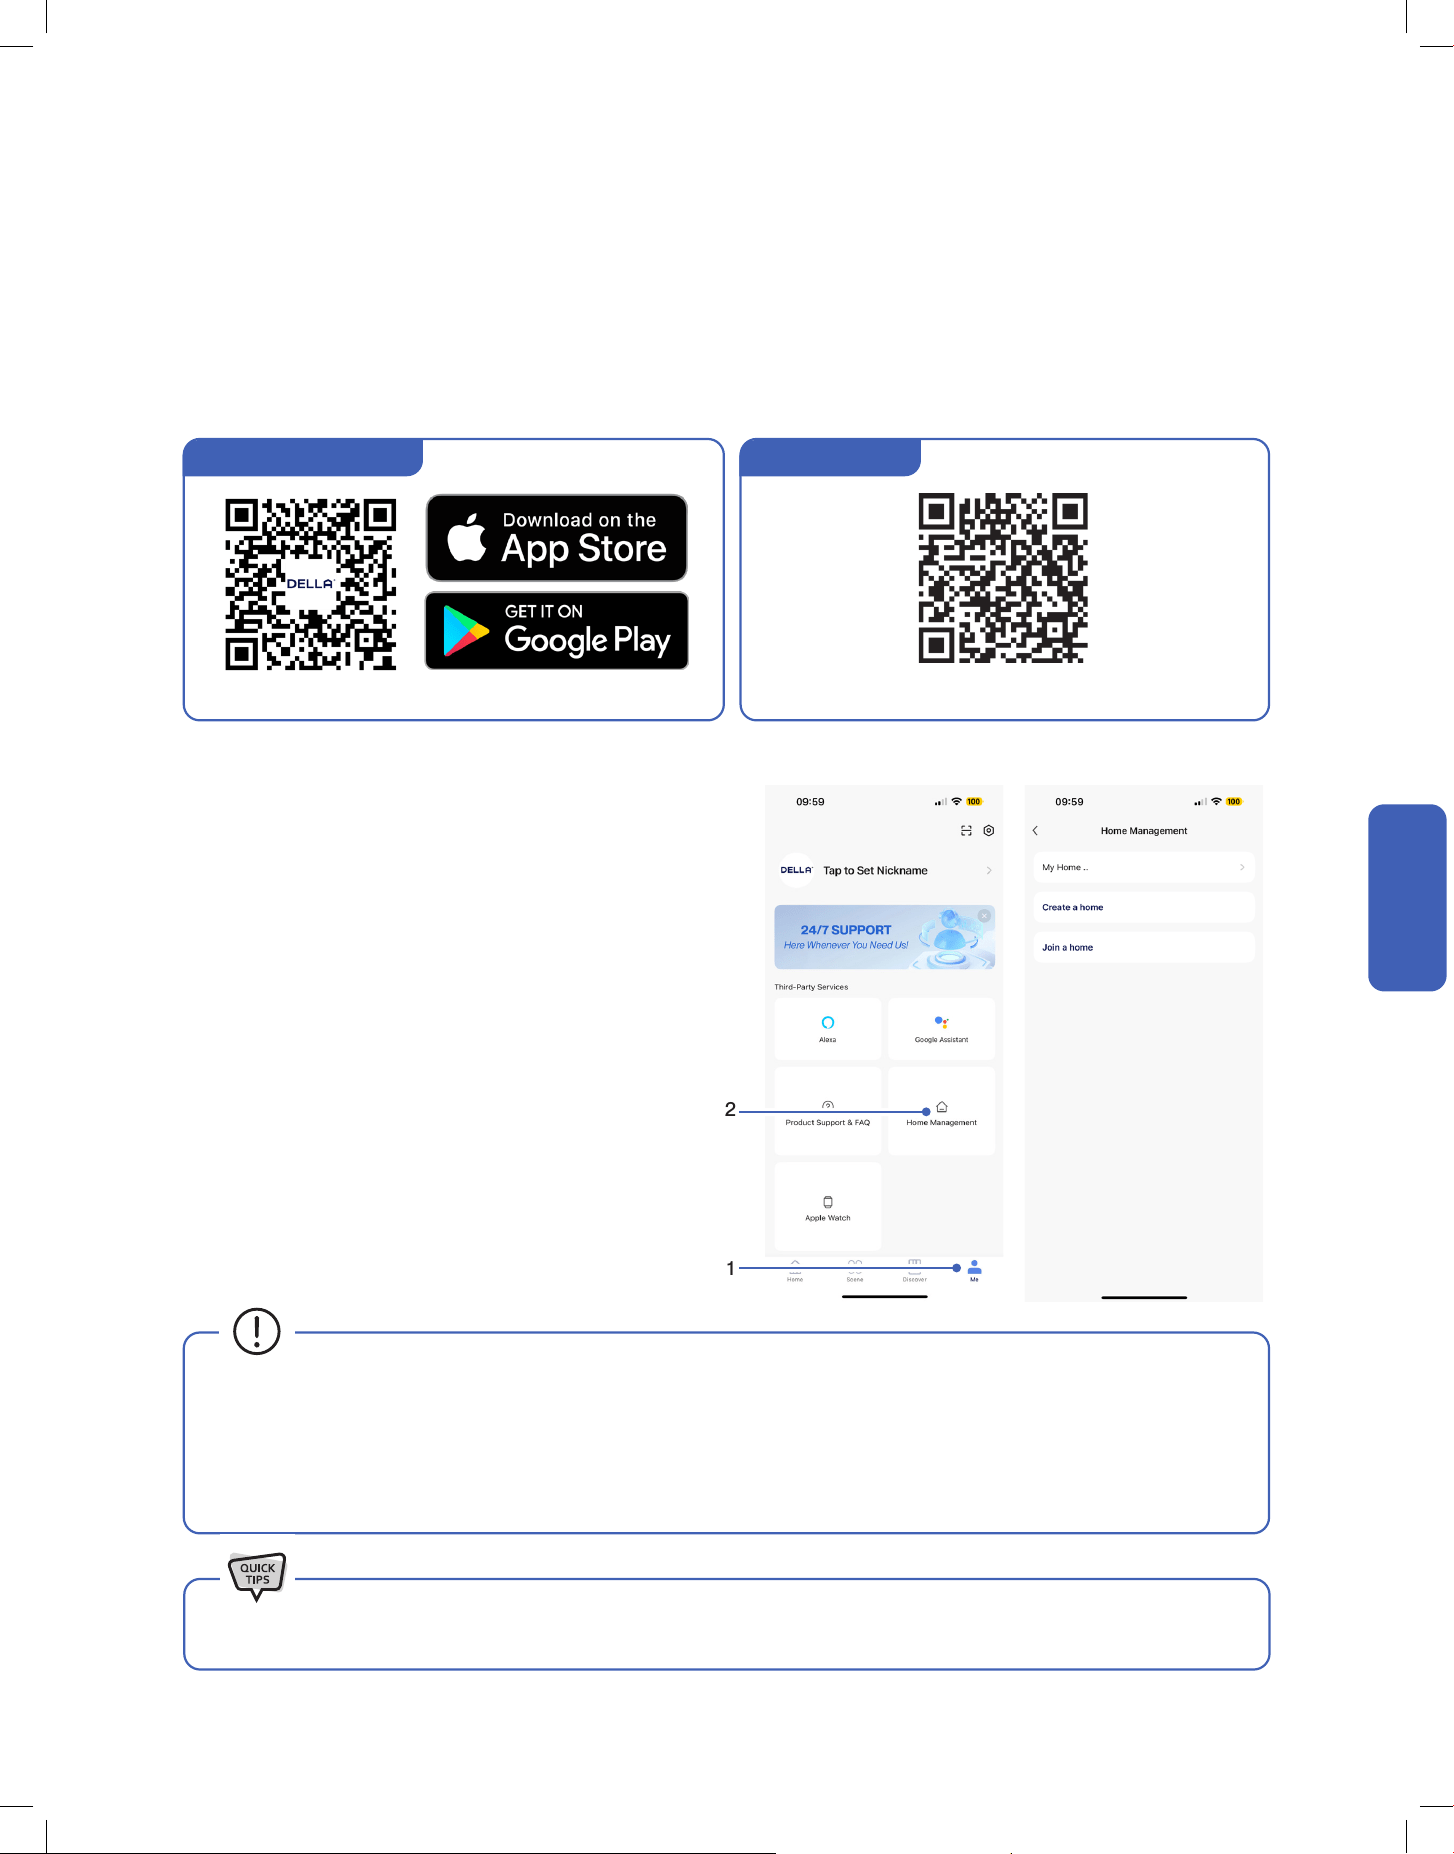
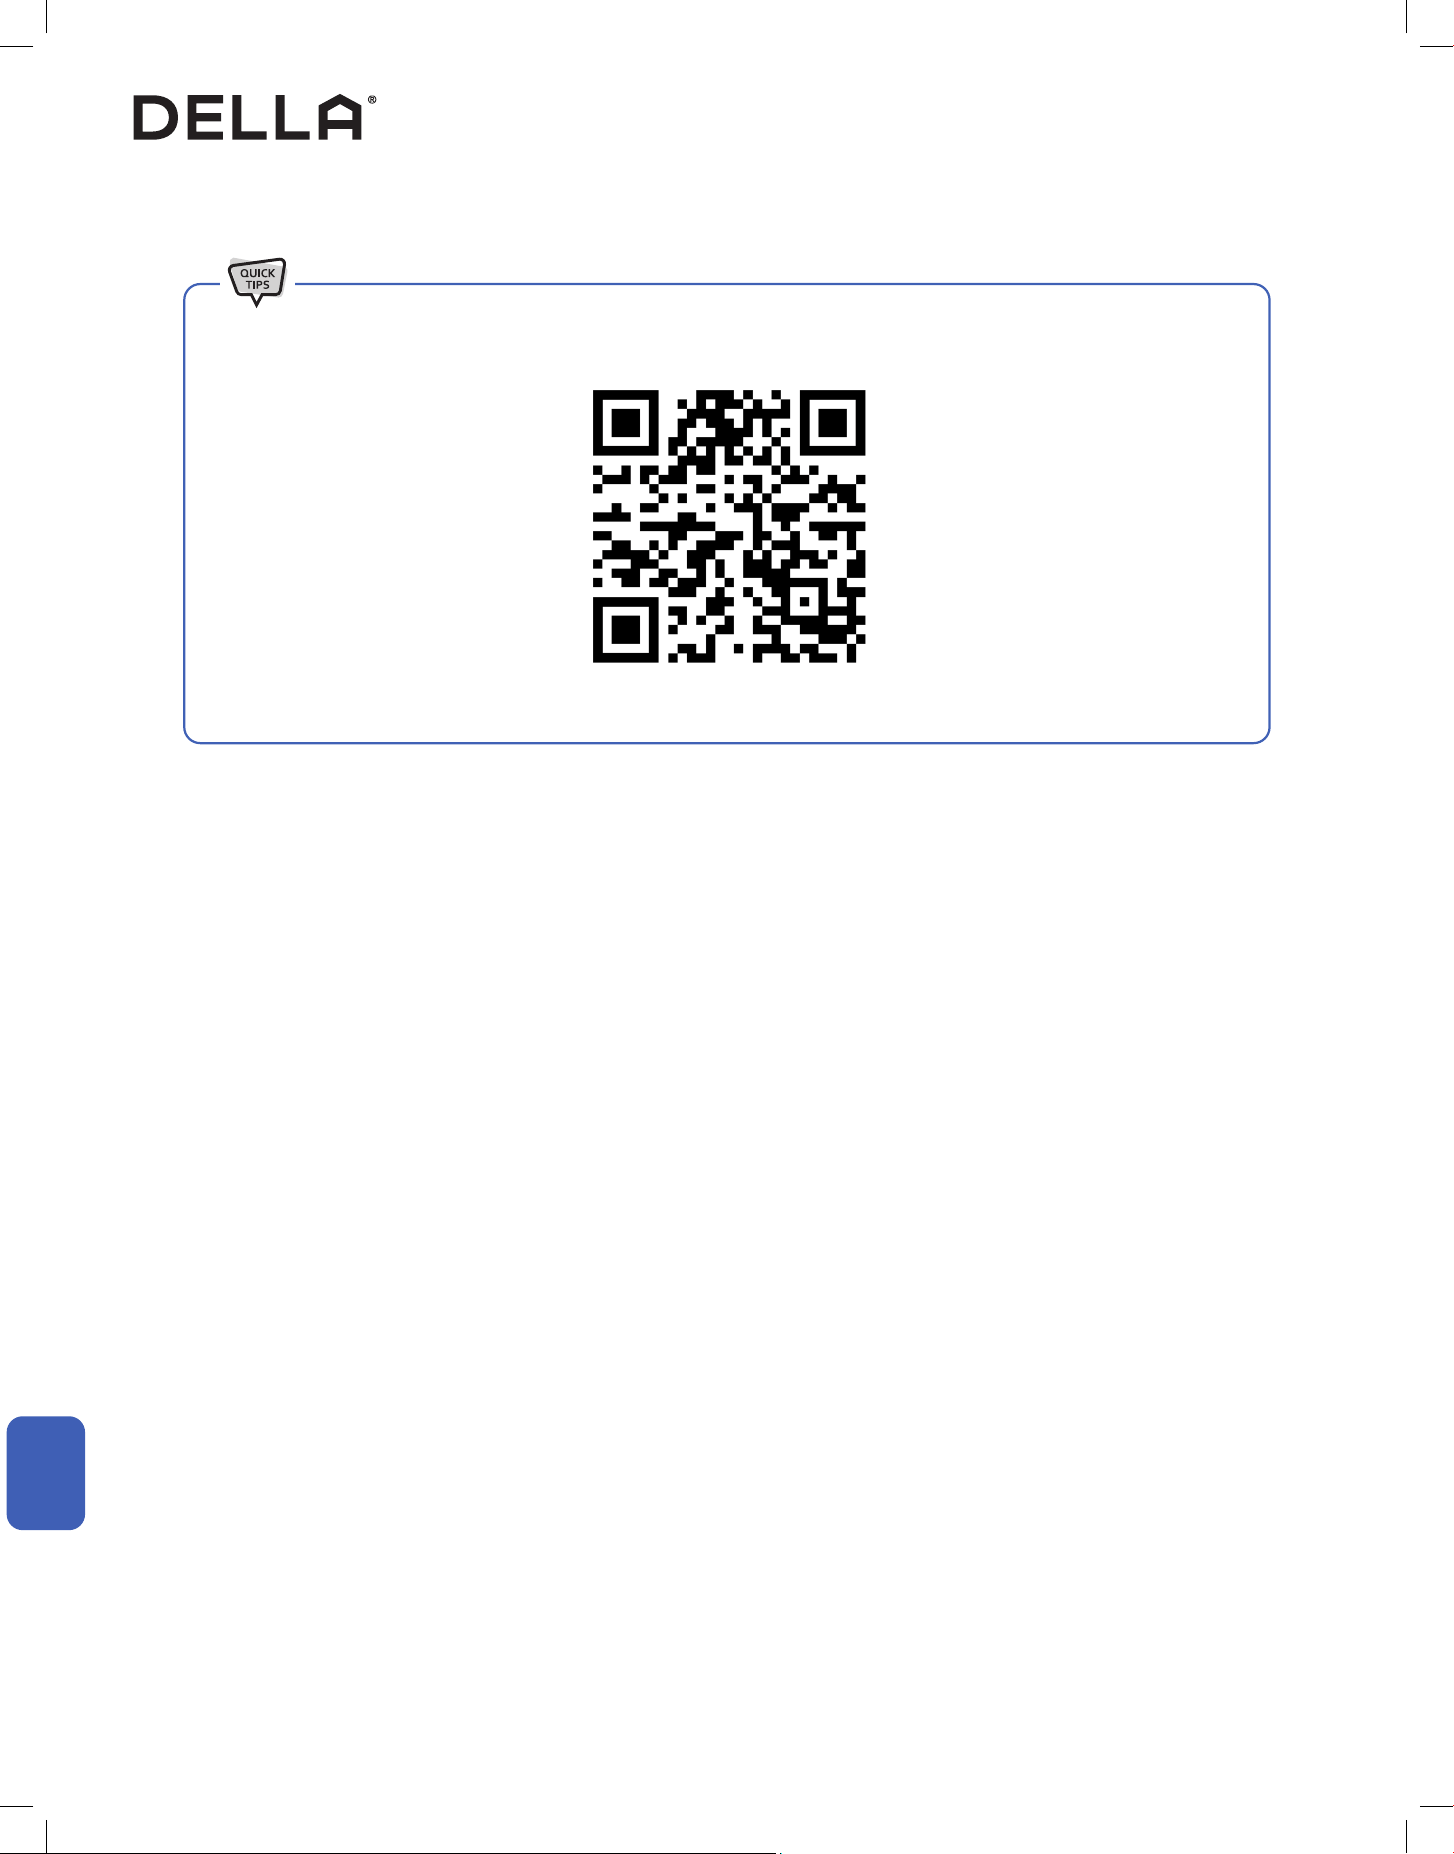
DELLA+ App Download
1. Search “DELLA+” on Apple app store or Google Play, or scan the QR code below to download the application.
2. Register an account in the app.
3. Follow the in app instructions to add and pair your Della AC to the app and complete the Wi-Fi set up. You can also scan the device QR code
in the DELLA+ app for a quick device search.
1. Click "Me" on the Della+ app.
2. Choose "Home Management".
3. Follow the in app instructions to create or join a home.
Advance Function
Wi-Fi Set up
Household Set up (Optional)
1
2
To set up the DELLA+ app to control your AC.
Create and Join home to control your Della AC via the Della+ app from
multiple devices and multiple accounts.
NOTE: Pairing your Della AC with a different account outside the
household will remove the original pairing. Only one household can be
paired at a time.
• The Della+ application is free, however, data charges may apply when downloading or using the application.
• Della+ can be altered without notice for quality improvement and also be deleted depending on the circumstances of manufacturing
firms.
• All trademarks, logo, brand names are the property of their respective companies. Use of these names, brands, and trademarks does
not imply endorsement. Della assumes no responsibility with regard to the performance or use of these products.
Check out detailed tutorial on the most updated application on dellahome.com/support.
Scan this QR code in your Della+ app to quickly add device.You can also scan the download QR code
Device QR code
26
Care and Maintenance
Care and Maintenance
Care and Maintenance
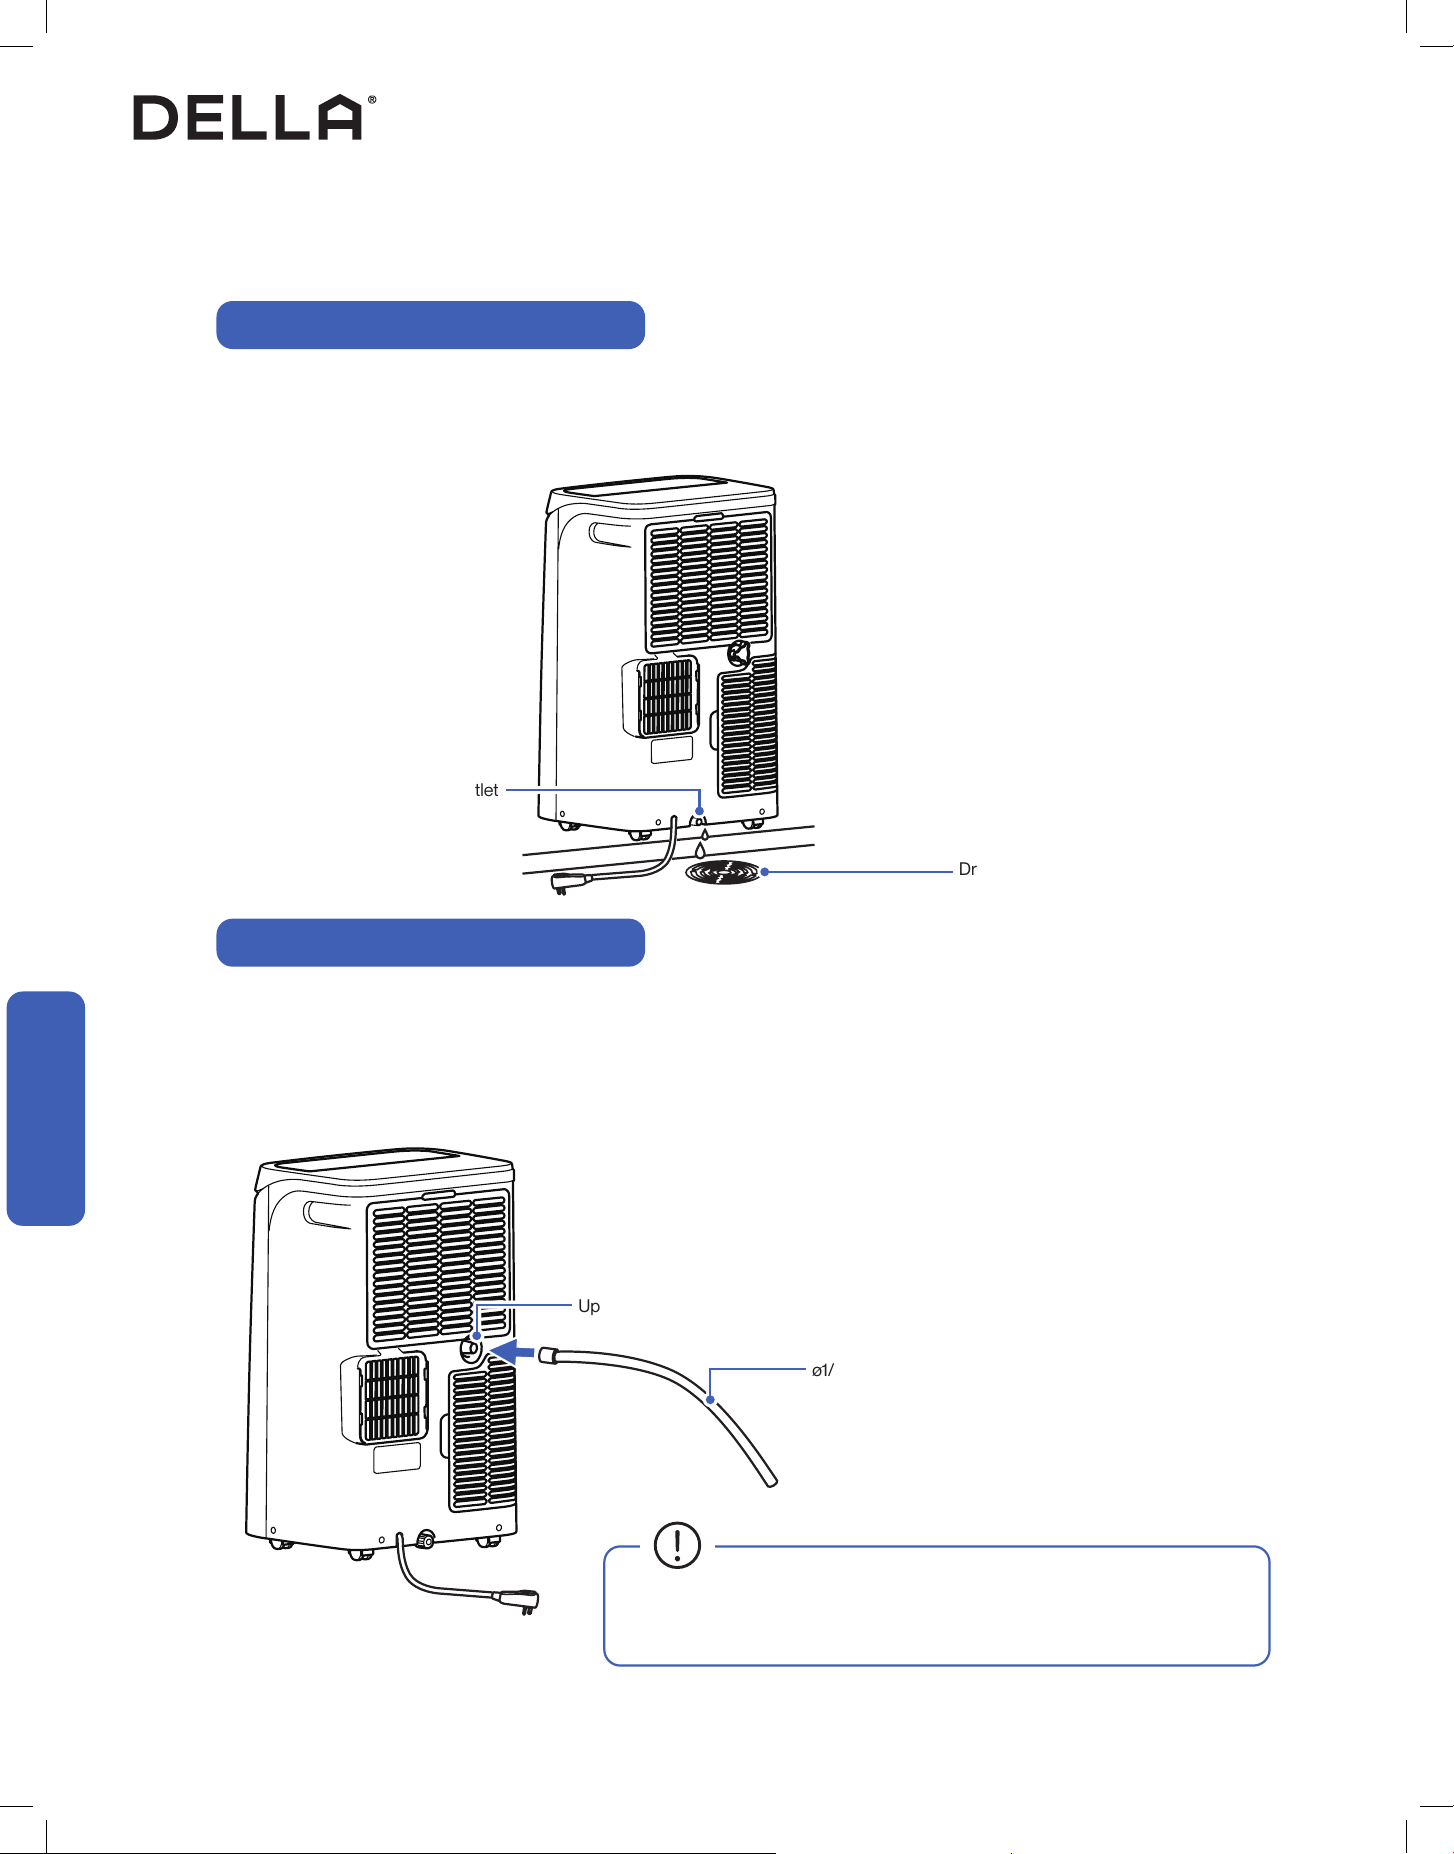
Water Drainage
Upper Drain Outlet
ø1/2" Drain Hose
Drain Area
When the internal water tank is full, the digital display will show "HL" error code, and water need to be drained.
1. Carefully move the air conditioner to a drain location, then open the bottom drain plug and drain the water.
2. After draining, turn the drain plug back into the drain outlet and restart the air conditioner.
Upper drain outlet allow continuous water drainage. It is only recommended if the air conditioner operate in dehumidify mode for extended period
of time. Avoid attach the drain hose to the upper drain outlet permanently, it might reduce the air conditioner performance.
1. Remove the cover on the upper drain outlet and insert the drain hose to the it.
2. Place the other end of the hose to a drain area.
Water drainage using the Bottom Drain Outlet
Water drainage using the Upper Drain Outlet
• Avoid having bends or dents on the drain hose.
• Do not leave the end of the hose into water to prevent air lock.
Bottom Drain Outlet
Drain / Water Container
27
v.20260130C
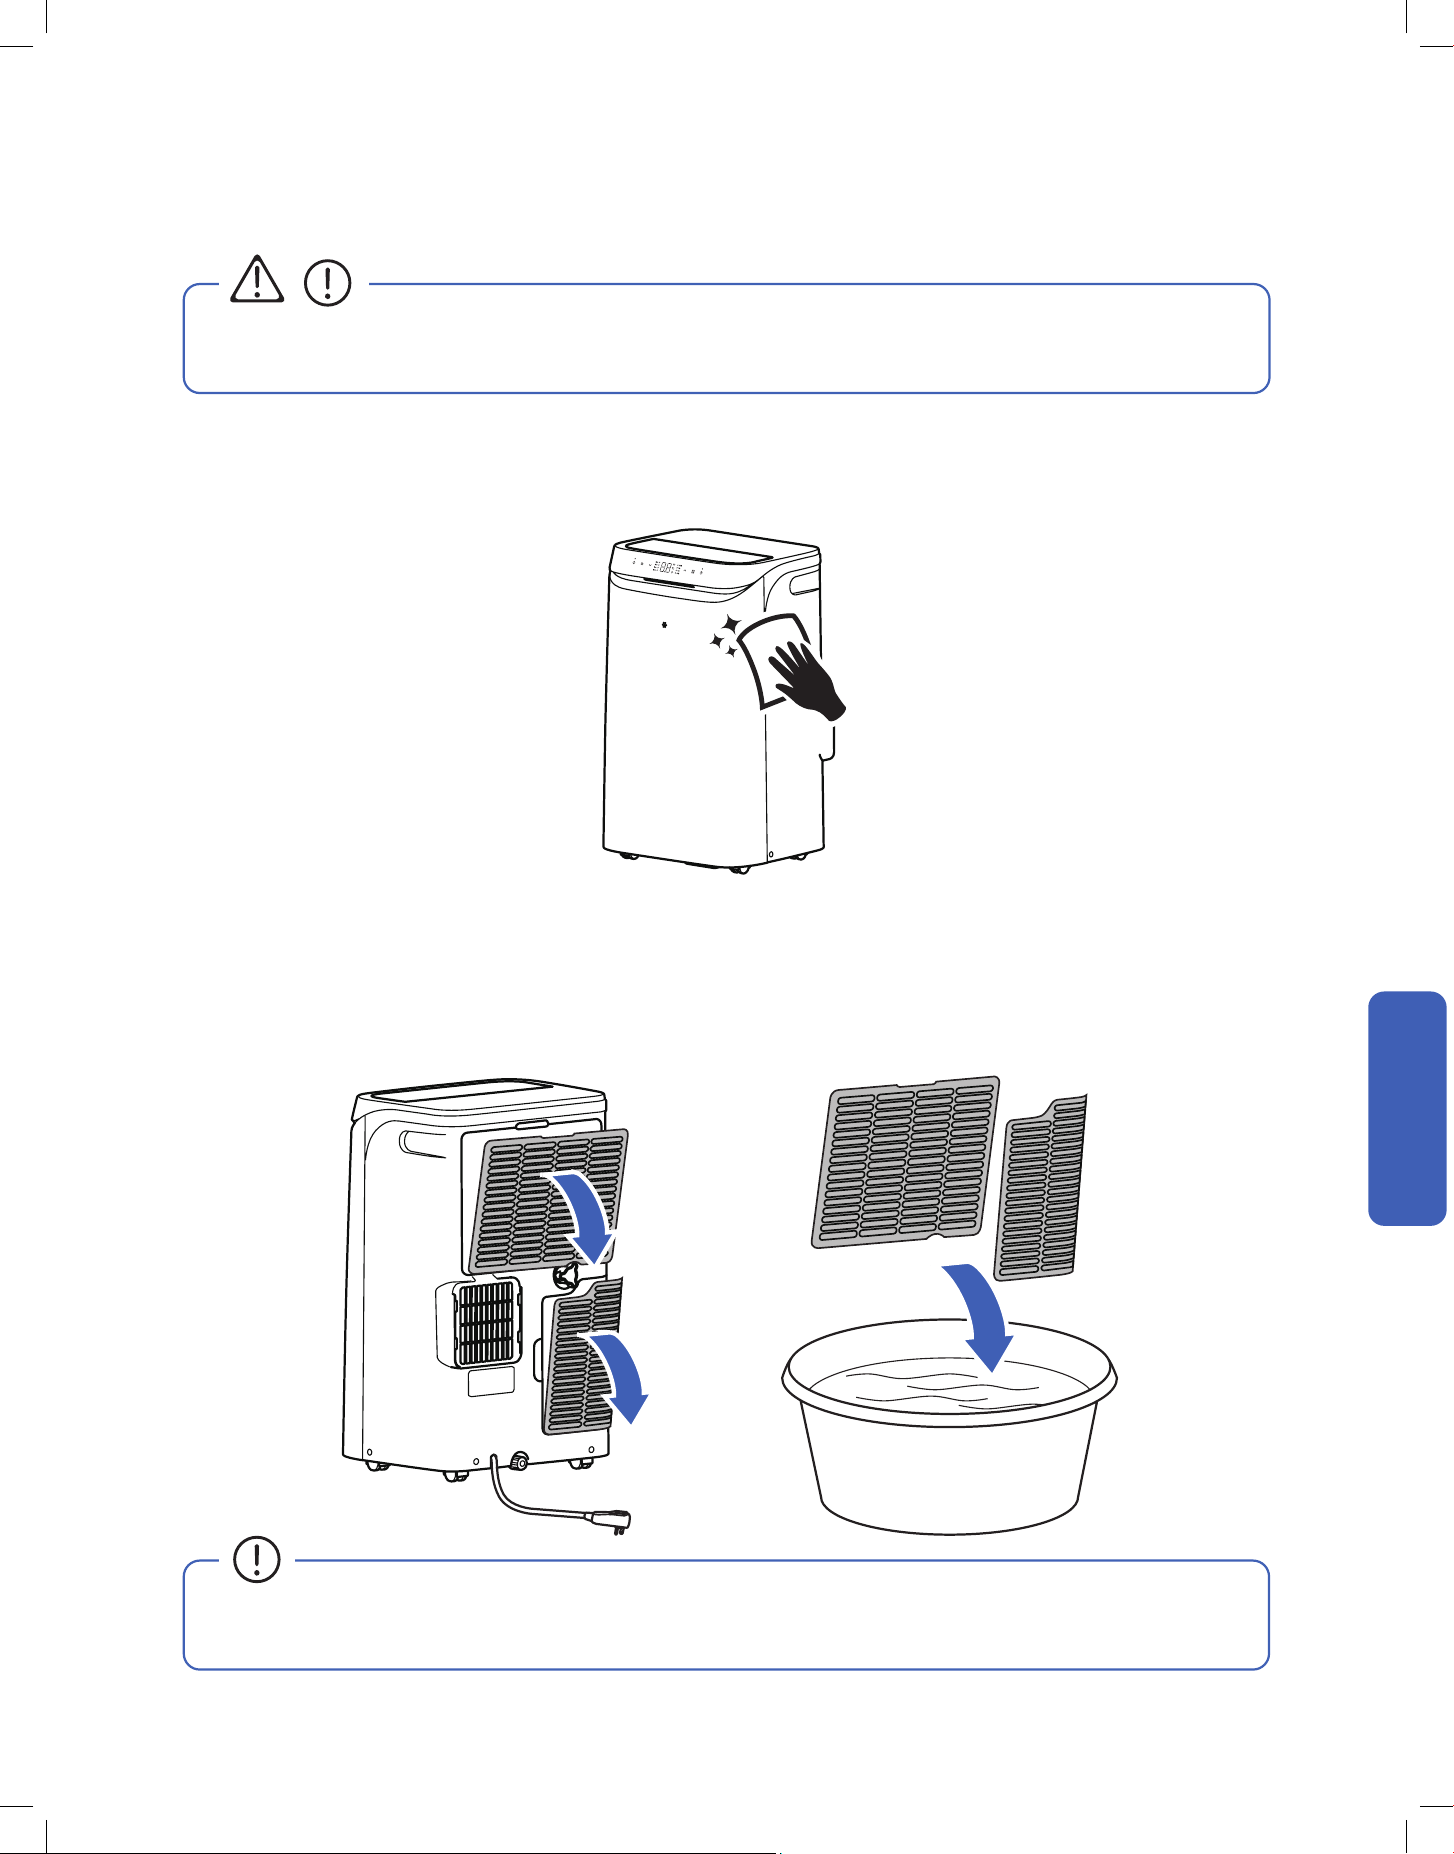
1. Clean the air conditioner with a soft dry cloth or a damped cloth with neutral detergent.
2. Remove any possible debris on the vents and air outlet.
Care and Maintenance
Clean the Unit
<104°F / 40°C
Care and Maintenance
Care and Maintenance
• Before cleaning the unit, you must shut down the machine and cut o the power supply for at least 5 minutes.
• Never ush the air conditioner with water.
CAUTION
1. Remove the air filter from the air conditioner.
2. Clean the air filter using a vacuum cleaner or with soapy water.
3. Air dry the air filter.
4. Put the air filter back to its original position after it is dry.
Clean the Air Filter
• Check and clean the air filter regularly to prevent dust accumulation.
• Clean the air filter frequently if the operating environment is dusty or has bad air quality.

28
Care and Maintenance
Care and Maintenance
Care and Maintenance
• Clean the air filter screen every month.
• Regularly check and remove any obstacles from the air vent.
• Take out the batteries from the remove control and disconnect the power supply of the air conditioner.
• Detach exhaust hose and window sealing board from the air conditioner.
• Drain all the remaining water from the air conditioner to prevent mold or bacteria growth.
• Clean the air filter.
• Store the air conditioner in a dry indoor location. The unit must be kept in an upright position.
• Clean the unit and the air filter screen.
• Remove any obstacles at the air inlet and outlet.
• Install batteries into the remove control and reinstall the air conditioner in your desired location.
Planning to Not Operate the Air Conditioner for a Long Period (e.g. Winter Season)
Using the Air Conditioner After a Long Idle Period
Maintenance Routine
29
v.20260130C
Having Problems?
Having Problems?
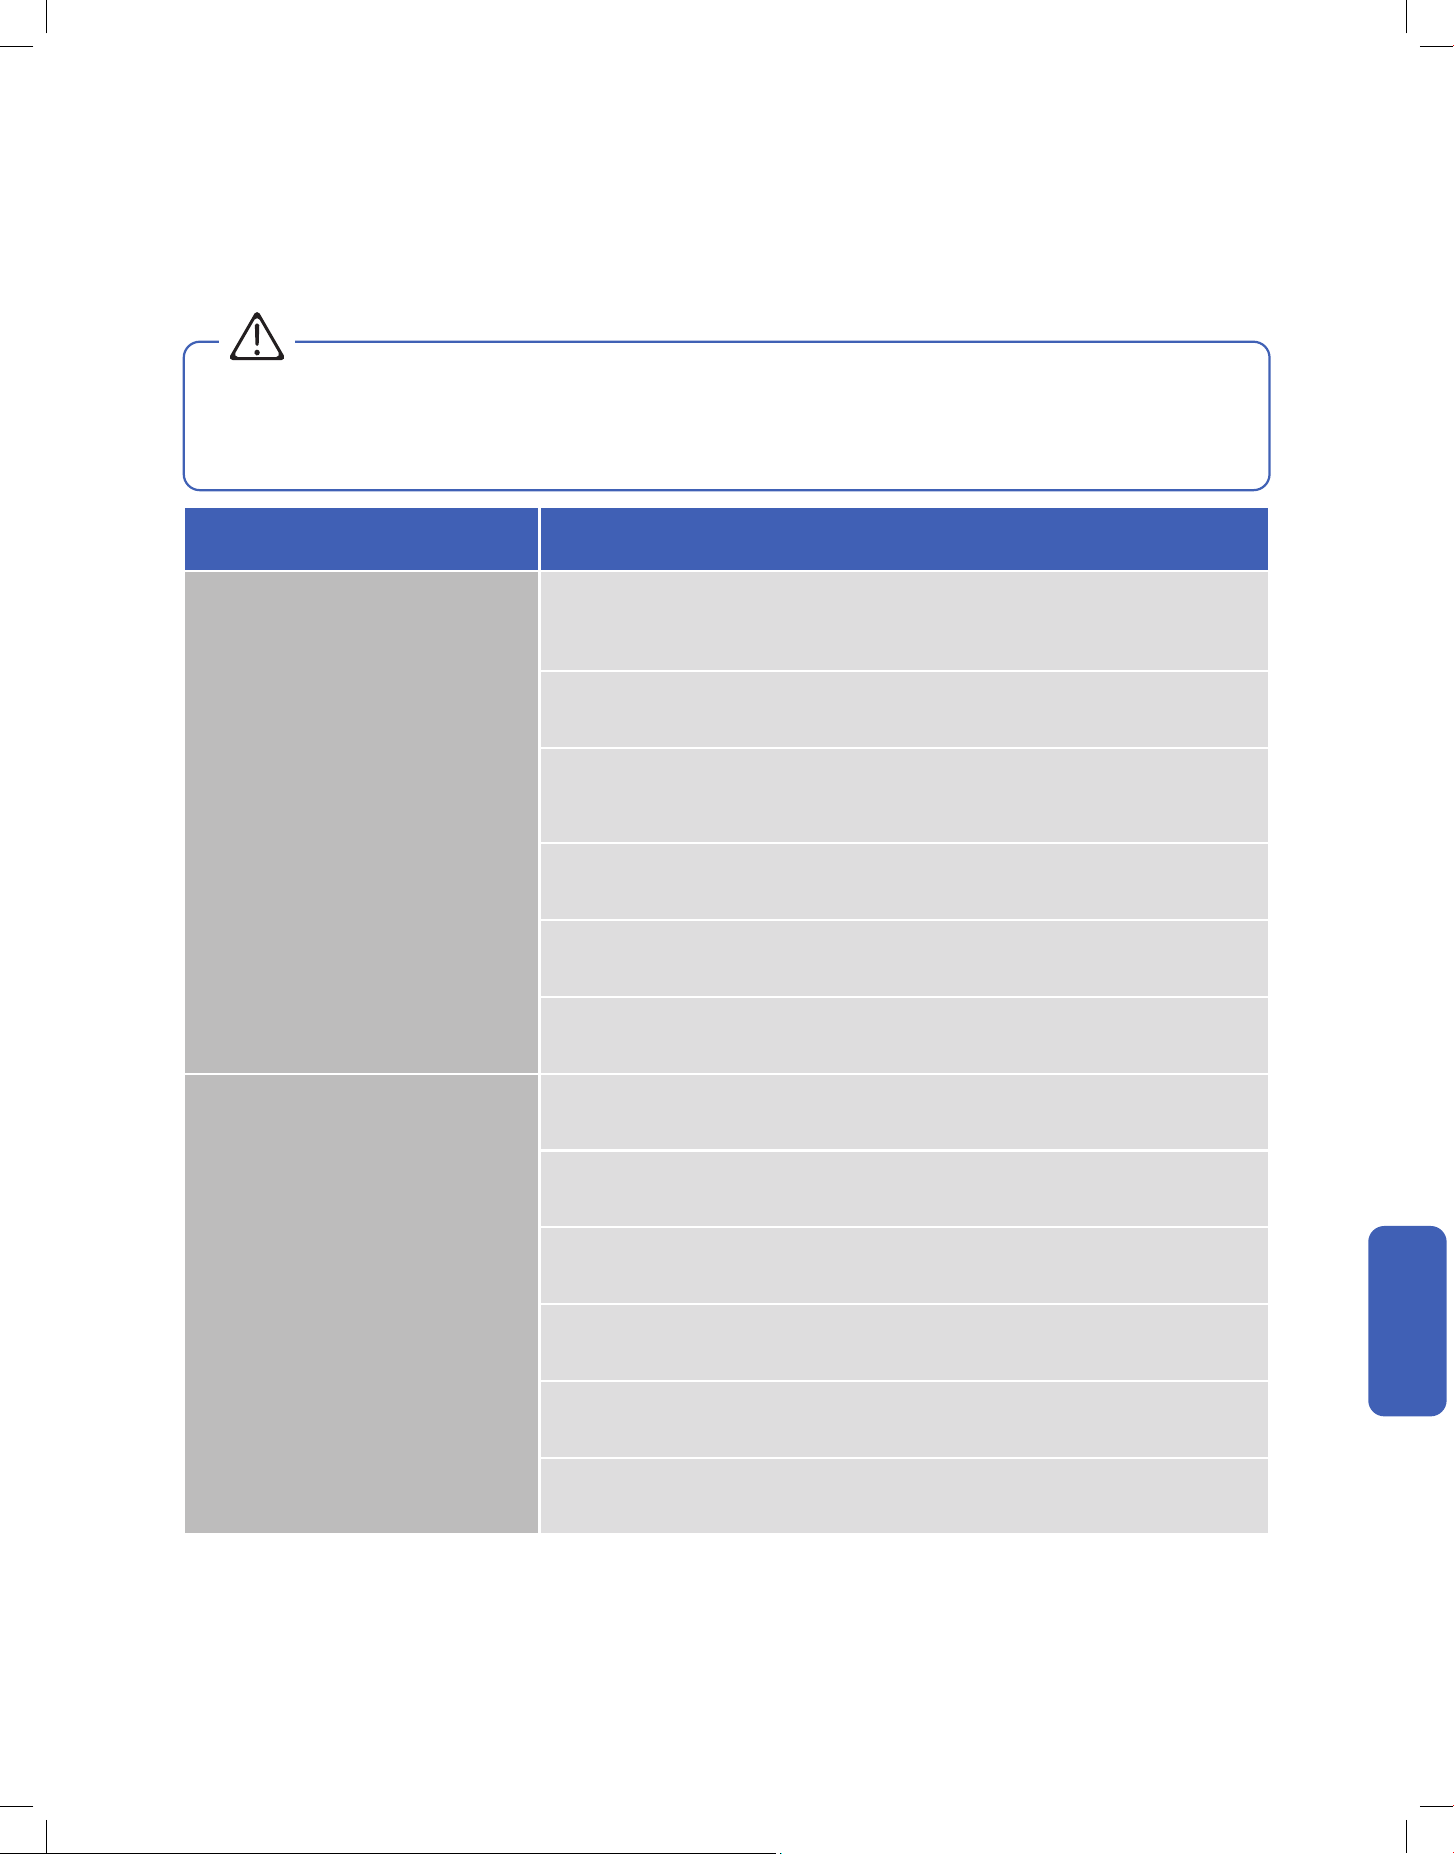
Troubleshooting
Before consulting repair or warranty, please check the following troubleshooting guide.
In the case of an persistent problem, contact a qualified technician for diagnosis and repair.
• When encountering persisting problem, stop operation and turn off the breaker. Continue operation in an abnormal condition may
cause electric shock, fire, or damage to the unit.
• Do not attempt to repair or modify the unit by yourself. Incorrect work may result in electric shock, fire or injury.
WARNING
Problem Possible Cause / Explanation / Solution
The air conditioner is non operational
The power cord is not plugged to a electric outlet.
The house's circuit breaker box tripped. Check and reset the breaker.
When pressing the power button soon after power failure
- The internal protection is activated, wait for a few minutes for the AC to resume normal
operation.
The LCDI plug tripped. Reset the power plug.
Faulty electric connection, mismatch outlet voltage, or damaged electronic control board.
Contact a qualied technician.
Water tank is fulled. Drain the water.
The air conditioner does not cool
Restricted airow. Try clearing any obstacles blocking the air outlet.
Check and make sure the temperature setting is below the room temperature.
Air lter is too dirty. Clean the air lter.
Cold air is leaking out from the room. Close windows to prevent cold air leaking out.
Other heat source in the room. Remove heat source.
Exhaust hose is loose, bent, or obstructed. Check the exhaust hose and window kit and make
sure installation guidance is followed.
30
Having Problems?
Having Problems?
Problem Possible Cause / Explanation / Solution
Strange odor from the air ow
Air lter is too dirty. Clean the air lter.
The smells of the room, furniture, or cigarettes are absorbed into the unit and then discharged.
Remove odorous objects from the room.
Water Leak Water tank is fulled. Drain the water.
Noise or Vibration The air conditioner is placed on uneven ground. Put it on a at surface.
The air conditioner does not respond to the
remote control commands
Remote Control is too far away from the air conditioner.
There is an obstruction between the remote control and the air conditioner..
The battery power has run out in the remote control. Replace the battery.
Troubleshooting
WARNING
Switch off the air conditioner immediately and cut off the power supply in the event of:
• Strange, loud noises during operation.
• Faulty electronic control board.
• Faulty fuses or switches.
• Spraying water or objects inside the appliance.
• Frequent circuit breaker tripped during operation.
• Abnormally hot or damaged power cord or plug.
• Very strong smells discharging from the appliance.
Error Code
Error Code Description
E0 Communication fault between main PCB and display panel
E1 Indoor temperature and humidity sensor fault
E2 Coil temperature sensor failure
F1 / HL Full water tank

31
v.20260130C
Having Problems?
Having Problems?
Disposal Guideline
This appliance contains refrigerant and other potentially hazardous materials. When disposing of the appliance, follow all federal, state, and local
regulations. DO NOT dispose of this product as normal household waste or unsorted municipal waste.
When disposing of this appliance, you have the following options:
• Dispose of the appliance at a designated municipal electronic waste collection facility.
• When buying a new appliance, the retailer will take the old appliance.
• The manufacturer may take back the old appliance.
• Sell the appliance to a certified scrap metal dealer.
32
Warranty
dellahome.com/pages/warranty
Warranty
Warranty
Scan the QR code or visit our page on dellahome.com/pages/warranty to sign up for warranty coverage on your new DELLA appliance.
33
v.20260130C
FCC ID: 2ANDL-WBR3
FCC Caution
This device complies with part 15 of the FCC Rules. Operation is subject to the following two conditions:
(1) This device may not cause harmful interference, and (2) this device must accept any interference received, including interference that may
cause undesired operation. Any changes or modifications not expressly approved by the party responsible for compliance could void the user's
authority to operate the equipment.
NOTE: This equipment has been tested and found to comply with the limits for a Class B digital device, pursuant to Part 15 of the FCC Rules.
These limits are designed to provide reasonable protection against harmful interference in a residential installation. This equipment generates,
uses and can radiate radio frequency energy and if not installed and used in accordance with the instructions, may cause harmful interference
to radio communications. However, there is no guarantee that interference will not occur in a particular installation. If this equipment does cause
harmful interference to radio or television reception, which can be determined by turning the equipment off and on, the user is encouraged to try
to correct the interference by one or more of the following measures:
• Reorient or relocate the receiving antenna.
• Increase the separation between the equipment and receiver.
• Connect the equipment into an outlet on a circuit different from that to which the receiver is connected.
• Consult the dealer or an experienced radio / TV technician for help.
Radio Frequency Interference
Model: 048-DPAC-8 / 048-DPAC-10
Compliance Information
34
Memo


© Della All rights reserved.
The design and specications are subject to change without prior
notice for product improvement. Any updates to the manual will be
uploaded to the della website.
www.dellahome.com
support@dellahome.com
800–863–4143
6:00 a.m. – 4:00 p.m. PST Monday – Friday