
Technical Support and E-Warranty Certificate www.vevor.com/support
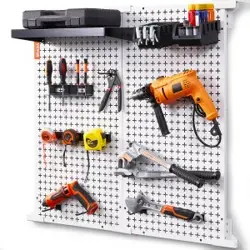
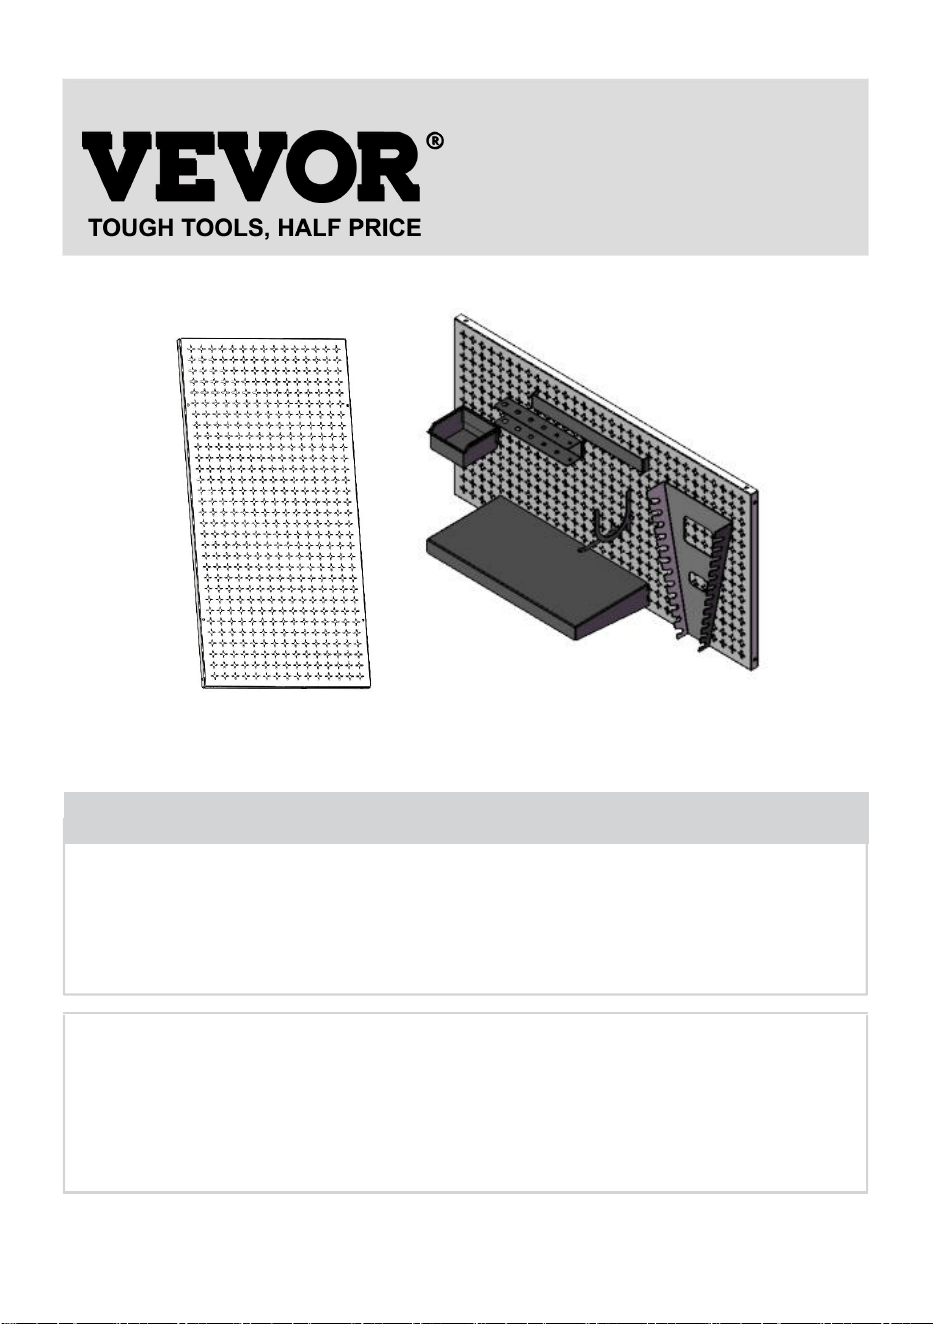
PEGBOARD
USER MANUAL
We continue to be committed to provide you tools with competitive price.
"Save Half", "Half Price" or any other similar expressions used by us only represents an
estimate of savings you might benefit from buying certain tools with us compared to the major
top brands and does not necessarily mean to cover all categories of tools offered by us. You
are kindly reminded to verify carefully when you are placing an order with us if you are
actually saving half in comparison with the top major brands.

- 1 -
MODEL:HB641601,HB641602,HB9632
Have product questions? Need technical support? Please feel free to
contact us:
Technical Support and E-Warranty Certificate
www.vevor.com/support
NEED HELP? CONTACT US!
This is the original instruction, please read all manual instructions
carefully before operating. VEVOR reserves a clear interpretation of our
user manual. The appearance of the product shall be subject to the
product you received. Please forgive us that we won't inform you again if
there are any technology or software updates on our product.
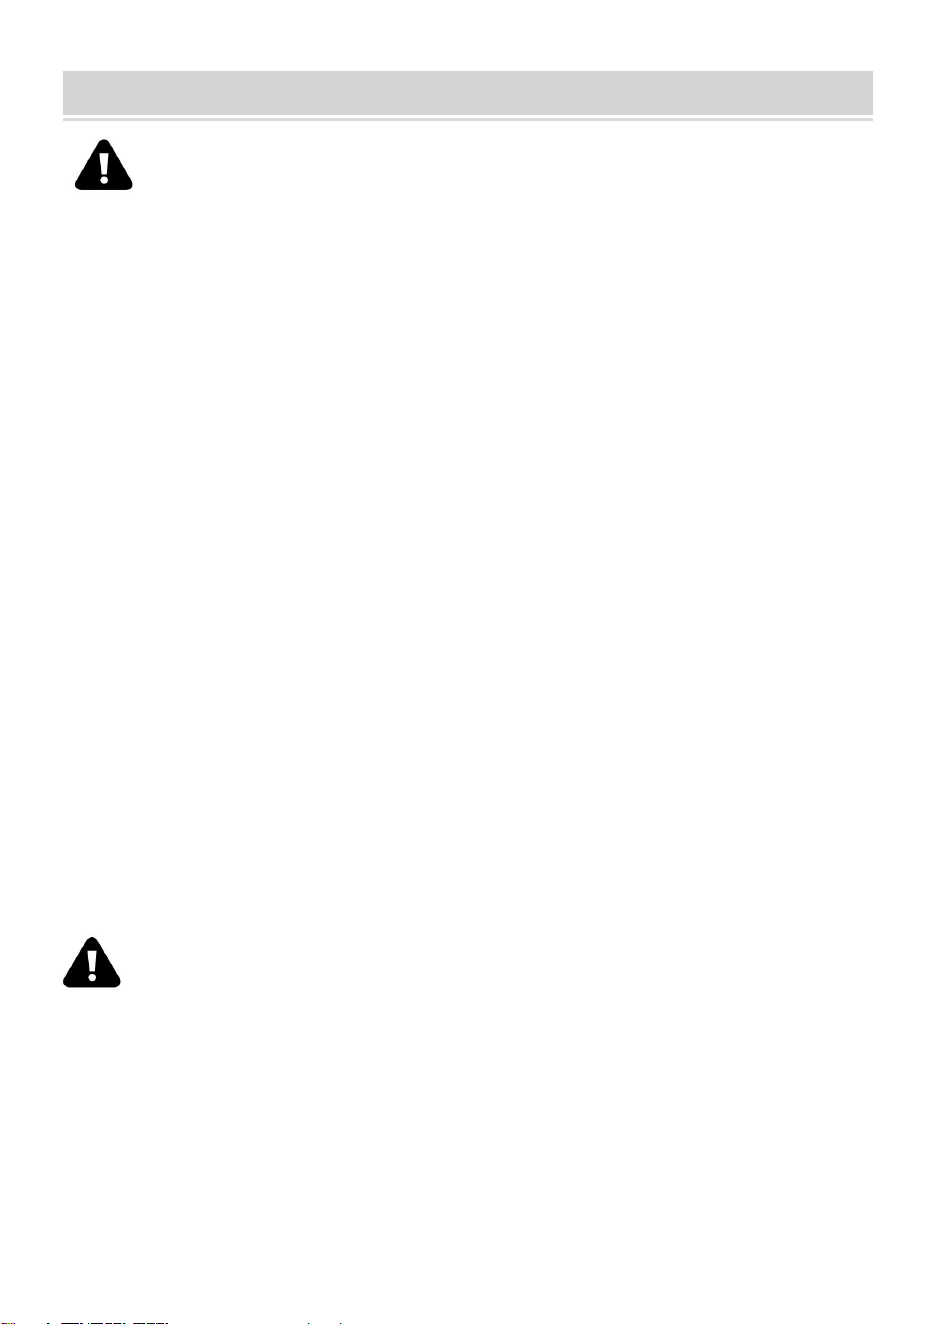
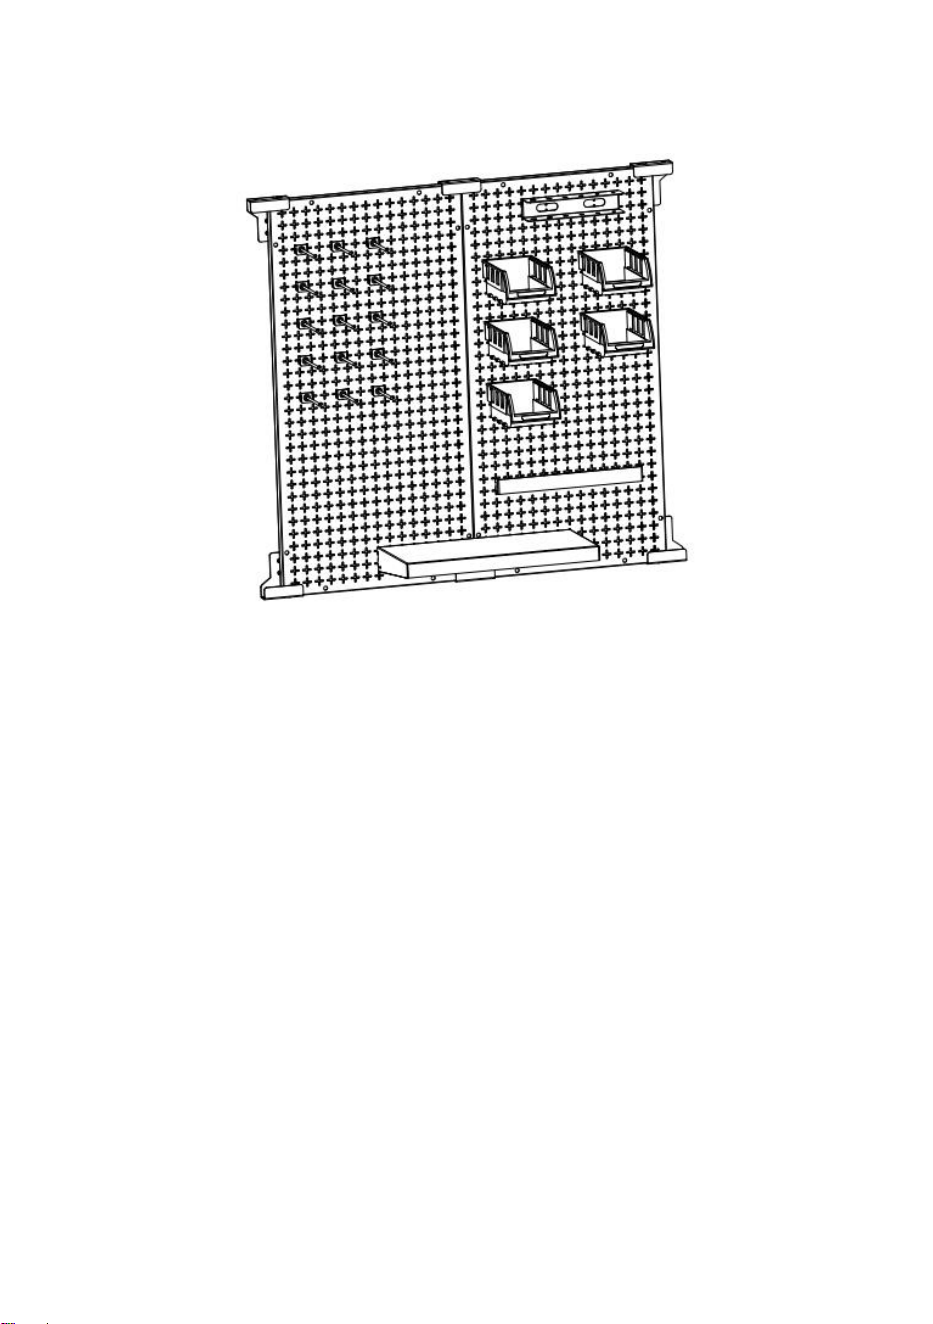
PEGBOARD
- 2 -
SAFETY INSTRUCTIONS
WARNING:
1.Read this material before using this product. Failure to do so can result in
serious injury.
2. Do not exceed working capacity for pallet fork.
3. After use, please dry before storage to avoid rusting of product.
4. Procedures not specifically explained in this manual must be performed
only by a qualified technician.
To prevent serious injury from tool failure,do not use when it is
damaged:
The pegboard must be mounted on a solid wall.
The pegboards shall not be installed on too thin wooden walls.
The pegboards shall not be installed on rotten or loose wooden walls.
The weight of the items to be hung shall not exceed the load of the
pegboard.
When replacing the hook, it must be selected to match the size of the
pegboard.
Avoid sharp points, blades, and other items to scratch the product
CAUTION:
Carefully read instructions and procedures for safe operations.
Save This Manual
- 3 -
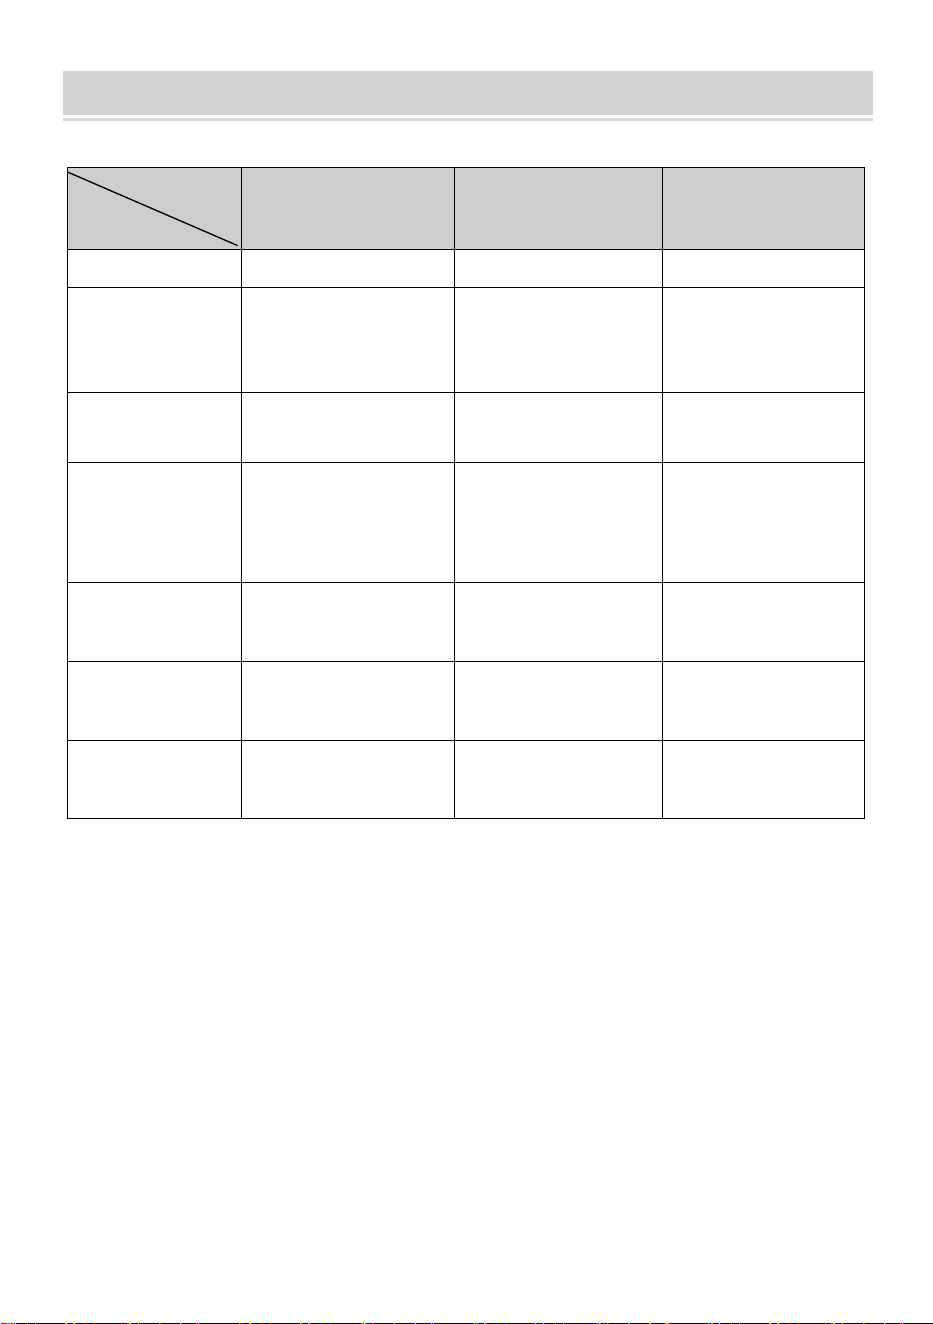
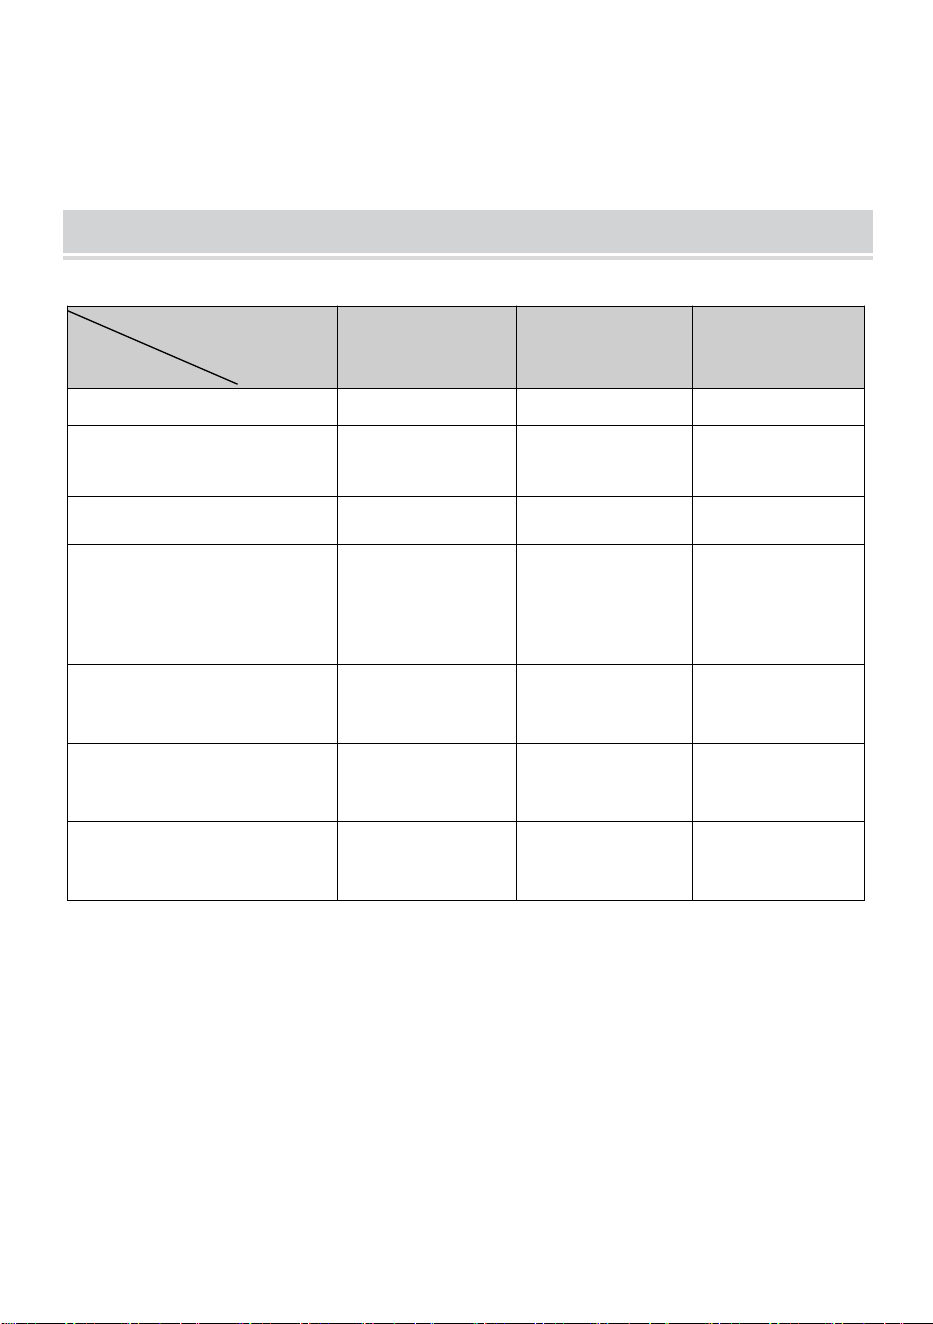
MODEL AND PARAMETERS
HB641601
HB641602
HB9632
Material
Steel
Steel
Steel
Max.Weight
Capacity(single
pegboard)
165lbs
165lbs
165lbs
Pegboard
Size(L*W)
32”*16”
32”*16”
32”*16”
Hole Spec.
1/4
”
1/4
”
1/4
”
Sheet Thickness
1.0mm
1.0mm
1.0mm
Surface Treatment
(pegboard)
Galvanization+Powder
Spraying
Galvanization+Powder
Spraying
Galvanization+Powder
Spraying
Color
white
white
white
Model
SPEC.
- 4 -
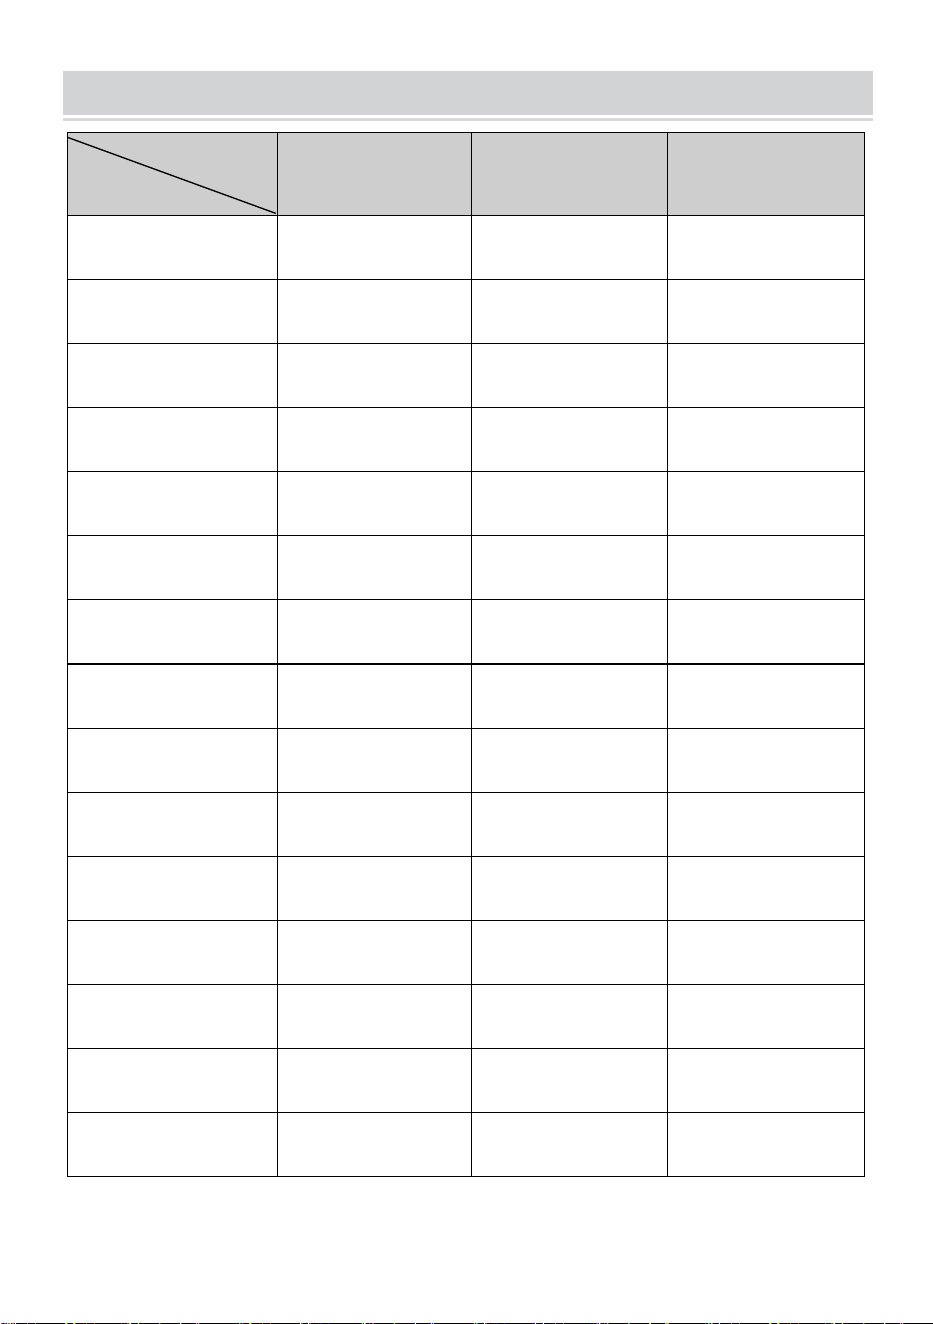
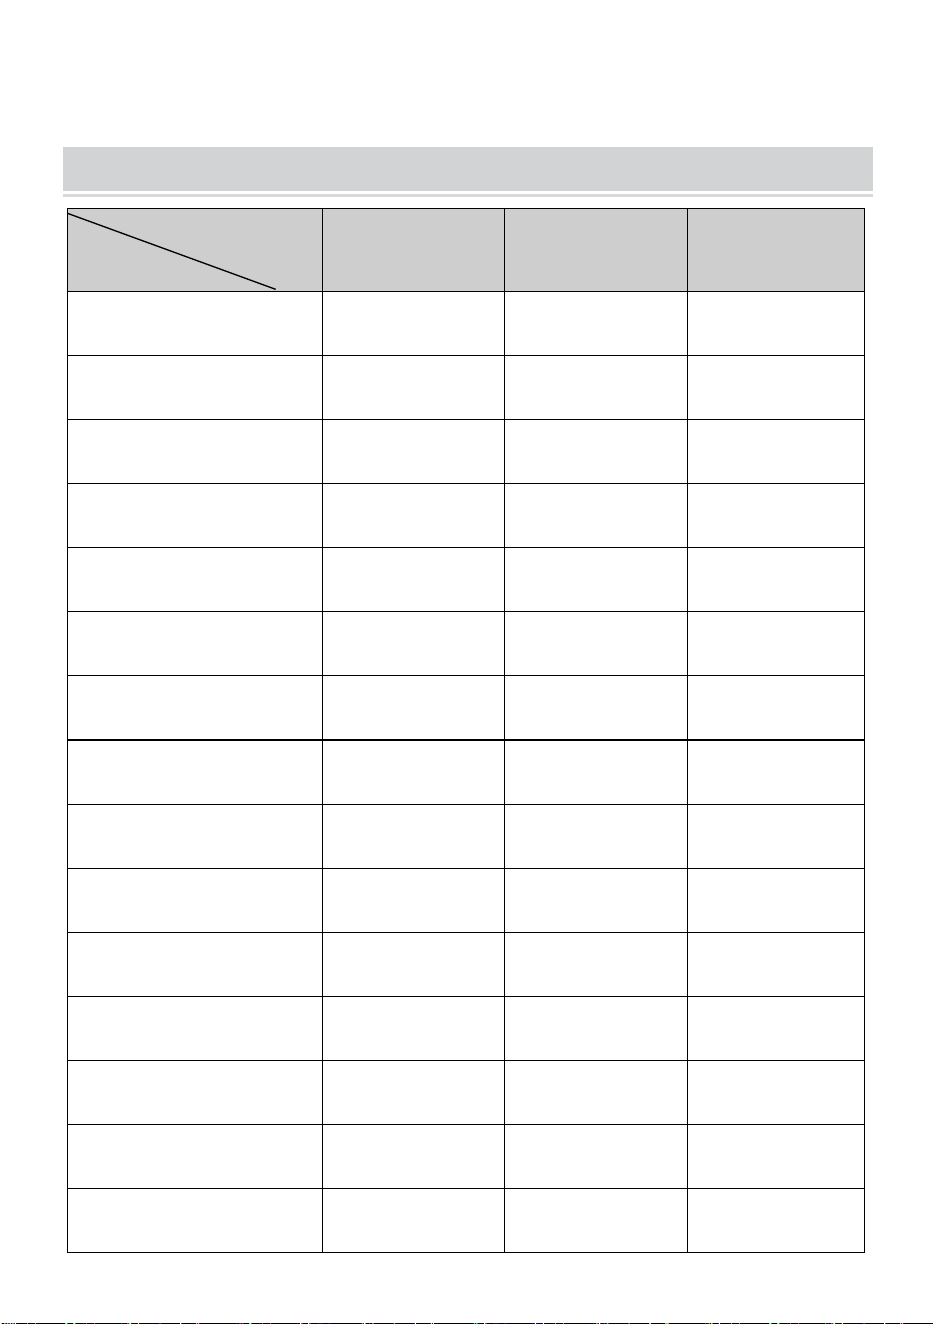
COMPONENTS
HB641601
HB641602
HB9632
Pegboard
×2
×2
×3
Hook
/
×15
×20
Storage Box
/
×5
×5
Storage Box Holder
/
×5
×5
Screwdriver Holder
/
×1
×1
Rack
/
×1
×1
Shelf
/
×1
×2
Mounting Block
/
×6
×8
U Hook
/
/
×4
Wrench Holder
/
/
×1
Limit Plug
/
×8
×12
Expansion Plug
×8
×12
×16
Self-tapping Screw
×8
×12
×16
Positioning Cardboard
/
×1
×1
User's Manual
×1
×1
×1
Model
Parts

- 5 -
INSTALLATION INSTRUCTION
Installation Preparation:
1. Two or more people to assemble the pegboard.
2. Please prepare a carpet or mat to protect your floor you need to spread
out all the accessories.
3. Please prepare gloves to avoid being scratched by sharp parts that may
occur during installation.
4. Please open all the boxes to check if the accessories are complete and
in good condition.
5. If you need to use power tools to install this product, please set the
speed to low speed in advance.
6. When installing, please align all the holes and do not tighten all the
screws first, otherwise, it may make the installation difficult.
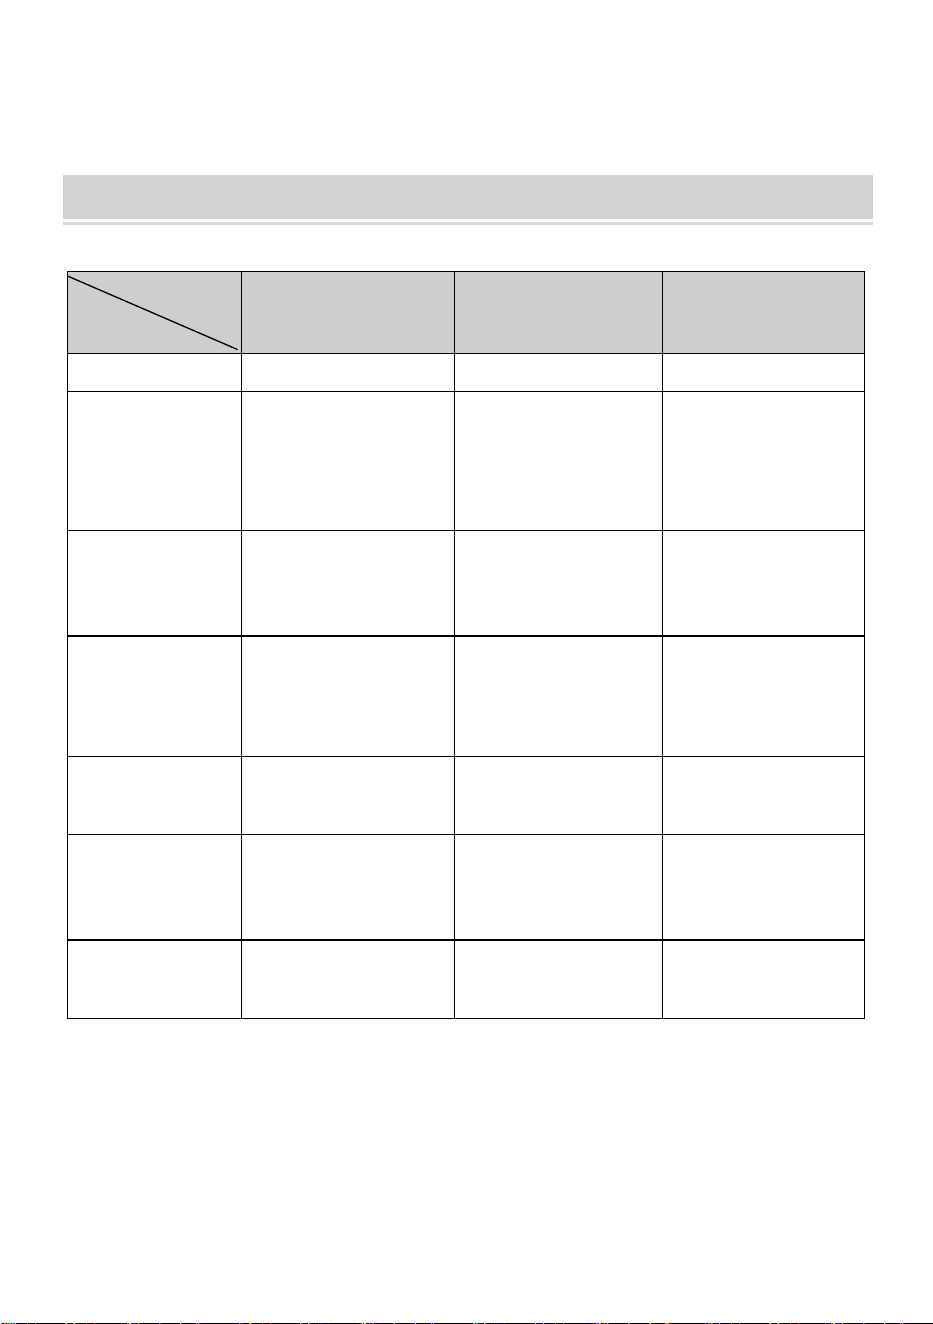
For Concrete Wall Installation
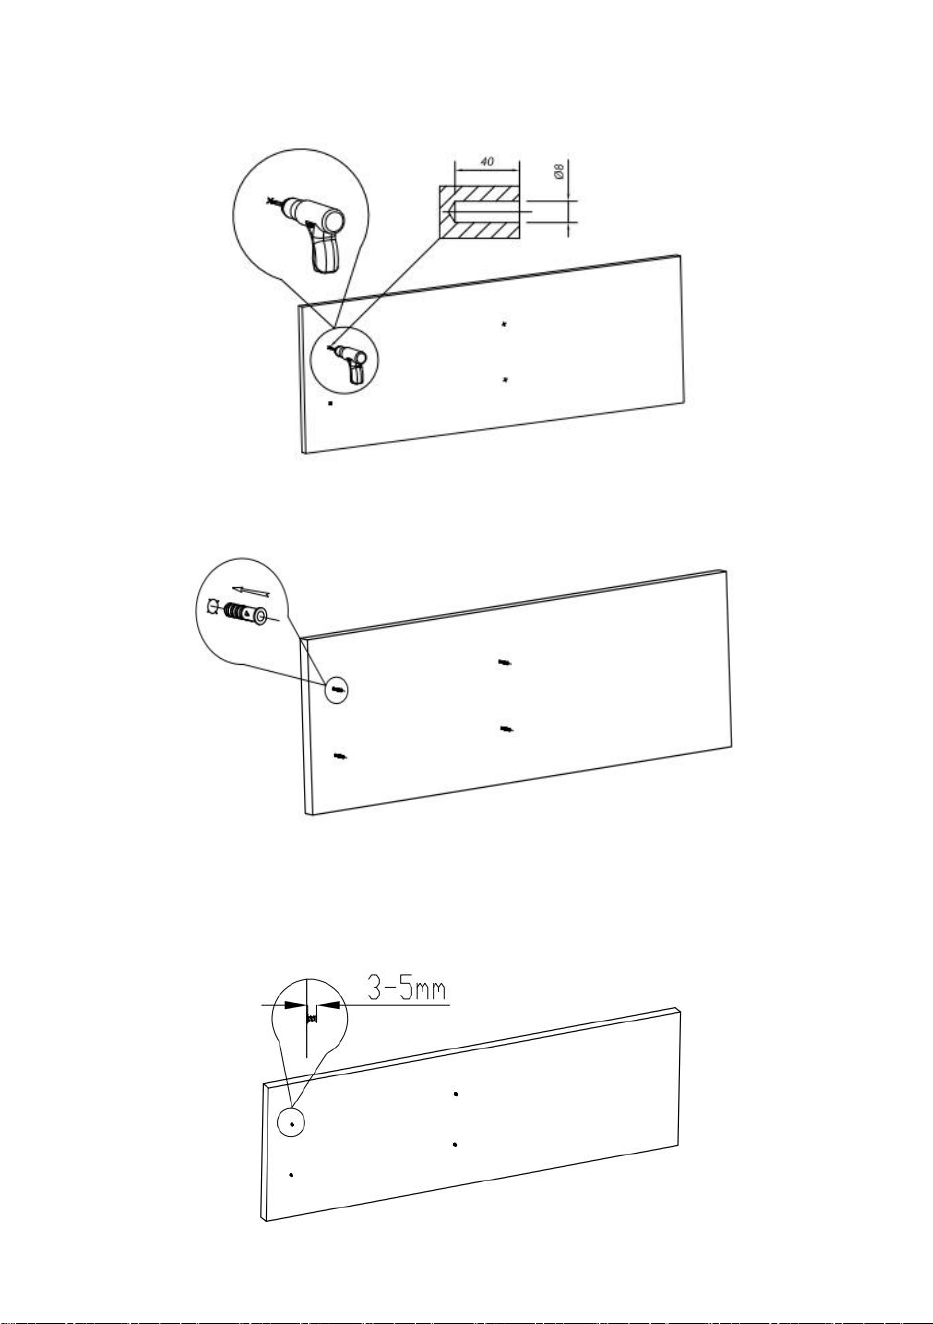
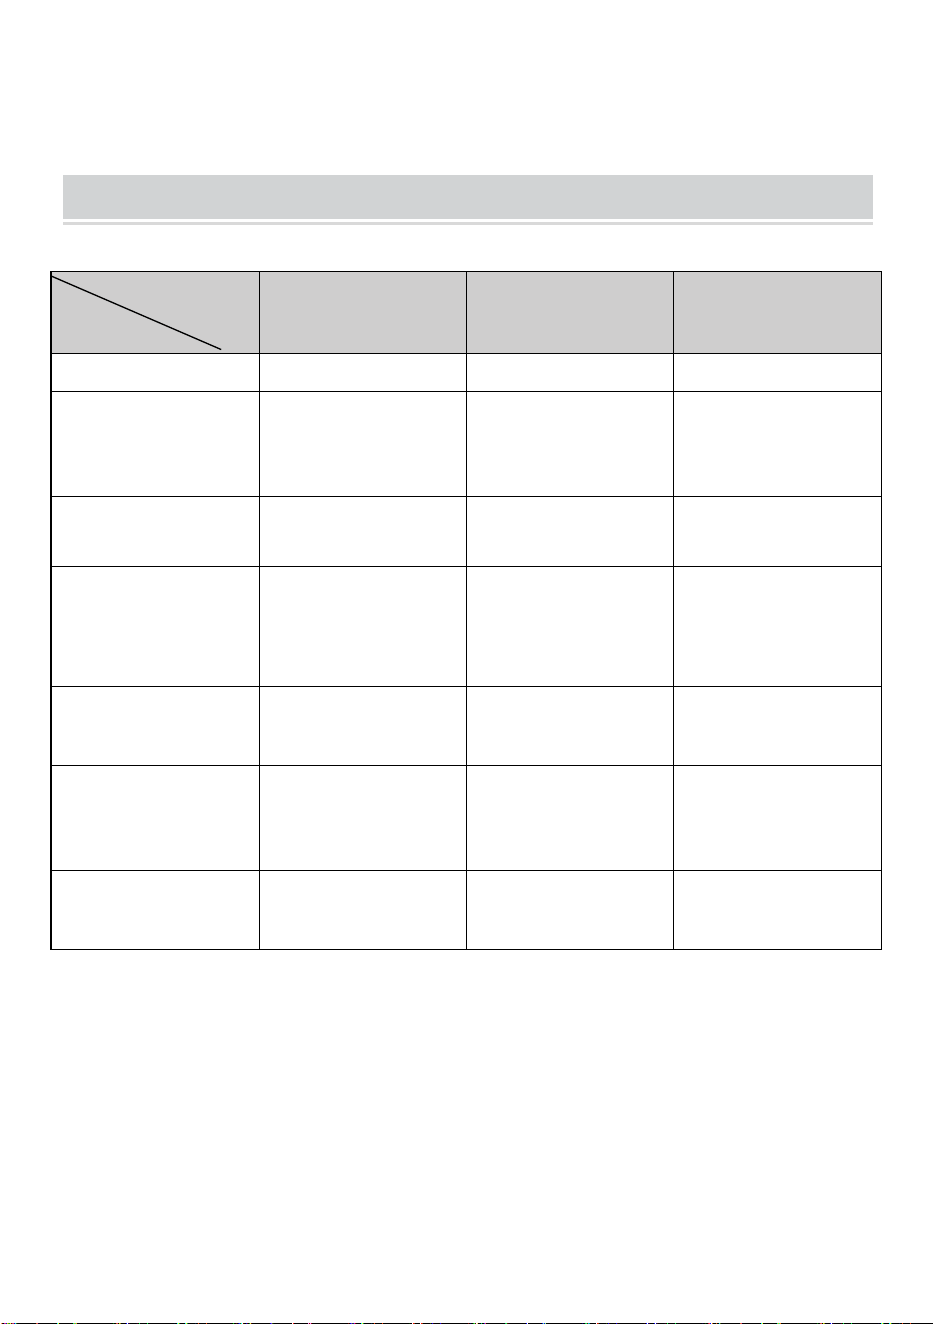
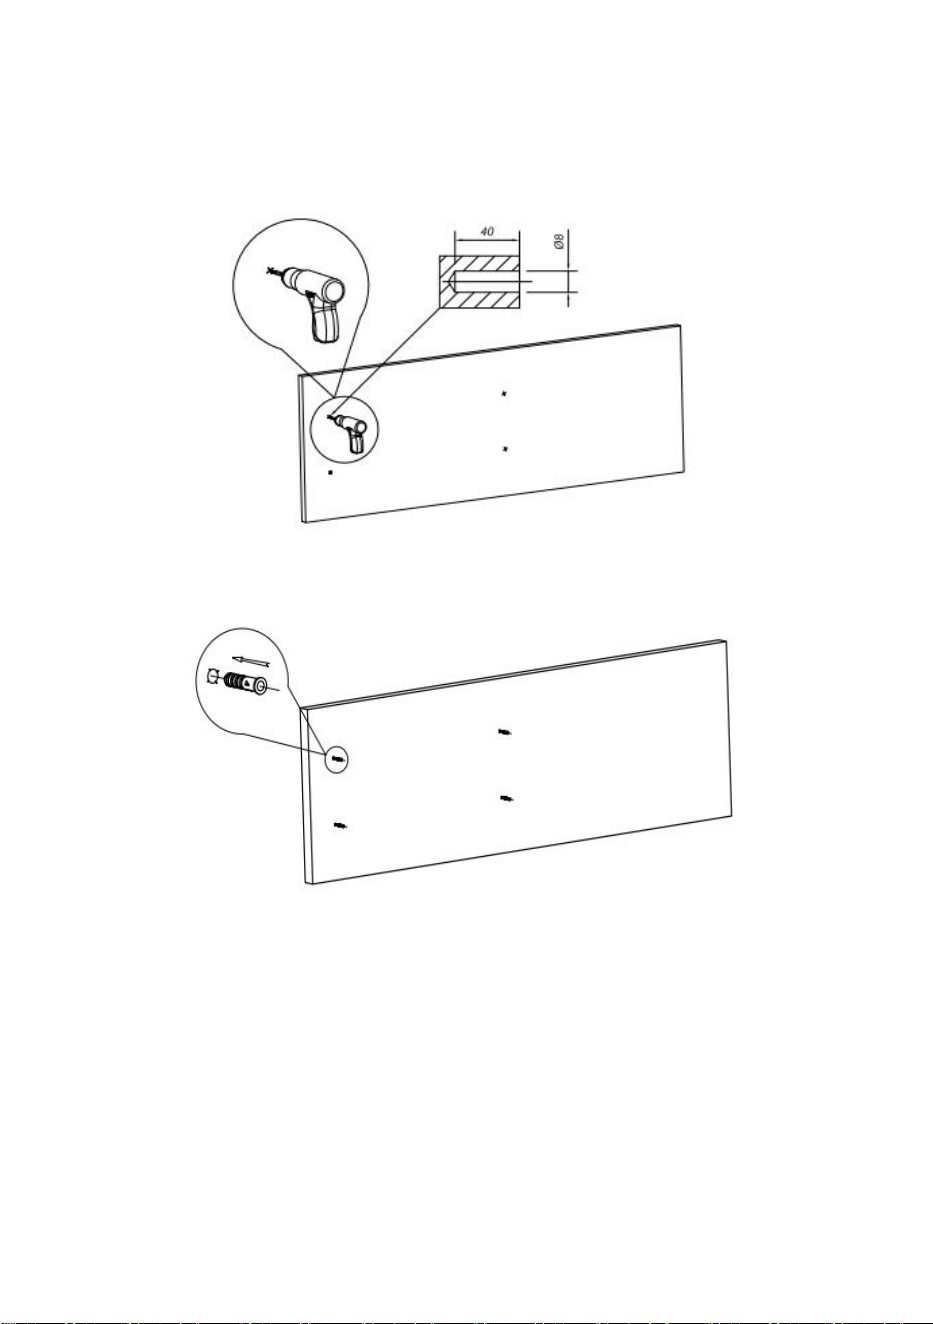
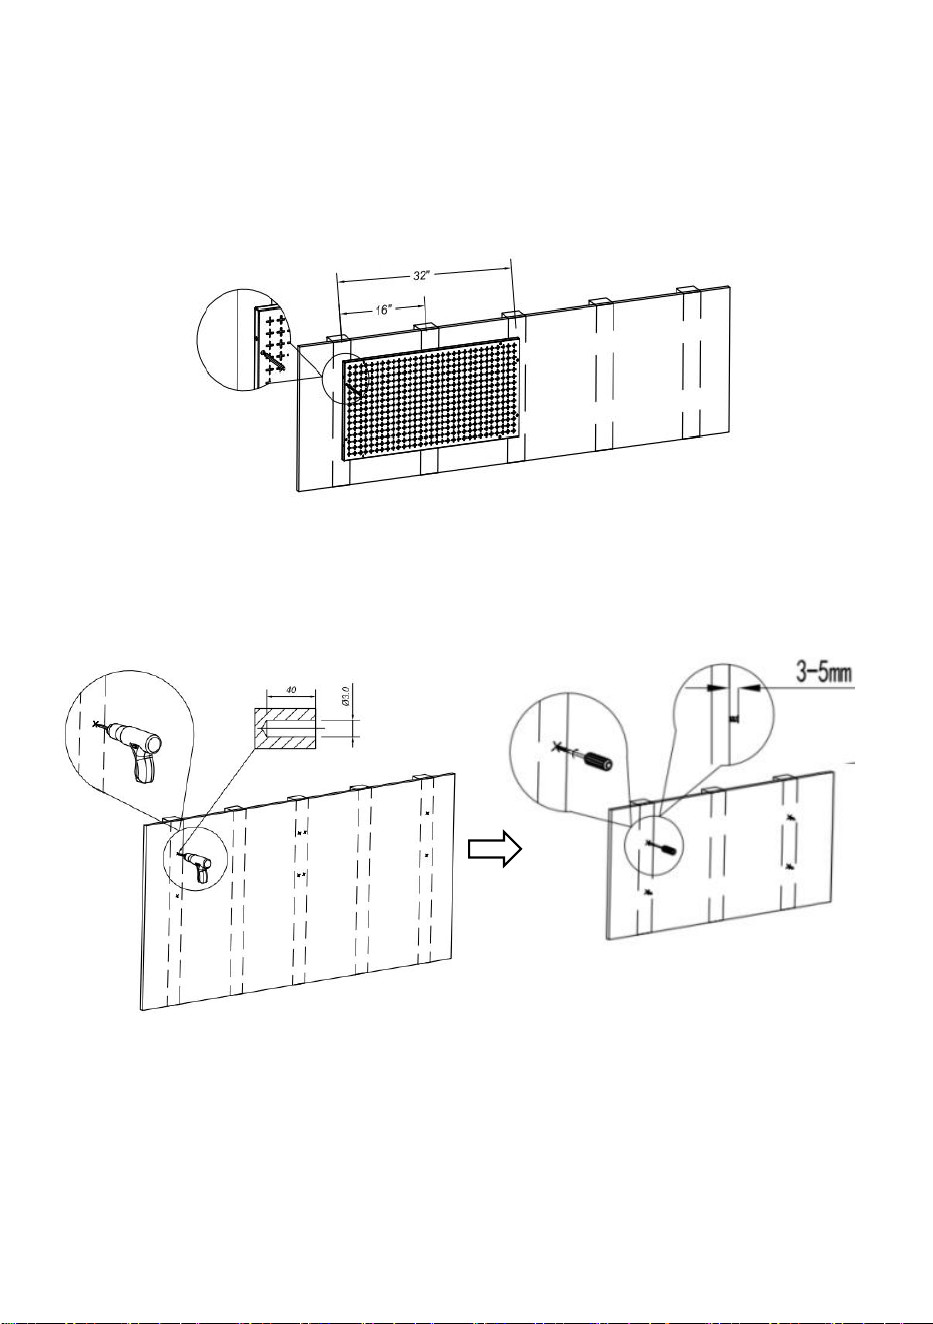
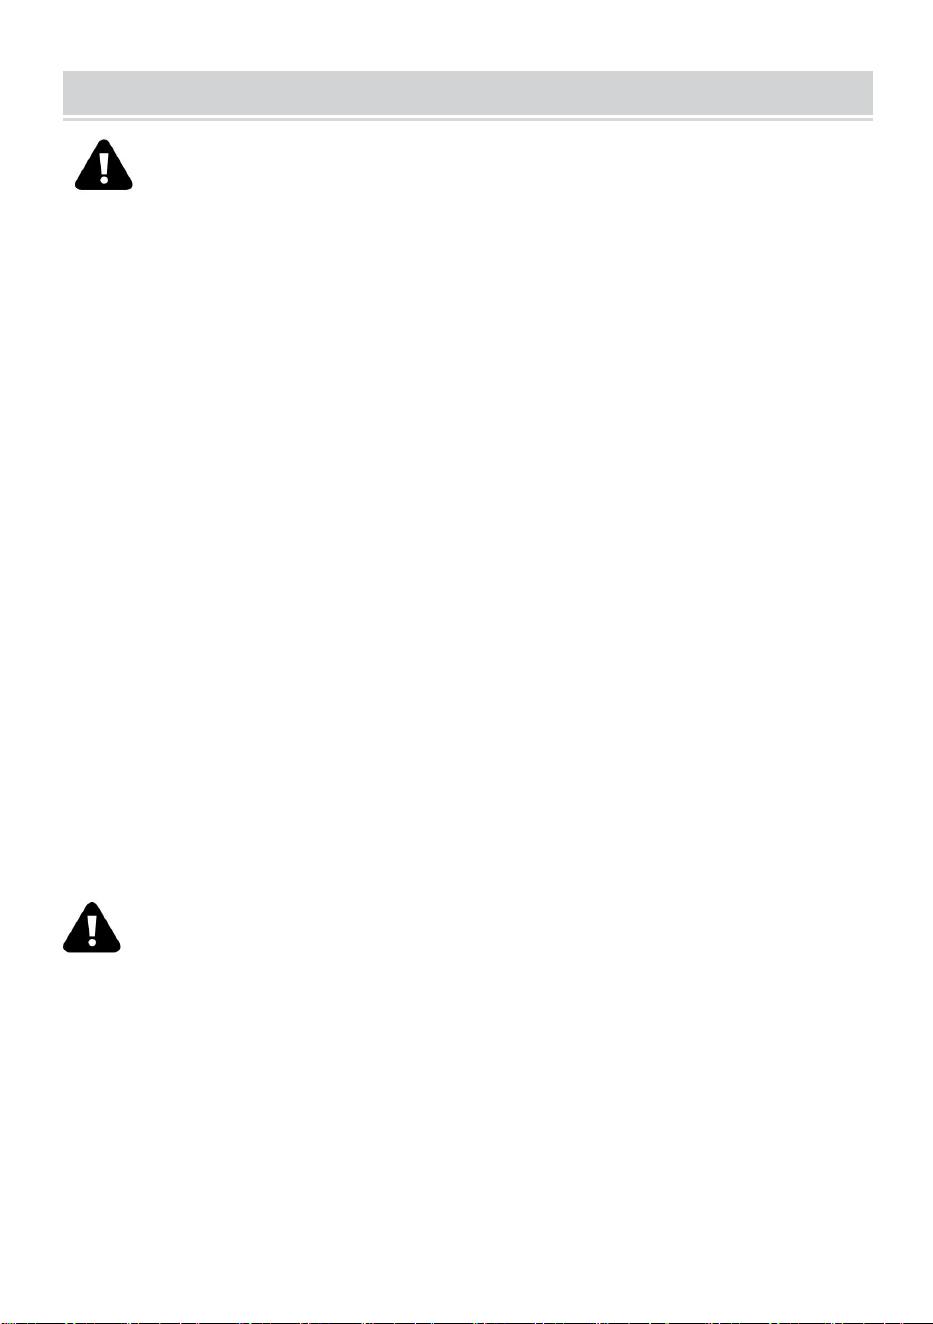
STEP 1: Place the hanging board near the installed wall and mark the
holes with a fine nail or pencil.(Note:Two holes on the left, two holes on the
right)
- 6 -
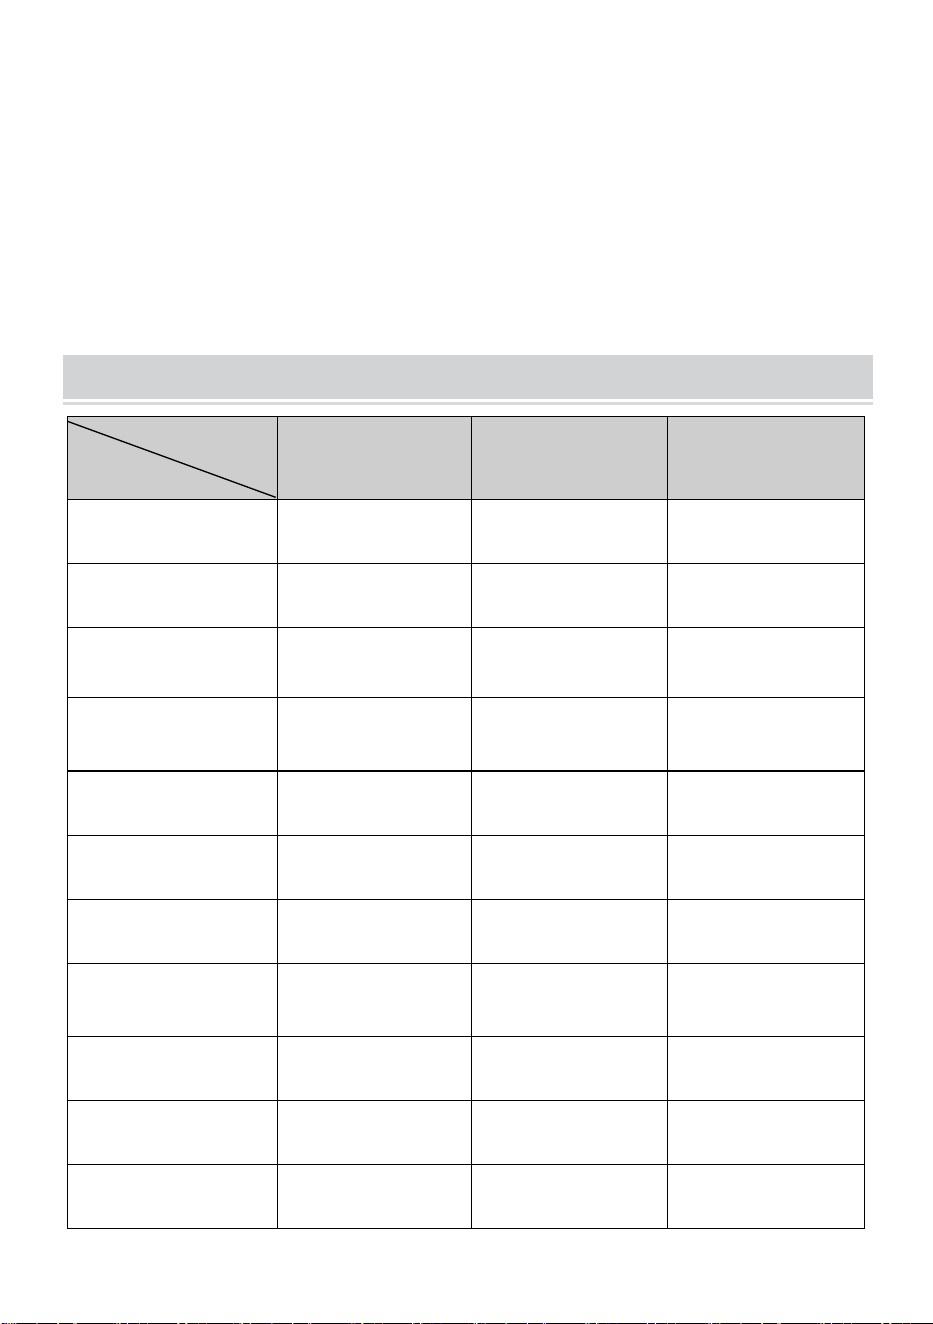
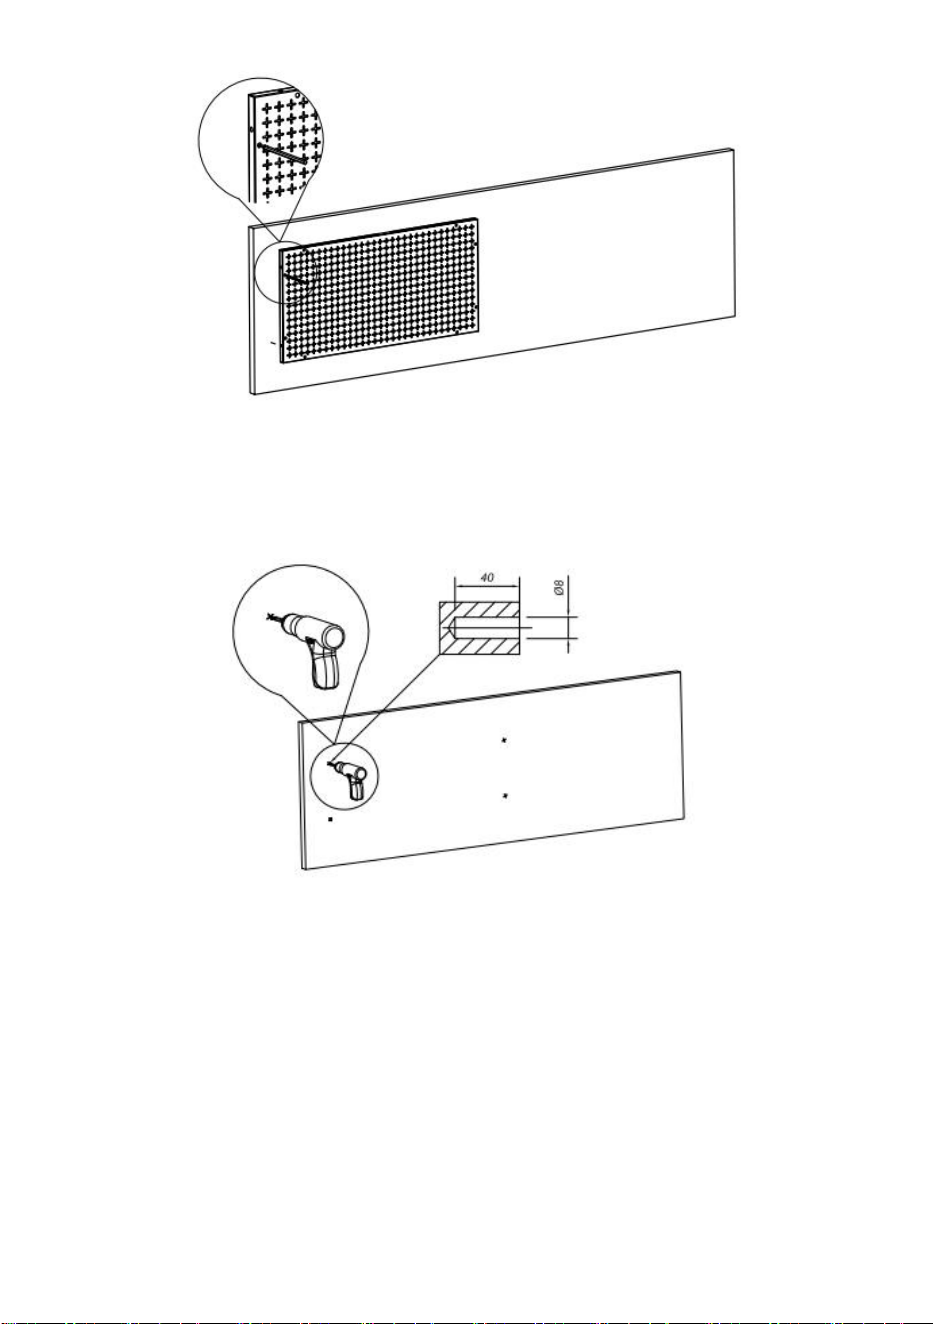
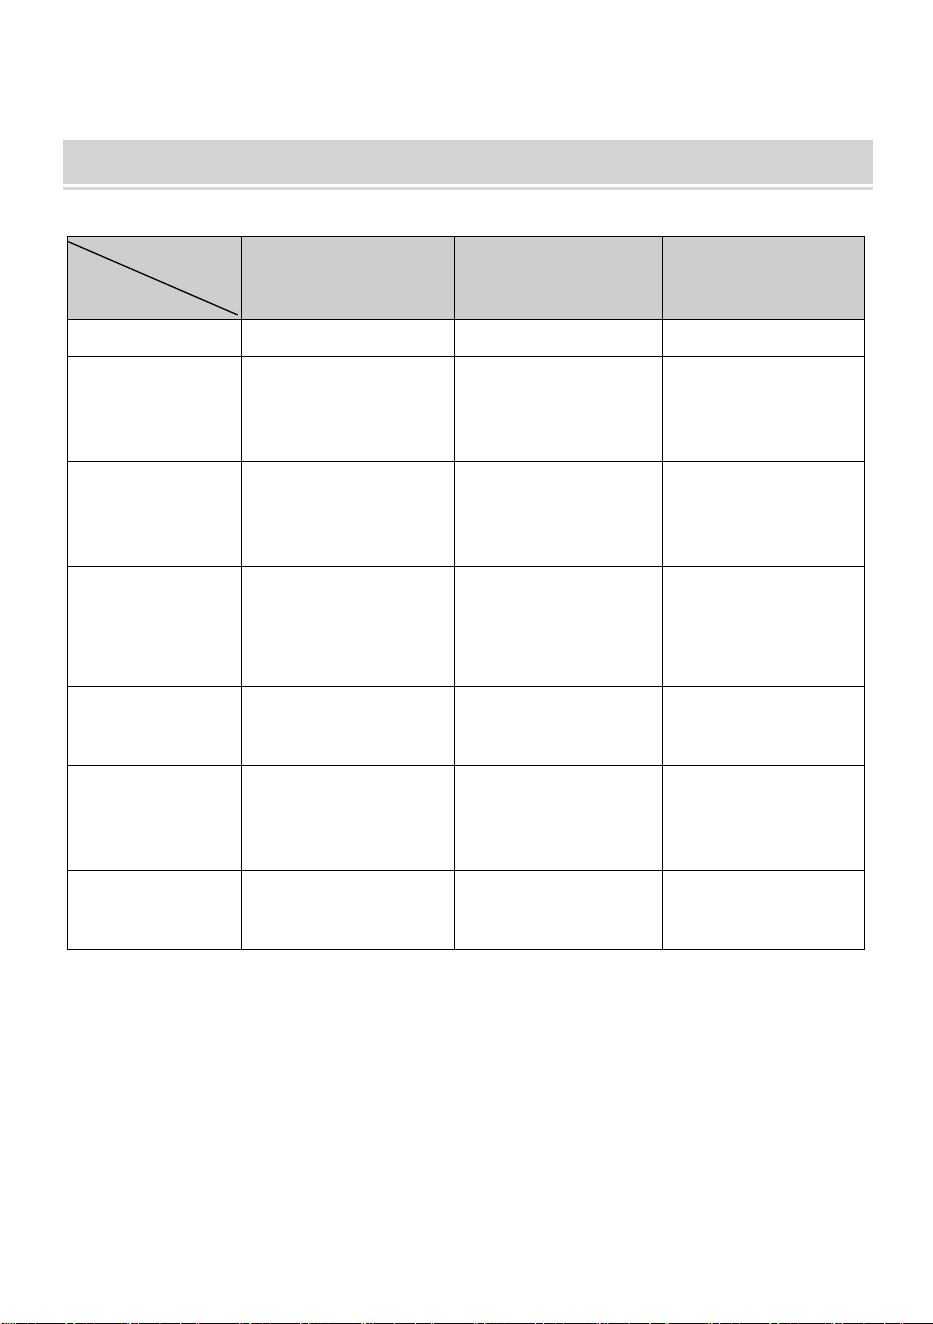
STEP 2: Drill holes 8mm in diameter and 40mm in depth at the marked
places.(Note: Prepare your own drilling tools.)
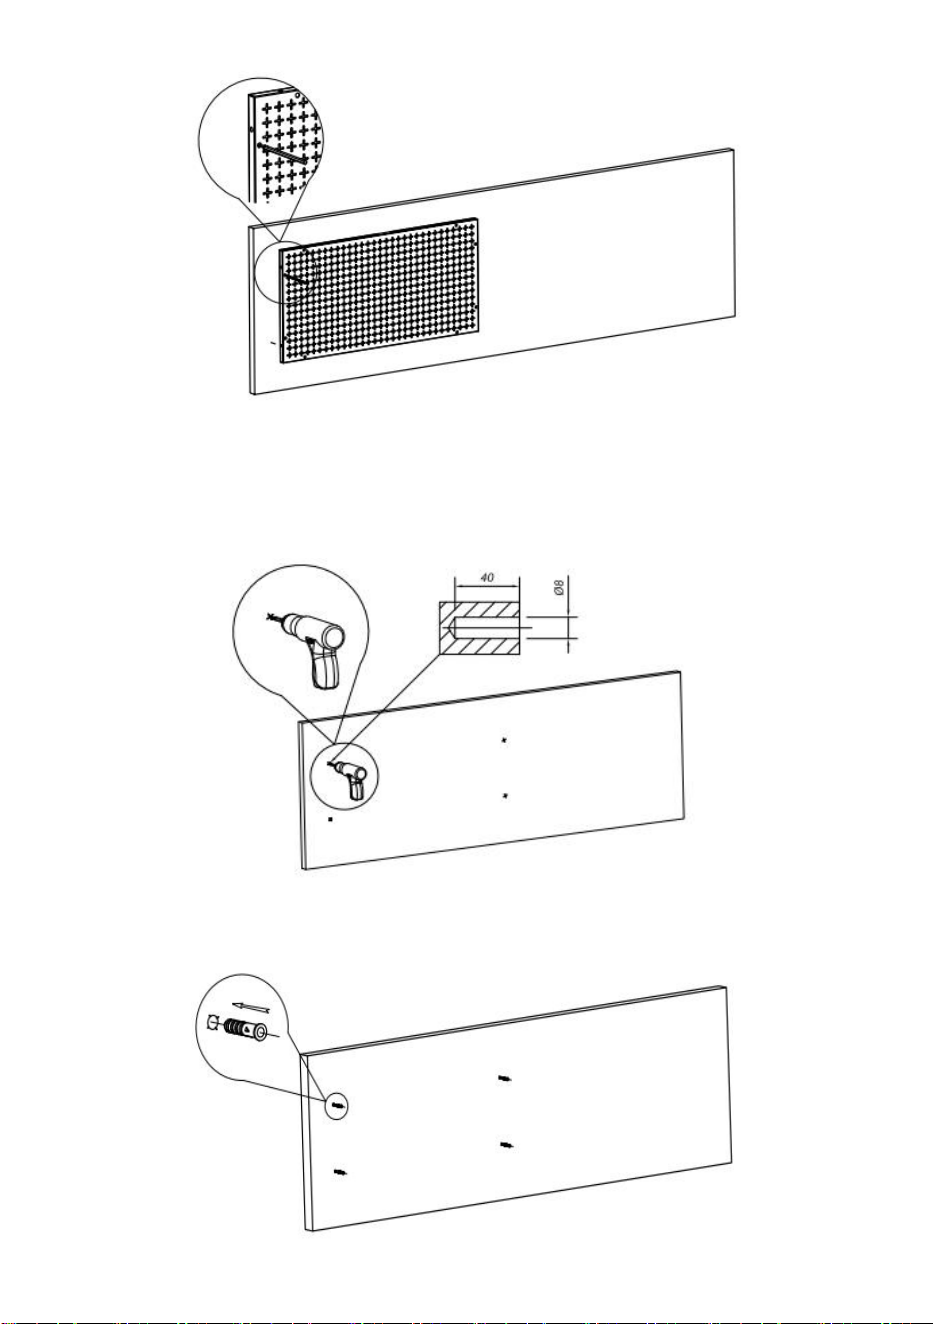
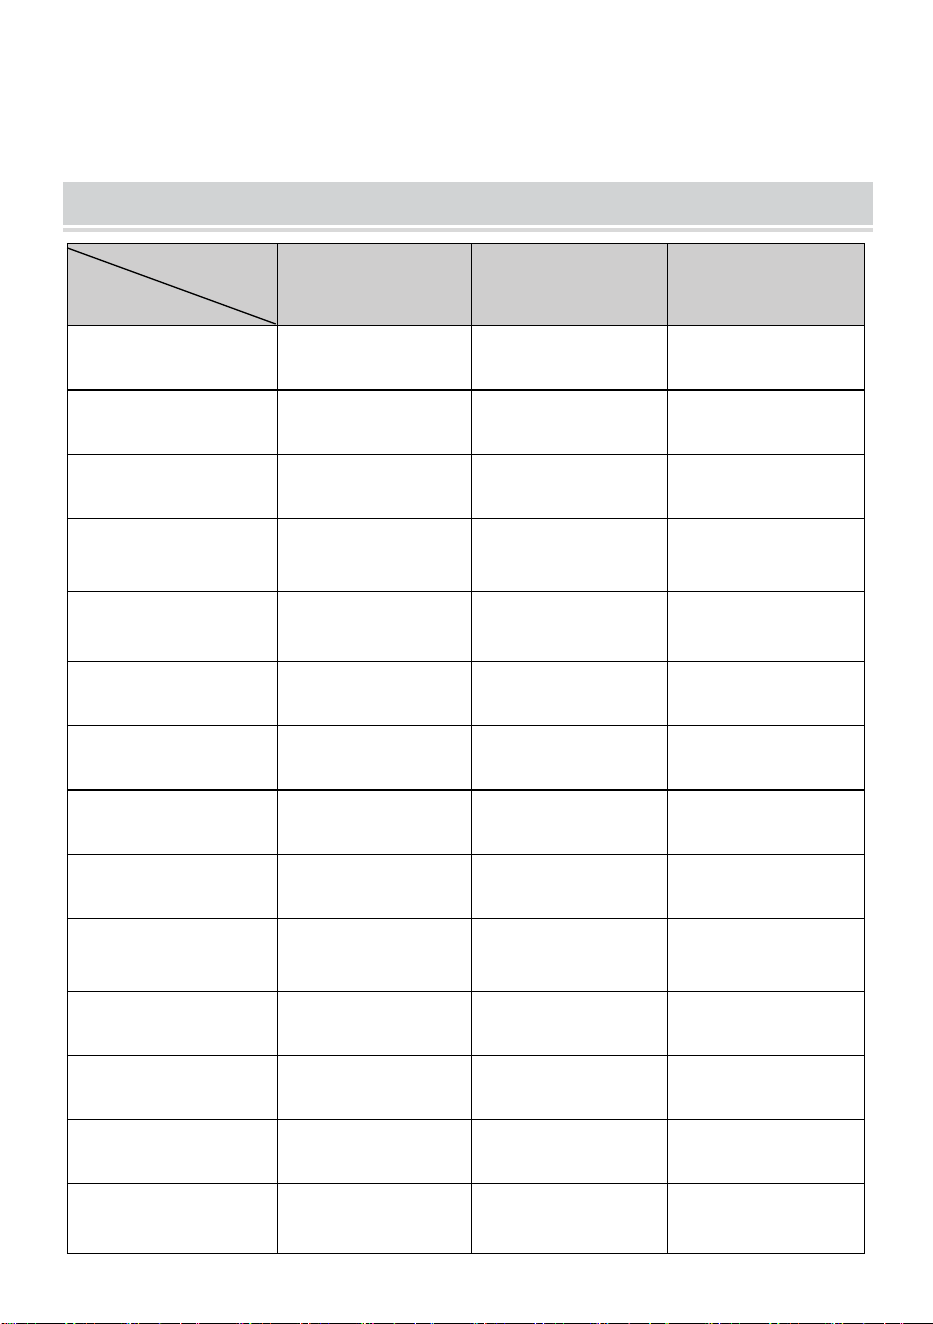
STEP 3: Nail the four expansion plugs completely into the hole.
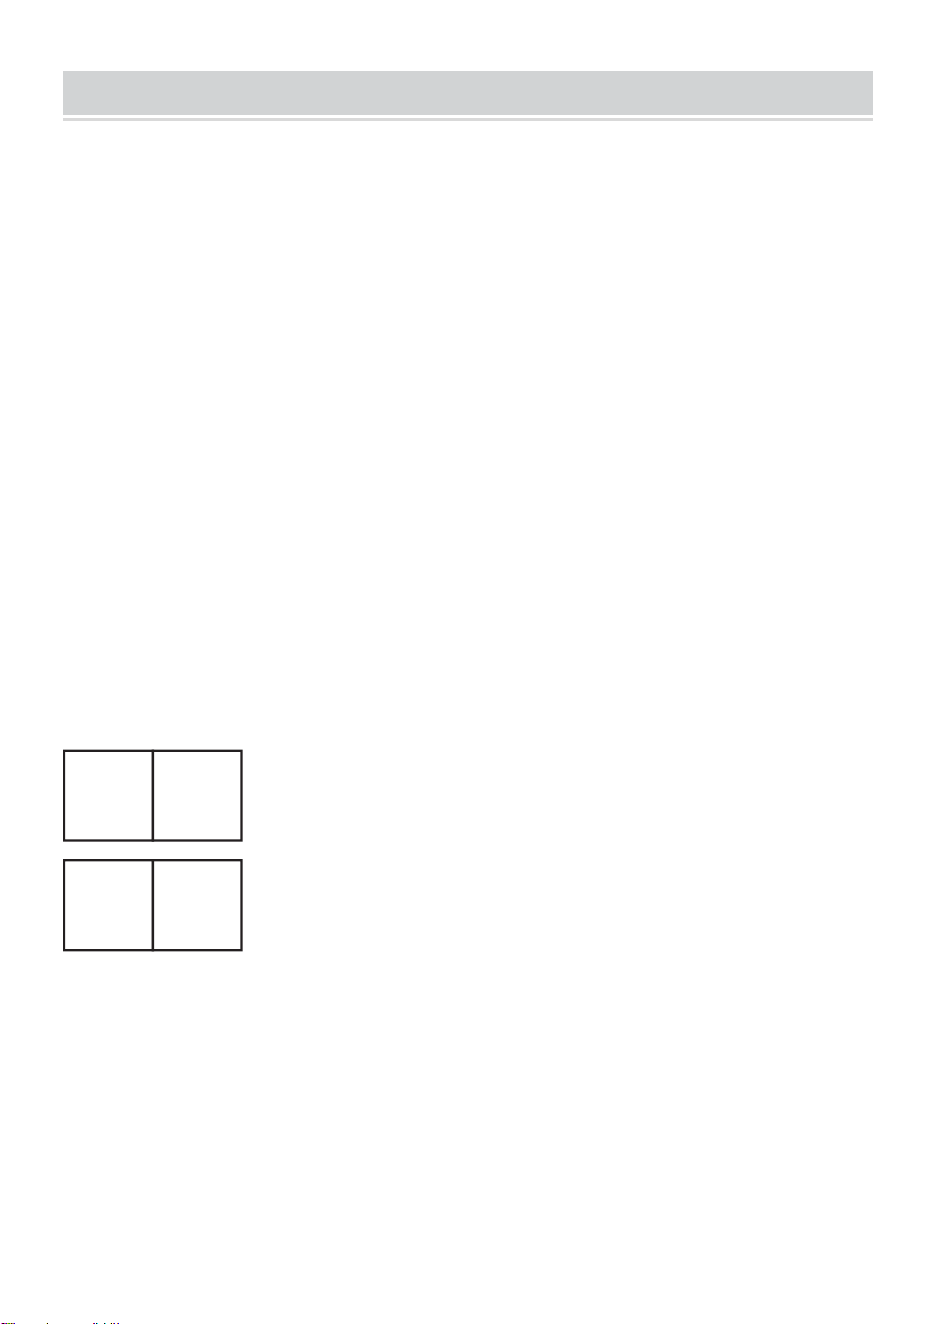
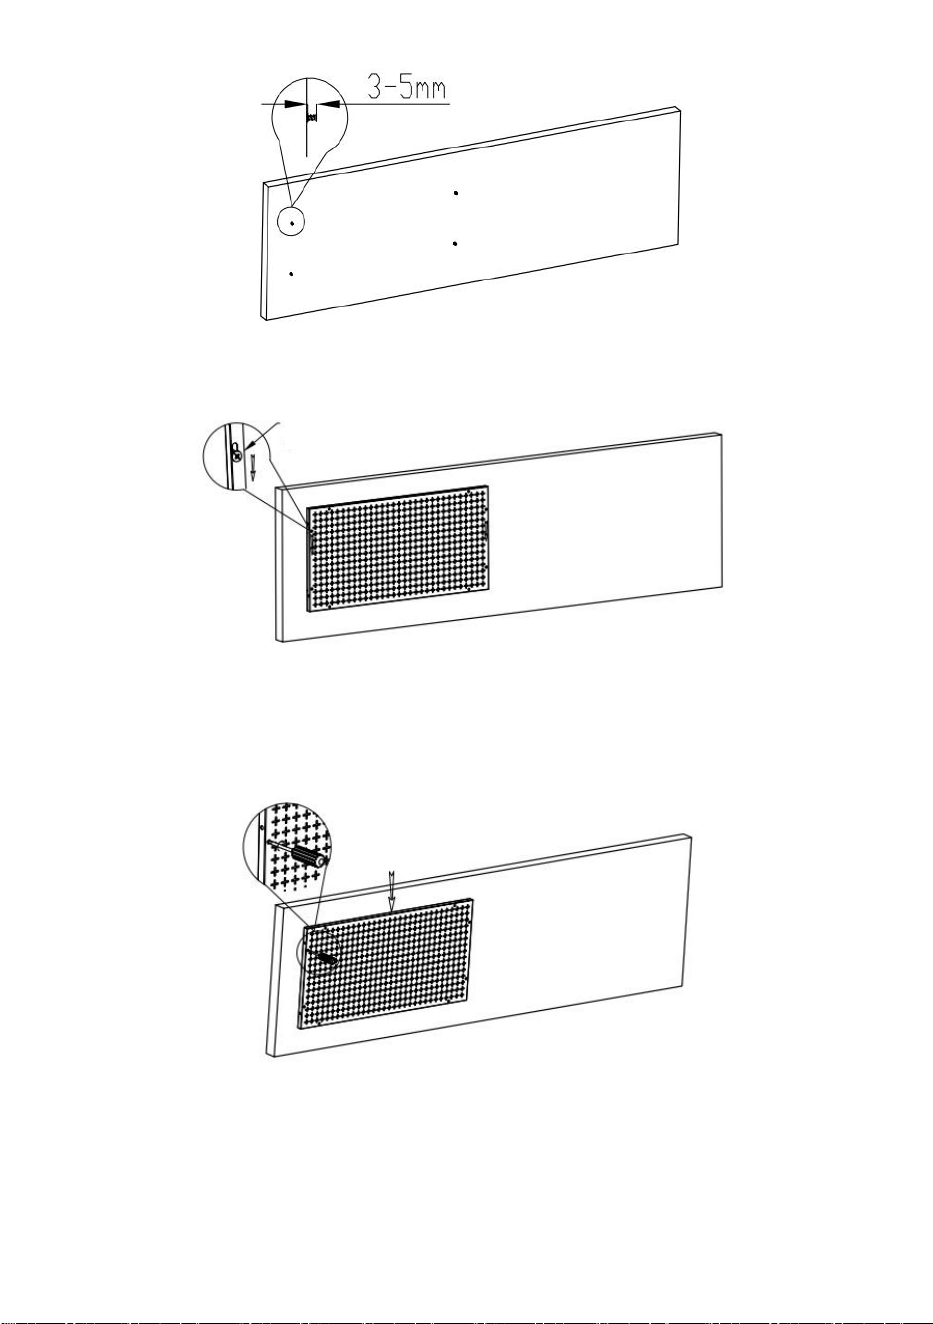
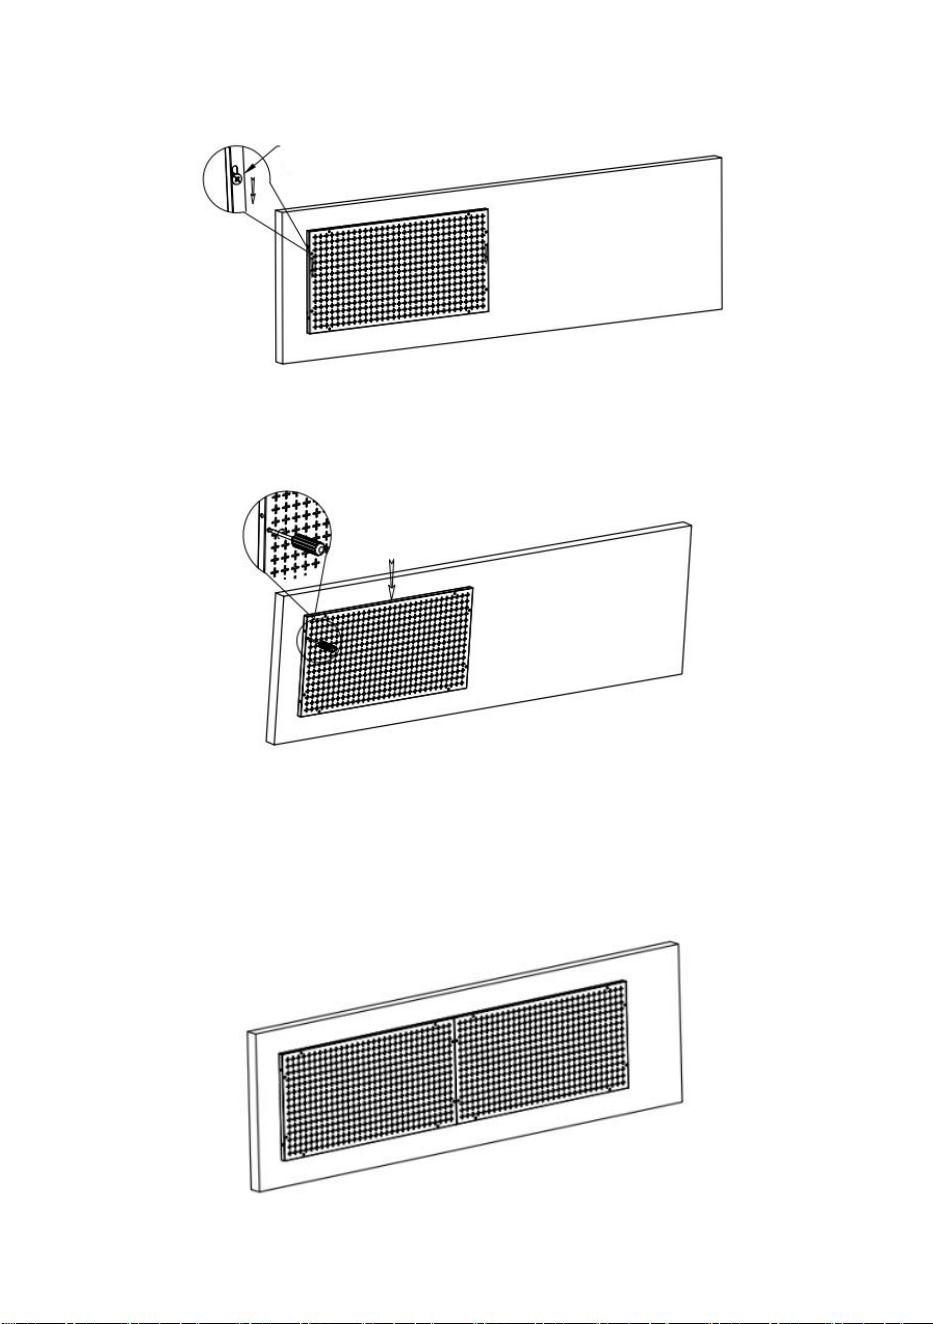
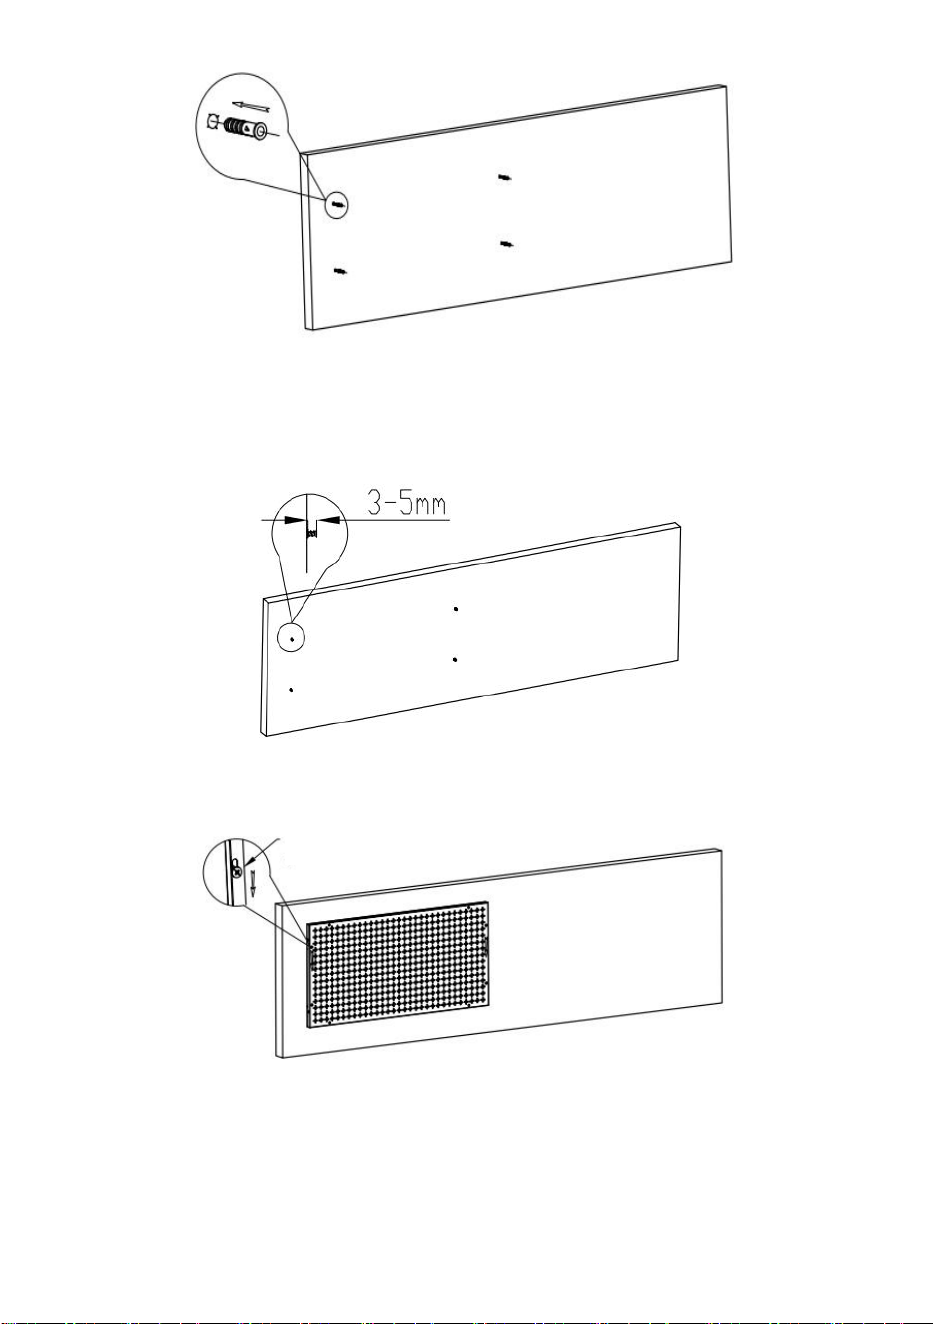
STEP 4: Screw the self-tapping screw into the expansion plug hole, leaving
3~5mm exposed.

- 7 -
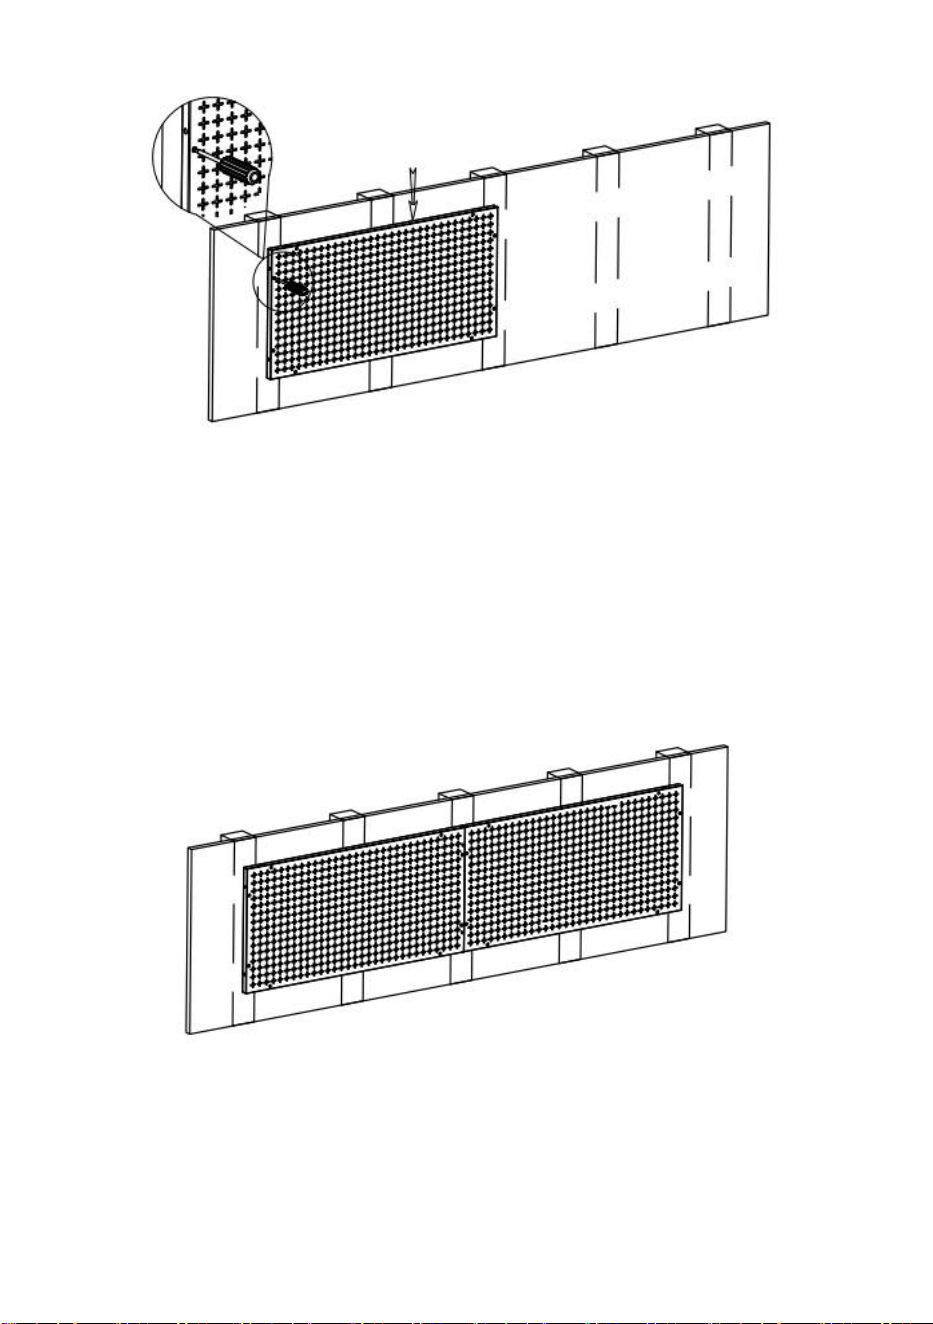
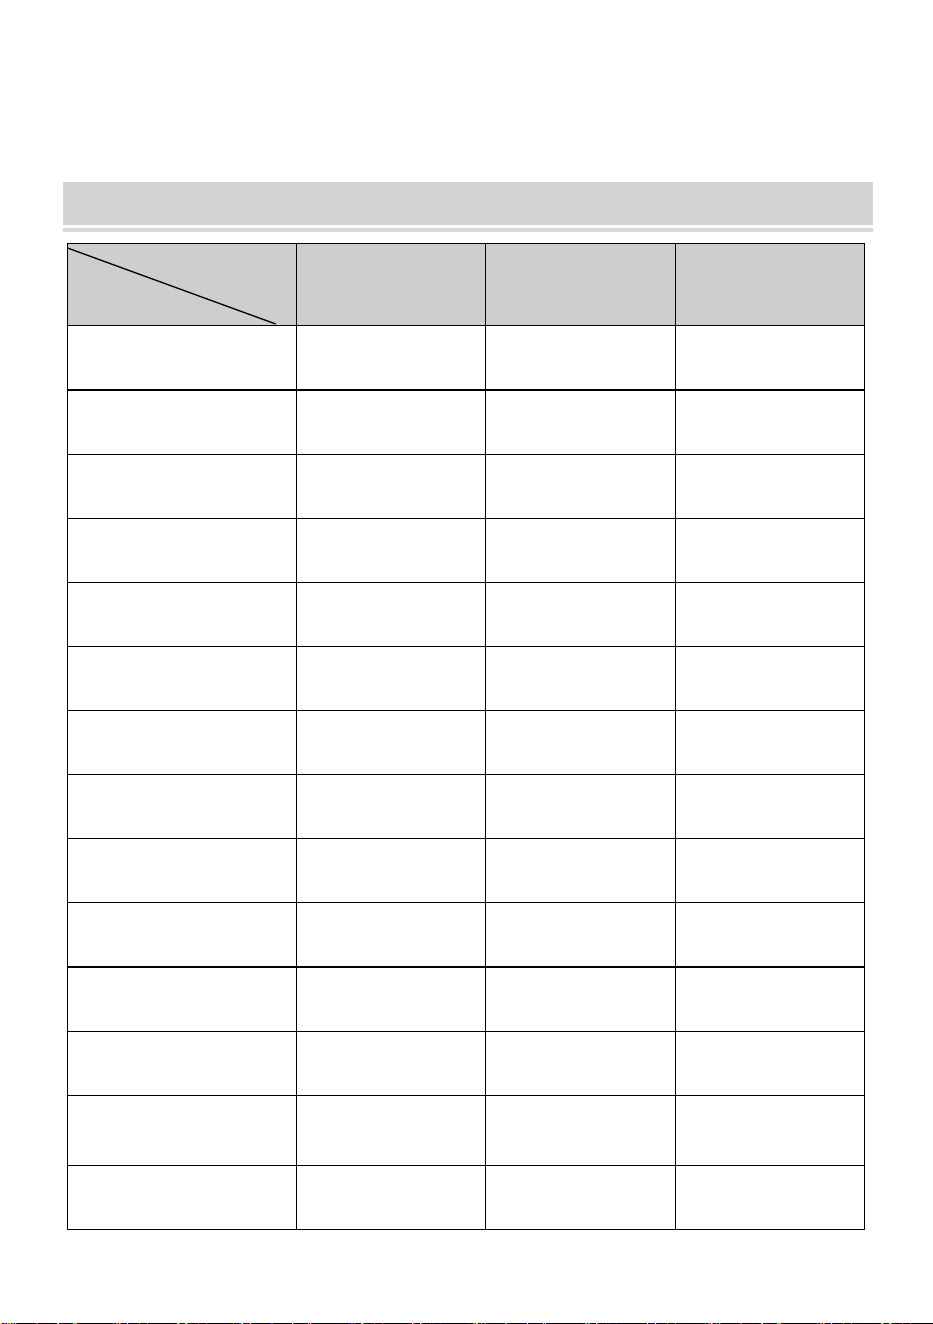
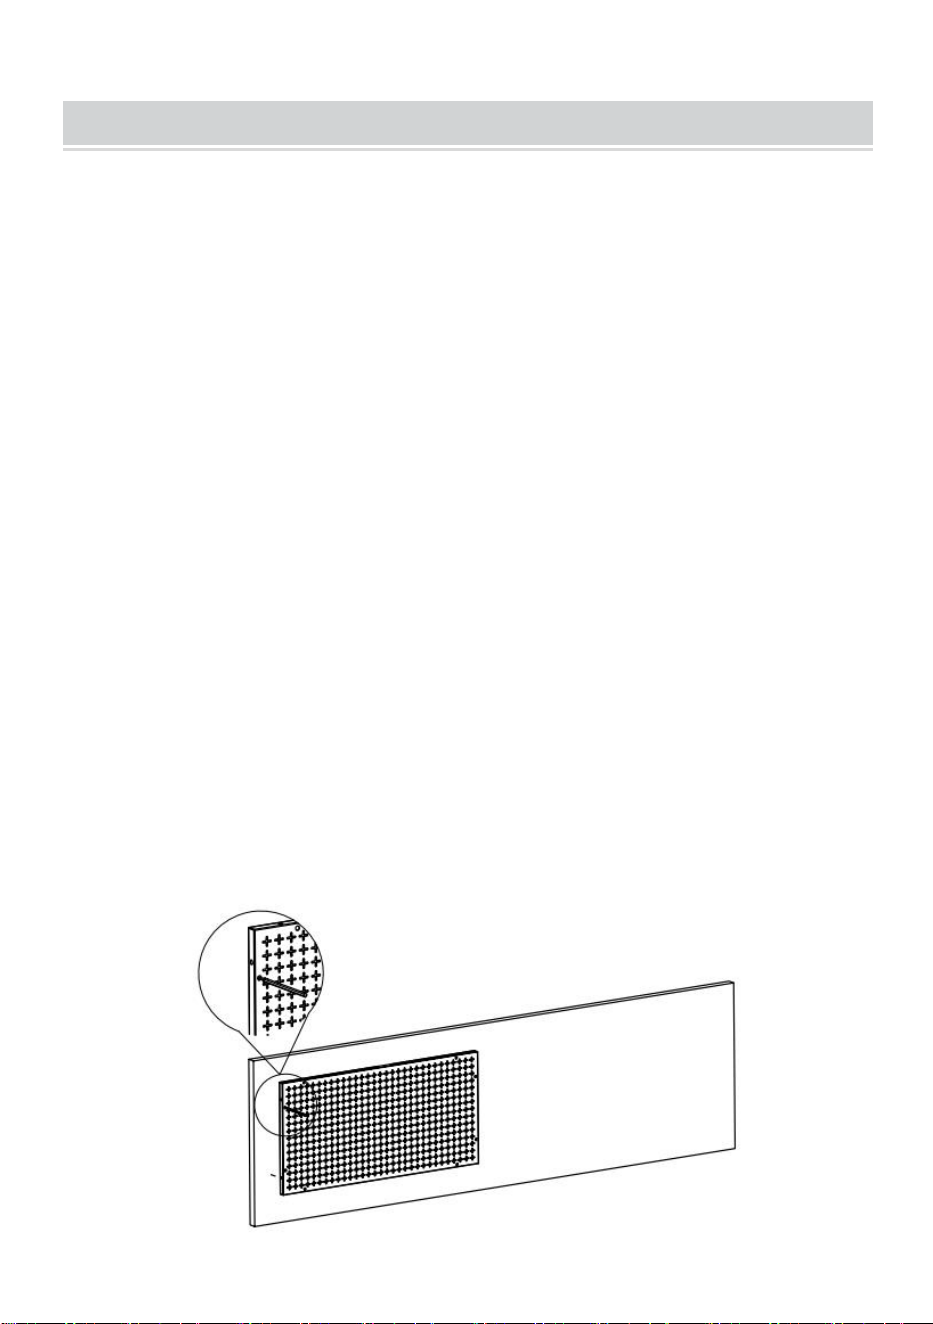
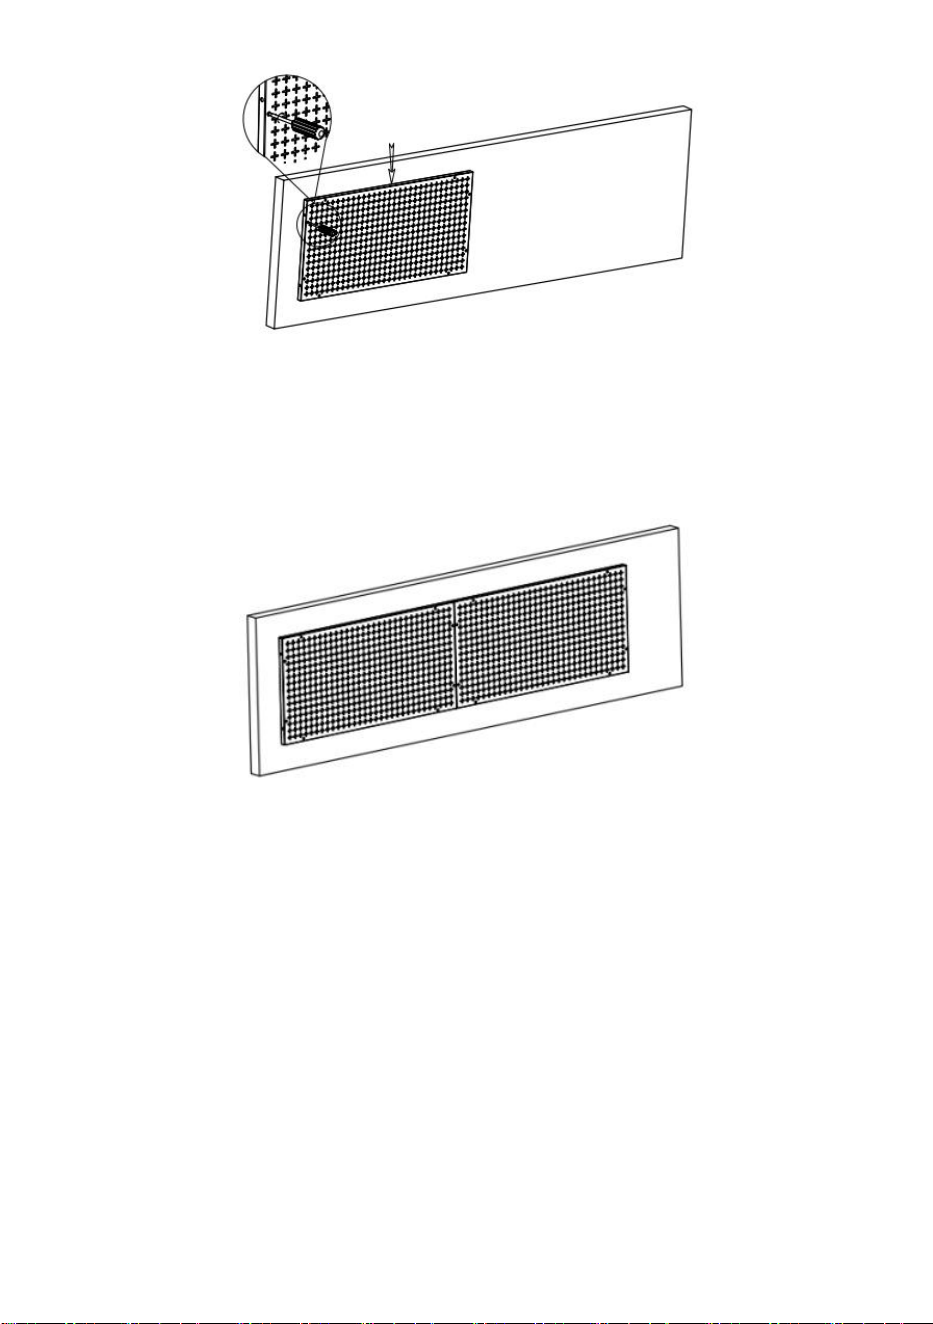
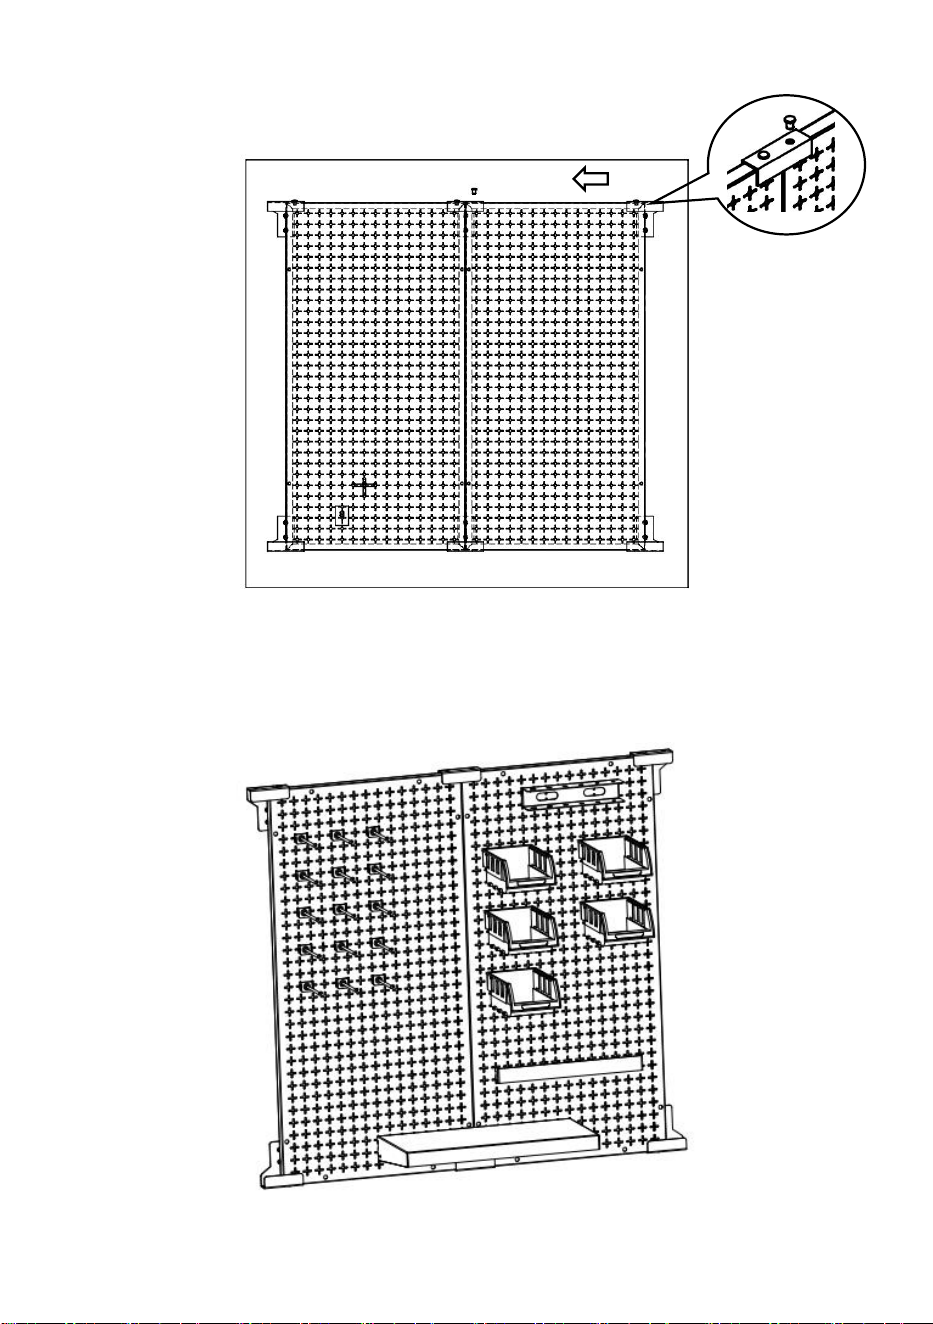
STEP 5: Hang the pegboard on the self-tapping screws, as shown in the
picture.
STEP 6: Ensure that the four self-tapping screws are hung into the
mounting holes of the pegboard and tighten the self-tapping screws.
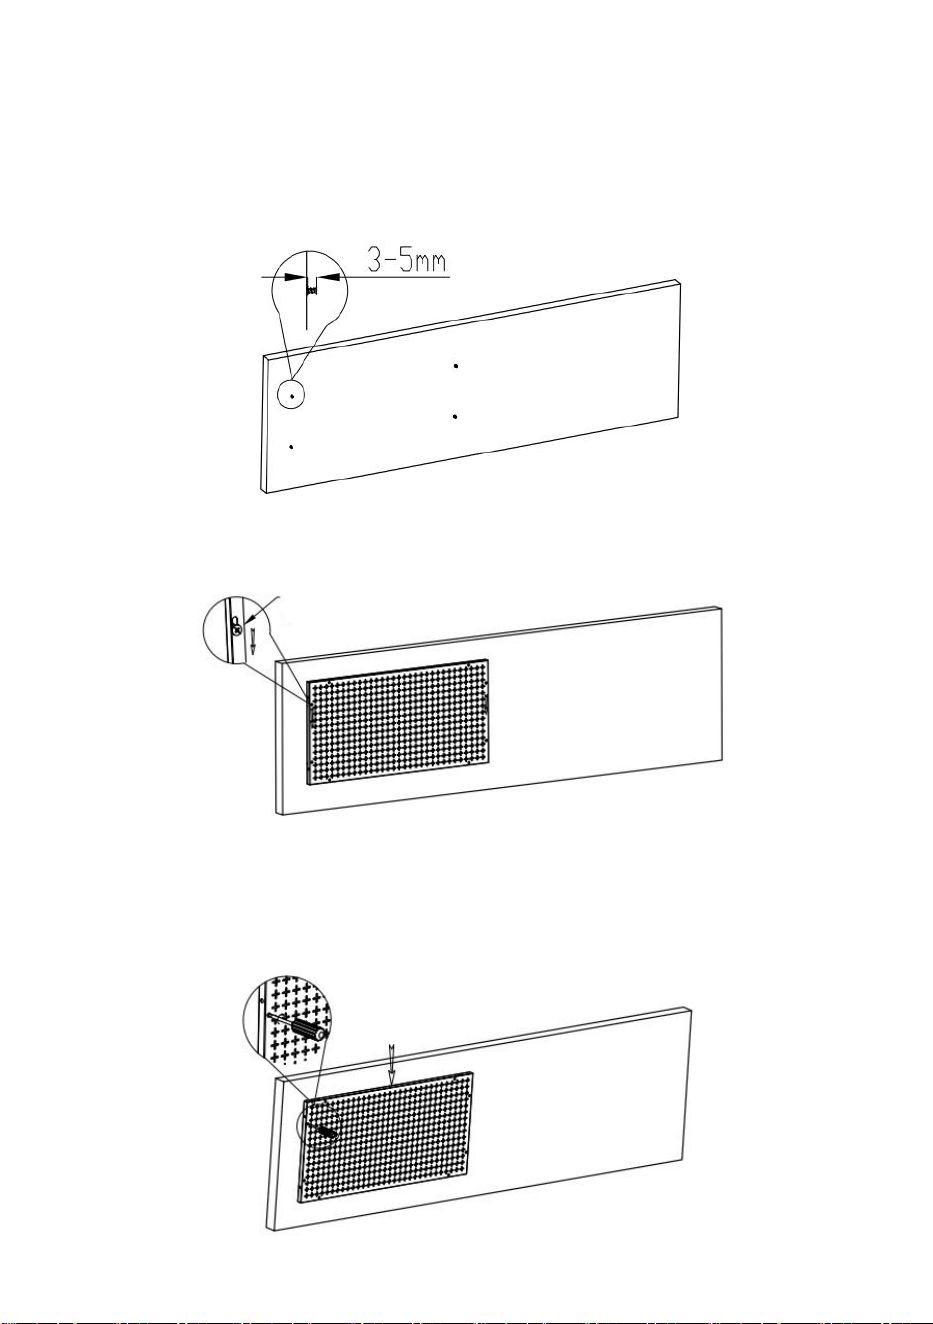
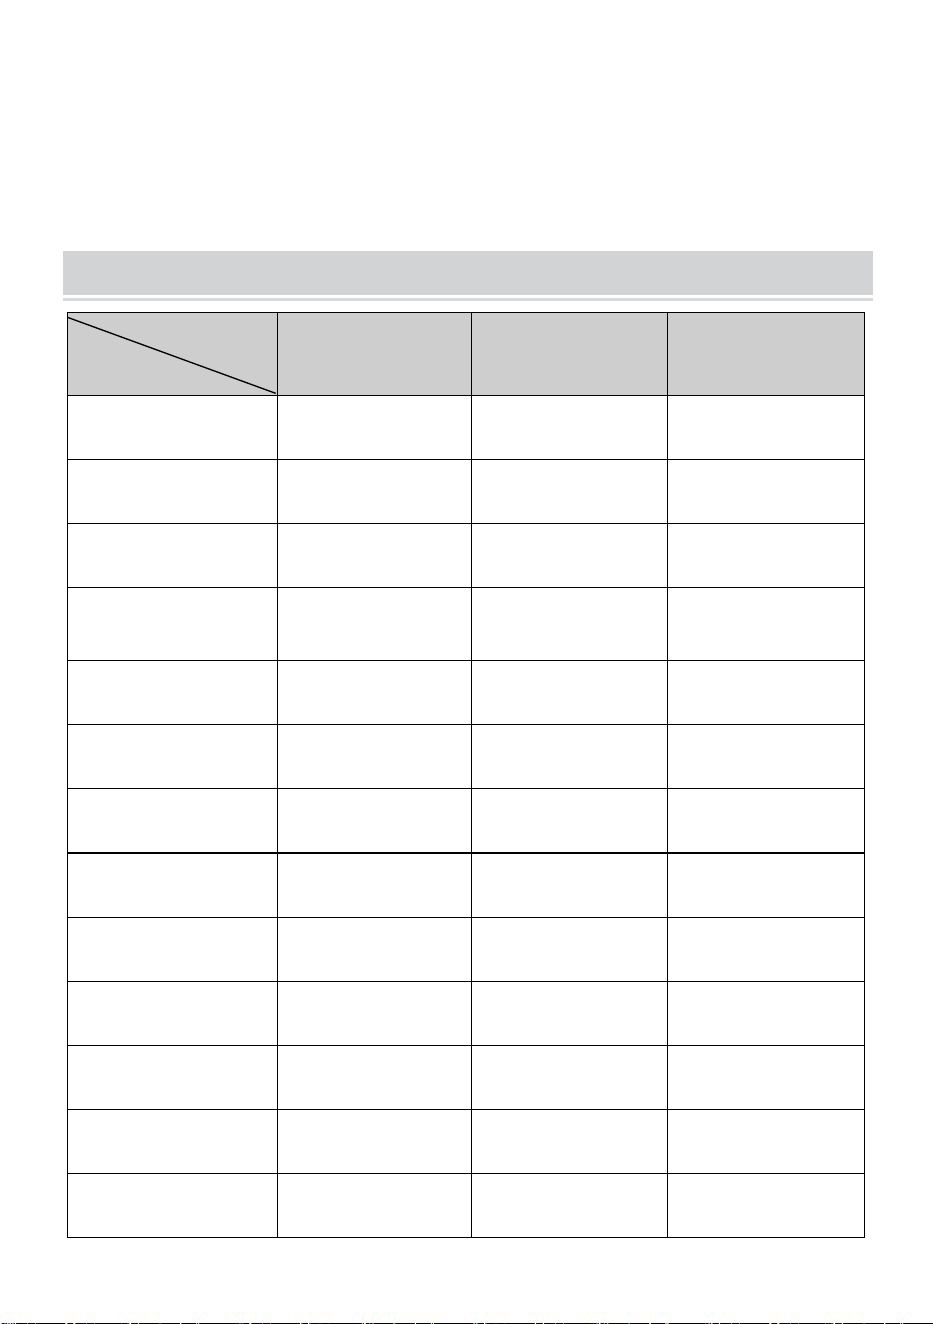
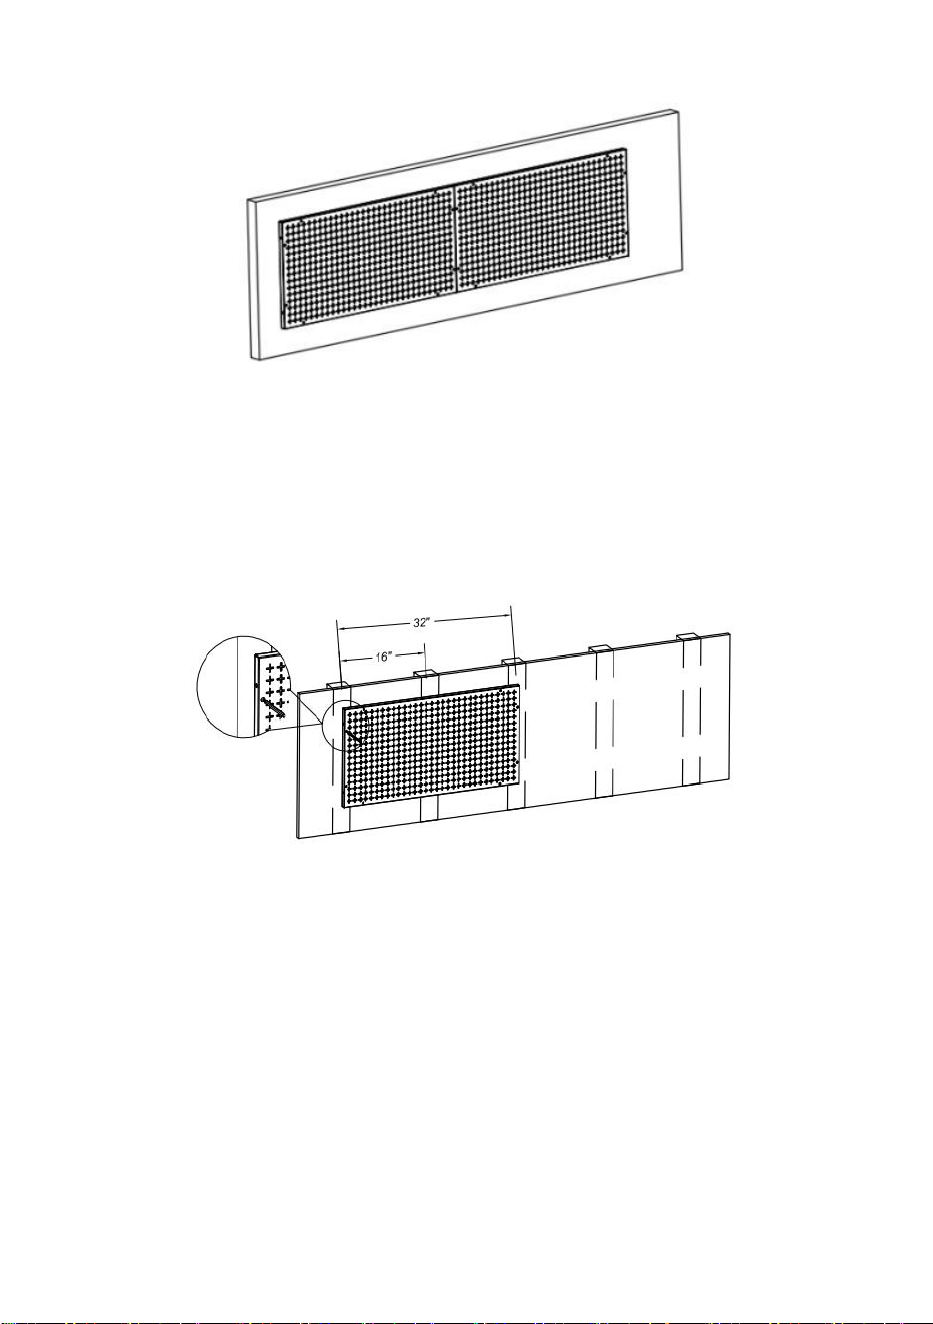
STEP 7: Follow the steps above to install other pegboards.
(Note:The pegboard is placed horizontally and vertically, and the
installation method is the same.)
back
- 8 -
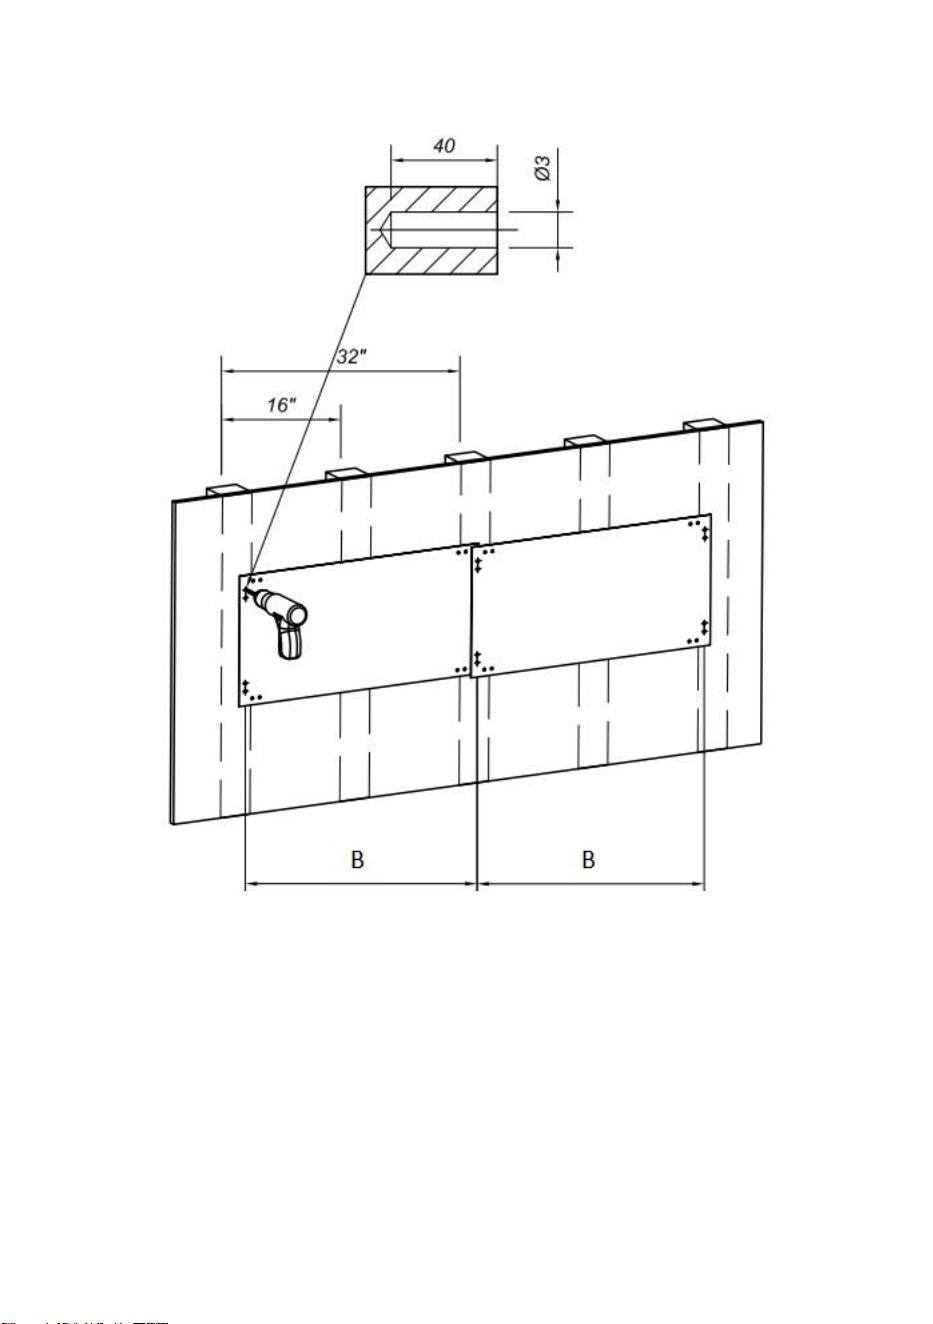
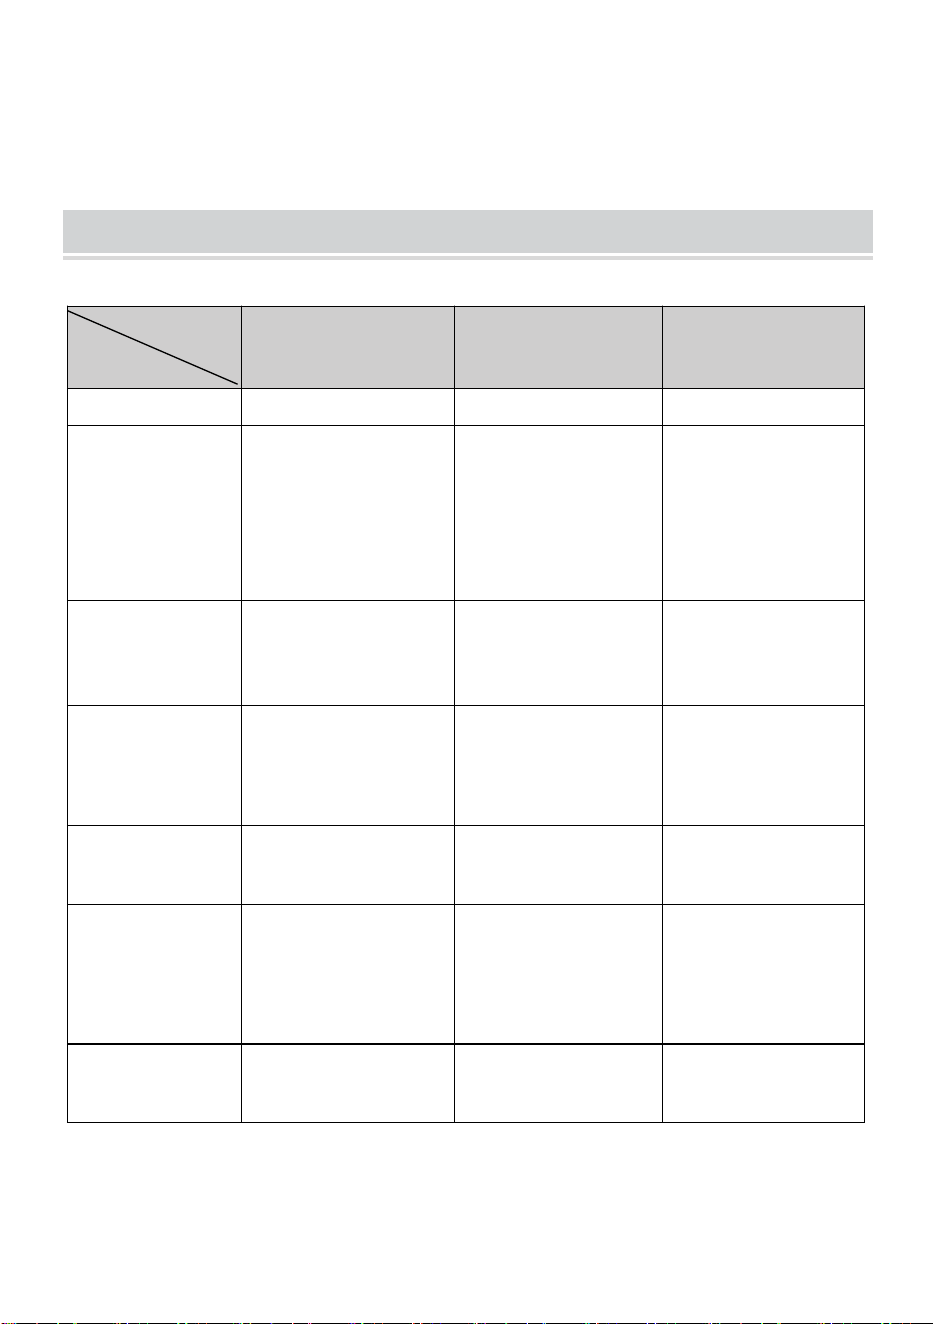
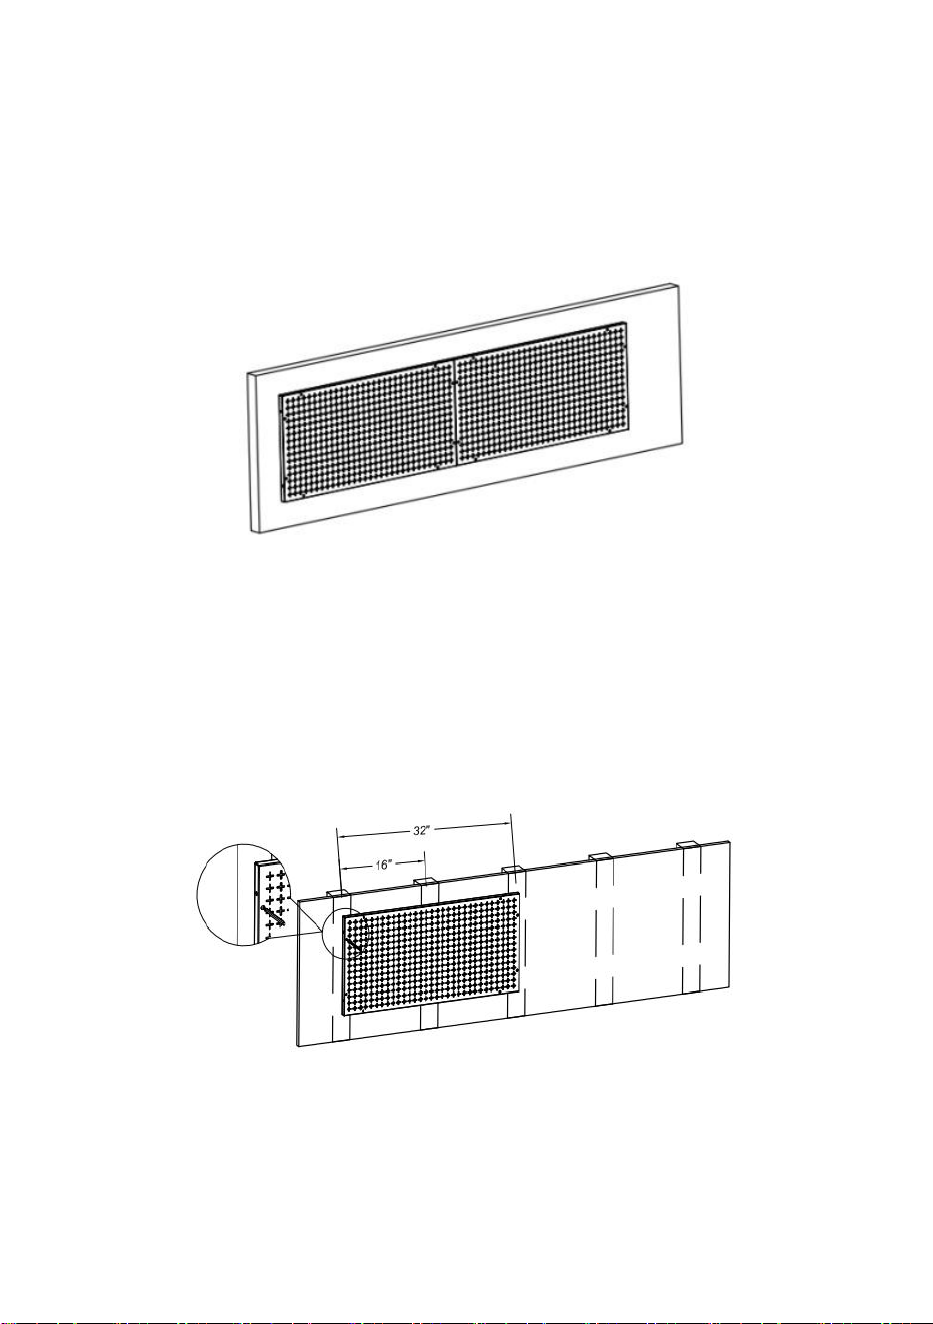
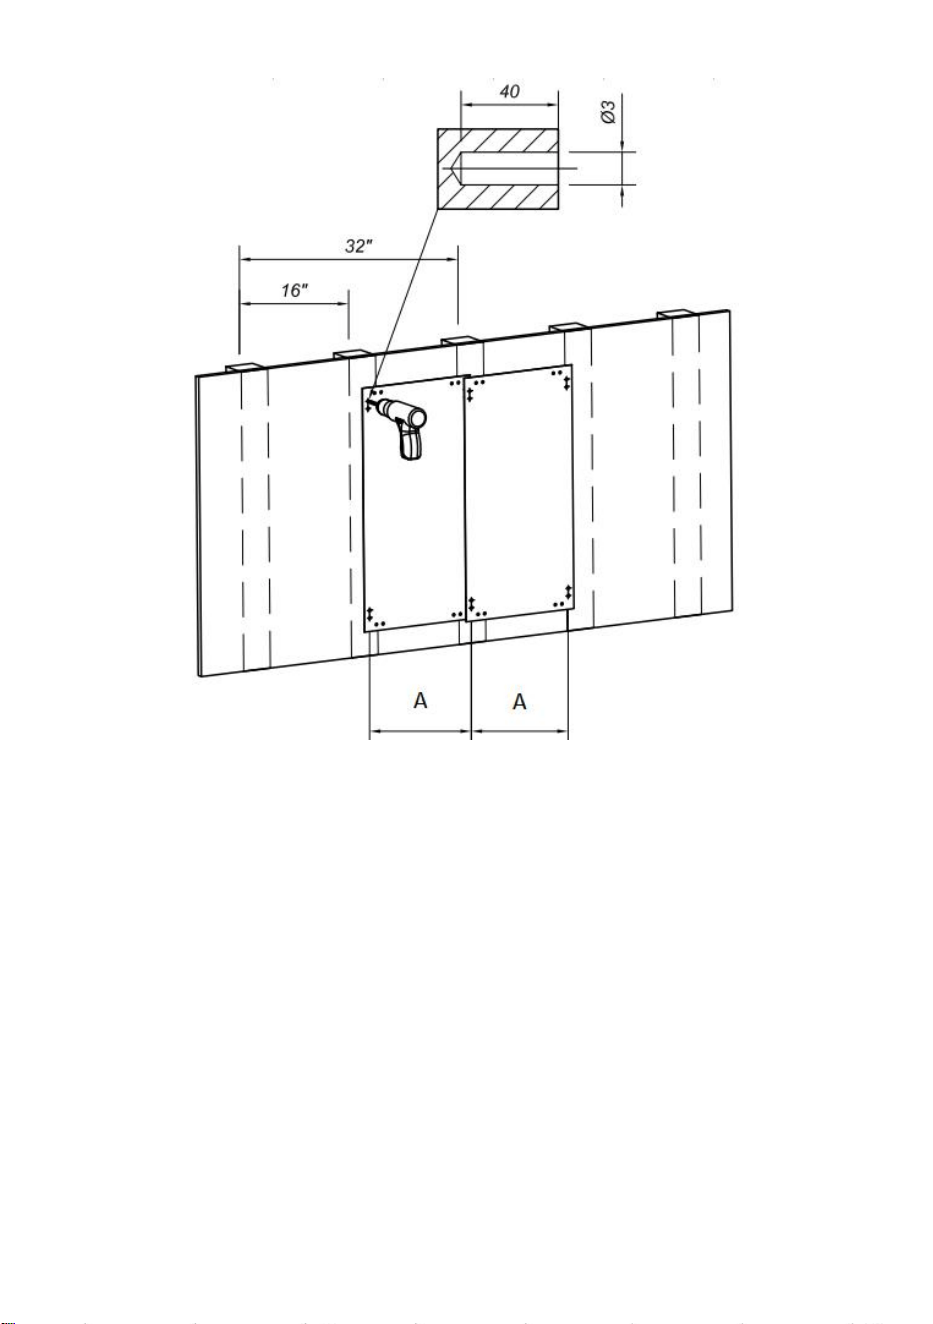
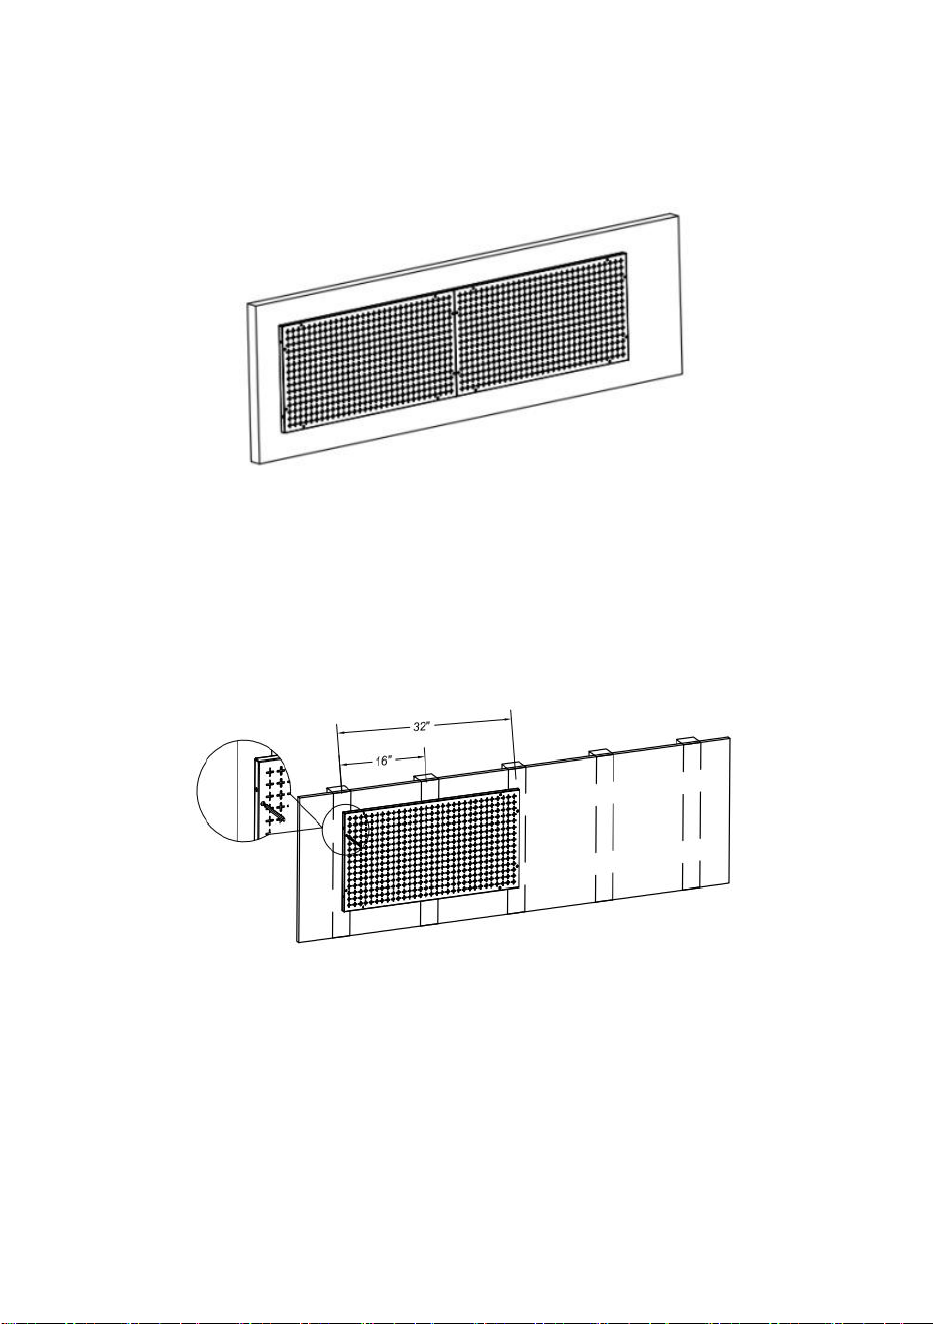
For Wooden Wall Post Installation
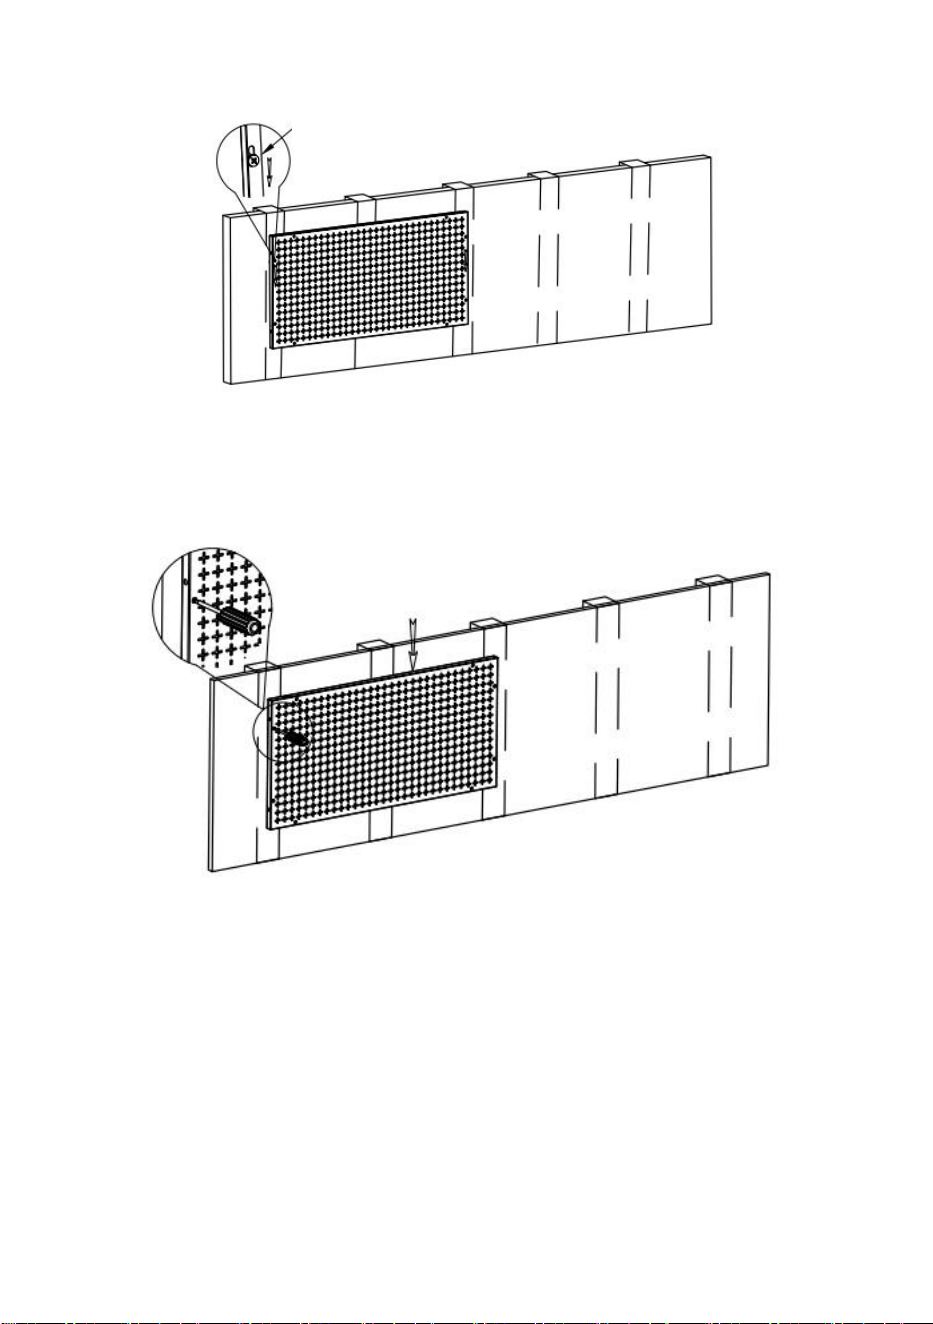
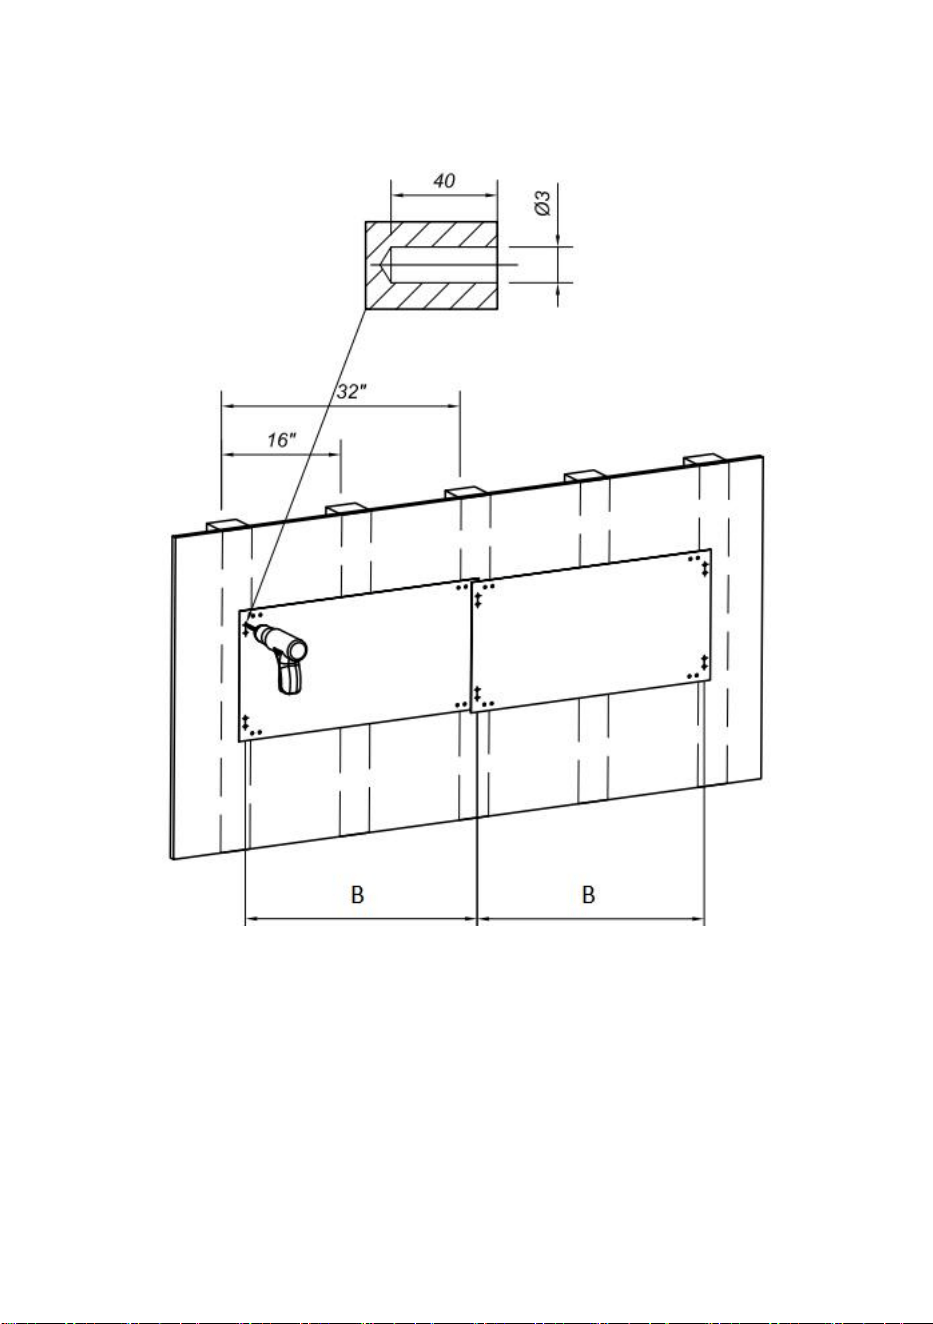
STEP 1: Align edge of pegboard with center-line of post,and mark the
holes with a fine nail or pencil.(Note:Two holes on the left, two holes on the
right)
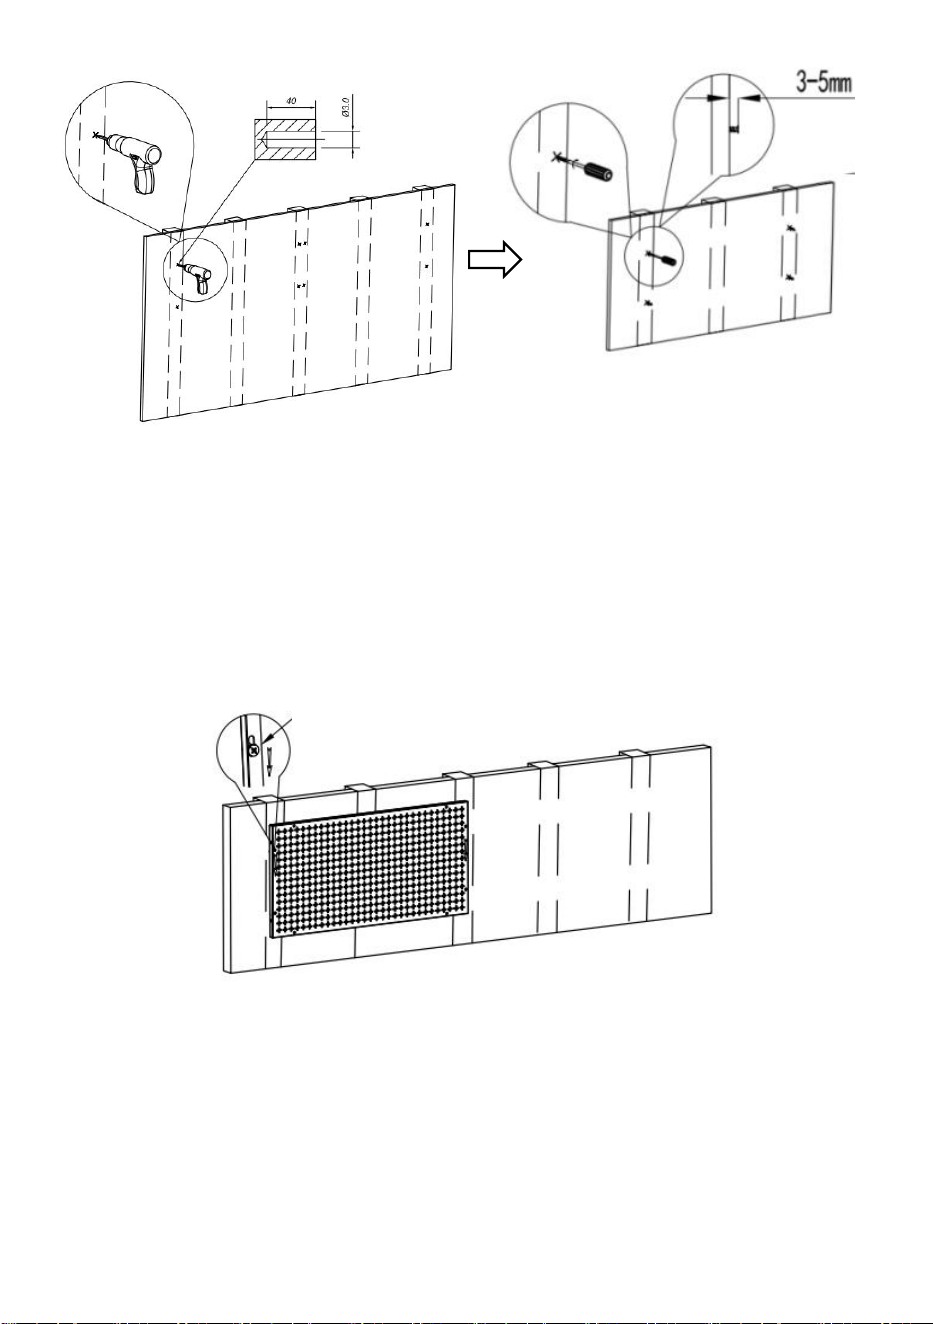
STEP 2: Drill holes 3mm in diameter and 40mm in depth at the marked
places,screw the self-tapping screw into the holes, leaving 3~5mm
exposed.(Note: Prepare your own tools.)
- 9 -
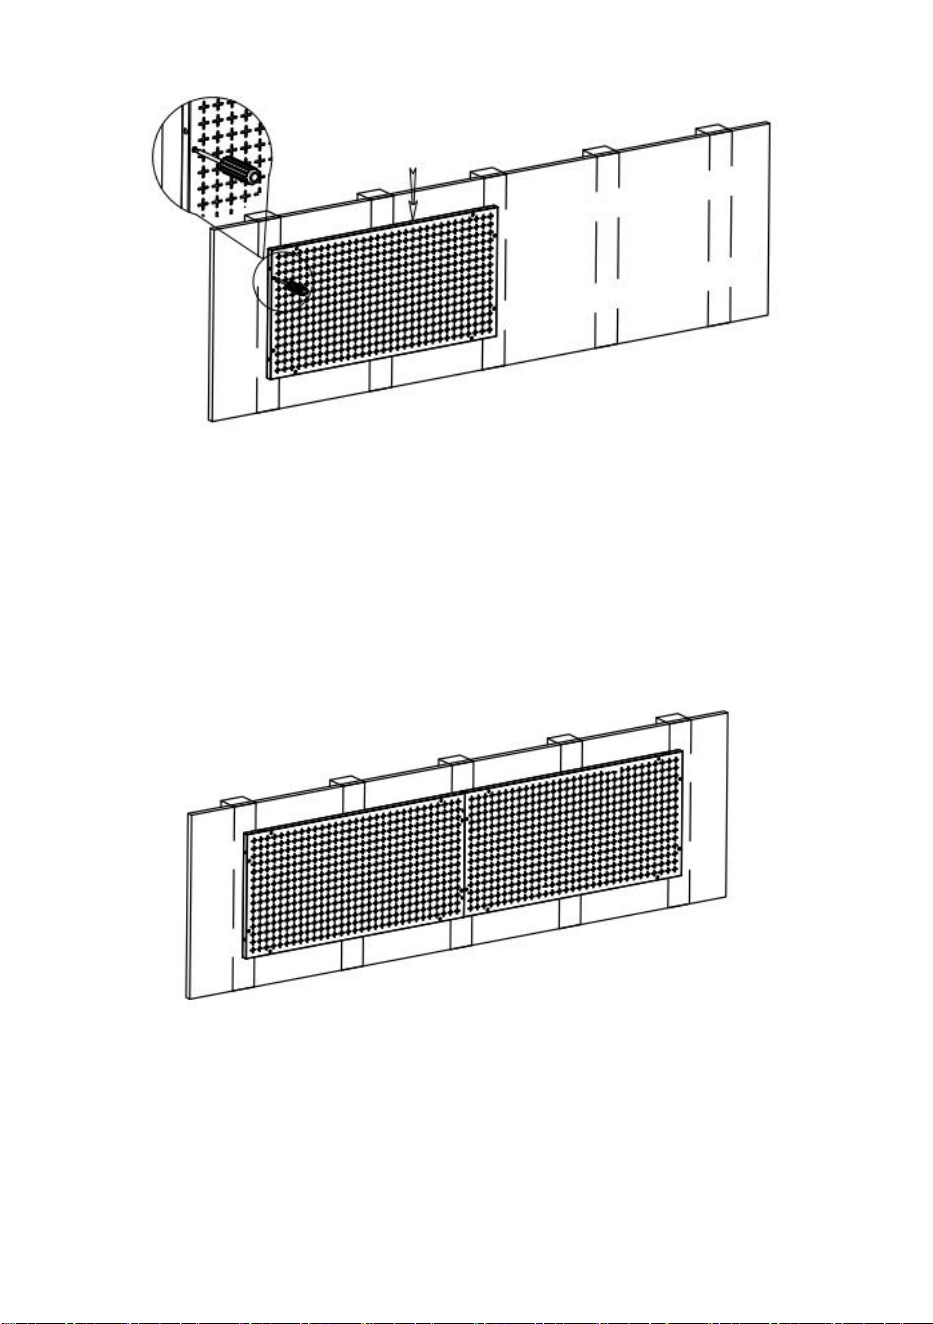
STEP 3: Hang the pegboard on the self-tapping screws, as shown in the
picture.
STEP 4: Ensure that the four self-tapping screws are hung into the
mounting holes of the pegboard and tighten the self-tapping screws.
STEP 5: Follow the steps above to install other pegboards.
(Note:The pegboard is placed horizontally and vertically, and the installation
method is the same.)
back

- 10 -
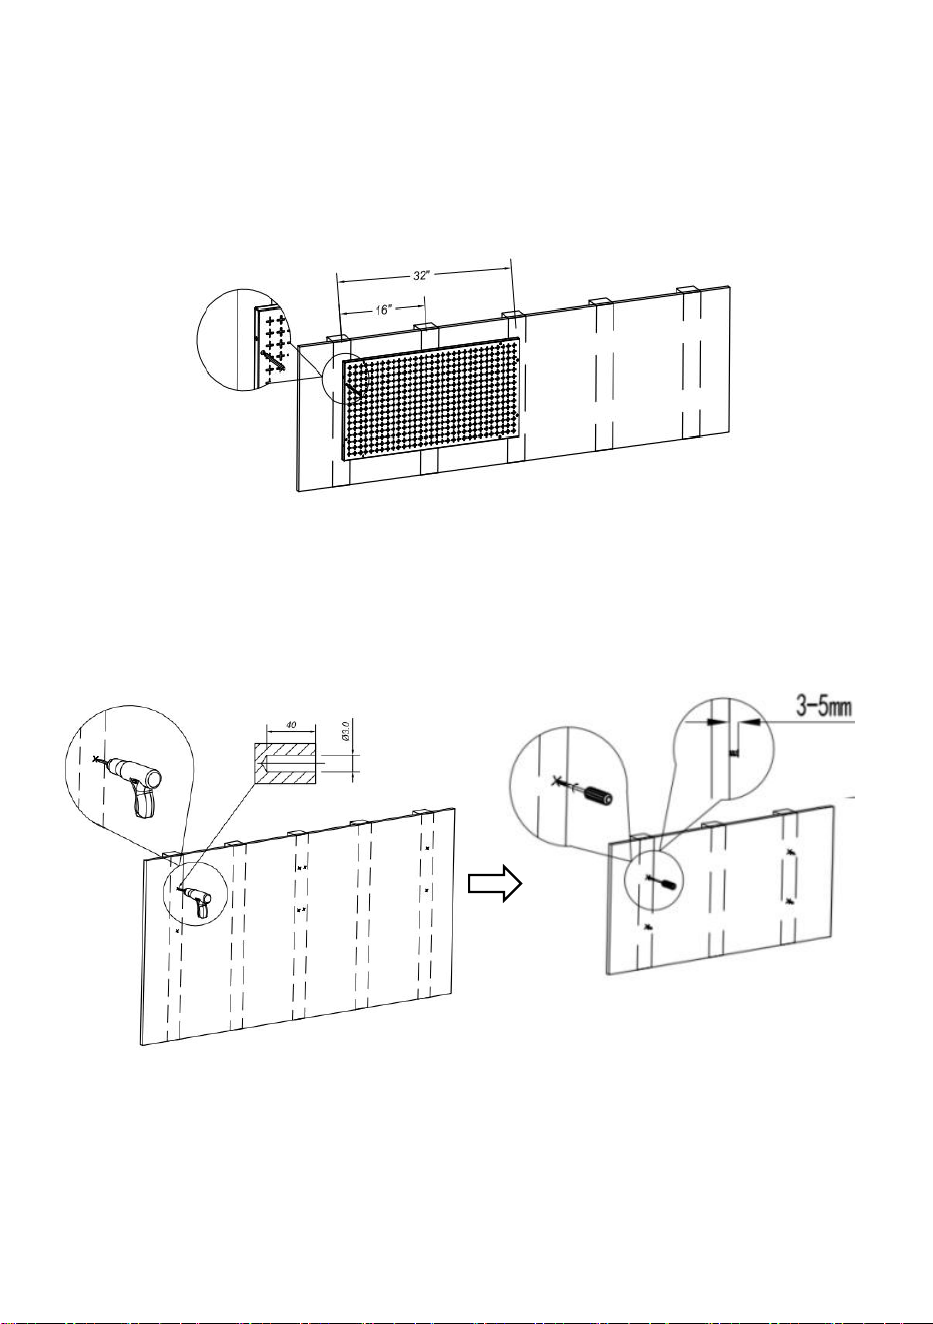
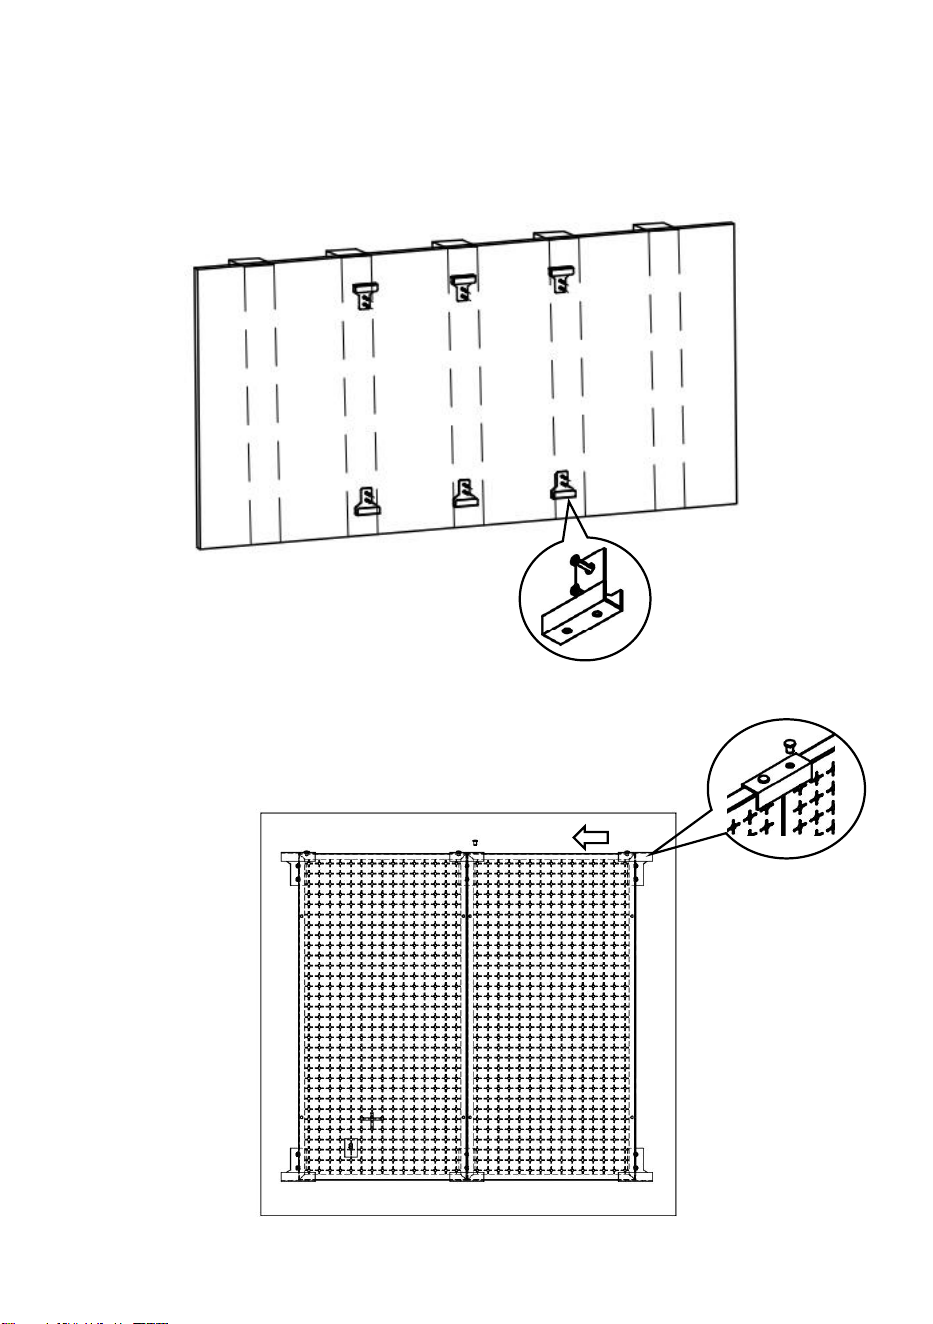
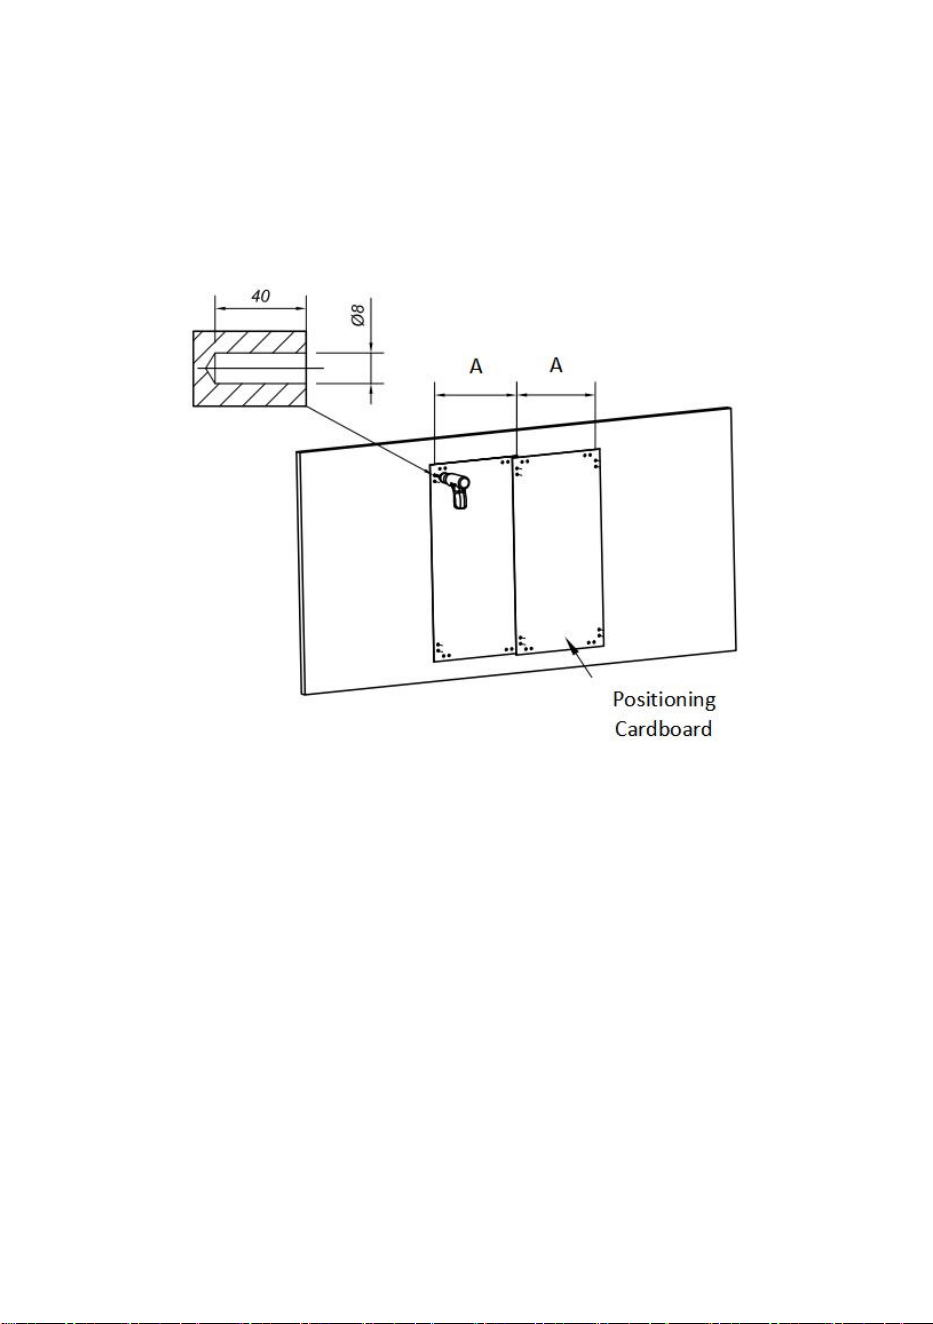
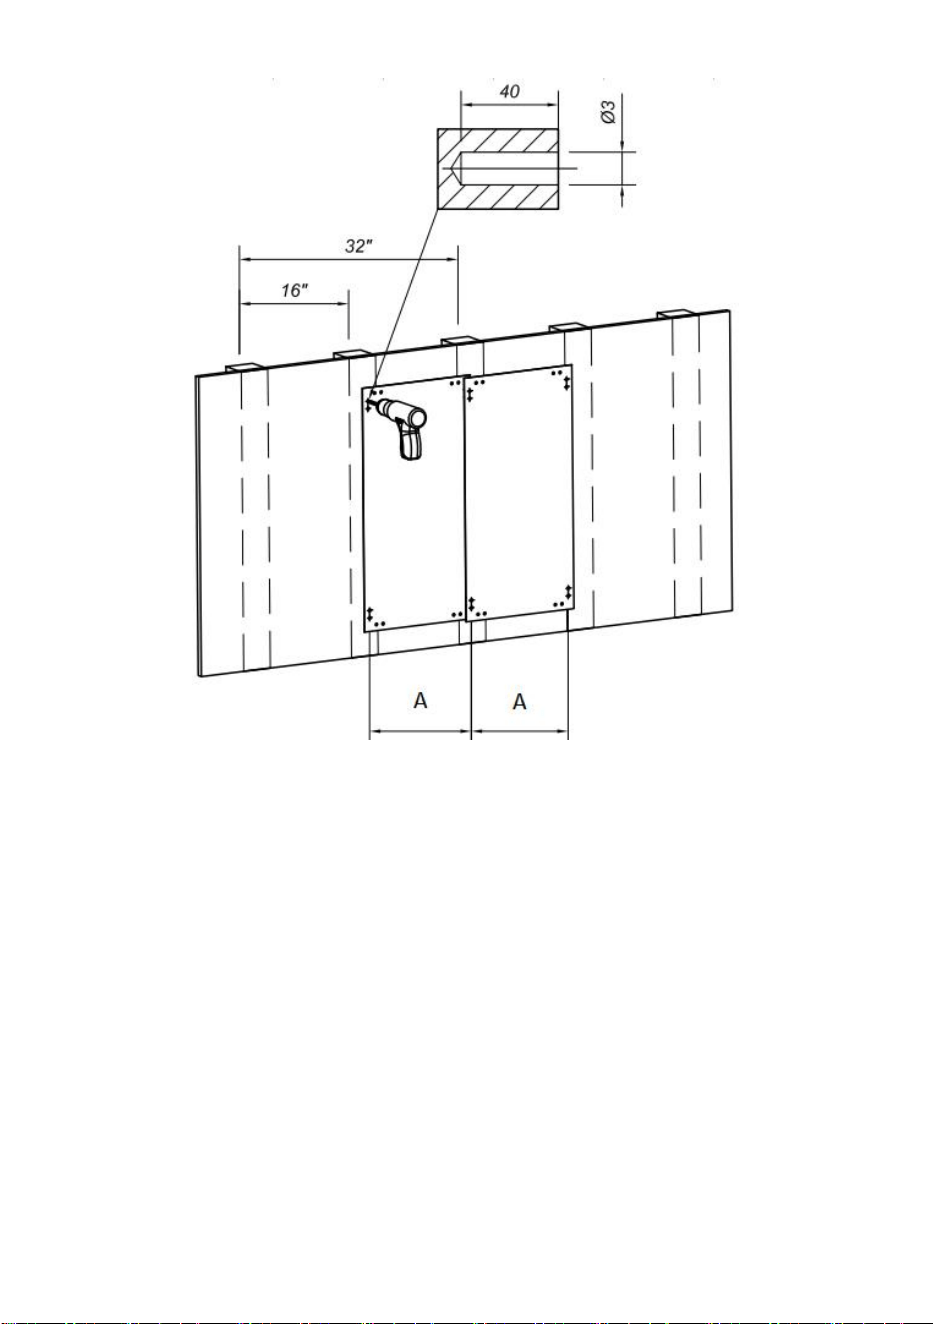
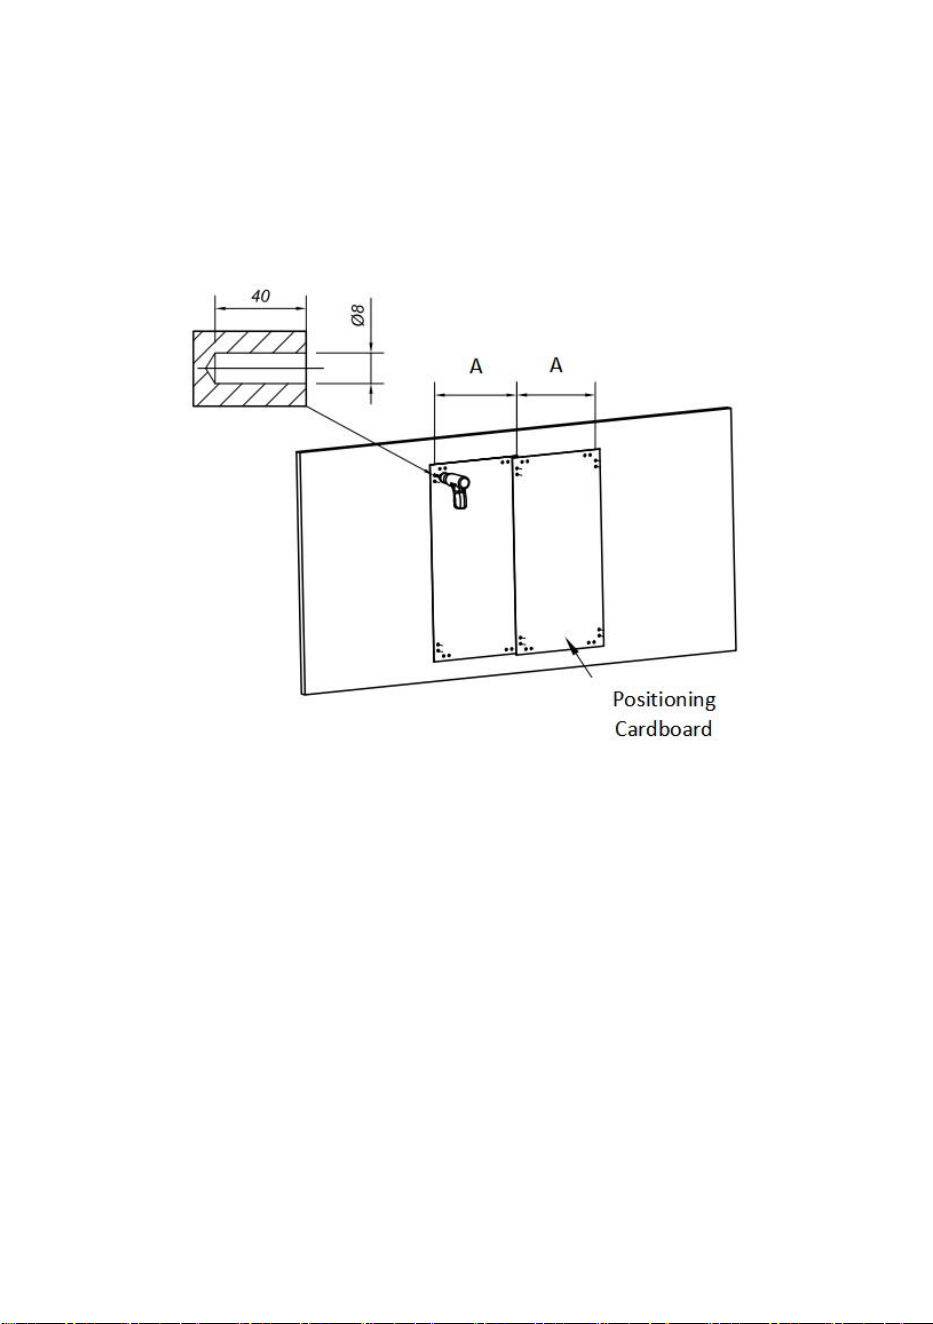
For Mounting Block + Concrete Wall Installation
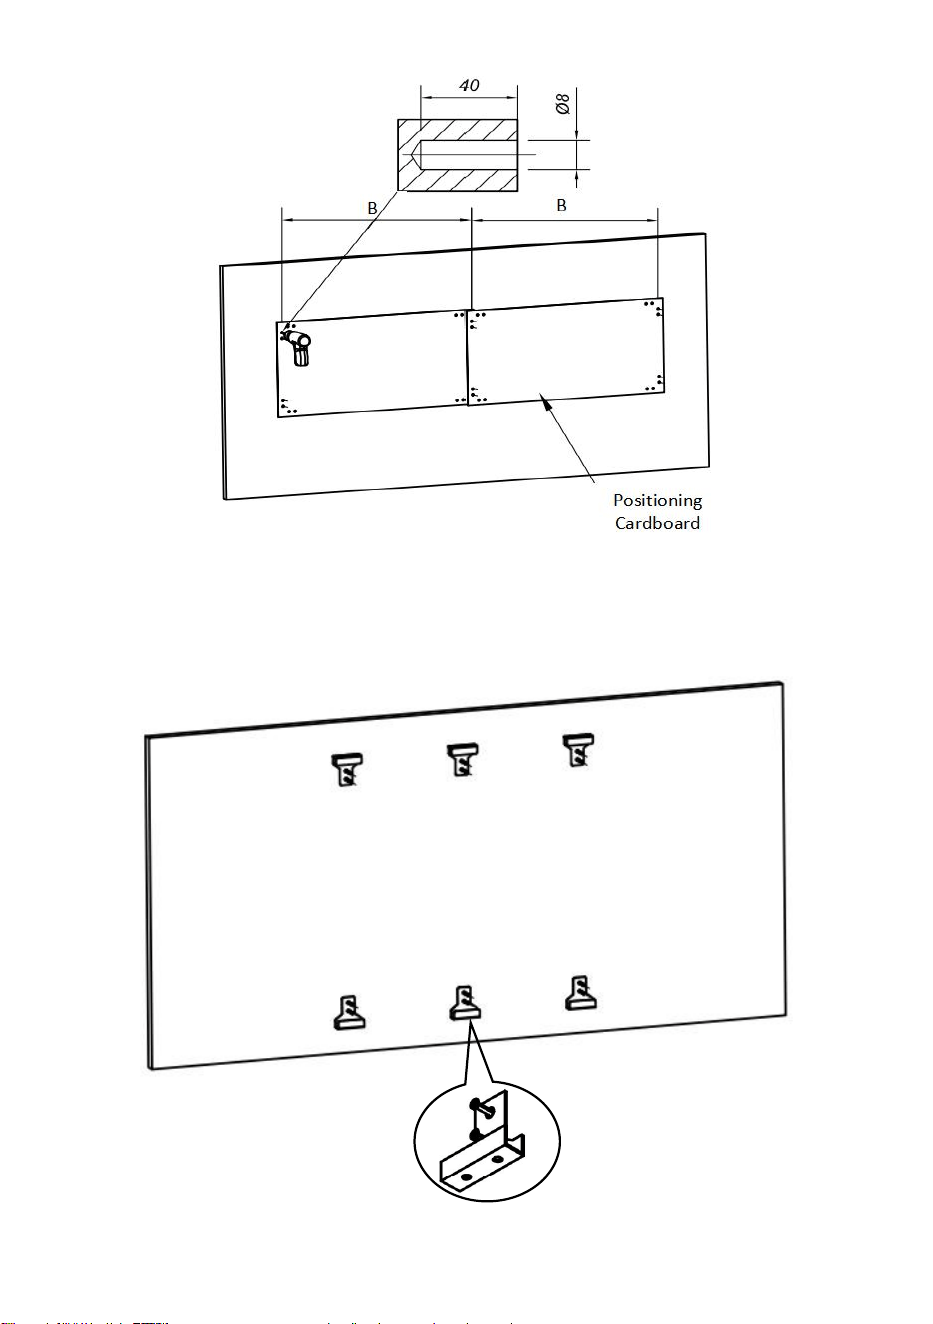
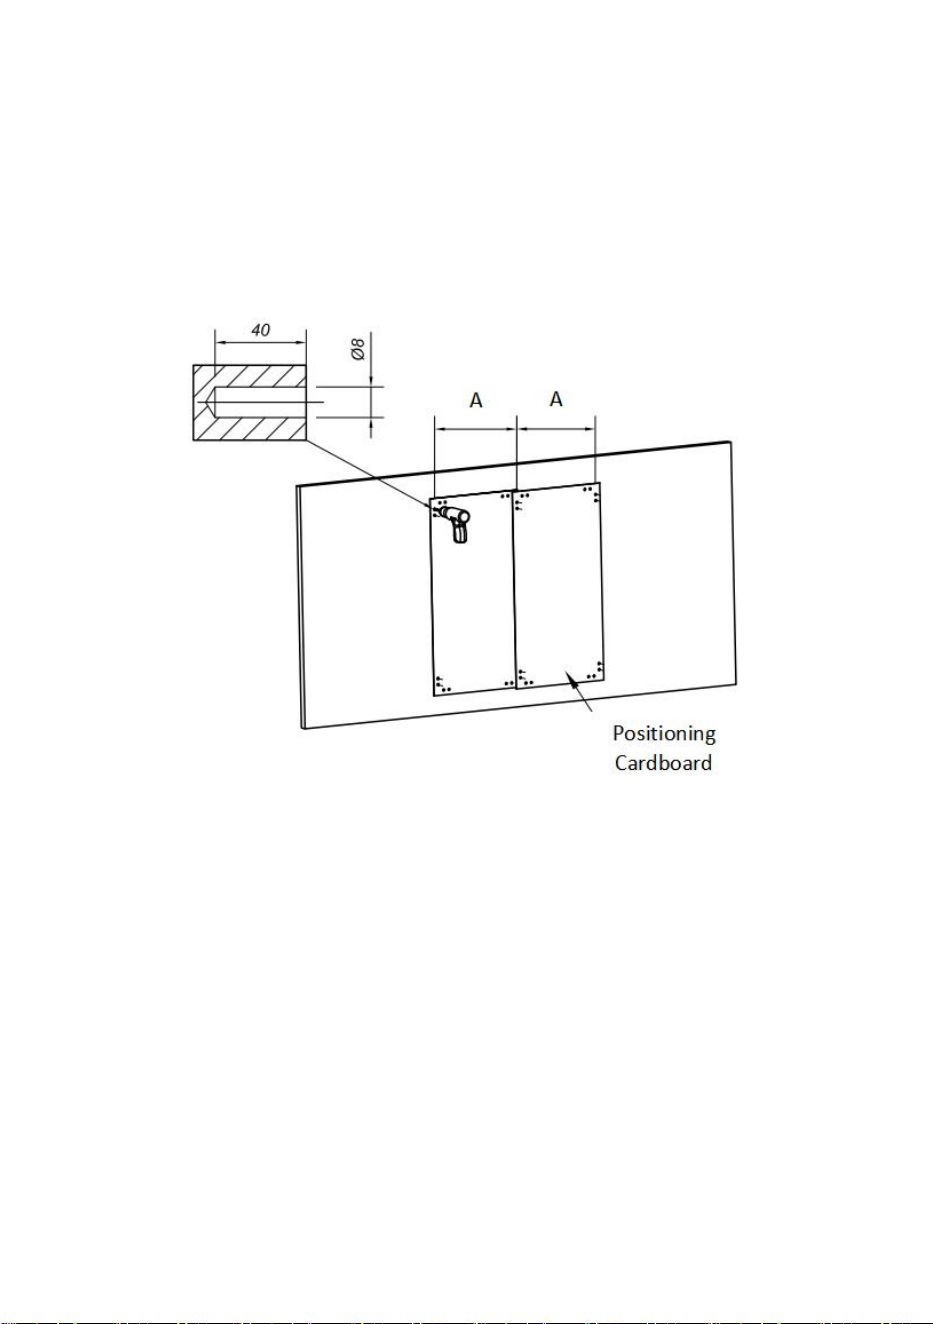
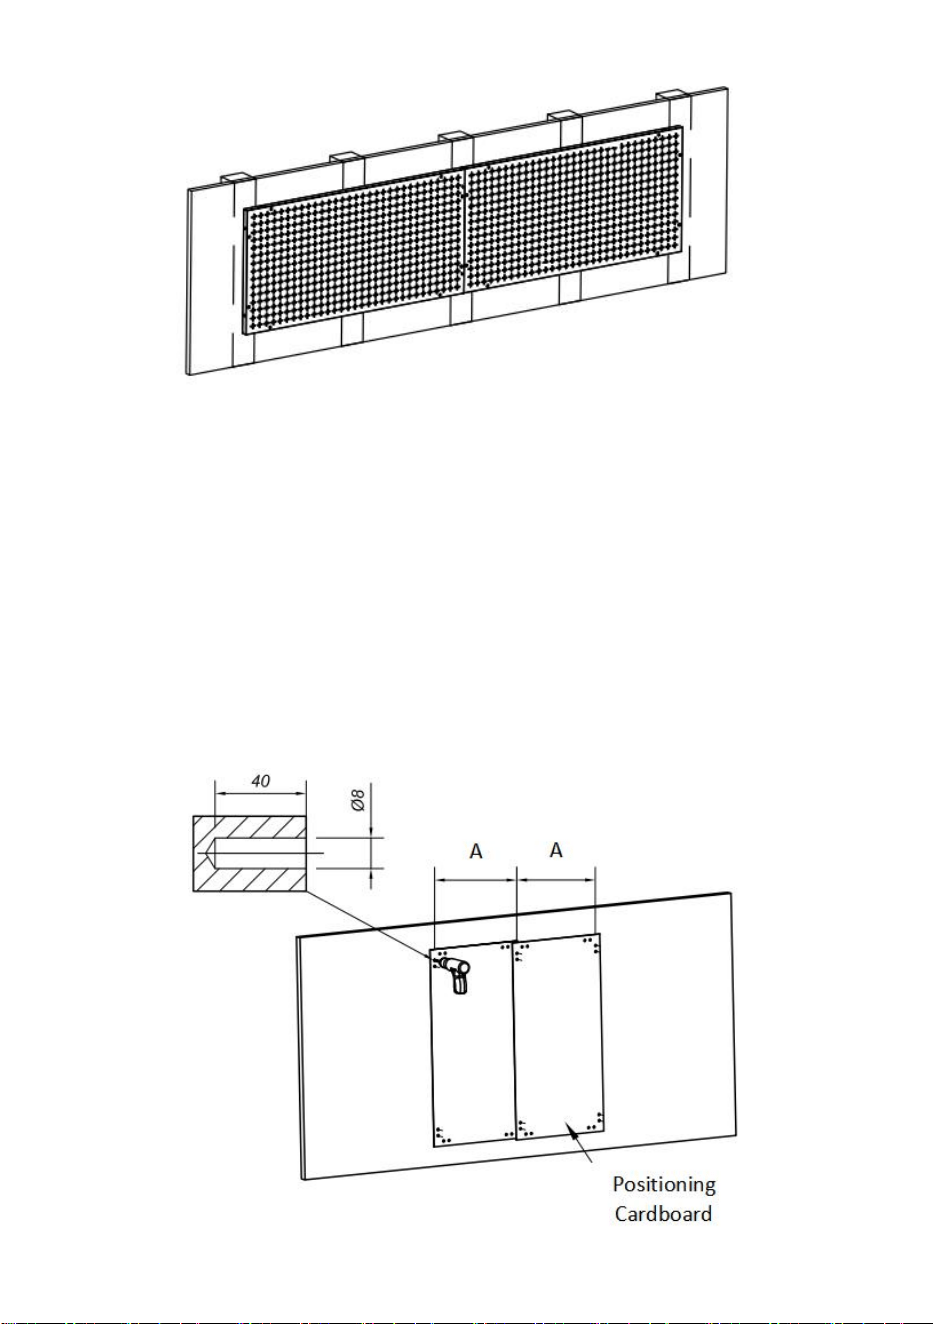
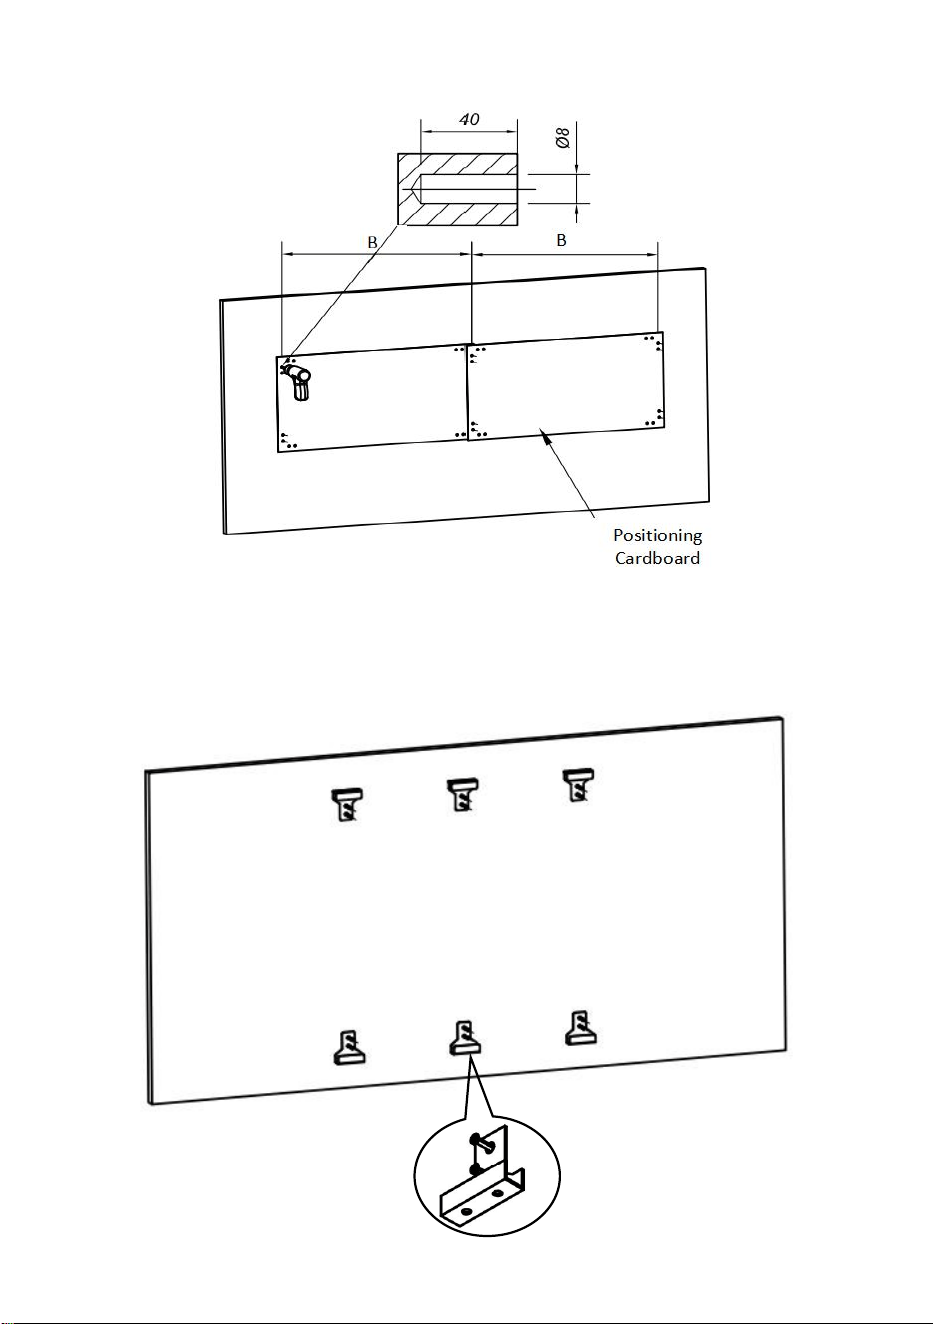
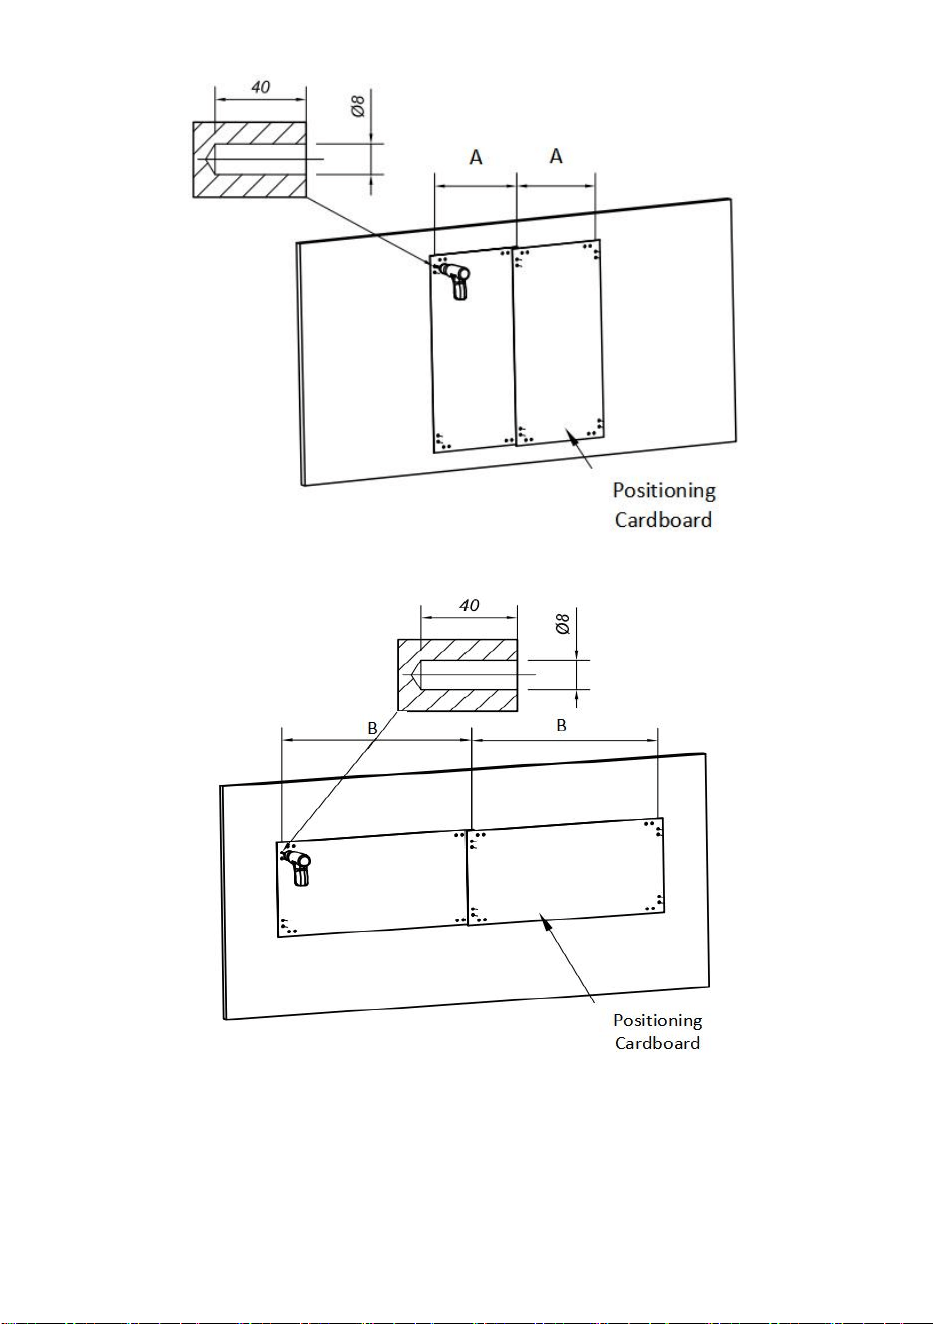
STEP 1: Lay the positioning cardboard on the wall to be installed,drill the
marking holes according to the holes marked on the positioning cardboard.
Take away cardboard and drill holes 8mm in diameter and 40mm in depth
at the marking holes.(Note: Prepare your own drilling tools.)
Nail the expansion plugs completely into the hole.
Vertical:A=406mm

- 11 -
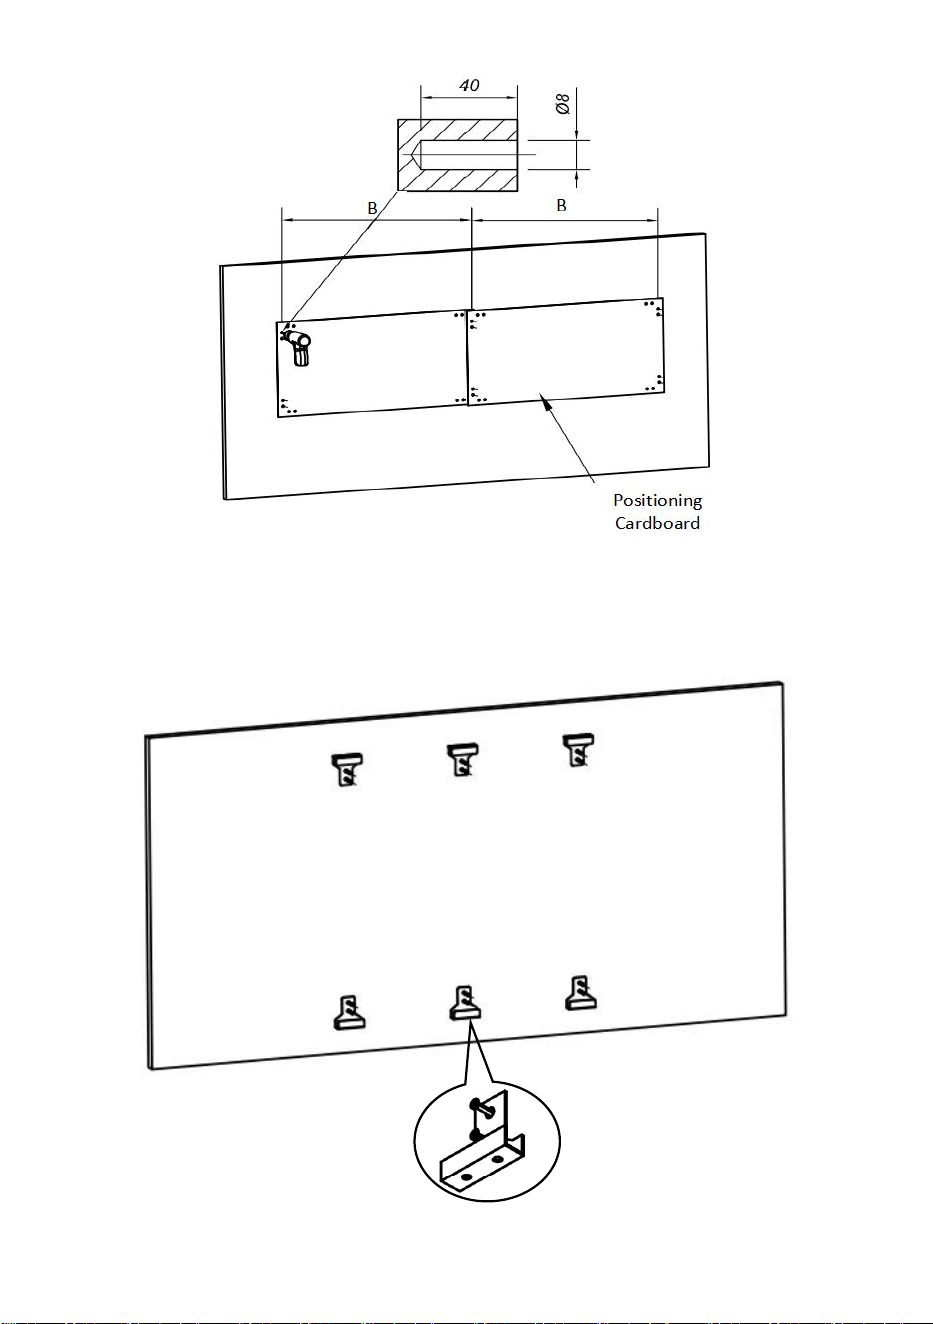
Horizontal:B=814mm
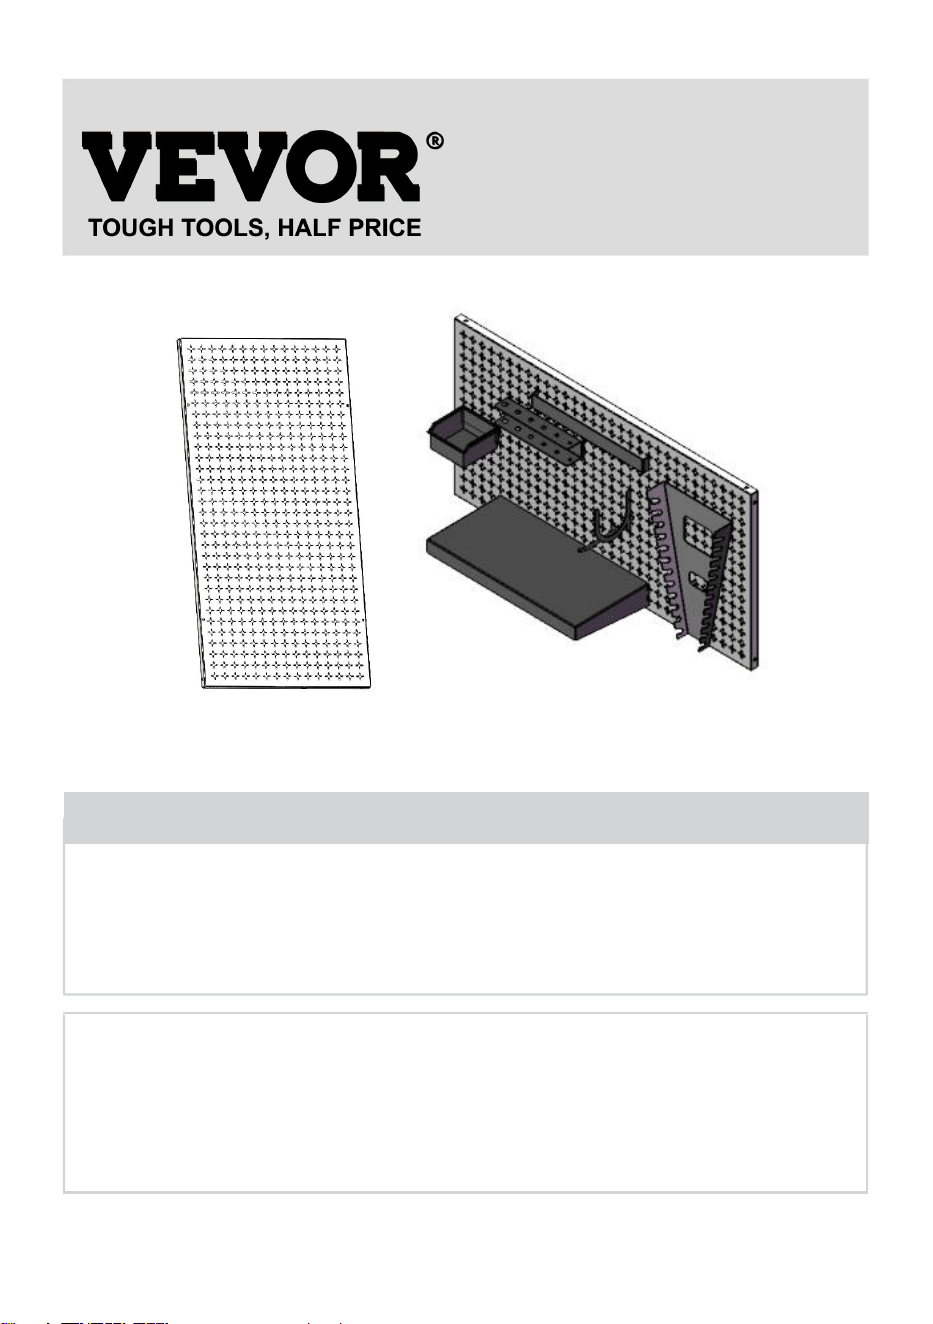
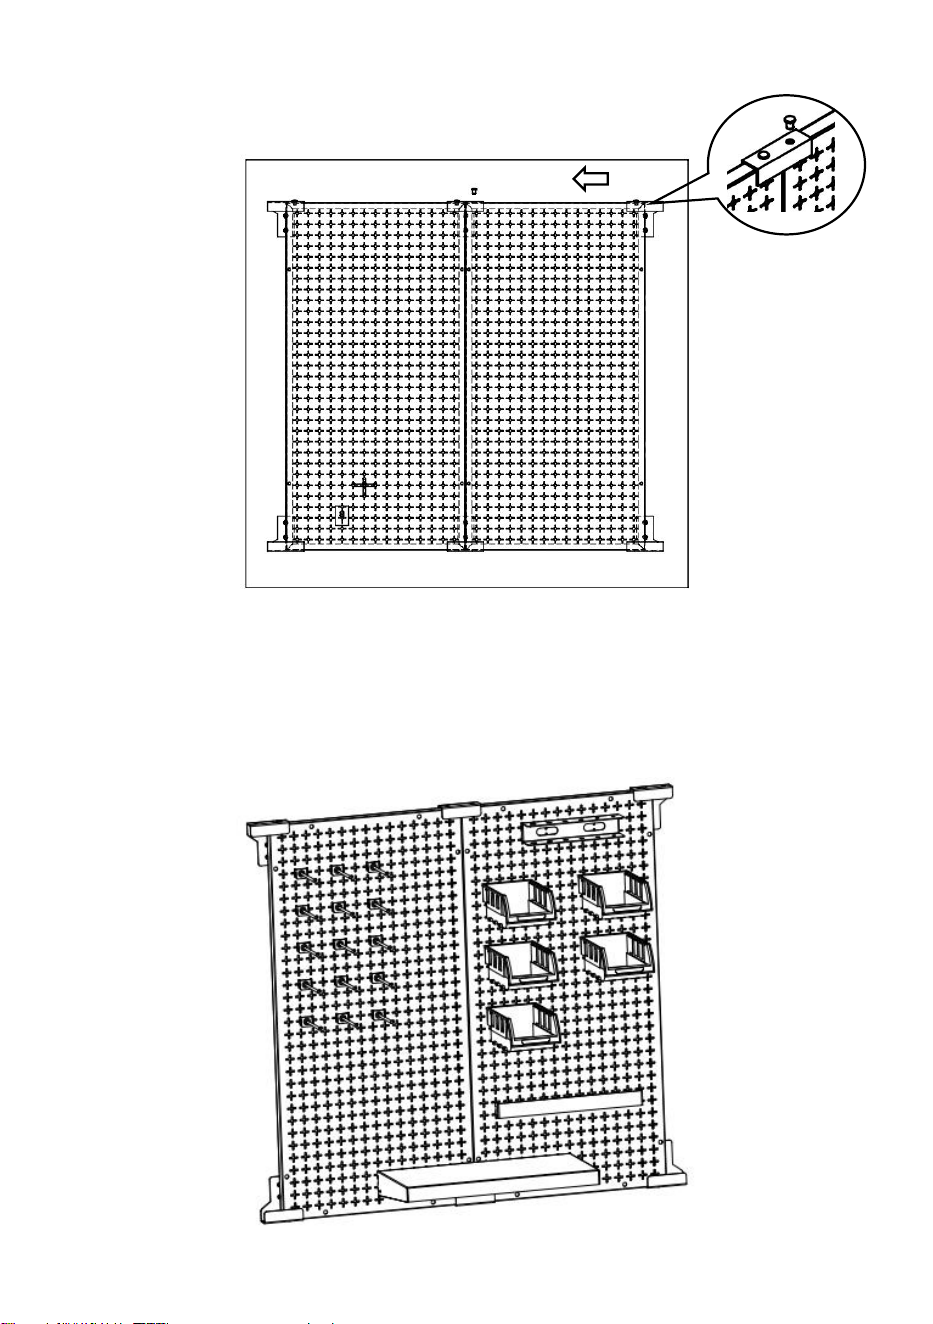
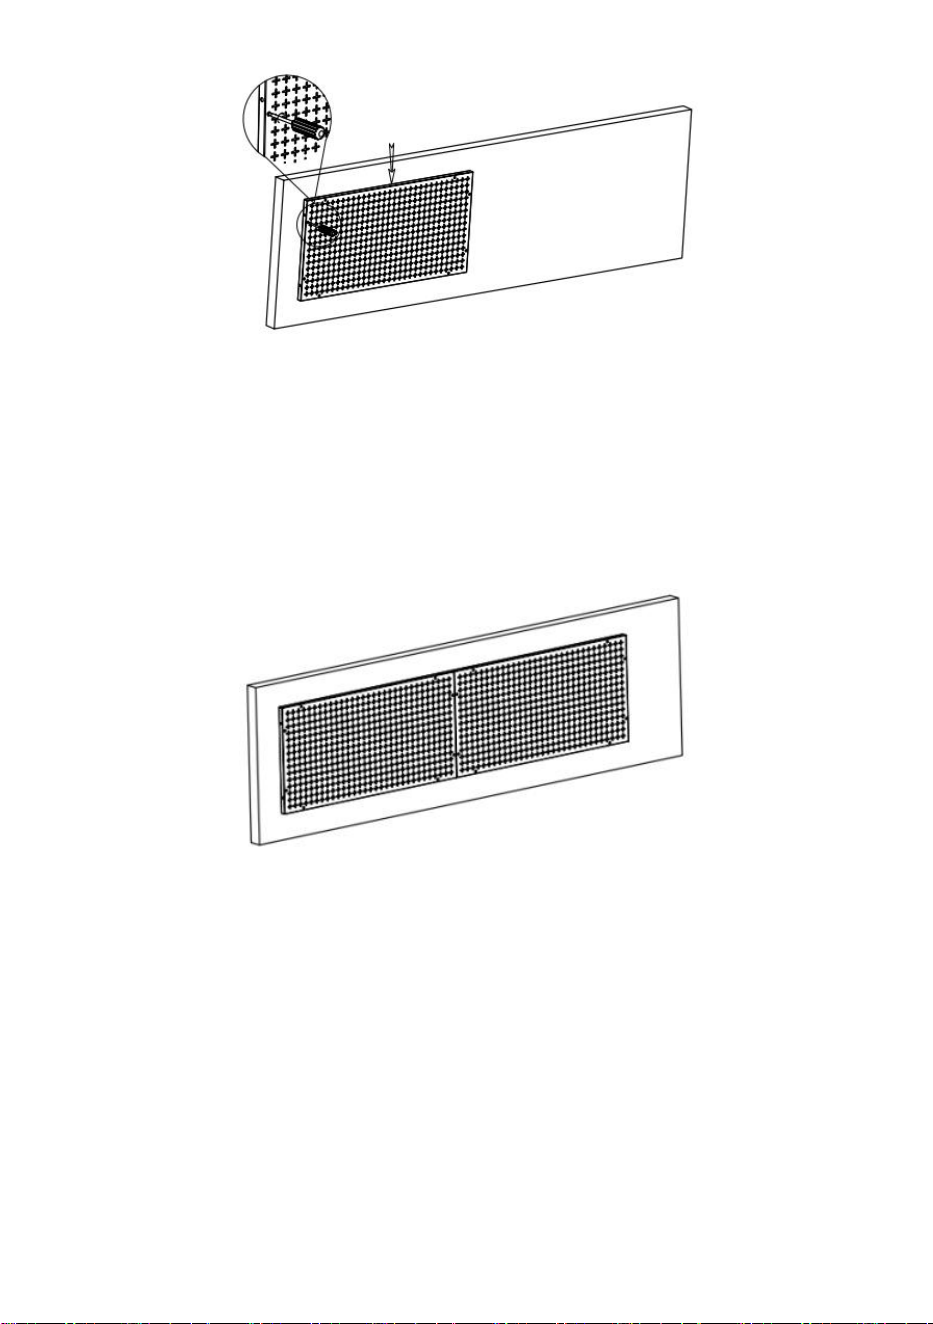
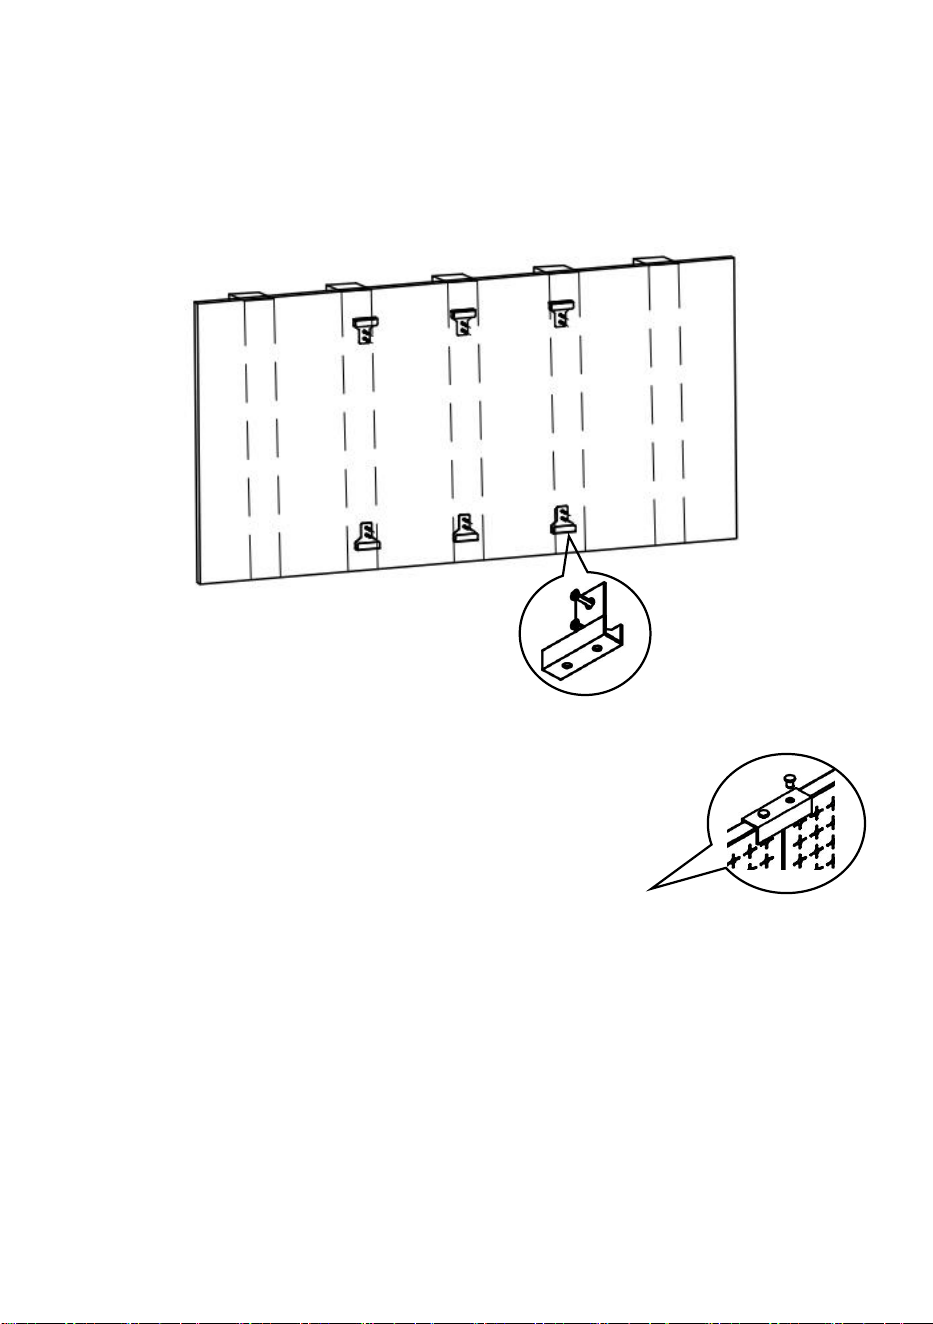
STEP 2: Fix the mounting block with self-tapping screws as
shown(Vertical).
Note:Horizontal and vertical installation method is the same.

- 12 -
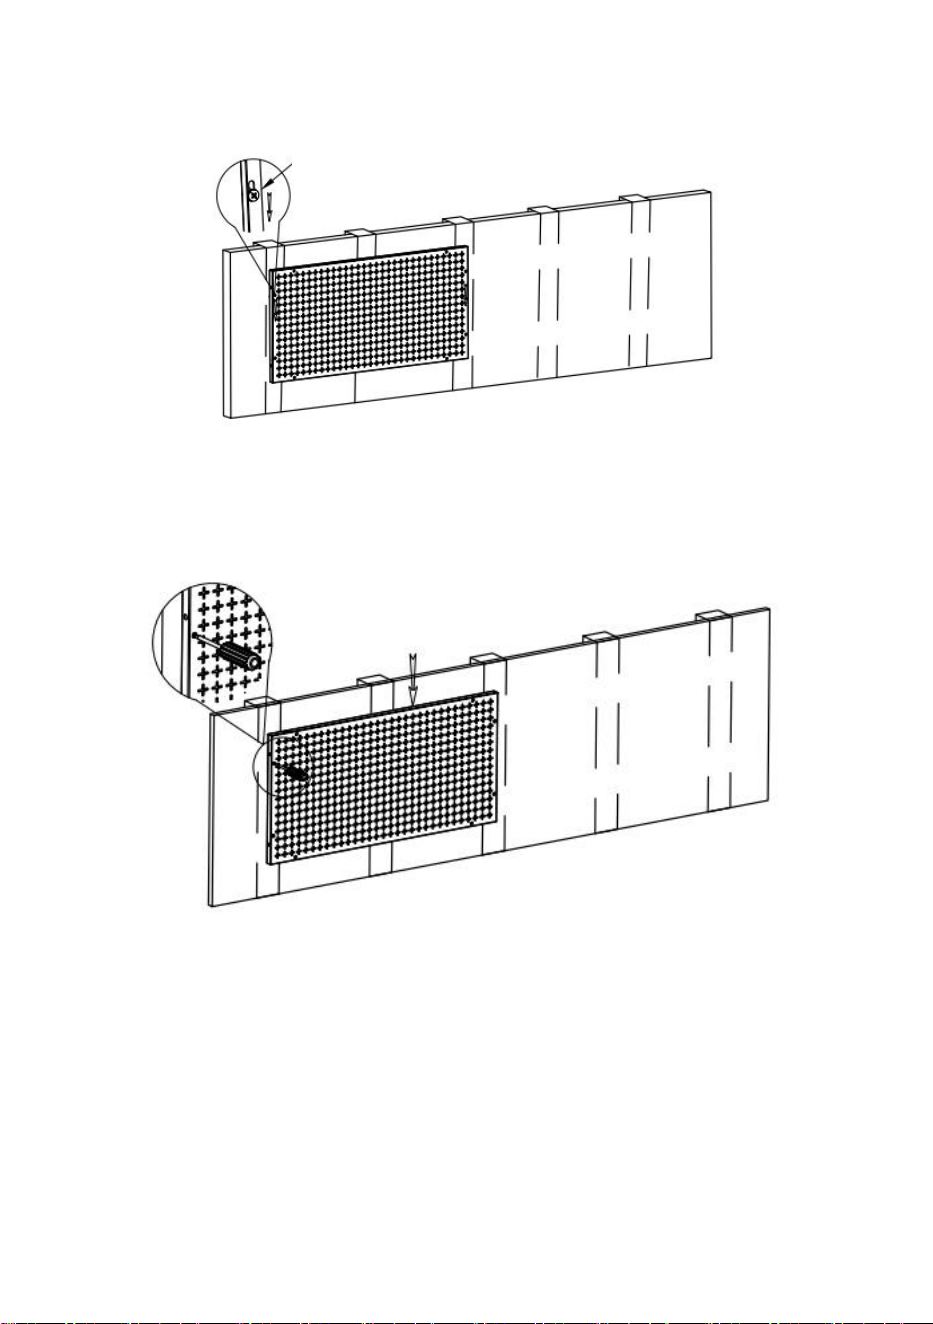
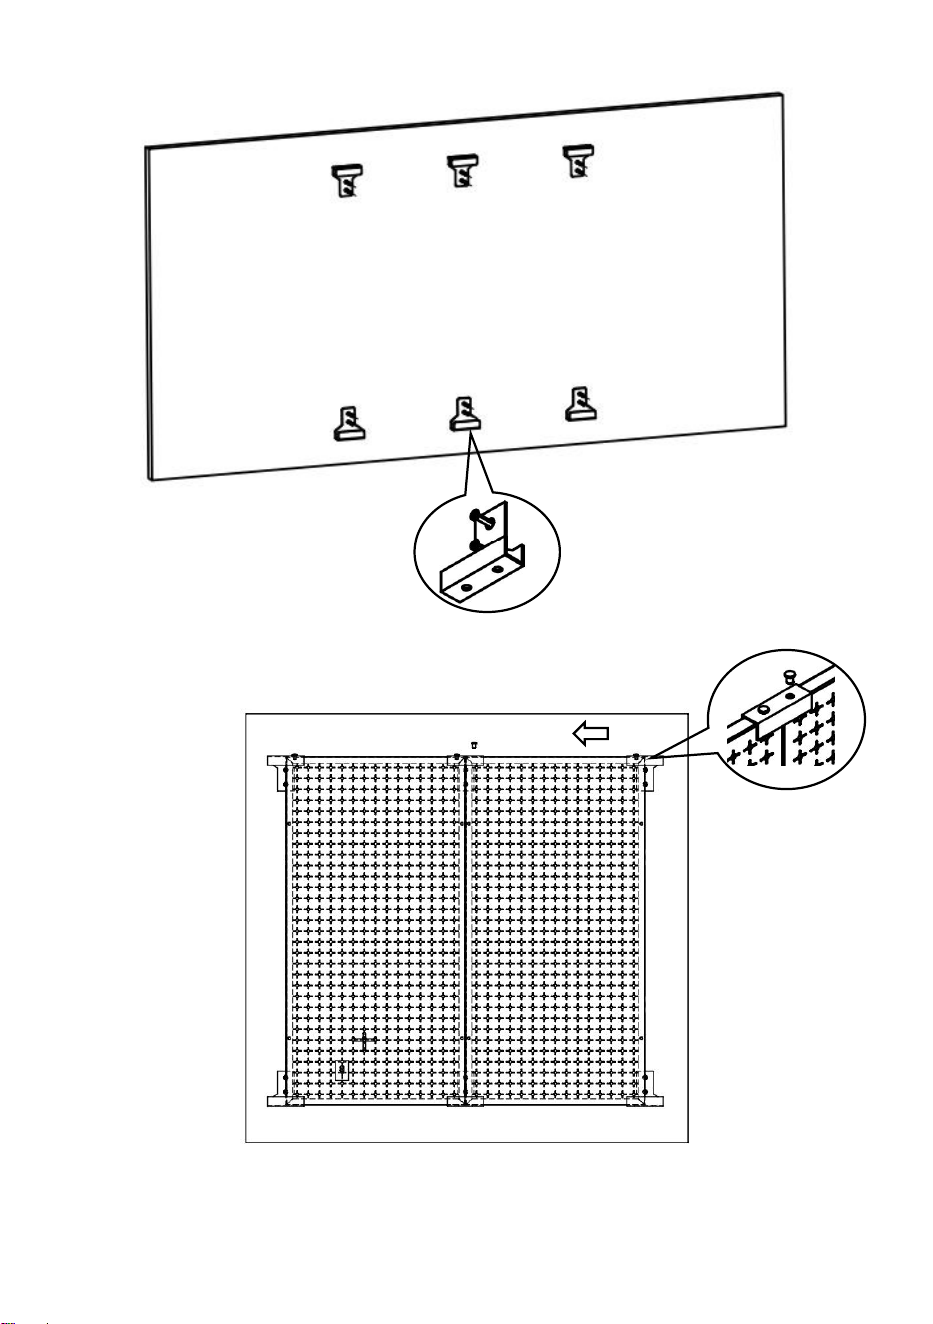
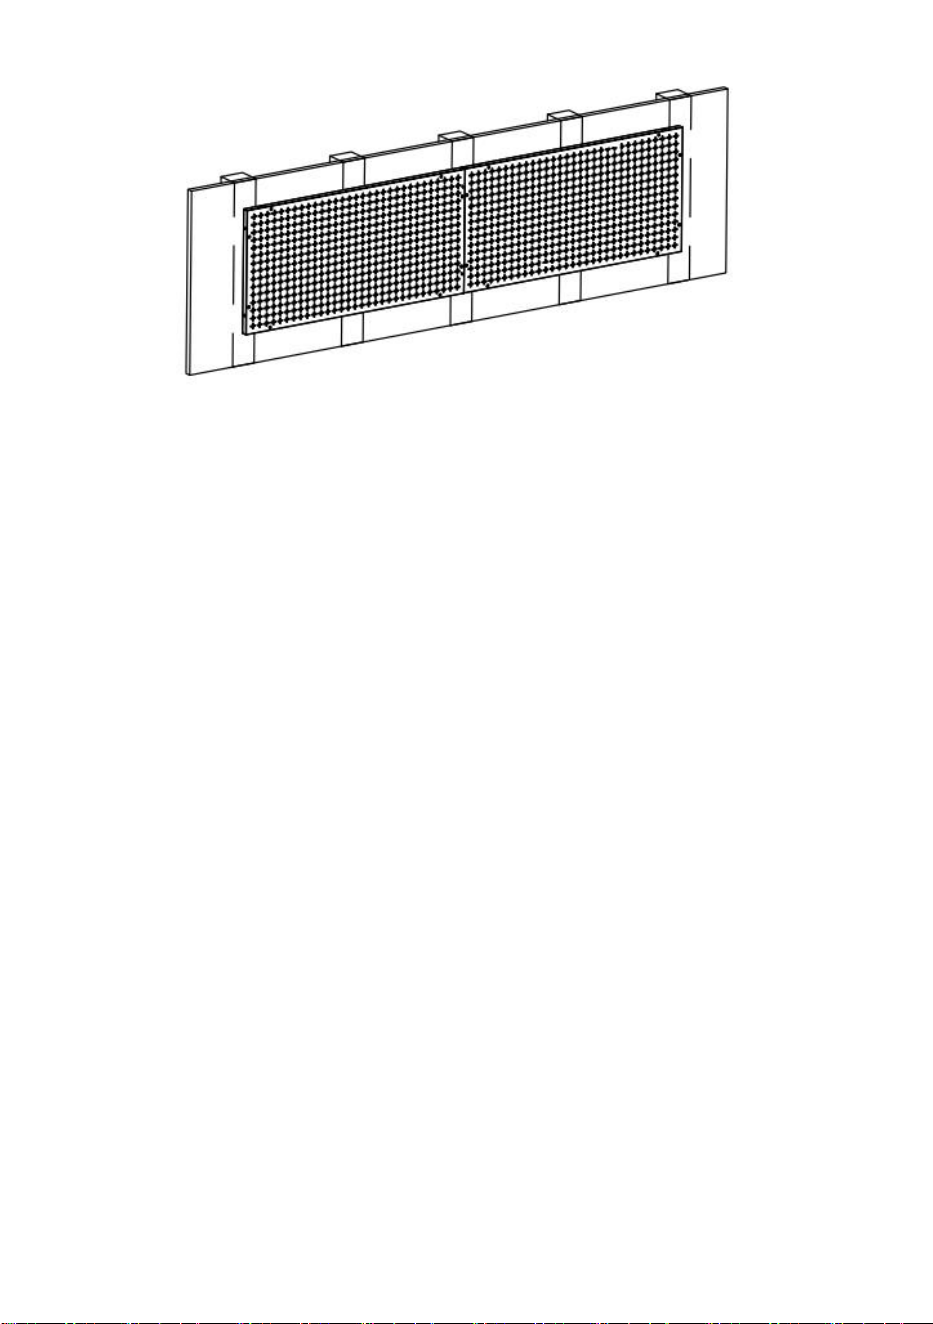
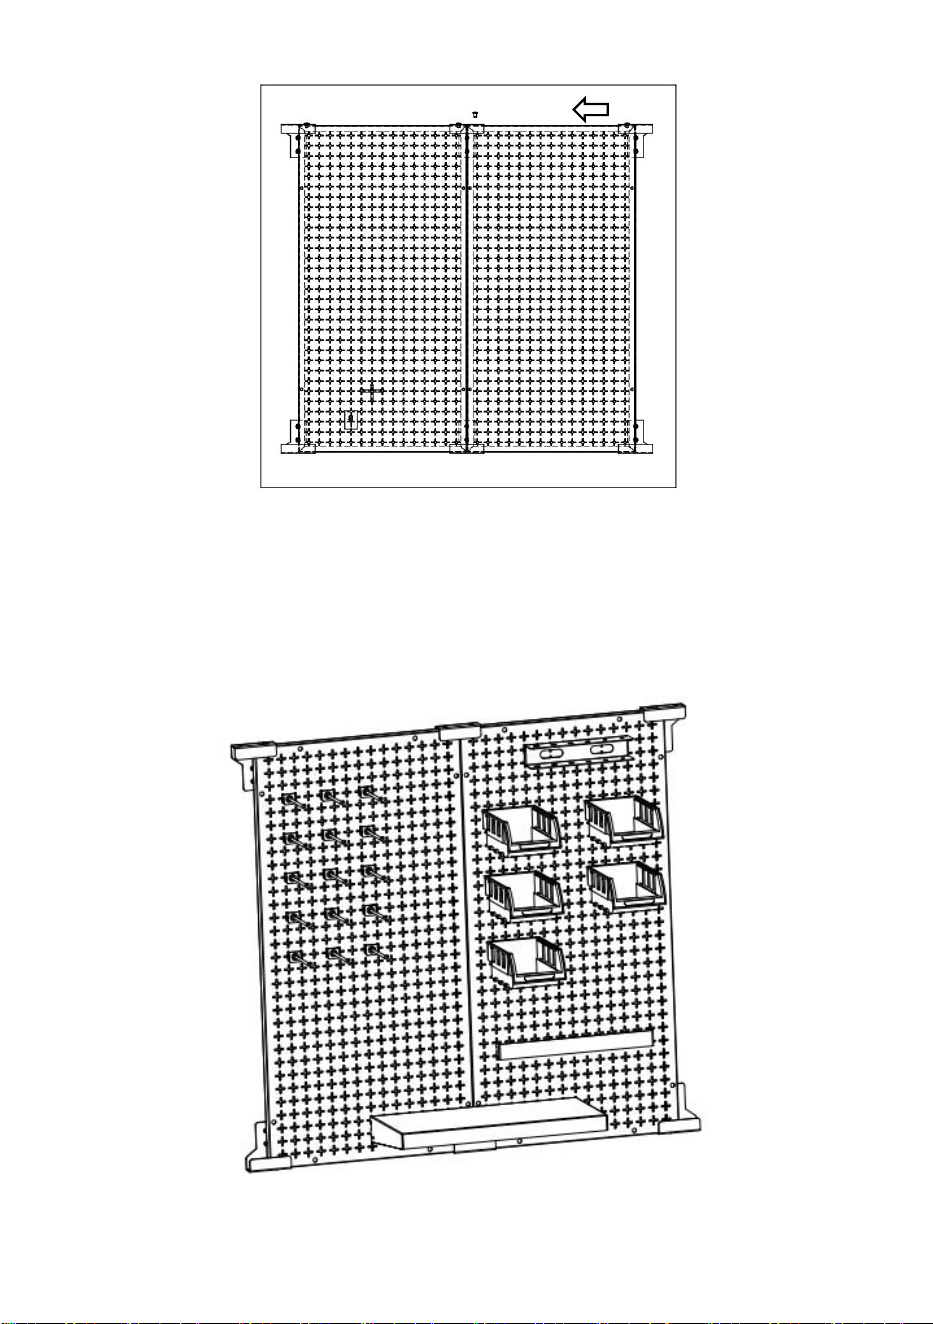
STEP 3: Insert the hanging plate into the mounting block and plug the limit plug
as shown.
STEP 4: Follow the steps above to install other pegboards.
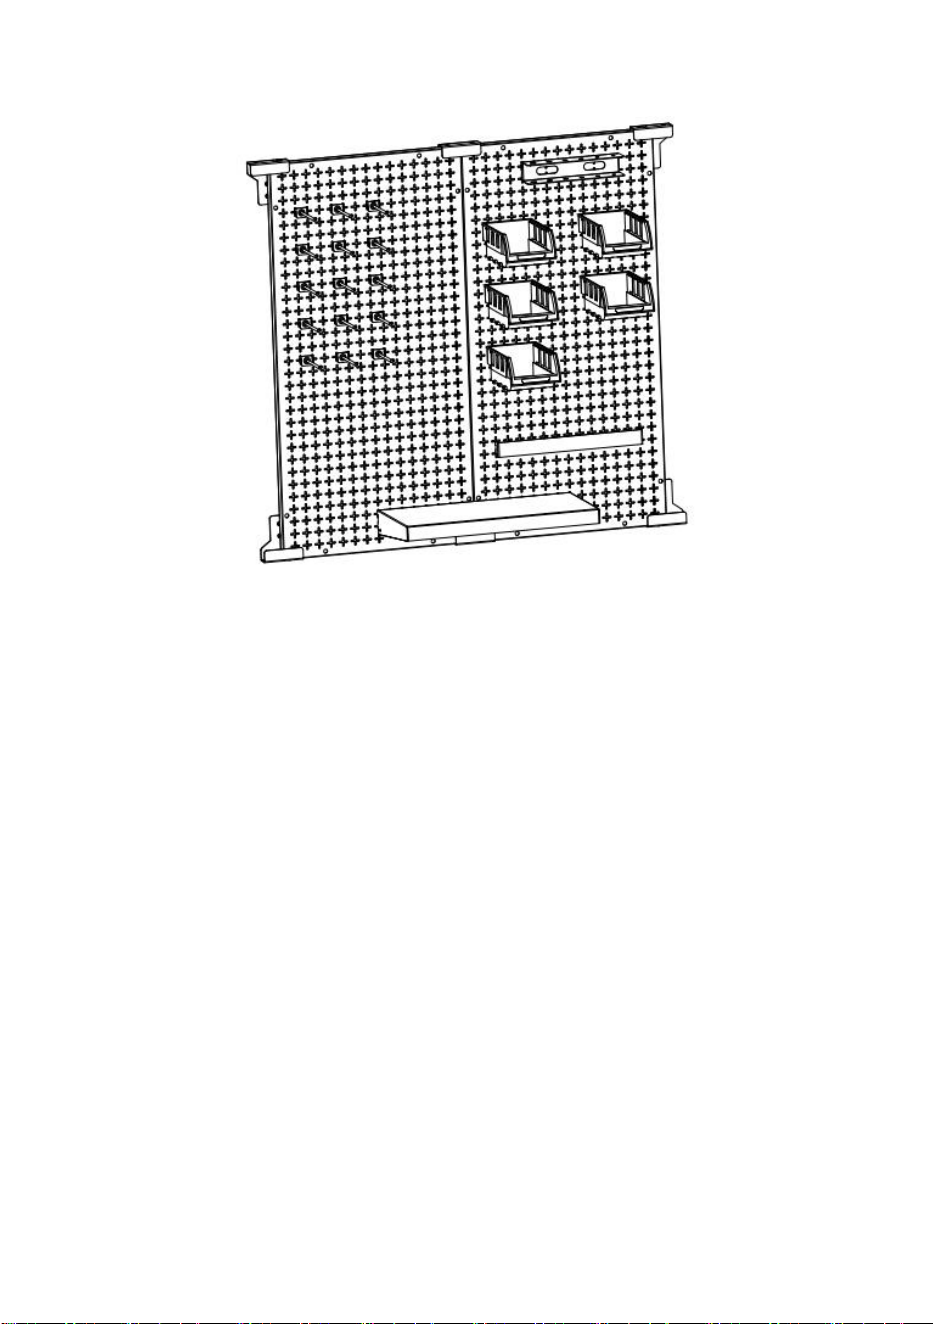
When the installation is complete, you can hang your items.
- 13 -
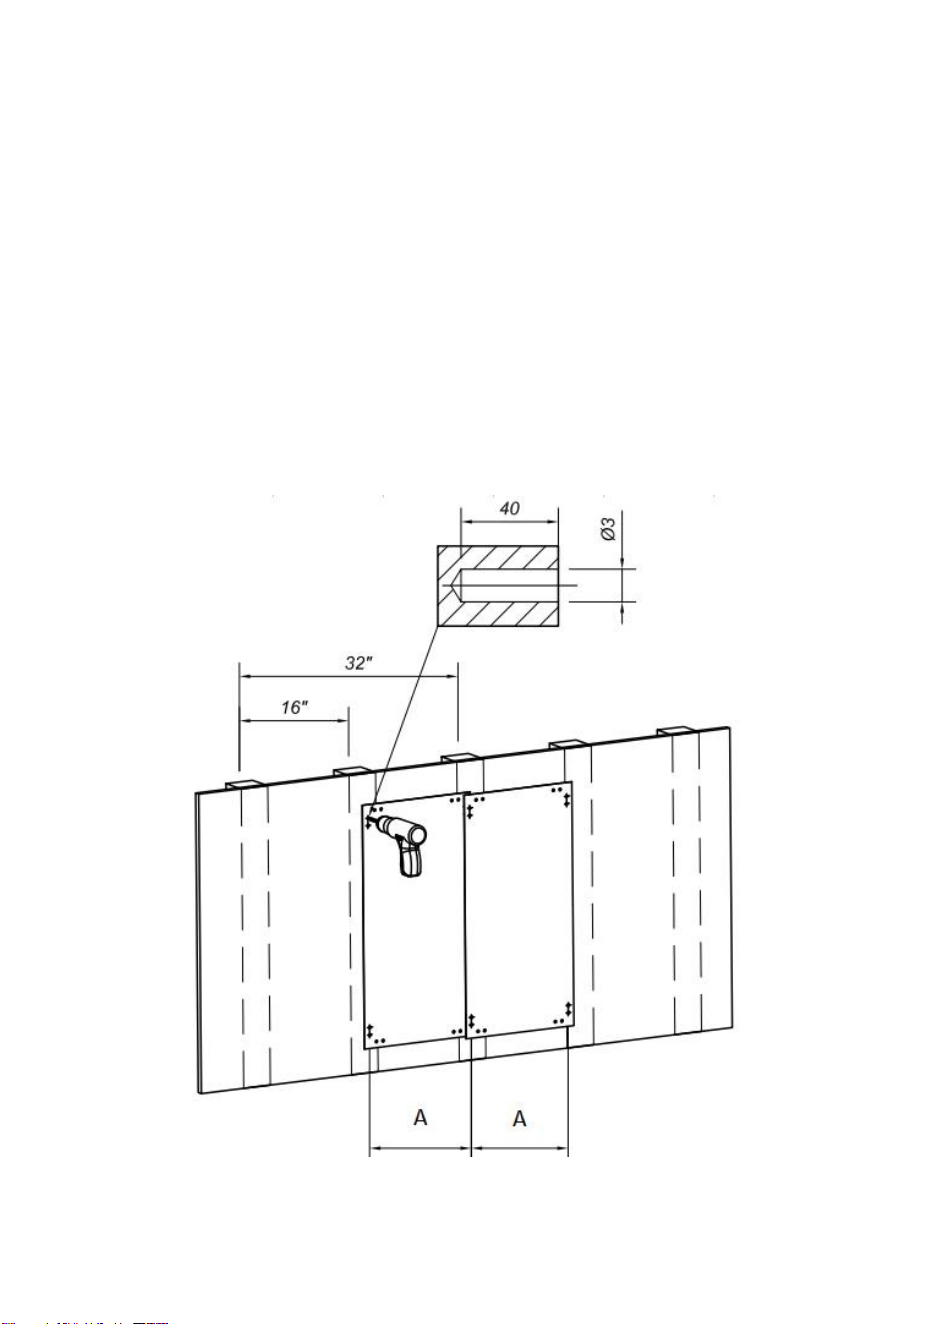
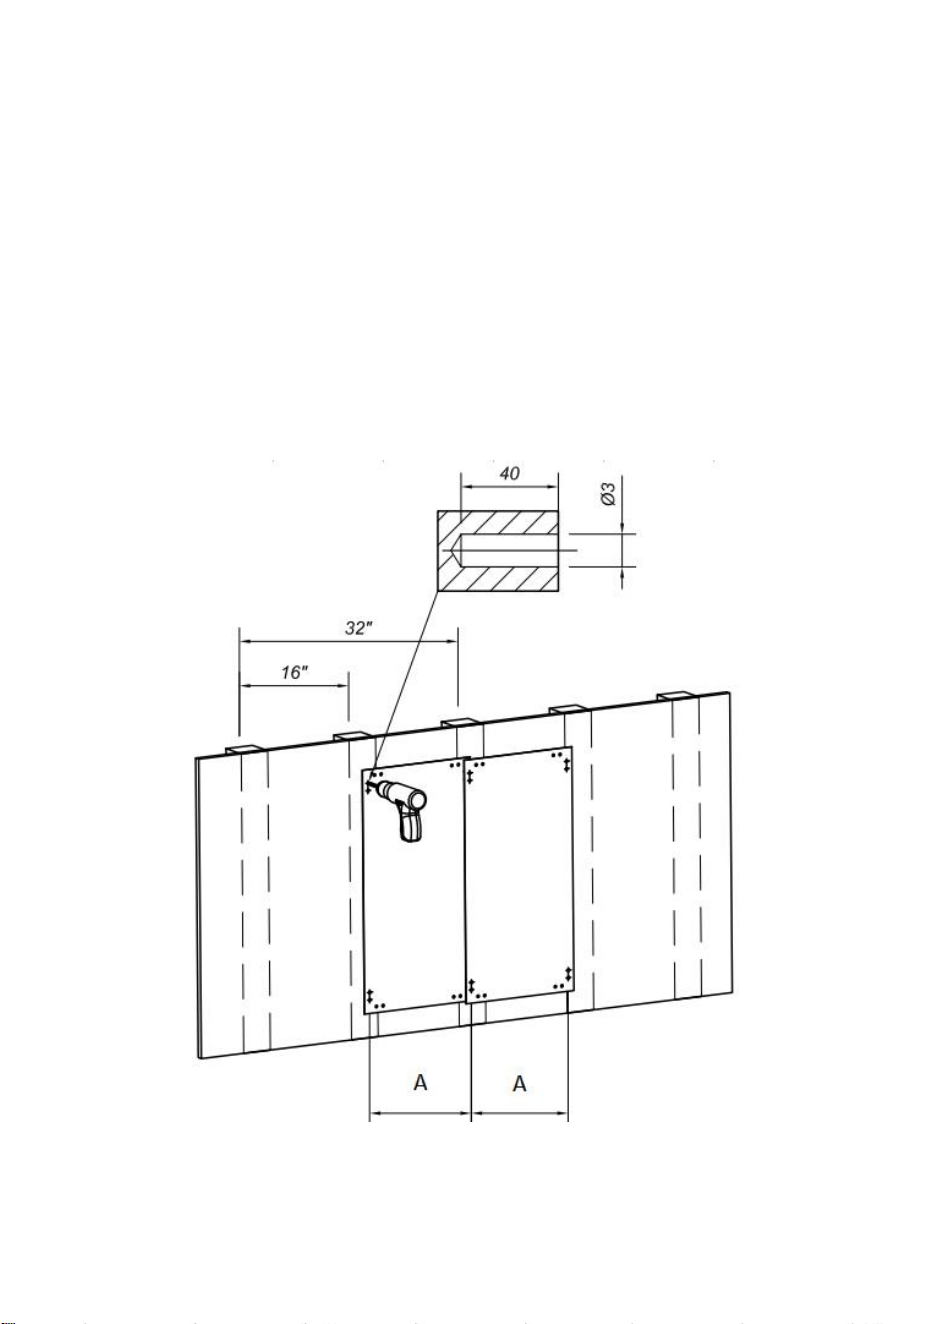
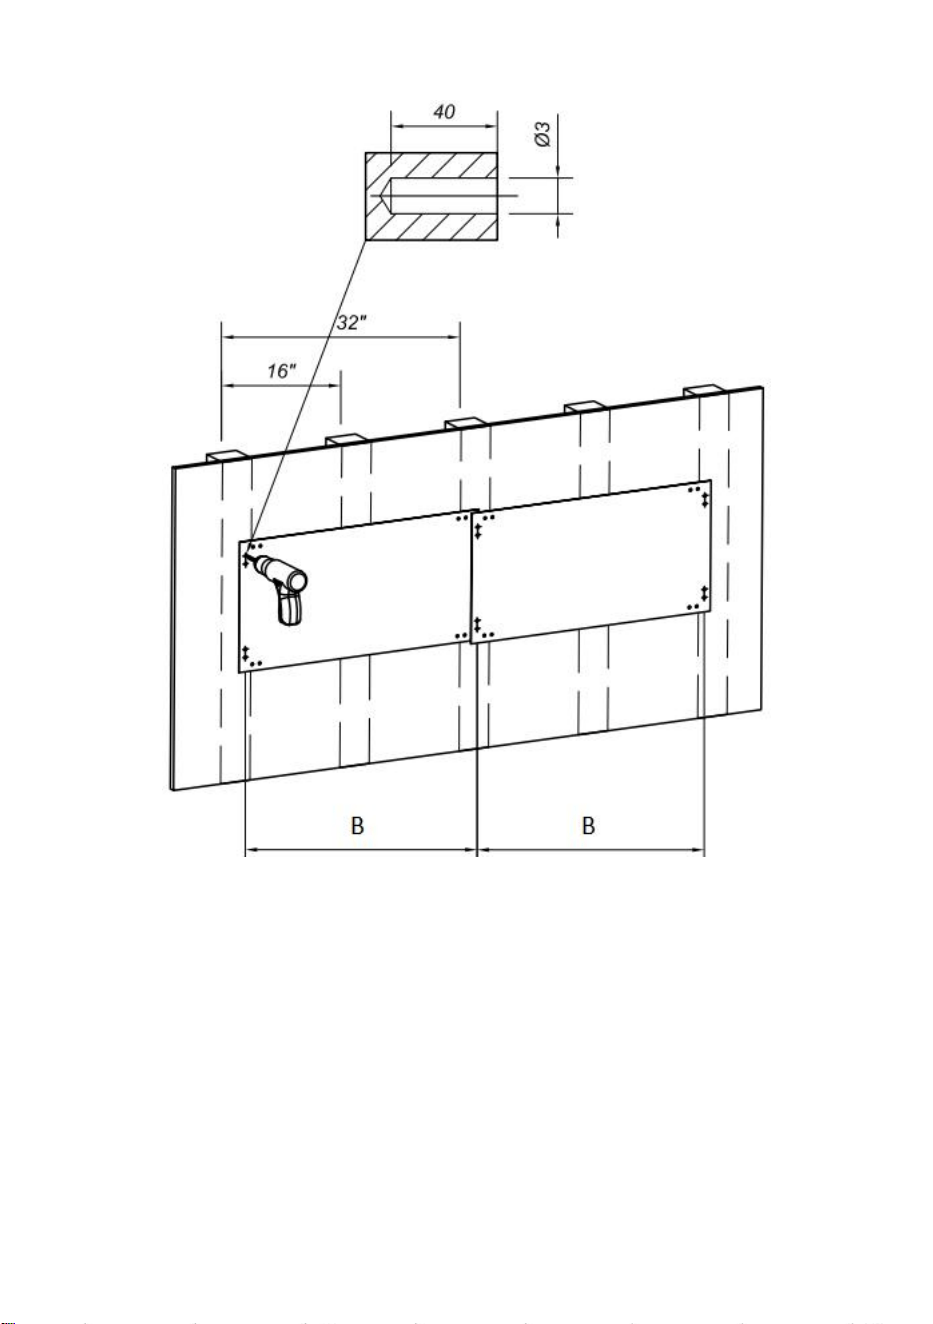
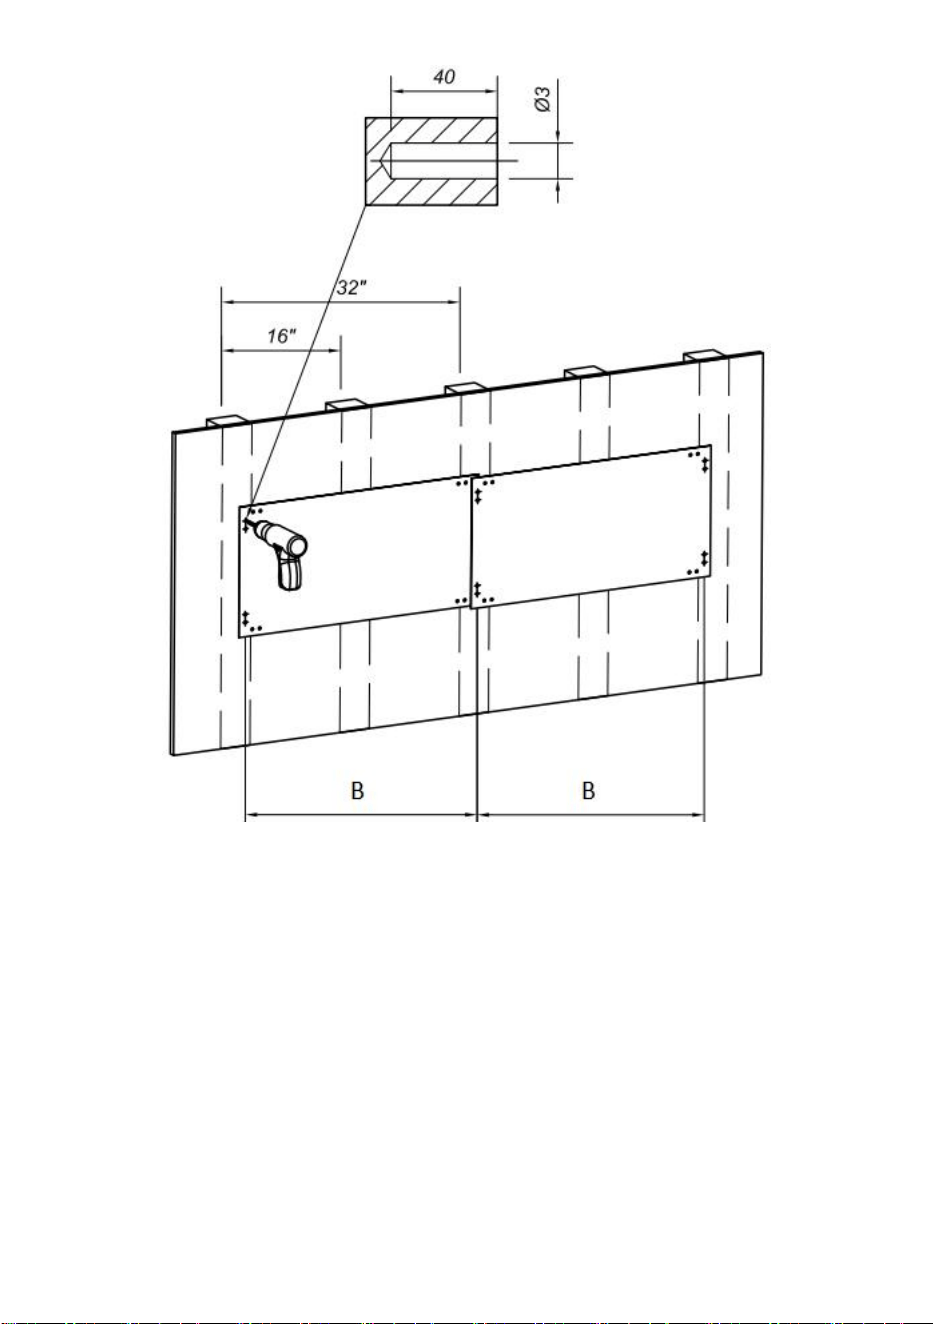
For Mounting Block + Wooden Wall Post Installation
STEP 1: Lay the positioning cardboard on the wall to be installed,and the
center of the hole on cardboard is located on the center-line of post.
Drill the marking holes according to the holes marked on the positioning
cardboard.
Take away cardboard and drill holes 3mm in diameter and 40mm in depth
at the marking holes.(Note: Prepare your own drilling tools.)
Vertical
:A=406mm
- 14 -
Horizontal:B=814mm
- 15 -
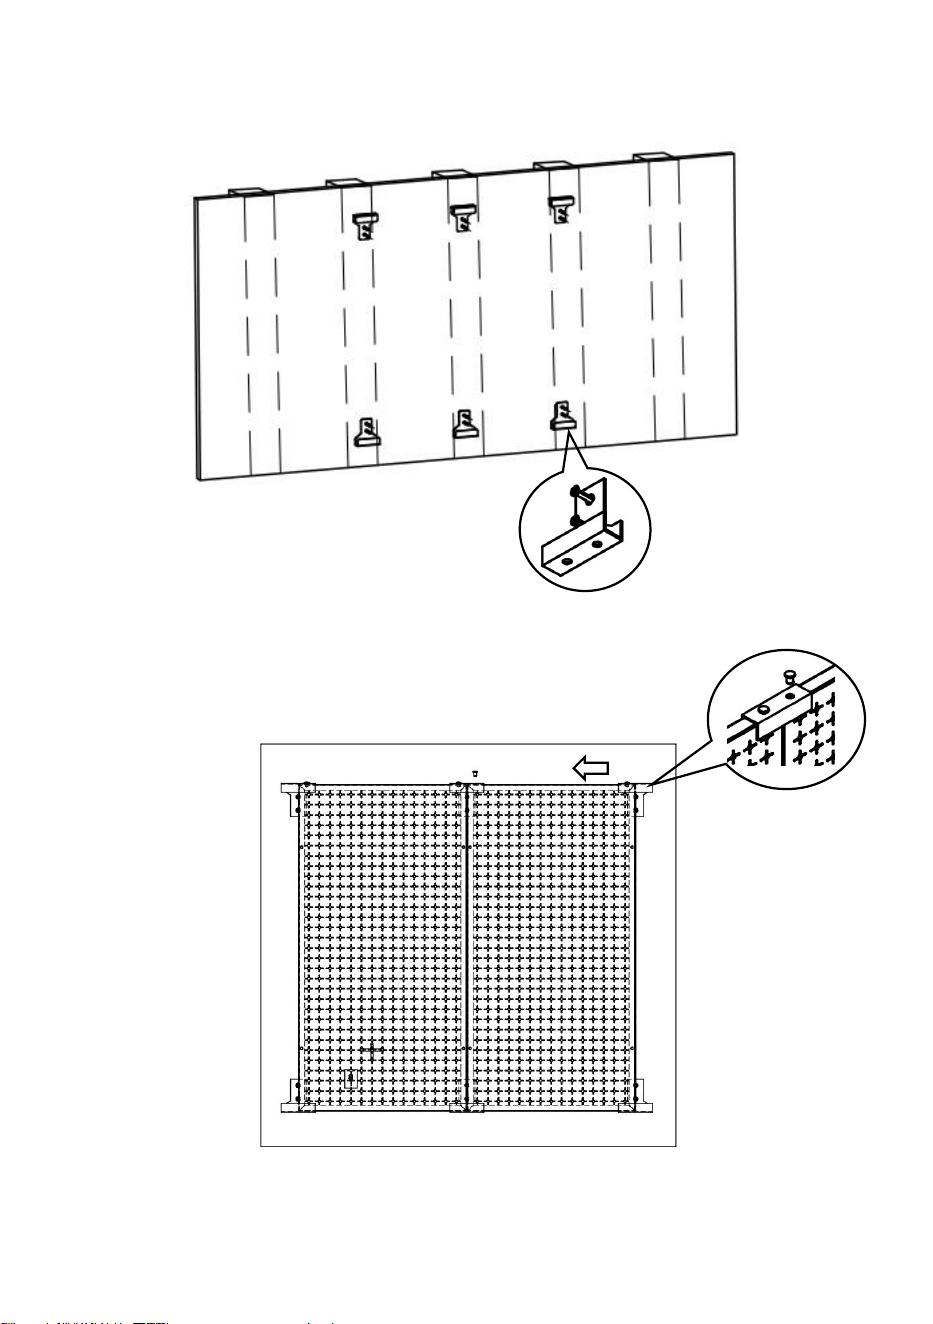
STEP 2: Fix the mounting block with self-tapping screws as
shown(Vertical).
Note:Horizontal and vertical installation method is the same.
STEP 3: Insert the hanging plate into the mounting block and plug the
limit plug as shown.

- 16 -
STEP 4: Follow the steps above to install other pegboards.
When the installation is complete, you can hang your items.
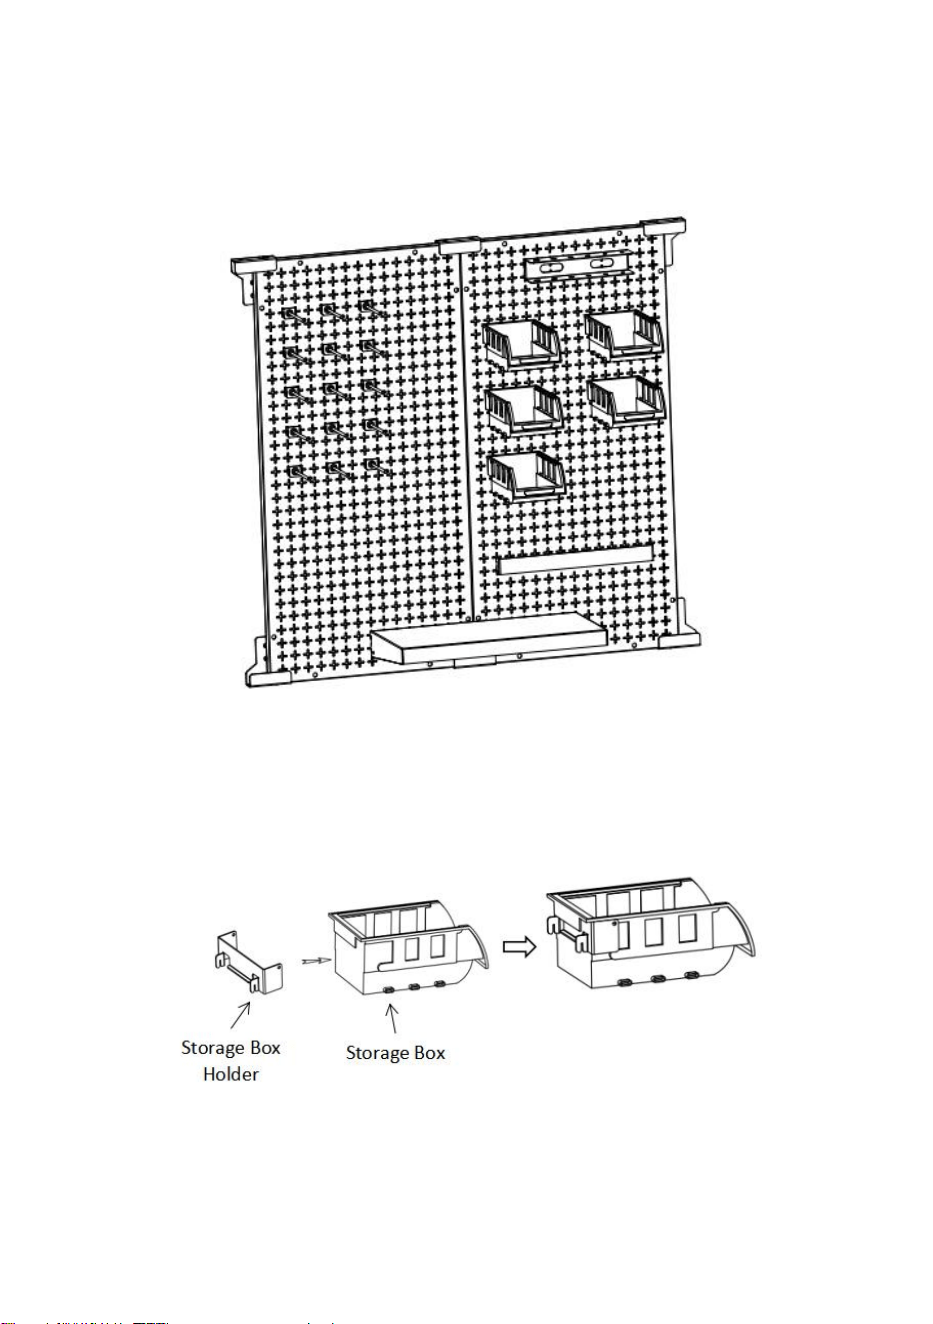
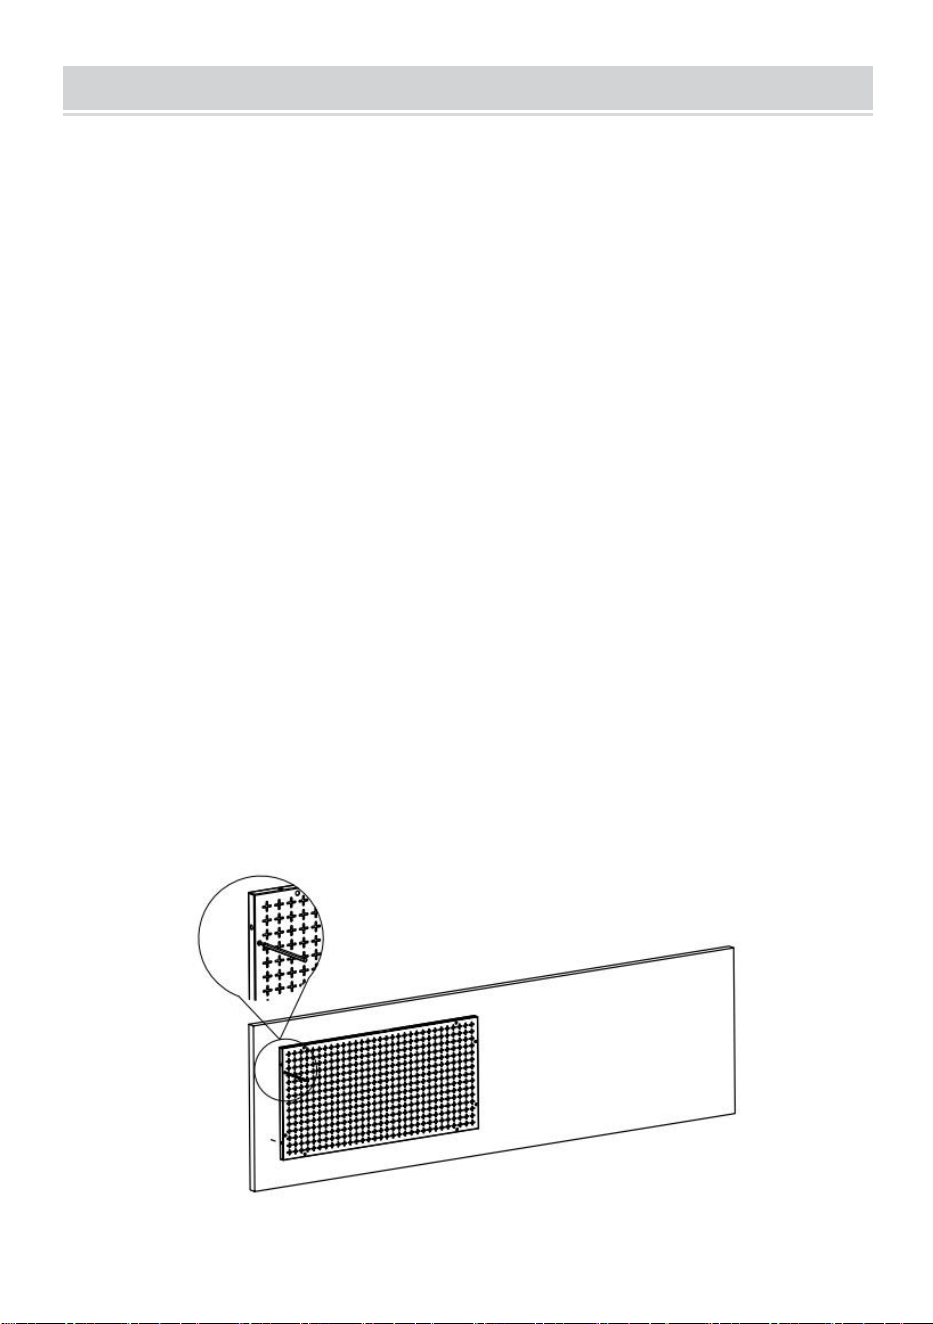
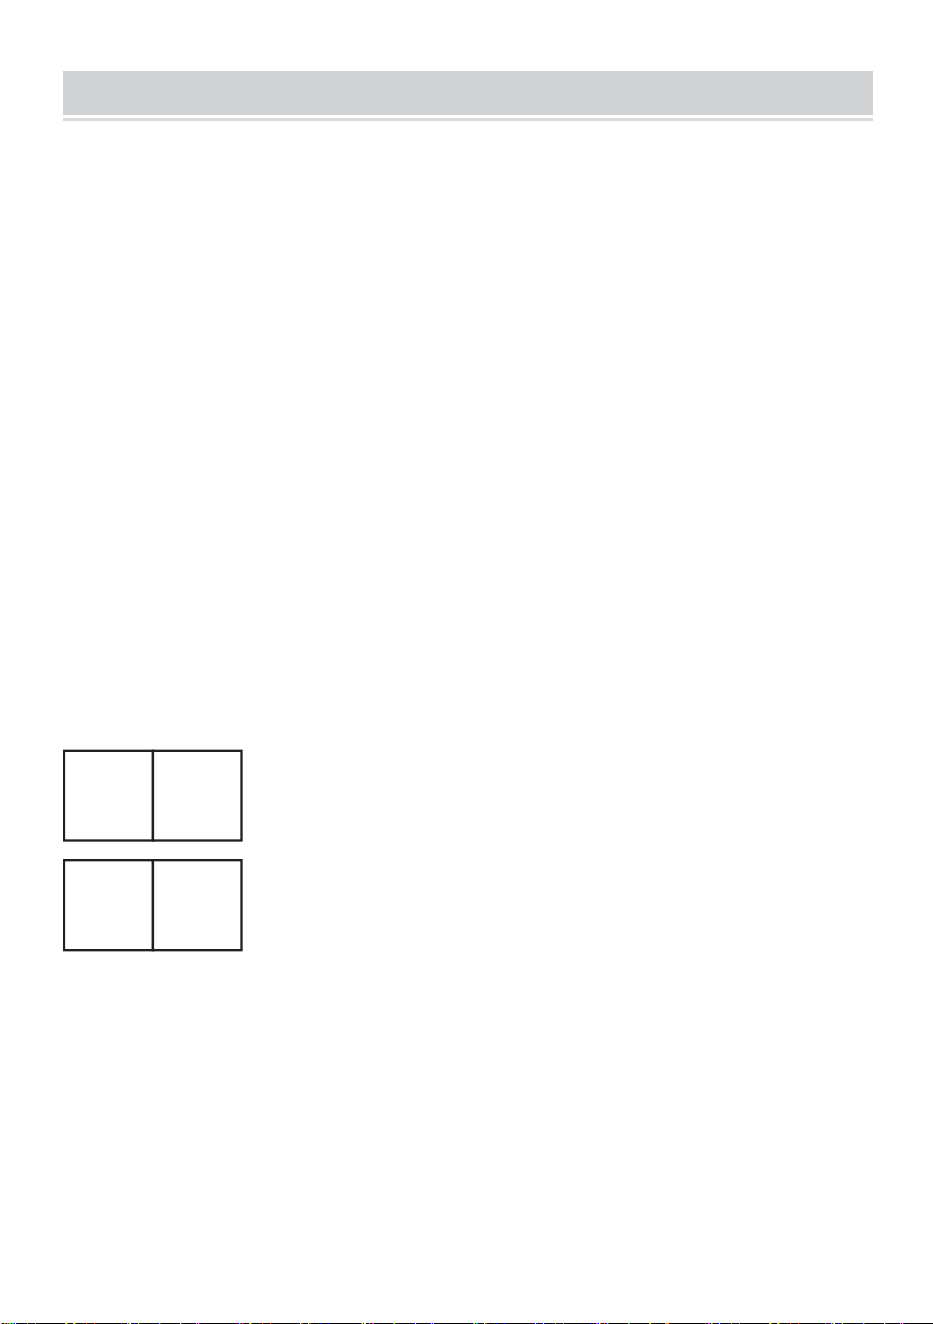
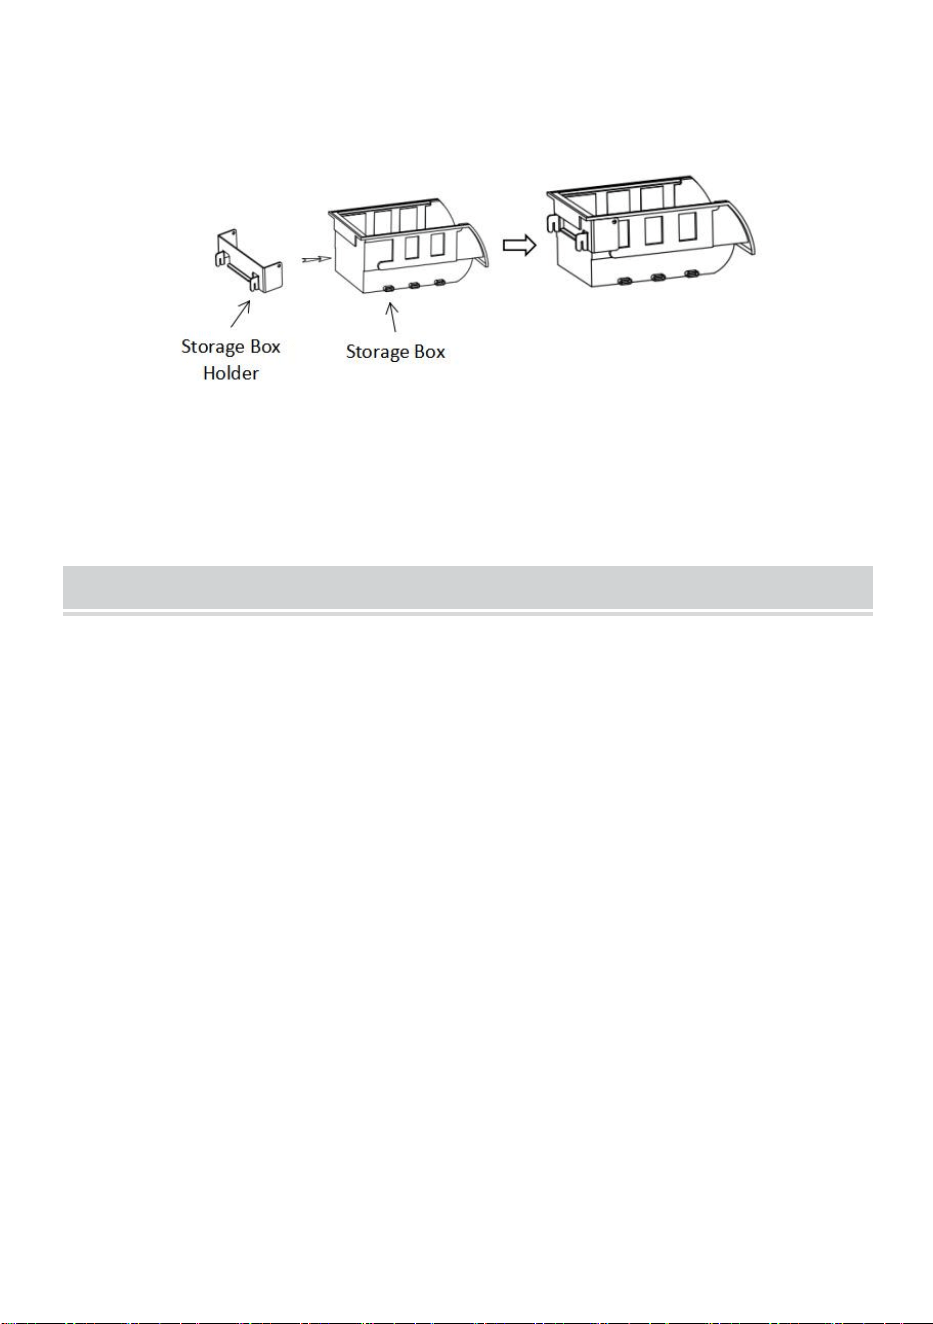
Storage box assembly:
- 17 -
MAINTENANCE
Do not exceed the weight capacity.
After use, please clean and dry the product in a dry ventilated place.
Manufacturer: Shanghaimuxinmuyeyouxiangongsi
Address: Shuangchenglu 803nong11hao1602A-1609shi, baoshanqu,
shanghai 200000 CN.
Imported to AUS: SIHAO PTY LTD, 1 ROKEVA STREETEASTWOOD NSW
2122 Australia
Imported to USA: Sanven Technology Ltd., Suite 250, 9166 Anaheim Place,
Rancho Cucamonga, CA 91730
REP
EC
E-CrossStu GmbH
Mainzer Landstr.69, 60329 Frankfurt am Main.
REP
UK
YH CONSULTING LIMITED.
C/O YH Consulting Limited Office 147, Centurion House,
London Road, Staines-upon-Thames, Surrey, TW18 4AX


Techniczny Wsparcie i certyfikat gwarancji elektronicznej www.vevor.com/support
PŁYTA PERGLOWANA
INSTRUKCJA OBSŁUGI
We continue to be committed to provide you tools with competitive price.
"Save Half", "Half Price" or any other similar expressions used by us only represents an
estimate of savings you might benefit from buying certain tools with us compared to the major
top brands and does not necessarily mean to cover all categories of tools offered by us. You
are kindly reminded to verify carefully when you are placing an order with us if you are
actually saving half in comparison with the top major brands.

- 1 -
MODELE:HB641601 ,HB641602,HB9632
Have product questions? Need technical support? Please feel free to
contact us:
Technical Support and E-Warranty Certificate
www.vevor.com/support
NEED HELP? CONTACT US!
This is the original instruction, please read all manual instructions
carefully before operating. VEVOR reserves a clear interpretation of our
user manual. The appearance of the product shall be subject to the
product you received. Please forgive us that we won't inform you again if
there are any technology or software updates on our product.
PEGBOARD
- 2 -
SAFETY INSTRUCTIONS
OSTRZEŻENIE:
1. Przeczytaj ten materiał przed użyciem tego produktu. Niedopełnienie
tego obowiązku może spowodować poważne obrażenia.
2. Nie przekraczać dopuszczalnego udźwigu wideł paletowych .
3. Po użyciu należy wysuszyć przed schowaniem, aby zapobiec
rdzewieniu produktu .
4. Procedury, które nie zostały szczegółowo opisane w niniejszej instrukcji,
mogą być wykonywane wyłącznie przez wykwalifikowanego technika.
Aby zapobiec poważnym obrażeniom spowodowanym awarią
narzędzia, nie należy go używać, gdy jest uszkodzone :
Tablicę perforowaną należy zamontować na ścianie litej.
Tablic perforowanych nie należy montować na zbyt cienkich ścianach
drewnianych.
Nie wolno montować tablic perforowanych na zgniłych lub luźnych
ścianach drewnianych.
Ciężar przedmiotów przeznaczonych do zawieszenia nie może
przekraczać obciążenia tablicy perforowanej.
Przy wymianie haka należy pamiętać o dobraniu go do rozmiaru tablicy
perforowanej.
Unikaj ostrych punktów, ostrzy i innych przedmiotów, które mogą
zarysować produkt.
OSTROŻNOŚĆ:
Uważnie przeczytaj instrukcje i procedury w celu zapewnienia
bezpiecznego działania.
Zapisz ten podręcznik
- 3 -
MODEL AND PARAMETERS
HB641601
HB641602
HB9632
Tworzywo
Stal
Stal
Stal
Maksymalna
nośność
(pojedyncza
tablica
perforowana)
165 funtów
165 funtów
165 funtów
Wymiary tablicy
perforowanej (dł. x
szer.)
32 ”* 16 ”
32 ” *16 ”
32 ” *16 ”
Specyfikacja
otworów
1/4 cala
1/4
”
1/4 cala
Grubość blachy
1,0 mm
1,0 mm
1,0 mm
Obróbka
powierzchni
(tablica
perforowana)
Galwanizacja +
Malowanie proszkowe
Galwanizacja +
Malowanie proszkowe
Galwanizacja +
Malowanie proszkowe
Kolor
biały
biały
biały
Model
SPEC.
- 4 -
COMPONENTS
HB641601
HB641602
HB9632
Tablica perforowana
×2
×2
×3
Hak
/
×15
×20
Skrzynka do
przechowywania
/
×5
×5
Uchwyt na pudełko do
przechowywania
/
× 5
× 5
załogi S Holder
/
×1
×1
Stojak
/
×1
×1
Półka
/
×1
×2
Blokada montażowa
/
×6
×8
Ty Hak
/
/
×4
W rench H older
/
/
×1
Wtyczka ograniczająca
/
× 8
×1 2
Model
Parts

- 5 -
Wtyczka rozprężna
× 8
×1 2
×1 6
Wkręt samogwintujący
× 8
×1 2
×1 6
Pozycjonowanie
tektury
/
× 1
× 1
Instrukcja obsługi
×1
×1
×1
INSTALLATION INSTRUCTION
Przygotowanie do instalacji:
1. Dwie lub więcej osób do montażu tablicy perforowanej.
2. Przygotuj dywan lub matę, aby zabezpieczyć podłogę i rozłożyć
wszystkie akcesoria.
3. Proszę przygotować rękawice, aby uniknąć zarysowań ostrymi
elementami, które mogą powstać w trakcie montażu.
4. Proszę otworzyć wszystkie pudełka, aby sprawdzić czy akcesoria są
kompletne i w dobrym stanie .
5. Jeśli do montażu tego produktu konieczne będzie użycie
elektronarzędzi, należy wcześniej ustawić niską prędkość.
6. Podczas instalacji należy wyrównać wszystkie otwory i nie dokręcać
najpierw wszystkich śrub , w przeciwnym razie może to utrudnić instalację.
Do montażu na ścianach betonowych
KROK 1: Umieść deskę wiszącą w pobliżu zamontowanej ściany i zaznacz
otwory cienkim gwoździem lub ołówkiem. (Uwaga: dwa otwory po lewej
stronie, dwa otwory po prawej stronie)
- 6 -
KROK 2: Wywierć otwory o średnicy 8 mm i głębokości 40 mm w
zaznaczonych miejscach. (Uwaga: Przygotuj własne narzędzia do
wiercenia .)
KROK 3: Wbij cztery kołki rozporowe do otworu.

- 7 -
KROK 4 : Wkręć wkręt samogwintujący w otwór kołka rozporowego,
pozostawiając 3~5 mm odsłoniętej powierzchni.
KROK 5: Zawieś płytę perforowaną na wkrętach samogwintujących, jak
pokazano na rysunku.
KROK 6: Upewnij się, że cztery wkręty samogwintujące są zawieszone w
otworach montażowych płyty perforowanej i dokręć je.
KROK 7: Aby zamontować pozostałe tablice perforowane, wykonaj
back

- 8 -
powyższe czynności.
(Uwaga: Tablicę perforowaną należy umieszczać poziomo i pionowo, a
metoda montażu jest taka sama.)
Do montażu drewnianych słupków ściennych
KROK 1 : Wyrównaj krawędź płyty perforowanej ze środkową linią słupka i
zaznacz otwory cienkim gwoździem lub ołówkiem. (Uwaga: dwa otwory po
lewej, dwa otwory po prawej)
KROK 2: Wywierć otwory o średnicy 3 mm i głębokości 40 mm w
zaznaczonych miejscach, wkręć wkręty samogwintujące w otwory,
pozostawiając 3~5 mm odsłoniętej powierzchni. (Uwaga: Przygotuj własne
narzędzia .)
- 9 -
KROK 3 : Zawieś płytę perforowaną na wkrętach samogwintujących , jak
pokazano na rysunku.
KROK 4 : Upewnij się, że cztery wkręty samogwintujące są zawieszone
w otworach montażowych płyty perforowanej, a następnie dokręć je .
back
- 10 -
KROK 5 : Aby zamontować pozostałe tablice perforowane, wykonaj
powyższe czynności.
(Uwaga: Tablicę perforowaną umieszcza się poziomo i pionowo, a metoda
montażu jest taka sama.)
Dla Montaż Blokady + Montaż Ściany Betonowej
KROK 1: Połóż tekturę pozycjonującą na ścianie, na której chcesz
zamontować płytę, wywierć otwory zgodnie z otworami zaznaczonymi na

- 11 -
tekturze pozycjonującej.
Zdejmij tekturę i wywierć otwory o średnicy 8 mm i głębokości 40 mm w
miejscach zaznaczonych otworów. (Uwaga: Przygotuj własne narzędzia do
wiercenia .)
Wbij kołki rozporowe do otworu, dokładnie je wkręcając.
Pionowo: A=406mm
Poziomo: B=814mm
- 12 -
KROK 2: Zamocuj blok montażowy za pomocą wkrętów samogwintujących,
jak pokazano ( pionowo ) .
Uwaga: Metoda montażu poziomego i pionowego jest taka sama.

- 13 -
KROK 3 : Włóż płytkę zawieszaną do bloku montażowego i zaślep zaślepkę
ograniczającą , jak pokazano .
KROK 4: Aby zamontować pozostałe panele perforowane , wykonaj
powyższe czynności .
Po zako
ń
czeniu instalacji możesz powiesić swoje przedmioty
.

- 14 -
Dla Montaż blokady B + Montaż słupka ściennego z drewna
KROK 1 : Połóż tekturę pozycjonującą na ścianie, na której chcesz
zamontować montaż, tak aby środek otworu w tekturze znajdował się na
linii środkowej słupka.
Wywierć otwory zgodnie z otworami zaznaczonymi na tekturze
pozycjonującej.
Zdejmij tekturę i wywierć otwory o średnicy 3 mm i głębokości 40 mm w
miejscach zaznaczonych otworów. (Uwaga: Przygotuj własne narzędzia do
wiercenia .)
Pionowo:
A=406mm

- 15 -
Poziomo : B=814mm

- 16 -
KROK 2 : Zamocuj blok montażowy za pomocą wkrętów samogwintujących, jak
pokazano ( pionowo ) .

- 17 -
Uwaga: Metoda montażu poziomego i pionowego jest taka sama.
KROK 3 : Włóż płytkę zawieszaną do bloku montażowego i zaślep
zaślepkę ograniczającą, jak pokazano .
KROK 4: Aby zamontować pozostałe panele perforowane , wykonaj
powyższe czynności .

- 18 -
Po zako
ń
czeniu instalacji możesz powiesić swoje przedmioty
.
Montaż pudełka do przechowywania:

- 19 -
MAINTENANCE
Nie przekraczać wagi pojemność .
Po użyciu należy wyczyścić i wysuszyć produkt w suchym i
wentylowanym miejscu.
Producent: Shanghaimuxinmuyeyouxiangongsi
Adres: Shuangchenglu 803nong11hao1602A-1609shi, baoshanqu, szanghaj
200000 CN.
Importowane do AUS: SIHAO PTY LTD, 1 ROKEVA STREETEASTWOOD
NSW 2122 Australia
Importowane do USA: Sanven Technology Ltd., Suite 250, 9166 Anaheim
Place, Rancho Cucamonga, CA 91730
REP
EC
E-CrossStu GmbH
Mainzer Landstr.69, 60329 Frankfurt am Main.
REP
UK
YH CONSULTING LIMITED.
C/O YH Consulting Limited Office 147, Centurion House,
London Road, Staines-upon-Thames, Surrey, TW18 4AX


Technisch Support und E-Garantie-Zertifikat www.vevor.com/support
Stecktafel
BEDIENUNGSANLEITUNG
We continue to be committed to provide you tools with competitive price.
"Save Half", "Half Price" or any other similar expressions used by us only represents an
estimate of savings you might benefit from buying certain tools with us compared to the major
top brands and does not necessarily mean to cover all categories of tools offered by us. You
are kindly reminded to verify carefully when you are placing an order with us if you are
actually saving half in comparison with the top major brands.
- 1 -
MODELL: HB641601 , HB641602, HB9632
Have product questions? Need technical support? Please feel free to
contact us:
Technical Support and E-Warranty Certificate
www.vevor.com/support
NEED HELP? CONTACT US!
This is the original instruction, please read all manual instructions
carefully before operating. VEVOR reserves a clear interpretation of our
user manual. The appearance of the product shall be subject to the
product you received. Please forgive us that we won't inform you again if
there are any technology or software updates on our product.
PEGBOARD
- 2 -
SAFETY INSTRUCTIONS
WARNUNG:
1. Lesen Sie dieses Material, bevor Sie dieses Produkt verwenden.
Andernfalls kann es zu schweren Verletzungen kommen.
2. Die Nutzlast der Palettengabel darf nicht überschritten werden .
3. Nach dem Gebrauch vor der Lagerung trocknen lassen, um ein Rosten
des Produkts zu vermeiden .
4. Verfahren, die in diesem Handbuch nicht ausdrücklich erläutert werden,
dürfen nur von einem qualifizierten Techniker durchgeführt werden.
Um schwere Verletzungen durch Werkzeugversagen zu vermeiden,
verwenden Sie das Gerät nicht, wenn es beschädigt ist :
Die Lochwand muss an einer stabilen Wand befestigt werden.
Die Lochplatten dürfen nicht an zu dünnen Holzwänden montiert werden.
Eine Montage der Lochwände an morschen oder losen Holzwänden ist
nicht zulässig.
Das Gewicht der aufzuhängenden Gegenstände darf die Tragkraft der
Lochwand nicht überschreiten.
Beim Austauschen der Haken muss darauf geachtet werden, dass diese
passend zur Größe der Lochwand ausgewählt werden.
Vermeiden Sie scharfe Spitzen, Klingen und andere Gegenstände, die das
Produkt zerkratzen könnten
VORSICHT:
Lesen Sie die Anweisungen und Verfahren für einen sicheren
Betrieb sorgfältig durch.
Bewahren Sie dieses Handbuch auf
- 3 -
MODEL AND PARAMETERS
HB641601
HB641602
HB9632
Material
Stahl
Stahl
Stahl
Max.
Gewichtskapazität
(einzelnes Steckbrett)
165 Pfund
165 Pfund
165 Pfund
Größe der Stecktafel (L
x B)
32 Zoll * 16 Zoll
32 ” *16 ”
32 ” *16 ”
Lochspez.
1/4 Zoll
1/4 Zoll
1/4 Zoll
Blechdicke
1,0 mm
1,0 mm
1,0 mm
Oberflächenbehandlun
g
(Stecktafel)
Galvanisierung+Pulver
spritzen
Galvanisierung+Pulver
spritzen
Galvanisierung+Pulver
spritzen
Farbe
Weiß
Weiß
Weiß
Model
SPEC.
- 4 -
COMPONENTS
HB641601
HB641602
HB9632
Stecktafel
×2
×2
×3
Haken
/
×15
×20
Aufbewahrungsbox
/
×5
×5
Aufbewahrungsbox-Halter
/
× 5
× 5
S Crew Fahrerhalter
/
×1
×1
Gestell
/
×1
×1
Regal
/
×1
×2
Montageblock
/
×6
×8
U Haken
/
/
×4
W rench H älter
/
/
×1
Begrenzungsstopfen
/
× 8
×1 2
Erweiterungsstecker
× 8
×1 2
×1 6
Selbstschneidende
Schraube
× 8
×1 2
×1 6
Positionierungskarton
/
× 1
× 1
Model
Parts

- 5 -
Benutzerhandbuch
×1
×1
×1
INSTALLATION INSTRUCTION
Vorbereitung der Installation:
1. Zum Zusammenbau der Stecktafel sind zwei oder mehr Personen
erforderlich.
2. Bitte legen Sie zum Schutz Ihres Bodens einen Teppich oder eine Matte
bereit, auf der Sie alle Accessoires ausbreiten können.
3. Bitte halten Sie Handschuhe bereit, um Kratzer durch scharfe Teile zu
vermeiden, die bei der Installation auftreten können.
4. Bitte öffnen Sie alle Kartons um zu prüfen, ob das Zubehör vollständig
und in gutem Zustand ist .
5. Wenn Sie zur Installation dieses Produkts Elektrowerkzeuge verwenden
müssen, stellen Sie die Geschwindigkeit bitte vorab auf niedrige
Geschwindigkeit ein.
6. bei der Installation darauf , dass alle Löcher ausgerichtet sind, und
ziehen Sie nicht zuerst alle Schrauben fest , da dies sonst die Installation
erschweren kann.
Für die Installation in Betonwänden
SCHRITT 1: Platzieren Sie das Hängebrett in der Nähe der zu
installierenden Wand und markieren Sie die Löcher mit einem feinen Nagel
oder Bleistift. (Hinweis: Zwei Löcher links, zwei Löcher rechts)

- 6 -
SCHRITT 2: Bohren Sie an den markierten Stellen Löcher mit 8 mm
Durchmesser und 40 mm Tiefe . (Hinweis: Bereiten Sie Ihre eigenen
Bohrwerkzeuge vor .)
SCHRITT 3: Nageln Sie die vier Spreizdübel vollständig in das Loch ein.
- 7 -
SCHRITT 4 : Schrauben Sie die selbstschneidende Schraube in das Loch
des Spreizdübels, lassen Sie jedoch 3–5 mm frei.
SCHRITT 5: Hängen Sie die Stecktafel wie in der Abbildung gezeigt an die
selbstschneidenden Schrauben.
SCHRITT 6: Stellen Sie sicher, dass die vier selbstschneidenden
Schrauben in die Montagelöcher der Stecktafel eingehängt werden und
ziehen Sie die selbstschneidenden Schrauben fest.
back
- 8 -
SCHRITT 7: Befolgen Sie die obigen Schritte, um andere Stecktafeln zu
installieren.
(Hinweis: Die Stecktafel wird horizontal und vertikal angebracht und die
Installationsmethode ist dieselbe.)
Für die Montage von Holzwandpfosten
SCHRITT 1 : Richten Sie die Kante der Stecktafel an der Mittellinie des
Pfostens aus und markieren Sie die Löcher mit einem feinen Nagel oder
Bleistift. (Hinweis: Zwei Löcher auf der linken Seite, zwei Löcher auf der
rechten Seite)
SCHRITT 2: Bohren Sie an den markierten Stellen Löcher mit 3 mm
Durchmesser und 40 mm Tiefe. Schrauben Sie die selbstschneidende
Schraube in die Löcher, lassen Sie jedoch 3–5 mm frei. (Hinweis: Legen
Sie Ihr eigenes Werkzeug bereit .)

- 9 -
SCHRITT 3 : Hängen Sie die Stecktafel wie in der Abbildung gezeigt an
die selbstschneidenden Schrauben .
SCHRITT 4 : Stellen Sie sicher, dass die vier selbstschneidenden
Schrauben in die Montagelöcher der Stecktafel eingehängt werden, und
ziehen Sie die selbstschneidenden Schrauben fest .
back

- 10 -
SCHRITT 5 : Befolgen Sie die obigen Schritte, um andere Stecktafeln zu
installieren.
(Hinweis: Die Stecktafel wird horizontal und vertikal platziert und die
Installationsmethode ist dieselbe.)
Für Montageblock + Betonwandmontage
SCHRITT 1: Legen Sie den Positionierungskarton an die zu montierende
Wand und bohren Sie die Markierungslöcher entsprechend den auf dem
- 11 -
Positionierungskarton markierten Löchern.
Nehmen Sie den Karton weg und bohren Sie an den Markierungslöchern
Löcher mit 8 mm Durchmesser und 40 mm Tiefe. (Hinweis: Legen Sie Ihre
eigenen Bohrwerkzeuge bereit .)
Nageln Sie die Spreizdübel vollständig in das Loch ein.
Vertikal: A = 406 mm
Horizontal: B=814mm

- 12 -
SCHRITT 2: Befestigen Sie den Montageblock wie gezeigt ( vertikal ) mit
selbstschneidenden Schrauben .
Hinweis: Die horizontale und vertikale Installationsmethode ist dieselbe.
- 13 -
SCHRITT 3 : Die Aufhängeplatte in den Montageblock einsetzen und den
Begrenzungsstopfen wie dargestellt einstecken .
SCHRITT 4: Befolgen Sie die obigen Schritte, um weitere Stecktafeln zu
installieren .
Wenn die Installation abgeschlossen ist, können Sie Ihre Artikel aufhängen .

- 14 -
Für Montageblock + Holzwandpfostenmontage
SCHRITT 1 : Legen Sie den Positionierungskarton an die zu installierende
Wand und achten Sie darauf, dass sich die Mitte des Lochs im Karton auf
der Mittellinie des Pfostens befindet.
Bohren Sie die Markierungslöcher entsprechend den auf dem
Positionierkarton markierten Löchern.
Nehmen Sie den Karton weg und bohren Sie an den Markierungslöchern
Löcher mit 3 mm Durchmesser und 40 mm Tiefe. (Hinweis: Legen Sie Ihre
eigenen Bohrwerkzeuge bereit .)
Vertikal:
A = 406 mm

- 15 -
Horizontal : B=814mm

- 16 -
SCHRITT 2 : Befestigen Sie den Montageblock wie gezeigt ( vertikal ) mit
selbstschneidenden Schrauben .
- 17 -
Hinweis: Die horizontale und vertikale Installationsmethode ist dieselbe.
SCHRITT 3 : Die Aufhängeplatte in den Montageblock einsetzen und den
Begrenzungsstopfen wie dargestellt einstecken .
SCHRITT 4: Befolgen Sie die obigen Schritte, um weitere Stecktafeln zu
installieren .
- 18 -
Wenn die Installation abgeschlossen ist, können Sie Ihre Artikel
aufhängen .
Montage der Aufbewahrungsbox:
- 19 -
MAINTENANCE
Das Gewicht nicht überschreiten Kapazität .
Bitte reinigen und trocknen Sie das Produkt nach dem Gebrauch an
einem trockenen, belüfteten Ort.
Hersteller: Shanghaimuxinmuyeyouxiangongsi
Adresse: Shuangchenglu 803nong11hao1602A-1609shi, baoshanqu,
Shanghai 200000 CN.
Nach AUS importiert: SIHAO PTY LTD, 1 ROKEVA STREETEASTWOOD
NSW 2122 Australien
Importiert in die USA: Sanven Technology Ltd., Suite 250, 9166 Anaheim
Place, Rancho Cucamonga, CA 91730
REP
EC
E-CrossStu GmbH
Mainzer Landstr.69, 60329 Frankfurt am Main.
REP
UK
YH CONSULTING LIMITED.
C/O YH Consulting Limited Office 147, Centurion House,
London Road, Staines-upon-Thames, Surrey, TW18 4AX


Technique Certificat d'assistance et de garantie électronique
www.vevor.com/support
PANNEAU PERFORÉ
MANUEL D'UTILISATION
We continue to be committed to provide you tools with competitive price.
"Save Half", "Half Price" or any other similar expressions used by us only represents an
estimate of savings you might benefit from buying certain tools with us compared to the major
top brands and does not necessarily mean to cover all categories of tools offered by us. You
are kindly reminded to verify carefully when you are placing an order with us if you are
actually saving half in comparison with the top major brands.

- 1 -
MODÈLE : HB641601 , HB641602, HB9632
Have product questions? Need technical support? Please feel free to
contact us:
Technical Support and E-Warranty Certificate
www.vevor.com/support
NEED HELP? CONTACT US!
This is the original instruction, please read all manual instructions
carefully before operating. VEVOR reserves a clear interpretation of our
user manual. The appearance of the product shall be subject to the
product you received. Please forgive us that we won't inform you again if
there are any technology or software updates on our product.
PEGBOARD

- 2 -
SAFETY INSTRUCTIONS
AVERTISSEMENT:
1. Lisez attentivement ce document avant d'utiliser ce produit. Le
non-respect de ces instructions peut entraîner des blessures graves.
2. Ne pas dépasser la capacité de travail de la fourche à palette .
3. Après utilisation, veuillez sécher avant de ranger le produit pour éviter la
rouille .
4. Les procédures non spécifiquement expliquées dans ce manuel doivent
être effectuées uniquement par un technicien qualifié.
Pour éviter des blessures graves dues à une défaillance de l'outil, ne
l'utilisez pas s'il est endommagé :
Le panneau perforé doit être monté sur un mur solide.
Les panneaux perforés ne doivent pas être installés sur des murs en bois
trop fins.
Les panneaux perforés ne doivent pas être installés sur des murs en bois
pourris ou détachés.
Le poids des objets à accrocher ne doit pas dépasser la charge du
panneau perforé.
Lors du remplacement du crochet, celui-ci doit être sélectionné pour
correspondre à la taille du panneau perforé.
Évitez les objets pointus, les lames et autres objets tranchants qui
pourraient rayer le produit
PRUDENCE:
Lisez attentivement les instructions et les procédures pour des
opérations en toute sécurité.
Sauvegarder ce manuel

- 3 -
MODEL AND PARAMETERS
HB641601
HB641602
HB9632
Matériel
Acier
Acier
Acier
Capacité de poids
maximale
(panneau perforé
unique)
165 livres
165 livres
165 livres
Taille du panneau
perforé (L x l)
32 ”* 16 ”
32 ” *16 ”
32 ” *16 ”
Spécification du
trou
1/4
”
1/4
”
1/4
”
Épaisseur de la
tôle
1,0 mm
1,0 mm
1,0 mm
Traitement de
surface
(panneau perforé)
Galvanisation +
pulvérisation de poudre
Galvanisation +
pulvérisation de poudre
Galvanisation +
pulvérisation de
poudre
Couleur
blanc
blanc
blanc
Model
SPEC.
- 4 -
COMPONENTS
HB641601
HB641602
HB9632
Panneau perforé
×2
×2
×3
Crochet
/
×15
×20
Boîte de rangement
/
×5
×5
Support de boîte de
rangement
/
× 5
× 5
d'équipage S Holder
/
×1
×1
Étagère
/
×1
×1
Étagère
/
×1
×2
Bloc de montage
/
×6
×8
Tu Crochet
/
/
×4
Clé H plus âgée
/
/
×1
Bouchon limiteur
/
× 8
×1 2
Fiche d'extension
× 8
×1 2
×1 6
Vis autotaraudeuse
× 8
×1 2
×1 6
Model
Parts

- 5 -
Positionnement du
carton
/
× 1
× 1
Manuel d' utilisation
×1
×1
×1
INSTALLATION INSTRUCTION
Préparation de l'installation :
1. Deux personnes ou plus pour assembler le panneau perforé.
2. Veuillez préparer un tapis ou un paillasson pour protéger votre sol, vous
devez étaler tous les accessoires.
3. Veuillez préparer des gants pour éviter d'être rayé par des pièces
tranchantes qui pourraient survenir lors de l'installation.
4. Veuillez ouvrir toutes les boîtes pour vérifier si les accessoires sont
complets et en bon état .
5. Si vous devez utiliser des outils électriques pour installer ce produit,
veuillez régler la vitesse sur basse à l'avance.
6. Lors de l'installation , veuillez aligner tous les trous et ne serrez pas
toutes les vis au préalable , sinon cela pourrait rendre l'installation difficile.
Pour l'installation de murs en béton
ÉTAPE 1 : Placez la planche suspendue près du mur installé et marquez
les trous avec un clou fin ou un crayon. (Remarque : deux trous à gauche,
deux trous à droite)

- 6 -
ÉTAPE 2 : Percez des trous de 8 mm de diamètre et de 40 mm de
profondeur aux endroits marqués. (Remarque : préparez vos propres outils
de perçage .)
ÉTAPE 3 : Clouez complètement les quatre chevilles d’expansion dans le
trou.

- 7 -
ÉTAPE 4 : Vissez la vis autotaraudeuse dans le trou du bouchon
d'expansion, en laissant 3 à 5 mm exposés.
ÉTAPE 5 : Accrochez le panneau perforé sur les vis autotaraudeuses,
comme indiqué sur l'image.
ÉTAPE 6 : Assurez-vous que les quatre vis autotaraudeuses sont
accrochées dans les trous de montage du panneau perforé et serrez les
vis autotaraudeuses.
back
- 8 -
ÉTAPE 7 : Suivez les étapes ci-dessus pour installer d’autres panneaux
perforés.
(Remarque : le panneau perforé est placé horizontalement et
verticalement, et la méthode d'installation est la même.)
Pour l'installation de poteaux muraux en bois
ÉTAPE 1 : Alignez le bord du panneau perforé avec la ligne centrale du
poteau et marquez les trous avec un clou fin ou un crayon. (Remarque :
deux trous à gauche, deux trous à droite)

- 9 -
ÉTAPE 2 : Percez des trous de 3 mm de diamètre et de 40 mm de
profondeur aux endroits marqués, vissez la vis autotaraudeuse dans
les trous, en laissant 3 à 5 mm exposés. (Remarque : préparez vos
propres outils .)
ÉTAPE 3 : Accrochez le panneau perforé sur les vis autotaraudeuses ,
comme indiqué sur l'image.

- 10 -
ÉTAPE 4 : Assurez-vous que les quatre vis autotaraudeuses sont
accrochées dans les trous de montage du panneau perforé et serrez les
vis autotaraudeuses .
ÉTAPE 5 : Suivez les étapes ci-dessus pour installer d’autres panneaux
perforés.
(Remarque : le panneau perforé est placé horizontalement et verticalement,
et la méthode d'installation est la même.)
back

- 11 -
Pour Bloc de montage + installation sur mur en béton
ÉTAPE 1 : Posez le carton de positionnement sur le mur à installer, percez
les trous de marquage en fonction des trous marqués sur le carton de
positionnement.
Retirez le carton et percez des trous de 8 mm de diamètre et de 40 mm de
profondeur au niveau des trous de marquage. (Remarque : préparez vos
propres outils de perçage .)
Clouez complètement les chevilles d’expansion dans le trou.
Verticale : A = 406 mm

- 12 -
Horizontale : B = 814 mm
ÉTAPE 2 : Fixez le bloc de montage avec des vis autotaraudeuses comme
indiqué ( vertical ) .
Remarque : la méthode d'installation horizontale et verticale est la même.
- 13 -
ÉTAPE 3 : Insérez la plaque de suspension dans le bloc de montage et branchez
le bouchon de limite comme indiqué .
ÉTAPE 4 : Suivez les étapes ci-dessus pour installer d’autres panneaux
perforés .
- 14 -
Une fois l'installation terminée, vous pouvez accrocher vos objets .
Pour Bloc de montage + installation de poteau mural en bois
ÉTAPE 1 : Posez le carton de positionnement sur le mur à installer, et le
centre du trou sur le carton est situé sur la ligne médiane du poteau.
Percez les trous de marquage en fonction des trous marqués sur le carton
de positionnement.
Retirez le carton et percez des trous de 3 mm de diamètre et de 40 mm de
profondeur au niveau des trous de marquage. (Remarque : préparez vos
propres outils de perçage .)
Verticale :
A = 406 mm

- 15 -
Horizontale : B=814mm

- 16 -
ÉTAPE 2 : Fixez le bloc de montage avec des vis autotaraudeuses comme
indiqué ( vertical ) .

- 17 -
Remarque : la méthode d'installation horizontale et verticale est la même.
ÉTAPE 3 : Insérez la plaque de suspension dans le bloc de montage et
branchez le bouchon de limite comme indiqué .
ÉTAPE 4 : Suivez les étapes ci-dessus pour installer d’autres panneaux
perforés .

- 18 -
Une fois l'installation terminée, vous pouvez accrocher vos objets .
Assemblage de la boîte de rangement :

- 19 -
MAINTENANCE
Ne pas dépasser le poids capacité .
Après utilisation, veuillez nettoyer et sécher le produit dans un endroit
sec et aéré.
Fabricant : Shanghaimuxinmuyeyouxiangongsi
Adresse : Shuangchenglu 803nong11hao1602A-1609shi, baoshanqu,
Shanghai 200000 CN.
Importé en Australie : SIHAO PTY LTD, 1 ROKEVA STREET, ASTWOOD
NSW 2122 Australie
Importé aux États-Unis : Sanven Technology Ltd., Suite 250, 9166 Anaheim
Place, Rancho Cucamonga, CA 91730
REP
EC
E-CrossStu GmbH
Mainzer Landstr.69, 60329 Frankfurt am Main.
REP
UK
YH CONSULTING LIMITED.
C/O YH Consulting Limited Office 147, Centurion House,
London Road, Staines-upon-Thames, Surrey, TW18 4AX


Technisch Ondersteuning en E-garantiecertificaat www.vevor.com/support
PEGBOARD
GEBRUIKSAANWIJZING
We continue to be committed to provide you tools with competitive price.
"Save Half", "Half Price" or any other similar expressions used by us only represents an
estimate of savings you might benefit from buying certain tools with us compared to the major
top brands and does not necessarily mean to cover all categories of tools offered by us. You
are kindly reminded to verify carefully when you are placing an order with us if you are
actually saving half in comparison with the top major brands.

- 1 -
MODEL:HB641601 ,HB641602,HB9632
Have product questions? Need technical support? Please feel free to
contact us:
Technical Support and E-Warranty Certificate
www.vevor.com/support
NEED HELP? CONTACT US!
This is the original instruction, please read all manual instructions
carefully before operating. VEVOR reserves a clear interpretation of our
user manual. The appearance of the product shall be subject to the
product you received. Please forgive us that we won't inform you again if
there are any technology or software updates on our product.
PEGBOARD

- 2 -
SAFETY INSTRUCTIONS
WAARSCHUWING:
1. Lees dit materiaal voordat u dit product gebruikt. Als u dit niet doet, kan
dit leiden tot ernstig letsel.
2. Overschrijd de werkcapaciteit van de palletvork niet .
3. Na gebruik het product laten drogen voordat u het opbergt, om
roestvorming van het product te voorkomen .
4. Procedures die niet specifiek in deze handleiding worden uitgelegd,
mogen uitsluitend door een gekwalificeerde technicus worden uitgevoerd.
Om ernstig letsel door een defect aan het gereedschap te voorkomen,
mag u het niet gebruiken als het beschadigd is :
Het gaatjesbord moet aan een stevige muur worden bevestigd.
De gaatjesborden mogen niet op te dunne houten wanden worden
gemonteerd.
De gaatjesborden mogen niet op rotte of losse houten wanden worden
geïnstalleerd.
Het gewicht van de op te hangen artikelen mag het draagvermogen van
het gaatjesbord niet overschrijden.
Bij het vervangen van de haak moet deze zo worden gekozen dat deze
overeenkomt met de maat van het gaatjesbord.
Vermijd scherpe punten, messen en andere voorwerpen die het product
kunnen krassen
VOORZICHTIGHEID:
Lees de instructies en procedures zorgvuldig door voor veilige
handelingen.
Bewaar deze handleiding
- 3 -
MODEL AND PARAMETERS
HB641601
HB641602
HB9632
Materiaal
Staal
Staal
Staal
Max. draagvermogen (enkele
prikbord)
165 pond
165 pond
165 pond
Afmeting prikbord (L*B)
32 ”* 16 ”
32 ” *16 ”
32 ” *16 ”
Gatspecificatie.
1/4 ”
1/4 ”
1/4 ”
Plaatdikte
1,0 mm
1,0 mm
1,0 mm
Oppervlaktebehandeling
(prikbord)
Galvaniseren +
Poederspuiten
Galvaniseren +
Poederspuiten
Galvaniseren +
Poederspuiten
Kleur
wit
wit
wit
Model
SPEC.
- 4 -
COMPONENTS
HB641601
HB641602
HB9632
Pegbord
×2
×2
×3
Haak
/
×15
×20
Opbergdoos
/
×5
×5
Opbergdooshouder
/
× 5
× 5
S bemanningslid houder
/
×1
×1
Rek
/
×1
×1
Plank
/
×1
×2
M ontage blok slot
/
×6
×8
Ik Haak
/
/
×4
Sleutelhouder
/
/
×1
Limietplug
/
× 8
×1 2
Expansieplug
× 8
×1 2
×1 6
Zelftappende schroef
× 8
×1 2
×1 6
Positionering Karton
/
× 1
× 1
Gebruikershandleiding
×1
×1
×1
Model
Parts
- 5 -
INSTALLATION INSTRUCTION
Voorbereiding van de installatie:
1. Twee of meer personen om het gaatjesbord in elkaar te zetten.
2. Zorg ervoor dat u een tapijt of mat neerlegt om uw vloer te beschermen.
U moet alle accessoires goed uitspreiden.
3. Zorg ervoor dat u handschoenen meeneemt om te voorkomen dat u
tijdens de installatie krassen oploopt door scherpe onderdelen.
4. Open alle dozen om te controleren of de accessoires compleet en in
goede staat zijn .
5. Als u elektrisch gereedschap nodig hebt om dit product te installeren,
stel de snelheid dan vooraf in op een lage snelheid.
6. bij de installatie voor dat alle gaten op één lijn liggen en draai niet eerst
alle schroeven vast , anders kan de installatie lastiger worden.
Voor installatie van betonnen muren
STAP 1: Plaats het hangbord bij de geïnstalleerde muur en markeer de
gaten met een dunne spijker of potlood. (Let op: twee gaten aan de
linkerkant, twee gaten aan de rechterkant)
- 6 -
STAP 2: Boor gaten met een diameter van 8 mm en een diepte van 40 mm
op de gemarkeerde plaatsen. (Let op: zorg dat u uw eigen
boorgereedschap bij de hand hebt .)
STAP 3: Spijker de vier expansiepluggen volledig in het gat.
STAP 4 : Draai de zelftappende schroef in het gat van de expansieplug en
laat 3 tot 5 mm vrij.
- 7 -
STAP 5: Hang het gaatjesbord aan de zelftappende schroeven, zoals op
de afbeelding te zien is.
STAP 6: Zorg ervoor dat de vier zelftappende schroeven in de
bevestigingsgaten van het gaatjesbord hangen en draai de zelftappende
schroeven vast.
STAP 7: Volg de bovenstaande stappen om andere gaatjesborden te
installeren.
(Let op: het gaatjesbord kan horizontaal en verticaal worden geplaatst en
de installatiemethode is hetzelfde.)
back
- 8 -
Voor installatie van houten wandpalen
STAP 1 : Lijn de rand van het gaatjesbord uit met de middellijn van de paal
en markeer de gaten met een dunne spijker of potlood. (Let op: twee gaten
aan de linkerkant, twee gaten aan de rechterkant)
STAP 2: Boor gaten met een diameter van 3 mm en een diepte van 40 mm
op de gemarkeerde plaatsen. Draai de zelftappende schroef in de gaten en
laat 3 tot 5 mm uitsteken. (Let op: zorg dat u uw eigen gereedschap bij de
hand hebt .)

- 9 -
STAP 3 : Hang het gaatjesbord aan de zelftappende schroeven , zoals op
de afbeelding te zien is.
STAP 4 : Zorg ervoor dat de vier zelftappende schroeven in de
montagegaten van het gaatjesbord hangen en draai de zelftappende
schroeven vast .
back

- 10 -
STAP 5 : Volg de bovenstaande stappen om andere gaatjesborden te
installeren.
(Let op: het gaatjesbord kan horizontaal en verticaal worden geplaatst en de
installatiemethode is hetzelfde.)
Voor Montageblok + Betonnen Muur Installatie
STAP 1: Leg het positioneringskarton op de te installeren muur en boor de
markeergaten volgens de gemarkeerde gaten op het positioneringskarton.
- 11 -
Haal het karton weg en boor gaten met een diameter van 8 mm en een
diepte van 40 mm op de plaats van de gemarkeerde gaten. (Let op: zorg
dat u uw eigen boorgereedschap bij de hand hebt .)
Spijker de expansiepluggen volledig in het gat.
Verticaal: A=406mm
Horizontaal: B=814mm

- 12 -
STAP 2: Bevestig het montageblok met zelftappende schroeven zoals
afgebeeld ( verticaal ) .
Let op: Horizontale en verticale installatiemethoden zijn hetzelfde.

- 13 -
STAP 3 : Plaats de ophangplaat in het montageblok en sluit de eindplug aan
zoals afgebeeld .
STAP 4: Volg de bovenstaande stappen om andere gaatjesborden te
installeren .
Zodra de installatie voltooid is, kunt u uw spullen ophangen .

- 14 -
Voor Montageblok + houten muurpaalinstallatie
STAP 1 : Leg het positioneringskarton op de te installeren muur en zorg
dat het midden van het gat in het karton zich op de middellijn van de paal
bevindt.
Boor de markeergaten volgens de gaten die op het positioneringskarton
zijn gemarkeerd.
Haal het karton weg en boor gaten met een diameter van 3 mm en een
diepte van 40 mm op de plaats van de gemarkeerde gaten. (Let op: zorg
dat u uw eigen boorgereedschap bij de hand hebt .)
Verticaal:
A=406mm
- 15 -
Horizontaal : B=814mm

- 16 -
STAP 2 : Bevestig het montageblok met zelftappende schroeven zoals
afgebeeld ( verticaal ) .

- 17 -
Let op: Horizontale en verticale installatiemethoden zijn hetzelfde.
STAP 3 : Plaats de ophangplaat in het montageblok en sluit de eindplug
aan zoals afgebeeld .
STAP 4: Volg de bovenstaande stappen om andere gaatjesborden te
installeren .

- 18 -
Zodra de installatie voltooid is, kunt u uw spullen ophangen .
Montage van de opbergdoos:

- 19 -
MAINTENANCE
Overschrijd het gewicht niet capaciteit .
Na gebruik het product schoonmaken en laten drogen op een droge,
geventileerde plaats.
Fabrikant: Shanghaimuxinmuyeyouxiangongsi
Adres: Shuangchenglu 803nong11hao1602A-1609shi, baoshanqu, shanghai
200000 CN.
Geïmporteerd naar AUS: SIHAO PTY LTD, 1 ROKEVA
STREETEASTWOOD NSW 2122 Australië
Geïmporteerd naar de VS: Sanven Technology Ltd., Suite 250, 9166
Anaheim Place, Rancho Cucamonga, CA 91730
REP
EC
E-CrossStu GmbH
Mainzer Landstr.69, 60329 Frankfurt am Main.
REP
UK
YH CONSULTING LIMITED.
C/O YH Consulting Limited Office 147, Centurion House,
London Road, Staines-upon-Thames, Surrey, TW18 4AX


Teknisk Support och e-garanticertifikat www.vevor.com/support
PEGBOARD
ANVÄNDARMANUAL
We continue to be committed to provide you tools with competitive price.
"Save Half", "Half Price" or any other similar expressions used by us only represents an
estimate of savings you might benefit from buying certain tools with us compared to the major
top brands and does not necessarily mean to cover all categories of tools offered by us. You
are kindly reminded to verify carefully when you are placing an order with us if you are
actually saving half in comparison with the top major brands.

- 1 -
MODELL: HB641601 , HB641602, HB9632
Have product questions? Need technical support? Please feel free to
contact us:
Technical Support and E-Warranty Certificate
www.vevor.com/support
NEED HELP? CONTACT US!
This is the original instruction, please read all manual instructions
carefully before operating. VEVOR reserves a clear interpretation of our
user manual. The appearance of the product shall be subject to the
product you received. Please forgive us that we won't inform you again if
there are any technology or software updates on our product.
PEGBOARD
- 2 -
SAFETY INSTRUCTIONS
VARNING:
1. Läs detta material innan du använder denna produkt. Underlåtenhet att
göra det kan resultera i allvarliga skador.
2 . Överskrid inte arbetskapaciteten för pallgaffeln .
3 . Efter användning, vänligen torka före förvaring för att undvika att
produkten rostar .
4 . Procedurer som inte specifikt förklaras i denna handbok får endast
utföras av en kvalificerad tekniker.
För att förhindra allvarliga skador från verktygsfel, använd inte när
det är skadat :
Plåtbrädan måste monteras på en solid vägg.
Pinnbrädorna ska inte monteras på för tunna träväggar.
Pinnbrädorna får inte monteras på ruttna eller lösa träväggar.
Vikten av föremålen som ska hängas får inte överstiga belastningen på
stiftbrädan.
Vid byte av kroken måste den väljas för att matcha storleken på
pinnbrädan.
Undvik vassa spetsar, knivar och andra föremål för att repa produkten
FÖRSIKTIGHET:
Läs noggrant instruktionerna och procedurerna för säker drift.
Spara denna manual
- 3 -
MODEL AND PARAMETERS
HB641601
HB641602
HB9632
Material
Stål
Stål
Stål
Max.
viktkapacitet
(enkel
stiftbräda)
165 pund
165 pund
165 pund
Pinnboard
Storlek (L*W)
32 ”* 16 ”
32 ” *16 ”
32 ” *16 ”
Hål Spec.
1/4
”
1/4
”
1/4
”
Plåttjocklek
1,0 mm
1,0 mm
1,0 mm
Ytbehandling
(pinnebräda)
Galvanisering+Pulverspr
utning
Galvanisering+Pulverspr
utning
Galvanisering+Pulverspr
utning
Färg
vit
vit
vit
Model
SPEC.

- 4 -
COMPONENTS
HB641601
HB641602
HB9632
Pinbräda
×2
×2
×3
H ook
/
×15
×20
S lagringslåda
/
×5
×5
Förvaringsboxhållare
/
× 5
× 5
S besättningsförare
Hållare
/
×1
×1
R ack
/
×1
×1
Hylla
/
×1
×2
Montering B lås
/
×6
×8
U H ook
/
/
×4
W rench H äldre
/
/
×1
Limit Plug
/
× 8
×1 2
Expansionsplugg
× 8
×1 2
×1 6
Självgängande Skruv
× 8
×1 2
×1 6
Positionerande kartong
/
× 1
× 1
Användarmanual
×1
×1
×1
Model
Parts
- 5 -
INSTALLATION INSTRUCTION
Installationsförberedelser:
1. Två eller flera personer för att montera stiftbrädan.
2. Förbered en matta eller matta för att skydda ditt golv du behöver för att
sprida ut alla tillbehör.
3. Förbered handskar för att undvika repor av vassa delar som kan uppstå
under installationen.
4. Öppna alla rutorna för att kontrollera om tillbehören är kompletta och i
gott skick .
5. Om du behöver använda elverktyg för att installera den här produkten,
ställ in hastigheten på låg hastighet i förväg.
6. När du installerar , vänligen rikta in alla hål och dra inte åt alla skruvar
först , annars kan det försvåra installationen.
För betongvägginstallation
STEG 1: Placera hängbrädan nära den installerade väggen och markera
hålen med en fin spik eller penna.(Obs: Två hål till vänster, två hål till
höger)

- 6 -
STEG 2: Borra hål med en diameter på 8 mm och ett djup på 40 mm på de
markerade platserna.(Obs: Förbered dina egna borrverktyg .)
STEG 3: Spika fast de fyra expansionspluggarna helt i hålet.
STEG 4 : Skruva in den självgängande skruven i expansionspluggens hål,
lämna 3~5 mm fri.
- 7 -
STEG 5: Häng pinnbrädan på de självgängande skruvarna, som visas på
bilden.
STEG 6: Se till att de fyra självgängande skruvarna hängs i
monteringshålen på stiftbrädan och dra åt de självgängande skruvarna.
STEG 7: Följ stegen ovan för att installera andra pegboards.
(Obs: Plåtbrädan placeras horisontellt och vertikalt, och
installationsmetoden är densamma.)
back
- 8 -
För montering av träväggstolpar
STEG 1 : Rikta in pinnbrädans kant med mittlinjen på stolpen och markera
hålen med en fin spik eller penna.(Obs: Två hål till vänster, två hål till
höger)
STEG 2: Borra hål 3 mm i diameter och 40 mm i djup på de markerade
platserna, skruva in den självgängande skruven i hålen, lämna 3~5 mm
exponerade.(Obs: Förbered dina egna verktyg .)
STEG 3 : Häng pinnbrädan på de självgängande skruvarna s, som visas
- 9 -
på bilden.
STEG 4 : Se till att de fyra självgängande skruvarna hängs i
monteringshålen på stiftbrädan och dra åt de självgängande skruvarna .
STEG 5 : Följ stegen ovan för att installera andra pegboards.
(Obs: Plåtbrädan placeras horisontellt och vertikalt, och
installationsmetoden är densamma.)
back
- 10 -
För Montering B lås + Montering av betongvägg
STEG 1: Lägg positioneringspappen på väggen som ska installeras, borra
markeringshålen enligt hålen markerade på positioneringspappen.
Ta bort kartong och borra hål 8 mm i diameter och 40 mm djupa vid
markeringshålen.(Obs: Förbered dina egna borrverktyg .)
Spika fast expansionspluggarna helt i hålet.
Vertikal: A=406mm
- 11 -
Horisontell: B=814mm
STEG 2: Fäst monteringsblocket med självgängande skruvar enligt bilden
( Vertikal ) .
Obs: Horisontell och vertikal installationsmetod är densamma.

- 12 -
STEG 3 : Sätt in hängplattan i monteringsblocket och sätt i gränspluggen enligt
bilden .
STEG 4: Följ stegen ovan för att installera andra stiftbrädor .
När installationen är klar kan du hänga dina föremål .
- 13 -
För Montering B lås + Träväggstolpeinstallation
STEG 1 : Lägg positioneringspappen på väggen som ska installeras, och
mitten av hålet på kartongen är placerat på stolpens mittlinje.
Borra markeringshålen enligt hålen markerade på positioneringspappen.
Ta bort kartong och borra hål 3 mm i diameter och 40 mm djupa vid
märkningshålen.(Obs: Förbered dina egna borrverktyg .)
Vertikal:
A=406mm
Horisontell : B=814mm
- 14 -

- 15 -
STEG 2 : Fäst monteringsblocket med självgängande skruvar enligt bilden
( Vertikal ) .
Obs: Horisontell och vertikal installationsmetod är densamma.
STEG 3 : Sätt in hängplattan i monteringsblocket och sätt i gränspluggen
enligt bilden .

- 16 -
STEG 4: Följ stegen ovan för att installera andra stiftbrädor .
När installationen är klar kan du hänga dina föremål .
Förvaringslåda montering:
- 17 -
MAINTENANCE
Överskrid inte vikten kapacitet .
Efter användning, rengör och torka produkten på en torr och ventilerad
plats.
Tillverkare: Shanghaimuxinmuyeyouxiangongsi
Adress: Shuangchenglu 803nong11hao1602A-1609shi, baoshanqu,
shanghai 200000 CN.
Importerad till AUS: SIHAO PTY LTD, 1 ROKEVA STREETEASTWOOD
NSW 2122 Australien
Importerad till USA: Sanven Technology Ltd., Suite 250, 9166 Anaheim
Place, Rancho Cucamonga, CA 91730
REP
EC
E-CrossStu GmbH
Mainzer Landstr.69, 60329 Frankfurt am Main.
REP
UK
YH CONSULTING LIMITED.
C/O YH Consulting Limited Office 147, Centurion House,
London Road, Staines-upon-Thames, Surrey, TW18 4AX


Técnico Soporte y certificado de garantía electrónica www.vevor.com/support
TABLERO
MANUAL DE USUARIO
We continue to be committed to provide you tools with competitive price.
"Save Half", "Half Price" or any other similar expressions used by us only represents an
estimate of savings you might benefit from buying certain tools with us compared to the major
top brands and does not necessarily mean to cover all categories of tools offered by us. You
are kindly reminded to verify carefully when you are placing an order with us if you are
actually saving half in comparison with the top major brands.
- 1 -
MODELO:HB641601 ,HB641602,HB9632
Have product questions? Need technical support? Please feel free to
contact us:
Technical Support and E-Warranty Certificate
www.vevor.com/support
NEED HELP? CONTACT US!
This is the original instruction, please read all manual instructions
carefully before operating. VEVOR reserves a clear interpretation of our
user manual. The appearance of the product shall be subject to the
product you received. Please forgive us that we won't inform you again if
there are any technology or software updates on our product.
PEGBOARD

- 2 -
SAFETY INSTRUCTIONS
ADVERTENCIA:
1. Lea este material antes de utilizar este producto. De lo contrario, podría
sufrir lesiones graves.
2. No exceda la capacidad de trabajo de la horquilla para paletas .
3. Después del uso, séquelo antes de guardarlo para evitar la oxidación
del producto .
4. Los procedimientos no explicados específicamente en este manual
deben ser realizados únicamente por un técnico calificado.
Para evitar lesiones graves debido a fallas de la herramienta, no la
utilice si está dañada :
El tablero perforado debe montarse en una pared sólida.
Los tableros perforados no se deben instalar en paredes de madera
demasiado delgadas.
Los tableros perforados no se deben instalar en paredes de madera
podridas o sueltas.
El peso de los objetos a colgar no debe superar la carga del tablero
perforado.
Al reemplazar el gancho, debe seleccionarse para que coincida con el
tamaño del tablero perforado.
Evite puntas afiladas, cuchillas y otros elementos que rayen el producto.
PRECAUCIÓN:
Lea atentamente las instrucciones y los procedimientos para
realizar operaciones seguras.
Guarde este manual
- 3 -
MODEL AND PARAMETERS
HB641601
HB641602
HB9632
Material
Acero
Acero
Acero
Capacidad
máxima de peso
(tablero perforado
simple)
165 libras
165 libras
165 libras
Tamaño del
tablero perforado
(L*A)
32 ”* 16 ”
32 ” *16 ”
32 ” *16 ”
Especificaciones
del agujero.
1/4
”
1/4
”
1/4
”
Espesor de la
chapa
1,0 mm
1,0 mm
1,0 mm
Tratamiento de
superficies
(tablero perforado)
Galvanización +
Pulverización de polvo
Galvanización +
Pulverización de polvo
Galvanización +
Pulverización de polvo
Color
blanco
blanco
blanco
Model
SPEC.

- 4 -
COMPONENTS
HB641601
HB641602
HB9632
Tablero perforado
×2
×2
×3
Gancho
/
×15
×20
Caja de
almacenamiento
/
×5
×5
Soporte para caja de
almacenamiento
/
× 5
× 5
de tripulación S Holder
/
×1
×1
Estante
/
×1
×1
Estante
/
×1
×2
Bloque de montaje
/
×6
×8
tú Gancho
/
/
×4
Porta llaves
/
/
×1
Tapón de límite
/
× 8
×1 2
Tapón de expansión
× 8
×1 2
×1 6
Tornillo autorroscante
× 8
×1 2
×1 6
Model
Parts

- 5 -
Posicionamiento de
cartón
/
× 1
× 1
M anual del usuario
×1
×1
×1
INSTALLATION INSTRUCTION
Preparación de la instalación:
1. Se necesitan dos o más personas para montar el tablero perforado.
2. Prepare una alfombra o tapete para proteger el piso donde necesita
distribuir todos los accesorios.
3. Prepare guantes para evitar rayarse con las piezas afiladas que puedan
producirse durante la instalación.
4. Abra todas las cajas para comprobar si los accesorios están completos
y en buenas condiciones .
5. Si necesita utilizar herramientas eléctricas para instalar este producto,
configure la velocidad a baja con antelación.
6. Al instalar , alinee todos los orificios y no apriete todos los tornillos
primero , de lo contrario, podría dificultar la instalación.
Para instalación en paredes de hormigón
PASO 1: Coloque el tablero colgante cerca de la pared instalada y marque
los agujeros con un clavo fino o un lápiz. (Nota: dos agujeros a la izquierda,
dos agujeros a la derecha)
- 6 -
PASO 2: Perfore agujeros de 8 mm de diámetro y 40 mm de profundidad
en los lugares marcados. (Nota: Prepare sus propias herramientas de
perforación ).
PASO 3: Clave los cuatro tapones de expansión completamente en el
orificio.
- 7 -
PASO 4 : Atornille el tornillo autorroscante en el orificio del tapón de
expansión, dejando entre 3 y 5 mm expuestos.
PASO 5: Cuelgue el tablero perforado en los tornillos autorroscantes,
como se muestra en la imagen.
PASO 6: Asegúrese de que los cuatro tornillos autorroscantes estén
colgados en los orificios de montaje del tablero perforado y apriete los
tornillos autorroscantes.
back
- 8 -
PASO 7: Siga los pasos anteriores para instalar otros tableros perforados.
(Nota: El tablero perforado se coloca horizontal y verticalmente, y el
método de instalación es el mismo).
Para instalación de postes de madera en la pared
PASO 1 : Alinee el borde del tablero perforado con la línea central del
poste y marque los orificios con un clavo fino o un lápiz. (Nota: dos orificios
a la izquierda, dos orificios a la derecha)

- 9 -
PASO 2: Taladre agujeros de 3 mm de diámetro y 40 mm de
profundidad en los lugares marcados, atornille el tornillo autorroscante
en los agujeros, dejando 3~5 mm expuestos. (Nota: Prepare sus propias
herramientas ).
PASO 3 : Cuelgue el tablero perforado en los tornillos autorroscantes ,
como se muestra en la imagen.

- 10 -
PASO 4 : Asegúrese de que los cuatro tornillos autorroscantes estén
colgados en los orificios de montaje del tablero perforado y apriete los
tornillos autorroscantes .
PASO 5 : Siga los pasos anteriores para instalar otros tableros perforados.
(Nota: El tablero perforado se coloca horizontal y verticalmente, y el método
de instalación es el mismo).
back
- 11 -
Para Bloque de montaje + Instalación de pared de hormigón
PASO 1: Coloque el cartón de posicionamiento sobre la pared a instalar,
taladre los orificios de marcado de acuerdo con los orificios marcados en
el cartón de posicionamiento.
Retire el cartón y taladre agujeros de 8 mm de diámetro y 40 mm de
profundidad en los agujeros marcados. (Nota: Prepare sus propias
herramientas de perforación ).
Clave los tacos de expansión completamente en el orificio.
Vertical: A=406 mm
- 12 -
Horizontal: B=814 mm
PASO 2: Fije el bloque de montaje con tornillos autorroscantes como se
muestra ( vertical ) .
Nota: El método de instalación horizontal y vertical es el mismo.

- 13 -
PASO 3 : Inserte la placa colgante en el bloque de montaje y conecte el tapón
de límite como se muestra .
PASO 4: Siga los pasos anteriores para instalar otros tableros perforados .
- 14 -
Una vez finalizada la instalación, podrás colgar tus artículos .
Para Instalación de bloque de montaje + poste de pared de madera
PASO 1 : Coloque el cartón de posicionamiento en la pared donde se va a
instalar, y el centro del orificio en el cartón debe ubicarse en la línea central
del poste.
Perfore los agujeros de marcado de acuerdo con los agujeros marcados
en el cartón de posicionamiento.
Retire el cartón y taladre agujeros de 3 mm de diámetro y 40 mm de
profundidad en los agujeros marcados. (Nota: Prepare sus propias
herramientas de perforación ).
Vertical:
A=406 mm
- 15 -
Horizontal : B=814 mm
- 16 -
PASO 2 : Fije el bloque de montaje con tornillos autorroscantes como se
muestra ( vertical ) .

- 17 -
Nota: El método de instalación horizontal y vertical es el mismo.
PASO 3 : Inserte la placa colgante en el bloque de montaje y conecte el
tapón de límite como se muestra .
PASO 4: Siga los pasos anteriores para instalar otros tableros
perforados .
- 18 -
Una vez finalizada la instalación, podrás colgar tus artículos .
Conjunto de caja de almacenamiento:
- 19 -
MAINTENANCE
No exceda el peso capacidad .
Después de su uso, limpie y seque el producto en un lugar seco y
ventilado.
Fabricante: Shanghaimuxinmuyeyouxiangongsi
Dirección: Shuangchenglu 803nong11hao1602A-1609shi, baoshanqu,
shanghai 200000 CN.
Importado a AUS: SIHAO PTY LTD, 1 ROKEVA STREETEASTWOOD NSW
2122 Australia
Importado a EE. UU.: Sanven Technology Ltd., Suite 250, 9166 Anaheim
Place, Rancho Cucamonga, CA 91730
REP
EC
E-CrossStu GmbH
Mainzer Landstr.69, 60329 Frankfurt am Main.
REP
UK
YH CONSULTING LIMITED.
C/O YH Consulting Limited Office 147, Centurion House,
London Road, Staines-upon-Thames, Surrey, TW18 4AX


Tecnico Supporto e certificato di garanzia elettronica www.vevor.com/support
PANNELLO FORATO
MANUALE D'USO
We continue to be committed to provide you tools with competitive price.
"Save Half", "Half Price" or any other similar expressions used by us only represents an
estimate of savings you might benefit from buying certain tools with us compared to the major
top brands and does not necessarily mean to cover all categories of tools offered by us. You
are kindly reminded to verify carefully when you are placing an order with us if you are
actually saving half in comparison with the top major brands.

- 1 -
MODELLO:HB641601 ,HB641602,HB9632
Have product questions? Need technical support? Please feel free to
contact us:
Technical Support and E-Warranty Certificate
www.vevor.com/support
NEED HELP? CONTACT US!
This is the original instruction, please read all manual instructions
carefully before operating. VEVOR reserves a clear interpretation of our
user manual. The appearance of the product shall be subject to the
product you received. Please forgive us that we won't inform you again if
there are any technology or software updates on our product.
PEGBOARD
- 2 -
SAFETY INSTRUCTIONS
AVVERTIMENTO:
1. Leggere questo materiale prima di utilizzare questo prodotto. La
mancata osservanza di questa precauzione può causare gravi lesioni.
2. Non superare la capacità di lavoro della forca per pallet .
3. Dopo l'uso, asciugare prima di riporre il prodotto per evitare che si
arrugginisca .
4. Le procedure non specificatamente spiegate nel presente manuale
devono essere eseguite esclusivamente da un tecnico qualificato.
Per evitare gravi lesioni dovute a guasti dell'utensile, non utilizzarlo
se danneggiato :
Il pannello forato deve essere montato su una parete solida.
I pannelli forati non devono essere installati su pareti di legno troppo sottili.
I pannelli forati non devono essere installati su pareti in legno marce o
allentate.
Il peso degli oggetti da appendere non deve superare il carico del pannello
forato.
Quando si sostituisce il gancio, è necessario selezionarne uno adatto alle
dimensioni del pannello forato.
Evitare punte affilate, lame e altri oggetti che possano graffiare il prodotto
ATTENZIONE:
Leggere attentamente le istruzioni e le procedure per operare in
sicurezza.
Salva questo manuale
- 3 -
MODEL AND PARAMETERS
HB641601
HB641602
HB9632
Materiale
Acciaio
Acciaio
Acciaio
Capacità massima
di peso (pannello
forato singolo)
165 libbre
165 libbre
165 libbre
Dimensioni del
pannello forato
(L*W)
32 ”* 16 ”
32 " *16 "
32 " *16 "
Specifiche del
foro.
1/4 "
1/4 "
1/4 "
Spessore del
foglio
1,0 mm
1,0 mm
1,0 mm
Trattamento
superficiale
(pannello forato)
Galvanizzazione +
verniciatura a polvere
Galvanizzazione +
verniciatura a polvere
Galvanizzazione +
verniciatura a polvere
Colore
bianco
bianco
bianco
Model
SPEC.
- 4 -
COMPONENTS
HB641601
HB641602
HB9632
Pannello forato
×2
×2
×3
Gancio
/
×15
×20
Scatola di stoccaggio
/
×5
×5
Supporto per scatola
portaoggetti
/
× 5
× 5
Titolare dell'equipaggio
S
/
×1
×1
Cremagliera
/
×1
×1
Mensola
/
×1
×2
Blocco di montaggio
/
×6
×8
Io Gancio
/
/
×4
Supporto per chiave
inglese
/
/
×1
Spina di limite
/
× 8
×1 2
Spina di espansione
× 8
×1 2
×1 6
Vite autofilettante
× 8
×1 2
×1 6
Posizionamento del
cartone
/
× 1
× 1
Model
Parts

- 5 -
Manuale
dell'utente
×1
×1
×1
INSTALLATION INSTRUCTION
Preparazione all'installazione:
1. Due o più persone per montare il pannello forato.
2. Si prega di preparare un tappeto o uno zerbino per proteggere il
pavimento su cui si desidera disporre tutti gli accessori.
3. Si prega di indossare dei guanti per evitare di graffiarsi con parti
taglienti che potrebbero presentarsi durante l'installazione.
4. Si prega di aprire tutte le scatole per verificare che gli accessori siano
completi e in buone condizioni .
5. Se per installare questo prodotto è necessario utilizzare utensili elettrici,
impostare in anticipo la velocità su bassa.
6. Durante l'installazione , allineare tutti i fori e non stringere prima tutte le
viti , altrimenti l'installazione potrebbe risultare difficoltosa.
Per l'installazione di pareti in calcestruzzo
FASE 1: Posizionare la tavola sospesa vicino alla parete installata e
segnare i fori con un chiodo sottile o una matita. (Nota: due fori a sinistra,
due fori a destra)
- 6 -
FASE 2: Praticare dei fori da 8 mm di diametro e 40 mm di profondità nei
punti contrassegnati. (Nota: preparare i propri utensili per la perforazione .)
FASE 3: Inchiodare completamente i quattro tasselli ad espansione nel
foro.

- 7 -
FASE 4 : Avvitare la vite autofilettante nel foro del tassello di espansione,
lasciando scoperti 3~5 mm.
FASE 5: Appendere il pannello forato alle viti autofilettanti, come mostrato
nell'immagine.
FASE 6: Assicurarsi che le quattro viti autofilettanti siano inserite nei fori di
montaggio del pannello forato e serrarle.
PASSO 7: Per installare altri pannelli forati, seguire i passaggi sopra
back
- 8 -
indicati.
(Nota: il pannello forato viene posizionato orizzontalmente e verticalmente
e il metodo di installazione è lo stesso.)
Per l'installazione di pali in legno
FASE 1 : Allineare il bordo del pannello forato con la linea centrale del palo
e segnare i fori con un chiodo sottile o una matita. (Nota: due fori a sinistra,
due fori a destra)
FASE 2: Praticare dei fori da 3 mm di diametro e 40 mm di profondità
nei punti contrassegnati, avvitare la vite autofilettante nei fori, lasciando
scoperti 3~5 mm. (Nota: preparare i propri utensili .)

- 9 -
FASE 3 : Appendere il pannello forato alle viti autofilettanti , come
mostrato in figura.
FASE 4 : Assicurarsi che le quattro viti autofilettanti siano inserite nei fori
di montaggio del pannello forato e serrarle .
back
- 10 -
FASE 5 : Seguire i passaggi precedenti per installare altri pannelli forati.
(Nota: il pannello forato viene posizionato orizzontalmente e verticalmente e
il metodo di installazione è lo stesso.)
Per Blocco di montaggio + installazione di pareti in calcestruzzo
PASSO 1: Appoggiare il cartone di posizionamento sulla parete da
installare, praticare i fori di marcatura in corrispondenza dei fori segnati sul
cartone di posizionamento.
- 11 -
Togliete il cartone e praticate dei fori di 8 mm di diametro e 40 mm di
profondità in corrispondenza dei fori di marcatura. (Nota: preparate i vostri
utensili da foratura .)
Inchiodare completamente i tasselli ad espansione nel foro.
Verticale: A=406mm
Orizzontale: B=814mm
- 12 -
PASSO 2: Fissare il blocco di montaggio con viti autofilettanti come
mostrato ( verticale ) .
Nota: il metodo di installazione orizzontale e verticale è lo stesso.
- 13 -
PASSO 3 : Inserire la piastra di sospensione nel blocco di montaggio e collegare
il tappo di finecorsa come mostrato in figura .
FASE 4: Seguire i passaggi sopra indicati per installare altri pannelli forati .
Una volta completata l'installazione, puoi appendere i tuoi oggetti .

- 14 -
Per Installazione del blocco di montaggio + palo della parete in legno
FASE 1 : Posizionare il cartone di posizionamento sulla parete da
installare; il centro del foro sul cartone si trova sulla linea centrale del palo.
Praticare i fori di marcatura in base ai fori segnati sul cartone di
posizionamento.
Togliete il cartone e praticate dei fori di 3 mm di diametro e 40 mm di
profondità in corrispondenza dei fori di marcatura. (Nota: preparate i vostri
utensili da foratura .)
Verticale:
A=406mm
- 15 -
Orizzontale : B=814mm
- 16 -
PASSO 2 : Fissare il blocco di montaggio con viti autofilettanti come mostrato
( verticale ) .
Nota: il metodo di installazione orizzontale e verticale è lo stesso.
PASSO 3 : Inserire la piastra di sospensione nel blocco di montaggio e
collegare il tappo di finecorsa come mostrato in figura .
- 17 -
FASE 4: Seguire i passaggi sopra indicati per installare altri pannelli
forati .
Una volta completata l'installazione, puoi appendere i tuoi oggetti .
- 18 -
Montaggio della scatola di immagazzinaggio:
MAINTENANCE
Non superare il peso capacità .
Dopo l'uso, pulire e asciugare il prodotto in un luogo asciutto e
ventilato.
Produttore: Shanghaimuxinmuyeyouxiangongsi
Indirizzo: Shuangchenglu 803nong11hao1602A-1609shi, baoshanqu,
shanghai 200000 CN.
Importato in AUS: SIHAO PTY LTD, 1 ROKEVA STREETEASTWOOD NSW
2122 Australia
Importato negli USA: Sanven Technology Ltd., Suite 250, 9166 Anaheim
Place, Rancho Cucamonga, CA 91730

- 19 -
REP
EC
E-CrossStu GmbH
Mainzer Landstr.69, 60329 Frankfurt am Main.
REP
UK
YH CONSULTING LIMITED.
C/O YH Consulting Limited Office 147, Centurion House,
London Road, Staines-upon-Thames, Surrey, TW18 4AX