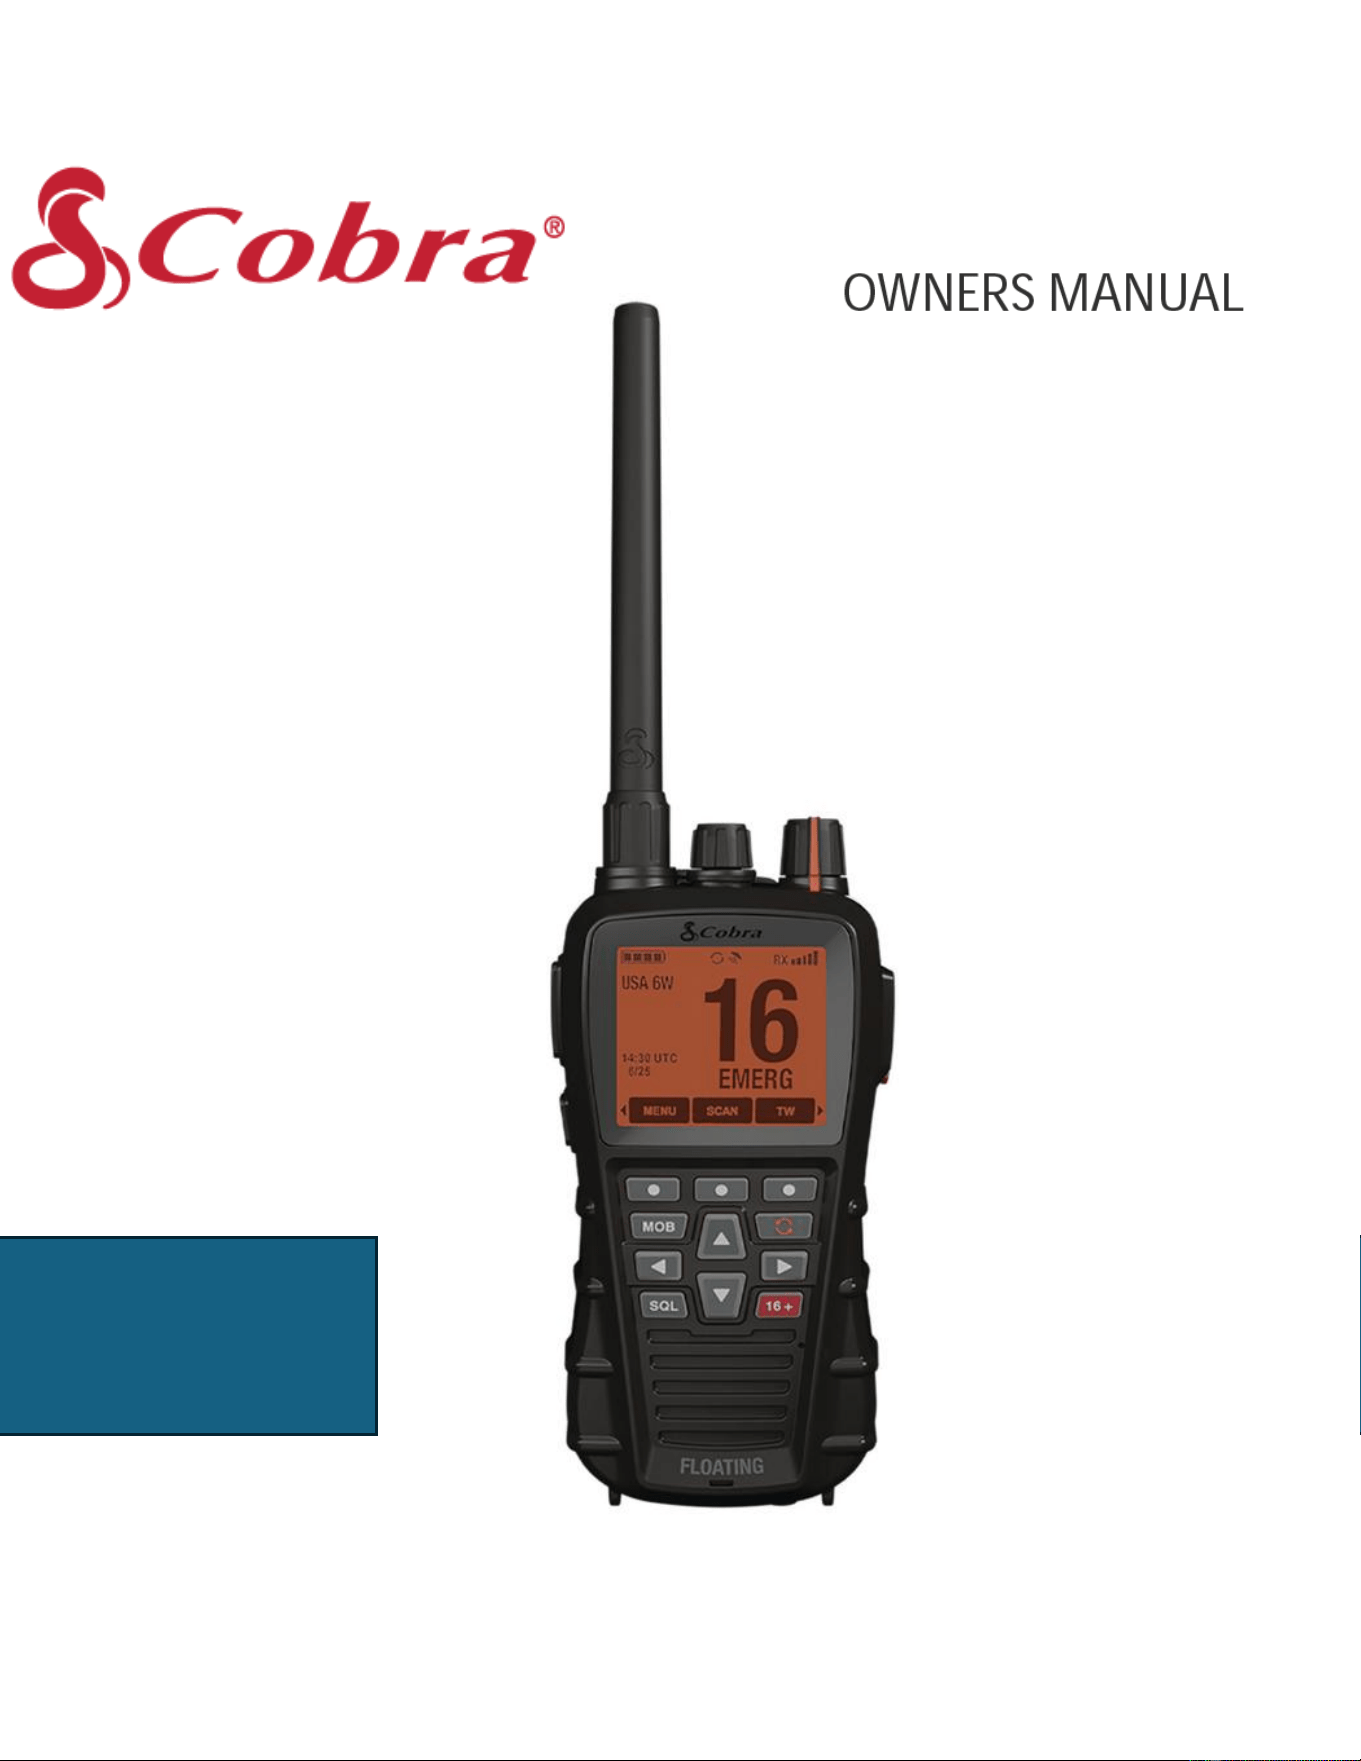
Thank you for purchasing a Cobra Marine® VHF radio. When used properly, this Cobra® product will
give you many years of reliable service.
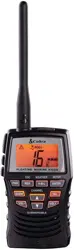
BlueBound 650B
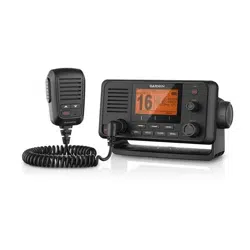
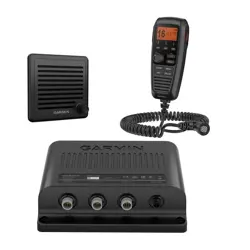
BlueBound 650W
VHF Marine Radio Transceiver
Cobra Electronics Corporation
1701 Golf Road Suite 3-900, Rolling Meadows, Illinois, 60008, United States
HVIN:BlueBound 650B
HVIN:BlueBound 650W

How Your Cobra Marine VHF Radio Works
This radio is a battery-powered portable transceiver for use on the water. It gives you 2-way ves-
sel-to-vessel and vessel-to-shore station communications, primarily for safety and secondarily for navi-
gation and operational purposes. With it, you can call for help, get information from other boaters, talk to
lock or bridge tenders and make radiotelephone calls to anywhere in the world through a marine oper-
ator. Besides 2-way communications, in the U.S.A., the radio can provide quick access to receive ten
NOAA (National Oceanographic and Atmospheric Administration) and two Canadian weather channels
for alerting you to weather emergencies with a tone on a weather channel you can select for your area.
Customer Assistance
Should you encounter any problems with this product or not understand its features, please refer to this
manual. If you require further assistance after reading this manual, Cobra Electronics offers the following
customer assistance services:
Call: 800-543-1608
• Monday-Friday 9:00 AM-5:00 PM EST
Open a support ticket on Cobra.com: https://www.cobra.com/pages/contact-us
Chat with a live agent: https://www.cobra.com/
• Monday-Friday 10:00 AM-6:30 PM EST
• Look for the chat icon at the lower bottom right side of the web pages.
For Assistance Outside the U.S.A
Contact Your Local Dealer
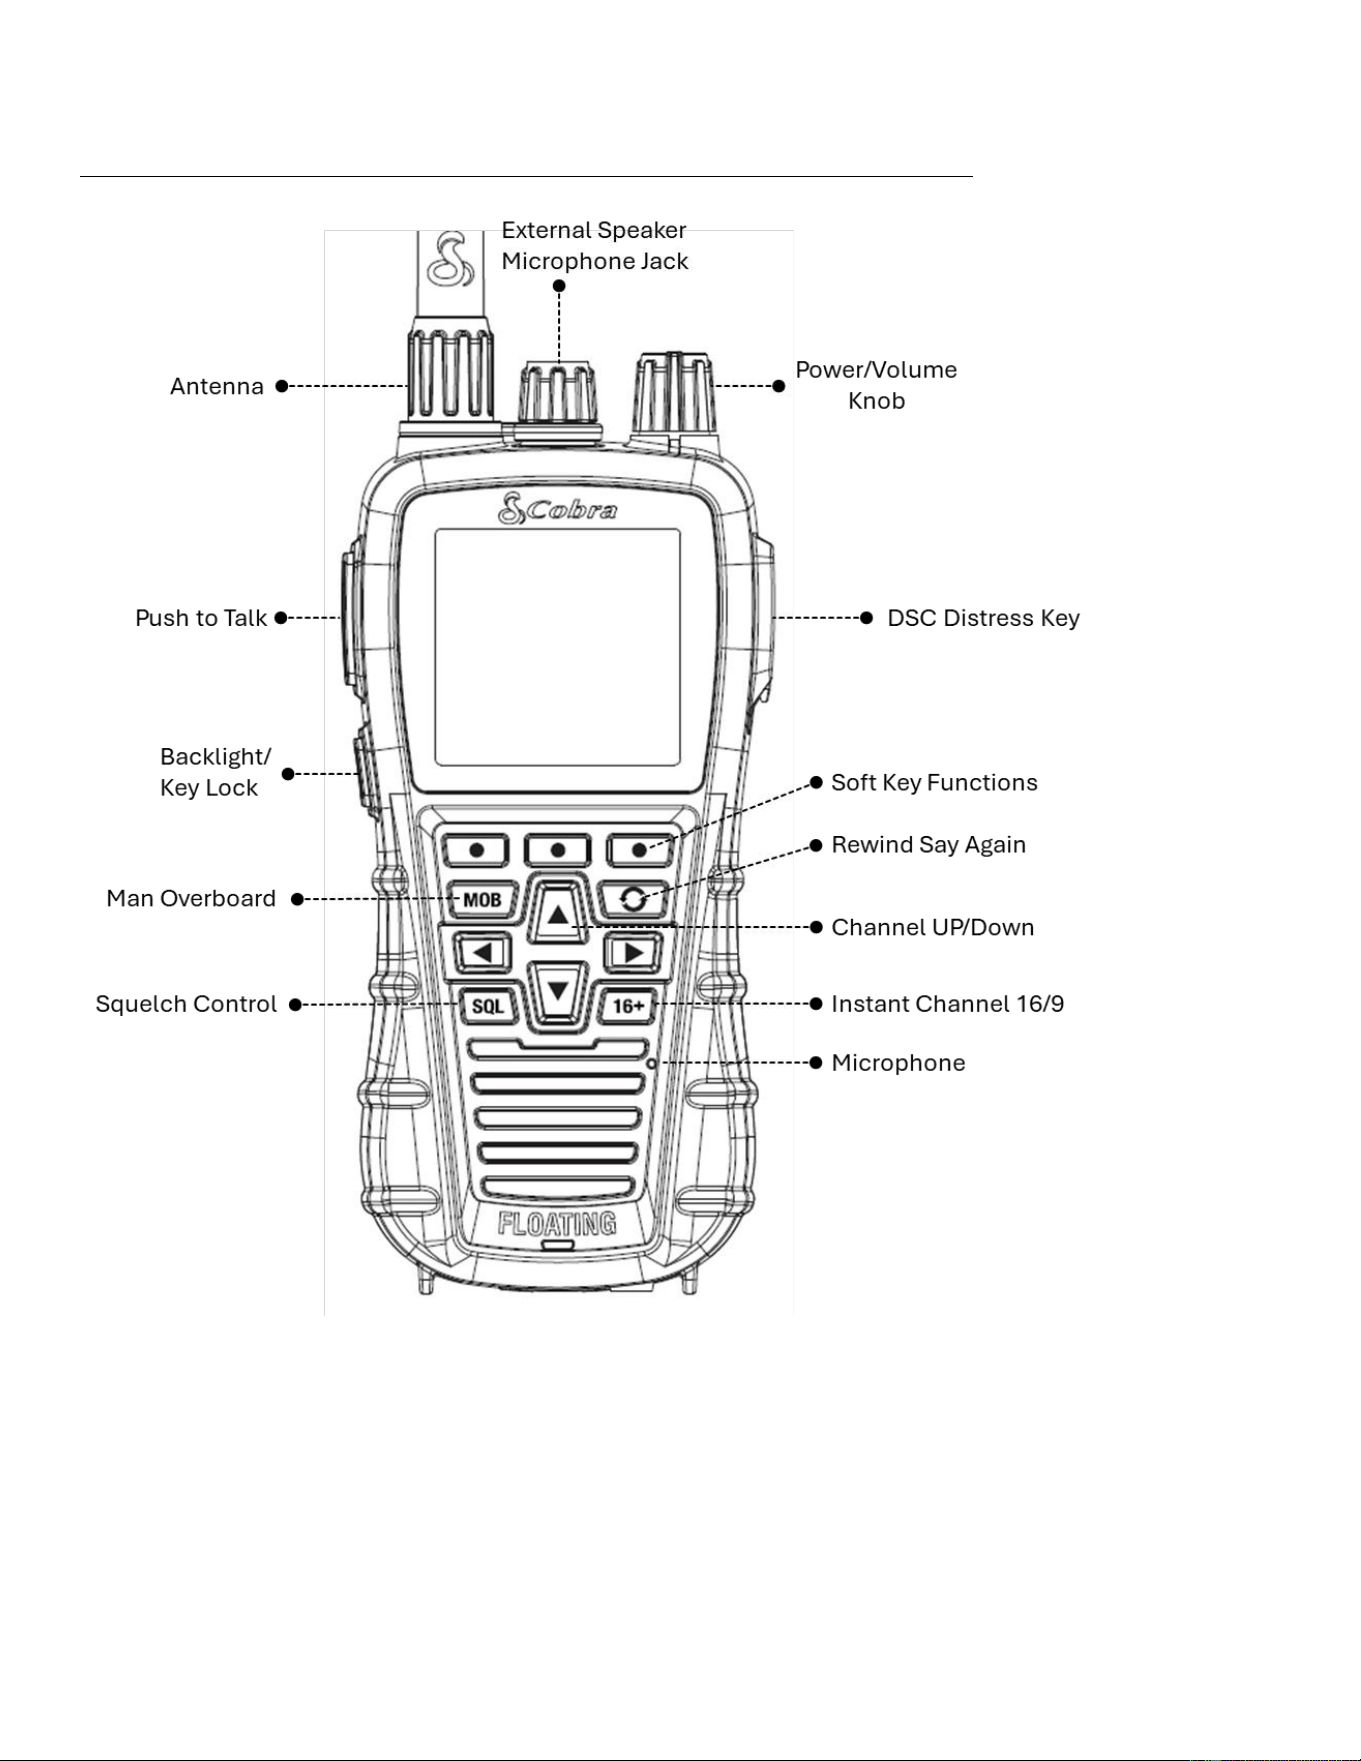
Radio Overview_______________________________________________
LCD Display Overview_______________________________________________
Product Features
Power Settings
Select 1, 3 or 6 Watts of output power for near or distant calling
Built-In GPS Receiver
Shows GPS coordinates on screen and automatically sends GPS location with DSC calls
Digital Selective Calling (DSC Class-D)
Allows the ability to maintain a listening watch on VHF Channel 16 while simultaneously monitoring Channel 70
for DSC calls. Allows sending a distress message at the touch of a button as well as specific station-to-station
calls.
Active Noise Cancelling
Reduce background noise on both incoming and outgoing transmissions.
Bluetooth Connectivity
Pair your cell phone to receive voice calls through the BlueBound 650B or pair with a wireless headset
for hands
free communication.
USA/International/Canada Channels
Allows operation on any of the three (3) different channel maps established for these areas
Floating and Waterproof
IPX7 waterproofing ensures radio floats when immersed in water
Float N’ Flash
Radio strobe light will flash while floating when dropped in water

Dock Charger
Dock charger with additional battery charging slot for recharging radio
Charging Adapters
Includes charging dock adapter cables for both AC and power outlets.
Instant Channel 16/9
Provides instant access to priority channel 16 and calling channel 9
Tri-Watch
Use to monitor three channels at once, Channel 16 and two user selected channels
Rechargeable Lithium-ion Battery
Recharge using the included USB-C dock charger and adaptor
Favorite Channels
Save important channels as favorites
Speaker Mic Jack
Allows for connection to the Cobra speaker mic accessory
Backlit Keypad & Day/Night Display
Day/Night LCD display and backlit functional buttons for high visibility
Locking Battery Latch
Quick release battery latch with sliding lock tab
BURP
Expels water from the speaker grill if the unit is dropped in the water or is subjected to extreme rain and
weather

Table of Contents
Introduction (Page 1)
Radio Overview (Page 2)
Product Features (Page 3)
Safety Information (Pages 5–8)
Operation (Pages 9–20, 23–30)
• Included in This Package (Page 7)
• Batteries and Charging (Page 10)
• Power Button (Page 11)
• Power Saver (Page 11)
• Volume Control (Page 11)
VHF Marine Radio Procedures
Emergency Messages & Distress Procedures
NOAA Weather (WX)
Navigation Compass (NAV)
Digital Selective Calling (DSC)
Bluetooth Operation
Radio Care
Warranty
Specifications
VHF Marine Channel Assignments & Maps

Before using your Cobra marine VHF radio, please read these general precautions and warnings.
How Your Cobra Marine VHF Radio Works
Proper usage of this radio is important to achieve full functionality, so please read the operating instructions
carefully before rst use and refer to this guide again whenever necessary. Please pay special attention to the
WARNING and NOTICE statements in this manual.
WARNING : Statements identify conditions that could result in personal injury or loss of life.
NOTICE : Statements identify conditions that could cause damage to the radio or other equipment.
Safety Training Information
This Cobra Marine VHF radio complies with the following guidelines and standards regarding RF energy and
electromagnetic energy levels as well as evaluation of those levels for human exposure.
1. FCC OET Bulletin 65 Edition 97-01 Supplement C, Evaluating Compliance with FCC Guidelines for human
exposure to radio frequency electromagnetic elds.
2. American National Standards Institute (C95.1-1992), IEEE Recommended Practice for the measurement
of Potentially Hazardous Electromagnetic Fields – RF and Microwave.
3. American National Standards Institute (C95.3-1992), IEEE Standard for Safety Levels with Respect to
Human Exposure to Radio Frequency Electromagnetic Fields, 3kHz to 300GHz.
4. Industry Canada RSS-102-Radio Frequency (RF) Exposure Compliance of Radiocommunication
Apparatus (All Frequency Bands).
a. Conformité d’exposition de la fréquence du Canada RSS-102-Radio d’industrie (rf) de
l’appareillage de communication par radio (toutes les bandes de fréquence).
ALWAYS use only Cobra authorized accessories.
DO NOT operate the radio in an explosive atmosphere, near blasting sites, or in any area where signs are posted
prohibiting radio transmissions.
NEVER place the transceiver or microphone/speaker where they might interfere with operation of your vessel or
cause injury.
DO NOT allow children or anyone unfamiliar with proper procedures to operate the radio without supervision.

Failure to observe any of these warnings may cause you to exceed FCC RF exposure limits or create other
dangerous conditions
For Products Purchased Outside the U.S.A. or Canada
Please contact your local dealer for product service information.
For Products Used in Canada
Industry Canada Notice
This device complies with Industry Canada license-exempt RSS standard(s). Operation is subject to the
following two conditions:
(1) this device may not cause interference, and
(2) this device must accept any interference, including interference that may cause undesired operation of the
device.
Le présent appareil est conforme aux CNR d’Industrie Canada applicables aux appareils radio excempts de
licence. L;exploitation est autorisée aux deux condtions suivantes:
(1) l’appariel ne doit pas produire de brouillage, et
(2) l’utilisateur de l’appareil doit accepter tout brouillage radioélectrique subi, même si le brouillage est
susceptible d’en compromettre le fonctionnement.
Industry Canada Antenna Notice
Under Industry Canada regulations, this radio transmitter may only operate using an antenna of a type and
maximum (or lesser) gain approved for the transmitter by Industry Canada. To reduce potential radio
interference to other users, the antenna type and its gain should be chosen so that the equivalent isotopically
radiated power is not more than necessary for successful communication.
Avis d’antenne du Canada d’industrie
En vertu de la réglementation de l’industrie du Canada, cet émetteur de radio ne peut fonctionner à l’aide d’une
antenne d’un type et un maximum (ou moins) Gain approuvé pour l’émetteur par Industrie Canada. Pour réduire
le risque d’interférence aux autres utilisateurs, le type d’antenne et son gain doivent être choisis an que la
puissanc isotrope rayonnée équivalente (PIRE) ne dépasse pas ce qui est nécessaire pour une communication
réussie.

NOTICE
Your radio is waterproof only when the battery is properly installed.
AVOID using or storing the radio at temperatures below -4˚F (-20˚C) or above 140˚F (60˚C).
KEEP your radio at least 3 ft (0.9 m) away from your vessel’s magnetic navigation compass.
DO NOT attempt to service any internal parts yourself. Have any necessary service performed by a qualied
technician.
This radio comes with a rechargeable Lithium-ion battery
Do not short circuit the battery.
When replacing the battery, dispose of the old battery properly.
Do not attempt to operate your radio while recharging the battery.
Changes of modications to your radio may void its compliance with FCC rules and regulations, making it
possibly unsafe and illegal to use.
Recommendations for Marine Communication
The frequencies your radio uses are set aside to enhance safety aoat, for vessel navigation, and for operational
messages over a range suitable for near-shore voyages. If the 6-Watt maximum output of your radio is not
suicient for the distances you travel from the coast, consider installing a Cobra Marine xed mount radio with
up to 25 Watts of output power.
The U.S Coast Guard does not endorse cellular telephones as substitutes for marine radios. They generally
cannot communicate with rescue vessels and, if you make a distress call on a mobile telephone, only the party
you call will be able to hear you. Additionally, mobile telephones may have limited coverage over water and can
be hard to locate. If you do not know where you are, the Coast Guard will have diiculty nding you if you are
using a mobile telephone
However, cellular telephones can have a place on board where cellular coverage is available to allow social
conversations and keep the marine frequencies uncluttered and available for their intended uses.
FCC Licensing Information
Cobra Marine VHF radios comply with the FCC requirements that regulate the Maritime Radio Service.
The radio operates on all currently allocated marine channels and is switchable for use according to USA,
International or Canadian regulations. It features instant access to emergency Channel 16 and calling Channel 9
as well as NOAA All Hazards Radio.
The transceiver is capable of Class-D Digital Selective Calling (DSC) operation in accordance with CFR Part 47,
Section 80,225.
Station License
An FCC ship station license is not required for any vessel traveling in U.S waters that use a VHF marine radio,
RADAR, or EPIRB, and those that are not required to carry radio equipment. However, any vessel required to
carry a marine radio on an international voyage, carrying an HF single side band radiotelephone, or carrying a
marine satellite terminal must obtain a station license.
International Station License

If your vessel will be entering the sovereign waters of a country other than the U.S.A. or Canada, you should
contact that country’s communications regulatory authority for licensing information.
Radio Call Sign
Currently, the FCC does not require recreational boaters to have a license. The United States Coast Guard
recommends that the boat’s registration number and state of registry be used as a call sign and be clearly visible
on the vessel.
Canadian Ship Station License
You need a Radio Operator’s Certicate if your vessel is operated in Canadian waters. Radio Operator training
and certication is available from the Canadian Power Squadron.
User Responsibility and Operating Locations
All users are responsible for observing domestic and foreign government regulations and are subject to severe
penalties for violations. The VHF frequencies on your radio are reserved for marine use and require a special
license to operate from land, including when your boat is on its trailer.
NOTE: This device complies with part 15 of the FCC Rules, and Industry Canada license-exempt RSS standards.
Operation is subject to the following two conditions:
1. This device may not cause harmful interference
2. This device must accept any interference received, including interference that may cause undesired
operation.
FCC Warning: Replacement or substitution of transistors, regular diodes or other parts of a unique nature, with
parts other than those recommended by Cobra may cause a violation of the technical regulations of part 80 of
the FCC Rules, or violation of type acceptance requirements of part 2 of the rules.
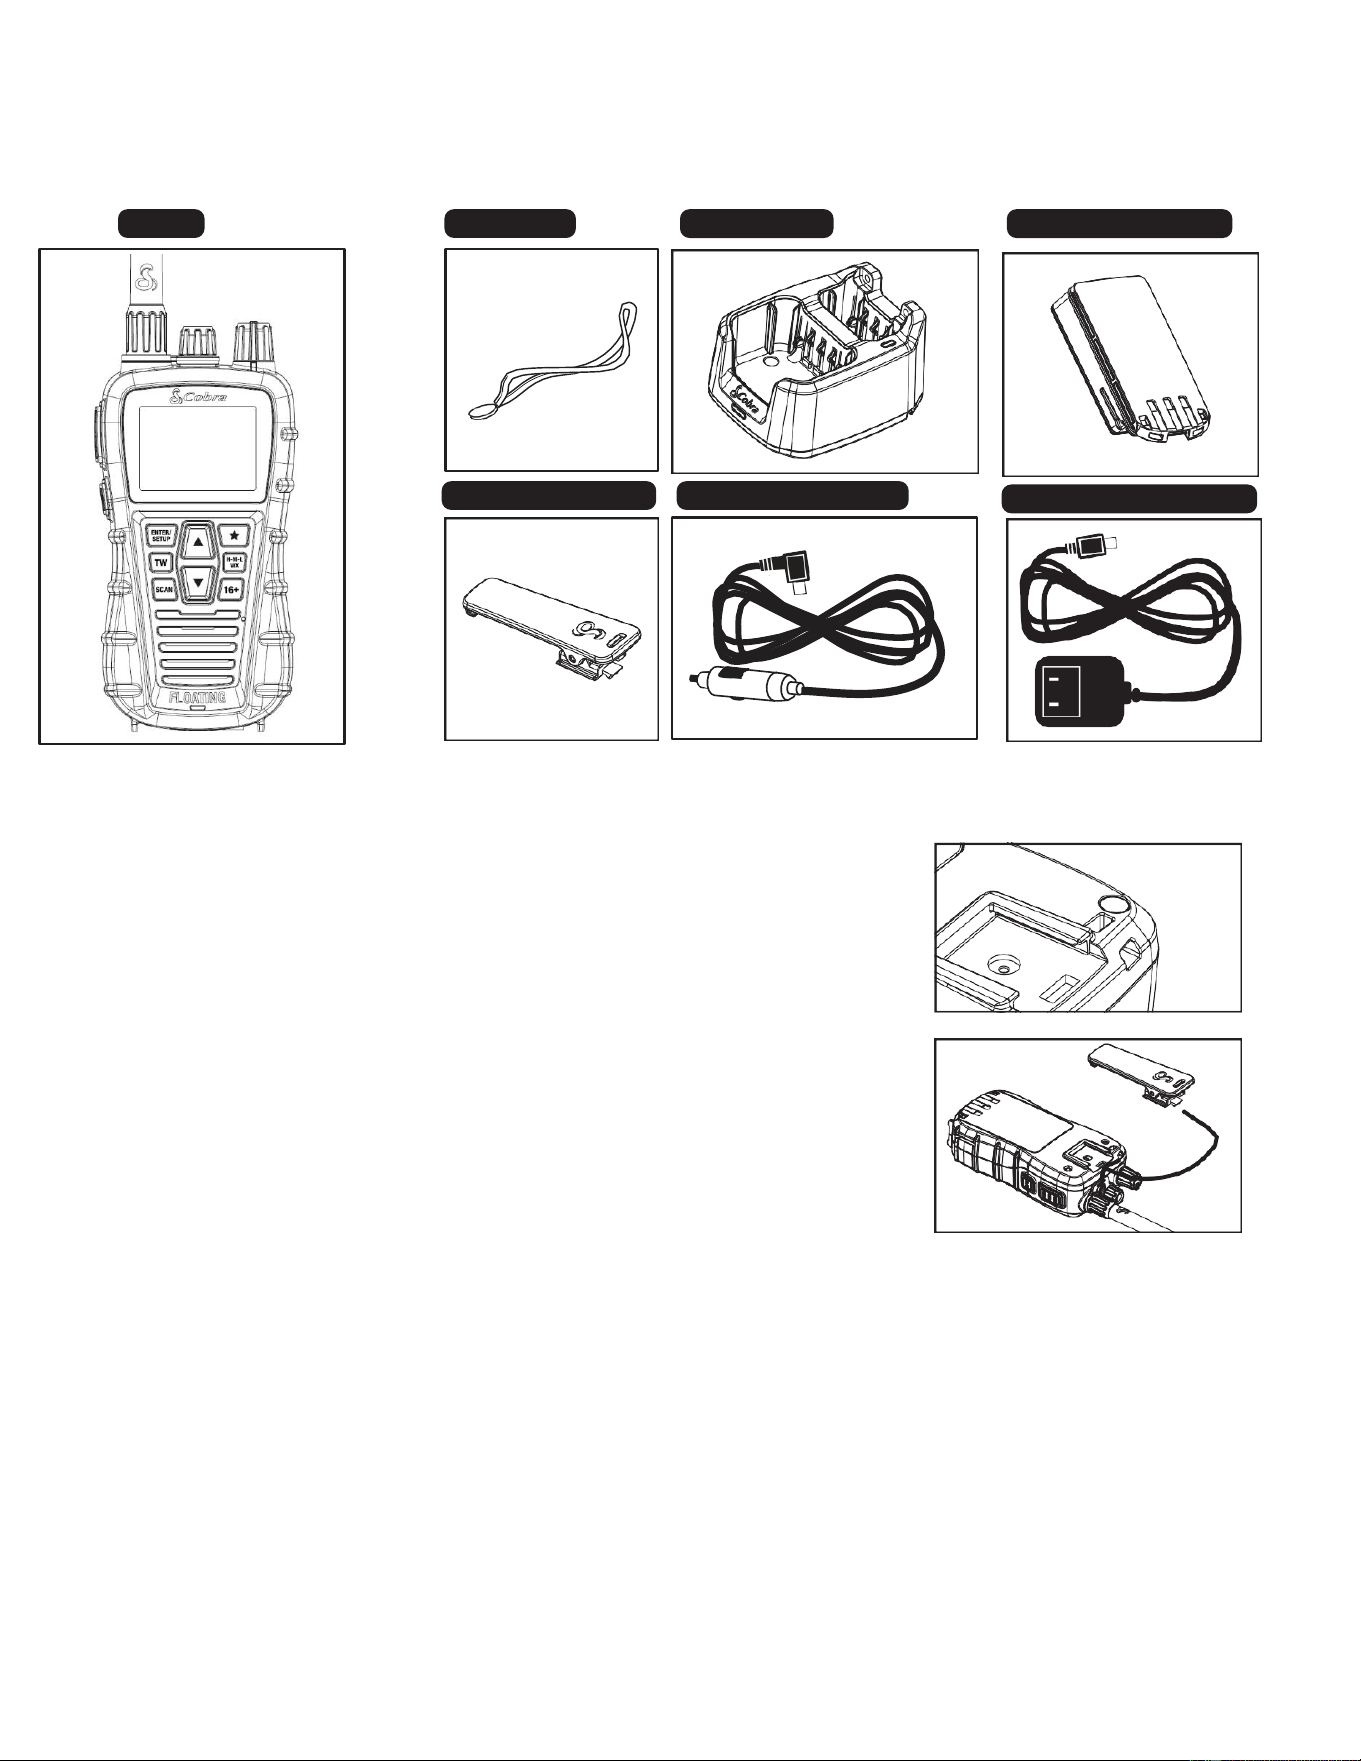
Included in this Package
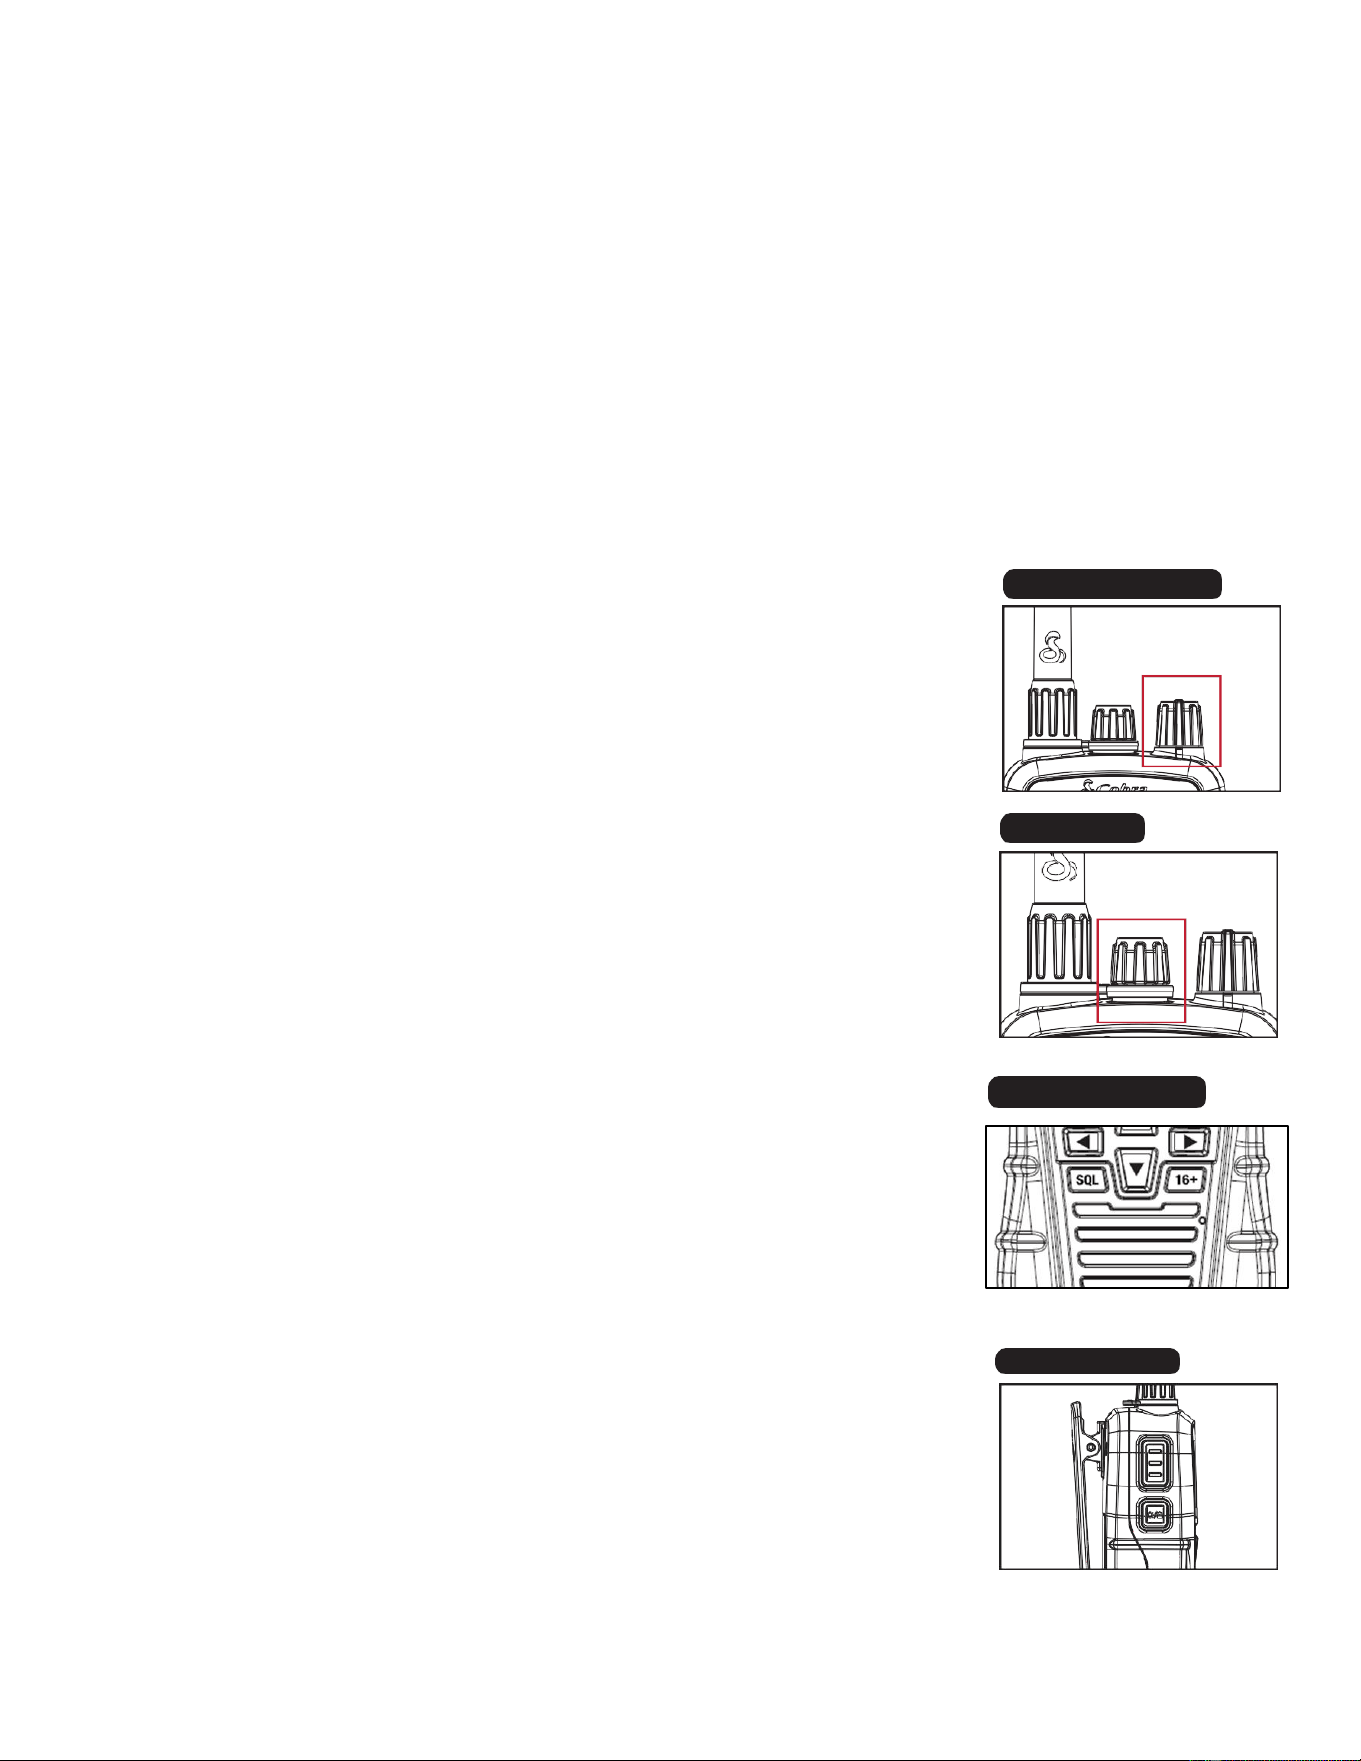
Wrist Strap and Belt Clip
Wrist Strap
The wrist strap is attached to the radio by routing the tether cord through
the wrist strap hole on the upper back portion of the radio’s housing.
Belt Clip
Use the spring-loaded belt clip to carry the radio on your person.
1. Slide the belt clip into the guide channel on the back of the radio until
it is locked in place
2. Press the belt clip open and place it over the belt.
3. To remove the belt clip from the radio, press the tab on the belt clip,
which unlocks the clip and slide the clip out from the radio.
External Speaker/Microphone Jack
Your radio can be fitted with an optional External Speaker/Microphone (not included), freeing your hands
for other tasks. Contact your local Cobra Marine dealer or visit Cobra.com to find out more about the
marine speaker mic accessory.
To attach the external speaker/microphone:
1. Open the speaker/microphone tab on top of the radio.
2. Insert the plug into the speaker/microphone jack.
Warning: An Improper connection of the speaker microphone can compromise the radio’s
waterproofness.
Radio
Wrist Strap
Dock Charger Lithium-ion Battery
Spring-Loaded Belt Clip
12V Charging Adaptor
AC Charging Adapter
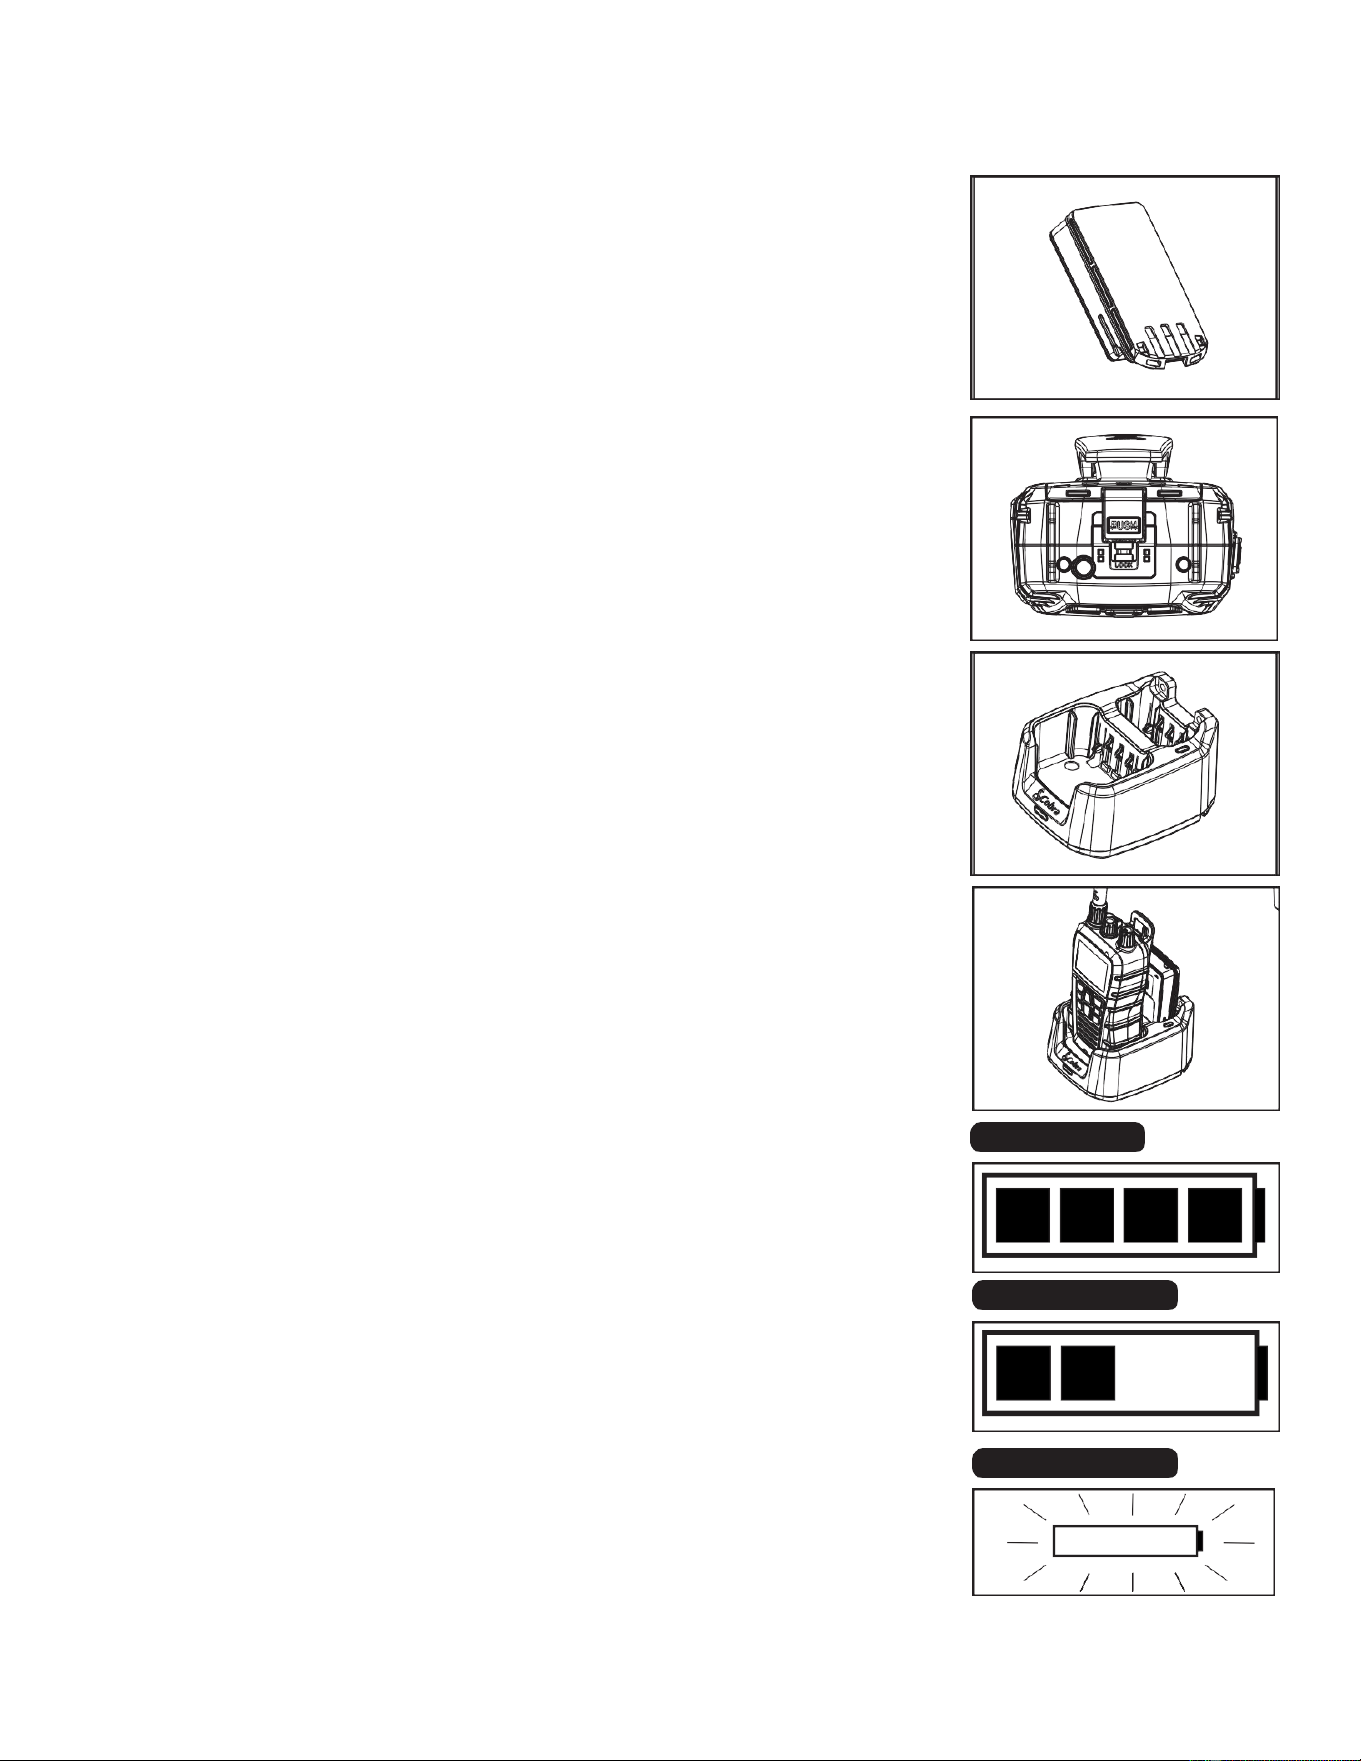
Batteries and Charging
The radio is shipped with a sealed rechargeable Lithium-ion (LiON) battery
(P/N 0010103-2).
Warning: The charger provided for this radio is only to be used to charge the
battery pack provided. Do not charge any other type of batteries in the
charger as fire, explosion or battery damage could occur. Avoiding extreme
temperatures will also help prolong the life of the battery pack for the radio.
Installing the Battery Pack
1. Slide the bottom locking latch to the Unlock position.
2. Position the battery pack over the back of the radio.
3. Insert the battery tabs into their corresponding slots and press down
to secure the battery with the battery latch.
4. Slide the battery locking latch to the locked position.
Removing the Battery Pack
1. Slide the battery locking latch to the Unlock position.
2. Push down on the battery latch to release the battery.
3. Gently remove the battery from the rear of the radio.
Initial Charge
The Cobra provided Lithium-ion battery pack may be charged using the
supplied dock charger with either the 12V or AC charging adapter.
Additionally, the provided dock charger also contains a slot to charge an
additional backup battery. Both the radio and an extra battery (sold
separately) can be charged simultaneously in the dock charger.
To charge your radio
1. Connect either the 12V or AC charging adapter to their respective
power outlets.
2. Connect the USB-C end of the charging adapter to the dock charger
3. Place your radio into the front slot on the dock charger. The light on the
front of the dock charge will indicate that the radio is being charged.
4. When the light turns green the radio’s battery is fully charged.
To charge an extra battery
1. Position the battery so that the terminals on the battery match the same
side as the terminals on the charger.
2. Slide the battery into the rear slot on the dock charger. The light on the
side of the dock charger will indicate that the battery is being charged.
3. When the light turns green the battery is fully charged.
Warning: Only use Cobra BlueBound battery packs with the supplied dock
charger.
Battery Charge Levels
As you use your radio, the battery power icon will show the remaining
Fully Charged
Partially Charged
Fully Discharged
battery power. As the radio’s battery is drained, the displayed charge bar will begin to decrease. When
the battery icon begins to flash, it is time to recharge or change the battery.
It is recommended to recharge your radio after every use to keep the battery
fully charged.
Basic Radio Functions
Refer to the radio overview section at the beginning of the manual to identify
the various controls and indicators on your radio. Throughout this manual you
will be instructed to “Press” or to “Press and Hold” various buttons (except
PTT “Push to Talk”) on the radio. “Press” means a momentary press of
approximately one second. “Press and Hold” means to hold the button down
for approximately three seconds.
Whenever you press any button except the PTT button on your radio, a brief tone
(beep) will sound to confirm the button press. With all button presses, the
appropriate icon will appear on the LCD and the backlight will turn on for 10
seconds.
At times, you will hear two other sounds. Two beeps will sound to confirm your
setting changes, and three beeps will sound to notify you of an error.
Power Knob
Powering ON/OFF the radio:
1. To turn the radio ON, rotate the power knob clockwise past the orange
indicator line
2. To turn the radio OFF, rotate the knob counterclockwise fully until the
orange line on the knob aligns with the orange indicator line on the radio.
Power Saver
Your radio has a unique circuit designed to extend battery life. If there are
no transmissions, signals, or button presses for ten seconds, the radio will
automatically switch to Power Save mode. Signal reception or any button
press will take the radio out of Power Save mode.
Volume Control
- To turn the volume up on the radio, rotate the POWER/VOLUME knob
clockwise, up to the maximum level.
- To turn the volume down on the radio, rotate the POWER/VOLUME knob
counterclockwise.
Radio Speaker and Microphone
The internal radio speaker and microphone are located on the bottom front
face of the radio below the lower control buttons.
An optional Speaker/Microphone jack is located at the top of the radio. Flip
the protective cap open and insert the plug into the jack to connect Cobra’s
Power/Volume Knob
Speaker Mic
Speaker & Microphone
Backlight/Key Lock

accessory Speaker Mic.
Backlight/Key Lock Button
The LCD will be illuminated by the backlight when any button is pressed (apart from
the PTT button) and will remain on for 10 seconds after the button is released.
Press the Backlight/Key Lock button to display the backlight temporarily. The backlight will
remain ON
for 10 seconds. If the backlight is already On, a press of the Backlight/Key Lock
button will turn the backlight Off.
Key Lock
To prevent accidental changes to your settings, you can lock all
the buttons on the front of the radio with the Backlight/Key Lock
button.
To Lock or Unlock the Buttons:
Press and hold the Backlight/Key Lock button for two seconds. The Key Lock icon
will appear or disappear on the LCD screen, indicating if Key Lock has been enabled
or disabled. When Key Lock is on, pressing any of the buttons on the front of the
radio will result in a three-beep error tone.
Both the Backlight/Key Lock button and the PTT button are still active when key lock
has been enabled. You can Receive (Rx) or Transmit (Tx) a message with Key Lock
On, but you cannot change channels or modify other settings.
Channel Up/Down Buttons
Your radio will Receive (Rx) and Transmit (Tx) VHF signals on the channel indicated
on the LCD display. You can change the channel at any time using the Channel
Up/Down buttons.
To Change Channels:
Press the Channel Up/Down buttons.
When you reach the highest channel in the current channel map,
pressing the Channel Up button will return to the beginning of the
channel map at the lowest channel. If you are on the lowest
channel in the current channel map, pressing the Channel Down
button will return to the end of the channel map at the highest
channel.

You can press and hold the Channel Up/Down button for automatic scrolling through
channels.
If the newly selected channel is restricted to low power, the radio will automatically
switch to Low Power mode, and the lower power level will display on the LCD screen
If the radio is in Key Lock mode, the channel will not change and
the three beep error signal will sound.
Squelch (SQL) Button
Squelch control filters weak signals and radio frequency (RF) noise so that you can clearly
hear the signals you want.
1. Press the SQL button to open the squelch control menu.
2. Press the UP/DOWN arrow keys to adjust squelch levels between 0-10.
3. To adjust squelch, press the DOWN arrow key until you hear a hissing sound, then press
and release the UP arrow key until the hissing stops. This will establish a “Baseline”
squelch.
4. Pressing the UP arrow key further will lter out weak and medium strength signals.
Pressing the DOWN arrow key will allow for the radio to receive weaker signals.
5. Press the ENTER softkey to save your selection and return to VHF standby mode.
Alternatively, if no action is taken by the user for 10 seconds, the radio will
automatically save settings and return to VHF standby mode.
Note: if squelch is too low where there is continuous received
transmission noise being output, Tri-Watch & scan functionality will be
temporarily disabled.
16+ Button
The 16+ button gives you quick access to Channel 16 and
Channel 9 from any operational mode.
- Press the 16+ button to change to Channel 16.
- Press the 16+ button again to change to Channel 9.
- Press the 16+ button a third time to return to the last used marine standby
channel.
Man Overboard (MOB) Button
Your radio features the Man Overboard function that marks and memorizes the position
information if a crew member falls overboard. The radio will help navigate back to that
location.
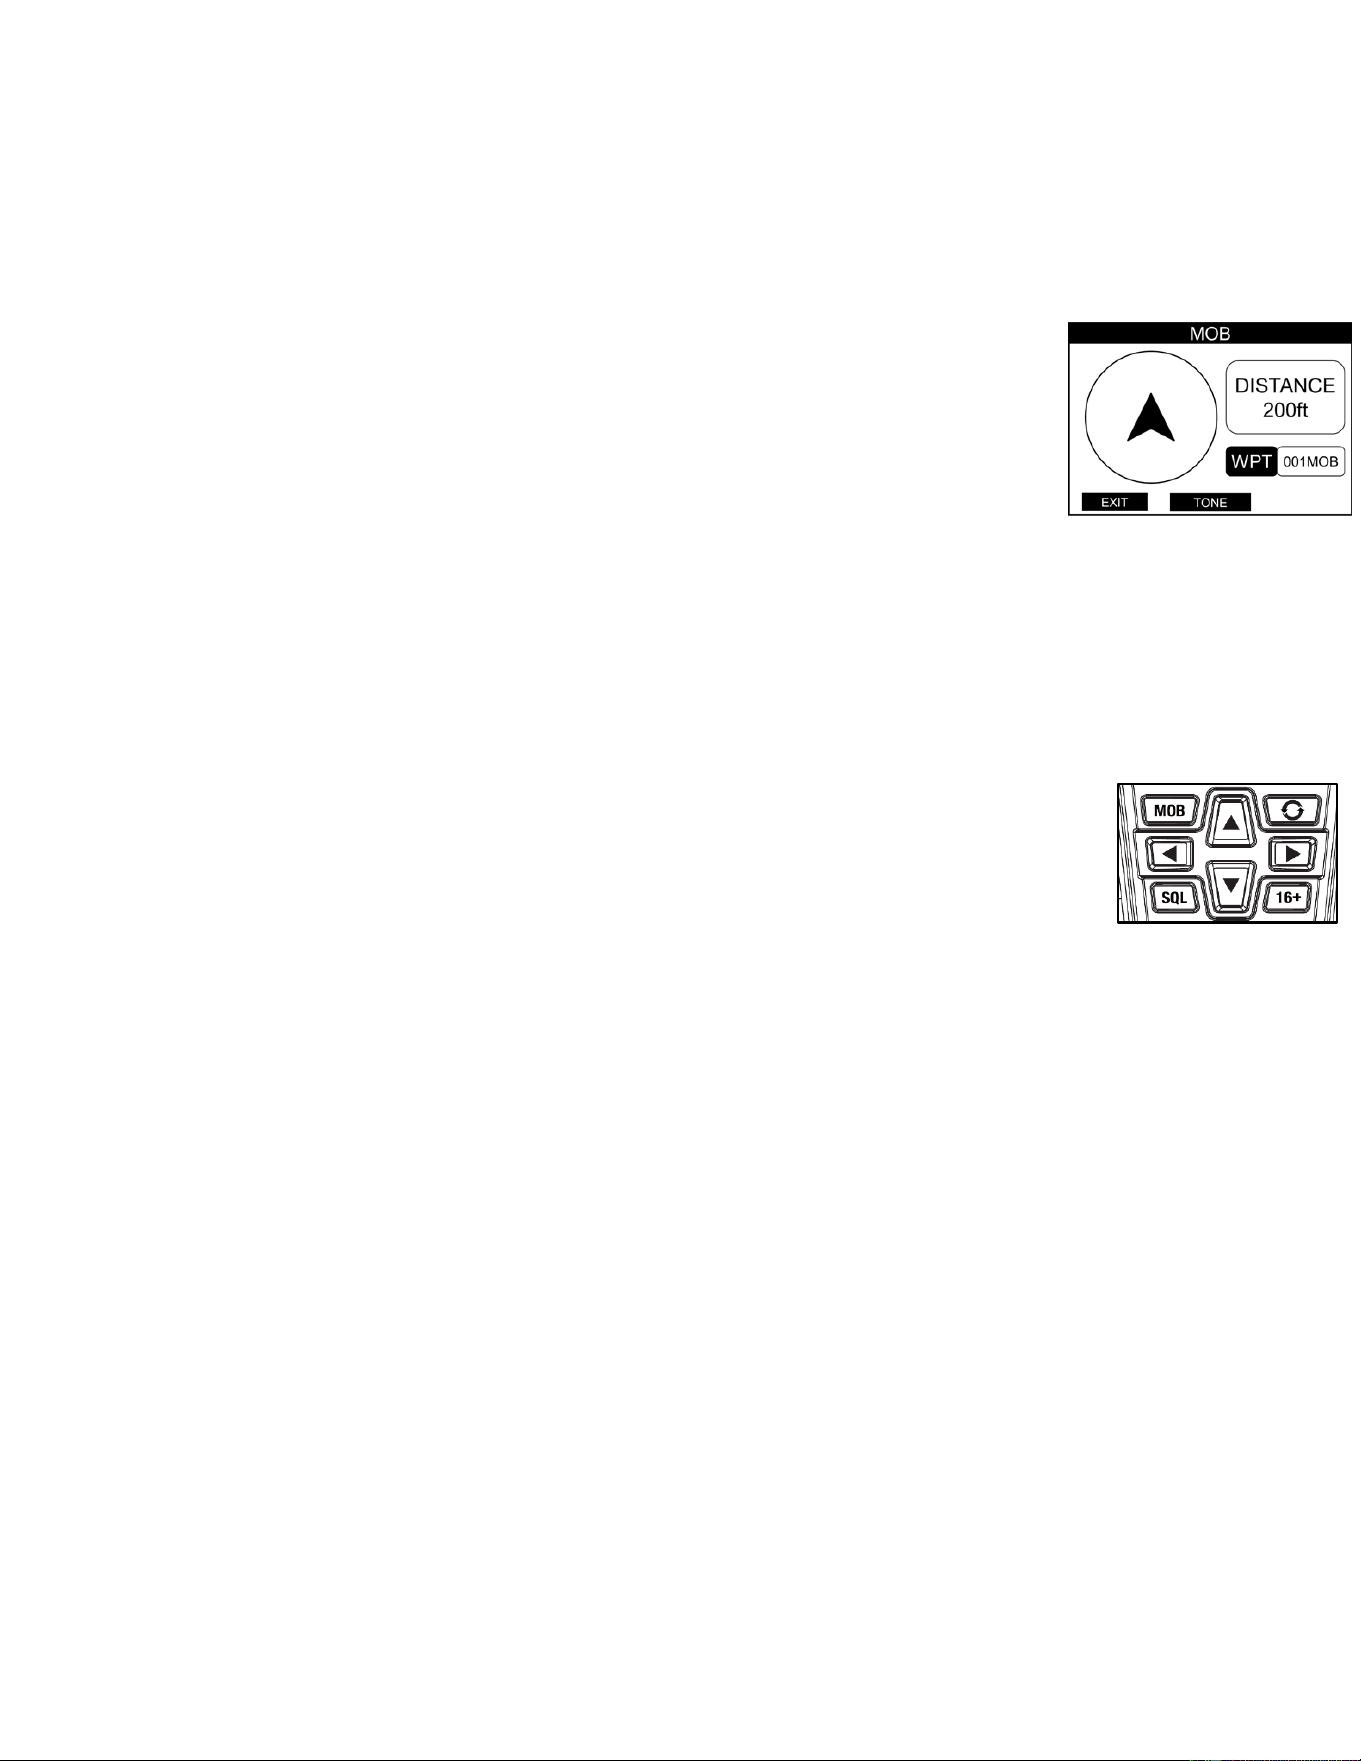
Note: The radio can’t calculate for the effects of tide, current and wind on your
crew member’s location over time. The MOB function can only act as a guide for
their possible location.
Note: The radio must have satellite reception for MOB to mark the position.
1. Press and release the MOB key to save your current coordinates as a
waypoint and automatically enter the MOB compass.
2. A compass view will show your vessel’s current position along with a pin
marking the location and distance to the MOB waypoint relative to the
radio’s current position.
3. While in this view, the compass will be set to Track Up and the arrow in the
center of the compass will rotate to point towards the location of the MOB
waypoint.
4. The radio will also sound a homing tone that increases in frequency the
closer you are to the MOB waypoint. To silence this tone, press the TONE
softkey.
5. Press the Exit softkey to exit the MOB compass and return to the VHF
standby screen.
Rewind Say Again Button
Your radio has the capability to record and playback incoming transmissions, as well pre-
record messages that can be sent out by the user on demand.
Turning on Transmission Playback
1. Press the Rewind Say Again key to activate transmission recording.
2. The Rewind Say Again icon and “Rewind Say Again” will show on the LCD display.
3. Any new incoming transmissions will be recorded and saved by the radio.
Playing Back Transmissions
If a transmission was received while Rewind Say Again was active, you can play it back on
demand.
1. Press and hold the Rewind Say Again key to enter the Rewind Say Again Menu.
2. Press the ENTER softkey on the View Recordings menu option to view the most
recently saved recordings.
3. Choose the desired recording to play and press the PLAY softkey.
4. To delete a recording, press the DEL softkey.

Recording a Message
Your BlueBound 650B
has three memory slots that allow you to pre-record messages that
can be transmitted on demand. To select a recording slot and record a message, follow the
steps below.
Selecting a Message Recording Slot:
1. While in the Rewind Say Again menu, choose the View Messages option with the
ENTER softkey.
2. Highlight which message slot you wish to use and press the SELECT softkey to
choose that slot. If there is already a message saved in that slot, you will have the
option to either delete the current message with the DEL softkey or playback the
message with the PLAY softkey.
3. Once the chosen message slot has been selected, the next recorded message will
be saved to that message slot.
Recording a Message:
1. While in the Rewind Say Again menu, choose the Record Message option with the
ENTER softkey.
2. Press and hold the PTT key to begin recording your message. When you have
nished recording, release the PTT key to stop the recording.
3. Press the PLAY softkey to playback your saved message.
4. Press the SAVE softkey to save your message.
Transmitting a Saved Message
1. Make sure you are on the correct channel you wish to transmit your message on.
2. Enter the Rewind Say Again menu by pressing and holding the Rewind Say Again
key.
3. Choose the View Messages option with the ENTER softkey
4. Choose which message you want with the SELECT softkey.
5. Press the SEND softkey and then press and hold the PTT to begin the transmission.
Continue to hold the PTT key for the duration of the transmission.
VHF Standby Menu Softkeys
Your BlueBound 650B
has multiple functions and settings that can be quickly accessed from
the VHF standby screen with the softkey buttons. Use the Left/Right arrow keys to scroll
through additional options while on the VHF standby screen.
• Menu: Press the MENU softkey to open the BlueBound 650B main menu.
• Scan: Press the SCAN softkey to automatically scan through all channels. Press and

hold the SCAN softkey to scan through only favorite channels.
• FAV: Press the FAV softkey to manually move to the next favorite channel. Press
and hold the FAV softkey to save the current channel as a favorite channel.
• CALL: Press the CALL softkey to open the DSC call menu.
• NAV: Press the NAV softkey to open the navigation compass screen.
• TW: Press the TW softkey to start Tri-Watch monitoring.
• H/M/L: Press the H/M/L softkey to change transmission power level between
6/3/1W.
• WX: Press the WX softkey to enter weather (WX) standby mode.
• BURP: Press the BURP softkey to initiate BURP water removal process.
• LIGHT: Press the LIGHT softkey to open the backlight menu.
• LOG: Press the LOG softkey to open the call waiting menu.
• MARK: Press the MARK softkey to mark your current GPS coordinates and save
them as a waypoint.
Main Menu
The main menu of the BlueBound 650B allows
access to additional settings that can be
changed by the user and radio functionality not present directly on the VHF Standby
Screen.
Radio Settings:
• Backlight
o Color: Use the UP/DOWN arrow keys to select between amber and white
backlight colors and press the SELECT softkey to save selection.
o Brightness: Use the UP/DOWN arrow keys to adjust the backlight brightness
levels.
• Contrast
o Use the UP/DOWN arrow keys to adjust the contrast level on the radio.
• Key Tone
o Use the UP/DOWN arrow keys to select key tone ON/OFF. When key tone is
set to ON, the radio will give audio feedback on key press, setting changes
and when errors occur
• Noise Reduction

o TX NR: Use the UP/DOWN arrow keys to adjust the level of noise reduction
on transmitted transmissions (TX). The higher the level chosen within the
settings, the greater level of noise reduction provided.
o RX NR: Use the UP/DOWN arrow keys to adjust the level of noise reduction
on received transmissions (RX). The higher the level chosen within the
settings, the greater level of noise reduction provided.
• Time Adjust
o Time Offset: Use the UP/DOWN arrow keys to change the local time offset
from the Coordinated Universal Time (UTC). Time increments are changed in
30-minute intervals.
o Time Format: Change between 12-hour and 24-hour time formats. The
selected time format is displayed on the VHF standby screen.
• Weather Alert
o Choose to activate/deactivate weather alert with the UP/DOWN arrow
keys. When weather alert is set to ON, the radio will sound an audible
alert when a 1050Hz weather alert tone from the NOAA is received by
the radio.
• GPS
o Coordinate System: Choose how the GPS coordinates will be displayed on
the VHF standby screen with the UP/DOWN arrow keys.
▪ DDD°MM,MM
▪ DDD°MM,MMM
▪ DDD°MM’SS”
• SBAS: Satellite Based Augmentation System (SBAS) can be turned on or off
with the UP/DOWN arrow keys. Some areas of the earth need it turned off for
greater accuracy. SBAS is set to ON by default.
• GPS Status: Displays the current GPS satellite info and GPS signal strength.
• GPS Info: Allows the user to change the GPS coordinates displayed on the
VHF standby screen. When set to ON, the GPS coordinates in the chosen
coordinate system will be displayed below the date/time on the VHF standby
screen. By default, this is set to OFF.
Channel Settings:
• Priority Channel
o Use the UP/DOWN arrow keys to turn priority channel ON/OFF. When set to
ON, the radio will always include channel 16 during a favorite channel scan,
even if channel 16 has not been set as a favorite channel. By default, this is
set to ON.
• Channel Map
o There are 3 sets of VHF channel maps that have been established for marine
use in the U.S.A, Canada, and the rest of the world (international). See the
channel list in the appendix of the manual for a full breakdown on all
channels. Use the UP/DOWN arrow keys to select between the 3 different
channel maps.
1. USA
2. International
3. Canada
• Watch Type
o Choose between the two different watch types with the UP/Down arrow keys.
1. Dual-Watch: Monitor channel 16 and one user selected channel.
2. Tri-Watch: Monitor channel 16 and two user selected channels.
• Call Channel
o Use the UP/DOWN arrow keys to select the call channel from the provided
list of channels. This chosen channel will be monitored when Tri-Watch is
activated.

DSC Setup:
• MMSI Entry
o If an MMSI number has not been entered by a user into the radio, this will
bring up a keyboard to enter in an MMSI number to the radio. Use the arrow
keys to enter in the MMSI number and press the CONFIRM softkey to save
entry. If an MMSI number has already been input to the radio, this will display
the radio’s current MMSI number
• Individual Directory
o New Entry: Pressing the NEW softkey while in the individual directory allows
the user to input a new record into the individual directory. Use the arrow
keys on the keyboard to input the desired name and MMSI number for the
new record and press the CONFIRM softkey to save.
o Select Saved Entry: Selecting a saved record brings up a window to either
view additional information, edit the saved record, or delete the record from
memory.
• Group MMSI
o New Entry: Pressing the NEW softkey while in the group directory allows the
user to input a new record into the group directory. Use the arrow keys on
the keyboard to input the desired name and MMSI number for the new
record and press the CONFIRM softkey to save.
o Select Saved Entry: Selecting a saved record brings up a window to either
view additional information, edit the saved record, or delete the record from
memory.
• Position Reply
The BlueBound 650B has the ability to send your position information to another
station when requested through a DSC call. This can be set to automatically
respond to all position requests it receives or to alert you to a position request and
allow for a manual response.
o Press the UP/DOWN arrow keys to choose between Auto and Manual.
• Auto Channel Switch
This setting allows the BlueBound 650B to automatically switch to the requested
channel when receiving an individual call.
o Press the UP/DOWN arrow keys to choose between On and Off.
o When set to On, the radio will automatically switch to the chosen call channel
when a DSC call is received.

• Individual Call Reply
This setting provides the ability to disable automatic replies when receiving
Individual DSC calls if desired.
o Press the UP/DOWN arrow keys to choose between Auto and Manual.
o When set to Manual, the radio will prompt the user to reply to a DSC call
when received, which can be manually responded to or exited to return to
VHF standby mode.
• Manual Position Entry
If the radio cannot acquire a GPS lock, there is an option to manually enter GPS
information into the radio. Once entered, that provided GPS information will be used
by the radio until a GPS lock has been established, or the radio has been power
cycled.
o Use the keyboard to enter the GPS time and coordinates, then press the
CONFIRM softkey to save entry into the radio and return to the DSC menu.
Waypoints:
The BlueBound 650B
can save waypoints into memory for future reference and direct
navigation with the NAV compass.
• Waypoint Directory
Waypoints saved from the VHF standby screen or entered in manually will be saved
within the Waypoint Directory.
o Saving a Waypoint from VHF Standby
1. Press the MARK softkey while in VHF standby when the radio has a
GPS lock to save those coordinates as a new waypoint within the
waypoint directory.
2. A new waypoint within the waypoint directory will be created with the
relevant coordinates automatically populated. Change the waypoint
name to a desired name of choice and press the CONFIRM softkey to
save the entry as a new navigation waypoint.
o Saving a new Waypoint from Waypoint Directory:
1. When in Waypoint Directory, choose between Navigation or MOB
waypoints. All waypoints saved from VHF standby with the MARK
softkey will be saved into Navigation waypoints and all waypoints
saved with the MOB key will be saved into MOB waypoints.
2. Press the NEW softkey to open a new waypoint setup menu.

3. Use the keyboard to enter in the waypoint name and GPS information.
4. Press the SAVE softkey to save a new waypoint with the entered
information.
o Saving a new Waypoint from NAV Compass
1. While in the NAV compass screen, press the WPNT softkey to save
the current coordinates as a new waypoint within the waypoint setup
menu.
2. Enter in the desired name of the new waypoint with the keyboard
entry and press the SAVE softkey to save the entry as a new
navigation waypoint.
o Starting a new Waypoint route in NAV Compass
1. When in Waypoint Directory, select a saved waypoint from the list of
current waypoints within the Navigation Waypoints list.
2. Press the NAV softkey to put that waypoint into the navigation
compass and start a new waypoint route navigation.
• Arrival Alarm
When the radio arrives at a waypoint destination, an arrival message will be
displayed, and an alert will sound if the arrival alarm is set to ON.
o Use the UP/ARROW keys to set the arrival alarm either OFF or ON.
Bluetooth:
The BlueBound 650B
can pair wirelessly to a mobile phone to receive voice calls or pair
wirelessly to a Bluetooth headset for hands free talking on the radio.
• Pair Phone
o Make sure your phone’s Bluetooth is turned on.
o Enter the pair phone menu section from the Bluetooth menu.
o Select the ON option to turn on Bluetooth pairing at the radio.
o Open Bluetooth menu on your compatible mobile device. The BlueBound
radio should appear in available devices as “BlueBound 650B”. Select the
BlueBound 650B to initiate pairing.
o Once the radio has been paired with your phone, you can answer incoming
phone calls from the radio directly.
Answering Phone Calls:
• When an incoming call is received by your phone, the radio will play

your phone’s ringtone through the radio’s speaker indicating there is an
incoming phone call.
• Press the PHONE softkey to answer the call. At any time press the END
softkey to terminate the phone call.
• Press and hold the PTT while speaking in the radio’s microphone to
communicate to the caller on the other end of the line.
• When your conversation has finished, press the END softkey to hang up
the phone call.
Redial Last Call:
• The BlueBound 650B can call back the last received phone number from
the radio directly.
• Select the Redial Last Call menu option and press the ENTER softkey.
The radio will initiate a call with the last phone number received.
Pair Headset:
The BlueBound 650B can also pair to a wireless headset for hands free
communication while underway.
Before attempting to pair to a wireless headset, make sure that the pair phone menu
setting is set to OFF.
Pairing to a new headset
1. Initiate the Bluetooth pairing mode on your headset
2. Select the scan headset menu option on the BlueBound 650B and
press the ENTER softkey. A status message will appear showing that
the radio is searching for discoverable Bluetooth devices.
3. Select the associated Bluetooth device that displays on screen. A
successful pairing message will display once you have connected.
4. While connected to a headset, disconnect at any time by selecting the
disconnect menu option and pressing the ENTER softkey.
Connecting to a paired headset
1. Make sure your desired Bluetooth headset is powered on.
2. Choose the device list menu option and press the ENTER softkey
3. Choose the desired headset you wish to connect to from the list of
paired devices and press the SELECT softkey.
4. To delete any saved devices, press the DEL softkey.
5. While connected to a headset, disconnect at any time by selecting the

disconnect menu option and pressing the ENTER softkey.
Pair Wireless PTT: The BlueBound 650B can also connect to Cobra’s wireless PTT
button.
Connecting to a Cobra PTT button
1. Initiate Bluetooth pairing mode on the Cobra PTT button.
2. Select the pair option from the BlueBound 650B wireless PTT menu and
press the ENTER softkey.
3. The BlueBound 650B will initiate paring with the wireless PTT button. If
pairing is successful, a status message indicating successful pairing will
display on screen. If pairing is unsuccessful, a failed pairing message will
display on screen.
4. To disconnect from the wireless PTT button, select the disconnect menu
option within the wireless PTT section and press the ENTER softkey.
One Touch PTT: The one touch PTT option allows for transmit (Tx) to be kept
open with one press of the PTT button rather than a press and hold of the
PTT button.
• When set to ON, pressing the PTT button will initiate transmit mode on
the radio and continue transmitting until a second press of the PTT
button.
• When set to OFF, transmit mode will only continue while the PTT
button is being pressed and held.
Bluetooth VOX: Bluetooth VOX gives the ability to initiate transmit mode by directly
speaking instead of pressing the PTT key.
• From the Bluetooth menu, enter the Bluetooth VOX section and choose
either on or off and press the SELECT softkey.
• By default, Bluetooth VOX is set to off.
VOX Level: You can adjust the VOX level on Bluetooth VOX to control the
voice threshold level at which transmission activated. Setting the VOX level
to a higher level increases the voice threshold level required for Bluetooth
VOX to activate.

Digital Selective Calling (DSC)
Digital selective calling is a semi-automated system for establishing a radio call. It has been
designed by the International Maritime Organization (IMO) as an international standard for
VHF, MF, and HF calls and is part of the Global Maritime Distress and Safety System
(GMDSS).
The DSC system allows mariners to instantly send a distress call with GPS position
coordinates to the Coast Guard and other vessels within range of the transmission. DSC
also allows mariners to initiate and receive distress, urgent, safety, routine, position
request, position send, and group calls between vessels equipped with DSC Capable
Radios.
Maritime Mobile Service Identity (MMSI)
An MMSI is a nine (9) digit number used on a marine radio capable of using digital selective
calling (DSC). It is used to selectively call other vessels or shore stations and is similar to a
telephone number.
For your Cobra BlueBound radio to operate in the DSC mode, you must enter your MMSI
number into the radio.
To obtain an MMSI number in the U.S.A, visit the following sources.
- U.S Power Squadron
- BoatUS
To obtain an MMSI number in Canada, visit the following source
- Industry Canada Spectrum Management Office
*Consult your country’s telecommunications authority or ship registry to obtain an MMSI
number outside of North America
Entering an MMSI Number: While there is no MMSI number entered in the BlueBound 650B,
it will prompt the user to enter in an MMSI number every time the radio is powered on.
1. Press the PROG softkey from the main VHF standby screen when the radio prompts
the user to enter in their MMSI number.
2. Use the keyboard to enter your 9 digit MMSI number and press the CONFIRM
softkey.
3. The radio will prompt you to re-enter the MMSI number to ensure accuracy. Enter
the correct MMSI number and press the CONFIRM softkey to save the MMSI
number. If an incorrect MMSI number is entered, the MMSI number will not be

saved.
*You can only enter in an MMSI number once on the radio. If an MMSI number has been
saved on the radio and it needs to be changed to a new number, you must contact Cobra
customer service to reset the radio’s MMSI number.
DSC Call Menu:
The BlueBound 650B has multiple different call methods that can be initiated with other
stations. To access this menu and the different DSC call options, press the CALL softkey
from the VHF standby screen.
• Individual Call
The BlueBound 650B has two options for initiating an Individual Call . A call can either
use manually entered information or utilize information from a saved record within
the Individual Directory. If there are no saved records within the Individual Directory,
only manual will be available as an option.
o Call a saved station from Individual Directory
1. Select an eligible record from the list. The list will only show records
from the Individual Directory.
2. Select the desired call channel from the dropdown list and press the
ENTER softkey.
3. Press the ENTER softkey to initiate the DSC Individual call.
4. While the call is waiting for acknowledgement, the radio will show a
standby screen with the elapsed time and the chosen call channel.
5. If needed, press the REPEAT softkey to repeat the transmission.
6. When the call has been acknowledged, an acknowledgement screen
will be displayed on the radio and the radio will switch to the chosen
channel.
o Call a manually entered station
1. To call a chosen station manually, select the Manual option within the
Individual Call menu.
2. Enter in the station’s MMSI number using the keyboard and press the
CONFIRM softkey.
3. Select the desired call channel from the dropdown list and press the
ENTER softkey.
4. Press the ENTER softkey to initiate the DSC individual call.

5. While the call is waiting for acknowledgement, the radio will show a
standby screen with the elapsed time and the chosen call channel.
6. If needed, press the REPEAT softkey to repeat the transmission.
7. When the call has been acknowledged, an acknowledgement screen
will be displayed on the radio and the radio will switch to the chosen
channel.
• Group Call
The group call function behaves in a similar manner to the individual call function.
Like the individual call, there are two ways to initiate a group call, either manually or
from a saved record. The group call list instead pulls from the Group MMSI list of
saved records instead of the individual directory.
o Call a saved station from Group MMSI
1. Select an eligible record from the list. The list will only show records
from the Group MMSI.
2. Select the desired call channel from the dropdown list and press the
ENTER softkey.
3. Press the ENTER softkey to initiate the DSC group call.
4. While the call is waiting for acknowledgement, the radio will show a
standby screen with the elapsed time and the chosen call channel.
5. If needed, press the REPEAT softkey to repeat the transmission.
6. When the call has been acknowledged, an acknowledgement screen
will be displayed on the radio and the radio will switch to the chosen
channel.
o Call a manually entered station
1. To call a chosen station manually, select the Manual option within the
Group Call menu.
2. Enter in the station’s MMSI number using the keyboard and press the
CONFIRM softkey.
3. Select the desired call channel from the dropdown list and press the
ENTER softkey.
4. Press the ENTER softkey to initiate the DSC group call.
5. While the call is waiting for acknowledgement, the radio will show a
standby screen with the elapsed time and the chosen call channel.
6. If needed, press the REPEAT softkey to repeat the transmission.
7. When the call has been acknowledged, an acknowledgement screen
will be displayed on the radio, and the radio will switch to the chosen

channel.
• All Ships Call
All ships that have a DSC transceiver use Channel 70 as their listening channel. The
all ships call gives the ability to announce a message to all ships within range on the
DSC channel 70. There are two message types that are a part of an all ships call,
Safety or Urgency.
o Initiating an All Ships Call
1. Select the all ships call option with the DSC Call Menu.
2. Choose either Safety or Urgency for the nature of the all ships call.
3. Select the desired call channel from the dropdown list of channels.
4. Press the ENTER softkey to initiate the All Ships Call.
5. While the call is waiting for acknowledgement, the radio will show a
standby screen with the elapsed time and the chosen call channel.
6. If needed, press the REPEAT softkey to repeat the transmission.
7. When the call has been acknowledged, an acknowledgement screen
will be displayed on the radio, and the radio will switch to the chosen
channel.
Note: Only use the All Ships Call for highly important transmissions
(Safety/Urgency). For regular DSC calls, use either the individual or group
call options listed earlier.
• Position Request
The position request function enables the BlueBound 650B to obtain the position of a
DSC station. This request can either be made manually or from a saved entry within
the Individual Directory.
o Position Request from Individual Directory
1. Select an eligible record from the list. The list will only show records
from the Individual Directory.
2. A message will appear with the chosen record from the Individual
Directory list with a question to transmit or not.
3. Press the ENTER softkey to initiate the position request with the
selected station.
4. A waiting for acknowledgement screen will display on the radio once
the request has been transmitted out. To repeat the transmitted
request, press the REPEAT softkey.
5. When the request has been acknowledged, the radio will display an

acknowledged status screen. Press the INFO key to display the
request GPS coordinates.
6. To save the GPS coordinates as a new waypoint to navigate towards,
press the WPNT softkey.
• Call Waiting
The Call Waiting section of the menu stores a record of all DSC distress and
received calls. Entering each saved call record will show a brief description of the
transmission received.
o Viewing a saved DSC call
1. While on the Call Waiting menu, choose between either Distress or
Received Calls to view a record of all saved calls.
2. Select a record to see additional details about the nature of the
received call.
o Deleting DSC Call Records
1. Select the Delete Call Logs options within the Call Waiting menu.
2. Choose between either Distress or Received calls list of the DSC
calls. A message will pop up asking if you would like to delete the
associated call logs.
3. Press the ENTER softkey to delete the currently selected call logs and
return to the previous menu.
• Test Call
The test call function allows the user to confirm that the radio is fully operation and
that the DSC call functions are working properly. The steps for initiating a Test call
are the same as with an Individual Call, the transmitted message will instead
indicate that it is a test call.
DSC Distress Call
The BlueBound 650B features a d edicated distress button for emergency transmissions to
the Coast Guard and nearby stations. An MMSI number must be programmed into the
radio for the DSC distress button to work.
Sending a DSC Distress Call
1. Press the DISTRESS button located on the side of the BlueBound 650B to bring up
the nature of distress menu.

2. Choose the distress from the list that corresponds best to the current nature of
distress, or undesignated if no other options are applicable.
3. Press the ENTER softkey to select the chosen distress and enter the distress
standby menu.
4. Press and hold the distress key for 3 seconds to initiate the distress call.
5. After transmitting, a screen will display while waiting for acknowledgement along
with a timer from when the transmission was sent. You can repeat the transmission
if necessary, with the softkey.
6. Once the transmission has been acknowledged, the radio will show a confirmation
screen along with a confirmation alarm.
Navigation Compass (NAV)
The BlueBound 650B features a compass for additional navigational support while
underway. This can be accessed from the VHF standby screen by pressing the NAV
softkey. While in the compass view, your vessels position will be plotted along with
supplemental navigational information.
- Speed Over Ground (SOG)
- Bearing (BRG)
- Course Over Ground (COG)
While in the compass screen, you can save your vessel’s current position as a new
waypoint by pressing the WPNT softkey. Use the keyboard to adjust the waypoint name as
needed.
NOAA Weather
NOAA provides continuous, around-the-clock broadcasts of the latest weather forecast.
Recorded weather messages repeat every four to six minutes and are revised every two or
three hours or as needed. The Coast Guard also announces weather and other safety
warnings on Channel 16.
Weather (WX) Standby Mode
To enter the WX Standby mode, press and release the WX softkey. When your radio is in
WX Standby mode, the following items will be displayed on the LCD display.
- The WX icon (cloud icon)
- The current weather channel

- “WX ALERT ON/OFF” status
Note: Only one or two of the weather channels will be operating in any given location (only
in Receive (Rx) mode). You will need to select the channel with the strongest signal in your
location.
Weather Alert
Weather Alert (WX Alert) allows your radio to listen for NOAA Hazard Alerts while in VHF
standby mode. When WX Alert is turned ON, the unit’s dedicated weather receiver will
periodically check for received weather alert tones.
If a WX Alert is received the radio will sound a weather alert tone and automatically switch
to the alerting weather channel so the alert broadcast can be heard.
To turn WX Alert ON, press the ALERT softkey while in WX Standby Mode. The LCD will
display the weather alert triangle icon on the LCD display along with the status message
“WX ALERT ON”.

Standby, Receive and Transmit
Marine Standby and Receive (Rx) Mode
Marine Standby mode is the default mode for the radio whenever it is turned on. From this
mode, you can change current settings with the different key functions that are active in
Marine Standby mode. While in Marine Standby mode, the user will be able to transmit by
pressing the Push to Talk (PTT) button. Users will hear messages on the selected
channel(s) they are tuned to while in Marine Standby mode.
Transmit (Tx) Mode
Transmit (Tx) mode gives you the ability to interact with safety services, other vessels, and
shore stations. When using this capability, be sure to follow the procedures and to observe
the courtesies that govern its use. See the Appendix to help select the proper channel(s).
To Transmit a Message:
1. Check to see that your radio is set to a proper channel for the type of message you
plan to send.
2. With the microphone about 2 inches from your mouth, press and hold the PTT
button and speak into the microphone. The Transmit icon will appear on the LCD.
3. Release the PTT button when you are finished speaking. Your radio can only
operate in either Transmit (Tx) or Receive (Rx) mode at any given time. You will not
hear the response to your message unless the PTT button is released. If the battery
power icon begins blinking on the LCD when the PTT is pressed, the radio will not
transmit.
Note: If the PTT button is held down for five minutes, the radio will automatically sound a
series of beeps and cease transmitting to prevent unwanted signal generation and battery
drain. As soon as the PTT button is released, it can be pressed again to resume
transmission.
Radio Care
Very little maintenance is required to keep your Cobra marine VHF radio in good operating
condition:
• Keep the radio clean by wiping with a soft cloth and mild detergent. Do not use
solvents or harsh, abrasive cleaners that could damage the case or scratch the LCD
screen.
• If the radio is exposed to salt water, wipe with a soft, moist cloth at least once a day
to prevent buildup of salt deposits, which could interfere with button operation.
• If the radio will be stored for a long period, such as over the winter, remove the
batteries from the battery tray and store them in a separate package. This is
especially important if you are using alkaline batteries.
VHF Marine Radio Procedures
Maintain Your Watch
Whenever your boat is underway, your radio must be operational and tuned to Channel 16
unless being used for other communications.
Power
Try 1 watt first, if the station being called is within a few miles. If there is no answer, switch
to 3 watts and call again. If necessary, increase to 6 watts of output power to maximize
your calling distance. The lower wattage outputs will conserve your battery and minimize
interference to other users.
Calling Coast Stations
Call a coast station on its assigned channel. You may use Channel 16 when you do not
know the assigned channel.
Calling Other Vessels
Call other vessels on Channel 16 or on Channel 9 (Channel 9 is preferred for recreational
vessel use). You may also call on ship-to-ship channels when you know that the vessel is
listening on a ship-to-ship channel.
Initial Calling on Channel 16 or 9
The use of Channel 16 is permitted for making initial contact (hailing) another vessel. The
limits on calling must be followed. As a reminder, Channel 16’s most important function is
for Emergency Messages. If for some reason, Channel 16 is congested, the use of Channel
9, especially in U.S. waters, may be used as the initial contact (hailing) channel for non-
emergency communication.
Limits on Calling
You must not call the same station for more than 30 seconds at a time. If you do not get a
reply, wait at least two minutes before calling again. After three calling periods, wait at least
15 minutes before calling again.
Change Channels

After contacting another station on a calling channel, change immediately to a channel
designated for the type of message you want to send.
Station Identification
At both the beginning and at the end of your message, make sure to identify yourself by
specifying your vessel name, state registration number, and FCC call sign (if applicable).
Prohibited Communications
You MUST NOT transmit:
• False distress or emergency messages.
• Messages containing obscene, indecent, or profane language.
• General calls or signals on Channel 16 (excluding emergencies)
• When you are on land.
Voice Calling
You are required to listen to channel 16 while standing by. Channel 16 is the distress and
safety channel used for establishing initial contact with another station and for emergency
communication. The Coast Guard also monitors Channel 16 for safety purposes for
everyone on the water.
Note: Channel 9 may be used by recreational vessels for general-purpose calling. This
frequency should be used whenever possible to help relieve congestion on Channel 16.
The Coast Guard generally does not make urgent marine information broadcasts or
weather warnings on Channel 9. Boaters are still asked to “keep watch” on Channel 16
whenever the radio is turned on and not in use with another station.
To call another vessel or shore installation (e.g., lock or bridge tender):
• Make sure the radio is ON.
• Make sure you are in standby listening mode on Channel 16. Make sure channel 16 is not
in use.
• When the channel is open (quiet), press the PTT button and call a vessel. Hold the radio
several inches from your face and speak clearly and distinctly in a normal voice tone. Say
“name or station being called,” “This is [your vessel name or call sign].”
• Once contact is made, you must leave Channel 16 and go to another working channel.
• If the other party does not respond, wait two minutes and repeat. You are permitted to
attempt contact 3 times, two minutes apart. If you still have not made contact, wait 15
minutes before trying again.
• After communications are completed, each vessel must sign off with its call sign or vessel
name and the word “out” and return to Channel 16
Note: “Over and Out”

The most commonly misused procedure words are “over and out” within the same
transmission. “Over” means you expect a reply. “Out” means you are finished and do not
expect a reply.
Emergency Messages and Distress Procedure
The ability to summon assistance in an emergency is the primary reason for having a VHF
marine radio. The marine environment is unforgiving and what may initially be a minor
problem can rapidly develop into a situation beyond your control.
The Coast Guard monitors Channel 16, responds to all distress calls, and coordinates all
search and rescue efforts. Depending on the availability of other capable vessels or
commercial assistance operators in your vicinity, Coast Guard or Coast Guard Auxiliary
craft may be dispatched.
In any event, communicate with the Coast Guard as soon as you experience difficulties and
before your situation becomes an emergency. Use the emergency message procedures
only after your situation has become grave or you are faced with sudden danger
threatening life or property and requiring immediate help. Use Channel 16 to communicate
your emergency message. Make sure you transmit on high power. If you are merely out of
fuel, do not send an emergency message. Drop your anchor and call a friendly vessel or
marina to bring the fuel you need or give you a tow.
Marine Emergency Signals
The three spoken international emergency signals are:
1. MAYDAY: The distress signal MAYDAY is used to indicate that a station is
threatened by grave and imminent danger and requests immediate assistance.
2. PAN PAN: The urgency signal PAN PAN is used when the safety of the vessel or
person is in jeopardy. (This signal is properly pronounced pahn pahn.)
3. SECURITE: The safety signal SECURITE is used for messages about the safety of
navigation or important weather warnings. (This signal is properly pronounced see-
cure-ee-tay.)
When using an international emergency signal, the appropriate signal is to be spoken three
times prior to the message.
If You Hear a Distress Call
Give priority to any message beginning with one of these signals. ALL stations MUST
remain silent on Channel 16 for the duration of the emergency unless the message relates
directly to the emergency.
If you hear a distress message from a vessel, stand by your radio. If it is not answered,
YOU should answer. If the distressed vessel is not nearby, wait a short time for others who

may be closer to acknowledge. Even if you cannot render direct assistance, you may be
able to relay the message for assistance.
Example Marine Distress Procedure
Speak slowly — clearly — calmly.
1. Make sure your radio is On.
2. Select Channel 16.
3. Press Talk button and say: “MAYDAY — MAYDAY — MAYDAY.” (Or “PAN PAN—
PAN PAN— PAN PAN,” or “SECURITE — SECURITE — SECURITE.”)
4. Say: “THIS IS [your vessel name or call sign],” repeated three (3) times.
5. Say: “MAYDAY (or “PAN PAN” or “SECURITE”) [your vessel name or call sign].
6. Tell where you are: (what navigational aids or landmarks are nearby).
7. State the nature of your distress.
8. State the kind of assistance needed.
9. Give number of persons aboard and conditions of any injured.
10. Estimate present seaworthiness of your vessel.
11. Briefly describe your vessel (length, type, color, hull).
12. Say: “I WILL BE LISTENING ON CHANNEL 16.
13. End message by saying: “THIS IS [your vessel name or call sign]. OVER.”
14. Release Talk button and listen. Someone should answer. If not, repeat the call,
beginning at step 3 above.

Warranty Terms:
Cobra warrants your product against all defects in materials and workmanship for a period
of three (3) years from the date of original purchase.
Cobra, at our sole discretion, will repair or replace your product (with the same or
comparable product) free of charge.
Cobra will not pay shipping charges that you incur for sending your product to us. Products
received COD will be refused.
To make a warranty claim, we will require proof or purchase in the form of an invoice or
receipt. No proof of purchase is required for factory direct purchases.
Warranty Exclusions: Warranty does not apply to your product under any of the following
conditions: 1. The serial number has been removed or modified. 2. Your product has been
subjected to misuse or damage (including water damage, physical abuse, and/or improper
installation). 3. Your product has been modified in any way. 4. Your receipt or proof-of-
purchase is from a non-authorized dealer or internet auction site including E-bay, U-bid, or
other non-authorized resellers.
LIMITATION OF WARRANTY: EXCEPT AS EXPRESSLY PROVIDED HEREIN, YOU ARE
ACQUIRING THE PRODUCT “AS IS” AND “WHERE IS”, WITHOUT REPRESENTATION OR
WARRANTY. COBRA SPECIFICALLY DISCLAIMS ANY REPRESENTATION OR
WARRANTY INCLUDING, BUT NOT LIMITED TO THOSE CONCERNING THE
MERCHANTABILITY AND SUITABILITY OF THE PRODUCT FOR A PARTICULAR
PURPOSE. COBRA SHALL NOT BE LIABLE FOR CONSEQUENTIAL, SPECIAL OR
INCIDENTAL DAMAGES INCLUDING, WITHOUT LIMITATION, DAMAGES ARISING OUT
OF THE USE, MISUSE OR MOUNTING OF THE PRODUCT.
The above limitations or exclusions shall be limited to the extent they violate the laws of any
particular state. Cobra is not responsible for products lost in shipment between the owner
and our service center.
General Warranty Information
Each product we manufacture is covered by our factory warranty. While each product may have
unique components and policy, the general guideline below will apply to most Cobra products.
All Cobra products purchased factory-direct or from our Authorized Resellers will come with a full
one to three (1-3) year warranty from the date of the original retail purchase (see policy statement
above for full warranty details and exclusions).
Standard accessories packaged with each model will have a one-year factory warranty.
Accessory items have a one-year factory warranty.
Shipping to our facility is not covered in our warranty. Return shipping is included within the US.
This warranty is non-transferable.
For the sake of clarity, ‘repair or replace the Product or its defective part’ does not include removal
or installation work, costs or expenses which include but are not limited to labor costs or expenses.
Cobra will not be responsible for lost packages.
If you have any questions about operation or installing your new Cobra product, PLEASE
CONTACT COBRA FIRST…do not return this product to any retail store.
The contact information for Cobra will vary depending on the country in which you purchased and
utilize the product. For the latest contact information, please go to www.cobra.com/support
For products purchased in the U.S.A. you may call 800-543-1608.
Should there be any problems with this product or further information is needed on its features
please visit www.cobra.com for support, frequently asked questions, Declarations of Conformity,
and full manuals.
Disposal of Old Electrical or Electronics Equipment
This product may contain hazardous substances that could impact health and the environment if
not disposed of properly.
The crossed out wheeled bin symbol indicates that the product should not be disposed of along
with household waste. It should be handed over to an applicable collection point for the recycling of
electrical equipment. By ensuring that this product is disposed of correctly you will help/prevent
potential negative impact on the environment.
If you need more information on the collection, reuse and recycling systems, please contact your
local civic office or the shop where it was originally purchased.
Specifications:
General
Channel Spacing 25kHz
Modulation FM
Input Voltage 7.4 V Nominal
Battery Life:
5%
TX,
5%
RX,
90%
Standby
8 Hours (High
Power)
12
Hours
(Low
Power)
Temperature Range -15C to +55 degC
Radio Dimensions 267mm H x 70mm W x 57mm D
Radio Weight
340g
Receiver
Frequency Range
Sensitivity:
12
dB
Sinad
-120 dBm
Adjacent Channel Selectivity -70 dB
IC:156.075-162.00MHz
FCC:156.05-162.00MHz
Intermodulation and Rejection -70 dB
Spurious and Image Rejection -60 dB
AF Output 700 mW @ 8 Ohms
Transmitter
Frequency Range (Tx)
RF Output Power
1, 3, 6 Watts max
Spurious Emissions -55 dB
Microphone Type Electret
Frequency Stability +/-10 ppm
FM Hum and Noise 40 dB
GPS
Receiver 56 Channels
Hot: Nominal: < 1 second, Limit +/- 5 seconds
Cold: Nominal: 30 seconds, Limit +/- 10 seconds
Antenna Type Internal Patch Antenna
GPS receiver first lock sensitivity -148 dBm
GPS receiver tracking sensitivity -165 dBm
Differential System Compatibility Yes
Bluetooth
Classification Standard and BLE
Version 5.2
Range 10 Meters
FCC:156.050-157.425MHz,IC:156.025-157.425MHz
DSC:156.525 MHz
Frequency Range (Tx)
Frequency Range
TX/RX:2402-2480MHz
Antenna types not included in this list that have a gain greater than the maximum gain indicated for any type lis
ted are s trictly prohibited for use with this device.
Antenna Type: Helical antenna Antenna Gain: 2dBi
Les types d'antennes non inclus dans cette liste qui ont un gain supérieur au gain maximum indiqué pour tout type
énuméré sont strictement interdits d'être utilisés avec ce dispositif.
Type d'antenne: Antenne hélico dale.
Gain d'antenne: 2dBi
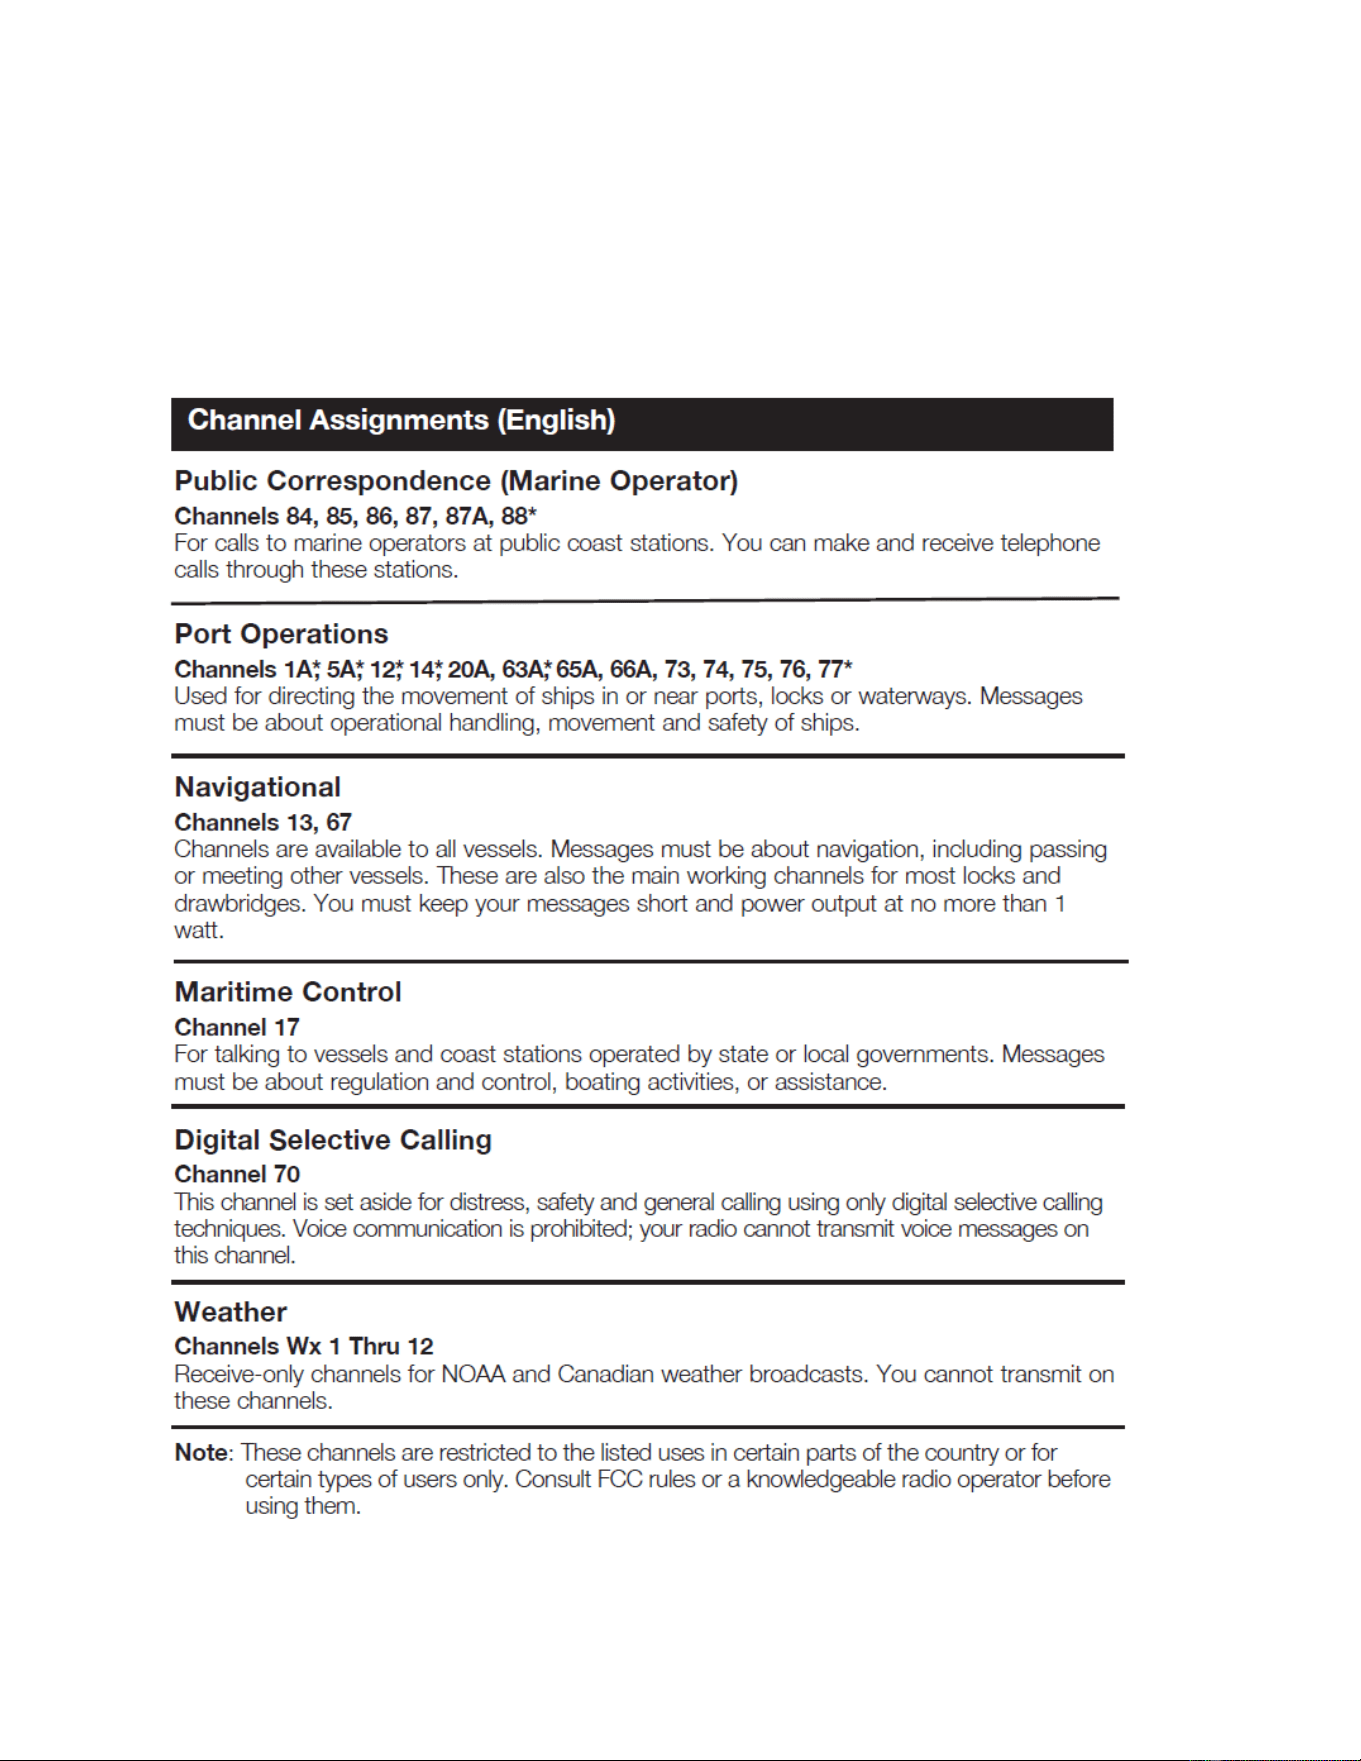
VHF Marine Channel Assignments
Three sets of VHF channels have been established for marine use in the U.S.A., Canada
and the rest of the world (International). Many of the channels are the same for all three
maps, but there are important distinctions (see table on the following pages). Your radio
has all three maps built into it and will operate correctly in whichever area you choose.
The following is a brief outline of the channel assignments in the U.S.A. Channel Map.
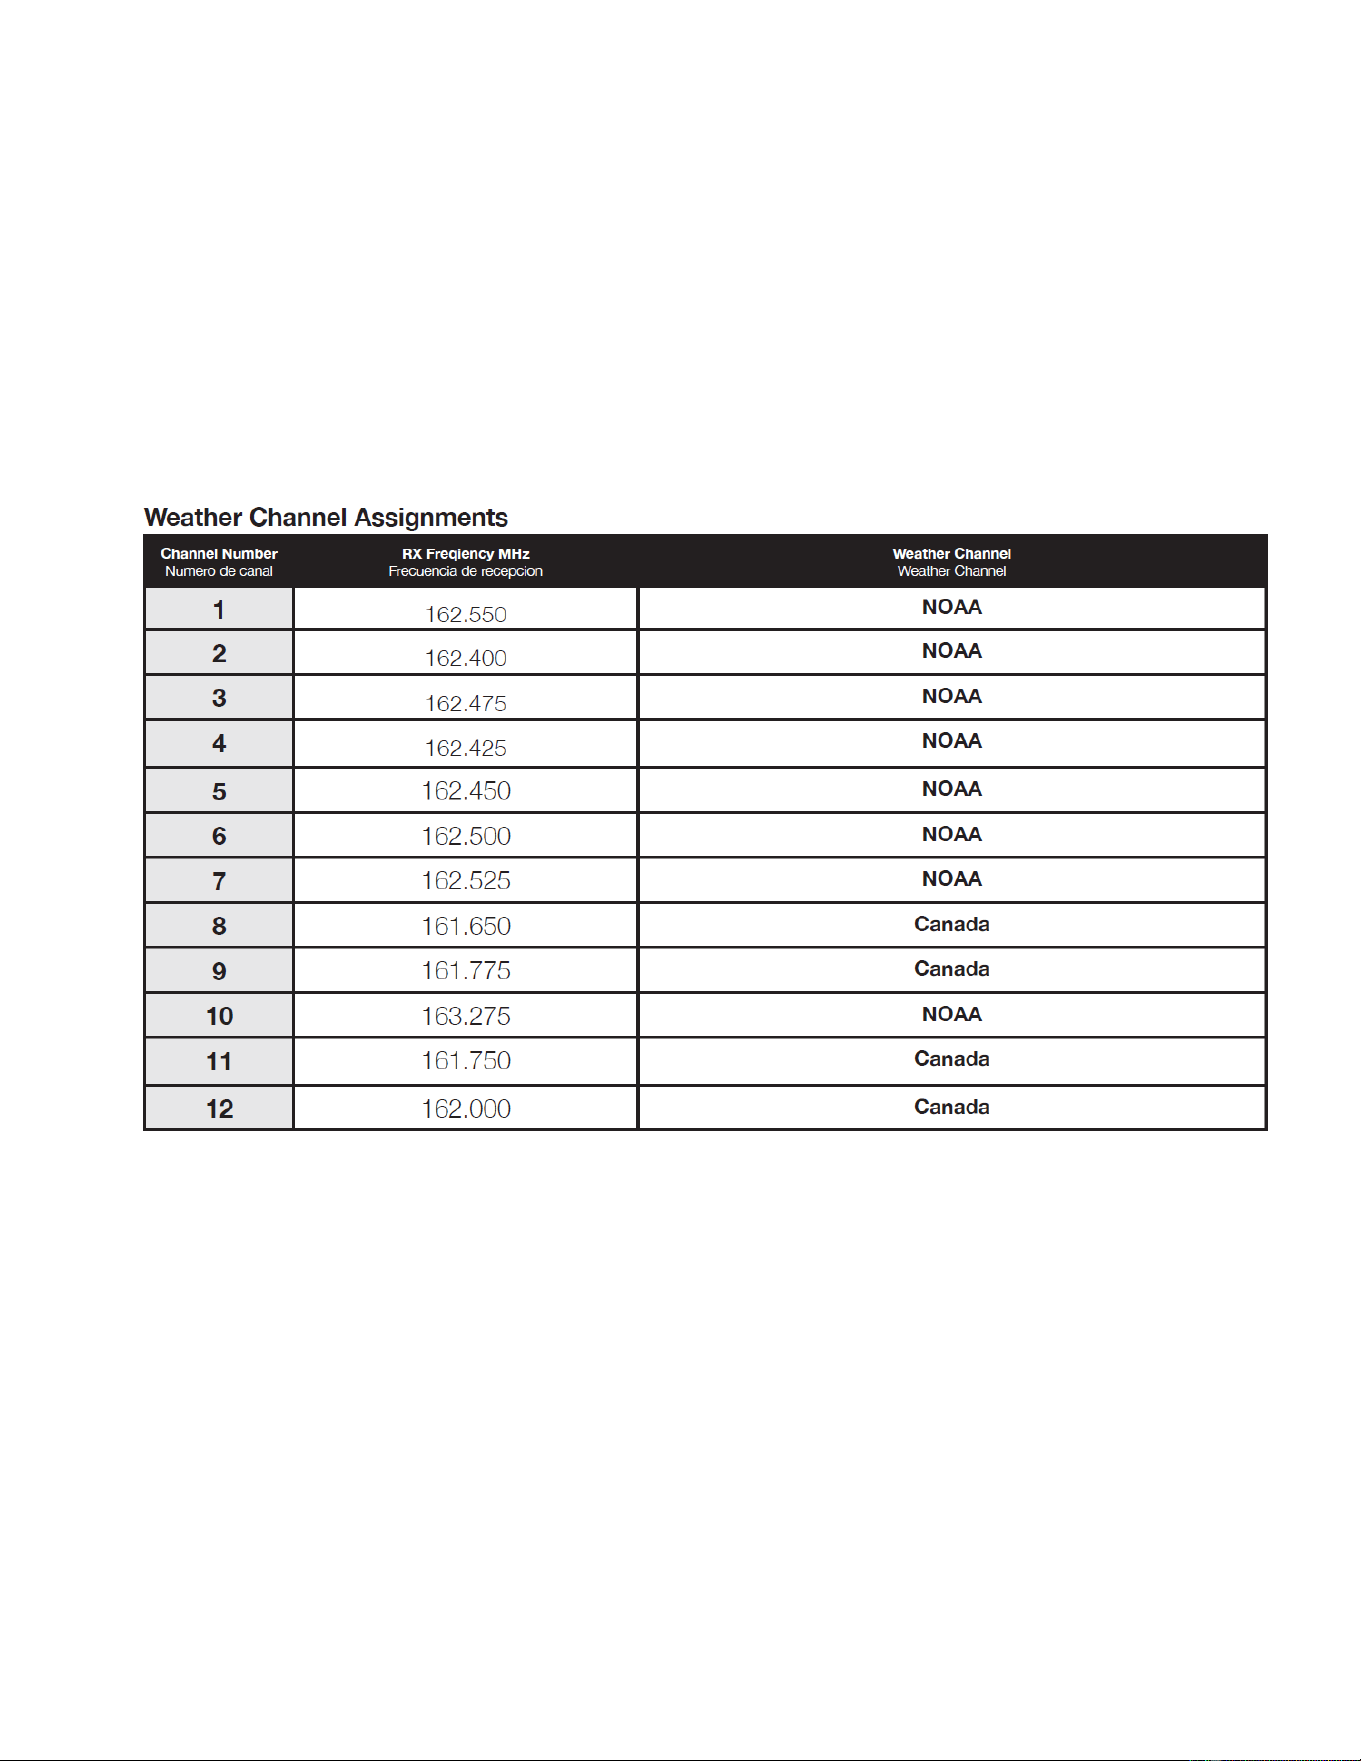
VHF Marine Channel Assignments (English)
NOTE: Many of the plain-numbered channels, such as 01, 02 and 03, transmit and
receive on different frequencies. This is termed duplex operation. Some other plain-
numbered channels (Including 4-digit channels) and all the A channels, such as
01A, 03A and 04A, transmit and receive on a single frequency, which is termed
simplex operation. Your radio automatically adjusts to these conditions.
This radio includes new four-digit channels to be compliant with the latest and future
regulations.

Note: This equipment has been tested and found to comply with the limits
for a Class B digital device,pursuant to part 15 of the FCC Rules. These
limits are designed to provide reasonable protection against harmful
interference in a residential installation. This equipment generates, uses
and can radiate radio frequency energy and, if not installed and used in
accordance with the instructions, may cause harmful interference to radio
communications. However, there is no guarantee that interference will
not occur in a particular installation. If this equipment does cause
harmful interference to radio or television reception, which can be
determined by turning the equipment off and on, the user is encouraged
to try to correct the interference by one or more of the following
measures:
---Reorient or relocate the receiving antenna.
---Increase the separation between the equipment and receiver.
---Connect the equipment into an outlet on a circuit different from that to
which the receiver is connected.
---Consult the dealer or an experienced radio/TV technician for help.
Hold the radio in a vertical position in front of face with the microphone (and
the other parts ofÿ the radio, including the antenna) at least one inch(2.5cm)
away from the nose. K eeping the radio at the proper distance is important
because RF exposures decrease with distance from the antenna. Antenna should
WWWwWhen worn on the body, always place the radio in approved clip, holder, holster,
case, or body harness for this product. Use of non-approved accessories may result in
exposure levels,which exceed the occupational/controlled environment RF exposure limits.
Use only manufacturer’s name approved supplied or replacement antennas, batteries,
accessories may exceed the FCC and IC RF exposure guidelines.
For a list approved accessories please consult your local dealer for information.
Users must be fully aware of the hazards of the exposure and able to exercise
be kept away from eyes.
and accessories. Use of non-manufacturer-name approved antennas,batteries, and
control over their RF exposure to qualify for the higher exposure.
K

to qualify for the higher exposure limits.
Your wireless hand-held portable transceiver contains a low power transmitter.
This product sends out radio frequency (RF) signals when the Push-to-Talk
Tenez la radio en position verticale devant le visage avec le microphone (et les autres
parties du la radio, y compris l'antenne) à au moins un pouce 2,5 cm) du nez. Garder le
la radio à la distance appropriée est importante parce que les expositions RF diminuent
avec la distance de L'antenne. L'antenne doit être tenue loin des yeux.
Lorsqu'il est porté sur le corps, placez toujours la radio dans un clip approuvé, un support, une
boîte, ou harnais de corps pour ce produit. L'utilisation d'accessoires non approuvés
peut entraîner des niveaux d'exposition, qui dépassent les limites d'exposition aux RF pour
la professionnel/l'environnement contrôléo.
The device is authorized to operate at a duty factor not to exceed 50%.
(PTT) button is pressed.
Utilisez uniquement les antennes fournies ou de remplacement approuvées par le nom du
fabricant, les batteries et accessoires. Utilisation d'antennes, de batteries et d'accessoires
non homologués par le fabricant peut dépasser les lignes directrices FCC et IC RF
pour obtenir des informations.
Les utilisateurs doivent être pleinement conscients des dangers de l’exposition et pouvoir
exercer un contrôle sur leur Exposition aux RF pour se qualifier pour les limites d'exposition
plus élevées.
Votre émetteur-récepteur portable sans fil contient un émetteur à faible puissance. Ce produit
Le dispositif est autorisé à fonctionner à un facteur de travail ne dépassant pas 50 %.
Pour une liste d'accessoires approuvés, veuillez consulter votre concessionnaire local
exposition.
envoie des signaux de radiofréquence (RF) lorsque le bouton Push-to-Talk (PTT) est appuyé.