ENGLISH
NEDERLANDS
POLSKI
EG3500 (SIN046)
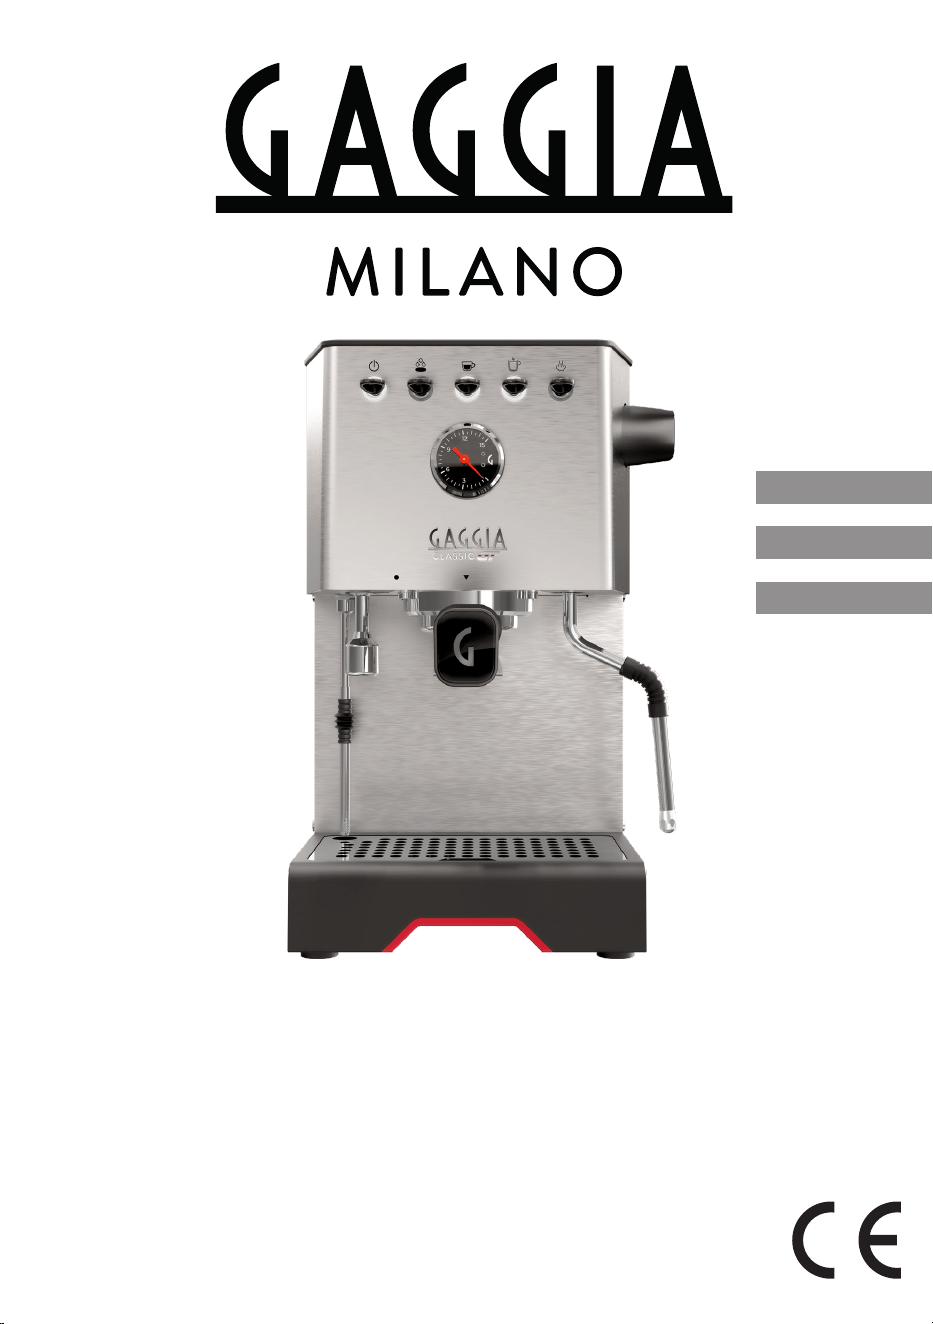
GAGGIA CLASSIC GT
User manual
Gebruiksaanwijzing
Instrukcja obsługi
10
11
12
13
15
14
33
27
26
30
29
28
31
20
18
19
22 2124
1 2 3 4
5 6 7 8 9
23
25
32
17
16
3
English
Thank you for choosing Gaggia Classic GT!
Built for the home baristas who aspire for more, this machine is for all of you who
demand cutting-edge performances in their own home.
Classic GT will give you the possibility to create your bespoke coffee experience,
making unforgettable moments and defining your own rituals.
Before using it for the first time, carefully read this user manual - including the
safety section. It provides all the information needed to install, use and clean your
machine and keep the instructions for future reference.
ENGLISH
04
Bedankt dat u gekozen heeft voor de Gaggia Classic GT!
Deze machine, die is gemaakt voor de thuisbarista's die meer willen, is bedoeld
voor iedereen die thuis de beste prestaties wenst.
Classic GT biedt de mogelijkheid om een koffie-ervaring op maat te creëren, voor
onvergetelijke momenten te zorgen en je eigen rituelen vorm te geven.
Lees deze gebruiksaanwijzing voor het eerste gebruik aandachtig door - inclusief
het hoofdstuk over de veiligheid. Hierin vindt u alle informatie die nodig is om uw
machine te installeren, te gebruiken en schoon te maken.
Bewaar de instructies om ze later te kunnen raadplegen.
NEDERLANDS
22
Dziękujemy za wybór Gaggia Classic GT!
Stworzony dla domowych baristów, którzy aspirują do czegoś więcej, ten ekspres
przeznaczony jest dla wszystkich tych, którzy wymagają nowatorskiego działania
w domowym zaciszu.
Classic GT umożliwia tworzenie indywidualnych kreacji kawowych, aby móc
przeżywać niezapomniane chwile i definiować własne rytuały.
Przed pierwszym użyciem urządzenia należy uważnie przeczytać niniejszy
podręcznik użytkownika, włącznie z częścią dotyczącą bezpieczeństwa.
Zawiera on wszystkie informacje potrzebne do instalacji, obsługi i czyszczenia
urządzenia. Podręcznik należy zachować do wykorzystania w przyszłości.
POLSKI
41

4
English
Contents
Icons and display _____________________________________________________ 5
Machine overview _____________________________________________________ 6
Control panel _________________________________________________________ 6
Multifunction buttons __________________________________________________________________ 6
Control panel toggle switches ___________________________________________________________ 6
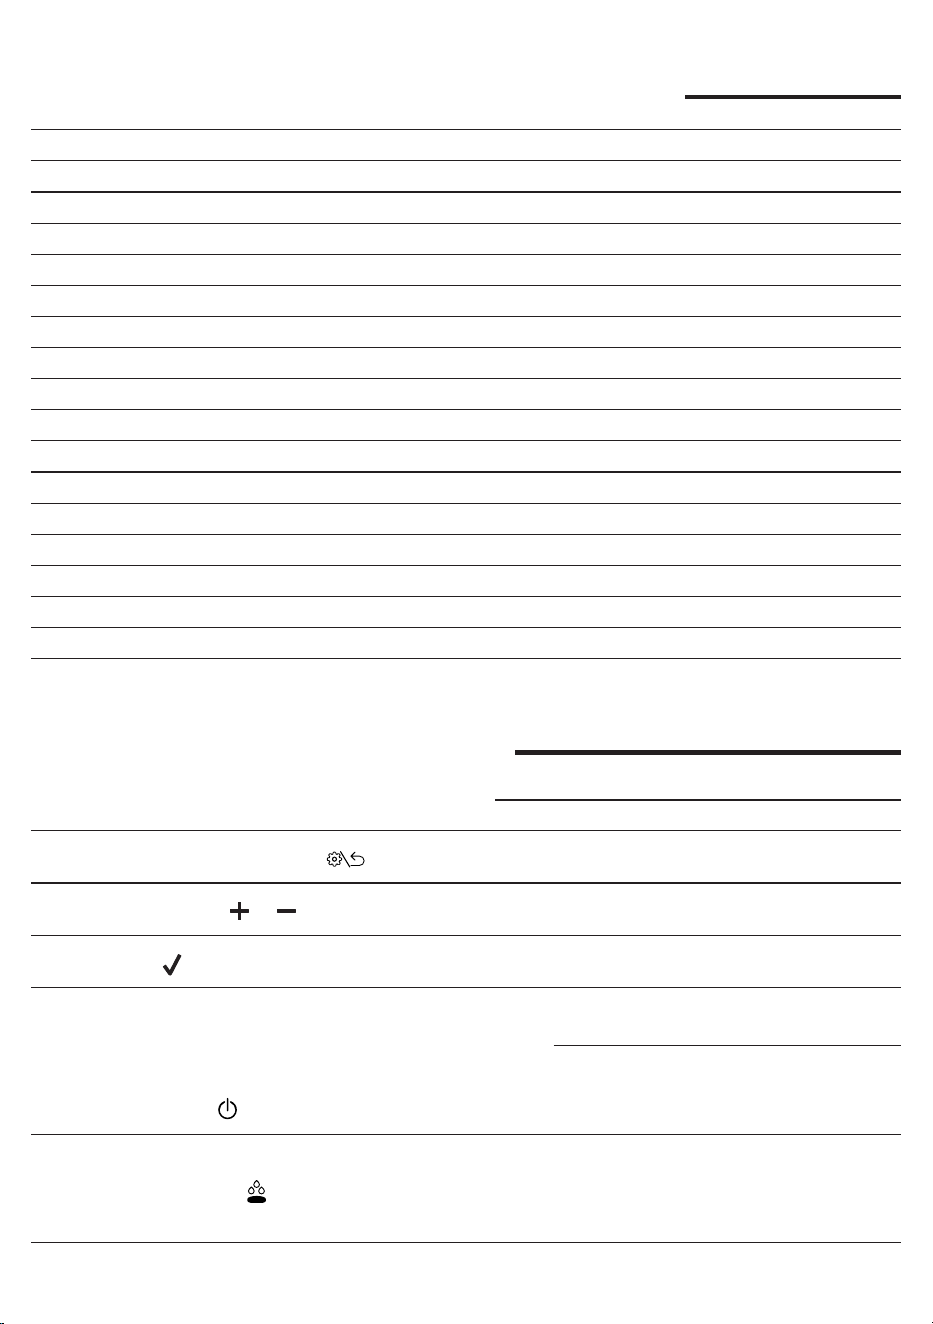
Filters supplied _______________________________________________________ 7
2-cup lter __________________________________________________________________________ 7
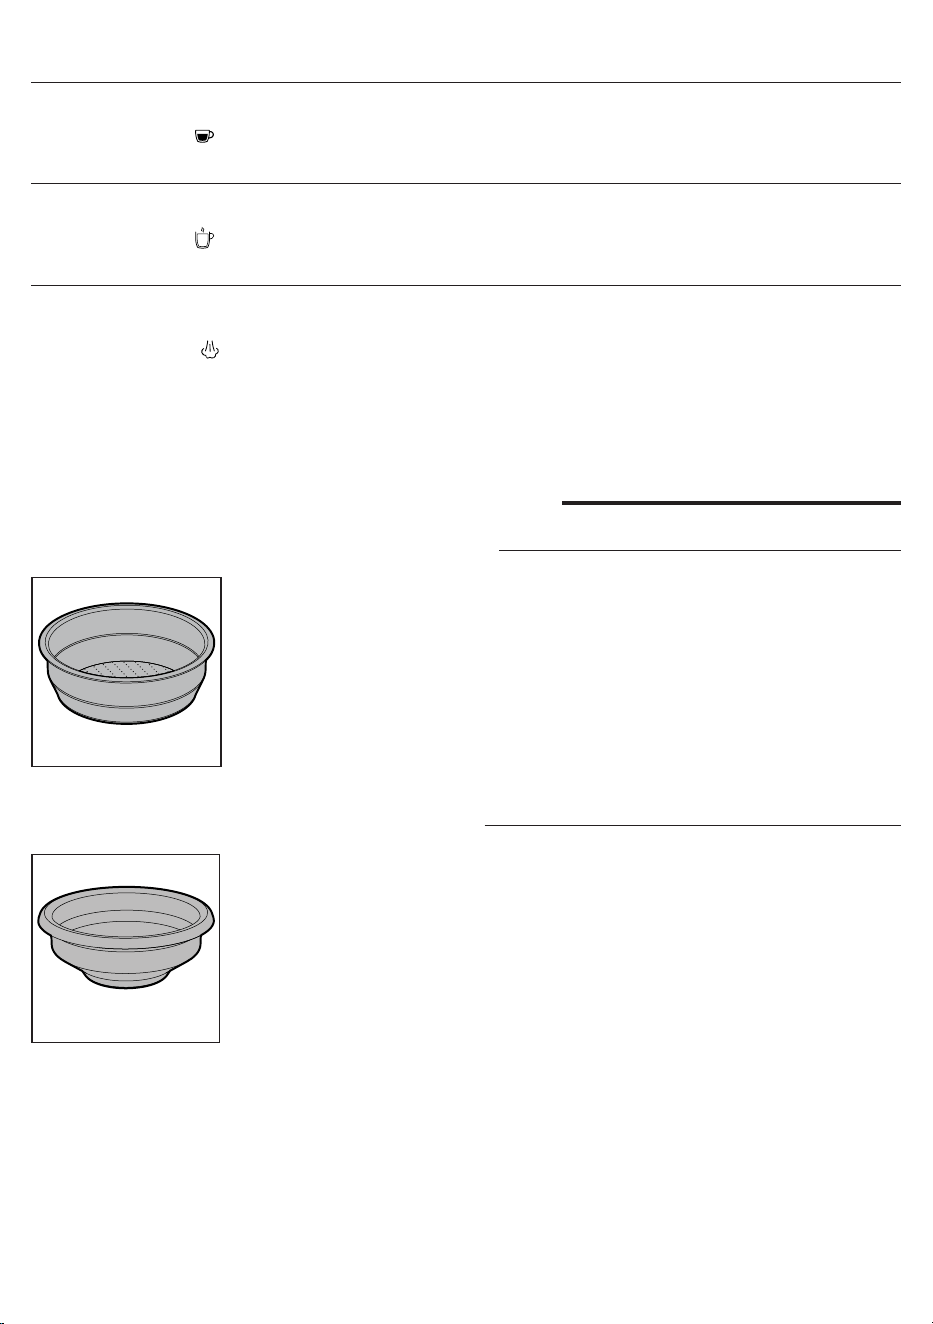
1-cup lter __________________________________________________________________________ 7
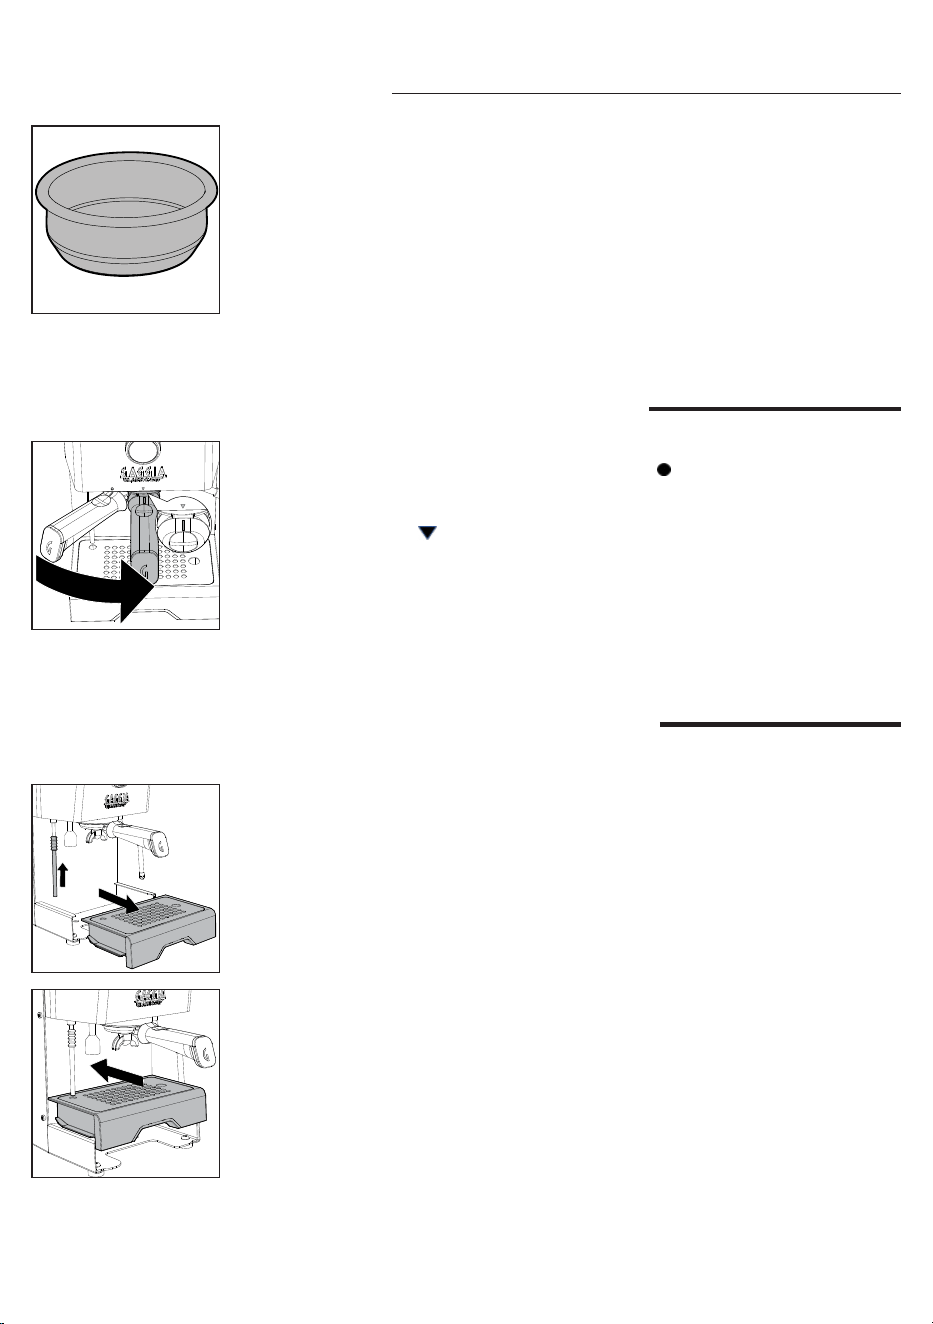
Blind lter __________________________________________________________________________ 7
Inserting the lter holder _______________________________________________ 8
Adjusting the grid height _______________________________________________ 8
Brew pressure adjustment ______________________________________________ 8
First installation _______________________________________________________ 9
First use or after a period of inactivity of more than 2 weeks ________________ 10
Coee preparation ____________________________________________________ 11
Coee brewing ______________________________________________________________________11
Coee brewing with automatic pre-infusion _______________________________________________ 12
Coee brewing with manual pre-infusion _________________________________________________ 12
Coee brewing with PRESET function ___________________________________________________ 13
Enabling and disabling PRESET function _________________________________________________ 13
Setting and saving the quantity of your coee _____________________________________________ 13
How to lower the temperature of the coee and hot water/steam boilers _________________________ 14
Frothing milk to prepare a cappuccino ___________________________________ 14
Dispensing hot water _________________________________________________ 15
Machine settings _____________________________________________________ 15
Automatic pre-infusion _______________________________________________________________ 15
Wake-up timer ______________________________________________________________________ 15
Stand-by __________________________________________________________________________ 16
Ecomode __________________________________________________________________________ 16
Button sound _______________________________________________________________________ 16
Temperature units ___________________________________________________________________ 16
Steam temperature __________________________________________________________________ 16

5
English
Cleaning and maintenance _____________________________________________ 17
Cleaning table _____________________________________________________________________ 17
Cleaning the steam wand _____________________________________________________________ 17
Cleaning the brew unit (
backushing
) ____________________________________________________ 17
The lter and lter holder cleaning ______________________________________________________ 18
Cleaning the screen _________________________________________________________________ 19
Cleaning the grid and drip tray _________________________________________________________ 19
Cleaning the water tank ______________________________________________________________ 19
Warning icons _______________________________________________________ 19
Error code key _______________________________________________________ 19
Troubleshooting _____________________________________________________ 20
Technical specications _______________________________________________ 22
93
130
1
2 3 4
5
7 6
93
9 8
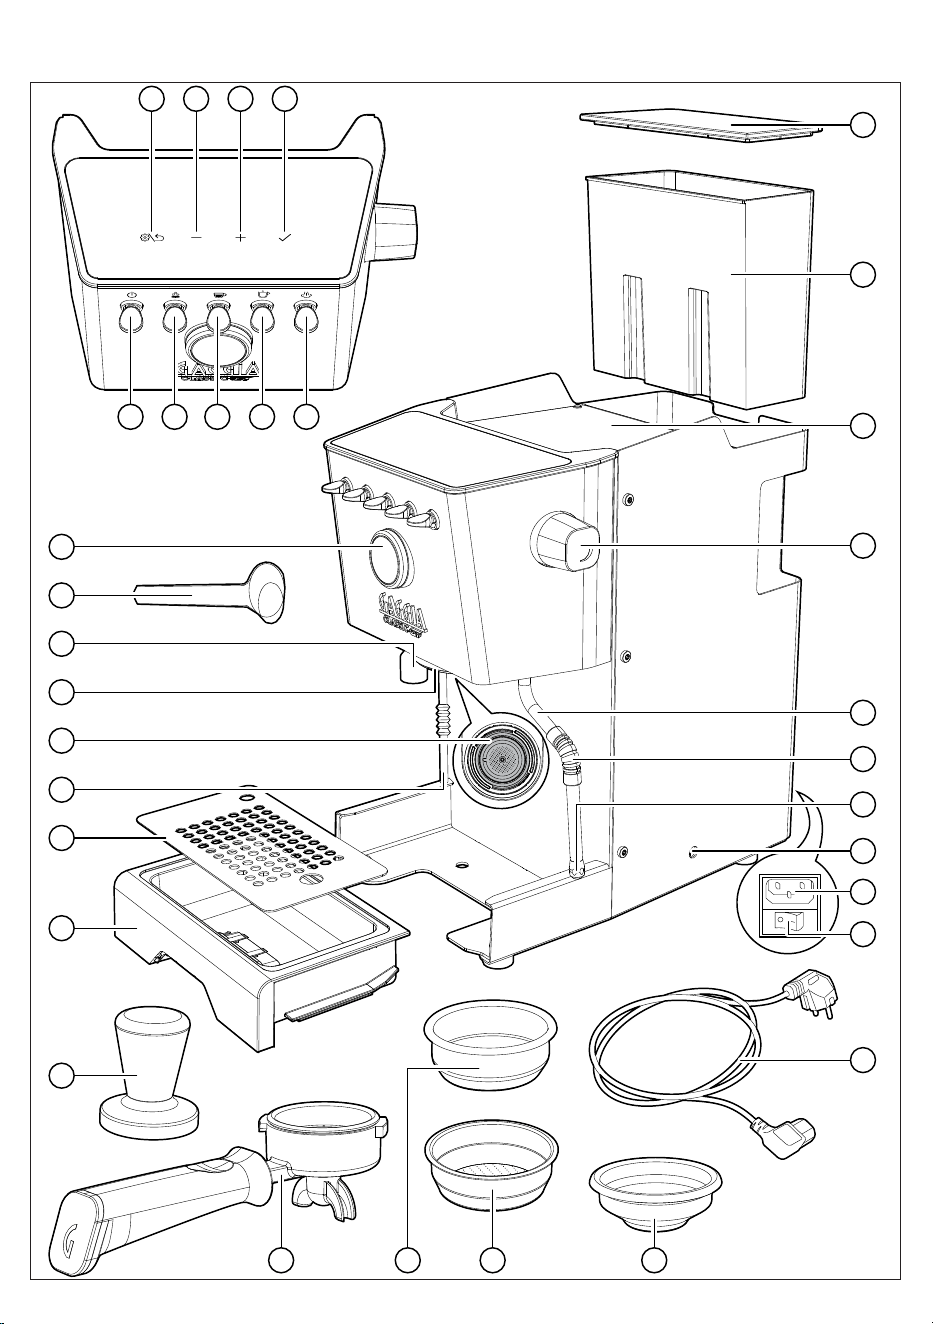
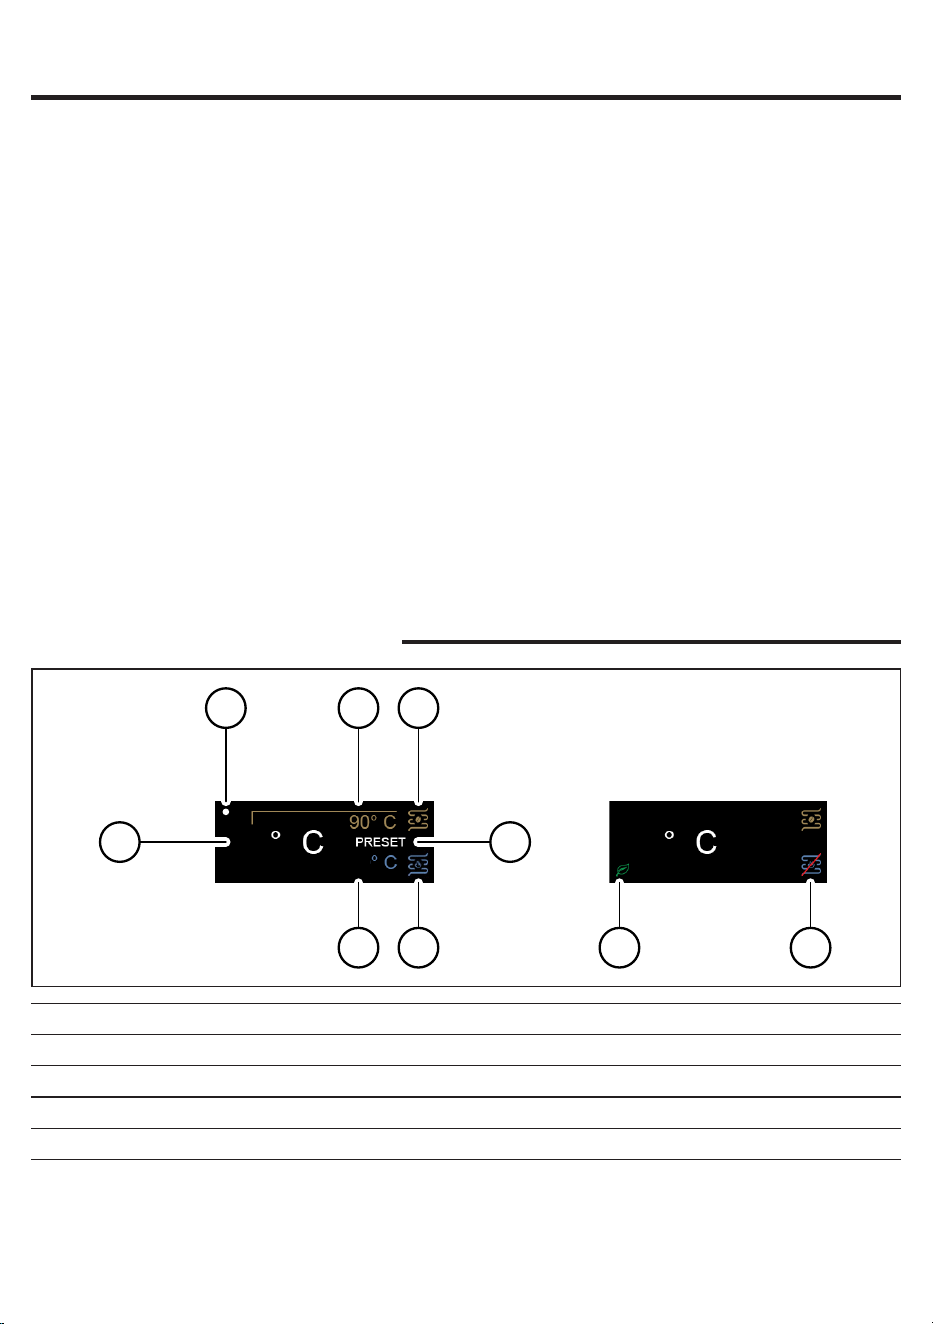
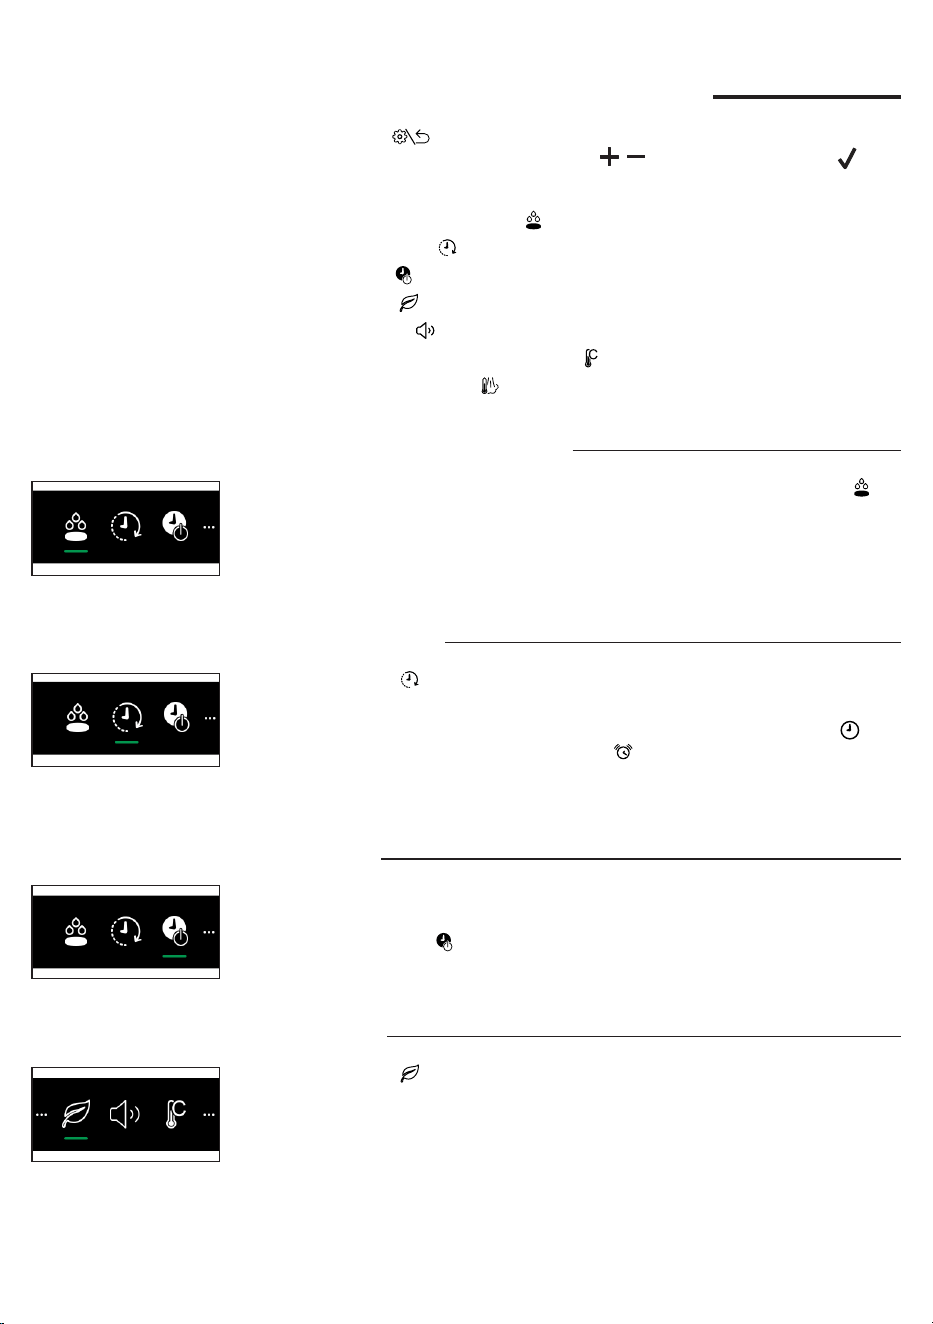
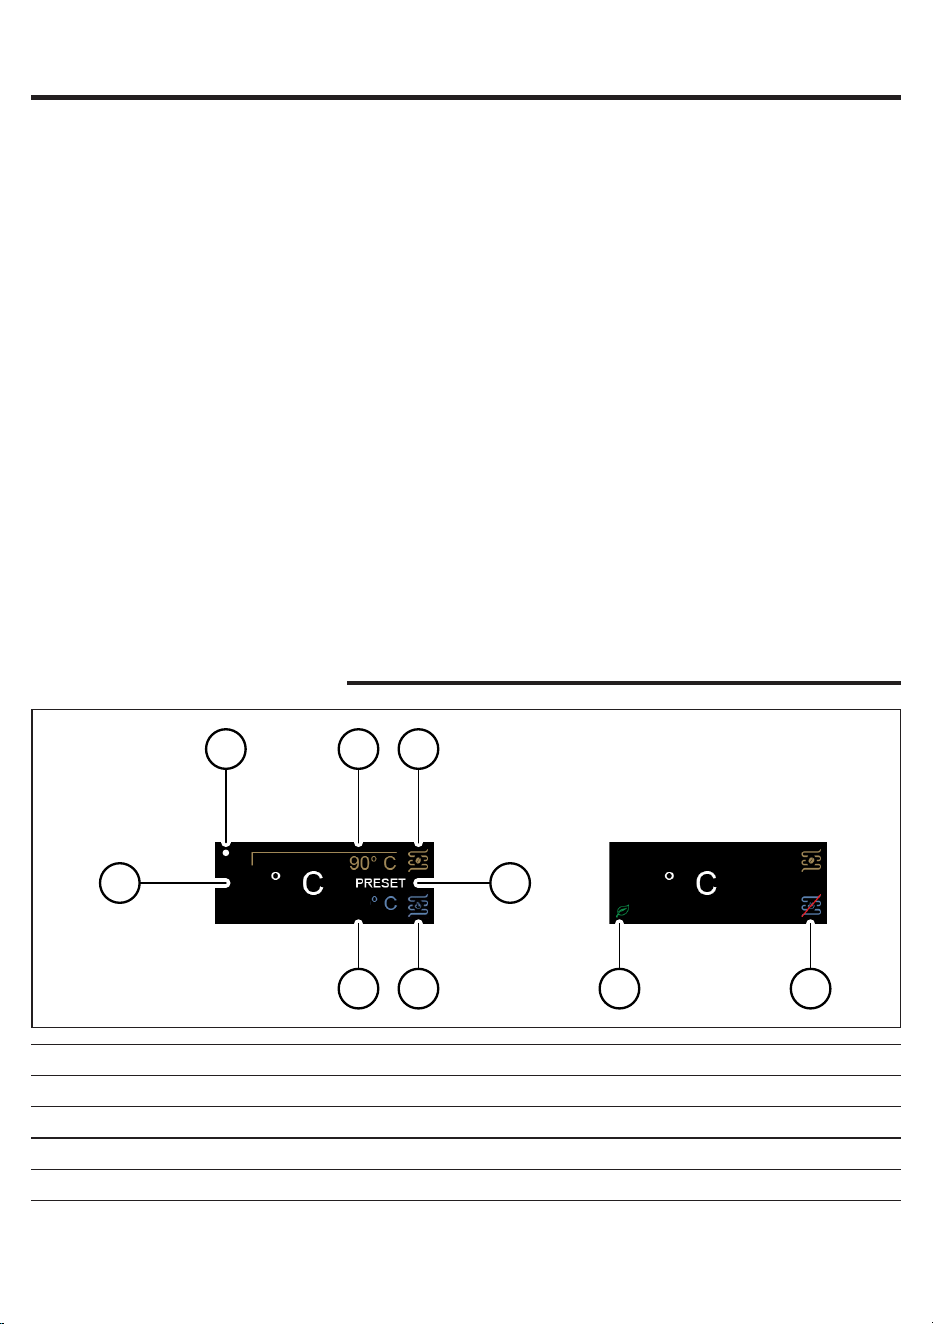
Icons and display
1 Factory set coffee brew temperature 6 Steam/water boiler
2 Wake-up time on 7 Factory set steam temperature
3 Actual temperature 8 Hot water/steam boiler off
4 Coffee boiler 9 Eco-mode on
5 PRESET on
6
English
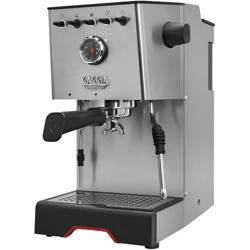
Machine overview
1 SETTING/BACK button 18 Power cord socket
2 Navigation button (-) 19 Main power button
3 Navigation button (+) 20 Power cord
4 OK button 21 1 cup lter
5 ON/OFF toggle switch 22 2 cups lter
6 Pre-infusion toggle switch 23 Blind lter
7 Coffee toggle switch 24 Filter holder
8 Water toggle switch 25 Tamper
9 Steam toggle switch 26 Drip tray
10 Water tank lid 27 Drip tray grid
11 Water tank 28 Telescopic drain pipe
12 Cup warmer 29 Screen
13 Steam knob 30 Coffee brew unit
14 Steam wand 31 Water dispenser
15 Steam wand handle 32 Measuring scoop
16 Steam wand nozzle 33 Manometer
17 Brew pressure adjustment screw
Control panel
Multifunction buttons
1
SETTING/BACK button
Click to enter the setting menu or to go back to the previous
screen.
2/3
Navigation and buttons
Click to move throughout the menu and to adjust the brew
temperature.
4
OK button
Click to conrm the selected option.
Control panel toggle switches
5
ON/OFF toggle switch
Press to turn the machine on and off.
The toggle lights up when the machine is on.
6
Pre-infusion toggle switch
Press to activate the automatic pre-infusion.
When the pre-infusion is activated the toggle lights up.
Hold down to activate the manual pre-infusion.
7
Coffee toggle switch
Press to brew.
The toggle is lit when the machine is ready to brew, blinks
when it is not at the set temperature.
7
English
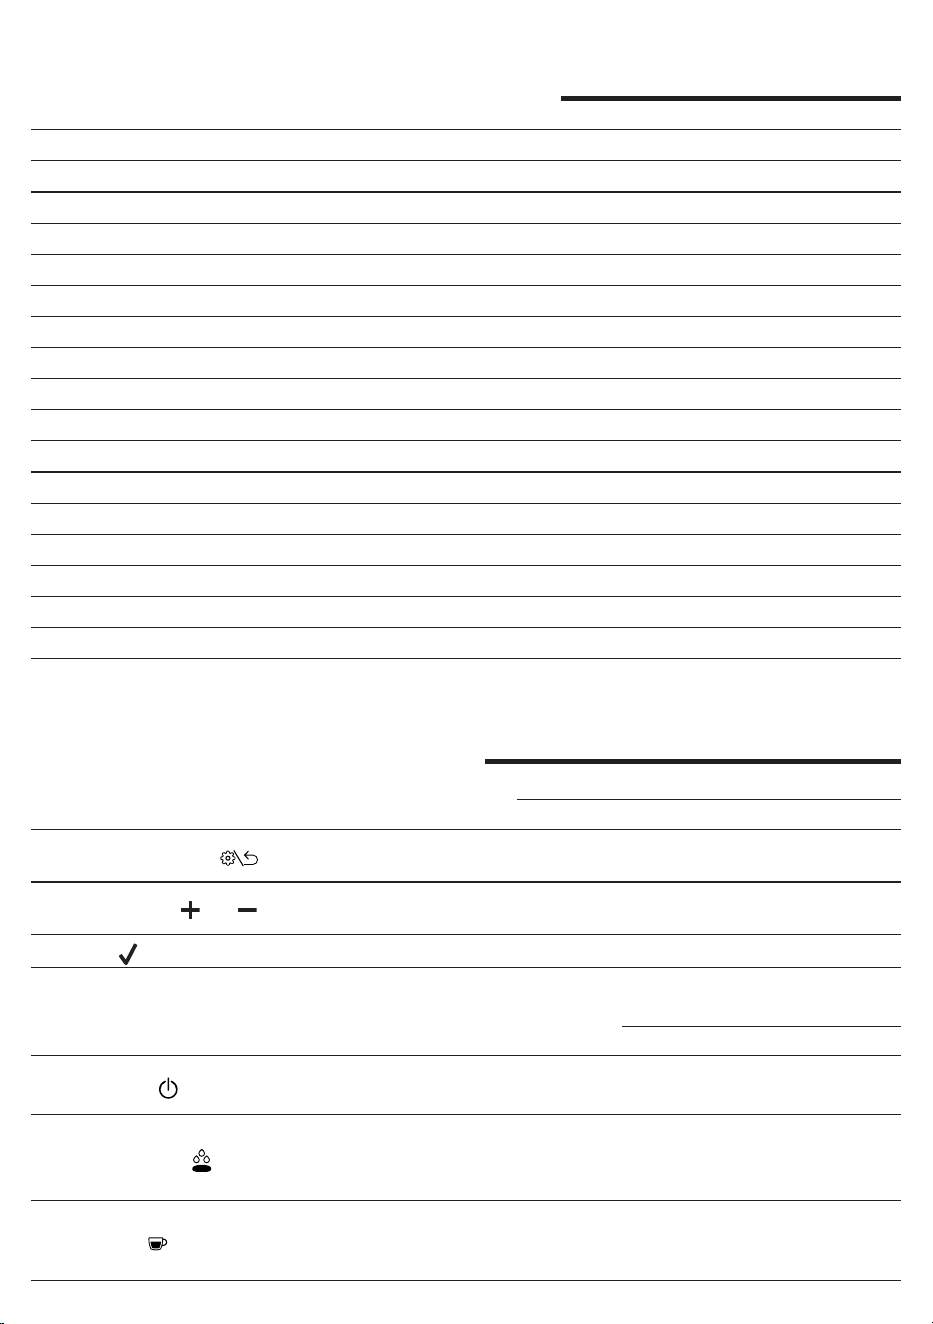
Filters supplied
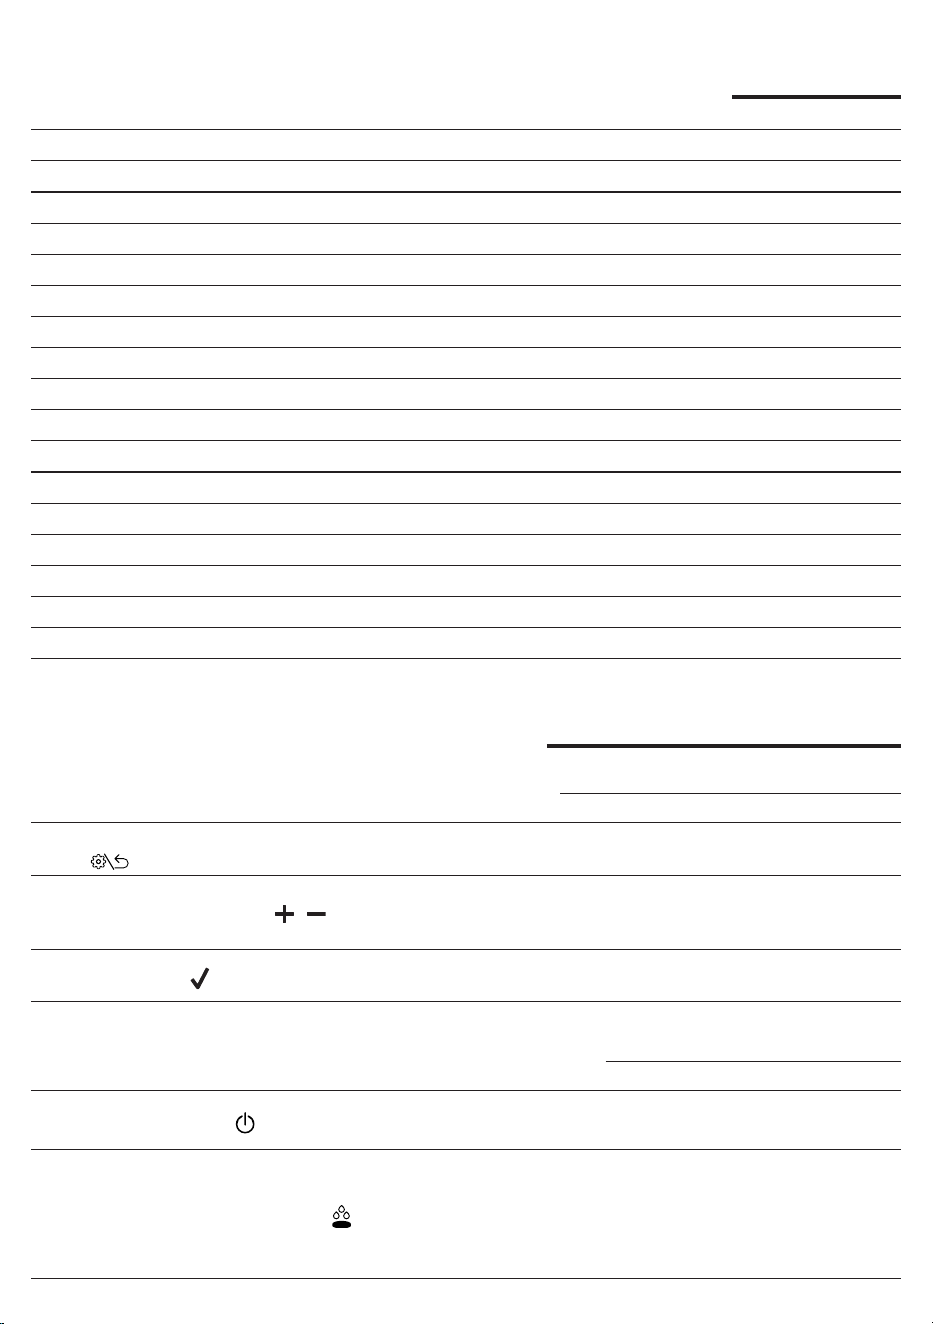
2-cup lter
The two-cup lter is already tted to the lter holder to brew 2 cups of espresso
with pre-ground coffee.
8
Water toggle switch
Press to dispense water.
The toggle is lit when the machine is ready to dispense water,
blinks when it is not at the set temperature.
9
Steam toggle switch
Press to activate the steaming function, the machine starts
warming up.
The toggle lights up when the machine is ready to dispense
steam, is blinking when it is not at the set temperature.
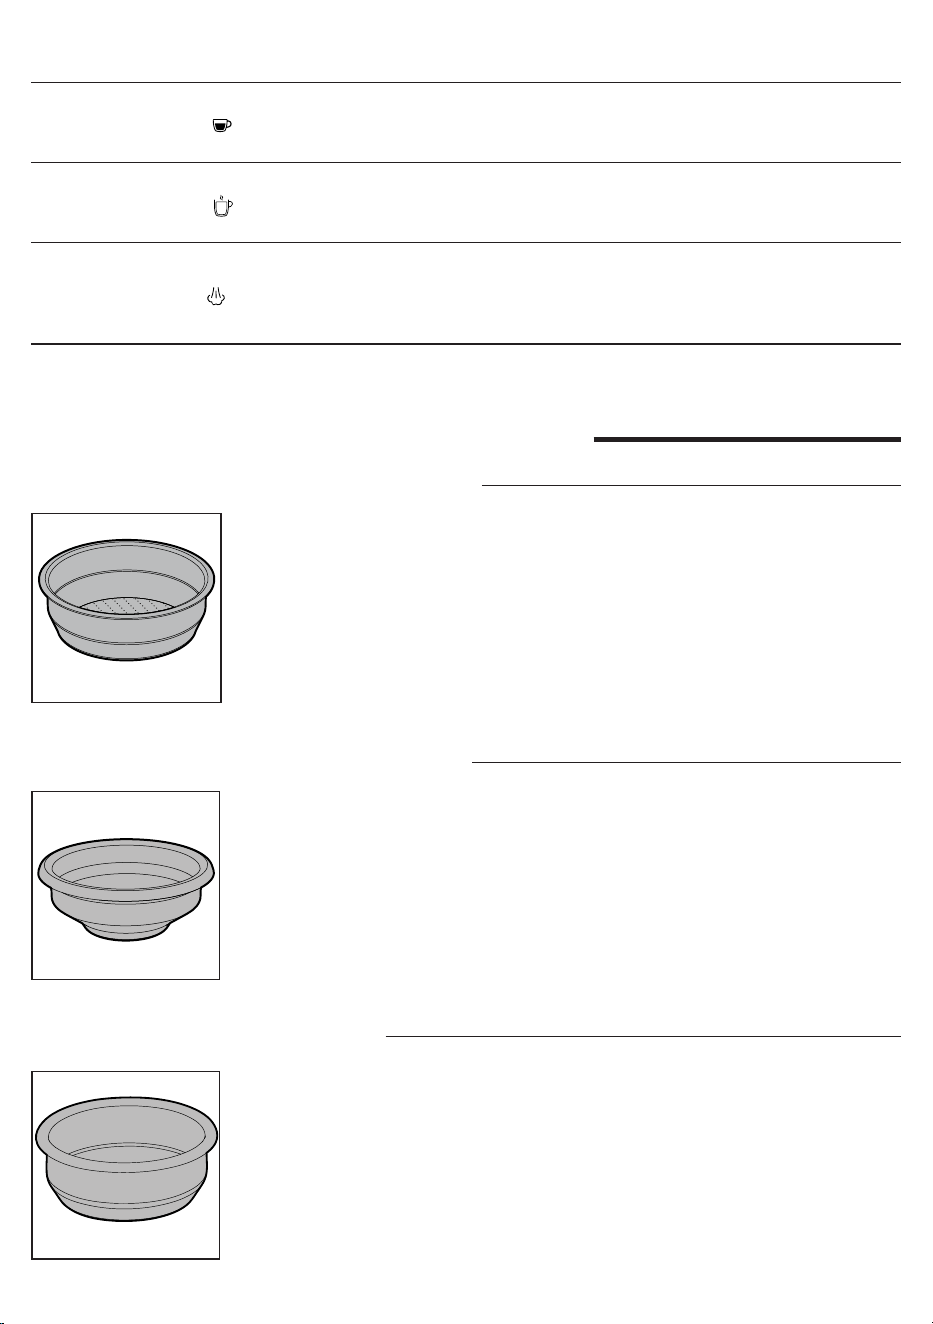
1-cup lter
This lter is suited to brew a single cup of espresso with pre-ground coffe.
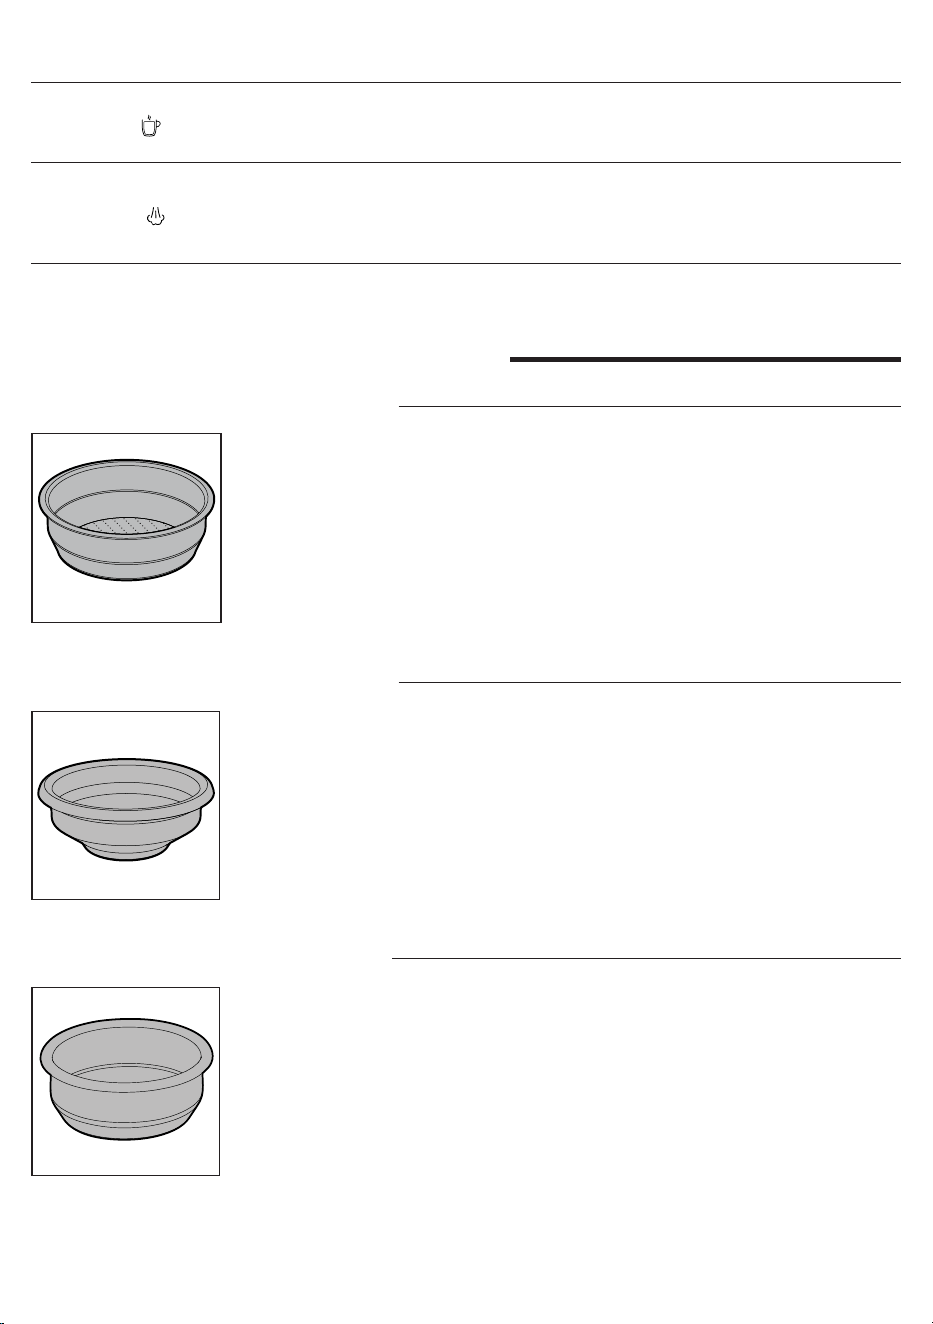
Blind lter
To clean the brew group or adjust the brew pressure by means of the adjustment
screw (17).
8
English
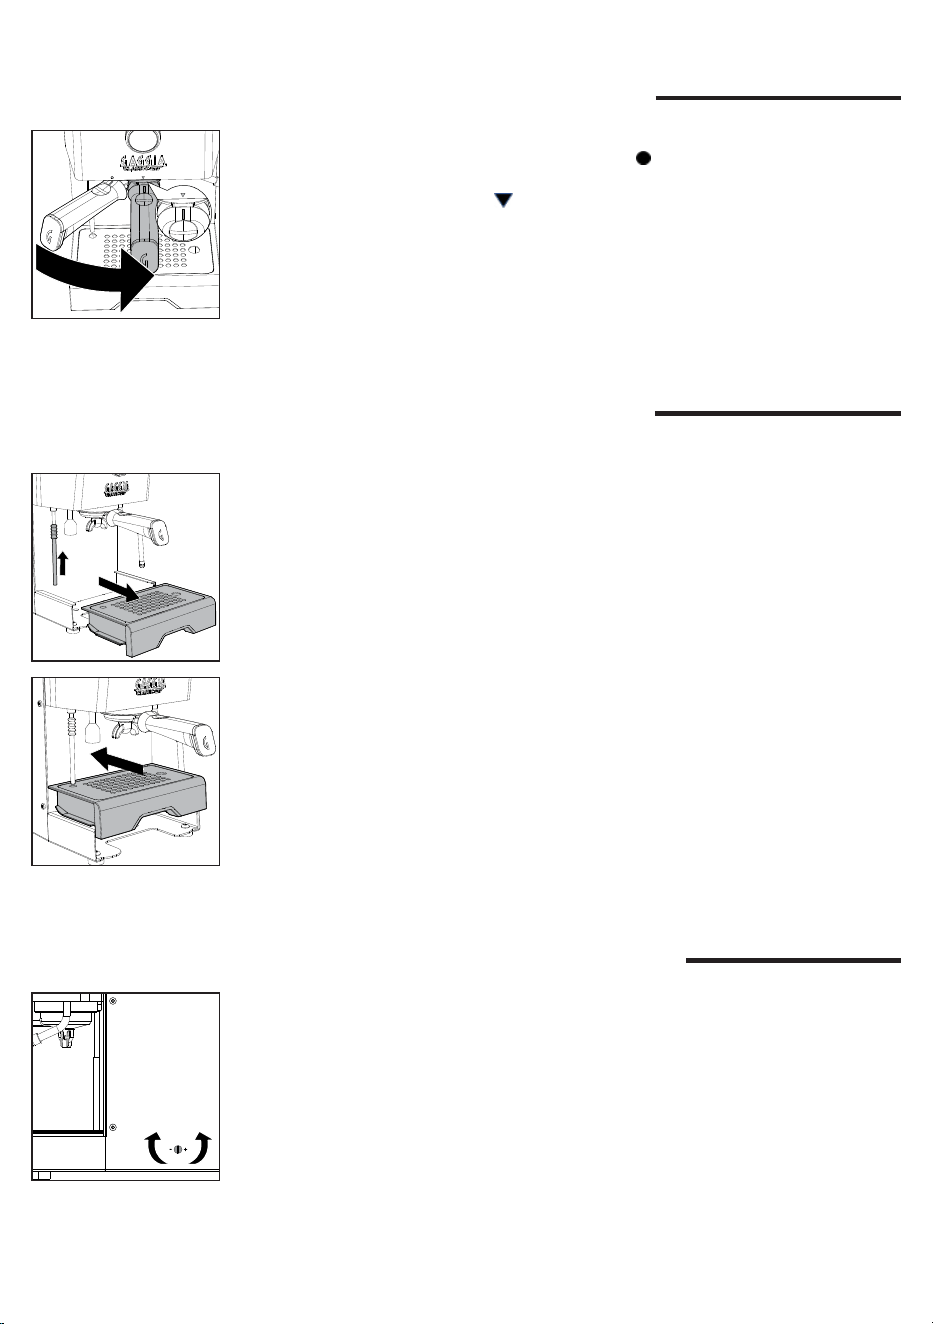
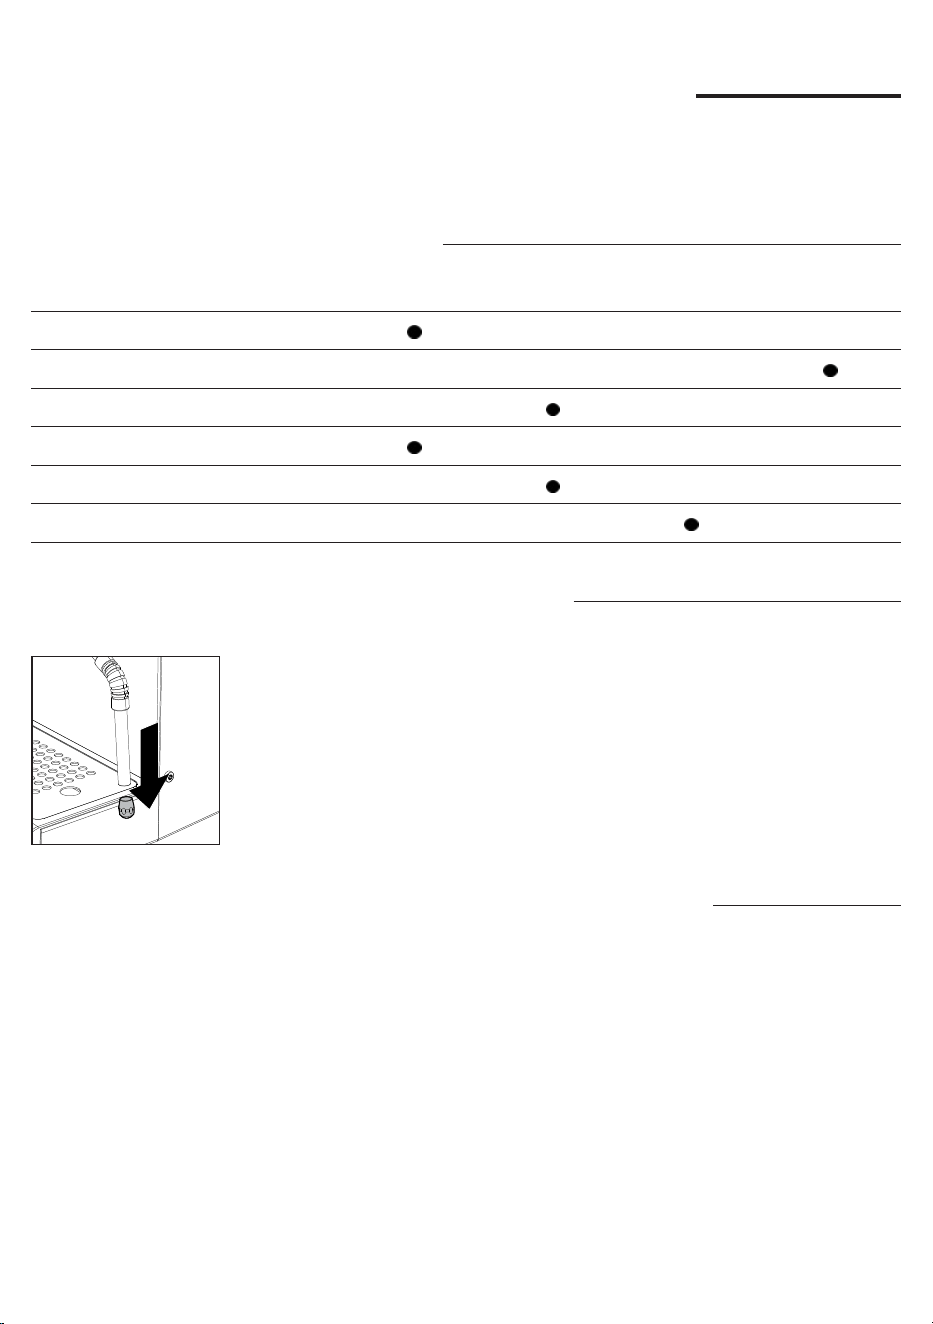
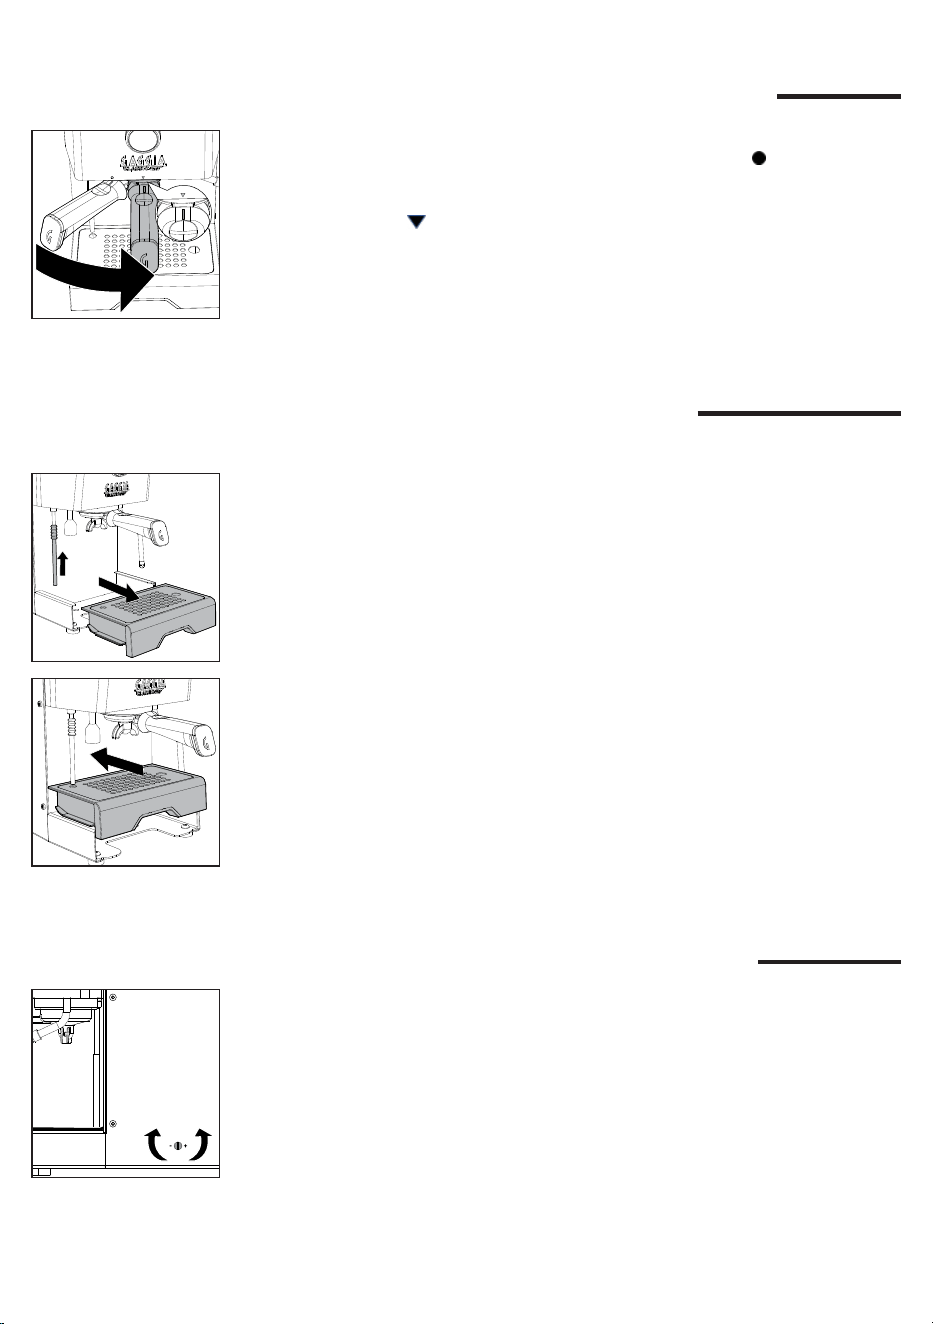
Adjusting the grid height
To reduce the cup clearance and use smaller espresso cups.
1 Place the telescopic drain tube at its shortest position.
2 Lift the drip tray and position it via the dedicated guides as shown in the
drawing
Inserting the lter holder
Insert the lter holder into the brew group from below, aligning the reference mark
on the handle of the lter holder with the symbol on the housing, rotating from
left to right until the lter holder locks into position, i.e. when the reference mark
on the handle and the triangle on the housing are perfectly aligned or slightly
shifted to the right.
Brew pressure adjustment
It is possible to adjust the brew pressure by rotating the external adjustment screw
(17) which is factory-set at 9 bars.
To adjust the brew pressure:
1 Disable the PRESET function if active.
2 Insert in the brew unit the lter holder with the blind lter.
3 Press the espresso toggle switch and read the bars on the manometer (34).
4 With a screwdriver rotate anticlockwise (-) to reduce the pressure or clockwise
(+) to increase it.
5 Stop the brewing by pressing the espresso toggle switch again when you
reach the desired bars on the brew gauge. .
6 Remove the lter holder and replace the blind lter with the 1 or 2 cups lter.
9
English
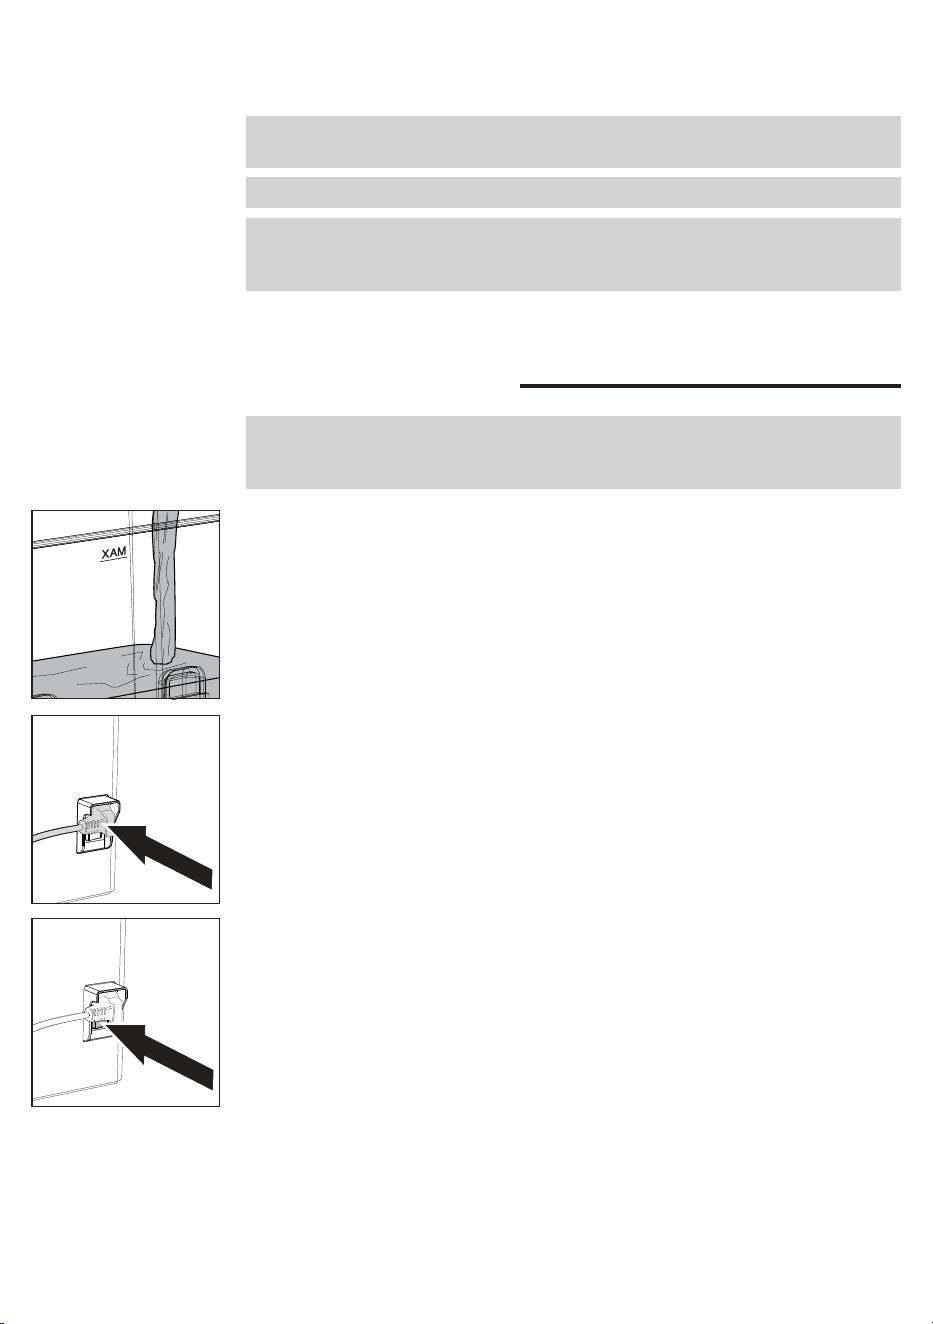
First installation
Note: this machine has been tested with coffee. Although it has been carefully
cleaned, there may be some coffee residues left. We guarantee, however, that the
machine is absolutely new.
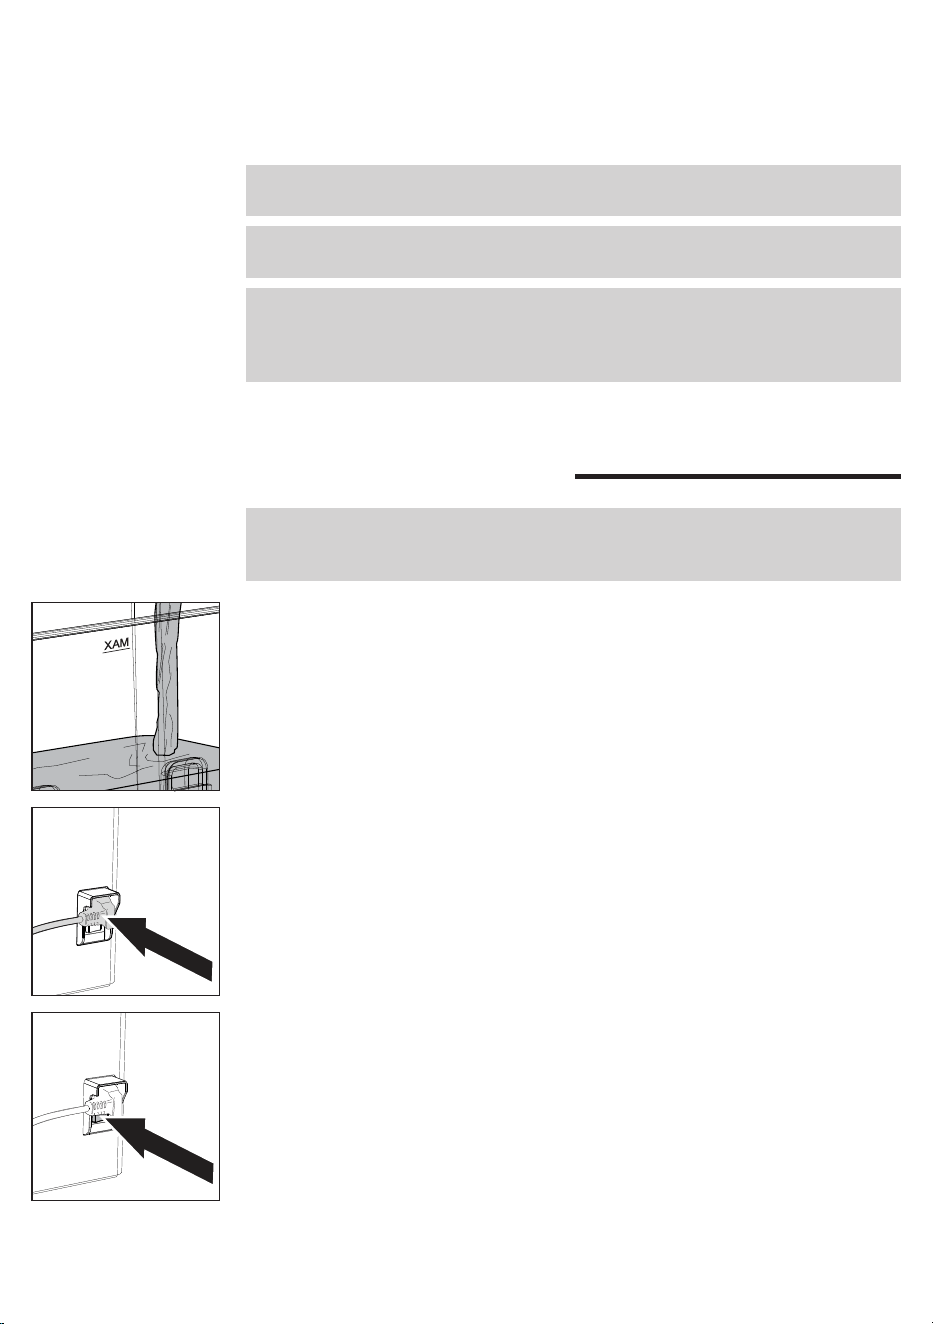
1 Remove the water tank, rinse it out and ll it with cold water to the MAX level.
It is recommended to check the water tank is correctly inserted.
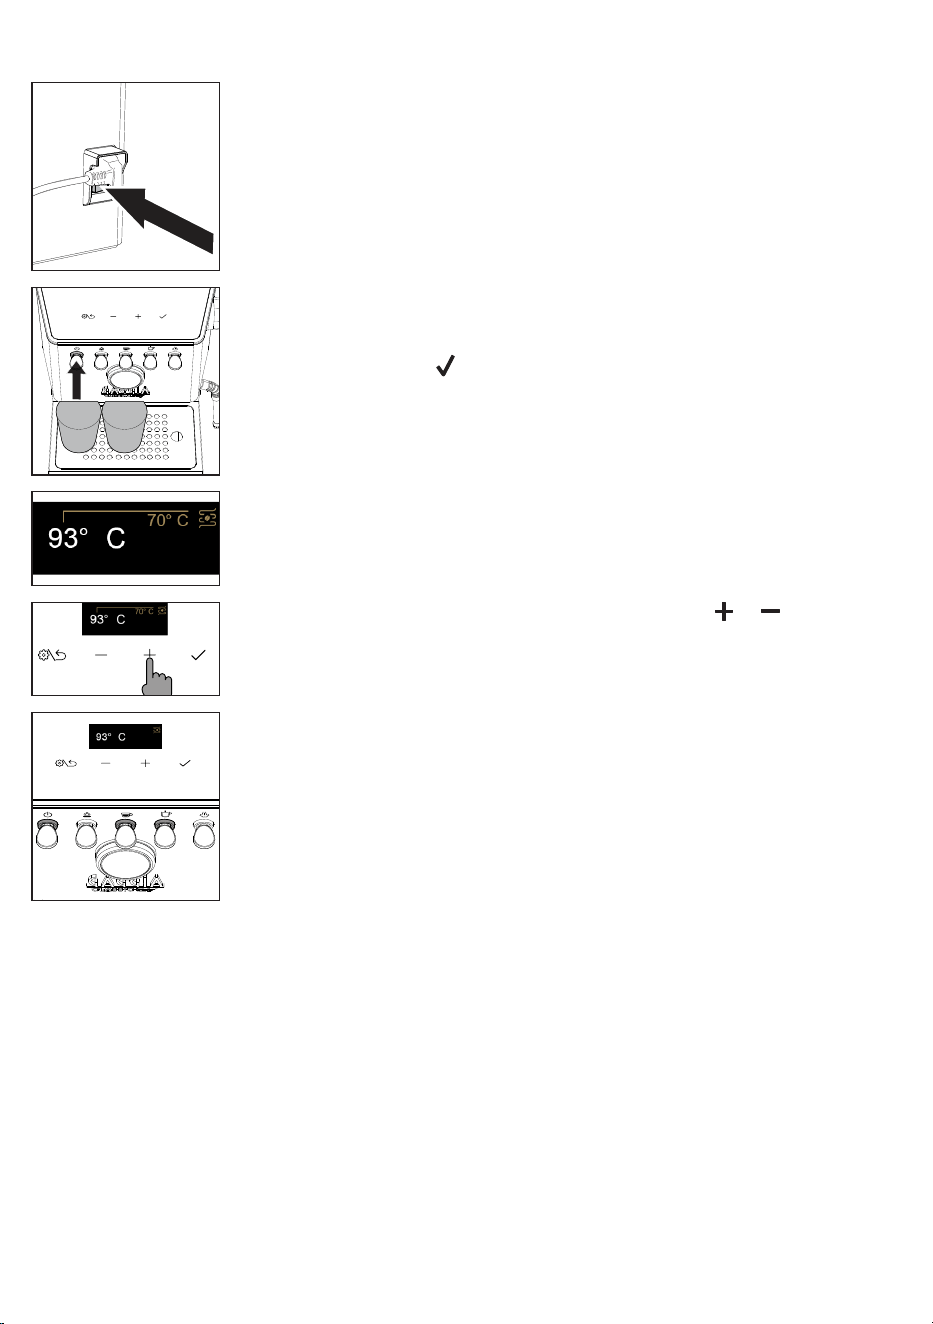
2 Insert the power cord, plug into a wall socket with suitable supply voltage.
3 Switch the power button, located on the rear of the machine, to "I".
4 The display will light up and show the historical Gaggia logo, before turning off
and going into standby.
7 The machine is now ready for brewing.
Note: do not adjust the brew pressure by using the 1 cup or 2 cups lters. Use only
the blind lter.
Note: to avoid the risk of burns, do not remove the lter holder before point 5.
Note: the machine is equipped with a protection system so that if you activate the
coffee dispensing with the blind lter inserted for a time longer than 90 seconds,
the alarm E16 appears. This is normal, not a product defect.
10
English
First use or after a period of inactivity of
more than 2 weeks
Note: new coffee machines may have an unpleasant smell. This is normal, not a
product defect. Please follow the instructions below. Water dispensed during this
process must be disposed of and cannot be used for feeding.
Note: to protect the machine from limescale, you must not use too hard water. If
required, we recommend using a water softener.
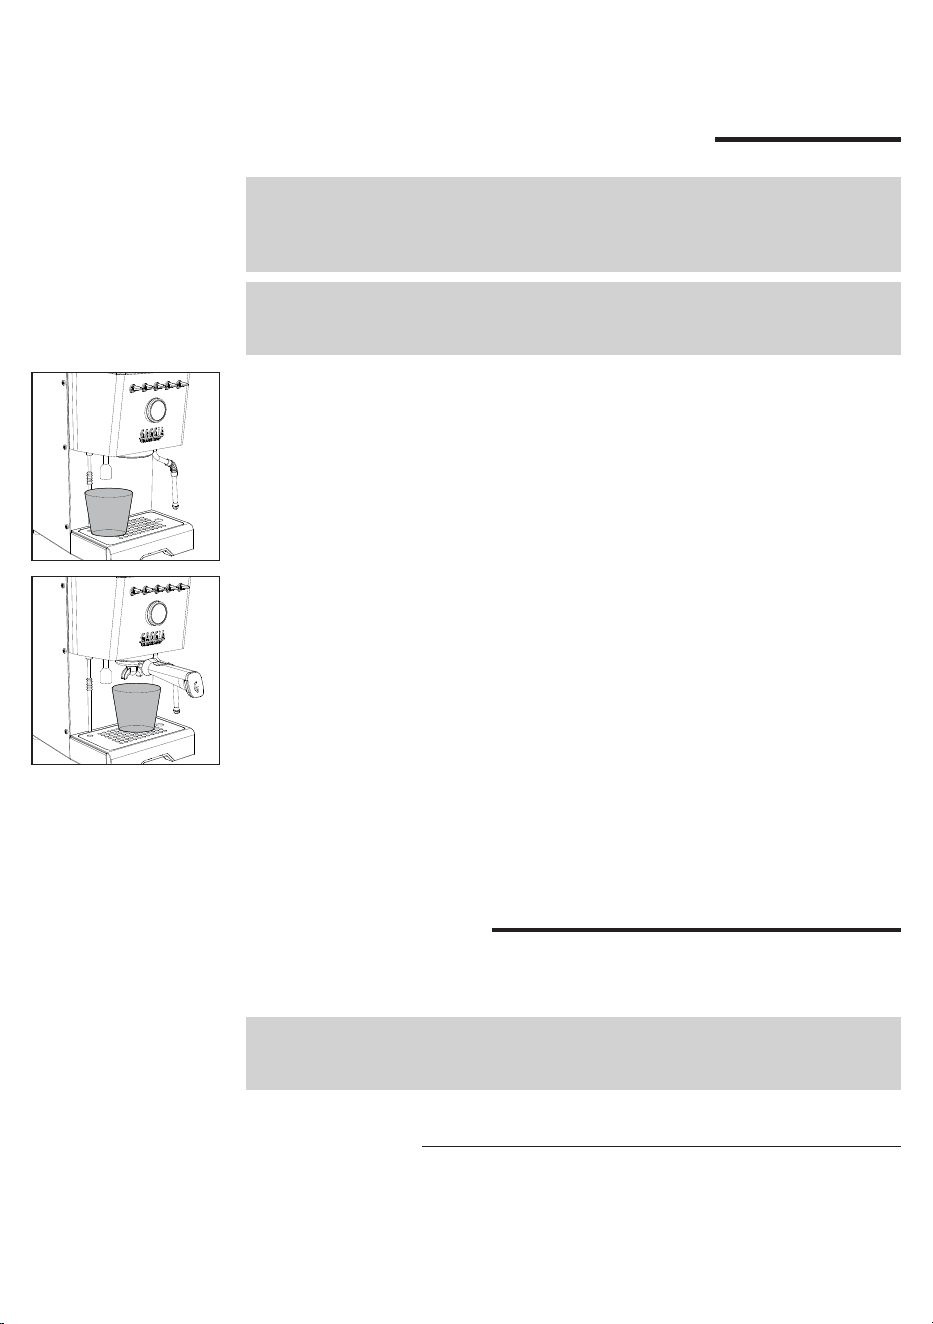
1 Place a large container under the hot water wand.
2 Remove the water tank rinse it out and ll it up to the MAX level.
3 Press the hot water toggle switch and dispense one tank of water from the
water dispenser. If the water dispensing stops, just press the water toggle
switch again when the LED is steady on until the water alarm appears on the
display. Emptying the entire water tank may take a few minutes.
4 Fill the water tank again up to the MAX level.
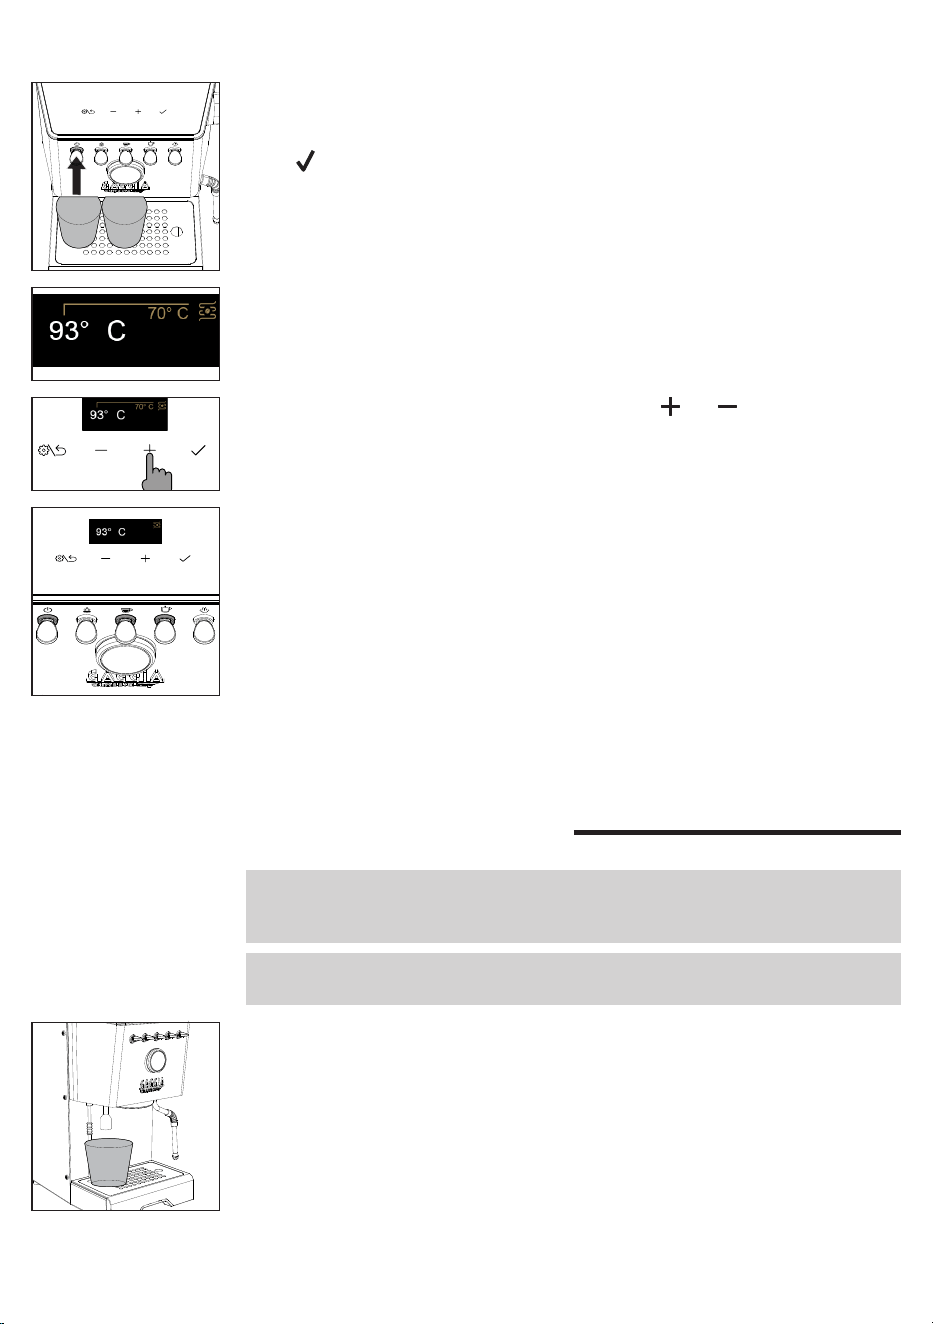
9 Once the desired temperature has been reached, the coffee and hot water
toggle switches light up steadily and the machine is ready for the rst
brewing.
10 Before brewing, follow the instructions in the chapter "First Use".
8 The set temperature can be changed using the and navigation buttons.
7 The display shows the factory-set coffee brew temperature and the relevant
growing value until the set temperature is reached.
5 Press the ON/OFF toggle switch to start the machine, the corresponding LED
will light up.
6 Place a glass under the brew group and the hot water wand, press the
navigation button and follow the instructions until the installation is
completed.
11
English
5 Insert the lter holder into the brew group and place a large container under it.
6 Press the coffee toggle switch and dispense water from the brew group. If
the water dispensing stops, just press the coffee toggle switch again untill the
water alarm appears on the display.
7 Remove the lter holder and rinse it under running water.
8 Rell the water tank up to the MAX level.
9 Press the steam toggle switch, when it is steady on, open the steam knob and
dispense steam for about one minute.
10 Turn the machine off and on again to ensure that all information is properly
saved. The machine is now ready for use.
Coee brewing
The lter holder is factory tted with a 2-cup lter.
To brew the rst coffee, the lter holder must be preheated.
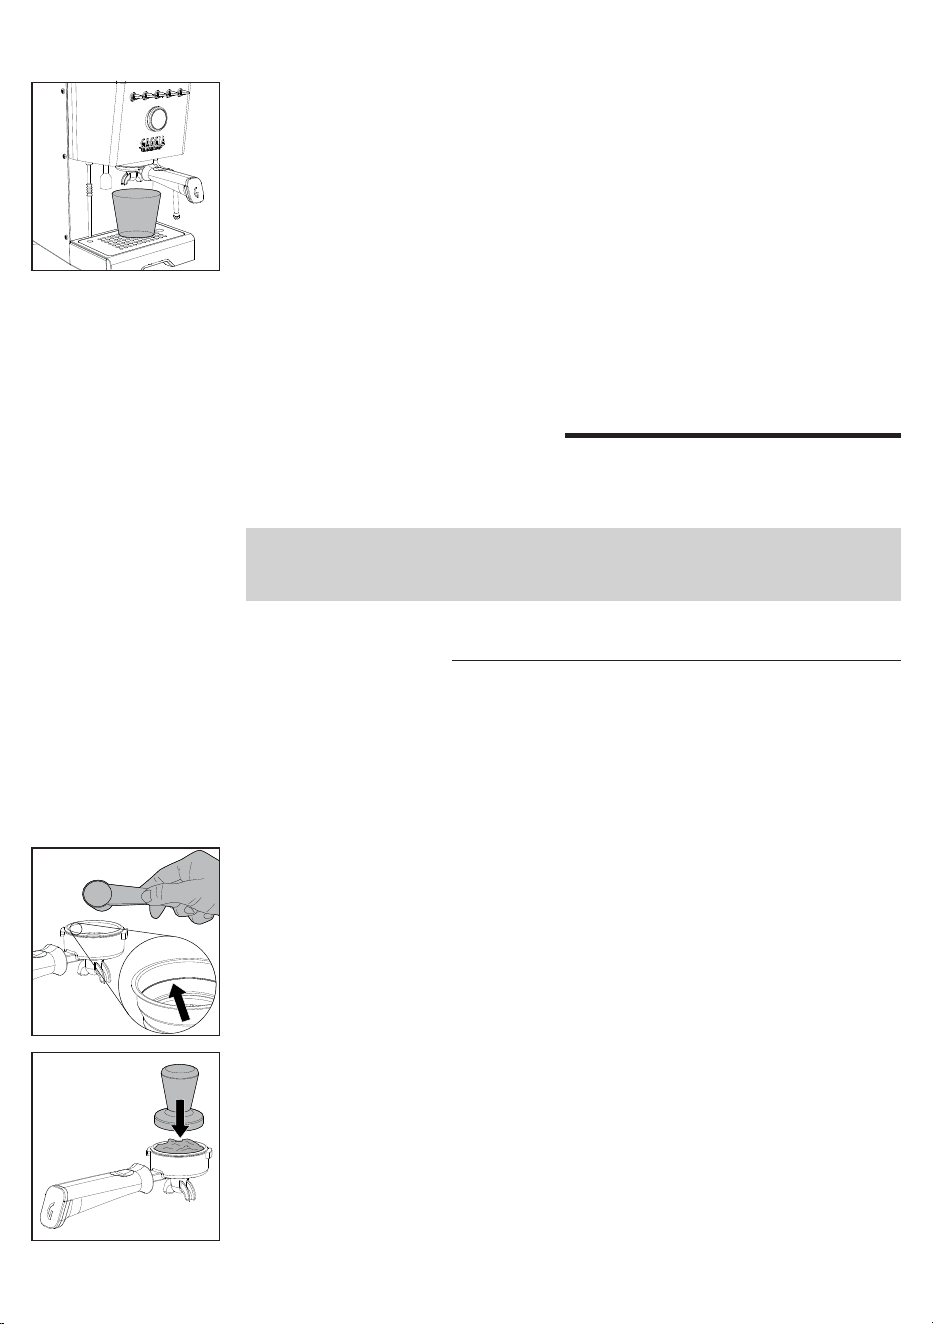
1 Insert the lter holder with the 1 or 2-cup lter into the brew group.
2 Place a cup under the lter holder and press the coffee toggle switch, when it
is steady on, dispensing a cup of water (
approx. 150 ml
).
3 Remove the lter holder and wipe away any traces of water.
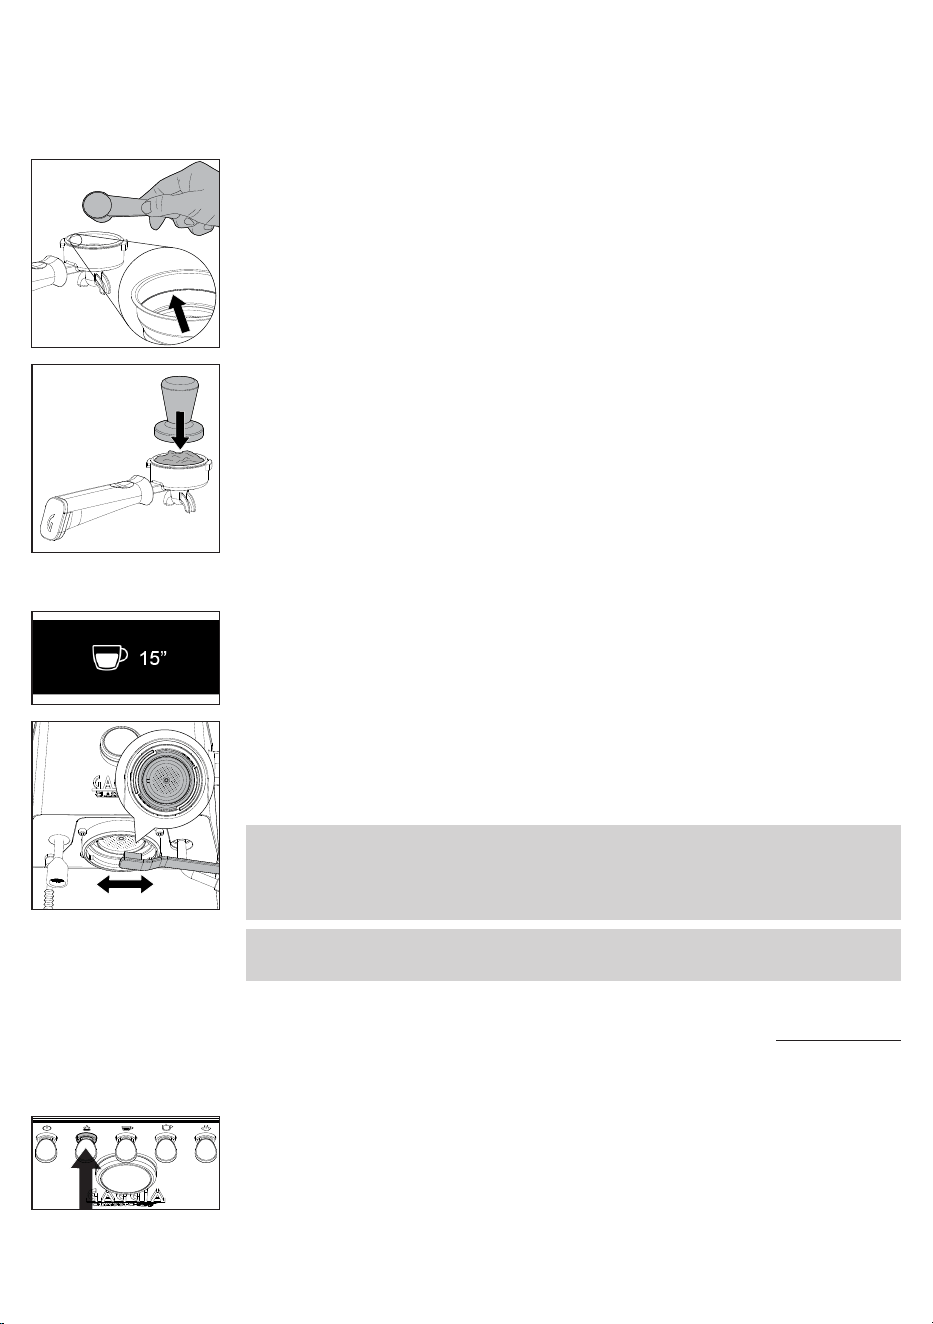
4 Fill the lter holder with 1 pre-ground coffee measuring scoop for a single
coffee or with 2 measuring scoops for a double coffee taking the reference
mark inside the lter as a reference. Tap the lter holder sideways to even out
coffee ground powder.
5 Press the coffee using the appropriate tamper provided. Tamping shall be
done in a uniform way, and the coffee surface must be well levelled, parallel to
the lter holder edge.
6 Clean the lter holder edge of any coffee residues.
7 Insert the lter holder correctly until it locks into place as described in the
chapter "Inserting the lter holder".
8 Place 1 or 2 cups under the lter holder.
9 Wait until the coffee toggle switch is steadily lit before pressing it to start
brewing.
Coee preparation
Make sure to use an appropriate grind setting for espresso brewing.
For proper grinding, we suggest you use our MDF55 coffee grinder.
Nota: if the set temperature is reduced when the machine is already warmed up,
to speed up the cooling follow the instructions in the chapter "How to lower the
temperature of coffee boilers and water/steam".
12
English
12 When brewing is over, remove the lter holder and empty the puck from the
lter, as well as any residue from both gasket and screen.
13 The display will now show the coffee brew temperature again.
Note: wait about 10 seconds before removing the lter holder. Remove it slowly
and carefully by turning it leftwards. Be careful not to scald yourself with any water
left on top of the coffee puck.
Note: if a small quantity of water remains in the lter holder, this is considered
absolutely normal and is due to the lter holder features.
10 When brewing, the display shows the brewing time in seconds.
11 Once the desired quantity is reached, press the coffee toggle switch again to
stop brewing.
Coee brewing with automatic pre-infusion
It is possible to enable the automatic pre-infusion, and change the PRESET pre-
infusion via the machine's menu.
1 To activate the automatic pre-infusion press the pre-infusion toggle switch
which will light up.
2 When pressing the coffee toggle switch to start brewing , the display will show
the PRESET pre-infusion and the brewing time.
3 Once the desired quantity has been reached press the coffee toggle switch
again to stop brewing.
MED
2 The display will show the coffee wetting time and the corresponding symbol
.
3 Once the desired wetting time (
maximum 20 seconds
) is reached, release the
pre-infusion toggle switch.
00
00
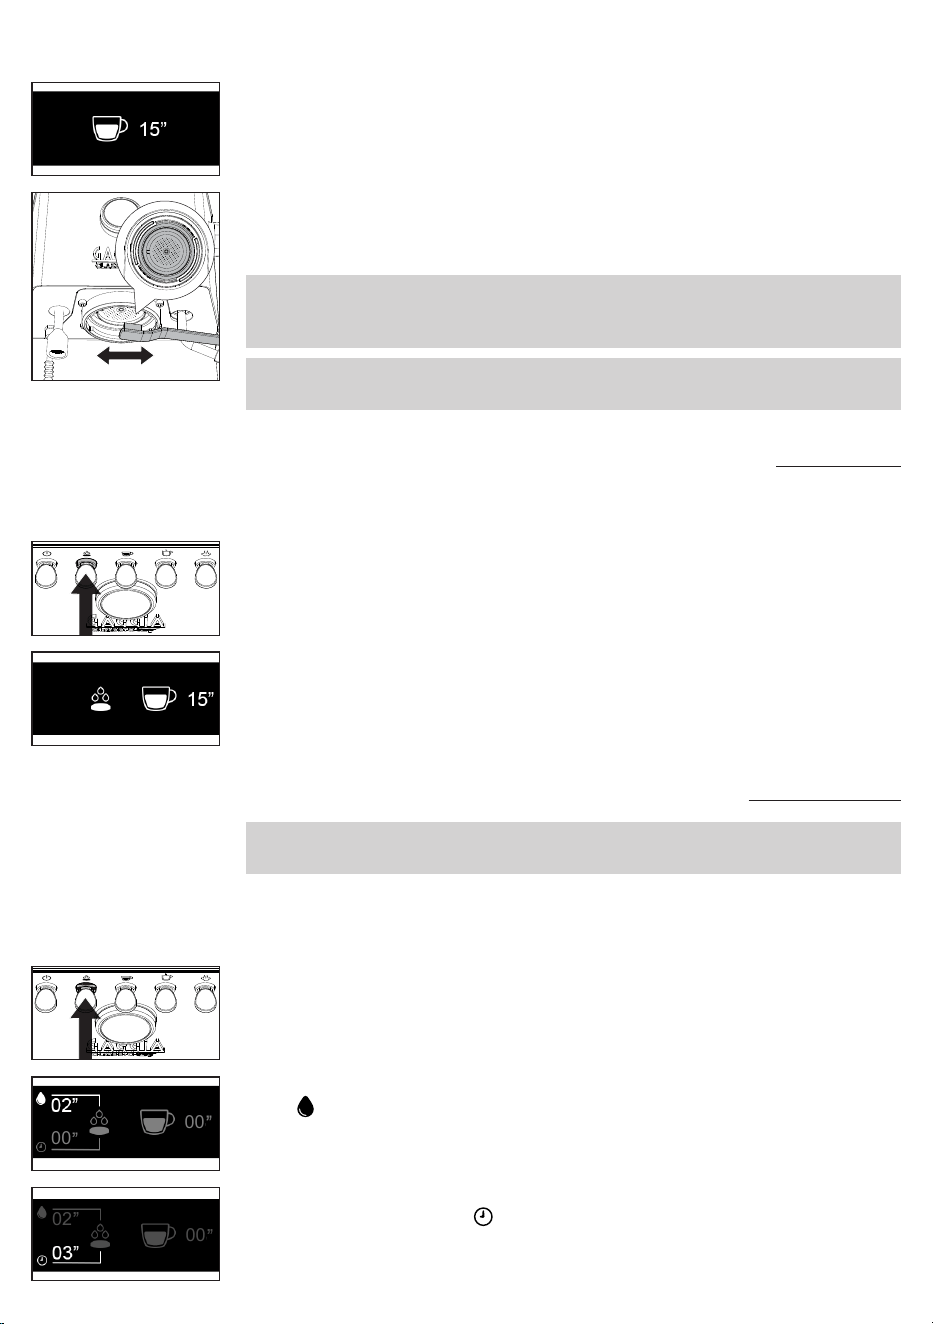
Coee brewing with manual pre-infusion
Warning: to avoid the risk of burns, do not remove the lter holder after you release
the pre-infusion lever but only after ending the brewing.
During brewing with manual pre-infusion, the display will show all stages in
succession - wetting of the pre-ground coffee with water - soaking time - actual
brewing.
1 Hold down the pre-infusion toggle switch which will start ashing.
4 The seconds will continue to run indicating the desired soaking time and the
corresponding symbol .
5 After the desired soaking time (
maximum 15 seconds
) has elapsed, press the
coffee toggle switch to start the actual high-pressure brewing.
02
00
13
English
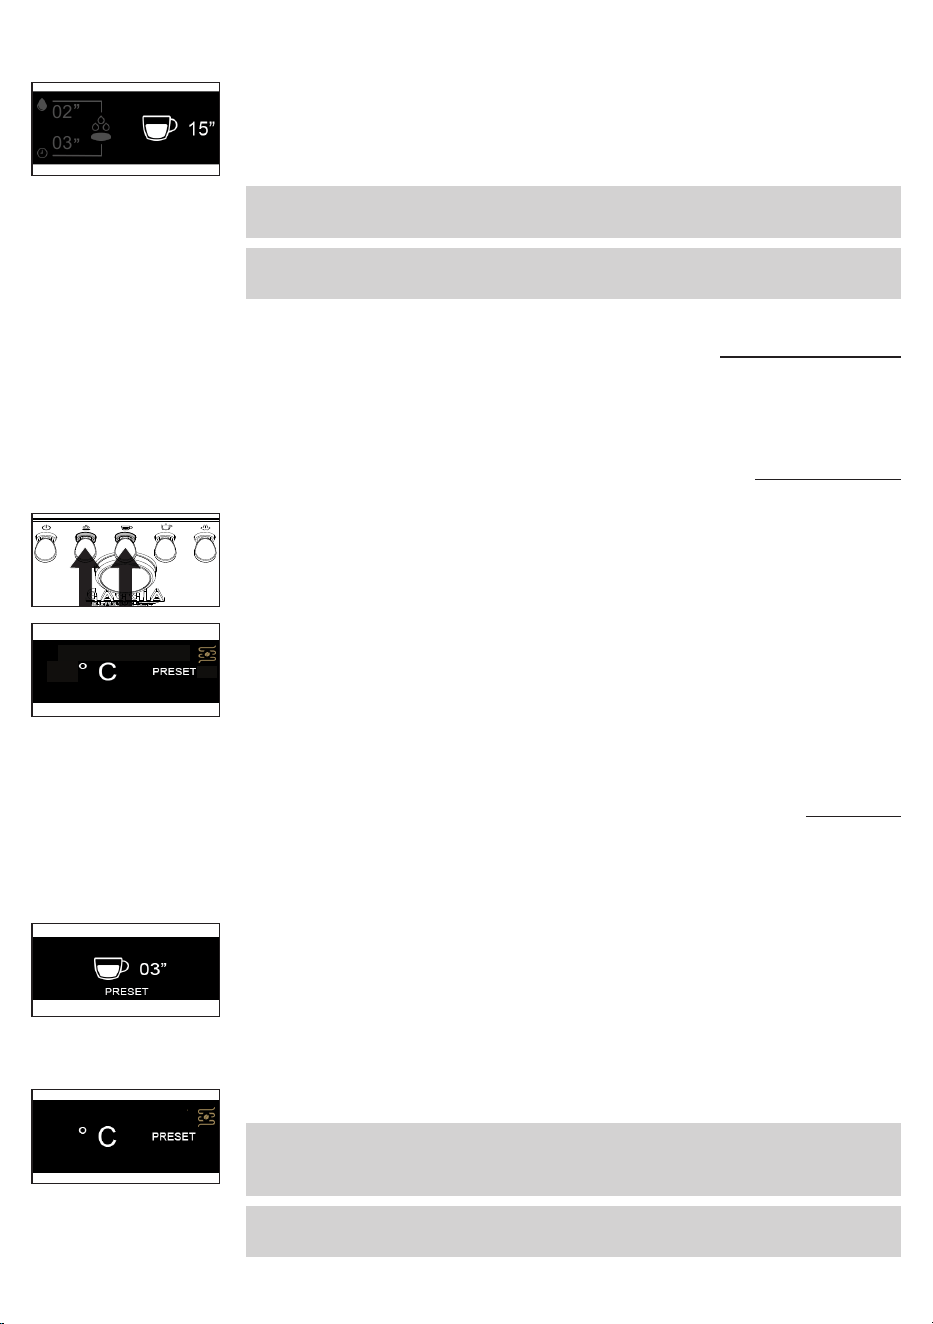
6 By pressing the coffee toggle switch, the seconds relating to brewing begin to
run.
7 When the desired quantity has been reached, press the coffee toggle switch
again to stop brewing.
Note: the coffee toggle switch is disabled while holding down the pre-infusion
toggle switch.
Note: once the maximum soaking time has elapsed, the machine cancels the
dispensing.
02
03
Coee brewing with PRESET function
By enabling this function the machine will automatically stop brewing when a
previously set quantity is reached.
Enabling and disabling PRESET function
1 In order to enable or disable this function, press and hold down the pre-
infusion and the coffee toggle switches simultaneously for a few seconds.
93
Setting and saving the quantity of your coee
The machine leaves the factory with a PRESET coffee quantity.
It is possible to change this quantity at any time by following the procedure
described below.
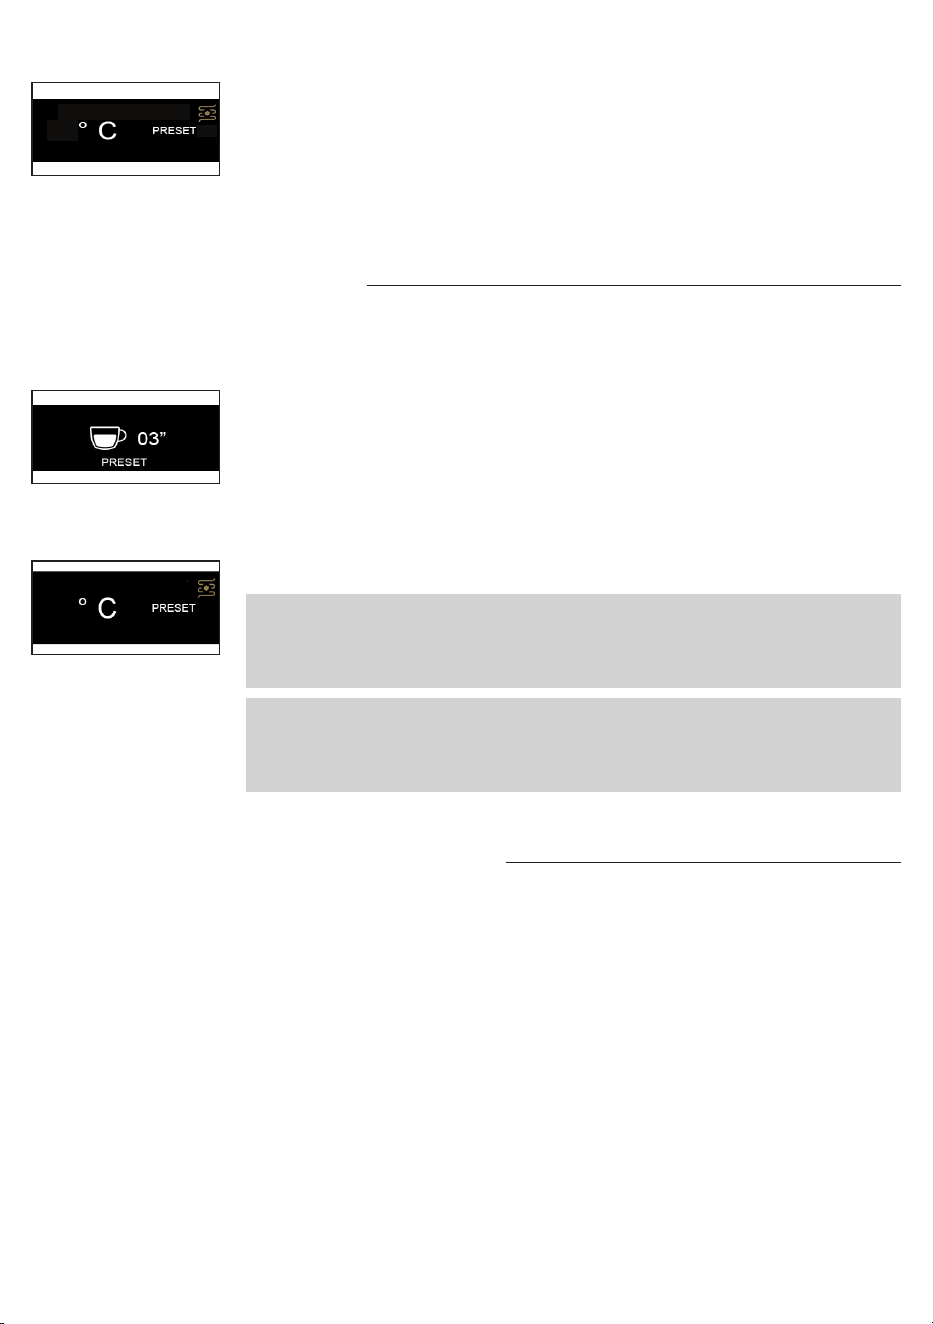
1 Hold down the coffee toggle switch for a few seconds, release it when the
brewing starts and on the display the timer with the word PRESET will appear
ashing.
2 Press again the coffee toggle switch once the desired quantity has been
reached.
3 A conrmation tick will appear on the display, indicating that the new quantity
has been saved, overwriting the one previously set.
4 The display will return to the main screen with the PRESET function active.
Note: the PRESET function saves the volume and not the time. The timer on the
display can indicate a different time for the same volume of coffee, due to the type
of coffee, the amount of ground coffee or the coarseness of the grind.
Note: the PRESET function is automatically disabled when a coffee with manual
pre-infusion is requested, and restored when the brewing process is completed.
93
93
2 The word PRESET on the display will indicate when the relevant function is
active.
3 With this function active, the machine will brew the set amount of coffee at
each coffee request.
4 Disabling this function will return you to manual mode, where the machine will
prompt you to press the coffee toggle switch again each time to stop brewing.
14
English
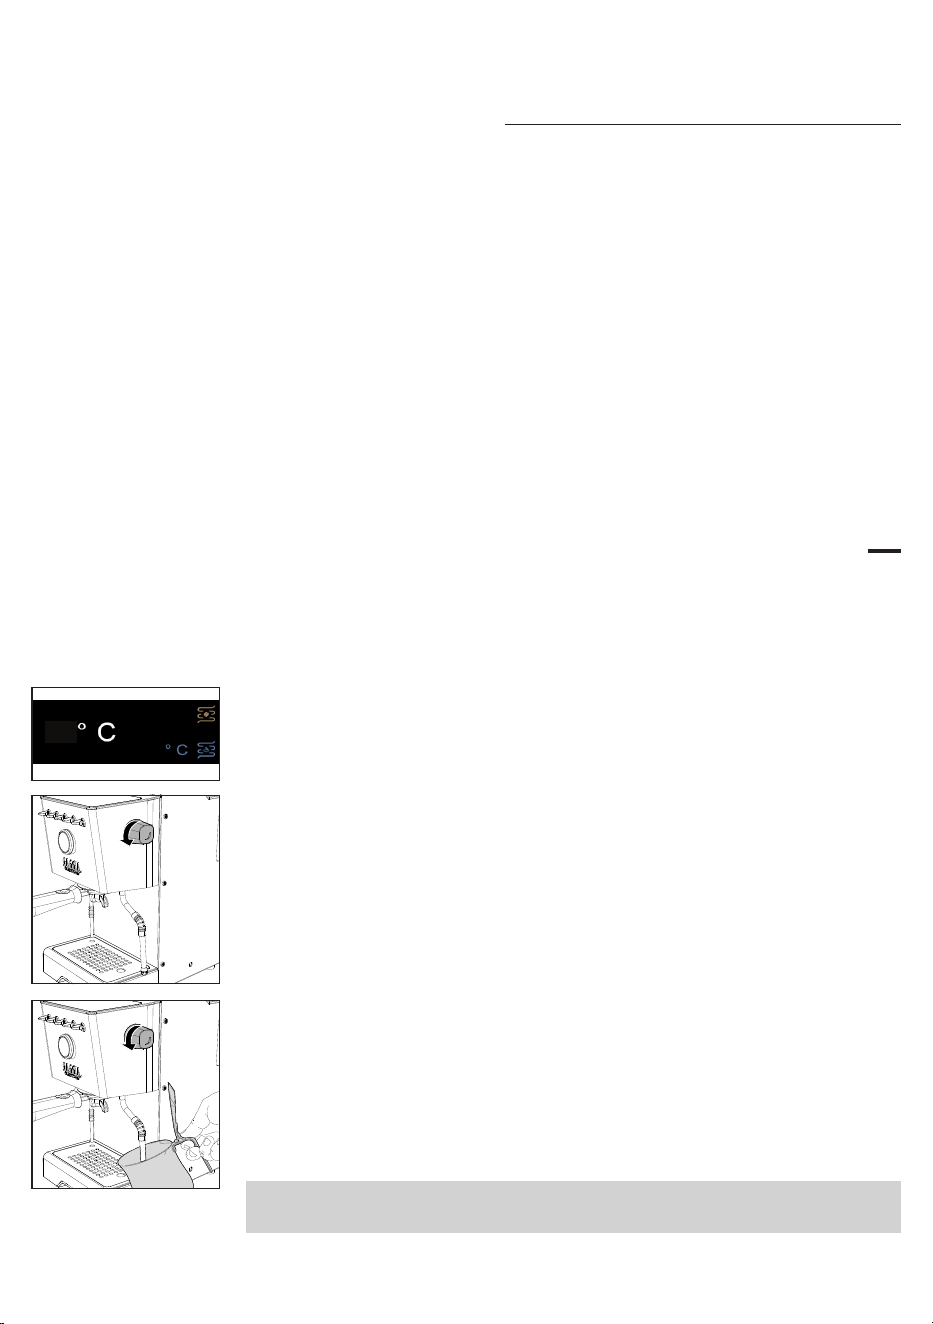
How to lower the temperature of the coee and hot
water/steam boilers
Coffee boiler
1 Place a cup under the brew group without the lter holder inserted.
2 Press the coffee toggle switch and dispense a cup of water.
3 Press the coffee toggle switch again to stop dispensing water.
4 Repeat if the machine has not yet reached the desired temperature visible on
the display.
Hot water/steam boiler
1 Place a cup under the water dispenser.
2 Press the water toggle switch and dispense a cup of water.
3 Press the water toggle switch again to stop dispensing water.
4 Repeat if the machine has not yet reached the desired temperature.
Frothing milk to prepare a cappuccino
To ensure a perfect result, we recommend using cold whole milk (
at about 5°C
)
with a protein content of at least 3% and a fat content of at least 3.5%. Good
results can also be obtained using semi-skimmed cow's milk, some types of
lactose-free milk, soy, almond as well as with oat beverages.
1 Press the steam toggle switch, which will start ashing until it has reached the
set temperature visible on the display.
2 When the toggle switch lights up steadily, the machine is ready for dispensing
steam.
130
93
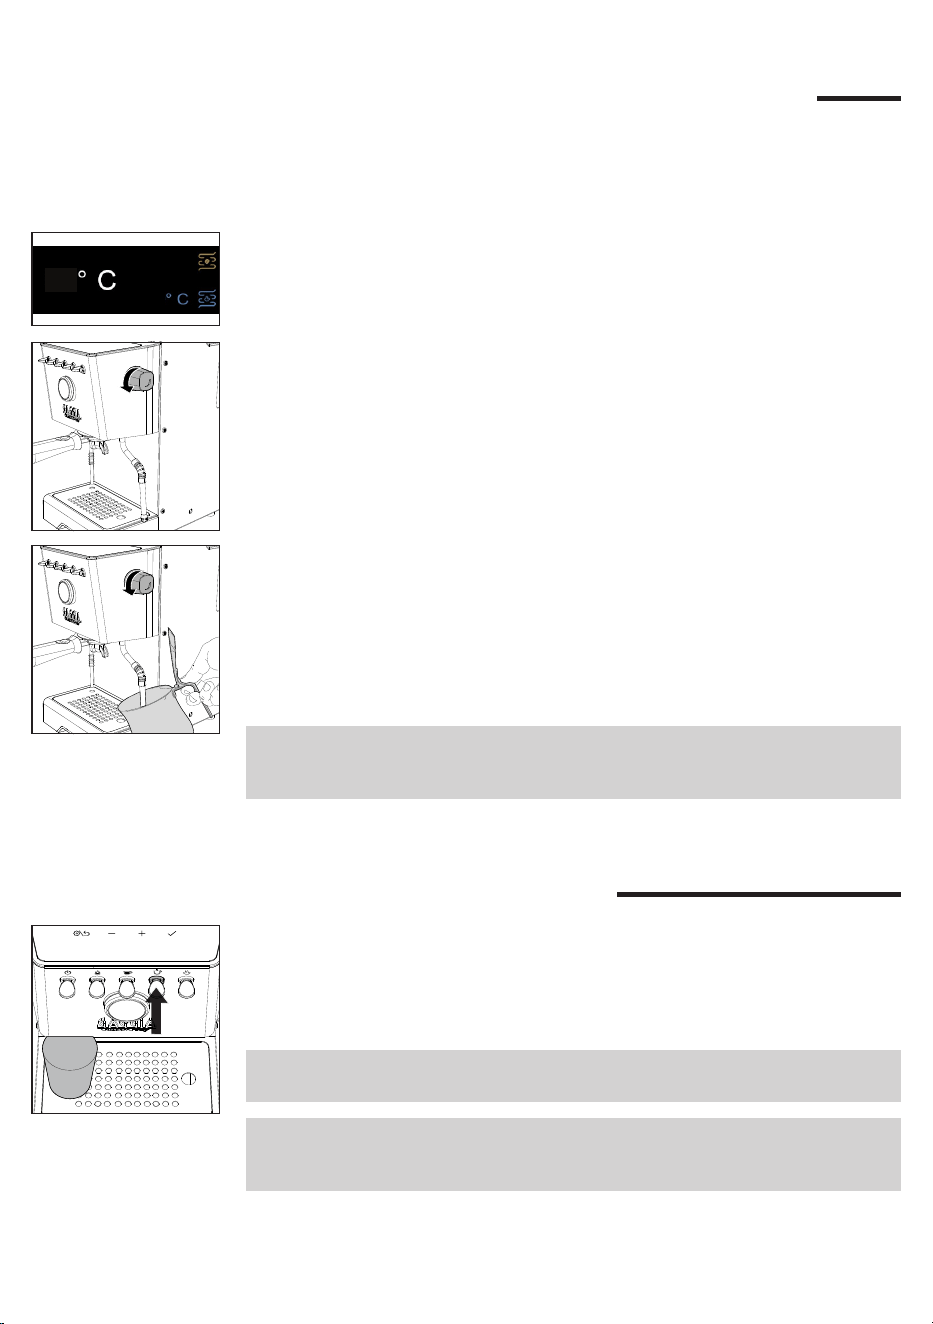
3 Before starting frothing milk, remove any residual condensation by opening
the steam knob until only steam is dispensed.
4 Fill a jug with cold milk about 1/3 full, insert the steam wand into the milk and
start frothing milk by opening the knob again.
5 When you obtain the desired milk froth, close the knob to stop steam
dispensing and remove the jug.
6 Clean the circuit by dispensing a little steam again in order to remove any milk
residue and wipe the wand with a damp cloth.
7 Press the steam toggle switch to exit the function and the LED will switch off.
Warning: dispensing may be preceded by small jets of hot water. The dispensing
tube may reach high temperatures: never touch it with bare hands.
15
English
Dispensing hot water
1 Place a cup or tea glass under the hot water wand.
2 Press the hot water toggle switch when it is steady on and, once desired
amount is reached, press it again to stop dispensing. Press again if you need
more water.
Note: water can be dispensed even if the water toggle switch is off or blinking. In
this case, the water temperature may not be optimal.
Warning: dispensing may be preceded by small jets of hot water. The dispensing
tube may reach high temperatures: never touch it with bare hands.
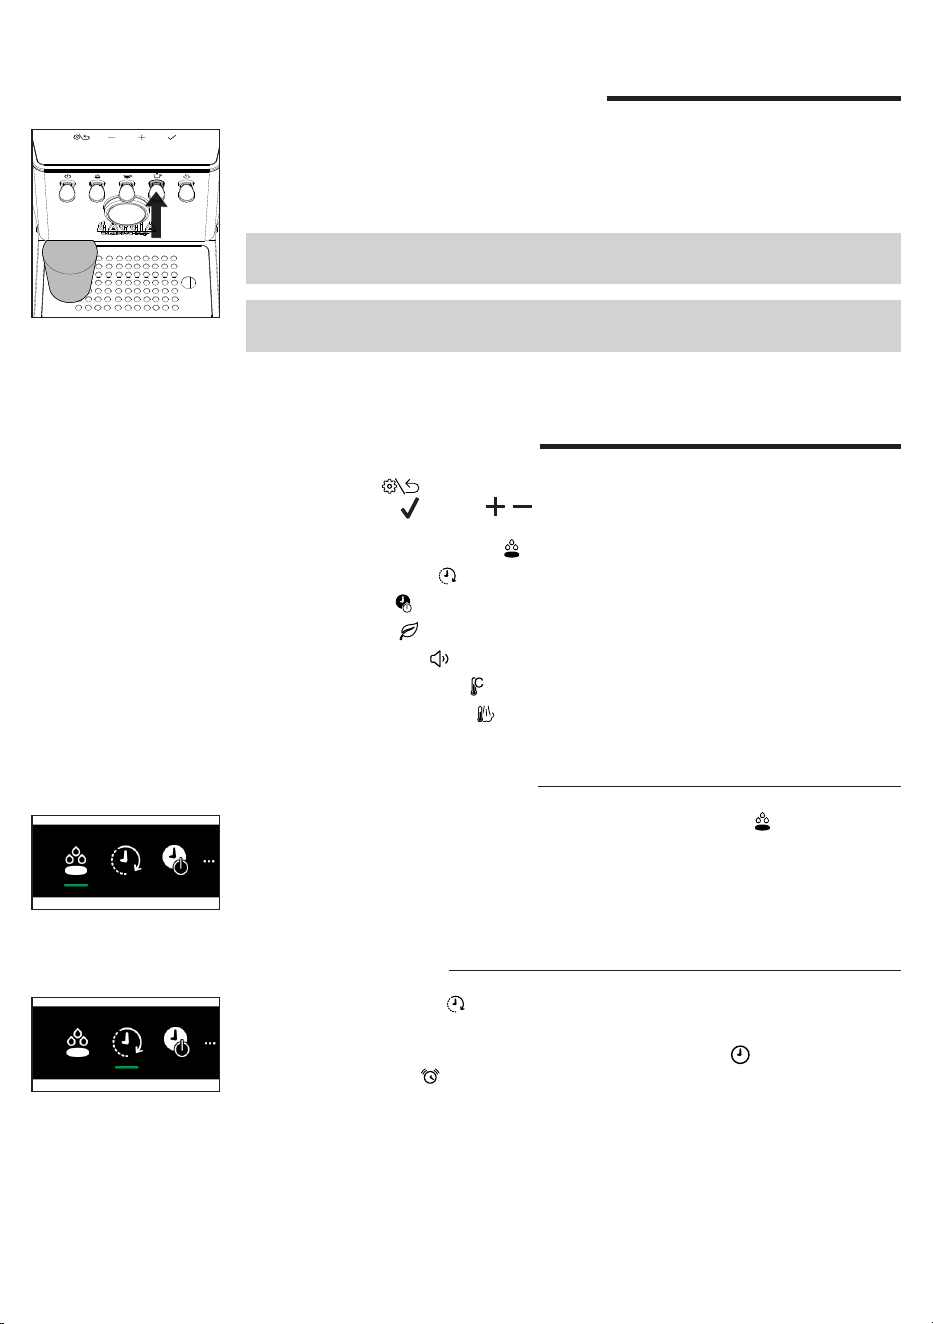
Machine settings
By pressing the button you can activate or modify some of the machine
settings using the and the , navigation buttons:
- Automatic pre-infusion
- Wake-up timer
- Stand-by
- Ecomode
- Button sound
- Temperature units
- Steam temperature
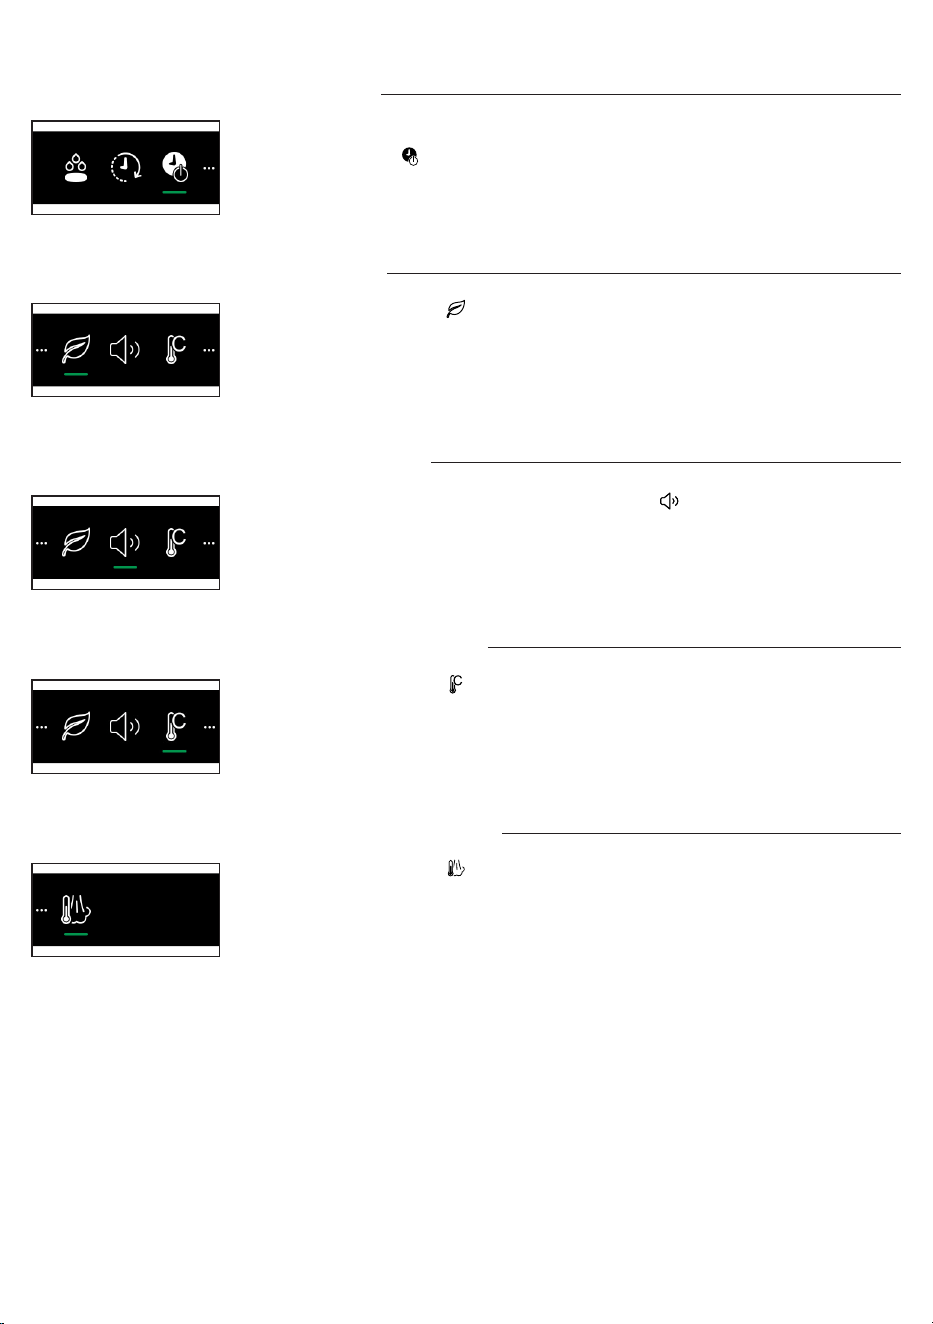
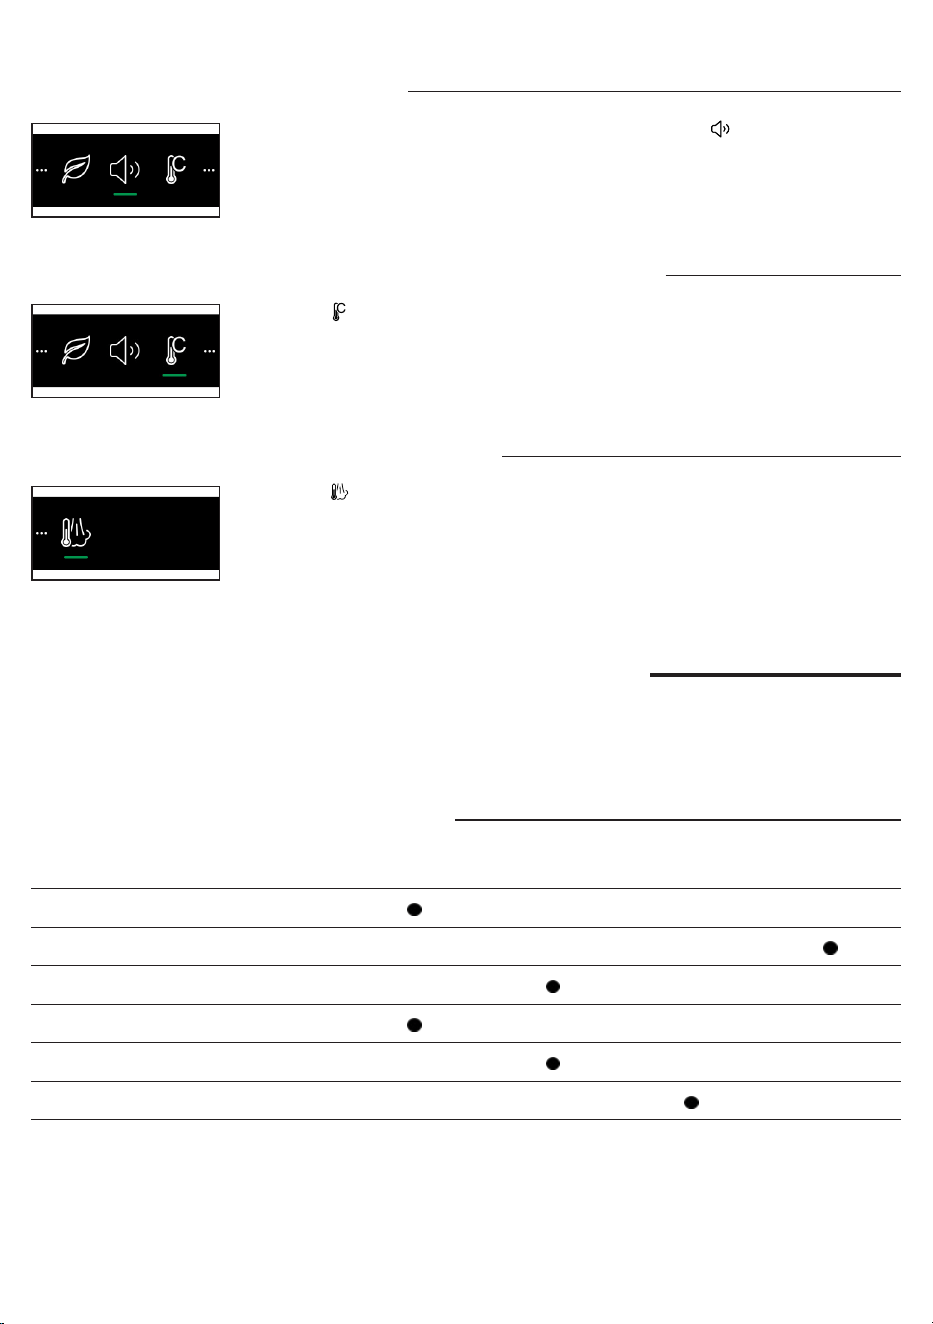
Wake-up timer
By selecting the symbol you can enable or disable the machine wake-up
function.
To enable this function select ON, conrm, select the symbol to set the time
and then the symbol to set the wake-up time (
it is adjustable in 15-minute
increments
). A white dot appears in the top left of the display to show the wake-up
timer is on.
Automatic pre-infusion
Is it possible to set 3 pre-infusion levels by selecting the symbol .
LGT Light roast
MED Medium roast
DRK Dark roast
16
English
Ecomode
By selecting the symbol you can enable or disable the Ecomode function.
With the Ecomode function active, the steam/hot water boiler is disabled. Steam/
hot water can still be dispensed on demand, but it will take longer to bring the
boiler to the required temperature for dispensing. By doing so, the Ecomode is
automatically disabled. It can be activated again via the setting menu.
Stand-by
The machine is equipped with an automatic 30-minute power-off function.
Select the symbol to disable the function or change the stand-by timer.
Temperature units
By selecting the symbol you can choose the temperature unit between C° and
F°.
Button sound
To switch button sound on or off, select the symbol .
Steam temperature
By selecting the symbol you can change the steam temperature setting.
17
English
Cleaning and maintenance
Regular cleaning and maintenance keep the machine in perfect conditions and
ensure perfect coffee avour, a constant coffee ow and excellent milk froth for a
long period of time.
Cleaning table
Part description After use Daily Weekly Monthly
Cleaning the steam wand
Cleaning the brew unit
Cleaning the lter and the lter-holder
Cleaning the screen
Cleaning the grid and drip tray
Cleaning the water tank
Cleaning the steam wand
After each milk frothing:
1 Clean the steam wand with a damp cloth. For a more thorough cleaning
unscrew the nozzle and wash it under running water and screw it back.
2 Open the steam knob for a few moments to remove any milk residues and
close the knob again.
Cleaning the brew unit (
backushing
)
Monthly:
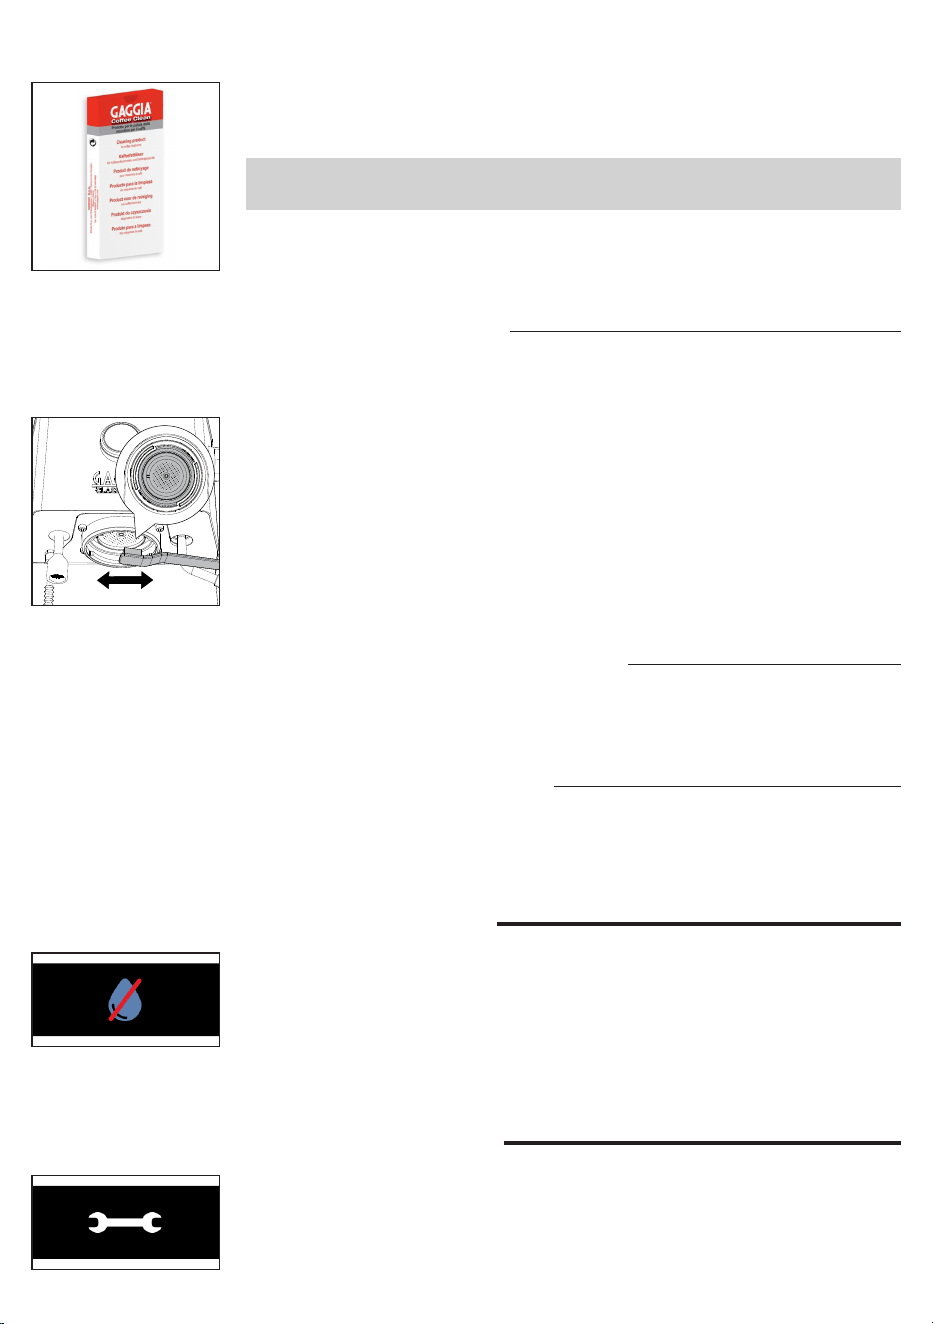
We recommend to clean the coffee brew unit with the Gaggia cleaning tablets
"Coffee oil remover" to remove coffee oil residues.
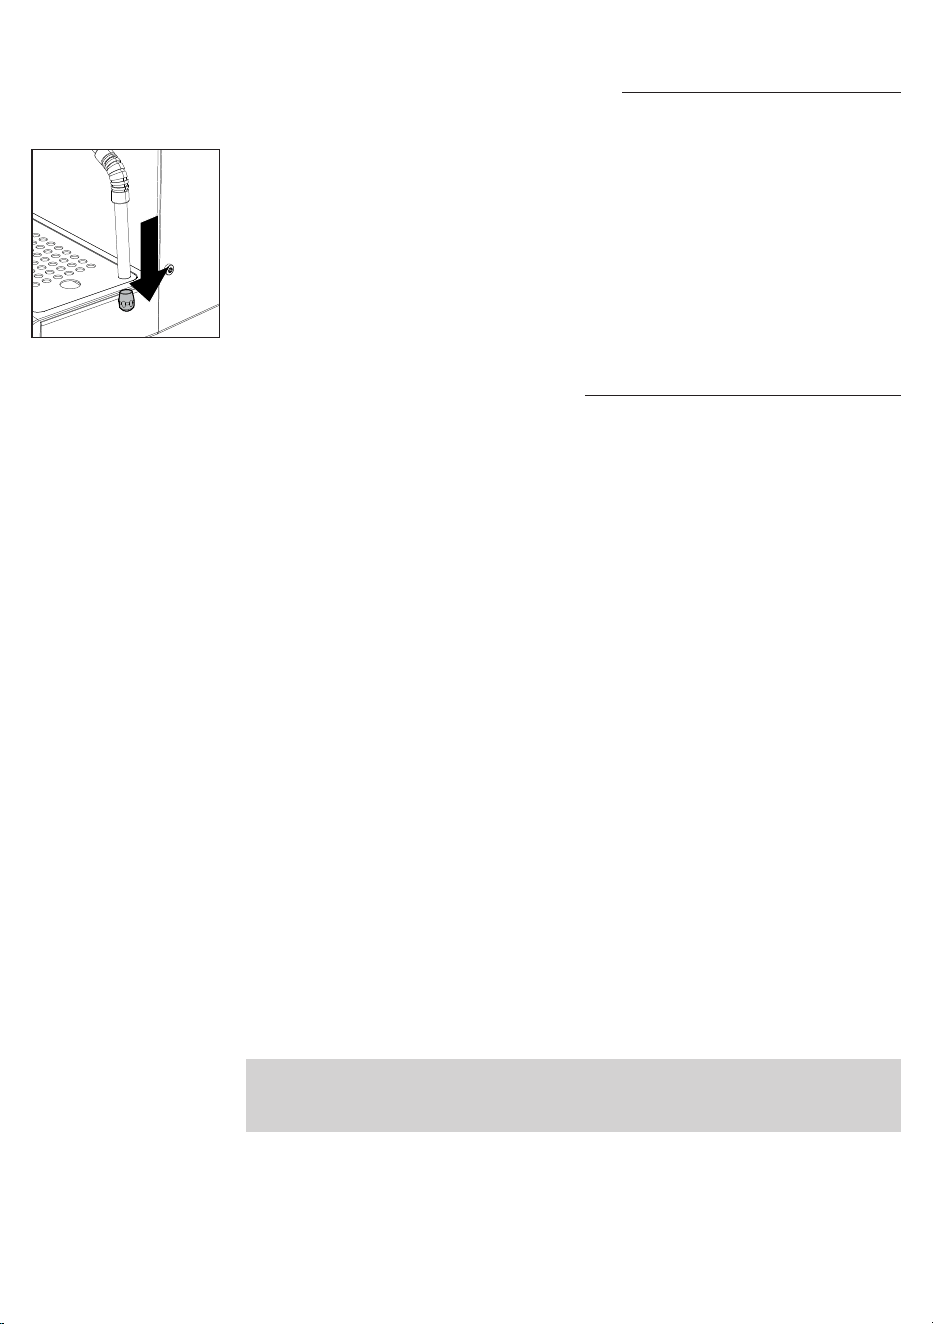
1 Ensure the drain pipe is correctly inserted (28).
2 Insert the blind lter (23) into the lter holder. Split a Gaggia cleaning tablet in
4 pieces and insert it in the blind lter.
3 Insert the lter holder (24) into the brew unit (30).
4 Press the coffee toggle switch to activate the pump and create the required
pressure.
5 Wait 5 seconds before pressing the coffee toggle switch again to disable the
pump.
6 Water mixed with detergent will ow into the drip tray through the drain pipe.
Wait about 30 seconds.
18
English
7 Repeat point 4 to 6 for at least 10 times until clear water ows from the drain
pipe.
8 Remove the lter holder and the blind lter and wash them carefully under hot
tap water.
9 Insert the lter holder with the blind lter again into the coffee brew unit and
repeat points 4 and 5 for at least 10 times to complete the rinsing cycle.
10 Remove the lter holder and clean the screen (29) by using a brush as
described in the relevant chapter.
11 Press the coffee toggle switch and let a cup of hot water (
ca. 150ml
) ow
from the brew unit.
12 Empty and wash the drip tray under tap water.
13 The machine is now ready for use.
Note: the machine is equipped with a protection system so that if you activate the
coffee dispensing with the blind lter inserted for a time longer than 90 seconds,
the alarm E16 appears. This is normal, not a product defect.
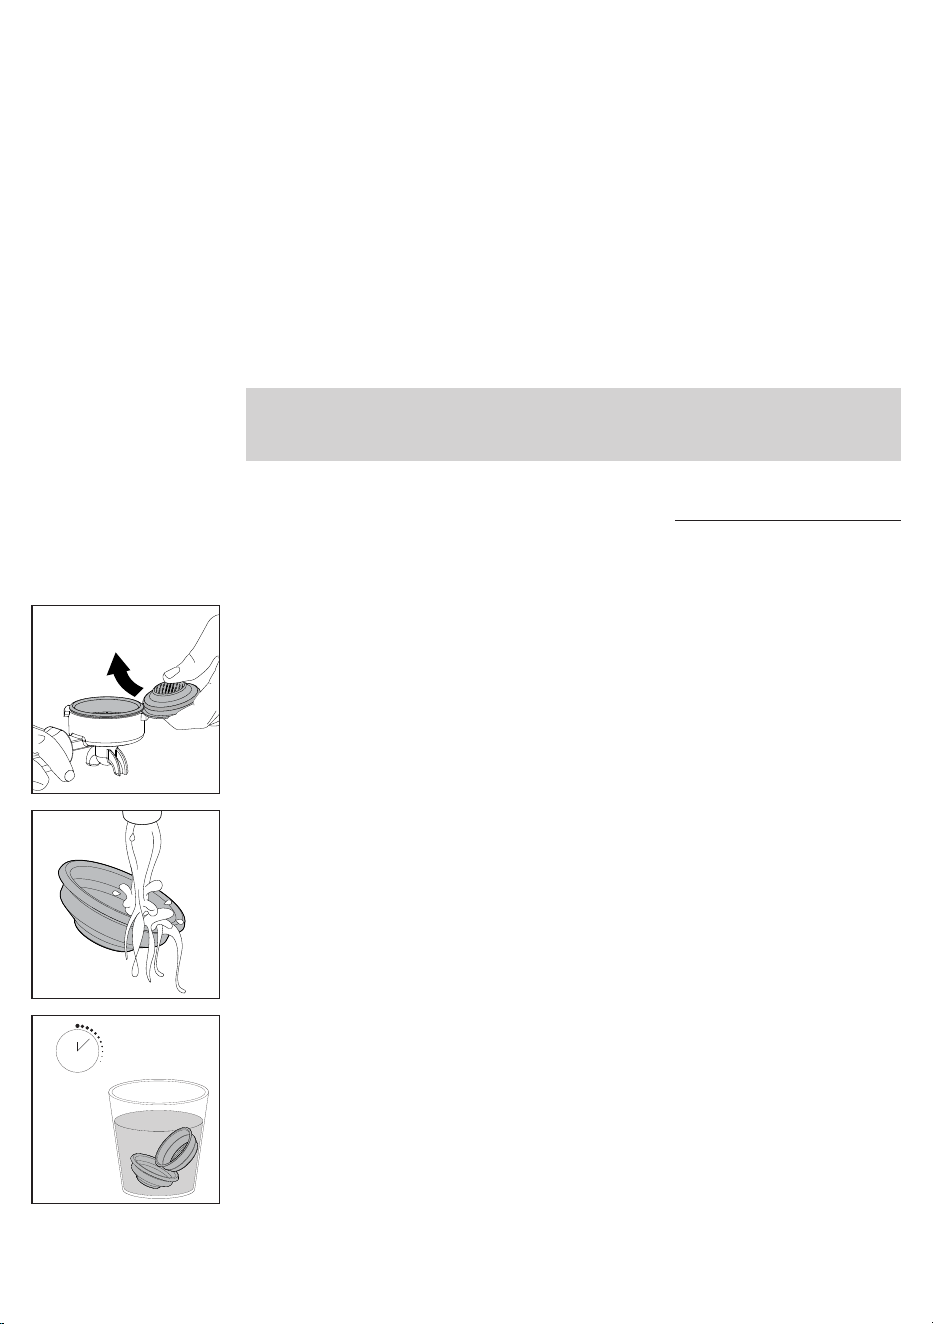
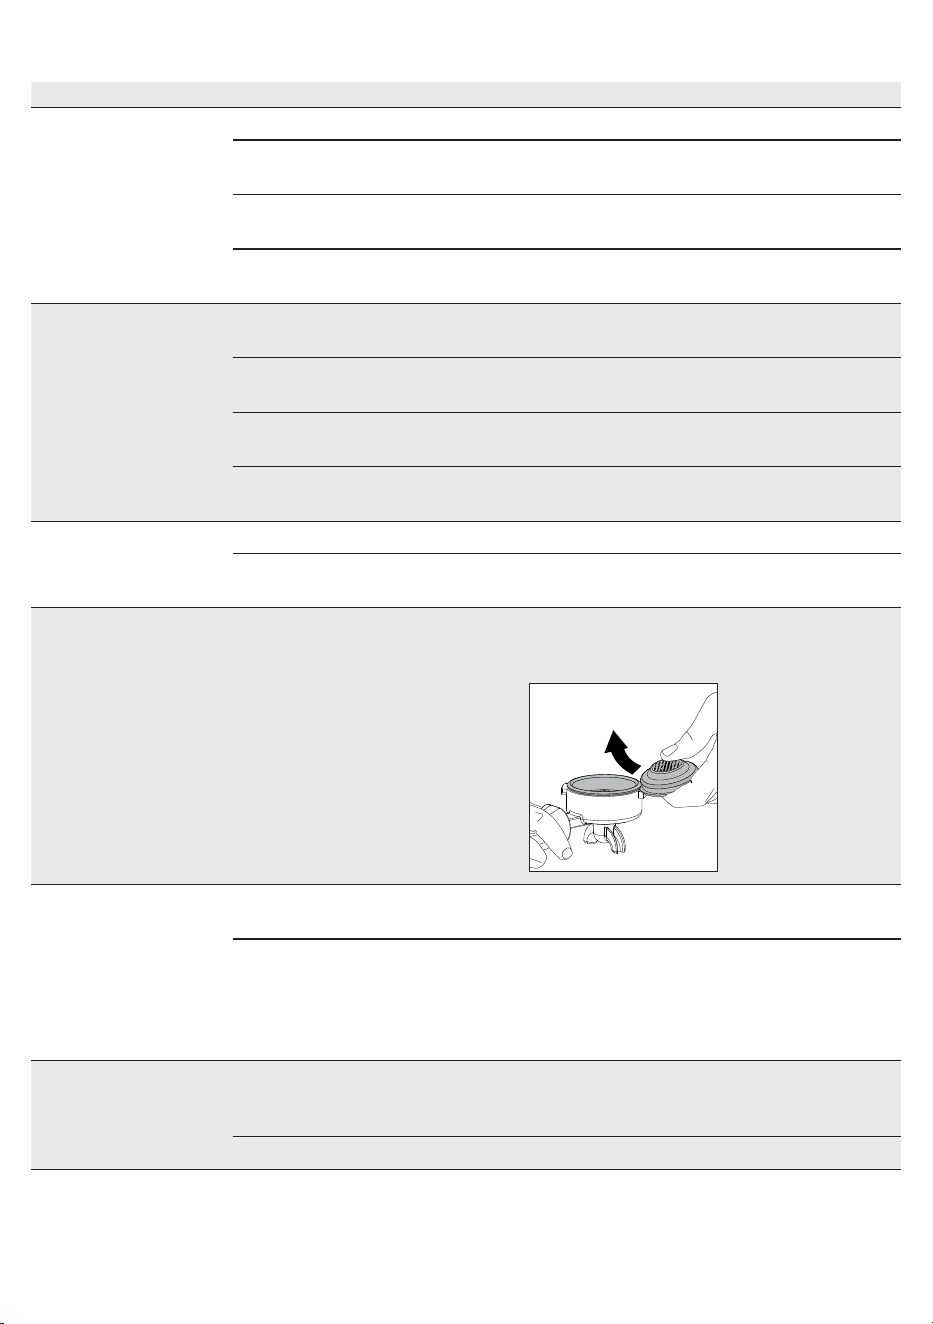
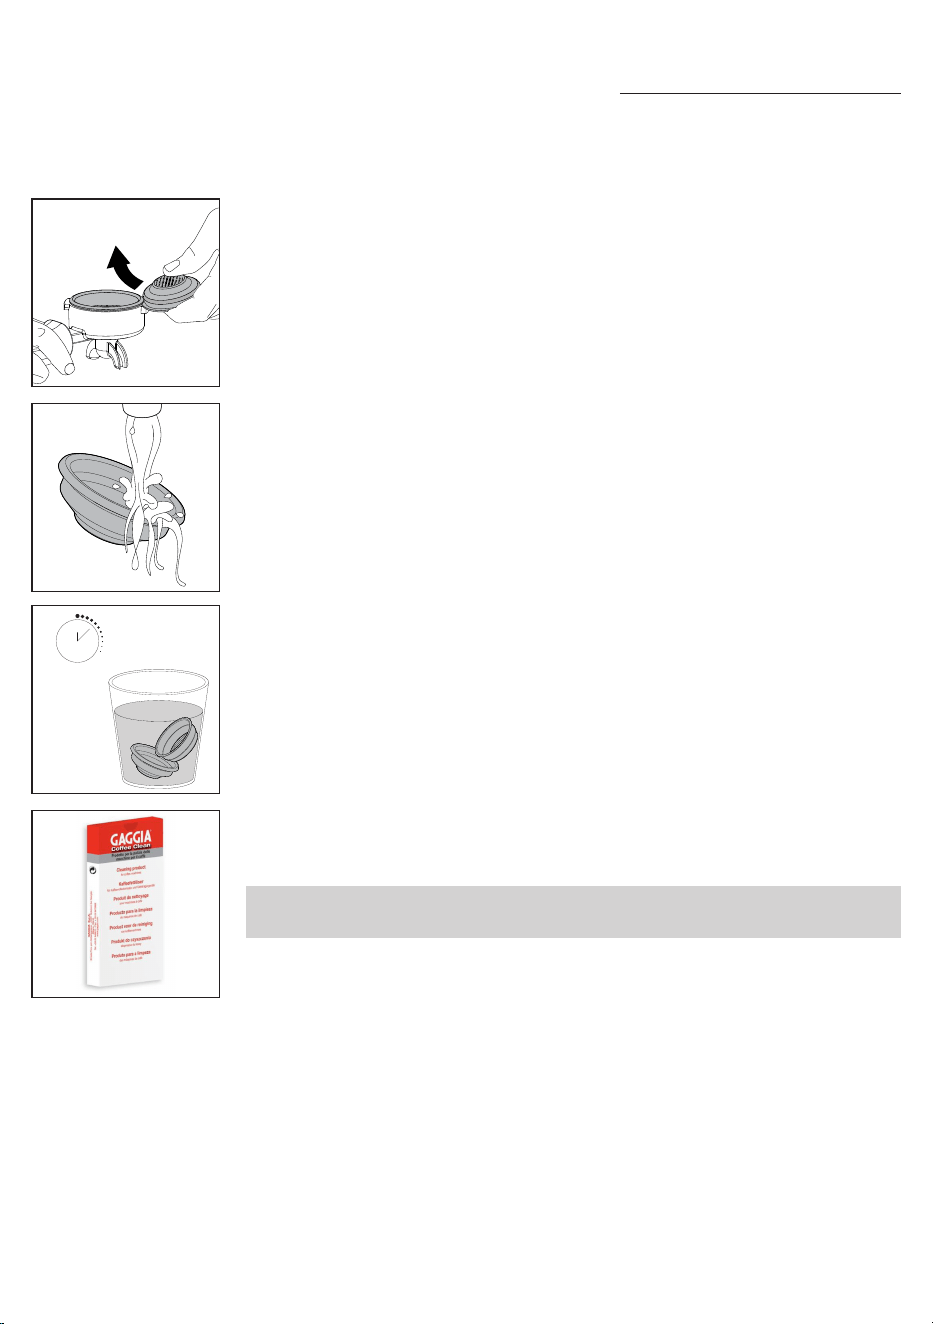
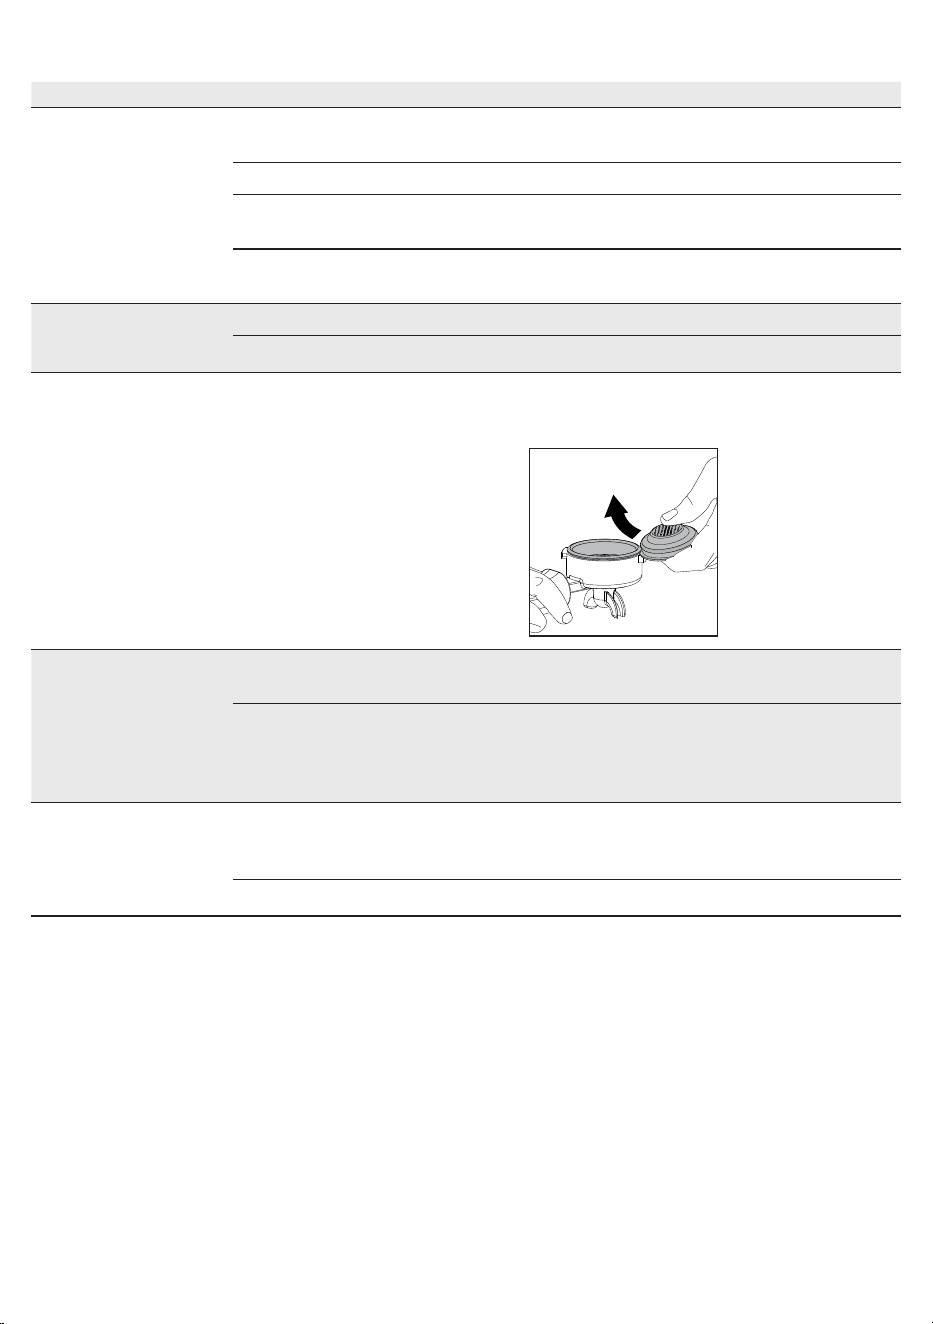
The lter and lter holder cleaning
Filters must be kept clean to ensure a perfect result.
Daily:
1 Remove the lter from the lter holder as described in the picture on the side.
2 Wash using lukewarm water.
3 If you notice a malfunction when brewing coffee, steep the lters in boiling
water for 10 minutes and then rinse them with running water.
10 min.
19
English
Cleaning the grid and drip tray
Remove the drip tray and grid and wash them under running water. Do not use
abrasive products.
Cleaning the water tank
1 Remove the water tank and wash it under running water.
Warning icons
The water tank needs to be lled with water.
Error code key
Open the steam knob and leave it open until the steam ow is almost over (
about 2
minutes
). Close the steam knob. Turn the machine off and on again using the main
switch. If the error persists, you need to contact an authorized service center.
Cleaning the screen
After each coffee brew:
1 Remove the lter holder from the brew group.
2 Remove any coffee grounds from the screen using a brush.
3 Clean with hot water by pressing the coffee toggle switch and dispensing a
cup of water.
E20
4 To clean the lters more thoroughly, we recommend using the GAGGIA
cleaning tablets specically designed to keep your machine in perfect working
order.
Warning: the lter must only be replaced when the lter holder has cooled down
completely to avoid scalds.
20
English
Turn the machine off and on again using the main switch. If inserted, do not
remove the lter holder before turning the machine off. Try repeating the operation
a couple of times. If the error persists, you need to contact an authorized service
center or the distributors in your country, reporting the error code shown on the
display above the symbol. Contact details are available on the website www.
gaggia.com.
E
Troubleshooting
This chapter outlines the most common problems you may encounter while using
the machine. If you are unable to solve the problem using the information provided
below, visit the FAQ sections on www.gaggia.com or contact either the Customer
Service Centre or the local distributors in your countrye.
Problem Cause Solution
The milk does not froth. The type of milk used is not
suitable for foaming.
The amount and the quality of froth vary
depending on the type of milk (
Chapter
"Frothing milk to prepare a cappuccino"
).
No coffee is brewed
after pressing the coffee
toggle swtich.
The lter holder is clogged. Press the coffee toggle swtich again.
Turn the machine off and let it cool down
(
approx. 1 hour
). Then remove and wash the
lter holder thoroughly. If the problem persists,
contact the service centre.
The display shows the
water alarm even if
the water tank is not
completely empty.
It is a normal behavior of the
machine requiring a reserve
of water to avoid possible
malfunctions.
Rell the water tank up to the MAX level.
Coffee is too cold. The lter holder is not inserted for
preheating.
Preheat the lter holder (
Chapter "Coffee
brewing"
).
The cups are cold. Place the cups on the cupwarmer.
The machine is not ready. Wait until the coffee toggle switch is lit steadily.
The coffee is too much
warm even afterwards
having lowered the
temperature on display.
Tutte le parti della macchina sono
calde
To speed up the cooling of the boiler
follow the instructions in the dedicated chapter
"How to lower the temperature of the coffee
and hot water/steam boilers".
The coffee is brewed
too fast, crema does
not form.
There is too little coffee in the lter
holder.
Add coffee.
The grind is too coarse. Use a ner grind.
Coffee has not been tamped or
tamped too lightly.
Tamp a bit harder with the supplied tamper
paying attention to avoid possible gaps.
The coffee is not fresh. Use a different blend.
21
English
Problem Cause Solution
Coffee does not come
out or drips only.
The grind is too ne. Use a coarser grind.
Coffee has been tamped too hard
in the lter holder.
Tamp the coffee more lightly.
There is too much coffee in the
lter holder.
Reduce the quantity of coffee in the lter
holder.
The lter in the lter holder is
clogged.
Clean the lter (
Chapter "The lter and lter
holder cleaning”
).
Coffee ows out of the
rim.
The lter holder is not correctly
inserted in the brew group.
Insert the lter holder as described in the
relevant chapter.
The upper rim of the lter holder
is dirty.
Clean the rim of the lter holder.
There is too much coffee in the
lter holder.
Reduce the quantity of coffee using the
measuring scoop.
The screen gasket is dirty. Clean the screen gasket as described in the
relevant Chapter.
The coffee pod is too
wet.
The grind is to coarse. Use a ner grind.
There is too little coffee in the lte
rholder.
Add coffee.
It’s dicult to remove
the lter from the lter
holder.
This is typical of professional lter
holders, to avoid them being too
loose.
Use another by-packed lter upside down as
a lever (
Chapter "The lter and lter holder
cleaning”
).
The machine does not
turn on.
The machine is not connected to
the electric network.
Connect the machine to the electric network.
The machine has been just
switched off by pressing the ON/
OFF switch toggle and it requires
a few seconds to complete the
procedure.
Wait a few seconds before switch it on again.
The machine does not
dispense water.
The water in the boiler has not yet
reached the minimum temperature
to dispense.
Wait until the water LED is on steadily.
Water alarm active. Rell the water tank.
22
English
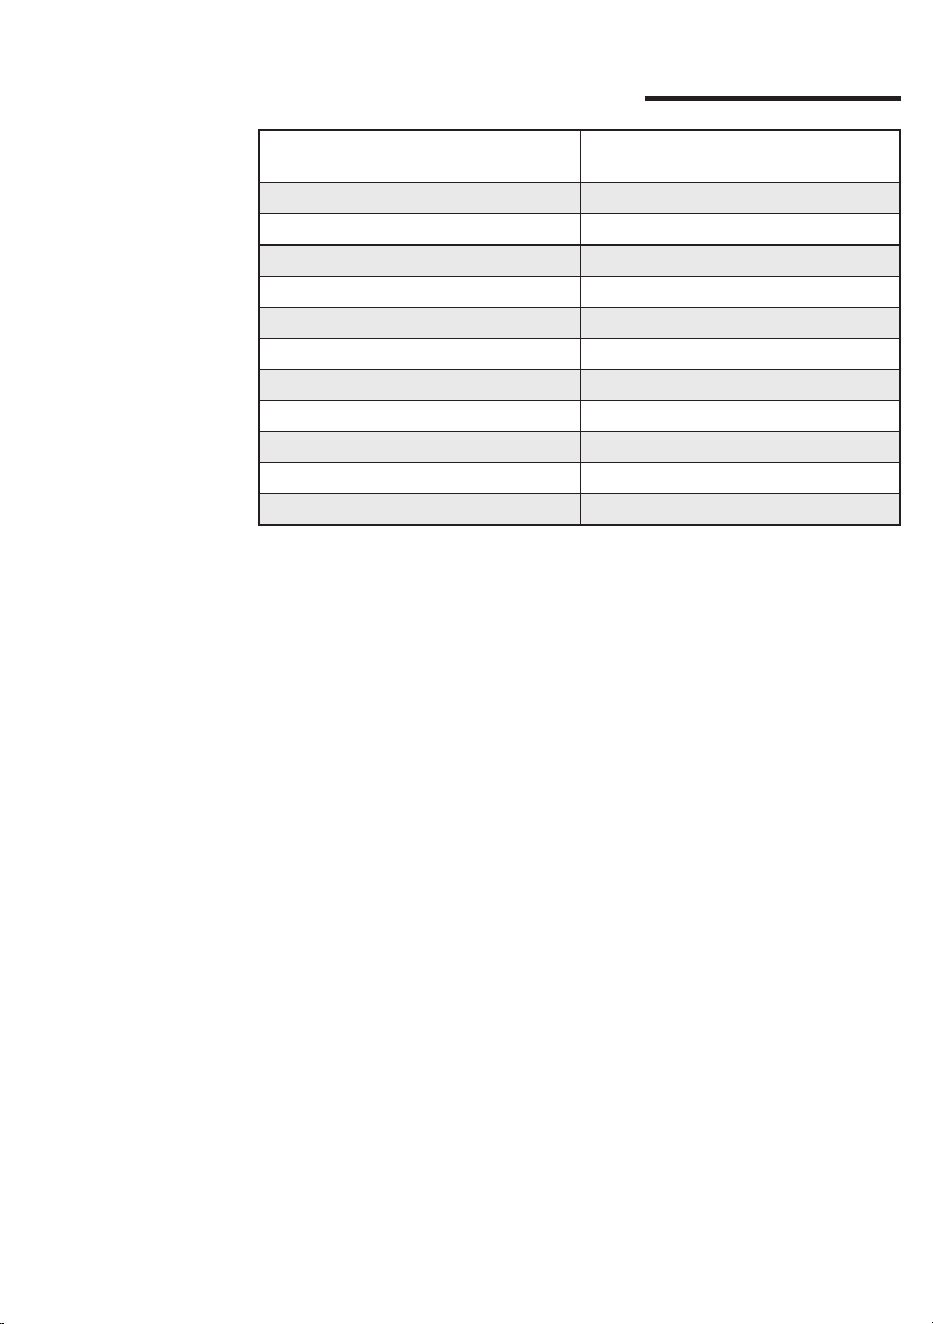
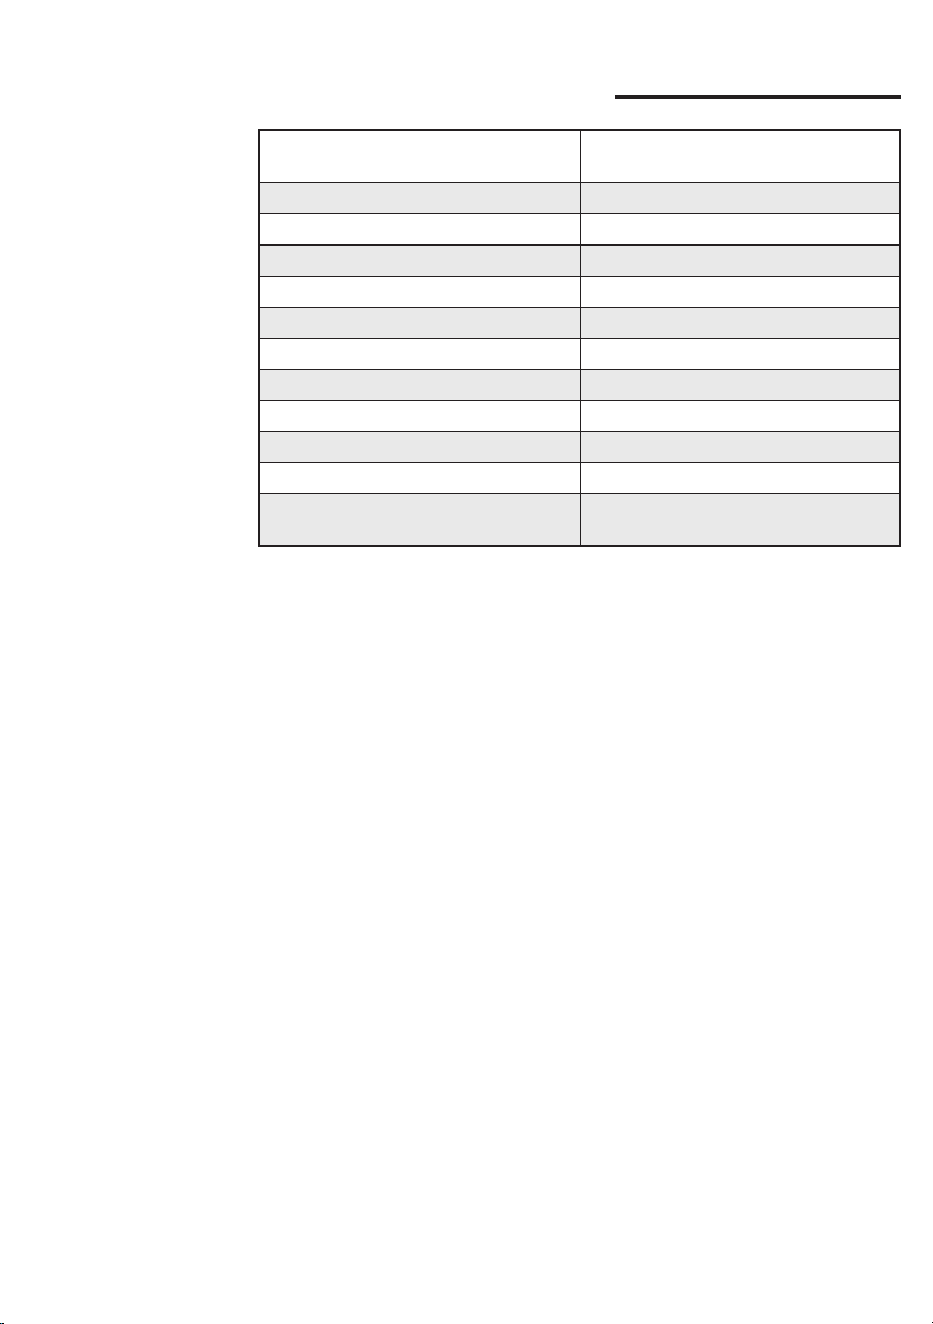
Technical specications
Nominal voltage - Power rating -
Power supply
See the data plate inside the water
tank compartment
Machine body material Stainless steel
Dimensions 260 x 423 x 416 mm
Weight 17,6 kg
Power cord length 1200 mm
Control panel Frontale
Water tank 2 liters - Removable
Coffee pump pressure 15 bar
Coffee boiler Brass 120 ml
Steam pump pressure 15 bar
Steam boiler Stainless Steel 900ml
Safety devices Thermal fuse

23
Nederlands
Inhoudsopgave
Display Pictogrammen ________________________________________________ 24
Overzicht van de machine _____________________________________________ 25
Controlepaneel ______________________________________________________ 25
Multifunctietoetsen __________________________________________________________________ 25
Hendels controlepaneel ______________________________________________________________ 25
Bijgeleverde lters ___________________________________________________ 26
Filter voor 2 kopjes __________________________________________________________________ 26
Filter voor 1 kopje ___________________________________________________________________ 26
Blind lter _________________________________________________________________________ 27
De lterhouder plaatsen _______________________________________________ 27
Hoogte-afstelling rooster ______________________________________________ 27
Afstelling afgiftedruk __________________________________________________ 28
Eerste installatie _____________________________________________________ 28
Eerste gebruik of als de machine meer dan 2 weken niet is gebruikt __________ 30
Voorbereiding _______________________________________________________ 30
Koe zetten _______________________________________________________________________ 30
Koe zetten met automatische voorinfusie________________________________________________ 31
Koe zetten met handmatige voorinfusie _________________________________________________ 32
Koe zetten met de PRESET functie ____________________________________________________ 32
De PRESET functie activeren en deactiveren _____________________________________________ 32
Het volume van uw koe instellen en in het geheugen opslaan________________________________ 33
De temperatuur van de koeketel en stoom/waterketel verlagen ______________________________ 33
Melk opschuimen voor cappuccino ______________________________________ 34
Afgifte van heet water _________________________________________________ 34
Instellingen van de machine ____________________________________________ 35
Automatische voorinfusie _____________________________________________________________ 35
Wake-up timer ______________________________________________________________________ 35
Stand-by __________________________________________________________________________ 35
Ecomode __________________________________________________________________________ 35
Toetsgeluid ________________________________________________________________________ 36
Meeteenheid van de temperatuur _______________________________________________________ 36
Temperatuur stoom __________________________________________________________________ 36
24
Nederlands
Reiniging en onderhoud _______________________________________________ 36
Reinigingstabel _____________________________________________________________________ 36
Reiniging van het stoompijpje __________________________________________________________ 37
Reiniging van de zetgroep ____________________________________________________________ 37
Reiniging lter en lterhouder __________________________________________________________ 38
Reiniging van het sproeiplaatje ________________________________________________________ 39
Reiniging van het rooster en het lekbakje _________________________________________________ 39
Reiniging van het waterreservoir ________________________________________________________ 39
Waarschuwingspictogrammen__________________________________________ 39
Betekenis van de foutcodes ____________________________________________ 39
Oplossing van problemen _____________________________________________ 40
Technische gegevens _________________________________________________ 42
93
130
1
2 3 4
5
7 6
93
9 8
Display Pictogrammen
1 Ingestelde koe temperatuur 6 Stoom/heet water ketel
2 Wake Up timer actief 7 Ingestelde stoom temperatuur
3 Actuele koe temperatuur 8 Stoom/heet water ketel uitgeschakelt
4 Koe ketel 9 Ecomode-functie actief
5 PRESET functie actief
25
Nederlands
Overzicht van de machine
1 Toets INSTELLINGEN/TERUG 18 Aansluiting voor voedingskabel
2 Navigatietoets (-) 19 Hoofdschakelaar
3 Navigatietoets (+) 20 Voedingskabel
4 Toets OK 21 Filter voor 1 kopje
5 ON/OFF-hendel 22 Filter voor 2 kopjes
6 Hendel Voorinfusie 23 Blind lter
7 Koehendel 24 Filterhouder
8 Waterhendel 25 Koestamper
9 Stoomhendel 26 Lekbakje
10 Deksel waterreservoir 27 Rooster lekbakje
11 Waterreservoir 28 Telescopische afvoerleiding
12 Kopjeswarmhoudplaat 29 Sproeiplaatje
13 Stoomknop 30 Zetgroep
14 Stoompijpje 31 Schenkinrichting voor water
15 Bescherming stoompijpje 32 Maatlepel voor voorgemalen koe
16 Spuitmond stoompijpje 33 Drukmeter
17 Stelschroef afgiftedruk
Controlepaneel
Multifunctietoetsen
1
Toets INSTELLINGEN/TERUG
Klik om het menu van de machine te openen en om naar het
vorige scherm terug te keren.
2/3
Navigatietoetsen en
Klik om te navigeren in het menu en om de temperatuurtarget
bij de uitgang van de zetgroep te wijzigen.
4
Toets ok
Klik om de in het menu van de machine geselecteerde functie
te bevestigen.
Hendels controlepaneel
5
ON/OFF-hendel
Druk om de machine in of uit te schakelen.
De hendel is verlicht wanneer de machine aan is.
6
Hendel Voorinfusie
Druk om de automatische voorinfusie te activeren.
Wanneer de voorinfusie is geactiveerd, licht de hendel op.
Houd de hendel ingedrukt om de handmatige voorinfusie te
activeren.
26
Nederlands
Bijgeleverde lters
Filter voor 2 kopjes
De lter voor twee kopjes is al op de lterhouder gemonteerd en maakt het
mogelijk om twee kopjes espresso met gemalen koe te zetten.
Filter voor 1 kopje
Deze lter kan worden gebruikt om één kopje espresso met gemalen koe te
zetten.
7
Koehendel
Druk om koe te zetten.
De hendel is vast verlicht wanneer de machine klaar is om
koe te zetten en knippert wanneer de machine niet op
temperatuur is.
8
Waterhendel
Druk om koe te zetten.
De hendel is vast verlicht wanneer de machine klaar is om
koe te zetten en knippert wanneer de machine niet op
temperatuur is.
9
Stoomhendel
Druk om de stoomfunctie te activeren, de machine begint met
opwarmen.
De hendel licht op wanneer de machine klaar is om stoom te
maken en knippert wanneer de machine niet op temperatuur
is.
27
Nederlands
De lterhouder plaatsen
Plaats de lterhouder van onderaf in de zetgroep, waarbij u het referentieteken
op de handgreep van de lterhouder uitlijnt met het symbool aanwezig op de
ombouw, draai van links naar rechts totdat de lterhouder op zijn plaats vastzit,
d.w.z. wanneer het referentieteken op de handgreep en de op de ombouw
aanwezige driehoek perfect zijn uitgelijnd of lichtelijk naar rechts verschoven.
Hoogte-afstelling rooster
Om te zorgen voor een optimale hoogte voor het gebruik van espressokopjes:
1 Zet de telescopische afvoerleiding in de kortste stand.
Blind lter
Deze lter kan worden gebruikt om de zetgroep schoon te maken of om de
pompdruk te regelen door middel van de stelschroef (17).
2 Til het lekbakje op en plaats het in de daarvoor bestemde geleiders zoals in de
tekening is aangegeven.

28
Nederlands
Afstelling afgiftedruk
Het is mogelijk om de afgiftedruk af te stellen en te wijzigen door te draaien aan de
stelschroef (17) die standaard op 9 bar staat afgesteld.
Om de afgiftedruk te wijzigen:
1 Schakel de PRESET-Functie uit als deze actief is.
2 Plaats de lterhouder met de blinde lter in de zetgroep.
3 Druk op de koehendel en lees de op de drukmeter (33) aangegeven bar af.
4 Draai met een platte schroevendraaier tegen de klok in (-) om de druk te
verlagen, met de klok mee (+) om de druk te verhogen.
5 Stop de afgifte door nogmaals op de hendel van de koe te drukken wanneer
op de drukmeter het gewenste aantal bar is bereikt.
6 Maak de lterhouder los en vervang de blinde lter door de lter voor 1 of 2
kopjes
7 De machine is nu weer klaar voor gebruik.
Opmerking: voer de afstelling niet uit met de lters voor 1 of 2 kopjes, maar alleen
met de blinde lter.
Opmerking: om brandwonden te voorkomen, mag u de lterhouder pas
verwijderen nadat u punt 5 hebt uitgevoerd.
Let op: het apparaat is uitgerust met een beveiligingssysteem, zodat als u de
koeafgifte activeert met het blindlter langer dan 90 seconden geplaatst, het
alarm E16 verschijnt. Dit is normaal, geen productdefect.
Eerste installatie
Opmerking: dit apparaat is getest met koe. Hoewel het apparaat zorgvuldig is
schoongemaakt, kunnen er wat koeresten zijn achtergebleven. We garanderen
dat het apparaat helemaal nieuw is.
1 Haal het waterreservoir eruit; spoel het om en vul het met vers water tot het
MAX niveau. Het is raadzaam om ervoor te zorgen dat de water reservoir
correct wordt geplaatst.
2 Steek de stekker van de voedingskabel in een stopcontact met de juiste
spanning.
29
Nederlands
7 Het display toont de temperatuur bij de uitgang van de zetgroep en de
oplopende waarde totdat de ingestelde temperatuur is bereikt.
8 De temperatuur kan worden gewijzigd met de toetsen en .
9 Als de gewenste temperatuur is bereikt, gaan de ledlampjes van de koe en
het hete water continu branden Volg voor het aeveren de instructies in de
paragraaf "Eerste gebruik".
5 Druk op de ON/OFF-hendel om de machine te starten, het betreffende
ledlampje gaat branden.
6 Plaats een glas onder de zetgroep en onder de schenkinrichting voor heet
water drukt op de toets en volgt en volg de instructies die op het display
verschijnen tot de installatie is voltooid.
3 Druk op de aan/uit-toets aan de achterkant van de machine.
4 Het display wordt ingeschakeld en toont het historische Gaggia-logo en
schakelt vervolgens uit en gaat in stand-by.
30
Nederlands
Eerste gebruik of als de machine meer
dan 2 weken niet is gebruikt
Opmerking: nieuwe koezetapparaten kunnen een onaangename geur afgeven.
Dit is een normaal verschijnsel en geen productdefect. Wij raden u aan de
onderstaande instructies te volgen.Het water dat er tijdens dit proces uitkomt,
moet worden weggegooid en mag niet worden gebruikt voor consumptie.
Opmerking: om de machine te beschermen tegen kalkaanslag, dient u water te
gebruiken dat niet te hard is. Indien nodig adviseren wij u een waterontharder te
gebruiken
1 Zet een grote bakje onder de schenkinrichting voor heet water.
2 Haal het waterreservoir eruit; spoel het om en vul het tot het MAX niveau.
3 Druk op de waterhendel en tap één tank water uit de schenkinrichting voor
water. Als de waterafgifte stopt, drukt u gewoon nogmaals op de waterhendel
wanneer de LED vast verlicht is, totdat het wateralarm op het display
verschijnt. Het legen van de hele watertank kan een paar minuten duren.
4 Vul het waterreservoir tot het MAX niveau.
5 Plaats de lterhouder in de zetgroep en plaats een grote bakje onder de
lterhouder.
6 Druk op de koehendel en tap water uit de zetgroup.Als de afgifte voortijdig
stopt, drukt u nogmaals op de koehendel totdat het 'geen water'-signaal
verschijnt.
7 Verwijder de lterhouder en spoel hem af onder stromend water.
8 Vul het waterreservoir opnieuw tot het MAX niveau.
9 Druk op de stoomhendel wanneer deze continu brandt, open de knop en laat
ongeveer een minuut lang stoom vrijkomen.
10 Schakel de machine uit en weer in om ervoor te zorgen dat alle informatie is
opgeslagen. De machine is nu klaar voor gebruik.
Voorbereiding
Zorg ervoor dat u een goede maaljnheid gebruikt voor de afgifte van espresso.
Voor de juiste maling raden we aan onze MDF55 koemolen te gebruiken.
Opmerking: als de machine heet is en u hebt de ingestelde temperatuur verlaagd,
volg dan de instructies in het hoofdstuk "De temperatuur van de koeketel en
stoom/waterketel verlagen" om het afkoelen te versnellen.
Koe zetten
De lterhouder wordt standaard met de lter voor 2 kopjes gemonteerd.
Alvorens het eerste kopje koe te zetten, moet u de lterhouder voorverwarmen.
1 Plaats de lterhouder met de lter voor 1 of 2 kopjes in de zetgroep.
31
Nederlands
2 Zet een kopje onder de lterhouder en druk op de koehendel waneer het vast
verlicht is, om een kopje water af te geven (
ca.150 ml
).
3 Verwijder de lterhouder en verwijder eventueel achtergebleven water.
4 Vul de lterhouder met 1 maatlepel voorgemalen koe voor een enkele koe
of met 2 maatlepels voor een dubbele koe waarbij het interne inkeping in het
lter als referentie wordt genomen. Tik daarbij zijwaarts op de lterhouder om
het koepoeder gelijkmatig te verdelen.
5 Druk de koe aan met de daarvoor bestemde meegeleverde stamper.
Het aandrukken moet gelijkmatig gebeuren en het oppervlak van de koe
moet goed genivelleerd zijn zonder groeven en parallel met de rand van de
lterhouder.
6 Reinig de rand van de lterhouder van eventuele koeresten.
7 Plaats de lterhouder correct zoals beschreven in de paragraaf "De
lterhouder plaatsen".
8 Zet 1 of 2 kopjes onder de lterhouder.
9 Wacht tot de koehendel vast is verlicht, druk hem dan in om de afgifte te
starten.
10 Tijdens de afgifte worden op het display de seconden van de afgifte
weergegeven.
11 Zodra het gewenste volume is bereikt, drukt u nogmaals op de koehendel
om de afgifte te stoppen.
12 Verwijder na aoop van de afgifte de lterhouder, verwijder het koedik uit het
lter en eventuele resten uit het sproeiplaatje.
13 Het display keert terug naar de weergave van de temperatuur aan de uitgang
van de zetgroep.
Opmerking: wacht ongeveer 10 seconden alvorens de lterhouder te verwijderen,
verwijder hem langzaam en voorzichtig door hem naar links te draaien. Kijk
uit dat u zich niet verbrandt aan het water dat mogelijk op het koeresidu is
achtergebleven.
Opmerking: in de lterhouder kan er een kleine hoeveelheid water achterblijven; dit
is normaal en ligt aan de kenmerken van de lterhouder zelf.
Koe zetten met automatische voorinfusie
Het is mogelijk om de automatische voorinfusie te activeren die een in de fabriek
ingestelde voorinfusietijd heeft die kan worden gewijzigd via het menu van de
machine.
1 Druk op de hendel voor voorinfusie om de automatische voorinfusie te
activeren. De hendel zal oplichten.

32
Nederlands
2 Bij het starten van de afgifte zullen, nadat u op de koehendel hebt gedrukt,
de ingestelde voorinfusietijd en de tijd van afgifte op het display worden
weergegeven.
3 Zodra het gewenste koevolume is bereikt, drukt u nogmaals op de
koehendel om de afgifte te stoppen.
MED
Koe zetten met handmatige voorinfusie
Let op: voorkom het risico op brandwonden. Verwijder de lterhouder niet nadat u
de hendel van de voorinfusie hebt losgelaten maar pas wanneer de koeafgifte is
beëindigd.
Tijdens de afgifte met handmatige voorinfusie worden op het display
achtereenvolgens alle fasen weergegeven – bevochtiging van de koepad met
water - rusttijd - daadwerkelijke afgifte.
1 Houd de voorinfusiehendel ingedrukt. Het betreffende ledlampje begint te
knipperen.
2 Op het display wordt de bevochtigingstijd van de koepad met water en het
bijbehorende symbool weergegeven.
3 Laat bij het bereiken van de gewenste bevochtigingstijd (
maximaal 20
seconden
) de hendel los.
00
00
4 De seconden zullen door blijven lopen om de gewenste rusttijd aan te geven
en het bijbehorende symbool .
5 Na het verstrijken van de gewenste rusttijd (
maximaal 15 seconden
) drukt u
op de koehendel om de daadwerkelijke afgifte onder hoge druk te starten.
02
00
6 Het display toont de lopende seconden voor de afgifte.
7 Zodra het gewenste volume is bereikt, drukt u nogmaals op de koehendel
om de afgifte te stoppen.
Opmerking: de koehendel is uitgeschakeld wanneer de hendel van de voorinfusie
ingedrukt wordt gehouden.
Opmerking: zodra de maximale rusttijd is verstreken, annuleert de machine de
aftgifte.
02
03
Koe zetten met de PRESET functie
Door deze functie te activeren, stopt de machine automatisch de afgifte bij het
bereiken van een vooraf ingesteld volume.
De PRESET functie activeren en deactiveren
1 Houd de hendels voor voorinfusie en koe gelijktijdig enkele seconden
ingedrukt om de functie te activeren of deactiveren.
93
33
Nederlands
93
2 Het woord PRESET op het display geeft aan wanneer de functie actief is.
3 Als de functie actief is, zal de machine de ingestelde hoeveelheid koe
afgeven.
4 Door de functie te deactiveren gaat u terug naar de handmatige modus en
moet u de koehendel indrukken om de afgifte te stoppen.
Het volume van uw koe instellen en in het geheugen
opslaan
De machine heeft een vooraf in de fabriek ingesteld koevolume.
Het vooraf ingestelde volume kan worden gewijzigd via de onderstaande
procedure.
1 Houd de koehendel een paar seconden ingedrukt, laat hem los wanneer
de afgifte start en de timer verschijnt op het display met het woord PRESET
knipperend.
2 Druk nogmaals op de koehendel zodra het gewenste volume is bereikt.
3 Op het display verschijnt het bevestigingsvinkje om aan te geven dat het
nieuwe volume in het geheugen is opgeslagen door de vorige ingestelde
waarde te overschrijven.
4 Het display keert terug naar het hoofdscherm met de actieve PRESET-functie.
Opmerking: de PRESET-functie slaat het volume op en niet het tempo. De timer
op het display kan een andere tijd aangeven voor dezelfde hoeveelheid koe,
afhankelijk van de koesoorten, de hoeveelheid gemalen koe en een grovere of
jnere maling.
Opmerking: de PRESET-functie slaat het volume op en niet de tijd. De timer op het
display kan een andere tijd aangeven voor dezelfde hoeveelheid koe, afhankelijk
van de koesoorten, de hoeveelheid gemalen koe en een grovere of jnere
maling.
93
De temperatuur van de koeketel en stoom/
waterketel verlagen
Koeketel
1 Zet een leeg kopje onder de zetgroep zonder dat de lterhouder is bevestigd.
2 Druk op de koehendel en tap een glas water af.
3 Druk nogmaals op de koehendel om de bereiding te stoppen.
4 Herhaal de handeling als het apparaat nog niet de gewenste temperatuur
heeft bereikt die op het display zichtbaar is.
Stoom/waterketel
1 Zet een leeg kopje onder de schenkinrichting voor water.
2 Druk op de waterhendel en tap een glas water af.
3 Druk nogmaals op de waterhendel om de bereiding te stoppen.
4 Herhaal de handeling als het apparaat nog niet de gewenste temperatuur
heeft bereikt.
34
Nederlands
3 Voordat u de melk gaat opschuimen, dient u eventuele resterende condens te
verwijderen door de stoomknop te openen totdat er alleen nog maar stoom uit
komt.
4 Vul een derde van een kannetje met koude melk, steek het stoompijpje in de
melk en begin met opschuimen door de knop opnieuw open te draaien.
5 Als de gewenste opschuiming is bereikt, sluit u de knop om de stoomafgifte te
stoppen en verwijdert u het melkkannetje.
6 Reinig het circuit door wederom een beetje stoom af te geven om eventuele
melkresten te verwijderen en reinig het stoompijpje met een vochtige doek.
7 Druk op de stoomhendel om de functie te verlaten en het ledlampje gaat uit.
Let op: aan het begin van de afgifte kan er wat heet water vrijkomen. Het
uitlooppijpje kan hoge temperaturen bereiken: vermijd direct contact met de
handen.
Melk opschuimen voor cappuccino
Om een optimaal resultaat te waarborgen, adviseren we om koude volle melk (
op
circa 5 °C
) met een eiwitgehalte van minstens 3% en met minstens 3,5% vet te
gebruiken. Maar ook halfvolle melk, bepaalde soorten lactosevrije melk, amandel-,
haver en sojadranken kunnen goede resultaten opleveren.
1 Druk op de stoomhendel die zal gaan knipperen totdat de machine de
ingestelde temperatuur heeft bereikt, zichtbaar op het display.
2 Als de hendel vast verlicht is, is de machine klaar voor de stoomafgifte.
130
93
Afgifte van heet water
1 Plaats een theekopje of theeglas onder de schenkinrichting voor heet water.
2 Druk op de hendel voor heet water wanneer hij vast verlicht is en druk zodra
de gewenste hoeveelheid is bereikt, nogmaals op de hendel om de afgifte
te stoppen. Als u een grotere hoeveelheid water wilt tappen, herhaalt u de
handeling.
Opmerking: er kan water worden afgegeven, zelfs als de waterhendel knippert of
niet verlicht is. In dit geval kan de watertemperatuur niet optimaal zijn.
Let op: aan het begin van de afgifte kan er wat heet water vrijkomen. Het
uitlooppijpje kan hoge temperaturen bereiken: vermijd direct contact met de
handen.
35
Nederlands
Instellingen van de machine
Als u op de toets op het display drukt, gaat u naar de machine-instellingen
waar u met gebruik van de navigatietoetsen , en de bevestigingstoets
enkele parameters kunt activeren of wijzigen:
- Automatische voorinfusie
- Wake-up timer
- Stand-by
- Ecomode
- Toetsgeluid
- Meeteenheid van de temperatuur
- Temperatuur stoom
Automatische voorinfusie
Voor de voorinfusie kunnen drie niveaus worden ingesteld, door het symbool te
selecteren.
LGT Light roast - Lichte branding
MED Medium roast - Medium branding
DRK Dark roast - Donkere branding
Wake-up timer
Door het symbool . te selecteren kunt u de wekfunctie van de machine activeren
of deactiveren.
Selecteer ON om de functie te activeren en bevestig, selecteer het symbool om
de tijd in te stellen en vervolgens het symbool om de wektijd in te stellen (
kan
met een interval van 15 minuten worden ingesteld
). Er verschijnt een witte stip in
de linkerbovenhoek van het scherm om aan te geven dat de functie actief is.
Stand-by
De machine is standaard uitgerust met een automatische uitschakelfunctie na 30
minuten van inactiviteit.
Selecteer het symbool om de functie te deactiveren of de tijd in stand-by te
wijzigen.
Ecomode
Door het symbool te selecteren kunt u de functie Ecomode activeren of
deactiveren.
Als de Ecomode-functie actief is, schakelt de Stoom/heet water ketel uit. Het is nog
steeds mogelijk om stoom/heet water aftegeven door op de betreffende hendels te
drukken, waardoor de Ecomode-functie automatisch wordt uitgeschakeld.
In dat geval duurt het langer voordat de temperatuur bereikt is die nodig is voor
een optimaal afgifte. U kunt de Ecomode-functie weer activeren door terug te gaan
naar de instellingen.
36
Nederlands
Meeteenheid van de temperatuur
Als u het symbool selecteert, kunt u voor de meeteenheid van de temperatuur
kiezen uit C° en F°.
Temperatuur stoom
Als u het symbool selecteert, kunt u de instelling van de temperatuur van de
stoom wijzigen.
Toetsgeluid
Om de toetsgeluiden in of uit te schakelen selecteert u het symbool.
Reiniging en onderhoud
Door de machine regelmatig te reinigen en te onderhouden blijft deze in
optimale staat en bent u langdurig verzekerd van goede koe, een continue
koevoorziening en perfect melkschuim.
Reinigingstabel
Beschrijving onderdeel Na gebruik Dagelijks Wekelijks Maandelijks
Reiniging stoompijpje
Reiniging van de zetgroep
Reiniging lter en lterhouder
Reiniging sproeiplaatje
Reiniging rooster en lekbakje
Reiniging van het waterreservoir
37
Nederlands
Reiniging van het stoompijpje
Iedere keer na het opschuimen van de melk:
1 Reinig het stoompijpje met een vochtige doek. Schroef voor een grondigere
reiniging de spuitmond los, spoel hem onder stromend water af en breng hem
weer aan.
2 Open heel even de stoomknop om mogelijke melkresten te verwijderen en
sluit de knop weer.
Reiniging van de zetgroep
Maandelijks:
Wij adviseren de zetgroep te reinigen met Gaggia-reinigingstabletten "Coffee oil
remover" om eventuele olieachtige koeresten te verwijderen.
1 Zorg ervoor dat de afvoerleiding (28) is geplaatst.
2 Plaat de blinde lter (23) in de lterhouder. Verdeel een Gaggia-reinigingstablet
in vier stukjes en doe ze in de blinde lter.
3 Plaats de lterhouder (24) in de zetgroep (30)
4 Druk op de koehendel om de pomp te activeren en de vereiste druk te
creëren.
5 Wacht 5 seconden voordat u nogmaals op de koehendel drukt om de pomp
te deactiveren.
6 Het water met het reinigingsmiddel stroomt via de afvoerleiding in het
lekbakje. Wacht ongeveer 30 seconden.
7 Herhaal de punten 4 t/m 6 minstens 10 keer totdat er schoon water uit de
afvoerleiding in het lekbakje komt.
8 Verwijder de lterhouder met de blinde lter en was lterhouder en lter
grondig met warm water.
9 Plaats de lterhouder met de blinde lter opnieuw in de zetgroep en herhaal
de punten 4 en 5 minstens 10 keer om de spoelfase te voltooien.
10 Verwijder de lterhouder en de blinde lter en reinig het sproeiplaatje (29) met
een borsteltje zoals in het betreffende hoofdstuk is beschreven.
11 Druk op de koehendel en laat een kopje heet water (
ca.150 ml
) uit de
zetgroep lopen.
12 Verwijder het lekbakje en spoel het af onder stromend water.
13 De machine is nu klaar voor gebruik.
Let op: het apparaat is uitgerust met een beveiligingssysteem, zodat als u de
koeafgifte activeert met het blindlter langer dan 90 seconden geplaatst, het
alarm E16 verschijnt. Dit is normaal, geen productdefect.
38
Nederlands
Reiniging lter en lterhouder
De lters moeten schoon gehouden worden om een perfect resultaat te
garanderen.
Dagelijks:
1 Verwijder de lter uit de lterhouder zoals in de guur wordt aangegeven.
3 Als u een storing in de koeafgifte opmerkt, dompelt u de lters gedurende
10 minuten onder in kokend water en spoelt u ze vervolgens onder stromend
water af.
10 min.
2 Was de lterhouder met lauwwarm water.
4 Voor een betere reiniging van de lters adviseren wij de aankoop van GAGGIA-
reinigingstabletten, die speciaal zijn vervaardigd om uw machine in perfecte
staat te houden.
Let op: de vervanging van het lter mag alleen plaatsvinden als de lterhouder
volledig is afgekoeld om brandwonden te voorkomen.
39
Nederlands
Reiniging van het sproeiplaatje
Na elke koeafgifte:
1 Verwijder de lterhouder van de groep.
2 Verwijder met een borsteltje eventueel koedik van het sproeiplaatje.
3 Voer een reiniging uit met heet water, door de koehendel in te drukken en
een kopje water af te geven.
Reiniging van het rooster en het lekbakje
Verwijder het lekbakje en het rooster en spoel ze af onder stromend water. Gebruik
geen schurende producten.
Reiniging van het waterreservoir
1 Haal het waterreservoir eruit en spoel het af onder stromend water.
Waarschuwingspictogrammen
Het waterreservoir moet worden gevuld.
Betekenis van de foutcodes
Open de stoomknop en laat deze open staan totdat de stoomstroom bijna voorbij
is (
ongeveer 2 minuten
). Sluit de stoomknop. Zet het apparaat uit en weer aan
met de hoofdschakelaar. Als de fout aanhoudt, moet u contact opnemen met een
geautoriseerd servicecentrum.
E20
Zet de machine uit en weer aan met de hoofdschakelaar. Verwijder de lterhouder
niet voordat u het apparaat hebt uitgeschakeld. Probeer de handeling een paar
keer te herhalen. Als de fout zich blijft voordoen, dient u contact op te nemen met
een erkend servicecentrum of de distributeurs in uw land. Geef daarbij de foutcode
door die op het display boven het symbool wordt weergegeven. Contactgegevens
vindt u op de website www.gaggia.com.
40
Nederlands
Oplossing van problemen
Dit hoofdstuk vat de meest voorkomende problemen samen die u bij de
machine zou kunnen aantreffen. Als u het probleem niet kunt oplossen met
de onderstaande informatie, ga dan naar www.gaggia.com voor een lijst met
veelgestelde vragen of neem contact op met het Customer Service Center of de
dealers in uw land.
Probleem Oorzaak Oplossing
Er vormt zich geen
schuim in de melk.
Het gebruikte type melk is niet
geschikt om schuim te maken.
Afhankelijk van het type melk, zijn de
hoeveelheid en de kwaliteit van het
geproduceerde schuim verschillend (
Hoofdstuk
"Melk opschuimen voor cappucino"
).
Er komt geen koe uit
als ik op de koehendel
druk.
De lterhouder is verstopt. Druk nogmaals op de koehendel.
Zet de machine uit en wacht tot hij is
afgekoeld (
circa 1 uur
). Verwijder vervolgens
de lterhouder en was hem goed af. Als het
probleem zich opnieuw voordoet, neem dan
contact op met het servicecentrum.
Het apparaat vraagt om
het waterreservoir bij te
vullen, ook als het niet
helemaal leeg is.
Dit is een normaal gedrag van
de machine en vereist een
waterreserve om mogelijke
storingen te voorkomen.
Vul de waterreservoir tot het MAX-niveau.
De koe is te koud. De lterhouder is niet geplaatst
voor de voorverwarming.
Verwarm de lterhouder voor (
Hoofdstuk
"Koe zetten"
).
Koude kopjes. Plaats de kopjes op de Kopjeswarmhoudplaat.
De machine is nog niet op
temperatuur.
Wacht tot het ledlampje van de koehendel
vast aan is.
De koe is te heet zelfs
na de temperatuur op
het display te hebben
verlaagd.
Alle onderdelen van de machine
zijn heet.
Volg de instructies in het hoofdstuk "De
temperatuur van de koeketel en stoom/
waterketel verlagen" om de afkoeling van de
ketel te versnellen.
De koe komt er te
snel uit, er wordt geen
crèmelaagje gevormd.
Te weinig koe in de lterhouder. Voeg koe toe.
Te grove maling. Gebruik een jnere maling.
Koe te licht aangedrukt en/of met
groeven.
Druk de koepoeder meer aan met de speciaal
daarvoor bestemde stamper en let er daarbij
op om geen groeven te maken.
Geen verse koe. Gebruik een andere melange.
De koe komt er
niet uit of komt er
druppelsgewijs uit.
Maling te jn. Gebruik een grovere maling.
Koe te veel aangedrukt in de
lterhouder.
Druk de koe minder krachtig aan.
Te veel koe in de lterhouder. Doe minder koe in de lterhouder.
Filter in lterhouder verstopt. Reinig de lter (
Hoofdstuk “Reiniging lter en
lterhouder”
).
41
Nederlands
Probleem Oorzaak Oplossing
De koe komt eruit bij
de randen.
Filterhouder slecht in de zetgroep
geplaatst.
Plaats de lterhouder zoals in het betreffende
hoofdstuk is beschreven.
Bovenrand van lterhouder vuil. Maak de rand van de lterhouder schoon.
Te veel koe in de lterhouder. Verminder de hoeveelheid koe. Gebruik de
maatlepel.
Pakking sproeiplaatje vuil. Reinig de pakking van het sproeiplaatje zoals in
het betreffende hoofdstuk is beschreven.
De koepad is te nat. De maling van de koe is te grof. Gebruik een jnere maling.
Weinig koe in de lterhouder. Doe meer koe in de lterhouder.
Het is moeilijk om het
lter uit de lterhouder
te verwijderen.
Dit is typerend voor professionele
lterhouders, om te voorkomen dat
ze te los zitten.
Gebruik een ander meegeleverd lter
ondersteboven als hefboom (
Hoofdstuk
“Reiniging lter en lterhouder”
).
De machine gaat niet
aan.
De machine is niet aangesloten. Controleer of de voedingskabel correct
ingestoken is.
De machine is zojuist uitgeschakeld
met de ON/OFF hendel en heeft
enkele seconden nodig voordat de
uitschakelbewerking is voltooid.
Wacht een paar seconden voordat u de
machine weer inschakelt.
De machine geeft geen
water af.
Het water in de boiler heeft nog niet
de minimale temperatuur bereikt
om te kunnen tappen.
Wacht tot de water-LED constant brandt.
Wateralarm actief. Vul de watertank bij.
42
Nederlands
Technische gegevens
Nominale spanning - Nominaal
vermogen - Voeding
Zie het typeplaatje in het
compartiment van het waterreservoir
Materiaal behuizing Staal
Afmetingen (L x H x D) 260 x 423 x 416 mm
Gewicht 17,6 kg
Kabellengte 1200 mm
Bedieningspaneel Voorkant
Waterreservoir 2 liter - Uitneembaar
Pompdruk koe 15 bar
Koeketel Messing 120 ml
Pompdruk stoom 15 bar
Stoomketel Roestvrij staal 900 ml
Veiligheidsinrichtingen
Thermozekering -
Maximumdrukventiel

43
Polski
Spis treści
Ikony i wyświetlacz ___________________________________________________ 44
Główne elementy urządzenia ___________________________________________ 45
Panel sterowania _____________________________________________________ 45
Przyciski wielofunkcyjne ______________________________________________________________ 45
Dźwignie panelu sterowania ___________________________________________________________ 45
Filtry z wyposażenia __________________________________________________ 46
Filtr do 2 liżanek ___________________________________________________________________ 46
Filtr do 1 liżanki ____________________________________________________________________ 46
Ślepy ltr __________________________________________________________________________ 46
Sposób wkładania uchwytu ltra ________________________________________ 47
Regulacja wysokości kratki ____________________________________________ 47
Regulacja ciśnienia dozowania _________________________________________ 47
Pierwsza instalacja ___________________________________________________ 48
Przy pierwszym użyciu lub po okresie nieużytkowania trwającym dłużej niż 2
tygodnie ____________________________________________________________ 49
Parzenie kawy _______________________________________________________ 50
Parzenie kawy ______________________________________________________________________ 50
Parzenie kawy z automatycznym parzeniem wstępnym ______________________________________ 51
Parzenie kawy z ręcznym parzeniem wstępnym ___________________________________________ 51
Parzenie kawy z użyciem funkcji PRESET ________________________________________________ 52
Włączanie i wyłączanie funkcji PRESET __________________________________________________ 52
Ustawianie i zapamiętywanie objętości kawy ______________________________________________ 52
Jak obniżyć temperaturę bojlerów do kawy i woda/para ______________________________________ 53
Spienianie mleka do przygotowania cappuccino ___________________________ 53
Nalewanie gorącej wody _______________________________________________ 54
Ustawienia urządzenia ________________________________________________ 54
Automatyczne parzenie wstępne _______________________________________________________ 54
Wake-up timer ______________________________________________________________________ 55
Stand-by __________________________________________________________________________ 55
Tryb eko __________________________________________________________________________ 55
Dźwięk przycisków __________________________________________________________________ 55
Jednostka miary temperatury __________________________________________________________ 55
44
Polski
Temperatura pary ___________________________________________________________________ 55
Czyszczenie i konserwacja _____________________________________________ 56
Tabela czyszczenia _________________________________________________________________ 56
Czyszczenie dyszy pary ______________________________________________________________ 56
Czyszczenie bloku kawy ______________________________________________________________ 56
Czyszczenie ltra i uchwytu ltra _______________________________________________________ 57
Czyszczenie sitka bojlera _____________________________________________________________ 58
Czyszczenie kratki i tacy ociekowej _____________________________________________________ 58
Czyszczenie zbiornika na wodę ________________________________________________________ 58
Ikony sygnalizacyjne __________________________________________________ 58
Znaczenie kodów błędów ______________________________________________ 58
Rozwiązywanie problemów ____________________________________________ 59
Dane techniczne _____________________________________________________ 61
93
130
1
2 3 4
5
7 6
93
9 8
Ikony i wyświetlacz
1 Ustaw temperaturę parzenia kawy 6 Bojler parowy/wodny
2 Czas budzenia włączony 7 Ustaw temperaturę pary
3 Rzeczywista temperatura 8 Bojler parowy/wodny wyłączony
4 Bojler do kawy 9 Tryb Eco włączony
5 PRESET włączony
45
Polski
Główne elementy urządzenia
1 Przycisk USTAWIENIA/POWRÓĆ 18 Gniazdo do kabla zasilającego
2 Przycisk nawigacyjny (-) 19 Wyłącznik główny
3 Przycisk nawigacyjny (+) 20 Kabel zasilający
4 Przycisk OK 21 Filtr do 1 liżanki
5 Dźwignia ON/OFF 22 Filtr do 2 liżanek
6 Dźwignia wstępnego parzenia 23 Ślepy ltr
7 Dźwignia kawy 24 Uchwyt ltra
8 Dźwignia wody 25 Tamper do kawy
9 Dźwignia pary 26 Taca ociekowa
10 Pokrywa zbiornika na wodę 27 Kratka ociekowa
11 Zbiornik na wodę 28 Teleskopowa rurka spustowa
12 Taca do podgrzewania liżanek 29 Sitko bojlera
13 Pokrętło pary 30 Blok parzenia kawy
14 Dysza pary 31 Dozownik wody
15 Zabezpieczenie dyszy pary 32 Miarka do kawy wstępnie zmielonej
16 Wylot dyszy pary 33 Manometr
17 Śruba do regulacji ciśnienia dozowania
Panel sterowania
Przyciski wielofunkcyjne
1
Przycisk USTAWIENIA/POWRÓĆ Kliknąć, aby przejść do menu urządzenia lub aby wrócić do
poprzedniego ekranu.
2/3
Przyciski nawigacyjne i
Kliknięcie umożliwia nawigowania wewnątrz menu oraz
modykowanie docelowej wartości temperatury na wyjściu
bloku kawy.
4
Przycisk OK
Kliknięcie umożliwia potwierdzenie funkcji wybranej w menu
urządzenia.
Dźwignie panelu sterowania
5
Dźwignia ON/OFF
Nacisnąć, aby włączyć lub wyłączyć urządzenie.
Dźwignia zaczyna świecić, kiedy urządzenie jest włączone.
6
Dźwignia wstępnego parzenia
Nacisnąć, aby włączyć automatyczne parzenie wstępne.
Kiedy parzenie wstępne jest włączone, dźwignia zaczyna
świecić.
Przytrzymać dźwignię wciśniętą, aby włączyć ręczne parzenie
wstępne.
46
Polski
Filtry z wyposażenia
Filtr do 2 liżanek
Filtr do dwóch liżanek jest już zamontowany na uchwycie ltra i umożliwia
napełnienie dwóch liżanek espresso uzyskanym z kawy mielonej.
Filtr do 1 liżanki
Ten ltr może być używany do napełniania jednej liżanki espresso uzyskanym z
kawy mielonej.
7
Dźwignia kawy
Nacisnąć, aby nalać kawę.
Dźwignia świeci światłem ciągłym, gdy maszyna jest gotowa
do dozowania, miga, gdy temperatura nie jest odpowiednia.
8
Dźwignia wody
Nacisnąć, aby nalać wodę.
Dźwignia świeci światłem ciągłym, gdy maszyna jest gotowa
do dozowania, miga, gdy temperatura nie jest odpowiednia.
9
Dźwignia pary
Nacisnąć, aby włączyć funkcję pary; urządzenie rozpocznie
podgrzewanie.
Dźwignia świeci światłem ciągłym, gdy maszyna jest gotowa
do dozowania, miga, gdy temperatura nie jest odpowiednia.
Ślepy ltr
Ten ltr może być używany do czyszczenia bloku kawy lub do regulowania
ciśnienia pompy za pomocą śruby regulacyjnej (17).
47
Polski
Sposób wkładania uchwytu ltra
Włożyć uchwyt ltra do bloku zaparzającego od dołu, wyrównując wskaźnik
odniesienia znajdujący się na rączce uchwytu ltra z symbolem umieszczonym
na korpusie, obracając od lewej strony do prawej do momentu, aż uchwyt ltra
zablokuje się w pozycji, a zatem kiedy wskaźnik odniesienia znajdujący się na
rączce oraz trójkąt umieszczony na korpusie będą idealnie wyrównane lub lekko
przesunięte w prawo.
Regulacja wysokości kratki
Aby zapewnić optymalną wysokość podczas używania liżanek espresso:
1 Ustawić teleskopową rurkę spustową w najkrótszej pozycji.
2 Podnieść tacę ociekową i włożyć ją w odpowiednie prowadnice, jak pokazano
na rysunku.
Regulacja ciśnienia dozowania
Możliwe jest regulowanie i modykowanie ciśnienia dozowania poprzez obracanie
śruby regulacyjnej (17), która fabrycznie jest ustawiona na ciśnienie 9 bar.
Aby zmodykować ciśnienie dozowania:
1 Wyłącz funkcji PRESET, jeśli jest aktywne.
2 Włożyć do bloku zaparzającego uchwyt ltra ze ślepym ltrem.
3 Nacisnąć dźwignię kawy i odczytać wartość w barach wskazywaną przez
manometr (34).
4 Za pomocą płaskiego śrubokręta obracać w kierunku przeciwnym do kierunku
ruchu wskazówek zegara (-), aby zmniejszyć ciśnienie, w kierunku zgodnym z
ruchem wskazówek zegara (+), aby zwiększyć ciśnienie.
5 Wyłączyć dozowanie, ponownie naciskając dźwignię kawy, kiedy manometr
osiągnie żądaną wartość w barach.
48
Polski
Pierwsza instalacja
Ważne: to urządzenie zostało przetestowane przy użyciu kawy. Wprawdzie
zostało gruntowanie oczyszczone, ale w środku mogły pozostać resztki kawy.
Gwarantujemy jednak, że urządzenie jest całkowicie nowe.
1 Wyjąć zbiornik na wodę, wypłukać go i napełnić zimną wodą do poziomu
MAX. Zaleca się sprawdzenie, czy zbiornik na wodę jest prawidłowo włożony.
2 Włożyć wtyczkę kabla zasilającego do znajdującego się na ścianie gniazdka
elektrycznego o odpowiednim napięciu.
3 Nacisnąć przycisk włączania/wyłączania umieszczony z tyłu urządzenia.
4 Włączy się wyświetlacz, pokazując legendarne logo marki Gaggia, po czym
wyłączy się i przejdzie w tryb czuwania.
6 Zdemontować uchwyt ltra i wymienić ślepy ltr na ltr do 1 liżanki lub 2
liżanek.
7 Urządzenie jest ponownie gotowe do pracy.
Ważne: nie należy wykonywać regulacji z ltrem do 1 liżanki lub 2 liżanek, ale
wyłącznie ze ślepym ltrem.
Uwaga: aby uniknąć ryzyka poparzenia, nie wyjmuj uchwytu ltra przed
wykonaniem punktu 5.
Uwaga: ekspres jest wyposażony w system zabezpieczający, dzięki któremu w
przypadku aktywacji dozowania kawy z włożonym ltrem ślepym przez czas
dłuższy niż 90 sekund, pojawi się alarm E16. Jest to normalne, a nie wada
produktu.
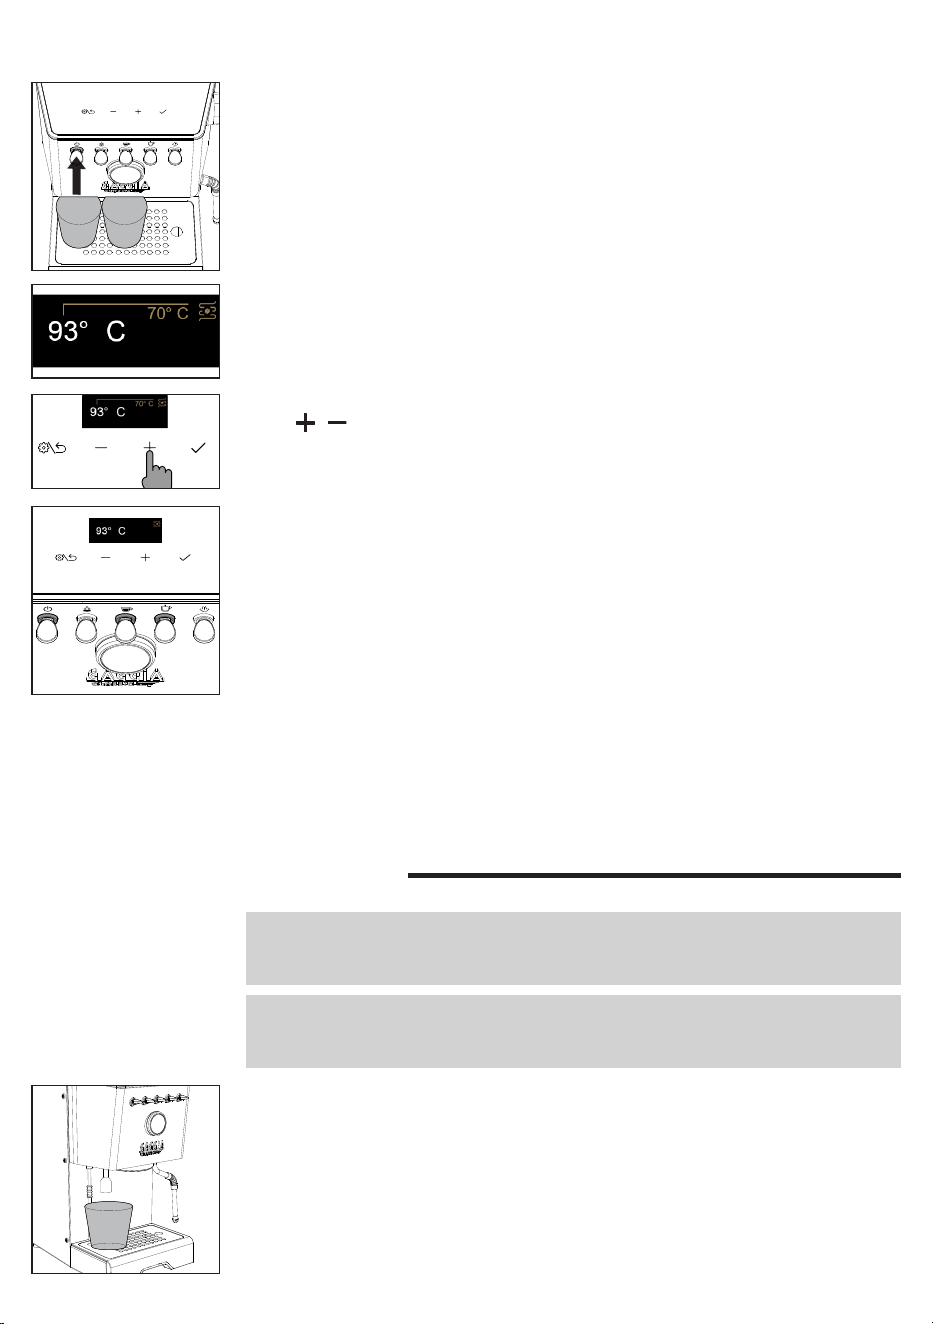
49
Polski
5 Nacisnąć dźwignię ON/OFF aby uruchomić urządzenie; zaświeci się
odpowiednia kontrolka.
6 Umieścić szklankę pod blokiem kawy i dozownikiem gorącej wody, a
następnie postępować zgodnie z pojawiającymi się na wyświetlaczu
instrukcjami do zakończenia instalacji.
7 Wyświetlacz pokazuje temperaturę na wylocie bloku kawy oraz wartość
rosnącą aż do osiągnięcia ustawionej temperatury.
Przy pierwszym użyciu lub po okresie
nieużytkowania trwającym dłużej niż 2
tygodnie
Ważne: nowe ekspresy do kawy mogą mieć nieprzyjemny zapach. To normalne, nie
jest to wada produktu. Postępuj zgodnie z poniższymi instrukcjami. Wodę nalaną
podczas tej czynności należy wylać i nie stosować jej do celów spożywczych.
Ważne: aby chronić maszynę przed osadem kamienia, należy używać wody, która
nie jest zbyt twarda. W razie konieczności zalecamy zastosowanie zmiękczacza
wody.
1 Ustawić pojemnik pod dozownikiem gorącej wody.
2 Wyjąć zbiornik na wodę, wypłukać go i napełnić do poziomu MAX.
3 Naciśnij dźwignię gorącej wody i uruchom zbiornik z gorącą wodą z
dozownika. Gdy dopływ wody zostanie przerwany, naciśnij ponownie dźwignię
ciepłej wody, gdy dioda LED świeci światłem ciągłym, i dopływaj wody, aż
pojawi się sygnał braku wody. Opróżnienie całego zbiornika może potrwać
kilka minut.
4 Ponownie napełnij zbiornik na wodę do poziomu MAX.
9 Po osiągnięciu żądanej temperatury przełączniki kawy i gorącej wody zaczną
świecić światłem ciągłym.
10 Przed zaparzeniem należy postępować zgodnie z instrukcją podaną w
rozdziale „Pierwsze użycie”.
8 Możliwe jest modykowanie ustawionej temperatury za pomocą przycisków
i .
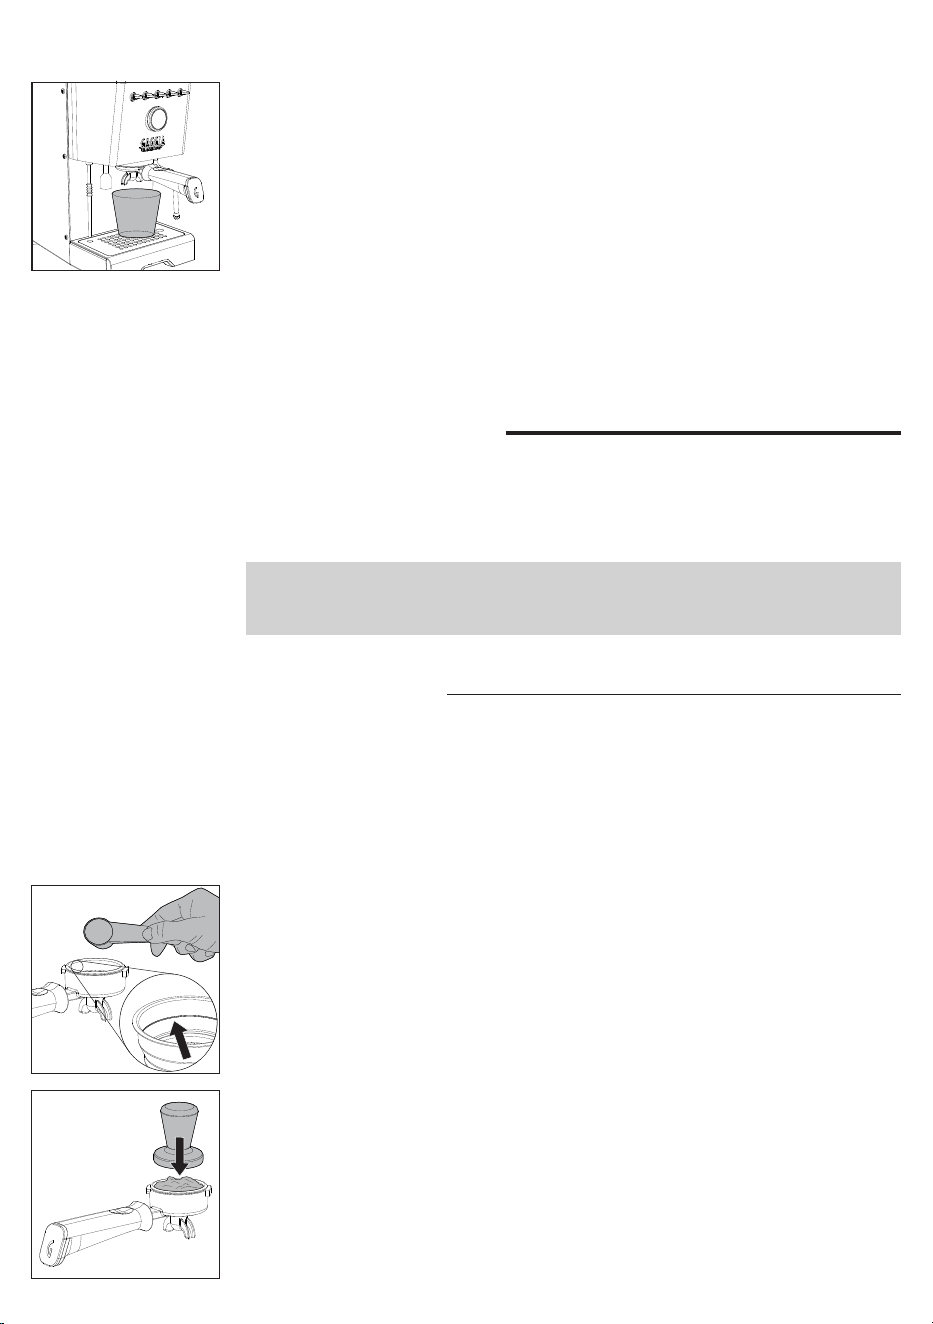
50
Polski
5 Włożyć uchwyt ltra do bloku kawy i ustawić odpowiedni pojemnik pod
uchwytem ltra.
6 Naciśnij przełącznik kawy i wypuść wodę z grupy zaparzającej. Jeśli
wydawanie wody zostanie przerwane, po prostu naciśnij przełącznik kawy
ponownie, aż na wyświetlaczu pojawi się alarm wody.
7 Usunąć uchwyt ltra i przepłukać go pod bieżącą wodą.
8 Napełnij zbiornik na wodę do poziomu MAX.
9 Naciśnij przełącznik pary, gdy jest włączony, otwórz pokrętło pary i dozuj parę
przez około jedną minutę.
10 Wyłącz urządzenie i włącz je ponownie, aby mieć pewność, że wszystkie
informacje zostały zapisane. Maszyna jest teraz gotowa do użycia.
Parzenie kawy
Należy się upewnić, że stosowany stopień mielenia jest odpowiedni do parzenia
kawy espresso.
W celu uzyskania prawidłowego zmielenia zalecamy korzystanie z naszego młynka
do kawy MDF55.
Ważne: jeśli ustawiona temperatura zostanie obniżona, gdy ekspres jest już
nagrzany, aby przyspieszyć chłodzenie, należy postępować zgodnie z instrukcjami
podanymi w rozdziale „Jak obniżyć temperaturę bojlerów do kawy i woda/para”.
Parzenie kawy
Uchwyt ltra jest fabrycznie dostarczany z zamontowanym ltrem do 2 liżanek.
Aby zaparzyć pierwszą kawę, należy najpierw podgrzać uchwyt ltra:
1 Włożyć uchwyt ltra z ltrem na 1 lub 2 liżanki do bloku parzenia kawy.
2 Ustawić liżankę pod uchwytem ltra i nacisnąć dźwignię kawy, co spowoduje
nalanie liżanki wody (
ok.150 ml
).
3 Wyjąć uchwyt ltra i usunąć ewentualne pozostałości wody.
4 Napełnić uchwyt ltra 1 miarką kawy wstępnie zmielonej w celu zaparzenia
1 liżanki lub 2 miarkami w celu zaparzenia podwójnej kawy, biorąc za punkt
odniesienia wewnętrzne wycięcie w ltrze. Uderzając w bok uchwytu, aby
wyrównać kawę w proszku.
5 Docisnąć kawę posługując się specjalnym tamperem, dołączonym do
wyposażenia. Ubijanie kawy powinno być wykonane równomierne, a jej
powierzchnia musi być jednolita, bez rowków i równoległa do krawędzi
uchwytu ltra.
6 Oczyścić krawędź uchwytu ltra z ewentualnych resztek kawy.
7 Prawidłowo włożyć uchwyt na ltr, jak opisano w punkcie „posób wkładania
uchwytu ltra”.
8 Ustawić 1 lub 2 liżanki pod uchwytem na ltr.
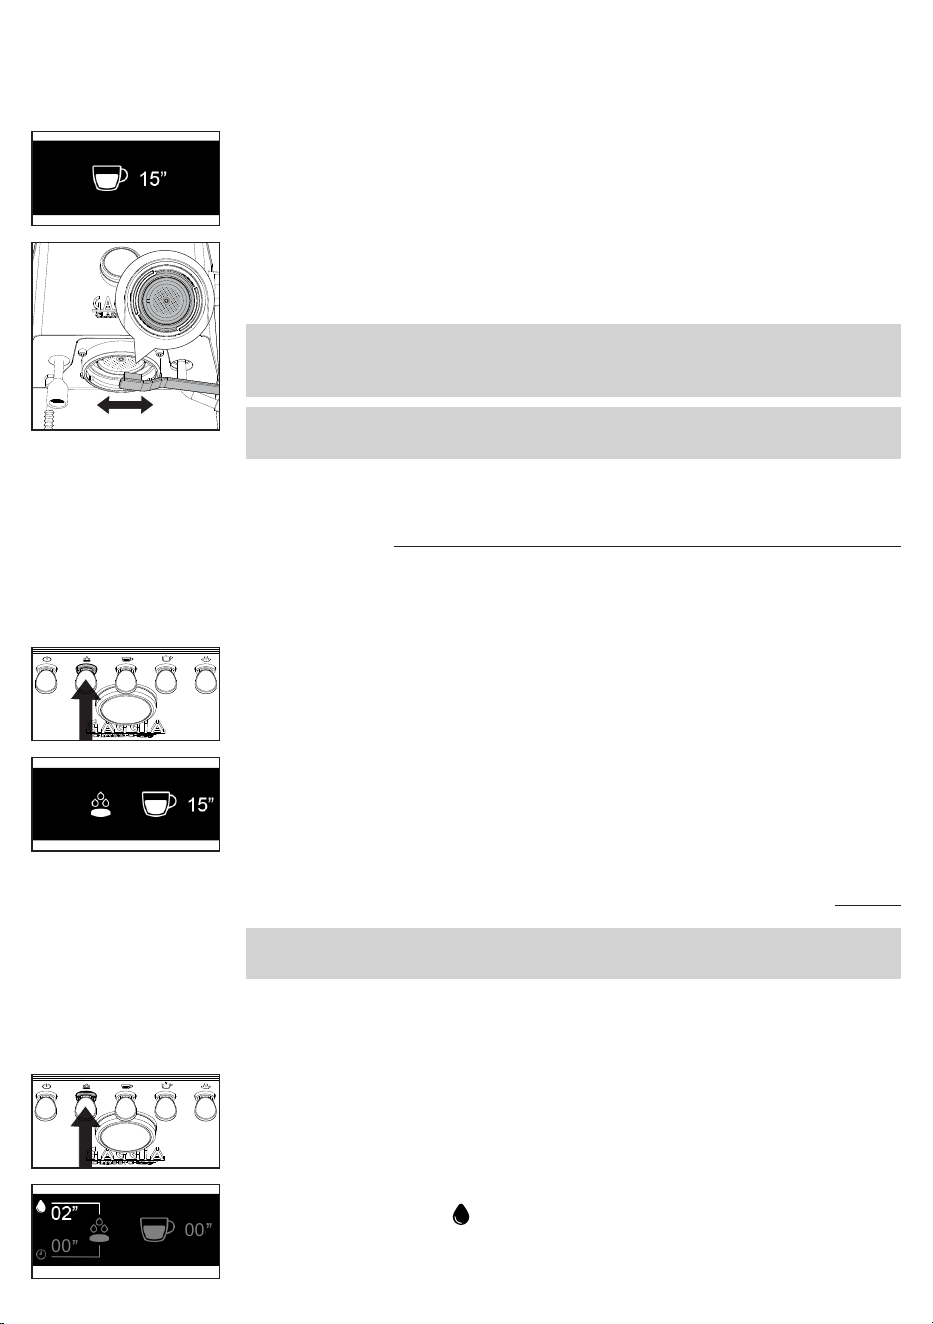
51
Polski
12 Po zakończeniu parzenia, wyjąć uchwyt na ltr, usunąć fusy z ltra i
ewentualne resztki z sitka bojlera.
13 Na wyświetlaczu ponownie pojawi się temperatura na wylocie bloku kawy.
Ważne: poczekać około 10 sekund przed wyjęciem uchwytu na ltr, wyjąć go
powoli, ostrożnie przekręcając w lewo. Uważać, aby nie poparzyć się ewentualną
wodą pozostałą na fusach.
Ważne: w uchwycie ltra może pozostać niewielka ilość wody. Jest to normalne
zjawisko wynikające z charakterystyki uchwytu ltra.
Parzenie kawy z automatycznym parzeniem
wstępnym
Możliwe jest włączenie automatycznego parzenia wstępnego, z czasem parzenia
wstępnego domyślnie ustawionym fabrycznie, który można zmienić w menu
urządzenia.
1 Aby włączyć automatyczne parzenie wstępne, nacisnąć dźwignię parzenia
wstępnego, która się zaświeci.
2 Kiedy po naciśnięciu dźwigni kawy rozpocznie się parzenie, na wyświetlaczu
będzie pokazane ustawione parzenie wstępne oraz czas parzenia.
3 Ponownie wcisnąć dźwignię kawy po uzyskaniu żądanej objętości kawy , aby
przerwać parzenie.
MED
Parzenie kawy z ręcznym parzeniem wstępnym
Uwaga: aby uniknąć ryzyka oparzeń, nie zdejmować uchwytu ltra po zwolnieniu
dźwigni parzenia wstępnego, ale dopiero po zakończeniu dozowania kawy.
Podczas parzenia z ręcznym parzeniem wstępnym na wyświetlaczu będą kolejno
pokazywane wszystkie fazy: zwilżenie porcji kawy wodą – czas przerwy –
rzeczywiste parzenie.
1 Trzymać wciśniętą dźwignię parzenia wstępnego; odpowiednia kontrolka
zacznie migać.
2 Na wyświetlaczu będzie pokazywany czas zwilżania porcji kawy wodą oraz
odpowiedni symbol .
3 Zwolnić dźwignię po osiągnięciu żądanego czasu zwilżania (
maksymalnie 20
sekund
).
00
00
9 Przed wciśnięciem dźwigni kawy w celu rozpoczęcia parzenia, poczekać, aż
zaświeci się ona na stałe.
10 Podczas parzenia na wyświetlaczu pokazywane są sekundy parzenia.
11 Po uzyskaniu żądanej ilości, ponownie wcisnąć dźwignię kawy, aby przerwać
parzenie.
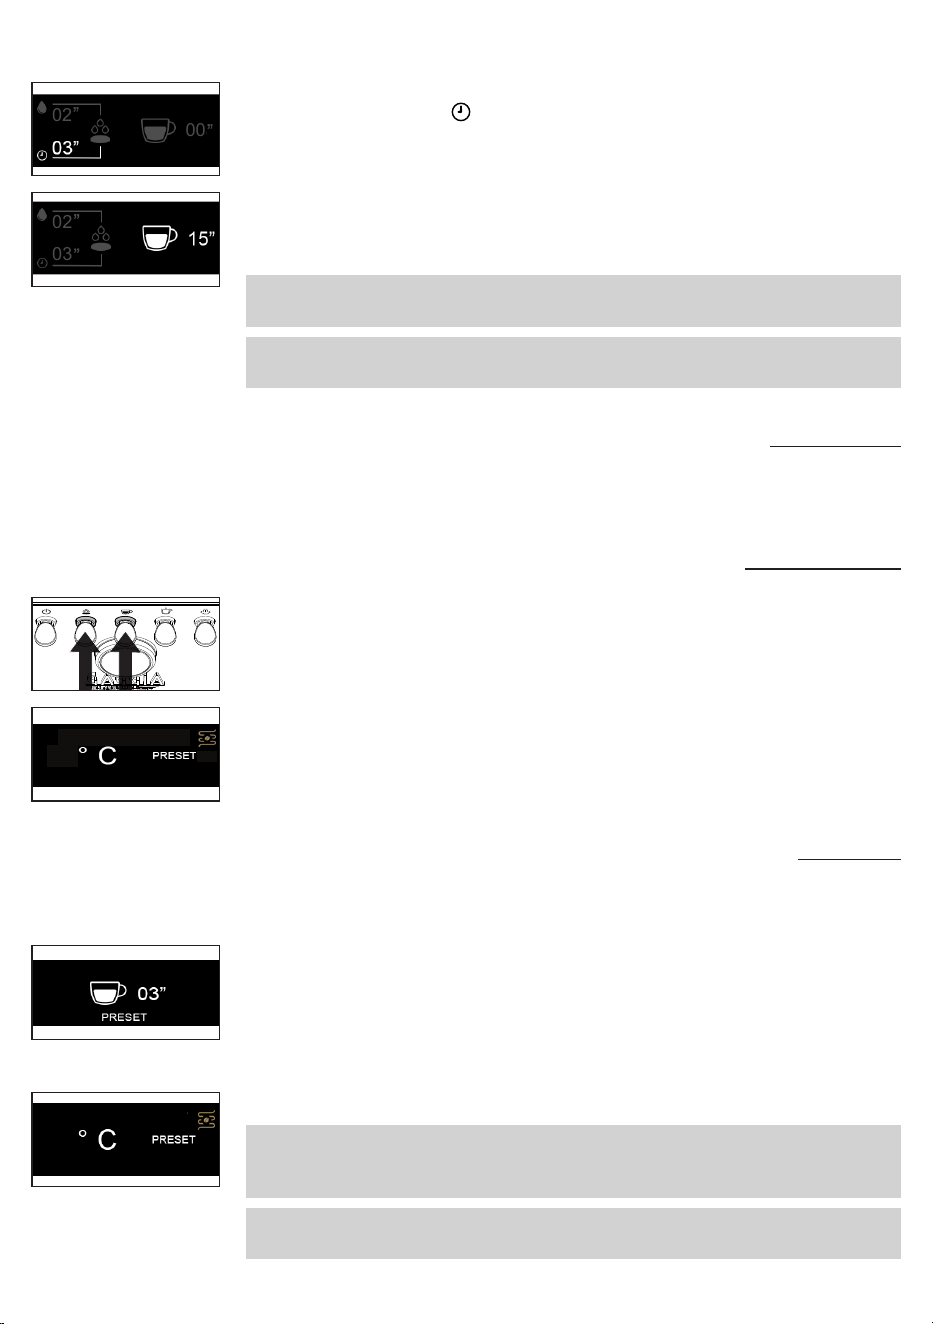
52
Polski
4 Sekundy będą nadal odliczane, wskazując żądany czas przerwy oraz
odpowiedni symbol .
5 Po upływie żądanego czasu (
maksymalnie 15 sekund
) przerwy nacisnąć
dźwignię kawy, aby uruchomić rzeczywiste parzenie pod wysokim ciśnieniem.
02
00
6 Na wyświetlaczu będą odliczane sekundy odnoszące się do parzenia.
7 Po uzyskaniu żądanej objętości ponownie wcisnąć dźwignię kawy, aby
przerwać parzenie.
Ważne: dźwignia kawy jest zablokowana, kiedy dźwignia parzenia wstępnego jest
wciśnięta.
Ważne: po upływie maksymalnego czasu spoczynku urządzenie anuluje
dozowanie.
02
03
Parzenie kawy z użyciem funkcji PRESET
Po włączeniu tej funkcji urządzenie automatycznie przerywa parzenie po
osiągnięciu wcześniej wstępnie ustawionej objętości.
Włączanie i wyłączanie funkcji PRESET
1 Aby włączyć lub wyłączyć funkcję, należy przez kilka sekund jednocześnie
przytrzymać dźwignię wstępnego parzenia i dźwignię kawy.
93
93
2 Napis PRESET na wyświetlaczu wskazuje, że funkcja jest włączona.
3 Jeżeli funkcja jest włączona, urządzenie naleje ustawioną ilość kawy.
4 Po wyłączeniu funkcji następuje powrót do trybu ręcznego i do zatrzymania
nalewania konieczne jest ponowne naciśnięcie dźwigni kawy.
Ustawianie i zapamiętywanie objętości kawy
Urządzenie ma fabrycznie domyślnie ustawioną objętość kawy.
Możliwa jest zmiana domyślnie ustawionej objętości, jak opisano poniżej.
1 Przytrzymać dźwignię kawy wciśniętą przez kilka sekund, zwolnić ją po
rozpoczęciu parzenia, a na wyświetlaczu pojawi się timer z migającym
napisem PRESET.
2 Po osiągnięciu żądanej objętości ponownie nacisnąć dźwignię kawy.
3 Na wyświetlaczu pojawi się znacznik potwierdzenia, wskazujący, że nowa
objętość została zapamiętana, zastępując wartość ustawioną poprzednio.
4 Wyświetlacz wróci do ekranu głównego, a funkcja PRESET będzie włączona.
Ważne: funkcja PRESET zapisuje objętość, a nie czas. Timer na wyświetlaczu
może wskazywać inny czas dla tej samej objętości kawy, ze względu na rodzaj
kawy, ilość zmielonej kawy lub grubość mielenia.
Ważne: funkcja PRESET wyłącza się automatycznie przy żądaniu kawy z ręcznym
parzeniem wstępnym i włącza się ponownie po zakończeniu parzenia.
93
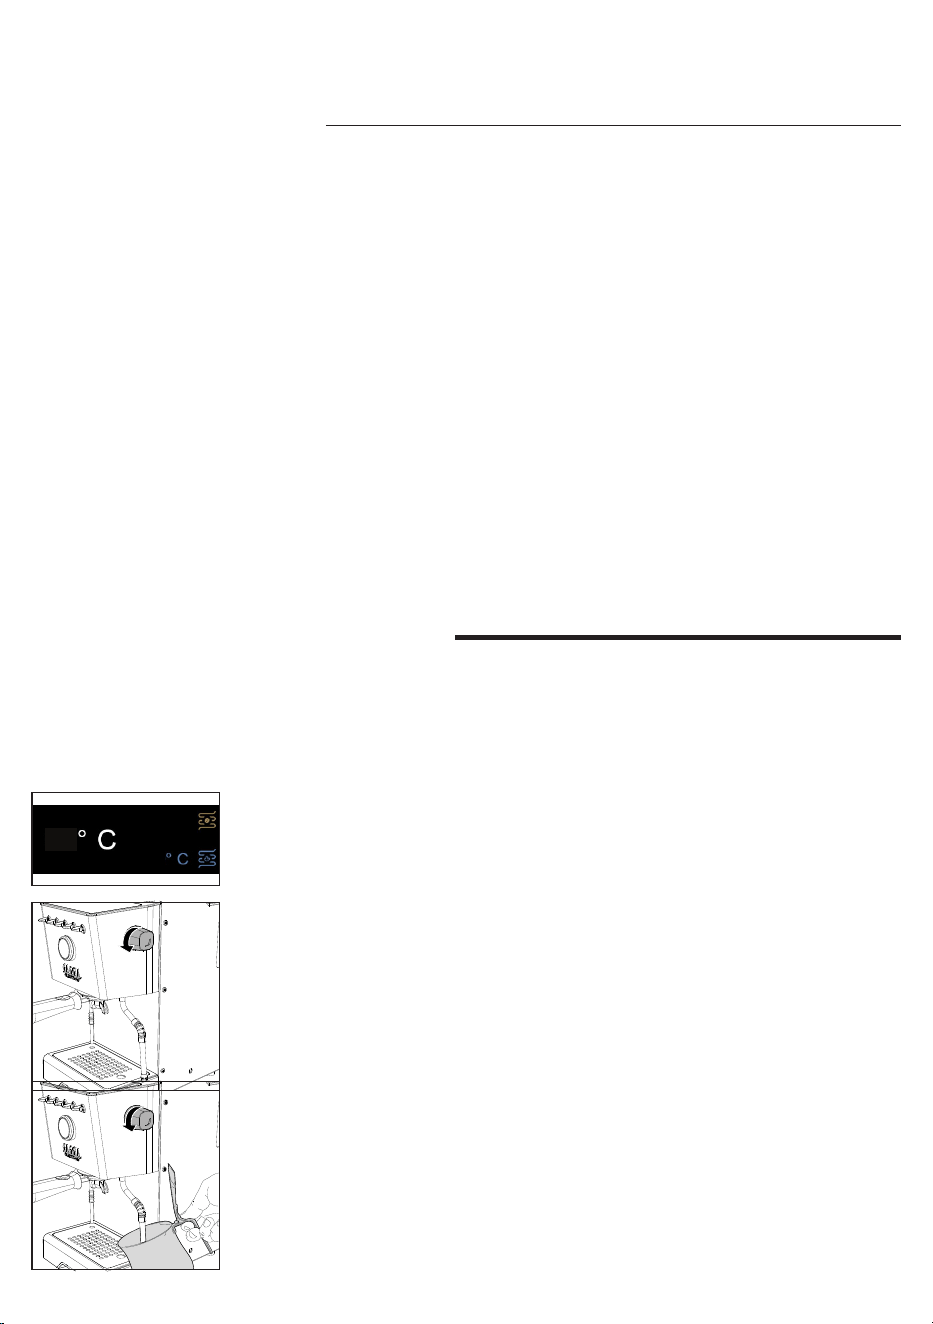
53
Polski
4 Wlać do dzbanka zimne mleko, do około 1/3 jego pojemności, włożyć dyszę
pary do mleka i rozpocząć spienianie poprzez ponowne otwarcie pokrętła.
5 Po osiągnięciu wystarczającego stopnia spienienia zamknąć pokrętło, aby
przerwać wytwarzanie pary i wyjąć dzbanek.
6 Wyczyścić obwód, ponownie wypuszczając niewielką ilość pary, aby usunąć
ewentualne pozostałości mleka, i wyczyścić dyszę wilgotną szmatką.
7 Nacisnąć dźwignię pary, aby wyjść z funkcji; kontrolka zgaśnie.
Spienianie mleka do przygotowania
cappuccino
Aby zagwarantować optymalny rezultat, najlepiej jest użyć zimnego pełnotłustego
mleka (
w temperaturze około 5°C
) o zawartości białka wynoszącej co najmniej 3%
i tłuszczu na poziomie co najmniej 3,5%. Dobre rezultaty uzyskuje się również w
przypadku częściowo odtłuszczonego mleka krowiego, niektórych rodzajów mleka
bez laktozy, mleka sojowego, migdałowego lub owsianego.
1 Nacisnąć dźwignię pary, która zacznie migać, do momentu, aż urządzenie
osiągnie ustawioną temperaturę, widoczną na wyświetlaczu.
2 Po zaświeceniu się dźwigni pary światłem ciągłym urządzenie będzie gotowe
do wytwarzania pary.
130
93
3 Przed rozpoczęciem spieniania mleka usunąć ewentualne pozostałości
skroplin poprzez otwieranie pokrętła pary do momentu, aż będzie się
wydostawać wyłącznie para.
Kocioł wodno-parowy
1 Umieść liżankę pod dozownikiem wody.
2 Naciśnij przełącznik wody i nalej liżankę wody.
3 Naciśnij ponownie przełącznik wody, aby zatrzymać nalewanie wody.
4 Jeśli maszyna nie osiągnęła jeszcze żądanej temperatury, należy powtórzyć
operację.
Jak obniżyć temperaturę bojlerów do kawy i woda/
para
Bojler do kawy
1 Umieścić pustą liżankę pod blokiem kawy, bez założonego uchwytu ltra.
2 Naciśnij przełącznik parzenia kawy i przygotuj liżankę wody.
3 Aby zatrzymać dozowanie wody, naciśnij ponownie przełącznik parzenia
kawy.
4 Jeśli urządzenie nie osiągnęło jeszcze żądanej temperatury widocznej na
wyświetlaczu, czynność tę należy powtórzyć.
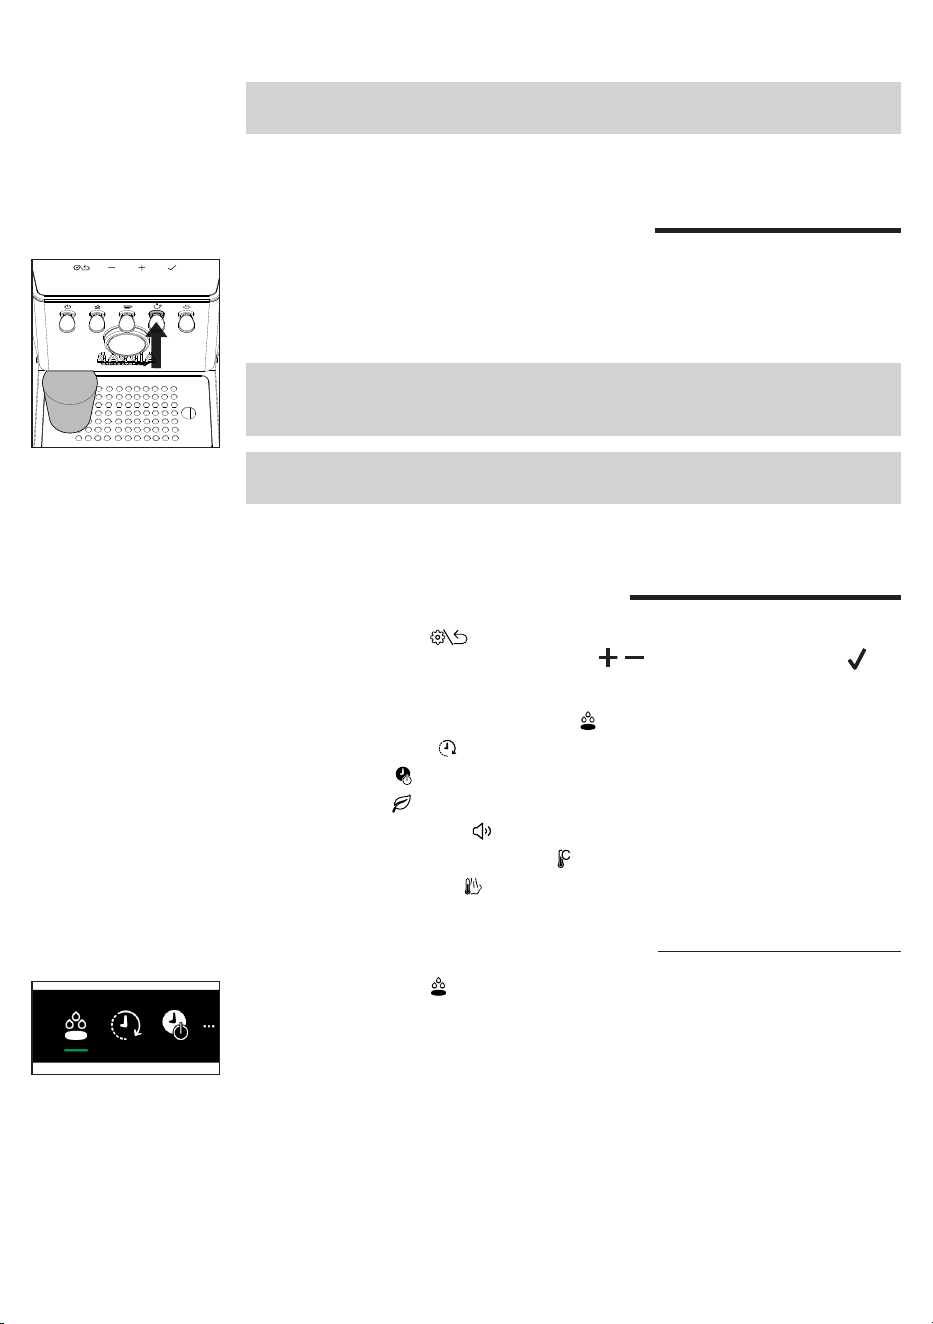
54
Polski
Uwaga: na początku może przez chwilę pryskać gorąca woda. Rurka wylotu może
osiągnąć wysokie temperatury: nie dotykać jej rękami.
Nalewanie gorącej wody
1 Ustawić liżankę lub szklankę do herbaty pod dozownikiem gorącej wody.
2 Nacisnąć dźwignię gorącej wody, kiedy będzie świecić światłem ciągłym, a
po osiągnięciu żądanej ilości ponownie ją nacisnąć, aby przerwać nalewanie.
Naciśnij ponownie, jeśli potrzebujesz więcej wody.
Ważne: woda może być dozowana nawet wtedy, gdy przełącznik wody jest
wyłączony lub miga. W takim przypadku temperatura wody może nie być
optymalna.
Uwaga: na początku może przez chwilę pryskać gorąca woda. Rurka wylotu może
osiągnąć wysokie temperatury: nie dotykać jej rękami.
Ustawienia urządzenia
Naciśnięcie przycisku na wyświetlaczu powoduje przejście do ustawień
urządzenia, w których używając przycisków , i przycisku potwierdzenia
można włączyć lub zmienić poszczególne parametry:
- Automatyczne parzenie wstępne
- Wake-up timer
- Stand-by
- Tryb eko
- Dźwięk przycisków
- Jednostka miary temperatury
- Temperatura pary
Automatyczne parzenie wstępne
Po wybraniu symbolu można wybrać 3 poziomy parzenia wstępnego.
LGT Light roast - Jasno palone
MED Medium roast - Średnio palone
DRK Dark roast - Ciemno palone
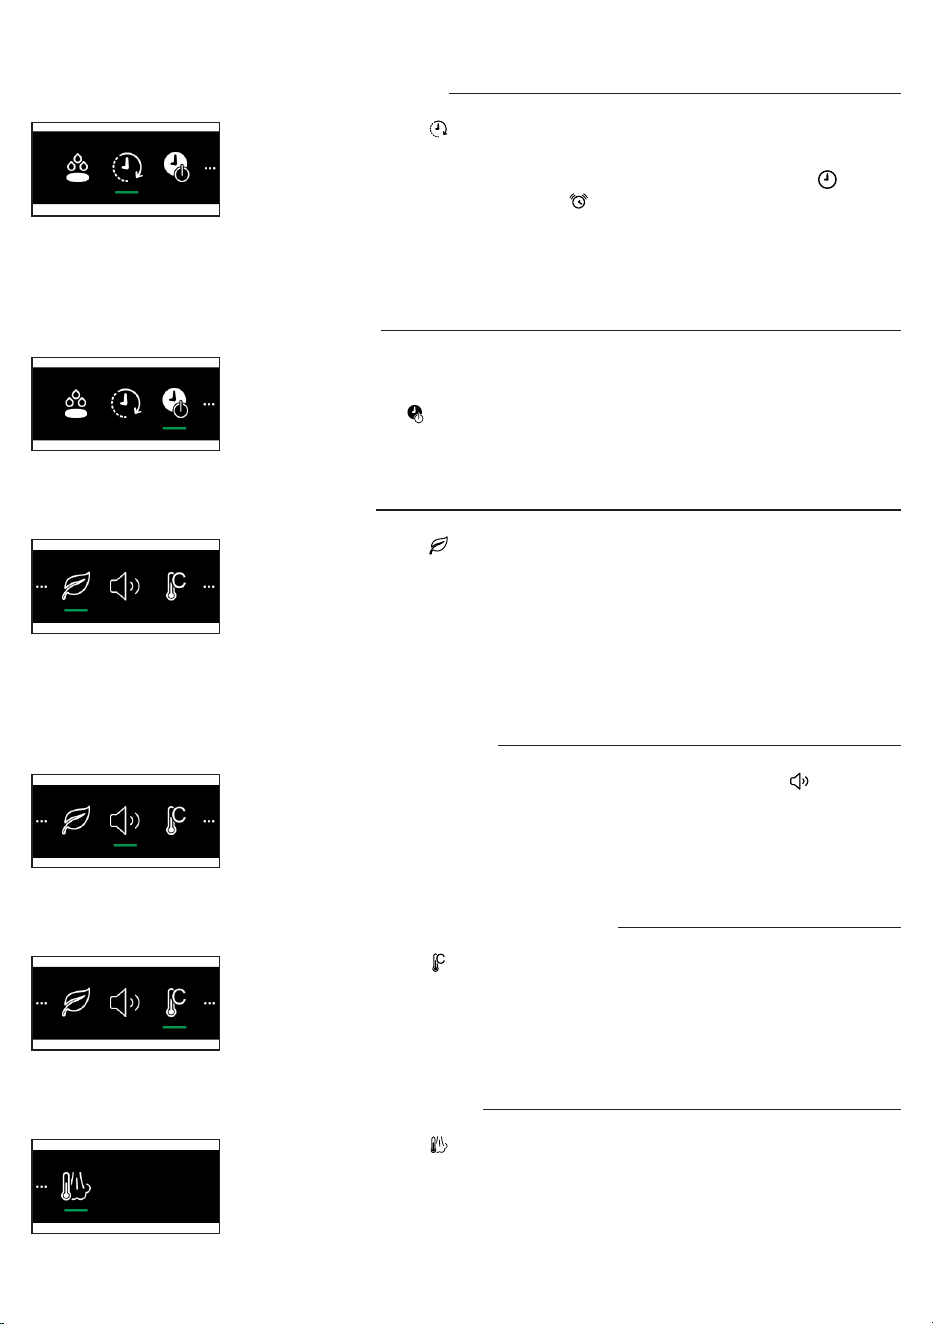
55
Polski
Stand-by
Urządzenie jest fabrycznie wyposażone w funkcję automatycznego wyłączania po
30 minutach bezczynności.
Wybranie symbolu umożliwia wyłączenie funkcji lub zmianę czasu przejścia w
stan stand-by.
Tryb eko
Po wybraniu symbolu . można włączyć lub wyłączyć funkcję trybu eko
urządzenia.
Jeżeli funkcja trybu eko jest aktywna, bojler pary/gorącej wody wyłącza się. Jest
mimo to możliwe wytwarzanie pary/gorącej wody, jednak potrzeba dłuższego
czasu na doprowadzenie bojlera do temperatury niezbędnej do jej wytwarzania.
W ten sposób Tryb eko jest automatycznie wyłączany. Można go ponownie
aktywować za pomocą menu ustawień.
Jednostka miary temperatury
Po wybraniu symbolu można wybrać jednostkę miary temperatury, C° lub F°.
Temperatura pary
Po wybraniu symbolu można zmienić ustawienie temperatury pary.
Dźwięk przycisków
Aby włączyć lub wyłączyć dźwięk przycisków, należy wybrać symbol .
Wake-up timer
Po wybraniu symbolu . można włączyć lub wyłączyć funkcję „budzenia się”
urządzenia.
W celu włączenia funkcji należy wybrać ON, potwierdzić, wybrać symbol w celu
ustawienia godziny, a następnie symbol w celu ustawienia harmonogramu
budzenia (
możliwość ustawiania od 15 minut w odstępach 15 minut
). W lewym
górnym rogu wyświetlacza pojawia się biała kropka informująca, że budzik jest
włączony.
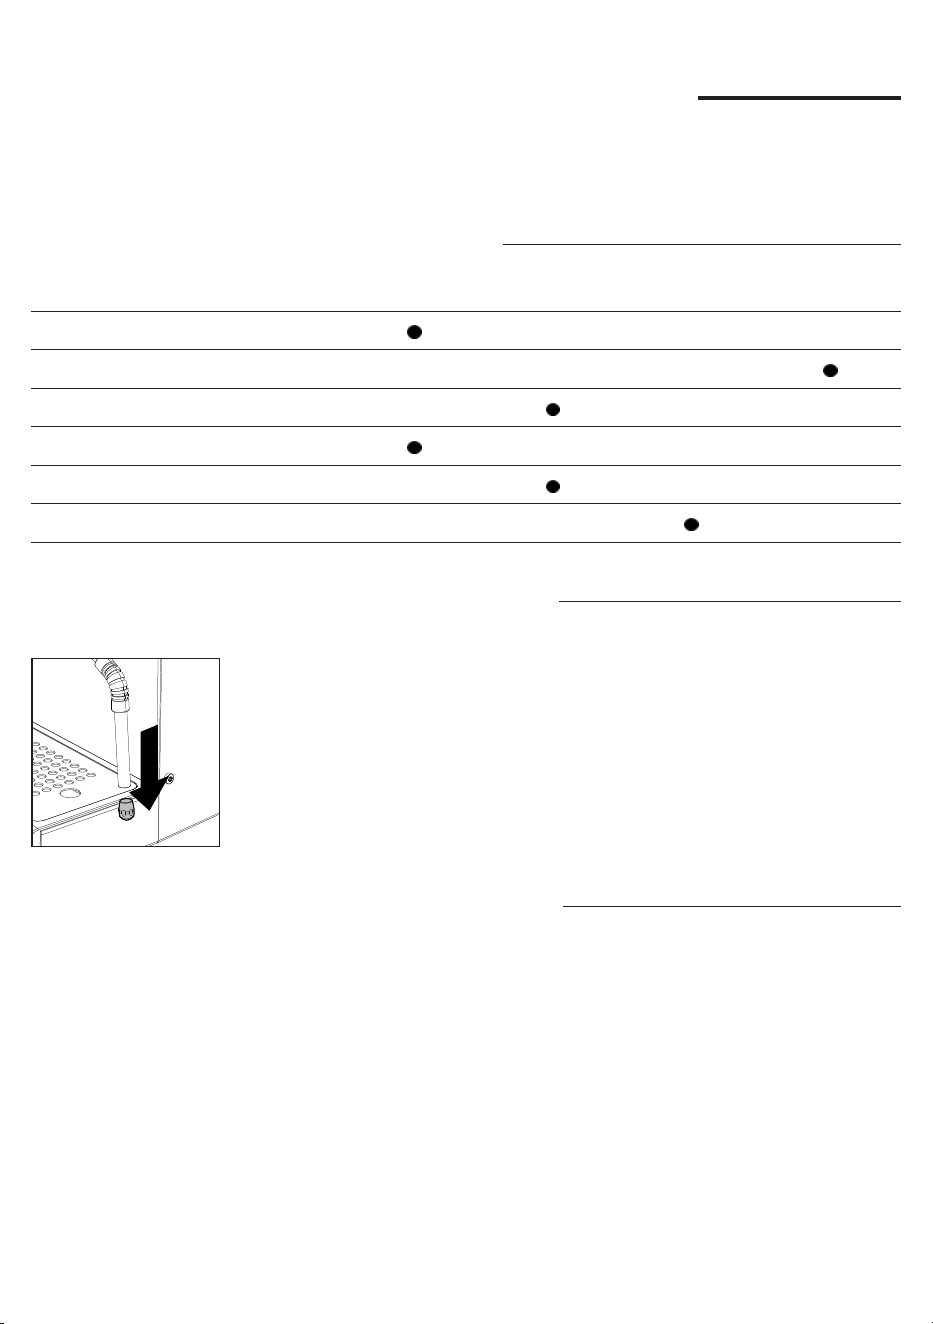
56
Polski
Czyszczenie i konserwacja
Regularne czyszczenie i konserwacja pozwalają na długotrwałe utrzymanie
urządzenia w optymalnym stanie, gwarantują dobrą kawę przez długi czas, stały
przepływ oraz doskonałą piankę mleka.
Tabela czyszczenia
Opis części Po użyciu Codziennie Co tydzień Co miesiąc
Czyszczenie dyszy pary
Czyszczenie bloku kawy
Czyszczenie ltra i uchwytu ltra
Czyszczenie sitka bojlera
Czyszczenie kratki i tacy ociekowej
Czyszczenie zbiornika na wodę
Czyszczenie dyszy pary
Po każdym spienieniu mleka należy:
1 Wyczyścić dyszę pary za pomocą wilgotnej ściereczki. W celu
dokładniejszego oczyszczenia jej można odkręcić wylot dyszy i umyć go pod
bieżącą wodą, a następnie zamontować ponownie.
2 Otworzyć na kilka sekund pokrętło pary, aby usunąć ewentualne resztki mleka.
Następnie zamknąć pokrętło.
Czyszczenie bloku kawy
Co miesiąc:
Zalecamy czyszczenie bloku kawy za pomocą pastylek do czyszczenia Gaggia
„Coffee oil remover”, w celu usunięcia ewentualnych tłustych pozostałości kawy.
1 Należy się upewnić, że rurka spustowa jest włożona (28).
2 Włożyć ślepy ltr (23) do uchwytu ltra. Podzielić pastylkę do czyszczenia
Gaggia na 4 części i włożyć ją do ślepego ltra.
3 Włożyć uchwyt ltra (24) do bloku parzenia kawy (30).
4 Nacisnąć dźwignię kawy w celu włączenia pompy i wytworzenia potrzebnego
ciśnienia.
5 Odczekać 5 sekund przed naciśnięciem dźwigni kawy w celu wyłączenia
pompy.
6 Woda z detergentem popłynie do tacy ociekowej przez rurkę spustową.
Odczekać około 30 sekund.
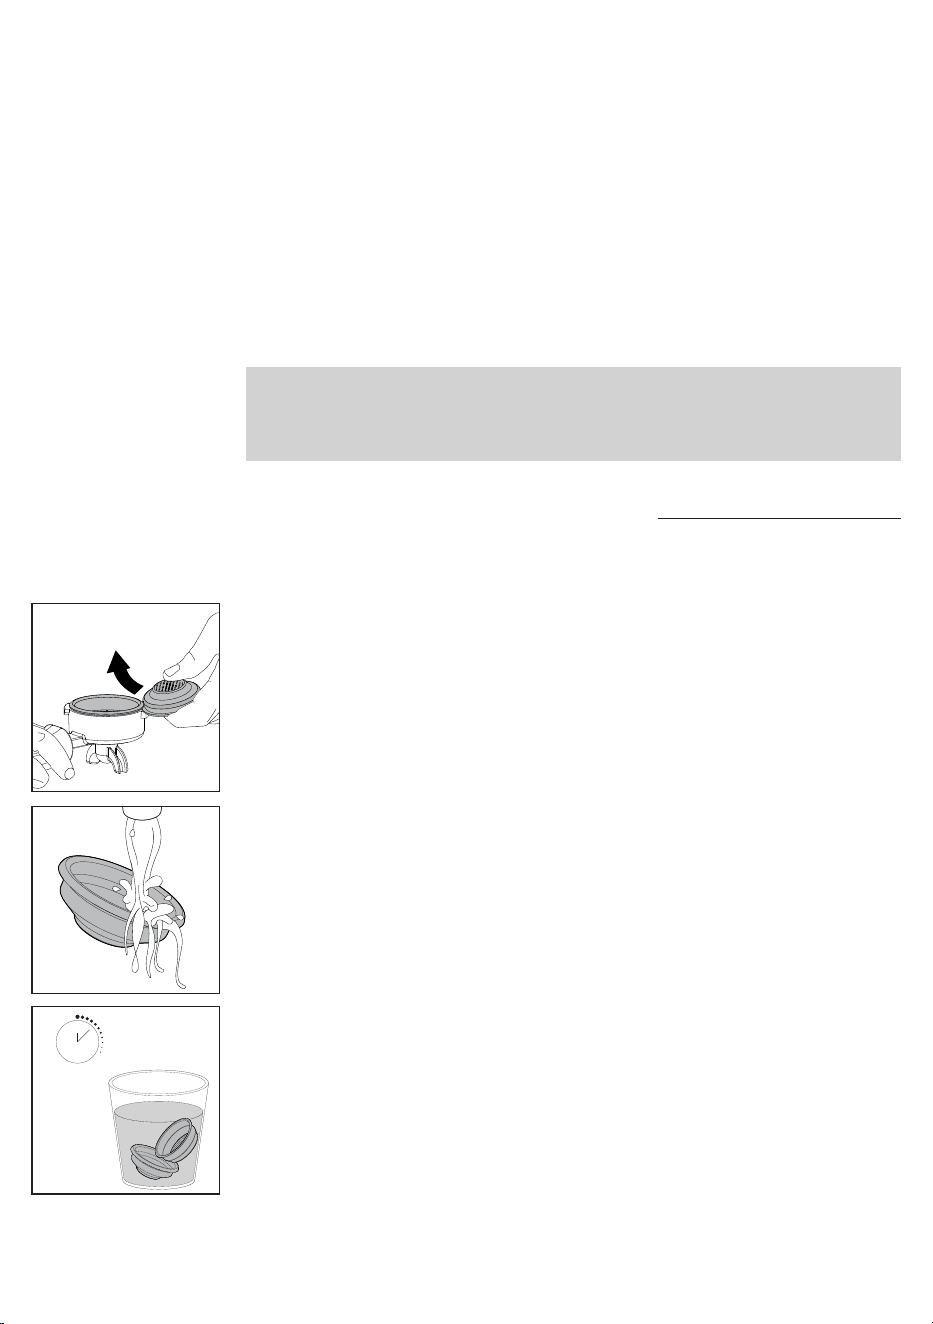
57
Polski
Czyszczenie ltra i uchwytu ltra
Aby zapewnić doskonałe rezultaty, zawsze utrzymywać ltry w czystości.
Codziennie:
1 Wyjąć ltr z uchwytu ltra, jak pokazano na ilustracji.
3 W razie zauważenia nieprawidłowego działania podczas parzenia kawy,
należy zanurzyć ltry na 10 minut we wrzącej wodzie, a następnie wypłukać je
pod bieżącą wodą.
10 min.
2 Umyć uchwyt ltra letnią wodą.
7 Powtórzyć punkty od 4 do 6 co najmniej 10 razy, do momentu, aż z rurki
spustowej na tacę ociekową będzie wypływać czysta woda.
8 Zdjąć uchwyt ltra ze ślepym ltrem i dokładnie umyć je gorącą wodą.
9 Włożyć ponownie uchwyt ltra ze ślepym ltrem do bloku parzenia kawy i
powtórzyć punkty od 4 do 5 co najmniej 10 razy, aby zakończyć fazę płukania.
10 Wyjąć uchwyt ltra i ślepy ltr i wyczyścić sitko bojlera (29), używając
szczoteczki, zgodnie z opisem w odpowiednim rozdziale.
11 Nacisnąć dźwignię kawy i nalać z bloku parzenia kawy liżankę gorącej wody
(
ok.150 ml
).
12 Wyjąć tacę ociekową i umyć ją pod bieżącą wodą.
13 Urządzenie jest gotowe do pracy.
Uwaga: ekspres jest wyposażony w system zabezpieczający, dzięki któremu w
przypadku aktywacji dozowania kawy z włożonym ltrem ślepym przez czas
dłuższy niż 90 sekund, pojawi się alarm E16. Jest to normalne, a nie wada
produktu.

58
Polski
4 Aby lepiej oczyścić ltry, zalecamy zakupić pastylki czyszczące GAGGIA
zaprojektowane specjalnie z myślą o utrzymywaniu w czystości opisywanego
urządzenia.
Uwaga: ltr można wymienić wyłącznie po całkowitym wystygnięciu uchwytu ltra,
aby uniknąć oparzeń.
Czyszczenie sitka bojlera
Po każdym zaparzeniu kawy:
1 Wyjąć uchwyt ltra z bloku.
2 Usunąć ewentualne resztki fusów po kawie z sitka bojlera, używając
szczoteczki.
3 Przeprowadzić czyszczenie z gorącą wodą, wciskając dźwignię kawy i
nalewając jedną liżankę wody.
Czyszczenie kratki i tacy ociekowej
Wyjąć tacę ociekową i kratkę i umyć je pod bieżącą wodą. Nie stosować produktów
ściernych.
Czyszczenie zbiornika na wodę
1 Wyjąć zbiornik na wodę i umyć go pod bieżącą wodą.
Ikony sygnalizacyjne
Należy napełnić zbiornik na wodę.
Znaczenie kodów błędów
Otwórz pokrętło pary i pozostaw je otwarte, aż przepływ pary prawie się skończy
(około 2 minut). Zamknij pokrętło pary. Wyłącz i włącz ponownie maszynę
za pomocą głównego wyłącznika. Jeśli błąd będzie się powtarzał, musisz
skontaktować się z autoryzowanym punktem serwisowym.
E20
59
Polski
Rozwiązywanie problemów
W niniejszym rozdziale podsumowano najczęstsze problemy, jakie mogą
występować w tym urządzeniu. Jeśli problemu nie uda się rozwiązać, korzystając
z podanych poniżej informacji, należy wejść na stronę www.gaggia.com lub www.
gaggia.pl, aby zapoznać się z często zadawanymi pytaniami lub skontaktować się
z Centrum obsługi klienta bądź dystrybutorami w danym kraju.
Problem Przyczyna Rozwiązanie
Na mleku nie tworzy się
pianka.
Użyty rodzaj mleka nie nadaje się
do spieniania.
W zależności od rodzaju mleka ilość i jakość
powstającej pianki mogą być różne (
Rozdział
„Spienianie mleka do przygotowania
cappuccino”
).
Po wciśnięciu dźwigni
kawy, kawa nie wypływa.
Zatkany uchwyt ltra. Ponownie nacisnąć dźwignię kawy.
Wyłączyć urządzenie i poczekać, aż się
ochłodzi (
około 1 godziny
). Następnie
wyjąć i dokładnie umyć uchwyt ltra. Jeżeli
problem się powtórzy, skontaktować się z
autoryzowanym centrum obsługi klienta.
Na wyświetlaczu widoczny
jest alarm dotyczący
braku wody, nawet jeśli
zbiornik na wodę nie jest
całkowicie pusty.
Jest to normalne zachowanie
maszyny, wymagającej rezerwy
wody w celu uniknięcia możliwych
awarii.
Uzupełnij zbiornik na wodę do poziomu MAX.
Kawa jest zbyt zimna. Uchwyt ltra nie został włożony do
nagrzania.
Nagrzać uchwyt ltra (
Rozdział „Parzenie
kawy"
).
Filiżanki są zimne. Umieść kubki na taca do podgrzewania
liżanek.
Urządzenie nie osiągnęło
właściwej temperatury.
Poczekać, aż kontrolka dźwigni kawy
zaświeci światłem ciągłym.
Kawa jest zbyt gorąca,
również po obniżeniu
temperatury na
wyświetlaczu.
Wszystkie elementy urządzenia są
gorące.
W celu przyspieszenia schładzania bojlera
należy postępować zgodnie z instrukcjami w
rozdziale „Jak obniżyć temperaturę bojlerów
do kawy i woda/para”.
Wyłącz i ponownie włącz maszynę za pomocą głównego wyłącznika. Jeśli uchwyt
ltra jest włożony, nie należy go wyjmować przed wyłączeniem urządzenia.
Spróbuj powtórzyć operację kilka razy. Jeżeli błąd nadal występuje, skontaktuj się
z autoryzowanym serwisem lub dystrybutorem w swoim kraju, podając kod błędu
wyświetlany na wyświetlaczu nad symbolem . Dane kontaktowe dostępne są na
stronie internetowej www.gaggia.com.
E
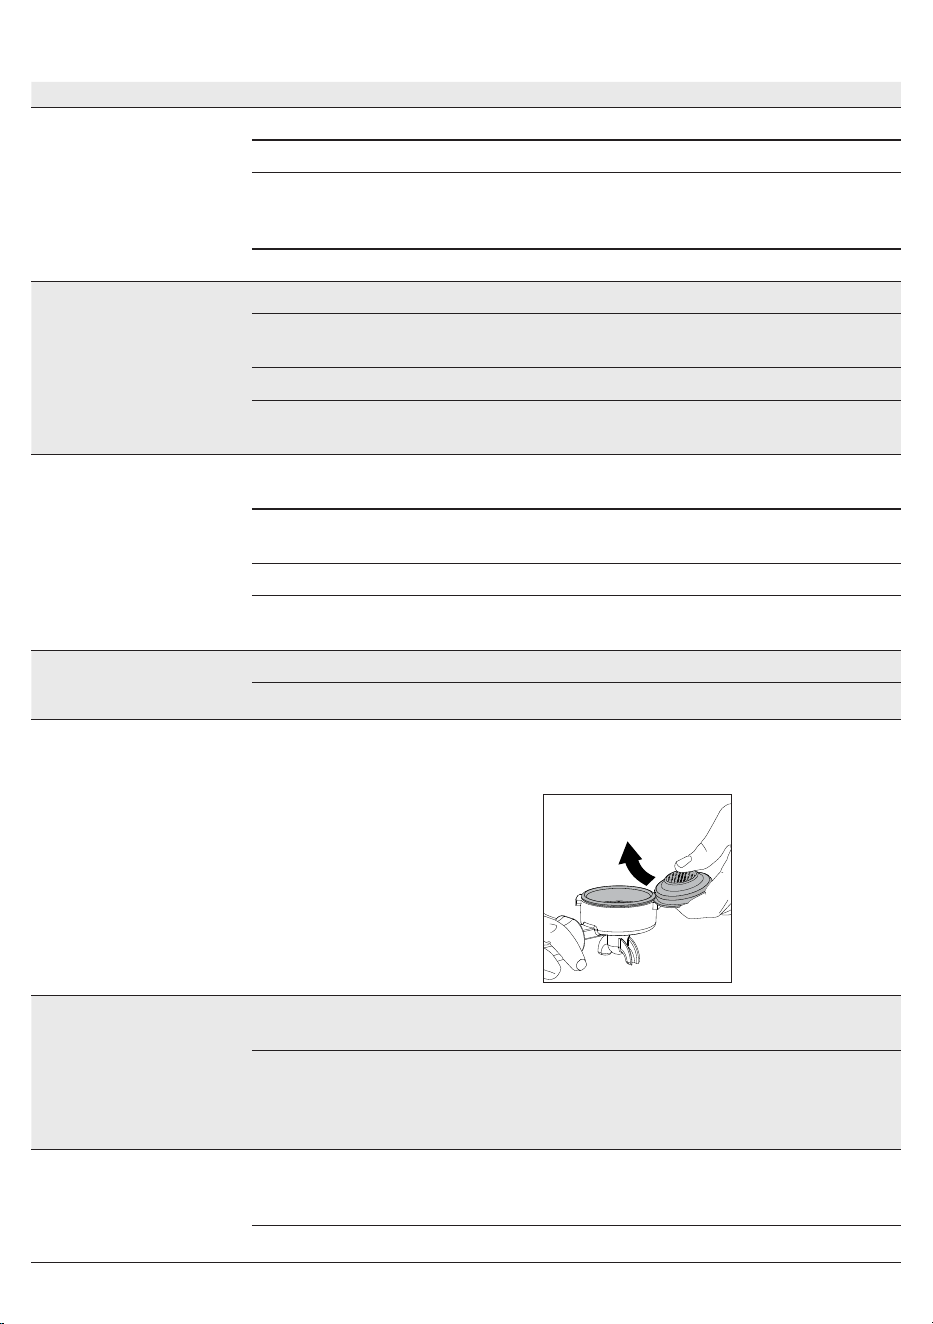
60
Polski
Problem Przyczyna Rozwiązanie
Kawa wypływa zbyt
szybko, nie wytwarza się
pianka.
Zbyt mało kawy w uchwycie ltra. Dosypać kawę.
Mielenie jest zbyt grube. Zastosować drobniejsze mielenie.
Zbyt lekkie ubicie i/lub obecność
rowków.
Lepiej ubić kawę mieloną za pomocą
odpowiedniego tampera. Uważać aby nie
powstawały rowki.
Kawa nie jest świeża. Użyć innej mieszanki kawy.
Kawa nie płynie lub sączy
się kroplami.
Mielenie jest zbyt drobne. Zastosować grubsze mielenie.
Kawa jest zbyt ubita w uchwycie
ltra.
Ubijać kawę z mniejszym naciskiem.
Zbyt dużo kawy w uchwycie ltra. Zmniejszyć ilość kawy w uchwycie ltra.
Filtr jest zatkany wewnątrz
uchwytu.
Wyczyścić ltr (
Rozdział „Filtry z
wyposażenia”
).
Kawa wypływa brzegami Uchwyt ltra nieprawidłowo
włożony do bloku zaparzającego.
Włożyć uchwyt ltra w sposób opisany w
odpowiednim rozdziale.
Górna krawędź uchwytu ltra jest
brudna.
Wyczyścić krawędź uchwytu ltra.
Zbyt dużo kawy w uchwycie ltra. Zmniejszyć ilość kawy przy pomocy miarki.
Uszczelka sitka bojlera jest brudna. Umyć uszczelkę sitka bojlera w sposób
opisany w odpowiednim rozdziale.
Pastylka kawy jest zbyt
zwilżona.
Zbyt grube mielenie kawy. Zastosować drobniejsze mielenie.
Zbyt mało kawy w uchwycie ltra. Zwiększyć ilość kawy w uchwycie ltra.
Trudno jest wyjąć ltr z
uchwytu ltra.
Jest to typowe dla profesjonalnych
uchwytów ltrów, aby zapobiec ich
zbyt luźnemu.
Użyj innego dostarczonego ltra
odwróconego do góry nogami jako dźwigni
(
Rozdział „Filtry z wyposażenia”
).
Urządzenie nie włącza się. Urządzenie nie jest podłączone. Sprawdzić, czy kabel zasilający jest włożony
prawidłowo.
Urządzenie zostało wyłączone
poprzez naciśnięcie przełącznika
ON/OFF. Procedura trwa kilka
sekund.
Odczekaj kilka sekund przed ponownym
włączeniem.
Maszyna nie podaje wody. Woda w bojlerze nie osiągnęła
jeszcze minimalnej temperatury
umożliwiającej nalewanie.
Poczekaj, aż dioda LED wody zaświeci się
światłem ciągłym.
Aktywny alarm wodny. Napełnij zbiornik na wodę.
61
Polski
Dane techniczne
Napięcie nominalne - Moc nominalna
- Zasilanie
Patrz tabliczka umieszczona w
komorze na zbiornik na wodę
Materiał obudowy Stal
Wymiary (dł. x wys. x gł.) 260 x 423 x 416 mm
Masa 17,6 kg
Długość kabla 1200 mm
Panel sterowania Przedni
Zbiornik na wodę 2 litry – Wyjmowany
Ciśnienie pompy kawy 15 barów
Bojler kawy Mosiądz 120 ml
Ciśnienie pompy pary 15 barów
Bojler pary Stal nierdzewna 900 ml
Urządzenia zabezpieczające
Bezpiecznik termiczny - Zawór
maksymalnego ciśnienia

62
Polski

COD. - Rev.01 - 12/02/25
GAGGIA S.p.A.
Sede Amministrativa/Administrative Oce
Via Torretta, 240
40041 Gaggio Montano - Bologna - Italia
+39 0534 771111
www.gaggia.com
GAGGIA S.p.A. reserves the right to make any necessary modication.
GAGGIA S.p.a. behoudt zich het recht voor om wijzigingen aan te brengen indien zij dit nodig acht.
GAGGIA S.p.a. zastrzega sobie prawo do wprowadzania wszelkich niezbędnych zmian.