
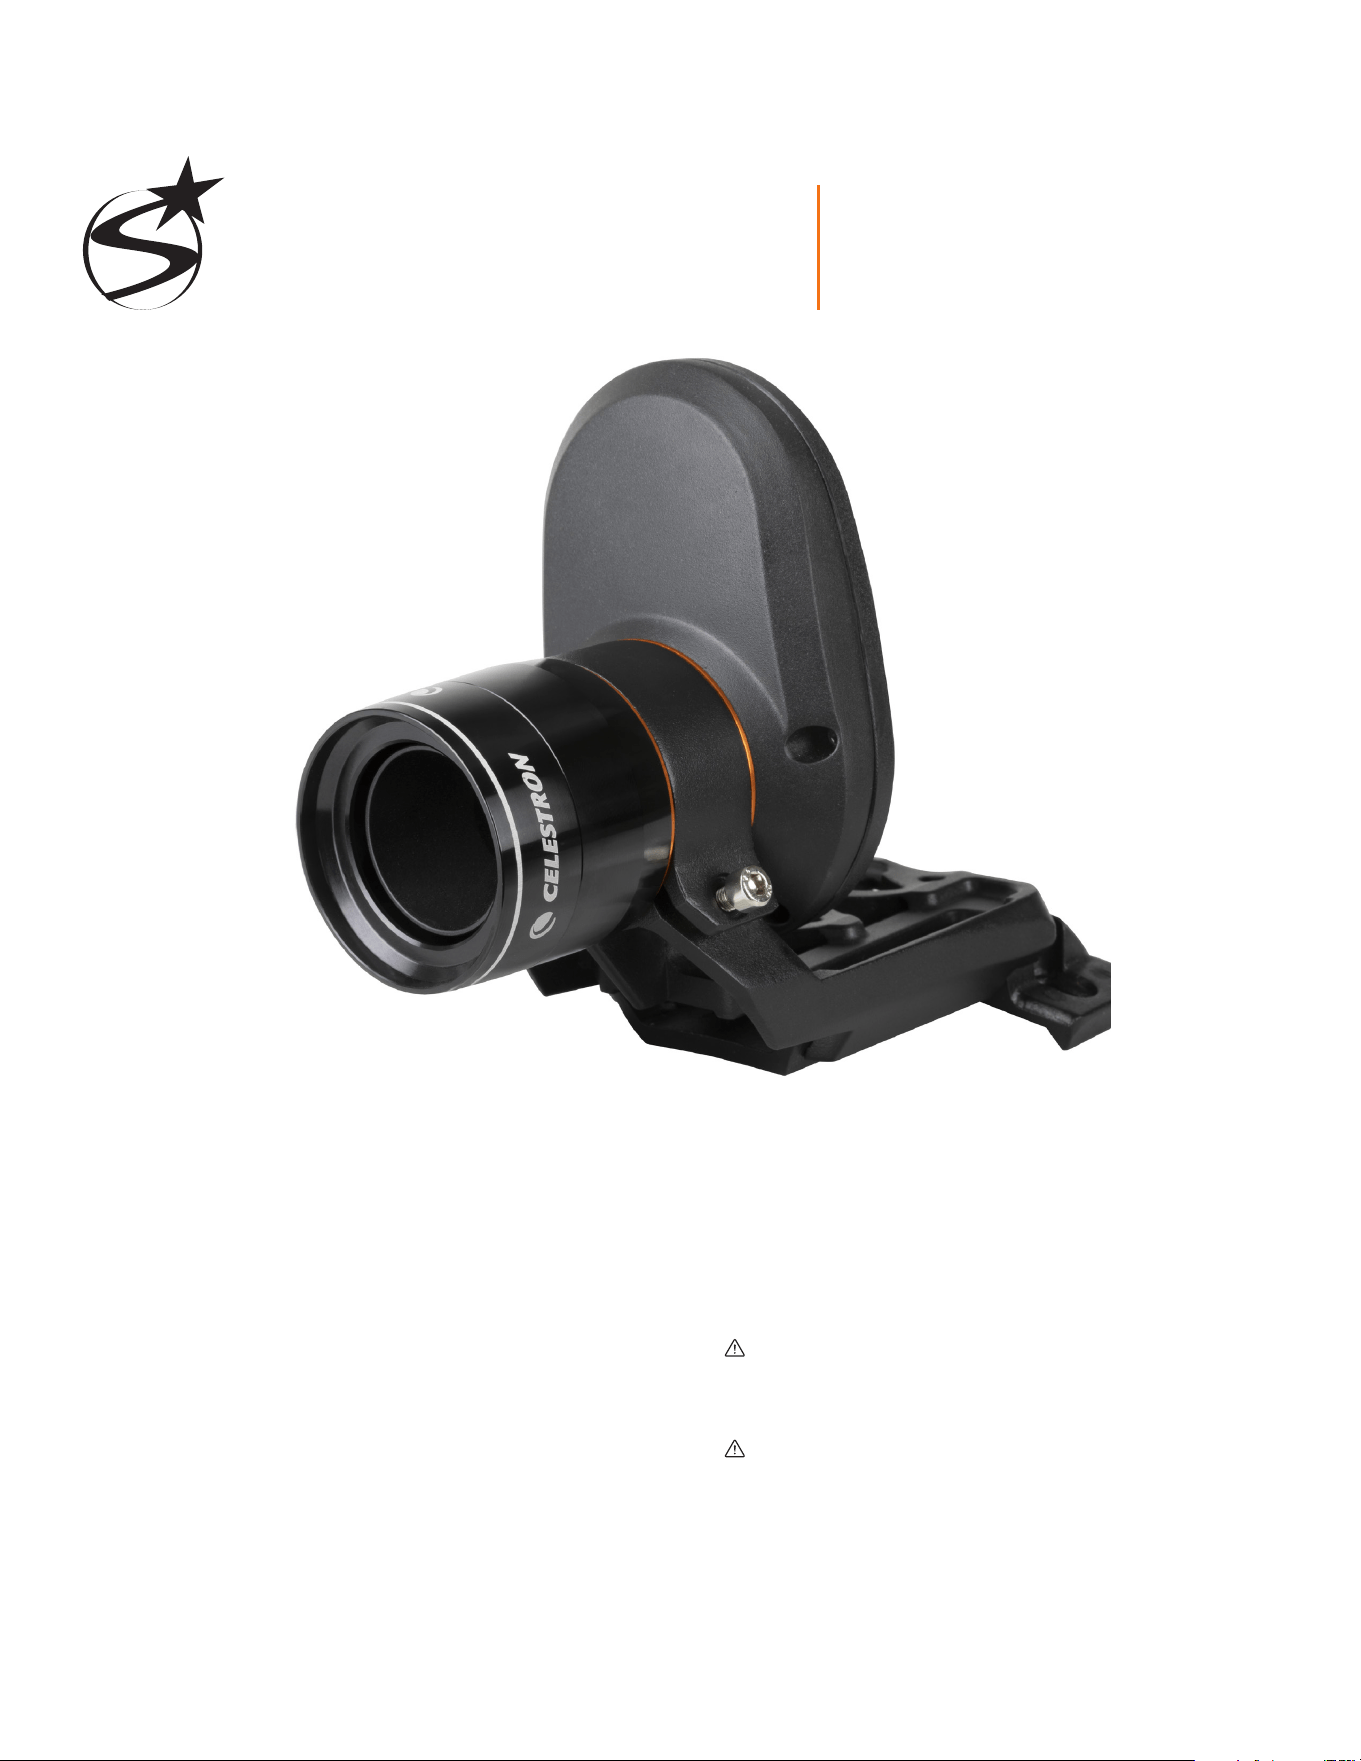
StarSense AutoAlign V2
ENGLISH # 94034
StarSense
®
AutoAlign V2
With the Celestron StarSense AutoAlign Version 2 (SSAA), using a
Celestron telescope has never been easier. This all-in-one accessory
automatically aligns your telescope and more! With your new StarSense
AutoAlign, you can:
• Automatically align your equatorial or altazimuth telescope to the night
sky in just a few minutes. Once aligned, your telescope will find and
center objects with enhanced pointing accuracy.
• Quickly and accurately polar align your equatorial mount, if desired.
INSTRUCTION MANUAL
Please read this manual before setting up and using your StarSense
AutoAlign. You can find the most current version of this instruction
manual on the StarSense AutoAlign V2 product page at celestron.com.
WARNING – Never point the StarSense AutoAlign at the Sun! Doing
so will damage SSAA’s image sensor. This damage is not covered under
your warranty. Keep SSAA’s cover cap on during the day.
WARNING: DO NOT PLUG STARSENSE AUTOALIGN INTO YOUR
MOUNT’S AUTOGUIDER PORT! Always connect StarSense AutoAlign to
one of your mount’s AUX ports. Connecting it to the Autoguider port
could damage StarSense AutoAlign.

StarSense AutoAlign V2
TABLE OF CONTENTS
1. Parts List .........................................................................................................1
2. Installation ........................................................................................................1
3. Controlling StarSense AutoAlign ....................................................................................3
4. StarSense AutoAlign Workflow ......................................................................................3
5. Using SSAA with NexStar+ Hand Control .............................................................................3
6. Using SSAA with CPWI ............................................................................................7
7. Using SSAA with SkyPortal .........................................................................................10
8. Focusing .........................................................................................................12
9. Updating SSAA’s Firmware and Live View via Web Interface .............................................................12
10. Updating SSAA’s Firmware via Celestron Firmware Manager (CFM) ......................................................13
11. Specifications. ...................................................................................................13
12. Troubleshooting and Tips. ..........................................................................................14
1 | ENGLISH
StarSense AutoAlign V2
Small
bracket
Standard dovetail
base for finderscope
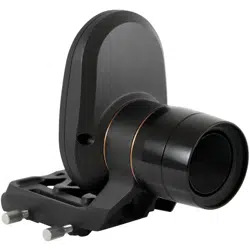
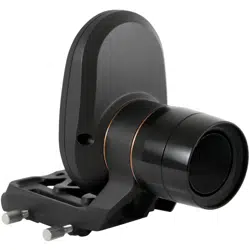
Fig. 3: If your telescope already has a standard finderscope base, you can use the
small bracket to mount SSAA on your telescope.
If you are using a telescope smaller than 5” in aperture, and your
telescope does not have a standard dovetail base for a finderscope,
you will need to purchase this base from a third-party supplier.
If you are using the pre-installed large bracket to mount SSAA to
your telescope tube:
1. Connect the large bracket base to the telescope. (Note: Some
telescopes may already have this base installed; it is the same one
used for the 8x50 finderscope included with several telescopes.) If
you need to install the base, use the Phillips-head accessory screws,
which are pre-installed in the rear cell of the telescope. There are
usually two locations on the rear cell to mount the base (Fig. 4).
Base
mounting
location 1
Base
mounting
location 2
Fig. 4: The large bracket base can be connected to the optical tube assembly (OTA)
in two locations on most Celestron telescopes.
2. Remove the screws, orient the base as shown, and line up the holes in
the base with the holes in the rear cell.
3. Reinstall the screws so the base is secure. If needed, use the two
supplied Phillips head screws.
4. Loosely thread the two thumbscrews into the large bracket (Fig. 5).
Thumbscrews
Fig. 5: Install the thumbscrews into the large bracket. These secure the bracket to
the base as shown.
5. Slide the bracket onto the base until it is fully seated.
6. Tighten the thumbscrews to secure the bracket to the base.
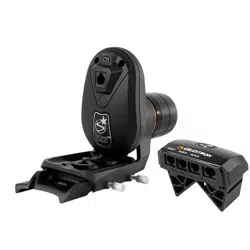
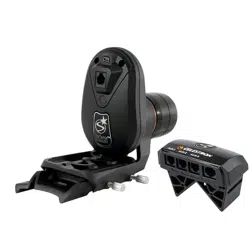
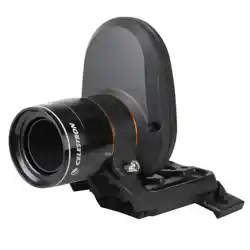
1. Parts List
A. StarSense AutoAlign with cover cap
B. Large bracket (pre-installed on StarSense AutoAlign)
C. Large bracket base
D. Small Bracket
E. AUX cable
F. Phillips head screws (2)
G. Large bracket base thumbscrews (2)
H. Hex key
A
D
B
C
E F G H
Fig. 1
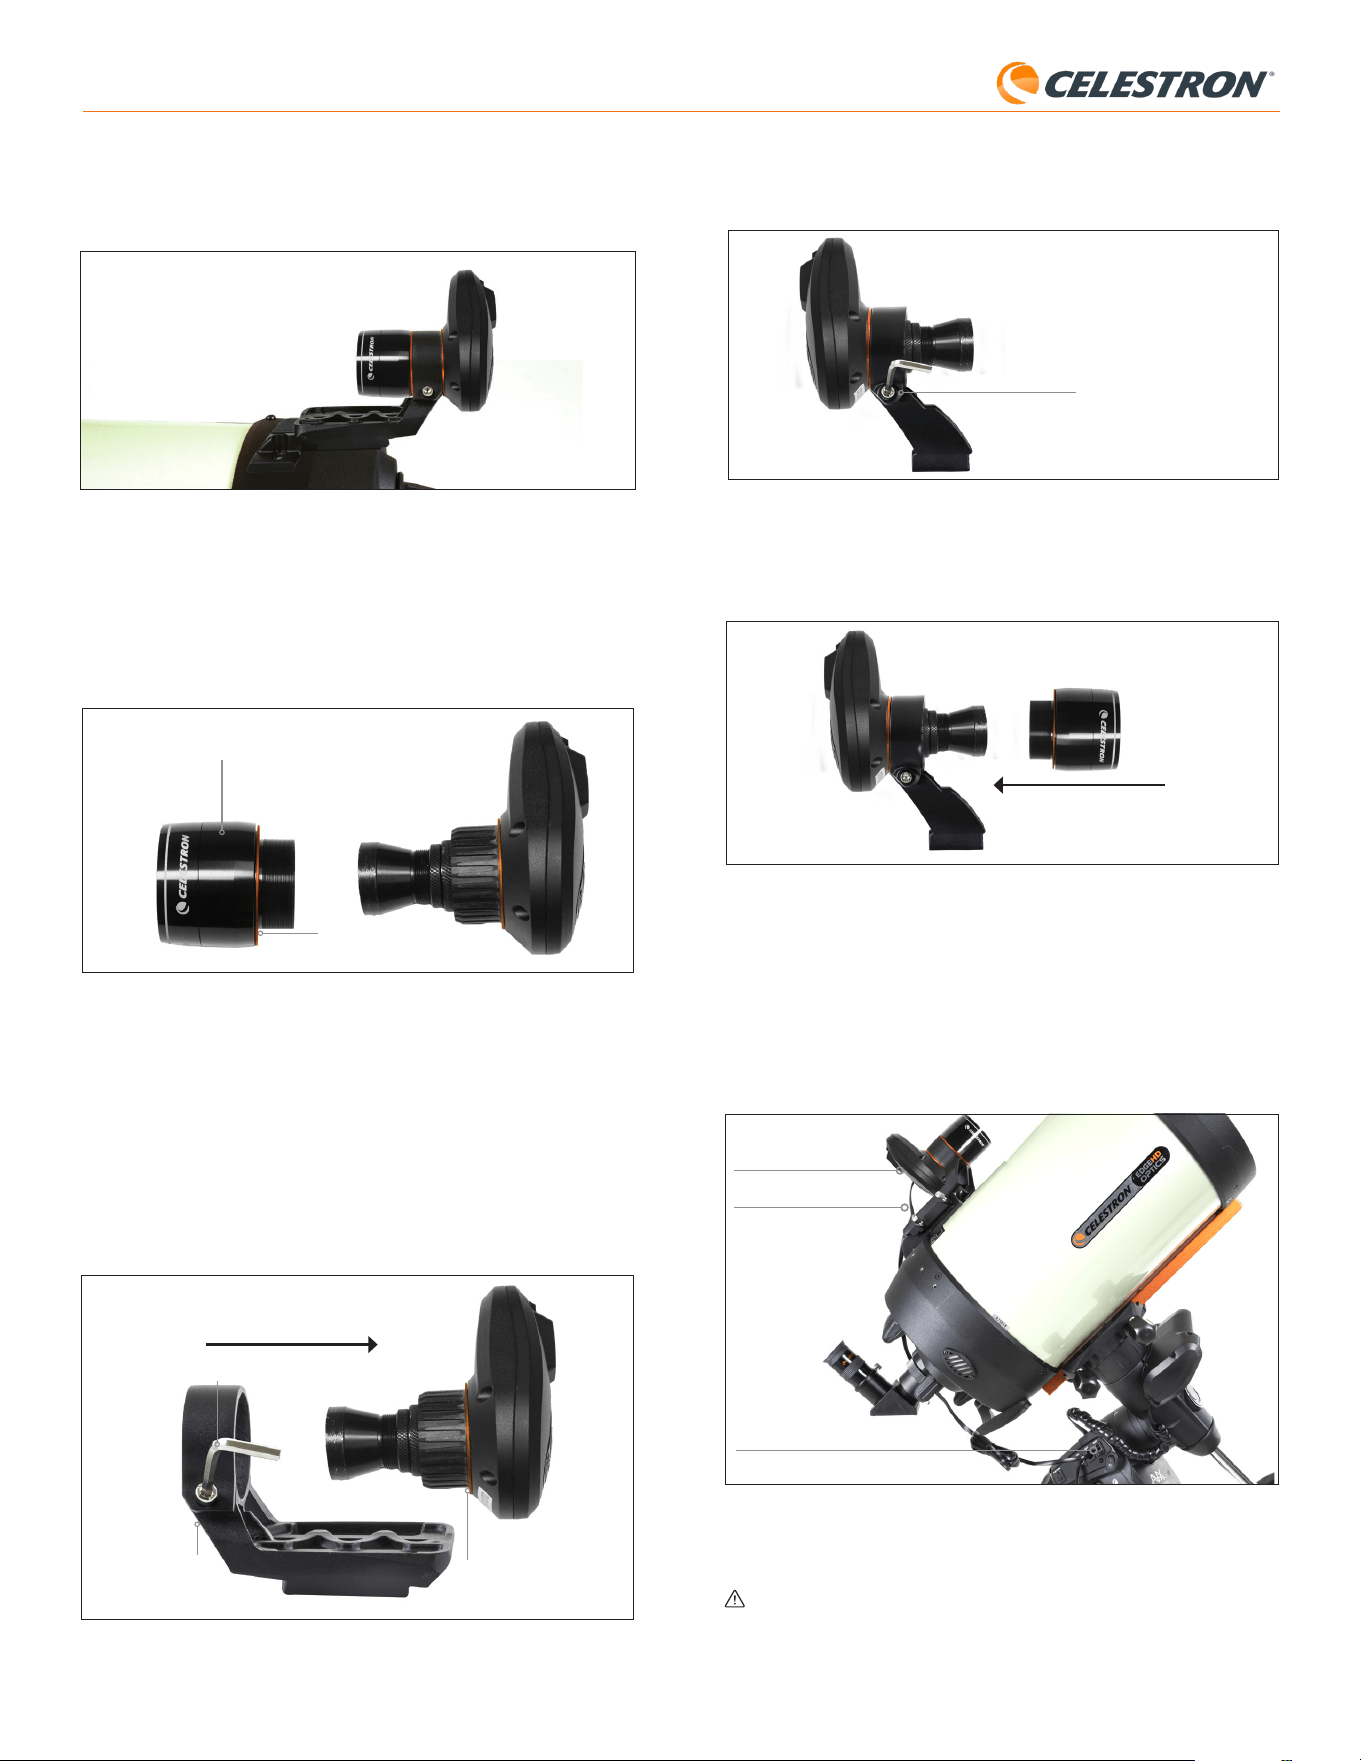
2. Installation
StarSense AutoAlign connects to your optical tube using one of the two
supplied brackets (i.e., the large bracket or the small bracket). Use the
large bracket with Schmidt-Cassegrain, EdgeHD, and RASA telescopes
with 5” or more of aperture (Fig. 2).
Large bracket
Large bracket base
Fig. 2: The large bracket and base connect SSAA to Celestron Schmidt-Cassegrain,
EdgeHD, and RASA telescopes 5” or larger.
Use the small bracket with other telescopes that have a standard dovetail
base for a finderscope (Fig. 3).
2 | ENGLISH
StarSense AutoAlign V2
3. Loosen the socket head cap screw on the small bracket’s clamp and
install SSAA and the orange ring into the small bracket. Orient it as
shown (Fig. 8).
Socket head cap screw
Fig. 8: Install SSAA into the small bracket as shown, then retighten the socket head
cap screw on the bracket.
4. Retighten the socket head cap screw on the small bracket’s clamp.
5. Reinstall SSAA’s front housing and the orange front ring (Fig. 9).
Fig. 9: Reinstall the front housing onto SSAA. Don’t forget the orange
cosmetic ring!
6. To install SSAA into your telescope’s standard finderscope dovetail
base, simply insert the small bracket into the base and tighten the
thumbscrew on the base to secure it in place.
Now that you have installed SSAA, you’ll need to connect its AUX port
to one of the AUX ports on your telescope mount. Use the supplied AUX
cable (Fig. 10). If you do not have an available AUX port on your mount,
consider purchasing an optional Celestron AUX Port Splitter.
AUX port (on SSAA)
AUX port (on mount)
AUX cable
Fig. 10: Use the supplied AUX cable to connect SSAA’s AUX port to the mount’s
AUX port.
WARNING: DO NOT PLUG StarSense AutoAlign INTO YOUR MOUNT’S
AUTOGUIDER PORT! Always connect StarSense AutoAlign to one of
your mount’s AUX ports. Connecting it to the Autoguider port could
damage StarSense AutoAlign.
The optional 8” CGE Dovetail Bar for mounting accessories will obstruct
SSAA’s large bracket. The CPC 800 fork arm also obstructs SSAA. For
these configurations, attach the base and large bracket backwards as
shown in Fig. 5a.
Fig. 5a: You’ll need to install the base and large bracket backwards on a CPC 800
telescope.
If you are using the small bracket, you’ll need to remove SSAA from
the large bracket first. To mount SSAA with the small bracket:
1. Unthread SSAA’s front housing completely and remove it. Doing this
will expose SSAA’s optical tube (Fig. 6). Also, remove the orange front
cosmetic ring.
Orange cosmetic ring
Fig. 6: To switch brackets, completely unthread and remove the entire front of the
SSAA housing, including the orange ring.
Front of SSAA housing
NOTE: When removing the front housing to install the small bracket,
you could accidentally affect SSAA’s factory focus. Keep this in
mind when you are using SSAA later. If the device is not working
correctly and you are receiving “No Stars!” error messages, you
may need to refocus. To do so, refer to the section on Focusing
later in this manual.
2. Use the hex key to loosen the socket head cap screw, which provides
the bracket’s clamping force. Then pull SSAA out of the bracket
(Fig. 7). Doing this will also remove the orange rear cosmetic ring.
Socket head
cap screw
Rear orange
cosmetic ring
Hex key
Fig. 7: Loosen the socket head cap screw. Remove SSAA from the large bracket,
including the rear orange ring.
3 | ENGLISH
StarSense AutoAlign V2
4. StarSense AutoAlign Workflow
Before diving into the step-by-step instructions, here’s a high-level look
at how StarSense AutoAlign is typically used. The setup process follows
this general sequence:
A. Polar Alignment – If you are using an equatorial mount, or an
altazimuth mount on an equatorial wedge, begin by using StarSense
AutoAlign to assist with polar alignment. This step aligns your mount
with Earth’s rotational axis.
If you are using a standard altazimuth mount, skip this step.
B. Sky Alignment – Next, perform a Sky Alignment. This allows the
mount to determine where it is pointing in the night sky. Several
alignment options are available, but in most cases, Auto Align is the
preferred and most commonly used method.
C. Center Calibration – Center Calibration aligns the StarSense
camera’s field of view with the telescope’s field of view. This only
needs to be completed once, as long as the StarSense AutoAlign
remains mounted in the same position. The calibration offset is stored
in the unit’s memory.
If you remove and reinstall StarSense AutoAlign, we recommend
performing Center Calibration again. After completing Center
Calibration, you will need to repeat the Sky Alignment.
The next three chapters explain how to perform these functions using the
NexStar+ hand control (chapter 5, page 3), CPWI PC software (chapter
6, page 7), or the SkyPortal app (chapter 7, page 10). You only need
to refer to the chapter that corresponds to the control method you are
using.
5. Using SSAA with the NexStar+
Hand Control
The NexStar+ hand control is one of the easiest ways to operate your
StarSense AutoAlign. It does not require a computer and allows you to
control your telescope just as you normally would, with StarSense’s
enhanced alignment capabilities built in.
Choose the section below that matches your setup:
- Section A – Celestron Altazimuth (AZ) mount
- Section B – Celestron Equatorial (EQ) mount
- Section C – Celestron AZ mount used on an optional equatorial wedge
Refer only to the section that applies to your mount configuration.
A. Using SSAA with an Altazimuth
(AZ) Mount
Altazimuth mounts cannot be polar aligned. This section walks you
through performing a Sky Alignment using StarSense AutoAlign.
1. Make sure the tripod is reasonably level. If your mount has a built-in
bubble level, use that for reference.
2. Manually point the telescope tube horizontally toward the northern
horizon. (If you are in the Southern Hemisphere, point it toward the
southern horizon.)
3. Power on the mount.
4. Press ENTER.
5. Select an alignment method. Use the SCROLL UP and SCROLL
DOWN keys to select “Auto Align.” Press ENTER.
- The other sky alignment options will be covered in section E of this
chapter (Page 6).
3. Controlling StarSense AutoAlign
There are several ways to control your StarSense AutoAlign:
NexStar+ Hand Control
To use SSAA with the NexStar+ hand control that came with your
Celestron mount, you will likely need to update the hand control’s
firmware. You’ll need firmware version 5.35.5340 or greater. To
check your firmware version number, press the MENU button. Use
the SCROLL and ENTER buttons to navigate to Utilities>Version.
Use the Celestron Firmware Manager (CFM) software to update
the firmware if needed. You’ll find the latest version of CFM here:
celestron.com/pages/drivers-and-software
You’ll need a USB cable (Type-A to Mini-B) to connect the hand control to
your PC. Refer to section 9 of this manual (page 13) for more information.
CPWI Telescope Control Software for PC
You can control your telescope and StarSense AutoAlign with our
free Celestron CPWI software. To download the latest version, visit:
https://www.celestron.com/pages/celestron-pwi-telescope-
control-software
You’ll need CPWI version 2.5.9 or greater. Install the software and open
CPWI. Select “Start” if the opening window appears. Then, click on the
“Connection” icon in the upper left corner of the screen. If you are using a
wired connection to your Celestron mount (i.e., through the hand control
or the mount itself), select “USB.” If you are connected via WiFi using
the SkyPortal WiFi module or your mount’s internal WiFi (e.g., NexStar
Evolution), select “WiFi.” CPWI should find and connect to the StarSense
AutoAlign. Once connected, the SSAA icon will appear in the selection
menu on the left side of the screen. Select the icon to display the StarSense
menu (Fig. 11).
Fig. 11: When you connect your Celestron mount to your PC and launch CPWI,
you should see the StarSense menu among the icons on the left side of
the screen.
SkyPortal App for iOS and Android
If you use the Celestron SkyPortal WiFi Module or have a Celestron
mount with built-in WiFi (e.g., NexStar Evolution), you can use the
SkyPortal app to control your SSAA. You’ll need a smartphone running
the most recent version of the SkyPortal app, available for free in the
Apple App Store or Google Play.
4 | ENGLISH
StarSense AutoAlign V2
Fig. 11B The index marks on the Advanced VX EQ mount.
8. You will be asked whether you would like to perform a polar alignment.
We recommend completing polar alignment now. If you skip it and
perform it later, you will need to repeat the sky alignment process.
- To polar align now, press ALIGN.
- To skip polar alignment, press ENTER to continue to sky alignment.
9. Follow the onscreen prompts to enter your location, local time, and
date.
- You may want to use the city database to set your location. Don’t
worry if your exact location is not in the database. Just select the
nearest city.
10. If you selected polar alignment, continue to Step 11.
If you skipped polar alignment, proceed to Step 21.
11. The hand control will ask you to slew the telescope to a clear area
of the sky. Use the hand control’s direction keys to point to a clear
location. Press ENTER.
• The telescope will slew from West to East for about 50° during
the polar alignment process. (If in the Southern Hemisphere, the
telescope will slew from East to West for about 50°). Try to slew to
a clear area with no obstructions along this path.
12. The telescope will slew from West to East to obtain polar alignment
references. (If in the Southern Hemisphere, the telescope will slew
from East to West.) This will take a few minutes.
13. When the telescope stops slewing, the hand control will display
“Adjust AZM.” Press ENTER. The LCD will now show the AZM and
ALT polar alignment errors.
14. If your mount has an azimuth axis lock knob or locking screws, loosen
them before adjusting the azimuth.
15. Use the mount’s azimuth fine adjustment knobs to adjust the
mount’s azimuth (left-to-right) positioning slowly. As you make these
adjustments, the AZM error will increase or decrease. Continue
adjusting until the AZM error is below two arcminutes. Press ENTER.
• Do not adjust the altitude of the mount! You will make altitude
adjustments in the next step.
• Make the adjustments slowly so SSAA can track them. If you adjust
too quickly and SSAA loses track, you may need to restart the
entire polar alignment process.
16. The hand control will now display “Adjust ALT.” Press ENTER.
17. If your mount has altitude axis lock knobs, loosen them before
adjusting altitude.
18. Use the mount’s altitude fine adjustment knobs to adjust the mount’s
altitude (up-and-down) positioning slowly. As you make these
adjustments, the ALT error will increase or decrease. Continue
adjusting until the ALT error is below two arcminutes. Press ENTER.
• Do not adjust the azimuth of the mount.
19. The hand control will now ask, “Fine Adjust AZM?”
a. If you wish to make additional adjustments to the azimuth, use
the SCROLL keys to select “Yes” and press ENTER. Adjust the
azimuth fine adjustment knobs until the error is less than two
arcminutes, and press ENTER.
6. Follow the onscreen prompts to enter your location, local time,
and date.
- You may want to use the city database to set your location. Don’t
worry if your exact location is not in the database. Just select the
nearest city.
7. The mount will begin slewing to a position where SSAA will obtain its
first alignment reference. Once the mount stops slewing, SSAA will
capture an image of the sky and determine its position.
NOTE: If the telescope automatically slews to point to an area of the
sky that is locally obstructed (by buildings, trees, etc.), it will fail and
automatically slew to another point to try again.
8. The mount will slew to another position to obtain the second alignment
reference.
9. The Auto Align process is now complete. You will see “Align Success!”
on the NexStar+ LCD screen.
Your mount is now aligned to the night sky. However, before it can
accurately place objects in the telescope’s field of view, SSAA must
determine the offset between its own field of view and that of the
telescope in a process called “Center Calibration.” If you have never
center-calibrated SSAA and your telescope, the hand control will prompt
you to do so immediately after initial sky alignment. Refer to section D for
center calibration instructions. If you have performed a center calibration
previously, the telescope is now ready to find and place objects near the
center of the field of view.
B. Using SSAA with an Equatorial
(EQ) Mount
Before powering on the mount, perform a rough polar alignment. Once
this is complete, you can refine the alignment using only the mount’s
altitude and azimuth fine adjustment knobs.
NOTE: These instructions explain how to perform rough polar alignment
in the Northern Hemisphere. If you are in the Southern Hemisphere, point
the mount due South instead of due North.
To roughly polar align:
1. Make sure the tripod is reasonably level. If your mount has a built-in
bubble level, use that for reference.
2. Adjust the altitude of the mount so that the mount’s latitude scale
indicates roughly the same latitude as your observing site.
3. Lift and rotate the entire tripod and mount so that the right ascension
(RA) axis points approximately due North. The mount’s position doesn’t
need to be perfect. Aim within about 5° due North so the mount is
within the range of the mount’s azimuth fine adjustment knobs. Use a
free compass app for your smartphone if you need help finding North.
4. If you loosened the altitude or azimuth adjustment knobs during rough
polar alignment, make sure they are securely retightened before
proceeding.
Now that you are roughly polar aligned, you’re ready to start the
alignment process:
5. Power on the mount.
6. Press ENTER.
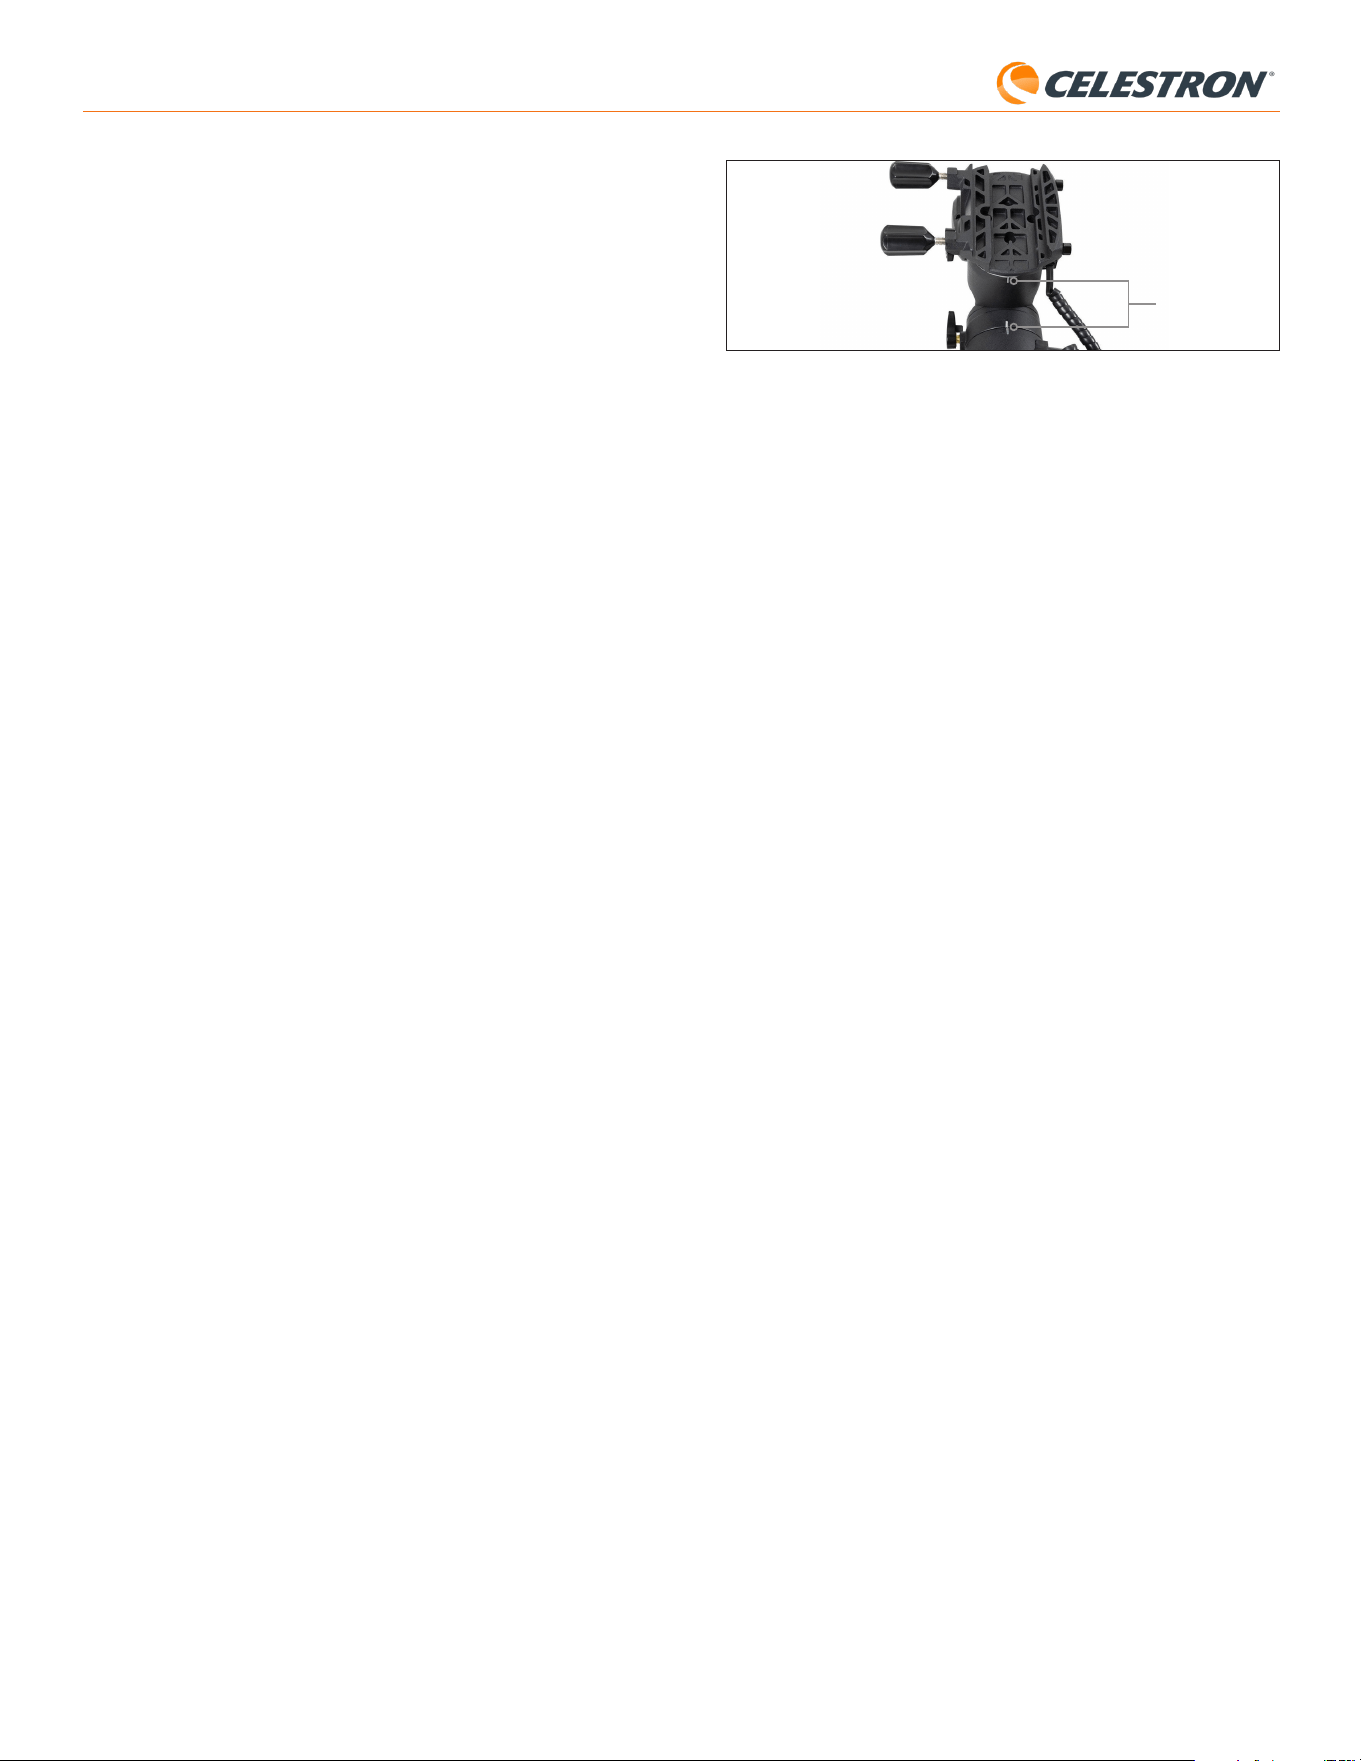
7. a. If you have an EQ mount with home position switches, such as the
CGX or CGX-L, the hand control will prompt you to move the mount
to its home position. Press ENTER.
b. If you have an EQ mount without home position switches, such as the
Advanced VX mount, the hand control will prompt you to manually
move the mount to its index marks (Fig. 11B). You may use the hand
control’s manual slew buttons to move the mount, or loosen the RA
and DEC clutches and rotate the axes by hand. Once the index
marks are aligned, retighten the clutches and press ENTER.
Index marks
5 | ENGLISH
StarSense AutoAlign V2
7. Use the SCROLL UP and SCROLL DOWN keys to select “EQ North
Align.” Press ENTER. (Choose “EQ South Align” if in the Southern
Hemisphere.)
8. Follow the onscreen prompts to enter your location, local time, and date.
- You may want to use the city database to set your location. Don’t
worry if your exact location is not in the database. Just select the
nearest city.
9. The LCD will now display “Set Alt To Index.” Position the mount as
shown in Figure 12. You can either use the hand control to manually
slew the telescope or, if your mount has axis clutches (like the Evolution
mount), you can loosen the clutches and manually position by hand.
10. You will be asked whether you would like to perform a polar alignment.
We recommend completing polar alignment now. If you skip it and
perform it later, you will need to repeat the sky alignment process.
- To polar align now, press ALIGN.
- To skip polar alignment, press ENTER to continue to sky alignment.
From this point forward, the alignment process is the same as for
equatorial mounts.
If you chose to perform polar alignment, refer to Section B, starting with
Step 11.
If you chose to skip polar alignment, refer to Section B, starting with
Step 21.
Northern Hemisphere
Southern Hemisphere
Points to North Pole
Points to South Pole
Optical tube perpendicular to fork arm
Optical tube perpendicular to fork arm
b. If you do not want to make further adjustments, use the SCROLL
keys to select “No” and press ENTER.
20. Congratulations! You have successfully polar-aligned your mount. If
your mount has altitude or azimuth locking knobs or screws, tighten
them firmly.
NOTE: We don’t recommend attempting to adjust the polar alignment
better than two arcminutes on each axis. Doing so will be difficult and will
not provide additional pointing or tracking benefits.
21. Next, you will be prompted to select a method for sky alignment. Use
the SCROLL UP and SCROLL DOWN keys to select “Auto Align.”
Press ENTER.
- The other sky alignment options will be covered later in this manual.
22. The mount will begin slewing to a position where SSAA will obtain its
first alignment reference. Once the mount stops slewing, SSAA will
capture an image of the sky and determine its position.
NOTE: If the telescope automatically slews to point to an area of the
sky that is locally obstructed (by buildings, trees, etc.), it will fail and
automatically slew to another point to try again.
23. The mount will slew to another position to obtain the second
alignment reference.
24. The mount will slew to a third position on the other side of the
meridian to obtain a third alignment reference.
25. After SSAA has captured three alignment references, you will see
“Align Success!” on the NexStar+ LCD screen.
Your mount is now aligned to the night sky. However, before it can
accurately place objects in the telescope’s field of view, SSAA must
determine the offset between its own field of view and that of the
telescope in a process called Center Calibration. If you have never
center-calibrated SSAA and your telescope, the hand control will prompt
you to do so immediately after initial sky alignment. Refer to section D for
center calibration instructions. If you have performed a center calibration
previously, the telescope is now ready to find and place objects near the
center of the field of view.
C. Using SSAA with an AZ mount on an
Equatorial Wedge
Before powering on the mount, perform a rough polar alignment. Once
this is complete, you can refine the alignment using only the wedge’s
altitude and azimuth fine adjustment knobs.
NOTE: These instructions explain how to perform rough polar alignment
in the Northern Hemisphere. If you are in the Southern Hemisphere, point
the mount due South instead of due North.
To roughly polar align:
1. Make sure the tripod is reasonably level. If your wedge has a built-in
bubble level, use that for reference.
2. Adjust the altitude of the wedge so that the wedge’s latitude scale
indicates roughly the same latitude as your observing site.
3. Lift and rotate the entire tripod and mount so that the fork arm points
approximately due North. The mount’s position doesn’t need to be
perfect. Aim within about 5° due North so the mount is within the range
of the wedge’s azimuth fine adjustment knobs. Use a free compass
app for your smartphone if you need help finding North.
4. If you loosened the altitude or azimuth adjustment knobs during rough
polar alignment, make sure they are securely retightened before
proceeding.
Now that you are roughly polar aligned, you’re ready to start the alignment
process:
5. Power on the mount.
6. Press ENTER.
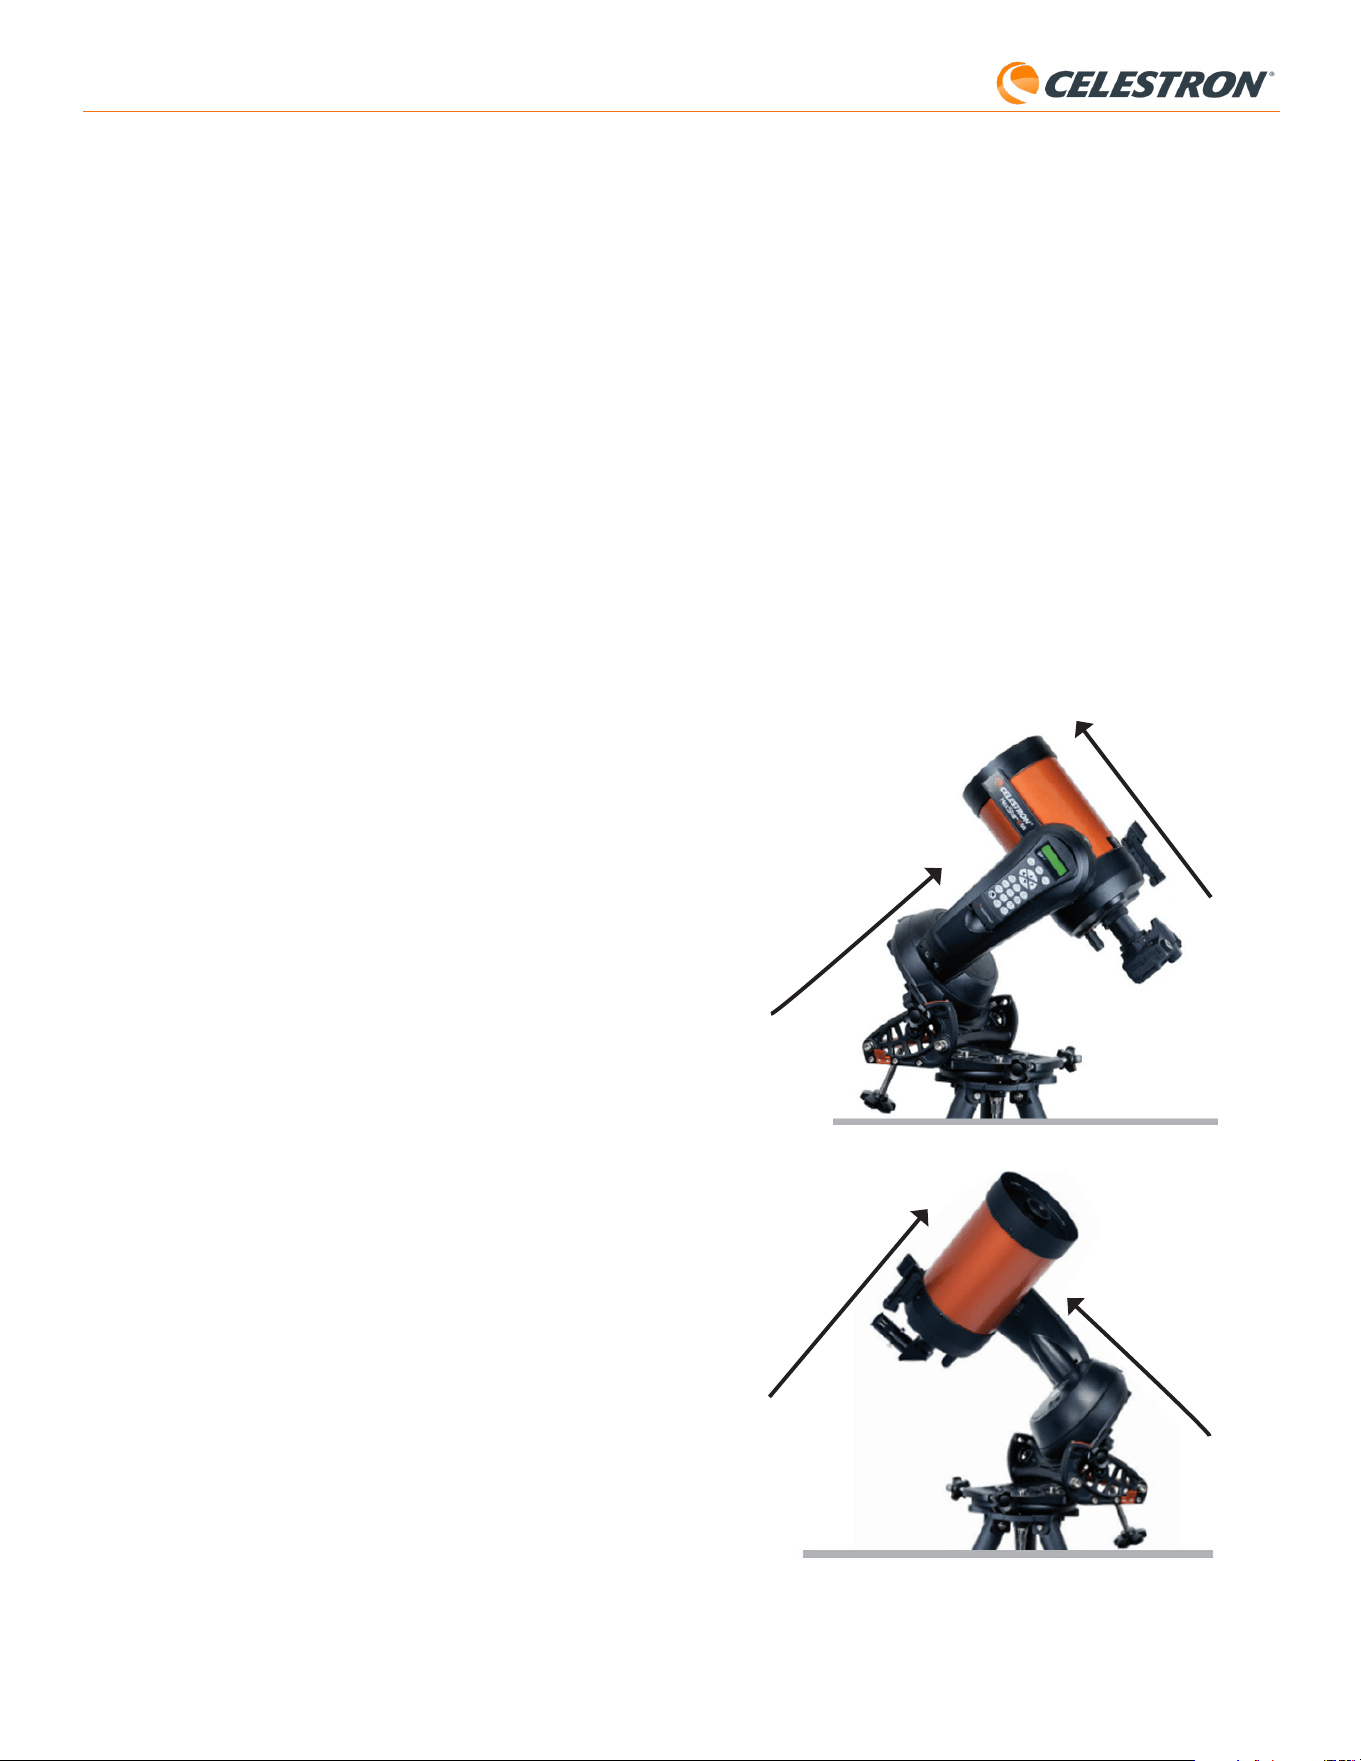
Fig. 12: When using an altazimuth (AZ) fork mount on an equatorial wedge, begin
with the mount in the position shown. The fork arm should point due North (or due
South in the Southern Hemisphere), and the optical tube should be perpendicular to
the fork arm.

6 | ENGLISH
StarSense AutoAlign V2
Manual Align
You may consider using the Manual Align option if you have many
obstructions at your observing location, such as buildings, trees, or power
lines. Manual Align works like Auto Align but allows you to manually slew
the telescope to clear areas of the sky to obtain the alignment references.
Because the telescope won’t automatically slew to positions blocked by
obstructions, the overall alignment process is quicker.
To perform a “manual” alignment using the NexStar+ hand
control:
1. When the hand control prompts you to select an alignment method,
use the SCROLL UP and SCROLL DOWN keys to select “Manual
Align” and press ENTER.
2. The hand control will prompt you to slew the telescope to a clear area
of the sky using the direction buttons. When the telescope is pointing
to a clear area of the sky, press ENTER. SSAA will capture an image
to use as an alignment reference.
NOTE: For best results with EQ mounts, do not slew the telescope
towards the North (or South) poles to capture alignment references.
3. The hand control will prompt you to manually slew the telescope to
another clear area of the sky.
a. For altazimuth mounts, slew the mount in both axes, making sure
SSAA is pointing at least 60° away from its first alignment point.
Press ENTER. The Manual Align is now complete. Skip to Step 7.
b. For equatorial mounts, slew the mount to another clear area of the
sky. This location must be on the same side of the meridian as the
first area you chose. Press ENTER.
4. After completing the first two alignment references, the hand control
will display “Add Calib Star?” We strongly recommend adding a third
alignment reference for the best overall pointing accuracy across the
sky.
a. Choose “No” to end the alignment with only two references. This
alignment may provide acceptable pointing accuracy in many
cases, especially if Precise GoTo is on (as explained later in this
manual). Skip to Step 7.
b. Choose “Yes” to add a third alignment reference. The telescope will
automatically slew to the other side of the meridian.
6. With the telescope now on the opposite side of the meridian from the
first two alignment points, the hand control will prompt you to choose
a third clear area of sky. Use the direction keys to slew to a clear area
of sky on this side of the meridian and press ENTER.
7. You will see “Align Success!” on the NexStar+ LCD screen when
completed.
User Auto Align
This alignment method only works after you have performed at least one
Manual Auto Align. When you select User Auto Align, the telescope
automatically moves to the alignment points you defined during the
previous Manual Auto Align. It’s a handy option if you set up in the same
location most nights and there are significant obstructions at the site.
To perform a User Auto Align, choose “User Auto Align” as the alignment
method. Once initiated, the telescope will automatically slew to the first
alignment point in the prior Manual Auto Align. It will then proceed to the
other user-defined points to complete the alignment.
Last Align
If you leave your telescope set up in a single location, such as a home
observatory, Last Align is a convenient choice. You can only use this
method if you do not slew or otherwise move the telescope in any way
after powering it off. This alignment method uses the previous SSAA
alignment data stored in the hand control. No further action is required.
D. Center Calibration
Center calibration aligns the StarSense AutoAlign camera’s field of view
with your telescope’s optical field of view.
You will typically only need to perform center calibration the first time
you use StarSense with a new optical tube. You may need to repeat the
procedure if you remove and reinstall the bracket base on the telescope.
If you remove only the StarSense unit and its bracket, but leave the
bracket base attached to the telescope, center calibration is usually not
required again.
Before performing center calibration, complete a sky alignment as
described in the previous sections. If center calibration has not been
performed previously, StarSense will automatically prompt you to begin
the process after sky alignment.
To perform a center calibration:
1. If you have never center-calibrated SSAA, the NexStar+ hand control
will automatically start the center calibration process after sky
alignment. Otherwise, press the MENU button and use the SCROLL
keys to select “StarSense.” Press ENTER. Use the SCROLL keys to
select “Center Calibrate” and press ENTER.
2. Next, use the SCROLL keys to select either Named Stars or Solar
System Objects (i.e., planets) to use for center calibration. Press
ENTER. Scroll through the list of stars or planets and select one
clearly visible from your location. Press ENTER.
• If you are unsure where the object you have chosen is in the night
sky, don’t worry. The telescope will point close to the object in
the next step. You can use the telescope as a guide to determine
which star or planet you are using to center-calibrate. Remember
that named stars and planets are among the brightest objects in
the night sky.
• For best results with an EQ mount, choose stars that are close to the
celestial equator (i.e., away from poles).
3. The telescope will slew to the star or planet you chose. Depending
on the offset between SSAA’s field of view and the telescope’s, the
object may or may not be in the telescope’s field of view. In any case,
the telescope should generally be pointing toward the object.
4. The NexStar+ hand control will ask you to center the object in the field
of view of the finderscope. Use the direction buttons on the keypad
to do this. Don’t worry about fine centering yet—that happens in the
next step. For now, roughly center the object in the field of view of the
finderscope and press ENTER.
• If the star is not within the finderscope’s field of view, slew the
telescope manually until it is.
• If you’re not using a finderscope, use your widest field eyepiece in
the telescope for this step. If the object is not in the field of view, try
sighting down the length of the telescope tube to point to the object.
5. The NexStar+ hand control will prompt you to center the object in
the eyepiece’s field of view. This is the fine-centering step. Make sure
there is a high-powered eyepiece in the telescope. Use the direction
buttons on the keypad to center the object. For the best results, use
the up and right direction keys last. When you finish, press ALIGN.
6. SSAA will perform the center calibration and return the message
“Center Calib Success.”
After successfully completing center calibration, you will be prompted
by the hand control to perform sky alignment again. After subsequently
performing sky alignment, you can command the telescope to accurately
place any celestial object you choose within the telescope’s field of view.
E. Other Sky Alignment Methods
Instead of choosing “Auto Align” for the sky alignment method, there are
several other options to choose from. These other options provide some
flexibility for your observing site and setup.
7 | ENGLISH
StarSense AutoAlign V2
Polar Align
If you have chosen not to Polar Align during initial alignment, you can
initiate polar alignment at any time with this menu option. For equatorial
mounts or AZ mounts on an equatorial wedge, refer to section B, steps
11 to 20. Remember that AZ mounts cannot be polar aligned unless they
are used on an optional equatorial wedge.
After successfully completing Polar Alignment, the hand control will
prompt you to perform sky alignment again. This is why we recommend
polar aligning initially, before sky alignment.
Version
Selecting this option displays the current version number of SSAA’s
internal software.
• To view the NexStar+ hand control firmware version, select the
“Version” option from MENU>Utilities.
Settings
Use Precise GoTo – This setting allows you to enable or disable
automatic Precise GoTo after every slew. Precise GoTo is on by default for
the best pointing accuracy. However, this feature causes the telescope
to take slightly longer to center objects. We recommend that most users
leave Precise GoTo on.
Factory Reset
This option clears any previously stored center calibration data in
StarSense AutoAlign. After selecting this option, you must power cycle
the mount.
We recommend performing a Factory Reset if you plan to use StarSense
AutoAlign with a different Celestron mount than the one you previously used.
6. Using SSAA with CPWI
If you already use a PC to control your telescope (e.g., for astroimaging),
Celestron’s free CPWI software is a great way to control SSAA. Its
intuitive user interface makes accessing all of SSAA’s features easy.
Sky Alignment
When you connect your PC running CPWI to your Celestron mount
with StarSense AutoAlign attached, the Alignment window will open
automatically (Fig. 14).
First, check the date, time, and location near the top of the window. If
you notice any mistakes, click the “Set Time” or “Set Location” buttons
to adjust.
Fig. 14: The SSAA alignment window in CPWI.
Quick Align
This procedure aligns the mount using only the time/date/location
information. It assumes initially that equatorial mounts are precisely
polar aligned and in the “home position” (i.e., the automatic starting
position if your mount has internal home position switches, or with index
marks aligned for mounts without internal home position switches),
and that altazimuth mounts are precisely level and pointing due North
(or due South in the Southern Hemisphere). For AZ fork mounts on
an EQ wedge, it initially assumes the mount is precisely polar aligned
with the telescope tube perpendicular, as shown in Figure 12. Quick
Align does not use the SSAA device. We don’t usually recommend this
alignment method because it is not very accurate, but it may provide
accurate enough pointing and tracking for some use cases with no
further alignment required. It can also be handy when you are searching
for planets in twilight.
F. Other Functionality
You can access all the additional options below by pressing the MENU
button, using the SCROLL keys to select “StarSense,” and pressing
ENTER. Refer to Fig. 13 for the StarSense menu tree.
PRECISE GOTO
PLATE SOLVE
CENTER CALIBRATE
POLAR ALIGN
VERSION
SETTINGS
FACTORY RESET
STARSENSE
Fig. 13: The StarSense menu tree in the NexStar+ hand control.
Precise GoTo
Precise GoTo uses SSAA to more accurately center objects in the field of
view. When this option is enabled, the telescope mount uses its internal
alignment model to slew close to the selected object. Then SSAA takes
over, making fine corrections to the centering, significantly improving the
overall pointing accuracy. When you are using SSAA, Precise GoTo is
enabled by default, so you do not need to initiate a Precise GoTo here.
However, if you have turned Precise GoTo off (see Settings section
below), you can initiate a Precise GoTo to a specific object from this
menu selection.
Plate Solve
When you choose this option, SSAA will capture an image and plate
solve. The hand control will display the center coordinates (RA and Dec)
to which the telescope is pointing in the sky.
Center Calibrate
If you want to initiate a new center calibration, you can do whenever
you wish with this option. If you remove the SSAA bracket base from
the telescope (by removing the mounting screws) and reinstall it, we
recommend performing a new center calibration. Just removing the
SSAA in its bracket from the base (by first loosening the thumbscrews
on the bracket) and then reinstalling it on the base should generally not
require a new center calibration. However, if you subsequently notice
that objects are not being placed in the center of the telescope’s field of
view, then a new center calibration may help improve centering.
After successfully completing center calibration, you will be prompted by
the hand control to perform sky alignment again.
8 | ENGLISH
StarSense AutoAlign V2
Auto Four Points
Auto Four Points is the most automated alignment choice. SSAA will
automatically slew to four points in the sky to achieve sky alignment. If it
points to an obstruction or otherwise fails to determine its position, the
telescope will simply slew to another point in the sky to obtain another
alignment reference.
Custom Points
Custom Points allows you to define points in the sky where the telescope
slews for alignment. It’s a good choice if your observing site has local
obstructions because you can define the alignment points so that the
telescope steers clear of them. If you choose this option, the StarSense
User Interface Auto Alignment Creator window will appear (Fig. 17).
Fig. 17: Auto Alignment Creator window in CPWI.
Click within the chart to select alignment points in the sky. You’ll find the
cardinal directions on the perimeter of the chart. The interior of the chart
goes from 0° altitude (i.e., the horizon) at the edge to 90° (i.e., zenith)
at the center. You can choose more than four alignment points if you
wish. For the best results, choose points spaced widely apart and avoid
points near the poles for EQ mounts. After selecting alignment points,
click “Complete” in the bottom left of the window. Before CPWI begins
the alignment, it will ask if you want to save your user-defined alignment
points. If you do, you can use the .sua file later with the “Load Custom
Points” option.
If you would like to use the StarSense User Interface Auto Alignment
Creator before beginning an alignment, select “User Auto-Align Creation
Tool” from the StarSense menu.
Load Custom Points
Once you have defined “Custom Points” as described above, you can
choose this option to use them again. Select the .sua file you created
previously, and alignment will automatically begin.
Manual Slewing
With this alignment option, you use the Mount Slew Controls window
to manually slew SSAA to a clear area of the sky and click “Solve Here”
to obtain an alignment reference. Repeat the process four times, and
alignment is complete. This is the least automated choice, but it can be
helpful if your observing site has obstructions or the sky is partly cloudy.
For best results, use four alignment points that are as widely spaced as
possible and avoid points near the poles for EQ mounts.
If you are using an AZ mount with an EQ Wedge, select the “EQ Wedge”
option that appears in the top right of the Alignment window. Selecting
this will treat the AZ mount as an EQ mount.
If you are using an EQ mount (or AZ mount on EQ wedge), you should
roughly polar align the mount prior to beginning alignment. SSAA
can assist in getting a precise polar alignment (described later in this
manual), but the process will be much quicker and easier if the EQ mount
is roughly polar aligned to begin with.
For automatic sky alignment using SSAA, choose “StarSense
Alignment,” then press the “Begin Alignment” button. The Pointing
Model Information will appear (Fig. 15). In the “Home Switches” section,
CPWI asks, “Is the mount ready to move to the home switches?” If your
mount has home switches (e.g., CGX and CGX-L), click “Ready,” and the
telescope will move to its home switches. If your EQ mount does not have
home switches but has index marks, manually move the telescope to its
index marks. If you are using an AZ mount on an EQ wedge, position the
telescope as shown in Figure 12 (on page 5).
Fig. 15: Pointing Model Info window in CPWI.
If you are using an altazimuth (AZ) mount, CPWI will prompt you to point
the telescope toward the northern horizon, with the tube positioned
horizontally and facing north. If you are in the Southern Hemisphere,
point it toward the southern horizon instead.
Use the onscreen Mount Slew Controls window to position the
telescope. Precision is not critical. This is simply the starting position for
the alignment routine.
If you have not previously performed center calibration, you should do
so when prompted by CPWI before sky alignment. Unlike the NexStar+
hand control, CPWI requires center calibration to be completed first. If
you skip it, you will need to repeat the sky alignment afterward. Refer to
the Center Calibrate section on page 9 for instructions.
Next, if you are using an equatorial (EQ) mount or an AZ mount on an
equatorial wedge, CPWI will ask whether you would like to perform a
polar alignment. We recommend completing polar alignment at this
stage. If you wait until after sky alignment, you will need to repeat the sky
alignment process.
- To polar align, click “Yes” and follow the instructions in the Polar Align
section on page 9.
- To skip polar alignment, click “No” to proceed directly to sky alignment.
You can perform polar alignment later by selecting “Polar Align Mount”
from the StarSense menu.
After polar alignment is complete, the window will display “StarSense
Alignment” and prompt you to select an alignment option (Fig. 16).
Fig. 16: StarSense Alignment options in CPWI.
9 | ENGLISH
StarSense AutoAlign V2
NOTE: These instructions explain how to perform the polar alignment
procedure in the Northern Hemisphere. If you are in the Southern
Hemisphere, always point your mount due South instead of due North.
To perform a polar alignment with SSAA through CPWI:
1. Roughly polar aligning your mount first will make the entire process
quicker and easier. Once you are roughly aligned, you can achieve an
accurate polar alignment using only the mount’s altitude and azimuth
fine adjustment knobs.
a. Make sure the mount is reasonably level. If your mount has a
built-in bubble level, use that for reference.
b. Adjust the altitude of the mount so that the mount’s latitude scale
indicates roughly the same latitude as your observing site.
c. Lift and rotate the entire tripod and mount so that the right
ascension (RA) axis points approximately due North. The
mount’s position doesn’t need to be perfect. Aim within about
5° due North so the mount is within the range of the mount’s
azimuth fine adjustment knobs. Use a free compass app for your
smartphone if you need help finding North.
d. If you loosened the altitude or azimuth adjustment knobs during
rough polar alignment, make sure they are retightened securely
before proceeding.
2. When prompted by CPWI, manually slew the telescope to an initial
start position using the Mount Slew Controls window.
• The telescope will slew from West to East for about 50° during
the polar alignment process. Try to slew to a clear area with no
obstructions along this path.
3. Click “Begin” in the SSAA Polar Alignment section of the Pointing
Model Information window. The mount will slew East, stopping about
every 10° to obtain a polar alignment reference.
4. After SSAA has obtained its polar alignment references, it will display
the azimuth axis adjustment window (Fig. 18). Slowly fine-adjust your
mount’s azimuth until the “Azm Error” is less than two arcminutes.
• If the mount has azimuth axis locks, loosen them first.
• Make the adjustments slowly so SSAA can track them. If you
adjust too quickly and SSAA loses track, you may need to restart
the entire polar alignment process.
Fig. 18: Azimuth Axis Adjustment window during polar alignment in CPWI.
5. Click “Next Axis” when you are done making adjustments to the
azimuth. The Altitude axis adjustment window will appear (Fig. 19).
Fig. 19: Altitude Axis Adjustment window during polar alignment in CPWI.
Adding Additional Alignment References
After alignment, you can see the information about the mount’s generated
pointing model, including the RMS error, the total number of points in the
alignment model, and the calculated polar alignment error.
You can add additional alignment references throughout the night by
selecting an object in the planetarium view, clicking on it, and choosing
“Model.” The mount will slew to the object’s location, and SSAA will
add the alignment reference to the mount’s pointing model. Pointing
accuracy should be quite good with only four points, but it will generally
increase with each alignment reference you add.
Center Calibrate
Center calibration aligns the StarSense AutoAlign camera’s field of view
with your telescope’s optical field of view.
You will typically only need to perform center calibration the first time
you use StarSense with a new optical tube. You may need to repeat the
procedure if you remove and reinstall the bracket base on the telescope.
If you remove only the StarSense unit and its bracket, but leave the
bracket base attached to the telescope, center calibration is usually not
required again.
CPWI will automatically prompt to perform a center calibration before sky
alignment. If you choose to skip this, you can select “Center Calibrate”
from the StarSense menu later. However, you will then need to redo the
sky alignment after you center calibrate.
To do a center calibration:
1. Select an object in the SkyViewer planetarium screen by clicking
on it. Choose a bright star or planet that is clearly visible from your
observing location.
2. The telescope will now slew to the selected object. Depending on the
offset between SSAA’s field of view and the telescope’s, the object
may or may not be in the telescope’s field of view. In any case, the
telescope should be pointing toward the object.
3. CPWI will prompt you to center the object in the field of view of the
telescope’s eyepiece. You can use the onscreen Mount Slew Controls
window. When you are finished, click “Centered” in the Pointing
Model Information window.
• If the star is not within the field of view of the finderscope, slew
manually until it is.
• If you are not using a finderscope, use your widest-field eyepiece
to find the object instead. If the object is not in the eyepiece’s
field of view, sight down the length of the telescope tube to point
it to the object.
• For final centering, use a high-powered eyepiece.
• When centering the star in the telescope’s field of view, use the up
and right direction keys last.
4. SSAA will perform the center calibration and return the message
“Center Calib Success.”
Once you’ve completed center calibration and sky alignment, you can
command the telescope to accurately place any celestial object you
choose within the telescope’s field of view.
Polar Alignment
Although your EQ mount (or AZ mount on EQ wedge) does not need
to be polar aligned to use SSAA, SSAA can help you achieve a very
accurate polar alignment. A precise polar alignment slightly improves
overall pointing accuracy—but only by a few arcminutes. If you choose
to polar align, do so before sky alignment. If you wish to polar align later,
you can select the “Polar Align Mount” option in the StarSense menu.
You will need to perform sky alignment again after polar alignment is
completed.
10 | ENGLISH
StarSense AutoAlign V2
NOTE: The support logs are not permanently stored within SSAA’s memory, so do not power off
your mount or disconnect SSAA from the mount before downloading the SSAA support logs.
Update Firmware
You can use this option to check whether your StarSense AutoAlign
(SSAA) firmware is up to date and install any available updates.
First, download and install the StarSense Windows driver on your
computer. You can find it in the Support & Downloads section of the
StarSense AutoAlign (#94034) product page at celestron.com.
Next, connect the SSAA’s USB-C port directly to your PC using a USB
cable (not included). Once connected, select “Update Firmware” and
follow the on-screen prompts to complete the process.
7. Using SSAA with SkyPortal
You can control your StarSense AutoAlign via your smartphone using
the Celestron SkyPortal Powered by SkySafari™ mobile app.
What you’ll need:
• A smartphone running the most recent version of the SkyPortal mobile
app, available free in the Apple App Store or Google Play
• Either a WiFi-enabled Celestron telescope, e.g., NexStar Evolution,
OR a Celestron computerized mount plus the SkyPortal WiFi Module
accessory (sold separately)
• StarSense AutoAlign, installed and connected to your telescope mount
To use SSAA with the SkyPortal app:
1. Ensure SSAA is connected to one of the telescope mount’s AUX ports.
2. Power on the mount.
3. Connect to the telescope’s WiFi network with your smartphone.
- Under available WiFi networks, the telescope will display as
“Celestron-###” with ### being digits and letters.
4. Open the SkyPortal app.
5. Select the telescope icon in the bottom right of the screen (Fig. 20).
Fig. 20: Select the telescope icon in the bottom right of the screen
6. Tap “Connect,” then “Connect and Align.” The app will now initiate
alignment. Position your telescope for alignment using one of the
following methods:
a. For EQ mounts with home position switches (e.g., CGX), press
“OK,” and the mount will move to the home position.
b. For EQ mounts without home position switches (e.g., Advanced
VX), the app will prompt you to move the telescope to the home
position index marks (refer to Figure 11B). You can manually move
the telescope or use the onscreen telescope controls.
c. For AZ mounts, point your telescope at the northern horizon using
the onscreen telescope controls. The telescope tube should be
roughly level to the ground and pointing North. If in the Southern
Hemisphere, then the telescope should be roughly level to the
ground and pointing South.
d. For AZ mounts on an EQ wedge, enable the wedge option on
6. Slowly fine-adjust your mount’s altitude until the “Alt Error” is less than
two arcminutes.
• If the mount has altitude axis locks, loosen them first.
7. If you would like to readjust the azimuth axis, click “Next Axis.”
Otherwise, click “Finish.”
8. Congratulations! You have successfully polar-aligned your mount.
If your mount has altitude or azimuth locking knobs or screws, tighten
them firmly. If you have already done a sky alignment, delete the
current alignment from the Alignment menu and perform sky
alignment again.
NOTE: Don’t attempt to adjust the polar alignment to better than two arcminutes on each
axis. Doing so will be difficult and will not provide additional pointing or tracking benefits.
Other Functionality
There are more options to choose from in the StarSense menu.
Live View
The Live View window displays a live readout from SSAA’s image sensor.
Its primary purpose is to aid in focusing SSAA’s lens (see the section on
Focusing later in this manual), but it can also be interesting to see what
SSAA is seeing.
To see the Live View, you’ll need to connect SSAA directly to your PC
using a USB-C to USB-A cable (not supplied). This is because the
AUX interface cannot support the transfer of images. You’ll also need to
install the StarSense Windows driver on your computer. You’ll find it in
the Support & Downloads section of the StarSense AutoAlign (#94034)
product page at celestron.com.
Once you install the driver and connect SSAA with the USB cable,
the Live View window will display the current view from SSAA’s image
sensor. There are no controls for the Live View. SSAA automatically
adjusts exposure and gain to obtain the best images.
NOTE: You should still connect SSAA to the mount via AUX while it is
connected to the PC via USB for Live View.
Precise GoTo
Precise GoTo uses SSAA to more accurately center objects in the field of
view. When this option is enabled, the telescope mount uses its internal
alignment model to slew close to the selected object. Then SSAA takes
over, making fine corrections to the centering, significantly improving the
overall pointing accuracy. When you are using SSAA, Precise GoTo is
enabled by default. If you want to turn this feature off, you can do so from
the StarSense menu.
Version
Selecting this option displays the current version of SSAA’s firmware.
Factory Reset
This option clears any previously stored center calibration data in
StarSense AutoAlign. After selecting this option, you must power cycle
the mount.
We recommend performing a Factory Reset if you plan to use StarSense
AutoAlign with a different Celestron mount than the one you previously
used.
Download Support Logs
If you are having technical difficulties and need to download support logs
to send to Celestron Technical Support, select this option. First, install the
StarSense Windows driver on your computer, available in the Support &
Downloads section of the StarSense AutoAlign (#94034) product page
at celestron.com. Then, connect SSAA’s USB-C port directly to your
PC using a USB cable (not supplied). Then select “Download Support
Logs.” The logs will be downloaded directly to your computer.
11 | ENGLISH
StarSense AutoAlign V2
the Scope Setup screen. Navigate to the Scope Setup screen
by selecting Menu>Settings>Setup and Control. Then select
“StarSense Wedge Align Enabled.” Next, go back to the main
planetarium screen, cancel the current alignment, and press
“Connect” and then “Connect and Align” again. Follow the
onscreen prompts. You’ll also need to set the telescope to the initial
position. Refer to Figure 12 on page 5.
NOTE: You can access to the Scope Setup screen directly by pressing the Celestron Settings icon
near the bottom of the screen. (Fig 21).
Fig. 21: The Celestron Settings icon
7. The automatic alignment will now begin. EQ mounts will slew to
two points in the western sky and then two points in the eastern
sky to obtain alignment references. AZ mounts will slew to three
points around the sky. If you previously performed a center
calibration, you can now use SSAA to locate objects. If you have not
completed a center calibration, SkyPortal will prompt you to do so.
Proceed to step 8.
8. Center calibration aligns SSAA’s field of view with the telescope’s
field of view. This step generally only needs to be done once because
SSAA saves center calibration data in its internal memory. The next
time you connect to SSAA with the app, you will not need to center
calibrate again unless you have moved the SSAA onto a different
telescope optical tube.
a. To center calibrate, choose a star from the planetarium interface,
then press “GoTo.” The telescope will slew close to the star, but the
star may not be in the telescope’s field of view.
b. Use the onscreen direction buttons to precisely center the star in
the telescope’s field of view. When you are finished, press “Align” at
the bottom of the screen. Then press “Calibrate.”
c. The app will complete the center calibrate process.
d. After center calibration, you will be prompted to redo sky alignment.
Tap “Disconnect”, then tap the Scope icon, then tap “Connect”
and then “Connect and Align” again. Go back to step 6.
You are now ready to use SSAA to find objects in the night sky. Simply
select an object in the app and tap “GoTo.” Precise GoTo functionality
is on by default, so stars should appear well-centered within the
telescope’s field of view. When SSAA is performing Precise GoTo, the
app will display “Star Sensing.”
Polar Alignment
Polar alignment assistance with SSAA is currently unavailable through
the SkyPortal app. However, SkyPortal supports the All-Star Polar
Alignment (ASPA) procedure for accurate polar alignment of your
equatorial mount. If you are using an equatorial mount (or AZ mount on an
EQ wedge), the app will ask if you want to perform ASPA after successful
sky alignment. If you would like to perform ASPA later, you can select
All-Star Polar Alignment at any time from the “three dots” icon as shown
in Figure 21B. After performing ASPA, you will be prompted to sky align
the mount again.
Three dots icon
Fig. 21B: You can polar align at any time by selecting the “All Star Polar Align” option
after tapping the three dots icon.
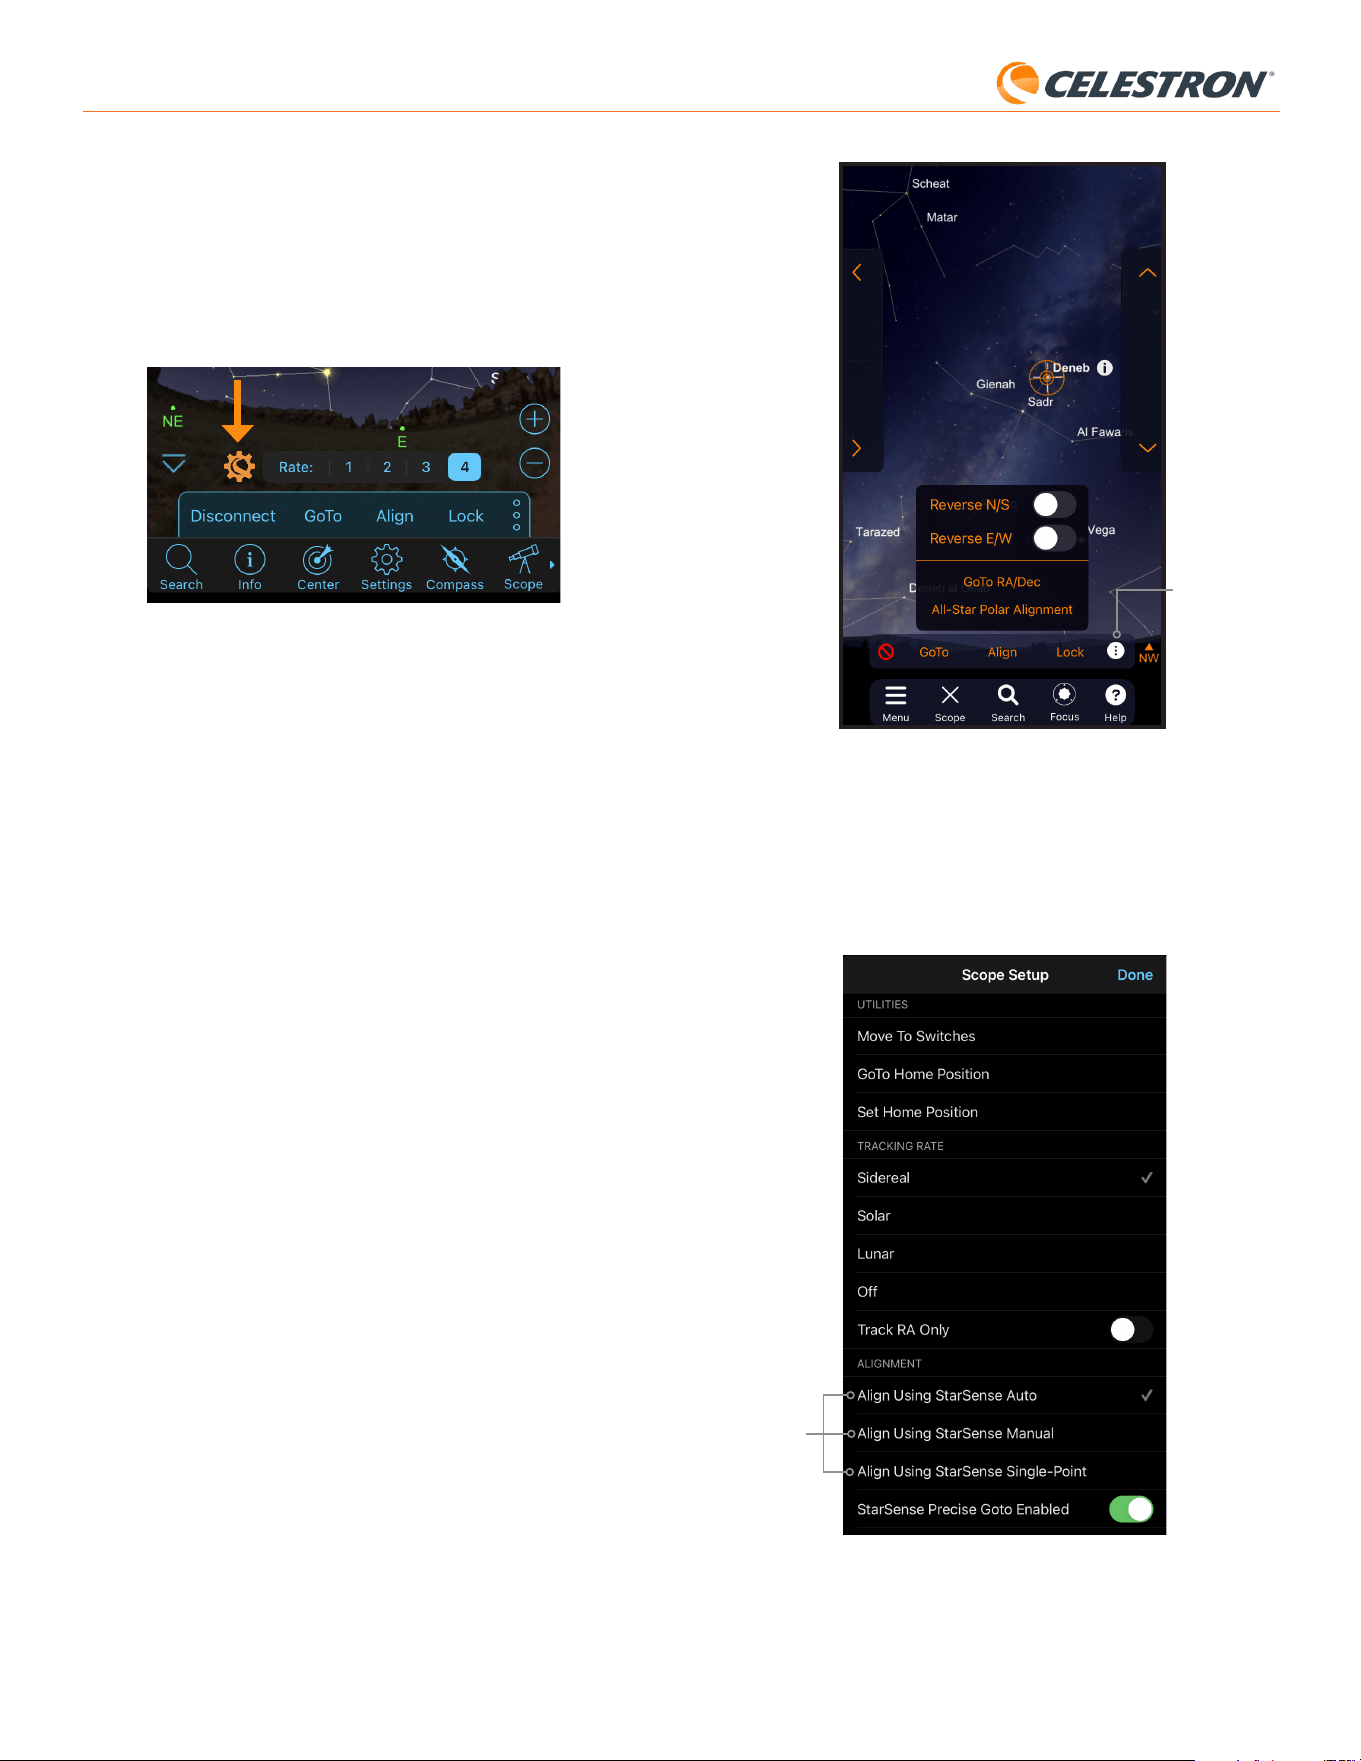
Other Alignment Options
On the Scope Setup screen (Settings Menu > Setup and Control, or
just press the Celestron Settings icon), you can select a couple of other
alignment options (Fig.22).
Alignment
options
Fig. 22: Besides Align Using StarSense Auto (the default option), there are other
alignment options available from the Scope Setup screen.
12 | ENGLISH
StarSense AutoAlign V2
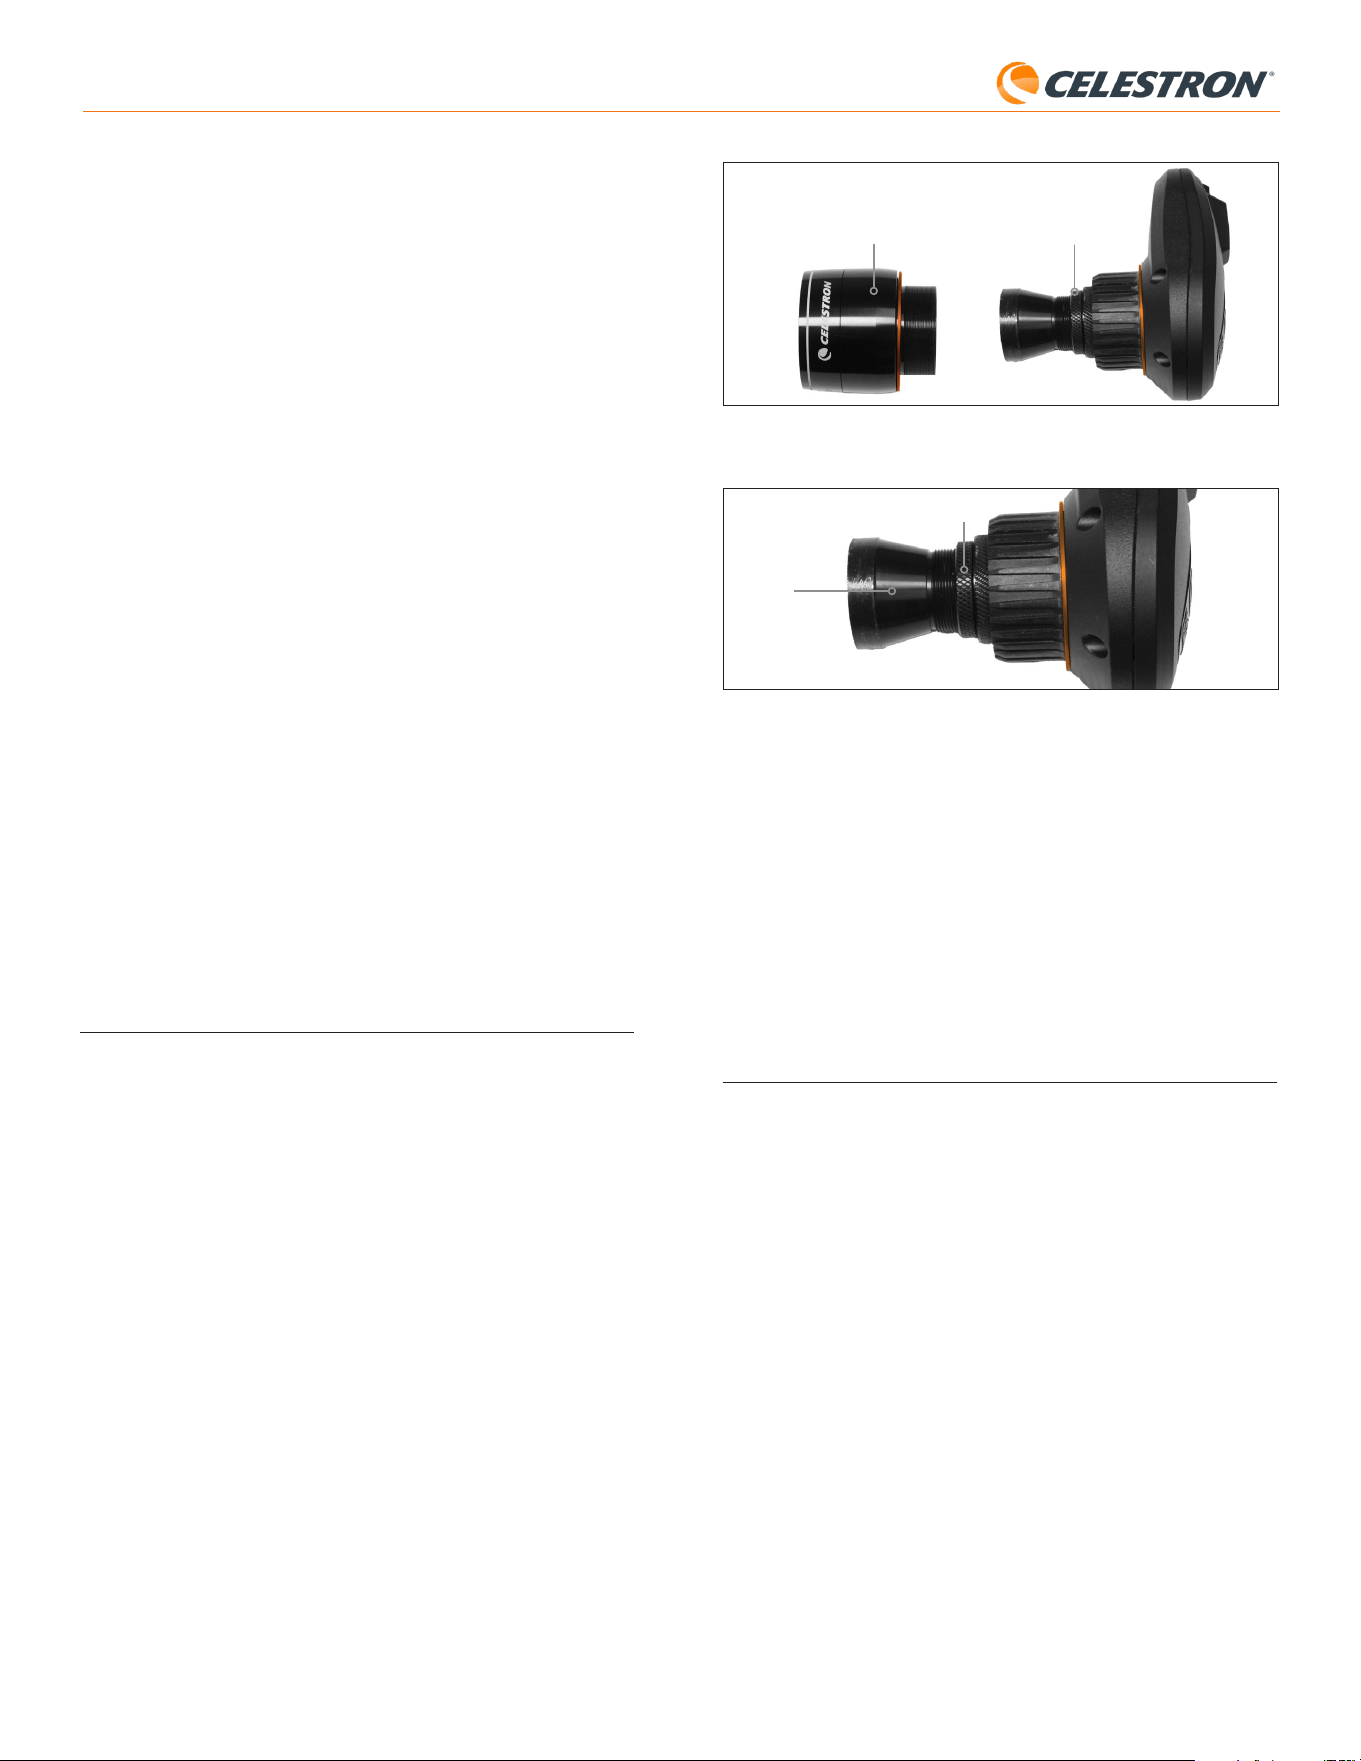
Fig. 23: Only remove the front cover, not the entire front of the housing
Focus Lock Ring
Front Cover
4. Loosen the focus lock ring (Fig. 24).
Fig. 24: Loosen the lock ring when making focus adjustments, then firmly retighten
when focused.
Focus Lock Ring
Optics
5. Rotate the optics clockwise by a quarter- to half-turn to see
if focus improves. If it does, continue rotating until the focus is as
sharp as possible. If the focus does not improve, rotate the optics
counterclockwise until the focus improves.
6. When you see a sharp image, retighten the lock ring and reinstall
SSAA’s front cover. If desired, you can now disconnect SSAA from
the PC’s USB port.
9. Updating SSAA’s Firmware and Live
View via Web Interface
Our engineers are constantly working on upgrades and improvements
to our products, so we recommend periodically checking for SSAA
firmware updates. If any new firmware is available, you’ll find it on the
StarSense AutoAlign V2 (#94034) product page at celestron.com
under “Support and Downloads.” To install the downloaded .swu file,
you’ll need a USB-C to USB-A cable (not supplied) and the StarSense
Windows driver, also available on the StarSense AutoAlign V2 (#94034)
product page.
Follow these steps to update SSAA’s firmware:
1. Install the StarSense Windows driver on your PC.
2. Connect SSAA to your PC via the USB cable. Wait about 10 seconds
for SSAA to boot up.
3. Open a web browser on your computer and enter
http://169.254.54.1/ to launch the SSAA web interface page
(Fig. 25).
Align Using StarSense Manual
StarSense Manual Align lets you manually slew the telescope to
alignment points you choose instead of automatic preset points. If your
observing site has many obstructions or clouds passing through, you
may find StarSense Manual faster and more convenient than StarSense
Auto. To use StarSense Manual, select “Align Using StarSense Manual”
from the Scope Setup screen. Now, the next time you choose “Connect
and Align,” the app will prompt you to perform a StarSense Manual Align.
Follow the onscreen instructions. You can slew the telescope to any
position in the sky that is free of obstructions. Keep alignment points at
least 30° away from each other in both axes.
Align Using StarSense Single-Point
StarSense Single-Point Align allows you to align by manually slewing
to only one area of the sky. It is the fastest way to align but provides
the least accurate pointing model for the mount. But remember, SSAA
will still use its Precise GoTo functionality to center objects accurately,
so this fast procedure may be all you need for casual observing. You
can also add additional alignment points later to improve your mount’s
accuracy using the Align>Align command (see below). To use StarSense
Single-Point, select “Align Using StarSense Single-Point” from the
Scope Setup screen. The next time you “Connect and Align,” you will
be prompted to perform a StarSense Single-Point Align. Follow the
onscreen instructions.
Adding Additional Alignment Points with
the Align>Align Command
SSAA’s built-in Precise GoTo functionality allows it to center objects in
the field of view regardless of how accurate the mount’s pointing model is.
Nevertheless, if desired, you can continually improve your mount’s pointing
accuracy by adding additional alignment points to its pointing model.
To add alignment points, slew the telescope to any area of clear sky.
Select “Align” from the options at the bottom of the screen, then select
“Align” again. You can add up to a total of 10 alignment points.
8. Focusing
Technicians at the factory have focused your StarSense AutoAlign, and it
should not need further adjustment. However, if you find that SSAA is not
working as it should (e.g., reporting “No Stars!” when there are plenty of
stars visible in the sky), you should check the focus.
To focus StarSense AutoAlign:
1. Follow the steps described earlier to access Live View in CPWI (see
page 10). Alternatively, you can access Live View through the web
interface. Refer to chapter 9 (on this page) for instructions.
2. If you are focusing during the day, point SSAA at an object at least a
quarter mile away. If you are focusing at night, point SSAA at a bright
star. You should see an image onscreen.
NOTE: It may be difficult to focus during bright daytime conditions due
to the very fast optics and sensitive sensor.
3. If the focus is sharp, you are done. If not, remove SSAA’s front cover
by grasping it and rotating it counterclockwise until it comes off
(Fig. 23). Remove the front cover to expose the focus lock ring.

13 | ENGLISH
StarSense AutoAlign V2
Fig. 25: You can update SSAA’s firmware via the web interface. You’ll also be
able to access Live View from here.
4. Select “Software Update.”
5. Drag and drop the downloaded .swu file as directed. SSAA’s software
will update.
You can also access the StarSense AutoAlign Live View through the
web interface. From here, you can switch between automatic and manual
camera settings and capture an image in TIFF format.
10. Updating SSAA’s Firmware
via Celestron Firmware Manager
(CFM)
You can also use Celestron Firmware Manager (CFM) to update
StarSense AutoAlign, your NexStar+ hand control, and your mount at
the same time.
Before beginning, download the Celestron Firmware Manager (CFM)
and the StarSense Windows Driver. Both are available at celestron.
com on the StarSense AutoAlign V2 (#94034) product page under
“Software and Downloads.”
To update using CFM, you will need two user-supplied cables:
- A USB Type-A to USB Mini-B cable to connect the NexStar+ hand
control to your PC.
- A USB Type-A to USB Type-C cable to connect StarSense AutoAlign
to your PC.
To install the firmware:
1. Install CFM and the StarSense Windows Driver on your PC.
2. Set up as your mount as you normally usually would, with the
NexStar+ hand control and SSAA plugged into the mount’s AUX
ports.
3. Power on the mount.
4. Connect the USB port on the bottom of the hand control to your PC
with the USB Type-A to USB Mini-B cable (user supplied).
5. Run CFM and click “Seek Devices.” CFM should find the hand
control, mount, and StarSense AutoAlign.
6. Click the Update button in CFM. CFM will install any available
firmware updates for the hand control and the mount.
7. If a firmware update is available for StarSense AutoAlign, CFM will
prompt you to connect it directly to your PC using a USB Type-A to
USB Type-C cable (user supplied).
Keep StarSense connected to the mount via its AUX cable. At the
same time, connect its USB-C port to your PC. Once the USB
connection is established, click “OK” in CFM to begin the firmware
update.
NOTE: StarSense AutoAlign must be updated via a direct USB
connection. The firmware file is too large to transfer through
the mount’s AUX connection.
8. When CFM displays a green checkmark (Fig. 26), the StarSense
AutoAlign update is complete.
Fig .26: When the SSAA update is complete, you will see a green checkmark.
11. Specifications
LENS
DESIGN Doublet
APERTURE 20mm
FOCAL LENGTH 40mm
EFFECTIVE FOCAL RATIO f/2
NUMBER OF ELEMENTS 2
COATINGS Fully multi-coated
CMOS IMAGE SENSOR
CMOS IMAGE SENSOR Sony IMX462LLR-C, monochrome,
back-illuminated
SENSOR SIZE 6.46mm diagonal
PIXEL SIZE 2.9μm x 2.9μm
NUMBER OF EFFECTIVE PIXELS 2.13 M
ONBOARD COMPUTER
PRIMARY ARM
®
CORE 2x Cortex
®
-A53 up to 1.4 GHz
SECONDARY ARM
®
CORE 1x Cortex
®
-M7 up to 600 MHz
RAM 512 MB
ROM 4 GB
GPU GC7000UltraLite
OPERATING TEMPERATURE -5°C to 40°C
PORTS
AUX: For connection to Celestron mounts
USB-C For PC connection to focus, see Live View,
and update firmware
HOUSING
HOUSING Aluminum with plastic covers

14 | ENGLISH
StarSense AutoAlign V2
12. Troubleshooting and Tips
1. If you continually get the “No Stars!” error message during plate-
solving when the sky is clear, try refocusing SSAA.
2. If the Moon is high and bright, StarSense AutoAlign may have difficulty
plate solving within a few degrees of it due to glare. In this case, you
may see a “No Stars!” error message. If there is light haze in the sky,
plate solving may fail even at greater distances from the Moon.
3. For the best overall performance, we recommend leveling your tripod.
SSAA will still work with a tripod that is not level, but its pointing
accuracy will be somewhat diminished.
4. For the most accurate Precise GoTo functionality, polar align your
mount. Precise GoTo will still work well if your mount is not polar
aligned, but overall accuracy will be slightly reduced—typically by
several arcminutes.
5. If you’d like, you can connect SSAA directly to your PC via the USB-C
port for control with CPWI. Before you connect, download and install
the StarSense Windows driver (available on the SSAA V2 product
page on celestron.com). Plug SSAA into your PC. After about 10
seconds SSAA will boot up, and your computer will recognize the
StarSense AutoAlign.
- Leave SSAA connected to your mount via the included AUX
cable, even while it’s connected to your PC via USB-C. Use
the AUX port on your mount, not the autoguiding port. (The
ST-4 autoguiding port is not compatible with SSAA.)
- Make sure to use a high-quality USB cable. If you have
trouble connecting to SSAA via USB, try another USB cable
or another USB port on your computer. We don’t recommend
using USB extension cables as they can contribute to signal
loss.
6. If you remove StarSense AutoAlign from its bracket base and later
reinstall it, you typically will not need to perform Center Calibration
again. However, if objects are no longer being placed near the center
of the field of view, repeat the Center Calibration procedure.
FCC NOTE: This equipment has been tested and found to comply with the limits for a Class
B digital device, pursuant to part 15 of the FCC Rules. These limits are designed to provide
reasonable protection against harmful interference in a residential installation. This equip-
ment generates, uses, and can radiate radio frequency energy and, if not installed and used in
accordance with the instructions, may cause harmful interference to radio communications.
However, there is no guarantee that interference will not occur in a particular installation. If
this equipment does cause harmful interference to radio or television reception, which can be
determined by turning the equipment off and on, the user is encouraged to try to correct the
interference by one or more of the following measures:
• Reorient or relocate the receiving antenna.
• Increase the separation between the equipment and receiver.
• Connect the equipment into an outlet on a circuit different from that to which the receiver
is connected.
• Consult the dealer or an experienced radio/TV technician for help.
Product design and specifications are subject to change without prior notification.
This product is designed and intended for use by those 14 years of age and older.
©2026 Celestron. Celestron and Symbol are trademarks of Celestron, LLC.
All rights reserved. • Celestron.com
US: 2835 Columbia Street, Torrance, CA 90503 USA
UK: Unit 2 Transigo, Gables Way, Thatcham RG19 4JZ, United Kingdom
This product is designed and intended for use by those 14 years of age and older.
Made in China
05-26
celestron.com/pages/warranty
FRANÇAIS # 94034
StarSense
®
AutoAlign V2
Avec le système Celestron StarSense AutoAlign Version 2 (SSAA),
utiliser un télescope Celestron n’a jamais été aussi simple. Cet
accessoire tout-en-un aligne automatiquement votre télescope et bien
plus encore! Avec votre nouveau StarSense AutoAlign, vous pouvez:
• Aligner automatiquement votre télescope équatorial et altazimuthal
sur le ciel nocturne en quelques minutes. Une fois l’alignement fait,
votre télescope trouvera et centrera les objets avec une précision de
pointage améliorée.
• Rapidement et précisément effectuer l’alignement polaire de votre
monture équatoriale, si désiré.
MODE D’EMPLOI
Veuillez lire ce manuel avant d’installer et d’utiliser StarSense AutoAlign.
Vous trouverez la version la plus à jour de ce mode d’emploi sur la page
de StarSense AutoAlign V2 sur le site Celestron.com.
AVERTISSEMENT – Ne pointez jamais StarSense AutoAlign vers le
Soleil! Cela pourrait endommager le capteur d’imagerie du SSAA. Ces
dommages ne sont pas couverts par la garantie. Laissez le capuchon de
protection sur le SSAA pendant la journée.
AVERTISSEMENT: NE BRANCHEZ PAS STARSENSE AUTOALIGN
SUR LE PORT D’AUTOGUIDE DE VOTRE MONTURE! Branchez toujours
StarSense AutoAlign aux ports AUX de votre monture. Brancher votre
StarSense AutoAlign sur un port d’autoguide pourrait l’endommager.

SOMMAIRE
1. Liste des pièces ...................................................................................................1
2. Installation ........................................................................................................1
3. Contrôle de StarSense AutoAlign .....................................................................................3
4. Méthode d’utilisation d’AutoAlign .....................................................................................3
5. Utiliser le SSAA avec la commande NexStar+ ..........................................................................3
6. Utiliser SSAA avec CPWI ...........................................................................................8
7. Utiliser SSAA avec SkyPortal .........................................................................................11
8. Mise au point ......................................................................................................12
9. Mettre à jour le logiciel interne de SSAA et Vue en temps réel via interface Web ..............................................13
10. Mise à jour du firmware SSAA via Celestron Firmware Manager (CFM) ....................................................13
11. Spécifications ....................................................................................................14
12. Dépannage et conseils. ............................................................................................14
1 | FRANÇAIS
StarSense AutoAlign V2
Petit support
Embase à queue d'aronde
standard pour chercheur
Fig. 3: Si votre télescope comporte déjà une base de chercheur standard, vous pouvez
utiliser le petit support pour monter le SSAA sur votre télescope.
Si vous utilisez un télescope dont l’ouverture est inférieure à 5” et
que votre télescope n’a pas de base à queue d’aronde standard pour
chercheur, vous devrez en acheter une auprès d’un fournisseur tiers.
Si vous utiliser le grand support préinstallé pour monter le SSAA
à votre tube de télescope:
1. Connectez le grand support au télescope. (Remarque: Certains
télescopes pourraient être livrés avec la base déjà installée. C’est
la même que celle utilisée par le chercheur 8x50 déjà inclus avec
plusieurs télescopes.) Si vous devez installer la base, utilisez les vis
cruciformes déjà installées sur la cellule arrière du télescope. La
cellule arrière est généralement pourvue de deux emplacements sur
la cellule arrière pour monter la base (Fig. 4).
Emplacement
de montage de
base 1
Emplacement
de montage de
base 2
Fig. 4: Le grand support peut être connecté au tube optique (OTA) à deux emplacements
sur la plupart des télescopes Celestron.
2. Retirez les vis, orientez la base comme indiqué et alignez les trous de
la base sur ceux de la cellule arrière.
3. Réinstallez les vis de manière à sécuriser la base. Si nécessaire,
utilisez deux des vis cruciformes incluses.
4. Vissez légèrement les deux vis à main dans le grand support (Fig. 5).
Vis à main
Fig. 5: Installez les vis à main dans le grand support. Ces fixations permettent de fixer le
support à la base, comme indiqué.
5. Faites glisser le support sur la base au maximum.
6. Serrez les vis à main pour fixer le support à la base.
1. Liste des pièces
A. Lunette d’autoguidage StarSense avec capuchon
B. Grand support (préinstallé sur la lunette d’autoguidage
StarSense)
C. Base du grand support
D. Petit support
E. Câble AUX
F. Vis cruciformes (2)
G. Vis à main de la base de support de grande taille (2)
H. Clé hexagonale
A
D
B
C
E F G H
Fig. 1:
2. Installation
StarSense AutoAlign se connecte à votre tube optique à l’aide de l’un des
deux supports fournis (c’est-à-dire le grand support ou le petit support).
Utilisez le grand support avec les télescopes Schmidt-Cassegrain,
EdgeHD et RASA avec une ouverture de 5” ou plus (Fig. 2).
Grand support
Base du grand support
Fig. 2: Le grand support et la base connectent le SSAA à des télescopes Celestron
Schmidt-Cassegrain, EdgeHD, et RASA de 5 pouces ou plus.
Utilisez le petit support avec d’autres télescopes qui ont une base à
queue d’aronde standard pour un chercheur (Fig. 3).
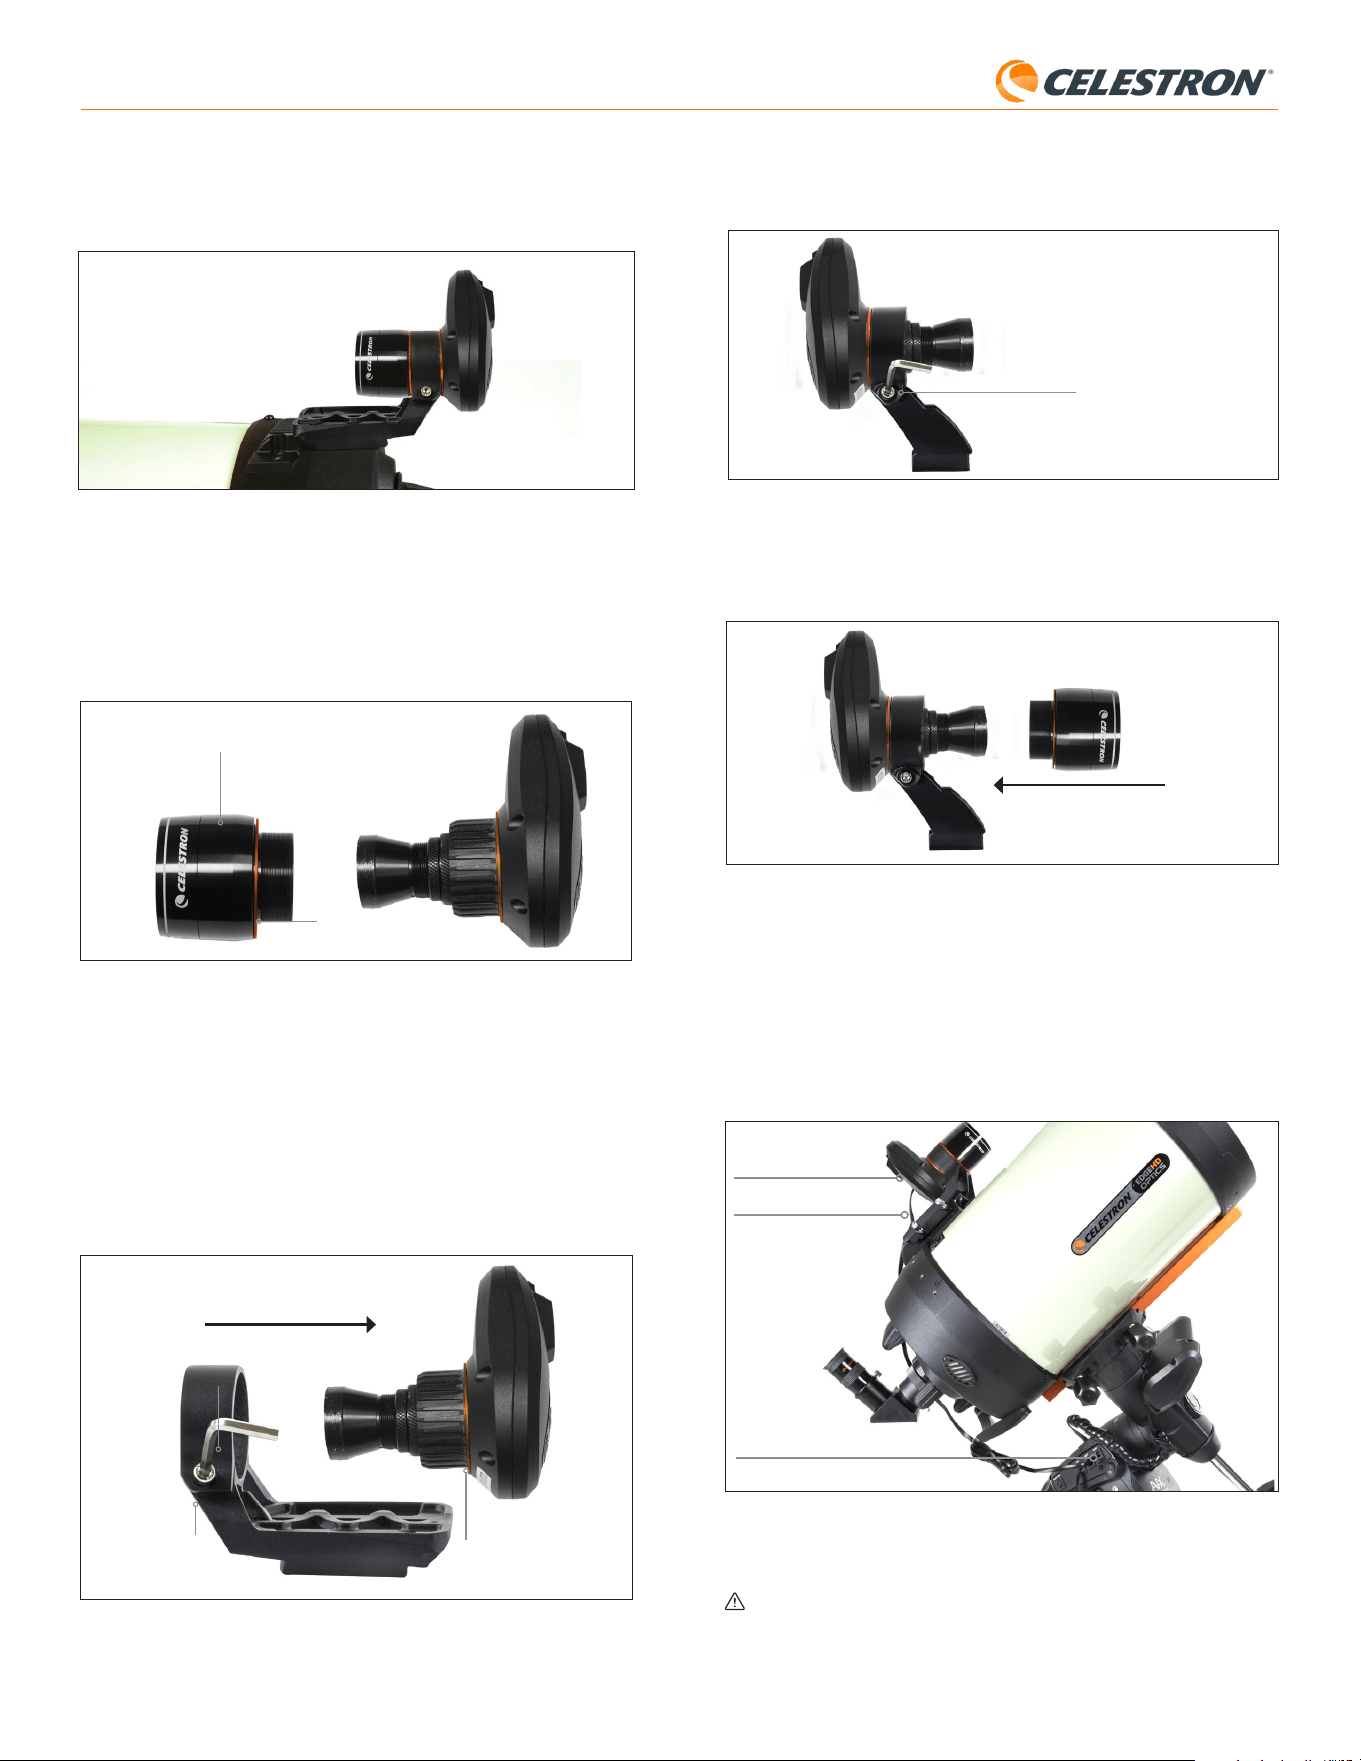
2 | FRANÇAIS
StarSense AutoAlign V2
3. Desserrez la vis à six pans creux sur la pince du petit support et installez
le SSAA et la bague orange dans le petit support. Orientez-le comme
indiqué (Fig. 8).
Vis à tête cylindrique
Fig. 8: Installez le SSAA dans le petit support comme illustré, puis resserrez la vis à six
pans creuse sur le support.
4. Resserrez la vis à six pans creux sur la pince du petit support.
5. Réinstallez le boîtier avant du SSAA et la bague avant orange (Fig. 9).
Fig. 9: Réinstallez le boîtier avant sur le SSAA. N'oubliez pas la bague cosmétique
orange!
6. Pour installer le SSAA dans la base en queue d’aronde standard du
chercheur de votre télescope, insérez simplement le petit support dans
la base et serrez la vis à main sur la base pour la fixer en place.
Maintenant que vous avez installé SSAA, vous devez connecter son port
AUX à l’un des ports AUX de votre monture de télescope. Utilisez le câble
AUX fourni (Fig. 10). Si vous n’avez pas de port AUX disponible sur votre
monture, envisagez d’acheter un répartiteur de port AUX Celestron en option.
Port AUX (sur SSAA)
Port AUX (sur la
monture)
Câble AUX
Fig. 10: Utilisez le câble AUX inclus pour connecter le port AUX de SSAA au port AUX
de la monture.
AVERTISSEMENT: NE BRANCHEZ PAS StarSense AutoAlign SUR LE
PORT D’AUTOGUIDE DE VOTRE MONTURE! Branchez toujours StarSense
AutoAlign aux ports AUX de votre monture. Brancher votre StarSense
AutoAlign sur un port d’autoguide pourrait l’endommager.
La barre à queue d’aronde CGE de 8” optionnelle pour la monture
d’accessoires bloquera le grand support du SSAA. Le bras à fourche CPC
800 bloque également le SSAA. Pour ces configurations, attachez la base
et le grand support en inversé comme illustré dans la Fig. 5a.
Fig. 5a: Vous devrez installer la base et le grand support à l'envers sur un télescope
CPC 800.
Si vous utilisez le petit support, vous devrez d’abord retirer le SSAA
du grand support. Pour monter le SSAA avec le petit support:
1. Dévissez complètement le boîtier avant du SSAA et retirez-le. Cela
exposera le tube optique du SSAA (Fig. 6). Retirez également l’anneau
cosmétique avant orange.
Bague cosmétique orange
Fig. 6: Pour changer de support, dévissez complètement et retirez tout l'avant du boîtier
SSAA, y compris l'anneau orange.
Avant du boîtier SSAA
REMARQUE: Lors du retrait du boîtier avant pour installer le petit support, vous
pourriez accidentellement dérégler la mise au point d’usine de SSAA. Gardez
cela à l’esprit lorsque avant de réutiliser le SSAA. Si l’appareil ne fonctionne pas
correctement et que vous recevez le message d’erreur «Pas d’étoiles:», vous
devrez peut-être refaire la mise au point. Pour ce faire, reportez-vous à la section
sur la mise au point plus bas dans ce manuel.
2. Utilisez la clé hexagonale pour desserrer la vis à six pans
creuse, qui fixe le support. Retirez ensuite le SSAA du support
(Fig. 7). Il faudra également retirer l’anneau cosmétique arrière orange.
Vis à tête
cylindrique
Bague cosmétique arrière
orange
Clef hexagonale
Fig. 7: Desserrez la vis à six pans creuse. Retirez le SSAA du grand support, y compris
l'anneau orange arrière.
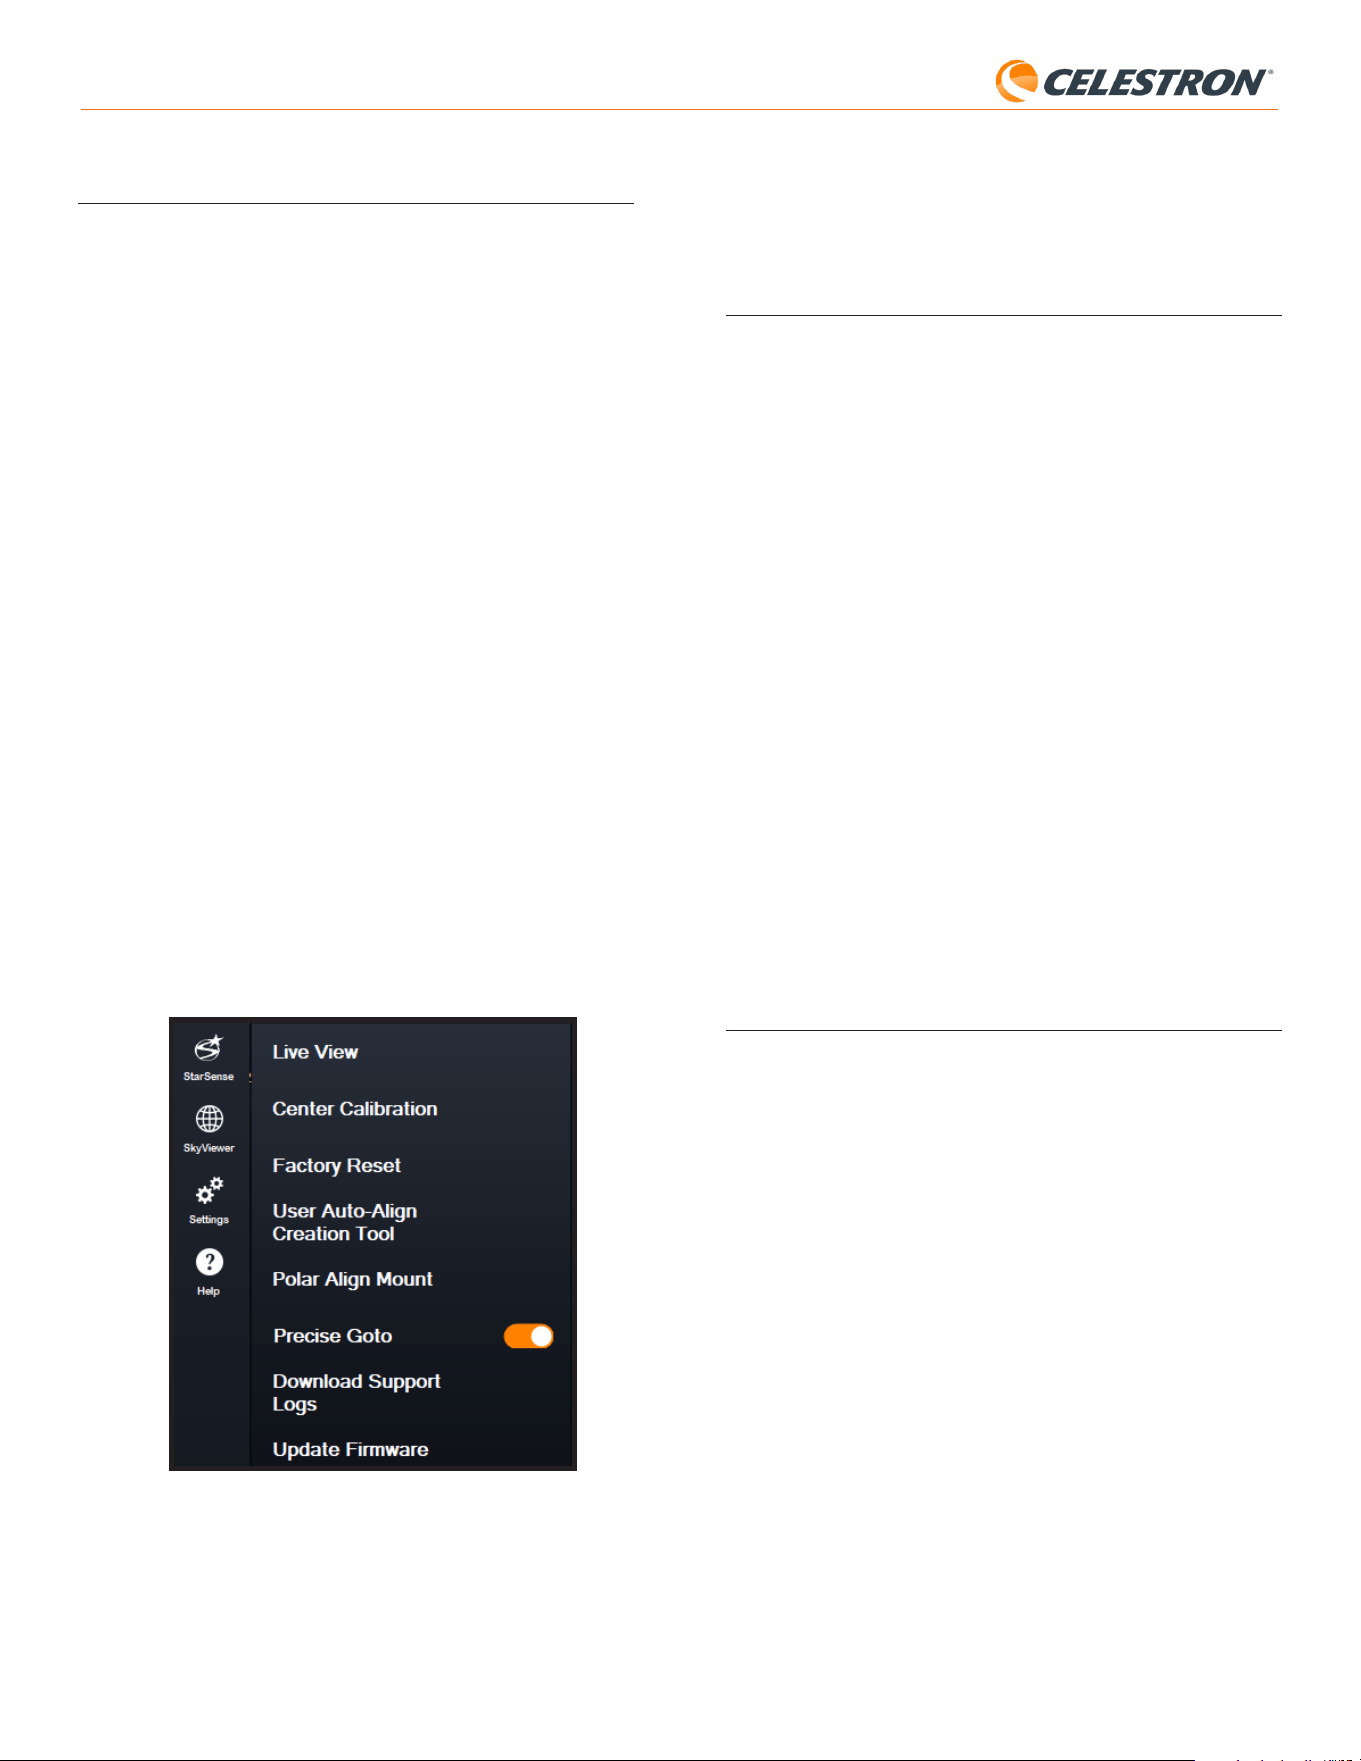
3 | FRANÇAIS
StarSense AutoAlign V2
Vous aurez besoin d’un smartphone équipé de la dernière version de
l’application SkyPortal, disponible gratuitement sur l’Apple App Store ou
Google Play.
4. Méthode d’alignement automatique
StarSense
Avant de vous présenter les instructions étape par étape, voici un aperçu
général de la façon dont StarSense AutoAlign est généralement utilisé. Le
processus d’installation suit la séquence générale suivante:
A. Alignement polaire – Si vous utilisez une monture équatoriale ou une
monture altazimutale sur un prisme équatorial, commencez par utiliser
StarSense AutoAlign pour faciliter l’alignement polaire. Cette étape
permet d’aligner votre monture avec l’axe de rotation de la Terre.
Si vous utilisez une monture altazimutale standard, passez cette étape.
B. Alignement sur le ciel – Ensuite, effectuez un alignement avec le
ciel. Cela permet à la monture de déterminer sa position dans le ciel
nocturne. Plusieurs options d’alignement sont disponibles, mais dans la
plupart des cas, l’alignement automatique est la méthode privilégiée et
la plus couramment utilisée.
C. Étalonnage du centre – L’étalonnage du centre aligne le champ de
vision de la caméra StarSense avec celui du télescope. Cette opération
n’est à effectuer qu’une seule fois, tant que le StarSense AutoAlign
n’est pas déplacé. Le décalage d’étalonnage est stocké dans la
mémoire de l’appareil.
Si vous désinstallez puis réinstallez StarSense AutoAlign, nous vous
recommandons d’effectuer à nouveau l’étalonnage du centre. Une fois
l’étalonnage du centre terminé, vous devrez répéter l’alignement sur le
ciel.
Les trois chapitres suivants expliquent comment effectuer ces fonctions à
l’aide de la commande NexStar (chapitre 5, page 3), du logiciel PC CPWI
(chapitre 6, page 7) ou de l’application SkyPortal (chapitre 7, page 10).
Il vous suffit de vous référer au chapitre correspondant à la méthode de
contrôle que vous utilisez.
5. Utilisation de SSAA avec la commande
NexStar+
La commande NexStar est l’un des moyens les plus simples de faire
fonctionner votre système d’alignement automatique StarSense. Vous
n’aurez pas besoin d’ordinateur et vous permet de contrôler votre télescope
comme d’habitude, grâce aux capacités d’alignement améliorées intégrées
de StarSense.
Choisissez ci-dessous la section qui correspond à votre configuration:
- Section A – Monture altazimutale (AZ) Celestron
- Section B – Monture équatoriale Celestron (EQ)
- Section C – Monture AZ Celestron utilisée avec un support équatorial
optionnel
Veuillez vous référer uniquement à la section qui s’applique à votre
configuration de montage.
A. Utilisation de SSAA avec une
monture altazimutale (AZ)
Les montures altazimutales ne peuvent pas être alignées sur le pôle. Cette
section vous guide pas à pas dans la réalisation d’un alignement sur le ciel
à l’aide de StarSense AutoAlign.
1. Assurez-vous que le support est au moins grossièrement à niveau. Si
votre support comporte un niveau à bulle intégré, utilisez-le comme
référence.
2. Pointez manuellement le tube du télescope horizontalement vers
l’horizon nord. (Si vous vous trouvez dans l’hémisphère sud, pointez-le
vers l’horizon sud.)
3. Allumez la monture
3. Contrôler StarSense AutoAlign
Il existe plusieurs façons de contrôler StarSense AutoAlign:
Commande NexStar+
Pour utiliser SSAA avec la commande NexStar+ fournie avec votre
monture Celestron, vous devrez probablement mettre à jour le
micrologiciel de la commande. Vous aurez besoin du firmware version
5.35.5340 ou plus récent. Pour vérifier le numéro de version de votre
micrologiciel, appuyez sur le bouton MENU. Utilisez les boutons
DÉFILEMENT et ENTRÉE pour accéder à Utilitaires >Version. Utilisez
le logiciel Celestron Firmware Manager (CFM) pour mettre à jour le
micrologiciel si nécessaire. Vous trouverez la dernière version de CFM ici:
celestron.com/pages/drivers-and-software
Vous aurez besoin d’un câble USB (Type-A vers Mini-B) pour connecter la
commande à votre PC. Reportez-vous à la section 9 de ce manuel (page
13) pour plus d’informations.
Logiciel de contrôle de télescope CPWI
pour PC
Vous pouvez contrôler votre télescope et StarSense AutoAlign avec notre
logiciel gratuit Celestron CPWI. Pour télécharger la dernière version, visitez:
https://www.celestron.com/pages/celestron-pwi-telescope-control-
software
Vous aurez besoin de CPWI version 2.5.9 ou supérieure. Installez
le logiciel et ouvrez CPWI. Sélectionnez « Démarrer » si la fenêtre
d’ouverture apparaît. Ensuite, cliquez sur l’icône « Connexion » dans
le coin supérieur gauche de l’écran. Si vous utilisez une connexion
filaire à votre monture Celestron (c’est-à-dire via la commande ou la
monture elle-même), sélectionnez « USB ». Si vous êtes connecté
via Wi-Fi en utilisant le module Wi-Fi SkyPortal ou le Wi-Fi interne de
votre monture (par exemple, NexStar Evolution), sélectionnez « Wi-
Fi ». CPWI devrait détecter et se connecter à StarSense AutoAlign.
Une fois connecté, l’icône SSAA apparaîtra dans le menu de sélection
sur le côté gauche de l’écran. Sélectionnez l’icône pour afficher le menu
StarSense (Fig. 11).
Fig. 11: Lorsque vous connectez votre monture Celestron à votre PC et lancez CPWI,
vous devriez voir le menu StarSense parmi les icônes sur le côté gauche de
l'écran.
Application SkyPortal pour iOS et Android
Si vous utilisez le module Wi-Fi Celestron SkyPortal ou si vous avez une
monture Celestron avec Wi-Fi intégré (par exemple, NexStar Evolution),
vous pouvez utiliser l’application SkyPortal pour contrôler votre SSAA.
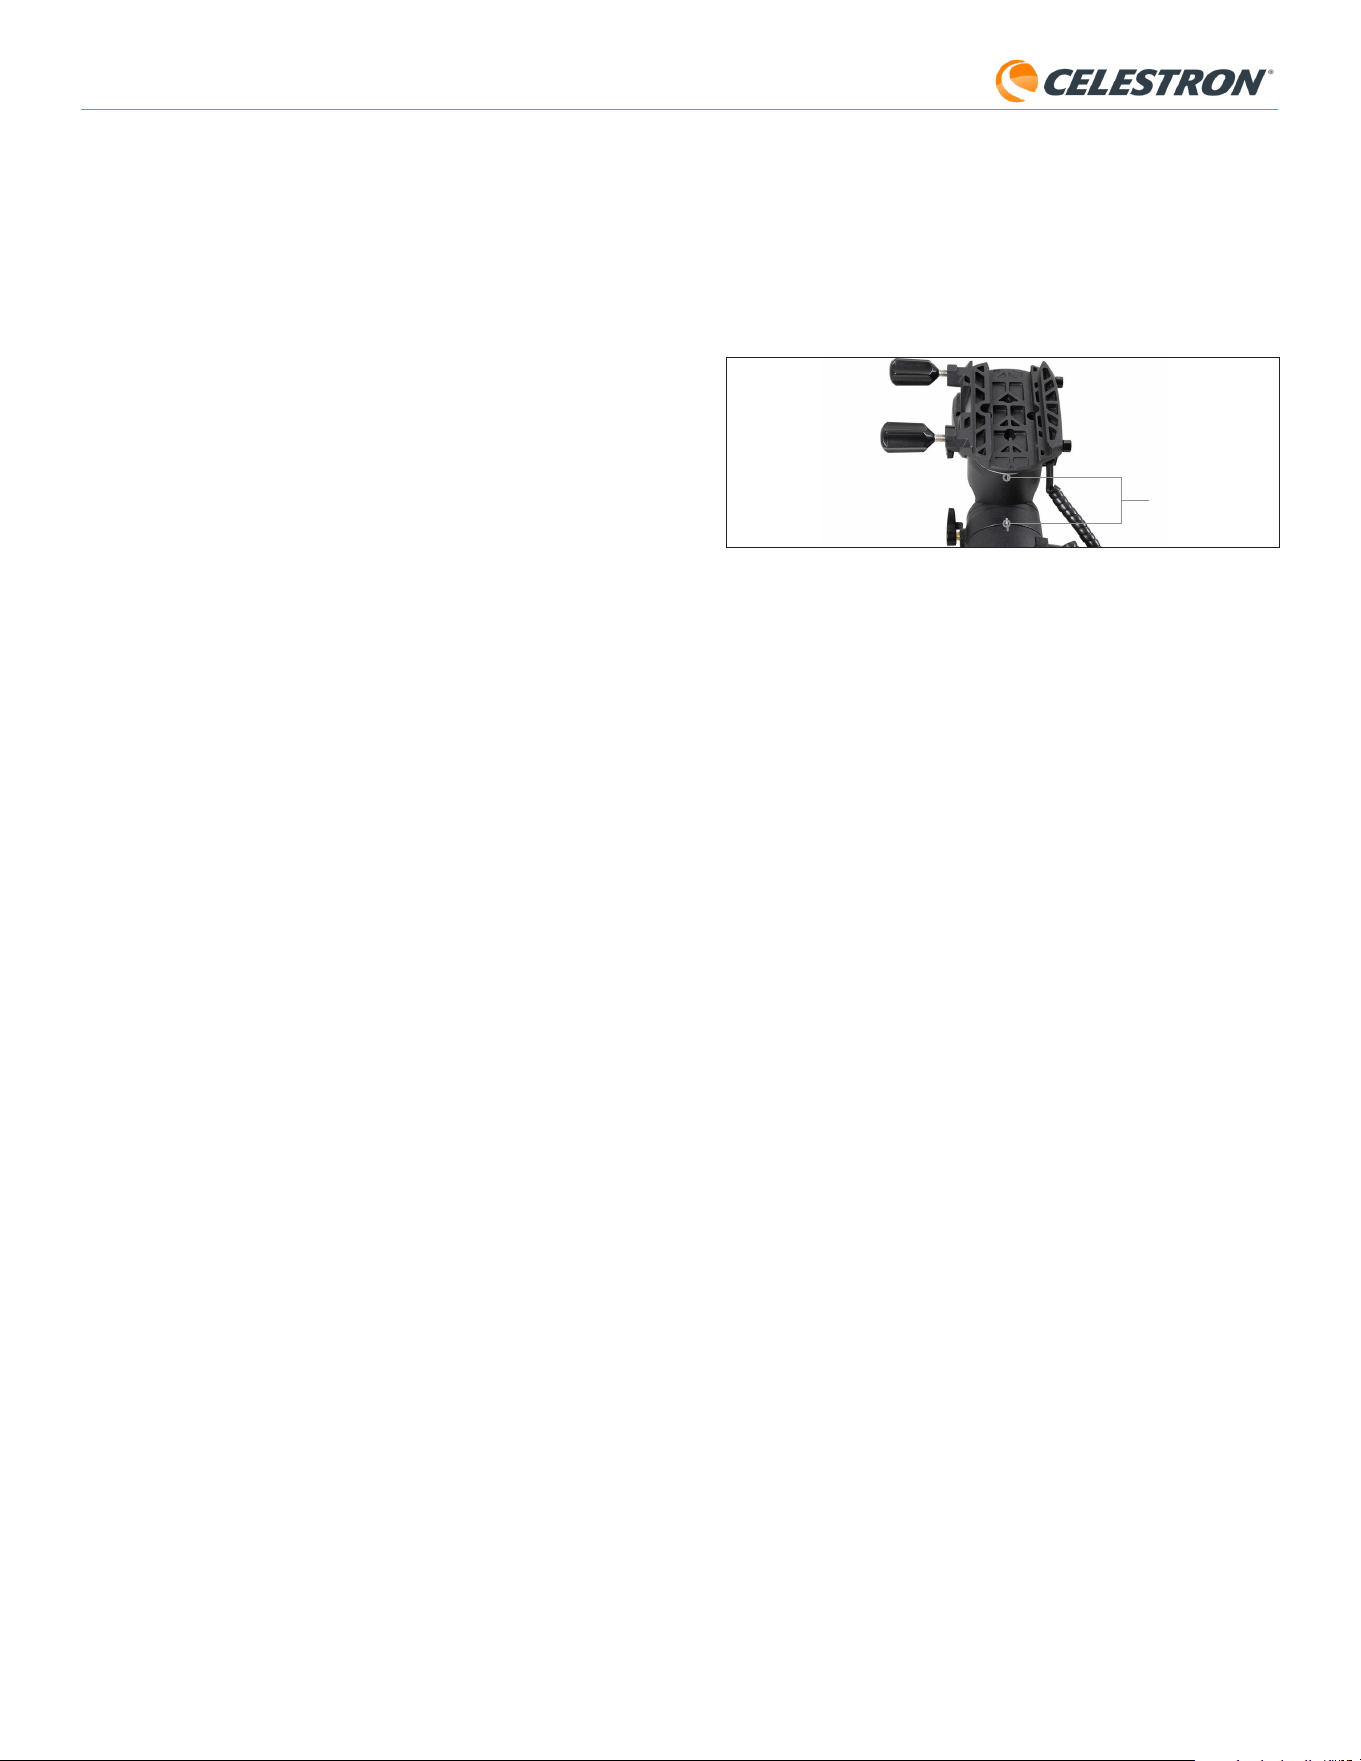
4 | FRANÇAIS
StarSense AutoAlign V2
replacer la monture sur sa position d’origine. Appuyez sur le bouton
ENTRER.
b. Si vous avez une monture EQ sans positionnement d’origine
commutateurs, tels que le support Advanced VX, la commande vous
invitera à déplacer manuellement le support jusqu’à ses marques
d’index (Fig. 11B). Vous pouvez utiliser les boutons de déplacement
manuel de la commande pour déplacer la monture, ou desserrer les
embrayages RA et DEC et faire tourner les axes à la main. Une fois les
repères alignés, resserrez les freins et appuyez sur ENTER.
Fig. 11B Les repères d’index sur la monture Advanced VX EQ.
8. Il vous sera demandé si vous souhaitez effectuer un alignement polaire.
Nous vous recommandons d’effectuer l’alignement polaire dès
maintenant. Si vous ignorez cette étape et l’effectuez plus tard, vous
devrez répéter le processus d’alignement sur le ciel.
- Pour effectuer l’alignement polaire maintenant, appuyez sur ALIGN.
- Pour ignorer l’alignement polaire, appuyez sur ENTER pour continuer
vers l’alignement sur le ciel.
9. Suivez les instructions à l’écran pour saisir votre emplacement, l’heure
locale, et la date.
- Vous pouvez utiliser la base de données des villes pour définir votre
emplacement. Ne vous inquiétez pas si votre emplacement exact ne
figure pas dans la base de données. Sélectionnez simplement la ville
la plus proche.
10. Si vous avez sélectionné Alignement polaire, passez à l’étape 11.
Si vous avez ignoré l’alignement polaire, passez à l’étape 21.
11. La commande vous invitera à orienter manuellement le télescope vers
une autre zone dégagée du ciel. Utilisez les boutons de direction de
la commande pour pointer le télescope sur un emplacement dégagé.
Appuyez sur le bouton ENTRER.
• Le télescope pivotera d’ouest en est d’environ 50° pendant
le processus d’alignement polaire. (Si vous vous trouvez dans
l’hémisphère sud, le télescope effectuera un mouvement d’est en
ouest d’environ 50°). Essayez de vous diriger vers une zone dégagée,
sans aucun obstacle sur ce trajet.
12. Le télescope pivotera d’ouest en est pour obtenir des références
d’alignement polaire. (Si vous vous trouvez dans l’hémisphère sud,
le télescope effectuera un mouvement d’est en ouest.) Cela prendra
quelques minutes.
13. Lorsque le télescope a fin, la commande affiche « Ajuster AZM ».
Appuyez sur le bouton ENTRER. L’écran LCD affichera maintenant les
erreurs d’alignement polaire AZM et ALT.
14. Si votre monture est équipée d’un bouton de verrouillage d’axe d’azimut
ou d’une vis de verrouillage, desserrez-les avant de régler l’azimut.
15. Utilisez les boutons de réglage fin de l’azimut de la monture pour régler
lentement le positionnement de l’azimut de la monture (de gauche à
droite). Au fur et à mesure que vous effectuez ces ajustements, l’erreur
AZM augmente ou diminue. Continuez à ajuster jusqu’à ce que l’erreur
AZM soit inférieure à deux minutes d’arc. Appuyez sur le bouton
ENTRER.
• N’ajustez pas l’altitude de la monture ! Vous ferez des ajustements
d’altitude à l’étape suivante.
• Effectuez les ajustements lentement afin que SSAA puisse les suivre.
Si vous vous ajustez trop rapidement et que SSAA perd ses repères,
vous devrez peut-être recommencer tout le processus d’alignement
polaire.
16. La commande indiquera maintenant « Ajuster ALT » Appuyez sur le
bouton ENTRER.
17. Si votre monture est équipée de boutons de verrouillage d’altitude,
desserrez-les avant de régler l’altitude.
4. Appuyez sur le bouton ENTRER.
5. Sélectionnez une méthode d’alignement. Utilisez les touches
DÉFILEMENT HAUT et DÉFILEMENT BAS pour sélectionner « Auto
Align ». Appuyez sur le bouton ENTRER.
- Les autres options d’alignement sur le ciel seront abordées dans la
section E de ce chapitre (page 6).
6. Suivez les instructions à l’écran pour saisir votre emplacement, l’heure
locale, et la date.
- Vous pouvez utiliser la base de données des villes pour définir votre
emplacement. Ne vous inquiétez pas si votre emplacement exact ne
figure pas dans la base de données. Sélectionnez simplement la ville
la plus proche.
7. La monture commencera à pivoter vers une position où SSAA obtiendra
sa première référence d’alignement. Une fois que la monture arrête de
pivoter, SSAA capture une image du ciel et détermine sa position.
REMARQUE: Si le télescope pivote automatiquement pour pointer
vers une zone du ciel qui est obstruée (par des bâtiments, des arbres,
etc.), il échouera et pivotera automatiquement vers un autre point pour
réessayer.
8. La monture pivotera vers une autre position pour obtenir la deuxième
référence d’alignement.
9. L’alignement auto est terminé Vous verrez « Alignement réussi! » sur
l’écran LCD du NexStar+.
Votre monture est maintenant alignée sur le ciel nocturne. Cependant,
avant de pouvoir centrer avec précision des objets dans le champ de vision
du télescope, SSAA doit déterminer le décalage entre son propre champ
de vision et celui du télescope dans un processus appelé « calibrage
central». Si vous n’avez jamais étalonné centralement le SSAA et votre
télescope, la commande vous demandera de le faire immédiatement
après l’alignement sur le ciel initial. Reportez-vous à la section D pour
les instructions d’étalonnage du centre. Si vous avez déjà effectué un
étalonnage du centre, le télescope est maintenant prêt à rechercher et à
placer des objets près du centre du champ de vision.
B. Utilisation de SSAA avec une
monture équatoriale (EQ)
Avant de mettre la monture sous tension, effectuez un alignement polaire
approximatif. Cela fait, vous pouvez affiner l’alignement en utilisant uniquement
les boutons de réglage fin de l’altitude et de l’azimut de la monture.
REMARQUE: Ces instructions expliquent comment effectuer la
procédure d’alignement polaire approximative dans l’hémisphère nord. Si
vous vous trouvez dans l’hémisphère sud, pointez votre monture plein sud
au lieu de plein nord.
Comment effectuer l’alignement polaire approximatif:
1. Assurez-vous que le trépied est raisonnablement à niveau. Si votre
support comporte un niveau à bulle intégré, utilisez-le comme référence.
2. Ajustez l’altitude de la monture de sorte que l’échelle de latitude de la
monture indique à peu près la même latitude que votre site d’observation.
3. Soulevez et faites pivoter l’ensemble du trépied et de la monture de
sorte que l’axe d’ascension droite (RA) pointe approximativement plein
nord. La position de la monture n’a pas besoin d’être parfaite. Visez à
environ 5° vers le nord afin que la monture se trouve dans la plage des
boutons de réglage fin de l’azimut de la monture. Utilisez une application
de boussole gratuite pour votre smartphone si vous avez besoin d’aide
pour trouver le Nord.
4. Si vous avez desserré les boutons de réglage de l’altitude ou de l’azimut
lors d’un alignement polaire approximatif, assurez-vous qu’ils sont bien
resserrés avant de continuer.
Maintenant que votre alignement polaire est approximativement
correct, vous êtes prêt à commencer le processus d’alignement:
5. Allumez la monture
6. Appuyez sur le bouton ENTRER
7. a. Si vous possédez une monture EQ avec des boutons de retour à
l’origine, comme CGX ou CGX-L, la commande vous demandera de
Marques d’index

5 | FRANÇAIS
StarSense AutoAlign V2
3. Soulevez et faites pivoter l’ensemble du trépied et de la monture de
sorte que le bras en fourche pointe approximativement plein nord. La
position de la monture n’a pas besoin d’être parfaite. Visez à environ 5°
vers le nord afin que la monture se trouve dans la plage des boutons de
réglage fin de l’azimut de la cale. Utilisez une application de boussole
gratuite pour votre smartphone si vous avez besoin d’aide pour trouver
le Nord.
4. Si vous avez desserré les boutons de réglage de l’altitude ou de l’azimut
lors d’un alignement polaire approximatif, assurez-vous qu’ils sont bien
resserrés avant de continuer.
Maintenant que vous êtes approximativement aligné sur les pôles, vous
êtes prêt à commencer le processus d’alignement:
5. Allumez la monture
6. Appuyez sur le bouton ENTRER.
7. Utilisez les touches DÉFILEMENT HAUT et DÉFILEMENT BAS pour
sélectionner « Auto Align EQ ». Appuyez sur le bouton ENTRER.
(Choisissez « Alignement Sud EQ » si vous êtes dans l’hémisphère sud.)
8. Suivez les instructions à l’écran pour saisir votre emplacement, l’heure
locale, et la date.
- Vous pouvez utiliser la base de données des villes pour définir votre
emplacement. Ne vous inquiétez pas si votre emplacement exact ne
figure pas dans la base de données. Sélectionnez simplement la ville
la plus proche.
9. L’écran LCD affichera désormais «Définir Alt sur Index ». Positionnez
le support comme indiqué sur la figure 12. Vous pouvez soit utiliser la
commande manuelle pour orienter manuellement le télescope, soit, si
votre monture est équipée de freins d’axe (comme la monture Evolution),
vous pouvez desserrer les freins et positionner manuellement à la main.
10. Il vous sera demandé si vous souhaitez effectuer un alignement polaire.
Nous vous recommandons d’effectuer l’alignement polaire dès
maintenant. Si vous ignorez cette étape et l’effectuez plus tard, vous
devrez répéter le processus d’alignement sur le ciel.
- Pour effectuer l’alignement polaire maintenant, appuyez sur ALIGN.
- Pour ignorer l’alignement polaire, appuyez sur ENTER pour continuer
vers l’alignement sur le ciel.
À partir de ce point, la procédure d’alignement est la même que pour les
montures équatoriales.
Si vous avez choisi d’effectuer un alignement polaire, reportez-vous à la
section B, en commençant par l’étape 11.
Si vous avez choisi de ne pas effectuer l’alignement polaire, reportez-vous
à la section B, en commençant par l’étape 21.
18. Utilisez les boutons de réglage fin de l’altitude de la monture pour
régler l’altitude de la monture (de haut en bas). Au fur et à mesure
que vous effectuez ces ajustements, l’erreur ALT augmente ou diminue.
Continuez à ajuster jusqu’à ce que l’erreur ALT soit inférieure à deux
minutes d’arc. Appuyez sur le bouton ENTRER.
• N’ajustez pas l’azimut de la monture.
19. La commande demandera alors «Ajuster finement AZM»
a. Si vous souhaitez faire des ajustements supplémentaires à l’azimut,
utilisez les touches de DÉFILEMENT pour sélectionner «Oui» et
appuyez sur ENTRER. Ajustez les molettes de réglage précis de
l’azimut jusqu’à ce que la tolérance soit inférieure à deux minutes
d’arc et appuyez sur ENTER.
b. Si vous ne souhaitez pas effectuer d’autres réglages, utilisez les
touches de DÉFILEMENT pour sélectionner « Non » et appuyez
sur ENTRER.
20. Félicitations! Vous avez terminé l’alignement polaire de votre monture.
Si votre monture est équipée de boutons ou de vis de verrouillage
d’altitude ou d’azimut, serrez-les fermement.
REMARQUE: Nous recommandons de ne pas tenter d’ajuster
l’alignement polaire à plus de deux minutes d’arc sur chaque axe. Cela
sera difficile et ne fournira pas d’avantages supplémentaires en matière de
pointage ou de suivi.
21. Ensuite, vous serez invité à sélectionner une méthode d’alignement
sur le ciel. Utilisez les touches DÉFILEMENT HAUT et DÉFILEMENT
BAS pour sélectionner « Auto Align ». Appuyez sur le bouton ENTRER.
- Les autres options d’alignement sur le ciel seront abordées plus loin
dans ce manuel.
22. La monture commencera à pivoter vers une position où SSAA obtiendra
sa première référence d’alignement. Une fois que la monture arrête de
pivoter, SSAA capture une image du ciel et détermine sa position.
REMARQUE: Si le télescope pivote automatiquement pour pointer vers
une zone du ciel qui est obstruée (par des bâtiments, des arbres, etc.), il
échouera et pivotera automatiquement vers un autre point pour réessayer.
23. La monture pivotera vers une autre position pour obtenir la deuxième
référence d’alignement.
24. La monture pivotera vers une troisième position de l’autre côté du
méridien pour obtenir une troisième référence d’alignement.
25. Une fois que SSAA a capturé trois références d’alignement, vous
verrez «Alignement réussi!» sur l’écran LCD du NexStar+.
Votre monture est maintenant alignée sur le ciel nocturne. Cependant,
avant de pouvoir centrer avec précision des objets dans le champ de vision
du télescope, SSAA doit déterminer le décalage entre son propre champ
de vision et celui du télescope dans un processus appelé « calibrage
central». Si vous n’avez jamais étalonné centralement le SSAA et votre
télescope, la commande vous demandera de le faire immédiatement
après l’alignement sur le ciel initial. Reportez-vous à la section D pour
les instructions d’étalonnage du centre. Si vous avez déjà effectué un
étalonnage du centre, le télescope est maintenant prêt à rechercher et à
placer des objets près du centre du champ de vision.
C. Utilisation d’un système SSAA
avec une monture AZ sur une cale
équatoriale
Avant de mettre la monture sous tension, effectuez un alignement polaire
approximatif. Une fois l’alignement approximatif effectué, vous pouvez
obtenir un alignement polaire précis en utilisant uniquement les boutons
de réglage fin de l’altitude et de l’azimut de la cale.
REMARQUE: Ces instructions expliquent comment effectuer la
procédure d’alignement polaire approximative dans l’hémisphère nord. Si
vous vous trouvez dans l’hémisphère sud, pointez votre monture plein sud
au lieu de plein nord.
Comment effectuer l’alignement polaire approximatif:
1. Assurez-vous que le trépied est raisonnablement à niveau. Si votre cale
comporte un niveau à bulle intégré, utilisez-le comme référence.
2. Ajustez l’altitude de la monture de sorte que l’échelle de latitude de la
monture indique à peu près la même latitude que votre site d’observation.
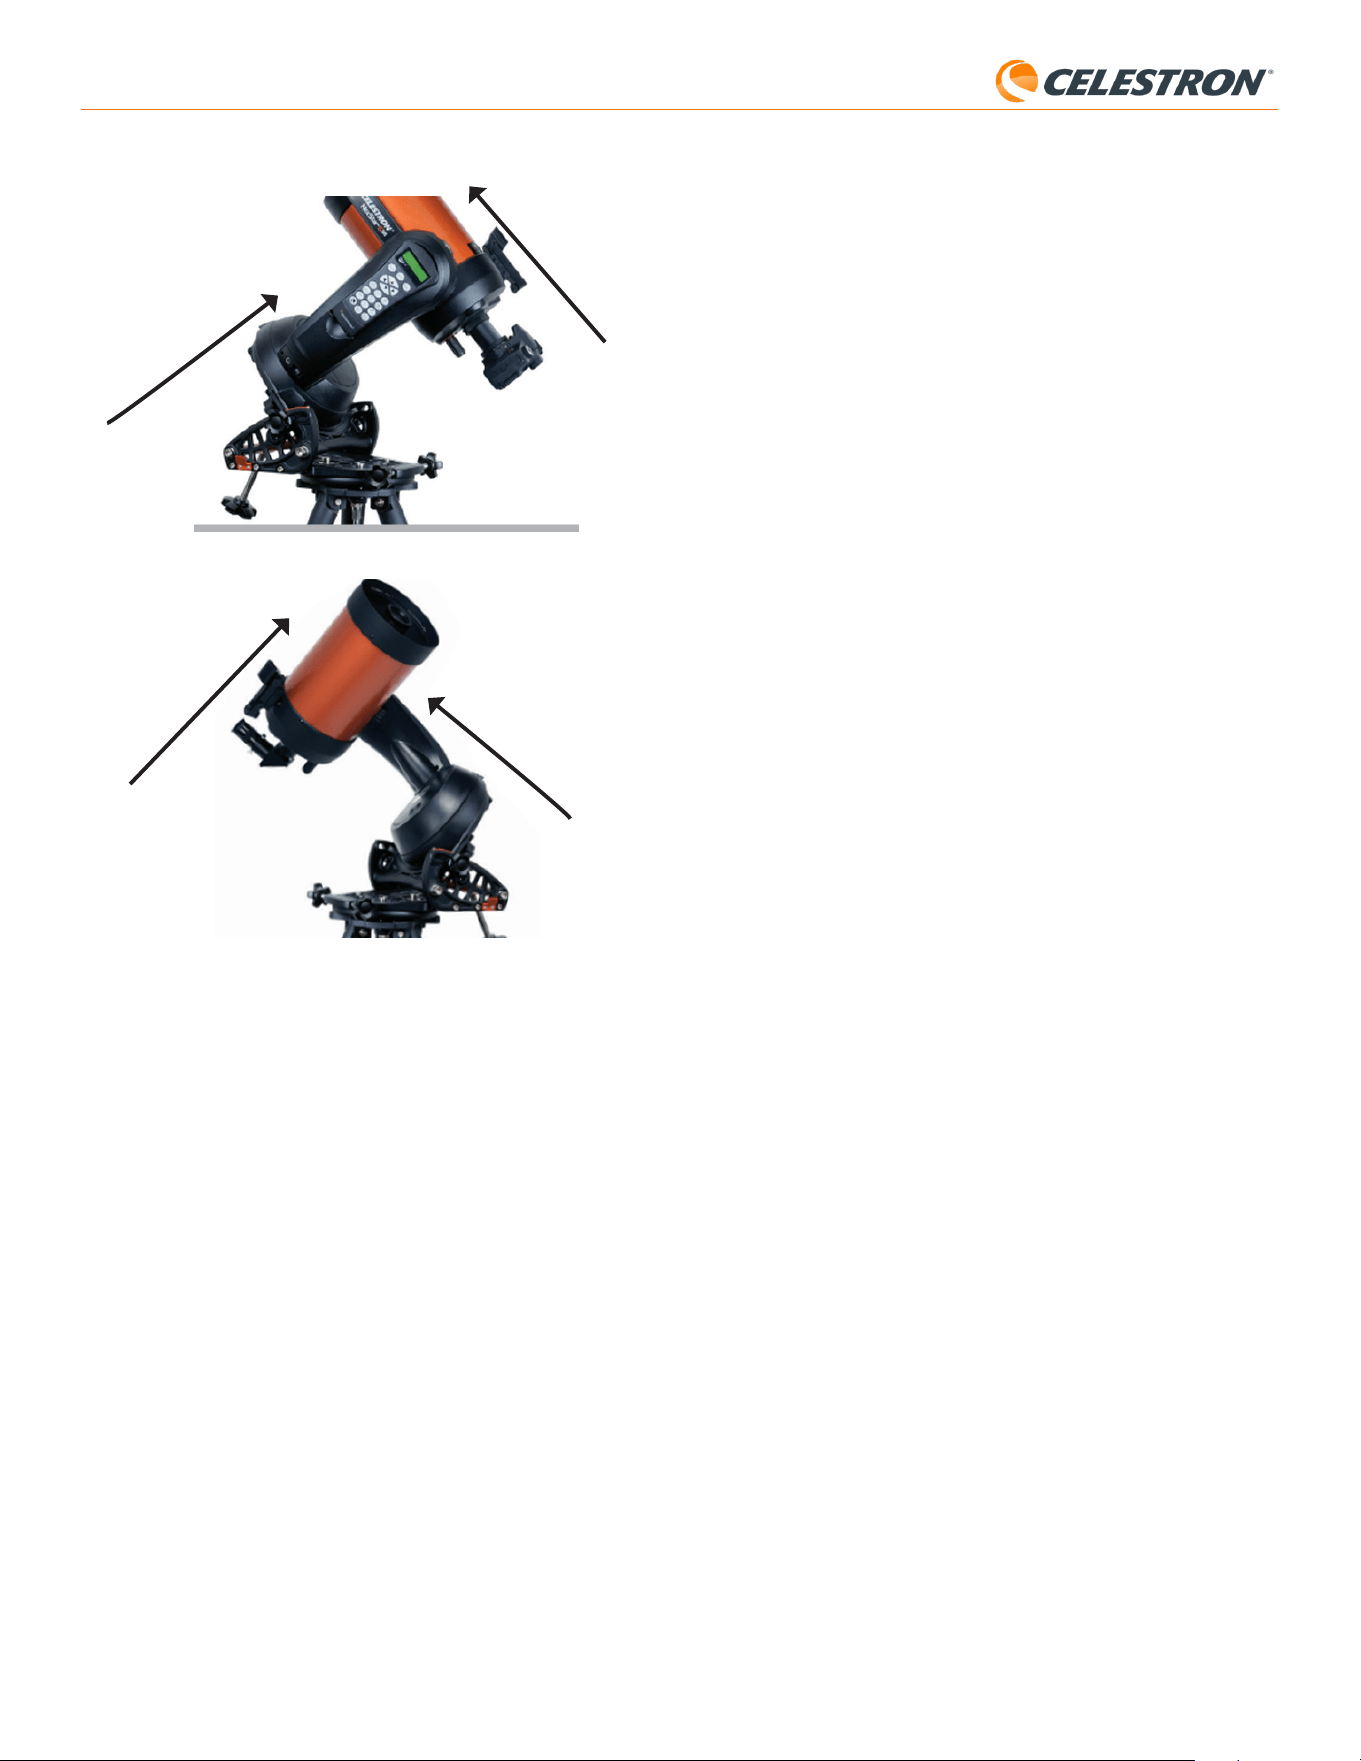
6 | FRANÇAIS
StarSense AutoAlign V2
sélectionnez-en une clairement visible depuis votre emplacement.
Appuyez sur le bouton ENTRER.
• Si vous ne savez pas où se trouve l’objet que vous avez choisi
dans le ciel nocturne, ne vous inquiétez pas. Le télescope pointera
proche de l’objet à l’étape suivante. Vous pouvez utiliser le télescope
comme guide pour déterminer quelle étoile ou planète vous utilisez
pour calibrer le centre. N’oubliez pas que les étoiles et les planètes
nommées sont parmi les objets les plus brillants du ciel nocturne.
• Pour de meilleurs résultats avec une monture EQ, choisissez des
étoiles proches de l’équateur céleste (c’est-à-dire éloignées des
pôles).
3. Le télescope se dirige vers l’étoile ou la planète que vous avez choisie.
Selon le décalage entre le champ de vision du SSAA et celui du
télescope, l’objet peut ou non se trouver dans le champ de vision du
télescope. Dans tous les cas, le télescope doit généralement pointer
vers l’objet.
4. La commande NexStar+ vous demandera de centrer l’objet dans le
champ de vision du chercheur. Utilisez les touches de direction pour
ce faire. Ne vous souciez pas encore du centrage fin, cela se produit
à l’étape suivante. Pour l’instant, centrez grossièrement l’objet dans le
champ de vision du chercheur et appuyez sur ENTER.
• Si l’étoile n’est pas dans le champ de vision du chercheur, faites pivoter
le télescope manuellement jusqu’à ce qu’elle y soit.
• Si vous n’utilisez pas de chercheur, utilisez votre oculaire à champ le
plus large dans le télescope pour cette étape. Si l’objet n’est pas dans
le champ de vision, essayez de viser le long du tube du télescope pour
pointer vers l’objet.
5. La commande NexStar+ vous demandera de centrer l’objet dans le
champ de vision de l’oculaire. C’est l’étape de centrage fin. Assurez-
vous d’installer un oculaire de grande puissance dans le télescope.
Utilisez les touches de direction pour centrer l’objet. Pour de meilleurs
résultats, utilisez les touches de direction haut et droite en dernier.
Lorsque vous avez terminé, appuyez sur ALIGN.
6. SSAA effectuera l’étalonnage du centre et renverra le message « Étal.
centre réussi ».
Une fois l’étalonnage du centre terminé avec succès, la commande
manuelle vous invitera à effectuer un nouvel alignement sur le ciel. Après
avoir terminé l’alignement automatique sur le ciel, vous pouvez commander
au télescope de placer avec précision tout objet céleste de votre choix
dans le champ de vision de ce dernier.
E. Autres méthodes d’alignement
sur le ciel
Au lieu de choisir « Alignement automatique » comme méthode
d’alignement sur le ciel, plusieurs autres options sont disponibles. Ces
autres options offrent une certaine flexibilité pour votre site d’observation
et son installation.
Alignement manuel
Vous pouvez utiliser l’option Alignement manuel si vous avez de nombreux
obstacles à votre emplacement d’observation, tels que des bâtiments, des
arbres ou des lignes électriques. L’alignement manuel fonctionne comme
l’alignement automatique mais vous permet de faire pivoter manuellement
le télescope pour vers des zones dégagées du ciel afin d’obtenir les
références d’alignement. Étant donné que le télescope ne pivote pas
automatiquement vers des positions bloquées par des obstacles, le
processus d’alignement global est plus rapide.
Pour effectuer un alignement « Manuel » à l’aide de la commande
NexStar+:
1. Lorsque la commande vous invite à sélectionner une méthode
d’alignement, utilisez les touches DEFILEMENT HAUT et DEFILEMENT
BAS pour sélectionner « Alignement manuel » et appuyez sur ENTRER.
2. La commande vous demandera d’orienter le télescope vers une zone
dégagée du ciel à l’aide des boutons de direction. Lorsque le télescope
pointe vers une zone dégagée du ciel, appuyez sur ENTRER. SSAA
capturera une image à utiliser comme référence d’alignement.
Hémisphère nord
Hémisphère sud
Indique la
direction du pôle Nord
Indique la direction du pôle Sud
Tube optique perpendiculaire au
bras de la fourche
Tube optique perpendiculaire au
bras de la fourche
D. Étalonnage du centre
L’étalonnage du centre aligne le champ de vision de la caméra StarSense
AutoAlign avec le champ de vision optique de votre télescope.
Vous n’aurez généralement besoin d’effectuer un étalonnage du centre
que la première fois que vous utiliserez Starsense avec un nouveau tube
optique. Il vous faudra peut-être répéter la procédure si vous retirez et
réinstallez la base du support sur le télescope.
Si vous retirez uniquement l’unité StarSense et son support, mais laissez
la base du support fixée au télescope, le calibrage du centre n’est
généralement plus nécessaire.
Avant de procéder à l’étalonnage du centre, effectuez un alignement
sur le ciel comme décrit dans les sections précédentes. Si l’étalonnage
du centre n’a pas été effectué précédemment, StarSense vous invitera
automatiquement à démarrer le processus après l’alignement sur le ciel.
Pour effectuer l’étalonnage du centre
1. Si vous n’avez jamais effectué l’étalonnage du centre du SSAA, la
commande NexStar+ commencera automatiquement le processus
après l’alignement sur le ciel. Sinon, appuyez sur le bouton MENU et
utilisez les touches de DÉFILEMENT pour sélection « StarSense ».
Appuyez sur le bouton ENTRER. Utilisez les boutons DÉFILEMENT
pour sélectionner « Étalonnage du centre » et appuyez sur ENTRER.
2. Ensuite, utilisez les boutons de DÉFILEMENT pour sélectionner soit
des étoiles nommées, soit des objets du système solaire (c-a-d des
planètes) pour faire office d’étalonnage du centre. Appuyez sur le
bouton ENTRER. Faites défiler la liste des étoiles ou des planètes et
Fig. 12: Lors de l’utilisation d’une monture à fourche altazimutale (AZ) sur une cale
équatoriale, commencez par placer la monture dans la position indiquée. Le bras de
la fourche doit être orienté plein nord (ou plein sud dans l’hémisphère sud), et le tube
optique doit être perpendiculaire au bras de la fourche.
7 | FRANÇAIS
StarSense AutoAlign V2
F. Autre fonctionnalité
Vous pouvez accéder à toutes les options supplémentaires ci-dessous en
appuyant sur le bouton MENU, en utilisant les touches de DÉFILEMENT
pour sélectionner « StarSense » et en appuyant sur ENTRER. Reportez-
vous à la Fig. 13 pour consulter l’arborescence du menu StarSense.
GOTO PRÉCIS
ANALYSE DE PLAQUE
ÉTALONNAGE DU CENTRE
ALIGNEMENT POLAIRE
VERSION
RÉGLAGES
RÉINITIALISATION DES PARAMÈTRES D'USINE
STARSENSE
Fig. 13: Le menu StarSense dans la commande NexStar+.
GoTo précis
GoTo précis utilise SSAA pour centrer plus précisément les objets dans
le champ de vision. Lorsque cette option est activée, la monture du
télescope utilise son modèle d’alignement interne pour se rapprocher
de l’objet sélectionné. Ensuite, SSAA prend le relais, apportant des
corrections fines au centrage, améliorant considérablement la précision
de pointage globale. Lorsque vous utilisez SSAA, GoTo précis est activé
par défaut, vous n’avez donc pas besoin de lancer la fonction GoTo
précis ici. Cependant, si vous avez désactivé GoTo précis (voir la section
Paramètres ci-dessous), vous pouvez activer GoTo précis vers un objet
spécifique à partir de cette sélection de menu.
Analyse de plaque
Lorsque vous choisissez cette option, SSAA capture une image et
effectue une analyse de plaque. La commande affichera les coordonnées
centrales (RA et Dec) vers lesquelles le télescope pointe dans le ciel.
Étalonnage du centre
Si vous souhaitez lancer un nouvel étalonnage du centre, vous pouvez
le faire à tout moment grâce à cette option. Si vous retirez la base
du support SSAA du télescope (en retirant les vis de fixation) et la
réinstallez, nous vous recommandons d’effectuer un nouvel étalonnage
du centre. Le simple fait de retirer le SSAA de son support de la base
(en desserrant d’abord les vis moletées du support) puis de le réinstaller
sur la base ne devrait généralement pas nécessiter un nouvel étalonnage
du centre. Toutefois, si vous remarquez par la suite que les objets ne
sont pas placés au centre du champ de vision du télescope, un nouvel
étalonnage du centre peut contribuer à améliorer le centrage.
Une fois l’étalonnage du centre terminé avec succès, la commande
manuelle vous invitera à effectuer un nouvel alignement sur le ciel.
Alignement polaire
Si vous avez choisi de ne pas effectuer d’alignement polaire lors de
l’alignement initial, vous pouvez lancer un alignement polaire à tout
moment grâce à cette option de menu. Pour les montures équatoriales
ou les montures AZ sur une cale équatoriale, reportez-vous à la section
B, étapes 11 à 20. N’oubliez pas que les montures AZ ne peuvent pas
être alignées sur l’axe polaire à moins d’être utilisées sur un support
équatorial optionnel.
Une fois l’alignement polaire réussi, la commande vous invitera à effectuer
un nouvel alignement sur le ciel. C’est pourquoi nous recommandons
d’effectuer l’alignement polaire en premier lieu, avant l’alignement sur le ciel.
Version
Sélectionnez cette option pour afficher le numéro de version actuel du
logiciel interne de SSAA.
REMARQUE: Pour de meilleurs résultats avec les montures EQ, ne
faites pas pivoter le télescope vers les pôles Nord (ou Sud) pour capturer
les références d’alignement.
3. La commande vous invitera à orienter manuellement le télescope vers
une autre zone dégagée du ciel.
a. Pour les montures azimutales, faites pivoter la monture dans les
deux axes, en vous assurant que le SSAA pointe à au moins 60° de
son premier point d’alignement. Appuyez sur le bouton ENTRER.
L’alignement manuel est terminé Allez à l’étape 7.
b. Pour les montures équatoriales,faites pivoter la monture vers une
autre zone dégagée du ciel. Cet emplacement doit être du même
côté du méridien que le premier que vous avez choisi. Appuyez sur
le bouton ENTRER.
4. Après avoir terminé les deux premières références d’alignement, la
commande affichera «Aj. étoile de calib?» Nous vous recommandons
fortement d’ajouter une troisième référence d’alignement pour la
meilleure précision de pointage globale dans le ciel possible.
a. Choisissez «Non» pour terminer l’alignement avec seulement deux
références. Cet alignement peut fournir une précision de pointage
acceptable dans de nombreux cas, en particulier si Precise GoTo est
activé (comme expliqué plus loin dans ce manuel). Allez à l’étape 7.
b. Choisissez «Oui» pour ajouter une troisième référence d’alignement.
Le télescope pivotera automatiquement de l’autre côté du méridien.
6. Avec le télescope maintenant sur le côté opposé du méridien des deux
premiers points d’alignement, la commande vous demandera de choisir
une troisième zone de ciel dégagée. Utilisez les touches de direction
pour pointer vers une zone de ciel dégagée de ce côté du méridien et
appuyez sur ENTRER.
7. Vous verrez «Alignement réussi! » sur l’écran LCD du NexStar+ une
fois terminé.
Alignement utilisateur automatique
Cette méthode d’alignement ne fonctionne qu’après avoir effectué au moins
un alignement automatique manuel. Lorsque vous sélectionnez l’alignement
utilisateur automatique, le télescope se déplace automatiquement vers les
points d’alignement que vous avez définis lors de l’alignement automatique
manuel précédent. C’est une option pratique si vous vous installez au
même endroit la plupart des nuits et qu’il y a des obstacles importants
sur le site.
Pour effectuer un alignement automatique utilisateur, choisissez
«Alignement automatique utilisateur» comme méthode d’alignement. Une
fois lancé, le télescope pivotera automatiquement vers le premier point
d’alignement de l’alignement automatique manuel précédent. Il passera
ensuite aux autres points définis par l’utilisateur pour terminer l’alignement.
Dernier alignement
Si vous laissez votre télescope installé dans un seul endroit, comme
un observatoire privé, Last Align est un choix pratique. Vous ne pouvez
utiliser cette méthode que si vous ne faites pas pivoter ou ne déplacez
pas le télescope de quelque manière que ce soit après l’avoir éteint. Cette
méthode d’alignement utilise les données d’alignement SSAA précédentes
stockées dans la commande. Aucune autre action n’est nécessaire.
Alignement rapide
Cette procédure aligne la monture en utilisant uniquement les informations
d’heure/date/emplacement. Il suppose initialement que les montures
équatoriales sont précisément alignées sur l’axe polaire et en « position
initiale » (c’est-à-dire la position de départ automatique si votre monture
possède des commutateurs de position initiale internes, ou avec des
repères d’index alignés pour les montures sans commutateurs de position
initiale internes), et que les montures altazimutales sont précisément mises
à niveau et pointent plein nord (ou plein sud dans l’hémisphère sud). Pour
les montures à fourche AZ sur une cale EQ, il suppose initialement que la
monture est précisément alignée polairement avec le tube du télescope
perpendiculaire, comme indiqué sur la figure 12. Quick Align n’utilise
pas le dispositif SSAA. Nous ne recommandons généralement pas cette
méthode d’alignement car elle n’est pas très précise, mais elle peut fournir
un pointage et un suivi suffisamment précis pour certains cas d’utilisation
sans qu’un alignement supplémentaire soit nécessaire. Cela peut
également être utile lorsque vous recherchez des planètes au crépuscule.
8 | FRANÇAIS
StarSense AutoAlign V2
«La monture est-elle prête à être orientée vers les boutons de retour à
l’origine?» Si votre monture comporte des boutons de retour à l’origine (par
exemple, CGX et CGX-L), cliquez sur «Prêt» et le télescope se déplacera
vers ses boutons de retour à l’origine. Si votre monture équatoriale ne
comporte pas de boutons de retour à l’origine mais est dotée de marques
d’index, déplacez manuellement le télescope vers ses marques d’index. Si
vous utilisez une monture AZ sur une cale EQ, positionnez le télescope
comme indiqué sur la figure 12 (page 5).
Fig. 15: Info de modèle de pointage dans CPWI.
Si vous utilisez une monture altazimutale (AZ), CPWI vous demandera de
pointer le télescope vers l’horizon nord, le tube horizontal et pointé vers le
nord. Si vous vous trouvez dans l’hémisphère sud, pointez-le plutôt vers
l’horizon sud.
Utilisez la fenêtre de commandes de déplacement de la monture à l’écran
pour positionner le télescope. La précision n’est pas essentielle. Il s’agit
simplement de la position de départ pour la procédure d’alignement.
Si vous n’avez pas effectué d’étalonnage du centre au préalable, vous
devez le faire lorsque CPWI vous y invite avant l’alignement sur le ciel.
Contrairement à la commande manuelle NexStar, le CPWI nécessite un
étalonnage du centre préalable. Si vous sautez cette étape, vous devrez
répéter l’alignement sur le ciel par la suite. Veuillez vous reporter à la
section « Étalonnage du centre » à la page 9.
Ensuite, si vous utilisez une monture (EQ ou AZ sur une cale équatoriale,
CPWI vous demandera si vous souhaitez un alignement polaire. Nous
recommandons de terminer l’alignement polaire à ce stade. Si vous
attendez après l’alignement sur le ciel, vous devrez effectuer à nouveau
l’alignement sur le ciel.
- Pour lancer l’alignement polaire, cliquez sur « Oui » et suivez les
instructions de la section Alignement polaire à la page 9.
- Pour ignorer l’alignement polaire, cliquez sur « Non » pour passer
directement à l’alignement sur le ciel.
Vous pouvez toujours effectuer un alignement polaire plus tard en
sélectionnant l’option « Effectuer l’alignement polaire » dans le menu
StarSense.
Après l’alignement polaire, la fenêtre affichera «StarSense Alignment» et
vous demandera de sélectionner une option d’alignement (Fig. 16).
Fig. 16: Options d’alignement StarSense dans CPWI.
Quatre points automatique
Quatre points automatique est le choix d’alignement le plus automatisé.
SSAA pivotera automatiquement vers quatre points dans le ciel pour
réaliser l’alignement sur le ciel. S’il pointe vers un obstacle ou ne parvient
pas à déterminer sa position, le télescope se déplacera simplement vers
un autre point dans le ciel pour obtenir une autre référence d’alignement.
Points personnalisés
Les points personnalisés vous permettent de définir des points dans le ciel
où le télescope pivote pour l’alignement. C’est un bon choix si votre site
• Pour afficher la version du micrologiciel de la commande NexStar+,
sélectionnez l’option « Version » dans MENU>Utilitaires.
Réglages
Utiliser GoTo précis - Ce paramètre vous permet d’activer ou de
désactiver le GoTo précis automatique après chaque balayage. GoTo
précis est activé par défaut pour une meilleure précision de pointage.
Cependant, cette fonctionnalité oblige le télescope à prendre un peu
plus de temps pour centrer les objets. Nous recommandons à la plupart
des utilisateurs de laisser GoTo précis activé.
Réinitialisation des paramètres d’usine
Cette option efface toutes les données d’étalonnage du centre
précédemment enregistrées dans StarSense AutoAlign. Après avoir
sélectionné cette option, vous devez redémarrer le support.
Nous vous recommandons d’effectuer une réinitialisation d’usine si vous
prévoyez d’utiliser StarSense AutoAlign avec une monture Celestron
différente de celle que vous utilisiez précédemment.
6. Utilisation de SSAA avec CPWI
Si vous utilisez déjà un PC pour contrôler votre télescope (par exemple,
pour l’astroimagerie), le logiciel CPWI gratuit de Celestron est un excellent
moyen de contrôler SSAA. Son interface utilisateur intuitive facilite l’accès
à toutes les fonctionnalités de SSAA.
Alignement sur le ciel
Lorsque vous connectez votre PC exécutant CPWI à votre monture
Celestron avec StarSense AutoAlign installé, la fenêtre d’alignement
s’ouvre automatiquement (Fig. 14).
Avant de commencer, vérifiez la date, l’heure et le lieu près du haut de
la fenêtre. En cas d’erreurs, cliquez sur les boutons «Définir l’heure» ou
«Définir l’emplacement» pour les corriger.
Fig. 14: La fenêtre d’alignement de SSAA dans CPWI.
Si vous utilisez une monture AZ avec un EQ Wedge, sélectionnez l’option
« EQ Wedge » qui apparaît en haut à droite de la fenêtre d’alignement. La
sélection de cette option traitera la monture AZ comme une monture EQ.
Si vous utilisez une monture équatoriale (ou une monture azimutale sur une
cale équatoriale), vous devez effectuer un alignement polaire approximatif
de la monture avant de commencer l’alignement. SSAA peut aider à
obtenir un alignement polaire précis (décrit plus loin dans ce manuel),
mais le processus sera beaucoup plus rapide et plus facile si la monture
équatoriale est déjà approximativement alignée polairement.
Pour un alignement automatique sur le ciel avec SSAA, choisissez «
Alignement StarSense », puis appuyez sur le bouton « Commencer
l’alignement ». Les informations sur le modèle de pointage s’affichent (Fig.
15). Dans la section «Boutons de retour à l’origine», CPWI demande:
9 | FRANÇAIS
StarSense AutoAlign V2
Vous pouvez ajouter des références d’alignement supplémentaires tout au
long de la nuit en sélectionnant un objet dans la vue du planétarium, en
cliquant dessus et en choisissant «Modèle ». La monture pivotera vers
l’emplacement de l’objet et SSAA ajoutera la référence d’alignement
au modèle de pointage de la monture. La précision de pointage devrait
être assez bonne avec seulement quatre points, mais elle augmentera
généralement avec chaque référence d’alignement que vous ajoutez.
Étalonnage du centre
L’étalonnage du centre aligne le champ de vision de la caméra StarSense
AutoAlign avec le champ de vision optique de votre télescope.
Vous n’aurez généralement besoin d’effectuer un étalonnage du centre
que la première fois que vous utiliserez Starsense avec un nouveau tube
optique. Il vous faudra peut-être répéter la procédure si vous retirez et
réinstallez la base du support sur le télescope.
Si vous retirez uniquement l’unité StarSense et son support, mais laissez
la base du support fixée au télescope, le calibrage du centre n’est
généralement plus nécessaire.
CPWI vous invitera automatiquement à effectuer un étalonnage du centre
avant l’alignement sur le ciel. Si vous choisissez de passer cette étape,
vous pourrez sélectionner «Calibrage du centre» dans le menu StarSense
ultérieurement. Cependant, vous devrez ensuite refaire l’alignement sur le
ciel après avoir effectué le calibrage du centre.
Pour effectuer un étalonnage du centre
1. Sélectionnez un objet dans le planétarium de vue du ciel en cliquant
dessus. Choisissez une étoile brillante ou une planète clairement visible
depuis votre emplacement d’observation.
2. Le télescope s’oriente maintenant vers l’objet sélectionné. Selon le
décalage entre le champ de vision du SSAA et celui du télescope,
l’objet peut ou non se trouver dans le champ de vision du télescope.
Dans tous les cas, le télescope devrait maintenant pointer vers l’objet.
3. CPWI vous demandera de centrer l’objet dans le champ de vision de
l’oculaire du télescope. Vous pouvez utiliser la fenêtre des contrôles
d’orientation à l’écran. Lorsque vous avez terminé, cliquez sur «Centré»
dans la fenêtre d’informations sur le modèle de pointage.
• Si l’étoile n’est pas dans le champ de vision du chercheur, pointez
manuellement jusqu’à ce qu’elle y soit.
• Si vous n’utilisez pas de chercheur, utilisez plutôt votre oculaire à
champ le plus large pour trouver l’objet. Si l’objet n’est pas dans le
champ de vision de l’oculaire, visez le long du tube du télescope
pour le diriger vers l’objet.
• Pour le centrage final, utilisez un oculaire de grande puissance.
• Lorsque vous centrez l’étoile dans le champ de vision du télescope,
utilisez les touches de direction haut et droite en dernier.
4. SSAA effectuera l’étalonnage du centre et renverra le message « Étal.
centre réussi ».
Une fois que vous avez terminé l’étalonnage du centre et l’alignement sur
le ciel, vous pouvez commander au télescope de placer avec précision tout
objet céleste de votre choix dans le champ de vision du télescope.
Alignement polaire
Bien que votre monture EQ (ou monture AZ sur une cale EQ) n’ait pas
besoin d’un alignement polaire parfait pour utiliser SSAA, SSAA peut
vous aider à obtenir un alignement polaire très précis. Un alignement
polaire précis améliore légèrement la précision de pointage globale, mais
seulement de quelques minutes d’arc. Si vous choisissez l’alignement
polaire, faites-le avant l’alignement sur le ciel. Si vous souhaitez effectuer
un alignement polaire plus tard en sélectionnant l’option « Effectuer
l’alignement polaire de la monture» dans le menu StarSense. Vous devrez
effectuer un nouvel alignement sur le ciel une fois l’alignement polaire
terminé.
REMARQUE: Ces instructions expliquent comment effectuer la
procédure d’alignement polaire dans l’hémisphère nord. Si vous vous
trouvez dans l’hémisphère sud, pointez toujours votre monture plein sud
au lieu de plein nord.
d’observation présente des obstructions locales, car vous pouvez définir
les points d’alignement de manière à ce que le télescope les évite. Si vous
choisissez cette option, la fenêtre d’interface utilisateur du Créateur pour
alignement auto StarSense s’affiche (Fig. 17).
Fig. 17: Fenêtre de création d’alignement auto dans CPWI.
Cliquez dans le graphique pour sélectionner des points d’alignement
dans le ciel. Vous trouverez les directions cardinales sur le périmètre du
graphique. L’intérieur de la carte va de 0° d’altitude (c’est-à-dire l’horizon)
au bord à 90° (c’est-à-dire le zénith) au centre. Vous pouvez choisir plus
de quatre points d’alignement si vous le souhaitez. Pour de meilleurs
résultats, choisissez des points largement espacés et évitez les points
proches des pôles pour les montures EQ. Après avoir sélectionné les
points d’alignement, cliquez sur «Terminer» en bas à gauche de la fenêtre.
Avant que CPWI ne commence l’alignement, il vous demandera si vous
souhaitez enregistrer vos points d’alignement définis par l’utilisateur. Si
vous le faites, vous pouvez utiliser le fichier .sua plus tard avec l’option
«Charger des points personnalisés».
Si vous souhaitez utiliser le Créateur d’alignement automatique de
l’interface utilisateur de StarSense avant de commencer l’alignement,
sélectionnez «Outil de génération d’alignement utilisateur automatique»
dans le menu StarSense.
Charger des points personnalisés
Une fois que vous avez défini les «points personnalisés» comme décrit
ci-dessus, vous pouvez choisir cette option pour les utiliser à nouveau.
Sélectionnez le fichier .sua que vous avez créé précédemment et
l’alignement commencera automatiquement.
Orientation manuelle
Avec cette option d’alignement, vous utilisez la fenêtre Contrôles
d’orientation de la monture pour orienter manuellement le SSAA vers une
zone dégagée du ciel et cliquez sur « Résoudre ici » pour obtenir une
référence d’alignement. Répétez le processus quatre fois et l’alignement
est terminé. C’est le choix le moins automatisé, mais il peut être utile
si votre site d’observation comporte des obstructions ou si le ciel est
partiellement nuageux. Pour de meilleurs résultats, utilisez quatre points
d’alignement aussi espacés que possible et évitez les points proches des
pôles pour les montures EQ.
Ajout de références d’alignement supplémentaires
Après l’alignement, vous pouvez voir les informations sur le modèle de
pointage généré par la monture, y compris l’erreur RMS, le nombre total
de points dans le modèle d’alignement et l’erreur d’alignement polaire
calculée.
10 | FRANÇAIS
StarSense AutoAlign V2
6. Faites doucement l’ajustement fin de l’altitude de la monture jusqu’à que
la valeur «Erreur Alt» soit inférieure à deuxminutes d’arc.
• Si la monture est pourvue de verrous d’axe d’altitude, desserrez-les
d’abord.
7. Si vous souhaitez ajuster de nouveau l’axe d’azimut, cliquez sur «Axe
suivant». Sinon, cliquez sur «Fini».
8. Félicitations! Vous avez terminé l’alignement polaire de votre monture.
Si votre monture est équipée de boutons ou de vis de verrouillage
d’altitude ou d’azimut, serrez-les fermement. Si vous avez déjà effectué
l’alignement sur le ciel, alors supprimez l’alignement actuel du menu
Alignement, et effectuez l’alignement sur le ciel à nouveau.
REMARQUE: N’essayez pas d’ajuster l’alignement polaire à plus de deux minutes d’arc sur chaque
axe. Cela sera difficile et ne fournira pas d’avantages supplémentaires en matière de pointage ou de suivi.
Autre fonctionnalité
Le menu StarSense propose davantage d’options.
Vue en direct
La fenêtre Vue en direct affiche une lecture en direct du capteur d’image
de SSAA. Son objectif principal est d’aider à la mise au point de l’objectif
de SSAA (voir la section sur la mise au point plus loin dans ce manuel),
mais il peut également être intéressant de voir ce que SSAA voit.
Pour voir la vue en direct, vous devrez connecter SSAA directement à
votre PC à l’aide d’un câble USB Type-A vers USB Type-C (non fourni). En
effet, l’interface AUX ne peut pas prendre en charge le transfert d’images.
Vous devrez également installer le pilote Windows StarSense sur votre
ordinateur. Vous le trouverez dans la section Assistance et téléchargements
de la page produit StarSense AutoAlign (#94034) sur celestron.com.
Une fois que vous avez installé le pilote et connecté SSAA avec le câble
USB, la fenêtre Vue en direct affiche la vue actuelle du capteur d’image
de SSAA. Il n’y a pas de commandes pour la vue en direct. SSAA ajuste
automatiquement l’exposition et le gain pour obtenir les meilleures images.
REMARQUE: SSAA doit toujours être connecté à la monture via AUX, même
lorsqu’il est connecté au PC via USB pour la vue en direct.
GoTo précis
GoTo précis utilise SSAA pour centrer plus précisément les objets dans le
champ de vision. Lorsque cette option est activée, la monture du télescope
utilise son modèle d’alignement interne pour se rapprocher de l’objet
sélectionné. Ensuite, SSAA prend le relais, apportant des corrections
fines au centrage, améliorant considérablement la précision de pointage
globale. Lorsque vous utilisez SSAA, GoTo précis est activé par défaut.
Si vous souhaitez désactiver cette fonction, vous pouvez le faire depuis le
menu StarSense.
Version
Sélectionnez cette option pour afficher le numéro de version actuel du
logiciel interne de SSAA.
Réinitialisation des paramètres d’usine
Cette option efface toutes les données d’étalonnage du centre
précédemment enregistrées dans StarSense AutoAlign. Après avoir
sélectionné cette option, vous devez redémarrer le support.
Nous vous recommandons d’effectuer une réinitialisation d’usine si vous
prévoyez d’utiliser StarSense AutoAlign avec une monture Celestron
différente de celle que vous utilisiez précédemment.
Télécharger les journaux d’assistance
Si vous rencontrez des difficultés techniques et devez télécharger des
journaux d’assistance pour les envoyer au support technique de Celestron,
sélectionnez cette option. Tout d’abord, installez le pilote StarSense pour
Windows sur votre ordinateur, disponible dans la section Support et
téléchargements de la page produit StarSense AutoAlign (#94034) sur
celestron.com. Ensuite, connectez le port USB-C du SSAA directement
à votre PC à l’aide d’un câble USB (non fourni). Sélectionnez ensuite
« Télécharger les journaux de support ». Les fichiers journaux seront
téléchargés directement sur votre ordinateur.
REMARQUE: Les journaux d’assistance ne sont pas stockés de manière permanente dans la
Pour effectuer un alignement polaire avec SSAA via CPWI:
1. L’alignement polaire approximatif de votre monture rendra l’ensemble du
processus plus rapide et plus facile. Une fois l’alignement approximatif
effectué, vous pouvez obtenir un alignement polaire précis en utilisant
uniquement les boutons de réglage fin de l’altitude et de l’azimut de la
monture.
a. Assurez-vous que le support est raisonnablement de
niveau. Si votre monture comporte un niveau à bulle intégré,
utilisez-le comme référence.
b. Ajustez l’altitude de la monture de sorte que l’échelle de latitude
de la monture indique à peu près la même latitude que votre site
d’observation.
c. Soulevez et faites pivoter l’ensemble du trépied et de la monture de
sorte que l’axe d’ascension droite (RA) pointe approximativement
plein nord. La position de la monture n’a pas besoin d’être parfaite.
Visez à environ 5° vers le nord afin que la monture se trouve dans la
plage des boutons de réglage fin de l’azimut de la monture. Utilisez
une application de boussole gratuite pour votre smartphone si
vous avez besoin d’aide pour trouver le Nord.
d. Si vous avez desserré les boutons de réglage de l’altitude ou de
l’azimut lors d’un alignement polaire approximatif, assurez-vous
qu’ils sont bien resserrés avant de continuer.
2. Lorsque CPWI vous le demande, orientez manuellement le télescope
sur une position initiale à l’aide des contrôles d’orientation de la monture.
• Le télescope pivotera d’ouest en est d’environ 50° pendant le
processus d’alignement polaire. Essayez de vous diriger vers une
zone dégagée, sans aucun obstacle sur ce trajet.
3. Cliquez sur « Commencer » dans la section d’alignement polaire
SSAA de la fenêtre d’informations de modèle de pointage. La monture
s’orientera vers l’est, s’arrêtant tous les 10° pour obtenir la référence
d’alignement polaire.
4. Après que SSAA ait obtenu les références d’alignement, il affichera
la fenêtre d’ajustement de l’axe d’azimut (Fig. 18). Faites doucement
l’ajustement fin de l’azimut de la monture jusqu’à que la valeur «Erreur
Azm» soit inférieure à deuxminutes d’arc.
• Si la monture est pourvue de verrous d’axe d’azimut, desserrez-les
d’abord.
• Effectuez les ajustements lentement afin que SSAA puisse les
suivre. Si vous vous ajustez trop rapidement et que SSAA perd
ses repères, vous devrez peut-être recommencer tout le processus
d’alignement polaire.
Fig. 18: Fenêtre d’ajustement de l’axe d’azimut pendant l’alignement polaire dans CPWI
5. Cliquez sur «Axe suivant » lorsque vous avez terminé d’effectuer les
ajustements d’azimut. La fenêtre d’ajustement de l’axe d’altitude
apparaîtra (Fig. 19).
Fig. 19: Fenêtre d’ajustement de l’axe d’altitude pendant l’alignement polaire dans CPWI
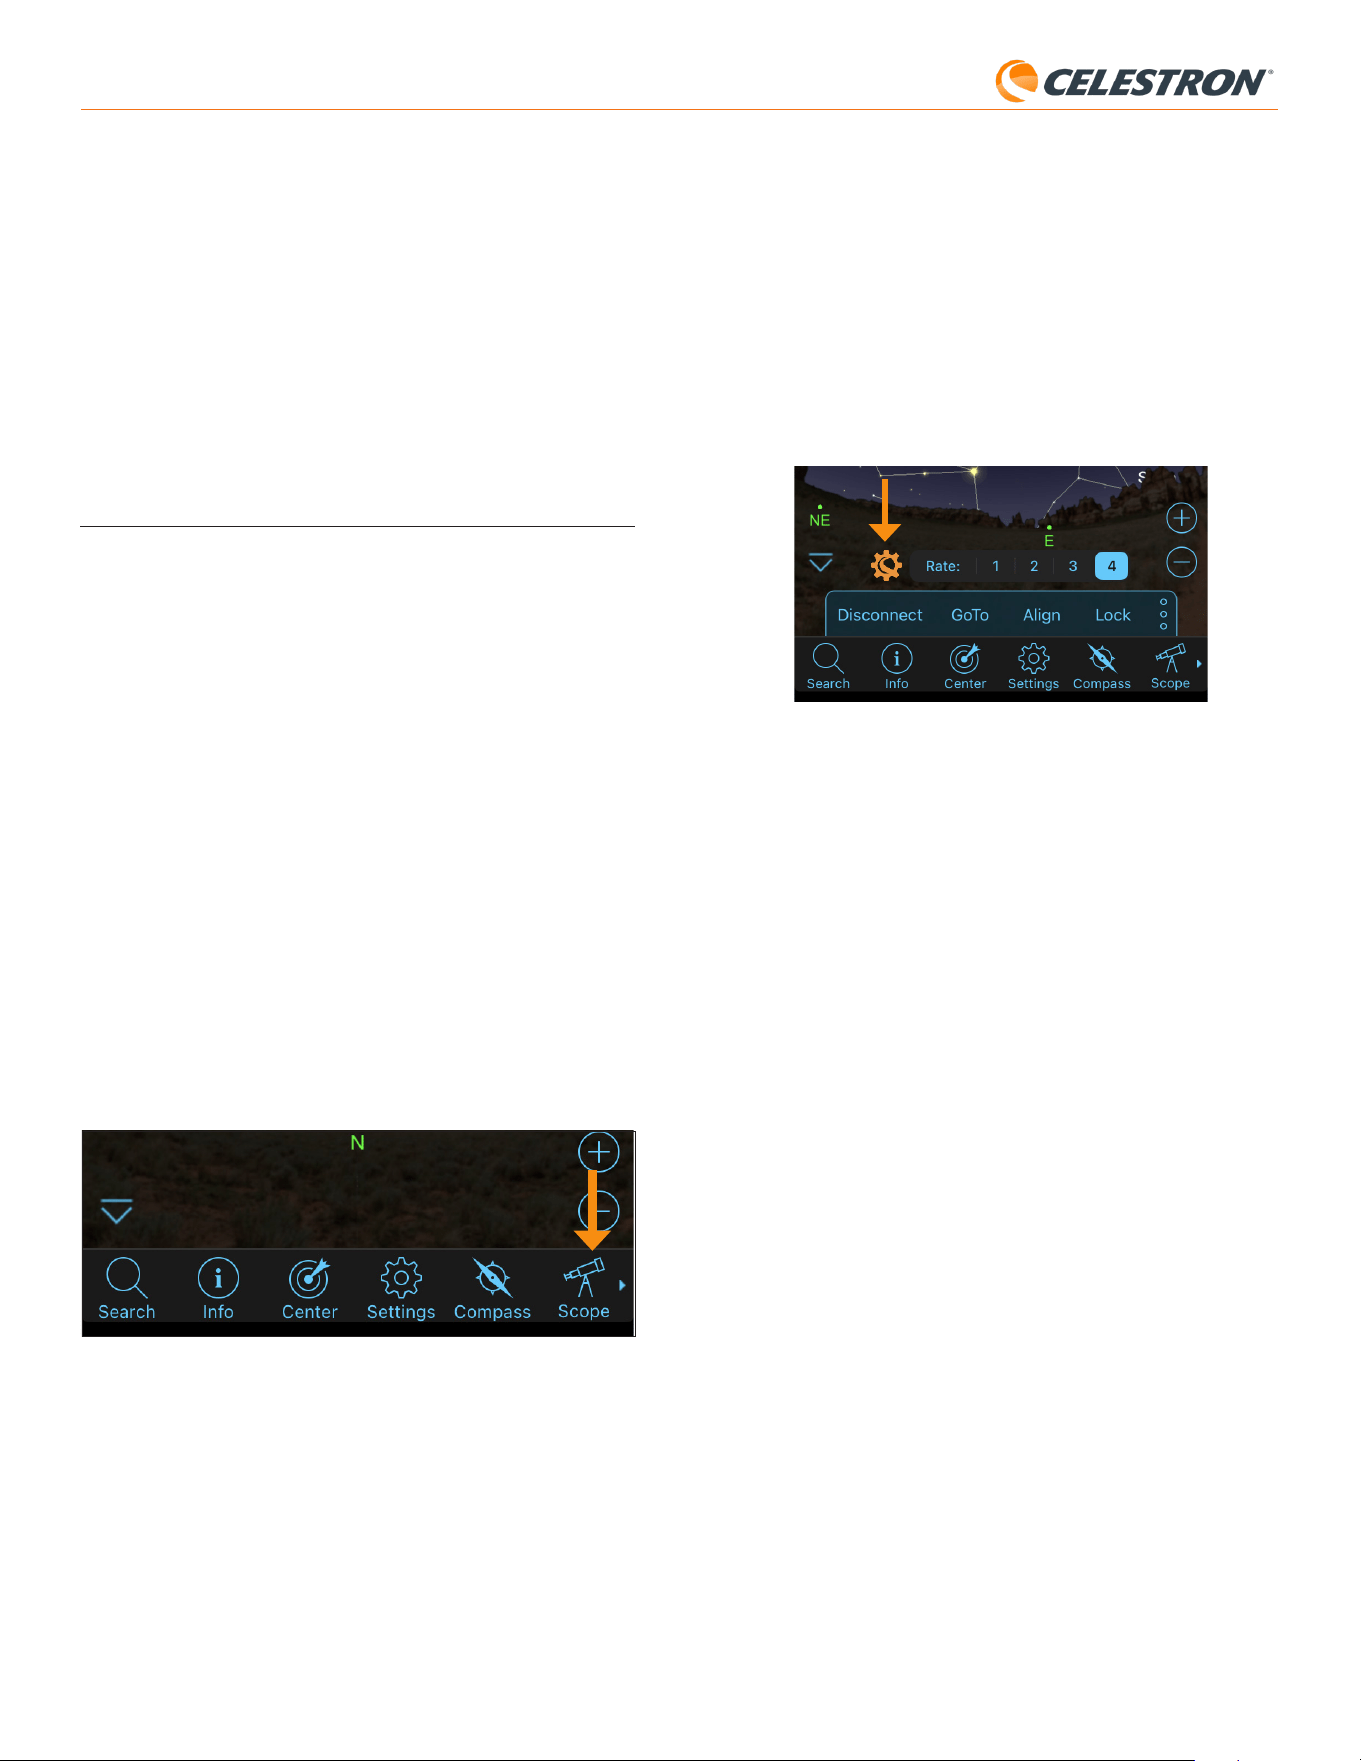
11 | FRANÇAIS
StarSense AutoAlign V2
mémoire de SSAA; par conséquent, ne mettez pas votre monture hors tension et ne déconnectez pas
SSAA de la monture avant de télécharger les journaux d’assistance de SSAA.
Mise à jour du firmware
Vous pouvez utiliser cette option pour vérifier si le micrologiciel de votre
StarSense AutoAlign (SSAA) est à jour et installer les mises à jour
disponibles.
Commencez par télécharger et installer le pilote StarSense pour Windows
sur votre ordinateur. Vous le trouverez dans la section Assistance et
téléchargements de la page produit StarSense AutoAlign (#94034) sur
celestron.com.
Ensuite, connectez le port USB-C du SSAA directement à votre PC à
l’aide d’un câble USB (non inclus). Une fois connecté, sélectionnez
«Mettre à jour le firmware» et suivez les instructions à l’écran pour terminer
le processus.
7. Utilisation de SSAA avec SkyPortal
Vous pouvez contrôler votre système StarSense AutoAlign via votre
smartphone grâce à l’application mobile Celestron SkyPortal Powered
by SkySafari™.
Ce dont vous aurez besoin:
• Un smartphone équipé de la dernière version de l’application mobile
SkyPortal, disponible gratuitement sur l’App Store d’Apple ou Google
Play.
• Soit un télescope Celestron compatible Wi-Fi, par exemple le NexStar
Evolution, soit une monture informatisée Celestron plus le module Wi-
Fi SkyPortal (vendu séparément)
• StarSense AutoAlign, installé et connecté à votre monture de télescope
Pour utiliser SSAA avec l’application
SkyPortal:
1. Assurez-vous que le SSAA est connecté à l’un des ports AUX de la
monture du télescope.
2. Allumez la monture.
3. Connectez-vous au réseau Wi-Fi du télescope avec votre smartphone.
- Sous les réseaux Wi-Fi disponibles, le télescope s’affichera comme «
Celestron-### » avec ### étant des chiffres et des lettres.
4. Ouvrez l’application SkyPortal.
5. Sélectionnez l’icône du télescope en bas à droite de l’écran (Fig. 20).
Fig. 20: Appuyez sur l’icône de télescope en bas de l’écran.
6. Appuyez sur « Connecter », puis sur « Connecter et aligner ».
L’application va maintenant lancer l’alignement. Positionnez votre
télescope pour l’alignement en utilisant l’une des méthodes suivantes:
a. Pour les montures EQ avec commutateurs de position d’origine (par
exemple, CGX), appuyez sur « OK », et la monture se déplacera vers
la position d’origine.
b. Pour les montures EQ sans commutateurs de position d’origine
(par exemple, Advanced VX), l’application vous invitera à déplacer le
télescope vers les marques d’index de position d’origine(voir figure
11B). Vous pouvez déplacer le télescope manuellement ou utiliser les
commandes du télescope à l’écran.
C. Pour les montures AZ, pointez votre télescope vers l’horizon nord à
l’aide des commandes du télescope à l’écran. Le tube du télescope
doit être à peu près horizontal par rapport au sol et pointer vers le
nord. Si vous vous trouvez dans l’hémisphère sud, le télescope doit
être à peu près horizontal et pointer vers le sud.
d. Pour les montures AZ sur une cale EQ, activez l’option coin sur l’écran
de configuration du télescope. Accédez à l’écran de configuration
de l’oscilloscope en sélectionnant Menu>Paramètres>Configuration
et contrôle. Sélectionnez ensuite « Alignement StarSense Wedge
activé». Ensuite, retournez à l’écran principal du planétarium, annulez
l’alignement en cours, puis appuyez sur «Connecter» puis à nouveau
sur «Connecter et aligner». Suivez les instructions à l’écran. Vous
devrez également régler le télescope sur sa position initiale. Se référer
à la figure 12 à la page 5.
REMARQUE: Vous pouvez accéder directement à l’écran de configuration du télescope en
appuyant sur l’icône Paramètres Celestron située en bas de l’écran. (Fig 21).
Fig. 21: L'icône des paramètres Celestron
7. L’alignement automatique va maintenant commencer. Les
montures équatoriales vont se pointer vers deux points dans
le ciel occidental, puis vers deux points dans le ciel oriental,
afin d’obtenir des références d’alignement. Les montures AZ
pourront pivoter vers trois points autour du ciel. Si vous avez
précédemment effectué un étalonnage du centre, vous pouvez
maintenant utiliser SSAA pour localiser les objets. Si vous n’avez pas
effectué d’étalonnage du centre, SkyPortal vous invitera à le faire.
Continuez à l’étape 8.
8. L’étalonnage du centre aligne le champ de vision du SSAA sur celui
de votre télescope. Cette étape ne doit généralement être effectuée
qu’une seule fois car SSAA enregistre les données d’étalonnage du
centre dans sa mémoire interne. La prochaine fois que vous vous
connecterez à SSAA avec l’application, vous n’aurez pas besoin de
procéder à un nouvel étalonnage du centre, sauf si vous avez déplacé
SSAA sur un tube optique de télescope différent.
a. Pour centrer l’étalonnage, choisissez une étoile dans l’interface
du planétarium, puis appuyez sur « GoTo ». Le télescope se
rapprochera de l’étoile, mais il se peut que celle-ci ne soit pas dans
son champ de vision.
b. Utilisez les boutons de direction à l’écran pour centrer précisément
l’étoile dans le champ de vision du télescope. Lorsque vous avez
terminé, appuyez sur «Aligner» en bas de l’écran. Appuyez ensuite
sur « Étalonner ».
c. L’application terminera le processus d’étalonnage du centre.
d. Après l’étalonnage du centre, vous serez invité à refaire l’alignement
sur le ciel. Appuyez sur « Déconnecter », puis sur l’icône de tube,
puis sur « Connecter », puis à nouveau sur « Connecter et aligner ».
Retournez à l’étape 6.
Vous êtes maintenant prêt à utiliser SSAA pour trouver des objets dans
le ciel nocturne. Il suffit de sélectionner un objet dans l’application et
d’appuyer sur « Aller à ». La fonction GoTo précise est activée par défaut,
les étoiles devraient donc apparaître bien centrées dans le champ de vision
du télescope. Lorsque SSAA effectue un pointage précis, l’application
affichera « Détection d’étoiles ».
Alignement polaire
L’assistance à l’alignement polaire avec SSAA n’est actuellement pas
disponible via l’application SkyPortal. Cependant, SkyPortal prend
en charge la procédure d’alignement polaire All-Star (ASPA) pour un
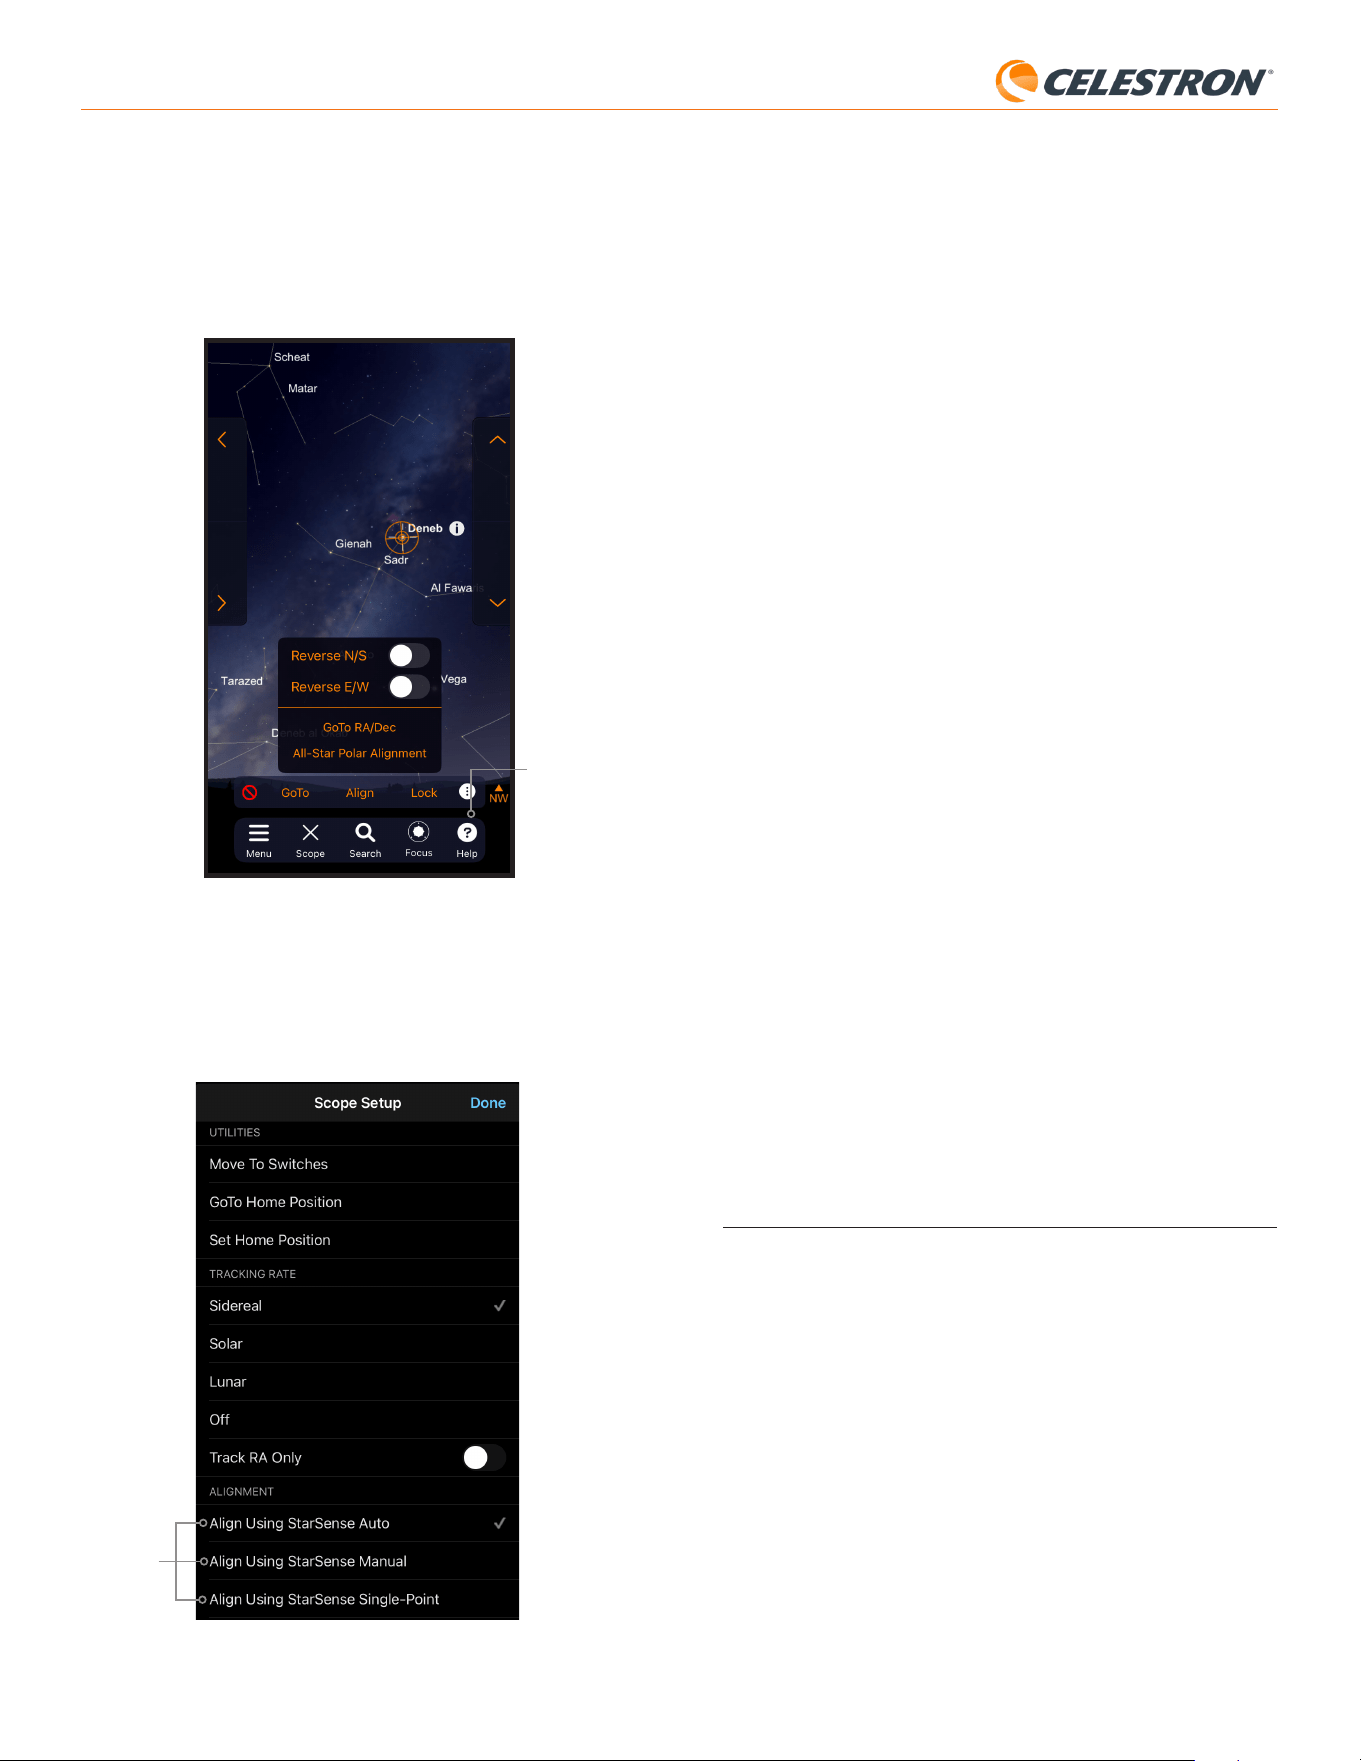
12 | FRANÇAIS
StarSense AutoAlign V2
Alignement manuel à l’aide StarSense
L’alignement manuel StarSense vous permet d’orienter manuellement
le télescope vers des points d’alignement de votre choix au lieu de
points prédéfinis automatiques. Si votre site d’observation présente
de nombreux obstacles ou est traversé par des nuages, vous trouverez
peut-être le mode manuel de StarSense plus rapide et plus pratique
que le mode automatique. Pour utiliser le mode manuel StarSense,
sélectionnez « Aligner à l’aide du mode manuel StarSense » dans l’écran
de configuration du télescope. Désormais, la prochaine fois que vous
choisirez «Connecter et aligner», l’application vous invitera à effectuer
un alignement manuel StarSense. Suivez les instructions à l’écran.
Vous pouvez orienter le télescope vers n’importe quelle position du
ciel dégagée. Maintenez une distance d’au moins 30° entre les points
d’alignement sur les deux axes.
Alignement par point unique avec StarSense
L’alignement point unique StarSense vous permet de vous aligner en
pointant manuellement vers une seule zone du ciel. C’est la méthode
d’alignement la plus rapide, mais elle offre le modèle de pointage le
moins précis pour la monture. Mais n’oubliez pas, SSAA Il utilisera
toujours sa fonction Precise GoTo pour centrer les objets avec précision
; cette procédure rapide pourrait donc suffire pour une observation
occasionnelle. Vous pouvez également ajouter ultérieurement des points
d’alignement supplémentaires pour améliorer la précision de votre
monture à l’aide de la commande Aligner > Aligner (voir ci-dessous).
Pour utiliser Point unique Starsense, sélectionnez « Alignement à l’aide
de Point unique Starsense » dans l’écran de configuration du télescope.
La prochaine fois que vous utiliserez la fonction «Connecter et aligner»,
vous serez invité à effectuer un alignement monopoint StarSense. Suivez
les instructions à l’écran.
Ajout de points d’alignement supplémentaires avec
la commande Aligner > Aligner
La fonction Precise GoTo intégrée de SSAA lui permet de centrer les
objets dans le champ de vision, quelle que soit la précision du modèle
de pointage de la monture. Néanmoins, si vous le souhaitez, vous pouvez
améliorer en permanence la précision de pointage de votre monture
en ajoutant des points d’alignement supplémentaires à son modèle de
pointage.
Pour ajouter des points d’alignement, orientez le télescope vers n’importe
quelle zone de ciel dégagé. Sélectionnez « Aligner » parmi les options
en bas de l’écran, puis sélectionnez à nouveau « Aligner ». Vous pouvez
ajouter jusqu’à un total de 10 points d’alignement.
8. Mise au point
Les techniciens ont mis au point votre StarSense AutoAlign en usine et il
ne devrait pas nécessiter de réglage supplémentaire. Cependant, si vous
constatez que SSAA ne fonctionne pas comme il le devrait (par exemple,
en signalant «Pas d’étoiles!» alors que beaucoup d’étoiles sont visibles
dans le ciel), vous devez vérifier la mise au point.
Pour mettre au point StarSense:
1. Suivez les étapes décrites précédemment pour accéder à Vue en direct
dans CPWI (voir page 10). Vous pouvez également accéder à la vue en
direct via l’interface web. Reportez-vous au chapitre 9 (sur cette page)
pour obtenir des instructions.
2. Si vous faites la mise au point pendant la journée, pointez le SSAA vers
un objet situé à au moins 400mètres de distance. Si vous faites la mise
au point la nuit, pointez le SSAA sur une étoile brillante. Vous devriez
voir une image à l’écran.
REMARQUE: La mise au point peut s’avérer difficile en plein jour en
raison de l’optique très rapide et du capteur sensible.
3. Si la mise au point est nette, vous avez terminé. Si ce n’est pas le
alignement polaire précis de votre monture équatoriale. Si vous utilisez
une monture équatoriale (ou AZ sur une cale équatoriale), l’application
vous demandera si vous souhaitez un ASPA après un alignement sur
le ciel réussi. Si vous souhaitez effectuer l’ASPA ultérieurement, vous
pouvez sélectionner l’alignement polaire All-Star à tout moment à partir
de l’icône « trois points » comme indiqué dans la figure 21B. Après avoir
effectué la procédure ASPA, vous serez invité à réaligner la monture
avec le ciel.
Icône à trois points
Fig. 21B: Vous pouvez effectuer un alignement polaire à tout moment en sélectionnant
l’option «Alignement polaire sur étoiles seulement» après avoir appuyé sur
l’icône à trois points.
Autres options d’alignement
Sur l’écran de configuration du télescope (menu Paramètres > Configuration
et contrôle, ou appuyez simplement sur l’icône Paramètres Celestron), vous
pouvez sélectionner quelques autres options d’alignement (Fig. 22).
Fig. 22: Outre l’alignement à l’aide de StarSense Auto (l’option par défaut), d’autres options
d’alignement sont disponibles à partir de l’écran de configuration du télescope.
Options
d’alignement
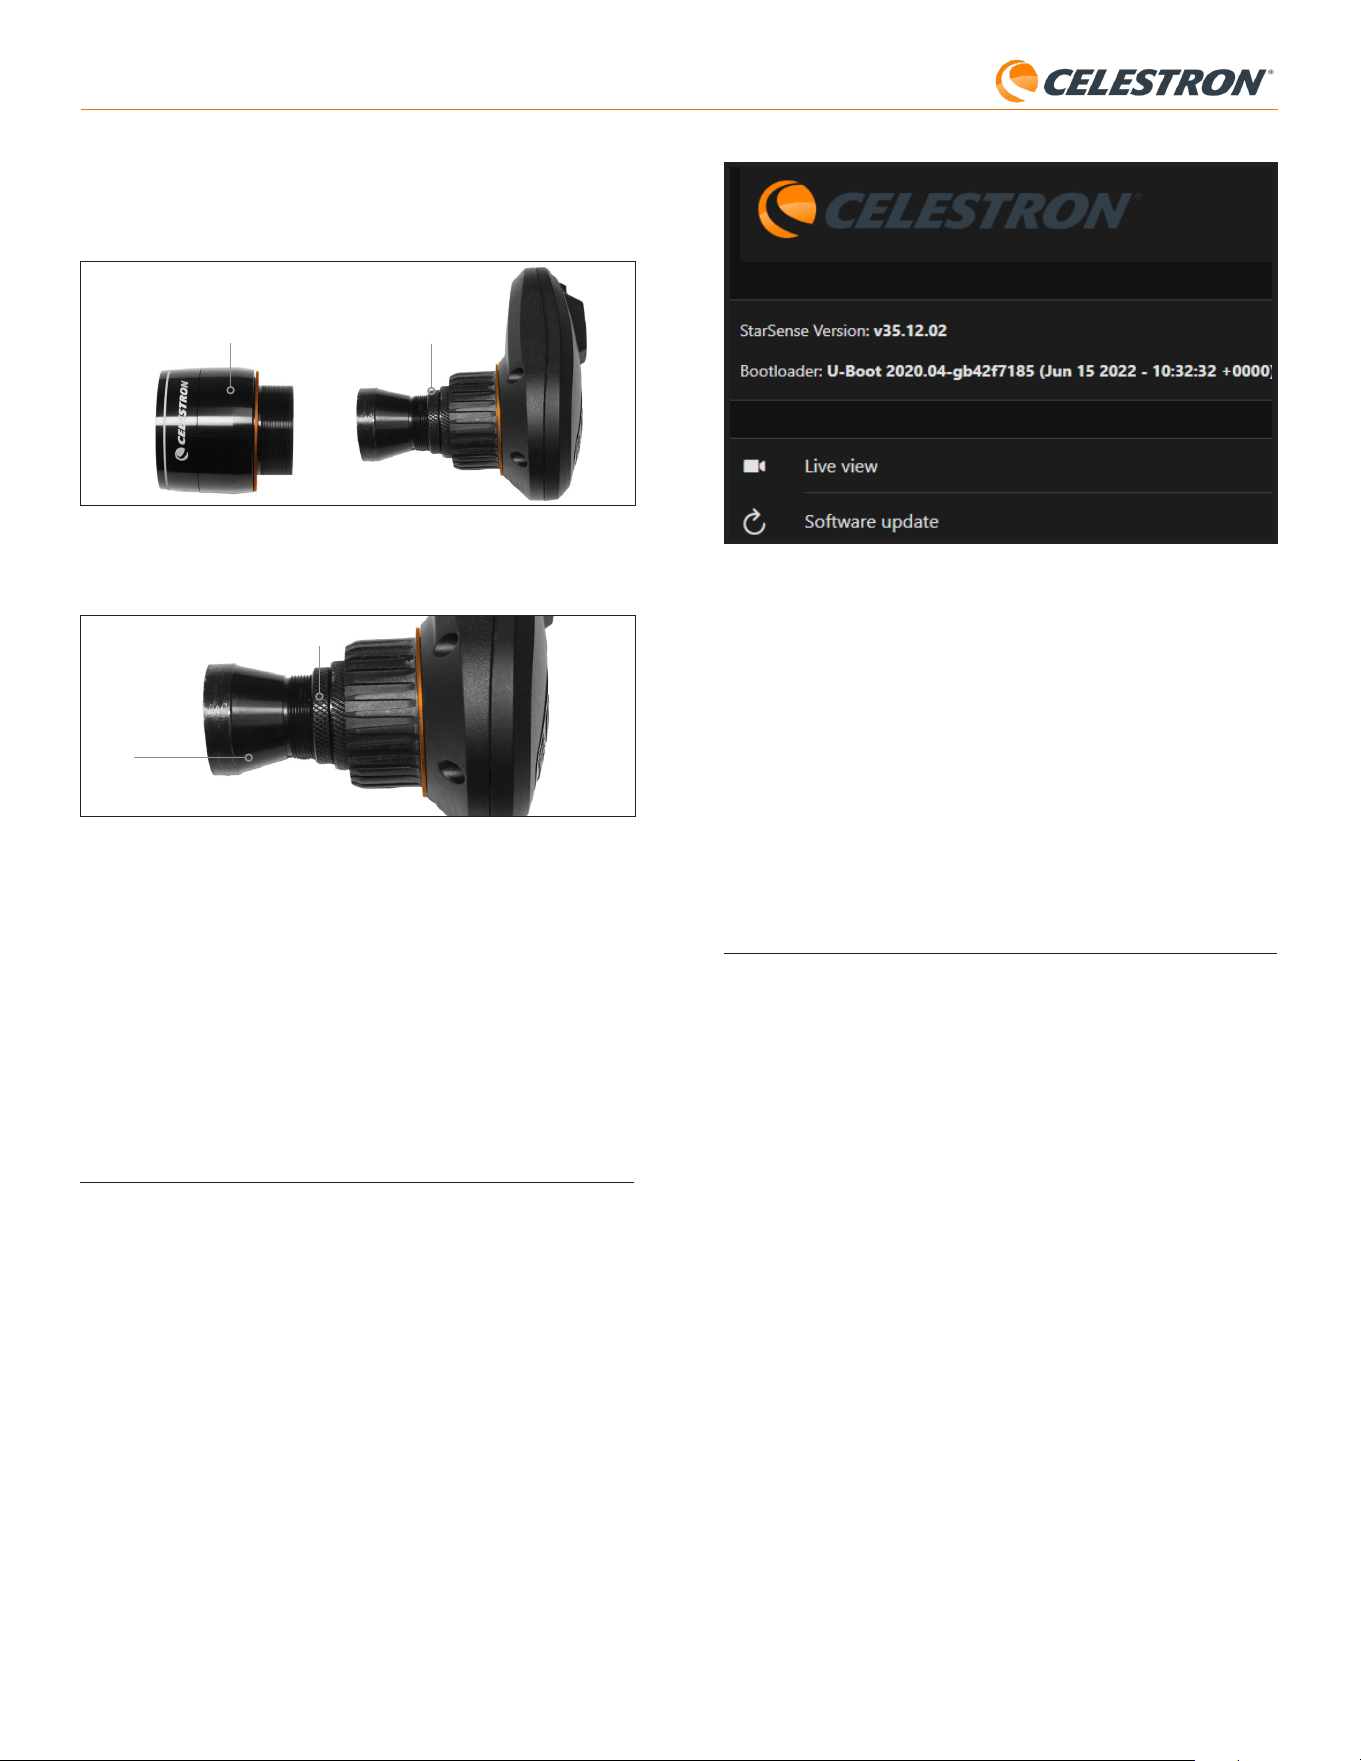
13 | FRANÇAIS
StarSense AutoAlign V2
cas, retirez le capot avant du SSAA en le faisant tourner dans le sens
antihoraire jusqu’à ce qu’il se détache (Fig. 23). Retirez le capot avant
pour accéder à la bague de verrouillage de la mise au point.
Fig. 23: Retirez uniquement le cache avant, pas l'ensemble de l'avant du boîtier.
Anneau de verrouillage de la
mise au point.
Cache avant
4. Desserrez la bague de verrouillage de la mise au point (Fig. 24).
Fig. 24: Desserrez l’anneau pour effectuer les réglages de mise au point, puis resserrez-
le fermement.
Anneau de verrouillage de la mise au point.
Éléments optiques
5. Tournez l’optique dans le sens horaire d’un quart à un demi-tour pour
voir si la mise au point s’améliore. Si c’est le cas, continuez à tourner
jusqu’à ce que la mise au point soit aussi nette que possible. Si la
mise au point ne s’améliore pas, faites pivoter l’optique dans le sens
antihoraire jusqu’à ce que la mise au point s’améliore.
6. Lorsque vous voyez une image nette, resserrez la bague de verrouillage
et réinstallez le capot avant du SSAA. Si vous le souhaitez, vous pouvez
maintenant déconnecter le SSAA du port USB du PC.
9. Mise à jour du firmware de SSAA et
de la vue en direct via l’interface Web
Nos ingénieurs travaillent constamment sur des mises à niveau et des
améliorations de nos produits, nous vous recommandons donc de vérifier
périodiquement les mises à jour du firmware du SSAA éventuellement
disponibles sur celestron.com/CFM. Si un nouveau firmware est
disponible, vous le trouverez sur la page produit StarSense AutoAlign V2
(#94034) sur celestron.com sous « Support et téléchargements ». Pour
installer le fichier .swu téléchargé, vous aurez besoin d’un câble USB-C
vers USB-A (non fourni) et du pilote Windows StarSense, également
disponible sur la page produit StarSense AutoAlign V2 (#94034).
Suivez ces étapes pour mettre à jour le logiciel de SSAA:
1. Installez le pilote Windows StarSense sur votre PC.
2. Connectez SSAA à votre PC via le câble USB. Attendez environ 10
secondes que le SSAA démarre.
3. Ouvrez un navigateur Web sur votre ordinateur et saisissez
http://169.254.54.1/ pour lancer la page d’interface Web SSAA
(Fig. 25).
Fig. 25: Vous pouvez mettre à jour le logiciel du SSAA dans l’interface Web. Vous
aurez également accès à la vue en direct d’ici.
4. Sélectionnez «Mise à jour du logiciel».
5. Faites glisser et déposez le fichier .swu téléchargé comme indiqué. Le
logiciel SSAA sera mis à jour.
Vous pouvez également accéder à la vue en direct de StarSense AutoAlign
à partir de cette interface Web. À partir d’ici, vous pouvez basculer entre
les réglages automatiques et manuels de l’appareil photo et capturer une
image au format TIFF.
10. Mise à jour du micrologiciel du
SSAA via Celestron Firmware
Manager (CFM)
Vous pouvez également utiliser Celestron Firmware Manager (CFM)
pour mettre à jour simultanément StarSense AutoAlign, votre raquette de
commande NexStar et votre monture.
Avant de commencer, téléchargez le gestionnaire de firmware Celestron
(CFM) et le pilote Windows StarSense. Les deux sont disponibles sur
celestron.com sur la page produit StarSense AutoAlign V2 (#94034)
sous « Logiciels et téléchargements ».
Pour effectuer la mise à jour à l’aide de CFM, vous aurez besoin de deux
câbles fournis par l’utilisateur:
- Vous aurez besoin d’un câble USB Type-A vers Mini-B pour connecter
la commande NexStar+ à votre PC.
- Un câble USB Type-A vers USB Type-C pour connecter StarSense
AutoAlign à votre PC.
Pour installer le firmware:
1. Installez CFM et le pilote Windows StarSense sur votre PC.
2. Configurez votre monture comme vous le feriez habituellement, avec
la commande NexStar+ et le SSAA branché aux ports AUX de la
monture.
3. Allumez la monture.
4. Connectez le port USB situé sous la commande à votre PC à l’aide du
câble USB Type-A vers USB Mini-B (fourni par l’utilisateur).
5. Exécutez CFM et cliquez sur «Rechercher les périphériques». CFM
devrait détecter la commande, la monture et StarSense AutoAlign.
6. Cliquez sur le bouton Mettre à jour dans CFM. CFM installera toutes
les mises à jour de micrologiciel disponibles pour la commande et le
support.
7. Si une mise à jour du firmware est disponible pour StarSense
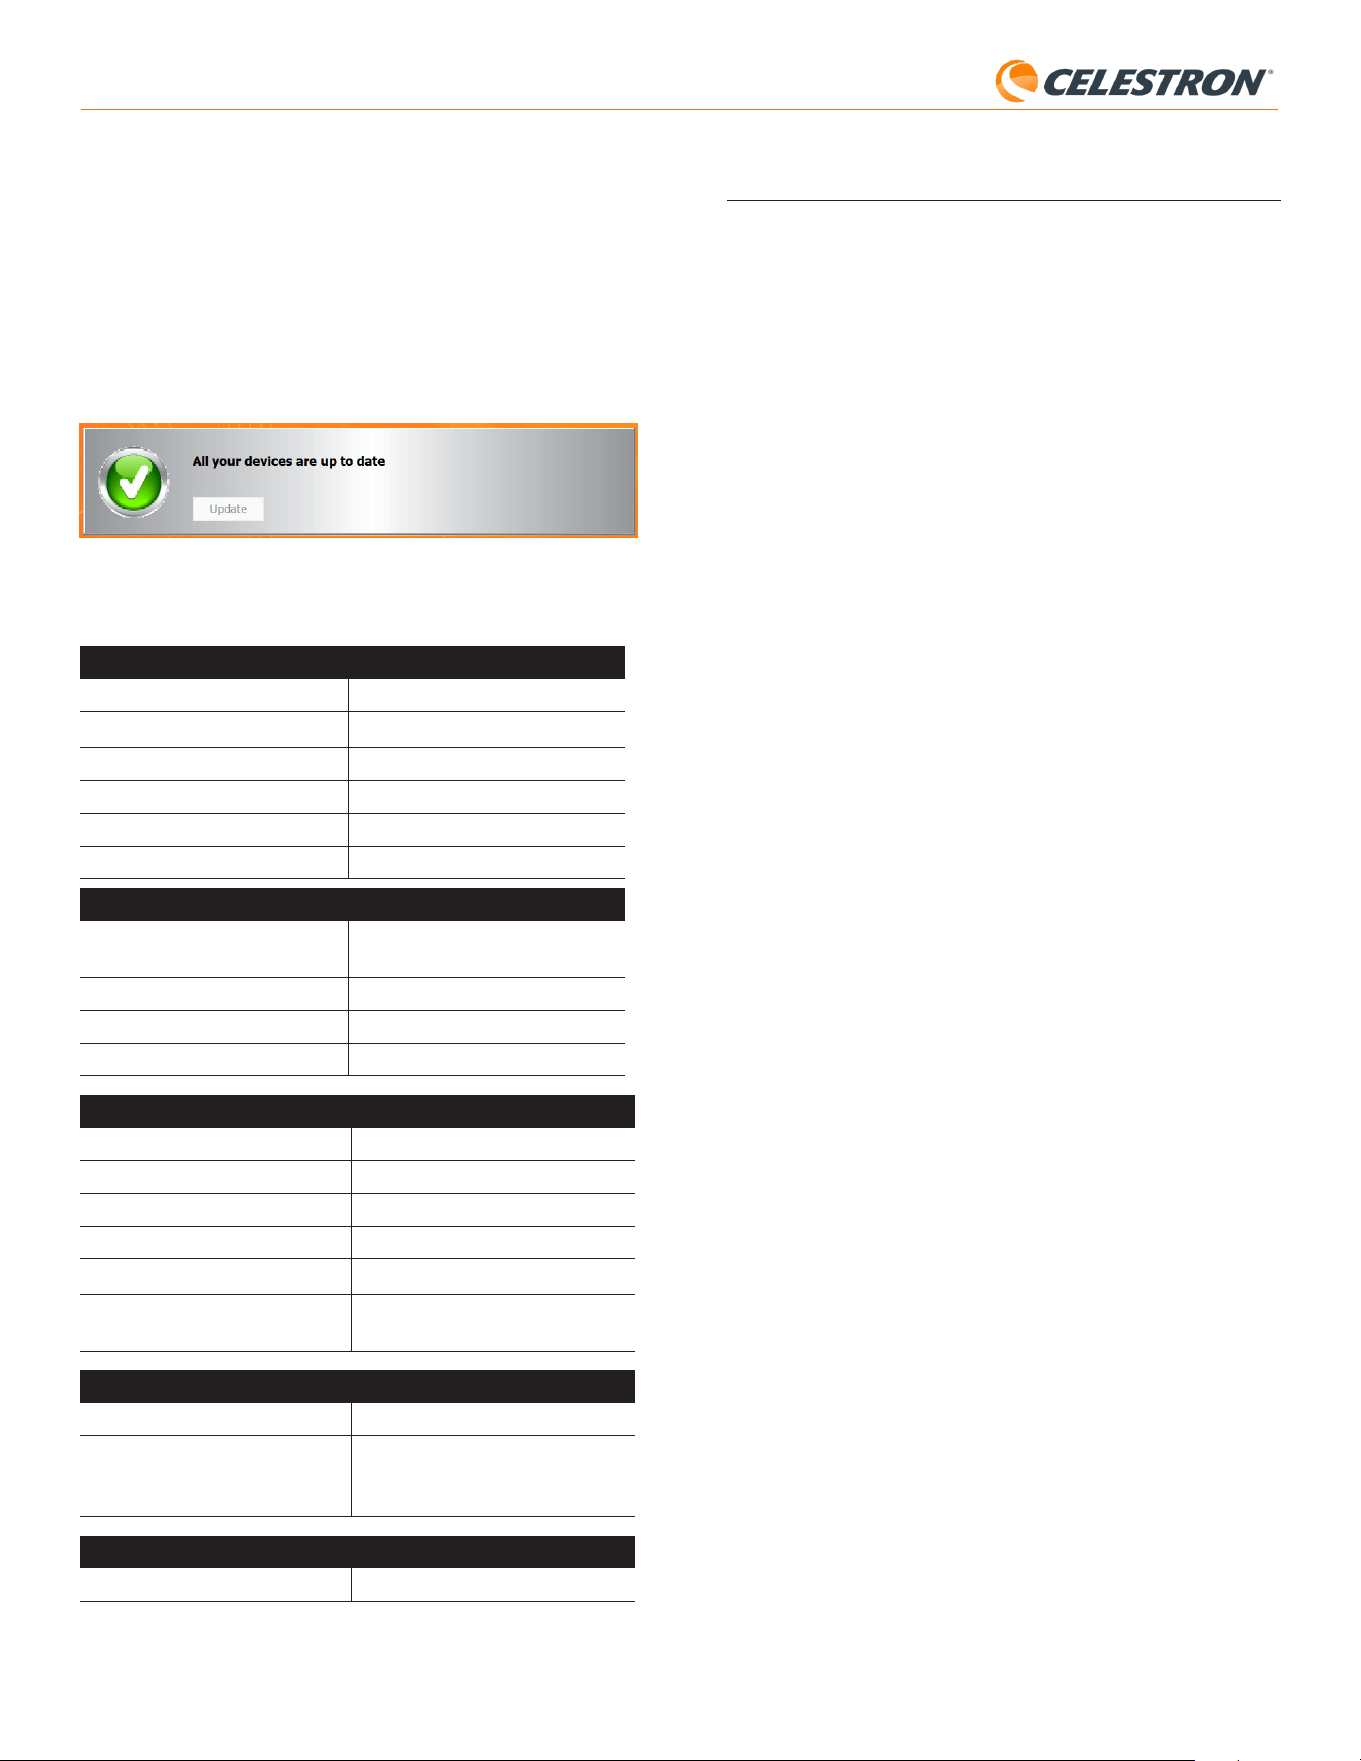
14 | FRANÇAIS
StarSense AutoAlign V2
AutoAlign, CFM vous invitera à le connecter directement à votre PC à
l’aide d’un câble USB Type-A vers USB Type-C (fourni par l’utilisateur).
Laissez StarSense connecté à la monture via son câble AUX.
Connectez simultanément son port USB-C à votre PC. Une fois la
connexion USB établie, cliquez sur « OK » dans CFM pour lancer la
mise à jour du firmware.
REMARQUE: StarSense AutoAlign doit être mis à jour via une
connexion USB directe. Le fichier du firmware est trop volumineux pour
être transféré via la connexion AUX du support.
8. Lorsque CFM affiche une coche verte (Fig. 26), la mise à jour
StarSense AutoAlign est terminée.
Fig 26: Une fois la mise à jour SSAA terminée, vous verrez une coche verte.
11. Spécifications
LENTILLE
TYPE Lentilles
doublées 20mm
LONGUEUR DE FOCALE 40mm
RATIO DE FOCAL EFFECTIF f/2
NOMBRE D’ÉLÉMENTS 2
TRAITEMENTS DE SURFACE Multitraitement complet
CAPTEUR D’IMAGE CMOS
CAPTEUR D’IMAGE CMOS Sony IMX462LLR-C, monochrome,
rétro-illuminé
TAILLE DU CAPTEUR Diagonale de 6,46mm
PAS DE PIXEL 2,9μm x 2,9μm
NOMBRE DE PIXELS EFFICACES 2,13M
ORDINATEUR EMBARQUÉ
CŒUR PRINCIPAL ARM
®
2x Cortex
®
-A53 jusqu’à 1,4 GHz
CŒUR PRINCIPAL ARM
®
1x Cortex
®
-M7 jusqu’à 600 MHz
RAM 512 Mo
ROM 4 Go
GPU GC7000UltraLite
TEMPÉRATURE EN
FONCTIONNEMENT:
-5°C - 40°C
PORTS
AUX: Pour la connexion de montures Celestron
USB-C Pour la connexion à un PC pour la mise au
point, la vue en direct et la mise à jour du
micrologiciel
BOÎTIER
BOÎTIER Aluminium avec revêtements en plastique
12. Dépannage et conseils
1. Si le message d’erreur «Pas d’étoiles!» persiste lors de la résolution de
plaque lorsque le ciel est clair, essayez de recentrer SSAA.
2. Si la Lune est haute et brillante dans le ciel, StarSense AutoAlign peut
avoir des difficultés à résoudre les plaques à quelques degrés de la
Lune, à cause de l’éblouissement. vous pourriez dans cas recevoir un
message d’erreur «Pas d’étoiles!» En cas de légère brume dans le ciel,
la résolution des plaques peut échouer même à de grandes distances
de la Lune.
3. Pour des performances globales optimales, nous vous recommandons
de mettre votre trépied à niveau. SSAA fonctionnera même avec un
trépied qui n’est pas à niveau, mais sa précision de pointage sera
quelque peu diminuée.
4. Pour garantir les meilleures performances de la fonctionnalité GoTo
précis, effectuez l’alignement polaire de votre monture. GoTo précis
fonctionnera toujours bien si l’alignement polaire de votre monture
n’est pas effecuté, mais la précision globale sera légèrement réduite,
généralement de plusieurs minutes d’arc.
5. Si vous le souhaitez, vous pouvez connecter SSAA directement à
votre PC via le port USB-C pour le contrôler avec CPWI. Avant de
vous connecter, téléchargez et installez StarSense Windows pilote
(disponible sur la page produit SSAA V2 sur celestron.com). Branchez
le SSAA à votre PC. Après environ 10 secondes, SSAA démarrera, et
votre ordinateur reconnaîtra l’alignement automatique StarSense.
- Laissez le SSAA connecté à votre monture via le câble
AUX fourni, même lorsqu’il est connecté à votre PC via
USB-C. Utilisez le port AUX de votre monture, et non le
port d’autoguidage. (Le port d’autoguidage ST-4 n’est pas
compatible avec SSAA.)
- Assurez-vous d’utiliser un câble USB de haute qualité. Si vous
rencontrez des difficultés pour vous connecter à SSAA via
USB, essayez un autre câble USB ou un autre port USB de
votre ordinateur. Nous déconseillons l’utilisation de rallonges
USB car elles peuvent contribuer à une perte de signal.
6. Si vous retirez StarSense AutoAlign de sa base de support et que
vous le réinstallez plus tard, vous n’aurez généralement pas besoin
d’effectuer à nouveau l’étalonnage du centre. Toutefois, si les objets
ne sont plus placés près du centre du champ de vision, répétez la
procédure d’étalonnage du centre.
15 | FRANÇAIS
StarSense AutoAlign V2
NOTE DE LA FCC: Cet équipement a été testé et jugé conforme aux limites établies pour un dispositif
numérique de classe B, conformément à la partie 15 de la réglementation de la FCC. Ces limites sont
conçues pour fournir une protection raisonnable contre les interférences nuisibles dans une installation
résidentielle. Cet équipement génère, utilise et peut émettre une énergie de fréquence radio et, s’il n’est
pas installé et utilisé conformément aux instructions, peut causer des interférences nuisibles aux com-
munications radio. Mais il n’existe aucune garantie que des interférences ne seront pas produites dans
une installation particulière. Si cet équipement cause des interférences nuisibles à la réception radio ou
télévision, ce qui peut être déterminé en éteignant et en rallumant l’équipement, l’utilisateur est encouragé
à essayer de corriger l’interférence par une ou plusieurs des mesures suivantes:
• Réorientez ou déplacez l’antenne de réception.
• Augmentez la distance entre l’équipement et le récepteur.
• Branchez l’équipement dans une prise sur un circuit différent de celui auquel le récepteur est connecté.
• Consultez le revendeur ou un technicien radio / TV expérimenté pour obtenir de l’aide.
Le design et les spécifications du produit sont sujettes à modification sans préavis.
Ce produit est conçu et prévu pour être utilisé par des personnes âgées de 14 ans et plus.
©2026 Celestron. Celestron et le Symbol sont des marques déposées de
Celestron, LLC.
Tous droits réservés. • Celestron.com
US: 2835 Columbia Street • Torrance, CA 90503 USA
UK: Unit 2 Transigo, Gables Way, Thatcham RG19 4JZ, Royaume Uni
Ce produit est conçu et prévu pour être utilisé par des personnes âgées de
14 ans et plus.
Fabriqué en Chine • 05-26
celestron.com/pages/warranty
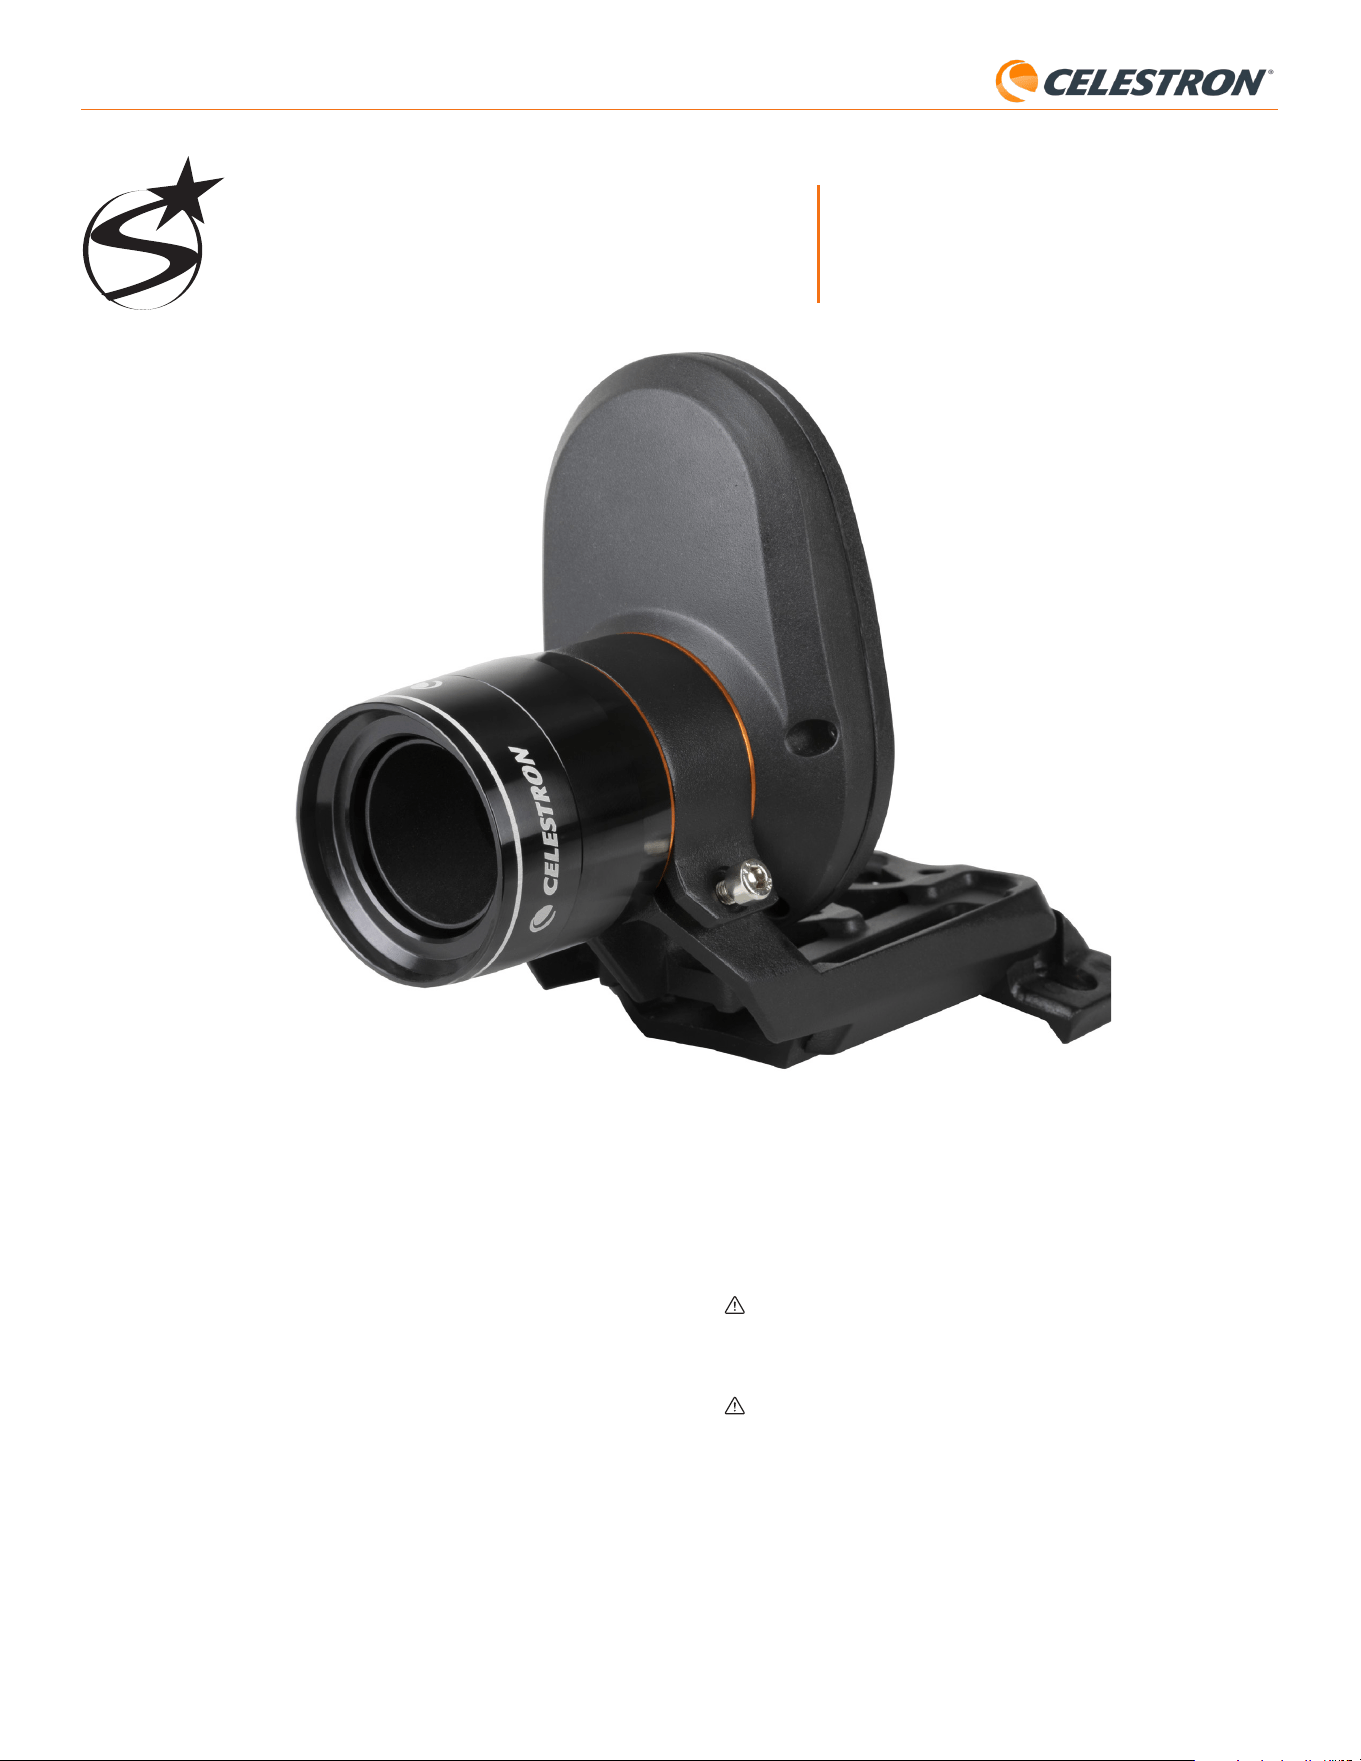
1 | DEUTSCH
StarSense AutoAlign V2
StarSense
®
AutoAlign V2
DEUTSCH # 94034
Mit dem Celestron StarSense AutoAlign Version 2 (SSAA) war die
Nutzung eines Celestron-Teleskops noch nie so einfach. Dieses All-
in-One-Zubehör richtet Ihr Teleskop automatisch aus und bietet noch
vieles mehr! Mit Ihrem neuen StarSense AutoAlign können Sie:
• Ihr äquatoriales oder Azimut-Teleskop in nur wenigen Minuten
automatisch am Nachthimmel ausrichten. Nach der Ausrichtung
findet und zentriert Ihr Teleskop Objekte mit verbesserter
Nachführgenauigkeit.
• Richten Sie Ihre äquatoriale Montierung bei Bedarf schnell und präzise
auf den Pol aus.
Lesen Sie bitte diese Anleitung, bevor Sie Ihren StarSense
AutoAlign einrichten und verwenden. Die aktuellste Version dieser
Bedienungsanleitung finden Sie auf der StarSense AutoAlign V2-
Produktseite unter celestron.com.
BEDIENUNGSANLEITUNG
WARNUNG – Richten Sie den StarSense AutoAlign niemals auf die
Sonne! Dadurch wird der Bildsensor des SSAA beschädigt. Dieser
Schaden ist nicht von Ihrer Garantie abgedeckt. Lassen Sie tagsüber
die Schutzkappe auf dem SSAA.
WARNUNG: STECKEN SIE STARSENSE AUTOALIGN NICHT IN
DEN AUTOGUIDER-ANSCHLUSS IHRER MONTIERUNG! Verbinden
Sie StarSense AutoAlign immer mit einem der AUX-Anschlüsse Ihrer
Montierung. Der Anschluss an den Autoguider-Anschluss kann StarSense
AutoAlign beschädigen.

StarSense AutoAlign V2
INHALTSVERZEICHNIS
1. Teileliste ..........................................................................................................1
2. Aufbau ...........................................................................................................1
3. Steuerung des StarSense AutoAlign ..................................................................................3
4. StarSense AutoAlign-Arbeitsablauf ....................................................................................3
5. Verwendung von SSAA mit NexStar+Handsteuerung ....................................................................3
6. Verwendung von SSAA mit CPWI ....................................................................................8
7. Verwendung von SSAA mit SkyPortal ..................................................................................11
8. Fokussierung ......................................................................................................12
9. Firmware-Update von SSAA und Live-Ansicht über Webschnittstelle .......................................................13
10. Firmware-Update von SSAA über Celestron Firmware Manager (CFM) ....................................................13
11. Technische Daten. .................................................................................................14
12. Fehlerbehebung und Tipps ..........................................................................................14
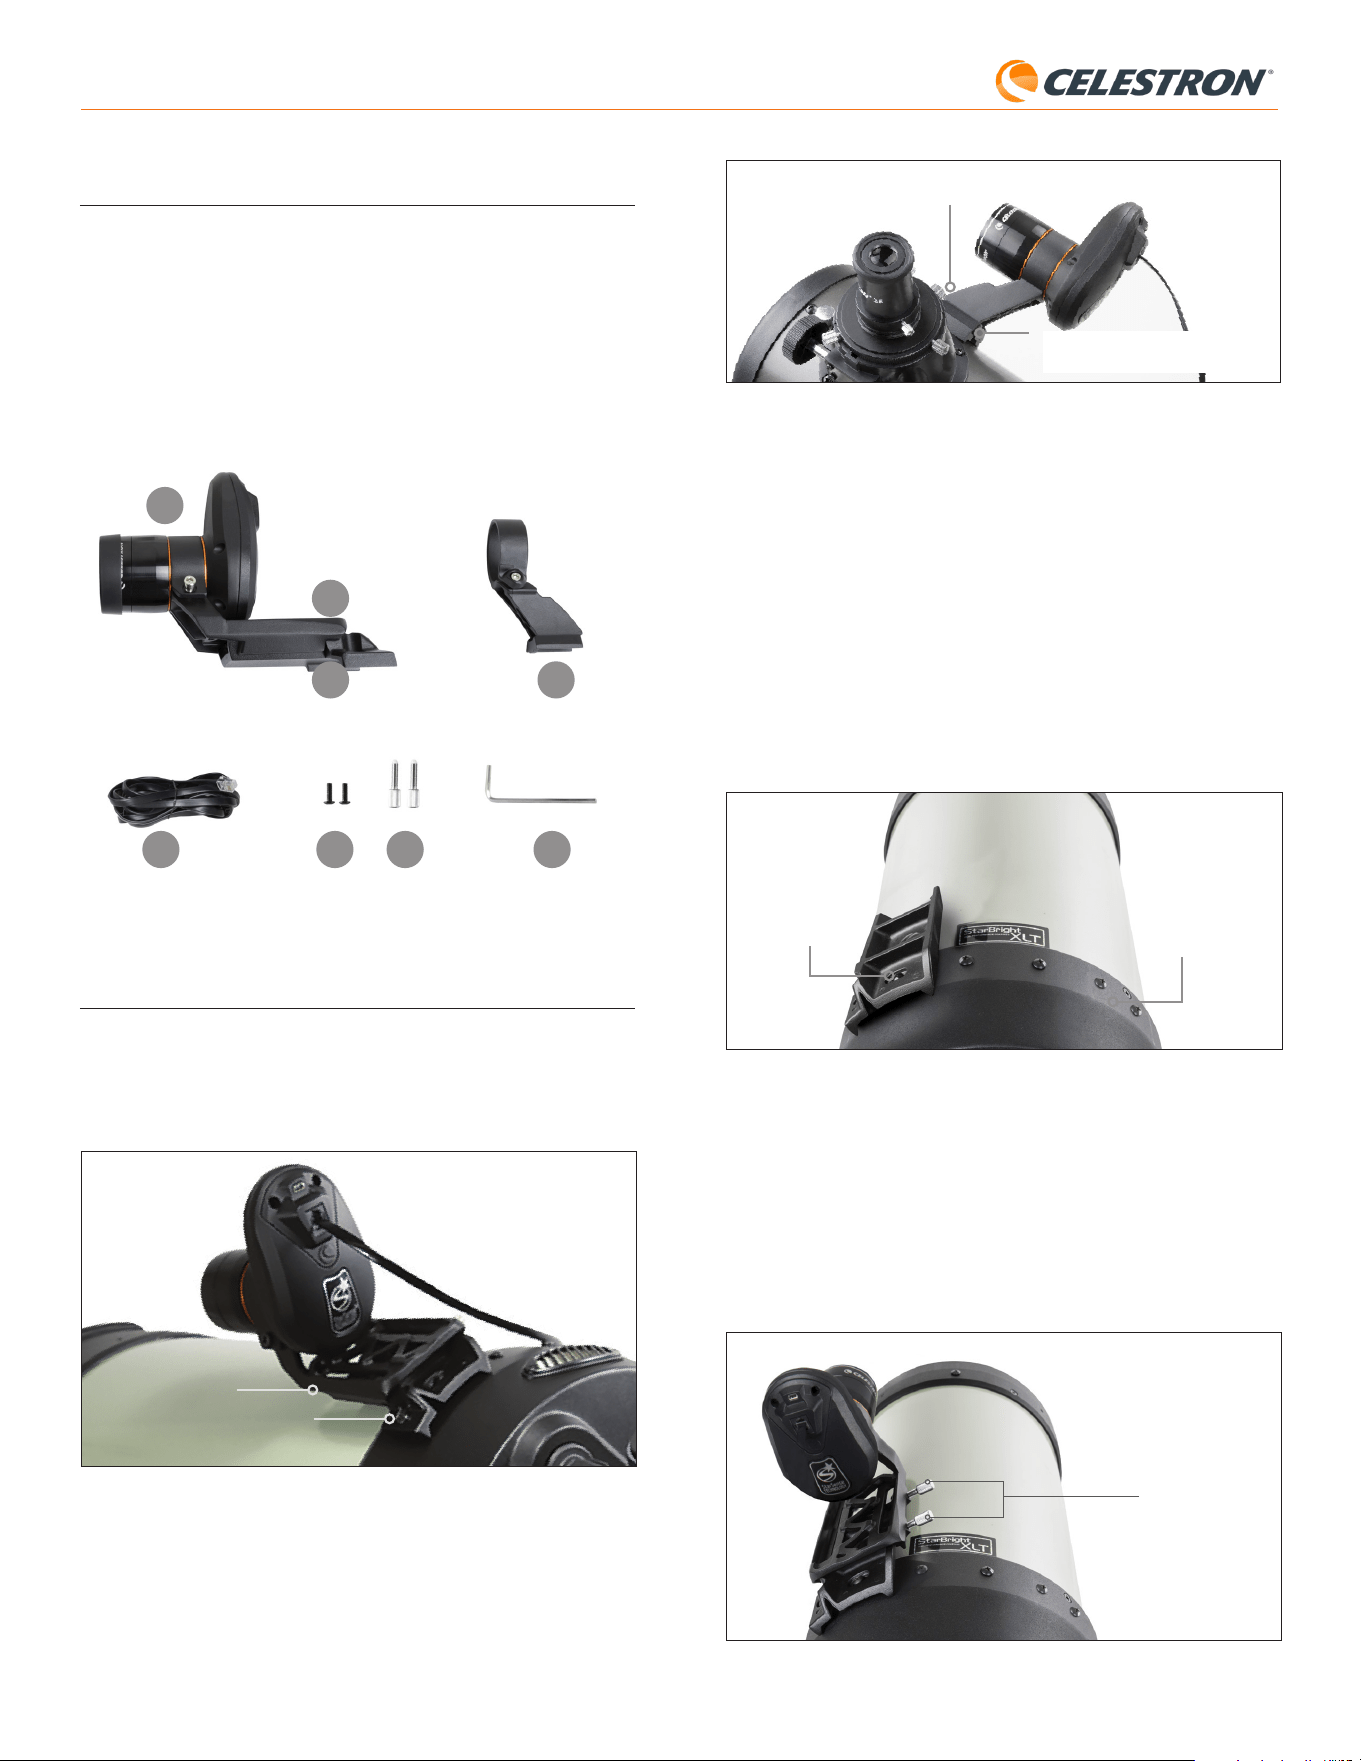
1 | DEUTSCH
StarSense AutoAlign V2
Kleine Halterung
Standard-Schwalbenschwanzschiene
für Sucherfernrohr
Abb. 3: Wenn Ihr Teleskop bereits eine Standard- Sucherfernrohr- Sockel hat,
können Sie die kleine Halterung verwenden, um SSAA an Ihrem Teleskop
zu montieren.
Wenn Sie ein Teleskop mit einer Öffnung von weniger als 5 Zoll
verwenden und Ihr Teleskop keine Standard-Prismenschiene für einen
Sucher besitzt, müssen Sie diese Schiene von einem Drittanbieter
erwerben.
Wenn Sie die vorinstallierte große Halterung zur Befestigung
des SSAA an Ihrem Teleskoptubus verwenden:
1. Verbinden Sie den großen Halterungssockel mit dem Teleskop.
(Hinweis: Einige Teleskope haben diese Basis bereits installiert; es
ist derselbe Sockel, der für das 8x50-Sucherfernrohr verwendet wird,
das bei mehreren Teleskopen im Lieferumfang enthalten ist.) Falls
Sie den Sockel montieren müssen, verwenden Sie die mitgelieferten
Kreuzschlitzschrauben, die sich bereits in der hinteren Fassung des
Teleskops befinden. Normalerweise gibt es an der hinteren Fassung
zwei Befestigungspunkte für den Sockel (Abb. 4).
Basis-
Montageposition 1
Basis-Montageposition 2
Abb. 4: Die große Halterungsbasis kann an den meisten Celestron-Teleskopen an zwei
Stellen mit der Tubus (OTA) verbunden werden.
2. Entfernen Sie die Schrauben, richten Sie die Basis wie abgebildet aus
und richten Sie die Löcher in der Basis mit den Löchern in der hinteren
Fassung aus.
3. Bringen Sie die Schrauben wieder an, damit die Basis sicher
sitzt. Verwenden Sie gegebenenfalls die beiden mitgelieferten
Kreuzschlitzschrauben.
4. Drehen Sie die beiden Rändelschrauben locker in die große Halterung
(Abb. 5).
Rändelschrauben
Abb. 5: Installieren Sie die Rändelschrauben in die große Halterung. Diese sichern die
Halterung an dem Fuß wie gezeigt.
1. Teileliste
A. StarSense AutoAlign mit Schutzkappe
B. Große Halterung (am StarSense AutoAlign vorinstalliert)
C. Großer Halterungssockel
D. Kleine Halterung
E. AUX-Kabel
F. Kreuzschlitzschrauben (2)
G. Rändelschrauben für großen Halterungssockel (2)
H. Innensechskantschlüssel
A
D
B
C
E F G H
Abb. 1
2. Aufbau
StarSense AutoAlign wird über eine der beiden mitgelieferten
Halterungen (d. h. die große Halterung oder die kleine Halterung) am
Tubus befestigt. Verwenden Sie die große Halterung bei Schmidt-
Cassegrain-, EdgeHD- und RASA-Teleskopen mit einer Öffnung von 5“
oder mehr (Abb. 2).
Große Halterung
Großer Halterungssockel
Abb. 2: Die große Halterung und der Sockel verbinden SSAA mit Celestron-Schmidt-
Cassegrain-, EdgeHD- und RASA-Teleskopen ab 5" oder größer
Verwenden Sie die kleine Halterung bei anderen Teleskopen mit einer
Standard-Prismenschiene für einen Sucher (Abb. 3).
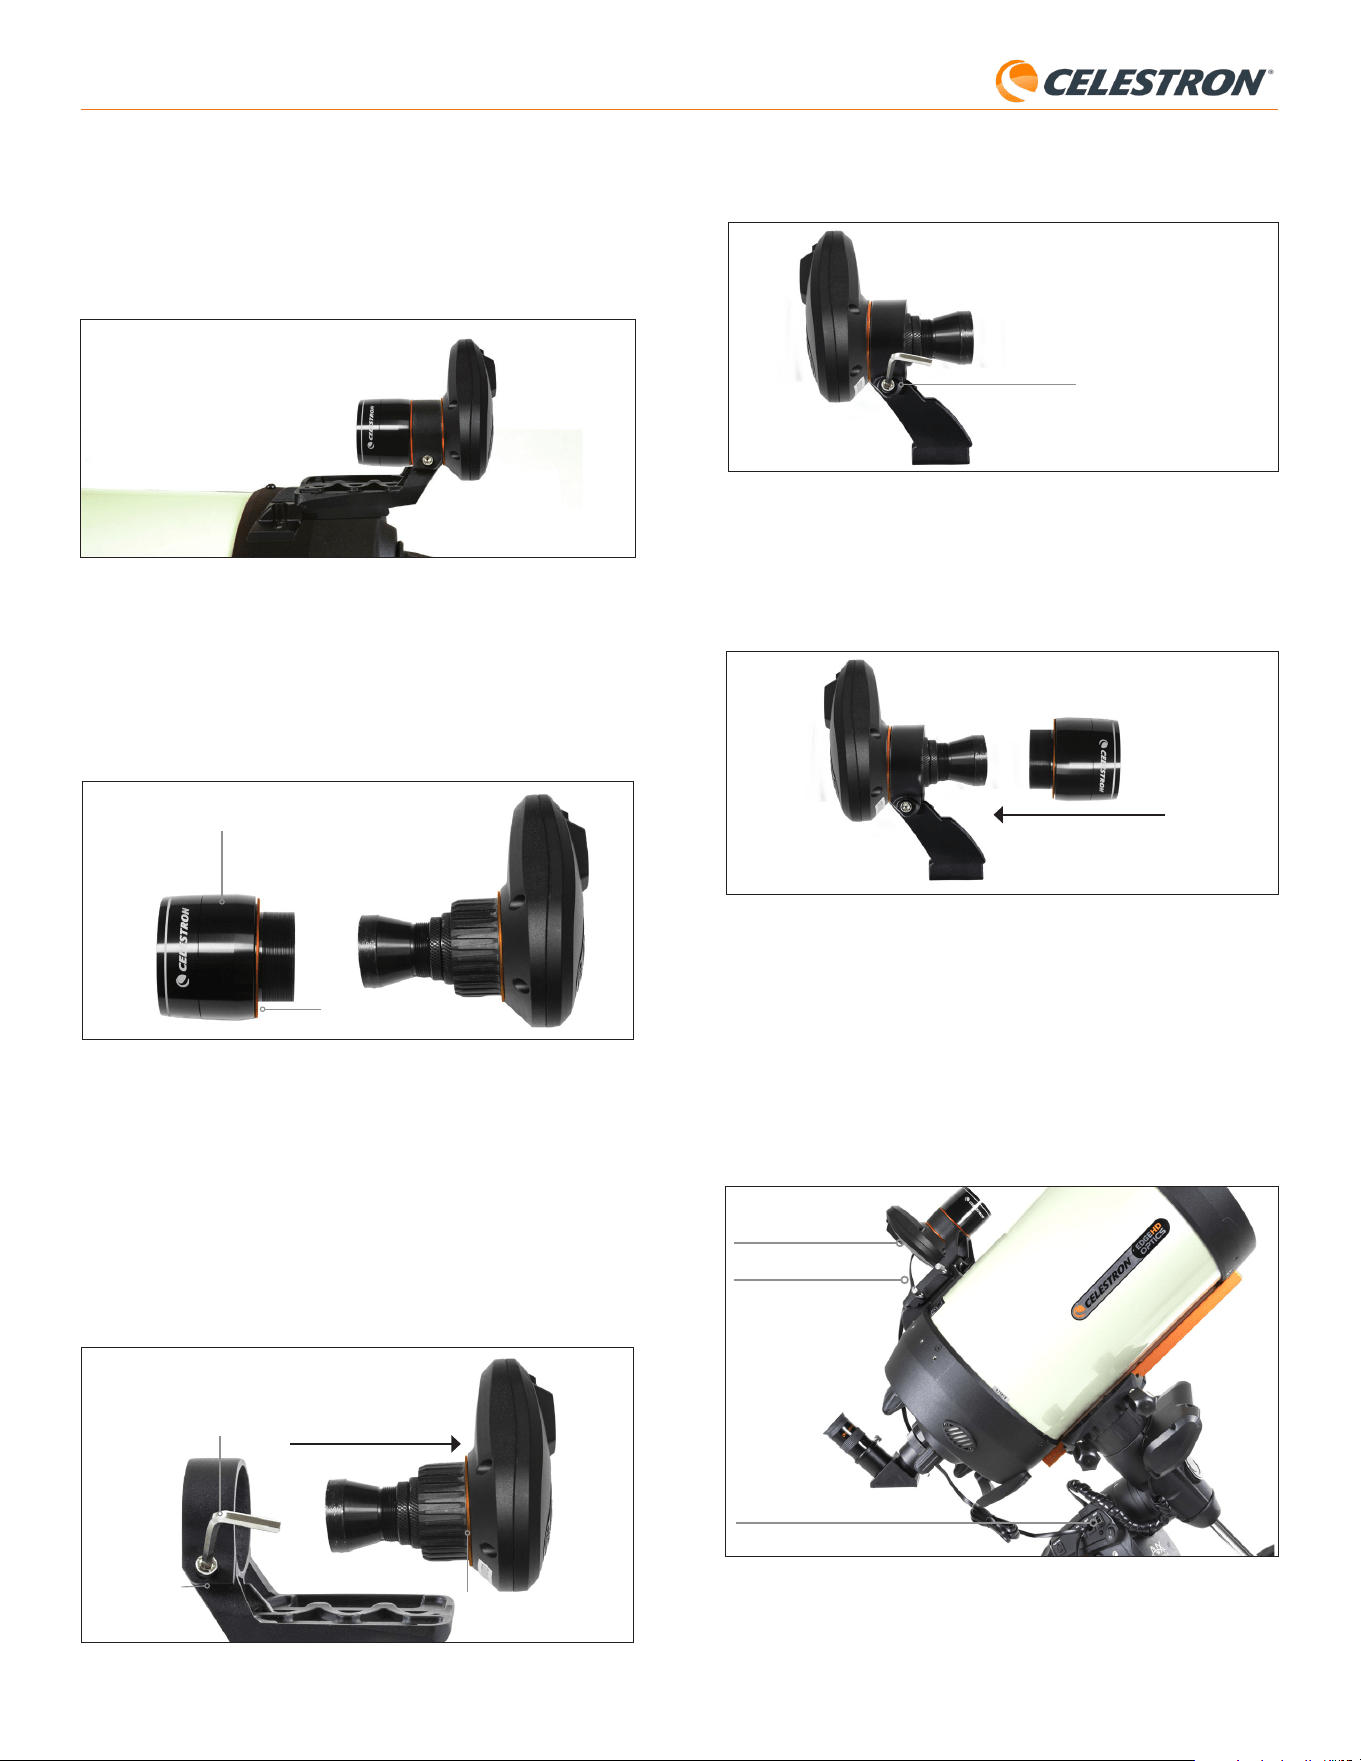
2 | DEUTSCH
StarSense AutoAlign V2
3. Lösen Sie die Senkschraube an der Klemme der kleinen Halterung und
setzen Sie SSAA und den orangefarbenen Ring in die kleine Halterung
ein. Richten Sie die Teile wie abgebildet aus (Abb. 8).
Senkschraube mit
Innensechskantschraube
Abb. 8: Installieren Sie SSAA wie gezeigt in die kleine Halterung, ziehen Sie dann die
Senkschraube mit Innensechskant an der Halterung fest.
4. Ziehen Sie die Senkschraube an der Klemme der kleinen Halterung
wieder fest.
5. Bringen Sie das vordere Gehäuse des SSAA und den vorderen
orangefarbenen Ring wieder an (Abb. 9).
Abb. 9: Bringen Sie das vordere Gehäuse wieder an SSAA an. Vergessen Sie den
orangefarbenen Zierring nicht!
6. Um SSAA in die Standard-Schwalbenschwanzschiene für das
Sucherfernrohr Ihres Teleskops einzusetzen, setzen Sie einfach die
kleine Halterung in die Basis ein und ziehen Sie die Rändelschraube
fest.
Nach der Installation von SSAA müssen Sie den AUX-Anschluss mit einem
der AUX-Anschlüsse Ihrer Teleskopmontierung verbinden. Verwenden Sie
das mitgelieferte AUX-Kabel (Abb. 10). Falls Ihre Montierung keinen freien
AUX-Anschluss hat, können Sie einen optionalen Celestron AUX-Port-
Splitter erwerben.
AUX-Anschluss
(an SSAA)
AUX-Anschluss
(an Montierung)
AUX-Kabel
Abb. 10: Verwenden Sie das mitgelieferte AUX-Kabel, um den AUX-Anschluss von
SSAA mit dem AUX-Anschluss der Montierung zu verbinden.
5. Schieben Sie die Halterung auf die Basis, bis sie vollständig eingerastet ist.
6. Ziehen Sie die Rändelschrauben fest, um die Halterung an der Basis
zu befestigen.
Die optionale 8-Zoll-CGE-Schwalbenschwanzschiene zur Montage von
Zubehör behindert die große Halterung des SSAA. Der CPC 800-Gabelarm
behindert ebenfalls den SSAA. Bei diesen Konfigurationen befestigen Sie
die Basis und die große Halterung wie in Abb. 5agezeigt umgekehrt.
Abb. 5a: Sie müssen den Fuß und die große Halterung bei einem CPC 800-Teleskop
rückwärts installieren.
Wenn Sie die kleine Halterung verwenden, müssen Sie SSAA zuerst
von der großen Halterung entfernen. So montieren Sie SSAA mit der
kleinen Halterung:
1. Schrauben Sie das vordere Gehäuse von SSAA vollständig ab und
entfernen Sie es. Dadurch wird der optische Tubus von SSAA freigelegt
(Abb. 6). Entfernen Sie außerdem den orangefarbenen Zierring an der
Vorderseite.
Orangefarbener Zierring
Abb. 6: Zum Wechseln der Halterungen die gesamte Vorderseite des SSAA-Gehäuses
inklusive des orangefarbenen Rings vollständig abschrauben und entfernen.
Vorderseite des
SSAA-Gehäuses
HINWEIS: Beim Entfernen des vorderen Gehäuses zur Montage der
kleinen Halterung kann die werkseitige Fokussierung des SSAA
versehentlich verändert werden. Beachten Sie dies bei der späteren
Verwendung des SSAA. Falls das Gerät nicht ordnungsgemäß funktioniert
und Fehlermeldungen wie „Keine Sterne!“ angezeigt werden, muss
möglicherweise neu fokussiert werden. Informationen dazu finden Sie im
Abschnitt „Fokussieren“ weiter unten in dieser Bedienungsanleitung.
2. Lösen Sie mit dem Innensechskantschlüssel die Senkschraube,
die die Klemmkraft der Halterung gewährleistet. Ziehen
Sie anschließend SSAA aus der Halterung heraus
(Abb. 7). Dadurch wird auch der orangefarbene Zierring entfernt.
Senkschraube
mit Innensechs-
kantschraube
Orangefarbener Zierring
hinten
Innensechskantschlüssel
Abb. 7: Lösen Sie die Innensechskantschraube. Entfernen Sie SSAA aus der großen
Montierung, einschließlich des hinteren orangefarbenen Rings.
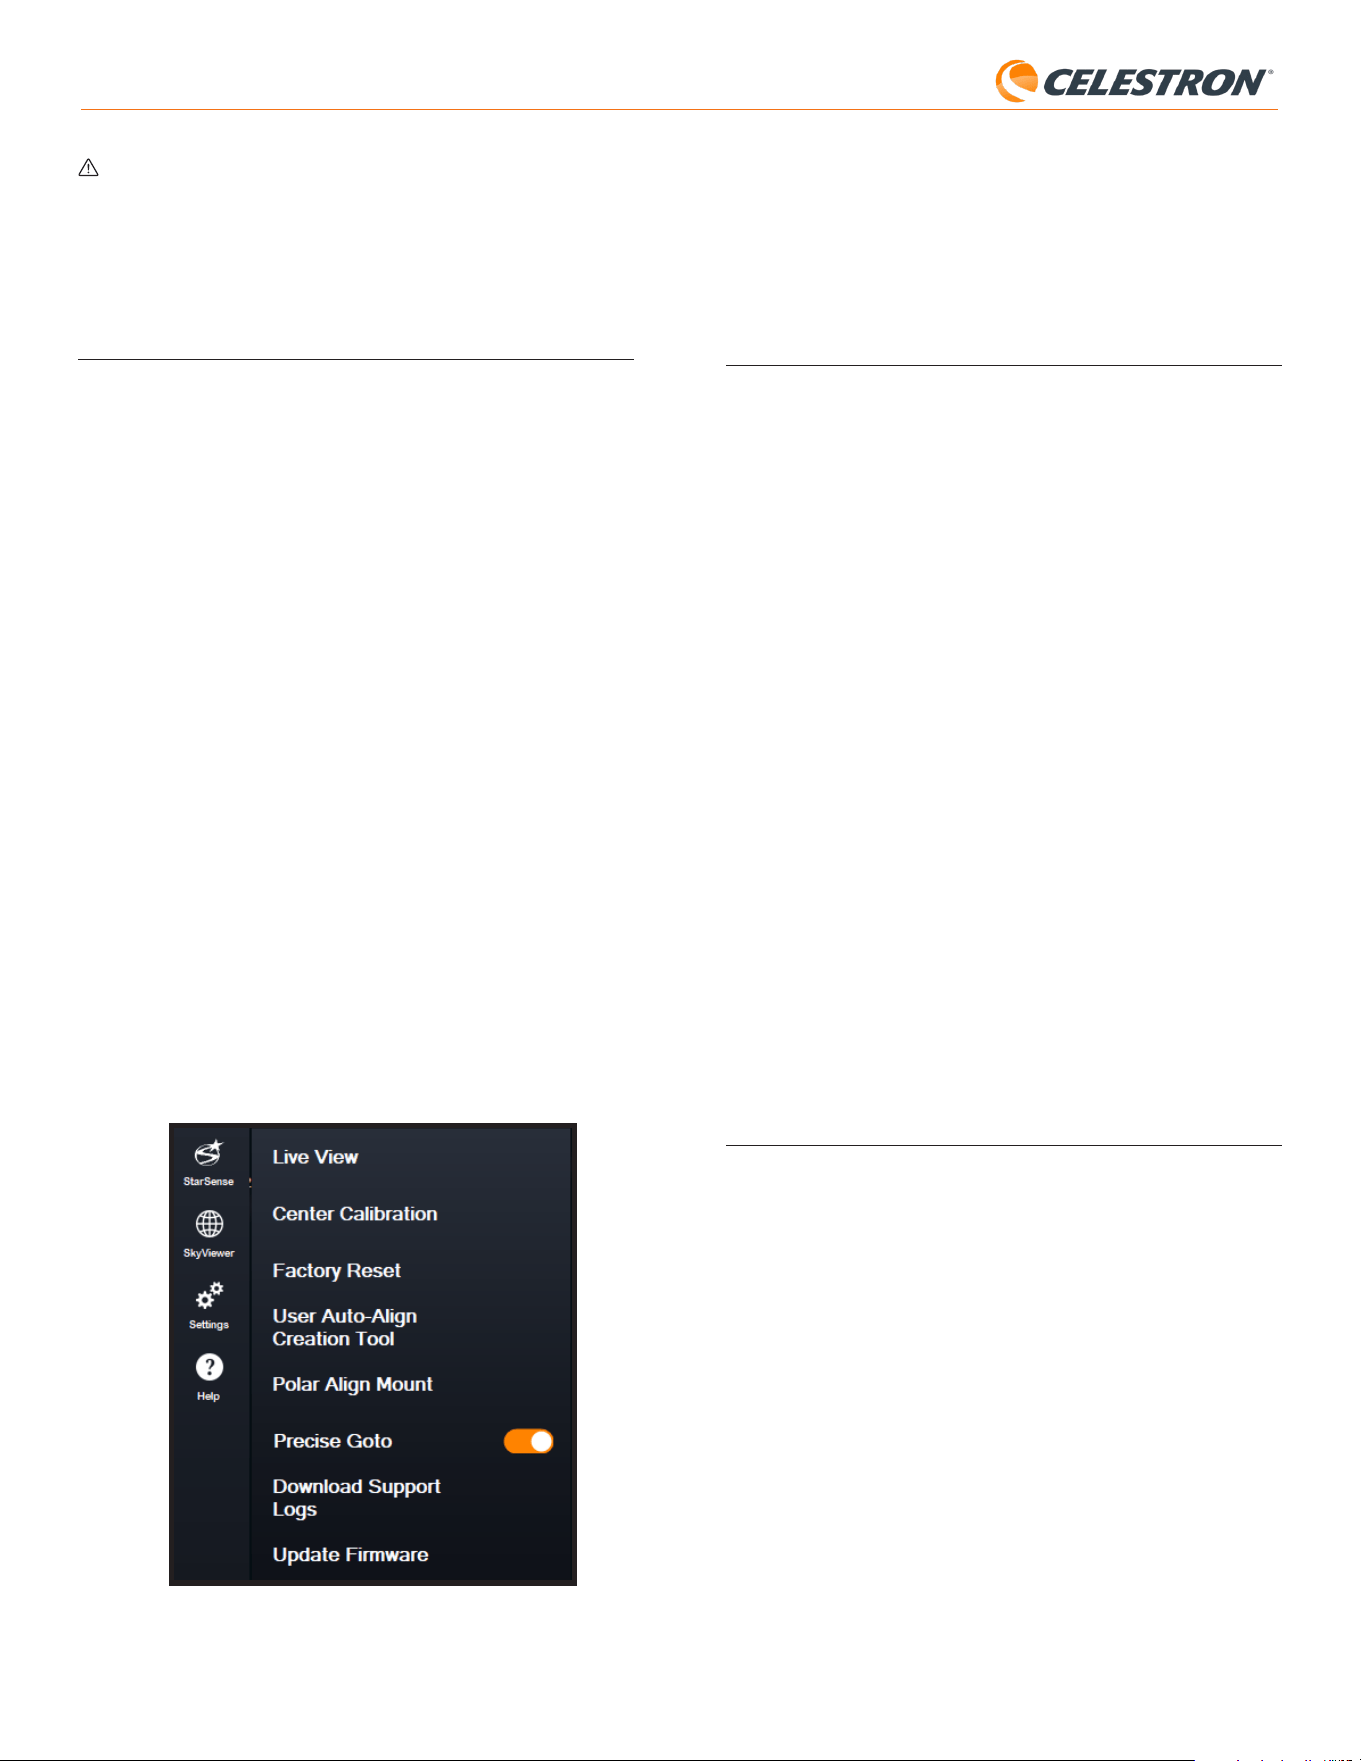
3 | DEUTSCH
StarSense AutoAlign V2
SkyPortal-App für iOS und Android
Wenn Sie das Celestron SkyPortal WLAN-Modul verwenden oder eine
Celestron-Montierung mit integriertem WLAN besitzen (z. B. NexStar
Evolution), können Sie Ihre SSAA mit der SkyPortal-App steuern. Sie
benötigen ein Smartphone mit der aktuellsten Version der SkyPortal-App,
die kostenlos im Apple App Store oder bei Google Play erhältlich ist.
4. StarSense AutoAlign-Arbeitsablauf
Bevor wir uns mit der Schritt-für-Schritt-Anleitung befassen, hier ein kurzer
Überblick über die typische Verwendung von StarSense AutoAlign. Die
Einrichtung erfolgt in folgender Reihenfolge:
A. Polausrichtung – Wenn Sie eine äquatoriale Montierung oder eine
azimutale Montierung auf einer Äquatorialkeil verwenden, beginnen Sie
mit der Polausrichtung mithilfe von StarSense AutoAlign. Dieser Schritt
richtet Ihre Montierung an die Erdrotationsachse aus.
Wenn Sie eine Standard-Azimutale-Montierung verwenden, überspringen
Sie diesen Schritt.
B. Himmelsausrichtung – Führen Sie als Nächstes eine
Himmelsausrichtung durch. Dadurch kann die Montierung ihre
Ausrichtung am Nachthimmel bestimmen. Es stehen verschiedene
Ausrichtungsoptionen zur Verfügung, wobei die automatische
Ausrichtung in den meisten Fällen die bevorzugte und am häufigsten
verwendete Methode ist.
C. Zentrier-Kalibrierung – Die Kollimation richtet das Sichtfeld der
StarSense-Kamera am Sichtfeld des Teleskops aus. Dies muss
nur einmal durchgeführt werden, solange StarSense AutoAlign an
derselben Position montiert bleibt. Der Kalibrierabweichungen wird im
Gerätespeicher gespeichert.
Wenn Sie StarSense AutoAlign deinstallieren und neu installieren,
empfehlen wir, die Kollimation erneut durchzuführen. Nach Abschluss der
Zentrier-Kalibrierung müssen Sie die Himmelsausrichtung wiederholen.
In den nächsten drei Kapiteln wird die Durchführung dieser Funktionen
mit der NexStar+-Handsteuerung (Kapitel 5, Seite 3), der CPWI-PC-
Software (Kapitel 6, Seite 7) oder der SkyPortal-App (Kapitel 7, Seite 10)
erläutert. Sie müssen sich nur auf das Kapitel beziehen, das der von Ihnen
verwendeten Steuerungsmethode entspricht.
5. Verwendung von SSAA mit der
NexStar+ Handsteuerung
Die NexStar+ Handsteuerung ist eine der einfachsten Möglichkeiten,
Ihr StarSense AutoAlign zu bedienen. Es ist kein Computer erforderlich
und ermöglicht die Steuerung Ihres Teleskops wie gewohnt, inklusive der
erweiterten Ausrichtungsfunktionen von StarSense.
Wählen Sie den Abschnitt, der zu Ihrer Konfiguration passt:
- Abschnitt A – Celestron Altazimut-Montierung (AZ)
- Abschnitt B – Celestron Äquatorial-Montierung (EQ)
- Abschnitt C – Celestron AZ-Montierung mit optionaler Äquatorialkeil
Beachten Sie bitte nur den Abschnitt, der Ihrer Montierungskonfiguration
entspricht.
A. Verwendung von SSAA mit einer
Azimut (AZ)-Montierung
Azimut-Montierungen können nicht polar ausgerichtet werden. Dieser
Abschnitt führt Sie durch die Himmelsausrichtung mit StarSense AutoAlign.
1. Vergewissern Sie sich, dass das Stativ annähernd waagerecht steht.
Wenn Ihre Montierung eine eingebaute Wasserwaage hat, verwenden
Sie diese als Referenz.
2. Richten Sie den Teleskoptubus manuell horizontal zum nördlichen
Horizont aus. (Wenn Sie sich auf der Südhalbkugel befinden, richten
WARNUNG: STECKEN SIE StarSense AutoAlign NICHT IN DEN
AUTOGUIDER-ANSCHLUSS IHRER MONTIERUNG! Verbinden Sie
StarSense AutoAlign immer mit einem der AUX-Anschlüsse Ihrer
Montierung. Der Anschluss an den Autoguider-Anschluss kann
StarSense AutoAlign beschädigen.
3. Steuerung des StarSense AutoAlign
Es gibt mehrere Möglichkeiten, Ihren StarSense AutoAlign zu steuern:
NexStar+ Handsteuerung
Um SSAA mit der NexStar+-Handsteuerung zu verwenden, die mit
Ihrer Celestron-Montierung geliefert wurde, müssen Sie wahrscheinlich
die Firmware der Handsteuerung aktualisieren. Sie benötigen
Firmware-Version 5.35.5340 oder höher. Um Ihre Firmware-Version
zu überprüfen, drücken Sie die MENU-Taste. Navigieren Sie mit den
Tasten SCROLL und ENTER zu Utilities > Version. Verwenden Sie die
Celestron Firmware Manager (CFM)-Software, um die Firmware bei
Bedarf zu aktualisieren. Die neueste Version von CFM finden Sie hier:
celestron.com/pages/drivers-and-software
Sie benötigen ein USB-Kabel (Typ-A auf Mini-B), um die Handsteuerung
mit Ihrem PC zu verbinden. Weitere Informationen finden Sie in Abschnitt
9 dieser Bedienungsanleitung (Seite 13).
CPWI Teleskopsteuerungssoftware für PC
Sie können Ihr Teleskop und StarSense AutoAlign mit unserer
kostenlosen Celestron CPWI-Software steuern. Um die neueste Version
herunterzuladen, besuchen Sie: https://www.celestron.com/pages/
celestron-pwi-telescope-control-software
Sie benötigen CPWI Version 2.5.9 oder höher. Installieren Sie die
Software und öffnen Sie CPWI. Wählen Sie „Start“, falls das Startfenster
erscheint. Klicken Sie anschließend auf das Verbindungssymbol in der
oberen linken Ecke des Bildschirms. Wenn Sie eine kabelgebundene
Verbindung zu Ihrer Celestron-Montierung verwenden (d. h. über die
Handsteuerung oder die Montierung selbst), wählen Sie „USB“. Wenn
Sie über WLAN mit dem SkyPortal WiFi-Modul oder dem internen WLAN
Ihrer Montierung (z. B. NexStar Evolution) verbunden sind, wählen Sie
„WLAN.” CPWI sollte StarSense AutoAlign finden und verbinden. Nach
der Verbindung erscheint das SSAA-Symbol im Auswahlmenü auf der
linken Seite des Bildschirms. Wählen Sie das Symbol aus, um das
StarSense-Menü anzuzeigen (Abb. 11).
Abb. 11: Wenn Sie Ihre Celestron-Montierung mit Ihrem PC verbinden und CPWI
starten, sollten Sie das StarSense-Menü unter den Symbolen auf der linken
Seite des Bildschirms sehen.
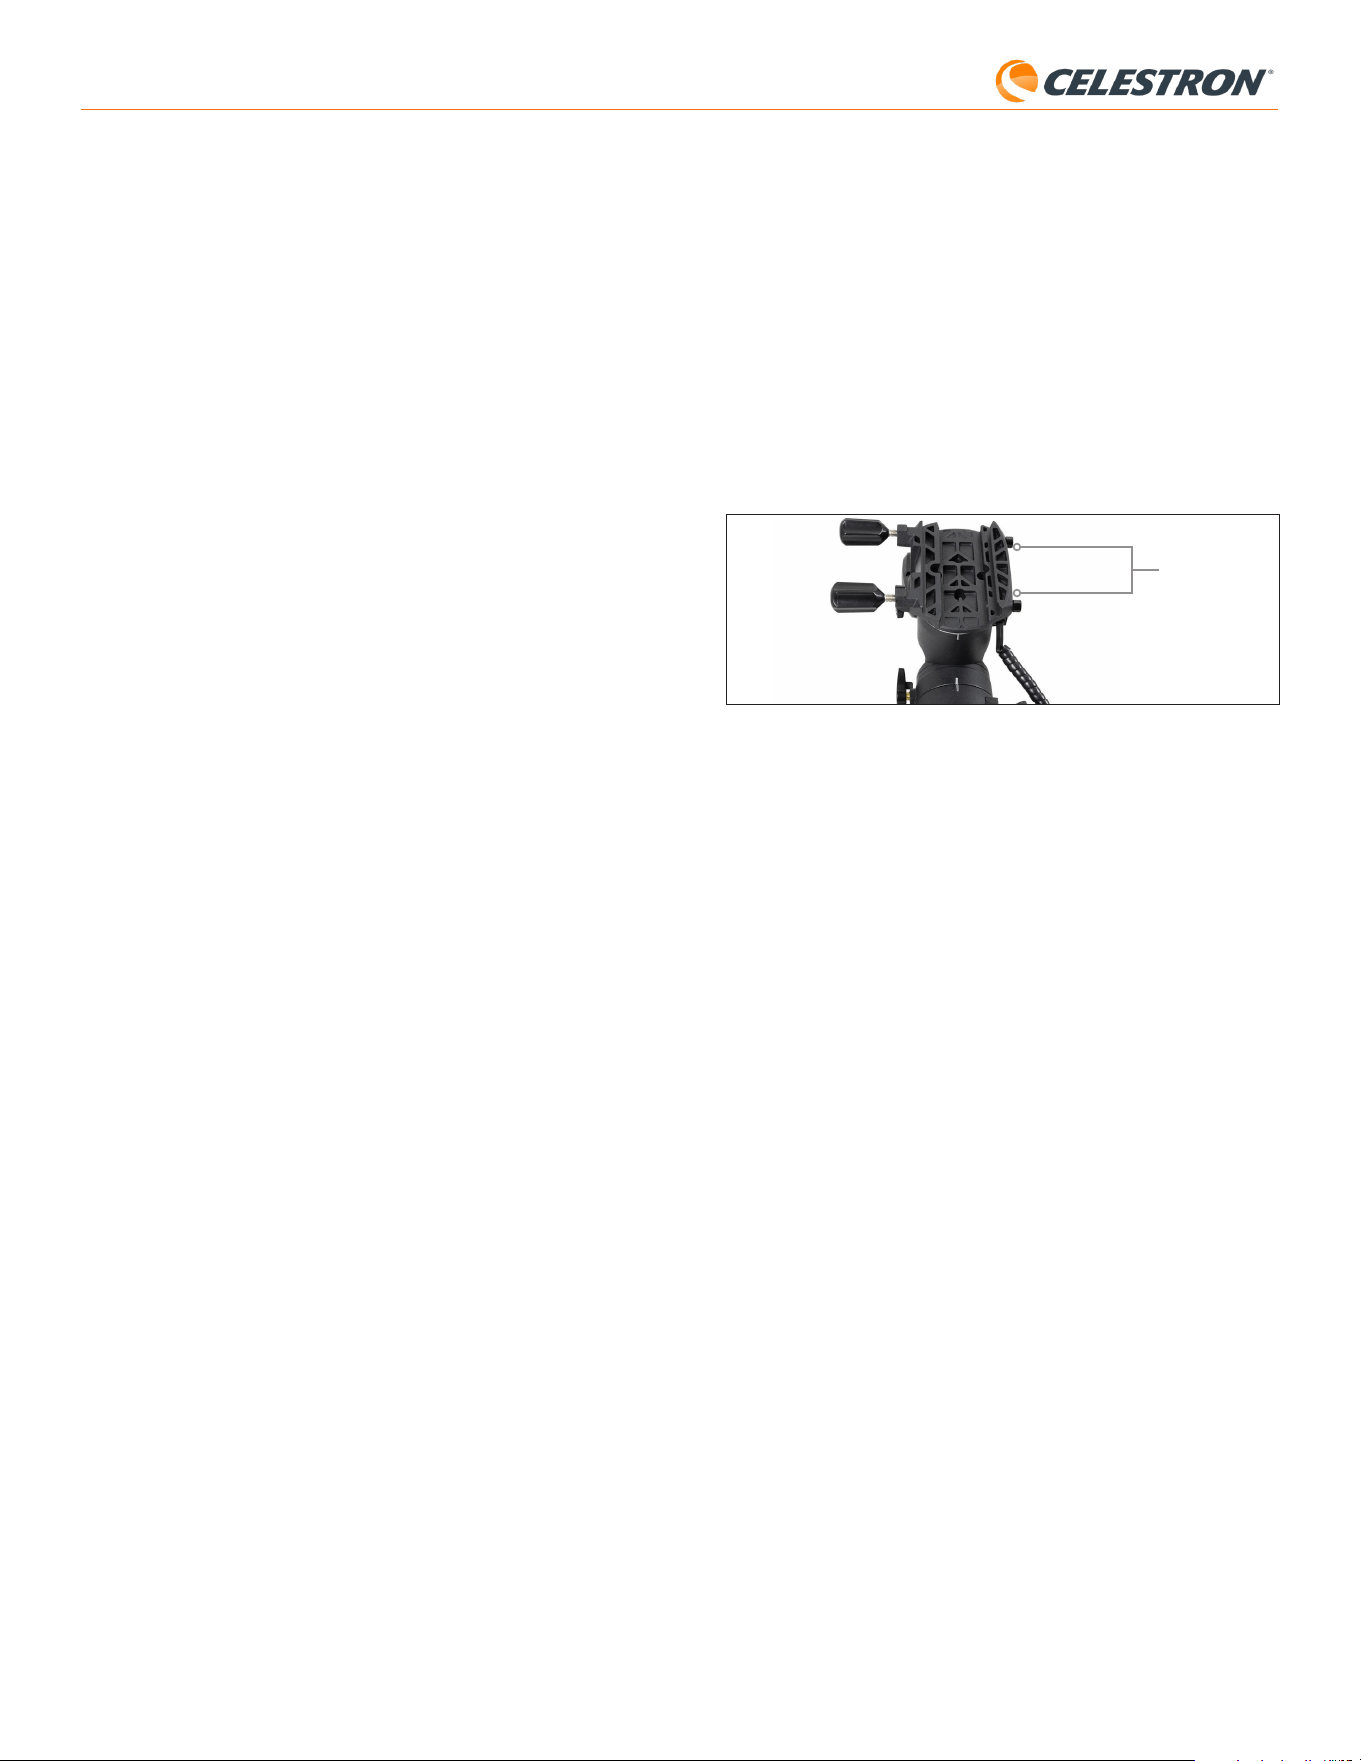
4 | DEUTSCH
StarSense AutoAlign V2
Da Sie nun grob polar ausgerichtet sind, können Sie mit dem
Ausrichtungsprozess beginnen:
5. Schalten Sie die Montierung ein.
6. Drücken Sie ENTER.
7. a. Bei äquatorialen Montierungen mit Nullstellungsschaltern, wie z. B. der
CGX oder CGX-L, werden Sie von der Handsteuerung aufgefordert,
die Montierung in die Nullstellung zu bewegen. Drücken Sie ENTER.
b. Bei äquatorialen Montierungen ohne Referenzpositionsschalter, wie z.
B. der Advanced VX-Montierung, werden Sie von der Handsteuerung
aufgefordert, die Montierung manuell zu den Indexmarkierungen zu
bewegen (Abb. 11B). Sie können die manuellen Schwenktasten der
Handsteuerung verwenden, um die Montierung zu bewegen, oder die
RA- und DEC-Kupplungen lösen und die Achsen von Hand drehen.
Sobald die Indexmarkierungen ausgerichtet sind, ziehen Sie die
Kupplungen wieder fest und drücken Sie ENTER.
Indexmarken
Abb. 11B Die Indexmarkierungen der Advanced VX-Montierung.
8. Sie werden gefragt, ob Sie eine Polausrichtung durchführen möchten.
Wir empfehlen, die Polausrichtung jetzt abzuschließen. Wenn
Sie sie überspringen und später durchführen, müssen Sie die
Himmelsausrichtung wiederholen.
– Um die Polausrichtung jetzt durchzuführen, drücken Sie auf
AUSRICHTEN.
– Um die Polausrichtung zu überspringen, drücken Sie ENTER, um mit
der Himmelsausrichtung fortzufahren.
9. Folgen Sie den Anweisungen auf dem Bildschirm, um Ihren Standort,
die Ortszeit und das Datum einzugeben.
- Sie können die Städtedatenbank verwenden, um Ihren Standort
festzulegen. Machen Sie sich keine Sorgen, wenn Ihr genauer Standort
nicht in der Datenbank ist. Wählen Sie einfach die nächstgelegene
Stadt.
10. Wenn Sie die Polausrichtung ausgewählt haben, fahren Sie mit Schritt
11 fort.
Wenn Sie die Polausrichtung übersprungen haben, fahren Sie mit
Schritte 21 fort.
11. Die Handsteuerung fordert Sie auf, das Teleskop auf einen freien
Himmelsbereich auszurichten. Verwenden Sie die Richtungstasten
der Handsteuerung, um auf eine klare Position zu zeigen. Drücken Sie
ENTER.
• Das Teleskop schwenkt während der Polausrichtung etwa 50° von
West nach Ost. (Auf der Südhalbkugel schwenkt das Teleskop etwa
50° von Ost nach West.) Wählen Sie für die Ausrichtung einen freien
Bereich ohne Hindernisse.
12. Das Teleskop schwenkt von West nach Ost, um die Polausrichtung zu
ermitteln. (Auf der Südhalbkugel schwenkt das Teleskop von Ost nach
West.) Dies dauert einige Minuten.
13. Sobald das Teleskop die Schwenkbewegung beendet hat, erscheint
auf der Handsteuerung „AZM einstellen“. Drücken Sie ENTER. Das
LCD-Display zeigt nun die Fehler der AZM- und ALT-Polausrichtung
an.
14. Falls Ihre Montierung über einen Azimut-Feststellknopf oder
Feststellschrauben verfügt, lösen Sie diese vor der Azimuteinstellung.
15. Verwenden Sie die Feineinstellknöpfe der Montierung, um die
Azimutposition (links/rechts) der Montierung langsam anzupassen.
Während dieser Anpassungen kann sich der Azimutfehler (AZM)
vergrößern oder verkleinern. Passen Sie die Position so lange an, bis
der Azimutfehler unter zwei Bogenminuten liegt. Drücken Sie ENTER.
Sie ihn zum südlichen Horizont aus.)
3. Schalten Sie die Montierung ein.
4. Drücken Sie ENTER.
5. Wählen Sie eine Ausrichtungsmethode. Wählen Sie mit den Pfeiltasten
„Aufwärts“ und „Abwärts“ die Option „Automatische Ausrichtung“.
Drücken Sie ENTER.
- Die weiteren Optionen zur Himmelsausrichtung werden in Abschnitt E
dieses Kapitels (Seite 6) beschrieben.
6. Folgen Sie den Anweisungen auf dem Bildschirm, um Ihren Standort,
die Ortszeit und das Datum einzugeben.
- Sie können die Städtedatenbank verwenden, um Ihren Standort
festzulegen. Machen Sie sich keine Sorgen, wenn Ihr genauer Standort
nicht in der Datenbank ist. Wählen Sie einfach die nächstgelegene
Stadt.
7. Die Montierung schwenkt zu einer Position, an der SSAA den ersten
Ausrichtungspunkt erhält. Sobald die Montierung stoppt, nimmt SSAA
ein Bild des Himmels auf und bestimmt seine Position.
HINWEIS: Wenn das Teleskop automatisch zu einem Bereich des
Himmels schwenkt, der lokal durch Hindernisse (Gebäude, Bäume
usw.) verdeckt ist, schlägt es fehl und schwenkt automatisch zu einem
anderen Punkt, um es erneut zu versuchen.
8. Die Montierung schwenkt zu einer anderen Position, um den zweiten
Ausrichtungspunkt zu erhalten.
9. Der automatische Ausrichtungsprozess ist nun abgeschlossen. Auf
dem LCD-Bildschirm des NexStar+ wird „Ausrichtung erfolgreich!“
angezeigt.
Ihre Montierung ist nun am Nachthimmel ausgerichtet. Bevor SSAA
Objekte präzise im Sichtfeld des Teleskops positionieren kann, muss
es die Abweichung zwischen seinem eigenen Sichtfeld und dem des
Teleskops in einem Vorgang namens „Zentrierkalibrierung“ bestimmen.
Wenn Sie SSAA und Ihr Teleskop noch nie zentriert kalibriert haben,
fordert Sie die Handsteuerung auf, dies sofort nach der ersten
Himmelsausrichtung zu tun. Anweisungen zur Kollimation finden Sie in
Abschnitt D. Wenn Sie zuvor eine Kollimation durchgeführt haben, ist das
Teleskop nun bereit, Objekte in die Nähe der Mitte des Bildfelds zu finden
und zu positionieren.
B. Verwendung von SSAA mit einer
Äquatorial (EQ)-Montierung
Bevor Sie die Montierung einschalten, führen Sie eine grobe
Polausrichtung durch. Anschließend können Sie die Ausrichtung mithilfe
der Feineinstellknöpfe für Höhe und Azimut der Montierung feiner justieren.
HINWEIS: Diese Anleitung erklärt die grobe Polausrichtung auf der
Nordhalbkugel. Auf der Südhalbkugel richten Sie die Montierung nach
Süden statt nach Norden aus.
So richten Sie die Montierung grob aus:
1. Vergewissern Sie sich, dass das Stativ annähernd
waagerecht steht. Wenn Ihre Montierung eine eingebaute
Wasserwaage hat, verwenden Sie diese als Referenz.
2. Passen Sie die Höhe der Montierung so an, dass die Breitengradskala
der Montierung ungefähr dem Breitengrad Ihres Beobachtungsortes
entspricht.
3. Heben und drehen Sie das gesamte Stativ und die Montierung, sodass
die Rektaszensionsachse (RA) ungefähr nach Norden zeigt. Die
Position der Montierung muss nicht exakt sein. Richten Sie sie innerhalb
von etwa 5° nach Norden aus, sodass sie sich im Bereich der Azimut-
Feinjustierung befindet. Verwenden Sie eine kostenlose Kompass-App
für Ihr Smartphone, falls Sie Hilfe beim Finden von Norden benötigen.
4. Falls Sie die Höhen- oder Azimut-Einstellknöpfe während der groben
Polausrichtung gelockert haben, stellen Sie sicher, dass diese vor dem
Weitermachen wieder fest angezogen sind.

5 | DEUTSCH
StarSense AutoAlign V2
HINWEIS: Diese Anleitung erklärt die grobe Polausrichtung auf der
Nordhalbkugel. Auf der Südhalbkugel richten Sie die Montierung nach
Süden statt nach Norden aus.
Zur groben Polausrichtung:
1. Vergewissern Sie sich, dass das Stativ annähernd
waagerecht steht. Wenn Ihr Äquatorialkeil eine eingebaute
Wasserwaage hat, verwenden Sie diese als Referenz.
2. Stellen Sie die Höhe des Äquatorialkeils so, dass die Breitengradskala
des Äquatorialkeils ungefähr dem Breitengrad Ihres Beobachtungsortes
entspricht.
3. Heben und drehen Sie das gesamte Stativ mit Montierung, sodass der
Gabelarm ungefähr nach Norden zeigt. Die Position der Montierung
muss nicht exakt sein. Richten Sie die Montierung innerhalb von etwa 5°
nach Norden aus, sodass sie sich im Bereich der Feineinstellknöpfe der
Polhöhenwiege befindet. Verwenden Sie eine kostenlose Kompass-App
für Ihr Smartphone, falls Sie Hilfe beim Finden von Norden benötigen.
4. Falls Sie die Höhen- oder Azimut-Einstellknöpfe während der groben
Polausrichtung gelockert haben, stellen Sie sicher, dass diese vor dem
Weitermachen wieder fest angezogen sind.
Nachdem Sie die Polhöhenwiege grob eingestellt haben, können Sie mit
der Ausrichtung beginnen.
5. Schalten Sie die Montierung ein.
6. Drücken Sie ENTER.
7. Verwenden Sie die Scrolltasten (Aufwärts/Abwärts), um „EQ
Nordausrichtung“ auszuwählen. Drücken Sie ENTER. (Wählen Sie „EQ
Südausrichtung“, wenn Sie sich auf der Südhalbkugel befinden.)
8. Folgen Sie den Anweisungen auf dem Bildschirm, um Ihren Standort,
die Ortszeit und das Datum einzugeben.
- Sie können die Städtedatenbank verwenden, um Ihren Standort
festzulegen. Machen Sie sich keine Sorgen, wenn Ihr genauer
Standort nicht in der Datenbank ist. Wählen Sie einfach die
nächstgelegene Stadt.
9. Das LCD-Display zeigt nun „Set Alt To Index“ an. Positionieren Sie die
Montierung wie in Abbildung 12 gezeigt. Sie können das Teleskop
entweder manuell mit der Handsteuerung schwenken oder, falls
Ihre Montierung über Achsenkupplungen verfügt (wie die Evolution-
Montierung), diese lösen und die Positionierung manuell durchführen.
10. Sie werden gefragt, ob Sie eine Polausrichtung durchführen möchten.
Wir empfehlen, die Polausrichtung jetzt abzuschließen. Wenn
Sie sie überspringen und später durchführen, müssen Sie die
Himmelsausrichtung wiederholen.
– Um die Polausrichtung jetzt durchzuführen, drücken Sie auf
AUSRICHTEN.
– Um die Polausrichtung zu überspringen, drücken Sie ENTER, um mit
der Himmelsausrichtung fortzufahren.
Ab diesem Punkt verläuft die Ausrichtung genauso wie bei äquatorialen
Montierungen.
Wenn Sie die Polausrichtung gewählt haben, fahren Sie mit Abschnitt B
ab Schritt 11 fort.
Wenn Sie die Polausrichtung überspringen möchten, fahren Sie mit
Abschnitt B ab Schritt 21 fort.
• Verstellen Sie nicht die Höhe der Montierung! Die Höhenanpassung
erfolgt im nächsten Schritt.
• Nehmen Sie die Anpassungen langsam vor, damit SSAA sie
erfassen kann. Wenn Sie zu schnell anpassen und SSAA die
Erfassung verliert, müssen Sie möglicherweise den gesamten
Polausrichtungsprozess neu starten.
16. Die Handsteuerung zeigt nun „Höhe anpassen“ an. Drücken Sie
ENTER.
17. Wenn Ihre Montierung über Feststellknöpfe für die Höhenachse verfügt,
lösen Sie diese, bevor Sie die Höhe einstellen.
18. Stellen Sie die Höhe (Auf- und Abwärtsbewegung) der Montierung
mithilfe der Feineinstellknöpfe langsam ein. Während dieser
Einstellungen wird der ALT-Fehler zunehmen oder abnehmen. Fahren
Sie mit der Einstellung fort, bis der ALT-Fehler unter zwei Bogenminuten
liegt. Drücken Sie ENTER.
• Stellen Sie den Azimut der Montierung nicht ein.
19. Die Handsteuerung fragt nun: „AZM-Feinjustierung?“
a. Wenn Sie weitere Azimutkorrekturen vornehmen möchten, wählen
Sie mit den Scrolltasten „Ja“ aus und drücken Sie ENTER. Stellen
Sie die Feineinstellungsknöpfe für Azimut so ein, bis der Fehler
weniger als zwei Bogenminuten beträgt und drücken ENTER.
b. Wenn Sie keine weiteren Einstellungen vornehmen möchten,
wählen Sie mit den Scrolltasten „Nein“ aus und drücken ENTER.
20. Herzlichen Glückwunsch! Sie haben Ihre Montierung erfolgreich
polar ausgerichtet. Falls Ihre Montierung über Feststellknöpfe oder
-schrauben für Höhe oder Azimut verfügt, ziehen Sie diese fest an.
HINWEIS: Wir empfehlen, die Polausrichtung nicht genauer als um zwei
Bogenminuten pro Achse anzupassen. Dies ist schwierig und bringt keine
zusätzlichen Vorteile bei der Nachführgenauigkeit oder dem Nachführen.
21. Anschließend werden Sie aufgefordert, eine Methode zur
Himmelsausrichtung auszuwählen. Wählen Sie mit den Pfeiltasten
„Aufwärts“ und „Abwärts“ die Option „Automatische Ausrichtung“.
Drücken Sie ENTER.
- Die weiteren Optionen zur Himmelsausrichtung werden später in
diesem Handbuch beschrieben.
22. Die Montierung schwenkt in eine Position, in der SSAA den ersten
Ausrichtungspunkt erhält. Sobald die Montierung stoppt, nimmt SSAA
ein Bild des Himmels auf und bestimmt seine Position.
HINWEIS: Wenn das Teleskop automatisch zu einem Bereich des
Himmels schwenkt, der lokal durch Hindernisse (Gebäude, Bäume usw.)
verdeckt ist, schlägt es fehl und schwenkt automatisch zu einem anderen
Punkt, um es erneut zu versuchen.
23. Die Montierung schwenkt zu einer anderen Position, um den zweiten
Ausrichtungspunkt zu erhalten.
24. Die Montierung schwenkt zu einer dritten Position auf der anderen
Seite des Meridians, um einen dritten Ausrichtungspunkt zu erhalten.
25. Nachdem SSAA drei Ausrichtungspunkte erfasst hat, erscheint
„Ausrichtung erfolgreich!“ auf dem LCD-Bildschirm des NexStar+.
Ihre Montierung ist nun am Nachthimmel ausgerichtet. Bevor SSAA
Objekte präzise im Sichtfeld des Teleskops positionieren kann, muss es die
Abweichung zwischen seinem eigenen Sichtfeld und dem des Teleskops
in einem Vorgang namens Zentrierkalibrierung bestimmen. Wenn Sie
SSAA und Ihr Teleskop noch nie zentriert kalibriert haben, fordert Sie die
Handsteuerung auf, dies sofort nach der ersten Himmelsausrichtung zu
tun. Anweisungen zur Kollimation finden Sie in Abschnitt D. Wenn Sie
zuvor eine Kollimation durchgeführt haben, ist das Teleskop nun bereit,
Objekte in die Nähe der Mitte des Bildfelds zu finden und zu positionieren.
C. Verwendung von SSAA mit einer AZ-
Montierung auf einem Äquatorialkeil
Bevor Sie die Montierung einschalten, führen Sie eine grobe Polausrichtung
durch. Sobald dies abgeschlossen ist, können Sie die Ausrichtung mithilfe
der Feineinstellknöpfe für Höhe und Azimut des Äquatorialkeils weiter
verfeinern.
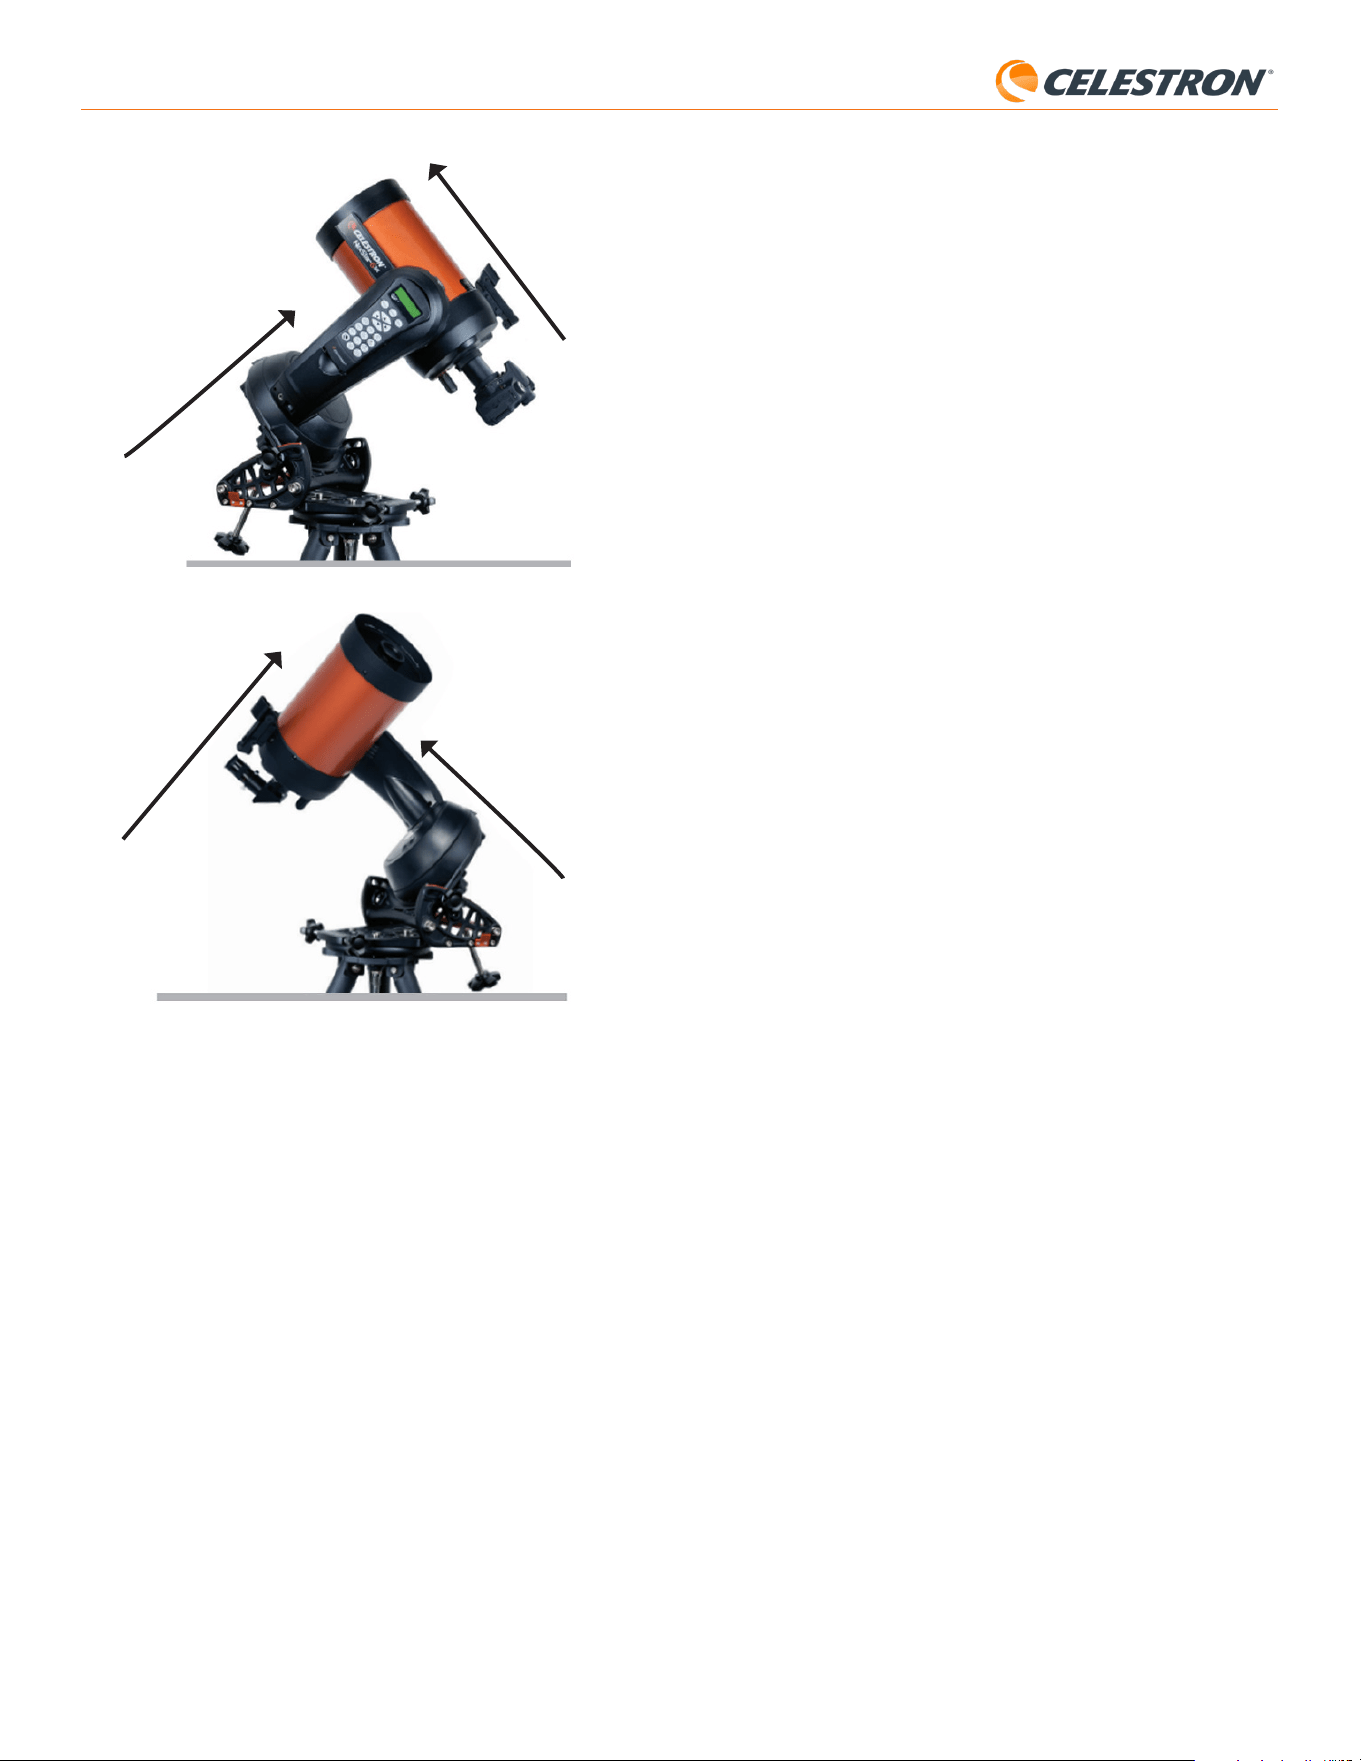
6 | DEUTSCH
StarSense AutoAlign V2
Zentrierkalibrierung aus. Drücken Sie ENTER. Scrollen Sie durch die
Liste der Sterne oder Planeten und wählen Sie einen aus, der von Ihrem
Standort aus gut sichtbar ist. Drücken Sie ENTER.
• Wenn Sie sich nicht sicher sind, wo sich das ausgewählte Objekt am
Nachthimmel befindet, ist das kein Problem. Das Teleskop zeigt im
nächsten Schritt nahe an das Objekt. Sie können das Teleskop als
Orientierungshilfe verwenden, um den Stern oder Planeten für die
Kollimation zu bestimmen. Beachten Sie, dass benannte Sterne und
Planeten zu den hellsten Objekten am Nachthimmel gehören.
• Für optimale Ergebnisse mit einer äquatorialen Montierung wählen
Sie Sterne in der Nähe des Himmelsäquators (d. h. fernab der Pole).
3. Das Teleskop schwenkt zu dem von Ihnen ausgewählten Stern oder
Planeten. Je nach Abweichung zwischen dem Sichtfeld des SSAA
und dem des Teleskops befindet sich das Objekt möglicherweise im
Sichtfeld des Teleskops oder nicht. In jedem Fall sollte das Teleskop
grundsätzlich auf das Objekt gerichtet sein.
4. Die NexStar+ Handsteuerung fordert Sie auf, das Objekt im
Sucherfernrohr zu zentrieren. Verwenden Sie dazu die Richtungstasten
auf dem Tastenfeld. Machen Sie sich noch keine Gedanken um die
Feinzentrierung – diese erfolgt im nächsten Schritt. Zentrieren Sie das
Objekt jetzt grob im Sichtfeld des Sucherfernrohrs und drücken Sie
ENTER.
• Befindet sich der Stern nicht im Sucherfernrohr, schwenken Sie das
Teleskop manuell, bis er sichtbar ist.
• Wenn Sie kein Sucherfernrohr verwenden, nutzen Sie für diesen
Schritt das Weitwinkelokular im Teleskop. Wenn sich das Objekt nicht
im Sichtfeld befindet, versuchen Sie, entlang des Teleskoptubus auf
das Objekt zu zielen.
5. Die NexStar+-Handsteuerung fordert Sie auf, das Objekt im Sichtfeld
des Okulars zu zentrieren. Dies ist der Feinzentrierungsschritt. Stellen
Sie sicher, dass sich ein hochvergrößerndes Okular im Teleskop
befindet. Verwenden Sie die Richtungstasten auf der Tastatur, um das
Objekt zu zentrieren. Für die besten Ergebnisse verwenden Sie die
Richtungstasten nach oben und rechts zuletzt. Wenn Sie fertig sind,
drücken Sie ALIGN.
6. SSAA führt die Zentrierkalibrierung durch und gibt die Meldung
„Zentrierkalibrierung erfolgreich“ zurück.
Nach erfolgreicher Zentrierkalibrierung werden Sie von der Handsteuerung
aufgefordert, die Himmelsausrichtung erneut durchzuführen. Nach
der Himmelsausrichtung können Sie das Teleskop anweisen, jedes
gewünschte Himmelsobjekt präzise im Sichtfeld zu positionieren.
E. Andere Methoden der
Himmelsausrichtung
Anstelle der automatischen Ausrichtung stehen Ihnen verschiedene andere
Optionen zur Verfügung. Diese Optionen bieten etwas Flexibilität für Ihren
Beobachtungsort und Ihre Konfiguration.
Manuelle Ausrichtung
Die manuelle Ausrichtung empfiehlt sich, wenn sich an Ihrem
Beobachtungsort viele Hindernisse wie Gebäude, Bäume oder
Stromleitungen befinden. Die manuelle Ausrichtung funktioniert ähnlich
wie die automatische, ermöglicht Ihnen jedoch, das Teleskop manuell
zu schwenken, um freie Himmelsbereiche für die Ausrichtungspunkte zu
finden. Da das Teleskop nicht automatisch zu Positionen schwenkt, die
durch Hindernisse blockiert sind, ist der gesamte Ausrichtungsprozess
schneller.
So führen Sie eine „manuelle“ Ausrichtung mit der NexStar+
Handsteuerung durch:
1. Wenn Sie von der Handsteuerung zur Auswahl einer
Ausrichtungsmethode aufgefordert werden, wählen Sie mit den Tasten
„Scrollen nach oben“ und „Scrollen nach unten“ die Option „Manuelle
Ausrichtung“ aus und drücken Sie die ENTER.
2. Die Handsteuerung fordert Sie auf, das Teleskop mit den Richtungstasten
zu einem freien Bereich des Himmels zu schwenken. Sobald das
Teleskop auf einen freien Himmelsbereich gerichtet ist, drücken Sie
ENTER. SSAA nimmt ein Bild auf, das als Ausrichtungspunkt verwendet
wird.
HINWEIS: Für optimale Ergebnisse mit äquatorialen Montierungen sollte
Nordhalbkugel
Südhalbkugel
Zeigt zum Nordpol
Zeigt zum Südpol
Optischer Tubus senkrecht zum Gabelarm
Optischer Tubus senkrecht zum Gabelarm
D. Zentrierkalibrierung bzw. Kollimation
Die Zentrierkalibrierung richtet das Sichtfeld der StarSense AutoAlign-
Kamera auf das optische Sichtfeld Ihres Teleskops aus.
Sie müssen die Kollimation normalerweise nur beim ersten Mal
durchführen, wenn Sie StarSense mit einem neuen optischen Tubus
verwenden. Möglicherweise müssen Sie den Vorgang wiederholen, wenn
Sie die Halterung am Teleskop entfernen und wieder anbringen.
Wenn Sie nur die StarSense-Einheit und ihre Halterung entfernen,
die Halterung aber am Teleskop belassen, ist eine erneute Kollimation
normalerweise nicht erforderlich.
Führen Sie vor der Zentrierkalibrierung eine Himmelsausrichtung wie in den
vorherigen Abschnitten beschrieben durch. Falls die Zentrierkalibrierung
noch nicht durchgeführt wurde, werden Sie nach der Himmelsausrichtung
automatisch von StarSense dazu aufgefordert.
So führen Sie eine Zentrierkalibrierung/Kollimation durch:
1. Wenn Sie SSAA noch nie zentriert kalibriert haben, startet die
NexStar+-Handsteuerung automatisch den Kollimationsprozess nach
der Himmelsausrichtung. Andernfalls drücken Sie die MENU-Taste
und verwenden die SCROLL-Tasten, um „StarSense“ auszuwählen.
Drücken Sie ENTER. Verwenden Sie die SCROLL-Tasten, um
„Zentrierkalibrierung“ auszuwählen. Drücken Sie ENTER.
2. Wählen Sie als Nächstes mit den SCROLL-Tasten entweder
benannte Sterne oder Sonnensystemobjekte (d. h. Planeten) für die
Abb. 12: Bei Verwendung einer Azimut (AZ)-Gabelmontierung auf einem äquatorialen
Keil beginnen Sie mit der Montierung in der gezeigten Position. Der Gabelarm sollte
nach Norden zeigen (oder nach Süden auf der Südhalbkugel), und der Tubus sollte
senkrecht zum Gabelarm sein.
7 | DEUTSCH
StarSense AutoAlign V2
Ausrichtung erforderlich ist. Sie kann auch praktisch sein, wenn Sie bei
Dämmerung nach Planeten suchen.
F. Weitere Funktionen
Sie können auf alle zusätzlichen Optionen unten zugreifen, indem Sie die
Taste MENU drücken, mit den SCROLL-Tasten „StarSense“ auswählen
und ENTER drücken. Die Menüstruktur von StarSense ist in Abb. 13
dargestellt.
PRÄZISES GOTO
PLATE SOLVING
ZENTRIERUNG
POLAUSRICHTUNG
VERSION
EINSTELLUNGEN
AUF WERKSEINSTELLUNGEN
ZURÜCKSETZEN
STARSENSE
Abb. 13: Der StarSense- Menübaum in der NexStar+-Handsteuerung.
Präzises GoTo
Präzises GoTo verwendet SSAA, um Objekte präziser im Gesichtsfeld
zu zentrieren. Wenn diese Option aktiviert ist, verwendet die
Teleskopmontierung ihr internes Ausrichtungsmodell, um sich dem
ausgewählten Objekt zu nähern. Dann übernimmt SSAA und führt
Feinkorrekturen der Zentrierung durch, wodurch die Zielgenauigkeit
deutlich verbessert wird. Bei Verwendung von SSAA ist Präzises
GoTo standardmäßig aktiviert, sodass Sie es hier nicht manuell starten
müssen. Wenn Sie jedoch Präzises GoTo deaktiviert haben (siehe
Abschnitt Einstellungen unten), können Sie über diese Menüauswahl ein
präzises GoTo zu einem bestimmten Objekt starten.
Plate Solving
Wenn Sie diese Option wählen, nimmt SSAA ein Bild auf und führt ein
Plate Solving oder Plattenauflösung durch. Die Handsteuerung zeigt die
Koordinaten (RA und Dec) des Teleskopmittelpunkts an, auf den das
Teleskop am Himmel ausgerichtet ist.
Zentrierung
Mit dieser Option können Sie jederzeit eine neue Zentrierung durchführen.
Wenn Sie die SSAA-Halterung vom Teleskop entfernen (indem Sie die
Befestigungsschrauben lösen) und wieder anbringen, empfehlen wir
eine neue Zentrierung. Das bloße Entfernen der SSAA-Halterung von
der Basis (indem Sie zuerst die Rändelschrauben an der Halterung
lösen) und anschließende Wiedermontage auf der Basis erfordert in
der Regel keine neue Zentrierung. Sollten Sie jedoch anschließend
feststellen, dass Objekte nicht mehr mittig im Sichtfeld des Teleskops
positioniert sind, kann eine neue Zentrierung die Zentrierung verbessern.
Nach erfolgreicher Zentrierkalibrierung werden Sie von der
Handsteuerung aufgefordert, die Himmelsausrichtung erneut
durchzuführen.
Polausrichtung
Wenn Sie bei der Erstausrichtung keine Polausrichtung vorgenommen
haben, können Sie diese jederzeit über diese Menüoption starten.
Für äquatoriale Montierungen oder AZ-Montierungen auf einem
Äquatorialkeil beachten Sie bitte Abschnitt B, Schritte 11 bis 20. Denken
Sie daran, dass AZ-Montierungen nicht polausgerichtet werden können,
es sei denn, sie werden auf einem optionalen Äquatorialkeil verwendet.
Nach erfolgreicher Polausrichtung wird die Handsteuerung Sie
auffordern, die Himmelsausrichtung erneut durchzuführen. Deshalb
empfehlen wir, die Polausrichtung zunächst vor der Himmelsausrichtung
durchzuführen.
das Teleskop nicht in Richtung Nord- (oder Süd-)Pol ausgerichtet werden,
um Ausrichtungspunkte aufzunehmen.
3. Die Handsteuerung fordert Sie auf, das Teleskop manuell zu einem
weiteren freien Bereich des Himmels zu schwenken.
a. Bei azimutalen Montierungen schwenken Sie die Montierung in
beiden Achsen und stellen Sie sicher, dass SSAA mindestens 60°
vom ersten Ausrichtungspunkt entfernt ist. Drücken Sie ENTER. Die
manuelle Ausrichtung ist nun abgeschlossen. Fahren Sie mit Schritt
7 fort.
b. Bei äquatorialen Montierungen schwenken Sie die Montierung
zu einem anderen freien Himmelsbereich. Dieser Ort muss auf
derselben Seite des Meridians wie der zuerst gewählte Bereich.
Drücken Sie ENTER.
4. Nachdem die ersten beiden Ausrichtungspunkte festgelegt wurden,
erscheint auf der Handsteuerung die Meldung „Kalibrierungsstern
hinzufügen?“. Wir empfehlen dringend, einen dritten Ausrichtungspunkt
hinzuzufügen, um die beste Zielgenauigkeit am Himmel zu erzielen.
a. Wählen Sie „Nein“, um die Ausrichtung mit nur zwei Punkten
abzuschließen. Diese Ausrichtung kann in vielen Fällen eine
akzeptable Zielgenauigkeit bieten, insbesondere wenn die präzise
GoTo-Funktion aktiviert ist (wie später in dieser Bedienungsanleitung
erklärt). Fahren Sie mit Schritt 7 fort.
b. Wählen Sie „Ja“, um einen dritten Ausrichtungspunkt hinzuzufügen.
Das Teleskop schwenkt automatisch auf die andere Seite des
Meridians.
6. Da sich das Teleskop nun auf der gegenüberliegenden Seite des
Meridians von den ersten beiden Ausrichtungspunkten befindet,
werden Sie von der Handsteuerung aufgefordert, einen dritten freien
Himmelsbereich auszuwählen. Verwenden Sie die Richtungstasten,
um zu einem freien Himmelsbereich auf dieser Seite des Meridians zu
schwenken und drücken ENTER.
7. Nach Abschluss des Vorgangs wird „Ausrichtung erfolgreich!“ auf dem
LCD-Bildschirm des NexStar+ angezeigt.
Benutzerdefinierte automatische Ausrichtung
Diese Ausrichtungsmethode funktioniert nur, nachdem Sie mindestens
eine manuelle Auto-Ausrichtung durchgeführt haben. Wenn Sie die
benutzerdefinierte automatische Ausrichtung auswählen, fährt das
Teleskop automatisch zu den Ausrichtungspunkten, die Sie bei der
vorherigen manuellen automatischen Ausrichtung definiert haben. Es ist
eine praktische Option, wenn Sie Ihr Teleskop die meisten Nächte am
selben Standort aufbauen und es erhebliche Hindernisse am Standort gibt.
Um eine benutzerdefinierte automatische Ausrichtung durchzuführen,
wählen Sie „benutzerdefinierte automatische Ausrichtung“ als
Ausrichtungsmethode. Nach dem Start schwenkt das Teleskop automatisch
zum ersten Ausrichtungspunkt der vorherigen manuellen automatischen
Ausrichtung. Anschließend fährt es mit den anderen benutzerdefinierten
Punkten fort, um die Ausrichtung abzuschließen.
Letzte Ausrichtung
Wenn Sie Ihr Teleskop an einem festen Standort, z. B. in Ihrer
Heimsternwarte, aufgebaut lassen, ist Last Align eine praktische
Option. Diese Methode kann nur verwendet werden, wenn Sie das
Teleskop nach dem Ausschalten weder schwenken noch anderweitig
bewegen. Diese Ausrichtungsmethode verwendet die vorherigen SSAA-
Ausrichtungsdaten, die in der Handsteuerung gespeichert sind. Es sind
keine weiteren Maßnahmen erforderlich.
Schnellausrichtung
Dieses Verfahren richtet die Montierung nur anhand der Zeit-/Datums-/
Ortsinformationen aus. Es wird zunächst davon ausgegangen,
dass äquatoriale Montierungen exakt polar ausgerichtet und in der
Ausgangsposition sind (d. h. der automatischen Startposition, falls Ihre
Montierung über interne Schalter für die Ausgangsposition verfügt oder
dass die Indexmarkierungen bei Montierungen ohne interne Schalter
ausgerichtet sind) und dass azimutale Montierungen exakt waagerecht
stehen und nach Norden (bzw. Süden auf der Südhalbkugel) zeigen. Bei
azimutalen Gabelmontierungen auf einem Äquatorialkeil wird zunächst
davon ausgegangen, dass die Montierung exakt polausgerichtet ist
und der Tubus senkrecht dazu steht, wie in Abbildung Abbildung 12
gezeigt. Quick Align verwendet das SSAA-Gerät nicht. Wir empfehlen
diese Ausrichtungsmethode normalerweise nicht, da sie nicht sehr
genau ist, aber sie kann für einige Anwendungsfälle eine ausreichend
genaue Zielerfassung und Nachführung bieten, ohne dass eine weitere
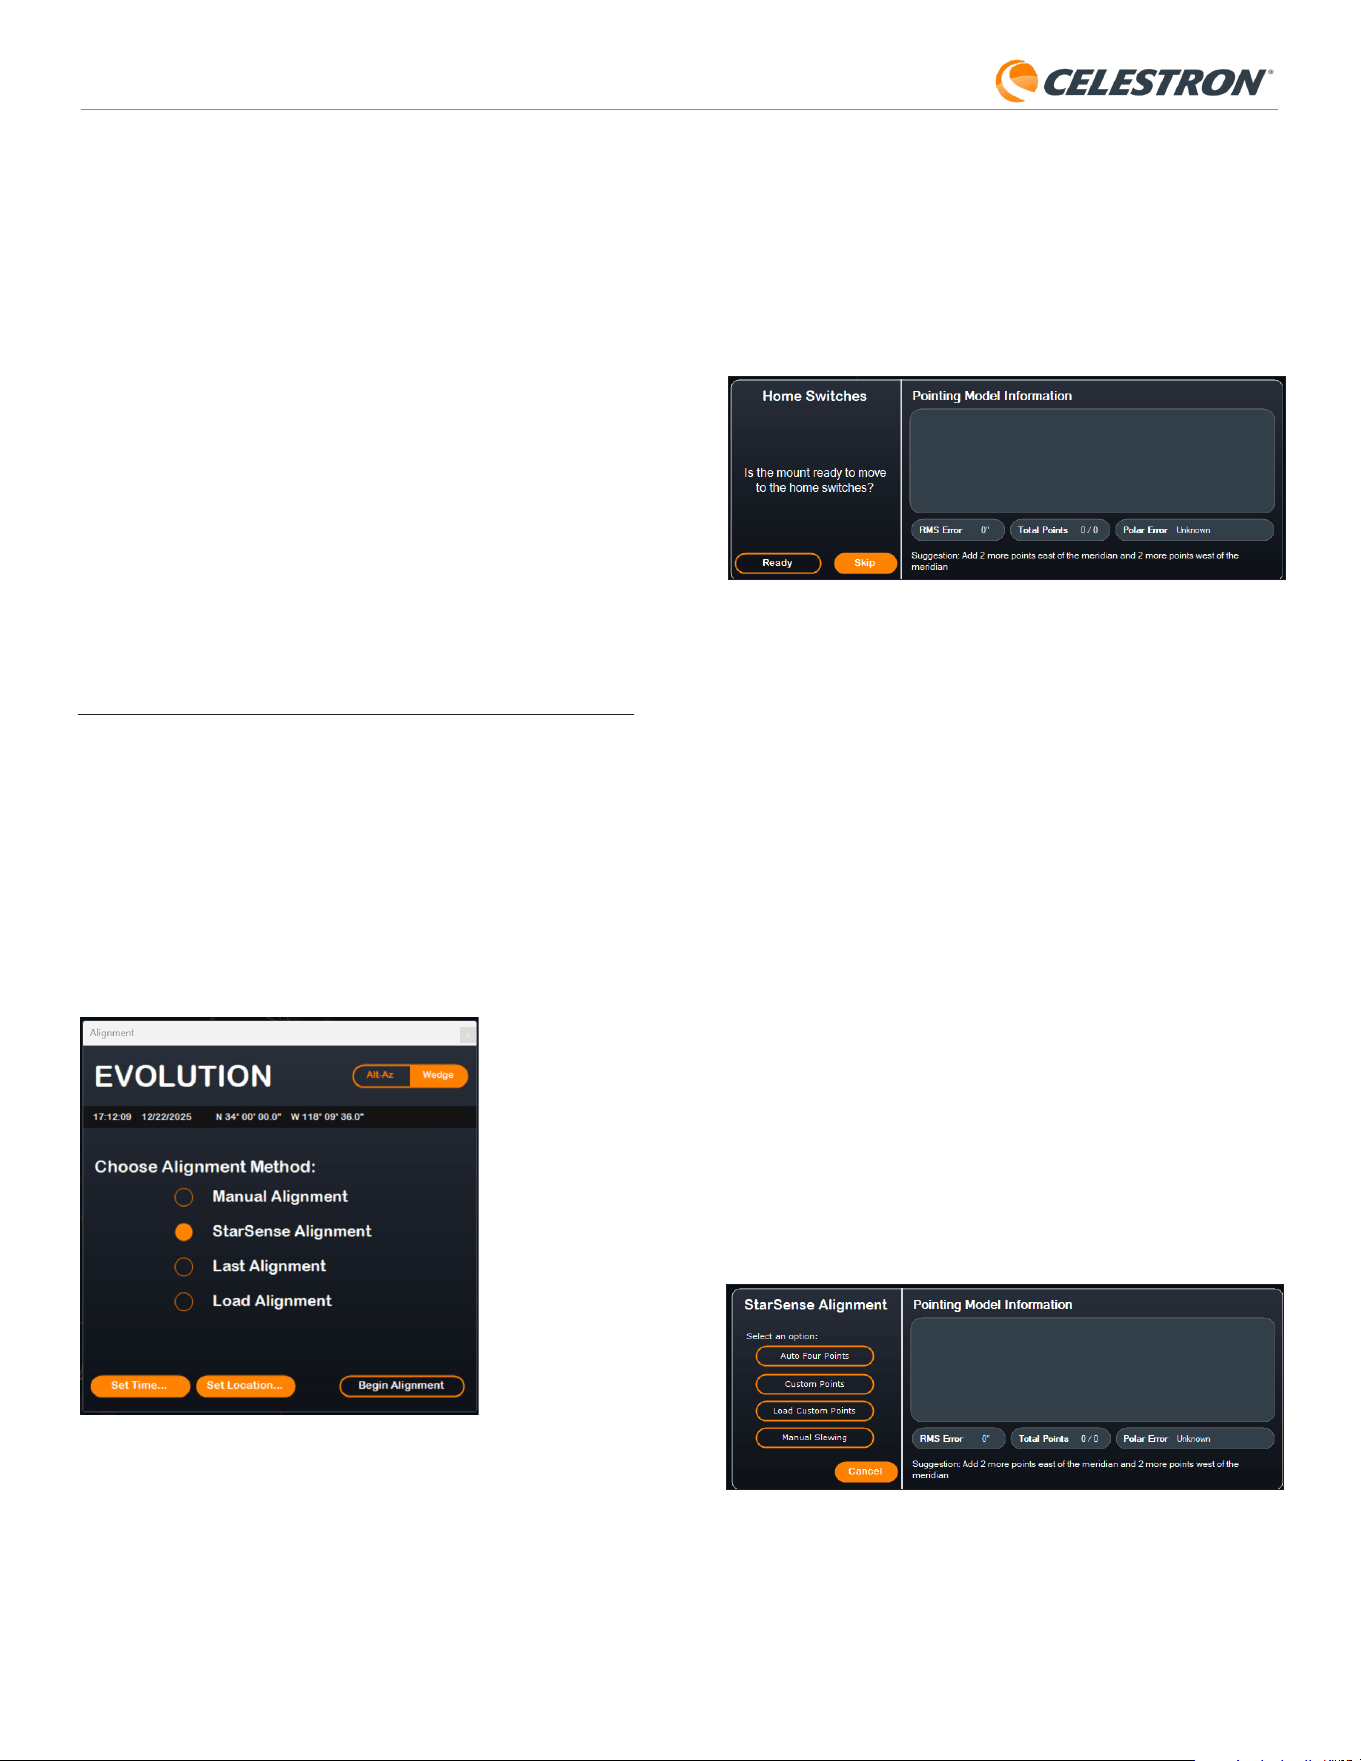
8 | DEUTSCH
StarSense AutoAlign V2
Für die automatische Himmelsausrichtung mit SSAA wählen Sie „StarSense
Ausrichtung“ und drücken Sie anschließend die Schaltfläche „Ausrichtung
starten“. Die Informationen zum Ausrichtungsmodell werden angezeigt
(Abb. 15). Im Abschnitt „Referenzpunkte“ fragt CPWI: „Ist die Montierung
bereit, die Referenzpunkte anzufahren?“ Wenn Ihre Montierung über
Referenzpunkte verfügt (z. B. CGX und CGX-L), klicken Sie auf
„Bereit“. Wenn Ihre EQ-Montierung keine Referenzschalter, sondern nur
Indexmarkierungen besitzt, bewegen Sie das Teleskop manuell zu den
Indexmarkierungen. Wenn Sie eine AZ-Montierung auf einer EQ-Keilplatte
verwenden, positionieren Sie das Teleskop wie in Abbildung 12 (Seite
5) gezeigt.
Abb. 15: Das Fenster „Informationen zum Ausrichtungsmodell“ in CPWI.
Wenn Sie eine azimutale Montierung (AZ) verwenden, fordert CPWI Sie
auf, das Teleskop mit horizontal ausgerichtetem Tubus und Blickrichtung
nach Norden auf den nördlichen Horizont auszurichten. Wenn Sie sich auf
der Südhalbkugel befinden, richten Sie das Teleskop stattdessen auf den
südlichen Horizont.
Positionieren Sie das Teleskop mithilfe des Fensters „Montierungs-
Schwenksteuerung“ auf dem Bildschirm. Präzision ist nicht entscheidend.
Dies ist lediglich die Ausgangsposition für die Ausrichtung.
Wenn Sie zuvor keine Zentrierkalibrierung durchgeführt haben, sollten
Sie dies tun, wenn CPWI Sie vor der Himmelsausrichtung dazu
auffordert. Im Gegensatz zur NexStar+ Handsteuerung erfordert
CPWI, dass die Zentrierkalibrierung zuerst abgeschlossen wird.
Wenn Sie dies überspringen, müssen Sie die Himmelsausrichtung
anschließend wiederholen. Anweisungen dazu finden Sie im Abschnitt
„Zentrierkalibrierung“ auf Seite 9.
Wenn Sie eine äquatoriale Montierung (EQ) oder eine azimutale
Montierung auf einer äquatorialen Polhöhenwiege verwenden, fragt CPWI
Sie, ob Sie eine Polausrichtung durchführen möchten. Wir empfehlen, die
Polausrichtung in diesem Stadium abzuschließen. Wenn Sie damit bis
nach der Himmelsausrichtung warten, müssen Sie die Himmelsausrichtung
wiederholen.
- Klicken Sie zur Polausrichtung auf „Ja“ und folgen Sie den Anweisungen
im Abschnitt „Polausrichtung“ auf Seite 9.
- Um die Polausrichtung zu überspringen, klicken Sie auf „Nein“, um direkt
zur Himmelsausrichtung fortzufahren.
Sie können die Polausrichtung später durchführen, indem Sie im
StarSense-Menü „Montierung polar ausrichten“ auswählen.
Nach Abschluss der Polausrichtung erscheint im Fenster „StarSense-
Ausrichtung“ und Sie werden aufgefordert, eine Ausrichtungsoption
auszuwählen (Abb. 16).
Abb. 16: StarSense Ausrichtungsoptionen in CPWI.
Automatische Vier-Punkte-Ausrichtung
Die automatische Vier-Punkte-Ausrichtung ist die am stärksten
automatisierte Ausrichtungsoption. SSAA schwenkt automatisch zu vier
Punkten am Himmel, um die Himmelsausrichtung zu erreichen. Wenn es
auf ein Hindernis zeigt oder seine Position anderweitig nicht bestimmen
Version
Durch Auswahl dieser Option wird die aktuelle Versionsnummer der
internen SSAA-Software angezeigt.
• Um die Firmware-Version der NexStar+ Handsteuerung anzuzeigen,
wählen Sie die Option „Version“ aus MENÜ>Dienstprogramme.
Einstellungen
Präzises GoTo verwenden – Diese Einstellung ermöglicht es Ihnen,
das automatische Präzises GoTo nach jedem Schwenken zu aktivieren
oder zu deaktivieren. Präzises GoTo ist standardmäßig aktiviert, um die
beste Ausrichtungsgenauigkeit zu gewährleisten. Diese Funktion führt
jedoch dazu, dass das Teleskop etwas länger benötigt, um Objekte
zu zentrieren. Wir empfehlen den meisten Benutzern, präzises GoTo
aktiviert zu lassen.
Auf Werkseinstellungen zurücksetzen
Diese Option löscht alle zuvor gespeicherten Kalibrierungsdaten in
StarSense AutoAlign. Nach Auswahl dieser Option müssen Sie die
Montierung neu starten.
Wir empfehlen einen Werksreset, wenn Sie StarSense AutoAlign mit
einer anderen Celestron-Montierung als der zuvor verwendeten nutzen
möchten.
6. Verwendung von SSAA mit CPWI
Wenn Sie Ihr Teleskop bereits mit einem PC steuern (z. B. für Astrofotografie),
ist die kostenlose CPWI-Software von Celestron eine hervorragende
Möglichkeit, SSAA zu steuern. Die intuitive Benutzeroberfläche erleichtert
den Zugriff auf alle Funktionen von SSAA.
Himmelsausrichtung
Wenn Sie Ihren PC mit CPWI an Ihre Celestron-Montierung mit
angeschlossenem StarSense AutoAlign anschließen, öffnet sich das
Alignment-Fenster automatisch (Abb. 14).
Überprüfen Sie zuerst Datum, Uhrzeit und Standort im oberen Bereich des
Fensters. Sollten Sie Fehler feststellen, klicken Sie auf die Schaltflächen
„Zeit einstellen“ oder „Position einstellen“, um diese zu korrigieren.
Abb. 14: Das SSAA-Ausrichtungsfenster in CPWI.
Wenn Sie eine AZ-Montierung mit einem Äquatorialkeil verwenden, wählen
Sie die Option „Äquatorialkeil“ oben rechts im Ausrichtungsfenster. Durch
Auswahl dieser Option wird die AZ-Montierung als äquatoriale Montierung
behandelt.
Wenn Sie eine äquatoriale Montierung (oder eine azimutale Montierung
auf einem Äquatorialkeil) verwenden, sollten Sie die Montierung vor
Beginn der Ausrichtung grob polar ausrichten. SAA kann bei der präzisen
Polausrichtung helfen (später in dieser Bedienungsanleitung beschrieben),
aber der Prozess ist viel schneller und einfacher, wenn die EQ-Montierung
von Anfang an grob polausgerichtet ist.
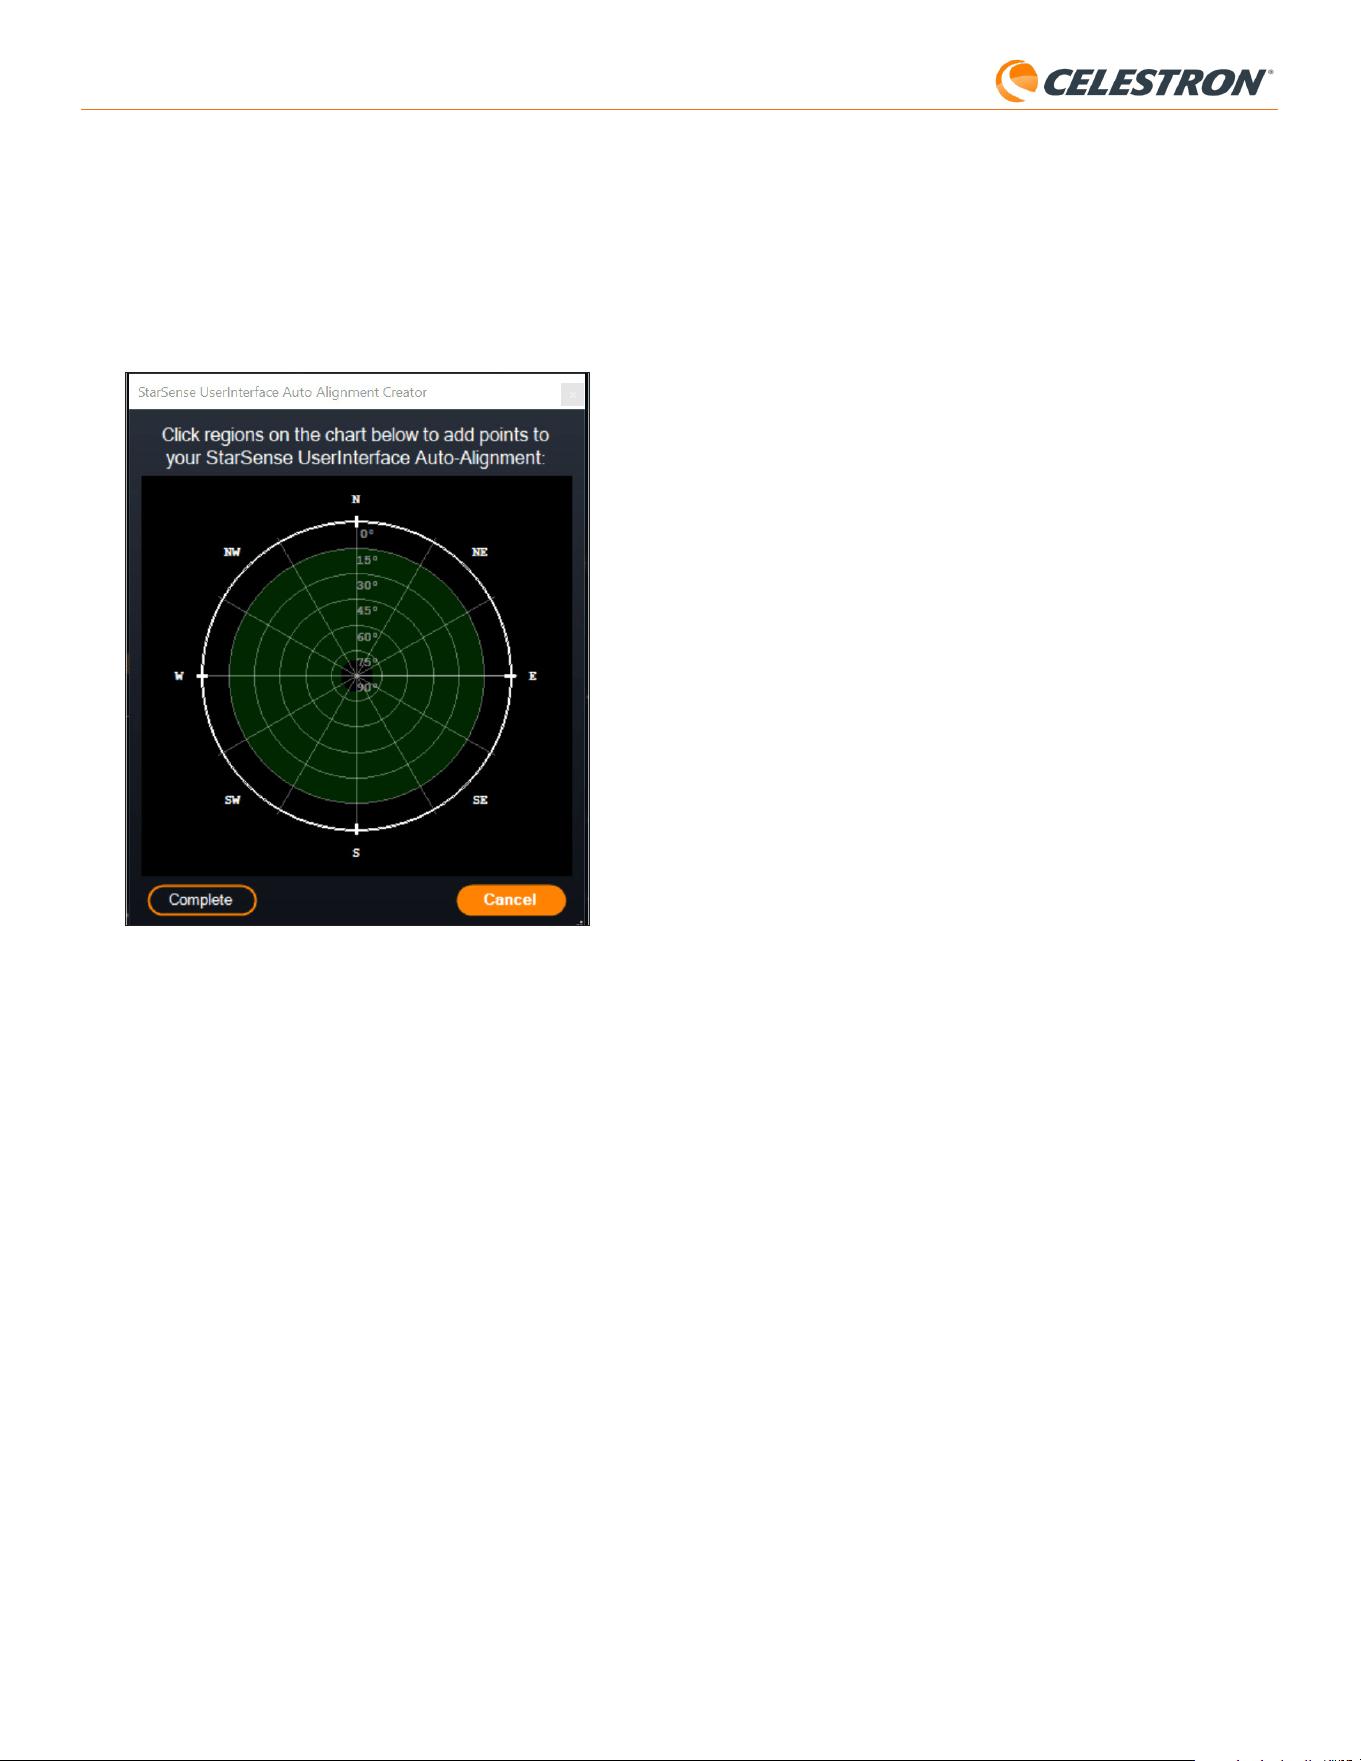
9 | DEUTSCH
StarSense AutoAlign V2
Hinzufügen zusätzlicher Ausrichtungspunkte
Nach der Ausrichtung werden Ihnen Informationen zum generierten
Ausrichtungsmodell der Montierung angezeigt, darunter der RMS-Fehler,
die Gesamtzahl der Punkte im Ausrichtungsmodell und der berechnete
Polausrichtungsfehler.
Sie können während der Nacht weitere Ausrichtungspunkte hinzufügen,
indem Sie ein Objekt in der Planetariumsansicht auswählen, darauf klicken
und „Modell“ wählen. Die Montierung schwenkt dann zur Position des
Objekts, und SSAA fügt den Ausrichtungspunkt dem Ausrichtungsmodell
der Montierung hinzu. Die Ausrichtungsgenauigkeit ist bereits mit vier
Punkten sehr gut, verbessert sich aber im Allgemeinen mit jedem weiteren
hinzugefügten Ausrichtungspunkt.
Zentrierkalibrierung bzw. Kollimation
Die Zentrierkalibrierung richtet das Sichtfeld der StarSense AutoAlign-
Kamera auf das optische Sichtfeld Ihres Teleskops aus.
Sie müssen die Kollimation normalerweise nur beim ersten Mal
durchführen, wenn Sie StarSense mit einem neuen optischen Tubus
verwenden. Möglicherweise müssen Sie den Vorgang wiederholen, wenn
Sie die Halterung am Teleskop entfernen und wieder anbringen.
Wenn Sie nur die StarSense-Einheit und ihre Halterung entfernen,
die Halterung aber am Teleskop belassen, ist eine erneute Kollimation
normalerweise nicht erforderlich.
CPWI fordert Sie automatisch auf, eine Zentrierkalibrierung vor
der Himmelsausrichtung durchzuführen. Wenn Sie diesen Schritt
überspringen, können Sie später im StarSense-Menü „Zentrierkalibrierung“
auswählen. Sie müssen dann jedoch die Himmelsausrichtung nach der
Zentrierkalibrierung wiederholen.
So führen Sie eine Zentrierkalibrierung durch:
1. Wählen Sie im Planetariumsbildschirm von SkyViewer ein Objekt durch
Anklicken aus. Wählen Sie einen hellen Stern oder Planeten, der von
Ihrem Beobachtungsort aus klar sichtbar ist.
2. Das Teleskop schwenkt nun zum ausgewählten Objekt. Je nach
Abweichung zwischen dem Sichtfeld des SSAA und dem des Teleskops
befindet sich das Objekt möglicherweise im Sichtfeld des Teleskops
oder nicht. In jedem Fall sollte das Teleskop auf das Objekt zeigen.
3. CPWI fordert Sie auf, das Objekt im Okular des Teleskops zu
zentrieren. Sie können dazu das Fenster „Montierungssteuerung“
auf dem Bildschirm verwenden. Klicken Sie anschließend im Fenster
„Informationen zum Ausrichtungsmodell“ auf „Zentriert“.
• Befindet sich der Stern nicht im Sucherfernrohr, schwenken Sie
das Teleskop manuell, bis er sichtbar ist.
• Wenn Sie keinen Sucher verwenden, verwenden Sie stattdessen
Ihr Okular mit dem weitesten Gesichtsfeld, um das Objekt zu
finden. Befindet sich das Objekt nicht im Okular, zielen Sie entlang
des Teleskoptubus auf das Objekt.
• Für die finale Zentrierung verwenden Sie ein hochvergrößerndes
Okular.
• Zentrieren Sie den Stern im Teleskop-Sichtfeld zuletzt mit den
Pfeiltasten nach oben und rechts.
4. SSAA führt die Zentrierkalibrierung durch und gibt die Meldung
„Zentrierkalibrierung erfolgreich“ aus.
Sobald Sie die Zentrierkalibrierung und die Himmelsausrichtung
abgeschlossen haben, können Sie das Teleskop anweisen, jedes beliebige
Himmelsobjekt präzise im Sichtfeld zu positionieren.
Polausrichtung
Obwohl Ihre EQ-Montierung (oder AZ-Montierung auf einer Äquatorialkeil)
für die Verwendung von SSAA nicht unbedingt polausgerichtet sein muss,
kann SSAA Ihnen dabei helfen, eine sehr genaue Polausrichtung zu
erreichen. Eine präzise Polausrichtung verbessert die Gesamtgenauigkeit
der Ausrichtung geringfügig – jedoch nur um wenige Bogenminuten.
Wenn Sie sich für die Polausrichtung entscheiden, tun Sie dies vor der
Himmelsausrichtung. Wenn Sie die Polausrichtung später durchführen
möchten, wählen Sie die Option „Montierung polar ausrichten“
kann, schwenkt das Teleskop einfach zu einem anderen Punkt am Himmel,
um einen weiteren Ausrichtungspunkt zu erhalten.
Benutzerdefinierte Punkte
Mit benutzerdefinierten Punkten können Sie Punkte am Himmel definieren,
zu denen das Teleskop für die Ausrichtung schwenkt. Dies ist eine gute
Wahl, wenn sich an Ihrem Beobachtungsort lokale Hindernisse befinden, da
Sie die Ausrichtungspunkte so definieren können, dass das Teleskop diese
umfährt. Wenn Sie diese Option wählen, wird das Fenster „StarSense-
Benutzeroberfläche: Automatische Ausrichtung“ angezeigt (Abb. 17).
Abb. 17: Das Fenster „Automatische Ausrichtung erstellen“ in CPWI.
Klicken Sie in die Karte, um Ausrichtungspunkte am Himmel auszuwählen.
Sie finden die Himmelsrichtungen am Rand der Karte. Der Bereich innerhalb
der Karte reicht von 0° Höhe (d. h. Horizont) am Rand bis 90° Höhe (d. h.
Zenit) in der Mitte. Sie können bei Bedarf mehr als vier Ausrichtungspunkte
wählen. Für optimale Ergebnisse wählen Sie weit auseinanderliegende
Punkte und vermeiden Sie Punkte in Polnähe für äquatoriale Montierungen.
Klicken Sie nach der Auswahl der Ausrichtungspunkte unten links im
Fenster auf „Fertigstellen“. Bevor CPWI mit der Ausrichtung beginnt,
fragt es, ob Sie Ihre benutzerdefinierten Ausrichtungspunkte speichern
möchten. Wenn Sie dies tun, können Sie die .sua-Datei später mit der
Option „Benutzerdefinierte Punkte laden“ verwenden.
Wenn Sie vor Beginn einer Ausrichtung den automatischen
Ausrichtungsgenerator der StarSense-Benutzeroberfläche verwenden
möchten, wählen Sie im StarSense-Menü „Werkzeug zur Erstellung
automatischer Ausrichtungen“ aus.
Benutzerdefinierte Punkte laden
Sobald Sie wie oben beschrieben „Benutzerdefinierte Punkte“ definiert
haben, können Sie diese Option wählen, um sie erneut zu verwenden.
Wählen Sie die zuvor erstellte .sua-Datei aus. Die Ausrichtung startet
automatisch.
Manuelles Schwenken
Mit dieser Ausrichtungsoption verwenden Sie das
Montierungsschwenksteuerung-Fenster, um SSAA manuell zu einem
freien Bereich des Himmels zu schwenken, und klicken auf „Hier
berechnen“, um einen Ausrichtungspunkt zu erhalten. Wiederholen Sie
den Prozess viermal, um die Ausrichtung abzuschließen. Dies ist die am
wenigsten automatisierte Wahl, aber sie kann hilfreich sein, wenn Ihr
Beobachtungsort Hindernisse hat oder der Himmel teilweise bewölkt ist.
Für die besten Ergebnisse verwenden Sie vier Ausrichtungspunkte, die
so weit auseinanderliegen wie möglich, und vermeiden Sie Punkte in der
Nähe der Pole für EQ-Montierungen.
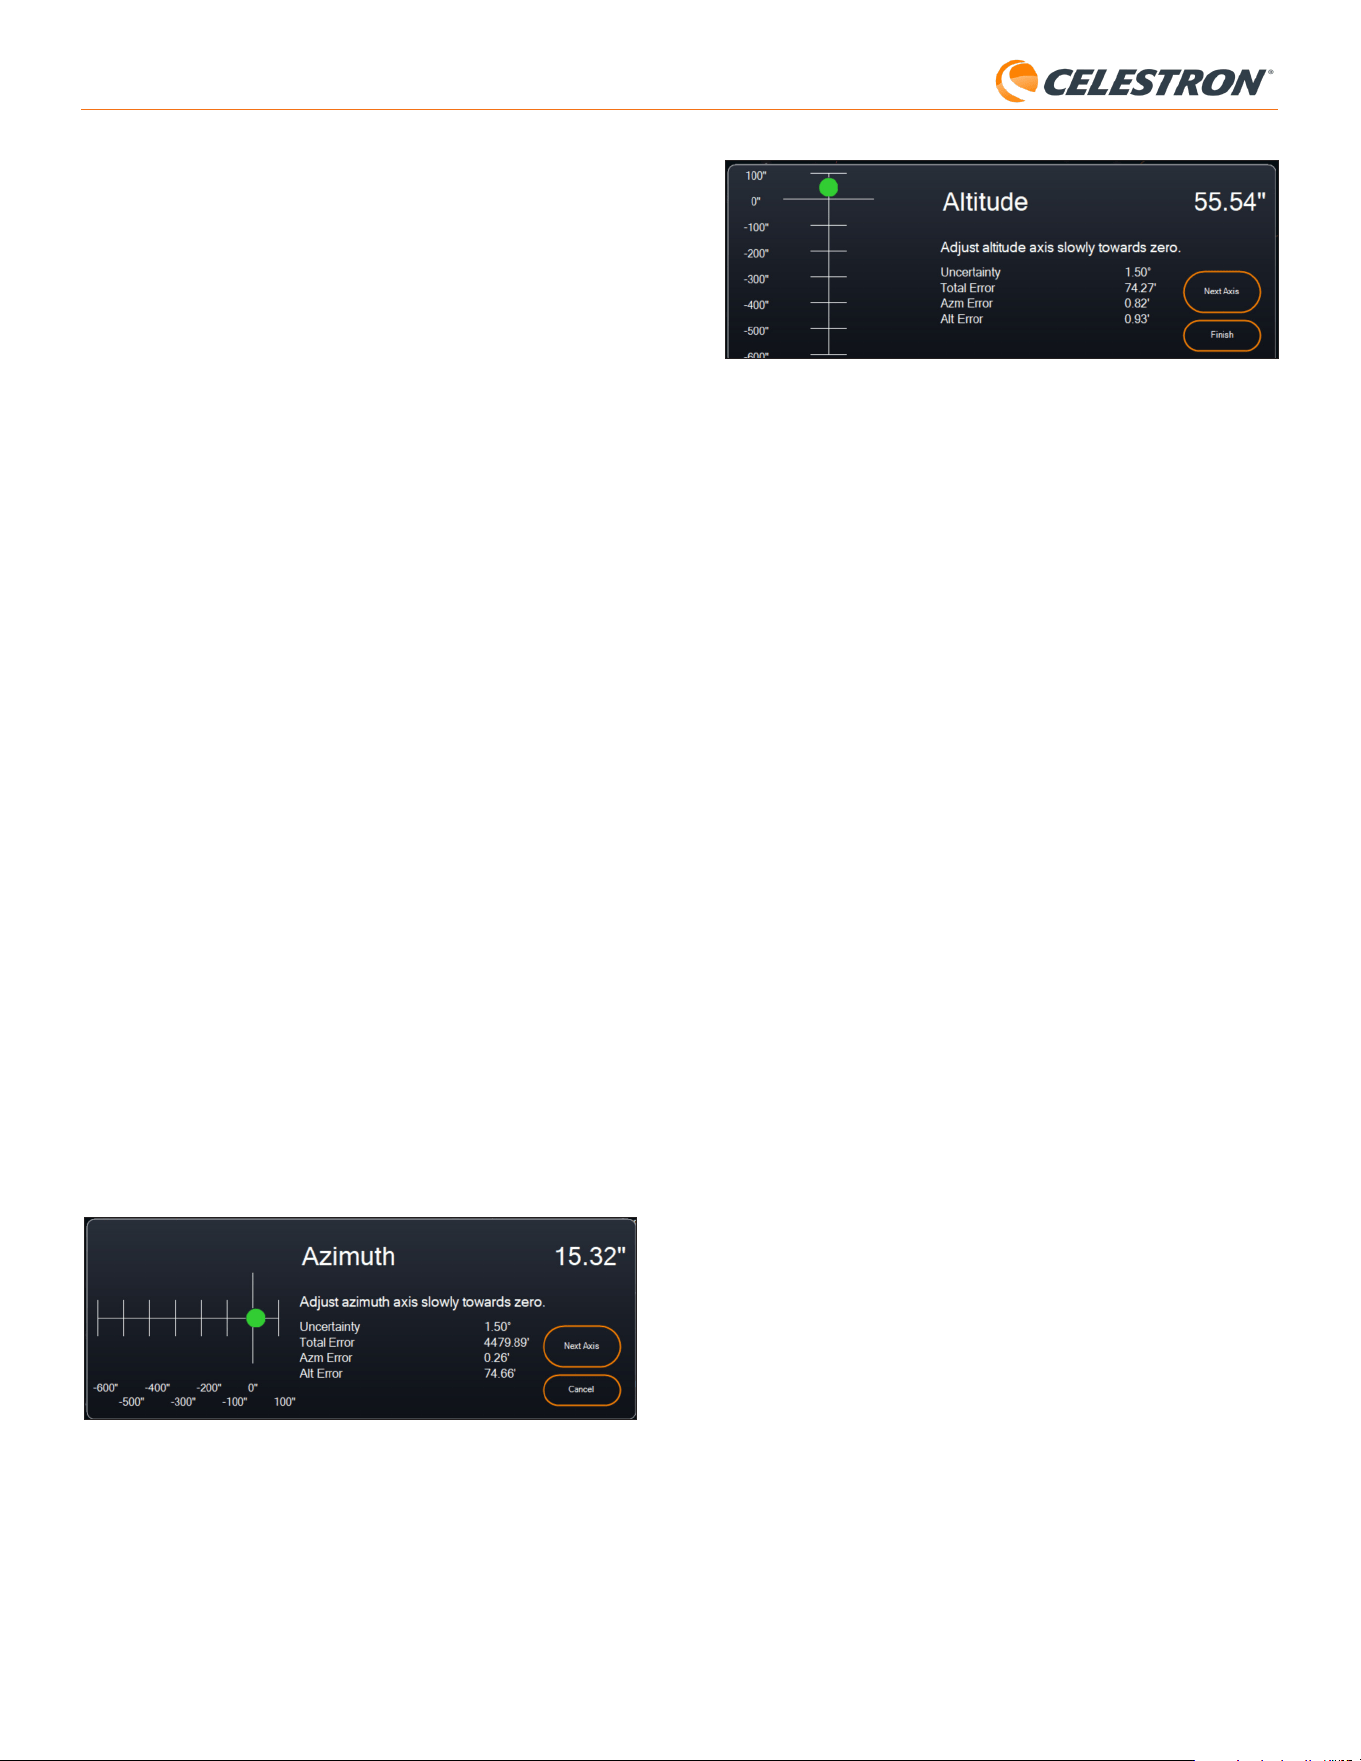
10 | DEUTSCH
StarSense AutoAlign V2
Abb. 19: Höhenachsen-Einstellungsfenster während der Polausrichtung in CPWI.
6. Stellen Sie die Höhe Ihrer Montierung langsam ein, bis der „Höhenfehler“
weniger als zwei Bogenminuten beträgt.
• Falls die Montierung über Höhenachsenverriegelungen verfügt,
lösen Sie diese zuerst.
7. Um die Azimutachse neu zu justieren, klicken Sie auf „Nächste Achse“.
Andernfalls klicken Sie auf „Fertigstellen“.
8. Herzlichen Glückwunsch! Sie haben Ihre Montierung erfolgreich
polar ausgerichtet. Falls Ihre Montierung über Feststellknöpfe oder
-schrauben für Höhe oder Azimut verfügt, ziehen Sie diese fest an. Wenn
Sie bereits eine Himmelsausrichtung durchgeführt haben, löschen Sie
die aktuelle Ausrichtung aus dem Ausrichtungsmenü und führen Sie die
Himmelsausrichtung erneut durch.
HINWEIS: Versuchen Sie nicht, die Polausrichtung auf weniger als zwei
Bogenminuten pro Achse einzustellen. Dies ist schwierig und bringt keine
zusätzlichen Vorteile bei der Nachführgenauigkeit oder dem Nachführen.
Weitere Funktionen
Im StarSense-Menü stehen Ihnen weitere Optionen zur Verfügung.
Live-Ansicht
Das Live-Ansicht-Fenster zeigt die Live-Daten des Bildsensors von SSAA
an. Der Hauptzweck ist es, beim Fokussieren des SSAA-Objektivs zu
helfen (siehe den Abschnitt Fokussieren später in diesem Handbuch), aber
es kann auch interessant sein, das Bild des SSAA zu sehen.
Um die Live-Ansicht zu nutzen, müssen Sie SSAA mithilfe eines USB-
C-auf-USB-A-Kabels (nicht im Lieferumfang) direkt an Ihren PC
anschließen. Die AUX-Schnittstelle unterstützt keine Bildübertragung. Sie
müssen außerdem den StarSense-Windows-Treiber auf Ihrem Computer
installieren. Sie finden ihn im Bereich „Support & Downloads“ auf der
Produktseite von StarSense AutoAlign (Nr. 94034) auf celestron.com.
Sobald Sie den Treiber installiert und SSAA mit dem USB-Kabel verbunden
haben, zeigt das Live-Ansichtsfenster das aktuelle Bild des SSAA-
Bildsensors an. Die Live-Ansicht verfügt über keine Bedienelemente.
SSAA passt Belichtung und Verstärkung automatisch an, um optimale
Bilder zu erzielen.
HINWEIS: Sie sollten SSAA weiterhin über AUX mit der Montierung
verbinden, während es über USB mit dem PC für das Live-
Ansicht verbunden ist.
Präzises GoTo
Präzises GoTo verwendet SSAA, um Objekte präziser im Gesichtsfeld
zu zentrieren. Wenn diese Option aktiviert ist, verwendet die
Teleskopmontierung ihr internes Ausrichtungsmodell, um sich dem
ausgewählten Objekt zu nähern. Dann übernimmt SSAA und führt
Feinkorrekturen der Zentrierung durch, wodurch die Zielgenauigkeit
deutlich verbessert wird. Wenn Sie SSAA verwenden, ist Präzises GoTo
standardmäßig aktiviert. Wenn Sie diese Funktion deaktivieren möchten,
können Sie dies über das StarSense-Menü tun.
Version
Durch Auswahl dieser Option wird die aktuelle Version der SSAA-
Firmware angezeigt.
Auf Werkseinstellungen zurücksetzen
Diese Option löscht alle zuvor gespeicherten Kalibrierungsdaten in
StarSense AutoAlign. Nach Auswahl dieser Option müssen Sie die
Montierung neu starten.
im StarSense-Menü. Nach der Polausrichtung ist eine erneute
Himmelsausrichtung erforderlich.
HINWEIS: Diese Anleitung beschreibt die Polausrichtung auf der
Nordhalbkugel. Auf der Südhalbkugel richten Sie Ihre Montierung immer
nach Süden statt nach Norden aus.
So führen Sie eine Polausrichtung mit SSAA über CPWI durch:
1. Eine grobe Polausrichtung Ihrer Montierung im Vorfeld beschleunigt
und vereinfacht den gesamten Vorgang. Sobald die grobe Ausrichtung
erfolgt ist, können Sie die genaue Polausrichtung mithilfe der
Feineinstellknöpfe für Höhe und Azimut der Montierung vornehmen.
a. Vergewissern Sie sich, dass die Montierung einigermaßen
waagerecht steht. Wenn Ihre Montierung eine integrierte
Wasserwaage hat, verwenden Sie diese als Referenz.
b. Stellen Sie die Höhe der Montierung so ein, dass die Breitenskala
der Montierung ungefähr dem Breitengrad Ihres Beobachtungsort
entspricht.
c. Heben Sie das gesamte Stativ samt Montierung an und drehen Sie
es so, dass die Rektaszensionsachse (RA) ungefähr genau nach
Norden zeigt. Die Position der Montierung muss nicht exakt sein.
Richten Sie sie innerhalb von etwa 5° nach Norden aus, sodass sie
sich im Bereich der Azimut-Feinjustierung befindet. Verwenden Sie
eine kostenlose Kompass-App für Ihr Smartphone, falls Sie Hilfe
beim Finden von Norden benötigen.
d. Falls Sie die Höhen- oder Azimutverstellknöpfe während der
groben Polausrichtung gelockert haben, stellen Sie sicher, dass
diese vor dem Fortfahren wieder fest angezogen sind.
2. Wenn CPWI Sie dazu auffordert, schwenken Sie das Teleskop
manuell über das Montierungsschwenksteuerung-Fenster in eine
Ausgangsposition.
• Das Teleskop schwenkt während der Polausrichtung etwa 50°
von West nach Ost. Wählen Sie für die Ausrichtung einen freien
Bereich ohne Hindernisse.
3. Klicken Sie im Fenster „Informationen zum Ausrichtungsmodell“ im
Abschnitt „SSAA-Polausrichtung“ auf „Starten“. Die Montierung
schwenkt nach Osten und hält etwa alle 10° an, um eine
Polausrichtungspunkt zu erhalten.
4. Nachdem SSAA die Polausrichtungspunkt ermittelt hat, wird das Fenster
zur Azimutachsen-Einstellung angezeigt (Abb. 18). Justieren Sie den
Azimut Ihrer Montierung langsam und präzise, bis der „Azimutfehler“
weniger als zwei Bogenminuten beträgt.
• Falls Ihre Montierung über Azimut-Achsen-Arretierungen verfügt,
lösen Sie diese zuerst.
• Nehmen Sie die Einstellungen langsam vor, damit SSAA sie
verfolgen kann. Wenn Sie zu schnell einstellen und SSAA die
Verfolgung verliert, müssen Sie möglicherweise den gesamten
Polausrichtungsprozess neu starten.
Abb. 18: Azimutachsen-Einstellungsfenster während der Polausrichtung in CPWI.
5. Klicken Sie auf „Nächste Achse“, sobald Sie die Azimut-Einstellungen
abgeschlossen haben. Das Fenster zur Höhenachsen--Einstellfenster
erscheint (Abb. 19).
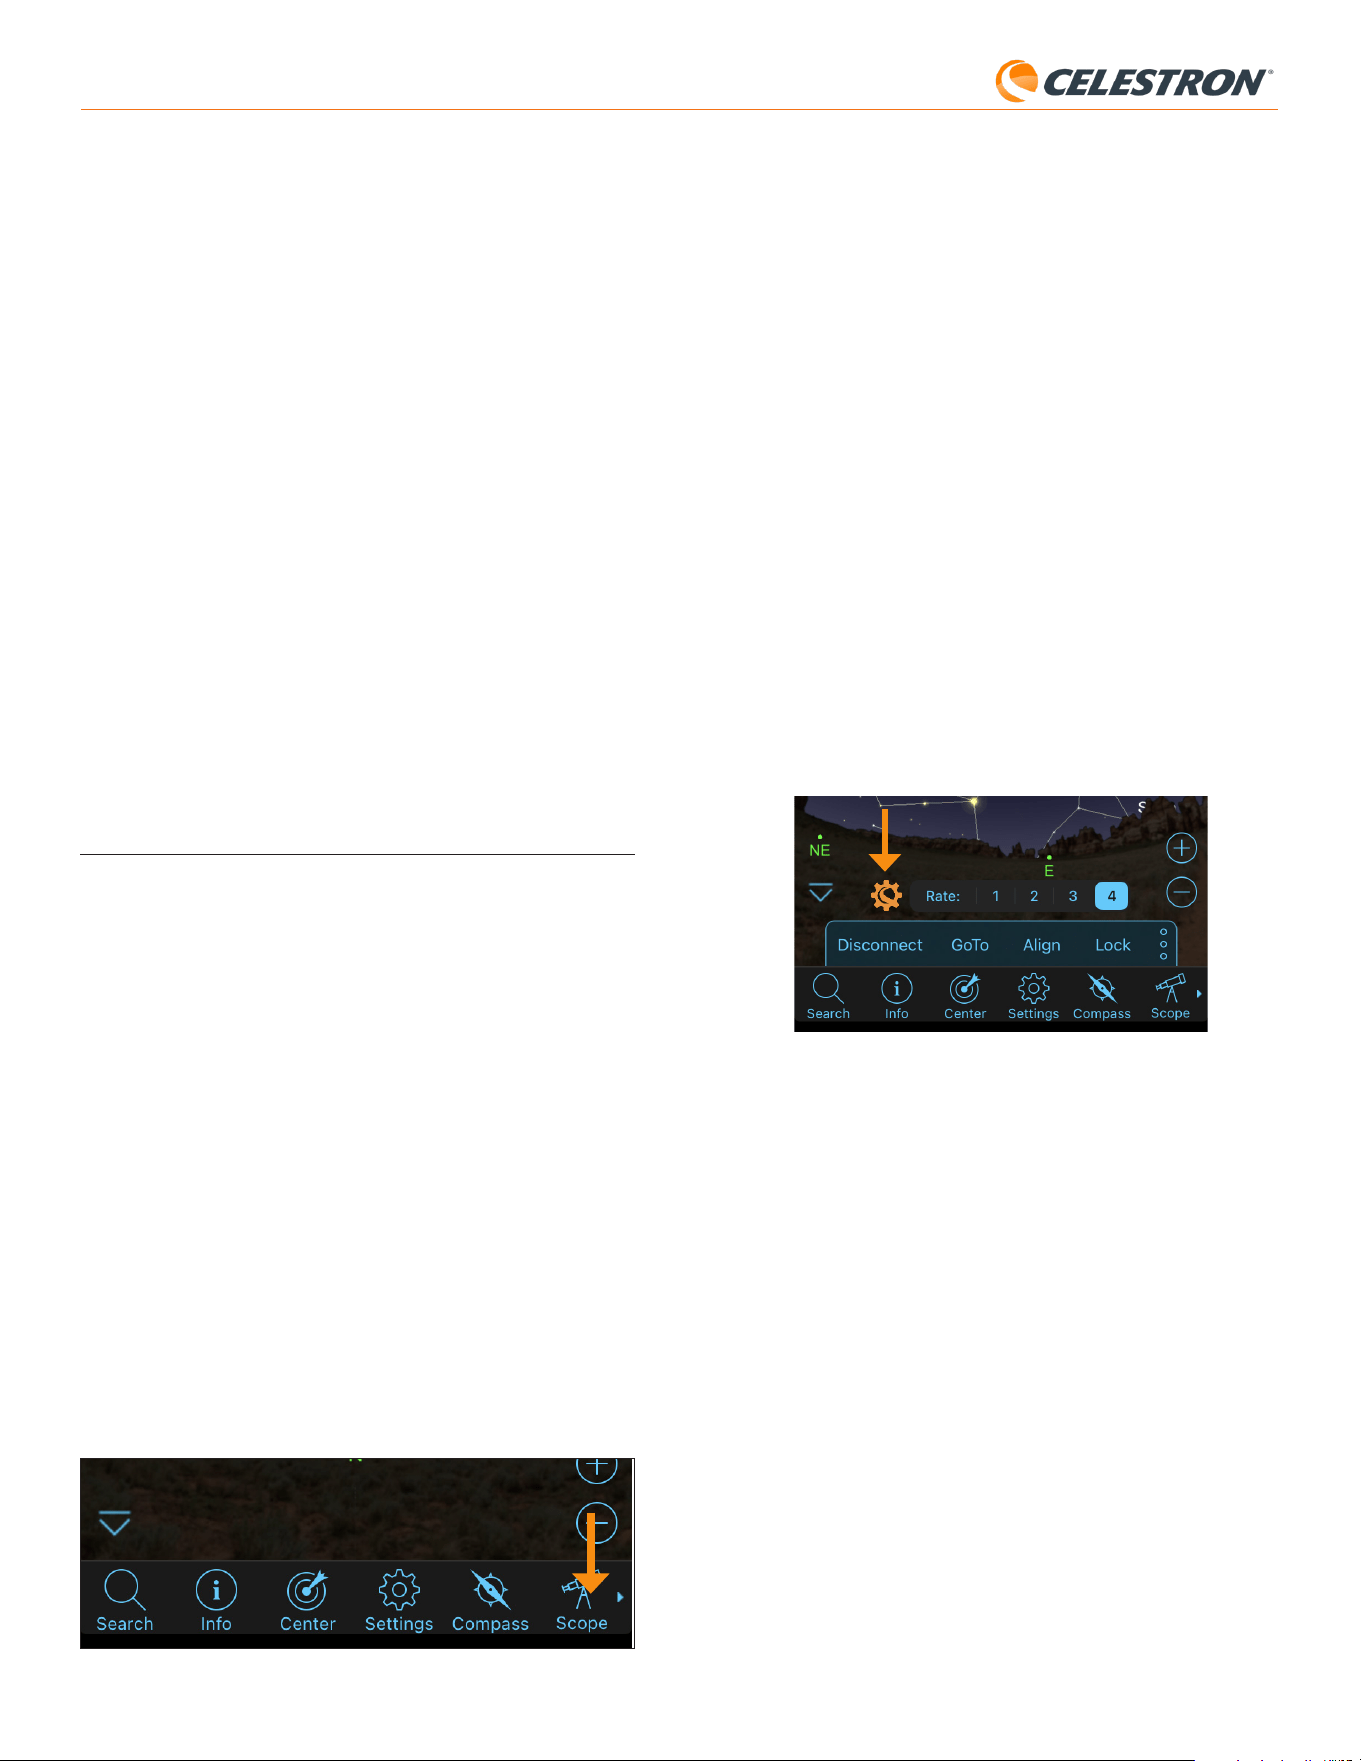
11 | DEUTSCH
StarSense AutoAlign V2
Wir empfehlen einen Werksreset, wenn Sie StarSense AutoAlign mit einer
anderen Celestron-Montierung als der zuvor verwendeten nutzen möchten.
Support-Protokolle herunterladen
Wenn Sie technische Schwierigkeiten haben und Support-Protokolle
herunterladen müssen, um sie an den technischen Support von Celestron
zu senden, wählen Sie diese Option. Installieren Sie zunächst den
StarSense Windows-Treiber auf Ihrem Computer. Sie finden ihn im
Bereich „Support & Downloads“ auf der Produktseite von StarSense
AutoAlign (#94034) auf celestron.com. Verbinden Sie anschließend den
USB-C-Anschluss von SSAA direkt mit Ihrem PC mithilfe eines USB-
Kabels (nicht im Lieferumfang enthalten). Wählen Sie dann „Support-
Protokolle herunterladen“. Die Protokolle werden direkt auf Ihren Computer
heruntergeladen.
HINWEIS: Die Support-Protokolle werden nicht dauerhaft im Speicher von SSAA gespeichert,
schalten Sie also Ihre Montierung nicht aus und trennen Sie SSAA nicht von der Montierung, bevor Sie
die SSAA-Support-Protokolle herunterladen.
Firmware aktualisieren
Mit dieser Option können Sie prüfen, ob die Firmware Ihres StarSense
AutoAlign (SSAA) auf dem neuesten Stand ist und verfügbare Updates
installieren.
Laden Sie zuerst den StarSense Windows-Treiber auf Ihren Computer
herunter und installieren ihn. Sie finden ihn im Abschnitt Support &
Downloads der StarSense AutoAlign (#94034)-Produktseite auf
celestron.com.
Verbinden Sie als Nächstes den USB-C-Port von SSAA direkt mit einem
USB-Kabel (nicht im Lieferumfang) mit Ihrem PC. Sobald Sie verbunden
sind, wählen Sie „Firmware aktualisieren“ und folgen den Anweisungen auf
dem Bildschirm, um den Vorgang abzuschließen.
7. Verwendung von SSAA mit SkyPortal
Sie können Ihr StarSense AutoAlign über Ihr Smartphone mit der
Celestron SkyPortal Powered by SkySafari™ App steuern.
Was Sie benötigen:
• Ein Smartphone mit der neuesten Version der SkyPortal-Mobil-App,
kostenlos verfügbar im Apple App Store oder Google Play
• Entweder ein WiFi-fähiges Celestron-Teleskop, z. B. NexStar Evolution,
ODER eine Celestron-computerisierte Montierung plus das SkyPortal
WiFi Module-Zubehör (separat erhältlich)
• StarSense AutoAlign, installiert und mit Ihrer Teleskopmontierung
verbunden
So verwenden Sie SSAA mit der
SkyPortal-App:
1. Stellen Sie sicher, dass SSAA an einem der AUX-Ports der
Teleskopmontierung angeschlossen ist.
2. Schalten Sie die Montierung ein.
3. Verbinden Sie sich mit dem WiFi-Netzwerk des Teleskops mit Ihrem
Smartphone.
- Unter verfügbaren WLAN-Netzwerken wird das Teleskop als
„Celestron-###“ angezeigt, wobei ### für Ziffern und Buchstaben
steht.
4. Öffnen Sie die SkyPortal-App.
5. Wählen Sie das Teleskop-Symbol unten rechts auf dem Bildschirm
(Abb. 20).
Abb. 20: Wählen Sie das Teleskop-Symbol unten rechts auf dem Bildschirm
6. Tippen Sie auf „Verbinden“, dann auf „Verbinden und Ausrichten“. Die
App startet nun die Ausrichtung. Positionieren Sie Ihr Teleskop für die
Ausrichtung mit einer der folgenden Methoden:
a. Bei EQ-Montierungen mit Ausgangspositionsschaltern (z.
B. CGX) drücken Sie „OK“. Die Montierung fährt dann in die
Ausgangsposition.
b. Bei EQ-Montierungen ohne Ausgangspositionsschalter (z. B. Advanced
VX), fordert die App Sie auf das Teleskop an die Markierungen der
Ausgangsposition zu bewegen (siehe Abbildung 11B). Sie können
das Teleskop manuell bewegen oder die Teleskopsteuerungen auf
dem Bildschirm verwenden.
c. Für AZ-Montierungen richten Sie Ihr Teleskop mit den
Teleskopsteuerungen auf dem Bildschirm zum nördlichen Horizont.
Der Tubus sollte ungefähr waagerecht zum Boden sein und nach
Norden zeigen. Wenn Sie sich auf der südlichen Hemisphäre
befinden, sollte das Teleskop ungefähr waagerecht zum Boden sein
und nach Süden zeigen.
d. Bei AZ-Montierungen auf einer Äquatorialkeil aktivieren Sie die
Äquatorialkeil-Option im Bildschirm „Teleskop-Einstellungen“.
Sie gelangen zu den „Teleskop-Einstellungen“ über Menü >
Einstellungen > Einrichtung und Steuerung. Wählen Sie anschließend
„StarSense-Äquatorialkeil-Ausrichtung aktiviert“. Kehren Sie nun
zum Hauptbildschirm des Planetariums zurück, brechen Sie die
aktuelle Ausrichtung ab und klicken Sie erneut auf „Verbinden“
und dann auf „Verbinden und Ausrichten“. Folgen Sie den
Anweisungen auf dem Bildschirm. Sie müssen das Teleskop in die
Ausgangsposition bringen. Siehe Abbildung 12 auf Seite 5.
HINWEIS: Sie können direkt auf die Teleskopeinstellungen zugreifen, indem Sie auf das Celestron-
Einstellungen-Symbol unten auf dem Bildschirm tippen. (Abb. 21).
Abb. 21: Das Celestron-Einstellungen-Symbol
7. Die automatische Ausrichtung beginnt nun. EQ-Montierungen
schwenken zu zwei Punkten im Westen und anschließend zu zwei
Punkten im Osten, um die Ausrichtungspunkte zu ermitteln. AZ-
Montierungen schwenken zu drei Punkten am Himmel. Wenn Sie zuvor
eine Zentrierkalibrierung durchgeführt haben, können Sie SSAA nun
verwenden, um Objekte zu finden. Wenn Sie keine Zentrierkalibrierung
abgeschlossen haben, fordert SkyPortal Sie dazu auf.
Fahren Sie mit Schritt 8 fort.
8. Die Zentrierkalibrierung richtet das Sichtfeld des SSAA auf das
Sichtfeld des Teleskops aus. Dieser Schritt muss im Allgemeinen nur
einmal durchgeführt werden, da SSAA Zentrierkalibrierungsdaten
in seinem internen Speicher speichert. Das nächste Mal, wenn
Sie sich mit SSAA über die App verbinden, ist keine erneute
Zentrierkalibrierung nötig, es sei denn, Sie haben SSAA an einen
anderen Tubus angebracht.
a. Wählen Sie zur Zentrierkalibrierung einen Stern in der
Planetariumsoberfläche aus und tippen Sie anschließend auf
„GoTo“. Das Teleskop schwenkt in die Nähe des Sterns, dieser
befindet sich jedoch möglicherweise nicht im Sichtfeld.
b. Verwenden Sie die Richtungstasten auf dem Bildschirm, um den
Stern präzise im Gesichtsfeld des Teleskops zu zentrieren. Wenn
Sie fertig sind, tippen Sie unten auf dem Bildschirm auf „Ausrichten“.
Tippen Sie anschließend auf „Kalibrieren“.
c. Die App schließt den Zentrierkalibrierungsprozess ab.
d. Nach der Zentrierkalibrierung werden Sie aufgefordert, die
Himmelsausrichtung wiederholen zu müssen. Tippen Sie auf
„Trennen“, dann auf das Teleskopsymbol, anschließend auf
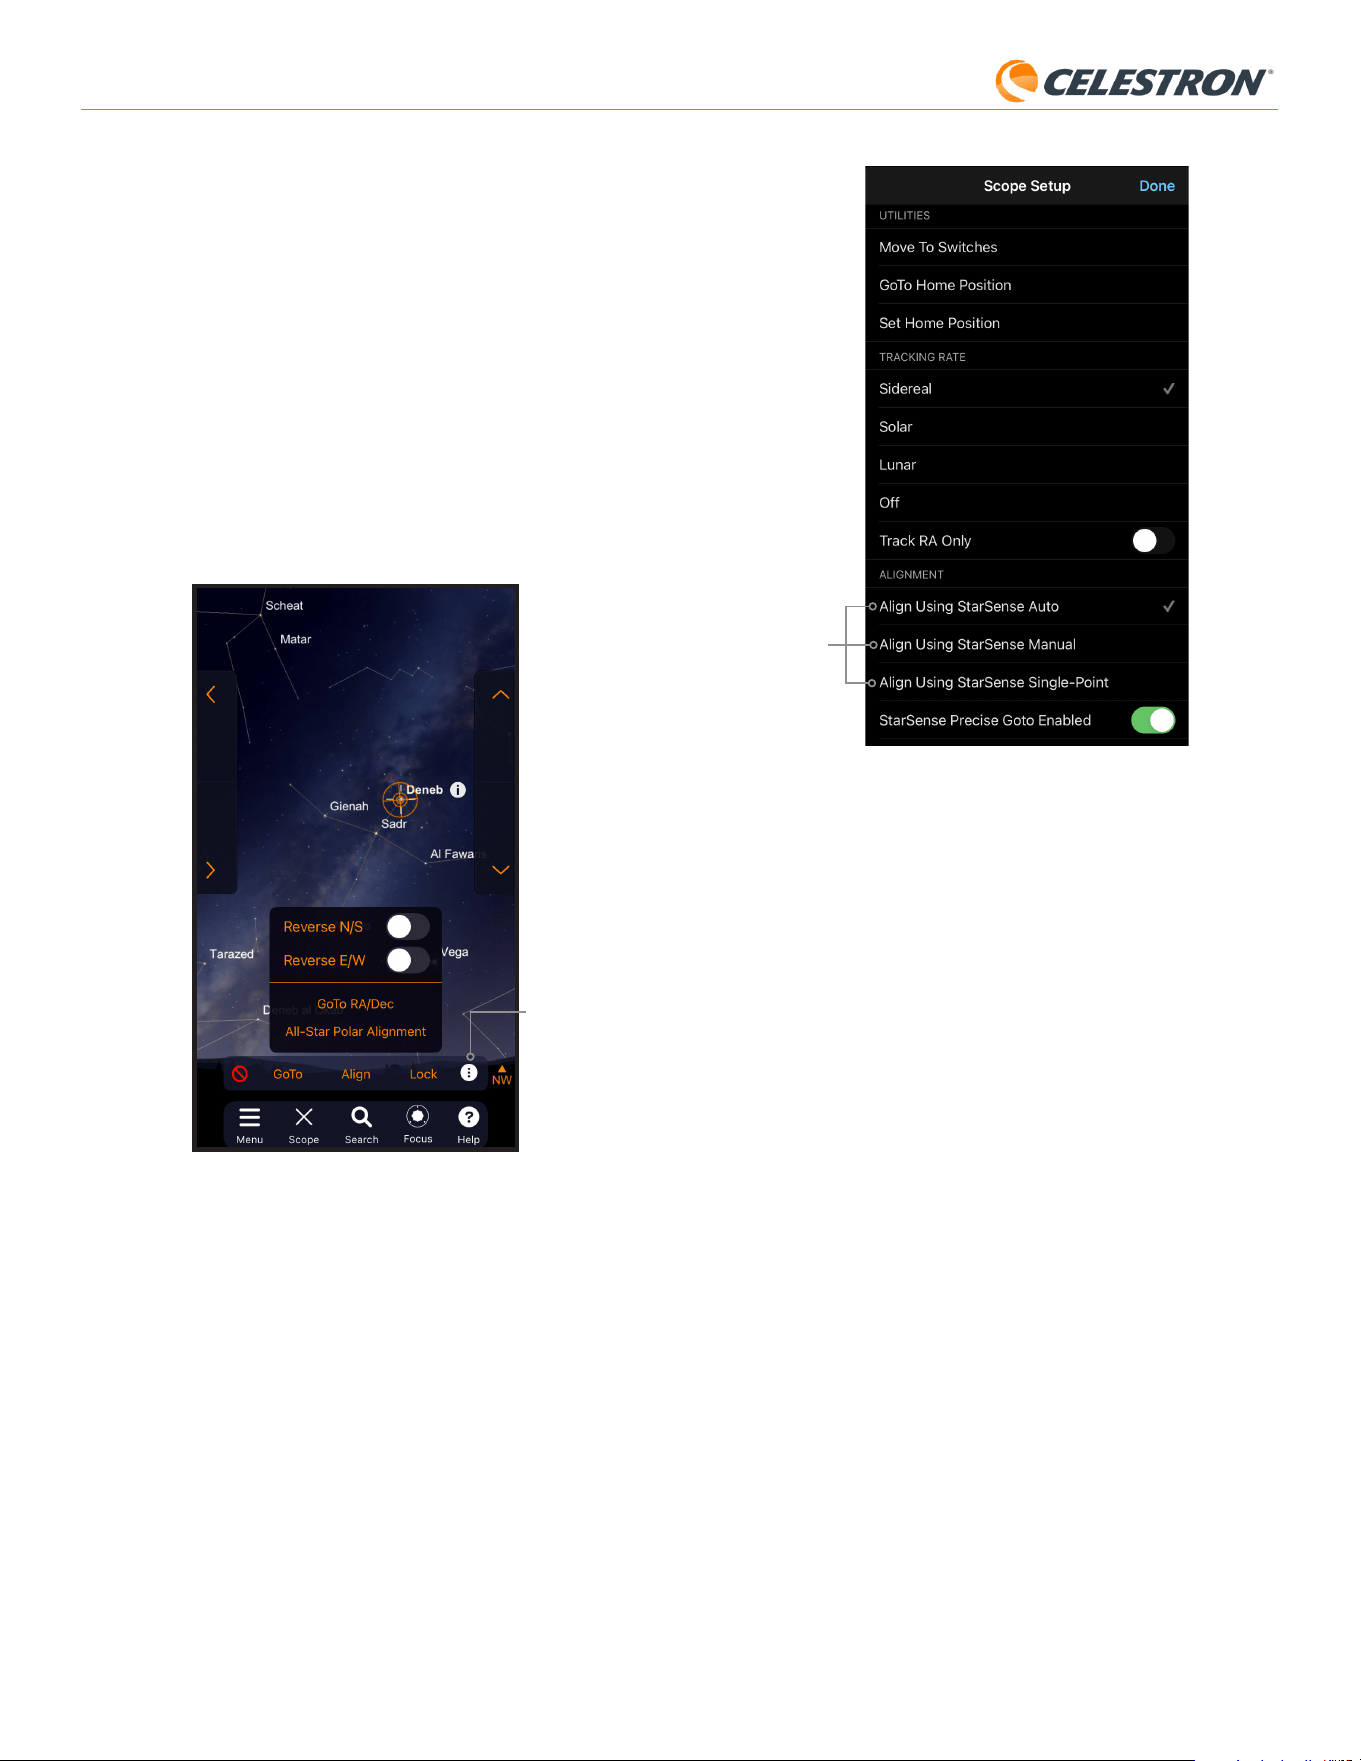
12 | DEUTSCH
StarSense AutoAlign V2
Ausrichtungs-
optionen
Abb. 22: Neben der automatischen Ausrichtung mit StarSense (Standardeinstellung)
stehen Ihnen im Bildschirm „Teleskop-Einstellungen“ weitere
Ausrichtungsoptionen zur Verfügung.
Manuelles Ausrichten mit StarSense
Mit der manuellen Ausrichtung von StarSense können Sie das Teleskop
manuell zu Ausrichtungspunkten schwenken, die Sie wählen, anstatt zu
den automatisch voreingestellten Punkten. Wenn Ihr Beobachtungsort
viele Hindernisse oder Wolken aufweist, ist die manuelle Ausrichtung
von StarSense möglicherweise schneller und komfortabler als die
automatische Ausrichtung von StarSense. Um die manuelle Ausrichtung
von StarSense zu verwenden, wählen Sie im Bildschirm „Teleskop-
Setup“ die Option „Ausrichten mit StarSense Manuell“. Wenn Sie
das nächste Mal „Verbinden und Ausrichten“ auswählen, werden Sie
von der App aufgefordert, eine manuelle Ausrichtung mit StarSense
durchzuführen. Folgen Sie den Anweisungen auf dem Bildschirm. Sie
können das Teleskop zu jeder Position am Himmel schwenken, die frei
von Hindernissen ist. Halten Sie die Ausrichtungspunkte in beiden
Achsen mindestens 30° voneinander entfernt.
Einzelpunkt-Ausrichtung mit StarSense
Mit der Einzelpunkt-Ausrichtung mit StarSense können Sie Ihr Teleskop
manuell auf einen bestimmten Himmelsbereich ausrichten. Dies ist die
schnellste Methode, bietet aber das ungenaueste Ausrichtungsmodell
für die Montierung. Aber denken Sie daran, SSAA wird weiterhin die
präzise GoTo-Funktion nutzen, um Objekte genau zu zentrieren. Daher
kann diese schnelle Vorgehensweise für gelegentliche Beobachtungen
völlig ausreichen. Sie können später auch mithilfe des Befehls
„Ausrichten > Ausrichten“ (siehe unten) zusätzliche Ausrichtungspunkte
hinzufügen, um die Genauigkeit Ihrer Montierung zu verbessern. Um
die StarSense Einzelpunkt-Ausrichtung zu verwenden, wählen Sie im
Bildschirm „Teleskop-Setup“ die Option „Mit StarSense Single-Point
ausrichten“. Beim nächsten Verbinden und Ausrichten werden Sie
aufgefordert, eine StarSense-Einzelpunkt-Ausrichtung durchzuführen.
Folgen Sie den Anweisungen auf dem Bildschirm.
Hinzufügen zusätzlicher Ausrichtungspunkte mit
dem Befehl „Ausrichten > Ausrichten“
Die integrierte Präzise-GoTo-Funktion von SSAA zentriert Objekte im
Sichtfeld, unabhängig von der Genauigkeit des Ausrichtungsmodells
Ihrer Montierung. Sie können die Ausrichtungsgenauigkeit Ihrer
„Verbinden“ und dann erneut auf „Verbinden und Ausrichten“.
Gehen Sie zurück zu Schritt 6.
Sie können SSAA nun verwenden, um Objekte am Nachthimmel zu finden.
Wählen Sie einfach ein Objekt in der App aus und tippen Sie auf „GoTo“.
Die präzise GoTo-Funktion ist standardmäßig aktiviert, sodass die Sterne
gut zentriert im Sichtfeld des Teleskops erscheinen sollten. Wenn SSAA
die präzise GoTo-Funktion nutzt, zeigt die App „Sternerkennung“ an.
Polausrichtung
Die Polausrichtungsunterstützung mit SSAA ist aktuell nicht über die
SkyPortal-App verfügbar. SkyPortal unterstützt jedoch die All-Star-
Polausrichtung (ASPA) für die präzise Polausrichtung Ihrer äquatorialen
Montierung. Wenn Sie eine äquatoriale Montierung (oder eine AZ-
Montierung auf einem Äquatorialkeil) verwenden, fragt die App nach
erfolgreicher Himmelsausrichtung, ob Sie ASPA durchführen möchten.
Wenn Sie ASPA später durchführen möchten, können Sie die All-Star-
Polausrichtung jederzeit über das Drei-Punkte-Symbol auswählen
Abbildung 21B. Nach der Durchführung von ASPA werden Sie
aufgefordert, erneut eine Himmelsausrichtung vorzunehmen.
Drei-Punkte-Symbol
Abb. 21B: Sie können die Polausrichtung jederzeit durchführen, indem Sie nach dem
Antippen des Drei-Punkte-Symbols die Option „All-Star-Polausrichtung“
auswählen.
Weitere Ausrichtungsoptionen
Auf dem Bildschirm „Teleskop-Setup“ (Menü „Einstellungen“ > „Setup
und Steuerung“ oder durch Drücken des Celestron-Einstellungen-
Symbols) können Sie weitere Ausrichtungsoptionen auswählen (Abb. 22).
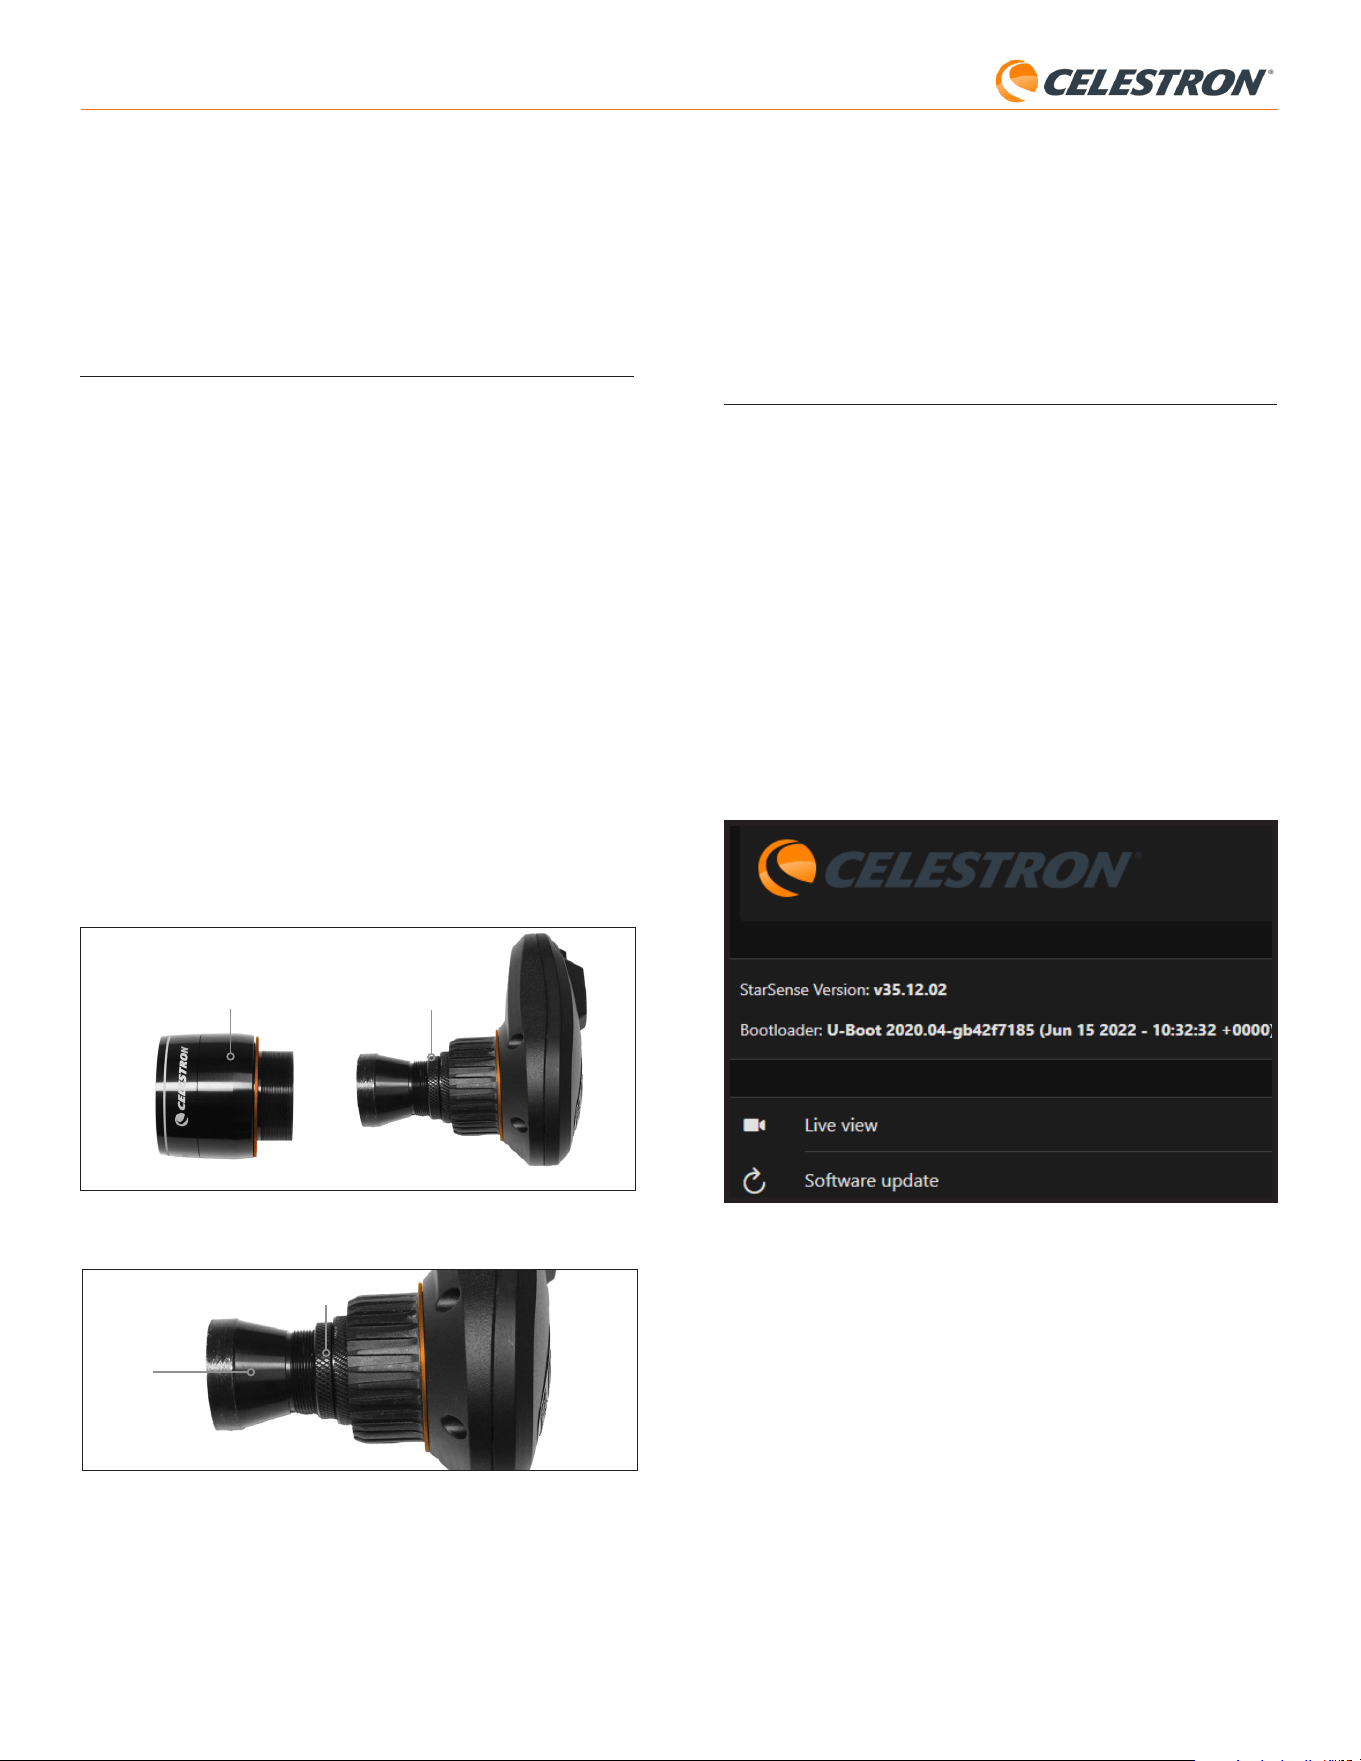
13 | DEUTSCH
StarSense AutoAlign V2
Montierung jedoch bei Bedarf weiter verbessern, indem Sie zusätzliche
Ausrichtungspunkte zum Ausrichtungsmodell hinzufügen.
Um Ausrichtungspunkte hinzuzufügen, schwenken Sie das Teleskop zu
einem beliebigen Bereich des klaren Himmels. Wählen Sie unten auf
dem Bildschirm „Ausrichten“ und anschließend erneut „Ausrichten“. Sie
können bis zu 10 Ausrichtungspunkte hinzufügen.
8. Fokussieren
Die Techniker im Werk haben Ihr StarSense AutoAlign bereits fokussiert.
Eine weitere Einstellung sollte nicht erforderlich sein. Wenn Sie jedoch
feststellen, dass SSAA nicht wie erwartet funktioniert (z. B. „Keine Sterne!“
meldet, wenn am Himmel viele Sterne sichtbar sind), überprüfen Sie bitte
die Fokussierung.
So fokussieren Sie StarSense AutoAlign:
1. Folgen Sie den zuvor beschriebenen Schritten, um die Live-Ansicht
in CPWI aufzurufen (siehe Seite 10). Alternativ können Sie die Live-
Ansicht über die Weboberfläche aufrufen. Siehe Kapitel 9 (auf dieser
Seite) für Anweisungen.
2. Wenn Sie tagsüber fokussieren, richten Sie SSAA auf ein Objekt in
mindestens 400 Metern Entfernung. Wenn Sie nachts fokussieren,
richten Sie SSAA auf einen hellen Stern. Sie sollten ein Bild auf dem
Bildschirm sehen.
HINWEIS: Aufgrund der sehr schnellen Optik und des empfindlichen
Sensors kann das Fokussieren bei hellem Tageslicht schwierig sein.
3. Wenn das Bild scharf ist, sind Sie fertig. Andernfalls entfernen
Sie die Frontabdeckung von SSAA, indem Sie sie fassen
und gegen den Uhrzeigersinn drehen, bis sie sich löst
(Abb. 23). Entfernen Sie die Frontabdeckung, um den Fokussperrring
freizulegen.
Abb. 23: Entfernen Sie nur die vordere Abdeckung, nicht das gesamte vordere Gehäuse
Fokusfeststellring
Vordere Abdeckung
4. Lösen Sie den Fokussperrring (Abb. 24).
Abb. 24: Lösen Sie den Arretierungsring beim Vornehmen von Fokussierungsanpassungen,
ziehen Sie ihn dann fest, wenn scharf fokussiert.
Fokusarretierungsring
Optik
5. Drehen Sie die Optik im Uhrzeigersinn um ein Viertel- bis halbe
Umdrehung, um zu sehen, ob sich der Fokus verbessert. Wenn ja, drehen
Sie weiter, bis der Fokus so scharf wie möglich ist. Wenn sich der Fokus
nicht verbessert, drehen Sie die Optik gegen den Uhrzeigersinn, bis
sich der Fokus verbessert.
6. Wenn Sie ein scharfes Bild sehen, ziehen Sie den Sperrring wieder fest
an und bringen die Frontabdeckung von SSAA wieder an. Sie können
den SSAA nun bei Bedarf vom USB-Anschluss des PCs trennen.
9. SSAA-Firmware aktualisieren
und Live-Ansicht über die
Weboberfläche nutzen
Unsere Ingenieure arbeiten kontinuierlich an Verbesserungen und
Aktualisierungen unserer Produkte. Wir empfehlen Ihnen daher, regelmäßig
nach SSAA-Firmware-Updates zu suchen. Falls neue Firmware verfügbar
ist, finden Sie sie auf der Produktseite StarSense AutoAlign V2 (#94034)
auf celestron.com unter „Support and Downloads“. Zur Installation der
heruntergeladenen .swu-Datei benötigen Sie ein USB-C-auf-USB-A-
Kabel (nicht im Lieferumfang enthalten) und den StarSense-Windows-
Treiber, der ebenfalls auf der Produktseite des StarSense AutoAlign V2
(#94034) verfügbar ist.
Folgen Sie diesen Schritten, um die SSAA-Firmware zu
aktualisieren:
1. Installieren Sie den StarSense Windows -Treiber auf Ihrem PC.
2. Verbinden Sie SSAA über das USB-Kabel mit Ihrem PC. Warten Sie ca.
10 Sekunden, bis SSAA hochgefahren ist.
3. Öffnen Sie einen Webbrowser auf Ihrem Computer und geben Sie
http://169.254.54.1/ ein, um die SSAA-Weboberfläche zu öffnen
(Abb. 25).
Abb. 25: Sie können die Firmware von SSAA über die Webschnittstelle aktualisieren.
Sie können auch von hier aus auf Live-Ansicht zugreifen.
4. Wählen Sie „Software Update“.
5. Ziehen Sie die heruntergeladene .swu-Datei wie beschrieben per Drag
& Drop in das Fenster. Die Software von SSAA wird aktualisiert.
Sie können die StarSense AutoAlign Live-Ansicht auch über die
Weboberfläche aufrufen. Hier können Sie zwischen automatischen und
manuellen Kameraeinstellungen wechseln und ein Bild im TIFF-Format
aufnehmen.
14 | DEUTSCH
StarSense AutoAlign V2
10. Aktualisierung der SSAA Firmware
über den Celestron Firmware
Manager (CFM)
Sie können auch den Celestron Firmware Manager (CFM) verwenden,
um StarSense AutoAlign, Ihre NexStar+ Handsteuerung und Ihre
Montierung gleichzeitig zu aktualisieren.
Bevor Sie beginnen, laden Sie den Celestron Firmware Manager
(CFM) und den StarSense Windows-Treiber herunter. Beide finden Sie
auf celestron.com auf der Produktseite von StarSense AutoAlign V2
(#94034) unter „Software und Downloads“.
Für die Aktualisierung mit CFM benötigen Sie zwei eigene Kabel:
- Ein USB-A-auf-USB-Mini-B-Kabel, um die NexStar+ Handsteuerung
mit Ihrem PC zu verbinden.
- Ein USB-A-auf-USB-C-Kabel, um StarSense AutoAlign mit Ihrem PC
zu verbinden.
So installieren Sie die Firmware:
1. Installieren Sie CFM und den StarSense Windows-Treiber auf Ihrem
PC.
2. Richten Sie Ihre Montierung wie gewohnt ein, indem Sie die NexStar+
Handsteuerung und SSAA an die AUX-Anschlüsse der Montierung
anschließen.
3. Schalten Sie die Montierung ein.
4. Verbinden Sie den USB-Anschluss an der Unterseite der
Handsteuerung mit Ihrem PC über das USB-Type-A-zu-USB-Mini-B-
Kabel (nicht im Lieferumfang enthalten).
5. Starten Sie CFM und klicken Sie auf „Geräte suchen“. CFM sollte die
Handsteuerung, die Montierung und StarSense AutoAlign finden.
6. Klicken Sie in CFM auf die Schaltfläche „Aktualisieren“. CFM installiert
alle verfügbaren Firmware-Updates für die Handsteuerung und die
Montierung.
7. Wenn ein Firmware-Update für StarSense AutoAlign verfügbar ist,
fordert CFM Sie auf, es mit einem USB-Type-A-zu-USB-Type-C-Kabel
(nicht im Lieferumfang enthalten) direkt mit Ihrem PC zu verbinden.
Halten Sie StarSense über sein AUX-Kabel mit der Montierung
verbunden. Gleichzeitig verbinden Sie seinen USB-C-Anschluss mit
Ihrem PC. Sobald die USB-Verbindung hergestellt ist, klicken Sie auf
„OK“ in CFM, um das Firmware-Update zu beginnen.
HINWEIS: StarSense AutoAlign muss über eine direkte USB-
Verbindung aktualisiert werden. Die Firmware-Datei ist
zu groß, um über die AUX-Verbindung der Montierung
übertragen zu werden.
8. Wenn CFM ein grünes Häkchen anzeigt (Abb. 26), ist das StarSense
AutoAlign-Update abgeschlossen.
Abb. 26: Wenn das SSAA-Update abgeschlossen ist, sehen Sie ein grünes Häkchen.
11. Technische Daten
OBJEKTIV
DESIGN Doublet
ÖFFNUNG 20 mm
BRENNWEITE 40 mm
EFFEKTIVE BRENNWEITE f/2
ANZAHL DER ELEMENTE 2
VERGÜTUNG Vollständig mehrfach vergütet
CMOS-BILDSENSOR
CMOS-BILDSENSOR Sony IMX462LLR-C, monochrom,
rückseitig belichtet
SENSORGRÖSSE 6,46 mm Diagonale
PIXELGRÖSSE 2,9 μm x 2,9 μm
ANZAHL EFFEKTIVER PIXEL 2,13 Mio.
INTEGRIERTER COMPUTER
PRIMÄRER ARM®-KERN 2 × Cortex®-A53 bis zu 1,4 GHz
SEKUNDÄRER ARM®-KERN 1 x Cortex
®
-M7 bis zu 600 MHz
Arbeitsspeicher (RAM): 512 MB
Speicherplatz (ROM): 4 GB
GPU GC7000 UltraLite
BETRIEBSTEMPERATUR: -5 °C bis 40 °C
ANSCHLÜSSE
AUX: Für Verbindung mit Celestron-Montierungen
USB-C Für PC-Verbindung zum Fokussieren, Live-
Ansicht anzeigen und Firmware aktualisieren
GEHÄUSE
GEHÄUSE Aluminium mit Kunststoffabdeckungen
12. Fehlerbehebung und Tipps
1. Wenn Sie bei klarem Himmel während des Plate Solving kontinuierlich
die Fehlermeldung „Keine Sterne!“ erhalten, versuchen Sie, SSA neu zu
fokussieren.
2. Bei hohem und hellem Mond kann StarSense AutoAlign aufgrund von
Blendung Schwierigkeiten bei der Plattenberechnung im Umkreis von
wenigen Grad um den Mond haben. In diesem Fall wird eine „Keine
Sterne!“-Fehlermeldung angezeigt. Bei leichtem Dunst kann die
Plattenberechnung selbst in größerer Entfernung vom Mond fehlschlagen.
3. Für optimale Ergebnisse empfehlen wir, Ihr Stativ waagerecht auszurichten.
SSAA funktioniert zwar auch mit einem nicht waagerechten Stativ, die
Genauigkeit der Zielerfassung ist jedoch etwas geringer.
4. Für eine optimale Genauigkeit der Präzises GoTo-Funktion richten Sie
Ihre Montierung polar aus. Präzises GoTo funktioniert auch ohne polare
Ausrichtung gut, die Gesamtgenauigkeit ist dann jedoch etwas geringer –
typischerweise um einige Bogenminuten.
5. Wenn Sie möchten, können Sie SSAA direkt über den USB-C-Port mit
Ihrem PC verbinden, um mit CPWI zu steuern. Bevor Sie sich verbinden,
laden Sie den StarSense Windows- Treiber herunter und installieren Sie

15 | DEUTSCH
StarSense AutoAlign V2
FCC-HINWEIS: Dieses Gerät wurde geprüft und entspricht den Grenzwerten für digitale
Geräte der Klasse B gemäß Teil 15 der FCC-Bestimmungen. Diese Grenzwerte sollen einen
angemessenen Schutz vor schädlichen Störungen in Wohngebieten gewährleisten. Dieses
Gerät erzeugt, verwendet und kann Hochfrequenzenergie abstrahlen. Bei nicht vorschrifts-
mäßiger Installation und Verwendung kann es Störungen des Funkverkehrs verursachen. Es
kann jedoch nicht ausgeschlossen werden, dass in bestimmten Fällen Störungen auftreten.
Wenn dieses Gerät schädliche Störungen des Radio- oder Fernsehempfangs verursacht, was
durch Aus- und Einschalten des Geräts festgestellt werden kann, wird der Benutzer aufgefor-
dert, die Störung durch eine oder mehrere der folgenden Maßnahmen zu beheben:
• Empfangsantenne neu ausrichten oder verlagern.
• Den Abstand zwischen dem Gerät und dem Empfänger vergrößern.
• Das Gerät an eine Steckdose anschließen, die sich in einem anderen Stromkreis als der
des Empfängers befindet.
• Den Händler oder einen erfahrenen Radio-/TV-Techniker um Rat fragen
Produktdesign und Spezifikationen können ohne vorherige Ankündigung geändert werden.
Dieses Produkt ist für Personen ab 14 Jahren konzipiert und vorgesehen.
©2026 Celestron. Celestron und Symbol sind Warenzeichen von Celestron, LLC.
Alle Rechte vorbehalten. • Celestron.com
USA: 2835 Columbia Street, Torrance, CA 90503 USA
UK: Unit 2 Transigo, Gables Way, Thatcham RG19 4JZ, Vereinigtes Königreich
Dieses Produkt ist für Personen ab 14 Jahren konzipiert und vorgesehen.
Hergestellt in China
05-26
celestron.com/pages/warranty
ihn (verfügbar auf der SSAA V2-Produktseite auf celestron.com). Stecken
Sie SSAA in Ihren PC. Nach etwa 10 Sekunden fährt SSAA hoch, und Ihr
Computer erkennt den StarSense AutoAlign.
- Lassen Sie SSAA über das mitgelieferte AUX-Kabel mit Ihrer
Montierung verbunden, auch während es über USB-C mit Ihrem PC
verbunden ist. Verwenden Sie den AUX-Anschluss Ihrer Montierung,
nicht den Autoguider-Anschluss. (Der ST-4-Autoguider-Anschluss ist
nicht kompatibel mit SSAA.)
- Verwenden Sie unbedingt ein hochwertiges USB-Kabel. Wenn Sie
Probleme haben, sich mit SSAA über USB zu verbinden, versuchen
Sie ein anderes USB-Kabel oder einen anderen USB-Port an
Ihrem Computer. Wir empfehlen nicht die Verwendung von USB-
Verlängerungskabeln, da sie zu Signalverlust beitragen können.
6. Wenn Sie StarSense AutoAlign von seiner Halterungsbasis entfernen und
später neu installieren, müssen Sie normalerweise keine Zentrierkalibrierung
erneut durchführen. Wenn jedoch Objekte nicht mehr in die Nähe der Mitte
des Sichtfelds stehen, wiederholen Sie das Zentrierkalibrierungsverfahren.

1 | ITALIANO
StarSense AutoAlign V2
StarSense
®
AutoAlign V2
ITALIANO # 94034
Con il Celestron StarSense AutoAlign Version 2 (SSAA), usare un
telescopio Celestron non è mai stato così semplice. Questo accessorio
tutto-in-uno allinea automaticamente il telescopio e molto altro! Con il
nuovo StarSense AutoAlign, è possibile:
• Allineare automaticamente il telescopio equatoriale o altazimutale al
cielo notturno in pochi minuti. Una volta allineato, il telescopio troverà e
centrerà gli oggetti con una maggiore precisione di puntamento.
• Allineamento polare rapido e preciso della montatura equatoriale, se
lo si desidera.
Leggere questo manuale prima di configurare e utilizzare StarSense
AutoAlign. È possibile trovare la versione più aggiornata di questo
manuale di istruzioni nella pagina prodotto StarSense AutoAlign V2 su
celestron.com.
MANUALE DI ISTRUZIONI
ATTENZIONE – Non puntare mai StarSense AutoAlign al Sole! Ciò
potrebbe danneggiare il sensore di immagine di SSAA. Questo danno non
è coperto dalla garanzia. Tenere il tappo di copertura di SSAA durante il
giorno.
AVVERTENZA: NON COLLEGARE STARSENSE AUTOALIGN ALLA PORTA
AUTOGUIDER DELLA TUA MONTATURA! Collega sempre StarSense
AutoAlign a una delle porte AUX della tua montatura. Collegandolo alla
porta Autoguider potrebbe danneggiare StarSense AutoAlign.

2 | ENGLISH
StarSense AutoAlign V2
SOMMARIO
1. Elenco componenti .................................................................................................1
2. Installazione .......................................................................................................1
3. Controllo di StarSense AutoAlign ....................................................................................3
4. Flusso di lavoro di StarSense AutoAlign ................................................................................3
5. Utilizzo di SSAA con pulsantiera NexStar+ .............................................................................3
6. Utilizzo di SSAA con CPWI ..........................................................................................8
7. Utilizzo di SSAA con SkyPortal .......................................................................................11
8. Messa a fuoco .....................................................................................................13
9. Aggiornamento del firmware di SSAA e della Live View tramite l'interfaccia web ..............................................13
10. Aggiornamento del firmware di SSAA tramite Celestron Firmware Manager (CFM) ...........................................14
11. Specifiche tecniche. ...............................................................................................14
12. Risoluzione dei problemi e suggerimenti. ..............................................................................15

1 | ITALIANO
StarSense AutoAlign V2
Staffa piccola
Base a coda di rondine standard
per cercatore
Fig. 3: Se il telescopio dispone già di una base standard per cercatore, è possibile
utilizzare la staffa piccola per montare lo SSAA sul telescopio.
Se si utilizza un telescopio con un’apertura inferiore a 5’’ e il telescopio
non dispone di una base a coda di rondine standard, è necessario
acquistare una base da un fornitore di terze parti.
Se si sta utilizzando la staffa grande pre-installata per il
montaggio di SSAA al proprio tubo del telescopio:
1. Collegare la base della staffa larga al telescopio. (Nota: Alcuni
telescopi potrebbero già avere questa base installata; è la stessa usata
per il cercatore 8x50 incluso con diversi telescopi.) Se è necessario
installare la base, utilizzare le viti accessorie con testa a croce, che
sono preinstallate nella cella posteriore del telescopio. Solitamente ci
sono due posizioni sulla cella posteriore per montare la base (Fig. 4).
Posizione di
montaggio base 1
Posizione di
montaggio base 2
Fig. 4: La base della staffa grande può essere collegata al tubo ottico (OTA) in due
posizioni sulla maggior parte dei telescopi Celestron.
2. Rimuovere le viti, orientare la base come mostrato, e allineare i fori
nella base con i fori nella cella posteriore.
3. Reinstallare le viti in modo che la base sia sicura. Se necessario,
utilizzare le viti con testa a croce fornite.
4. Avvitare senza stringere le due viti a testa zigrinata nella staffa grande
(Fig. 5).
Viti
Fig. 5: Installare le viti nella staffa grande. Questi fissano la staffa alla base come
mostrato.
1. Elenco componenti
A. StarSense AutoAlign con tappo di copertura
B. Staffa larga (pre-installato su StarSense AutoAlign)
C. Base staffa larga
D. Staffa piccola
E. Cavo AUX
F. Viti con testa a croce (2)
G. Viti base staffa larga (2)
H. Chiave esagonale
A
D
B
C
E F G H
Fig. 1
2. Installazione
StarSense AutoAlign si collega al tubo ottico utilizzando una delle due
staffe fornite (ad es., la staffa grande o la staffa piccola). Utilizzare la
staffa grande con i telescopi Schmidt-Cassegrain, EdgeHD e RASA con
apertura di 5’’ o superiore (Fig. 2).
Staffa larga
Base staffa larga
Fig. 2: La base e la staffa grande collegano SSAA ai telescopi Celestron Schmidt-
Cassegrain, EdgeHD e RASA da 5" o superiori.
Utilizzare la staffa piccola con altri telescopi dotati di una base a coda di
rondine standard per un cercatore (Fig. 3).
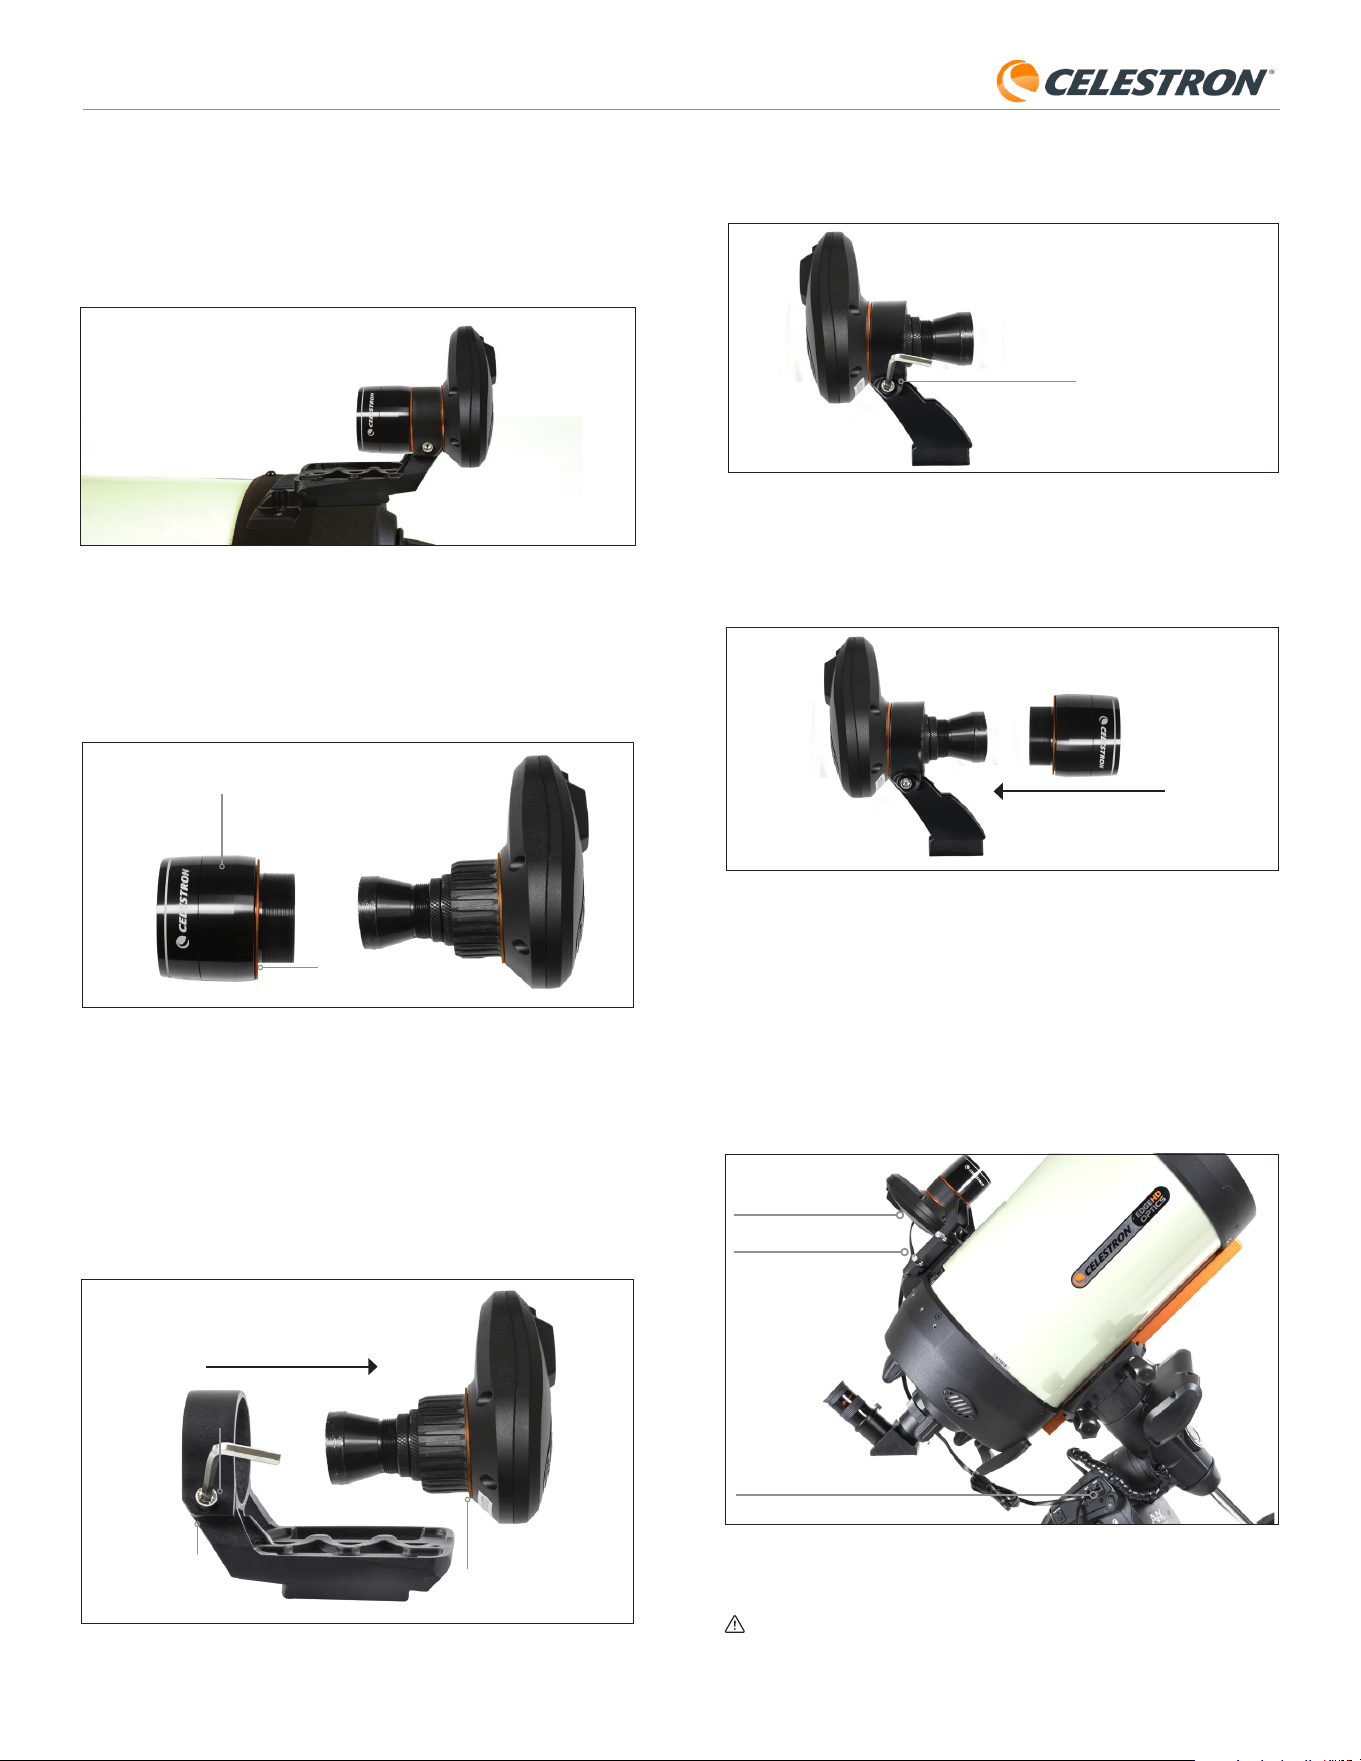
2 | ITALIANO
StarSense AutoAlign V2
3. Allentare la vite a brugola sul morsetto della staffa piccola e installare
SSAA e l’anello arancione nella staffa piccola. Orientare come indicato
(Fig. 8).
Vite a brugola
Fig. 8: Installare il SSAA nella staffa piccola come mostrato, quindi riserrare la vite a
brugola sulla staffa.
4. Riavvitare la vite a brugola sul morsetto della staffa piccola.
5. Reinstallare l’alloggiamento anteriore di SSAA e l’anello anteriore
arancione (Fig. 9).
Fig. 9: Reinstallare l'alloggiamento anteriore su SSAA. Non dimenticare l'anello
cosmetico arancione!
6. Per installare SSAA nella base a coda di rondine standard del cercatore
del telescopio, è sufficiente inserire la piccola staffa nella base e serrare
la vite a testa zigrinata sulla base per fissarla in posizione.
Ora che si è installato SSAA, si dovrà collegare la sua porta AUX a una
delle porte AUX sulla montatura del telescopio. Utilizzare il cavo AUX in
dotazione (Fig. 10). Se non si dispone di una porta AUX disponibile sulla
montatura, prendere in considerazione l’acquisto di uno sdoppiatore di
porta AUX Celestron opzionale.
Porta AUX (su SSAA)
Porta AUX (su montatura)
Cavo AUX
Fig. 10: Utilizzare il cavo AUX fornito per collegare la porta AUX di SSAA alla porta
AUX della montatura.
AVVERTENZA: NON COLLEGARE StarSense AutoAlign ALLA PORTA
AUTOGUIDER DELLA TUA MONTATURA! Collega sempre StarSense
AutoAlign a una delle porte AUX della tua montatura. Collegandolo alla
porta Autoguider potrebbe danneggiare StarSense AutoAlign.
5. Far scorrere la staffa sulla base finché non è completamente inserita.
6. Serrare le viti a testa zigrinata per fissare la staffa alla base.
La barra a coda di rondine CGE da 8” opzionale per il montaggio degli
accessori ostruirà la staffa grande di SSAA. Anche il braccio della forcella
CPC 800 ostruirà il SSAA. Per queste configurazioni, fissare la base e la
staffa grande all’indietro come mostrato nella Fig. 5a.
Fig. 5a: Sarà necessario installare la base e la staffa grande al contrario su un telescopio
CPC 800.
Se si utilizzando la staffa piccola, si dovrà prima rimuovere SSAA
dalla staffa grande. Per montare SSAA con la staffa piccola:
1. Sfilare completamente l’alloggiamento anteriore del SSAA e rimuoverlo.
In questo modo si esporrà il tubo ottico di SSAA (Fig. 6). Inoltre,
rimuovere l’anello cosmetico anteriore arancione.
Anello cosmetico arancione
Fig. 6: Per cambiare le staffe, svitare completamente e rimuovere l'intera parte anteriore
dell'alloggiamento SSAA, compreso l'anello arancione.
Parte anteriore dell'alloggiamento SSAA
NOTA: Quando si rimuove l’alloggiamento anteriore per installare la staffa
piccola, si potrebbe accidentalmente influenzare la messa a fuoco di fabbrica di
SSAA. Tenerlo a mente quando si utilizzerà il SSAA in seguito. Se il dispositivo
non funziona correttamente e si riceve il messaggio di errore “Nessuna stella!”,
potrebbe essere necessario rimettere a fuoco. Per fare ciò, fare riferimento alla
sezione Messa a fuoco successiva in questo manuale.
2. Utilizzare la chiave esagonale per allentare la vite a brugola, che fornisce
la forza di serraggio della staffa. Quindi estrarre il SSAA dalla staffa
(Fig. 7). In questo modo si rimuoverà anche l’anello cosmetico posteriore
arancione.
Vite a brugola
Anello cosmetico arancione
posteriore
Chiave esagonale
Fig. 7: Allentare la vite a brugola. Rimuovere il SSAA dalla staffa grande, incluso l'anello
arancione posteriore.

3 | ITALIANO
StarSense AutoAlign V2
App SkyPortal per iOS e Android
Se si utilizza il modulo WiFi Celestron SkyPortal o si dispone di una
montatura Celestron con WiFi integrato (ad es. NexStar Evolution), è
possibile utilizzare l’app SkyPortal per controllare il proprio SSAA. È
richiesto uno smartphone con installata la versione più recente dell’app
SkyPortal, disponibile gratuitamente su Apple App Store o Google Play.
4. Flusso di lavoro di StarSense
AutoAlign
Prima di passare alle istruzioni passo-passo, ecco una panoramica
generale di come viene normalmente utilizzato StarSense AutoAlign. Il
processo di configurazione segue generalmente la seguente sequenza:
A. Allineamento polare – Se si utilizza una montatura equatoriale,
oppure una montatura altazimutale montata su una base equatoriale,
iniziare utilizzando StarSense AutoAlign per assistere nell’allineamento
polare. Questo passaggio allinea la montatura con l’asse di rotazione
terrestre.
Se si utilizza una montatura altazimutale standard, saltare questo
passaggio.
B. Allineamento del cielo – Successivamente, eseguire l’allineamento
del cielo. Questo consente alla montatura di determinare dove è puntata
nel cielo notturno. Sono disponibili diverse opzioni di allineamento,
ma nella maggior parte dei casi Auto Align è il metodo preferito e più
comunemente utilizzato.
C. Calibrazione del centro – La calibrazione del centro allinea il campo
visivo della fotocamera StarSense con il campo visivo del telescopio.
Questa operazione deve essere eseguita una sola volta, purché lo
StarSense AutoAlign rimanga montato nella stessa posizione. L’offset
di calibrazione viene memorizzato nella memoria dell’unità.
Se si rimuove e si reinstalla lo StarSense AutoAlign, si consiglia di
eseguire nuovamente la calibrazione del centro. Dopo aver completato
la calibrazione del centro, sarà necessario ripetere anche l’allineamento
del cielo.
I tre capitoli successivi spiegano come eseguire queste operazioni
utilizzando il controller NexStar+ (capitolo 5, pagina 3), il software per PC
CPWI (capitolo 6, pagina 7) oppure l’app SkyPortal (capitolo 7, pagina 10).
È sufficiente consultare il capitolo corrispondente al metodo di controllo
che si sta utilizzando.
5. Utilizzo di SSAA con pulsantiera
NexStar+
Il controller manuale NexStar+ è uno dei modi più semplici per utilizzare lo
StarSense AutoAlign. Non richiede un computer e consente di controllare
il telescopio come di consueto, con le funzionalità di allineamento avanzato
di StarSense integrate.
Scegliere la sezione seguente corrispondente alla propria configurazione:
- Sezione A – Montatura altazimutale (AZ) Celestron
- Sezione B – Montatura equatoriale (EQ) Celestron
- Sezione C – Montatura AZ Celestron utilizzata con una base equatoriale
opzionale
Consultare solo la sezione applicabile alla configurazione della propria
montatura.
A. Utilizzo di SSAA con una montatura
altazimutale (AZ)
Le montature altazimutali non possono essere allineate al polo. Questa
sezione descrive la procedura per eseguire un allineamento del cielo
utilizzando StarSense AutoAlign.
3. Controllo di StarSense AutoAlign
Ci sono molti modi per controllare il proprio StarSense AutoAlign:
Pulsantiera NexStar+
Per utilizzare SSAA con la pulsantiera NexStar+ fornita con la propria
montatura Celestron, potrebbe essere necessario aggiornare il firmware
della pulsantiera. Sarà necessaria la versione firmware 5.35.5340 o
successiva. Per verificare il numero della versione del firmware, premere
il pulsante MENU. Utilizzare i pulsanti SCROLL (SCORRIMENTO)
ed ENTER (INVIO) per accedere a Utilità > Versione. Utilizzare
il software Celestron Firmware Manager (CFM) per aggiornare il
firmware, se necessario. Si troverà l’ultima versione di CFM qui:
celestron.com/pages/drivers-and-software
Si avrà bisogno di un cavo USB (Type-A a Mini-B) per collegare la
pulsantiera al proprio PC. Fare riferimento alla sezione 9 di questo manuale
(pag. 13) per ulteriori informazioni.
Software di controllo telescopio
CPWI per PC
È possibile controllare il proprio telescopio e StarSense AutoAlign con il
nostro software gratuito Celestron CPWI. Per scaricare la versione più
recente, visitare: https://www.celestron.com/pages/celestron-pwi-
telescope-control-software
Sarà necessaria la versione CPWI 2.5.9 o superiore. Installare il software
e aprire CPWI. Selezionare “Start” se viene visualizzata la finestra di
apertura. Quindi, fare clic sull’icona “Connessione” nell’angolo in alto a
sinistra dello schermo. Se si sta usando una connessione cablata alla
propria montatura Celestron (ad es. attraverso la pulsantiera o la montatura
stessa), selezionare “USB”. Se si è connessi tramite WiFi utilizzando il
modulo SkyPortal WiFi o il WiFi integrato della montatura (ad es. NexStar
Evolution), selezionare “WiFi”. CPWI dovrebbe cercare e connettersi a
StarSense AutoAlign. Una volta connesso, l’icona SSAA apparirà nel
menu di selezione sul lato sinistro dello schermo. Selezionare l’icona per
visualizzare il menu StarSense (Fig. 11).
Fig. 11: Quando si collega la propria montatura Celestron al proprio PC e si lancia CPWI,
si vedrà il menu di StarSense tra le icone sul lato sinistro dello schermo.
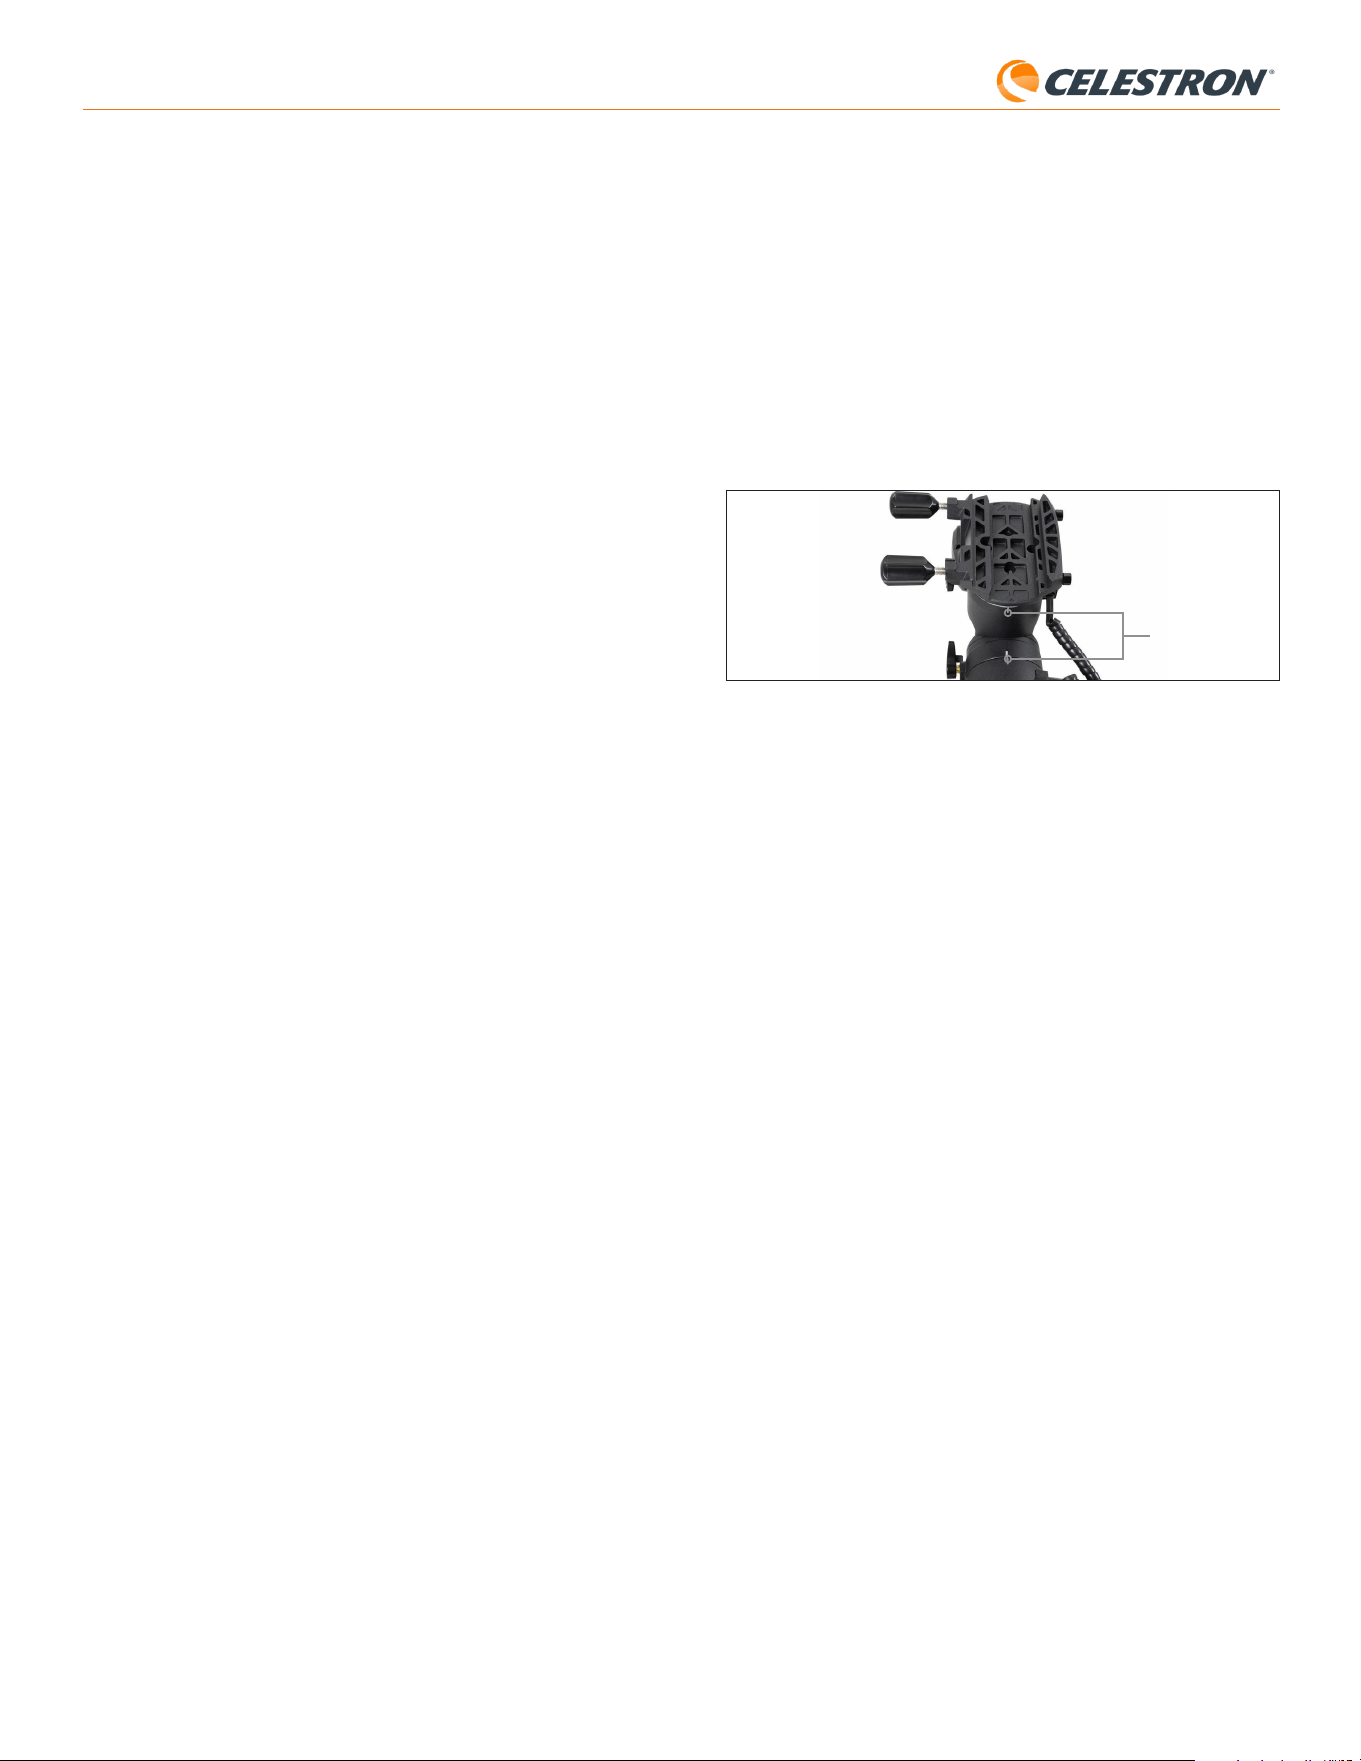
4 | ITALIANO
StarSense AutoAlign V2
Una volta completato l’allineamento polare approssimativo, si è
pronti per avviare il processo di allineamento:
5. Accendere la montatura.
6. Premere INVIO.
7. a. Se si ha una montatura EQ con selettori di posizione iniziale, come
CGX o CGX-L, la pulsantiera chiederà di spostare la montatura alla
sua posizione iniziale. Premere INVIO.
b. Se si dispone di una montatura EQ senza sensori di posizione iniziale,
come la montatura Advanced VX, il controller richiederà di spostare
manualmente la montatura fino ai segni di riferimento (Fig. 11B). È
possibile utilizzare i pulsanti di movimento manuale del controller
per spostare la montatura oppure allentare le frizioni degli assi RA
e DEC e ruotare gli assi manualmente. Una volta allineati i segni di
riferimento, serrare nuovamente le frizioni e premere INVIO.
Fig. 11B I segni di riferimento sulla montatura equatoriale Advanced VX.
8. Verrà richiesto se si desidera eseguire l’allineamento polare.
Si consiglia di eseguirlo in questa fase. Se si salta questo passaggio
e lo si esegue in seguito, sarà necessario ripetere il processo di
allineamento del cielo.
Per eseguire l’allineamento polare ora, premere ALLINEA.
Per saltare l’allineamento polare, premere INVIO per continuare con
l’allineamento del cielo.
9. Seguire le indicazioni sullo schermo per inserire la propria località, l’ora
locale e la data.
- Si potrebbe voler utilizzare il database delle città per impostare la
propria posizione. Non preoccuparsi se la propria posizione esatta non
è nel database. Basta selezionare la città più vicina.
10. Se è stato selezionato l’allineamento polare, proseguire al passo 11.
Se si è saltato l’allineamento polare, passare al passo 21.
11. La pulsantiera chiederà di ruotare il telescopio verso un’area libera del
cielo. Utilizzare i tasti di direzione della pulsantiera per indicare una
posizione libera. Premere INVIO.
• Il telescopio ruoterà da ovest a est per circa 50° durante il processo di
allineamento polare. (Se ci si trova nell’emisfero australe, il telescopio
si sposterà da Est verso Ovest per circa 50°). Cercare di spostare
il telescopio verso un’area di cielo libera da ostacoli lungo questo
percorso.
12. Il telescopio ruoterà da ovest a est per ottenere riferimenti di
allineamento polare. (Se ci si trova nell’emisfero australe, il telescopio
si sposterà da Est verso Ovest.) Ci vorranno alcuni minuti.
13. Quando il telescopio smette di ruotare, la pulsantiera visualizzerà
“Regola AZM”. Premere INVIO. Il display LCD mostrerà ora gli errori di
allineamento polare AZM e ALT.
14. Se la montatura ha una manopola di blocco dell’asse azimutale o viti di
bloccaggio, allentarle prima di regolare l’azimut.
15. Utilizzare le manopole di regolazione fine dell’azimut della montatura
per regolare lentamente il posizionamento dell’azimut (da sinistra a
destra) della montatura. Man mano che si apportano queste modifiche,
l’errore AZM aumenterà o diminuirà. Continuare a regolare fino a
quando l’errore AZM è inferiore a due minuti d’arco. Premere INVIO.
• Non regolare l’altitudine della montatura! Le regolazioni dell’altitudine
si effettueranno nel passo successivo.
• Apportare le modifiche lentamente in modo che SSAA possa
seguirle. Se si regola troppo velocemente e SSAA perde traccia, è
necessario riavviare l’intero processo di allineamento polare.
1. Assicurarsi che il treppiede sia sufficientemente livellato. Se la propria
montatura ha una livella a bolla incorporata, usarla come riferimento.
2. Puntare manualmente il tubo del telescopio in posizione orizzontale
verso l’orizzonte Nord. (Se ci si trova nell’emisfero australe, puntarlo
verso l’orizzonte Sud.)
3. Accendere la montatura.
4. Premere INVIO.
5. Selezionare un metodo di allineamento. Utilizzare i tasti SCROLL UP
(SCORRIMENTO SU) e SCROLL DOWN (SCORRIMENTO GIÙ)
per selezionare “Allineamento automatico”. Premere INVIO.
- Le altre opzioni di allineamento del cielo sono trattate nella sezione E
di questo capitolo (pag. 6).
6. Seguire le indicazioni sullo schermo per inserire la propria località, l’ora
locale e la data.
- Si potrebbe voler utilizzare il database delle città per impostare la
propria posizione. Non preoccuparsi se la propria posizione esatta non
è nel database. Basta selezionare la città più vicina.
7. La montatura inizierà a ruotare a una posizione in cui SSAA otterrà il
suo primo riferimento di allineamento. Una volta che la montatura inizia
a ruotare, SSAA catturerà un’immagine dal cielo e determinerà la sua
posizione.
NOTA: Se il telescopio ruoterà automaticamente per puntare un’area del
cielo che è localmente ostruita (da edifici, alberi ecc.), fallirà e ruoterà
automaticamente a un altro punto per riprovare.
8. La montatura ruoterà in un’altra posizione per ottenere il secondo
riferimento di allineamento.
9. Il processo di allineamento automatico è ora completato. Sul display
LCD del NexStar+ verrà visualizzato “Allineamento con successo!”.
La montatura è ora allineata al cielo notturno. Tuttavia, prima di poter
posizionare con precisione gli oggetti nel campo visivo del telescopio,
SSAA deve determinare l’offset tra il proprio campo visivo e quello del
telescopio in un processo chiamato “Calibrazione del centro”. Se non si è
mai calibrato al centro SSAA e il proprio telescopio, la pulsantiera chiederà
di farlo subito dopo l’allineamento del cielo iniziale. Fare riferimento alla
sezione D per le istruzioni sulla calibrazione del centro. Se in precedenza
è stata eseguita una calibrazione del centro, il telescopio è ora pronto per
trovare e posizionare oggetti vicino al centro del campo visivo.
B. Utilizzo di SSAA con una montatura
equatoriale (EQ)
Prima di accendere la montatura, eseguire un allineamento polare
approssimativo. Una volta completato, è possibile affinare l’allineamento
utilizzando esclusivamente le manopole di regolazione fine in altezza e
azimut della montatura.
NOTA: Queste istruzioni spiegano come eseguire un allineamento polare
approssimativo nell’emisfero settentrionale. Se ci si trova nell’emisfero
australe, puntare la montatura esattamente verso Sud invece che verso
Nord.
Eseguire approssimativamente l’allineamento polare:
1. Assicurarsi che il treppiede sia sufficientemente livellato. Se la propria
montatura ha una livella a bolla incorporata, usarla come riferimento.
2. Regolare l’altitudine della montatura in modo che la scala della
latitudine della montatura indichi all’incirca la stessa latitudine del sito
di osservazione.
3. Sollevare e ruotare l’intero treppiede e montarlo in modo che l’asse
di ascensione retta (AR) punti approssimativamente verso nord. La
posizione della montatura non deve essere perfetta. Puntare entro circa
5° rispetto al Nord in modo che la montatura sia all’interno del raggio
delle manopole di regolazione fine dell’azimut della montatura. Utilizzare
un’app bussola gratuita per il proprio smartphone se si ha bisogno di
aiuto per trovare il nord.
4. Se durante l’allineamento polare approssimativo sono state allentate le
manopole di regolazione in altezza o azimut, assicurarsi che siano state
nuovamente serrate correttamente prima di procedere.
Segni di riferimento

5 | ITALIANO
StarSense AutoAlign V2
Eseguire approssimativamente l’allineamento polare:
1. Assicurarsi che il treppiede sia sufficientemente livellato. Se la base
equatoriale è dotata di una livella a bolla integrata, utilizzarla come
riferimento.
2. Regolare l’altezza della base equatoriale in modo che la scala della
latitudine indichi approssimativamente la stessa latitudine del sito di
osservazione.
3. Sollevare e ruotare l’intero treppiede con la montatura in modo che
il braccio della forcella punti approssimativamente verso Nord. La
posizione della montatura non deve essere perfetta. Puntare entro circa
5° rispetto al Nord in modo che la montatura sia all’interno del raggio
delle manopole di regolazione fine dell’azimut della base. Utilizzare
un’app bussola gratuita per il proprio smartphone se si ha bisogno di
aiuto per trovare il nord.
4. Se durante l’allineamento polare approssimativo sono state allentate le
manopole di regolazione in altezza o azimut, assicurarsi che siano state
nuovamente serrate correttamente prima di procedere.
Una volta completato l’allineamento polare approssimativo, si è pronti per
avviare il processo di allineamento:
5. Accendere la montatura.
6. Premere INVIO.
7. Utilizzare i tasti SCROLL UP (SCORRIMENTO SU) e SCROLL
DOWN (SCORRIMENTO GIÙ) per selezionare “Allineamento EQ
Nord”. Premere INVIO. (Selezionare “Allineamento EQ Sud” se ci si
trova nell’emisfero australe.)
8. Seguire le indicazioni sullo schermo per inserire la propria località, l’ora
locale e la data.
- Si potrebbe voler utilizzare il database delle città per impostare la
propria posizione. Non preoccuparsi se la propria posizione esatta
non è nel database. Basta selezionare la città più vicina.
9. Il display LCD mostrerà ora “Set Alt To Index”. Posizionare la montatura
come mostrato in Fig. 12. È possibile utilizzare il controller per
spostare manualmente il telescopio oppure, se la montatura è dotata
di frizioni sugli assi (come la montatura Evolution), allentare le frizioni e
posizionarlo manualmente.
10. Verrà richiesto se si desidera eseguire l’allineamento polare.
Si consiglia di eseguirlo in questa fase. Se si salta questo passaggio
e lo si esegue in seguito, sarà necessario ripetere il processo di
allineamento del cielo.
- Per eseguire l’allineamento polare ora, premere ALLINEA.
- Per saltare l’allineamento polare, premere INVIO per continuare con
l’allineamento del cielo.
Da questo punto in avanti, il processo di allineamento è lo stesso previsto
per le montature equatoriali.
Se si è scelto di eseguire l’allineamento polare, fare riferimento alla Sezione
B, a partire dal passo 11.
Se si è scelto di saltare l’allineamento polare, fare riferimento alla Sezione
B, a partire dal passo 21.
16. La pulsantiera ora visualizzerà “Regola ALT”. Premere INVIO.
17. Se la propria montatura ha le manopole di blocco dell’asse dell’altitudine,
allentarle prima di regolare l’altitudine.
18. Utilizzare le manopole di regolazione fine dell’altitudine della montatura
per regolare lentamente il posizionamento dell’altitudine (da su a giù)
della montatura. Man mano che si apportano queste modifiche, l’errore
ALT aumenterà o diminuirà. Continuare a regolare fino a quando l’errore
ALT è inferiore a due minuti d’arco. Premere INVIO.
• Non regolare l’azimut della montatura.
19. La pulsantiera ora chiederà: “Regolazione fine AZM?”
a. Se si desidera effettuare ulteriori regolazioni all’azimut, utilizzare i
tasti SCROLL (SCORRIMENTO) per selezionare “Sì” e premere
ENTER (INVIO). Regolare le manopole di regolazione fine in azimut
fino a ridurre l’errore a meno di due primi d’arco, quindi premere
INVIO.
b. Se non si desidera effettuare ulteriori regolazioni, utilizzare i tasti
SCROLL (SCORRIMENTO) per selezionare “No” e premere
ENTER (INVIO).
20. Congratulazioni! La montatura è stata allineate polarmente con
successo. Se la propria montatura ha manopole o viti di blocco
dell’altitudine o dell’azimut, serrarle in modo fermo.
NOTA: Si sconsiglia di tentare di migliorare l’allineamento polare oltre i
due primi d’arco su ciascun asse. Farlo sarà difficile e non fornirà ulteriori
vantaggi di puntamento o tracciamento.
21. Successivamente, verrà richiesto di selezionare un metodo di
allineamento del cielo. Utilizzare i tasti SCROLL UP (SCORRIMENTO
SU) e SCROLL DOWN (SCORRIMENTO GIÙ) per selezionare
“Allineamento automatico”. Premere INVIO.
- Le altre opzioni di allineamento del cielo saranno trattate più avanti
in questo manuale.
22. La montatura inizierà a ruotare a una posizione in cui SSAA otterrà il
suo primo riferimento di allineamento. Una volta che la montatura inizia
a ruotare, SSAA catturerà un’immagine dal cielo e determinerà la sua
posizione.
NOTA: Se il telescopio ruoterà automaticamente per puntare un’area
del cielo che è localmente ostruita (da edifici, alberi ecc.), fallirà e ruoterà
automaticamente a un altro punto per riprovare.
23. La montatura ruoterà in un’altra posizione per ottenere il secondo
riferimento di allineamento.
24. La montatura si sposterà verso una terza posizione sull’altro lato del
meridiano per ottenere un terzo riferimento di allineamento.
25. Dopo che lo SSAA avrà acquisito tre riferimenti di allineamento,
sul display LCD del NexStar+ verrà visualizzato “Allineamento con
successo!”.
La montatura è ora allineata al cielo notturno. Tuttavia, prima di poter
posizionare con precisione gli oggetti nel campo visivo del telescopio,
SSAA deve determinare l’offset tra il proprio campo visivo e quello del
telescopio in un processo chiamato Calibrazione del centro. Se non si è
mai calibrato al centro SSAA e il proprio telescopio, la pulsantiera chiederà
di farlo subito dopo l’allineamento iniziale. Fare riferimento alla sezione D
per le istruzioni sulla calibrazione del centro. Se in precedenza è stata
eseguita una calibrazione del centro, il telescopio è ora pronto per trovare
e posizionare oggetti vicino al centro del campo visivo.
C. Utilizzo di SSAA con una montatura
AZ su base equatoriale
Prima di accendere la montatura, eseguire un allineamento polare
approssimativo. Una volta completata questa operazione, è possibile
affinare l’allineamento utilizzando esclusivamente le manopole di
regolazione fine in altezza e azimut della base equatoriale.
NOTA: Queste istruzioni spiegano come eseguire un allineamento polare
approssimativo nell’emisfero settentrionale. Se ci si trova nell’emisfero
australe, puntare la montatura esattamente verso Sud invece che verso
Nord.
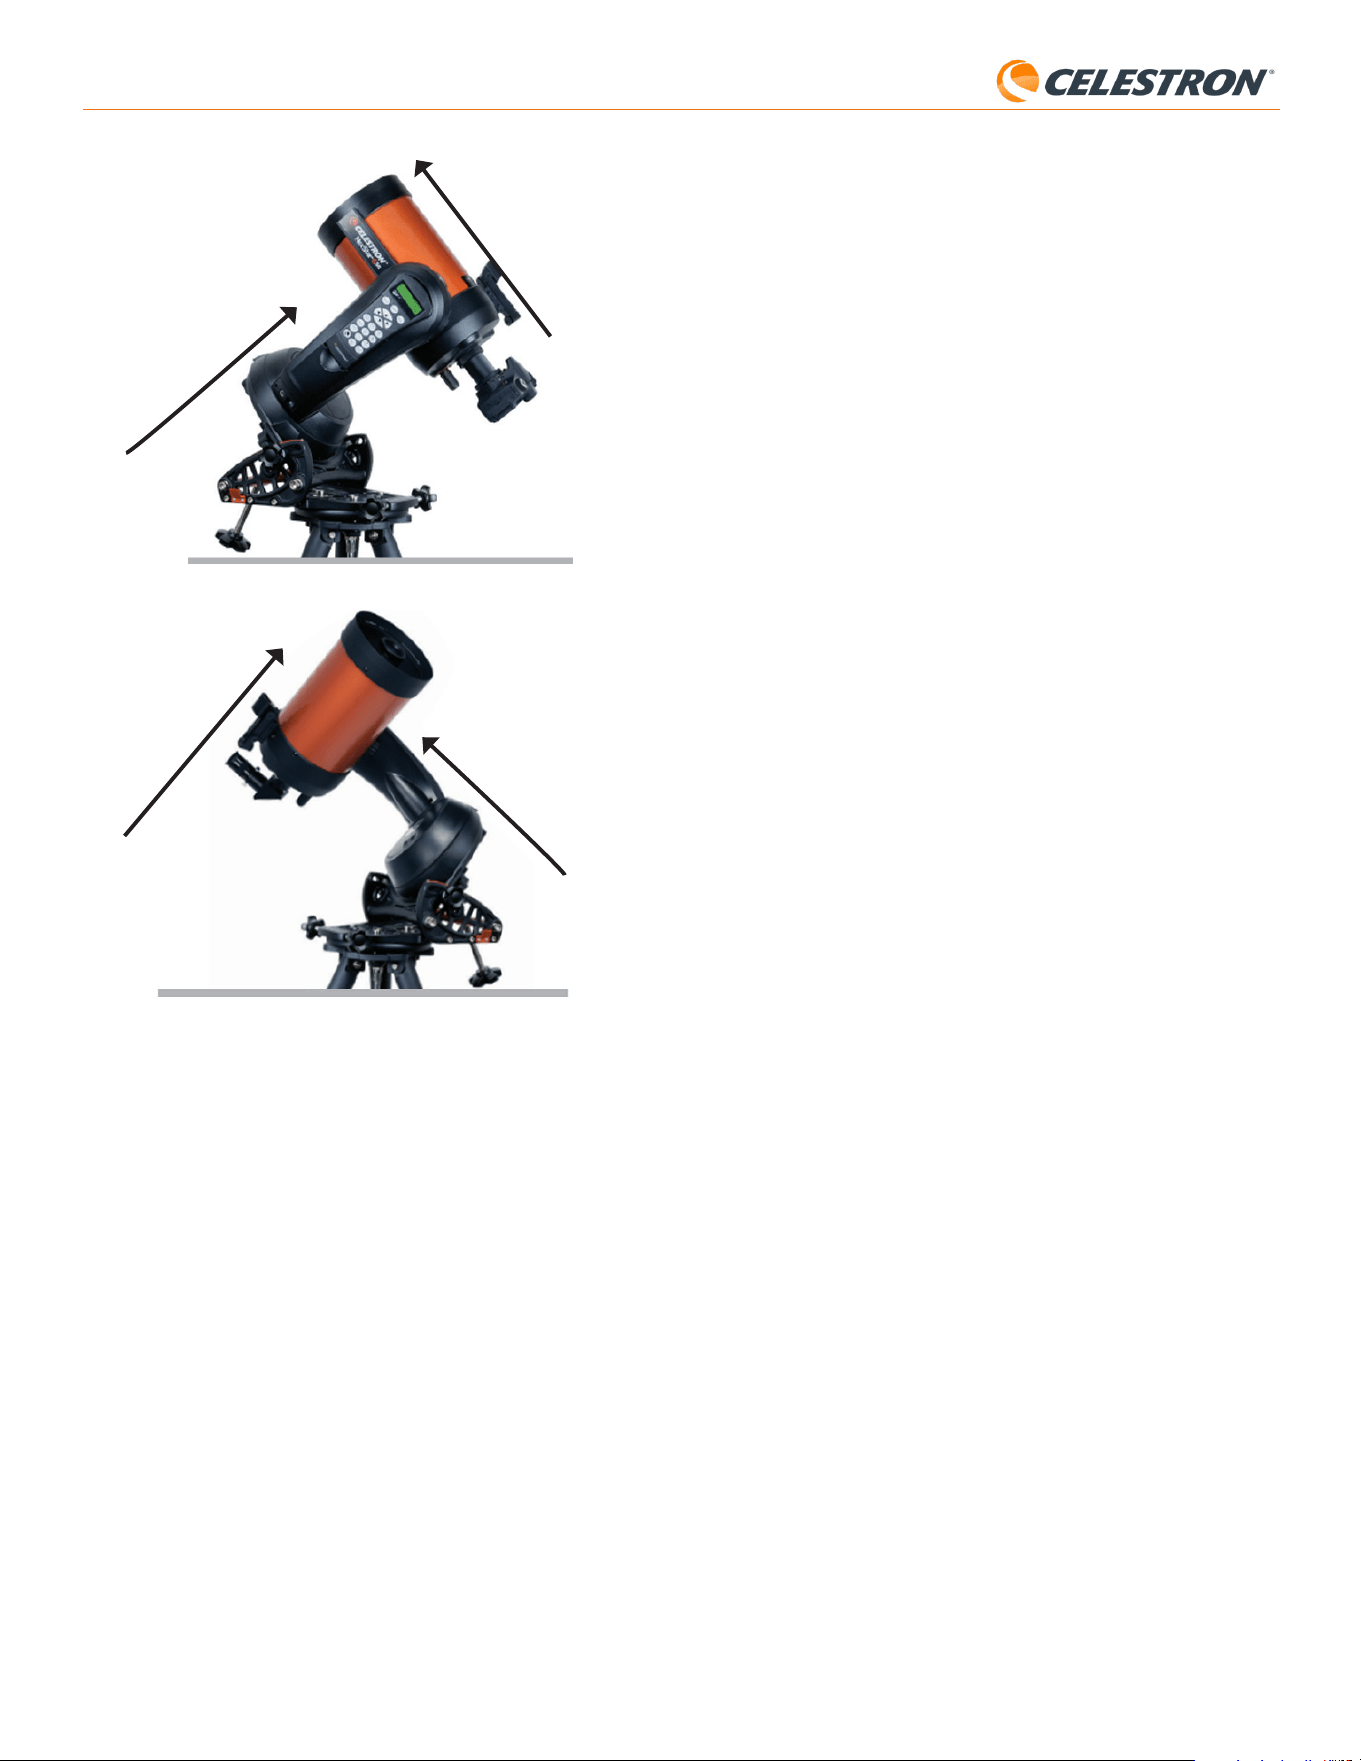
6 | ITALIANO
StarSense AutoAlign V2
nominate o Oggetti del sistema solare (ad es. pianeti) per utilizzare la
calibrazione del centro. Premere INVIO. Scorrere attraverso l’elenco
di stelle e pianeti e selezionarne uno chiaramente visibile dalla propria
posizione. Premere INVIO.
• Se non si è sicuri di dove si trovi l’oggetto che scelto nel cielo
notturno, non preoccuparsi. Il telescopio punterà vicino all’oggetto
nel passo successivo. È possibile usare il telescopio come guida
per determinare quale stella o pianeta si sta usando per calibrare il
centro. Ricordarsi che le stelle e i pianeti nominati sono tra gli oggetti
più luminosi nel cielo notturno.
• Per ottenere i migliori risultati con una montatura EQ, scegliere stelle
vicine all’equatore celeste (cioè lontane dai poli).
3. Il telescopio si sposterà sulla stella o sul pianeta che scelto. A seconda
dell’offset tra il campo visivo di SSAA e quello del telescopio, l’oggetto
può trovarsi o meno nel campo visivo del telescopio. In ogni caso, il
telescopio dovrebbe essere generalmente puntato verso l’oggetto.
4. La pulsantiera NexStar+ chiederà di centrare l’oggetto nel campo visivo
del cercatore. Utilizzare i pulsanti di direzione sulla tastiera per eseguire
questa operazione. Non preoccuparsi ancora del centraggio fine, che
avverrà nel passo successivo. Per ora, centrare approssimativamente
l’oggetto nel campo visivo del cercatore e premere ENTER (INVIO).
• Se la stella non è all’interno del campo visivo del cercatore, ruotare
manualmente il telescopio finché non lo è.
• Se non si sta usando un cercatore, usare l’oculare a campo più ampio
del telescopio per questo passaggio. Se l’oggetto non è nel campo
visivo, provare a puntare lungo il tubo del telescopio per puntare
l’oggetto.
5. La pulsantiera NexStar+ chiederà di centrare l’oggetto nel campo
visivo dell’oculare. Questo è il passo di centraggio fine. Assicurarsi che
ci sia un oculare ad alta potenza nel telescopio. Utilizzare i pulsanti di
direzione sulla tastiera per centrare l’oggetto. Per ottenere i migliori
risultati, utilizzare per ultimi i tasti di direzione su e destra. Al termine,
premere ALIGN (ALLINEA).
6. SSAA eseguirà la calibrazione del centro e restituirà il messaggio
“Calibrazione del centro eseguita con successo”.
Dopo aver completato con successo la calibrazione del centro, il controller
richiederà di eseguire nuovamente l’allineamento del cielo. Dopo aver
eseguito successivamente l’allineamento del cielo, sarà possibile
comandare il telescopio per posizionare con precisione qualsiasi oggetto
celeste scelto all’interno del campo visivo del telescopio.
E. Altri metodi di allineamento del cielo
Invece di selezionare “Allineamento automatico” come metodo di
allineamento del cielo, sono disponibili diverse altre opzioni. Queste
opzioni offrono maggiore flessibilità in base al sito di osservazione e alla
configurazione utilizzata.
Allineamento manuale
Si potrebbe prendere in considerazione l’utilizzo dell’opzione Allineamento
manuale se ci sono molti ostacoli nella posizione di osservazione, come
edifici, alberi o linee elettriche. Allineamento manuale funziona come
Allineamento automatico, ma consente di spostare manualmente il
telescopio in aree libere del cielo per ottenere i riferimenti di allineamento.
Poiché il telescopio non si sposta automaticamente verso posizioni ostruite
da ostacoli, il processo di allineamento complessivo è più rapido.
Per eseguire un allineamento “manuale” usando la pulsantiera
NexStar+:
1. Quando la pulsantiera chiede di selezionare un metodo di allineamento,
utilizzare i tasti SCROLL UP (SCORRIMENTO SU) e SCROLL
DOWN (SCORRIMENTO GIÙ) per selezionare “Allineamento
manuale” e premere ENTER (INVIO).
2. La pulsantiera chiederà di ruotare il telescopio verso un’area libera del
cielo usando i pulsanti di direzione. Quando il telescopio è puntato
verso un’area di cielo libera, premere ENTER (INVIO). SSAA catturerà
un’immagine da utilizzare come riferimento per l’allineamento.
Emisfero settentrionale
Emisfero meridionale
Punta verso il Polo Nord
Punta verso il Polo Sud
Tubo ottico perpendicolare al
braccio della forcella
Tubo ottico perpendicolare al
braccio della forcella
D. Calibrazione del centro
La calibrazione del centro allinea il campo visivo della fotocamera
StarSense AutoAlign con il campo visivo ottico del telescopio.
In genere è necessario eseguire la calibrazione del centro solo la prima
volta che si utilizza StarSense con un nuovo tubo ottico. Potrebbe essere
necessario ripetere la procedura se si rimuove e si reinstalla la base della
staffa sul telescopio.
Se si rimuove solo l’unità StarSense con la relativa staffa, lasciando la
base della staffa fissata al telescopio, di solito non è necessario eseguire
nuovamente la calibrazione del centro.
Prima di eseguire la calibrazione del centro, completare un allineamento del
cielo come descritto nelle sezioni precedenti. Se la calibrazione del cielo
non è stata eseguita in precedenza, StarSense richiederà automaticamente
di avviare la procedura dopo l’allineamento del cielo.
Per eseguire una calibrazione del centro:
1. Se non si è mai calibrato al centro SSAA, la pulsantiera NexStar+
avvierà automaticamente il processo di calibrazione del centro
dopo l’allineamento del cielo. In caso contrario, premere il pulsante
MENU e utilizzare i tasti SCROLL (SCORRIMENTO) per
selezionare “StarSense”. Premere INVIO. Utilizzare i tasti SCROLL
(SCORRIMENTO) per selezionare “Calibra centro” e premere ENTER
(INVIO).
2. Poi utilizzare i tasti SCROLL (SCORRIMENTO) per selezionare Stelle
Fig. 12: Quando si utilizza una montatura a forcella altazimutale (AZ) su una base equatoriale,
iniziare con la montatura nella posizione mostrata. Il braccio della forcella deve essere rivolto
esattamente verso Nord (oppure verso Sud nell’emisfero australe) e il tubo ottico deve essere
perpendicolare al braccio della forcella.
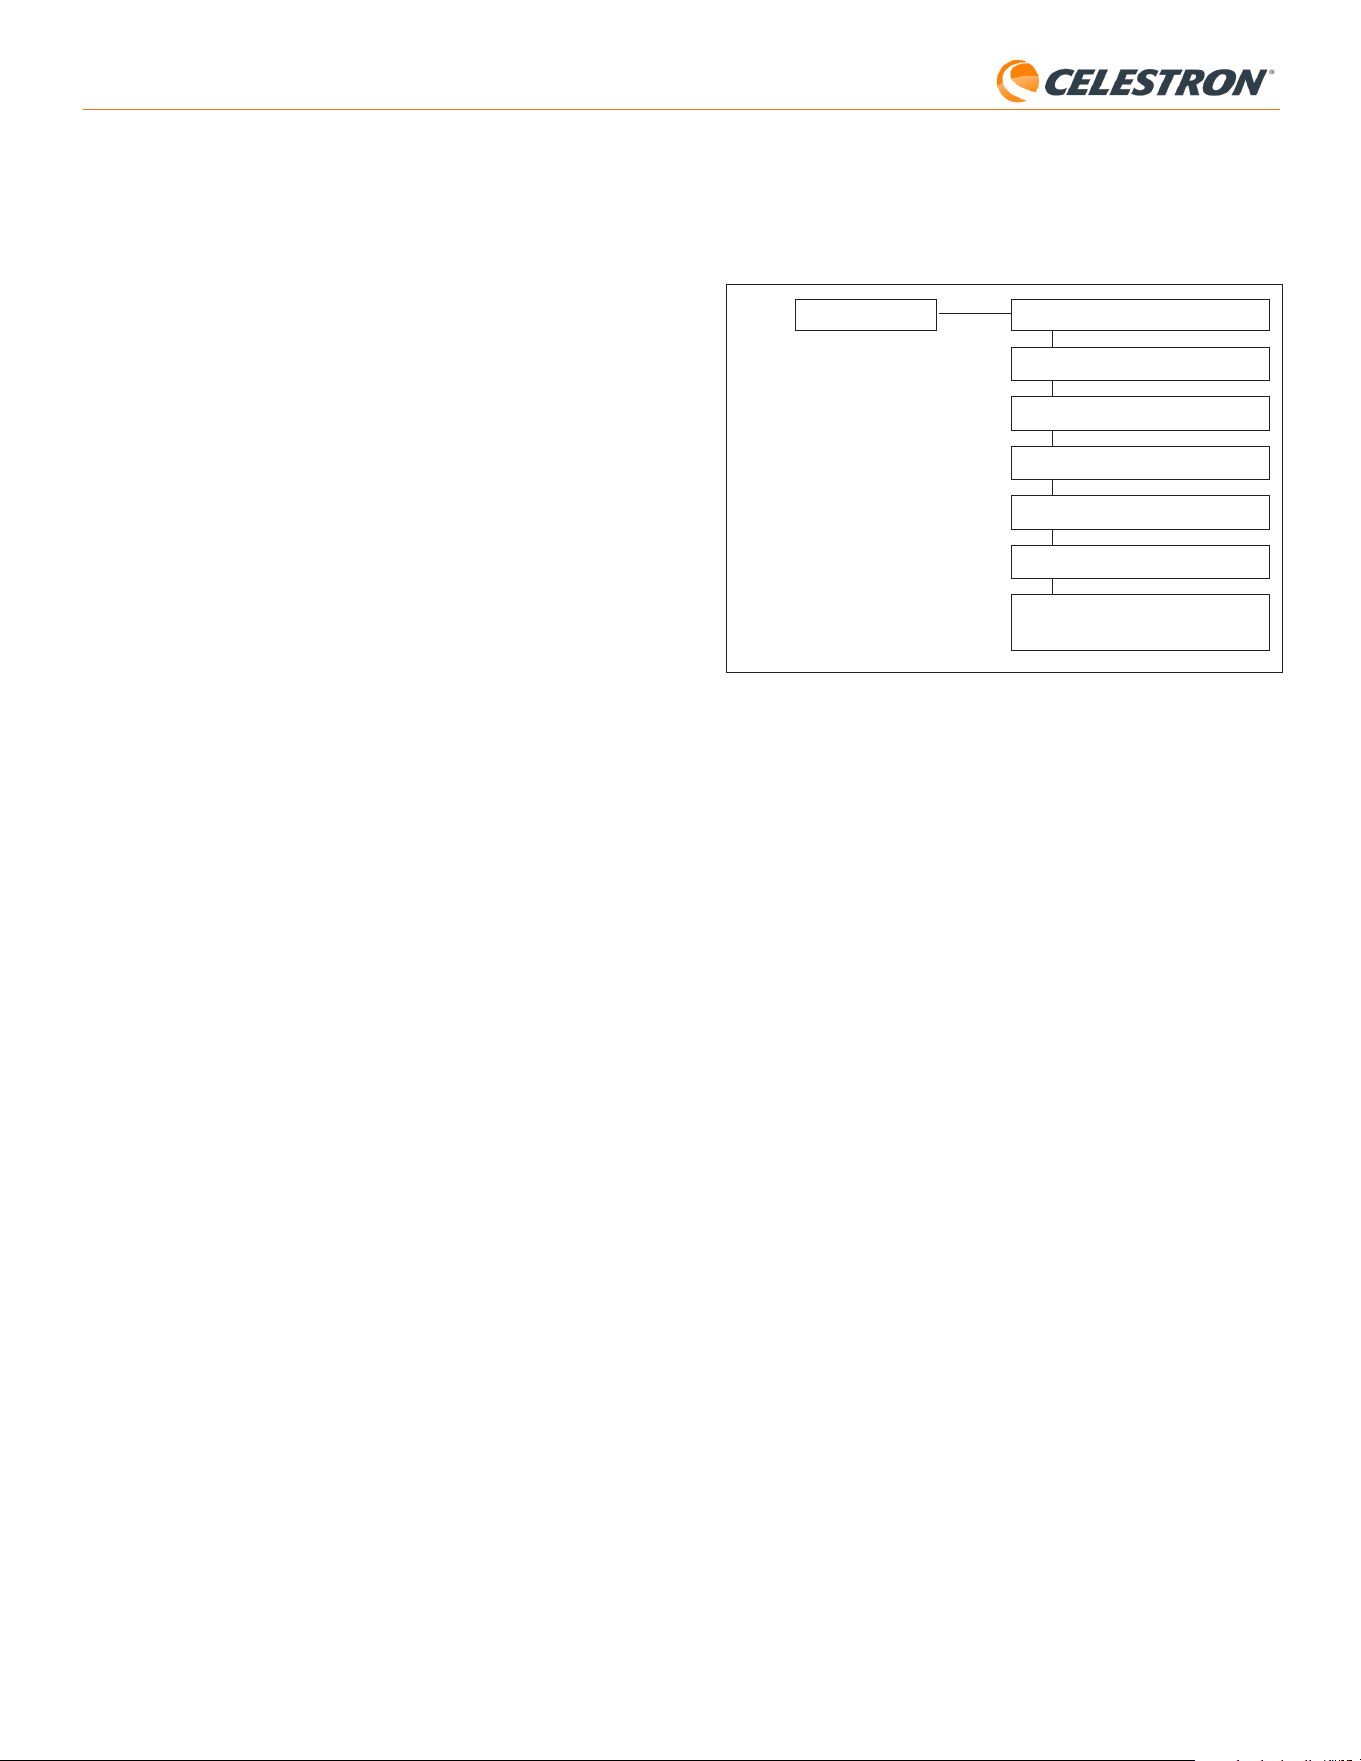
7 | ITALIANO
StarSense AutoAlign V2
F. Altre funzionalità
È possibile accedere a tutte le opzioni aggiuntive riportate di seguito
premendo il pulsante MENU, utilizzando i tasti SCROLL (SCORRIMENTO)
per selezionare “StarSense” e premendo ENTER (INVIO). Fare riferimento
alla Fig. 13 per la struttura del menu StarSense.
PRECISE GOTO
PLATE SOLVE
CALIBRA CENTRO
ALLINEAMENTO POLARE
VERSIONE
IMPOSTAZIONI
RIPRISTINO DELLE IMPOSTAZIONI DI
FABBRICA
STARSENSE
Fig. 13: La struttura del menu StarSense nella pulsantiera NexStar+.
Precise GoTo
Precise GoTo utilizza SSAA per centrare più accuratamente gli oggetti
nel campo visivo. Quando questa opzione è abilitata, la montatura
del telescopio utilizza il proprio modello di allineamento interno per
spostarsi in prossimità dell’oggetto selezionato. Quindi SSAA interviene,
apportando correzioni fini al centraggio, migliorando significativamente
la precisione di puntamento complessiva. Quando si utilizza SSAA,
Precise GoTo è abilitato per impostazione predefinita, quindi non è
necessario avviare un Precise GoTo qui. Tuttavia, se non si è disattivato
Precise GoTo (si veda la sezione Impostazioni di seguito), è possibile
avviare Precise GoTo su un oggetto specifico da questa selezione di
menu.
Plate Solve
Quando si sceglie questa opzione, SSAA acquisirà un’immagine ed
effettuerà il plate solve. La pulsantiera visualizzerà le coordinate centrali
(RA e Dec) verso le quali il telescopio sta puntando verso il cielo.
Calibra centro
Se si desidera avviare una nuova calibrazione del cielo, è possibile farlo
in qualsiasi momento tramite questa opzione. Se si rimuove la base
della staffa dello SSAA dal telescopio (svitando le viti di fissaggio) e
la si reinstalla, si consiglia di eseguire una nuova calibrazione del
centro. La semplice rimozione dello SSAA con la sua staffa dalla base
(allentando prima le viti a testa zigrinata della staffa) e la successiva
reinstallazione sulla base, in genere non richiede una nuova calibrazione
del centro. Tuttavia, se successivamente si nota che gli oggetti non
vengono posizionati al centro del campo visivo del telescopio, una nuova
calibrazione del centro può aiutare a migliorare il centraggio.
Dopo aver completato con successo la calibrazione del centro, il
controller richiederà di eseguire nuovamente l’allineamento del cielo.
Allineamento polare
Se si è scelto di non eseguire l’allineamento polare durante l’allineamento
iniziale, è possibile avviarlo in qualsiasi momento tramite questa opzione
di menu. Per le montature equatoriali o le montature AZ su base
equatoriale, fare riferimento alla Sezione B, passi da 11 a 20. Ricordare
che le montature AZ non possono essere allineate al polo, a meno che
non siano utilizzate su una base equatoriale opzionale.
Dopo aver completato con successo l’allineamento polare, il controller
richiederà nuovamente di eseguire l’allineamento del cielo. Per questo
motivo si consiglia di eseguire l’allineamento polare inizialmente, prima
dell’allineamento del cielo.
NOTA: Per ottenere i migliori risultati con le montature EQ, non orientare il
telescopio verso i poli nord (o sud) per acquisire i riferimenti di allineamento.
3. La pulsantiera chiederà di ruotare manualmente il telescopio verso
un’altra area libera del cielo.
a. Per le montature altazimutali, ruotare la montatura su entrambi gli
assi, assicurandosi che SSAA punti ad almeno 60° dal suo primo
punto di allineamento. Premere INVIO. L’Allineamento manuale è ora
completo. Saltare al passo 7.
b. Per le montature equatoriali, ruotare la montatura in un’altra area
libera del cielo. Questa posizione deve trovarsi sullo stesso lato del
meridiano della prima area scelta. Premere INVIO.
4. Dopo aver completato i primi due rifermenti di allineamento, la
pulsantiera mostrerà “Aggiungere calib stella?” Consigliamo vivamente
di aggiungere un terzo riferimento di allineamento per la migliore
precisione complessiva di puntamento nel cielo.
a. Scegliere “No” per terminare l’allineamento con solo due riferimenti.
Questo allineamento può fornire una precisione di puntamento
accettabile in molti casi, specialmente se Precise GoTo è attivo
(come spiegato più avanti in questo manuale). Saltare al passo 7.
b. Scegliere “Sì” per aggiungere un terzo riferimento di allineamento. Il
telescopio si sposterà automaticamente dall’altra parte del meridiano.
6. Con il telescopio ora sul lato opposto del meridiano rispetto ai primi due
punti di allineamento, la pulsantiera chiederà di scegliere una terza area
di cielo libera. Utilizzare i tasti di direzione per spostarsi su un’area di
cielo limpido su questo lato del meridiano e premere ENTER (INVIO).
7. Quando completato sullo schermo LCD di NexStar+ apparirà
“Allineamento con successo!”.
Allineamento automatico utente
Questo metodo di allineamento funziona solo dopo aver eseguito almeno
un Allineamento automatico manuale. Quando si seleziona Allineamento
automatico utente, il telescopio si sposta automaticamente sui punti
di allineamento definiti durante il precedente Allineamento automatico
manuale. È un’opzione utile se ci si posiziona nella stessa posizione quasi
tutte le sere e ci sono ostacoli significativi nel sito.
Per eseguire un Allineamento automatico utente, selezionare “Allineamento
automatico utente” come metodo di allineamento. Una volta avviato, il
telescopio ruoterà automaticamente verso il primo punto di allineamento
nel precedente Allineamento automatico manuale. Procederà quindi agli
altri punti definiti dall’utente per completare l’allineamento.
Ultimo allineamento
Se si lascia il proprio telescopio installato in un’unica posizione, come un
osservatorio domestico, Ultimo allineamento è una scelta conveniente. È
possibile utilizzare questo metodo solo se non si ruota o si sposta in altro
modo il telescopio dopo averlo spento. Questo metodo di allineamento
utilizza i dati di allineamento SSAA precedenti memorizzati nella pulsantiera.
Non è necessaria nessuna ulteriore azione.
Allineamento rapido
Questa procedura allinea la montatura utilizzando solo le informazioni
su ora/data/posizione. Questo metodo presuppone inizialmente che le
montature equatoriali siano perfettamente allineate al polo e in “posizione
iniziale” (ovvero la posizione di partenza automatica per le montature dotate
di sensori di posizione iniziale, oppure con i segni di riferimento allineati
per le montature prive di tali sensori), e che le montature altazimutali
siano perfettamente livellate e puntate esattamente verso Nord (oppure
verso Sud nell’emisfero australe). Per le montature a forcella AZ su base
equatoriale, si assume inizialmente che la montatura sia perfettamente
allineata al polo, con il tubo ottico perpendicolare, come mostrato in Fig.
12. Allineamento rapido non utilizza il dispositivo SSAA. Di norma non
consigliamo questo metodo di allineamento perché non è molto preciso,
ma può comunque fornire una precisione di puntamento e inseguimento
sufficiente per alcuni utilizzi senza richiedere ulteriori allineamenti. Può
anche essere utile quando si cercano pianeti al crepuscolo.
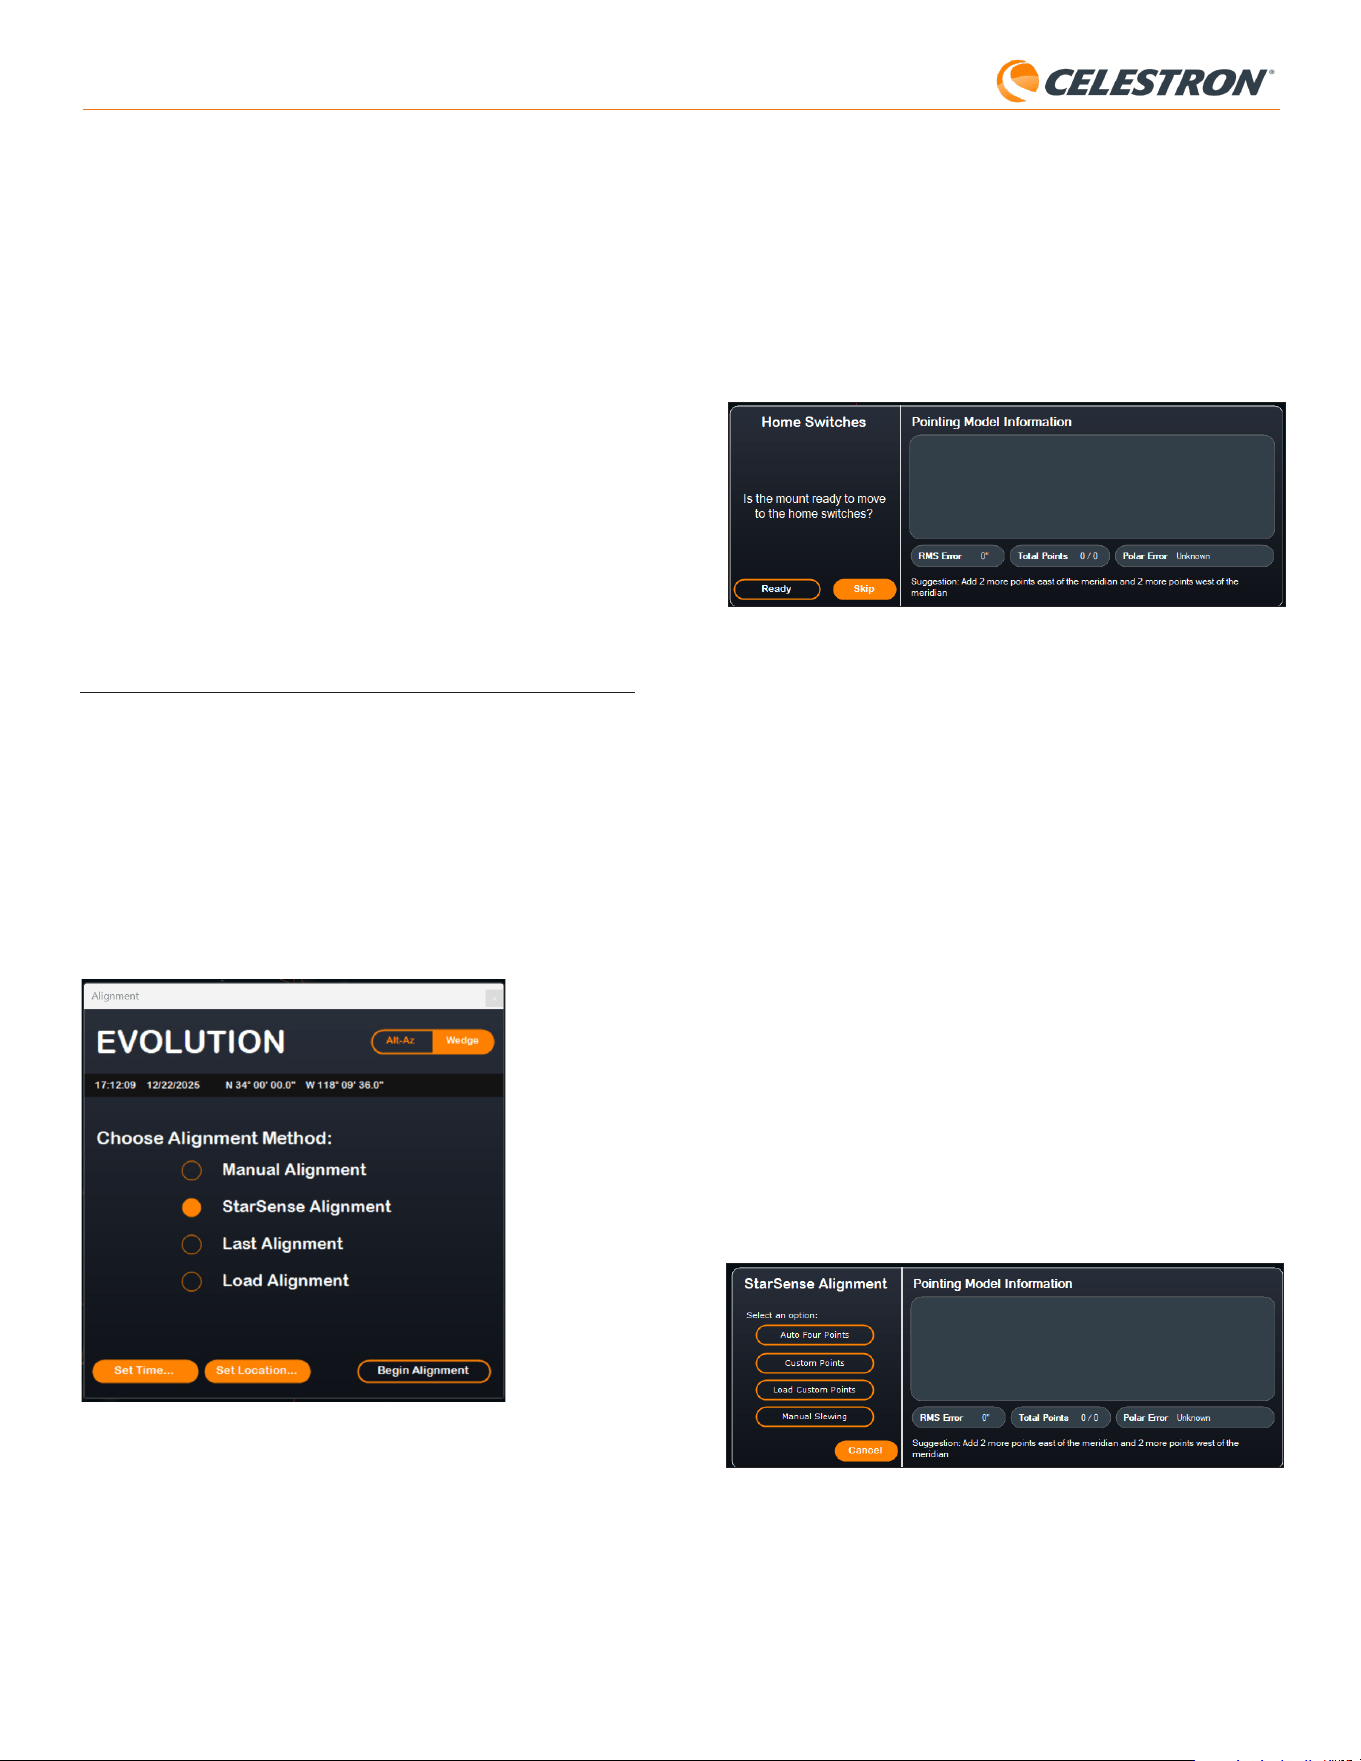
8 | ITALIANO
StarSense AutoAlign V2
Per eseguire l’allineamento automatico del cielo utilizzando lo SSAA,
selezionare “Allineamento StarSense”, quindi premere il pulsante “Inizia
allineamento”. Appariranno le informazioni sul Modello di puntamento
(Fig. 15). Nella sezione “Selettori posizione iniziale”, CPWI chiede: “La
montatura è pronta per passare agli interruttori della posizione iniziale?”
Se la montatura dispone di interruttori della posizione iniziale (ad es.
CGX e CGX-L), fare clic su “Pronto” e il telescopio si sposterà su i
suoi selettori della posizione iniziale. Se la montatura EQ non dispone di
sensori di posizione iniziale ma è dotata di segni di riferimento, spostare
manualmente il telescopio fino a tali segni. Se si utilizza una montatura AZ
su base equatoriale, posizionare il telescopio come mostrato in Fig. 12
(a pag. 5).
Fig. 15: Finestra Info modello di puntamento in CPWI.
Se si utilizza una montatura altazimutale (AZ), CPWI richiederà di puntare
il telescopio verso l’orizzonte Nord, con il tubo in posizione orizzontale e
rivolto verso Nord. Se ci si trova nell’emisfero australe, puntarlo invece
verso l’orizzonte Sud.
Utilizzare la finestra Controlli rotazione montatura sullo schermo
per posizionare il telescopio. La precisione non è critica. Questa è
semplicemente la posizione iniziale per la procedura di allineamento.
Se non è stata precedentemente eseguita la calibrazione del centro, è
consigliabile eseguirla quando richiesto da CPWI prima dell’allineamento
del cielo. A differenza del controller NexStar+, CPWI richiede che la
calibrazione del centro venga completata prima. Se viene saltata, sarà
necessario ripetere l’allineamento del cielo successivamente. Fare
riferimento alla sezione Calibrazione del cielo a pag. 9 per le istruzioni.
Successivamente, se si utilizza una montatura equatoriale (EQ) o una
montatura AZ su un base equatoriale, CPWI chiederà se si desidera
eseguire l’allineamento polare. Si consiglia di eseguire l’allineamento
polare in questa fase. Se si attende fino a dopo l’allineamento del cielo,
sarà necessario ripetere il processo di allineamento.
- Per eseguire l’allineamento polare, fare clic su “Sì” e seguire le istruzioni
nella sezione Allineamento polare a pag. 9.
- Per saltare l’allineamento polare, fare clic su “No” per procedere
direttamente all’allineamento del cielo.
È possibile eseguire l’allineamento polare in un secondo momento
selezionando “Allineamento polare montatura” dal menu StarSense.
Dopo il completamento dell’allineamento polare, la finestra visualizzerà
“Allineamento StarSense” e richiederà di selezionare un’opzione di
allineamento (Fig. 16).
Fig. 16: Opzioni di allineamento StarSense in CPWI.
Quattro punti automatici
Quattro punti automatici è la scelta di allineamento più automatizzata.
SSAA ruoterà automaticamente verso quattro punti nel cielo per ottenere
l’allineamento del cielo. Se punta verso un’ostruzione o altrimenti non riesce
a determinare la sua posizione, il telescopio ruoterà semplicemente verso
un altro punto nel cielo per ottenere un altro riferimento di allineamento.
Versione
Selezionando questa opzione viene visualizzato il numero di versione
corrente del software interno di SSAA.
• Per visualizzare la versione del firmware della pulsantiera NexStar+,
selezionare l’opzione “Versione” da MENU>Utilità.
Impostazioni
Uso Precise GoTo – Questa impostazione consente di abilitare o
disabilitare Precise GoTo automatico dopo ogni rotazione. Precise
GoTo è attivo per impostazione predefinita per la massima precisione di
puntamento. Tuttavia, questa funzione fa sì che il telescopio impieghi un
po’ più tempo per centrare gli oggetti. Consigliamo alla maggior parte
degli utenti di lasciare attivo Precise GoTo.
Ripristino delle impostazioni di fabbrica
Questa opzione cancella tutti i dati di calibrazione del centro
precedentemente memorizzati in StarSense AutoAlign. Dopo aver
selezionato questa opzione, è necessario riavviare la montatura.
Si consiglia di eseguire un ripristino delle impostazioni di fabbrica se si
prevede di utilizzare StarSense AutoAlign con una montatura Celestron
diversa da quella utilizzata in precedenza.
6. Utilizzo di SSAA con CPWI
Se già si utilizza un PC per controllare il telescopio (ad es. per l’imaging
astronomico), il software CPWI gratuito di Celestron è un ottimo modo per
controllare SSAA. La sua interfaccia utente intuitiva semplifica l’accesso a
tutte le funzionalità di SSAA.
Allineamento del cielo
Quando si collega il PC con CPWI alla montatura Celestron con StarSense
AutoAlign collegato, la finestra Allineamento si aprirà automaticamente
(Fig. 14).
Prima, controllare la data, l’ora e la posizione nella parte superiore della
finestra. Se si notano degli errori, fare clic sui pulsanti “Imposta ora” o
“Imposta posizione” per effettuare la regolazione.
Fig. 14: La finestra di allineamento SSAA in CPWI.
Se stai usando una montatura AZ con una base equatoriale, selezionare
l’opzione “Base equatoriale” che appare in alto a destra nella finestra
Allineamento. Selezionando ciò la montatura AZ sarà trattata come
montatura EQ.
Se si utilizza una montatura EQ (oppure una montatura AZ su base
equatoriale), è necessario eseguire un allineamento polare approssimativo
prima di iniziare l’allineamento. Lo SSAA può assistere nell’ottenere un
allineamento polare preciso (descritto più avanti in questo manuale), ma
il processo sarà molto più rapido e semplice se la montatura EQ è già
approssimativamente allineata al polo fin dall’inizio.
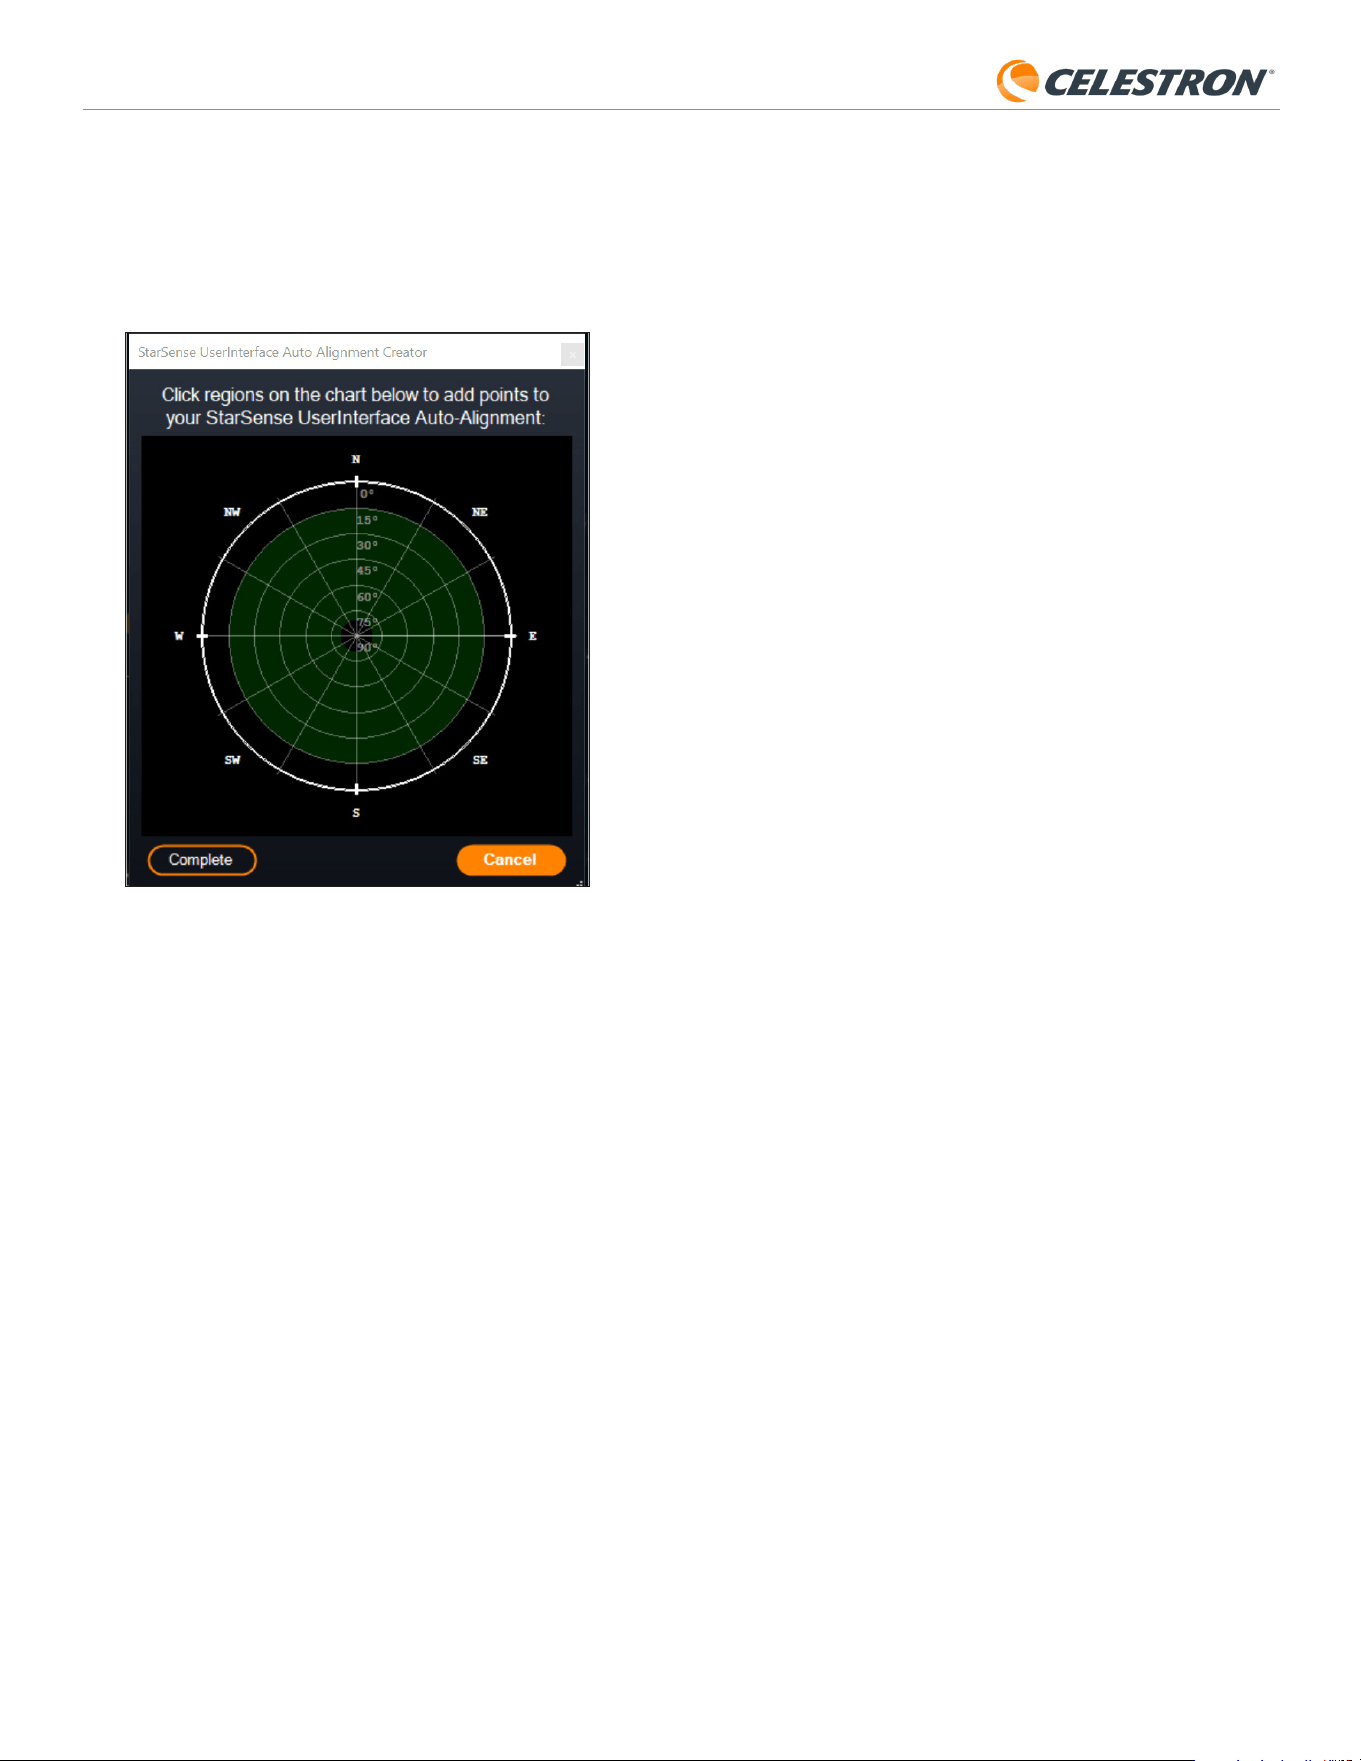
9 | ITALIANO
StarSense AutoAlign V2
Aggiunta di ulteriori riferimenti di allineamento
Dopo l’allineamento, è possibile visualizzare le informazioni sul modello
di puntamento generato dalla montatura, incluso l’errore RMS, il numero
totale di punti nel modello di allineamento e l’errore di allineamento polare
calcolato.
È possibile aggiungere ulteriori riferimenti di allineamento durante la notte
selezionando un oggetto nella vista del planetario, facendo clic su di esso e
scegliendo “Modello”. La montatura ruoterà verso la posizione dell’oggetto
e SSAA aggiungerà il riferimento di allineamento al modello di puntamento
della montatura. La precisione di puntamento dovrebbe essere abbastanza
buona con solo quattro punti, ma generalmente aumenterà con ogni
riferimento di allineamento aggiunto.
Calibrazione del centro
La calibrazione del centro allinea il campo visivo della fotocamera
StarSense AutoAlign con il campo visivo ottico del telescopio.
In genere è necessario eseguire la calibrazione del centro solo la prima
volta che si utilizza StarSense con un nuovo tubo ottico. Potrebbe essere
necessario ripetere la procedura se si rimuove e si reinstalla la base della
staffa sul telescopio.
Se si rimuove solo l’unità StarSense con la relativa staffa, lasciando la
base della staffa fissata al telescopio, di solito non è necessario eseguire
nuovamente la calibrazione del centro.
CPWI richiederà automaticamente di eseguire la calibrazione del centro
prima dell’allineamento del cielo Se si sceglie di saltare questo passaggio,
è possibile selezionare “Calibrazione del centro” dal menu StarSense in
un secondo momento. Tuttavia, sarà necessario eseguire nuovamente
l’allineamento del cielo dopo aver effettuato la calibrazione del centro.
Per eseguire una calibrazione del centro:
1. Selezionare un oggetto nella schermata del planetario SkyViewer
facendo clic su di esso. Scegliere una stella o un pianeta luminoso che
sia chiaramente visibile dal punto di osservazione.
2. Il telescopio ora ruoterà verso l’oggetto selezionato. A seconda
dell’offset tra il campo visivo di SSAA e quello del telescopio, l’oggetto
può trovarsi o meno nel campo visivo del telescopio. In ogni caso, il
telescopio dovrebbe puntare verso l’oggetto.
3. CPWI chiederà di centrare l’oggetto nel campo visivo dell’oculare
del telescopio. È possibile utilizzare la finestra Controlli rotazione
montatura sullo schermo. Al termine, fare clic su “Centrato” nella finestra
Informazioni sul modello di puntamento.
• Se la stella non è all’interno del campo visivo del cercatore, ruotare
manualmente finché non lo è.
• Se non si sta usando un cercatore, usare invece l’oculare a campo
più ampio per trovare l’oggetto. Se l’oggetto non è nel campo
visivo dell’oculare, mirare lungo il tubo del telescopio per puntarlo
verso l’oggetto.
• Per il centraggio finale, utilizzare un oculare ad alta potenza.
• Quando si centra la stella nel campo visivo del telescopio, utilizzare
per ultimi i tasti direzionali su e destra.
4. SSAA eseguirà la calibrazione del centro e restituirà il messaggio
“Calibrazione del centro eseguita con successo”.
Una volta completate la calibrazione del centro e l’allineamento del cielo,
sarà possibile comandare il telescopio per posizionare con precisione
qualsiasi oggetto celeste scelto all’interno del campo visivo del telescopio.
Allineamento polare
Sebbene la montatura EQ (o montatura AZ su base equatoriale) non
abbia bisogno di essere allineata polarmente per utilizzare SSAA,
SSAA può aiutare a ottenere un allineamento polare molto accurato.
Un preciso allineamento polare migliora leggermente la precisione di
puntamento complessiva, ma solo di pochi minuti d’arco. Se si sceglie
di eseguire l’allineamento polare, farlo prima dell’allineamento del cielo.
Se si desidera eseguire l’allineamento polare in un secondo momento, è
possibile selezionare l’opzione “Allineamento polare montatura” nel menu
StarSense. Sarà necessario eseguire nuovamente l’allineamento del cielo
dopo aver completato l’allineamento polare.
Punti personalizzati
Punti personalizzati consente di definire i punti nel cielo in cui il telescopio
ruota per l’allineamento. È una buona scelta se il sito di osservazione
presenta ostacoli locali perché è possibile definire i punti di allineamento
in modo che il telescopio si allontani da essi. Se si sceglie questa
opzione, verrà visualizzata la finestra Creatore di allineamento automatico
dell’interfaccia utente di StarSense (Fig. 17).
Fig. 17: Finestra Auto Alignment Creator in CPWI.
Fare clic all’interno del grafico per selezionare i punti di allineamento nel
cielo. Si troveranno le direzioni cardinali sul perimetro del grafico. L’interno
del grafico va da 0° di altitudine (cioè l’orizzonte) al bordo a 90° (cioè lo
zenit) al centro. Si possono scegliere più di quattro punti di allineamento se
lo si desidera. Per i migliori risultati, scegliere punti molto distanziati tra loro
ed evitare punti vicino ai poli per le montature EQ. Dopo aver selezionato i
punti di allineamento, fare clic su “Completato” nella parte inferiore sinistra
della finestra. Prima che CPWI inizi l’allineamento, chiederà se si desidera
salvare i punti di allineamento definiti dall’utente. Se lo si fa, è possibile
utilizzare il file .sua in un secondo momento con l’opzione “Carica punti
personalizzati”.
Se si desidera utilizzare il Creatore di allineamento automatico
dell’interfaccia utente StarSense prima di iniziare un allineamento,
selezionare “Strumento creazione allineamento automatico utente” dal
menu StarSense.
Carica punti personalizzati
Dopo aver definito i “Punti personalizzati” come descritto in precedenza,
è possibile scegliere questa opzione per riutilizzarli. Selezionare il file .sua
che si è creato in precedenza e l’allineamento inizierà automaticamente.
Rotazione manuale
Con questa opzione di allineamento, si utilizza la finestra Controlli rotazione
montatura per spostare manualmente SSAA su un’area libera del cielo
e fare clic su “Risolvi qui” per ottenere un riferimento di allineamento.
Ripetere il processo quattro volte e l’allineamento è completo. Questa è la
scelta meno automatizzata, ma può essere utile se il sito di osservazione
presenta ostacoli o il cielo è parzialmente nuvoloso. Per ottenere i migliori
risultati, utilizzare quattro punti di allineamento il più distanziati possibile ed
evitare punti vicino ai poli per le montature EQ.
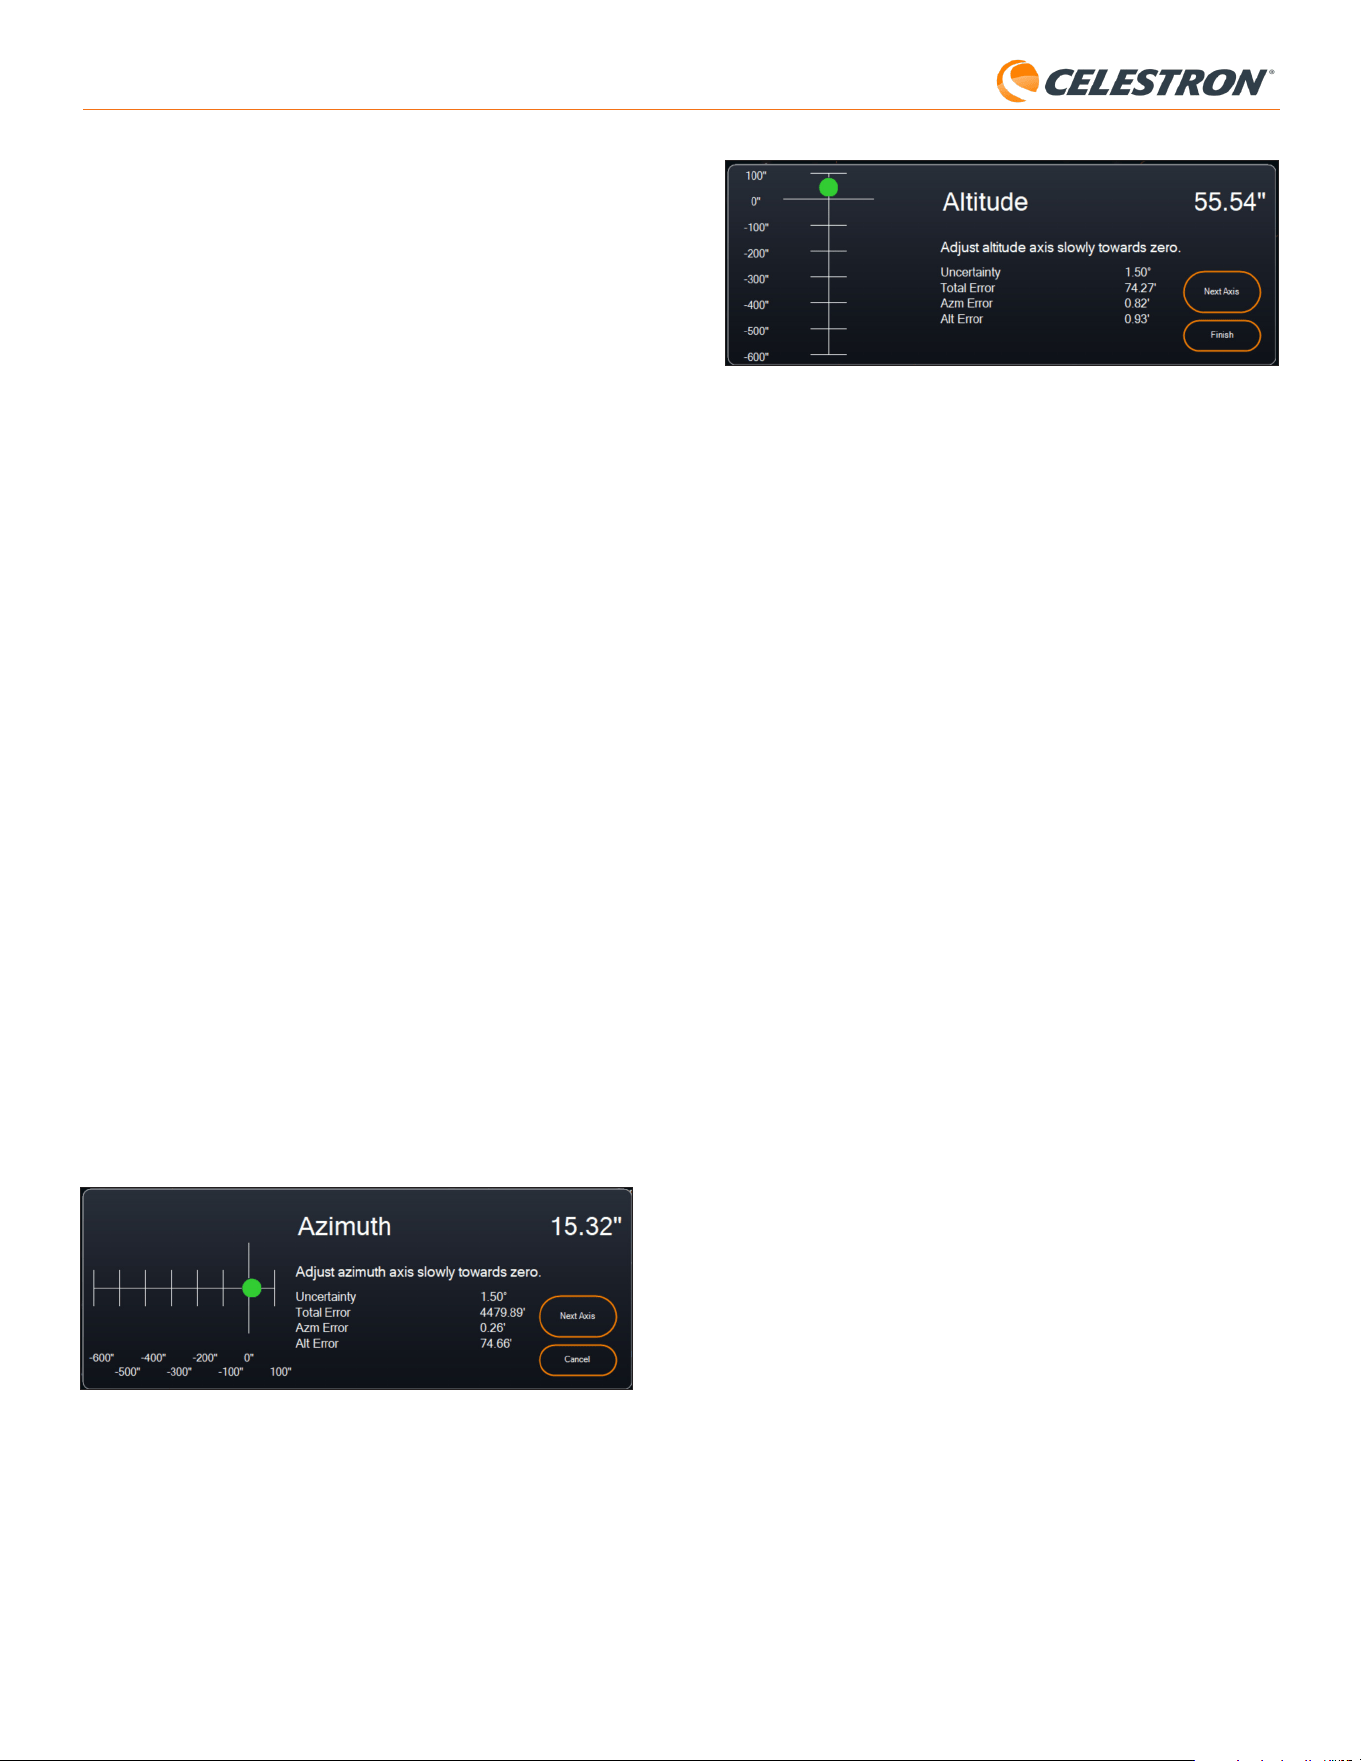
10 | ITALIANO
StarSense AutoAlign V2
Fig. 19: Finestra Regolazione dell'asse di altitudine durante l'allineamento polare in
CPWI.
6. Regolare lentamente l’altitudine della montatura finché l’”Errore Alt” non
è inferiore a due minuti d’arco.
• Se la montatura è dotata di blocchi dell’asse dell’altitudine, allentarli
prima.
7. Se si desidera regolare nuovamente l’asse azimutale, fare clic su “Asse
successivo”. Altrimenti, fai clic su “Fine”.
8. Congratulazioni! La montatura è stata allineate polarmente con successo.
Se la propria montatura ha manopole o viti di blocco dell’altitudine o
dell’azimut, serrarle in modo fermo. Se si è già eseguito un allineamento
del cielo, eliminare l’allineamento corrente dal menu Allineamento ed
eseguire nuovamente l’allineamento del cielo.
NOTA: Non tentare di regolare l’allineamento polare a meno di due minuti d’arco su
ciascun asse. Farlo sarà difficile e non fornirà ulteriori vantaggi di puntamento o tracciamento.
Altre funzionalità
Nel menu StarSense sono disponibili ulteriori opzioni tra cui scegliere.
Live View
La finestra Live View mostra una lettura in tempo reale dal sensore di
immagine di SSAA. Il suo scopo principale è aiutare a mettere a fuoco
l’obiettivo di SSAA (vedere la sezione Messa a fuoco successiva in questo
manuale), ma può anche essere interessante vedere cosa sta vedendo
SSAA.
Per visualizzare la Live View, è necessario collegare lo SSAA direttamente
al PC utilizzando un cavo USB-C a USB-A (non fornito). Questo perché
l’interfaccia AUX non può supportare il trasferimento di immagini. Sarà
anche necessario installare il driver StarSense Windows sul proprio
computer. Si troverà nella sezione Supporto e Download della pagina
prodotto StarSense AutoAlign (#94034) su celestron.com.
Una volta installato il driver e collegato il SSAA con il cavo USB, la finestra
Live View mostrerà la vista corrente dal sensore di immagine di SSAA.
Non ci sono controlli per la Live View. SSAA regolerà automaticamente
l’esposizione e il guadagno per ottenere le immagini migliori.
NOTA: si dovrebbe comunque collegare SSAA alla montatura tramite AUX
mentre è collegato al PC tramite USB per Live View.
Precise GoTo
Precise GoTo utilizza SSAA per centrare più accuratamente gli oggetti
nel campo visivo. Quando questa opzione è abilitata, la montatura del
telescopio utilizza il proprio modello di allineamento interno per spostarsi in
prossimità dell’oggetto selezionato. Quindi SSAA interviene, apportando
correzioni fini al centraggio, migliorando significativamente la precisione di
puntamento complessiva. Quando si utilizza SSAA, Precise GoTo è attivata
come funzionalità predefinita. Se si vuole disattivare questa funzionalità, è
possibile farlo dal menu StarSense.
Versione
Selezionando questa opzione appare la versione corrente del firmware di
SSAA.
Ripristino delle impostazioni di fabbrica
Questa opzione cancella tutti i dati di calibrazione del centro
precedentemente memorizzati in StarSense AutoAlign. Dopo aver
selezionato questa opzione, è necessario riavviare la montatura.
NOTA: Queste istruzioni spiegano come eseguire la procedura di
allineamento polare nell’emisfero settentrionale. Se ci si trova nell’emisfero
australe, puntare sempre la propria montatura verso sud invece che verso
nord.
Per eseguire un allineamento polare con SSAA attraverso CPWI:
1. L’allineamento polare approssimativo della montatura renderà
l’intero processo più rapido e semplice. Una volta allineato in modo
approssimativo, è possibile ottenere un allineamento polare accurato
utilizzando solo le manopole di regolazione fine dell’altitudine e
dell’azimut della montatura.
a. Assicurarsi che la montatura sia ragionevolmente a livello. Se la
propria montatura ha una livella a bolla incorporata, usarla come
riferimento.
b. Regolare l’altitudine della montatura in modo che la scala della
latitudine della montatura indichi all’incirca la stessa latitudine del
sito di osservazione.
c. Sollevare e ruotare l’intero treppiede e montarlo in modo che l’asse
di ascensione retta (AR) punti approssimativamente verso nord.
La posizione della montatura non deve essere perfetta. Puntare
entro circa 5° rispetto al Nord in modo che la montatura sia
all’interno del raggio delle manopole di regolazione fine dell’azimut
della montatura. Utilizzare un’app bussola gratuita per il proprio
smartphone se si ha bisogno di aiuto per trovare il nord.
d. Se sono state allentate le manopole di regolazione dell’altitudine
o dell’azimut durante un allineamento polare approssimativo,
assicurarsi che siano nuovamente serrate prima di continuare.
2. Quando viene richiesto da CPWI, spostare manualmente il telescopio
in una posizione di partenza iniziale utilizzando la finestra Controlli
rotazione montatura.
• Il telescopio ruoterà da ovest a est per circa 50° durante il processo
di allineamento polare. Cercare di spostare il telescopio verso
un’area di cielo libera da ostacoli lungo questo percorso.
3. Fare clic su “Inizia” nella sezione Allineamento polare SSAA della finestra
Informazioni sul modello di puntamento. La montatura ruoterà verso est,
fermandosi circa ogni 10° per ottenere un riferimento di allineamento
polare.
4. Dopo che SSAA ha ottenuto i suoi riferimenti di allineamento polare,
visualizzerà la finestra di regolazione dell’asse azimutale (Fig. 18).
Regolare lentamente l’azimut della montatura finché l’”Errore Azm” non
è inferiore a due minuti d’arco.
• Se la montatura è dotata di blocchi dell’asse azimutale, allentarli
prima.
• Apportare le modifiche lentamente in modo che SSAA possa
seguirle. Se si regola troppo velocemente e SSAA perde traccia, è
necessario riavviare l’intero processo di allineamento polare.
Fig. 18: Finestra Regolazione dell'asse azimutale durante l'allineamento polare in CPWI.
5. Fare clic su “Asse successivo” quando si è finito di apportare modifiche
all’azimut. Apparirà la finestra di regolazione dell’asse dell’altitudine
(Fig. 19).
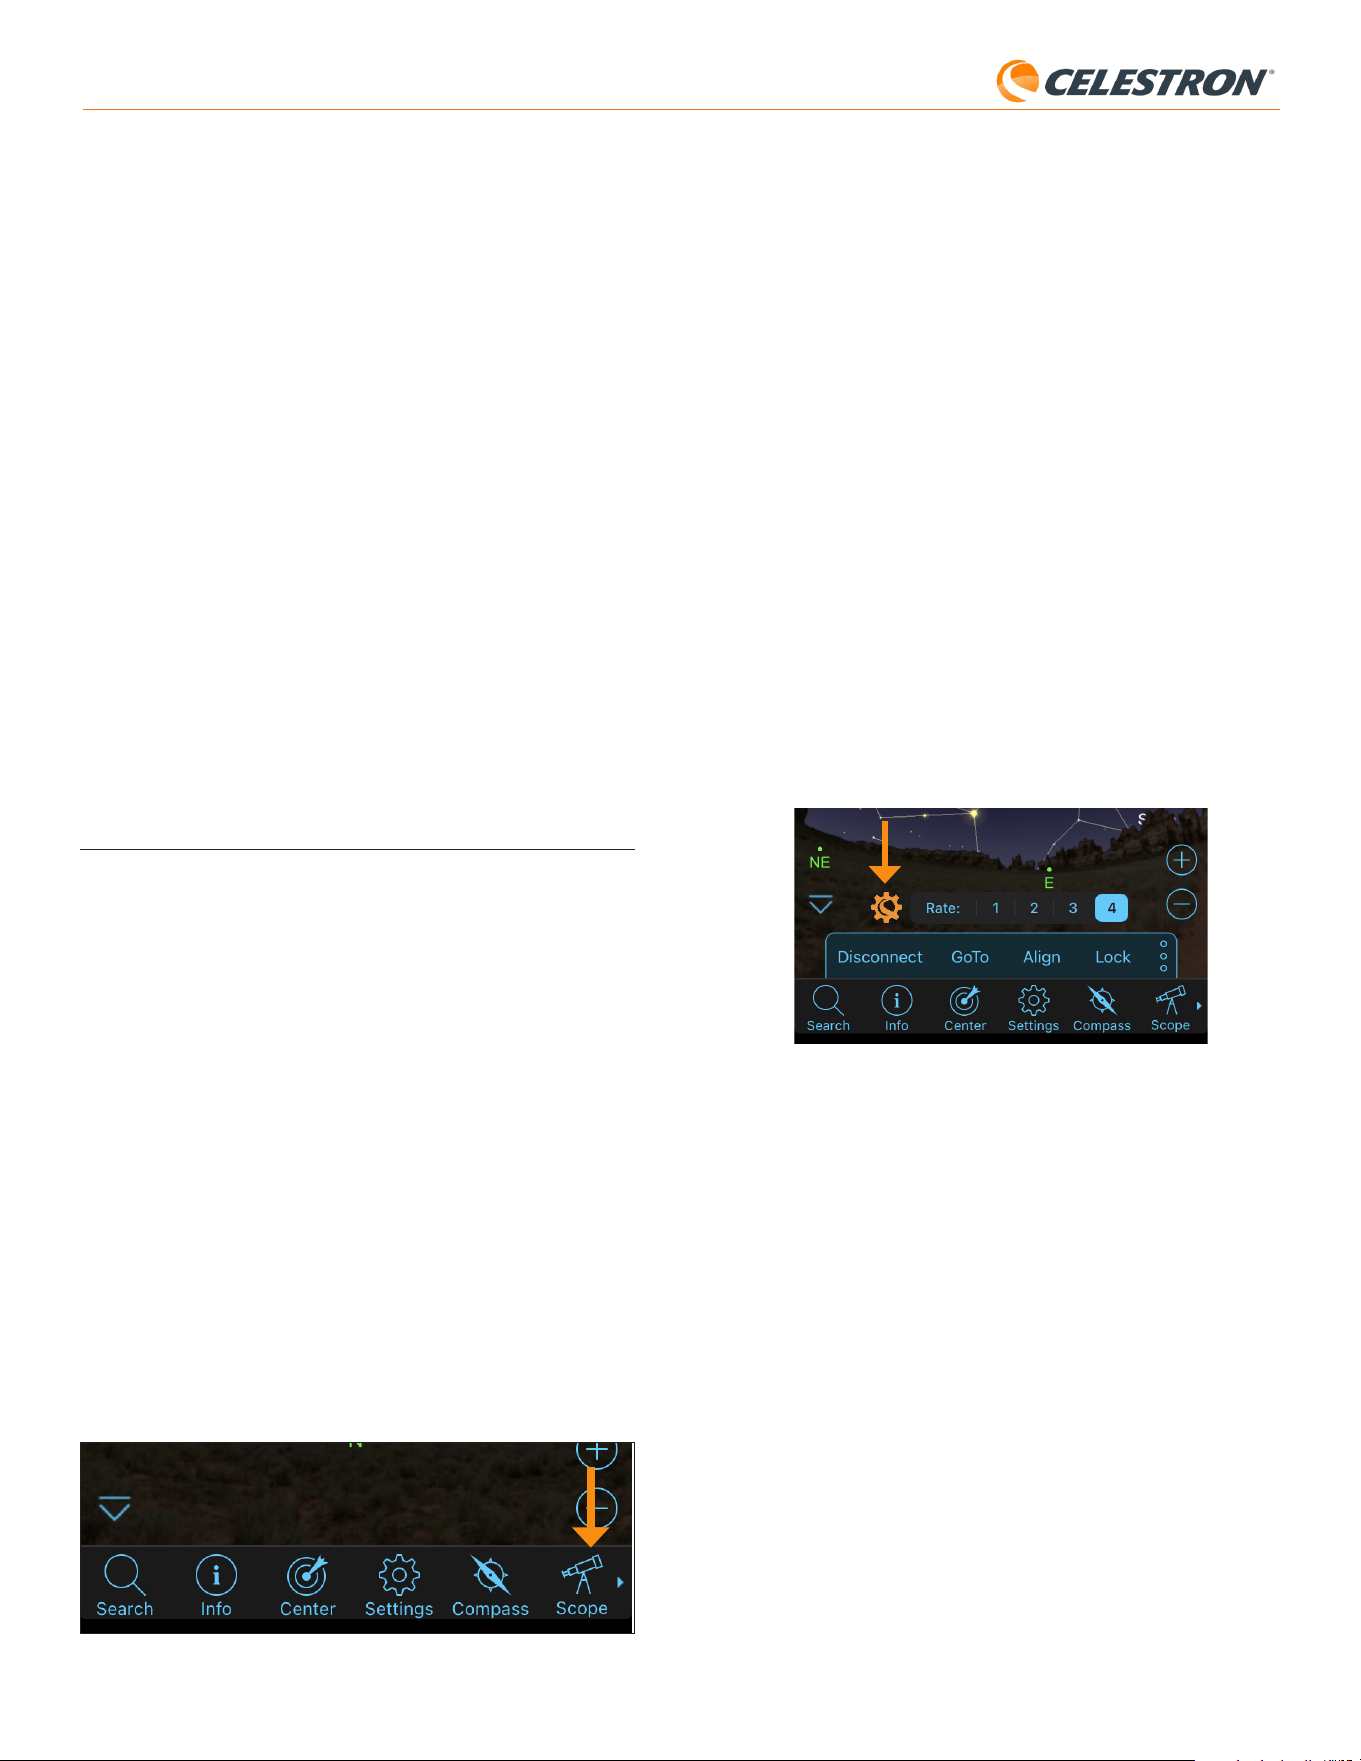
11 | ITALIANO
StarSense AutoAlign V2
Si consiglia di eseguire un ripristino delle impostazioni di fabbrica se si
prevede di utilizzare StarSense AutoAlign con una montatura Celestron
diversa da quella utilizzata in precedenza.
Download dei log di supporto
Se si verificano difficoltà tecniche e si desidera scaricare i log di supporto
da inviare all’assistenza tecnica Celestron, selezionare questa opzione.
Per prima cosa, installare il driver StarSense per Windows sul computer,
disponibile nella sezione Supporto e Download della pagina del prodotto
StarSense AutoAlign (#94034) su celestron.com. Successivamente,
collegare direttamente la porta USB-C dello SSAA al PC utilizzando un
cavo USB (non fornito). Quindi selezionare “Download dei log di supporto”.
I log verranno scaricati direttamente sul computer.
NOTA: I log di supporto non vengono memorizzati permanentemente nella memoria dello SSAA,
pertanto non spegnere la montatura né scollegare lo SSAA dalla montatura prima di aver scaricato i
log di supporto.
Aggiornamento del firmware
È possibile utilizzare questa opzione per verificare se il firmware di
StarSense AutoAlign (SSAA) è aggiornato e installare eventuali
aggiornamenti disponibili.
Per prima cosa, scaricare e installare il driver StarSense per Windows
sul computer. Si troverà nella sezione Supporto e Download della pagina
prodotto StarSense AutoAlign (#94034) su celestron.com.
Successivamente, collegare direttamente la porta USB-C dello SSAA
al PC utilizzando un cavo USB (non incluso). Una volta stabilita la
connessione, selezionare “Aggiornamento firmware” e seguire le istruzioni
visualizzate sullo schermo per completare la procedura.
7. Utilizzo di SSAA con SkyPortal
È possibile controllare lo StarSense AutoAlign tramite smartphone
utilizzando l’app mobile Celestron SkyPortal Powered by SkySafari™.
Requisiti:
• Uno smartphone con la versione più recente dell’app SkyPortal,
disponibile gratuitamente su Apple App Store o Google Play
• Un telescopio Celestron con WiFi integrato (ad es. NexStar Evolution)
oppure una montatura Celestron computerizzata con modulo
accessorio SkyPortal WiFi (venduto separatamente)
• StarSense AutoAlign installato e collegato alla montatura del telescopio
Per utilizzare SSAA con l’app SkyPortal:
1. Assicurarsi che lo SSAA sia collegato a una delle porte AUX della
montatura del telescopio.
2. Accendere la montatura.
3. Connettere lo smartphone alla rete WiFi del telescopio.
- Tra le reti WiFi disponibili, il telescopio verrà visualizzato come
“Celestron-###”, dove ### indica una combinazione di numeri e
lettere.
4. Aprire l’app SkyPortal.
5. Selezionare l’icona del telescopio in basso a destra dello schermo
(Fig. 20).
Fig. 20: Selezionare l’icona del telescopio in basso a destra dello schermo
6. Toccare “Connetti”, quindi “Connetti e allinea”. L’app avvierà ora la
procedura di allineamento. Posizionare il telescopio per l’allineamento
utilizzando uno dei seguenti metodi:
a. Per le montature EQ con sensori di posizione iniziale (ad es. CGX),
premere “OK” e la montatura si sposterà automaticamente nella
posizione iniziale.
b. Per le montature EQ senza sensori di posizione iniziale (ad es.
Advanced VX), l’app richiederà di spostare il telescopio fino ai segni
di riferimento della posizione iniziale (fare riferimento alla Fig. 11B).
È possibile spostare manualmente il telescopio oppure utilizzare i
controlli del telescopio sullo schermo.
c. Per le montature AZ, puntare il telescopio verso l’orizzonte Nord
utilizzando i controlli del telescopio sullo schermo. Il tubo del
telescopio deve essere approssimativamente parallelo al terreno e
puntato verso Nord. Se ci si trova nell’emisfero australe, il telescopio
deve essere approssimativamente parallelo al terreno e puntato
verso Sud.
d. Per le montature AZ su base equatoriale, abilitare l’opzione base
nella schermata Configurazione telescopio. Accedere alla schermata
Scope Setup selezionando Menu > Impostazioni > Configurazione
e Controllo. Quindi selezionare “Allineamento con base equatoriale
StarSense attivato”. Successivamente, tornare alla schermata
principale del planetario, annullare l’allineamento corrente e premere
“Connetti”, quindi “Connetti e allinea” nuovamente. Seguire le
istruzioni visualizzate sullo schermo. Sarà inoltre necessario impostare
il telescopio nella posizione iniziale. Fare riferimento alla Fig. 12 a
pagina 5.
NOTA: È possibile accedere direttamente alla schermata Configurazione telescopio premendo l’icona
Impostazioni Celestron nella parte inferiore dello schermo. (Fig. 21).
Fig. 21: L’icona Impostazioni Celestron
7. L’allineamento automatico inizierà ora. Le montature EQ si sposteranno
verso due punti nel cielo occidentale e successivamente verso due
punti nel cielo orientale per ottenere i riferimenti di allineamento. Le
montature AZ si sposteranno verso tre punti nel cielo. Se è stata
precedentemente eseguita una calibrazione del centro, è ora possibile
utilizzare lo SSAA per individuare oggetti. Se non è stata completata
una calibrazione del centro, SkyPortal richiederà di eseguirla.
Procedere al passo 8.
8. La calibrazione del centro allinea il campo visivo dello SSAA con quello
del telescopio. Questo passo generalmente deve essere eseguito una
sola volta, poiché lo SSAA memorizza i dati di calibrazione del centro
nella memoria interna. Alla successiva connessione allo SSAA tramite
l’app, non sarà necessario eseguire nuovamente la Calibrazione del
centro, a meno che lo SSAA non sia stato spostato su un diverso tubo
ottico del telescopio.
a. Per eseguire la Calibrazione del centro, selezionare una stella
dall’interfaccia del planetario, quindi premere “GoTo”. Il telescopio
si sposterà vicino alla stella, ma potrebbe non trovarsi nel campo
visivo del telescopio.
b. Utilizzare i pulsanti direzionali sullo schermo per centrare con
precisione la stella nel campo visivo del telescopio. Al termine,
premere “Allinea” nella parte inferiore dello schermo, quindi premere
“Calibra”.
c. L’app completerà il processo di Calibrazione del centro.
d. Dopo la calibrazione del centro, verrà richiesto di ripetere
l’allineamento del cielo. Toccare “Scollega”, quindi l’icona
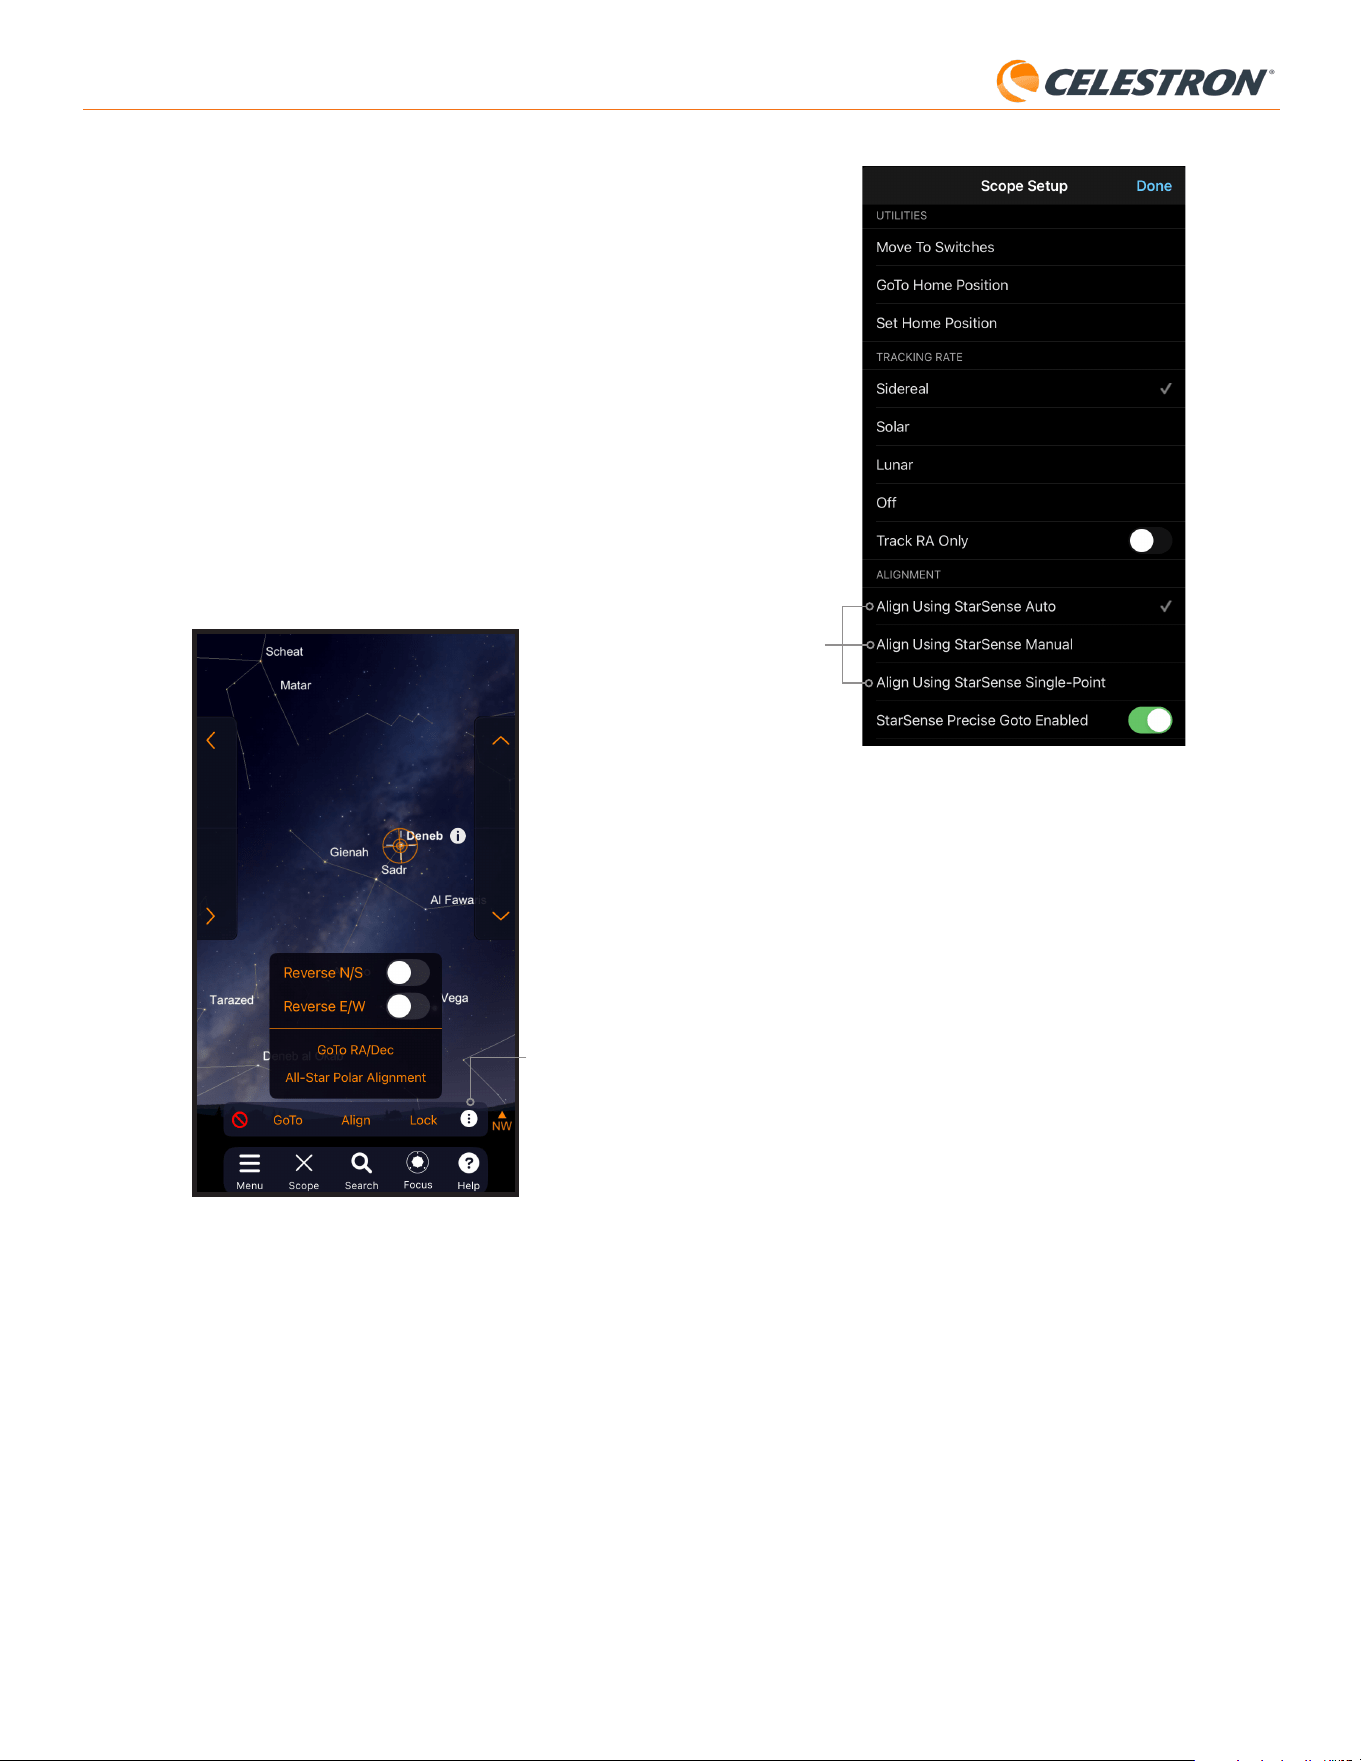
12 | ITALIANO
StarSense AutoAlign V2
Opzioni di
allineamento
Fig. 22: Oltre a “Allineamento tramite StarSense Auto” (opzione predefinita), sono
disponibili ulteriori opzioni di allineamento dalla schermata Configurazione
telescopio.
Allineamento tramite StarSense Manual
StarSense Manual Align consente di spostare manualmente il telescopio
verso i punti di allineamento scelti dall’utente, invece di utilizzare i punti
automatici preimpostati. Se il sito di osservazione presenta molti ostacoli
oppure se sono presenti nubi in transito, StarSense Manual può risultare
più rapido e pratico rispetto a StarSense Auto. Per utilizzare StarSense
Manual, selezionare “Allineamento tramite StarSense Manual” dalla
schermata Configurazione telescopio. Alla successiva selezione di
“Connetti e allinea”, l’app richiederà di eseguire uno StarSense Manual
Align. Seguire le istruzioni visualizzate sullo schermo. È possibile
spostare il telescopio verso qualsiasi posizione del cielo libera da
ostacoli. Mantenere i punti di allineamento ad almeno 30° di distanza
l’uno dall’altro su entrambi gli assi.
Allineamento tramite StarSense Single-Point
StarSense Single-Point Align consente di eseguire l’allineamento
spostando manualmente il telescopio verso una sola area del cielo.
È il metodo di allineamento più rapido, ma fornisce il modello di
puntamento meno preciso per la montatura. Tuttavia, tenere presente
che SSAA utilizzerà comunque la funzione Precise GoTo per centrare
accuratamente gli oggetti, quindi questa procedura rapida potrebbe
essere sufficiente per l’osservazione occasionale. È inoltre possibile
aggiungere ulteriori punti di allineamento in un secondo momento per
migliorare la precisione della montatura utilizzando il comando Allinea >
Allinea (vedere sotto). Per utilizzare StarSense Single-Point, selezionare
“Allineamento tramite StarSense Single-Point” dalla schermata
Configurazione telescopio. Alla successiva selezione di “Connetti e
allinea”, verrà richiesto di eseguire uno StarSense Single-Point Align.
Seguire le istruzioni visualizzate sullo schermo.
Aggiunta di ulteriori punti di allineamento con il
comando Allinea > Allinea
La funzione Precise GoTo integrata in SSAA consente di centrare
gli oggetti nel campo visivo indipendentemente dalla precisione del
modello di puntamento della montatura. Tuttavia, se lo si desidera, è
Telescopio, poi “Connetti” e infine nuovamente “Connetti e allinea”.
Tornare al passo 6.
Ora si è pronti a utilizzare lo SSAA per individuare oggetti nel cielo
notturno. È sufficiente selezionare un oggetto nell’app e toccare “GoTo”.
La funzione Precise GoTo è attiva per impostazione predefinita, pertanto
le stelle dovrebbero apparire ben centrate nel campo visivo del telescopio.
Quando lo SSAA esegue il Precise GoTo, l’app visualizzerà “Rilevamento
stellare”.
Allineamento polare
L’assistenza all’allineamento polare con SSAA non è attualmente
disponibile tramite l’app SkyPortal. Tuttavia, SkyPortal supporta la
procedura All-Star Polar Alignment (ASPA) per un allineamento polare
accurato della montatura equatoriale. Se si utilizza una montatura
equatoriale (oppure una montatura AZ su base equatoriale), l’app
chiederà se si desidera eseguire l’ASPA dopo aver completato con
successo l’allineamento del cielo. Se si desidera eseguire l’ASPA in un
secondo momento, è possibile selezionare Allineamento polare All-Star
in qualsiasi momento dall’icona con tre punti, come mostrato in Fig. 21B.
Dopo aver eseguito l’ASPA, verrà richiesto di effettuare nuovamente
l’allineamento del cielo della montatura.
Icona con
tre punti
Fig. 21B: È possibile eseguire l’allineamento polare in qualsiasi momento selezionando
l’opzione “Allineamento polare All-Star” dopo aver toccato l’icona con tre
punti.
Altre opzioni di allineamento
Nella schermata Configurazione telescopio (Menu Impostazioni >
Configurazione e Controllo, oppure premendo l’icona Impostazioni
Celestron), è possibile selezionare altre opzioni di allineamento (Fig. 22).
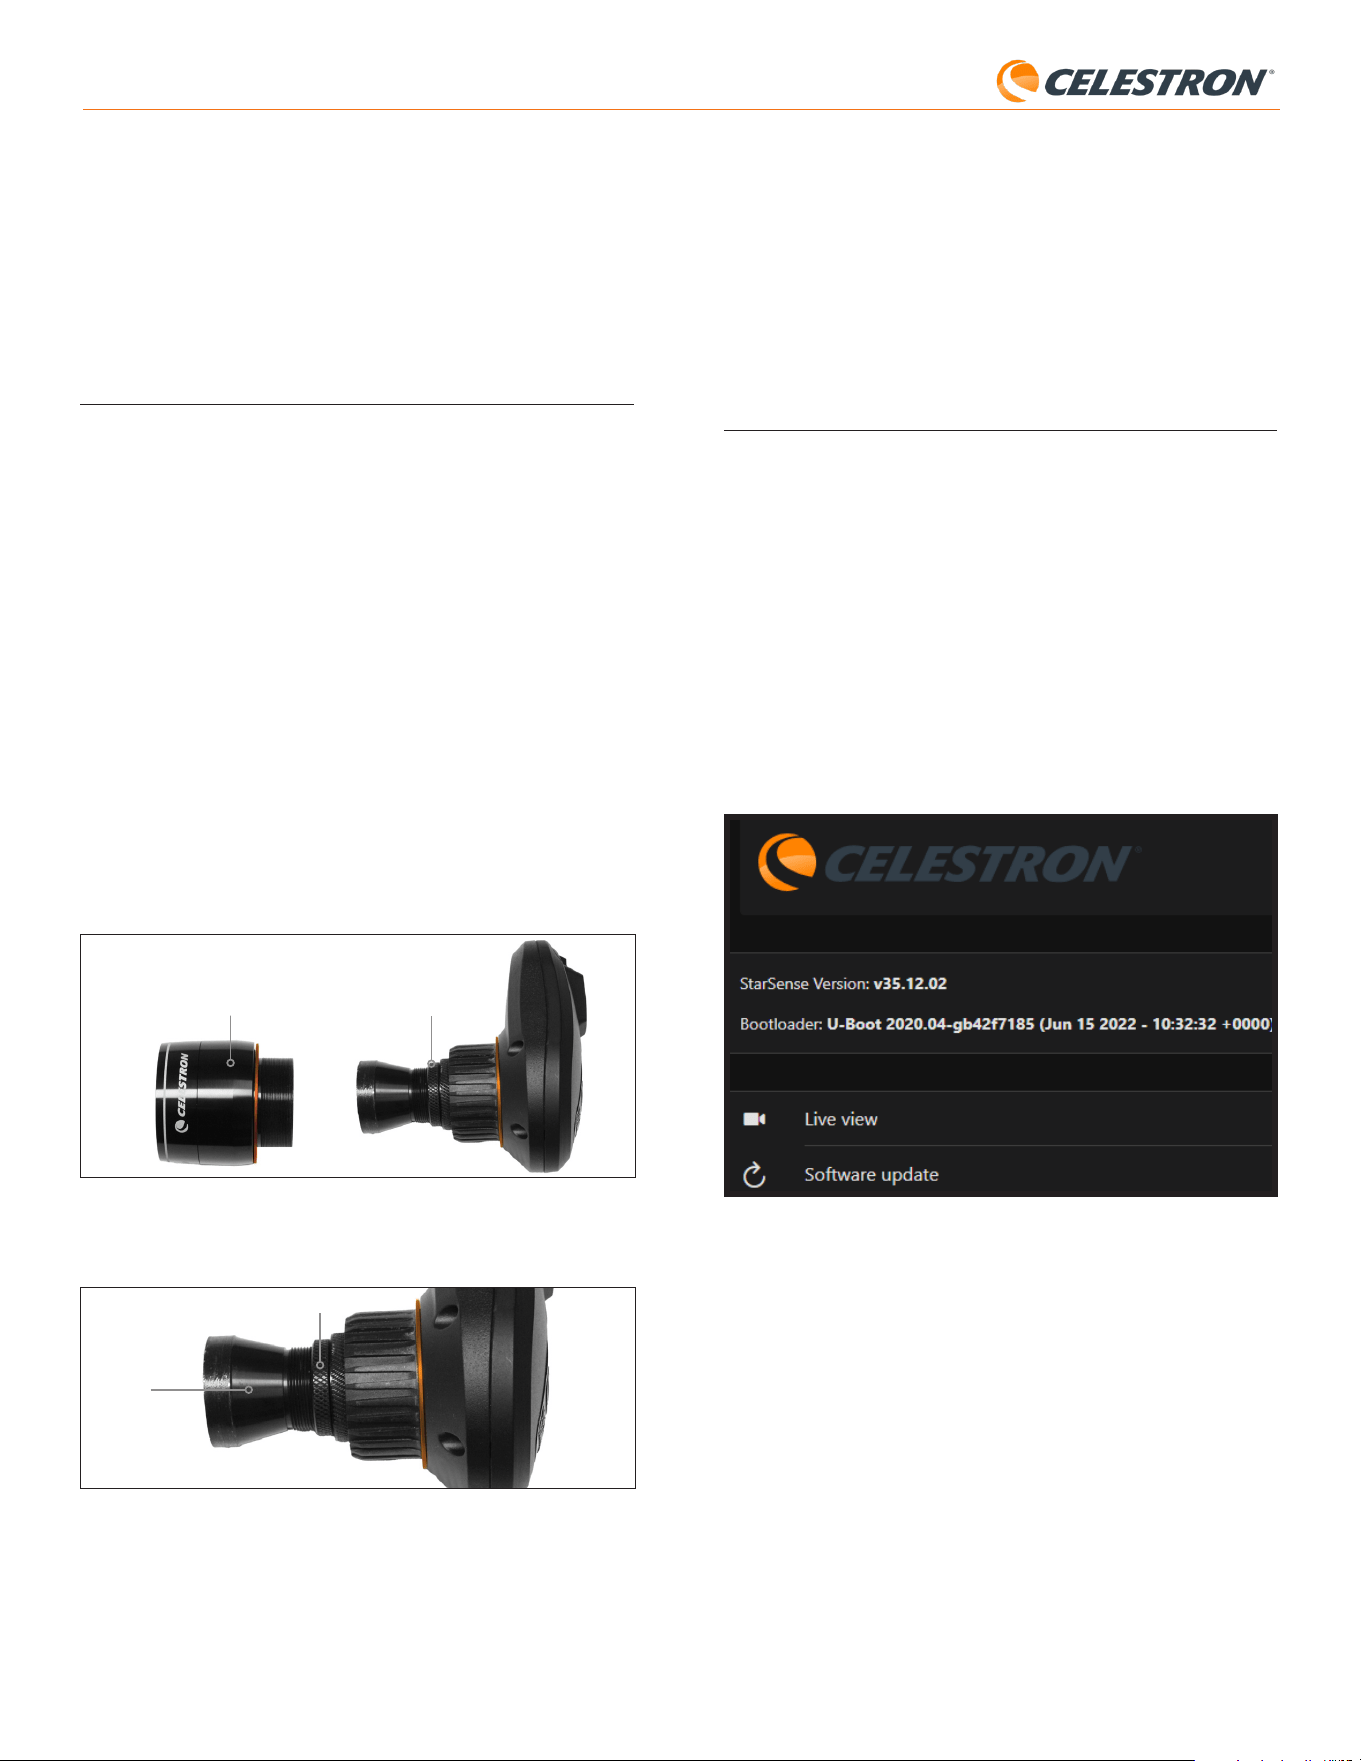
13 | ITALIANO
StarSense AutoAlign V2
possibile migliorare continuamente la precisione di puntamento della
montatura aggiungendo ulteriori punti di allineamento al suo modello di
puntamento.
Per aggiungere punti di allineamento, spostare il telescopio verso una
qualsiasi area di cielo libero. Selezionare “Align” tra le opzioni nella
parte inferiore dello schermo, quindi selezionare nuovamente “Align”. È
possibile aggiungere fino a un massimo di 10 punti di allineamento.
8. Messa a fuoco
I tecnici in fabbrica hanno messo a fuoco StarSense AutoAlign e non
dovrebbero essere necessarie ulteriori regolazioni. Tuttavia, se si scopre
che SSAA non funziona come dovrebbe (ad esempio, segnalando
“Nessuna stella!” quando ci sono molte stelle visibili nel cielo), si dovrebbe
controllare la messa a fuoco.
Per mettere a fuoco StarSense AutoAlign:
1. Seguire i passi descritti in precedenza per accedere alla Live View
in CPWI (vedere pagina 10). In alternativa, è possibile accedere alla
Live View tramite l’interfaccia web. Per le istruzioni, fare riferimento al
capitolo 9 (in questa pagina).
2. Se si sta eseguendo la messa a fuoco durante il giorno, puntare SSAA
verso un oggetto ad almeno un quarto di miglio di distanza. Se si sta
eseguendo la messa a fuoco di notte, puntare i SSAA verso una stella
luminosa. Sullo schermo dovrebbe apparire un’immagine.
NOTA: Potrebbe essere difficile mettere a fuoco in condizioni di forte
luminosità diurna a causa dell’ottica molto veloce e del sensore sensibile.
3. Se la messa a fuoco è nitida, si è concluso. In caso contrario,
rimuovere il coperchio anteriore di SSAA afferrandolo
e ruotandolo in senso antiorario finché non si stacca
(Fig. 23). Rimuovere il coperchio anteriore per esporre l’anello di blocco
della messa a fuoco.
Fig. 23: Rimuovere solo il coperchio anteriore, non l'intero parte anteriore
dell'alloggiamento.
Anello di blocco della
messa a fuoco
Copertura anteriore
4. Allentare l’anello di blocco della messa a fuoco (Fig. 24).
Fig. 24: Allentare l'anello di blocco quando si effettuano le regolazioni della messa a
fuoco, quindi serrare saldamente quando si mette a fuoco.
Anello di blocco della messa a fuoco
Ottica
5. Ruotare l’ottica in senso orario da un quarto a mezzo giro per vedere
se la messa a fuoco migliora. In tal caso, continuare a ruotare finché la
messa a fuoco non è il più nitida possibile. Se la messa a fuoco non
migliora, ruotare l’ottica in senso antiorario finché la messa a fuoco non
migliora.
6. Quando si vede un’immagine nitida, stringere nuovamente l’anello di
blocco e reinstallare il coperchio anteriore di SSAA. Se lo si desidera,
ora è possibile disconnettere SSAA dalla porta USB del PC.
9. Aggiornamento del firmware di
SSAA e della Live View tramite
l’interfaccia web
I nostri ingegneri lavorano costantemente ad aggiornamenti e miglioramenti
dei nostri prodotti, pertanto consigliamo di verificare periodicamente la
disponibilità di aggiornamenti del firmware SSAA. Se è disponibile un
nuovo firmware, sarà pubblicato nella pagina del prodotto StarSense
AutoAlign V2 (#94034) su celestron.com, nella sezione “Supporto e
Download”. Per installare il file .swu scaricato, sarà necessario un cavo
USB-C a USB-A (non fornito) e il driver StarSense per Windows,
anch’esso disponibile nella pagina del prodotto StarSense AutoAlign V2
(#94034).
Seguire questi passi per aggiornare il firmware di SSAA:
1. Installare il driver StarSense per Windows sul PC.
2. Collegare SSAA al proprio PC attraverso il cavo USB. Attendere circa
10 secondi affinché lo SSAA si avvii.
3. Aprire un browser web sul computer e inserire http://169.254.54.1/
per avviare la pagina dell’interfaccia web SSAA (Fig. 25).
Fig. 25: È possibile aggiornare il firmware di SSAA attraverso l'interfaccia web. Da
qui sarà possibile anche avere accesso alla Live View.
4. Selezionare “Aggiornamento software”.
5. Trascinare e rilasciare il file .swu scaricato come indicato. Il software di
SSAA sarà aggiornato.
È inoltre possibile accedere alla Live View di StarSense AutoAlign tramite
l’interfaccia web. Da qui è possibile passare tra le impostazioni automatiche
e manuali della fotocamera e acquisire un’immagine in formato TIFF.
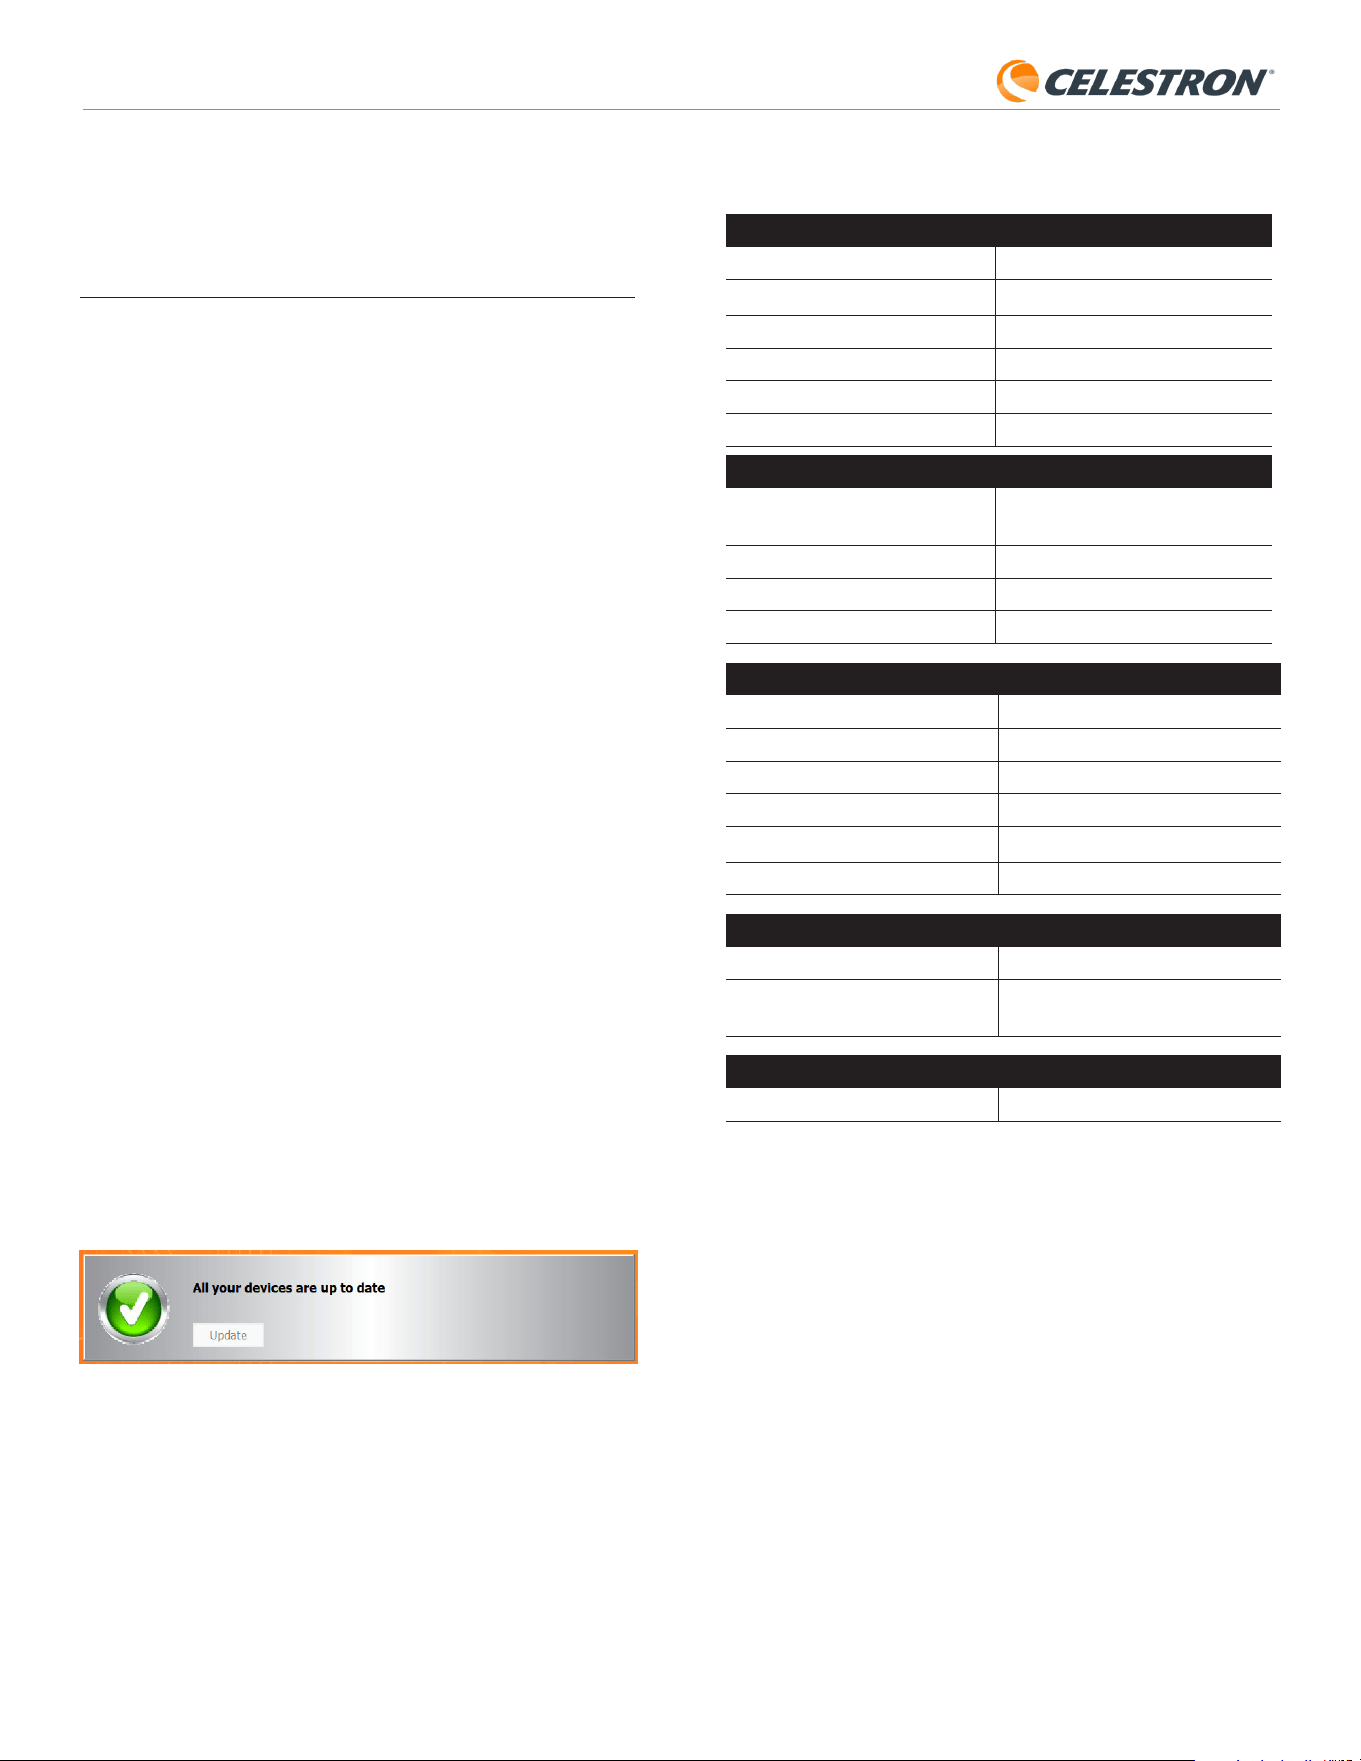
14 | ITALIANO
StarSense AutoAlign V2
10. Aggiornamento del firmware di
SSAA tramite Celestron Firmware
Manager (CFM)
È inoltre possibile utilizzare Celestron Firmware Manager (CFM) per
aggiornare contemporaneamente StarSense AutoAlign, il controller
NexStar+ e la montatura.
Prima di iniziare, scaricare Celestron Firmware Manager (CFM) e il
driver StarSense per Windows. Entrambi sono disponibili su celestron.
com nella pagina del prodotto StarSense AutoAlign V2 (#94034), nella
sezione “Software e Download”.
Per eseguire l’aggiornamento tramite CFM sono necessari due cavi forniti
dall’utente:
- Un cavo USB Type-A a USB Mini-B per collegare il controller NexStar+
al PC.
- Un cavo USB Type-A a USB Type-C per collegare lo StarSense
AutoAlign al PC.
Per installare il firmware:
1. Installare Celestron Firmware Manager (CFM) e il driver StarSense per
Windows sul PC.
2. Configurare la montatura come di consueto, con il controller NexStar+
e lo SSAA collegati alle porte AUX della montatura.
3. Accendere la montatura.
4. Collegare la porta USB nella parte inferiore del controller al PC
utilizzando un cavo USB Type-A a USB Mini-B (fornito dall’utente).
5. Avviare CFM e fare clic su “Cerca Dispositivi”. CFM dovrebbe rilevare
il controller, la montatura e StarSense AutoAlign.
6. Fare clic sul pulsante Aggiorna in CFM. CFM installerà eventuali
aggiornamenti firmware disponibili per il controller e la montatura.
7. Se è disponibile un aggiornamento firmware per StarSense AutoAlign,
CFM richiederà di collegarlo direttamente al PC utilizzando un cavo
USB Type-A a USB Type-C (fornito dall’utente).
Mantenere StarSense collegato alla montatura tramite il cavo AUX.
Allo stesso tempo, collegare la porta USB-C al PC. Una volta
stabilita la connessione USB, fare clic su “OK” in CFM per avviare
l’aggiornamento del firmware.
NOTA: StarSense AutoAlign deve essere aggiornato tramite una
connessione USB diretta. Il file firmware è troppo grande per
essere trasferito tramite la connessione AUX della montatura.
8. Quando CFM visualizza un segno di spunta verde (Fig. 26),
l’aggiornamento di StarSense AutoAlign è completato.
Fig. 26: Quando l’aggiornamento dello SSAA è completato, verrà visualizzato un segno di
spunta verde.
11. Specifiche
LENTE
DESIGN Doppietto
APERTURA 20 mm
LUNGHEZZA FOCALE 40 mm
RAPPORTO FOCALE EFFETTIVO f/2
NUMERO DI ELEMENTI 2
RIVESTIMENTI Completamente multistrato
SENSORE IMMAGINE CMOS
SENSORE IMMAGINE CMOS Sony IMX462LLR-C, monocromo,
retroilluminato
DIMENSIONI DEL SENSORE Diagonale 6,46mm
DIMENSIONE PIXEL 2.9μm x 2.9μm
NUMERO DI PIXEL EFFETTIVI 2.13 M
COMPUTER DI BORDO
ARM
®
CORE PRINCIPALE 2x Cortex
®
-A53 fino a 1.4 GHz
ARM
®
CORE SECONDARIO 1x Cortex
®
-M7 fino a 600 MHz
RAM 512 MB
ROM 4 GB
GPU GC7000UltraLite
TEMPERATURA OPERATIVA da -5°C a 40°C
PORTE
AUX: Per connessione a montature Celestron
USB-C Per mettere a fuoco la connessione al PC,
vedere Live View e aggiornare il firmware
ALLOGGIAMENTO
ALLOGGIAMENTO Alluminio con coperture in plastica
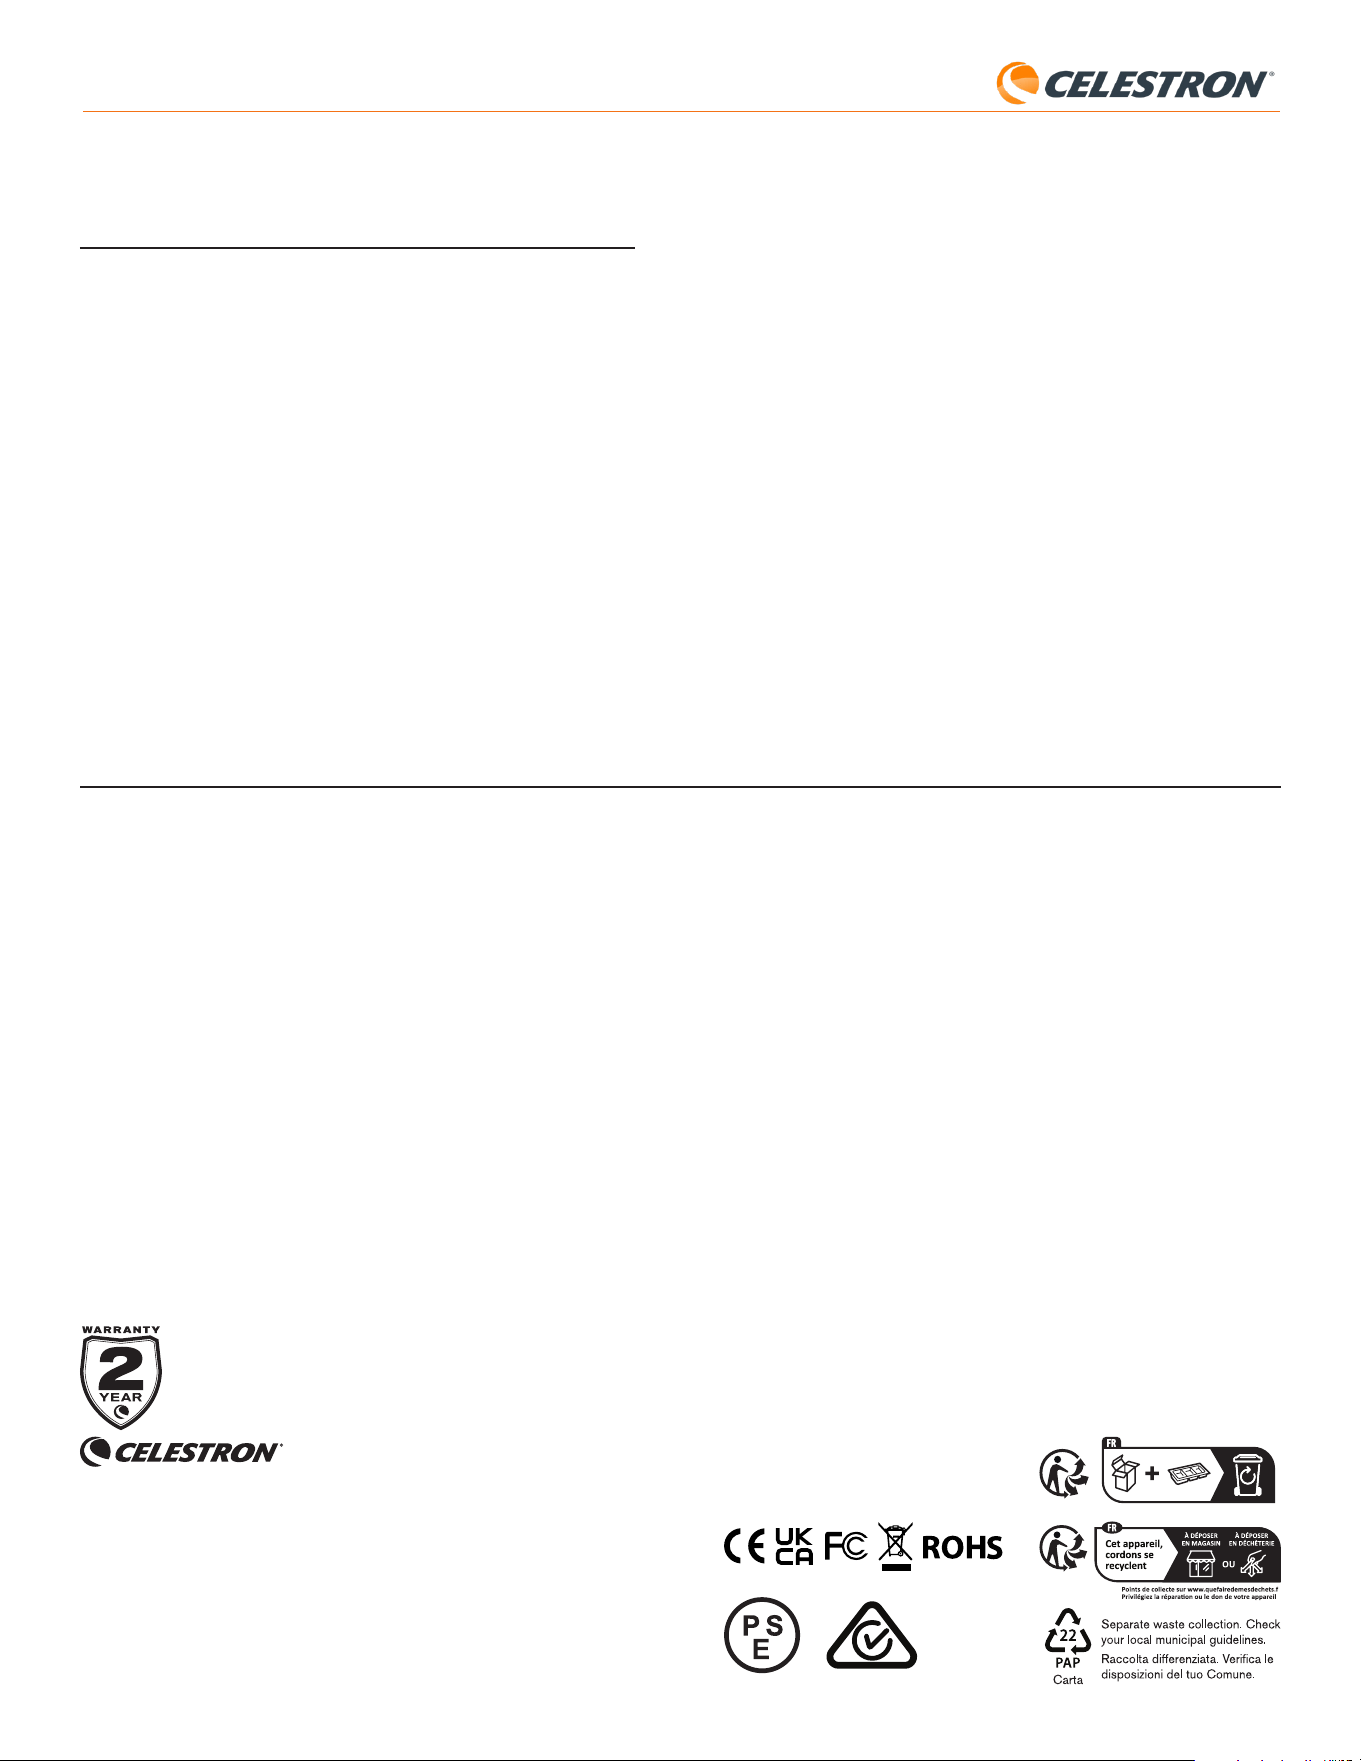
15 | ENGLISH
StarSense AutoAlign V2
12. Risoluzione dei problemi e
suggerimenti
1. Se si riceve continuamente il messaggio di errore “Nessuna stella!”
durante il plate solve quando il cielo è sereno, prova a rimettere a fuoco
SSAA.
2. Se la Luna è alta e luminosa, StarSense AutoAlign potrebbe avere
difficoltà a eseguire il plate solving entro pochi gradi da essa a causa
dell’abbagliamento. In questo caso, potrebbe essere visualizzato un
messaggio di errore “Nessuna stella!”. In presenza di una leggera
foschia nel cielo, il plate solving potrebbe non riuscire anche a distanze
maggiori dalla Luna.
3. Per le migliori prestazioni complessive, consigliamo di mettere a livello
il treppiede. SSAA funzionerà comunque con un treppiede non a livello,
ma la sua precisione di puntamento sarà in qualche modo ridotta.
4. Per la funzionalità Precise GoTo più precisa, effettuare l’allineamento
polare della propria montatura. Precise GoTo funzionerà ancora bene se
la montatura non è allineata ai poli, ma la precisione complessiva sarà
leggermente ridotta, in genere di diversi minuti d’arco.
5. Se lo si desidera, è possibile collegare lo SSAA direttamente al
PC tramite la porta USB-C per il controllo con CPWI. Prima del
collegamento, scaricare e installare il driver StarSense per Windows
(disponibile nella pagina del prodotto SSAA V2 su celestron.com).
Collegare lo SSAA al PC. Dopo circa 10 secondi lo SSAA si avvierà e
il computer riconoscerà lo StarSense AutoAlign.
- Lasciare lo SSAA collegato alla montatura tramite il cavo
AUX in dotazione, anche mentre è collegato al PC tramite
USB-C. Utilizzare la porta AUX della montatura, non la porta
di autoguida. (La porta di autoguida ST-4 non è compatibile
con lo SSAA.)
- Assicurarsi di utilizzare un cavo USB di alta qualità. Se ci sono
problemi per il collegamento al SSAA via USB, provare un
altro cavo USB o un’altra porta USB del proprio computer. Si
sconsiglia l’uso di prolunghe USB, poiché possono contribuire
alla perdita di segnale.
6. Se si rimuove lo StarSense AutoAlign dalla base della staffa e lo si
reinstalla successivamente, in genere non sarà necessario eseguire
nuovamente la calibrazione del centro. Tuttavia, se gli oggetti non
vengono più posizionati vicino al centro del campo visivo, ripetere la
procedura di calibrazione del centro.
NOTA FCC: La presente apparecchiatura è stata testata ed è risultata conforme ai limiti
imposti per i dispositivi digitali di Classe B, ai sensi della Parte 15 delle Normative FCC. Tali
limiti sono stati ideati per fornire un’adeguata protezione nei confronti di interferenze dan-
nose in installazioni residenziali. La presente apparecchiatura genera, utilizza e può irradiare
energia in radio frequenza e, se non installata e utilizzata conformemente alle istruzioni, può
causare interferenze dannose alle radiocomunicazioni. Tuttavia, non esiste alcuna garanzia
che l’interferenza non si verifichi in una particolare installazione. Nel caso in cui la presente
apparecchiatura causi interferenze dannose alla ricezione radio o televisiva, il che potrebbe
essere determinato dall'accensione e dallo spegnimento dell'apparecchiatura, l'utente è in-
coraggiato a tentare di correggere l'interferenza mediante una o più delle misure seguenti:
• Riorientare o riposizionare l’antenna di ricezione.
• Aumentare la distanza tra l'apparecchiatura e il ricevitore.
• Collegare l’apparecchiatura a una presa su un circuito diverso da quello a cui è collegato
il ricevitore.
• Collegare il dispositivo a una presa su un circuito diverso da quello a cui è collegato il
ricevitore.
Il design del prodotto e le specifiche sono soggetti a modifiche senza previa notifica.
Questo prodotto è progettato per essere utilizzato da persone di età pari o superiore ai 14
anni.
©2026 Celestron. Celetron e Symbol sono marchi di Celestron, LLC.
Tutti i diritti riservati. • Celestron.com
Stati Uniti: 2835 Columbia Street Torrance, CA 90503 Stati Uniti
Regno Unito: Unit 2 Transigo, Gables Way, Thatcham RG19 4JZ Regno Unito
Questo prodotto è progettato per essere utilizzato da persone di età pari o
superiore ai 14 anni.
Prodotto in Cina
05-26
celestron.com/pages/warranty

16 | ITALIANO
StarSense AutoAlign V2

1 | ESPAÑOL
StarSense AutoAlign V2
StarSense
®
AutoAlign V2
ESPAÑOL# 94034
Con Celestron StarSense AutoAlign Versión 2 (SSAA), nunca ha sido
tan fácil usar un telescopio Celestron. ¡Este accesorio todo en uno alinea
automáticamente su telescopio, y mucho más! Con su nuevo StarSense
AutoAlign, puede:
• Alinear automáticamente su telescopio ecuatorial o altazimut con el
firmamento nocturno en solo unos minutos. Una vez alineado, su
telescopio localizará y centrará objetos con una precisión de apuntado
mejorada.
• Alinear polarmente rápidamente y con precisión su soporte ecuatorial,
si lo desea.
Lea este manual antes de instalar y usar su StarSense AutoAlign. Puede
encontrar la versión más actual de este manual de instrucciones en la
página de producto de StarSense AutoAlign en celestron.com.
MANUAL DE INSTRUCCIONES
ADVERTENCIA – ¡No apunte nunca StarSense AutoAlign al Sol!
Hacerlo dañará el sensor de imagen del SSAA. Este daño no está cubierto
por la garantía. Mantenga puesta la tapa del SSAA durante el día.
ADVERTENCIA: ¡NO CONECTE STARSENSE AUTOALIGN AL PUERTO
DE AUTOGUÍA DE SU SOPORTE! Conecte siempre StarSense AutoAlign a
uno de los puertos AUX de su soporte. Conectarlo al puerto de autoguía
puede dañar StarSense AutoAlign.

StarSense AutoAlign V2
ÍNDICE
1. Lista de piezas .....................................................................................................1
2. Instalación ........................................................................................................1
3. Controlar StarSense AutoAlign .......................................................................................3
4. Flujo de funcionamiento de StarSense AutoAlign ........................................................................3
5. Usar SSAA con mando manual NexStar+ ..............................................................................3
6. Usar SSAA con CPWI ..............................................................................................8
7. Usar SSAA con SkyPortal ...........................................................................................11
8. Enfoque ..........................................................................................................13
9. Actualizar el firmware de SSAA y vista en directo mediante interfaz web .....................................................12
10. Actualizar el firmware de SSAA mediante el gestor de firmware Celestron (CFM) ............................................13
11. Especificaciones. ..................................................................................................14
12. Solución de problemas y recomendaciones. ...........................................................................15
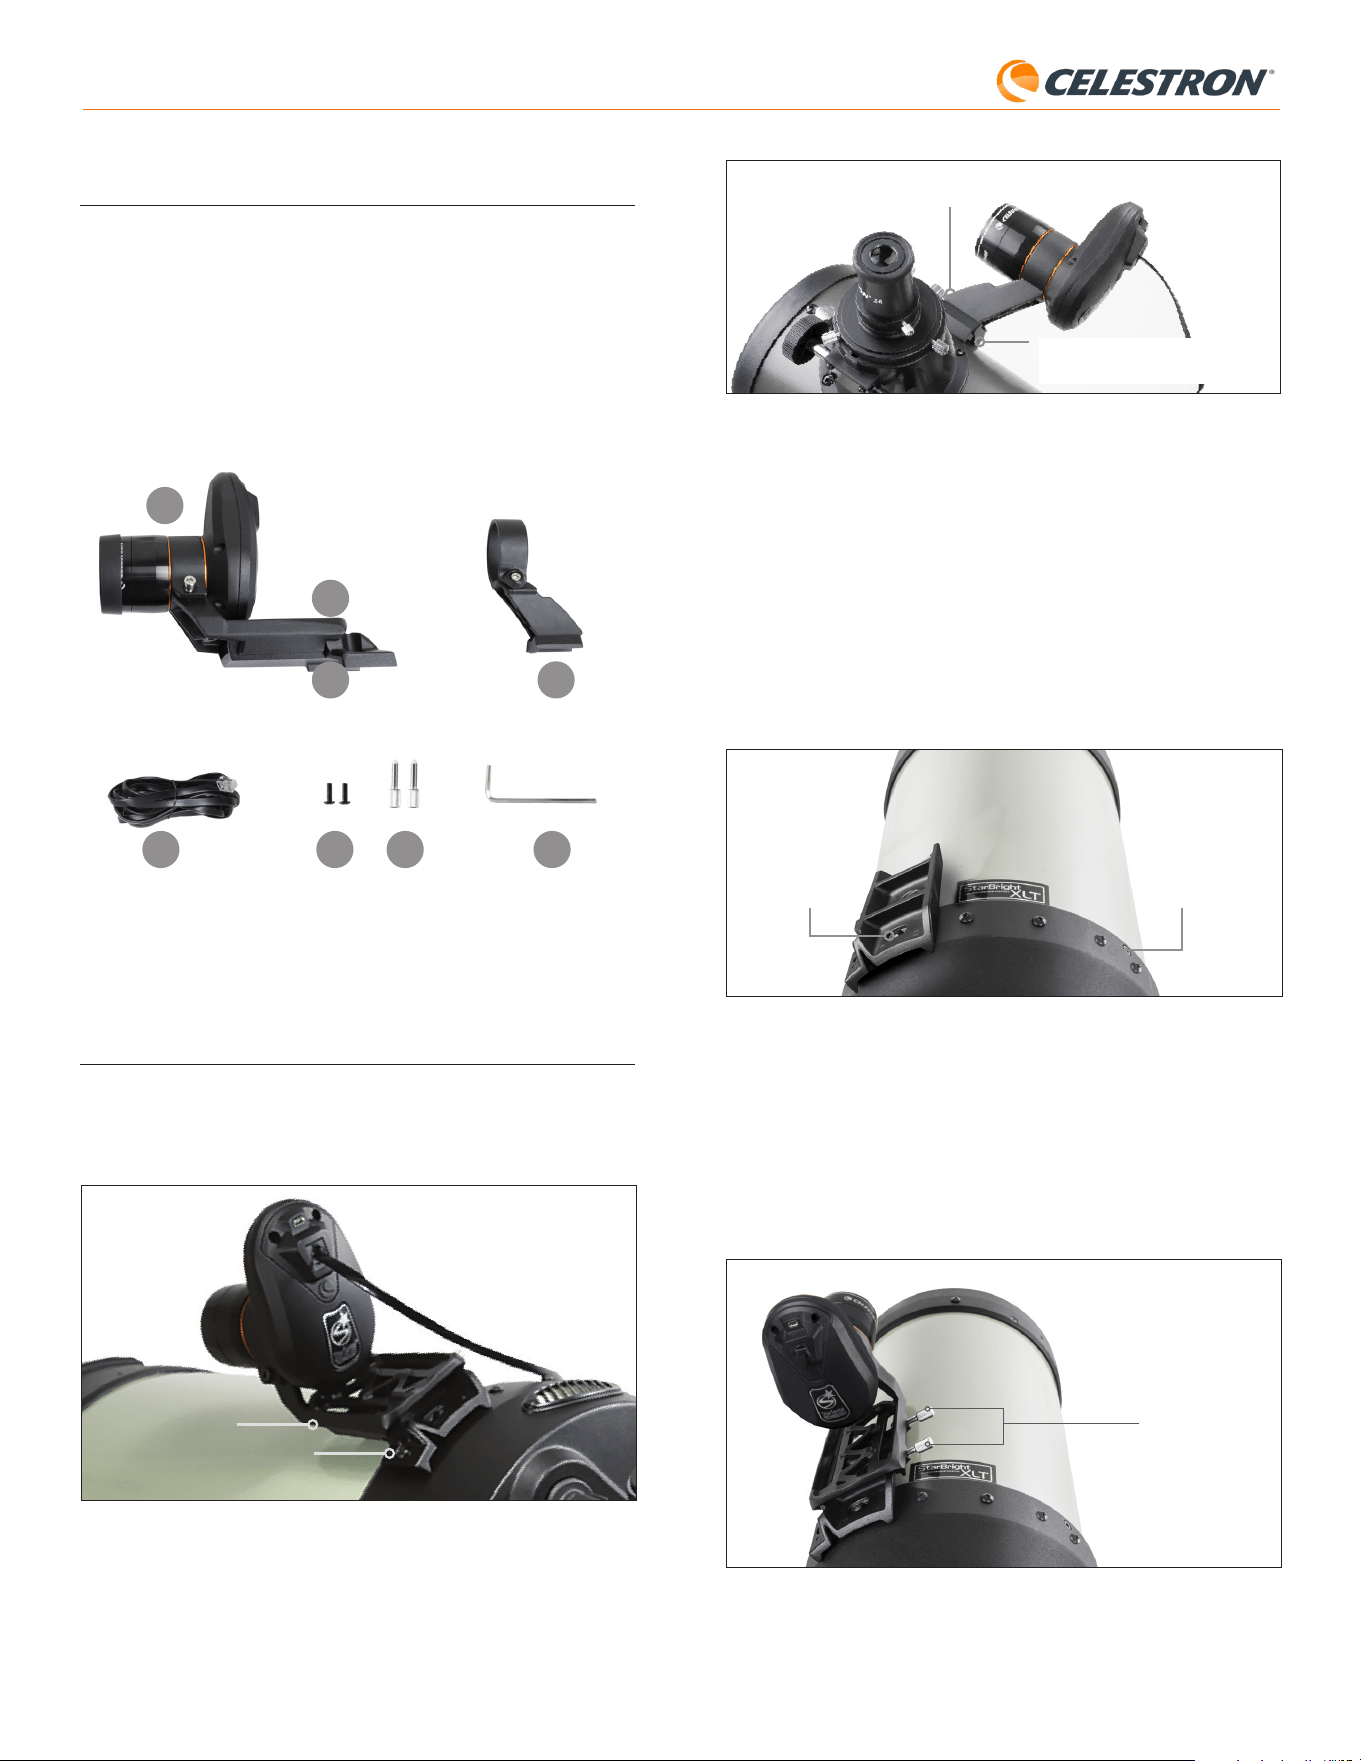
1 | ESPAÑOL
StarSense AutoAlign V2
Soporte pequeño
Base machihembrada estándar
para localizador
Fig. 3: Si su telescopio ya tiene una base de localizador estándar, puede usar el
soporte pequeño para montar SSAA en su telescopio.
Si usa un telescopio de menos de 5” de apertura, y su telescopio no
tiene una base machihembrada estándar para un localizador, deberá
adquirir la base de terceros.
Si usa el soporte grande preinstalado para montar el SSAA a su
tubo de telescopio:
1. Conecte la base del soporte grande al telescopio. (Nota: Algunos
telescopios pueden ya tener esta base instalada; es la misma que se
usa para el localizador de 8x50 incluido con diversos telescopios). Si
necesita instalar la base, use los tornillos de accesorios con cabezal
Phillips, que están preinstalados en la célula posterior del telescopio.
Normalmente hay dos ubicaciones para montar la base en la célula
posterior (Fig. 4).
Ubicación
de montaje de
base 1
Ubicación de montaje
de base 2
Fig. 4: La base del soporte grande puede conectarse a la estructura de tubo óptico (OTA)
en dos ubicaciones en la mayoría de telescopios Celestron.
2. Retire los tornillos, oriente la base como se indica, y alinee los agujeros
en la base con los agujeros en la célula posterior.
3. Reinstale los tornillos de forma que la base quede asegurada. Si es
necesario, use los dos tornillos de cabezal Phillips incluidos.
4. Enrosque parcialmente los dos tornillos mauales en el soporte grande
(Fig. 5).
Tornillos
Fig. 5: Instale los tornillos manuales en el soporte grande. Estos aseguran el soporte a
la base como se muestra.
5. Deslice el soporte sobre la base hasta que quede totalmente asentado.
1. Lista de piezas
A. StarSense AutoAlign con tapa
B. Soporte grande (preinstalado en StarSense AutoAlign)
C. Base del soporte grande
D. Soporte pequeño
E. Cable AUX
F. Tornillos con cabezal Phillips (2)
G. Tornillos manuales de la base del soporte grande¡ (2)
H. Llave hexagonal
A
D
B
C
E F G H
Fig. 1
2. Instalación
StarSense AutoAlign se conecta a su tubo óptico usando uno de los dos
soportes incluidos (es decir, el soporte grande o el soporte pequeño).
Use el soporte grande con telescopios Schmidt-Cassegrain, EdgeHD y
RASA con 5” o más de apertura (Fig. 2).
Soporte grande
Base del soporte grande
Fig. 2: El soporte grande y la base conectan SSAA a telescopios Celestron Schmidt-
Cassegrain, EdgeHD, y RASA de 5” o mayores.
Use el soporte pequeño con otros telescopios que tengan una base
machihembrada estándar para un localizador (Fig. 3).

2 | ESPAÑOL
StarSense AutoAlign V2
3. Afloje el tornillo cautivo de la fijación del soporte pequeño e instale el
SSAA y la arandela naranja en el soporte pequeño. Oriéntelo como se
indica (Fig. 8).
Tornillo cautivo
Fig. 8: Instale SSAA en el soporte pequeño como se indica, y apriete de nuevo el tornillo
cautivo en el soporte.
4. Vuelva a apretar el tornillo cautivo en la fijación del soporte pequeño.
5. Vuelva a instalar la carcasa anterior del SSAA y la arandela anterior
naranja (Fig. 9).
Fig. 9: Reinstale la carcasa anterior en SSAA. ¡No olvide la arandela naranja
cosmética!
6. Para instalar el SSAA en la base machihembrada estándar para
localizador de su telescopio, inserte el soporte pequeño en la base y
apriete el tornillo manual de la base para asegurarlo en posición.
Ahora que ha instalado el SSAA, deberá conectar su puerto AUX a uno de
los puertos AUX del soporte de su telescopio. Use el cable AUX incluido
(Fig. 10). Si no tiene un puerto AUX disponible en su soporte, puede
adquirir un divisor de puerto AUX Celestron opcional.
Puerto AUX (en SSAA)
Puerto AUX
(en el soporte)
Cable AUX
Fig. 10: Use el cable AUX incluido para conectar el puerto AUX de SSAA al puerto
AUX del soporte.
ADVERTENCIA: ¡NO CONECTE StarSense AutoAlign AL PUERTO DE
AUTOGUÍA DE SU SOPORTE! Conecte siempre StarSense AutoAlign a
uno de los puertos AUX de su soporte. Conectarlo al puerto de autoguía
puede dañar StarSense AutoAlign.
6. Apriete los tornillos manuales para asegurar el soporte a la base.
La barra machihembrada opcional de 8” CGE para montar accesorios
obstruirá el soporte grande de SSAA. El brazo en horquilla CPC 800
también obstruirá el SSAA. Para estas configuraciones, instale la base y el
soporte grande invertidas como se muestra en la Fig. 5a.
Fig. 5a: Deberá inistalar la base y el soporte grande invertidos en un telescopio CPC 800.
Si usa el soporte pequeño, deberá retirar el SSAA del soporte
grande primero. Para montar el SSAA con el soporte pequeño:
1. Desenrosque la carcasa delantera del SSAA por completo y retírela.
Hacelo expondrá el tubo óptico del SSAA (Fig. 6). Retire también la
arandela cosmética anterior naranja.
Arandela cosmética naranja
Fig. 6: Para cambiar los soportes, desenrosque por completo y retire toda la parte
anterior de la carcasa de SSAA, incluyendo la arandela naranja.
Anterior de la carcasa de
SSAA
NOTA: Cuando retire la carcasa anterior para instalar el soporte pequeño, puede
afectar accidentalmente al enfoque de fábrica del SSAA. Téngalo en
cuenta cuando use posteriormente el SSAA. Si el dispositivo no funciona
correctamente y recibe mensajes de error “¡No hay estrellas!!”, puede
tener que reenfocar. Para hacerlo, consulte la sección Enfoque más
adelante en este manual.
2. Use la llave hexagonal para aflojar el tornillo cautivo de la tapa, que
proporciona la fuerza de fijación del soporte. Tire del SSAA para sacarlo
del soporte (Fig. 7). Hacelo también retirará la arandela cosmética
posterior naranja.
Tornillo cautivo
Arandela cosmética
naranja posterior
Llave hexagonal
Fig. 7: Aflojar el tornillo cautivo Retirar SSAA del soporte grande, incluyendo la arandela
naranja posterior.
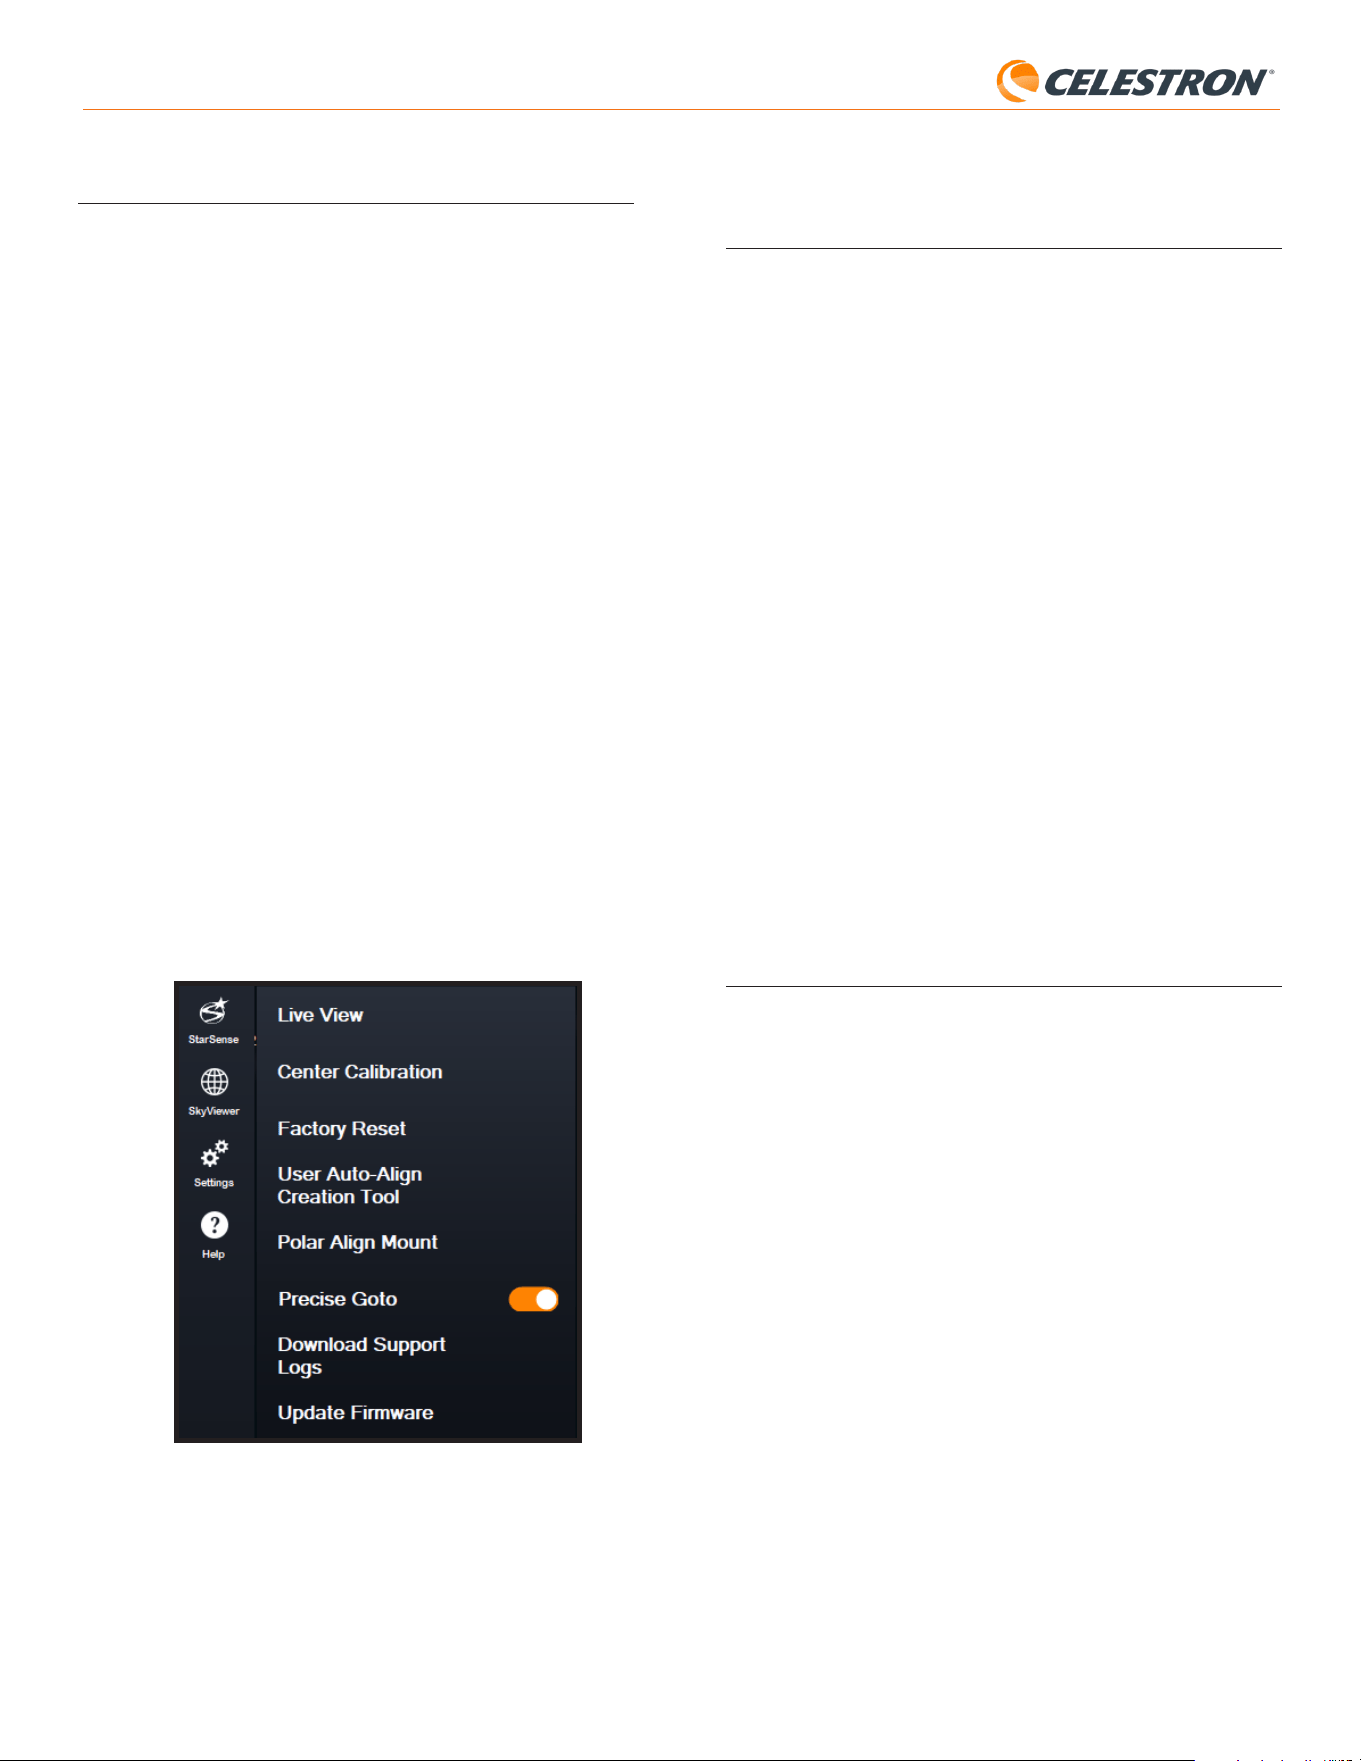
3 | ESPAÑOL
StarSense AutoAlign V2
4. Flujo de funcionamiento de
StarSense AutoAlign
Antes de ponernos con las instrucciones paso a paso, aquí tiene una vista
de alto nivel del modo en que se usa normalmente StarSense AutoAlign.
El proceso de configuración sigue esta secuencia general:
A. Alineación polar – Si usa un soporte ecuatorial, o un soporte altazimut
sobre una cuña ecuatorial, comience usando StarSense AutoAlign para
ayudar con la alineación polar. Este paso alinea su soporte con el eje
de rotación de la Tierra.
Si usa un soporte altazimut estándar, sáltese este paso.
B. Alineación celeste – A continuación, realice una alineación celeste.
Esto permite al soporte determinar dónde apunta en el firmamento
nocturno. Dispone de diversas opciones de alineación, pero en la
mayoría de casos la alineación automática es el método preferido y
usado más frecuentemente.
C. Calibración del centro – La calibración del centro alinea el campo
visual de la cámara de StarSense con el campo visual del telescopio.
Esto solo debe completarse una vez, siempre que StarSense AutoAlign
se mantenga montado en la misma posición. El desvío de la calibración
se guarda en la memoria de la unidad.
Si retira y vuelve a instalar StarSense AutoAlign, recomendamos volver
a realizar la calibración del centro. Tras completar la calibración del
centro, deberá repetir la alineación celeste.
Los tres capítulos siguientes explican el modo para rtealizar etas funciones
con el mando manual NexStar+ (capítulo 5, página 3), software para PC
CPWI (capítulo 6, página 7) o la aplicación SkyPortal (capítulo 7, página
10). Solo necesita consultar el capítulo que se corresponda con el método
de control que use.
5. Usar SSAA con mando manual
NexStar+
El mando manual NexStar+ es una de las formas más sencillas de usar su
StarSense AutoAlign. No precisa de ordenador y le permite controlar su
telescopio como lo haría normalmente, con las capacidades mejoradas de
alineación de StarSense integradas.
Seleccione la sección siguiente que coincida con su instalación:
- Sección A – Soporte altazimut (AZ) Celestron
- Sección B – Soporte ecuatorial (EQ) Celestron
- Sección C – Soporte AZ Celestron usado sobre una cuña ecuatorial
opcional
Consulte solamente laa sección aplicable a su configuración de soporte.
A. Usar SSAA con un soporte
altazimut (AZ)
Los soportes altazimut no se pueden alinear polarmente. Esta sección
le guía por la realización de una alineación celeste usando StarSense
AutoAlign.
1. Asegúrese de que el trípode esté razonablemente nivelado. Si su
soporte tiene un nivel de burbuja integrado, úselo como referencia.
2. Apunte manualmente el tubo del telescopio horizontalmente hacia el
horizonte norte. (Si está en el hemisferio sur, apúntelo al horizonte sur).
3. Encienda el soporte.
4. Pulse ENTER.
5. Seleccione un método de alineación. Use los botones MOVER ARRIBA
y MOVER ABAJO para seleccionar “Alineación automática”. Pulse
ENTER.
- Las otras opciones de alineación celeste se tratarán en la sección E
3. Controlar StarSense AutoAlign
Hay diversos modos de control para su StarSense AutoAlign:
Mando manual NexStar+
Para usar SSAA con el mando manual NexStar+ que acompañaba a su
soporte Celestron, probablemente tenga que actualizar el firmware del
mando manual. Necesitará la versión de firmware 5.35.5340 o superior.
Para comprobar el número de versión de su firmware, pulse el botón
MENÚ. Use los botones SCROLL y ENTER para ir a Utilidades>Versión.
Use el software gestor de firmware de Celestron (CFM) pare actualizar
el firmware si es necesario. Encontrará la última versión de CFM aquí:
celestron.com/pages/drivers-and-software
Necesitará un cable USB (tipo A a Mini-B) para conectar el mando manual
a su PC. Consulte la sección 9 de este manual (página 13) para más
información.
Software de control de telescopio CPWI
para PC
Puede controlar su telescopio y StarSense AutoAlign con nuestro
software gratuito Celestron CPWI. Para descargar la última versión, visite:
https://www.celestron.com/pages/celestron-pwi-telescope-control-
software
Necesitará la versión de CPWI 2.5.9 o superior. Instale el software
y abra CPWI. Seleccione “Inicio” si aparece la ventana de bienvenida.
Pulse en el icono “Conexión” en la esquina superior izquierda de la
pantalla. Si usa una conexión cableada a su soporte Celestron (es
decir, mediante el mando manual o el mismo soporte), seleccione
“USB”. Si está conectado por WiFi usando el módulo WiFi de SkyPortal
o la WiFi interna de su soporte (por ejemplo, NexStar Evolution),
seleccione “WiFi.” CPWI debería encontrar y conectar con StarSense
AutoAlign. Una vez conectado, el icono SSAA aparecerá en el menú
de selección del lado izquierdo de la pantalla. Seleccione el icono para
mostrar el menú de StarSense (Fig. 11).
Fig. 11: Cuando conecte su soporte Celestron a su PC y ejecute CPWI, debería ver el
menú de StarSense entre los iconos del lado izquierdo de la pantalla.
Aplicación SkyPortal para iOS y Android
Si usa el módulo WiFi de SkyPortal de Celestron o tiene un soporte
Celestron con WiFi integrada (como NexStar Evolution), puede usar la
aplicación SkyPortal para controlar su SSAA. Necesitará un teléfono con la
versión más reciente de la aplicación SkyPortal, disponible gratuitamente
en Apple App Store o Google Play.
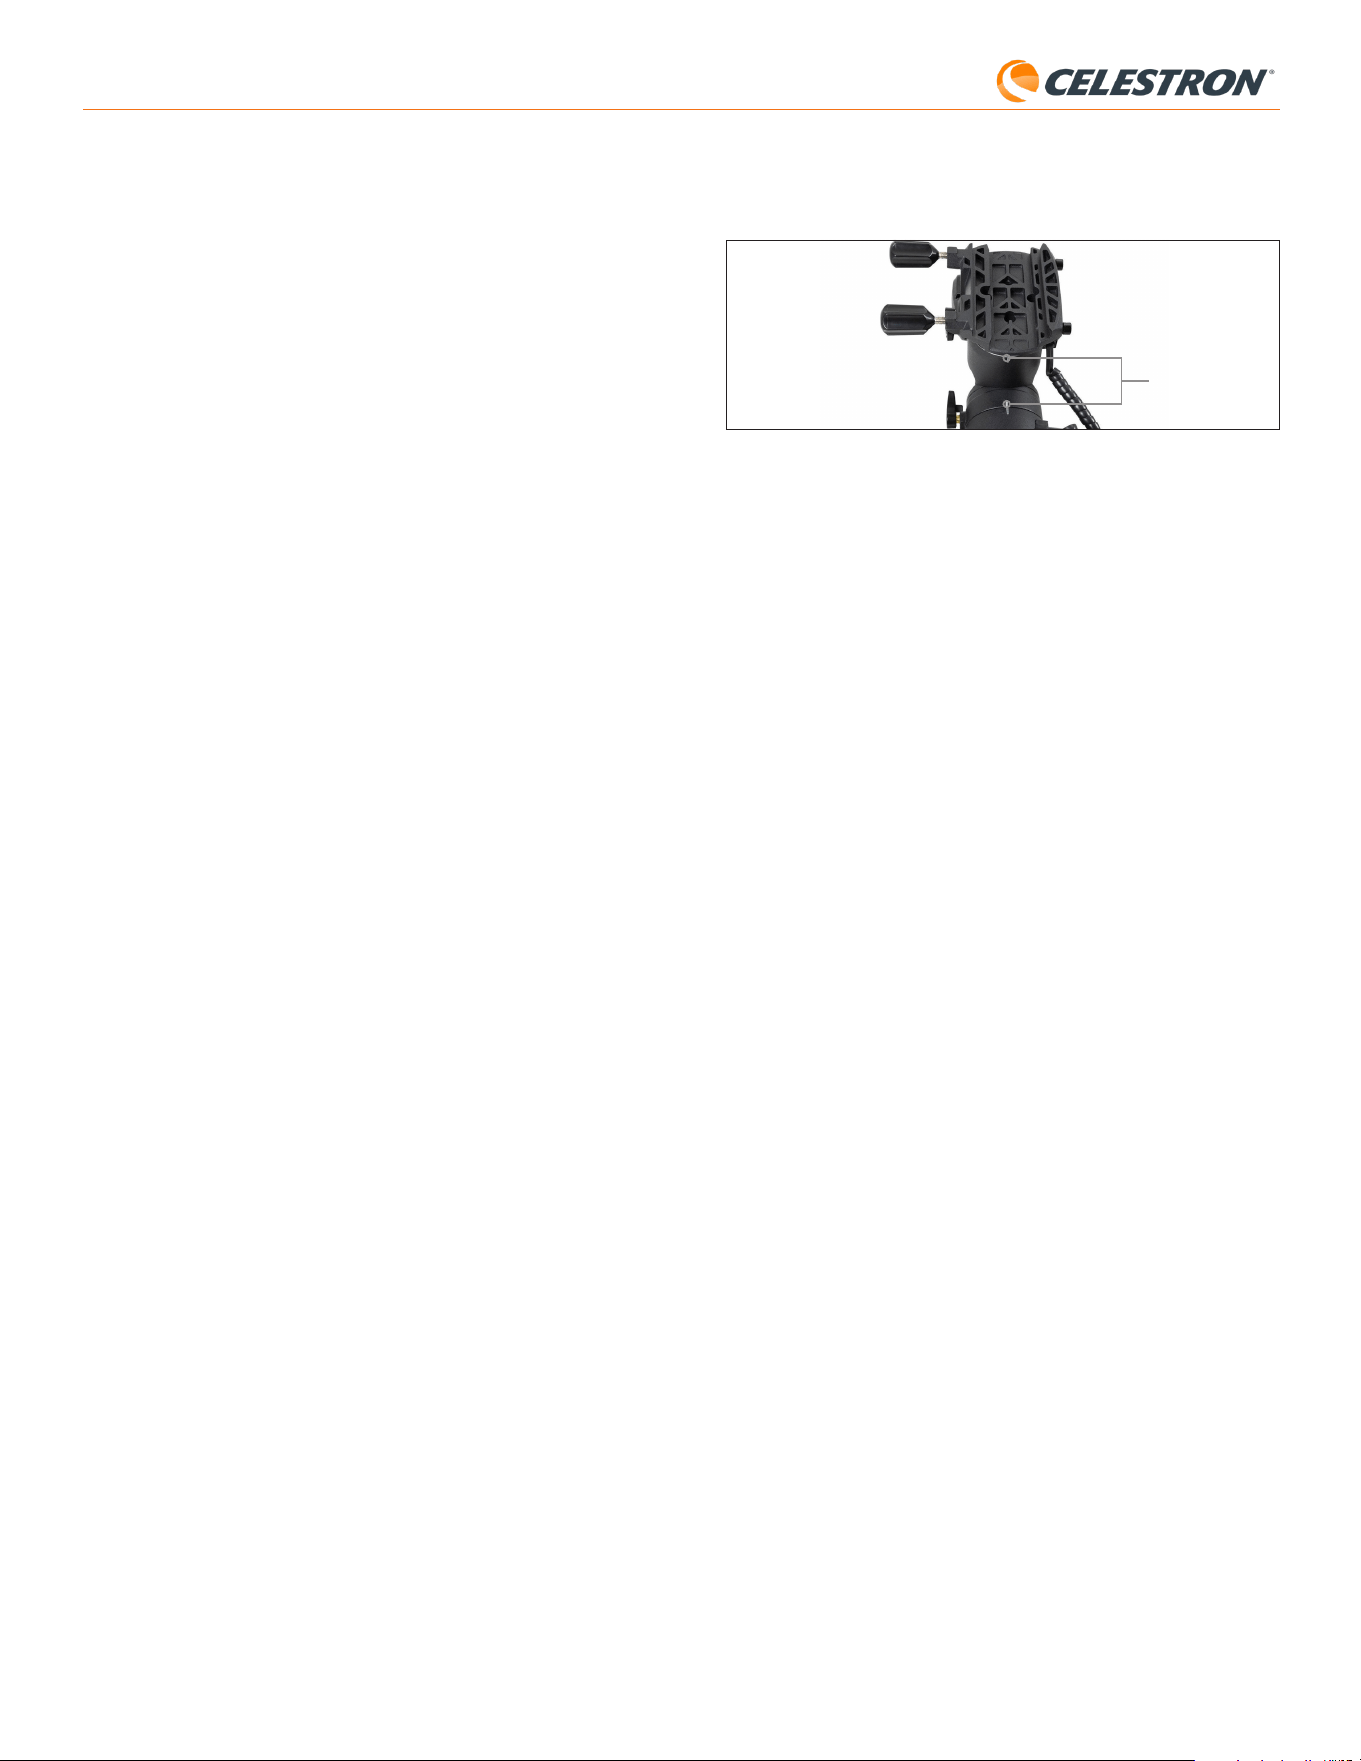
4 | ESPAÑOL
StarSense AutoAlign V2
alineadas las marcas de índice, vuelva a apretar los mandos y pulse
ENTER.
Fig. 11B Marcas de índice en el soporte EQ Advanced VX.
8. Se le solicitará si desea realizar una alineación polar.
Recomendamos completar ahora la alineación polar. Si salta este paso
y lo realiza más tarde, deberá repetir el proceso de alineación celeste.
- Para alinear polarmente ahora, pulse ALINEAR.
- Para saltarse la alineación polar, pulse ENTER para continuar a la
alineación celeste.
9. Siga las indicaciones en pantalla para introducir su ubicación, hora local,
y fecha.
- Puede querer usar la base de datos de ciudades para establecer su
ubicación. No se preocupe si su ubicación exacta no está en la base
de datos. Seleccione la ciudad más cercana.
10. Si ha seleccionado alineación polar, prosiga al paso 11.
Si se ha saltado la alineación polar, prosiga al paso 21.
11. El mando manual le solicitará desplazar el telescopio a una zona
despejada del firmamento. Use las teclas de dirección del mando
manual para apuntar a una ubicación despejada. Pulse ENTER.
• El telescopio se desplazará de oeste a este en aproximadamente
50° durante el proceso de alineación polar. (Si está en el hemisferio
sur, el telescopio se desplazará de este a oeste aproximadamente
50°). Intente desplazar a una zona despejada sin obstrucciones en
toda la ruta.
12. El telescopio se desplazará de oeste a este para obtener referencias
de alineación polar. (Si está en el hemisferio sur, el telescopio se
desplazará de este a oeste). Tardará unos momentos.
13. Cuando el telescopio deje de desplazarse, el mando manual mostrará
“Ajustar AZM”. Pulse ENTER. La LCD mostrará ahora los errores de
alineación polar AZM y ALT.
14. Si su soporte tiene un mando de bloqueo de eje de azimut o tornillos
de bloqueo, aflójelos antes de ajustar el azimut.
15. Use los mandos de ajuste preciso de azimut para ajustar el
posicionamiento de azimut del soporte (izquierda a derecha)
lentamente. A medida que realice estos ajustes, el error AZM
aumentará o se reducirá. Prosiga el ajuste hasta que el error AZM sea
inferior a dos arcominutos. Pulse ENTER.
• ¡No ajuste la altitud del soporte! Realizará ajustes de altitud en el
paso siguiente.
• Realice los ajustes lentamente de forma que el SSAA pueda seguirlos.
Si ajusta demasiado rápido y el SSAA pierde el seguimiento, puede
tener que reiniciar todo el proceso de alineación polar.
16. El mando manual mostrará ahora “Ajustar ALT”. Pulse ENTER.
17. Si su soporte tiene mandos de bloqueo de eje de altitud, aflójelos antes
de ajustar el azimut.
18. Use los mandos de ajuste preciso de altitud para ajustar el
posicionamiento de altitud del soporte (arriba y abajo) lentamente. A
medida que realice estos ajustes, el error ALT aumentará o se reducirá.
Prosiga el ajuste hasta que el error ALT sea inferior a dos arcominutos.
Pulse ENTER.
• No ajuste el azimut del soporte.
19. El mando manual mostrará ahora “¿Ajuste preciso AZM?”
de este capítulo (página 6).
6. Siga las indicaciones en pantalla para introducir su ubicación, hora local,
y fecha.
- Puede querer usar la base de datos de ciudades para establecer su
ubicación. No se preocupe si su ubicación exacta no está en la base
de datos. Seleccione la ciudad más cercana.
7. El soporte comenzará a desplazarse a una posición donde SSAA
obtendrá su primera referencia de alineación. Cuando el soporte deje de
desplazarse, SSAA capturará unaa imagen del firmamento y determinará
su posición.
NOTA: Si el telescopio se desplaza automáticamente para apuntar a
una zona del firmamento que esté obstruida localmente (por edificios,
árboles, etc.), fallará y se desplazará automáticamente a otro punto para
intentarlo otra vez.
8. El soporte se desplazará a otra posición para obtener la segunda
referencia de alineación.
9. El proceso de alineación automática se habrá completado. Verá
“¡Alineación correcta!” en la pantalla LCD de NexStar+.
Su soporte estará alineado con el firmamento nocturno. Sin embargo,
antes de poder ubicar con precisión objetos en el campo visual del
telescopio, SSAA debe determinar el desvío entre su propio campo visual
y el del telescopio, en un proceso llamado “Calibración del centro”. Si
nunca ha calibrado el centro de SSAA y su telescopio, el manod manual
le solicitará hacerlo inmediatamente tras la alineación celeste inicial.
Consulte la sección D para las instrucciones de la calibración del centro.
Si ha realizado previamente una calibración del centro, el telescopio estará
listo para localizar y colocar objetos cerca del centro del campo visual.
B. Usar SSAA con un soporte ecuatorial
(EQ)
Antes de encender el soporte, realice una alineación polar aproximada.
Cuando se haya completado, puede refinar la alineación usando solamente
los mandos de ajuste preciso de altitud y azimut del soporte.
NOTA: Estas instrucciones explican el modo de realización de una
alineación polar aproximada en el hemisferio norte. Si está en el hemisferio
sur, apunte el soporte al sur en lugar de al norte.
Para alinear polarmente de forma aproximada:
1. Asegúrese de que el trípode esté razonablemente nivelado. Si su
soporte tiene un nivel de burbuja integrado, úselo como referencia.
2. Ajuste la altitud del soporte de forma que la escala de latitud del soporte
indique aproximadamente la misma latitud que su lugar de observación.
3. Levante y gire todo el trípode y el soporte de forma que el eje de la
ascensión recta (RA) apunte aproximadamente al norte. La posición del
soporte no necesita ser perfecta. Apunte dentro de aproximadamente
5° del norte de forma que el soporte esté dentro del alcance de los
mandos de ajuste preciso de azimut del soporte. Use una aplicación de
brújula gratuita para su teléfono si necesita ayuda localizando el norte.
4. Si ha aflojado los mandos de ajuste de altitud o azimut durante la
allineación polar aproximada, asegúrese de que vuelvan a apretarse con
seguridad antes de continuar.
Ahora que tiene una alineación polar aproximada, está preparado
para iniciar el proceso de alineación:
5. Encienda el soporte.
6. Pulse ENTER.
7. a. Si tiene un soporte EQ con conmutadores de posición inicial, como
el CGX o el CGX-L, el mando manual solicitará mover el soporte a su
posición inicial. Pulse ENTER.
b. Si tiene un soporte EQ sin conmutadores de posición inicial, como el
soporte Advanced VX, el mando manual solicitará mover manualmente
el soporte a sus marcas de índice (Fig. 11B). Puede usar los botones
de desplazamiento del mando manual para mover el soporte, o aflojar
los mandos de RA y DEC y girar los ejes con la mano. Una vez estén
Marcas de índice

5 | ESPAÑOL
StarSense AutoAlign V2
allineación polar aproximada, asegúrese de que vuelvan a apretarse con
seguridad antes de continuar.
Ahora que tiene una alineación polar aproximada, está preparado para
iniciar el proceso de alineación:
5. Encienda el soporte.
6. Pulse ENTER.
7. Use los botones MOVER ARRIBA y MOVER ABAJO para seleccionar
“Alineación norte EQ”. Pulse ENTER. (Seleccione “Alineación sur EQ”
si está en el hemisferio sur).
8. Siga las indicaciones en pantalla para introducir su ubicación, hora
local, y fecha.
- Puede querer usar la base de datos de ciudades para establecer su
ubicación. No se preocupe si su ubicación exacta no está en la base
de datos. Seleccione la ciudad más cercana.
9. El LCD mostrará ahora “Establecer Alt a índice”. Coloque el soporte
como se muestra en la Figura 12. Puede usar el mando manual para
desplazar manualmente el telescopio o, si su soporte tiene mandos de
eje (como el soporte Evolution), puede aflojar los mandos y posicionar
manualmente.
10. Se le solicitará si desea realizar una alineación polar.
Recomendamos completar ahora la alineación polar. Si salta este paso
y lo realiza más tarde, deberá repetir el proceso de alineación celeste.
- Para alinear polarmente ahora, pulse ALINEAR.
- Para saltarse la alineación polar, pulse ENTER para continuar a la
alineación celeste.
Desde este punto, el proceso de alineación es el mismo que en soportes
ecuatoriales.
Si elige realizar la alineación polar, consulte la sección B, comenzando por
el paso 11.
Si elige saltarse la alineación polar, consulte la sección B, comenzando
por el paso 21.
a. Si desea realizar ajustes adicionales de azimut, use las teclas de
DESPLAZAMIENTO para seleccionar “Sí” y pulse ENTER. Ajuste
los mandos de ajuste preciso de azimut hasta que el error sea
inferior a dos arcominutos y pulse ENTER.
b. Si no desea realizar más ajustes, use las teclas de
DESPLAZAMIENTO para seleccionar “No” y pulse ENTER.
20. ¡Felicidades! Ha alineado polarmente con éxito su soporte. Si su
soporte tiene mandos o tornillos de bloqueo de altitud o azimut,
apriételos firmemente.
NOTA: No recomendamos intentar ajustar la alineación polar mejor de dos
arcominutos en cada eje. Hacerlo será difícil y no ofrecerá más ventajas de
apuntado o seguimiento.
21. A continuación se le solicitará seleccionar un método de alineación
celeste. Use los botones MOVER ARRIBA y MOVER ABAJO para
seleccionar “Alineación automática”. Pulse ENTER.
- Las otras opciones de alineación celeste se tratarán más adelante
en este manual.
22. El soporte comenzará a desplazarse a una posición donde SSAA
obtendrá su primera referencia de alineación. Cuando el soporte
deje de desplazarse, SSAA capturará unaa imagen del firmamento y
determinará su posición.
NOTA: Si el telescopio se desplaza automáticamente para apuntar a una
zona del firmamento que esté obstruida localmente (por edificios, árboles,
etc.), fallará y se desplazará automáticamente a otro punto para intentarlo
otra vez.
23. El soporte se desplazará a otra posición para obtener la segunda
referencia de alineación.
24. El soporte se desplazará a una tercera posición al otro lado del
meridiano para obtener una tercera referencia de alineación.
25. Cuando SSAA haya capturado tres referencias de alineación, verá
“¡Alineación correcta!” en la pantalla LCD de NexStar+.
Su soporte estará alineado con el firmamento nocturno. Sin embargo,
antes de poder ubicar con precisión objetos en el campo visual del
telescopio, SSAA debe determinar el desvío entre su propio campo visual
y el del telescopio, en un proceso llamado Calibración del centro. Si
nunca ha calibrado el centro de SSAA y su telescopio, el manod manual
le solicitará hacerlo inmediatamente tras la alineación celeste inicial.
Consulte la sección D para las instrucciones de la calibración del centro.
Si ha realizado previamente una calibración del centro, el telescopio estará
listo para localizar y colocar objetos cerca del centro del campo visual.
C. Usar SSAA con un soporte AZ sobre
una cuña ecuatorial
Antes de encender el soporte, realice una alineación polar aproximada.
Cuando se haya completado, puede refinar la alineación usando solamente
los mandos de ajuste preciso de altitud y azimut de la cuña.
NOTA: Estas instrucciones explican el modo de realización de una
alineación polar aproximada en el hemisferio norte. Si está en el hemisferio
sur, apunte el soporte al sur en lugar de al norte.
Para alinear polarmente de forma aproximada:
1. Asegúrese de que el trípode esté razonablemente nivelado. Si su cuña
tiene un nivel de burbuja integrado, úselo como referencia.
2. Ajuste la altitud de la cuña de forma que la escala de latitud de la cuña
indique aproximadamente la misma latitud que su lugar de observación.
3. Levante y gire todo el trípode y el soporte de forma que el brazo de
horquilla apunte aproximadamente al norte. La posición del soporte
no necesita ser perfecta. Apunte dentro de aproximadamente 5° del
norte de forma que el soporte esté dentro del alcance de los mandos
de ajuste preciso de azimut de la cuña. Use una aplicación de brújula
gratuita para su teléfono si necesita ayuda localizando el norte.
4. Si ha aflojado los mandos de ajuste de altitud o azimut durante la
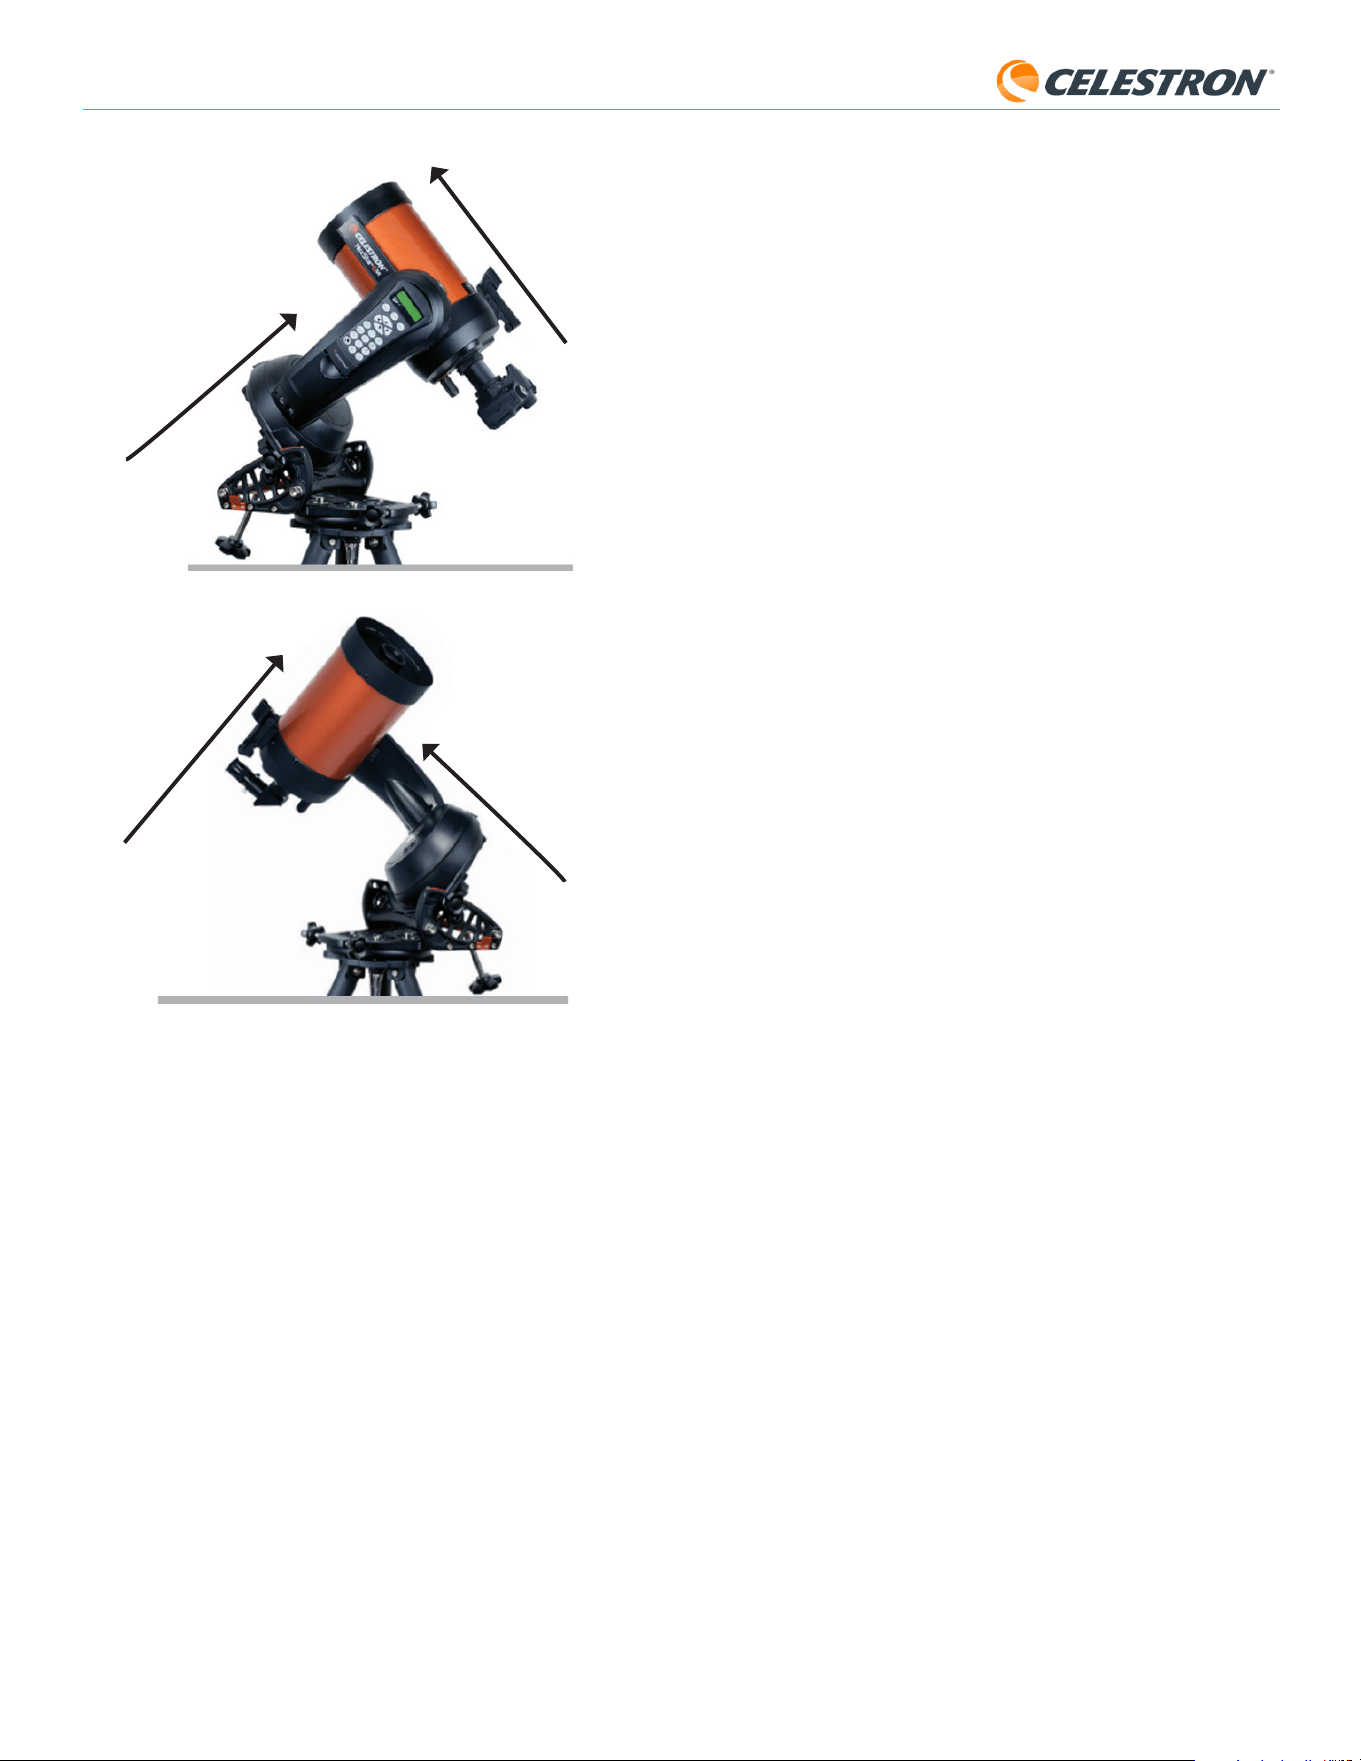
6 | ESPAÑOL
StarSense AutoAlign V2
2. A continuación, use las teclas de DESPLAZAMIENTO para seleccionar
Estrellas con nombre u Objetos del sistema solar (es decir, planetas)
para usarlos para la calibración del centro. Pulse ENTER. Desplácese
por la lista de estrellas o planetas y seleccione uno claramente visible
desde su ubicación. Pulse ENTER.
• Si no está seguro del lugar en el que el objeto elegido se encuentra
en el firmamento nocturno, no se preocupe. El telescopio apuntará
cerca del objeto en el paso siguiente. Puede usar el telescopio como
guía para determinar la estrella o planeta que está usando para
calibrar el centro. Recuerde que las estrellas con nombre y planetas
son algunos de los objetos más brillantes del firmamento nocturno.
• Para obtener los mejores resultados con un soporte EQ, elija estrellas
cercanas al ecuador celeste (es decir, lejos de los polos).
3. El telescopio se desplazará a la estrella o planeta que ha elegido. Según
el desvío entre el campo visual de SSAA y el del telescopio, el objeto
puede estar o no en el campo visual del telescopio. En cualquier caso,
el telescopio debe apuntar en general hacia el objeto.
4. El mando manual NexStar+ le solicitará centrar el objeto en el campo
visual del localizador. Use los botones de dirección del teclado para
hacerlo. No se preocupe aún en centrar con precisión - esto se hace en
el paso siguiente. Por el momento, centre aproximadamente el objeto en
el campo visual del localizador y pulse ENTER.
• Si la estrella no está en el campo visual del localizador, desplace
manualmente el telescopio hasta que lo esté.
• Si no está usando un localizador, use el ocular con mayor campo visual
en el telescopio para este paso. Si el objeto no está en el campo
visual, intente mirar a lo largo del tubo del telescopio para apuntar al
objeto.
5. El mando manual NexStar+ le solicitará centrar el objeto en el campo
visual del ocular. Este es el paso de centrado preciso. Asegúrese de
que haya un ocular de alta potencia en el telescopio. Use los botones
de dirección del teclado para centrar el objeto. Para obtener los mejores
resultados, use al final las teclas de dirección arriba y derecha. Cuando
termine, pulse ALINEAR.
6. SSAA realizará la calibración del centro y devolverá el mensaje
“Calibración de centro correcta”.
Tras completar correctamente la calibración del centro, el mando manual
le solicitará realizar otra vez la alineación celeste. Tras realizar la alineación
celeste puede ordenar al telescopio ubicar con precisión cualquier objeto
celeste que seleccione dentro el campo visual del telescopio.
E. Otros métodos de alineación celeste
En lugar de elegir “Alineación automática” para el método de alineación
celeste, puede elegir diversas otras opciones. Estas otras opciones
ofrecen cierta flexibilidad para su lugar de observación e instalación.
Alineación manual
Puede querer usar la opción de alineación manual si tiene muchas
obstrucciones en su ubicación de observación, como edificios, árboles
o líneas eléctricas. La alineación manual funciona como la alineación
automática, pero le permite desplazar manualmente el telescopio a zonas
despejadas del firmamento para obtener las referencias de alineación.
Como el telescopio no se desplazará automáticamente a posiciones
obstruidas, el proceso global de alineación será más rápido.
Para realizar una alineación “manual” usando el mando manual
NexStar+:
1. Cuando el mando manual le solicite seleccionar un método de
alineación, use las teclas MOVER ARRIBA y MOVER ABAJO para
seleccionar “Alineación manual” y pulse ENTER.
2. El mando manual le solicitará desplazar el telescopio a una zona
despejada del firmamento usando los botones de dirección. Cuando el
telescopio apunte a una zona despejada del firmamento, pulse ENTER.
SSAA capturará una imagen para usarla como referencia de alineación.
Hemisferio norte
Hemisferio sur
Apunta al polo norte
Apunta al polo sur
Tubo óptico perpendicular al brazo
de horquilla
Tubo óptico perpendicular al brazo de
horquilla
D. Calibración del centro
La calibración del centro alinea el campo visual de la cámara de StarSense
AutoAlign con el campo visual del telescopio.
Normalmente solamente deberá realizar la calibración del centro la primera
vez que use StarSense con un nuevo tubo óptico. Puede tener que repetir
el procedimiento si retira y vuelve a instalar la base del soporte en el
telescopio.
Si solamente retira la unidad StarSense y su soporte, pero deja la base del
soporte instalada en el telescopio, la calibración del centro normalmente
no vuelve a ser necesaria.
Antes de realizar la calibración del centro, complete una alineación celeste
como se indica en las secciones anteriores. Si la calibración del centro no
se ha realizado previamente, StarSense le indicará automáticamente que
inicie el proceso tras la alineación celeste.
Para realizar una calibración del centro:
1. Si no ha calibrado nunca el centro de SSAA, el mando manual
NexStar+ iniciará automáticamente el proceso de calibración del centro
tras la alineación celeste. En caso contrario, pulse el botón MENÚ y
use las teclas de DESPLAZAMIENTO para seleccionar “StarSense”.
Pulse ENTER. Use las teclas de DESPLAZAMIENTO para seleccionar
“Calibrar centro” y pulse ENTER.
Fig. 12: Cuando use un soporte en horquilla altazimut (AZ) sobre una cuña
ecuatorial, comience con el soporte en la posición mostrada. El brazo en horquilla
debe apuntar al norte (o al sur en el hemisferio sur), y el tubo óptico debe estar
perpendicular al brazo en horquilla.
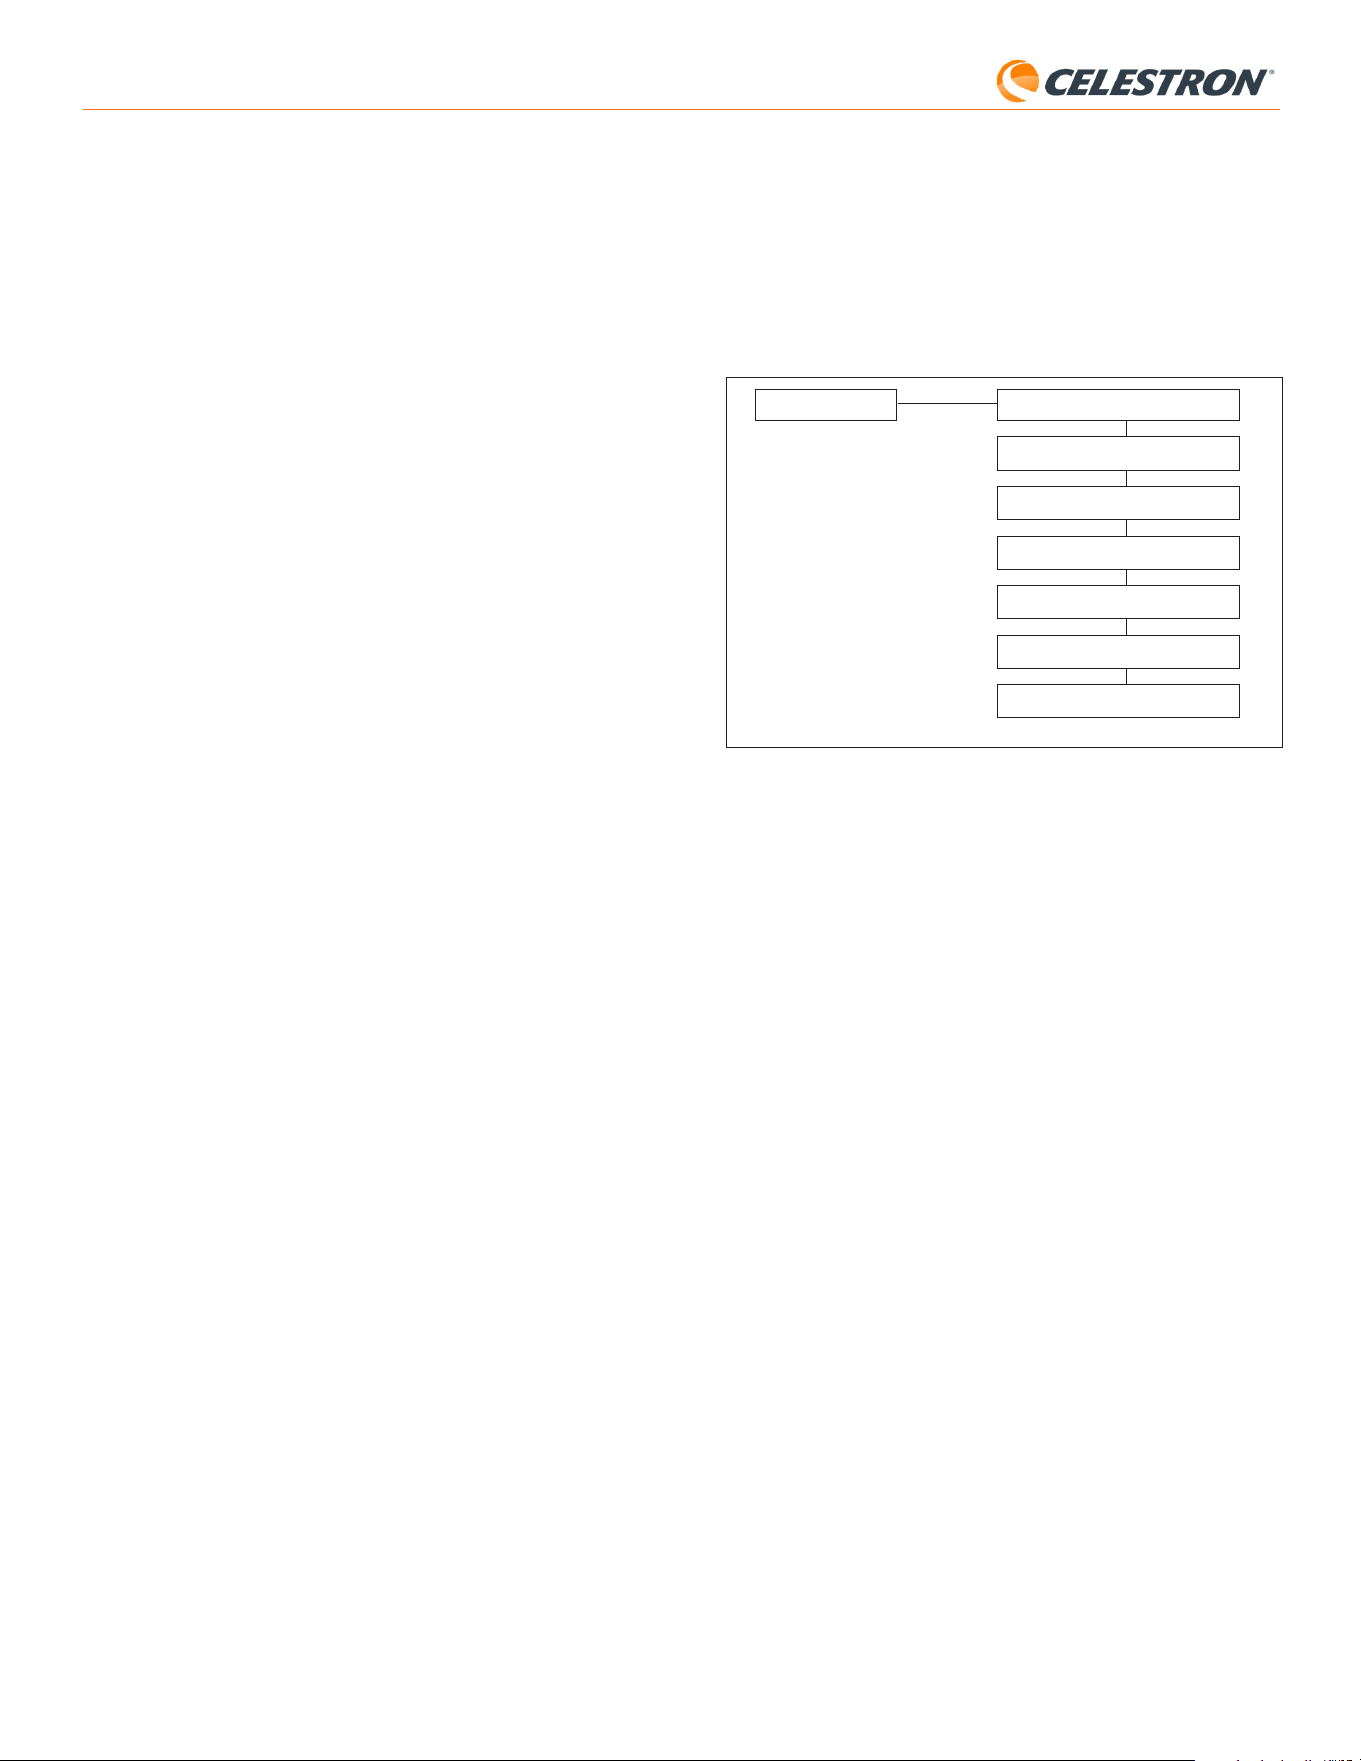
7 | ESPAÑOL
StarSense AutoAlign V2
apuntado y seguimiento suficientemente precisos para algunos casos de
uso sin necesitar más alineación. También puede ser práctico cuando esté
buscando planetas durante el crepúsculo.
F. Otras funcionalidades
Puede acceder a todas las opciones adicionales siguientes pulsando el
botón MENÚ, usando las teclas de DESPLAZAMIENTO para seleccionar
“StarSense” y pulsando ENTER. Consulte la Fig. 13 para el árbol del
menú de StarSense.
Fig. 13: El árbol del menú de StarSense en el mando manual NexStar+.
IR A PRECISO
SOLUCIONAR PLACA
CALIBRAR CENTRO
ALINEACIÓN POLAR
VERSIÓN
CONFIGURACIÓN
RESTABLECIMIENTO DE FÁBRICA
STARSENSE
Ir a preciso
Ir a preciso usa SSAA para centrar con mayor precisión objetos en el
campo visual. Cuando se habilita esta opción, el soporte del telescopio
usa su modelo de alineación interno para desplazarse cerca del
objeto seleccionado. A continuación SSAA se hace cargo, realizando
correcciones precisas al centrado, mejorando notablemente la precisión
de apuntado global. Cuando use SSAA, Ir a preciso está habilitado
de forma predeterminada, por lo que no necesita iniciar aquí un Ir a
preciso. Sin embargo, si ha apagado Ir a preciso (consulte la sección
Configuración más adelante) puede iniciar un Ir a preciso a un objeto
específico desde esta selección del menú.
Solucionar placa
Cuando seleccione esta opción, SSAA capturará una imagen y
solucionará la placa. El mando manual mostrará las coordenadas
del centro (RA y Dec) a las que está apuntando el telescopio en el
firmamento.
Calibrar centro
Si desea iniciar una nueva calibración del centro, puede hacerlo
siempre que lo desee con esta opción. Si saca la base del soporte de
SSAA del telescopio (retirando los tornillos de montaje) y la vuelve a
instalar, recomendamos realizar una nueva calibración del centro.
Retirar solamente el SSAA en su soporte de la base (aflojando primero
los tornillos manuales del soporte) y volverlo a instalar en la base
normalmente no precisa de una nueva calibración del centro. Sin
embargo, si nota posteriormente que los objetos no se están colocando
en el centro del campo visual del telescopio, una nueva calibración del
centro puede ayudar a mejorar el centrado.
Tras completar correctamente la calibración del centro, el mando manual
le solicitará realizar otra vez la alineación celeste.
Alineación polar
Si ha elegido no realizar la alineación polar durante la alineación inicial,
puede iniciar la alineación polar en cualquier momento con esta opción
del menú. Para soportes ecuatoriales o soportes AZ sobre una cuña
ecuatorial, consulte la sección B, pasos 11 a 20. Recuerde que los
soportes AZ no pueden alinearse polarmente a menos que se usen
sobre una cuña ecuatorial opcional.
NOTA: Para los mejores resultados con soportes EQ, no desplace
el telescopio hacia el polo norte (o sur) para capturar referencias de
alineación.
3. El mando manual le solicitará desplazar manualmente el telescopio a
otra zona despejada del firmamento.
a. Para soportes altaximut, desplace el soporte en ambos ejes,
asegurándose de que SSAA apunte como mínimo a 60° de distancia
desde su primer punto de alineación. Pulse ENTER. La alineación
manual se habrá completado. Salte al paso 7.
b. Para soportes ecuatoriales, desplace el soporte a otra zona
despejada del firmamento. Esta ubicación debe estar en el mismo
lado del meridiano que la primera zona que elija. Pulse ENTER.
4. Tras completar las dos primera referencias de alineación, el mando
manual mostrará “¿Añadir estrella de calibración?” Recomendamos
encarecidamente añadir una tercera referencia de alineación para
obtener la mejor precisión de apuntado global en todo el firmamento.
a. Seleccione “No” para finalizar la alineación con solamente dos
referencias. Esta alineación puede proporcionar una precisión de
apuntado aceptable en muchos casos, especialmente si Ir A Preciso
está activado (como se indica más adelante en este manual). Salte
al paso 7.
b. Seleccione “Sí” para añadir una tercera referencia de alineación. El
telescopio se desplazará automáticamente al otro lado del meridiano.
6. Con el telescopio en el lado opuesto del meridiano respecto a los dos
primeros puntos de alineación, el mando manual le solicitará elegir una
tercera zona despejada del firmamento. Use las teclas de dirección
para desplazarse a una zona despejada del firmamento en este lado del
meridiano y pulse ENTER.
7. Verá “¡Alineación correcta!” en la pantalla LCD de NexStar+ cuando se
complete.
Alineación automática del usuario
Este método de alineación solamente funciona cuando haya realizado como
mínimo una alineación manual o automática. Cuando seleccione alineación
automática del usuario, el telescopio se moverá automáticamente a los
puntos de alineación que haya definido durante la alineación manual o
automática anterior. Es una opción práctica si se instala en la misma
ubicación la mayoría de las noches y existen obstrucciones notables en
la ubicación.
Para realizar la alineación automática del usuario, seleccione “Alineación
automática del usuario” como método de alineación. Una vez iniciada, el
telescopio se desplazará automáticamente al primer punto de alineación
de la alineación manual o automática anterior. Continuará a los otros
puntos definidos por el usuario para finalizar la alineación.
Última alineación
Si deja su telescopio instalado en una única ubicación, como un
observatorio doméstico, Última alineación es una elección práctica. Solo
puede usar este método si no desplaza o mueve de otro modo el telescopio
en modo alguno tras apagarlo. Este método de alineación usa los datos
de alineación de SSAA anteriores guardados en el mando manual. No se
necesitan más acciones.
Alineación rápida
Este procedimiento alinea el soporte usando solamente la información de
hora/fecha/ubicación. Asume inicialmente que los soportes ecuatoriales
están alineados polarmente con precisión y en “posición inicial” (es
decir, la posición inicial automática si su soporte tiene conmutadores de
posición inicial internos, o con marcas de índice alineadas para soportes
sin conmutadores de posición inicial internos), y que los soportes altazimut
están nivelados con precisión y apuntando al norte (o al sur en el hemisferio
sur). Para soportes de horquilla AZ sobre una cuña EQ, asume inicialmente
que el soporte está alineado polarmente con precisión con el tubo del
telescopio perpendicular, como se indica en la Figura 12. La alineación
rápida no usa el dispositivo SSAA. Normalmente no recomendamos este
método de alineación porque no es muy preciso, pero puede ofrecer un
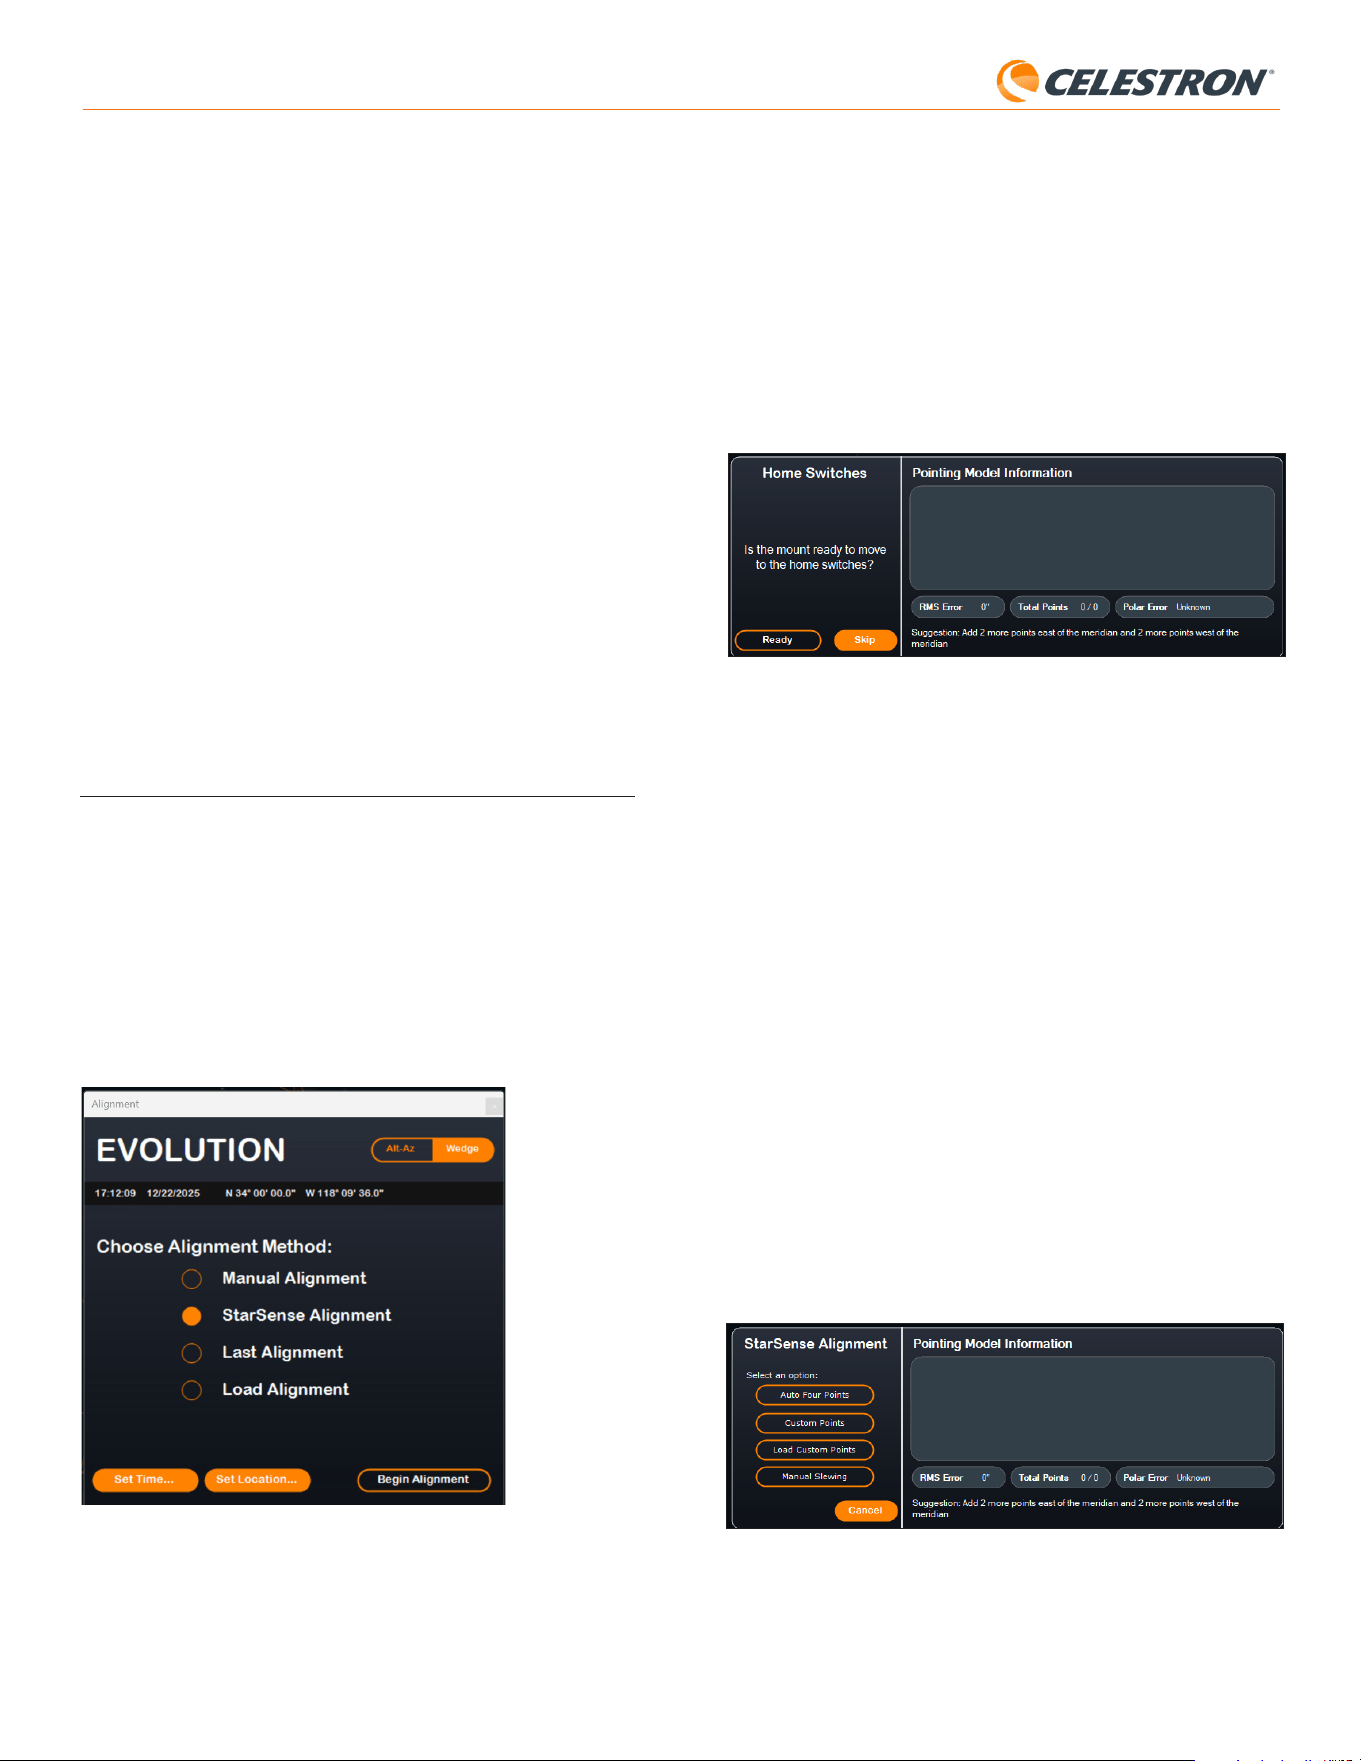
8 | ESPAÑOL
StarSense AutoAlign V2
ayudar a obtener una alineación polar precisa (descrita más adelante en
este manual), pero el proceso será mucho más rápido y fácil si el soporte
EQ está alineado polarmente de forma aproximada para empezar.
Para la alineación celeste automática usando SSAA, seleccione “Alineación
StarSense”, y pulse el botón “Iniciar alineación”. Aparecerá la información
del modelo de apuntado (Fig. 15). En la sección “Conmutadores de inicio”,
CPWI solicita “¿Está listo el soporte para moverse a los conmutadores de
inicio?” Si su soporte tiene conmutadores de inicio (por ejemplo, CGX y
CGX-L), pulse “Listo” y el telescopio se moverá a sus conmutadores de
inicio. Si su soporte EQ no tiene conmutadores de inicio pero tiene marcas
de índice, mueva manualmente el telescopio a sus marcas de índice. Si
usa un soporte AZ sobre una cuña EQ, posicione el telescopio como se
muestra en la Figura 12 (en la página 5).
Fig. 15: Ventana de información de modelo de apuntado en CPWI.
Si usa un soporte altazimut (AZ), CPWI le solicitará apuntar el telescopio
al horizonte norte, con el tubo posicionado horizontalmente y orientado al
norte. Si está en el hemisferio sur, apúntelo al horizonte sur en su lugar.
Use la ventana de controles de desplazamiento del soporte para posicionar
el telescopio. La precisión no es crucial. Es solamente la posición inicial
para la rutina de alineado.
Si no ha realizado previamente la calibración del centro, debería hacerlo
cuando lo solicite CPWI antes de la alineación celeste. A diferencia del
mando manual NexStar+, CPWI precisa que la calibración del centro se
complete primero. Si se la salta, deberá repetir el proceso de alineación
celeste posteriormente. Consulte la sección calibrar centro en la página 9
para obtener instrucciones.
A continuación, si usa un soporte ecuatorial (EQ) o un soporte AZ sobre
una cuña ecuatorial, CPWI solicitará si desea realizar una alineación polar.
Recomendamos completar la alineación polar en este momento. Si espera
a después de la alineación celeste, deberá repetir el proceso de alineación
celeste.
- Para la alineación polar, pulse “Sí” y siga las instrucciones en la sección
Alineación polar en la página 9.
- Para saltarse la alineación polar, pulse “No” para ir directamente a la
alineación celeste.
Puede realizar más tarde la alineación polar seleccionando “Alinear soporte
polarmente” desde el menú de StarSense.
Tras finalizar la alineación polar, la ventana mostrará “Alineación StarSense”
y le solicitará seleccionar una opción de alineación (Fig. 16).
Fig. 16: Opciones de alineación de StarSense en CPWI.
Cuatro puntos automáticos
Cuatro puntos automáticos es la elección de alineación más automatizada.
SSAA se desplazará automáticamente a cuatro puntos en el firmamento
Tras completar correctamente la alineación polar, el mando manual le
solicitará realizar otra vez la alineación celeste. Por ello recomendamos
alinear polarmente al inicio, antes de la alineación celeste.
Versión
Seleccionar esta opción muestra el número de versión actual del
software interno de SSAA.
• Para ver la versión de firmware del mando manual NexStar+, seleccione la
opción “Versión” desde MENÚ>Utilidades.
Configuración
Usar Ir a preciso – Esta configuración le permite habilitar o deshabilitar
Ir a preciso automático después de cada desplazamiento. Ir a preciso
está activado de forma predeterminada para la mejor precisión en
el apuntado. Sin embargo, esta función hace que el telescopio tarde
un poco más en centrar objetos. Recomendamos que la mayoría de
usuarios dejen Ir a preciso activo.
Restablecimiento de fábrica
Esta opción borra todos los datos de calibración de centro guardados
previamente en StarSense AutoAlign. Tras seleccionar esta opción,
debe realizar un ciclo de encendido del soporte.
Recomendamos realizar un restablecimiento de fábrica si tiene intención
de usar StarSense AutoAlign con un soporte Celestron distinto del
usado anteriormente.
6. Usar SSAA con CPWI
Si ya usa un PC para controlar su telescopio (por ejemplo, para
astrofotografía), el software gratuito CPWI de Celestron es una magnífica
forma de controlar el SSAA. Su intuitiva interfaz de usuario facilita acceder
a todas las funciones de SSAA.
Alineación celeste
Cuando conecte su PC con CPWI a su soporte Celeston con StarSense
AutoAlign instalado, se abrirá automáticamente la ventana de alineación
(Fig. 14).
Compruebe primero la fecha, hora y ubicación cerca de la parte superior
de la ventana. Si nota errores, pulse los botones “Establecer hora” o
“Establecer ubicación” para ajustarlos.
Fig. 14: Ventana de alineación de SSAA en CPWI.
Si usa un soporte AZ con una cuña EQ, seleccione la opción “Cuña EQ”
que aparece en la sección superior derecha de la ventana de alineación.
Seleccionarlo tratará el soporte AZ como un soporte EQ.
Si usa un soporte EQ (o soporte AZ con cuña EQ), debería realizar una
alineación polar aproximada antes de comenzar la alineación. SSAA puede
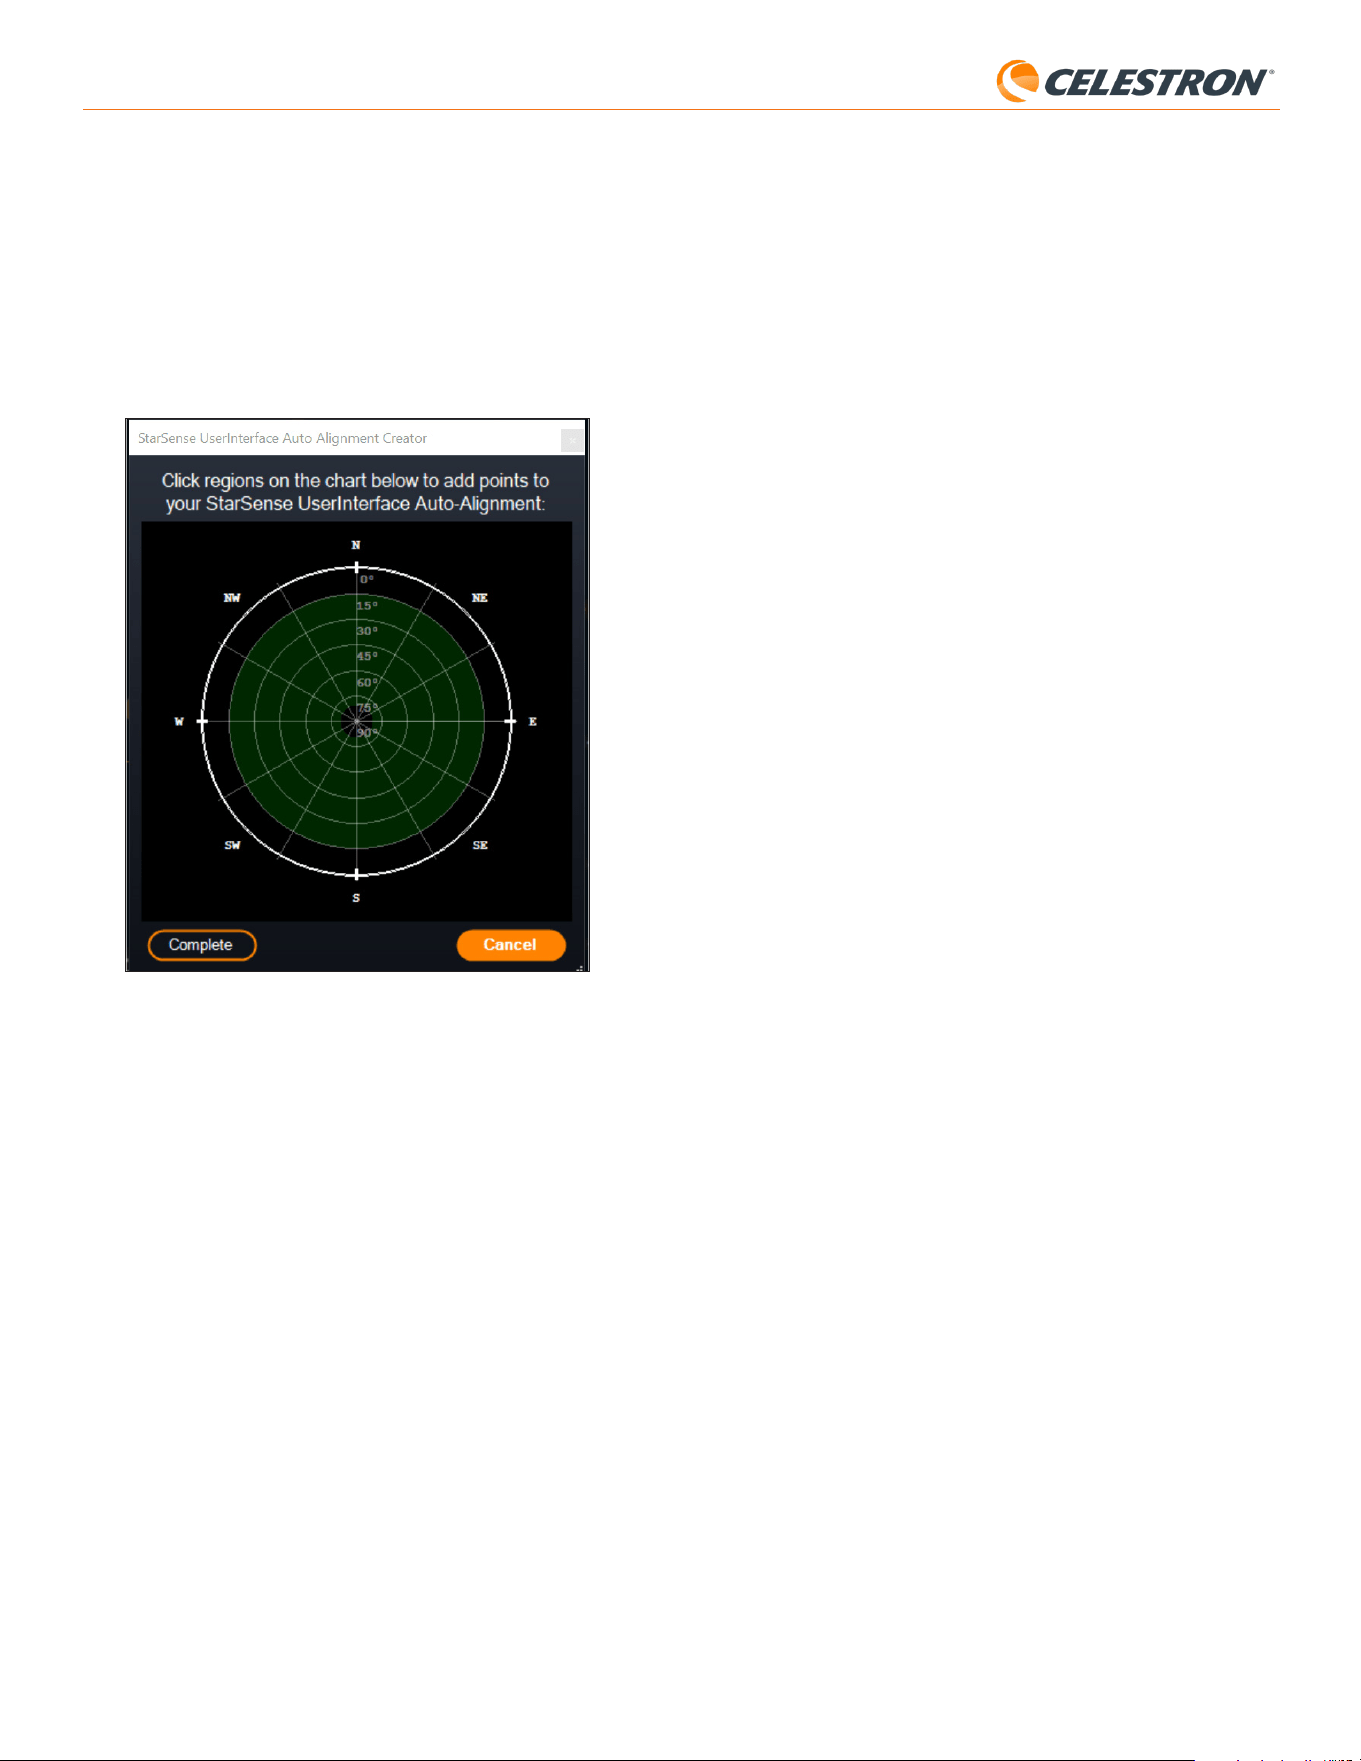
9 | ESPAÑOL
StarSense AutoAlign V2
Añadir referencias de alineación adicionales
Tras la alineación puede ver información del modelo de apuntado generado
por el soporte, incluyendo el error RMS, el número total de puntos en el
modelo de alineación, y el error de alineación polar calculado.
Puede añadir referencias de alineación adicionales durante la noche
seleccionando un objeto en la vista de planetario, pulsando en él, y
seleccionando “Modelar”. El soporte se desplazará a la ubicación del
objeto, y SSAA añadirá la referencia de alineación al modelo de apuntado
del soporte. La precisión de apuntado debe ser bastante buena con
solo cuatro puntos, pero en general aumentará con cada referencia de
alineación que añada.
Calibrar centro
La calibración del centro alinea el campo visual de la cámara de StarSense
AutoAlign con el campo visual del telescopio.
Normalmente solamente deberá realizar la calibración del centro la primera
vez que use StarSense con un nuevo tubo óptico. Puede tener que repetir
el procedimiento si retira y vuelve a instalar la base del soporte en el
telescopio.
Si solamente retira la unidad StarSense y su soporte, pero deja la base del
soporte instalada en el telescopio, la calibración del centro normalmente
no vuelve a ser necesaria.
CPWI solicitará automáticamente realizar una calibración del centro antes
de la alineación celeste. Si elige saltarse este paso, puede seleccionar
“Calibrar centro” más tarde desde el menú de StarSense. Sin embargo,
deberá rehacer la alineación celeste tras calibrar el centro.
Para realizar una calibración del centro:
1. Seleccione un objeto en la pantalla de planetario SkyViewer pulsando
en él. Elija una estrella brillante o planeta que sea claramente visible
desde su ubicación de observación.
2. El telescopio se desplazará al objeto seleccionado. Según el desvío
entre el campo visual de SSAA y el del telescopio, el objeto puede estar
o no en el campo visual del telescopio. En cualquier caso, el telescopio
debe apuntar hacia el objeto.
3. CPWI le solicitará centrar el objeto en el campo visual del ocular
del telescopio. Puede usar la ventana en pantalla de controles de
desplazamiento del soporte. Cuando haya terminado, pulse “Centrado”
en la ventana de información del modelo de apuntado.
• Si la estrella no está en el campo visual del localizador, desplace
manualmente hasta que lo esté.
• Si no está usando un localizador, use el ocular con mayor campo
visual para encontrar el objeto en su lugar. Si el objeto no está en
el campo visual del ocular, mire a lo largo del tubo del telescopio
para apuntar al objeto.
• Para el centrado final, use un ocular de alta potencia.
• Cuando centre la estrella en el campo visual del telescopio, use al
final las teclas de dirección arriba y derecha.
4. SSAA realizará la calibración del centro y devolverá el mensaje
“Calibración de centro correcta”.
Cuando haya completado la calibración del centro y la alineación celeste,
puede ordenar al telescopio ubicar con precisión cualquier objeto celeste
que seleccione en el campo visual del telescopio.
Alineación polar
Aunque su soporte EQ (o soporte AZ sobre cuña EQ) no necesita alinearse
polarmente para usar SSAA, SSAA puede ayudarle a lograr una alineación
polar muy precisa. Una alineación polar precisa mejora ligeramente la
precisión de apuntado global - pero solo por unos pocos arcominutos.
Si selecciona alinear polarmente, hágalo antes de la alineación celeste.
Si desea alinear polarmente más tarde, puede seleccionar la opción
“Alineación polar de soporte” en el menú de StarSense. Deberá realizar de
nuevo la alineación celeste tras finalizar la alineación polar.
para lograr la alineación celeste. Si apunta a una obstrucción o falla de
otro modo al determinar su posición, el telescopio se desplazará a otro
punto del firmamento para obtener otra referencia de alineación.
Puntos personalizados
Puntos personalizados permite definir puntos en el firmamento a donde
se desplazará el telescopio para la alineación. Es una buena elección si
su ubicación de observación tiene obstrucciones locales, porque puede
definir los puntos de alineación de forma que el telescopio se mantenga
a distancia de éstas. Si selecciona esta opción aparecerá la ventana del
Creador de alineación automática de la interfaz del usuario de StarSense
(Fig. 17).
Fig. 17: Ventana de creador de alineación automática en CPWI.
Pulse en la carta para seleccionar los puntos de alineación en el
firmamento. Encontrará las direcciones cardinales en el perímetro de la
carta. El interior de la carta va de 0° de altitud (es decir, el horizonte) en el
borde al 90° (es decir, el cénit) en el centro. Puede elegir más de cuatro
puntos de alineación si lo desea. Para los mejores resultados, seleccione
puntos separados ampliamente y evite puntos cerca de los polos para
soportes EQ. Tras seleccionar puntos de alineación, pulse “Completar”
en la parte inferior izquierda de la ventana. Antes de que CPWI inicie la
alineación, solicitará si desea guardar los puntos de alineación definidos
por el usuario. Si lo hace, puede usar el archivo .sua más adelante con la
opción “Cargar puntos personalizados”.
Si quiere usar el creador de alineación automática de la interfaz del usuario
de StarSense antes de iniciar una alineación, seleccione “Herramienta de
creación de alineación automática del usuario” del menú de StarSense.
Cargar puntos personalizados
Una vez haya definido los “Puntos personalizados” como se indica
anteriormente, puede elegir esta opción para usarlos de nuevo. Seleccione
el archivo .sua que ha creado previamente y comenzará automáticamente
la alineación.
Desplazamiento manual
Con esta opción de alineación, usa la ventana de controles de
desplazamiento del soporte para desplazar manualmente el SSAA a una
zona despejada del firmamento y pulsa “Solucionar aquí” para obtener
una referencia de alineación. Repita el proceso cuatro veces y finalizará
la alineación. Es la elección menos automatizada, pero puede ser útil si
su ubicación de observación tiene obstrucciones o el firmamento está
parcialmente nublado. Para obtener los mejores resultados, use cuatro
puntos de alineación tan separados como sea posible y evite puntos cerca
de los polos para soportes EQ.
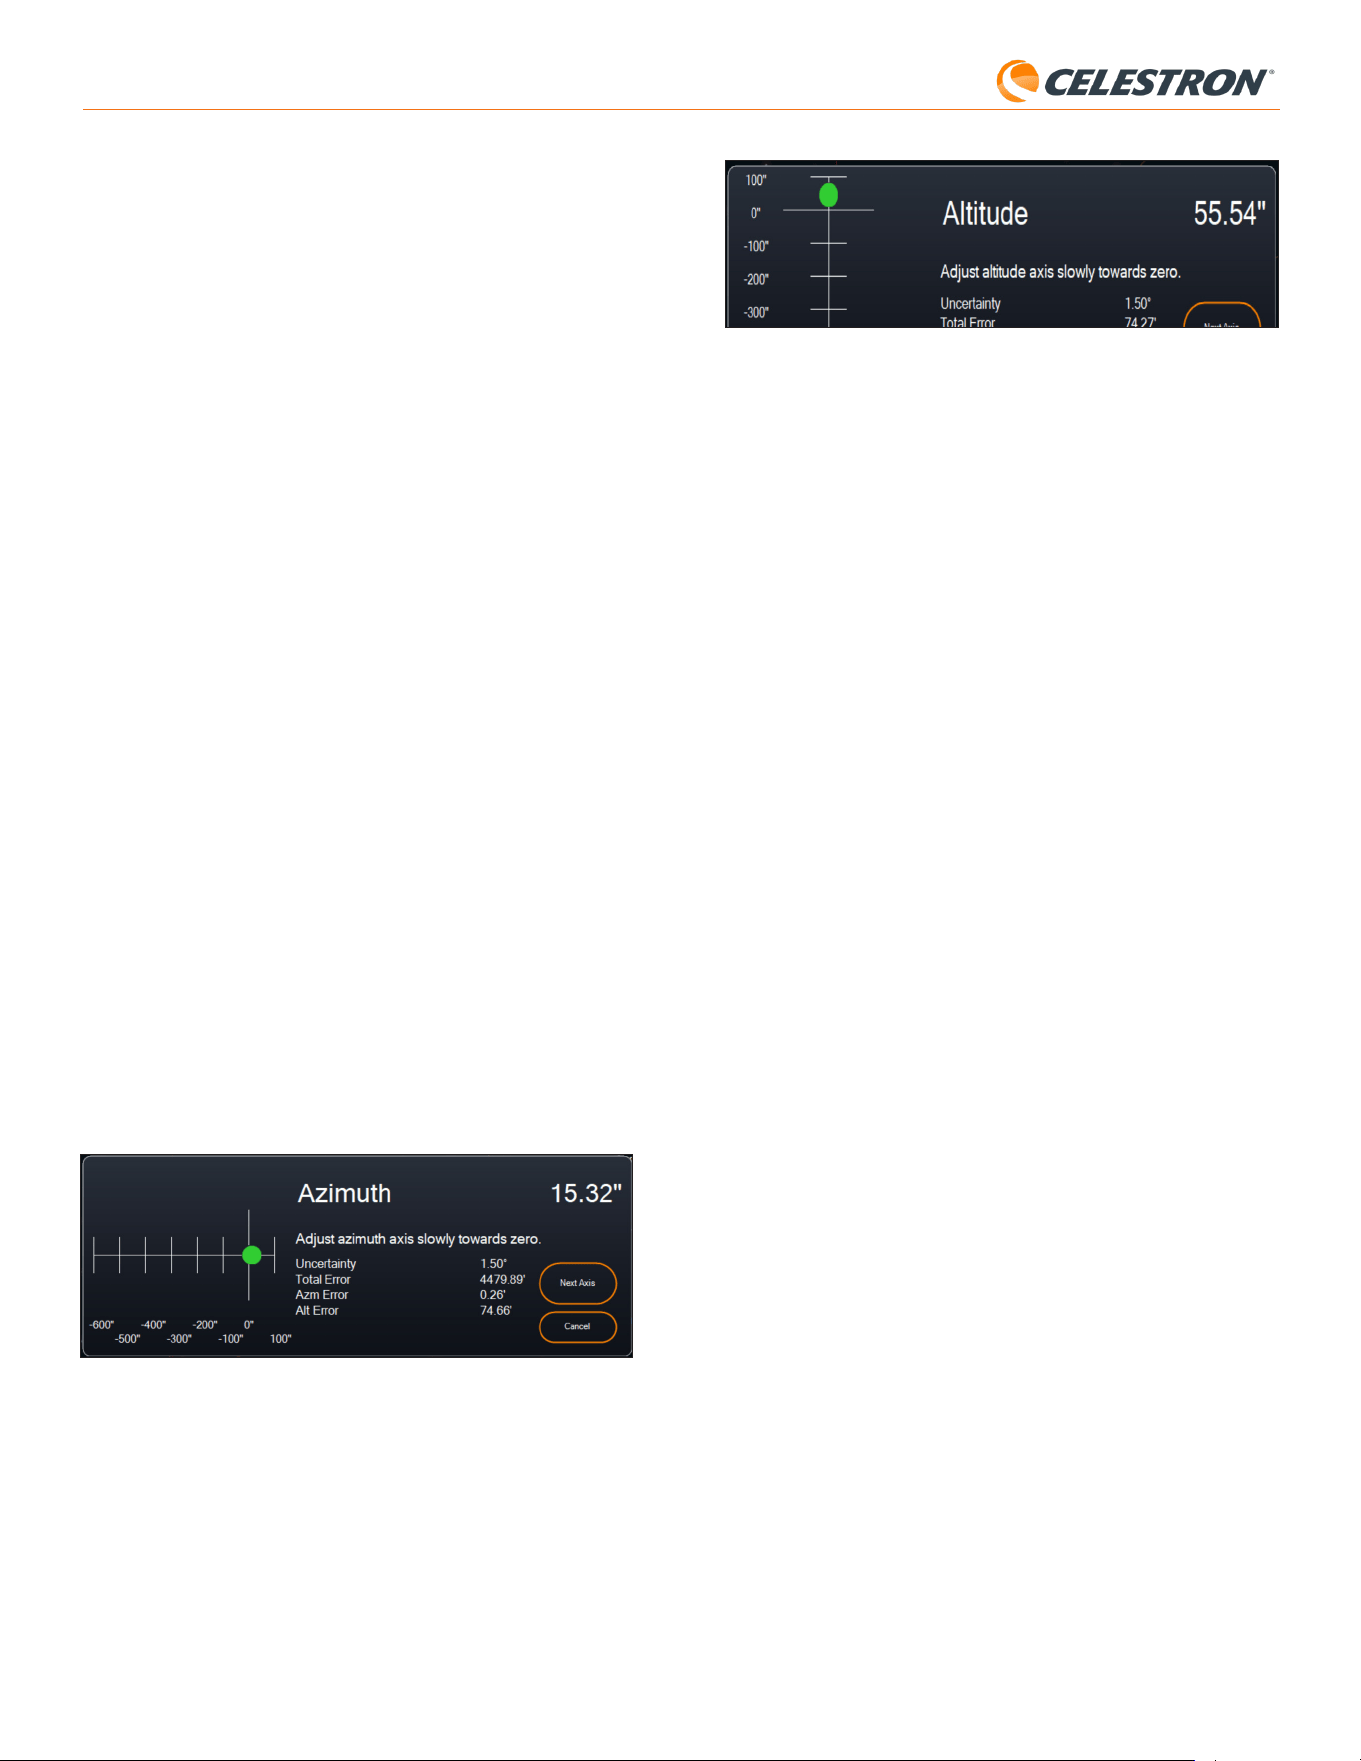
10 | ESPAÑOL
StarSense AutoAlign V2
Fig. 19: Ventana de ajuste de eje de altitud durante alineación polar en CPWI.
6. Ajuste con precisión lentamente la altitud de su soporte hasta que
“Error Alt” sea menor de dos arcominutos.
• Si el soporte tiene bloqueos de altitud, aflójelos primero.
7. Si quiere volver a ajustar el eje de azimut, pulse “Siguiente eje”. En caso
contrario, pulse “Finalizar”.
8. ¡Felicidades! Ha alineado polarmente con éxito su soporte. Si su soporte
tiene mandos o tornillos de bloqueo de altitud o azimut, apriételos
firmemente. Si ya ha realizado una alineación celeste, borre la alineación
actual del menú alineación y vuelva a realizar la alineación celeste.
NOTA: No intente ajustar la alineación polar mejor de dos arcominutos en cada eje. Hacerlo será difícil
y no ofrecerá más ventajas de apuntado o seguimiento.
Otras funcionalidades
Dispone de más opciones para elegir en el menú de StarSense.
Vista en directo
La ventana Vista en directo muestra una lectura en tiempo real del sensor
de imagen de SSAA. Su finalidad principal es ayudar a enfocar la lente de
SSAA (consulte la sección Enfoque más adelante en este manual), pero
también puede ser interesante ver lo que está viendo SSAA.
Para ver la vista en directo, deberá conectar SSAA directamente a su
PC usando un cable USB-C a USB-A (no incluido). Esto se debe a que
la interfaz AUX no puede soportar la transferencia de imágenes. También
deberá instalar el controlador Windows de StarSense en su ordenador. Lo
encontrara en la sección Soporte y descargas de la página de producto
de StarSense AutoAlign (#94034) en celestron.com.
Cuando instale el controlador y conecte SSAA con el cable USB, la ventana
de vista en directo mostrará la vista actual del sensor de imagen del SSAA.
No hay controles para la vista en directo. SSAA ajusta automáticamente la
exposición y rendimiento para obtener las mejores imágenes.
NOTA: Aún debe conectar SSAA al soporte por AUX mientras esté
conectado al PC por USB para la vista en directo.
Ir a preciso
Ir a preciso usa SSAA para centrar con mayor precisión objetos en el
campo visual. Cuando se habilita esta opción, el soporte del telescopio
usa su modelo de alineación interno para desplazarse cerca del
objeto seleccionado. A continuación SSAA se hace cargo, realizando
correcciones precisas al centrado, mejorando notablemente la precisión
de apuntado global. Cuando use SSAA, Ir a preciso está habilitado de
forma predeterminada. Si quiere desactivar esta función, puede hacerlo
desde el menú de StarSense.
Versión
Seleccionar esta opción muestra la versión actual del firmware de SSAA.
Restablecimiento de fábrica
Esta opción borra todos los datos de calibración de centro guardados
previamente en StarSense AutoAlign. Tras seleccionar esta opción, debe
realizar un ciclo de encendido del soporte.
Recomendamos realizar un restablecimiento de fábrica si tiene intención
de usar StarSense AutoAlign con un soporte Celestron distinto del usado
anteriormente.
NOTA: Estas instrucciones explican el modo de realización de una
alineación polar en el hemisferio norte. Si está en el hemisferio sur, apunte
siempre el soporte al sur en lugar de al norte.
Para realizar una alineación polar con SSAA por CPWI:
1. Alinear polarmente de forma aproximada el soporte primero hará
que el proceso sea más rápido y sencillo. Cuando esté alineado
aproximadamente, puede lograr una alineación polar precisa usando
solamente los mandos de ajuste preciso de altitud y azimut del soporte.
a. Asegúrese de que el soporte esté razonablemente nivelado. Si su
soporte tiene un nivel de burbuja integrado, úselo como referencia.
b. Ajuste la altitud del soporte de forma que la escala de latitud del
soporte indique aproximadamente la misma latitud que su lugar de
observación.
c. Levante y gire todo el trípode y soporte de forma que el eje de
ascensión recta (RA) apunte aproximadamente al norte. La
posición del soporte no necesita ser perfecta. Apunte dentro
de aproximadamente 5° del norte de forma que el soporte esté
dentro del alcance de los mandos de ajuste preciso de azimut del
soporte. Use una aplicación de brújula gratuita para su teléfono si
necesita ayuda localizando el norte.
d. Si ha aflojado los mandos de ajuste de altitud o azimut durante
la allineación polar aproximada, asegúrese de que vuelvan a
apretarse con seguridad antes de continuar.
2. Cuando lo solicite CPWI, desplace manualmente el telescopio a una
posición inicial usando la ventana de controles de desplazamiento del
soporte.
• El telescopio se desplazará de oeste a este en aproximadamente
50° durante el proceso de alineación polar. Intente desplazar a una
zona despejada sin obstrucciones en toda la ruta.
3. Pulse “Comenzar” en la sección de alineación polar de SSAA de
la ventana de información del modelo de apuntado. El soporte se
desplazará al este, deteniéndose aproximadamente cada 10° para
obtener una referencia de alineación polar.
4. Cuando SSAA haya obtenido sus referencias de alineación polar,
mostrará la ventana de ajuste del eje de azimut (Fig. 18). Ajuste con
precisión lentamente el azimut de su soporte hasta que “Error Azm” sea
menor de dos arcominutos.
• Si el soporte tiene bloqueos del eje de azimut, aflójelos primero.
• Realice los ajustes lentamente de forma que el SSAA pueda
seguirlos. Si ajusta demasiado rápido y el SSAA pierde el
seguimiento, puede tener que reiniciar todo el proceso de
alineación polar.
Fig. 18: Ventana de ajuste de eje de azimut durante alineación polar en CPWI.
5. Pulse “Siguiente eje” cuando termine de realizar ajustes en el azimut.
Aparecerá la ventana de ajuste de eje de altitud (Fig. 19).
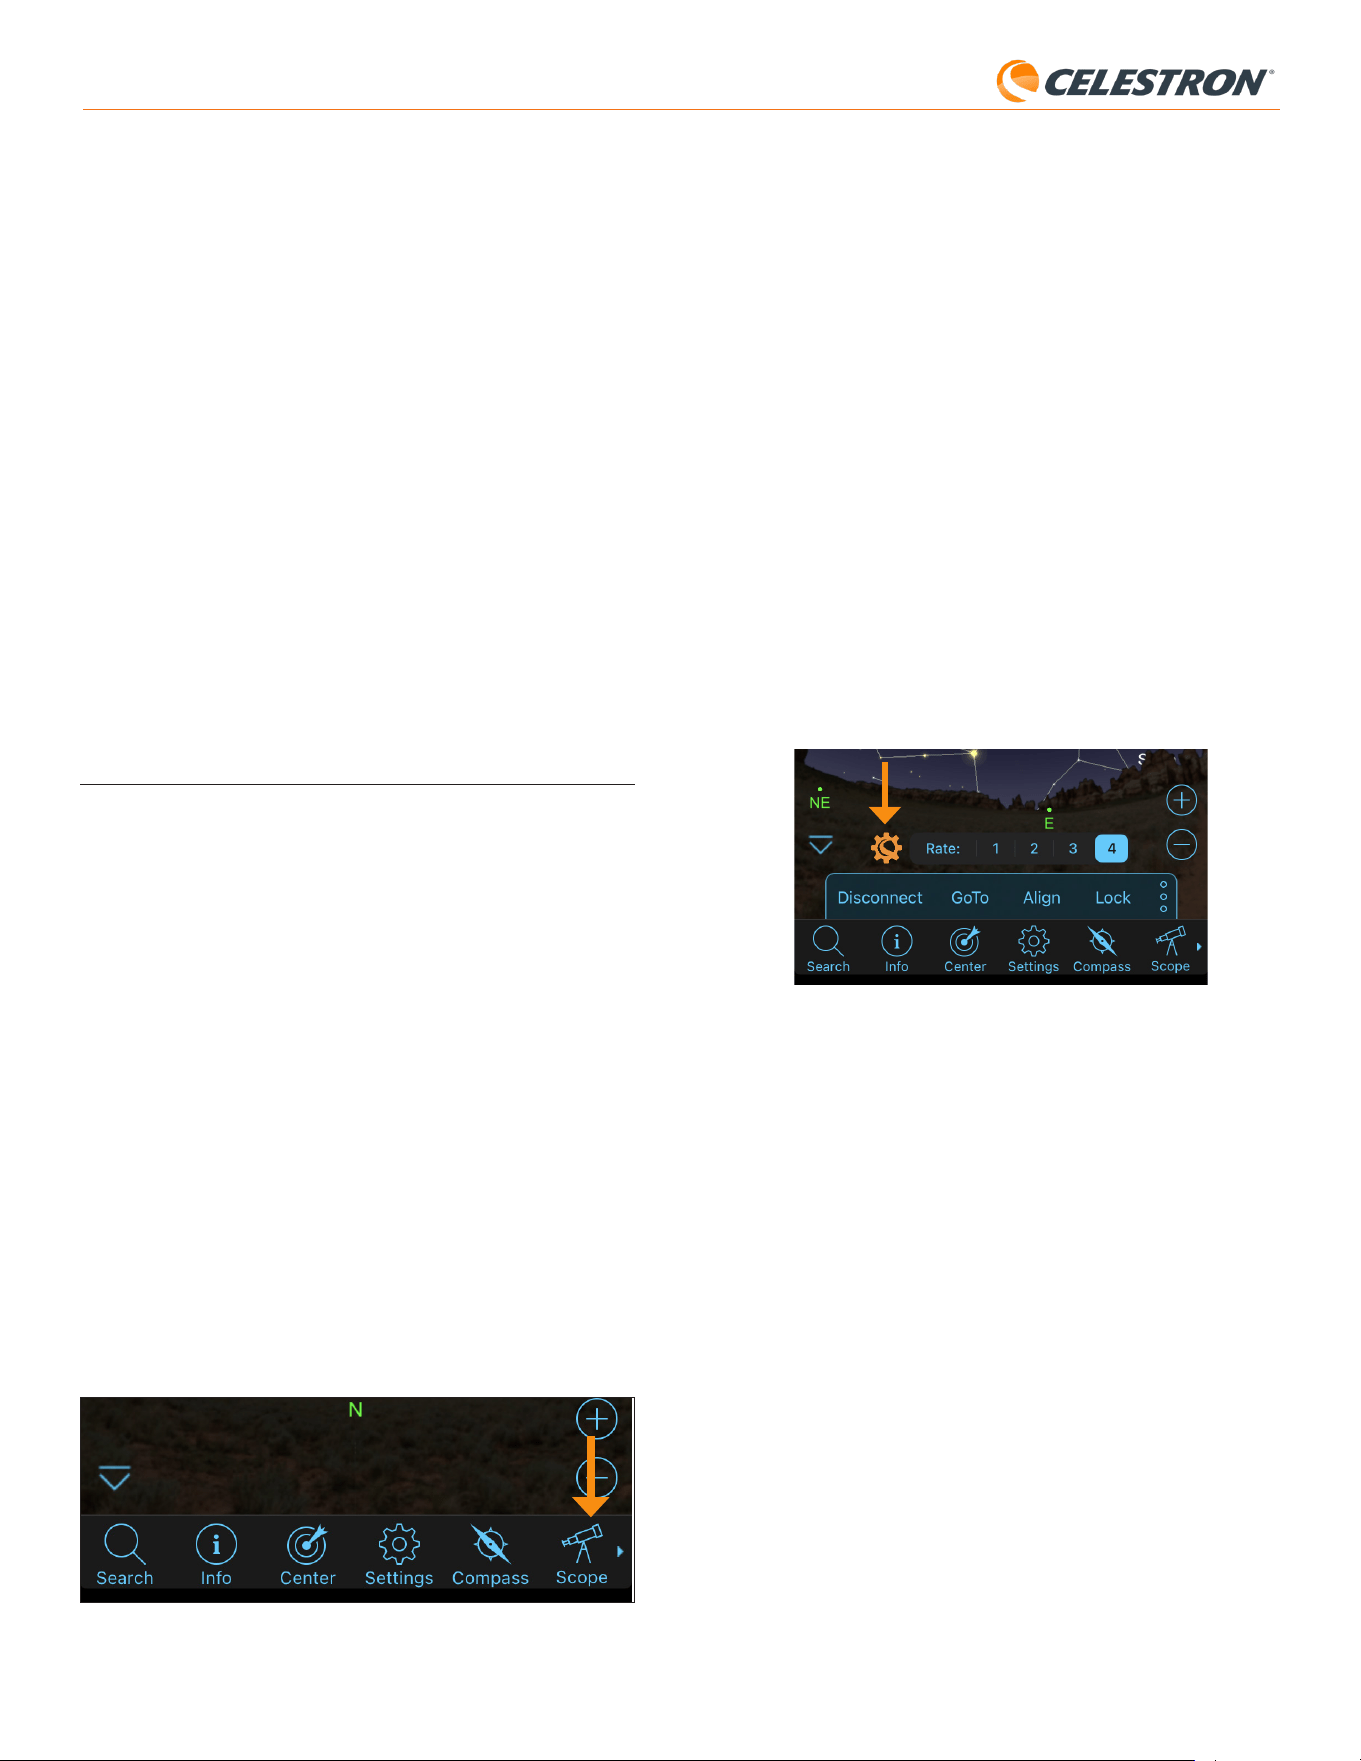
11 | ESPAÑOL
StarSense AutoAlign V2
Descargar registros de soporte
Si tiene dificultades técnicas y necesita descargar registros de soporte
para enviarlos al soporte técnico de Celestron, seleccione esta opción.
Primero, instale el controlador Windows de StarSense en su ordenador,
disponible en la sección Soporte y descargars de la página de producto
de StarSense (#94034) en celestron.com. A continuación, conecte el
puerto USB-C de StarSense directamente a su PC usando un cable USB
(no incluido). Seleccione “Descargar registros de soporte”. Los registros
se descargarán directamente en su ordenador.
NOTA: Los registros de soporte no se guardan permanentemente en la memoria de SSAA, por lo
que no debe apagar el soporte ni desconectar SSAA del soporte antes de descargar los registros de
soporte de SSAA.
Actualizar firmware
Puede usar esta opción para comprobar si el firmware de su StarSense
AutoAlign (SSAA) está actualizado e instalar cualquier actualización
disponible.
Primero, descargue e instale el controlador Windows de StarSense en su
ordenador. Puede encontrarlo en la sección Soporte y descargas de la
página de producto de StarSense AutoAlign (#94034) en celestron.com.
A continuación, conecte el puerto USB-C de SSAA directamente a su
PC usando un cable USB (no incluido). Una vez conectado, seleccione
“Actualizar firmware” y siga las indicaciones en pantalla para completar el
proceso.
7. Usar SSAA con SkyPortal
Puede controlar su StarSense AutoAlign mediante su teléfono usando
la aplicación móvil Celestron SkyPortal Powered by SkySafari™.
Qué necesitará:
• Un teléfono con la versión más reciente de la aplicación móvil SkyPortal,
disponible gratuitamente en Apple App Store o Google Play
• Un telescopio Celestron con WiFi habilitado, por ejemplo, NexStar
Evolution, O un soporte Celestron informatizado y el accesorio del
módulo WiFi de SkyPortal (vendido por separado)
• StarSense AutoAlign, instalado y conectado al soporte de su telescopio
Para usar SSAA con la aplicación
SkyPortal:
1. Asegúrese de que SSAA esté conectado a uno de los puertos AUX
del soporte del telescopio.
2. Encienda el soporte.
3. Conecte a la red WiFi del telescopio con su teléfono.
- En redes WiFi disponibles, el telescopio se mostrará como
“Celestron-###”, con ### siendo dígitos y letras.
4. Abra la app SkyPortal.
5. Seleccione el icono del telescopio en la sección inferior derecha de la
pantalla (Fig. 20).
Fig. 20: Seleccione el icono del telescopio en la sección inferior derecha de la pantalla
6. Toque “Conectar,” y “Conectar y alinear”. La aplicación iniciará ahora
la alineación. Posicione su telescopio para alineación usando uno de
los métodos siguientes:
a. Para soportes EQ con conmutadores de posición inicial (como
CGX), pulse “OK” y el soporte se moverá a la posición inicial.
b. Para soportes EQ sin conmutadores de posición inicial (como Advanced
VX), la aplicación le solicitará mover el telescopio a las marcas de
índice de posición inicial (consulte la Figura 11B). Puede mover
manualmente el telescopio o usar los controles de telescopio en
pantalla.
c. Para soportes AZ, apunte su telescopio al horizonte norte usando
los controles de telescopio en pantalla. El tubo del telescopio debe
estar aproximadamente nivelado con el suelo y apuntando al norte.
En el hemisferio sur, el telescopio debe estar aproximadamente
nivelado con el suelo y apuntando al sur.
d. Para soportes AZ sobre una cuña EQ, habilite la opción de
cuña en la pantalla de Configuración del telescopio. Navegue
a la pantalla de Configuración del telescopio seleccionando
Menú>Configuración>Configuración y control. Seleccione
“Alineación de cuña StarSense habilitada”. A continuación, vuelva a
la pantalla de planetario principal, cancele la alineación actual, y pulse
“Conectar” y “Conectar y alinear” de nuevo. Siga las indicaciones
en pantalla. También necesitará poner el telescopio en la posición
inicial. Consulte la Figura 12 en la página 5.\NOTA: Puede acceder a la
configuración del telescopio directamente pulsando el icono de Configuración Celestron cerca de
la parte inferior de la pantalla. (Fig 21).
Fig. 21: Icono de configuración Celestron
7. Comenzará la alineación automática. Los soportes EQ se desplazarán
a dos puntos en el firmamento occidental y a continuacion dos puntos
en el firmamento oriental para obtener referencias de alineación. Los
soportes AZ se desplazarán a tres puntos en el firmamento. Si ha
realizado previamente una calibración del centro, puede usar SSAA
para localizar objetos. Si no ha completado una calibración del centro,
SkyPortal le solicitará que lo haga. Proceda al paso 8.
8. La calibración del centro alinea el campo visual de SSAA con el
campo visual del telescopio. Este paso normalmente solo necesita
realizarse una vez, porque SSAA guarda los datos de calibraciòn del
centro en su memoria interna. La próxima vez que conecte con SSAA
con la aplicación no necesitará volver a calibrar el centro a menos que
haya movido el SSAA a un tubo óptico de telescopio distinto.
a. Para calibrar el centro, seleccione una estrella desde la interfaz
de planetario y pulse “Ir a”. El telescopio se desplazará cerca de
la estrella, pero la estrella puede no estar en el campo visual del
telescopio.
b. Use los botones de dirección en pantalla para centrar con precisión
la estrella en el campo visual del telescopio. Cuando termine, pulse
“Alinear” en la parte inferior de la pantalla. Pulse “Calibrar”.
c. La aplicación completará el proceso de calibración de centro.
d. Tras la calibración de centro, se le solicitará volver a realizar la
alineación celeste. Toque “Desconectar”, y toque el icono
Telescopio, toque”Conectar” y “Conectar y alinear” de nuevo.
Vuelva al paso 6.
Ahora puede usar SSAA para localizar objetos en el firmamento nocturno.
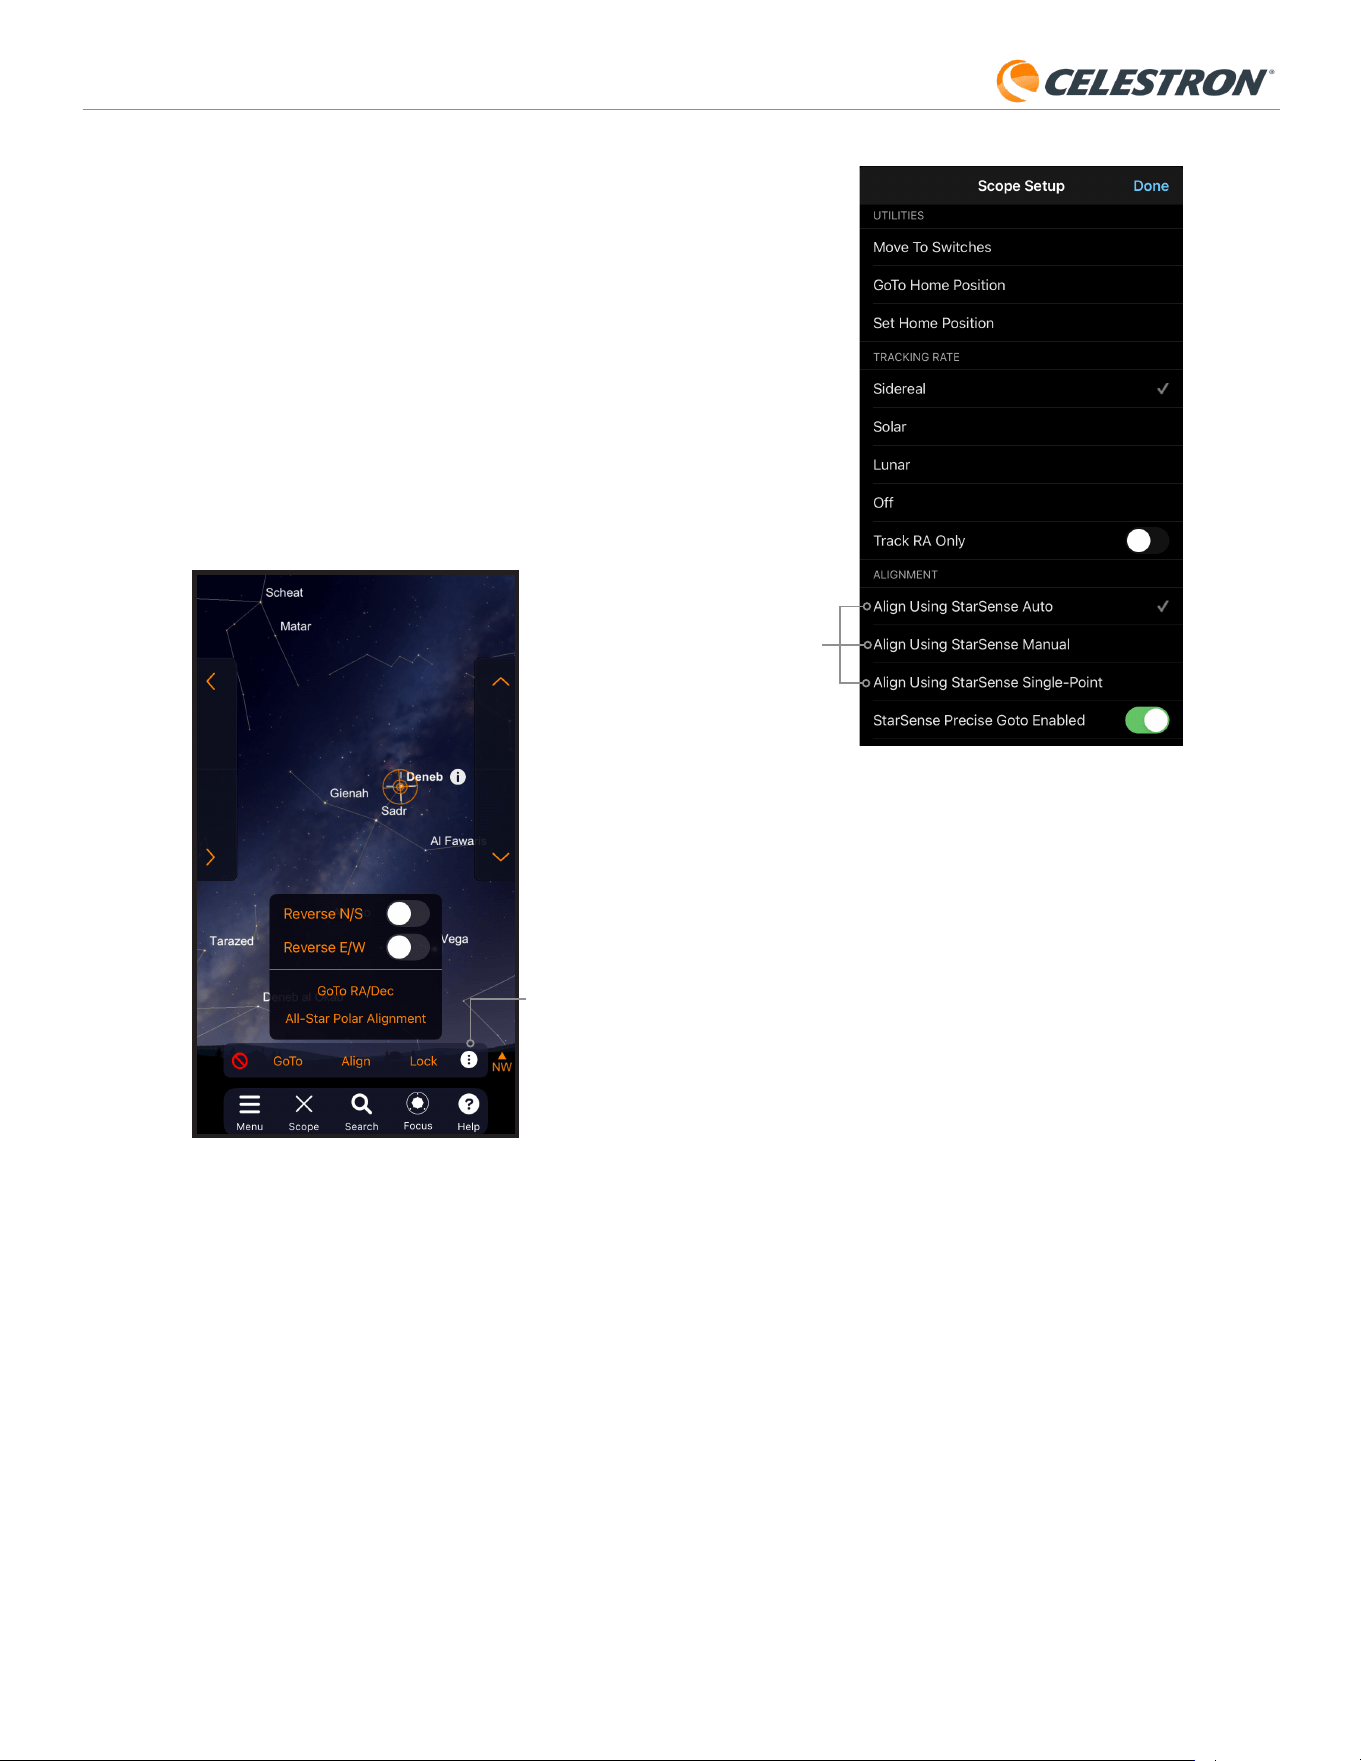
12 | ESPAÑOL
StarSense AutoAlign V2
Opciones de
alineación
Fig. 22: Además de alinear usando StarSense Auto (la opción predeterminada), hay
otras opciones de alineación disponibles desde la pantalla Configuración del
telescopio.
Alinear usando StarSense Manual
Alineación Manual StarSense le permite desplazar manualmente el
telescopio a los puntos de alineación que seleccione en lugar de puntos
preestablecidos automáticos. Si su lugar de observacion tiene muchas
obstrucciones o nubes, puede encontrar que StarSense Manual es más
rápido y práctico que StarSense Auto. Para usar StarSense Manual,
seleccione “Alinear usando StarSense Manual” desde la pantalla de
Configuración del telescopio. Ahora, la próxima vez que elija “Conectar y
alinear”, la aplicación solicitará realizar una alineación manual StarSense.
Siga las instrucciones en pantalla. Puede desplazar el telescopio a
cualquier posición en el firmamento libre de obstrucciones. Mantenga
los puntos de alineación separados como mínimo 30° entre sí en ambos
ejes.
Alinear usando StarSense punto único
La alineación StarSense punto único permite alinear desplazando
manualmente a solo una zona del firmamento. Es la forma más rápida
de alinear, pero ofrece el modelo de apuntado menos preciso para el
soporte. Recuerde, SSAA seguirá usando su funcionalidad Ir a preciso
para centrar con precision objetos, por lo que este procedimiento rápido
puede ser todo lo que necesita para una observación casual. También
puede añadir puntos de alineación adicionales más tarde para mejorar
la precisión de su soporte usando el comando Alinear>Alinear (ver
más adelante). Para usar StarSense punto único, seleccione “Alinear
usando StarSense punto único” desde la pantalla de Configuración del
telescopio. La próxima vez que elija “Conectar y alinear”, la aplicación
solicitará realizar una alineación StarSense punto único. Siga las
instrucciones en pantalla.
Añadir puntos de alineación adicionales con
el comando Alinear>Alinear
La funcionalidad integrada de SSAA Ir a preciso permite centrar objetos
en el campo visual sin importar la precisión del modelo de apuntado
del soporte. Sin embargo, si lo desea, puede mejorar continuamente la
precisión de apuntado de su soporte añadiendo puntos de alineación
adicionales a su modelo de apuntado.
Seleccione un objeto en la aplicación y toque “Ir a”. La funcionalidad Ir a
preciso está activada de forma predeterminada, por lo que las estrellas
deben aparecer bien centradas en el campo visual del telescopio. Cuando
SSAA esté realizando Ir a preciso, la aplicación mostrará “Detectando
estrella”.
Alineación polar
La asistencia en alineación polar con SSAA actualmente no está
disponible con la aplicación SkyPortal. Sin embargo, SkyPortal soporta
el procedimiento Alineación polar de todas las estrellas (ASPA) para
una alineación polar precisa de su soporte ecuatorial. Si usa un soporte
ecuatorial (o un soporte AZ sobre una cuña EQ), la aplicación solicitará
si desea realizar ASPA tras una alineación celeste correcta. Si quiere
realizar ASPA más tarde, puede seleccionar Alineación polar de todas
las estrellas en cualquier momento desde el icono de “tres puntos”
como se muestra en la Figura 21B. Tras realizar ASPA se le solicitará
volver a realizar la alineación celeste del soporte.
Icono de tres
puntos
Fig. 21B: Puede realizar la alineación polar en cualquier momento seleccionando la
opción “Alineación polar de todas las estrellas” tras tocar el icono de tres
puntos.
Otras opciones de alineación
En la pantalla de Configuración del telescopio (Menú Configuración >
Configuración y control, o pulse el icono Configuración Celestron), puede
seleccionar un par de opciones de alineación distintas (Fig.22).
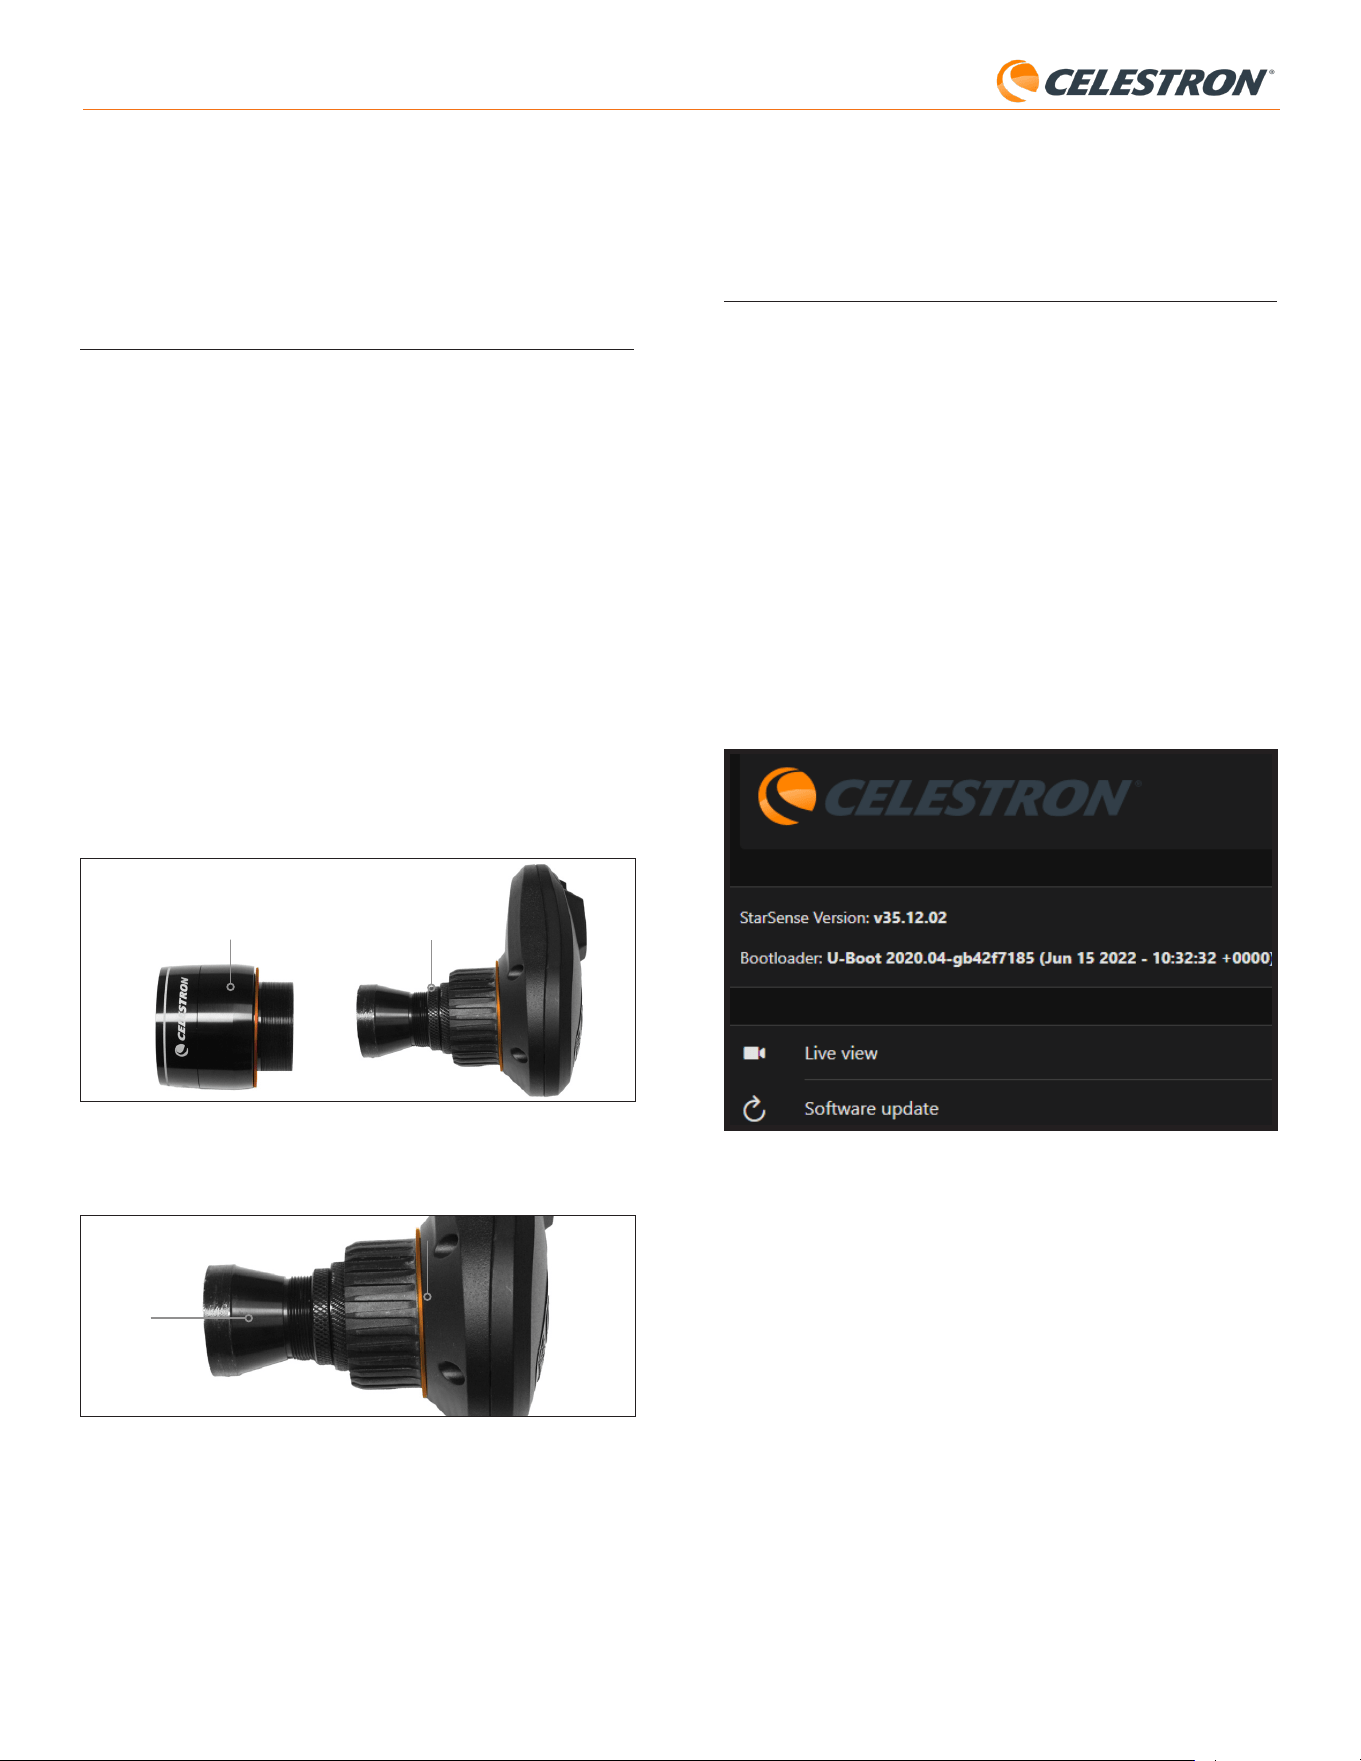
13 | ESPAÑOL
StarSense AutoAlign V2
Para añadir puntos de alineación, desplace el telescopio a cualquier
zona de firmamento despejado. Seleccione “Alinear” de las opciones
en la parte inferior de la pantalla, y seleccione de nuevo “Alinear”. Puede
añadir hasta un total de 10 puntos de alineación.
8. Enfoque
Los técnicos en la fábrica han enfocado su StarSense AutoAlign, y no
debería necesitar más ajustes. Sin embargo, si observa que SSAA no
funciona como debería (por ejemplo, informa “¡No hay estrellas!” cuando
hay muchas estrellas visibles en el firmamento), debería comprobar el
enfoque.
Para enfocar StarSense AutoAlign:
1. Siga los pasos descritos previamente para acceder a vista en directo
en CPWI (ver página 10). Alternativamente, puede acceder a vista en
directo mediante la interfaz web. Consulte el capítulo 9 (en esta página)
para las instrucciones.
2. Si está enfocando de día, apunte SSAA a un objeto a como mínimo
un cuarto de milla (400 m) de distancia. Si está enfocando de noche,
apunte SSAA a una estrella brillante. Debería ver una imagen en
pantalla.
NOTA: Puede ser difícil enfocar en condiciones luminosas diurnas por la
óptica muy rápida y el sensible sensor.
3. Si el enfoque está definido, ya ha terminado. Si no, retire la cubierta
anterior de SSAA agarrándola y girándola en sentido antihorario hasta
que se suelte (Fig. 23). Retire la cubierta anterior para exponer la
arandela de bloqueo del enfoque.
Fig. 23: Retire solamente la cubierta anterior, no toda la parte anterior de la carcasa
Arandela de bloqueo de
enfoque
Cubierta anterior
4. Afloje la arandela de bloqueo del enfoque (Fig. 24).
Fig. 24: Afloje la arandela de bloqueo cuando realice ajustes de enfoque, y vuelva a
apretar firmemente cuando esté enfocado.
Arandela de bloqueo de enfoque
Óptica
5. Gire la óptica en sentido horario de un cuarto a media vuelta para ver si
mejora el enfoque. Si lo hace, siga rotando hasta que el enfoque sea lo
más definido posible. Si el enfoque no mejora, gire la óptica en sentido
antihorario hasta que mejore el enfoque.
6. Cuando vea una imagen definida, vuelva a apretar la arandela de
bloqueo y vuelva a instalar la cubierta anterior de SSAA. Si lo desea,
puede desconectar SSAA del puerto USB del PC.
9. Actualizar el firmware de SSAA
y vista en directo mediante
interfaz web
Nuestros ingenieros trabajan constantemente en actualizaciones y
mejoras de nuestros productos, por lo que recomendamos comprobar
periódicamente las actualizaciones del firmware de SSAA. Si está
disponible nuevo firmware, lo encontrará en la página de producto de
StarSense AutoAlign V2 (#94304) en celestron.com, en “Soporte y
descargas”. Para instalar el archivo .swu descargado, necesitará un cable
USB-C a USB-A (no incluido) y el controlador Windows de StarSense,
también disponible en la página de producto de StarSense AutoAlign V2
(#94304).
Siga estos pasos para actualizar el firmware de SSAA:
1. Instale el controlador Windows de StarSense en su PC.
2. Conecte el SSAA a su PC con el cable USB. Espere aproximadamente
10 segundos para que SSAA arranque.
3. Abra un navegador en su ordenador e introduzca
http://169.254.54.1/ para mostrar la página de interfaz web de
SSAA
(Fig. 25).
Fig. 25: Puede actualizar el firmware de SSAA mediante la interfaz web. También
podrá acceder a la vista en directo desde aquí.
4. Seleccione “Actualización de software”.
5. Arrastre y suelte el archivo .swu descargado como se indique. Se
actualizará el software de SSAA.
También puede acceder a la vista en directo de StarSense AutoAlign
mediante la interfaz web. Desde aquí puede cambiar entre configuración
de cámara automática y manual y capturar una imagen en formato TIFF.

14 | ESPAÑOL
StarSense AutoAlign V2
10. Actualizar el firmware de SSAA
mediante el gestor de firmware
Celestron (CFM)
También puede usar el gestor de firmware Celestron (CFM) para
actualizar StarSense AutoAlign, su mando manual NexStar+, y su
soporte simultáneamente.
Antes de empezar, descargue el gestor de firmware Celestron (CFM)
y el controlador Windows de StarSense. Ambos están disponibles en
celestron.com en la página de producto de StarSense AutoAlign V2
(#94304) en “Software y descargas”.
Para actualizar usando CFM, necesitará dos cables proporcionados por
el usuario:
- Un cable USB tipo A a Mini-B para conectar el mando manual
NexStar+ a su PC.
- Un cable USB tipo A a USB tipo C para conectar StarSense AutoAlign
a su PC.
Para instalar el firmware:
1. Instale CFM y el controlador Windows de StarSense en su PC.
2. Configure su soporte como lo haría normalmente, con el mando
manual NexStar+ y SSAA conectado a los puertos AUX del soporte.
3. Encienda el soporte.
4. Conecte el puerto USB en la parte inferior del mando manual a su PC
con el cable USB tipo A a USB Mini-B (proporcionado por el usuario).
5. Ejecute CFM y pulse “Buscar dispositivos”. CFM debería encontrar el
mando manual, soporte y StarSense AutoAlign.
6. Pulse el botón Actualizar en CFM. CFM instalará cualquier
actualización de firmware disponible para el mando manual y el
soporte.
7. Si hay disponible una actualización de firmware para StarSense
AutoAlign, CFM le solicitará conectarlo directamente a su PC usando
un cable USB tipo A a USB tipo C (proporcionado por el usuario).
Mantenga conectado StarSense al soporte con su cable AUX.
Simultáneamente, conecte su puerto USB-C a su PC. Cuando se
establezca la conexión USB, pulse “OK” en CFM para iniciar la
actualización del firmware.
NOTA: StarSense AutoAlign debe actualizarse mediante una conexión
USB directa. El archivo de firmware es demasiado grande para
transferirse mediante la conexión AUX del soporte.
8. Cuando CFM muestre una marca verde (Fig. 26), la actualización de
StarSense AutoAlign se ha completado.
Fig .26: Cuando termine la actualización de SSAA, verá una marca verde.
11. Especificaciones
LENTE
DISEÑO Doblete
APERTURA 20 mm
LONGITUD FOCAL 40 mm
DISTANCIA FOCAL EFECTIVA f/2
NÚMERO DE ELEMENTOS 2
RECUBRIMIENTOS Recubrimiento múltiple completo
SENSOR DE IMAGEN CMOS
SENSOR DE IMAGEN CMOS Sony IMX462LLR-C, monocromo,
retroiluminado
TAMAÑO DE SENSOR 6,46mm diagonal
TAMAÑO DE PÍXEL 2,9μm x 2,9μm
NÚMERO DE PÍXELES EFECTIVOS 2,13 M
ORDENADOR A BORDO
NÚCLEO PRIMARY ARM
®
2x Cortex
®
-A53 hasta 1,4 GHz
NÚCLEO SECONDARY ARM
®
1x Cortex
®
-M7 hasta 600 MHz
RAM 512 MB
ROM 4 GB
GPU GC7000UltraLite
TEMPERATURA OPERATIVA -5°C a 40°C
PUERTOS
AUX: Para conexión a soportes Celestron
USB-C Para conexión a PC para enfocar, ver vista
en directo, y actualizar firmware
CARCASA
CARCASA Aluminio con cubiertas de plástico

15 | ESPAÑOL
StarSense AutoAlign V2
celestron.com/pages/warranty
NOTA FCC: Este equipo ha sido probado y cumple con los límites de un dispositivo digital de
Clase B, según el apartado 15 de las normas FCC. Estos límites están diseñados para propor-
cionar una protección razonable contra interferencias dañinas en una instalación doméstica.
Este equipo genera, usa y puede radiar energía de radiofrecuencia, y podría causar interferen-
cias perjudiciales a comunicaciones de radio si no se instala y usa según las instrucciones.
Sin embargo, no existe ninguna garantía de que no se produzcan interferencias en una insta-
lación concreta. Si este equipo causa interferencias perjudiciales para la recepción de radio
o televisión, lo que puede determinarse apagando y encendiendo el equipo, se recomienda al
usuario intentar corregir las interferencias con una o más de las medidas siguientes:
• Reorientar o recolocar la antena receptora.
• Aumentar la separación entre el equipo y el receptor.
• Conectar el equipo a una toma de corriente o circuito distinto de aquél al que esté conec-
tado el receptor.
• Consultar al vendedor o a un técnico experimentado de radio/TV para obtener ayuda.
El diseño y las especificaciones del producto están sujetos a cambios sin notificación previa.
Este producto ha sido diseñado y está pensado para ser usado por personas de 14 años o
más de edad.
©2026 Celestron. Celestron y su símbolo son marcas comerciales de Celestron, LLC.
Todos los derechos reservados. • Celestron.com
EE.UU.: 2835 Columbia Street, Torrance, CA 90503 EE.UU.
GB: Unit 2 Transigo, Gables Way, Thatcham RG19 4JZ, Reino Unido
Este producto ha sido diseñado y está pensado para ser usado por personas de 14
años o más de edad.
Fabricado en China
05-26
12. Solución de problemas y
recomendaciones
1. Si recibe continuamente el mensaje de error “¡No hay estrellas!”
durante la solución de placa cuando el firmamento está despejado,
intente reenfocar el SSAA.
2. Si la Luna está alta y brillante, StarSense AutoAlign puede tener
dificultades en solulcionar la placa a unos pocos grados de ella
por el resplandor. En este caso, puede ver un mensaje de error
“¡No hay estrellas!”. Si hay una leve neblina en el firmamento,
puede fallar la solución de placa incluso a mayores distancias de
la Luna.
3. Para el mejor rendimiento global, recomendamos nivelar su trípode.
SSAA seguirá funcionando con un trípode que no esté nivelado,
pero su precisión de apuntado se reducirá en cierto grado.
4. Para la funcionalidad Ir a preciso más precisa, alinee polarmente
su soporte. Ir a preciso seguirá funcionando bien si su soporte
no está alineado polarmente, pero la precisión global se reducirá
ligeramente - normalmente en verios arcominutos.
5. Si lo desea puede conectar SSAA directamente a su PC mediante
el puerto USB-C para controlarlo con CPWI. Antes de conectar,
descargue e instale el controlador Windows de StarSense (disponible
en la página de producto de SSAA V2 en celestron.com). Conecte
SSAA a su PC. Pasados aproximadamente 10 segundos SSAA
arrancará, y su ordenador reconocerá StarSense AutoAlign.
- Deje conectado SSAA a su soporte con el cable AUX
incluido, incluso cuando esté conectado a su PC por USB-C.
Use el puerto AUX en su soporte, no el puerto de autoguía. (El
puerto de autoguía ST-4 no es compatible con SSAA).
- Asegúrese de usar un cable USB de alta calidad. Si tiene
problemas conectando a SSAA mediante USB, pruebe
otro cable USB u otro puerto USB en su ordenador. No
recomendamos usar cables extensores USB, dado que
pueden contribuir a la pérdida de señal.
6. Si retira StarSense AutoAlign de su soprote base y lo vuelve a instalar
más tarde, normalmente no tendrá que volver a realizar la calibraciòn del
centro. Sin embargo, si los objetos ya no se ubican cerca del centro del
campo visual, repita el procedimiento de calibración del centro.