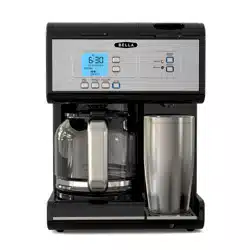
BREW
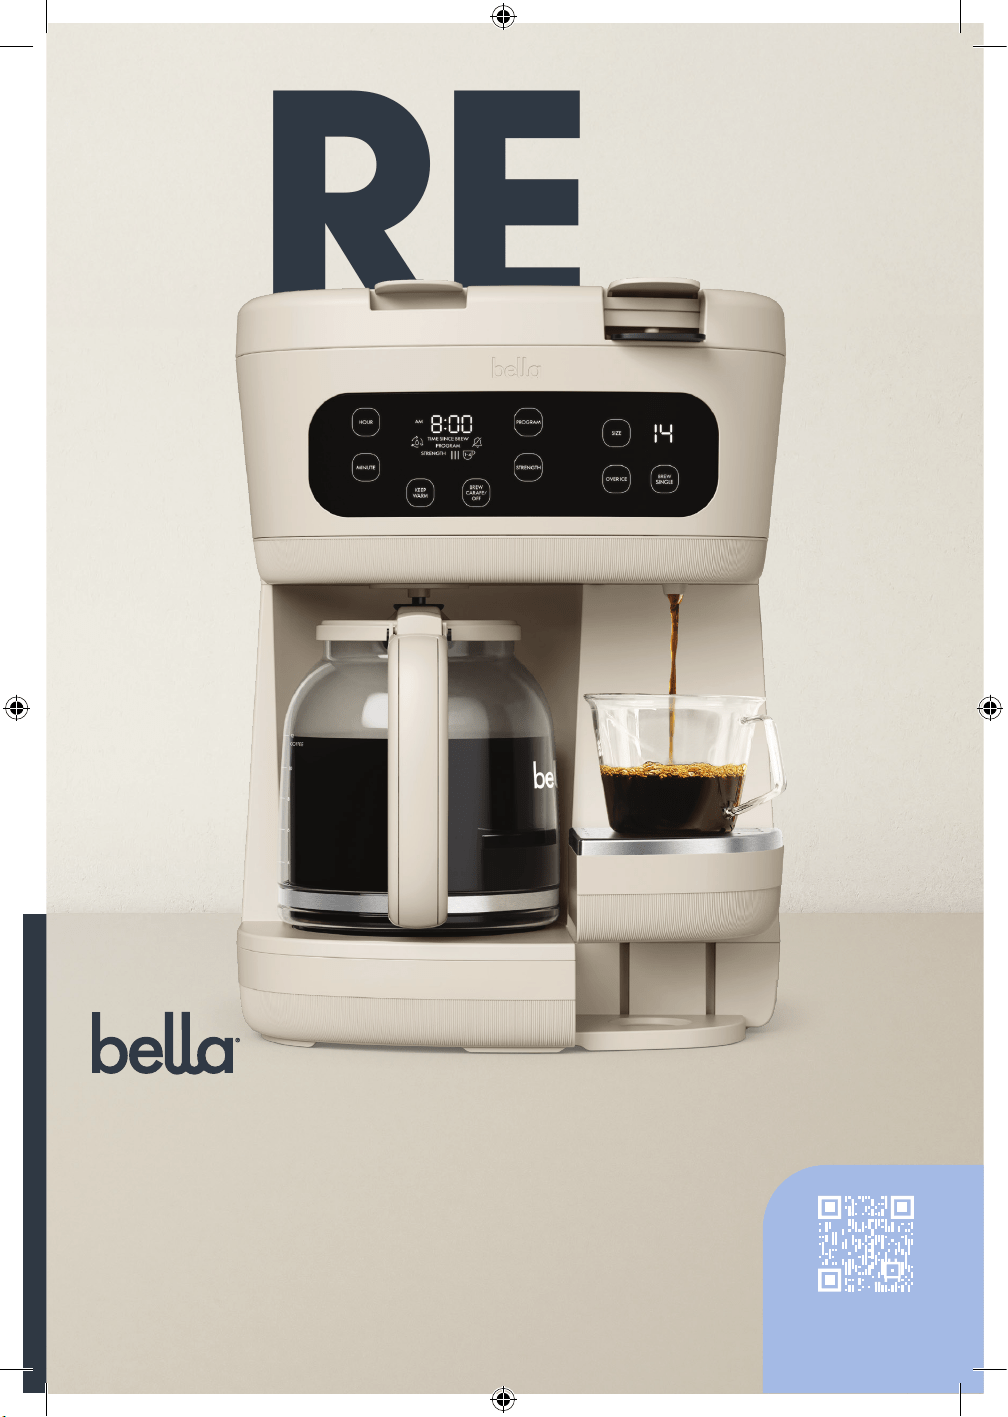
12-Cup & Single Serve
Coffee Maker
Instruction Manual
Cafetera de 12 tazas y
porción individual
Manual de instrucciones
Scan to register
bellakitchenware.com
bellaD_SAMsClub_12cup-SingleServe_CoffeeMaker_IM_V5_R3.indd 1bellaD_SAMsClub_12cup-SingleServe_CoffeeMaker_IM_V5_R3.indd 1 2025-12-12 11:13 AM2025-12-12 11:13 AM

TABLE OF CONTENTS
IMPORTANT SAFEGUARDS ................................................................................................................................................ 1-2
ADDITIONAL IMPORTANT SAFEGUARDS ........................................................................................................................3
NOTES ON THE PLUG ..............................................................................................................................................................4
NOTES ON THE CORD.............................................................................................................................................................4
ELECTRIC POWER ......................................................................................................................................................................4
COFFEE YIELD .............................................................................................................................................................................5
REUSABLE FILTER BASKET .......................................................................................................................................................5
GETTING TO KNOW YOUR MULTIBREW COFFEE MAKER ....................................................................................... 6
TOUCH-ACTIVATED DISPLAY CONTROL PANEL ....................................................................................................... 7-8
BEFORE BREWING DRIP COFFEE FOR THE FIRST TIME ............................................................................................... 9
DRIP COFFEE BREWING OPERATION ............................................................................................................................... 9
PAUSE & SERVE .......................................................................................................................................................................... 9
BREW LATER ..........................................................................................................................................................................9-10
HINTS FOR GREAT TASTING COFFEE ..............................................................................................................................10
BEFORE BREWING SINGLE SERVE FOR THE FIRST TIME ...........................................................................................10
SINGLE SERVE BREWING OPERATION ......................................................................................................................10-11
SINGLE SERVE HOT WATER .................................................................................................................................................. 11
USER MAINTENANCE INSTRUCTIONS ..........................................................................................................................12
CARE & CLEANING INSTRUCTIONS ................................................................................................................................ 12
CLEAN .........................................................................................................................................................................................12
STORING INSTRUCTIONS ...................................................................................................................................................12
WARRANTY ............................................................................................................................................................................... 13
ÍNDICE
PROTECCIONES IMPORTANTES .................................................................................................................................. 14-16
PROTECCIONES IMPORTANTES ADICIONALES .................................................................................................... 16-17
NOTAS SOBRE EL ENCHUFE ...............................................................................................................................................17
NOTAS SOBRE EL CABLE ......................................................................................................................................................17
ENERGÍA ELÉCTRICA..............................................................................................................................................................17
RENDIMIENTO DEL CAFÉ .................................................................................................................................................... 18
CANASTA DE FILTRO REUTILIZABLE .................................................................................................................................18
CONOZCA SU CAFETERA MULTIBREW ...........................................................................................................................19
PANEL DE CONTROL CON PANTALLA TÁCTIL ......................................................................................................20-22
ANTES DE PREPARAR CAFÉ DE FILTRO POR PRIMERA VEZ ..................................................................................... 22
OPERACIÓN DE PREPARACIÓN DE CAFÉ DE FILTRO................................................................................................22
PAUSAR Y SERVIR ................................................................................................................................................................... 22
PREPARAR MÁS TARDE .........................................................................................................................................................22
CONSEJOS PARA UN CAFÉ DE EXCELENTE SABOR ...........................................................................................22-23
ANTES DE PREPARAR UNA ÚNICA PORCIÓN POR PRIMERA VEZ ......................................................................23
CÓMO PREPARAR UNA SOLA TAZA ........................................................................................................................ 23-24
AGUA CALIENTE PARA UNA SOLA TAZA .............................................................................................................. 24-25
INSTRUCCIONES DE MANTENIMIENTO DEL USUARIO .........................................................................................25
INSTRUCCIONES DE CUIDADO Y LIMPIEZA ................................................................................................................25
LIMPIAR ............................................................................................................................................................................... 25-26
INSTRUCCIONES DE ALMACENAMIENTO ..................................................................................................................26
GARANTÍA ...............................................................................................................................................................................27
bellaD_SAMsClub_12cup-SingleServe_CoffeeMaker_IM_V5_R3.indd 2bellaD_SAMsClub_12cup-SingleServe_CoffeeMaker_IM_V5_R3.indd 2 2025-12-12 11:13 AM2025-12-12 11:13 AM

1
IMPORTANT SAFEGUARDS
When using electrical appliances, basic safety precautions shouldalways
be followed, including the following:
1. READ ALL INSTRUCTIONS.
2. Do not touch hot surface. Use handles or knobs only.
3. This Coffee Maker is not intended for use by persons (including children) with
reduced physical, sensory or mental capabilities, or lack of experience
and knowledge, unless they have been given supervision or instruction
concerning use of the appliance by a person responsible for their safety.
4. Close supervision is necessary when any appliance is used by or near children.
5. In order to minimize the risk of property damage, never place the Coffee
Maker under cabinets. Make sure the area several feet above the Coffee
Maker is clear from all furniture or cabinetry.
6. Do not open any lid while coffee is brewing. Scalding may occur if any of the
lids are lifted during any coffee brewing cycle.
7. Do not use outdoors.
8. Unplug Coffee Maker from the electrical outlet and allow to cool before
cleaning, putting on or taking off parts.
CAUTION: There are 2 sharp needles that puncture the capsules. One is
located inside the capsule adapter.
and the other is located on the top underside of the adapter compartment. To
avoid risk of injury do not place fingers inside either parts. Exercise caution
when cleaning single serve capsule brewing parts.
9. To protect against fire or electrical shock, do not immerse cord, plugs, or
appliance in water or other liquids.
10. Do not operate any appliance with a damaged cord or plug, or after the
appliance malfunctions, or has been damaged in any manner. Contact
Consumer Service.
NOTE: do not attempt to repair the unit yourself. This will void the warranty.
11. The use of accessory attachments not recommended by the appliance
manufacturer may result in fire, electric shock or injury to persons.
12. Never move the appliance by pulling the cord. Do not let the cord hang over
the edge of a table or counter or touch hot surfaces.
13. Stand the appliance on a table or flat surface.
14. Do not use a cracked glass carafe or a carafe having a loose
orweakenedhandle.
15. Only use the glass carafe with this appliance. Handle with care as the glass
may become hot.
16. Snap lid securely onto glass carafe before serving coffee.
17. Never use your Coffee Maker without water in the water reservoir.
18. Do not place appliance on or near a hot gas or electric burner
orinaheatedoven.
19. The carafe is designed for use with this appliance. It must never be used
onarange top.
bellaD_SAMsClub_12cup-SingleServe_CoffeeMaker_IM_V5_R3.indd 1bellaD_SAMsClub_12cup-SingleServe_CoffeeMaker_IM_V5_R3.indd 1 2025-12-12 11:13 AM2025-12-12 11:13 AM

2
20. Do NOT place carafe into a microwave oven
21. Do NOT set hot glass carafe on a wet or cold surface.
22. Do NOT clean glass carafe with cleaners, steel wool pads, or other
abrasivematerial.
23. Before unplugging, make sure that the Coffee Maker is not in brewing mode.
Press the BREW CARAFE/OFF button to turn the Coffee Maker off. Press the
PROGRAM button if the PROGRAM indicator light is illuminated. Press any
active BREW CARAFE/OFF or BREW SINGLE or OVER ICE button if either
indicator light is illuminated. To disconnect, immediately remove plug from
walloutlet.
24. To interrupt the brewing cycle at any time, press BREW CARAFE/OFF.
Unlessthe Coffee Maker is malfunctioning, do not remove plug from wall
outlet. Unplug the power cord from the electrical outlet when the appliance
isnot in use, left unattended, or when the carafe is empty.
25. Be certain all 3 lids are down, and securely in place before operating.
26. Do not use this appliance for other than its intended use.
27. To reduce the risk of fire, do not place unit over or near any portion
ofaheating or cooking appliance.
28. To reduce the risk of electric shock, do not mount over a sink.
29. To reduce the risk of fire, do not store anything directly on top of the appliance
surface when the appliance is in operation.
30. Only use capsules intended for this appliance.
If the capsule does not fit, do not force the capsule into the appliance.
31. WARNING: To avoid the risk of injury, do not open the brew chamber during
the brewing process.
32. The use of an accessory not evaluated for use with this appliance may
causeinjuries.
33. Do not use and extension cord.
34. Do not place in a cabinet when in use.
35. Cleaning and user maintenance shall not be performed by children
withoutsupervision.
36. WARNING: The water tank lids, and coffee compartments should not be
opened during use.
37. WARNING: Do not spill on the warming plate.
38. WARNING: Do not touch hot surfaces, the warming plate is subject to residual
heat after use.
39. If the supply cord is damaged, it must be replaced by the manufacturer, its
service agent or similarly qualified.
40. It is recommended to use a heat-resistant trivet or cutting board underneath
this appliance to avoid possible heat damage to the countertop.
FOR HOUSEHOLD USE ONLY
SAVE THESE INSTRUCTIONS
bellaD_SAMsClub_12cup-SingleServe_CoffeeMaker_IM_V5_R3.indd 2bellaD_SAMsClub_12cup-SingleServe_CoffeeMaker_IM_V5_R3.indd 2 2025-12-12 11:13 AM2025-12-12 11:13 AM

3
ADDITIONAL IMPORTANT
SAFEGUARDS
WARNING: This Coffee Maker generates heat and escaping steam during use.
Proper precautions must be taken to prevent the risk of burns, fires, or other
injury to persons or damage to property.
1. All users of this Coffee Maker must read and understand this instruction
manual before operating or cleaning this Coffee Maker.
2. The cord to this Coffee Maker should be plugged into a 120V AC electrical
outlet electrical outlet only.
3. Use water only in this Coffee Maker! Do not put any other liquids or food
products in this Coffee Maker. Do not mix or add anything to the water
placed in this Coffee Maker, except as instructed in the CLEAN section of this
instruction manual to descale the Coffee Maker.
4. DO NOT attempt to move a Coffee Maker containing hot liquids. Allow Coffee
Maker to cool completely before moving.
5. Keep Coffee Maker at least 4 inches away from walls or other objects during
operation. Do not place any objects on top of Coffee Maker while it is
operating. Place the Coffee Maker on a surface that is resistant to heat.
6. If this appliance begins to malfunction while brewing drip coffee, press
the BREW CARAFE/OFF button. Then immediately unplug the cord. If this
appliance begins to malfunction while brewing single serve, press the active
BREW SINGLE button; then immediately unplug the cord. Do not use or
attempt to repair the malfunctioning appliance. Call Consumer Service.
7. If this Coffee Maker falls or accidentally becomes immersed in water or any
other liquid, unplug it immediately. Do not reach into the water! Do not use this
Coffee Maker after it has fallen into or has become immersed in water.
CAUTION: Allow 15 minutes for the Coffee Maker to cool sufficiently before
adding water to the water reservoir.
8. Always use fresh, cool water in your Coffee Maker. Warm water or other
liquids, except as listed in cleaning section, may cause damage to the
CoffeeMaker.
9. DO NOT put carafe into a microwave oven.
10. DO NOT leave empty carafe on warming plate when the Coffee Maker is
turned ON, as the carafe may crack or become otherwise damaged. Press
BREW CARAFE/OFF to turn Coffee Maker off.
11. This Coffee Maker is equipped with Pause & Serve. The flow valve is located on
the bottom of the removable filter basket and is activated when the carafe is
removed. This design makes it possible for you to remove the carafe and pour a
cup of coffee before the entire carafe is brewed.
CAUTION: To prevent injury when utilizing the Pause & Serve feature,
replacecarafe within 30 seconds of removing during brewing process.
bellaD_SAMsClub_12cup-SingleServe_CoffeeMaker_IM_V5_R3.indd 3bellaD_SAMsClub_12cup-SingleServe_CoffeeMaker_IM_V5_R3.indd 3 2025-12-12 11:13 AM2025-12-12 11:13 AM

4
NOTES ON THE PLUG
This appliance has a polarized plug (one blade is wider than the other). To reduce
the risk of electric shock, this plug will fit in a polarized outlet only one way. If the
plug does not fit fully into the outlet, reverse the plug. If it still does not fit, contact a
qualified electrician. Do not modify the plug in any way.
NOTES ON THE CORD
A. A short power-supply cord (or detachable power-supply cord) is to be
provided to reduce risks resulting from becoming entangled in or tripping over
a longer cord.
B. Longer detachable power-supply cords or extension cords are available and
may be used if care is exercised in their use.
C. If a long detachable power-supply cord or extension cord is used:
1. The marked electrical rating of the detachable power-supply cord or
extension cord should be at least as great as the electrical rating of
theappliance;
2. If the appliance is of the grounded type,the extension cord should be
agrounding- type 3-wire cord;
3. The longer cord should be arranged so that it will not drape over
thecounter top or table top where it can be pulled on by children
ortripped over.
ELECTRIC POWER
If the electrical circuit is overloaded with other appliances, your appliance may
not operate properly. It should be operated on a separate electrical circuit from
otherappliances.
bellaD_SAMsClub_12cup-SingleServe_CoffeeMaker_IM_V5_R3.indd 4bellaD_SAMsClub_12cup-SingleServe_CoffeeMaker_IM_V5_R3.indd 4 2025-12-12 11:13 AM2025-12-12 11:13 AM

5
COFFEE YIELD
Coffee Maker: 12 (5-oz.) cups
NOTE: A 5-oz. cup is the American industry standard and is used by most Coffee Maker manufacturers. To fill your
favorite over-sized mug, fill Coffee Maker reservoir with enough water for 3 to 4 cups (15 to 20 ounces).
NOTE: The amount of brewed coffee will always be less than the amount of water placed into the water reservoir; as
much as 10% may be absorbed by coffee grounds and filter.
WARNING: TO REDUCE THE RISK OF FIRE OR ELECTRIC SHOCK, DO NOT REMOVE THE BOTTOM COVER. NO
USER-SERVICEABLE PARTS INSIDE. REPAIR SHOULD BE DONE BY AUTHORIZED SERVICE PERSONNELONLY.
REUSABLE FILTER BASKET
1. Eco-friendly, the reusable filter basket eliminates the need for disposable papers filters.
2. The flat-bottomed reusable filter basket sits easily on any flat, clean surface for easy, mess-free filling.
3. After brewing, lift to open the Coffee Maker lid. Unfold the reusable filter basket handle to lift it up and out of
the removable filter basket holder; discard used coffee grounds, rinse and replace.
4. Fold handle down and close the Coffee Maker lid.
bellaD_SAMsClub_12cup-SingleServe_CoffeeMaker_IM_V5_R3.indd 5bellaD_SAMsClub_12cup-SingleServe_CoffeeMaker_IM_V5_R3.indd 5 2025-12-12 11:13 AM2025-12-12 11:13 AM
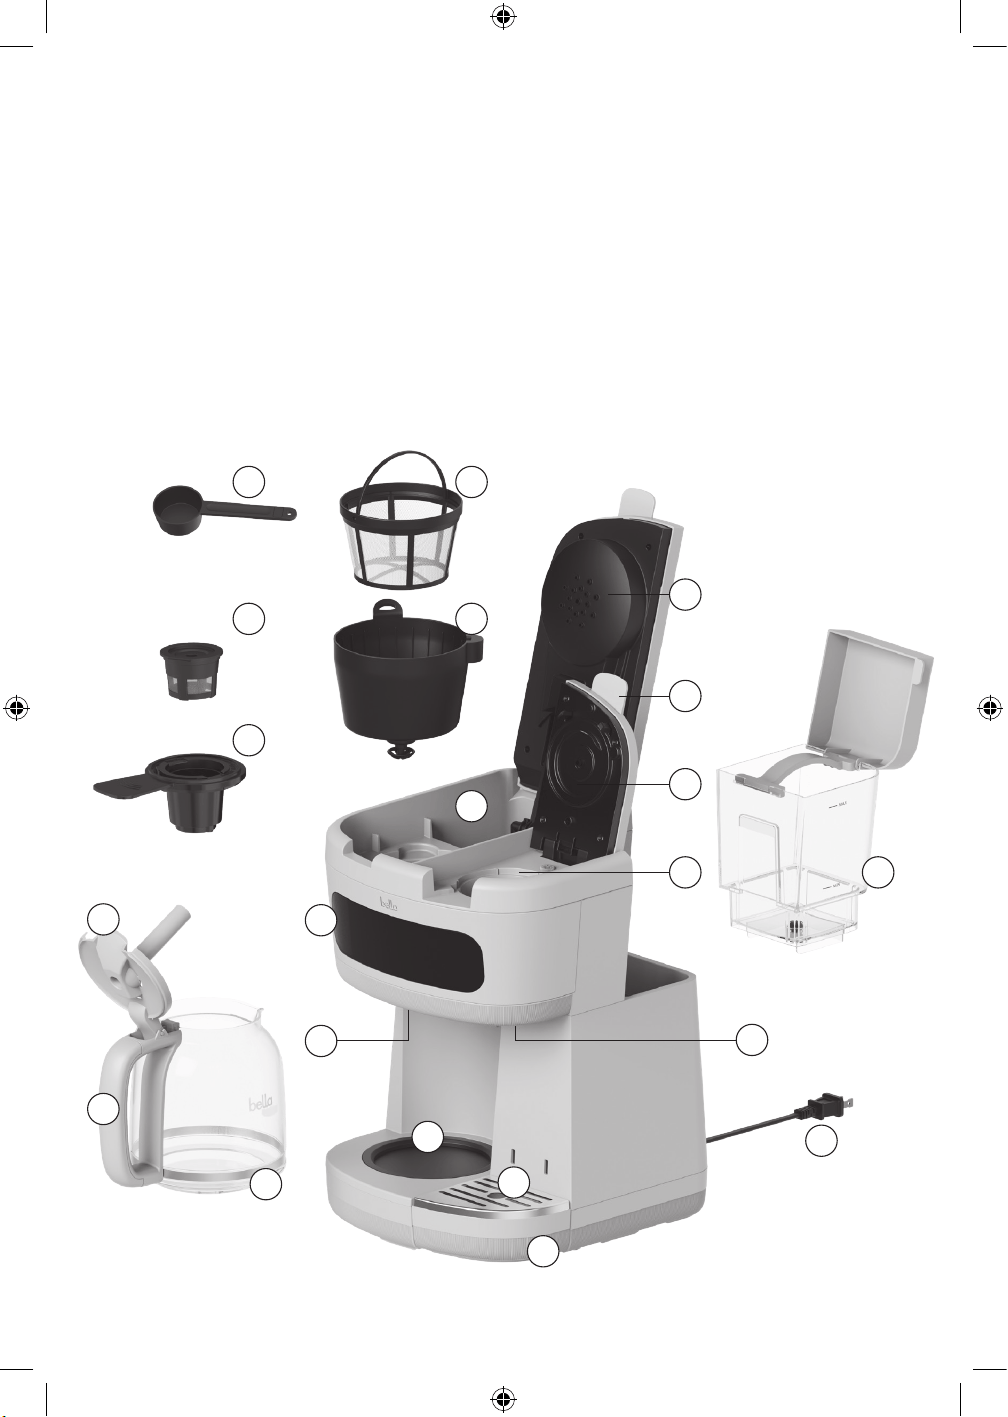
6
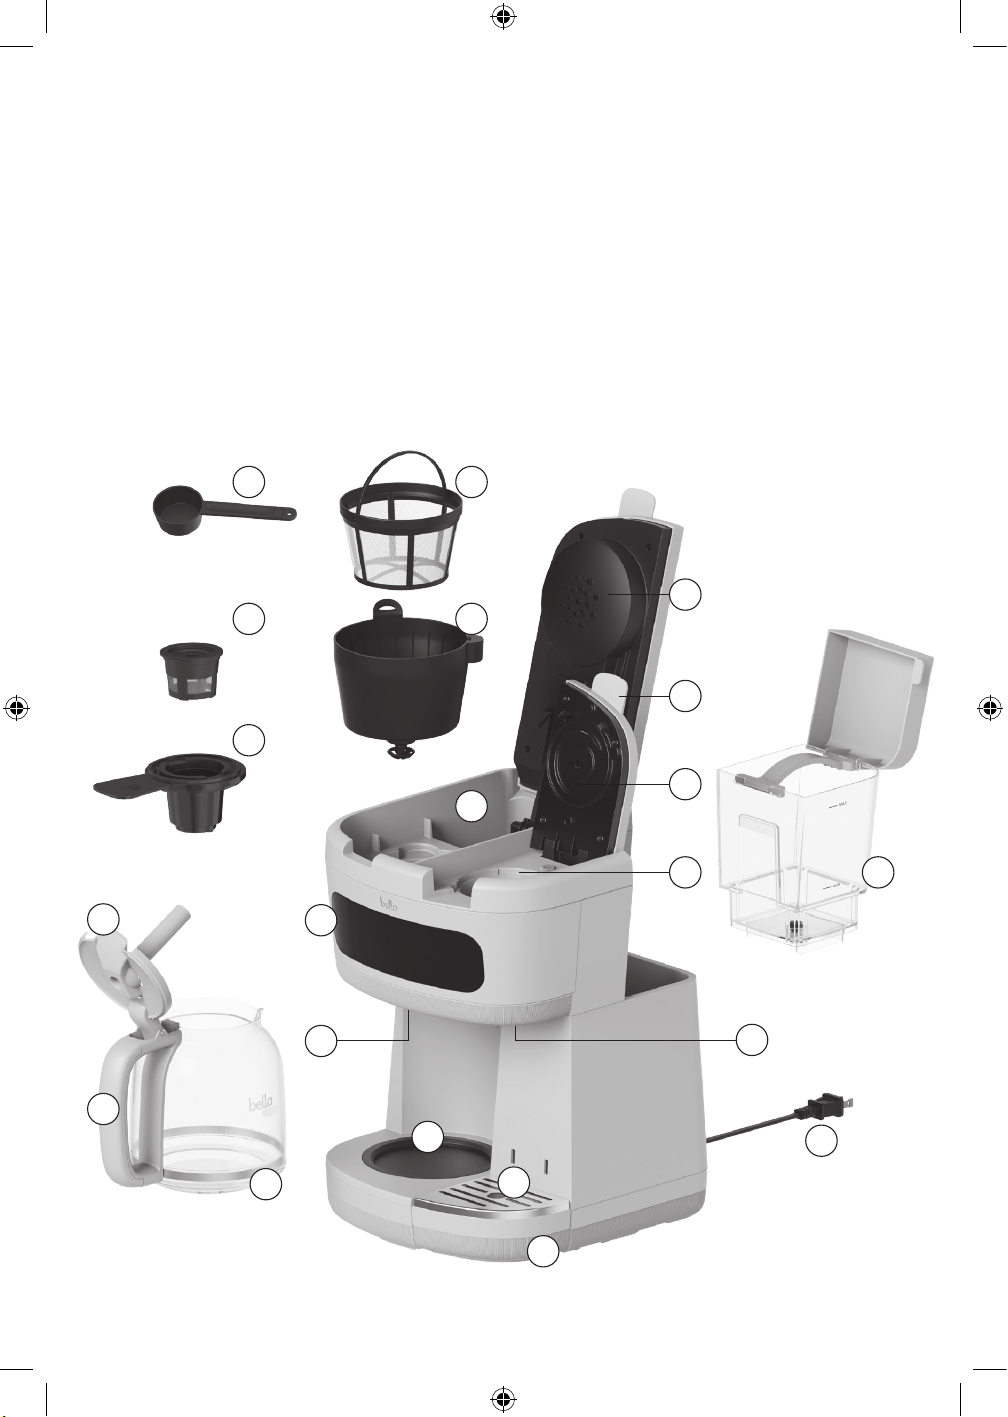
GETTING TO KNOW YOUR MULTIBREW COFFEE MAKER
Product may vary slightly from illustration.
1. Touch-Activated Display Control Panel
2. Carafe Lid
3. Carafe Handle
4. Carafe with Infusion Lid
5. Coffee Scoop
6. Reusable Filter Basket with Handle
7. Removable Filter Basket Holder
8. Warming Plate
9. Shower Head
10. Water Reservoir
11. Pause & Serve Flow Valve
12. Removable Single Serve Water Tank
13. Locking Adapter Compartment Lid
14. Top Capsule Punch
15. Adapter Compartment
16. Single Serve Coffee Spout
17. Single Serve Drip Tray Cover
18. Capsule Adapter
19. Reusable Ground Coffee Basket
20. Adjustable Height Drip Tray
21. 2-prong 120V AC plug
20
21
1215
14
13
9
6
7
10
18
19
5
17
16
8
11
1
4
3
2
bellaD_SAMsClub_12cup-SingleServe_CoffeeMaker_IM_V5_R3.indd 6bellaD_SAMsClub_12cup-SingleServe_CoffeeMaker_IM_V5_R3.indd 6 2025-12-12 11:13 AM2025-12-12 11:13 AM
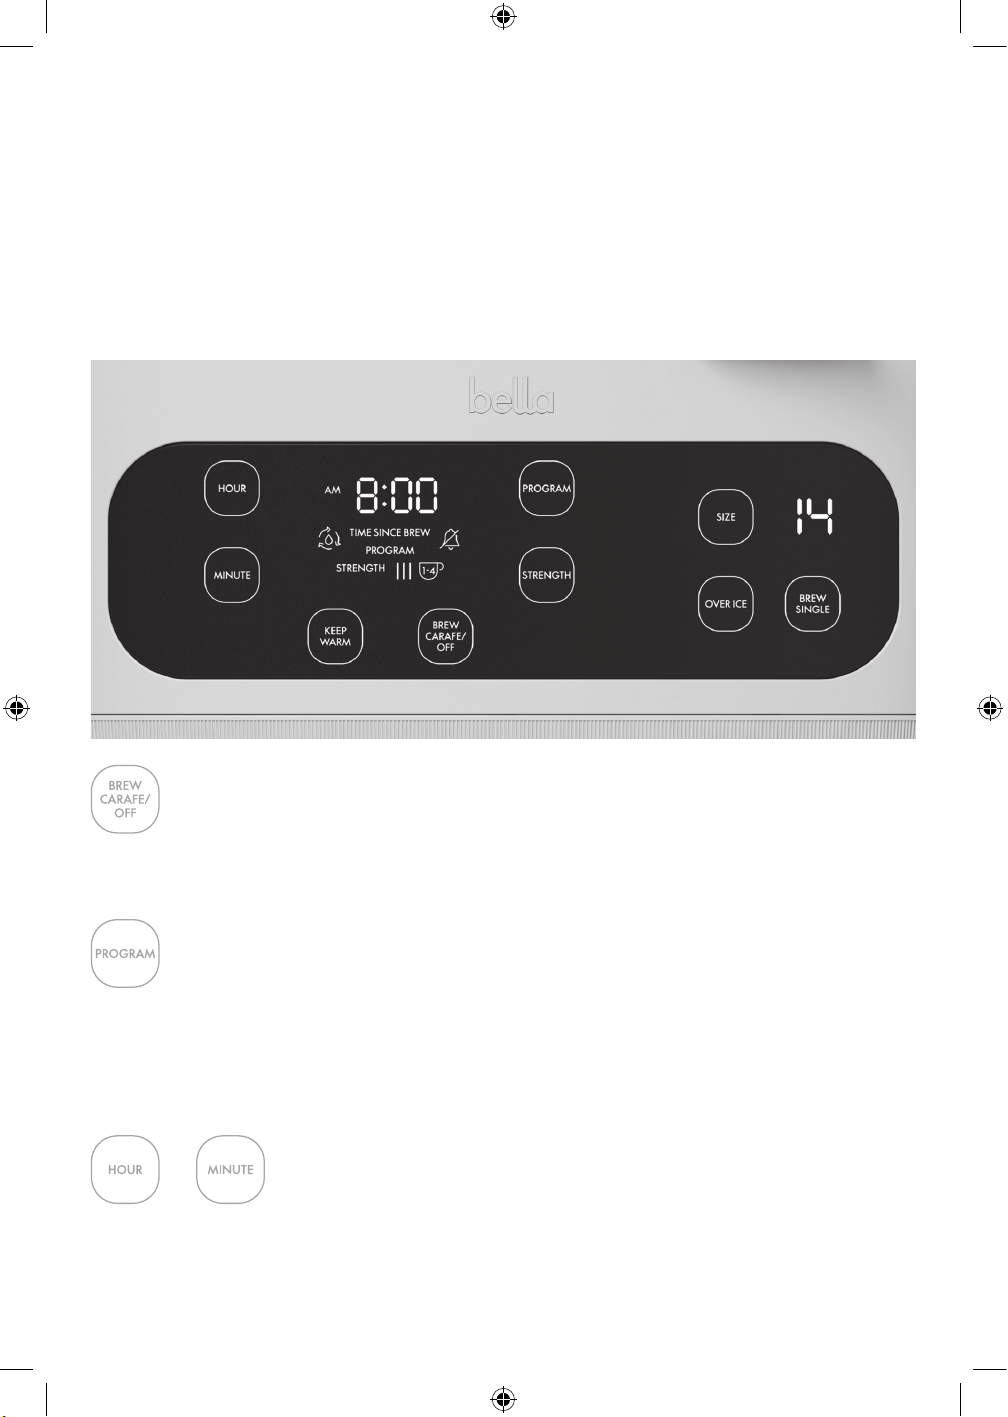
7
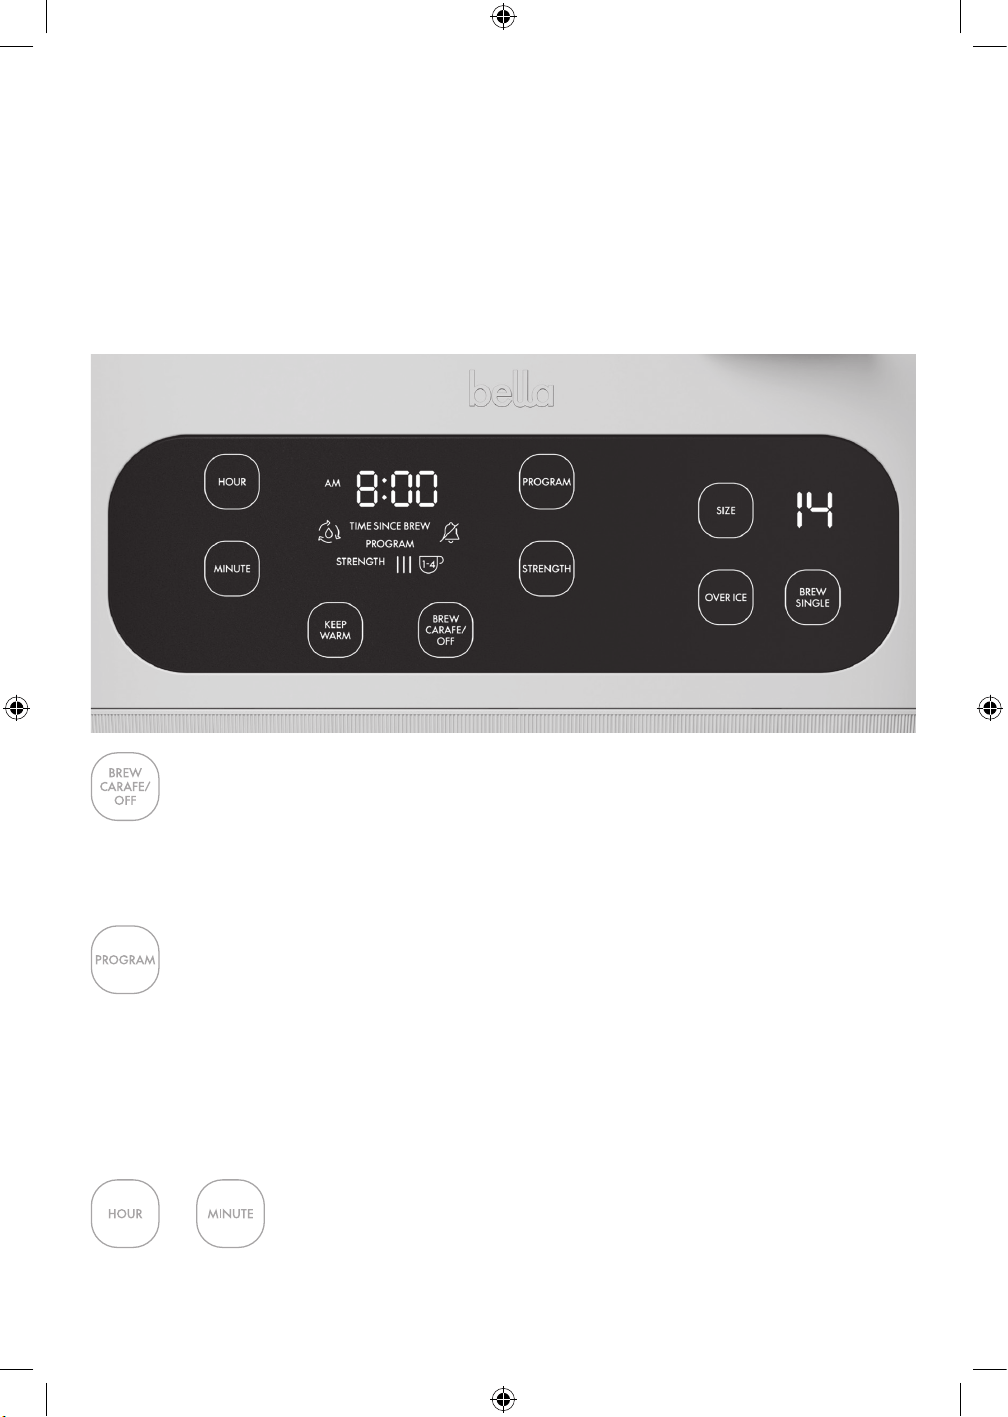
TOUCH-ACTIVATED DISPLAY CONTROL PANEL
A screen that only shows up when you need it.
1. 24-hour LED Digital Clock with AM/PM indicator.
2. SOUND OFF
3. STRENGTH
4. KEEP WARM
5. 1 - 4 CUPS
6. CLOCK
7. CLEAN
8. PROGRAM
9. SELECT
10. Brew Strength – 3 options
11. HOUR and MINUTE
12. BREW CARAFE/OFF
13. Cup size indicator (shows cup size in oz)
14. BREW SINGLE (to brew a cup)
15. OVER ICE – to brew a cup over ice
16. SIZE – to select a cup size in oz
• Press the BREW CARAFE/OFF button to activate the Drip Coffee unit and coffee will begin to brew.
• When the BREW CARAFE/OFF button is pressed while brewing, the unit will stop working and return
tostandbymode.
• Press and hold the PROGRAM button for 1.5 seconds to set FUTURE BREW TIME.
• Use the HOUR and MINUTE buttons to adjust the time until the desired FUTURE BREW TIME has been selected.
• Press the PROGRAM button to confirm the FUTURE BREW TIME has been set or wait 5 seconds to confirm
thetime.
• The PROGRAM button will stay illuminated indicating that the coffee maker is now programmed for
futurebrew.
• Press HOUR to adjust the HOUR.
• Press MINUTE to adjust the MINUTES.
• Press and hold HOUR or MINUTE to fast reverse or fast advance time.
bellaD_SAMsClub_12cup-SingleServe_CoffeeMaker_IM_V5_R3.indd 7bellaD_SAMsClub_12cup-SingleServe_CoffeeMaker_IM_V5_R3.indd 7 2025-12-12 11:13 AM2025-12-12 11:13 AM
8
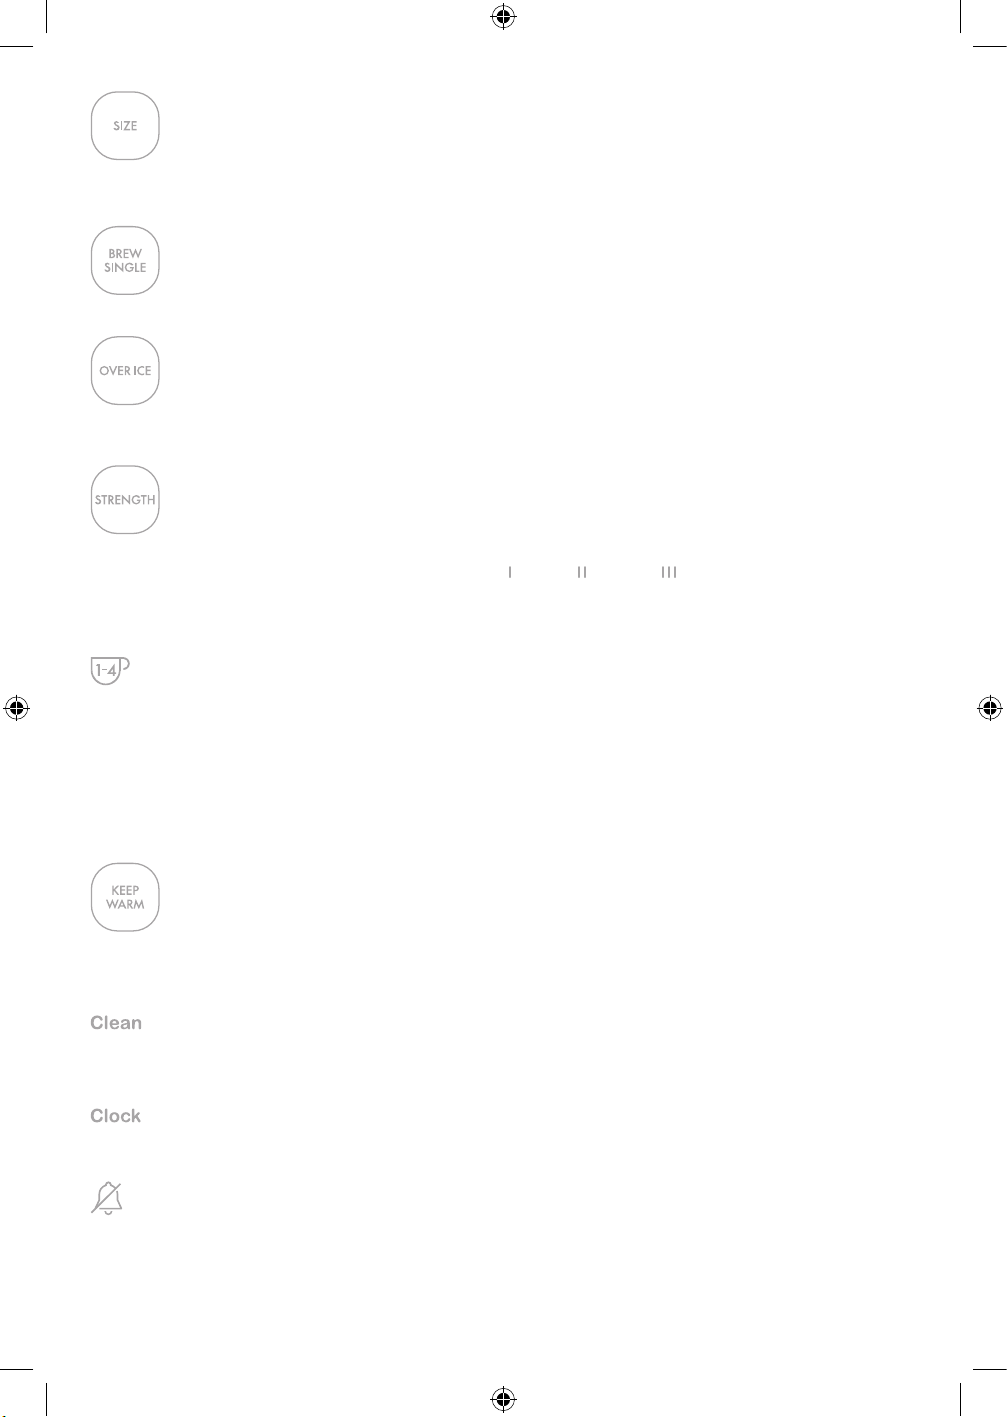
• Press the SIZE button to select the single serve brew size in oz. Press again until you reach the desired size.
Brews a 6oz, 8oz, 10oz, 12oz and 14oz cup. The default size is 8oz.
• Press the BREW SINGLE button to activate the Single Serve unit and coffee will begin to brew.
• Place ice in a cup, mug or travel mug to brew over ice. Press the OVER ICE button to activate the single serve
unit and coffee will begin to brew.
• Press STRENGTH until STRENGTH illuminates.
• Press STRENGTH to choose from 4 brew STRENGTHS:
Regular, Gourmet, Bold or 1-4 cups.
• The active brew strength is displayed on the control panel.
NOTE: For your convenience, the last chosen brew STRENGTH will be the default for the next carafe
ofbrewedcoffee.
IMPORTANT: The 1-4 CUPS option must be programmed immediately before brewing.
• Press STRENGTH until 1-4 CUPS illuminates.
• When brewing 1 to 4 cups of coffee, the 1-4 CUPS option automatically adjusts the brewing process for
maximum flavor.
• Press the BREW CARAFE/OFF button to begin brewing.
NOTE: The Coffee Maker will not measure water quantity. When using the 1 - 4 Cup Mode, the entire water
reservoir will brew. Always ensure to fill the water reservoir with 4 CUPS of water if you plan to use the
1-4CUPS option.
• KEEP WARM time defaults to 2:00 hours but can be adjusted from 00:00 minutes to 4:00 hours.
• Press and hold KEEP WARM until KEEP WARM time flashes.
• Press HOUR or MINUTE to adjust KEEP WARM time.
• If descaling is necessary, press and hold HOUR and MINUTE at the same time until CLEAN illuminates.
• Please follow detailed instructions in the CLEAN section of this instruction manual for optimal results.
• After every 150 brews, CLEAN will automatically flash.
• Press and hold HOUR or MINUTE button until CLOCK flashes.
• Press HOUR or MINUTE to set the time.
• To turn the sound off, press and hold MINUTE and PROGRAM buttons at the same until icon illuminates.
Theicon will display next to the clock on the control panel.
• To turn the sound back on, press and hold MINUTE and PROGRAM buttons at the same time. The icon will
disappear with 1 audible tone.
bellaD_SAMsClub_12cup-SingleServe_CoffeeMaker_IM_V5_R3.indd 8bellaD_SAMsClub_12cup-SingleServe_CoffeeMaker_IM_V5_R3.indd 8 2025-12-12 11:13 AM2025-12-12 11:13 AM
9
BEFORE BREWING DRIP COFFEE FOR THE FIRST TIME
1. Remove all packing material and labels from the inside and outside of the Coffee Maker. Place the unit on a
flat, clean surface.
2. Before preparing coffee, thoroughly clean the glass carafe, carafe lid, removable filter basket, reusable filter
basket and coffee scoop in hot, sudsy water. Rinse and dry. Replace disassembled parts.
NOTE: The carafe, carafe lid, removable filter basket holder and reusable filter basket are all top-rack
dishwasher safe. The coffee scoop should be placed in the dishwasher alongside the cutlery.
3. Clean the inside of the Coffee Maker by brewing 2 full carafes of tap water (see Brewing Coffee Instructions).
Do not add the reusable filter basket or ground coffee for this initial cleaning
DRIP COFFEE BREWING OPERATION
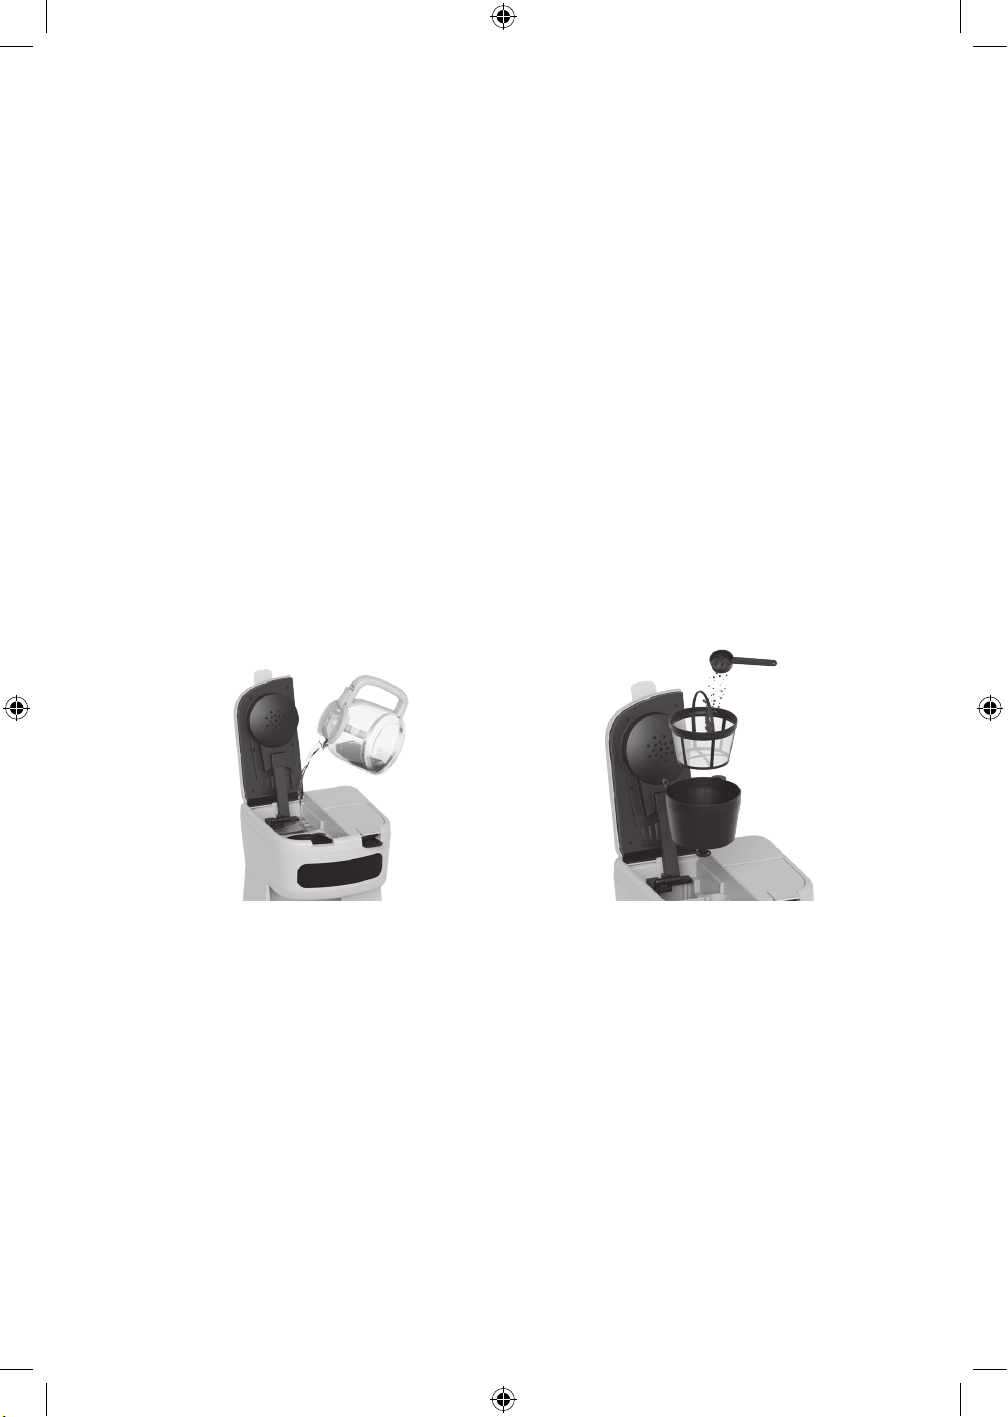
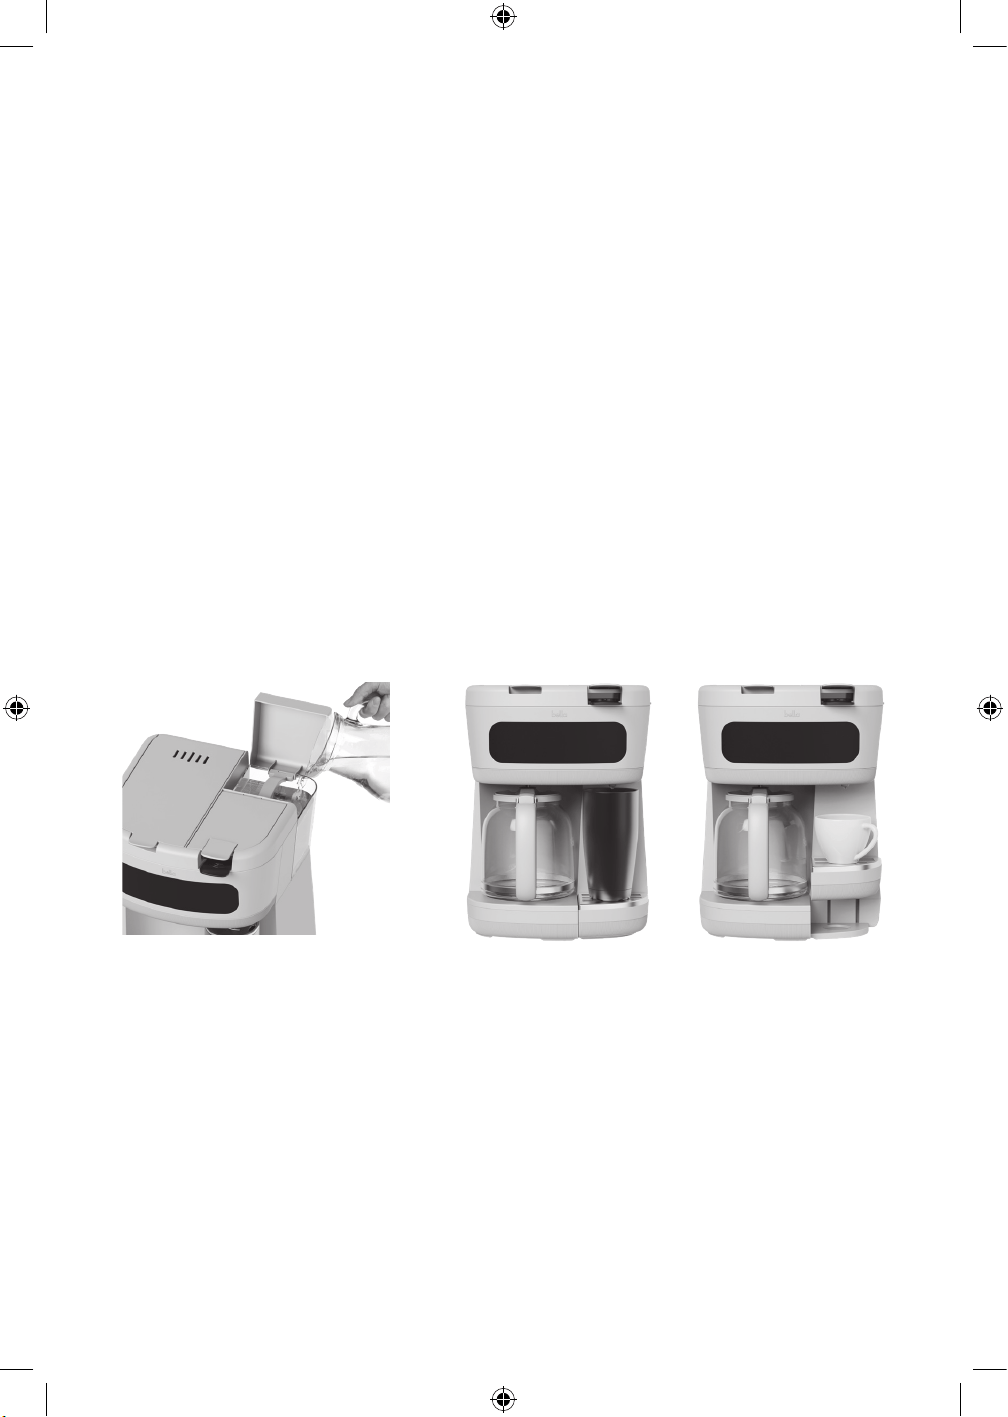
1. Fill carafe with cold tap or distilled water and carefully pour into water reservoir (figure 1).
CAUTION: Never operate the Coffee Maker when the water reservoir is empty.
IMPORTANT: Before brewing, always make sure water level is past the 4 cup step and add water if needed.
CAUTION: Never add water to exceed the 12-cup step.
2. Drop the removable filter basket into the housing and place the coffee-filled reusable filter basket into the
removable filter (figure 2).
3. Close the lid & press BREW CARAFE/OFF button. By default, Regular brew will illuminate. To adjust the brew
strength, see (page 8).
4. Press the BREW CARAFE/OFF button to start brewing.
5. When brewing is complete, 3 audible tones will sound. The Coffee Maker will display 0:00, as it advances to
KEEP WARM. The time will begin to count up to 2:00 hours.
IMPORTANT! Press BREW CARAFE/OFF button at any time to turn the Coffee Maker off.
6. At the end of KEEP WARM, 2 audible tones will sound as the Coffee Maker turns itself off within 5 minutes if no
further operation.
CAUTION: Always make sure the lid is aligned with the spout before pouring hot coffee.
PAUSE & SERVE
Pause & Serve allows you to pour a cup of coffee before the entire carafe is brewed. Return the carafe to the warming
plate; dripping will resume.
CAUTION: Replace carafe under the filter basket within 30 seconds to prevent overflow.
BREW LATER
1. The Coffee Maker can be programmed to begin brewing up to 24 hours in the future.
WARNING: Make sure the Coffee Maker is set up to brew coffee. Fill the water reservoir, add fresh
ground coffee to the reusable filter basket, close the lid. Place the empty carafe with lid in the center of the
warmingplate.
2. Press and hold the PROGRAM button for 1.5 seconds. The last programmed FUTURE BREW TIME will begin
toflash.
3. Press HOUR to adjust the HOUR.
4. Press MINUTE to adjust the MINUTES.
NOTE: Pay attention to AM and PM setting. Press the PROGRAM button or wait 5 seconds to confirm the time.
Only the PROGRAM, BREW SINGLE, OVER ICE, SIZE and STRENGTH buttons will illuminate.
5. When the pre-programmed time is reached, brewing will begin.
Figure 1 Figure 2
bellaD_SAMsClub_12cup-SingleServe_CoffeeMaker_IM_V5_R3.indd 9bellaD_SAMsClub_12cup-SingleServe_CoffeeMaker_IM_V5_R3.indd 9 2025-12-12 11:13 AM2025-12-12 11:13 AM
10
6. At the end of the brew cycle, 3 audible tones will signal completion and the Coffee Maker will advance
toKEEPWARM.
7. To start brew time at the same time the next day, simply press the PROGRAM button, the PROGRAM,
BREWSINGLE, OVER ICE, SIZE and STRENGTH buttons will illuminate.
HINTS FOR GREAT TASTING COFFEE
• A clean Coffee Maker is essential for brewing great tasting coffee. Regular cleaning, as described in the
CLEAN section of this instruction manual, is highly recommended.
• Always use fresh, cold water in your Coffee Maker.
• Finer grinds, such as drip and ADC coffee, promote fuller extraction and provide rich, full-bodied coffee.
• For optimum taste, program your Coffee Maker to brew coffee to your preferred STRENGTH. Choose from
Regular, Gourmet, or Bold.
• For optimum brewed coffee flavor, buy whole beans and grind just before brewing.
• Do not re-use coffee grounds since this will greatly impair coffee flavor.
• Reheating coffee is not recommended. Coffee is at its peak flavor immediately after brewing.
• Small oil droplets on the surface of brewed, black coffee is due to the extraction of oil from the coffee grounds.
Oiliness may occur more frequently if heavily roasted coffees are used. Overextraction may also cause oiliness,
indicating a need to clean your Coffee Maker.
BEFORE BREWING SINGLE SERVE FOR THE FIRST TIME
1. To pre-clean and prime the pump, fill a tall mug/cup with up to 15 oz. cold water and add to the single serve
water tank. See (figure 3).
Center the empty mug/cup on the single serve base, directly under the coffee spout.
2. Press the BREW CARAFE/OFF button, then press BREW SINGLE button, the unit will start brewing.
3. The pump will activate, and water will begin to stream through the spout. Upon completion, all indicators lights
will illuminate.
4. The pump is now primed, and the MultiBrew single cup coffee brewing system is ready for use.
SINGLE SERVE BREWING OPERATION
The capsule brewing system gives you the option to brew any pre-packaged coffee pods or to use your own favorite
coffee blends using the reusable ground coffee basket.
1. Add cold filtered water to the single serve water tank. The water tank has MIN and MAX lines. Do not overfill
the MAX fill line.
WARNING: Before heating, it is recommended the water tank be filled at least to the MIN line. To avoid
damage to your Coffee Maker, never operate when the water tank is empty.
2. Center tall travel mugs/tumblers (up to 15 oz.) on the single serve base, directly under the coffee spout. Center
cup/mug on the drip tray plate, directly under the coffee spout. See (figure 4).
3. Use the front tab to unlock and open the MultiBrew adapter compartment lid.
4. Insert the capsule adapter into the adapter compartment.
IMPORTANT: To avoid loose coffee grounds, you must line up the front tube with the spout in the front of the
housing. Turn the adapter so that it fits flush into the housing.
CAUTION: There are two sharp needles that puncture the capsules. One is located inside the capsule adapter
and the other is located on the top underside of the adapter compartment. To avoid risk of injury, do not place
fingers inside either parts. Also exercise caution when cleaning the parts.
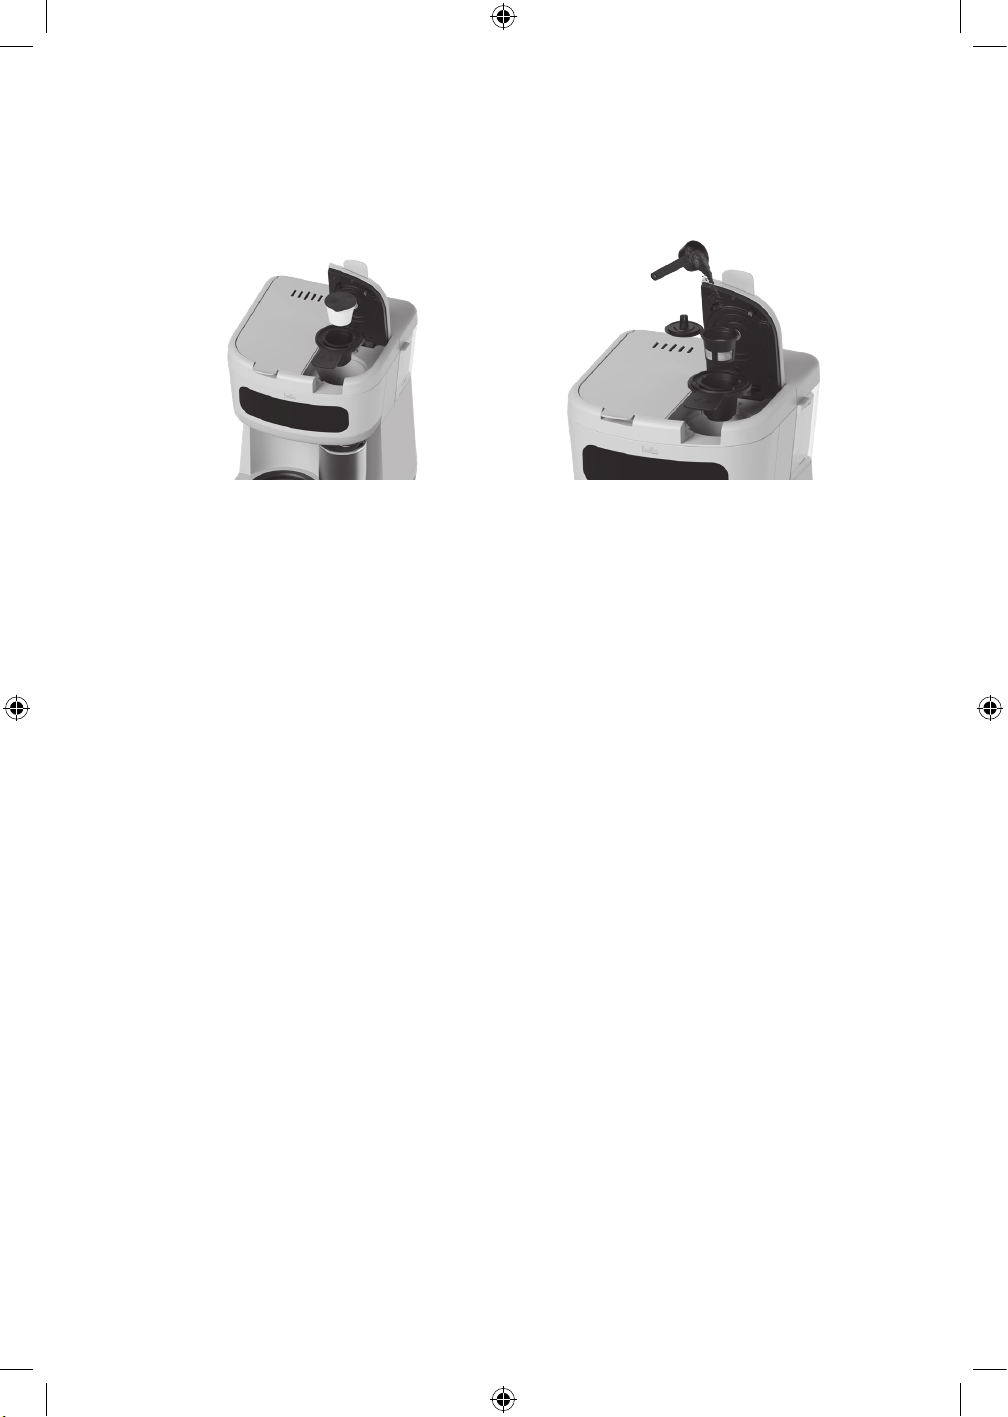
5. Coffee Pod capsules: Add the capsule of your choice into the capsule adapter. See (figure 5).
Figure 3 Figure 4
bellaD_SAMsClub_12cup-SingleServe_CoffeeMaker_IM_V5_R3.indd 10bellaD_SAMsClub_12cup-SingleServe_CoffeeMaker_IM_V5_R3.indd 10 2025-12-12 11:13 AM2025-12-12 11:13 AM
11
NOTE: Both the top and bottom of the capsule will be punctured.
6. Reusable Ground Coffee Basket: Add the filled reusable ground coffee basket to the adapter compartment.
See (figure 6).
NOTE: For best results, when filling the reusable ground coffee basket, please use medium grind.
7. Press the adapter compartment’s lid down firmly. An audible click can be heard as the lid is locked.
8. Press the SIZE button to select the desired cup size in oz, then press the BREW SINGLE button for hot single
serve coffee, or press the OVER ICE button to brew over ice.
NOTE: Upon completion of the single serve brew cycle, the BREW SINGLE or OVER ICE button will be
illuminated, while the other buttons will be off during brewing.
NOTE: To interrupt the brewing cycle at any time, press the active BREW SINGLE or OVER ICE button and all
the buttons will illuminate, the unit will go back to the standby mode.
NOTE: Iced coffee volume is half of the size setting Ex.: 6oz size, will only brew 3 oz of coffee.
NOTE: To brew Iced coffee, ice cubes need to be added to the mug, or cup before brewing.
NOTE: To select the size, press the SIZE button. The display will show the 8oz default setting. To change the
size press the SIZE button again, until the desired size is reached. The other size options are: 10oz, 12oz, 14oz,
and6oz. Press the BREW SINGLE or OVER ICE button to brew coffee. Unit will remember the size last used,
unless it is unplugged.
9. During pod brewing, if the water from the tank runs out the BREW SINGLE, OVER ICE, SIZE button will all flash
to indicate that user needs to add water. If water is added within 3 minutes press any button to continue the
rest of the brew cycle. If over 3 minutes has passed the unit will return to the standby mode. Press the BREW
CARAFE/OFF button to enter the standby mode at anytime the buttons are flashing.
SINGLE SERVE HOT WATER
Use your MultiBrew Coffee Maker to quickly and easily dispense hot water to prepare single cups of bagged teas,
instant soups, quick cooking oats, packaged hot chocolate, hot apple cider or any food that requires boiling water.
WARNING: Before heating, it is recommended the water tank be filled at least to the MIN fill line. DO NOT EXCEED
the MAX fill line. To avoid damage to your Coffee Maker, never operate your MultiBrew Coffee Maker when the water
tank is empty.
IMPORTANT: To prevent tainted or “off” flavors when changing hot beverages, while the unit is OFF (cool), use a damp
paper towel to completely remove any residue from the adapter compartment.
1. Follow step 1 & 2 from Single Serve Brewing Operation (page 10).
2. Insert the capsule adapter (without coffee or capsule) into the adapter compartment and follow step 7 & 8 from
Single Serve Brewing Operation (page 11).
3. After water has been heated and dispensed, indicator light will illuminate. Stir ingredients well before serving.
Figure 5 Figure 6
bellaD_SAMsClub_12cup-SingleServe_CoffeeMaker_IM_V5_R3.indd 11bellaD_SAMsClub_12cup-SingleServe_CoffeeMaker_IM_V5_R3.indd 11 2025-12-12 11:13 AM2025-12-12 11:13 AM

12
USER MAINTENANCE INSTRUCTIONS
This appliance requires little maintenance. It contains no user-serviceable parts. Any servicing requiring disassembly
other than cleaning must be performed by a qualified appliance repair technician.
CARE & CLEANING INSTRUCTIONS
1. Always make sure Coffee Maker is unplugged and warming plate is cool before attempting to clean.
2. After every use, remove the reusable filter basket, discard used coffee grounds, and rinse thoroughly.
3. Wash the reusable filter basket and glass carafe in hot, sudsy water. Pull the carafe lid out of the carafe and
scrub with a soaped kitchen brush. The carafe, carafe lid, removable filter basket holder and the reusable
filter basket are all top-rack dishwasher safe. The coffee scoop should be placed in the dishwasher alongside
thecutlery.
WARNING: To avoid breakage, handle carafe with care. Avoid impact. Glass will break as a result of impact.
Use care when filling with water to avoid hitting faucet.
4. Wipe the Coffee Maker exterior with a damp cloth to remove superficial stains. For stubborn stains, use a nylon
or plastic pad with a nonabrasive cleanser. Do not use metal scouring pads or abrasive cleansers.
5. Dry and replace disassembled parts. Make sure the removable filter basket holder drops down and is properly
seated into the housing.
6. Close the lid.
CLEAN
To assure optimal flavor and performance of your MultiBrew Coffee Maker, when used regularly, and under normal
conditions, it is recommended that the CLEAN cycle be run every 150 uses. The CLEAN will automatically flash on the
display to alert you that CLEAN is necessary.
NOTE: The entire cleaning cycle will take 30 to 40 minutes to complete.
NOTE: The MultiBrew Coffee Maker has dual water tanks that must be descaled separately and as needed.
Drip Coffee System
1. Combine 6 cups of white vinegar and 4 cups of cold water in the carafe and pour vinegar solution into the
water reservoir.
2. Place the empty carafe onto the warming plate.
3. Close the lid and press and hold HOUR and MINUTE at the same time until CLEAN illuminates. Press the BREW
CARAFE/OFF button. An audible tone will sound as the CLEAN cycle begins. CLEAN and BREW CARAFE/OFF
buttons will be illuminated on the display. Part of the mixture will pass through the brew cycle in a slow 3 minute
sequence. During the CLEAN cycle, the remaining mixture will be held in the Coffee Maker and then dispensed
periodically for 30 minutes.
IMPORTANT! Press the BREW CARAFE/OFF button at any time to exit CLEAN function or press
BREWCARAFE/OFF button at any time to turn the Coffee Maker off. At the end of CLEAN cycle, 3 audible
tones will sound, CLEAN will disappear from the display and Coffee Maker will turn itself off automatically.
4. Discard water in the carafe. Wash carafe, removable filter basket and reusable filter basket in hot sudsy water.
5. Brew 2 or 3 carafes of fresh water through the Coffee Maker brewing coffee again.
6. Dry parts thoroughly.
7. Replace the removable filter basket in the housing, then drop the clean reusable filter basket into place.
SINGLE SERVE BREWING SYSTEM
1. Fill with 4 oz. white vinegar and 10 oz. cold water and pour vinegar solution into the single serve water tank.
2. Center a 15 oz. cup or container under the single serve coffee spout.
3. Press the BREW SINGLE button. The indicator light will flash as the cleaning solution streams through the
coffeespout.
4. After cleaning, refill the single serve water tank with fresh, cold water. Rinse thoroughly by brewing another
2to 3 (15 oz.) cups of clean, cold water.
5. Allow the MultiBrew Coffee Maker to cool for 15 minutes before next use.
STORING INSTRUCTIONS
1. Never store Coffee Maker while it is still plugged in.
2. Unplug Coffee Maker and allow it to cool.
3. Store Coffee Maker fully assembled, the reusable filter basket and removable filter basket holder in position.
Place the carafe on the warming tray. Close the lid.
4. Store Coffee Maker in its box or in a cool, dry place.
bellaD_SAMsClub_12cup-SingleServe_CoffeeMaker_IM_V5_R3.indd 12bellaD_SAMsClub_12cup-SingleServe_CoffeeMaker_IM_V5_R3.indd 12 2025-12-12 11:13 AM2025-12-12 11:13 AM

13
LIMITED TWO-YEAR WARRANTY
Sensio Inc. dba Made by Gather™ hereby warrants that for a period of TWO YEARS from
the date of delivery, this product will be free from mechanical defects in material and
workmanship, and for 90 days in respect to non-mechanical parts. At its sole discretion,
Sensio Inc. dba Made by Gather™ will either repair or replace the product found to be
defective, or issue a refund on the product during the warranty period.
The warranty is only valid for the original retail purchaser from the date of the initial
delivery and is not transferable. Keep the original sales receipt, as proof of purchase is
required to obtain warranty validation, which commences on the date of delivery. Retail
stores selling this product do not have the right to alter, modify, or in any way revise the
terms and conditions of the warranty.
EXCLUSIONS:
The warranty does not cover normal wear of parts or damage resulting from any of
the following: negligent use of the product, use of improper voltage or current, improper
routine maintenance, use contrary to the operating instructions, disassembly, repair, or
alteration by anyone other than qualified Sensio Inc. dba Made by Gather™ personnel.
Also, the warranty does not cover Acts of God such as fire, floods, hurricanes, or tornadoes.
Sensio Inc. dba Made by Gather™ shall not be liable for any incidental or consequential
damages caused by the breach of any express or implied warranty. Apart from the extent
prohibited by applicable law, any implied warranty of merchantability or fitness for a
particular purpose is limited in time to the duration of the warranty. Some states, provinces
or jurisdictions do not allow the exclusion or limitation of incidental or consequential
damages, or limitations on how long an implied warranty lasts, and therefore, the above
exclusions or limitations may not apply to you. The warranty covers specific legal rights
which may vary by state, province and/or jurisdiction.
HOW TO OBTAIN WARRANTY SERVICE:
You must contact Customer Service at our toll-free number: 1-866-832-4843. A Customer
Service Representative will attempt to resolve warranty issues over thephone. If the
Customer Service Representative is unable to resolve the problem, you will be provided
with a case number and asked to return the product to Sensio Inc. dba Made by Gather™.
Attach a tag to the product that includes: your name, address, daytime contact telephone
number, case number, and description of the problem. Also, include a copy of the original
sales receipt. Carefully package the tagged product with the sales receipt, and send it (with
shipping and insurance prepaid) to Sensio Inc. dba Made by Gather™’s address. Sensio
Inc. dba Made by Gather™ shall bear no responsibility or liability for the returned product
while in transit to Sensio Inc. dba Made by Gather™ Customer Service Center.
bellaD_SAMsClub_12cup-SingleServe_CoffeeMaker_IM_V5_R3.indd 13bellaD_SAMsClub_12cup-SingleServe_CoffeeMaker_IM_V5_R3.indd 13 2025-12-12 11:13 AM2025-12-12 11:13 AM

14
PROTECCIONES IMPORTANTES
Al usar electrodomésticos, siempre deben seguirse las precauciones básicas de
seguridad, incluidas las siguientes:
1. LEA TODAS LAS INSTRUCCIONES.
2. No toque la superficie caliente. Use solo las manijas o perillas.
3. Esta cafetera no está diseñada para ser utilizada por personas (incluidos
niños) con capacidades físicas, sensoriales o mentales reducidas, o falta de
experiencia y conocimiento, a menos que una persona responsable de su
seguridad les haya proporcionado supervisión o instrucciones sobre el uso del
electrodoméstico.
4. Es necesaria una supervisión estrecha cuando un electrodoméstico es utilizado
por niños o cerca de ellos.
5. Para minimizar el riesgo de daños a la propiedad, nunca coloque la cafetera
debajo de gabinetes. Asegúrese de que el área que se encuentra a varios pies
por encima de la cafetera esté libre de todos los muebles o gabinetes.
6. No abra ninguna tapa mientras se esté preparando café. Pueden producirse
quemaduras si se levanta cualquiera de las tapas durante cualquier ciclo de
preparación de café.
7. No lo use al aire libre.
8. Desenchufe la cafetera de la toma eléctrica y deje que se enfríe antes de
limpiar, poner o quitar piezas.
PRECAUCIÓN: Hay 2 agujas afiladas que perforan las cápsulas. Una se
encuentra dentro del adaptador de cápsula y la otra se encuentra en el
reverso de la parte superior del compartimento del adaptador. Para evitar
el riesgo de lesiones, no coloque los dedos dentro de ninguna de las piezas.
Tenga cuidado al limpiar las piezas de preparación de cápsulas de una única
porción.
9. Para protegerse contra incendios o descargas eléctricas, no sumerja el cable,
los enchufes ni el electrodoméstico en agua u otros líquidos.
10. No opere ningún electrodoméstico con un cable o enchufe dañados o después
de que el electrodoméstico funcione mal o se haya dañado de alguna manera.
Comuníquese con el Servicio de Atención al Consumidor.
NOTA: no intente reparar la unidad usted mismo. Esto anulará la garantía.
11. El uso de accesorios no recomendados por el fabricante del electrodoméstico
puede provocar incendios, descargas eléctricas o lesiones a las personas.
12. Nunca mueva el electrodoméstico tirando del cable. No deje que el cable
eléctrico cuelgue sobre el borde de una mesa o encimera ni que toque
superficies calientes.
13. Coloque el electrodoméstico sobre una mesa o superficie plana.
14. No utilice una jarra de vidrio agrietada o una jarra con un mango suelto o
debilitado.
15. Utilice únicamente la jarra de vidrio con este electrodoméstico. Manipule con
cuidado, ya que el vidrio puede calentarse.
16. Coloque la tapa firmemente en la jarra de vidrio antes de servir el café.
17. Nunca utilice su cafetera sin agua en el depósito de agua.
bellaD_SAMsClub_12cup-SingleServe_CoffeeMaker_IM_V5_R3.indd 14bellaD_SAMsClub_12cup-SingleServe_CoffeeMaker_IM_V5_R3.indd 14 2025-12-12 11:13 AM2025-12-12 11:13 AM

15
18. No coloque el electrodoméstico sobre un quemador de gas o eléctrico caliente
ni cerca de este, ni dentro de un horno calentado.
19. La jarra está diseñada para su uso con este electrodoméstico. Nunca debe
usarse en una hornalla.
20. NO coloque la jarra en un horno microondas.
21. NO coloque la jarra de vidrio caliente sobre una superficie húmeda o fría.
22. NO limpie la jarra de vidrio con limpiadores, almohadillas de lana de acero u
otro material abrasivo.
23. Antes de desenchufarla, asegúrese de que la cafetera no esté en modo de
preparación. Presione el botón BREW CARAFE/OFF (apagar la jarra de
filtrado) para apagar la cafetera. Presione el botón PROGRAM, si el indicador
luminoso PROGRAM está iluminado. Presione cualquier botón activo BREW
CARAFE/OFF o BREW SINGLE (preparación única) o OVER ICE (sobre hielo)
si cualquiera de los indicadores luminosos está encendido. Para desconectar el
electrodoméstico, retire de inmediato el enchufe del tomacorriente.
24. Para interrumpir el ciclo de preparación en cualquier momento, presione
BREW CARAFE/OFF. A menos que la cafetera no funcione correctamente,
no retire el enchufe del tomacorriente de pared. Desenchufe el cable de
alimentación de la toma eléctrica cuando el electrodoméstico no esté en uso,
quede desatendido o cuando la jarra esté vacía.
25. Asegúrese de que las 3 tapas estén bajas y bien colocadas en su lugar antes
de poner el electrodoméstico en funcionamiento.
26. No utilice este electrodoméstico para otro uso que no sea el previsto.
27. Para reducir el riesgo de incendio, no coloque la unidad sobre ni cerca de
ninguna parte de un electrodoméstico de calefacción o cocción.
28. Para reducir el riesgo de descarga eléctrica, no lo monte sobre un fregadero.
29. Para reducir el riesgo de incendio, no guarde nada directamente sobre la
superficie del electrodoméstico cuando esté en funcionamiento.
30. Utilice únicamente cápsulas diseñadas para este electrodoméstico. Si la
cápsula no encaja, no la fuerce en el electrodoméstico.
31. ADVERTENCIA: Para evitar el riesgo de lesiones, no abra la cámara de
preparación durante el proceso de elaboración correspondiente.
32. El uso de un accesorio no evaluado para su uso con este electrodoméstico
puede causar lesiones.
33. No utilice un cable de extensión.
34. No la coloque en un armario cuando esté en uso.
35. La limpieza y el mantenimiento del usuario no deben ser realizados por niños
sin supervisión.
36. ADVERTENCIA: Las tapas del depósito de agua y los compartimentos de café
no deben abrirse durante el uso.
37. ADVERTENCIA: No derrame sobre la placa de calentamiento.
38. ADVERTENCIA: No toque superficies calientes, la placa de calentamiento está
sujeta a calor residual después del uso.
39. Si el cable de alimentación está dañado, debe ser reemplazado por el
fabricante, su agente de servicio o un técnico con calificaciones similares.
bellaD_SAMsClub_12cup-SingleServe_CoffeeMaker_IM_V5_R3.indd 15bellaD_SAMsClub_12cup-SingleServe_CoffeeMaker_IM_V5_R3.indd 15 2025-12-12 11:13 AM2025-12-12 11:13 AM

16
40. Se recomienda usar un posafuentes resistente al calor o una tabla de cortar
debajo de este electrodoméstico para evitar posibles daños por calor en la
encimera.
SOLO PARA USO DOMÉSTICO
GUARDE ESTAS INSTRUCCIONES
PROTECCIONES IMPORTANTES
ADICIONALES
ADVERTENCIA: Esta cafetera genera calor y deja escapar vapor durante el
uso. Se deben tomar las precauciones adecuadas para evitar el riesgo de
quemaduras, incendios u otras lesiones a las personas o daños a la propiedad.
1. Todos los usuarios de esta cafetera deben leer y comprender este manual de
instrucciones antes de operar o limpiar esta cafetera.
2. El cable de esta cafetera debe enchufarse únicamente a un tomacorriente
eléctrico de 120 V CA.
3. ¡Utilice agua solo en esta cafetera! No ponga ningún otro líquido ni producto
alimenticio en esta cafetera. No mezcle ni añada nada al agua colocada en
esta cafetera, excepto como se indica en la sección LIMPIEZA de este manual
de instrucciones para descalcificar la cafetera.
4. NO intente mover una cafetera que contenga líquidos calientes. Deje que la
cafetera se enfríe por completo antes de moverla.
5. Mantenga la cafetera al menos a 4 pulgadas de distancia de las paredes
u otros objetos durante el funcionamiento. No coloque ningún objeto sobre
la cafetera mientras esté en funcionamiento. Coloque la cafetera sobre una
superficie resistente al calor.
6. Si este electrodoméstico empieza a funcionar mal mientras se prepara el café
de filtro, presione el botón BREW CARAFE/OFF. A continuación, desenchufe
inmediatamente el cable. Si este electrodoméstico empieza a funcionar mal
mientras se prepara una sola porción, presione el botón BREW SINGLE activo
y, a continuación, desenchufe inmediatamente el cable. No utilice ni intente
reparar un electrodoméstico que no funcione correctamente. Llame al Servicio
de atención al consumidor.
7. Si esta cafetera se cae o sumerge accidentalmente en agua o en cualquier otro
líquido, desenchúfelo de inmediato. ¡No meta la mano en el agua! No utilice
esta cafetera después de que se haya caído o se haya sumergido en agua.
PRECAUCIÓN: Deje que transcurran 15 minutos para que la cafetera se enfríe
lo suficiente antes de añadir agua al depósito de agua.
8. Utilice siempre agua fresca y fría en su cafetera. El agua tibia u otros líquidos,
excepto como se indica en la sección de limpieza, pueden dañar la cafetera.
9. NO coloque la jarra en un horno microondas.
bellaD_SAMsClub_12cup-SingleServe_CoffeeMaker_IM_V5_R3.indd 16bellaD_SAMsClub_12cup-SingleServe_CoffeeMaker_IM_V5_R3.indd 16 2025-12-12 11:13 AM2025-12-12 11:13 AM

17
10. NO deje la jarra vacía sobre la placa de calentamiento cuando la cafetera
esté en ON (encendida), ya que la jarra puede agrietarse o dañarse de otro
modo. Presione BREW CARAFE/OFF para apagar la cafetera.
11. Esta cafetera está equipada con Pause & Serve (Pausa y Servir). La válvula
de flujo se encuentra en la parte inferior de la canasta del filtro extraíble y se
activa cuando se retira la jarra. Este diseño permite retirar la jarra y servir una
taza de café antes de preparar toda la jarra.
PRECAUCIÓN: Para evitar lesiones al utilizar la función Pause & Serve,
reemplace la jarra dentro de los 30 segundos de haberla retirado durante el
proceso de elaboración.
NOTAS SOBRE EL ENCHUFE
Este aparato tiene un enchufe polarizado (una cuchilla es más ancha que la
otra). Para reducir el riesgo de descarga eléctrica, este enchufe encajará en
un tomacorriente polarizado de una sola manera. Si el enchufe no encaja
completamente en el tomacorriente, invierta el enchufe. Si aún no encaja,
comuníquese con un electricista calificado. No modifique el enchufe de
ninguna manera.
NOTAS SOBRE EL CABLE
A. Se debe proporcionar un cable corto de suministro de energía (o cable
desmontable de suministro de energía) para reducir los riesgos resultantes de
enredarse o tropezarse con un cable más largo.
B. Hay disponibles cables de suministro de energía desmontables más largos o
cables de extensión que pueden utilizarse si se tiene cuidado durante su uso.
C. Si se utiliza un cable de alimentación o un cable prolongador desmontable
largo:
1. La clasificación eléctrica marcada del cable de alimentación desmontable
o del cable de extensión debe ser al menos igual a la clasificación
eléctrica del electrodoméstico.
2. Si el electrodoméstico es del tipo de conexión a tierra, el cable de
extensión debe ser un cable de 3 cables del tipo de conexión a tierra. ;
3. El cable más largo debe disponerse de manera que no cuelgue
sobre la encimera o la mesa donde pueda ser tirado por los niños o
generar tropiezos.
ENERGÍA ELÉCTRICA
Si el circuito eléctrico está sobrecargado con otros electrodomésticos, es posible
que su electrodoméstico no funcione correctamente. Debe operarse en un circuito
eléctrico separado de otros electrodomésticos.
bellaD_SAMsClub_12cup-SingleServe_CoffeeMaker_IM_V5_R3.indd 17bellaD_SAMsClub_12cup-SingleServe_CoffeeMaker_IM_V5_R3.indd 17 2025-12-12 11:13 AM2025-12-12 11:13 AM

18
RENDIMIENTO DEL CAFÉ
Cafetera: 12 tazas (5 onzas)
NOTA: Una taza de 5 onzas es el estándar de la industria estadounidense y es utilizado por la mayoría de los
fabricantes de cafeteras. Para llenar su tazón grande favorito, llene el depósito de la cafetera con suficiente agua
para 3 a 4 tazas (15 a 20 onzas).
NOTA: La cantidad de café preparado siempre será menor que la cantidad de agua que se coloca en el depósito de
agua; los granos de café y el filtro pueden absorber hasta el 10 %.
ADVERTENCIA: PARA REDUCIR EL RIESGO DE INCENDIO O DESCARGA ELÉCTRICA, NO RETIRE LA CUBIERTA
INFERIOR. NO HAY PIEZAS QUE EL USUARIO PUEDA REPARAR EN EL INTERIOR. LA REPARACIÓN DEBE SER
REALIZADA ÚNICAMENTE POR PERSONAL TÉCNICO AUTORIZADO.
CANASTA DE FILTRO REUTILIZABLE
1. Respetuosa con el medio ambiente, la canasta de filtro reutilizable elimina la necesidad de filtros de
papel desechables.
2. La canasta de filtro reutilizable de fondo plano se asienta fácilmente sobre cualquier superficie plana y limpia
para un llenado fácil y sin complicaciones.
3. Después de la elaboración, levante para abrir la tapa de la cafetera. Despliegue el mango de la canasta de
filtro reutilizable para levantarla y sacarla del soporte de la canasta del filtro extraíble; deseche los granos de
café usados, enjuague y sustituya.
4. Doble el mango hacia abajo y cierre la tapa de la cafetera.
bellaD_SAMsClub_12cup-SingleServe_CoffeeMaker_IM_V5_R3.indd 18bellaD_SAMsClub_12cup-SingleServe_CoffeeMaker_IM_V5_R3.indd 18 2025-12-12 11:13 AM2025-12-12 11:13 AM
19
CONOZCA SU CAFETERA MULTIBREW
El producto puede variar ligeramente de la ilustración.
1. Panel de control con pantalla táctil
2. Tapa de la jarra
3. Mango de la jarra
4. Jarra con tapa de infusión
5. Cuchara de café
6. Canasta de filtro reutilizable con mango
7. Soporte de canasta de filtro extraíble
8. Placa de calentamiento
9. Cabezal de ducha
10. Depósito de agua
11. Válvula de flujo de pausa y servir
12. Depósito de agua extraíble de una única porción
13. Tapa del compartimento del adaptador de bloqueo
14. Perforador de cápsula superior
15. Compartimento del adaptador
16. Boquilla de café de una única porción
17. Cubierta de la bandeja de goteo de una
única porción
18. Adaptador de cápsula
19. Canasta reutilizable para café molido
20. Bandeja de goteo de altura ajustable
21. Enchufe de 120 V CA de 2 clavijas
20
21
1215
14
13
9
6
7
10
18
19
5
17
16
8
11
1
4
3
2
bellaD_SAMsClub_12cup-SingleServe_CoffeeMaker_IM_V5_R3.indd 19bellaD_SAMsClub_12cup-SingleServe_CoffeeMaker_IM_V5_R3.indd 19 2025-12-12 11:13 AM2025-12-12 11:13 AM
20
PANEL DE CONTROL CON PANTALLA TÁCTIL
Una pantalla que solo aparece cuando la necesita.
1. Reloj digital LED de 24 horas con indicador AM/PM.
2. SOUND OFF
3. STRENGTH
4. KEEP WARM
5. 1 - 4 TAZAS
6. CLOCK
7. CLEAN
8. PROGRAM
9. SELECT
10. Intensidad de la preparación: 3 opciones
11. HOUR y MINUTE
12. BREW CARAFE/OFF
13. Indicador del tamaño de taza (muestra el tamaño
de la taza en oz)
14. BREW SINGLE (para preparar una taza)
15. OVER ICE: para preparar una taza sobre hielo
16. TAMAÑO: para seleccionar un tamaño de taza
en oz
• Presione el botón BREW CARAFE/OFF para activar la unidad de café de filtro y el café comenzará
a prepararse.
• Cuando se presiona el botón BREW CARAFE/OFF durante la preparación, la unidad deja de funcionar y
vuelve al modo de espera.
• Mantenga presionado el botón PROGRAM durante 1.5 segundos para ajustar el TIEMPO DE PREPARACIÓN
FUTURO.
• Utilice los botones de HORA y MINUTOS para ajustar el tiempo hasta que se haya seleccionado el TIEMPO DE
PREPARACIÓN FUTURO deseado.
• Presione el botón PROGRAM para confirmar que se ha configurado el TIEMPO DE PREPARACIÓN FUTURO o
espere 5 segundos para confirmar el tiempo.
• El botón PROGRAM permanecerá iluminado, lo que indica que la cafetera está ahora programada para una
futura preparación.
• Presione HOUR para configurar la HORA.
• Presione MINUTE para configurar los MINUTOS.
• Mantenga presionado HOUR o MINUTE para retroceder rápidamente o avanzar rápidamente el tiempo.
bellaD_SAMsClub_12cup-SingleServe_CoffeeMaker_IM_V5_R3.indd 20bellaD_SAMsClub_12cup-SingleServe_CoffeeMaker_IM_V5_R3.indd 20 2025-12-12 11:13 AM2025-12-12 11:13 AM
21
• Presione el botón SIZE para seleccionar el tamaño de la preparación de una sola porción en onzas. Presione
de nuevo hasta alcanzar el tamaño deseado. Prepare una taza de 6 oz, 8 oz, 10 oz, 12 oz y 14 oz. El tamaño
predeterminado es de 8 oz.
• Presione el botón BREW SINGLE para activar la unidad de una única porción (Single Serve) y el café
comenzará a prepararse.
• Coloque hielo en una taza, jarra o taza de viaje para prepararlo sobre hielo. Presione el botón OVER ICE para
activar la unidad de una única porción (Single Serve) y el café comenzará a prepararse.
• Presione STRENGTH hasta que se ilumine STRENGTH.
• Presione STRENGTH para elegir entre 4 INTENSIDADES de preparación: Normal, gourmet, fuerte o de 1 a 4
tazas.
• La intensidad de la preparación activa se muestra en el panel de control.
NOTA: Para su comodidad, la última INTENSIDAD de preparación elegida será la predeterminada para la
siguiente jarra de café preparado
IMPORTANTE: La opción 1-4 CUPS (1-4 TAZAS) debe programarse inmediatamente antes de la preparación.
• Presione STRENGTH hasta que se ilumine 1-4 CUPS.
• Al preparar de 1 a 4 tazas de café, la opción 1-4 CUPS ajusta automáticamente el proceso de preparación
para obtener el máximo sabor.
• Presione el botón BREW CARAFE/OFF para comenzar la preparación.
NOTA: La cafetera no medirá la cantidad de agua. Cuando se utiliza el modo de 1 a 4 tazas, se preparará
todo el depósito de agua. Asegúrese siempre de llenar el depósito de agua con 4 TAZAS de agua, si tiene
previsto utilizar la opción 1-4 TAZAS.
• El tiempo predeterminado para MANTENER CALIENTE es 2:00 horas, pero se puede ajustar de 00:00 minutos
a 4:00 horas.
• Mantenga presionado KEEP WARM hasta que titile el tiempo para KEEP WARM (MANTENER CALIENTE).
• Presione HOUR o MINUTE para ajustar el tiempo para KEEP WARM.
• Si es necesario descalcificar, mantenga presionados HOUR y MINUTE al mismo tiempo hasta que se ilumine
CLEAN.
• Siga las instrucciones detalladas en la sección LIMPIEZA de este manual de instrucciones.
• Después de cada 150 preparaciones, CLEAN titilará automáticamente.
• Mantenga presionado el botón HOUR o MINUTE hasta que CLOCK titile.
• Presione HOUR o MINUTE para ajustar la hora.
bellaD_SAMsClub_12cup-SingleServe_CoffeeMaker_IM_V5_R3.indd 21bellaD_SAMsClub_12cup-SingleServe_CoffeeMaker_IM_V5_R3.indd 21 2025-12-12 11:13 AM2025-12-12 11:13 AM
22
• Para apagar el sonido, mantenga presionados los botones MINUTE y PROGRAM al mismo tiempo hasta que
se ilumine el ícono. El ícono se mostrará junto al reloj en el panel de control.
• Para volver a encender el sonido, mantenga presionados los botones MINUTE y PROGRAM al mismo tiempo.
El ícono desaparecerá con 1 tono audible.
ANTES DE PREPARAR CAFÉ DE FILTRO POR PRIMERA VEZ
1. Retire todo el material de embalaje y las etiquetas desde el interior y exterior de la cafetera. Coloque la
unidad sobre una superficie plana y limpia.
2. Antes de preparar el café, limpie a fondo la jarra de vidrio, la tapa de la jarra, la canasta con filtro extraíble,
la canasta con filtro reutilizable y la cuchara para café en agua caliente y con espuma. Enjuague y seque.
Vuelva a colocar las piezas desmontadas.
NOTA: La jarra, la tapa de la jarra, el soporte de la canasta del filtro extraíble y la canasta del filtro
reutilizable son todos aptos para el lavavajillas en la rejilla superior. La pala para café debe colocarse en el
lavavajillas junto con los cubiertos.
3. Limpie el interior de la cafetera preparando 2 jarras completas de agua del grifo (consulte las Instrucciones
para preparar café). No añada la canasta del filtro reutilizable ni el café molido para esta limpieza inicial.
OPERACIÓN DE PREPARACIÓN DE CAFÉ DE FILTRO
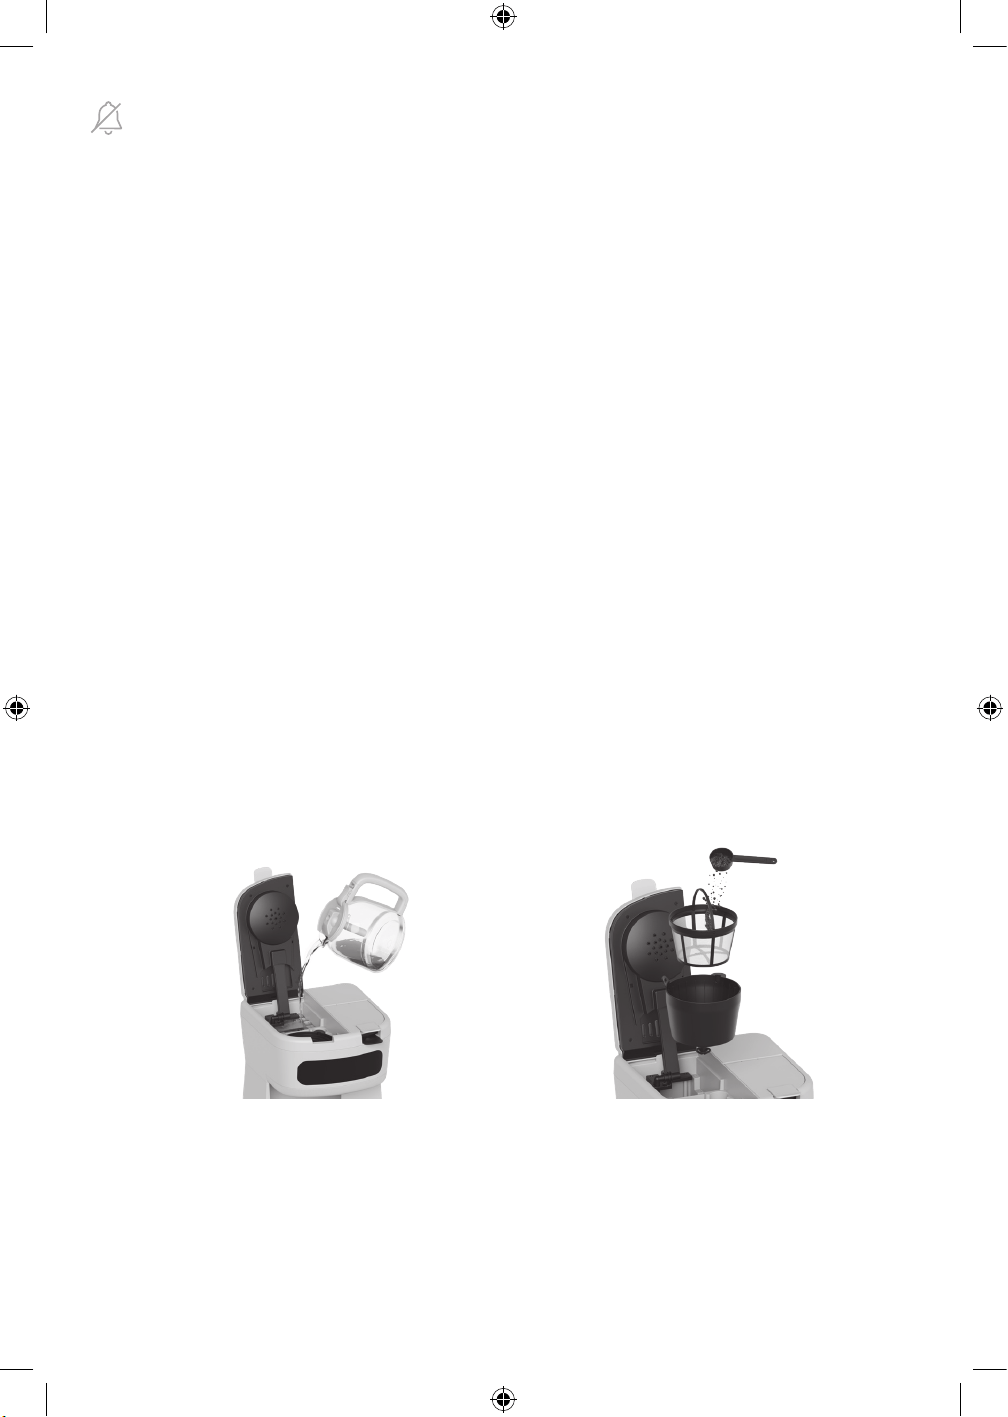
1. Llene la jarra con agua fría del grifo o destilada y vierta con cuidado en el depósito de agua (figura 1).
PRECAUCIÓN: Nunca utilice la cafetera cuando el depósito de agua esté vacío.
IMPORTANTE: Antes de preparar el café, asegúrese siempre de que el nivel de agua haya pasado el paso de
4 tazas y añada agua, si es necesario.
PRECAUCIÓN: Nunca añada agua de forma que supere el paso de 12 tazas.
2. Introduzca la canasta de filtro extraíble en la carcasa y coloque la canasta de filtro reutilizable llena de café
en el filtro extraíble (figura 2).
3. Cierre la tapa y presione el botón BREW CARAFE/OFF. De forma predeterminada, se iluminará la preparación
Regular (normal). Para ajustar la intensidad de la preparación, consulte (página 21).
4. Presione el botón BREW CARAFE/OFF para comenzar la elaboración.
5. Una vez finalizada la elaboración, sonarán 3 tonos audibles. La cafetera mostrará 0:00, a medida que avanza
hasta KEEP WARM (MANTENER CALIENTE). El tiempo comenzará a contar hasta las 2:00 horas.
¡IMPORTANTE! Presione el botón BREW CARAFE/OFF en cualquier momento para apagar la cafetera.
6. Al final de KEEP WARM, sonarán 2 tonos audibles cuando la cafetera se apague dentro de los 5 minutos, si no
sigue funcionando.
PRECAUCIÓN: Asegúrese siempre de que la tapa esté alineada con el pico antes de verter el café caliente.
PAUSAR Y SERVIR
Pause & Serve (Pausar y servir) le permite servir una taza de café antes de que se prepare toda la jarra. Vuelva a
colocar la jarra en la placa de calentamiento; se reanudará el goteo.
PRECAUCIÓN: Vuelva a colocar la jarra debajo de la canasta del filtro en un plazo de 30 segundos para evitar
el desborde.
PREPARAR MÁS TARDE
1. La cafetera se puede programar para que comience a prepararse hasta 24 horas en el futuro.
ADVERTENCIA: Asegúrese de que la cafetera esté configurada para preparar café. Llene el depósito de agua,
añada café recién molido a la canasta del filtro reutilizable y cierre la tapa. Coloque la jarra vacía con tapa en
el centro de la placa de calentamiento.
Figura 1 Figura 2
bellaD_SAMsClub_12cup-SingleServe_CoffeeMaker_IM_V5_R3.indd 22bellaD_SAMsClub_12cup-SingleServe_CoffeeMaker_IM_V5_R3.indd 22 2025-12-12 11:13 AM2025-12-12 11:13 AM
23
2. Mantenga presionado el botón PROGRAM durante 1.5 segundos. El último TIEMPO DE PREPARACIÓN
FUTURO programado comenzará a parpadear.
3. Presione HOUR para ajustar la HORA.
4. Presione MINUTE para ajustar los MINUTOS.
NOTA: Preste atención a la configuración de AM y PM. Presione el botón PROGRAM o espere 5 segundos para
confirmar la hora. Solo se iluminarán los botones PROGRAM, BREW SINGLE, OVER ICE, SIZE y STRENGTH.
5. Cuando se alcance el tiempo preprogramado, comenzará la elaboración.
6. Al final del ciclo de preparación, 3 tonos sonoros indicarán que se ha completado y la cafetera avanzará a
KEEP WARM.
7. Para comenzar la hora de preparación a la misma hora del día siguiente, simplemente presione el botón
PROGRAM, se iluminarán los botones PROGRAM, BREW SINGLE, OVER ICE, SIZE y STRENGTH.
CONSEJOS PARA UN CAFÉ DE EXCELENTE SABOR
• Una cafetera limpia es esencial para preparar un café de excelente sabor. Se recomienda encarecidamente la
limpieza habitual, tal como se describe en la sección LIMPIEZA de este manual de instrucciones.
• Siempre use agua fresca y fría en su cafetera.
• Los molidos más finos, como el café de filtro y ADC, promueven una extracción más completa y proporcionan
café rico y de cuerpo completo.
• Para un sabor óptimo, programe su cafetera para preparar café con su INTENSIDAD preferida. Elija entre
Normal, Gourmet o Intenso.
• Para obtener un sabor óptimo de café, compre granos enteros y muela justo antes de prepararlos.
• No reutilice los granos de café, ya que esto afectará en gran medida el sabor del café.
• No se recomienda recalentar el café. El café alcanza su máximo sabor inmediatamente después de la
elaboración.
• Pequeñas gotas de aceite en la superficie del café negro preparado se deben a la extracción de aceite de los
granos de café. La oleosidad puede ocurrir con más frecuencia si se utilizan cafés muy tostados. La extracción
en exceso también puede causar oleosidad, lo que indica la necesidad de limpiar la cafetera.
ANTES DE PREPARAR UNA ÚNICA PORCIÓN POR PRIMERA VEZ
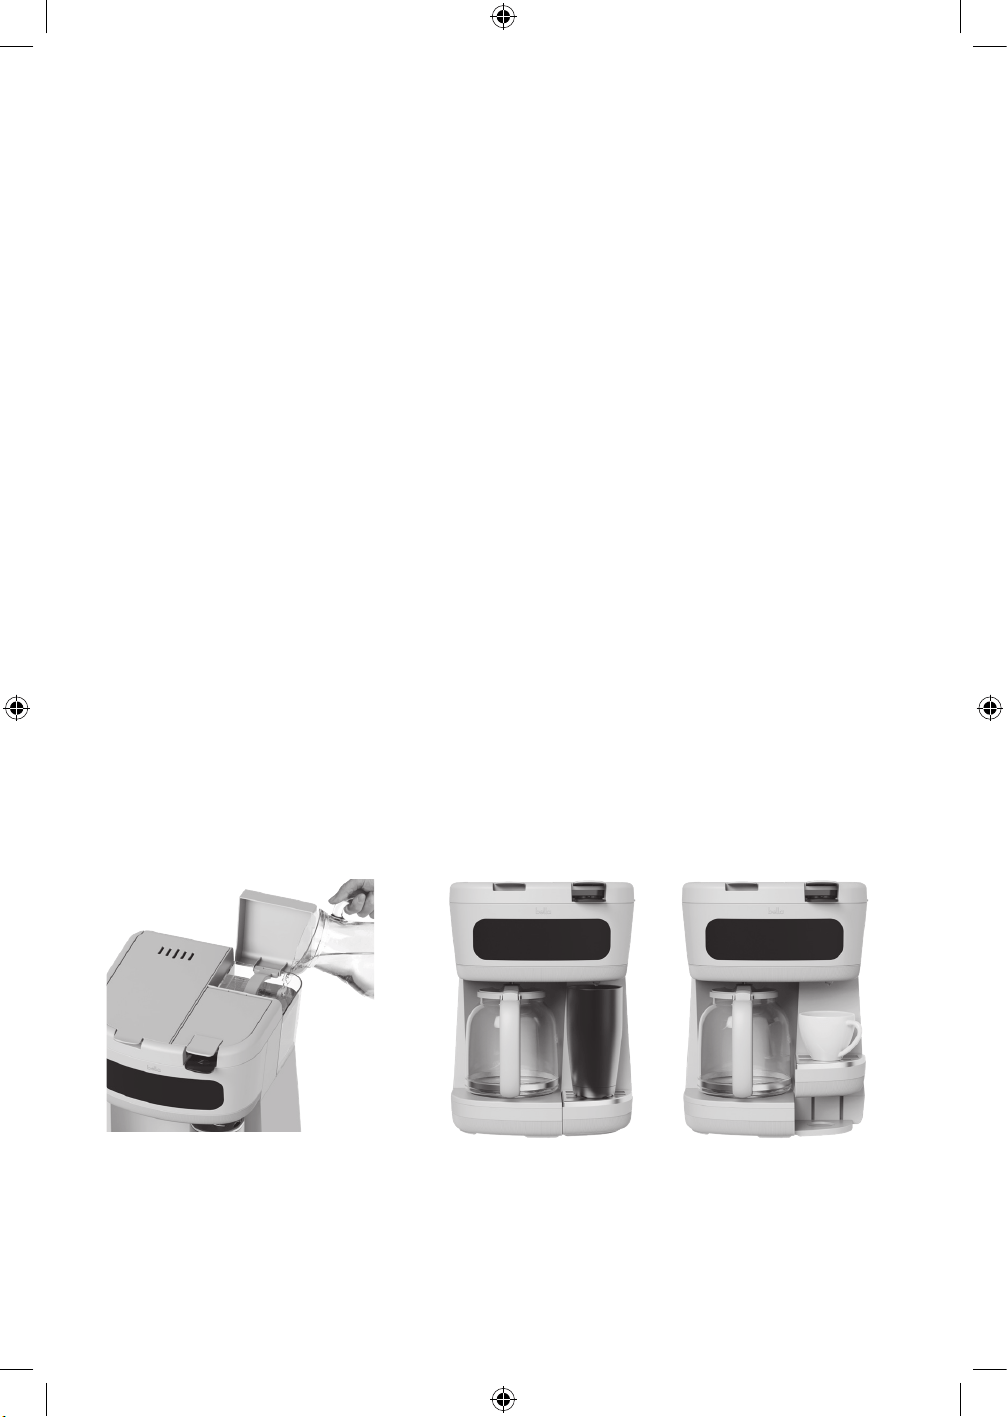
1. Para prelimpiar y cebar la bomba, llene una taza alta con hasta 15 onzas de agua fría y añádala al depósito
de agua de porción única. Consulte (Figura 3). Centre la taza/tazón vacío en la base de porción única,
directamente debajo del pico de café.
2. Presione el botón BREW CARAFE/OFF y, a continuación, presione el botón BREW SINGLE, la unidad
empezará a preparar el café.
3. La bomba se activará y el agua comenzará a fluir a través del pico. Al finalizar, se iluminarán todos los
indicadores luminosos.
4. La bomba está ahora cebada y el sistema de preparación de café de una taza MultiBrew está listo para su uso.
CÓMO PREPARAR UNA SOLA TAZA
El sistema de preparación de cápsulas le da la opción de preparar cualquier cápsula de café preenvasada o usar sus
propias mezclas de café favoritas con la canasta de café molido reutilizable.
1. Añada agua filtrada fría al depósito de agua de una sola porción. El depósito de agua tiene líneas MÍN y
MÁX. No llene por sobre la línea MÁX.
ADVERTENCIA: Antes de calentar, se recomienda llenar el depósito de agua al menos hasta la línea MÍN.
Para evitar daños en su cafetera, nunca la haga funcionar cuando el depósito de agua esté vacío.
Figura 3 Figura 4
bellaD_SAMsClub_12cup-SingleServe_CoffeeMaker_IM_V5_R3.indd 23bellaD_SAMsClub_12cup-SingleServe_CoffeeMaker_IM_V5_R3.indd 23 2025-12-12 11:13 AM2025-12-12 11:13 AM
24
2. Centre las tazas/tazones de viaje altos (hasta 15 oz.) en la base de una sola porción, directamente debajo del
pico de café. Centre la taza/tazón en la bandeja de goteo, directamente debajo del pico de café. Consulte
(figura 4).
3. Utilice la pestaña delantera para desbloquear y abrir la tapa del compartimento del adaptador MultiBrew.
4. Inserte el adaptador de cápsula en el compartimento del adaptador.
IMPORTANTE: Para evitar granos de café sueltos, debe alinear el tubo delantero con el pico en la parte
delantera de la carcasa. Gire el adaptador de modo que encaje al ras en la carcasa.
PRECAUCIÓN: Hay dos agujas afiladas que perforan las cápsulas. Uno se encuentra dentro del adaptador
de la cápsula y la otra se encuentra en el reverso de la parte superior del compartimento del adaptador. Para
evitar el riesgo de lesiones, no coloque los dedos dentro de cualquiera de las piezas. Tenga también cuidado al
limpiar las piezas.
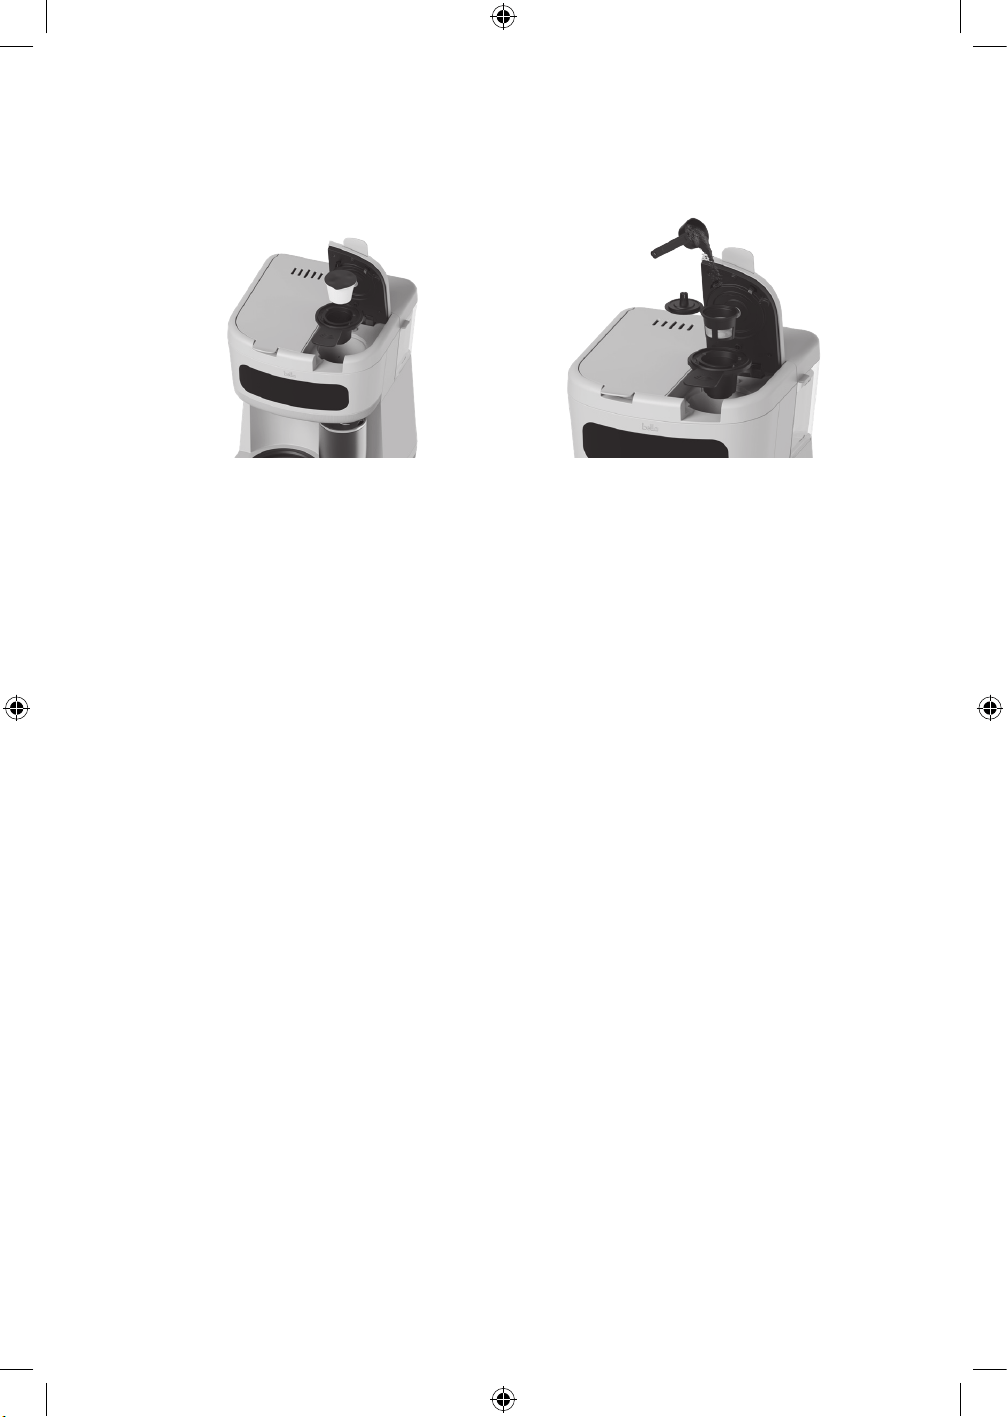
5. Cápsulas de café: Añada la cápsula de su elección en el adaptador de la cápsula. Consulte (figura 5).
NOTA: Se perforará tanto la parte superior como la inferior de la cápsula.
6. Canasta reutilizable para café molido: Añada la canasta de café molido reutilizable llena al compartimento
del adaptador. Consulte (figura 6).
NOTA: Para obtener los mejores resultados, al llenar la canasta de café molido reutilizable, utilice un
molido medio.
7. Presione firmemente la tapa del compartimento del adaptador hacia abajo. Se puede oír un clic cuando la
tapa quedó cerrada.
8. Presione el botón SIZE para seleccionar el tamaño de taza deseado en oz, luego presione el botón BREW
SINGLE para café caliente de una sola porción o presione el botón OVER ICE para prepararlo sobre hielo.
NOTA: Una vez finalizado el ciclo de preparación de una sola porción, el botón BREW SINGLE u OVER ICE se
iluminará, mientras que los otros botones se apagarán durante la preparación.
NOTA: Para interrumpir el ciclo de preparación en cualquier momento, presione el botón activo BREW SINGLE
u OVER ICE y se iluminarán todos los botones; la unidad volverá al modo de espera.
NOTA: El volumen de café helado es la mitad de la configuración del tamaño. Por ejemplo: 6 oz de tamaño,
solo preparará 3 oz de café.
NOTA: Para preparar café helado, es necesario añadir cubitos de hielo a la taza o vaso antes de prepararlo.
NOTA: Para seleccionar el tamaño, presione el botón SIZE. La pantalla mostrará la configuración
predeterminada de 8 oz. Para cambiar el tamaño, presione de nuevo el botón SIZE hasta alcanzar el tamaño
deseado. Las otras opciones de tamaño son: 10 oz, 12 oz, 14 oz y 6 oz. Presione el botón BREW SINGLE u OVER
ICE para preparar café. La unidad recordará el último tamaño utilizado, a menos que esté desenchufada.
9. Durante la elaboración de la cápsula, si el agua del depósito se agota, el botón BREW SINGLE, OVER ICE,
SIZE parpadeará para indicar que el usuario necesita añadir agua. Si se añade agua en un plazo de 3 minutos,
presione cualquier botón para continuar con el resto del ciclo de preparación. Si han pasado más de 3 minutos,
la unidad volverá al modo de espera. Presione el botón BREW CARAFE/OFF para entrar en el modo de espera
en cualquier momento en que los botones parpadeen.
AGUA CALIENTE PARA UNA SOLA TAZA
Use su cafetera MultiBrew para dispensar rápida y fácilmente agua caliente para preparar tazas individuales de té
en bolsa, sopas instantáneas, avena de cocción rápida, chocolate caliente envasado, sidra de manzana caliente o
cualquier alimento que requiera agua hirviendo.
ADVERTENCIA: Antes de calentar, se recomienda llenar el depósito de agua al menos hasta la línea MÍN de llenado.
NO SUPERE la línea de llenado MÁX. Para evitar daños en su cafetera, no utilice nunca la cafetera MultiBrew cuando
el depósito de agua esté vacío.
Figura 5 Figura 6
bellaD_SAMsClub_12cup-SingleServe_CoffeeMaker_IM_V5_R3.indd 24bellaD_SAMsClub_12cup-SingleServe_CoffeeMaker_IM_V5_R3.indd 24 2025-12-12 11:13 AM2025-12-12 11:13 AM

25
IMPORTANTE: Para evitar sabores contaminados o “apagados” al cambiar bebidas calientes, mientras la unidad
está apagada en OFF (fría), utilice una toalla de papel húmeda para eliminar por completo cualquier residuo del
compartimento del adaptador.
1. Siga los pasos 1 y 2 de la Operación de elaboración de porción única (página 23-24).
2. Inserte el adaptador de la cápsula (sin café ni cápsula) en el compartimento del adaptador y siga los pasos 7 y
8 de la Operación de elaboración de porción única (página 24).
3. Después de calentar y dispensar el agua, se encenderá el indicador luminoso. Revuelva bien los ingredientes
antes de servir.
INSTRUCCIONES DE MANTENIMIENTO DEL USUARIO
Este electrodoméstico requiere poco mantenimiento. No contiene piezas que el usuario pueda reparar. Cualquier
servicio que requiera desensamblaje que no sea limpieza debe ser realizado por un técnico calificado en reparación
de electrodomésticos.
INSTRUCCIONES DE CUIDADO Y LIMPIEZA
1. Asegúrese siempre de que la cafetera esté desenchufada y la placa de calentamiento esté fría antes de
intentar limpiarla.
2. Después de cada uso, retire la canasta del filtro reutilizable, deseche los granos de café usados y enjuague bien.
3. Lave la canasta del filtro reutilizable y la jarra de vidrio en agua caliente y jabonosa. Saque la tapa de la jarra
y frote con un cepillo de cocina enjabonado. La jarra, la tapa de la jarra, el soporte de la canasta del filtro
extraíble y la canasta del filtro reutilizable son todos aptos para el lavavajillas en la rejilla superior. La pala
para café debe colocarse en el lavavajillas junto con los cubiertos.
ADVERTENCIA: Para evitar roturas, manipule la jarra con cuidado. Evite el impacto. El vidrio se romperá como
resultado del impacto. Tenga cuidado al llenar con agua para evitar golpear el grifo.
4. Limpie el exterior de la cafetera con un paño húmedo para eliminar las manchas superficiales. Para manchas
difíciles, utilice una almohadilla de nailon o plástico con un limpiador no abrasivo. No utilice estropajos
metálicos ni limpiadores abrasivos.
5. Seque y vuelva a colocar las piezas desmontadas. Asegúrese de que el soporte de la canasta del filtro
extraíble caiga y esté correctamente asentado en la carcasa.
6. Cierre la tapa.
LIMPIAR
Para garantizar un sabor y rendimiento óptimos de su cafetera MultiBrew, cuando se usa regularmente y en
condiciones normales, se recomienda que el ciclo de LIMPIEZA se ejecute cada 150 usos. La palabra CLEAN
parpadeará automáticamente en la pantalla para avisarle que es necesario LIMPIAR.
NOTA: Todo el ciclo de limpieza tardará entre 30 y 40 minutos en completarse.
NOTA: La cafetera MultiBrew tiene dos depósitos de agua que deben descalcificarse por separado y según sea
necesario.
Sistema de café de filtro
1. Mezcle 6 tazas de vinagre blanco y 4 tazas de agua fría en la jarra y vierta la solución de vinagre en el
depósito de agua.
2. Coloque la jarra vacía en la placa de calentamiento.
3. Cierre la tapa y mantenga presionados HOUR y MINUTE al mismo tiempo hasta que se ilumine CLEAN.
Presione el botón BREW CARAFE/OFF. Cuando comience el ciclo de LIMPIEZA, sonará un tono audible. Los
botones CLEAN y BREW CARAFE/OFF se iluminarán en la pantalla. Parte de la mezcla pasará a través del
ciclo de preparación en una secuencia lenta de 3 minutos. Durante el ciclo CLEAN, la mezcla restante se
mantendrá en la cafetera y luego se dispensará periódicamente durante 30 minutos.
¡IMPORTANTE! Presione el botón BREW CARAFE/OFF en cualquier momento para salir de la función
CLEAN o presione el botón BREW CARAFE/OFF en cualquier momento para apagar la cafetera. Al final
del ciclo CLEAN, sonarán 3 tonos audibles, CLEAN desaparecerá de la pantalla y la cafetera se apagará
automáticamente.
4. Deseche el agua en la jarra. Lave la jarra, la canasta de filtro extraíble y la canasta de filtro reutilizable en
agua caliente con espuma.
5. Prepare 2 o 3 jarras de agua fresca a través de la cafetera.
6. Seque bien las piezas.
7. Vuelva a colocar la canasta del filtro extraíble en la carcasa y, a continuación, deje caer la canasta del filtro
reutilizable limpia en su lugar.
bellaD_SAMsClub_12cup-SingleServe_CoffeeMaker_IM_V5_R3.indd 25bellaD_SAMsClub_12cup-SingleServe_CoffeeMaker_IM_V5_R3.indd 25 2025-12-12 11:13 AM2025-12-12 11:13 AM

26
SISTEMA DE PREPARACIÓN DE UNA ÚNICA PORCIÓN
1. Llene con 4 oz de vinagre blanco y 10 oz de agua fría y vierta la solución de vinagre en el depósito de agua de
una única porción.
2. Centre una taza o recipiente de 15 oz debajo del pico de café de una única porción.
3. Presione el botón BREW SINGLE. La luz indicadora parpadeará a medida que la solución de limpieza fluye a
través del pico del café.
4. Después de la limpieza, rellene el depósito de agua de una única porción con agua fría y fresca. Enjuague bien
preparando otras 2 o 3 tazas (15 oz) de agua limpia y fría.
5. Deje que la cafetera MultiBrew se enfríe durante 15 minutos antes del siguiente uso.
INSTRUCCIONES DE ALMACENAMIENTO
1. Nunca almacene la cafetera mientras aún esté enchufada.
2. Desenchufe la cafetera y deje que se enfríe.
3. Guarde la cafetera completamente montada, la canasta de filtro reutilizable y el soporte de canasta de filtro
extraíble en su posición. Coloque la jarra en la bandeja de calentamiento. Cierre la tapa.
4. Guarde la cafetera en su caja o en un lugar fresco y seco.
bellaD_SAMsClub_12cup-SingleServe_CoffeeMaker_IM_V5_R3.indd 26bellaD_SAMsClub_12cup-SingleServe_CoffeeMaker_IM_V5_R3.indd 26 2025-12-12 11:13 AM2025-12-12 11:13 AM

27
Mediante la presente, SENSIO Inc. dba Made by Gather™ garantiza que, durante el plazo
de DOS AÑOS a partir de la fecha de entrega, este producto no presentará defectos
mecánicos en el material ni en la mano de obra, y durante 90 días, no los presentará
en las piezas no mecánicas. A su entera discreción, SENSIO Inc. dba Made by Gather™
reparará o reemplazará el producto que resulte defectuoso, o emitirá un reembolso
por el producto durante el plazo de garantía.
Esta garantía es válida únicamente para el comprador minorista original a partir de la fecha
de la entrega inicial y no es transferible. Conserve el recibo de compra original, ya que
se exige una prueba de compra para obtener la validación de la garantía, que comienza
en la fecha de entrega. Las tiendas minoristas no tienen derecho a alterar, modificar
ni corregir de ninguna manera los términos y condiciones de la garantía.
EXCLUSIONES:
La garantía no cubre el desgaste normal de las piezas ni el daño ocasionado por cualquiera
de las siguientes causas: uso negligente del producto, uso de un voltaje o corriente
incorrectos, mantenimiento de rutina inadecuado, uso contrario al de las instrucciones
de funcionamiento, desarmado, reparación o alteración a cargo de personas que no sean
miembros del personal calificado de SENSIO Inc. dba Made by Gather™.
Asimismo, la garantía no cubre actos de la naturaleza, como incendios, inundaciones,
huracanes o tornados.
SENSIO Inc. dba Made by Gather™ no asumirá responsabilidad por daños incidentales
o resultantes ocasionados por la violación de cualquier garantía expresa o implícita.
Salvo en la medida en que lo prohíban las leyes aplicables, cualquier garantía implícita
de comerciabilidad o aptitud para un propósito particular se limita temporalmente
a la duración de la garantía. Algunos estados, provincias o jurisdicciones no permiten
la exclusión ni la limitación de daños incidentales o resultantes, o limitaciones sobre la
duración de una garantía implícita y, por lo tanto, es posible que las exclusiones
o limitaciones mencionadas no le correspondan. La garantía cubre derechos legales
específicos que pueden variar de un estado, una provincia o una jurisdicción a otros.
CÓMO OBTENER EL SERVICIO DE GARANTÍA:
Debe comunicarse con el Servicio de atención al cliente a nuestro número telefónico gratuito:
1-866-832-4843. Un representante del Servicio de atención al cliente intentará resolver los
problemas referidos a la garantía por teléfono. Si este no puede resolver el problema,
le proporcionarán un número de caso y le solicitarán que devuelva el producto a SENSIO Inc.
dba Made by Gather™. Adhiera una etiqueta al producto que incluya: su nombre, dirección,
número telefónico de contacto durante el día, número de caso y descripción del problema.
Además, incluya una copia del recibo de compra original. Envuelva cuidadosamente el
producto etiquetado con el recibo de compra, y envíelo (con el envío y el seguro prepagados)
a la dirección de SENSIO Inc. dba Made by Gather™. SENSIO Inc. dba Made by Gather™
no asumirá obligación ni responsabilidad alguna por el producto devuelto que esté
en el trayecto hacia el Centro de servicio al cliente de SENSIO Inc. dba Made by Gather™.
GARANTÍA LIMITADA DE DOS AÑOS
bellaD_SAMsClub_12cup-SingleServe_CoffeeMaker_IM_V5_R3.indd 27bellaD_SAMsClub_12cup-SingleServe_CoffeeMaker_IM_V5_R3.indd 27 2025-12-12 11:13 AM2025-12-12 11:13 AM

bellaD_SAMsClub_12cup-SingleServe_CoffeeMaker_IM_V5_R3.indd 28bellaD_SAMsClub_12cup-SingleServe_CoffeeMaker_IM_V5_R3.indd 28 2025-12-12 11:13 AM2025-12-12 11:13 AM

bellaD_SAMsClub_12cup-SingleServe_CoffeeMaker_IM_V5_R3.indd 29bellaD_SAMsClub_12cup-SingleServe_CoffeeMaker_IM_V5_R3.indd 29 2025-12-12 11:13 AM2025-12-12 11:13 AM
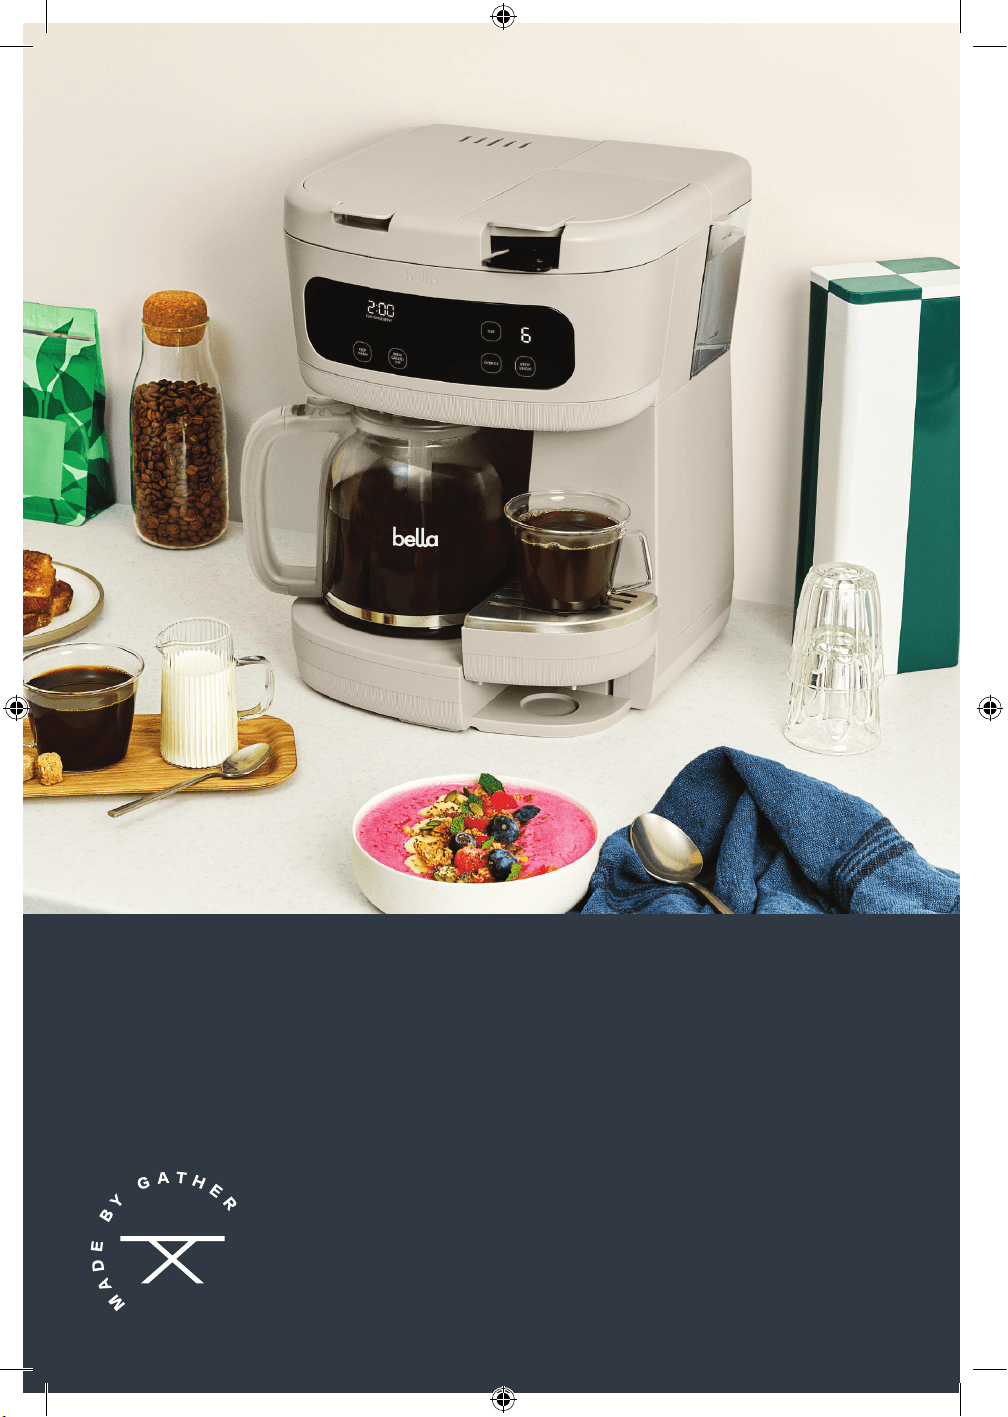
35482 R3
For customer service questions or comments
Para preguntas o comentarios para el servicio de atención al cliente
1-866-832-4843 / help@bellahousewares.com
Sensio Inc.
dba Made by Gather™
New York, NY 10016/USA
bellaD_SAMsClub_12cup-SingleServe_CoffeeMaker_IM_V5_R3.indd 30bellaD_SAMsClub_12cup-SingleServe_CoffeeMaker_IM_V5_R3.indd 30 2025-12-12 11:13 AM2025-12-12 11:13 AM