
2
Table of Contents
Getting started
4 Device layout and functions
8 Charging the battery
10 Nano-SIM card and eSIM (Mobile
network enabled models)
12 microSD card
14 Turning the device on and off
15 Initial setup
15 Using networks
16 Samsung account
16 Transferring data from your previous
device (Smart Switch)
17 Understanding the screen
23 Notification panel
24 Quick settings panel
25 Screen capture and screen record
27 Entering text
Apps and features
28 Installing or uninstalling apps
28 Galaxy AI
35 S Pen
39 Phone
43 Contacts
43 Camera
48 Gallery
50 Bixby
51 Multi window (Using multiple apps
at once)
52 Samsung Browser
52 Samsung Health
53 Samsung Notes
55 Samsung Members
56 Samsung Global Goals
56 Samsung TV Plus
56 Samsung Find
56 Samsung Shop
57 Galaxy Store
58 PENUP
58 Calendar
58 Voice Recorder
58 My Files (Checking and managing
the files)
59 Clock
59 Calculator
59 Weather
60 Gaming Hub
61 Game Booster (Configuring your
gaming environment)
61 SmartThings
62 Sharing content
63 Smart View (Mirroring on a TV
screen)
64 Samsung Flow
65 Daily Board
67 Google apps

Table of Contents
3
88 Google services
89 Advanced features
90 Digital Wellbeing
90 Parental controls
91 Device care
92 Apps
92 General management
93 Accessibility
93 Software update
94 About tablet
Usage notices
95 Precautions for using the device
97 Notes on package contents and
accessories
98 Maintaining water and dust
resistance
99 Device overheating situations and
solutions
102 How to find the standby power
consumption information for this
product
Appendix
103 Accessibility
119 Troubleshooting
124 Removing the battery
Settings
68 Introduction
68 Sign in to your Galaxy
68 Warranty and care
68 Connections
70 Wi-Fi
71 Bluetooth
72 Mobile Hotspot (Mobile
network enabled models)
73 Connected devices
74 Galaxy AI
75 Modes and Routines
76 Sounds
76 Notifications
77 Display
78 Battery
79 Wallpaper and style
79 Home screen
79 Lock screen
80 Security and privacy
81 Face recognition
82 Fingerprint recognition
83 Secure Wi-Fi
84 Secure Folder
84 Samsung Pass
85 Location
85 Safety and emergency
86 Accounts and backup
87 Users
4
Getting started
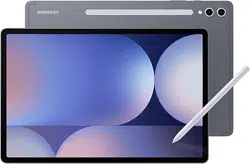
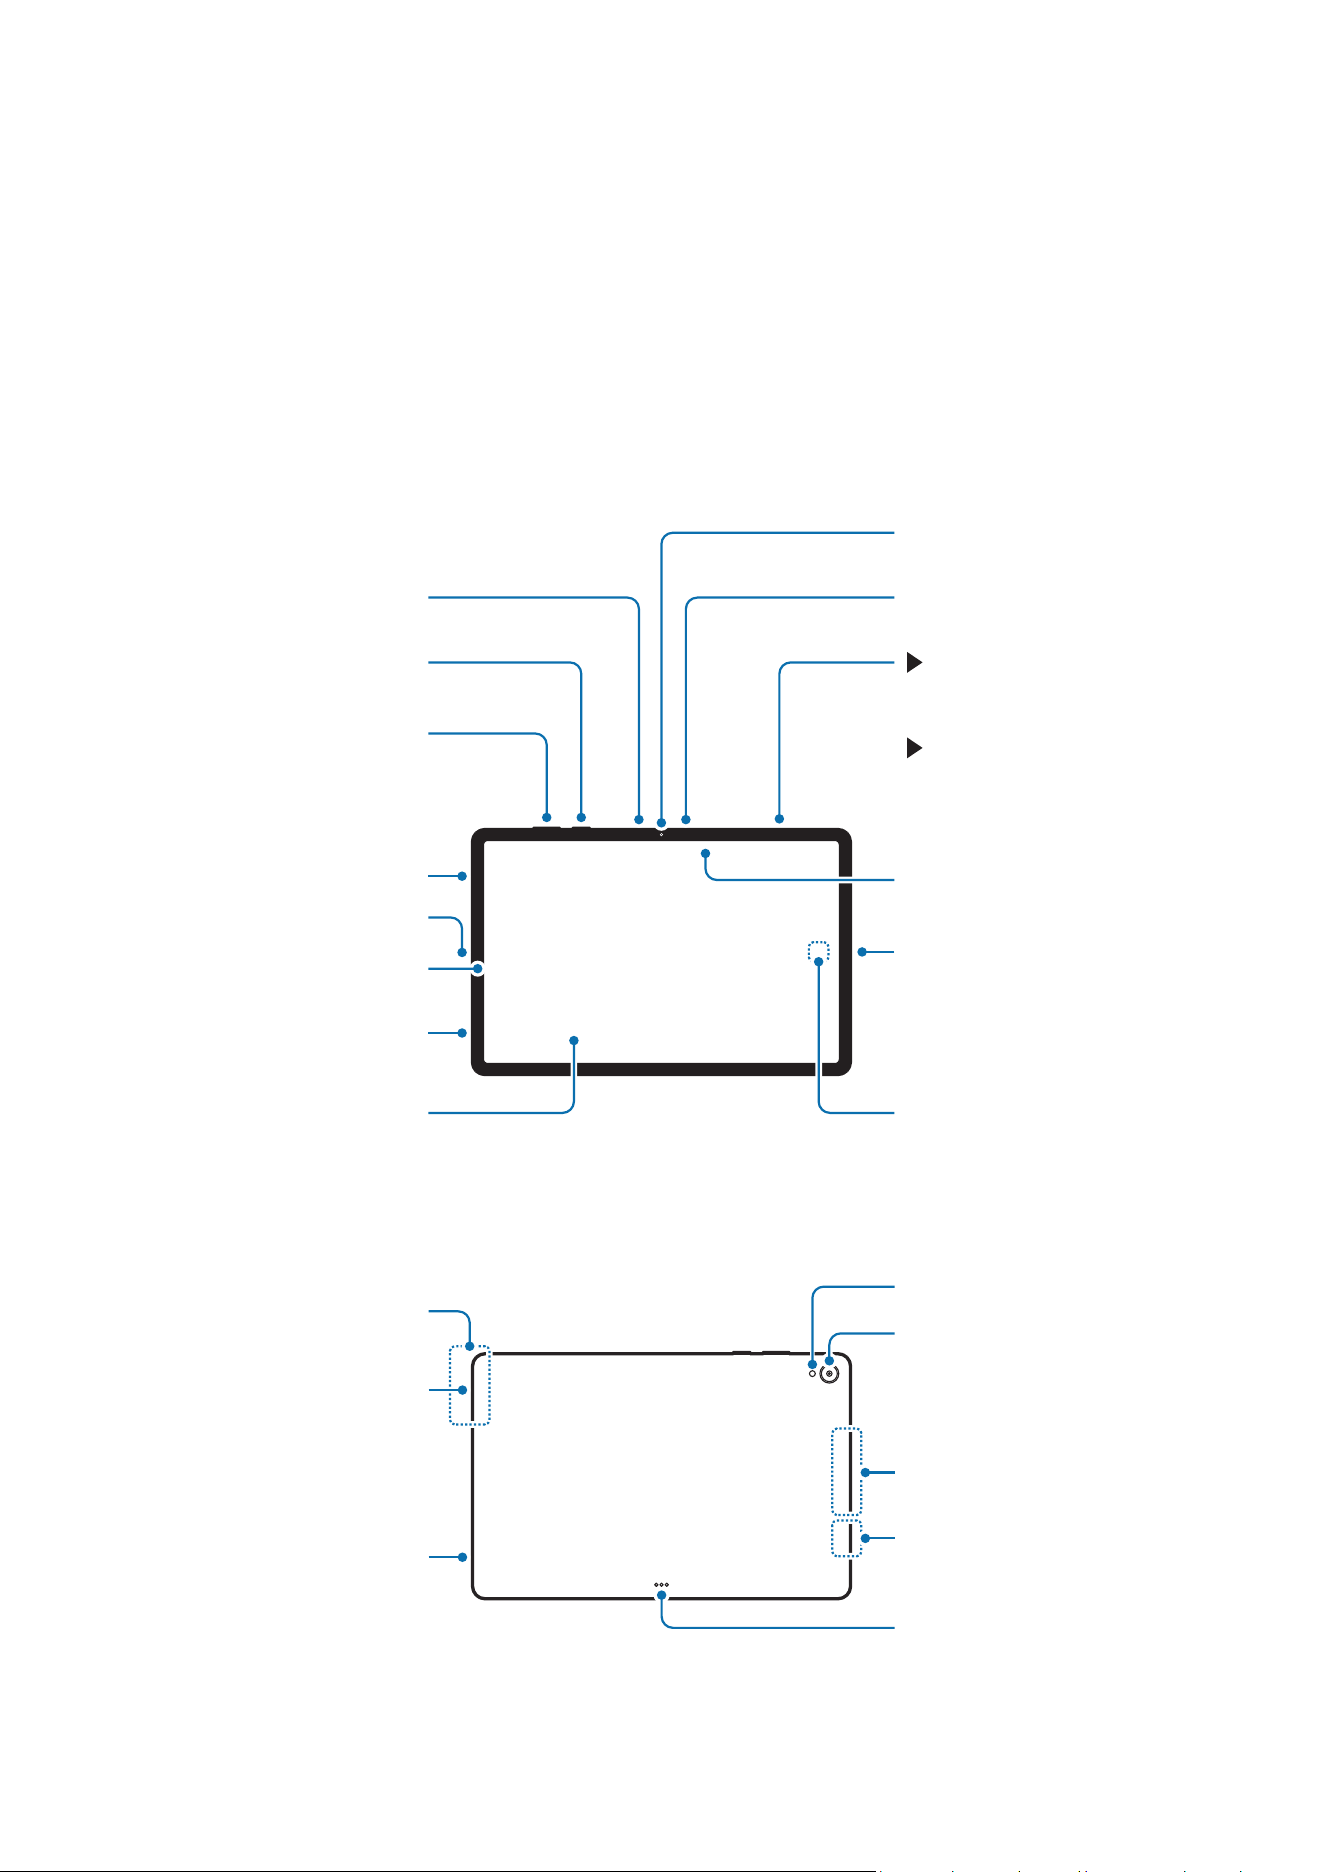
Device layout and functions
▶
SM-X840, SM-X846B, SM-X846E:
Headphone jack /
Multipurpose jack
(USB Type-C)
Speaker
Speaker
Light sensor
Microphone
Screen
Volume button
SM-X846B, SM-X846E:
Nano-SIM card /
microSD card tray
SM-X840: microSD card
tray
Front camera
Light sensor
Air vent hole
Microphone
Fingerprint recognition
sensor
Side button
Speaker
Speaker
Flash
GPS antenna
Main antenna (SM-X846B,
SM-X846E)
Main antenna (SM-X846B,
SM-X846E)
Rear camera
Keyboard dock port
Getting started
5
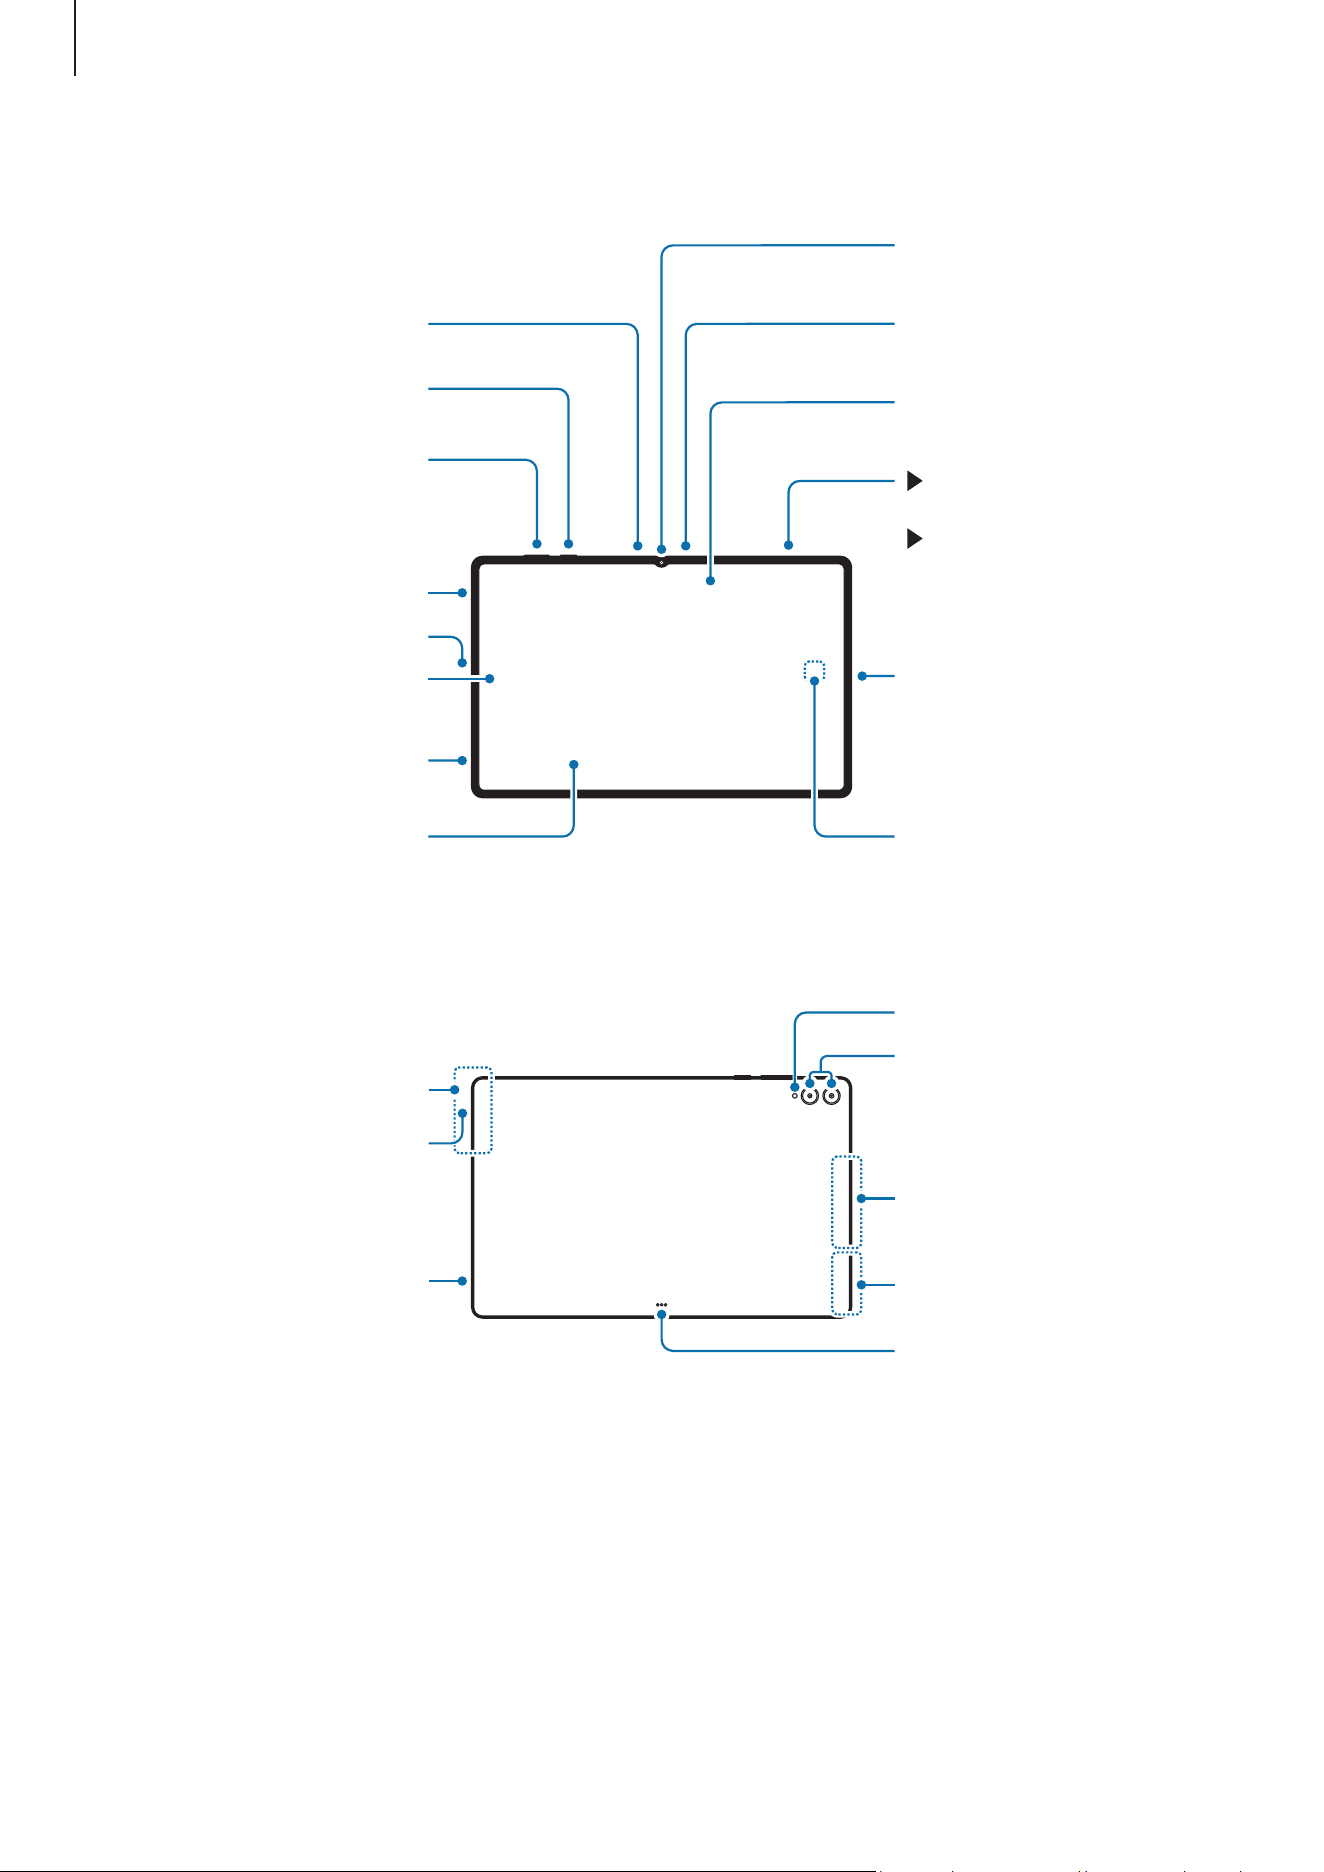
▶
SM-X940, SM-X946B:
Headphone jack /
Multipurpose jack
(USB Type-C)
Speaker
Speaker
Light sensor
Microphone
Screen
SM-X946B: Nano-SIM
card / microSD card tray
SM-X940: microSD card
tray
Microphone
Light sensor
Front camera
Air vent hole
Fingerprint recognition
sensor
Volume button
Side button
GPS antenna
Speaker
Speaker
Main antenna (SM-X946B)
Rear camera
Flash
Keyboard dock port
Main antenna (SM-X946B)

Getting started
6
•
Use the device in a place without magnetic interference for the device to operate
normally.
•
Your device and some accessories (sold separately) contain magnets. Keep
it away from credit cards, implanted medical devices, and other devices that
may be affected by magnets. In the case of medical devices, keep your device
more than 15 cm apart. Stop using your device if you suspect any interference
with your medical device and consult your physician or your medical device
manufacturer.
•
Keep a safe distance between objects that are affected by magnets, and your
device and some accessories (sold separately) that contain magnets. Objects
such as credit cards, passbooks, access cards, boarding passes, or parking passes
may be damaged or disabled by the magnets in the device.
•
When using the speakers, such as when playing media files or using
speakerphone, do not place the device close to your ears.
•
Be careful not to expose the camera lens to a strong light source, such as direct
sunlight or a laser. If the camera lens is exposed to a strong light source, such as
direct sunlight, the camera image sensor may be damaged. A damaged image
sensor is irreparable and will cause dots or spots in pictures.
•
Do not use the device if any parts are broken or damaged, such as glass or
acrylic body, as this may result in injury. Use only after it has been repaired by a
Samsung Service Centre or an authorised service centre.
•
If dust or foreign materials enter the microphone, speaker, or receiver, or if these
parts are covered, the device’s sound may become quiet or certain features may
not work. If you attempt to remove the dust or foreign materials with a sharp
object, the device may be damaged and its appearance may be affected.

Getting started
7
•
Connectivity problems and battery drain may occur in the following situations:
‒
If you attach metallic stickers on the antenna area of the device
‒
If you attach a device cover made with metallic material to the device
‒
If you cover the device’s antenna area with your hands or other objects while
using certain features, such as calls or the mobile data connection
•
If the air vent hole or the area around the rear camera is covered by an accessory,
such as a protective film or sticker, unwanted noises may occur during calls or
media playback.
•
Do not cover the light sensor area with accessories, such as stickers or a cover.
Doing so may cause the sensor to malfunction.
Hard buttons
Button Function
Side button
•
When the device is off, press and hold to turn it on.
•
Press to turn on or lock the screen.
•
Press twice or press and hold to open the app or feature you
set. To change the app or feature, open
Settings
, tap
Advanced
features
→
Side button
, and then select an option you want.
Side button +
Volume Down
button
•
Press simultaneously to capture a screenshot.
•
Press and hold simultaneously to turn off the device.
Getting started
8
Charging the battery
Charge the battery before using it for the first time or when it has been unused for
extended periods.
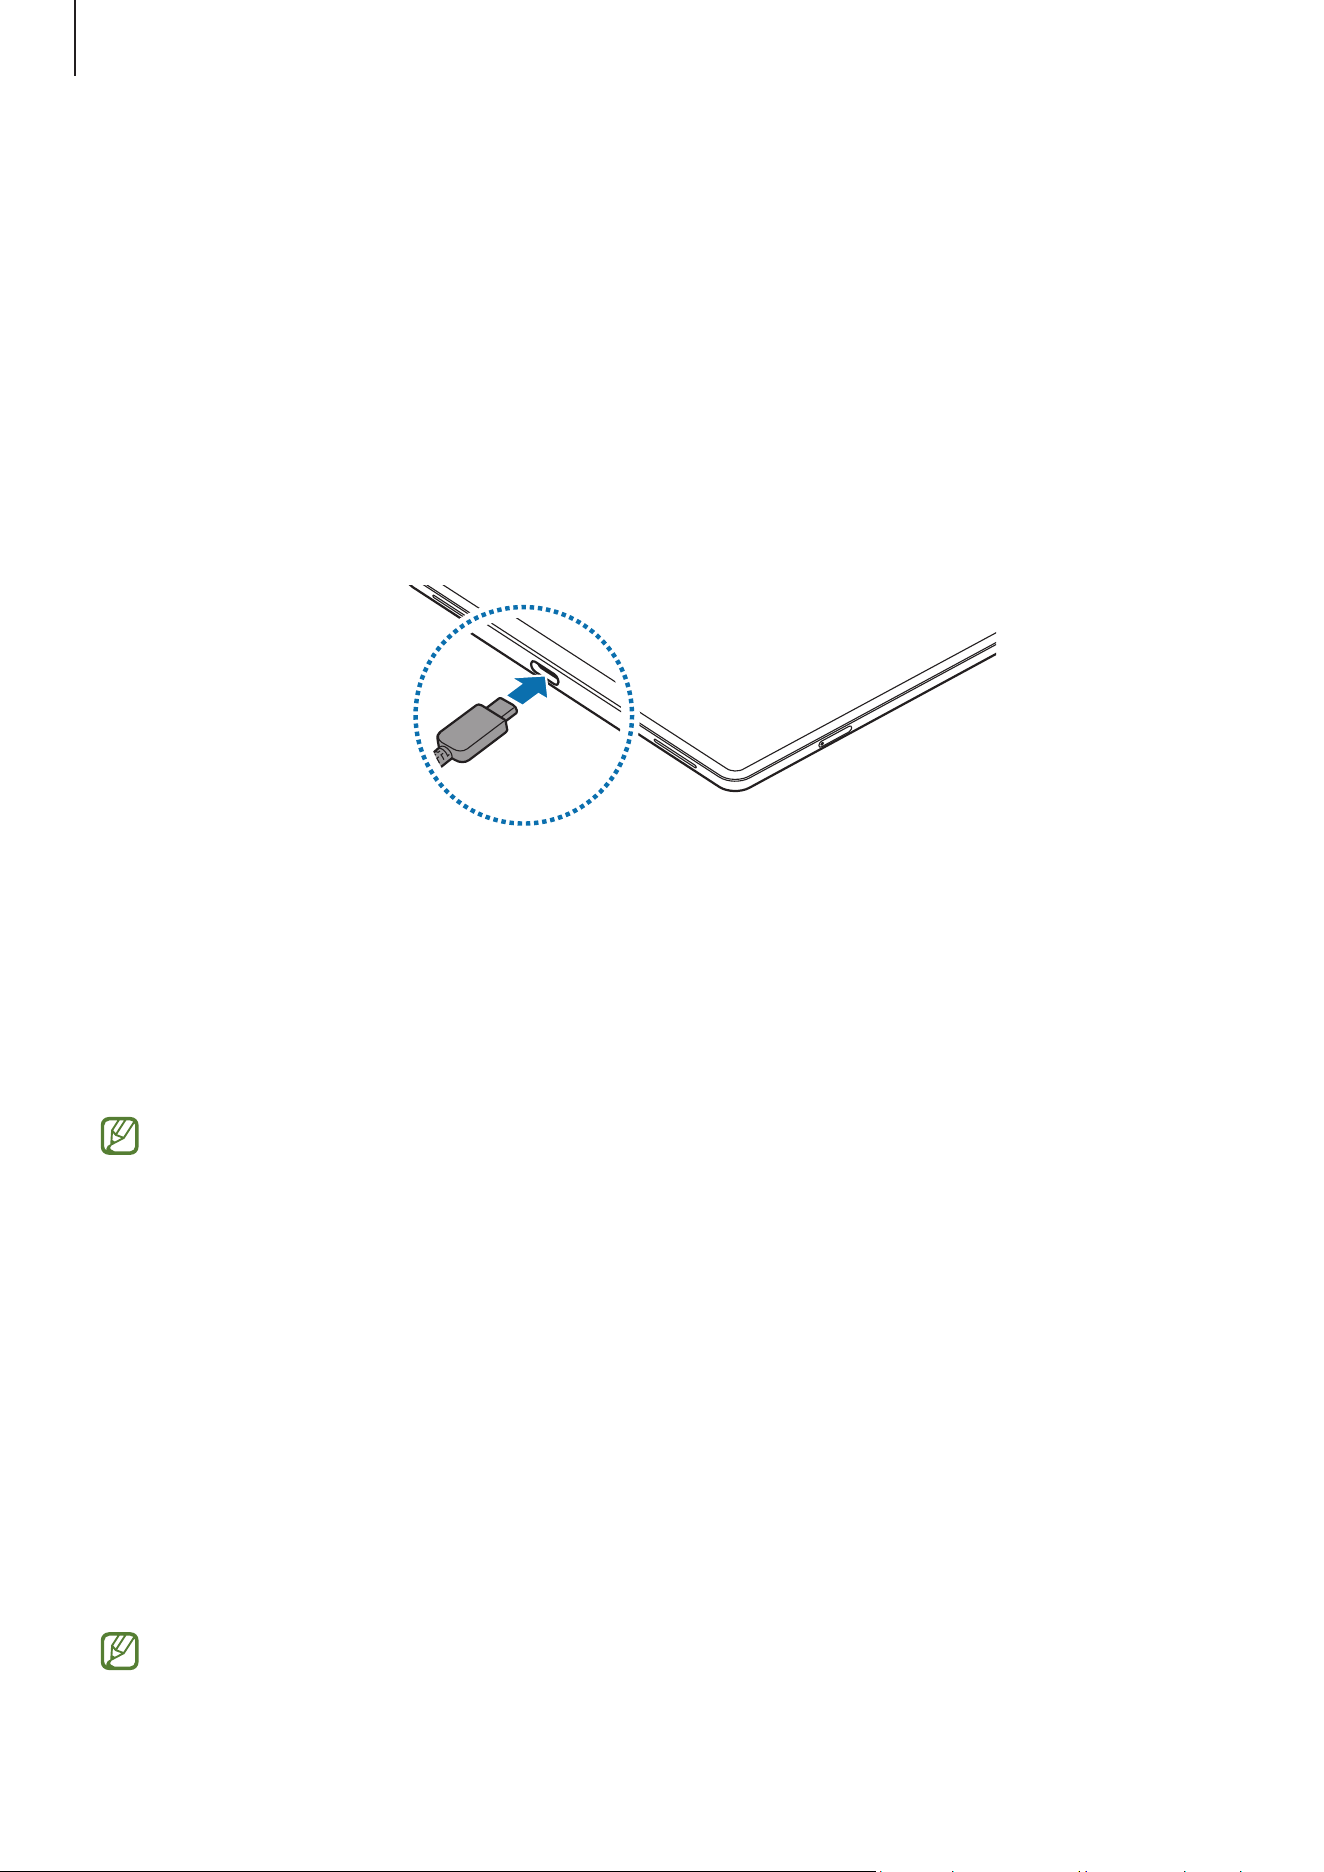
Wired charging
Connect the USB cable to the USB power adapter and plug the cable into the device’s
multipurpose jack to charge the battery. After fully charging, disconnect the charger
from the device.
Quick charging
Use a super fast charger or fast charger.
You can check the connection status of the charger by opening
Settings
and tapping
Battery
.
•
If fast charging does not work, open
Settings
, tap
Battery
→
Charging settings
,
and then check if the feature you want is turned on. Also, check if the USB cable
and the USB power adapter are connected properly.
•
You can charge the battery more quickly while the device or its screen is turned
off.
Charging other devices
Use the USB cable to charge another mobile device with your tablet’s battery.
Connect your tablet and the other device using your tablet’s USB cable. A USB connector
may be needed depending on the other device.
When charging starts, the battery charging icon will appear on the other device’s screen.
The app selection pop-up window that appears on your tablet is for data transfer.
Do not select an app from the pop-up window.
Getting started
9
Battery charging tips and precautions
•
Use only Samsung-approved battery specifically designed for your device.
Incompatible batteries can cause serious injuries or damage to your device.
•
Use of Samsung-approved chargers and cables specifically designed for your
device is recommended. Use of incompatible chargers or cables may result in
injury or damage to the device.
•
Connecting the charger improperly may cause serious damage to the device. Any
damage caused by misuse is not covered by the warranty.
•
Use of the USB Type-C cable supplied with the device is recommended. Using a
Micro USB cable may cause damage to the device.
•
If you charge the device while the multipurpose jack is wet, the device may be
damaged. Thoroughly dry the multipurpose jack before charging the device.
•
To save energy, unplug the charger when not in use. The charger does not have a
power switch, so you must unplug the charger from the electric socket when not
in use to avoid wasting power. The charger should remain close to the electric
socket and easily accessible while charging.
•
Use of a charger approved by Samsung that guarantees charging performance is
recommended.
•
If the battery is completely discharged, the device cannot be turned on
immediately when the charger is connected. Allow a depleted battery to charge
for a few minutes before turning on the device.
•
If you use multiple apps at once, network apps, or apps that need a connection
to another device, the battery will drain quickly. To avoid losing power during a
data transfer, always use these apps after fully charging the battery.
•
Using a power source other than the charger, such as a computer, may result in a
slower charging speed because of a lower electric current.
•
The device can be used while it is charging, but it may take longer to fully charge
the battery.
•
If the device receives an unstable power supply while charging, the screen may
not function. If this happens, unplug the charger from the device.
•
While charging, the device and the charger may heat up. This is normal and
should not affect the device’s lifespan or performance. If the battery gets hotter
than usual, the charger may stop charging.
•
If the device is not charging properly, take the device and the charger to a
Samsung Service Centre or an authorised service centre.
Getting started
10
Nano-SIM card and eSIM (Mobile network enabled
models)
Insert the nano-SIM card or download the eSIM provided by your carrier.
Differing from a physical nano-SIM card, an eSIM is an embedded digital SIM. To have
two phone numbers or carriers for a single device, download another eSIM.
•
eSIM may not be available depending on the region, carrier, or model.
•
Some services that require a network connection may not be available
depending on the carrier.
•
Using both the nano-SIM card and the eSIM may result in slower data transfer
speeds in some areas.
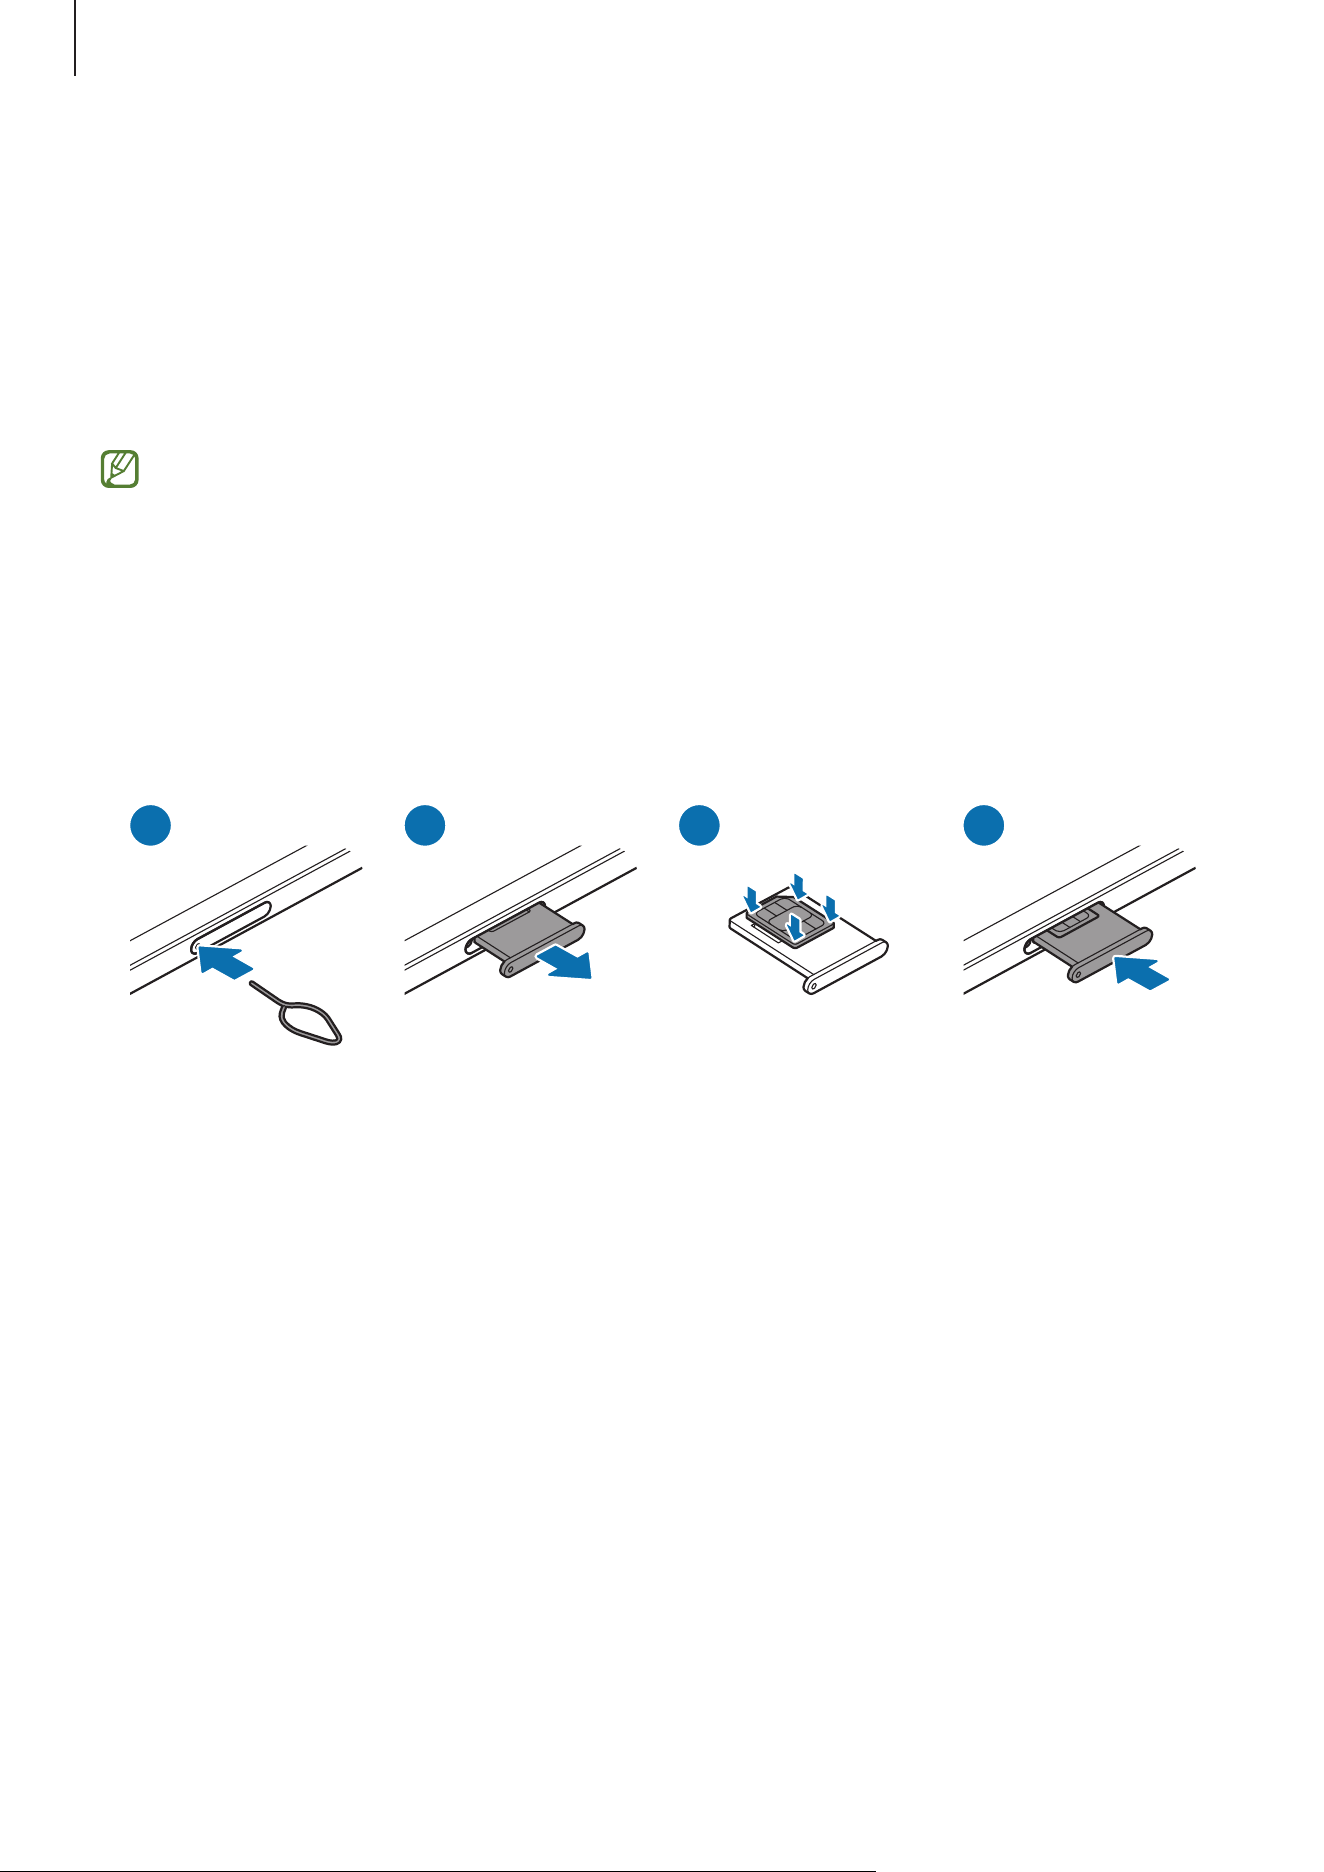
Inserting the nano-SIM card
1 2 4
3
1 Insert the ejection pin into the hole on the tray to loosen the tray.
2 Pull out the tray gently from the tray slot.
3 Place the nano-SIM card on the tray with the gold-coloured contacts facing upwards
and gently press the nano-SIM card into the tray to secure it.
4 Insert the tray back into the tray slot.

Getting started
11
•
Use only a nano-SIM card.
•
Use caution not to lose or let others use the nano-SIM card. Samsung is not
responsible for any damages or inconveniences caused by lost or stolen cards.
•
Ensure that the ejection pin is perpendicular to the hole. Otherwise, the device
may be damaged.
•
If the card is not fixed firmly into the tray, the nano-SIM card may leave or fall
out of the tray.
•
If you insert the tray into your device while the tray is wet, your device may be
damaged. Always make sure the tray is dry.
•
Fully insert the tray into the tray slot to prevent liquid from entering your device.
Downloading an eSIM
Open
Settings
, tap
Connections
→
SIM manager
→
Add eSIM
, and then follow the
on-screen instructions to download the eSIM.
If you have a QR code provided by your carrier, open
Settings
, tap
Connections
→
SIM
manager
→
Add eSIM
→
Scan QR code
, and then scan the QR code.
SIM manager
Open
Settings
and tap
Connections
→
SIM manager
.
•
SIM cards
: Activate the nano-SIM card to use and customise the nano-SIM card
settings.
•
eSIMs
: Download or activate the eSIM.
•
Preferred SIMs
: Select to use specific SIM cards for some features, such as voice
calls, when two cards are activated.
•
Data switching
: Set the device to use another SIM card for data services if the
preferred SIM card cannot connect to the network.
You may incur additional charges when using this feature.
•
More SIM settings
: Customise additional settings.
•
Privacy
: Access the Privacy Notice and the Terms and Conditions.
Getting started
12
microSD card
Inserting an SD card
Your device’s SD card capacity may vary from other models and some SD cards may not
be compatible with your device depending on the SD card manufacturer and type. To
check out your device’s maximum SD card capacity, refer to the Samsung website.
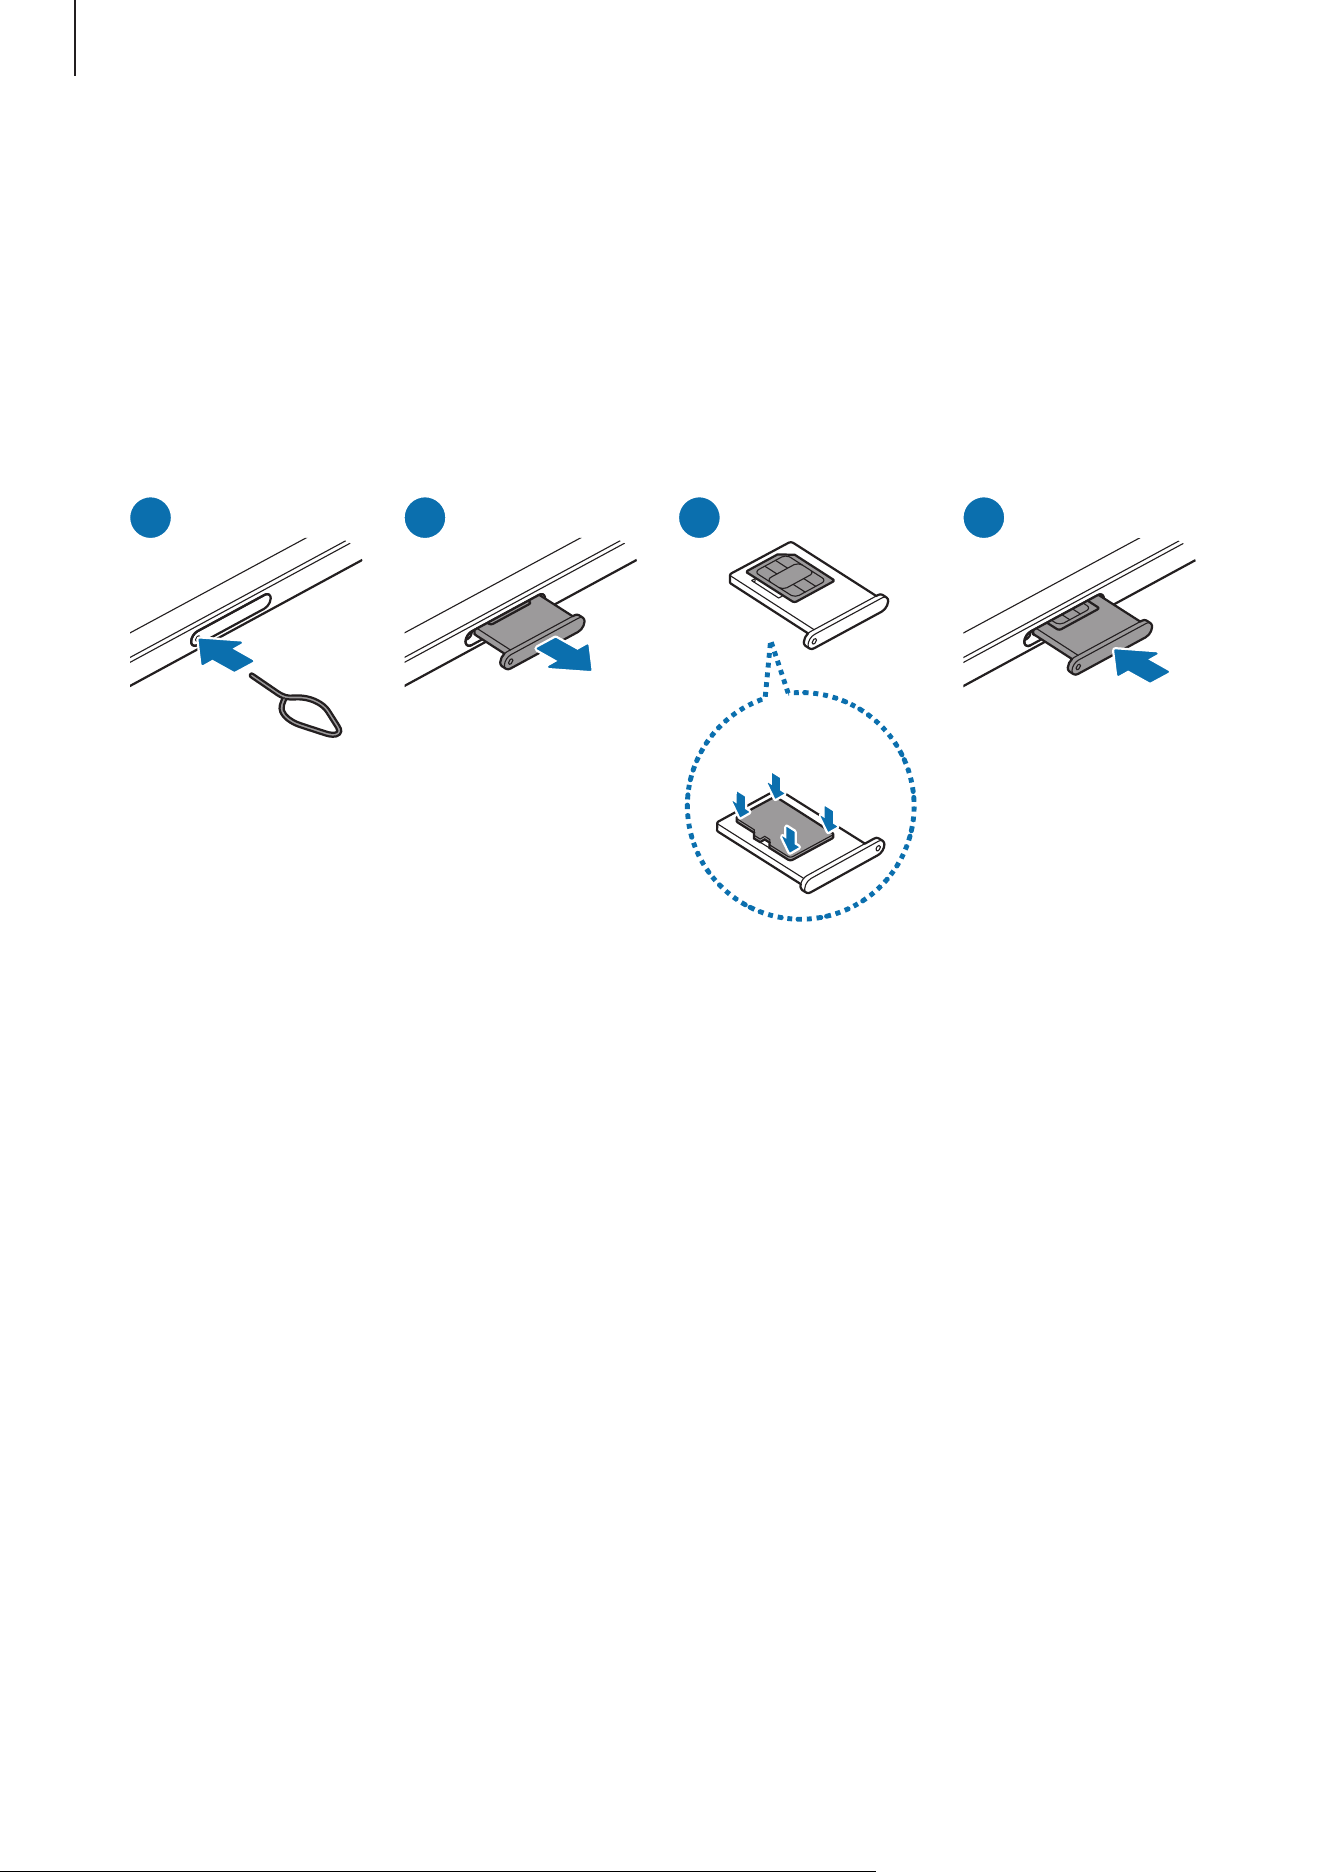
1 2 4
3
<Underside>
1 Insert the ejection pin into the hole on the tray to loosen the tray.
2 Pull out the tray gently from the tray slot.
3 Place an SD card on the tray with the gold-coloured contacts facing upwards and
gently press the SD card into the tray to secure it.
4 Insert the tray back into the tray slot.
Getting started
13
•
Use only a microSD card.
•
Some SD cards may not be fully compatible with the device. Using an
incompatible card may damage the device, the SD card, or the data stored in it.
•
Use caution to insert the SD card right-side up.
•
Ensure that the ejection pin is perpendicular to the hole. Otherwise, the device
may be damaged.
•
When you remove the tray from the device, the mobile data connection will be
disabled. (Mobile network enabled models)
•
If the card is not fixed firmly into the tray, the SD card may leave or fall out of the
tray.
•
If you insert the tray into your device while the tray is wet, your device may be
damaged. Always make sure the tray is dry.
•
Fully insert the tray into the tray slot to prevent liquid from entering your device.
•
The device supports the FAT and the exFAT file systems for SD cards. When
inserting a card formatted in a different file system, the device will ask to
reformat the card or will not recognise the card. To use the SD card, you must
format it. If your device cannot format or recognise the SD card, contact the SD
card manufacturer, a Samsung Service Centre or an authorised service centre.
•
Frequent writing and erasing of data shortens the lifespan of SD cards.
•
When inserting an SD card into the device, the SD card’s file directory appears in
the
My Files
→
SD card
folder.

Getting started
14
Removing the SD card
Before removing the SD card, first unmount it for safe removal.
1 Open
Settings
and tap
Device care
→
Storage
→
Internal storage
→
SD card
.
2 Tap the More options icon ( )
→
Unmount
.
Do not remove external storage, such as an SD card or USB storage, while the
device is transferring or accessing information, or right after transferring data.
Doing so can cause data to be damaged or lost or cause damage to the external
storage or tablet. Samsung is not responsible for losses, including loss of data,
resulting from the misuse of external storage devices.
Formatting the SD card
An SD card formatted on a computer may not be compatible with the device. Format the
SD card on the device.
1 Open
Settings
and tap
Device care
→
Storage
→
Internal storage
→
SD card
.
2 Tap the More options icon ( )
→
Format
.
Before formatting the SD card, remember to make backup copies of all important
data stored in the SD card. The manufacturer’s warranty does not cover loss of data
resulting from user actions.
Turning the device on and off
Follow all posted warnings and directions from authorised personnel in areas
where the use of wireless devices is restricted, such as aeroplanes and hospitals.
Turning the device on
Press and hold the Side button for a few seconds to turn on the device.

Getting started
15
Turning the device off
1 To turn off the device, press and hold the Side button and the Volume Down button
simultaneously. Alternatively, open the quick settings panel and tap the Power off
icon (
).
2 Tap
Power off
→
Power off
.
If you want to set the device to turn off when you press and hold the Side button,
tap
Side button settings
→
Long press
→
Power off menu
.
Emergency calls and medical information (Mobile network enabled
models)
You can make an emergency call or check the medical information you saved.
Press and hold the Side button and the Volume Down button simultaneously, and then
tap
Emergency call
or
Medical info
. Alternatively, open the quick settings panel and tap
the Power off icon (
)
→
Emergency call
or
Medical info
.
To manage your medical information and emergency contacts, open
Settings
and
tap
Safety and emergency
.
Initial setup
When you turn on your device for the first time or after performing a data reset, follow
the on-screen instructions to set up your device.
If you do not connect to a Wi-Fi network, you might not be able to set up some
device features during the initial setup.
Using networks
You can use networks, such as a Wi-Fi, Bluetooth, or mobile network.
Open
Settings
, tap
Connections
, and then tap the switch of the desired network to turn
it on.
For the mobile network, tap
Data usage
and tap the
Mobile data
switch to turn it on.
When not using the network, tap the switch to turn it off.
Some features may not be available depending on the model.

Getting started
16
Samsung account
Using the Samsung account, you can use a variety of Samsung services that are provided
through mobile devices, TVs, and the Samsung website.
To check the list of services that can be used with your Samsung account, visit
account.samsung.com.
Open
Settings
and tap
Sign in to your Galaxy
. Alternatively, open
Settings
and tap
Accounts and backup
→
Manage accounts
→
Add account
→
Samsung account
.
When you sign out of your Samsung account, your data, such as contacts or events,
will also be removed from your device.
Transferring data from your previous device
(Smart Switch)
Transfer data from your previous device with the USB cable or wirelessly. You can also
transfer data from external storage or computer.
Open
Settings
, tap
Accounts and backup
→
Transfer data for device setup
, and then
follow the on-screen instructions to transfer data.
Visit www.samsung.com/smartswitch for details and limitations.
•
To transfer data using external storage, tap the External storage icon ( ).
•
To check the data that has been transferred, tap the More options icon ( )
→
Transfer
result
.
•
This feature may not be supported on some devices or computers.
•
Samsung takes copyright seriously. Only transfer content that you own or have
the right to transfer.
Getting started
17
Understanding the screen
Controlling the screen
•
Tapping: Tap the screen.
•
Touching and holding: Touch and hold the screen for approximately 2 seconds.
•
Dragging: Touch and hold an item and drag it to the target position.
•
Double tapping: Double tap the screen.
•
Swiping: Swipe upwards, downwards, to the left, or to the right.
•
Spreading and pinching: Spread two fingers apart or pinch on the screen.
•
Do not allow the screen to come into contact with other electrical devices.
Electrostatic discharges can cause the screen to malfunction.
•
To avoid damaging the screen, do not tap it with anything sharp or apply
excessive pressure to it with your fingertips or other object.
•
It is recommended not to use fixed graphics on part or all of the screen for
extended periods. Doing so may result in afterimages (screen burn-in) or
ghosting.
The device may not recognise touch inputs close to the edges of the screen, which
are outside of the touch input area.
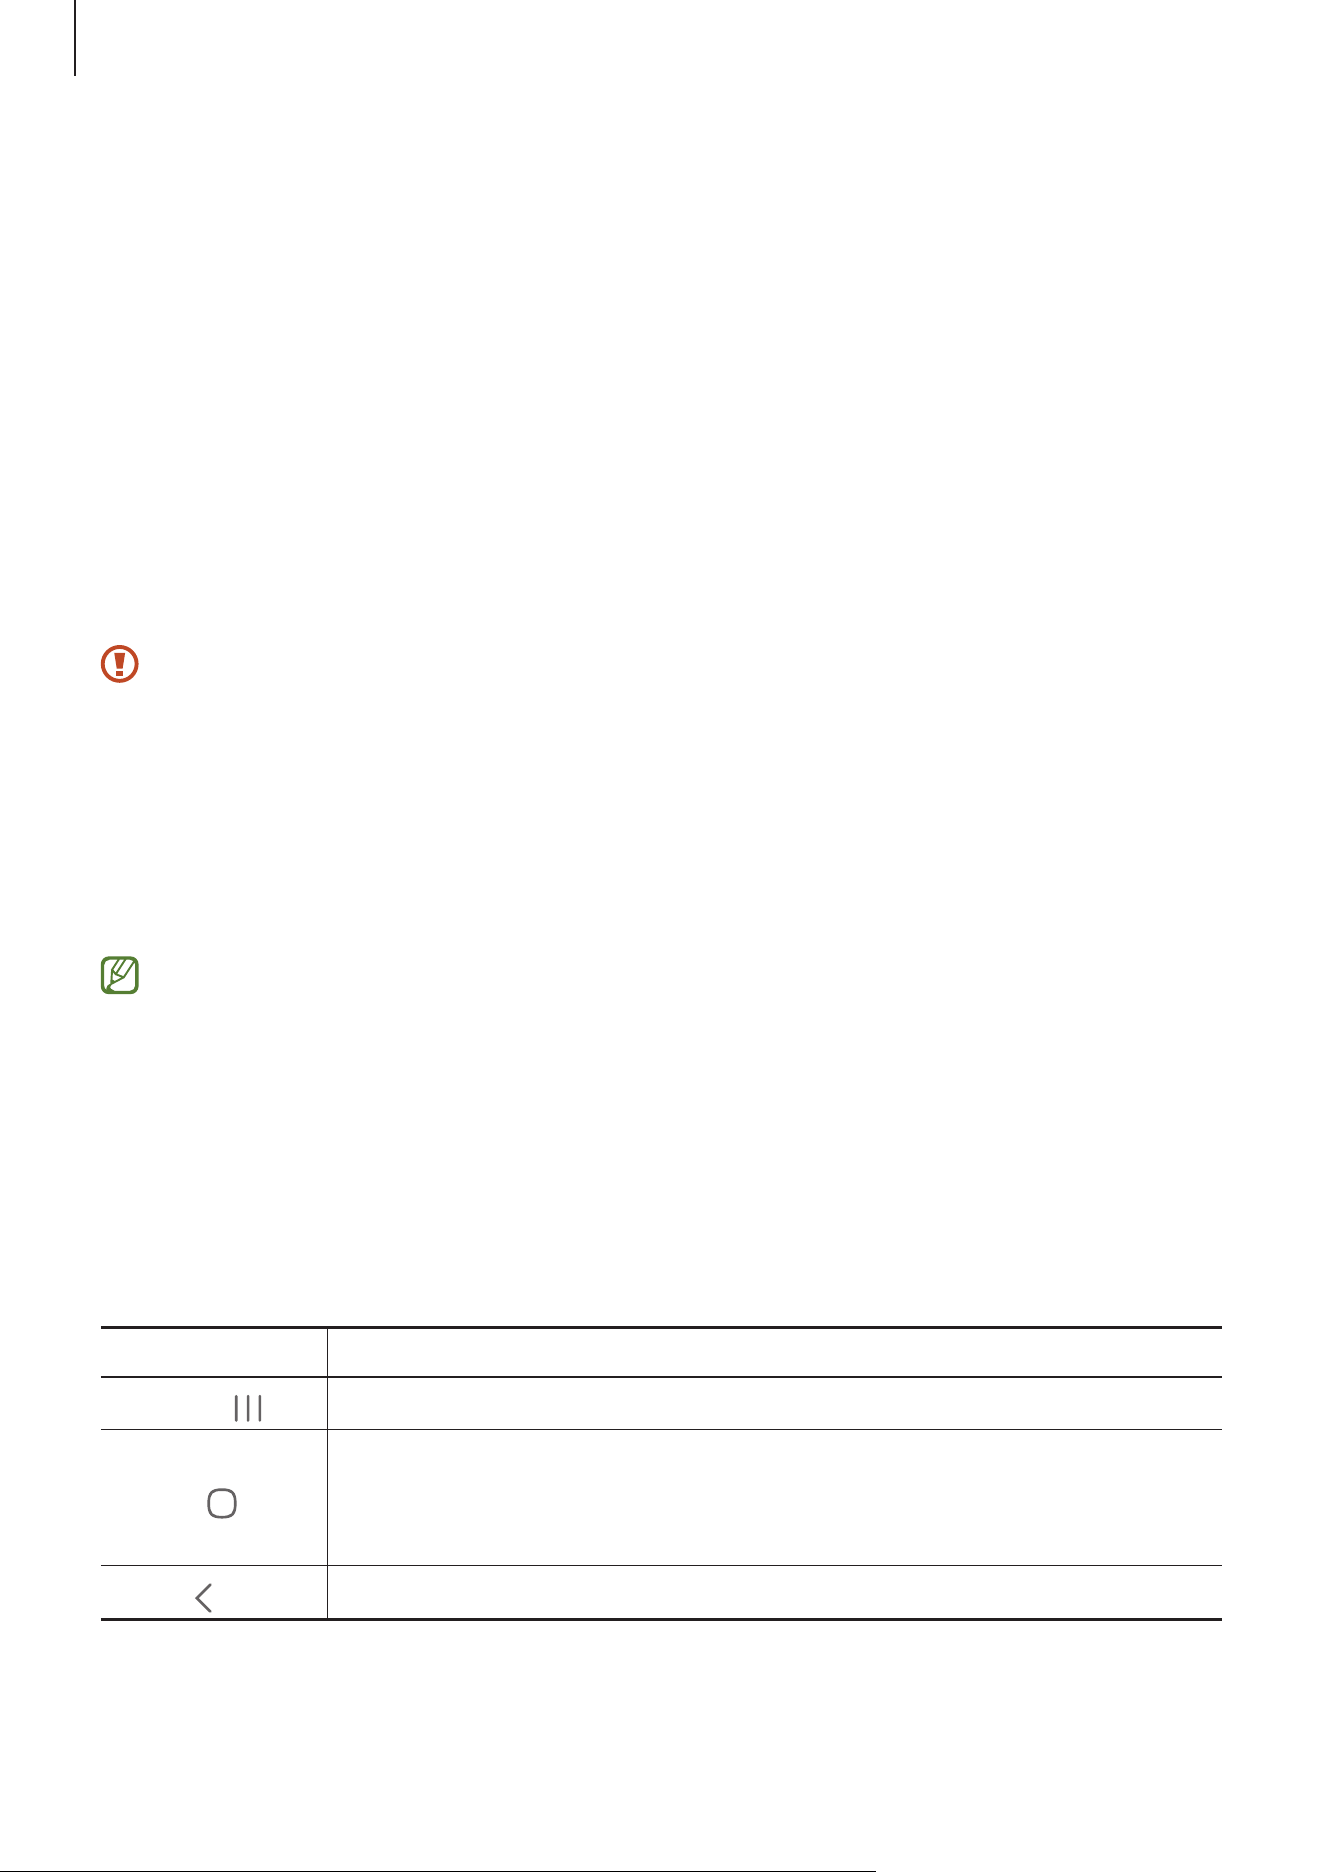
Navigation bar (soft buttons)
When you turn on the screen, the soft buttons will appear on the navigation bar at the
bottom of the screen. The soft buttons are set to the Recents button, Home button, and
Back button by default. The functions of the buttons can change according to the app
currently being used or usage environment.
Button Function
Recents (
)
Tap to open the list of recent apps.
Home (
)
•
Tap to return to the Home screen.
•
Touch and hold to launch
Circle to Search
. Tap or draw a circle
around an image or text.
Back (
)
Tap to return to the previous screen.
Getting started
18
Hiding the navigation bar
Check files or use apps on a wider screen by hiding the navigation bar.
Open
Settings
and tap
Display
→
Navigation bar
→
Swipe gestures
.
Home screen and Apps screen
The Home screen is the starting point for accessing all of the device’s features. It
displays widgets, shortcuts to apps, and more.
The Apps screen displays icons for all apps, including newly installed apps.
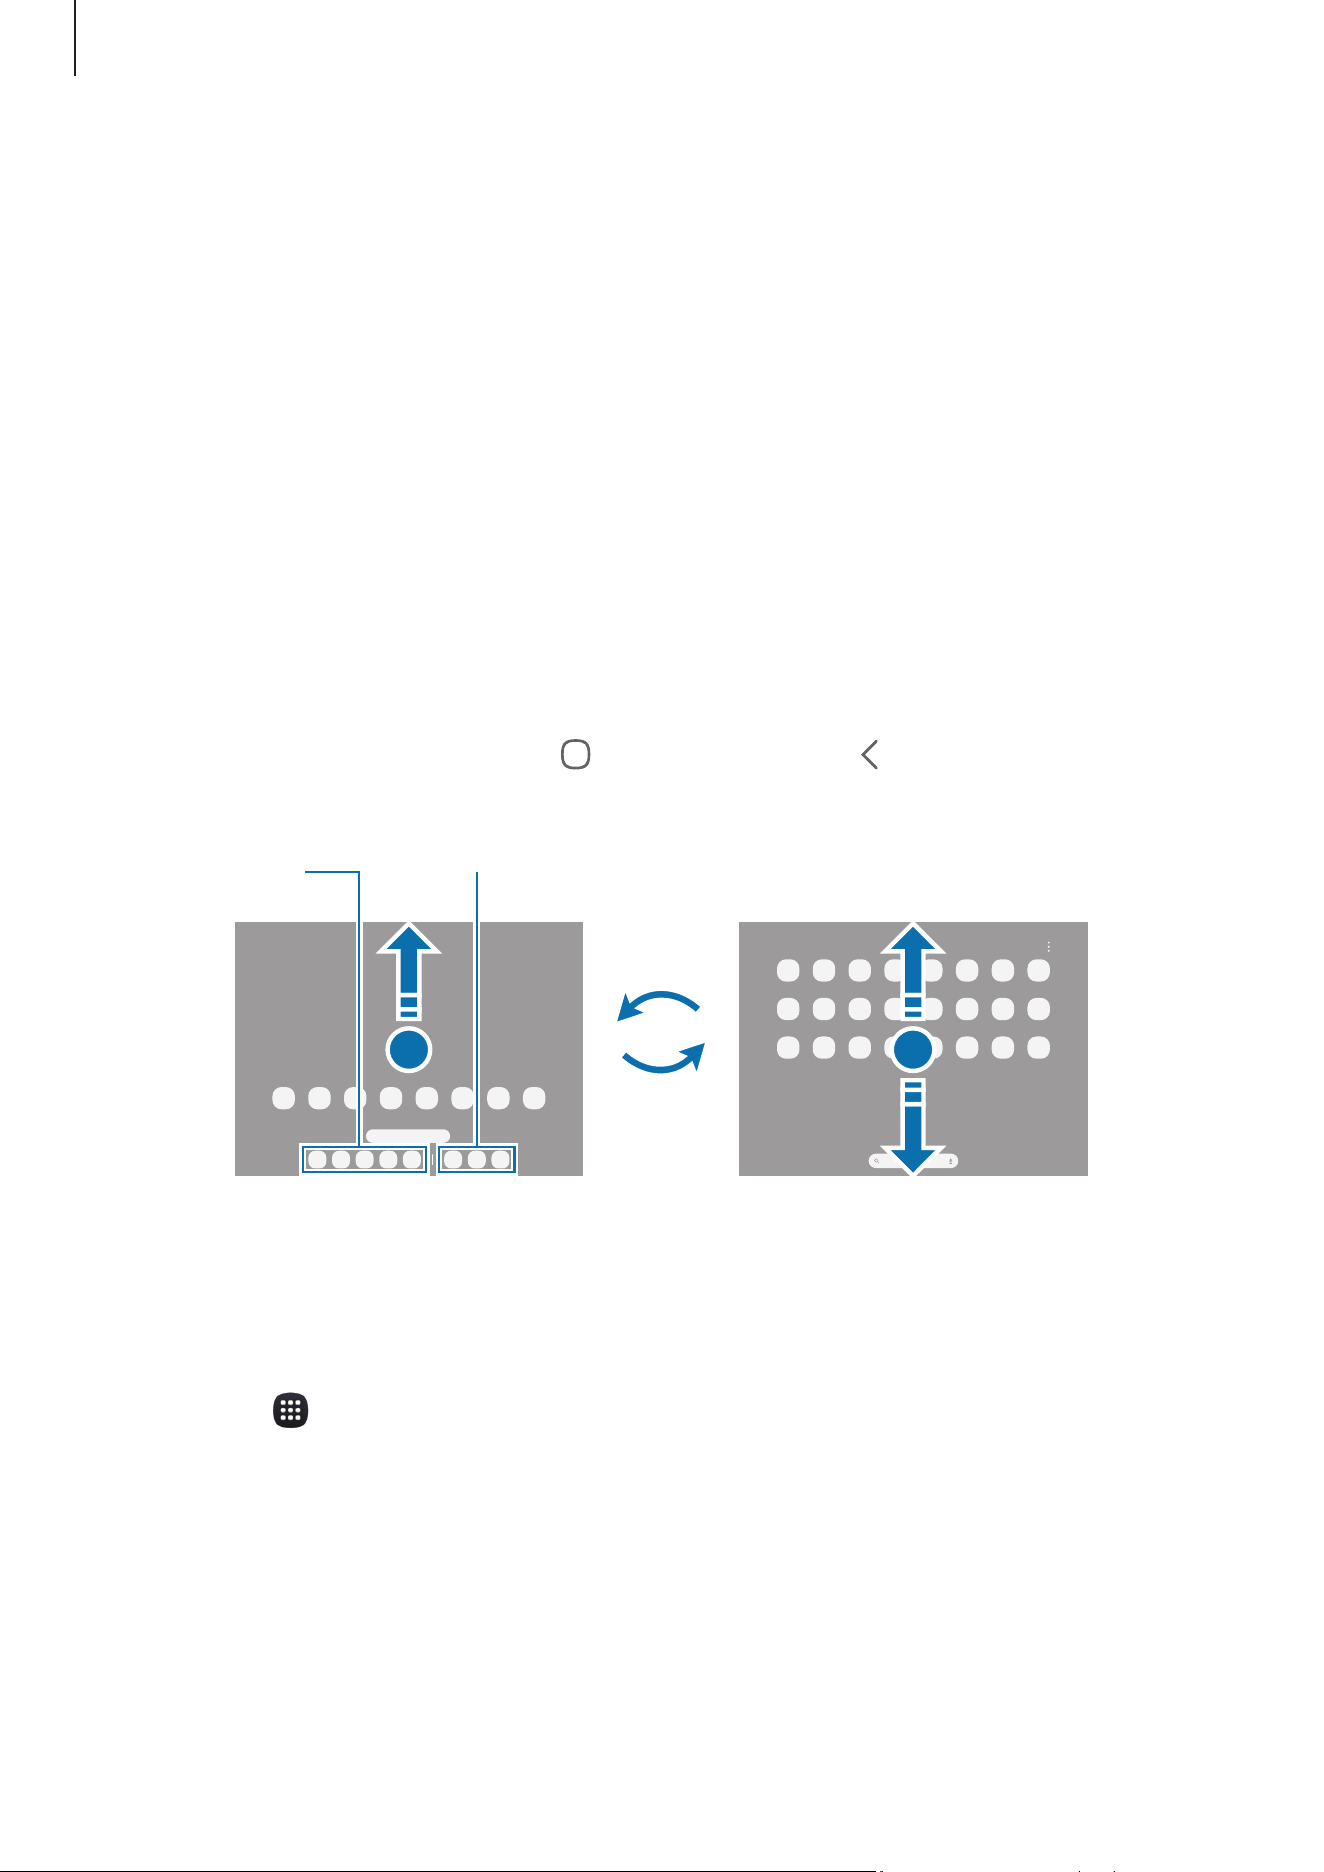
Switching between Home and Apps screens
On the Home screen, swipe upwards to open the Apps screen.
To return to the Home screen, swipe upwards or downwards on the Apps screen.
Alternatively, tap the Home button (
) or the Back button ( ).
Apps screenHome screen
Recently used or
suggested apps
Favourite apps
If you add the Apps button on the Home screen, you can open the Apps screen by
tapping the button. On the Home screen, touch and hold an empty area, tap
Settings
,
and then tap the
Show Apps screen button on Home screen
switch to turn it on. The
Apps button (
) will be added at the bottom of the Home screen.
Getting started
19
Editing the Home screen
On the Home screen, touch and hold an empty area, or pinch your fingers together to
access the editing options. You can set the wallpaper, add widgets, and more.
You can also add, delete, or rearrange Home screen panels.
•
Adding panels: Swipe to the left, and then tap the Add page icon ( ).
•
Moving panels: Drag a panel preview to a new location.
•
Deleting panels: Tap the Remove icon ( ) on the panel.
Displaying all apps on the Home screen
Without using a separate Apps screen, you can set the device to display all apps on the
Home screen. On the Home screen, touch and hold an empty area, and then tap
Settings
→
Home screen layout
→
Home screen only
→
Apply
.
Moving items
Drag an item to a new location. To move the item to another panel, drag it to the side of
the screen. If you touch and hold an item and tap
Select
, you can select more items and
move them together at once.
To add a shortcut to an app on the Home screen, touch and hold an item on the Apps
screen, and then tap
Add to Home
. A shortcut to the app will be added on the Home
screen.
You can also move frequently used apps to the shortcuts area at the bottom of the Home
screen.
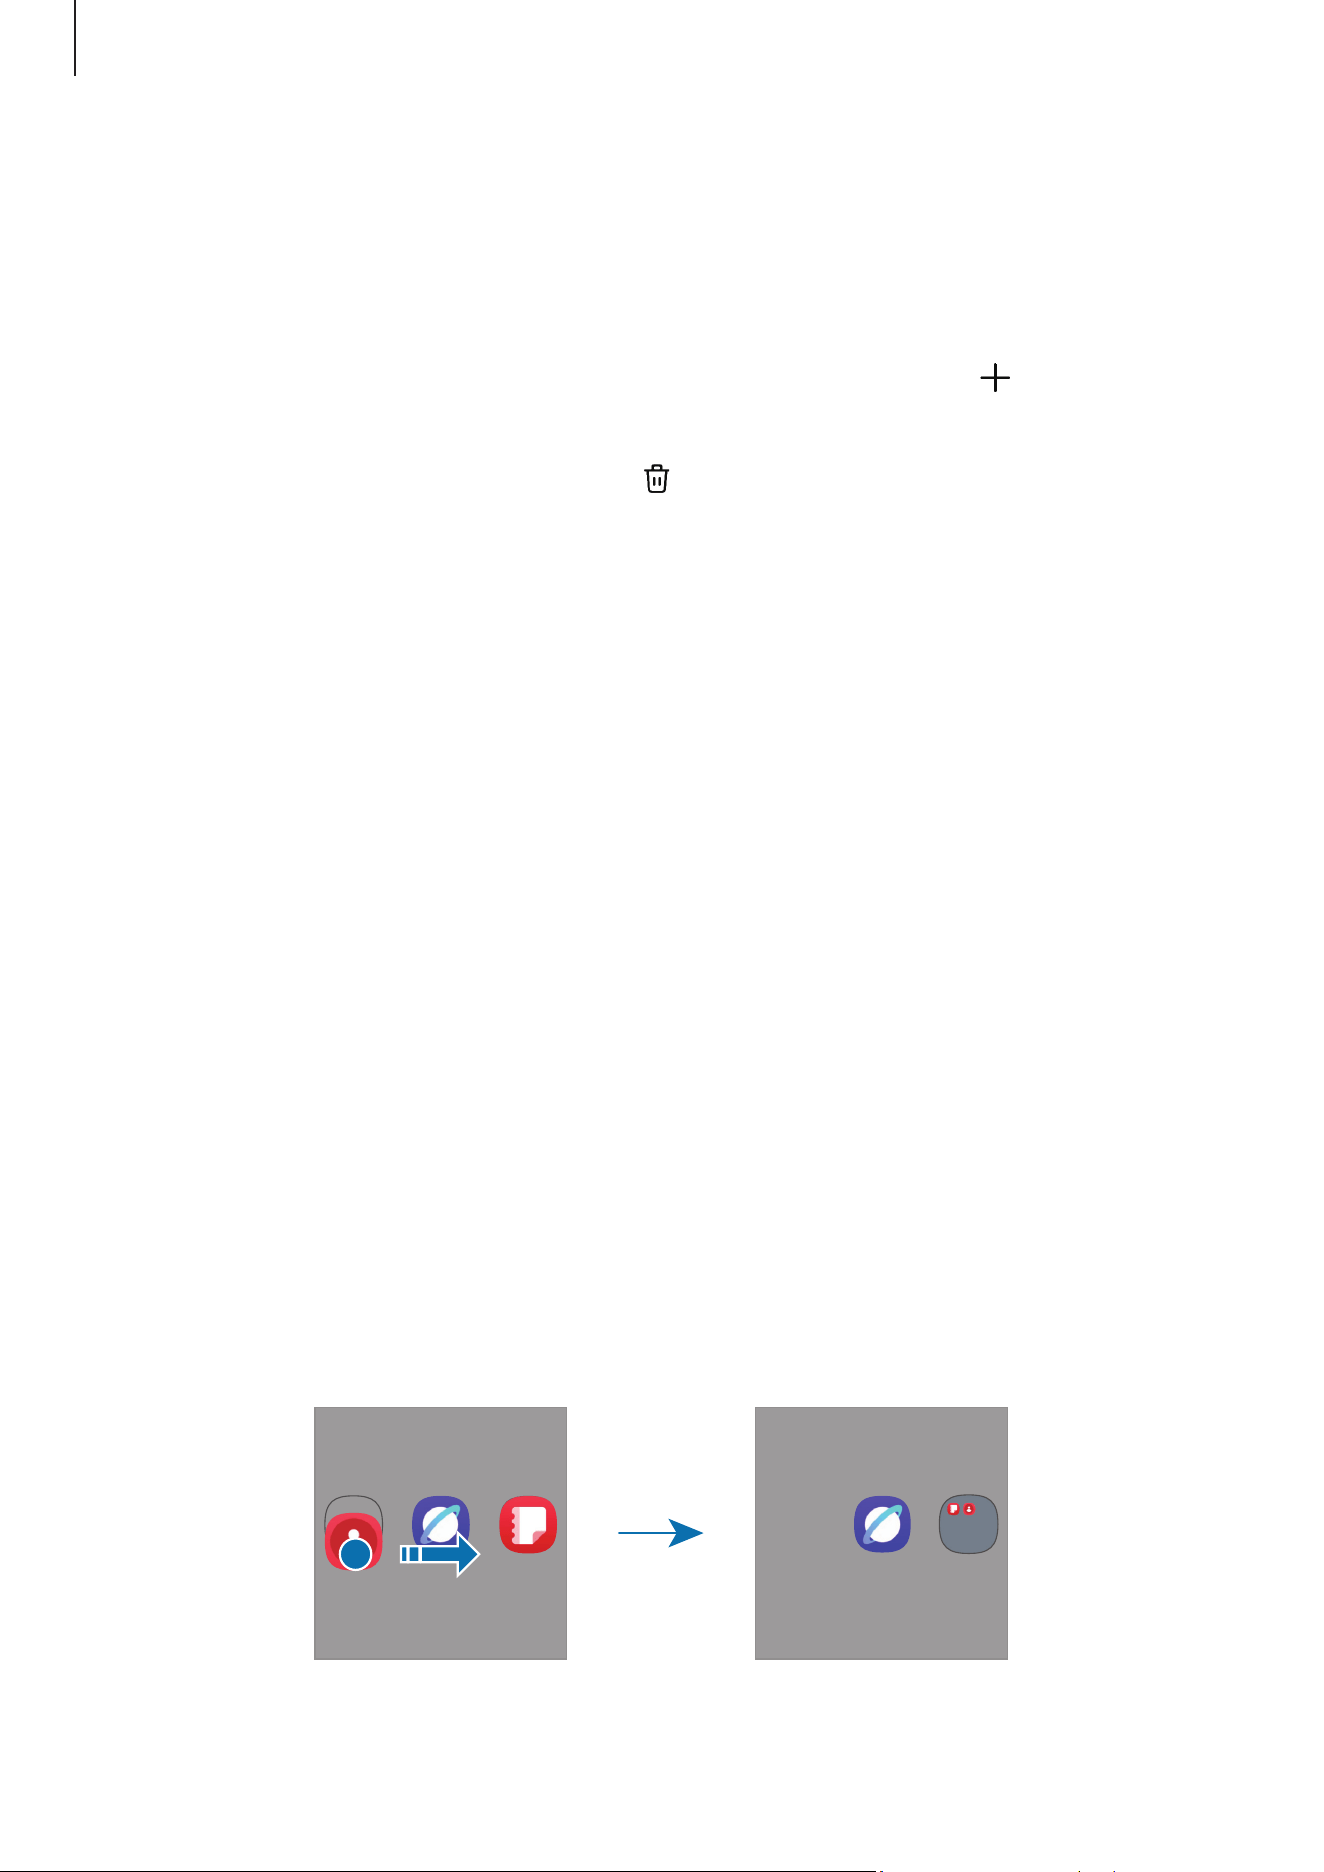
Creating folders
On the Home screen or the Apps screen, drag an app over another app.
A new folder containing the selected apps will be created. Tap
Folder name
and enter a
folder name.
Getting started
20
Taskbar
The taskbar appears at the bottom of screen while using an app. The favourite apps
from the bottom of the Home screen, recently used or suggested apps, and the all apps
button will be displayed on the taskbar. You can switch apps by selecting the app you
want from the taskbar.
You can also run multiple apps at the same time. While using an app, drag the app you
want from the taskbar upwards, and then drop it wherever you want.
If you do not want to use the taskbar, open
Settings
, tap
Display
, and then tap the
Taskbar
switch to turn it off.
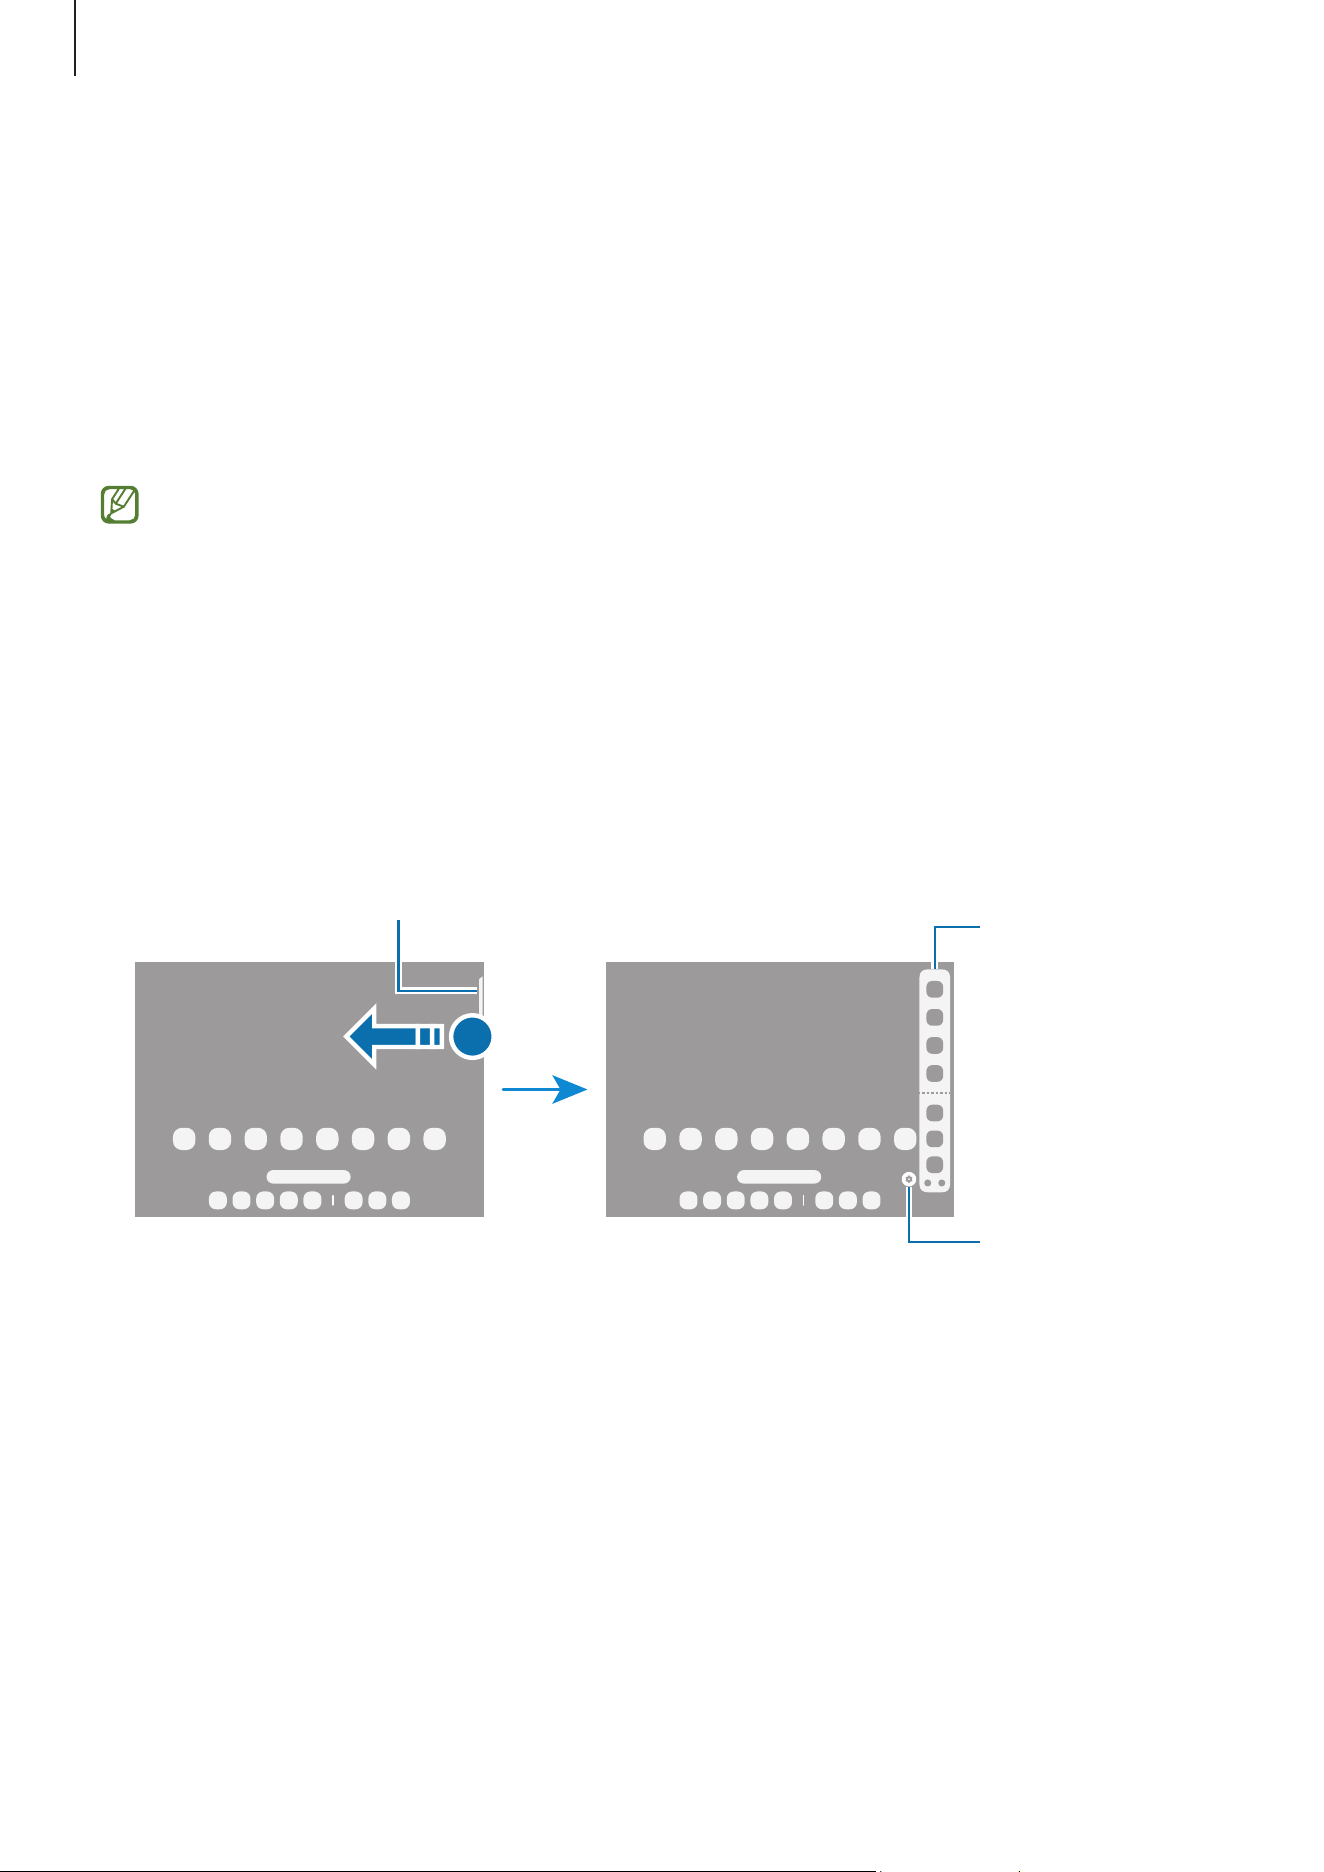
Edge panel
You can access your favourite apps and features from the Edge panels.
Drag the Edge panel handle towards the centre of the screen.
If the Edge panel handle is not visible, open
Settings
, tap
Display
, and then tap the
Edge
panels
switch to turn it on.
Edge panel
Edge panel
settings
Edge panel handle
Lock screen
Pressing the Side button turns off the screen and locks it. Also, the screen turns off and
automatically locks if the device is not used for a specified period.
To unlock the screen, swipe in any direction except downwards when the screen turns
on.
If the screen is off, press the Side button to turn on the screen. Alternatively, double tap
the screen.
Getting started
21
Editing shortcuts
You can change the shortcuts at the bottom of the locked screen to other apps or
features you want.
Touch and hold on the locked screen, tap the shortcut icon, select an app or feature you
want, and then tap
Done
.
Changing the screen lock method
To change the screen lock method, open
Settings
, tap
Lock screen
→
Screen lock and
biometrics
, and then select a method.
When you set a pattern, PIN, password, or your biometric data for the screen lock
method, you can protect your personal information by preventing others from accessing
your device. After setting the screen lock method, the device will require an unlock code
whenever unlocking it.
You can set your device to perform a factory data reset if you enter the unlock code
incorrectly several times in a row and reach the attempt limit. Open
Settings
, tap
Lock screen
→
Secure lock settings
, unlock the screen using the preset screen lock
method, and then tap the
Auto factory reset
switch to turn it on.
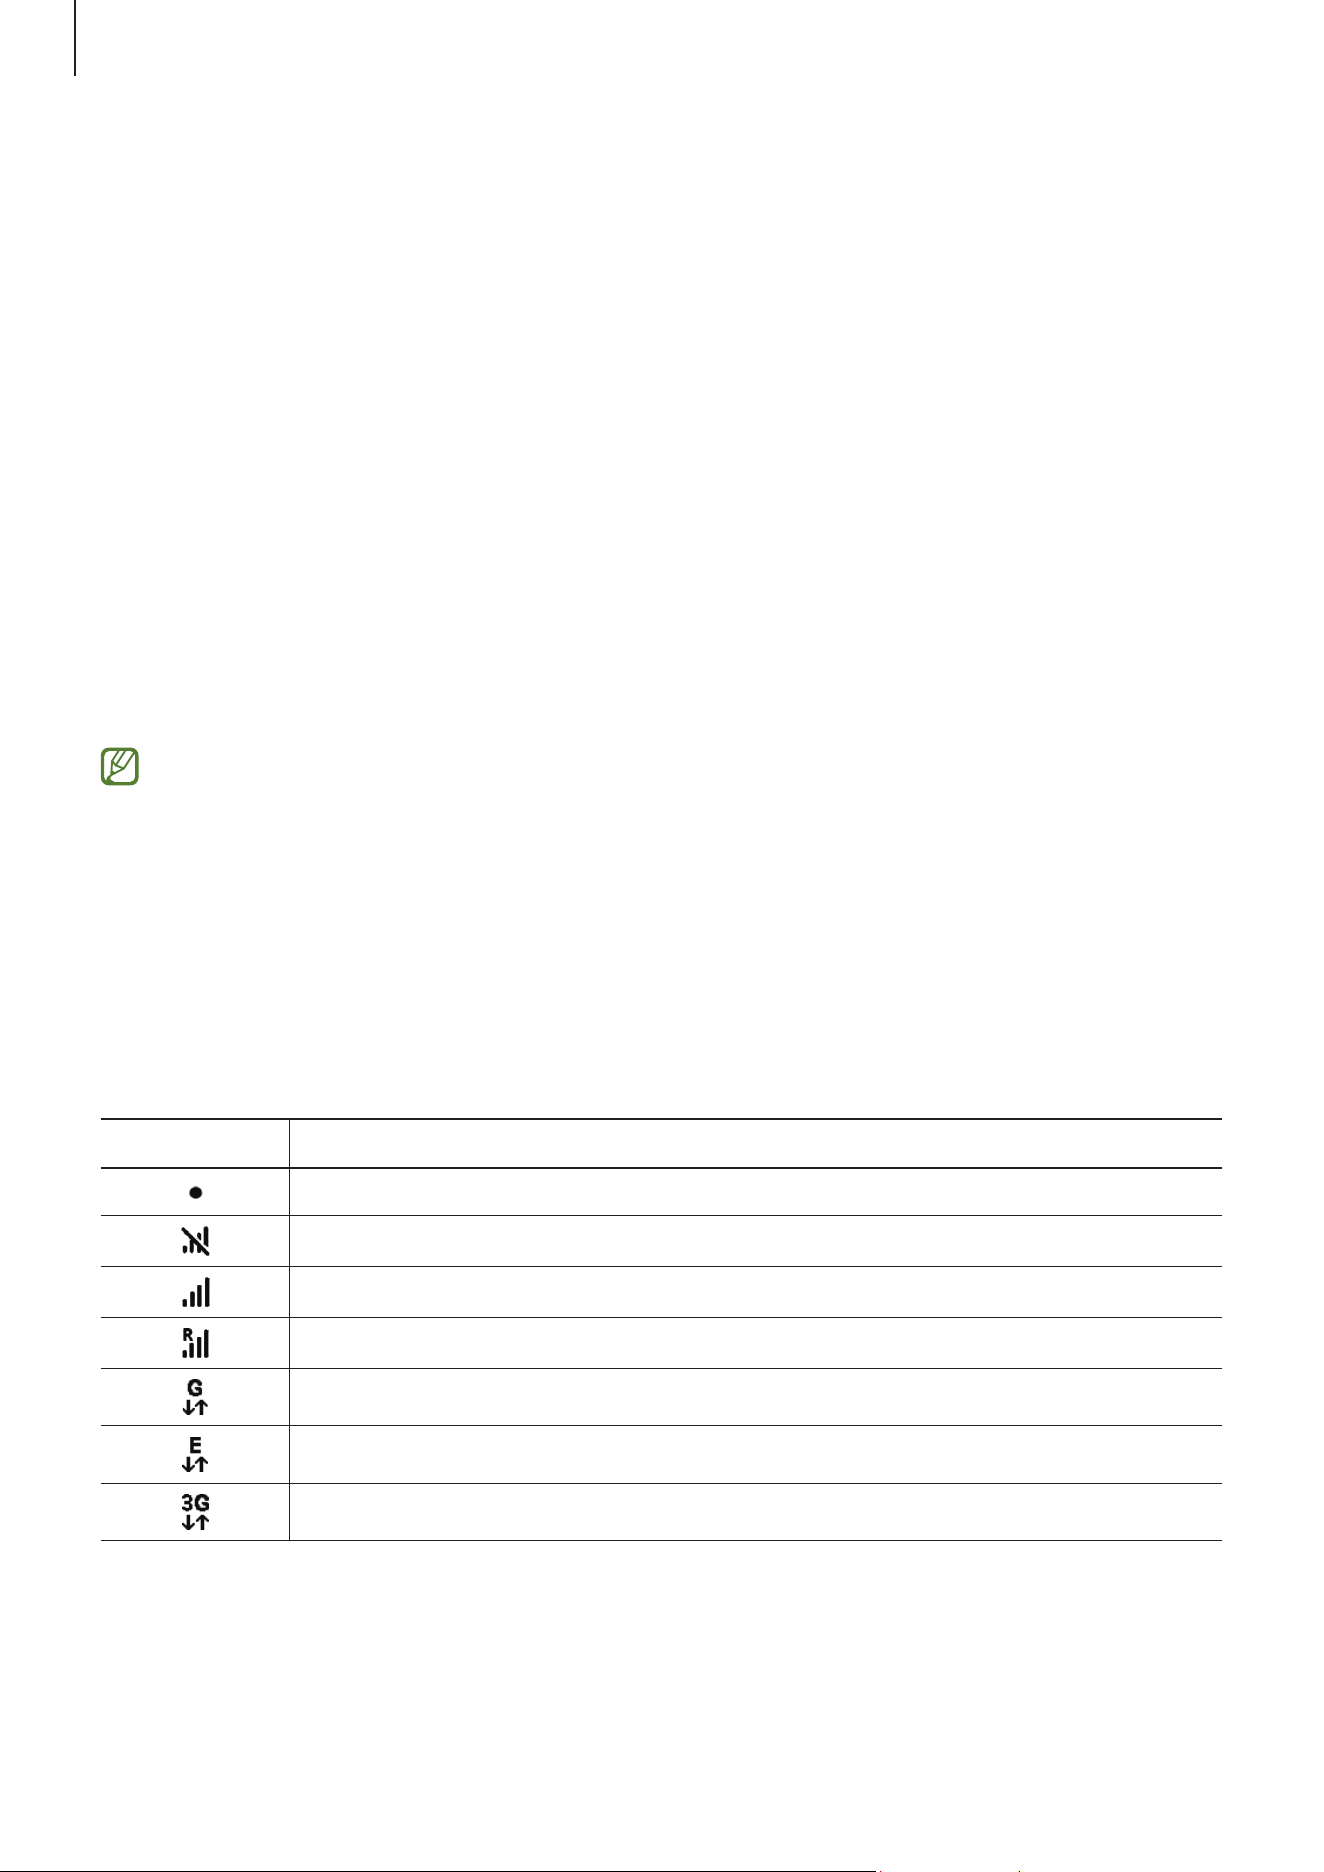
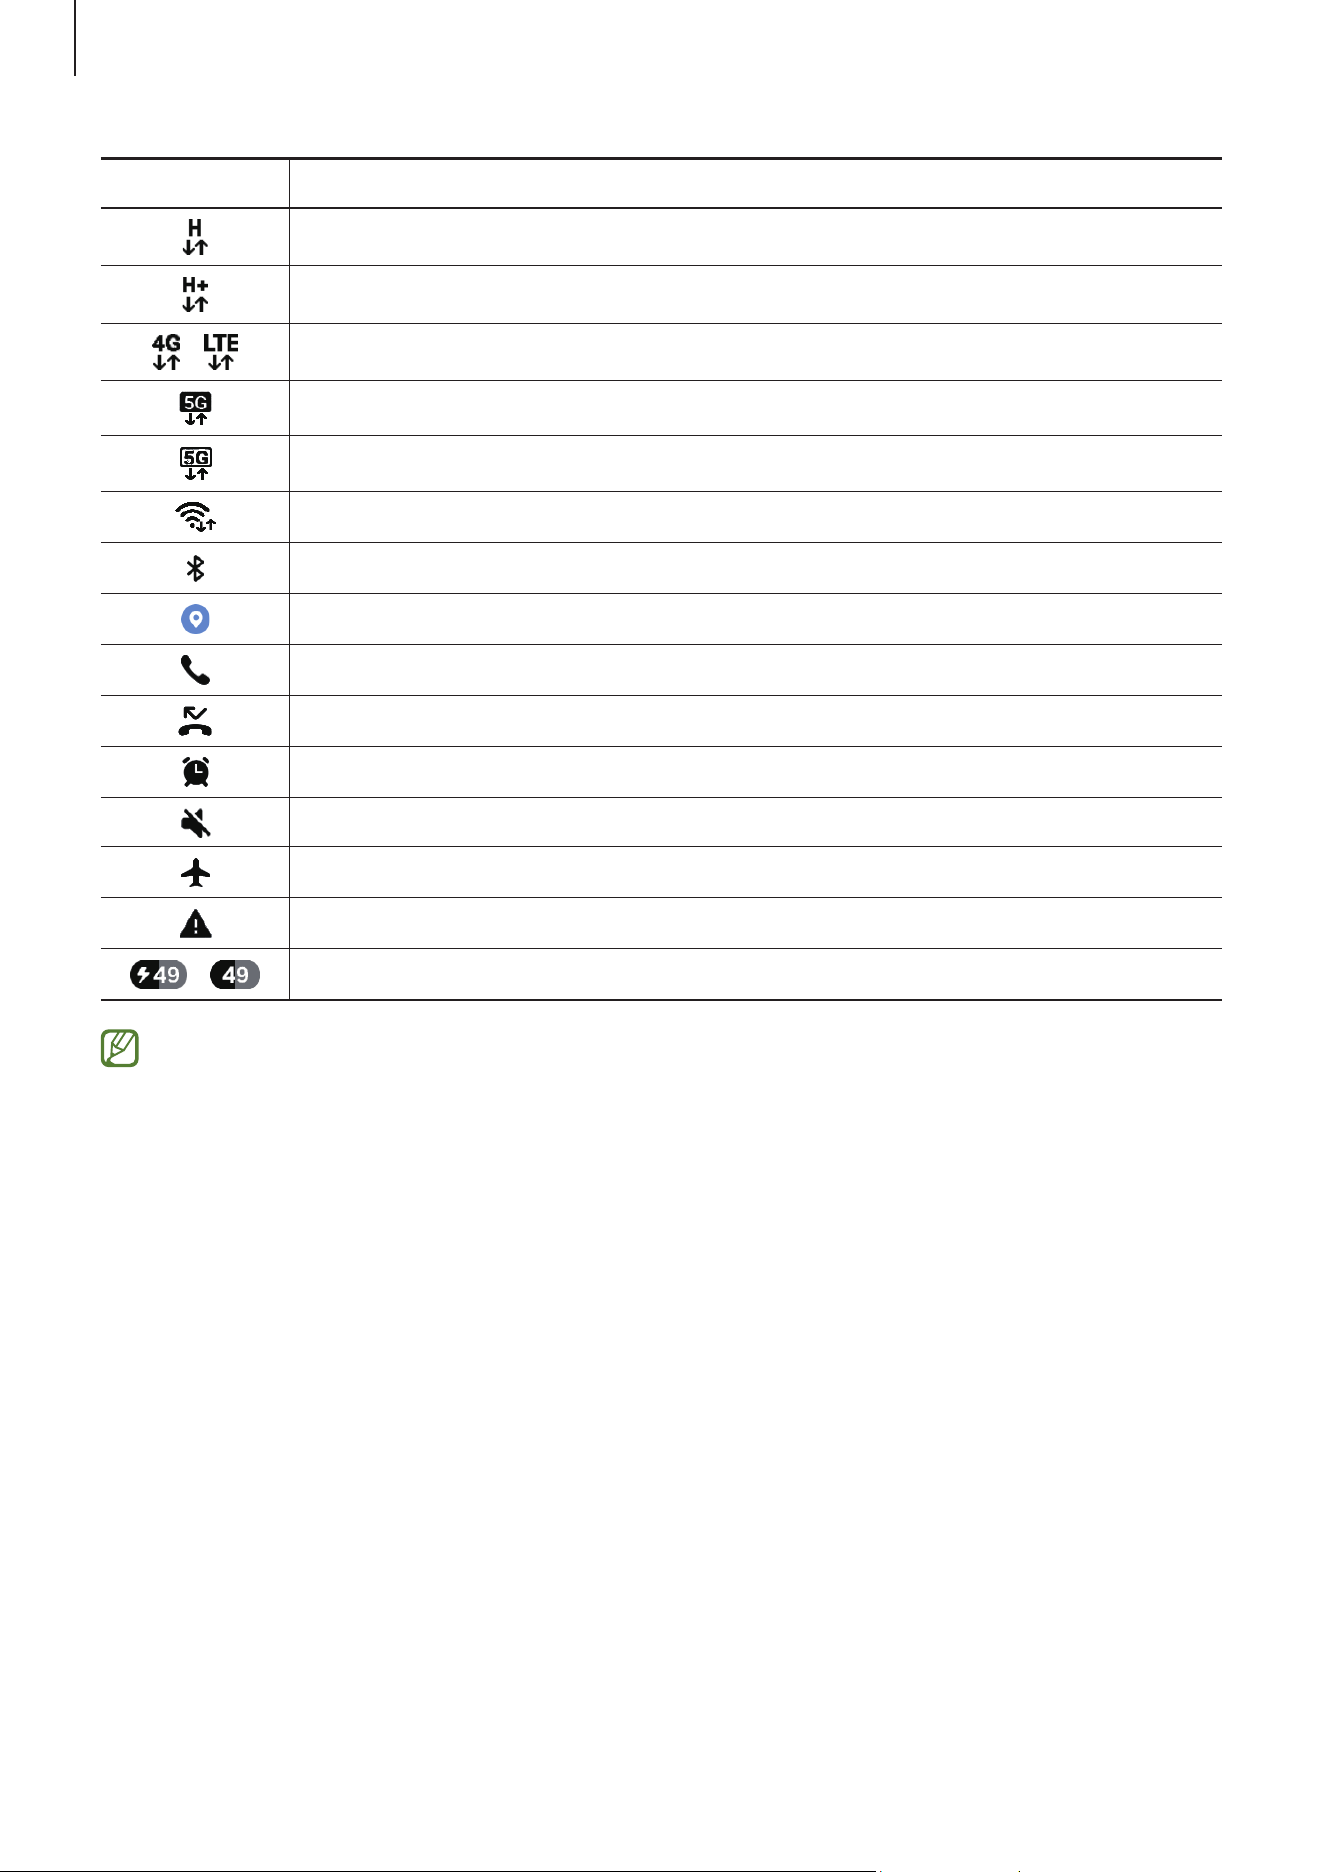
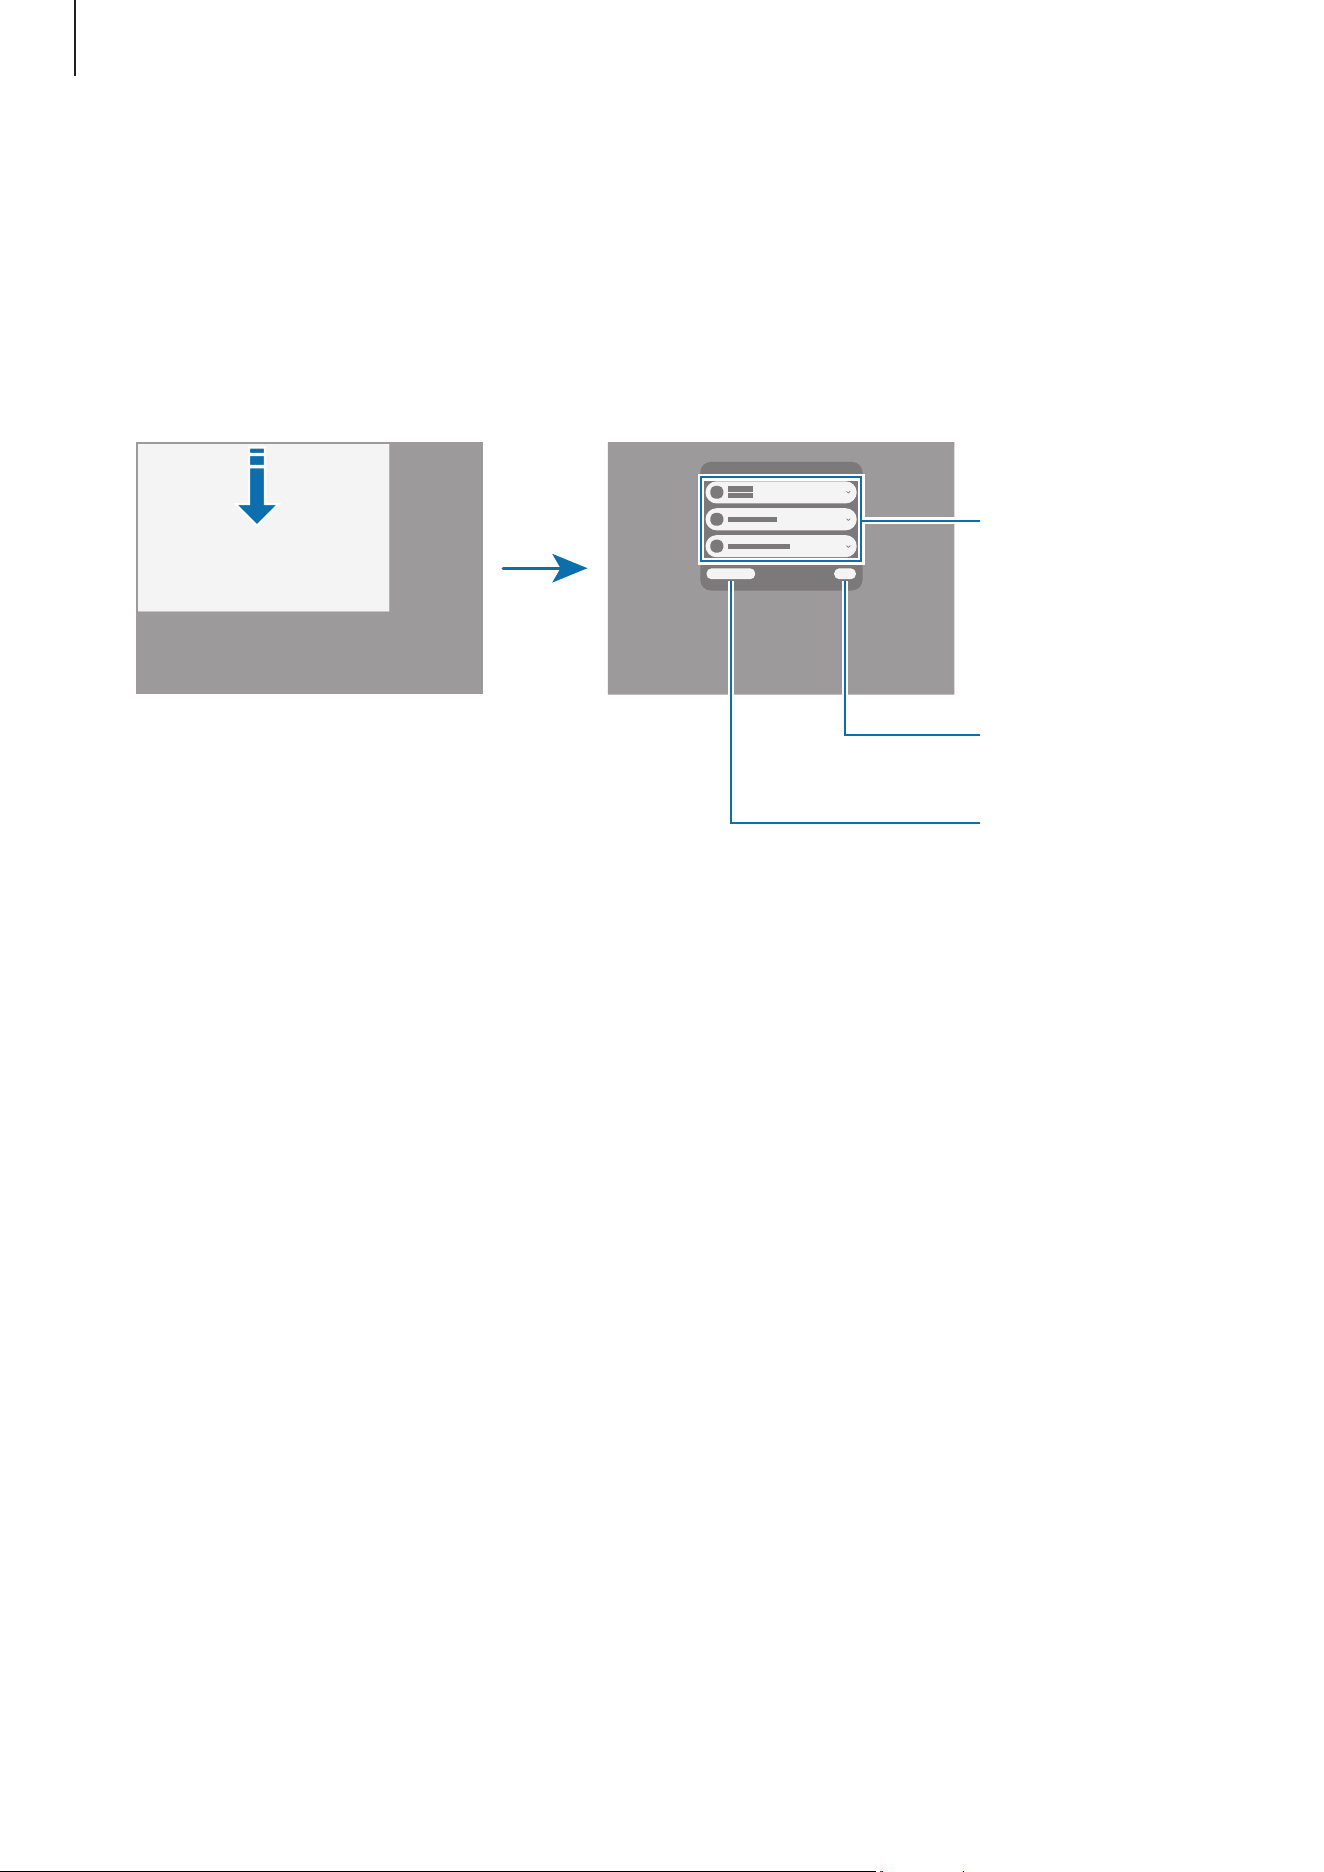
Indicator icons
Indicator icons appear on the status bar at the top of the screen. The icons listed in the
table are most common.
Icon Meaning
New notifications
No signal
Signal strength
Roaming (outside of normal service area)
GPRS network connected
EDGE network connected
UMTS network connected
Getting started
22
Icon Meaning
HSDPA network connected
HSPA+ network connected
/
LTE network connected
5G network connected
LTE network connected in LTE network that includes the 5G network
Wi-Fi connected
Bluetooth feature turned on
Location services being used
Call in progress
Missed call
Alarm turned on
Mute mode
Flight mode turned on
Error occurred or caution required
/
Battery charging / Battery power level
•
The status bar may not appear at the top of the screen in some apps. To display
the status bar, drag down from the top of the screen.
•
Some indicator icons appear only when you open the notification panel.
•
Some notifications will be displayed as a dot.
•
The indicator icons may appear differently depending on the carrier or model.
Getting started
23
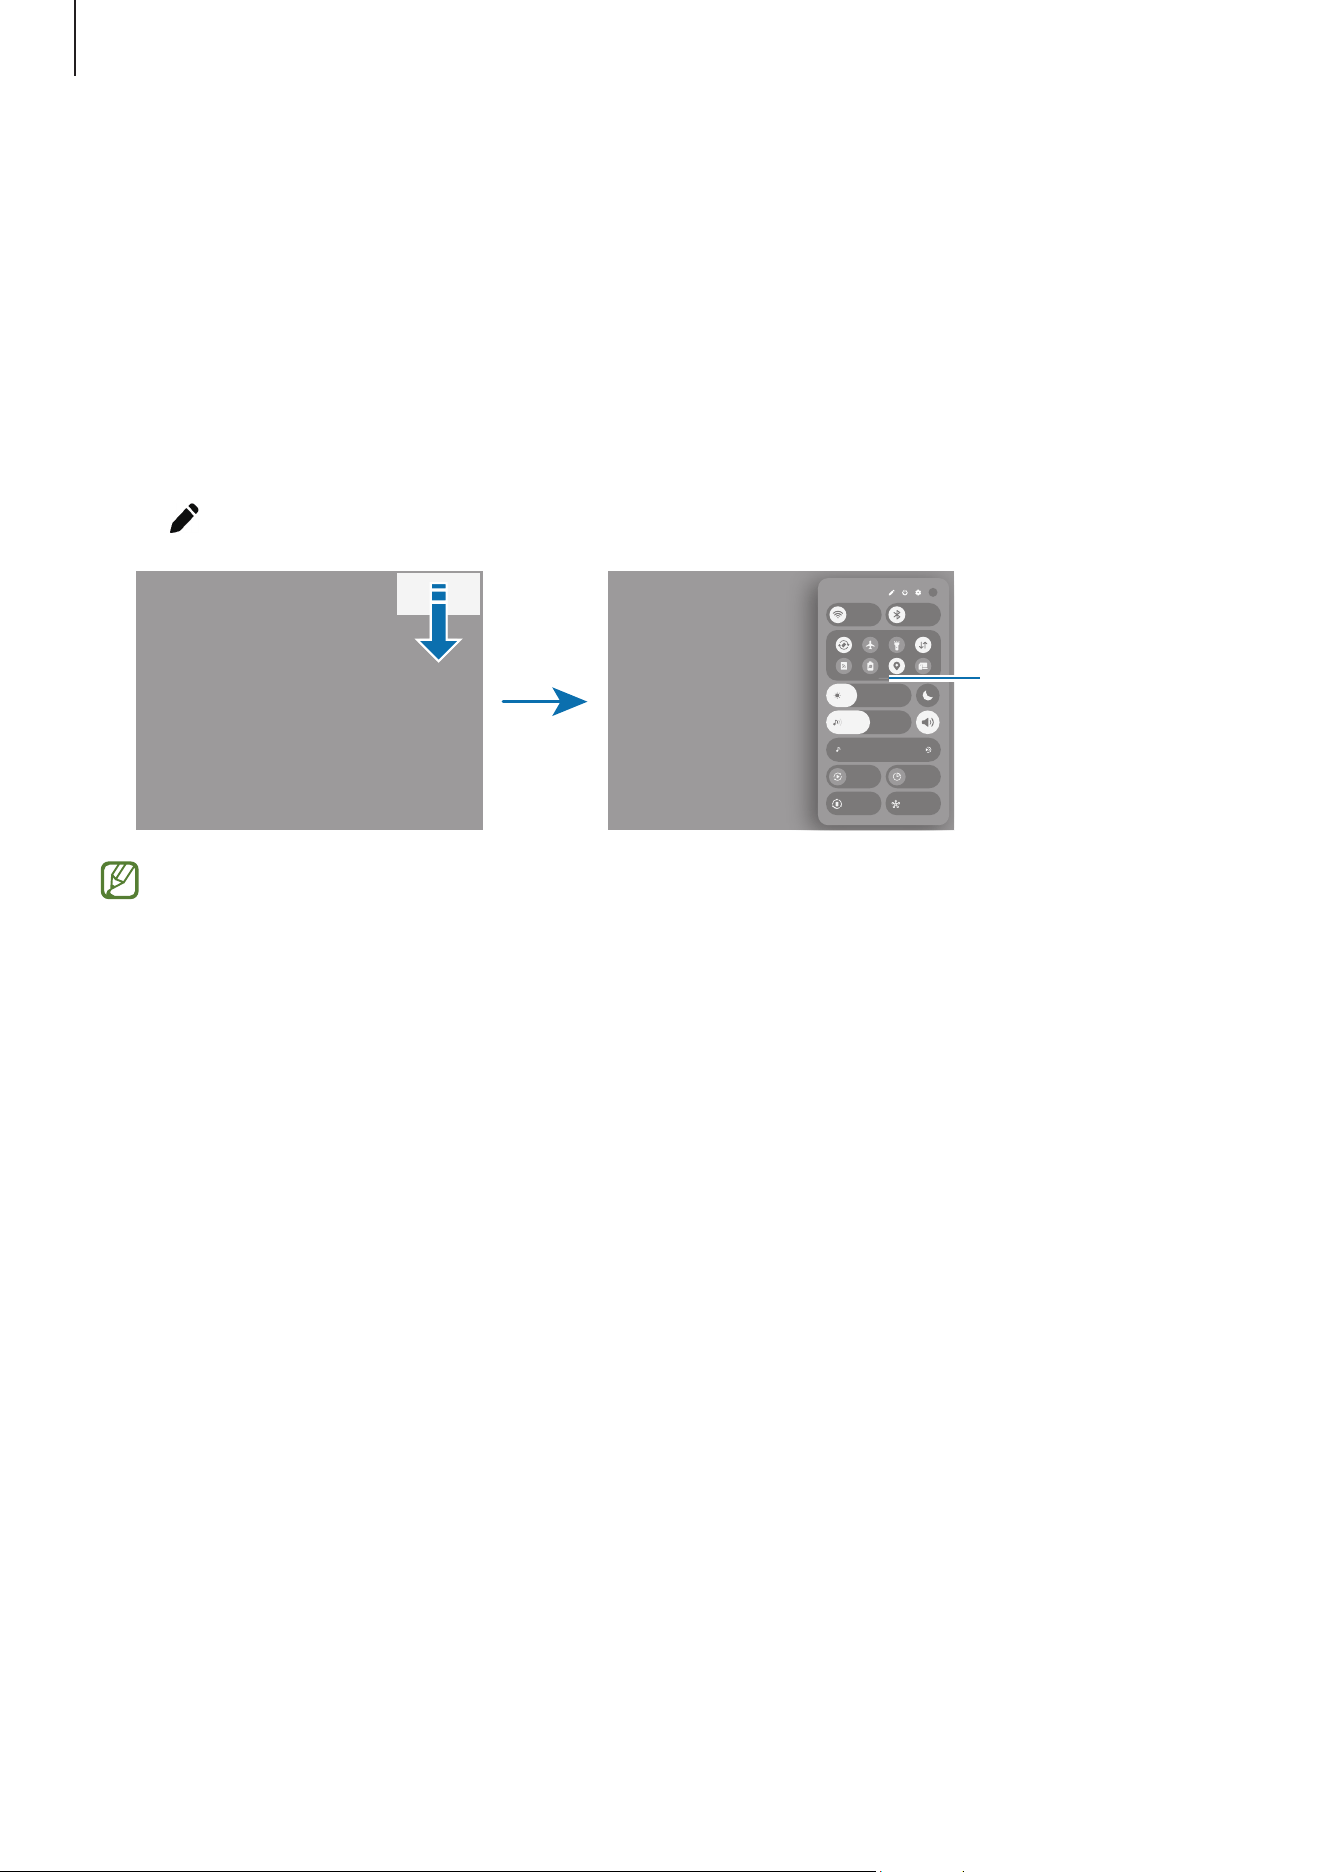
Notification panel
When you receive new notifications, indicator icons appear on the status bar. Open the
notification panel to check the details.
To open the notification panel, swipe downwards from the top of the screen, except for
the right side. To close the notification panel, swipe upwards on the screen.
Check the
notification
details and
perform various
actions.
Clear all
notifications.
Access the
notification
settings.
Getting started
24
Quick settings panel
You can turn specific features on or off, such as the Wi-Fi or Bluetooth feature, by
tapping each button. You can also connect to nearby devices, control media, and use the
SmartThings app to control connected devices.
To open the quick settings panel, swipe downwards from the top right side of the screen.
To close the quick settings panel, swipe upwards on the screen.
To access more detailed settings, touch and hold a button. To edit buttons, tap the Edit
icon (
)
→
Edit
.
Check more
buttons.
This image may differ depending on the region or model.
Getting started
25
Screen capture and screen record
Screen capture
Use the following methods to capture a screenshot. You can check the captured
screenshots in
Gallery
.
•
Button capture
Press the Side button and the Volume Down button simultaneously.
•
Swipe capture
With the edge of your hand, swipe your hand to the left or right across the screen.
If capturing a screenshot by swiping is not turned on, open
Settings
, tap
Advanced
features
→
Motions and gestures
, and then tap the
Palm swipe to capture
switch to
turn it on.
It is not possible to capture a screenshot while using some apps and features.
After capturing a screenshot, use the following options on the toolbar at the bottom of
the screen:
•
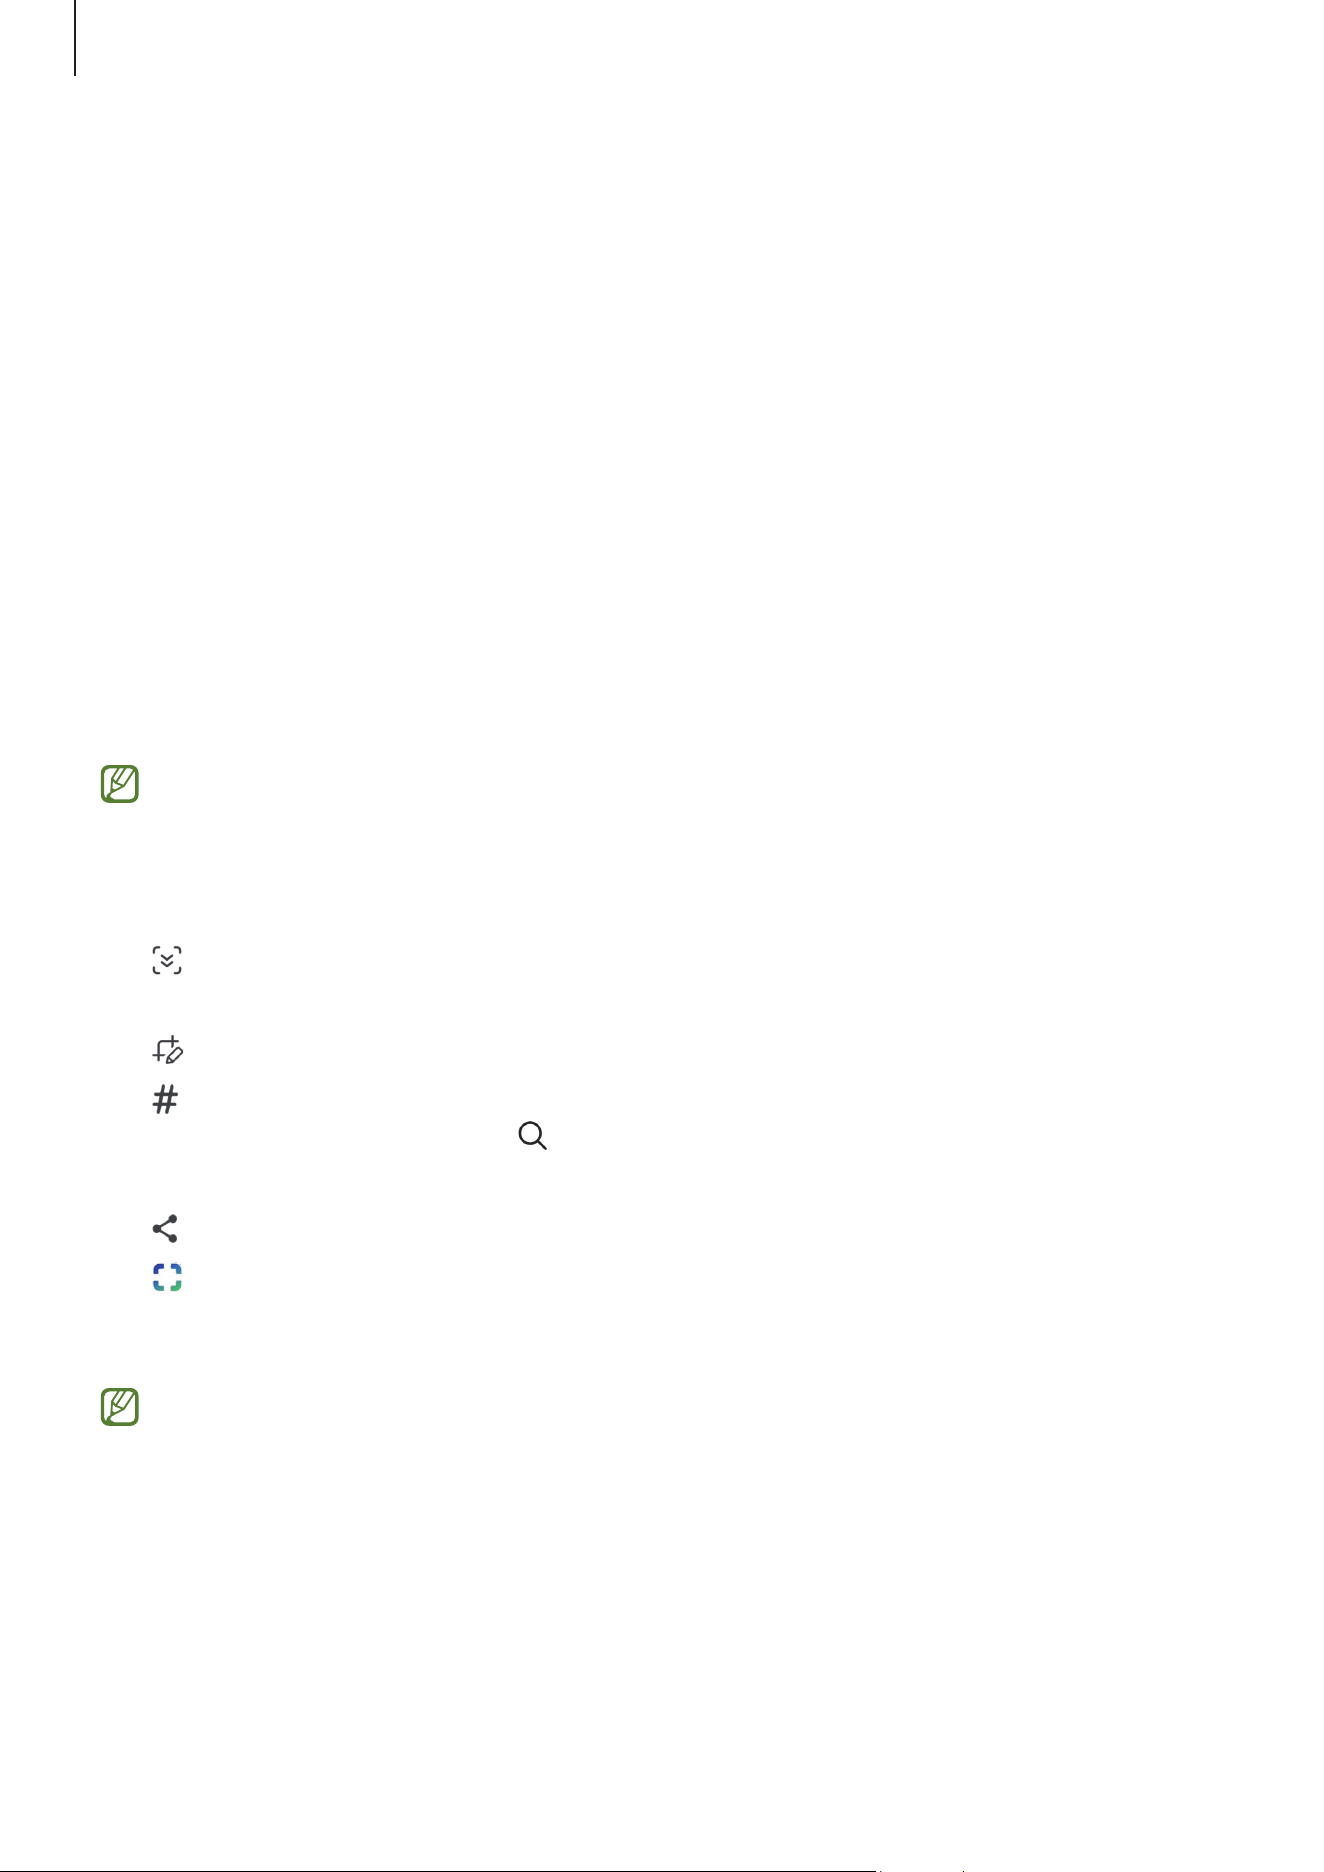
: Capture the current content and the hidden content on an elongated page, such
as a webpage.
•
: Write or draw on the screenshot or crop a portion from the screenshot.
•
: Add tags to the screenshot. To search for screenshots by tag, open the
Gallery
app and tap the Search icon (
). You can access the tags list and search for the
screenshot you want.
•
: Share the screenshot with others.
•
: Select an area and perform actions, such as sharing or saving. Tap or draw a
circle around the content you want to select. Then, select an option to use with the
selected area.
If the options are not visible on the captured screen, open
Settings
, tap
Advanced
features
→
Screenshots and screen recordings
, and then tap the
Show toolbar
after capturing
switch to turn it on.

Getting started
26
Screen record
1 Open the quick settings panel, tap the Expand icon ( ), and then tap
Screen
recorder
( ).
2 Customise the settings and tap
Start recording
.
After a countdown, recording will start.
•
To write or draw on the screen, tap the Draw icon ( ).
•
To show the S Pen pointer on the screen, tap the Pointer icon ( ).
•
To record the screen with a video overlay of yourself, tap the Selfie video icon ( ).
3 When you are finished recording the video, tap the Stop icon ( ).
To change the screen recorder settings, open
Settings
and tap
Advanced features
→
Screenshots and screen recordings
.
Getting started
27
Entering text
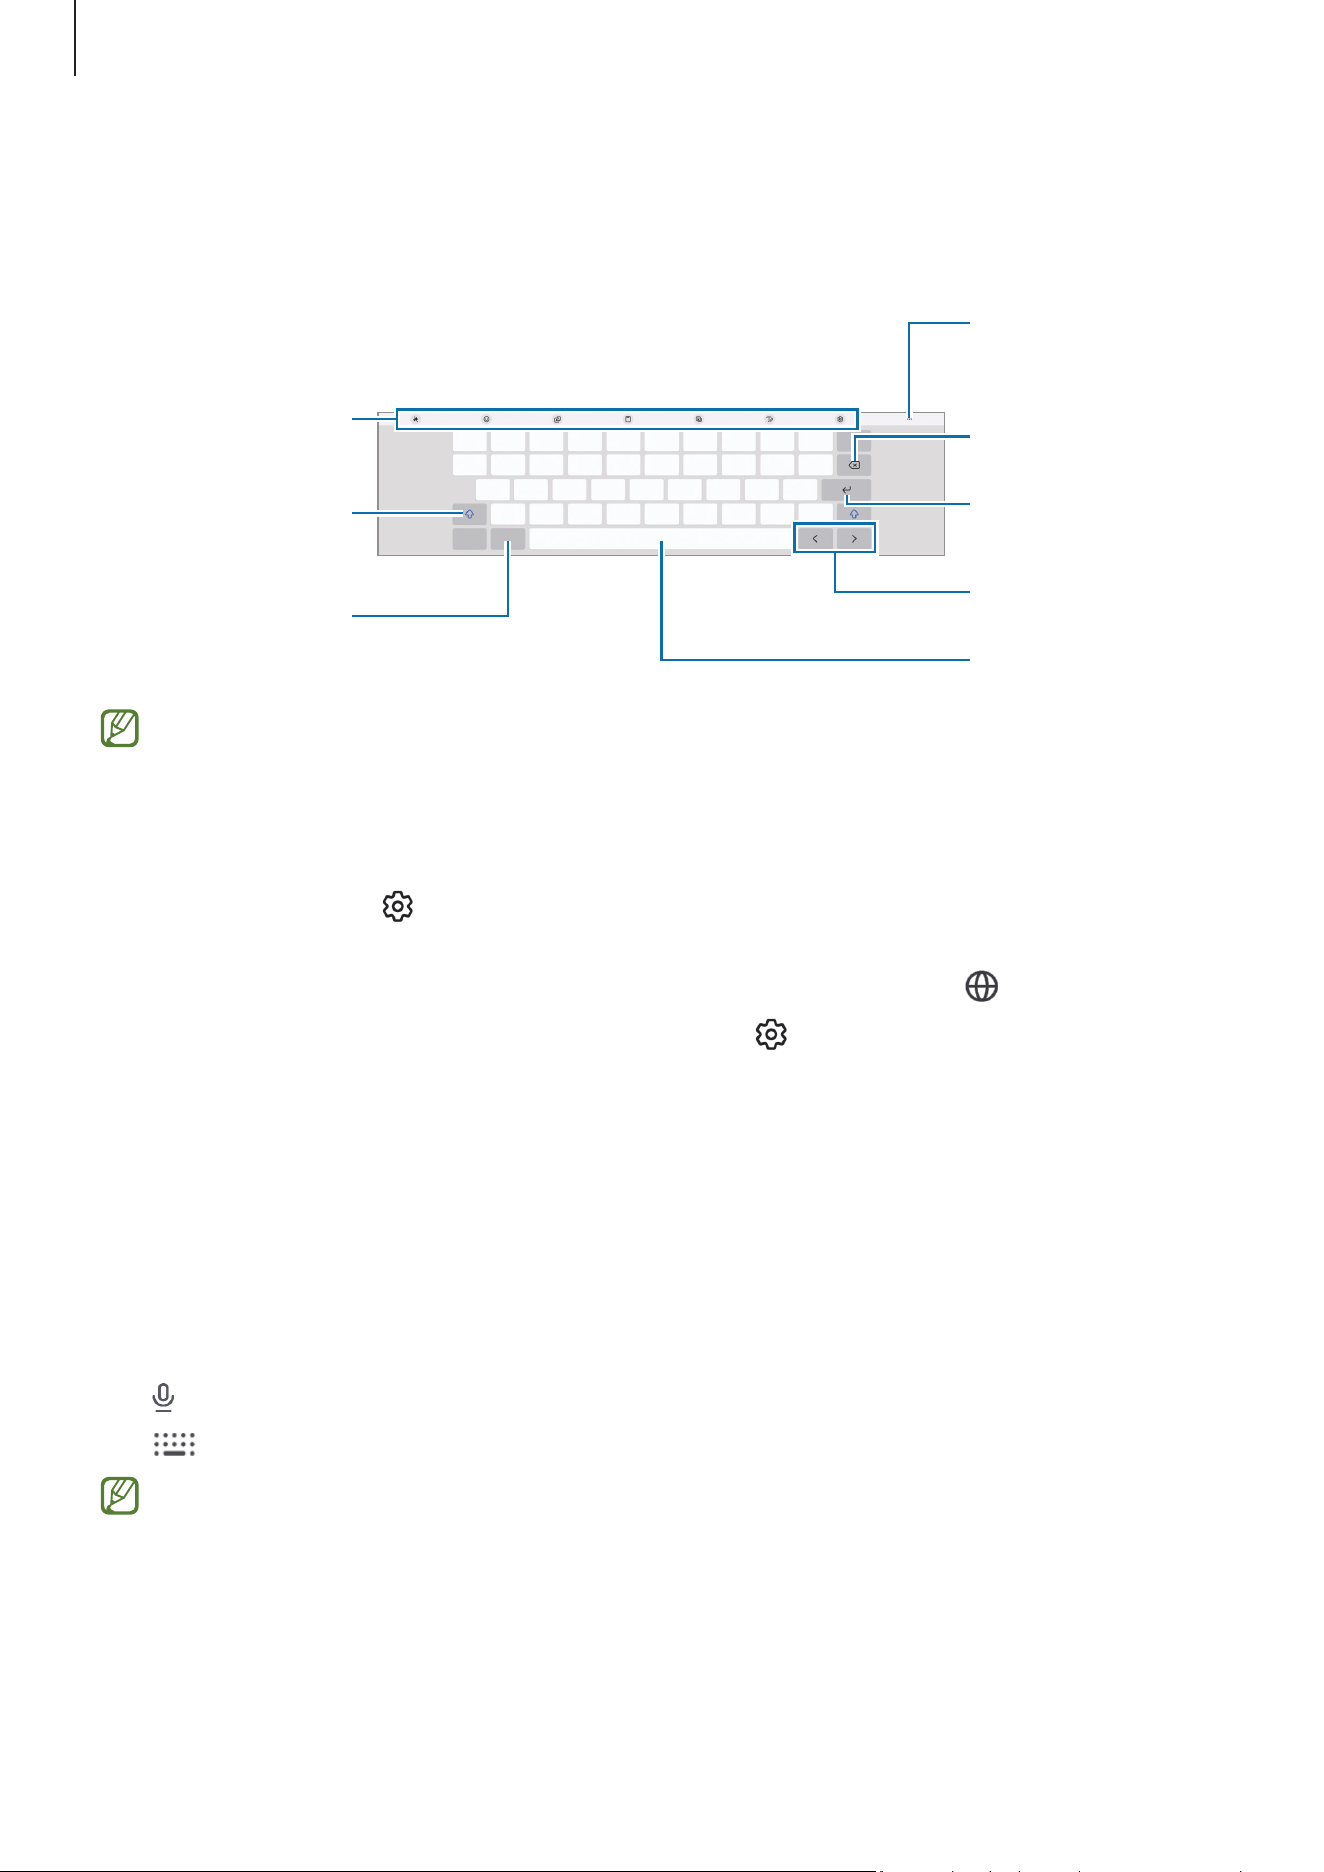
A keyboard appears automatically when you enter text.
Break to the next
line.
Delete a preceding
character.
Enter symbols.
Enter uppercase.
For all caps, tap it
twice.
Additional
keyboard functions
Move the cursor.
Enter a space.
Access more
keyboard
functions.
Text entry is not supported in some languages. To enter text, you must change the
input language to one of the supported languages.
Changing the input language
Tap the Settings icon ( )
→
Languages and types
→
Manage input languages
and
select the languages to use. When you select two or more languages, you can switch
between the input languages by tapping the Change language icon (
).
To change the keyboard type, tap the Settings icon (
)
→
Languages and types
, select a
language, and then select the keyboard type you want.
Using the input method button
You can change the text input method by tapping the input method button on the
navigation bar.
To change the input method button on the navigation bar, touch and hold the input
method button and select an option you want.
•
: Enter text by voice.
•
: Change the keyboard.
If the input method button does not appear on the navigation bar, open
Settings
,
tap
General management
→
Keyboard
, and then tap the
Show input method
button on navigation bar
switch to turn it on.

28
Apps and features
Installing or uninstalling apps
Purchase and download apps from
Galaxy Store
or
Play Store
.
Uninstalling or disabling apps
Touch and hold an app and select an option.
•
Uninstall
: Uninstall downloaded apps.
•
Disable
: Disable selected default apps that cannot be uninstalled from the device.
Some apps may not support this feature.
Galaxy AI
Introduction
Use advanced intelligence features to help you use your device.
•
Some features may not be available depending on the region, carrier, or model.
•
If you want data processed only within your device to strengthen the protection
of your personal information, open
Settings
, tap
Galaxy AI
, and then tap the
Process data only on device
switch to turn it on. Some features require online
processing for better results and data processing.

Apps and features
29
Enhancing your communication
Translating phone calls in real time (Call assist)
Get real-time translation into the language you select during voice calls.
To use this feature, open the
Phone
app, tap the Settings icon ( )
→
Live translate
, tap
the switch to turn it on, and then select the languages to use.
When making or receiving a voice call, tap the Assist icon (
)
→
Live translate
. To stop
translating, tap the Stop translating icon (
).
To change additional settings, open the
Phone
app and tap the Settings icon (
)
→
Live
translate
.
Translating messages in message apps (Writing assist)
You can translate text messages in message apps.
1 While checking or composing a message, tap the Assist icon ( ) on the Samsung
Keyboard and tap
Chat translation
.
2 Select the languages on the translator panel at the top of the screen.
Translations will be displayed under each message.
Using writing tools (Writing assist)
You can change the writing style, receive spelling and grammar suggestions, generate
text automatically on a topic you describe, and more.
While composing a message, tap the Assist icon (
) on the Samsung Keyboard and
select an option you want.
•
Spelling and grammar
: Get spelling and grammar suggestions.
•
Writing style
: Change the writing style.
•
Summarise
: Summarise the text.
•
Bullet point
: Organise the content into subheadings and add bullet points.
•
Table
: Organise the text into a table.
•
Composer
: When you enter the topic you want the device to write about, the device
will compose sentences in whatever style you select.

Apps and features
30
Using live translation (Interpreter)
Get live translation of lectures, meetings, and more. You can also get live translation of
your conversations and output it into speech or text.
1 Drag the Edge panel handle towards the centre of the screen and tap
Interpreter
.
2 Select a mode you want.
3 Select your language and the other party’s language.
If the language you want is not on the list, tap
Add languages
and download the
language pack.
4 Tap the Microphone icon ( ) to start translating.
Unleashing your productivity
Using Note assist features (Samsung Notes)
Auto format or summarise notes, correct spelling errors, or translate notes. You can also
generate new art from your drawing using the Creative studio feature.
Open the
Notes
app, create a note, tap the Assist icon ( ) on the toolbar, and then
select an option you want.
Converting voice recordings to text (Samsung Notes)
You can convert voice recordings you inserted in notes on the
Samsung Notes
app to
text.
Open the
Notes
app, select a note that includes a voice recording, tap the Assist icon ( )
on the toolbar, and then tap
Transcribe
.

Apps and features
31
Summarising and translating voice recordings (Voice Recorder)
Convert voice recordings into on-screen text and check summaries.
Open the
Voice Recorder
app, select a voice recording, and then tap the Assist icon ( )
→
Transcribe
. You can also translate the converted text into other languages.
Summarising and converting call recordings into text (Transcript assist)
You can record a call and convert the recorded call into a text transcript and summarise
it.
1 Open the
Phone
app, tap the Settings icon ( )
→
Record calls
→
Transcript assist
,
and then tap the
Auto transcribe recorded calls and Direct voicemail
switch to turn it
on.
2 Tap
Transcription language
and select a language to use.
3 During a voice call, tap
More
→
Record
to record the conversation.
4 Open the
Phone
app, tap
Recents
, and then select a recorded call with a transcript.
The Call recording icon (
) will be displayed next to calls with recordings.
5 Tap the converted transcripts.
To summarise the transcripts, tap
Summarise
.
Translating text using the camera (Camera)
You can translate text using the camera.
1 Open the
Camera
app and tap
PHOTO
on the shooting modes list.
2 Point the camera towards the object and tap the Scan documents and text icon ( ).
The Scan documents and text icon (
) will only appear when a document or text is
detected.
3 Tap the Translate icon ( ) or
Live
.
The text will be translated into the current device language.

Apps and features
32
Creating epic images and videos
Removing people or objects from an image (Gallery)
Edit images by removing people or objects from them and then generate a new
background to fill in any missing pieces.
1 Open the
Gallery
app, select an image, and then tap the Assist icon ( )
→
the AI
eraser icon (
).
2 Tap or draw around anything you want to remove, and then tap
Erase
.
Moving people or objects in an image (Gallery)
Edit images by moving or resizing people or objects in them and then generate a new
background to fill in any missing pieces.
1 Open the
Gallery
app, select an image, and then tap the Assist icon ( )
→
the Move
icon (
).
2 Tap or draw around anything you want to move, touch and hold the selected area,
drag it to where you want, and then tap
Generate
.
Adding objects to an image (Gallery)
You can add objects to images by drawing or describing what you want. You can also add
objects from other images by extracting them from the images.
1 Open the
Gallery
app, select an image, and then tap the Assist icon ( )
→
the Create
icon (
).
2 Select an option you want, complete the editing, and then tap
Generate
.
•
Describe what to change
: Describe what you want to change in text. You can also
select the spot to add an object by drawing on the screen before describing the
object in text.
•
: Select an image you want to extract objects from and tap
Done
. If you want to
add additional objects along with the extracted objects, tap
Describe how to blend
images
and describe what you want to add.
•
: Draw on the screen.

Apps and features
33
Changing the image style (Gallery)
You can change the image style.
1 Open the
Gallery
app, select an image, and then tap the Assist icon ( )
→
the Style
icon (
).
If you are selecting an image of people or pets (cats and dogs), tap the Assist icon (
)
→
the Style icon ( )
→
Photo
or
Portrait
.
2 Select a style you want and tap
Generate
.
Making stereoscopic images (Gallery)
You can apply the stereoscopic effect to images.
Open the
Gallery
app, select an image, swipe upwards on the screen, and then tap
Live
effect
.
Using the Instant slow-mo feature (Gallery)
You can play a selected part of the video in slow motion and check more details by
touching and holding that part.
Open the
Gallery
app, select a video to play, and then touch and hold the screen while
playing the video.
This feature may not be available depending on the file.
Using the Creative studio feature
Generate new art from your drawing, text descriptions, or an image you select. You can
also create stickers, invitations, and more using the templates.
1 Drag the Edge panel handle towards the centre of the screen and tap
Creative studio
.
Alternatively, tap
Creative studio
on the Air command panel.
2 Tap the Create icon ( ).
You can also make artistic creations by selecting items from
Templates
.
3 Select an option you want, complete the editing, and then tap
Generate
.
•
Describe what you want to create
: Describe what you want to create in text.
•
: Draw on the screen.
•
: Select an image you want.

Apps and features
34
Using the AI select feature
Select an area on the screen and use various intelligent features.
1 Touch and hold the Edge panel handle to launch
AI select
.
Alternatively, tap
AI select
on the Air command panel.
2 Tap or draw a circle around the content you want to select, and then select an option
to use with the selected area.
Editing sounds in a video (Audio eraser)
Eliminate distracting noises in videos by adjusting the volume of voices, wind, and other
sounds.
1 Open the
Gallery
app and select a video to edit.
2 Tap the Edit icon ( )
→
the My FanCam and Audio eraser icon ( )
→
the Audio
eraser icon (
).
3 Select a sound type and tap
Mute
to mute the sound or drag the adjustment bar to
adjust the volume.
Creating your own wallpapers
Create wallpapers by selecting categories and keywords or automatically change the
locked screen wallpaper based on the time and weather. You can also create wallpapers
using the Creative studio feature.
1 Open
Settings
and tap
Wallpaper and style
.
2 Tap
Change wallpapers
→
Create with AI
and select an option you want.
Getting personalised insights
Now brief
Get a briefing generated by AI based on your interests.
Drag the Edge panel handle towards the centre of the screen and tap
Now brief
.
Now nudge
AI offers useful information and features based on what is on your screen. For example,
it may suggest checking the location mentioned in a message.
Open
Settings
, tap
Galaxy AI
→
Now nudge
, and then tap the switch to turn it on.
Apps and features
35
S Pen
Using the S Pen
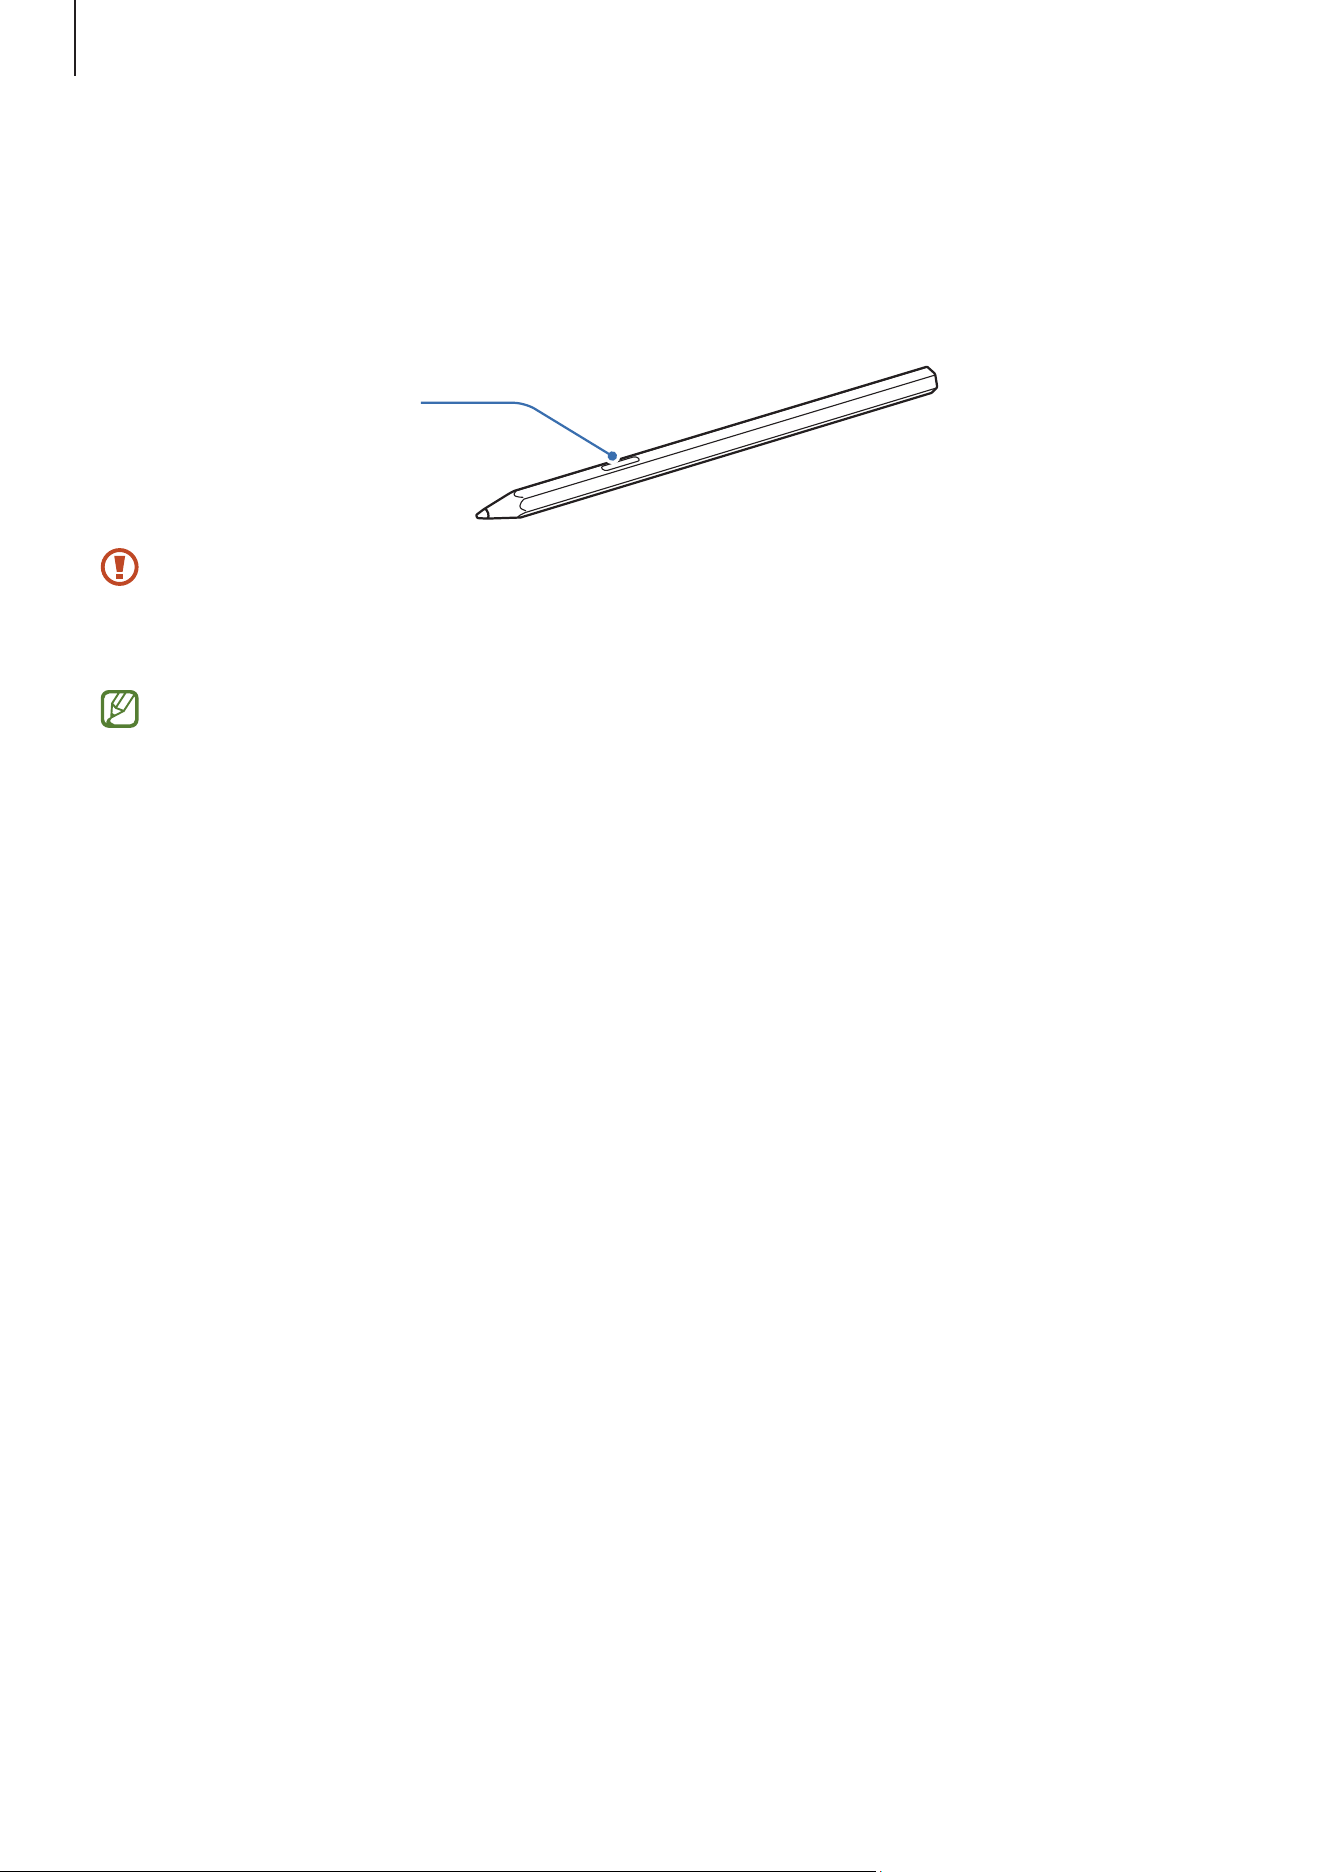
S Pen button
•
Do not bend or apply excessive pressure with the S Pen while using it. The S Pen
may be damaged or the nib may be deformed.
•
Do not hard press on the screen with the S Pen. The pen nib may be deformed.
•
You can replace the S Pen nib by pulling it out with your fingernail and inserting
a new nib.
•
The S Pen nibs for Galaxy Tab S12+ and Galaxy Tab S12 Ultra are compatible with
those for Galaxy Tab S11 and Galaxy Tab S11 Ultra. To replace the nibs, purchase
the S Pen nibs for Galaxy Tab S11 and Galaxy Tab S11 Ultra (sold separately).
•
If there is a magnet near the device, some S Pen actions, such as tapping the
screen, may not work.
•
If you use the S Pen at sharp angles on the screen, the device may not recognise
the S Pen actions.
•
If the S Pen is not working properly, take it to a Samsung Service Centre or an
authorised service centre.
Apps and features
36
Attaching the S Pen
When you are not using the S Pen, attach the S Pen to the top right side of the device. If
you attach a side of the S Pen other than the grey side, the attachment may be weak and
the S Pen may fall off the device.
Air command
(Launching S Pen features and apps directly)
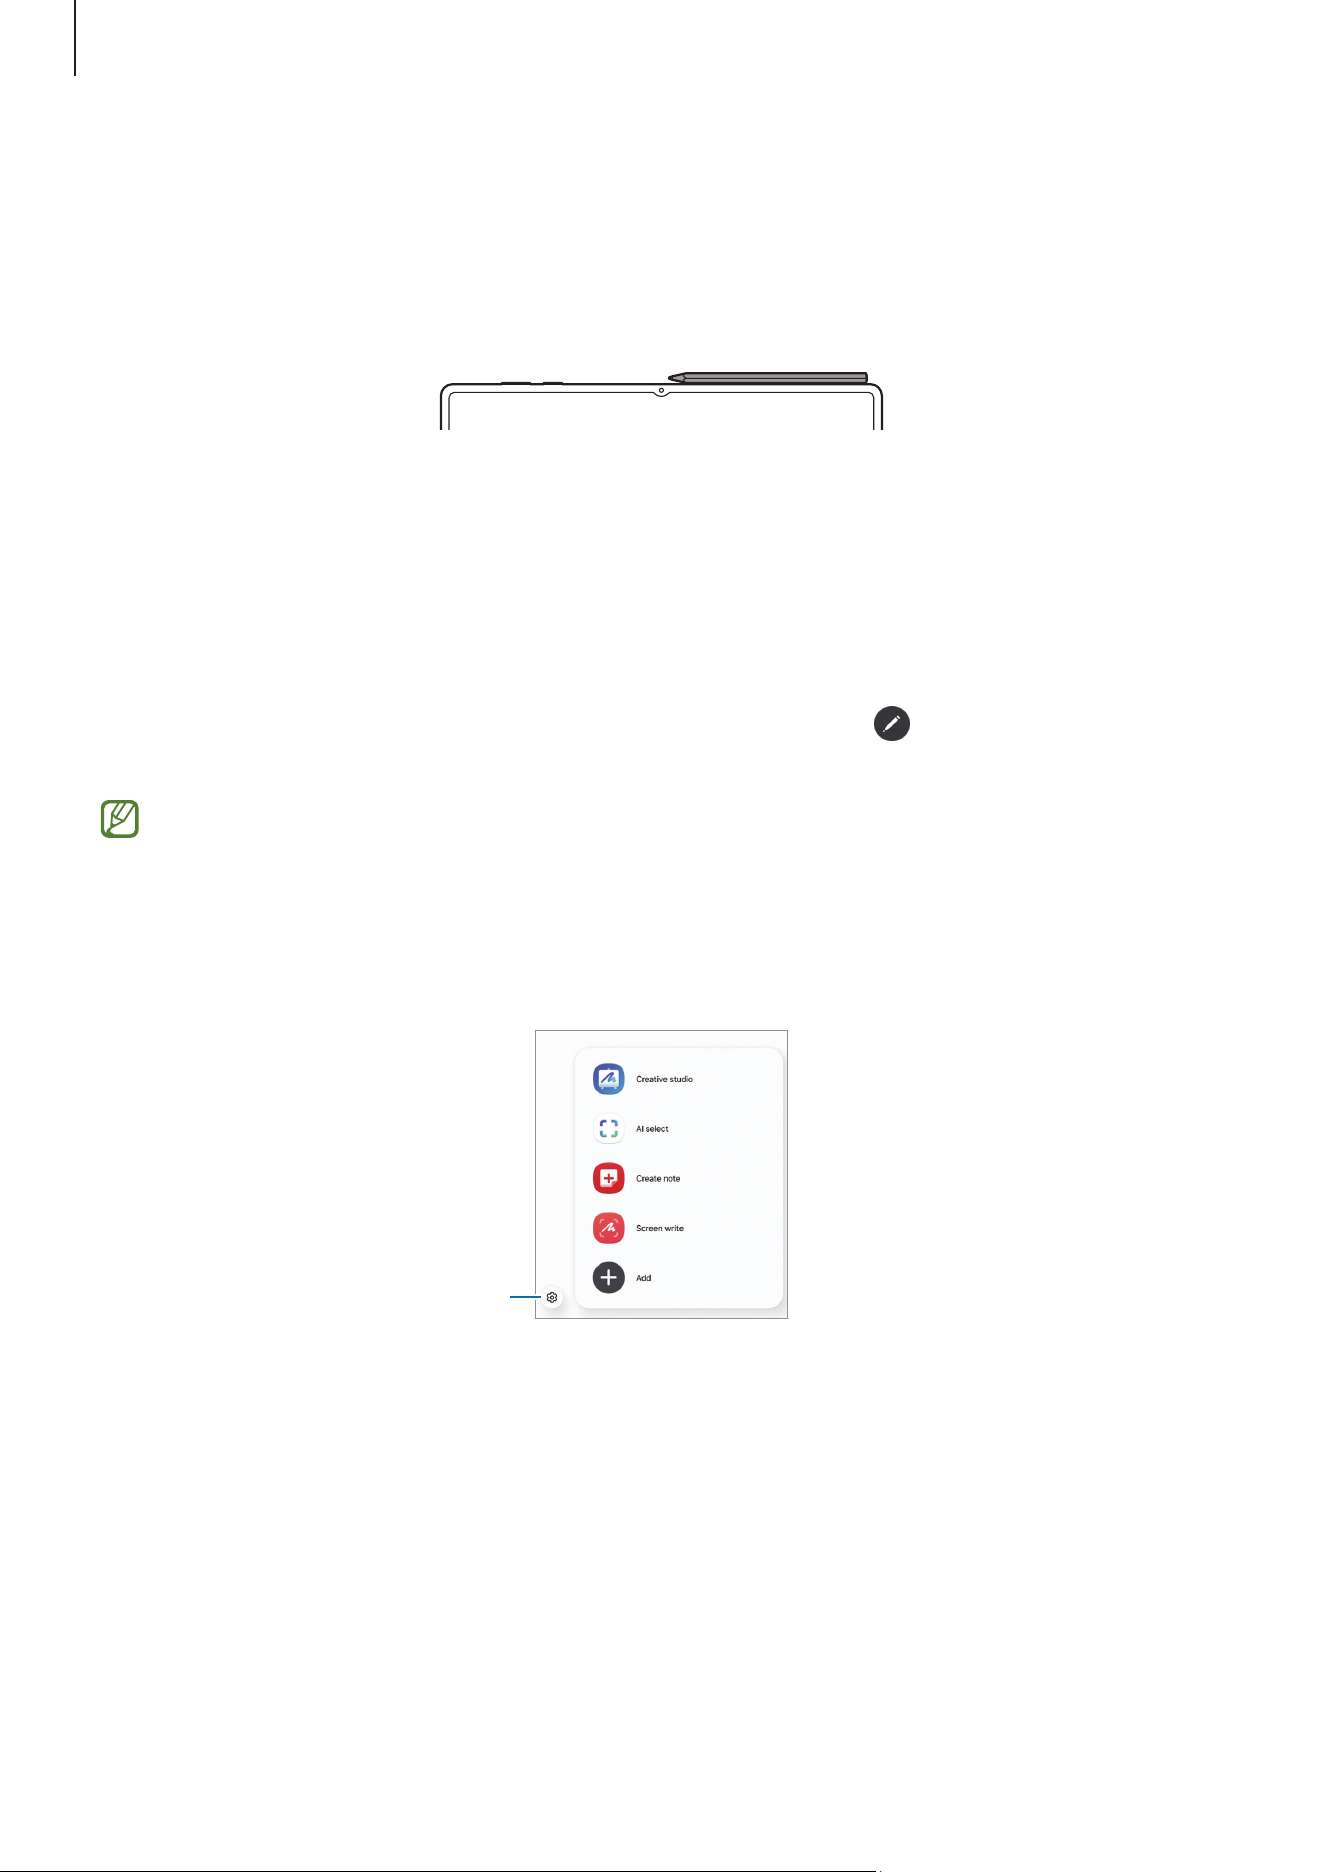
Air command is a menu that provides S Pen features and direct access to frequently used
apps.
Tap the screen with the S Pen and tap the Air command icon (
). Select a function or
app on the Air command panel.
If the Air command icon does not appear on the screen, open
Settings
, tap
Advanced features
→
S Pen
→
Air command
, and then tap the
Show Air command
icon
switch to turn it on. If you turn on the
Open Air command with Pen button
switch, you can open the Air command panel by hovering the S Pen over the screen
and pressing the S Pen button.
S Pen settings
•
Creative studio
: Generate new art from your drawing, text descriptions, or an image
you select. Refer to Using the Creative studio feature for more information.
•
AI select
: Use the S Pen to select an area and perform actions, such as sharing or
saving. Tap or draw a circle around the content you want to select. Then, select an
option to use with the selected area.
•
Create note
: Create notes in a pop-up window. You can also launch this feature by
double tapping the screen while pressing and holding the S Pen button. Refer to
Samsung Notes for more information.

Apps and features
37
•
Screen write
: Capture screenshots to write or draw on them or crop an area from the
captured image. You can also capture the current content and the hidden content on
an elongated page, such as a webpage.
•
View all notes
: Access all notes in the
Samsung Notes
app.
•
Translate
: Hover the S Pen over a word to translate it.
•
Magnify
: Hover the S Pen over an area of the screen to enlarge it.
•
PENUP
: Post your artwork, check out others’ artwork, and get useful drawing tips.
•
Write on calendar
: Fill in your plans by writing or drawing on the calendar screen.
•
Add
: Add shortcuts to frequently used apps to the Air command panel.
S Pen to text
You can set the device to convert anything you write with the S Pen into text.
1 Open
Settings
, tap
Advanced features
→
S Pen
→
S Pen to text
, and then tap the
switch to turn it on.
To learn about how to edit text with the S Pen, tap
How to edit
.
2 Write in a text input field, such as a search field or address bar, using the S Pen.
The handwriting will be converted to text.
Air view
Hover the S Pen over an item on the screen to preview content or access information in a
pop-up window.
If this feature is not turned on, open
Settings
, tap
Advanced features
→
S Pen
, and
then tap the
Air view
switch to turn it on.
Apps and features
38
Pen Select
(Selecting items quickly with the S Pen)
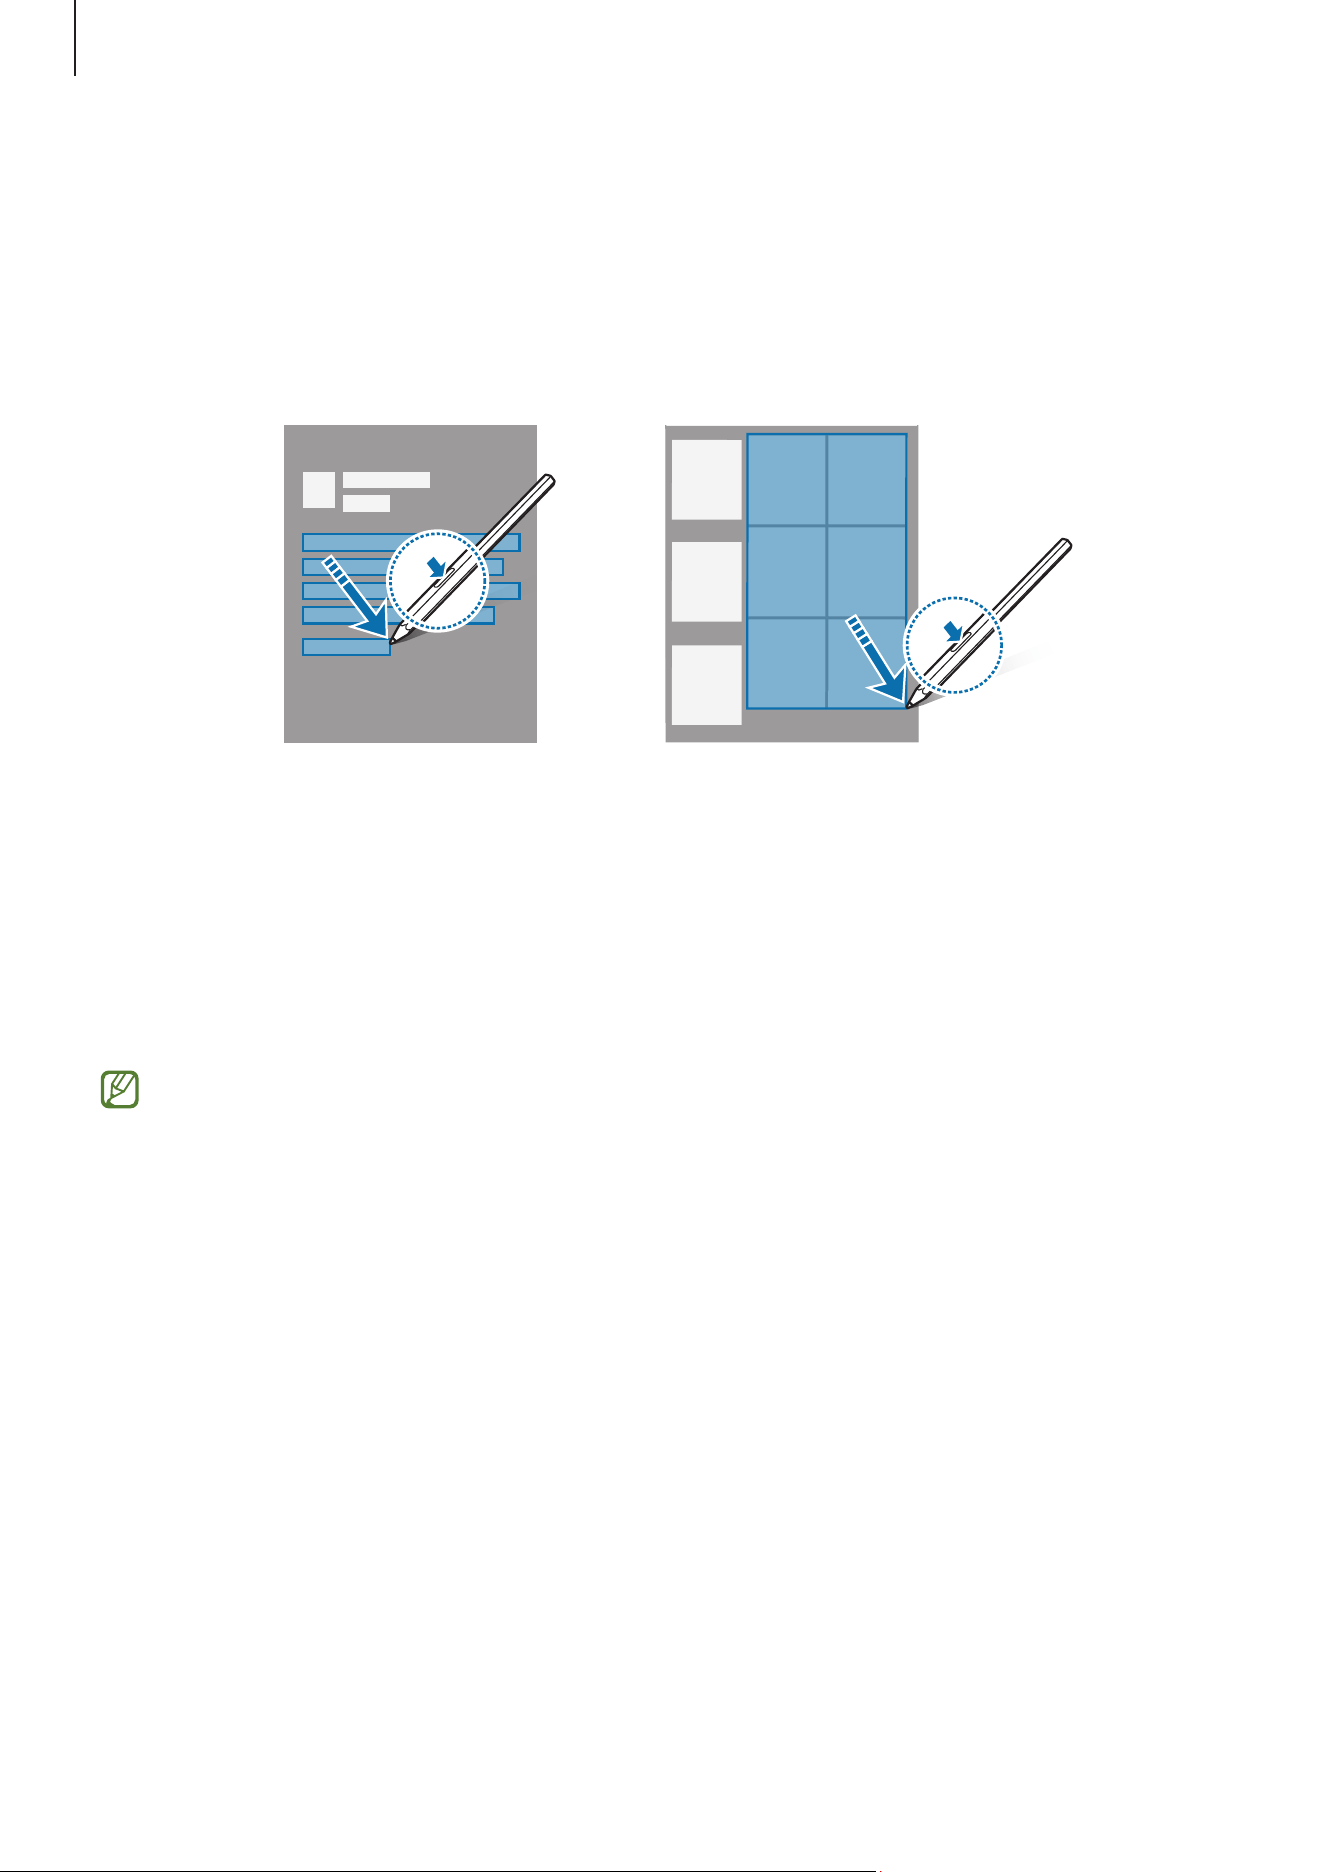
While pressing and holding the S Pen button, drag the S Pen over text or item lists to
select multiple items or text. You can also copy and paste the selected items or text into
another app or share them with others.
Screen off memos
You can create memos by writing on the screen without turning on it.
When the screen is off, double tap the screen while pressing and holding the S Pen
button.
When you tap
Save
after writing a memo, the memo will be saved to
Samsung Notes
.
If this feature is not turned on, open
Settings
, tap
Advanced features
→
S Pen
, and
then tap the
Screen off memos
switch to turn it on.
Apps and features
39
Phone
Introduction
Make or answer voice and video calls.
You can use calling and messaging features on your tablet with your phone number
using the
Call & text on other devices
feature. On your tablet and phone, open
Settings
, tap
Connected devices
→
Call & text on other devices
, and then tap the
switch to turn it on. You must sign in to the same Samsung account on the tablet
and phone. Some calling and messaging features may not be available.
Making calls
1 Open the
Phone
app and tap
Keypad
.
2 Enter a phone number.
3 Tap the Voice call icon ( ) to make a voice call, or tap the Video call icon ( ) or the
Meet video call icon (
) to make a video call.
Making calls from call logs or contacts list
Open the
Phone
app, tap
Recents
or
Contacts
, and then swipe to the right on a contact
or a phone number to make a call.
If this feature is turned off, tap the Settings icon (
)
→
Other call settings
, and then tap
the
Swipe to call or text
switch to turn it on.
Using speed dial
To set a number to speed dial, open the
Phone
app, tap
Keypad
→
the More options icon
(
) on the keypad screen
→
Speed dial numbers
, select a speed dial number, and then
add a phone number.
To make a call, touch and hold a speed dial number on the keypad. For speed dial
numbers 10 and up, tap the first digit(s) of the number, and then touch and hold the last
digit.
For example, if you set the number 123 as a speed dial number, tap 1, tap 2, and then
touch and hold 3.
Apps and features
40
Making an international call
1 Open the
Phone
app and tap
Keypad
.
2 Touch and hold 0 until the + sign appears.
3 Enter the country code, area code, and phone number, and then tap the Call icon ( ).
Receiving calls
Answering a call
When a call comes in, drag the Answer icon ( ) outside the large circle.
Rejecting a call
When a call comes in, drag the Decline icon ( ) outside the large circle.
To send a message when rejecting an incoming call, drag the
Send message
bar upwards
and select a message to send. If you tap the Reminder icon (
) and send the message,
you can receive a reminder one hour later.
To create various rejection messages, open the
Phone
app and tap the Settings icon ( )
→
Quick decline messages
. Tap the Add icon ( ), enter a message, and then tap
Save
.
Blocking phone numbers
Block calls from specific numbers added to your block list.
Open the
Phone
app, tap the Settings icon ( )
→
Block numbers
, and then select
contacts or phone numbers to save in the blocked numbers list.
When blocked numbers try to contact you, you will not receive notifications. The calls
will be logged in the call log.
You can also block incoming calls from people that do not show their caller ID. Tap
the
Block calls from unknown numbers
switch to turn the feature on.
Apps and features
41
Options during calls
•
: Switch to a video call.
•
→
Text call
: Communicate with the other party through text. Refer to Text call for
more information.
•
→
Live translate
: Get real-time translation into the language you select during
voice calls. To use this feature, open the
Phone
app, tap the Settings icon ( )
→
Live
translate
, and then tap the switch to turn it on. Refer to Translating phone calls in
real time (Call assist) for more information.
•
Add call
: Dial a second call. The first call will be put on hold. When you end the
second call, the first call will be resumed.
•
Mute
: Turn off the microphone so that the other party cannot hear you.
•
Bluetooth
: Switch to a Bluetooth headset if it is connected to the device.
•
Hold call
: Hold a call.
•
Keypad
/
Hide
: Open or close the keypad.
•
More
: Use additional features.
•
: End the current call.
•
: During a video call, switch to a voice call.
•
: During a video call, lock the screen.
•
Effects
: During a video call, apply various effects.
•
: Set the device to change the angle and zoom automatically by recognising and
tracking people during a video call.
•
Camera
: During a video call, turn off the camera so that the other party cannot see
you.
•
Switch
: During a video call, switch between the front and rear cameras.
Some features may not be available depending on the carrier or model.

Apps and features
42
Call assist (Mobile network enabled models)
Call screening
An AI assistant answers calls on your behalf and asks the caller who they are and what
the call is about.
To use this feature, open the
Phone
app, tap the Settings icon ( )
→
Call screening
, and
then tap the switch to turn it on. Then tap
Auto screen calls
, tap the switch to turn it on,
and then follow the on-screen instructions to complete the setup.
When a call comes in, an automated voice message is played to the caller and what the
caller says is recorded.
If you want to check the content of an ongoing call in real time, open the notification
panel and tap the notification for the call. You can also answer the call or switch to a text
call.
To check the message left by the caller after the call ends, open the
Phone
app, tap
Recents
, and then select the call. The Call screening icon ( ) will be displayed next the
calls.
Text call
Communicate with the other party through text.
To use this feature, open the
Phone
app, tap the Settings icon ( )
→
Text call
, and then
tap the switch to turn it on. When making a voice call or during a call, tap the Assist icon
(
)
→
Text call
.
When the call is connected, a voice greeting is automatically delivered to the other party
and what the other party says is displayed as text on your screen.
If you select a response from the quick response list or enter text, it will be transmitted
through a voice to the other party.
To switch to a voice call, tap the Switch to voice call icon (
).
To change the settings, open the
Phone
app and tap the Settings icon ( )
→
Text call
.
Live translate
Get real-time translation into the language you select during voice calls. Refer to
Translating phone calls in real time (Call assist) for more information.

Apps and features
43
Contacts
Create new contacts or manage contacts on the device.
Open the
Contacts
app.
•
To add a new contact, tap the Create icon ( ).
•
To delete contacts, touch and hold a contact to delete, then tap
Delete
.
•
To merge duplicate contacts or manage contacts, tap the More options icon ( ) at the
top of the contacts list
→
Settings
.
Camera
Introduction
Take pictures and record videos using various modes and settings.
Taking pictures
1 Open the
Camera
app.
2 Tap the image on the preview screen where the camera should focus.
•
On the preview screen, swipe upwards or downwards, or tap the Switch to the front
camera icon (
) to switch to the front camera for self-portraits.
•
To zoom in or out while using the rear camera, select the desired zoom icon on the
preview screen.
•
To adjust the brightness of pictures, drag the adjustment bar that appears above or
below the circular frame.
Apps and features
44
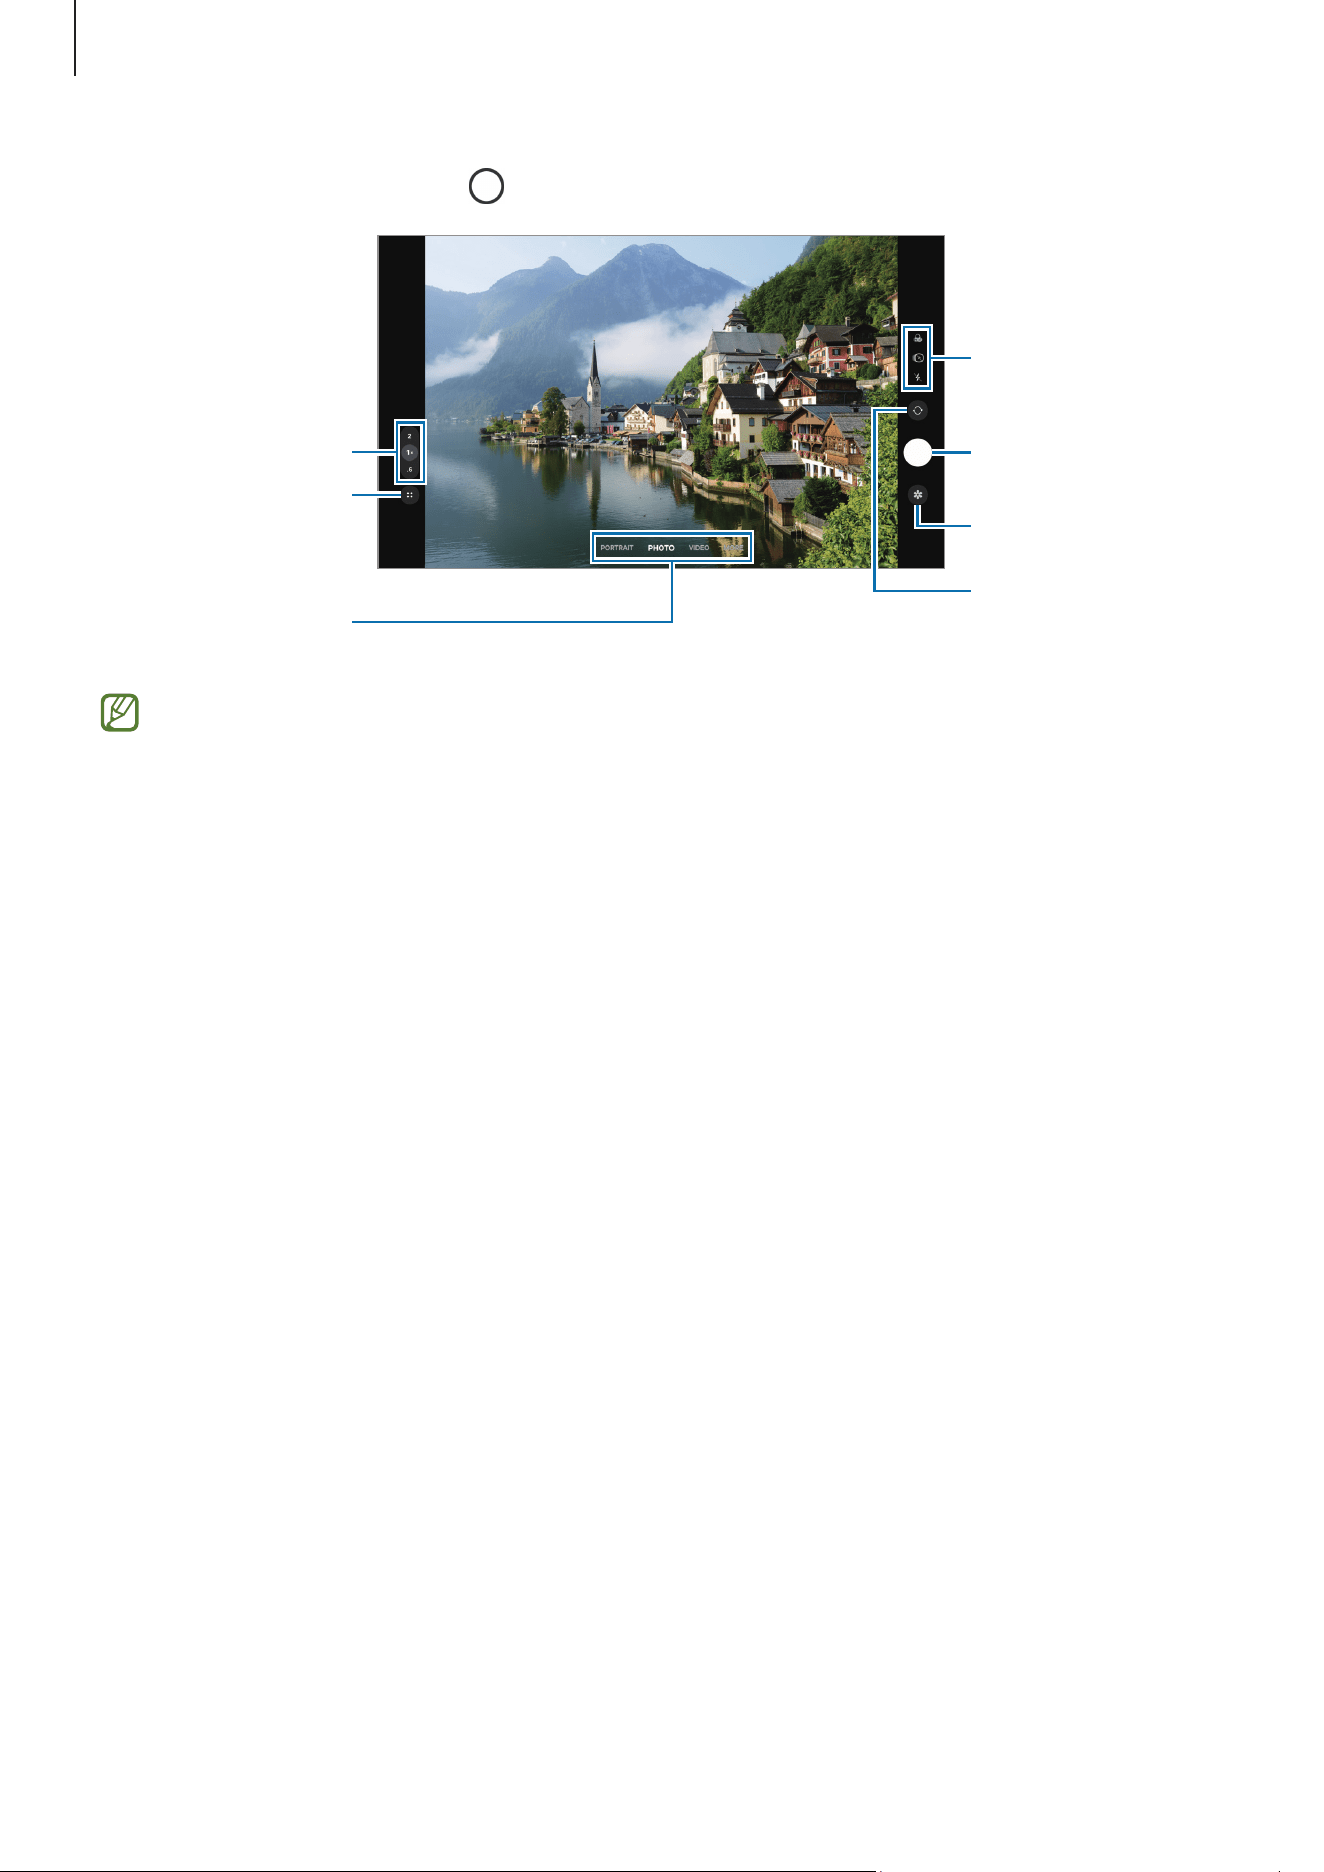
3 Tap the Take picture icon ( ) to take a picture.
Take a picture.
Preview thumbnail
Shooting modes
list
Switch between
the front and rear
cameras.
Options for current
shooting mode
Zoom
Quick controls
•
The preview screen may vary depending on the shooting mode and which
camera is being used.
•
The focus may not be clear if the subject is close. Take pictures or videos from a
good distance.
•
If pictures you take appear blurry, clean the camera lens and try again.
•
Make sure that the lens is not damaged or contaminated. Otherwise, the device
may not work properly in some modes that require high resolutions.
•
Your device’s camera features a wide-angle lens. Minor distortion may occur
in wide-angle pictures or videos and does not indicate device performance
problems.
•
The camera may fog up or form condensation if the device is exposed to sudden
changes in air temperature, because of the difference in temperature outside
and inside the camera cover. Try to avoid such conditions when planning to use
the camera. If fogging does occur, allow the camera to dry naturally at room
temperature before taking pictures or recording videos, otherwise results may
look blurry.
•
This image may differ depending on the model.
Apps and features
45
Using the camera button
•
Touch and hold the camera button to record a video.
•
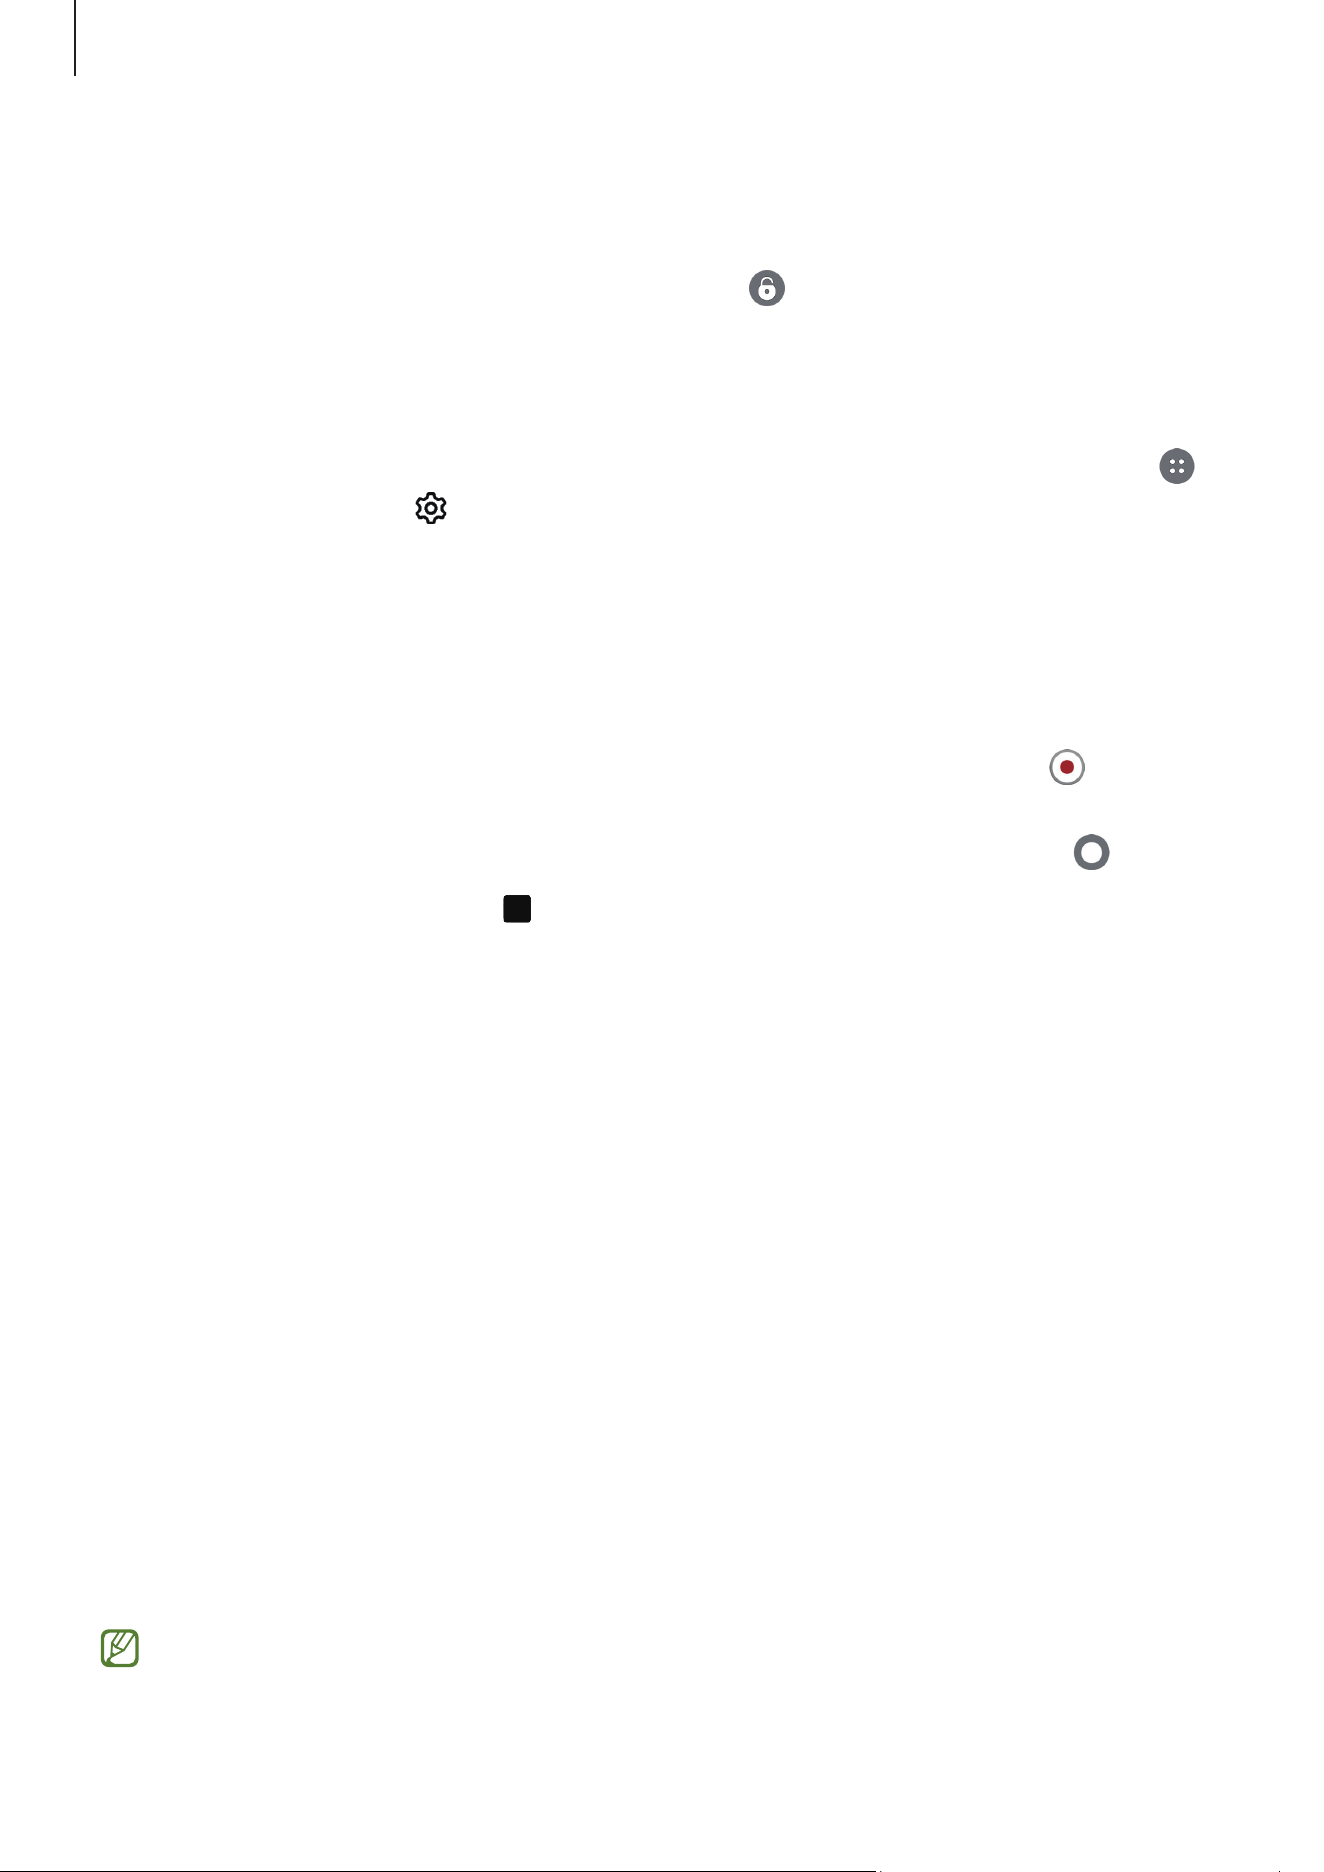
If you drag the camera button to the Lock icon ( ), you can record a video without
holding the button.
•
To take burst shots, swipe the camera button to the edge of the screen and hold it.
•
If you add another camera button, you can move it anywhere on the screen and take
pictures more conveniently. On the preview screen, tap the Quick controls icon (
)
→
the Settings icon ( )
→
Shooting methods
and tap the
Floating Shutter button
switch to turn it on.
Taking videos
1 Open the
Camera
app.
2 On the shooting modes list, tap
VIDEO
and tap the Start recording icon (
) to record
a video.
To capture an image from the video while recording, tap the Capture icon (
).
3 Tap the Stop recording icon ( ) to stop recording the video.
Shooting modes
To change the shooting mode, drag the shooting modes list to the left or right, or swipe
to the left or right on the preview screen. Tap
MORE
to access various shooting modes.
•
PORTRAIT
/
PORTRAIT VIDEO
: Capture pictures or videos where the background is
blurred and the subject stands out clearly. You can also apply a background effect
and edit it after taking a picture.
•
PRO
/
PRO VIDEO
: Capture pictures or videos while manually adjusting various
shooting options, such as exposure value and ISO value.
•
NIGHT
: Take a picture in low-light conditions, without using the flash.
•
FOOD
: Take pictures of food with more vibrant colours.
•
PANORAMA
: Take a series of pictures and then stitch them together to create a wide
scene.
•
HYPERLAPSE
: Record scenes, such as passing people or cars, and view them as
fast-motion videos.
To edit the shooting modes list, tap
MORE
on the list, tap
Edit
, and then drag
modes to where you want.

Apps and features
46
Options for current shooting mode
On the preview screen, use the following options.
•
: Turn the flash on or off.
•
: Turn the motion photo feature on or off. If you turn it on, a video clip will also be
taken from a few seconds before tapping the camera button.
•
: Apply a filter effect.
•
: Apply beauty effects.
•
: Select a frame rate for hyperlapse videos.
•
: Select a resolution for videos.
•
: Select a metering method. This determines how light values are calculated.
Centre-weighted metering
( ) uses the light in the centre portion of the shot to
calculate the exposure of the shot.
Matrix metering
( ) averages the entire scene.
Spot metering
( ) uses the light in a concentrated centre area of the shot to
calculate the exposure of the shot.
•
: In
FOOD
mode, focus on a subject inside the frame and blur the image outside
the frame.
•
Scan
: This option appears only when there is a document or text. Scan the document
or text.
•
: This option appears only when there is text to extract. Extract text from the
preview screen.
•
: This option appears only in dark environments. Turn the night shooting feature
on or off.
•
: Switch to a wide-angle shot of the landscape or people when taken with the
front camera.
•
: In
PORTRAIT
or
PORTRAIT VIDEO
mode, select a background effect you want or
drag the adjustment bar to adjust the intensity of the background effect.
•
: In
PRO
or
PRO VIDEO
mode, hide the shooting options.
Apps and features
47
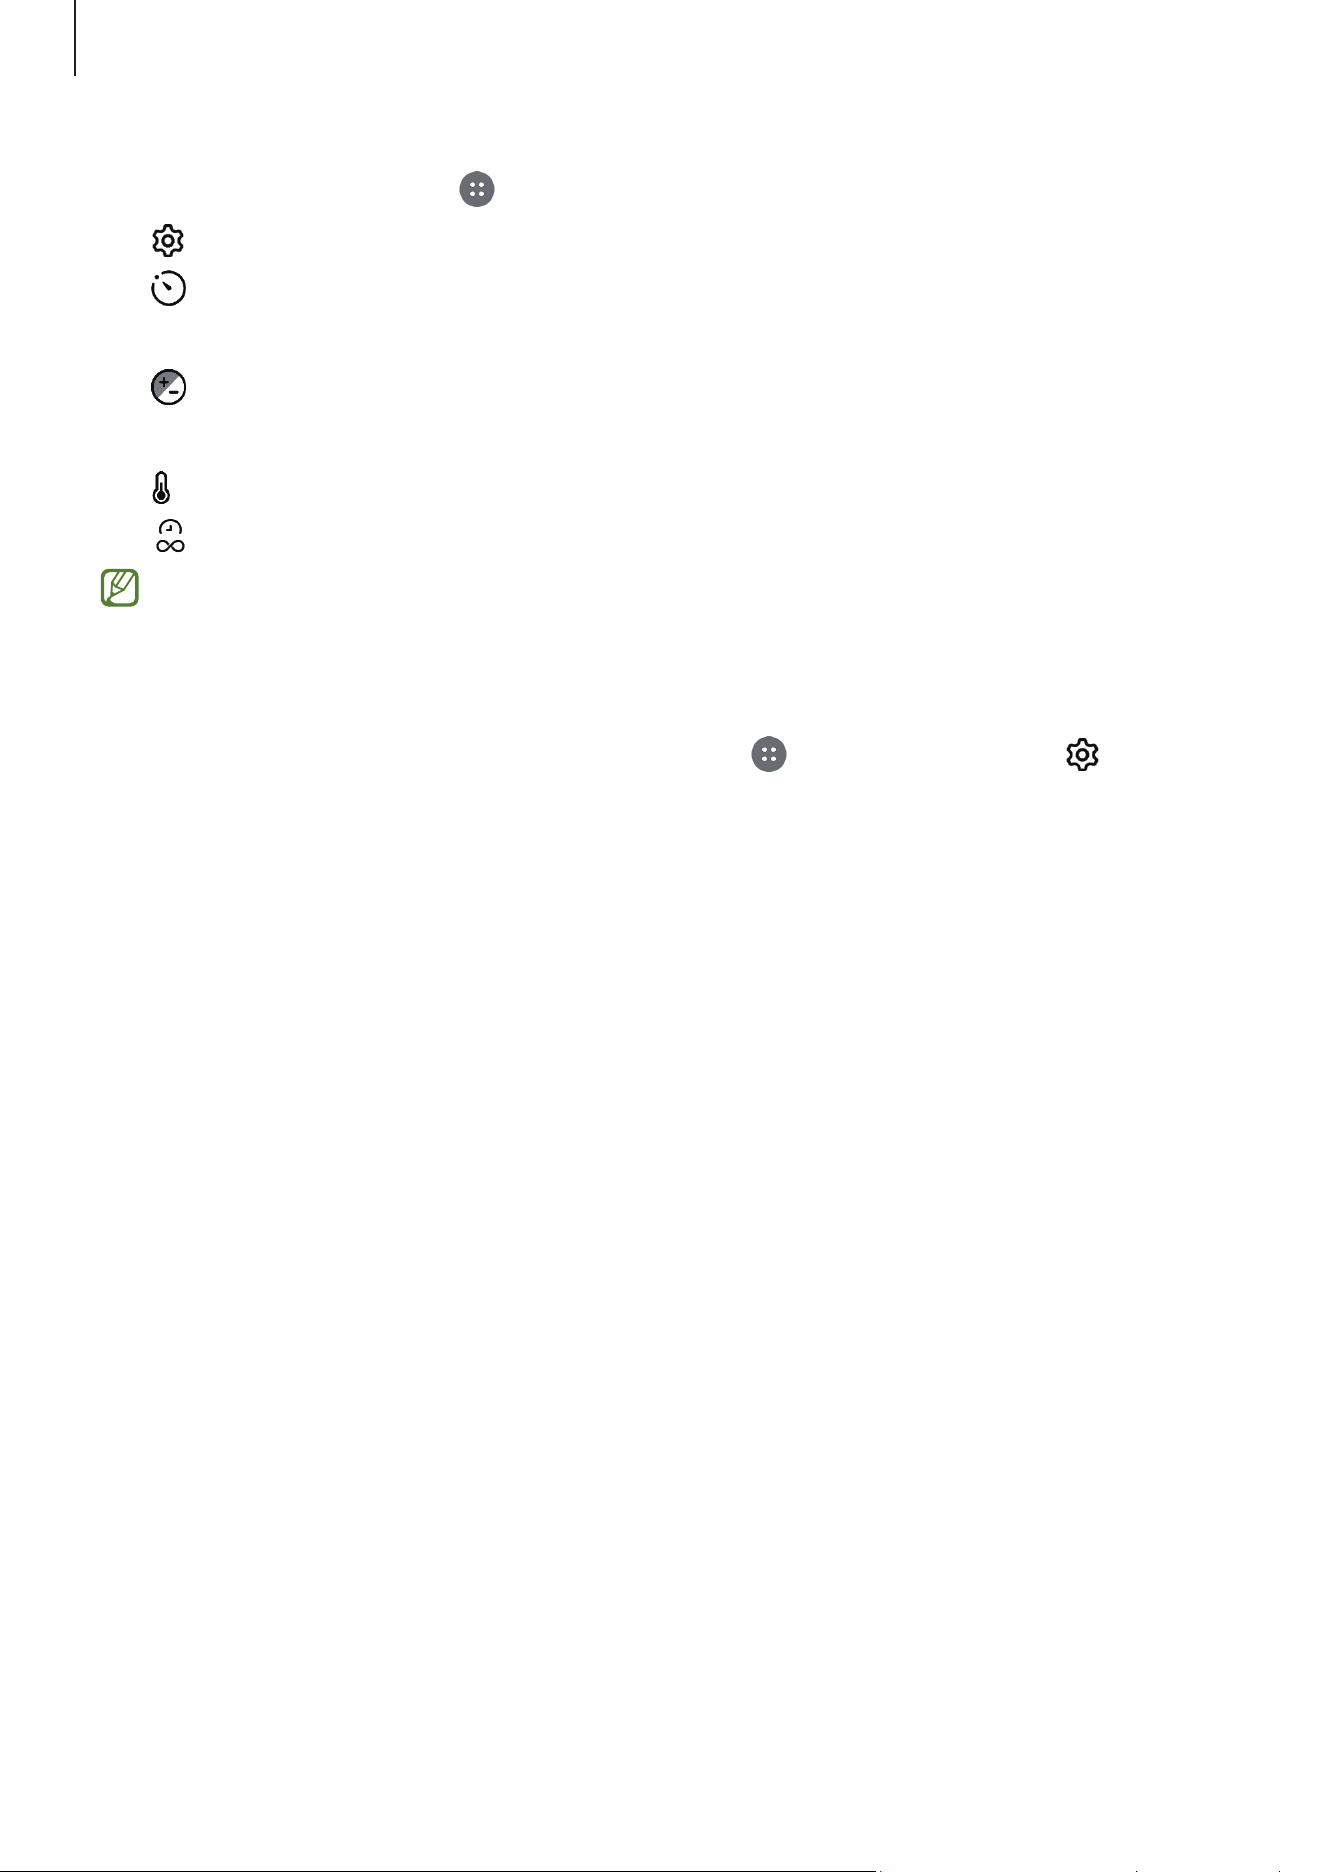
Tap the Quick controls icon ( ) to use more shooting options.
•
: Customise camera settings.
•
: Select the length of the delay before the camera automatically takes a picture.
•
4:3
: Select an aspect ratio for pictures.
•
: Change the exposure value.
•
16:9
: Select an aspect ratio for videos.
•
: In
FOOD
mode, adjust the colour temperature.
•
: Change the recording time for hyperlapse videos.
The available options may vary depending on the model or shooting mode.
Customising camera settings
On the preview screen, tap the Quick controls icon ( )
→
the Settings icon ( ) and
customise camera settings. For more information, refer to the instructions for each
menu in the camera settings.
Apps and features
48
Gallery
Introduction
Access images and videos stored in your device. You can also manage images and videos
by album or create stories.
Viewing images
Open the
Gallery
app and select an image. You can view other files by swiping to the
left or right on the screen. You can also use additional features to enhance the image by
swiping upwards on the screen.
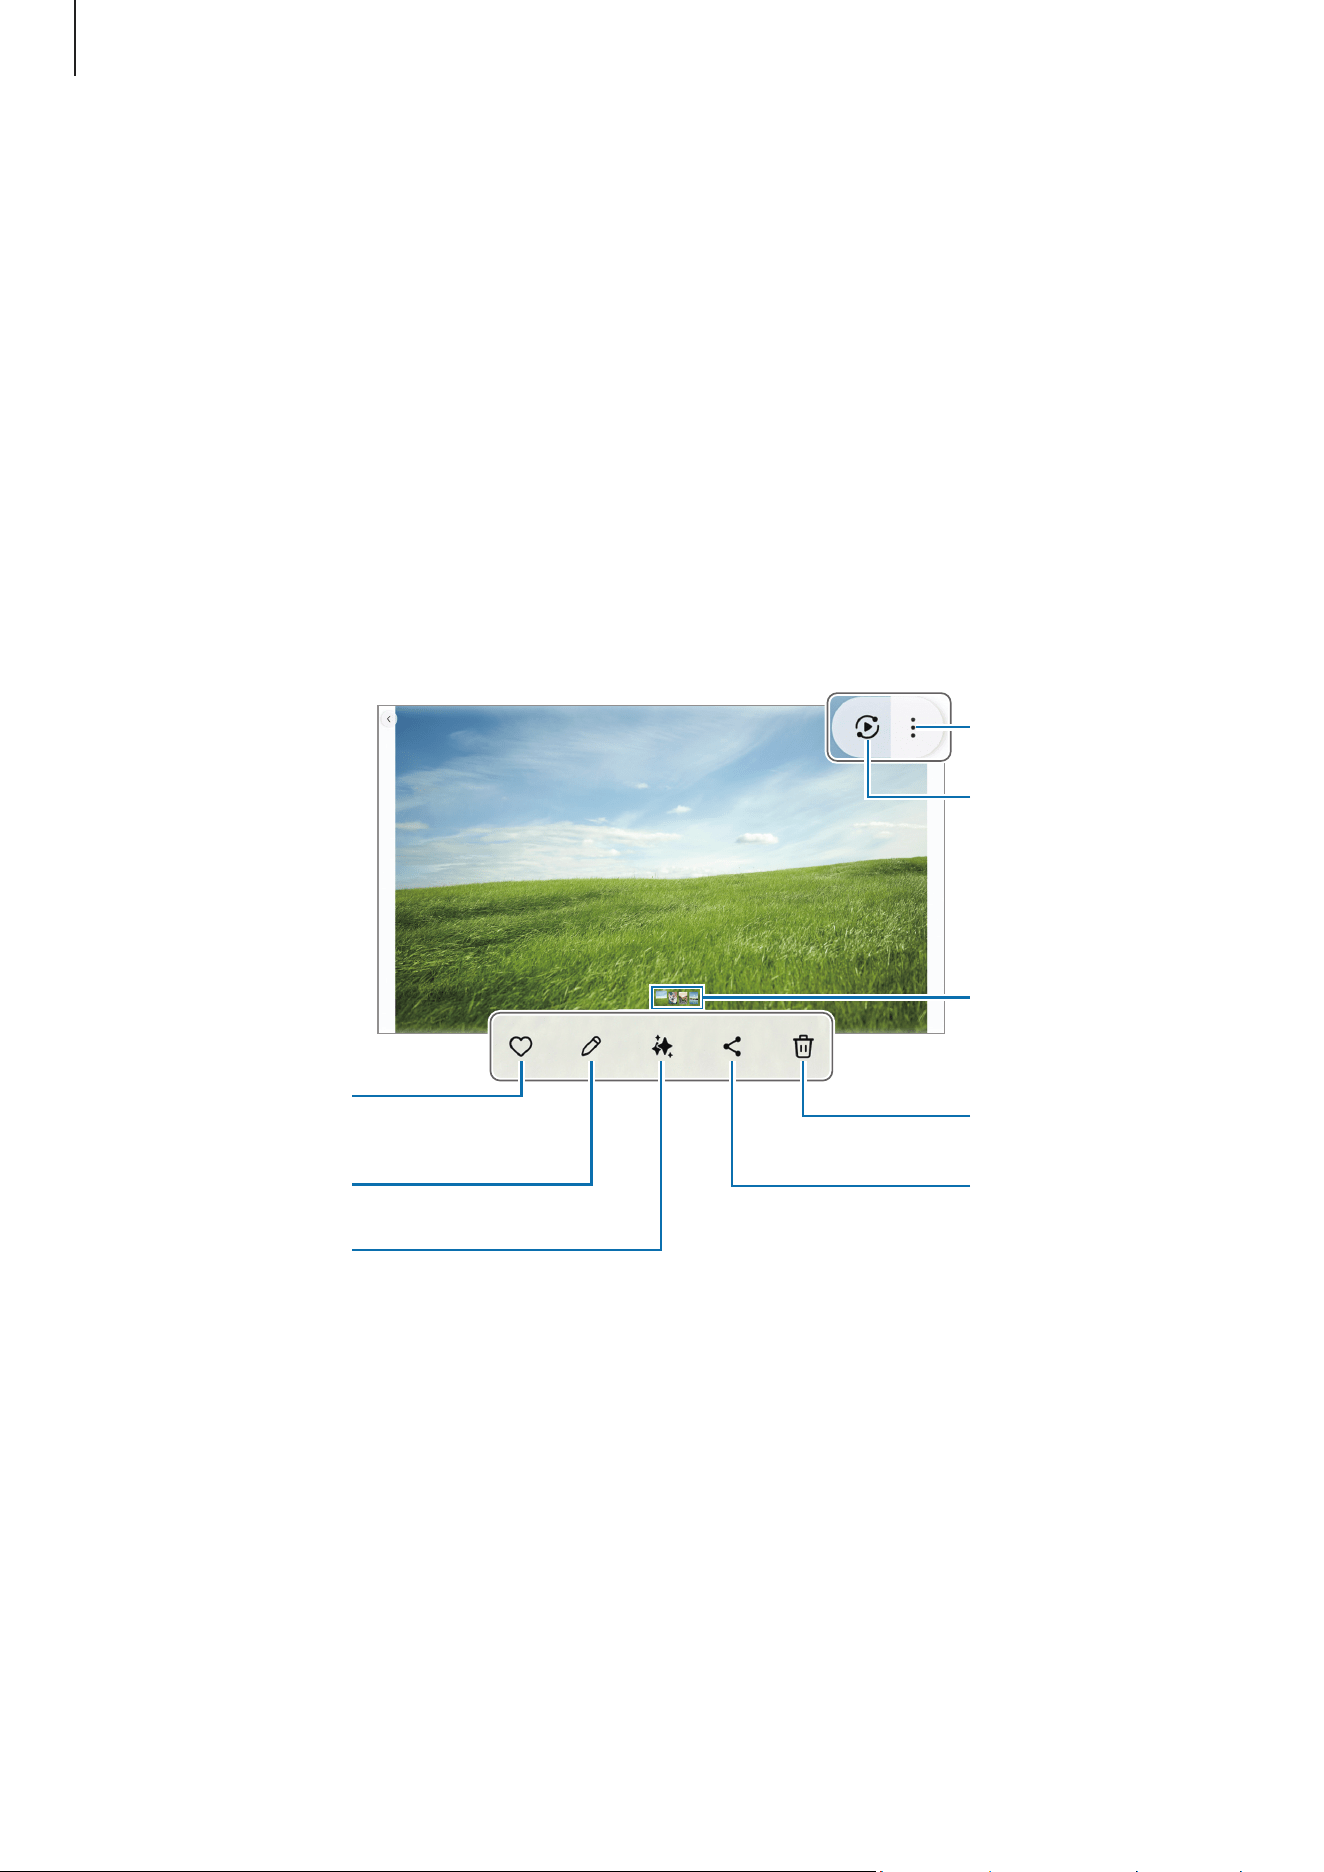
More options
Image and video
thumbnail
View the content
on a large screen
using the Smart
View feature.
Modify the image.
Photo assist
Add the image to
favourites.
Delete the image.
Share the image
with others.
Touch and hold on an object in the image or paused video to separate it from the
background and use it in various ways.
You can also spread two fingers apart to zoom in on the image and crop the area you
want.
Apps and features
49
Viewing videos
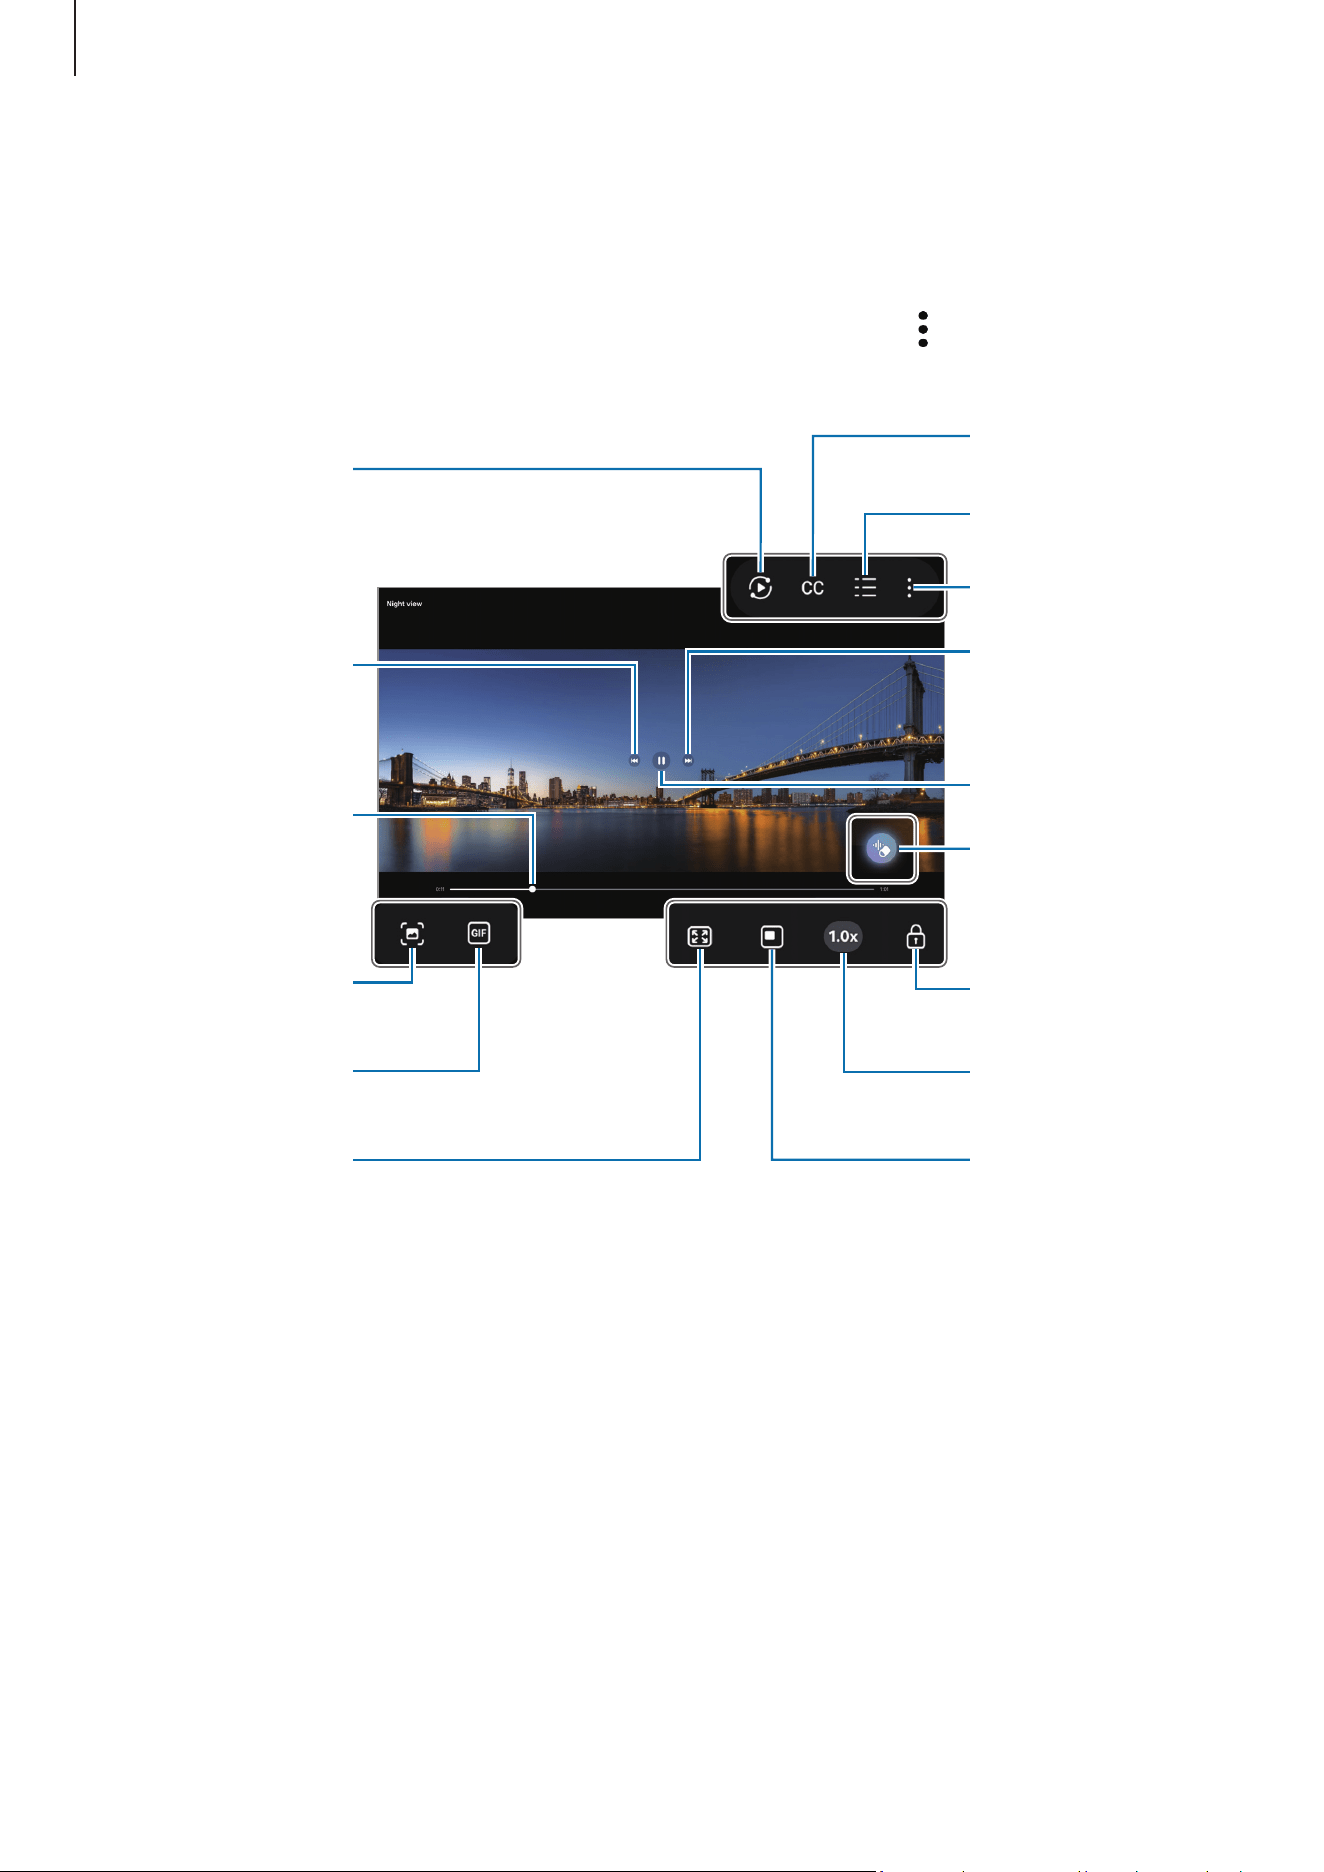
Open the
Gallery
app and select a video to play. To view other files, swipe to the left or
right on the screen.
To use more options during playback, tap the More options icon (
)
→
Open in Video
player
.
Video list
Configure the
caption settings.
More options
View the content
on a large screen
using the Smart
View feature.
Lock the playback
screen.
Skip to the previous
video. Touch and
hold to rewind.
Capture the current
screen.
Create a GIF.
Rewind or
fast-forward by
dragging the bar.
Switch to the
pop-up video
player.
Change the
playback speed.
Skip to the next
video. Touch and
hold to fast-for-
ward.
Pause and resume
playback.
Audio eraser
Change the screen
ratio.
Drag up or down on the left side of the playback screen to adjust the brightness, or drag
up or down on the right side of the playback screen to adjust the volume.
To rewind or fast-forward, swipe to the left or right on the playback screen.
Deleting images or videos
Open the
Gallery
app, touch and hold an image, a video, or an album to delete, and then
tap
Delete
. Images and videos you delete will be temporarily stored in the recycle bin.
The files will be deleted after a certain period.
To access files in the recycle bin, open the
Gallery
app and tap
Recycle bin
.

Apps and features
50
Bixby
Bixby is a user interface that helps you use your device more conveniently. You can say
what you want to Bixby. Bixby will launch a feature you request or show the information
you want.
Visit www.samsung.com/bixby for more information.
Bixby is only available in some languages, and it may not be available depending
on the region.
Waking up Bixby
While pressing and holding the Side button, say what you want to Bixby. To use this
feature, open
Settings
and tap
Advanced features
→
Side button
→
Long press
→
Bixby
.
Alternatively, say the wake-up phrase, such as “Hi, Bixby” or “Bixby”, and then say what
you want.
Setting a wake-up phrase
1 Open
Settings
and tap
Advanced features
→
Bixby
→
Voice wake-up
.
2 Select the wake-up phrase you want.
When running this app for the first time or restarting it after performing a data
reset, follow the on-screen instructions to complete the initial setup.
Apps and features
51
Multi window
(Using multiple apps at once)
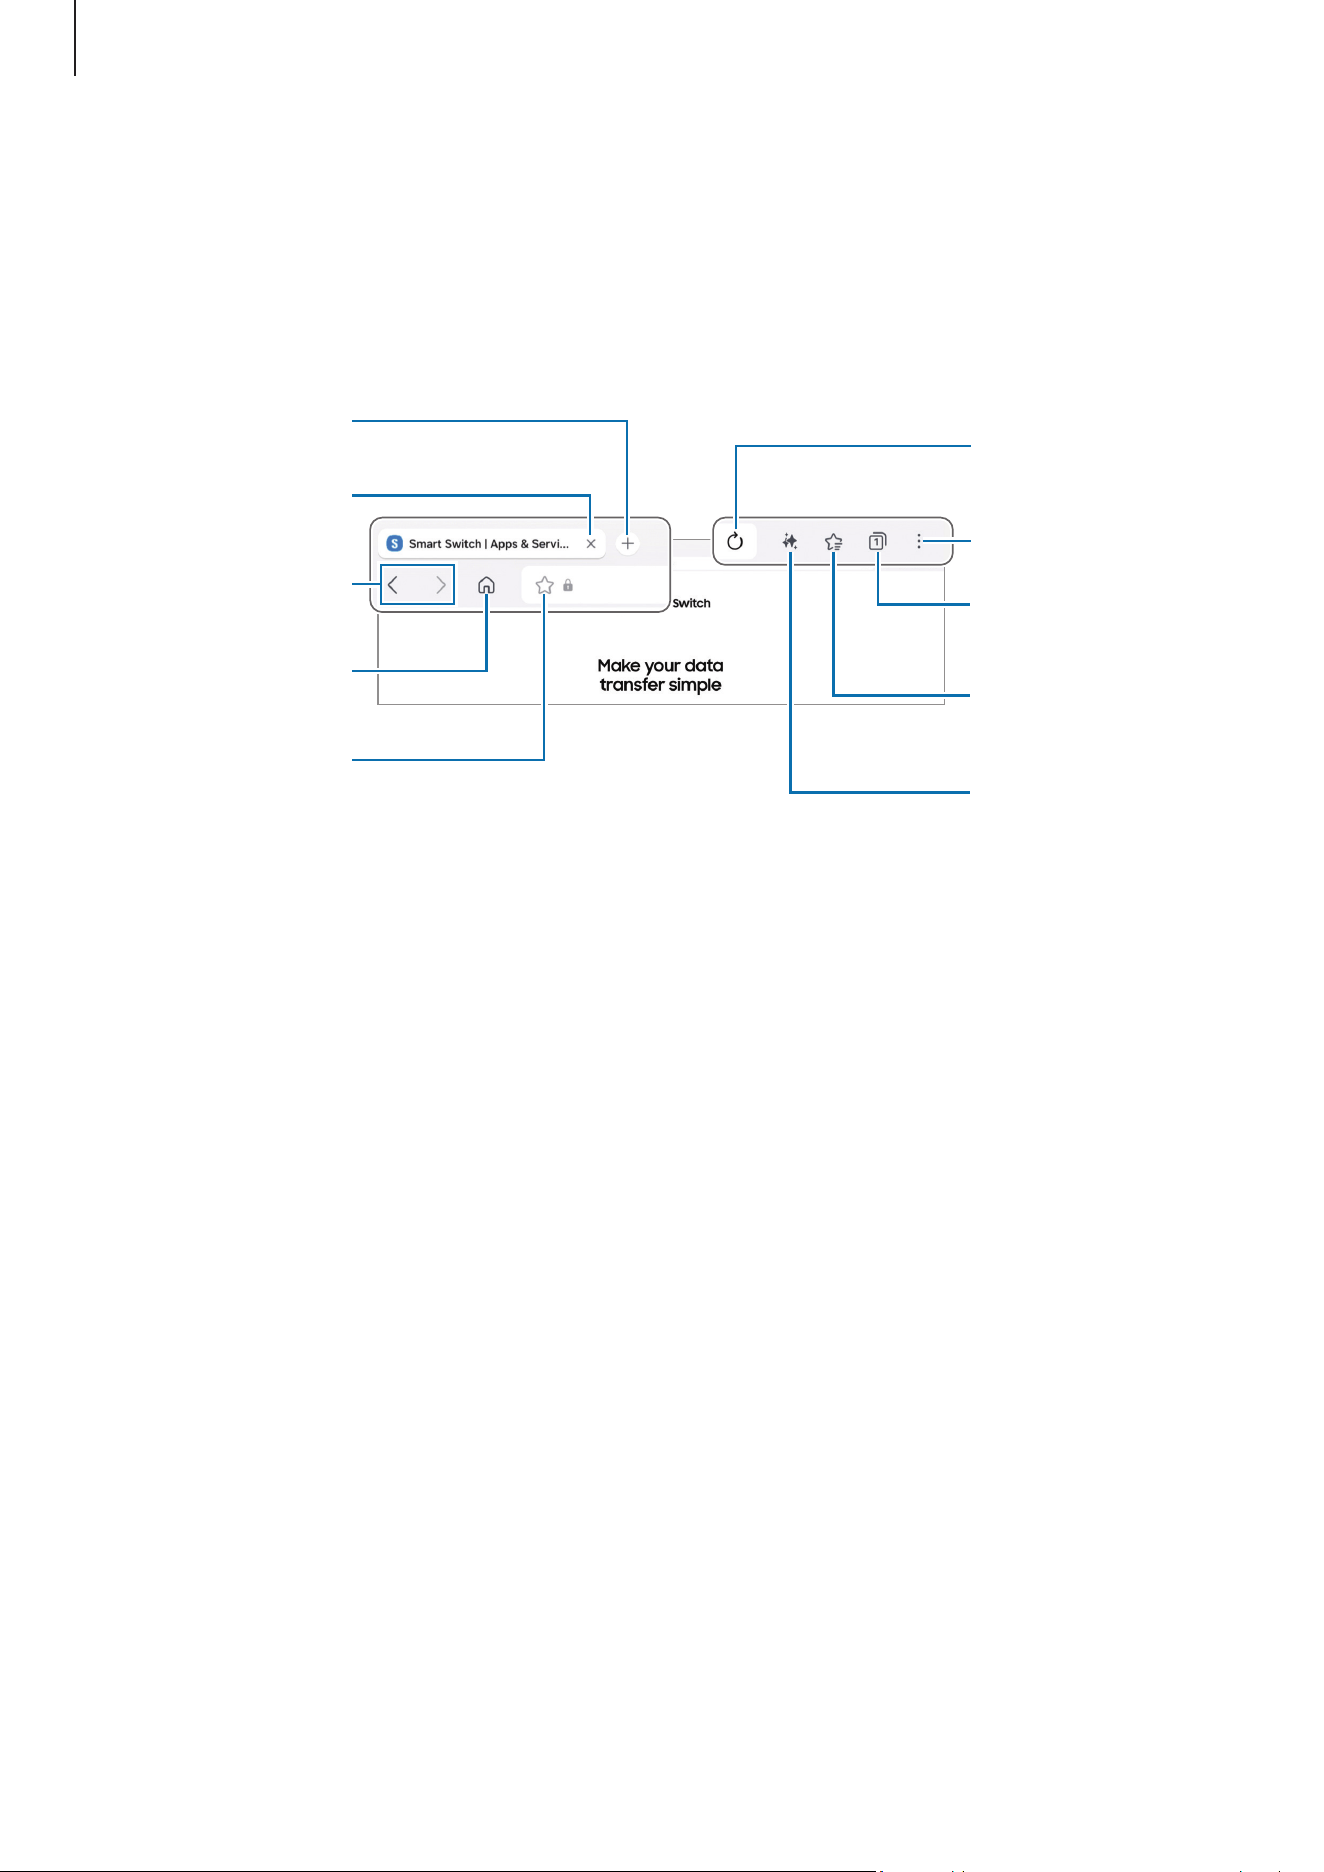
Run apps at the same time in split screen view or multiple apps in the pop-up view.
Some apps may not support this feature.
Split screen view Pop-up view
Launching Multi window
•
Recents button
Tap the Recents button (
), tap an app’s icon, and then tap
Open in split screen
view
or
Open in pop-up view
.
•
Swipe screen
Open
Settings
, tap
Advanced features
→
Multi window
, and then tap the
Swipe for
split screen
or
Swipe for pop-up view
switch to turn it on.
•
Taskbar
While using an app, drag the app you want from the taskbar upwards and drop it
wherever you want.
•
Drag the circles ( ) between the app windows to adjust the size of the
windows.
•
Tap the circles ( ) between the app windows and tap the Add app pair icon
(
). The apps you are using in the split screen view will be saved as an app pair.
•
Drag the multi window handle ( ) to a new location to move the app window.
•
When you tap the multi window handle ( ), the available menus will appear.
Apps and features
52
Samsung Browser
Browse the internet to search for information and bookmark your favourite webpages to
access them conveniently.
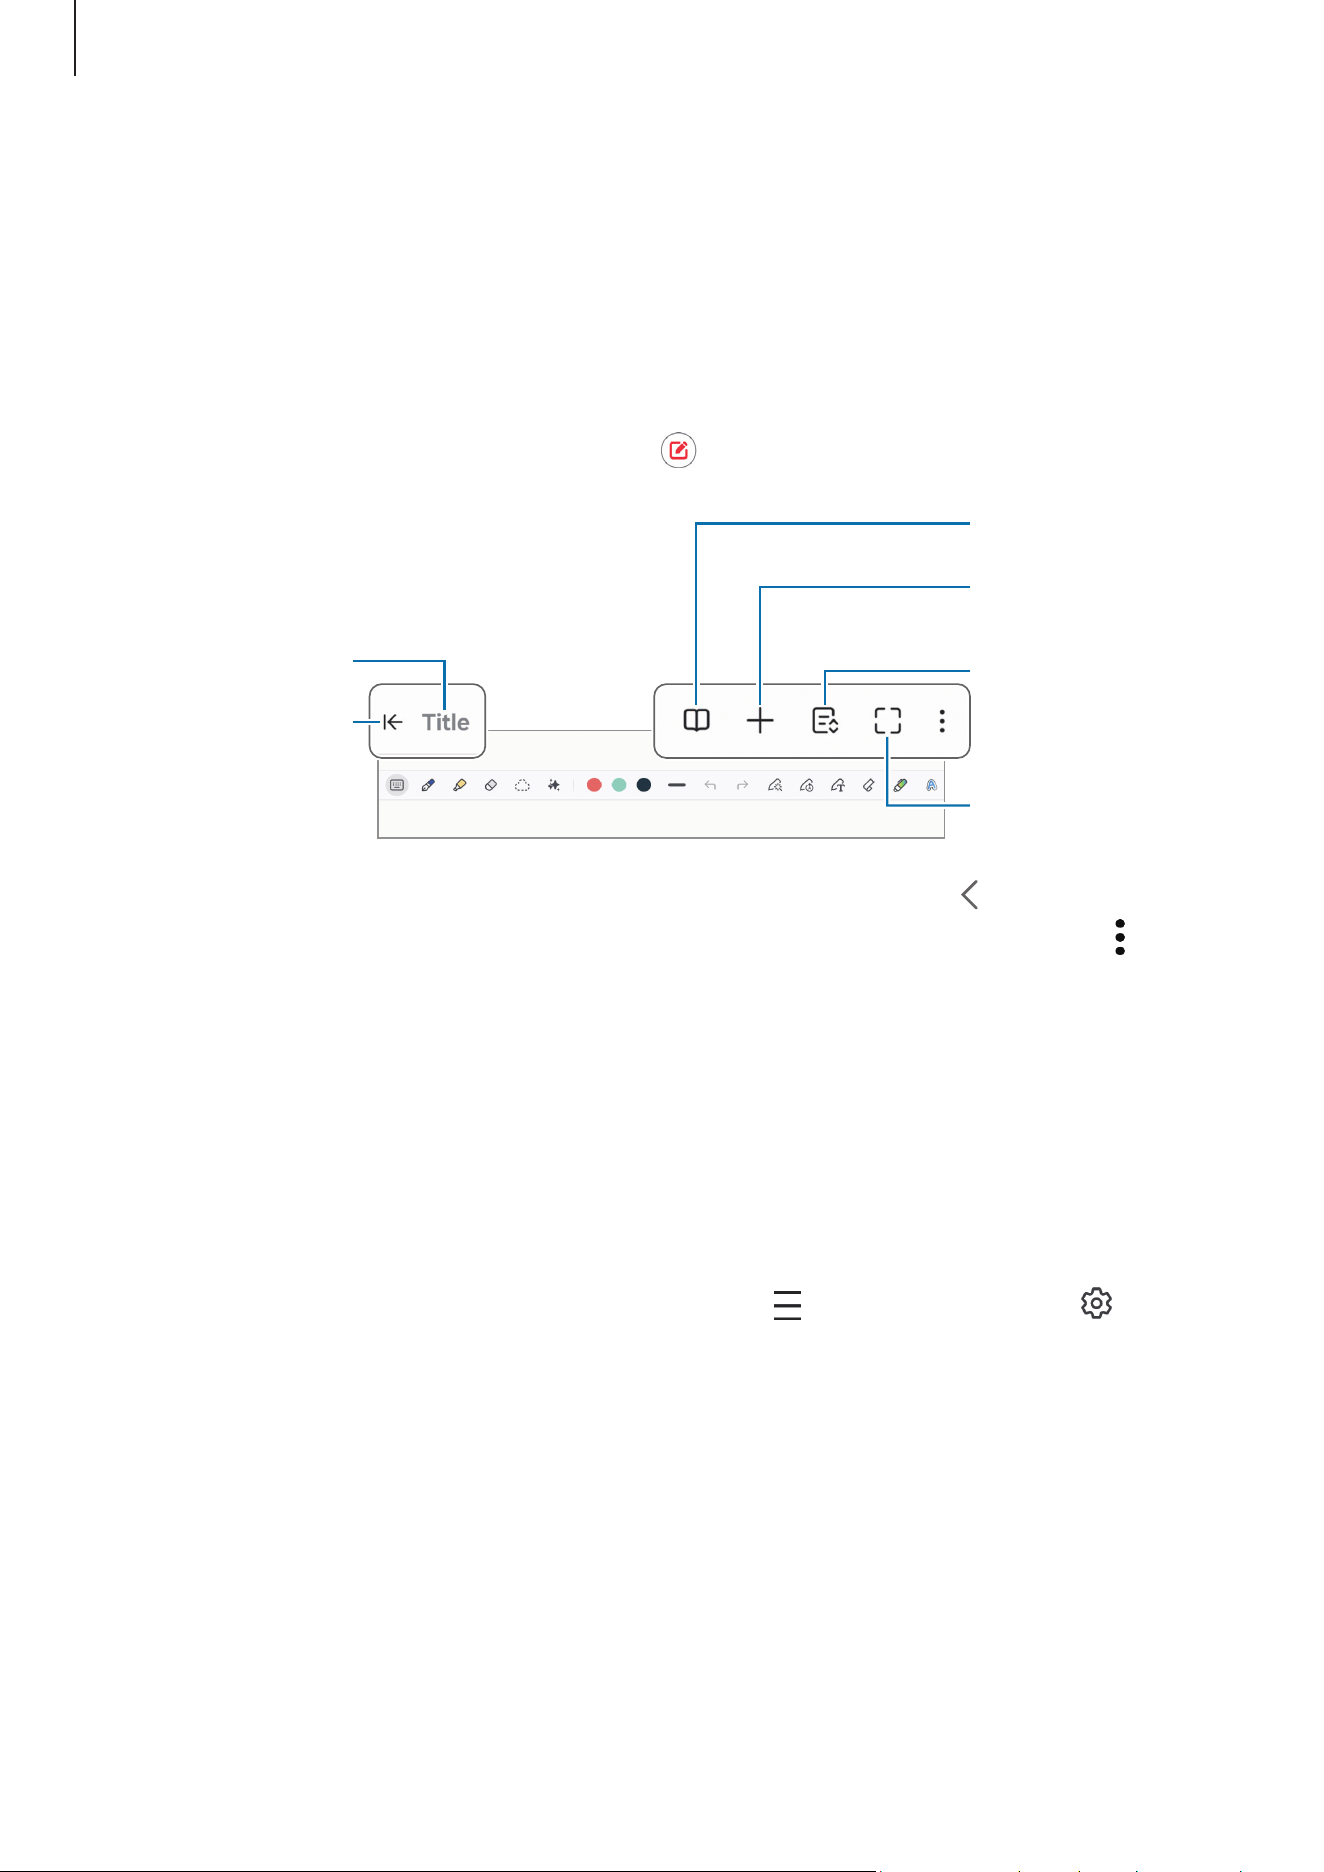
Open the
Browser
app.
Open a new tab.
Close the tab.
Translate,
summarise, or read
the webpage's
highlights aloud.
More options
Refresh the
current webpage.
Manage tabs. /
Use Secret mode.
Access your
bookmarks.
Move between
pages.
Open the
homepage.
Bookmark the
current webpage.
Samsung Health
Samsung Health helps you manage your wellness and fitness. Set fitness goals, check
your progress, and keep track of your overall wellness and fitness. You can also compare
your step count records with other Samsung Health users and check out health tips.
Open the
Health
app. Visit www.samsung.com/samsung-health for more information.
Apps and features
53
Samsung Notes
Create notes by entering text from the keyboard or by handwriting or drawing on the
screen. You can also insert images or voice recordings into your notes.
Creating notes
1 Open the
Notes
app, tap the Create icon (
), and then create a note.
Insert files or
record voice.
Manage pages.
Full screen
Reading mode
Enter a title.
Expand the screen.
2 When you are finished composing the note, tap the Back button ( ) to save it.
If you want to save the note in another file format, tap the More options icon (
)
→
Save as
.
Deleting notes
Touch and hold a note to delete and tap
Delete
.
Syncing notes
You can check and edit notes on all your devices signed in to the same Samsung account.
Open the
Notes
app, tap the Navigation drawer icon (
)
→
the Settings icon ( ), and
then tap the
Sync with Samsung Cloud
switch to turn it on.
Apps and features
54
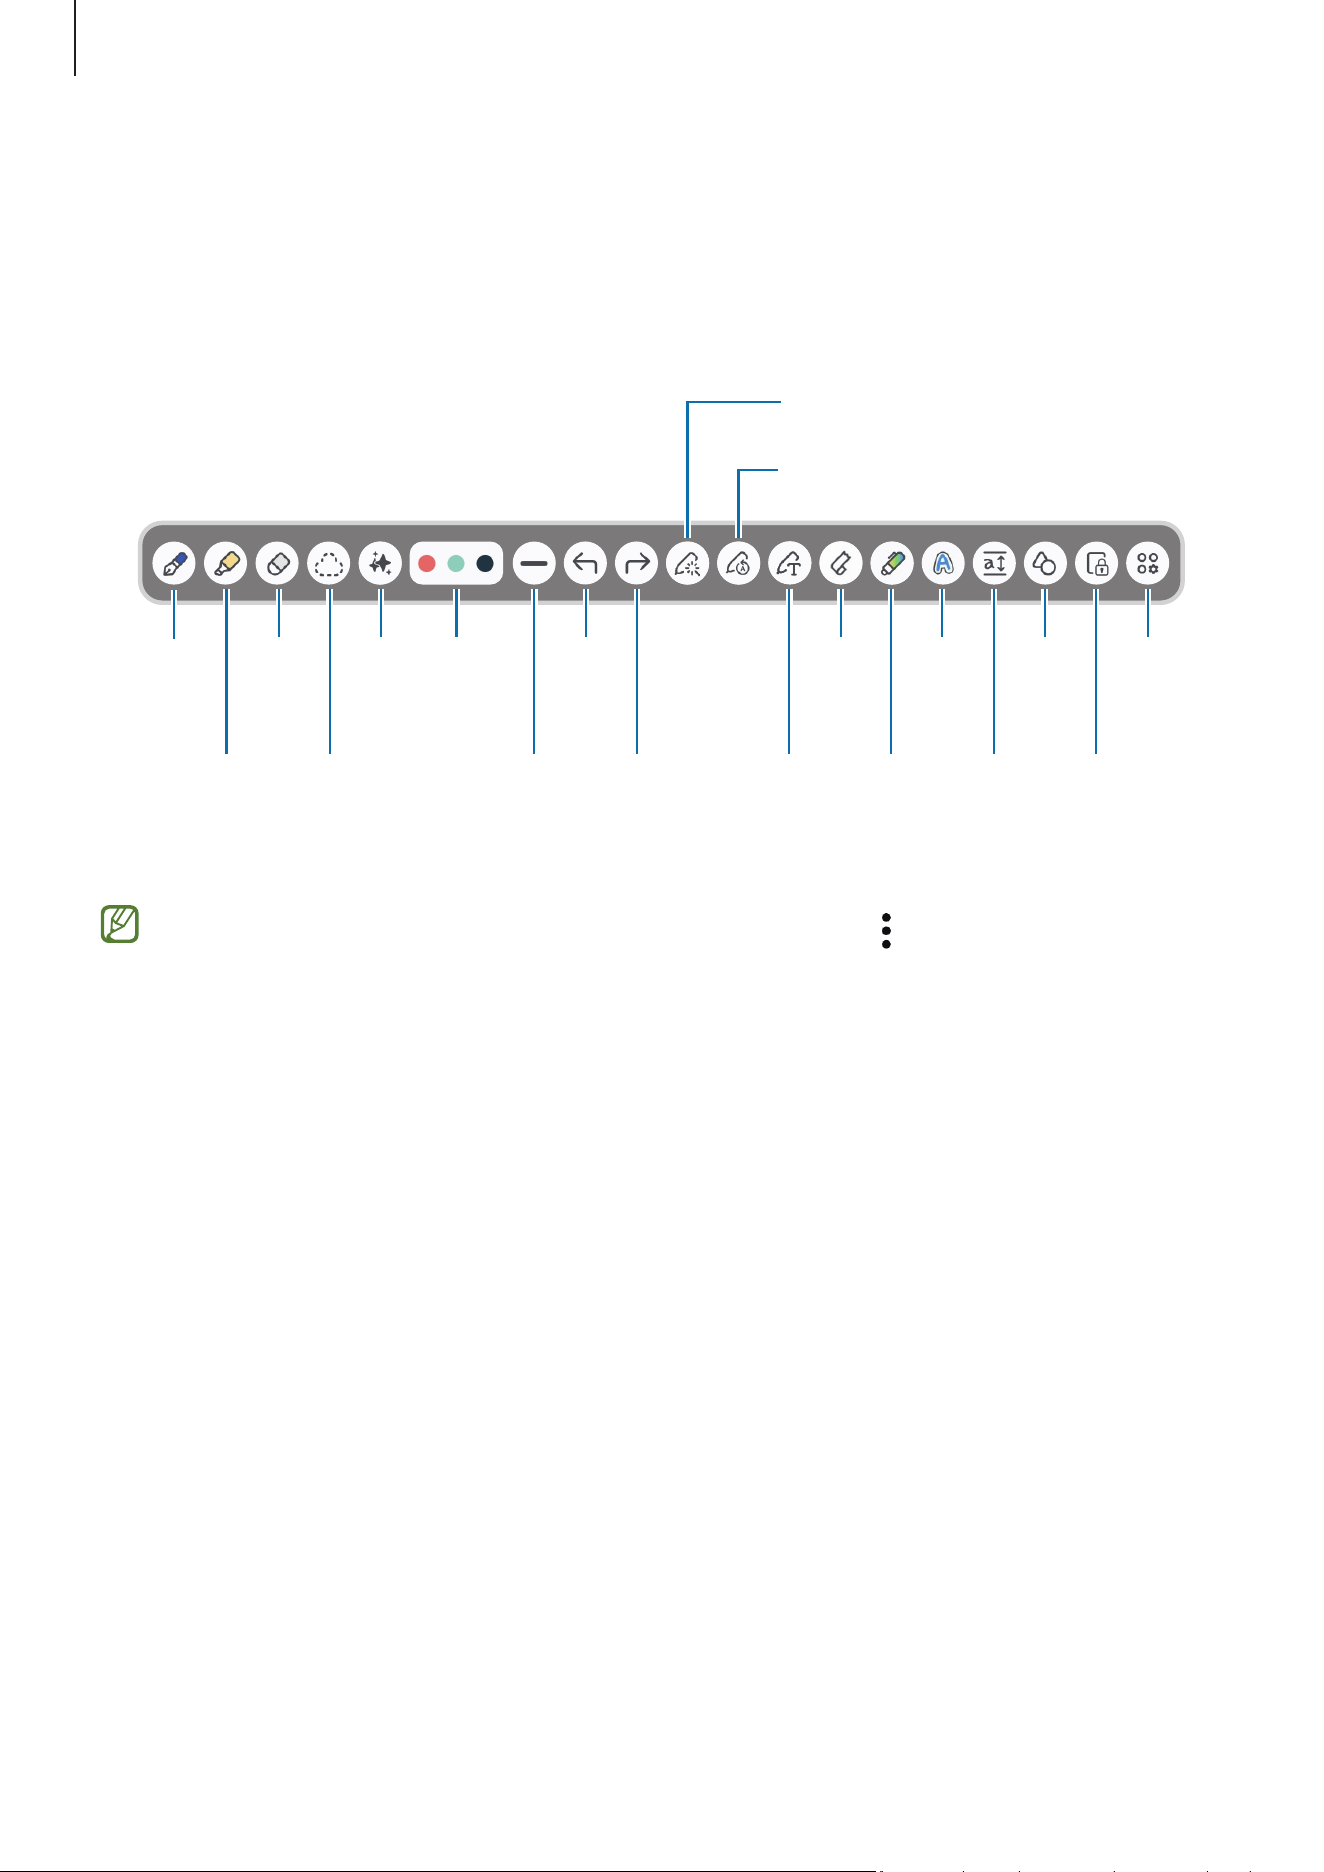
Composing notes with handwriting
On the note composer screen, draw or write in your own handwriting.
You can enter your handwriting in a larger size if you magnify the screen by spreading
two fingers on it.
Highlighter
Eraser Note
assist
Clean up
handwriting
Handwriting
help
Select
and edit.
Pen
colour
Pen
thickness
S Pen to
text
UndoPen
Redo
Change
styles.
Easy
writing
pad
Canvas
lock
Laser
pointer
Auto-fix
shapes
Edit
toolbar
Tape
If finger input does not work, tap the More options icon ( ) on the note composer
screen
→
Turn on finger drawing
.

Apps and features
55
Samsung Members
Samsung Members offers support services to customers, such as device problem
diagnosis, and lets users submit questions and error reports. You can also share
information with others in the Galaxy users’ community or check the latest news and
tips. Samsung Members can help you solve any problems you might encounter while
using your device.
Open the
Members
app.
If you have questions while using other Samsung apps, access the app’s settings menu
and select the contact us option.
•
Discover
: You can get official information from Samsung, such as Galaxy product
launches and newsletters.
•
Community
: You can communicate with other Galaxy users on various topics and
share information with them.
•
Support
: You can use customer support services, such as feedback or tablet
diagnostics, which can help you check if your device is functioning properly.
Available features may vary depending on the device’s software version, app
version, or model.

Apps and features
56
Samsung Global Goals
The Global Goals, which were set up by the United Nations General Assembly in 2015,
consist of goals that aim to create a sustainable society. These goals have the power to
end poverty, fight inequality, and stop climate change.
With Samsung Global Goals, learn more about the global goals and join the movement
for a better future.
Samsung TV Plus
Select the channels like you would use a TV and enjoy various video content free of
charge.
Open the
TV
app.
This app may not be available depending on the carrier or model.
Samsung Find
You can locate your device even if it is not connected to a network. You can also share
your location with other people you preset.
Open the
Find
app.
Samsung Shop
Samsung Shop
is the mobile shopping service provided by Samsung. Get offers or
information about Samsung and its partners’ products and services.
Open the
Samsung Shop
app.
This app may not be available depending on the carrier or model.

Apps and features
57
Galaxy Store
You can purchase or download various apps, games, themes, or paid services.
Open the
Store
app.
Available features may vary depending on the device’s software version, app
version, or model.
Purchasing or download content
Browse content by category or tap the Search icon (
) to search for a keyword. Then
purchase or download the content you want.
Managing your apps and content
On the Galaxy Store screen, tap
My apps
. You can check your purchased or downloaded
content and reinstall content that has been deleted from your device.
To check for available updates for your apps, tap
Updates
. If you want to update, tap the
Update icon (
) next to the apps you want or tap
Update all
to update all at once.
By default, auto app updates are set to run only when connected to a Wi-Fi
network. To change the auto update settings, tap the Settings icon (
)
→
Auto
update apps
and select an option.
Adding payment methods or checking your purchase history
On the Galaxy Store screen, tap
Payment methods
and add a payment method, such as
a credit card. You can use the registered payment method to purchase paid content in
Galaxy Store
.
If you want to check your purchase history, tap
Receipts
.

Apps and features
58
PENUP
PENUP is a social network service for sharing artwork drawn with the S Pen. Post your
artwork, check out others’ artwork, and get useful drawing tips.
Open the
PENUP
app.
Calendar
Manage your schedule by entering upcoming events in your planner.
Open the
Calendar
app and tap the Add event icon ( ).
Voice Recorder
Record or play voice recordings.
Open the
Voice Recorder
app, tap the Record icon ( ) to start recording, and then tap
the Stop icon (
) to finish recording.
My Files
(Checking and managing the files)
Access and manage various files stored in the device.
Open the
My Files
app.
To check for unnecessary data and free up the device’s storage, tap
Manage storage
.

Apps and features
59
Clock
Set alarms, check the current time in many cities around the world, time an event, or set
a specific duration.
Open the
Clock
app.
Calculator
Perform basic arithmetic or scientific calculations.
Open the
Calculator
app.
Weather
You can check the weather information for your current location or specific locations you
set.
•
To get the weather information for your current location, you must turn on the
GPS feature and allow the Weather app to collect and use your current location.
•
To get precise weather information, you must allow the Weather app to access
your location.
•
Available features may vary depending on the device’s software version, app
version, or model.
Launching Weather
Launch Weather using one of these methods.
•
Tap the Weather widget on the Home screen. If the widget is not on the screen,
touch and hold an empty area on the Home screen, tap
Widgets
→
Weather
, select a
widget, and then tap
Add
.
•
Open the
Weather
app. If the app icon is not on the screen, tap
Search
on the Apps
screen, search for
Weather
, and then launch the app. If you want to add the app icon
to the Apps screen, on the Weather screen, tap the Weather menu and city list icon
(
)
→
the More options icon ( )
→
Settings
and tap the
Show Weather on Apps
screen
switch to turn it on.

Apps and features
60
Using main features
•
To add locations you want to check the weather for, on the Weather screen, tap the
Search icon (
).
•
To set a primary location to display in the widget, touch and hold the widget, then
tap
Settings
. Then tap
Change
, select the location, and then tap
Save
.
•
To get customised forecasts according to your sleep patterns, activities, and more, on
the Weather screen, tap the Weather menu and city list icon (
)
→
the More options
icon (
)
→
Settings
and tap the
Customisation Service
switch to turn it on.
Gaming Hub
Gaming Hub gathers your downloaded games in one place. You can browse popular
games from different genres and check for the latest trends. You can also play games
without installing them on your device through Instant Plays.
Open the
Gaming Hub
app.
Available features may vary depending on the device’s software version, app
version, or model.
Playing downloaded games
Games downloaded from
Play Store
and
Galaxy Store
will be automatically shown on
the Gaming Hub screen.
On the Gaming Hub screen, select the game you want.
If your games are not there, tap
My games
→
the More options icon ( )
→
Add games
.
To bookmark content you use often while playing games, such as images or apps, on the
Gaming Hub screen, tap the More options icon (
)
→
Bookmarks
→
the Add bookmark
icon (
).

Apps and features
61
Playing Instant Plays
On the Gaming Hub screen, select the game with the Instant Plays icon ( ) on it.
Checking events
On the Gaming Hub screen, tap the Events icon ( ). You can check notifications about
various game-related events and exclusive benefits for Galaxy Store users.
Game Booster
(Configuring your gaming environment)
You can play games in a better environment with Game Booster. You can use Game
Booster while playing games.
To open the Game Booster panel while playing games, tap the Game Booster icon (
)
at the bottom of the screen. If the icon is hidden, drag upwards from the bottom of the
screen to show it.
SmartThings
Control and manage smart appliances and Internet of Things (IoT) products.
Open the
SmartThings
app. For more information, tap
Menu
→
How to use
.
Connected devices’ own problems or defects are not covered by the Samsung
warranty. When problems or defects occur on the connected devices, contact the
device’s manufacturer.

Apps and features
62
Sharing content
Share content by using various sharing options. The following actions are an example of
sharing images.
1 Open the
Gallery
app and select an image.
2 Tap the Share icon ( ) and select a sharing method you want.
You may incur additional charges when sharing files through the mobile network.
Quick Share
Share content with nearby devices or people in your contacts.
1 On the other device, open
Settings
and tap
Connected devices
→
Quick Share
→
Who
can share with you
→
Your devices
,
Contacts
, or
Everyone (10 minutes only)
.
2 Open the
Gallery
app and select an image.
3 Tap the Share icon (
)
→
Quick Share
and select a device to transfer the image to.
4 Accept the file transfer request on the other device.
Setting who can find your tablet
Set who is allowed to find and send content to your tablet.
Open
Settings
and tap
Connected devices
→
Quick Share
→
Who can share with you
.

Apps and features
63
Smart View
(Mirroring on a TV screen)
View your tablet’s displayed content on a large screen by connecting your tablet to a
screen mirroring-enabled TV or monitor.
1 Open the quick settings panel and tap
Smart View
.
2 Select a device to mirror your tablet’s screen.
When you play a video with Smart View, the resolution may vary depending on the
TV model.
Casting apps to the screen
Only display the video on the connected screen while you are checking private messages
or using other features on your tablet at the same time.
Open the app to cast a video on the connected screen and tap the Smart View icon (
)
→
the App cast icon ( ).
Some apps may not support this feature.

Apps and features
64
Samsung Flow
Connect your tablet to a phone or a computer and use them together doing things like
checking notifications and sharing content.
Samsung Flow must be installed on both devices that you want to connect. If Samsung
Flow is not installed, download it from
Galaxy Store
or
Play Store
. For computers, you
can download it from the Microsoft Store.
This feature is only available on some Samsung Android devices and computers
running Windows 10 or higher.
Connecting to a phone
1 On your phone, open the Samsung Flow app.
2 On your tablet, open the
Flow
app and tap
Connect to phone
.
If your tablet is connected to a computer, tap the More options icon (
)
→
Connect to
phone
.
3 Select your phone from the detected devices list.
If the connection method selection pop-up window appears, select the method you
want.
4 Confirm the passkey on both devices.
The devices will be connected.
Connecting to a computer
1 On your tablet, open the
Flow
app and tap
Connect to computer
.
If your tablet is connected to a phone, tap the More options icon (
)
→
Connect to
computer
.
2 On your computer, open the Samsung Flow app and tap
Start
.
3 Select your tablet from the detected devices list.
If the connection method selection pop-up window appears, select the method you
want.
4 Confirm the passkey on both devices.
The devices will be connected.

Apps and features
65
Daily Board
Introduction
Use your tablet as a picture frame or bulletin board when it is charging with a USB cable
or charging dock. You can enjoy a slide show with your favourite images and check
information, such as the time, weather, or your calendar. You can also create a note and
control music while using it.
Starting Daily Board
1 Charge the device with a USB cable or charging dock.
To connect the device to a charging dock, slide the device into the charging dock to
bring the device’s connectors and charging dock’s charging terminals into contact
with each other.
2 Tap the Daily Board button ( ) on the navigation bar.
The Daily Board main screen will appear and you can check the clock, weather, or
calendar.
Using Daily Board
Playing the slide show
You can use your device as a picture frame. Enjoy slide shows of your favourite images on
Daily Board.
On the Daily Board main screen, swipe to the right to play a slide show.
To add your favourite images to display to a slide show, open
Settings
, tap
Advanced features
→
Daily Board
→
Slideshow
→
the Settings icon ( ) next to
Albums
, and then select the album.
Making a note on Daily Board
You can use your device as a bulletin board to make a note on Daily Board.
1 Swipe to the left on the Daily board main screen and tap the Draw icon ( ).
2 Select a pen and write or draw on the screen.
3 Tap
Done
.
The note you make will be pinned to Daily Board.

Apps and features
66
Controlling the music
You can control music playback on Daily Board.
Tap the Music playback icon (
) and select an app to control playback.
Configuring settings for Daily Board
Configure various settings for Daily Board and make Daily board more personalised.
Open
Settings
and tap
Advanced features
→
Daily Board
.
•
Time, weather, and calendar
: Change the setting for Daily Board main screen.
•
Memo
: Turn the memo feature on Daily Board on or off.
•
SmartThings
: Set the device to show SmartThings devices and scenes on the Daily
Board.
•
Slideshow
: Select the images to add to the slide show and change the settings for
slide show, such as the image order, transition speed, and style. You can also set the
clock or weather information shown on the slide show.
•
Music
: Turn the music controller feature on Daily Board on or off.
•
Charge battery or tap icon
: While charging, the Daily Board button ( ) will be added
to the navigation bar.
‒
Add Daily Board to Apps screen
: The Daily Board app icon ( ) will be added to
the Apps screen.
‒
Auto start when connected to USB charger
: Daily Board will be start
automatically when the device is charging with a USB cable.
•
Same as screen saver
: Use Daily Board as a screen saver.
•
Dark mode
: Apply Dark mode to the Daily Board. You can also set the schedule to
apply Dark mode.
•
Turn off as scheduled
: Set the schedule to close Daily Board. When activating this
feature, tap
Set time
to set the time to close Daily Board.
•
About Daily Board
: Check out the Daily Board version and legal information.
•
Contact us
: Ask questions or check frequently asked questions.
Closing Daily Board
To close Daily Board, tap the Home button ( ) or the Back button ( ).

Apps and features
67
Google apps
Google provides entertainment, social network, and business apps. You may require a
Google Account to access some apps.
To check out more app information, access each app’s help menu.
•
Chrome
: Search for information and browse webpages.
•
Gmail
: Send or receive emails through the Google Mail service.
•
Maps
: Find your location on the map, search the world map, and access location
information for various places around you.
•
YT Music
: Enjoy various music and videos provided by YouTube Music. You can also
access the music collections stored on your device and play them.
•
Google TV
: Purchase or rent videos, such as movies and TV programmes, from
Play
Store
.
•
Drive
: Store your content on the cloud, access it from anywhere, and share it with
others.
•
YouTube
: Watch or create videos and share them with others.
•
Photos
: Search for, manage, and edit all your pictures and videos from various
sources in one place.
•
Google
: Search for items on the internet or your device.
•
Meet
: Make video calls or create or join video meetings.
•
Messages
: Send and receive messages on your device or computer, and share
various content, such as images and videos.
•
Gemini
: Chat with Gemini to use various features, such as searching for information,
creating custom images, or writing content.
Some apps may not be available depending on the carrier or model.

68
Settings
Introduction
Customise device settings.
On the Apps screen, tap
Settings
. Alternatively, open the quick settings panel and tap
the Settings icon (
).
Sign in to your Galaxy
Sign in to your Samsung account and manage it.
On the Settings screen, tap
Sign in to your Galaxy
.
Warranty and care
Check for your device’s warranty information and use support services, such as repair
request.
On the Settings screen, tap
Warranty and care
.
Connections
Options
Change settings for various connections, such as the Wi-Fi feature and Bluetooth.
On the Settings screen, tap
Connections
.
•
Wi-Fi
: Turn on the Wi-Fi feature to connect to a Wi-Fi network and access the
internet or other network devices. Refer to Wi-Fi for more information.
•
Bluetooth
: Use Bluetooth to exchange data or media files with other
Bluetooth-enabled devices. Refer to Bluetooth for more information.

Settings
69
•
Flight mode
: Set the device to turn off all wireless functions on your device. You can
use only non-network services.
Follow the regulations provided by the airline and the instructions of aircraft
personnel. In cases where it is allowed to use the device, always use it in Flight
mode.
•
SIM manager
: Activate your SIM cards and customise the SIM card settings. Refer to
SIM manager for more information.
•
Mobile networks
: Configure your mobile network settings.
•
Data usage
: Keep track of your data usage amount and customise the settings for
the limitation. Set the device to automatically disable the mobile data connection
when the amount of mobile data you have used reaches your specified limit.
You can turn on the data saver feature to prevent some apps running in the
background from sending or receiving data.
You can also set apps to use only a Wi-Fi or mobile data, or both.
•
Mobile Hotspot and Tethering
: Use the tablet as a mobile hotspot to share the
tablet’s mobile data connection with other devices. For more information about
Mobile Hotspot, refer to Mobile Hotspot (Mobile network enabled models).
You may incur additional charges when using this feature.
•
Tethering
: Use tethering to share the device’s internet connection with other
devices.
•
More connection settings
: Customise settings to control other connection features,
such as scanning for nearby devices to connect and connecting to a printer to print
images or documents.
Some features may not be available depending on the model.

Settings
70
Wi-Fi
Turn on the Wi-Fi feature to connect to a Wi-Fi network and access the internet or other
network devices.
Connecting to a Wi-Fi network
1 On the Settings screen, tap
Connections
→
Wi-Fi
and tap the switch to turn it on.
2 Select a network from the Wi-Fi networks list.
Networks with a lock icon require a password.
•
Once the device connects to a Wi-Fi network, the device will reconnect to that
network each time it is available without requiring a password. To prevent the
device from connecting to the network automatically, tap the Settings icon (
)
next to the network and tap the
Auto reconnect
switch to turn it off.
•
If you cannot connect to a Wi-Fi network properly, restart your device’s Wi-Fi
feature or the wireless router.
Wi-Fi Direct
Wi-Fi Direct connects devices directly through a Wi-Fi network without requiring an
access point.
1 On the Settings screen, tap
Connections
→
Wi-Fi
and tap the switch to turn it on.
2 Tap the More options icon ( )
→
Wi-Fi Direct
.
The detected devices are listed.
If the device you want to connect to is not in the list, request that the device turns on
its Wi-Fi Direct feature.
3 Select a device to connect to.
The devices will be connected when the other device accepts the Wi-Fi Direct
connection request.
To end the device connection, select the device to disconnect from the list.
Settings
71
Bluetooth
Use Bluetooth to exchange data or media files with other Bluetooth-enabled devices.
Once the device connects to the other device, the device will reconnect to that device
each time it is available without requiring a verification.
Pairing with other Bluetooth devices
1 On the Settings screen, tap
Connections
→
Bluetooth
and tap the switch to turn it
on.
The detected devices will be listed.
2 Select a device to pair with.
If the device you want to pair with is not on the list, set the device to enter Bluetooth
pairing mode.
Your tablet is visible to other devices while the Bluetooth settings screen is open.
3 Accept the Bluetooth connection request on your tablet to confirm.
The devices will be connected when the other device accepts the Bluetooth
connection request.
To unpair the devices, tap the Settings icon (
) next to the device name to unpair and
tap
Unpair
.
Precautions for using Bluetooth
•
Samsung is not responsible for the loss, interception, or misuse of data sent or
received through Bluetooth.
•
Always ensure that you share and receive data with devices that are trusted and
properly secured. If there are obstacles between the devices, the operating distance
may be reduced.
•
Some devices, especially those that are not tested or approved by the Bluetooth SIG,
may be incompatible with your device.
•
Do not use the Bluetooth feature for illegal purposes (for example, pirating copies of
files or illegally tapping communications for commercial purposes). Samsung is not
responsible for the repercussion of illegal use of the Bluetooth feature.

Settings
72
Mobile Hotspot (Mobile network enabled models)
Use your tablet as a mobile hotspot to share your tablet’s mobile data connection with
other devices.
1 On the Settings screen, tap
Connections
→
Mobile Hotspot and Tethering
→
Mobile
Hotspot
.
2 Tap the switch to turn it on.
You can change the network name, password, and more.
The Hotspot icon (
) appears on the status bar.
3 On the other device’s screen, search for and select your tablet from the Wi-Fi
networks list.
Alternatively, tap
QR code
on the Mobile Hotspot screen and scan the QR code with
the other device.
•
If the mobile hotspot is not found, on your tablet, set
Band
to
2.4 GHz
, tap
Advanced
, and then tap the
Hidden network
switch to turn it off.
•
If you turn on the
Auto Hotspot
feature, you can share your tablet’s mobile data
connection with other devices signed in to your Samsung account.

Settings
73
Connected devices
Change settings for device connections.
On the Settings screen, tap
Connected devices
.
•
Quick Share
: Change the Quick Share settings. Refer to Quick Share for more
information.
•
Music Share
: Play music from your friend’s device through your Bluetooth speaker.
You can also listen to the same music on your Galaxy Buds and another person’s
Galaxy Buds.
•
Audio broadcast
: Broadcast music, voice, or other audio content from your device
using the Auracast standard. When you connect Bluetooth LE Audio-compatible
devices, such as speakers, headphones, or hearing aids, you can listen to other audio
broadcasts.
•
Auto switch Buds
: Set the Galaxy Buds to switch from another device to your tablet
when you make or answer a call, play media, and more. You can use this feature only
when you signed in to the same Samsung account on the other device and you are
wearing your Galaxy Buds.
•
Call & text on other devices
: Connect your tablet and phone to use calling and
messaging features on the tablet with your phone number. You must sign in to
the same Samsung account on the tablet and phone. Some calling and messaging
features may not be available.
•
Continue on other devices
: Use your tablet’s apps and features on other devices
signed in to your Samsung account.
•
Camera Share
: Use your phone’s camera as a webcam for your tablet. To use this
feature, both devices need to be signed in to the same Samsung account and have
Wi-Fi, Bluetooth, and the Camera Share feature turned on.
•
Storage Share
: Share your tablet’s files with your Samsung TV or Galaxy Book. To use
this feature, both devices need to be signed in to the same Samsung account and
have Wi-Fi, Bluetooth, and the Storage Share feature turned on.
•
Link to Windows
: Use apps and check notifications from your mobile device on
a Windows computer. A Microsoft account is required to use this feature. Visit
https://aka.ms/setupltw for details.

Settings
74
•
Multi control
: Use a mouse and keyboard connected to a Samsung computer that
supports this feature on your tablet.
•
Second screen
: Connect your tablet and computer to use the tablet as an additional
display for the computer. This feature is available on computers running Windows 11
or higher and optimised for the Galaxy Book.
•
Samsung DeX
: Use your mobile device’s features in an interface environment similar
to a computer. Refer to www.samsung.com/samsung-dex for more information.
•
Smart View
: View your tablet’s displayed content on a large screen by connecting
your tablet to a screen mirroring-enabled TV or monitor. Refer to Smart View for
more information.
•
SmartThings
: Control and manage smart appliances and Internet of Things (IoT)
products. Refer to SmartThings for more information.
•
Android Auto
: Connect your device to a vehicle and control some of your device’s
features on the vehicle’s display.
Some features may not be available depending on the model.
Galaxy AI
Use advanced intelligence features to help you use your device.
On the Settings screen, tap
Galaxy AI
. Refer to Galaxy AI for more information.

Settings
75
Modes and Routines
Using modes
Add a mode based on your current activity or location. Your device’s settings will change
to match your activity or situation.
1 On the Settings screen, tap
Modes and Routines
→
Modes
.
2 Select a mode you want or tap
Add mode
to add your own modes.
Modes will run automatically when their conditions are detected.
To run modes manually, select the mode you want and tap
Turn on
. Alternatively,
open the quick settings panel, tap
Modes
, and then select a mode to turn it on.
Using routines
Automate your repetitive daily tasks. For example, you can automatically change your
sound settings depending on where you are, optimise your device’s settings for gaming,
and more.
1 On the Settings screen, tap
Modes and Routines
→
Routines
.
2 Tap the Create icon ( ) and add your own routines or tap
Discover
and select a
routine you want.
Auto routines will run automatically when their conditions are detected.
To run routines which you set the running condition as
Start manually
, tap the Start
icon (
) next to the routine.

Settings
76
Sounds
Change settings for various sounds on the device.
On the Settings screen, tap
Sounds
.
•
Sound
/
Mute
: Set the device to use sound mode or silent mode.
•
Temporary mute
: Set the device to use silent mode for a certain period.
•
Ringtone
: Change the call ringtone.
•
Notification sound
: Change the notification sound.
•
System sound
: Change the sound to use for certain actions, such as charging the
device.
•
Volume
: Adjust the device’s volume level.
•
Sound quality and effects
: Set the device’s sound quality and effects.
•
Separate app sound
: Set the device to play media sound from a specific app on
the connected Bluetooth speaker or headset. For example, you can listen to the
Navigation app through your device’s speaker while listening to playback from the
Music app through the vehicle’s Bluetooth speaker.
Some features may not be available depending on the model.
Notifications
Change the notification settings.
On the Settings screen, tap
Notifications
.

Settings
77
Display
Change the display and the Home screen settings.
On the Settings screen, tap
Display
.
•
Light
/
Dark
: Turn Dark mode on or off.
•
Dark mode schedule
: Reduce eye strain by applying the dark theme when using the
device at night or in a dark place. You can set a schedule for applying Dark mode.
The dark theme may not be applied in some apps.
•
Brightness
: Adjust the brightness of the display.
•
Adaptive brightness
: Set the device to keep track of your brightness adjustments
and apply them automatically in similar lighting conditions.
•
Extra brightness
: Set the display to be brighter than the maximum brightness. This
feature is available when you turn off the
Adaptive brightness
feature.
•
Motion smoothness
: Change the refresh rate of the screen. When a high refresh rate
is set, the screen will scroll more smoothly.
•
Eye comfort shield
: Reduce eye strain by limiting the amount of blue light emitted
by the screen. You can set a schedule for applying this feature.
•
Screen mode
: Change the screen mode to adjust the display’s colour and contrast.
•
Font size and style
: Change the font size and style.
•
Screen zoom
: Make the items on the screen larger or smaller.
•
Aspect ratio
: Select an aspect ratio for each app to run.
•
Camera cutout
: Set the device to hide the front camera from the screen.
•
Screen timeout
: Set the length of time the device waits before turning off the
display’s backlight.
•
Edge panels
: Change the settings for the Edge panel.
•
Taskbar
: Change the settings for the taskbar. Refer to Taskbar for more information.
•
Navigation bar
: Change the navigation bar settings. Refer to Navigation bar (soft
buttons) for more information.
•
Increase touch sensitivity
: Increase the touch sensitivity of the screen for use with
screen protectors.
•
Screen saver
: Set the device to launch a screensaver when the device is charging.
Some features may not be available depending on the model.

Settings
78
Battery
Check the remaining battery power and time to use the device. For devices with low
battery levels, conserve battery power by turning on power saving features.
On the Settings screen, tap
Battery
.
•
Daily usage
: Check the battery level and usage history.
•
Power saving
: Turn on power saving mode to extend the battery’s usage time.
•
Background usage limits
: Limit battery usage for apps that you do not use often.
•
Battery protection
: Set to stop charging when the battery is fully charged or limit
the maximum charge to the preset level.
•
Battery information
: Check out battery information.
You can check the following battery information here. The available
information may vary depending on the region, service provider, or model.
•
Date of battery manufacturing
•
Date of first use
•
Number of full charge/discharge cycles (based on rated capacity)
•
Measured state of health
•
Charging settings
: Configure the charging settings.
•
Auto dim screen
: Dim the screen when the remaining battery power drops below a
certain level.
•
The usage time left shows the time remaining before the battery power runs
out. Usage time left may vary depending on your device settings and operating
conditions.
•
You might not receive notifications from some apps that use power saving
mode.

Settings
79
Wallpaper and style
Change the wallpaper settings for the Home screen and the locked screen.
On the Settings screen, tap
Wallpaper and style
.
Home screen
Configure settings for the Home screen, such as the screen layout.
On the Settings screen, tap
Home screen
.
Lock screen
Change the settings for the locked screen.
On the Settings screen, tap
Lock screen
.
•
Screen lock and biometrics
: Change the screen lock method.
•
Extend Unlock
: Set the device to unlock itself when trusted locations or devices are
detected.
•
Secure lock settings
: Change screen lock settings for the selected lock method.
•
Now bar
: Select items to display on the locked screen.
•
Touch and hold to edit
: Set the device to display the editing options when you touch
and hold the locked screen.
•
Roaming clock
: Change the clock to show both the local and home time zones on
the locked screen when roaming.
•
Contact information
: Set the device to show contact information, such as your email
address, on the locked screen.
•
Show unlock transition effect
: Set to display the unlock transition effect when you
unlock the screen through your biometric data.
•
About Lock screen
: Check out the Lock screen version and legal information.
•
Some features may not be available depending on the carrier or model.
•
The available options may vary depending on the screen lock method selected.

Settings
80
Security and privacy
Options
Check the device’s security and privacy status and change the settings.
On the Settings screen, tap
Security and privacy
.
•
Lock screen
: Change the settings for the locked screen.
•
Account security
: Change the settings for your accounts.
•
Lost device protection
: Turn the Find My Mobile feature on or off. Access
smartthingsfind.samsung.com to track and control your lost or stolen tablet. You can
also check the location of the wearable devices connected to this tablet. To prevent
others from accessing your device’s apps and data in case your device is stolen, set to
use the
Theft protection
feature.
•
App security
: Scan apps and keep your device safe from malicious software.
•
Updates
: Check the version of your device’s software and check for updates.
•
Screen lock and biometrics
: Change the settings for the locked screen and biometric
data. Refer to Face recognition and Fingerprint recognition for more information.
•
Auto Blocker
: Keep your device safe by blocking threats and other suspicious
activity.
•
Security status of your devices
: Check the security status of your devices that are
signed in to your Samsung account.
•
More security settings
: Configure additional security settings. Refer to Secure Wi-Fi,
Secure Folder, and Samsung Pass for more information.
•
Permissions used in last 24 hours
: Check the app or feature’s permission usage
history.
•
AI assistant activity
: Monitor AI assistant activity.
•
Controls and alerts
: Control access to features such as the microphone and
clipboard.
•
More privacy settings
: Configure additional privacy settings.
Some features may not be available depending on the carrier or model.

Settings
81
Face recognition
You can set the device to unlock the screen by recognising your face.
On the Settings screen, tap
Security and privacy
→
Screen lock and biometrics
→
Face
recognition
and follow the on-screen instructions to register your face. For better face
registration, register your face indoors and out of direct sunlight.
On the locked screen, look at the screen. When your face is recognised, you can
unlock the screen without using any additional screen lock method. If your face is not
recognised, use the preset screen lock method.
•
If you use your face as a screen lock method, your face cannot be used to unlock
the screen for the first time after turning on the device. To use the device,
you must unlock the screen using the pattern, PIN, or password you set when
registering the face. Be careful not to forget your pattern, PIN, or password.
•
If you change the screen lock method to
Swipe
or
None
, which are not secure, all
of your biometric data will be deleted.
•
If unlocking the screen with your face is not working properly, tap
Remove face
data
to remove your registered face and register your face again.
•
To enhance the face recognition, tap
Add alternative appearance to enhance
recognition
and add an alternate appearance.
Precautions for using face recognition
Before using the face recognition to unlock your device, keep the following precautions
in mind.
•
Your device could be unlocked by someone or something that looks like your image.
•
Face recognition is less secure than Pattern, PIN, or Password.

Settings
82
Fingerprint recognition
In order for fingerprint recognition to function, your fingerprint information needs to be
registered and stored in your device.
On the Settings screen, tap
Security and privacy
→
Screen lock and biometrics
→
Fingerprints
and follow the on-screen instructions to register your fingerprint.
On the locked screen, place your finger on the fingerprint recognition sensor and scan
your fingerprint to unlock the screen.
If you turn on the
Fingerprint always on
feature, you can unlock the screen with your
fingerprint when the screen is turned off.
•
This feature may not be available depending on the carrier or model.
•
Fingerprint recognition uses the unique characteristics of each fingerprint to
enhance the security of your device. The likelihood of the fingerprint sensor
confusing two different fingerprints is very low. However, in rare cases where
separate fingerprints are very similar the sensor may recognise them as
identical.
•
Thick or coloured protective film can affect performance. If you use a screen
protector, check to make sure it’s labelled as compatible with the on-screen
fingerprint sensor. (such as screen protectors sold by Samsung)
•
If you use your fingerprint as a screen lock method, your fingerprint cannot be
used to unlock the screen for the first time after turning on the device. To use
the device, you must unlock the screen using the pattern, PIN, or password you
set when registering the fingerprint. Be careful not to forget your pattern, PIN, or
password.
•
If your fingerprint is not recognised, unlock the device using the pattern, PIN,
or password you set when registering the fingerprint, and then re-register your
fingerprints. If your pattern, PIN, or password is forgotten, you will not be able to
use the device if you do not reset it. Samsung is not responsible for any data loss
or inconvenience caused by forgotten unlock codes.
•
If you change the screen lock method to
Swipe
or
None
, which are not secure, all
of your biometric data will be deleted.

Settings
83
For better fingerprint recognition
When you scan your fingerprints on the device, be aware of the following conditions that
may affect the feature’s performance:
•
The device may not recognise fingerprints that are affected by wrinkles or scars.
•
The device may not recognise fingerprints from small or thin fingers.
•
To improve recognition performance, register the fingerprints of the fingers used
most often to perform tasks on the device.
•
Your device has a built-in fingerprint recognition sensor at the screen. Ensure that
the screen protector or the screen on the fingerprint recognition sensor area is not
scratched or damaged by objects, such as coins, keys, pens, and necklaces.
•
Ensure that the fingerprint recognition sensor area and your fingers are clean and
dry.
•
If you bend your finger or use a fingertip, the device may not recognise your
fingerprints. Press the screen so that your fingertip spreads over the wide surface of
the fingerprint recognition area.
Secure Wi-Fi
Secure Wi-Fi is a service that secures your Wi-Fi network connection. For example, when
using an unsecure Wi-Fi network in public places, such as cafes or airports, Secure Wi-Fi
is automatically turned on so that no one can hack your login information or monitor
your activity in apps and websites.
On the Settings screen, tap
Security and privacy
→
More security settings
→
Secure
Wi-Fi
and follow the on-screen instructions to complete the setup. When Secure Wi-Fi is
turned on, the VPN icon (
) will appear on the status bar.
•
Using this feature may result in a slower Wi-Fi network speed.
•
This feature may not be available depending on the Wi-Fi network, carrier, or
model.
Settings
84
Secure Folder
Secure Folder protects your private content and apps, such as pictures and contacts,
from being accessed by others.
Setting up Secure Folder
On the Settings screen, tap
Security and privacy
→
More security settings
→
Secure
Folder
and follow the on-screen instructions to complete the setup. When the setup is
complete, the Secure Folder screen will appear and the Secure Folder app icon (
) will
be added to the Apps screen.
To add an app to use in Secure Folder, tap the Add apps icon (
). You can also move
content, such as pictures and videos, to Secure Folder by tapping the More options icon
(
)
→
Add files
.
When a pop-up window asking whether you want to reset the Secure Folder lock
type with your Samsung account appears, tap
Allow
. If you do not turn on this
feature, you cannot reset the lock type when you have forgotten it.
Uninstalling Secure Folder
You can uninstall Secure Folder, including the content and apps in it.
Open the
Secure Folder
app and tap the More options icon ( )
→
Settings
→
More
settings
→
Uninstall
.
Precautions for using Secure Folder
Secure Folder is a separate, secured storage area. The data in Secure Folder cannot be
transferred to other devices through unapproved sharing methods, such as USB or Wi-Fi
Direct. Attempting to customise the operating system or modifying software will cause
Secure Folder to be automatically locked and inaccessible. Before saving data in Secure
Folder, make sure to back up a copy of the data in another secure location.
Samsung Pass
Verify your identity with Samsung Pass when using services which require your login or
personal information.
On the Settings screen, tap
Security and privacy
→
More security settings
→
Passwords, passkeys, and autofill
→
Samsung Pass
. Follow the on-screen instructions
to complete the setup.

Settings
85
Location
Change settings for location information permissions.
On the Settings screen, tap
Location
.
•
App permissions
: Check the list of apps that have permission to access the device’s
location and edit the permission settings.
•
Location services
: Set the device to use the Wi-Fi or Bluetooth feature to increase
the accuracy of your location information, even when the features are turned off. You
can also check the location services your device is using.
•
Recent access
: Check which apps request your current location information.
Safety and emergency
Manage your medical information and emergency contacts. You can also change
settings for emergency features, such as wireless emergency alerts.
On the Settings screen, tap
Safety and emergency
.
•
Medical info
: Enter your medical information.
•
Emergency contacts
: Add your emergency contacts.
•
Emergency SOS
: Make an emergency call to the preset number when you press the
Side button several times as specified on the settings screen of this feature.
•
Emergency sharing
: Set the device to send information, such as your location or your
device’s lower battery notifications, to your emergency contacts for a certain period
of time.
•
Emergency Location Service
: Turn on the Emergency Location Service (ELS) feature.
•
Wireless emergency alerts
: Change the settings for wireless emergency alerts.
•
Earthquake alerts
: Turn on the earthquake alert feature.
Some features may not be available depending on the region or the model.

Settings
86
Accounts and backup
Options
Sync, back up, or restore your device’s data using Samsung Cloud. You can also sign in to
accounts, such as your Samsung account or Google Account, or transfer data to or from
other devices through Smart Switch.
On the Settings screen, tap
Accounts and backup
.
•
Manage accounts
: Add your Samsung and Google accounts, or other accounts, to
sync with.
•
Users
: Set up additional user accounts for other users to use the device with
personalised settings, such as email accounts, wallpaper preferences, and more.
Refer to Users for more information.
•
Samsung Cloud
: Back up your device’s data to Samsung Cloud and restore it later.
•
Google Drive
: Keep your personal information, app data, and settings safe on your
device. You can back up your sensitive information. You must sign in to your Google
Account to back up data.
•
Smart Switch
: Open Smart Switch and transfer data from your previous device. Refer
to Transferring data from your previous device (Smart Switch) for more information.
Regularly back up your data to a safe location, such as Samsung Cloud or a
computer, so that you can restore it if the data is damaged or lost because of an
unintended factory data reset.

Settings
87
Users
Set up additional user accounts for other users to use the device with personalised
settings, such as email accounts, wallpaper preferences, and more.
Following types of user accounts are available:
•
Owner
: The owner account is created only when setting up the device for the first
time, and cannot be created more than one. This account has full control of the
device including user account management. You can add or delete user accounts
only when using this account.
•
Guest
: A guest account can access the device, but information and data used during
a guest session is temporarily stored. Each time you use this account, you are asked
whether to continue the previous guest session or reset it.
•
New user
: A user account can access its own apps and content, and customise the
device settings that affect all accounts.
•
New profile
: A restricted account can only access the apps and content allowed
by the owner account, and cannot use the services that require logging in. (Wi-Fi
models)
Adding users
1 On the Settings screen, tap
Accounts and backup
→
Users
.
2 Tap
Add user
/
Add user or profile
and follow the on-screen instructions to set up a
user account.
Adding restricted profiles (Wi-Fi models)
1 On the Settings screen, tap
Accounts and backup
→
Users
.
2 Tap
Add user or profile
→
Restricted profile
and follow the on-screen instructions to
set up a user account.

Settings
88
Switching users
Open the quick settings panel, tap the Users icon ( ), and then select an account to
switch to.
Managing users
When using the owner account, you can delete accounts or change account settings.
On the Settings screen, tap
Accounts and backup
→
Users
.
To delete a user account, tap the user account you want to delete and tap
Delete user
.
To change account settings, tap user account and change the settings.
Google services
Configure settings for some features provided by Google.
On the Settings screen, tap
Google services
.

Settings
89
Advanced features
Turn on advanced features and change the settings that control them.
On the Settings screen, tap
Advanced features
.
•
Bixby
: Bixby is a user interface that helps you use your device more conveniently.
Refer to Bixby for more information.
•
Labs
: Use new features of the device.
•
S Pen
: Change the settings for using the S Pen. Refer to S Pen for more information.
•
Side button
: Select an app or feature to launch using the Side button.
•
Voice wake-up
: Select which AI assistants to launch with your voice.
•
Multi window
: Set how to launch Multi window. You can also configure settings for
Multi window. Refer to Multi window for more information.
•
Motions and gestures
: Set a feature to launch when certain actions or gestures are
detected.
•
Screenshots and screen recordings
: Change the settings for screenshots and screen
recorder.
•
Daily Board
: Set the device to show a slideshow with selected features while
charging. Refer to Daily Board for more information.
•
Accessories
: Change the accessory settings.
•
Video effects
: Set to use various effects, such as changing the background while
using the camera in certain apps. While using the camera in apps that support this
feature, open the quick settings panel and tap
Video effects
.
This feature is only available in some apps.
•
Video brightness
: Increase the screen brightness and make colours more vibrant
when you play videos.
This feature may not be available in some apps.
•
Super HDR
: Set to adjust the display to show the full range of colours and contrast in
pictures taken with Galaxy devices.

Settings
90
•
Game Booster settings
: Configure settings for Game Booster.
•
Galaxy Avatar
: Create avatars any way you want and have fun using them in various
features.
•
Dual Messenger
: Install the second app and use two separate accounts for the same
messenger app. The second app’s icon will be displayed with the Second app icon
(
).
Some features may not be available depending on the carrier or model.
Digital Wellbeing
Check the history of your device usage and use features to prevent your device from
interfering with your life.
On the Settings screen, tap
Digital Wellbeing
.
•
Screen time today
: Check out today’s screen time by app or category.
•
Most used app categories
: Check out the list of the most used app categories for a
day.
•
App timers
: Limit the daily usage time for each app by setting a timer. When you
reach the limit, the app will be turned off and you cannot use it.
•
Screen time goal
: Set goals for how much you use your device a day.
•
Driving screen time
: Monitor the amount of the time you use your device while
driving.
•
Walking screen time
: Monitor the amount of the time you use your device while
walking.
•
Volume monitor
: Monitor your volume level to protect your hearing.
Parental controls
Set up parental controls for your children and manage their device use.
On the Settings screen, tap
Parental controls
.

Settings
91
Device care
The device care feature provides an overview of the status of your device’s battery,
storage, memory, and system security. You can also optimise the device.
On the Settings screen, tap
Device care
.
•
Optimise now
: Close apps running in the background or using an abnormal amount
of battery and scan for crashed apps and malware to optimise your device.
•
Battery
: Check the remaining battery power and time to use the device. For devices
with low battery levels, conserve battery power by turning on power saving features.
Refer to Battery for more information.
•
Storage
: Check the status of used and available storage and free up storage by
deleting unnecessary files, such as the files in the recycle bin, unused files, or
duplicated files after checking them.
•
The actual available capacity of the internal storage is less than the
specified capacity because the operating system and default apps occupy
part of the storage. The available capacity may change when you update the
device.
•
You can check the available capacity of the internal storage in the
Specification section for your device on the Samsung website.
•
Memory
: Check memory usage or tap
Clean now
to free up memory by stopping
background apps.
•
App protection
: Scan your device for malware and other suspicious activity to stay
safe.
•
Auto optimisation
: Perform auto optimisation by closing background apps or
cleaning up memory, to keep the device running in its best condition.
Tap
Auto restart
to set the device to restart automatically when performance issues
are detected or at a time you set.
•
Software update
: Update your device’s software through the firmware over-the-air
(FOTA) service. You can also schedule software updates.
•
Diagnostics
: Test your device using Samsung Members.
•
Maintenance mode
: Turn on maintenance mode to protect your privacy while
someone else is using your device, such as when you send it for repairs.

Settings
92
Apps
Manage the device’s apps and change their settings. You can check the apps’ usage
information, change their notification or permission settings, or uninstall or disable
unnecessary apps.
On the Settings screen, tap
Apps
.
General management
Customise your device’s system settings or reset the device.
On the Settings screen, tap
General management
.
•
Language
: Select device languages.
•
App languages
: Select the language you want to use for each app.
•
Language packs
: Manage or download language packs for voice input, the text-to-
speech feature, and translation.
•
Date and time
: Access and alter the settings to control how the device displays the
time and date.
If the battery remains fully discharged, the time and date is reset.
•
Samsung Keyboard settings
: Change the settings for the Samsung Keyboard.
•
Keyboard
: Select a keyboard to use by default and change the keyboard settings.
•
Physical keyboard
: Change the settings for an external keyboard.
•
Mouse
: Change the settings for an external mouse.
•
Touchpad
: Change the settings for an external touchpad.
•
Reset
: Reset your device’s settings or perform a factory data reset.
•
Customisation Service
: Set to get personalised service based on your interests and
how you use your device.
•
Contact us
: Ask questions or check the frequently asked questions.

Settings
93
Accessibility
Configure various settings to improve accessibility to the device. Refer to Accessibility
for more information.
On the Settings screen, tap
Accessibility
.
Software update
Update your device’s software through the firmware over-the-air (FOTA) service. You can
also change the auto download setting.
On the Settings screen, tap
Software update
. Tap
Check for updates
and check for or
install updates manually.
To change the auto download setting, tap the More options icon (
)
→
Auto download
or
Auto download over Wi-Fi
.
If emergency software updates are released for your device’s security and to block
new types of security threats, they will be installed automatically without your
agreement.
Security updates information
Security updates are provided to strengthen the security of your device and
protect your personal information. For security updates for your model, visit
security.samsungmobile.com.
The website supports only some languages.

Settings
94
About tablet
Access your device’s information.
On the Settings screen, tap
About tablet
.
To change your device’s name, tap the name.
•
Status information
: Check out various device information, such as the Wi-Fi MAC
address and serial number.
•
Legal information
: Access legal information related to the device, such as safety
information and the open source licence.
•
Software information
: Access the device’s software information, such as its
operating system version and firmware version.
•
Battery information
: Check out battery information.
You can check the following battery information here. The available
information may vary depending on the region, service provider, or model.
•
Date of battery manufacturing
•
Date of first use
•
Number of full charge/discharge cycles (based on rated capacity)
•
Measured state of health

95
Usage notices
Precautions for using the device
Please read this guide when using the device to ensure safe and proper use.
•
Descriptions are based on the device’s default settings.
•
Some content may differ from your device depending on the region, service provider,
model specifications, or device’s software.
•
The device may require a connection to a Wi-Fi or mobile network when using some
apps or features.
•
Content (high quality content) that requires high CPU and memory usage will affect
the overall performance of the device. Apps related to the content may not work
properly depending on the device’s specifications and the environment that it is
used in.
•
Samsung is not liable for performance issues caused by apps supplied by providers
other than Samsung.
•
Samsung is not liable for performance issues or incompatibilities caused by edited
registry settings or modified operating system software. Attempting to customise
the operating system may cause the device or apps to work improperly.
•
Software, sound sources, wallpapers, images, and other media provided with
this device are licensed for limited use. Extracting and using these materials for
commercial or other purposes is an infringement of copyright laws. Users are
entirely responsible for illegal use of media.
•
You may incur additional charges for data services, such as messaging, uploading
and downloading, auto-syncing, or using location services depending on your data
plan. For large data transfers, it is recommended to use the Wi-Fi feature.
•
Default apps that come with the device are subject to updates and may no longer be
supported without prior notice.
•
Modifying the device’s operating system or installing software from unofficial
sources may result in device malfunctions and data damage or loss. These actions
are violations of your Samsung licence agreement and will void your warranty.

Usage notices
96
•
You can see the screen clearly even in strong outdoor sunlight by automatically
adjusting the contrast range based on the surrounding environment. Because of the
nature of the product, displaying fixed graphics for extended periods may result in
afterimages (screen burn-in) or ghosting.
‒
It is recommended not to use fixed graphics on part or all of the screen for
extended periods and turn off the screen when not using the device.
‒
You can set the screen to turn off automatically when you are not using it. Open
Settings
, tap
Display
→
Screen timeout
, and then select the length of time you
want the device to wait before turning off the screen.
‒
To set the screen to automatically adjust its brightness based on the surrounding
environment, open
Settings
, tap
Display
, and then tap the
Adaptive brightness
switch to turn it on.
•
Depending on the region or model, some devices are required to receive approval
from the Federal Communications Commission (FCC).
If your device is approved by the FCC, you can check out the FCC ID of the device. To
access the FCC ID, open
Settings
and tap
About tablet
→
Status information
. If your
device does not have an FCC ID, it means that the device has not been authorised for
sale in the U.S. or its territories and may only be brought to the U.S. for the owner’s
personal use.
•
Depending on the region, you can check out the regulatory information on the
device. To access the information, open
Settings
and tap
About tablet
→
Regulatory
information
.
•
The bandwidths supported by the device may vary depending on the region or
carrier.
•
5G network availability may vary depending on the model, country, network
provider, and user environment.
•
Your device contains magnets. Keep it away from credit cards, implanted medical
devices, and other devices that may be affected by magnets. In the case of medical
devices, keep your device more than 15 cm apart. Stop using your device if you
suspect any interference with your medical device and consult your physician or your
medical device manufacturer.

Usage notices
97
Instructional icons
Warning: situations that could cause injury to yourself or others
Caution: situations that could cause damage to your device or other equipment
Notice: notes, usage tips, or additional information
Notes on package contents and accessories
Refer to the quick start guide for package contents.
•
The items supplied with the device and any available accessories may vary
depending on the region or carrier.
•
The supplied items are designed only for this device and may not be compatible with
other devices.
•
Appearances and specifications are subject to change without prior notice.
•
You can purchase additional accessories from your local Samsung retailer. Make sure
they are compatible with the device before purchase.
•
Use of Samsung-approved accessories is recommended. Using unapproved
accessories may result in performance issues or malfunctions, which may not be
covered by warranty.
•
Availability of all accessories is subject to change depending entirely on
manufacturing companies. For more information about available accessories, refer
to the Samsung website.
•
When using the device with the book cover (sold separately) attached and in close
proximity to magnetic objects or external metal plates, the book cover may not work
properly because of magnetic interference.
•
Headphones (USB Type-C) that support digital output can be used with the device.
However, the device may not be compatible with headphones that use a different
audio output method or were made by a different manufacturer.
•
The included USB cable supports up to 3A charging. Charger not included. For
optimal charging performance, use of an official Samsung 45W charger and a cable
compatible with your device, sold separately, is recommended.
•
For environmental reasons, this package does not include a charger. This device can
be powered with most USB power adapters and a cable with a USB Type-C plug.
The charger may be supplied with the device depending on the region.

Usage notices
98
Maintaining water and dust resistance
Your device is water- and dust-resistant and meets the following international
standards.
•
IP68 water resistance rating certification: According to the requirements of the
IEC 60529 standard, it was tested in 15-35 °C, 86-106 kPa, 1.5 m fresh water for
30 minutes without moving.
You must follow the guidelines to maintain the water- and dust-resistance of your
device.
•
Do not expose the device to swimming pool water or sea water.
•
If the device is exposed to unclean water or other liquids, such as soapy water, oil,
perfume, sunscreen, hand cleaner, chemical products such as cosmetics, or liquids
that include the alcohol, clean the device with fresh water that does not flow, wipe
it with a soft and clean cloth, and then dry it thoroughly before use to maintain the
water resistance.
•
Do not expose the device to water moving with force. A sudden rise in the water
pressure may exceed the guaranteed level of water resistance.
•
In places, such as a sauna or steam room, the water-resistant performance may be
damaged because of sudden changes in the temperature.
•
If the device is subjected to an external shock or is damaged, its water resistance
may decrease.
If the device is exposed to water or pollutants, follow the guidelines:
•
Wipe the device with a soft and clean cloth, and then dry it thoroughly.
•
If the microphone or speaker is not completely dry, it may result in the sound not
being clear during a call.
•
The screen and other features may not work properly if the device is used in water.
•
Do not connect the charger or any accessories until the device is completely dry.
The device can be damaged if an accessory or charger is connected when the
multipurpose jack is not yet dry.
The water and dust resistance of your Samsung Galaxy device is not permanent and may
diminish over time because of normal wear and tear.

Usage notices
99
Device overheating situations and solutions
When the device heats up while charging the battery
While charging, the device and the charger may become hot. During wireless charging
or fast charging, the device may feel hotter to the touch. This does not affect the device’s
lifespan or performance and is in the device’s normal range of operation. If the battery
becomes too hot, the charging speed may decrease or the charger may stop charging.
Do the following when the device heats up:
•
Disconnect the charger from the device and close any running apps. Wait for the
device to cool down and then begin charging the device again.
•
If the lower part of the device overheats, it may be because of a damaged USB
cable. Replace the USB cable with a new one. A Samsung-approved USB cable is
recommended.
•
When using a wireless charger, do not place foreign materials, such as metal
objects, magnets, and magnetic stripe cards, between the device and the
wireless charger.
The wireless charging or fast charging feature is only available on supported
models.
When the device heats up during use
When you use features or apps that require more power or use them for extended
periods, your device may temporarily heat up because of increased battery consumption.
Close any running apps and do not use the device for a while.
Refer to the following examples of situations in which the device may overheat.
•
During the initial setup after purchase or when restoring data
•
When downloading large files

Usage notices
100
•
When using apps that require more power or using apps for extended periods
‒
When playing high-quality games for extended periods
‒
When recording videos for extended periods
‒
When streaming videos while using the maximum brightness setting
‒
When connecting to a TV
•
While multitasking (or, when running many apps in the background)
‒
When using Multi window
‒
When updating or installing apps while recording videos
‒
When downloading large files during a video call
‒
When recording videos while using a navigation app
•
When using large amount of data for syncing with the cloud, email, or other accounts
•
When using a navigation app in a car while the device is placed in direct sunlight
•
When using the Mobile Hotspot and Tethering feature
•
When using the device in areas with weak signals or no reception
•
When charging the battery with a damaged USB cable
•
When the device’s multipurpose jack is damaged or exposed to foreign materials,
such as liquid, dust, metal powder, and pencil lead
•
When you are roaming
Do the following when the device heats up:
•
Keep the device updated with the latest software.
•
Conflicts between running apps may cause the device to heat up. Restart the
device.
•
Turn off the Wi-Fi, GPS, and Bluetooth features when not using them.
•
Close apps that increase battery consumption or that run in the background
when not in use.
•
Delete unnecessary files or unused apps.
•
Decrease the screen brightness.
•
If the device overheats or feels hot for a prolonged period, do not use it for a
while. If the device continues to overheat, contact a Samsung Service Centre or
an authorised service centre.

Usage notices
101
Precautions for device overheating
If you begin to feel uncomfortable because of the device overheating, stop using the
device.
When the device heats up, the features and performance may be limited or the device
may turn off to cool down. The feature is only available on supported models.
•
If the device overheats, the screen brightness, the screen refresh rate, and the
performance speed will be limited to lower the device’s temperature. Even if the
battery charging indicator icon appears, charging may be slow. When charging stops
because of a rise in the device’s temperature, the battery indicator icon will blink.
•
If the device reaches a certain temperature, a warning message will appear to
prevent device failure, skin irritation and damage, and battery leakage. Running
apps will be closed and all calling and other features will be limited, except for
emergency calls, until the device cools down.
•
If the second message appears because of a further increase of the device’s
temperature, the device will turn off. Do not use the device until the device’s
temperature is within the recommended operating temperature range. If the
second warning message appears during an emergency call, the call will not be
disconnected by a forced termination.
Recommended operating temperature range
The device’s recommended operating temperature is between 0 °C to 35 °C. Using
the device outside of the recommended temperature range may damage the
device or reduce the battery’s lifespan.

Usage notices
102
Precautions for operating environment
Your device may heat up because of the environment in the following conditions. Use
caution to avoid shortening the battery’s lifespan, damaging the device, or causing a fire.
•
Do not store your device in very cold or very hot temperatures.
•
Do not expose your device to direct sunlight for extended periods.
•
Do not use or store your device for extended periods in very hot areas, such as inside
a car in the summertime.
•
Do not place the device in any areas that may overheat, such as on an electric
heating mat.
•
Do not store your device near or in heaters, microwaves, hot cooking equipment, or
high pressure containers.
•
Do not use a cable whose covering is peeled off or damaged, and do not use any
charger or battery that is damaged or malfunctioning.
How to find the standby power consumption
information for this product
•
Access www.samsung.com/global/ecodesign_energy.
•
Search using the product model number.
This feature may not be available depending on the region, carrier, or model.

103
Appendix
Accessibility
About Accessibility
Improve accessibility with features that make the device easier to use for users who have
impaired vision, hearing, and reduced dexterity.
Open
Settings
and tap
Accessibility
. To turn off the features in use, tap the Expand icon
(
)
→
Turn off
.
To check for new accessibility features, tap
What’s new in One UI 9
.
Vision enhancements
Display mode
Change the display mode.
Open
Settings
, tap
Accessibility
→
Vision enhancements
, and then select a mode you
want under
Display mode
.
Using the high contrast font
Adjust the colour and outline of fonts to increase the contrast between the text and the
background.
Open
Settings
, tap
Accessibility
→
Vision enhancements
, and then tap the
High
contrast fonts
switch to turn it on.

Appendix
104
Using the high contrast keyboard
Change the colours of the Samsung Keyboard to increase the contrast between the text
and the background.
Open
Settings
, tap
Accessibility
→
Vision enhancements
, and then tap the
High
contrast keyboard
switch to turn it on.
Displaying button shapes
Display button shapes with frames to make them stand out.
Open
Settings
, tap
Accessibility
→
Vision enhancements
, and then tap the
Highlight
buttons
switch to turn it on.
Making outlines clearer
Display objects in images and videos more clearly with strong outlines.
Open
Settings
, tap
Accessibility
→
Vision enhancements
→
Relumino outline
, and then
tap the switch to turn it on.
To adjust the outline thickness, drag the adjustment bar under
Outline thickness
.
Reversing the display colours
Improve screen visibility to help users recognise text on the screen.
Open
Settings
, tap
Accessibility
→
Vision enhancements
, and then tap the
Colour
inversion
switch to turn it on.
Colour correction
Adjust how colours are displayed on the screen if you have difficulty in distinguishing
colours. The device changes the colours into more recognisable colours.
Open
Settings
, tap
Accessibility
→
Vision enhancements
→
Colour correction
, and then
tap the switch to turn it on. Select an option.

Appendix
105
Colour filter
Adjust the screen colours if you have difficulty in reading the text.
Open
Settings
, tap
Accessibility
→
Vision enhancements
→
Colour filter
, and then tap
the switch to turn it on. Select a colour you want.
To adjust the transparency level, drag the adjustment bar under
Opacity
.
Reducing screen motion effects
Reduce animation effects if you are sensitive to animations or screen movement.
Open
Settings
, tap
Accessibility
→
Vision enhancements
, and then tap the
Reduce
animations
switch to turn it on.
Reducing transparency and blur effects
Reduce the transparency and blur effects to make the content on the screen more
visible.
Open
Settings
, tap
Accessibility
→
Vision enhancements
, and then tap the
Reduce
transparency and blur
switch to turn it on.
Dimming the screen
Dim the screen below the minimum brightness setting for a more comfortable viewing
experience.
Open
Settings
, tap
Accessibility
→
Vision enhancements
, and then tap the
Extra dim
switch to turn it on.
Dimming strobing effects
Reduce the intensity of strobing effects in videos when playing them.
Open
Settings
, tap
Accessibility
→
Vision enhancements
, and then tap the
Dim
strobing
switch to turn it on.

Appendix
106
Magnifying the screen
Magnify the screen and zoom in on a specific area.
Open
Settings
, tap
Accessibility
→
Vision enhancements
→
Magnification
→
Magnification shortcut
, and then tap the switch to turn it on. Then tick the actions to
use to start using this feature directly.
•
Tap Accessibility button
: Zoom in by tapping the Magnification icon ( ).
•
Press Side and Volume up buttons
: Zoom in by pressing the Side button and the
Volume Up button simultaneously.
•
Press and hold Volume up and down buttons for 3 seconds
: Zoom in by pressing
and holding the Volume Up button and the Volume Down button simultaneously for
3 seconds.
•
Triple-tap screen
: Zoom in by tapping the screen three times.
•
Physical keyboard shortcuts
: Zoom in by pressing the Cmd, Alt, and M keys together
on the connected external keyboard.
You can magnify wherever you want on the screen using the magnifier window. To move
the magnifier, drag the edge of the magnifier frame.
To explore the screen, drag two fingers across the magnified screen.
To adjust zoom ratio, pinch two fingers on the magnified screen or spread them apart.
•
When you magnify the entire screen, the keyboard and navigation bar on the
screen cannot be magnified. If you want to magnify the keyboard and navigation
bar as well, open
Settings
, tap
Accessibility
→
Vision enhancements
→
Magnification
, and then tap the
Magnify keyboard while typing
switch to turn it
on.
•
When this feature is turned on, the performance of some apps may be affected.
Using the magnifier
Use the camera as a magnifying glass to magnify objects.
Open
Settings
, tap
Accessibility
→
Vision enhancements
→
Magnifier
→
Magnifier
shortcut
, and then tap the switch to turn it on. Then tick the actions to use to start
using this feature directly. When you perform the action, the camera will work like a
magnifying glass.

Appendix
107
Text spotlight
Display on-screen text enlarged and highlighted in a separate window.
1 Open
Settings
and tap
Accessibility
→
Vision enhancements
→
Text spotlight
.
2 Tap the switch to turn it on.
The Text spotlight icon will appear on the screen.
3 Tap the Text spotlight icon and tap text on the screen you want.
Changing the cursor thickness
Open
Settings
and tap
Accessibility
→
Vision enhancements
→
Cursor thickness
.
Changing the size and colour of the pointer
Enlarge the pointer when using an external mouse or touchpad. You can also change the
colour of the pointer.
Open
Settings
and tap
Accessibility
→
Vision enhancements
→
Pointer size and colour
.
Changing font
Change the font size and style.
Open
Settings
and tap
Accessibility
→
Vision enhancements
→
Font size and style
.
Changing screen zoom
Make the items on the screen larger or smaller.
Open
Settings
and tap
Accessibility
→
Vision enhancements
→
Screen zoom
.
Select to Speak
Set the device to read aloud what you select on the screen.
Open
Settings
, tap
Accessibility
→
Vision enhancements
→
Select to Speak
→
Select
to Speak shortcut
, and then tap the switch to turn it on. Then tick the actions to use to
start using this feature directly.

Appendix
108
Speak keyboard input aloud
Set the device to read aloud what you enter on the keyboard.
Open
Settings
, tap
Accessibility
→
Vision enhancements
→
Speak keyboard input
aloud
, tap the switch to turn it on, and then select an option.
Using audio description
Set the device to play the audio description when playing a video that provides audio
descriptions.
Open
Settings
, tap
Accessibility
→
Vision enhancements
, and then tap the
Audio
description
switch to turn it on.
TalkBack (Voice feedback)
Turning TalkBack on or off
When you turn on TalkBack, the device will start voice feedback. When you tap the
selected feature once, the device will read the text on the screen aloud. Tapping the
feature twice will turn on the feature.
Open
Settings
, tap
Accessibility
→
TalkBack
, and then tap the switch to turn it on.
To turn off TalkBack, tap the switch and double tap anywhere on the screen. Then, tap
Turn off
and double tap anywhere on the screen.
To check out how to use TalkBack, tap
Settings
→
TalkBack tutorial
.
Some features are not available while you are using TalkBack.
Privacy protection while using TalkBack
•
Password input protection: Passwords entered or displayed on the screen are read
aloud as symbols, such as asterisks (*), rather than the actual characters to help
protect your password. You can also connect headphones to listen to TalkBack voice
feedback privately.
•
Hide screen: You can protect your privacy in public places by turning off the screen.
You can find this option in the TalkBack menu. Keep your device somewhere that
other people cannot see.

Appendix
109
Controlling the screen with finger gestures
You can use various finger gestures to control the screen while you are using TalkBack.
To check out and customise available finger gestures, open
Settings
and tap
Accessibility
→
TalkBack
→
Settings
→
Gestures
.
Using the TalkBack menu
While you are using TalkBack, tap the screen with three fingers. The TalkBack menu will
appear, and you can select the feature you want to use. For example, if you select
Hide
screen
and double tap anywhere on the screen, the screen will turn off to help protect
your privacy.
Using the reading menu
While you are using TalkBack, swipe to the left or right with three fingers. The reading
menu will appear and the device will read the options aloud. Swipe to the left or right
with three fingers to scroll through the options. When you hear the option you want,
swipe upwards or downwards to use the option or adjust the settings for the option. For
example, when you hear
Speech rate
, you can adjust the speech rate by swiping upwards
or downwards.
Adding and managing image labels
You can assign labels to images on the screen. The device reads aloud the labels
when the images are selected. Add labels to unlabelled images by swiping upwards or
downwards, then to the right. Then, tap
Add label
when the TalkBack menus appear.
To manage the labels, open
Settings
and tap
Accessibility
→
TalkBack
→
Settings
→
Advanced settings
→
Custom labels
.

Appendix
110
Configuring settings for TalkBack
Configure settings for TalkBack for your convenience.
Open
Settings
and tap
Accessibility
→
TalkBack
→
Settings
.
•
New features in TalkBack
: Check for key updates and changes to TalkBack.
•
Text to speech
: Change the settings for text-to-speech features used when TalkBack
is turned on, such as languages, speed, and more.
•
Verbosity
: Customise the detailed settings for voice feedback.
•
Image and screen descriptions
: Configure the automatic description settings. You
can hear descriptions when you focus on an image or icon, or an image that contains
text. If you turn on the
Detailed image and screen descriptions
feature, you can
listen to detailed screen or image descriptions. While using TalkBack, swipe upwards
or downwards, then to the right. Then, tap
Describe image
or
Describe screen
when
the TalkBack menus appear.
•
Sound
: Change sound settings for TalkBack.
•
Change focus indicator
: Set the device to thicken the border of the focus indicator
that appears when you tap items. You can also change the colour of the indicator.
•
Display speech output
: Set to display voice feedback in text on the screen.
•
Gestures
: Check out various finger gestures to control the screen while you are
using TalkBack and customise the settings for gestures.
•
Edit menus
: Select which TalkBack menus and reading menus to use.
•
Keyboard shortcuts
: Customise the connected external keyboard’s shortcuts.
•
On-screen keyboard
: Customise the on-screen keyboard settings.
•
Braille keyboard
: Enter letters on the screen using a 6-dot braille keyboard.
•
Braille display
: Connect a braille display and change the settings.
•
Advanced settings
: Configure advanced settings for TalkBack.
•
TalkBack tutorial
: Learn how to use TalkBack.
•
Help and feedback
: Visit the TalkBack help webpage.
•
Contact Google Disability Support
: Visit the Google accessibility help webpage.

Appendix
111
Entering text using the keyboard
To display the keyboard, tap the text input field and double tap anywhere on the screen.
When you touch the keyboard with your finger, the device reads aloud the character keys
under your finger. When you hear the character you want, release your finger from the
screen to select it. The character is entered and the device reads the text aloud.
Entering additional characters
Touch and hold a key on the keyboard to enter additional characters available for the
key. A pop-up window appears above the key showing available characters. To select a
character, drag your finger on the pop-up window until you hear the character you want,
and release it.
Hearing enhancements
Live Transcribe
Set the device to capture speech using the device’s microphone and convert it to
on-screen text.
Open
Settings
, tap
Accessibility
→
Hearing enhancements
→
Live Transcribe
→
Live
Transcribe shortcut
, and then tap the switch to turn it on. Tick the actions to use to start
using this feature directly. Then, perform the action to transcribe speech.
Live Caption
Set the device to detect speech and automatically generate captions when you play
media content, such as videos or podcasts.
Open
Settings
, tap
Accessibility
→
Hearing enhancements
→
Live Caption
, and then
tap the
Use Live Caption
switch to turn it on.
Caption settings
Open
Settings
, tap
Accessibility
→
Hearing enhancements
→
Caption preference
, and
then tap the
Show captions
switch to turn it on.
Select an option for configuring the caption settings.

Appendix
112
Setting light notification
Set the device to blink the flash or the screen when an alarm sounds or when you have
notifications, such as incoming calls or new messages.
Open
Settings
, tap
Accessibility
→
Hearing enhancements
→
Flash notification
, and
then tap the switches next to the options you want to turn on.
Hearing aid support
Set the device to enhance the sound quality to work better with hearing aids.
Open
Settings
, tap
Accessibility
→
Hearing enhancements
→
Hearing aid support
.
Sound Notifications
Set the device to detect sounds, such as the beeping of smoke detectors or crying
babies. The device will vibrate when it detects sound and the alert will be saved as a log.
While this feature is turned on, the voice recognition will not operate.
Open
Settings
and tap
Accessibility
→
Hearing enhancements
→
Sound Notifications
→
Open Sound Notifications
. Follow the on-screen instructions to turn on the sound
notification feature. When sound is detected, the log will be displayed.
Amplify ambient sound
Set the device to amplify the sound around you to help you hear better when using
headphones.
1 Open
Settings
, tap
Accessibility
→
Hearing enhancements
→
Amplify ambient
sound
→
Amplify ambient sound shortcut
, and then tap the switch to turn it on.
2 Tick the actions to use to start using this feature directly.
3 Connect headphones to the device and wear them.
4 Perform the action.

Appendix
113
Adapt sound
Optimise the sound setting to find the best sound quality and use it for calls or media
playback.
Open
Settings
, tap
Accessibility
→
Hearing enhancements
→
Adapt sound
, tap the
switch to turn it on, and then optimise the sound setting.
Turning off all sounds
Set the device to mute all device sounds, such as media sounds, and the caller’s voice
during a call.
Open
Settings
, tap
Accessibility
→
Hearing enhancements
→
Mute all sounds
, and
then tap the switch to turn it on.
Mono audio
Mono output combines stereo sound into one signal that is played through all
headphone speakers. Use this if you have a hearing impairment or if a single earbud is
more convenient.
Open
Settings
, tap
Accessibility
→
Hearing enhancements
, and then tap the
Mono
audio
switch to turn it on.
Adjusting the sound balance
Set the device to adjust the sound balance.
1 Open
Settings
and tap
Accessibility
→
Hearing enhancements
.
2 Drag the adjustment bars under
Left/right sound balance
to the left or right and
adjust the sound balance.

Appendix
114
Interaction and dexterity
Universal switch
You can control the screen by connecting an external switch or by using head
movements and face gestures.
1 Open
Settings
and tap
Accessibility
→
Interaction and dexterity
→
Universal switch
.
2 Read the on-screen instructions and tap
Done
.
3 Tap the switch to turn it on.
4 If the universal switches are not registered on the device, tap
Add switch
and set
switches to control the device.
To turn on the universal switch feature, at least one switch must be registered on
the device.
To set switches to control the device, tap the switch under
Switches
.
To turn off this feature, press the Side button and the Volume Up button simultaneously.
Assistant menu
Displaying the assistive shortcut icon
Set the device to display the assistive shortcut icon for accessing apps, features, and
settings. You can control the device by tapping the assistive menus in the icon.
1 Open
Settings
and tap
Accessibility
→
Interaction and dexterity
→
Assistant menu
.
2 Tap the switch to turn it on.
The assistive shortcut icon appears at the bottom right of the screen.
To adjust the assistant shortcut icon’s transparency level, drag the adjustment bar
under
Transparency
.
Accessing assistive menus
The assistive shortcut icon appears as a floating icon for access to the assistive menus
from any screen.
When you tap the assistive shortcut icon, the icon expands slightly and the assistive
menus appear on the icon. Tap the left or right arrow, or swipe to the left or right, to
select other menus.

Appendix
115
Using enhanced assistive menus
Set the device to display enhanced assistive menus for selected apps.
Open
Settings
, tap
Accessibility
→
Interaction and dexterity
→
Assistant menu
→
Select apps to show contextual menus with
, and then tap the switches next to the apps
you want to turn on.
Voice Access
Use this feature to control your device by voice.
Open
Settings
, tap
Accessibility
→
Interaction and dexterity
→
Voice Access
, and then
tap the switch to turn it on.
Answering or ending calls (Mobile network enabled models)
Change the method for answering or ending calls.
Open
Settings
, tap
Accessibility
→
Interaction and dexterity
→
Answering and ending
calls
, and then change the settings.
Replace swipe with single tap
You can replace swiping on the screen with tapping in certain situations. For example,
you can answer a call by tapping the icon instead of dragging it.
Open
Settings
, tap
Accessibility
→
Interaction and dexterity
, and then tap the
Replace
swipe with single tap
switch to turn it on.
Interaction control
Turn on the interaction control mode to restrict the device’s reaction to inputs while
using apps.
1 Open
Settings
and tap
Accessibility
→
Interaction and dexterity
→
Interaction
control
.
2 Tap the
Interaction control shortcut
switch to turn it on.
3 Press the Side button and the Volume Up button simultaneously while using an app.

Appendix
116
4 Adjust the size of the frame or draw a line around an area that you want to restrict.
5 Tap
Done
.
The device displays the restricted area. The restricted area will not react when you
touch it and the device’s buttons will be blocked. However, you can unblock functions
for the Side button, Volume button, and keyboard in interaction control mode.
To turn off the interaction control mode, press the Side button and the Volume Up
button simultaneously.
To set the device to lock the screen after turning off the interaction control mode, open
Settings
, tap
Accessibility
→
Interaction and dexterity
→
Interaction control
, and then
tap the
Lock screen when deactivated
switch to turn it on.
Time to take action
Set the amount of time to display pop-up windows that ask you to take action, such as
notifications or volume controller.
Open
Settings
, tap
Accessibility
→
Interaction and dexterity
→
Time to take action
, and
then select an option.
Touch and hold delay
Set the recognition time for touching and holding the screen.
Open
Settings
, tap
Accessibility
→
Interaction and dexterity
→
Touch and hold delay
→
Set
, and then select an option.
Tap duration
Set the duration you must touch the screen for the device to recognise it as a tap.
Open
Settings
, tap
Accessibility
→
Interaction and dexterity
→
Tap duration
→
Set
, and
then set the time.
Ignore repeated touches
Set the device to recognise only the first tap within a set time when you tap the screen
repeatedly.
Open
Settings
, tap
Accessibility
→
Interaction and dexterity
→
Ignore repeated
touches
→
Set
, and then set the time.

Appendix
117
Dwell action
Set the device to select an item automatically when you place the mouse pointer over
the item.
Open
Settings
, tap
Accessibility
→
Interaction and dexterity
→
Dwell action
, and then
tap the switch to turn it on.
You can customise the settings by selecting options.
Corner actions
Assign actions to trigger when you move the mouse pointer to a corner of the screen.
Open
Settings
, tap
Accessibility
→
Interaction and dexterity
→
Corner actions
, and
then tap the switch to turn it on. Then select an option under
Corner actions
and select
an action.
Sticky keys
Set an external keyboard’s modifier key, such as the Shift, Ctrl, or Alt keys, to stay
pressed. This helps you use keyboard shortcuts without pressing two keys at the same
time.
Open
Settings
, tap
Accessibility
→
Interaction and dexterity
→
Sticky keys
, and then
tap the switch to turn it on.
Slow keys
Set the recognition time for pressing a key on the external keyboard.
Open
Settings
, tap
Accessibility
→
Interaction and dexterity
→
Slow keys
, tap the
switch to turn it on, and then set the time.
Bounce keys
Set the device to recognise only the first time you press a key within a set time when you
press the same key repeatedly.
Open
Settings
, tap
Accessibility
→
Interaction and dexterity
→
Bounce keys
, tap the
switch to turn it on, and then set the time.

Appendix
118
Mouse keys
Use the connected keyboard to function as the mouse.
Open
Settings
, tap
Accessibility
→
Interaction and dexterity
→
Mouse keys
, and then
tap the switch to turn it on.
Accessibility shortcuts
Set to open the accessibility features directly.
Open
Settings
and tap
Accessibility
→
Accessibility shortcuts
. Tap
Accessibility button
→
Select actions
, or select
Quick panel buttons
,
Side and Volume up buttons
,
Volume
up and down buttons
, or
Physical keyboard shortcuts
, and then tick the accessibility
features you want to use.
Installed apps
Check out the accessibility services installed on the device.
Open
Settings
and tap
Accessibility
→
Installed apps
.

Appendix
119
Troubleshooting
Before contacting a Samsung Service Centre or an authorised service centre, please
attempt the following solutions. Some situations may not apply to your device.
You can also use Samsung Members to solve any problems you might encounter while
using your device.
When you turn on your device or while you are using the device, it
prompts you to enter one of the following codes:
•
Password: When the device lock feature is turned on, you must enter the password
you set for the device.
•
PIN: When using the device for the first time or when the PIN requirement is turned
on, you must enter the PIN supplied with the nano-SIM card. You can turn off this
feature by using the Lock SIM card menu.
•
PUK: Your nano-SIM card is blocked, usually as a result of entering your PIN
incorrectly several times. You must enter the PUK supplied by your carrier.
•
PIN2: When you access a menu requiring the PIN2, you must enter the PIN2 supplied
with the nano-SIM card. For more information, contact your carrier.
Your device displays network or service error messages
•
When you are in areas with weak signals or poor reception, you may lose reception.
Move to another area and try again. While moving, error messages may appear
repeatedly.
•
You cannot access some options without a subscription. For more information,
contact your carrier.

Appendix
120
Your device does not turn on
When the battery is completely discharged, your device will not turn on. Fully charge the
battery before turning on the device.
Touch recognition works slowly or improperly
•
Touch recognition may not work properly in the following situations:
‒
If you attach a screen protector or optional accessories to the screen
‒
If you are wearing gloves, if your hands are not clean while touching the screen, or
if you tap the screen with a sharp object or your fingertips
‒
In humid conditions or when exposed to water
•
Restart your device to clear any temporary software problems.
•
Ensure that your device software is updated to the latest version.
•
If the screen is scratched or damaged, visit a Samsung Service Centre or an
authorised service centre.
Your device freezes or encounters a fatal problem
Try the following solutions. If the problem is still not resolved, contact a Samsung
Service Centre or an authorised service centre.
Restarting the device
If your device freezes or hangs, you may need to close apps or turn off the device and
turn it on again.
Forcing restart
If your device is frozen and unresponsive, press and hold the Side button and the Volume
Down button simultaneously for more than 7 seconds to restart it.
Resetting the device
If these methods do not solve your problem, perform a factory data reset.
Open
Settings
and tap
General management
→
Reset
→
Factory data reset
→
Reset
→
Delete all
. Before performing the factory data reset, remember to make backup copies
of all important data stored in the device.

Appendix
121
Calls are not connected
•
Ensure that you have accessed the right cellular network.
•
Ensure that you have not set call barring for the phone number you are dialling.
•
Ensure that you have not set call barring for the incoming phone number.
Others cannot hear you speaking on a call
•
Ensure that you are not covering the built-in microphone.
•
Ensure that the microphone is close to your mouth.
•
If you are using headphones, ensure that they are properly connected.
Sound echoes during a call
Adjust the volume by pressing the Volume button or move to another area.
A cellular network or the internet is often disconnected or audio
quality is poor
•
Ensure that you are not blocking the device’s internal antenna.
•
When you are in areas with weak signals or poor reception, you may lose reception.
You may have connectivity problems because of issues with the carrier’s base
station. Move to another area and try again.
•
When using the device while moving, wireless network services may be disabled
because of issues with the carrier’s network.
The battery does not charge properly (For Samsung-approved
chargers)
•
Ensure that the charger is connected properly.
•
Visit a Samsung Service Centre or an authorised service centre and have the battery
replaced. Bring the charger and USB cable you are using for better service support.

Appendix
122
The battery depletes faster than when first purchased
•
When you expose the device or the battery to very cold or very hot temperatures, the
useful charge may be reduced.
•
Battery consumption will increase when you use certain features or apps, such as
GPS, games, or the internet.
•
The battery is consumable and the useful charge will get shorter over time.
Error messages appear when opening the camera
Your device must have sufficient available storage and battery power to operate the
camera app. If you receive error messages when opening the camera, try the following:
•
Charge the battery.
•
Free some storage by transferring files to a computer or deleting files from your
device.
•
Restart the device.
If you are still having trouble with the camera app after trying these tips, contact a
Samsung Service Centre or an authorised service centre.
Picture quality is poorer than the preview
•
The quality of your pictures may vary, depending on the surroundings and the
photography techniques you use.
•
If you take pictures in dark areas, at night, or indoors, image noise may occur or
images may be out of focus.
Error messages appear when opening multimedia files
If you receive error messages or multimedia files do not play when you open them on
your device, try the following:
•
Free some storage by transferring files to a computer or deleting files from your
device.
•
Ensure that the music file is not Digital Rights Management (DRM)-protected. If the
file is DRM-protected, ensure that you have the appropriate licence or key to play the
file.

Appendix
123
•
Ensure that the file formats are supported by the device. If a file format is not
supported, such as DivX or AC3, install an app that supports it. To check the file
formats that your device supports, visit the Samsung website.
•
Your device supports pictures and videos captured with the device. Pictures and
videos captured by other devices may not work properly.
•
Your device supports multimedia files that are authorised by your carrier or providers
of additional services. Some content circulated on the internet, such as ringtones,
videos, or wallpapers, may not work properly.
Bluetooth is not working well
If another Bluetooth device is not located or there are connection problems or
performance malfunctions, try the following:
•
Ensure that the device you wish to connect with is ready to be scanned or connected
to.
•
Ensure that your tablet and the other Bluetooth device are within the maximum
Bluetooth range (10 m).
•
On your tablet, open
Settings
, tap
Connections
, and then tap the
Bluetooth
switch
to turn it on again.
•
On your tablet, open
Settings
, tap
General management
→
Reset
→
Reset Wi-Fi
and Bluetooth settings
→
Reset settings
to reset network settings. You may lose
registered information when performing the reset.
If these tips do not solve the problem, contact a Samsung Service Centre or an
authorised service centre.
A connection is not made when you connect the device to a
computer
•
Ensure that the USB cable you are using is compatible with your device.
•
Ensure that you have the proper driver installed and updated on your computer.
Your device cannot find your current location
GPS signals may be obstructed in some locations, such as indoors. Set the device to use
Wi-Fi or a mobile network to find your current location in these situations.

Appendix
124
Data stored in the device has been lost
Always make backup copies of all important data stored in the device. Otherwise, you
cannot restore data if it is damaged or lost. Samsung is not responsible for the loss of
data stored in the device.
A small gap appears around the outside of the device case
•
This gap is a necessary manufacturing feature and some minor rocking or vibration
of parts may occur.
•
Over time, friction between parts may cause this gap to expand slightly.
There is not enough space in the device’s storage
Delete unnecessary data, such as cache, using the device care feature or manually delete
unused apps or files to free up storage space.
The Home button does not appear
The navigation bar containing the Home button may disappear while using certain apps
or features. To access the navigation bar, drag upwards from the bottom of the screen.
You may hear a rattling sound when shaking the device
For devices with the Optical Image Stabilisation (OIS) feature or the Auto Focus (AF)
feature in their cameras, this sound may occur as related internal components come into
contact. This is a normal phenomenon because of the characteristics of the device.
Removing the battery
•
To remove the battery, contact an authorised service centre. To obtain battery
removal instructions, please visit www.samsung.com/global/ecodesign_energy.
•
For your safety, you must not attempt to remove the battery. If the battery is not
properly removed, it may lead to damage to the battery and device, cause personal
injury, and result in the device being unsafe.
•
Samsung does not accept liability for any damage or loss (whether in contract or
tort, including negligence) which may arise from failure to precisely follow these
warnings and instructions, other than death or personal injury caused by Samsung’s
negligence.

Additional information
Copyright
Copyright © 2026 Samsung Electronics Co., Ltd.
This guide is protected under international copyright laws.
No part of this guide may be reproduced, distributed, translated, or transmitted in any
form or by any means, electronic or mechanical, including photocopying, recording, or
storing in any information storage and retrieval system.
Trademarks
•
Samsung and the Samsung logo are registered trademarks of Samsung Electronics
Co., Ltd.
•
Bluetooth
®
is a registered trademark of Bluetooth SIG, Inc. worldwide.
•
Wi-Fi
®
, Wi-Fi Direct
™
, Wi-Fi CERTIFIED
™
, and the Wi-Fi logo are registered
trademarks of the Wi-Fi Alliance.
•
Manufactured under license from Dolby Laboratories. Dolby, Dolby Atmos, and the
double-D symbol are trademarks of Dolby Laboratories.
•
All other trademarks and copyrights are the property of their respective owners.