EG9856 Revised 04/24
(continued on back page)
INSTRUCTION SHEET
#A227496
®
leg
gusset
sink
front-to-back
crossbrace
end-to-end
crossbrace
corner casting
front casting
• Using allen wrench, secure legs into gussets
(see figure 1a)—1 set screw* per gusset.
Secure crossbrace assembly onto
legs (6˝ min. from bottom)
—1 set screw* per casting.
• Place sink in its upright
position (might require
assistance).
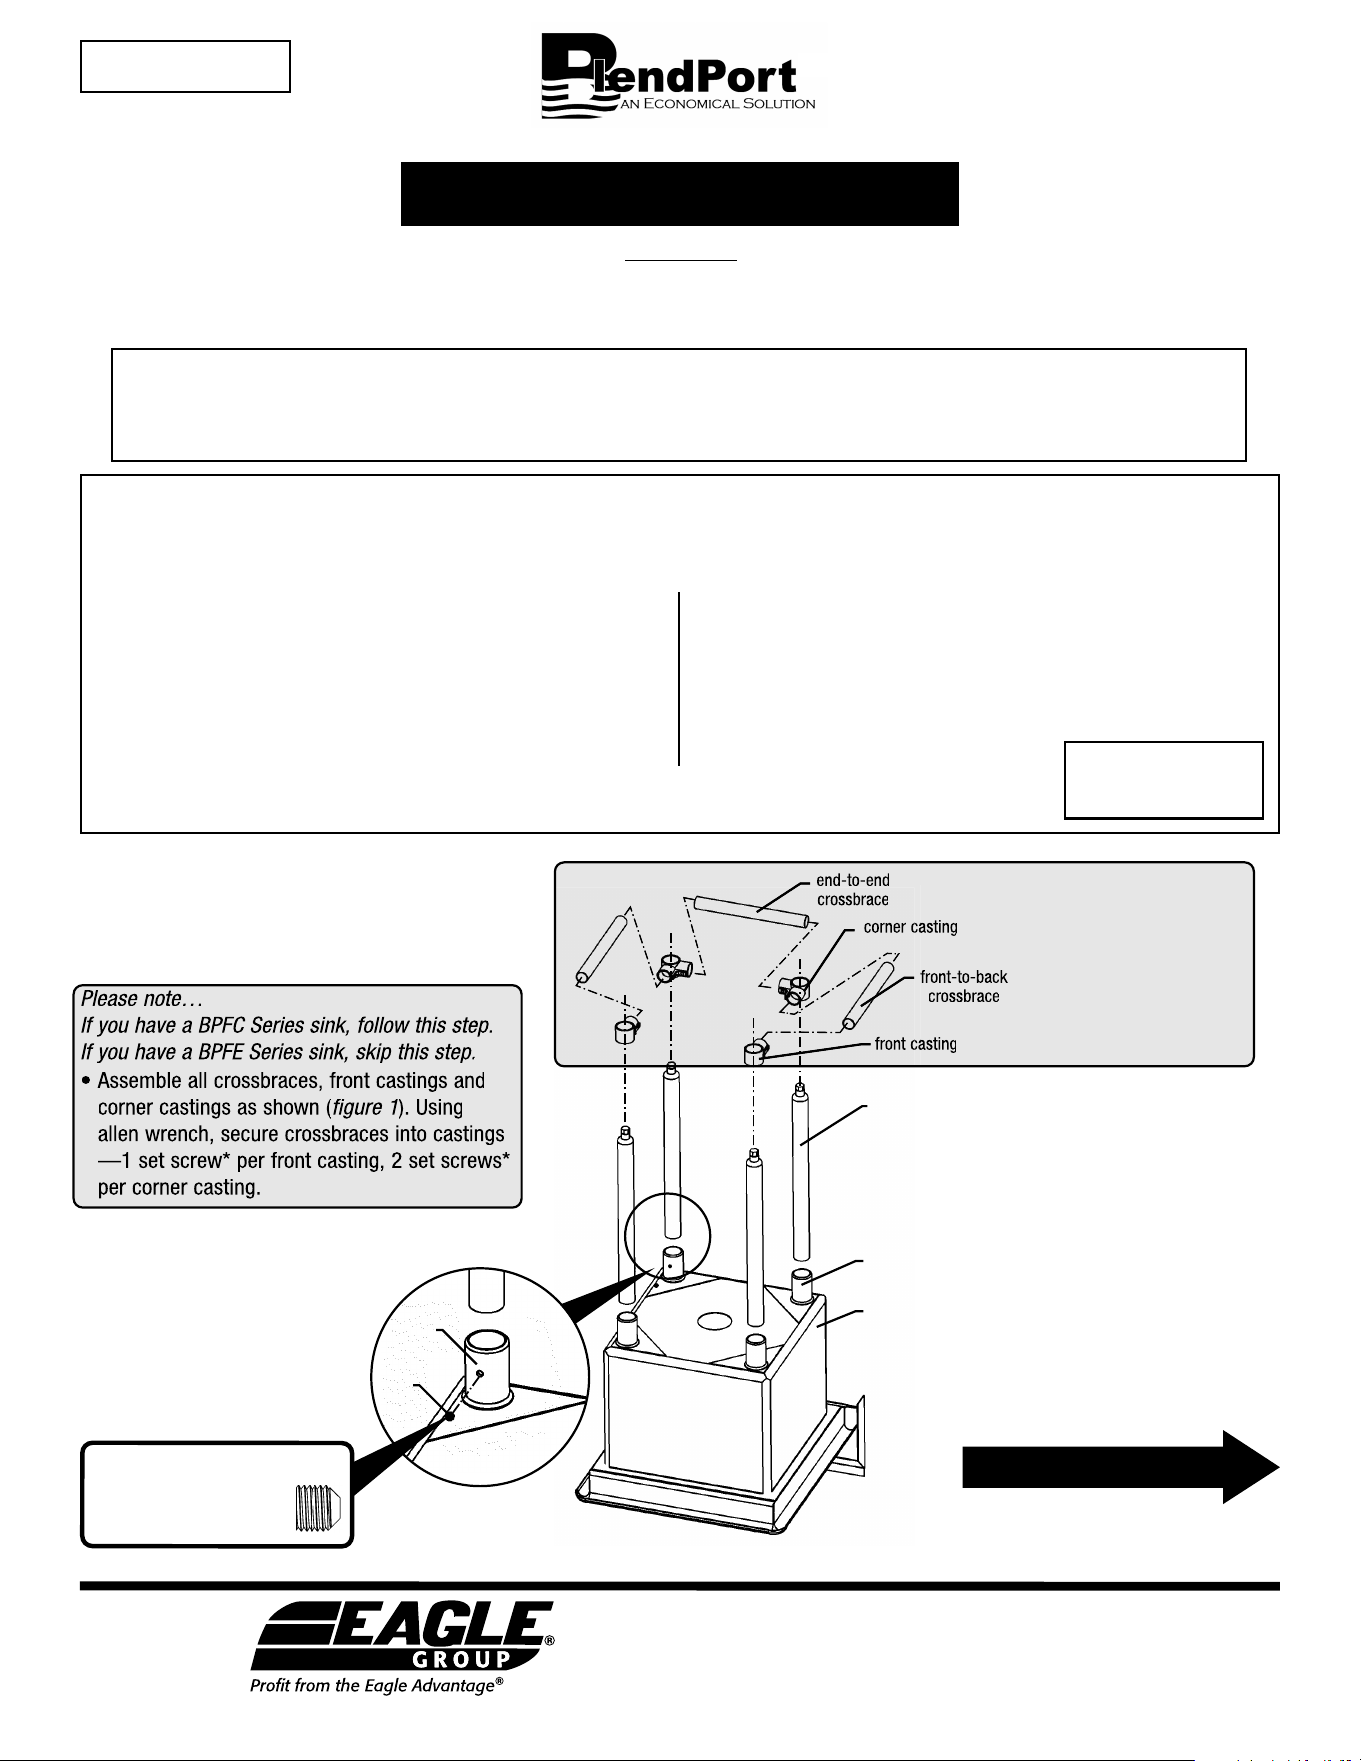
• Assemble all crossbraces, front castings and
corner castings as shown (figure 1). Using
allen wrench, secure crossbraces into castings
—1 set screw* per front casting, 2 set screws*
per corner casting.
Step 1 - Assemble and attach
crossbrace assembly and legs.
• Place sink upside down (see figure 1).
• Insert top of legs into gussets.
Please note…
If you have a BPFC Series sink, follow this step.
If you have a BPFE Series sink, skip this step.
Local codes regarding installation vary by location. Installation must comply with all required codes. Contact the authorities in your
area having jurisdiction over requirements for installation of this equipment.
BEFORE ASSEMBLY, PLEASE READ:
• (14) Set Screws
• (1) Assembly Instructions
• Drain(s)*, 1-1/2˝ NPS - with
coupling nut, gasket, and
sealing washer
• (1) Sink Unit
• (4) Legs
• (2) Front Castings
• (2) Corner Castings
• (1) End-to-End Crossbrace
• (2) Front-to-Back Crossbraces
• (1) Sink Unit
• (4) Legs
• (14) Set Screws
• (1) Assembly Instructions
• Drain(s)*, 1-1/2˝ NPS - with
coupling nut, gasket, and
sealing washer
Remove contents from crate. Verify that all contents listed are included. Consult the factory, the factory representative
or Eagle’s authorized service center in your area if parts are missing.
* Quantity of drains depends on quantity of sink bowls included with sink ordered.
CONTENTS:
BPFC Series Sinks BPFE Series Sinks
Step 2 - Install drain(s)
and faucet(s), provided
separately.
Follow instructions provided
with hardware for installation.
set
screw
gusset
figure 1a
ASSEMBLY INSTRUCTIONS
Sinks
CAUTION
INSPECT CONTENTS IMMEDIATELY AND FILE CLAIM WITH DELIVERING
CARRIER FOR ANY DAMAGE. SAVE YOUR CRATE AND ALL PACKING MATERIALS.
YOU ARE RESPONSIBLE FOR DAMAGE TO YOUR UNIT IF RETURNED IMPROPERLY PACKED.
figure 1
Tools required:
• 5/32˝ allen wrench
Set screws must be filled
with NSF-approved sealant.
* To meet NSF standards:
Please note…
Only BPFC Series sinks
utilize crossbracing.
Eagle Foodservice Equipment, Eagle MHC, and SpecFAB
®
are divisions of Eagle Group. ©2024 by the Eagle Group
• 100 Industrial Boulevard, Clayton, Delaware 19938-8903 U.S.A.
• Phone: 302/653-3000 • 800/441-8440 • Fax: 302/653-2065
• www.eaglegrp.com • www.eaglemhc.com
Step 6 - Flush system and check for leaks.
Step 5 - Secure and seal unit to wall as required.
(End)
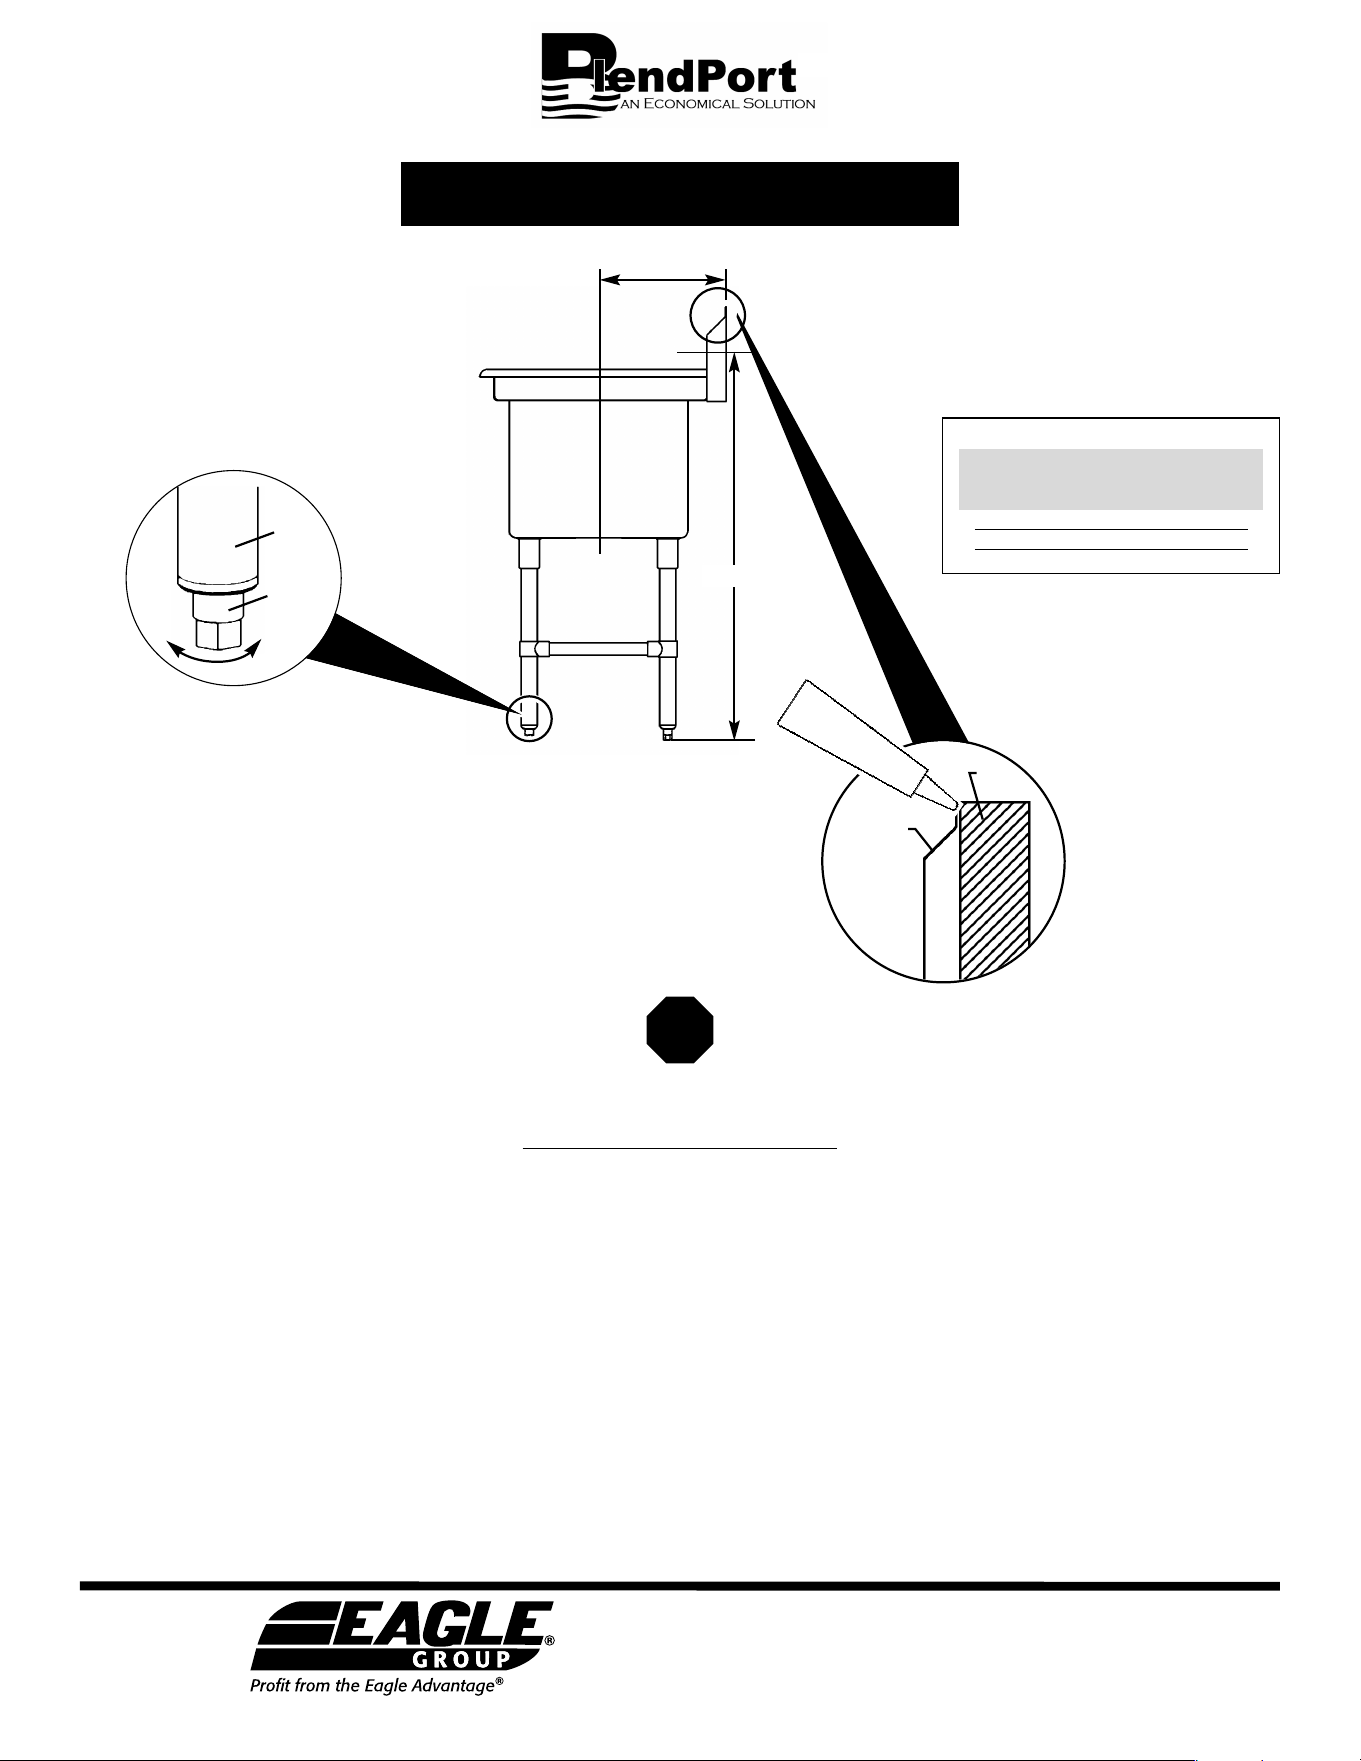
Step 3 - Level sink.
• Place sink in the intended
installation location.
• Level sink by turning adjustable
bullet foot (see figure 2) on
each leg.
For NSF approval:
• Apply silicone sealant along the topmost flange of backsplash, or…
• Cover topmost flange with finished wall.
Step 4 - Plumb drain(s) and
water supply lines, referring
to chart below and illustration
at left.
leveling
foot
leg
CLEANING INSTRUCTIONS
Properly cared for, sink will last indefinitely. Improper use of commercial chemicals, sterilizers, and detergents may cause corrosion,
discoloring, and pitting. For best results, follow these recommendations:
• You must clean sink thoroughly and flush with water after using detergent and sterilizers.
• NEVER LEAVE SOLUTIONS IN SINK OVERNIGHT.
• Use solutions ONLY IN STRENGTH RECOMMENDED BY MANUFACTURER, or they may cause severe damage. High content of chlorine, chlorine
derivatives, or bleach are not recommended for stainless steel bowls, for they cause pitting or corrosion.
• Avoid spillage or splashing of full-strength chemicals directly onto stainless steel surface. Always put water in sink before adding sanitizing
agents or soaps.
• Between cleanings, wipe the stainless steel sink with a damp cloth. Deposits of dirt or grease in sinks provide local points of attack.
• CAUTION: NEVER USE ORDINARY STEEL WOOL. Use only stainless steel wool or scouring pads.
• DO NOT USE steel scrapers to clean stainless steel.
NOTE: A discoloration may show at the seams, which is SURFACE RUST. It may be caused by the iron in your water or strong detergents. CLEAN
AT ONCE with any good strong cleanser.
DIMENSION
bowl size A
(inches) (inches)
15˝ x 15˝ 10
1
⁄2˝
18˝ x 18˝ 11˝
24˝ x 24˝ 15˝
Drain location from backsplash
wall
backsplash
of sink
figure 2
(BPFC sink shown)
SEALANT
DIMENSION
A
39-1/2˝
®
ASSEMBLY INSTRUCTIONS
Sinks
Eagle Foodservice Equipment, Eagle MHC, and SpecFAB
®
are divisions of Eagle Group. ©2024 by the Eagle Group
• 100 Industrial Boulevard, Clayton, Delaware 19938-8903 U.S.A.
• Phone: 302/653-3000 • 800/441-8440 • Fax: 302/653-2065
• www.eaglegrp.com • www.eaglemhc.com