

60v Battery Powered Grass Trimmer
HYTR60Li
User Manual
FOR YOUR SAFETY
You must read and understand this
manual before use.
Keep this manual for future
reference.

2
Contents
General power tool safety warnings. ...................................................................... 03
Work area safety. .................................................................................................... 03
Electrical safety. ...................................................................................................... 04
Personal safety. ....................................................................................................... 04
Power tool use and care… ...................................................................................... 05
Battery tool use and care… ..................................................................................... 06
Service… ................................................................................................................. 07
Special safety instructions ...................................................................................... 08
Symbols ................................................................................................................... 15
Diagram… ............................................................................................................... 17
Parts list… ............................................................................................................... 17
Intended use… ........................................................................................................ 18
Assembly… ............................................................................................................. 19
Unpacking… ............................................................................................................ 19
Installing the handle… ............................................................................................. 19
Installing the guard and edge guide. ........................................................................ 20
Installing the spool of string. .................................................................................... 21
Insert the battery. .................................................................................................... 22
Charge the battery. .................................................................................................. 22
Operation… ............................................................................................................. 23
Starting and stopping… ........................................................................................... 23
Adjust the length of the grass trimmer. .................................................................... 23
Adjust the working head angle. ............................................................................... 24
Using the edge guide. ............................................................................................. 24
Working… ................................................................................................................ 25
Tips… ...................................................................................................................... 26
Line feeding… ......................................................................................................... 27
Auto-feeding… ........................................................................................................ 27
After use… .............................................................................................................. 27
Cleaning and maintenance ..................................................................................... 28
Cleaning the grass trimmer. .................................................................................... 28
Storage and transportation. .................................................................................... 28
Battery. .................................................................................................................... 28
Charger. .................................................................................................................. 28
Replacing the spool… ............................................................................................. 28
Cleaning and Maintenance ...................................................................................... 29
Troubleshooting ....................................................................................................... 30
Recycling and disposal… ........................................................................................ 32
Technical data… ..................................................................................................... 32
Warranty… .............................................................................................................. 32
Declaration of Conformity…………………………………………………………………33

General power tool safety warnings
3
General power tool safety warnings
WARNING! Read all safety warnings and all instructions.
Failure to follow the warnings and instructions may result
in electric shock, fire and/or serious injury.
WARNING! Read all safety warnings designated by
the
symbol and all instructions. Save all warnings
and instructions for future reference.
The term "power tool" in the warnings refers to your
mains-operated (corded) power tool or battery- operated
(cordless) power tool.
WARNING! Depending on the actual use of the
product the vibration values can differ from the
declared total! Adopt proper measures to protect your
self against vibration exposures. Take the whole work
process including times the product is running under no
load or switched off into consideration.
Proper measures include, among others, regular
maintenance and care of the product and application
tools, keeping hands warm, periodical breaks and
proper planning of work processes.
Work area safety
·
Keep work areas clean and well lit. Cluttered or dark
areas invite accidents.
·
Do not operate power tools in explosive atmospheres,
such as in the presence of flammable liquids, gases or
dust. Power tools create sparks which may ignite the
dust or fumes.
·
Keep children and bystanders away while operating a
power tool. Distractions can cause you to lose control.

4
General power tool safety warnings
Electrical safety
·
Power tool plugs must match the outlet. Never modify the
plug in any way. Do not use any adapter plugs with
earthed (grounded) power tools. Unmodified plugs and
matching outlets will reduce risk of electric shock.
·
Avoid body contact with earthed or grounded surfaces,
such as pipes, radiators and refrigerators. There is an
increased risk of electric shock if your body is earthed or
grounded.
·
Do not expose power tools to rain or wet conditions.
Water entering a power tool will increase the risk of
electric shock.
·
Do not abuse the cord. Never use the cord for carrying,
pulling or unplugging the power tool. Keep cord away
from heat, oil, sharp edges or moving parts. Damaged or
entangled cords increase the risk of electric shock.
·
When operating a power tool outdoors, use an extension
cord suitable for outdoor use. Use of a cord suitable for
outdoor use reduces the risk of electric shock.
·
If operating a power tool in a damp location is
unavoidable, use a residual current device (RCD)
protected supply. Use of an RCD reduces the risk of
electric shock.
Personal safety
·
Stay alert, watch what you are doing and use common
sense when operating a power tool. Do not use a power
tool while you are tired or under the influence of drugs,
alcohol or medication. A moment of inattention while
operating power tools may result in serious personal
injury.

5
General power tool safety warnings
·
Use personal protective equipment. Always wear eye
protection. Protective equipment such as a dust mask,
non-skid safety shoes, hard hat, or hearing protection
used for appropriate conditions will reduce personal
injuries.
·
Prevent unintentional starting. Ensure the switch is in the
off-position before connecting to a power source and/ or
battery pack, picking up or carrying the tool. Carrying
power tools with your finger on the switch or energising
power tools that have the switch on invites accidents.
·
Remove any adjusting key or spanner before turning the
power tool on. A spanner or a key left attached to a
rotating part of the power tool may result in personal
injury.
·
Do not overreach. Keep proper footing and balance at all
times. This enables better control of the power tool in
unexpected situations.
·
Dress properly. Do not wear loose clothing or jewelry.
Keep your hair, clothing and gloves away from moving
parts. Loose clothes, jewelry or long hair can be
caught in moving parts.
·
If devices are provided for the connection of dust
extraction and collection facilities, ensure these are
connected and properly used. Use of dust collection can
reduce dust-related hazards.
Power tool use and care
·
Do not force the power tool. Use the correct power tool
for your application. The correct power tool will do the job
better and safer at the rate for which it was designed.

6
General power tool safety warnings
·
Do not use the power tool if the switch does not turn it on
and off. Any power tool that cannot be controlled with the
switch is dangerous and must be repaired.
·
Disconnect the plug from the power source and/or the
battery pack from the power tool before making any
adjustments, changing accessories, or storing power
tools. Such preventive safety measures reduce the risk of
starting the power tool accidentally.
·
Store idle power tools out of the reach of children and do
not allow persons unfamiliar with the power tool or these
instructions to operate the power tool. Power tools are
dangerous in the hands of untrained users.
·
Maintain power tools. Check for misalignment or binding
of moving parts, breakage of parts and any other
condition that may affect the power tool’s operation. If
damaged, have the power tool repaired before use. Many
accidents are caused by poorly maintained power tools.
·
Keep cutting tools sharp and clean. Properly maintained
cutting tools with sharp cutting edges are less likely to
bind and are easier to control.
·
Use the power tool, accessories and tool bits etc. in
accordance with these instructions, taking into account
the working conditions and the work to be performed. Use
of the power tool for operations different from those
intended could result in a hazardous situation.
Battery tool use and care
·
Recharge only with the charger specified by the
manufacturer. A charger that is suitable for one type of

7
General power tool safety warnings
battery pack may create a risk of fire when used with
another battery pack.
·
Use power tools only with specifically designated battery
packs. Use of any other battery packs may create a risk
of injury and fire.
·
When the battery pack is not in use, keep it away from
other metal objects like paper clips, coins, keys, nails,
screws or other small metal objects that can make a
connection from one terminal to another. Shorting the
battery terminals together may cause burns or a fire.
·
Under abusive conditions liquid may be ejected from the
battery; avoid contact. If contact accidentally occurs, flush
with water. If liquid contacts eyes, seek medical help.
Liquid ejected from the battery may cause irritation or
burns.
Service
·
Have your power tools serviced by a qualified repair
person using only identical replacement parts. This will
ensure that safety of the power tool is maintained.

8
Special safety instructions
Important! Read carefully before use! Keep for your
reference.
WARNING! When using the product the safety rules
must be followed. For your own safety and that of
bystanders, please read these instructions before
operating the product. Please keep the instructions safe
for later use.
Training
·
Read the instructions carefully. Be familiar with the
controls and the proper use of the product.
·
Never allow people unfamiliar with these instructions or
children to use the product. Local regulations can restrict
the age of the operator.
·
Keep in mind that the operator or user is responsible for
accidents or hazards occurring to other people or their
property.
Preparation
·
Never operate the product while people, especially
children, or pets are nearby.
·
Wear eye protection and sturdy shoes at all times while
operating the product.
Operation
·
Use the product only in daylight or good artificial light.
·
Never operate the product with damaged guards or
shields or without guards or shields in place.
·
Keep hands and feet away from the cutting attachment
at all times and especially when switching on the motor.
·
Before use, check the controls and proper use of the

9
Special safety instructions
product.
·
Before using the product and after any impact, check for
signs of wear or damage, and repair as necessary.
·
Always disconnect the product from the power supply (i.e.
remove the plug from the power supply or the battery
pack) in the following situations:
- whenever leaving the product unattended;
- before clearing a blockage;
- before checking, cleaning or working on the product
- after striking a foreign object;
- whenever the product starts vibrating abnormally.
·
Take care against injury to feet and hands from the
cutting attachment.
·
Always ensure that the air vents are kept clear of debris.
·
Take care against injury from any device fitted for
trimming the filament line length, if applicable. After
extending new cutter line always return the product to its
normal operating position before switching on.
·
Never fit metal cutting elements.
·
Never replace non-metallic cutting means with metallic
cutting means.
·
Never use replacement parts or accessories not
provided or recommended by the manufacturer.
·
Avoid using the product in bad weather conditions
especially when there is a risk of lightning.
·
WARNING! The cutting elements continue to rotate after
the product is switched off.
·
Do not expose the product to rain.
Maintenance and storage
·
Disconnect the product from the power supply (i.e.
remove the plug from the power supply or the battery

10
Special safety instructions
pack) and check for damage after use.
·
Disconnect the product from the power supply (i.e.
remove the plug from the power supply or the battery
pack) before carrying out maintenance or cleaning work.
·
Use only the manufacturer’s recommended replacement
parts and accessories.
·
Inspect and maintain the product regularly. Have the
product repaired only by an authorised service centre or
similar qualified specialist.
·
When not in use, store the product out of the reach of
children.
Charger safety warnings
·
This charger is not intended for use by persons (including
children) with reduced physical, sensory or mental
capabilities, or lack of experience and knowledge,
unless they have been given supervision or instruction
concerning use of the product by a person responsible for
their safety.
·
Children should be supervised to ensure that they do not
play with the charger.
·
Before using the charger, read all the instructions and
cautionary markings on the charger and battery pack.
·
Do not attempt to charge battery packs other than those
supplied. The charger and battery pack supplied with
the product are specifically designed to work together.
·
Charge the battery pack indoors only as the charger is
designed for indoor use only.
·
Do not charge non-rechargeable batteries.
·
Protect the charger against moisture and wet conditions.
There is a danger of electric shock.
·
Ensure proper ventilation when charging.

11
Special safety instructions
·
Do not place any object on top of the charger as it could
cause overheating. Do not place the charger near any
heat source.
·
Do not use an extension cord unless it is absolutely
necessary. The use of an improper extension cord could
cause the risk of fire, electric shock or electrocution.
·
Do not use the charger if it has been subjected to a
heavy knock, dropped or otherwise damaged in any
way. Have the charger checked and repaired by an
authorised service centre.
·
Do not disassemble the charger. Incorrect
re-assembly may result in the risk of fire, electric shock
or electrocution.
·
Disconnect the charger from the power supply before
attempting to clean it to reduce the risk of an electric
shock. Removing the battery pack alone does not
reduce the risk.
Battery pack safety warnings
·
Do not attempt to charge the battery pack with any other
charger than the one supplied. The charger and battery
pack supplied with the product are specifically designed
to work together.
·
Charge and store the battery pack in an ambient
temperature of 18 - 24°C (65 - 75°F) to ensure the longest
battery life and best performance. Do not charge or store
the battery pack in temperatures below 0°C
(32 °F) and above 45°C (113°F).
·
Small leakage of liquid from the battery pack may
occur under extreme usage or temperature conditions.
However, if the outer seal is broken and this leakage
comes into contact with your skin wash the affected area

12
Special safety instructions
quickly with water. If the leakage gets in your eyes flush
your eyes with clean water for a minimum of 10 minutes
and seek immediate medical attention.
·
Never attempt to open the battery pack for any reason.
If the plastic housing of the battery pack breaks open or
cracks, immediately discontinue its use and do not
recharge it.
·
Do not store or carry a spare battery pack in a pocket
or toolbox or any other place where it may come into
contact with metal objects. The battery pack may be
short-circuited causing damage to the battery pack, burns
or a fire.
·
Do not pierce the battery with nails, strike the battery
with a hammer, step on the battery or otherwise subject it
to strong impacts or shocks.
·
Protect the battery pack against heat. Do not place the
battery in direct sunlight or use or store the battery inside
cars in hot weather. Doing so may cause the battery to
generate heat, explode or ignite.
·
Never try to charge a battery pack that is cracked or
damaged in any other way. There is a danger of electric
shock or electrocution.
Vibration and noise reduction
To reduce the impact of noise and vibration emissions, limit
the time of operation, use low-vibration and low-noise
operating modes as well as wear personal protective
equipment.
Take the following points into account to minimise the
vibration and noise exposure risks:
·
Only use the product as intended by its design and these
instructions.

13
Special safety instructions
·
Ensure that the product is in good condition and well
maintained.
·
Use correct accessories/attachments for the product and
ensure they are in good condition.
·
Keep tight grip on the handles/grip surface.
·
Maintain this product in accordance with these instructions
and keep it well lubricated (where appropriate).
·
Plan your work schedule to spread any high vibration
tool use across a longer period of time.
Emergency
Familiarise yourself with the use of this product by means
of this instruction manual. Memorise the safety directions
and follow them to the letter. This will help to prevent risks
and hazards.
·
Always be alert when using this product, so that you can
recognise and handle risks early. Fast intervention can
prevent serious injury and damage to property.
·
Switch off and disconnect from the power supply if
there is any malfunction. Have the product checked by a
qualified specialist and repaired, if necessary, before you
put it into operation again.
Residual risks
Even if you are operating this product in accordance with
all the safety requirements, potential risks of injury and
damage remain. The following dangers can arise in
connection with the structure and design of this product:
·
Health defects resulting from vibration emission if the
product is being used over long periods of time or not
adequately managed and properly maintained.

14
Special safety instructions
·
Injuries and damage to property due to broken accessories
or the sudden impact of hidden objects during use.
·
Danger of injury and property damage caused by flying
objects.
WARNING! This product produces an electromagnetic
field during operation! This field may under some
circumstances interfere with active or passive medical
implants! To reduce the risk of serious or fatal injury, we
recommend persons with medical implants to consult
their doctor and the medical implant manufacturer
before operating this product!

15
Symbols
IMPORTANT: Some of the following symbols may be used on your tool. Be sure to
study them and learn their meaning. Proper interpretation of these symbols will allow
you to use the machine more effectively and reduce the risk of accident.
Read the instruction manual.
Objects thrown by the product could hit the user or other bystanders.
Always ensure that other people and pets remain at a safe distance from
the product when it is in operation. In general, children must not come near
the area where the product is.
Wear eye protection.
Wear ear protection.
Do not expose the product to rain or wet conditions..
Guaranteed sound power level (tested according to Directive 2000/14/EC
as amended by 2005/88/EC
The product complies with the applicable European directives and an
evaluation method of conformity for these directives was done.
WEEE symbol. Waste electrical products should not be disposed of with
household waste. Please recycle where facilities exist. Check with your
local authority or local store for recycling advice.

16
Symbols
For dry indoor use only.
This product is of protection class II. That means it is equipped with
enhanced or double insulation.
Do note expose battery packs to heat in excess of 50ºC.
Do not dispose of battery packs in fire. They will explode and cause injury.
Do not dispose of battery packs in rivers or immerse in water.
Li-ion
Batteries and battery packs should not be disposed of with household
waste. Please recycle where facilities exist. Check with your local authority
or local store for recycling advice.
17
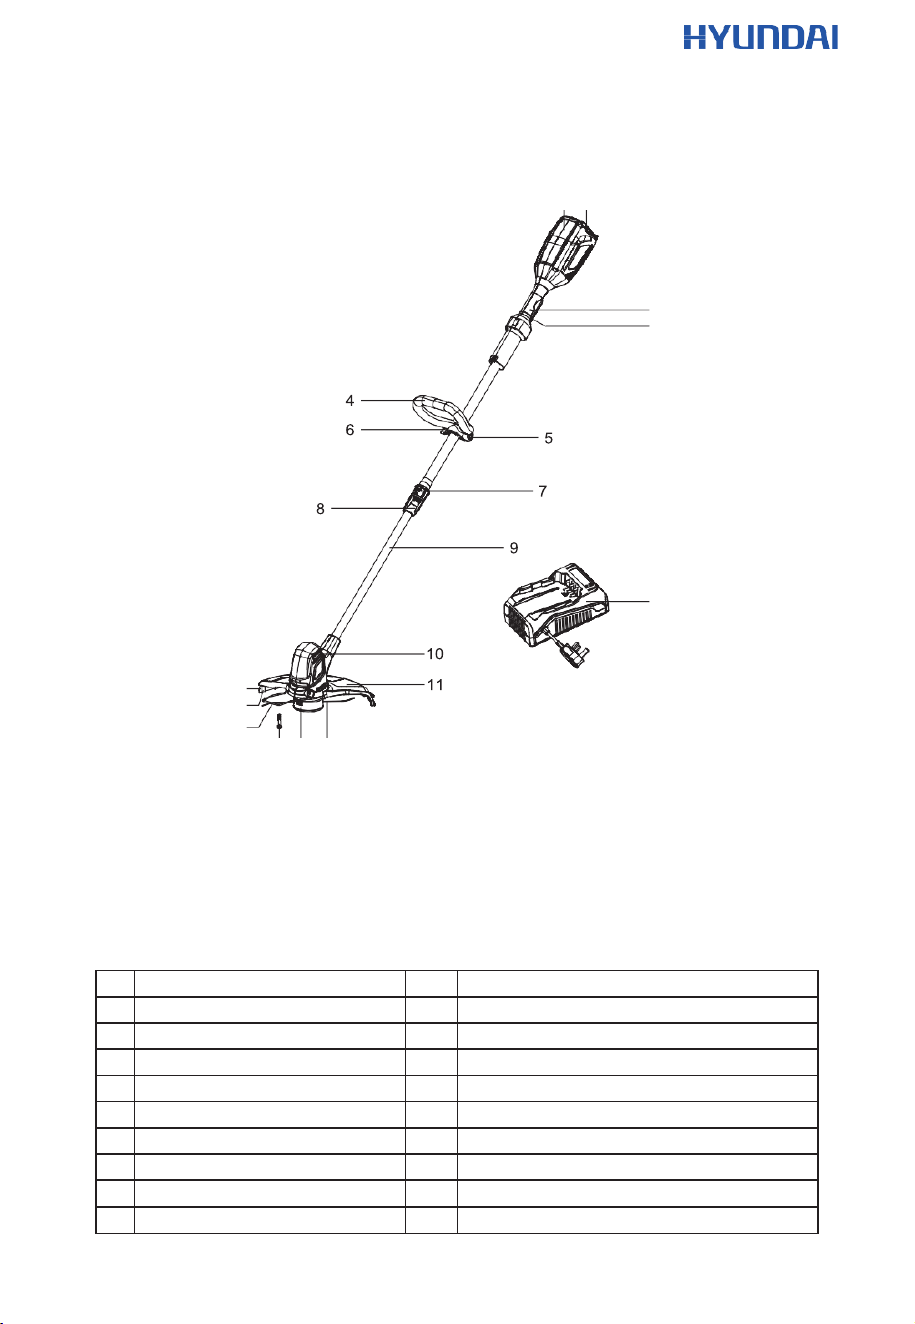
Diagram
Fig. 1
1 18
2
3
17
13
14
15
Parts list
(See Fig. 1)
16 12 12a
1.
Rear handle
11
Safety guard
2.
Trigger
12
Cutter head assembly
3.
Safety button
12a
Trimmer line
4.
Adjustable handle
13
Cut-off blade
5.
Bolt
14
Blade cover
6.
Handle lock
15
Edge guide
7.
Rotating lock
16
Screw
8.
Telescoping lock
17
Charger
9.
Tube assembly
18
Battery
10.
Housing with motor assembly

18
Accessories
Battery x1, Charger x1, Edge guide x1, Safety guard x1,
Handle lock x1, Adjustable handle x1, Screw x1 &
¢
6 Bolt x1

19
Intended use
This cordless grass trimmer is designated with a rated voltage of 58V. It is designed
only to be used with the battery pack YT8033-02.
YT8085-02 designates the respective charger with a charging voltage of 58V.
The product is intended for cutting weed, grass or similar soft vegetation in areas that
are hard to reach, e.g. under bushes, on slopes and edges. It may not be used to
work on unusual thick, dry or wet grass, e.g. pasture grass, or to shred leaves.
For safety reasons it is essential to read the entire instruction manual before first
operation and to observe all the instructions therein.
This product is intended for private domestic use only, not for any commercial trade
use. It must not be used for any purposes other than those described.
20
Assembly
WARNING! Before using the product, familiarise yourself with the operating
features read the entire instruction manual paying particular attention to the
safety rules and operating procedures.
WARNING! The product must be fully assembled before operation! Do not use
a product that is only partly assembled or assembled with damaged parts!
Follow the assembly instructions step-by-step and use the illustrations provided
as a visual guide to easily assemble the product!
Do not connect the battery pack to the product before it is completely assembled!
Note: Take care of small parts that are removed during assembly or when
making adjustments. Keep them secure to avoid loss.
ASSEMBLY INSTRUCTIONS
Follow the operating instructions step-by-step and use the illustrations provided
as a visual guide to easily assemble the machine.
Unpacking
1. Unpack all parts and lay them on a flat, stable surface.
2. Remove all packing materials and shipping devices if applicable.
3. Make sure the delivery contents are complete and free of any damage. If you find
that parts are missing or show damage, do not use the product but contact your
dealer. Using an incomplete or damaged product represents a hazard to people
and property.
4. Ensure that you have all the accessories and tools needed for assembly and
operation. This also includes suitable personal protective equipment.
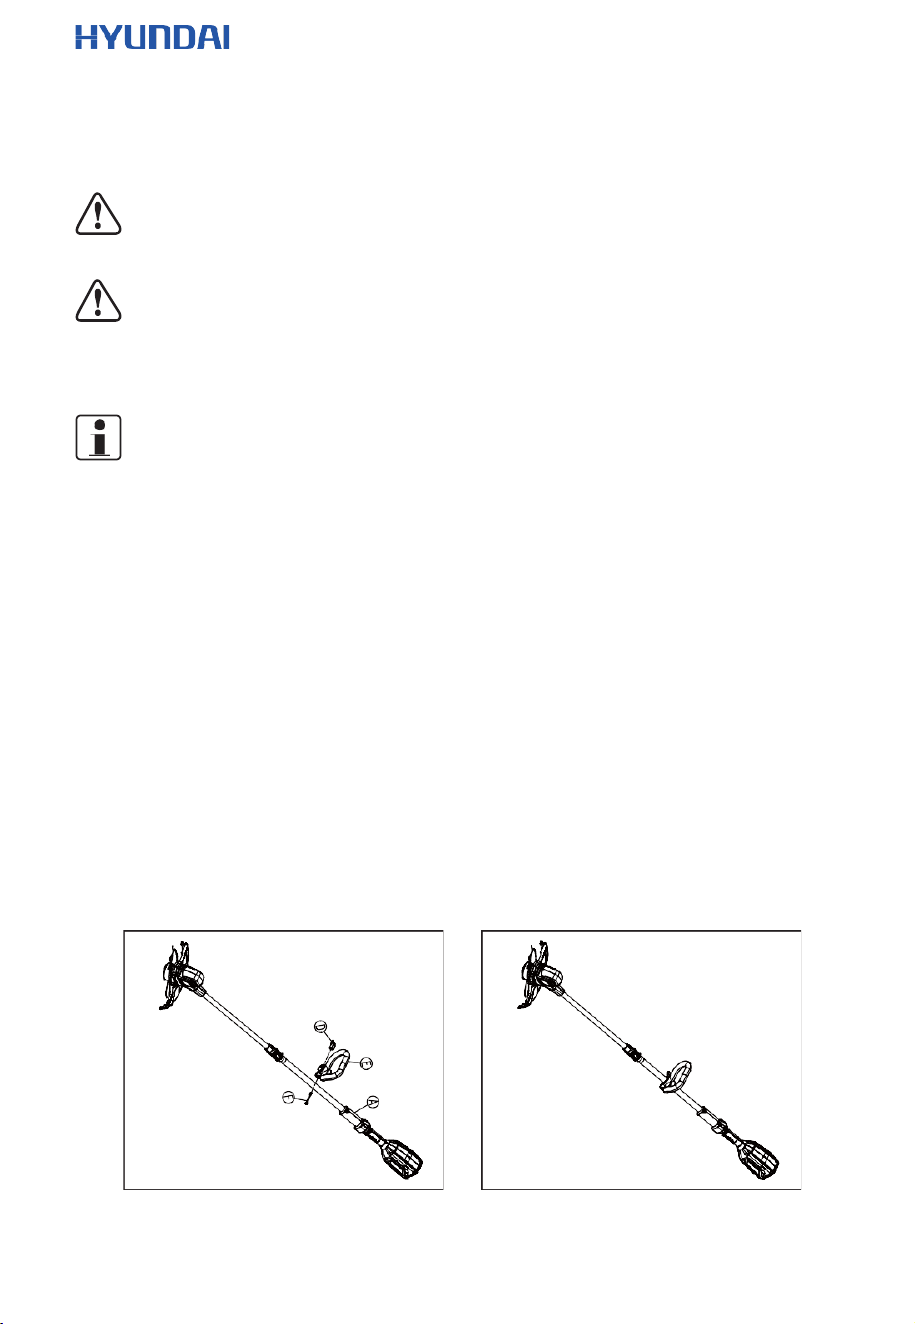
Installing the handle
Slide the front handle (E) into place and swivel it into the desired position. Use the included
bolt (F) and handle adjustment knob (D) to secure it into place. (See Fig. 1a, 1b).
Fig. 1a Fig. 1b
21
Assembly
Installing the handle
Note: Ensure the connection is properly secured. Tighten the knob until there is
no gap between the handle and front handle.
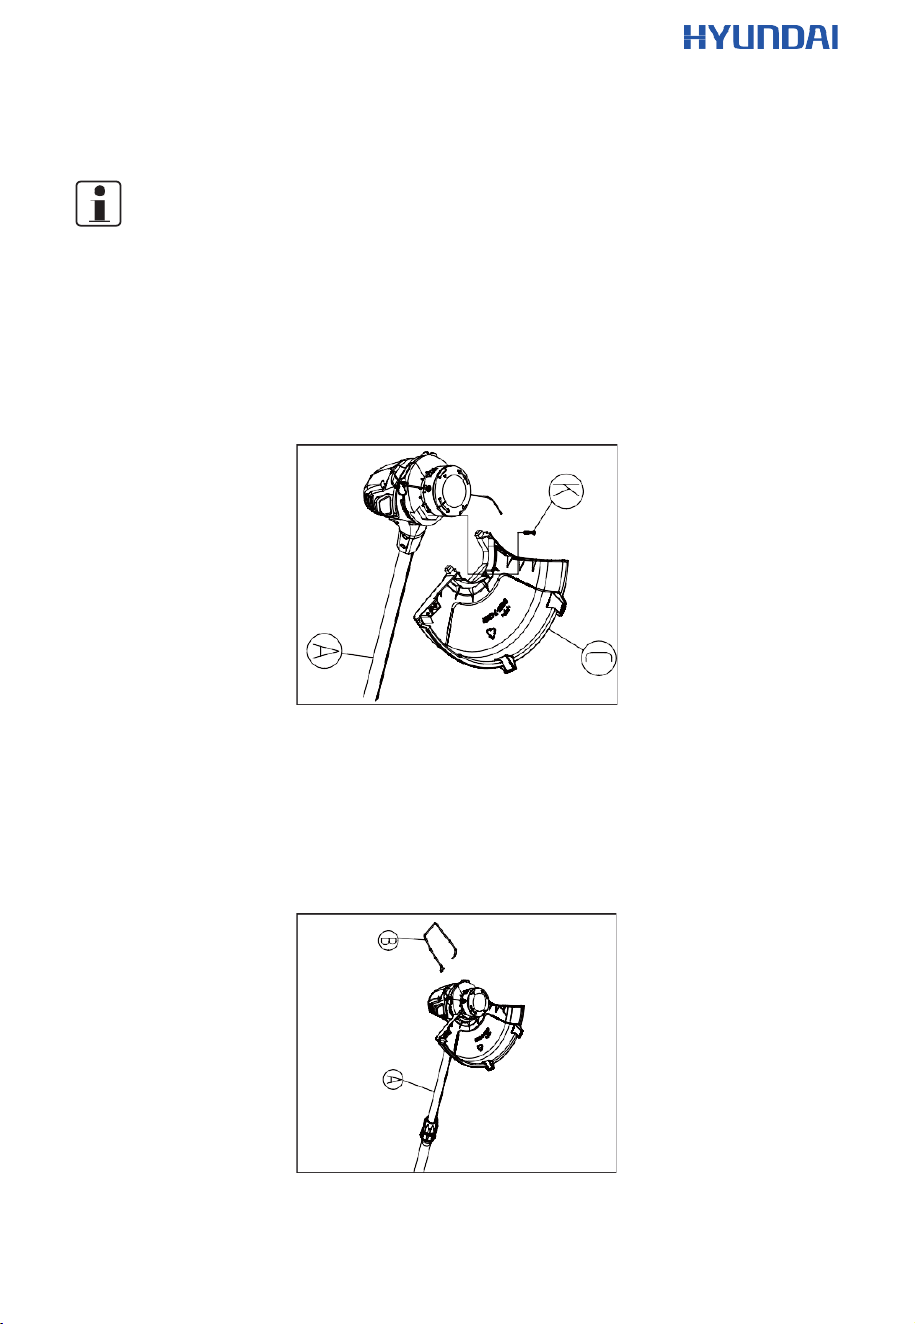
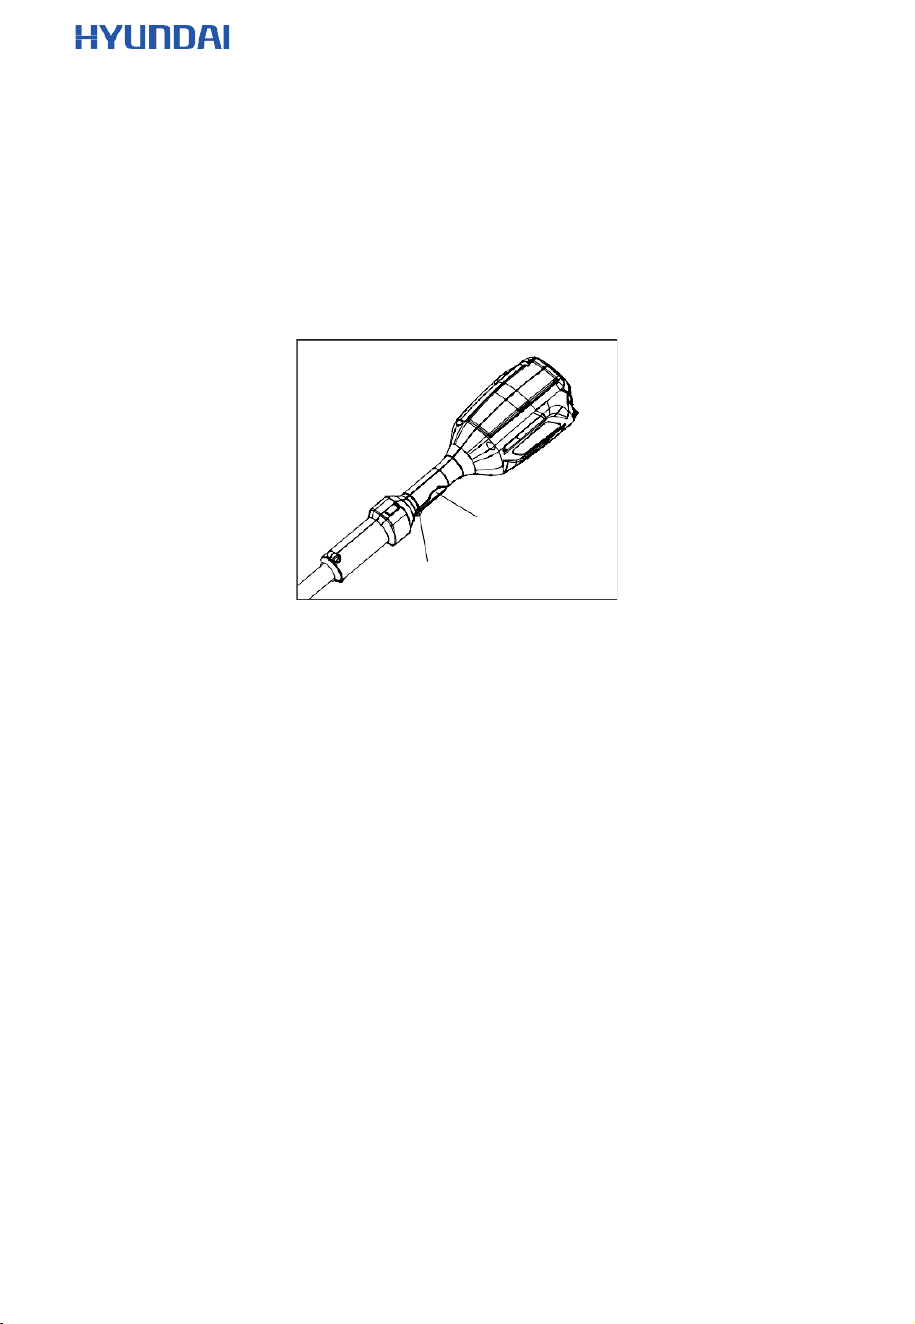
Installing the guard and edge guide
a). The safety guard (C) of the trimmer’s head can be installed with a single screw (K).
Slide the guard into place onto the head of the grass trimmer. On the underside
of the guard, right next to the spool casing, there is a small screw hole. Attach the
guard in place by fastening a screw. (See Fig. 2)
Fig. 2
b). Once the guard has been put into place, attach the edge guide (B) into the holes
mounted on either side of the front of the motor housing. The guide requires slight
stretching for installation, allowing each end to snap into its respective hole. (See
Fig. 3)
Fig. 3
22
Assembly
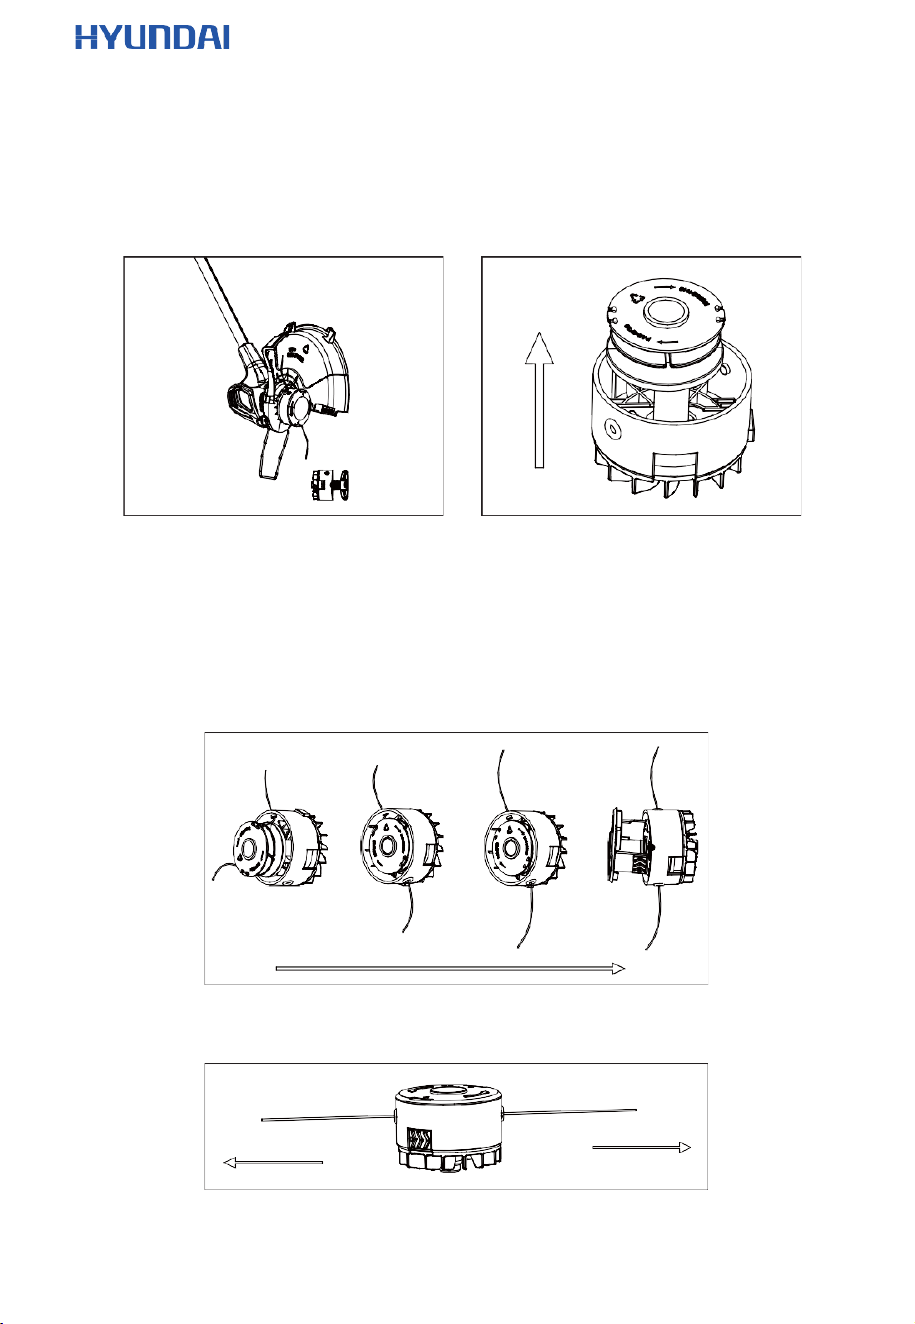
Installing the spool string
Below are the installation instructions if you need to replace the spool:
a). Press two buttons on either side of the grass trimmer’s string casing (the buttons
have a “›››” symbol on them) to remove the lid of the casing. (See Fig. 4 & 5).
Fig. 4 Fig. 5
b). Place the grass trimmer spool on to the internal spindle. The base of the spool
has grooves that lock into place with the triangular notches found at the bottom of
the grass trimmer casing. Make sure that the spool faces with ratchet, faces
towards the inside of the head. The smoother side should be facing out towards
the ground.
c). Feed the line through the holes on either side of the spool casing. Each hole
should have one string coming out of it. (See Fig. 6).
Fig. 6
d). Replace the cover of the string casing. Make sure the lid snaps into place. (See Fig. 7).
Fig. 7
23
Assembly
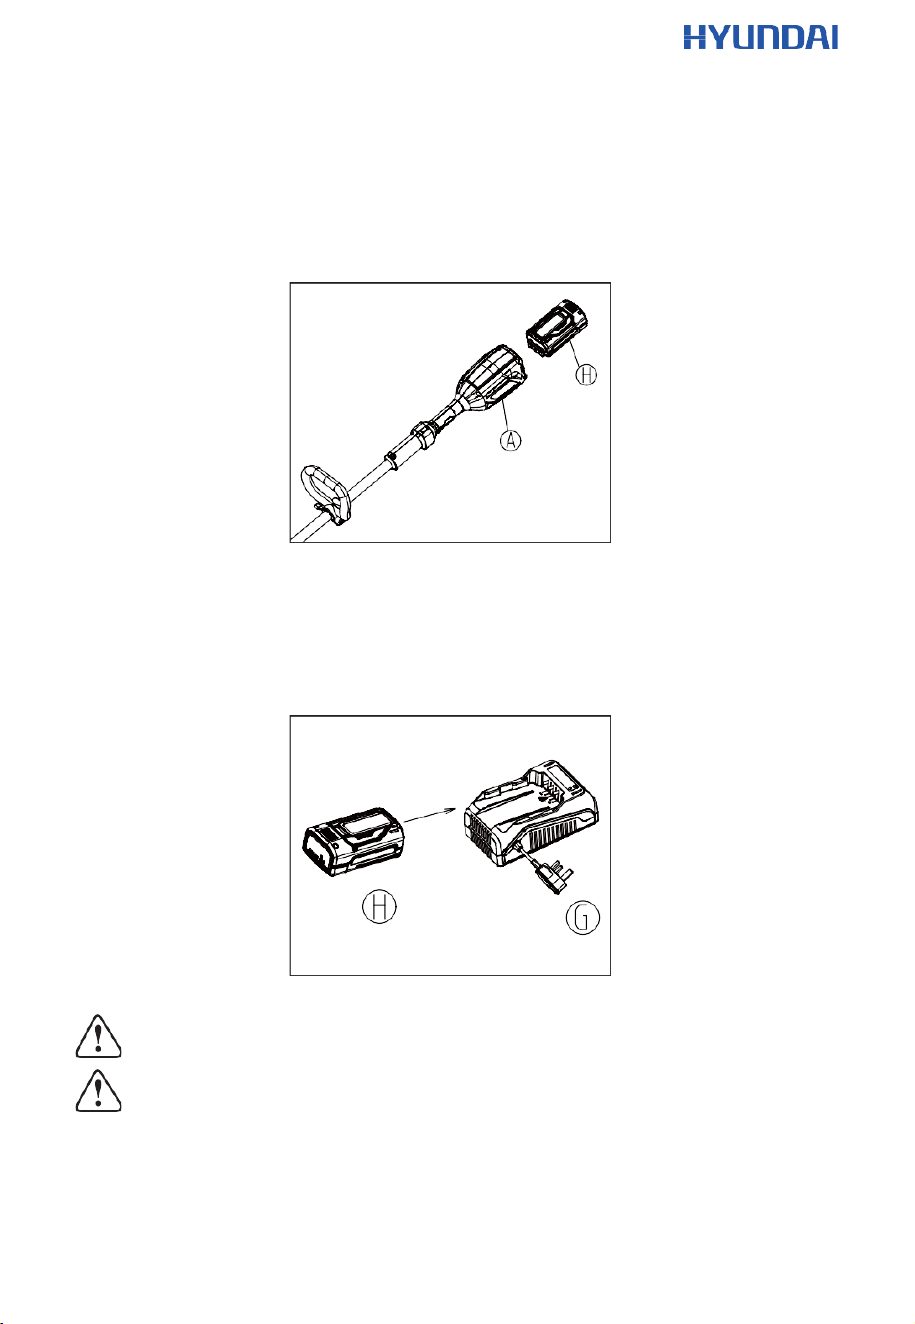
Insert the battery
To insert the battery, slide it into the back of the grass trimmer until a “click” is heard.
Make sure the battery is fully inserted and latched into position. (See Fig. 8). To
remove the battery, press the green release button and slide the battery out of the
grass trimmer.
Charge the battery
Fig. 8
The battery is not fully charged at the time of purchase. Before using the grass trimmer
for the first time, place the battery in the charger and charge it fully. (See Fig. 9)
Fig. 9
WARNING! Charge in a safe location away from moisture and heat sources!
WARNING! Check the voltage! The voltage must comply with the information
on the rating label!
24
Operation
Starting and stopping
Starting
The grass trimmer is equipped with a safety switch. In order to power the machine on,
you must first press the safety switch. While holding down the safety switch, squeeze the
trigger in order to power the grass trimmer. Always hold the grass trimmer with both hands
during operation. (See Fig. 10)
Fig. 10
Note: Before starting the grass trimmer, check that the trigger switches and safety
switches are moving freely, returning automatically and quickly upon release. Also
check that the cooling air vents are not obstructed and that both the front and rear
handles are clean and dry.
Important: Remove the small plastic cover found on the cut-off blade of the string
guard before starting the tool. This will cut the string as it gets too long. Save the cover in
order to put it back on the blade for safe storage.
Stopping
The product will automatically stop once the trigger is released. The lock-off button will
have to be depressed and the trigger squeezed to restart the product motor.
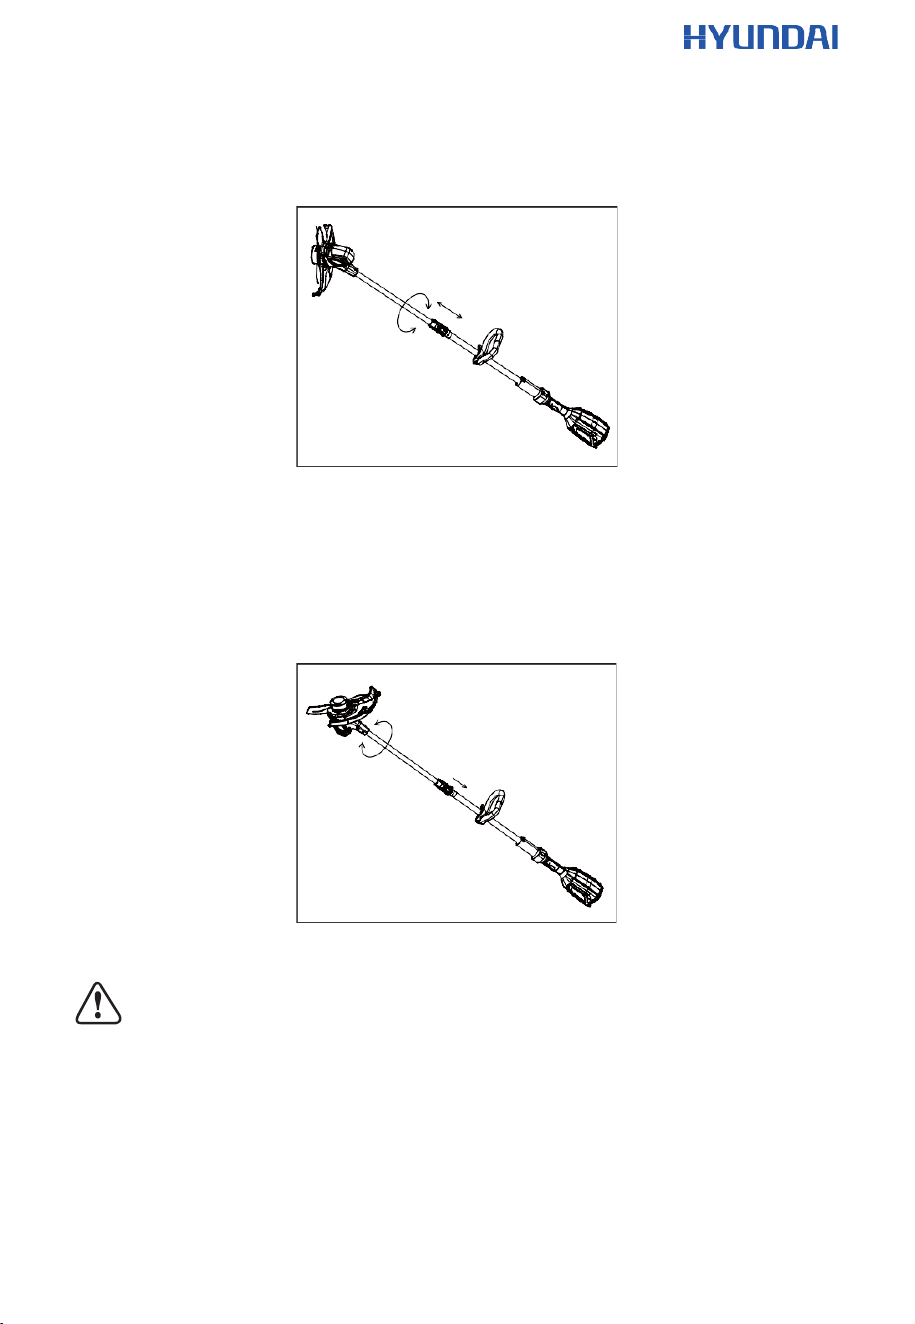
Adjust the length of the grass trimmer
Turn the telescoping adjustment lock to unlock the length of the grass trimmer. The
directional arrows on the lock show which directions will lock and unlock the length.
Once unlocked, slide the grass trimmer to the desired length and re-tighten the
telescoping adjustment lock. (See Fig. 11)
trigger
safety switch
25
Operation
Fig. 11
Adjust the working head angle
Pull up on the rotation lock to allow the head of the string to freely rotate 180 degrees
for edging functions. Once the head has been fully rotated, re-lock the rotation lock
to secure it in place. (See Fig. 12)
Fig. 12
WARNING! Always ensure that the sleeve snaps into place after adjusting the
handle in one of the end positions! Never adjust to an intermediate position!
Using the edge guide
If you are working close to any shrubbery or surfaces that you do not intend to cut, it
is best to use the metal edge guide to prevent the string from accidental trimmings.
To engage the guide, flip it down to its lowest point. Anything on the outside of the
metal edge guide will not be within the reach of the string. To disengage the guide,
flip it back up. (See Fig. 13)
26
Operation
Fig. 13
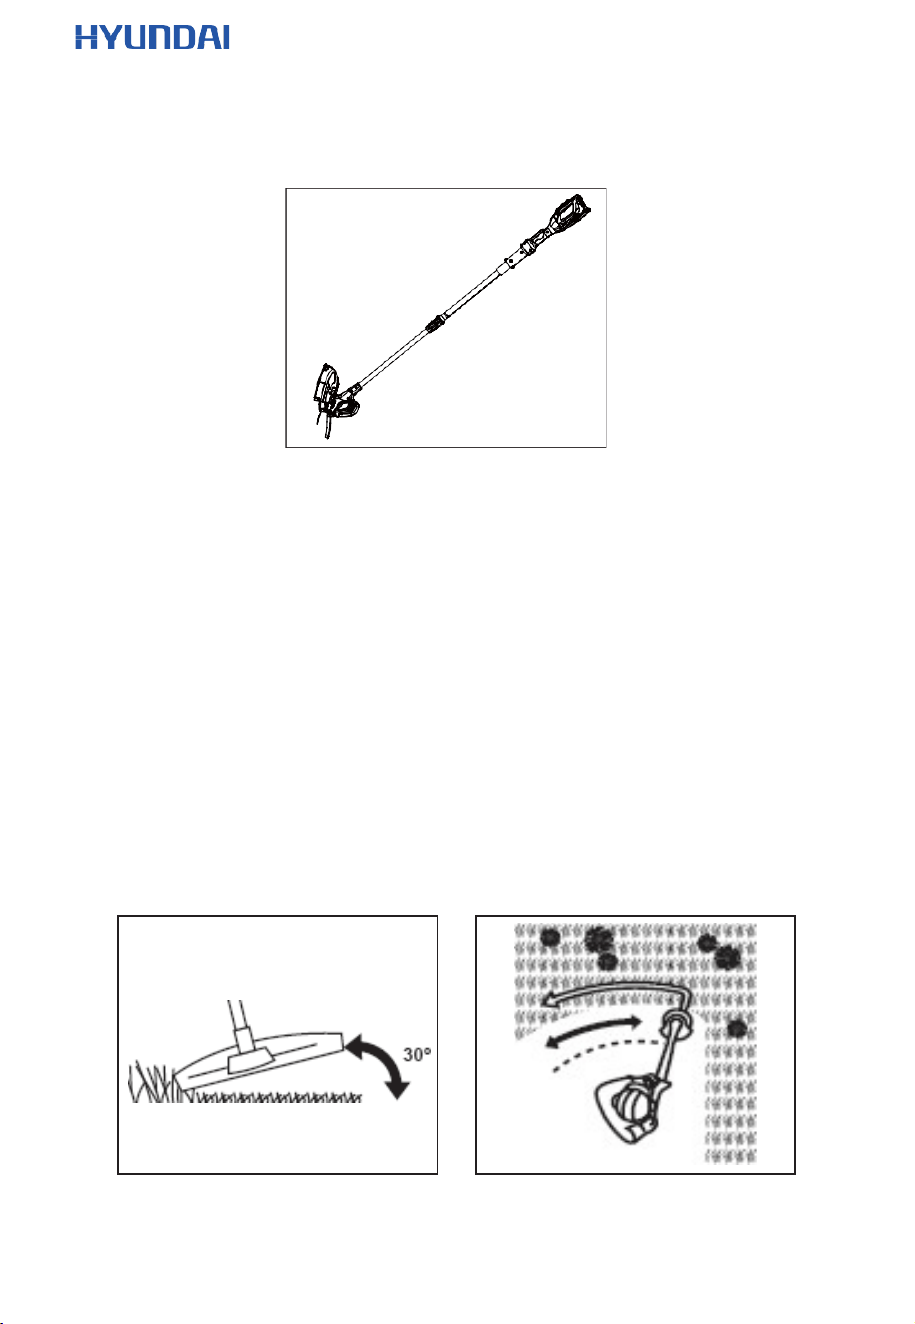
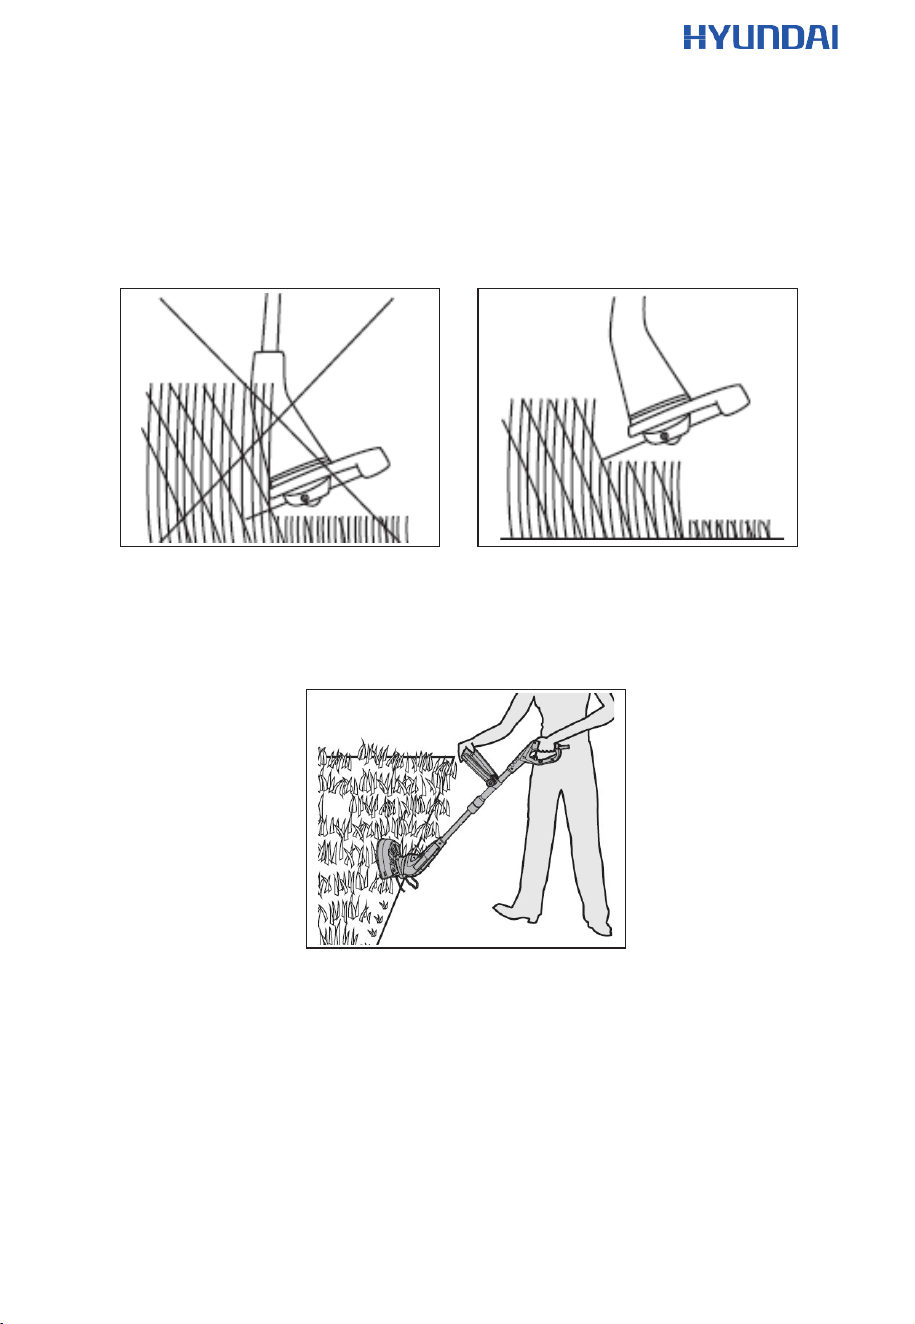
Working
Trimming
Keep the trimmer tilted towards the intended cutting area. Make sure to use the tip of the
trimmer’s string to do the cutting. Do not force the entire string head into heavy and thick
grass. When string trimming, move the unit from left to right to help prevent debris from
flying back at you.
1. Ensure the knife protector is removed before use.
2. Fold the plant protector in.
3. Adjust the trimmer head angle to 0° for trimming operation.
4. Hold the product firmly with a gap between the product and your right side.
5. Stand upright, do not lean forward and pay attention to your posture. Keep both feet
apart to help retain your balance.
6. Hold the trimmer head just above the ground at an angle of approximately 30°.
7. Move the product with a slow regular arc from left to right, before moving it back to
the starting position before trimming the next area
27
Operation
8. Ensure the cutting device remains clean and free from off-cuts that may cause it
to jam. Check regularly. Release the on/off switch and rack before checking.
9. Trim longer grass in stages; do not cut long grass in one cut. For the best results,
cut longer grass in steps.
Edging
1. Ensure the knife protector is removed before use.
2. Fold the plant protector out.
3. Adjust the trimmer head angle to 180° for edging.
Tips
1. For best results, do not cut wet grass because it tends to stick to the cutting head
and guard which prevents proper discharge of grass trimmings, and could cause
you to slip or fall.
2. Do not allow the spool cover to drag on the ground or other surfaces.
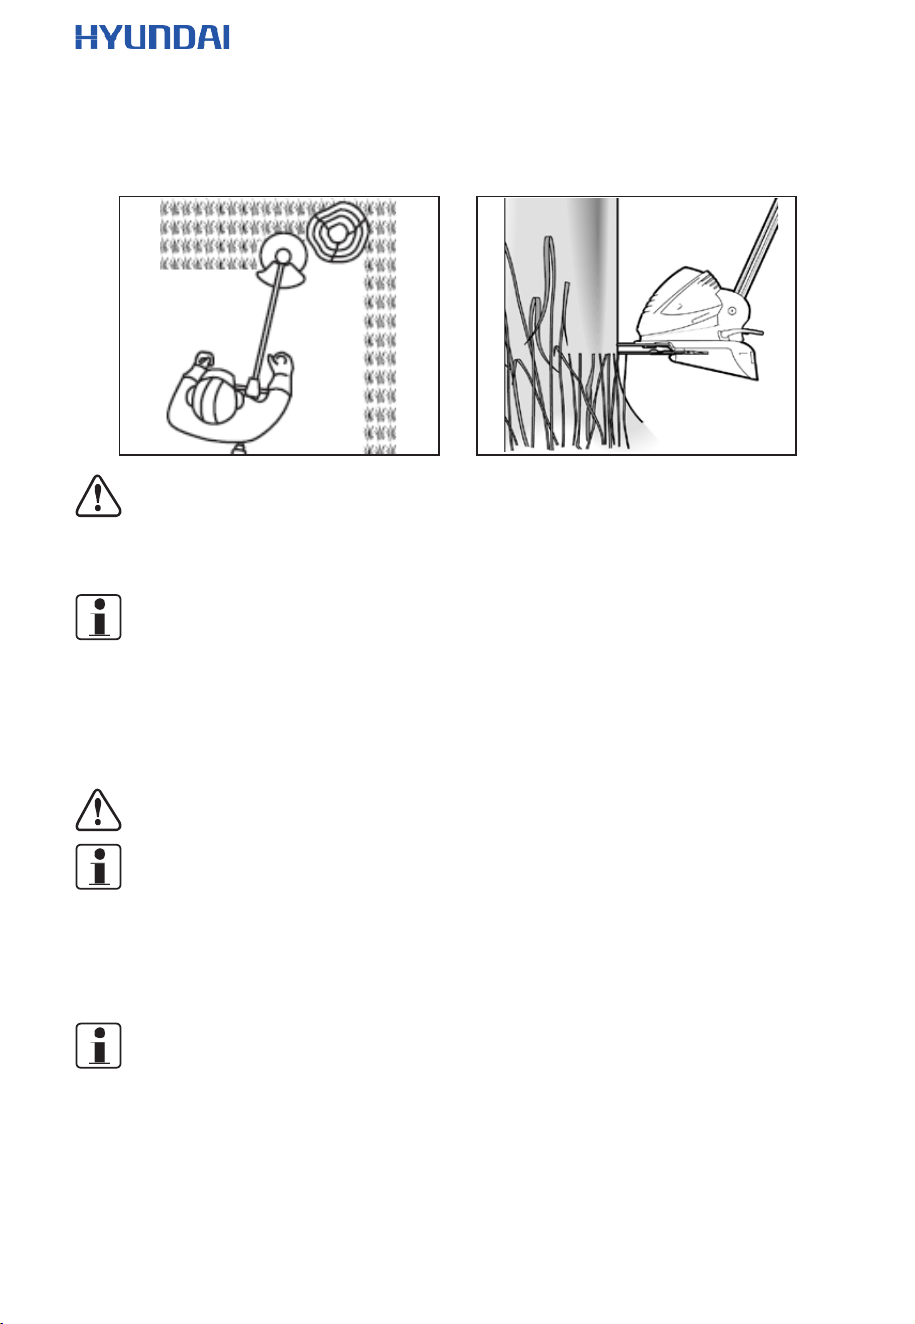
3. Pay special attention when performing the work close to trees and bushes. The
cutting head could damage sensitive bark and fence posts.
4. Fold the plant protector out to avoid bringing the cutting device into contact with
hard objects, such as walls and kerb stones.
28
Operation
WARNING! In some countries regulations define what time of the day and on
what special days products are allowed to be used and what restrictions apply!
Ask your community for detailed information and observe the regulations in order
to preserve a peaceful neighborhood and avoid committing an offence!
Note: The trimming line will wear faster and require more feeding if the cutting or
edging is done along sidewalks, other abrasive surfaces or heavier weeds are
being cut.
Line feeding
During use, the tip of the trimming line will get shorter due to wear. Regularly check
the condition of the trimming line and adjust if necessary.
WARNING! Extensive vibration of the product during operation is an indication
of damage! The product should be promptly inspected and repaired!
Note: This product is equipped with an auto-feed head. Do not bump the
trimming head on the ground as this would damage the product.
Auto-feeding
1. With the product running, release on/off switch to let it stop completely.
2. Press the lock-off button and on/off switch to start the product.
Note: The line will extend about 8mm with each stop and start until the line
reaches the length of the knife. Do not stop and start frequently as the trimming
line may auto-feed unintentionally and cause you to use a lot of line.
After use
1. Switch the product off, remove the battery back and let it cool down.
2. Check, clean and store the product as described below.

29
Cleaning and maintenance
WARNING! Always be sure to remove the battery before adjusting, cleaning, or
checking a function on the tool.
Cleaning the grass trimmer
Keep all safety devices, air vents, and motor housing free of debris and dirt. Wipe
down the equipment with a cloth and/or compressed air. It is highly suggested that
you clean the device after every use. Do not use cleaning agents, as these can attack
the plastic and weaken the structural integrity of the grass trimmer. Remove deposits
from the guard hood with a brush.
Storage and transportation
Always remove the battery pack and replace the blade cover before storing or
transporting the grass trimmer. Avoid the sharp teeth of the blade when doing so. It
is highly recommended to clean the grass trimmer before storing it. Store in a place
where the trimmer cannot be easily accessed by children or untrustworthy foes.
Battery
1. Make sure the battery is fully charged before storage in order to maximise the life
of the battery.
2. Do not store the battery pack on the tool.
3. After charging, the battery pack may be stored in the charger, as long as the
charger is not plugged in.
Charger
1. Keep the charger clean and clear of debris. Do not allow foreign material to get into
the recessed cavity or onto the contacts. Wipe the charger clean with a dry cloth. Do
not use solvents or water and do not place the charger in wet conditions.
2. Unplug the charger when there is no battery in it.
3. Fully charge the battery before placing it in storage.
4. Store the charger at normal room temperature. Do not store it in excessive heat. Do
not use the charger in direct sunlight or in damp conditions. Do not charge outside.
Recharge at room temperature. If the battery is hot, allow it to cool down before
recharging.
Replacing the spool
1. Press two buttons on either side of the grass trimmer’s string casing (the buttons
have a “›››” symbol on them) to remove the lid of the casing.
2. Place the grass trimmer spool on to the internal spindle. The base of the spool has
grooves that lock into place with the triangular notches found at the bottom of the
grass trimmer casing. Make sure the spool face with ratchet, faces towards the
inside of the head. The smoother side should be facing out towards the ground.

30
Cleaning and maintenance
3. Feed the line through the holes on either side of the spool casing. Each hole
should have one string coming out of it.
4. Replace the cover of the string casing. Make sure the lid snaps into place.
Repair
This product does not contain any parts that can be repaired by the consumer.
Contact an authorised service centre or a similarly qualified person to have it checked
and repaired.
Troubleshooting
Suspected malfunctions are often due to causes that the users can fix themselves.
Therefore check the product using this section. In most cases the problem can be
solved quickly.
Problem
Possible cause
Solution
1.Product
does
not start
1.1 Battery pack not properly
attached
1.1 Attach properly
1.2 Battery pack discharged
1.2 Remove and charge
battery pack
1.3 Battery pack damaged
1.3 Replace with a new one
of the same type
1.4 Other electrical defect to
the product
1.4 Check by a specialist
electrician
2.Product
does not
reach
full power
2.1 Battery pack capacity too low
2.1 Charge battery pack
3.1 Cutting attachment is worn
3.1 Replace with a new one
3.Unsatisfactory
result
3.1 Cutting attachment is worn
3.1 Replace with a new one

31
Technical data
Motor
Brush motor
No-load speed
6300-8000/min
Battery
58V 2.5Ah battery
Max. cutting diameter
33cm
Cutting line thickness
1.6mm
Feed type
Auto feed
Line length
9m
Lights in the charger indicates information as below
Red light is on, green light off
Connected to socket, ready for charging
Red light in on, green is blinking
battery is charging
Red light is off, green light is on
battery is full
Red light and green light is alternate
blinking
battery is overheated
Red light is blinking, green light is off
battery is malfunction

32
Recycling and disposal
1. The product comes in a package that protects it against damage during
shipping. Keep the package until you are sure that all parts have been
delivered and the product is working properly. Recycle the package
afterwards.
2. WEEE symbol. Waste electrical products should not be disposed of with
household waste. Please recycle where facilities exist. Check with your
local authority or local store for recycling advice.
Genpower contact details
1. Postal address;
Genpower Limited, Isaac Way, Pembroke Dock,
Pembrokeshire, SA72 4RW, UK.
2. Telephone contact number;
Office +44 (0)1646 687880
3. Email contact;
aftersales@genpower.co.uk
4. Web site;
www.hyundaipowerequipment.co.uk
Warranty
To register your machine for the manufacturer’s warranty, please visit
https://www.hyundaipowerequipment.co.uk/warranty

33
DECLARATIONS OF CONFORMITY
1. Genpower Ltd confirms that this Hyundai product conform to the following CE Directives;
1.1. 2006/42/EC (Machinery Directive)
1.2. 2014/30/EU(EMC)
1.3.2011/65/EU(RoHS)
1.4. 2000/14/EC, Amended by 2005/88/EC (as amended)
E C D E C L A R A T I O N O F C O N F O R M I T Y
The undersigned, as authorised by: Genpower Ltd
Declares that the following equipment manufactured under licence by Hyundai Korea
Conforms to the Directive
2000/14/EC, Amended by 2005/88/EC (as amended)
Of the European Parliament and of the council on the approximation of the laws of the
Member States relating to the noise emission in the environment by equipment for use
outdoors.
Equipment Category: Cordless Lawn Trimmer
Product Name/Model: Hyundai HYTR60Li (YT7425-01)
Type/Serial No: Battery Powered Grass Trimmer
Net installed power: 0.35KW
The technical documentation is kept by: Roland Llewellin, Genpower Ltd,
Issac Way, Pembroke
Dock, Pembrokeshire,
SA72 4RW.
The conformity assessment procedure followed was in accordance with annex V of
the Directive.
Notified Body: TÜV Rheinland LGA Products
GmbH.Tillystraße 2-90431
Nürnberg,Germany
Guaranteed Sound Power Level: 96 dB(A)
A copy of this certificate has been submitted to the European Commission and to EU
Member State United Kingdom.
Place of Declaration: Pembroke Dock, SA72 4RW
Date: 11/1/2018
Signed by: Roland Llewellin
Position in Company: Managing Director
Named and address of manufacture or Authorised representative:
Genpower Ltd
Issac Way, Pembroke
Dock, Pembrokeshire,
SA72 4RW.

34

35

36