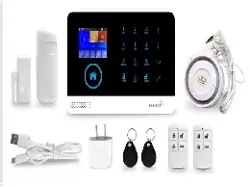
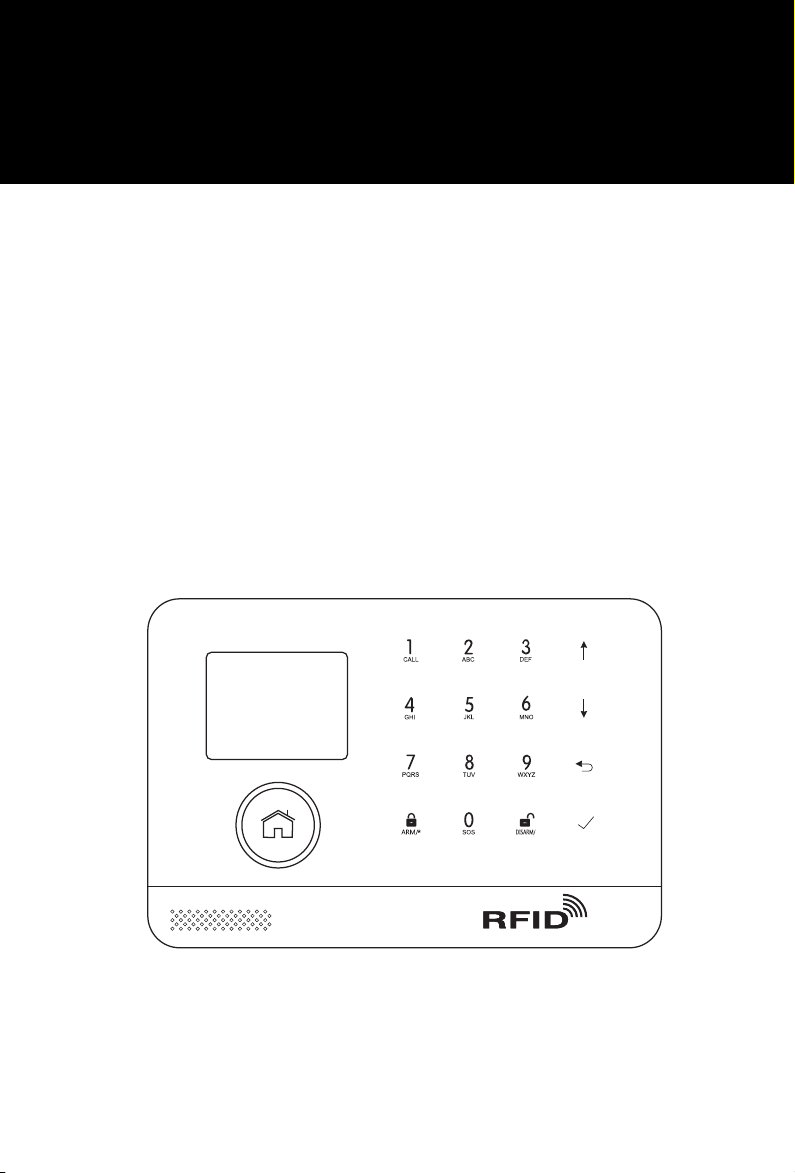
Cellular + Wi-Fi Smart Security System
USER’S GUIDE

CONTENTS
DO THIS FIRST ..............................................................................
Things to Note Before Getting Started
System Requirements
IN THE BOX....................................................................................
MEET YOUR ALARM SYSTEM.........................................................
How the Alarm System Works
Getting to Know Your System
Smart Hub (Panel)
Remote Control
RFID Tag
Door/Window Sensor
PIR Motion Detector
PLACEMENT/INSTALLATION TIPS..................................................
Where to Place/Install Smart Hub
Where to Place Door/Window Sensor
How to Install PIR Motion Detector
GETTING STARTED.......................................................................
Install the SIM Card
Cellular Network Connection
How to Set Phone Numbers for SMS and Phone Calls by Panel
How to Record a Voice Message by Panel
How to Pair a New Remote Control by Panel
How to Pair a New Wireless Sensor by Panel
How to Pair a New RFID Tag by Panel
How to Pair a New Wireless Siren by Panel
APP..............................................................................................
Download App
Signing Up/In
Adding Device
USING SMART SECURITY SYSTEM...............................................
The Security Levels
How to Arm or Disarm
Smart Hub Features
RESET TO FACTORY SETTINGS....................................................
TROUBLESHOOTINGS..................................................................
SPECIFICATIONS..........................................................................
2
3
4
14
15
20
21
23
24
27
1

You have selected a 2.4GHz Wi-Fi network. The hub does not
support the 5GHz option. Select the 5GHz band instead of the
most common mistake when setting up the hub for the first time.
Your Wi-Fi must not contains space or other special characters.
Place your hub as close as to your router when setting up.
A slow network speed will also affect the performance of your hub.
It is recommended that you have an upload speed of at least
2Mbps or faster.
Make sure that the AP isolation setting in your router is disabled.
If using 3G/4G SIM card, make sure the 2G network of your service
provider is still available in your country. You should purchase the
hub with 3G/4G cellular communicator if the 2G network is
Please check the following conditions for a successful set-up:
unavailable.
System Requirements
To set up and use Alarm System you’ll need a comptiable iOS or
Android phone, the Security Security System app,an unused
indoor power outlet, a Wi-Fi 802.11 b/g/n(2.4GHz) network
connection, and a micro SIM card supporting 2G/GSM(for
2G version) or 3G network(for 3G version).
2
DO THIS FIRST.
Things to Note Before Getting Started
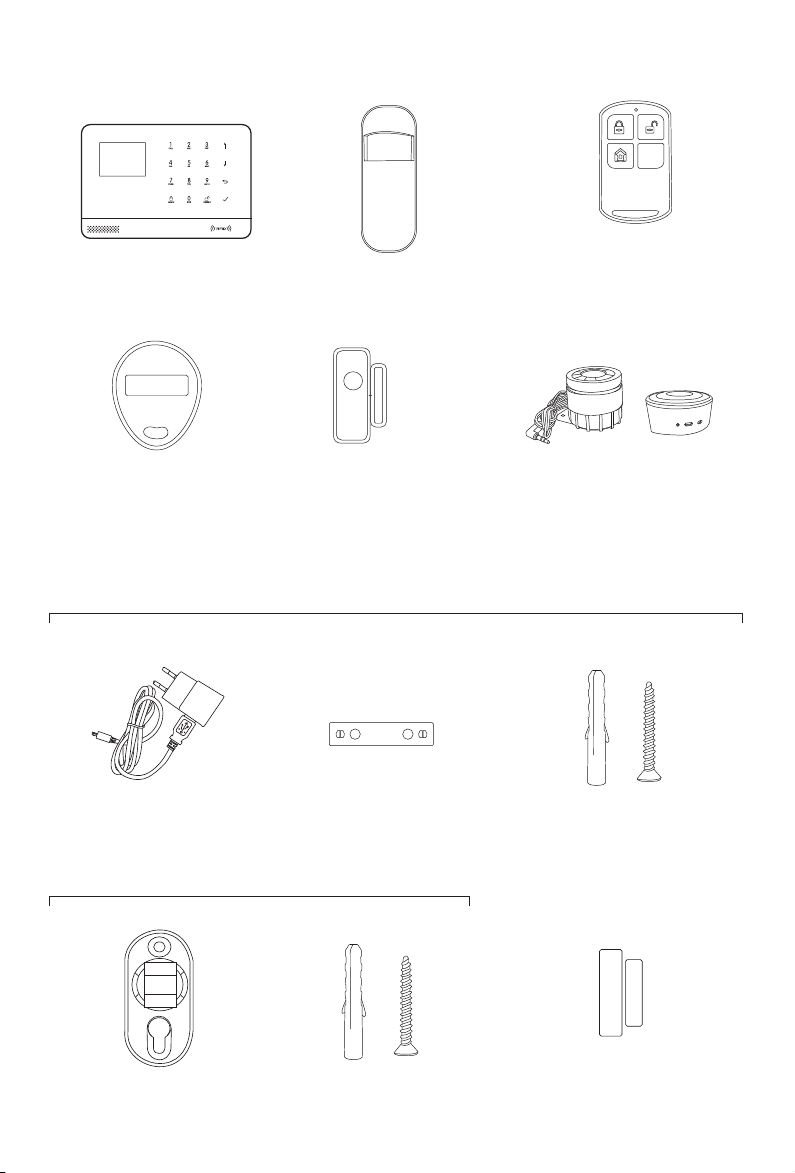
Alarm, display and keypad.
Remote Control x2
Senses when a door or window opens.
Door/Window Sensor
x1(x2 optional)
Wireless key to quickly away-arm,
home-arm and disarm your home,
and to trigger an emergency alarm.
PIR Motion Detector x1
RFID Tags x2 (Optional)
Key fob to quickly arm and disarm your home.
External Siren (Optional)
Wireless Siren (Optional)
Sounds when the alarm goes off.
3
Smart Hub(panel)
For Smart Hub installation
Power Adapter
Hub Bracket
Screws x2
Screws x2
For PIR Motion Detector installation
Extra Adhesive
Mounting Strips
For door/window installation
PIR Motion Detector Bracket
IN THE BOX.
SOS
Senses when someone walks nearby.
SET
ON
OFF
TDC 12V
4
MEET YOUR ALARM SYSTEM
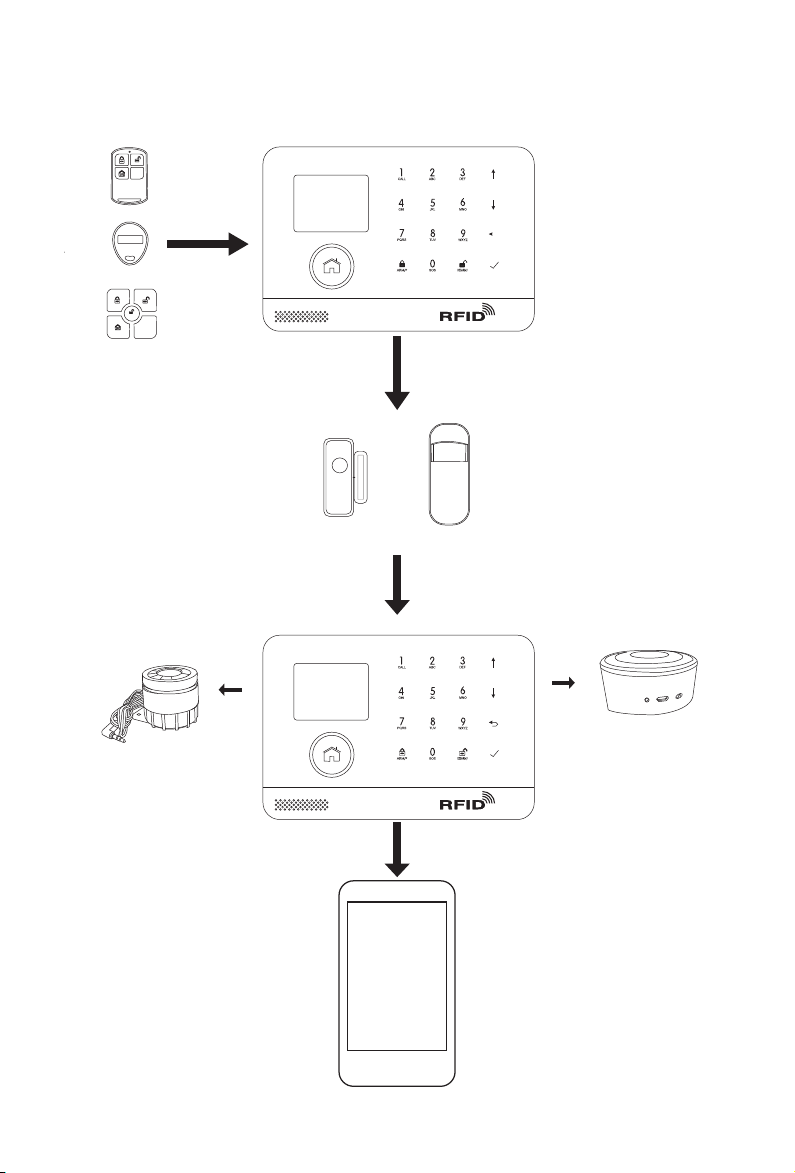
How the Alarm System Works
The APP lets you know what’s
happening at home from anywhere.
The Panel sends a push notification
and text message to your phone when
a sensor is triggered if you enable the
notification function located in your app
settings. After that the panel will also
make phone calls to each preset phone
numbers.
The Panel sounds at 85dB
on-site, and an optional siren
sounds at 100dB.
When an optional external
wireless siren has been
placed there will be send
a signal to the siren.
Arm the system using the
remote, RFID tag, the ARM
button of hub panel or the APP.
When a Door/Window Sensor
detects a door/window opening,
the sensor sends a signal to the
panel letting the panel know .
there has been an intrusion.
The Panel receives the
command and enters “Armed” mode.
SET
ON
O
FF
DC 5
V
SOS
SOS
Disar med
5
Getting to Know Your System
This is a dual network system that utilizes both WiFi and cellular (GSM/3G).
All sensors are wirelessly linked to the panel. In the event of alarm
when a sensor is triggered, a push notification
will automatically be sent and an alarm call will be made to all
registered users.
The system can be controlled and monitored both on-site by using the
remote control supplied or remotely from anywhere with our free
The system can connect with up to 90 wireless sensors and
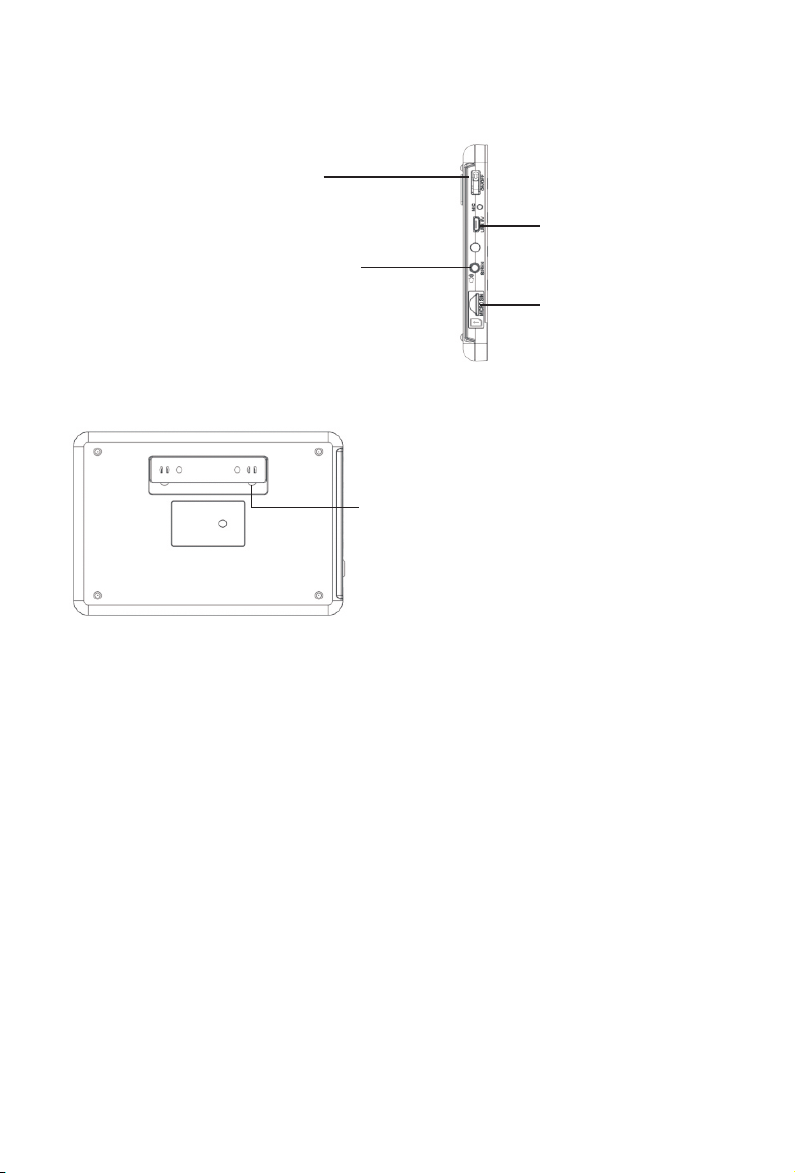
Smart Hub (Panel)
Alarm, display, keypad and the brains of the system
Keypad
Enter your passcode, dial, ...
Display window
Display system status, time,
the alarm’s information and
menus.
For spoken alerts and
the alarm.
Speaker
Press to instantly.sound the
alarm, send an emergency
alert to everyone.
Panic button
Use when you want to
make a call.
Call button
Navigation buttons
4 navigation buttons.
Disarm button
Use when you don’t want
security.The alarm won’t sound.
RFID tag reader
Tap RFID tag here to arm and disarm.
Arm/Home Arm button
Press once for away and guarding.
This mode is used when no one is
home. The alarm sounds when a
door or window opens, or when
there’s motion in a room.
Front
10 remote controls.
dedicated mobile application.
activation, for example,
Press twice for home and guarding.
This mode is used when you’re
home and want security. The alarm
sounds when a door or window opens.
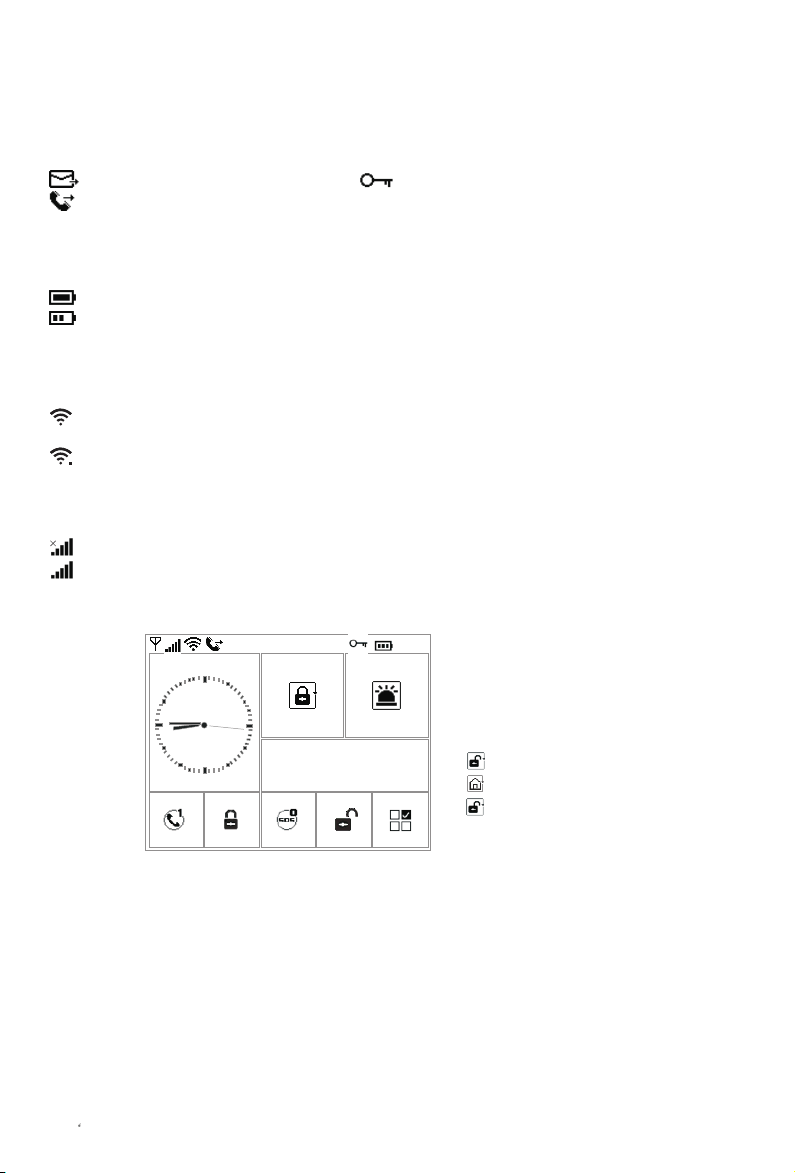
Plug in the siren cable here.
Siren port
SIM card slot
Plug in the SIM card here.
Power port
Plug in the power cable here.
Tamper switch
The tamper switch (small black lever underneath
the bracket) will trigger an alarm notification if an
attempt is made to remove the panel from its
installed location. And the alarm sounds.
Back
ON/OFF button
Press to turn the panel on, and
“Welcome” is displayed.
Press and hold it until the
screen is off to turn the panel off.
Side
6
7
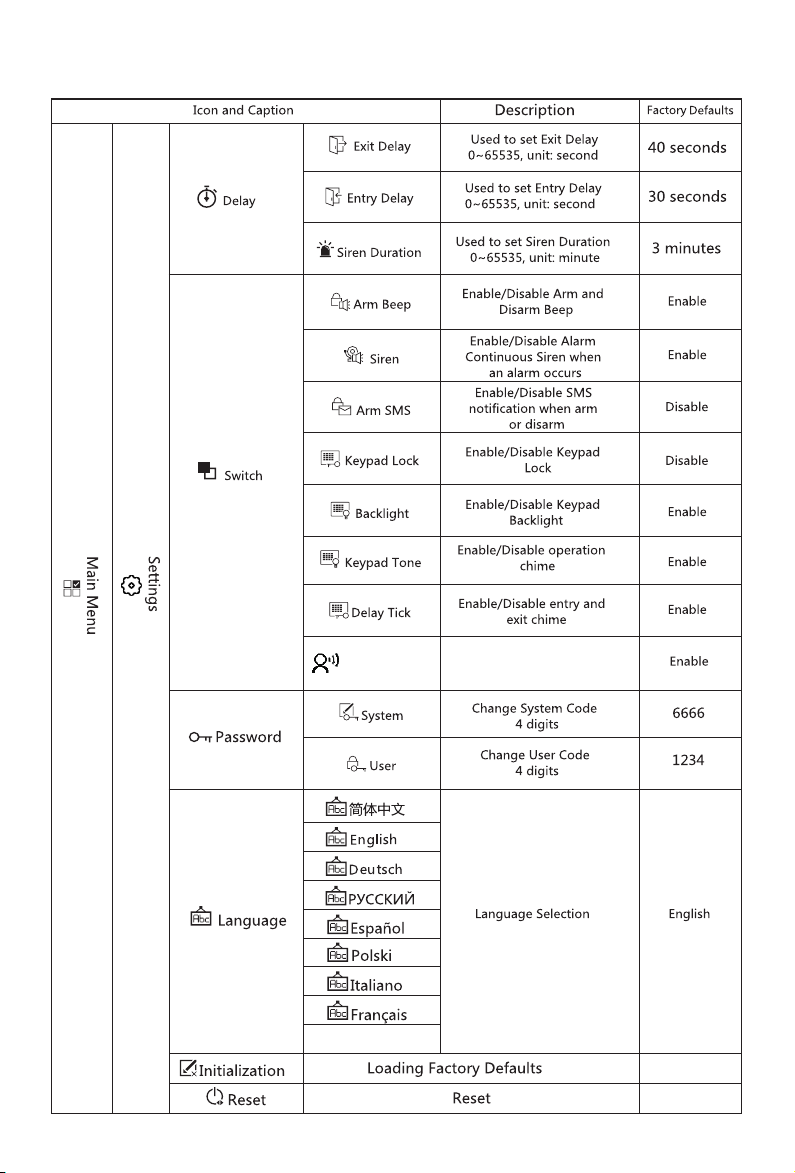
What you see and What it means about the home screen display
SMS/Call Status
Text message sending
Calling
Keypad locked
Power status
AC powered, and the progress bars shows in case of charging.
Displayed when the system has lost AC power. The icon is red when the backup battery
power is low.
Wi-Fi network status
Indicates that the hub is connected to a WiFi source and the signal strength when it
is displayed in white.
Indicates that the hub is connected to internet when dot is displayed.
Cellular network status
No SIM card inserted or SIM card faulty
RSSI level signal strength, it is displayed by a series of 1 to 5 bars (weak to strong),
and bars are gray if not registered with cell network.
2016-12-28 Wednesday
8:45
Arm/Disarm status area
System is AWAY ARMED.
System is HOME ARMED.
System is DISARMED.
System status display area
Ready: Clock
‘Please exit’ Countdown Bar: You now have xx seconds to leave home before the exit delay expires.
When the exit delay is completed, the alarm system is armed.
‘Please disarm’ Countdown Bar: You must disarm the system before the entry delay expires, or an
alarm will go off.
‘Synchronizing’ Countdown Bar: You must active the wireless transmitter before the sniffer delay expires
Alarm status area
An alarm(bell) icon is displayed alternately with the ZONE that has caused the alarm.
8
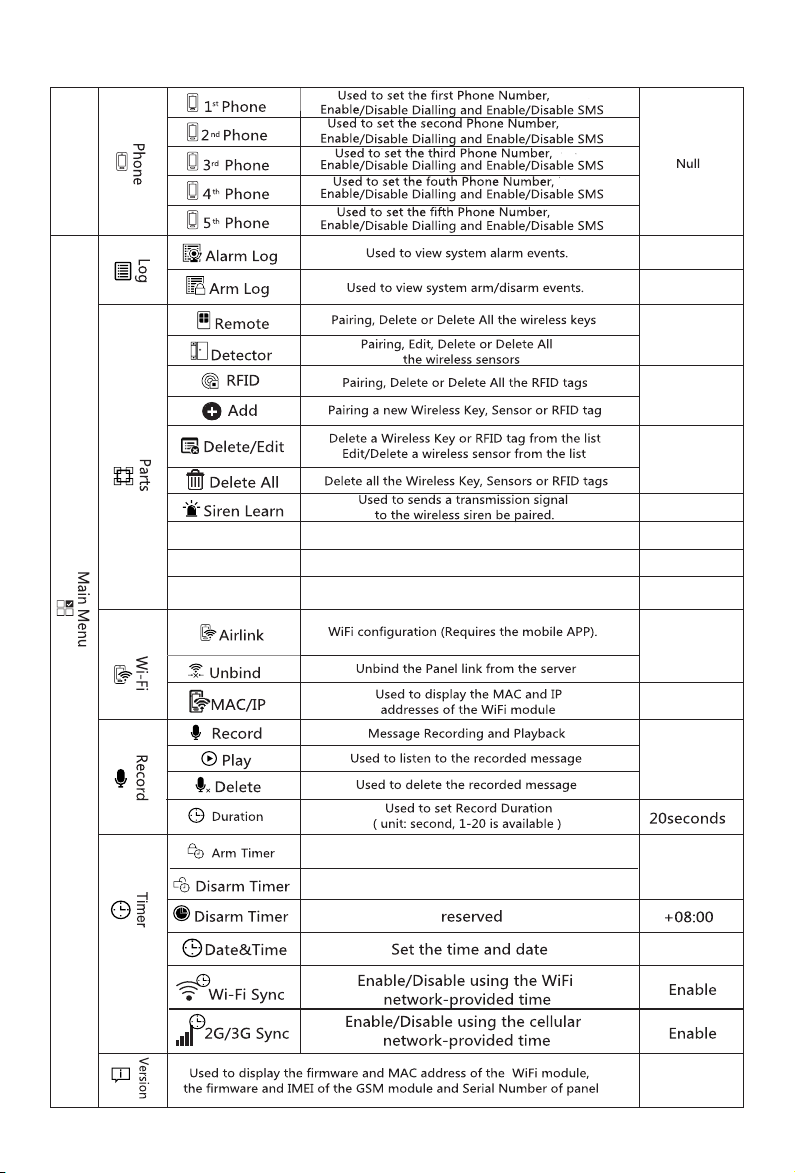
Quick view of menu functions
(1)
(1)
(2)
(3)
(4)
(5)
(6)
(7)
(8)
(9)
Human Voice
Enable/Disable
Human Voice
9
Used to set a schedule to disarm automatically,
and Enable/Disable automation
Used to set a schedule to arm automatically,
and Enable/Disable automation

10
Description
Exit/Entry Delay: Your security system has been programmed with
delay times that allow you to exit the premises after arming, and to
disarm the system upon entry, before an alarm occurs. If you leave
the premises too late when exiting, or disarm too late when arriving
home, it will cause a false alarm. If an alarm occurs, you should
disarm the system immediately.
1.
2.
3.
4.
5.
6.
7.
8.
9.
Arm Beep: When enabled, the external siren will sound when
armed or disarmed.
Keypad Lock: For additional security, you can require a passcode
to unlock the panel. The panel locks automatically if you don’t
operate the keypad on home screen for 30 seconds or so.
Backlight: When disabled, display backlight turn off after 30
seconds if no operation on home screen.
Human Voice: When enabled, you’ll hear a human voice that tell
you what done.
System Password: used for keypad unlocking and SMS remote settings.
User Password: user for keypad unlocking, SMS Remote Control
and alarm text notification prefix setting.
Language: Human Voice, Displaying and SMS notification will be
in the selected language. After selecting the desired language, the
panel will reset.
Initialization: If the factory default configuration is loaded, any data
that has already been programmed into the system will be changed
into the Factory Default Configuration!
11
Remote Control
Wireless Key to quickly away-arm, home-arm and disarm your
home, and to trigger an emergency alarm.
LED indicator
Arm button
Use when no one is home.
The alarm sounds when a
Home arm button
Use when you’re home and
want security. The alarm sounds
when a door or window opens.
door or window opens, or
when there’s motion in a room.
SOS button
Use in case of emergency.
The alarm sounds and send
an alert notification to
registered users .
Disarm button
Use when you don’t want
security. The alarm
won’t sound.
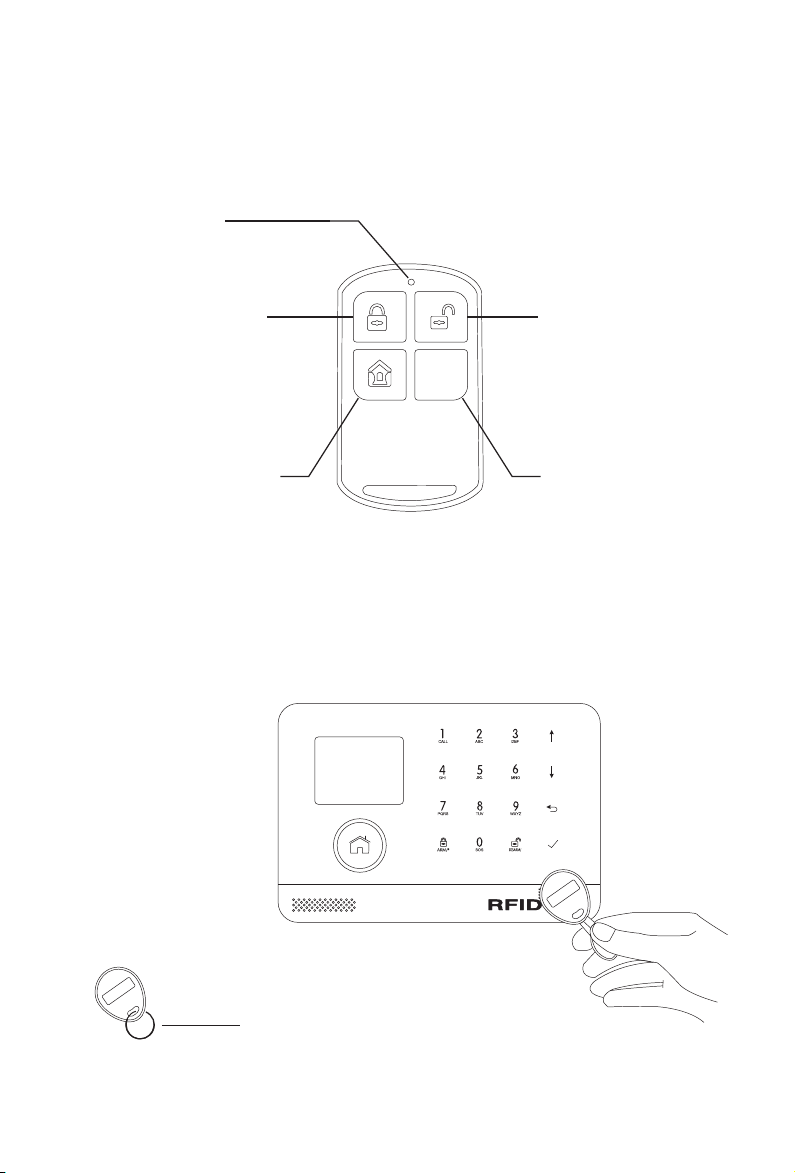
RFID Tag (optional)
Key fob lets you arm or disarm without entering a passcode.
Disarm with a tap
Tap and hold RFID tag on the
panel to arm or disarm when
you’re leaving and coming home.
Key loop
Attach to your key ring.
SOS
12
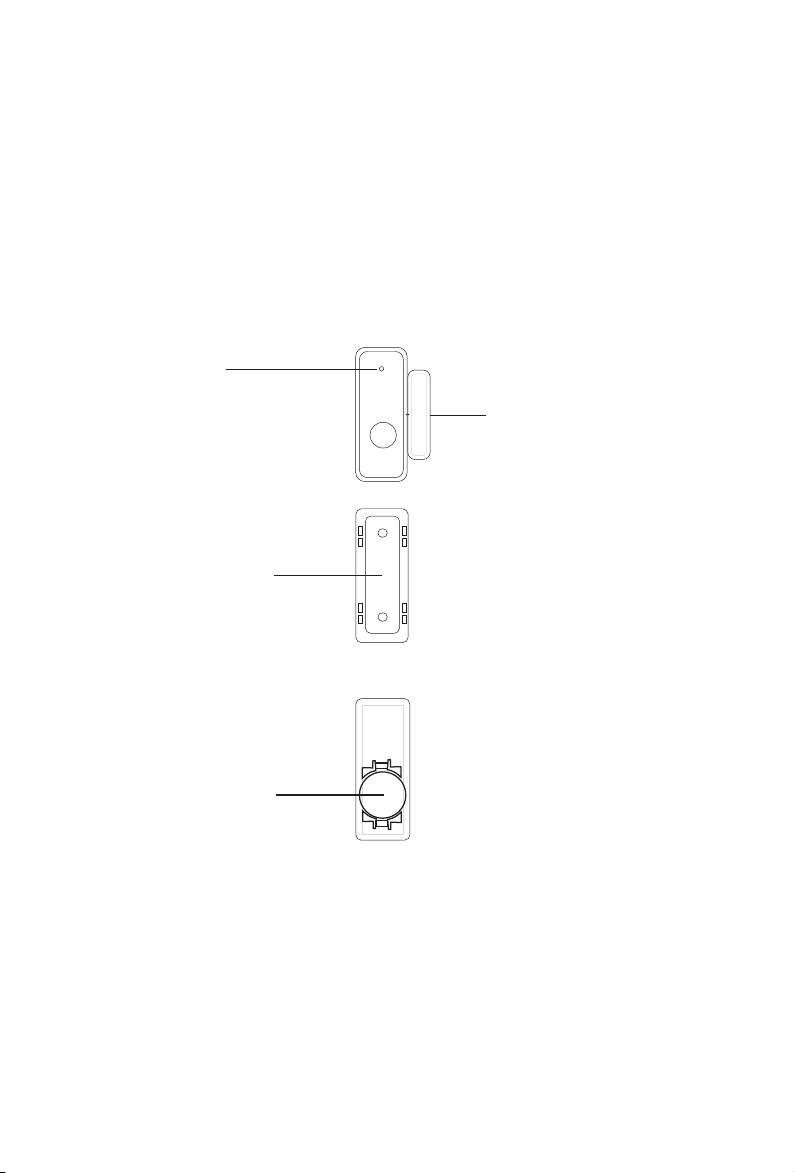
Door/Window Sensor
Door/window sensors are set to ‘Stay Arm Active’ mode by default
and are ideal for protecting entry/exit points,such as front/back
doors and all windows. When the system is armed or home armed
and a sensor is triggered (magnet separated from the sensor), a
push notification including the sensor name will automatically be
sent to the registered users, and the alarm will sound .
LED Indicator
Lights up when door/window opens.
And blinks in case of low battery,
please replace the battery soon.
Battery receptacle
Includes one CR2032 3V lithium battery.
Mounting backplate
Attaches sensor and magnet to
a flat surface.
Open-close magnet
Works with sensor to sense when
a door or window open or close.
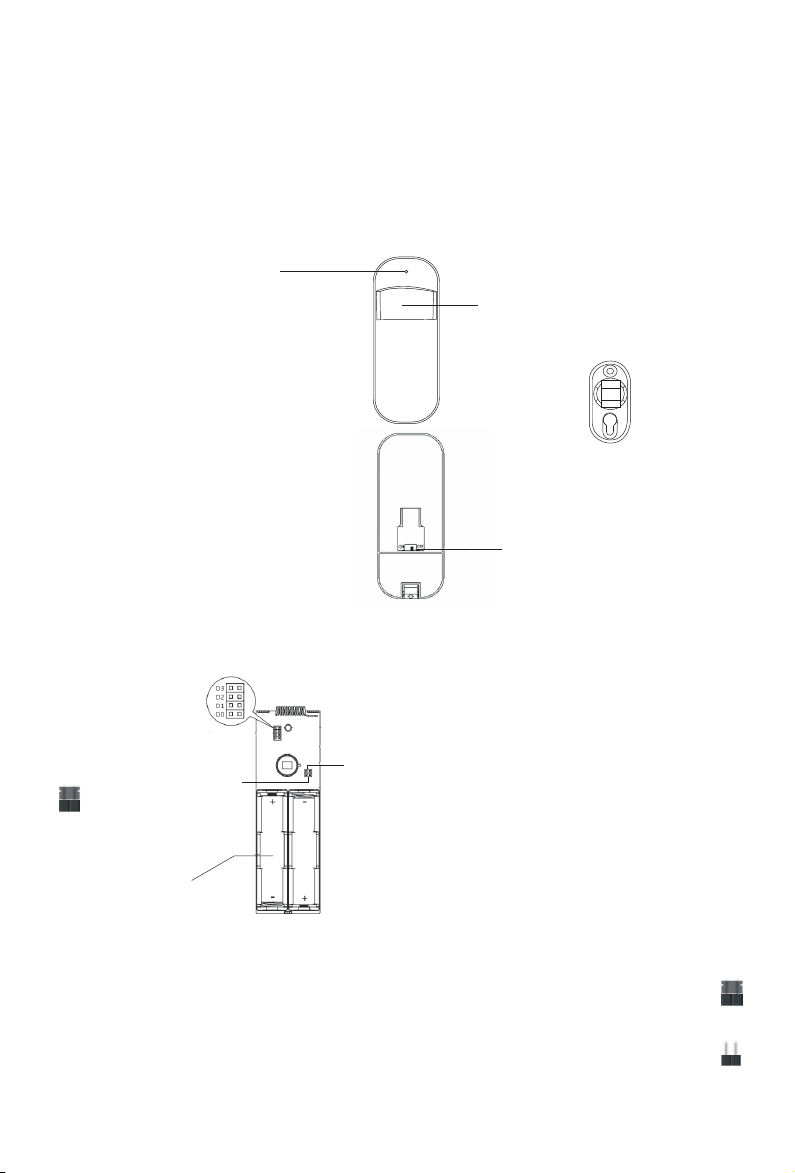
PIR Motion Detector
The motion detector is designed for use on interior walls and is set to
‘Out Arm Active’ Mode by default. Whenever the sensor detects
movement (only while the alarm is armed), a push notification including
the sensor name will automatically be sent to the registered users,and
the alarm will sound .
Detection window
LED Indicator
Blinks for 30 seconds after detector
powers up. Lights up when there’s
motion in the room. And blinks in
case of low battery, please replace
the battery soon.
Zone setting
Bracket
Power ON/OFF
Slide it to ‘ON’ to power up the detector.
LED on/off jumper
ON enables the LED on.
To save battery power in normal use,
if the detector is triggered twice within 3
minutes, it enters sleeping state
immediately. During this period,
movement detected does not
generate an alarm. After no
any
within the next 3 minutes, it goes back to
working state again.
movement
For effective walk
testing, set ON as shown to the right.
When walk testing done, set OFF to
save power as shown to the right .
Working mode jumper
Battery receptacle
Includes two AAA 1.5V battery.
13
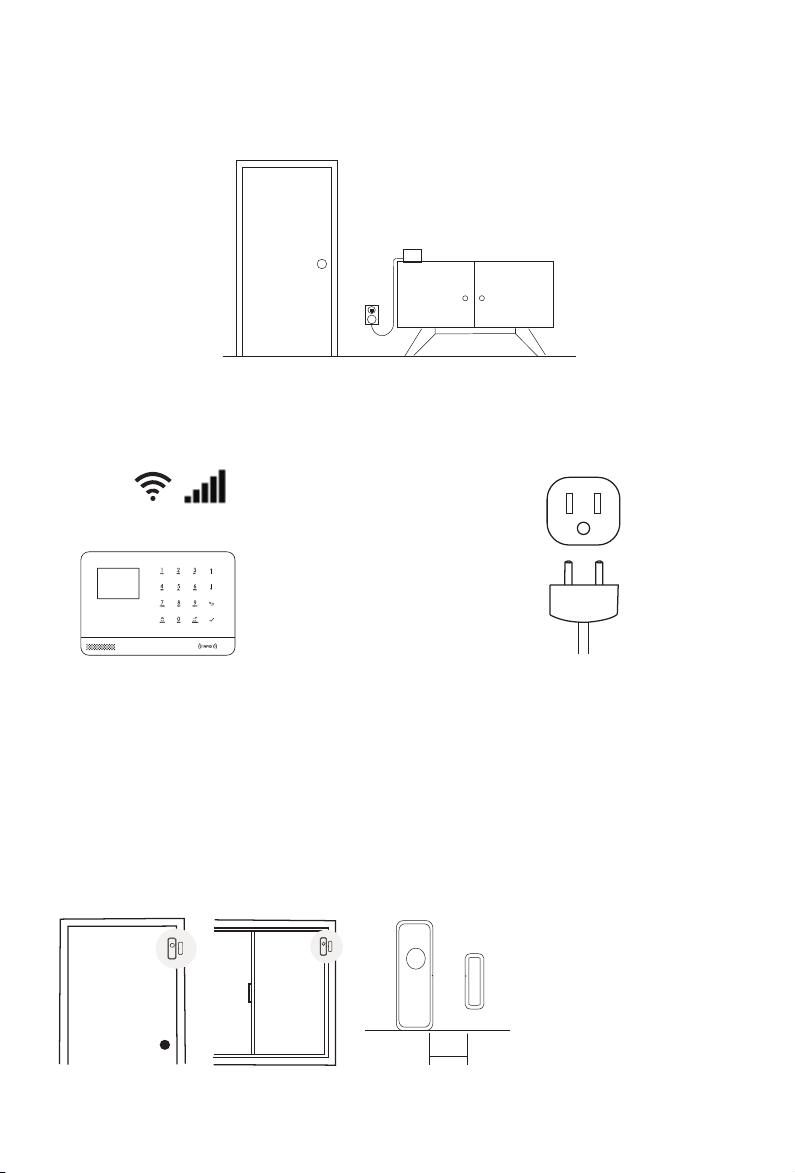
PLACEMENT/INSTALLATION TIPS
Where to place/install Smart Hub
It should be close to where you come and go.
So it’s easy to access on your way in and out.
14
. . .. . . . .. . .. . . . .
. . .. . . . .. . .. . . . .
Find a spot with a good Wi-Fi and
cellular signal.
The hub needs a Wi-Fi inernet connection and a
cellular network so it can send notifications and text
message to your phone.
Use an unswitched wall outlet.
Choose an outlet that’s not controlled by a switch,
so you don’t accidentally turn off the hub. The
included bracket helps keep the hub plugged in.
On a door
On a window
The magnet should be aligned
with the middle of sensor and
placed within 1.0 inches (2.5 cm)
of sensor when the door or
window is closed, as shown in
the image to the left.
1.0 inches(2.5cm) max
Where to place Door/Window Sensor
15
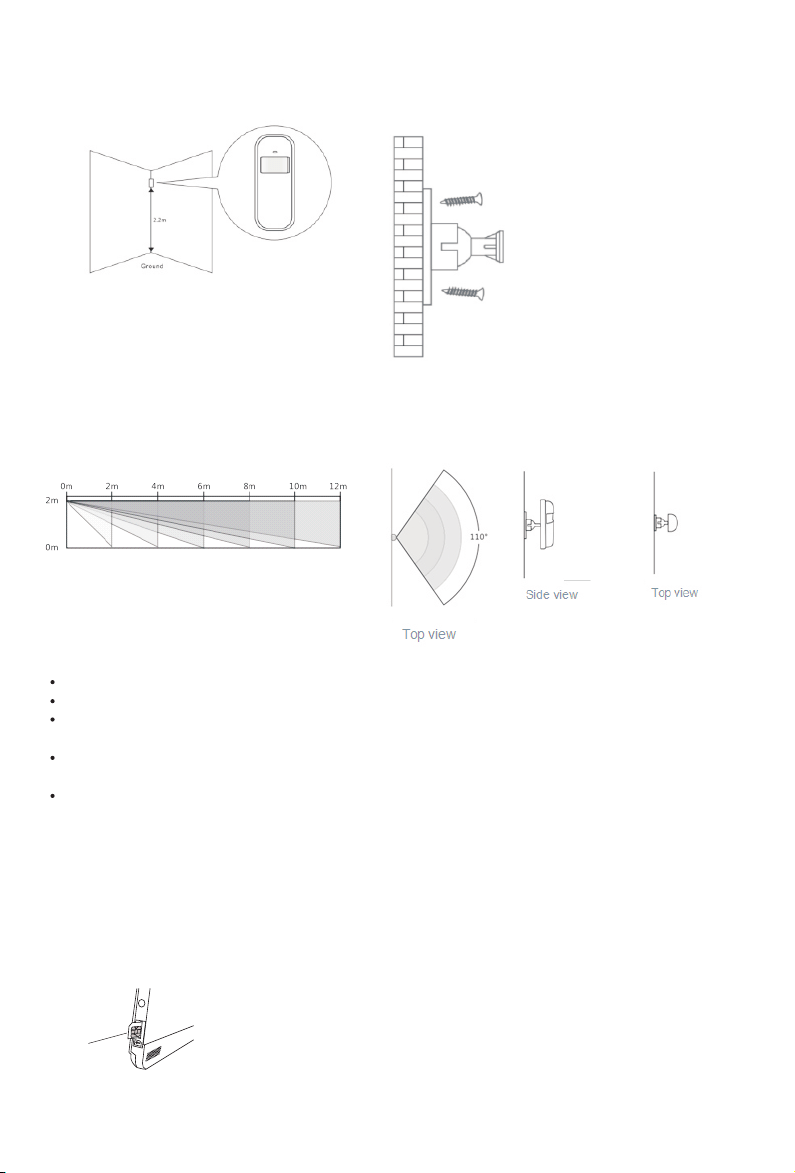
How to install PIR Motion Detector
Mounting height
Motion Detector should be mounted
87inches(2.2m) above the floor.
Mount the bracket with the
included screws as shown to
the left. Then place the motion
detector in the bracket. Specify
the right direction of the detection
range of the motion sensor.
Test the operation of the motion
detector by putting it into testing
mode which is described at the
former page.
Detection Area
Side view
Special considerations
Don’t install PIR Motion Detector outdoors, in a garage and on glass.
PIR Motion Detector can’t detect motion through glass, like if someone’s moving outside a window.
Don’t install where PIR Motion Detector could get wet, like swing-out windows that could
be rained on.
Don’t install PIR Motion Detector within 3 feet (1 m) of a heat source like an electric heater, heat
vent or fireplace or another source that may produce turbulent air.
Don’t install PIR Motion Detector behind large appliances or furniture that may obstruct its
motion sensors.
GETTING STARTED
Install the SIM card
Important: A Micro-SIM card is required in order to use cellular
services when connecting to GSM/3G networks. Availability of
cellular capabilities depends on the wireless network.
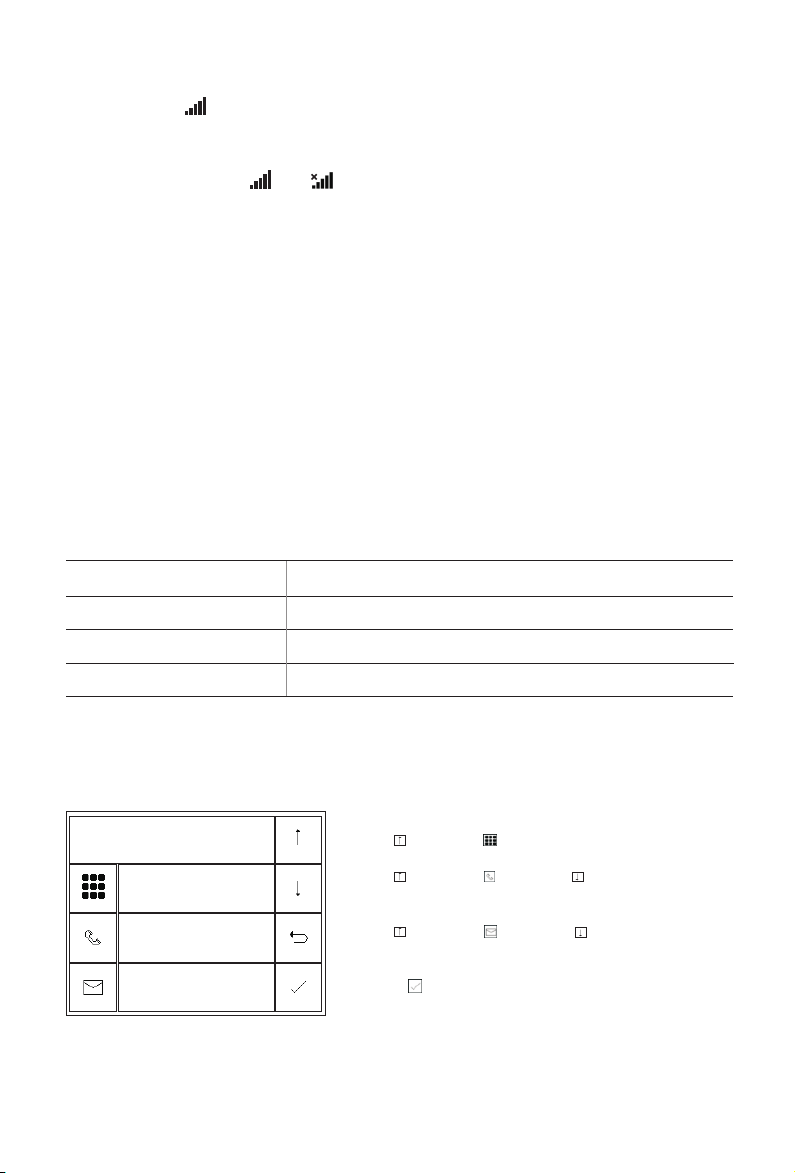
Cellular network connection
If the white
appears at the top of the home screen, you’re
connected to a cellular network.
NOTE: If the gray or is always displayed, the panel has
not connected to a network. Make sure the SIM card has been put in
the panel when it was off and the security code of the SIM card is
permanently deactivated
How to set Phone Numbers for SMS texts and phone calls by Panel
Up to 5 stored Phone Numbers will receive text messages (SMS) and
phone calls in case of triggered alarms .
The panel will make phone calls to the stored phone numbers
successively (up to 2 rounds in turn). If the phone call is answered
and any KEYPAD COMMAND has been operated by one of these
users, it will stop calling the next phone number; otherwise it will
continue to remind users until it is up to 2 rounds.
Keypad Commands
WHICH BUTTON YOU
PRESS ON PHONE
WHAT HAPPENS
1
Arm
2
Disarm or silence when the alarming is sounding
3 or 4
Two-way talk
Phone to set a phone number.
Go to Menu>Phone>1st Phone/2nd Phone/3rd Phone/4th Phone/5th
1st Phone
Number
Dial
SMS
Function
Backspace
Cancel
Enter
on
on
13888888888
Use to scroll to , then use digits keypad to enter the
Phone Number (up to 18 digits).
Use to scroll to , then use to toggle between
‘off’ and ‘on’.
Use to scroll to , then use to toggle between
‘off’ and ‘on’.
When ‘on’ is selected, the Alarm Text Message will be active.
Press to save your new settings.
When ‘on’ is selected, the Alarm Call will be active.
16
S
O
S
How to record a Voice Message by Panel
Your system can Record/Playback/Delete a brief voice message(up to
20 seconds) that can be played back later. The voice message will be
played to the remote when a alarm call is connected.
Go to Menu>Record> and enter:
Select ‘Record.’
Ready to record when ‘Recording’ is displayed in the title box and
the system display will count down the recording time remaining.
Speak into the panel and the recording automatically stops
after the time expires.
The system plays back the message automatically.
Press button to save the message.
Go to Menu>Record>Duration to adjust the record timing.
Go to Menu>Record>Play/Delete to playback or delete the voice
message recorded.
How to pair a new Remote Control by Panel
Go to Menu>Parts>Remote>Add and enter:
‘Synchronizing’ is displayed, the panel goes
into the sniffer mode and count down the
remaining pairing time .
Press any button of Remote Control to
send a transmission signal to the panel.
As the serial number of Remote Control is
added to panel, ‘Leaning OK’ will be displayed.
The panel will display ‘Device code has
been learnt’ if serial number of Remote
Control have been learned.
Go to Menu>Parts>Remote>Delete to delete the Remote
Control specified by serial number .
Go to Menu>Parts>Remote>Delete All to delete all the Remote Controls.
17
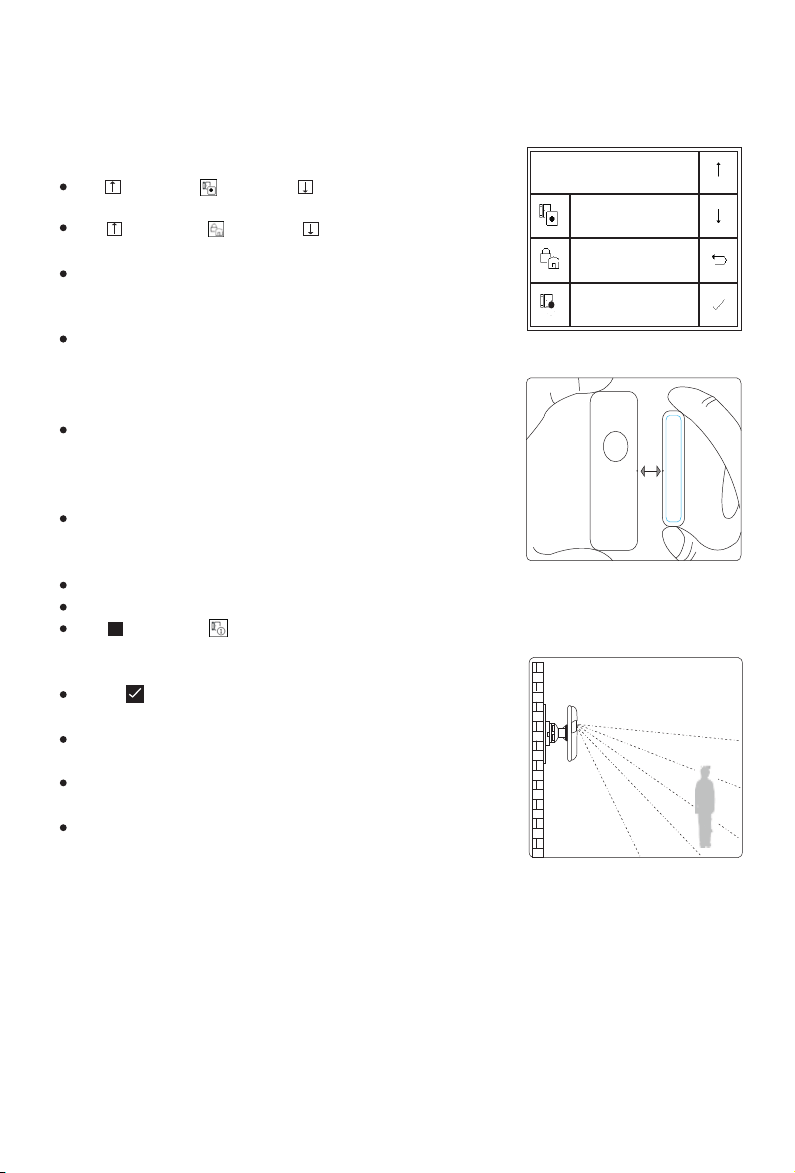
How to pair a wireless sensor by Panel
(Door/Window
Sensor or PIR Motion Detector)
Go to Menu>Parts>Detector>Add and enter
Use to scroll to , then use to scroll to the desired
Zone Name.
Use to scroll to , then use to scroll to the desired
Zone Mode(Type).
You must assign a Zone Mode to each zone(sensor),
which defines the way in which the system responds to
faults in that zone.
Stay Arm Active usually assigned to sensors on entry and
exit doors, exterior doors and windows, perimeter. Active
when armed in AWAY or HOME mode. We recommend to
set Door/Window Sensor to Stay Arm Active.
Out Arm Active usually assigned to a interior area (i.e.:
foyer, lobby,or room). Bypassed automatically when
armed in STAY mode. We recommend setting PIR Motion
Detector to Out Arm Active.
24 Hours Active usually assigned to a zone containing an
Emergency Button, Smoke Sensor, CO, Water Leakage
and Gas Sensors.
To used as doorbell, select Doorbell.
To disable the zone, select Close.
Use to scroll to , then use digits keypad to enter the
Zone Number (0-89 are available). The Zone Number
should be unique.
Press ,’Synchronizing’ is displayed, the panel goes into
the sniffer mode and count down the pairing time remaining .
Active wireless sensor to send a transmission signal to
the panel as shown to the right .
Active wireless sensor to send a transmission signal to
the panel as shown to the right .
The system will display ‘Device code has been learnt’ if
serial number of wireless sensor have been learned, and
the Zone Name/Mode/Number will be refreshed.
Zone Name/Zone Mode of selected zone
specified by the zone number, or delete the selected zone .
Go to Menu>Parts>Detector>Edit to edit
Go to Menu>Parts>Detector>Delete All to delete all the wireless sensors.
Set Name/Mode/Number
Name
Mode
Number
Function
Select
Cancel
Enter
1
Door Alarm
Stay Arm Active
1
Separate the sensor from
the magnet by at least 1.0
inches(2.5cm)
Place the PIR motion
detector in a high position
and then walk within the
detection area to trigger the
PIR alarm once (the indicator
light flashes once)
18
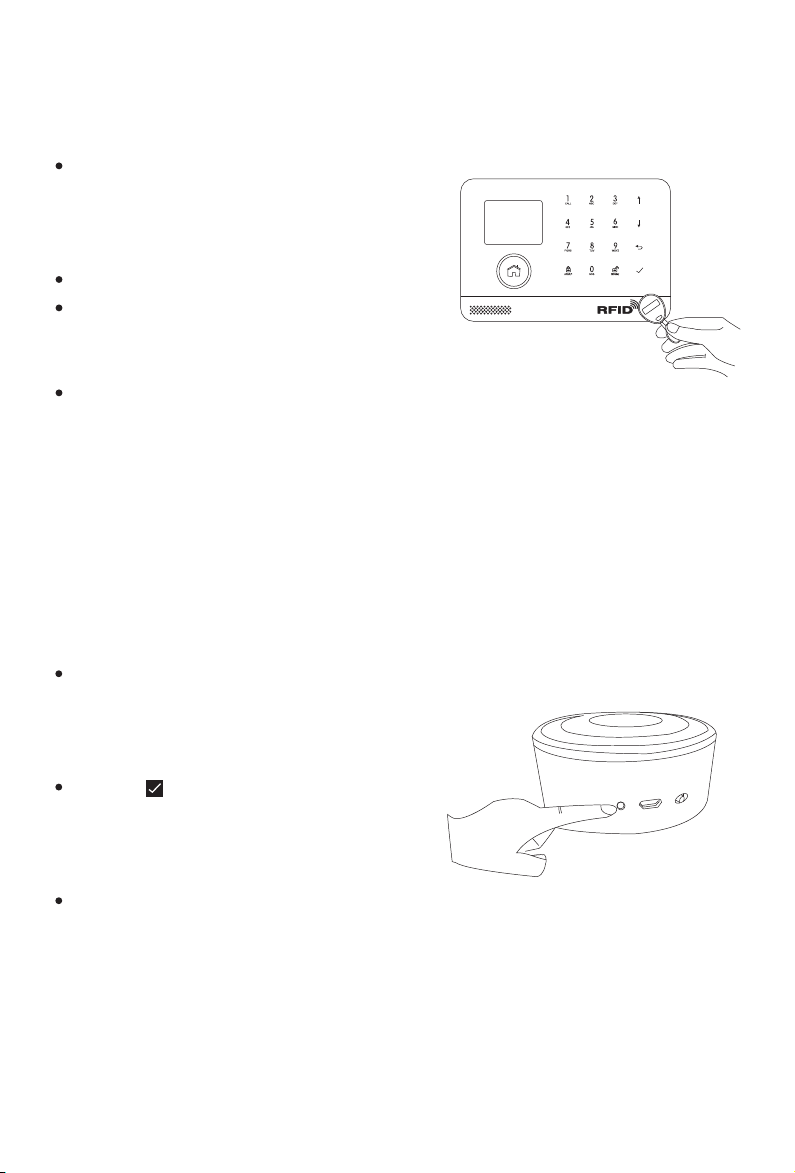
How to Pair a New RFID Tag by Panel
Go to Menu>Parts>RFID>Add and enter
‘Synchronizing’ is displayed, the
panel goes into the sniffer mode
and count down the pairing time
remaining .
Tap the RFID Tag on the panel.
As the serial number of RFID Tag
is added to the panel, ‘Leaning OK’
will be displayed.
The panel will display ‘Device code
has been learnt’ if serial number of
RFID Tag have been learned.
Go to Menu>Parts>RFID>Delete to delete the RFID Tag specified
by serial number .
How to pair a new wireless siren by Panel
Go to Menu>Parts>Siren Learn
SET
O
N
OF
F
DC 5
V
Go to Menu>Parts>RFID>Delete All to delete all the RFID Tags.
Press and hold the SET button of
the siren until you hear two beeps,
then the siren goes into the Sniffer
mode and the light ring blinks quickly.
Press button on the panel within
6 seconds. The panel displays
‘Learn Signal Sent’ and sends
a transmission signal to the siren.
The siren gives a four beeps of
successful indication
If you want to unbind the wireless siren from the panel, press
and hold the SET button of the siren until you hear three beeps.
19

APP
Download app
Scan the QR codes via a smart phone to download and install the application.
Special Tips
After installing the app, the phone will request permission to receive
notifications from ’Smart Security Control’. Forbidden to receive notifications
may result in an application running failure.
Signing Up/In
If you have not registered an account yet, please tap the Sign up on the app
and follow the instructions to create your account first.
* If you do not receive an account verification code in your email registration
process, please remember to check your spam/junk folder. Once you have an
account with us, please enter your email address and password to log in.
Adding Device
One account can operate multiple devices in this app. You can establish a
connection between your hub and your smartphone via Wi-Fi.
NOTE: The hub does not support the 5GHz Wi-Fi band. If you have a
dual-band router (5GHz and 2.4GHz) and both the 2.4GHz and 5.0GHz
networks are under the same name, you will need to separate those two bands
into different names in your router settings. Android users may need to disable
cellular (mobile) data before proceeding to this step. This setting is normally
found in your smartphone’s settings under Data Usage, or Mobile Networks.
If you’re unable to find the setting location, we suggest using a search engine
with the following syntax: Disable (Phone Model) cellular data.
1.Tap the Airlink[+] button on Device List page on your smartphone.
2.Enter the WiFi network password on Airlink page on your smartphone.
3.Set the hub to Wi-Fi network configuration mode:
Go to Menu>Wi-Fi>Airlink and enter, ’Airlinking...’ is displayed, the panel goes
into the configuration mode and counts down the time remaining .
4.Tap the Completed above operation and Start Configure on your smartphone.
This binding process should take about 15 seconds.
5.You’ll find the MAC address on Device List when the network is connected.
Pick the MAC address, now you can control your bub.
20
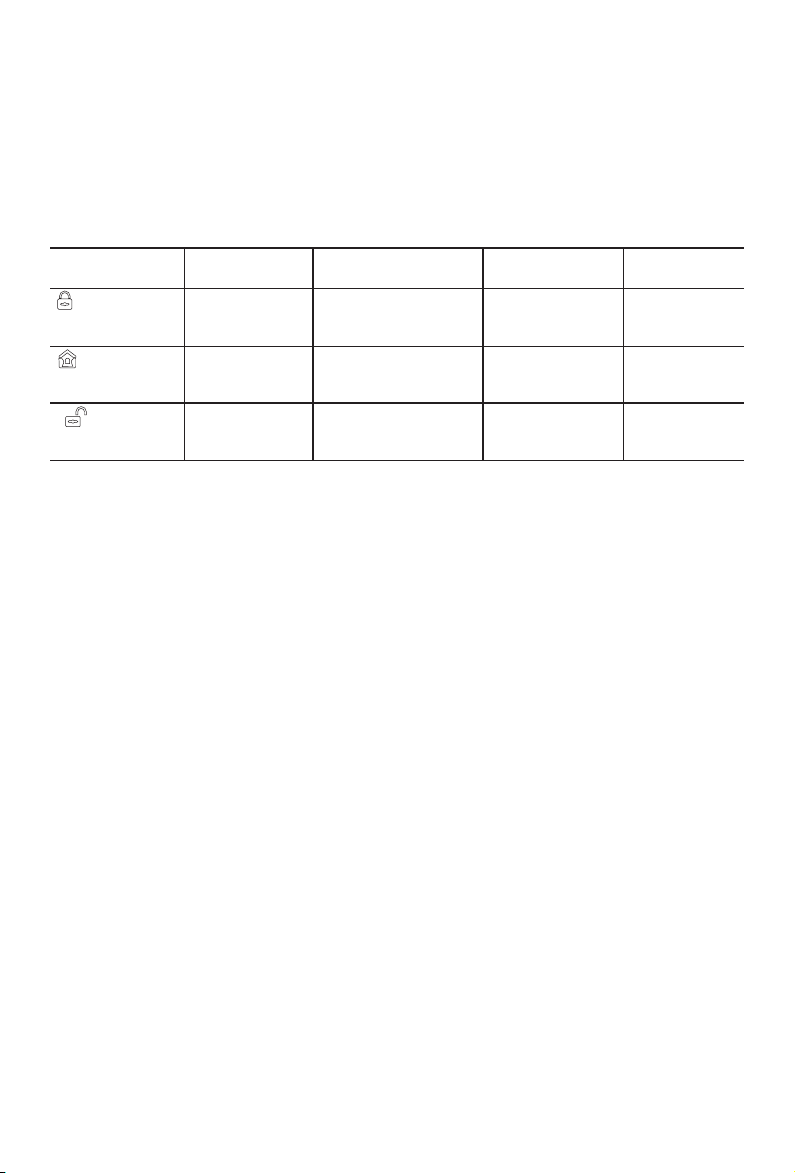
USING SMART SECURITY SYSTEM.
The security levels
Smart Hub has three different security levels you’ll use when
you’re home or away. You can easily switch between them on
Smart Hub or with RFID tag, Remote Control, or the app.
WHAT YOU HEAR
WHAT HAPPENS
WHAT’S DETECTED
Motion Open
NOTIFICATIONS
and CALLS
Away Arm
Use when no one is
home.
“Please input
password”
“System Armed”
The alarm sounds when a
door or window opens, or
when there’s motion in a room.
Home Arm
Use when you’re home
and want security.
Disarm
Use when you don’t
want security.
“Please input
password”
“System Armed”
“System
Disarmed”
The alarm sounds when
a door or window opens.
The alarm won’t sound.
√ √
√
√
√
-
-
-
-
How to arm and disarm
You can arm and disarm your home in three ways: entering your
passcode on the panel if keypad is locked and press ARM/DISARM
button , tapping Tag on the panel, or using the app. When you hear
the panel’s chime alert, the screen will also show you a countdown
so you know how much time you have before the alarm sounds.
No Rush
With No Rush, you can take the time you leave home or disarm
before the alarm sounds. By default, you have 40 seconds. But
you can use the app to choose a different time with No Exit Delay,
30 Seconds, 1 Minute or 2 Minutes to arm.
To adjust the countdown timing by the panel, go to Menu>
Settings>Delay>Exit Delay/Entry Delay(Refer to the Exit/Entry
Delay description in menu functions )
21
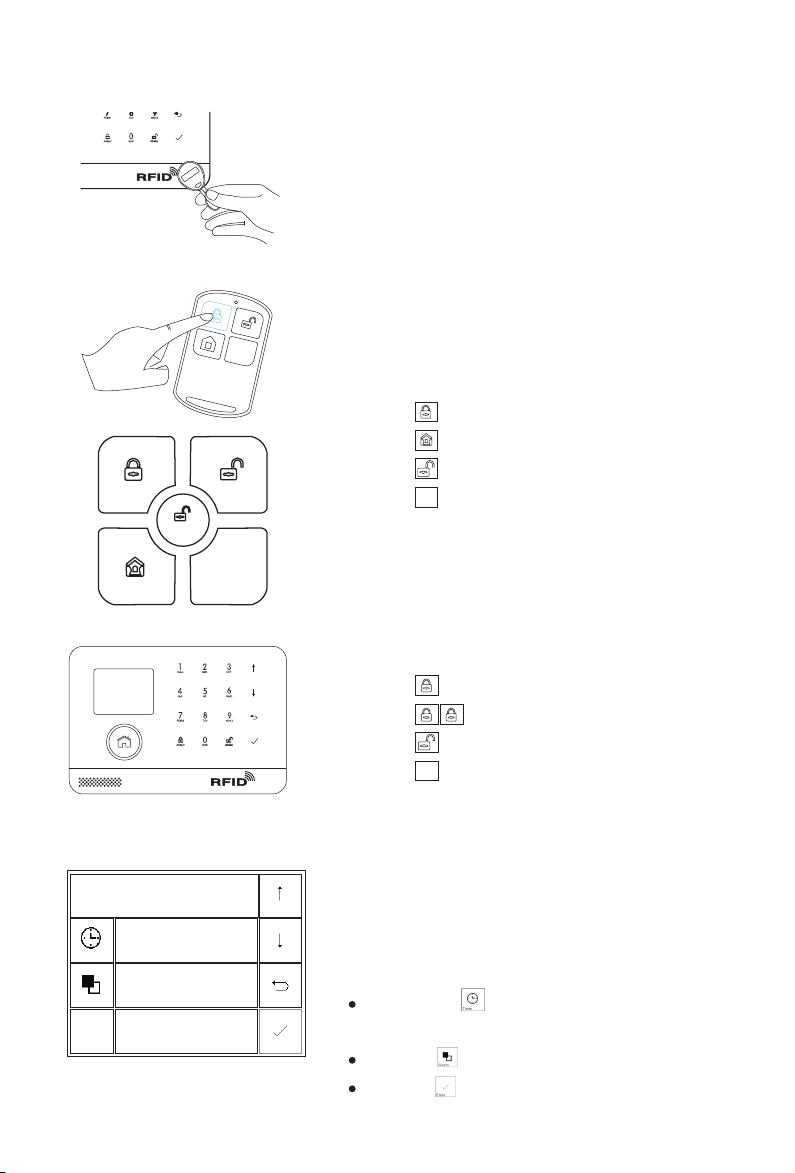
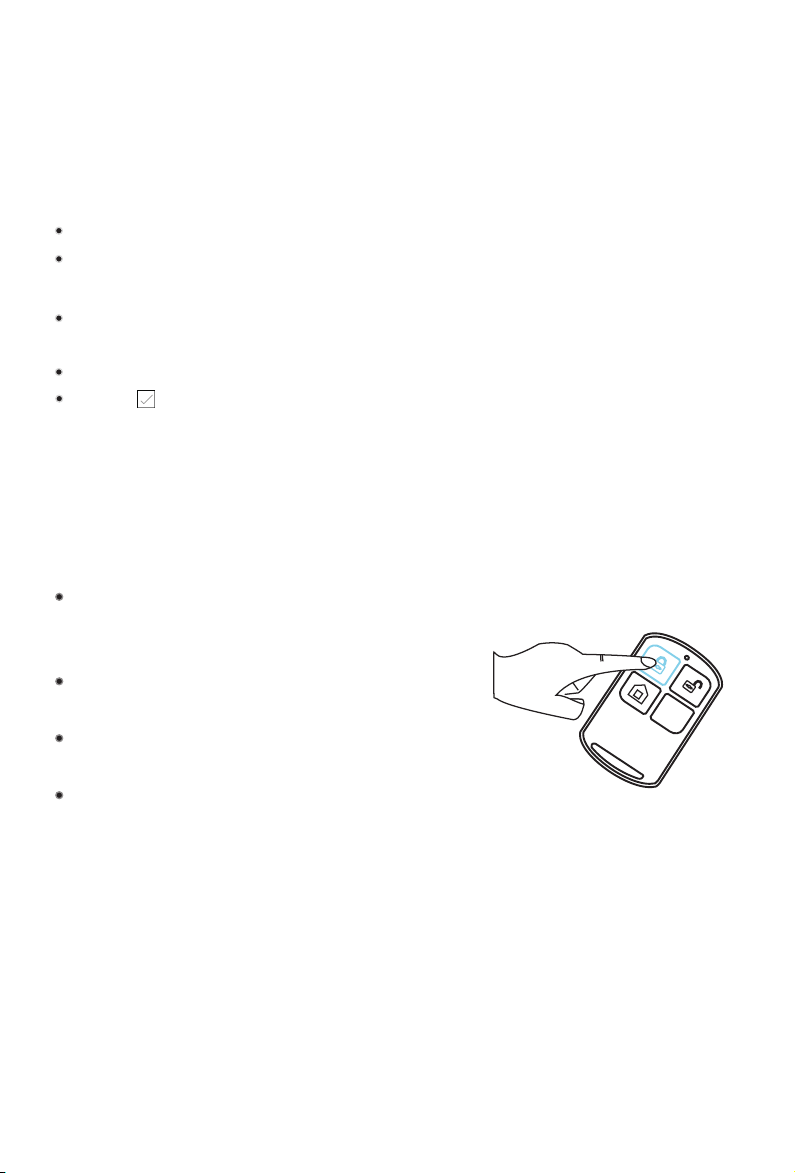
RFID tag
Tap the tag on the panel to:
Disarm in case of arm mode.
Arm in case of disarm mode.
SOS
Disarmed
SOS
Remote Control or App
Press to away arm .
Press to home arm.
Press to disarm.
Press to trigger an emergency alarm.Press to trigger an emergency alarm.
SOS
Panel
Press to away arm.
Press to home arm.
Press to disarm.
Press to trigger an emergency alarm.Press to trigger an emergency alarm.
Arm Timer
Timer
Switch
Function
Backspace
Cancel
Enter
08:00
on
Schedule
You can set a arm schedule and a
disarm schedule to arm or disarm the
system automatically at a daily time.
Go to Menu>Timer>Arm Timer/
/Disarm Timer and enter
Scroll to , Enter the Daily Arm/
Disarm time (in 24-hr)
Scroll to , select ‘on’ to enable the schedule
Press to save your schedule.
22
S
OS

Smart Hub features
Battery backup
If the building and/or neighbourhood has lost electrical power,
Smart Hub includes a backup battery that will last for more than
6 hours. So even if the power is out, Smart Hub can still detect
when an intruder is in your home and sound the alarm.
The battery icon in the upper-right corner shows the battery level
or charging status, this level is just for reference.
If the backup battery is very low, the battery icon turns red,and
for up to 15 minutes before the hub works well. And Low Battery
notifications are be sent to the registered users.
The battery is fully charged in 8 to 12 hours.
Loss/Restoration of AC power
If the event of AC power loss or restoration, the hub will send you
an alert notification to let you know.
Tamper detection
If someone tampers with Smart Hub and removes it from the
backplate, the hub will send you an alert notification to let you know.
RESET TO FACTORY SETTINGS
You have two ways to reset Smart Hub to factory settings.
Go to Menu>Settings>Initialization> and enter, or press the
ON/OFF button on the panel 5 times.
Note: You won’t be able to reset if Smart Hub is locked. All the
paired accessories and event logs will be deleted when reset is done.
23

TROUBLESHOOTINGS
24
Issues
Reason/Solution
The alarm cannot start up.
1. Make sure alarm hub power adapter is connected to AC
power properly;
2. Ensure the power is on
No text massage
notification (SMS)
No sound when alarm
PIR does not work
when triggered.
1. Check if indicator on remote control is on when pressing,
if not, please re-install or replace battery ;
2. Make sure remote control is connected to alarm hub successfully;
3. Check if distance between alarm hub and remote control is
too far away.
Remote control
does not work.
1. Check if LED indicator is on when magnetic
separates from transmitter;
2. Check if door/window sensor is far away from alarm hub
3. Check if system is in armed state.
4. Check if installation distance between magnetic and
transmitter is within 2-3 cm;
5. Check if hub learns door closing code of door/window
sensor, if yes, delete door sensor from hub and reconnect
sensor to hub.
Door/Window sensor does
not work when triggered.
1. Make sure insulation strip is pulled away and PIR is
switched to ON.
2. Check if detector is in sleeping state;
3. Check if system is in armed state;
4. Check if battery level is too low.
5. Check if detector is too far away from alarm hub
1. Check whether the siren sounds switch1. Check whether the siren sounds switch
(go to Menu> Settings> Switch>Siren) and time
(go to Menu> Settings> Delay>Siren Duration) are on.
2. You can set alarm tone and siren ring on APP
1. Make sure inserting direction of SIM card is right "Chip
facing up, gap facing outward";
2. Insert SIM card before turning on hub.
3. Check if SIM card supports correct GSM or 3G network,
if there is a network signal;
4. Check if SIM card is with enough balance credit;
5. Check if SIM card has enabled caller ID, SMS function;
6. Check if it is necessary to bind hub IMEI number;
1. Check if alarm phone numbers are stored and turn on
phone/SMS notification;
2. When answering calls after alarms, do not immediately
disarm, otherwise system will stop calling;
3. Check if SIM card is with enough balance credit;
4. Check if hub is set with invalid network server IP or
invalid APN.
No phone calls received
when alarm.

25
The alarm hub
cannot start up
1. Make sure alarm hub power adapter is connected to
AC power properly;
2. Make sure alarm hub power is on.
Remote control
does not work
1. Check if indicator on remote control is on when pressing,
if not, please re-install or replace battery ;
2. Make sure remote control is connected to alarm hub
successfully;
3. Check if distance between alarm hub and remote control
control is too far away.
1. Check if LED indicator is on when magnetic separates
from transmitter;
2. Check if door/window sensor is far away from alarm hub;
3. Check if system is in armed state.
4. Check if installation distance between magnetic and
transmitter is within 2-3 cm;
5. Check if hub learns door closing code of door/window
sensor, if yes, delete door sensor from hub and reconnect
sensor to hub.
PIR does not work
when triggerd
1. Make sure insulation strip is pulled away and PIR is switched to ON.
2.Check if detector is in sleeping state;
3.Check if system is in armed state;
4.Check if battery level is too low.
5.Check if detector is too far away from alarm hub
No sound when alarm
1. Make sure inserting direction of SIM card is right "Chip
facing up, gap facing outward";
2. Insert SIM card before turning on hub.
3. Check if SIM card supports correct GSM or 3G network,
if there is a network signal;
4. Check if SIM card is with enough balance credit;
5. Check if SIM card has enabled caller ID, SMS function;
6. Check if it is necessary to bind hub IMEI number;
not work when triggerd
Door/Window sensor does
The alarm hub shows
no SIM card inserted
1.Check if hub alarm tone and siren ring time is on;
2.You can set alarm tone and siren ring time on APP.
No phone calls
received when alarm
1. Check if alarm phone numbers are stored and turn on
phone/SMS notification;
2. When answering calls after alarms, do not immediately
disarm, otherwise system will stop calling;
3. Check if SIM card is with enough balance credit;
4. Check if hub is set with invalid network server IP or invalid APN
No response when
swiping RFID tag:
1.Please make sure hub is running with AC power connected,
RFID function can only be used when hub is connected to AC power
2.Please check if RFID tag is paired to alarm hub or not. If not,
If not, please pair it again

26
For example: for a family of three people who go out early
and come home late without anyone at home in the daytime,
battery can work about 24 months; for places with large
people flow every day, such as stores, battery standby time
will be much shorter.
How long can the
PIR motion motion detector
detector battery work ?
For example: for a family of three people who go out early
and come home late without anyone at home in the daytime,
battery can work about 24 months; for places with large
people flow every day, such as stores, battery standby time
will be much shorter.
The detector is with battery installed, which can work for
about 12-24 months.
How long can the
door/window detector
battery work ?
How long can the alarm hub
backup battery stand by
during AC power failure ?
The alarm hub backup battery can stand by 4 to 12 hours
depending on the actual working status, if the system is
trigged during AC power failure,and the alarm hub keeps
ringing it internal siren and sending notification, SMS and
making phone calls to phone numbers, the backup time can
be much shorter.
The detector is with batteries installed, which can work for
about 12-24 months.
No SMS notification when
hub is arming or disarming:
1.Please make sure your arm/disarm SMS notification switch is on.
2.Please make sure alarm notification numbers are stored and turned on.
Mobile phones cannot
control panel remotely:
1.Please make sure phone number is set as system alarm number.
2.Please make sure SIM card is with enough balance credit.
The meaning of
SM icon indicator
1.“X”in Grey indicates that hub has not detected GSM SIM
card or no SIM signal around, please move to location with
strong signal, re-insert SIM card and turn on hub again.
2.Grey means that hub is detecting SIM card signal.
3.White shows that hub has detected GSM signal.
Alarm phone numbers
already set via APP,but
phone call or SMS received
when system alarms
1.Please confirm that your phone number is input correctly
in the list of alarm numbers.
2.Please confirm that switch of alarm call and SMS
notification are turned on.
App is failed to be
airlinked with hub:
1.Please make sure that hub and airlinking mobile phone are
in same WiFi network.
2.Please confirm data transmission of network connection is normal.
3.Please confirm WiFi network is 2.4G, currently 5G WiFi
is not supported.
4.The APP airlink configuration should be simultaneous with
hub airlink configuration
5.Do not touch mobile phone screen during configuration.
6.Please close APP completely and restart configuration.
The hub cannot be controlled
remotely after successfully
binded to mobile phone APP:
1.Please confirm network connection is available.
2.Please close App and open it again.

Remote Control
Power Supply: DC 3V (CR2025 Lithium Battery x1)
Standby Current:<5uA
Alarm Current: <15mA
Transmitting Distance: <80m (Open Area/No Interference)
Radio Frequency: 433Mhz
Operation Temperature: 0~55℃
Door/Window Sensor
Power Supply: DC 3V (CR2032 Lithium Battery x1)
Standby Current:<8uA
Alarm Current: <15mA
Transmitting Distance: <80m (Open Area/No Interference)
Radio Frequency: 433Mhz
Operation Temperature: 0~55℃
PIR Motion Sensor
Power Supply: DC 3V (1.5 AAA Battery x2)
Standby Current:<15uA
Alarm Current: <25mA
Detection Scope:<12m/110°
Transmitting Distance: <80m (Open Area/No Interference)
Radio Frequency: 433Mhz
Operation Temperature: 0~55℃
27
SPECIFICATIONS
Hub
Power Supply: Micro USB 110/220VAC to 5V, 1000mA
Backup Battery: 3.7V, 500mAh Rechargeable Lithium Battery
Consumption: <150mA@normal
Siren Output: <300mA
Radio Frequency: 433Mhz
GSM: 850/900/1800/1900MHz
Wi-Fi: IEEE802.11b/g/n
Operation Temperature: 0~55℃

RFID Tag
Chip:4100
Read Distance:<2cm
Frequency: 125KHz
Power Supply: Micro USB 110/220VAC to 5V, 1000mA
Backup Battery: 3.7V, 300mAh Rechargeable Lithium Battery
Standby Current:<15mA
Alarm Current:<230mA
Volume:100dB
Radio Frequency: 433Mhz
Operation Temperature: 0~55℃
Siren with 3.5mm Male Cable
Power Supply: DC 3~12V
Working Current:<110mA
Volume:100dB
Wireless Siren
28

