
Technical Support and E-Warranty Certificate www.vevor.com/support
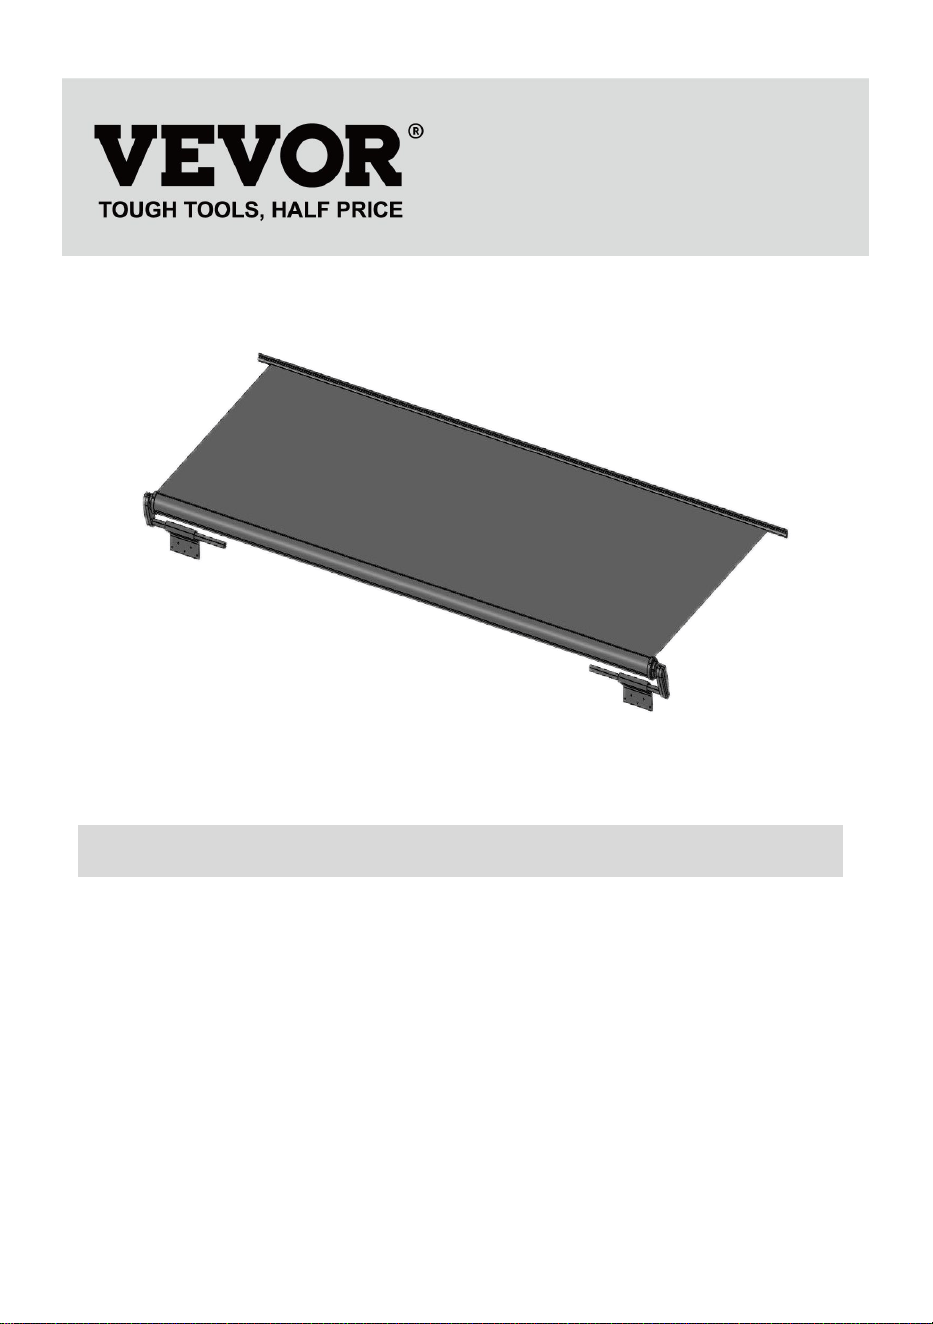
RV MODULAR SLIDE AWNING
MODEL: A6
We continue to be committed to provide you tools with competitive price.
"Save Half", "Half Price" or any other similar expressions used by us only
represents an estimate of savings you might benefit from buying certain tools
with us compared to the major top brands and does not necessarily mean to cover
all categories of tools offered by us. You are kindly reminded to verify carefully
when you are placing an order with us if you are actually Saving
Half in comparison with the top major brands.


- 1 -
MODEL:A6
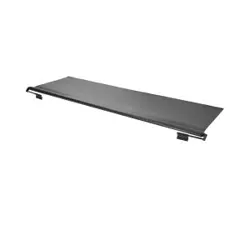
<Picture Only For Reference >
NEED HELP? CONTACT US!
Have product questions? Need technical support? Please feel free to
contact us:
Technical Support and E-Warranty Certificate
www.vevor.com/support
This is the original instruction, please read all manual instructions
carefully before operating. VEVOR reserves a clear interpretation of our
user manual. The appearance of the product shall be subject to the
product you received. Please forgive us that we won't inform you again if
there are any technology or software updates on our product.
RV MODULAR
SLIDE AWNING

- 2 -
IMPORTANT SAFEGUARDS
WARNING: Read and understand this entire manual before operating
or servicing this product. Failure to follow these warnings and
instructions can cause personal injury or damage to valuable property.
Avoid children using the product. And this product is not a toy. Do not allow
children to play.
ASSEMBLY PRECAUTIONS
1. Assembly only according to these instructions. Improper assembly can create
hazards.
2. Wear ANSI-approved safety goggles and heavy-duty work gloves during
assembly and use.
3. Keep the assembly area clean and well-lit.
4. Keep bystanders out of the area during assembly.
5. Do not assemble when tired or when under the influence of alcohol, drugs or
medication.
6. Product capabilities apply to properly and completely assembled product only.
7. For additional information regarding the parts listed in the following pages,
please refer to the Assembly Diagram of this manual. Unwrap and separate all
parts in a clean work area. Please keep small spare parts out of children's reach
8. Preparations before install:
1) it is suggested that 2 or more people should cooperate to complete
2) Two 4-foot ladders 10 ft high
3) Some power tools, for example- a drill
SAVE THESE INSTRUCTIONS
- 3 -
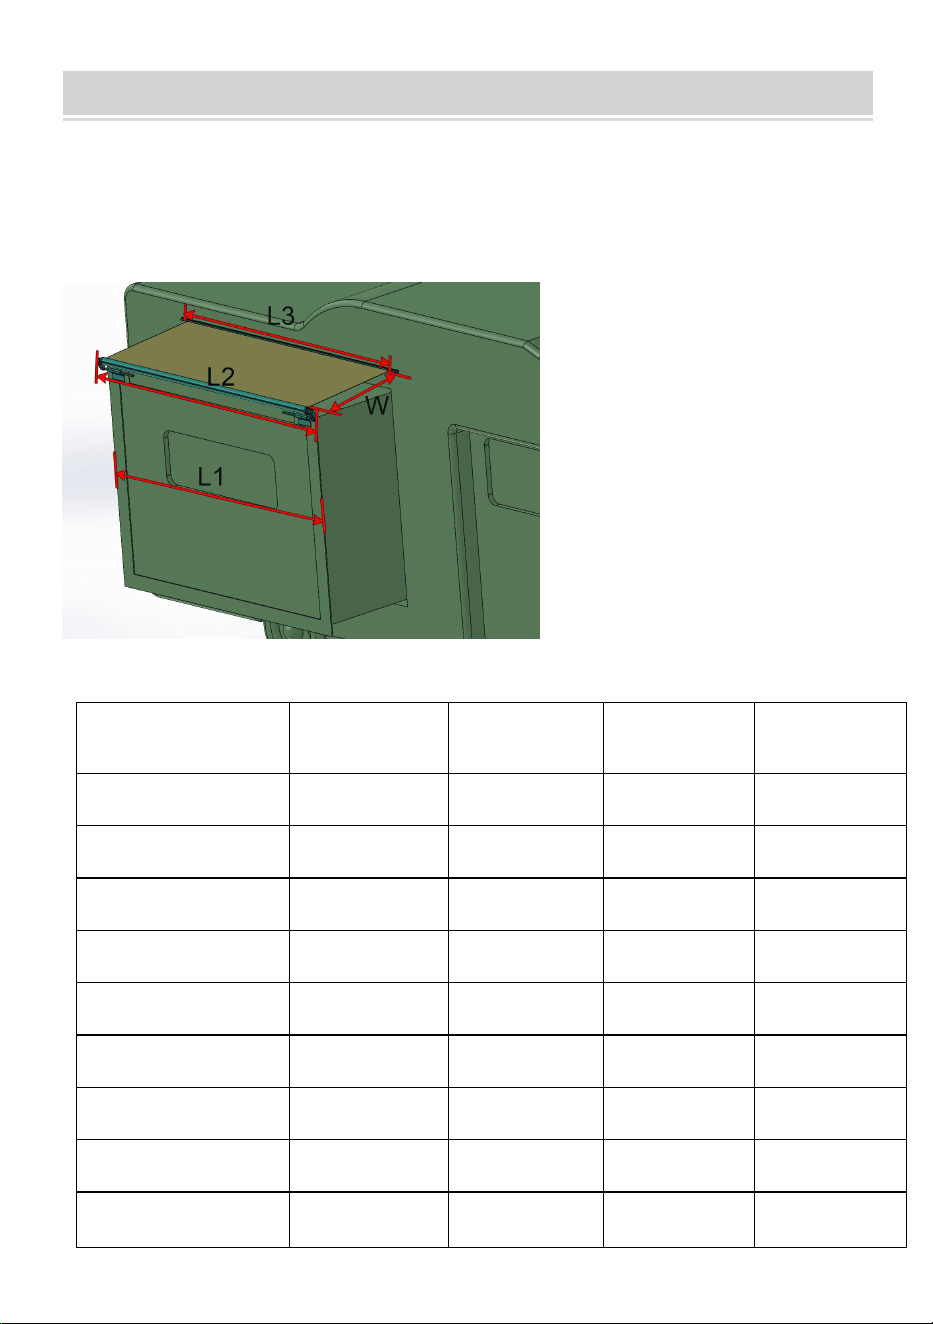
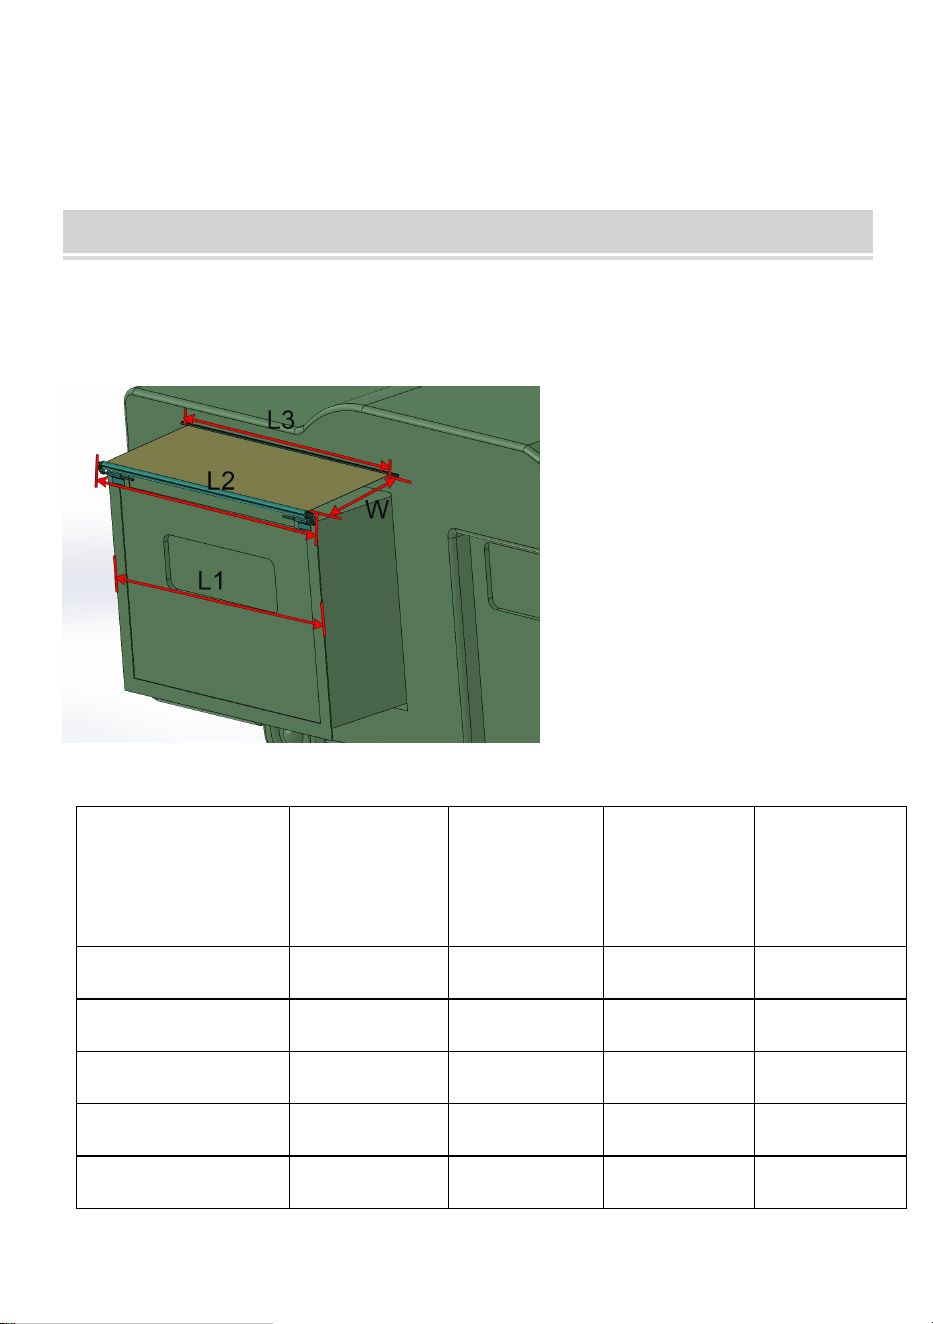
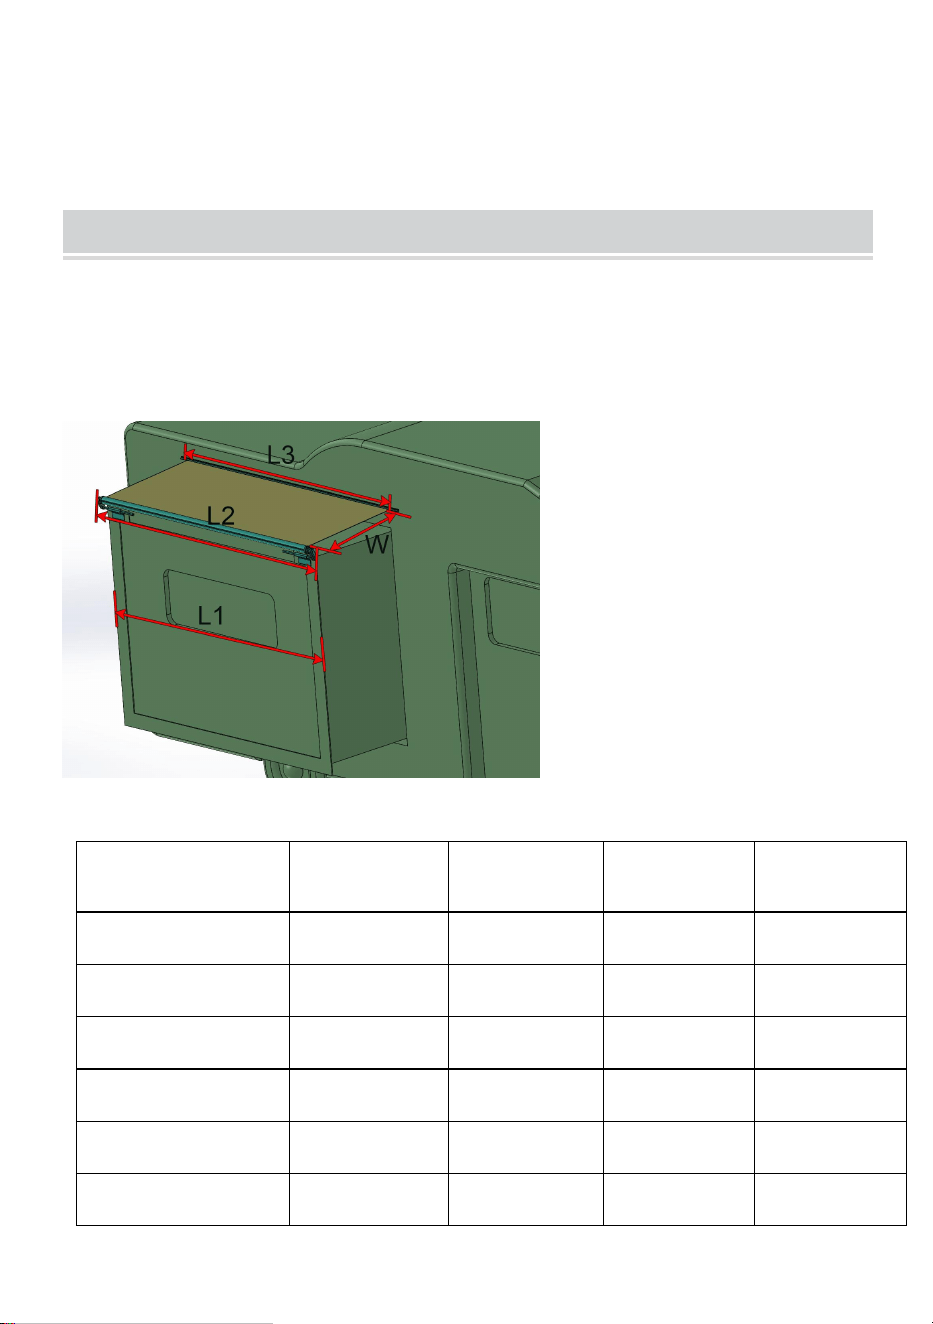
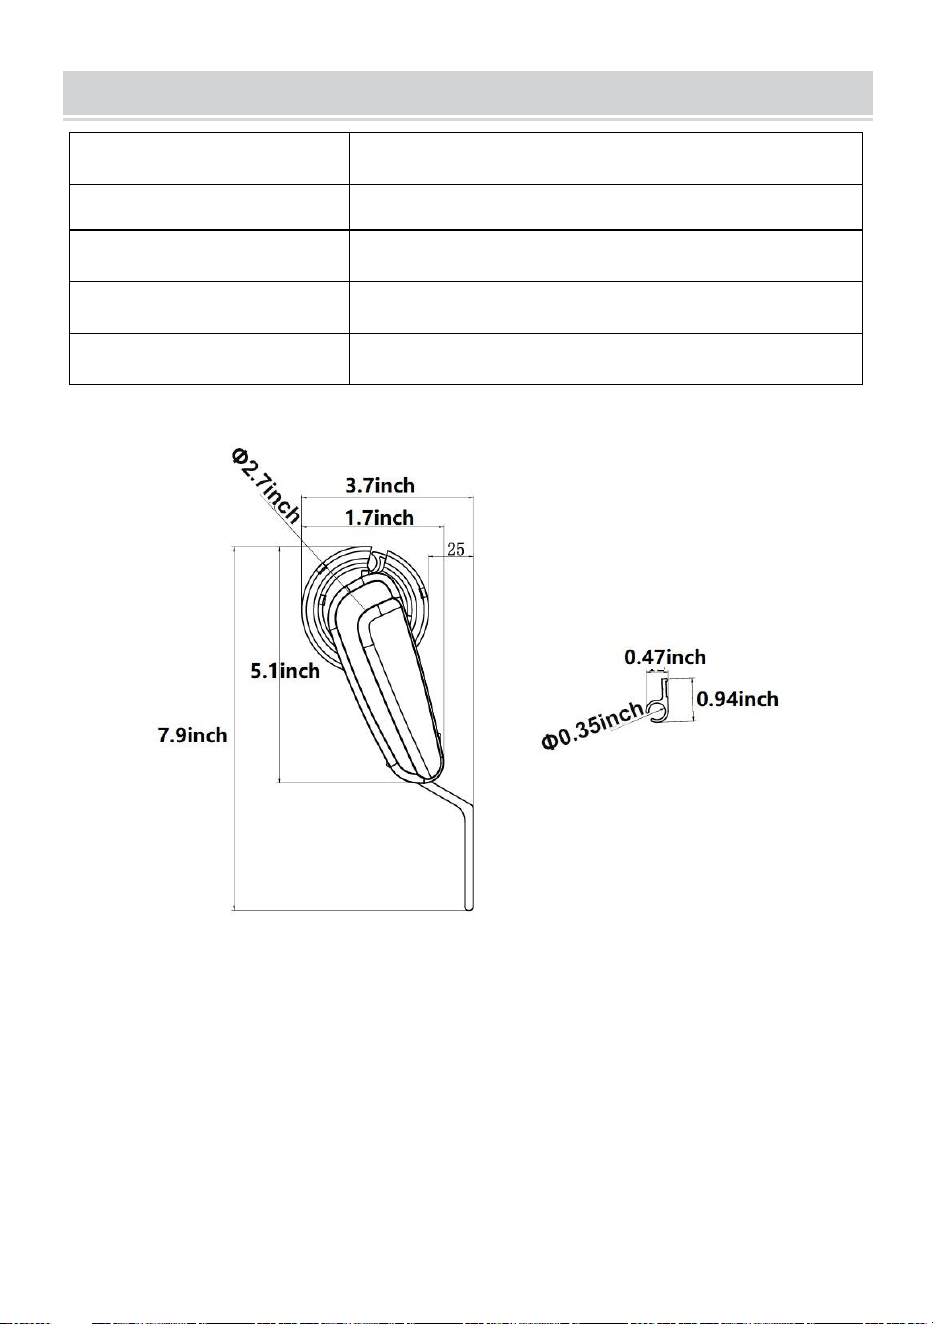
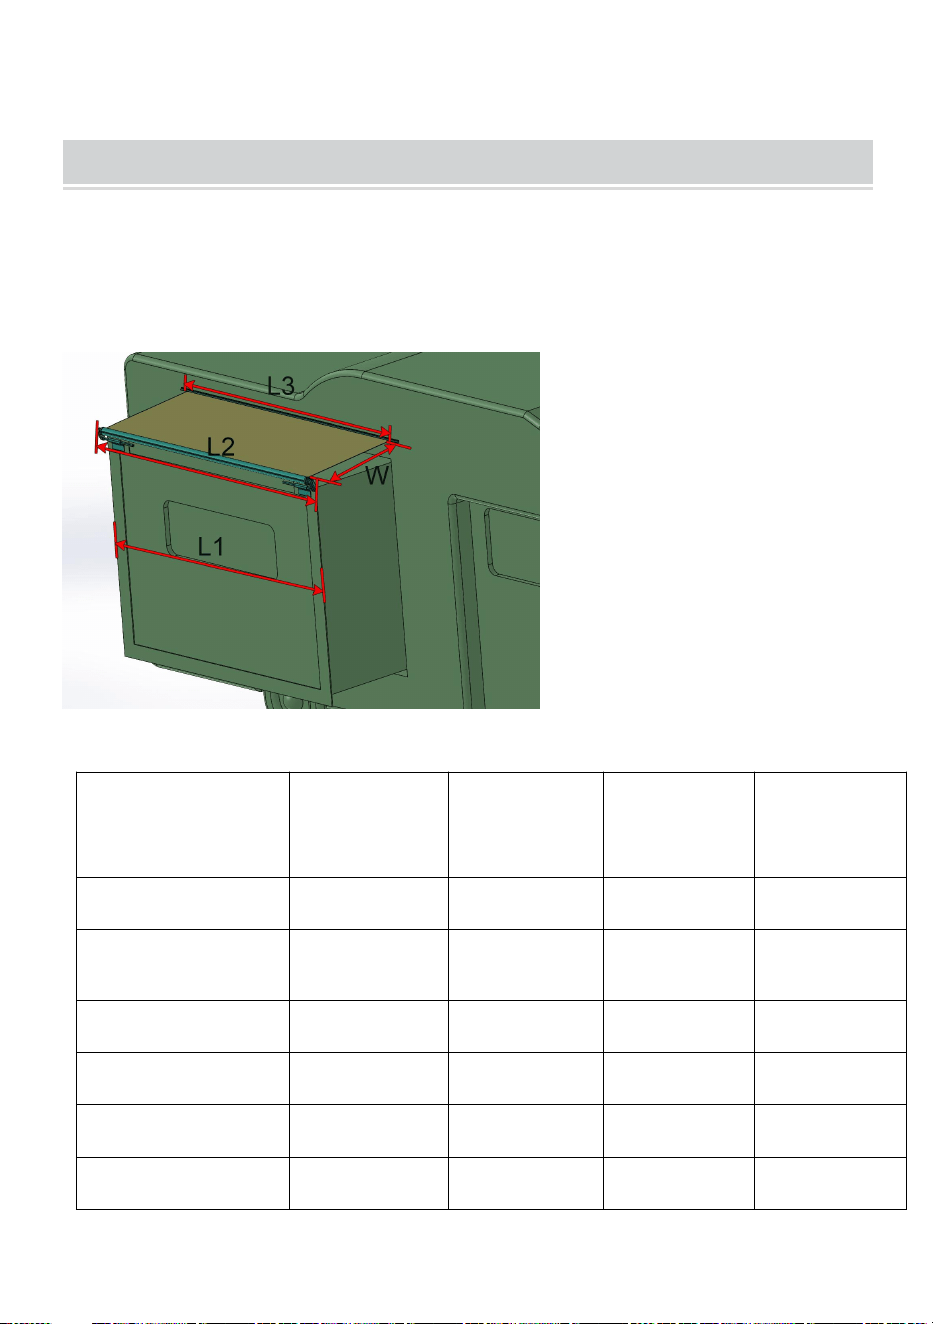
PRODUCT DIMENSIONS
How to order the correct size?
Measuring the length of the slide out awning, It is recommended that the
slide fabric dimension be 1-6 inches longer than the length of the slide out
awning size.
Slide out size
(L1)
Awning
size(L2)
Fabric
Size(L3)
W
(Max)
Color
6’7’’~7’
7’7’’
7’1’’
51”
Black
7’1’’~7’6’’
8’1’’
7’7’’
51”
Black
7’7’’~8’
8’7’’
8’1’’
51”
Black
11’7’’~12’
12’7’’
12’1’’
51”
Black
12’1’’~12’6’’
13’1’’
12’7’’
51”
Black
12’7’’~13’
13’7’’
13’1’’
51”
Black
12’7’’~13’
13’7’’
13’1’’
51”
White
13’1’’~13’6’’
14’1’’
13’7’’
51”
Black
13’1’’~13’6’’
14’1’’
13’7’’
51”
White
- 4 -
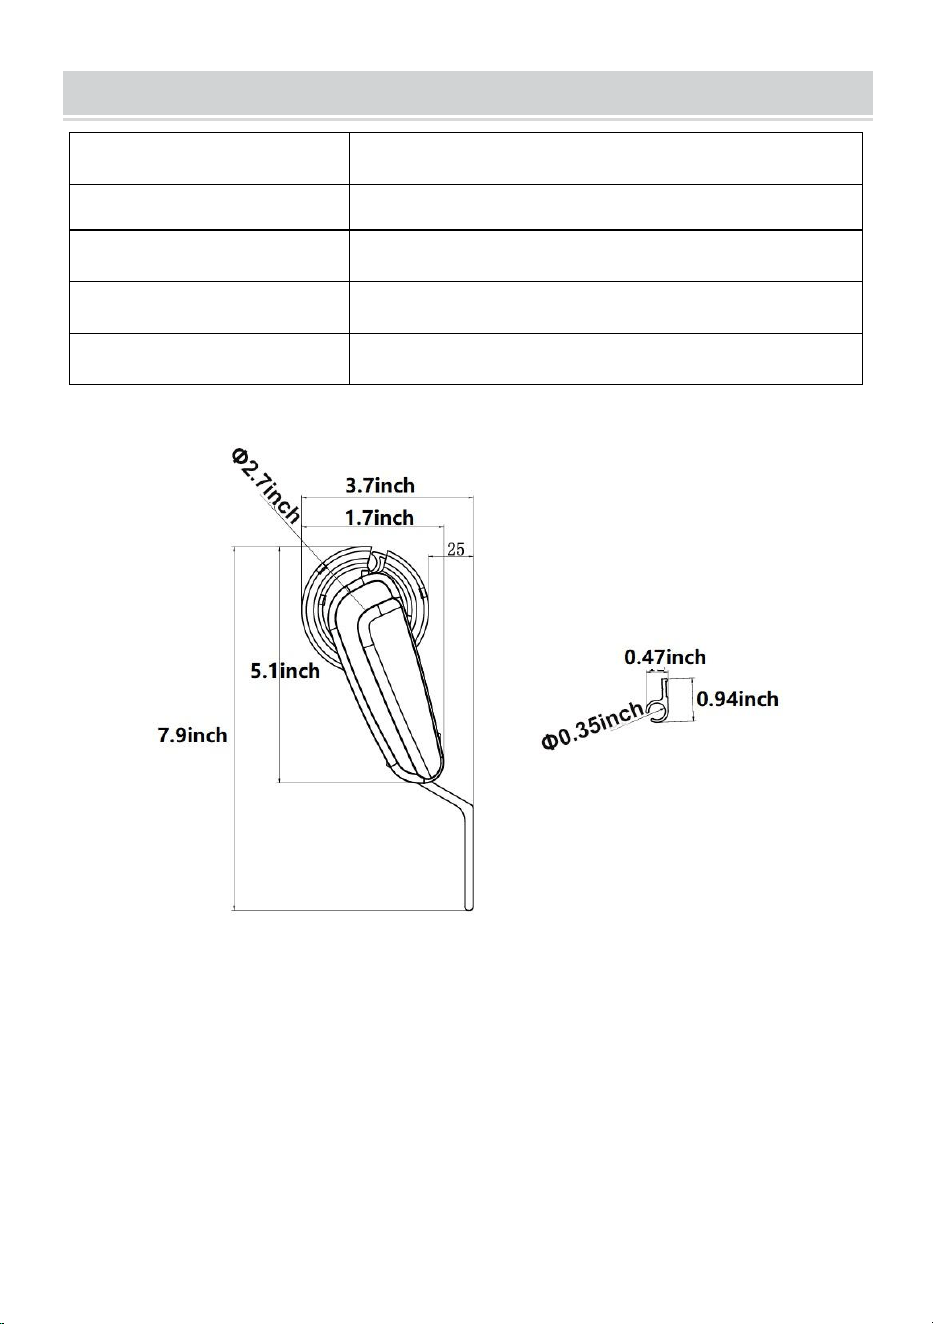
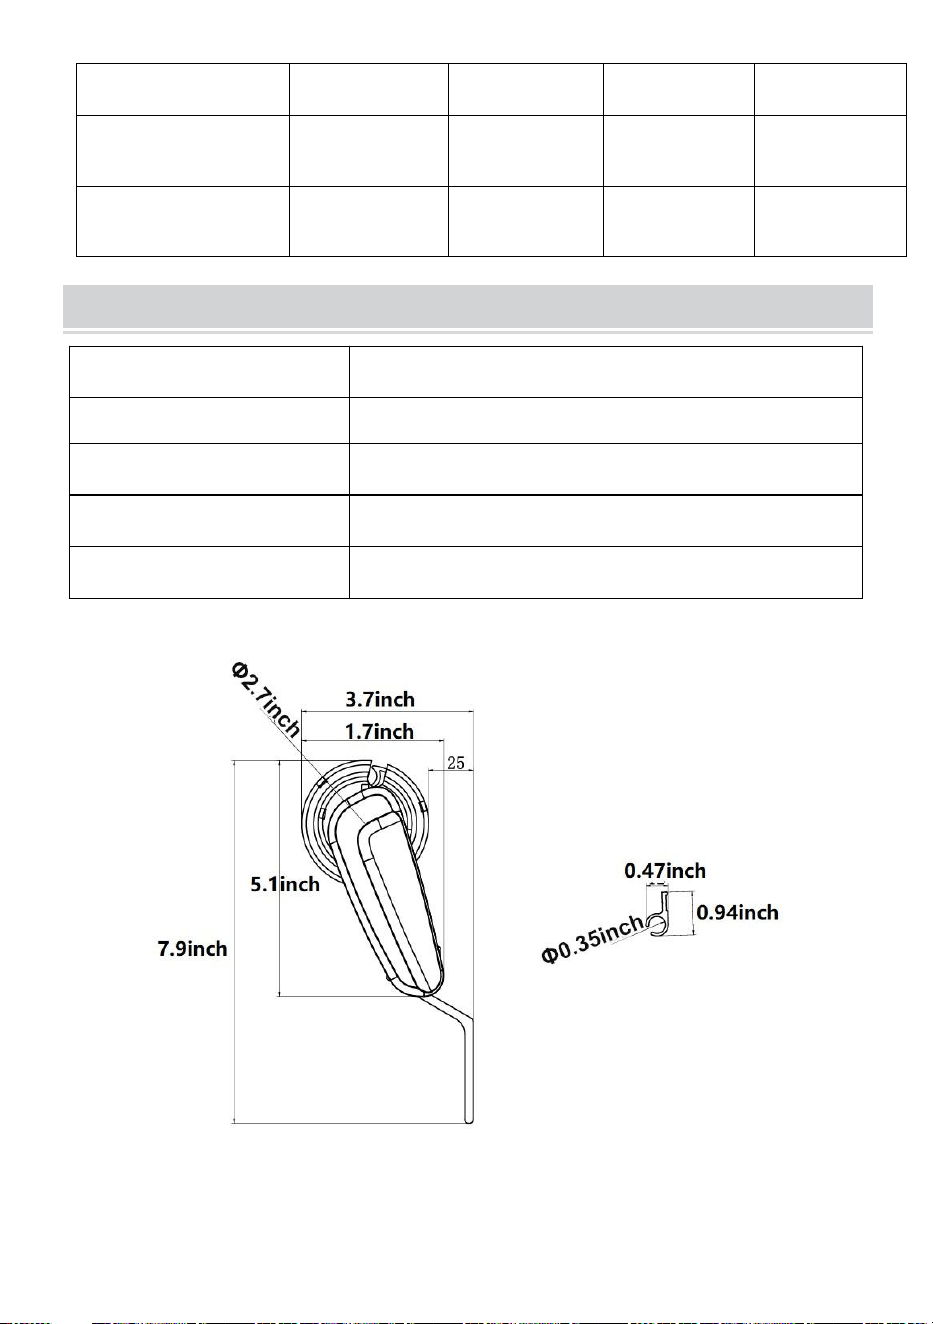
SPECIFICATION
Model
A6
Material
Aluminium
Fabric
PVC
Color
White & Black
Suitable vehicle
RVs with slide out
Unit:mm
- 5 -
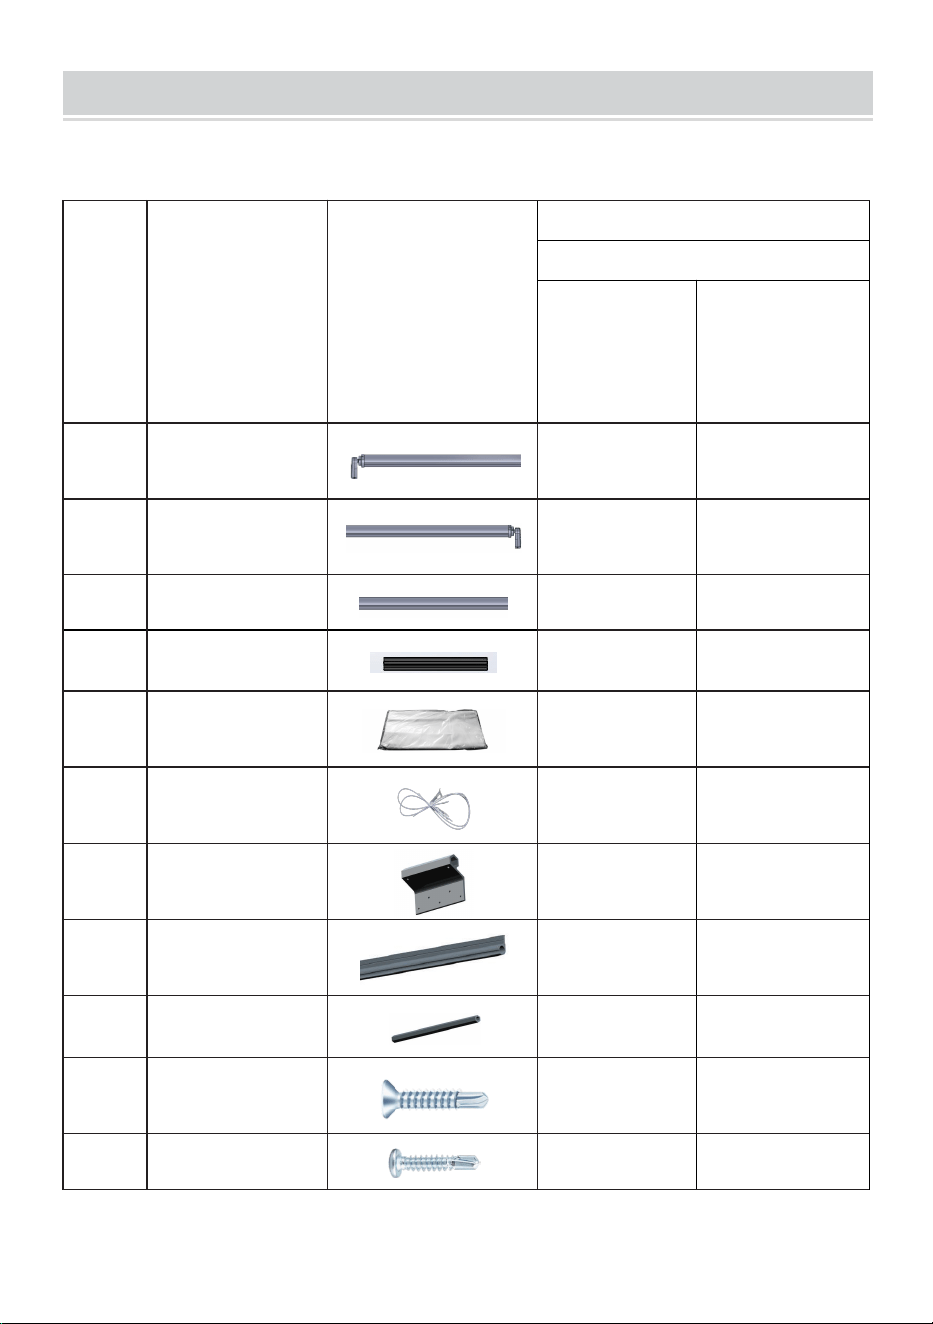
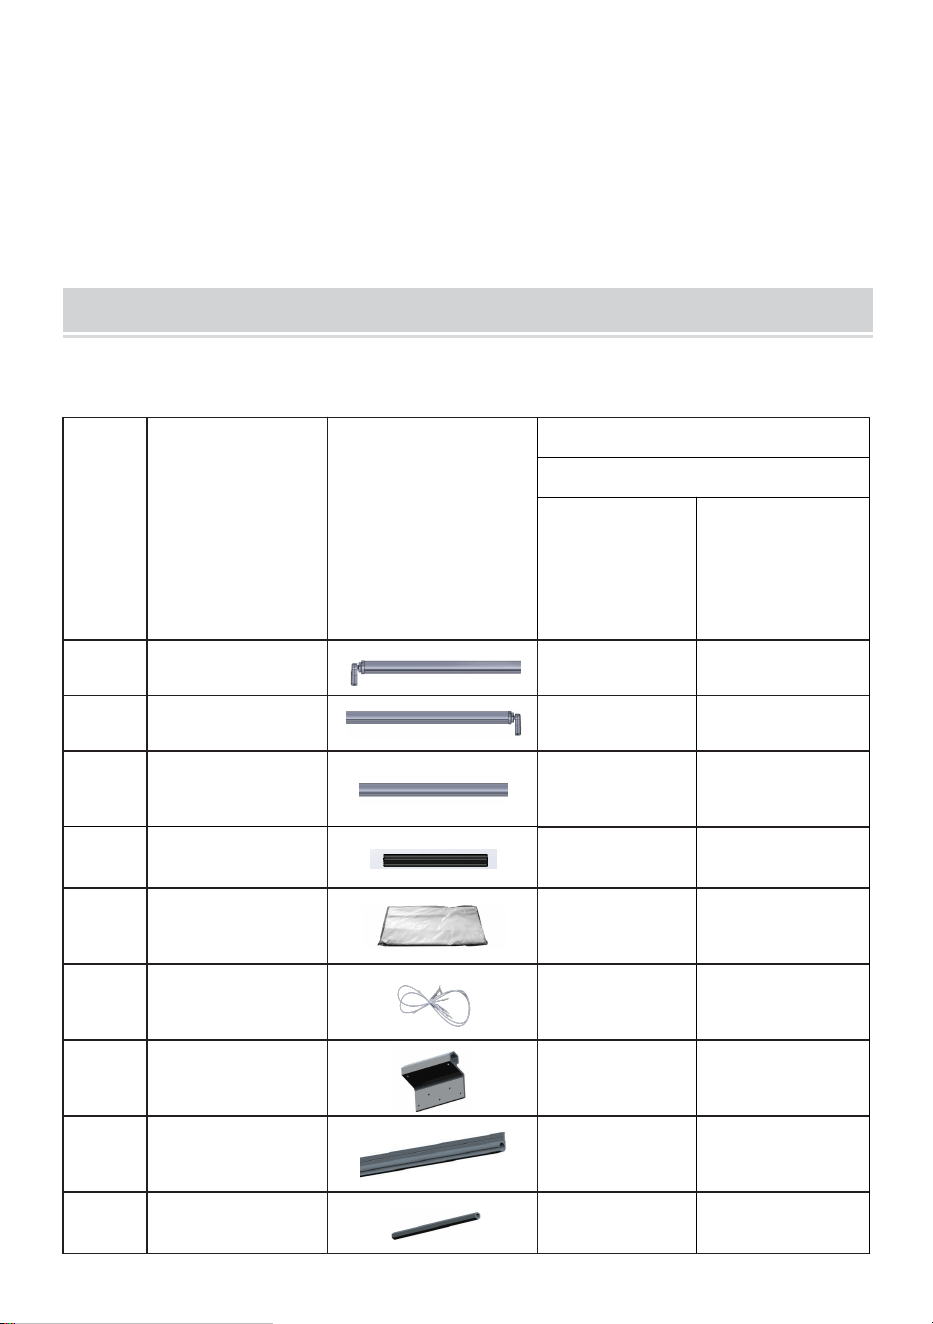
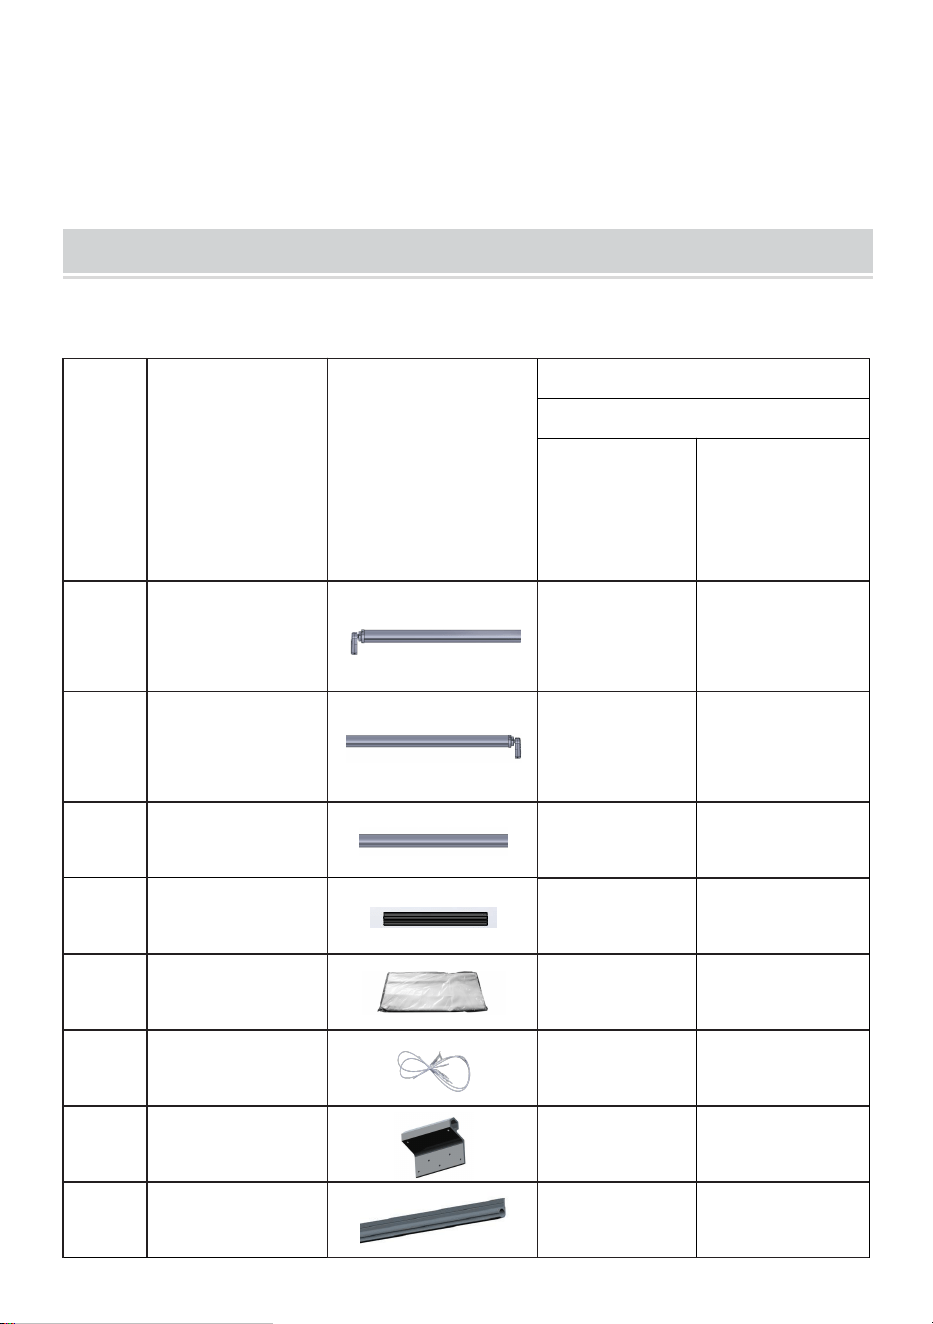
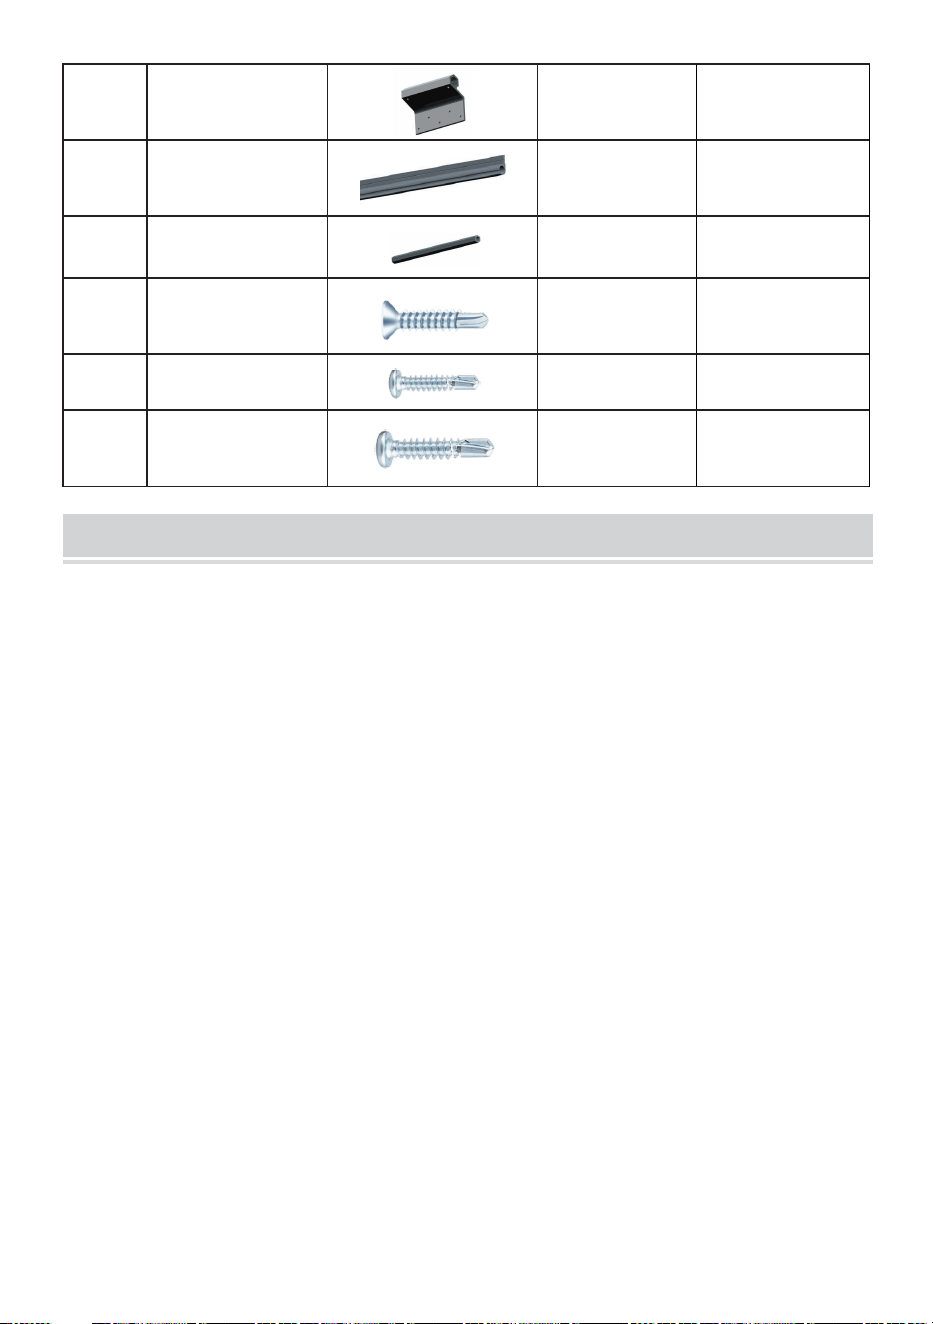
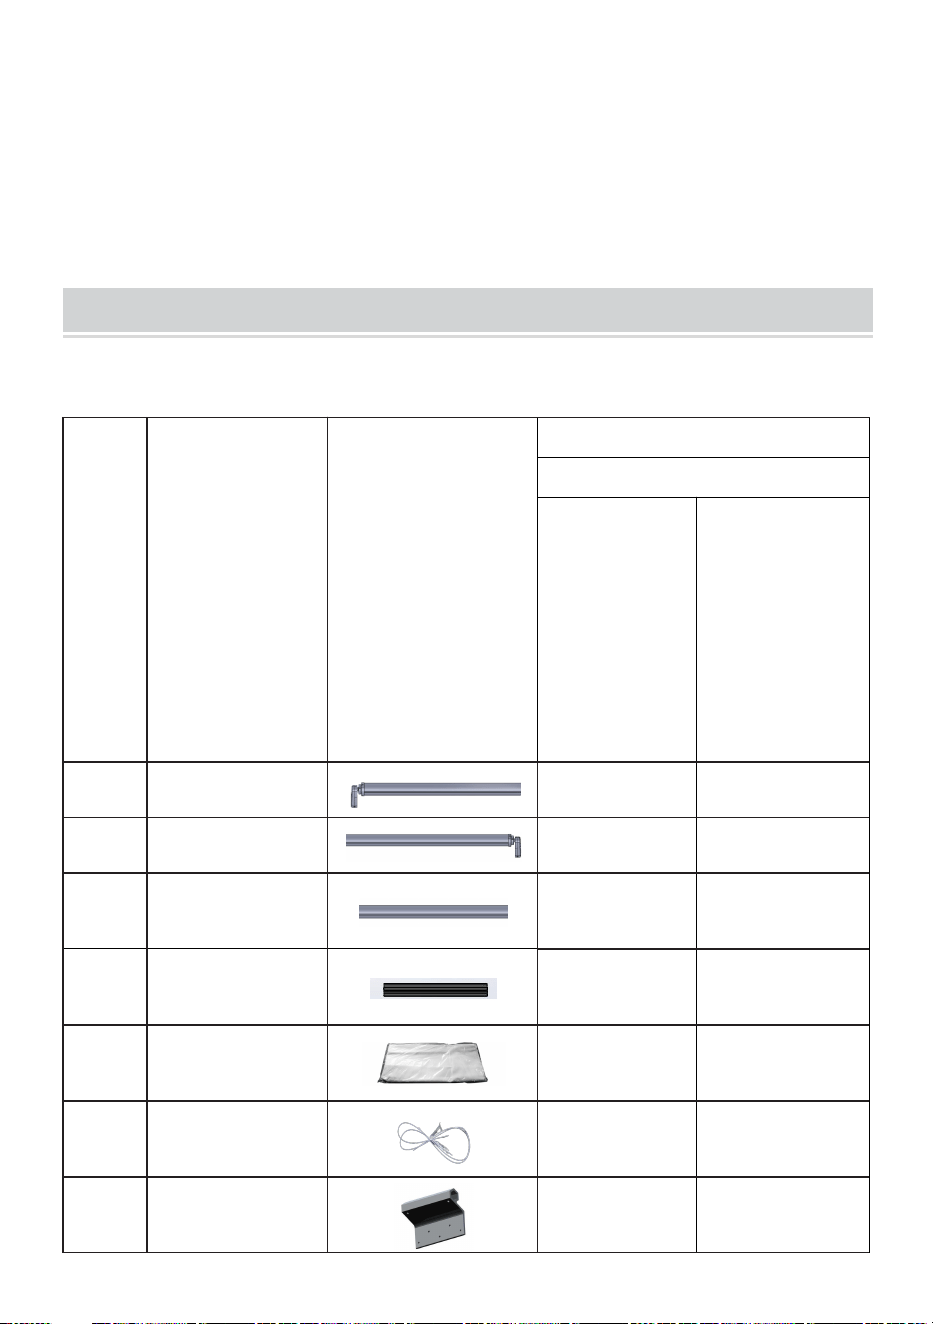
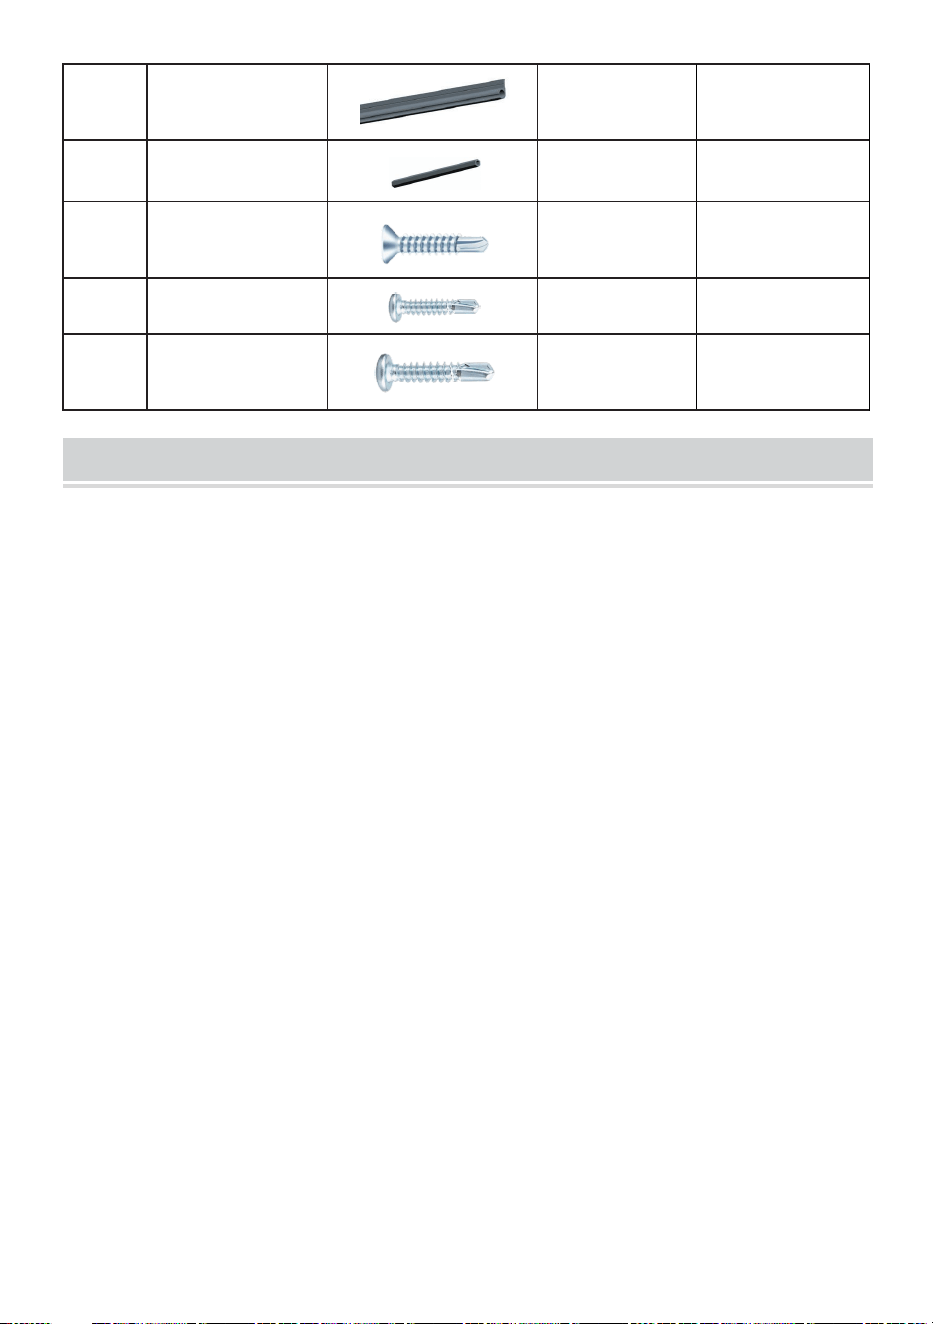
PACKAGE LIST
No.
Name
Picture
QTY
SPECIFICATION
7ft 1inch
7ft 7inch
8ft 1inch
12ft 1inch
12ft 7inch
13ft 1inch
13ft 7inch
1
Roller
Assembly (L)
1
1
2
Roller
Assembly (R)
1
1
3
Extension Roller
/
1
4
Connect pipe
1
2
5
Fabric
1
1
6
Fabric ploy-cord
2
2
7
Bracket
2
2
8
Fabric Rail
2
3
9
Hexagonal tube
2
2
10
A Screw
(M4.8*18mm)
12
24
11
B Screw
(M4*15mm)
36
36
- 6 -
INSTALLATION PRECAUTIONS
1. Check to confirm that there is enough installation space on the vehicle
body and slide out, and do not bend the cloth inserts.
2. Check the vehicle body do have strengthen plates where the mounting
bracket and fabric rail are mounted, or ask the vehicle seller for
information.
3. The slide out awning leaves the factory with a preset force. In order to
facilitate the installation and operation, you can turn around and loosen the
sunshade cloth roll for 1~2 turns (about 300mm) for installation. If the
number of open turns of the cloth roll is too large during installation, and
the number of preset force is not restored after installation, the force will be
weakened, resulting in insufficient tension on the cloth surface.
4. The preset number of force turns of the slide out awning is 11 turns, if
there is not enough force, you can turn the end bracket counterclockwise
according to the direction shown in the diagram to increase the force.
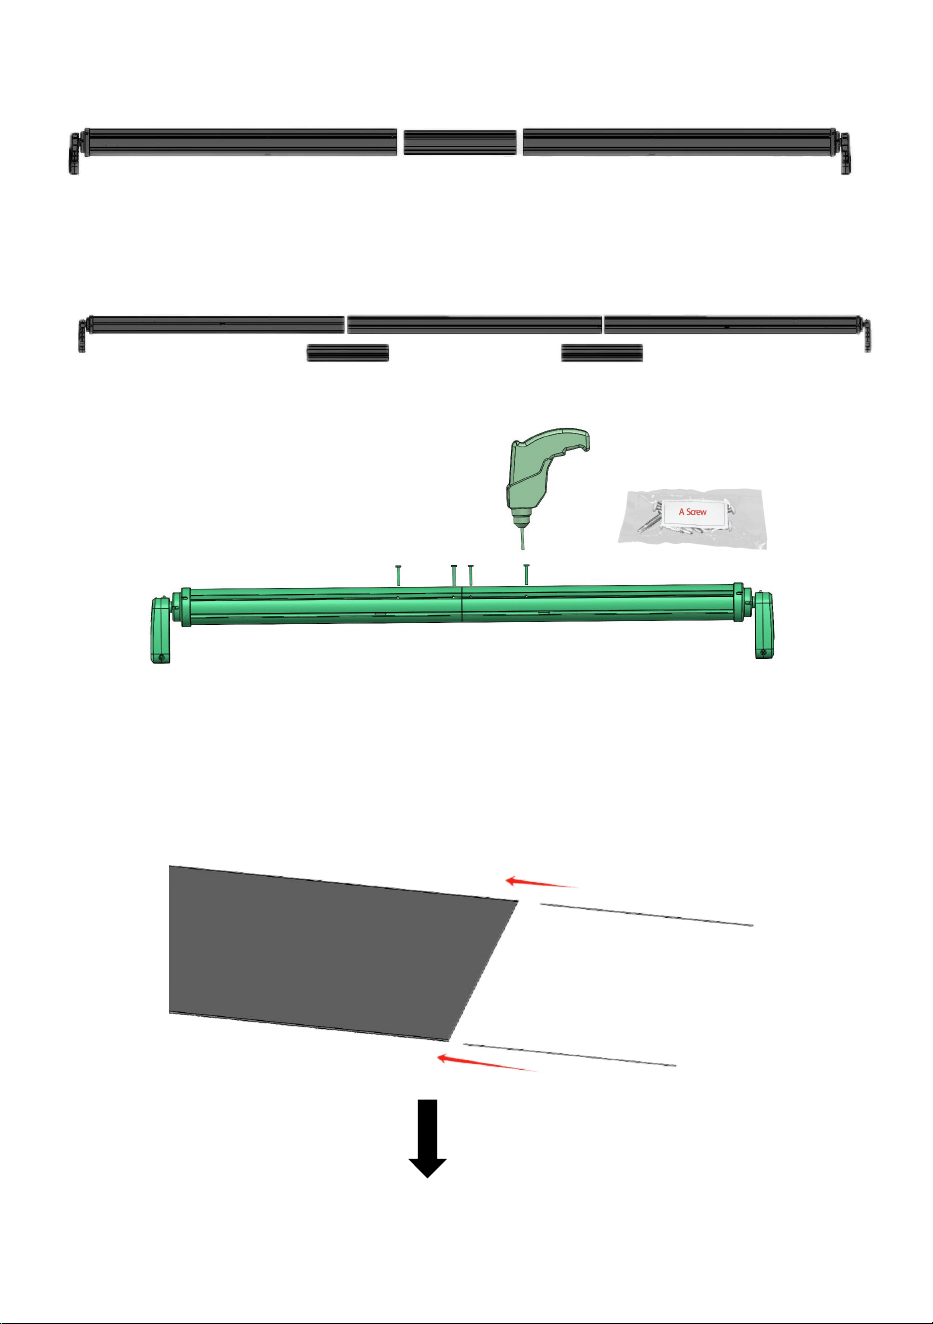
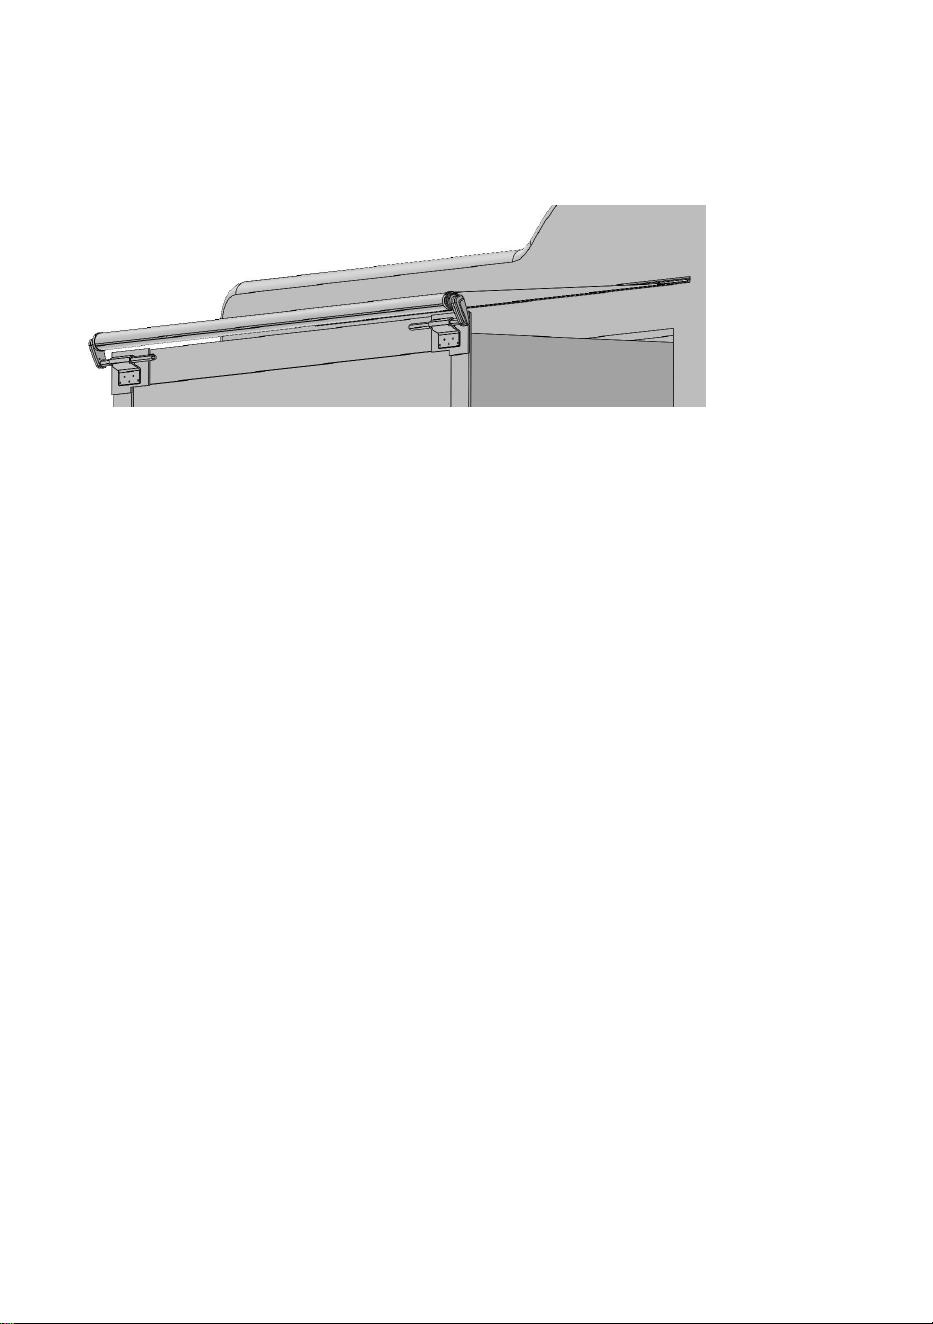
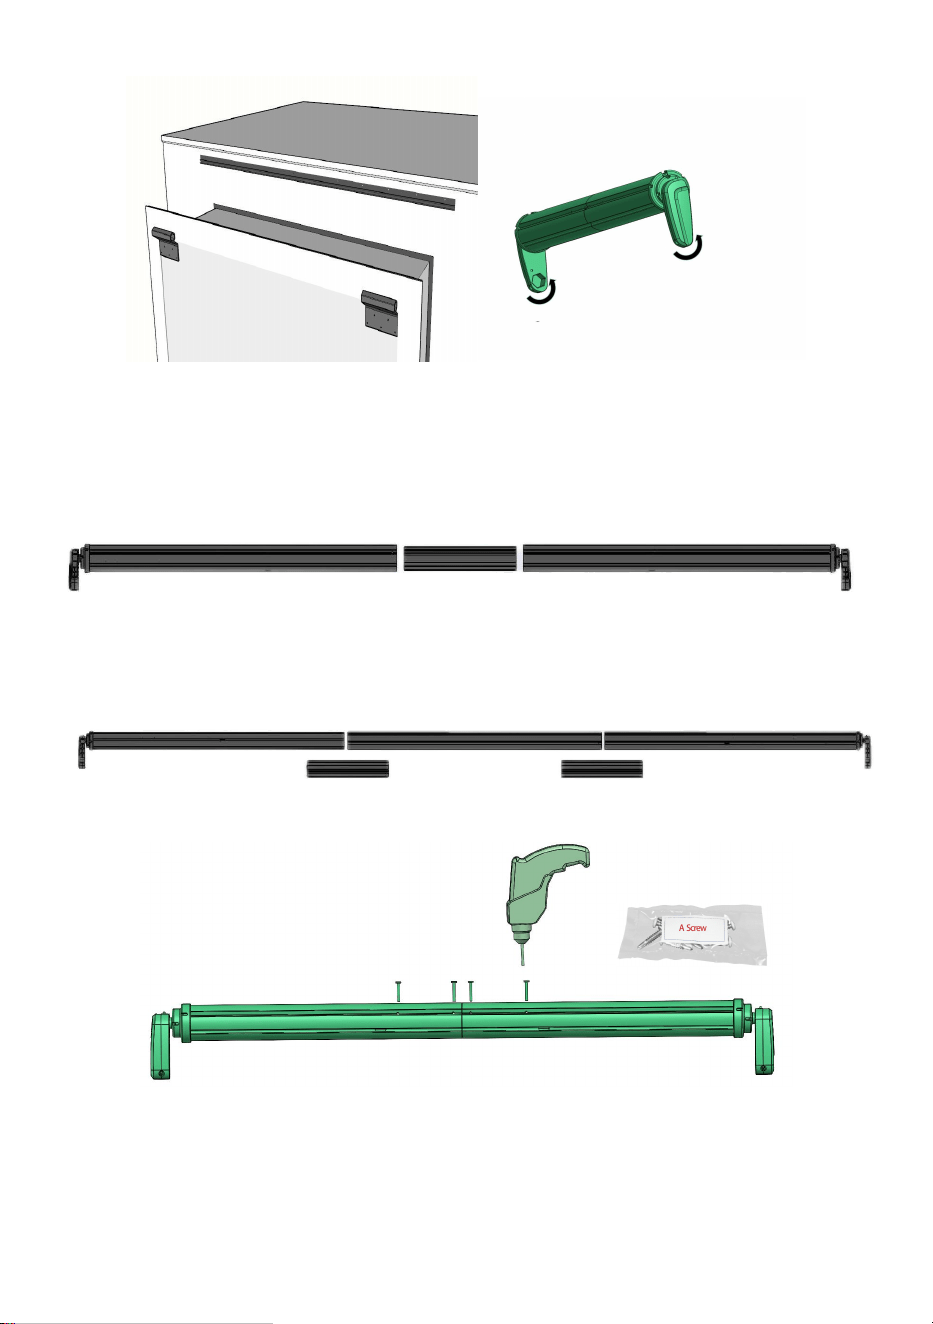
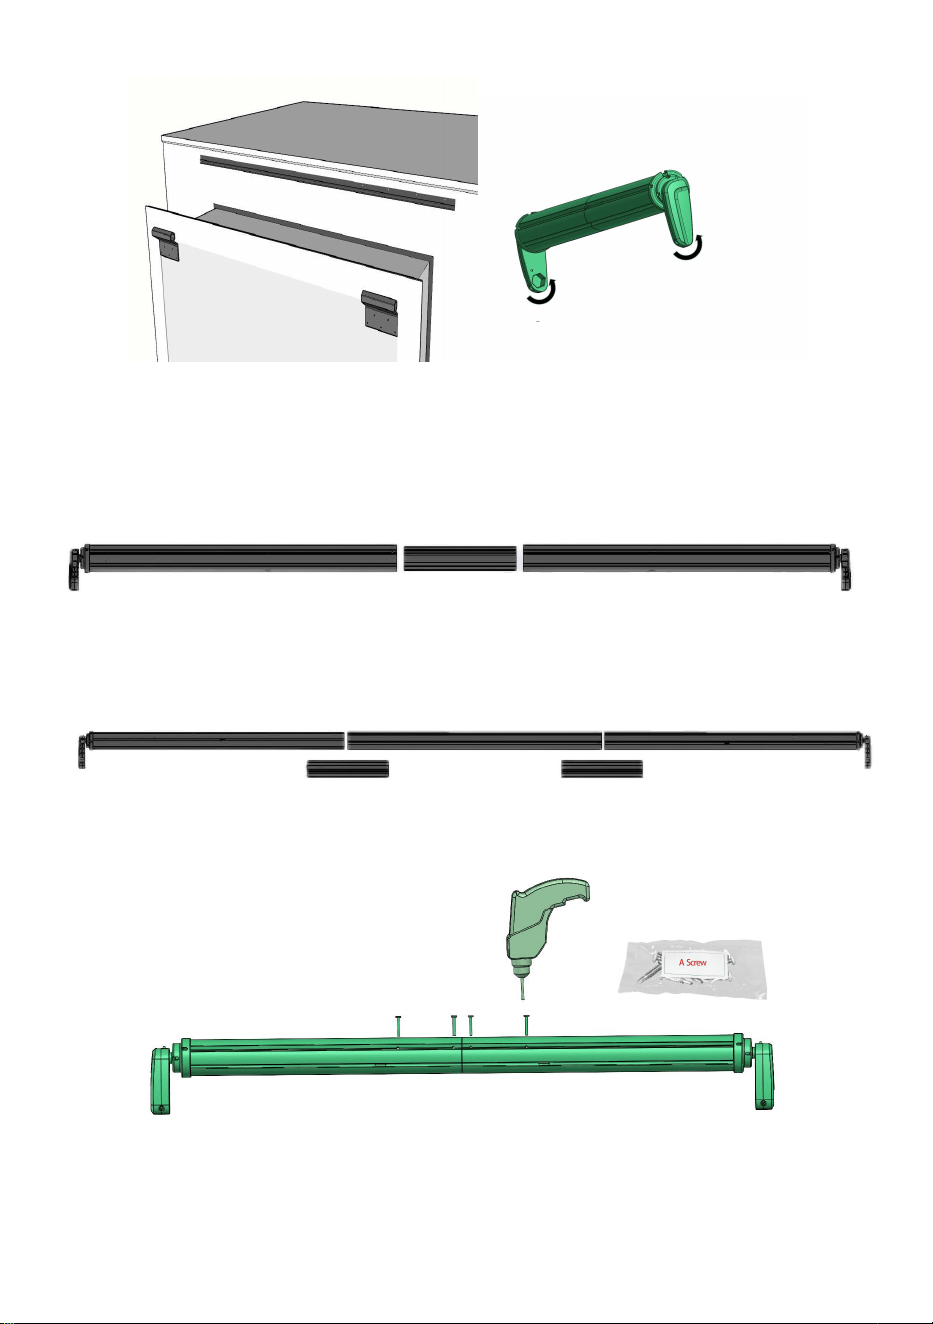
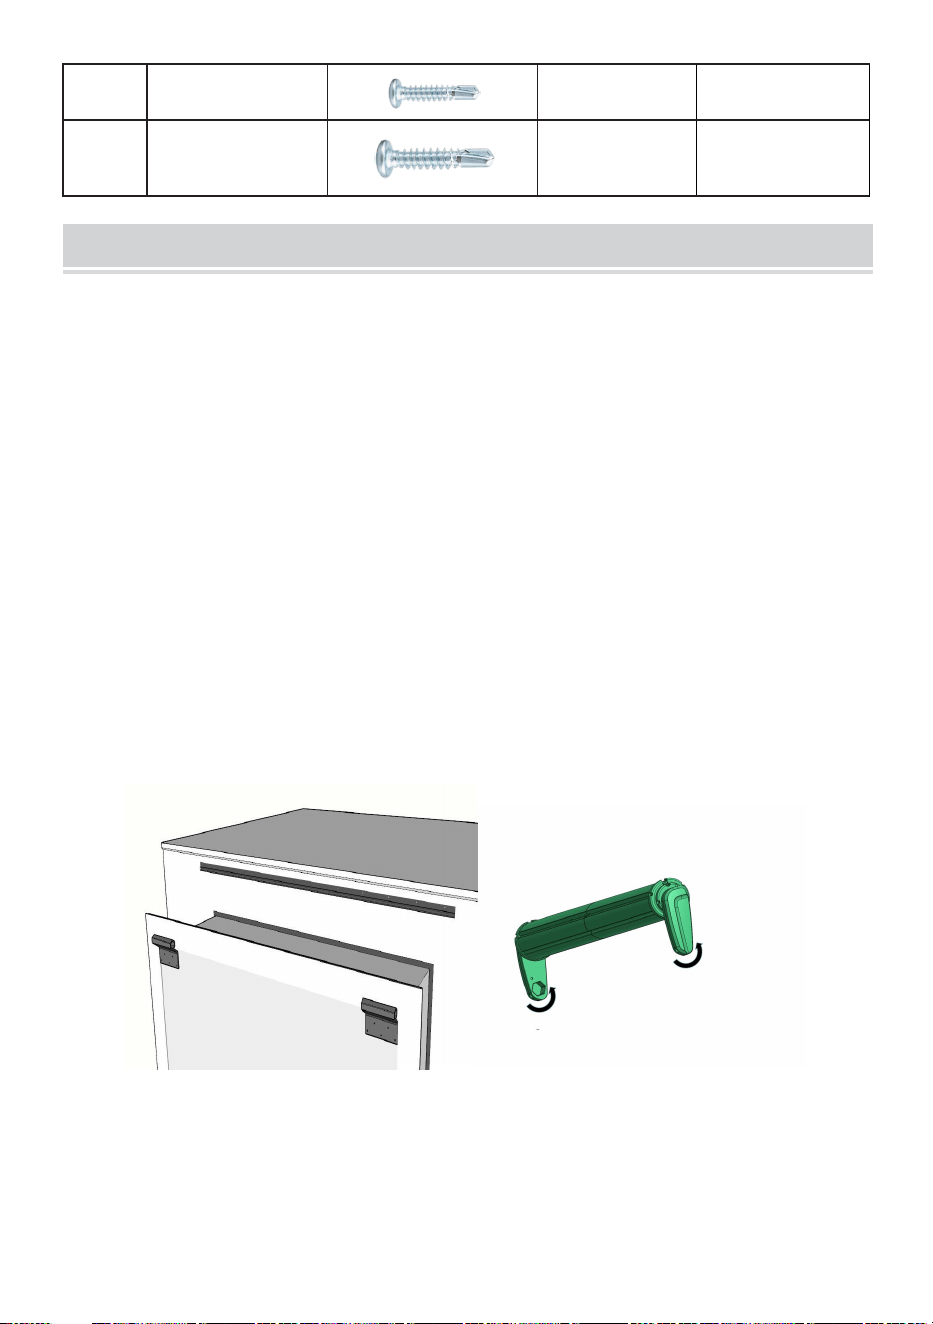
STEP 1:Assembly the Roller Assembly and connect Pipes.
For 1 piece connect pipe.
12
C Screw
(M4.8*22mm)
10
10
- 7 -
For 2 piece connect pipe.
STEP 2:Assembly these parts with “A” screw.
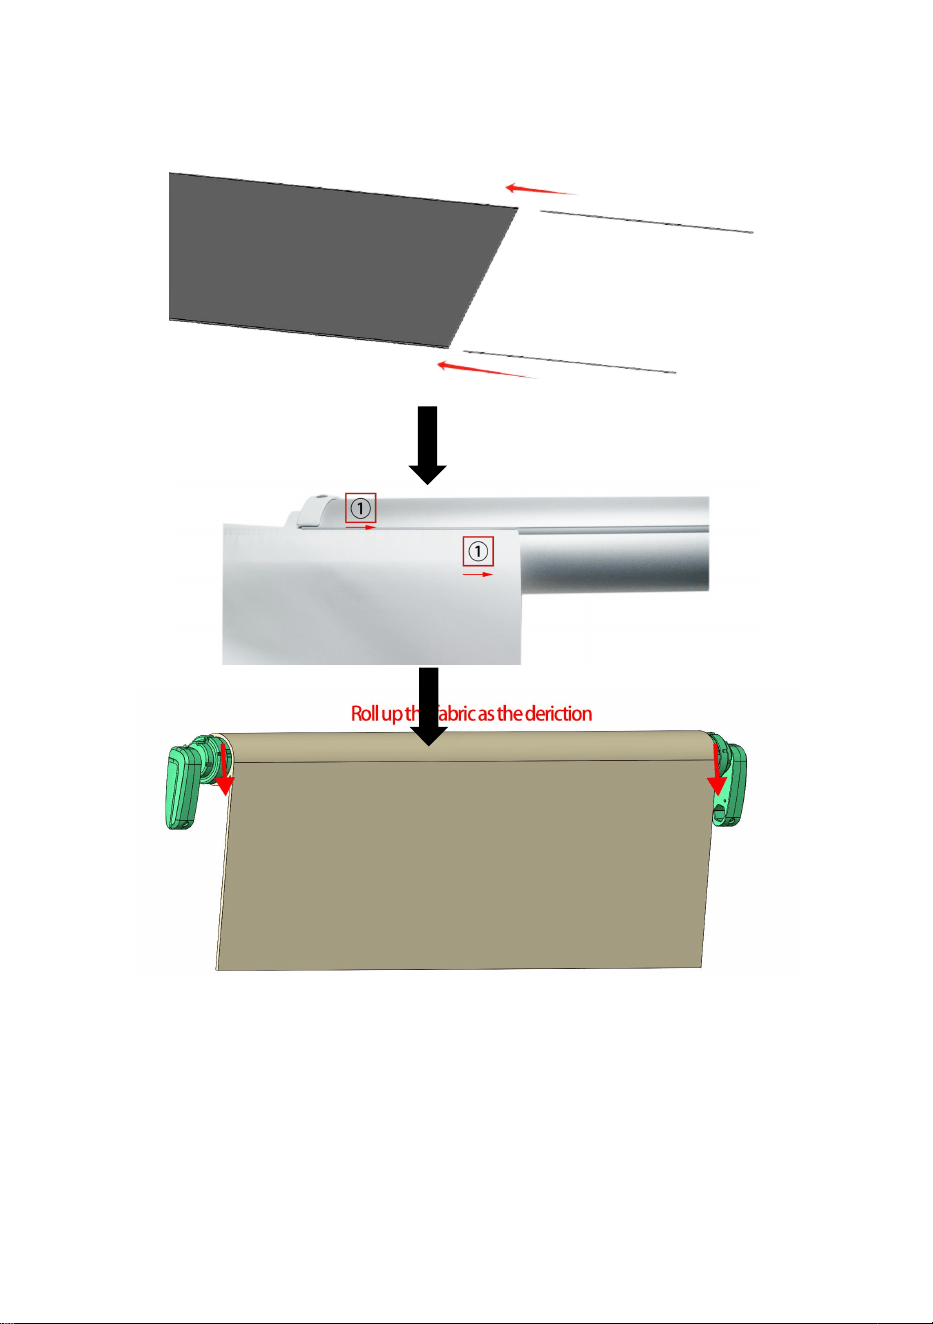
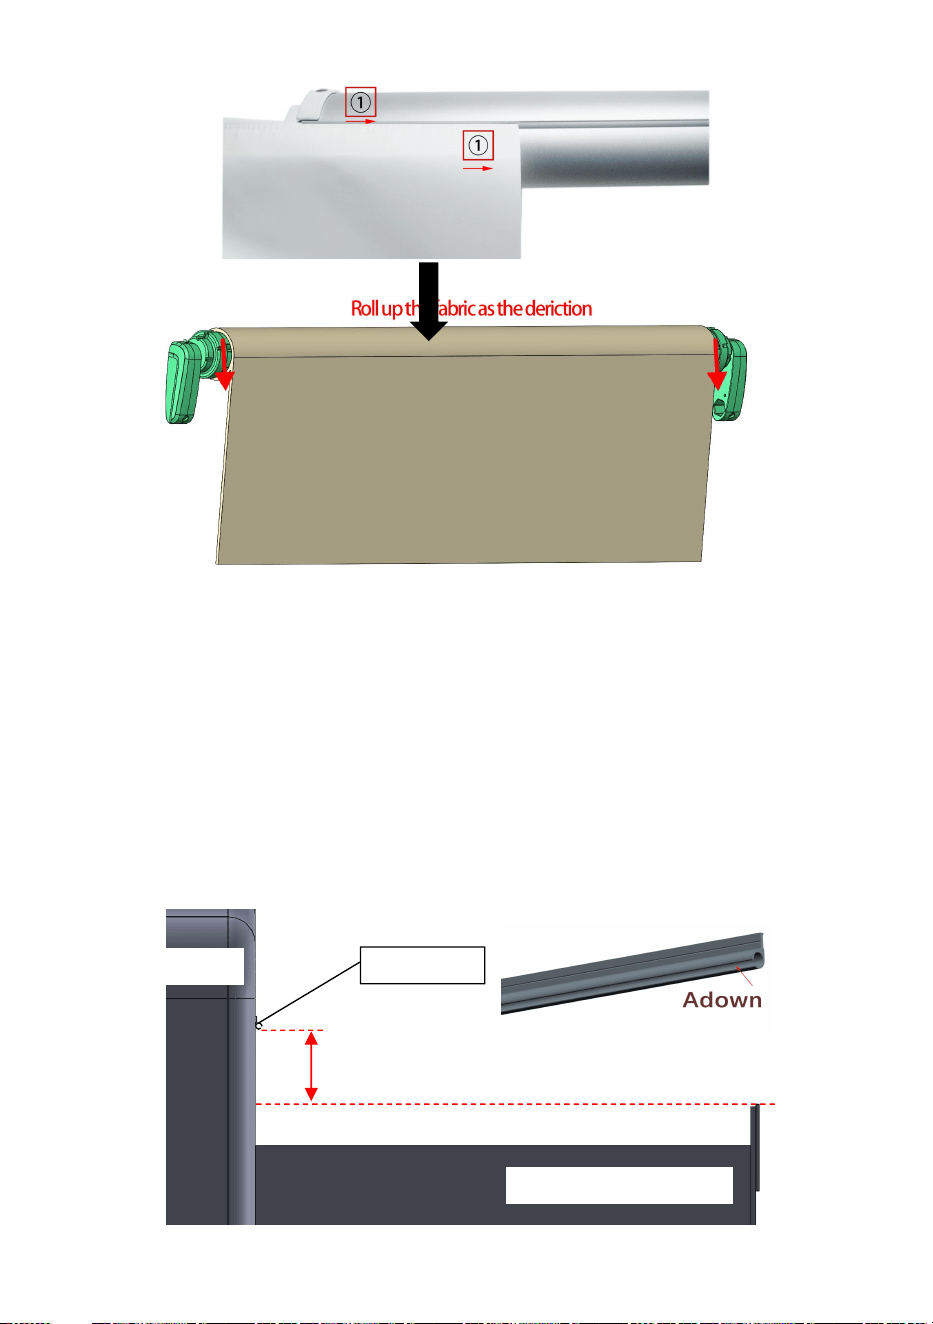
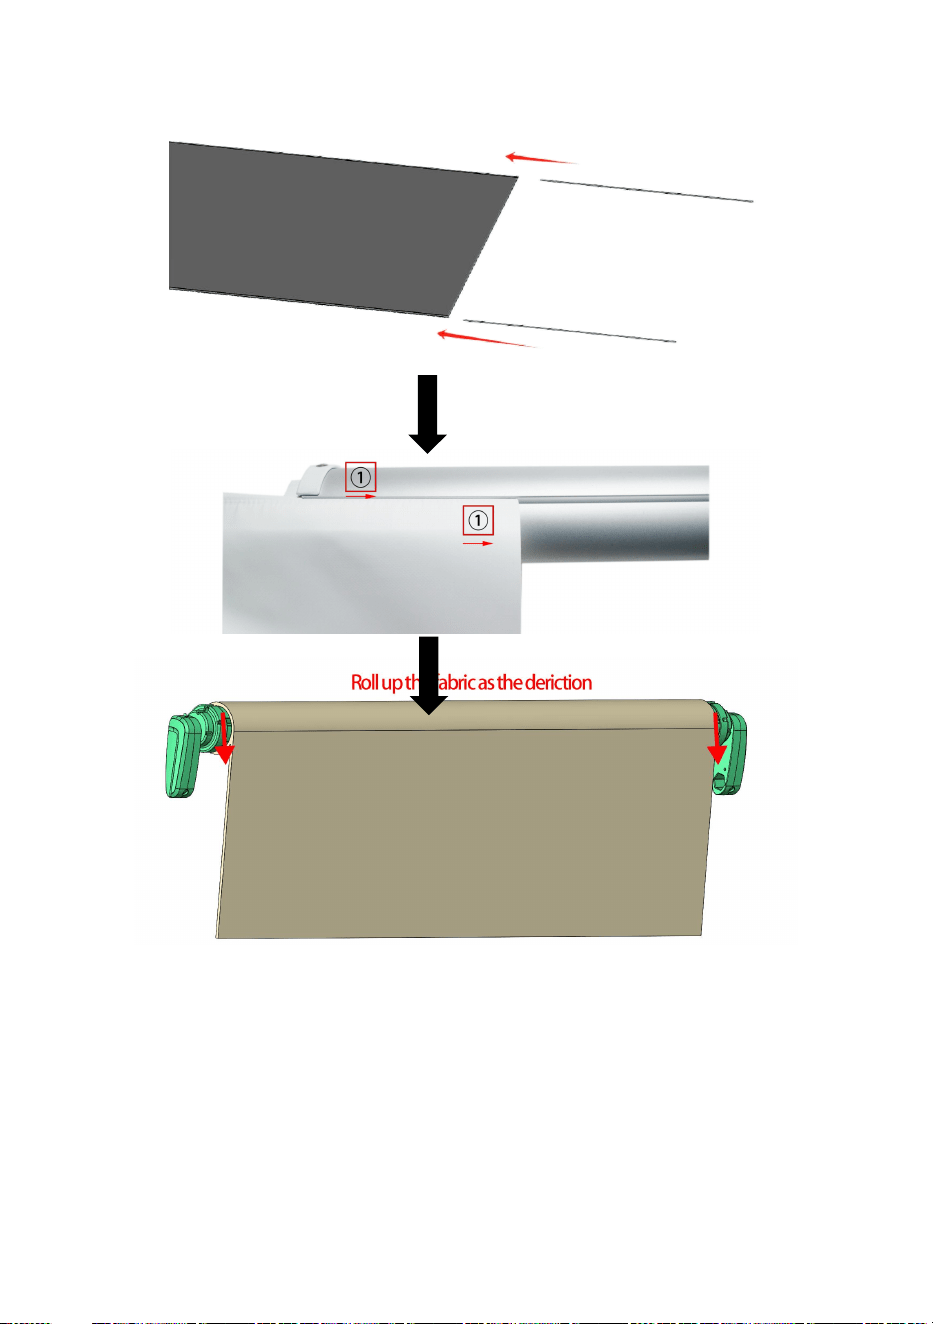
STEP 3:Mounting the fabric.
Inset 2pcs poly-cords into the two sides of fabric. Find the ① label in the
Fabric and the ① label in the Roller, Slide the fabric into the roller by the
arrow direction, then roll up the fabric onto the roller.
- 8 -
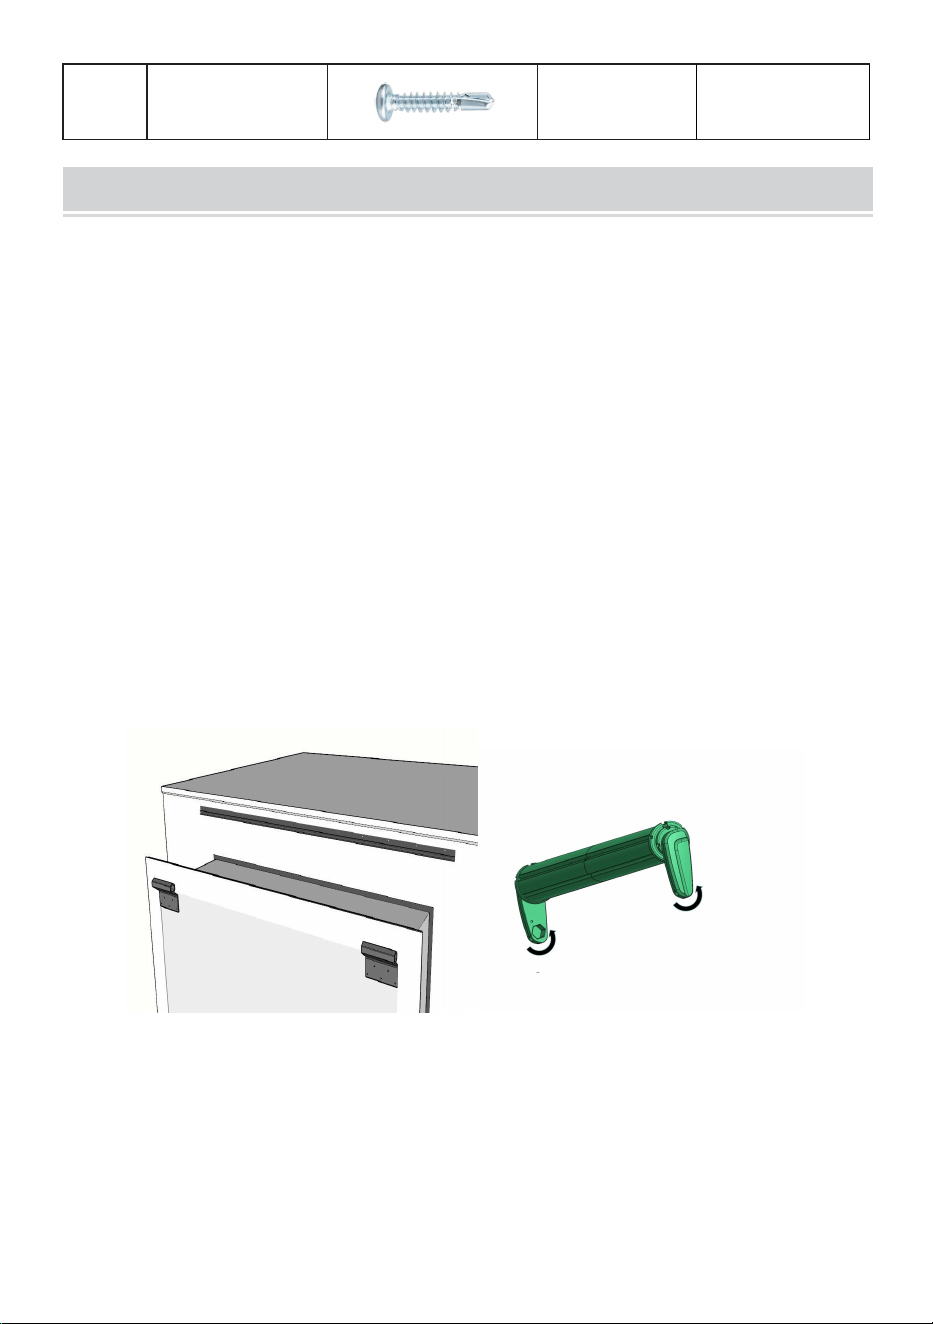
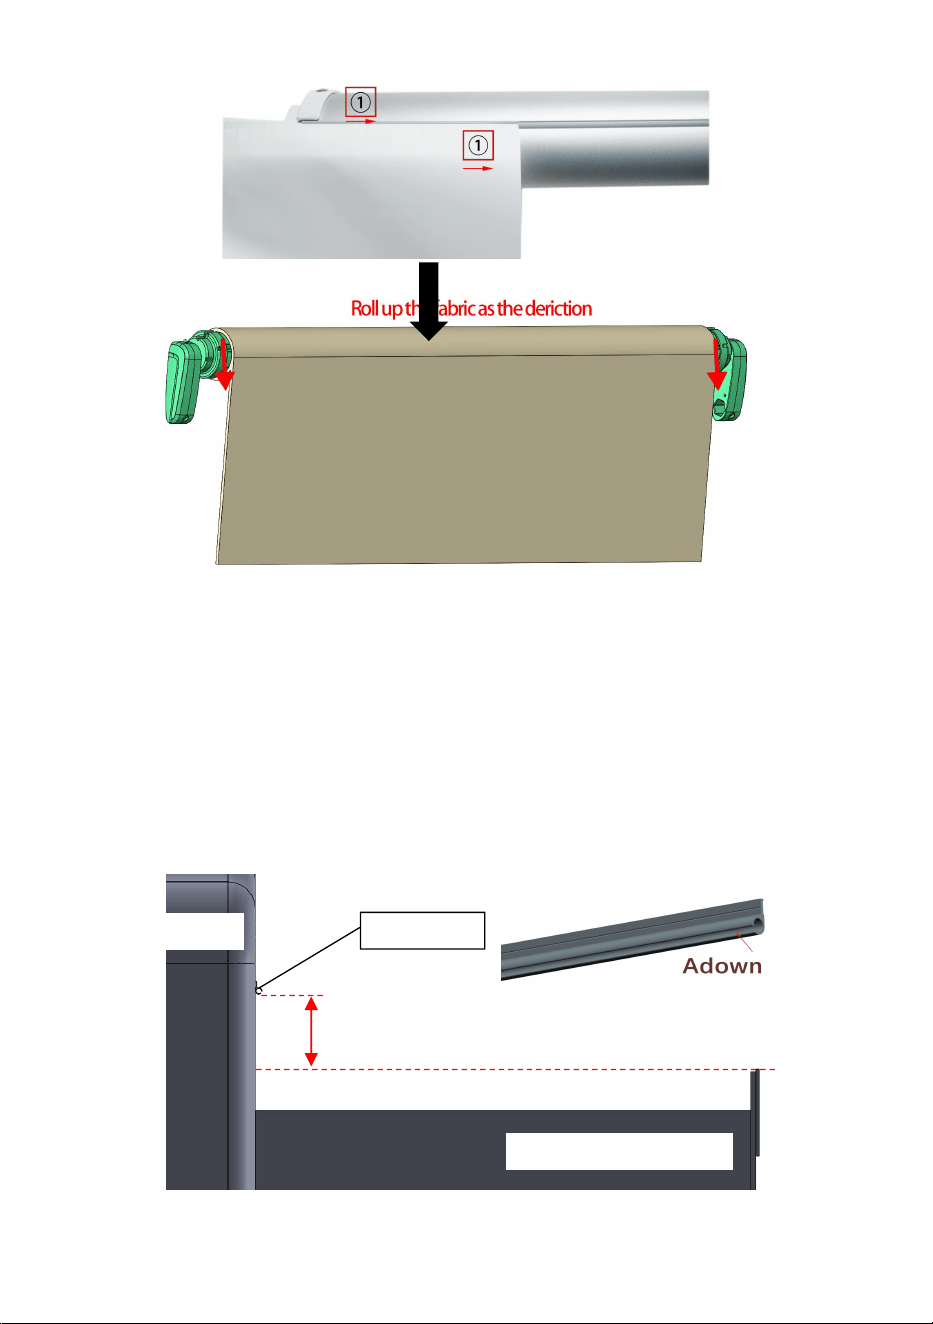
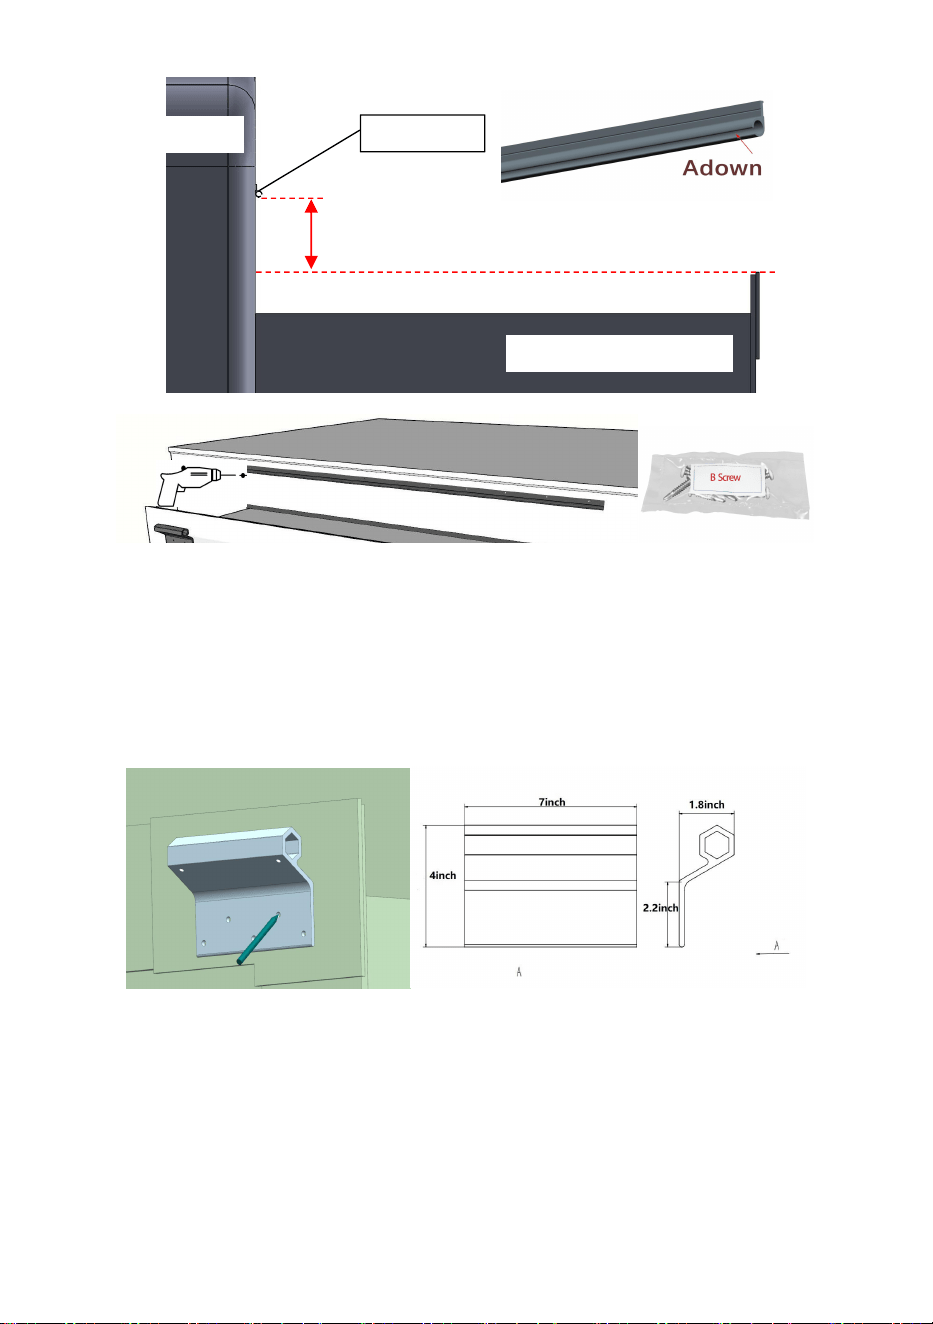
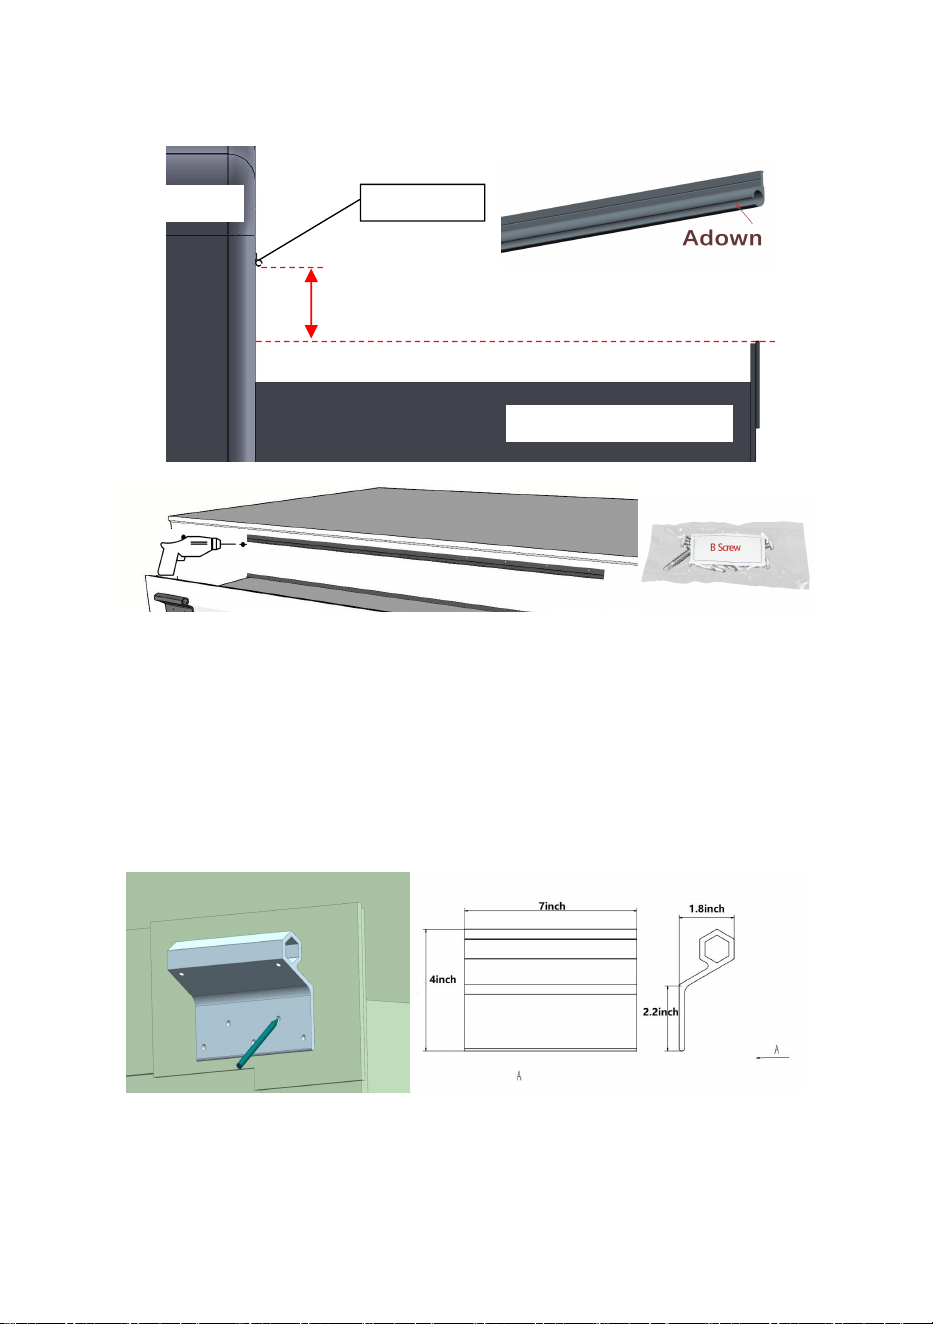
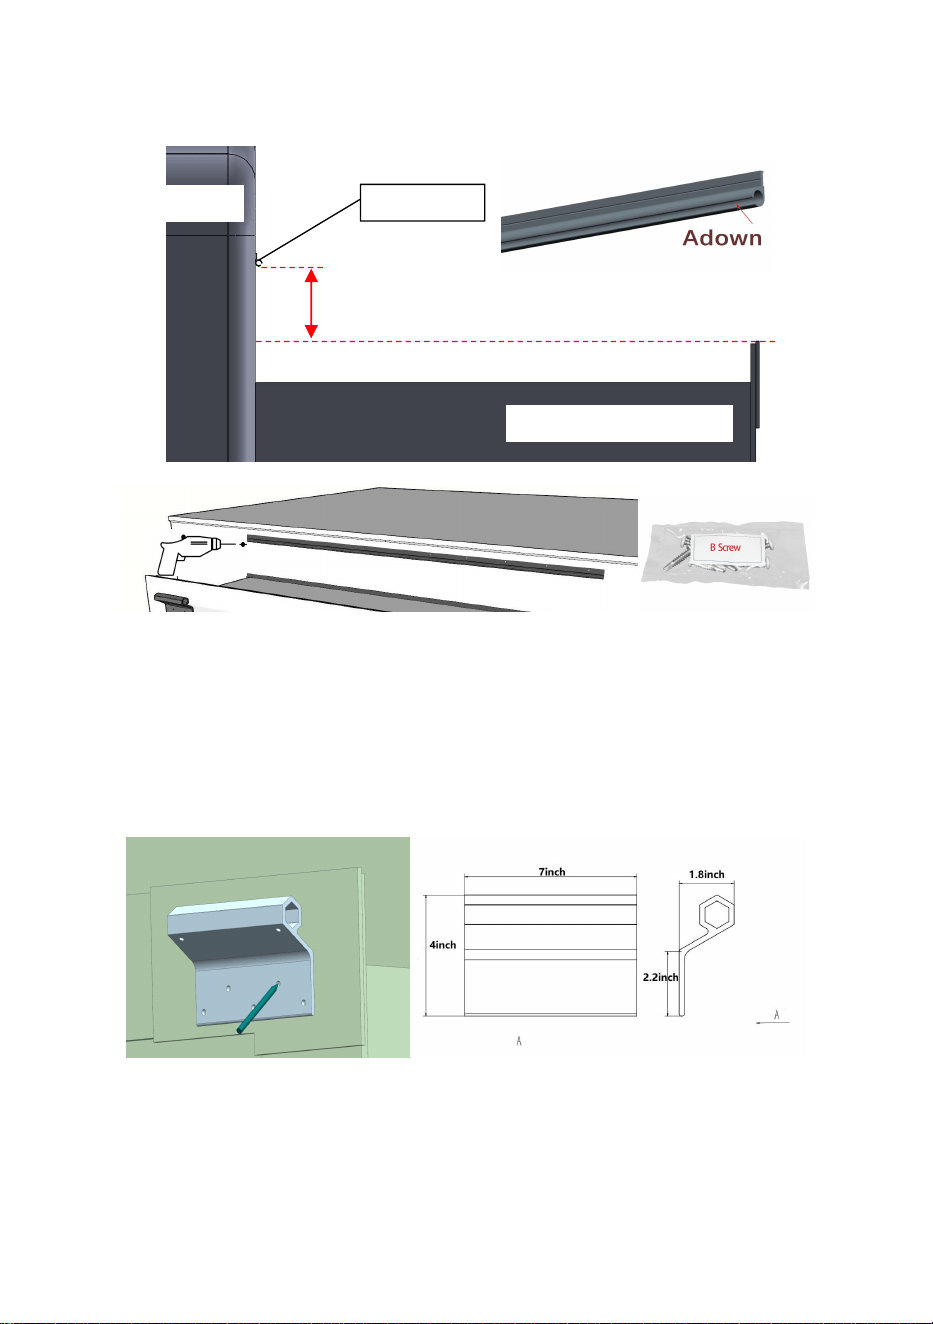
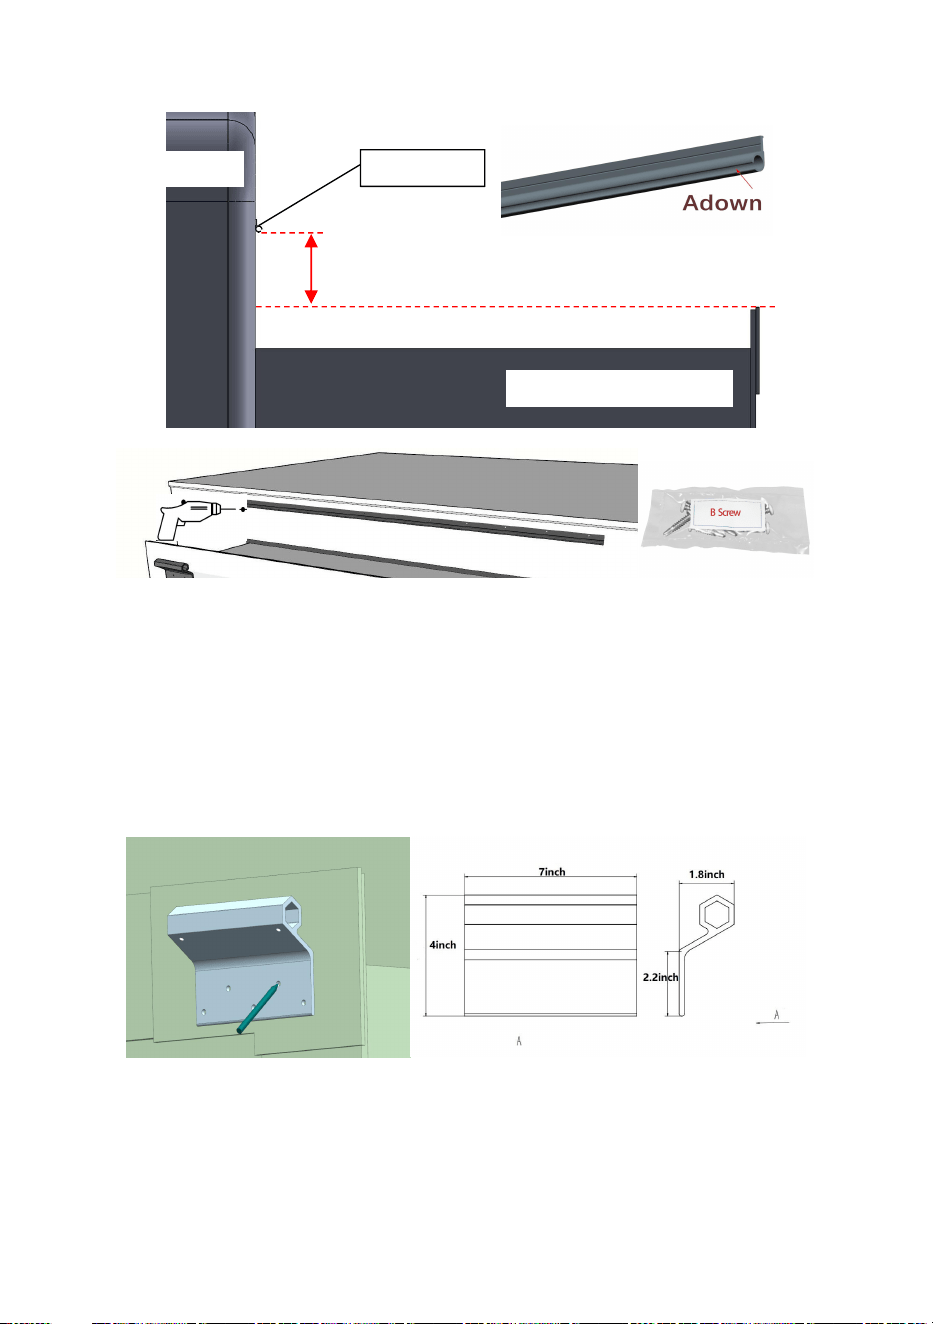
STEP 4:Install the fabric rail
The fabric rail is fixed on the side of the vehicle body, and the lower height
of the fabric rail is more than 1.5inch higher than the top of the slide out
awning. It must be kept on a horizontal line and on the same plane. If the
front and rear positions are not on the same plane due to the curvature of
the body and other reasons, it is necessary to use a cushion block to pad
the fabric rail flat (the cushion block needs to be self-matched).
Next page
1.5in<H<2in
RV’s body
RV’s slide out module
fabric rail

- 9 -
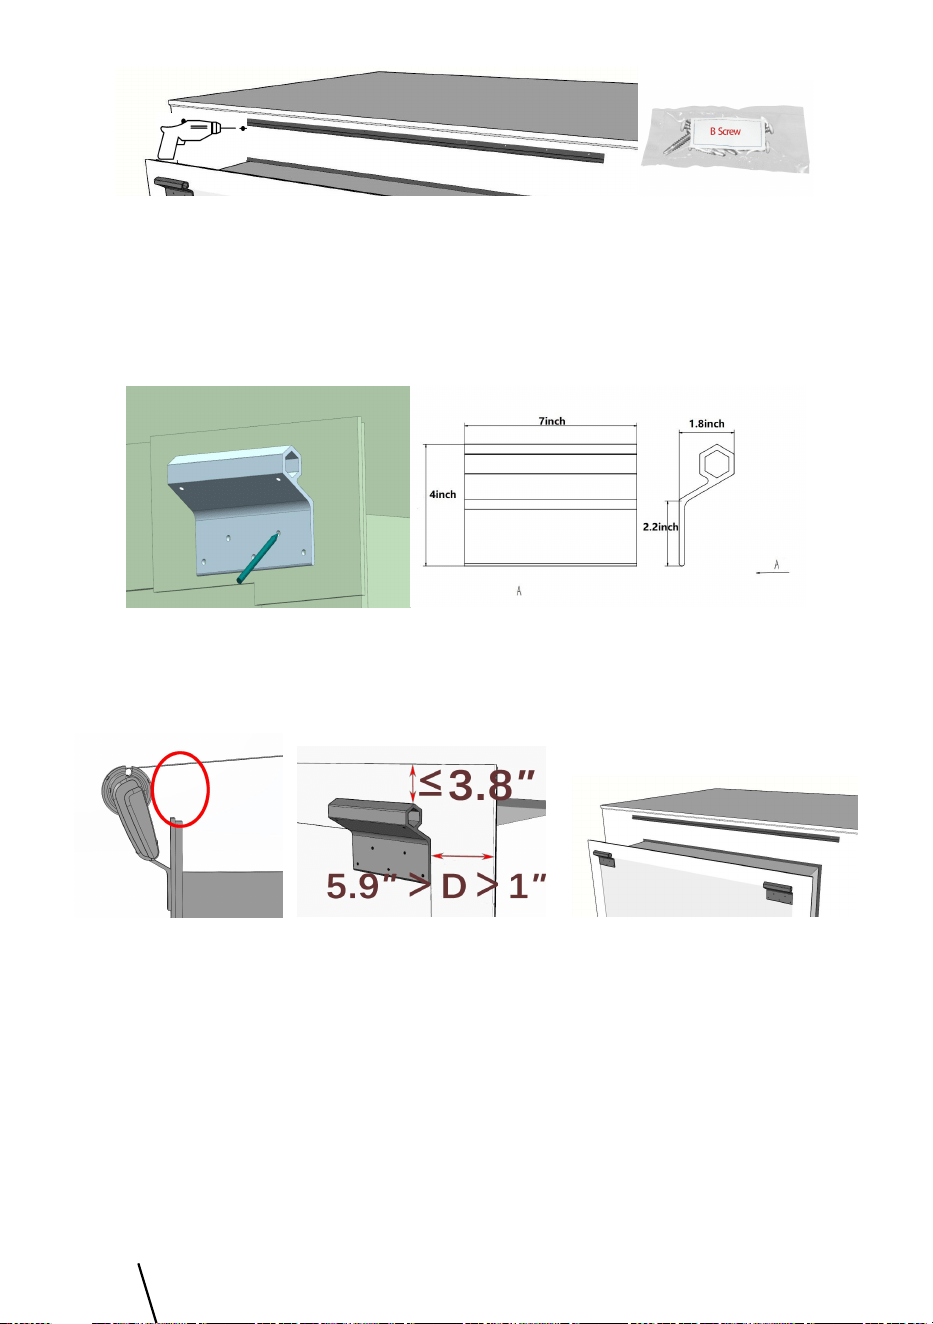
※ Note: Before starting to install the drilling screws, please make
sure that the drilling location is free of obstacles, such as electrical
wiring.
STEP 5:Place the mounting brackets in a suitable installation position, drill
holes after marking the fixed hole position on the outside of the slide out
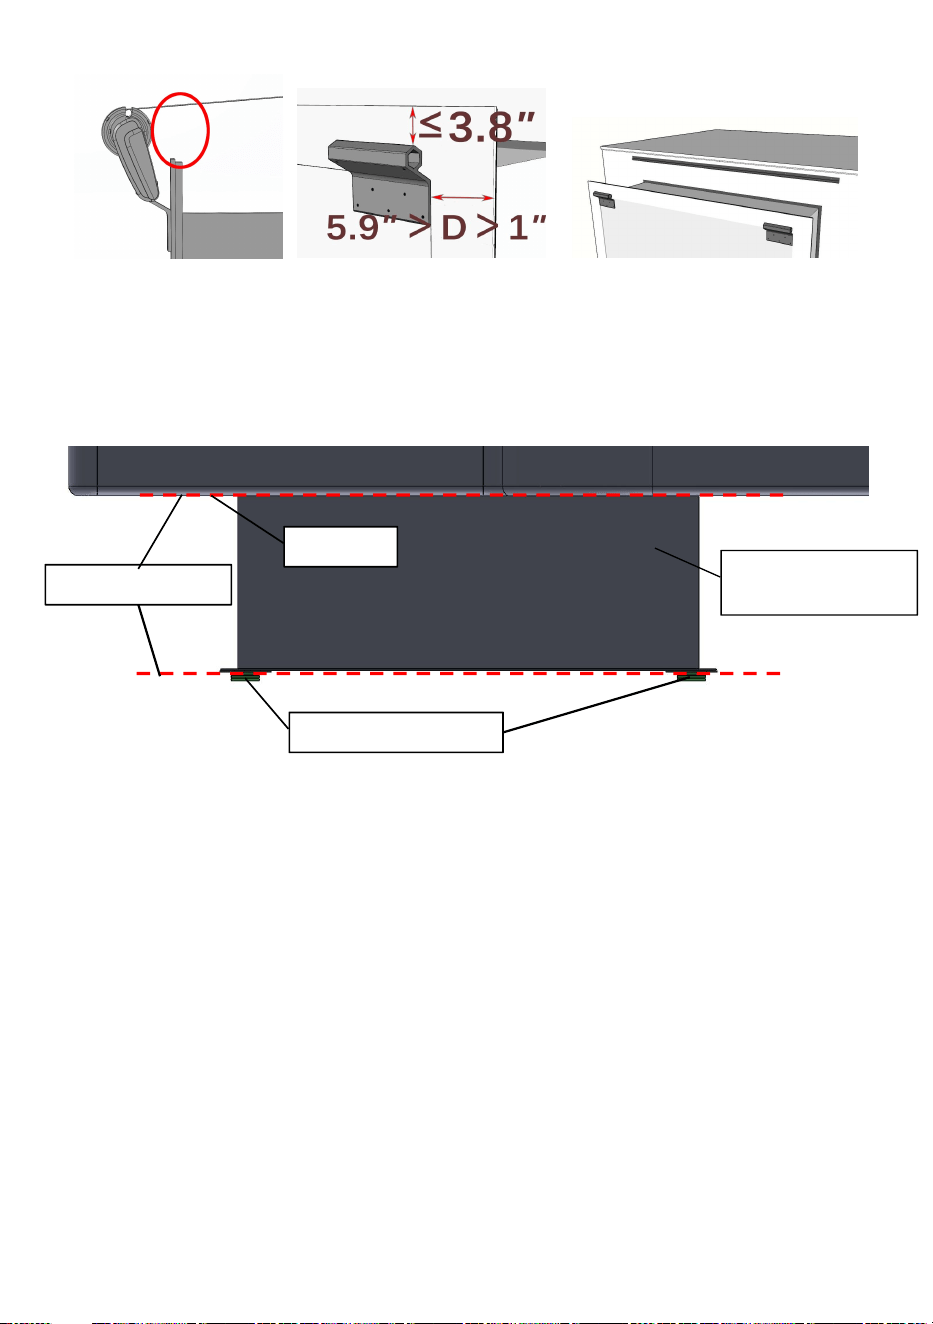
awning, see the size of it, and fix with Screw C.
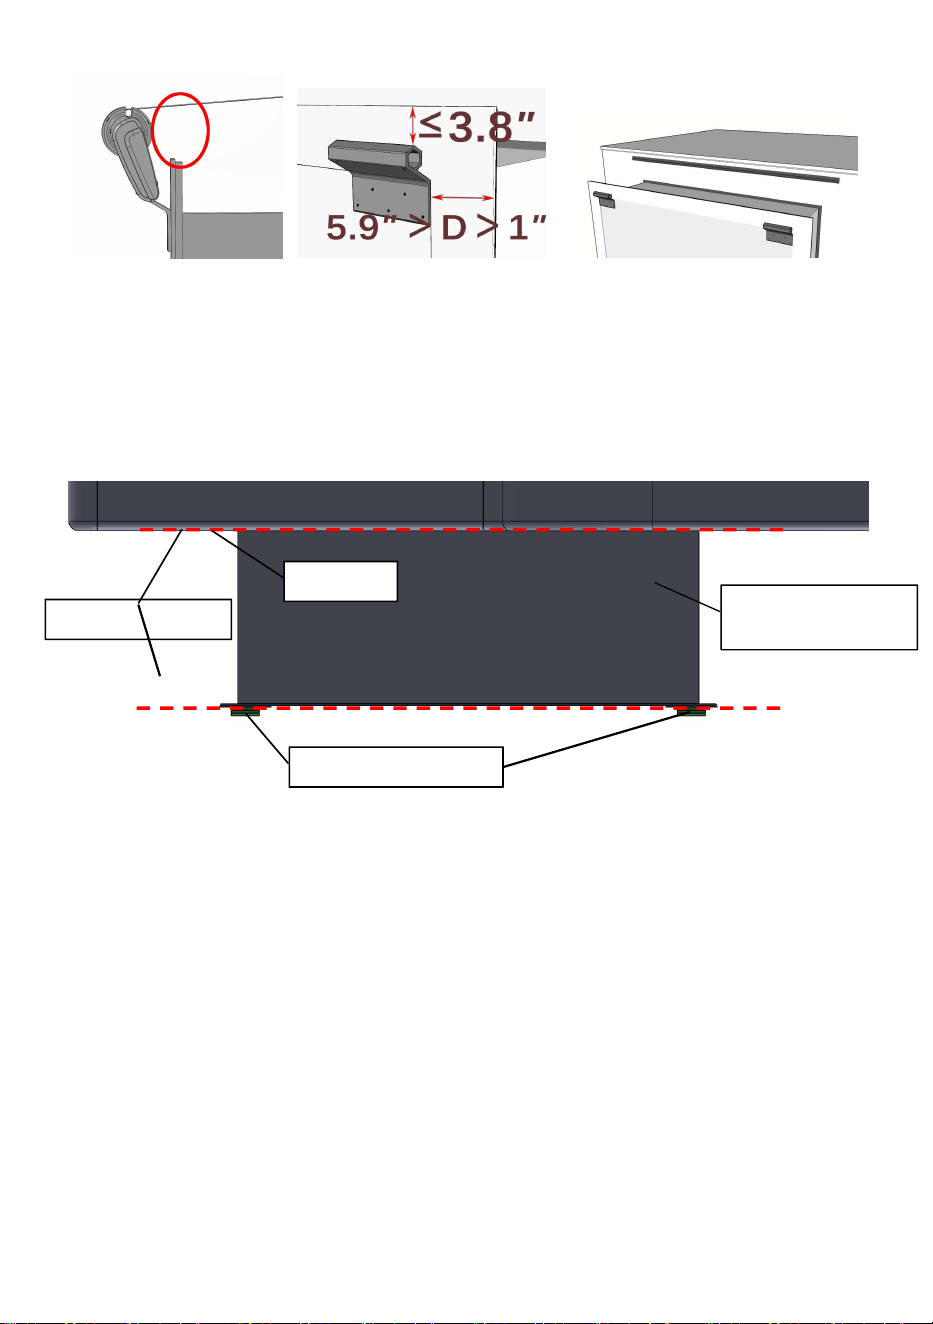
In order to prevent the fabric from scratching the edge of the expansion
cabin, the upper part of the fixed baffle should be ≤ 3.8inch away from the
upper cornice of the slide out.
The height of the two brackets must be kept on a horizontal line and in the
same plane. If the front and rear positions are not on the same plane due
to the curvature of the body and other reasons, the mounting brackets
needs to be flattened with a cushion block (the cushion block needs to be
equipped by itself)
- 10 -
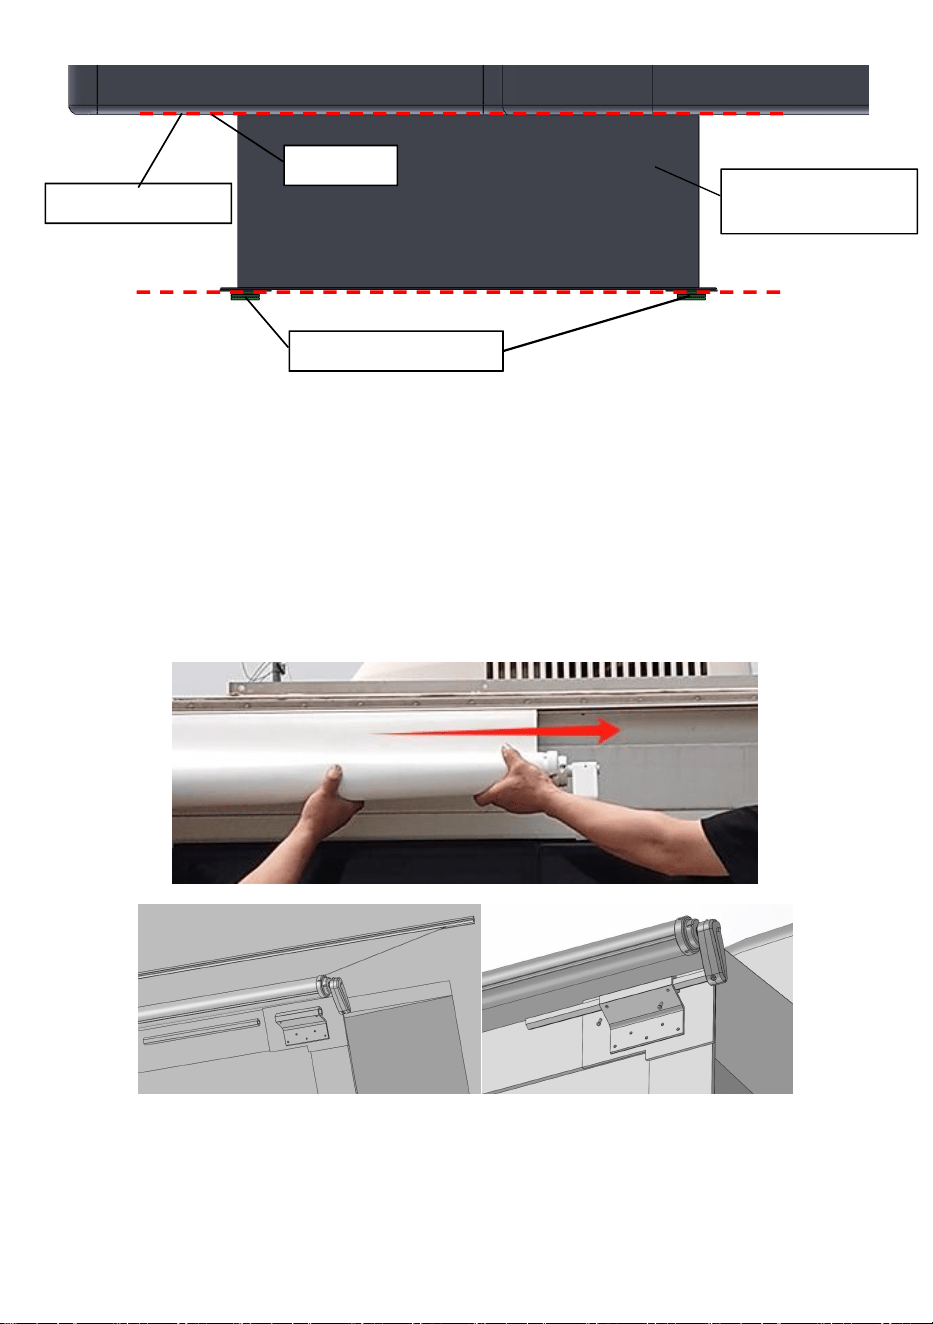
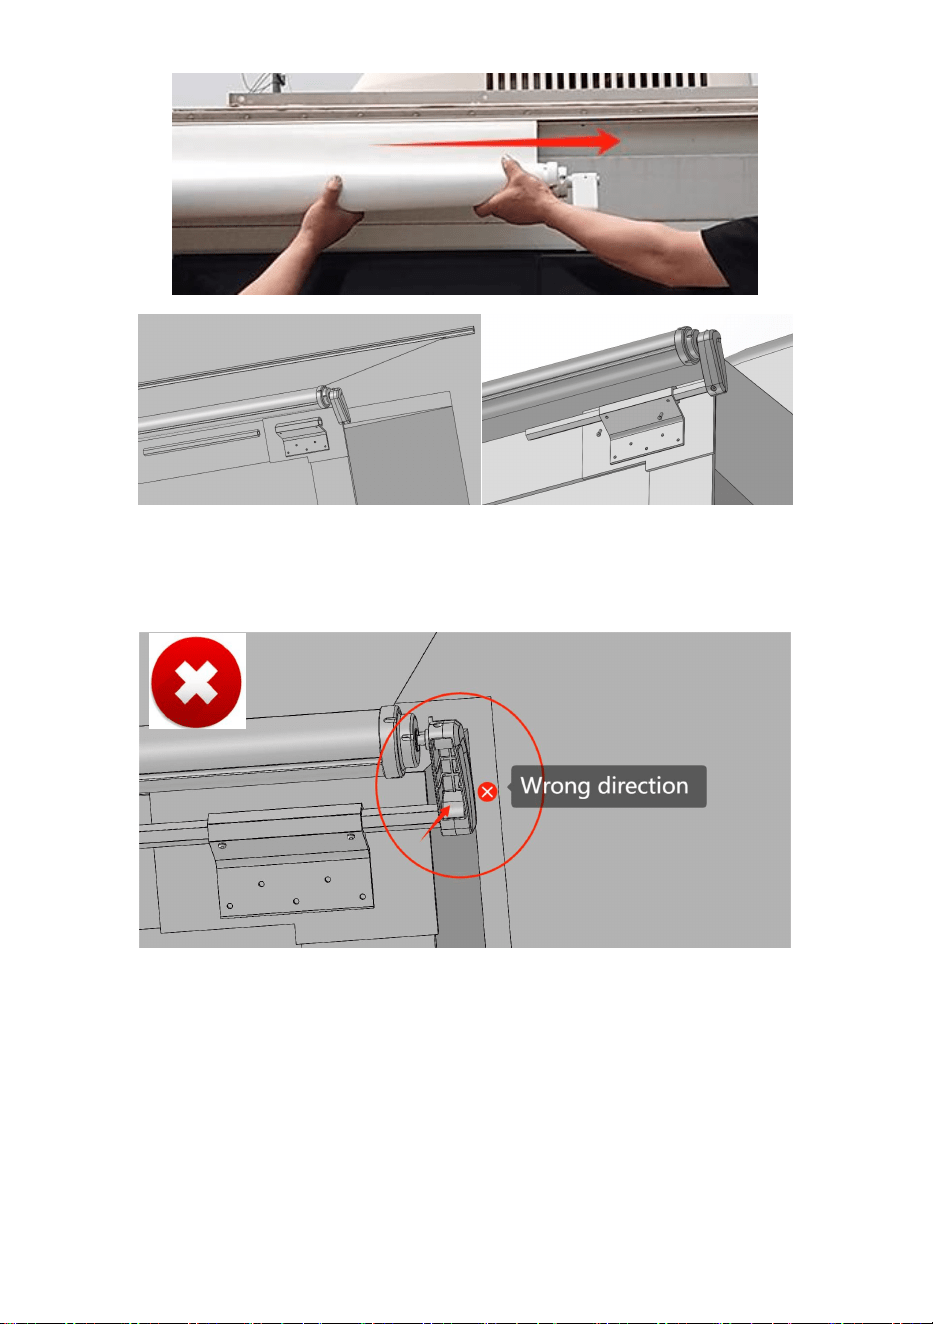
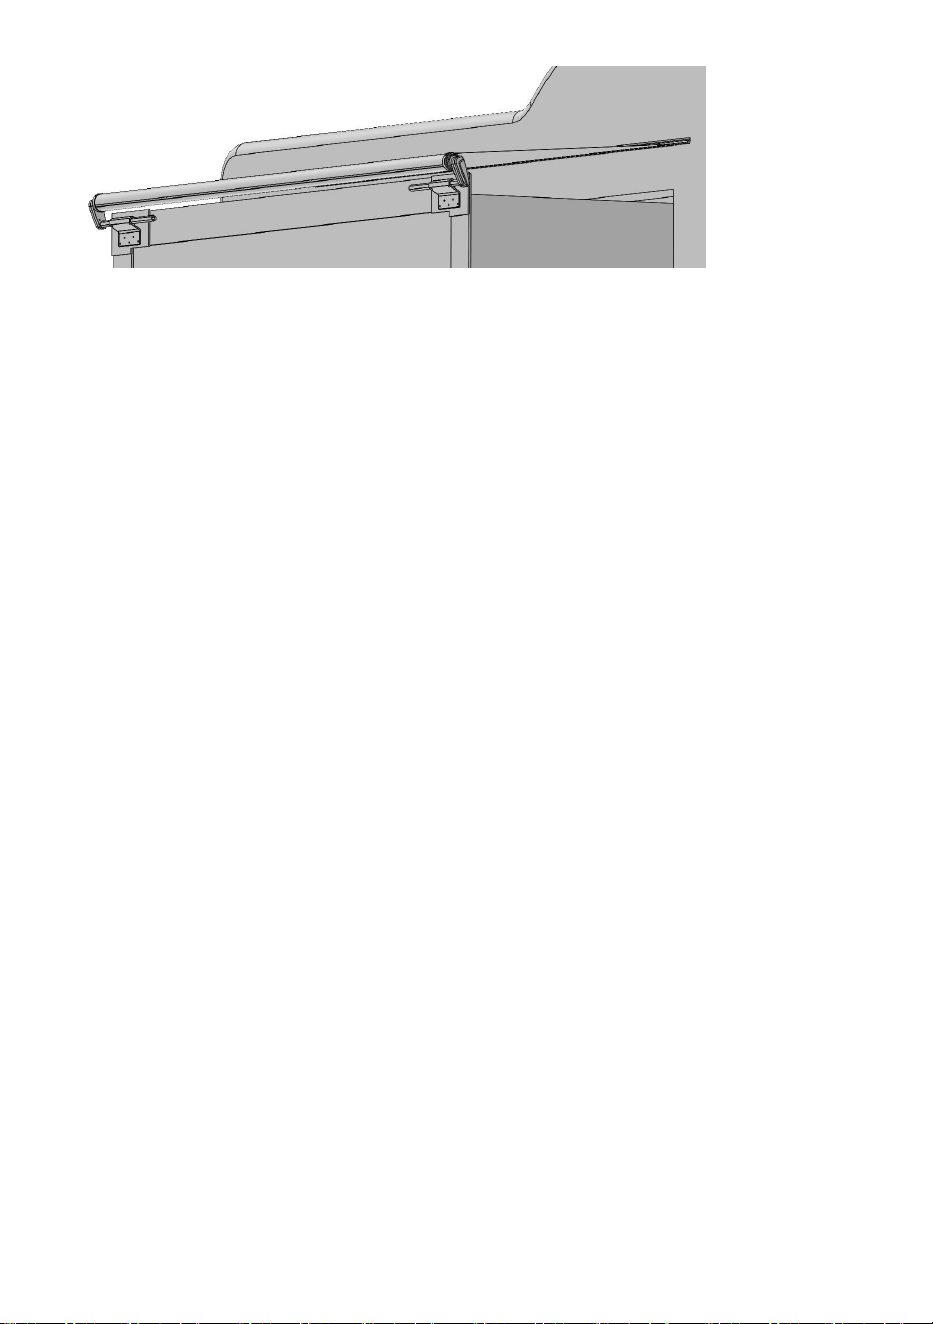
STEP 6:The fabric is inserted into the track, and the awning is
secured with the bracket as a whole.
In order to facilitate the installation and operation, the slide out awning
fabric is turned around and loosened for 1~2 turns (within about 300mm),
inset the rubber of fabric into the fabric rail, and then the slide out awning is
placed near the mounting brackets, penetrate the hexagonal tube from the
mounting bracket to the end of slide out awning, fix it with Screw B.
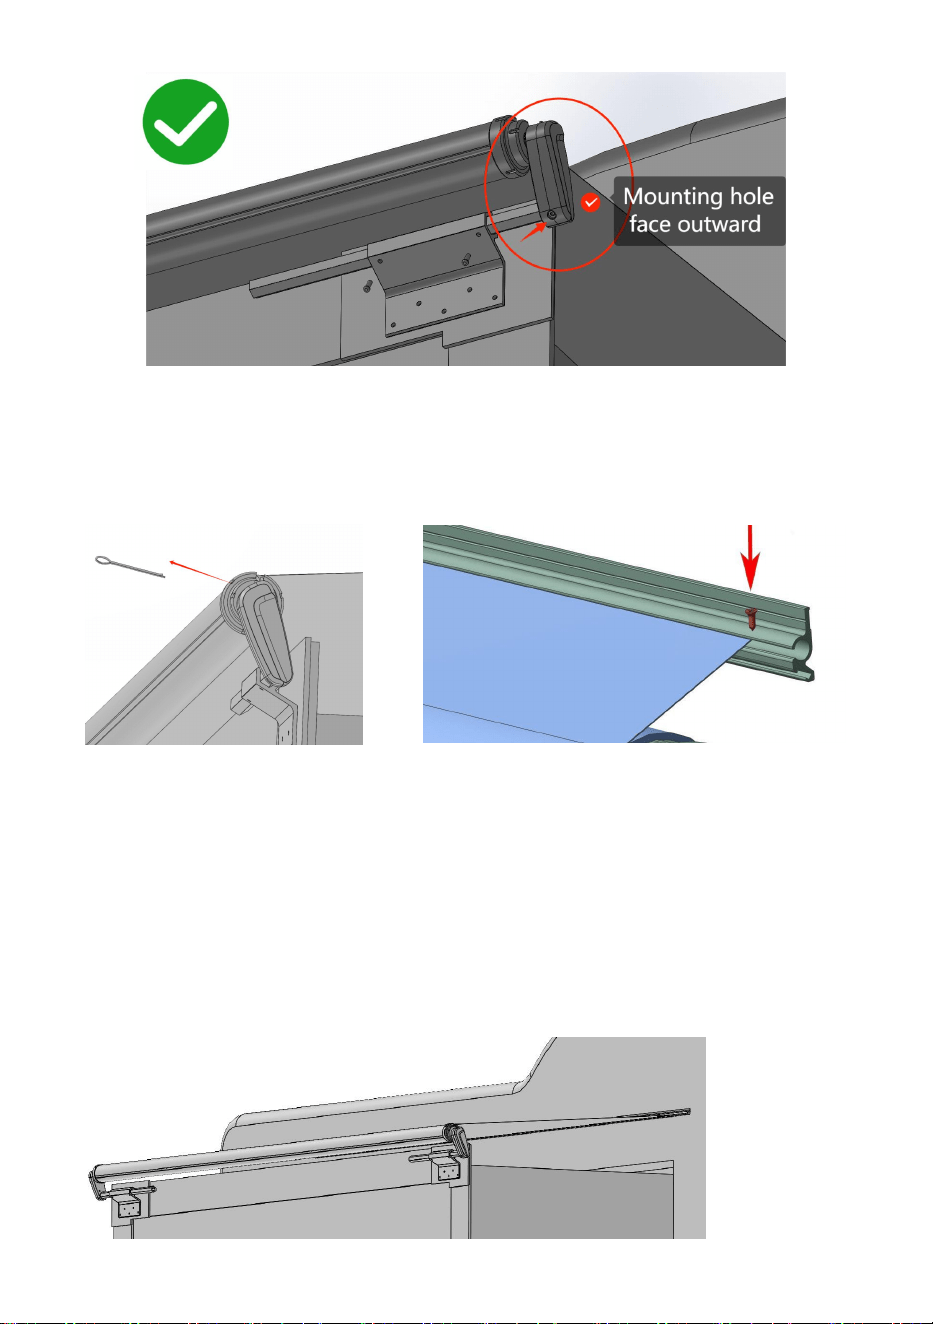
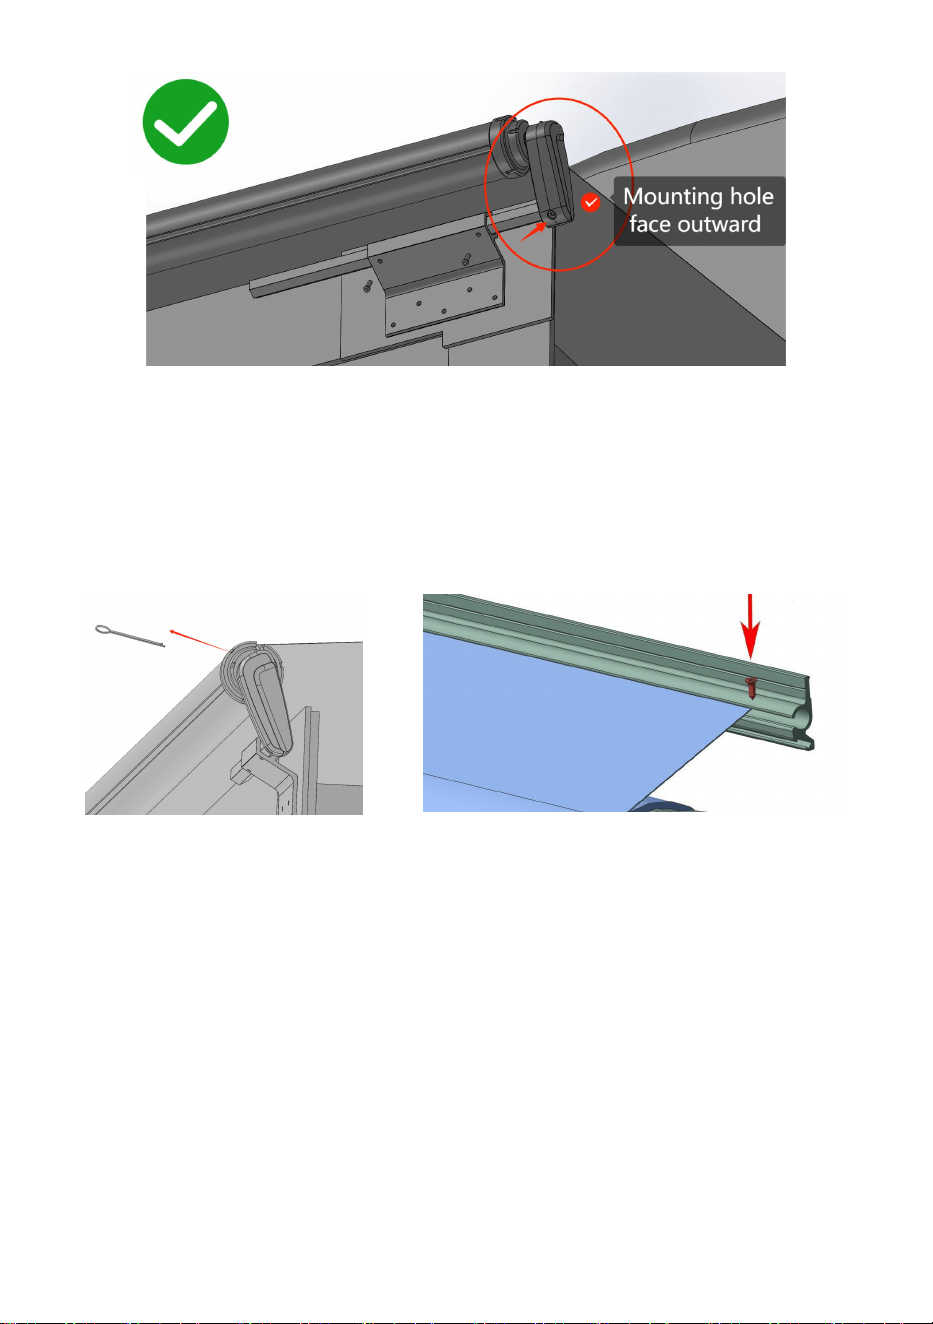
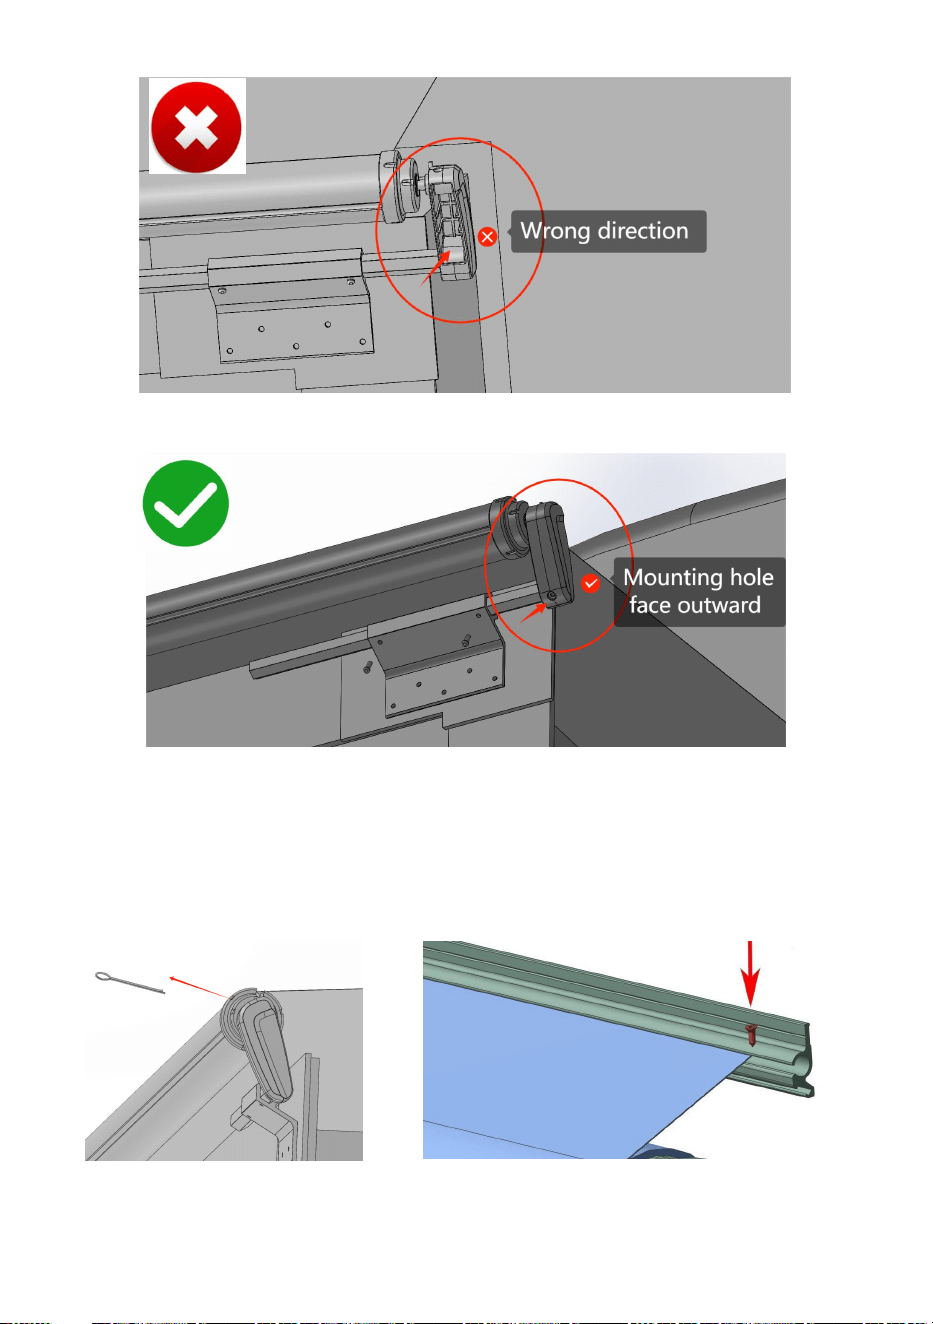
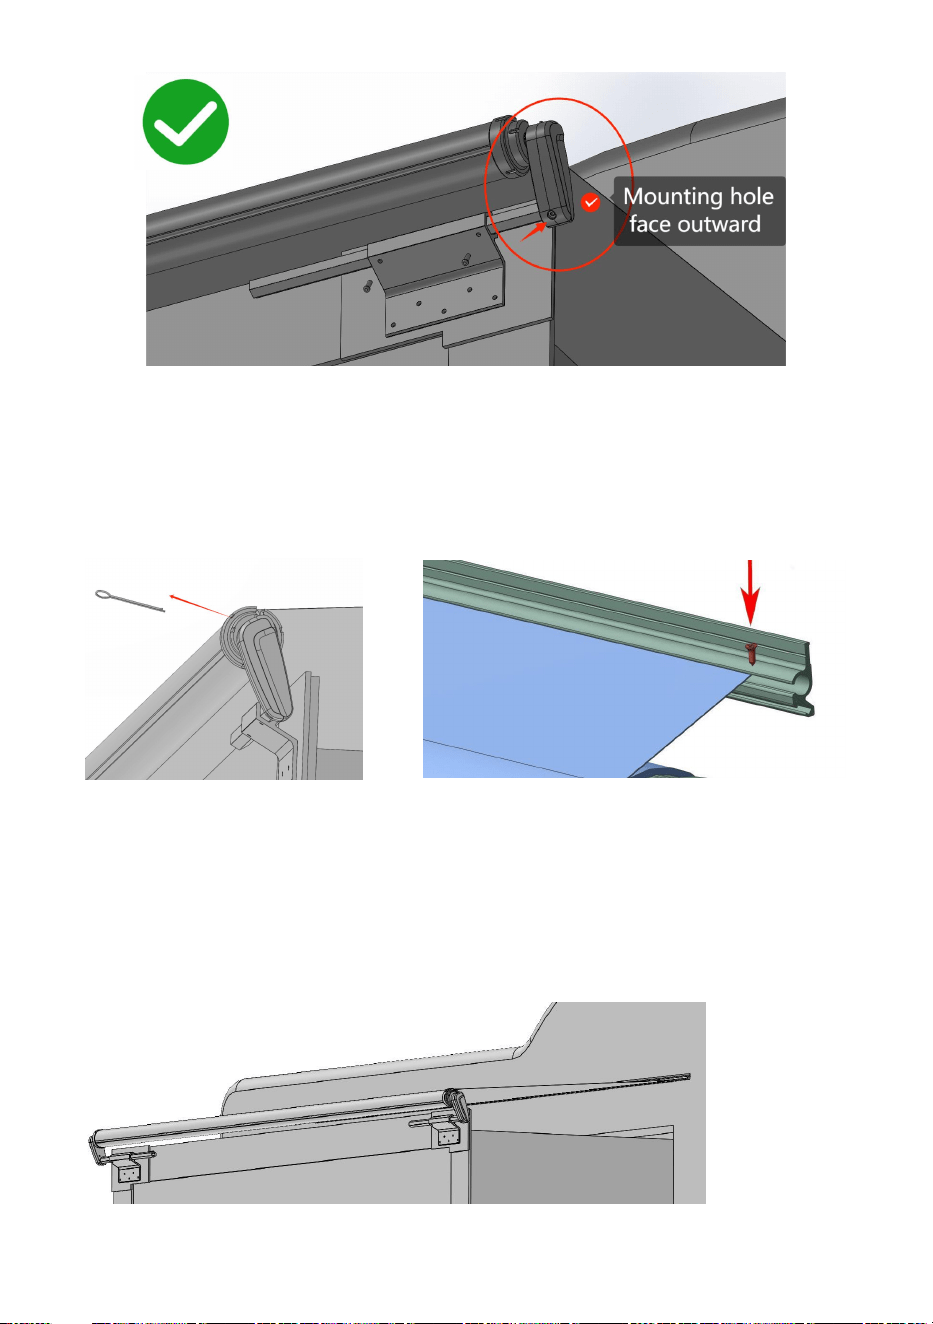
※ NOTE: the orientation of the RV AWNING mounting bracket when
mounting to the RV.
RV’s slide out
module
Mounting brackets
Require parallel
fabric rail

- 11 -
STEP 7:Debug
Adjust the slide fabric, Check that all screws are fastened,remove the
spring latch,and repeatedly test the opening and closing of the slide out
awning for several times. If no problem fix B screws for both sides to
protect the fabric from moving.
※Note: Please do guarantee to fix the screws for both sides of the
- 12 -
fabric, otherwise the slide out awning will be broken.
Congratulations on the completion of the expansion module installation,
wish you a happy camping
- 13 -
Manufacturer: Shanghaimuxinmuyeyouxiangongsi
Address: Shuangchenglu 803nong11hao1602A-1609shi, baoshanqu,
shanghai 200000 CN.
Imported to AUS: SIHAO PTY LTD. 1 ROKEVA STREETEASTWOOD
NSW 2122 Australia
Imported to USA: Sanven Technology Ltd. Suite 250, 9166 Anaheim
Place, Rancho Cucamonga, CA 91730
REP
UK
YH CONSULTING LIMITED.
C/O YH Consulting Limited Office 147,
Centurion House, London Road,
Staines-upon-Thames, Surrey, TW18 4AX
REP
EC
E-CrossStu GmbH
Mainzer Landstr.69,
60329 Frankfurt am Main.


Techniczny Wsparcie i certyfikat gwarancji elektronicznej www.vevor.com/support
MARKIZA MODUŁOWA DO KAMPERÓW
MODEL: A6
Nadal staramy się oferować Państwu narzędzia w konkurencyjnych cenach.
„Oszczędź połowę”, „Połowa ceny” lub jakiekolwiek inne podobne wyrażenia używane
wyłącznie przez nas
przedstawia szacunkowe oszczędności, jakie możesz uzyskać kupując określone
narzędzia
z nami w porównaniu do głównych, najlepszych marek i niekoniecznie oznacza to okładka
wszystkie kategorie narzędzi oferowanych przez nas. Przypominamy o sprawdzeniu
ostrożnie
gdy składasz u nas zamówienie, jeśli faktycznie Oszczędność
Połowa w porównaniu z wiodącymi markami.


- 1 -
MODEL: A6
< Zdjęcie tylko w celach poglądowych >
POTRZEBUJESZ POMOCY? SKONTAKTUJ SIĘ Z NAMI!
Masz pytania dotyczące produktu? Potrzebujesz wsparcia
technicznego? Skontaktuj się z nami:
Wsparcie techniczne i certyfikat e-gwarancji
www.vevor.com/support
To jest oryginalna instrukcja, przed użyciem należy uważnie przeczytać
wszystkie instrukcje. VEVOR zastrzega sobie jasną interpretację naszej
instrukcji obsługi. Wygląd produktu będzie zależał od produktu, który
otrzymałeś. Prosimy o wybaczenie, że nie poinformujemy Cię ponownie,
jeśli w naszym produkcie pojawią się jakiekolwiek aktualizacje
technologiczne lub oprogramowania.
RV MODULAR
SLIDE AWNING

- 2 -
IMPORTANT SAFEGUARDS
OSTRZEŻENIE: Przeczytaj i zrozum całą instrukcję przed
rozpoczęciem obsługi lub serwisowania tego produktu.
Nieprzestrzeganie tych ostrzeżeń i instrukcji może spowodować
obrażenia ciała lub uszkodzenie cennego mienia.
Unikaj używania produktu przez dzieci . Produkt ten nie jest zabawką. Nie
pozwalaj dzieciom się nim bawić .
ASSEMBLY PRECAUTIONS
1. Montaż wyłącznie zgodnie z niniejszą instrukcją. Nieprawidłowy montaż
może stwarzać zagrożenia.
2. i użytkowania należy nosić okulary ochronne zatwierdzone przez ANSI oraz
wytrzymałe rękawice robocze .
3. Utrzymuj miejsce zgromadzenia w czystości i zapewnij dobre oświetlenie.
4. Nie dopuszczać osób postronnych na teren montażu podczas jego trwania.
5. Nie przychodź na spotkania, jeśli jesteś zmęczony lub pod wpływem alkoholu,
narkotyków lub leków.
6. Możliwości produktu odnoszą się wyłącznie do produktu prawidłowo i
kompletnie zmontowanego.
7. Aby uzyskać dodatkowe informacje dotyczące części wymienionych na
kolejnych stronach, zapoznaj się ze schematem montażu w tej instrukcji. Rozpakuj
i oddziel wszystkie części w czystym miejscu pracy. Trzymaj małe części
zamienne poza zasięgiem dzieci.
8. Przygotowania przed instalacją:
1) zaleca się współpracę co najmniej 2 osób w celu ukończenia
2) Dwie drabiny 4-stopowe o wysokości 10 stóp
3) Niektóre elektronarzędzia, na przykład wiertarka
- 3 -
ZAPISZ TE INSTRUKCJE
PRODUCT DIMENSIONS
Jak zamówić właściwy rozmiar ?
Mierząc długość markizy wysuwanej, zaleca się, aby wymiar tkaniny
wysuwanej był o 1-6 cali dłuższy od długości markizy wysuwanej.
Rozmiar
wysuwanego
elementu
(L1)
Rozmiar
markizy (L2)
Rozmiar
tkaniny (L3)
W
(Maks.)
Kolor
6 ' 7 '' ~ 7 '
7 ' 7 ''
7 ' 1 '
51 ”
Czarny
7 ' 1 '' ~7 ' 6 ''
8 ' 1 '
7 ' 7 ''
51 ”
Czarny
7 ' 7 '' ~ 8 '
8 ' 7 ''
8 ' 1 '
51 ”
Czarny
11 ' 7 '' ~ 12 '
12 ' 7 ''
12 ' 1 '
51 ”
Czarny
12 ' 1 '' ~ 12 ' 6 ''
13 ' 1 '
12 ' 7 ''
51 ”
Czarny

- 4 -
SPECIFICATION
Model
A6
Tworzywo
Aluminium
Tkanina
PCV
Kolor
Biały & Czarny
Odpowiedni pojazd
Kampery z wysuwaną częścią
12 ' 7 '' ~ 13 '
13 ' 7 ''
13 ' 1 '
51 ”
Czarny
12 ' 7 '' ~ 13 '
13 ' 7 ''
13 ' 1 '
51 ”
Biały
13 ' 1 '' ~13 ' 6 ''
14 ' 1 '
13 ' 7 ''
51 ”
Czarny
13 ' 1 '' ~13 ' 6 ''
14 ' 1 '
13 ' 7 ''
51 ”
Biały
Unit:mm
- 5 -
PACKAGE LIST
NIE.
Nazwa
Zdjęcie
ILOŚĆ
SPECYFIKACJA
7 stóp i 1 cal
7 stóp i 7 cali
8 stóp i 1 cal
12 stóp i 1 cal
12 stóp i 7 cali
13 stóp i 1 cal
13 stóp i 7 cali
1
Zespół rolek (L)
1
1
2
Zespół rolek (R)
1
1
3
Wałek
przedłużający
/
1
4
Podłącz rurę
1
2
5
Tkanina
1
1
6
Sznurek z
tkaniny
2
2
7
Nawias
2
2
8
Szyna
materiałowa
2
3
9
Rura
2
2

- 6 -
INSTALLATION PRECAUTIONS
1. Sprawdź, czy na karoserii pojazdu jest wystarczająco dużo miejsca na
montaż i wysuń , nie zginając wkładek materiałowych.
2. Sprawdź, czy nadwozie pojazdu posiada płyty wzmacniające w
miejscach mocowania uchwytu montażowego i listwy materiałowej , lub
poproś o informacje sprzedawcę pojazdu.
3. Markiza wysuwana opuszcza fabrykę z ustawioną siłą . Aby ułatwić
instalację i obsługę, można obrócić i poluzować rolkę materiału osłony
przeciwsłonecznej o 1~2 obroty (około 300 mm) w celu instalacji. Jeśli
liczba otwartych obrotów rolki materiału jest zbyt duża podczas instalacji, a
liczba wstępnie ustawionych jeśli po instalacji siła nie zostanie
przywrócona, siła zostanie osłabiona, co spowoduje niewystarczające
naprężenie powierzchni tkaniny.
4. Liczba wstępnie ustawionych obrotów siły wysuwanej markizy wynosi
11 obrotów. Jeśli siła jest niewystarczająca , można przekręcić uchwyt
końcowy przeciwnie do ruchu wskazówek zegara zgodnie z kierunkiem
pokazanym na schemacie, aby zwiększyć siłę .
sześciokątna
10
Śruba
(M4.8*18mm)
1 2
24
11
Śruba B
(M4*15mm)
36
36
12
Śruba C
( M4.8*22mm )
10
10
- 7 -
KROK 1: Złóż zespół rolek i podłącz rury.
Do 1 sztuki rury przyłączeniowej.
Do 2-częściowej rury przyłączeniowej.
KROK 2 : Złóż te części z ekipą „ A ” .
KROK 3: Montaż tkaniny.
Włóż 2 szt. poliestrowych sznurków w obie strony tkaniny. Znajdź etykietę
① w Tkanina i etykietę ① w Rolce, Wsuń tkaninę do rolki zgodnie z

- 8 -
kierunkiem strzałki, a następnie zwiń tkaninę na rolce.
KROK 4: Zamontuj szynę materiałową
Szyna materiałowa jest zamocowana z boku nadwozia pojazdu, a dolna
wysokość szyny materiałowej jest o ponad 1,5 cala wyższa niż górna
część wysuwanej markizy. Musi być utrzymywana w linii poziomej i na tej
samej płaszczyźnie. Jeśli pozycje przednia i tylna nie znajdują się na tej
samej płaszczyźnie z powodu krzywizny nadwozia i innych przyczyn,
konieczne jest użycie bloku amortyzującego, aby wyłożyć szynę
materiałową na płasko (blok amortyzujący musi być dopasowany).
Next page
- 9 -
※ Uwaga: Przed rozpoczęciem montażu wkrętów należy upewnić się,
że w miejscu wiercenia nie ma przeszkód, takich jak przewody
elektryczne .
KROK 5: Umieść uchwyty montażowe w odpowiedniej pozycji montażowej,
wywierć otwory po zaznaczeniu pozycji otworu stałego na zewnątrz
markizy wysuwanej, sprawdź jej rozmiar i zamocuj za pomocą śruby C.
Aby zapobiec zarysowaniu krawędzi kabiny rozszerzającej przez tkaninę,
górna część stałej przegrody powinna być oddalona o ≤ 3,8 cala od
górnego gzymsu wysuwanego elementu.
1.5in<H<2in
RV’s body
RV’s slide out module
fabric rail

- 10 -
Wysokość dwóch wsporników musi być utrzymywana na linii poziomej i w
tej samej płaszczyźnie. Jeśli przednie i tylne pozycje nie znajdują się w tej
samej płaszczyźnie ze względu na krzywiznę nadwozia i inne przyczyny,
wsporniki montażowe muszą zostać spłaszczone za pomocą bloku
amortyzującego (blok amortyzujący musi być wyposażony osobno)
KROK 6: Materiał wkłada się do szyny, a markizę mocuje się w całości
za pomocą wspornika.
Aby ułatwić montaż i obsługę, należy obrócić tkaninę markizy wysuwanej i
poluzować ją o 1-2 obroty (w zakresie około 300 mm), włożyć gumową
część tkaniny w szynę tkaniny, a następnie umieścić markizę wysuwaną w
pobliżu uchwytów montażowych, przełożyć rurę sześciokątną od uchwytu
montażowego do końca markizy wysuwanej i przymocować śrubą B.
RV’s slide out
module
Mounting brackets
Require parallel
fabric rail
- 11 -
※ UWAGA: orientacja uchwytu montażowego MARKIZY DO
POJAZDU KEMPINGOWEGO podczas montażu do pojazdu
kempingowego.
- 12 -
KROK 7: Debugowanie
kilkakrotnie przetestuj otwieranie i zamykanie markizy wysuwanej . Jeśli
nie ma problemu, napraw Śruby B po obu stronach zabezpieczają tkaninę
przed przesuwaniem.
※Uwaga: Proszę zagwarantować prawidłowe zamocowanie śrub po
obu stronach materiału, w przeciwnym razie markiza wysuwana
ulegnie uszkodzeniu.
Gratulujemy ukończenia instalacji modułu rozszerzającego , życzymy
udanego kempingu

- 13 -
Producent: Shanghaimuxinmuyeyouxiangongsi
Adres: Shuangchenglu 803nong11hao1602A-1609shi, baoshanqu,
szanghaj 200000 CN.
Importowane do AUS: SIHAO PTY LTD. 1 ROKEVA
STREETEASTWOOD NSW 2122 Australia
Importowane do USA: Sanven Technology Ltd. Suite 250, 9166 Anaheim
Place, Rancho Cucamonga, CA 91730

- 14 -
REP
UK
YH CONSULTING LIMITED.
C/O YH Consulting Limited Office 147,
Centurion House, London Road,
Staines-upon-Thames, Surrey, TW18 4AX
REP
EC
E-CrossStu GmbH
Mainzer Landstr.69,
60329 Frankfurt am Main.


Technisch Support und E-Garantie-Zertifikat www.vevor.com/support
MODULARE SCHIEBEMARKISE FÜR
WOHNMOBILE
MODELL: A6
Wir sind weiterhin bestrebt, Ihnen Werkzeuge zu wettbewerbsfähigen Preisen anzubieten.
"Sparen Sie die Hälfte", "Halber Preis" oder andere ähnliche Ausdrücke, die wir nur
verwenden
stellt eine Schätzung der Einsparungen dar, die Sie durch den Kauf bestimmter Werkzeuge
erzielen können
mit uns im Vergleich zu den großen Top-Marken und bedeutet nicht unbedingt, Abdeckung
alle von uns angebotenen Werkzeugkategorien. Wir möchten Sie bitten, zu überprüfen
sorgfältig
wenn Sie bei uns eine Bestellung aufgeben, wenn Sie tatsächlich Speichern
Hälfte im Vergleich mit den Top-Großmarken.


- 1 -
MODELL: A6
< Bild nur als Referenz >
Brauchen Sie Hilfe? Kontaktieren Sie uns!
Sie haben Fragen zu unseren Produkten? Sie benötigen technischen
Support? Dann kontaktieren Sie uns gerne:
Technischer Support und E-Garantie-Zertifikat
www.vevor.com/support
Dies ist die Originalanleitung. Bitte lesen Sie alle Anweisungen sorgfältig
durch, bevor Sie das Gerät in Betrieb nehmen. VEVOR behält sich eine
klare Auslegung unserer Bedienungsanleitung vor. Das Erscheinungsbild
des Produkts richtet sich nach dem Produkt, das Sie erhalten haben. Bitte
verzeihen Sie uns, dass wir Sie nicht erneut informieren, wenn es
Technologie- oder Software-Updates für unser Produkt gibt .
RV MODULAR
SLIDE AWNING

- 2 -
IMPORTANT SAFEGUARDS
WARNUNG: Lesen Sie das gesamte Handbuch sorgfältig durch,
bevor Sie dieses Produkt bedienen oder warten. Die Nichtbeachtung
dieser Warnungen und Anweisungen kann zu Verletzungen oder
Sachschäden führen.
des Produkts durch Kinder . Dieses Produkt ist kein Spielzeug. Erlauben Sie
Kindern nicht, damit zu spielen .
ASSEMBLY PRECAUTIONS
1. Die Montage darf nur gemäß dieser Anleitung erfolgen. Bei unsachgemäßer
Montage können Gefahren entstehen.
2. und Verwendung eine ANSI-geprüfte Schutzbrille und strapazierfähige
Arbeitshandschuhe .
3. Halten Sie den Versammlungsbereich sauber und gut beleuchtet.
4. Halten Sie während der Montage unbeteiligte Zuschauer vom Bereich fern.
5. Nicht zusammenbauen, wenn Sie müde sind oder unter Einfluss von Alkohol,
Drogen oder Medikamenten stehen.
6. Die Produktfunktionen gelten nur für ordnungsgemäß und vollständig montierte
Produkte.
7. Weitere Informationen zu den auf den folgenden Seiten aufgeführten Teilen
finden Sie im Montagediagramm dieses Handbuchs. Packen Sie alle Teile in
einem sauberen Arbeitsbereich aus und trennen Sie sie. Bitte bewahren Sie kleine
Ersatzteile außerhalb der Reichweite von Kindern auf.
8. Vorbereitungen vor der Installation:
1) Es wird empfohlen, dass zwei oder mehr Personen zusammenarbeiten, um
2) Zwei 4-Fuß-Leitern, 10 Fuß hoch
3) Einige Elektrowerkzeuge, zum Beispiel eine Bohrmaschine

- 3 -
BEWAHREN SIE DIESE ANWEISUNGEN AUF
PRODUCT DIMENSIONS
Wie bestelle ich die richtige Größe ?
Beim Messen der Länge der ausziehbaren Markise wird empfohlen, dass
der Stoff der Ausziehmarkise 1-6 Zoll länger ist als die Länge der
ausziehbaren Markise.
Auszugsgröße
(L1)
Markisengröße
(L2)
Stoffgröße
(L3)
B
(Max)
Farbe
6 ' 7 '' ~7 '
7 ' 7 ''
7 ' 1 ''
51 ”
Schwarz
7 ' 1 '' ~7 ' 6 ''
8 ' 1 ''
7 ' 7 ''
51 ”
Schwarz
7 ' 7 '' ~8 '
8 ' 7 ''
8 ' 1 ''
51 ”
Schwarz
11 ' 7 '' ~12 '
12 ' 7 ''
12 ' 1 ''
51 ”
Schwarz
12 ' 1 '' ~12 ' 6 ''
13 ' 1 ''
12 ' 7 ''
51 ”
Schwarz
12 ' 7 '' ~13 '
13 ' 7 ''
13 ' 1 ''
51 ”
Schwarz

- 4 -
SPECIFICATION
Modell
A6
Material
Aluminium
Stoff
aus PVC
Farbe
Weiß und Schwarz
Passendes Fahrzeug
Wohnmobile mit Slide-Out
12 ' 7 '' ~13 '
13 ' 7 ''
13 ' 1 ''
51 ”
Weiß
13 ' 1 '' ~13 ' 6 ''
14 ' 1 ''
13 ' 7 ''
51 ”
Schwarz
13 ' 1 '' ~13 ' 6 ''
14 ' 1 ''
13 ' 7 ''
51 ”
Weiß
Unit:mm
- 5 -
PACKAGE LIST
NEIN.
Name
Bild
Menge
SPEZIFIKATION
7 Fuß 1 Zoll
7 Fuß 7 Zoll
8 Fuß 1 Zoll
12 Fuß 1 Zoll
12 Fuß 7 Zoll
13 Fuß 1 Zoll
13 Fuß 7 Zoll
1
Rollenbaugruppe
(Mitte)
1
1
2
Rollenbaugruppe
(R)
1
1
3
Verlängerungsrol
le
/
1
4
Rohr
anschließen
1
2
5
Stoff
1
1
6
Stoff Ploy-Cord
2
2
7
Klammer
2
2
8
Stoffschiene
2
3
- 6 -
INSTALLATION PRECAUTIONS
1. Karosserie und am Auszug genügend Einbauraum vorhanden ist und
verbiegen Sie die Stoffeinsätze nicht.
2. Überprüfen Sie, ob die Karosserie des Fahrzeugs an den Stellen, an
denen die Halterung und die Stoffschiene montiert sind,
Verstärkungsplatten besitzt , oder fragen Sie den Fahrzeugverkäufer nach
Informationen.
3. Die ausziehbare Markise wird werkseitig mit einer voreingestellten Kraft
ausgeliefert . Um die Installation und Bedienung zu erleichtern, können Sie
die Sonnenschutztuchrolle für die Installation um 1 bis 2 Umdrehungen (ca.
300 mm) drehen und lösen. Wenn die Anzahl der offenen Umdrehungen
der Tuchrolle während der Installation zu groß ist und die Anzahl der
voreingestellten Wenn die Kraft nach der Installation nicht
wiederhergestellt wird, wird die Kraft geschwächt, was zu einer
unzureichenden Spannung auf der Tuchoberfläche führt.
4. Die voreingestellte Kraftanzahl der Ausziehmarkise beträgt 11
Umdrehungen, sollte die Kraft nicht ausreichen , können Sie die
Endhalterung entsprechend der in der Abbildung gezeigten Richtung
gegen den Uhrzeigersinn drehen und so die Kraft erhöhen .
9
Sechskantrohr
2
2
10
Eine Schraube
(M4,8 x 18 mm)
1 2
24
11
B Schraube
(M4 x 15 mm)
36
36
12
C-Schraube
( M4,8 x 22 mm)
10
10

- 7 -
SCHRITT 1: Rollenbaugruppe zusammenbauen und Rohre anschließen.
Für 1-teiliges Verbindungsrohr.
Für 2-teiliges Verbindungsrohr.
SCHRITT 2: Montieren Sie diese Teile mit dem Team von „ A “ .
SCHRITT 3: Anbringen des Stoffes.
Legen Sie 2 Polykordeln in die beiden Seiten des Stoffes ein. Suchen Sie
das Etikett ① im Stoff und das Etikett ① in der Rolle. Schieben Sie den

- 8 -
Stoff in Pfeilrichtung in die Rolle und rollen Sie den Stoff dann auf die
Rolle.
SCHRITT 4:Stoffschiene montieren
Die Stoffschiene ist seitlich an der Fahrzeugkarosserie befestigt und die
untere Höhe der Stoffschiene ist mehr als 1,5 Zoll höher als die Oberseite
der ausziehbaren Markise. Sie muss auf einer horizontalen Linie und auf
derselben Ebene gehalten werden. Wenn die vorderen und hinteren
Positionen aufgrund der Krümmung der Karosserie und aus anderen
Gründen nicht auf derselben Ebene liegen, muss ein Polsterblock
verwendet werden, um die Stoffschiene flach zu polstern (der Polsterblock
Next page
- 9 -
muss selbst angepasst werden).
※ Hinweis: Bevor Sie mit der Installation der Bohrschrauben
beginnen, stellen Sie sicher, dass die Bohrstelle frei von
Hindernissen, wie beispielsweise elektrischen Leitungen, ist .
SCHRITT 5: Platzieren Sie die Montagehalterungen an einer geeigneten
Installationsposition, bohren Sie Löcher, nachdem Sie die Position der
festen Löcher an der Außenseite der ausziehbaren Markise markiert haben,
sehen Sie sich die Größe an und befestigen Sie sie mit Schraube C.
Um zu verhindern, dass der Stoff die Kante der Erweiterungskabine
zerkratzt, sollte der obere Teil der festen Schallwand ≤ 3,8 Zoll vom oberen
Gesims des Auszugs entfernt sein.
1.5in<H<2in
RV’s body
RV’s slide out module
fabric rail
- 10 -
Die Höhe der beiden Halterungen muss auf einer horizontalen Linie und in
derselben Ebene gehalten werden. Wenn die vorderen und hinteren
Positionen aufgrund der Krümmung des Körpers und aus anderen
Gründen nicht auf derselben Ebene liegen, müssen die
Montagehalterungen mit einem Polsterblock abgeflacht werden (der
Polsterblock muss selbst ausgestattet sein).
SCHRITT 6: Der Stoff wird in die Schiene eingelegt und die Markise im
Ganzen mit der Halterung befestigt.
Um die Installation und Bedienung zu erleichtern, wird der Stoff der
Ausziehmarkise umgedreht und 1 bis 2 Umdrehungen (innerhalb von etwa
300 mm) gelockert, der Stoffgummi in die Stoffschiene eingelegt und die
Ausziehmarkise anschließend in der Nähe der Montagehalterungen
platziert. Führen Sie das Sechskantrohr von der Montagehalterung bis
zum Ende der Ausziehmarkise und befestigen Sie es mit Schraube B.
RV’s slide out
module
Mounting brackets
Require parallel
fabric rail

- 11 -
※ HINWEIS: Beachten Sie die Ausrichtung der RV
AWNING-Montagehalterung bei der Montage am Wohnmobil.
- 12 -
SCHRITT 7:Debug
Passen Sie den Stoff an, überprüfen Sie, ob alle Schrauben festgezogen
sind, entfernen Sie die Federverriegelung und testen Sie das Öffnen und
Schließen der ausziehbaren Markise mehrere Male. Wenn kein Problem
auftritt, beheben Sie es . B -Schrauben für beide Seiten, um den Stoff vor
dem Verrutschen zu schützen.
※Hinweis: Achten Sie unbedingt darauf, die Schrauben auf beiden
Seiten des Stoffes festzuziehen, da sonst die ausziehbare Markise
kaputt geht.
Installation des Erweiterungsmoduls und wünschen Ihnen viel Spaß beim
Camping
- 13 -
Hersteller: Shanghaimuxinmuyeyouxiangongsi
Adresse: Shuangchenglu 803nong11hao1602A-1609shi, baoshanqu,
Shanghai 200000 CN.
- 14 -
Nach AUS importiert: SIHAO PTY LTD. 1 ROKEVA
STREETEASTWOOD NSW 2122 Australien
Importiert in die USA: Sanven Technology Ltd. Suite 250, 9166 Anaheim
Place, Rancho Cucamonga, CA 91730
REP
UK
YH CONSULTING LIMITED.
C/O YH Consulting Limited Office 147,
Centurion House, London Road,
Staines-upon-Thames, Surrey, TW18 4AX
REP
EC
E-CrossStu GmbH
Mainzer Landstr.69,
60329 Frankfurt am Main.


Technique Certificat d'assistance et de garantie électronique
www.vevor.com/support
AUVENT COULISSANT MODULAIRE
POUR CAMPING-CAR
MODÈLE : A6
Nous continuons à nous engager à vous fournir des outils à des prix compétitifs.
« Économisez la moitié », « Moitié prix » ou toute autre expression similaire utilisée par
nous uniquement
représente une estimation des économies dont vous pourriez bénéficier en achetant
certains outils
avec nous par rapport aux grandes marques et ne signifie pas nécessairement couverture
toutes les catégories d'outils que nous proposons. Nous vous rappelons de bien vouloir
vérifier soigneusement
lorsque vous passez une commande chez nous si vous êtes réellement Économie
Moitié par rapport aux plus grandes marques.


- 1 -
MODÈLE : A6
< Image à titre indicatif uniquement >
BESOIN D'AIDE? CONTACTEZ-NOUS!
Vous avez des questions sur nos produits ? Vous avez besoin
d'assistance technique ? N'hésitez pas à nous contacter :
Assistance technique et certificat de garantie électronique
www.vevor.com/support
Il s'agit de la notice d'utilisation d'origine. Veuillez lire attentivement toutes
les instructions du manuel avant de l'utiliser. VEVOR se réserve le droit
d'interpréter clairement notre manuel d'utilisation. L'apparence du produit
dépend du produit que vous avez reçu. Veuillez nous excuser, nous ne
vous informerons plus en cas de mise à jour technologique ou logicielle
de notre produit.
RV MODULAR
SLIDE AWNING

- 2 -
IMPORTANT SAFEGUARDS
AVERTISSEMENT: Veuillez lire attentivement et comprendre
l'intégralité de ce manuel avant d'utiliser ou d'entretenir ce produit. Le
non-respect de ces avertissements et instructions peut entraîner des
blessures corporelles ou des dommages matériels.
Évitez que les enfants n'utilisent ce produit . Ce produit n'est pas un jouet. Ne
laissez pas les enfants jouer avec .
ASSEMBLY PRECAUTIONS
1. Assemblage uniquement selon ces instructions. Un assemblage incorrect
peut créer des dangers.
2. Portez des lunettes de sécurité approuvées ANSI et des gants de travail
robustes pendant l'assemblage et l' utilisation .
3. Gardez la zone de montage propre et bien éclairée.
4. Gardez les spectateurs hors de la zone pendant le montage.
5. Ne pas monter si vous êtes fatigué ou sous l’influence de l’alcool, de drogues
ou de médicaments.
6. Les capacités du produit s'appliquent uniquement au produit correctement et
entièrement assemblé.
7. Pour plus d'informations sur les pièces répertoriées dans les pages suivantes,
veuillez vous reporter au schéma d'assemblage de ce manuel. Déballez et
séparez toutes les pièces dans un espace de travail propre. Veuillez conserver les
petites pièces de rechange hors de portée des enfants
8. Préparations avant l'installation :
1) il est suggéré que 2 personnes ou plus coopèrent pour terminer
2) Deux échelles de 4 pieds de haut et 10 pieds de haut
3) Certains outils électriques, par exemple une perceuse
- 3 -
CONSERVEZ CES INSTRUCTIONS
PRODUCT DIMENSIONS
Comment commander la bonne taille ?
Pour mesurer la longueur de l'auvent coulissant, il est recommandé que la
dimension du tissu coulissant soit de 1 à 6 pouces plus longue que la
longueur de l'auvent coulissant.
Taille coulissante
(L1)
Taille de
l'auvent (L2)
Taille du
tissu (L3)
L
(Max)
Couleur
6 ' 7 '' ~7 '
7 ' 7 ''
7 ' 1 ''
51 ”
Noir
7 ' 1 '' ~7 ' 6 ''
8 ' 1 ''
7 ' 7 ''
51 ”
Noir
7 ' 7 '' ~8 '
8 ' 7 ''
8 ' 1 ''
51 ”
Noir
11 ' 7 '' ~12 '
12 ' 7 ''
12 ' 1 ''
51 ”
Noir
12 ' 1 '' ~ 12 ' 6 ''
13 ' 1 ''
12 ' 7 ''
51 ”
Noir
12 ' 7 '' ~ 13 '
13 ' 7 ''
13 ' 1 ''
51 ”
Noir

- 4 -
SPECIFICATION
Modèle
A6
Matériel
Aluminium
Tissu
PVC
Couleur
Blanc & Noir
Véhicule adapté
Camping-cars avec extension coulissante
12 ' 7 '' ~ 13 '
13 ' 7 ''
13 ' 1 ''
51 ”
Blanc
13 ' 1 '' ~ 13 ' 6 ''
14 ' 1 ''
13 ' 7 ''
51 ”
Noir
13 ' 1 '' ~ 13 ' 6 ''
14 ' 1 ''
13 ' 7 ''
51 ”
Blanc
Unit:mm
- 5 -
PACKAGE LIST
Non.
Nom
Image
Qté
SPÉCIFICATION
7 pieds 1
pouce
7 pieds 7
pouces
8 pieds 1 pouce
12 pieds 1
pouce
12 pieds 7
pouces
13 pieds 1
pouce
13 pieds 7
pouces
1
Ensemble de
rouleaux (L)
1
1
2
Ensemble de
rouleaux (R)
1
1
3
Rouleau
d'extension
/
1
4
Raccorder le
tuyau
1
2
5
Tissu
1
1
6
Cordon en tissu
2
2
7
Support
2
2

- 6 -
INSTALLATION PRECAUTIONS
1. Vérifiez qu'il y a suffisamment d'espace d'installation sur la carrosserie
du véhicule et faites-le glisser , et ne pliez pas les inserts en tissu.
2. Vérifiez que la carrosserie du véhicule dispose de plaques de
renforcement là où le support de montage et le rail en tissu sont montés,
ou demandez des informations au vendeur du véhicule.
3. Le store coulissant quitte l'usine avec une force préréglée . Afin de
faciliter l'installation et le fonctionnement, vous pouvez retourner et
desserrer le rouleau de toile du pare-soleil pendant 1 à 2 tours (environ
300 mm) pour l'installation. Si le nombre de tours ouverts du rouleau de
toile est trop important pendant l'installation et le nombre de préréglages la
force n'est pas restaurée après l'installation, la force sera affaiblie,
entraînant une tension insuffisante sur la surface du tissu.
4. Le nombre prédéfini de tours de force du store coulissant est de 11
tours. S'il n'y a pas assez de force , vous pouvez tourner le support
d'extrémité dans le sens inverse des aiguilles d'une montre selon la
direction indiquée sur le schéma pour augmenter la force .
8
Rail en tissu
2
3
9
Tube hexagonal
2
2
10
Une vis
(M4,8*18mm)
1 2
24
11
Vis B
(M4*15mm)
36
36
12
Vis C
( M4,8*22 mm)
10
10
- 7 -
ÉTAPE 1 : Assemblez l'ensemble du rouleau et connectez les tuyaux.
Pour tuyau de raccordement 1 pièce.
Pour tuyau de raccordement en 2 pièces.
ÉTAPE 2 : Assemblez ces pièces avec l’ équipage « A » .
ÉTAPE 3 : Montage du tissu.
Insérez 2 cordons en polyester dans les deux côtés du tissu. Trouvez
- 8 -
l'étiquette ① dans le tissu et l'étiquette ① dans le rouleau, faites glisser
le tissu dans le rouleau dans le sens de la flèche, puis enroulez le tissu sur
le rouleau.
ÉTAPE 4 : Installer le rail en tissu
Le rail en tissu est fixé sur le côté de la carrosserie du véhicule et la
hauteur inférieure du rail en tissu est supérieure de plus de 1,5 pouce
au-dessus du haut de l'auvent coulissant. Il doit être maintenu sur une
ligne horizontale et sur le même plan. Si les positions avant et arrière ne
sont pas sur le même plan en raison de la courbure de la carrosserie et
d'autres raisons, il est nécessaire d'utiliser un bloc de coussin pour
Next page
- 9 -
rembourrer le rail en tissu à plat (le bloc de coussin doit être auto-adapté).
※ Remarque : avant de commencer à installer les vis de perçage,
assurez-vous que l'emplacement de perçage est exempt d'obstacles,
tels que des câbles électriques .
ÉTAPE 5 : Placez les supports de montage dans une position d'installation
appropriée, percez des trous après avoir marqué la position du trou fixe à
l'extérieur du store coulissant, voyez sa taille et fixez-le avec la vis C.
Afin d'éviter que le tissu ne raye le bord de la cabine d'extension, la partie
supérieure du déflecteur fixe doit être à ≤ 3,8 pouces de la corniche
supérieure de la coulisse.
1.5in<H<2in
RV’s body
RV’s slide out module
fabric rail

- 10 -
La hauteur des deux supports doit être maintenue sur une ligne horizontale
et dans le même plan. Si les positions avant et arrière ne sont pas sur le
même plan en raison de la courbure de la carrosserie et d'autres raisons,
les supports de montage doivent être aplatis avec un bloc de coussin (le
bloc de coussin doit être équipé seul)
ÉTAPE 6 : Le tissu est inséré dans le rail et le store est fixé avec le
support dans son ensemble.
Afin de faciliter l'installation et le fonctionnement, le tissu du store
coulissant est retourné et desserré pendant 1 à 2 tours (dans un rayon
d'environ 300 mm), insérez le caoutchouc du tissu dans le rail du tissu,
puis le store coulissant est placé près des supports de montage, pénétrez
le tube hexagonal du support de montage jusqu'à l'extrémité du store
coulissant, fixez-le avec la vis B.
RV’s slide out
module
Mounting brackets
Require parallel
fabric rail

- 11 -
※ REMARQUE : l'orientation du support de montage de l'AUVENT RV
lors du montage sur le RV.

- 12 -
ÉTAPE 7 : Débogage
Réglez le tissu coulissant, vérifiez que toutes les vis sont serrées, retirez le
loquet à ressort et testez à plusieurs reprises l'ouverture et la fermeture du
store coulissant . Si aucun problème ne se pose, corrigez-le Vis B des
deux côtés pour protéger le tissu contre les mouvements.
※Remarque : veuillez vous assurer de fixer les vis des deux côtés du
tissu, sinon le store coulissant sera cassé.
Félicitations pour l'achèvement de l'installation du module d'extension , je
vous souhaite un bon camping

- 13 -
Fabricant : Shanghaimuxinmuyeyouxiangongsi
Adresse : Shuangchenglu 803nong11hao1602A-1609shi, baoshanqu,
Shanghai 200000 CN.
Importé en Australie : SIHAO PTY LTD. 1 ROKEVA
STREETEASTWOOD NSW 2122 Australie
Importé aux États-Unis : Sanven Technology Ltd. Suite 250, 9166
Anaheim Place, Rancho Cucamonga, CA 91730

- 14 -
REP
UK
YH CONSULTING LIMITED.
C/O YH Consulting Limited Office 147,
Centurion House, London Road,
Staines-upon-Thames, Surrey, TW18 4AX
REP
EC
E-CrossStu GmbH
Mainzer Landstr.69,
60329 Frankfurt am Main.


Technisch Ondersteuning en E-garantiecertificaat www.vevor.com/support
RV MODULAIRE SCHUIFLUIFEL
MODEL: A6
Wij streven er voortdurend naar om u gereedschappen tegen concurrerende prijzen te
leveren.
"Bespaar de helft", "halve prijs" of andere soortgelijke uitdrukkingen die alleen door ons
worden gebruikt
geeft een schatting van de besparingen die u kunt behalen door bepaalde gereedschappen
te kopen
bij ons vergeleken met de grote topmerken en betekent niet per se dat omslag
alle categorieën van tools die wij aanbieden. U wordt vriendelijk verzocht om te verifiëren
voorzichtig
wanneer u een bestelling bij ons plaatst, als u daadwerkelijk Besparing
Half in vergelijking met de grote topmerken.

- 1 -
MODEL: A6
< Foto alleen ter referentie >
HULP NODIG? NEEM CONTACT MET ONS OP!
Heeft u vragen over het product? Heeft u technische ondersteuning
nodig? Neem dan gerust contact met ons op:
Technische ondersteuning en e-garantiecertificaat
www.vevor.com/support
Dit is de originele instructie, lees alle handleidingen zorgvuldig door
voordat u het product gebruikt. VEVOR behoudt zich een duidelijke
interpretatie van onze gebruikershandleiding voor. Het uiterlijk van het
product is afhankelijk van het product dat u hebt ontvangen. Vergeef ons
dat we u niet opnieuw zullen informeren als er technologie- of
software-updates voor ons product zijn .
RV MODULAR
SLIDE AWNING

- 2 -
IMPORTANT SAFEGUARDS
WAARSCHUWING: Lees en begrijp deze volledige handleiding
voordat u dit product bedient of onderhoudt. Het niet opvolgen van
deze waarschuwingen en instructies kan leiden tot persoonlijk letsel of
schade aan waardevolle eigendommen.
Laat kinderen het product niet gebruiken . En dit product is geen speelgoed.
Laat kinderen er niet mee spelen .
ASSEMBLY PRECAUTIONS
1. Alleen monteren volgens deze instructies. Onjuiste montage kan gevaren
opleveren.
2. en het gebruik een ANSI-goedgekeurde veiligheidsbril en stevige
werkhandschoenen .
3. Zorg ervoor dat de verzamelplaats schoon en goed verlicht is.
4. Houd omstanders uit de buurt tijdens de montage.
5. Kom niet bijeen als u moe bent of onder invloed van alcohol, drugs of
medicijnen.
6. De producteigenschappen gelden alleen voor producten die correct en volledig
zijn gemonteerd.
7. Voor aanvullende informatie over de onderdelen die op de volgende pagina's
worden vermeld, raadpleegt u het montageschema van deze handleiding. Pak alle
onderdelen uit en scheid ze in een schone werkruimte. Houd kleine
reserveonderdelen buiten bereik van kinderen.
8. Voorbereidingen voor de installatie:
1) Het wordt aangeraden dat 2 of meer personen samenwerken om het te
voltooien
2) Twee 4-voet ladders, 10 voet hoog
3) Sommige elektrische gereedschappen, bijvoorbeeld een boormachine

- 3 -
BEWAAR DEZE INSTRUCTIES
PRODUCT DIMENSIONS
Hoe bestel ik de juiste maat ?
Meet de lengte van de uitschuifbare luifel. Het wordt aanbevolen dat de
afmeting van het uitschuifbare doek 1-6 inch langer is dan de lengte van de
uitschuifbare luifel.
Uitschuifformaat
(L1)
Luifelmaat
(L2)
Stofmaat
(L3)
W
(Maximaal)
Kleur
6 ' 7 '' ~ 7 '
7 ' 7 ''
7 ' 1 ''
51 ”
Zwart
7 ' 1 '' ~7 ' 6 ''
8 ' 1 ''
7 ' 7 ''
51 ”
Zwart
7 ' 7 '' ~8 '
8 ' 7 ''
8 ' 1 ''
51 ”
Zwart
11 ' 7 '' ~12 '
12 ' 7 ''
12 ' 1 ''
51 ”
Zwart
12 ' 1 '' ~12 ' 6 ''
13 ' 1 ''
12 ' 7 ''
51 ”
Zwart
12 ' 7 '' ~ 13 '
13 ' 7 ''
13 ' 1 ''
51 ”
Zwart

- 4 -
SPECIFICATION
Model
A6
Materiaal
Aluminium
Stof
PVC
Kleur
Wit & Zwart
Geschikt voertuig
Campers met uitschuifbare delen
12 ' 7 '' ~ 13 '
13 ' 7 ''
13 ' 1 ''
51 ”
Wit
13 ' 1 '' ~13 ' 6 ''
14 ' 1 ''
13 ' 7 ''
51 ”
Zwart
13 ' 1 '' ~13 ' 6 ''
14 ' 1 ''
13 ' 7 ''
51 ”
Wit
Unit:mm

- 5 -
PACKAGE LIST
Nee.
Naam
Afbeelding
Hoeveelheid
SPECIFICATIE
2,13 meter
2,23 meter
8ft 1inch
12 voet 1 inch
12ft 7 inch
13 voet 1 inch
13ft 7 inch
1
Rollenmontage
(L)
1
1
2
Rollenmontage
(R)
1
1
3
Verlengrol
/
1
4
Buis aansluiten
1
2
5
Stof
1
1
6
Stoffen koord
2
2
7
Beugel
2
2
8
Stoffen rail
2
3

- 6 -
INSTALLATION PRECAUTIONS
1. Controleer of er voldoende installatieruimte is op de carrosserie van het
voertuig en schuif de stoffen inzetstukken eruit . Buig de inzetstukken niet.
2. Controleer of de carrosserie van het voertuig is voorzien van
verstevigingsplaten op de plekken waar de montagebeugel en de stoffen
rail zijn gemonteerd, of vraag de verkoper van het voertuig om informatie.
3. De uitschuifbare luifel verlaat de fabriek met een vooraf ingestelde
kracht . Om de installatie en bediening te vergemakkelijken, kunt u de rol
van het zonneschermdoek omdraaien en 1~2 slagen (ongeveer 300 mm)
losmaken voor installatie. Als het aantal open slagen van de doekrol te
groot is tijdens de installatie en het aantal vooraf ingestelde slagen Als de
kracht na de installatie niet wordt hersteld, wordt de kracht verzwakt en
ontstaat er onvoldoende spanning op het doekoppervlak.
4. Het vooraf ingestelde aantal krachtomwentelingen van het uitschuifbare
zonnescherm is 11. Als er niet genoeg kracht is , kunt u de eindbeugel
tegen de klok in draaien volgens de richting die in het diagram wordt
aangegeven om de kracht te vergroten .
9
Zeshoekige buis
2
2
10
Een schroef
(M4,8*18mm)
1 2
24
11
B Schroef
(M4*15mm)
36
36
12
C-schroef
( M4,8*22mm )
10
10

- 7 -
STAP 1: Monteer de rollenconstructie en sluit de leidingen aan.
Voor 1 stuk aansluitbuis.
Voor 2-delige aansluitbuis.
STAP 2: Monteer deze onderdelen met de ploeg van “ A ” .
STAP 3: Het doek monteren.
Plaats 2 stuks poly-koorden in de twee kanten van de stof. Zoek het ①
label in de stof en het ① label in de roller, schuif de stof in de roller in de

- 8 -
richting van de pijl en rol de stof vervolgens op de roller.
STAP 4: De stoffen rail installeren
De stoffen rail is aan de zijkant van de carrosserie bevestigd en de
onderste hoogte van de stoffen rail is meer dan 1,5 inch hoger dan de
bovenkant van de uitschuifbare luifel. Deze moet op een horizontale lijn en
in hetzelfde vlak worden gehouden. Als de voor- en achterposities niet in
hetzelfde vlak liggen vanwege de kromming van de carrosserie en andere
redenen, is het noodzakelijk om een kussenblok te gebruiken om de
stoffen rail plat te maken (het kussenblok moet zelf worden afgestemd).
Next page

- 9 -
※ Let op: Voordat u begint met het installeren van de boorschroeven,
dient u ervoor te zorgen dat de boorlocatie vrij is van obstakels, zoals
elektrische bedrading .
STAP 5: Plaats de montagebeugels op een geschikte installatiepositie,
boor gaten nadat u de positie van het vaste gat aan de buitenkant van het
uitschuifbare zonnescherm hebt gemarkeerd, meet de maat ervan en
bevestig met schroef C.
Om te voorkomen dat het doek de rand van de expansiecabine krast, moet
het bovenste deel van de vaste afschermplaat ≤ 3,8 inch (9,6 cm)
verwijderd zijn van de bovenste kroonlijst van de uitschuifruimte.
1.5in<H<2in
RV’s body
RV’s slide out module
fabric rail

- 10 -
De hoogte van de twee beugels moet op een horizontale lijn en in
hetzelfde vlak worden gehouden. Als de voorste en achterste posities niet
op hetzelfde vlak liggen vanwege de kromming van de carrosserie en
andere redenen, moeten de montagebeugels worden afgevlakt met een
kussenblok (het kussenblok moet op zichzelf worden uitgerust)
STAP 6: Het doek wordt in de rail geschoven en het zonnescherm
wordt met de beugel als geheel vastgezet.
Om de installatie en bediening te vergemakkelijken, wordt het doek van de
uitschuifbare luifel omgedraaid en 1 tot 2 slagen losgemaakt (binnen
ongeveer 300 mm). Plaats het rubber van het doek in de doekrail en plaats
de uitschuifbare luifel vervolgens bij de montagebeugels. Steek de
zeshoekige buis van de montagebeugel naar het einde van de
uitschuifbare luifel en bevestig deze met schroef B.
RV’s slide out
module
Mounting brackets
Require parallel
fabric rail

- 11 -
※ OPMERKING: de oriëntatie van de montagebeugel van de RV
LUIFEL bij montage op de RV.

- 12 -
STAP 7:Debug
Pas de schuifstof aan, controleer of alle schroeven vastzitten, verwijder de
veergrendel en test herhaaldelijk het openen en sluiten van de schuifluifel
meerdere keren. Als er geen probleem is, repareer B- schroeven voor
beide zijden om te voorkomen dat de stof beweegt.
※Let op: zorg ervoor dat u de schroeven aan beide kanten van de
stof goed vastdraait, anders zal het uitschuifbare zonnescherm
kapotgaan.
installatie van de uitbreidingsmodule , ik wens u veel kampeerplezier.

- 13 -
Fabrikant: Shanghaimuxinmuyeyouxiangongsi
Adres: Shuangchenglu 803nong11hao1602A-1609shi, baoshanqu,
shanghai 200000 CN.
Geïmporteerd naar AUS: SIHAO PTY LTD. 1 ROKEVA
STREETEASTWOOD NSW 2122 Australië
Geïmporteerd naar de VS: Sanven Technology Ltd. Suite 250, 9166
Anaheim Place, Rancho Cucamonga, CA 91730

- 14 -
REP
UK
YH CONSULTING LIMITED.
C/O YH Consulting Limited Office 147,
Centurion House, London Road,
Staines-upon-Thames, Surrey, TW18 4AX
REP
EC
E-CrossStu GmbH
Mainzer Landstr.69,
60329 Frankfurt am Main.


Teknisk Support och e-garanticertifikat www.vevor.com/support
RV MODULAR SLIDE MARKIS
MODELL: A6
Vi fortsätter att vara engagerade i att ge dig verktyg till konkurrenskraftiga priser.
"Spara hälften", "Halva priset" eller andra liknande uttryck som endast används av oss
representerar en uppskattning av besparingar du kan dra nytta av att köpa vissa verktyg
med oss jämfört med de stora toppmärkena och betyder inte nödvändigtvis att täcka
alla kategorier av verktyg som erbjuds av oss. Du påminns vänligen om att verifiera
försiktigt
när du gör en beställning hos oss om du faktiskt gör det Sparande
Halv i jämförelse med de främsta varumärkena.


- 1 -
MODELL: A6
< Endast bild för referens >
BEHÖVER HJÄLP? KONTAKTA OSS!
Har du produktfrågor? Behöver du teknisk support? Kontakta oss
gärna:
Teknisk support och e-garanticertifikat
www.vevor.com/support
Detta är den ursprungliga instruktionen, läs alla instruktioner noggrant
innan du använder den. VEVOR reserverar sig för en tydlig tolkning av vår
användarmanual. Utseendet på produkten är beroende av den produkt du
fått. Ursäkta oss att vi inte kommer att informera dig igen om det finns
någon teknik eller mjukvaruuppdateringar på vår produkt.
RV MODULAR
SLIDE AWNING

- 2 -
IMPORTANT SAFEGUARDS
VARNING: Läs och förstå hela denna bruksanvisning innan du
använder eller servar denna produkt. Underlåtenhet att följa dessa
varningar och instruktioner kan orsaka personskada eller skada på
värdefull egendom.
Undvik att barn använder produkten . Och hans produkt är inte en leksak. Låt
inte barn leka .
ASSEMBLY PRECAUTIONS
1. Montering endast enligt dessa instruktioner. Felaktig montering kan skapa
faror.
2. Bär ANSI-godkända skyddsglasögon och kraftiga arbetshandskar under
montering och användning .
3. Håll monteringsområdet rent och väl upplyst.
4. Håll åskådare borta från området under monteringen.
5. Sätt dig inte ihop när du är trött eller påverkad av alkohol, droger eller
mediciner.
6. Produktegenskaper gäller endast för korrekt och färdigmonterad produkt.
7. För ytterligare information om delarna som listas på följande sidor, se
monteringsdiagrammet i denna manual. Packa upp och separera alla delar på ett
rent arbetsområde. Förvara små reservdelar utom räckhåll för barn
8. Förberedelser före installation:
1) det föreslås att 2 eller fler personer ska samarbeta för att slutföra
2) Två 4-fots stegar 10 fot höga
3) Vissa elverktyg, till exempel- en borrmaskin
SPARA DESSA INSTRUKTIONER

- 3 -
PRODUCT DIMENSIONS
Hur beställer man rätt storlek ?
Mätning av längden på den utskjutbara markisen. Det rekommenderas att
dimensionen av glidtyget är 1-6 tum längre än längden på den utskjutbara
markisstorleken.
Skjut ut storlek
(L1)
Markisstorlek
(L2)
Tygstorlek
(L3)
W
(Max)
Färg
6 ' 7 '' ~7 '
7 ' 7 ''
7 ' 1 ''
51 ”
Svart
7 ' 1 '' ~7 ' 6 ''
8 ' 1 ''
7 ' 7 ''
51 ”
Svart
7 ' 7 '' ~8 '
8 ' 7 ''
8 ' 1 ''
51 ”
Svart
11 ' 7 '' ~12 '
12 ' 7 ''
12 ' 1 ''
51 ”
Svart
12 ' 1 '' ~12 ' 6 ''
13 ' 1 ''
12 ' 7 ''
51 ”
Svart
12 ' 7 '' ~13 '
13 ' 7 ''
13 ' 1 ''
51 ”
Svart
12 ' 7 '' ~13 '
13 ' 7 ''
13 ' 1 ''
51 ”
Vit
13 ' 1 '' ~13 ' 6 ''
14 ' 1 ''
13 ' 7 ''
51 ”
Svart
13 ' 1 '' ~13 ' 6 ''
14 ' 1 ''
13 ' 7 ''
51 ”
Vit
- 4 -
SPECIFICATION
Modell
A6
Material
Aluminium
Tyg
PVC
Färg
Vit & Svart
Lämpligt fordon
Husbilar med utdragbar
Unit:mm
- 5 -
PACKAGE LIST
Inga.
Namn
Bild
ANTAL
SPECIFIKATION
7 fot 1 tum
7 fot 7 tum
8 fot 1 tum
12 fot 1 tum
12 fot 7 tum
13 fot 1 tum
13 fot 7 tum
1
R
ollermontering
(L)
1
1
2
R
ollermontering
(R)
1
1
3
Förlängningsrull
e
/
1
4
Anslut röret
1
2
5
Tyg
1
1
6
Tyg knep-sladd
2
2
7
Konsol
2
2
8
Tygskena
2
3
9
Sexkantigt rör
2
2
10
En skruv
(M4,8*18 mm)
1 2
24
- 6 -
INSTALLATION PRECAUTIONS
1. Kontrollera att det finns tillräckligt med installationsutrymme på
fordonskarossen och skjut ut , och böj inte tyginsatserna.
2. Kontrollera att fordonskarossen har förstärkningsplattor där
monteringsfästet och tygskena är monterade, eller fråga fordonssäljaren
om information.
3. Den utskjutbara markisen lämnar fabriken med en förinställd kraft . För
att underlätta installation och drift kan du vända och lossa
solskyddsduksrullen i 1~2 varv (ca 300 mm) för installation. Om antalet
öppna varv på tygrullen är för stort under installationen och antalet
förinställda kraften inte återställs efter installationen kommer kraften att
försvagas, vilket resulterar i otillräcklig spänning på tygytan.
4. Det förinställda antalet kraftvarv för den utskjutbara markisen är 11 varv,
om det inte finns tillräckligt med kraft kan du vrida ändfästet moturs enligt
riktningen som visas i diagrammet för att öka kraften .
STEG 1: Montera rullenheten och anslut rören.
För 1 st anslut rör.
11
B Skruv
(M4*15mm)
36
36
12
C Skruv
( M4,8*22 mm)
10
10

- 7 -
För 2-delat anslutningsrör.
STEG 2: Montera dessa delar med “ A ” s besättning .
STEG 3:Montering av tyget.
Sätt in 2st poly-sladdar i tygets två sidor. Hitta etiketten ① i tyget och
etiketten ① i rullen, skjut in tyget i rullen med pilens riktning och rulla
sedan upp tyget på rullen.
- 8 -
STEG 4: Montera tygskenan
Tygskenan är fixerad på sidan av fordonskarossen, och den nedre höjden
på tygskenan är mer än 1,5 tum högre än toppen av den utskjutbara
markisen. Den måste hållas på en horisontell linje och på samma plan. Om
de främre och bakre positionerna inte är i samma plan på grund av
kroppens krökning och andra orsaker, är det nödvändigt att använda ett
kuddblock för att stoppa tygskenan platt (kuddblocket måste anpassas till
sig själv).
Next page
1.5in<H<2in
RV’s body
RV’s slide out module
fabric rail
- 9 -
※ Obs: Innan du börjar installera borrskruvarna, se till att borrplatsen
är fri från hinder, såsom elektriska ledningar .
STEG 5: Placera monteringsfästena i ett lämpligt monteringsläge, borra
hål efter att ha markerat det fasta hålläget på utsidan av den utskjutbara
markisen, se storleken på den och fixera med skruv C.
För att förhindra att tyget repar kanten på expansionshytten, bör den övre
delen av den fasta baffeln vara ≤ 3,8 tum bort från den övre taklisten på
utskjutningen.
Höjden på de två konsolerna måste hållas på en horisontell linje och i
samma plan. Om de främre och bakre positionerna inte är i samma plan på
grund av kroppens krökning och andra skäl, måste monteringsfästena
plattas till med ett kuddblock (kuddblocket måste utrustas av sig självt)

- 10 -
STEG 6: Tyget sätts in i spåret och markisen fästs med fästet som
helhet.
För att underlätta installationen och manövreringen vänds den utskjutbara
markisduken runt och lossas i 1~2 varv (inom ca 300 mm), för in tyggummit
i tygskenan och sedan placeras den utskjutbara markisen nära markisen.
monteringsfästen, penetrera sexkantsröret från monteringsfästet till slutet
av utskjutbar markis, fixera det med skruv B.
※ OBSERVERA: orienteringen av RV AWNING-monteringsfästet vid
montering på RV.
RV’s slide out
module
Mounting brackets
Require parallel
fabric rail
- 11 -
STEG 7: Felsök
Justera glidtyget, kontrollera att alla skruvar är åtdragna, ta bort
fjäderspärren och testa flera gånger öppningen och stängningen av den
utskjutbara markisen flera gånger. Om inga problem fixa B skruvar för
båda sidor för att skydda tyget från att röra sig.
※Obs: Vänligen garantera att skruvarna för båda sidorna av tyget
- 12 -
fixeras, annars kommer den utskjutbara markisen att gå sönder.
installationen av expansionsmodulen , önskar dig en trevlig camping
Tillverkare: Shanghaimuxinmuyeyouxiangongsi
- 13 -
Adress: Shuangchenglu 803nong11hao1602A-1609shi, baoshanqu,
shanghai 200000 CN.
Importerad till AUS: SIHAO PTY LTD. 1 ROKEVA STREETEASTWOOD
NSW 2122 Australien
Importerad till USA: Sanven Technology Ltd. Suite 250, 9166 Anaheim
Place, Rancho Cucamonga, CA 91730
REP
UK
YH CONSULTING LIMITED.
C/O YH Consulting Limited Office 147,
Centurion House, London Road,
Staines-upon-Thames, Surrey, TW18 4AX
REP
EC
E-CrossStu GmbH
Mainzer Landstr.69,
60329 Frankfurt am Main.


Técnico Soporte y certificado de garantía electrónica www.vevor.com/support
TOLDO DESLIZANTE MODULAR PARA RV
MODELO: A6
Seguimos comprometidos a brindarle herramientas a precios competitivos.
"Ahorra la mitad", "mitad de precio" o cualquier otra expresión similar utilizada únicamente
por nosotros
Representa una estimación de los ahorros que podría obtener al comprar ciertas
herramientas.
con nosotros en comparación con las principales marcas líderes y no significa
necesariamente cubrir
Todas las categorías de herramientas que ofrecemos. Le recordamos que debe verificar
con cuidado
Cuando realiza un pedido con nosotros, si realmente está Ahorro
Medio en comparación con las principales marcas líderes.


- 1 -
MODELO: A6
< Imagen solo como referencia >
¿NECESITA AYUDA? ¡CONTÁCTENOS!
¿Tiene preguntas sobre el producto? ¿Necesita asistencia técnica? No
dude en ponerse en contacto con nosotros:
Soporte técnico y certificado de garantía electrónica
www.vevor.com/support
Estas son las instrucciones originales, lea atentamente todas las
instrucciones del manual antes de utilizar el producto. VEVOR se reserva
una interpretación clara de nuestro manual de usuario. La apariencia del
producto estará sujeta al producto que recibió. Perdónenos por no
informarle nuevamente si hay actualizaciones de tecnología o software
en nuestro producto.
RV MODULAR
SLIDE AWNING

- 2 -
IMPORTANT SAFEGUARDS
ADVERTENCIA: Lea y comprenda todo este manual antes de
operar o realizar tareas de mantenimiento en este producto. Si no
sigue estas advertencias e instrucciones, puede causar lesiones
personales o daños a bienes valiosos.
Evite que los niños utilicen el producto . Este producto no es un juguete. No
permita que los niños jueguen con él .
ASSEMBLY PRECAUTIONS
1. Realice el montaje únicamente de acuerdo con estas instrucciones. Un
montaje inadecuado puede generar peligros.
2. Use gafas de seguridad aprobadas por ANSI y guantes de trabajo resistentes
durante el montaje y el uso .
3. Mantenga el área de reunión limpia y bien iluminada.
4. Mantenga a los transeúntes fuera del área durante el montaje.
5. No se reúna cuando esté cansado o bajo la influencia del alcohol, drogas o
medicamentos.
6. Las capacidades del producto se aplican únicamente a productos
ensamblados de forma correcta y completa.
7. Para obtener información adicional sobre las piezas que se enumeran en las
páginas siguientes, consulte el diagrama de ensamblaje de este manual.
Desembale y separe todas las piezas en un área de trabajo limpia. Mantenga las
piezas de repuesto pequeñas fuera del alcance de los niños.
8. Preparaciones antes de la instalación:
1) Se sugiere que 2 o más personas cooperen para completar
2) Dos escaleras de 4 pies por 10 pies de alto
3) Algunas herramientas eléctricas, por ejemplo, un taladro.
- 3 -
GUARDE ESTAS INSTRUCCIONES
PRODUCT DIMENSIONS
¿Cómo pedir la talla correcta ?
Al medir la longitud del toldo deslizable, se recomienda que la dimensión
de la tela deslizable sea de 1 a 6 pulgadas más larga que la longitud del
toldo deslizable.
Tamaño
deslizable
(Nivel 1)
Tamaño del
toldo (L2)
Tamaño de
la tela (L3)
Yo
(Máximo)
Color
6'7 ' ' ~ 7 '
7'7 ' '
7 ' 1 ''
51 ”
Negro
7'1 ' ' ~ 7'6 ' '
8 ' 1 ''
7'7 ' '
51 ”
Negro
7'7 ' ' ~ 8 '
8'7 ' '
8 ' 1 ''
51 ”
Negro
11 ' 7 '' ~12 '
12'7 ' '
12 ' 1 ''
51 ”
Negro
12'1 ' ' ~ 12'6 ' '
13 ' 1 ''
12'7 ' '
51 ”
Negro
- 4 -
SPECIFICATION
Modelo
A6
Material
Aluminio
Tela
CLORURO DE POLIVINILO
Color
Blanco & Negro
Vehículo adecuado
Autocaravanas con plataforma deslizable
12'7 ' ' ~ 13 '
13'7 ' '
13 ' 1 ''
51 ”
Negro
12'7 ' ' ~ 13 '
13'7 ' '
13 ' 1 ''
51 ”
Blanco
13'1 ' ' ~ 13'6 ' '
14 ' 1 ''
13'7 ' '
51 ”
Negro
13'1 ' ' ~ 13'6 ' '
14 ' 1 ''
13'7 ' '
51 ”
Blanco
Unit:mm
- 5 -
PACKAGE LIST
No.
Nombre
Imagen
CANTIDAD
ESPECIFICACIÓN
7 pies 1
pulgada
7 pies 7
pulgadas
8 pies 1 pulgada
12 pies 1
pulgada
12 pies 7
pulgadas
13 pies 1
pulgada
13 pies 7
pulgadas
1
Conjunto de
rodillos (L)
1
1
2
Conjunto de
rodillos (R)
1
1
3
Rodillo de
extensión
/
1
4
Conectar
tubería
1
2
5
Tela
1
1
6
Cordón de tela
poliamida
2
2
- 6 -
INSTALLATION PRECAUTIONS
1. Verifique que haya suficiente espacio de instalación en la carrocería del
vehículo y deslícelo hacia afuera , y no doble los insertos de tela.
2. Verifique que la carrocería del vehículo tenga placas de refuerzo donde
se montan el soporte de montaje y el riel de tela , o solicite información al
vendedor del vehículo.
3. El toldo deslizable sale de fábrica con una fuerza preestablecida . Para
facilitar la instalación y el funcionamiento, puede girar y aflojar el rollo de
tela del parasol entre 1 y 2 vueltas (aproximadamente 300 mm) para la
instalación. Si la cantidad de vueltas abiertas del rollo de tela es
demasiado grande durante la instalación y la cantidad de vueltas
preestablecidas La fuerza no se restaura después de la instalación, la
fuerza se debilitará, lo que provocará una tensión insuficiente en la
superficie de la tela.
4. El número predeterminado de vueltas de fuerza del toldo deslizable es
de 11 vueltas; si no hay suficiente fuerza , puede girar el soporte del
extremo en sentido antihorario según la dirección que se muestra en el
diagrama para aumentar la fuerza .
7
Soporte
2
2
8
Riel de tela
2
3
9
Tubo hexagonal
2
2
10
Un tornillo
(M4,8 x 18 mm)
1 2
24
11
Tornillo B
(M4*15 mm)
36
36
12
Tornillo C
( M4,8 x 22 mm)
10
10

- 7 -
PASO 1: Ensamble el conjunto de rodillos y conecte las tuberías.
Para 1 pieza de tubo de conexión.
Para tubo de conexión de 2 piezas.
PASO 2: Ensamble estas piezas con la tripulación “ A ” .
PASO 3:Montaje de la tela.
Inserte 2 cordones de poliéster en los dos lados de la tela. Busque la
etiqueta ① en la tela y la etiqueta ① en el rodillo. Deslice la tela en el
- 8 -
rodillo siguiendo la dirección de la flecha y luego enrolle la tela sobre el
rodillo.
PASO 4:Instalar el riel de tela
El riel de tela se fija en el costado de la carrocería del vehículo y la altura
inferior del riel de tela es más de 1,5 pulgadas más alta que la parte
superior del toldo deslizable. Debe mantenerse en una línea horizontal y
en el mismo plano. Si las posiciones delantera y trasera no están en el
mismo plano debido a la curvatura de la carrocería y otras razones, es
necesario usar un bloque de amortiguación para acolchar el riel de tela (el
bloque de amortiguación debe ser autoadaptable).
Next page
- 9 -
※ Nota: Antes de comenzar a instalar los tornillos de perforación,
asegúrese de que la ubicación de la perforación esté libre de
obstáculos, como cableado eléctrico .
PASO 5: Coloque los soportes de montaje en una posición de instalación
adecuada, taladre agujeros después de marcar la posición del orificio fijo
en el exterior del toldo deslizable, observe su tamaño y fíjelo con el tornillo
C.
Para evitar que la tela raye el borde de la cabina de expansión, la parte
superior del deflector fijo debe estar a ≤ 3,8 pulgadas de distancia de la
cornisa superior de la salida deslizable.
1.5in<H<2in
RV’s body
RV’s slide out module
fabric rail
- 10 -
La altura de los dos soportes debe mantenerse en una línea horizontal y
en el mismo plano. Si las posiciones delantera y trasera no están en el
mismo plano debido a la curvatura de la carrocería u otras razones, los
soportes de montaje deben aplanarse con un bloque amortiguador (el
bloque amortiguador debe estar equipado por sí solo)
PASO 6:La tela se inserta en el riel y el toldo se asegura con el
soporte como un todo.
Para facilitar la instalación y el funcionamiento, la tela del toldo deslizable
se gira y se afloja durante 1 o 2 vueltas (dentro de unos 300 mm), se
inserta la goma de la tela en el riel de tela y luego se coloca el toldo
deslizable cerca de los soportes de montaje, se penetra el tubo hexagonal
desde el soporte de montaje hasta el extremo del toldo deslizable y se fija
con el tornillo B.
RV’s slide out
module
Mounting brackets
Require parallel
fabric rail

- 11 -
※ NOTA: la orientación del soporte de montaje del TOLDO RV al
montarlo en el RV.
- 12 -
PASO 7: Depuración
Ajuste la tela corrediza, verifique que todos los tornillos estén apretados,
retire el pestillo de resorte y pruebe repetidamente la apertura y el cierre
del toldo corredizo varias veces. Si no hay problema, solucione el
problema . Tornillos B para ambos lados para evitar que la tela se mueva.
※Nota: Asegúrese de fijar los tornillos en ambos lados de la tela; de
lo contrario, el toldo deslizable se romperá.
Felicitaciones por la finalización de la instalación del módulo de
expansión , le deseo un feliz campamento.

- 13 -
Fabricante: Shanghaimuxinmuyeyouxiangongsi
Dirección: Shuangchenglu 803nong11hao1602A-1609shi, baoshanqu,
shanghai 200000 CN.
Importado a AUS: SIHAO PTY LTD. 1 ROKEVA STREETEASTWOOD
NSW 2122 Australia
Importado a EE. UU.: Sanven Technology Ltd. Suite 250, 9166 Anaheim
Place, Rancho Cucamonga, CA 91730

- 14 -
REP
UK
YH CONSULTING LIMITED.
C/O YH Consulting Limited Office 147,
Centurion House, London Road,
Staines-upon-Thames, Surrey, TW18 4AX
REP
EC
E-CrossStu GmbH
Mainzer Landstr.69,
60329 Frankfurt am Main.


Tecnico Supporto e certificato di garanzia elettronica www.vevor.com/support
TENDA SCORREVOLE MODULARE PER
CAMPER
MODELLO: A6
Continuiamo a impegnarci per fornirvi strumenti a prezzi competitivi.
"Risparmia la metà", "Metà prezzo" o altre espressioni simili utilizzate solo da noi
rappresenta una stima dei risparmi che potresti ottenere acquistando determinati strumenti
con noi rispetto ai principali marchi top e non significa necessariamente copertina
tutte le categorie di strumenti da noi offerti. Ti ricordiamo cortesemente di verificare
accuratamente
quando effettui un ordine con noi se sei effettivamente Risparmio
Metà rispetto ai marchi più importanti.


- 1 -
MODELLO: A6
< Immagine solo per riferimento >
HAI BISOGNO DI AIUTO? CONTATTACI!
Hai domande sui prodotti? Hai bisogno di supporto tecnico? Non
esitare a contattarci:
Supporto tecnico e certificato di garanzia elettronica
www.vevor.com/support
Questa è l'istruzione originale, si prega di leggere attentamente tutte le
istruzioni del manuale prima di utilizzare. VEVOR si riserva una chiara
interpretazione del nostro manuale utente. L'aspetto del prodotto sarà
soggetto al prodotto ricevuto. Vi preghiamo di perdonarci se non vi
informeremo di nuovo se ci sono aggiornamenti tecnologici o software sul
nostro prodotto.
RV MODULAR
SLIDE AWNING

- 2 -
IMPORTANT SAFEGUARDS
AVVERTIMENTO: Leggere e comprendere l'intero manuale prima di
utilizzare o riparare questo prodotto. La mancata osservanza di queste
avvertenze e istruzioni può causare lesioni personali o danni a beni di
valore.
Evitare che i bambini utilizzino il prodotto . E questo prodotto non è un
giocattolo. Non permettere ai bambini di giocare .
ASSEMBLY PRECAUTIONS
1. Assemblaggio solo secondo queste istruzioni. Un assemblaggio improprio
può creare pericoli.
2. e l'uso , indossare occhiali di sicurezza omologati ANSI e guanti da lavoro
resistenti .
3. Mantenere l'area di riunione pulita e ben illuminata.
4. Durante l'assemblea, tenere gli astanti lontani dall'area.
5. Non riunirsi quando si è stanchi o sotto l'effetto di alcol, droghe o farmaci.
6. Le capacità del prodotto si applicano solo al prodotto correttamente e
completamente assemblato.
7. Per ulteriori informazioni sulle parti elencate nelle pagine seguenti, fare
riferimento allo schema di montaggio di questo manuale. Disimballare e separare
tutte le parti in un'area di lavoro pulita. Tenere i piccoli pezzi di ricambio fuori dalla
portata dei bambini
8. Preparativi prima dell'installazione:
1) si suggerisce che 2 o più persone cooperino per completare
2) Due scale alte 4 piedi e 10 piedi
3) Alcuni utensili elettrici, ad esempio un trapano
SALVA QUESTE ISTRUZIONI
- 3 -
PRODUCT DIMENSIONS
Come ordinare la taglia corretta ?
Misurando la lunghezza della tenda da sole scorrevole, si consiglia che la
dimensione del tessuto scorrevole sia da 1 a 6 pollici più lunga della
lunghezza della tenda da sole scorrevole.
Dimensioni dello
scorrimento
(L1)
Dimensioni
tenda (L2)
Dimensioni
del tessuto
(L3)
L'
(Massimo)
Colore
6 ' 7 '' ~7 '
7 ' 7 ''
7 ' 1 ''
51 ”
Nero
Altezza: 7'1 ' ' ~
7'6 ' '
8 ' 1 ''
7 ' 7 ''
51 ”
Nero
7 ' 7 '' ~8 '
8 ' 7 ''
8 ' 1 ''
51 ”
Nero
11 ' 7 '' ~12 '
12 ' 7 ''
12 ' 1 ''
51 ”
Nero
12 ' 1 '' ~12 ' 6 ''
13 ' 1 ''
12 ' 7 ''
51 ”
Nero
12 ' 7 '' ~13 '
13 ' 7 ''
13 ' 1 ''
51 ”
Nero
- 4 -
SPECIFICATION
Modello
La A6
Materiale
Alluminio
Tessuto
PVC
Colore
Bianco e Nero
Veicolo adatto
Camper con scivolo
12 ' 7 '' ~13 '
13 ' 7 ''
13 ' 1 ''
51 ”
Bianco
Altezza : 13 ' '
14 ' 1 ''
13 ' 7 ''
51 ”
Nero
Altezza : 13 ' '
14 ' 1 ''
13 ' 7 ''
51 ”
Bianco
Unit:mm
- 5 -
PACKAGE LIST
NO.
Nome
Immagine
Quantità
SPECIFICHE
7 piedi e 1
pollice
7 piedi e 7
pollici
8 piedi e 1
pollice
12 piedi 1
pollice
12 piedi e 7
pollici
13 piedi e 1
pollice
13 piedi e 7
pollici
1
Gruppo rulli (l)
1
1
2
Gruppo rulli (R)
1
1
3
Rullo di
estensione
/
1
4
Collegare il
tubo
1
2
5
Tessuto
1
1
6
Corda di tessuto
2
2
7
Staffa
2
2
- 6 -
INSTALLATION PRECAUTIONS
1. Controllare che vi sia sufficiente spazio di installazione sulla carrozzeria
del veicolo e far scorrere fuori gli inserti in tessuto senza piegarli.
2. Controllare che la carrozzeria del veicolo sia dotata di piastre di rinforzo
in corrispondenza delle quali sono montate la staffa di montaggio e la
guida in tessuto , oppure chiedere informazioni al venditore del veicolo.
3. La tenda scorrevole esce dalla fabbrica con una forza preimpostata .
Per facilitare l'installazione e il funzionamento, è possibile girare e allentare
il rullo di telo parasole per 1~2 giri (circa 300 mm) per l'installazione. Se il
numero di giri aperti del rullo di telo è troppo grande durante l'installazione
e il numero di giri preimpostati Se la forza non viene ripristinata dopo
l'installazione, la forza verrà indebolita, con conseguente tensione
insufficiente sulla superficie del tessuto.
4. Il numero preimpostato di giri di forza della tenda scorrevole è 11 giri; se
la forza non è sufficiente , è possibile ruotare la staffa terminale in senso
antiorario secondo la direzione indicata nel diagramma per aumentare la
forza .
8
Binario in tessuto
2
3
9
Tubo esagonale
2
2
10
Una vite
(M4.8*18mm)
1 2
24
11
Vite B
(M4*15mm)
36
36
12
Vite C
( M4.8*22mm )
10
10
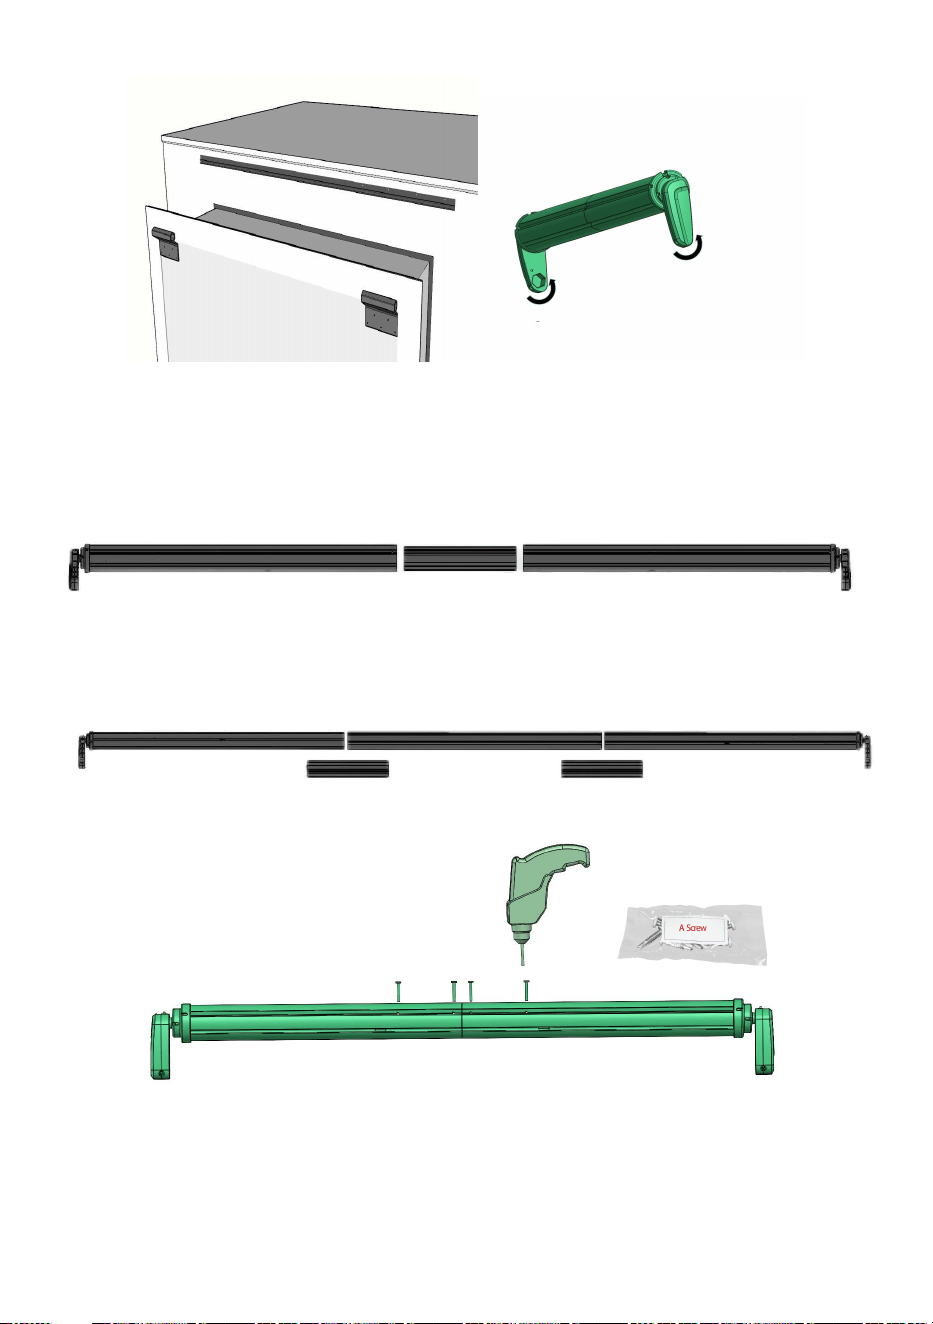
- 7 -
FARE UN PASSO 1: Montare il gruppo rulli e collegare i tubi.
Per 1 pezzo di tubo di collegamento.
Per tubo di collegamento in 2 pezzi.
FARE UN PASSO 2: Assemblare queste parti con la squadra “ A ” .
FARE UN PASSO 3: Montaggio del tessuto.
Inserire 2 pezzi di poly-cord nei due lati del tessuto. Trovare l'etichetta ①
nel tessuto e l'etichetta ① nel rullo, far scorrere il tessuto nel rullo
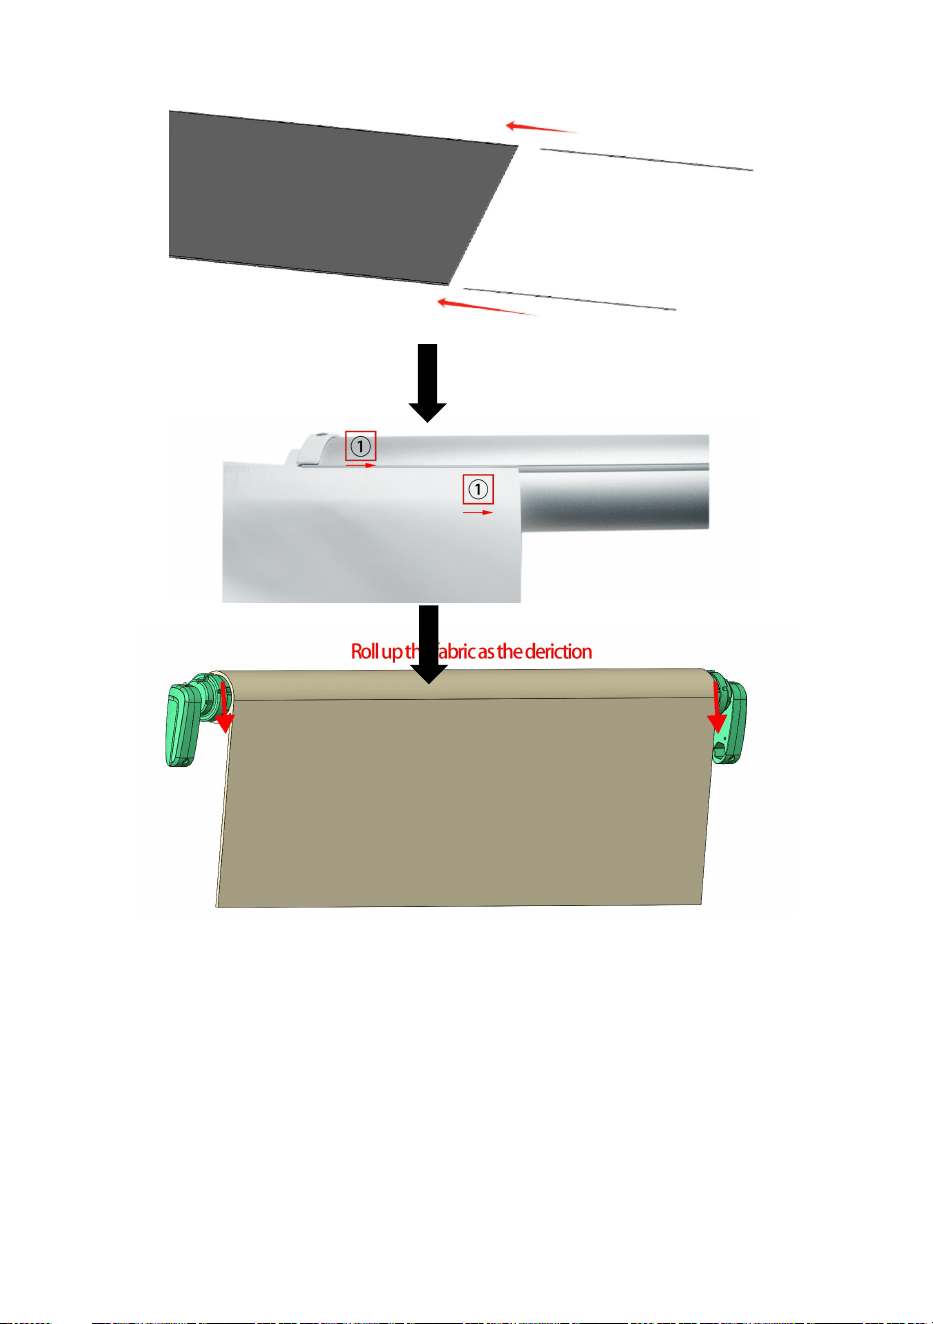
- 8 -
seguendo la direzione della freccia, quindi arrotolare il tessuto sul rullo.
FARE UN PASSO 4: Installare la guida in tessuto
La guida in tessuto è fissata sul lato della carrozzeria del veicolo e l'altezza
inferiore della guida in tessuto è più alta di oltre 1,5 pollici rispetto alla parte
superiore della tenda scorrevole. Deve essere mantenuta su una linea
orizzontale e sullo stesso piano. Se le posizioni anteriore e posteriore non
sono sullo stesso piano a causa della curvatura della carrozzeria e per altri
motivi, è necessario utilizzare un blocco di imbottitura per imbottire la guida
in tessuto (il blocco di imbottitura deve essere auto-adattato).
Next page
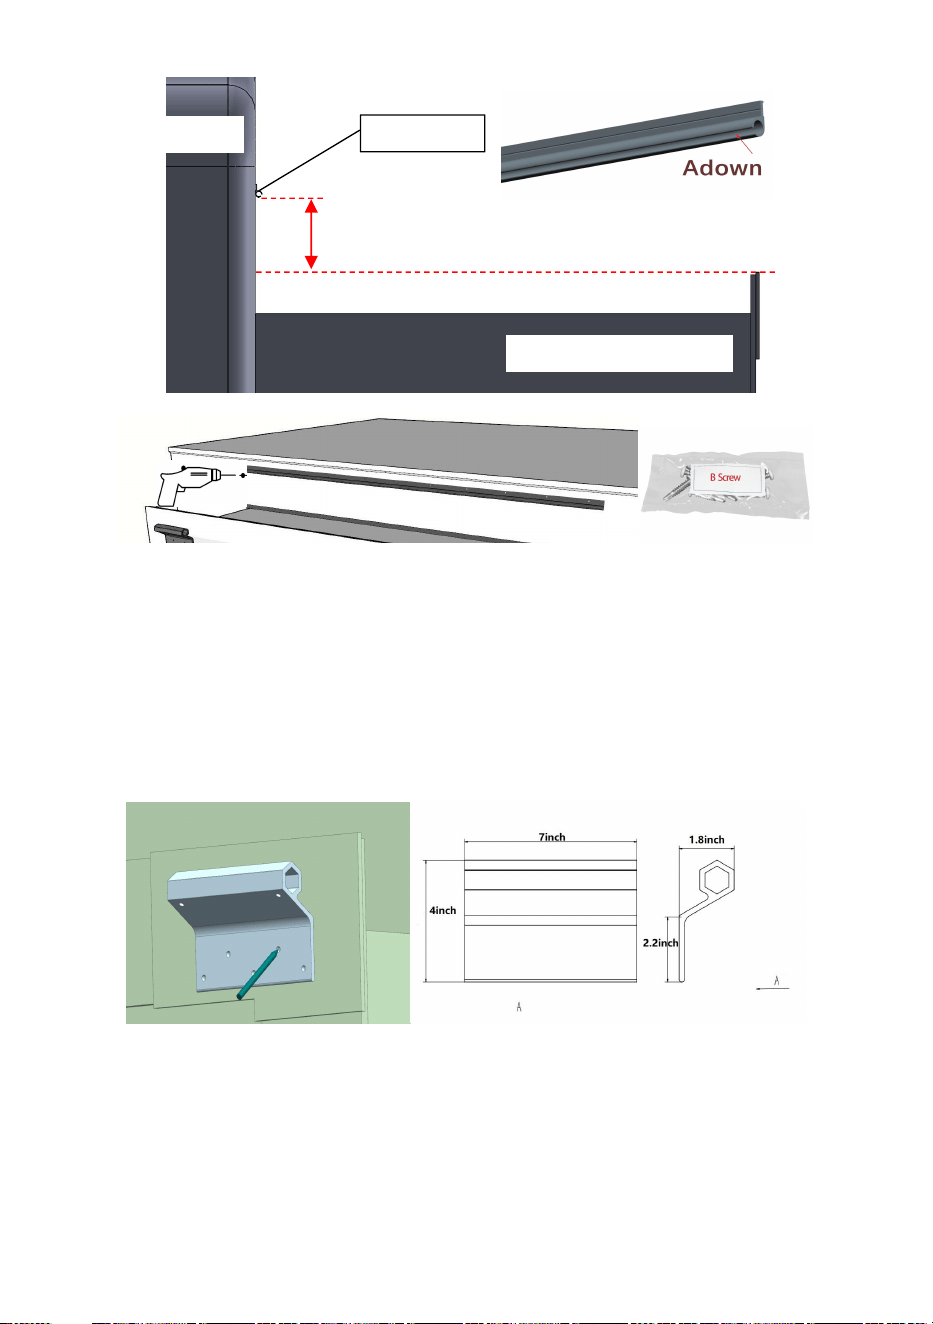
- 9 -
※ Nota: prima di iniziare a installare le viti di perforazione,
assicurarsi che il punto di perforazione sia libero da ostacoli, come
cavi elettrici .
FARE UN PASSO 5: Posizionare le staffe di montaggio in una posizione di
installazione adatta, praticare i fori dopo aver contrassegnato la posizione
dei fori fissi sulla parte esterna della tenda da sole scorrevole, verificarne le
dimensioni e fissare con la vite C.
Per evitare che il tessuto graffi il bordo della cabina di espansione, la parte
superiore del deflettore fisso deve trovarsi a ≤ 3,8 pollici di distanza dalla
cornice superiore dello scorrevole.
1.5in<H<2in
RV’s body
RV’s slide out module
fabric rail

- 10 -
L'altezza delle due staffe deve essere mantenuta su una linea orizzontale
e sullo stesso piano. Se le posizioni anteriore e posteriore non sono sullo
stesso piano a causa della curvatura del corpo e di altri motivi, le staffe di
montaggio devono essere appiattite con un blocco di ammortizzazione (il
blocco di ammortizzazione deve essere equipaggiato da solo)
FARE UN PASSO 6: Il tessuto viene inserito nella guida e la tenda
viene fissata con la staffa nel suo complesso.
Per facilitare l'installazione e il funzionamento, il tessuto della tenda
scorrevole viene girato e allentato per 1~2 giri (entro circa 300 mm), si
inserisce la gomma del tessuto nella guida del tessuto, quindi la tenda
scorrevole viene posizionata vicino alle staffe di montaggio, si penetra il
tubo esagonale dalla staffa di montaggio all'estremità della tenda
scorrevole, fissandolo con la vite B.
RV’s slide out
module
Mounting brackets
Require parallel
fabric rail
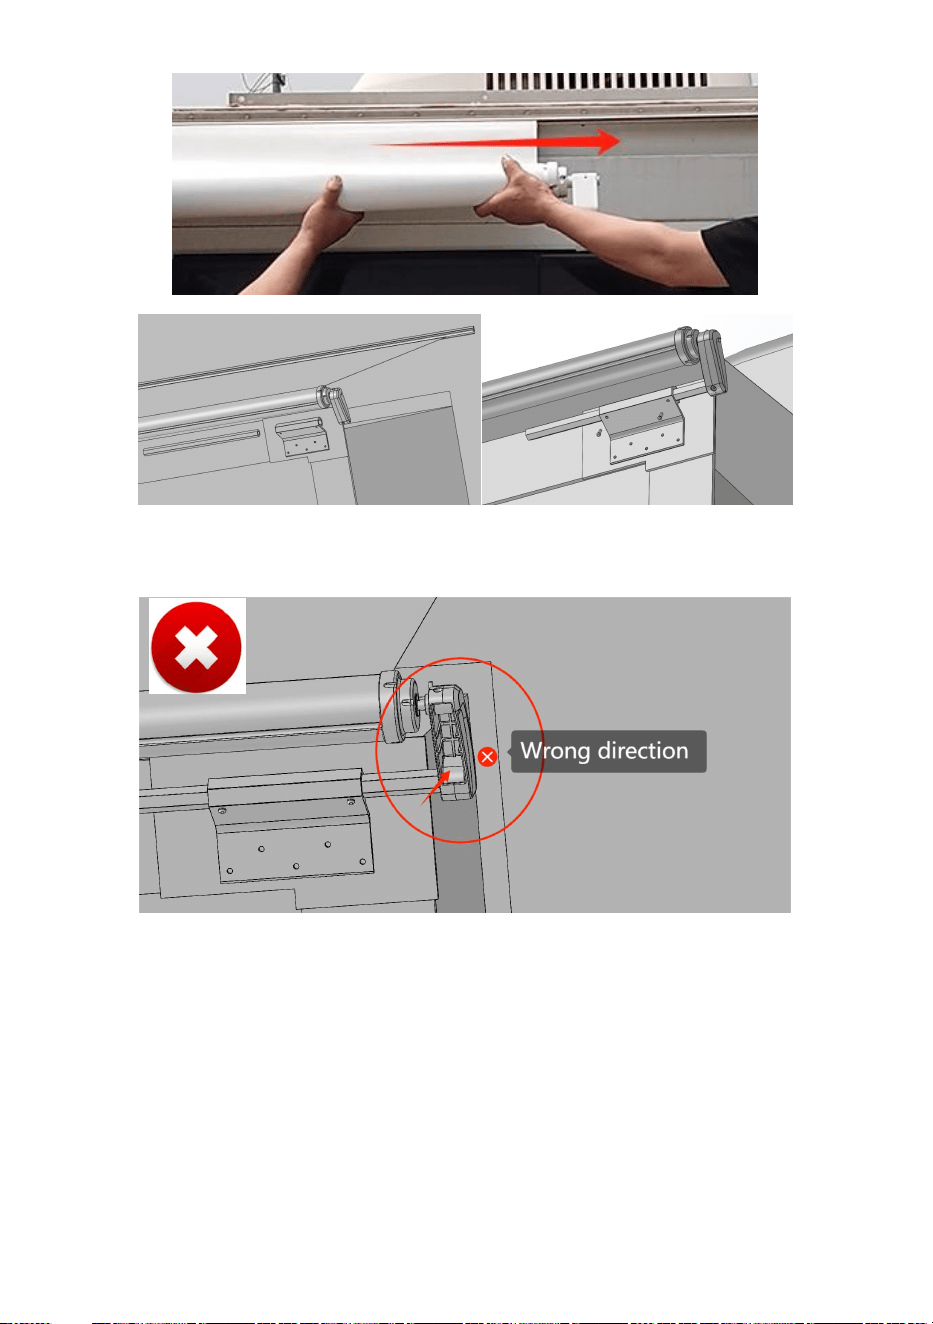
- 11 -
※ NOTA: l'orientamento della staffa di montaggio della VERANDA
PER RV durante il montaggio sul camper.
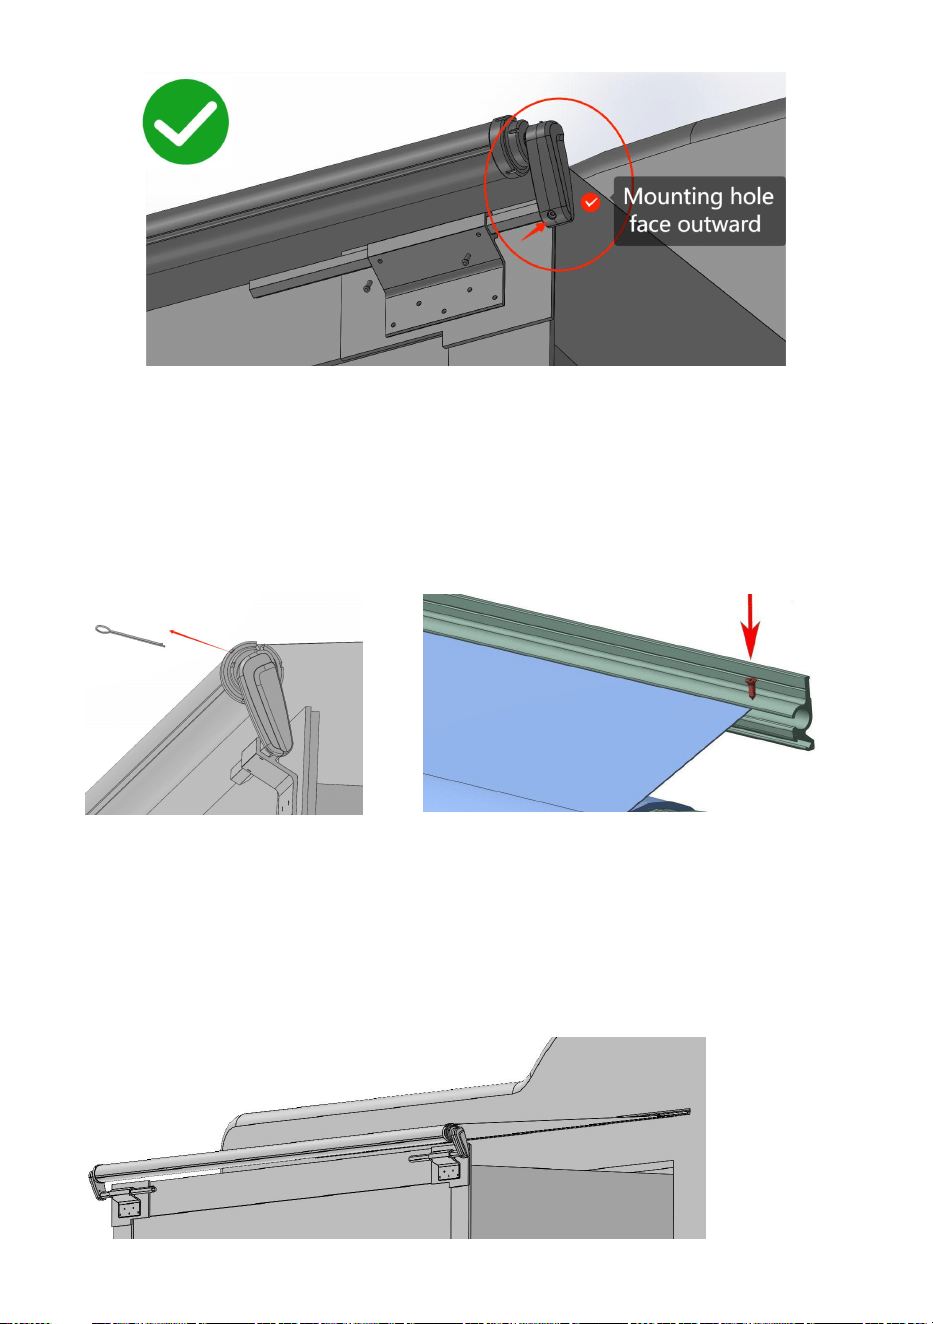
- 12 -
FARE UN PASSO 7:Esegui debug
Regolare il tessuto scorrevole, controllare che tutte le viti siano serrate,
rimuovere il fermo a molla e testare ripetutamente l'apertura e la chiusura
della tenda scorrevole per diverse volte. Se non si verificano problemi,
risolvere Viti B su entrambi i lati per proteggere il tessuto da eventuali
movimenti.
※Nota: assicurarsi di fissare le viti su entrambi i lati del tessuto,
altrimenti la tenda scorrevole si romperà.
Congratulazioni per il completamento dell'installazione del modulo di
espansione , ti auguro un felice campeggio

- 13 -
Produttore: Shanghaimuxinmuyeyouxiangongsi
Indirizzo: Shuangchenglu 803nong11hao1602A-1609shi, baoshanqu,
shanghai 200000 CN.
Importato in AUS: SIHAO PTY LTD. 1 ROKEVA STREETEASTWOOD
NSW 2122 Australia
Importato negli USA: Sanven Technology Ltd. Suite 250, 9166 Anaheim
Place, Rancho Cucamonga, CA 91730

- 14 -
REP
UK
YH CONSULTING LIMITED.
C/O YH Consulting Limited Office 147,
Centurion House, London Road,
Staines-upon-Thames, Surrey, TW18 4AX
REP
EC
E-CrossStu GmbH
Mainzer Landstr.69,
60329 Frankfurt am Main.

