model number 060-1913-8 | contact us: 1.866.523.5218
IMPORTANT:
Read and follow all safety rules and operating
instructions before using this product.
Instruction
Manual
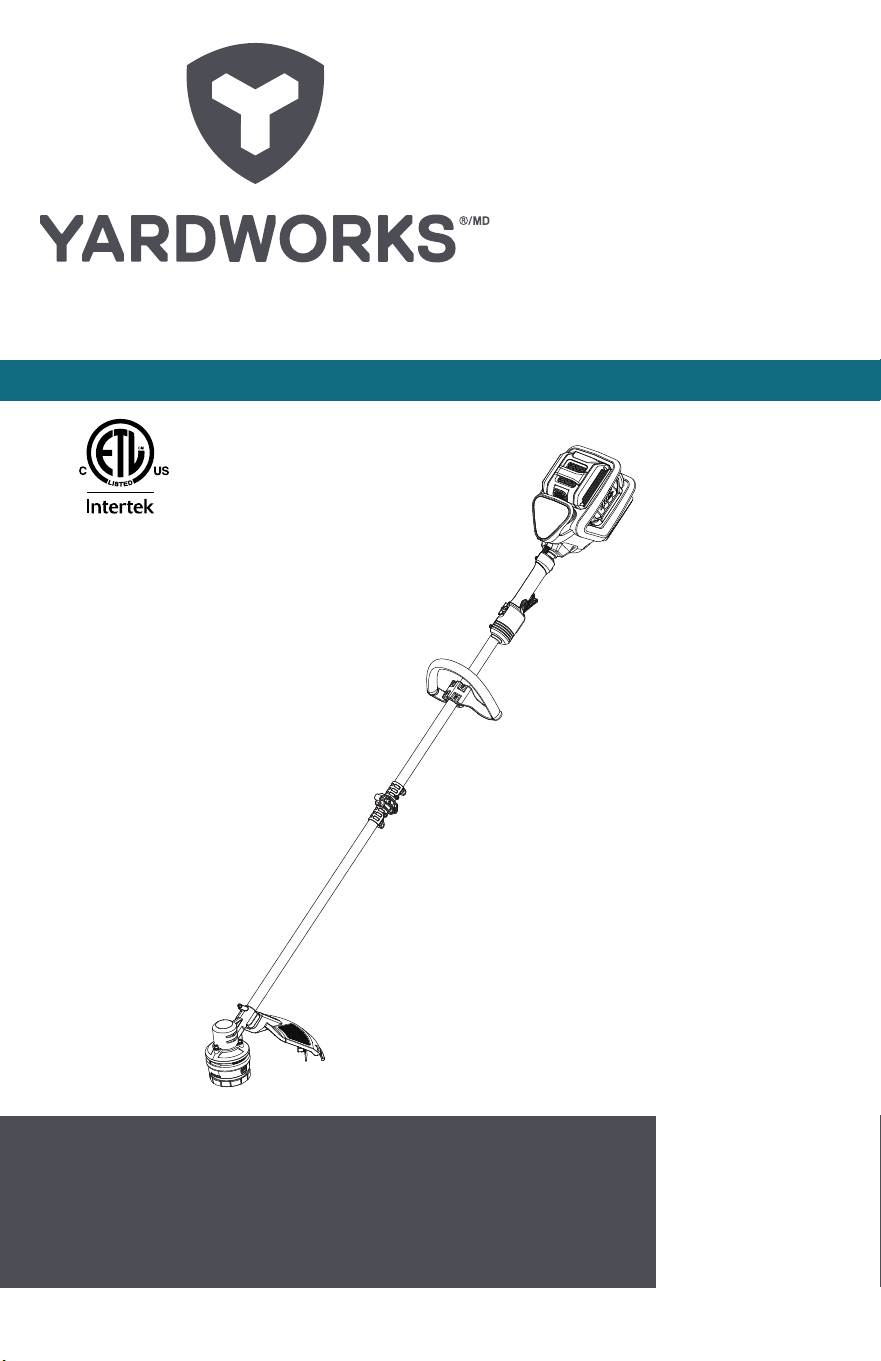
15” (38.1 CM) BRUSHLESS GRASS TRIMMER
3026035
model no. 060-1913-8 | contact us: 1.866.523.5218model no. 060-1913-8 | contact us: 1.866.523.5218
2

model no. 060-1913-8 | contact us: 1.866.523.5218 model no. 060-1913-8 | contact us: 1.866.523.5218
3
model no. 060-1913-8 | contact us: 1.866.523.5218
Introduction 4
Safety Instructions & Symbols 5
Product Specications 9
Product Diagram 10
Assembly 11
Operation 14
Maintenance 17
Storage 18
Troubleshooting 19
Exploded View 20
Parts List 21
Warranty 22
Table of Contents
model no. 060-1913-8 | contact us: 1.866.523.5218
4
Introduction
INTRODUCTION
Congratulations on your purchase of your new Yardworks
®
tool. It has been designed, engineered
and manufactured to give you the best possible dependability and performance.
Should you experience any problem you cannot easily remedy, please contact our Yardworks
®
customer service line at 1.866.523.5218.
PLEASE READ AND RETAIN THIS INSTRUCTION MANUAL. These instructions will enable you to
assemble and maintain your appliance properly. ALWAYS observe the “SAFETY RULES”.
The instruction manual was designed to conveniently help you get your purchase ready to use so
there’s less risk of damaging it and so you may features so you may operate provide you with enough
information to get familiar with your product’s controls and features and to operate it safely.
Please do not operate garden equipment near children. This could
lead to severe injury or death.
Model number:
Serial number:
Date of purchase (MM/DD/YYYY):
Notes:
Please read this manual carefully and make sure you understand the instructions
before using the machine.
SAFETY FIRST
CAUTION: The operation of lawn equipment can
result in foreign objects thrown into the eyes, which
can result in SEVERE EYE INJURY. ALWAYS wear
safety glasses or eye shields while operating your
lawn equipment or performing any adjustments or
repairs. We recommend standard safety glasses or a
wide vision safety mask worn over spectacles.

model no. 060-1913-8 | contact us: 1.866.523.5218 model no. 060-1913-8 | contact us: 1.866.523.5218
5
!
Important Safety Instructions
WARNING: Read all safety warnings and instructions. Failure to
follow the warnings and instructions may result in electric shock,
re and/or serious injury.
FOR ALL APPLIANCES
• Avoid dangerous environments — do not
use appliances in damp or wet locations.
• Don’t use in rain.
• Keep children away — all people and
pets should be kept at a distance from
the work area.
• Dress properly — do not wear loose
clothing or jewellery. They can be
caught in moving parts. Wear protective
clothing; use of work gloves, long
pants, a long-sleeved shirt and safety
footwear is recommended when working
outdoors. Wear protective hair covering
to contain long hair.
• Use safety glasses — always use face
or dust mask if the area in which you are
working is dusty.
• Use the right appliance — do not use
appliance for any job except that for
which it is intended.
• Do not force appliance — it will do the
job better and with less likelihood of a
risk of injury at the rate for which it was
designed.
• Do not overreach — keep proper footing
and balance at all times.
• Stay alert. Use common sense. Do not
operate appliance when you are tired or
under the inuence of drugs, alcohol or
medication.
• When not in use, appliances should be
stored indoors in dry places out of reach
of children.
• Maintain appliance with care. Follow
instructions for lubricating and changing
accessories. Keep handles dry, clean,
and free from oil and grease.
• Check damaged parts. Before using the
appliance, make sure the safety guards
are intact. Never use a tool without its
safety guard. Check the alignment of the
moving parts, the binding of the moving
parts. Check for broken or defective
parts that can affect the safe operation
of your tool. A guard or other part that is
damaged should be properly repaired
or replaced by an authorized service
centre unless indicated elsewhere in this
manual.
1. FOR ALL BATTERY-OPERATED
GARDENING APPLIANCES:
1. Prevent unintentional starting. Ensure
the switch is in the off-position before
connecting to battery pack, picking up
or carrying the appliance. Carrying the
appliance with your nger on the switch
or energizing an appliance that has the
switch on invites accidents.
2. Disconnect the battery pack from
the appliance before making any
adjustments, changing accessories,
or storing appliance. Such preventive
safety measures reduce the risk of
starting the appliance accidentally.
3. Recharge only with the charger specied
by the manufacturer. A charger that is
suitable for one type of battery pack
may create a risk of re when used with
another battery pack.
4. Use appliances only with specically
designated battery packs. Use of any
other battery packs may create a risk of
injury and re.
5. When battery pack is not in use, keep
it away from other metal objects, like
paper clips, coins, keys, nails, screws
or other small metal objects, that can
make a connection from one terminal to
another. Shorting the battery terminals
together may cause burns or a re.
6. Under abusive conditions, liquid may be
ejected from the battery; avoid contact.
Safety Instructions

model no. 060-1913-8 | contact us: 1.866.523.5218
6
Safety Instructions
If contact accidentally occurs, ush with
water. If liquid contacts eyes, additionally
seek medical help. Liquid ejected from
the battery may cause irritation or burns.
7. Do not use a battery pack or appliance
that is damaged or modied. Damaged
or modied batteries may exhibit
unpredictable behaviour resulting in re,
explosion or risk of injury.
8. Do not expose a battery pack
or appliance to re or excessive
temperature. Exposure to re or
temperature above 265°F(130°C) may
cause an explosion.
9. Follow all charging instructions and do
not charge the battery pack or appliance
outside of the temperature range
specied in the instructions. Charging
improperly or at temperatures outside
of the specied range may damage the
battery and increase the risk of re.
10. Have servicing performed by a qualied
repair person using only identical
replacement parts. This will ensure that
the safety of the product is maintained.
11. Do not modify or attempt to repair
the appliance or the battery pack (as
applicable) except as indicated in the
instructions for use and care.
ADDITIONAL SAFETY RULES FOR LAWN
TRIMMER AND EDGE TRIMMER
1. Keep guards in place and in good
working order.
2. Keep hands and feet away from cutting
area.
3. Do not use heavier lines than
recommended in this manual.
4. Do not use line materials of other types
– for example, metal wire, rope, and the
like.
SAFETY WARNINGS FOR BATTERY PACK
a) Do not dismantle, open or shred
battery pack.
b) Do not expose battery pack to heat or
re. Avoid storage in direct sunlight.
c) Do not short-circuit a battery pack. Do
not store battery packs haphazardly
in a box or drawer where they may
short-circuit each other or be short-
circuited by other metal objects. When
battery pack is not in use, keep it away
from other metal objects, like paper clips,
coins, keys, nails, screws or other small
metal objects, that can make a connection
from one terminal to another. Shorting
the battery terminals together may cause
burns or re.
d) Do not remove battery pack from its
original packaging until required for
use.
e) Do not subject battery pack to
mechanical shock.
f) In the event of battery leaking, do not
allow the liquid to come in contact with
the skin or eyes. If contact has been
made, wash the affected area with
copious amounts of water and seek
medical advice.
g) Observe the plus (+) and minus
(–) marks on the battery back and
equipment and ensure correct use.
h) Do not use any battery pack which
is not designed for use with the
equipment.
i) Keep battery pack out of the reach of
children.
j) Seek medical advice immediately if a
cell or battery has been swallowed.
k) Always purchase the battery
pack recommended by the device
manufacturer for the equipment.
l) Keep battery pack clean and dry.
m) Wipe the battery pack terminals with a
clean, dry cloth if they become dirty.
n) Battery pack needs to be charged
before use. Always use the correct
charger and refer to the manufacturer’s
instructions or equipment manual for
proper charging instructions.
o) Do not leave battery pack on prolonged
charge when not in use.
p) After extended periods of storage,
it may be necessary to charge
and discharge the battery pack
model no. 060-1913-8 | contact us: 1.866.523.5218 model no. 060-1913-8 | contact us: 1.866.523.5218
7
several times to obtain maximum
performance.
q) The battery pack gives its best
performance when it is operated at
normal room temperature (68°F ±
9°F/20°C ± 5°C).
r) When disposing of battery packs,
keep battery packs of different
electrochemical systems separate
from each other.
s) Recharge only with the charger
specied by
Yardworks
®
. Do not
use any charger other than that
specically provided for use with the
equipment. A charger that is suitable
for one type of battery pack may create
a risk of re when used with another
battery pack.
t) Retain the original product literature
for future reference.
u) Use only the battery pack in the
application for which it was intended.
v) Remove the battery pack from the
equipment when not in use.
w) Dispose of properly.
Information for radiated emission
This device complies with Canadian ICES-
001.
This device complies with Part 15 of the FCC
Rules.
Operation is subject to the following two
conditions:
(1) This device may not cause harmful
interference, and
(2) This device must accept any interference
received, including interference that may
cause undesired operation.
NOTE: This equipment has been tested and
found to comply with the limits for a Class B
digital device, pursuant to Part 15 of the FCC
Rules.
These limits are designed to provide
reasonable protection against harmful
interference in a residential installation. This
equipment generates, uses and can radiate
radio frequency energy and, if not installed
and used in accordance with the instructions,
may cause harmful interference to radio
communications.
However, there is no guarantee that
interference will not occur in a particular
installation. If this equipment does cause
harmful interference to radio or television
reception, which can be determined by
turning the equipment off and on, the user is
encouraged to try to correct the interference
by one or more of the following measures:
• Reorient or relocate the receiving
antenna.
• Increase the separation between the
equipment and receiver.
• Connect the equipment into an outlet on
a circuit different from that to which the
receiver is connected.
• Consult the dealer or an experienced
radio/TV technician for help.
Safety Instructions
WARNING: Changes or modications to this unit not expressly
approved by the party responsible for compliance could void the user’s
authority to operate the equipment.
model no. 060-1913-8 | contact us: 1.866.523.5218
8
SAVE THESE INSTRUCTIONS!
Symbols
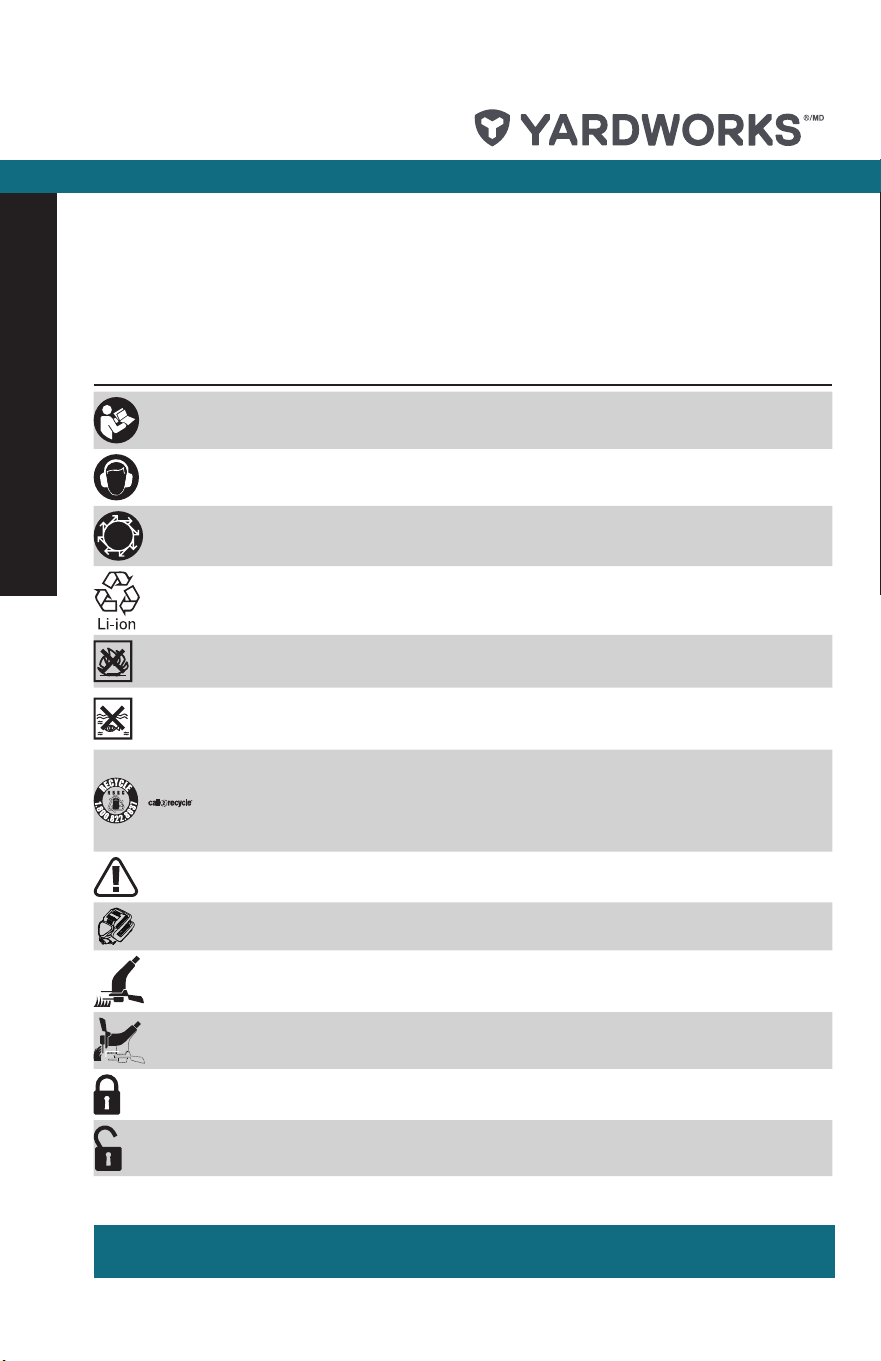
Symbol Designation/Explanation
To reduce the risk of injury, user must read instruction manual
Wear ear protection
This part directs thrown objects away from the operator
Li-ion battery; battery must be recycled
Do not burn
Batteries may enter water cycle if disposed improperly, which can be
hazardous for ecosystem. Do not dispose of waste batteries as unsorted
municipal waste.
Yardworks
®
Inc. has established a partnership with the RBRC Corporation
to recycle any
Yardworks
®
batteries with the RBRC-call2recycle seal. For
environmental protection, please do not discard batteries in the trash.
After the battery’s life cycle is ended, please call 1-800-822-8837 for a free
service that will properly dispose of the battery.
Warning
Make sure the battery is removed prior to changing accessories
Trimming
Edging
Lock
Unlock
Some of the following symbols may be used on this product. Please study them and learn
their meaning. Proper interpretation of these symbols will allow you to operate the product
effectively and safely.
model no. 060-1913-8 | contact us: 1.866.523.5218 model no. 060-1913-8 | contact us: 1.866.523.5218
9
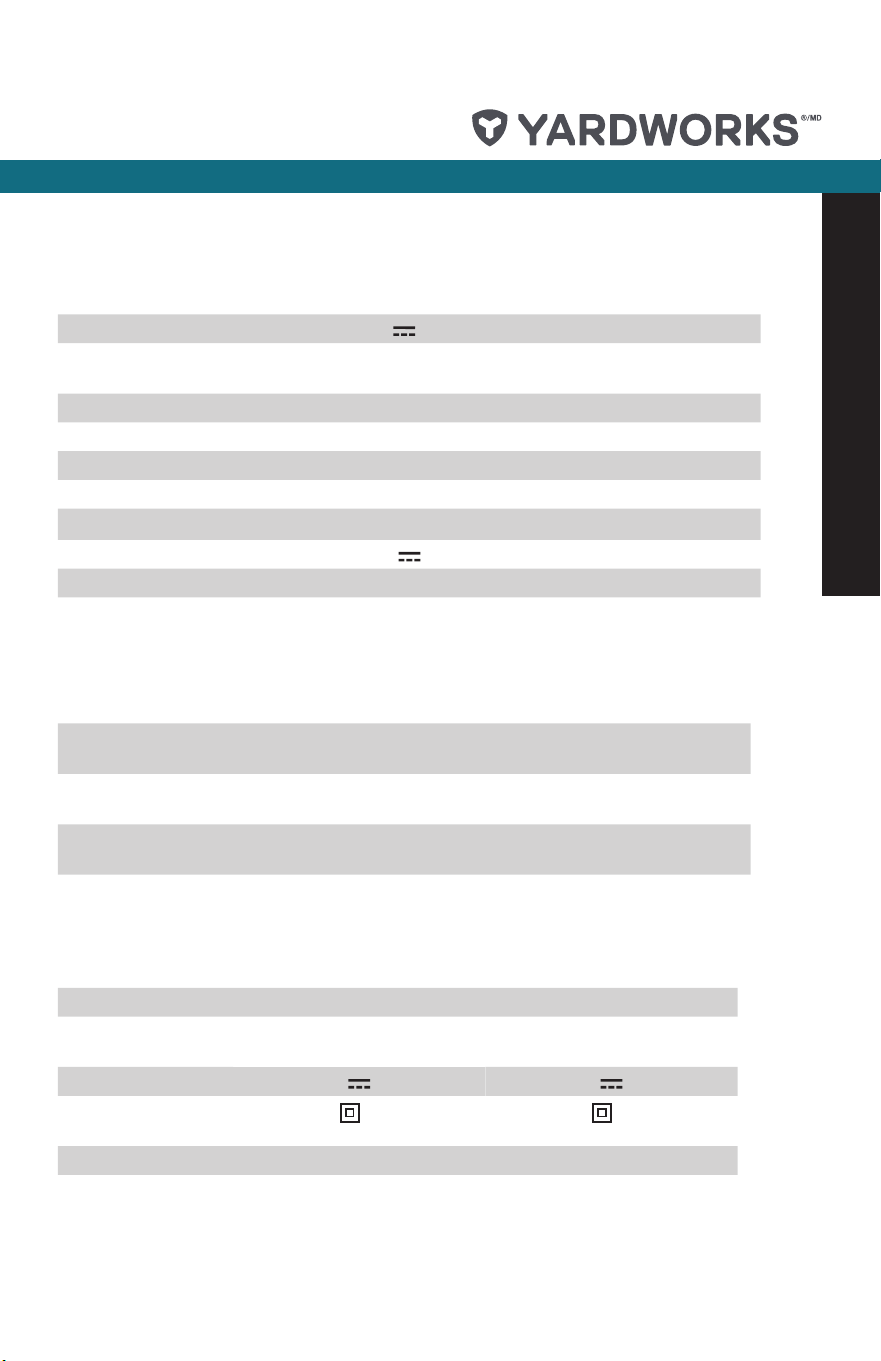
TECHNICAL DATA
Voltage 48V
Speed Power sense mode: 4500/min to 6000/min;
MAX mode: 6000/min
Cutting Diameter 15" (38 cm)
Line Diameter 0.094” (2.39 mm)
Line length 16 ft (4.9 m)
Battery capacity (060-1987-2) 2.0 Ah
Charger Input(060-1990-2) 120 V~, 60 Hz, 110 W
Charger Output(060-1990-2) 48 V , 2 A
Charging time 1 hr
Machine Weight 11 lb 7 oz (5.2 kg)
SUITABLE BATTERY PACKS
Item
Number
060-1987-2
ABP4830SH
060-1988-0
ABP4850SH
060-1989-8
Battery
Capacity
2.0 Ah 3.0 Ah 4.0 Ah 5.0 Ah 6.0 Ah
Included Not
included
Not
included
Not
included
Not
included
SUITABLE CHARGERS
Item Number 060-1990-2 060-1992-8
Charger Input 120 V~, 60 Hz,
110 W
120 V~, 60 Hz,
320 W
Charger Output 48 V , 2 A 48 V , 6 A
Charger
Protection Class
/II /II
Included Not included
Product Specications
model no. 060-1913-8 | contact us: 1.866.523.5218
10
6
13
4
1
2
Tool storage
3
5
7
14 15 16
17
8
9
10
11
12
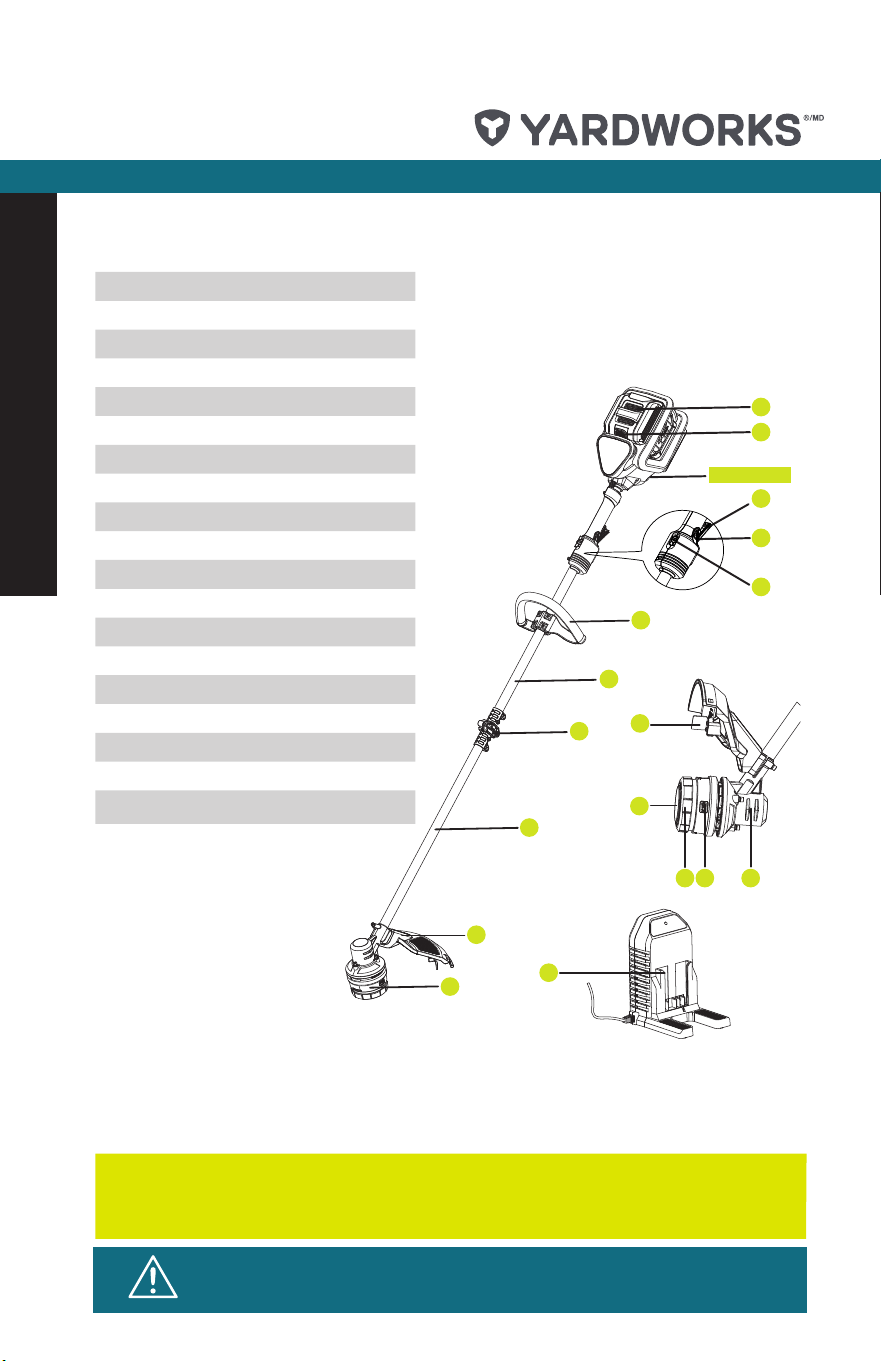
Product Diagram
We recommend that you purchase your accessories listed in the above list
from the same store that sold you the tool. Refer to the accessory packaging
for further details. Store personnel can assist you and offer advice.
1.
Battery pack (060-1987-2)
2. Battery pack release button
3. On/Off switch
4. Lock-off button
5. Mode selecting control
6. Auxiliary handle
7. Upper shaft
8. Couplings
9. Lower shaft
10. Safety guard
11. Spool holder
12. Line cutter
13. Bump knob
14. Line tting knob
15. Line tting hole
16. Trimmer head
17. Charger (060-1990-2)
18. Hex key x 2 (Fig. A2 & C1)
19. Bolt x 7 (Fig. A2, B & C1)
20. Spool holder release knob
x 2 (Fig. K1)
WARNING: Any other accessory or attachment may increase the risk of
injury.
model no. 060-1913-8 | contact us: 1.866.523.5218 model no. 060-1913-8 | contact us: 1.866.523.5218
11
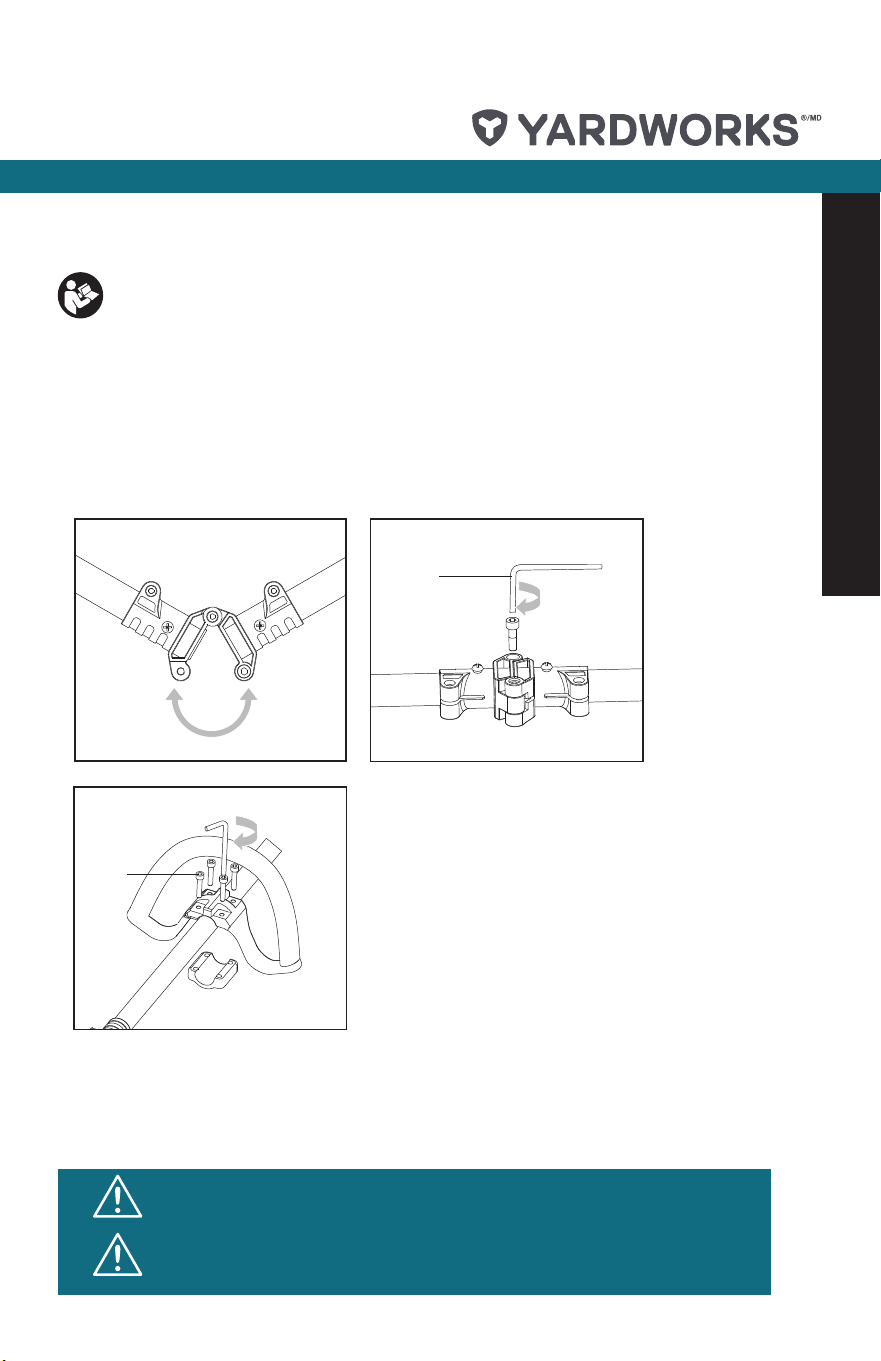
1. Assembling the upper shaft and lower shaft
Connect the couplings into each other (see Fig. A1). Align the holes and fasten the couplings
by screwing the bigger bolt with the bigger hex key (see Fig. A2).
2. Assembling the auxiliary handle
Place the auxiliary handle onto the shaft and align with the anti-vibration circle on the shaft.
Tighten the auxiliary handle by screwing the four bolts with the hex key (see Fig. B).
To reduce the risk of injury, user must read instruction manual.
Intended Use
The machine is intended for the cutting of grass and weeds under bushes, as well as on
slopes and edges that cannot be reached with a lawn mower.
Power sense
mode
MAX mode
1
2
18
19
30
0
1
2
3
1
2
1
1
2
20
20
11
a
A2
A1
C2
C1
B
E1
E2
G
F
H2
H1
H4
H3
J1
I
J3
J2
K2
J4
K1
K3
Assembly
CAUTION! The trimmer must not be operated before it has been
assembled completely.
CAUTION! Do not insert the battery until the trimmer has been completely
assembled.
model no. 060-1913-8 | contact us: 1.866.523.5218
12
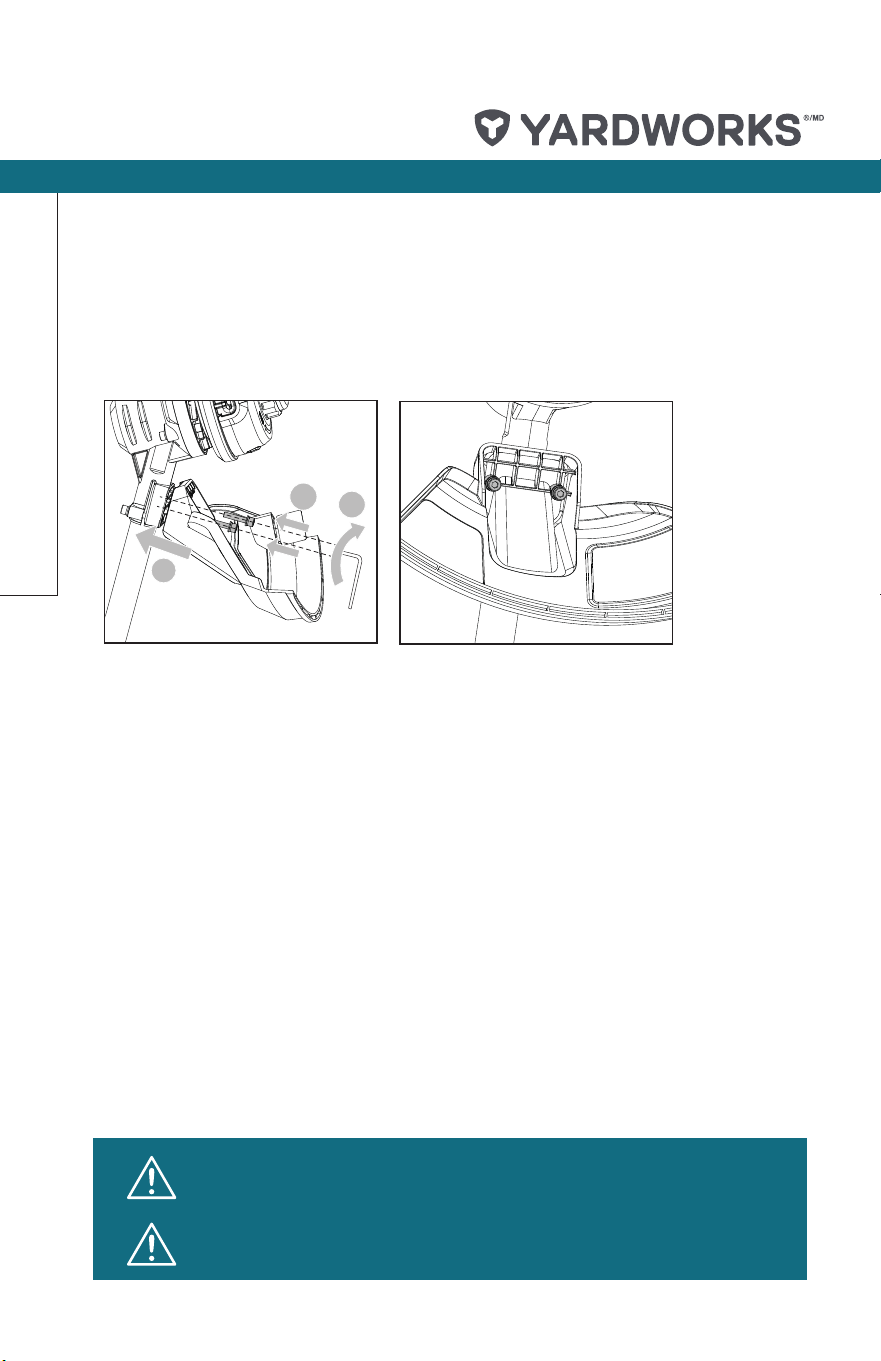
3. Assembling the safety guard
Attach the safety guard to the lower shaft as shown in Fig. C1. Align the 2 holes on the
safety guard with the 2 corresponding holes on the lower shaft.
Hold the safety guard in place and insert the 2 small bolts into the 2 aligned holes.
Secure the safety guard onto the lower shaft with the provided hex key (see Fig. C2).
BEFORE OPERATION
1. Charging the battery pack
IMPORTANT NOTES FOR CHARGING BATTERY
The battery in your new tool is not charged when it leaves the plant; therefore, it must be fully
charged before using the rst time.
NOTE:
If the battery pack is very hot, remove the battery from the charger and allow it to cool to
ambient temperature before attempting to recharge.
To prevent damage to the battery pack, please charge the battery to full or no less than half
charge before storage.
If the tool will not be used for long periods of time, charge the battery every 3 – 6 months.
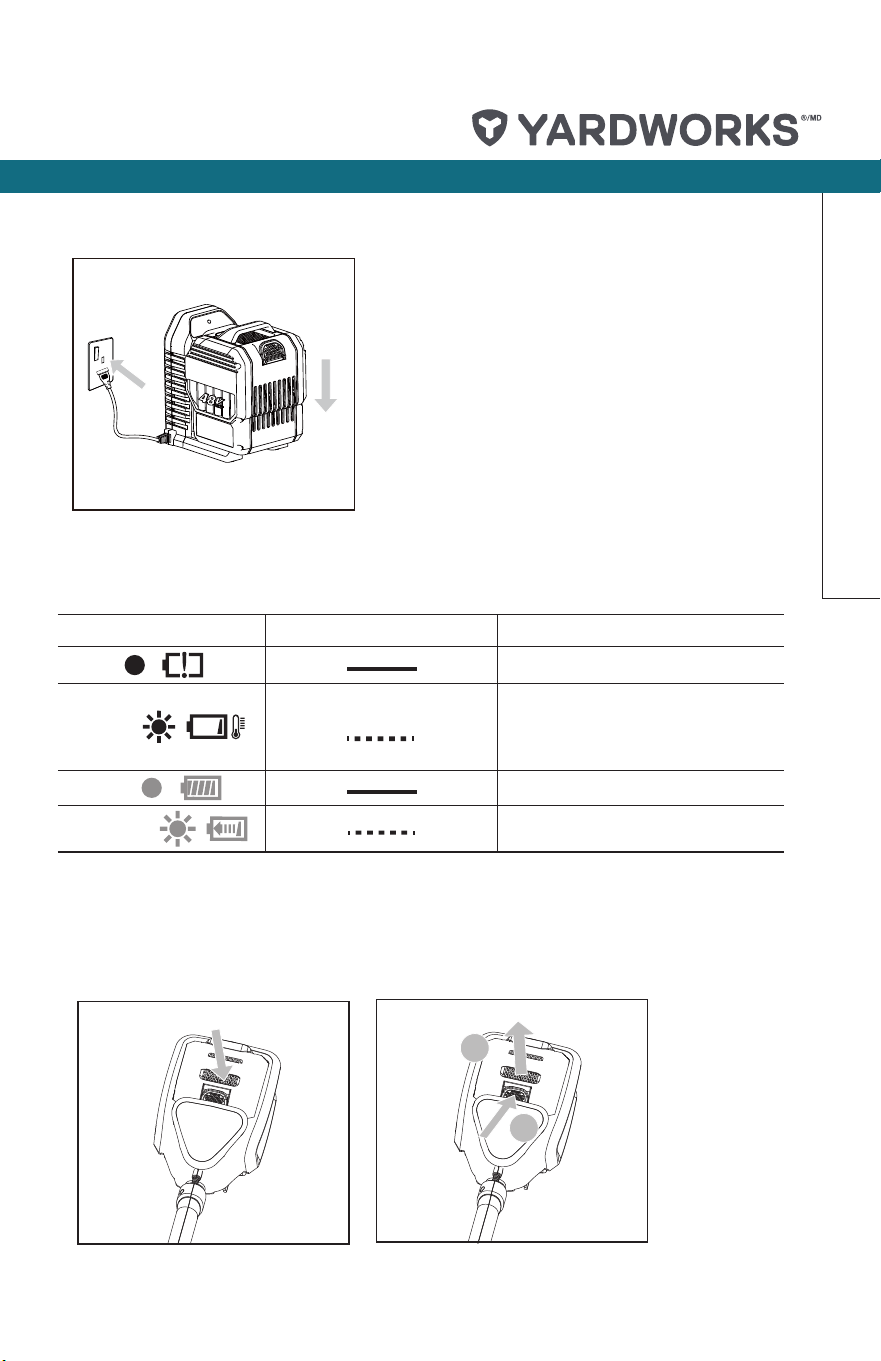
Charging procedure (SEE FIG. D)
1) Plug the charger into an appropriate outlet.
2) Slide the battery pack into the charger; the light will begin ashing green to indicate the
charging process has started.
3) When charging is completed, the light will turn solid green. The pack is now fully
charged; unplug the charger and remove the battery pack.
WARNING: When battery charge runs out after continuous use or
exposure to direct sunlight or heat, allow time for the tool to cool down
before re-charging to achieve the full charge.
WARNING: Never use the tool without the guard properly in place.
Using the device without the protector installed may result in injury.
Power sense
mode
MAX mode
1
2
18
19
30
0
1
2
3
1
2
1
1
2
20
20
11
a
A2
A1
C2
C1
B
E1
E2
G
F
H2
H1
H4
H3
J1
I
J3
J2
K2
J4
K1
K3
Assembly
model no. 060-1913-8 | contact us: 1.866.523.5218 model no. 060-1913-8 | contact us: 1.866.523.5218
13
2. Installing and removing the battery pack
Slide the battery pack into tool’s battery port. A simple push and slight pressure will be
sufcient (see Fig. E1).
Press the battery pack latch and remove the battery pack from the tool (see Fig. E2).
Power sense
mode
MAX mode
1
2
18
19
30
0
1
2
3
1
2
1
1
2
20
20
11
a
A2
A1
C2
C1
B
E1
E2
G
F
H2
H1
H4
H3
J1
I
J3
J2
K2
J4
K1
K3
Assembly
Light ON/ Flash Status
Red on
Defective battery.
Red ash
Battery Temperature Protection.
The temperature of battery pack is
less than 32
o
F (0
o
C) or more than
104
o
F (40
o
C).
Green on
Fully charged.
Green ash
Charging.
D
Charging indicator
This charger is designed to detect some problems that can arise with battery packs.
Indicator lights indicate problems (see table below).
model no. 060-1913-8 | contact us: 1.866.523.5218model no. 060-1913-8 | contact us: 1.866.523.5218
14
WARNING: Always wear eye protection. Never lean over the
trimmer head. Rocks or debris can ricochet or be thrown into
eyes and face and cause blindness or other serious injury.
WARNING: Make sure that line is fed out before operation. Make sure
motor is up to full speed before trimming.
WARNING: Do not remove or alter the line-cutting blade assembly.
Excessive line length will be cut to suitable length.
Operation
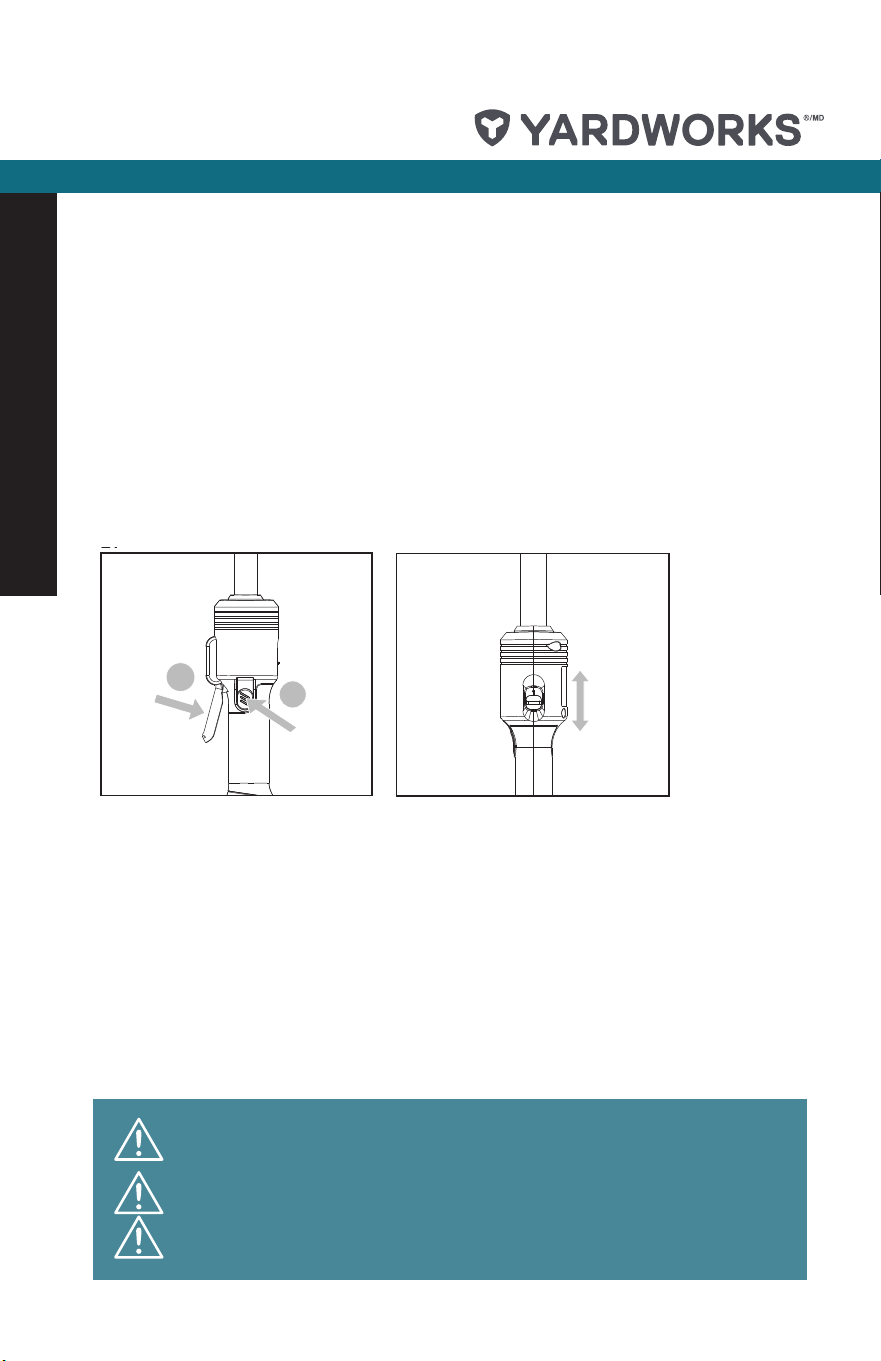
1. Switch On/Off
To switch on, press the lock-off button rst, then the On/Off switch (see Fig. F).
To switch off, release the On/Off switch.
2. Mode selecting control
The trimmer has a two mode speed control designed for working at power sense mode
(mark is 1) and MAX mode (mark is 2) (see Fig. G). Select different mode according to the
required working condition.
NOTE:
Power sense mode: automatically adjusts the cutting speed according to the working
conditions to extend the running time, lower speed for light duty work and high speed for
heavy duty work;
MAX mode: high speed for more efciency and heavy duty jobs.
Power sense
mode
MAX mode
1
2
18
19
30
0
1
2
3
1
2
1
1
2
20
20
11
a
A2
A1
C2
C1
B
E1
E2
G
F
H2
H1
H4
H3
J1
I
J3
J2
K2
J4
K1
K3
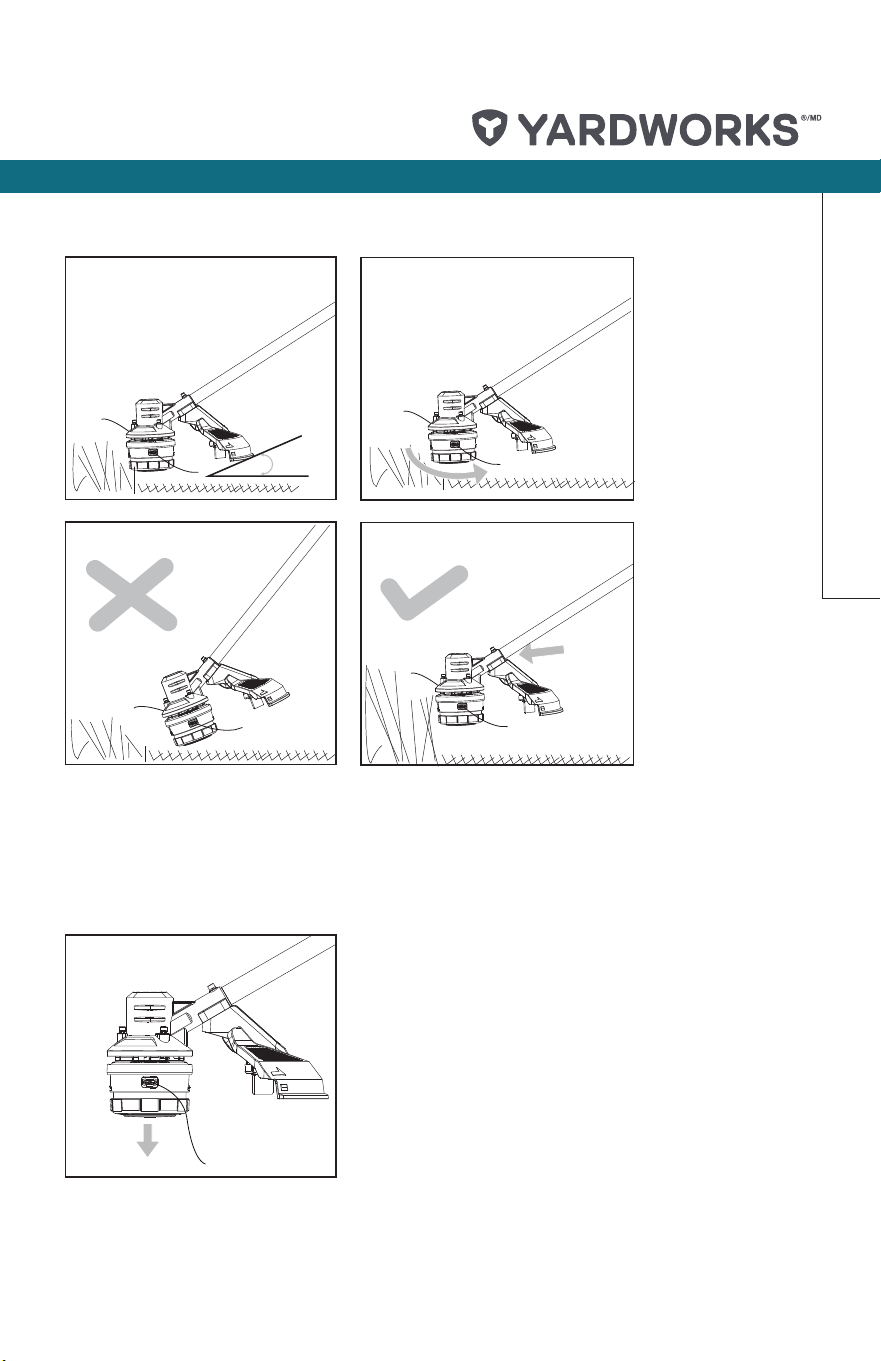
3. Trimming
1) Keep the trimmer head at an angle of about 30° to the ground when trimming (see Fig.
H1).
2) Do not cut wet grass because it tends to stick to the trimmer head and guard, prevents
proper discharge of grass clippings, and could cause you to slip and fall.
3) Regularly remove clippings and dirt around the trimmer head with a switched off trimmer.
4) Work rhythmically, stand rmly with your feet apart. Cut from right to left so the trimmings will be
thrown away from the work area (see Fig. H2).
5) When cutting long or high grass, please make sure that you cut this down in 2 to 3 stages (see Fig.
H3, H4).
6) Do not move the trimmer too fast as this will result in ineffective cutting and possible damage.
model no. 060-1913-8 | contact us: 1.866.523.5218 model no. 060-1913-8 | contact us: 1.866.523.5218
15
model no. 060-1913-8 | contact us: 1.866.523.5218
Power sense
mode
MAX mode
1
2
18
19
30
0
1
2
3
1
2
1
1
2
20
20
11
a
A2
A1
C2
C1
B
E1
E2
G
F
H2
H1
H4
H3
J1
I
J3
J2
K2
J4
K1
K3
4. Adjusting cutting line length
The trimmer head allows the operator to release more cutting line without stopping the motor. As
line becomes frayed or worn, additional line can be released by lightly tapping the bump knob on
the ground while operating the trimmer (see Fig. I).
NOTE: Line release will become more difcult if the line cutter becomes dull.
Power sense
mode
MAX mode
1
2
18
19
30
0
1
2
3
1
2
1
1
2
20
20
11
a
A2
A1
C2
C1
B
E1
E2
G
F
H2
H1
H4
H3
J1
I
J3
J2
K2
J4
K1
K3
Operation
model no. 060-1913-8 | contact us: 1.866.523.5218model no. 060-1913-8 | contact us: 1.866.523.5218
16
Operation
5.
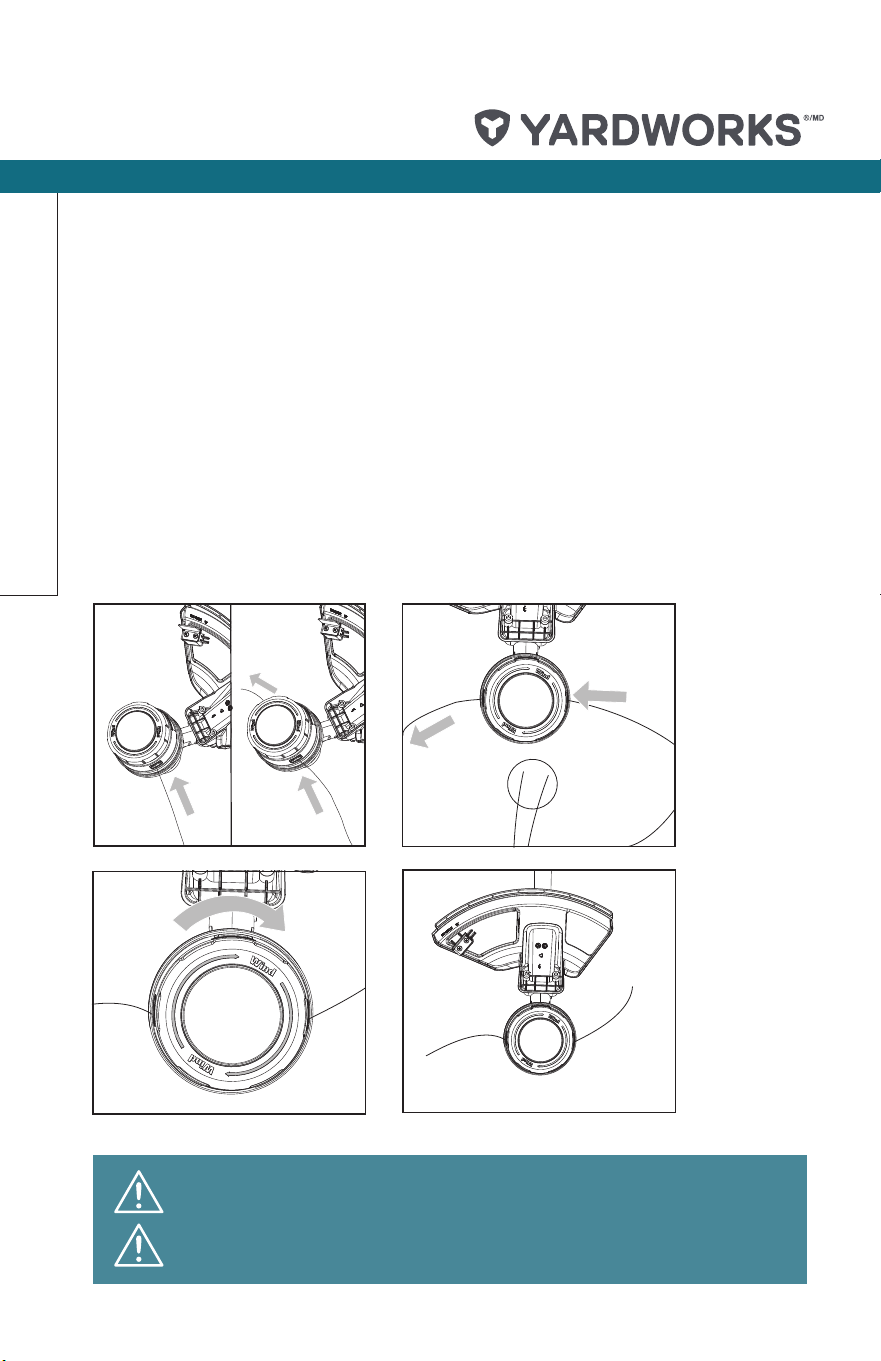
Replacing the line only
With the automatic line tting system, you only need to replace the line instead of replacing
the whole spool holder, also without winding the line manually.
1) Take a line of approximately 16’ (4.9 m).
2) Turn over the grass trimmer. Rotate the spool holder anti-clockwise, and insert one end
of the line continuously into a line tting hole at the edge side of the spool holder, and
the line will go through the inner spool holder itself and stretch out from the other line
tting hole (see Fig. J1).
3) Pull out the other end of the line until half of the line is streched out from the other hole.
Note that the length of the two parts line should be the same (see Fig. J2).
4) Hold the spool holder by hand and grip the line tting knob with another hand, rotate the
line tting knob clockwise (the same direction shown on the bump knob). The line will
wind onto the spool automatically (see Fig. J3).
5) Continue to rotate the line tting knob until the line is at the desired length (see Fig. J4).
NOTE:
Do not over-rotate the line tting knob, or the extended line will be too short.
Power sense
mode
MAX mode
1
2
18
19
30
0
1
2
3
1
2
1
1
2
20
20
11
a
A2
A1
C2
C1
B
E1
E2
G
F
H2
H1
H4
H3
J1
I
J3
J2
K2
J4
K1
K3
Power sense
mode
MAX mode
1
2
18
19
30
0
1
2
3
1
2
1
1
2
20
20
11
a
A2
A1
C2
C1
B
E1
E2
G
F
H2
H1
H4
H3
J1
I
J3
J2
K2
J4
K1
K3
WARNING: Your trimmer is designed to use only line with a
maximum diameter of 0.095” (0.24 cm).
WARNING: Always remove the battery pack from your trimmer after
use.
model no. 060-1913-8 | contact us: 1.866.523.5218 model no. 060-1913-8 | contact us: 1.866.523.5218
17
model no. 060-1913-8 | contact us: 1.866.523.5218
Maintenance
MAINTENANCE
Always check the product prior to being used for any damage.
After use, disconnect the battery from the tool and check for damage.
Your power tool requires no additional lubrication or maintenance. There are no user
serviceable parts in your power tool. Never use water or chemical cleaners to clean your
power tool. Wipe clean with a dry cloth. Always store your trimmer in a dry room. Keep
the motor ventilation slots clean. Keep all working controls free of dust.
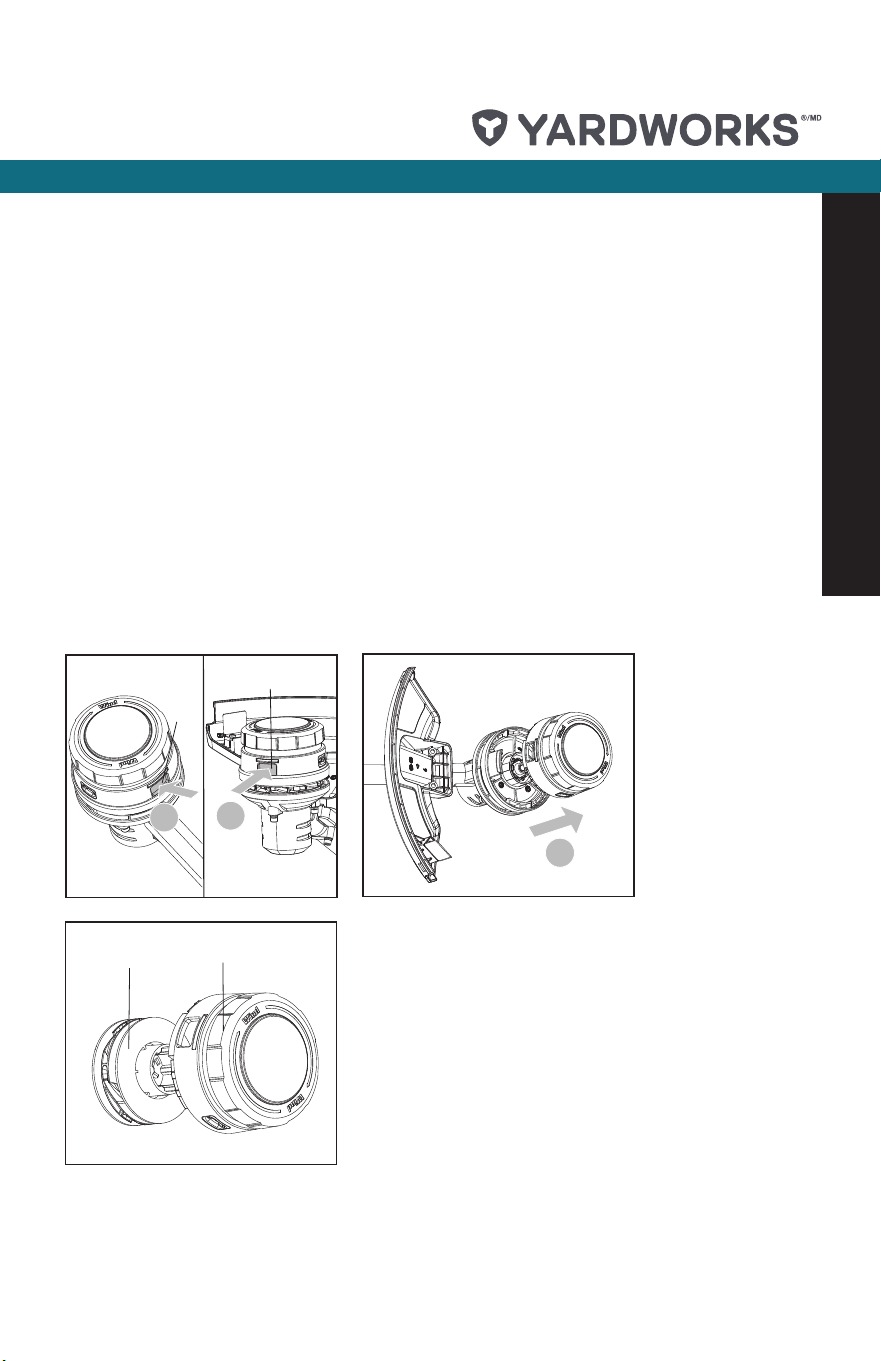
1. Replacing the spool holder or spool
If you nd that the automatic line tting system is damaged (i.e. the line cannot wind itself
automatically), you should replace the spool holder or the spool. Follow the instructions
below to change the spool holder or the spool.
1) Depress both spool holder release knobs (20) at the edge side of the spool holder (see
Fig. K1).
2) Pull the whole spool holder with spool out from the trimmer head (see Fig. K2).
3) Take the spool (a) out from the spool holder (11). Check the spool or the spool holder
for damage and change for new ones (see Fig. K3).
Power sense
mode
MAX mode
1
2
18
19
30
0
1
2
3
1
2
1
1
2
20
20
11
a
A2
A1
C2
C1
B
E1
E2
G
F
H2
H1
H4
H3
J1
I
J3
J2
K2
J4
K1
K3

model no. 060-1913-8 | contact us: 1.866.523.5218
18
Storage
STORING YOUR GRASS TRIMMER
Store in a dry place where the trimmer and battery can be protected from damage.
For Battery tools
The ambient temperature range for the use and storage of tool and battery is 32°F to 113°F
(0°C to 45°C).
The recommended ambient temperature range for the charging system during charging is
32°F to 104°F (0°C to 40°C).
It is recommended that the battery be stored indoors for the winter months.

model no. 060-1913-8 | contact us: 1.866.523.5218 model no. 060-1913-8 | contact us: 1.866.523.5218
19
The following table gives problems and actions that you can perform if your machine does
not operate correctly. Warning: Switch the trimmer off and remove the battery prior to any
troubleshooting.
Problem Possible Cause Corrective Action
Trimmer fails to operate.
Battery discharged.
Battery too hot/cold.
Motor is broken.
Internal wiring of machine
damaged.
Recharge battery; also see the content
in charger manual.
Allow to cool/warm.
Contact Yardworks
®
at 1.866.523.5218.
Contact Yardworks
®
at 1.866.523.5218.
Trimmer runs
intermittently.
Motor is broken.
Battery not fully charged.
On/Off switch defective.
Contact Service Agent.
Recharge battery.
Contact Yardworks
®
at 1.866.523.5218.
Excessive vibrations
/noise.
Machine defective.
Line spool is not wound well.
Contact Yardworks
®
at 1.866.523.5218.
Rewind the line. See “To replace the
line on the spool’’.
Cutting time per battery
charge too short.
Battery has not been used for
long period or only charged for
short term.
Grass too high.
Battery defective.
Fully charge battery; also see
the content in charger manual.
Cut in stages.
Replace the battery.
Machine does not cut.
Line broken.
Battery not fully charged.
Motor is broken (speed is too
low).
Grass entangled around cutting
head.
Replace the line.
Recharge battery; also see.
the content in charger manual.
Contact Yardworks
®
at 1.866.523.5218.
Remove grass.
Continuous lighting of the
battery charge indicator/
battery not charging.
Battery not (properly) inserted.
Battery contacts contaminated.
Battery defective.
Properly insert battery into battery
charger.
Clean the battery contacts or replace
the battery.
Replace the battery.
Battery charge indicator
does not light up.
Plug of battery charger not
plugged in (properly).
Outlet or mains cable defective.
Battery charger defective.
Insert mains plug (fully) into the socket
outlet.
Check the mains voltage.
Replace the battery charger.
Troubleshooting
model no. 060-1913-8 | contact us: 1.866.523.5218
20
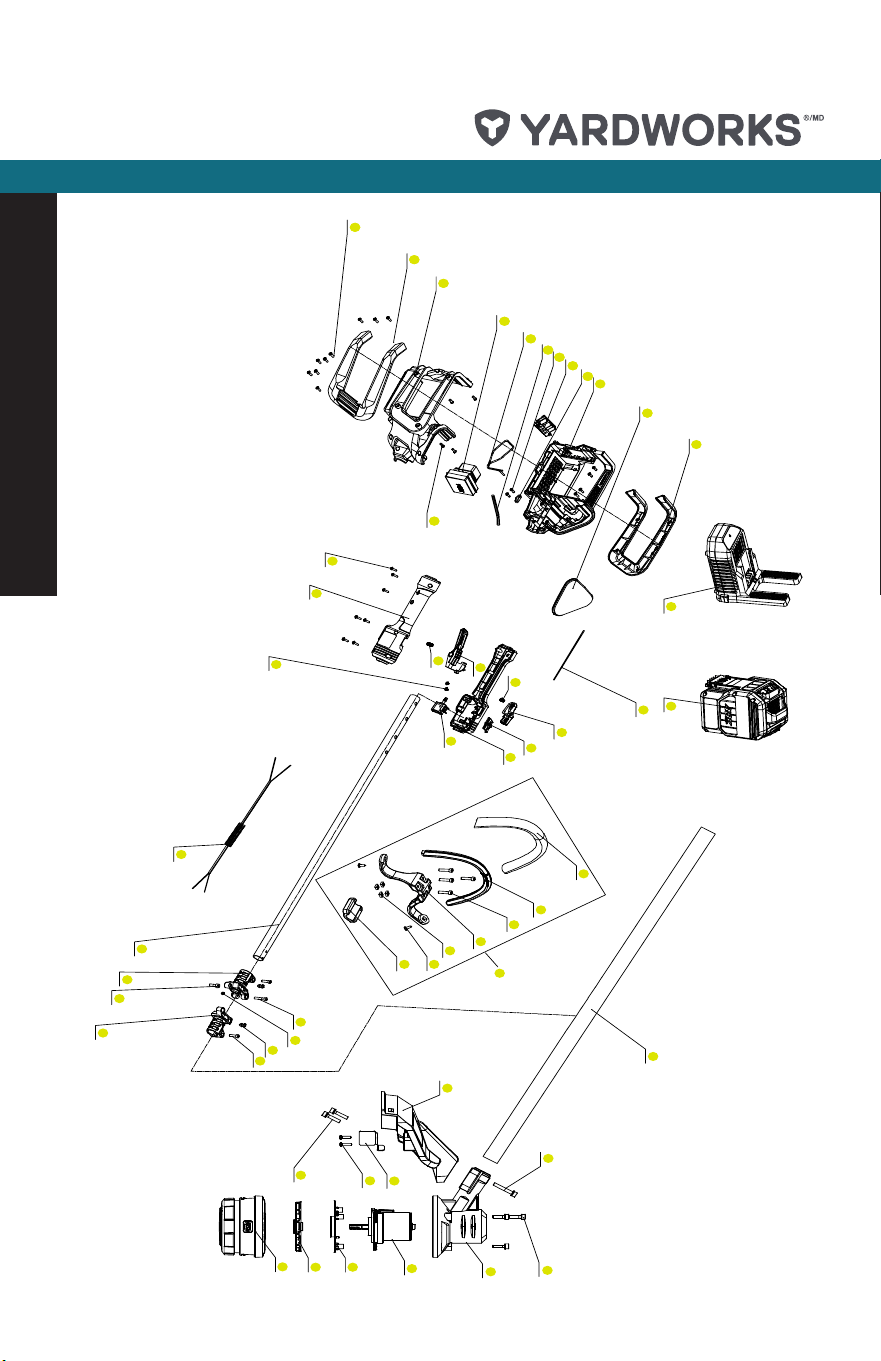
Exploded View
3
2
1
4
6
7
8
9
12
11
10
13
47
48
49
50
51
52
53
101
17
61
15
14
16
18
19
20
21
27
22
11
60
25
22
23
24
26
30
29
54
55
34
44
35
42
4441
4436
4439
4438
4437
4435
4434
4411
4436
4444

model no. 060-1913-8 | contact us: 1.866.523.5218 model no. 060-1913-8 | contact us: 1.866.523.5218
21
Parts List
No. Part Description Quantity
1 Self Tapping Screw M5*25 3
2 Housing 1
3 Motor 1
4 Motor Mounting Plate 1
6 Fan 1
7 Cutting Head 1
8 Screw M5*30 1
9 Shield 1
10 Blade 1
11
Self Tapping Screw
ST3.9X16
18
12
Self Tapping Screw
M5X25
2
13 Aluminium Tube 1
14 Screw M5*20 2
15
Screw washer assembly
M4X10
2
16 Connector II 1
17 Screw 1
18 Screw M6*20 1
19 Connector I 1
20 Aluminium Tube 1
21 Coiled Cable 1
22 Left/Right Handle 1
23 Push Button 1
24 Lock Knob 1
25 Switch 1
26 Compression spring 1
27
Self Tapping Screw
ST3X6.5
2
29 Spring 1
30 Trigger 1
34
Left/Right Decorative
Cover
1
35 Left/Right battery support 1
36
Self tapping screw
ST3.9x13
10
37 Protect Control Board 1
38 Torsional Spring 1
39 Spanner 1
41 Terminal 1
42 Cord Clamp 1
44 Cover 1
47 Tube 1
48 Auxiliary Handle 1
49 Screw M6x30 4
50 Steady Handle Supper 1
51 Nut M6 4
52
Self Tapping Screw
ST4.8X22
2
53 Steady Handle Cover 1
54
Battery Pack
(Li-ion,2.0Ah,48V)
ABP4820SH
1
55
Charger
(120V,48V,110W)
ACG4820HU
1
60 Inner wiring 1
61 Lock nut 1
101
Auxiliary Handle
Assembly
1

model no. 060-1913-8 | contact us: 1.866.523.5218model no. 060-1913-8 | contact us: 1.866.523.5218
22
Warranty
!
Always remove or disconnect the battery pack before adjusting, cleaning,
servicing or transporting your appliance.
Made in China. Imported by Yardworks Canada
Toronto, Canada M4S 2B8
FIVE-YEAR LIMITED WARRANTY
For ve (5) years from the date of purchase
within Canada, YARDWORKS CANADA
will, at its option, repair or replace for the
original purchaser, free of charge, any part
or parts found to be defective in material or
workmanship (excludes battery).
For THREE (3) years from the date of
purchase within Canada, YARDWORKS
CANADA will, at its option, repair or replace
for the original purchaser, free of charge, any
battery found to be defective in material or
workmanship.
THIS WARRANTY DOES NOT COVER
1. Any part that has become inoperative
due to misuse, commercial use, abuse,
neglect, accident, improper maintenance,
or alteration;
2. The unit, if it has not been operated and/
or maintained in accordance with the
owner’s manual;
3. Normal wear, except as noted below;
4. Routine maintenance items such as
lubricants, blade sharpening; or
5. Normal deterioration of the exterior nish
due to use or exposure.
FULL ONE YEAR (365) DAYS WARRANTY
ON NORMAL WEAR PARTS
Normal wear parts are dened as blade
adaptors, blades, grass bags and tires.
These parts are warranted to the original
purchaser to be free from defects in
material and workmanship for a period of
three hundred and sixty-ve (365) days from
the date of retail purchase.
HOW TO OBTAIN SERVICE
Warranty service is available by calling
the toll-free helpline at 1.866.523.5218.
The factory will not accept the return of a
complete unit unless prior written permission
has been extended by YARDWORKS
CANADA.
TRANSPORTATION CHARGES
Transportation charges for the movement
of any power equipment unit or attachment
are the responsibility of the purchaser.
The purchaser must pay transportation
charges for any part submitted for
replacement under this warranty unless
such return is requested in writing by
YARDWORKS CANADA.
OTHER WARRANTIES
All other warranties, express or implied,
including any implied warranty of
merchantability is limited in its duration to
that set forth in this express limited warranty.
The provisions as set forth in this warranty
provide the sole and exclusive remedy of
YARDWORKS CANADA obligations arising
from the sale of its products.

model no. 060-1913-8 | contact us: 1.866.523.5218 model no. 060-1913-8 | contact us: 1.866.523.5218
23
model no. 060-1913-8 | contact us: 1.866.523.5218
FCC Part 15
Supplier’s Declaration of Conformity
Product Description: 48V 2.0 A Charger
Model Number: 060-1990-2
Trade Name: Yardworks
®
This device complies with part 15 of the FCC Rules.
Operation is subject to the following two conditions:
(1) This device may not cause harmful interference, and
(2) This device must accept any interference received, including interference that may
cause undesired
operation.
Responsible Party:
Positec USA, Inc.
PO Box 681298, Charlotte, NC 28216
Tel: 1.866.523.5218
Fax: (704) 599-6390