TCL / NA
1:1
210*140 mm
白底黑字
Q95K
2026-06-26
QSG
V0.2
美工/质量/产品
项目审核
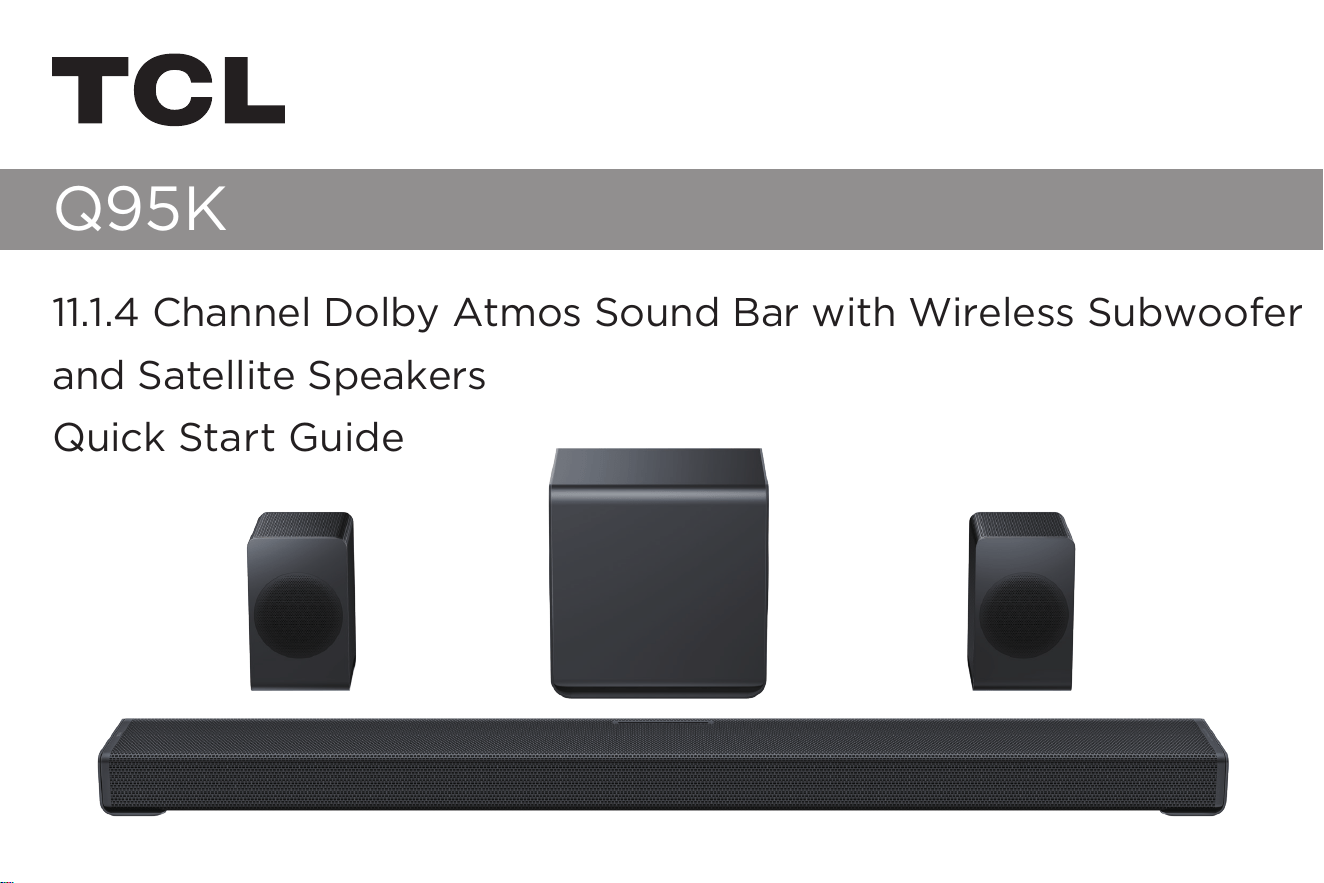
11.1.4 Channel Dolby Atmos Sound Bar with Wireless Subwoofer
and Satellite Speakers
Quick Start Guide
Q95K

1
Register Your Product
Register your TCL Sound Bar to receive
the latest news on product releases,
promotional offers, and more!*
Enjoy exclusive benefits with registration:
Expedited support and service Insider tips on your Sound Bar
Exclusive offers and promotions Verification of ownership
*Only Available to North America Customers
1
Or register online at register.tcl.com
Need help? Visit photoregister.com/help
or text HELP to 71403
TEXT TO REGISTER
TCLSBQS
Text a photo of the
camera icon to 71403
2
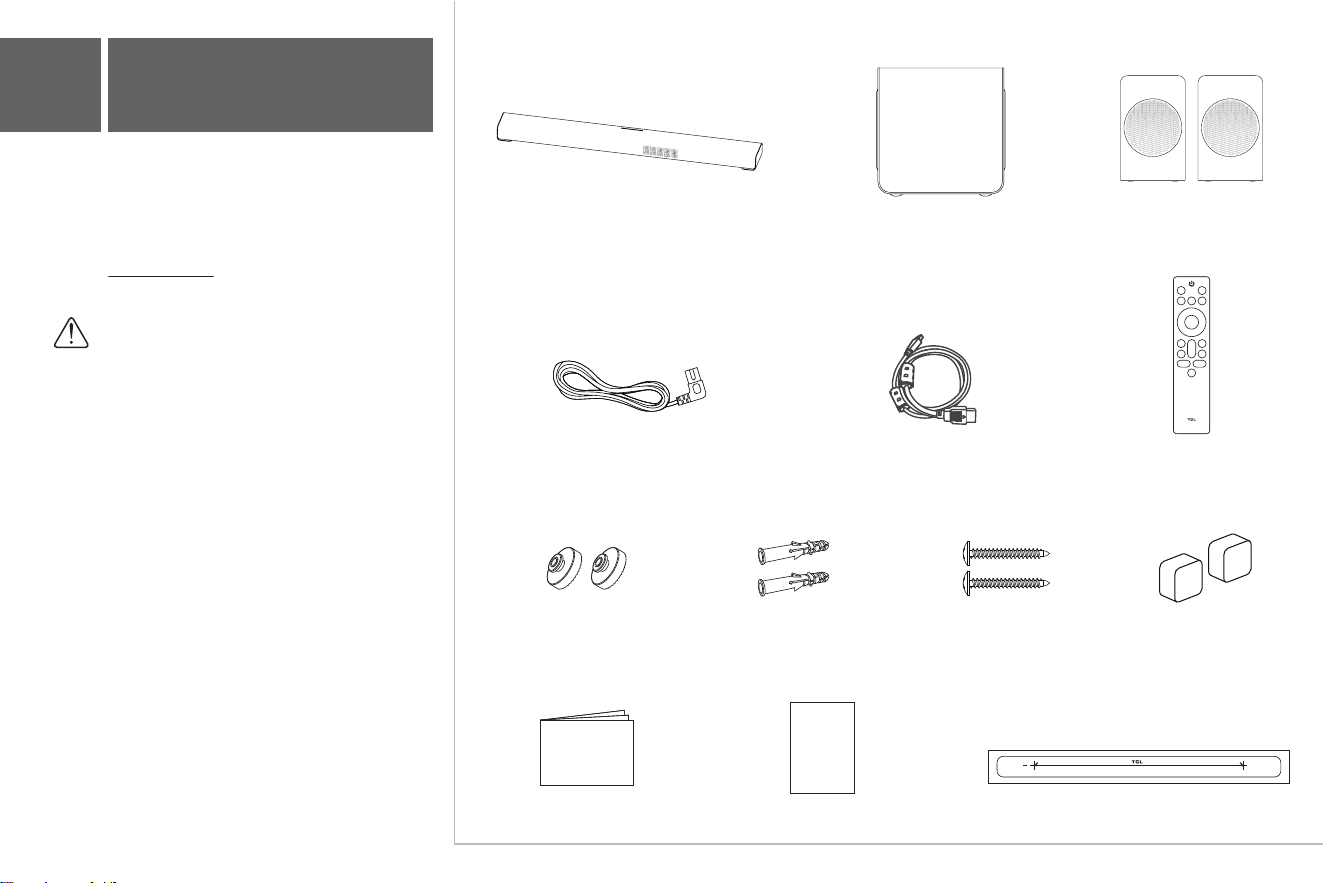
What’s in the box
2
Make sure you read all the safety
information before you use this product.
User Manual can be found at
www.tcl.com on the specific product
page in the “Download” section.
Warning:
To avoid the danger of suffocation, keep
plastic packaging away from pets,
babies, and children. Do not use
packaging bags in cribs, beds, carriages,
or playpens.
Note:
Figures and illustrations in this QSG are
provided for reference only and may
differ from actual product appearance.
Product design and specifications may
be changed without notice.
Warranty
card
Warranty Card Wall Mount Template
QSG
Quick Start Guide
Remote Control
Power Cord x 4 HDMI Cable
(For reference only)
Subwoofer Satellite Speaker x 2Sound Bar
Wall Mounting Screw x 2
M5*40 mm
Wall Anchor x 2
Wall Mount Bracket x 2
Spacer Pads
3a
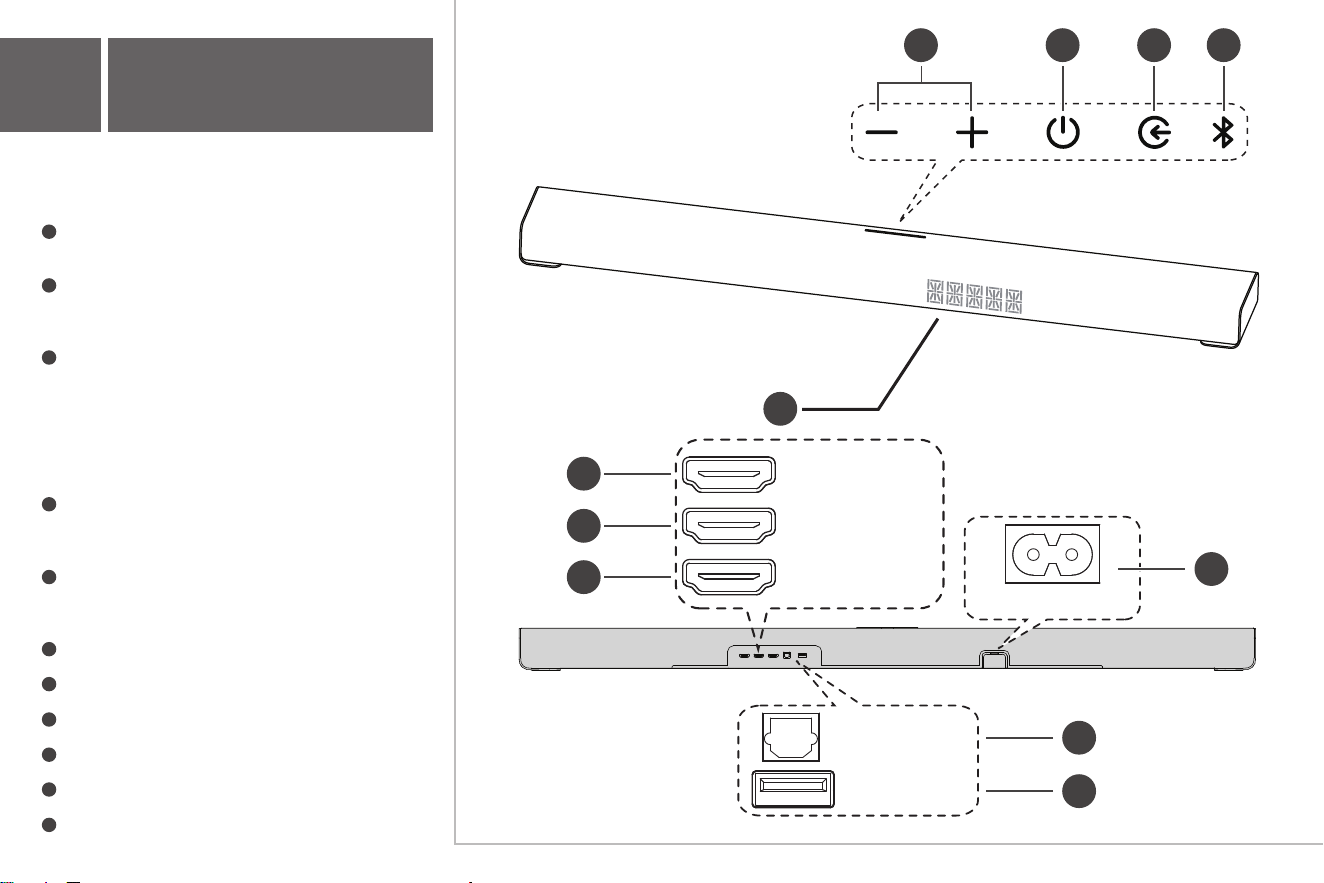
Overview
3
1
Volume buttons:
Press to increase or decrease the volume level
3
Source button:
Short press: Switch input sources
(HDMI eARC/OPT/USB/Bluetooth/HDMI IN 1/
HDMI IN 2)
Long press: Press and hold for 10 seconds to
enter pairing mode for the subwoofer or
satellite speakers (if disconnected).
4
Bluetooth button:
Short press: Switch to Bluetooth mode.
Long press: Enter Bluetooth pairing mode.
2
Power button:
Short press: power on/power off
Long press: power off
5
LED display:
Displays the Sound Bar source or control status
Receive signal from the remote control
6
AC input power connector
7
HDMl eARC connector
8
HDMl IN 1 connector
9
HDMl IN 2 connector
10
Optical input connector
11
USB Type A connector
Sound Bar
2 3
5
41
OPTICAL
USB
AC~IN
6
HDMI (eARC)
HDMI IN 1
7
8
HDMI IN 2
9
10
11
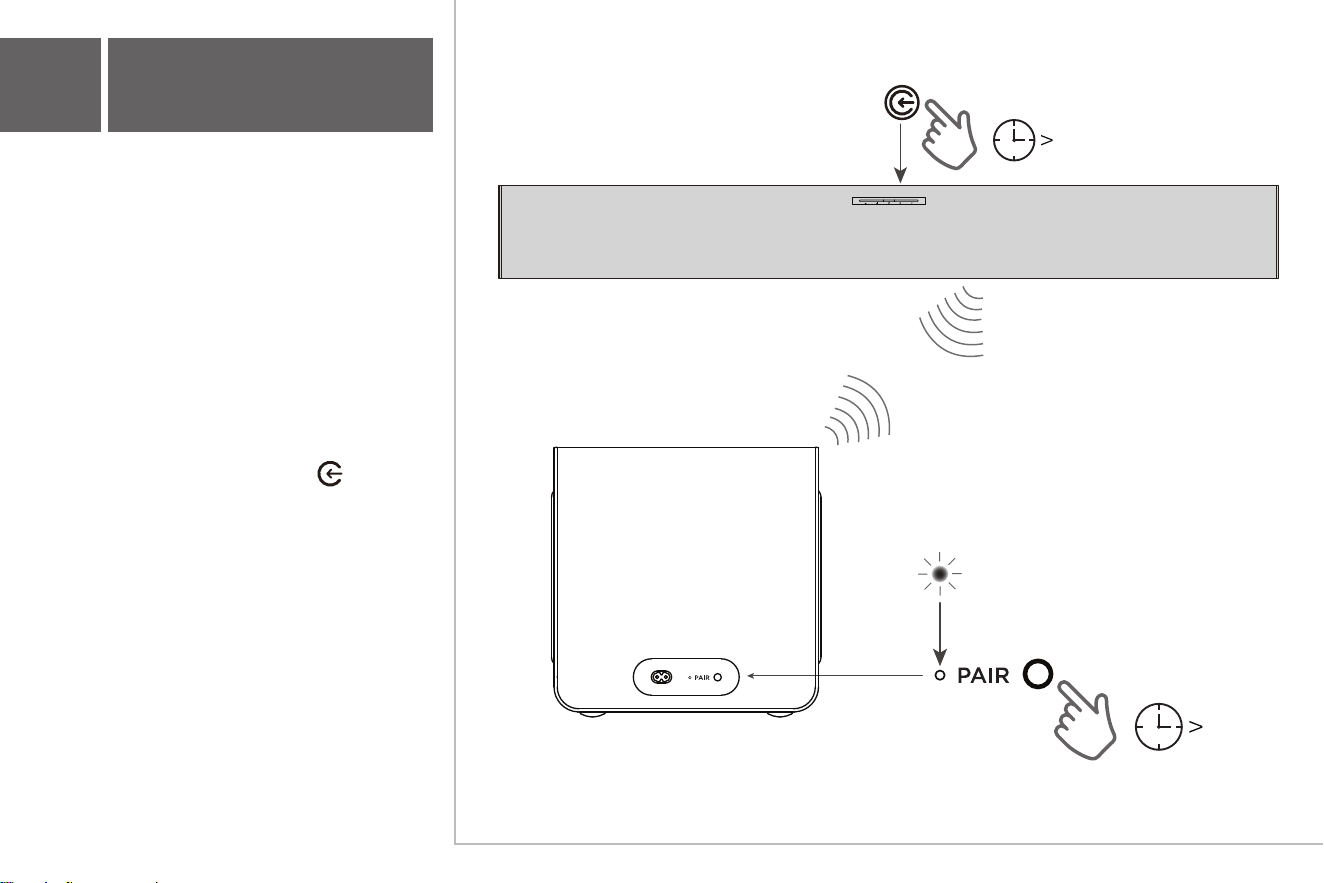
The subwoofer powers on automatically when
connected to power. When the Sound Bar
enters standby mode, the subwoofer will enter
standby mode immediately.
The subwoofer automatically pairs with the
Sound Bar upon first use. If connection issues
occur, follow these steps to pair manually:
1. Press and hold the "PAIR" button on the
subwoofer for 3 seconds until the indicator light
next to the "PAIR" button starts flashing quickly
to enter pairing mode.
2. At this time, press and hold the button on
the Sound Bar panel for 10 seconds until the
Sound Bar LED display shows "SETUP PAIRING".
3. When paired successfully, the indicator light
on the subwoofer will stay solid, and the Sound
Bar LED display will show "SUB CONNECTED".
Wireless Subwoofer
3b
Overview
4
3 s
10 s
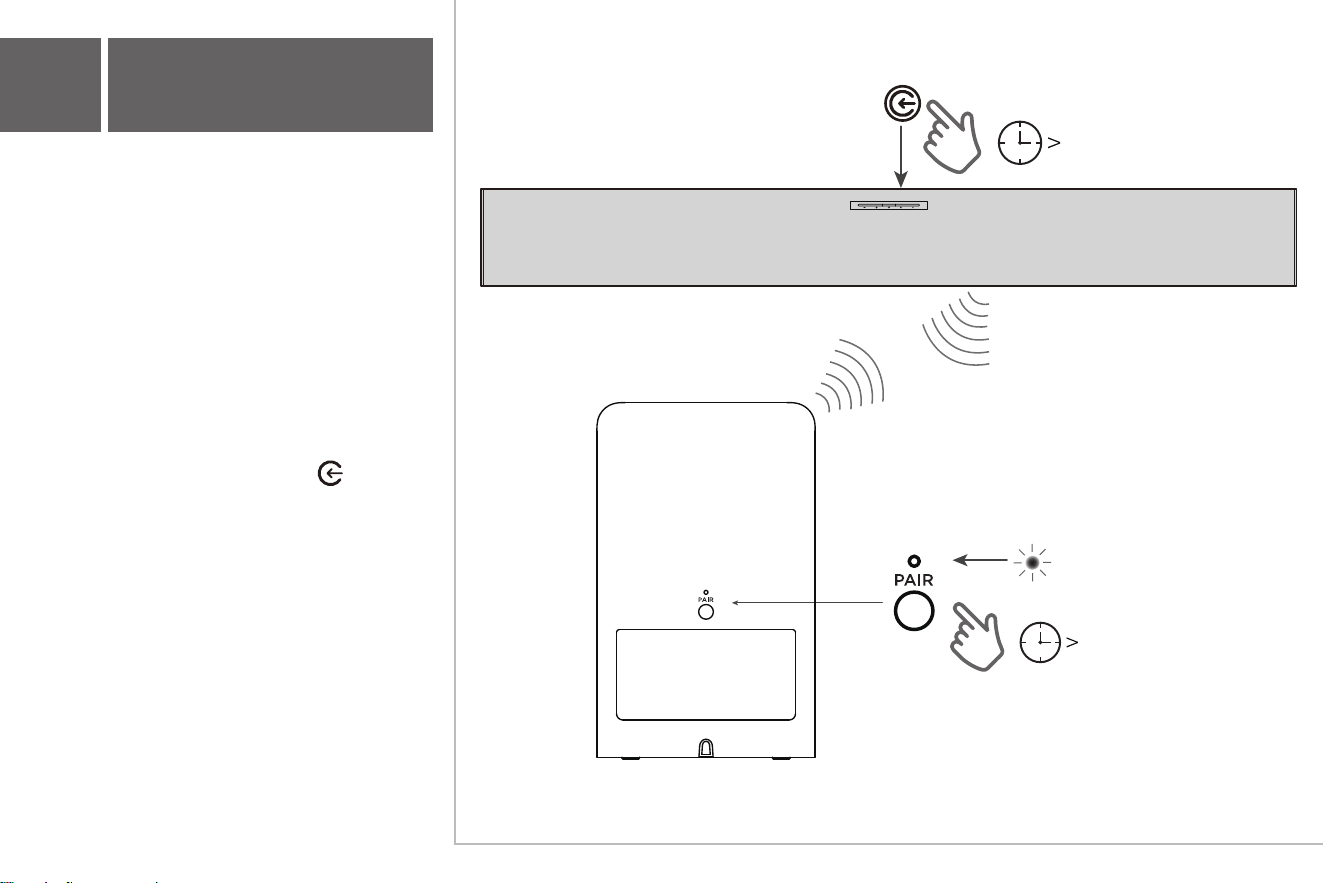
The satellite speakers power on automatically
when connected to power. When the Sound Bar
enters standby mode, the satellite speakers will
enter standby mode immediately.
The satellite speakers automatically pair with the
Sound Bar upon first use. If connection issues
occur, follow these steps to pair manually:
1. Press and hold the "PAIR" button on the
satellite speaker for 3 seconds until the indicator
light above the "PAIR" button flashes quickly,
entering pairing mode.
2. At this time, press and hold the button on
the Sound Bar panel for 10 seconds until the
Sound Bar LED display shows "SETUP PAIRING".
3. When paired successfully, the indicator light
on the satellite speaker will stay solid, and the
Sound Bar LED display will show "SURR
CONNECTED".
Satellite Speaker
3c
Overview
5
3 s
10 s
4
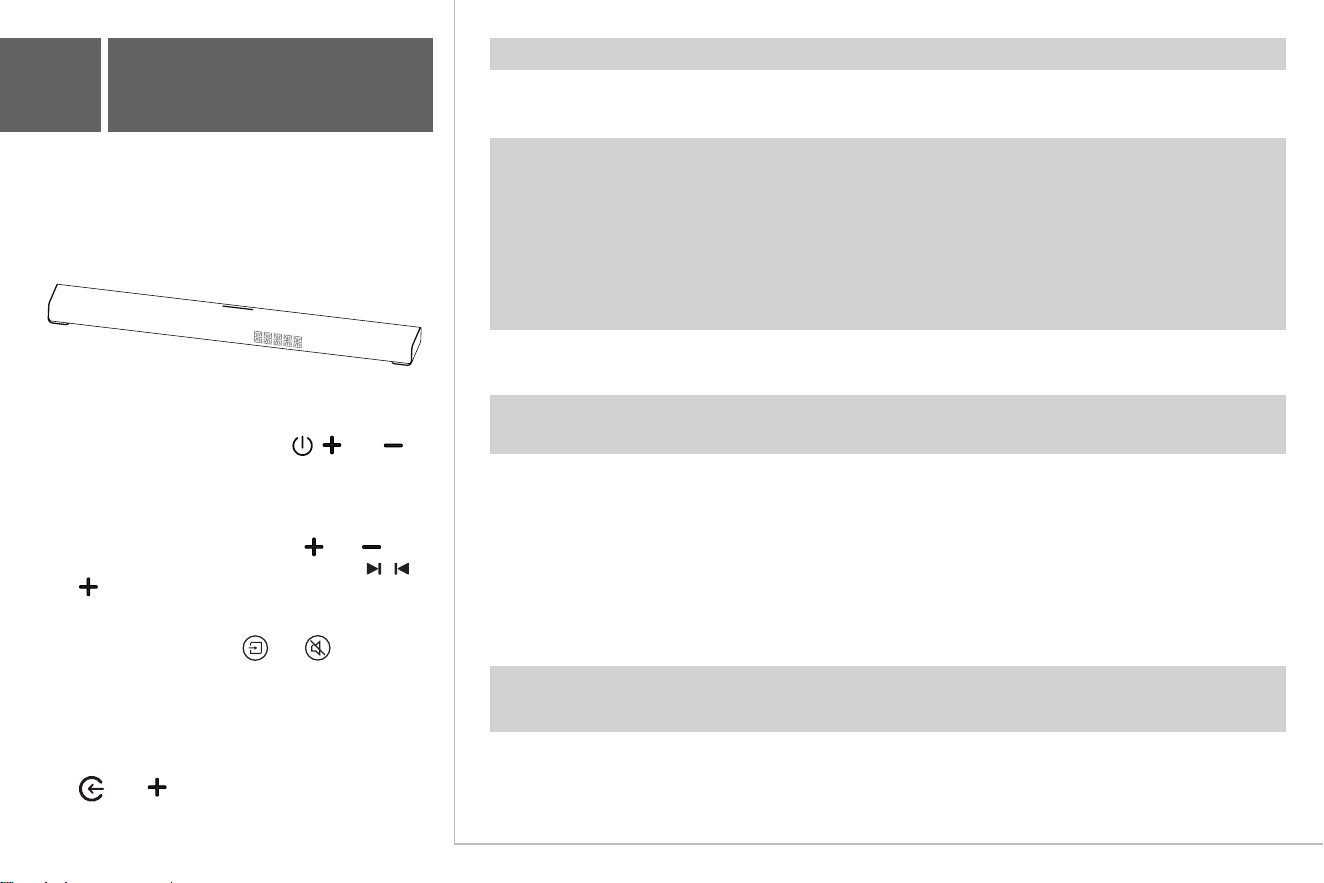
Sound Bar LED Display
The Sound Bar LED display indicates
various Sound Bar functions.
6
LED Display Status
Sound Bar Status
HELLO
Power Power on
STDBY / sleep
Power off
BT
Bluetooth Bluetooth mode
PAIRING
Pairing mode
BT
Bluetooth
HDMI IN 1/HDMI IN 2
HDMI IN
OPT
OPT
HDMI EARC
Source HDMI eARC (TV Disconnected)
HDMI EARC
HDMI eARC (TV Connected)
USB
USB
V30
Volume control Volume level
MUTE
Mute
Casting
AIRPLAY
Airplay
GOOGLE CAST
Google Cast
SPOTIFY
Spotify Connect
Audio setting
BAS-6~+6
Bass (+/-)
TRE-6~+6
Treble (+/-)
POSITION 1 / POSITION 2
/ POSITION 3 / OFF
AI SONIC
SURR OFF / SURR LOW / SURR MEDIUM /
SURR HIGH
Surround Enhance
VOICE OFF / VOICE LOW / VOICE
MEDIUM / VOICE HIGH
Voice Enhance
standard / MOVIE / MUSIC
/ VOICE / GAME / NIGHT
/ SPORTS / CUSTOM
Sound modes
Standard/Movie/Music/Voice/
Game/Night/Sports/Custom
Note:
• Factory reset: Press and hold , , and on
the Sound Bar panel simultaneously for 10 seconds
until the LED display shows "FACTORY RESET",
then the device will automatically restart.
• View version: While the device is powered on or
in standby mode, press and hold and on the
Sound Bar panel for 10 seconds, or press , ,
and on the remote control (please follow the
sequence and keep the interval within 2 seconds).
• Automatic standby switch: In the powered-on
state, press and hold the and on the
remote control simultaneously for 10 seconds. If
this function is enabled, the Sound Bar will enter
an automatic standby state after 20 minutes
without signal input.
• WIFI Factory Reset and Network Configuration:
While the device is powered on, press and hold
the and buttons on the Sound Bar panel
for 10 seconds. The Sound Bar’s WIFI will be
restored to factory settings and enter network
configuration pairing mode.
5a
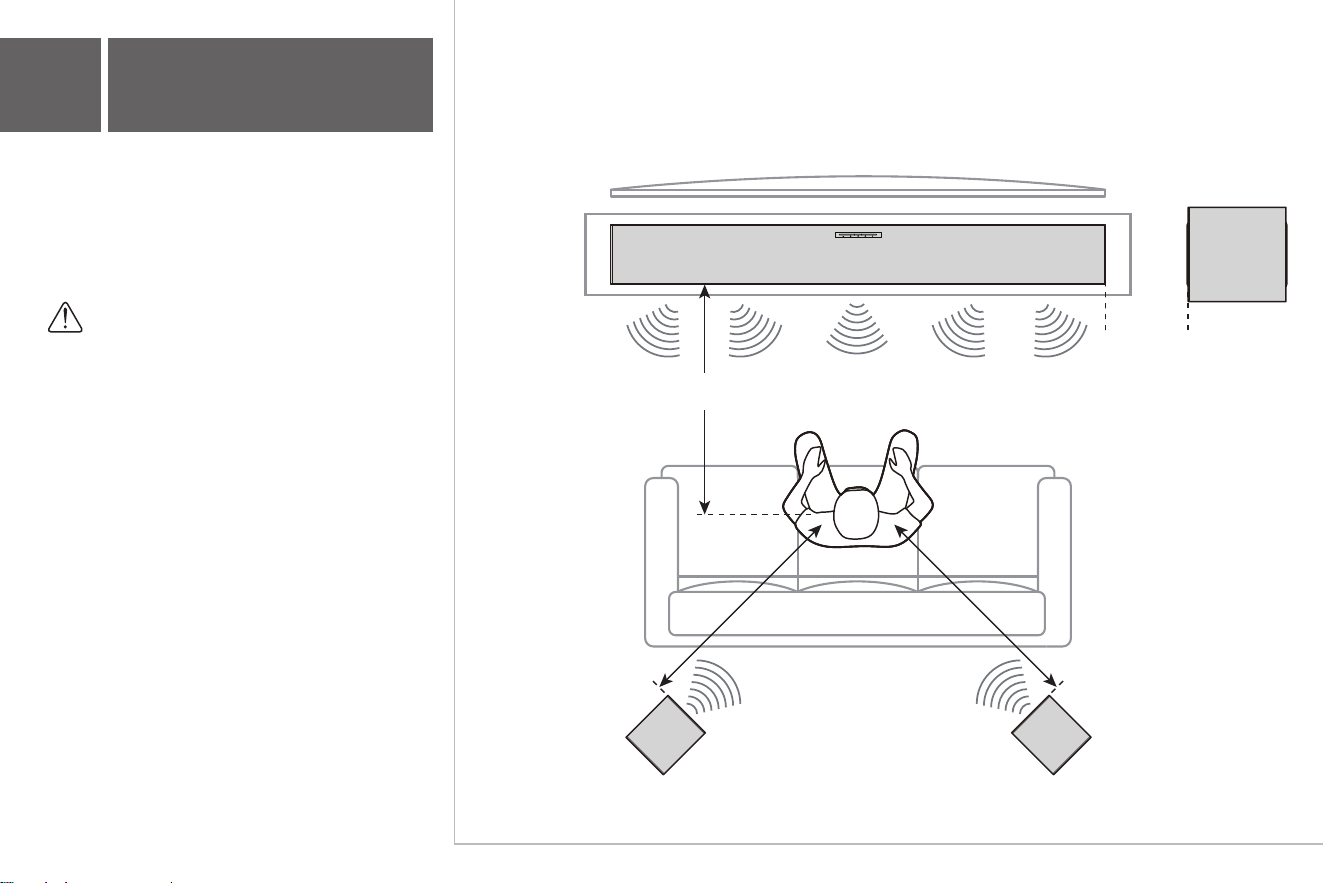
Speaker Placement
The ideal location for the Sound Bar is
centered beneath the TV.
The ideal location for the Subwoofer is
on the floor, adjacent to the TV.
Note: Do not place your Sound Bar in a
location exposed to direct sunlight, heat,
fire, or moisture.
7
Top View
Under 10 feet
(3 m)
6.5 feet – 10 feet
(2 m – 3 m)
2.5 feet – 3.5 feet
(0.7 m – 1 m)
2.5 feet – 3.5 feet
(0.7 m – 1 m)
Sound Bar
Subwoofer
TV
5b
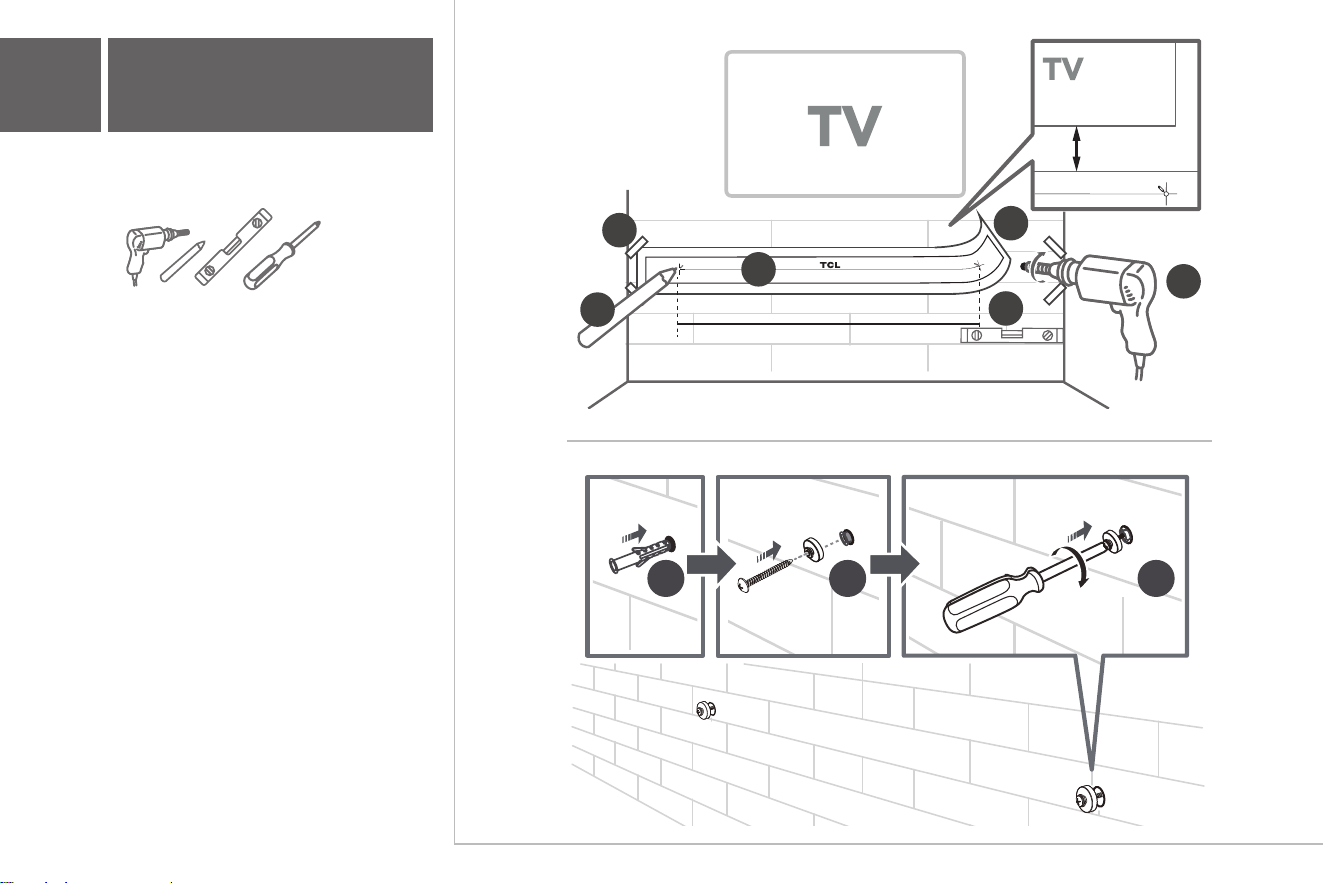
Wall Mount Installation
8
Required tools:
1. Place the supplied wall mount template on the
wall. Make sure the wall mount template is at least
2 inches/5 cm below the center of the TV.
2. Use a level to make sure the wall mount
template is positioned accurately.
3. Use the tape to stick the wall mount template
firmly on the wall.
4. Mark the screw hole positions on the wall
through the template.
5. Take away the wall mount template.
6. Drill holes at the markings.
7. Insert the wall anchors into the holes in the wall.
8. Insert the included screws through the wall
mount brackets and into the wall anchors.
9. Tighten the screws to secure the wall mount
brackets to the wall.
> 2 in (5 cm)
3
2
5
6
4
1
924 mm / 36.4 in
7 8 9
5c
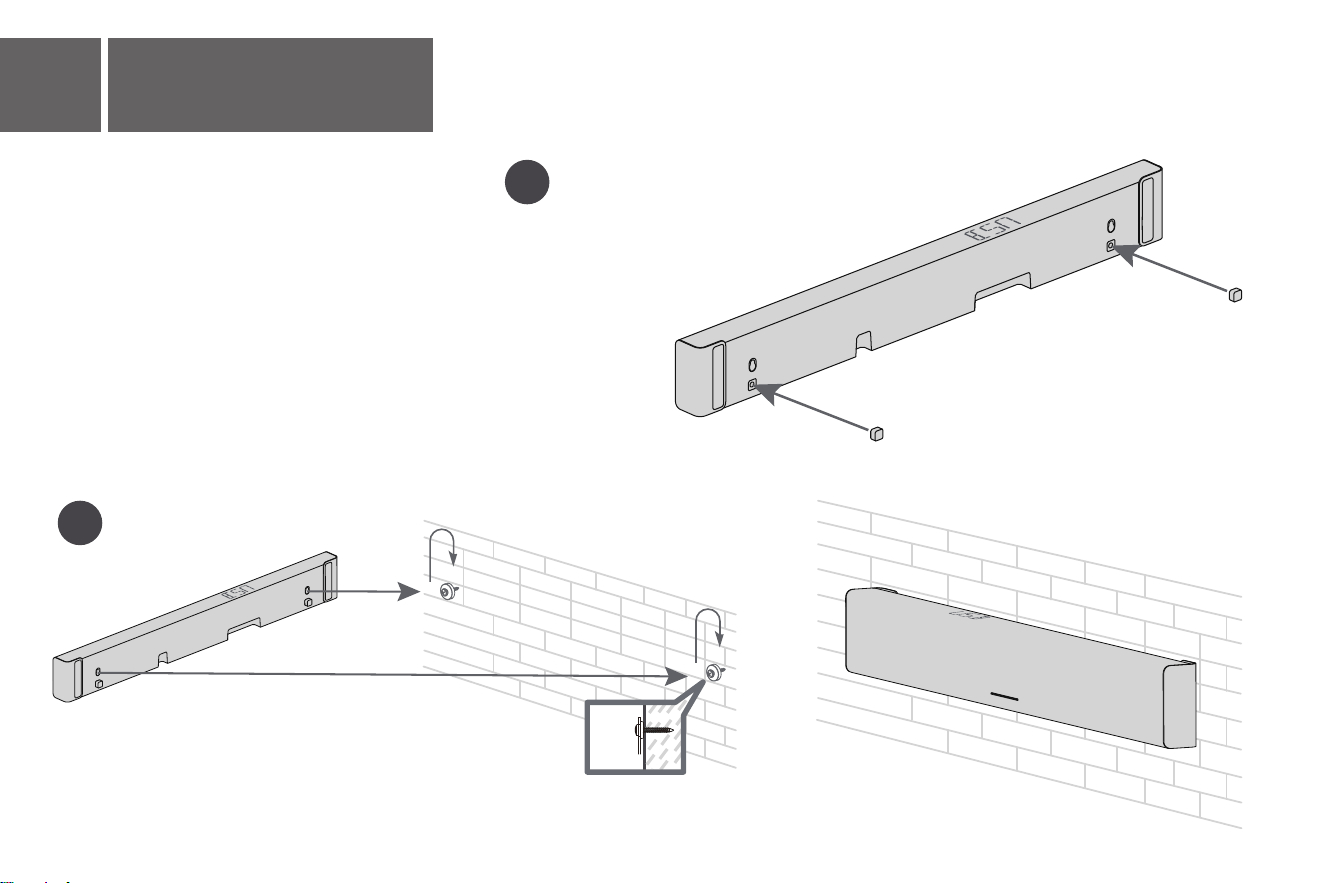
Wall Mount Installation
9
10. Attach the included Spacer Pads to the
bottom case of the Sound Bar.
11. Pick up the Sound Bar (with the display
facing up, plug in the power cord and any
necessary HDMI or optical cables), align the
mounting holes on both ends of the Sound Bar
with the wall mount brackets, and snap it
downwards to securely lock the Sound Bar
onto the wall.
Note:
• Do not place the Sound Bar in direct sunlight,
high temperatures, open flames, or humid
environments. Suitable mounting height: <
78.74 inches/2 meters.
11
10
6a
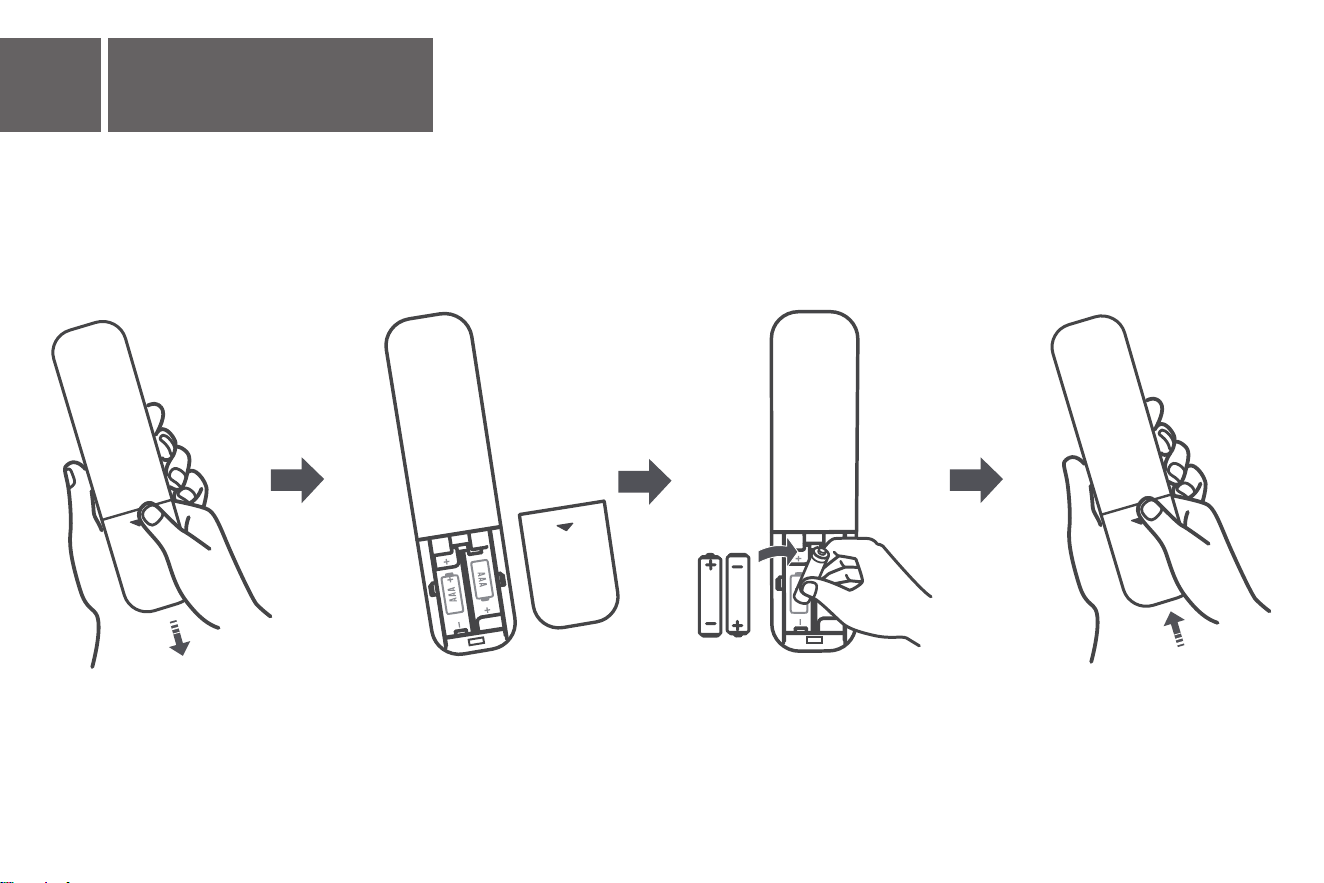
Install or replace the
remote batteries
Battery type: 1.5V AAA battery x 2
10
6b
Use the Remote
3
5
8
12
13
1
6
2
4
10
14
7
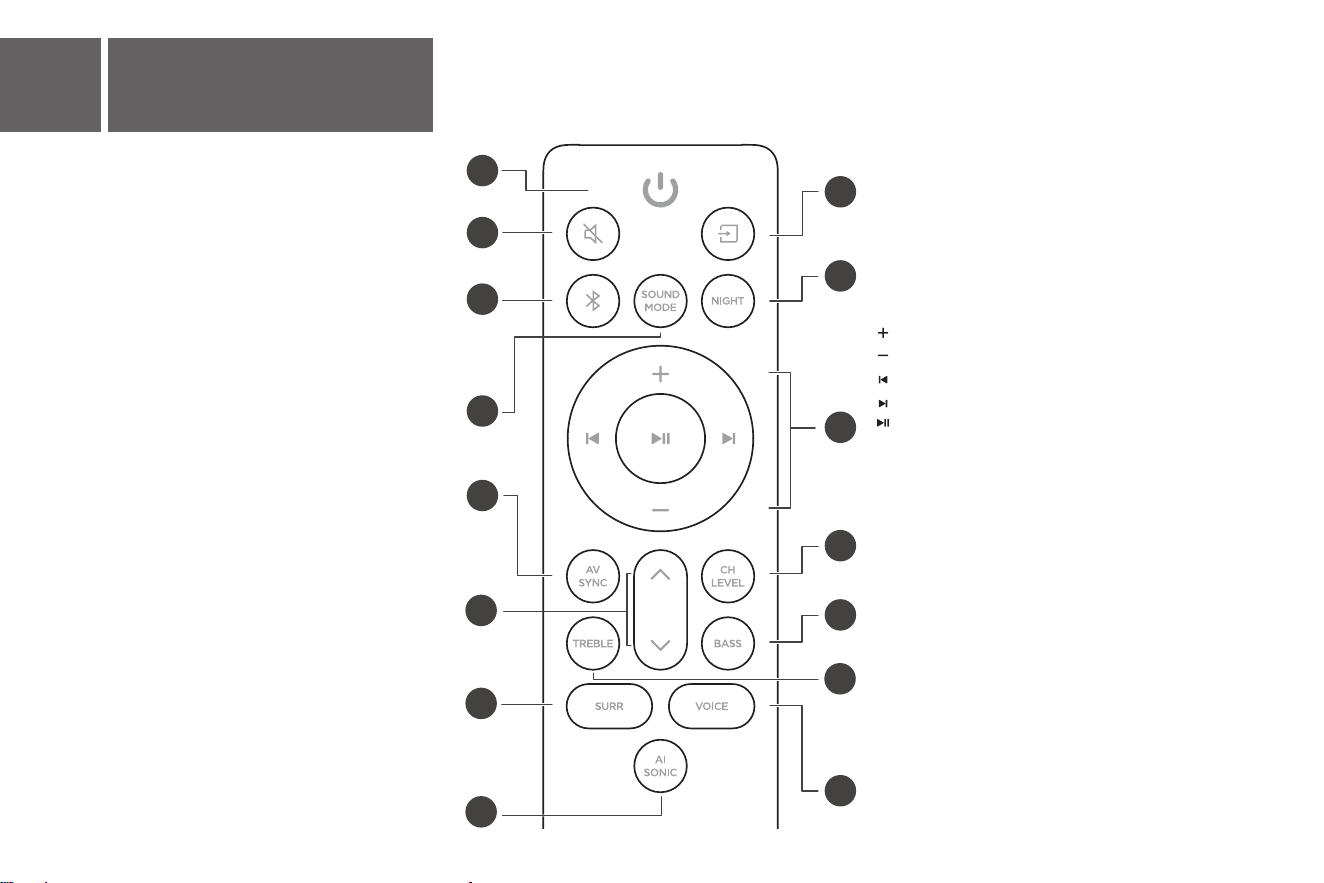
Short press: Power on/Power off
Long press: Power off
Short press: Mute/Unmute the sound
Short press: Switch input sources
(HDMI eARC/OPT/USB/Bluetooth/HDMI IN 1/HDMI IN 2)
Short press: Turn Night Mode On
Long press (5s+): Cycle through LED display brightness levels:
Level 1 (100%)/Level 2 (70%)/Level 3 (40%). Default: 100%.
9
Short press to switch between Front Top, Wide, Side, Center,
Rear Top, Rear Side, Rear, and Woofer channels. Then short
press the Up/Down buttons to adjust the volume of the
corresponding channel.
The Up/Down buttons can adjust: Sound Mode (and Custom),
AV Sync, Channel Level, Treble, Bass, AI SONIC, Surround
Enhance, and Voice Enhance
Short press to toggle Surround Enhance
(Off/Low/Medium/High)
11
Short press to enter Bass adjustment mode, then short press
the Up/Down buttons to increase or decrease the bass.
Short press: Select Bluetooth mode
Long press: Bluetooth pairing
Short press: Switch Sound Mode
(Standard/Movie/Music/Voice/Game/Night/Sports/Custom)
Short press to wake up the LED display, then use the
Up/Down buttons to adjust the Audio Delay within a range of
0 to 300 ms.
Short press to enter Treble adjustment mode, then short
press the Up/Down buttons to increase or decrease the
treble.
Short press to toggle Voice Enhance
(Off/Low/Medium/High)
Long press to turn on/off voice prompts
15
Short press: Enter AI SONIC mode. Press again to switch
between user-defined AI Sonic scenes: Off/Position 1/Position
2/Position 3. (Note: These scenes must be set up in the App to
take effect).
Increase volume
Decrease volume
Play previous music
Play next music
Short press: Play/Pause music.
Long press to wake up the LED display and scroll through
the “Source
①
+ Audio Format
②
”. (The “Audio Format” is not
displayed for USB and BT sources; only the “Source” is
shown.) When paused or not playing, long press this button
to display only the “Source
①
”.
Note:
① Source: HDMI eARC/OPTICAL/USB/BT/HDMI IN 1/HDMI IN 2
② Audio Format: PCM AUDIO/DOLBY SURROUND/DOLBY ATMOS/DTS/DTS HD/DTS:X, etc.
11
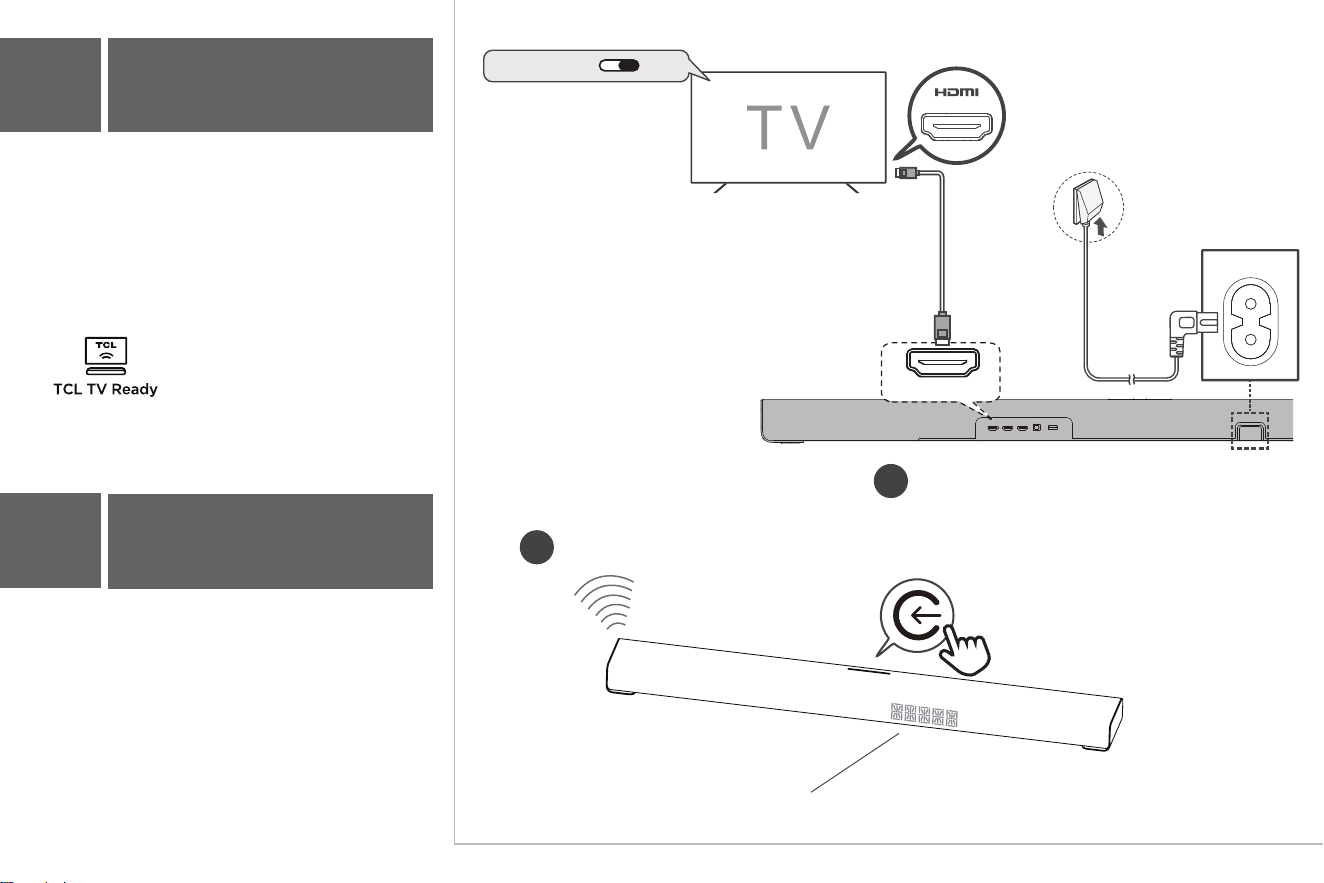
7a
HDMI (eARC)
7
TV Connection
Connect the Sound Bar to your TV with the
included HDMI cable.
Connect the Sound Bar to the power outlet with
the included power cord.
12
There are 2 ways to connect your Sound Bar to
the TV (listed in order that we recommend):
HDMI eARC (refer to 7a),
and Optical (refer to 7c).
If you have a TCL TV, simply plug in the HDMI
cable to the eARC/ARC ports and follow the
TCL TV Ready on-screen instructions.
This function is available
in some TCL TVs and
some TCL models.
HDMI EARC
2
1
(eARC/ARC)
HDMI CEC ON
HDMI (eARC)
AC~IN
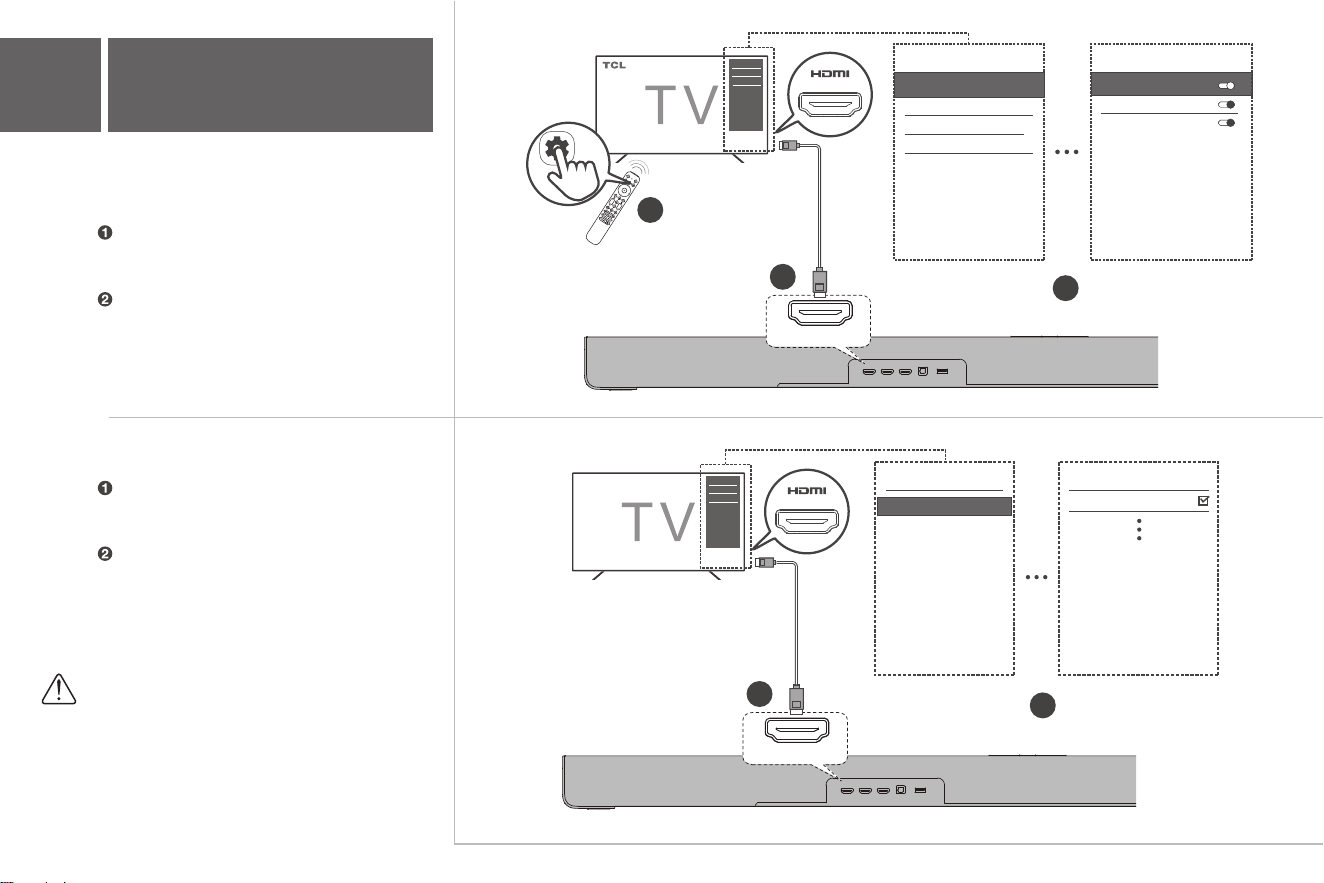
7a
HDMI (eARC)
Enable CEC function on other brand TV.
Enable the CEC function in the settings of
the TCL TV.
(See TV User Manual for instructions)
Enable CEC function on TCL TV.
Connect HDMI cable from the HDMI
(eARC) interface on the Sound Bar to the
HDMI (eARC/ARC) interface on the TV.
Connect HDMI cable from the HDMI (eARC)
interface on the Sound Bar to the HDMI
(eARC/ARC) interface on the TV.
Note:
CEC (Consumer Electronic Control)
function naming may differ by TV
manufacturer.
This feature may be called CEC, Anynet+,
SimpLink, BRAVIA Link, EasyLink or
VIERA Link. Please see your TV’s user
manual for more information.
13
Enable the CEC function in the settings of
the TV.
2
2
1
(eARC/ARC)
HDMI (eARC)
HDMI Control
Auto Standby
Auto Power On
External devices control (CEC)
External devices control (CEC)
HDMI 2
External Inputs
HDMI 3
HDMI 4 (eARC/ARC)
TCL Q95K
HDMI 1
2
1
(eARC/ARC)
HDMI (eARC)
Home
Setting
eARC (HDMI 4)
Search for CEC devices
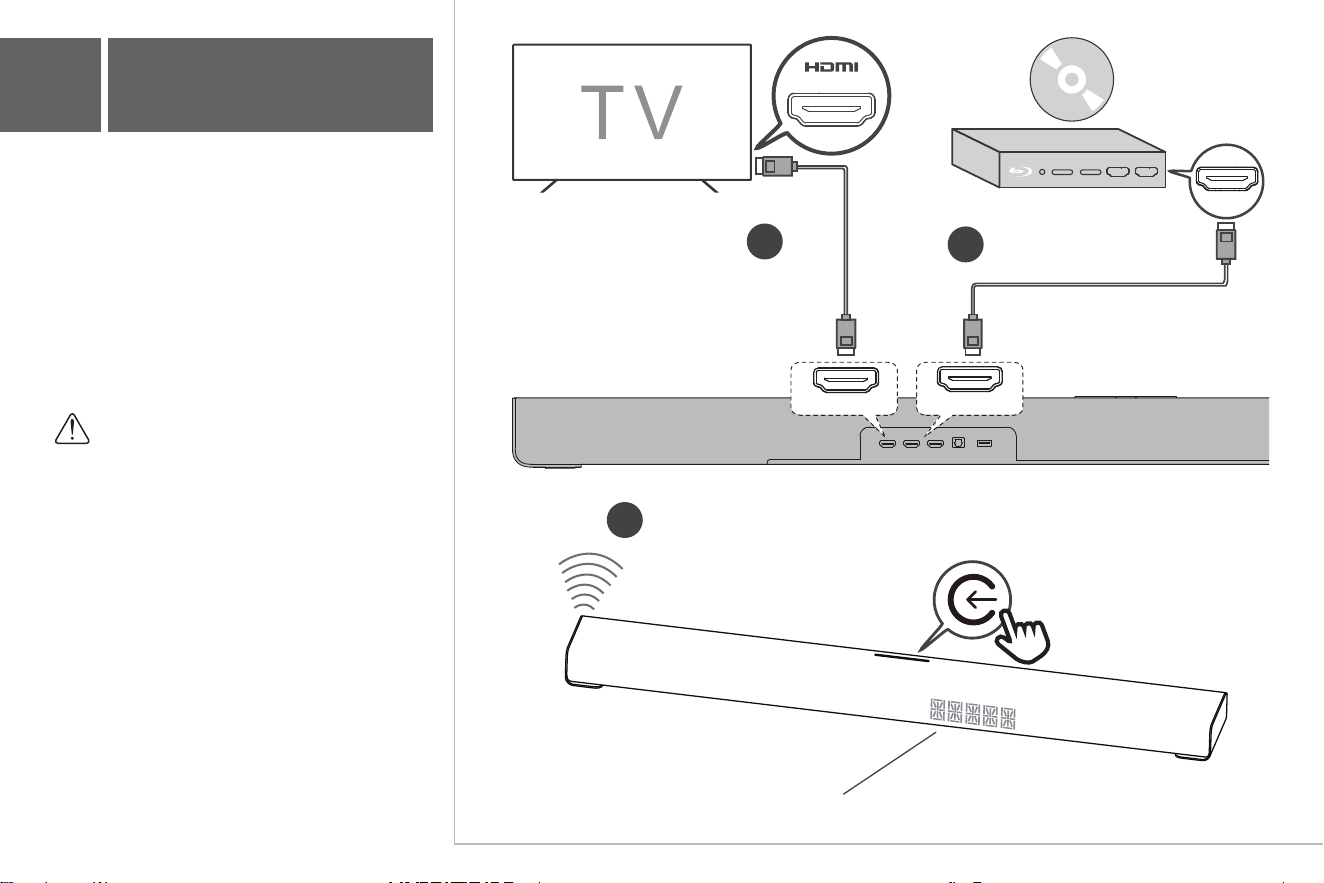
7b
HDMI IN
(Connect and play audio from the external devices)
14
1. Connect one end of the HDMI cable to
the HDMI eARC input on the Sound Bar,
and the other end to the HDMI
(eARC/ARC) output on the TV.
2. Connect one end of another HDMI
cable to the HDMI IN 1 or HDMI IN 2 on
the Sound Bar, and the other end to the
HDMI output on the external device (e.g.,
Blu-ray player).
3. Switch the Sound Bar source to "HDMI
IN 1" or "HDMI IN 2".
Note:
Make sure to use high-speed HDMI cables
that support the required audio/video
formats.
HDMI IN 1/HDMI IN 2
3
HDMI
2
HDMI IN 1/2
1
(eARC/ARC)
HDMI (eARC)
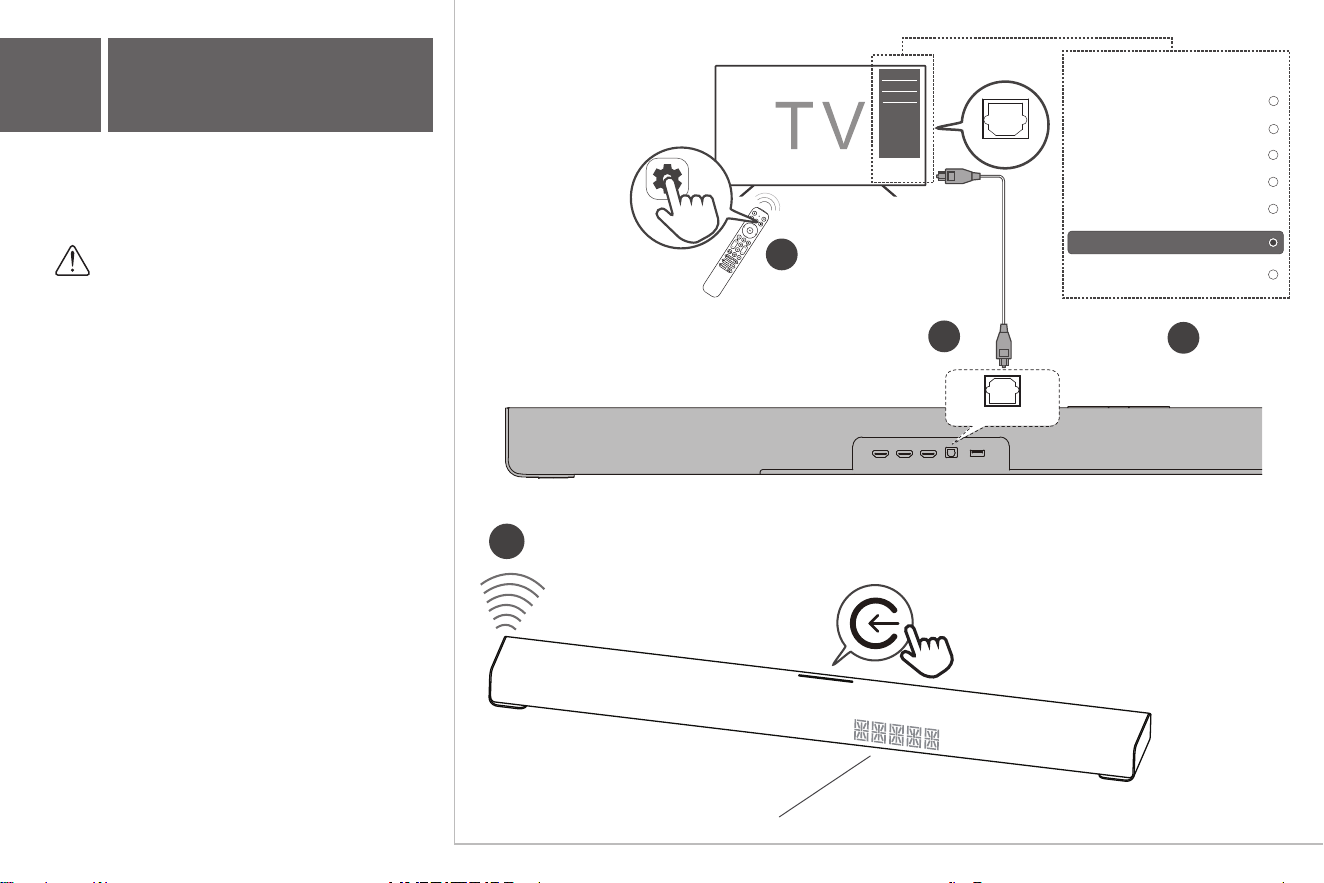
7c
Optical
15
Connect the Sound Bar to the TV with an
Optical cable.
Warning:
Do not bend or kink the optical cable as it
is fragile and can easily get damaged and
broken.
2
2
1
Internal Speaker
HDMI ARC/eARC
Bluetooth
Optical
Audio Output
Tutti Choral
Auto
Internal Speaker + Subwoofer
OPTICAL
OPTICAL
OPT
3
8
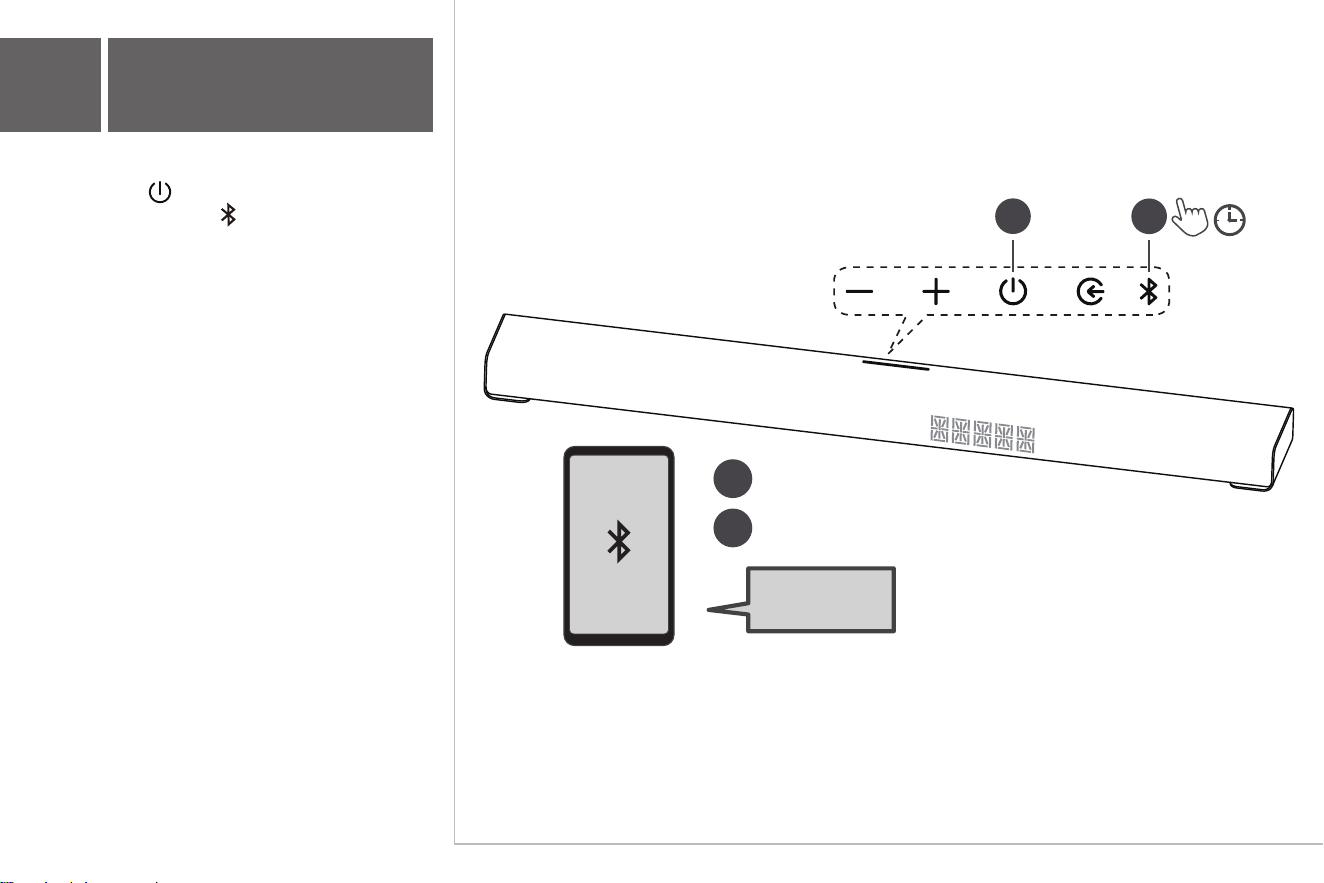
Bluetooth Pairing
16
1. Press the button.
2. Press and hold the button on the Sound Bar.
→ The LED display shows "PAIRING". The Sound
Bar is ready to pair.
3 Turn on your Bluetooth device and ensure it is in
pairing mode.
4 Select TCL Q95K.
→ The LED display shows "BT CONNECTED".
Pairing is successful.
5 Repeat the steps above to pair with other
Bluetooth devices.
TCL Q95K
3
4
1
>3s
2
9
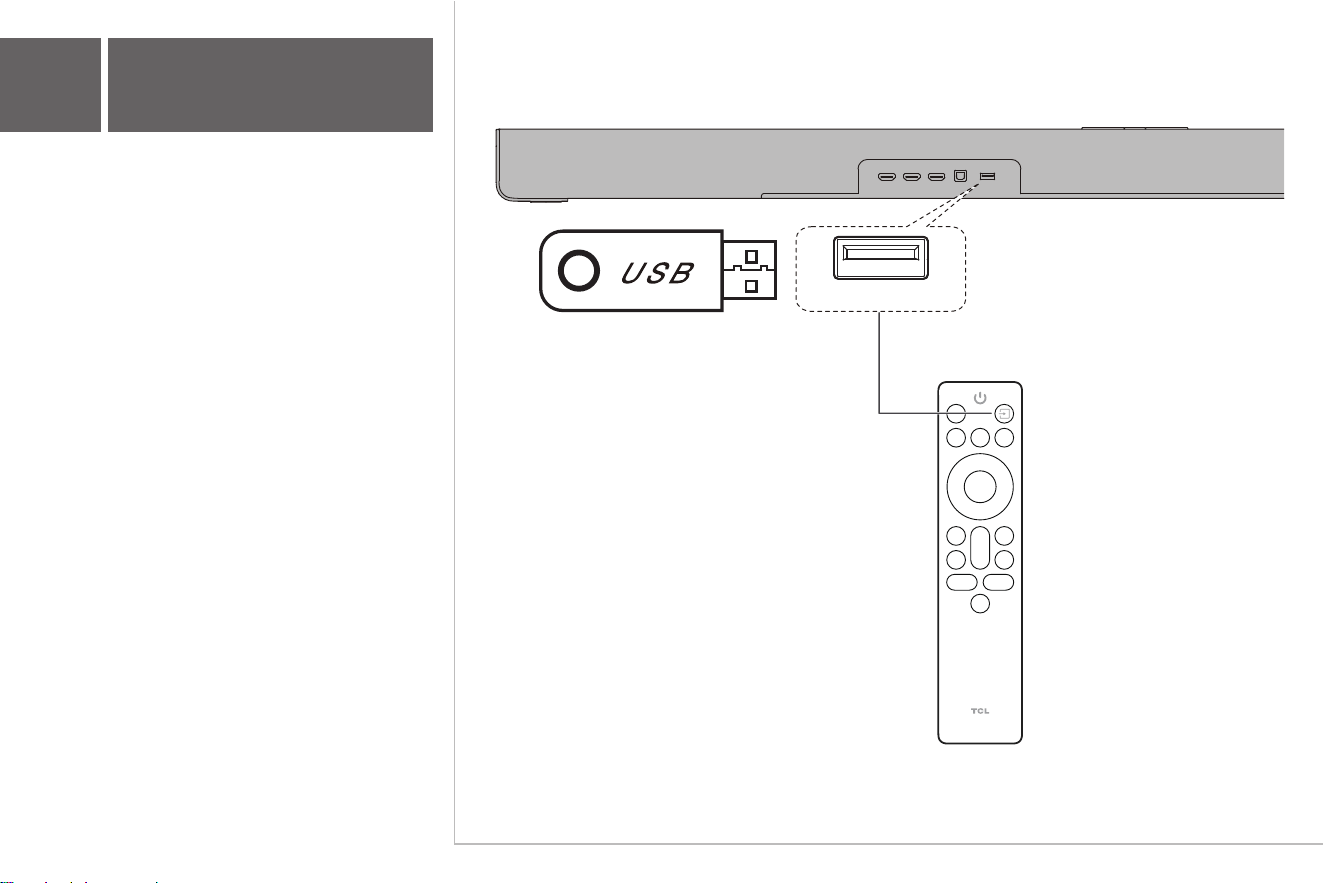
Other connections
- USB
Supported audio files: MP3, WMA, WAV, FLAC.
USB format: FAT 16/FAT 32, exFat.
Max USB capacity: 128 GB.
17
USB
10
TCL Tutti Choral
18
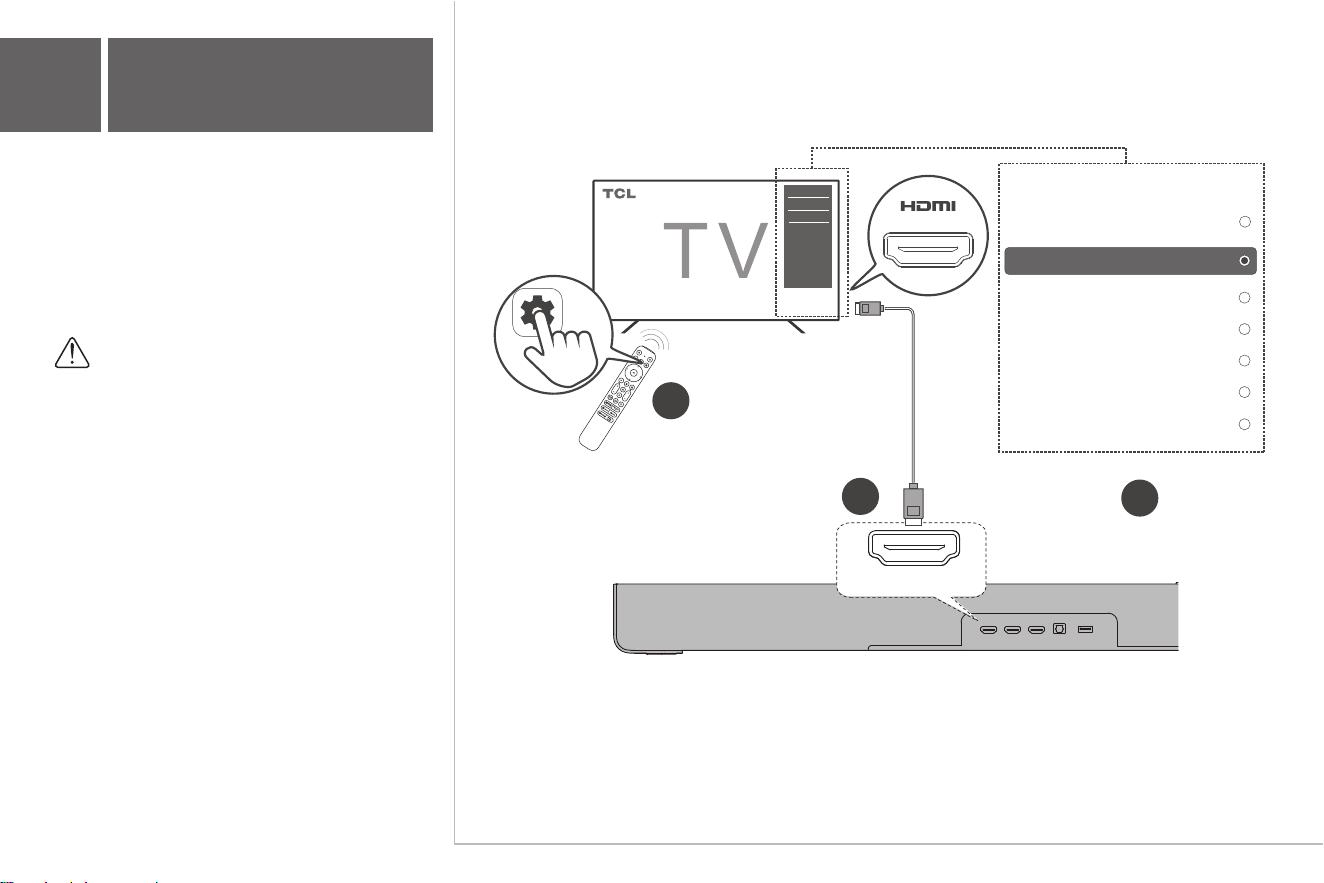
When the Sound Bar is connected, “Tutti
Choral” menu appears on the TV.
All settings → Display and sound →
Audio Output Settings → Audio Output
→ Tutti Choral
Note:
The message displayed may differ with
the TV model.
This function is compatible with some TCL
TVs.
The operation methods for different
televisions may vary.
2
2
1
(eARC/ARC)
HDMI (eARC)
Tutti Choral
Internal Speaker
HDMI ARC/eARC
Bluetooth
Optical
Audio Output
Auto
Internal Speaker + Subwoofer
11
TCL App
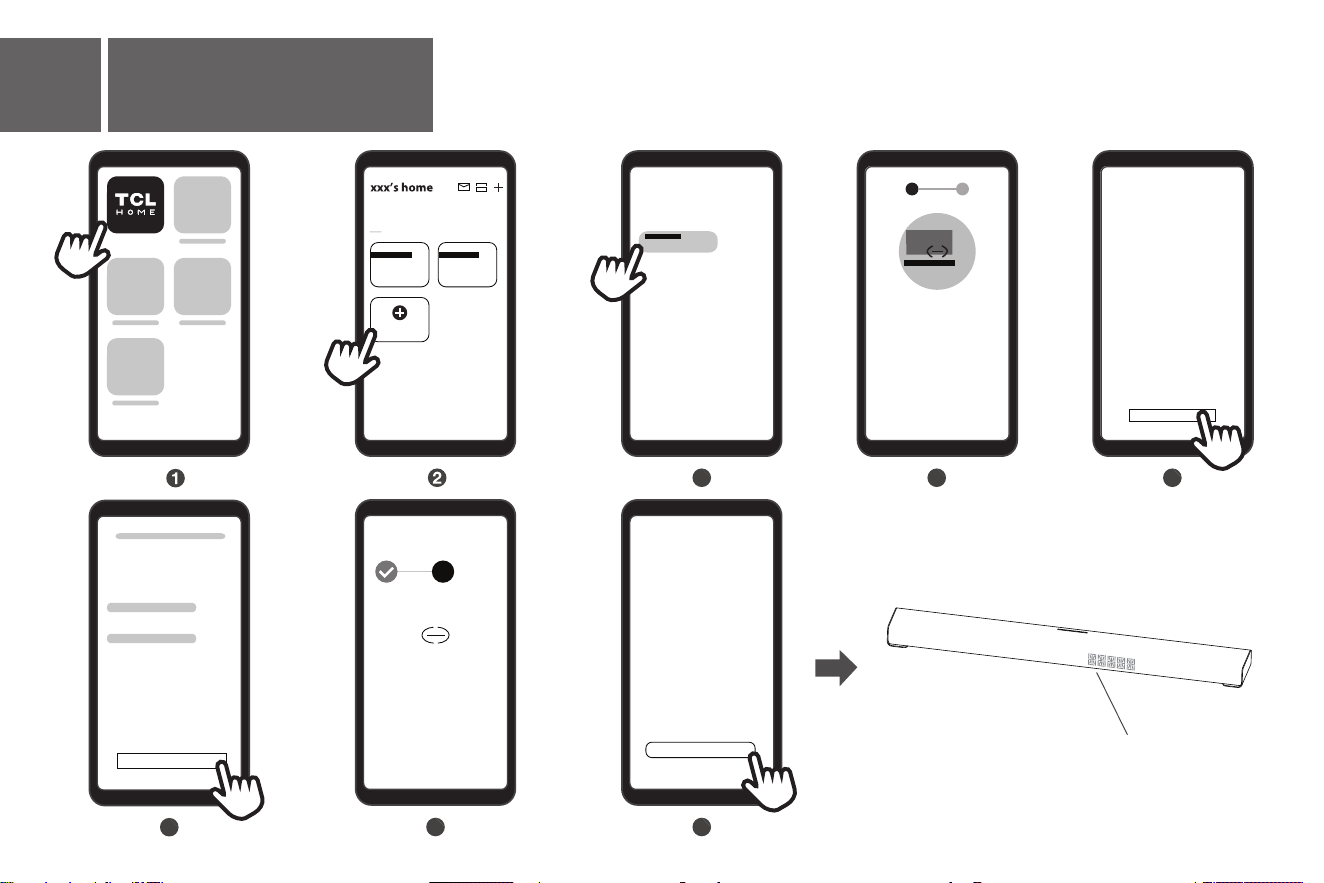
Network Configuration
19
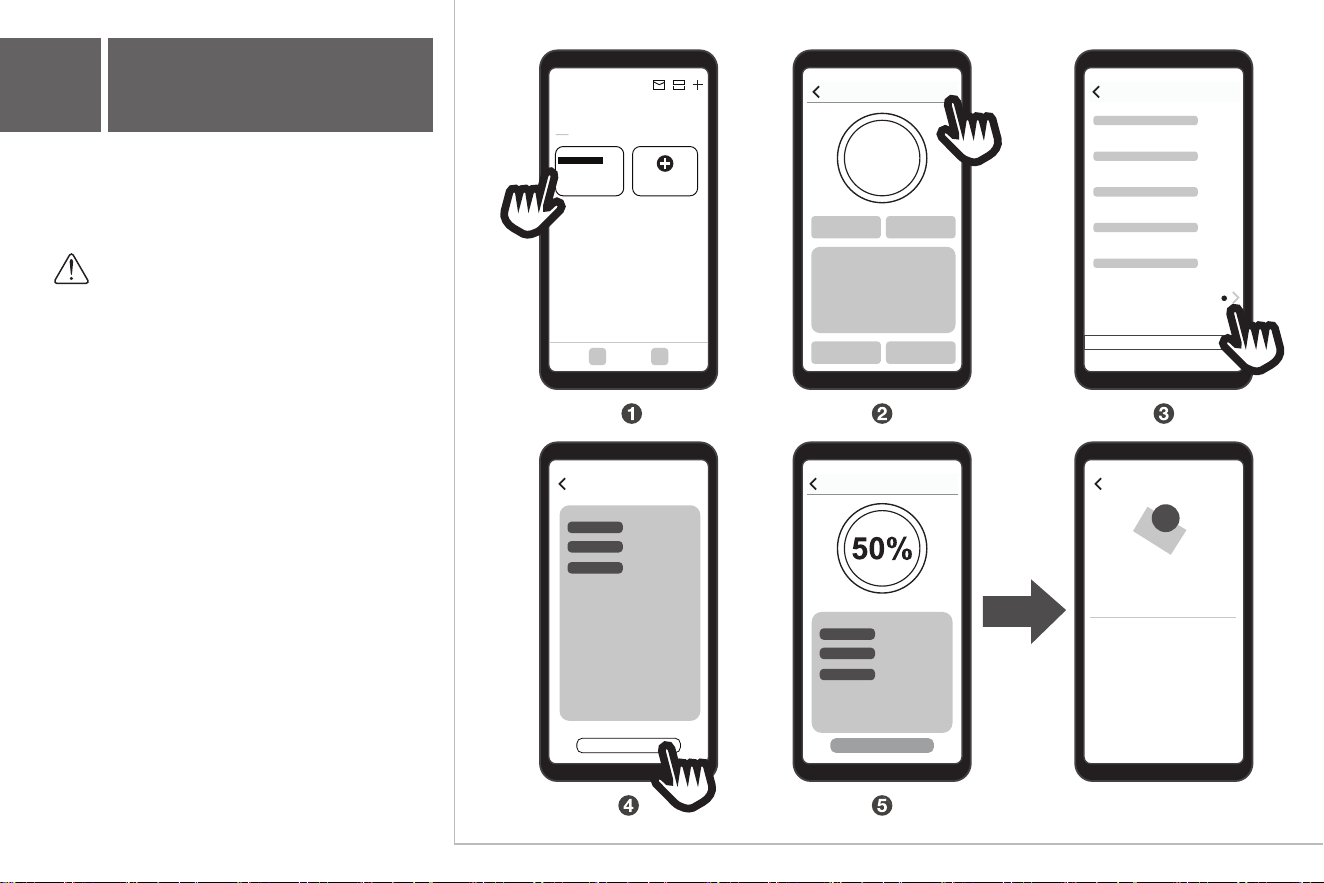
For the TCL App to work properly, a specific or newer version of the operating system is required. The app
supports Android and iOS systems.
For more information about the operating system versions, please refer to the TCL App description in the
app store.
Please follow the steps below to configure the network:
Devices
All Living Room
Sound Bar S45H
Living Room
Sound Bar S55H
Living Room
Add devices
Choose device
Discover devices
Searching
TCL Q95K
3
Connecting...30%
Your mobile phone is
connecting to the device
now, please wait a
moment...
1
2
4
Select connection network
Wi-Fi or Hotspot
Please choose the available Wi-Fi
Password
Next
6
Device Networking
2
Connecting...XX%
Your mobile phone is
connecting to the device Wi-Fi
hardware now, please wait a
moment...
7
Complete
Once connected to the network,
you can use AirPlay, Google
Cast, and Spotify, and receive
the latest system updates.
Start using
8
Add a success
Device name
Device room
Completed
TCL Q95K
Try now
5
TCL Home
WIFI CONNECTED
12
AI Sonic-Adaptation
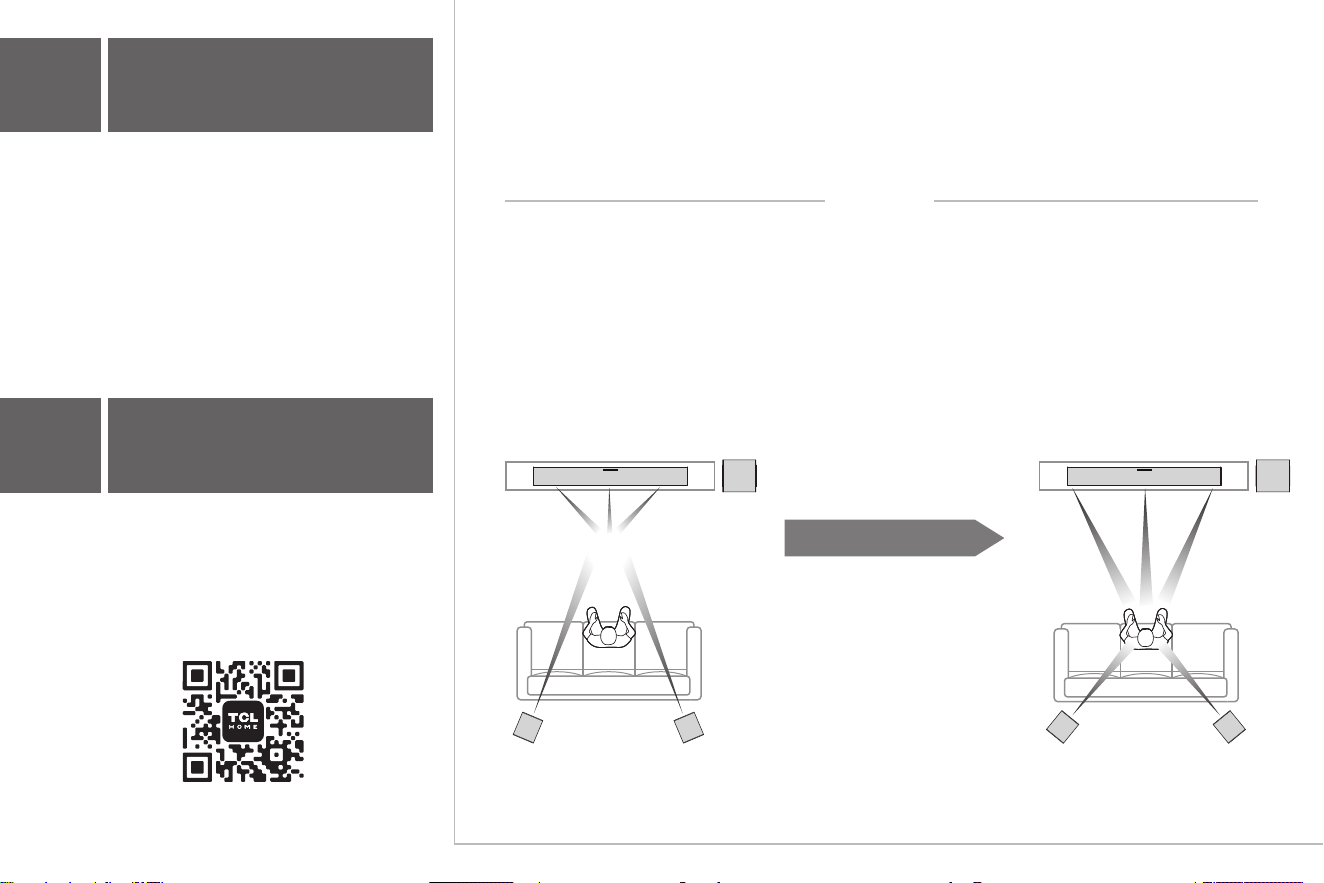
What is AI Sonic-Adaptation?
(Auto Room Calibration)
Before AI Sonic-Adaptation
After AI Sonic-Adaptation
Speaker distance, sound pressure
level, and frequency response may be
uneven based on your seating position
and environment.
Speaker distance, sound pressure
level, and frequency response are all
optimized based on your seating
position and environment.
AI Sonic-Adaptation is a Room Calibration Technology developed by TCL Audio Lab. To use
this function, you need to download TCL Home App and follow the instructions.
13
Download
TCL HOME App
Control this Sound Bar using the TCL Home App.
Functions include power control, volume
adjustment, source switching, sound modes, AI
Sonic-Adaptation, Beosonic, etc. Explore more
smart features within the TCL Home App.
Please download the latest version from the app
stores.
TCL Home App
Your TCL Smart Hub.
Download Now!
20
The cellphone’s microphone
will measure the test signals
Follow the on-screen
instructions in the TCL Home
App.
Calibration
How Does It Work?
Sitting area with
cellphone microphone
Sitting area with
cellphone microphone
14a
Online Firmware Update
Follow the instructions on the right side to
update the software on TCL HOME App.
Note:
The message displayed may differ.
Do not exit the TCL HOME App during
the update process.
21
Sound Bar Q95K
EQ Mode
...
Settings
Firmware version
Remove device
Firmware update
Update now
Devices
xxx’s home
All Living Room
Sound Bar Q95K
Living Room
Add devices
Firmware update Firmware update
The current version is the latest
System
xxxxxx
Updating...
Update now
14b
USB Drive Update
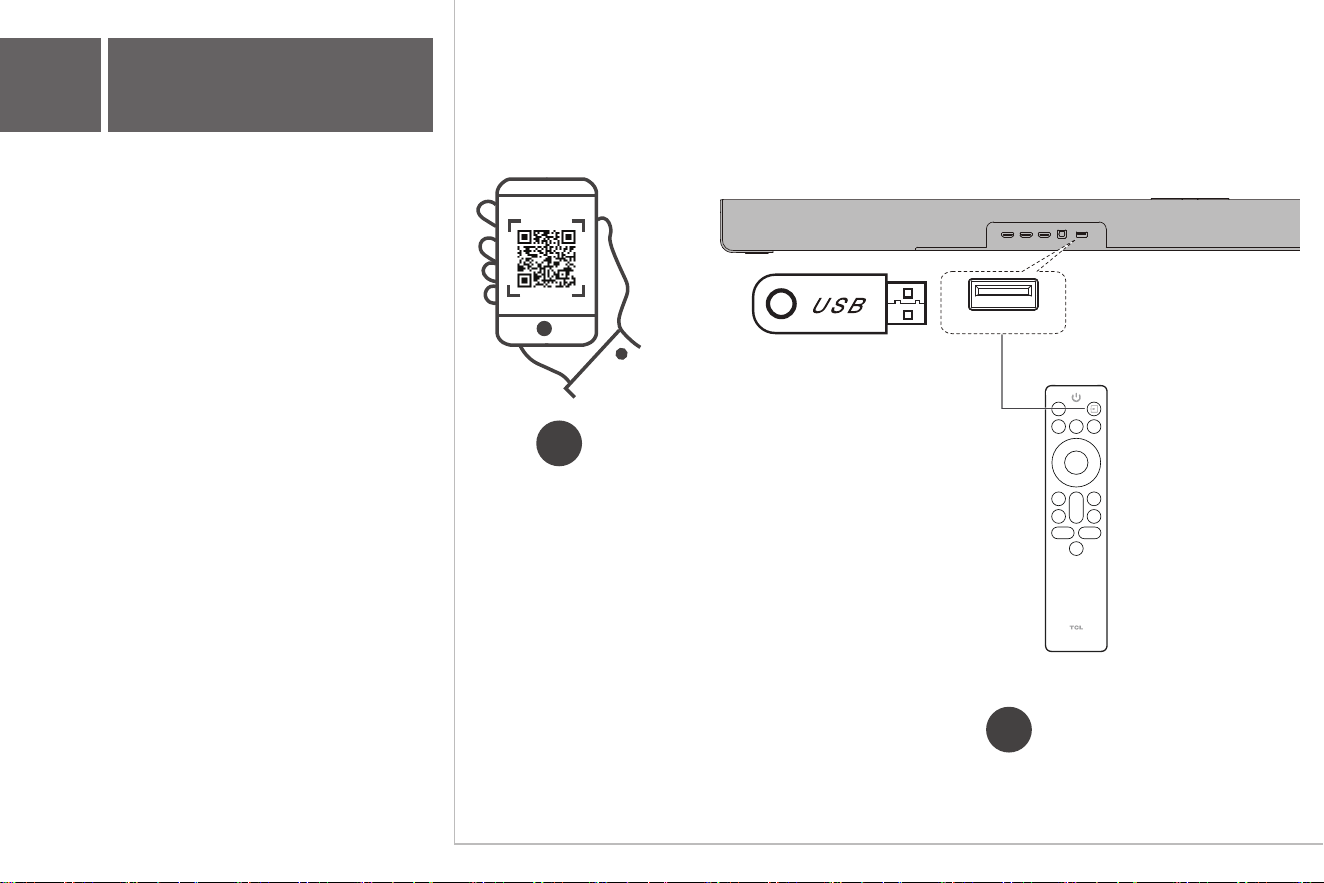
22
Please visit the official TCL support website, go
to the corresponding product page, follow the
online instructions to download the latest
software, and use a USB drive to upgrade the
Sound Bar.
1
2
USB
Trademarks
Dolby, Dolby Vision, Dolby Atmos, and the double-D symbol are registered trademarks of Dolby
Laboratories Licensing Corporation. Manufactured under license from Dolby Laboratories.
Confidential unpublished works. Copyright © 2012–2024 Dolby Laboratories. All rights reserved.
The Bluetooth® word mark and logos are registered trademarks owned by Bluetooth SIG, Inc. and
any use of such marks by TTE Corporation is under license. Other trademarks and trade names are
those of their respective owners.
The terms HDMI, HDMI High-Definition Multimedia Interface, HDMI trade dress and the HDMI Logos
are trademarks or registered trademarks of HDMI Licensing Administrator, Inc.
Manufactured under license from DTS, Inc. and/or its affiliates. For patents, see
https://xperi.com/dts-patents/. DTS, the DTS logo, DTS:X, and the DTS:X logo are trademarks or
registered trademarks of DTS, Inc. and/or its affiliates in the U.S. and/or other countries. © DTS, Inc.
and/or its affiliates. All rights reserved.
23
Trademarks
24
The Wi-Fi CERTIFIED Logo is a trademark of Wi-Fi Alliance®.
Use your phone, tablet or computer as a remote control for Spotify. Go to spotify.com/connect to
learn how. The Spotify Software is subject to third party licenses found here:
https://www.spotify.com/connect/third-party-licenses.
Use of the Works with Apple badge means that an accessory has been designed to work
specifically with the technology identified in the badge and has been certified by the developer to
meet Apple performance standards. Apple, AirPlay, Apple Home, and Apple TV are trademarks of
Apple Inc., registered in the U.S. and other countries and regions.
Google, Google Home and Google Cast are trademarks of Google LLC.
Important Safety Instructions
Make sure you read all the safety information before you use this product.
TCL North America bears no responsibility for accidents or damages caused
by unauthorized changes, modifications or improper use of the product.
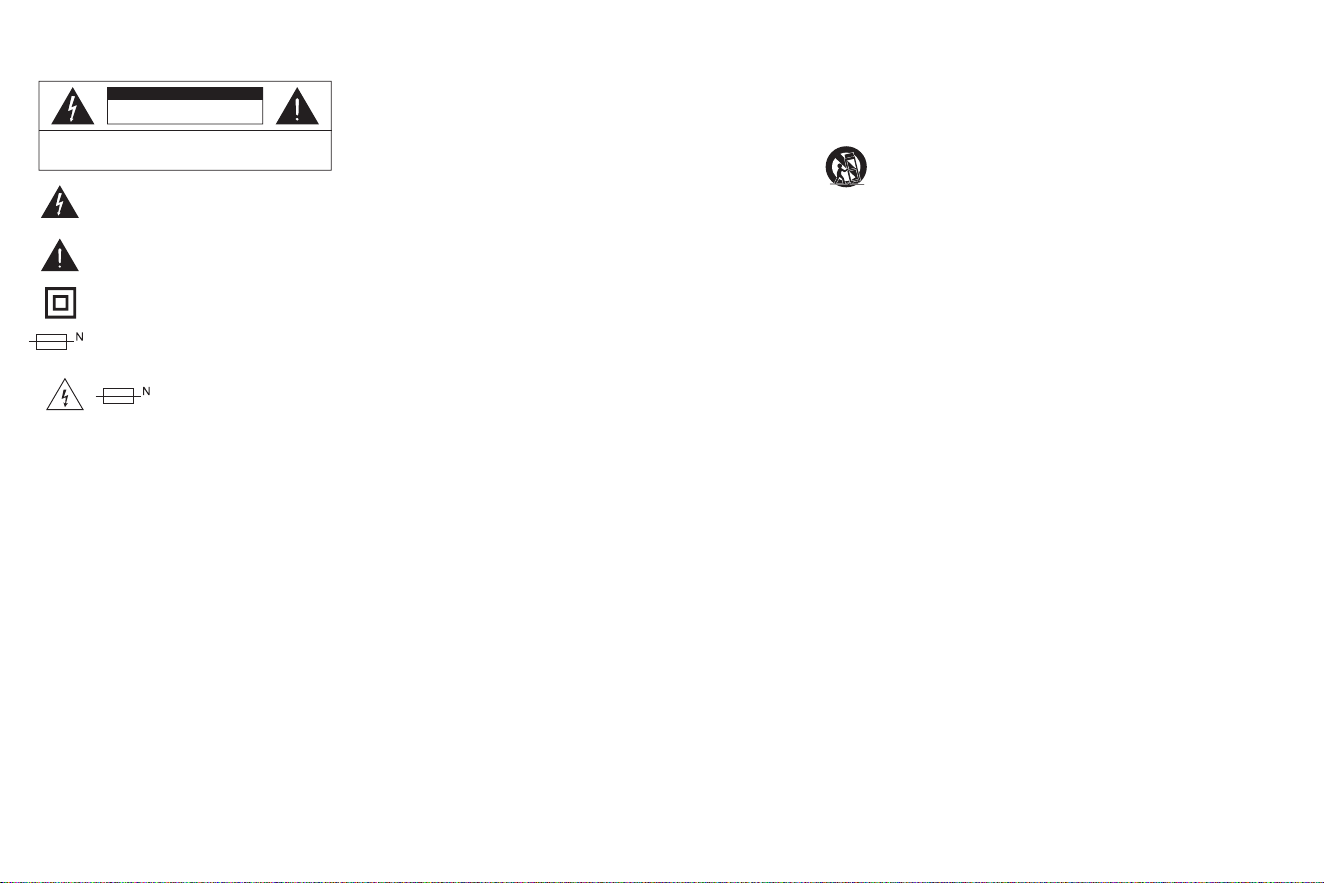
The lightning flash with arrowhead symbol, within an equilateral
triangle is intended to alert the user to the presence of uninsulated
dangerous voltage within the product's enclosure that may be of
sufficient magnitude to constitute a risk of electric shock.
The exclamation point within an equilateral triangle is intended to
alert the user to the presence of important operating and
maintenance (servicing) instructions in the literature accompanying
the product.
This symbol indicates that this product incorporates double
insulation between hazardous main voltage and user accessible
parts. When servicing, use only identical replacement parts.
This symbol indicates that the fuse may be in the neutral, and that
the mains shall be disconnected to deenergize the phase
conductors.
Warnings
DOUBLE POLE/NEUTRAL FUSING !
- Touching dangerous live parts on the power board may result in electric
shock.
- During maintenance, it is necessary to disconnect from mains (such as
unplugging the power plug) and confirm that there is no dangerous voltage
on the power supply board.
• To reduce the risk of fire or electric shock, do not expose this product to
rain or moisture. This product should not be exposed to dripping or
splashing. No objects filled with liquids, such as vases, should be placed on or
near the product.
• The product is unstable if it is not properly placed or mounted to the wall.
Be sure to follow the wall mounting instructions provided in the user manual
to ensure your safety.
• Do not expose batteries to excessive heat such as sunshine, fire, and so
forth.
• To avoid danger of suffocation, keep this plastic bag away from babies and
children. Do not use this bag in cribs, beds, carriages or playpens. This bag is
not a toy.
• Shielded cables must be used with this unit to ensure compliance with the
Class B FCC limits.
Safety
• Read these instructions - Read all the safety and operating instructions
before operating the product.
• Retain these instructions - Retain the safety and operating instructions for
future reference.
• Heed all warnings - Adhere to all warnings on the product and in the
operating instructions.
• Follow all instructions - Follow all operating and use instructions.
• Do not use this apparatus near water - The appliance should not be used
near water or moisture - for example, in a wet basement or near a swimming
pool and the like.
• Clean only with a dry cloth.
• Do not block any ventilation openings. Install in accordance with the
manufacturer's instructions.
• Do not install near any heat sources such as radiators, heat registers,
stoves, or other apparatus (including amplifiers) that produce heat.
• Do not defeat the safety purpose of the polarized or grounding-type plug.
A polarized plug has two blades with one wider than the other. A grounding
type plug has two blades and a third grounding prong. The wide blade or the
third prong are provided for your safety. lf the provided plug does not fit into
your outlet, consult an electrician for replacement of the obsolete outlet.
• Protect the power cord from being walked on or pinched particularly at
plugs, convenience receptacles, and the point where it exits from the
product. If the cord set is damaged, it must be replaced by a special cord set
available from the manufacturer or its service agent.
• Use only attachments/accessories specified by the manufacturer.
• Use only with the cart, stand, tripod, bracket, or table specified by
the manufacturer, or sold with the apparatus. When a cart is used,
use caution when moving the cart/apparatus combination to avoid
injury from tip-over.
• Unplug this apparatus during lightning storms or when unused for long
periods of time.
• Refer all servicing to qualified service personnel. Servicing is required when
the apparatus has been damaged in any way, such as power-supply cord or
plug damaged, liquid has been spilled or objects have fallen into the
apparatus, the apparatus has been exposed to rain or moisture, does not
operate normally, or has been dropped.
• The user must maintain a minimum distance of 8 inches (20 cm) from the
device at all time.
• This appliance is not intended for use by young children or infirm persons
without supervision. Young children should be supervised to ensure that they
do not play with the appliance.
Cautions
• To prevent electric shock, match wide blade of plug to wide slot, fully
insert.
• Do not place any sources of danger on the product (for example: liquid
filled objects, lighted candles).
• Disconnect the power cord to shut off when find trouble or not in use. The
power cord shall be readily operable.
• Use of controls or adjustments or performance of procedures other than
those described herein, may result in hazardous radiation exposure or other
unsafe operation.
• The power cord/appliance coupler is used as the disconnect device, the
disconnect device must remain readily operable.
• The rating label is located at the bottom or back of the product.
• The use of apparatus in tropical and moderate climates. Operating
temperature: 32°F – 113°F (0°C – 45°C)
Battery CAUTION and Disposal Information
• Only use the battery types specified.
• Risk of fire or explosion if the battery is replaced by an incorrect type.
• Make sure you use the correct polarity.
• Do not mix new and used batteries.
• Do not use rechargeable batteries.
• Disposal of a battery into fire or a hot oven, or mechanically crushing or
cutting of a battery, may result in an explosion.
• Leaving a battery in an extremely high temperature surrounding
environment, such as sunshine, fire, or hot surface may result in an explosion
or the leakage of flammable liquid or gas.
• A battery subjected to extremely low air pressure can result in an explosion
or the leakage of flammable liquid or gas.
• Remove the batteries from the remote control if you are not using it for a
long period of time.
• Attention should be drawn to the environmental aspects of battery
disposal.
Disposal of Your Old Product
Recycle Your Device Properly. In accordance with state and local laws, this
product may be classified as a covered electronic device and must not be
disposed of with household trash. TCL encourages consumers to always look
for a recycling or reuse alternative to discarding electronic products through
drop-off and mail-back options. Visit
tcl.com/us/en/sustainability/electronics-recycling for instructions and
authorized collection sites. Click on our convenient interactive map to quickly
locate a solution in your community. For the US ONLY, for mail-back option,
visit www.mrmrecycling.com/recycle-now.php and follow the instructions.
Compliance notice
Notice for US
FCC Information
Warning
Changes or modifications to this unit not expressly approved by the party
responsible for compliance could void the user’s authority to operate the
equipment.
Note
This equipment has been tested and found to comply with the limits for a
Class B digital device, pursuant to Part 15 of the FCC Rules. These limits are
designed to provide reasonable protection against harmful interference in a
residential installation. This equipment generates, uses and can radiate radio
frequency energy and, if not installed and used in accordance with the
instructions, may cause harmful interference to radio communications.
However, there is no guarantee that interference will not occur in a particular
installation.
If this equipment does cause harmful interference to radio or television
reception, which can be determined by turning the equipment off and on, the
user is encouraged to try to correct the interference by one or more of the
following measures:
• Reorient or relocate the receiving antenna.
• Increase the separation between the equipment and receiver.
• Connect the equipment into an outlet on a circuit different from that to
which the receiver is connected.
• Consult the dealer or an experienced radio/TV technician for help.
This device complies with Part 15 of the FCC Rules. Operation is subject to
the following two conditions:
(1) this device may not cause harmful interference, and
(2) this device must accept any interference received, including interference
that may cause undesired operation.
FCC Radiation Exposure Statement: This equipment complies with FCC
radiation exposure limits set forth for an uncontrolled environment. This
equipment should be installed and operated with a minimum distance of 8
inches (20 cm) between the radiator and your body. This transmitter must
not be co-located or operated in conjunction with any other antenna or
transmitter.
Notice for Canada
Class B Clause
This Class B digital apparatus complies with Canadian ICES-003
This device contains licence-exempt transmitter(s)/receiver(s) that comply
with Innovation, Science and Economic Development Canada’s
licence-exempt RSS(s). Operation is subject to the following two conditions:
1. This device may not cause interference.
2. This device must accept any interference, including interference that may
cause undesired operation of the device.
Radiation Exposure Statement
This equipment complies with IC radiation exposure limits set forth for an
uncontrolled environment. This equipment should be installed and operated
with minimum distance 20cm between the radiator & your body.
Warning: The user is cautioned that changes or modifications not expressly
approved by the party responsible for compliance could void the user's
authority to operate the equipment.
The device for operation in the band 5150–5250 MHz is only for indoor use to
reduce the potential for harmful interference to co-channel mobile satellite
systems.
CAUTION
RISK OF ELECTRIC SHOCK
DO NOT OPEN
CAUTION: TO REDUCE THE RISK OF ELECTRIC SHOCK, DO NOT
REMOVE COVER (OR BACK). NO USER-SERVICEABLE PARTS
INSIDE. REFER SERVICING TO QUALIFIED SERVICE PERSONNEL.
Consignes de sécurité importantes
Assurez-vous de lire toutes les informations de sécurité avant d'utiliser ce
produit.
TCL North America décline toute responsabilité en cas d'accidents ou de
dommages causés par des changements non autorisés, des modifications ou
une utilisation incorrecte du produit.
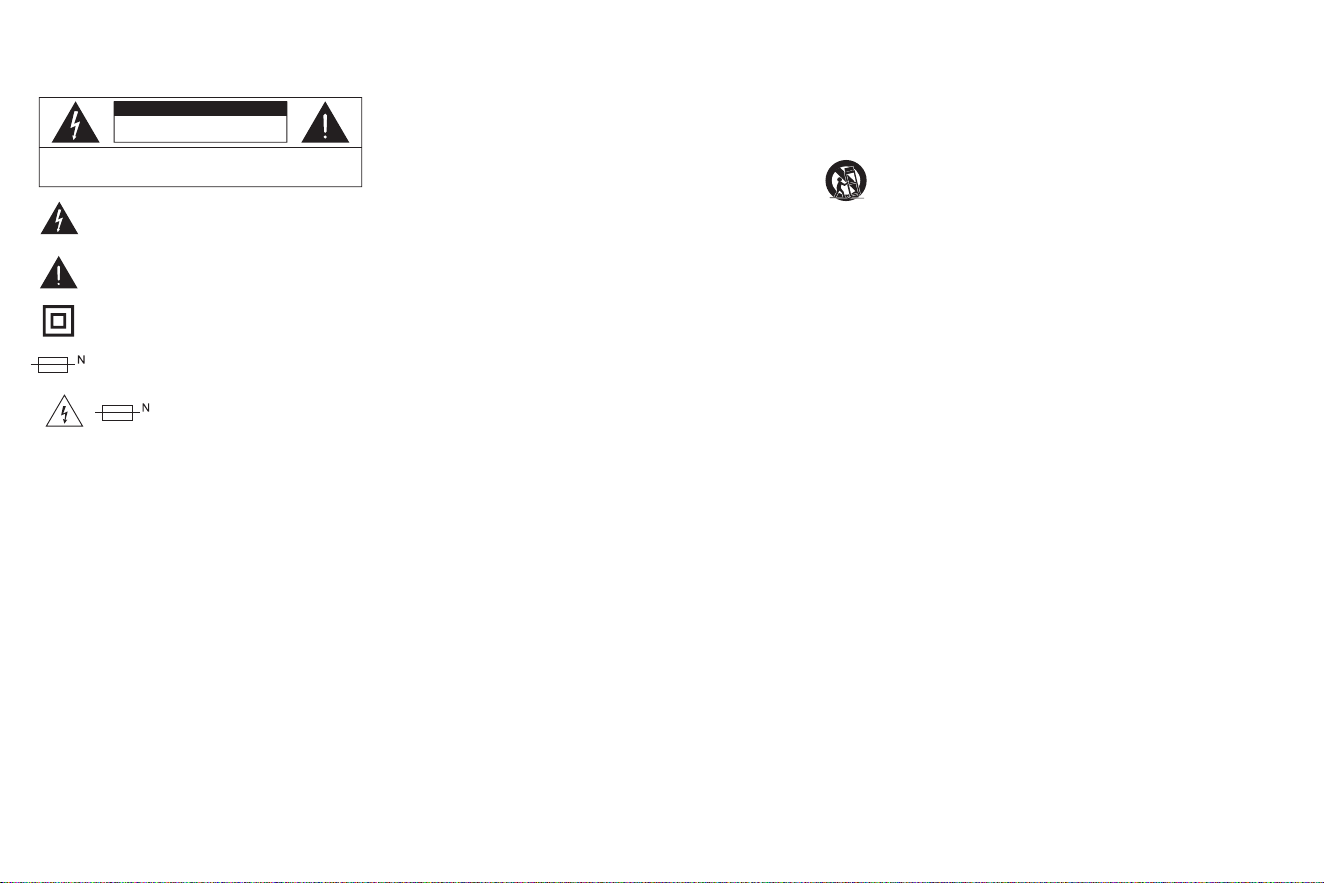
Le symbole de l'éclair en forme de flèche, situé dans un triangle
équilatéral, a pour but d'alerter l'utilisateur de la présence d'une
tension dangereuse non isolée à l'intérieur du boîtier du produit
pouvant être suffisamment importante pour constituer un risque
d'électrocution.
Le point d'exclamation dans un triangle équilatéral est destiné à
alerter l'utilisateur de la présence de consignes importantes
d'utilisation et de maintenance (entretien) dans la documentation
accompagnant le produit.
Ce symbole indique que ce produit comporte une double isolation
entre la tension principale dangereuse et les pièces accessibles à
l'utilisateur. Lors de l'entretien, utilisez uniquement des pièces de
rechange identiques.
Ce symbole indique que le fusible peut être au neutre et que le
secteur doit être déconnecté pour mettre hors tension les
conducteurs de phase.
Avertissements
FUSIBLE DOUBLE PÔLE/NEUTRE !
- Le contact avec des pièces sous tension dangereuses sur le panneau
électrique peut entraîner une électrocution.
- Pendant la maintenance, il est nécessaire de débrancher l'appareil du
secteur (par exemple en débranchant la fiche d'alimentation) et de vérifier
qu'il n'y a pas de tension dangereuse sur le panneau d'alimentation.
• Pour réduire les risques d'incendie ou d'électrocution, n'exposez pas ce
produit à la pluie ou à l'humidité. Ce produit ne doit pas être exposé à des
gouttes ou des éclaboussures. Aucun objet rempli de liquide, tel qu'un vase,
ne doit être placé au-dessus ou à proximité du produit.
• Le produit est instable s'il n'est pas correctement placé ou fixé au mur.
Veuillez suivre les instructions de montage mural fournies dans ce manuel
d'utilisation pour assurer votre sécurité.
• N'exposez pas les piles à une source de chaleur excessive telle que le soleil,
le feu, etc.
• Pour éviter tout risque de suffocation, gardez ce sac en plastique hors de
portée des bébés et des enfants. N'utilisez pas ce sac dans un berceau, un lit,
une poussette ou un parc. Ce sac n'est pas un jouet.
• Des câbles blindés doivent être utilisés avec cet appareil pour garantir la
conformité aux limites de la classe B de la FCC.
Sécurité
• Lisez ces consignes – Lisez toutes les consignes de sécurité et d'utilisation
avant d'utiliser le produit.
• Conservez ces consignes – Conservez les consignes de sécurité et
d'utilisation pour une consultation ultérieure.
• Respectez tous les avertissements – Respectez tous les avertissements sur
le produit et dans le mode d'emploi.
• Observez toutes les consignes – Observez le mode d'emploi et toutes les
consignes d'utilisation.
• N'utilisez pas cet appareil à proximité d'eau – Cet appareil ne doit pas être
utilisé à proximité d'eau ou d'humidité – par exemple, dans un sous-sol
humide ou près d'une piscine, etc.
• Nettoyez uniquement avec un chiffon sec.
• Ne bloquez aucune bouche d'aération. Installez conformément aux
instructions du fabricant.
• Ne l'installez pas près de sources de chaleur telles que les radiateurs, les
bouches de chaleur, les poêles ou autres appareils (y compris les
amplificateurs) produisant de la chaleur.
• Ne détruisez pas l'objectif de sécurité de la fiche polarisée ou mise à la •
terre. Une fiche polarisée a deux lames avec une plus large que l'autre. Une
fiche de type mise à la terre a deux broches et une troisième broche de mise
à la terre. La lame large ou la troisième broche sont fournies pour votre
sécurité. Si la fiche fournie ne rentre pas dans votre prise, consultez un
électricien pour remplacer la prise obsolète.
• Protégez le cordon d'alimentation des piétinements et des pincements, en
particulier au niveau des fiches, des prises de courant et du point de sortie du
produit. Si l'ensemble de câble est endommagé, il faut le remplacer par un
câble spécial disponible auprès du fabricant ou de son agent de service.
• N'utilisez que les pièces jointes / accessoires spécifiés par le fabricant.
• N'utilisez que le chariot, le support, le trépied, la console ou la
table spécifiés par le fabricant ou vendus avec l'appareil. En cas
d'utilisation d'un chariot, soyez prudent lorsque vous déplacez
l'ensemble chariot-appareil afin d'éviter tout risque de basculement
ou de blessures.
• Débranchez cet appareil en cas d'orage ou lorsqu'il n'est pas utilisé
pendant de longues périodes.
• Confiez l'entretien de l'appareil à un personnel qualifié. Une réparation est
nécessaire lorsque l'appareil a été endommagé de quelque manière que ce
soit, par exemple si le cordon d'alimentation ou la fiche sont endommagés, si
un liquide a été renversé ou si des objets sont tombés dans l'appareil, si
l'appareil a été exposé à la pluie ou à l'humidité, s'il ne fonctionne pas
normalement ou s'il est tombé.
• L'utilisateur doit se tenir à une distance minimale de 20 cm de l'appareil à
tout moment.
• Cet appareil n'est pas destiné à être utilisé par de jeunes enfants ou des
personnes infirmes sans surveillance. Il faut surveiller les jeunes enfants pour
s'assurer qu'ils ne jouent pas avec l'appareil.
Mises en garde
• Pour éviter les électrocutions, faites correspondre la lame large de la fiche à
la fente large et insérez-la complètement.
• Ne placez aucune source de danger sur le produit (par exemple, objets
remplis de liquide, bougies allumées).
• Débranchez le cordon d'alimentation pour l'éteindre en cas de problème ou
si vous ne l'utilisez pas. Le cordon d'alimentation doit être facilement
utilisable.
• L'utilisation de commandes ou de réglages ou l'exécution de procédures
autres que celles décrites dans le présent document peuvent entraîner une
exposition à des radiations dangereuses ou d'autres opérations dangereuses.
• Si le raccord d'alimentation avec l'appareil est utilisé pour le
débranchement, celui doit rester facilement utilisable.
• L'étiquette d'identification se trouve au bas ou à l'arrière du produit.
• L'appareil peut être utilisé dans des climats tropicaux et modérés.
Température de fonctionnement : 0 à 45 °C
Informations relatives à la pile et à son élimination
• Utilisez uniquement les types de piles spécifiés.
• Le remplacement de la pile par un type incorrect peut entraîner un risque
d'incendie ou d'explosion.
• Veillez à respecter la polarité.
• Ne mélangez pas des piles neuves et usagées.
• N'utilisez pas de piles rechargeables.
• Jeter une pile dans un feu ou un four chaud, ou écraser ou couper
mécaniquement une pile peut entraîner une explosion.
• Laisser une pile dans un environnement à température extrêmement élevée,
tel que la lumière du soleil, un feu ou une surface chaude, peut entraîner une
explosion ou une fuite de liquide ou de gaz inflammable.
• Une pile soumise à une pression atmosphérique extrêmement basse peut
provoquer une explosion ou une fuite de liquide ou de gaz inflammable.
• Retirez les piles de la télécommande si vous ne l'utilisez pas pendant une
longue période.
• Il convient de prêter attention aux aspects environnementaux liés à la mise
au rebut des piles.
Mise au rebut de votre ancien produit
Recyclez votre appareil de manière appropriée. Conformément aux lois
nationales et locales, ce produit peut être classé comme un appareil
électronique couvert et ne doit pas être jeté avec les ordures ménagères.
TCL encourage les consommateurs à toujours rechercher une alternative de
recyclage ou de réutilisation plutôt que de jeter les produits électroniques, en
utilisant les options de dépôt et de retour par la poste. Rendez-vous sur
tcl.com/us/en/sustainability/electronics-recycling pour obtenir des
instructions et connaître les sites de collecte agréés. Cliquez sur notre carte
interactive pratique pour trouver rapidement une solution dans votre
communauté. Uniquement pour les États-Unis, pour les options de retour par
courrier, rendez-vous sur www.mrmrecycling.com/recycle-now.php et
suivez les instructions.
Avis de conformité
Avis pour les États-Unis
Informations sur la FCC
Avertissement
Les changements ou les modifications sur cet appareil non expressément
approuvés par la partie responsable de la conformité pourraient invalider
l'autorité de l'utilisateur pour manipuler l'équipement.
Remarque
Cet équipement a été testé et déclaré conforme aux limites imposées aux
appareils numériques de classe B, conformément à la section 15 du règlement
de la FCC. Ces limites sont conçues pour fournir une protection suffisante
contre les interférences préjudiciables dans une installation résidentielle. Cet
équipement génère, utilise et peut émettre de l'énergie radioélectrique et, s'il
n'est pas installé et utilisé conformément aux instructions fournies, peut
produire des interférences affectant les communications radio. Cependant,
rien ne garantit que des interférences ne se produiront pas dans certaines
installations.
Si cet équipement génère des interférences préjudiciables à la réception de
signaux radio ou de télévision (ce qui peut être constaté en éteignant puis en
rallumant l'appareil), nous conseillons à l'utilisateur d'essayer une ou plusieurs
des mesures suivantes pour tenter de corriger le problème :
• Réorienter ou déplacer l'antenne de réception.
• Éloigner davantage le récepteur de l'équipement.
• Brancher l'équipement sur une prise de circuit différente de celle sur
laquelle le récepteur est branché.
• Consulter le revendeur ou un technicien qualifié spécialisé en équipements
radio/de télévision.
Cet appareil est conforme à la section 15 de la réglementation de la FCC. Le
fonctionnement est soumis aux deux conditions suivantes :
(1) cet appareil ne doit pas causer d'interférences nuisibles, et
(2) cet appareil doit accepter toutes les interférences reçues, y compris celles
susceptibles de provoquer un fonctionnement indésirable.
Déclaration de la FCC sur l'exposition aux rayonnements : Cet appareil
est conforme aux limites de la FCC sur l'exposition aux rayonnements
définies pour un environnement non contrôlé. Cet équipement doit être
installé et utilisé avec une distance minimale de 20 cm entre le radiateur et
votre corps. Cet émetteur ne doit pas être installé ou utilisé en conjonction
avec une autre antenne ou un autre émetteur.
Avis pour le Canada
Clause de classe B
Cet appareil numérique de classe B est conforme à la norme canadienne
ICES-003.
L'émetteur/récepteur exempt de licence contenu dans le présent appareil est
conforme aux CNR d'Innovation, Sciences et Développement économique
Canada applicables aux appareils radio exempts de licence. L'exploitation est
autorisée aux deux conditions suivantes :
1) L'appareil ne doit pas produire de brouillage;
2)
L'appareil doit accepter tout brouillage radioélectrique subi, même si le
brouillage est susceptible d'en compromettre le fonctionnement.
Déclaration d'exposition aux rayonnements
Cet équipement est conforme aux limites d'exposition au rayonnement IC
établies pour un appareil non contrôlé Environnement. Cet équipement doit
être installé et utilisé avec une distance minimale de 20 cm entre le radiateur
et votre corps.
Avertissement : l'utilisateur est averti que les changements ou modifications
non expressément approuvés par la partie responsable de la conformité
peuvent annuler l'autorité de l'utilisateur à faire fonctionner l'équipement.
L'appareil fonctionnant dans la bande 5150-5250 MHz ne doit être utilisé qu'à
l'intérieur des bâtiments afin de réduire les risques d'interférences nuisibles
avec les systèmes mobiles par satellite à canaux communs.
MISE EN GARDE
RISQUE DE CHOC ELECTRIQUE
NE PAS OUVRIR
ATTENTION : POUR RÉDUIRE LE RISQUE D'ÉLECTROCUTION, NE RETIREZ PAS
LE COUVERCLE (OU LE DOS). L'INTÉRIEUR DE L'APPAREIL NE CONTIENT
AUCUNE PIÈCE SUSCEPTIBLE D'ÊTRE RÉPARÉE PAR L'UTILISATEUR.
CONFIEZ L'ENTRETIEN DE L'APPAREIL À UN PERSONNEL QUALIFIÉ.
Copyright © 2026 TCL.
All rights reserved.
Q95K-NA_EN&FR&ES_QSG_V0.2
US: support.tcl.com
CA: www.tcl.com/ca/en
www.tcl.com/ca/fr
1-877-300-9223
MX: www.tcl.com/mx/es
800-112-4656
TCL SUPPORT:
User
manual
DO NOT RETURN TO STORE
WE ARE
READY TO
HELP
contact us first
with any questions
TAKE CARE WHEN
REMOVING THE SOUND BAR
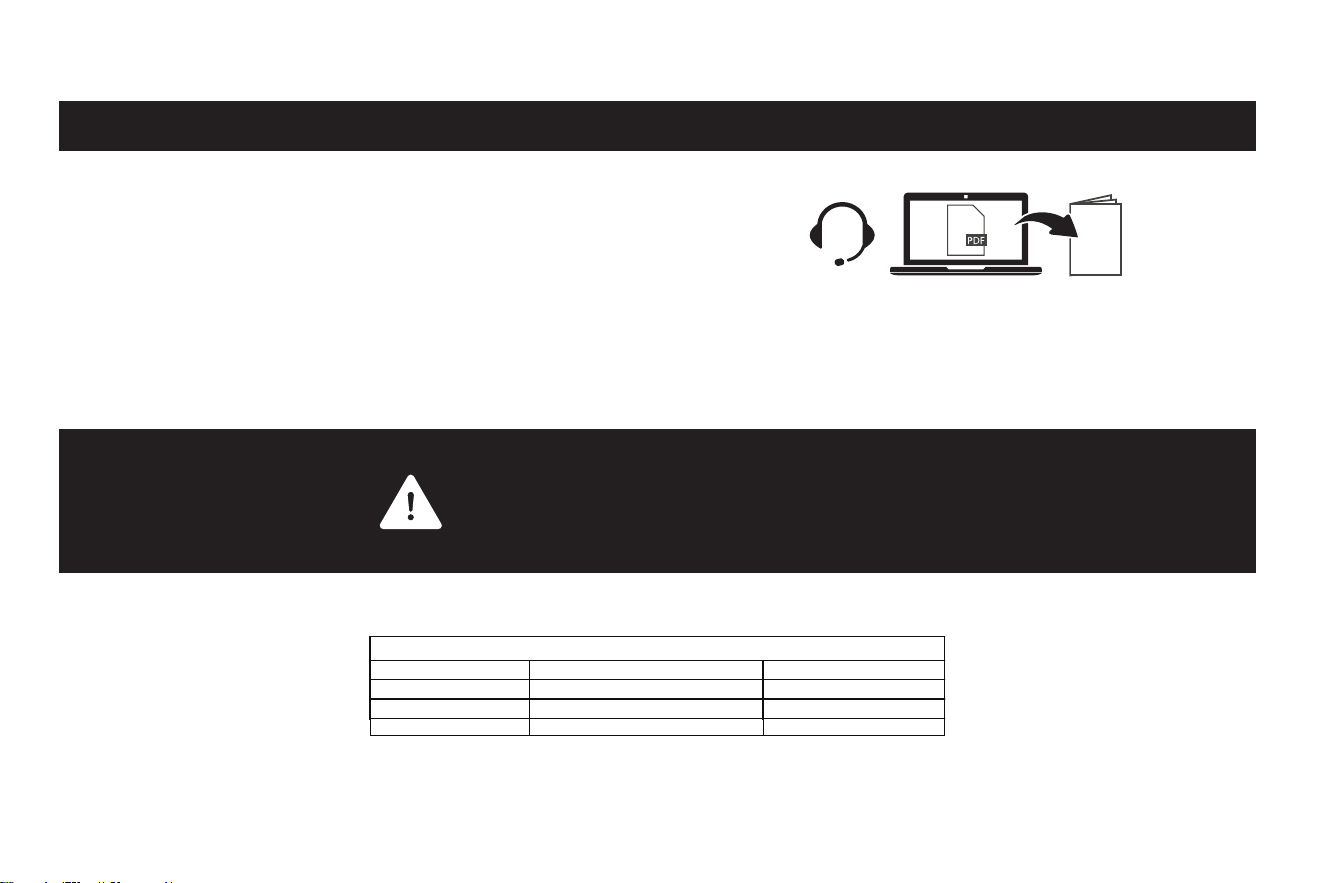
Model Electrical requirements Power consumption
Q95K 80 W
SW9
Q95K-RS
100-240 V~ 50/60 Hz
100-240 V~ 50/60 Hz
100-240 V~ 50/60 Hz
50 W
25 W
Nominal electrical characteristics