S301
Quick Sta Guide
English
1. Product Description
Quick Sta GuideCutting Mat
Quick Sta Guide
S301
Material Instructions
Material Instructions
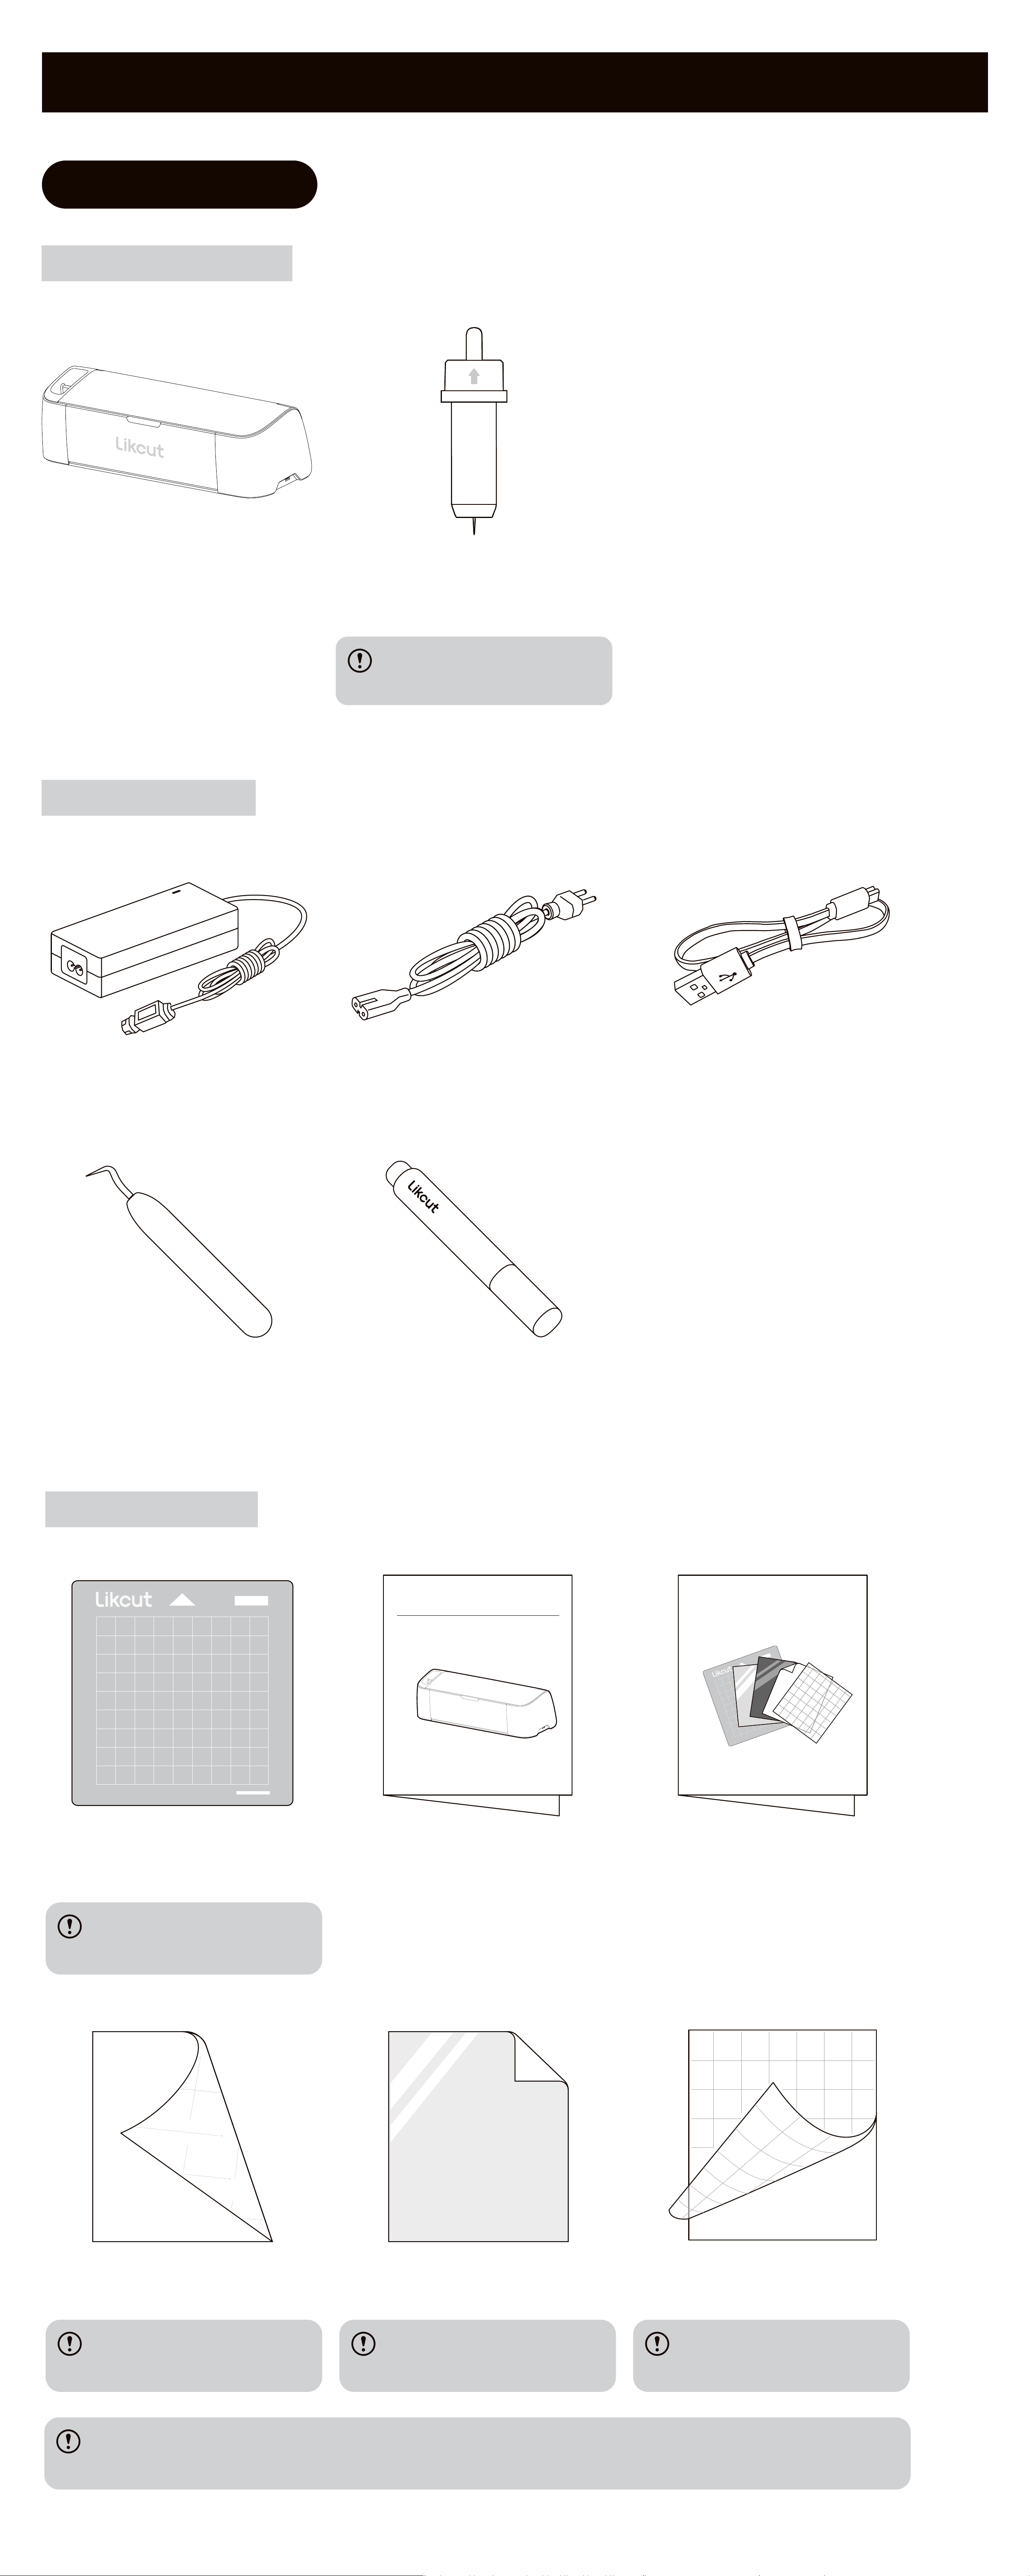
Materials Set
Sma adhesive vinyl Vinyl Transfer Tape
S
m
a
S
m
a
S
m
a
Works with the cutting
mat
Helps transfer the
design to the suace
Works without the
cutting mat
12*12 in
30.5*30.5cm
For more information on products please visit:
www.likcut.com
Power Adapter Power Cord Type-B Cable
Weeder Pen
Accesso Kit
1.1 Packing List
Cutting Machine
Fine-pointBlade
A built-in45°blade in
the machine
Cutting Machine

1.2 Cutting Machine Pas
Power Button
Top Cover
Mobile Device Rack
Tool Clamp
Pen Clamp
Storage
Cup
Storage Box
Load/Unload
Button
Sta Button
Pause Button
Material
Guide Slot
Type-A Data Cable Po
Power Cable Po
Type-B Data Cable Po
The blade has been pre-installed properly upon delive and is ready to use.
2. Preparation Before Use
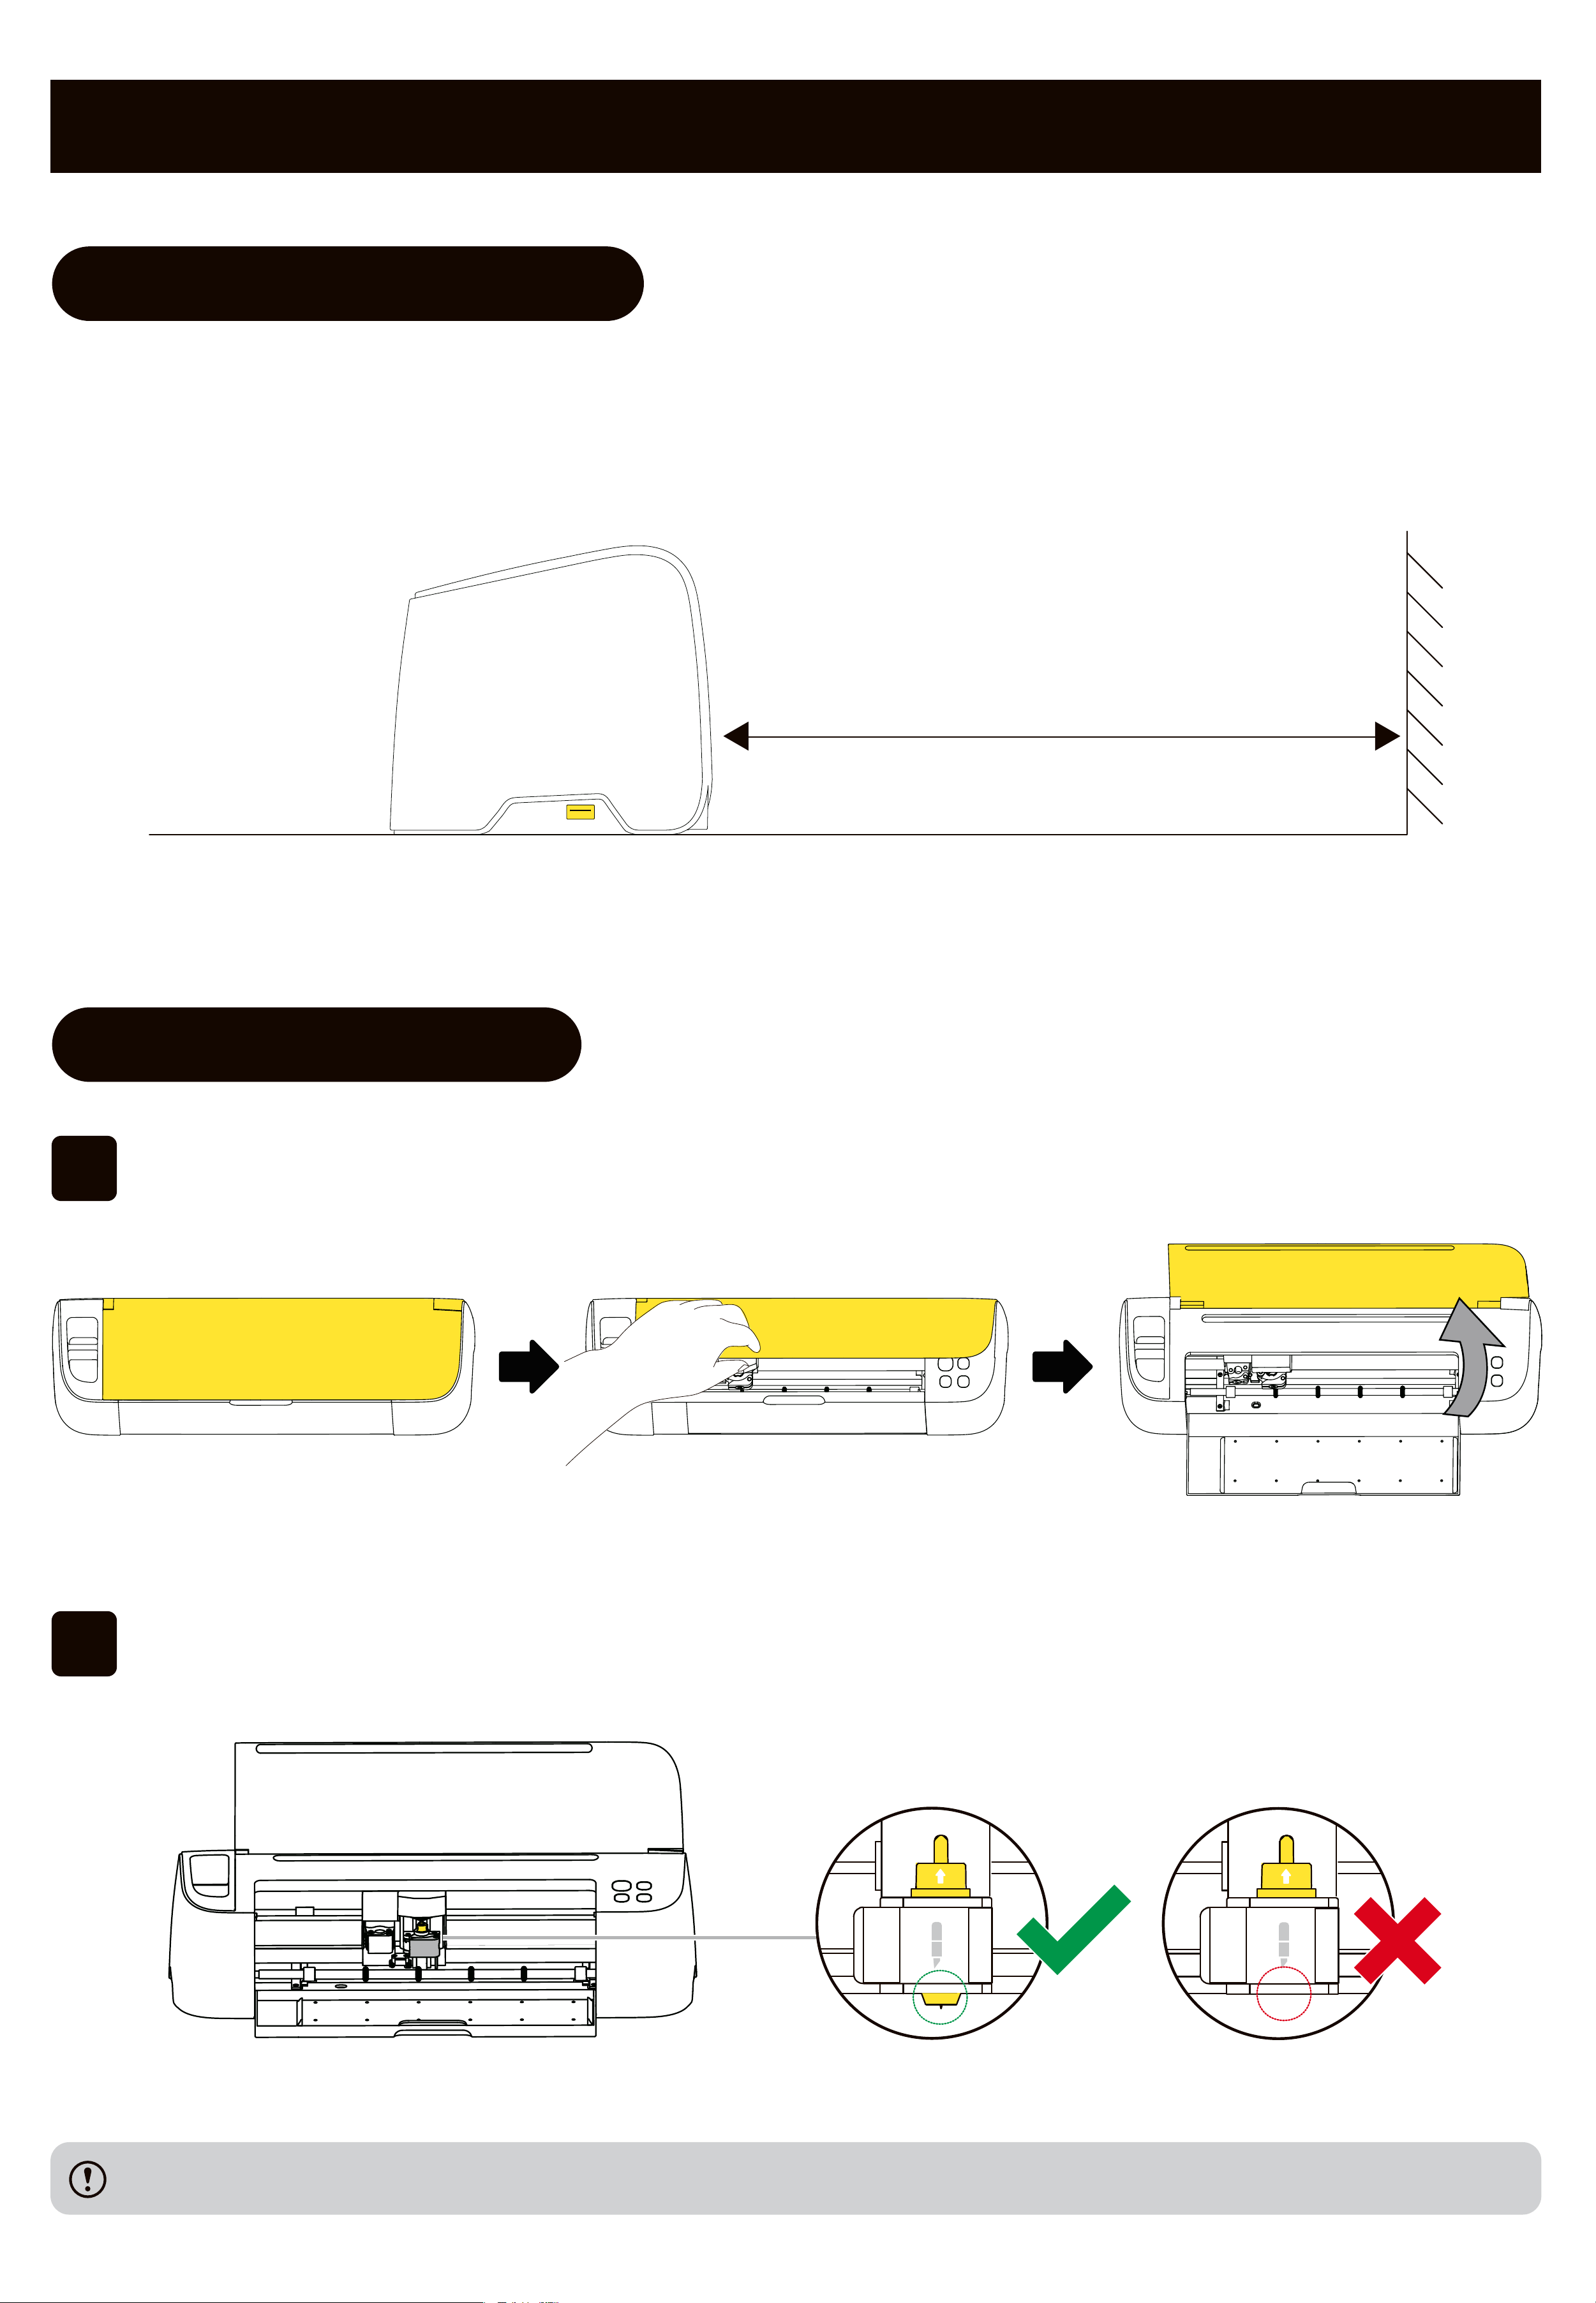
2.1 Machine Placement
Place the cutting machine on a at, d suace and leave at least a space of 35 ㎝
behind the machine for proper operation.
35㎝
2.2 Blade Inspection
01
Open the top cover of the cutting machine.
02
Make sure the blade inside the clamp is correctly installed.
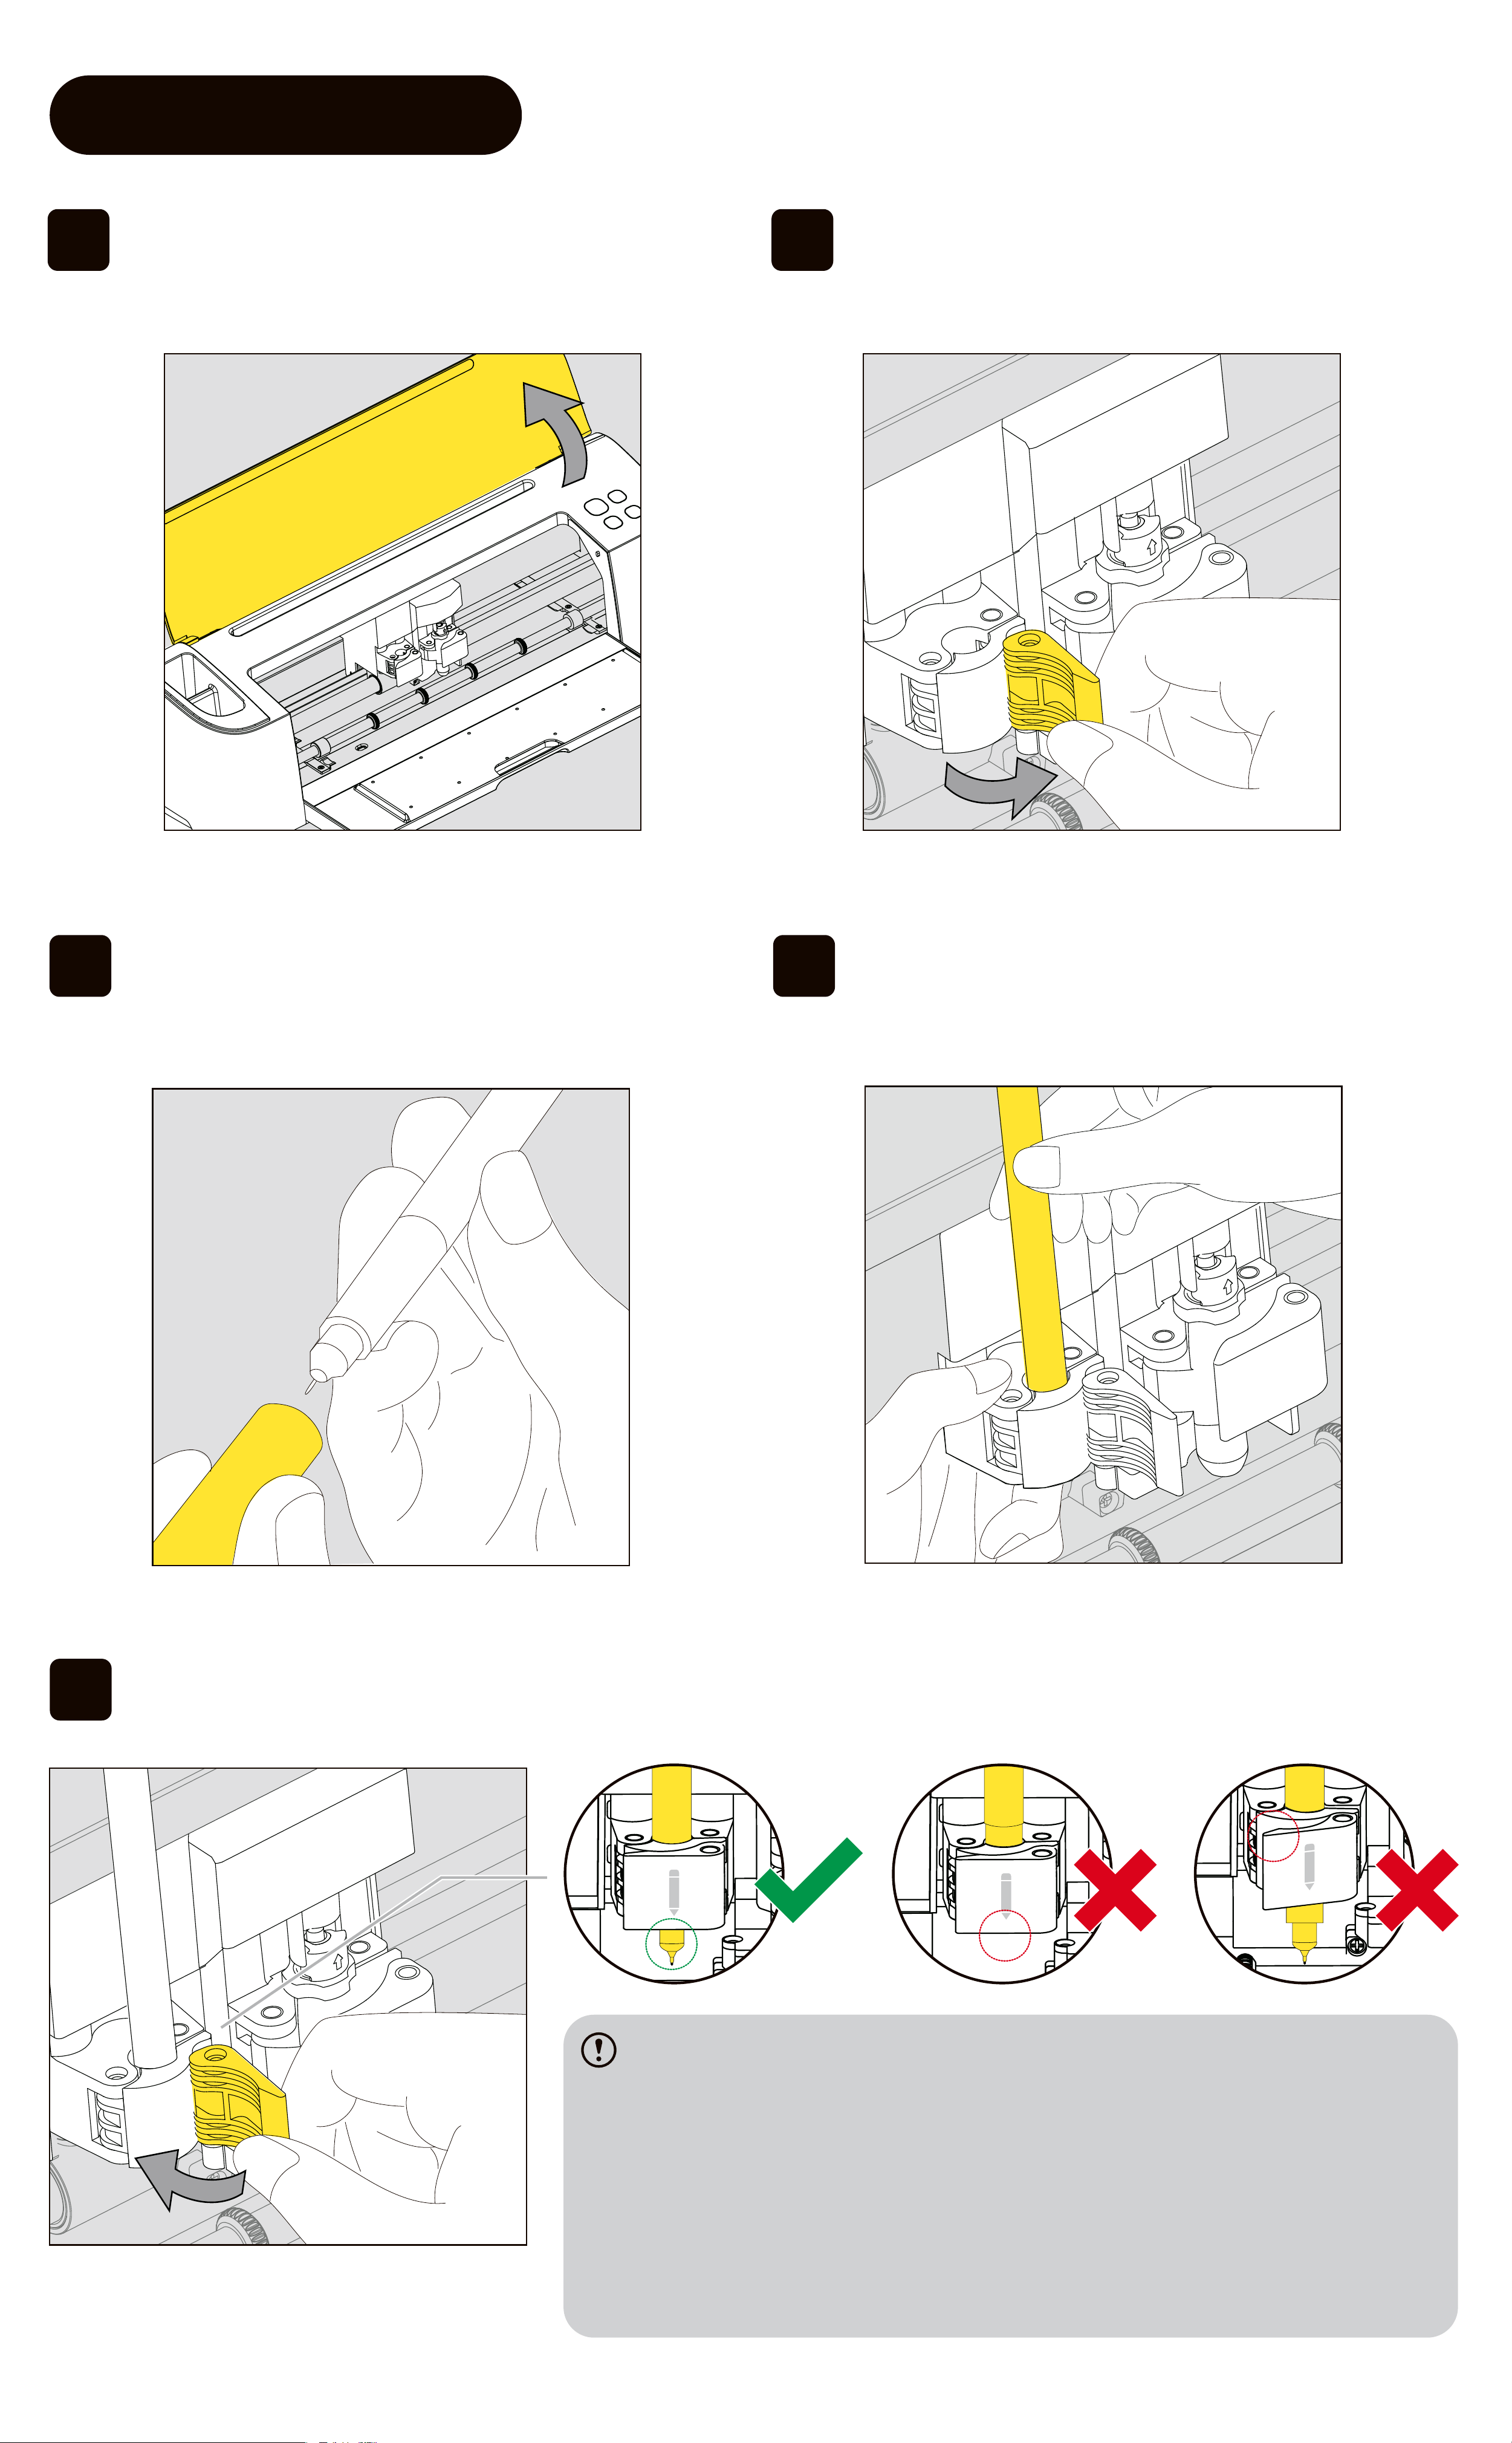
2.3 Pen Installation
01 Open the top cover of the cutting
machine.
02 Unlock the pen clamp.
05 Secure the pen clamp lock, and the installation is complete.
Ensure pen installation by exmaning whether:
1. The narrow pa of the pen contacts with the upper
pa of the pen clamp;
2. The tip and front of the pen are exposed underneath
the pen clamp;
3. The pen is so far down that the pen clamp cannot be
locked.
03 Remove the pen cap. 04 Lift the pen clamp and push the
pen downward into the xture.
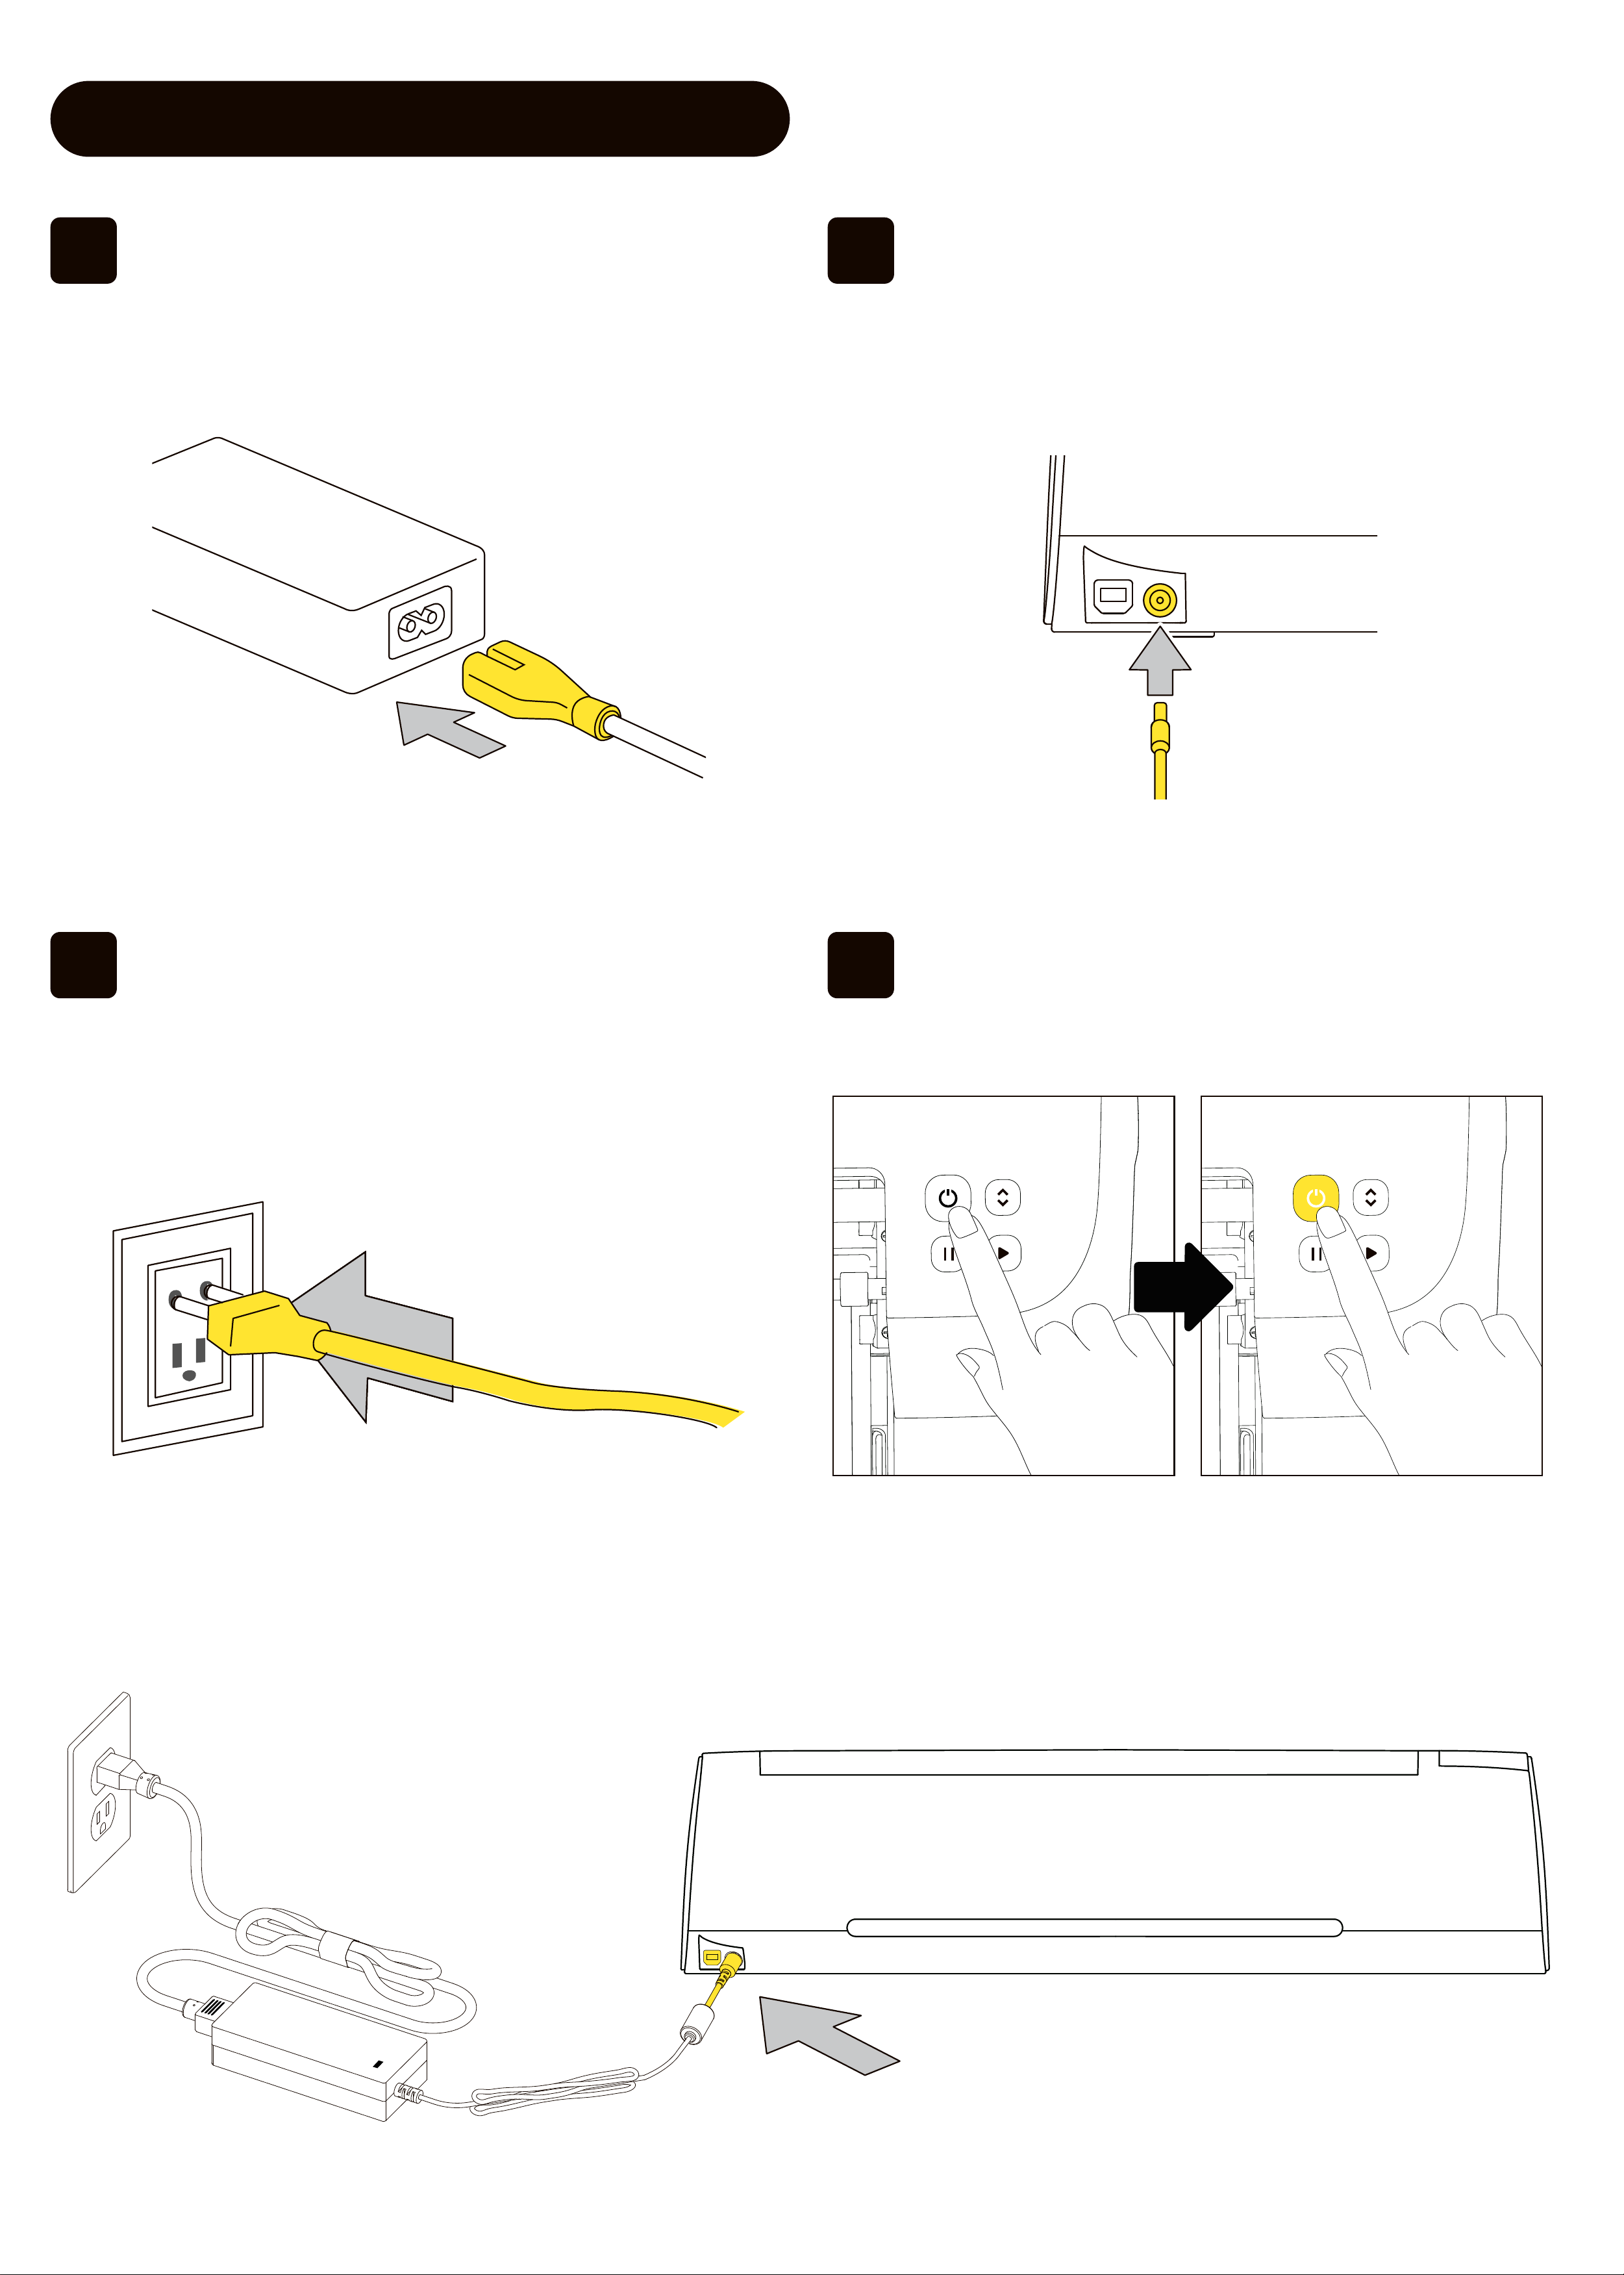
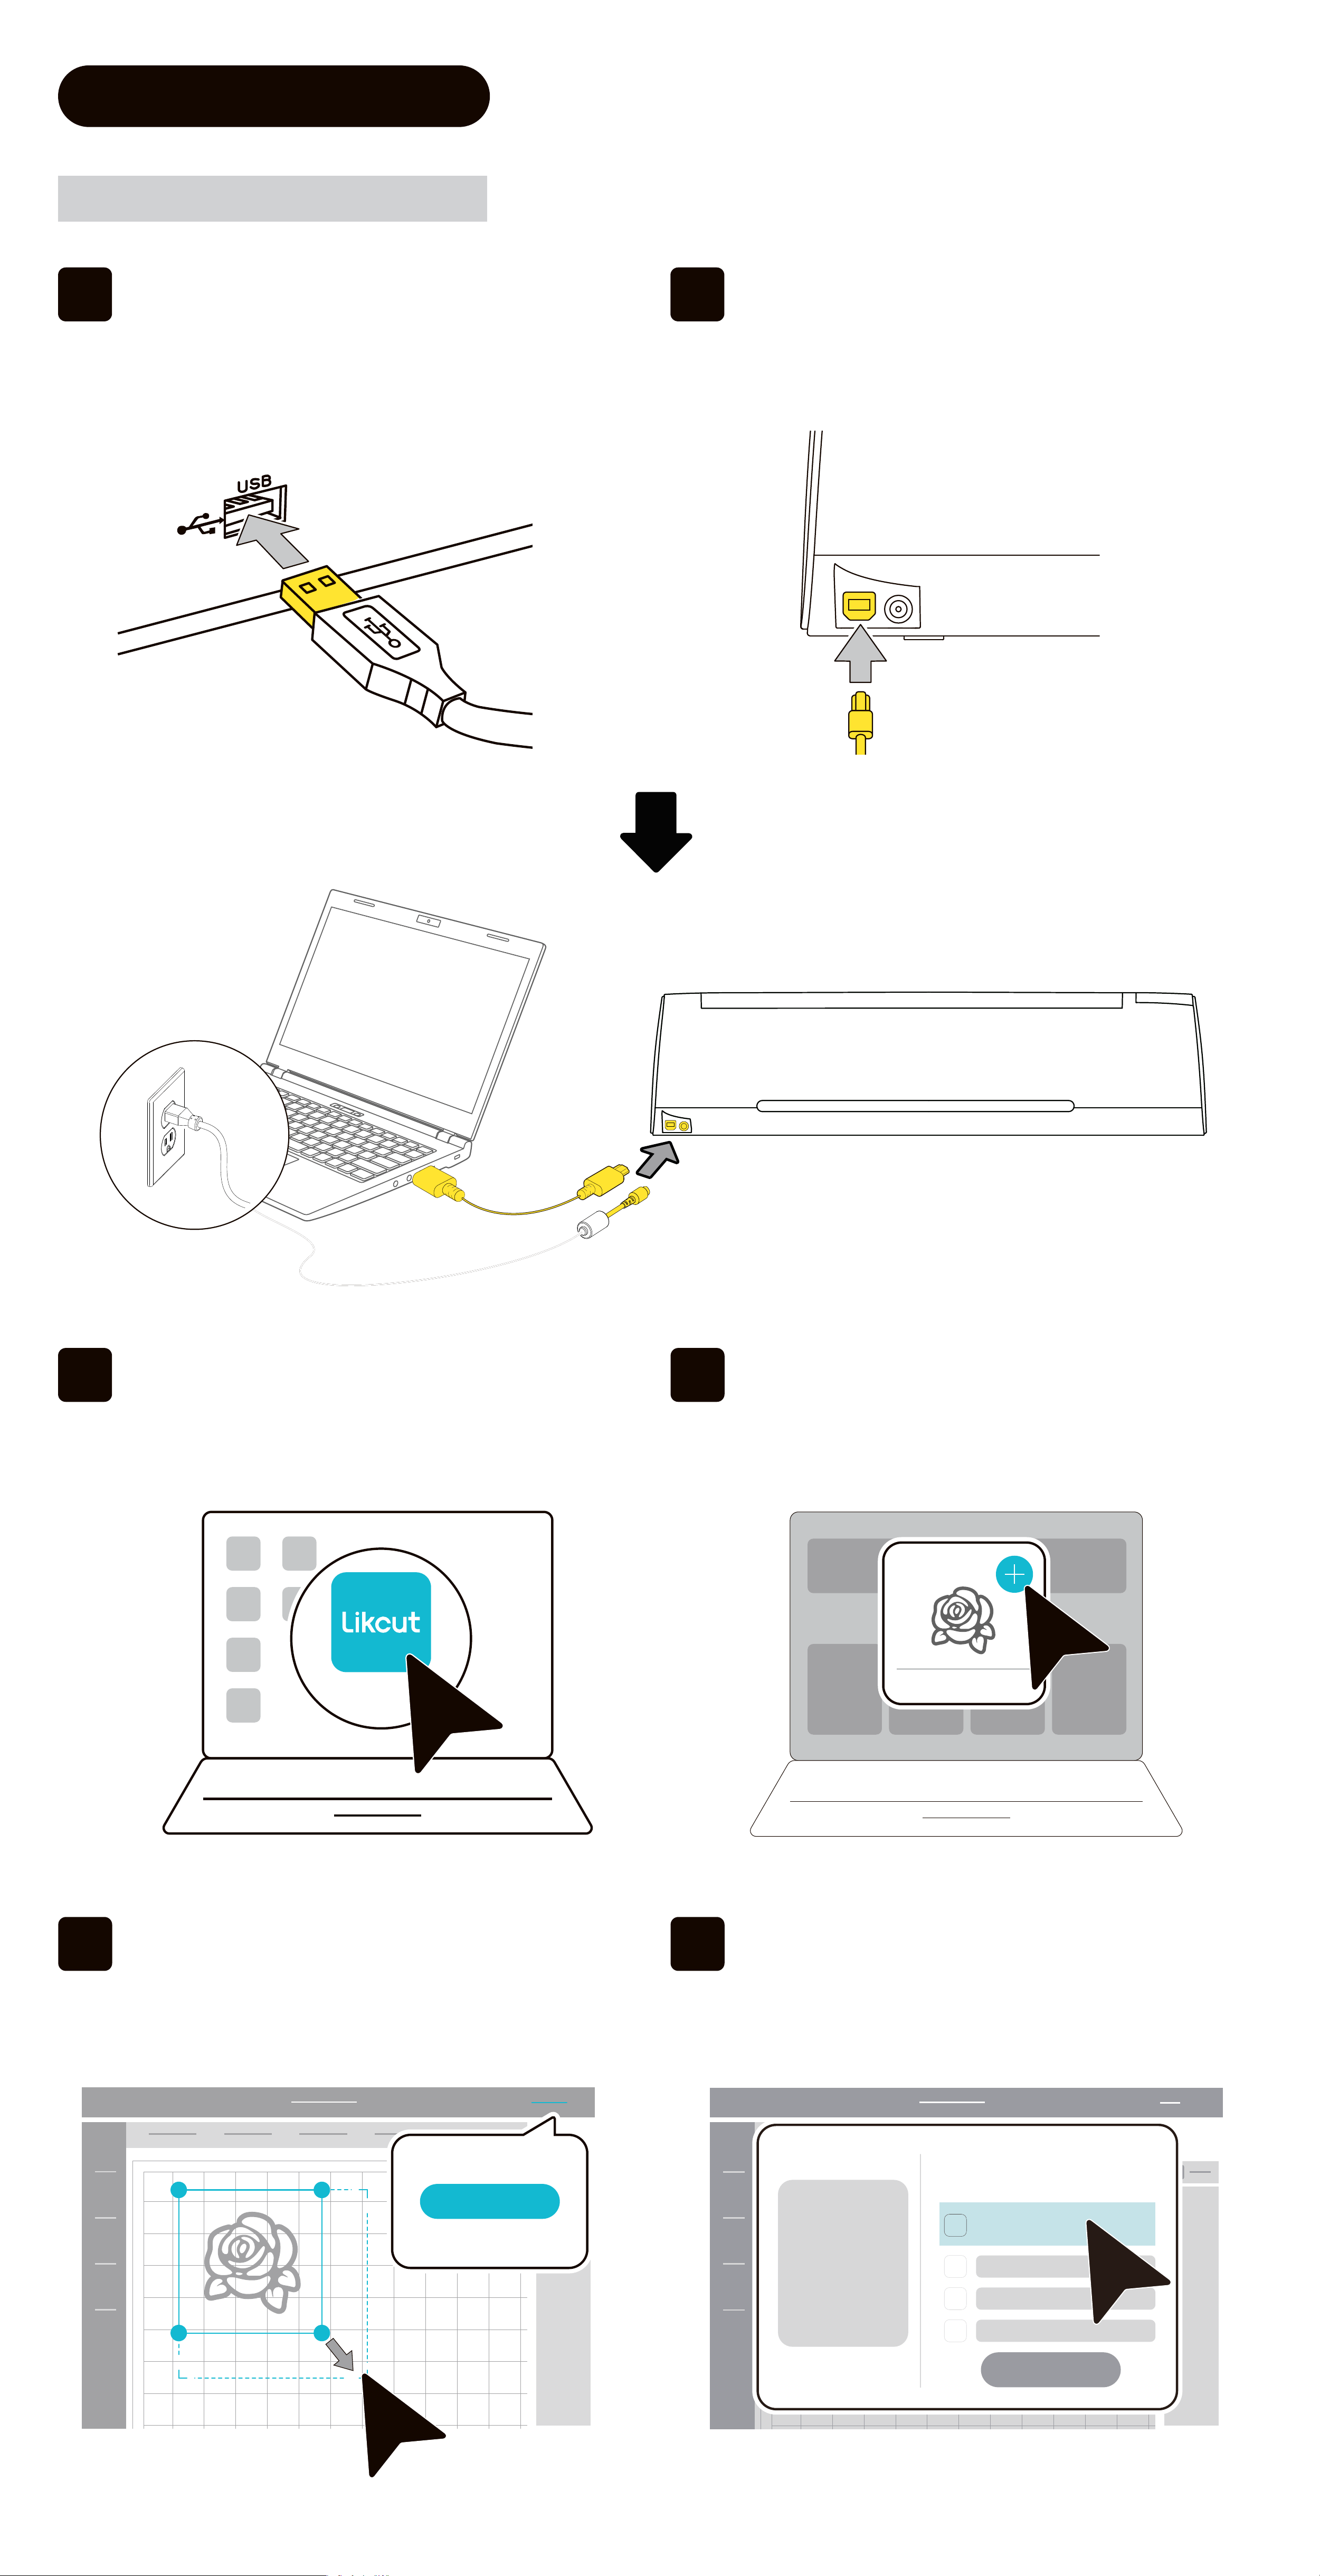
01
Inse the Power Cord into the
Power Adapter.
02
Inse the round end of the Power
Adapterinto the Power Po of the
machine.
03
Inse the Power Cordinto an
electrical outlet.
04
Press Power Button until the Power
Indicator Light turns white.
2.4 Power Supply Connection
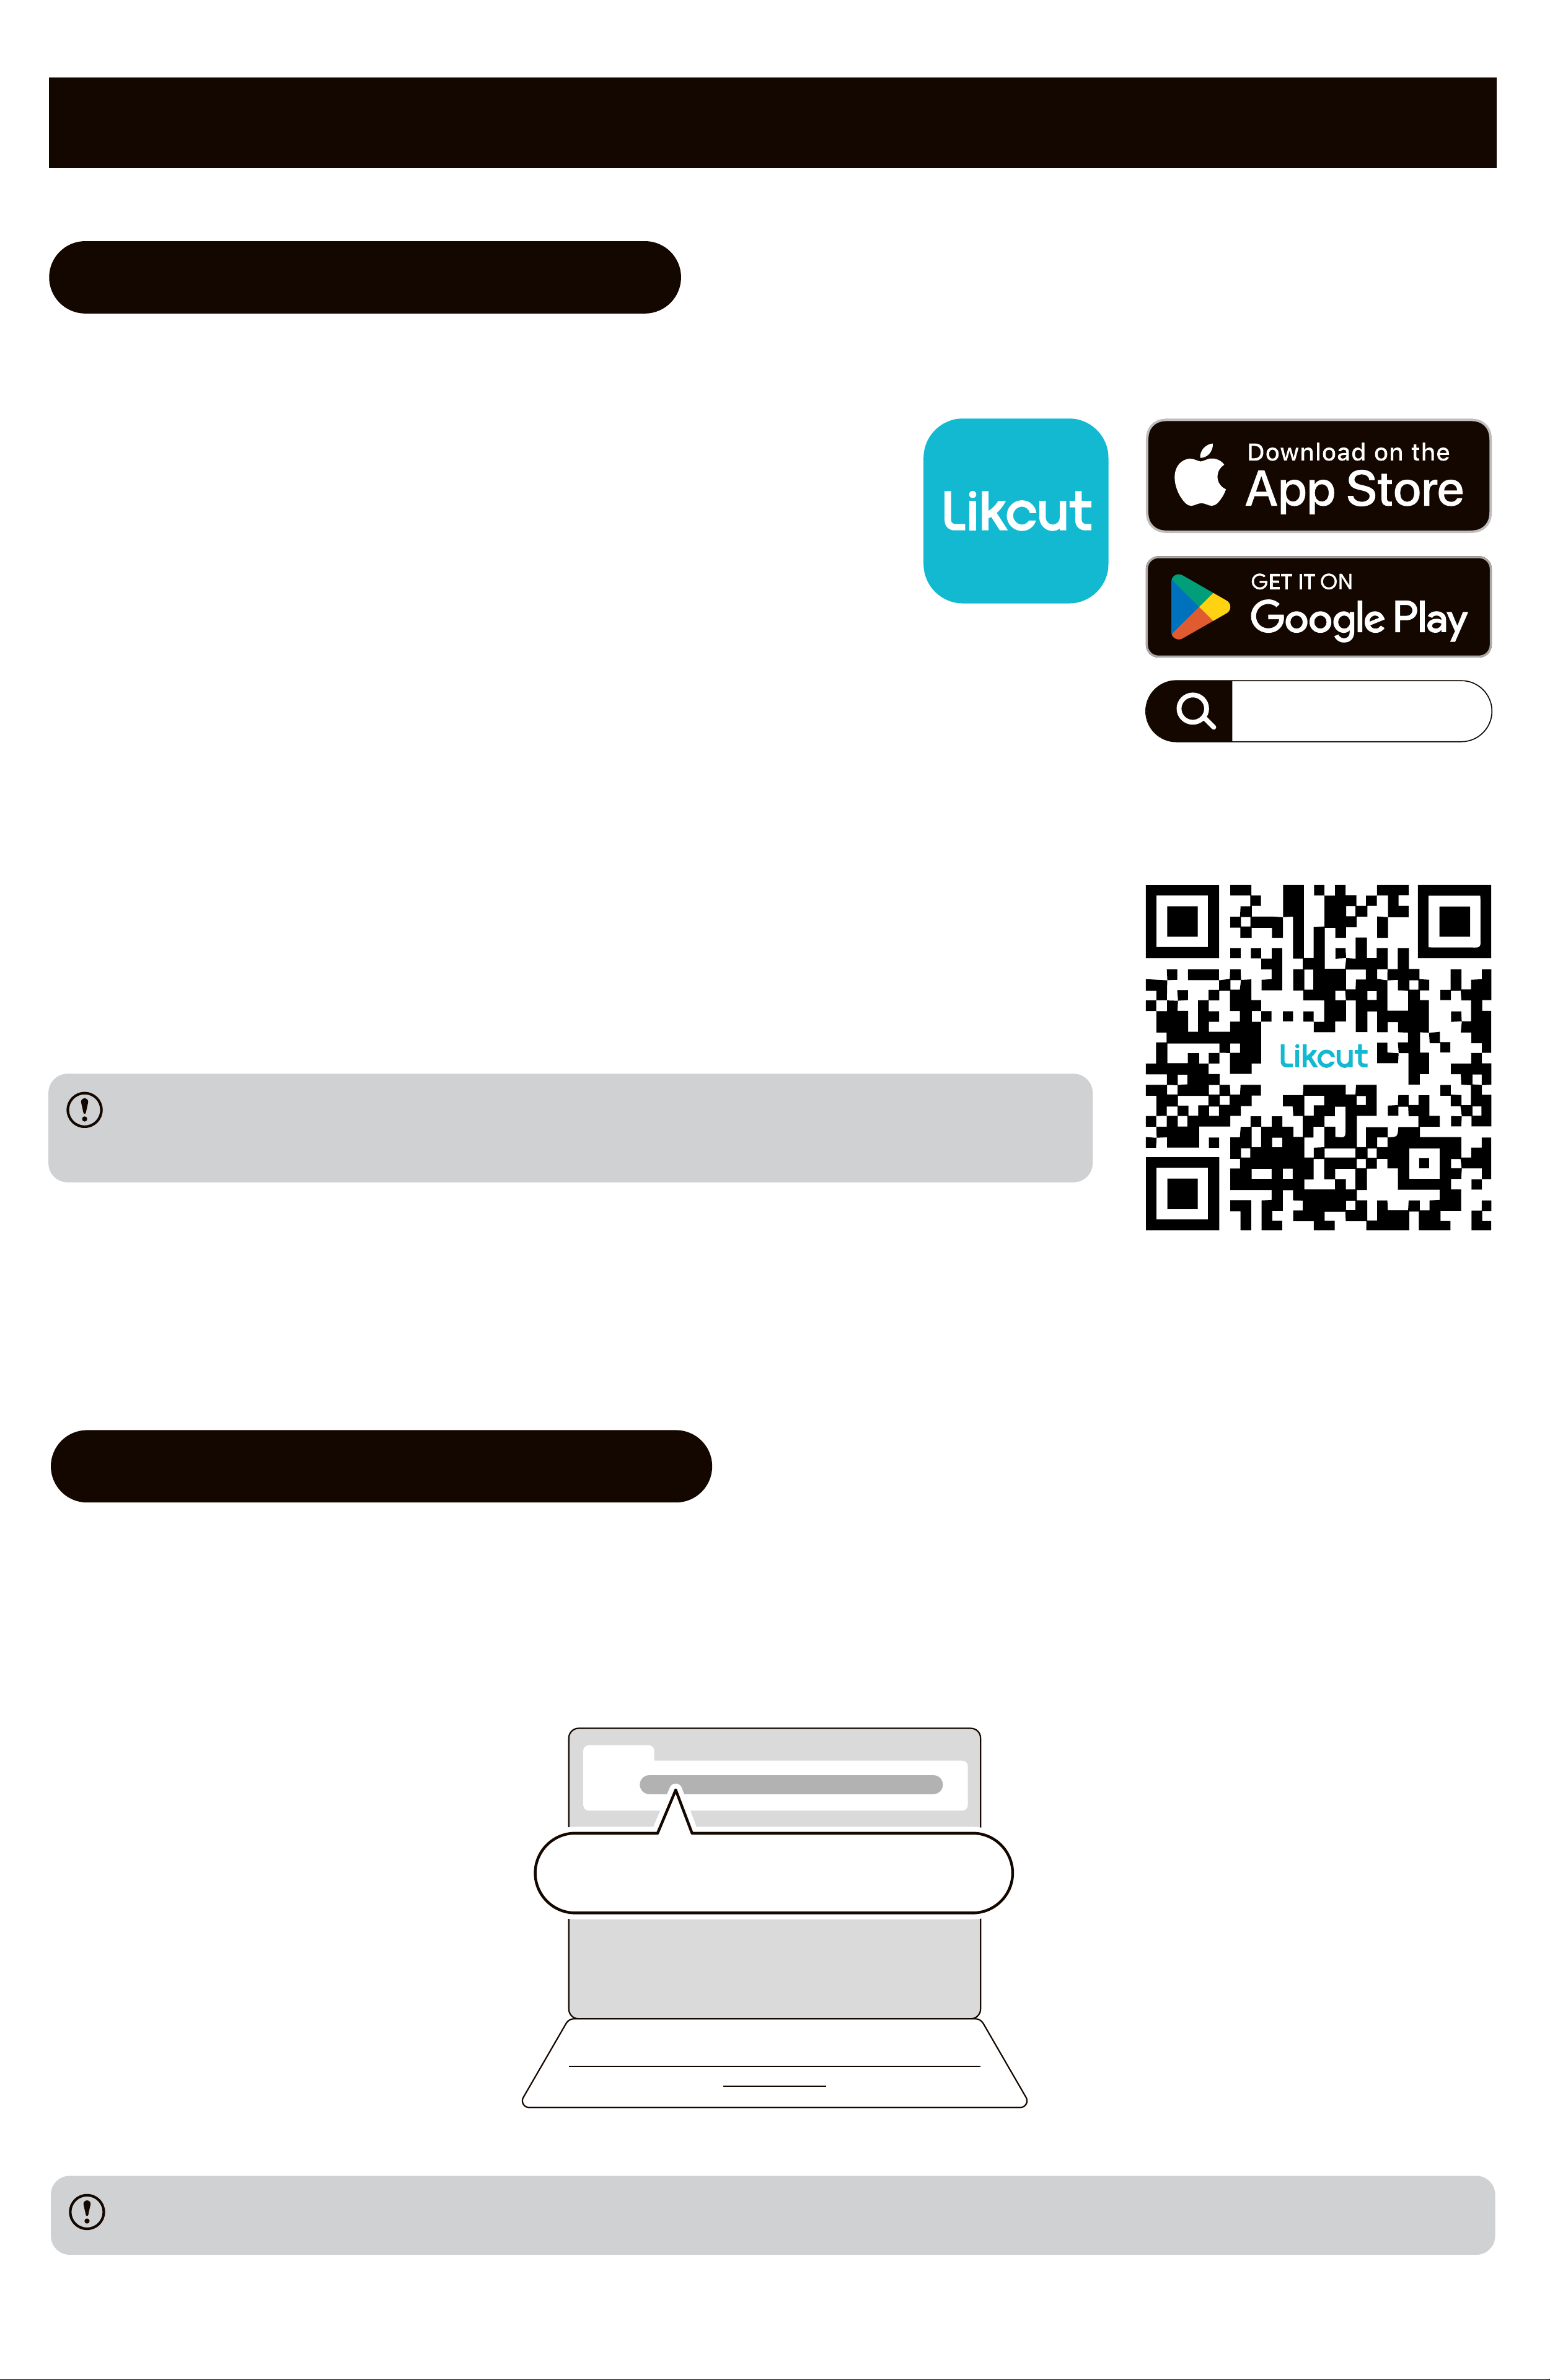
3. Software Download
Method 1
Method 2
The Safari on Apple devices does not suppo code scanning.
Please use the built-in code scanner of your device instead.
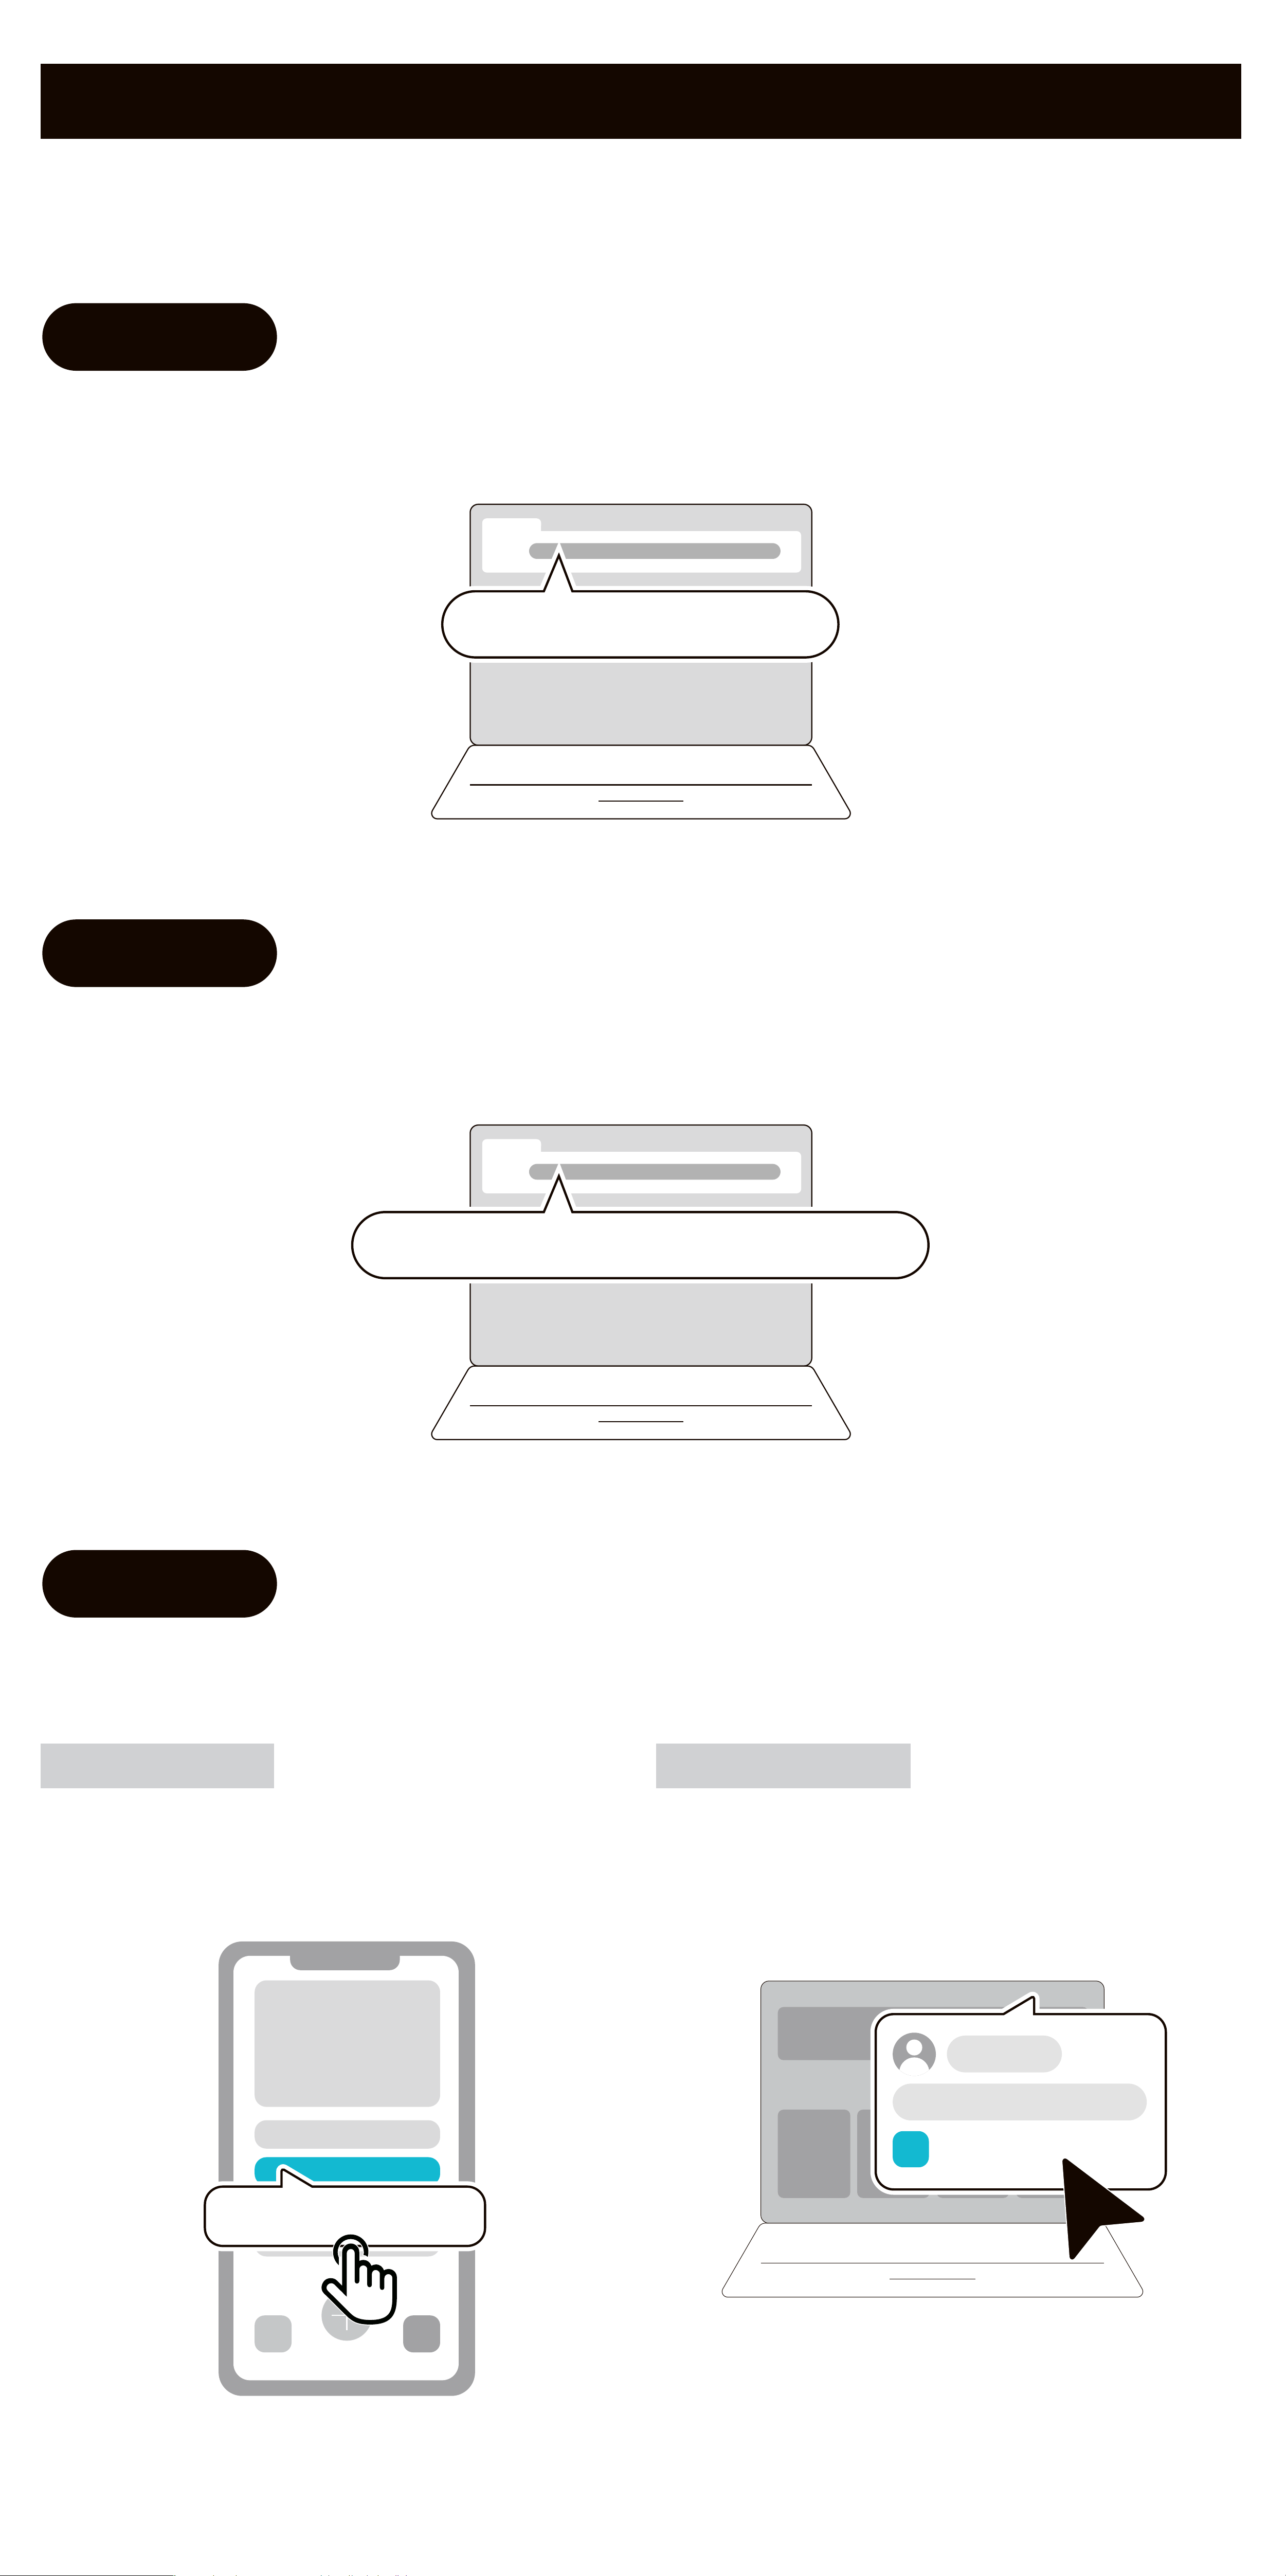
3.1 Download Mobile App
Search for the "Likcut" apponthe App Store®
or Google Play™ to download and install.
Scan the QR code to download the app.
You can scan the QR code with your phone's camera, a
code scanner built in the browser, or a code scanner app.
Likcut
Visit suppo.likcut.com to download and install theapp.
suppo.likcut.com
Choose the installer package suppoed by your operating system.
3.2 Download Desktop App
4. Quick Sta Guide
Please refer to the actual software version.
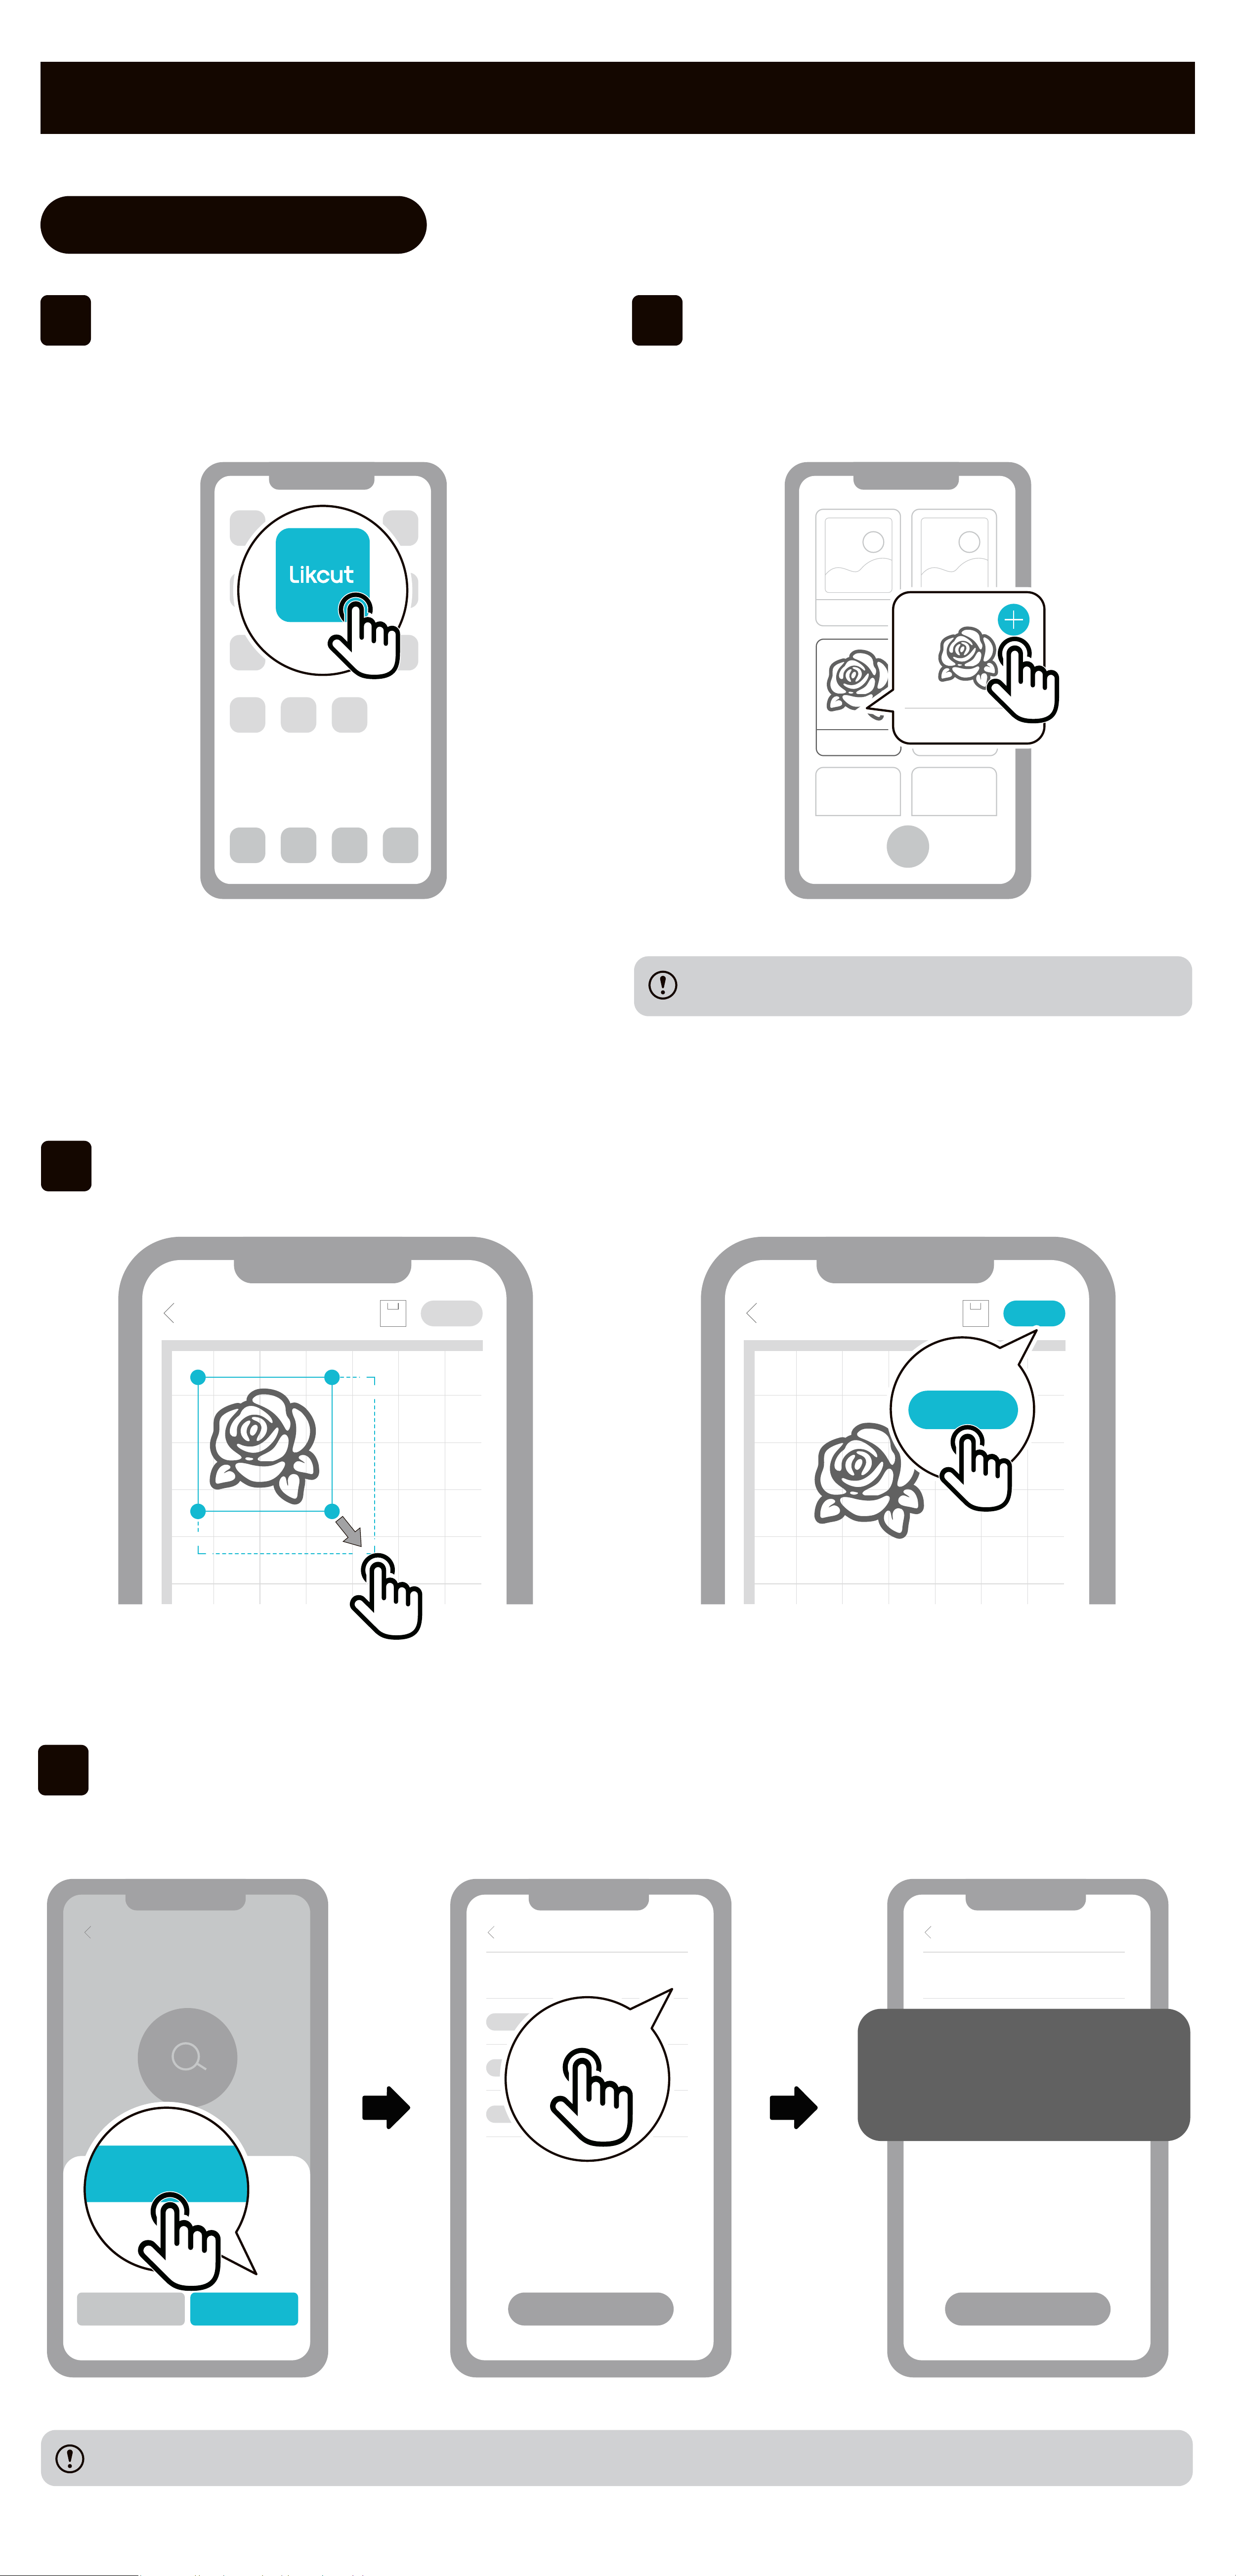
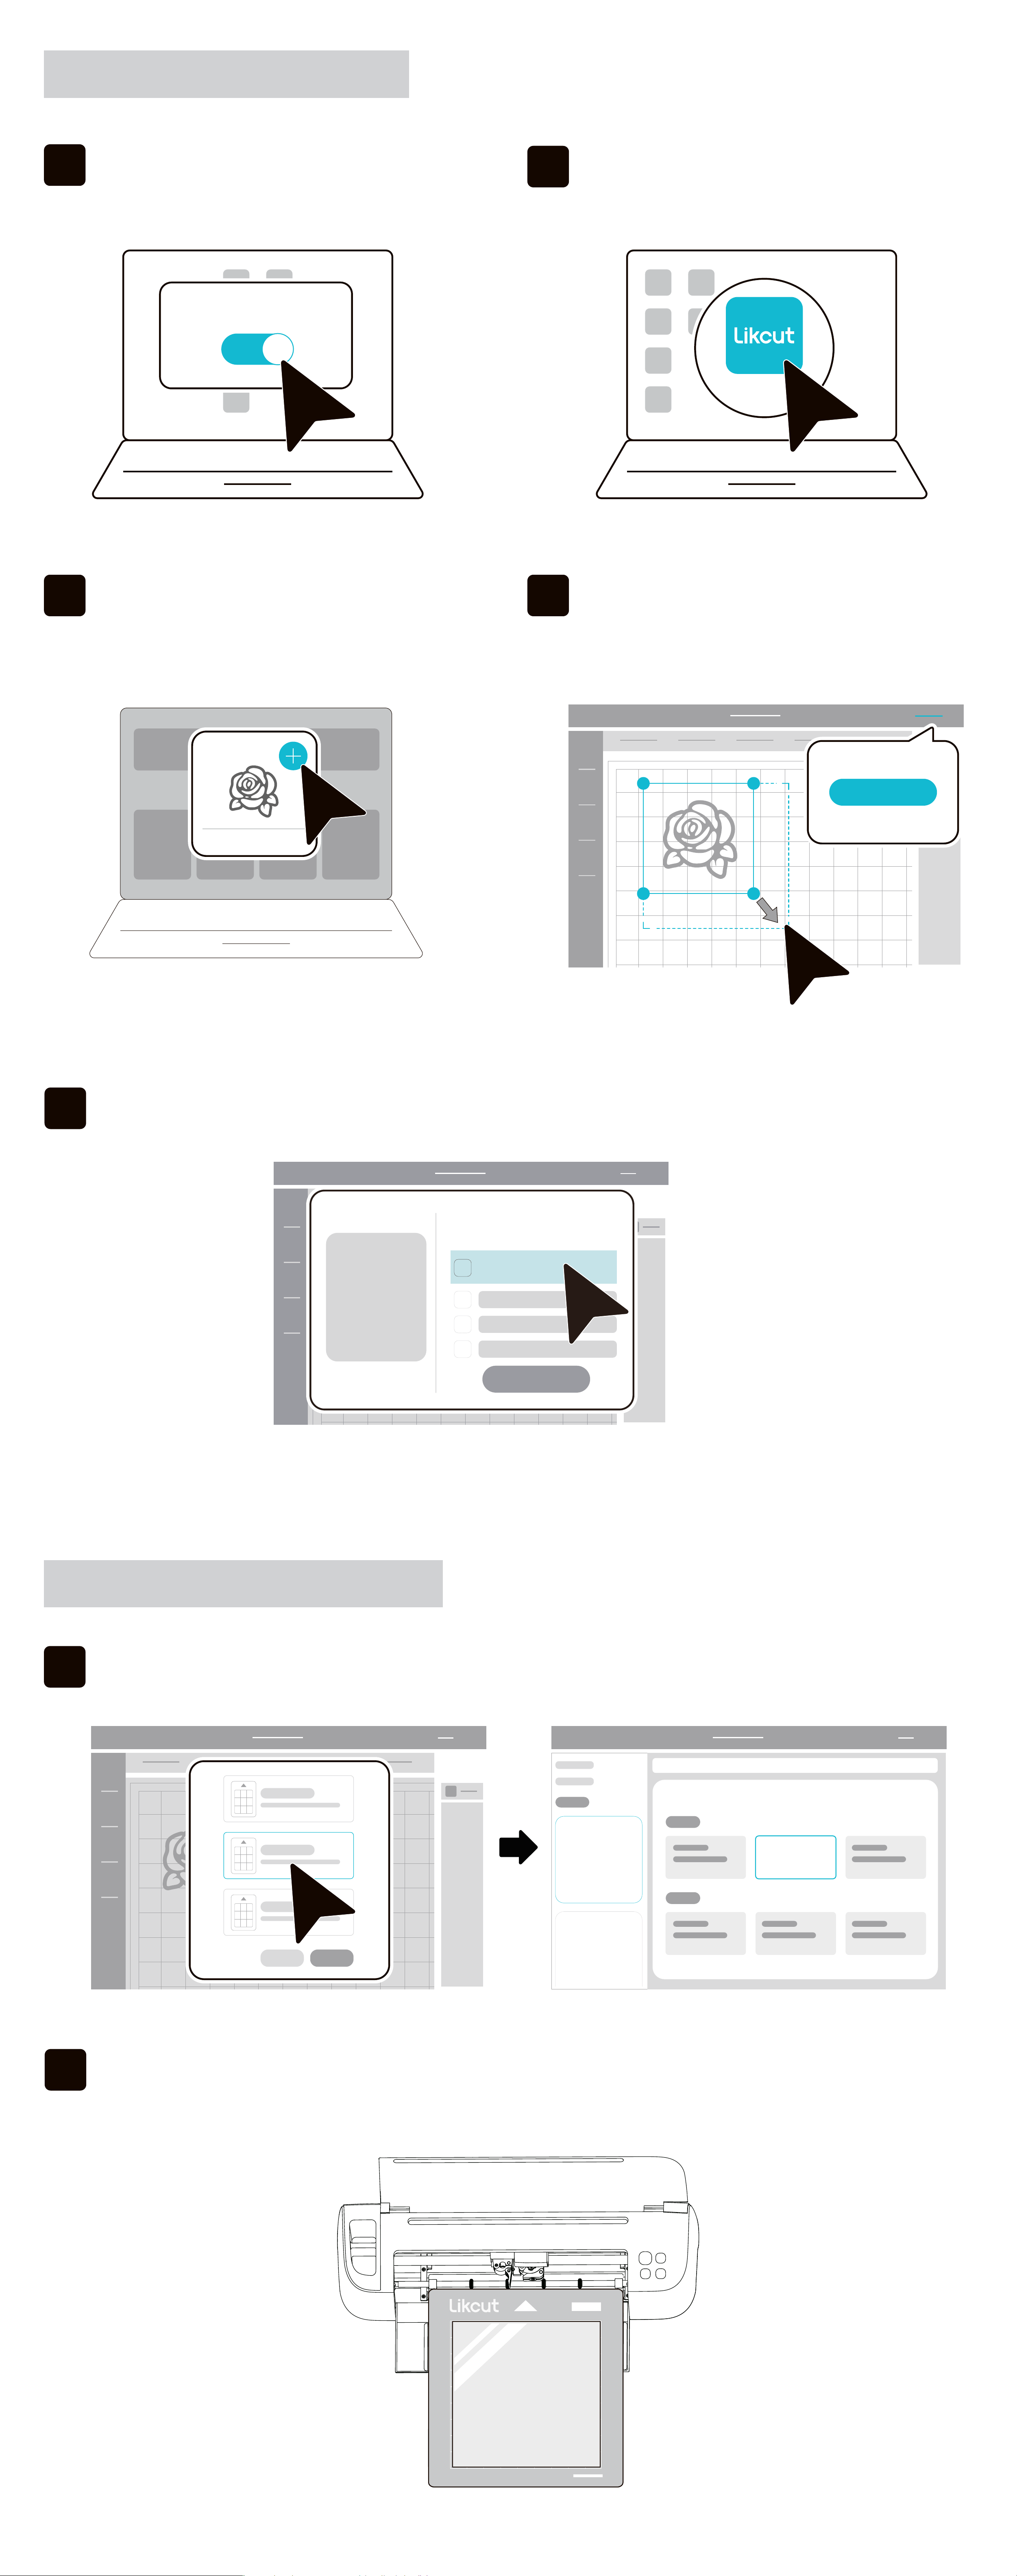
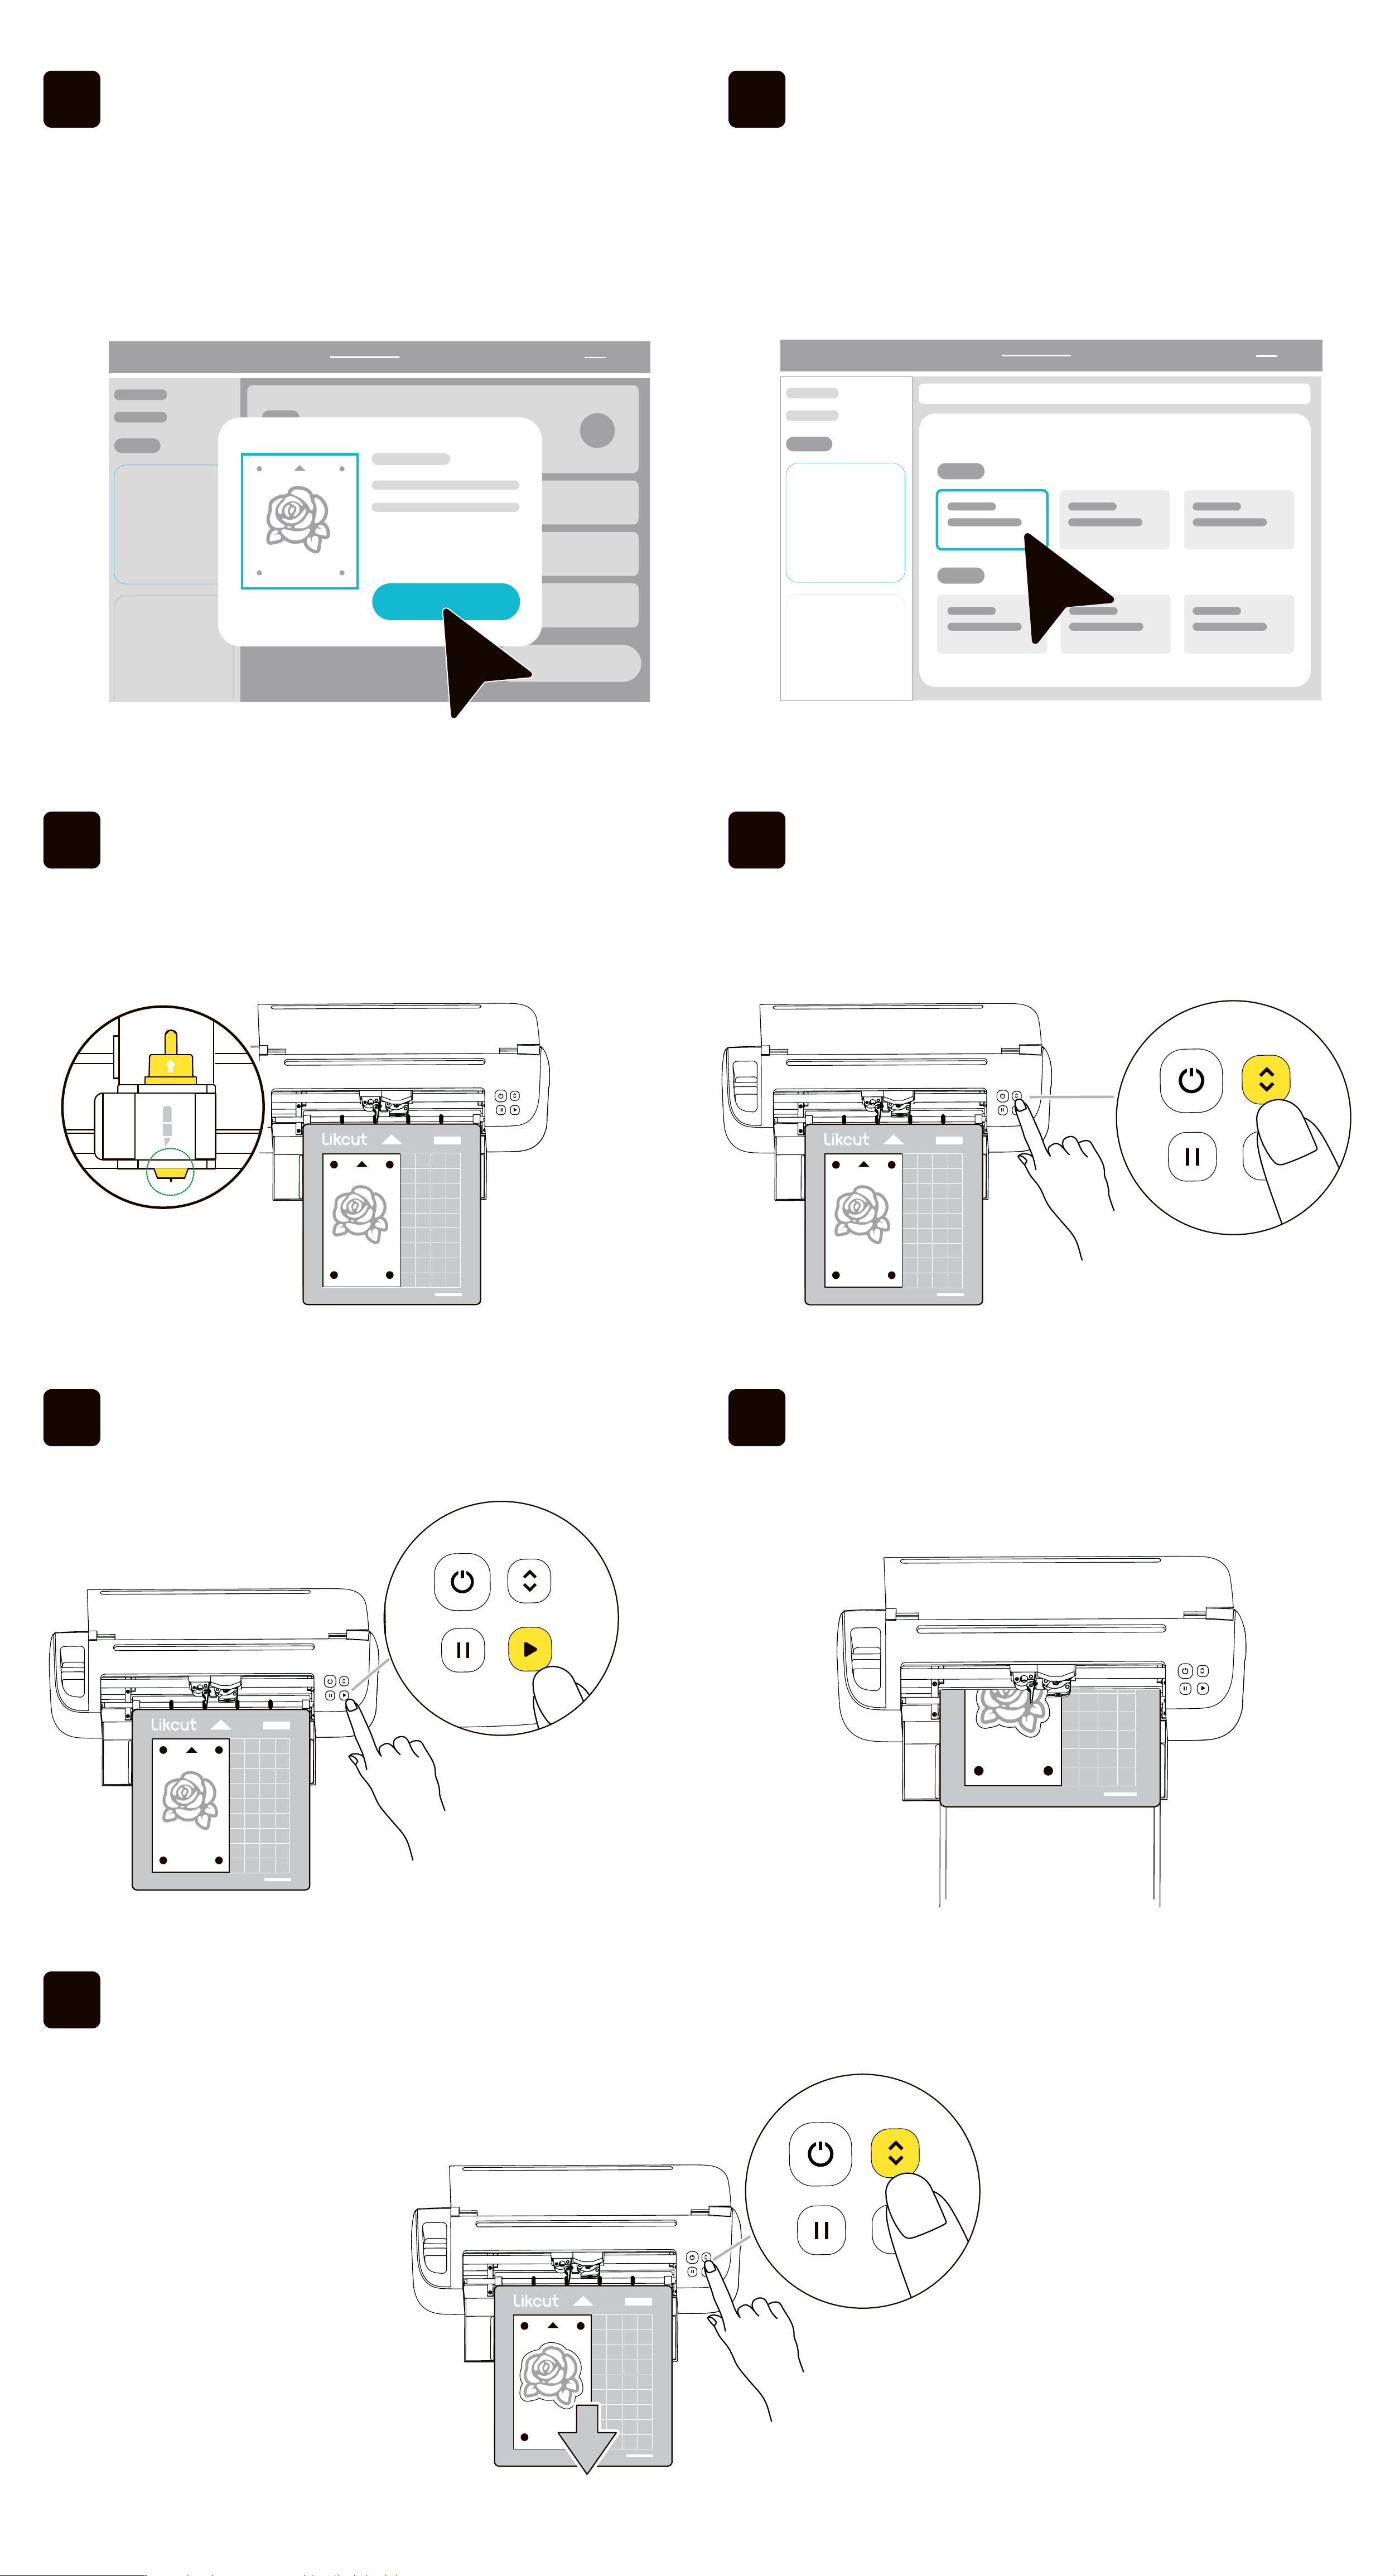
4.1 For Mobile App
02
Select or search for a design on the
homepage and impo it to the
canvas.
01
Open the "Likcut"app.
04
Please grant permissions and follow the instructions to connect the cutting
machine.
03
Adjust the design on the canvas to your preferred size,click [Make].
Likcut
Make
Device Connection
S301
Connect
Connect
Connect
Connect
Connect
Device Connection
AcceptDecline
Accept
Device Connection
S301
Connect
Connect
Connect
Connect
Machine connected
Your phone will request necessa permissions for the connection.
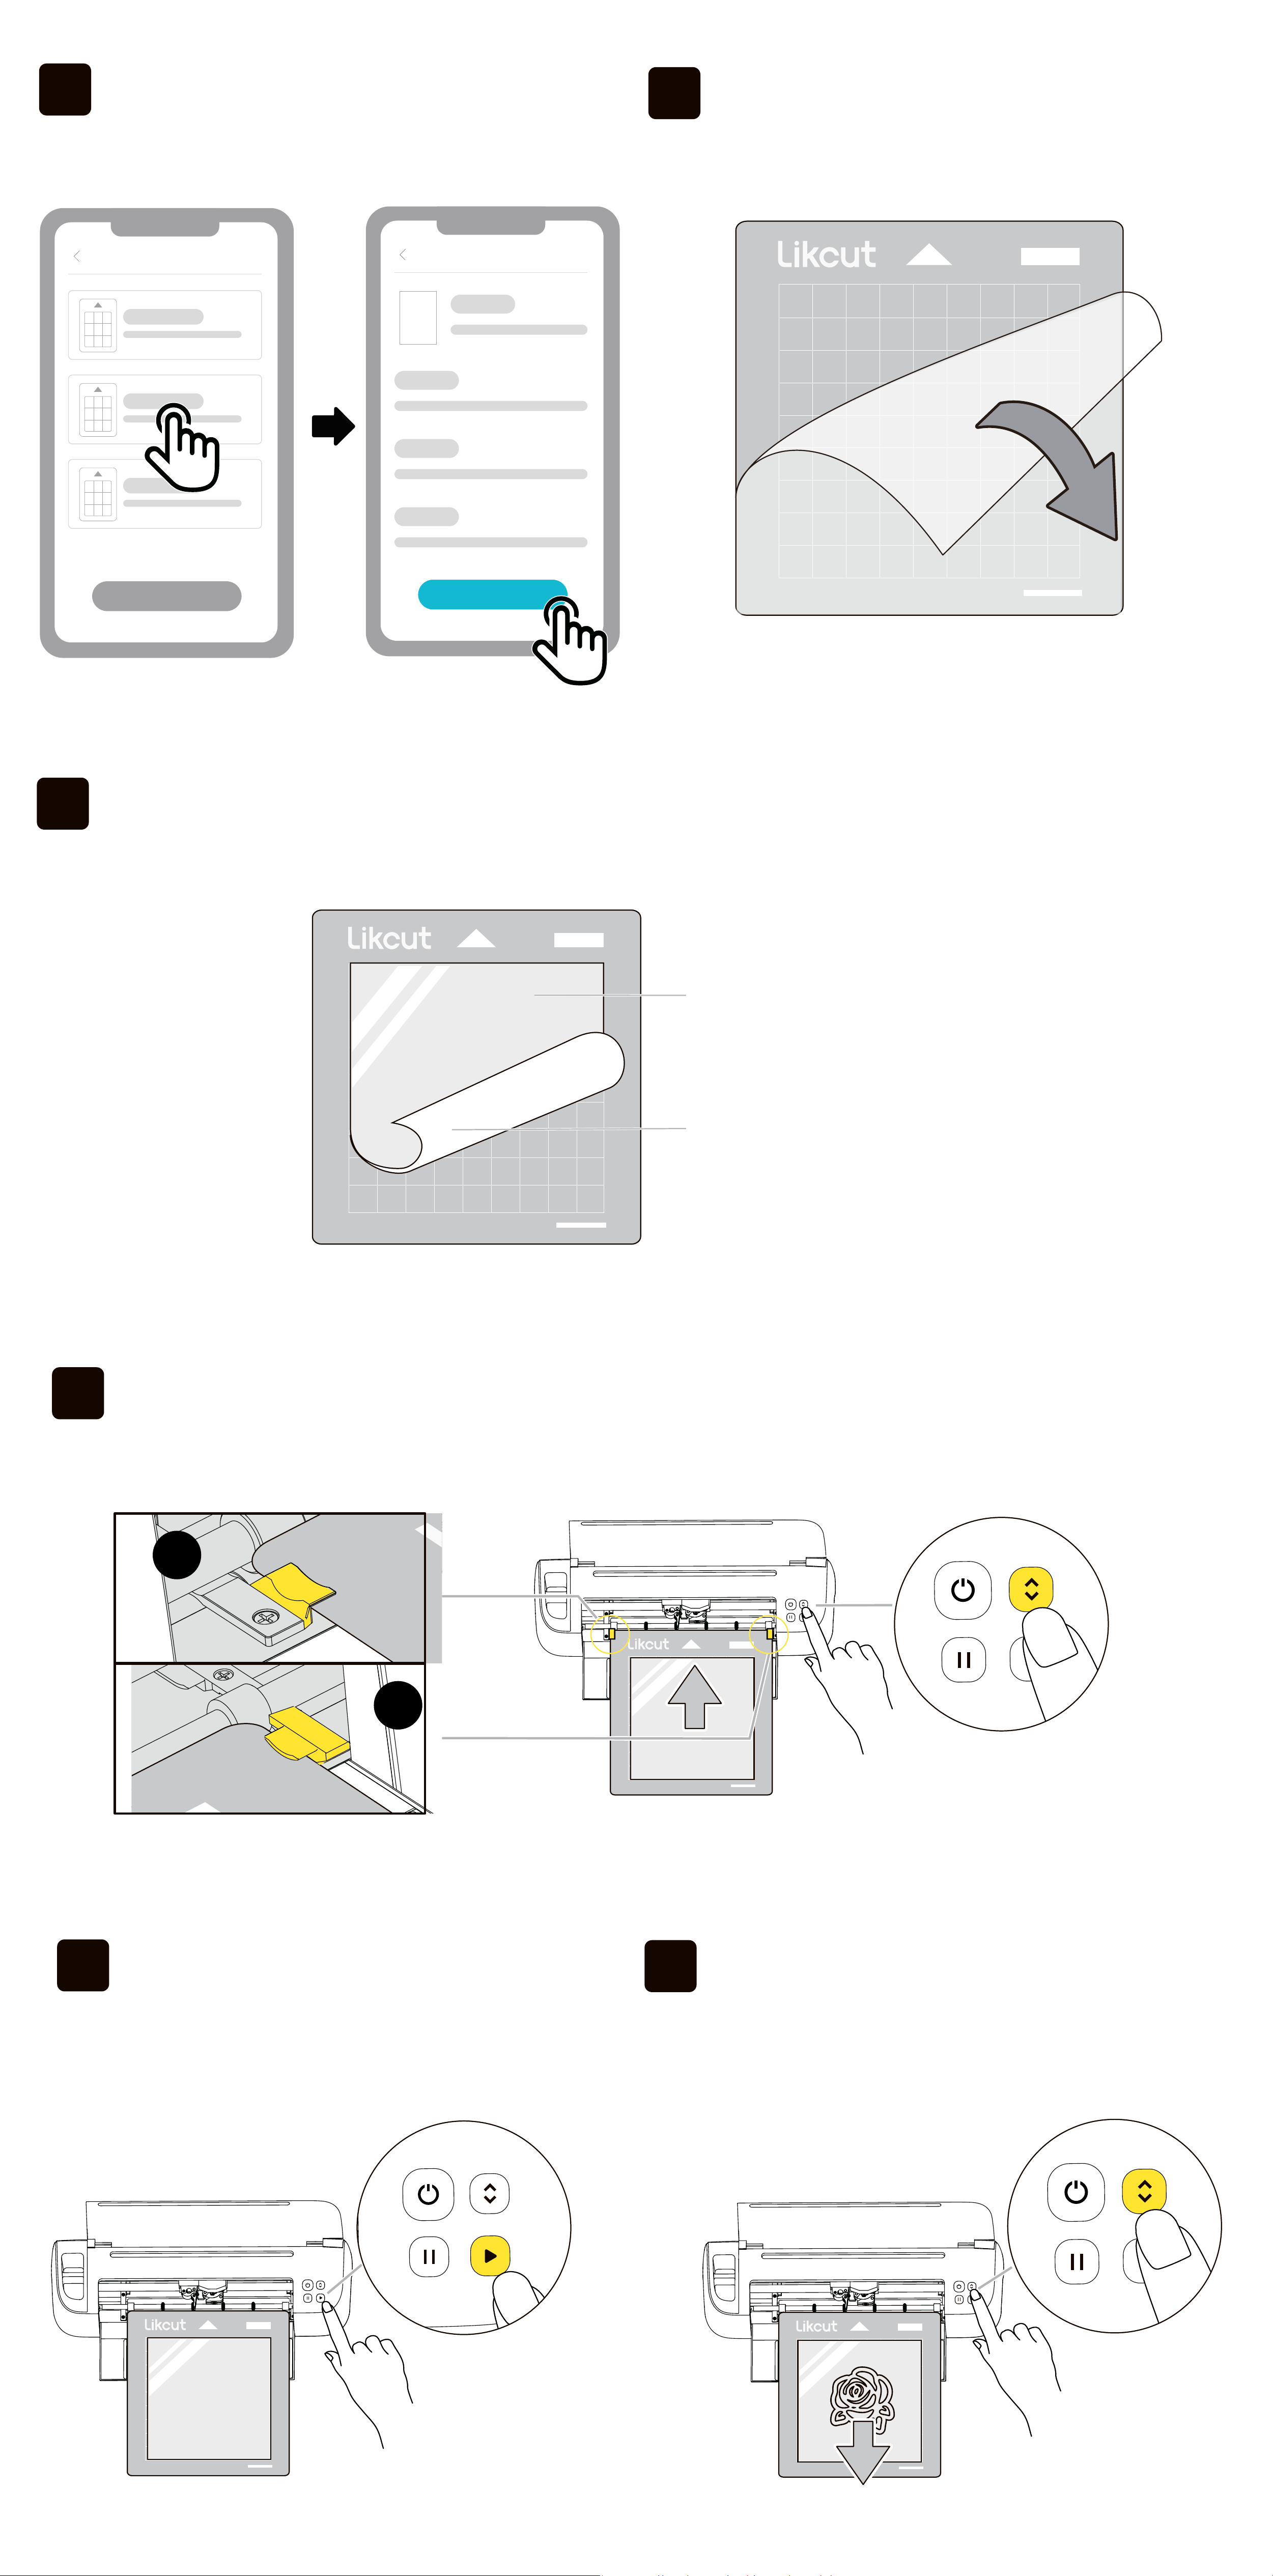
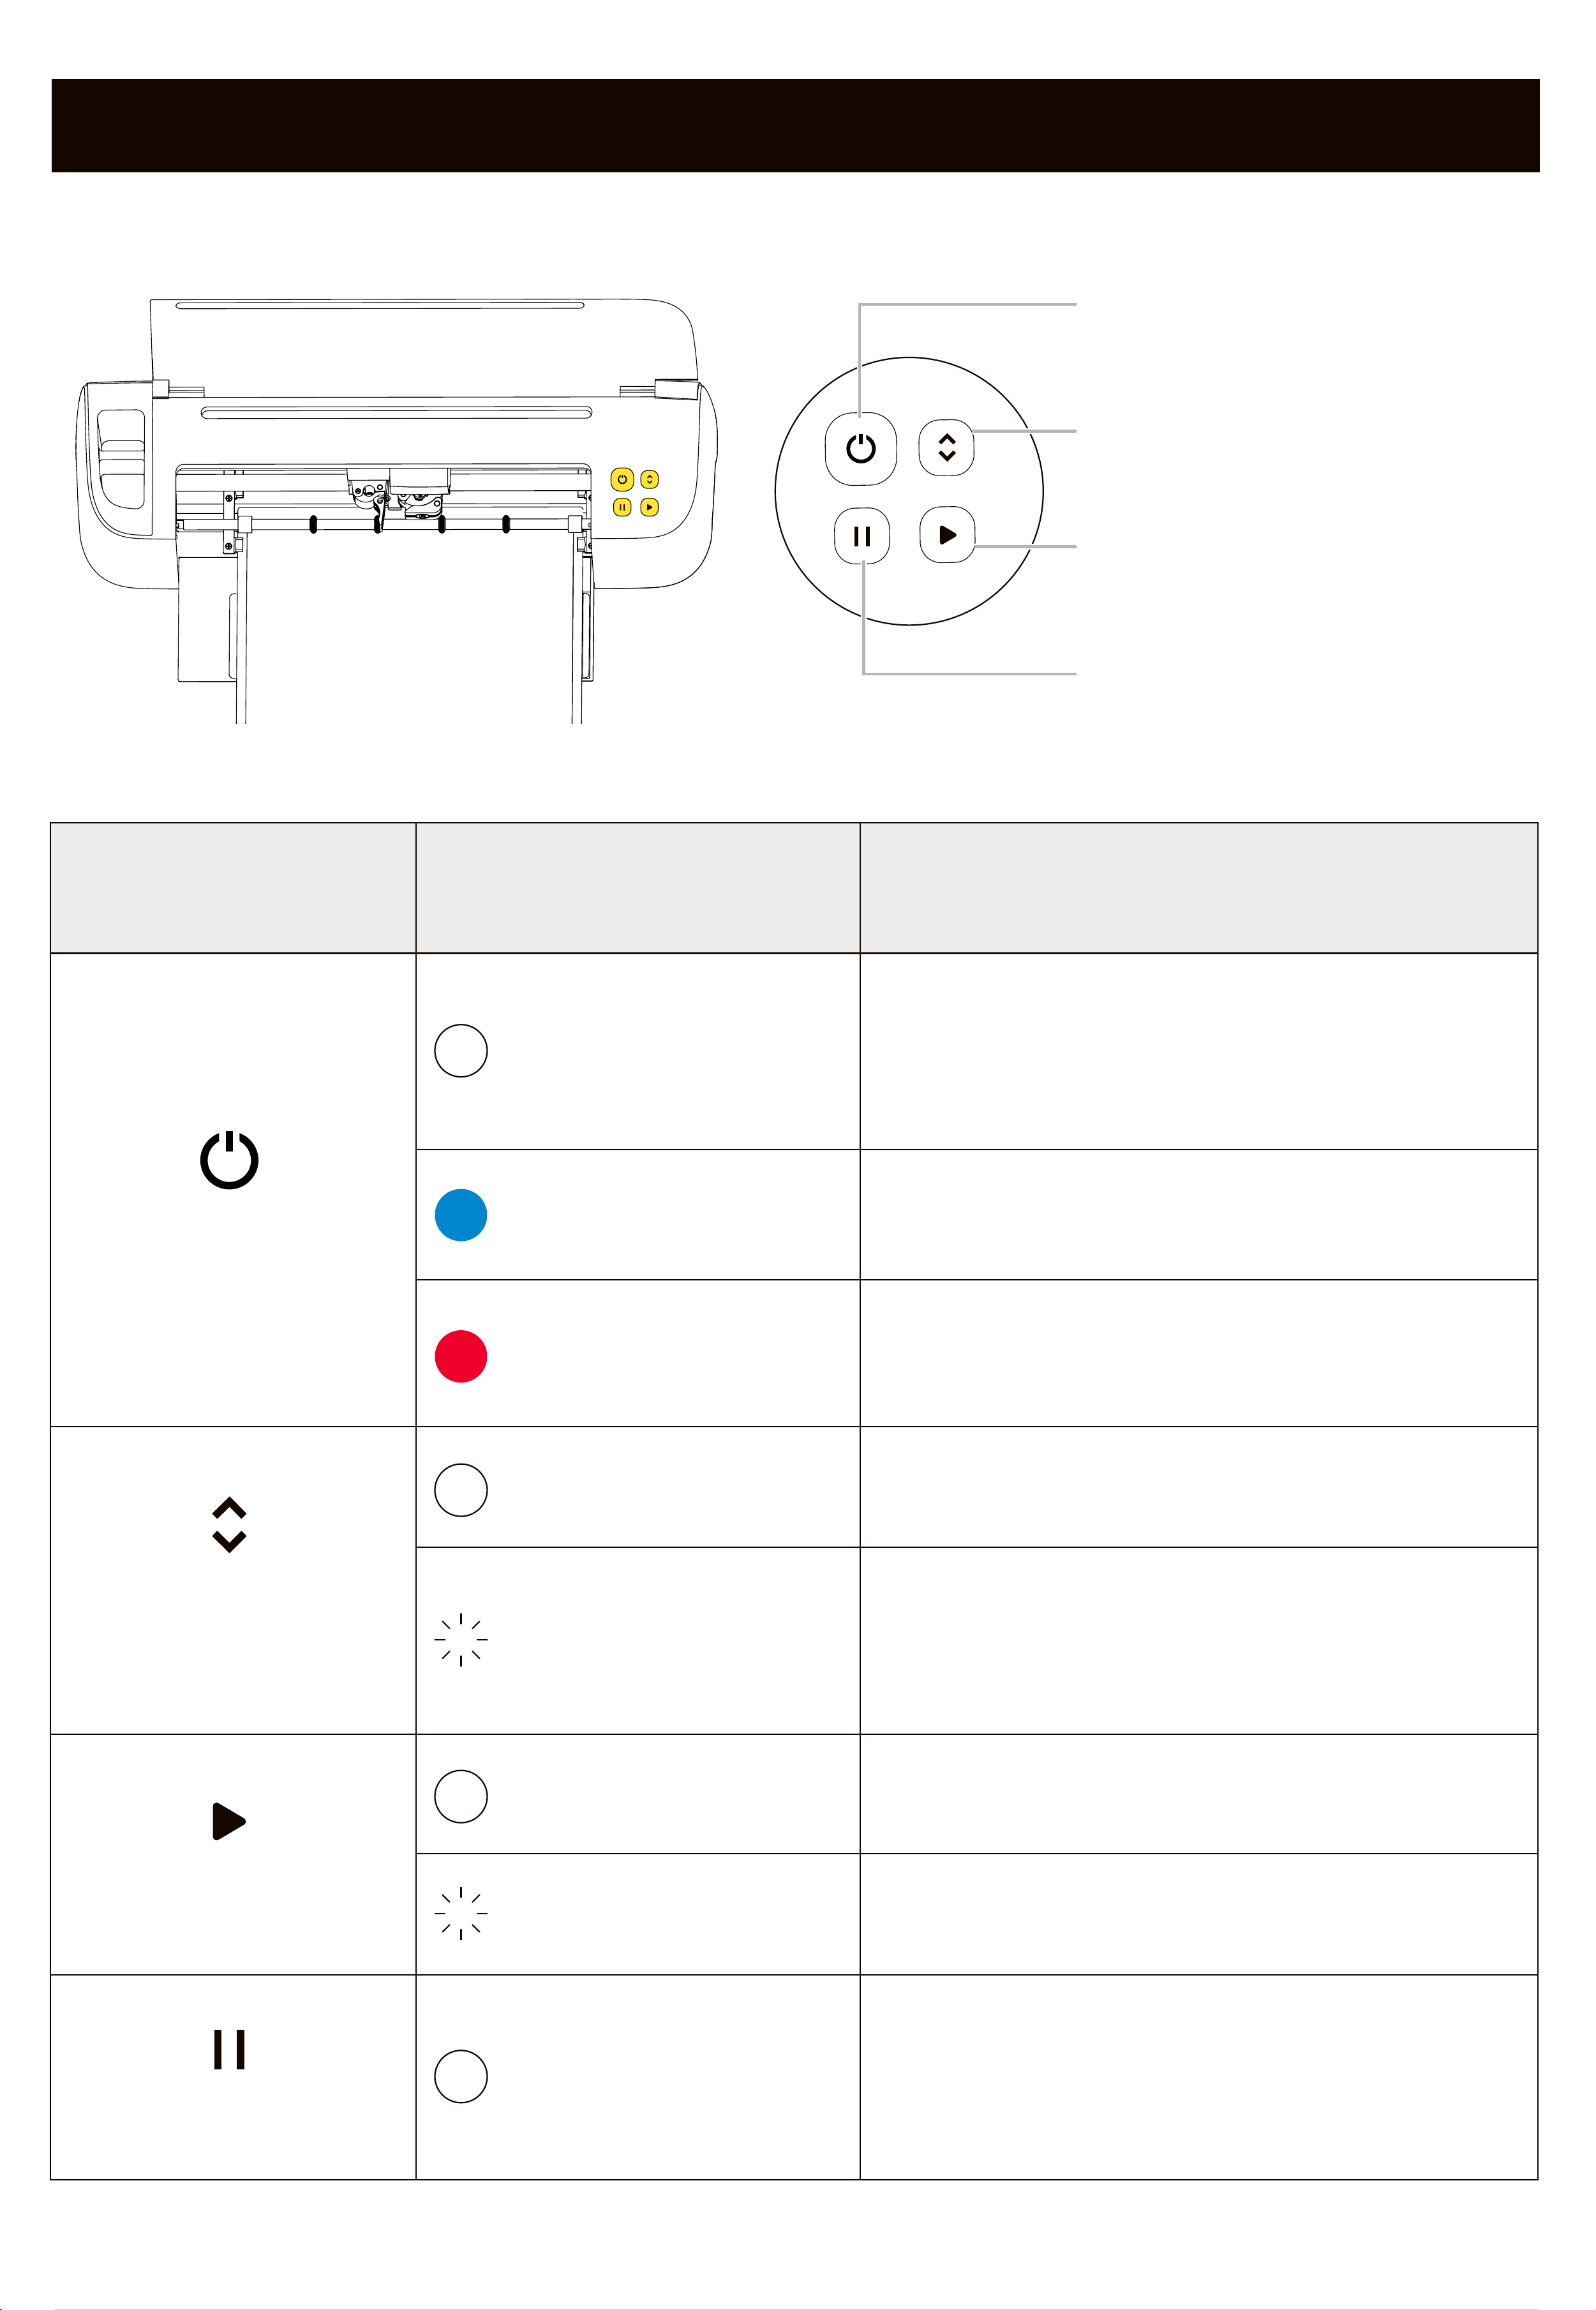
09
After the detection is completed,
press theSta Button.
07
Place the vinyl cutting suace facing up and the liner facing down within the
white frame of the mat.
08
Place the cutting mat, press theLoad/Unload Buttonto peorm material
detection.
06
Peel o the protective lm from the
cutting mat.
10
After the cutting is completed,
press the Load/Unload Button to
remove the cutting mat.
05
Select the sho cutting mat and
vinyl.
Mat Selection
Confirm
Make
Confirm
L
R
Liner
matte
Cutting suace
glossy
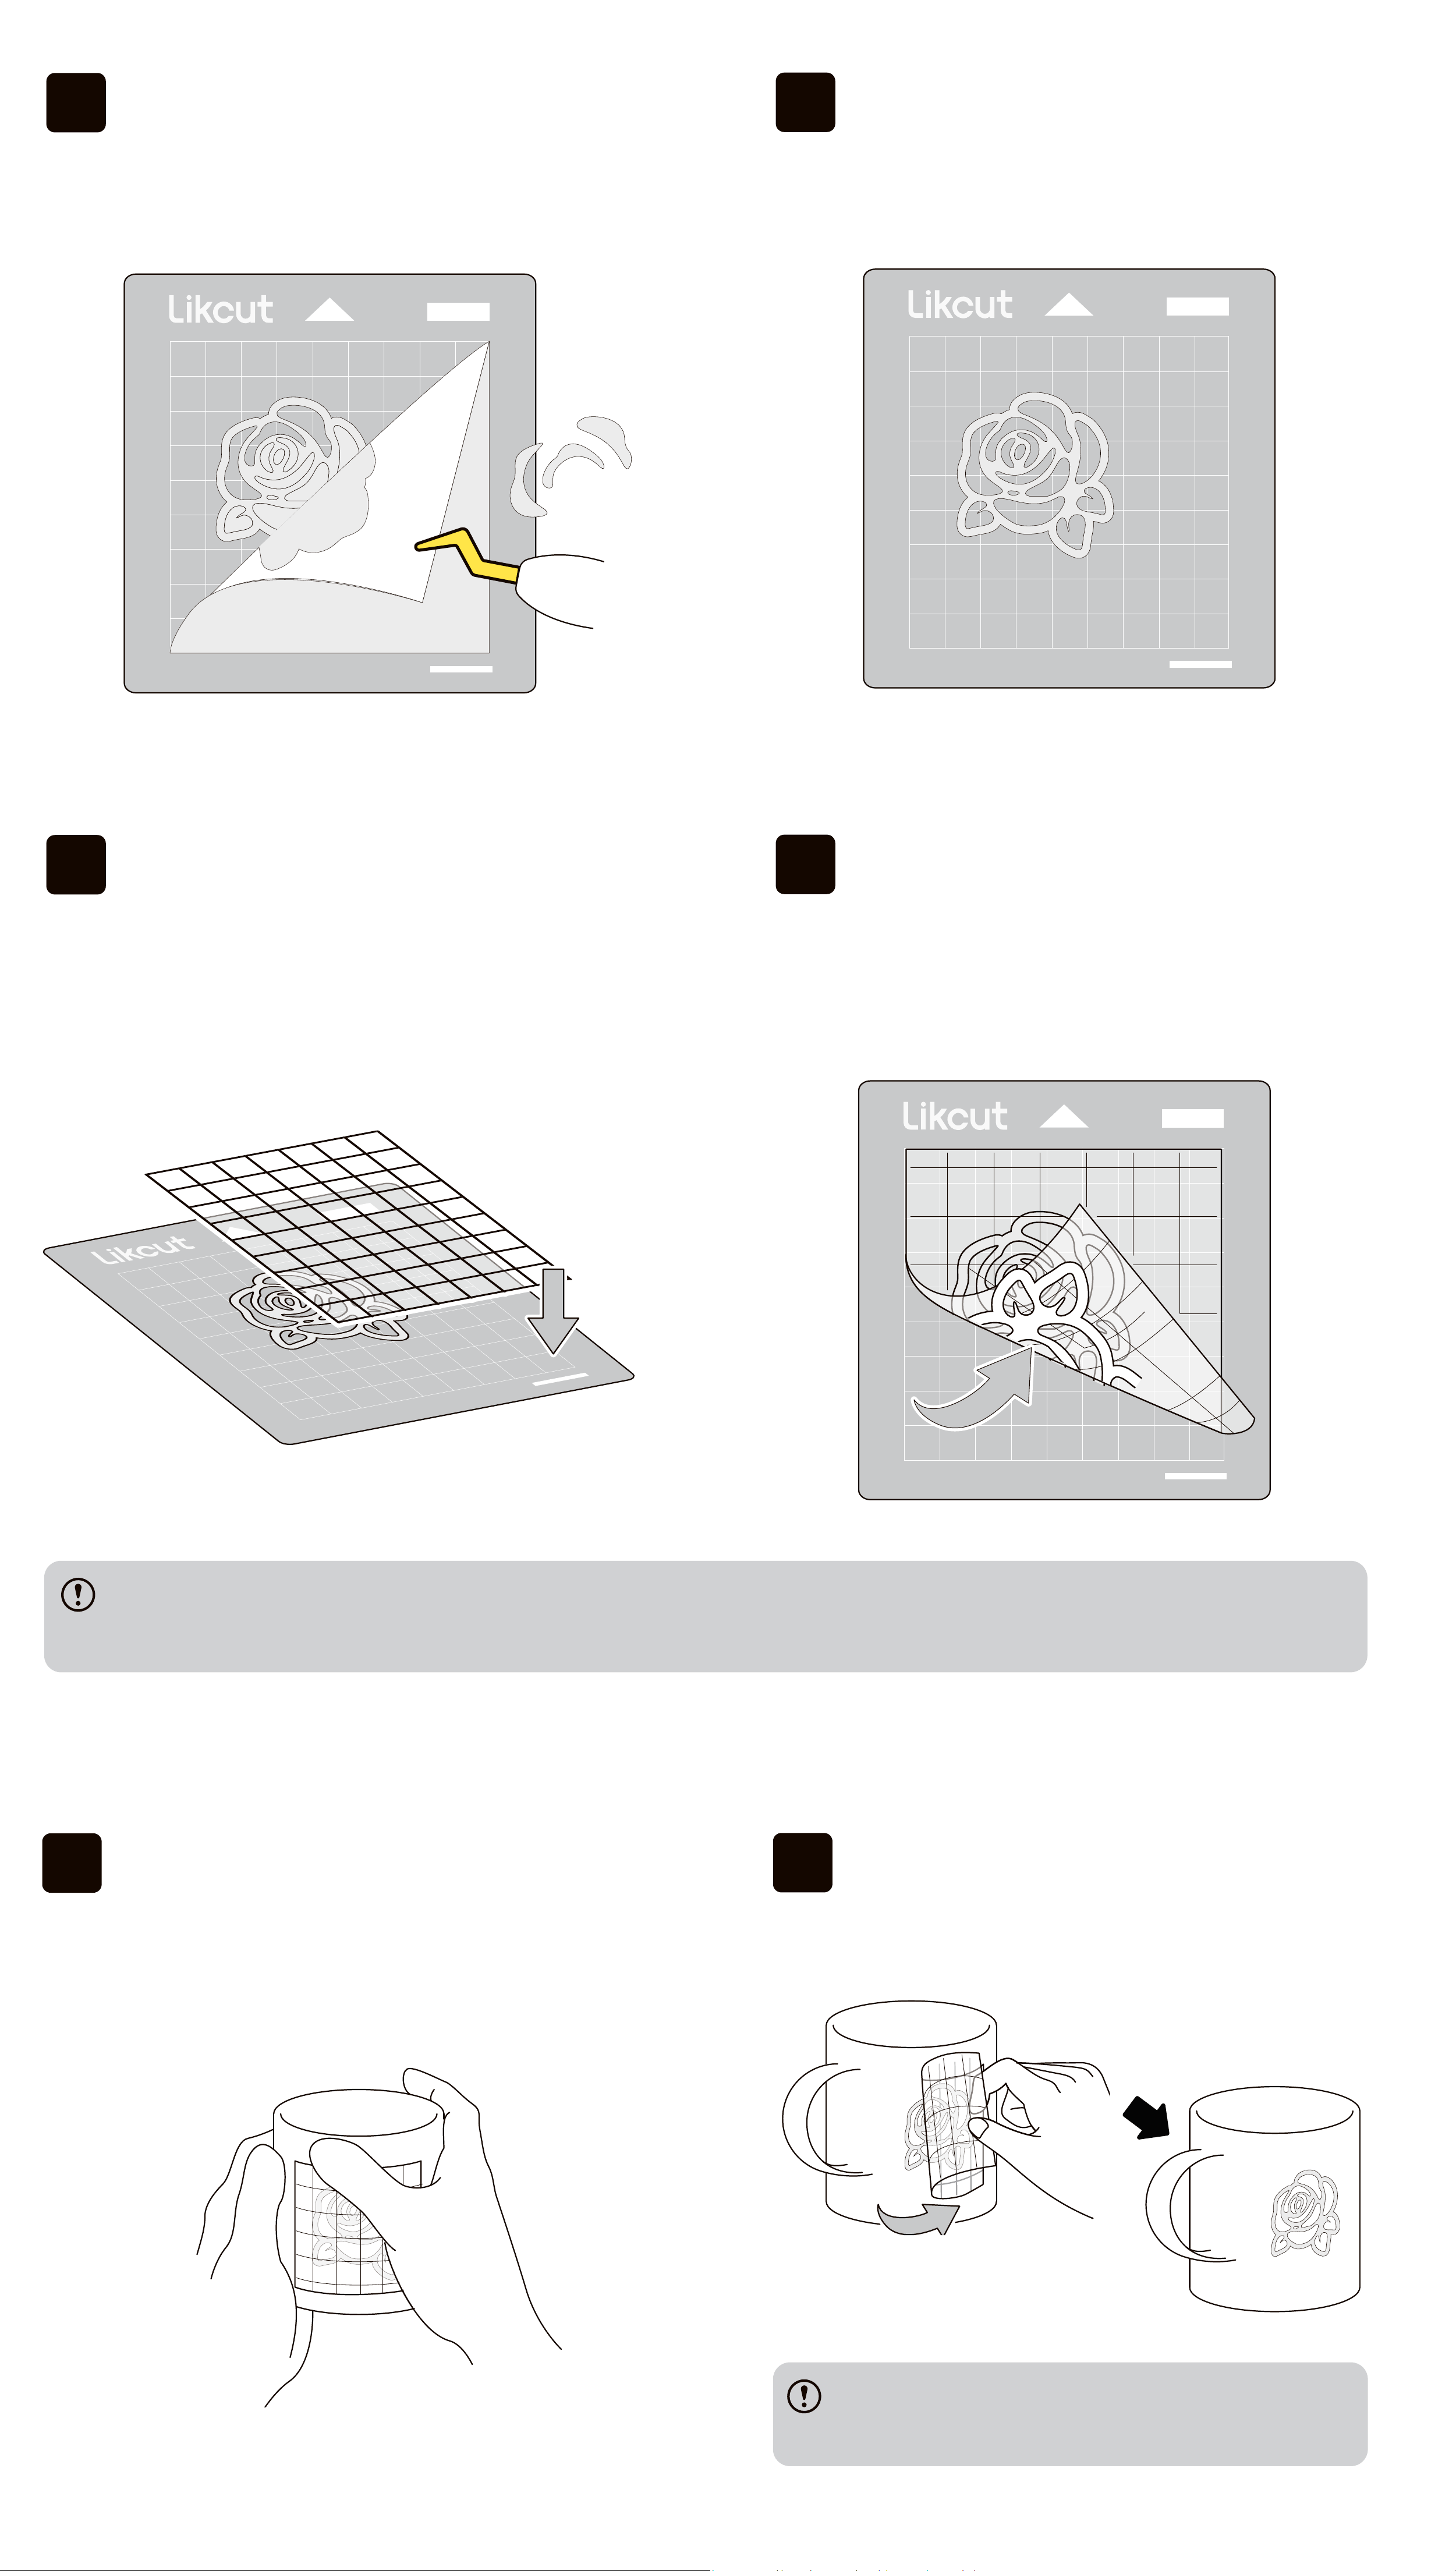
If the design is not successfully transferred, please press more rmly on the design area of
the tape.
12
The weeding is completed.
11
Use the Weeder to remove the
excess pas of the design on
the mat.
14
Use your hand or a tool to press
the transfer tape and then peel it
away from the bottom.
13
Attach the adhesive side of the
grid transfer tape to the design.
16
Remove the transfer tape.
15
Attach the design to a clean, smooth
and d suace and press the design
area tightly with your hands.
lf the design stays on the tape, please
press more rmly on the design area.
06
Select and connect your machine.
05
Adjust the design on the
canvas to your preferred size,
click [Make].
04
Select or search for a design on the
homepage and impo it to the
canvas.
03
Open Desktop App.
Likcut
4.2 For Desktop App
4.2.1 Wired Connection
02
Inse the Type-B end of the data
cable into the Type-B po of the
cutting machine.
01
Inse the Type-A (wider end) of
the data cable into the computer
po.
Make
Device Connection
S301
Device Connection
S301
4.2.2 Wireless Connection
02
Open Desktop App.
01
Turn on the settings on the
computer as shown in the gure.
Bluetooth
Likcut
04
Adjust the design on the canvas to
your preferred size, click [Make].
03
Select or search for a design on
the homepage and impo it to
the canvas.
4.2.3 Guide After Connection
02
For mat loading and subsequent operations, please refer to Steps 6-16 from
Section 4.1 For the Mobile App in this guide.
01
Select the sho cutting mat and vinyl.
vinyl
05
Select and connect your machine.
Make
[Flatten] is available only when more than one designs are applied.
Next
?
How to...
1
?
How to...
1
Print
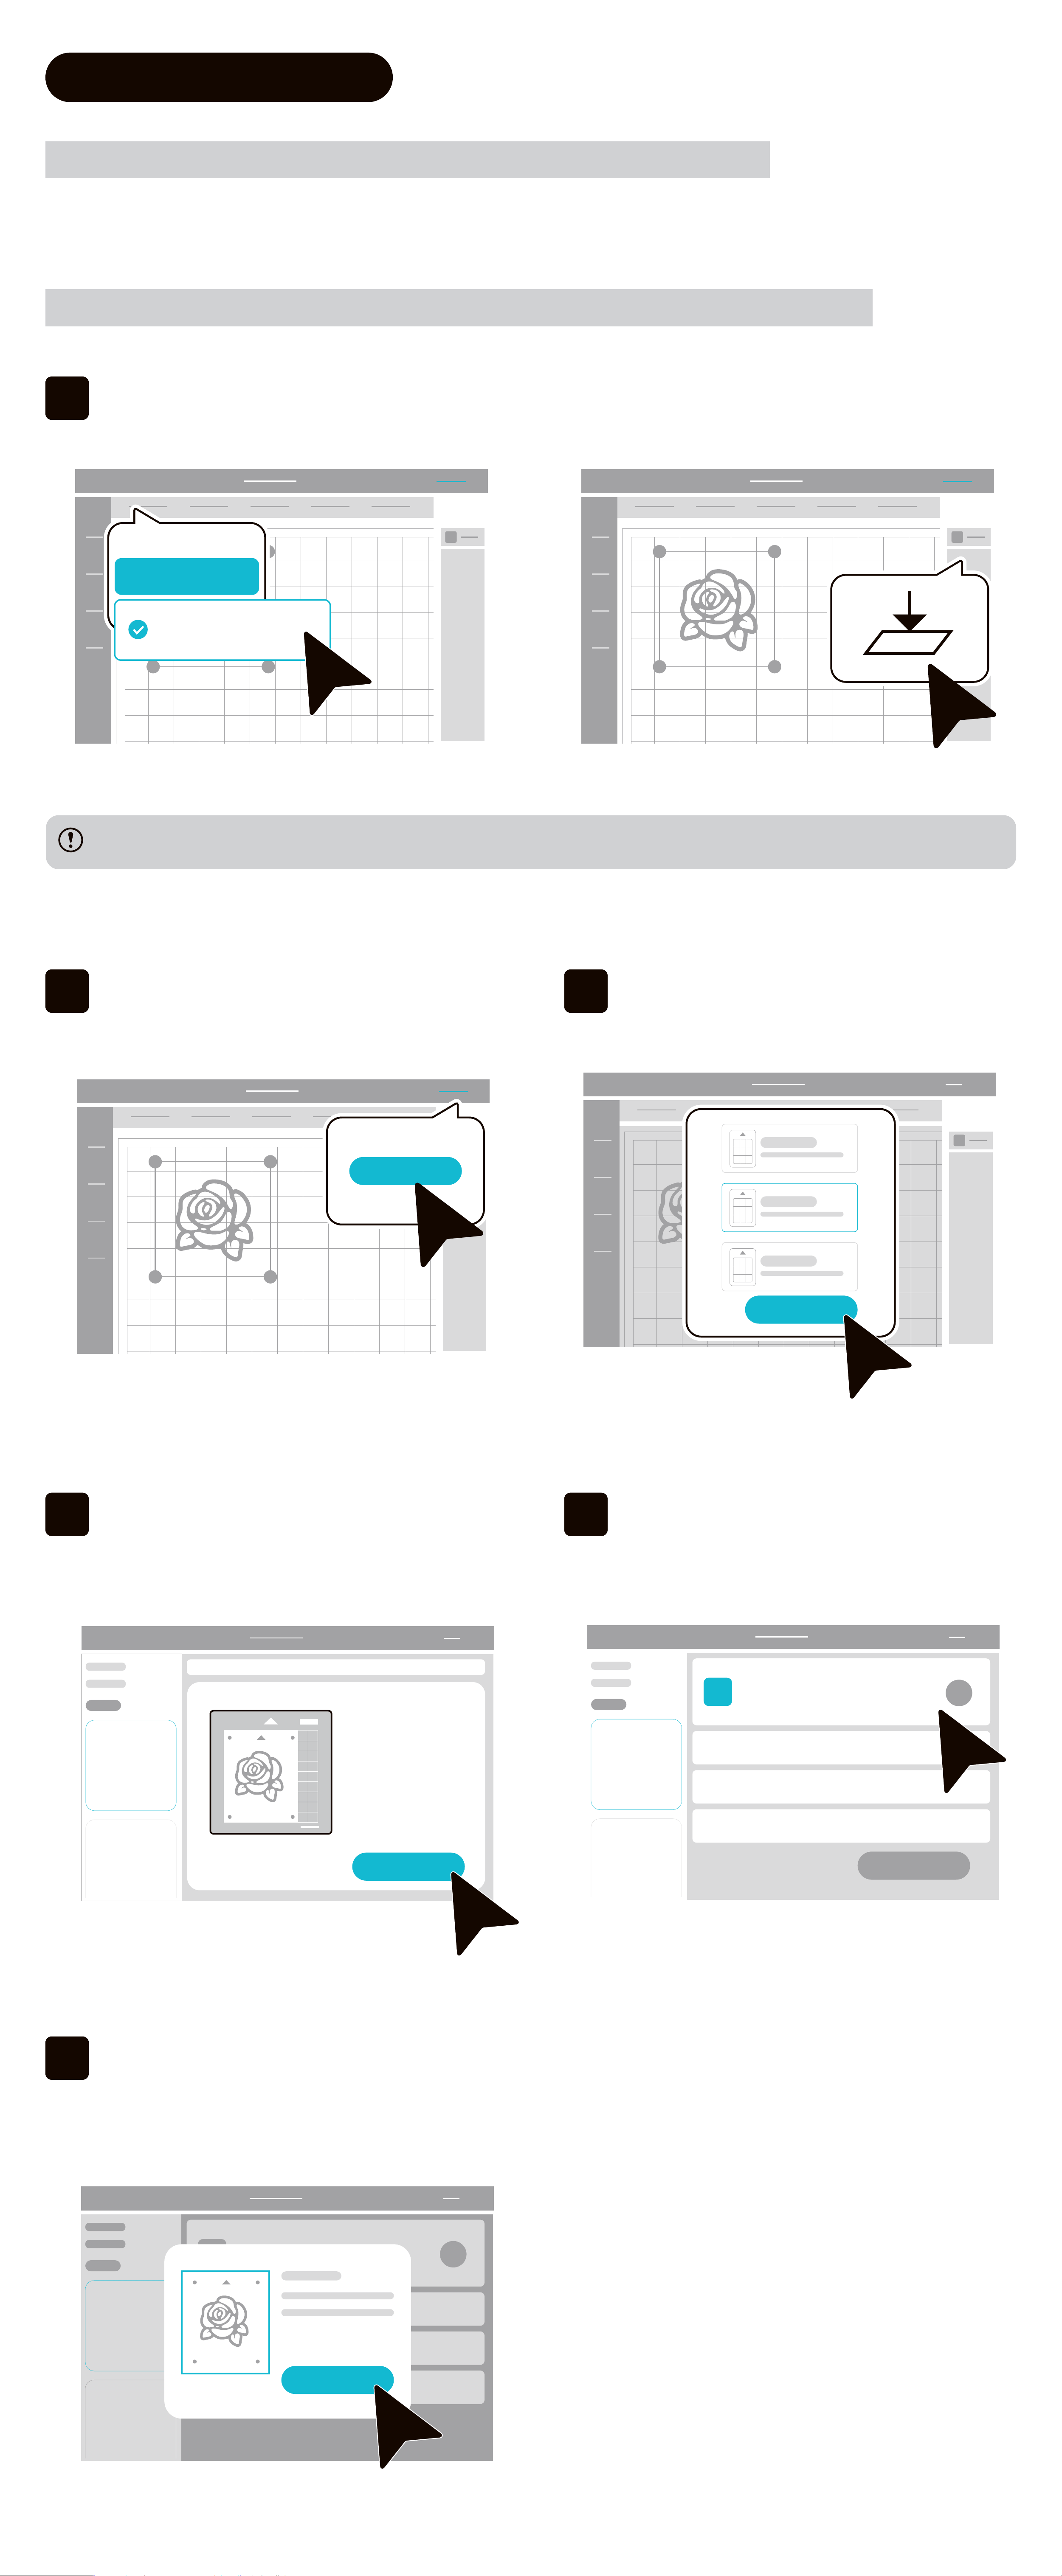
4.3 Print Then Cut
4.3.1 Select or search for a design to add to the canvas
4.3.2 Adjust the size of the design as you need and click [Make]
01
Click [Operation] and select [Print Then Cut], or click [Flatten].
Operation
Print Then Cut
02
Click [Make].
03
After selecting the cutting mat
size, click [Conrm].
04
After checking the content ready
to make in Preview, click [Next].
05
Click "How to connect the printer"
on the top left to learn the steps
to connect the printer.
06
Click [Go to print], select the
printer, enter the number of
copies and then click [Print].
Please refer to the actual software version.
Make
Conrm
?
How to...
1
Printed
Done
07
After printing, check the print eect
according to the instructions on the
app. If all of the requirements can
be met, click [Done], and then click
[Printed].
08
Select the corresponding material
type.
09
Ensure that the Fine Blade is installed
corerctly and attach the printed paper
on the cutting mat.
10
Inse the cutting mat into the
machine and press the blinking
Load/Unload Button.
11
Press the blinking Sta Button
13
After the cutting is completed, press the Load/Unload Button.
12
Wait for the machine to nish
cutting
5. Button Instructions
Button Types
Indicator Light Status
Solid white
Solid red
Solid blue
Status Descriptions
1.The cutting machine is powered
on;
2. Normal operation
The cutting machine is experiencing
an abnormality
Cutting
Cutting task is ready
Cutting task is paused
The cutting machine is connected
Flashing white
Solid white
Flashing white
Solid white
Solid white
The materials are ready
1. Waiting for materials to be
placed;
2. Cutting task completed
Power Button
Load/Unload
Button
Sta Button
Pause Button
Power Button
Load/Unload Button
Sta Button
Pause Button
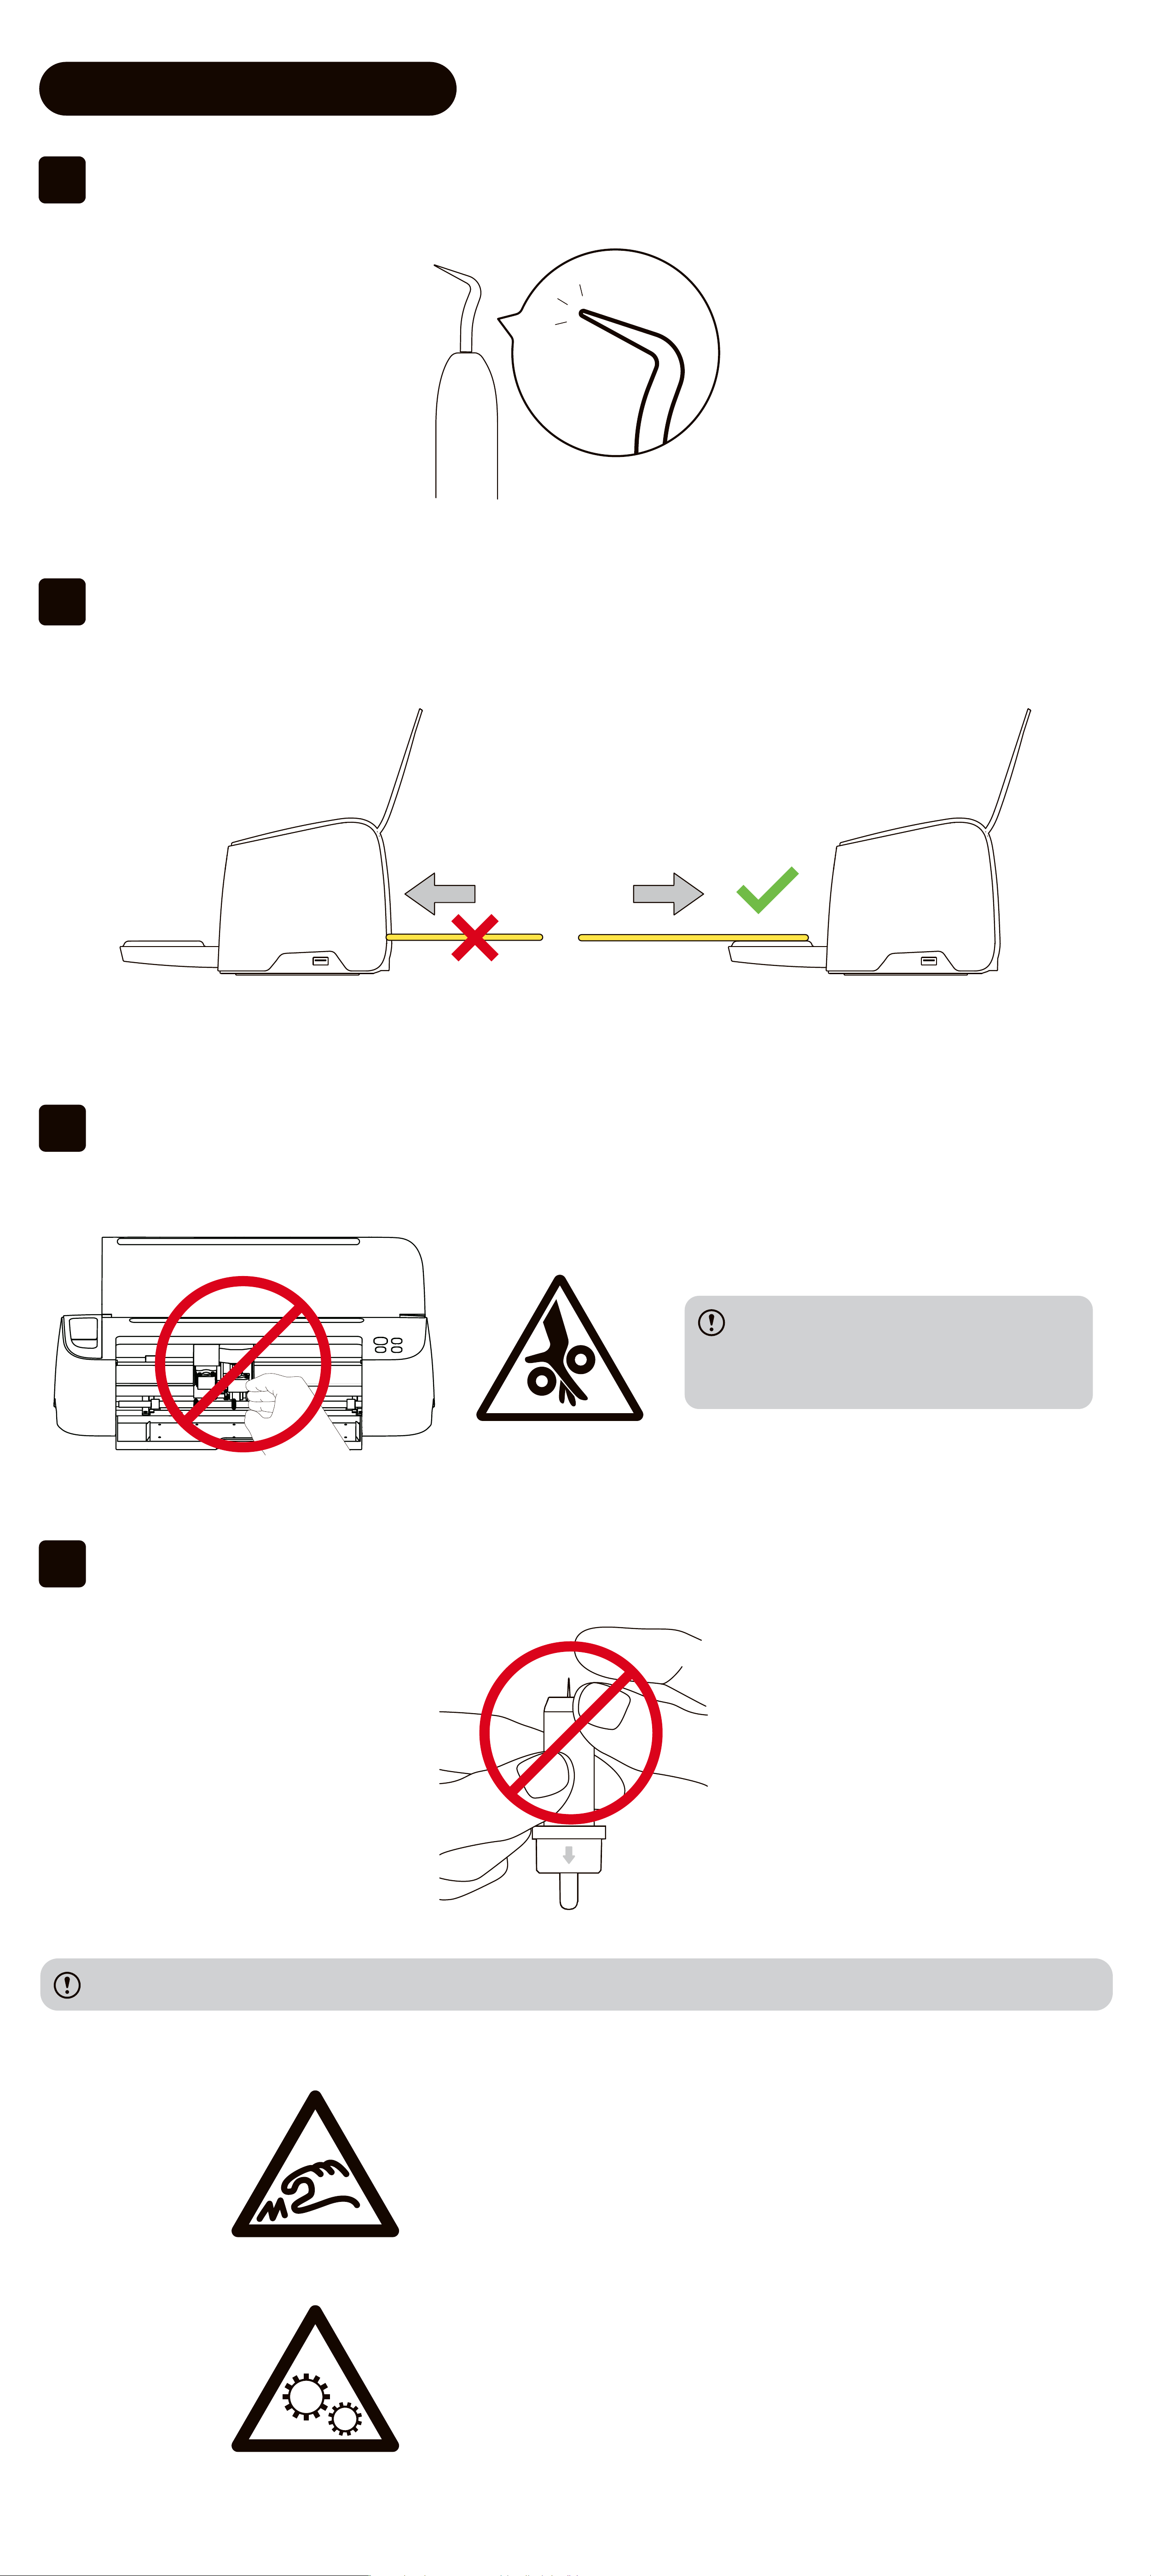
5.2 Safety Instructions
01
The weeder is sharp. Please use it carefully and keep it away from children.
02
To avoid any damage to the cutting machine, DO NOT inse the cutting mat
or other materials from the back of the machine.
03
To avoid pinching, DO NOT touch inside the cutting machine when it is
running.
Make sure children DO NOT put
their hands inside the cutting
machine.
04
The blade is sharp. Please use it carefully.
Please keep the blade away from children.
Please never touch the cutting pa
may be injured.
Warning:moving pas.
Mobile App
Go back to[Prole] andclick [Help
Center]
Desktop App
Go back to[Prole] andclick [Help &
Feedback]
6. More Tutorials and Video Guides
Get more tutorials, video guides, and FAQs available via any of the following
methods:
Visit suppo.likcut.com.
suppo.likcut.com
Visit www.youtube.com/@Likcut_ocial.
www.youtube.com/@Likcut_ocial
Refer to the Tutorials section in the "Likcut" app.
Help Center
Help & Feedback
Method 1
Method 2
Method 3

7. Information to User
7.1 FCC INFORMATION (U.S.A.)
FCC Compliance Statement :
This device complies with Pa 15 of the FCC Rules. Operation is subject to the fol-
lowing two conditions: (1) This device may not cause harmful inteerence, and (2)
This device must accept any inteerence received, including inteerence that may
cause undesired operation.
Note:
This equipment has been tested and found to comply with the limits for a Class A
digital device, pursuant to pa 15 of the FCC Rules. These limits are designed to
provide reasonable protection against harmful inteerence when the equipment is
operated in a commercial environment. This equipment generates, uses, and can
radiate radio frequency energy and, if not installed and used in accordance with
the instruction manual, may cause harmful inteerence to radio communications.
Operation of this equipment in a residential area is likely to cause harmful inteer-
ence in which case the user will be required to correct the inteerence at his own
expense.
FCC Caution :
• Any changes or modications not expressly approved by the pay responsible
for compliance could void the user’s authority to operate this equipment.
• This product satises FCC regulations when shielded cables and connectors are
used to connect the unit to other equipment. To prevent electromagnetic inteer-
ence with electric appliances, such as radios and televisions, use shielded cables
and connectors for connections.
FCC Radiation Exposure Statement :
This equipment complies with FCC radiation exposure limits set foh for an uncon-
trolled environment. This equipment should be installed and operated so there is
at least 8 inches (20cm) between the radiator and your body. This device and its
antenna(s) must not be co-located or operated in conjunction with any other an-
tenna or transmitter.
7.2 ISED NOTICE (Canada)
This device contains licence-exempt transmitter(s)/receiver(s) that comply with ln-
novation, Science and Economic Development Canada's licence-exempt RSS(s).
Operation is subject to the following two conditions: 1.This device may not cause
inteerence. 2. This device must accept any inteerence, including inteerence
that may cause undesired operation of the device.
This equipment complies with ISED radiation exposure limits set foh for an un-
controlled environment and meets RSS-102 of the ISED radio frequency (RF) Ex-
posure rules. This equipment should be installed and operated keeping the radia-
tor at least 20cm or more away from person's body.

7.3 AVS ISDE(Canada)
Cet appareil contient un émetteur (S)/ récepteur (S) exempté (S) de licence qui est
conforme aux RSS(S) exemptés (S) de licence d’innovation, Science et développe-
ment économique Canada. Le fonctionnement est soumis aux deux conditions
suivantes: 1. Cet appareil ne peut pas causer d’inteérences. 2. Cet appareil doit
accepter toute inteérence, y compris les inteérences qui peuvent causer un
fonctionnement indésirable de l’appareil.
Cet équipement est conforme aux limites d’exposition aux rayonnements ionisants
xées pour un environnement non contrôlé et répond à RSS-102 des règles d’ex-
position aux rayonnements ionisants (RF). Cet équipement devrait être installé et
utilisé en gardant le radiateur au moins 20cm ou plus loin du corps de la personne.
7.4 European Union
These symbols on the products, packaging, and/or accom-
panying documents mean that used electrical and electron-
ic products should not be mixed with general household
waste.
These symbols are only valid in the European Union. lf you wish to discard these
items, please contact your local authorities or dealer and ask for the correct
method of disposal.
For more information about collection and recycling of old products, please con-
tact your local municipality, your waste disposal seice or the point of sale
where you purchased the items.
Information for users on collection and disposal of old equipment:
Type of wireless Radio Frequency
Maximum Output Power
(ElRP)
Bluetooth 2400 ~ 2483.5 MHz 6 dBm
SIMPLIFIED EU DECLARATION OF CONFORMITY
Hereby, Changsha Benlei Technology Co., Ltd. declares that
this product is in compliance with Radio Equipment Direc-
tive 2014/53/EU. The full texts of the EU declaration of con-
formity is available at the following internet address:
https://www.eprcut.com