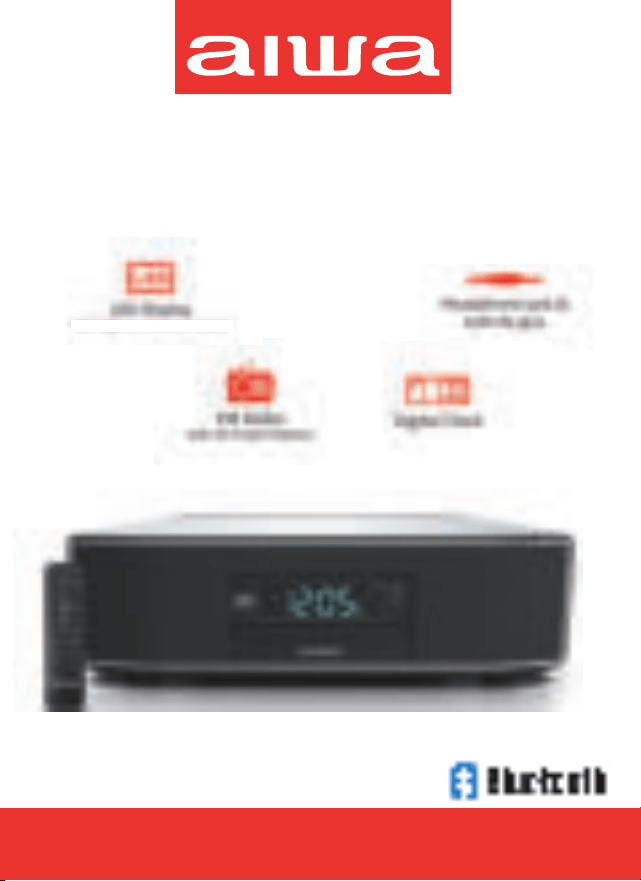
User Manual
Item: AI6006
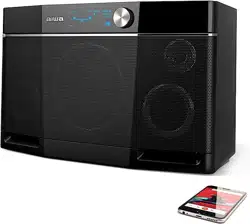
Exos Home Speaker
2 x 15W RMS
with high/mid/low dimmer control
-
-
-BLK
Safety Precautions
TO PREVENT FIRE OF SHOCK HAZARD, DO NOT USE THIS PLUG WITH AN EXTENSION CORD, RECEPTACLE OR
OTHER OUTLET UNLESS THE BLADES CAN BE FULLY INSERTED TO PREVENT BLADE EXPOSURE. TO PREVENT
FIRE OR SHOCK HAZARD, DO NOT EXPOSE THIS APPLIANCE TO RAIN OR MOISTURE.
1. READ AND FOLLOW ALL INSTRUCTIONS. HEED ALL WARNINGS .
2. Do not use device near water.
3. Clean only with dry cloth.
4. Do not block any ventilation openings. Install in accordance with the manufacturer9s instructions.
5. Do not install near any heat sources such as radiators, heat registers, stoves, or other devices (including
ampliüers) that produce heat.
6. Do not defeat the safety purpose of the polarized or grounding-type plug. A polarized plug has two blades with
one wider than the other. A grounding type plug has two blades and a third grounding prong. The wide blade or
the third prong is provided for your safety. If the provided plug does not üt into your outlet, consult an electrician
for replacement of the obsolete outlet.
7. Protect the power cord from being walked on or applied force that may bend the plugs, prongs, wires or device
entry points.
8. Only use attachments/accessories speciüed by the manufacturer.
9. Unplug this device during lightning storms or when unused for a long period of time.
10. This appliance shall not be exposed to dripping or splashing water and that no object ülled with liquids such as
vases shall be placed on or next to the device.
11. Do not overload wall outlet. Only use power source as indicated.
12. Use replacement parts as speciüed by the manufacturer.
13. Upon completion of any service or repairs to this product, ask the service technician to perform safety checks.
14. Power Sources - This product should be operated only from the type of power source indicated on the
marking label. If you are not sure of the type of power supply to your home, consult your product dealer or local
power company. For products intended to operate from battery power, or other sources, refer to the operating
instruction.
15. Object and Liquid Entry - Never push objects of any kind into this product through openings as they may touch
dangerous voltage points or short-out parts that could result in a üre or electric shock. Never spill liquid of any kind
on the product.
16. Damage Requiring Service - Unplug this product from the wall outlet and refer servicing to qualiüed service
personnel under the following conditions:
a) When the power-supply cord or plug is damaged,
b) If liquid has been spilled, or objects have fallen into or onto the product.
c) If the product has been exposed to rain or water.
d) If the product does not operate normally by following the operating instructions. Adjust only those controls that
are covered by the operating instructions as an improper adjustment of other controls may result in damage and
will often require extensive work by a qualiüed technician to restore the product to its normal operation.
e) If the product has been dropped or damaged in any way.
f) When the product exhibits a distinct change in performance.
17. Disconnect plugs completely from sockets.
18. Do not expose batteries to excessive heat.
19. Excessive sound pressure from earphones and headphone can cause hearing loss.
20. Keep external objects away at a minimum distance of 4 inches around the device for suþcient ventilation.
21. The ventilation should not be impeded by covering the ventilation openings with items, such as newspapers,
table-cloths, curtains, etc.
22. No naked ýame sources, such as lighted candles, should be placed on or next to the device.
23. Dispose batteries properly based on local laws and regulations.
1
Safety Precautions CONT.
--AI6006 Exos Home speaker
--AC Adapter (DC 12V 3.5A )
--2xAAA batteries (for remote control)
--Remote Control
--User Manua
l
WHAT9S INCLUDED
FOLLOW THE ADVICE BELOW FOR SAFE OPERATIONS
ON PROTECTION AGAINST LASER ENERGY EXPOSURE:
!
"As the laser beam used in this compact disc player is harmful to the eyes, do not attempt to
disassemble the casing.
"Stop operation immediately if any liquid or solid object falls into the cabinet.
"Do not touch the lens or poke at it. If you do, you may damage the lens and the player may not
operate properly.
"Do not place any object that is not a suitable disc inside the CD compartment. The laser diode
will stay ON while the CD door is kept open. Do not keep the CD compartment door open.
"If the device is unused for a long period of time, make sure that all power sources are
disconnected from the device. Remove all batteries from the battery compartment.
"This device employs a laser. The use of controls or adjustment or performance of procedures
other than those speciüed here may result in exposure to hazardous radiation.
"This device should not be adjusted or repaired by anyone except qualiüed service personnel.
ON PLACEMENT
" Do not use the device in places which are extremely hot, cold, dusty or humid.
" Place the device on a ýat and even surface.
" Do not restrict the air-ýow of the unit by placing it in a place with poor ventilation, by covering
it with a cloth or by placing it on a carpet.
ON CONDENSATION
"When left in a warm and damp room, water droplets or condensation may form inside of the
device.
"When there is condensation inside of the device, it may not function normally. Let it standby
for 1 to 2 hours before turning the power on, or gradually heat the room up and dry the device
before use.
Should any trouble occur, remove the power source and refer servicing to qualiüed personnel.
2
1. Your remote control takes 2 AAA batteries (included).
2. Open the battery compartment on the rear of your remote.
3. Insert batteries with the correct polarity (+,-).
4. Close the battery compartment.
Inserting Batteries
YOUR REMOTE
BATTERY WARNING:
· Do not mix old and new batteries.
· Do not mix alkaline, standard (carbon-zinc) or
rechargeable (nickle-cadmium) batteries.
· Batteries are not to be inserted with the wrong polarity.
· Exhausted batteries are to be removed.
· The supply terminals are not to be short-circuited.
Please recycle or dispose of the battery properly. Contact local
recycling facilities and/or the manufacturer of your battery for
further information
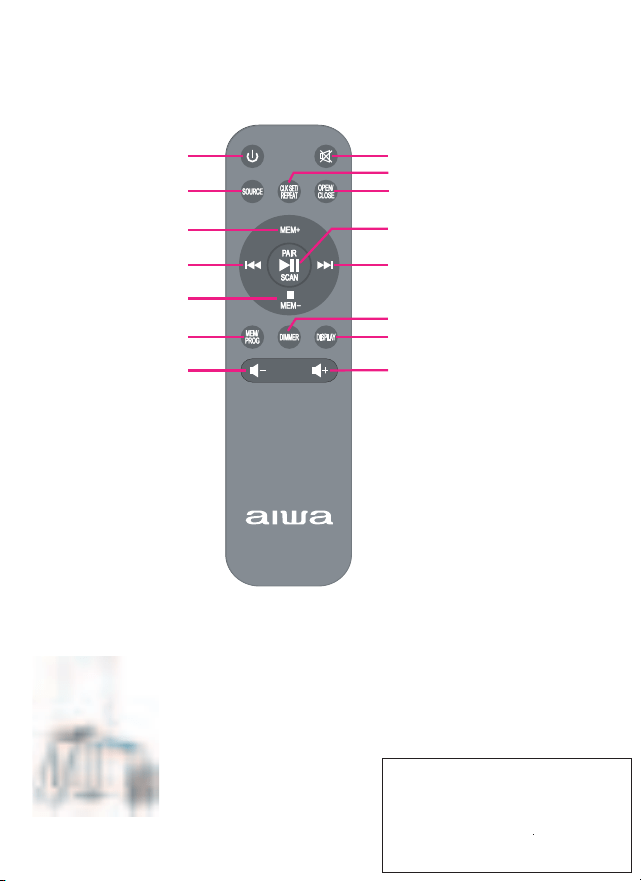
Volume +
Display
Dimmer
Next Track
Pair/Play/Pause/Scan
Standby/On
Source
Mem+
Previous Track
Stop/Mem-
Mem/Program
Volume -
Mute
Clock Set/Repeat
Open/Close
3
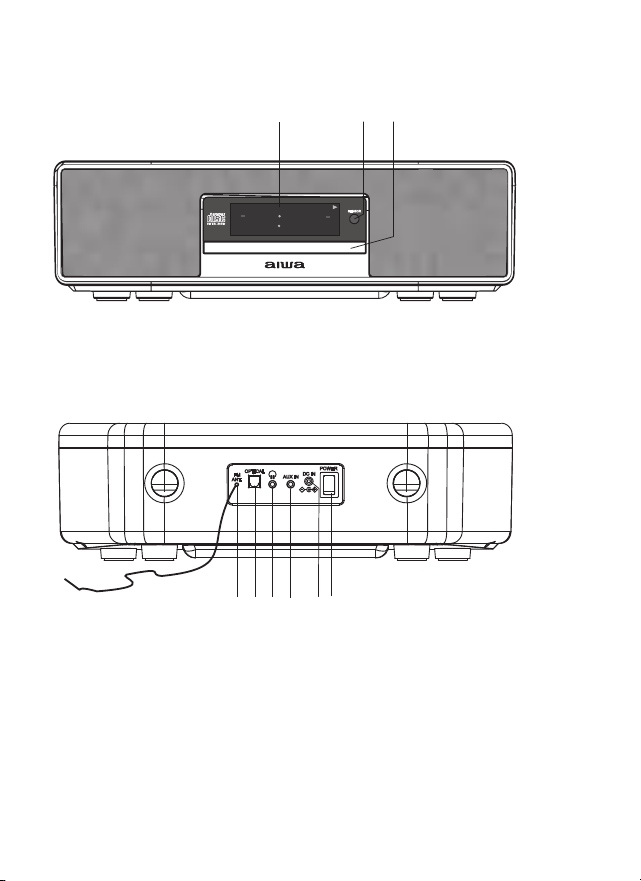
Rear View
Front View
YOUR Speaker
1
2
4
5
6
7
8
3
9
1. LED Display Screen
2. IR Sensor
3. CD Compartment Door
4. FM Antenna
5. OPTICAL IN Jack
6. Headphone Jack
7. AUX IN Jack
8. DC INPUT Jack
9. Power Switch
4
12 05
5
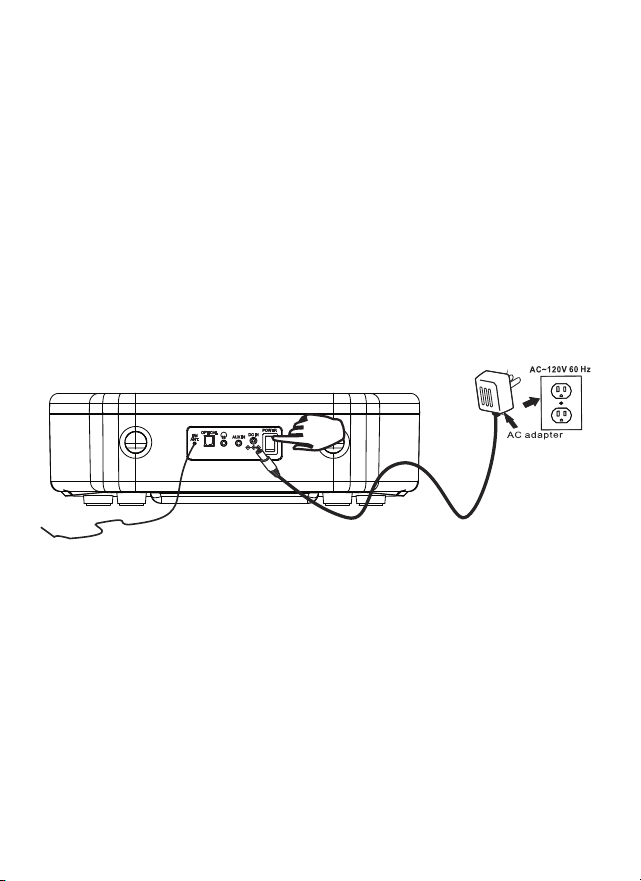
POWERING
AC POWER OPERATION
1. Insert the DC plug adapter into the DC INPUT Jack at the back of your
speaker.
2. Plug the AC adapter plug into a standard 120V AC outlet in your home.
3. Press the Power Switch to the ON position to power up the speaker. The
speaker will turn on standby mode and the display screen will ýash 12:00 to
indicate the clock is ready to be set up.
Note: Unplug when not in use for extended periods.
5
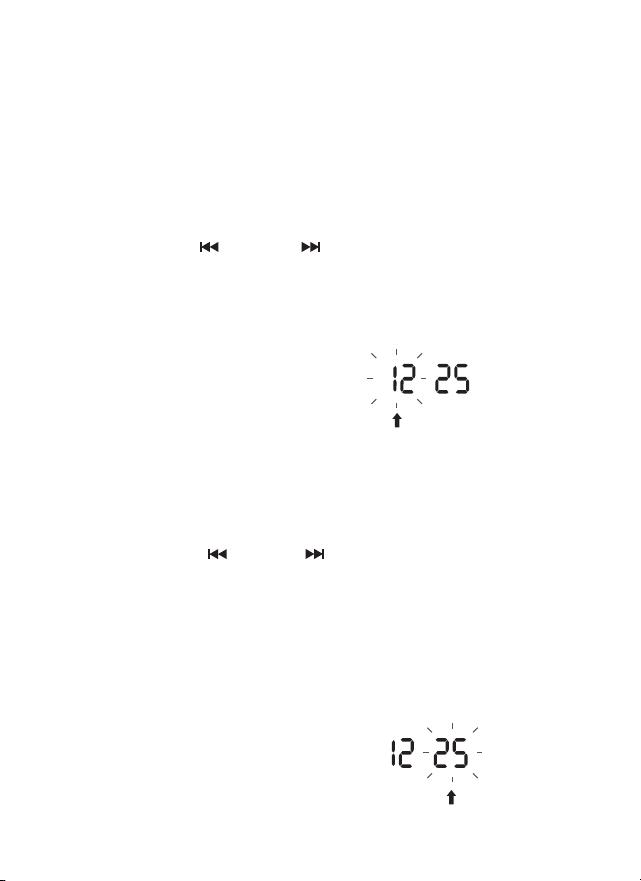
1. Press the Clock Set button to conürm the hour and the minute digits will start
to blink.
2. Repeatedly press the button or button to set the minute. Press and
hold the buttons for fast reverse/forward setting.
3. Press the Clock Set button to conürm and complete the setting. The display
will stop blinking.
Note: The speaker will automatically save and exit the time set mode if you do
not press the Clock Set button within 10 seconds.
Setting the TIME
While the speaker is on standby mode, you can set the time on your display
screen.
To set the hour:
1. Press and hold the Clock Set button on the remote until the hour digits start to
blink on the display screen.
2. Repeatedly press the button or button on your remote to set the hour.
Press and hold the buttons for fast reverse/forward setting.
Note: Be aware of setting a PM hour or an AM hour, the PM indicator on the left
of the display screen will light during a PM hour and turn oû during an AM hour.
To set the minute:
6
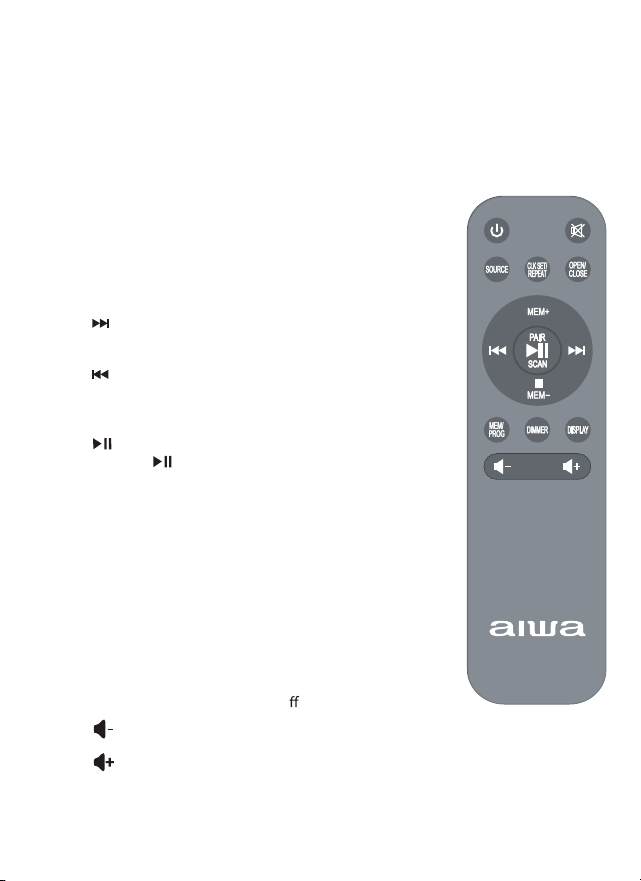
Press the Standby/On button to put device into standby mode.
Press the Mute button to mute sound/music.
Press the Source button to switch between modes CD, FM,
AUX IN, Bluetooth and OPTICAL IN.
Press and hold the Clock Set/Repeat button on standby mode
to set the time.
Press the Clock Set/Repeat button to repeat track.
Press the Mem+ button to go to the next preset station on FM
radio mode.
Press the button to skip track, change the time on standby
mode, or go to the next station on FM radio mode.
Press the button to go to the previous track, change the
time on standby mode, or go to the next station on FM radio
mode.
Press the button to pause or play the track.
Press and hold the button to start scanning on FM radio
mode.
Press the Stop/Mem- button to stop track or press twice to end
a CD program.
Press the Stop/Mem- button on FM radio to go to the previous
preset station.
Press and hold the Mem/Program button to set FM radio
presents or CD programs.
Press the DIMMER button to adjust the display screen
brightness.
Press the DISPLAY button to turn on or o
display screen.
Press the button to lower the volume.
Press the button to raise the volume.
USING YOUR REMOTE
7

CD Function
IMPORTANT NOTE
The CD player is designed to work with all commercial discs. It may not play
some recordable CDs or computer CDs.
USING THE SPEAKER TO PLAY CDs
1. Press the Standby/On button to power on the speaker.
2. If the speaker is not in CD mode, press the Source button on your remote
repeatedly until CD mode is selected. The display screen will show <- - -= brieýy. If
no CD has been loaded in the CD compartment, the display screen message will
change to show <no= to indicate that there is no disc.
3. Press the "OPEN/CLOSE" button on the remote control to open the CD
compartment door.
4. Carefully load a CD disc with its label side upward into the CD compartment
then press the OPEN/CLOSE button on the remote control to close the CD door.
5. The player will start reading the contents of the disc. The total number of
tracks on the CD will appear on the display screen after a few seconds.
Using Your Remote Control To Play Music On CD Mode
Press the button to start playing.
Tap the Volume 3 button or Volume + to lower or raise the volume.
To pause track, press the Play/Pause button.
To resume playing, press the Play/Pause button again.
You can go to a previous track by pressing the button or go to the next track
with the button. The display screen will indicate the current track number.
To locate a particular section within a track, press and hold the / buttons
until the section is found.
To stop track, press the Stop button.
To repeat the current track, press the Repeat button once. The track will continue
to play until the repeat function is turned oû.
To repeat all tracks, press the Repeat button twice. All the tracks on the disc will
be played repeatedly.
To cancel repeat function, press the REPEAT button until REPEAT indicator turns
oû from the display screen.
8

SETTING UP PROGRAMS
This function allows tracks to be played in a programmed sequence.
TO SET UP A PROGRAM:
1. In CD stop mode, press the Program button. The program indicator
(=PROG=) will illuminate and Program Number <P01= will show on the display
screen.
2. Press the or button to select the desired track. The track number
<1= will blink on the display screen to prompt for input.
3. Press the Program button to conürm the selection. The Program Number
will advance to <P02=.
4. Repeat steps 2 & 3 to program up to a maximum of 20 tracks.
5. When a maximum of 20 tracks have been programmed, the display screen
will show <FUL= to indicate the program is at full capacity.
6. When you have completed programming, press the Play/Pause button to
start playing. The program (=PROG=) and Play/Pause indicators will brieýy
illuminate.
7. To cancel programmed play, press the Mem- button twice. The program
indicator (=PROG=) will shut oû.
NOTE: You can also set programs using the MEM/PROG button on the remote
control.
CD Function CONT.
9

BLUETOOTH FUNCTION
The Bluetooth feature enables you to stream and play digital music from your
Bluetooth enabled device to your speaker.
1. With your speaker on standby mode/on, press the Source button repeatedly
to select Bluetooth mode. The Bluetooth indicator will start to ýash on the
display screen. The speaker will go into auto connection mode and search for a
previously paired device that is active and in range (30 feet/10 meters).
2. To pair a new device, go to the Bluetooth settings menu of your Bluetooth
enabled device, and make sure Bluetooth is turned on. Go to the Bluetooth
menu and select <Aiwa Exos Home= from the list of available devices (If required,
enter the pass code <0000= to connect).
3. Once a connection is made, you will hear a tone and the indicator light will
stop ýashing and remain solid.
4. You can now play music from your Bluetooth enabled device wirelessly to your
speaker.
Using Your Remote Control On Bluetooth Mode
Press the button to play or pause music.
Press the button to skip to next song.
Press the button to skip to previous song.
Adjust the volume using the Volume - and Volume + buttons.
To pair with a diûerent Bluetooth device, press and hold the button, the
Bluetooth indicator will ýash. The speaker will go into pairing/discoverable
mode. Repeat steps #2 to #3 above to make a new link.
NOTES:
" If your Bluetooth enabled device does not support A2DP, it will not play the
music through the AI6006 system even after it is paired and connected
successfully.
" If you are pairing and connecting your personal computer to the AI6006 using
Bluetooth, you may need to set the AI6006 as your computer9s default sound
device.
10
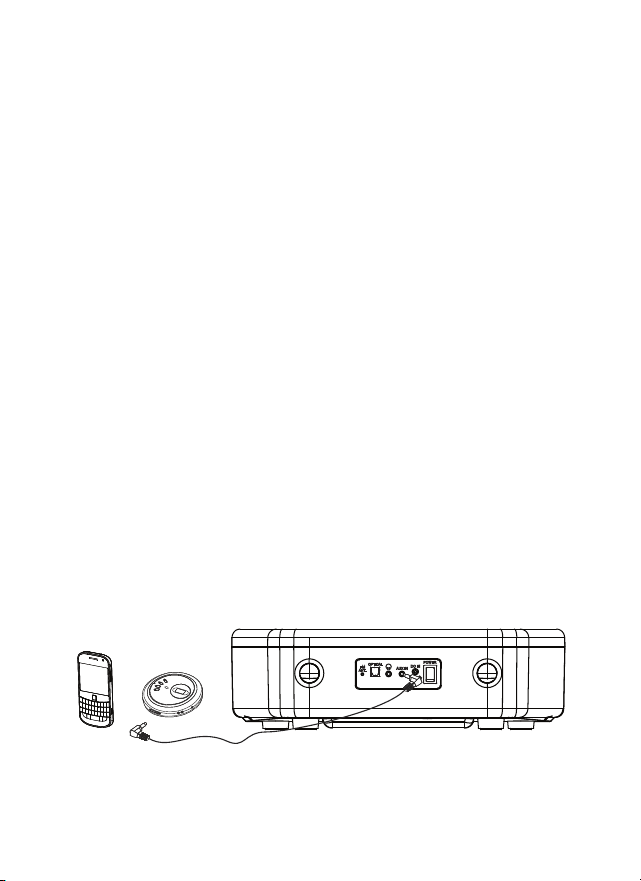
AUX IN FUNCTION
You can play other music sources (iPods, MP3 players or other digital audio
players) through the speakers of the speaker by connecting the AUX IN Jack to
your external player9s audio out jack or headphone jack.
1. Plug one end of a 3.5mm audio cable (not included) into the AUX IN Jack
located at the back of the speaker and the other end of the cable to the
headphone jack of your digital audio player.
2. Press the Source button repeatedly until AUX IN mode is accessed. The <AUX=
indicator will light up on the display screen.
3. Turn on and start playing the external device you plugged into the AUX IN Jack.
4. Slowly adjust both the volume controls of your unit and the external device
until you reach a comfortable listening level.
5. Turn oû both the external audio player and your speaker after use. Unplug the
audio cable from AUX IN Jack.
NOTES:
--If you connect the speaker to the line-out jack of your external device, you only
need to adjust the volume of your speaker. If you connect to the headphone jack
of your external device, you may need to adjust both the volume controls of your
external device and the speaker to obtain a desirable listening level.
--Remember to turn oû the speaker when you have ünished listening. Don't
forget to switch oû the power of your external audio device as well.
Insert into Headphone Jack
or
External Device
AUX Cable Not Included
11
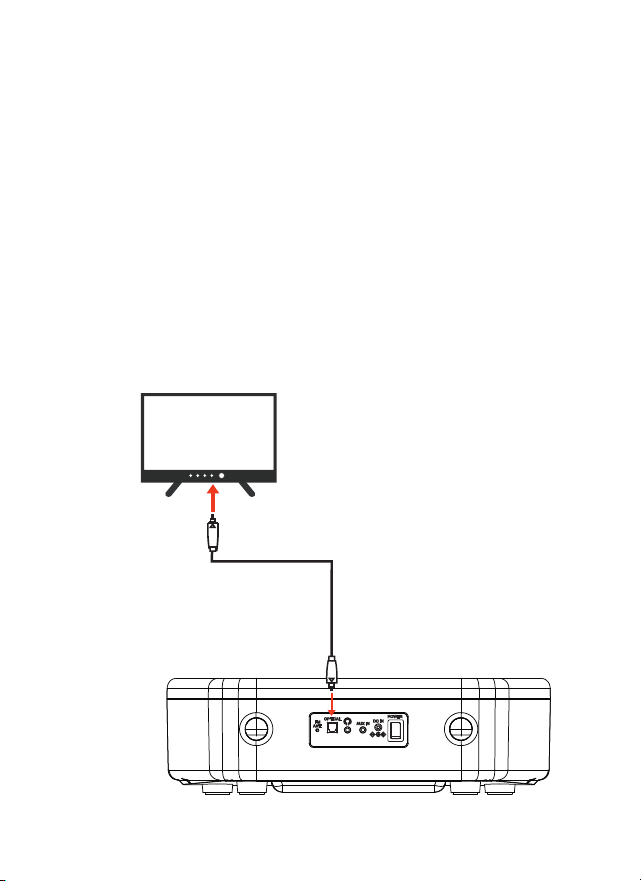
1. Plug one end of an optical cable (not included) into the OPTICAL IN Jack
located at the back of the speaker and the other end of the cable to the optical
out jack of your TV or digital audio player.
2. Press the Standby/On button to turn the speaker on
3. Press the Source button repeatedly to select OPTICAL IN mode, the optical
indicator will light up on the display screen.
4. Turn on and start playing the TV or other external device that is plugged
into the OPTICAL IN Jack.
5. Cautiously adjust both the volume controls of your speaker, by using your
speaker remote, and the TV or other external device until you reach a
comfortable listening level.
TV/oPTICAL aUDIO fUNCTION
OPTICAL CABLE NOT INCLUDED
12

1. Press the Standby/On button to put your speaker in standby mode.
2. Press the Source button repeatedly until FM mode is accessed. The <FM=
indicator on the display screen will light up.
Using Your Remote Control On FM Radio Mode
Press the button or the button to search through available FM radio
stations.
Adjust the volume to your desired level using the Volume + and Volume -
buttons.
SETTING YOUR RADIO PRESETS
This device allows you to preset up to 20 FM stations for easy recall at any time.
1. Turn on the speaker, and press the Source button repeatedly until FM radio
mode is activated.
2. Select your desired radio station using the / buttons.
3. Press the Mem button until <P01= shows on the display screen.
4. Press the / buttons to select a preset number (P01-P20).
5. Press the Mem button again to conürm the preset.
6. Repeat steps 3 through 5 to preset up to 20 stations.
RECALL A PRESET STATION
To recall one of the preset stations already programmed, tap the M- button or
M+ button repeatedly until you reach the desired preset radio station.
NOTE: You can overwrite a present station by storing another station number
in its place.
FM RADIO FUNCTION
13
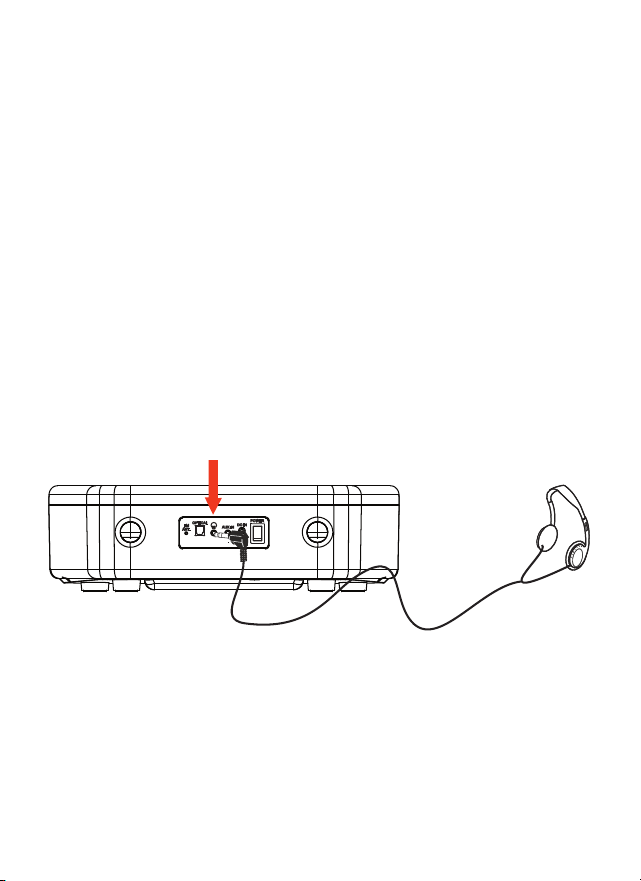
Connect your headphones
Insert the plug of your headphones (not included) into the Headphone Jack
located on the rear panel. After successful connection, the speakers will
disconnect and the sound will channel through the headphones.
Read this Important Information before Using Your Headphones
Not Included
--Avoid extended play at very high volume as it may impair your hearing.
--If you experience ringing in your ears, lower the volume or shut oû the speaker.
--Keep the volume at a reasonable level.
14
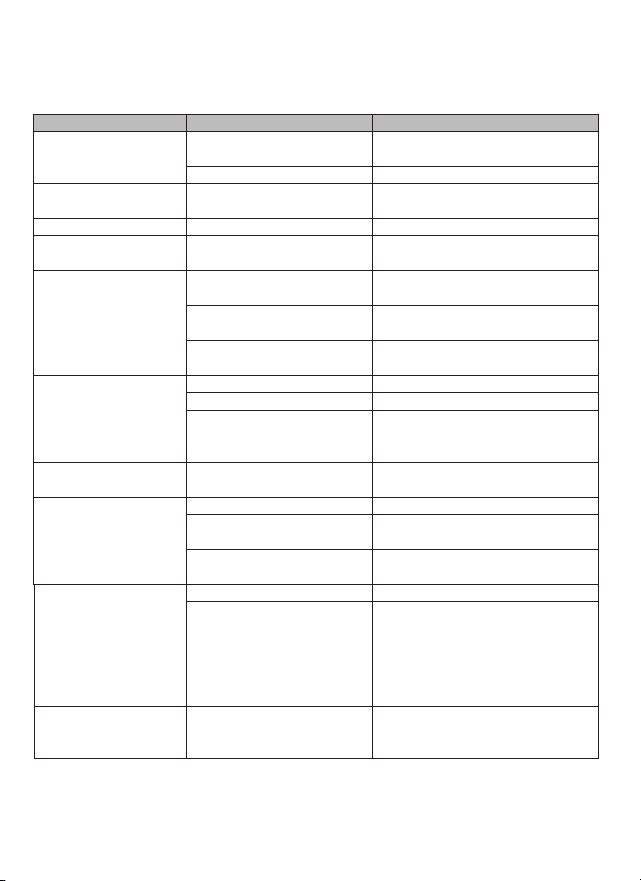
Troubleshooting guide
Problem
The device does not
respond (no power)
Device is ON but there is
low or no volume
FM no sound
Noise or sound distorted
on FM broadcast
No sound on Bluetooth
mode
CD player will not play
CD skips while playing
Intermittent sound from
CD Player
Sound is distorted
Device gets warm after
extended play at high
volume
Possible Cause
The device is disconnected
from the AC outlet.
The AC outlet has no power.
Volume set too low.
Device not in Radio mode.
Station is not tuned properly.
Device is not linked with your
Bluetooth enabled device.
Device placement out of range.
Your Bluetooth enabled device
Volume is set too low.
Device is not in CD mode.
CD is installed incorrectly.
If the CD is self-compiled, the
media used may not be
compatible with the player.
Disc is dirty or scratched.
Dirty or defective disc.
Dirty pickup lens.
Player is subject to excessive
shock or vibration.
Volume level is set too high.
Sound source is distorted.
This is normal.
Solution
Reconnect to the AC outlet.
Try another AC outlet.
Use the Volume buttons on your
remote to raise the volume.
Press Source button to select FM.
Reposition the device and tune the
FM broadcast station again.
Go through <Bluetooth Operations=
process to link the speakers.
Relocate the device within Bluetooth
operating range (30 feet).
Increase Volume level of your
Bluetooth enabled device.
Press Source button to select CD.
Insert CD with label side outward.
Use better quality blank media and
retest.
Wipe CD with clean cloth or use
another disc.
Clean or replace the defective disc.
Use a CD-lens cleaning cloth to clean
the lens.
Relocate the player away from shock
or vibration.
Decrease the volume.
Try a diûerent sound source.
If you are using an external sound
source such as an older generation
of iPod, try reducing the output
volume on the device itself.
Turn the device oû for a period of
time or lower the volume.
15
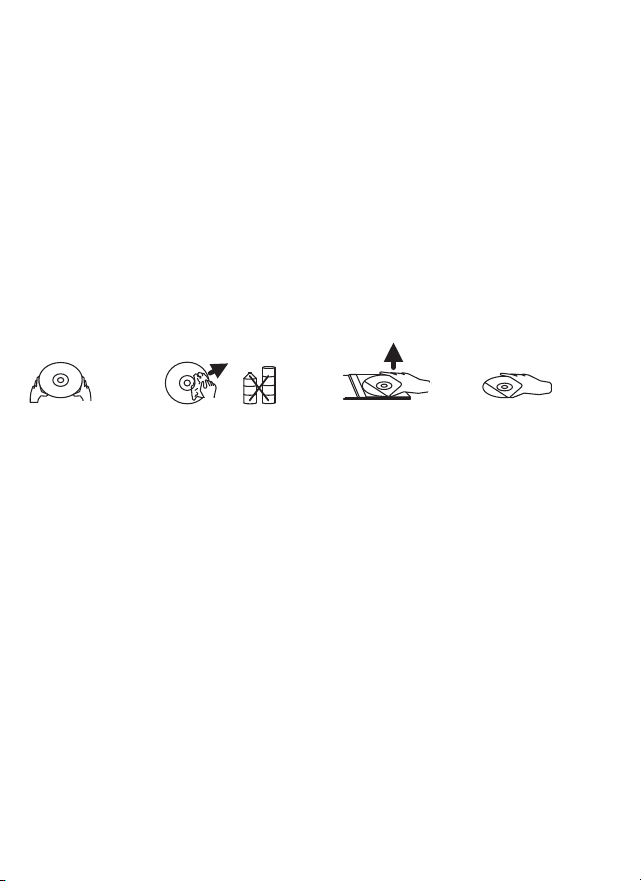
CARE AND MAINTENANCE
1. Do not subject the unit to excessive force, shock, dust or extreme temperatures.
2. To prevent üre or shock hazard, disconnect your unit from the AC power source
when cleaning.
3. Do not tamper with the internal components of the unit.
4. Clean your unit with a dry cloth. Solvents or detergents should never be used.
5. Avoid leaving your unit in direct sunlight or in hot, humid or dusty places.
6. Keep your unit away from heating appliances and sources of electrical noise
such as ýuorescent lamps or motors.
7. If interruptions or stops occur in the music during CD play, or if the CD fails to
play at all, the disc9s bottom surface may require cleaning. Before playing, wipe the
disc from the center outwards with a soft cleaning cloth.
8. If the front panel becomes dirty or smudged with üngerprints it may be cleaned
with a soft cloth slightly dampened with a mild soap and water solution. Never use
abrasive cloths or polishes as these will damage the ünish of your device.
CAUTION: Never allow any water or other liquids to get inside the unit while
cleaning.
16

Specifications
Radio Frequency Range: FM 87.5 - 108MHz
Bluetooth: V5.1
Audio Output Power: 15Wx2 (RMS)
Power Source: Input AC 120V~60Hz
AC Adapter: Output DC 12V ,3.5A
*Note: specs may change due to factory model or system upgrades
FCC STATEMENT
Changes or modiücations not expressly approved by the party responsible for
compliance could void the user9s authority to operate the equipment.
This device complies with Part 15 of the FCC Rules. Operation is subject to the
following two conditions: (1) this device may not cause harmful interference, and (2)
this device must accept any interference received, including interference that may
cause undesired operation.
This equipment has been tested and found to comply with the limits for a Class B
digital device, pursuant to Part 15 of the FCC Rules. These limits are designed to
provide reasonable protection against harmful interference in a residential
installation. This equipment generates, uses and can radiate radio frequency
energy and, if not installed and used in accordance with the instructions, may
cause harmful interference to radio communications. However, there is no
guarantee that interference will not occur in a particular installation.
If this equipment does cause harmful interference to radio or television reception,
which can be determined by turning the equipment oû and on, the user is
encouraged to try to correct the interference by one or more of the following
measures:
-- Reorient or relocate the receiving antenna.
-- Increase the separation between the equipment and receiver.
-- Connect the equipment into an outlet on a circuit diûerent from that to which the
receiver is connected.
-- Consult the dealer or an experienced radio/TV technician for help.
17

WARRANTY
This warranty covers the original consumer purchaser only and is not
transferable.
This warranty covers products that fail to function properly UNDER NORMAL
USAGE, due to defects in material or workmanship. Your product will be repaired
or replaced at no charge for parts or labor for a period of one year.
What Is Not Covered By Warranty
Damages or malfunctions not resulting from defects in material or
workmanship and damages or malfunctions from other than normal use, including
but limited to, repair by unauthorized parties, tampering, modiücation or accident.
To Obtain Warranty Service and Troubleshooting Information:
Call (877) 397-8200 or visit our website at www.aiwa.co.
To receive Warranty service along with the name and address of an authorized
product service center, the original consumer purchaser must contact us for
problem determination and service procedures. Proof of purchase in the form of a
bill of sale or receipted invoice, evidencing that the product is within the applicable
Warranty period(s), MUST be presented in order to obtain the requested service. It
is your responsibility to properly package and send any defective products along
with a dated copy of proof of purchase, a written explanation of the problem, and
a valid return address of the authorized service center at your expense. Do not
include any other items or accessories with the defective product. Any products
received by the authorized service center that are not covered by warranty will be
returned unrepaired.
18

©2022 Sakar International
195 Carter Drive
Edison, NJ 08817
www.sakar.com
Support: (877)-397-8200