FCC Caution:
This device complies with part �� of the FCC Rules. Operation is subject to the
following two conditions: (�) this device may not cause harmful interference,
and (�) this device must accept any interference received, including interference
that may cause undesired operation.
Any changes or modifications not expressly approved by the party responsible f
or compliance could void the user's authority to operate the equipment.
NOTE: This equipment has been tested and found to comply with the limits for a
Class B digital device, pursuant to Part �� of the FCC Rules. These limits are
designed to provide reasonable protection against harmful interference in a
residential installation. This equipment generates, uses and can radiate radio
frequency energy and, if not installed and used in accordance with the
instructions, may cause harmful interference to radio communications.
However, there is no guarantee that interference will not occur in a particular
installation.
If this equipment does cause harmful interference to radio or television
reception,which can be determined by turning the equipment off and on,
the user is encouraged to try to correct the interference by one or more of
the following measures:
-- Reorient or relocate the receiving antenna.
-- Increase the separation between the equipment and receiver.
-- Connect the equipment into an outlet on a circuit different
from that to which the receiver is connected.
-- Consult the dealer or an experienced radio/TV technician for help.
To maintain compliance with FCC’s RF Exposure guidelines, This equipment
should be installed and operated with minimum distance between ��cm the
radiator your body: Use only the supplied antenna.
English (英语)
UBox
Quick Start Guide for the App
As the app is updated, some modifications may occur.
The manual is for reference only.
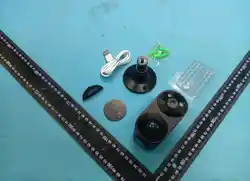
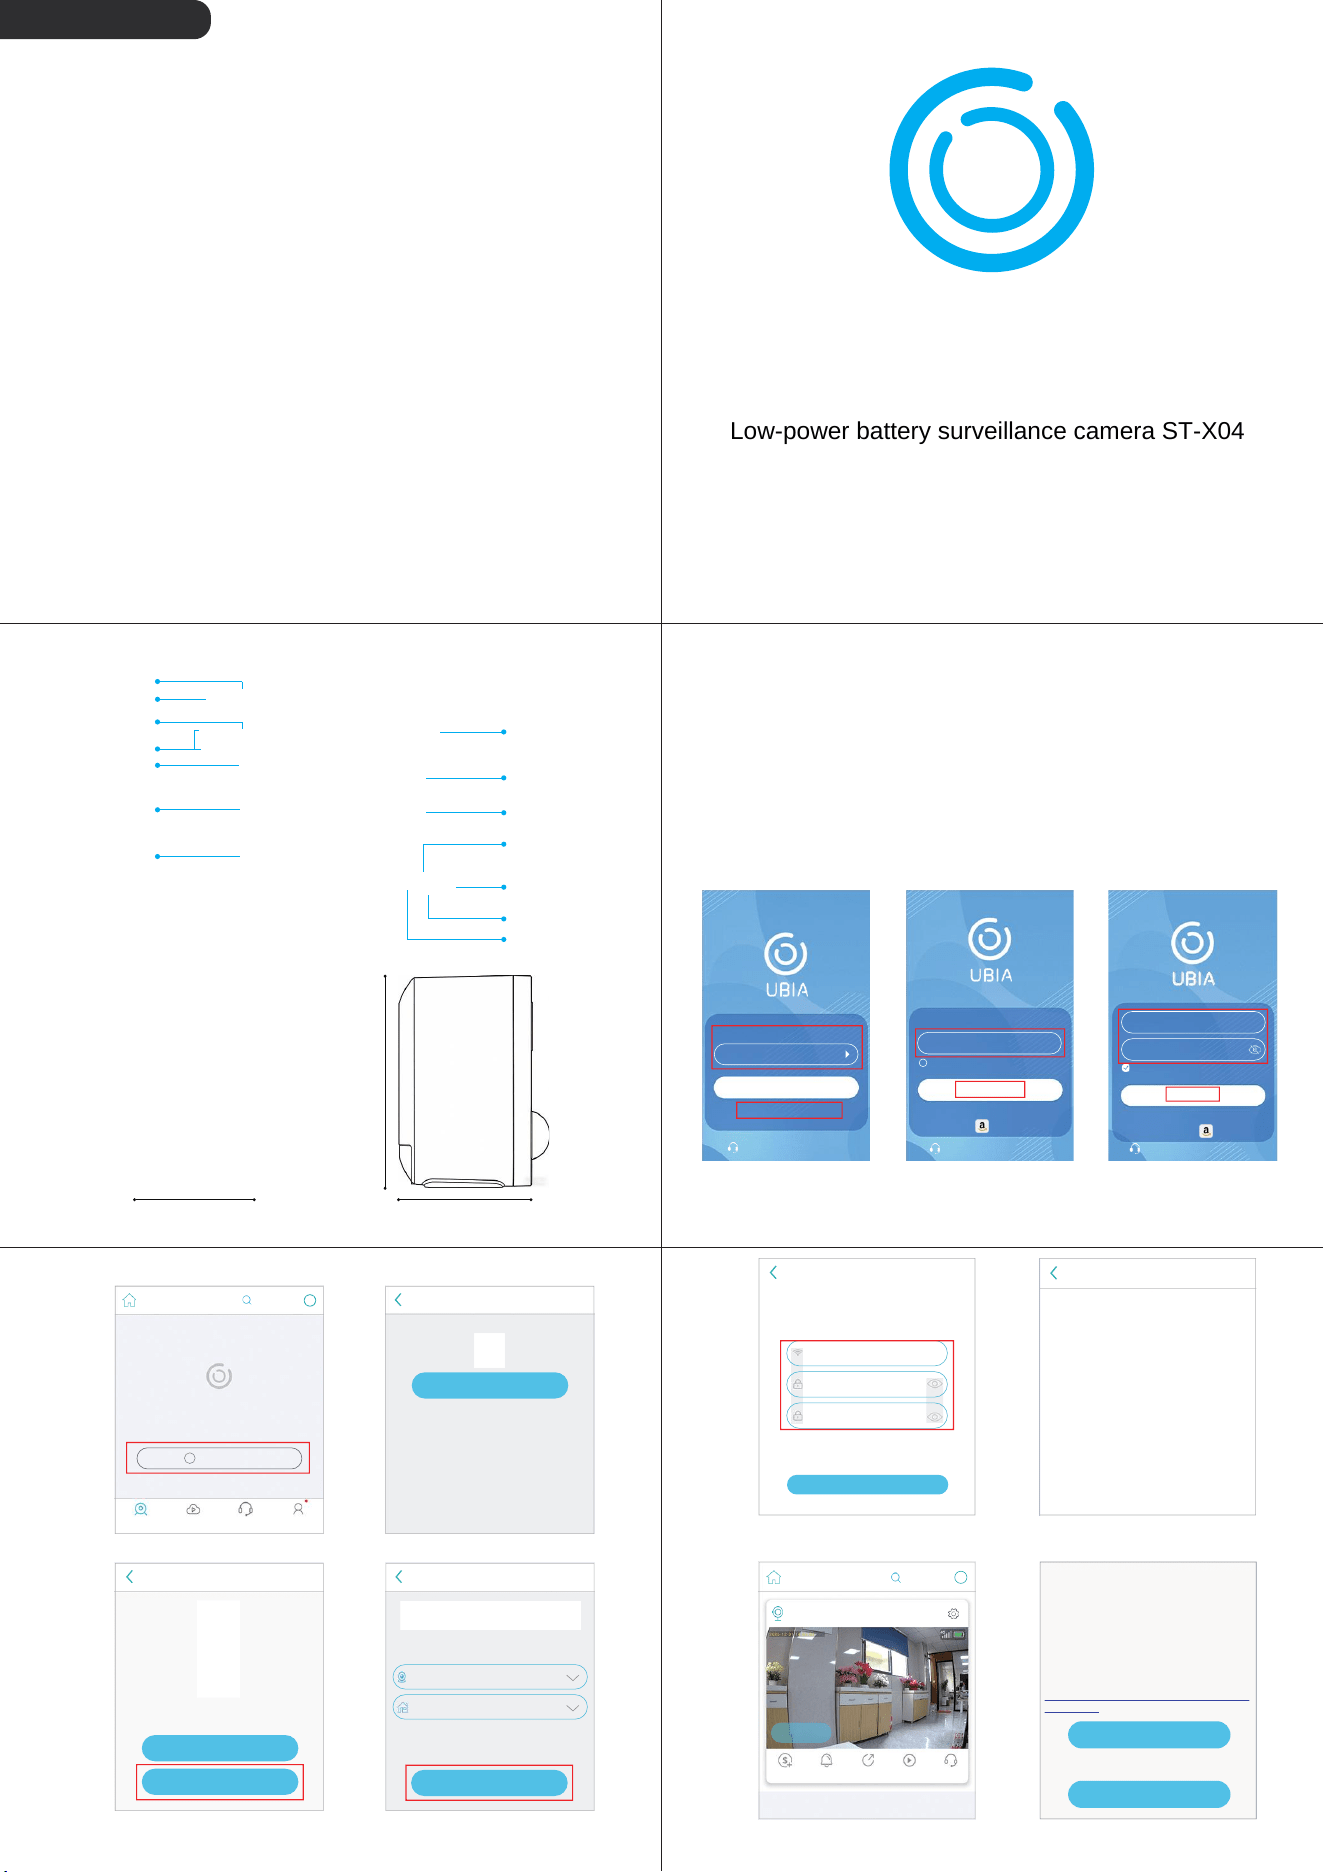
Product Appearance:
Product Dimensions:
5.1cm/2.01inch 7cm/2.76inch
9.7cm/3.82inch
① Select your country
Click Register Now
② Enter your phone number, tap
Register, then enter the verification
code and set a password. Tap
Register to complete the process.
③ After successful registration,
enter your account credentials
and click Login.
II. Register and Log In to Your Account
1、Download and install the app
Open the app and register an account using your phone number. Set up a login password.
After successful registration, log in using the registered phone number and password.
Scan the QR code below, click to download the UBox software, and install it.
Please select country
CHINA
Login
No account,Register Now
Click to contact customer service
Register
Login
Register
Please enter your email
Or login with the following account:
I read and agree to User Agreement and
Privacy Policy
Login
1587521****
Remember Forgot Password
.............
No account,Register Now
① After successful login, click Add Smart Device ② Select and install WiFi devices
⑤ Enter your home WiFi network and password to configure the device.
Alternatively, tap the bottom-right corner to select Sonic Configuration.
(Be sure to select a 2.4GHz Wi-Fi network; do not choose a 5GHz Wi-Fi network.)
⑥ Hold the camera lens about 10 cm away from the QR
code displayed on your phone. After hearing the prompt
tone, tap “Confirm.”
③ After powering on the camera, press and hold the reset
button until you hear the reset confirmation. When you hear
“Entering configuration mode,” press the button.
④ Set the camera name,
then click Next.
Ⅲ. WiFi Connection Guide (WiFi devices only)
No device added, please click the button below
to add device.
+
+
No
Yes
Power on your camera and check that the blue
indicator LED is blinking, or hear the voice
prompt "The camera is now readyto begin pairing"
Discover Devices
Next
Device
My Home
Set device
info
Select Wi-Fi Add device
Device information
Configuring devices
More notes Sound wave configuration
Wi-Fi network
Wi-Fi password
Please re-enter your password.
This device does not currently support 5GHz WiFi. If your
phone is connected to a 5GHz WiFi network, please switch
to a 2.4GHz WiFi network. Please increase your phone's
volume and maintain a distance of approximately one phone
length from the camera.
Connect to Wi-Fi
Set device
info
Select Wi-Fi Add device
Add device
Connecting..
Place the phone with the QR code facing the camera's lens and
maintain a distance of 10cm, you will hear a confirmation voice
after the security camera scanned successfully
⑦Camera successfully connected Installing WiFi Equipment Important Notes
Got it
Scan QR code
setup notes
1. Is the LED flashing blue? If not, please reset the device.
2. WIFI device only supports 2.4G signal. If you are on a 5G
signal, please check your router settings and switch to 2.4G.
3. Please check if the WIFI password is correct, and make
sure your password will not exceed over 30 characters.
4. Is the device placed too far from the router? Please
install closer for better reception.
If you need help, you can scan the device's QR code to view
the installation video guide or contact customer service
5: If none of the above works. please try to pair to hotspot
setup by phone
- �� -
- �� -
- �� -
- �� -
- �� -
White light
bulbs
Lens
Speaker
Battery
compartment
Mounting holes
TF memory card
Reset button
Power button
Charging port
Infrared
Lights*4
photosensitive
MIC
PIR Motion
Sensor
LED
Indicator Light
Click to contact customer service Click to contact customer service
Or login with the following account:
Device list
Add a Device
Device Cloud video Customer Service Me
Setup WiFi Device
Set up a new device, or
relocate an existing device
to a new Wi-Fi network.
Setup
Device list
Device
Subscription
Online
Silent mode Share Cloud video Contact us
+
Low-power battery surveillance camera ST-X04
Cloud Services
Device Sorting
My Friends
General Settings
Push Settings
Link WeChat
FAQ
Data Protection
App Wizard
Network Diagnostics
System Permissions
Account Management
About
1587970****
Log Out
Important Notes:
�, Your device is powered by a rechargeable lithium battery, the life of which can be
influenced by how often and how long the device is awakened. To extend the battery
life, especially in areas with high activity levels, it is advisable to either disable or
reduce the sensitivity of the motion detection feature, thereby decreasing the
frequency and duration of device wake-ups.
�, For optimal device performance, install it in a location with strong signal reception.
The device relies on a network connection to function properly, and poor network
reception can hinder its operation. If you are using a WiFi-enabled device, make sure
it is within range of a stable WiFi signal.
�, To ensure you receive timely push notifications, please verify the notification settings
within the App to guarantee that it can send you alerts as intended.
�, Each device is entitled to a complimentary monthly trial of cloud services. Should you
wish to continue using the services after the trial ends, you can purchase a subscription
within the App. If you choose not to continue, no further action is necessary.
Frequency band and frequency used by wireless equipment:
�.� GHz; WIFi: ����-��
6
� MHz
Maximum radio power transmitted by wireless equipment within the
IV. Functional Interface Operation Guide
frequency band used: Wi-Fi:�
3
.�dBm。
1. Detailed Guide to the App's Functional Interface: App Main Interface
My Smart Devices
Online
Purchase of
Services
Do Not Disturb Share Cloud Video
Contact
Customer Service
Add smart devices
Smart Camera
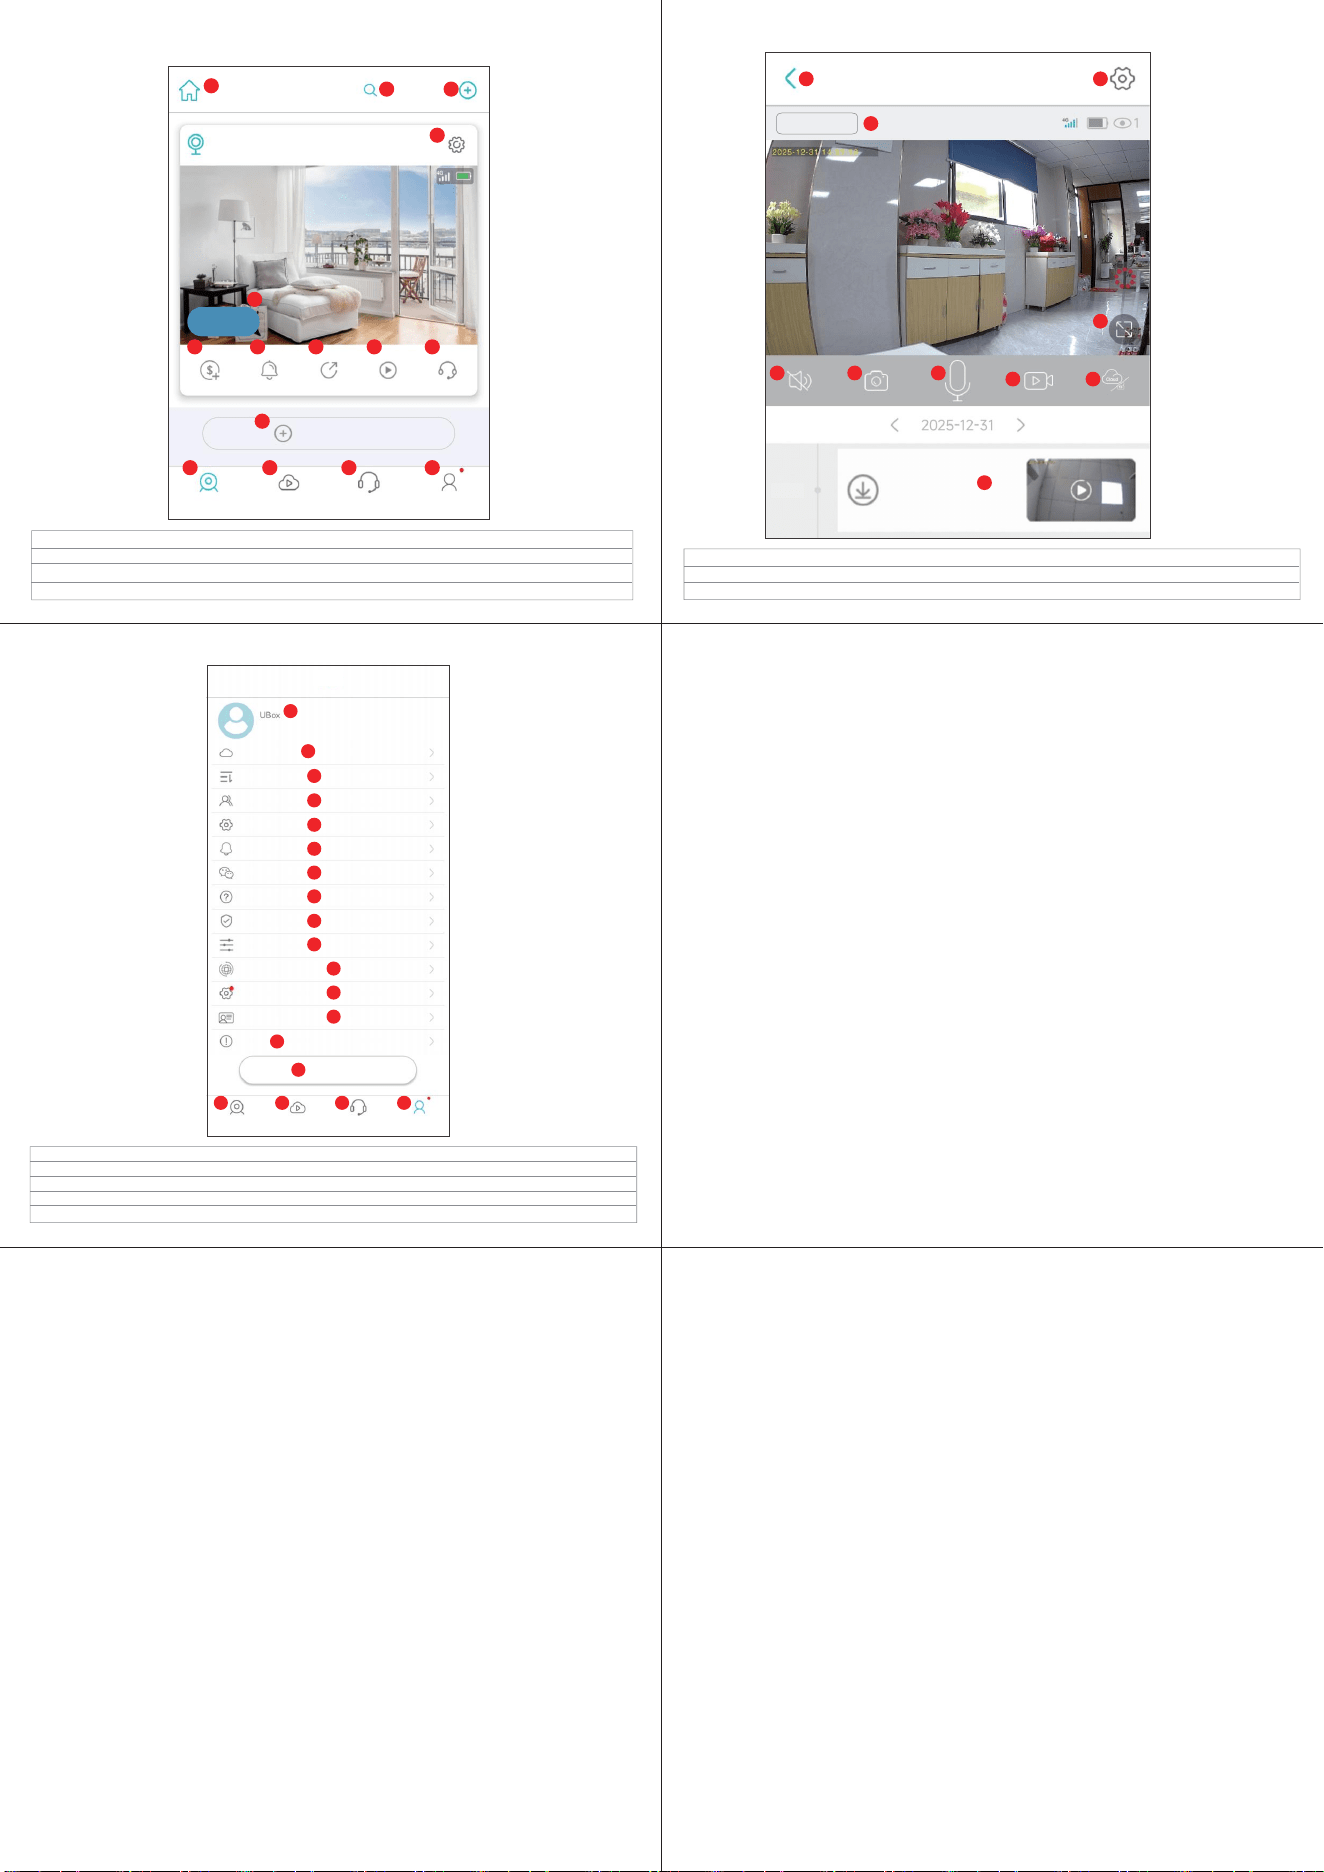
1. Main Interface 2. Search My Devices 3. Add Device 4. Set Camera Parameters 5. Camera Online/Offline
6. Purchase Data or Cloud Storage 7. Enable Do Not Disturb 8. Share Camera with Family 9. Cloud Storage Videos
10. Contact Customer Support 11. Add Smart Devices 12. My Devices 13. Cloud Video Event List
14. Contact Customer Support 15. My (Personal Settings or Camera Settings, etc.)
1. Personal Information 2. Purchase Cloud Storage Service
3. Device Priority Ordering 4. My Friends 5. Camera Settings
6. Push Notification Management 7. Bind Your WeChat Account 8. App Usage Scenario FAQ 9. Protecting User Privacy and Security
10. Application Button Guide 11. Check Your Network Connection 12.APP Permissions Settings. 13.View Your Account
14.View App Information 15.Log Out of Current Account 16.Camera Main Interface 17.View Cloud Storage Videos
18.Contact Customer Support 19.My (Set Personal Info or Camera Settings, etc.)
�
� �
�
�
� � � �
��
��
��
��
�� ��
New Device
Continuous Recording
Recording Duration: 10 Seconds
Select
Smart Camera
High Definition
2. Detailed Guide to the App's Camera Interface
3. Detailed Guide to the App's Functional Interface: My Interface
1. Return to the app's main interface 2. Set camera parameters 3. Switch camera resolution
4. Tap to view camera feed in full screen
5. Turn speaker on or off 6. Save camera images
7. Tap to enable two-way audio intercom 8. Record camera feed
9. Cloud storage or TF card storage 10. Video event list
� �
�
�
� � �
��
��
�
�
�
�
�
�
�
�
�
��
��
��
��
��
��
�� �� �� ��
��
- �� -
- �� -
- �� -
- �� -
Device Cloud video Customer Service Me
My
Device Cloud video Customer Service Me
14:54